{ STIHL FSA 45 Instruction Manual

Welcome message from author
This document is posted to help you gain knowledge. Please leave a comment to let me know what you think about it! Share it to your friends and learn new things together.
Transcript

{
STIHL FSA 45
Instruction Manual
Tran
slat
ion
of O
rigin
al In
stru
ctio
n M
anua
lPr
inte
d on
chl
orin
e-fre
e pa
per
Prin
ting
inks
con
tain
veg
etab
le o
ils, p
aper
can
be
recy
cled
.©
AN
DR
EAS
STIH
L AG
& C
o. K
G 2
016
0458
-718
-012
1-A.
VA3
.M16
. English
Contents
007363
_011
_GB
1 Introduction . . . . . . . . . . . . . . . . . . . . . . . . . . . . . . . . . . . . . . . . . 22 Guide to Using this Manual . . . . . . . . . . . . . . . . . . . . . . . . . . 22.1 Applicable Documentation . . . . . . . . . . . . . . . . . . . . . . . . . . . 22.2 Symbols used with warnings in the text . . . . . . . . . . . . . . 32.3 Symbols in Text . . . . . . . . . . . . . . . . . . . . . . . . . . . . . . . . . . . . . 33 Overview. . . . . . . . . . . . . . . . . . . . . . . . . . . . . . . . . . . . . . . . . . . . 33.1 Trimmer and Charging Cable . . . . . . . . . . . . . . . . . . . . . . . . 33.2 Cutting Attachments. . . . . . . . . . . . . . . . . . . . . . . . . . . . . . . . . 43.3 Symbols . . . . . . . . . . . . . . . . . . . . . . . . . . . . . . . . . . . . . . . . . . . . 44 Safety Precautions . . . . . . . . . . . . . . . . . . . . . . . . . . . . . . . . . . 54.1 Introduction . . . . . . . . . . . . . . . . . . . . . . . . . . . . . . . . . . . . . . . . . 54.2 Warning Signs . . . . . . . . . . . . . . . . . . . . . . . . . . . . . . . . . . . . . . 54.3 Intended Use. . . . . . . . . . . . . . . . . . . . . . . . . . . . . . . . . . . . . . . . 64.4 The Operator . . . . . . . . . . . . . . . . . . . . . . . . . . . . . . . . . . . . . . . . 64.5 Clothing and Equipment . . . . . . . . . . . . . . . . . . . . . . . . . . . . . 64.6 Work Area and Surroundings . . . . . . . . . . . . . . . . . . . . . . . . 74.7 Safe Condition . . . . . . . . . . . . . . . . . . . . . . . . . . . . . . . . . . . . . . 74.8 Built-in Battery . . . . . . . . . . . . . . . . . . . . . . . . . . . . . . . . . . . . . . 94.9 Operation . . . . . . . . . . . . . . . . . . . . . . . . . . . . . . . . . . . . . . . . . . 104.10 Charging. . . . . . . . . . . . . . . . . . . . . . . . . . . . . . . . . . . . . . . . . . . 104.11 Transporting . . . . . . . . . . . . . . . . . . . . . . . . . . . . . . . . . . . . . . . 114.12 Storing. . . . . . . . . . . . . . . . . . . . . . . . . . . . . . . . . . . . . . . . . . . . . 114.13 Cleaning, Maintenance and Repairs . . . . . . . . . . . . . . . . 125 Preparing Trimmer for Operation . . . . . . . . . . . . . . . . . . . 125.1 Preparing Trimmer for Operation . . . . . . . . . . . . . . . . . . . 126 Charging the Trimmer, LEDs . . . . . . . . . . . . . . . . . . . . . . . 136.1 Charging the Trimmer . . . . . . . . . . . . . . . . . . . . . . . . . . . . . . 136.2 State of Charge . . . . . . . . . . . . . . . . . . . . . . . . . . . . . . . . . . . . 136.3 LEDs. . . . . . . . . . . . . . . . . . . . . . . . . . . . . . . . . . . . . . . . . . . . . . . 137 Assembling the Trimmer . . . . . . . . . . . . . . . . . . . . . . . . . . . 137.1 Mounting Deflector for Mowing Heads . . . . . . . . . . . . . . 137.2 PolyCut 2-2 Mowing Head . . . . . . . . . . . . . . . . . . . . . . . . . . 147.3 Mounting the Loop Handle . . . . . . . . . . . . . . . . . . . . . . . . . 15
8 Adjusting Trimmer for User . . . . . . . . . . . . . . . . . . . . . . . . . 158.1 Adjusting Shaft Angle . . . . . . . . . . . . . . . . . . . . . . . . . . . . . . 158.2 Adjusting Length of Shaft. . . . . . . . . . . . . . . . . . . . . . . . . . . 158.3 Adjusting the Loop Handle . . . . . . . . . . . . . . . . . . . . . . . . . 168.4 Converting Trimmer to Edger . . . . . . . . . . . . . . . . . . . . . . . 169 Inserting and Removing Activation Key . . . . . . . . . . . . . 169.1 Inserting the Activation Key . . . . . . . . . . . . . . . . . . . . . . . . 169.2 Removing the Activation Key . . . . . . . . . . . . . . . . . . . . . . . 1710 Switching the Trimmer On/Off . . . . . . . . . . . . . . . . . . . . . . 1710.1 Switching On . . . . . . . . . . . . . . . . . . . . . . . . . . . . . . . . . . . . . . 1710.2 Switching Off . . . . . . . . . . . . . . . . . . . . . . . . . . . . . . . . . . . . . . 1711 Testing the Trimmer. . . . . . . . . . . . . . . . . . . . . . . . . . . . . . . . 1711.1 Checking the Controls . . . . . . . . . . . . . . . . . . . . . . . . . . . . . 1711.2 Inspecting the Cutting Attachment . . . . . . . . . . . . . . . . . 1811.3 Checking the Built-In Battery . . . . . . . . . . . . . . . . . . . . . . . 1812 Operating the Trimmer . . . . . . . . . . . . . . . . . . . . . . . . . . . . . 1812.1 Holding and Controlling the Trimmer . . . . . . . . . . . . . . . 1812.2 Edging. . . . . . . . . . . . . . . . . . . . . . . . . . . . . . . . . . . . . . . . . . . . . 1812.3 Mowing . . . . . . . . . . . . . . . . . . . . . . . . . . . . . . . . . . . . . . . . . . . . 1913 After Finishing Work . . . . . . . . . . . . . . . . . . . . . . . . . . . . . . . 1913.1 After Finishing Work . . . . . . . . . . . . . . . . . . . . . . . . . . . . . . . 1914 Transporting . . . . . . . . . . . . . . . . . . . . . . . . . . . . . . . . . . . . . . . 1914.1 Transporting the Trimmer . . . . . . . . . . . . . . . . . . . . . . . . . . 1915 Storing . . . . . . . . . . . . . . . . . . . . . . . . . . . . . . . . . . . . . . . . . . . . . 1915.1 Storing the Trimmer. . . . . . . . . . . . . . . . . . . . . . . . . . . . . . . . 1915.2 Storing the Blades . . . . . . . . . . . . . . . . . . . . . . . . . . . . . . . . . 1915.3 Storing the Charging Cable . . . . . . . . . . . . . . . . . . . . . . . . 2016 Cleaning . . . . . . . . . . . . . . . . . . . . . . . . . . . . . . . . . . . . . . . . . . . 2016.1 Cleaning the Trimmer . . . . . . . . . . . . . . . . . . . . . . . . . . . . . . 2016.2 Cleaning the Deflector and Cutting Attachment . . . . . 2016.3 Cleaning the charging cable . . . . . . . . . . . . . . . . . . . . . . . 2017 Maintenance and Repairs . . . . . . . . . . . . . . . . . . . . . . . . . . 2017.1 Servicing and Repairing the Trimmer. . . . . . . . . . . . . . . 20
0000
0458-718-0121-A 1
{ This instruction manual is protected by copyright. All rights reserved, especially the rights to reproduce, translate and process with electronic systems.
English 1 Introduction
Dear Customer,Thank for choosing STIHL. We develop and manufacture our quality products to meet our customers’ requirements. The products are designed for reliability even under extreme conditions.STIHL also stands for premium service quality. Our specialist dealers guarantee competent advice and instruction as well as comprehensive service support.We thank you for your confidence in us and hope you will enjoy working with your STIHL product.
Dr. Nikolas Stihl
IMPORTANT: READ BEFORE USE AND KEEP IN A SAFE PLACE.
2.1 Applicable DocumentationLocal safety regulations apply.► Read, understand and save the following documents in
addition to this instruction manual:– Safety information for STIHL batteries and products
with built in batteries: www.stihl.com/safety-data-sheets
17.2 Servicing and repairing the charging cable . . . . . . . . . 2018 Troubleshooting . . . . . . . . . . . . . . . . . . . . . . . . . . . . . . . . . . . . 2118.1 Troubleshooting Trimmer or Charging Cable . . . . . . . 2119 Specifications . . . . . . . . . . . . . . . . . . . . . . . . . . . . . . . . . . . . . . 2219.1 STIHL FSA 45 Trimmer . . . . . . . . . . . . . . . . . . . . . . . . . . . . 2219.2 STIHL LK 45 Charging Cable . . . . . . . . . . . . . . . . . . . . . . 2219.3 Noise and Vibration Data. . . . . . . . . . . . . . . . . . . . . . . . . . . 2219.4 REACH . . . . . . . . . . . . . . . . . . . . . . . . . . . . . . . . . . . . . . . . . . . . 2220 Combinations of Cutting Attachments and
Deflectors . . . . . . . . . . . . . . . . . . . . . . . . . . . . . . . . . . . . . . . . . . 2320.1 STIHL FSA 45 Trimmer . . . . . . . . . . . . . . . . . . . . . . . . . . . . 2321 Spare Parts and Accessories . . . . . . . . . . . . . . . . . . . . . . . 2321.1 Spare Parts and Accessories. . . . . . . . . . . . . . . . . . . . . . . 2322 Disposal . . . . . . . . . . . . . . . . . . . . . . . . . . . . . . . . . . . . . . . . . . . 2322.1 Disposing of Trimmer and Charging Cable . . . . . . . . . 2323 EC Declaration of Conformity. . . . . . . . . . . . . . . . . . . . . . . 2323.1 STIHL FSA 45 Trimmer . . . . . . . . . . . . . . . . . . . . . . . . . . . . 2323.2 STIHL LK 45 Charging Cable . . . . . . . . . . . . . . . . . . . . . . 24
1 Introduction
2 Guide to Using this Manual
0458-718-0121-A2

English 3 Overview
2.2 Symbols used with warnings in the text
WARNINGThis symbol indicates dangers that can cause serious injuries or death.► The measures indicated can avoid serious injuries or
death.
NOTICEThis symbol indicates dangers that can cause damage to property.► The measures indicated can avoid damage to property.
2.3 Symbols in Text
3.1 Trimmer and Charging CableThe rechargeable battery is built into the trimmer.
1 Control HandleFor operating, holding and controlling the trimmer.
2 Trigger LockoutLocks trigger in position.
3 Release SlideOperated together with the trigger lockout to unlock the trigger.
4 Activation KeyActivates the trimmer.
5 Key SocketAccommodates the activation key.
6 Star Knob NutSecures loop handle to shaft.
7 HousingContains the built-in rechargeable battery.
This symbol refers to a chapter in this instruction manual.
3 Overview
1 2
8
7
9
101112
17 18
19
20
14
15
6
5
4
3
13
16
0000
-GXX
-154
4-A1
0458-718-0121-A 3

English 3 Overview
8 Lockout ButtonLocks the shaft at the required length.
9 Loop HandleFor holding and controlling the trimmer.
10 LEDsIndicate trimmer’s state of charge and malfunctions.
11 ButtonActivates the LEDs on the trimmer.
12 Charging SocketAccommodates the charger plug.
13 TriggerThe trigger switches the motor on and off.
14 ShaftConnects all components.
15 LeverLocks selected angle between shaft and motor housing.
16 Bump GuardProtects objects from contact with the cutting attachment and maintains ground clearance when edging.
17 Charger PlugConnects charging cable to charger socket.
18 Connecting CableConnects charger plug to appliance plug.
19 Appliance PlugConnects charging cable to wall outlet.
20 Charging CableServes to charge the trimmer.
# Rating label with serial number
3.2 Cutting Attachments
1 DeflectorProtects user from flying debris and contact with the cutting attachment.
2 Line Limiter BladeTrims surplus mowing line to correct length.
3 BladesFor cutting grass.
4 BushingsSecure the blades in position.
5 Mowing LineThe mowing lines cut grass.
6 Mowing HeadHolds the mowing lines and cutting blades.
3.3 SymbolsThe following symbols may be applied to the trimmer or charging cable:
This symbol indicates in what direction the release slide has to be pushed.
This symbols indicates that the length of the shaft is adjustable.
1
2
3 65
4
0000
-GXX
-140
4-A1
0458-718-0121-A4
English 4 Safety Precautions
4.1 IntroductionThis product was designed for safe operation and features safety devices. Nevertheless, you should observe the following safety precautions in order to avoid possible dangers.
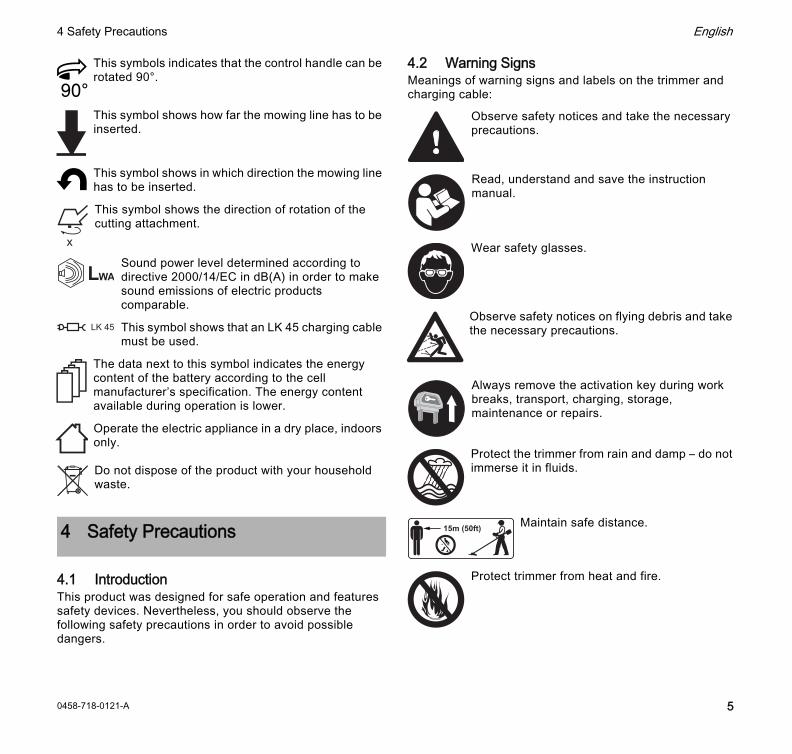
4.2 Warning SignsMeanings of warning signs and labels on the trimmer and charging cable:
This symbols indicates that the control handle can be rotated 90°.
This symbol shows how far the mowing line has to be inserted.
This symbol shows in which direction the mowing line has to be inserted.
This symbol shows the direction of rotation of the cutting attachment.
Sound power level determined according to directive 2000/14/EC in dB(A) in order to make sound emissions of electric products comparable.
This symbol shows that an LK 45 charging cable must be used.
The data next to this symbol indicates the energy content of the battery according to the cell manufacturer’s specification. The energy content available during operation is lower.
Operate the electric appliance in a dry place, indoors only.
Do not dispose of the product with your household waste.
4 Safety Precautions
LWA
LK 45
Observe safety notices and take the necessary precautions.
Read, understand and save the instruction manual.
Wear safety glasses.
Observe safety notices on flying debris and take the necessary precautions.
Always remove the activation key during work breaks, transport, charging, storage, maintenance or repairs.
Protect the trimmer from rain and damp – do not immerse it in fluids.
Maintain safe distance.
Protect trimmer from heat and fire.
15m (50ft)
0458-718-0121-A 5
English 4 Safety Precautions
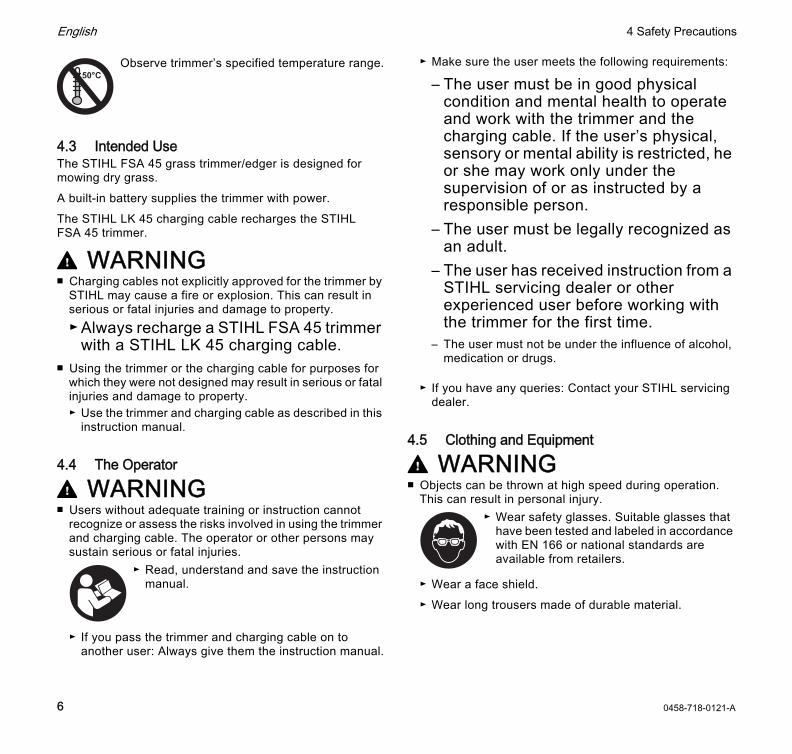
4.3 Intended UseThe STIHL FSA 45 grass trimmer/edger is designed for mowing dry grass.A built-in battery supplies the trimmer with power.The STIHL LK 45 charging cable recharges the STIHL FSA 45 trimmer.
WARNING■ Charging cables not explicitly approved for the trimmer by
STIHL may cause a fire or explosion. This can result in serious or fatal injuries and damage to property.► Always recharge a STIHL FSA 45 trimmer
with a STIHL LK 45 charging cable.■ Using the trimmer or the charging cable for purposes for
which they were not designed may result in serious or fatal injuries and damage to property.► Use the trimmer and charging cable as described in this
instruction manual.
4.4 The Operator
WARNING■ Users without adequate training or instruction cannot
recognize or assess the risks involved in using the trimmer and charging cable. The operator or other persons may sustain serious or fatal injuries.
► If you pass the trimmer and charging cable on to another user: Always give them the instruction manual.
► Make sure the user meets the following requirements:
– The user must be in good physical condition and mental health to operate and work with the trimmer and the charging cable. If the user’s physical, sensory or mental ability is restricted, he or she may work only under the supervision of or as instructed by a responsible person.
– The user must be legally recognized as an adult.
– The user has received instruction from a STIHL servicing dealer or other experienced user before working with the trimmer for the first time.
– The user must not be under the influence of alcohol, medication or drugs.
► If you have any queries: Contact your STIHL servicing dealer.
4.5 Clothing and Equipment
WARNING■ Objects can be thrown at high speed during operation.
This can result in personal injury.
► Wear a face shield.► Wear long trousers made of durable material.
Observe trimmer’s specified temperature range.
► Read, understand and save the instruction manual.
► Wear safety glasses. Suitable glasses that have been tested and labeled in accordance with EN 166 or national standards are available from retailers.
0458-718-0121-A6
English 4 Safety Precautions
■ Dust can be whipped up during operation: Whipped up dust can damage the respiratory passages and cause allergic reactions.► Wear a respirator.
■ Inappropriate clothing can snag on wood, brush or the trimmer. Not wearing personal protective equipment may result in serious injury.► Wear snug-fitting clothing.► Do not wear a scarf or jewelry.
■ The user can come into contact with the rotating cutting attachment during operation. This can result in serious injuries.► Wear work gloves made of durable material.► Wear long trousers made of durable material.
■ The user can come into contact with the cutting attachment or line limiter blade during cleaning and maintenance work. This can result in personal injury.► Wear work gloves made of durable material.
■ Wearing unsuitable footwear may cause you to slip or stumble. This can result in personal injury.► Wear sturdy footwear with non-slip soles.
4.6 Work Area and Surroundings4.6.1 Trimmer
WARNING■ Bystanders, children and animals are not aware of the
dangers of the trimmer or flying debris. Innocent bystanders, children and animals may be seriously injured.
► Maintain a clearance of 15 meters from objects.
■ The trimmer is not waterproof. Working in the rain or a damp location may result in an electric shock. This can result in injuries to the user and may damage the trimmer.
■ The trimmer’s electric motor may produce sparks. Sparks may cause a fire or an explosion in an easily combustible or explosive environment. This can result in serious or fatal injuries and damage to property.► Do not work in an easily combustible or explosive
environment.
4.6.2 Charging Cable
WARNING■ Children are not aware of and cannot assess the dangers
of a charging cable or electric current. Children may sustain serious or fatal injuries.► Keep children away from the work area.
■ The charging cable is not protected against all ambient conditions. If the charging cable is exposed to certain ambient conditions, it may catch fire or explode. This can result in serious injuries and damage to property.► Protect the charging cable from rain and dampness.► Operate the charging cable in a dry place, indoors only.► Do not operate the charging cable in an easily
combustible or explosive environment.► Use and store the charging cable at a temperature
between 0°C and +40 °C.
■ Persons may trip over the connecting cable. This can result in injuries and may damage the charging cable.► Lay the connecting cable flat on the floor.
4.7 Safe Condition4.7.1 TrimmerThe trimmer is in a safe condition if the following points are observed:– The trimmer is not damaged.
► Do not allow bystanders, children or animals within 15 meters of the work area.
15m (50ft)
► Do not work in the rain or a damp location.
0458-718-0121-A 7
English 4 Safety Precautions
– The trimmer is clean and dry.– The controls function properly and have not been
modified.– A combination of cutting attachment and deflector
recommended in this instruction manual is mounted.– Cutting attachment and deflector are properly mounted.– Only original STIHL accessories designed for this trimmer
are fitted.– Accessories are properly mounted.
WARNING■ If the product does not comply with safety requirements,
components will no longer function properly or safety devices may be rendered inoperative. This can result in serious or fatal injuries.► Work only with an undamaged trimmer.► Never recharge a damaged trimmer.► If the trimmer is dirty or wet: Clean the trimmer and allow
it to dry.► Never attempt to modify your trimmer. Exception:
Mounting one of the combinations of cutting attachment and deflector recommended in this instruction manual.
► If the controls do not function properly: Do not use your trimmer.
► Only fit original STIHL accessories designed for this trimmer.
► Mount the cutting attachment and deflector as described in this instruction manual.
► Mount accessories as described in this instruction manual or the instruction manual supplied with the accessory.
► Never insert objects in the trimmer’s openings.► Never bridge the contacts in the activation key socket
with metallic objects (short circuit).► Do not open the trimmer.
■ Fluid may escape from a damaged trimmer. The fluid can cause irritation if it contacts the skin or eyes.► Avoid contact with the fluid.► In case of contact with the skin: Wash affected areas
with plenty of water and soap.► In case of contact with the eyes: Rinse eyes with plenty
of water for at least 15 minutes and seek medical advice.
■ A damaged or defective trimmer may smell unusual, emit smoke or burn. This can result in serious or fatal injuries and damage to property.► If the trimmer smells unusual or emits smoke: Do not
use the trimmer and keep it away from combustible substances.
► If the trimmer catches fire: Extinguish the trimmer with a fire extinguisher or water.
4.7.2 Deflector
The deflector is in a safe condition if the following points are observed:– The deflector is not damaged.– The line limiter blade is correctly installed.
WARNING■ If the product does not comply with safety requirements,
components will no longer function properly or safety devices may be rendered inoperative. This can result in serious injuries.► Work only with an undamaged deflector.► Work with a correctly installed line limiter blade.► If you have any queries: Contact your STIHL servicing
dealer.
4.7.3 Mowing Head
The mowing head is in a safe condition if the following points are observed:– The mowing head is not damaged.
0458-718-0121-A8
English 4 Safety Precautions
– The mowing head is not jammed.– Cutting blades are undamaged.– The mowing lines or the blades are properly installed.
WARNING■ If they are in an unsafe condition, parts of the mowing
head, mowing lines or blades may come off and be thrown at high speed. This can result in serious injuries.► Always work with an undamaged mowing head or
blades.► If the mowing head is jammed: Stop work, remove the
activation key and clear the blockage.► Never use metal objects in place of the nylon mowing
lines or blades.► If you have any queries: Contact your STIHL servicing
dealer.
4.7.4 Charging Cable
The charging cable is in a safe condition if the following points are observed:– Charging cable is undamaged.– Charging cable is clean and dry.
WARNING■ If the product does not comply with safety requirements,
components will no longer function properly or safety devices may be rendered inoperative. This can result in serious or fatal injuries.► Do not use a damaged charging cable.► If the charging cable is dirty or wet: Clean the charging
cable and allow it to dry.► Do not modify the charging cable.
► Never bridge the charging cable's contacts with metallic objects (short circuit).
► Do not open the charging cable.
4.8 Built-in Battery
WARNING■ The built-in battery is not protected against all ambient
conditions. If the built-in battery is exposed to certain ambient conditions, the trimmer may catch fire or explode. This can result in serious or fatal injuries and damage to property.
► Keep trimmer away from metallic objects.► Protect the trimmer from rain and damp – do not
immerse it in fluids.► Do not expose trimmer to high pressure.► Do not expose trimmer to microwaves.► Protect trimmer from chemicals and salts.► Do not transport a damaged trimmer.
■ Fluid may escape from a damaged battery. The fluid can cause irritation if it contacts the skin or eyes.► Avoid contact with the fluid.► In case of contact with the skin: Wash affected areas
with plenty of water and soap.► In case of contact with the eyes: Rinse eyes with plenty
of water for at least 15 minutes and seek medical advice.
► Protect trimmer from heat and fire.► Do not throw the trimmer into a fire.
► Use and store your trimmer at temperatures between 0°C and +50°C.
0458-718-0121-A 9
English 4 Safety Precautions
■ A damaged or defective battery may smell unusual, emit smoke or burn. This can result in serious or fatal injuries and damage to property.► If the trimmer smells unusual or emits smoke: Do not
use the trimmer and keep it away from combustible substances.
► If the trimmer catches fire: Extinguish the trimmer with a fire extinguisher or water.
4.9 Operation
WARNING■ The user cannot concentrate on the work in certain
situations. The user may trip, fall and be seriously injured.► Work calmly and carefully.► If light and visibility are poor: Do not use your trimmer.► Operate the trimmer alone.► Watch out for obstacles.► Stand on the ground while working and keep a good
balance.
■ The rotating cutting attachment can cut the user. This can result in serious injuries.► Do not touch the rotating cutting attachment.
■ If the behavior of the trimmer changes during operation or feels unusual, it may no longer be in a safe condition. This can result in serious injuries and damage to property.► Stop work, remove the activation key and contact your
STIHL servicing dealer.
■ Trimmer vibrations may occur during operation.► Wear gloves.► Take regular breaks.► If signs of circulation problems occur: Seek medical
advice.
■ Note that the cutting attachment continues to rotate for a short period after you release the trigger. This can result in serious injuries.► Wait until the cutting attachment comes to a complete
stop.
4.10 Charging
WARNINGContact with live components may occur for the following reasons:
– Connecting cable is damaged.– Plug is damaged.– Wall outlet is not properly installed.
■ Contact with live components can result in an electric shock. This may result in serious or fatal injuries.► Check that the connecting cable and plug are not
damaged.► Insert the plug in a properly installed wall outlet.
0458-718-0121-A10

English 4 Safety Precautions
■ Overvoltage can occur in the charging cable if the line voltage or frequency are incorrect during charging. The charging cable may be damaged.► Make sure the line voltage and frequency agree with the
data on the charging cable’s rating label.
■ A damaged or defective charging cable may produce an unusual smell or emit smoke during the charging process. This may result in personal injuries and damage to property.► Disconnect the plug from the wall outlet.
■ The charging cable can overheat and cause a fire if heat dissipation is inadequate. This can result in serious or fatal injuries and damage to property.► Do not cover the charging cable.
■ If several charging cables are connected to one wall outlet, electric cables may be overloaded during the charging process. The cables can overheat and cause a fire. This can result in serious or fatal injuries and damage to property.► Connect the charging cable to a single wall outlet.► Do not connect the charging cable to multiple sockets.
4.11 Transporting
WARNING■ The trimmer may turn over or shift during transport. This
may result in personal injuries and damage to property.
► Pack the trimmer in packaging or a transport box in such a way that it cannot move.
► Secure the packaging or transport box so that the packaging or transport box cannot move.
4.12 Storing4.12.1 Trimmer
WARNING■ Children are not aware of and cannot assess the dangers
of a trimmer and can be seriously injured.
► Store the trimmer out of the reach of children.
■ The electrical contacts in the activation key socket can corrode if they are damp. This can damage the trimmer.
► Store the trimmer in a clean and dry condition.
■ The trimmer is not protected against all ambient conditions. The trimmer may be damaged if it is exposed to certain ambient conditions.► Store the trimmer in a clean and dry condition.► Store the trimmer in a confined space.► Store the activation key separately from the trimmer.
► Remove the activation key.
► Remove the activation key.
► Remove the activation key.
0458-718-0121-A 11
English 5 Preparing Trimmer for Operation
4.12.2 Charging Cable
WARNING■ Children are not aware of and cannot assess the dangers
of a charging cable. Children may sustain serious or fatal injuries.► Keep the charging cable out of the reach of children.
■ The charging cable is not protected against all ambient conditions. The charging cable may be damaged if it is exposed to certain ambient conditions.► If the charging cable is hot: Allow the charging cable to
cool down.
► Store the charging cable in a clean and dry condition.
► Store the charging cable in a confined space.
► Store the charging cable within temperature range of 0°C to +40°C.
4.13 Cleaning, Maintenance and Repairs
WARNING■ The trimmer may start unintentionally if the activation key
remains inserted during cleaning, maintenance or repair operations. This can result in serious injuries and damage to property.
■ Aggressive cleaning agents, high pressure cleaners or pointed objects can damage the trimmer, deflector, cutting attachment and charging cable. If the trimmer, deflector, cutting attachment or charging cable are not cleaned
correctly, components may no longer function properly or safety devices may be rendered inoperative. This can result in serious injuries.► Clean the trimmer, deflector, cutting attachment and
charging cable as described in this instruction manual.
■ If the trimmer, deflector, cutting attachment or charging cable are not serviced or repaired correcting, components may no longer function properly or safety devices may be rendered inoperative. This can result in serious or fatal injuries.► Do not attempt to service or repair the trimmer,
deflector, cutting attachment or charging cable.► If the trimmer, deflector, cutting attachment or charging
cable require servicing or repairs: Contact your STIHL servicing dealer.
5.1 Preparing Trimmer for Operation
Perform the following steps before starting work:► Make sure the following components are in a safe
condition:– Trimmer, @ 4.7.1.– Deflector, @ 4.7.2.– Mowing head, @ 4.7.3.– Charging cable, @ 4.7.4.
► Check the built-in battery, @ 11.3.► Fully charge the trimmer, @ 6.1.► Clean the trimmer, @ 16.1.► Mount the deflector, @ 7.1.► Fit the mowing lines or blades, @ 7.2.1 or @ 7.2.3.► Mount the loop handle, @ 7.3.► Adjust length of shaft, @ 8.2.► Adjust the loop handle, @ 8.3.► Check the controls, @ 11.1.
► Remove the activation key.
5 Preparing Trimmer for Operation
0458-718-0121-A12
English 6 Charging the Trimmer, LEDs
► If 3 LEDs flash red while you are checking the controls: Remove the activation key and contact your STIHL servicing dealer.There is a malfunction in the trimmer.
► If you cannot carry out this work: Do not use your trimmer and contact your STIHL servicing dealer.
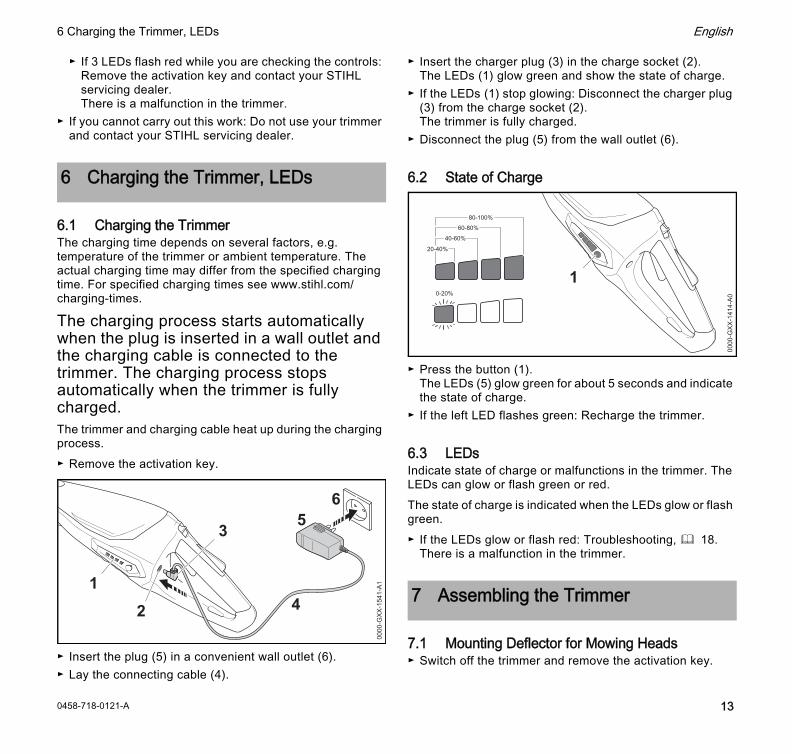
6.1 Charging the TrimmerThe charging time depends on several factors, e.g. temperature of the trimmer or ambient temperature. The actual charging time may differ from the specified charging time. For specified charging times see www.stihl.com/charging-times.
The charging process starts automatically when the plug is inserted in a wall outlet and the charging cable is connected to the trimmer. The charging process stops automatically when the trimmer is fully charged.The trimmer and charging cable heat up during the charging process.► Remove the activation key.
► Insert the plug (5) in a convenient wall outlet (6).► Lay the connecting cable (4).
► Insert the charger plug (3) in the charge socket (2).The LEDs (1) glow green and show the state of charge.
► If the LEDs (1) stop glowing: Disconnect the charger plug (3) from the charge socket (2).The trimmer is fully charged.
► Disconnect the plug (5) from the wall outlet (6).
6.2 State of Charge
► Press the button (1).The LEDs (5) glow green for about 5 seconds and indicate the state of charge.
► If the left LED flashes green: Recharge the trimmer.
6.3 LEDsIndicate state of charge or malfunctions in the trimmer. The LEDs can glow or flash green or red.The state of charge is indicated when the LEDs glow or flash green.► If the LEDs glow or flash red: Troubleshooting, @ 18.
There is a malfunction in the trimmer.
7.1 Mounting Deflector for Mowing Heads► Switch off the trimmer and remove the activation key.
6 Charging the Trimmer, LEDs
21
3
4
56
0000
-GXX
-154
1-A1
7 Assembling the Trimmer
20-40%
40-60%
60-80%
80-100%
0-20%
1
0000
-GXX
-141
4-A0
0458-718-0121-A 13
English 7 Assembling the Trimmer
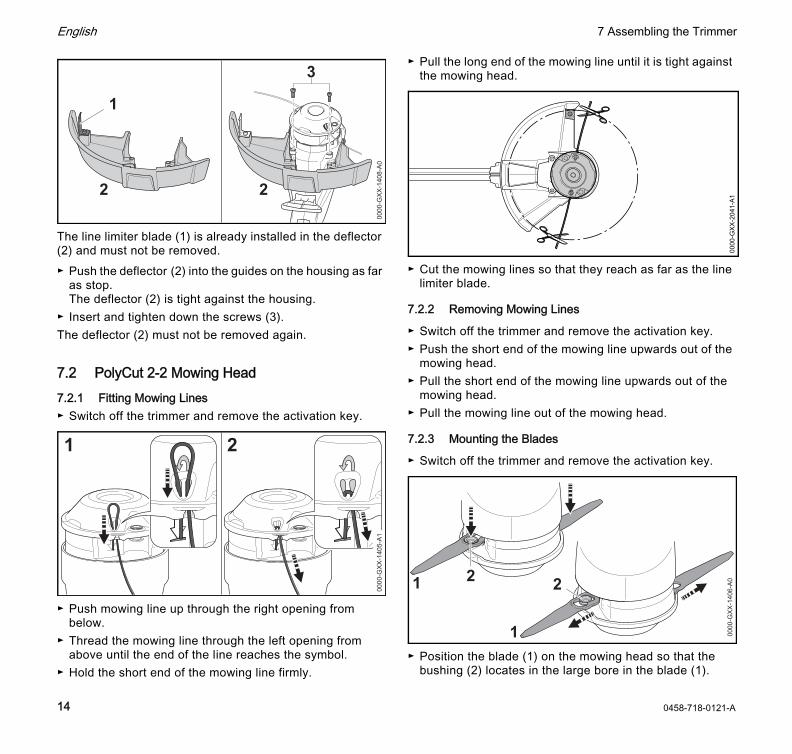
The line limiter blade (1) is already installed in the deflector (2) and must not be removed.► Push the deflector (2) into the guides on the housing as far
as stop.The deflector (2) is tight against the housing.
► Insert and tighten down the screws (3).The deflector (2) must not be removed again.
7.2 PolyCut 2-2 Mowing Head7.2.1 Fitting Mowing Lines► Switch off the trimmer and remove the activation key.
► Push mowing line up through the right opening from below.
► Thread the mowing line through the left opening from above until the end of the line reaches the symbol.
► Hold the short end of the mowing line firmly.
► Pull the long end of the mowing line until it is tight against the mowing head.
► Cut the mowing lines so that they reach as far as the line limiter blade.
7.2.2 Removing Mowing Lines
► Switch off the trimmer and remove the activation key.► Push the short end of the mowing line upwards out of the
mowing head.► Pull the short end of the mowing line upwards out of the
mowing head.► Pull the mowing line out of the mowing head.
7.2.3 Mounting the Blades
► Switch off the trimmer and remove the activation key.
► Position the blade (1) on the mowing head so that the bushing (2) locates in the large bore in the blade (1).
1
22
3
0000
-GXX
-140
8-A0
00
00-G
XX-1
405-
A1
1 2
0000-GXX-2041-A1
1
1
22
0000
-GXX
-140
6-A0
0458-718-0121-A14
English 8 Adjusting Trimmer for User
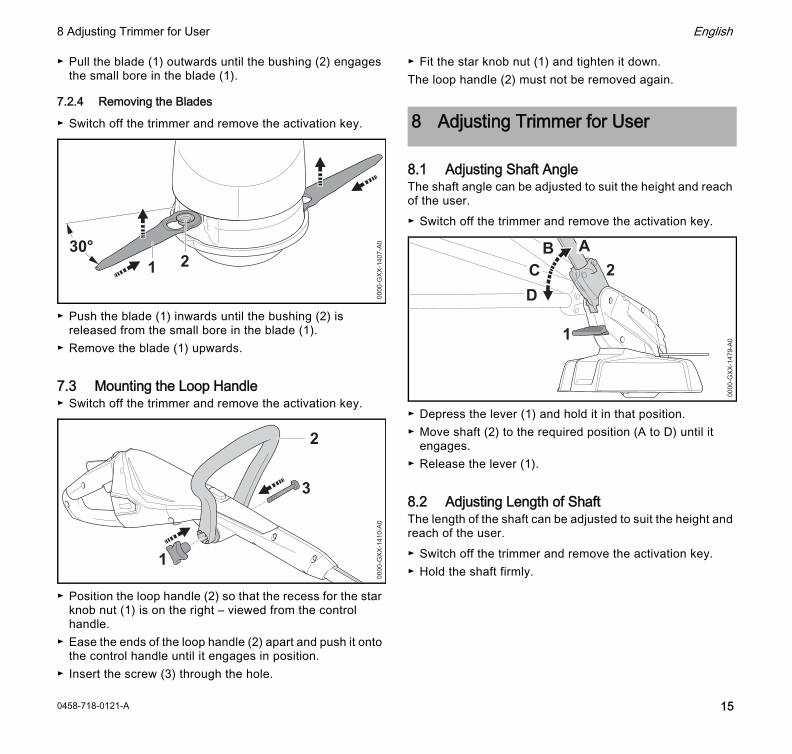
► Pull the blade (1) outwards until the bushing (2) engages the small bore in the blade (1).
7.2.4 Removing the Blades
► Switch off the trimmer and remove the activation key.
► Push the blade (1) inwards until the bushing (2) is released from the small bore in the blade (1).
► Remove the blade (1) upwards.
7.3 Mounting the Loop Handle► Switch off the trimmer and remove the activation key.
► Position the loop handle (2) so that the recess for the star knob nut (1) is on the right – viewed from the control handle.
► Ease the ends of the loop handle (2) apart and push it onto the control handle until it engages in position.
► Insert the screw (3) through the hole.
► Fit the star knob nut (1) and tighten it down.The loop handle (2) must not be removed again.
8.1 Adjusting Shaft AngleThe shaft angle can be adjusted to suit the height and reach of the user.► Switch off the trimmer and remove the activation key.
► Depress the lever (1) and hold it in that position.► Move shaft (2) to the required position (A to D) until it
engages.► Release the lever (1).
8.2 Adjusting Length of ShaftThe length of the shaft can be adjusted to suit the height and reach of the user.► Switch off the trimmer and remove the activation key.► Hold the shaft firmly.
1 230°
0000
-GXX
-140
7-A0
3
1
2
0000
-GXX
-141
0-A0
8 Adjusting Trimmer for User
1
2AB
CD
0000
-GXX
-147
9-A0
0458-718-0121-A 15
English 9 Inserting and Removing Activation Key
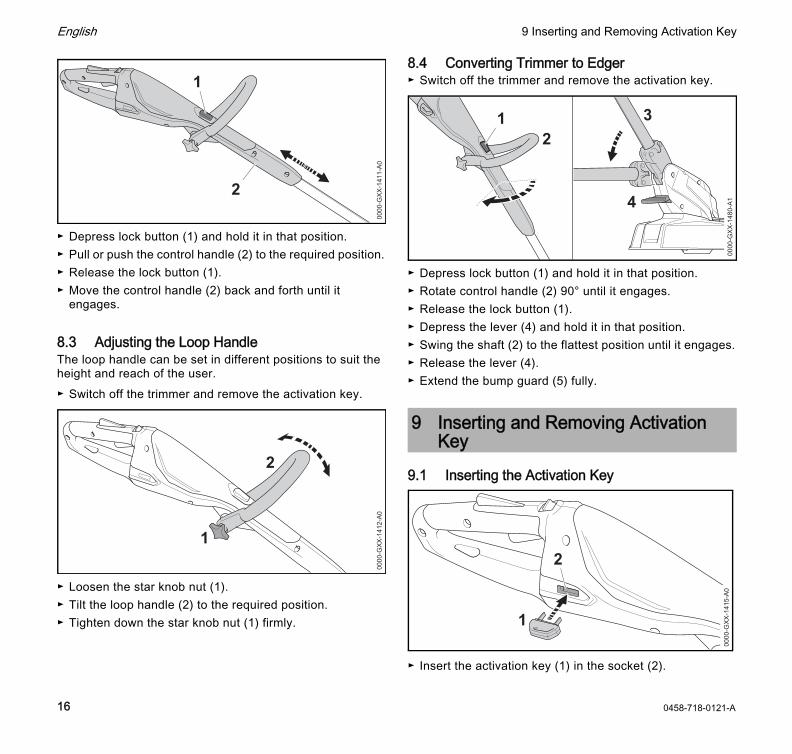
► Depress lock button (1) and hold it in that position.► Pull or push the control handle (2) to the required position.► Release the lock button (1).► Move the control handle (2) back and forth until it
engages.
8.3 Adjusting the Loop HandleThe loop handle can be set in different positions to suit the height and reach of the user.► Switch off the trimmer and remove the activation key.
► Loosen the star knob nut (1).► Tilt the loop handle (2) to the required position.► Tighten down the star knob nut (1) firmly.
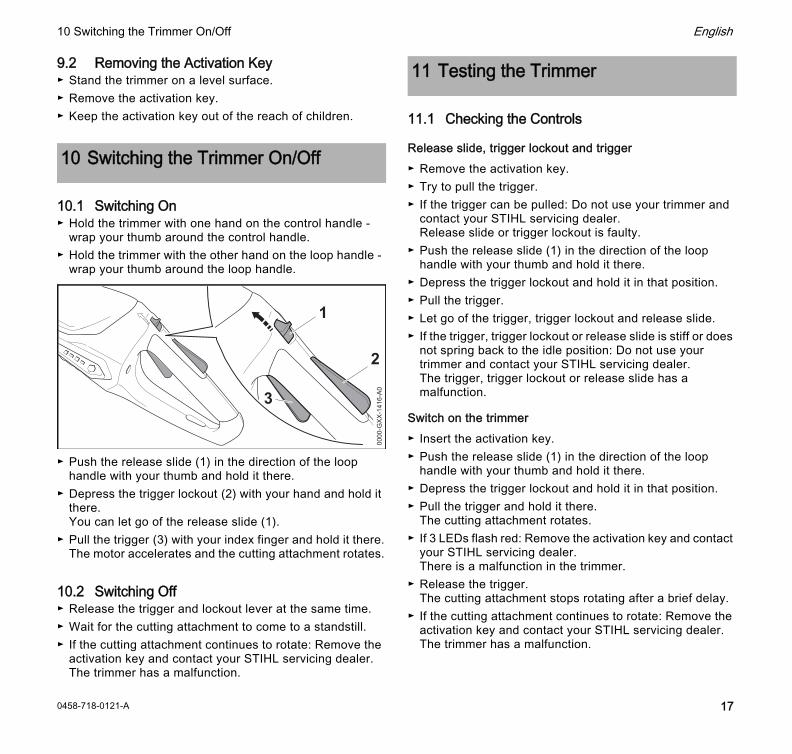
8.4 Converting Trimmer to Edger► Switch off the trimmer and remove the activation key.
► Depress lock button (1) and hold it in that position.► Rotate control handle (2) 90° until it engages.► Release the lock button (1).► Depress the lever (4) and hold it in that position.► Swing the shaft (2) to the flattest position until it engages.► Release the lever (4).► Extend the bump guard (5) fully.
9.1 Inserting the Activation Key
► Insert the activation key (1) in the socket (2).
1
2
0000
-GXX
-141
1-A0
1
2
0000
-GXX
-141
2-A0
9 Inserting and Removing Activation Key
3
4
21
0000
-GXX
-148
0-A1
1
2
0000
-GXX
-141
5-A0
0458-718-0121-A16
English 10 Switching the Trimmer On/Off
9.2 Removing the Activation Key► Stand the trimmer on a level surface.► Remove the activation key.► Keep the activation key out of the reach of children.
10.1 Switching On► Hold the trimmer with one hand on the control handle -
wrap your thumb around the control handle.► Hold the trimmer with the other hand on the loop handle -
wrap your thumb around the loop handle.
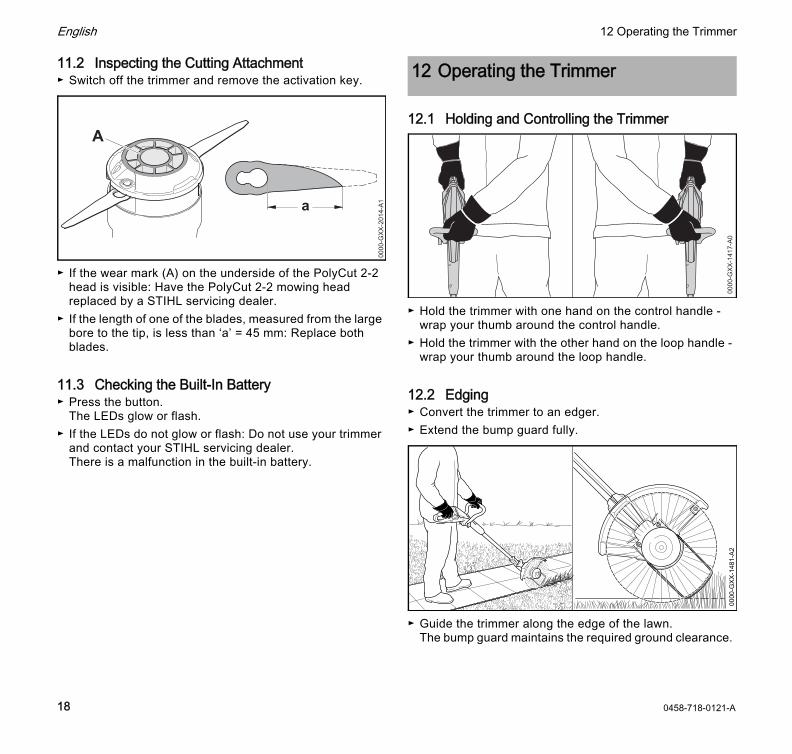
► Push the release slide (1) in the direction of the loop handle with your thumb and hold it there.
► Depress the trigger lockout (2) with your hand and hold it there.You can let go of the release slide (1).
► Pull the trigger (3) with your index finger and hold it there.The motor accelerates and the cutting attachment rotates.
10.2 Switching Off► Release the trigger and lockout lever at the same time.► Wait for the cutting attachment to come to a standstill.► If the cutting attachment continues to rotate: Remove the
activation key and contact your STIHL servicing dealer.The trimmer has a malfunction.
11.1 Checking the Controls
Release slide, trigger lockout and trigger► Remove the activation key.► Try to pull the trigger.► If the trigger can be pulled: Do not use your trimmer and
contact your STIHL servicing dealer.Release slide or trigger lockout is faulty.
► Push the release slide (1) in the direction of the loop handle with your thumb and hold it there.
► Depress the trigger lockout and hold it in that position.► Pull the trigger.► Let go of the trigger, trigger lockout and release slide.► If the trigger, trigger lockout or release slide is stiff or does
not spring back to the idle position: Do not use your trimmer and contact your STIHL servicing dealer.The trigger, trigger lockout or release slide has a malfunction.
Switch on the trimmer► Insert the activation key.► Push the release slide (1) in the direction of the loop
handle with your thumb and hold it there.► Depress the trigger lockout and hold it in that position.► Pull the trigger and hold it there.
The cutting attachment rotates.► If 3 LEDs flash red: Remove the activation key and contact
your STIHL servicing dealer.There is a malfunction in the trimmer.
► Release the trigger.The cutting attachment stops rotating after a brief delay.
► If the cutting attachment continues to rotate: Remove the activation key and contact your STIHL servicing dealer.The trimmer has a malfunction.
10 Switching the Trimmer On/Off
1
2
300
00-G
XX-1
416-
A0
11 Testing the Trimmer
0458-718-0121-A 17
English 12 Operating the Trimmer
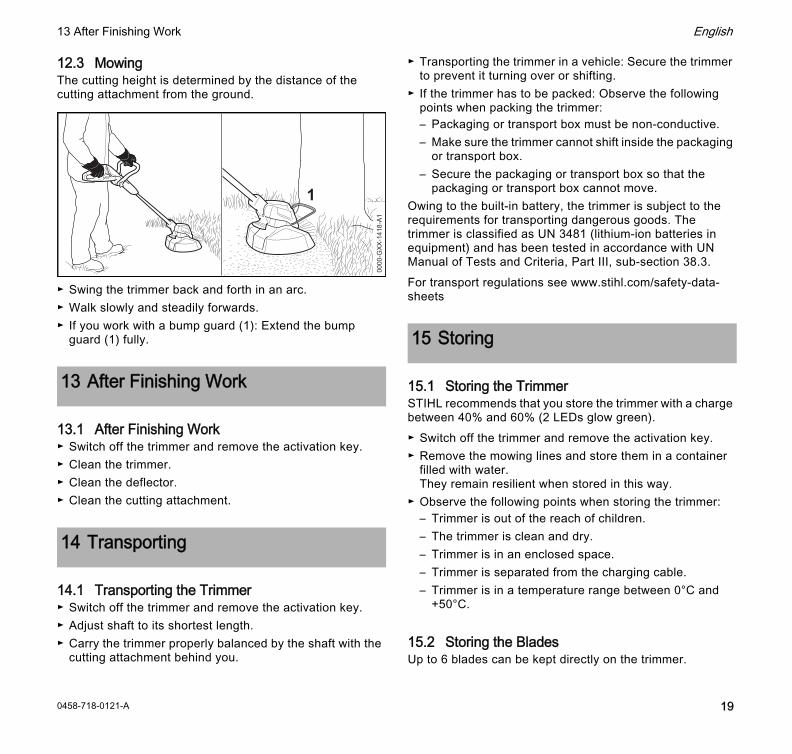
11.2 Inspecting the Cutting Attachment► Switch off the trimmer and remove the activation key.
► If the wear mark (A) on the underside of the PolyCut 2-2 head is visible: Have the PolyCut 2-2 mowing head replaced by a STIHL servicing dealer.
► If the length of one of the blades, measured from the large bore to the tip, is less than ‘a’ = 45 mm: Replace both blades.
11.3 Checking the Built-In Battery► Press the button.
The LEDs glow or flash.► If the LEDs do not glow or flash: Do not use your trimmer
and contact your STIHL servicing dealer.There is a malfunction in the built-in battery.
12.1 Holding and Controlling the Trimmer
► Hold the trimmer with one hand on the control handle - wrap your thumb around the control handle.
► Hold the trimmer with the other hand on the loop handle - wrap your thumb around the loop handle.
12.2 Edging► Convert the trimmer to an edger.► Extend the bump guard fully.
► Guide the trimmer along the edge of the lawn.The bump guard maintains the required ground clearance.
0000-GXX-2014-A1a
A
12 Operating the Trimmer
0000
-GXX
-141
7-A0
0000-GXX-1481-A2
0458-718-0121-A18
English 13 After Finishing Work
12.3 MowingThe cutting height is determined by the distance of the cutting attachment from the ground.
► Swing the trimmer back and forth in an arc.► Walk slowly and steadily forwards. ► If you work with a bump guard (1): Extend the bump
guard (1) fully.
13.1 After Finishing Work► Switch off the trimmer and remove the activation key.► Clean the trimmer.► Clean the deflector.► Clean the cutting attachment.
14.1 Transporting the Trimmer► Switch off the trimmer and remove the activation key.► Adjust shaft to its shortest length.► Carry the trimmer properly balanced by the shaft with the
cutting attachment behind you.
► Transporting the trimmer in a vehicle: Secure the trimmer to prevent it turning over or shifting.
► If the trimmer has to be packed: Observe the following points when packing the trimmer:– Packaging or transport box must be non-conductive.– Make sure the trimmer cannot shift inside the packaging
or transport box.– Secure the packaging or transport box so that the
packaging or transport box cannot move.Owing to the built-in battery, the trimmer is subject to the requirements for transporting dangerous goods. The trimmer is classified as UN 3481 (lithium-ion batteries in equipment) and has been tested in accordance with UN Manual of Tests and Criteria, Part III, sub-section 38.3.For transport regulations see www.stihl.com/safety-data-sheets
15.1 Storing the TrimmerSTIHL recommends that you store the trimmer with a charge between 40% and 60% (2 LEDs glow green). ► Switch off the trimmer and remove the activation key.► Remove the mowing lines and store them in a container
filled with water.They remain resilient when stored in this way.
► Observe the following points when storing the trimmer:– Trimmer is out of the reach of children.– The trimmer is clean and dry.– Trimmer is in an enclosed space.– Trimmer is separated from the charging cable.– Trimmer is in a temperature range between 0°C and
+50°C.
15.2 Storing the BladesUp to 6 blades can be kept directly on the trimmer.
13 After Finishing Work
14 Transporting
1
0000
-GXX
-141
8-A1
15 Storing
0458-718-0121-A 19
English 16 Cleaning
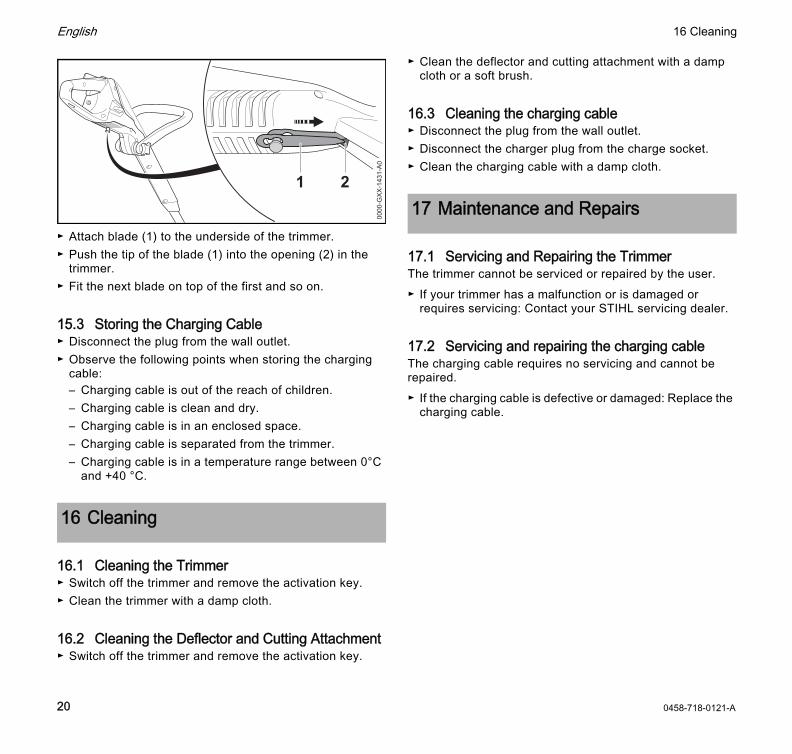
► Attach blade (1) to the underside of the trimmer.► Push the tip of the blade (1) into the opening (2) in the
trimmer.► Fit the next blade on top of the first and so on.
15.3 Storing the Charging Cable► Disconnect the plug from the wall outlet.► Observe the following points when storing the charging
cable:– Charging cable is out of the reach of children.– Charging cable is clean and dry.– Charging cable is in an enclosed space.– Charging cable is separated from the trimmer.– Charging cable is in a temperature range between 0°C
and +40 °C.
16.1 Cleaning the Trimmer► Switch off the trimmer and remove the activation key.► Clean the trimmer with a damp cloth.
16.2 Cleaning the Deflector and Cutting Attachment► Switch off the trimmer and remove the activation key.
► Clean the deflector and cutting attachment with a damp cloth or a soft brush.
16.3 Cleaning the charging cable► Disconnect the plug from the wall outlet.► Disconnect the charger plug from the charge socket.► Clean the charging cable with a damp cloth.
17.1 Servicing and Repairing the TrimmerThe trimmer cannot be serviced or repaired by the user.► If your trimmer has a malfunction or is damaged or
requires servicing: Contact your STIHL servicing dealer.
17.2 Servicing and repairing the charging cableThe charging cable requires no servicing and cannot be repaired.► If the charging cable is defective or damaged: Replace the
charging cable.
16 Cleaning
1 2
0000
-GXX
-143
1-A0
17 Maintenance and Repairs
0458-718-0121-A20
English 18 Troubleshooting
18.1 Troubleshooting Trimmer or Charging Cable
18 Troubleshooting
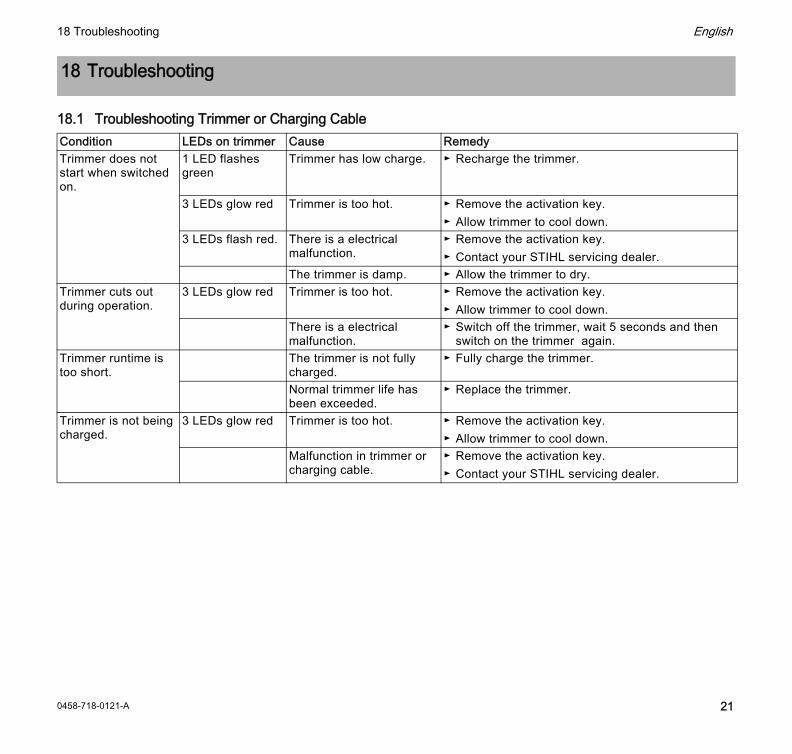
Condition LEDs on trimmer Cause RemedyTrimmer does not start when switched on.
1 LED flashes green
Trimmer has low charge. ► Recharge the trimmer.
3 LEDs glow red Trimmer is too hot. ► Remove the activation key.► Allow trimmer to cool down.
3 LEDs flash red. There is a electrical malfunction.
► Remove the activation key.► Contact your STIHL servicing dealer.
The trimmer is damp. ► Allow the trimmer to dry.Trimmer cuts out during operation.
3 LEDs glow red Trimmer is too hot. ► Remove the activation key.► Allow trimmer to cool down.
There is a electrical malfunction.
► Switch off the trimmer, wait 5 seconds and then switch on the trimmer again.
Trimmer runtime is too short.
The trimmer is not fully charged.
► Fully charge the trimmer.
Normal trimmer life has been exceeded.
► Replace the trimmer.
Trimmer is not being charged.
3 LEDs glow red Trimmer is too hot. ► Remove the activation key.► Allow trimmer to cool down.
Malfunction in trimmer or charging cable.
► Remove the activation key.► Contact your STIHL servicing dealer.
0458-718-0121-A 21
English 19 Specifications
19.1 STIHL FSA 45 Trimmer– Weight without battery, cutting attachment and deflector:
2.3 kg– Length: 1100 mm up to 1310 mm– Battery Technology: Lithium-ion– Voltage: 18 V– Capacity in Ah: see rating label– Energy content in Wh: see rating label– Permissible temperature range for operation and storage:
0°C up to +50°C
If the trimmer is used at temperatures higher than +30°C the battery runtime may be shortened and the trimmer’s performance reduced.
19.2 STIHL LK 45 Charging Cable– Voltage: 100-240 V, 50--60 Hz– Power rating: 14.6 W– Charge current: 0.65 A– Permissible temperature range for operation and storage:
0°C up to 40 °C
For charging times see www.stihl.com/charging-times.
19.3 Noise and Vibration DataSTIHL recommends that you wear hearing protection.STIHL FSA 45 with PolyCut 2-2 mowing head equipped with 1.6 mm diameter “round, quiet” nylon line– Sound pressure level Lp measured according to
EN 50636-2-91: 80 dB(A) K-value for noise pressure level is 2.5 dB(A).
– Sound power level Lw measured according to EN 50636-2-91: 94 dB(A) K-value for noise power level is 2.5 dB(A).
STIHL FSA 45 with PolyCut 2-2 and cutting blades– Sound pressure level Lp measured according to
EN 50636-2-91: 77 dB(A) K-value for noise pressure level is 2.5 dB(A).
– Sound power level Lw measured according to EN 50636-2-91: 87 dB(A) K-value for noise power level is 2.5 dB(A).
– Vibration measurement ahv measured according to EN 50636291– Control handle: 4.9 m/s² K-value for vibration level is
2.0 m/s².– Loop handle: 1.7 m/s² K-value for vibration level is
2.0 m/s²
The vibration values quoted above have been measured according to a standardized test procedure and may be used to compare electric power tools. Depending on the type of usage, the vibrations that actually occur may differ from the values quoted. The vibration values quoted may be used for an initial assessment of the user's exposure to vibrations. The actual exposure to vibrations has to be estimated. This process may also take into account times during which the electric power tool is switched off and times during which it is switched on but running without load.
19.4 REACHREACH is an EC regulation and stands for the Registration, Evaluation, Authorisation and Restriction of Chemical substances.For information on compliance with the REACH regulation see www.stihl.com/reach.
19 Specifications
0458-718-0121-A22
English 20 Combinations of Cutting Attachments and Deflectors
20.1 STIHL FSA 45 TrimmerThe following mowing heads may be mounted together with the deflector for mowing heads:– AutoCut 2-2 mowing head with 1.6 mm diameter “round,
quiet” nylon line– PolyCut 2-2 mowing head with cutting blades
Using the PolyCut 2-2 mowing head with nylon lines may shorten the battery runtime.Mowing head cannot be installed by the user.► Have the mowing head installed by a STIHL servicing
dealer.
21.1 Spare Parts and Accessories
STIHL recommends the use of original STIHL replacement parts and accessories.Original STIHL replacement parts and original STIHL accessories are available from STIHL servicing dealers.
22.1 Disposing of Trimmer and Charging CableThe trimmer contains a built-in rechargeable battery which must be disposed of separately.
► Have trimmer disposed of by STIHL servicing dealer.The STIHL dealer removes the built-in battery from the trimmer for separate disposal.
► Dispose of the deflector, cutting attachment, charging cable, accessories and packaging in accordance with local regulations and environmental requirements.
23.1 STIHL FSA 45 TrimmerANDREAS STIHL AG & Co. KGBadstrasse 115D-71336 WaiblingenGermanydeclare in exclusive responsibility that the product– Category: Cordless grass trimmer/edger– Make: STIHL– Model: STIHL FSA 45:– Serial identification: 4512
conforms to the relevant provisions of Directives 2011/65/EU, 2006/42/EC, 2014/30/EU and 2000/14/EC and has been developed and manufactured in compliance with the following standards in the versions valid on the date of production: EN 55014-1, EN 55014-2, EN 60335-1 and EN 50636-2-91 (Paragraph 7.1 modified using Art. 3 of Directive 2003/10/EU)Applied conformity assessment procedure in accordance with Directive 2000/14/EC, Annex V.Notified body: Intertek House, Cleeve Road, Leatherhead, Surrey KT22 7SB, UK– Measured sound power level: 94 dB(A)– Guaranteed sound power level: 96 dB(A)
Technical documents are kept at ANDREAS STIHL AG & Co. KG Produktzulassung (Product Licensing).
20 Combinations of Cutting Attachments and Deflectors
21 Spare Parts and Accessories
These symbols identify original STIHL replacement parts and original STIHL accessories.
22 Disposal
23 EC Declaration of Conformity
0458-718-0121-A 23

English 23 EC Declaration of Conformity
The year of manufacture and serial number are applied to the trimmer.Done at Waiblingen, 01.07.2016ANDREAS STIHL AG & Co. KG
Thomas Elsner, Director Product Management and Services
23.2 STIHL LK 45 Charging CableThis charging cable is manufactured and put on the market in accordance with the following directives: 2014/35/EU, 2014/30/EU and 2011/65/EU.The complete EC Declaration of Conformity is available from ANDREAS STIHL AG & Co. KG, Badstrasse 115, 71336 Waiblingen, Germany.
0458-718-0121-A24


www.stihl.com
*04587180121A*0458-718-0121-A
0458-718-0121-A
englischG
Related Documents


