step by step install oracle 10gR2 rac +ASM on windows using vmware 操作系统 : windows 2003 server 企业版 安装软件包 :10G 集群软件包 10201_clusterware_win32.zip 数据库软件包 10201_database_win32.zip 1.安装第一个节点 windows 2003 虚拟机 ..................................................................................... 1 2.编辑 c:\windows\system32\drivers\etc\hosts ................................................................................. 2 3.设置两个网卡 ip 地址................................................................................................................... 3 4.配置共享磁盘................................................................................................................................ 3 5.安装另外个节点 2....................................................................................................................... 11 6.启动两个节点后 看互相是否能 ping 通................................................................................... 11 7.安装 clustware 集群软件 ............................................................................................................ 12 8. Install the Database Software and Create an ASM Instance ....................................................... 27 9.dbca 创建集群数据库 ................................................................................................................ 36 1.安装第一个节点 windows 2003 虚拟机 用 vmware 添加 5 块虚拟硬盘, 1,2 两块做 ocr 和 voting disk, 3,4,5 三块做 asm 存储,并且添加一块网卡 1.在虚拟机配置文件中 rac1.vmx 文件 加入以下内容 设定两节点可以 共享磁盘 disk.locking = "FALSE" diskLib.dataCacheMaxSize = "0" diskLib.dataCacheMaxReadAheadSize = "0" diskLib.dataCacheMinReadAheadSize = "0" diskLib.dataCachePageSize = "4096" diskLib.maxUnsyncedWrites = "0" scsi1.present = "TRUE" scsi1.virtualDev = "lsilogic" scsi1.sharedBus = "VIRTUAL" scsi1:1.present = "TRUE" scsi1:1.mode = "independent-persistent" scsi1:1.fileName = "e:\shared\ocr.vmdk" scsi1:1.deviceType = "Disk"

Step By Step Install Oracle 10g Rac Asm On Windows
May 13, 2015
Steps on How to install Oracle on ASM vmware
Welcome message from author
This document is posted to help you gain knowledge. Please leave a comment to let me know what you think about it! Share it to your friends and learn new things together.
Transcript

step by step install oracle 10gR2 rac +ASM on windows using vmware
操作系统 : windows 2003 server 企业版 安 装 软 件 包 :10G 集 群 软 件 包 10201_clusterware_win32.zip 数 据 库 软 件 包
10201_database_win32.zip 1.安装第一个节点 windows 2003 虚拟机 .....................................................................................1 2.编辑 c:\windows\system32\drivers\etc\hosts.................................................................................2 3.设置两个网卡 ip 地址...................................................................................................................3 4.配置共享磁盘................................................................................................................................3 5.安装另外个节点 2.......................................................................................................................11 6.启动两个节点后 看互相是否能 ping 通...................................................................................11 7.安装 clustware 集群软件 ............................................................................................................12 8. Install the Database Software and Create an ASM Instance .......................................................27 9.dbca 创建集群数据库 ................................................................................................................36
1.安装第一个节点 windows 2003 虚拟机
用 vmware 添加 5 块虚拟硬盘, 1,2 两块做 ocr 和 voting disk, 3,4,5 三块做 asm 存储,并且添加一块网卡
1.在虚拟机配置文件中 rac1.vmx 文件 加入以下内容 设定两节点可以
共享磁盘
disk.locking = "FALSE"
diskLib.dataCacheMaxSize = "0"
diskLib.dataCacheMaxReadAheadSize = "0"
diskLib.dataCacheMinReadAheadSize = "0"
diskLib.dataCachePageSize = "4096"
diskLib.maxUnsyncedWrites = "0"
scsi1.present = "TRUE"
scsi1.virtualDev = "lsilogic"
scsi1.sharedBus = "VIRTUAL"
scsi1:1.present = "TRUE"
scsi1:1.mode = "independent-persistent"
scsi1:1.fileName = "e:\shared\ocr.vmdk"
scsi1:1.deviceType = "Disk"
scsi1:1.redo = ""
scsi1:2.present = "TRUE"
scsi1:2.mode = "independent-persistent"
scsi1:2.fileName = "e:\shared\votingdisk.vmdk"
scsi1:2.deviceType = "Disk"
scsi1:2.redo = ""
scsi1:3.present = "TRUE"
scsi1:3.mode = "independent-persistent"
scsi1:3.fileName = "e:\shared\asm1.vmdk"
scsi1:3.deviceType = "Disk"
scsi1:3.redo = ""
scsi1:4.present = "TRUE"
scsi1:4.mode = "independent-persistent"
scsi1:4.fileName = "e:\shared\asm2.vmdk"
scsi1:4.deviceType = "plainDisk"
scsi1:4.redo = ""
scsi1:4.present = "TRUE"
scsi1:4.mode = "independent-persistent"
scsi1:4.fileName = "e:\shared\asm3.vmdk"
scsi1:4.deviceType = "Disk"
scsi1:4.redo = ""
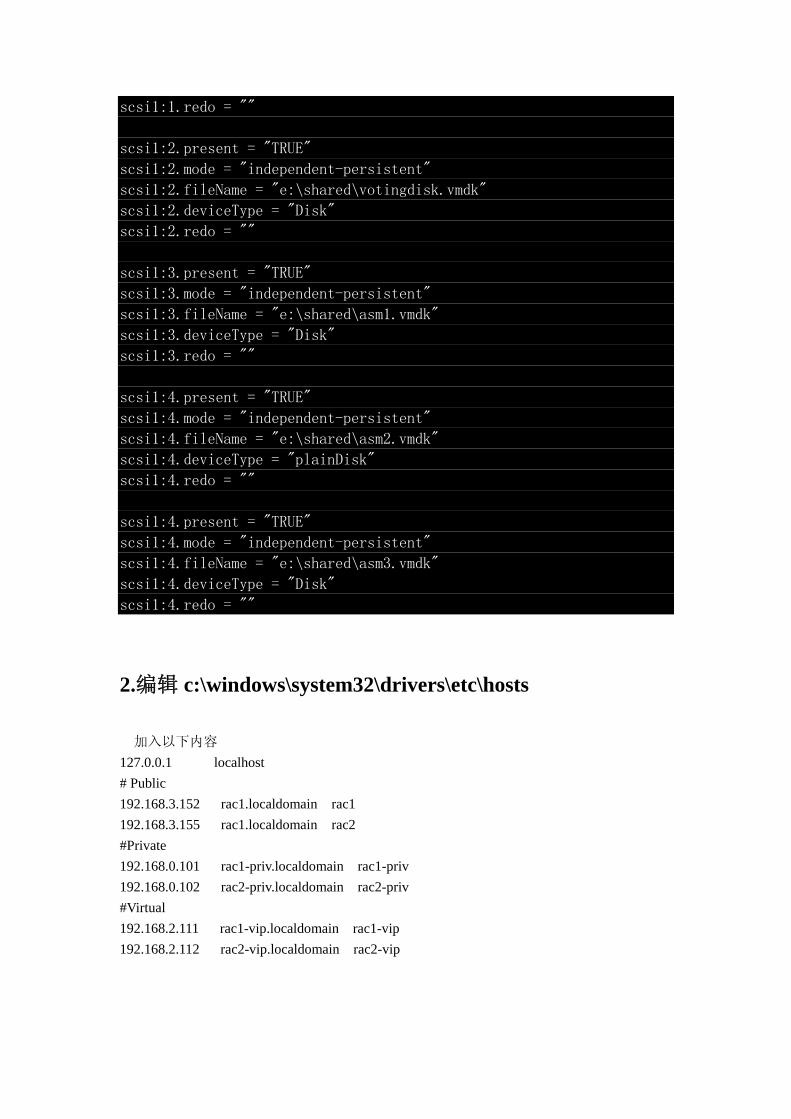
2.编辑 c:\windows\system32\drivers\etc\hosts
加入以下内容 127.0.0.1 localhost # Public 192.168.3.152 rac1.localdomain rac1 192.168.3.155 rac1.localdomain rac2 #Private 192.168.0.101 rac1-priv.localdomain rac1-priv 192.168.0.102 rac2-priv.localdomain rac2-priv #Virtual 192.168.2.111 rac1-vip.localdomain rac1-vip 192.168.2.112 rac2-vip.localdomain rac2-vip

3.设置两个网卡 ip 地址
Rac1 节点 public 为 192.168.3.152,Private 为 192.168.0.101
设置完成后,点 网上邻居 右键属性 菜单栏上的 高级设置
选择适配器与绑定 把 public 的 list 放到最前面
4.配置共享磁盘
设置共享盘自动加载 C:\diskpart Diskpart>automount enable Diskpart>exit When the server restarts, open the "Computer Management" dialog (Start > All Programs >
Administrative Tools > Computer Management) and click on the Disk Management tree node. This action should initiate the "Initialize and Convert Disk Wizard". Click the "Next" button to continue.
Iinitialize all 5 disks by clicking the "Next" button.
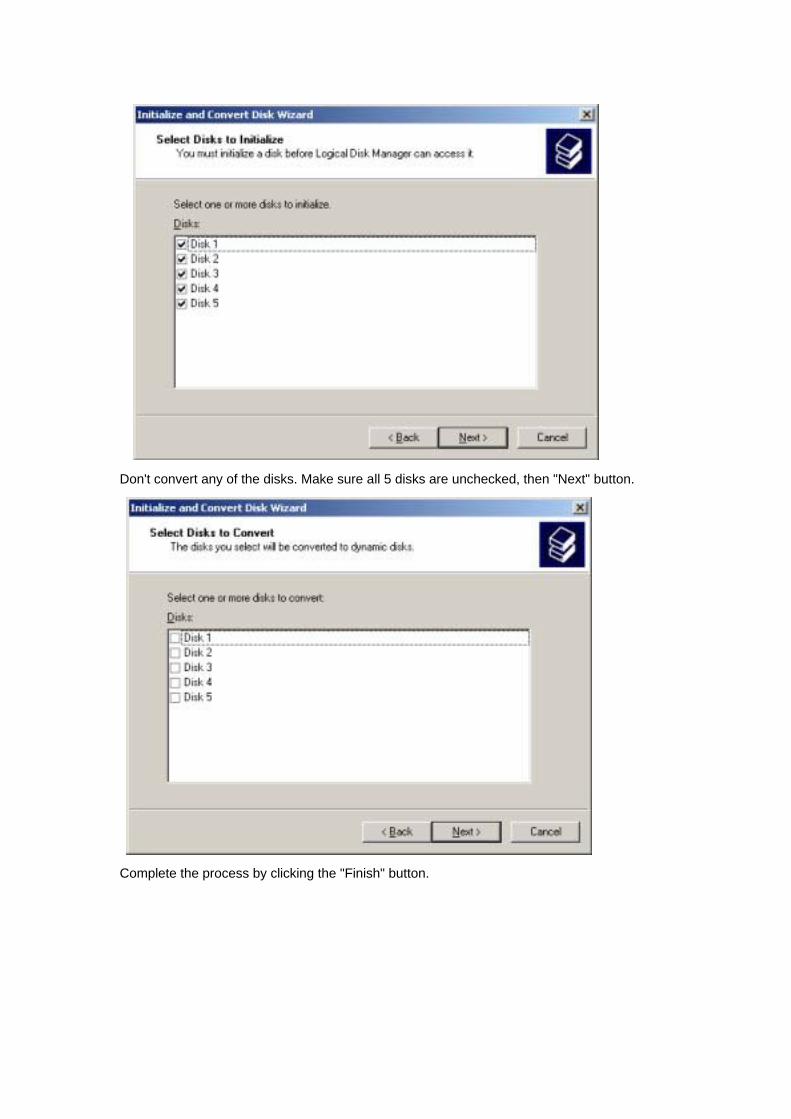
Don't convert any of the disks. Make sure all 5 disks are unchecked, then "Next" button.
Complete the process by clicking the "Finish" button.

Right-click on "Disk 1" and select the "New Partition..." option to start the "New Partition Wizard".
Click the "Next" button to continue.
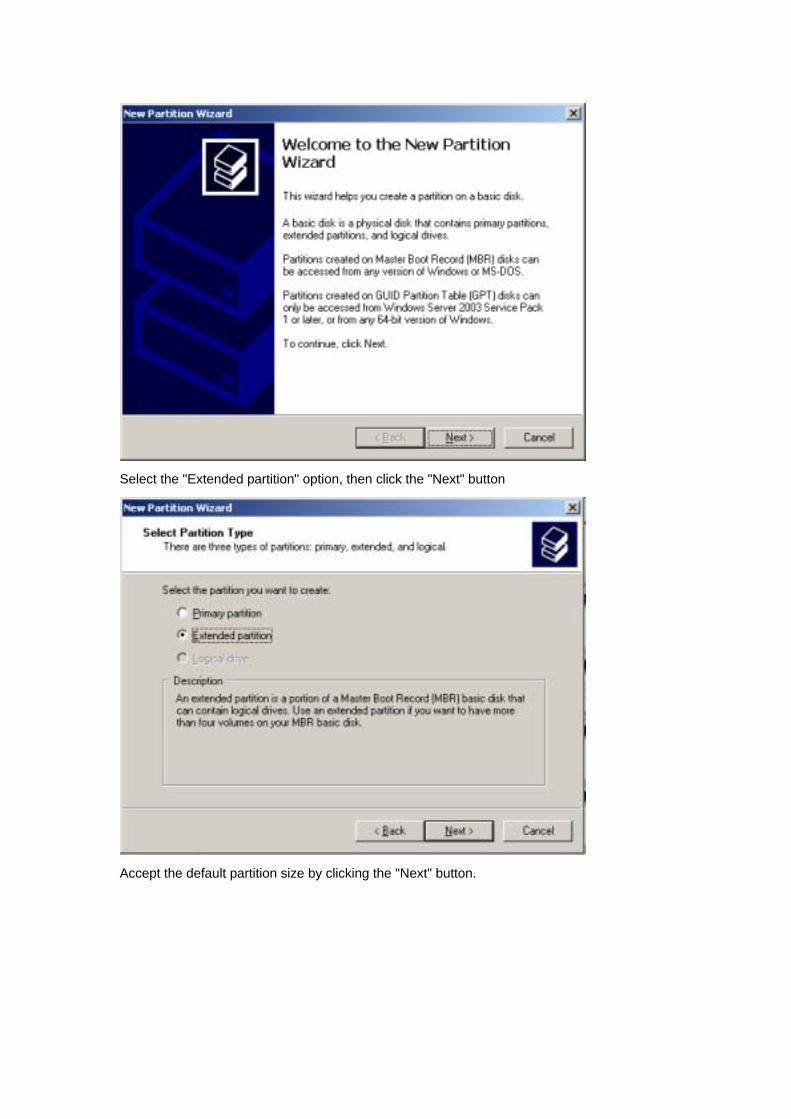
Select the "Extended partition" option, then click the "Next" button.
Accept the default partition size by clicking the "Next" button.

Complete the partition by clicking the "Finish" button.
The partition will now be displayed with a green bar. Right-click on the partition and select the "New Logical Drive" option to restart the "New Partition Wizard".
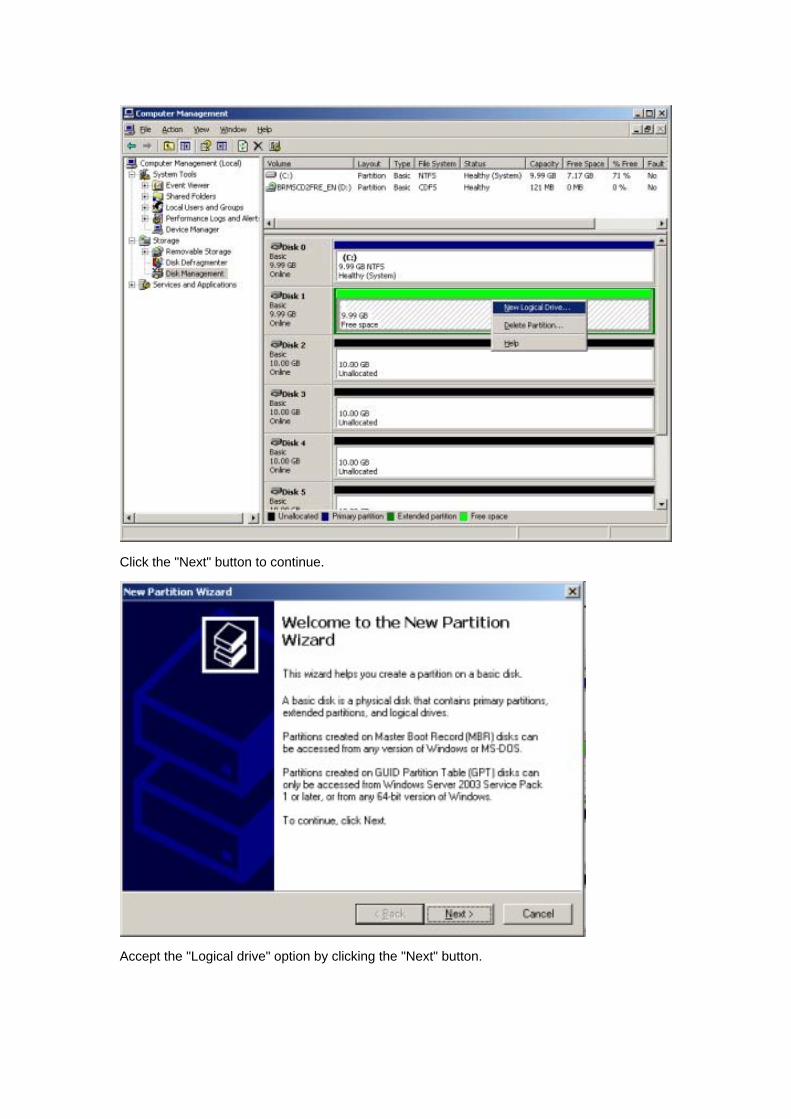
Click the "Next" button to continue.
Accept the "Logical drive" option by clicking the "Next" button.

Accept the default partition size by clicking the "Next" button.
Select the "Do not assign a drive letter or drive path" option, then click the "Next" button.

Select the "Do not format this partition" option, then cclick the "Next" buttonhe "Next"
butto
Complete the logical drive by clicking the "Finish" button.
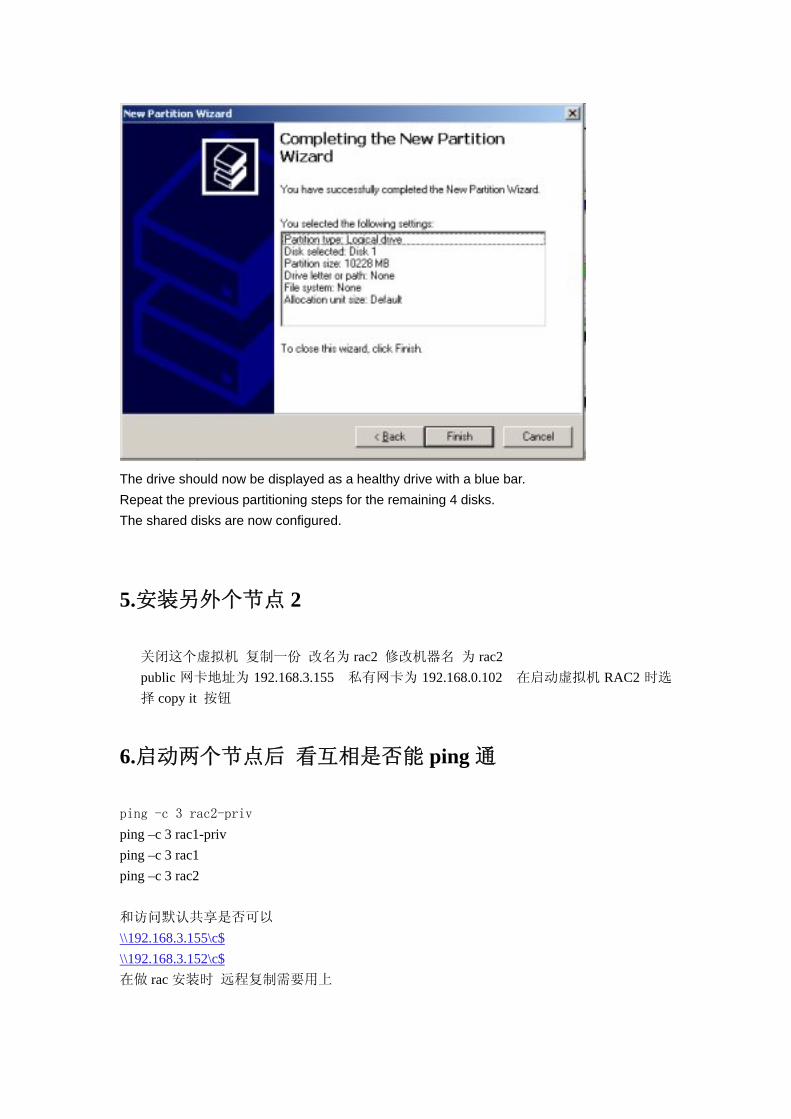
The drive should now be displayed as a healthy drive with a blue bar. Repeat the previous partitioning steps for the remaining 4 disks. The shared disks are now configured. \
5.安装另外个节点 2
关闭这个虚拟机 复制一份 改名为 rac2 修改机器名 为 rac2 public 网卡地址为 192.168.3.155 私有网卡为 192.168.0.102 在启动虚拟机 RAC2 时选
择 copy it 按钮
6.启动两个节点后 看互相是否能 ping 通
ping -c 3 rac2-priv
ping –c 3 rac1-priv ping –c 3 rac1 ping –c 3 rac2 和访问默认共享是否可以 \\192.168.3.155\c$\\192.168.3.152\c$在做 rac 安装时 远程复制需要用上
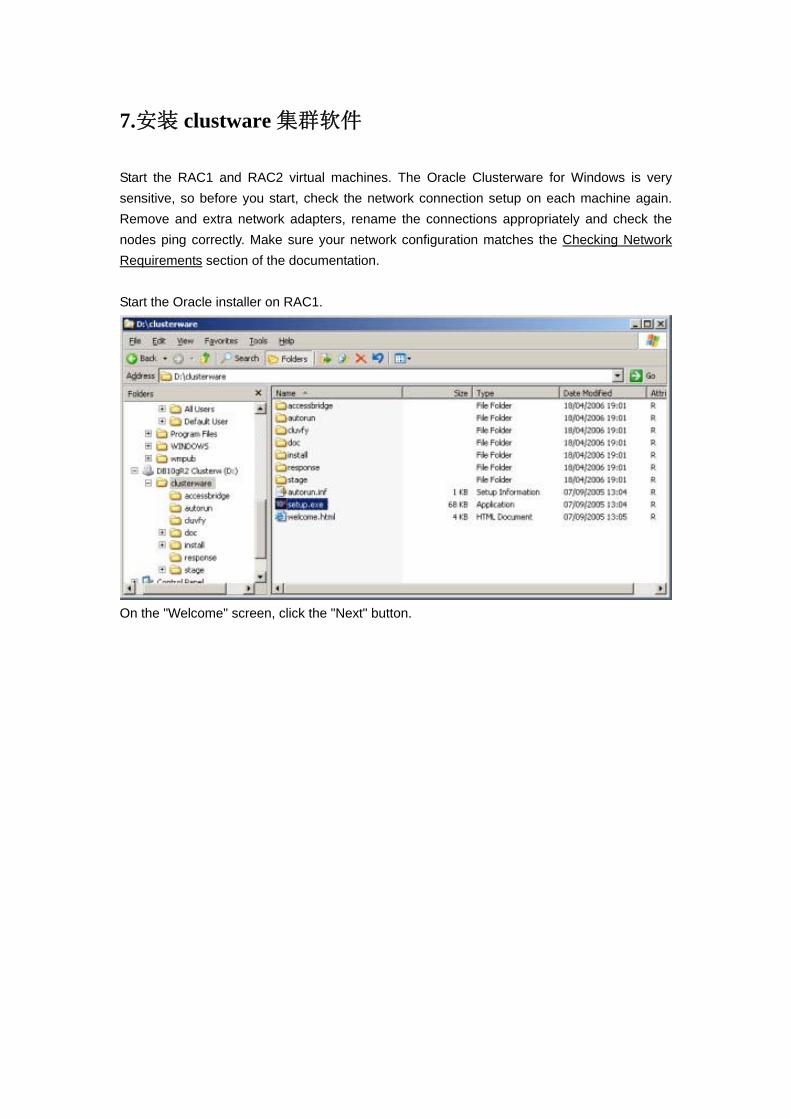
7.安装 clustware 集群软件
Start the RAC1 and RAC2 virtual machines. The Oracle Clusterware for Windows is very sensitive, so before you start, check the network connection setup on each machine again. Remove and extra network adapters, rename the connections appropriately and check the nodes ping correctly. Make sure your network configuration matches the Checking Network Requirements section of the documentation. Start the Oracle installer on RAC1.
On the "Welcome" screen, click the "Next" button.

Accept the default inventory location by clicking the "Next" button.
Enter the appropriate name and path for the Oracle Home and click the "Next" button.

Wait while the prerequisite checks are done. If you have any failures correct them and retry the tests before clicking the "Next" button.

The "Specify Cluster Configuration" screen shows only the RAC1 node in the cluster. Click the "Add" button to continue.
Enter the details for the RAC2 node and click the "OK" button.
Click the "Next" button to continue.

The "Specific Network Interface Usage" screen defines how each network interface will be used. Highlight the "public" interface and click the "Edit" button.
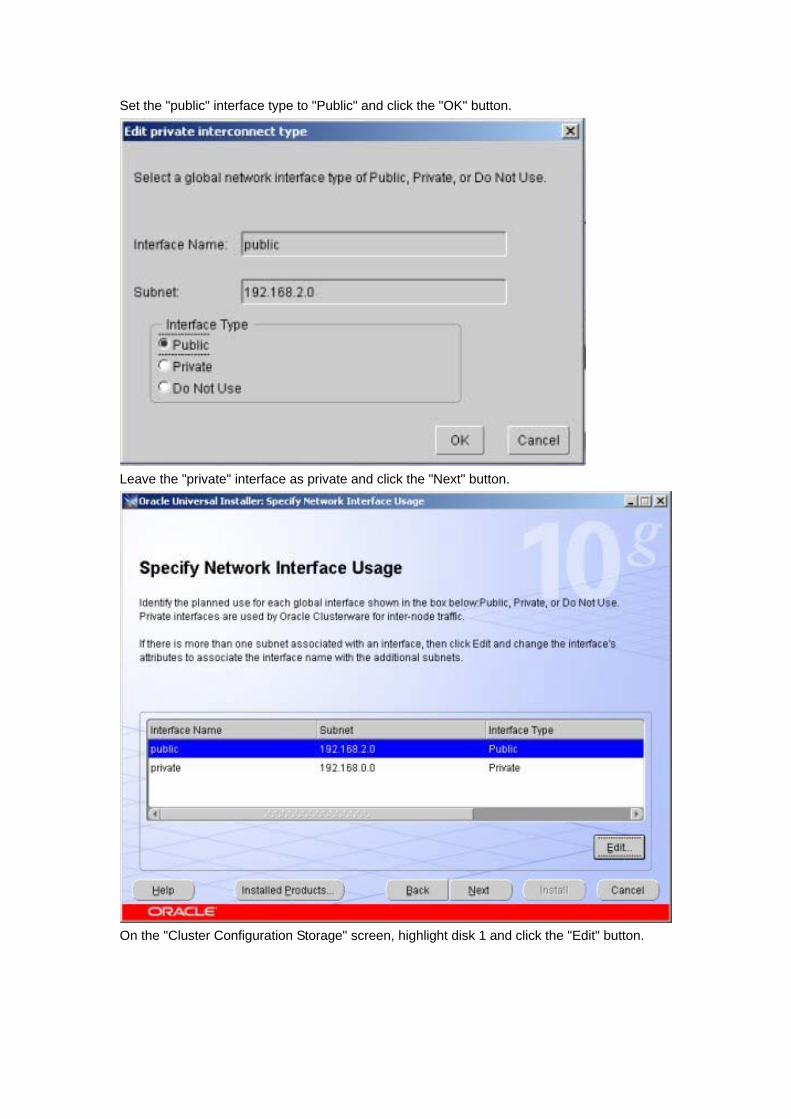
Set the "public" interface type to "Public" and click the "OK" button.
Leave the "private" interface as private and click the "Next" button.
On the "Cluster Configuration Storage" screen, highlight disk 1 and click the "Edit" button.
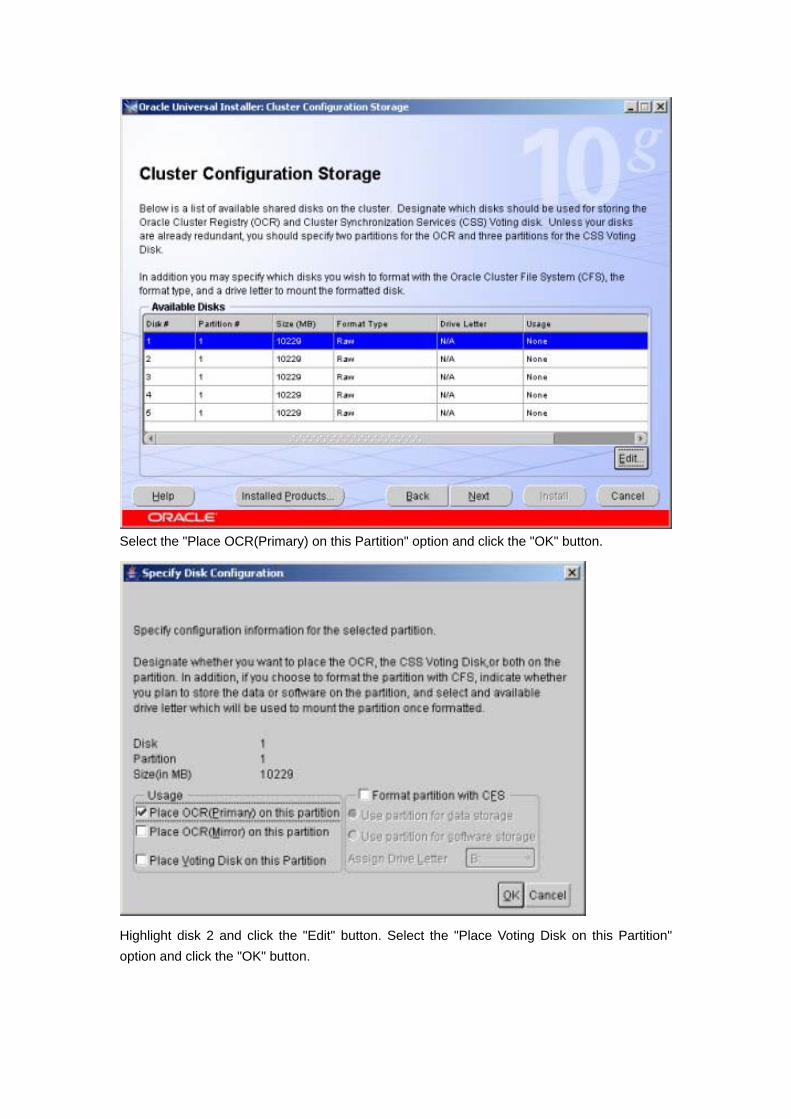
Select the "Place OCR(Primary) on this Partition" option and click the "OK" button.
Highlight disk 2 and click the "Edit" button. Select the "Place Voting Disk on this Partition" option and click the "OK" button.
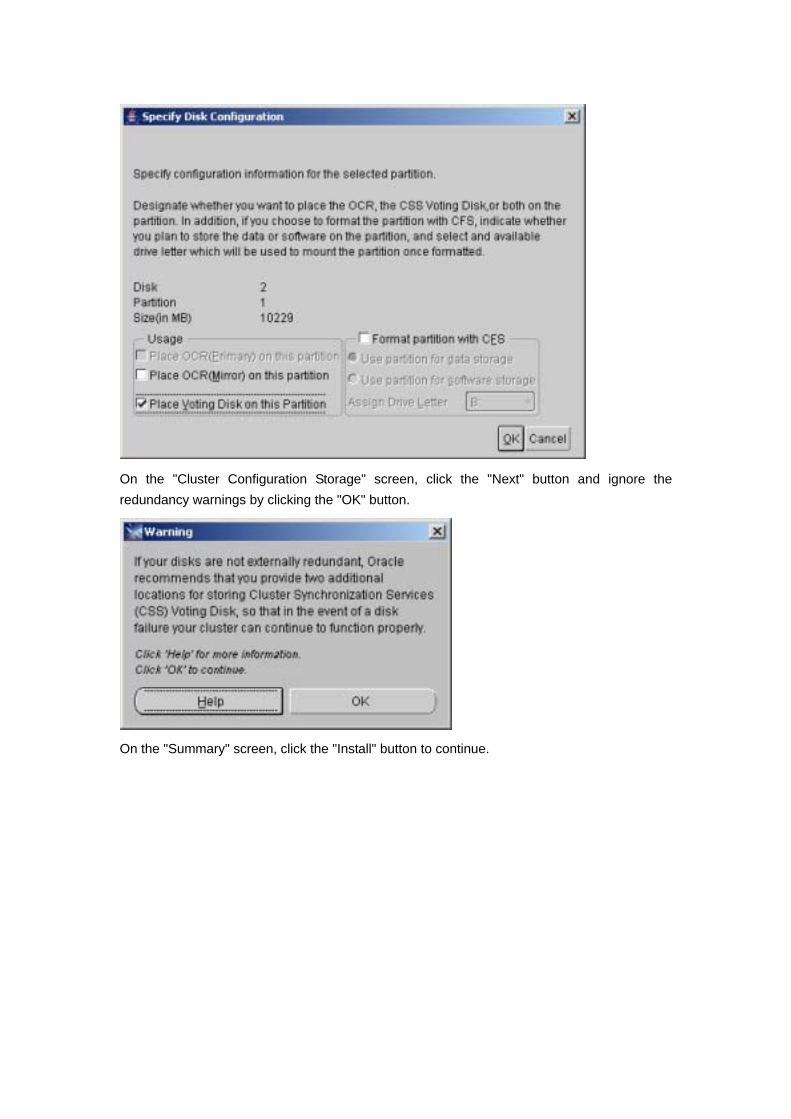
On the "Cluster Configuration Storage" screen, click the "Next" button and ignore the redundancy warnings by clicking the "OK" button.
On the "Summary" screen, click the "Install" button to continue.

Wait while the installation takes place.
Wait while the configuration assistants run.
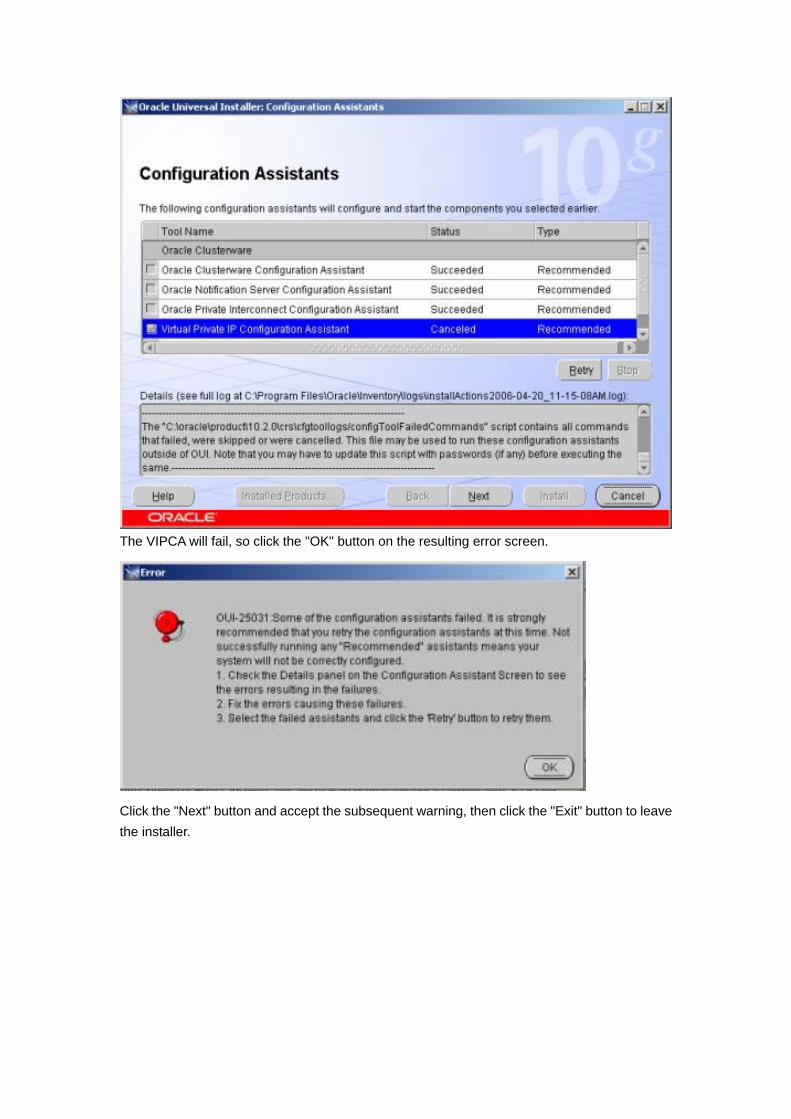
The VIPCA will fail, so click the "OK" button on the resulting error screen.
Click the "Next" button and accept the subsequent warning, then click the "Exit" button to leave the installer.

On the RAC1 virtual machine, run the VIPCA manually by issuing the following commands in a command prompt.
cd c:\oracle\product\10.2.0\crs\bin
vipca.bat
Click the "Next" button on the VIPCA welcome screen.
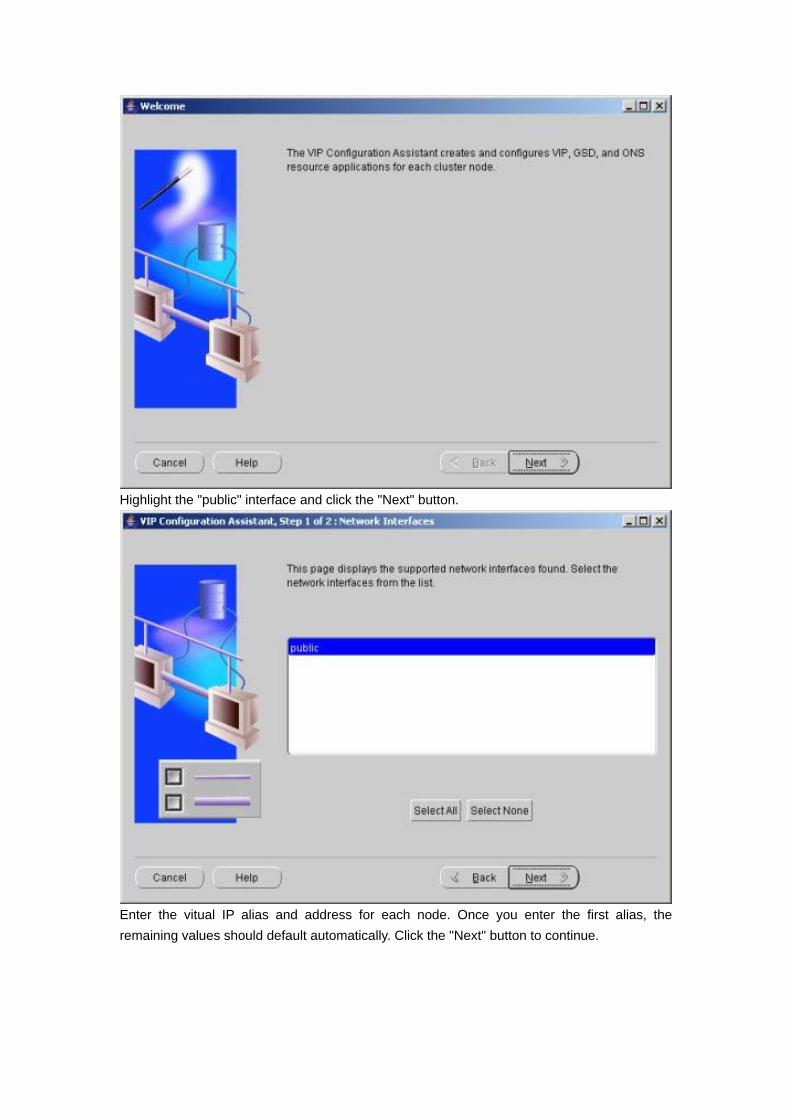
Highlight the "public" interface and click the "Next" button.
Enter the vitual IP alias and address for each node. Once you enter the first alias, the remaining values should default automatically. Click the "Next" button to continue.
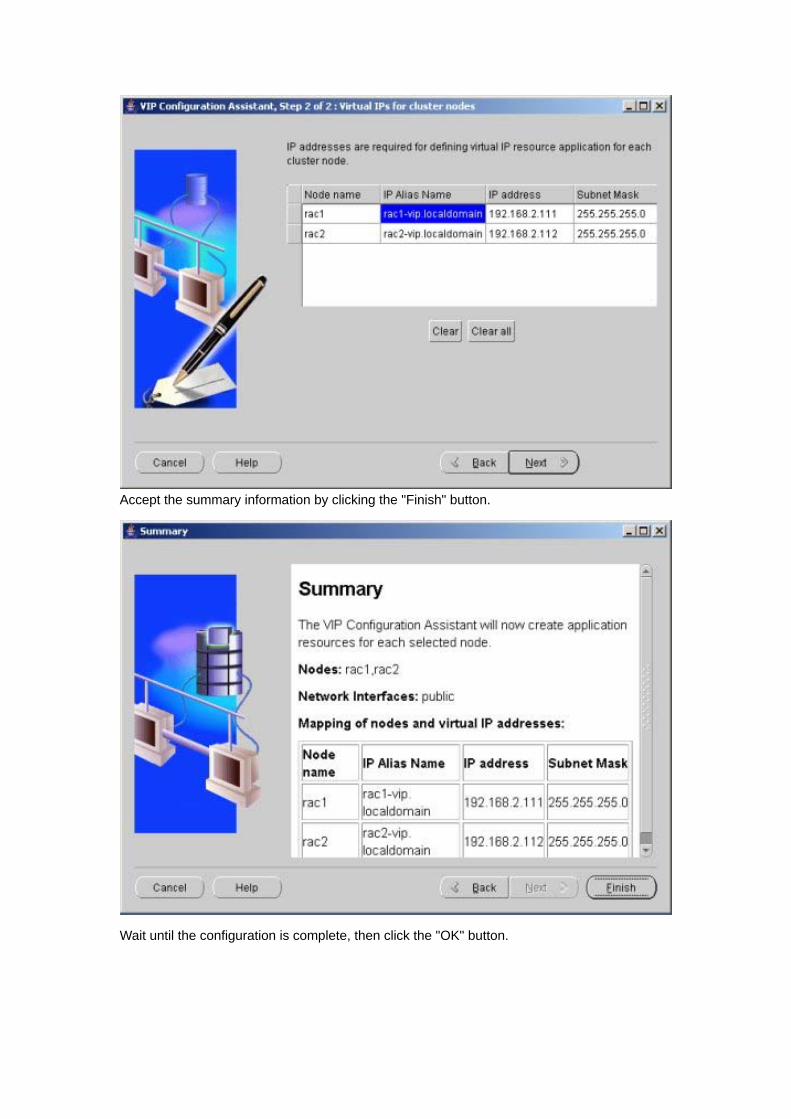
Accept the summary information by clicking the "Finish" button.
Wait until the configuration is complete, then click the "OK" button.
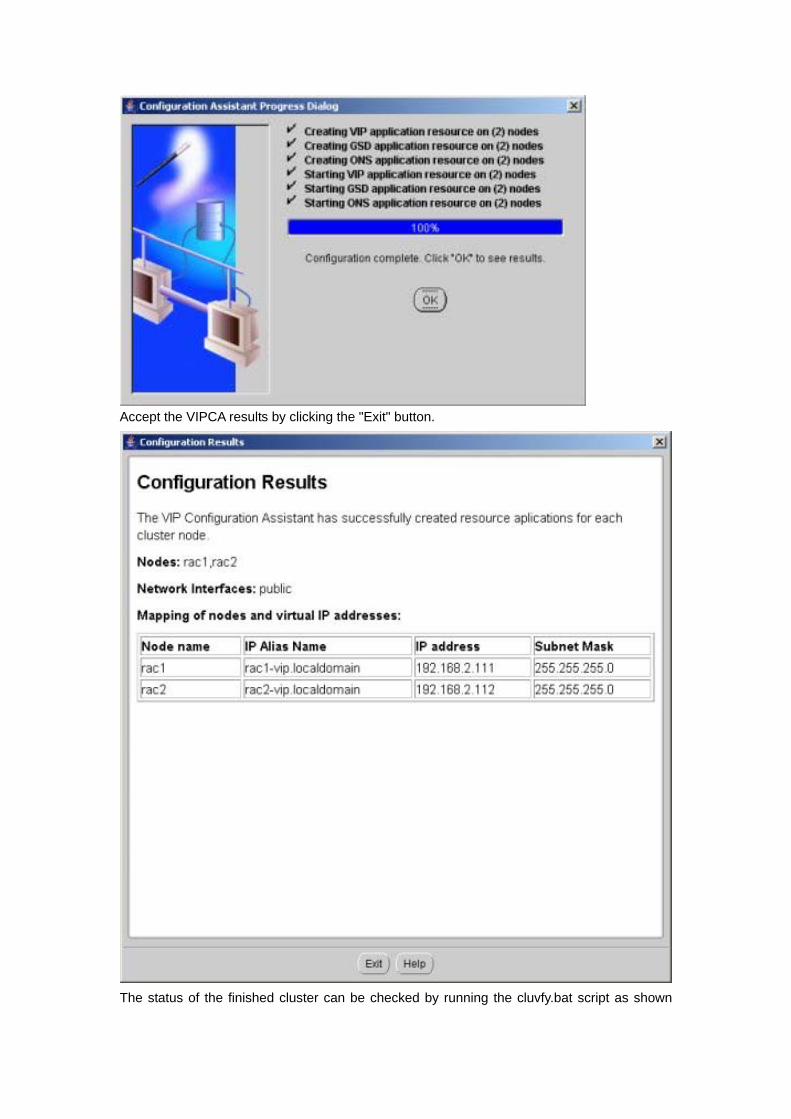
Accept the VIPCA results by clicking the "Exit" button.
The status of the finished cluster can be checked by running the cluvfy.bat script as shown

below. C:\oracle\product\10.2.0\crs\BIN>cluvfy.bat stage -post crsinst -n rac1,rac2
Performing post-checks for cluster services setup
Checking node reachability...
Node reachability check passed from node "rac1".
Checking user equivalence...
User equivalence check passed for user "Administrator".
Checking Cluster manager integrity...
Checking CSS daemon...
Daemon status check passed for "CSS daemon".
Cluster manager integrity check passed.
Checking cluster integrity...
Cluster integrity check passed
Checking OCR integrity...
Checking the absence of a non-clustered configuration...
All nodes free of non-clustered, local-only configurations.
Uniqueness check for OCR device passed.
Checking the version of OCR...
OCR of correct Version "2" exists.
Checking data integrity of OCR...
Data integrity check for OCR passed.
OCR integrity check passed.
Checking CRS integrity...
Checking daemon liveness...
Liveness check passed for "CRS daemon".
Checking daemon liveness...
Liveness check passed for "CSS daemon".
Checking daemon liveness...
Liveness check passed for "EVM daemon".
Checking CRS health...
CRS health check passed.
CRS integrity check passed.
Checking node application existence...
Checking existence of VIP node application (required)
Check passed.
Checking existence of ONS node application (optional)
Check passed.
Checking existence of GSD node application (optional)
Check passed.
Post-check for cluster services setup was successful.
C:\oracle\product\10.2.0\crs\BIN>

8. Install the Database Software and Create an ASM
Instance
Start the RAC1 and RAC2 virtual machines, login to RAC1 and start the Oracle installer.
On the "Welcome" screen, click the "Next" button.
Select the "Enterprise Edition" option and click the "Next" button.

Enter the name and path for the Oracle Home and click the "Next" button.
Select the "Cluster Installation" option and make sure both RAC nodes are selected, then click

the "Next" button.
Wait while the prerequisite checks are done. If you have any failures correct them and retry the tests before clicking the "Next" button.
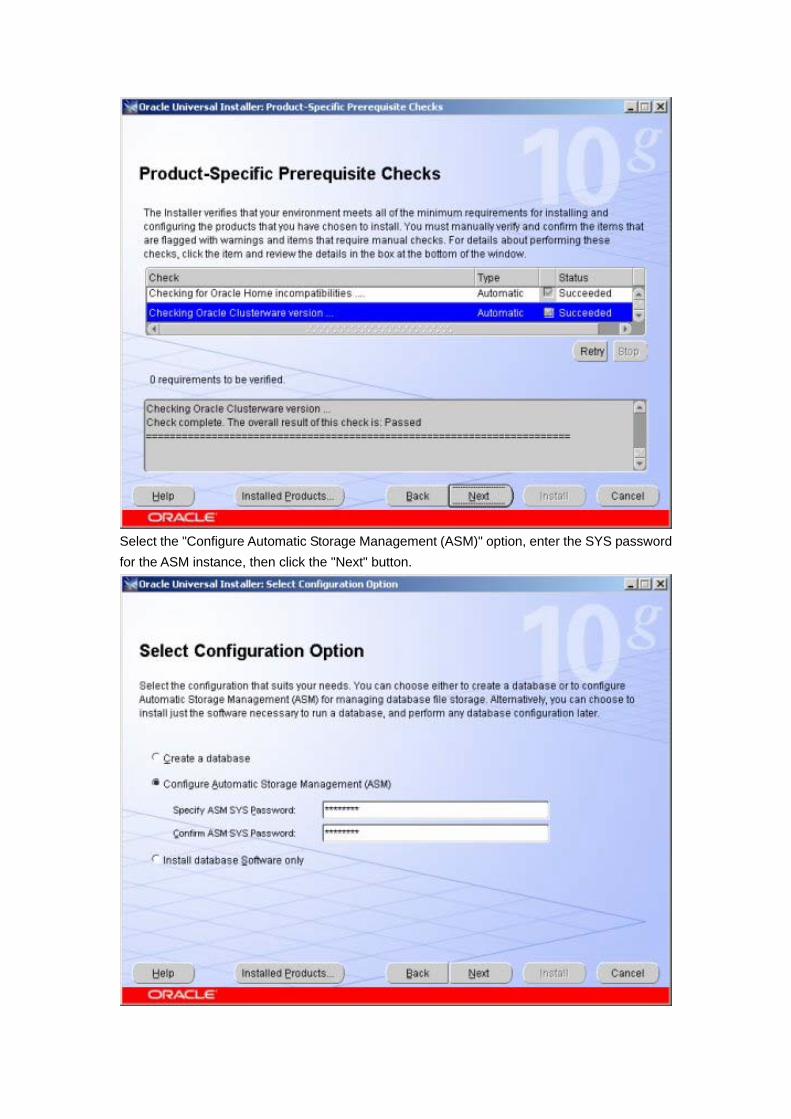
Select the "Configure Automatic Storage Management (ASM)" option, enter the SYS password for the ASM instance, then click the "Next" button.
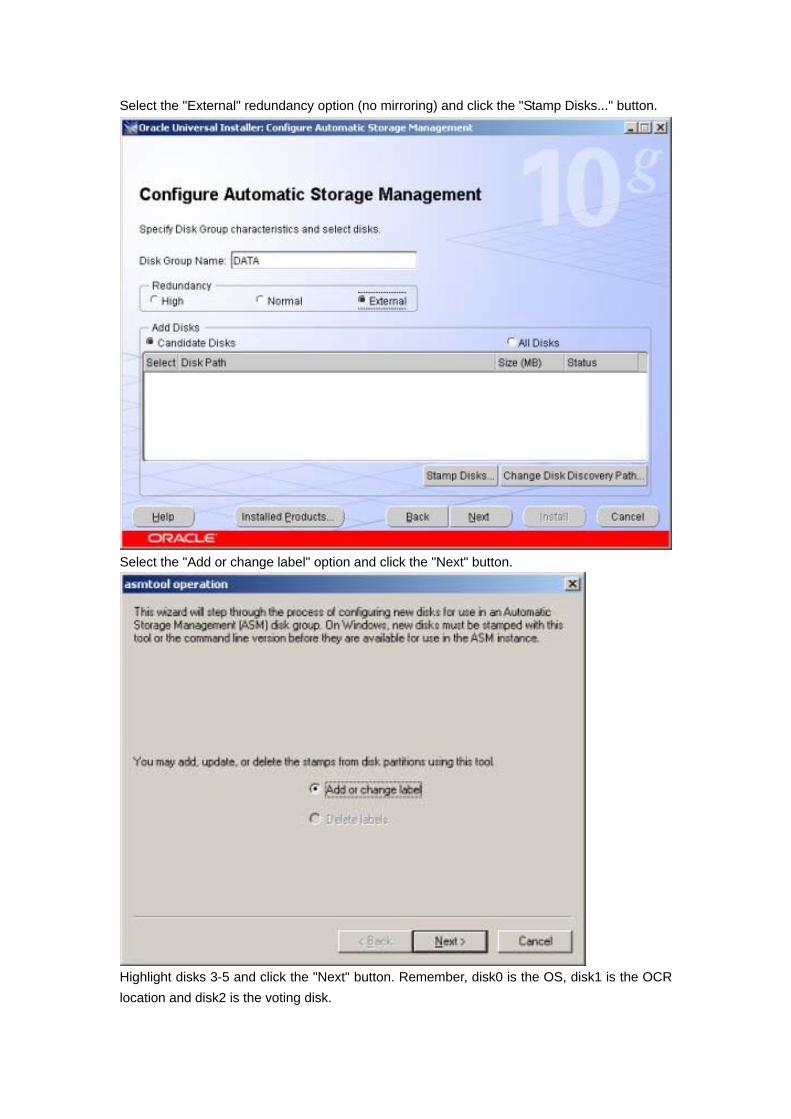
Select the "External" redundancy option (no mirroring) and click the "Stamp Disks..." button.
Select the "Add or change label" option and click the "Next" button.
Highlight disks 3-5 and click the "Next" button. Remember, disk0 is the OS, disk1 is the OCR location and disk2 is the voting disk.
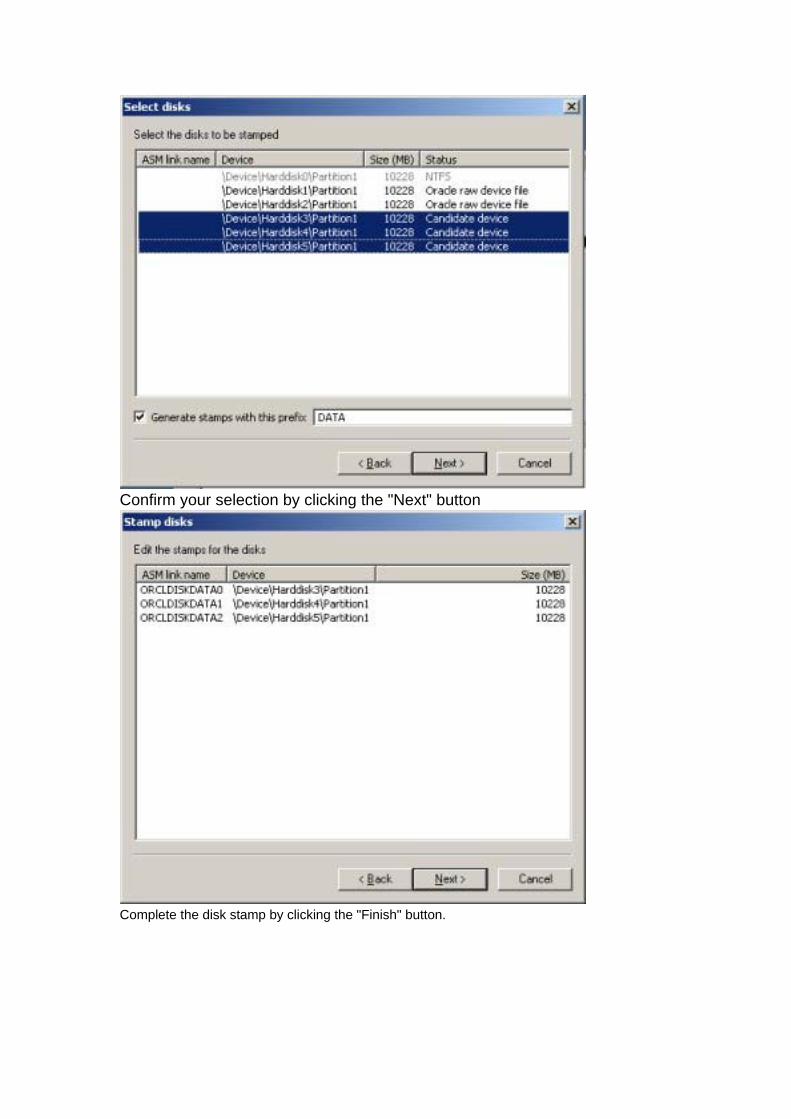
Confirm your selection by clicking the "Next" button
Complete the disk stamp by clicking the "Finish" button.
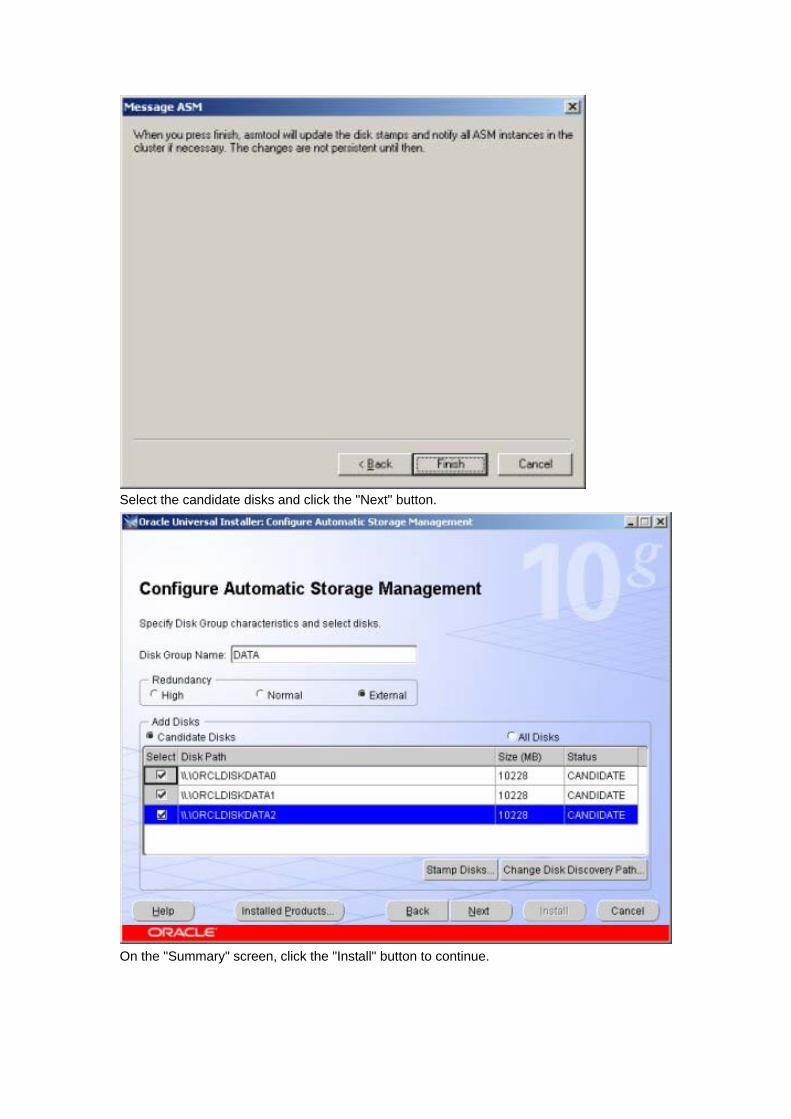
Select the candidate disks and click the "Next" button.
On the "Summary" screen, click the "Install" button to continue.
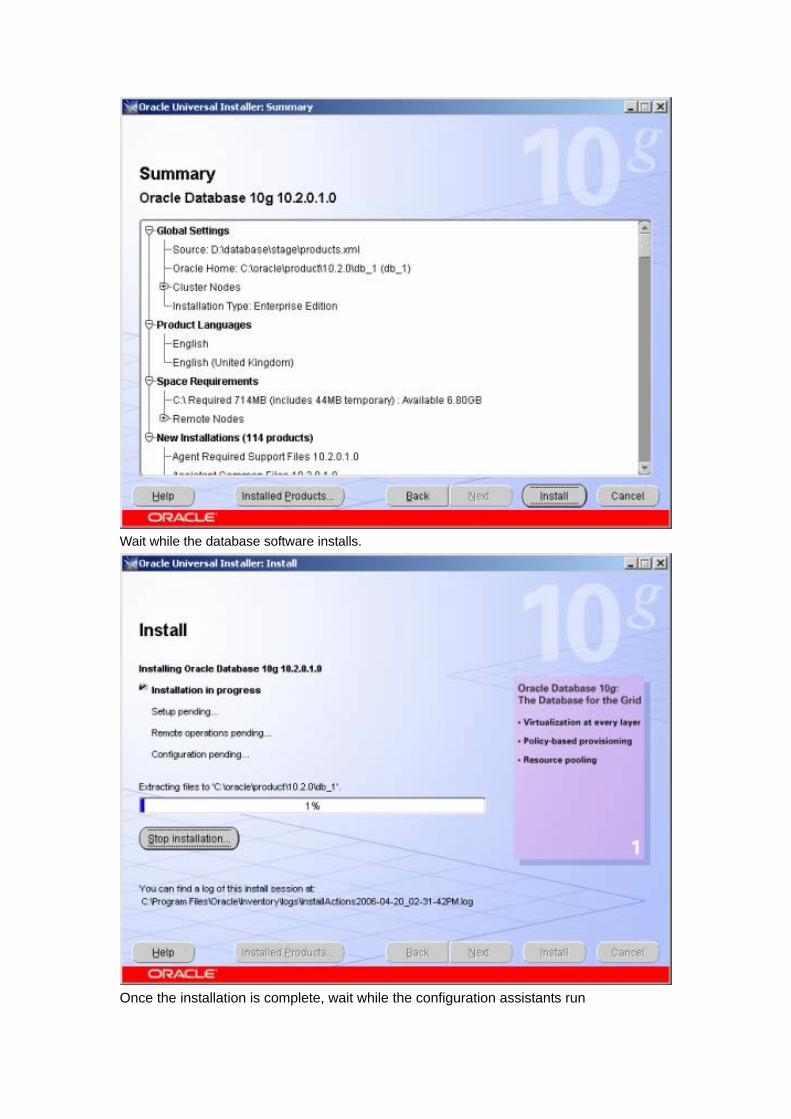
Wait while the database software installs.
Once the installation is complete, wait while the configuration assistants run
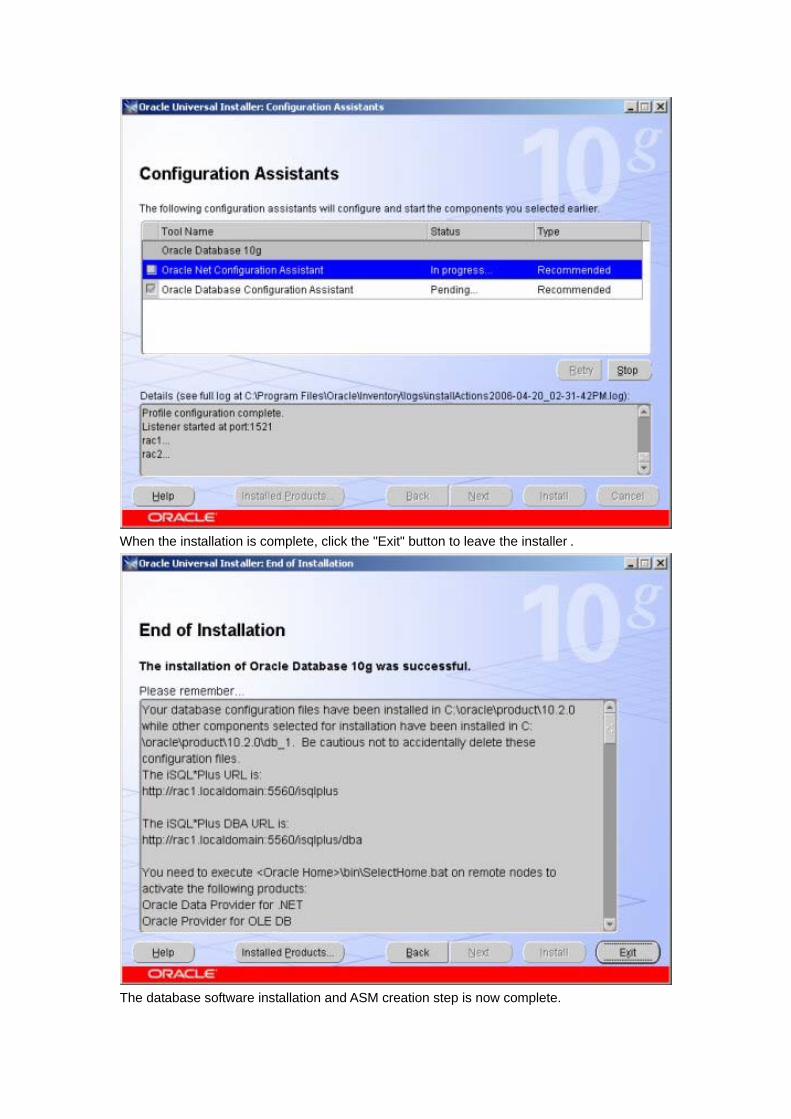
When the installation is complete, click the "Exit" button to leave the installer..
The database software installation and ASM creation step is now complete.

9.dbca 创建集群数据库
下面一步就是用 dbca 来创建数据库,选择集群和 asm 存储,data diskgroup 创建即可 完成
Related Documents