Starting a STEM Lab at Your Site 1 Tips, Tricks, Resources & Ideas to Help Get You Going! by Karly Moura , Amanda Young , Wendy Townlin & Claire Simón 1 <http://ctbythenumbers.info/files/2014/07/stemlogo.jpg >

Welcome message from author
This document is posted to help you gain knowledge. Please leave a comment to let me know what you think about it! Share it to your friends and learn new things together.
Transcript
Starting a STEM Lab at Your Site
1
Tips, Tricks, Resources & Ideas to Help Get You Going!
by Karly Moura, Amanda Young, Wendy Townlin & Claire Simón
1 <http://ctbythenumbers.info/files/2014/07/stemlogo.jpg>
Table of Contents
Getting Started: First Steps, Building and Purchasing Tools
Gamifying Your STEM Lab with Challenges & Badges
Not Just Robots and Circuits: Incorporating Math, NGSS & ELA
Extension Activities
Additional Resources
Getting Started: First Steps,
Building and Purchasing Tools
On October 1st, 2015 the very first class entered our STEM lab and it was
truly magical. The kids were engaged, they were learning, exploring and
discovering the entire time they were in there. It was the moment we had
worked so hard for when we created this innovative learning space. It was
a long journey that our little STEM lab team took to get there and we
learned a lot along the way!
The lab was originally Wendy Townlin's idea. She wanted to create a
dedicated science lab for our school. It evolved into a STEM lab, then
(with a little help from Twitter) we decided to add in the element of a
makerspace. With the support of our awesome principal Kris Martin-Meyer,
four of us, Wendy, Amanda Young, Claire Simon, and Karly Moura put our
heads together, researched, reflected then began building. Here are some
things we learned along the way.
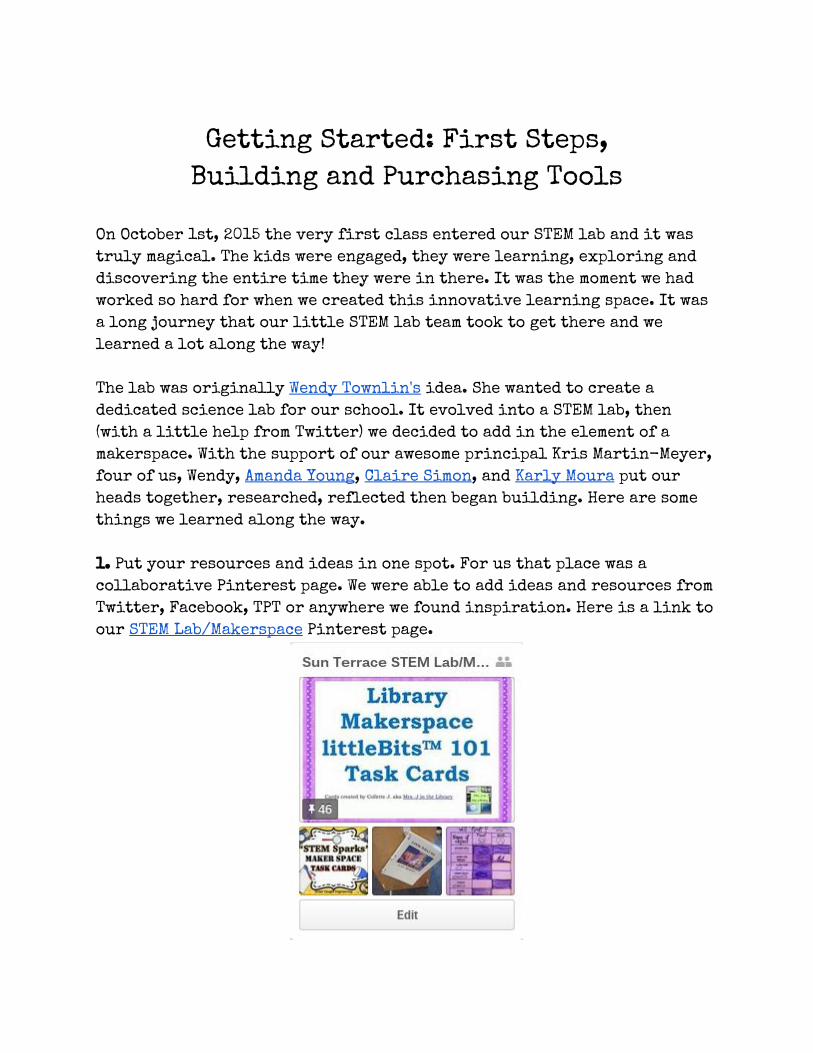
1. Put your resources and ideas in one spot. For us that place was a
collaborative Pinterest page. We were able to add ideas and resources from
Twitter, Facebook, TPT or anywhere we found inspiration. Here is a link to
our STEM Lab/Makerspace Pinterest page.

2. Find great people to connect with and follow those on Twitter that are
already doing it! Don't reinvent the wheel. We also visited Live Oak
Elementary School in San Ramon, CA because we had heard they were doing
amazing things with technology. There we connected with Nick Zefeldt and
Chi Shui who shared their awesome with us and gave us some incredible
ideas. We also followed the experts on Twitter then took ideas that worked
for us (and that we could afford to do) and tweaked them as we went along.
The great thing about Twitter is that you are able to tweet to the experts
and ask questions and they will respond and help! Here are our go-to
makerspace gurus.
Diana Rendina @DianaLRendina http://renovatedlearning.com/
Colleen Graves @gravescolleen https://about.me/colleen.graves
Laura Fleming @NMHS_lms http://worlds-of-learning.com/
3. Invest in some cool tech tools. There are many great devices and tools
out there but here are the ones we have in our lab.
● Dash Robots by Wonder Workshop. Dash is very popular in our STEM
Lab/Makerspace! A cute little robot that can be programmed using
apps at various levels. Dash is a fantastic edition because it can be
used by our Transitional Kindergarten (TK) students as well as our
fifth graders. The apps provide different levels of programming
skills so the possibilities for using Dash are endless!
● Cubelets from Modular Robotics. Cubelets are robot blocks that kids
as young as TK can put together to form tons of different types of
robots. We also purchased the Lego adapters to make even more
creations!
● LittleBits by LittleBits. Small electronic building blocks that snap
together to make circuits. We started out with 5 Base Kits $99 and
upgraded with 5 Gizmo and Gadgets kits $199.95. This kits contains
the materials to make tons of cool projects. Even the littlest
inventors can create some seriously cool stuff. The step-by-step
instructions provide lots of easy to build creations. Our
innovative kiddos can use the littleBits app to browse through
hundreds of project ideas or they can just start inventing their own!
Each LittleBits tub we have contains the two base kits and one Gizmo
and Gadgets kit, 5 Lego adapters and a bag of "maker" materials
(cardboard tubes, tape, wire, lightbulbs, straws, paper cups, rubber
bands and more) so students are able to create amazing things! We love
these LittleBits Task Cards from Mrs. J in the Library. A freebie from
TPT!

● Green Screen backdrop from Chromakey sold on Amazon. We used PVC
pipe to make a frame for the screen so it is moveable. Using the green
screen with the DoInk app available on the App Store is an easy way
to start using a green screen. If you want a cheap way to get a green
screen check out the bright green shower curtains from the Dollar
Store, they work great!
● Sphero Robots from @Sphero $129.99. A very cool app enabled sphere
shaped robot. Sphero is super tough and can get moving up to 4.5 mph!
Sphero has it's own app for IOS and Android and can also be
programmed using the Tickle App (currently only available for IOS).
You must have a smartphone or tablet to use these robots so be sure to
take that into account when ordering!
● MaKey MaKey from @TheJoyLabz classic starts at $49.95. MaKey MaKey
is an awesome little inventor's kit that turns almost anything into a
touchpad. Plug the board into a computer and use the alligator clips
to connect all sorts of fun objects creating your very own mouse and
keyboard.
● Piper from @withpiper $269.99. This amazing little kit includes
everything you need to build a fully working computer! It includes a
plywood case, 7" LED screen, Raspberry Pi, USB mouse, sensors, lights,
buttons, power bank AND a DIY Minecraft controller! Once it's built
students can build hardware in real-life to control to build and
create in a modified Minecraft world. Piper is an engaging and very
effective way to get kids creating rather than just consuming
technology.
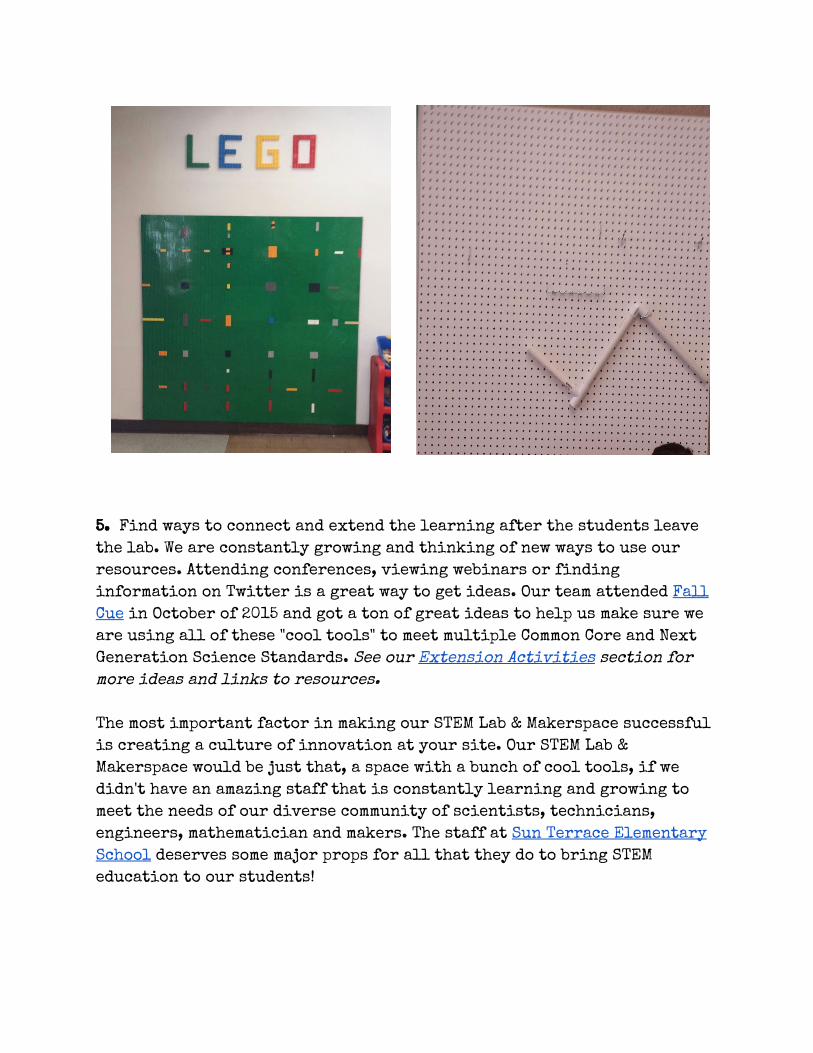
4. Build a Lego and Pegboard wall! We are VERY proud of our Lego wall and
pegboard wall. The building, creating and engineering that is happening
in these two spaces is pretty cool. Watching the kids put together pvc
pipes to build a marble run or use the Legos to make a map of the school is
pretty fantastic. Plus they are just plain fun! To make our Lego wall we
followed Diana Rendina's tips found here.
5. Find ways to connect and extend the learning after the students leave
the lab. We are constantly growing and thinking of new ways to use our
resources. Attending conferences, viewing webinars or finding
information on Twitter is a great way to get ideas. Our team attended Fall
Cue in October of 2015 and got a ton of great ideas to help us make sure we
are using all of these "cool tools" to meet multiple Common Core and Next
Generation Science Standards. See our Extension Activities section for
more ideas and links to resources.
The most important factor in making our STEM Lab & Makerspace successful
is creating a culture of innovation at your site. Our STEM Lab &
Makerspace would be just that, a space with a bunch of cool tools, if we
didn't have an amazing staff that is constantly learning and growing to
meet the needs of our diverse community of scientists, technicians,
engineers, mathematician and makers. The staff at Sun Terrace Elementary
School deserves some major props for all that they do to bring STEM
education to our students!
Gamifying Your STEM Lab with
Challenges & Badges Our STEM Lab/Makerspace is a HUGE hit with our students. Since Karly
oversees the lab and takes the classes in she gets bombarded by kids all
day asking if it is their day to go to the STEM Lab. They are building,
discovering, exploring, designing, problem solving, and having a blast
doing it. However, as the kids continued to explore the STEM Lab we began
to notice that they had moved past the exploration phase and wanted a bit
more direction and challenge. We realized that we needed to up our game a
bit to take our lab to the next level so we decided to gamify our STEM Lab
with challenges and badges! It took some prep but once the challenge cards
and badges were created we were ready to roll. We are happy to share our
tips, tricks and resources so that you can gamify your STEM or STEAM Lab
too.
How You Can Gamify Your STEM/STEAM Lab
1. Make challenge cards.
We looked online for ready-made challenges and used the instruction
booklets that came with our kits to create challenge cards for our
students. As we add to our STEM lab and work to make our lab a true STEAM
lab we will continue to add challenge cards and create badges to match.
You can view our challenge cards and challenge card template here. Feel
free to make a copy to use and/or start creating your own.
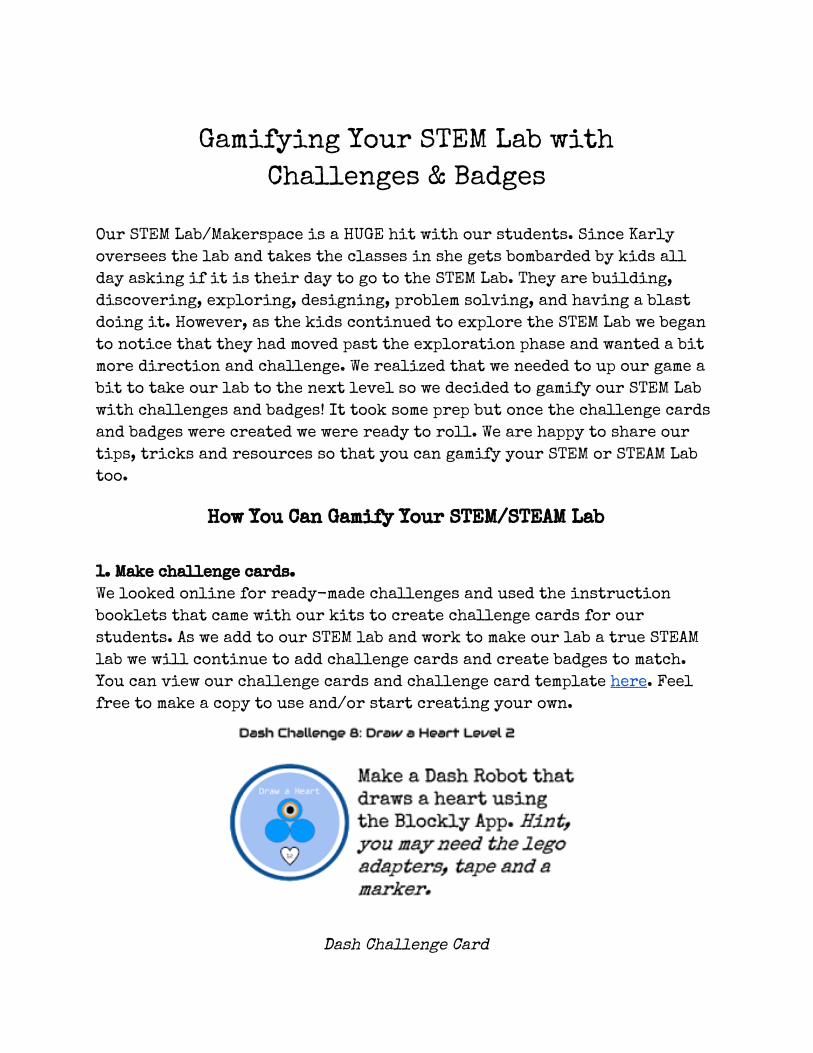
Dash Challenge Card

2. Create your own or find ready-made digital badges.
We used Google Draw to create our badges. After following this tutorial
Creating a Badge with Google Draw by Alice Keeler it was easy to create our
own template and make our own badges. You can upload all of our STEM Lab
badges for ideas and inspiration or use them in your own lab.
littleBits Art Bot Badge
Looking to find more badge resources? Cate Tolnai, who inspired us to
explore badges, shares lots of resources on Twitter and on her blog. Also
check out 5 Awesome Resources for Badges in the Classroom by Kasey Bell.
3. Identify a way to keep track of earnings.
In our lab we go pretty low tech with a simple STEM Lab Student Check Off
Sheet. Each student has their own check off sheet which is kept in a file
under their teacher's name. While in the lab the students let us know when
they have earned a badge and they get it initialed.
If you want to go totally digital check out Creating Badges with Google
Sheets by Alice Keeler. This awesome post shows you how to create (in draw),
then organize and assign digital badges with Google Sheets.
4. Display those shiny new badges!
Now that our students have started earning their badges they need a place
to display them. The fourth and fifth graders are creating a Google Site as
their digital portfolio so one page is dedicated to displaying their
badges. The 2nd and 3rd graders will use this My Badges Google Doc
assigned through Google Classroom to display their badges.

Example of "My Badges" page on a Google Site
What our Gamification & Badge System is NOT
So far our badge system has worked out really well in our STEM Lab. Our
kids are excited about the badges and look forward to displaying them on
their Google site or badge page. We are still working out the kinks and
will continue to create challenges and badges as we grow our STEM Lab.
However it is important to note what our challenges and badges are NOT.
● It is NOT a competition. There is no public display of which badges
are earned by whom. The Google Sites and Docs can be shared of course
but only if the students share them. Students who work together on
projects all earn the badge. We go over this together and teamwork is
encouraged.
● It is NOT a requirement. Students do not have to earn badges. It is
completely optional for students to work towards badges. We also
created "inventor" badges for students who just want to create
something new but also would like a badge (check the badges folder
and challenge cards for updates).
● It is NOT used for assessment. Our challenges and badges are a fun
way to encourage students to create and discover in the lab. The
badges give students something to "take" with them after their time
in the lab. It can be tough for a kid to work hard on an awesome
marble run then have to dismantle it when it's time to clean up!
● Our Makerspace is NOT gamified. When the kids are just making and
creating there are no directions or badges to earn (other than an "I
am A Maker" badge) just tools, resources and their own imagination.
Not Just Robots and Circuits:
Incorporating Math, NGSS & ELA
Math
Lego Wall
Legos aren’t just for playing or making marble runs! Legos are an
excellent way to teach math concepts! Use Lego to Teach Math Concepts an
article by Scholastic that contains ideas for using Legos to teach
Part-Part-Total, Arrays, Multiplication, Division, Fractions and more.
Use Coding to Teach Geometry
Using Dash or Sphero and the Tickle App provides students with a
concrete way to learn about angles, measurement, patterns, problem
solving, computational strategies and more. In his article Exploring
Geometry by Coding With Sphero and Tickle App Brian Aspinall breaks down
the different areas of math that can be taught using robots and coding.
360° Math
Our lab has whiteboard covered cabinets which create 3 walls of
whiteboards. The idea behind 360° math is that students are standing
around the room completing their math problems while the teacher gives
real-time feedback. Ed Campos Jr is where we learned about 360° math,
visit his blog and check out this documentary to learn more. Also follow
#360Math, @MathPrincessC, @reubenhoffman, @jasonseliskar, @tbed63, @AlexOverwijk, and @jcorippo on Twitter for more information on 360
degree math.
ELA
STEM into STEAM with Language Arts
Novel Engineering is so simple and easy to incorporate into ANY
Language Arts program, theme or unit. “Students use existing classroom
literature - stories, novels, and expository texts - as the basis for
engineering design challenges that help them identify problems, design
realistic solutions, and engage in the Engineering Design Process while
reinforcing their literacy skills.” novelengineering.org. You can use any

book that your class is reading and turn it into an engineering project.
Use this Design Process Hyperdoc created by Sean Fahey to get your
students familiar with the design process and get started with Novel
Engineering.
Science: NGSS
Elementary Is Engineering EIE EIE is a science curriculum designed with incorporating more
engineering into our science teachings. They have over 20 flexible
curriculums for grades 1-5. The EIE curriculum is designed so that each
topic is adaptable to all grade levels 1-5. EIE also has after school
curriculums for 1-5 and 6-8. Each topic has several engineering
challenges and experiments in order extend the learning. Our STEM Lab
serves as a perfect way for the teachers at our school utilize the
resources we have in our lab and set up these engineering challenges.
Science Demonstrations
We all know a great way to hook students with our next science topic
is through a great demonstration that leaves them wondering about the
phenomenon they just witnessed. Our STEM Lab gives teachers a great space
that allows them to set up, conduct, and clean up engaging science
demonstrations without having to re-arrange or worry about making a
mess in their own classroom. It also allows the extra space need for
teachers to have students conduct their own investigation.
Makerspace
Our STEM Lab also serves as our school’s Makerspace. In our STEM Lab
we have gathered materials such as cardboard, cardboard tubes, yarn,
feathers, cups, plates, rubber bands, lots of tape, etc. Students have used
these materials to make their own inventions as well as to add to and adapt
the challenges we have presented using the little bits challenge cards.
This year our school opted to do a Maker Faire instead of your traditional
Science fair. We showed the students the video of Caine’s Arcade and then
presented our students with the cardboard challenge. We have seen some
great inventing, engineering and making come out of our makerspace!
Extension Activities
Blogging
If you are ready to have your students start blogging (or if they
already are) having them reflect on their time in the STEM lab can make for
an excellent blog post. Since your class has the shared experience of
visiting the lab they can comment on each other’s posts.
A blogging platform like Kidblog gives your students a safe space to
write for an authentic audience while still giving the teacher the
ability to monitor students blogs and comments. Unfortunately, Kidblog
does cost money so check it out and ask other users to see if it’s worth the
cost.
Not quite ready for blogging or just want something free? Google
Slides can provide your students with a blogging like experience in the
class or beyond depending on share settings. You can share your students’
“blog” posts with another class or even another school to give your
students a global audience. Use this STEM Lab Class Blog Template and
modify as needed.
Google Classroom
Another way you can have your students reflect on their learning in
the STEM Lab is by posing a question in Google Classroom. This allows you
to focus in on one key aspect you wanted your students to get out of the
STEM Lab that day. This also poses as a more simplified reflection of what
students learned in the STEM Lab by simply asking “What did you learn in
the STEM Lab today?” One nice feature about asking questions is that it
shows up in your classroom stream; all students will be able to see their
classmates responses. This allows for you to be able to do your own mini
version of blogging if you want by enabling students comments to each
other. The comment feature allows you to extend this activity from a
simple teacher to student conversation to a virtual collaborative class
conversation.
Google Drawing
For younger students or as a quick reflection tool you can have your
students recreate their inventions in Google Drawing. They can add text,
images and can even make 3D shapes. For more ideas on how to use Google
Drawing check out Eric Curts’ Google Apps User Group for tutorials plus a
link to 40+ graphic organizer templates you can adapt to fit your needs.
Padlet
Another simple reflection tool is Padlet. A free application that
creates an online bulletin board that anyone can use to display
information including images, videos, attachments, text and more.
STEM Lab Reflection Hyperdoc
We have our students complete this STEM lab reflection hyperdoc
after visiting the lab as one way to extend the learning. A simple 3-2-1
reflection, a Google drawing, a padlet link and a few games at the end
provide students with multiple opportunities to show what they learned.
Show What You Know Bingo
Use this Show What You Know Bingo hyperdoc (originally created by
Lisa Highfill) to have students create a project that will share their
learning at the end of a lesson or unit. Each bingo box contains a link to a
tutorial for students.
Google Site
Students can easily create a Google Site with an “announcement page”
that can serve as a blogging platform. If students are already using Google
Sites as their online portfolio, creating a “blog” page along with a page
for displaying badges would be an easy addition. Here is a Creating a
Google Sites hyperdoc with links to examples and how-to screencasts.

Additional Resources
● Jerry Blumengarten has a page on almost everything so it's no
surprise that he has one on STEM Education. Check out his site for
TONS of resources!
● Makerspaces.com has a FREE e-book that includes a list of maker
materials, conferences, links to conferences, Twitter hashtags to
follow and MORE!
● Be sure to check out Elementary Library Makerspace Resources by
Colleen Graves for a list of people doing amazing things with
Makerspaces and STEM Labs.
● Starting a Makerspace by Lori Gracey from TCEA Technotes Blog.
● Check out this Green Screen activities page and Creating a Green
Screen Video in Your Classroom from Scholastic for ideas for using a
green screen with your students.
Do you have more resources to share?
Please add them to this crowdsourced padlet!
Related Documents