Start a Blog: From Hosting to Posting www.WPTechCafe.com

Welcome message from author
This document is posted to help you gain knowledge. Please leave a comment to let me know what you think about it! Share it to your friends and learn new things together.
Transcript

www.WPTechCafe.com
Start a Blog:From Hosting to Posting

www.WPTechCafe.com
Module 1: Hosting, Domain, Install• Hosting• Domain• Install WordPress• Visit the cPanel• Create email address and add forwarder

www.WPTechCafe.com
HostingVisit SiteGround.com to create your hosting account.
Click on Web Hosting in the top menu.
This presentation may include affiliate links, meaning if you click on and purchase a product or service I may be compensated.

www.WPTechCafe.com
HostingChoose the StartUp Plan and click the blue Order Now button.
The $3.95 per month is paid annually.

www.WPTechCafe.com
HostingComplete the client and payment information requested on this page.

www.WPTechCafe.com
HostingOnce all the fields are completed, click the blue Pay Now button.

www.WPTechCafe.com
HostingYou’ll arrive on this page with the option to Proceed to Customer Area.

www.WPTechCafe.com
HostingYou’ll arrive on this page to begin setting up your hosting account.
In the top section, you will choose your domain. Add your existing domain name or register a new domain name and click the green Confirm button.
In the middle section, choose the option to start a new website. When the section opens, click the WordPress icon.
Choose an existing domain or Register a new domain
Start a new website

www.WPTechCafe.com
HostingComplete the fields to create your WordPress Admin Account.
DO NOT USE ‘Admin’ as your username.
Choose a strong password.
Add the email you use most often.
www.WPTechCafe.com
HostingAfter completing your WordPress Admin details, you’ll reach the bottom section.
You do not need to purchase the monitoring service.
Click the green Confirm button.

www.WPTechCafe.com
HostingYou can now access your new WordPress website.
http://yourdomain.com will show you the ‘front’ of your website.
http://yourdomain.com/wp-admin will cause the login screen to appear.
You will use the username and password you just created.
www.WPTechCafe.com
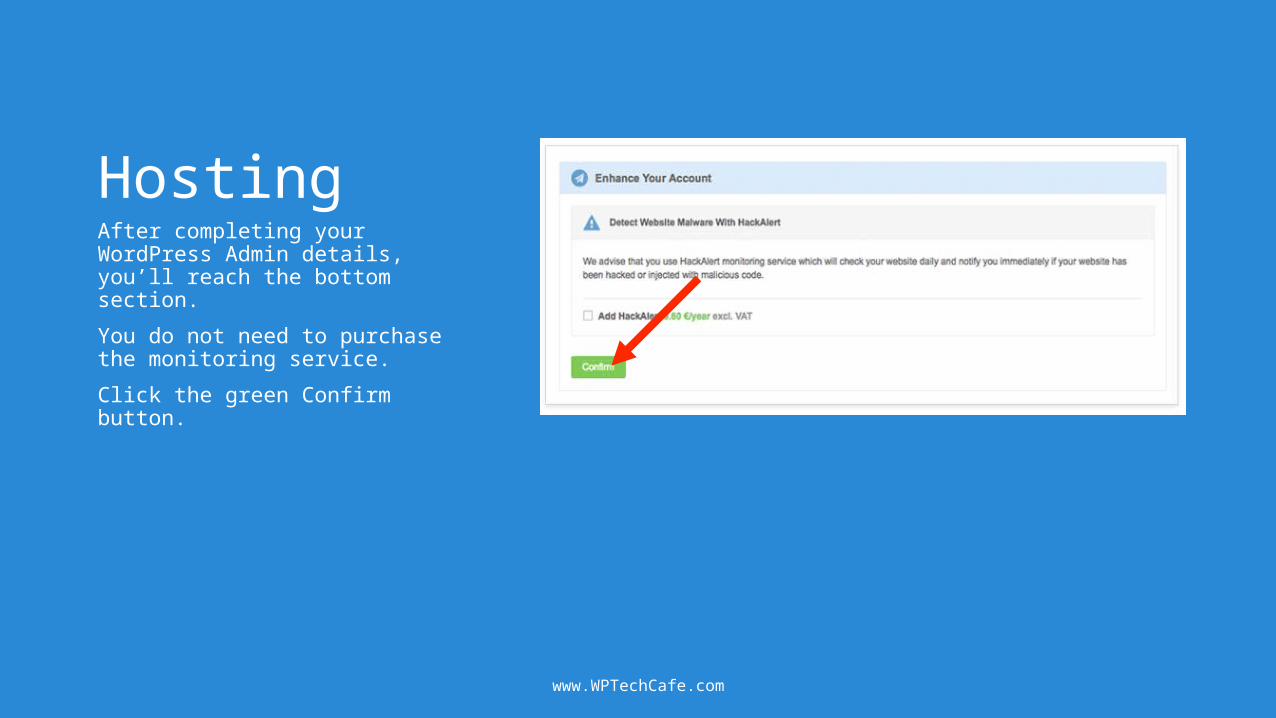
HostingThis is the page you will see whenever you log in to your SiteGround account.
To reach a shortcut link to your WordPress dashboard and a link to your cPanel (control panel), click the ‘My Accounts’ tab.

www.WPTechCafe.com
Email AddressWhile you’re in your cPanel, take the time to create a domain-based email address. Gmail and other email clients now prefer that messages like newsletters or blog posts updates be sent from a domain-based email address.
You will create an email address and then forward it to the email address you are currently using (unless you want to start using it as your primary email address.)
You can visit SiteGround’s tutorial:
https://www.siteground.com/tutorials/email/create_email_addresses.htm

www.WPTechCafe.com
Email AddressOnce you have created your new email address, visit your cPanel again and click on the Forwarders icon.

www.WPTechCafe.com
Email AddressOnce you have created your new email address, visit your cPanel again and click on the Forwarders icon.
Click the Add Forwarder button.
Put the name of the email address you wish to forward from in the first blank field. For example: for [email protected], put user in the first blank field.
You can choose to what address the incoming mail should be forwarded.
Click the Add Forwarder button.
Add a New Forwarder
Email address you just created
Gmail or other address you check regularly

www.WPTechCafe.com
HostingWatch your email inbox for up to four email messages from SiteGround. You can see the messages I received at the top of the screen.
If you register a new domain with your account creation, you may need to verify your contact information by clicking the blue button at the bottom of the email message shown on this screen.

www.WPTechCafe.com
Username and Password ListAnytime I talk to a new blogging client and need access to the blog or other platforms, she scrambles for a username and/or password.
Save yourself some time by creating a list of usernames and passwords for all your accounts.

www.WPTechCafe.com
Content PlansBegin considering the content you want to include on your site. Begin making notes about the following:
• Menu items• Pages• Categories• Sidebar Content – Author Box, Email
Subscription Form, Instagram or Twitter Feed, etc.
• Any other feature or function you’ve seen that you might want to include on your site.

www.WPTechCafe.com
I share easy-to-follow tutorials and effective tools to improve your blogging journey. I specialize
in identifying the best resources to prevent online overwhelm.
Related Documents