Department of Social 700 Governors Drive Pierre, SD 57501 2014 STARS User Manual Division of Behavioral Health Department of Social Services

Welcome message from author
This document is posted to help you gain knowledge. Please leave a comment to let me know what you think about it! Share it to your friends and learn new things together.
Transcript

Department of Social
7 0 0 G o v e r n o r s D r i v e P i e r r e , S D 5 7 5 0 1
2014
STARS User Manual
Division of Behavioral Health
Department of Social Services

Department of Social Services
Division of Behavioral Health
STARS User Manual i
Updated: 2014
Table of Contents Part 1 Login Information ......................................................................................................... 6
STARS Login Screen .............................................................................................................. 7
Application Page ..................................................................................................................... 8
Part 2 Providers ......................................................................................................................... 9
Provider List Screen .............................................................................................................. 10
Provider Information Screen ................................................................................................. 11
Provider’s Satellite Office(s) Screen ..................................................................................... 12
Provider’s Satellite Office(s) Detail Screen .......................................................................... 13
Satellite’s Capacity Information Screen –ADA Only ........................................................... 14
Satellite’s Capacity Information Detail Screen –ADA Only ................................................. 15
Provider’s Medicaid # Screen ................................................................................................ 17
Provider’s Medicaid # Detail Screen ..................................................................................... 18
Provider’s Capacity Information Screen – ADA Only .......................................................... 19
Provider’s Capacity Information Detail Screen –ADA Only ................................................ 21
Provider’s ADA Counselors Screen- ADA Only .................................................................. 23
Provider’s ADA Counselors Detail Screen ........................................................................... 24
Part 3 Client Search ................................................................................................................ 25
Client Search Screen .............................................................................................................. 26
Client Search Screen .............................................................................................................. 27
Adding a New Client ............................................................................................................. 29
ADA: Admission/Readmission ............................................................................................. 31
MH: Admission/Readmission................................................................................................ 33
Unique ID Modification ........................................................................................................ 35
Unique ID Merge ................................................................................................................... 36
Part 4 General Information .................................................................................................... 41
Client Information Screen ..................................................................................................... 42
Services .................................................................................................................................. 44
Services Detail Screen ........................................................................................................... 45
Department of Social Services
Division of Behavioral Health
STARS User Manual ii
Updated: 2014
Income Eligibility .................................................................................................................. 46
Income Eligibility Detail Screen ........................................................................................... 47
Hardship/Administration Review Screen .............................................................................. 48
Hardship/Administration Review Detail Screen ................................................................... 50
Part 5 Mental Health ............................................................................................................... 51
MH Admission Information .................................................................................................. 52
MH Discharge Information ................................................................................................... 53
MH Program Transfer ........................................................................................................... 55
MH Program Transfer Detail Screen ..................................................................................... 56
MH DSM Diagnosis .............................................................................................................. 57
MH DSM Diagnosis Detail Screen ....................................................................................... 58
MH IMPACT ......................................................................................................................... 62
Part 6 ADA I ............................................................................................................................ 63
ADA Admission Information Screen .................................................................................... 64
ADA Admission Information Screen .................................................................................... 65
ADA Transfer Service Level Screen ..................................................................................... 72
ADA Transfer Service Level Detail Screen .......................................................................... 73
ADA Discharge Information Screen ..................................................................................... 74
ADA Discharge Information Screen ..................................................................................... 75
ADA Discharge Information Screen ..................................................................................... 76
ADA Discharge Information Screen ..................................................................................... 77
Part 7 ADA II ........................................................................................................................... 80
Assessment ............................................................................................................................ 81
Continued Stay Review Detail Screen ................................................................................... 85
ADA Program Eligibility Screen ........................................................................................... 88
ADA Program Eligibility Detail Screen ................................................................................ 89
ADA Waiting List Screen ...................................................................................................... 94
ADA Waiting List Detail Screen ........................................................................................... 95
Part 8 Utilities .......................................................................................................................... 96
Batch Load Screen ................................................................................................................. 97
Export Screen ........................................................................................................................ 98
Department of Social Services
Division of Behavioral Health
STARS User Manual iii
Updated: 2014
Non-Contract Unit Reporting .............................................................................................. 100
Non-Contract Unit Reporting Detail Screen ....................................................................... 102
Non-Contract Unit Reporting Screen with Error Message .................................................. 103
Part 9 Reports ........................................................................................................................ 104
Contract Remittance Advice Viewing ................................................................................. 105
Part 10 Supplemental Information ...................................................................................... 109
Gambling Admission Information ....................................................................................... 110
Client Transfer Information ................................................................................................. 111
Alcohol and Drug Discharge Information ........................................................................... 112
Confidentiality Rules & Information ................................................................................... 113
Deletion of System Records: ............................................................................................... 114
STARS User Manual Page 6 of 115 Updated: 2014
Part 1
Login Information
Department of Social Services
Division of Behavioral Health
STARS User Manual Login Information Page 7 of 115
Updated: 2014
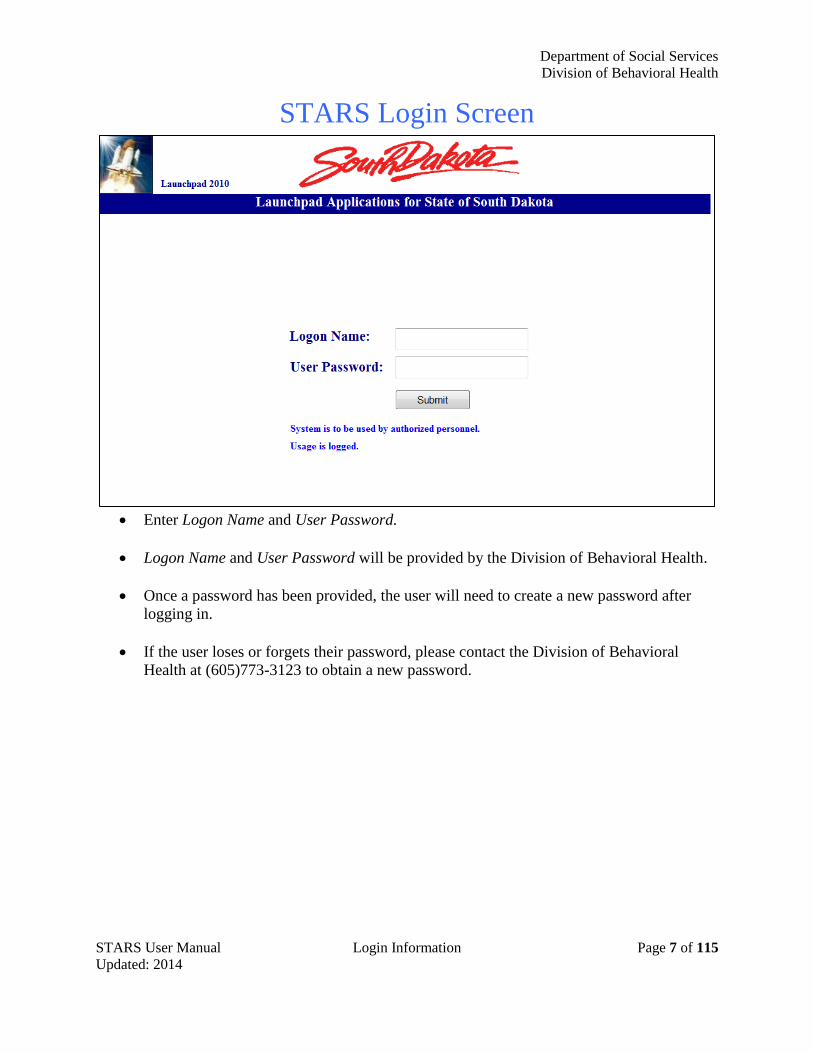
STARS Login Screen
Enter Logon Name and User Password.
Logon Name and User Password will be provided by the Division of Behavioral Health.
Once a password has been provided, the user will need to create a new password after
logging in.
If the user loses or forgets their password, please contact the Division of Behavioral
Health at (605)773-3123 to obtain a new password.
Department of Social Services
Division of Behavioral Health
STARS User Manual Login Information Page 8 of 115
Updated: 2014
Application Page
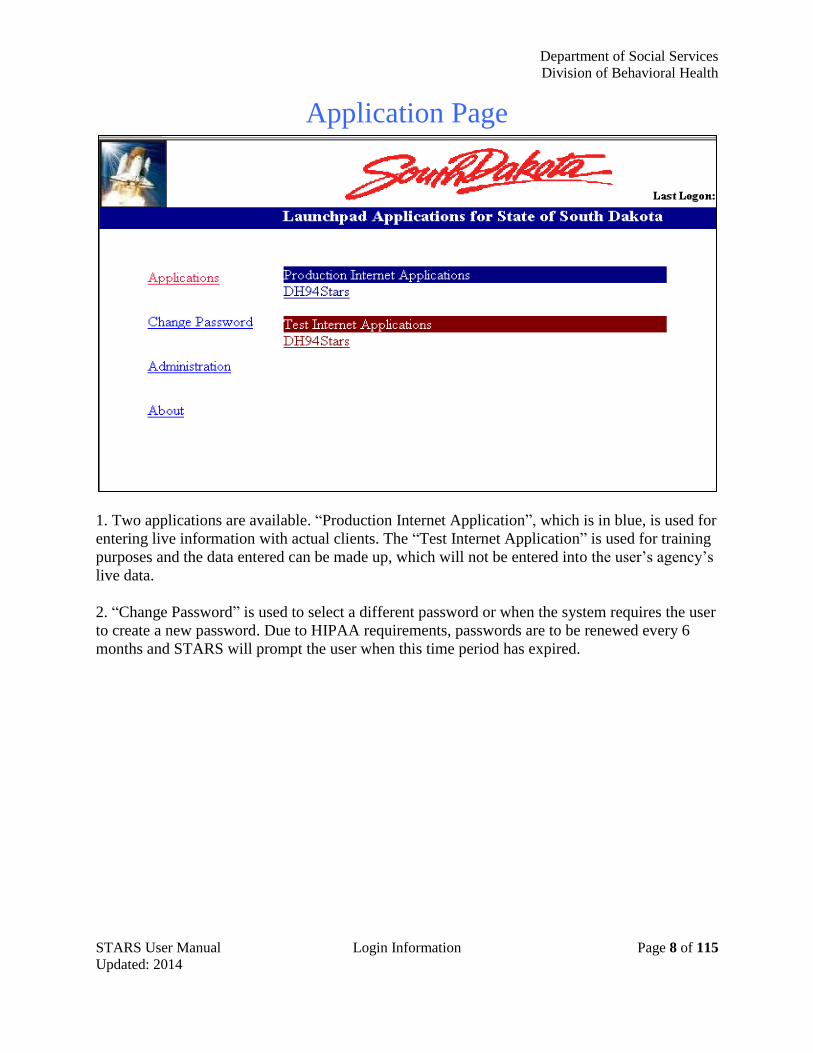
1. Two applications are available. “Production Internet Application”, which is in blue, is used for
entering live information with actual clients. The “Test Internet Application” is used for training
purposes and the data entered can be made up, which will not be entered into the user’s agency’s
live data.
2. “Change Password” is used to select a different password or when the system requires the user
to create a new password. Due to HIPAA requirements, passwords are to be renewed every 6
months and STARS will prompt the user when this time period has expired.
STARS User Manual Page 9 of 115 Updated: 2014
Part 2
Providers
Department of Social Services
Division of Behavioral Health
STARS User Manual Providers Page 10 of 115
Updated: 2014
Provider List Screen
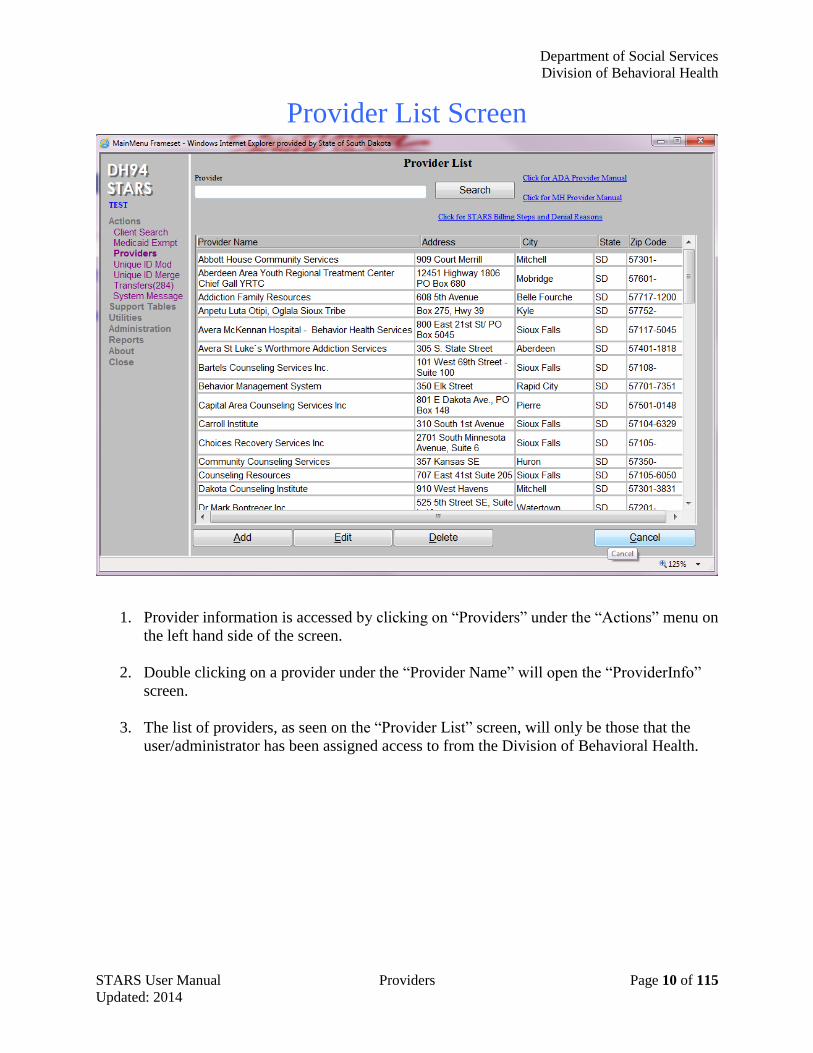
1. Provider information is accessed by clicking on “Providers” under the “Actions” menu on
the left hand side of the screen.
2. Double clicking on a provider under the “Provider Name” will open the “ProviderInfo”
screen.
3. The list of providers, as seen on the “Provider List” screen, will only be those that the
user/administrator has been assigned access to from the Division of Behavioral Health.
Department of Social Services
Division of Behavioral Health
STARS User Manual Providers Page 11 of 115
Updated: 2014
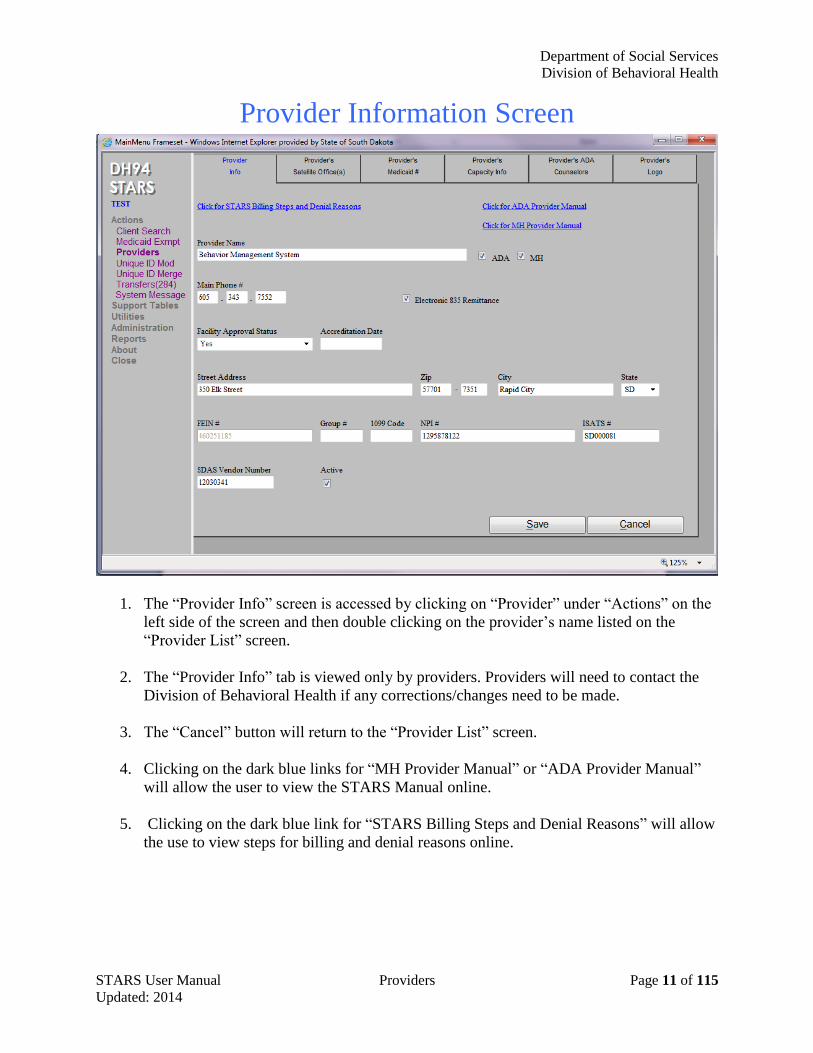
Provider Information Screen
1. The “Provider Info” screen is accessed by clicking on “Provider” under “Actions” on the
left side of the screen and then double clicking on the provider’s name listed on the
“Provider List” screen.
2. The “Provider Info” tab is viewed only by providers. Providers will need to contact the
Division of Behavioral Health if any corrections/changes need to be made.
3. The “Cancel” button will return to the “Provider List” screen.
4. Clicking on the dark blue links for “MH Provider Manual” or “ADA Provider Manual”
will allow the user to view the STARS Manual online.
5. Clicking on the dark blue link for “STARS Billing Steps and Denial Reasons” will allow
the use to view steps for billing and denial reasons online.

Department of Social Services
Division of Behavioral Health
STARS User Manual Providers Page 12 of 115
Updated: 2014
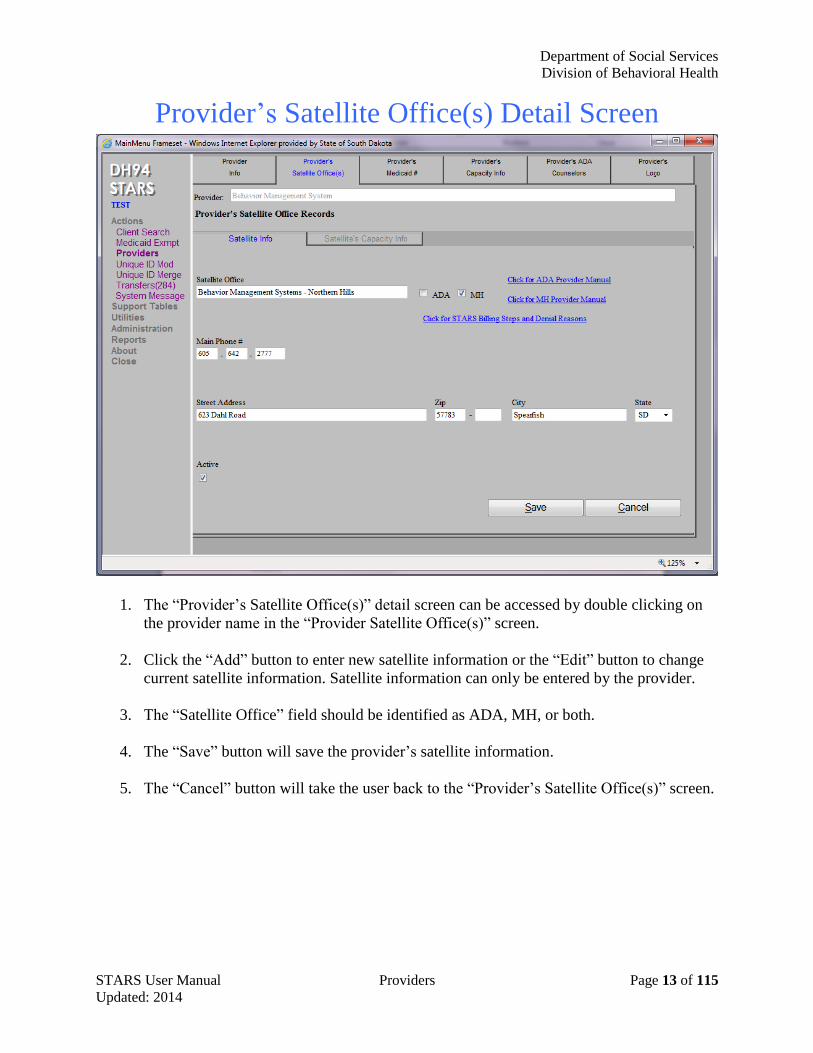
Provider’s Satellite Office(s) Screen
1. The “Provider Satellite Office(s)” screen can be accessed through the following steps: Click on
“Providers” under “Actions” on the left side of the screen and double click on the provider’s name
listed on the “Provider List” screen.
2. Click on the “Provider’s Satellite Office(s)” tab located on the top menu bar, which will open up the
above screen.
3. Satellite information must be added by the provider.
4. The “Add” button will open a new “Provider Satellite Office Records” screen.
5. To edit an existing Satellite Office record, highlight the record and then click on the “Edit” button and
the screen will open to the “Provider Satellite Office Record”.
6. To delete an existing satellite office record, highlight the record that is to be deleted and click on the
“Delete” button to remove the satellite office information. Note: If there are any connections tied to
the satellite office such as billing, etc., the deletion will not occur.
7. The “Cancel” button will return the user to the “Provider List” screen.
8. The “Add”, “Edit”, and “Delete” buttons will be enabled based on provider assigned user security.
Department of Social Services
Division of Behavioral Health
STARS User Manual Providers Page 13 of 115
Updated: 2014
Provider’s Satellite Office(s) Detail Screen
1. The “Provider’s Satellite Office(s)” detail screen can be accessed by double clicking on
the provider name in the “Provider Satellite Office(s)” screen.
2. Click the “Add” button to enter new satellite information or the “Edit” button to change
current satellite information. Satellite information can only be entered by the provider.
3. The “Satellite Office” field should be identified as ADA, MH, or both.
4. The “Save” button will save the provider’s satellite information.
5. The “Cancel” button will take the user back to the “Provider’s Satellite Office(s)” screen.
Department of Social Services
Division of Behavioral Health
STARS User Manual Providers Page 14 of 115
Updated: 2014
Satellite’s Capacity Information Screen –ADA Only
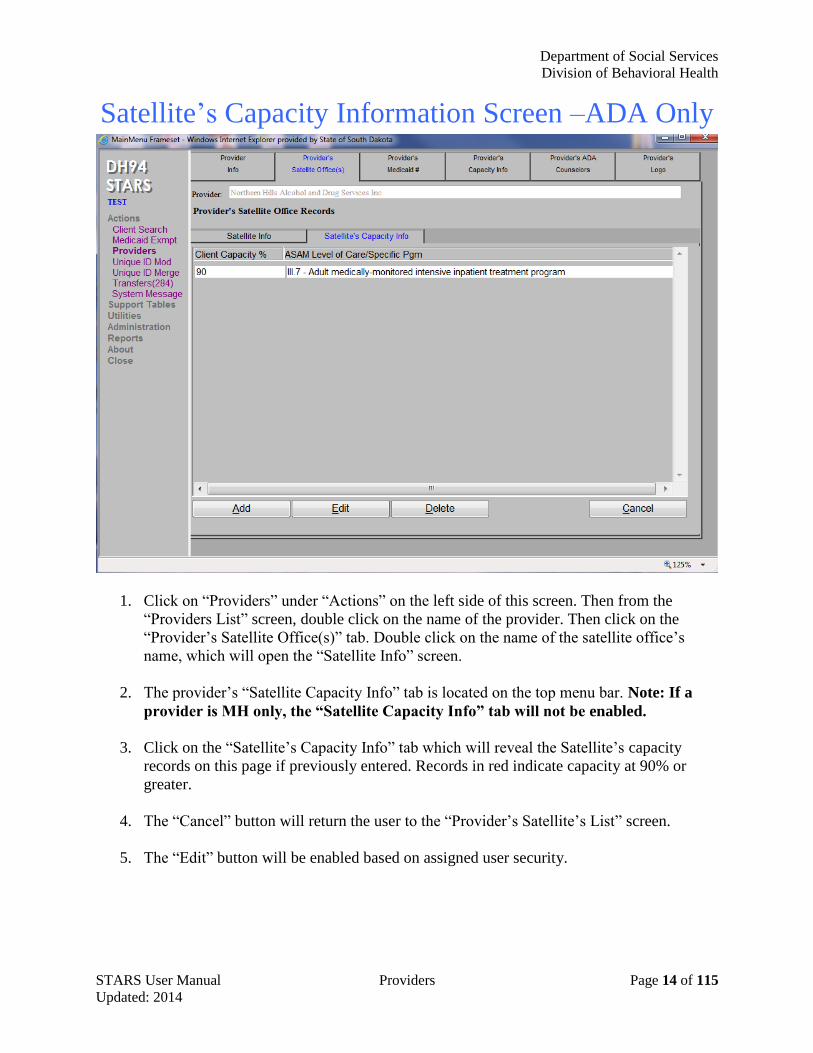
1. Click on “Providers” under “Actions” on the left side of this screen. Then from the
“Providers List” screen, double click on the name of the provider. Then click on the
“Provider’s Satellite Office(s)” tab. Double click on the name of the satellite office’s
name, which will open the “Satellite Info” screen.
2. The provider’s “Satellite Capacity Info” tab is located on the top menu bar. Note: If a
provider is MH only, the “Satellite Capacity Info” tab will not be enabled.
3. Click on the “Satellite’s Capacity Info” tab which will reveal the Satellite’s capacity
records on this page if previously entered. Records in red indicate capacity at 90% or
greater.
4. The “Cancel” button will return the user to the “Provider’s Satellite’s List” screen.
5. The “Edit” button will be enabled based on assigned user security.
Department of Social Services
Division of Behavioral Health
STARS User Manual Providers Page 15 of 115
Updated: 2014
Satellite’s Capacity Information Detail Screen –ADA Only
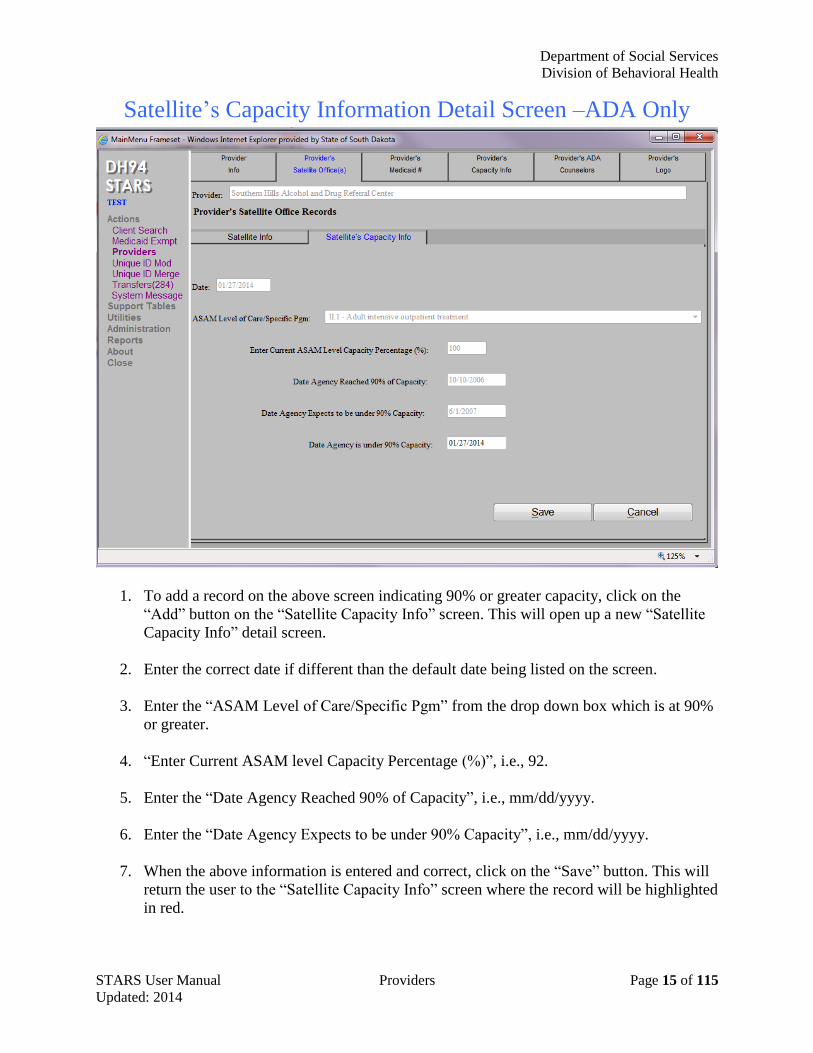
1. To add a record on the above screen indicating 90% or greater capacity, click on the
“Add” button on the “Satellite Capacity Info” screen. This will open up a new “Satellite
Capacity Info” detail screen.
2. Enter the correct date if different than the default date being listed on the screen.
3. Enter the “ASAM Level of Care/Specific Pgm” from the drop down box which is at 90%
or greater.
4. “Enter Current ASAM level Capacity Percentage (%)”, i.e., 92.
5. Enter the “Date Agency Reached 90% of Capacity”, i.e., mm/dd/yyyy.
6. Enter the “Date Agency Expects to be under 90% Capacity”, i.e., mm/dd/yyyy.
7. When the above information is entered and correct, click on the “Save” button. This will
return the user to the “Satellite Capacity Info” screen where the record will be highlighted
in red.
Department of Social Services
Division of Behavioral Health
STARS User Manual Providers Page 16 of 115
Updated: 2014
8. To enter the “Date Agency is under 90% Capacity”, return to the “Satellite Capacity
Info” screen, highlight the ASAM Level and click on the “Edit” button. This will return
the user to the “Satellite Capacity Info” detail screen.
9. The only text box enabled that information can be entered into is the “Date Agency is
under 90% Capacity”. Enter the date (mm/dd/yyyy), and click on the “Save” button.
10. The “Save” button will return to the “Satellite Capacity Info” screen where the record
will no longer be highlighted in red.
11. The “Cancel” button will return the user to the “Provider List” screen.
12. The “Add” button will be enabled based on assigned user security.
Department of Social Services
Division of Behavioral Health
STARS User Manual Providers Page 17 of 115
Updated: 2014
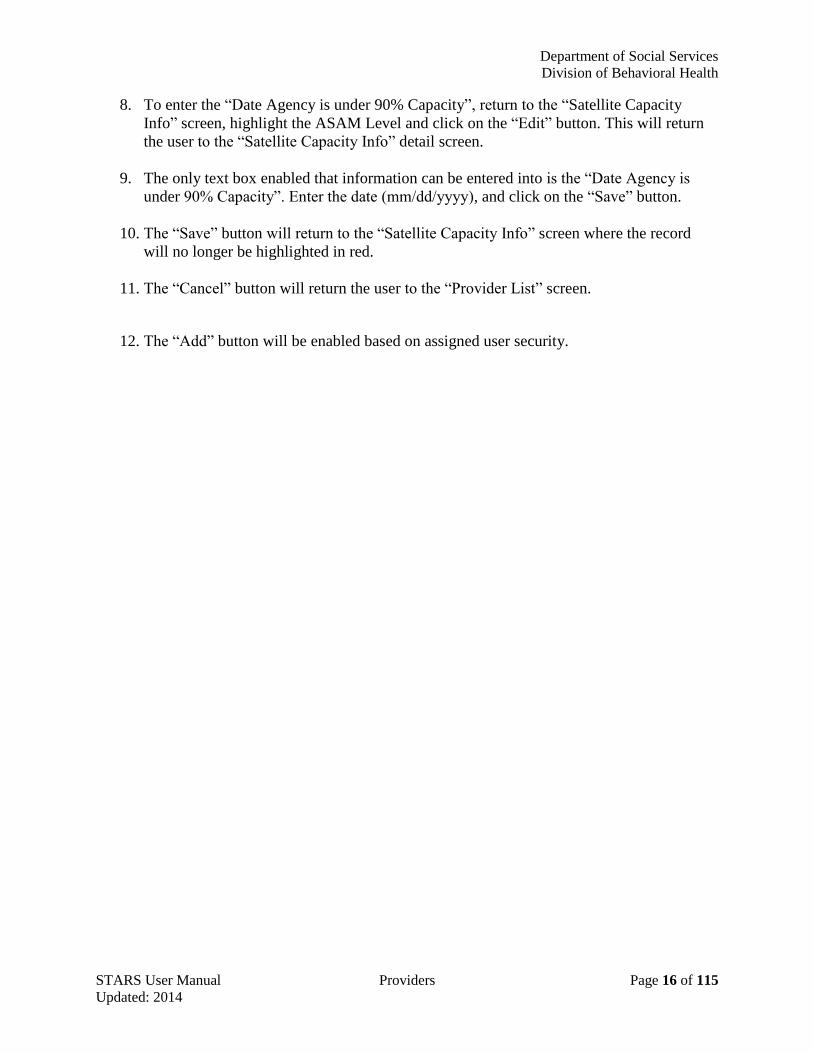
Provider’s Medicaid # Screen
1. “Provider Medicaid #” screen is accessed by clicking on “Providers” under “Actions” on
the side menu and double clicking on the provider name listed on the “Provider List”
screen, then choosing the “Provider’s Medicaid #” tab located along the top of the page.
2. The “Add” button on the above screen will open the “Provider’s Medicaid #” detail
screen. Add the “Provider Medicaid Number” and “Taxonomy Code”. Also, indicate
either ADA or MH by clicking on the appropriate check box. It cannot be both.
3. The “Edit” button on the above screen will open up the “Provider’s Medicaid #” detail
screen in order to edit the provider’s Medicaid number record.
4. To delete a Medicaid record, highlight the record and then click on the “Delete” button. If
any billings are attached to the Medicaid record, the deletion will not occur. Note:
Deletion permission will be based on the user security level assigned.
5. The “Cancel” button will return the user to the “Provider List” screen.
Department of Social Services
Division of Behavioral Health
STARS User Manual Providers Page 18 of 115
Updated: 2014
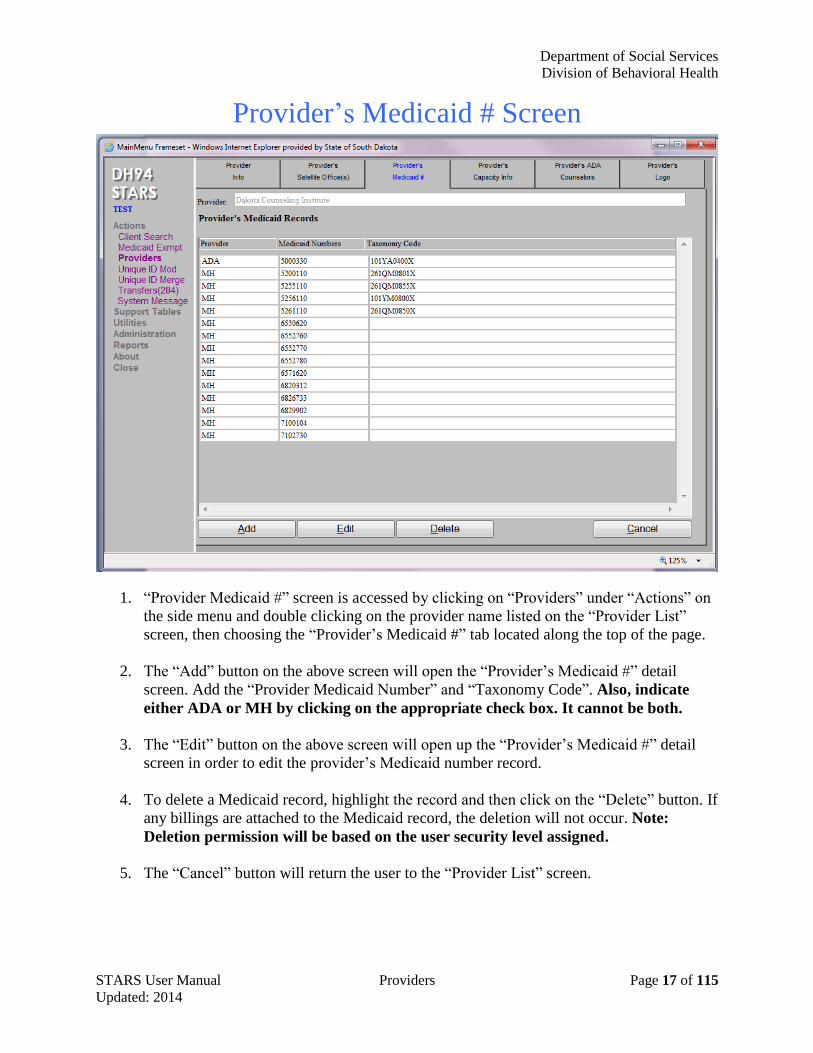
Provider’s Medicaid # Detail Screen
1. To access the “Provider’s Medicaid #” detail screen click on the “Add” tab on the
“Provider’s Medicaid #” screen.
2. To edit a record, highlight the record on the “Provider’s Medicaid #” screen and then
click on the “Edit” button which will open up the above screen. Indicate either ADA or
MH by clicking on the appropriate check box. It cannot be both.
3. The “Save” button will save the provider’s Medicaid information.
4. The “Cancel” button will return the user to the “Provider’s Medicaid #”screen.
Department of Social Services
Division of Behavioral Health
STARS User Manual Providers Page 19 of 115
Updated: 2014
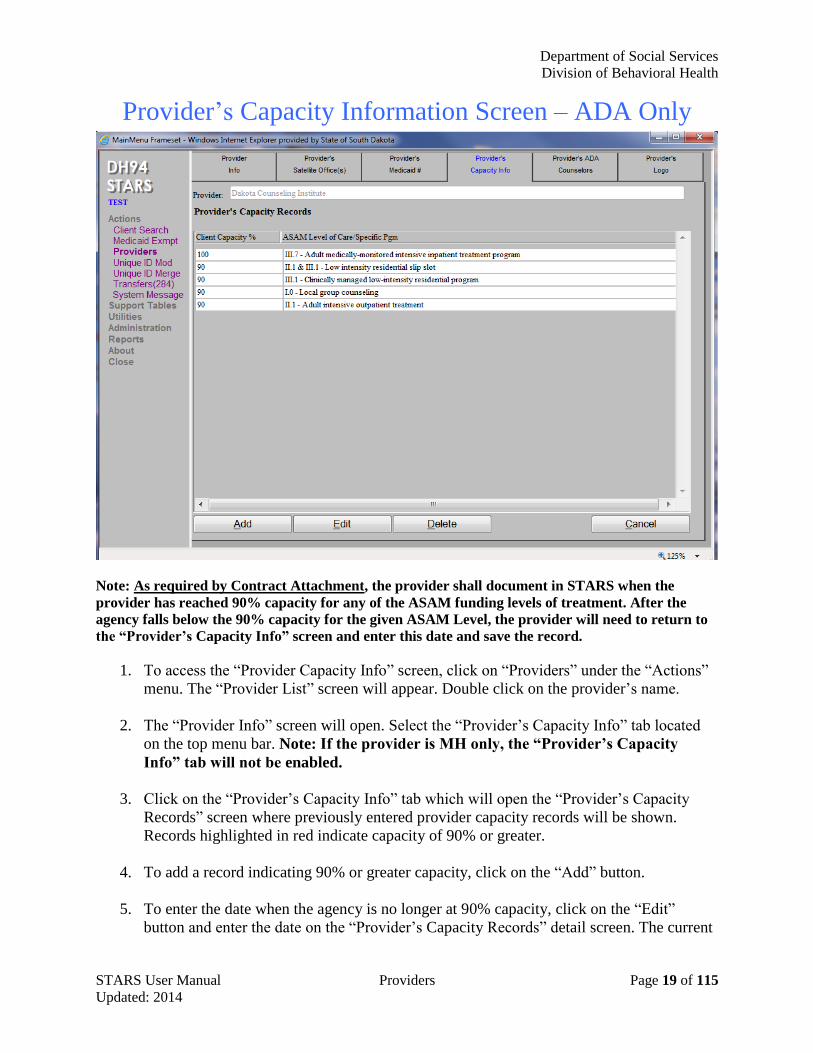
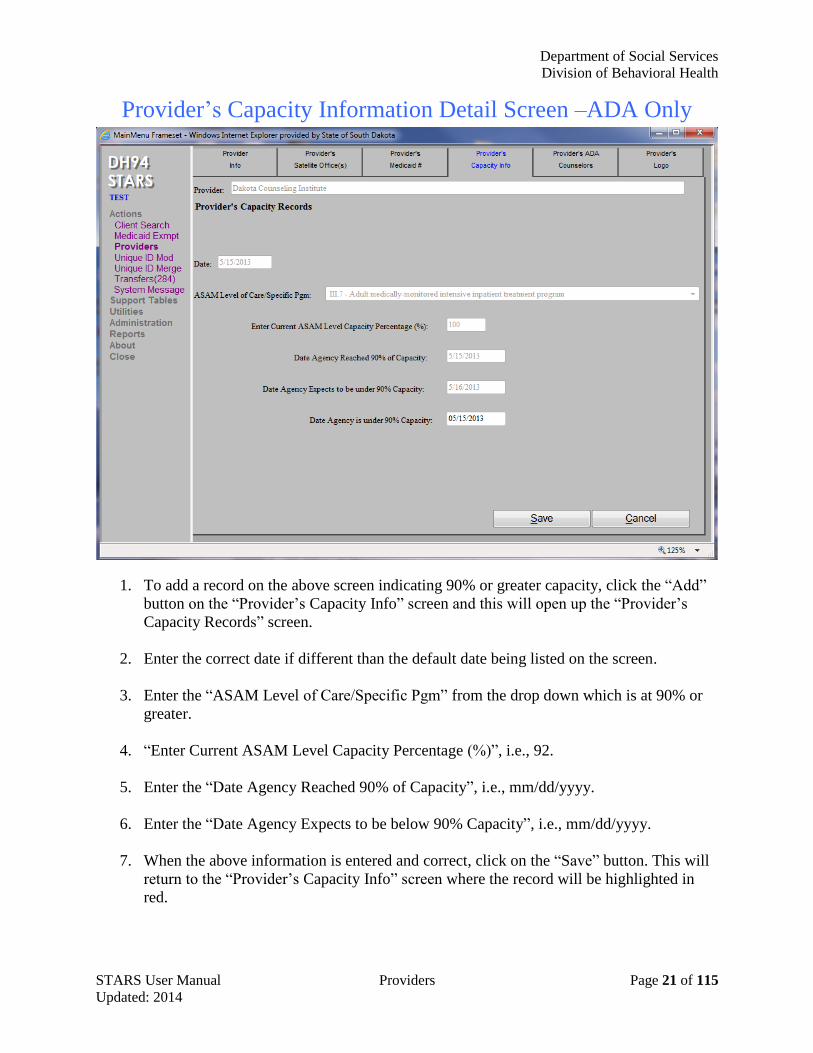
Provider’s Capacity Information Screen – ADA Only
Note: As required by Contract Attachment, the provider shall document in STARS when the
provider has reached 90% capacity for any of the ASAM funding levels of treatment. After the
agency falls below the 90% capacity for the given ASAM Level, the provider will need to return to
the “Provider’s Capacity Info” screen and enter this date and save the record.
1. To access the “Provider Capacity Info” screen, click on “Providers” under the “Actions”
menu. The “Provider List” screen will appear. Double click on the provider’s name.
2. The “Provider Info” screen will open. Select the “Provider’s Capacity Info” tab located
on the top menu bar. Note: If the provider is MH only, the “Provider’s Capacity
Info” tab will not be enabled.
3. Click on the “Provider’s Capacity Info” tab which will open the “Provider’s Capacity
Records” screen where previously entered provider capacity records will be shown.
Records highlighted in red indicate capacity of 90% or greater.
4. To add a record indicating 90% or greater capacity, click on the “Add” button.
5. To enter the date when the agency is no longer at 90% capacity, click on the “Edit”
button and enter the date on the “Provider’s Capacity Records” detail screen. The current
Department of Social Services
Division of Behavioral Health
STARS User Manual Providers Page 20 of 115
Updated: 2014
date will be the default and can be changed by deleting and entering the correct date if it
is different from today’s date.
6. The “Cancel” button will return the user to the “Provider List” screen.
7. The “Add” and “Edit” buttons will be enabled based on assigned user security.
Department of Social Services
Division of Behavioral Health
STARS User Manual Providers Page 21 of 115
Updated: 2014
Provider’s Capacity Information Detail Screen –ADA Only
1. To add a record on the above screen indicating 90% or greater capacity, click the “Add”
button on the “Provider’s Capacity Info” screen and this will open up the “Provider’s
Capacity Records” screen.
2. Enter the correct date if different than the default date being listed on the screen.
3. Enter the “ASAM Level of Care/Specific Pgm” from the drop down which is at 90% or
greater.
4. “Enter Current ASAM Level Capacity Percentage (%)”, i.e., 92.
5. Enter the “Date Agency Reached 90% of Capacity”, i.e., mm/dd/yyyy.
6. Enter the “Date Agency Expects to be below 90% Capacity”, i.e., mm/dd/yyyy.
7. When the above information is entered and correct, click on the “Save” button. This will
return to the “Provider’s Capacity Info” screen where the record will be highlighted in
red.
Department of Social Services
Division of Behavioral Health
STARS User Manual Providers Page 22 of 115
Updated: 2014
8. To enter the date when the provider is below 90% capacity, return to the “Provider
Capacity Info” screen, highlight the “ASAM level of Care/Specific Pgm” and click on the
“Edit” button. This will return the provider to the “Provider’s Capacity Records” detail
screen.
9. The only text box enabled that information can be entered into is the “Date Agency is
under 90% Capacity”. Enter the date (mm/dd/yyyy) and click on the “Save” button.
10. The “Save” button will return the provider to the “Provider Capacity Info” screen where
the record will no longer be highlighted in red.
11. The “Cancel” button will return the user to the “Provider List” screen.
Department of Social Services
Division of Behavioral Health
STARS User Manual Providers Page 23 of 115
Updated: 2014
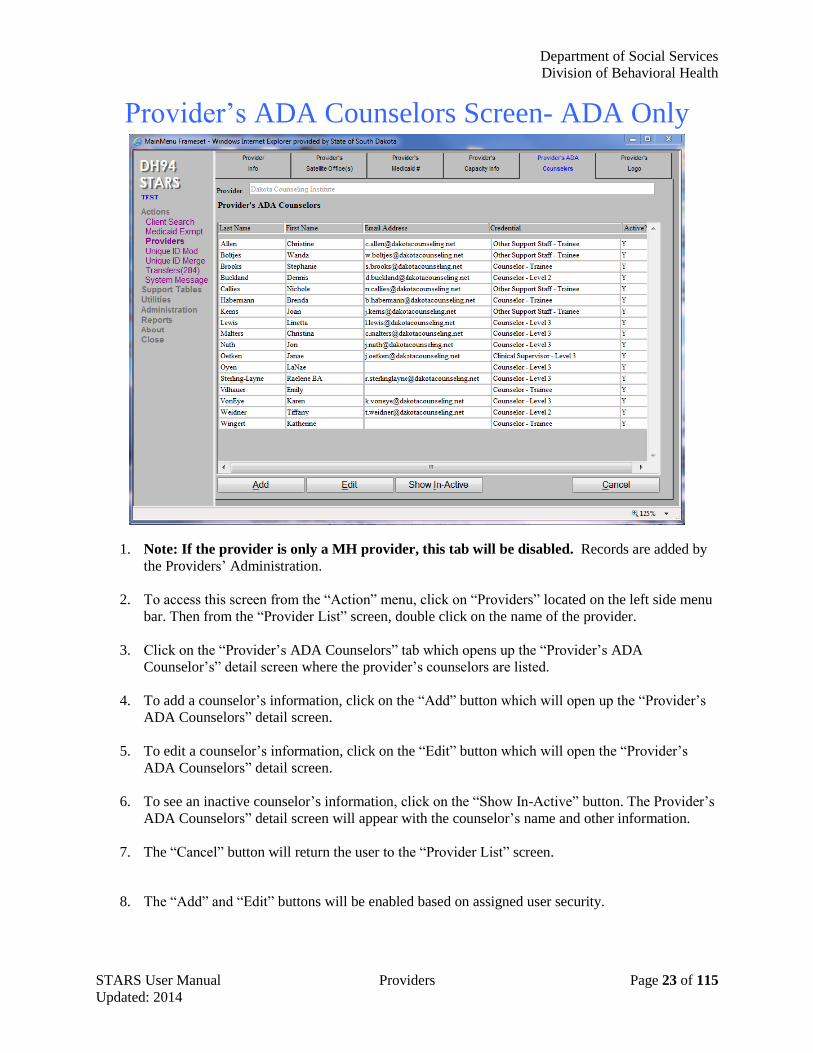
Provider’s ADA Counselors Screen- ADA Only
1. Note: If the provider is only a MH provider, this tab will be disabled. Records are added by
the Providers’ Administration.
2. To access this screen from the “Action” menu, click on “Providers” located on the left side menu
bar. Then from the “Provider List” screen, double click on the name of the provider.
3. Click on the “Provider’s ADA Counselors” tab which opens up the “Provider’s ADA
Counselor’s” detail screen where the provider’s counselors are listed.
4. To add a counselor’s information, click on the “Add” button which will open up the “Provider’s
ADA Counselors” detail screen.
5. To edit a counselor’s information, click on the “Edit” button which will open the “Provider’s
ADA Counselors” detail screen.
6. To see an inactive counselor’s information, click on the “Show In-Active” button. The Provider’s
ADA Counselors” detail screen will appear with the counselor’s name and other information.
7. The “Cancel” button will return the user to the “Provider List” screen.
8. The “Add” and “Edit” buttons will be enabled based on assigned user security.

Department of Social Services
Division of Behavioral Health
STARS User Manual Providers Page 24 of 115
Updated: 2014
Provider’s ADA Counselors Detail Screen
1. To add a counselor’s information, click on the “Add” button on the bottom of the “Provider’s
ADA Counselors” screen. This will open up the “Provider’s ADA Counselors” detail screen.
Complete the information and click on the “Save” button. The screen will then return to the user
to the “Provider’s ADA Counselors” screen.
2. To edit a counselor’s information, highlight the counselor’s name on the “Provider’s ADA
Counselors” screen and then click the “Edit” button which opens up the “Provider’s ADA
Counselors” detail screen. Make the necessary changes and click the “Save” button, which will
then return the user to the “Provider’s ADA Counselor’s” screen.
3. Once a counselor has been entered into the system and saved, the user cannot remove this
person. If the counselor no longer works for the agency, change the counselor’s “Active”
status from “Yes” to “No”.
4. Click on the “Cancel” button to return to the “Provider List” screen.
STARS User Manual Page 25 of 115 Updated: 2014
Part 3
Client Search
Department of Social Services
Division of Behavioral Health
STARS User Manual Client Search Page 26 of 115 Updated: 2014
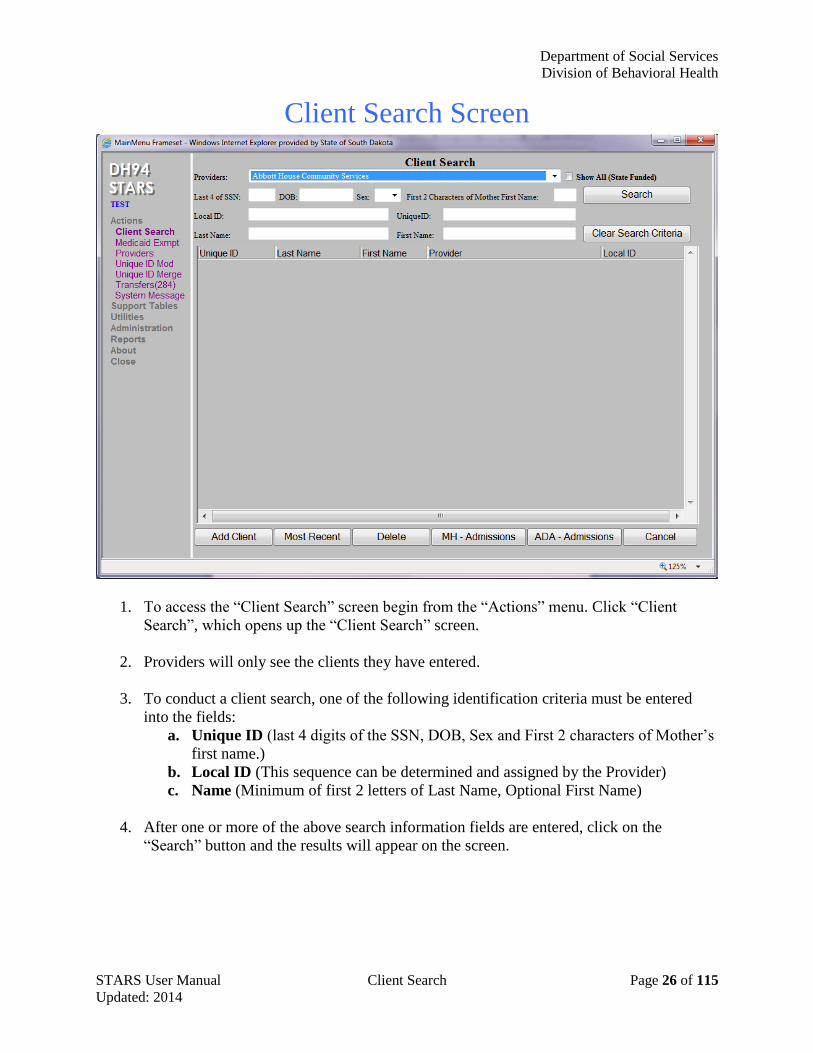
Client Search Screen
1. To access the “Client Search” screen begin from the “Actions” menu. Click “Client
Search”, which opens up the “Client Search” screen.
2. Providers will only see the clients they have entered.
3. To conduct a client search, one of the following identification criteria must be entered
into the fields:
a. Unique ID (last 4 digits of the SSN, DOB, Sex and First 2 characters of Mother’s
first name.)
b. Local ID (This sequence can be determined and assigned by the Provider)
c. Name (Minimum of first 2 letters of Last Name, Optional First Name)
4. After one or more of the above search information fields are entered, click on the
“Search” button and the results will appear on the screen.
Department of Social Services
Division of Behavioral Health
STARS User Manual Client Search Page 27 of 115 Updated: 2014
Client Search Screen
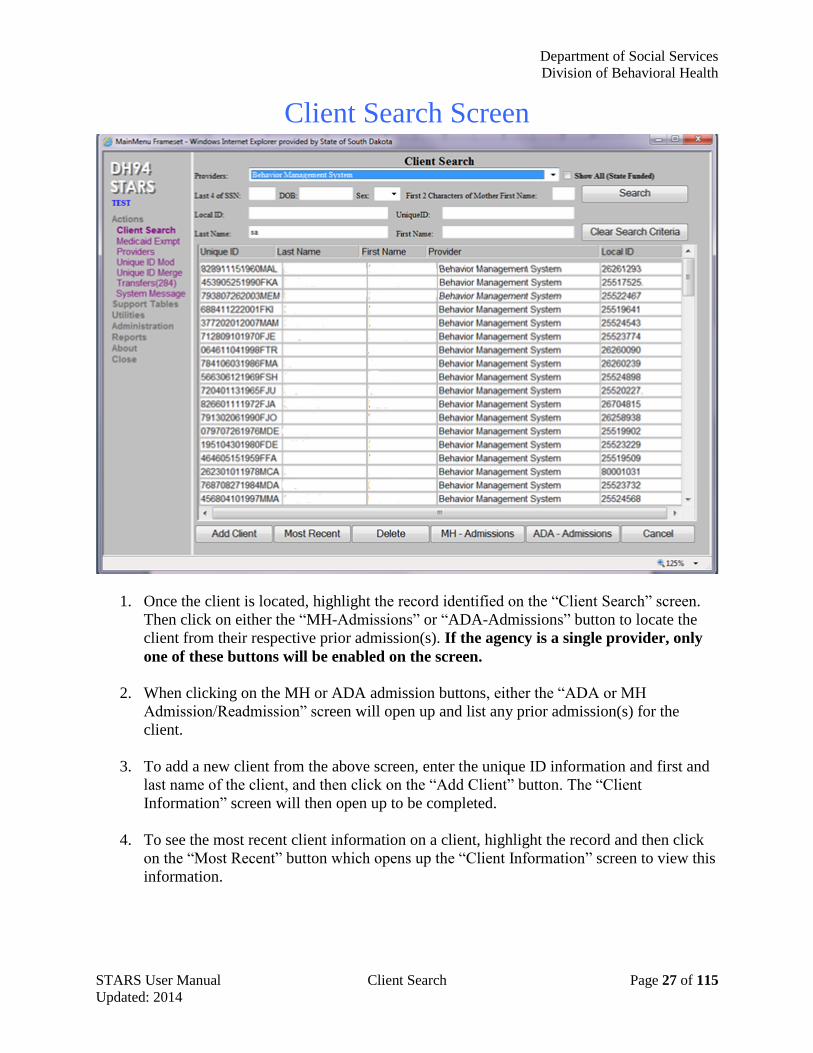
1. Once the client is located, highlight the record identified on the “Client Search” screen.
Then click on either the “MH-Admissions” or “ADA-Admissions” button to locate the
client from their respective prior admission(s). If the agency is a single provider, only
one of these buttons will be enabled on the screen.
2. When clicking on the MH or ADA admission buttons, either the “ADA or MH
Admission/Readmission” screen will open up and list any prior admission(s) for the
client.
3. To add a new client from the above screen, enter the unique ID information and first and
last name of the client, and then click on the “Add Client” button. The “Client
Information” screen will then open up to be completed.
4. To see the most recent client information on a client, highlight the record and then click
on the “Most Recent” button which opens up the “Client Information” screen to view this
information.
Department of Social Services
Division of Behavioral Health
STARS User Manual Client Search Page 28 of 115 Updated: 2014
5. To delete a client’s information, highlight the record and then click on the “Delete”
button. If there is any billing information attached to the record, the deletion will not
occur.
6. The “Cancel” button on the “Client Search” screen will return the user to the “STARS
Application Page.”
7. The “Add Client”, “Delete”, “MH-Admission”, and “ADA-Admission” buttons will be
enabled based on assigned security.
Department of Social Services
Division of Behavioral Health
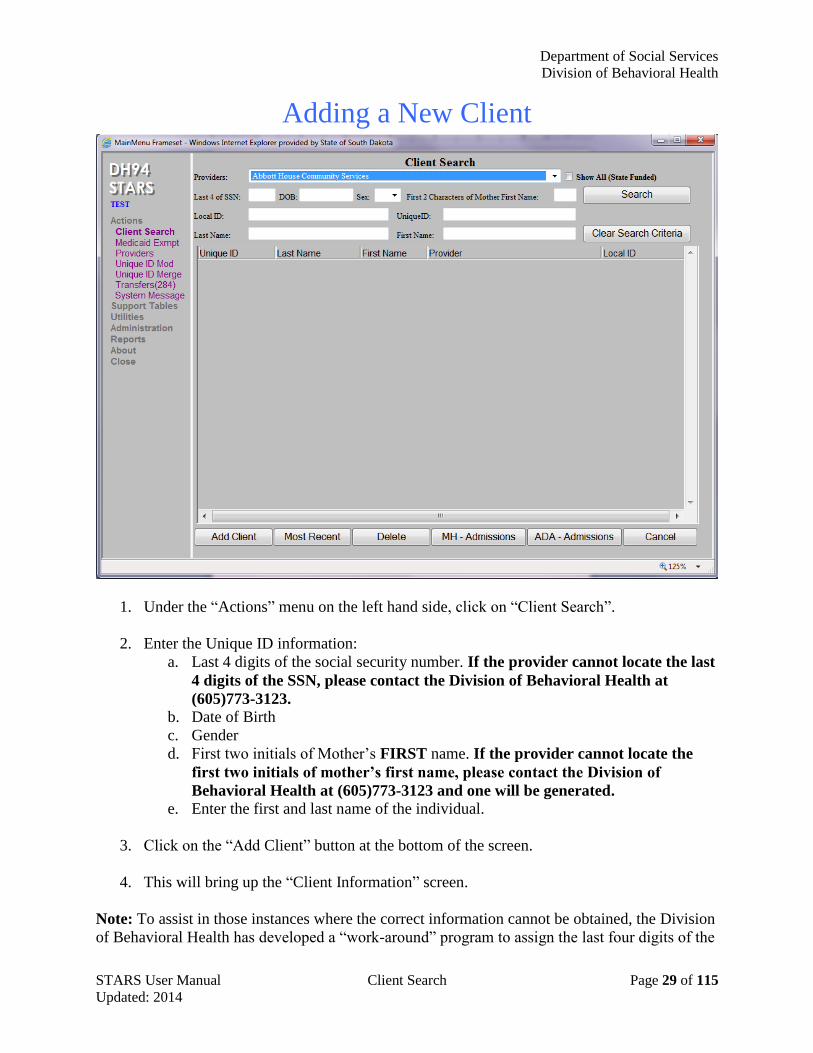
STARS User Manual Client Search Page 29 of 115 Updated: 2014
Adding a New Client
1. Under the “Actions” menu on the left hand side, click on “Client Search”.
2. Enter the Unique ID information:
a. Last 4 digits of the social security number. If the provider cannot locate the last
4 digits of the SSN, please contact the Division of Behavioral Health at
(605)773-3123. b. Date of Birth
c. Gender
d. First two initials of Mother’s FIRST name. If the provider cannot locate the
first two initials of mother’s first name, please contact the Division of
Behavioral Health at (605)773-3123 and one will be generated. e. Enter the first and last name of the individual.
3. Click on the “Add Client” button at the bottom of the screen.
4. This will bring up the “Client Information” screen.
Note: To assist in those instances where the correct information cannot be obtained, the Division
of Behavioral Health has developed a “work-around” program to assign the last four digits of the
Department of Social Services
Division of Behavioral Health
STARS User Manual Client Search Page 30 of 115 Updated: 2014
social security number field and/or mother’s first two initials. This program will be maintained
by the Division of Behavioral Health, with access only by Division staff. Even though there is a
work-around program, this is only to be used as a last resort when the unique ID information
cannot be obtained.
Every opportunity should be researched and explored prior to contacting the Division of
Behavioral Health.
The process for receiving an assigned work-around is as follows:
1) Providers must make every reasonable effort to obtain the last four digits of the social
security number or the first two initials of the mother’s first name for an individual prior
to contacting the Division of Behavioral Health.
2) If the last four digits of the social security number or the first two initials of the mother’s
first name cannot be obtained, please contact the Division at (605)773-3123.
ATTENTION
When adding a new client, STARS will not accept 0001 or 9999 for the last four digits of
the Social Security number (SSN) or XX for the mother’s first two initials. Since there is a
chance someone’s SSN could end in 0001, the agency will need to contact the Division to
have the Unique ID entered into STARS. Once the Division enters the client, the provider
can then maintain the record.
Department of Social Services
Division of Behavioral Health
STARS User Manual Client Search Page 31 of 115 Updated: 2014
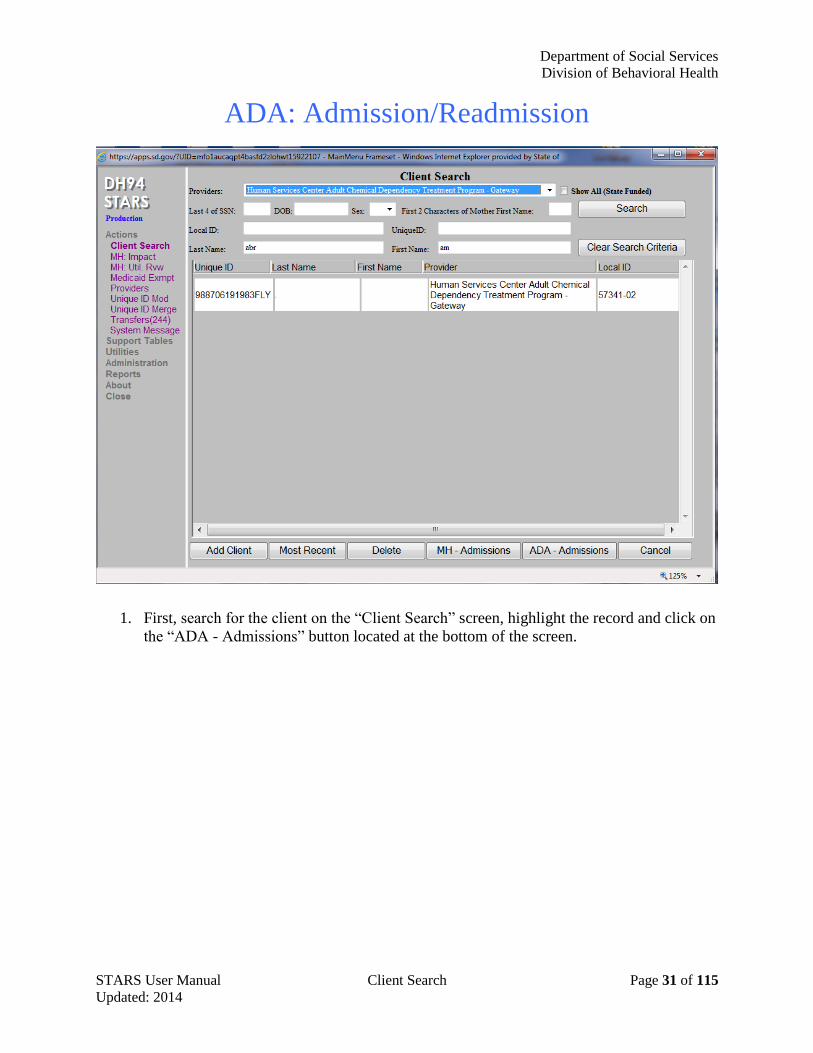
ADA: Admission/Readmission
1. First, search for the client on the “Client Search” screen, highlight the record and click on
the “ADA - Admissions” button located at the bottom of the screen.
Department of Social Services
Division of Behavioral Health
STARS User Manual Client Search Page 32 of 115 Updated: 2014
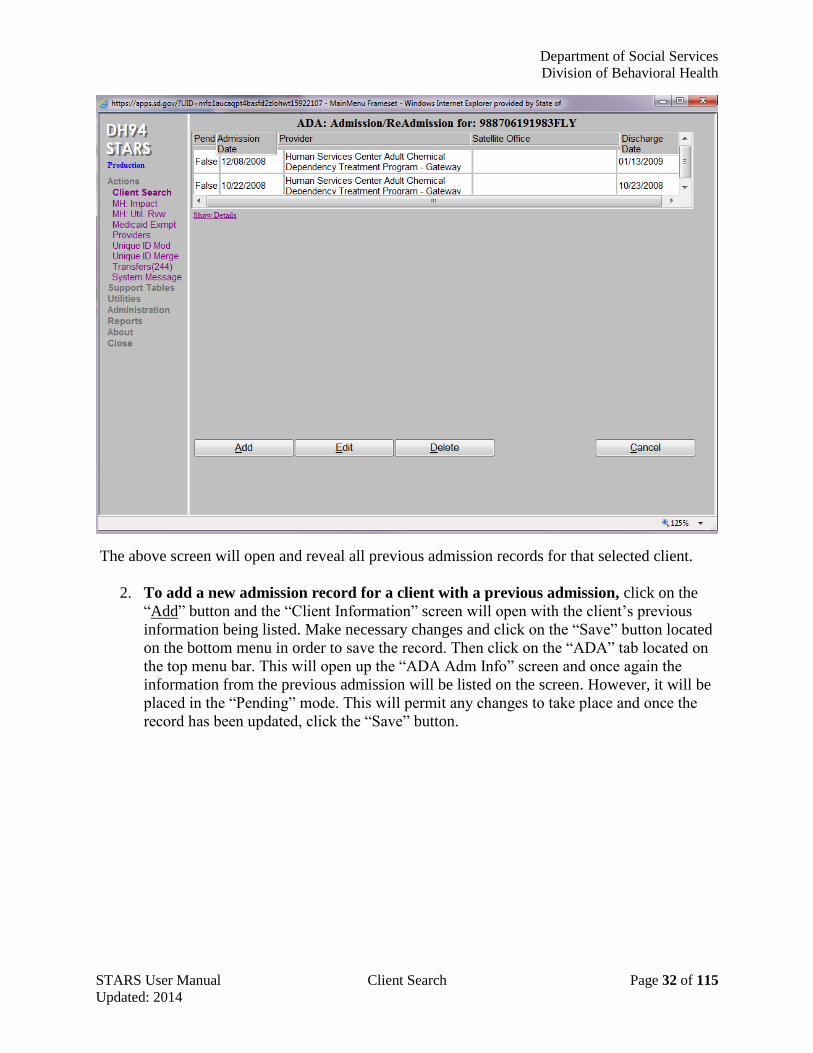
The above screen will open and reveal all previous admission records for that selected client.
2. To add a new admission record for a client with a previous admission, click on the
“Add” button and the “Client Information” screen will open with the client’s previous
information being listed. Make necessary changes and click on the “Save” button located
on the bottom menu in order to save the record. Then click on the “ADA” tab located on
the top menu bar. This will open up the “ADA Adm Info” screen and once again the
information from the previous admission will be listed on the screen. However, it will be
placed in the “Pending” mode. This will permit any changes to take place and once the
record has been updated, click the “Save” button.
Department of Social Services
Division of Behavioral Health
STARS User Manual Client Search Page 33 of 115 Updated: 2014
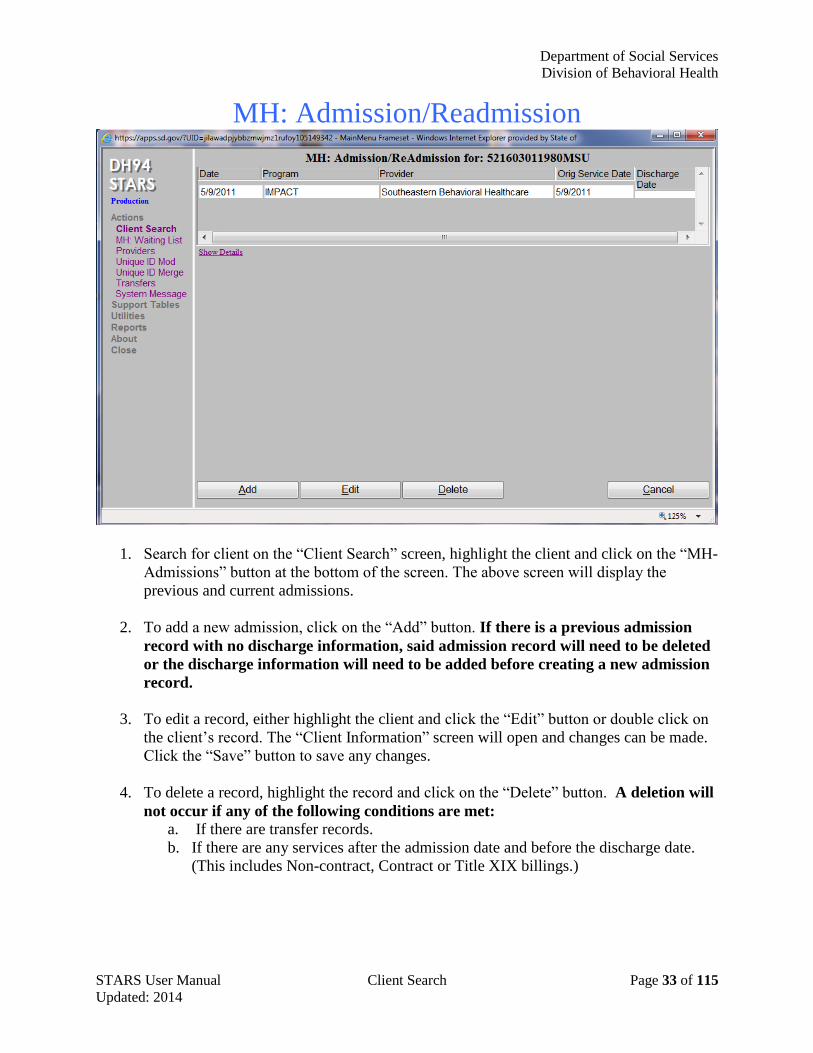
MH: Admission/Readmission
1. Search for client on the “Client Search” screen, highlight the client and click on the “MH-
Admissions” button at the bottom of the screen. The above screen will display the
previous and current admissions.
2. To add a new admission, click on the “Add” button. If there is a previous admission
record with no discharge information, said admission record will need to be deleted
or the discharge information will need to be added before creating a new admission
record.
3. To edit a record, either highlight the client and click the “Edit” button or double click on
the client’s record. The “Client Information” screen will open and changes can be made.
Click the “Save” button to save any changes.
4. To delete a record, highlight the record and click on the “Delete” button. A deletion will
not occur if any of the following conditions are met: a. If there are transfer records.
b. If there are any services after the admission date and before the discharge date.
(This includes Non-contract, Contract or Title XIX billings.)
Department of Social Services
Division of Behavioral Health
STARS User Manual Client Search Page 34 of 115 Updated: 2014
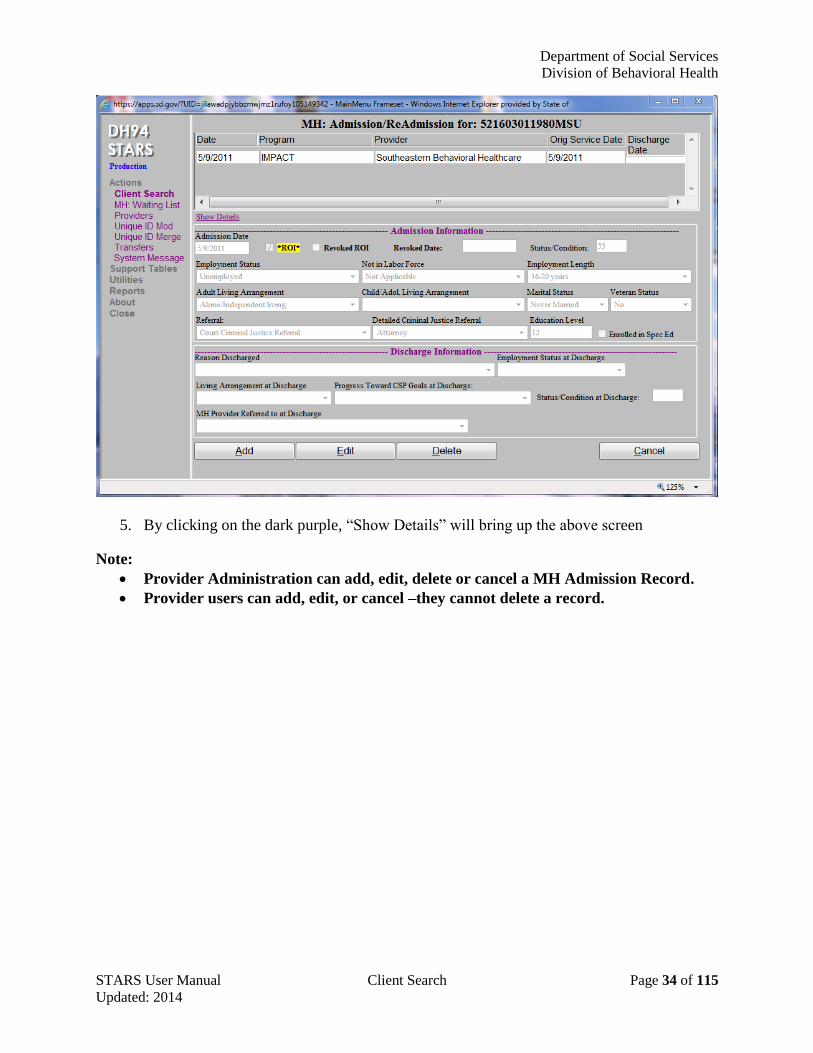
5. By clicking on the dark purple, “Show Details” will bring up the above screen
Note:
Provider Administration can add, edit, delete or cancel a MH Admission Record.
Provider users can add, edit, or cancel –they cannot delete a record.
Department of Social Services
Division of Behavioral Health
STARS User Manual Client Search Page 35 of 115 Updated: 2014
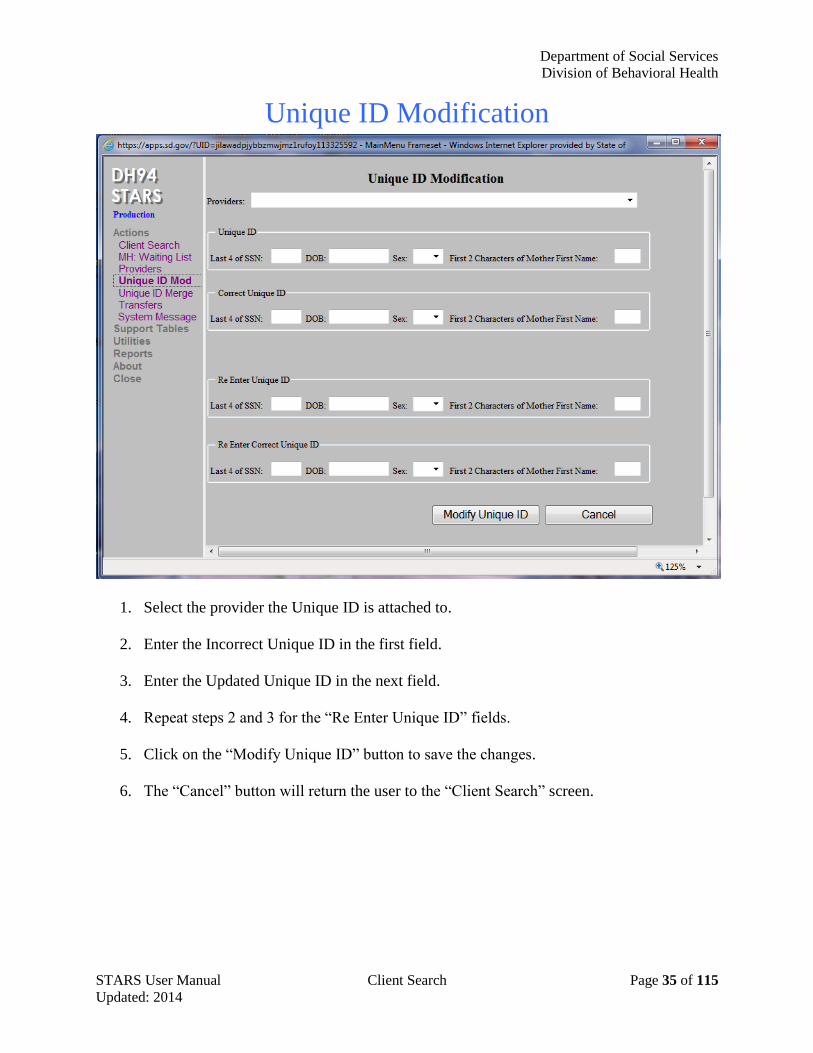
Unique ID Modification
1. Select the provider the Unique ID is attached to.
2. Enter the Incorrect Unique ID in the first field.
3. Enter the Updated Unique ID in the next field.
4. Repeat steps 2 and 3 for the “Re Enter Unique ID” fields.
5. Click on the “Modify Unique ID” button to save the changes.
6. The “Cancel” button will return the user to the “Client Search” screen.
Department of Social Services
Division of Behavioral Health
STARS User Manual Client Search Page 36 of 115 Updated: 2014
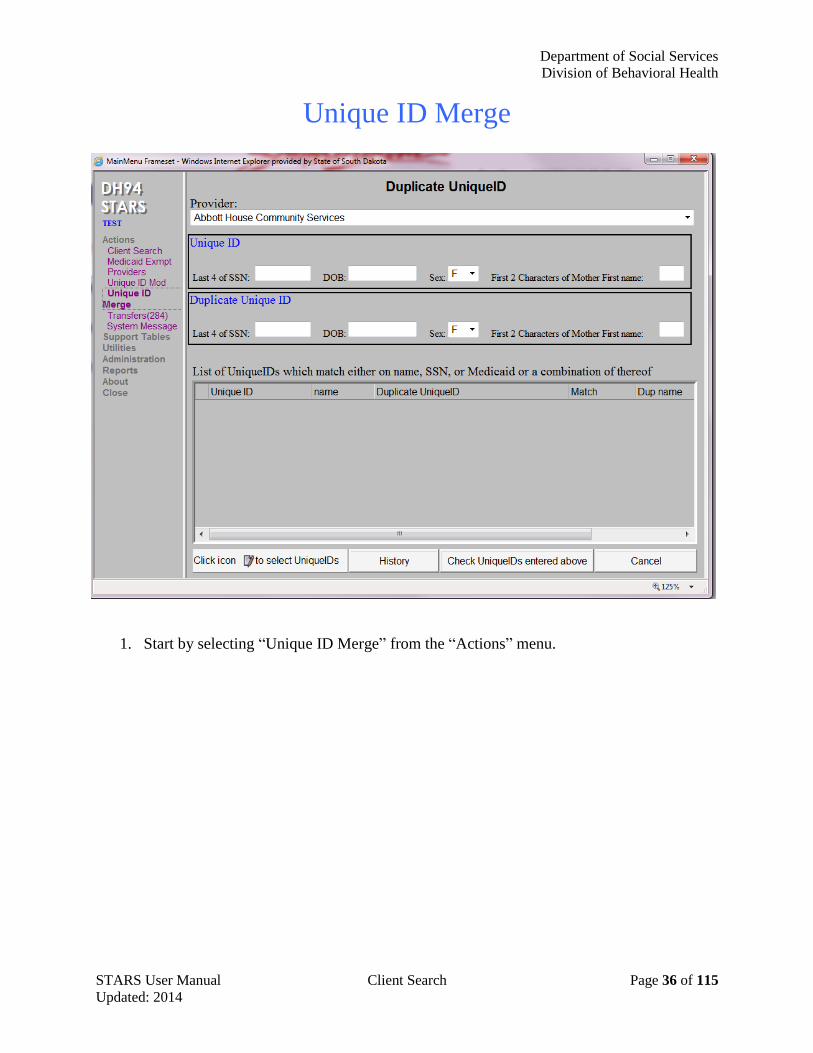
Unique ID Merge
1. Start by selecting “Unique ID Merge” from the “Actions” menu.
Department of Social Services
Division of Behavioral Health
STARS User Manual Client Search Page 37 of 115 Updated: 2014
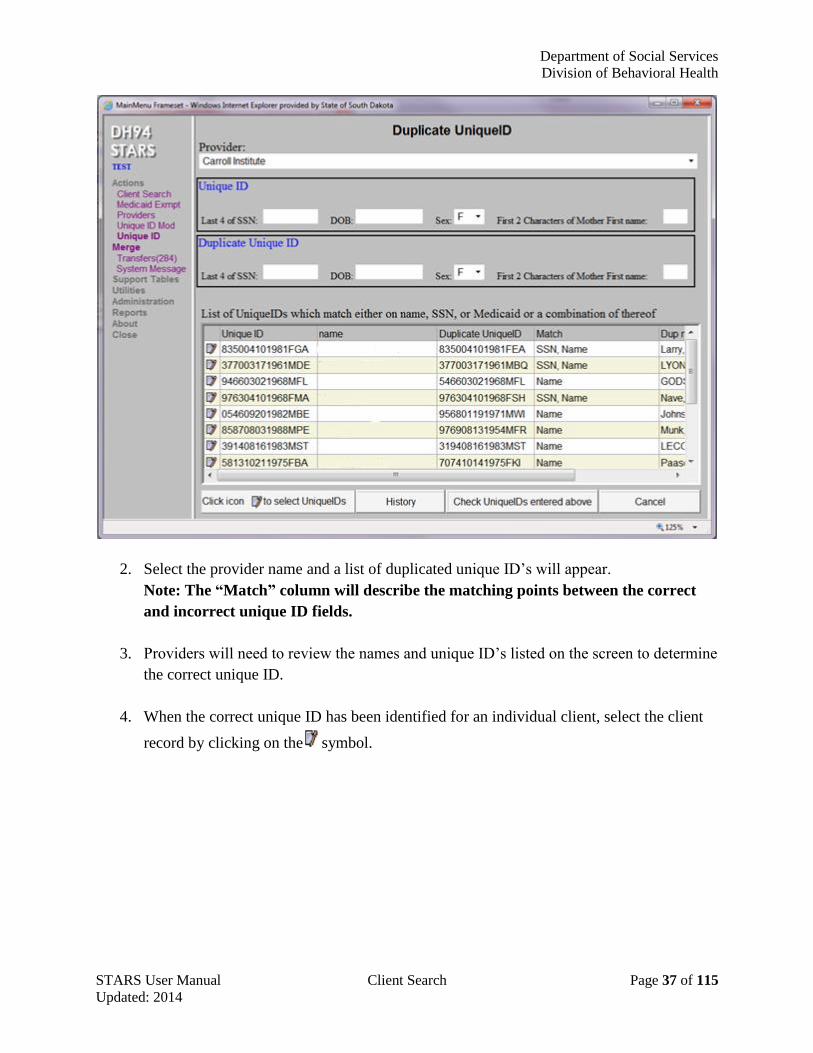
2. Select the provider name and a list of duplicated unique ID’s will appear.
Note: The “Match” column will describe the matching points between the correct
and incorrect unique ID fields.
3. Providers will need to review the names and unique ID’s listed on the screen to determine
the correct unique ID.
4. When the correct unique ID has been identified for an individual client, select the client
record by clicking on the symbol.
Department of Social Services
Division of Behavioral Health
STARS User Manual Client Search Page 38 of 115 Updated: 2014
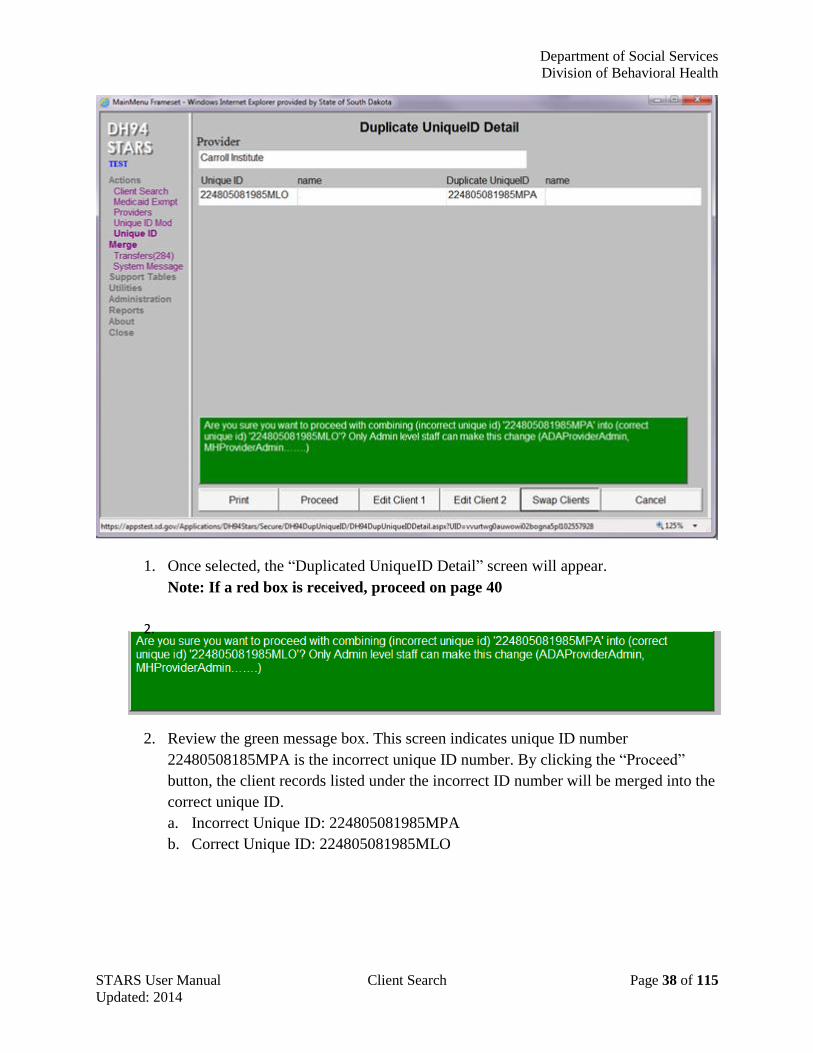
1. Once selected, the “Duplicated UniqueID Detail” screen will appear.
Note: If a red box is received, proceed on page 40
2.
2. Review the green message box. This screen indicates unique ID number
22480508185MPA is the incorrect unique ID number. By clicking the “Proceed”
button, the client records listed under the incorrect ID number will be merged into the
correct unique ID.
a. Incorrect Unique ID: 224805081985MPA
b. Correct Unique ID: 224805081985MLO

Department of Social Services
Division of Behavioral Health
STARS User Manual Client Search Page 39 of 115 Updated: 2014
1. If the incorrect unique ID is identified as the correct unique ID, click on the “Swap
Clients” button. This will reverse the message box and allow the incorrect unique ID to
be merged into the correct unique ID.
2. When the correct unique ID has been identified and the incorrect unique ID identified,
click the “Proceed” button to complete the unique ID merge.
3. Once the merge has been completed, the screen will return to the main “Duplicate
UniqueID” screen.
Department of Social Services
Division of Behavioral Health
STARS User Manual Client Search Page 40 of 115 Updated: 2014
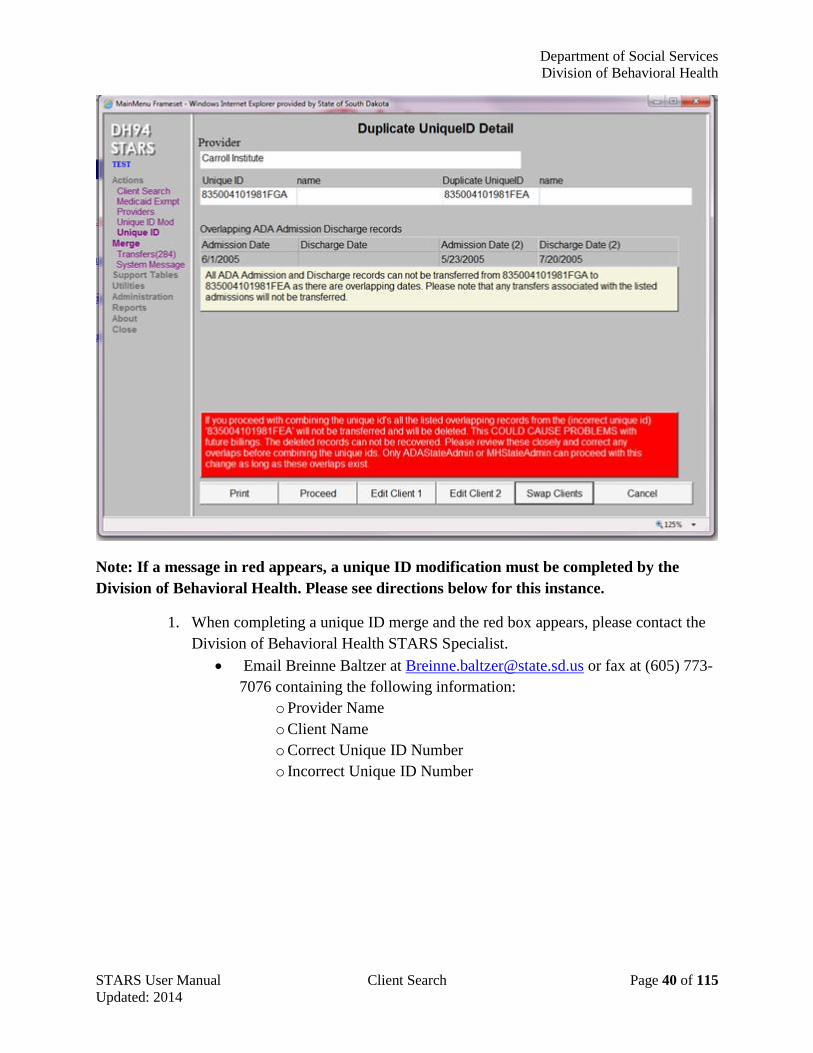
Note: If a message in red appears, a unique ID modification must be completed by the
Division of Behavioral Health. Please see directions below for this instance.
1. When completing a unique ID merge and the red box appears, please contact the
Division of Behavioral Health STARS Specialist.
Email Breinne Baltzer at [email protected] or fax at (605) 773-
7076 containing the following information:
o Provider Name
o Client Name
o Correct Unique ID Number
o Incorrect Unique ID Number

STARS User Manual Page 41 of 115 Updated: 2014
Part 4
General Information
Department of Social Services
Division of Behavioral Health
STARS User Manual General Information Page 42 of 115
Updated: 2014
Client Information Screen
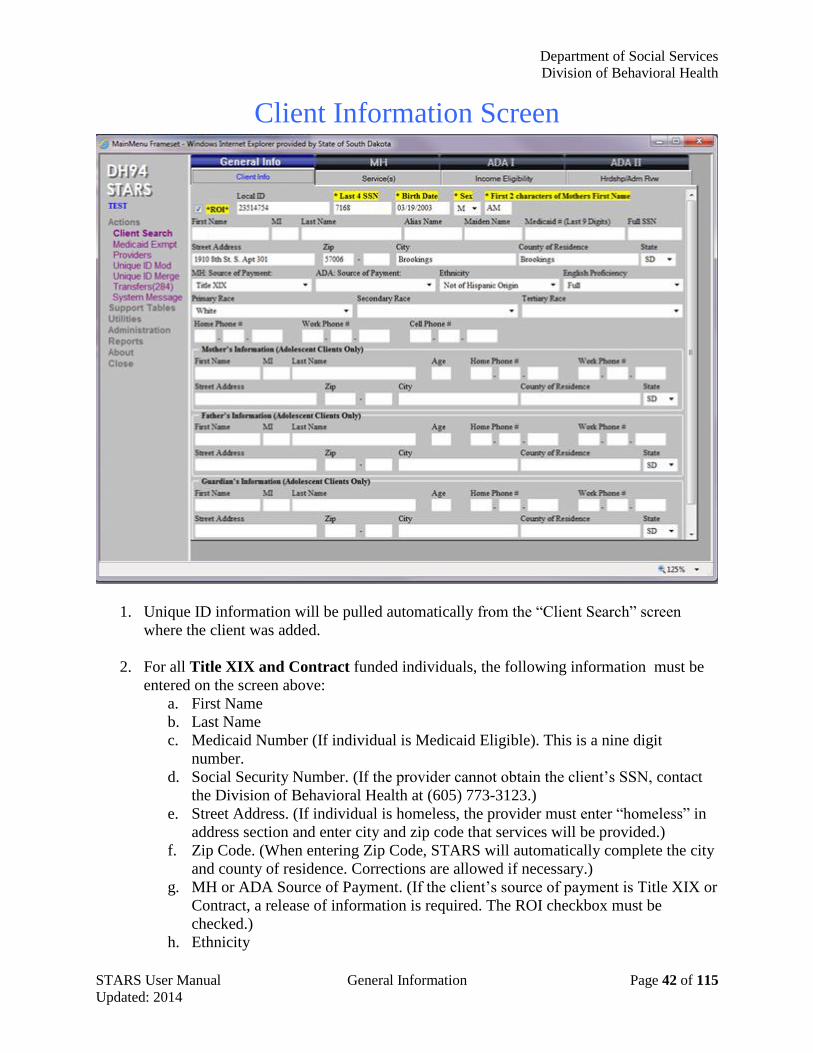
1. Unique ID information will be pulled automatically from the “Client Search” screen
where the client was added.
2. For all Title XIX and Contract funded individuals, the following information must be
entered on the screen above:
a. First Name
b. Last Name
c. Medicaid Number (If individual is Medicaid Eligible). This is a nine digit
number.
d. Social Security Number. (If the provider cannot obtain the client’s SSN, contact
the Division of Behavioral Health at (605) 773-3123.)
e. Street Address. (If individual is homeless, the provider must enter “homeless” in
address section and enter city and zip code that services will be provided.)
f. Zip Code. (When entering Zip Code, STARS will automatically complete the city
and county of residence. Corrections are allowed if necessary.)
g. MH or ADA Source of Payment. (If the client’s source of payment is Title XIX or
Contract, a release of information is required. The ROI checkbox must be
checked.)
h. Ethnicity
Department of Social Services
Division of Behavioral Health
STARS User Manual General Information Page 43 of 115
Updated: 2014
i. English Proficiency
j. Primary Race (Secondary or tertiary race is not required, but information should
be provided if available.)
3. Self-Pay/Private Pay or Other 3rd
Party source of payment clients require only the
fields associated with unique ID, county, state, MH source of payment or ADA source of
payment, primary race, ethnicity and English proficiency.
4. Fields for Mother’s, Father’s, and Guardian’s information are for adolescent clients only.
5. Clicking on the “Cancel” button will take the user back to the “Client Search” screen.
6. Clicking on the “Print” button will allow the user to print out the client information
screen.
Department of Social Services
Division of Behavioral Health
STARS User Manual General Information Page 44 of 115
Updated: 2014
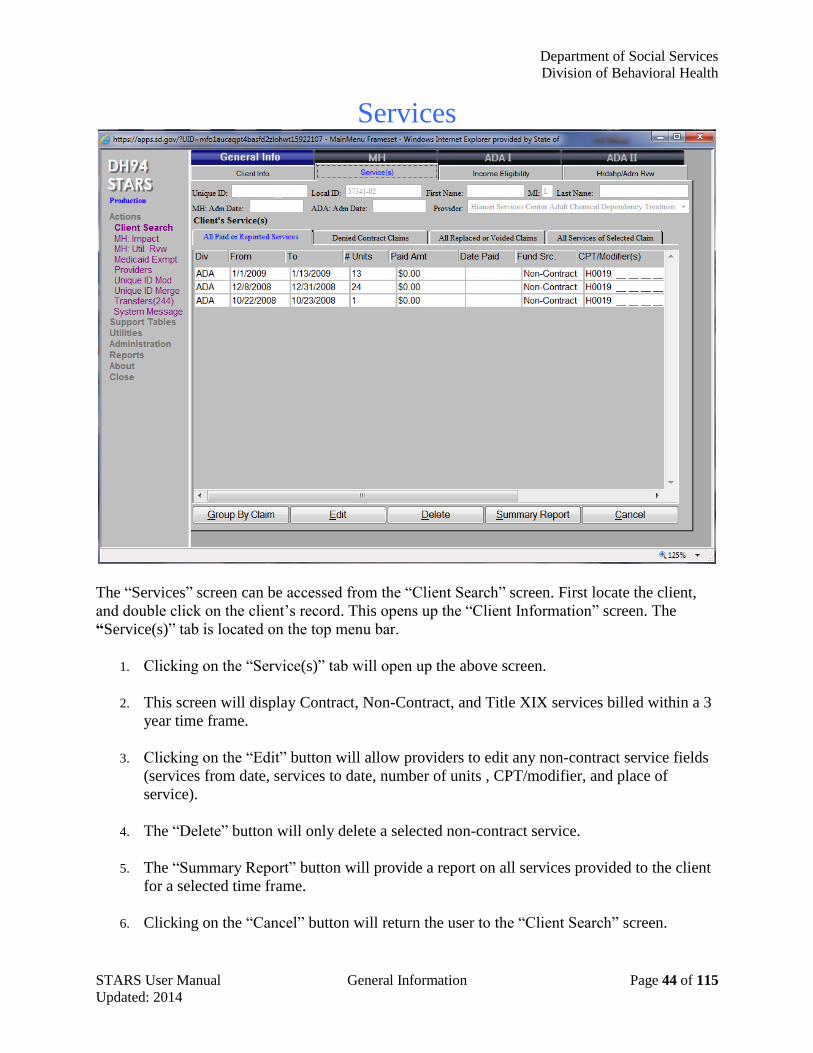
Services
The “Services” screen can be accessed from the “Client Search” screen. First locate the client,
and double click on the client’s record. This opens up the “Client Information” screen. The
“Service(s)” tab is located on the top menu bar.
1. Clicking on the “Service(s)” tab will open up the above screen.
2. This screen will display Contract, Non-Contract, and Title XIX services billed within a 3
year time frame.
3. Clicking on the “Edit” button will allow providers to edit any non-contract service fields
(services from date, services to date, number of units , CPT/modifier, and place of
service).
4. The “Delete” button will only delete a selected non-contract service.
5. The “Summary Report” button will provide a report on all services provided to the client
for a selected time frame.
6. Clicking on the “Cancel” button will return the user to the “Client Search” screen.
Department of Social Services
Division of Behavioral Health
STARS User Manual General Information Page 45 of 115
Updated: 2014
Services Detail Screen
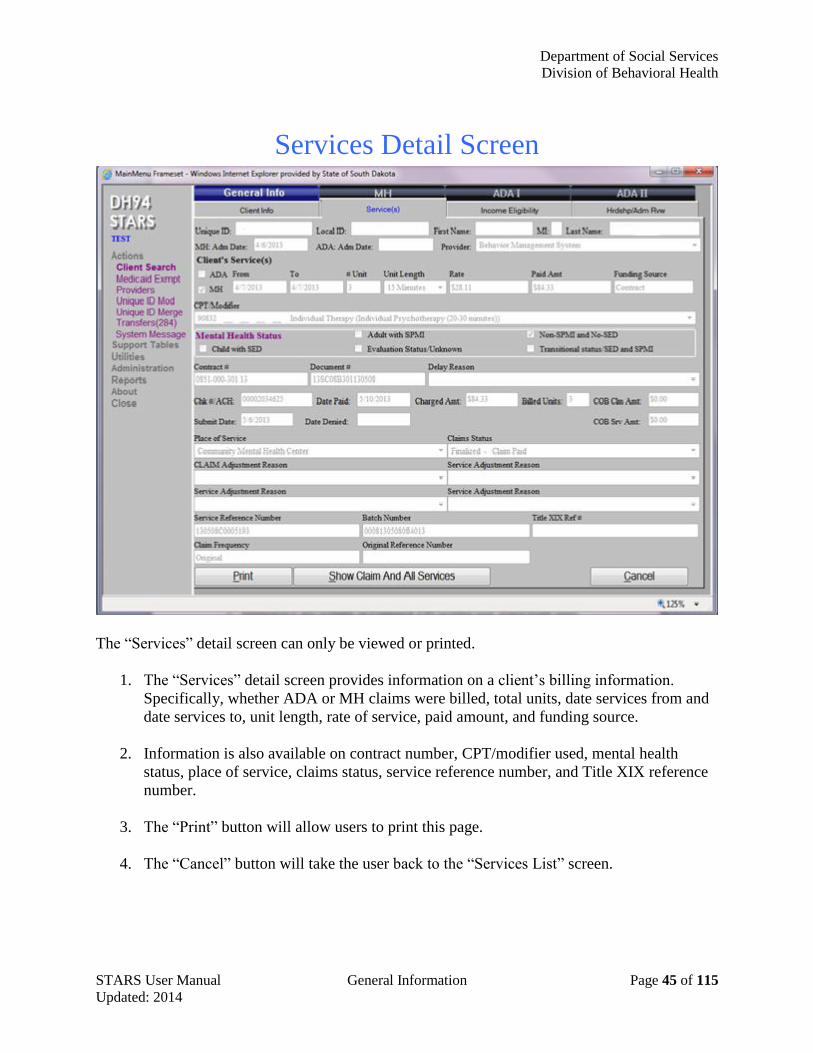
The “Services” detail screen can only be viewed or printed.
1. The “Services” detail screen provides information on a client’s billing information.
Specifically, whether ADA or MH claims were billed, total units, date services from and
date services to, unit length, rate of service, paid amount, and funding source.
2. Information is also available on contract number, CPT/modifier used, mental health
status, place of service, claims status, service reference number, and Title XIX reference
number.
3. The “Print” button will allow users to print this page.
4. The “Cancel” button will take the user back to the “Services List” screen.

Department of Social Services
Division of Behavioral Health
STARS User Manual General Information Page 46 of 115
Updated: 2014
Income Eligibility
1. The “Income Eligibility” screen can be accessed by clicking on the “General Info” tab at
the top of the screen. Then click on the “Income Eligibility” tab.
2. To add a new record, click on the “Add” button at the bottom of the screen. When
completing the “Annual Net Inc” field, numerals must be positive.
3. To edit an existing record, highlight the record and then click on the “Edit” button which
will open up the “Income Eligibility” detail screen. Make the necessary changes and click
on the “Save” button to save the information.
4. To delete an existing record, click on the “Delete” button in which a pop up message will
ask, “Are you sure you want to delete?” Click on “Yes” to delete the record. If there are
any contract services in the STARS claims table, the deletion will not occur.
5. The “Cancel” button will take the user back to the “Client Search” screen.
6. The “Add”, “Edit”, and “Delete” buttons will be enabled based on assigned user security.

Department of Social Services
Division of Behavioral Health
STARS User Manual General Information Page 47 of 115
Updated: 2014
Income Eligibility Detail Screen
1. To add a new record, click on the “Add” button on the “Income Eligibility” screen. A
new record may be added on the above screen.
2. Enter the “Start Intake Date”. The “Annual Review Date” will automatically be entered
for exactly one year later. If the “Annual Review Date” is entered manually, it cannot be
more than 1 year and 30 days later than the “Start Intake Date”.
3. Enter the “Annual Net Income” in positive numbers and then the “Number in
Household”. Click on the “Save” button to save the record and return to the “Income
Eligibility” screen. The “Income Eligibility” screen will verify either “Yes” or “No”
regarding the client’s eligibility.
4. The “Cancel” button will return the provider to the “Income Eligibility” screen.
5. The dark blue “Duel Means” on the lower left side of the screen will open up the
respective form when selected.
Department of Social Services
Division of Behavioral Health
STARS User Manual General Information Page 48 of 115
Updated: 2014
Hardship/Administration Review Screen
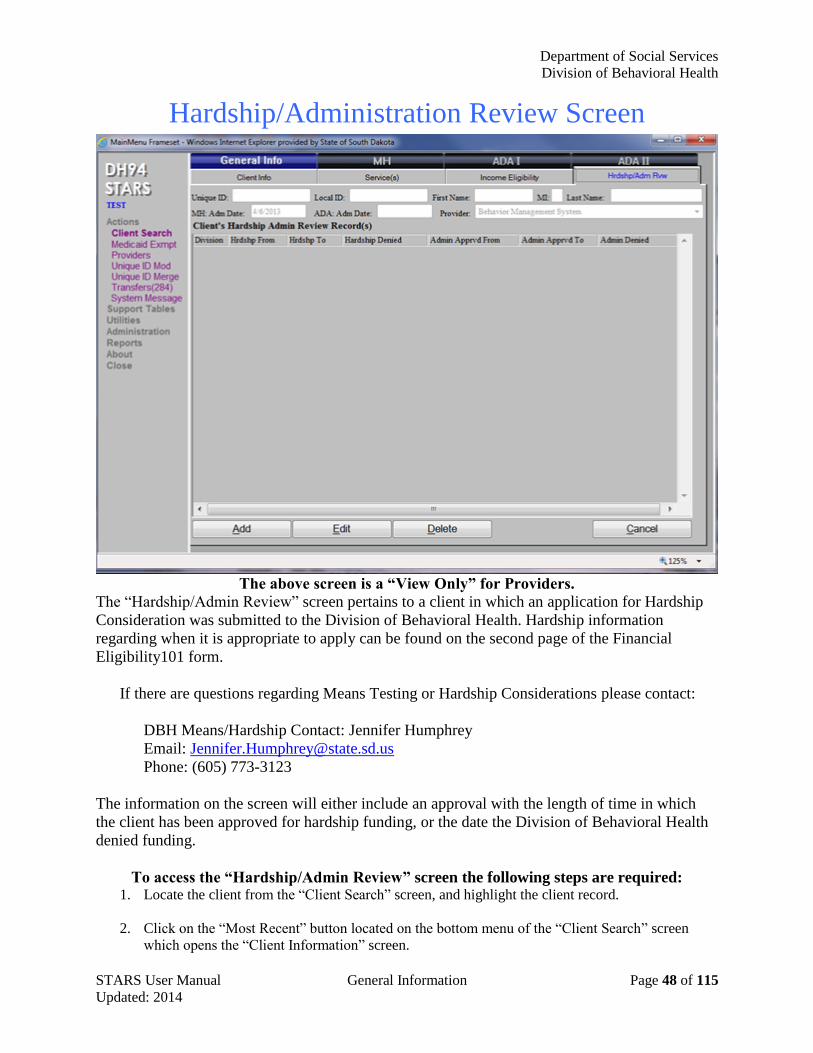
The above screen is a “View Only” for Providers.
The “Hardship/Admin Review” screen pertains to a client in which an application for Hardship
Consideration was submitted to the Division of Behavioral Health. Hardship information
regarding when it is appropriate to apply can be found on the second page of the Financial
Eligibility101 form.
If there are questions regarding Means Testing or Hardship Considerations please contact:
DBH Means/Hardship Contact: Jennifer Humphrey
Email: [email protected]
Phone: (605) 773-3123
The information on the screen will either include an approval with the length of time in which
the client has been approved for hardship funding, or the date the Division of Behavioral Health
denied funding.
To access the “Hardship/Admin Review” screen the following steps are required: 1. Locate the client from the “Client Search” screen, and highlight the client record.
2. Click on the “Most Recent” button located on the bottom menu of the “Client Search” screen
which opens the “Client Information” screen.
Department of Social Services
Division of Behavioral Health
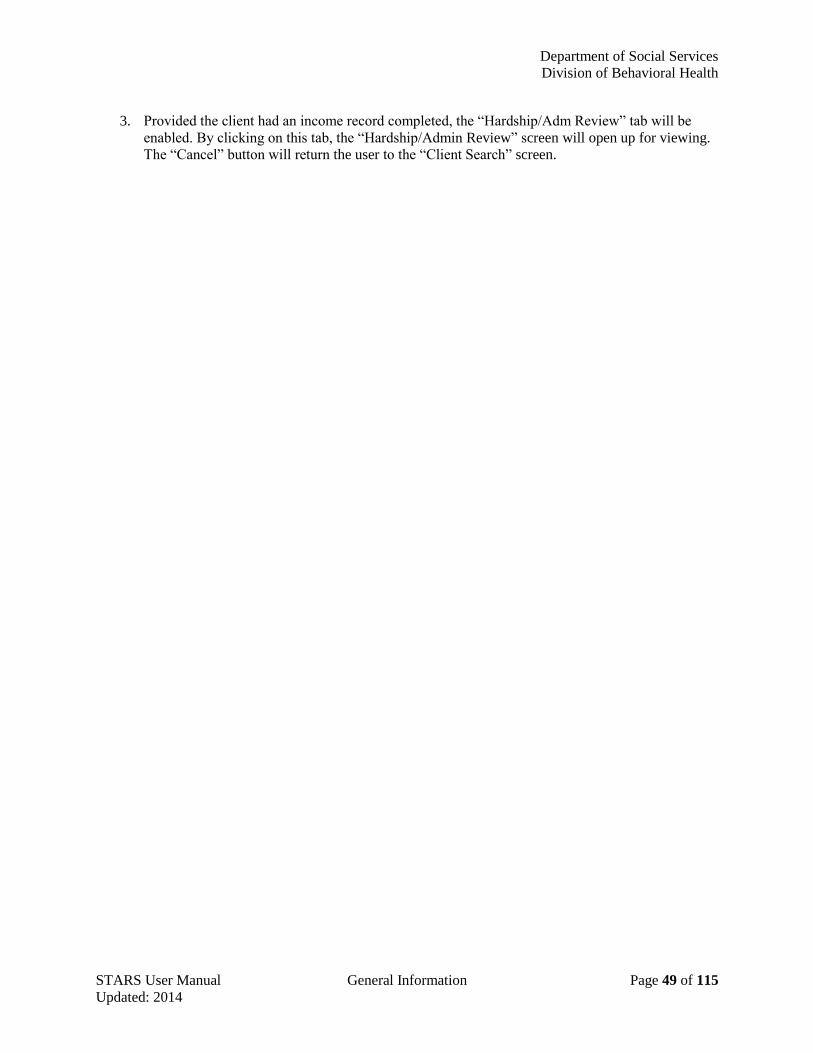
STARS User Manual General Information Page 49 of 115
Updated: 2014
3. Provided the client had an income record completed, the “Hardship/Adm Review” tab will be
enabled. By clicking on this tab, the “Hardship/Admin Review” screen will open up for viewing.
The “Cancel” button will return the user to the “Client Search” screen.
Department of Social Services
Division of Behavioral Health
STARS User Manual General Information Page 50 of 115
Updated: 2014
Hardship/Administration Review Detail Screen
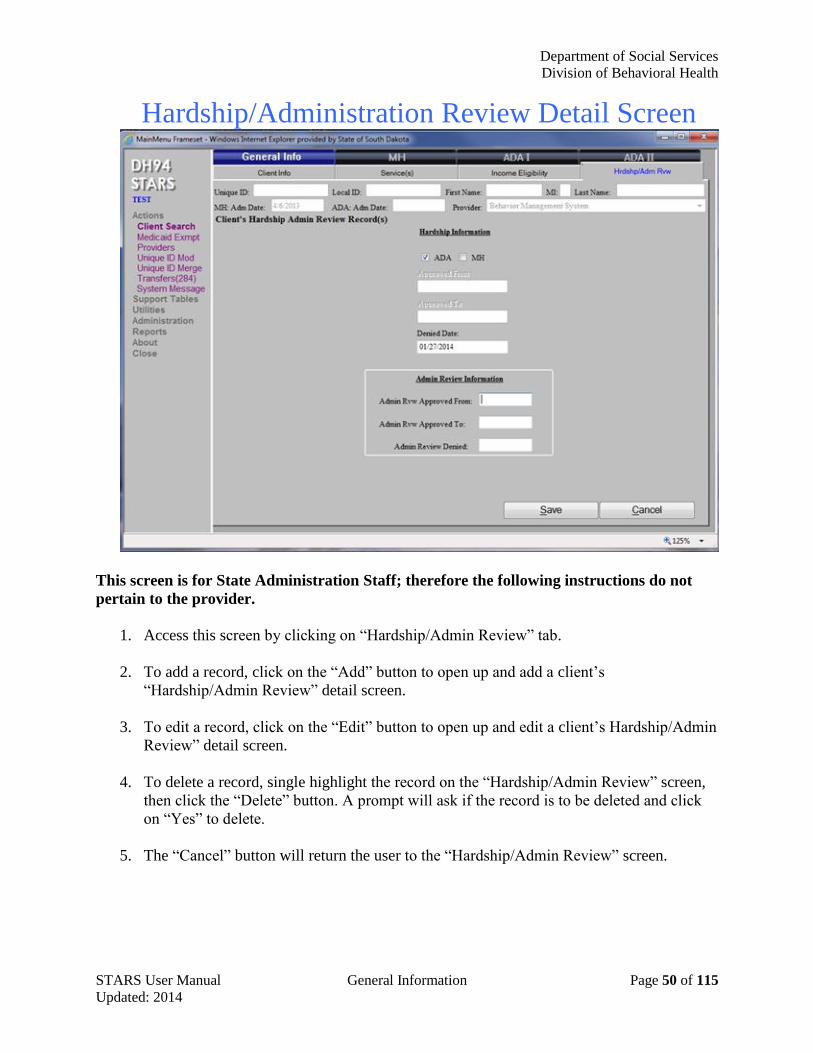
This screen is for State Administration Staff; therefore the following instructions do not
pertain to the provider.
1. Access this screen by clicking on “Hardship/Admin Review” tab.
2. To add a record, click on the “Add” button to open up and add a client’s
“Hardship/Admin Review” detail screen.
3. To edit a record, click on the “Edit” button to open up and edit a client’s Hardship/Admin
Review” detail screen.
4. To delete a record, single highlight the record on the “Hardship/Admin Review” screen,
then click the “Delete” button. A prompt will ask if the record is to be deleted and click
on “Yes” to delete.
5. The “Cancel” button will return the user to the “Hardship/Admin Review” screen.

STARS User Manual Page 51 of 115 Updated: 2014
Part 5
Mental Health

Department of Social Services
Division of Behavioral Health
STARS User Manual Mental Health Page 52 of 115 Updated: 2014
MH Admission Information
1. “Original Service Date” is the date the client FIRST started services with the provider.
2. “Admission Date” is the date of specific admission of the client to a specific program. This date
will automatically populate the field with the current date. Note: Admission date must be
greater than or equal to the original services date.
3. All fields in the “MH Admission Information” screen are required.
4. “Revoked Date” is completed only if the client refused to sign the Release of Information.
5. “Status/Condition” refers to the Global Assessment of Functioning (GAF) score upon the client’s
entrance into services. The GAF must be a number from 0 to 100.
6. The “Save” button will save all information entered into the “MH Admission Information”
screen.
7. The “Cancel” button will take the user back to the “Client Search” screen.
Department of Social Services
Division of Behavioral Health
STARS User Manual Mental Health Page 53 of 115 Updated: 2014
MH Discharge Information
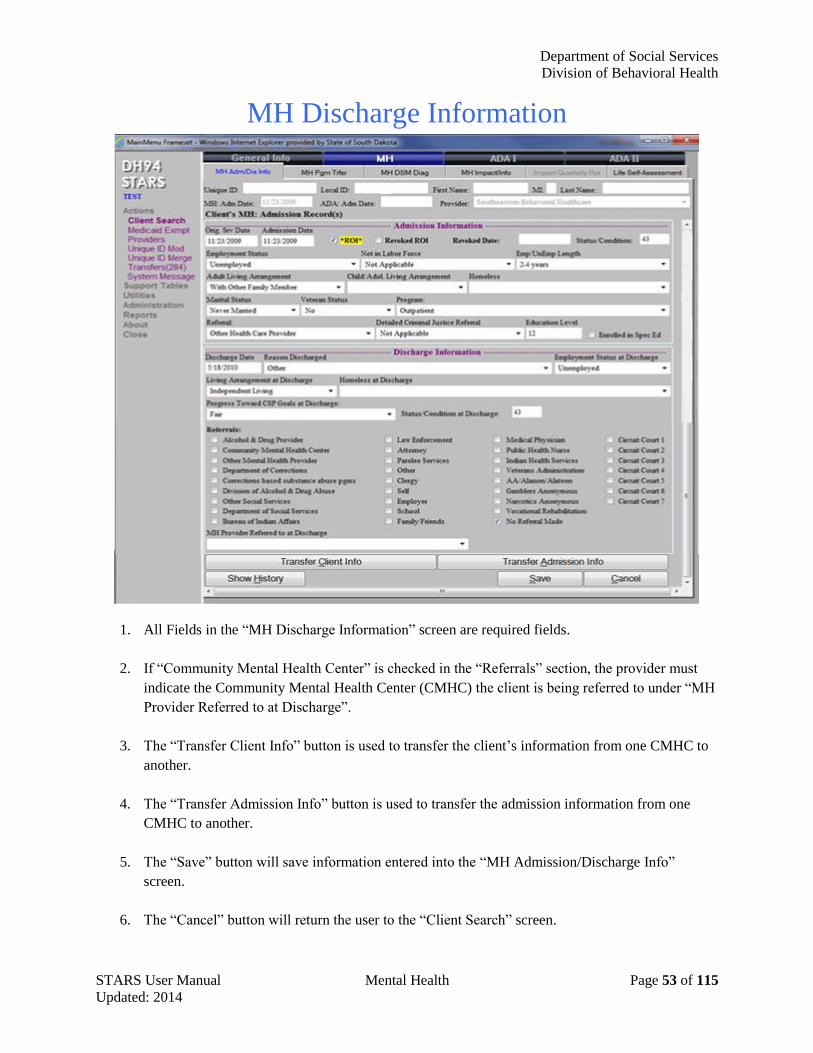
1. All Fields in the “MH Discharge Information” screen are required fields.
2. If “Community Mental Health Center” is checked in the “Referrals” section, the provider must
indicate the Community Mental Health Center (CMHC) the client is being referred to under “MH
Provider Referred to at Discharge”.
3. The “Transfer Client Info” button is used to transfer the client’s information from one CMHC to
another.
4. The “Transfer Admission Info” button is used to transfer the admission information from one
CMHC to another.
5. The “Save” button will save information entered into the “MH Admission/Discharge Info”
screen.
6. The “Cancel” button will return the user to the “Client Search” screen.
Department of Social Services
Division of Behavioral Health
STARS User Manual Mental Health Page 54 of 115 Updated: 2014
Transfer of Individual
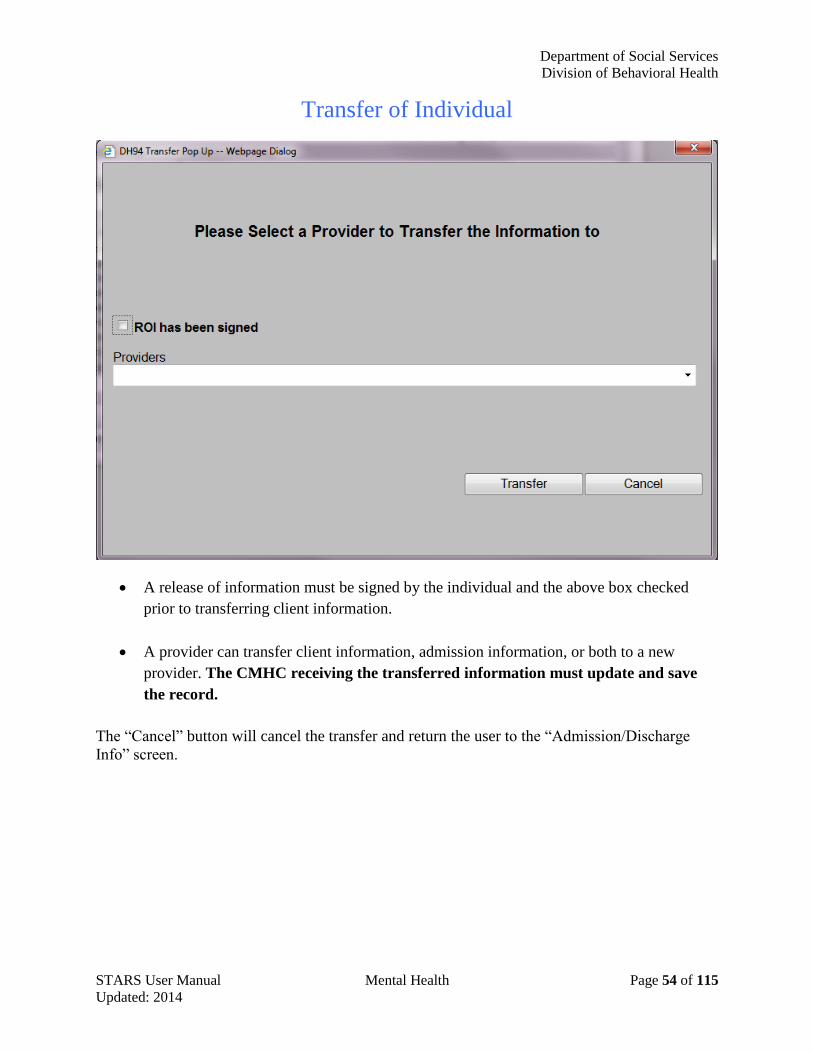
A release of information must be signed by the individual and the above box checked
prior to transferring client information.
A provider can transfer client information, admission information, or both to a new
provider. The CMHC receiving the transferred information must update and save
the record.
The “Cancel” button will cancel the transfer and return the user to the “Admission/Discharge
Info” screen.
Department of Social Services
Division of Behavioral Health
STARS User Manual Mental Health Page 55 of 115 Updated: 2014
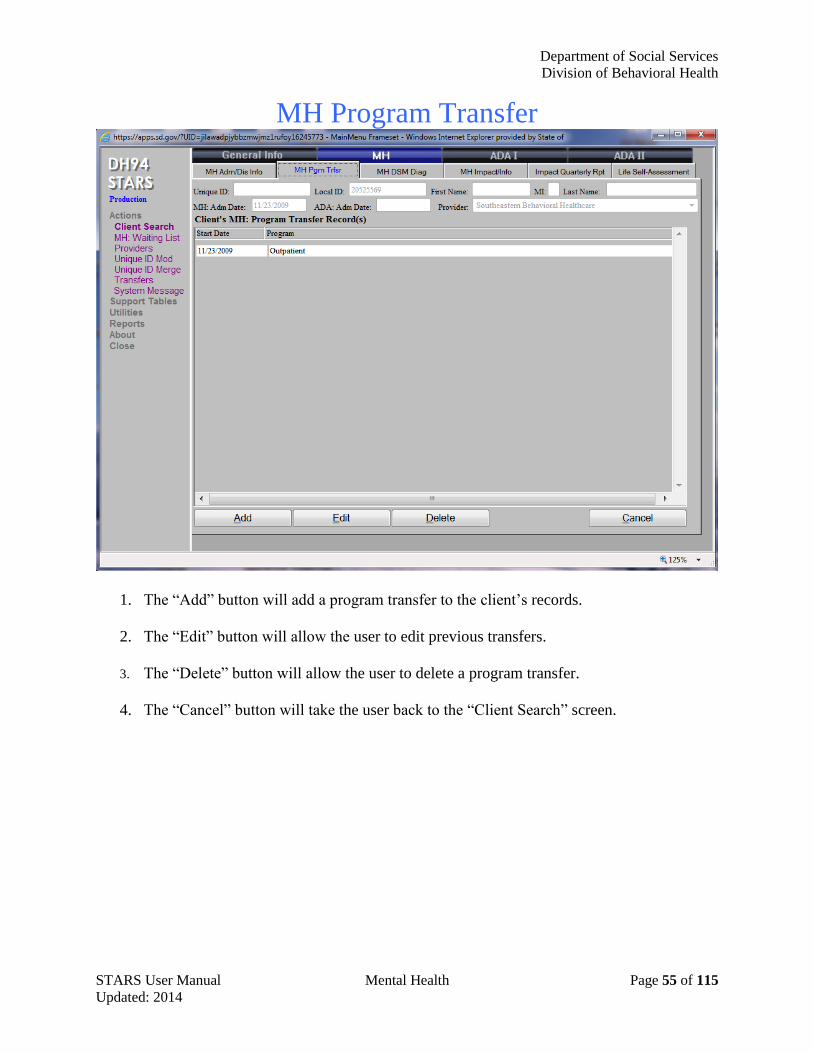
MH Program Transfer
1. The “Add” button will add a program transfer to the client’s records.
2. The “Edit” button will allow the user to edit previous transfers.
3. The “Delete” button will allow the user to delete a program transfer.
4. The “Cancel” button will take the user back to the “Client Search” screen.
Department of Social Services
Division of Behavioral Health
STARS User Manual Mental Health Page 56 of 115 Updated: 2014
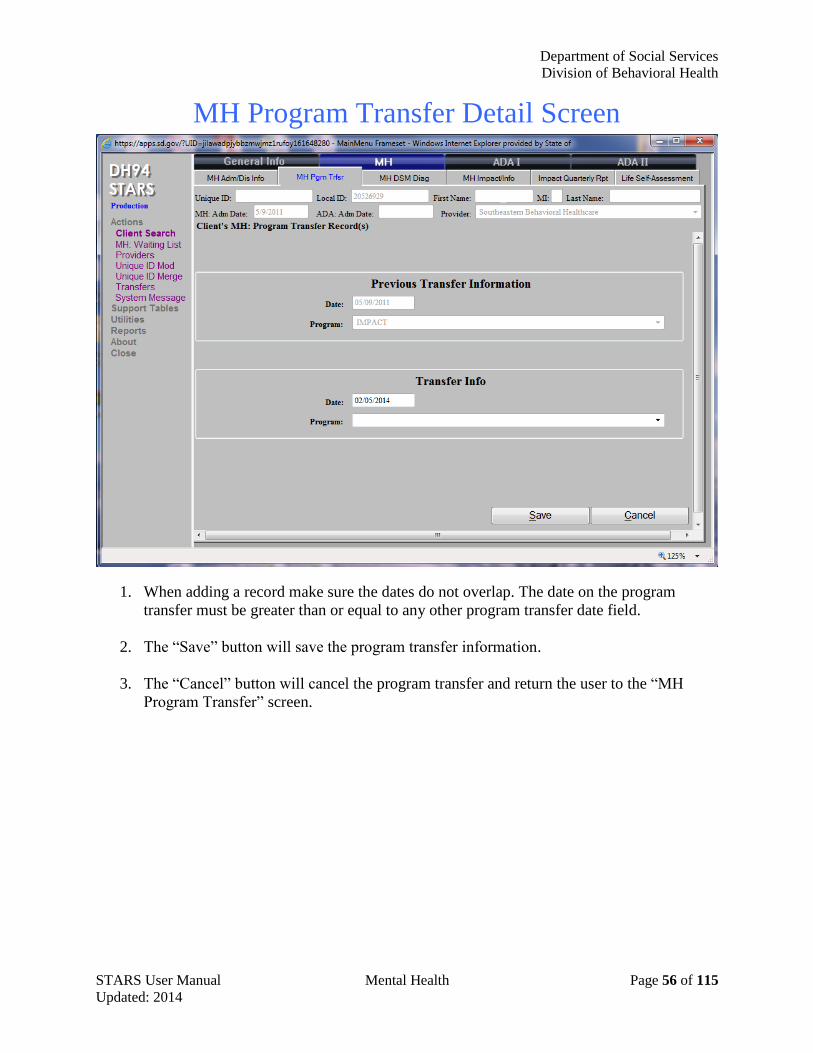
MH Program Transfer Detail Screen
1. When adding a record make sure the dates do not overlap. The date on the program
transfer must be greater than or equal to any other program transfer date field.
2. The “Save” button will save the program transfer information.
3. The “Cancel” button will cancel the program transfer and return the user to the “MH
Program Transfer” screen.
Department of Social Services
Division of Behavioral Health
STARS User Manual Mental Health Page 57 of 115 Updated: 2014
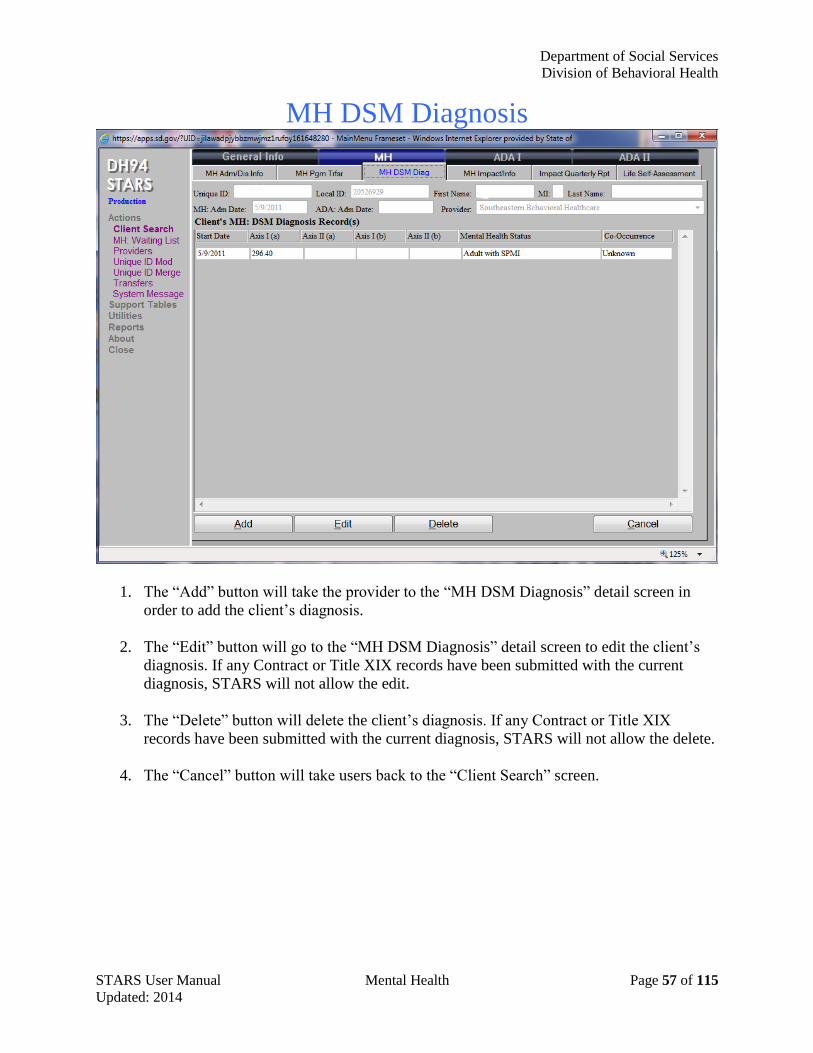
MH DSM Diagnosis
1. The “Add” button will take the provider to the “MH DSM Diagnosis” detail screen in
order to add the client’s diagnosis.
2. The “Edit” button will go to the “MH DSM Diagnosis” detail screen to edit the client’s
diagnosis. If any Contract or Title XIX records have been submitted with the current
diagnosis, STARS will not allow the edit.
3. The “Delete” button will delete the client’s diagnosis. If any Contract or Title XIX
records have been submitted with the current diagnosis, STARS will not allow the delete.
4. The “Cancel” button will take users back to the “Client Search” screen.
Department of Social Services
Division of Behavioral Health
STARS User Manual Mental Health Page 58 of 115 Updated: 2014
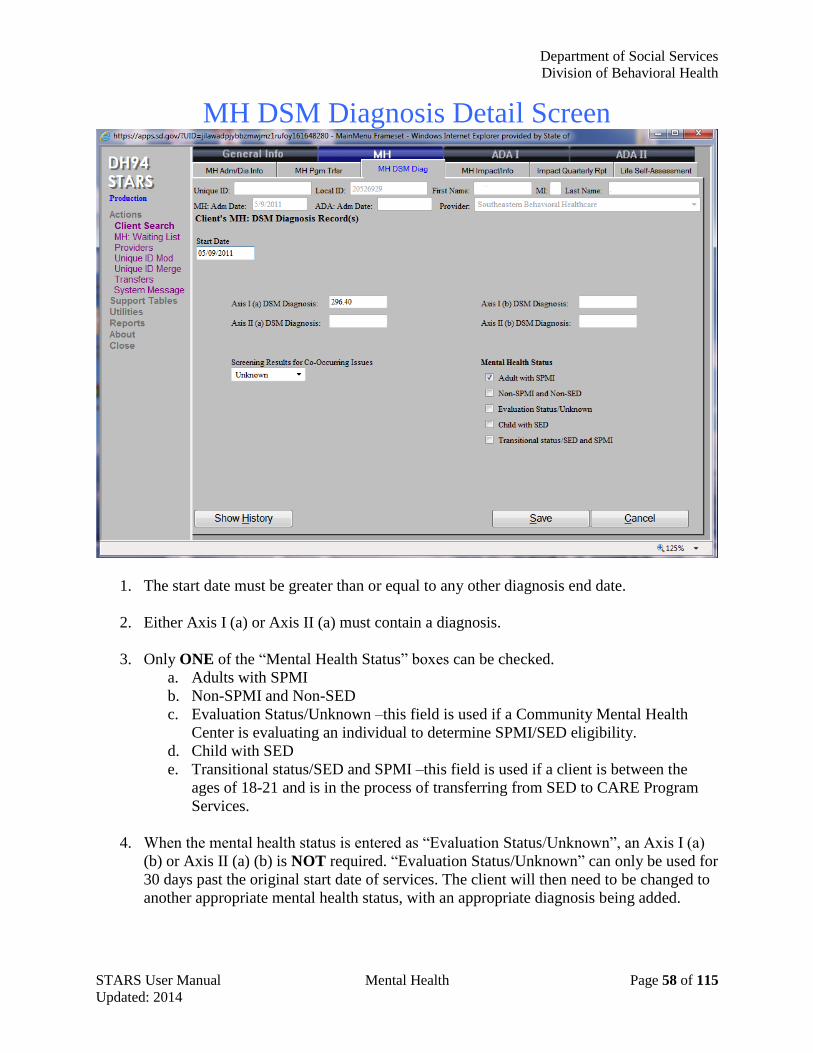
MH DSM Diagnosis Detail Screen
1. The start date must be greater than or equal to any other diagnosis end date.
2. Either Axis I (a) or Axis II (a) must contain a diagnosis.
3. Only ONE of the “Mental Health Status” boxes can be checked.
a. Adults with SPMI
b. Non-SPMI and Non-SED
c. Evaluation Status/Unknown –this field is used if a Community Mental Health
Center is evaluating an individual to determine SPMI/SED eligibility.
d. Child with SED
e. Transitional status/SED and SPMI –this field is used if a client is between the
ages of 18-21 and is in the process of transferring from SED to CARE Program
Services.
4. When the mental health status is entered as “Evaluation Status/Unknown”, an Axis I (a)
(b) or Axis II (a) (b) is NOT required. “Evaluation Status/Unknown” can only be used for
30 days past the original start date of services. The client will then need to be changed to
another appropriate mental health status, with an appropriate diagnosis being added.
Department of Social Services
Division of Behavioral Health
STARS User Manual Mental Health Page 59 of 115 Updated: 2014
5. The “Save” button will save the new diagnosis code entered and create a new record for
the client. Diagnosis codes entered will be verified against a common database of
diagnosis codes before saving.
6. The “Cancel” button will take the user back to the “Client Search” screen.
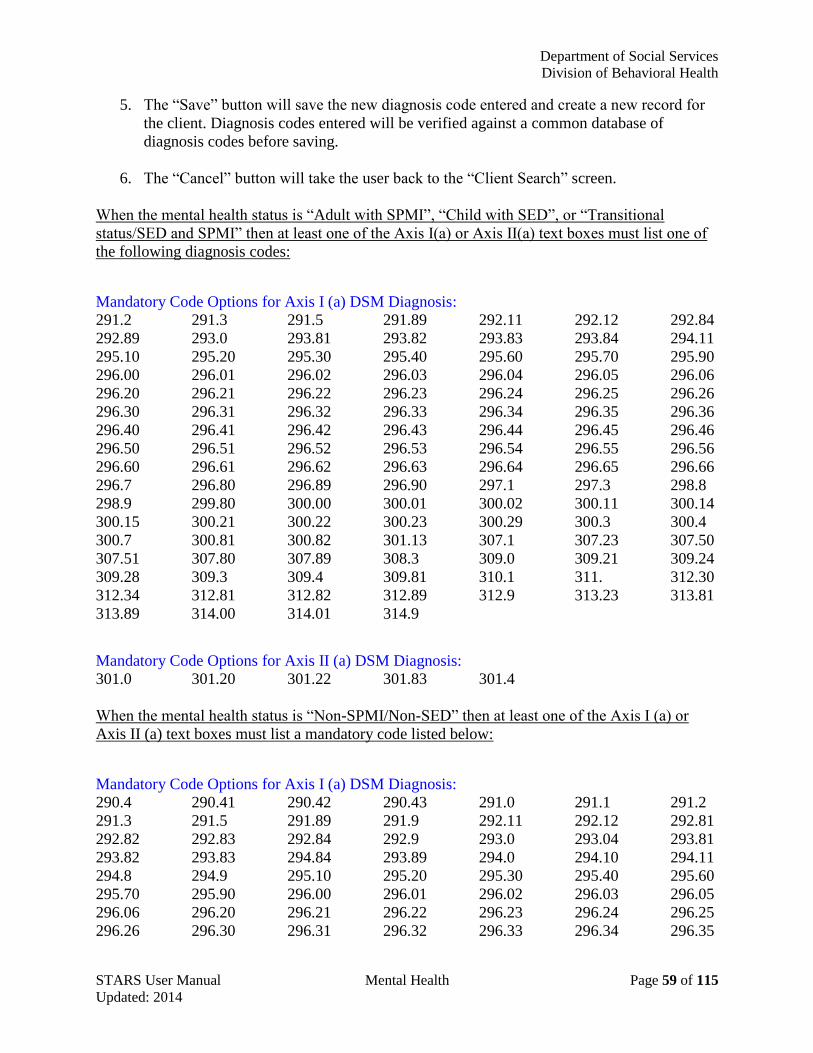
When the mental health status is “Adult with SPMI”, “Child with SED”, or “Transitional
status/SED and SPMI” then at least one of the Axis I(a) or Axis II(a) text boxes must list one of
the following diagnosis codes:
Mandatory Code Options for Axis I (a) DSM Diagnosis:
291.2 291.3 291.5 291.89 292.11 292.12 292.84
292.89 293.0 293.81 293.82 293.83 293.84 294.11
295.10 295.20 295.30 295.40 295.60 295.70 295.90
296.00 296.01 296.02 296.03 296.04 296.05 296.06
296.20 296.21 296.22 296.23 296.24 296.25 296.26
296.30 296.31 296.32 296.33 296.34 296.35 296.36
296.40 296.41 296.42 296.43 296.44 296.45 296.46
296.50 296.51 296.52 296.53 296.54 296.55 296.56
296.60 296.61 296.62 296.63 296.64 296.65 296.66
296.7 296.80 296.89 296.90 297.1 297.3 298.8
298.9 299.80 300.00 300.01 300.02 300.11 300.14
300.15 300.21 300.22 300.23 300.29 300.3 300.4
300.7 300.81 300.82 301.13 307.1 307.23 307.50
307.51 307.80 307.89 308.3 309.0 309.21 309.24
309.28 309.3 309.4 309.81 310.1 311. 312.30
312.34 312.81 312.82 312.89 312.9 313.23 313.81
313.89 314.00 314.01 314.9
Mandatory Code Options for Axis II (a) DSM Diagnosis:
301.0 301.20 301.22 301.83 301.4
When the mental health status is “Non-SPMI/Non-SED” then at least one of the Axis I (a) or
Axis II (a) text boxes must list a mandatory code listed below:
Mandatory Code Options for Axis I (a) DSM Diagnosis:
290.4 290.41 290.42 290.43 291.0 291.1 291.2
291.3 291.5 291.89 291.9 292.11 292.12 292.81
292.82 292.83 292.84 292.9 293.0 293.04 293.81
293.82 293.83 294.84 293.89 294.0 294.10 294.11
294.8 294.9 295.10 295.20 295.30 295.40 295.60
295.70 295.90 296.00 296.01 296.02 296.03 296.05
296.06 296.20 296.21 296.22 296.23 296.24 296.25
296.26 296.30 296.31 296.32 296.33 296.34 296.35
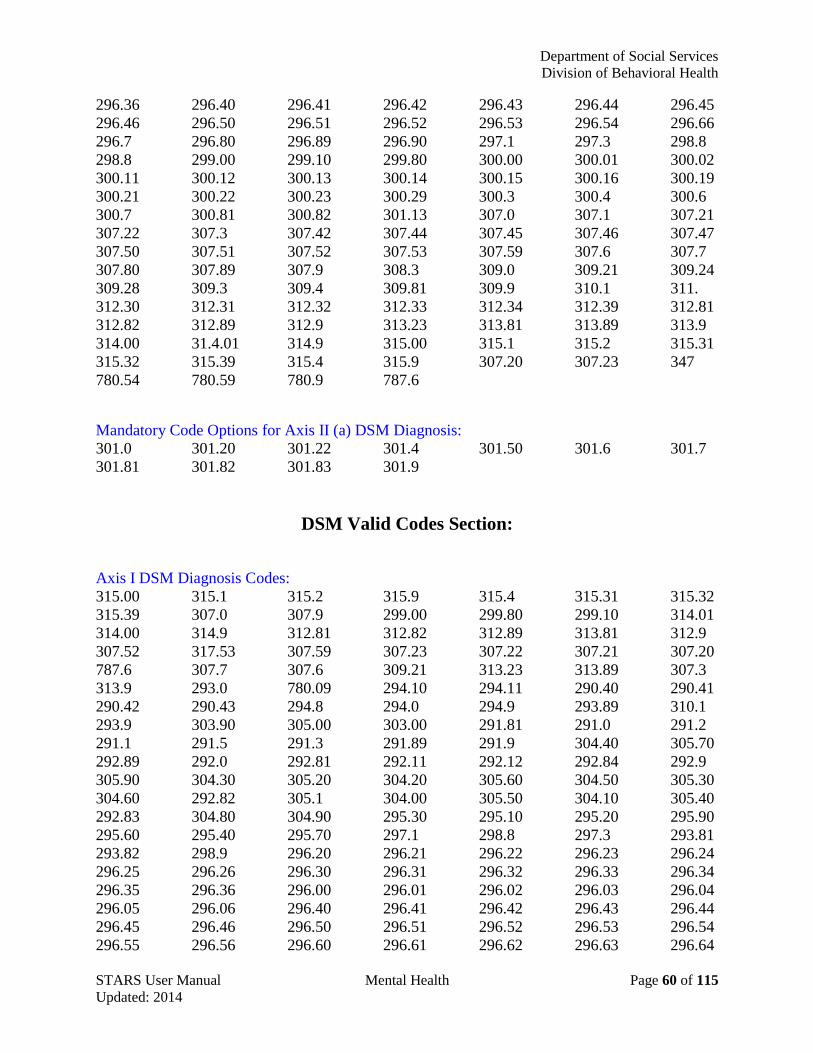
Department of Social Services
Division of Behavioral Health
STARS User Manual Mental Health Page 60 of 115 Updated: 2014
296.36 296.40 296.41 296.42 296.43 296.44 296.45
296.46 296.50 296.51 296.52 296.53 296.54 296.66
296.7 296.80 296.89 296.90 297.1 297.3 298.8
298.8 299.00 299.10 299.80 300.00 300.01 300.02
300.11 300.12 300.13 300.14 300.15 300.16 300.19
300.21 300.22 300.23 300.29 300.3 300.4 300.6
300.7 300.81 300.82 301.13 307.0 307.1 307.21
307.22 307.3 307.42 307.44 307.45 307.46 307.47
307.50 307.51 307.52 307.53 307.59 307.6 307.7
307.80 307.89 307.9 308.3 309.0 309.21 309.24
309.28 309.3 309.4 309.81 309.9 310.1 311.
312.30 312.31 312.32 312.33 312.34 312.39 312.81
312.82 312.89 312.9 313.23 313.81 313.89 313.9
314.00 31.4.01 314.9 315.00 315.1 315.2 315.31
315.32 315.39 315.4 315.9 307.20 307.23 347
780.54 780.59 780.9 787.6
Mandatory Code Options for Axis II (a) DSM Diagnosis:
301.0 301.20 301.22 301.4 301.50 301.6 301.7
301.81 301.82 301.83 301.9
DSM Valid Codes Section:
Axis I DSM Diagnosis Codes:
315.00 315.1 315.2 315.9 315.4 315.31 315.32
315.39 307.0 307.9 299.00 299.80 299.10 314.01
314.00 314.9 312.81 312.82 312.89 313.81 312.9
307.52 317.53 307.59 307.23 307.22 307.21 307.20
787.6 307.7 307.6 309.21 313.23 313.89 307.3
313.9 293.0 780.09 294.10 294.11 290.40 290.41
290.42 290.43 294.8 294.0 294.9 293.89 310.1
293.9 303.90 305.00 303.00 291.81 291.0 291.2
291.1 291.5 291.3 291.89 291.9 304.40 305.70
292.89 292.0 292.81 292.11 292.12 292.84 292.9
305.90 304.30 305.20 304.20 305.60 304.50 305.30
304.60 292.82 305.1 304.00 305.50 304.10 305.40
292.83 304.80 304.90 295.30 295.10 295.20 295.90
295.60 295.40 295.70 297.1 298.8 297.3 293.81
293.82 298.9 296.20 296.21 296.22 296.23 296.24
296.25 296.26 296.30 296.31 296.32 296.33 296.34
296.35 296.36 296.00 296.01 296.02 296.03 296.04
296.05 296.06 296.40 296.41 296.42 296.43 296.44
296.45 296.46 296.50 296.51 296.52 296.53 296.54
296.55 296.56 296.60 296.61 296.62 296.63 296.64
Department of Social Services
Division of Behavioral Health
STARS User Manual Mental Health Page 61 of 115 Updated: 2014
296.65 296.66 296.7 296.89 301.13 296.80 293.83
296.90 300.4 311 300.11 300.21 300.22 300.29
300.23 300.3 309.81 308.30 300.02 293.84 300.00
300.81 300.82 300.11 307.80 307.89 300.7 300.16
300.19 300.12 300.14 300.6 300.15 302.71 302.79
302.72 302.73 302.74 302.75 302.76 306.51 625.8
608.89 307.84 625.0 302.70 302.4 302.81 302.89
302.2 302.83 302.84 302.3 302.82 302.9 302.6
302.85 302.6 302.9 307.1 307.51 307.50 307.42
307.44 347 780.59 307.45 307.47 307.46 780.52
780.54 780.59 312.34 312.32 312.33 312.31 312.39
312.30 309.0 309.24 309.28 309.3 309.4 309.9
V61.9 V61.20 V61.8 V62.81 V61.21 V61.12 V62.83
V15.81 V65.2 V71.01 V71.02 780.9 V62.82 V62.3
V62.2 313.83 V62.4 300.9 V71.09 799.9 V61.10
Axis II DSM Diagnosis Codes:
317 318.0 318.1 318.2 319 301.0 301.20
301.22 301.7 301.83 301.50 301.81 301.82 301.6
301.4 301.9 316 332.1 332.92 333.7 333.99
333.82 333.1 333.90 995.2 V62.89
Department of Social Services
Division of Behavioral Health
STARS User Manual Mental Health Page 62 of 115 Updated: 2014
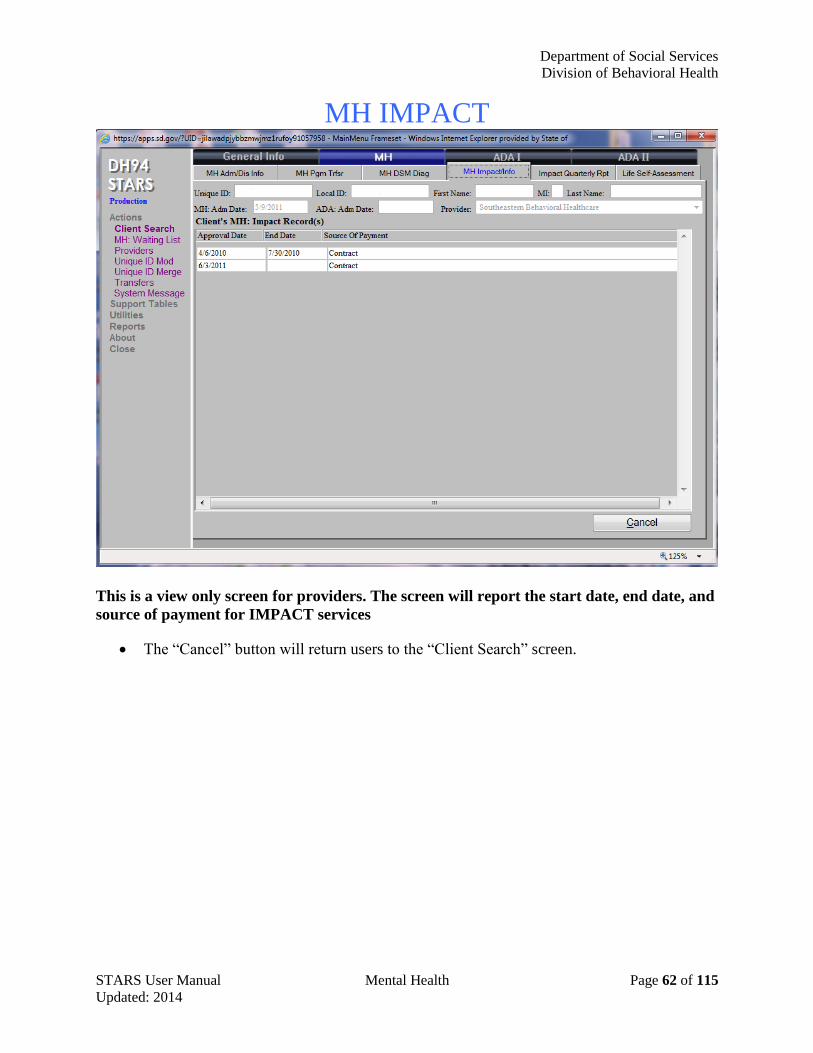
MH IMPACT
This is a view only screen for providers. The screen will report the start date, end date, and
source of payment for IMPACT services
The “Cancel” button will return users to the “Client Search” screen.
STARS User Manual Page 63 of 115 Updated: 2014
Part 6
ADA I
Department of Social Services
Division of Behavioral Health
STARS User Manual ADA I Page 64 of 115
Updated: 2014
ADA Admission Information Screen
Department of Social Services
Division of Behavioral Health
STARS User Manual ADA I Page 65 of 115
Updated: 2014
ADA Admission Information Screen
Accessing the ADA Admission Information Screen
1. Enter an existing client’s unique ID on the “Client Search” screen. Highlight the client
record and click on the “Most Recent” button which will open up the “Client Info”
screen. Click on the “ADA I” tab at the top of the page and select the “ADA Admin
Info”.
OR
2. If adding a new client, follow the Adding a New Client steps starting on page 29.
ADA Information Screen
General Instructions for Completing the ADA Admission Record Screen
When Co-Dependent is “Yes”
Note: Co-Dependent services are non-billable.
1. The “Date” will be entered by the system, but can be changed to match the correct date of
admission. “Time” can be added manually by the provider.
2. When “Co-Dependent” is ”Yes”, the person is defined as having no alcohol or drug
problem but is seeking services because of problems arising from his or her relationship
with an alcohol or drug user. In addition, the system will enter the ASAM level of Care
as “0.5 Co-Dependent treatment only”.
3. The “ROI” box will need to be checked if the payment source is either: Tile XIX or
Contract.
4. The light blue highlighted fields must be completed for a co-dependent client.
Department of Social Services
Division of Behavioral Health
STARS User Manual ADA I Page 66 of 115
Updated: 2014
5. Click on the “Save” button after the fields have been completed to save the record.
When Co-Dependent is “No”
1. The “Date” will be entered by the provider. The “Time” can be entered manually as an
optional field.
2. When “Co-Dependent” is “No”, the person is defined as being admitted for treatment
because of his/her own drug or alcohol problem.
3. The “ROI” box will need to be checked if the payment source is Title XIX or Contract.
The ROI cannot be unchecked after Title XIX or Contract records have been submitted
to the Division of Behavioral Health. To revoke an ROI, the client’s source of payment
must be either “Self Pay” or “Private Pay”.
4. Enter the “ASAM level of Care/Specific Program” other than “0.5-Co-Dependent
treatment only” and the light blue highlighted fields must be completed.
5. Enter the actual number in “# of Days Waiting to Enter Treatment” field.
6. The “Pregnant” and “Due Date” fields will only be enabled for a female client. Enter the
estimated due date in the following format: mm/dd/yyyy.
7. The “Source of Payment” field is a more specific breakdown of funding sources required
for federal reporting.
8. When the “Referral” field is a court/criminal justice referral, the “Detailed Criminal
Justice Referral” field is also required to be completed. When the client is receiving
services as a result of a DWI/DUI, select this category from the drop down list and
not an attorney, etc.
Department of Social Services
Division of Behavioral Health
STARS User Manual ADA I Page 67 of 115
Updated: 2014
9. The “Satellite Location” field is for an agency that has more than one location. The
provider will be able to identify which location the client is being seen at. This is an
optional field.
10. The “Adult and Adolescent Living Arrangement” fields will be enabled depending on the
client’s birth date listed on the “Client Information” screen. Clients 17 and under are
classified as adolescents for reporting purposes.
11. Complete the “Source of Income”, “Marital Status”, and “Veteran Status” fields from the
dropdown boxes provided on the screen.
12. Enter the client’s last year of education completed in the “Education Level” field. If the
client obtains their GED, enter 12.
13. When completing the “Emp/UnEmp Status” field and “Not in Labor Force” is selected
from the dropdown box, another response will be required in the “Not in Labor Force”
dropdown field. In this dropdown, select the appropriate response that matches the
client’s status. The above example does not require this response.
14. In responding to the “Emp/UnEmp Length” field, enter the appropriate length of time the
client has been either employed or unemployed.
15. Complete the field “Did client attend a self-help or support group 30 days prior to
admission” by marking either “Yes” or “No” This is a required field in order to save
the record.
Department of Social Services
Division of Behavioral Health
STARS User Manual ADA I Page 68 of 115
Updated: 2014
ADA Mental Health
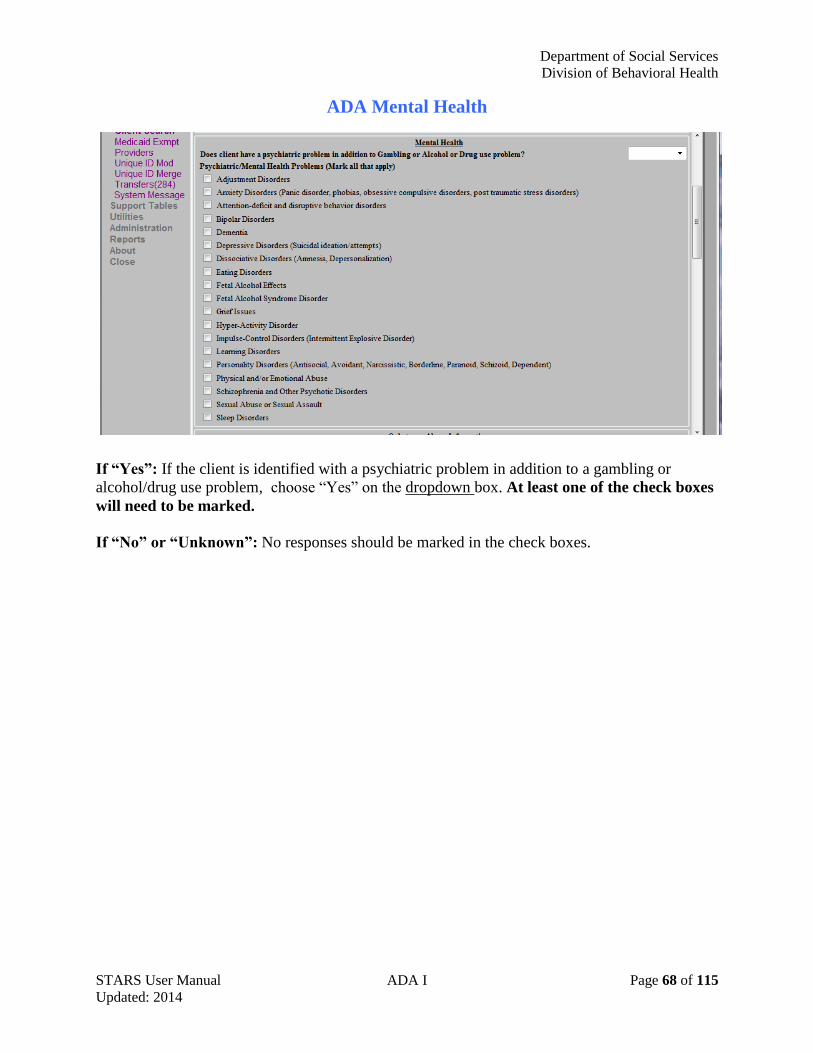
If “Yes”: If the client is identified with a psychiatric problem in addition to a gambling or
alcohol/drug use problem, choose “Yes” on the dropdown box. At least one of the check boxes
will need to be marked.
If “No” or “Unknown”: No responses should be marked in the check boxes.
Department of Social Services
Division of Behavioral Health
STARS User Manual ADA I Page 69 of 115
Updated: 2014
Substance Abuse Information
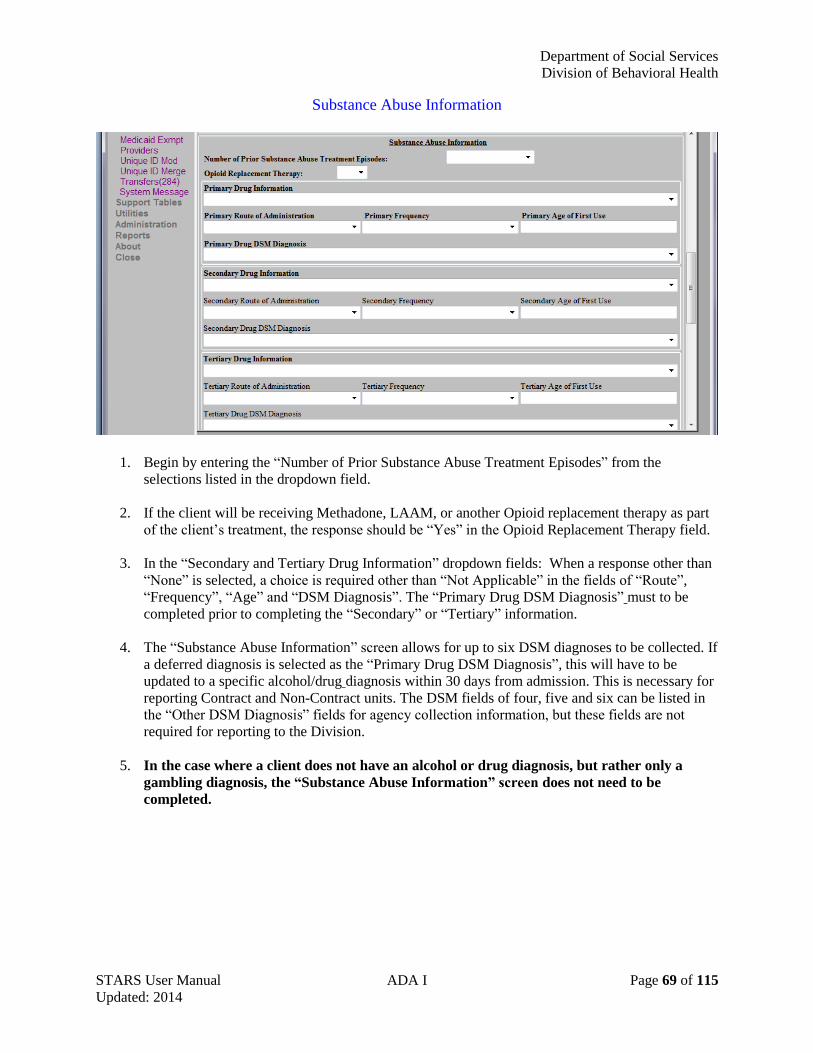
1. Begin by entering the “Number of Prior Substance Abuse Treatment Episodes” from the
selections listed in the dropdown field.
2. If the client will be receiving Methadone, LAAM, or another Opioid replacement therapy as part
of the client’s treatment, the response should be “Yes” in the Opioid Replacement Therapy field.
3. In the “Secondary and Tertiary Drug Information” dropdown fields: When a response other than
“None” is selected, a choice is required other than “Not Applicable” in the fields of “Route”,
“Frequency”, “Age” and “DSM Diagnosis”. The “Primary Drug DSM Diagnosis” must to be
completed prior to completing the “Secondary” or “Tertiary” information.
4. The “Substance Abuse Information” screen allows for up to six DSM diagnoses to be collected. If
a deferred diagnosis is selected as the “Primary Drug DSM Diagnosis”, this will have to be
updated to a specific alcohol/drug diagnosis within 30 days from admission. This is necessary for
reporting Contract and Non-Contract units. The DSM fields of four, five and six can be listed in
the “Other DSM Diagnosis” fields for agency collection information, but these fields are not
required for reporting to the Division.
5. In the case where a client does not have an alcohol or drug diagnosis, but rather only a
gambling diagnosis, the “Substance Abuse Information” screen does not need to be
completed.
Department of Social Services
Division of Behavioral Health
STARS User Manual ADA I Page 70 of 115
Updated: 2014
Gambling Information
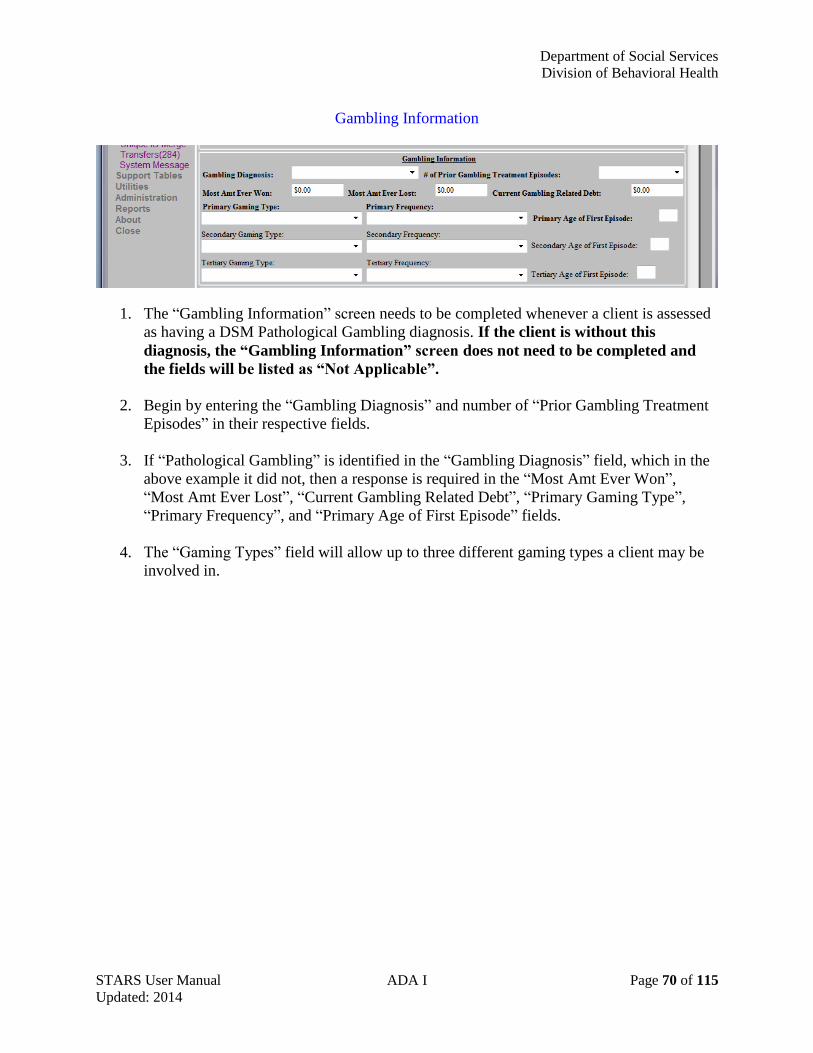
1. The “Gambling Information” screen needs to be completed whenever a client is assessed
as having a DSM Pathological Gambling diagnosis. If the client is without this
diagnosis, the “Gambling Information” screen does not need to be completed and
the fields will be listed as “Not Applicable”.
2. Begin by entering the “Gambling Diagnosis” and number of “Prior Gambling Treatment
Episodes” in their respective fields.
3. If “Pathological Gambling” is identified in the “Gambling Diagnosis” field, which in the
above example it did not, then a response is required in the “Most Amt Ever Won”,
“Most Amt Ever Lost”, “Current Gambling Related Debt”, “Primary Gaming Type”,
“Primary Frequency”, and “Primary Age of First Episode” fields.
4. The “Gaming Types” field will allow up to three different gaming types a client may be
involved in.
Department of Social Services
Division of Behavioral Health
STARS User Manual ADA I Page 71 of 115
Updated: 2014
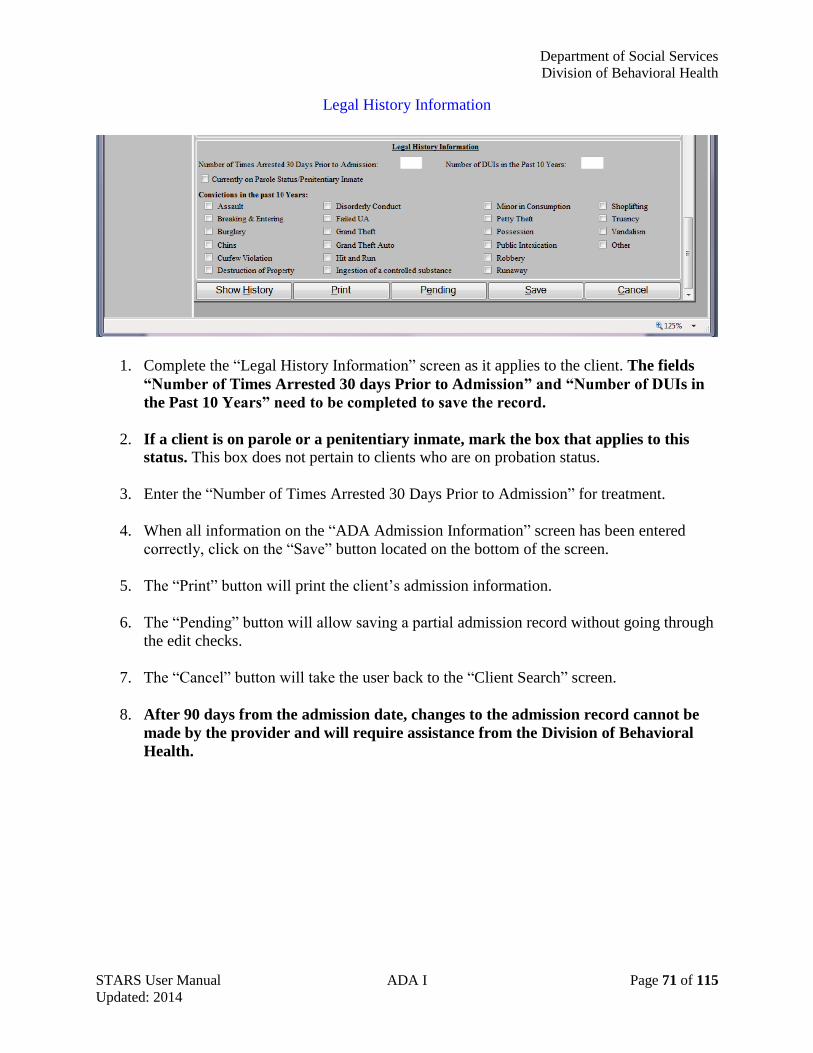
Legal History Information
1. Complete the “Legal History Information” screen as it applies to the client. The fields
“Number of Times Arrested 30 days Prior to Admission” and “Number of DUIs in
the Past 10 Years” need to be completed to save the record.
2. If a client is on parole or a penitentiary inmate, mark the box that applies to this
status. This box does not pertain to clients who are on probation status.
3. Enter the “Number of Times Arrested 30 Days Prior to Admission” for treatment.
4. When all information on the “ADA Admission Information” screen has been entered
correctly, click on the “Save” button located on the bottom of the screen.
5. The “Print” button will print the client’s admission information.
6. The “Pending” button will allow saving a partial admission record without going through
the edit checks.
7. The “Cancel” button will take the user back to the “Client Search” screen.
8. After 90 days from the admission date, changes to the admission record cannot be
made by the provider and will require assistance from the Division of Behavioral
Health.

Department of Social Services
Division of Behavioral Health
STARS User Manual ADA I Page 72 of 115
Updated: 2014
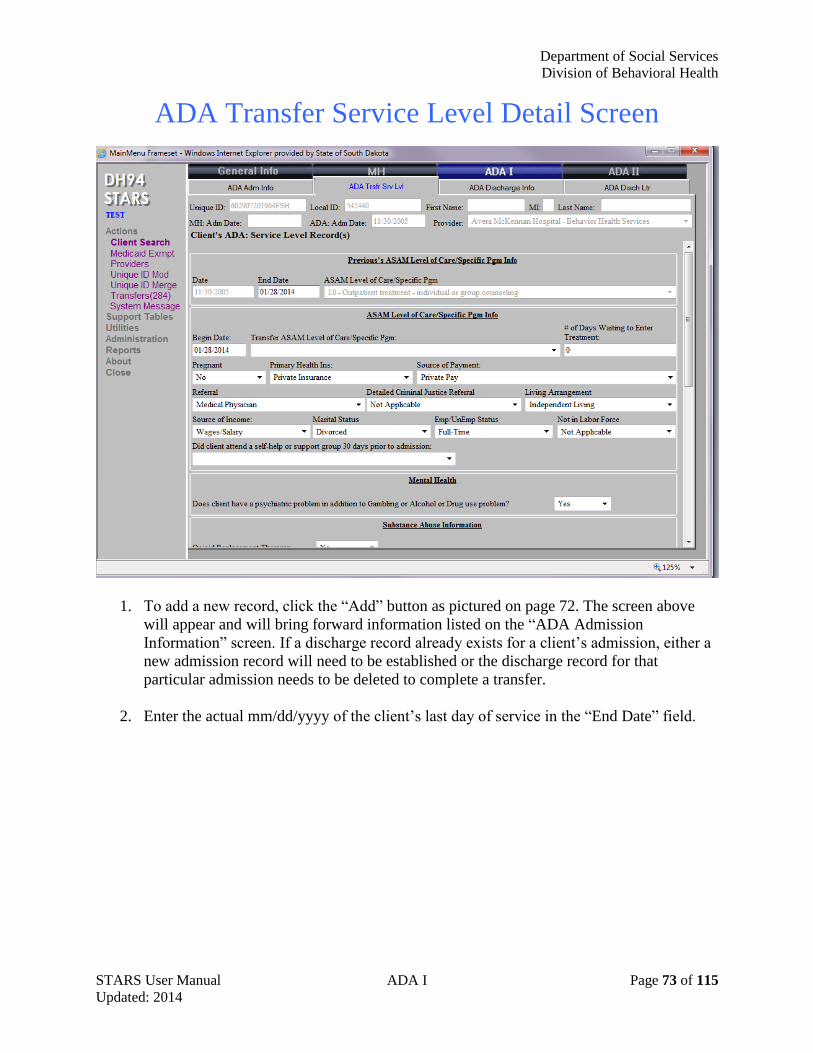
ADA Transfer Service Level Screen
1. The “Add” button will open the “ADA Transfer Service Level” screen.
2. To delete a transferred record, click the “Delete” button. If the client has a discharge
record for the current admission, the deletion will not occur.
3. The “Cancel” button will return the user to the “Client Search” screen.
Department of Social Services
Division of Behavioral Health
STARS User Manual ADA I Page 73 of 115
Updated: 2014
ADA Transfer Service Level Detail Screen
1. To add a new record, click the “Add” button as pictured on page 72. The screen above
will appear and will bring forward information listed on the “ADA Admission
Information” screen. If a discharge record already exists for a client’s admission, either a
new admission record will need to be established or the discharge record for that
particular admission needs to be deleted to complete a transfer.
2. Enter the actual mm/dd/yyyy of the client’s last day of service in the “End Date” field.
Department of Social Services
Division of Behavioral Health
STARS User Manual ADA I Page 74 of 115
Updated: 2014
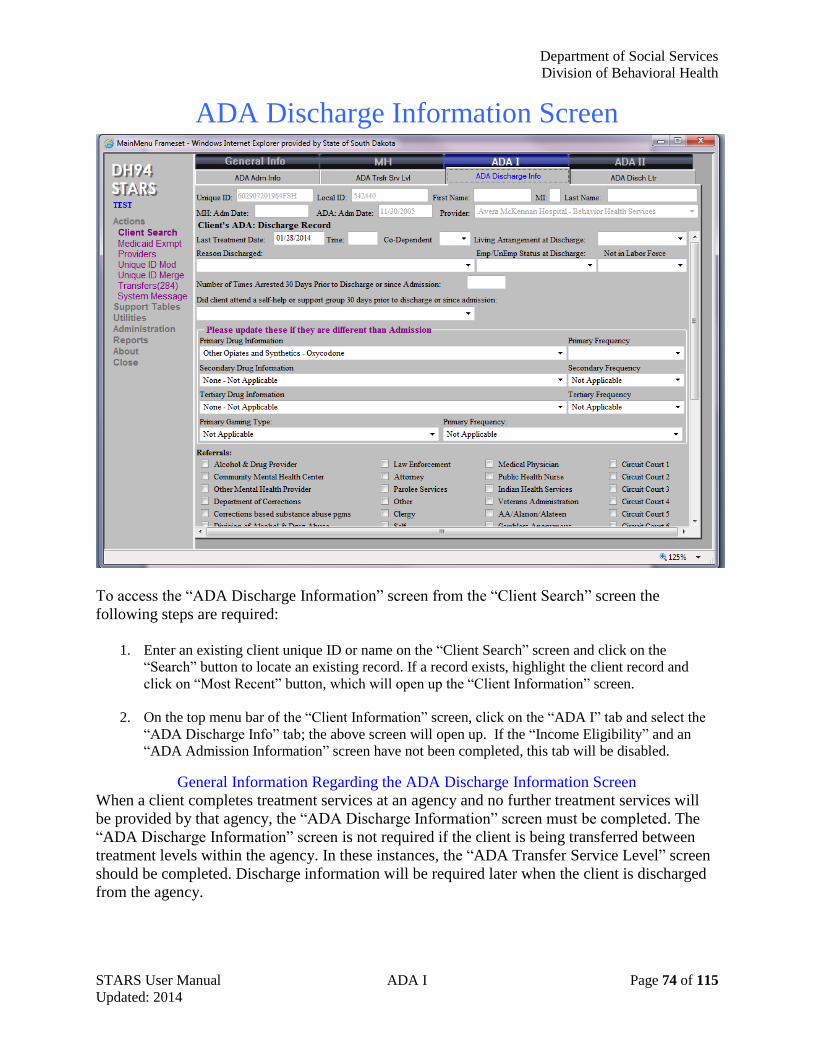
ADA Discharge Information Screen
To access the “ADA Discharge Information” screen from the “Client Search” screen the
following steps are required:
1. Enter an existing client unique ID or name on the “Client Search” screen and click on the
“Search” button to locate an existing record. If a record exists, highlight the client record and
click on “Most Recent” button, which will open up the “Client Information” screen.
2. On the top menu bar of the “Client Information” screen, click on the “ADA I” tab and select the
“ADA Discharge Info” tab; the above screen will open up. If the “Income Eligibility” and an
“ADA Admission Information” screen have not been completed, this tab will be disabled.
General Information Regarding the ADA Discharge Information Screen
When a client completes treatment services at an agency and no further treatment services will
be provided by that agency, the “ADA Discharge Information” screen must be completed. The
“ADA Discharge Information” screen is not required if the client is being transferred between
treatment levels within the agency. In these instances, the “ADA Transfer Service Level” screen
should be completed. Discharge information will be required later when the client is discharged
from the agency.
Department of Social Services
Division of Behavioral Health
STARS User Manual ADA I Page 75 of 115
Updated: 2014
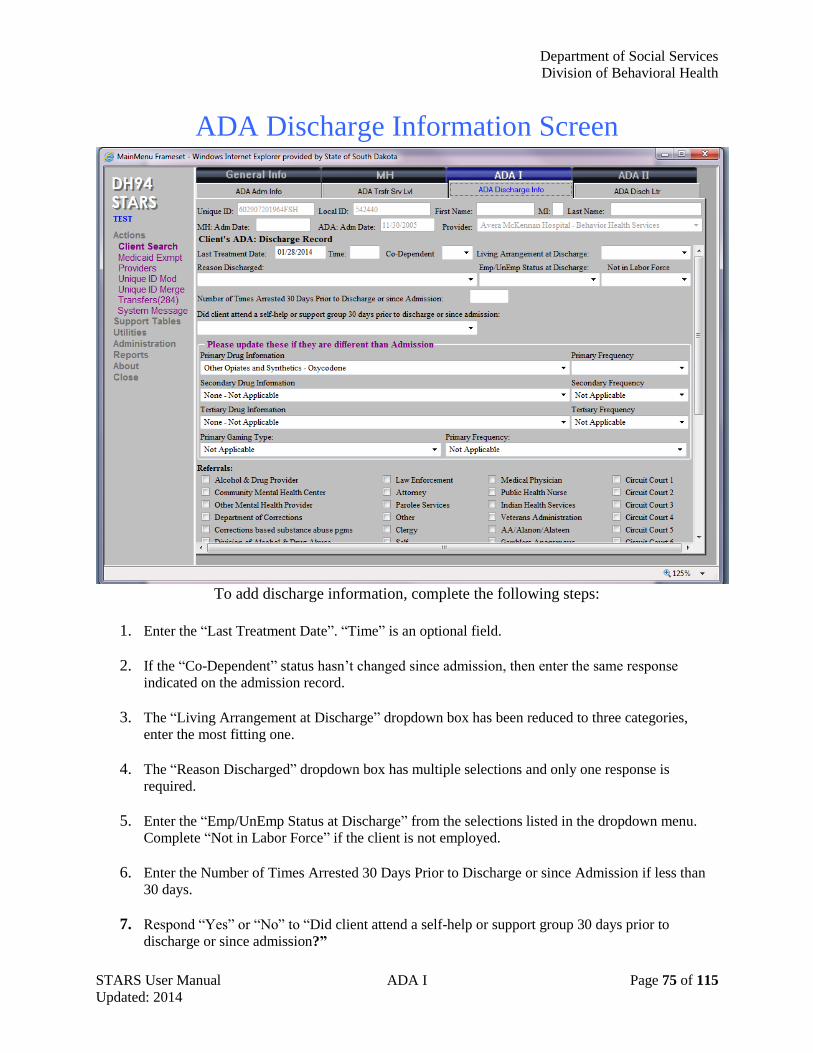
ADA Discharge Information Screen
To add discharge information, complete the following steps:
1. Enter the “Last Treatment Date”. “Time” is an optional field.
2. If the “Co-Dependent” status hasn’t changed since admission, then enter the same response
indicated on the admission record.
3. The “Living Arrangement at Discharge” dropdown box has been reduced to three categories,
enter the most fitting one.
4. The “Reason Discharged” dropdown box has multiple selections and only one response is
required.
5. Enter the “Emp/UnEmp Status at Discharge” from the selections listed in the dropdown menu.
Complete “Not in Labor Force” if the client is not employed.
6. Enter the Number of Times Arrested 30 Days Prior to Discharge or since Admission if less than
30 days.
7. Respond “Yes” or “No” to “Did client attend a self-help or support group 30 days prior to
discharge or since admission?”
Department of Social Services
Division of Behavioral Health
STARS User Manual ADA I Page 76 of 115
Updated: 2014
ADA Discharge Information Screen
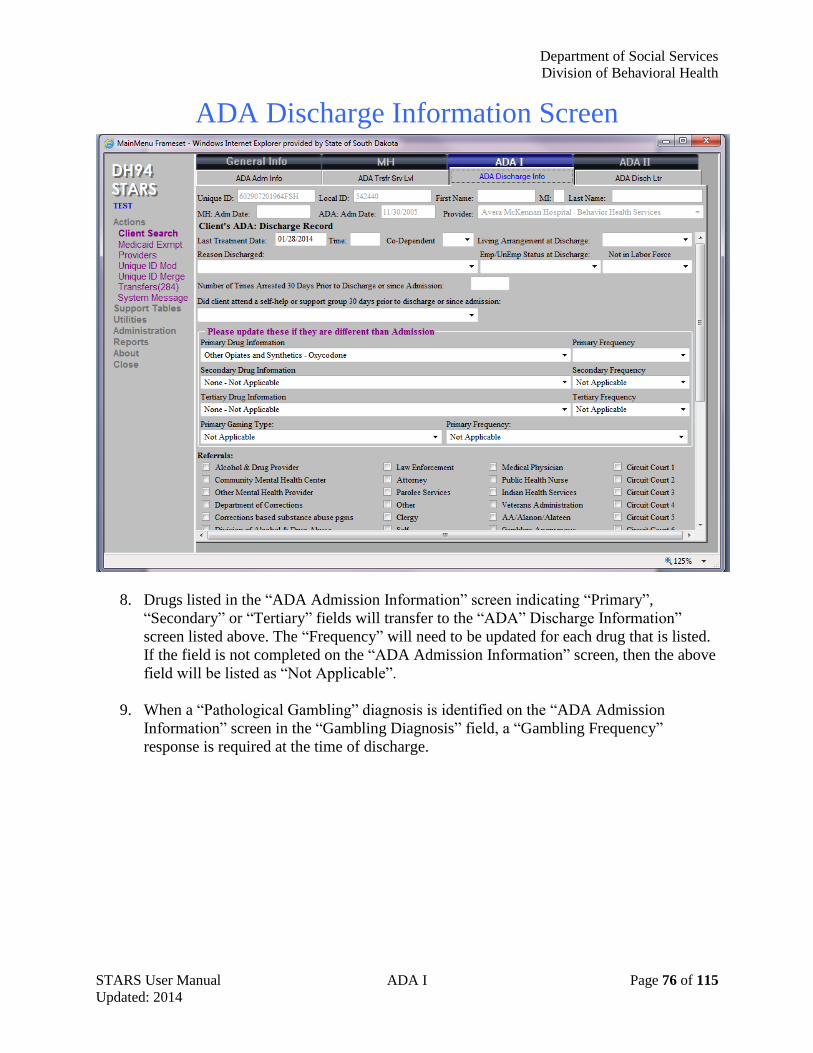
8. Drugs listed in the “ADA Admission Information” screen indicating “Primary”,
“Secondary” or “Tertiary” fields will transfer to the “ADA” Discharge Information”
screen listed above. The “Frequency” will need to be updated for each drug that is listed.
If the field is not completed on the “ADA Admission Information” screen, then the above
field will be listed as “Not Applicable”.
9. When a “Pathological Gambling” diagnosis is identified on the “ADA Admission
Information” screen in the “Gambling Diagnosis” field, a “Gambling Frequency”
response is required at the time of discharge.
Department of Social Services
Division of Behavioral Health
STARS User Manual ADA I Page 77 of 115
Updated: 2014
ADA Discharge Information Screen
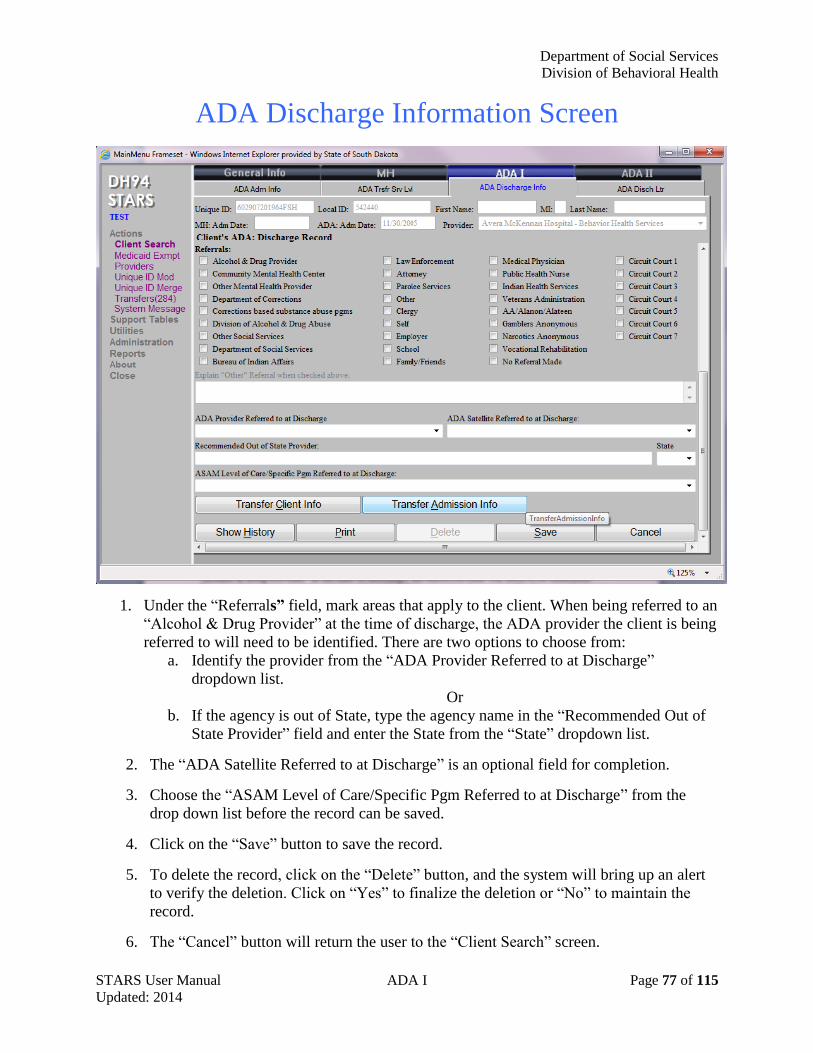
1. Under the “Referrals” field, mark areas that apply to the client. When being referred to an
“Alcohol & Drug Provider” at the time of discharge, the ADA provider the client is being
referred to will need to be identified. There are two options to choose from:
a. Identify the provider from the “ADA Provider Referred to at Discharge”
dropdown list.
Or
b. If the agency is out of State, type the agency name in the “Recommended Out of
State Provider” field and enter the State from the “State” dropdown list.
2. The “ADA Satellite Referred to at Discharge” is an optional field for completion.
3. Choose the “ASAM Level of Care/Specific Pgm Referred to at Discharge” from the
drop down list before the record can be saved.
4. Click on the “Save” button to save the record.
5. To delete the record, click on the “Delete” button, and the system will bring up an alert
to verify the deletion. Click on “Yes” to finalize the deletion or “No” to maintain the
record.
6. The “Cancel” button will return the user to the “Client Search” screen.
Department of Social Services
Division of Behavioral Health
STARS User Manual ADA I Page 78 of 115
Updated: 2014
7. The “Delete” and “Transfer” buttons will be enabled based on assigned user security.
8. Note: If the “Referral” is marked as “Alcohol & Drug Provider,” the field “ADA
Provider Referred to at Discharge” must be completed from the list of accredited
providers. If the provider is not on the list, mark “Other” in the “Referrals” field
before the record can be saved. The field “ADA Provider Referred to at
Discharge” can be left blank.
9. When “Other” is checked, the user will need to explain this type of referral in the text
field.
General Information Regarding the Transfer of Client Information
Information obtained on the “Client Information” screen, and “ADA Admission Information”
screen can be transferred to another program from the “ADA Discharge Information” screen.
Client discharge records cannot be transferred. Prior to transferring this information to
another provider, a release of information is required to be signed by the client in order to be in
compliance with 42 C.F.R. Part 2.
To transfer a client record from the “ADA Discharge Information” screen, the following steps
are required: Only users with Provider Administration permission levels can transfer
records.
1. Enter an existing client’s Unique ID or name on the “Client Search” screen and click the
“Search” button to locate an existing record. If a record exists, highlight the client record
and click on the “Most Recent” button which opens up the “Client Information” screen.
2. On the top menu bar under the “ADA I” tab, click on the “ADA Discharge Info” tab
which opens the “ADA Discharge Information” screen. If the client does not have a
completed “Income Eligibility” and “ADA Admission Information” screen, this tab
will be disabled.
3. Scroll down to the bottom of the page and select either the
“Transfer Client Info” or “Transfer Admission Info” button. Only one record at a time
can be transferred.
4. The “Print” button will print the discharge screen.
ADA Transfer Pop-Up
Department of Social Services
Division of Behavioral Health
STARS User Manual ADA I Page 79 of 115
Updated: 2014
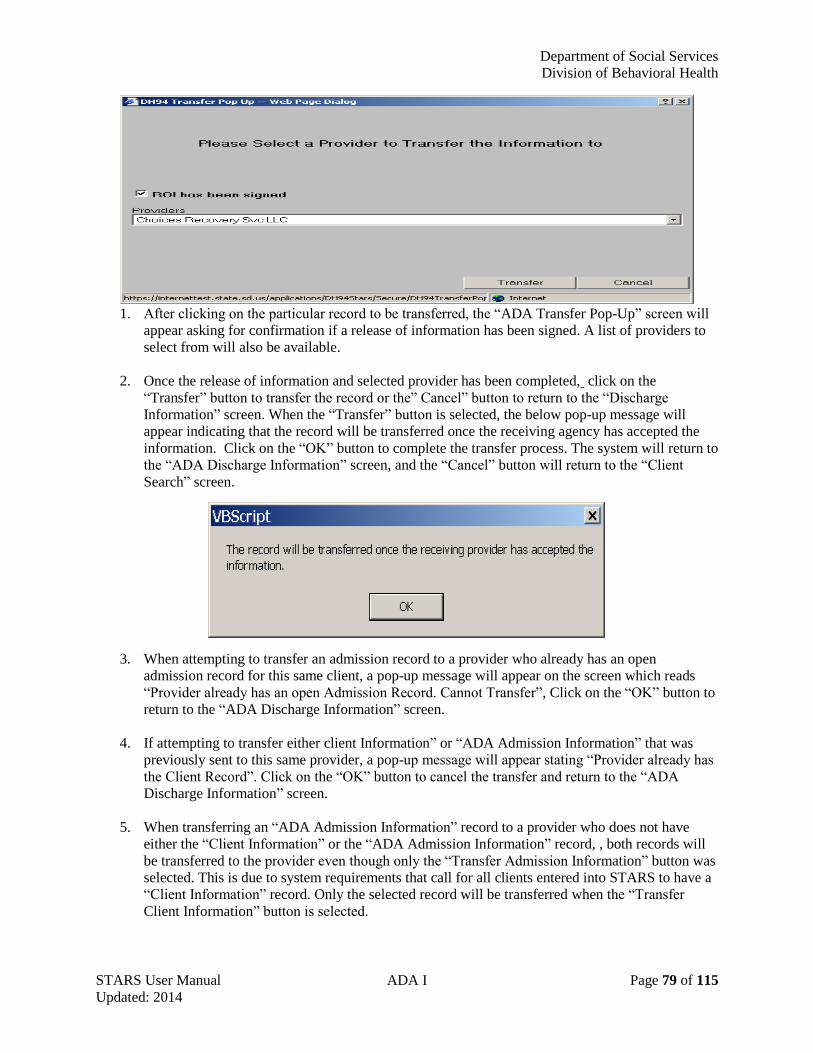
1. After clicking on the particular record to be transferred, the “ADA Transfer Pop-Up” screen will
appear asking for confirmation if a release of information has been signed. A list of providers to
select from will also be available.
2. Once the release of information and selected provider has been completed, click on the
“Transfer” button to transfer the record or the” Cancel” button to return to the “Discharge
Information” screen. When the “Transfer” button is selected, the below pop-up message will
appear indicating that the record will be transferred once the receiving agency has accepted the
information. Click on the “OK” button to complete the transfer process. The system will return to
the “ADA Discharge Information” screen, and the “Cancel” button will return to the “Client
Search” screen.
3. When attempting to transfer an admission record to a provider who already has an open
admission record for this same client, a pop-up message will appear on the screen which reads
“Provider already has an open Admission Record. Cannot Transfer”, Click on the “OK” button to
return to the “ADA Discharge Information” screen.
4. If attempting to transfer either client Information” or “ADA Admission Information” that was
previously sent to this same provider, a pop-up message will appear stating “Provider already has
the Client Record”. Click on the “OK” button to cancel the transfer and return to the “ADA
Discharge Information” screen.
5. When transferring an “ADA Admission Information” record to a provider who does not have
either the “Client Information” or the “ADA Admission Information” record, , both records will
be transferred to the provider even though only the “Transfer Admission Information” button was
selected. This is due to system requirements that call for all clients entered into STARS to have a
“Client Information” record. Only the selected record will be transferred when the “Transfer
Client Information” button is selected.
STARS User Manual Page 80 of 115 Updated: 2014
Part 7
ADA II
Department of Social Services
Division of Behavioral Health
STARS User Manual ADA II Page 81 of 115 Updated: 2014
Assessment Beginning September 1, 2013 all assessments completed by accredited agencies must include the
Assessment Criteria listed in the following pages. Agencies may use any assessment tool or
format they choose so long as it includes all of the Assessment Criteria.
Agencies must share assessment information with other providers as individuals move through
different levels of care. When a client is assessed as requiring a more or less intensive level of
care, each provider must facilitate the client’s placement and have written procedures for
ensuring communication of relevant clinical information directly to the new provider.
The assessment process should include various avenues to obtain the necessary clinical
information, including structured clinical interviews, self-assessment instruments, clinical
records, assessment measures, and retrospective data including previous evaluations, discharge
summaries, etc. Rather than using one method for evaluation, assessments should include
multiple sources of information to obtain a broad perspective of the client’s history, level of
functioning and impairment, and degree of distress. In addition, information included in the
assessment should be verified through collateral contacts such as family, friends, previous
treatments, other providers, and other official records (with client’s permission) when possible.
In situations where an assessment was recently completed by another provider, that assessment
can be used to meet the assessment criteria; however, an update should also be included that
notes any areas that have changed since the original assessment. The file would need to include
both a copy of the previous assessment and the update conducted by the current provider.
Assessment is an ongoing process that should be repeated over time in recognition of the
changing nature of the individual’s status and of the disorders. For the purposes of both clinical
and program evaluation, ongoing assessment should be conducted to consider new issues that
arise such as continued use, changes in living arrangements, employment, etc.
Individuals must be determined financially eligible for state funded services, through Means
Testing, before assessments or assessment updates can be billed to the Division.
For information on billing assessments refer to your contract, contract attachments, and billing
appendix.
Criteria for Behavioral Health Assessments
Assessments: A staff member shall meet with the client and the client's family if appropriate, to
complete an integrated initial assessment, within 30 days of intake. The integrated initial
assessment shall include both functional and diagnostic components. For mental health services
for children under 18 years of age, the mental health staff must obtain permission from the parent
or guardian to meet with the child, and at least one parent or guardian must participate in the
initial assessment. The initial assessment shall include the following components:

Department of Social Services
Division of Behavioral Health
STARS User Manual ADA II Page 82 of 115 Updated: 2014
(1) Strengths of the client and the client's family if appropriate, as well as previous periods
of success and the strengths that contributed to that success. Identification of potential
resources within the family, if applicable;
(2) Presenting problems or issues that indicate a need for services;
(3) Identification of readiness for change for problem areas, including motivation and
supports for making such changes;
(4) Relevant treatment history, including attention to previous mental health and substance
abuse/gambling treatment and periods of success, psychiatric hospital admissions,
psychotropic and other medications, relapse history or potential for relapse, physical
illness, and hospitalization;
(5) Relevant family history, including family relationship dynamics and family psychiatric
and substance abuse history;
(6) Family and relationship issues along with social needs;
(7) Educational history and needs;
(8) Legal issues;
(9) Living environment or housing;
(10) Safety needs and risks with regards to physical acting out, health conditions, acute
intoxication, or risk of withdrawal;
(11) Past or current indications of trauma, domestic violence, or both if applicable;
(12) Vocational and financial history and needs;
(13) Behavioral observations or mental status, for example, a description of whether affect
and mood are congruent or whether any hallucinations or delusions are present;
(14) Formulation of a diagnosis per DSM-IV, including documentation of co-occurring
medical, developmental disability, mental health, substance abuse, or gambling issues or a
combination of these based on integrated screening;
(15) Eligibility determination, including ASAM level of care determination for substance
abuse services and/or;
(16) Eligibility determination, including documentation regarding sufficient information
to determine SMI or SED for mental health services;
(17) GAF score or current level of functioning;
Department of Social Services
Division of Behavioral Health
STARS User Manual ADA II Page 83 of 115 Updated: 2014
(18) Clinician’s signature, credentials, and date; and
(19) Clinical supervisor's signature, credentials, and date verifying review of the
assessment and agreement with the initial diagnosis or the formulation of the initial
diagnosis in cases where the staff does not have the education and training to make a
diagnosis.
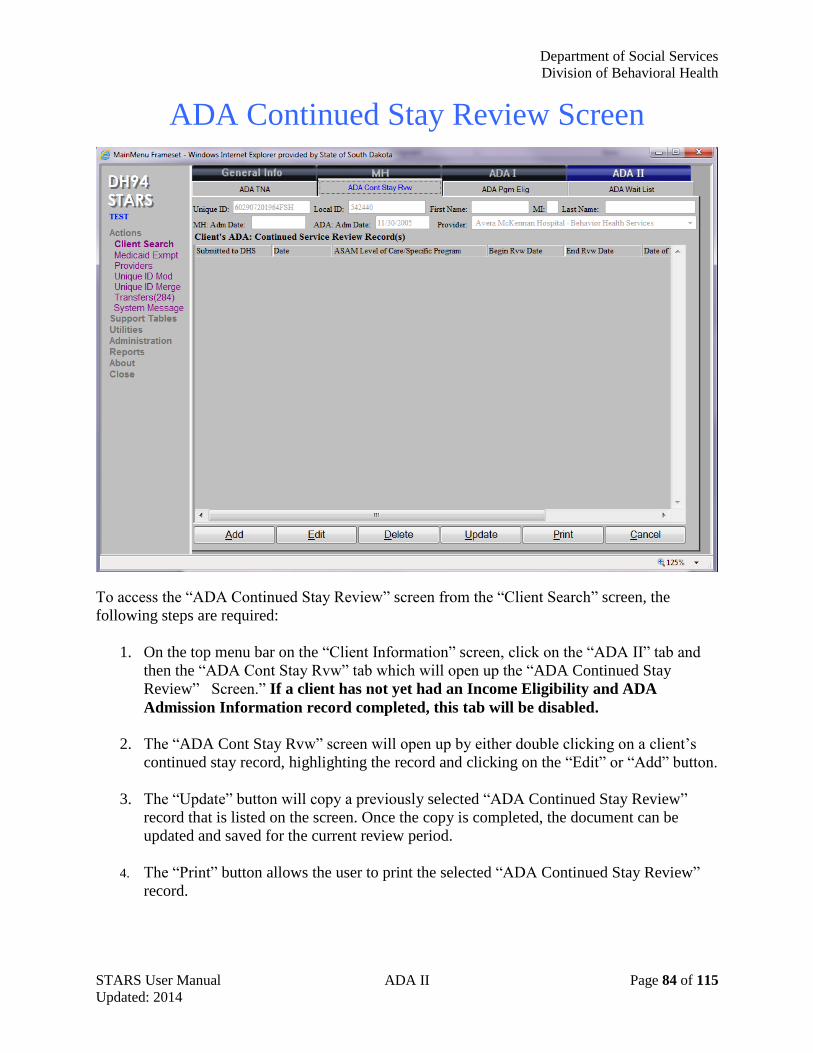
Department of Social Services
Division of Behavioral Health
STARS User Manual ADA II Page 84 of 115 Updated: 2014
ADA Continued Stay Review Screen
To access the “ADA Continued Stay Review” screen from the “Client Search” screen, the
following steps are required:
1. On the top menu bar on the “Client Information” screen, click on the “ADA II” tab and
then the “ADA Cont Stay Rvw” tab which will open up the “ADA Continued Stay
Review” Screen.” If a client has not yet had an Income Eligibility and ADA
Admission Information record completed, this tab will be disabled.
2. The “ADA Cont Stay Rvw” screen will open up by either double clicking on a client’s
continued stay record, highlighting the record and clicking on the “Edit” or “Add” button.
3. The “Update” button will copy a previously selected “ADA Continued Stay Review”
record that is listed on the screen. Once the copy is completed, the document can be
updated and saved for the current review period.
4. The “Print” button allows the user to print the selected “ADA Continued Stay Review”
record.
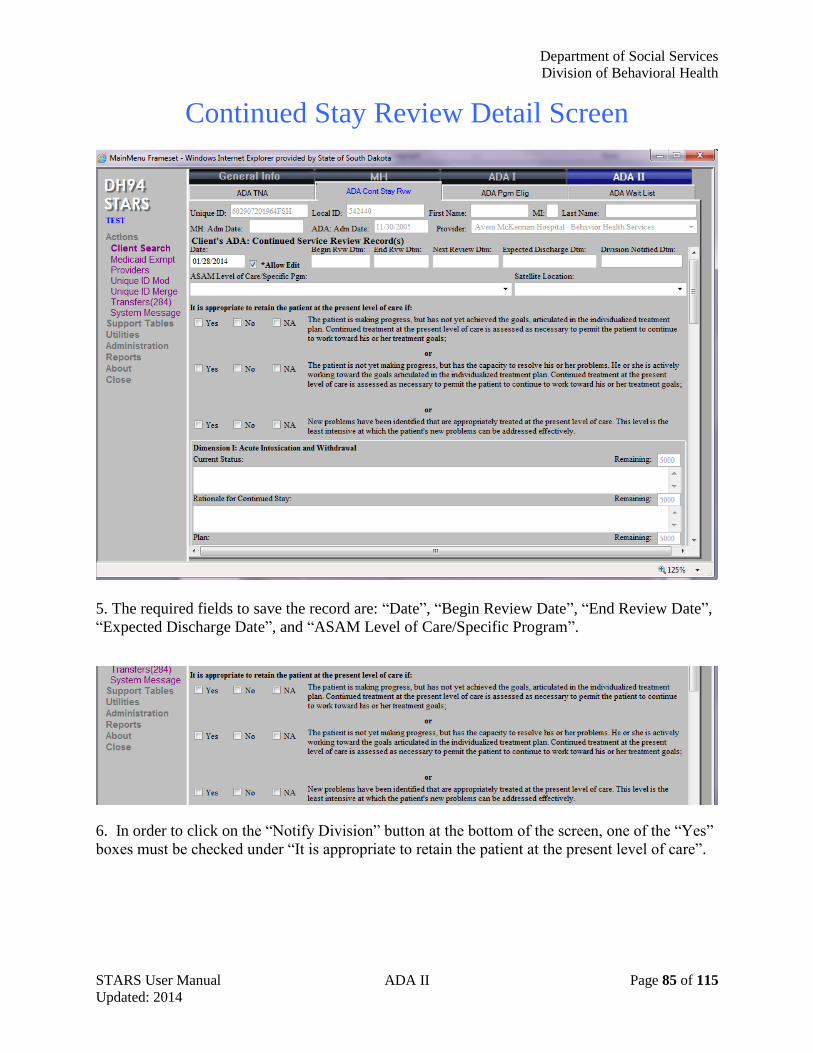
Department of Social Services
Division of Behavioral Health
STARS User Manual ADA II Page 85 of 115 Updated: 2014
Continued Stay Review Detail Screen
5. The required fields to save the record are: “Date”, “Begin Review Date”, “End Review Date”,
“Expected Discharge Date”, and “ASAM Level of Care/Specific Program”.
6. In order to click on the “Notify Division” button at the bottom of the screen, one of the “Yes”
boxes must be checked under “It is appropriate to retain the patient at the present level of care”.
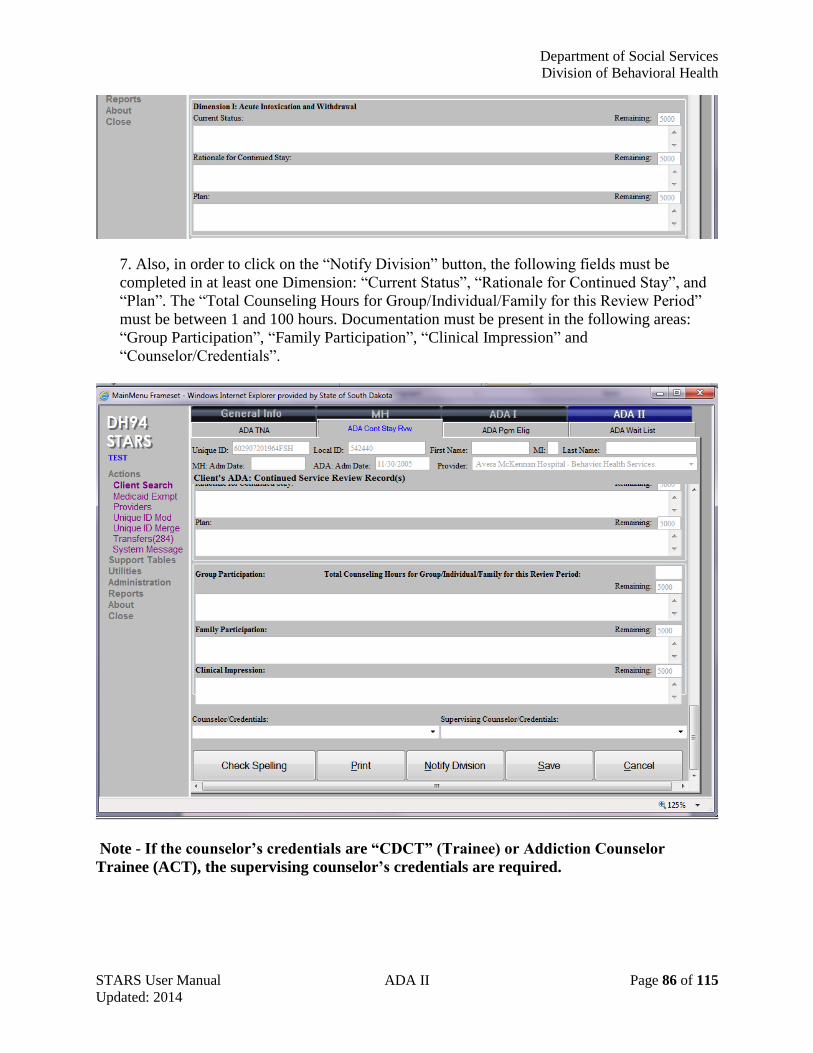
Department of Social Services
Division of Behavioral Health
STARS User Manual ADA II Page 86 of 115 Updated: 2014
7. Also, in order to click on the “Notify Division” button, the following fields must be
completed in at least one Dimension: “Current Status”, “Rationale for Continued Stay”, and
“Plan”. The “Total Counseling Hours for Group/Individual/Family for this Review Period”
must be between 1 and 100 hours. Documentation must be present in the following areas:
“Group Participation”, “Family Participation”, “Clinical Impression” and
“Counselor/Credentials”.
Note - If the counselor’s credentials are “CDCT” (Trainee) or Addiction Counselor
Trainee (ACT), the supervising counselor’s credentials are required.
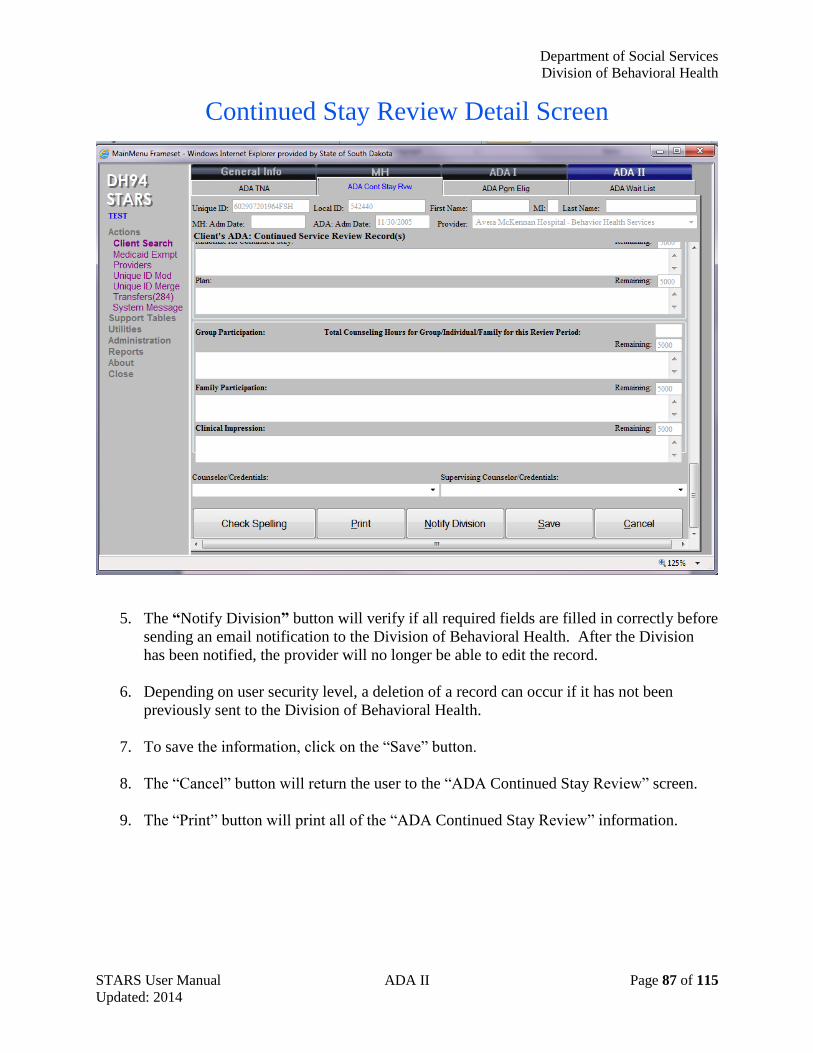
Department of Social Services
Division of Behavioral Health
STARS User Manual ADA II Page 87 of 115 Updated: 2014
Continued Stay Review Detail Screen
5. The “Notify Division” button will verify if all required fields are filled in correctly before
sending an email notification to the Division of Behavioral Health. After the Division
has been notified, the provider will no longer be able to edit the record.
6. Depending on user security level, a deletion of a record can occur if it has not been
previously sent to the Division of Behavioral Health.
7. To save the information, click on the “Save” button.
8. The “Cancel” button will return the user to the “ADA Continued Stay Review” screen.
9. The “Print” button will print all of the “ADA Continued Stay Review” information.
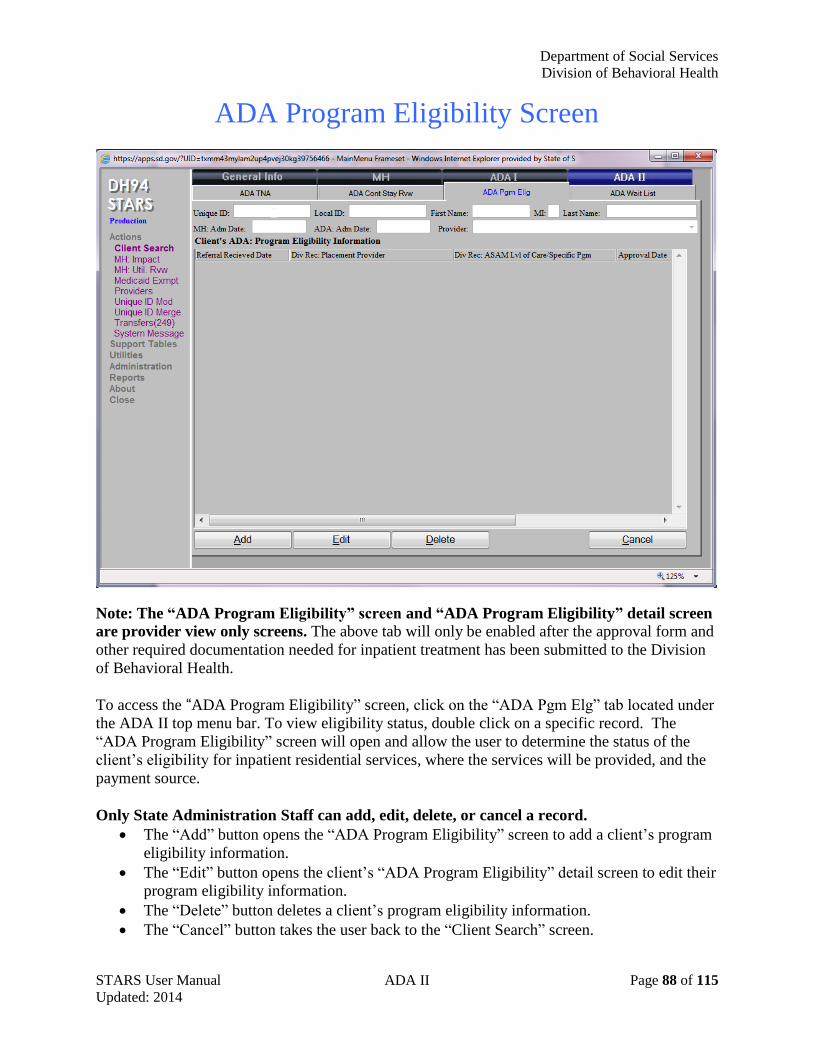
Department of Social Services
Division of Behavioral Health
STARS User Manual ADA II Page 88 of 115 Updated: 2014
ADA Program Eligibility Screen
Note: The “ADA Program Eligibility” screen and “ADA Program Eligibility” detail screen
are provider view only screens. The above tab will only be enabled after the approval form and
other required documentation needed for inpatient treatment has been submitted to the Division
of Behavioral Health.
To access the “ADA Program Eligibility” screen, click on the “ADA Pgm Elg” tab located under
the ADA II top menu bar. To view eligibility status, double click on a specific record. The
“ADA Program Eligibility” screen will open and allow the user to determine the status of the
client’s eligibility for inpatient residential services, where the services will be provided, and the
payment source.
Only State Administration Staff can add, edit, delete, or cancel a record.
The “Add” button opens the “ADA Program Eligibility” screen to add a client’s program
eligibility information.
The “Edit” button opens the client’s “ADA Program Eligibility” detail screen to edit their
program eligibility information.
The “Delete” button deletes a client’s program eligibility information.
The “Cancel” button takes the user back to the “Client Search” screen.
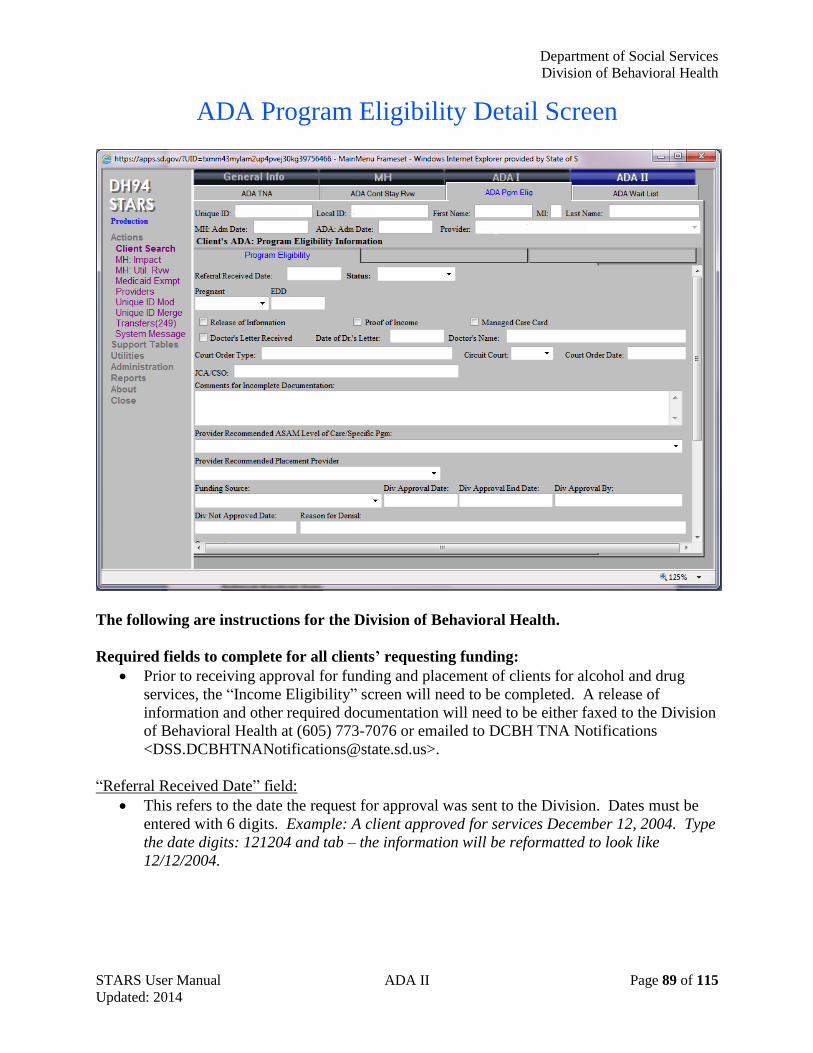
Department of Social Services
Division of Behavioral Health
STARS User Manual ADA II Page 89 of 115 Updated: 2014
ADA Program Eligibility Detail Screen
The following are instructions for the Division of Behavioral Health.
Required fields to complete for all clients’ requesting funding:
Prior to receiving approval for funding and placement of clients for alcohol and drug
services, the “Income Eligibility” screen will need to be completed. A release of
information and other required documentation will need to be either faxed to the Division
of Behavioral Health at (605) 773-7076 or emailed to DCBH TNA Notifications
“Referral Received Date” field:
This refers to the date the request for approval was sent to the Division. Dates must be
entered with 6 digits. Example: A client approved for services December 12, 2004. Type
the date digits: 121204 and tab – the information will be reformatted to look like
12/12/2004.
Department of Social Services
Division of Behavioral Health
STARS User Manual ADA II Page 90 of 115 Updated: 2014
“Status” dropdown box:
“Active” indicates the client has been approved for services. Providers: scroll down to
the bottom of the screen to view the recommended provider for services, when the client
was approved, level of care, and the funding source.
“Hold” indicates the Division of Behavioral Health has received the request for
placement, but more information is need. Providers: Review “Comments for Incomplete
Documentation”.
“Denied” indicates the client requesting services does not meet criteria. Providers: Please
contact the Division of Behavioral Health at (605)773-3123 if there are questions.
“Withdraw” indicates the request has been withdrawn by the requesting provider or by
the Division of Behavioral Health.
“Release of Information” checkbox:
The release of information (ROI) is to be signed and sent to the Division of Behavioral
Health. The ROI allows the Division to discuss the client with the referring agency. The
checkbox labeled “Release of Information” will be checked when the ROI has been
received by the Division.
“Proof of Income” checkbox:
The Division will review the “Income Eligibility” and “Hardship/Administrative
Review” screens prior to approval. Once the client’s income eligibility has been
reviewed, the checkbox along the left side of the field labeled “Proof of Income” will be
checked.
Required Documents for Title XIX Funding:
A copy of a doctor’s letter: The letter must state the client is recommended to receive
substance abuse services. Alternative to the rule: a copy of a Managed Care card, which
fulfills the doctor’s letter requirement.
OR
Court Order: The court order must state the client is recommended to obtain an alcohol
and drug assessment and follow the recommendations of the assessment or a court order
which places the client into the custody of another state entity, such as the Department of
Social Services or Department of Corrections.
For Pregnant Women Approvals:
A letter signed by a medical doctor which verifies the client’s pregnancy and estimated
due date.
The above mentioned items will need to be either faxed to the Division of Behavioral Health at
(605) 773-7076 or emailed to DCBH TNA Notifications
[email protected]. Once received by the Division, staff will complete
the required fields below:
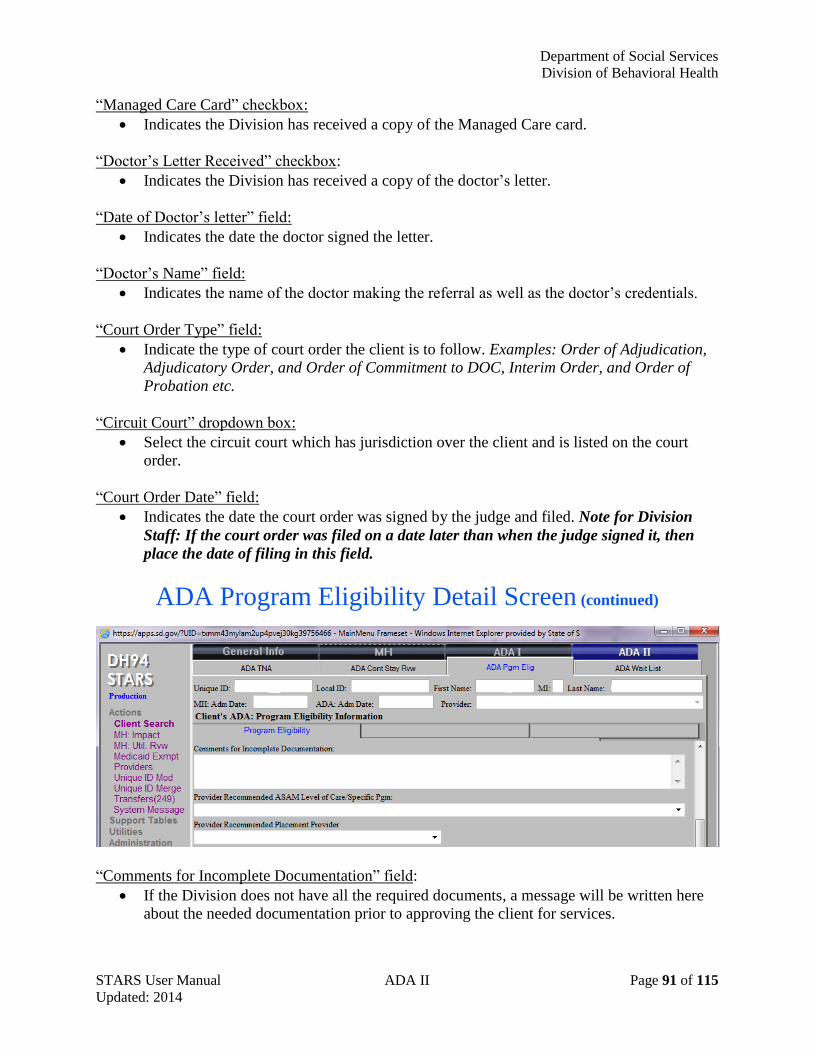
Department of Social Services
Division of Behavioral Health
STARS User Manual ADA II Page 91 of 115 Updated: 2014
“Managed Care Card” checkbox:
Indicates the Division has received a copy of the Managed Care card.
“Doctor’s Letter Received” checkbox:
Indicates the Division has received a copy of the doctor’s letter.
“Date of Doctor’s letter” field:
Indicates the date the doctor signed the letter.
“Doctor’s Name” field:
Indicates the name of the doctor making the referral as well as the doctor’s credentials.
“Court Order Type” field:
Indicate the type of court order the client is to follow. Examples: Order of Adjudication,
Adjudicatory Order, and Order of Commitment to DOC, Interim Order, and Order of
Probation etc.
“Circuit Court” dropdown box:
Select the circuit court which has jurisdiction over the client and is listed on the court
order.
“Court Order Date” field:
Indicates the date the court order was signed by the judge and filed. Note for Division
Staff: If the court order was filed on a date later than when the judge signed it, then
place the date of filing in this field.
ADA Program Eligibility Detail Screen (continued)
“Comments for Incomplete Documentation” field:
If the Division does not have all the required documents, a message will be written here
about the needed documentation prior to approving the client for services.
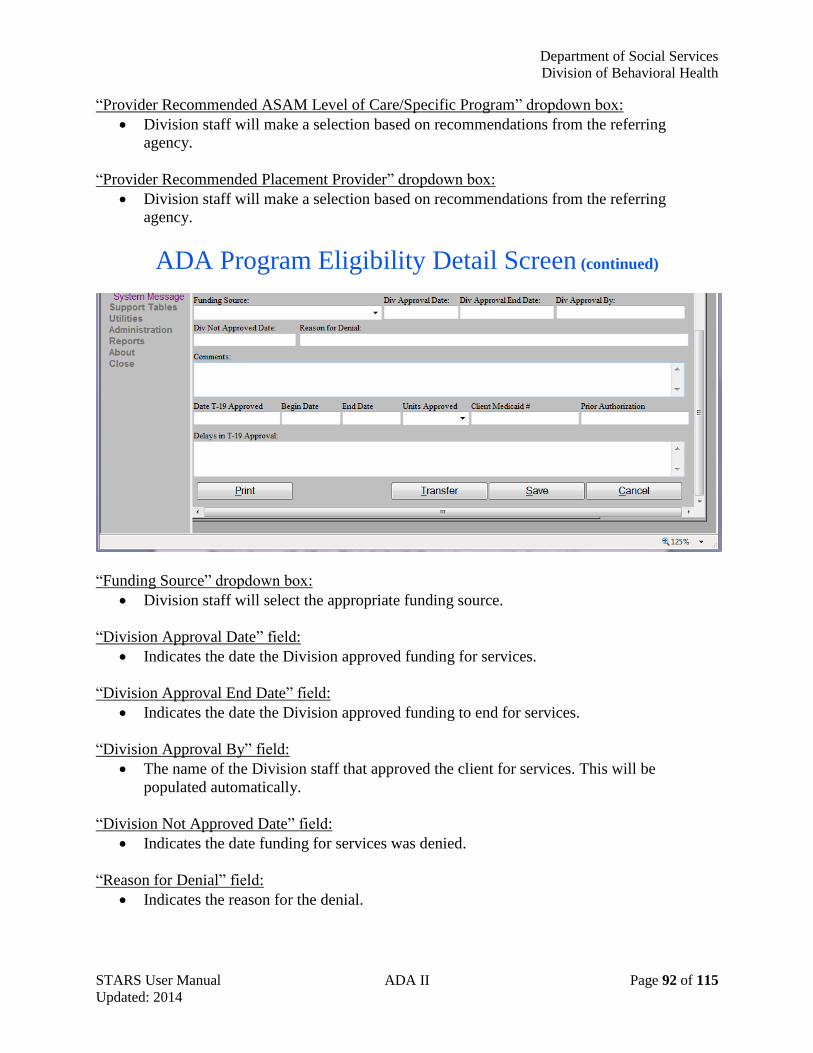
Department of Social Services
Division of Behavioral Health
STARS User Manual ADA II Page 92 of 115 Updated: 2014
“Provider Recommended ASAM Level of Care/Specific Program” dropdown box:
Division staff will make a selection based on recommendations from the referring
agency.
“Provider Recommended Placement Provider” dropdown box:
Division staff will make a selection based on recommendations from the referring
agency.
ADA Program Eligibility Detail Screen (continued)
“Funding Source” dropdown box:
Division staff will select the appropriate funding source.
“Division Approval Date” field:
Indicates the date the Division approved funding for services.
“Division Approval End Date” field:
Indicates the date the Division approved funding to end for services.
“Division Approval By” field:
The name of the Division staff that approved the client for services. This will be
populated automatically.
“Division Not Approved Date” field:
Indicates the date funding for services was denied.
“Reason for Denial” field:
Indicates the reason for the denial.
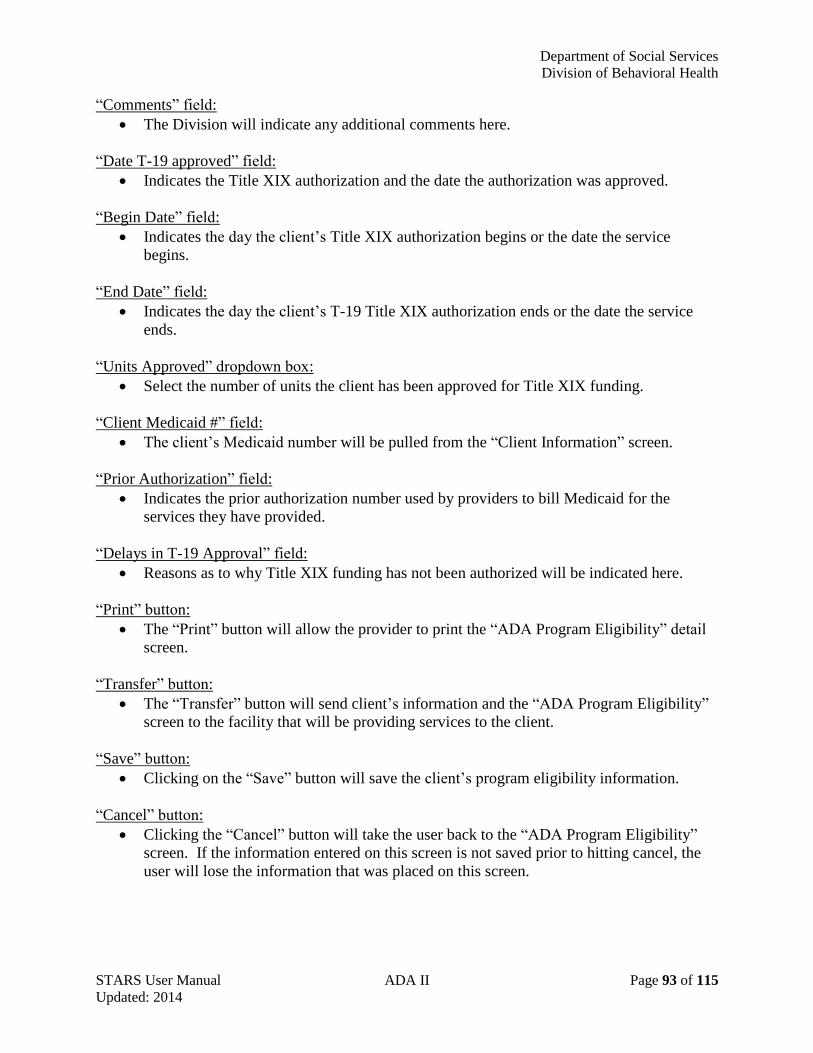
Department of Social Services
Division of Behavioral Health
STARS User Manual ADA II Page 93 of 115 Updated: 2014
“Comments” field:
The Division will indicate any additional comments here.
“Date T-19 approved” field:
Indicates the Title XIX authorization and the date the authorization was approved.
“Begin Date” field:
Indicates the day the client’s Title XIX authorization begins or the date the service
begins.
“End Date” field:
Indicates the day the client’s T-19 Title XIX authorization ends or the date the service
ends.
“Units Approved” dropdown box:
Select the number of units the client has been approved for Title XIX funding.
“Client Medicaid #” field:
The client’s Medicaid number will be pulled from the “Client Information” screen.
“Prior Authorization” field:
Indicates the prior authorization number used by providers to bill Medicaid for the
services they have provided.
“Delays in T-19 Approval” field:
Reasons as to why Title XIX funding has not been authorized will be indicated here.
“Print” button:
The “Print” button will allow the provider to print the “ADA Program Eligibility” detail
screen.
“Transfer” button:
The “Transfer” button will send client’s information and the “ADA Program Eligibility”
screen to the facility that will be providing services to the client.
“Save” button:
Clicking on the “Save” button will save the client’s program eligibility information.
“Cancel” button:
Clicking the “Cancel” button will take the user back to the “ADA Program Eligibility”
screen. If the information entered on this screen is not saved prior to hitting cancel, the
user will lose the information that was placed on this screen.
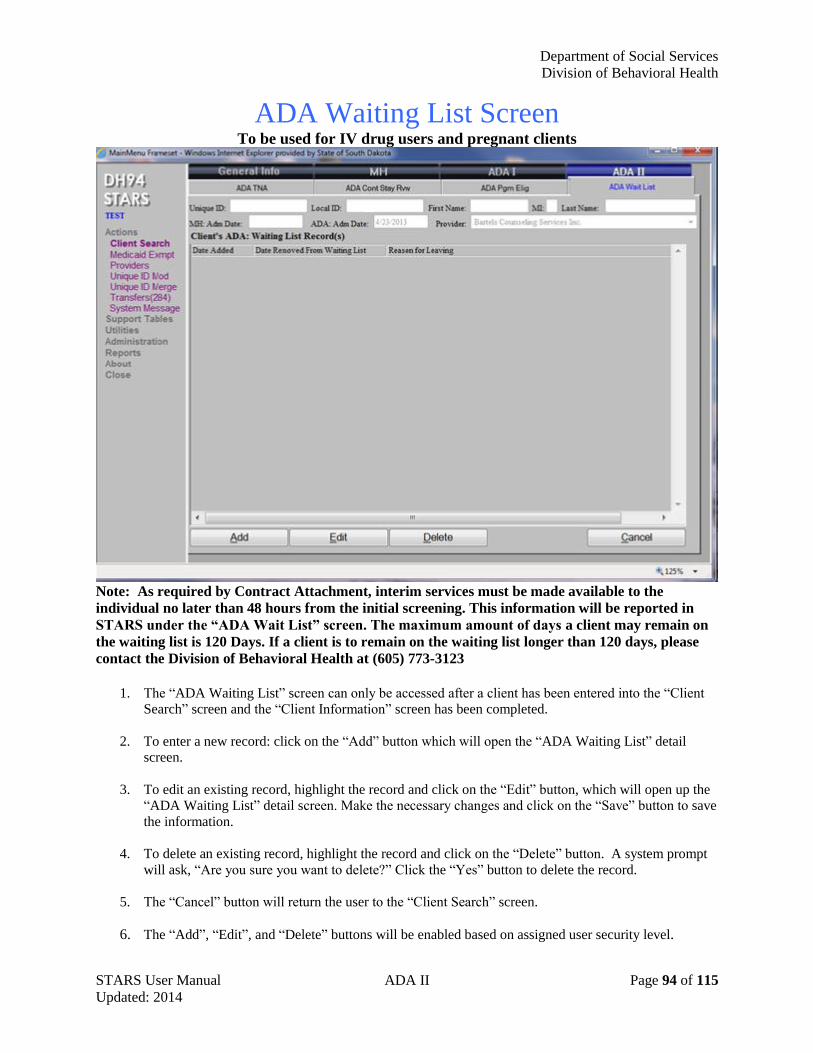
Department of Social Services
Division of Behavioral Health
STARS User Manual ADA II Page 94 of 115 Updated: 2014
ADA Waiting List Screen To be used for IV drug users and pregnant clients
Note: As required by Contract Attachment, interim services must be made available to the
individual no later than 48 hours from the initial screening. This information will be reported in
STARS under the “ADA Wait List” screen. The maximum amount of days a client may remain on
the waiting list is 120 Days. If a client is to remain on the waiting list longer than 120 days, please
contact the Division of Behavioral Health at (605) 773-3123
1. The “ADA Waiting List” screen can only be accessed after a client has been entered into the “Client
Search” screen and the “Client Information” screen has been completed.
2. To enter a new record: click on the “Add” button which will open the “ADA Waiting List” detail
screen.
3. To edit an existing record, highlight the record and click on the “Edit” button, which will open up the
“ADA Waiting List” detail screen. Make the necessary changes and click on the “Save” button to save
the information.
4. To delete an existing record, highlight the record and click on the “Delete” button. A system prompt
will ask, “Are you sure you want to delete?” Click the “Yes” button to delete the record.
5. The “Cancel” button will return the user to the “Client Search” screen.
6. The “Add”, “Edit”, and “Delete” buttons will be enabled based on assigned user security level.

Department of Social Services
Division of Behavioral Health
STARS User Manual ADA II Page 95 of 115 Updated: 2014
ADA Waiting List Detail Screen
1. To add a record to the waiting list: Complete the “Date Added to Waiting List” field and one or
more of the interim services being provided to the client while on the waiting list.
2. To remove a record from the waiting list: After the client enters the appropriate services,
complete the following dropdown boxes: “Reason for Leaving”, “ASAM Level of Care/Specific
Program”, and “Placement Provider”. Click on the “Save” button to save the record.
3. If an out of state provider is being referred, type the name of that provider into the
“Recommended Out of State Provider” field and identify the “State” in the dropdown list.
4. The “Cancel” button will return the user to the “ADA Waiting List” screen.

STARS User Manual Page 96 of 115 Updated: 2014
Part 8
Utilities
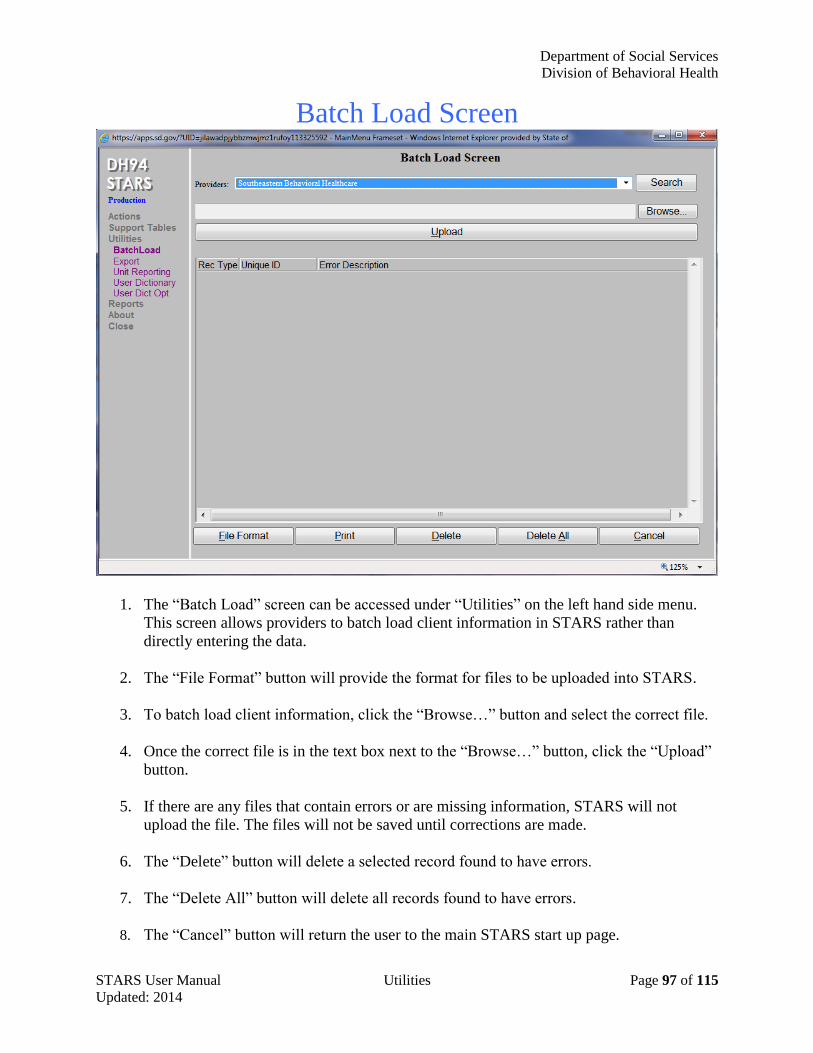
Department of Social Services
Division of Behavioral Health
STARS User Manual Utilities Page 97 of 115 Updated: 2014
Batch Load Screen
1. The “Batch Load” screen can be accessed under “Utilities” on the left hand side menu.
This screen allows providers to batch load client information in STARS rather than
directly entering the data.
2. The “File Format” button will provide the format for files to be uploaded into STARS.
3. To batch load client information, click the “Browse…” button and select the correct file.
4. Once the correct file is in the text box next to the “Browse…” button, click the “Upload”
button.
5. If there are any files that contain errors or are missing information, STARS will not
upload the file. The files will not be saved until corrections are made.
6. The “Delete” button will delete a selected record found to have errors.
7. The “Delete All” button will delete all records found to have errors.
8. The “Cancel” button will return the user to the main STARS start up page.
Department of Social Services
Division of Behavioral Health
STARS User Manual Utilities Page 98 of 115 Updated: 2014
Export Screen
The “Export Screen” exports information from STARS into the provider’s own system or
program.
1. Selecting the “File Format” button will allow the provider to see what format the files can
be exported in and what information each field being exported contains.
2. The “Client(s)” button will export the entire client file, which includes all information
that is found on the “Client Information” screen.
3. The “Claim(s)” and “Service(s)” buttons will provide information on claims and services
submitted.
4. The “ADA Admission(s)”, “MH Admission(s)”, “ADA Discharge(s),” and “MH
Discharge(s)” buttons will export files specifically related to admissions and discharges.
5. The “ADA Counselor(s)” button provides the name, email and credentials of any ADA
counselors listed in STARS
6. The “MH Diagnosis(s)” button will provide diagnosis information on all clients listed in
STARS.
Department of Social Services
Division of Behavioral Health
STARS User Manual Utilities Page 99 of 115 Updated: 2014
7. The “ADA Transfer(s)” button will export all clients transferred, the location transferred,
and the client discharge reasons.
8. The “MH Waiting List Info” button will export all client information from the “Waiting
List” screen.
9. The “Cancel” button will return the user to the main STARS page.
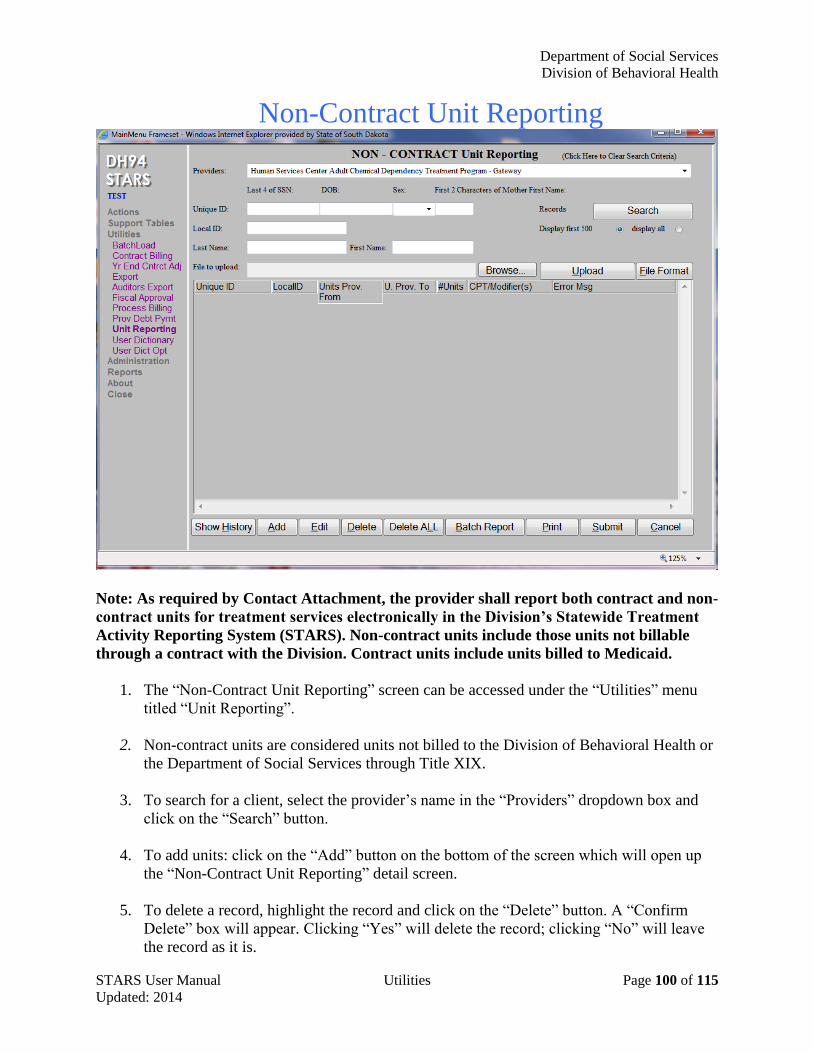
Department of Social Services
Division of Behavioral Health
STARS User Manual Utilities Page 100 of 115 Updated: 2014
Non-Contract Unit Reporting
Note: As required by Contact Attachment, the provider shall report both contract and non-
contract units for treatment services electronically in the Division’s Statewide Treatment
Activity Reporting System (STARS). Non-contract units include those units not billable
through a contract with the Division. Contract units include units billed to Medicaid.
1. The “Non-Contract Unit Reporting” screen can be accessed under the “Utilities” menu
titled “Unit Reporting”.
2. Non-contract units are considered units not billed to the Division of Behavioral Health or
the Department of Social Services through Title XIX.
3. To search for a client, select the provider’s name in the “Providers” dropdown box and
click on the “Search” button.
4. To add units: click on the “Add” button on the bottom of the screen which will open up
the “Non-Contract Unit Reporting” detail screen.
5. To delete a record, highlight the record and click on the “Delete” button. A “Confirm
Delete” box will appear. Clicking “Yes” will delete the record; clicking “No” will leave
the record as it is.
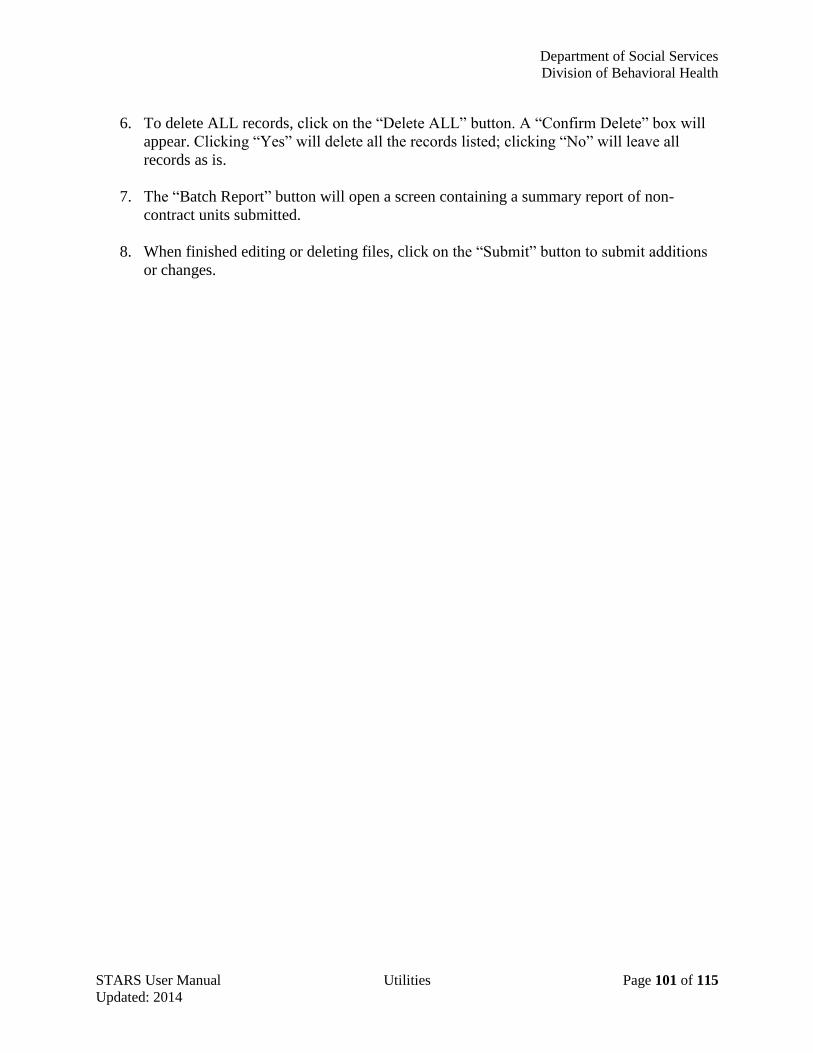
Department of Social Services
Division of Behavioral Health
STARS User Manual Utilities Page 101 of 115 Updated: 2014
6. To delete ALL records, click on the “Delete ALL” button. A “Confirm Delete” box will
appear. Clicking “Yes” will delete all the records listed; clicking “No” will leave all
records as is.
7. The “Batch Report” button will open a screen containing a summary report of non-
contract units submitted.
8. When finished editing or deleting files, click on the “Submit” button to submit additions
or changes.
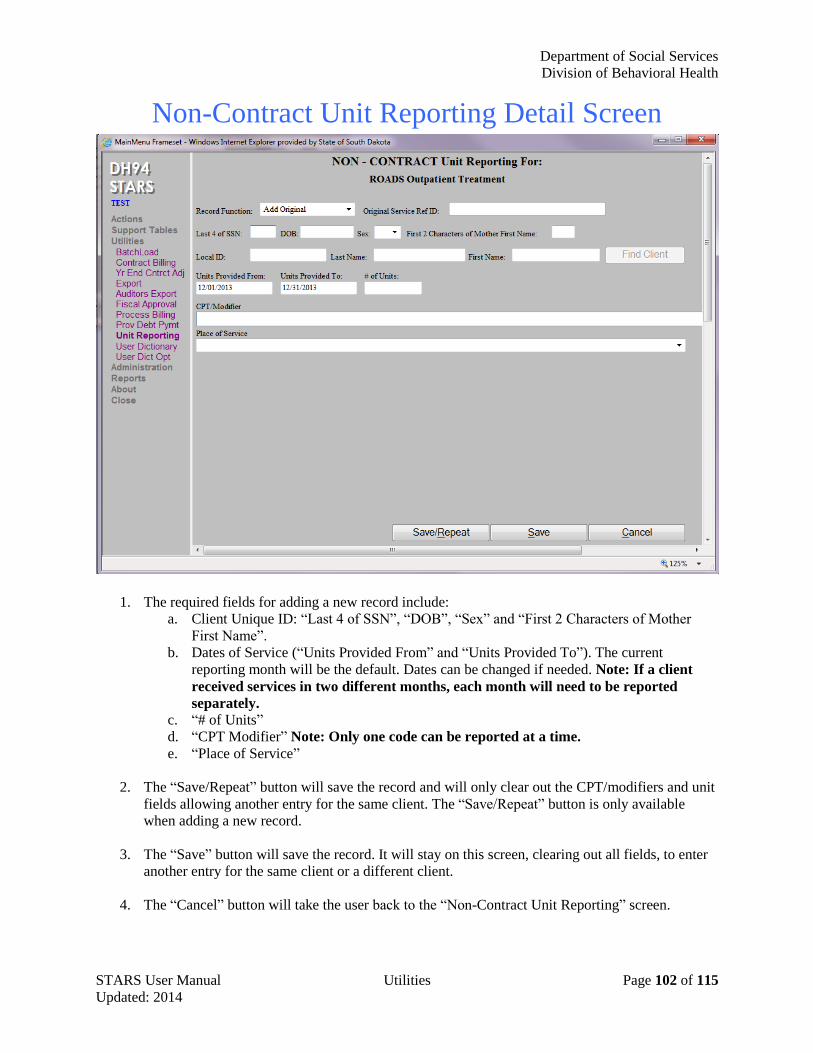
Department of Social Services
Division of Behavioral Health
STARS User Manual Utilities Page 102 of 115 Updated: 2014
Non-Contract Unit Reporting Detail Screen
1. The required fields for adding a new record include:
a. Client Unique ID: “Last 4 of SSN”, “DOB”, “Sex” and “First 2 Characters of Mother
First Name”.
b. Dates of Service (“Units Provided From” and “Units Provided To”). The current
reporting month will be the default. Dates can be changed if needed. Note: If a client
received services in two different months, each month will need to be reported
separately. c. “# of Units”
d. “CPT Modifier” Note: Only one code can be reported at a time.
e. “Place of Service”
2. The “Save/Repeat” button will save the record and will only clear out the CPT/modifiers and unit
fields allowing another entry for the same client. The “Save/Repeat” button is only available
when adding a new record.
3. The “Save” button will save the record. It will stay on this screen, clearing out all fields, to enter
another entry for the same client or a different client.
4. The “Cancel” button will take the user back to the “Non-Contract Unit Reporting” screen.

Department of Social Services
Division of Behavioral Health
STARS User Manual Utilities Page 103 of 115 Updated: 2014
Non-Contract Unit Reporting Screen with Error Message
9. Error Message: Once the non-contract unit records have been submitted, a series of edit
checks will be performed to check for errors. Records that have errors will remain on the
“Non-Contract Units Reporting” screen with an error message describing the error. The
user can click on the “Edit” button to edit and resubmit the record.
10. The “Cancel” button will take the user back to the main STARS screen.
11. The “File Format” button will open a Microsoft Excel spreadsheet with the file layout for
batch loading the non-contract units into STARS.
12. To Batch Load Files: Click on the “Browse” button to locate the file to be uploaded.
Click on the “Upload” button to upload the non-contract units into STARS. Once
uploaded, the non-contract unit records will show on the “Non-Contract Unit Reporting”
screen.
13. Click on the “Submit” button to submit the records.

STARS User Manual Page 104 of 115 Updated: 2014
Part 9
Reports
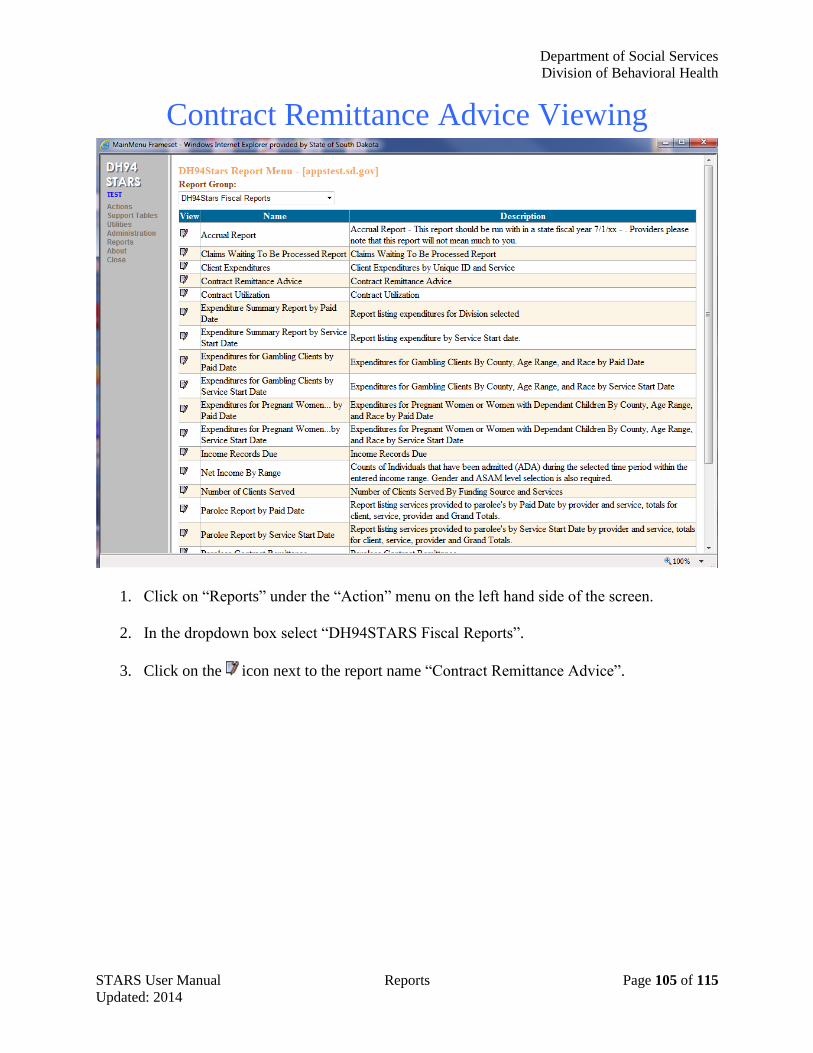
Department of Social Services
Division of Behavioral Health
STARS User Manual Reports Page 105 of 115
Updated: 2014
Contract Remittance Advice Viewing
1. Click on “Reports” under the “Action” menu on the left hand side of the screen.
2. In the dropdown box select “DH94STARS Fiscal Reports”.
3. Click on the icon next to the report name “Contract Remittance Advice”.
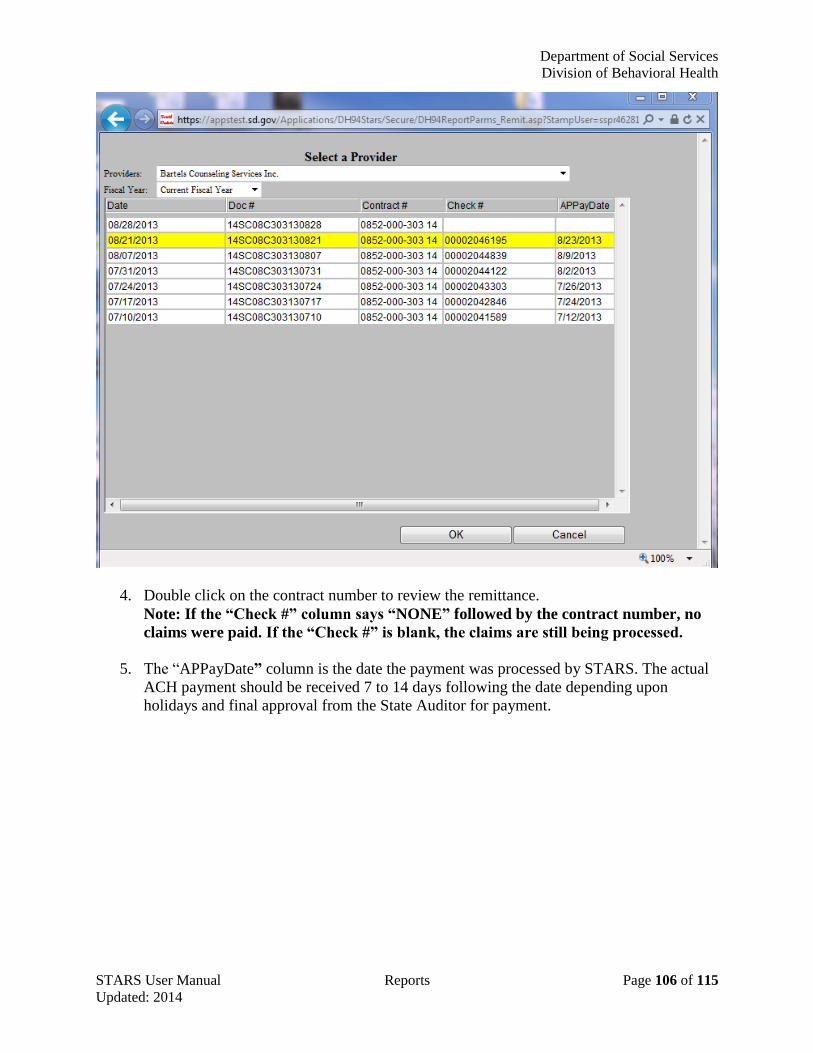
Department of Social Services
Division of Behavioral Health
STARS User Manual Reports Page 106 of 115
Updated: 2014
4. Double click on the contract number to review the remittance.
Note: If the “Check #” column says “NONE” followed by the contract number, no
claims were paid. If the “Check #” is blank, the claims are still being processed.
5. The “APPayDate” column is the date the payment was processed by STARS. The actual
ACH payment should be received 7 to 14 days following the date depending upon
holidays and final approval from the State Auditor for payment.
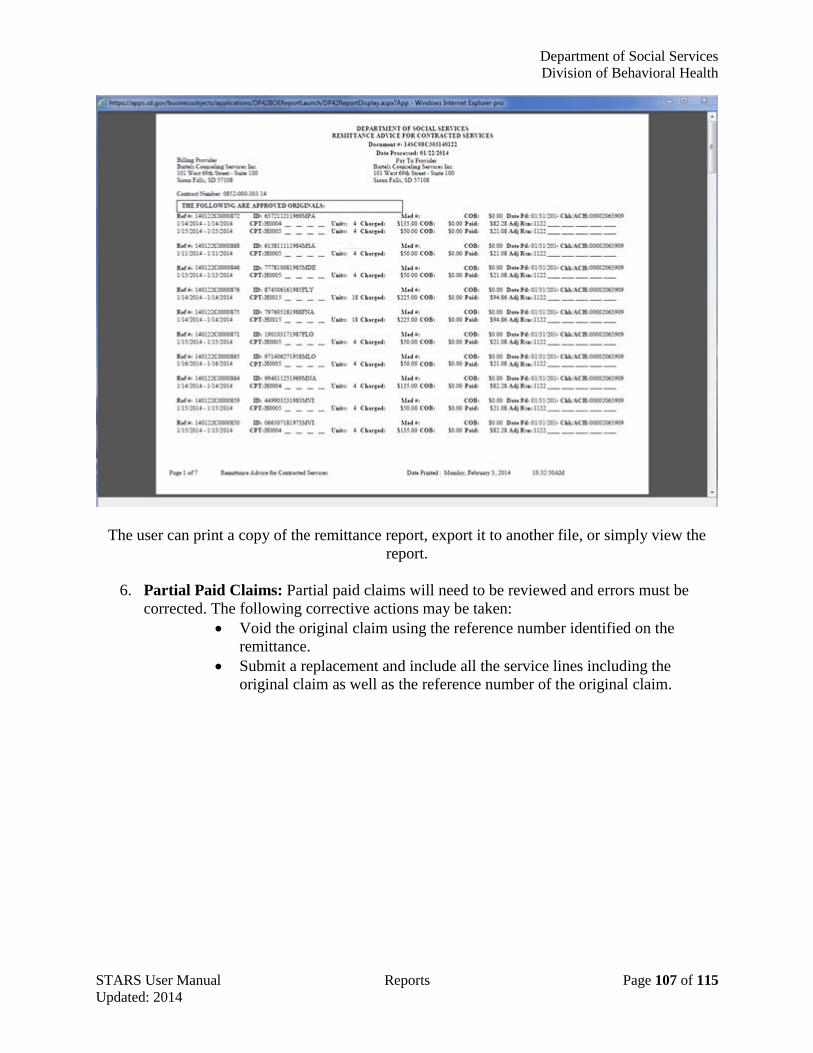
Department of Social Services
Division of Behavioral Health
STARS User Manual Reports Page 107 of 115
Updated: 2014
The user can print a copy of the remittance report, export it to another file, or simply view the
report.
6. Partial Paid Claims: Partial paid claims will need to be reviewed and errors must be
corrected. The following corrective actions may be taken:
Void the original claim using the reference number identified on the
remittance.
Submit a replacement and include all the service lines including the
original claim as well as the reference number of the original claim.
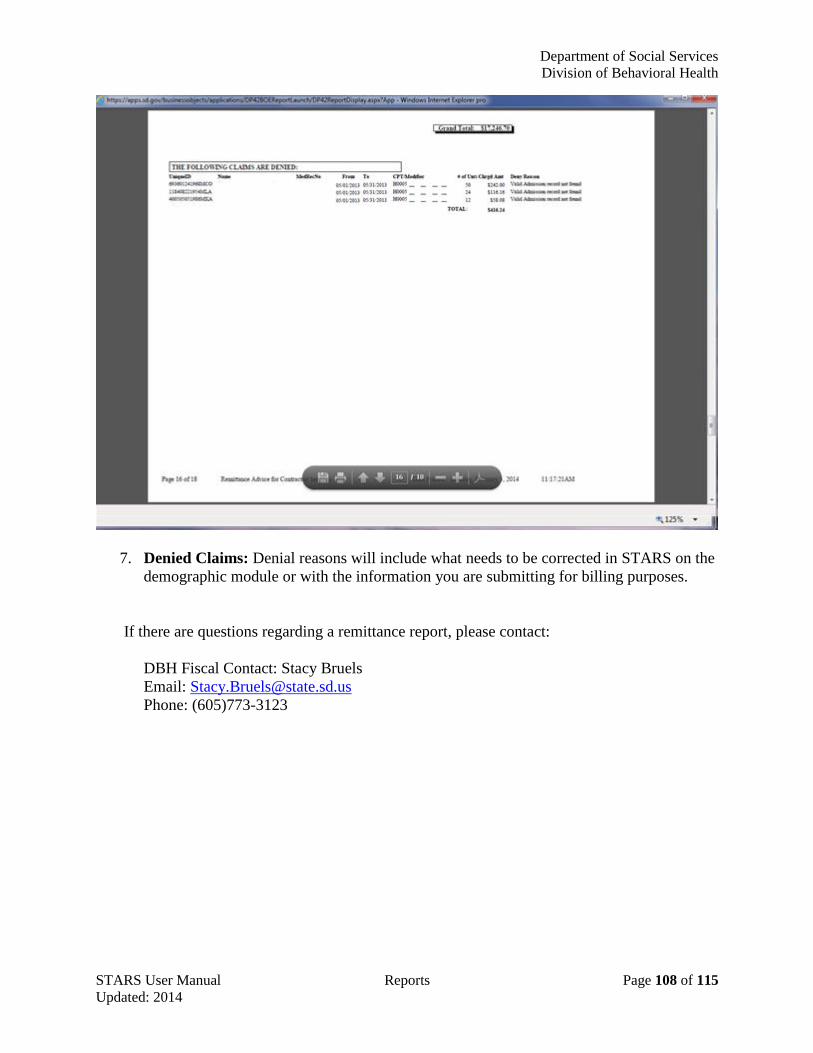
Department of Social Services
Division of Behavioral Health
STARS User Manual Reports Page 108 of 115
Updated: 2014
7. Denied Claims: Denial reasons will include what needs to be corrected in STARS on the
demographic module or with the information you are submitting for billing purposes.
If there are questions regarding a remittance report, please contact:
DBH Fiscal Contact: Stacy Bruels
Email: [email protected]
Phone: (605)773-3123
STARS User Manual Page 109 of 115 Updated: 2014
Part 10
Supplemental
Information
Department of Social Services
Division of Behavioral Health
STARS User Manual Supplemental Information Page 110 of 115
Updated: 2014
Gambling Admission Information
Follow the “Client Admission Information” instructions for admission requirements. However,
when completing the “ADA Admission Information” screen, the “Co-Dependent” field should be
“No” and the “Gambling ASAM Level/Specific Program” field should be identified. Under the
“Gambling Information” section, select “Pathological Gambling” in the “Gambling Diagnosis”
field. The “Substance Abuse Information” fields will be programmed as “Not Applicable”.
Department of Social Services
Division of Behavioral Health
STARS User Manual Supplemental Information Page 111 of 115
Updated: 2014
Client Transfer Information
Co- Dependent: If a client was identified as “co-dependent” at admission and was placed in
ASAM Level 0.5 “Co-dependent Treatment Only” and then becomes a “Substance abuse client”,
a new admission record needs to occur.
Substance Abuse or Gambling specific client: If the client is identified as a substance abuse
client or gambling specific client and placed in an ASAM level of care other than “0.5 Co-
dependent treatment only” and then becomes a “Co-dependent client”, a discharge record and
new admission record needs to occur.
Gambling client to Substance Abuse client: If a client was placed in one of the gambling
ASAM levels and then becomes a “substance abuse client”, a discharge record and a new
admission record needs to occur. Note: A client placed in a gambling ASAM level of care
cannot be transferred to either a co-dependent ASAM treatment level or any of the non-
gambling ASAM levels of treatment on the “Client Transfer” screen.
Substance Abuse client to Gambling client: If a client was placed in a non-gambling ASAM
level and then becomes solely a “Gambling Client”, a discharge record and new admission
record needs to occur for this client.
Adding Gambling services to Substance Abuse client: If a substance abuse client was placed
in a non-gambling ASAM level and then is identified while in that same level of treatment as
having a gambling diagnosis, a new admission record is NOT needed. Add the additional
gambling information into the admission record. Note: The client must remain in a non-
gambling ASAM level, but if the provider has a contract with the Division for gambling
treatment, they may bill the appropriate gambling code.

Department of Social Services
Division of Behavioral Health
STARS User Manual Supplemental Information Page 112 of 115
Updated: 2014
Alcohol and Drug Discharge Information
Discharge: When a client completes service(s) or services are terminated, the “ADA Discharge
Information” screen must be completed.
Diagnosis Fields: The Primary, Secondary, and Tertiary drug codes in the “ADA Admission
Information” screen will be forwarded to the discharge Primary, Secondary, and Tertiary fields.
The frequency at discharge will need to be completed for substance abuse and gambling fields.
Referrals: If “Alcohol & Drug Provider” is checked, the “ADA Provider Referred to at
Discharge Field” will need to list the provider or its “ADA Satellite’s location”. Also, the
“ASAM Level of Care/Specific Program Referred to at Discharge” will need to be completed.
Department of Social Services
Division of Behavioral Health
STARS User Manual Supplemental Information Page 113 of 115
Updated: 2014
Confidentiality Rules & Information
Release of Information (ROI): The ROI allows client information to be released to the
Department of Social Services, Division of Behavioral Health for processing
eligibility/payment(s) and is required when the client is requesting to be funded by Title XIX or
State Contract funds. If a client refuses to sign the ROI, providers will need to develop a policy
on how they will address the situation.
Revocation of ROI: When client receiving State funding revokes an ROI, the provider will
check the “Revoked Release of Information” check box and enter the “Revoked Date” on the
admission screen.
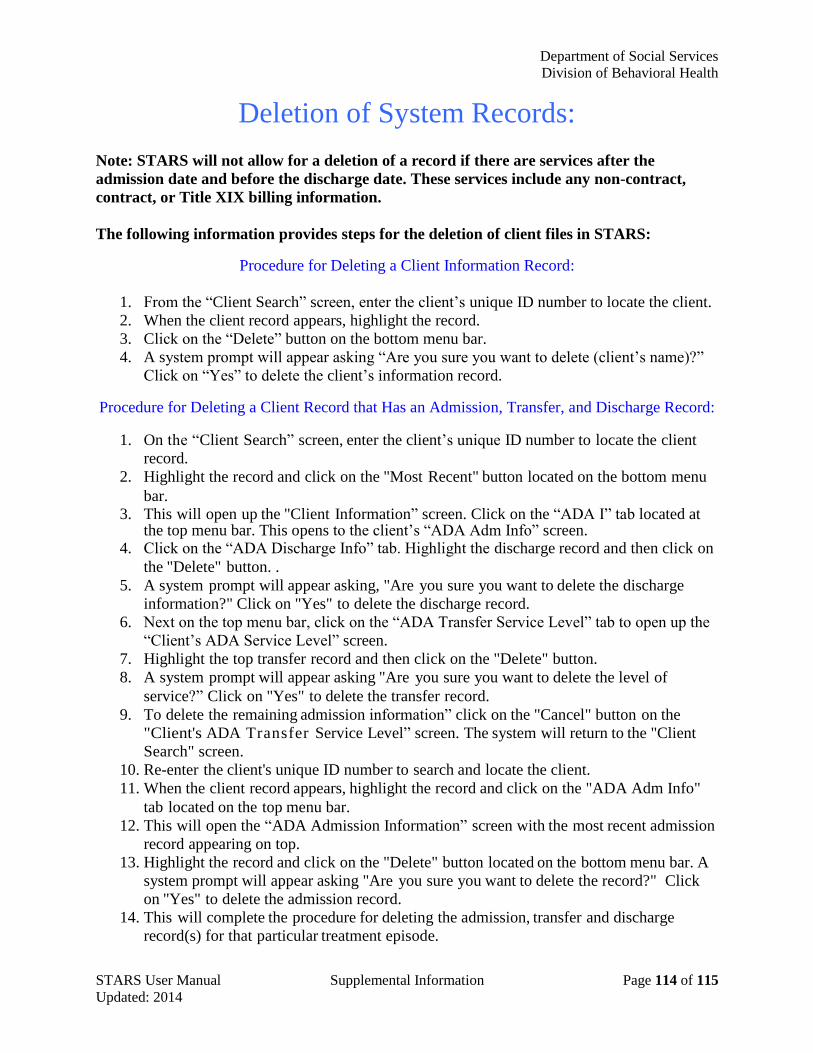
Department of Social Services
Division of Behavioral Health
STARS User Manual Supplemental Information Page 114 of 115
Updated: 2014
Deletion of System Records:
Note: STARS will not allow for a deletion of a record if there are services after the
admission date and before the discharge date. These services include any non-contract,
contract, or Title XIX billing information.
The following information provides steps for the deletion of client files in STARS:
Procedure for Deleting a Client Information Record:
1. From the “Client Search” screen, enter the client’s unique ID number to locate the client.
2. When the client record appears, highlight the record.
3. Click on the “Delete” button on the bottom menu bar.
4. A system prompt will appear asking “Are you sure you want to delete (client’s name)?”
Click on “Yes” to delete the client’s information record.
Procedure for Deleting a Client Record that Has an Admission, Transfer, and Discharge Record:
1. On the “Client Search” screen, enter the client’s unique ID number to locate the client
record.
2. Highlight the record and click on the "Most Recent" button located on the bottom menu
bar. 3. This will open up the "Client Information” screen. Click on the “ADA I” tab located at
the top menu bar. This opens to the client’s “ADA Adm Info” screen. 4. Click on the “ADA Discharge Info” tab. Highlight the discharge record and then click on
the "Delete" button. .
5. A system prompt will appear asking, "Are you sure you want to delete the discharge
information?" Click on "Yes" to delete the discharge record.
6. Next on the top menu bar, click on the “ADA Transfer Service Level” tab to open up the
“Client’s ADA Service Level” screen.
7. Highlight the top transfer record and then click on the "Delete" button.
8. A system prompt will appear asking "Are you sure you want to delete the level of
service?” Click on "Yes" to delete the transfer record.
9. To delete the remaining admission information” click on the "Cancel" button on the
"Client's ADA Transfer Service Level” screen. The system will return to the "Client
Search" screen.
10. Re-enter the client's unique ID number to search and locate the client.
11. When the client record appears, highlight the record and click on the "ADA Adm Info"
tab located on the top menu bar.
12. This will open the “ADA Admission Information” screen with the most recent admission
record appearing on top.
13. Highlight the record and click on the "Delete" button located on the bottom menu bar. A
system prompt will appear asking "Are you sure you want to delete the record?" Click
on "Yes" to delete the admission record.
14. This will complete the procedure for deleting the admission, transfer and discharge
record(s) for that particular treatment episode.
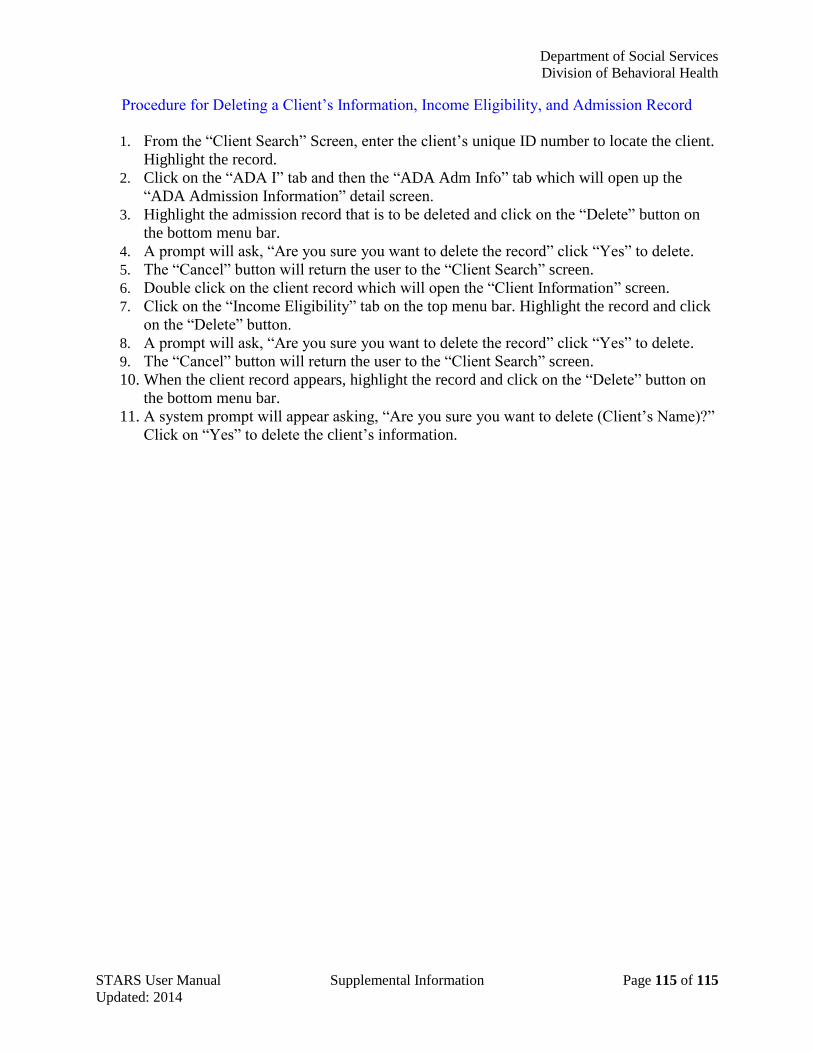
Department of Social Services
Division of Behavioral Health
STARS User Manual Supplemental Information Page 115 of 115
Updated: 2014
Procedure for Deleting a Client’s Information, Income Eligibility, and Admission Record
1. From the “Client Search” Screen, enter the client’s unique ID number to locate the client.
Highlight the record. 2. Click on the “ADA I” tab and then the “ADA Adm Info” tab which will open up the
“ADA Admission Information” detail screen. 3. Highlight the admission record that is to be deleted and click on the “Delete” button on
the bottom menu bar. 4. A prompt will ask, “Are you sure you want to delete the record” click “Yes” to delete. 5. The “Cancel” button will return the user to the “Client Search” screen.
6. Double click on the client record which will open the “Client Information” screen. 7. Click on the “Income Eligibility” tab on the top menu bar. Highlight the record and click
on the “Delete” button.
8. A prompt will ask, “Are you sure you want to delete the record” click “Yes” to delete. 9. The “Cancel” button will return the user to the “Client Search” screen. 10. When the client record appears, highlight the record and click on the “Delete” button on
the bottom menu bar. 11. A system prompt will appear asking, “Are you sure you want to delete (Client’s Name)?”
Click on “Yes” to delete the client’s information.
Related Documents