Stabalux H 1.1 Stabalux H - System 3 1.1.1 System properties 3 1.1.2 System cross sections and inner seals - facade 7 1.1.3 System cross sections and inner seals - roof 13 1.1.4 Cover strips and outer seals 16 1.2 Stabalux H - Processing notes 19 1.2.1 Material information 19 1.2.2 Profile design 21 1.2.3 Mullion-transom joint 22 1.2.4 Tips for laying seals 28 1.2.5 Seals - Facade 30 1.2.6 Seals - roof 39 1.2.7 Glass inset and glass support 45 1.2.8 Screw fittings 55 1.2.9 Flat cover strip DL 5073 / DL 6073 59 1.2.10 Slab insulation 60 1.3 Stabalux H - Design 62 1.3.1 Pane support variants 62 1.3.2 System cross sections 65 1.3.3 System details 66 1.3.4 Structural attachments 71 1.3.5 Installing windows and doors 81

Welcome message from author
This document is posted to help you gain knowledge. Please leave a comment to let me know what you think about it! Share it to your friends and learn new things together.
Transcript

Stabalux H
10 Stabalux H 1
11 Stabalux H - System 3
111 System properties 3112 System cross sections and inner seals - facade 7113 System cross sections and inner seals - roof 13114 Cover strips and outer seals 16
12 Stabalux H - Processing notes 19
121 Material information 19122 Profile design 21123 Mullion-transom joint 22124 Tips for laying seals 28125 Seals - Facade 30126 Seals - roof 39127 Glass inset and glass support 45128 Screw fittings 55129 Flat cover strip DL 5073 DL 6073 591210 Slab insulation 60
13 Stabalux H - Design 62
131 Pane support variants 62132 System cross sections 65133 System details 66134 Structural attachments 71135 Installing windows and doors 81
S T A B A L U X
Stabalux H System 310718 3
Stabalux HSystem
111
System properties
Timber facade system with direct screw fittings
H_11_001dwg
S T A B A L U X
Stabalux H System 310718 4
Stabalux HSystem
Stabalux H
bull The Stabalux System H provides a complete range of products in 50 60 and 80 mm widths to produce vertical and inclined glazing on a supporting timber substructure
bull Stabalux H is characterised by direct screw fittings and the milled central groove
bull The inner seal is pressed directly into the transom groove on the mullion and guarantees precise guid-ance of the sealing section
System properties 111
Passive house certificatesPassivhaus Institut Dr Feist
Frame size 120 x 250 m
Ucw value W(m2K) SpacersGlass carriers
System width 50U
cw= 079 W(m2K)Ucw= 078 W(m2K)
Swisspacer VGlass carrier ALUSwisspacer VGlass carrier GFK
System width 60Ucw= 079 W(m2K)Ucw= 078 W(m2K)
Swisspacer VGlass carrier ALUSwisspacer VGlass carrier GFK
SpecificationsFacade5 mm sealing height
Facades with inclinations up to 20deg overlapping inner seals
Roof ge 2deg inclination
System widths 50 60 80 mm 50 60 80 mm 50 60 80 mm
Air permeability EN 12152
AE AE AE
WatertightnessEN 12154ENV 13050
StaticDynamic
RE 1650 Pa250 Pa750 Pa
RE 1650 Pa250 Pa750 Pa
RE 1350 Pa
Resistanceto wind load EN 13116
Permitted loadIncreased load
2 kNm2
3 kNm2
2 kNm2
3 kNm2
2 kNm2
3 kNm2
Impact resistanceEN 14019
E5 I5 E5 I5
Increased require-ments in accordance with Cahier 3228 du CSTB Meacutethode dlsquoessai de choc sur verriegravere Weight 50 kgHead 24 m
Glass weight le 670 kg le 670 kg le 670 kg
Burglar resistanceDIN EN 1627
RC2 RC2
the test was carried out using a water volume of 34l(m2min) - above the amount required by the standard
Fire protection approval
System width 60G30 facade 5 mm sealing heightF30 facade 5 mm sealing height
Approval Z-1914-1283Approval Z-1914-1280
bull The outer seal of the clamping strip is screwed di-rectly on to the timber construction
bull The homogeneous glazing system satisfies all tech-nical and aesthetic standards
bull The certificate lsquoMullion and transom facade com-ponents to passive house standardrsquo was issued for the Stabalux H system widths 50 and 60 mm
S T A B A L U X
Stabalux H System 310718 5
Stabalux H
Certifications authorisations CE mark (Section 9)
The tests we have carried out provide contractors and planners with certainty as well as the ability to use the test results and product passports For example they might use this information to issue the CE mark
PermeabilitySafety
bull The Stabalux sealing geometry prevents moisture ingress
bull Condensation is guided away in a controlled man-ner
bull Stabalux offers slotted and overlapping sealing sys-tems for vertical glazing Overlapping systems have been tested for inclined facades up to 20deg
bull Seal flaps increase the safety and impermeability of the installation on vertical glazing
bull For roof glazing a special Stabalux sealing system with offset sealing sections is used This keeps the supporting structure level during planning and pro-duction processes
bull Sealing the transom rebate allows flat roofs to be created with an incline of ge 2deg
bull Creation of the required drainage takes place at the construction site by pushing together the seals in the facade or slotting together the offset sealing sections in the facade or roof
InsulationThermal Separation (Section 9)
The Stabalux System H has excellent thermal properties A heat transfer coefficient of Uf for frames of up to 06 W(m2) are achieved
Noise insulation of the glass facade (Section 9)
The noise insulating properties of a facade depend on a variety of factors each of which affects the properties in a different way The task of the planner is to expert-ly select the optimum design on a case-by-case basis Different combinations of frame profiles glazing systems and noise reducing glass have vastly different effects on noise insulation Investigations and measurements per-formed by us are just examples of a huge range of possi-bilities and serve only as a guideline
Fire protection (Section 9)
Outstanding fire protection properties are achieved by small additions to the system and the use of fire-resistant glass The Stabalux H in G 30 and F 30 have general ap-provals by the building authorities in Germany in accord-ance with DIN 4102 Part 13
The following applies to fire-resistant glass follow-ing authorisation
bull Mandatory use of Stabalux stainless steel pressure strips or Stabalux stainless steel cover strips
bull Identical sealing geometries individual seal types (different materials) must be selected according to the authorisation
bull All requirements defined in the authorisation must be adhered to
Burglar resistance (Section 9)
The Stabalux System H has burglar resistant properties The test was performed according to DIN EN 1627 Fa-cades in resistance class RC2 can be mounted on the system widths 50 mm 60 mm and 80 mmClass RC2 is classified as a moderate risk It is recom-mended for use in residential commercial and public buildingsVery few constructive measures are needed to achieve the burglary-resistant properties tested panels must also be installed The appearance of burglar-resistant facades using Stabalux System H is the same as the normal construc-tion All benefits of using threaded tubes are preserved The benefits of direct screw fittings in the central groove are preserved
System properties 111
System
S T A B A L U X
Stabalux H System 310718 6
Stabalux H
Stabalux SOL sun protection (Section 6)
Alongside the usual measures to prevent glare and excessive energy irradiation we offer a spe-cially developed system of outside lamellae Particular attention has been paid here to ensure attach-ment and assembly of these can be done easily with Stabalux systems whilst meeting architectural and cli-matic requirements Glass panes and clamping strips are not subject to any load from application of the sun pro-tection Assembly and sealing are simple and efficient
System properties 111
H_11_002dwg
System
S T A B A L U X
Stabalux H System 310718 7
Stabalux HSystem
1 Cover strip
2 Pressure profile
3 Outer seal
31 Outer seal convex polygonal glazing
32 Outer seal concave polygonal glazing
4 Glass panel
Vertical glazing transomVertical glazing mullion
System cross sections and inner seals - facade
12
3
4
5
6
7
1
2
3 4 51
6
7
112
12
31
4
52
6
7
5 Inner seal
51 Inner sealing using a seal flap
52 Inner seal convex polygonal glazing
53 Inner seal concave polygonal glazing
6 System screw fittings
7 Timber profile
Inner seal 5 mm tall 1 drainage level
Polygonal glazing mullions - concave 3deg - 10degPolygonal glazing mullions - convex 3deg - 15deg
H_11_003dwg
12
32
4
53
6
7
S T A B A L U X
Stabalux H System 310718 8
Stabalux HSystem
System cross sections and inner seals - facade 112
Inner seal 5 mm tall 1 drainage level
eg GD 5204
eg GD 6204
GD 8202 GD 8204
seals for different requirements have the same geometries They are distinguished by their different designations eg G30 or F30 to match the corresponding classifications and fire-resistant glass
System 50 mm
System 60 mm
System 80 mm
Mullion
Mullion
Mullion
Transom
Transom
TransomH_11_004dwg
GD 5201
GD 6210 Polygonalconvex
eg GD 6202
GD 6211 Polygonalconcave
S T A B A L U X
Stabalux H System 310718 9
Stabalux HSystem
1 Cover strip
2 Pressure profile
3 Outer seal
4 Glass panel
Vertical glazing transom -1st levelVertical glazing mullion - 2nd level
System cross sections and inner seals - facade
12
3
4
5
6
7
1
2
3 4 51
6
7
112
5 Inner seal 10 mm
51 Inner sealing using a seal flap 10 mm
6 System screw fittings
7 Timber profile
Inner seal 10 mm tall 2 overlapping drainage levels
H_11_003dwg
tested system for vertical facades and facades with an incline up to 20deg
S T A B A L U X
Stabalux H System 310718 10
Stabalux HSystem
System cross sections and inner seals - facade 112
Inner seal 10 mm tall 2 overlapping drainage levels
System 50 mm upon request
System 50 mm
System 60 mm
System 80 mm
Mullions - 2nd level
Mullions - 2nd level
Mullions - 2nd level
Transom - 1st level
Transom - 1st level
Transom - 1st level
H_11_004dwg
GD 5205
GD 6206 GD 6303
GD 8303GD 8206
S T A B A L U X
Stabalux H System 310718 11
Stabalux HSystem
112
1 Cover strip
2 Pressure profile
3 Outer seal
4 Glass panel
Vertical glazing transom - 2nd levelVertical glazing main mullion - 3rd level
System cross sections and inner seals - facade
12
3
4
5
6
7
1
2
3 4 51
6
7
12
3
4
52
6
7
5 Inner seal 12 mm main mullion
51 Inner seal using a seal flap
52 Inner seal 12 mm secondary mullion
6 System screw fittings
7 Timber profile
Inner seal 12 mm tall 3 overlapping drainage levels
Vertical glazing secondary mullion - 1st level
H_11_003dwg
tested system for vertical facades and facades with an incline up to 20deg
S T A B A L U X
Stabalux H System 310718 12
Stabalux HSystem
System 50 mm
System cross sections and inner seals - facade 112
Inner seal 12 mm tall 3 overlapping drainage levels
Transom - 2nd level
System 60 mm
Main mullion - 3rd level Secondary mullion - 1st level
System 80 mm
Transom - 2nd levelMain mullion - 3rd level Secondary mullion - 1st level
Transom - 2nd levelMain mullion - 3rd level Secondary mullion - 1st level
System 80 mm upon request H_11_004dwg
GD 5314 GD 5315 GD 5317
GD 6314 GD 6315 GD 6318
GD 8314 GD 8315 GD 8318
S T A B A L U X
Stabalux H System 310718 13
Stabalux HSystem
113
1 Cover strip
2 Pressure profile
3 Outer seal
4 Glass panel
5 Inner seal 10 mm rafter
51 Inner seal 10 mm transom
Angled glazing transomInclined glazing rafter
12
3
4
5
6
7
1
2
3
4
516
7
6 System screw fittings
7 Timber profile
8 Hold-down clamp
9 Washer
10 All weather silicone seal
11 Rope seal
Inner seal 10 mm tall 2 overlapping levels
H_11_003dwg
System cross sections and inner seals - roof
Angled glazing transom ge 2deg inclinationAngled glazing rafter ge 2deg inclination1
2
3
4
5
6
7
89
4
51
67
11
10
S T A B A L U X
Stabalux H System 310718 14
Stabalux HSystem
System cross sections and inner seals - roof 113
Inner seal 10 mm tall 2 overlapping levels
Transom - 1st levelRafter - 2nd level
Rafter - 2nd level
Rafter - 2nd level
Transom - 1st level
Transom - 1st level
System 50 mm
System 60 mm
System 80 mm
H_11_004dwg
GD 5205
GD 6206
GD 5207
GD 6208
GD 8208GD 8206
S T A B A L U X
Stabalux H System 310718 16
Stabalux HSystem
Cover strips and outer seals
Aluminium - concealed screw fittings
114
Seals for stainless steel pressure or cover strips satisfy different requirements with the same geometry Refer to the designation eg G30F30 fire protection WK burglar resistance
1)
2)
3)
4)
5)
The corresponding sections ie the general building approval must be adhered to if specific requirements are placed in the facade in regard to fire protection burglar resistance
Use screws without sealing washerOL 5022 possibly with PA washer Z 0033
System 80 mm upon request
The geometry of the clipping process is different for the 50 60 and 80 mm widths
H_11_005dwg
S T A B A L U X
Stabalux H System 310718 17
Stabalux HSystem
Cover strips and outer seals
Stainless steel - concealed screw fittings
114
Aluminium - visiblescrew fittings
Stainless steel - visiblescrew fittings
Flat cover stripDL 5073DL 6073
H_11_005dwg
S T A B A L U X
Stabalux H System 310718 18
Stabalux HSystem
Cover strips and outer seals
Wood covering strips
114
H_11_006dwg
System 60 System 80
Wooden cover strips can be easily mounted to mullions and transoms using aluminium top or lower bars The pressure profile UL5003UL6003UL8003 acts as a clamping stripAssembly apply the two-piece GD 1903 outer seal to the upper strip attach to the system using screws Divide the OL 1903 into 80 mm long pieces and attached cen-trally using 3 screws to the wooden cover strip at 300 mm intervals and then clip to the upper strip
(Please see section 125 on assembling the outer seal)
Transom
Mullion
Set the wooden upper strip in the transom with an in-cline of 5deg
Example System 50 mm
UL5003
GD1903 (2-teilig)
OL1903
UL6003
UL8003
System 50
S T A B A L U X
Stabalux H Processing notes 310718 19
Stabalux HProcessing notes
Wood type and quality
The wooden load-bearing substructure is used for mount-ing the glazing and must meet all load and suitability re-quirements The profile dimensions and choice of mate-rials are key The type of wood chosen depends on the client architect andor processor
All wood materials are produced using wood types per-mitted by the current Eurocode 5 (DIN EN 1995-1) stand-ard Alongside the mature solid wood sections and lam-inated solid timbers facade construction is increasingly using a multi-layer construction method Due to its stabil-ity against deformations we recommend using plywood sections The following minimum requirements must be met for all wooden materialsbull Softwood strength class C24bull Laminated timber strength class GL24hbull For fireproof glazing pay attention to the specifica-
tions given in the relevant authorisationsThe use of comparable hardwoods is also permitted
Spruce fir C16 800
Pine larch spruce fir C24 1100
Douglas fir southern pine C30 1200
Western Hemlock C35 1300
Yellow Cedar C40 1400
Oak teak keruing D30 1100
Beech D35 1200
Beech azalea intsia D40 1300
Angelique (Basralocus) D40 1300
Azobeacute (Bongossi) D60 1700
Laminated timber made using wood from class
C24 GL24h 1160
C30 GL28h 1260
C35 GL32h 1370
C40 GL36h 1470
Laminated veneer
Kerto Q 1000-1050
Kerto S 1380
Kerto T 1000
Multiplex sheets
(plywood) 900-1600
The woods and values mentioned here are examples for guidance only
Exact values for your choice should be determined with the supplier and
according to applicable standards
Material information 121
Wood typeStrength class Elastic modulus
E0mean [kNcm2]
Seal profiles
Stabalux seals are organic natural rubber materials based on EPDM and conform to the DIN 7863 standard non-cellular elastomer sealing profiles for window and facade construction Compatibility with contact media should tested by the processor particularly when using plastic glazing and making structural joints with non-Stabalux products Fire seals are special products their specific data are filed with DIBt (German Centre of Com-petence for Construction)Sealing the rebate with all weather silicone seal is pos-sible
All weather silicone seal
Only certified materials may be used for sealing the re-bate with all-weather silicone Pay attention to all infor-mation provided by the manufacturer and the sealing work must be carried out by trained persons It is recom-mended that a licensed and certified specialist contrac-tor is hired for this purpose We further refer you to the DIN 52460 standard and IVD data sheets (Trade Associ-ation for Sealants)The compatibility of the materials is particularly impor-tant when using all-weather silicone In this case the compatibility of the sealant with the edge bonding of the glass and the backfill of the joints If self-cleaning glass is used the compatibility must be established in advance Glass sealants and edge bonding must be UV-resistant The incline of roofs should also be taken into account Information about UV-resistance can be requested from the manufacturer Silicone edge bonding generally pro-vides better UV-resistance than polysulfide-based ma-terials The advantage of silicone lies in its high vapour sealing properties which is particularly useful when using more volatile argon fillings Highly elastic weatherproof and UV-resistant seals meet the widest range of demands for reliable joints
Aluminium profiles
The aluminium profiles we supply are generally made from EN AW 6060 according to DIN EN 573-3 T66 ac-cording to DIN EN 755-2
S T A B A L U X
Stabalux H Processing notes 310718 20
Stabalux HProcessing notes
Material information 121
Coating the aluminium
Alongside anodic oxidation with the corresponding pre-treatment conventional coating methods such as air-drying multi-layer coating systems (wet coating) or thermosetting coatings (stove enamelling powder-coat-ing) can be used By using different mass distribution longitudinal shadow formation is possible with cover strips DL 5073 and DL 6073 Resulting actions are to be taken with the agreement of the coater
Longitudinal expansions in aluminium pro-files exposed to temperature stress
When cutting the cover and pressure profiles from alu-minium allowance should be made for temperature-in-duced longitudinal expansion The theoretical rod lengths ℓ should be shortened by
∆ℓ = αT ∆T ℓ
Example
∆ℓ = 24 10-6 40 1000 = 096 asymp 10 mm
αT asymp 24 10-6 1K Coefficient of thermal expansion for aluminium
∆T = 40 K Assumed temperature difference of al-uminium dependent on the colour and amount of solar radiation
ℓ = 1000 mm Rod length
∆ℓ asymp 1 mm Longitudinal expansion
further examples
∆ℓ = 24 10-6 60 1000 = 144 asymp 15 mm∆ℓ = 24 10-6 100 1000 = 24 asymp 25 mm
A rod with a system length of ℓ = 1000 mm should be shortened by 1 mm for a temperature difference of ∆T = 40 degC A rod of length ℓ = 3000 mm should be shortened by 3 mm For ∆T = 100 degC (often occurs in roof areas and south-facing facades) a rod of length ℓ = 1000 should be shortened by 25 mm
Rod length ℓ (mm) Temperature differ-
ence ∆T
Longitudinal expan-
sion ∆ℓ (mm)
1000 40degC 1
3000 40degC 3
1000 60degC 15
3000 60degC 45
1000 100degC 25
3000 100degC 75
Note
We recommend shortening the pressure profile by asymp 25 mm per ℓ = 1000 mm of length When doing so ensure to use the correct length of the outer seal When using cover strips in roof area it is recommended that holes for screwing on the cover strip are created with a diameter of d = 9 mm
Stainless steel profile
Pressure profiles and bottom sections of cover strips are made from 14301 stainless steel for visible screw fit-tings The surface conforms to classification 2B accord-ing to DIN EN 10088-2Cover strips using 14401 stainless steel The surface has a ground finish (grain 220 DIN EN 10088-2) The upper parts of the cover strip are made from 14571 stainless steel with ground finish (grain 240 DIN EN 10088-2) To protect the surface a film has been applied to one side whose edge can be seen on narrow side
Other items
All system items are produced according to applicable standards
Maintenance and care
The information sheets WP01 ndash WP05 from the Associa-tion of Window and Facade Producers (VFF) must be ob-served The address can be found in the address section Further information can be found in section 90 - Cleaning Maintenance
S T A B A L U X
Stabalux H Processing notes 310718 21
Stabalux H
System with direct screw fittings in the central groove
The type of wood chosen depends on the client architect and processor according to the following considerations
bull Softwood strength class C24bull Laminated timber strength class GL24hbull For fireproof glazing pay attention to the specifica-
tions given in the relevant authorisations
The use of comparable hardwoods is also permitted
We prescribe the necessary geometry around the seal support and in regard to the screw fittings required for our systems
Profile design 122
H_12_001dwg
Processing notes
Note
Worked grooves and edges must be free of shavings and imperfections
When using hardwood cylinders for glass supports GH 5053 and GH 5055 you must not make a groove in the cylinder The sealing base is removed around the cylinder
System 50
Profile processing Profile processing Profile processing
System 60 System 80
S T A B A L U X
Stabalux H Processing notes 310718 22
Stabalux H
Mullion-transom joint 123
Principle
bull Attachment of the transoms to the mullions must match the static base system of the mullion-tran-som design selected
bull Load bearing capacity and suitability are to be stat-ically demonstrated on site In doing so the design and technical processing experiences of the pro-cessor can be considered
bull Designs are to be chosen that can be considered regular joints for the intended purpose and meet the standards of the Eurocode 5 (DIN EN 1995) or are covered by general building approvals
bull The solutions presented by us are purely examples A range of designs are possible depending on the shape of the wood and different jointing options
H_12_002dwg
H_12_003dwg
Processing notes
S T A B A L U X
Stabalux H Processing notes 310718 23
Stabalux H
Stabalux AK-H S T A B A L U X
Riegelverbinder fuumlr HolzsystemeTypen
AK-H_32_005-1
Processing notes
RHT transom connector for wood systems
bull The RHT links wooden mullion and transom con-structions with a visible width of 50ndash80 mm
bull The two identical connector parts are mounted to mullions and transoms and linked with one another by pushing together the transoms
bull A connecting screw locks the connection in all three dimensions
bull The clamping foot on the transom inner seal must be disengaged in the area of the mullion-transom joint
Transom assembly
Mullion assembly
123
1
1
2
2
Mullion-transom joint
Central connecting bolt3
3
Transoms pushed together
Transom assembly Mullion assembly
The connecting bolt tensions the transom holder in all three dimen-sions
H_12_005dwg
H_12_004dwg
bull When attaching the clamping strips to the system take care to place the screws outside of the mul-lion-transom connection in order to avoid a colli-sion with the RHT connector screw fittings
bull The central wooden groove in the transom should begin approx 80 mm before the end of the tran-som
bull The glass support should be mounted approx 100 mm from the end of the transom to prevent any collision between the RHT screws in the transom
S T A B A L U X
Stabalux H Processing notes 310718 24
Stabalux HProcessing notes
RHT for wood systems - types
bull The range comprises 7 RHT types with different lengths and therefore different load-bearing capac-ities
bull The screw group comprising a larger number of screws (shown in the diagram) is positioned toward the front edge of the mullion and transom (glass side)
123
Mullion-transom joint
H_12_004dwg
Connector typesStandard screw fittings
Front edge profile
S T A B A L U X
Stabalux H Processing notes 310718 25
Stabalux HProcessing notes
Assembly on the mullion
bull The front edge of the connector lies 6 mm behind the front edge of the mullion
bull Z 0126 screws in length 550 are always used for attaching to horizontal timbers (mullions)
123
Mullion-transom joint
H_12_004dwg
Mullion assembly
Fron
t edg
e pr
ofile
Front edge profile
Left mullion with connector eg RHT 8094
Screw fittings mullion Z 0126
Right mullion with connector eg RHT 8094
bull When using hard woods or when working near the edge of the wood a hole of 3 mm diameter should be pre-drilled
bull The number of screws varies for standard screw fit-tings depending on the connector type (Refer to the previous page)
bull A combination of screws can be used and calculat-ed case-by-case
S T A B A L U X
Stabalux H Processing notes 310718 26
Stabalux H
Assembly on the transom
bull A recess with 12-125 mm depth is milled into the (front of the) transom
bull The milling dimensions are With x length x depth 40 x (RHT length + 6) x 12-125 (mm)bull The milling can be carried out using a standard
hand routerbull The front edge of the connector lies 6 mm behind
the front edge of the transom
123
Mullion-transom joint
H_12_004dwg
Connector type Transom
depth
R (mm)
Milling di-
mensions
L (mm)
RHT 8040 55-73 46
RHT 8058 74-91 64
RHT 8076 92-109 82
RHT 8094 110-145 100
RHT 8130 146-181 136
RHT 8166 182-235 172
RHT 8220 236-300 226
Transom assembly
Processing notes
Screw fitting transom Z 0127
Front edge profile
Fron
t edg
e pr
ofile
Transom with connector left front side eg RHT 8094
Transom with connector right front side eg RHT 8094
Front-side transom groove depth 12-125 mm
Transom depth R
Milling dimensions L
12 - 125
bull Z 0127 screws in length 580 are always used for attaching to longitudinal timbers (transoms)
bull When using hard woods or when working near the edge of the wood a hole of 3 mm diameter should be pre-drilled
bull The number of screws varies for standard screw fit-tings depending on the connector type (Refer to the previous page)
bull A combination of screws can be used and calculat-ed case-by-case
S T A B A L U X
Stabalux H Processing notes 310718 27
Stabalux HProcessing notes
123
Mullion-transom joint
Constructing the timber joint
bull The transom is pushed in from the inside to the outside
bull Screwing in the greased connecting screw allows the locked mullion-transom joint to be released in all three dimensions if necessary This tightens the transom evenly to the mullion along the entire depth
Example RHT 8130 top and side views
H_12_004dwg
Linked connectors
bull If the transom depth is over 300 mm 2 connectors can be used along the entire length to improve ten-sioning of the mullion-transom joint
bull The connector type RHT 8220 is always used on the front edge of the profile Another connector can be fitted on the RHT 8220 as required
bull A peg is inserted and positioned correctly by the into the connecting screw in order to improve ten-sioning of the second connector
bull The maximum load-bearing capacity of the RHT 8220 applies in regard to resilience
bull By request a connector longer than 220mm can be produced The maximum load-bearing capacity of the RHT 8220 is also valid hereSelf-tapping screws 50 x
50 mm Self-tapping screws 50 x 80 mm
Tran
som
dep
th
Metal threaded screw 55 x 120 mm
S T A B A L U X
Stabalux H Processing notes 310718 28
Stabalux HProcessing notes
Sealing system principle general information about glazing seals
The Stabalux sealing system consists of the outer and inner sealing sections
bull The outer sealing section has the primary function of preventing the ingress of moisture At the same time the sealing section provides a flexible support for the glass panes
bull The inner sealing section acts to protect the inner space water guiding section and elastic glass sup-ports from moisture and vapour
Both sealing sections must perform this function over a long period of time
Seals should be adapted at the building site but can be pre-cut to length in the factory and inserted into the sup-port profiles ie the camping strips with proper consid-eration of the assembly instructions for the seals Always ensure that seals are not bearing any loads once installed and are firmly pressed onto joints All joints should be sealed as per the following descriptions
Fire seals
Like all organic materials elastomers are combustible if they are exposed to high temperatures for a sufficient period in the presence of oxygen Inorganic substances are added to the seals in order to reduce their combus-tibility The proportion of inorganic substances positively influences the flame-retardant properties but they also make the products harder and reduce their mechanical strength It is therefore imperative when fitting fire seals to ensure that the structure is absolutely flat and that the sealant joints connect preciselyDepending on their geometry it may be necessary to stretch fire seals into a mountable form ie to leave them to settle into their mountable form once they have been removed from their rolled packaging Warm temperatures also make the seals more malleable and therefore facili-tate installation
Pressure equalisation and controlled drainage
Pressure equalisation is generally achieved via openings at the base head and ridge points Should additional ven-tilation be required in the area of the transom (eg where panes are only supported on 2 sides or where transom length is ℓ ge 2 m) then this ventilation should be created by placing holes into the cover strip andor using notch-es on the lower sealing lips of the outer seal
The pressure equalisation openings also serve toextract moisture The inner sealing section is formed in such a way that when the joints are properly sealed any moisture that occurs and does not dissipate via the rebate ventilation will drain away downwards In facades water is guided via the seal flap into the mullions There is a choice between using tested sealing systems with between 1 and 3 levels With inclined glazing with 2 drainage levels the higher sealing section of the transom overlaps the lower mullion seal These principles must be consistently implemented down to the lowest point of the glazing so that the water-guiding level of the structure carries moisture to the outside Film is placed beneath the seals accordingly It must be ensured that the film will last for a long time
Tips for laying seals 124
H_12_009dwg
S T A B A L U X
Stabalux H Processing notes 310718 29
Stabalux HProcessing notes
Inner sealing section
The structure of the inner sealing section is different for vertical facades and facades with an inward incline up to 20deg as well as roof glazing
Inner sealing for vertical glazing and glazing with an inward incline up to 20deg
bull 5 mm high butt jointed seals with a drainage sec-tion for vertical facades (α=0deg)
bull 10 mm high seals with two drainage sections to safely guide away any moisture or condensation to the outside These seals are created by overlapping the seal joints in which the higher sealing section of the transom goes underneath the lower level of the mullion These seals can be used for vertical facades and facades with an incline up to 20deg
bull 12 mm high seals follow the same principle but allow an additional third drainage section for an in-termediate mullion
bull The shaped seal flap protects the vulnerable area of the rebate and ensures that moisture is drained away via the vertical or up to 20deg inwards inclined mullions
Inner seals for glazed roofs
bull A special seal geometry for glazed roofs also allows for two-level stepped drainage The 10 mm high seals are laid with overlapping joints
Some basic information for sealing and sticking down Stabalux seals
bull All joints and seal penetrations must be water-proofed with the exception of the Stabalux screw fittings
bull Gasket joints should always be sealed using Stabalux sealant regardless of whether they are butt joints or overlapping (We recommend Stabalux connecting paste Z 0094 Pay attention to the directions provided by the manufacturer)
bull For difficult to seal places we recommend first us-ing a fixing adhesive such as the Stabalux quick fix-ing glue Z 0055
bull Before gluing ensure all surfaces are free from moisture dirt and grease
bull Weather conditions such as snow and rain prevent an effective seal
bull Temperatures below +5 degC are not suitable for fix-ing seals
bull The hardened connecting paste should not prevent level support of glass
124
Tips for laying seals
S T A B A L U X
Stabalux H Processing notes 310718 30
Stabalux HProcessing notes
Assemble the inner seal on vertical facade glazing - 1 level join
bull The horizontal transom seals are laid continuous-ly across the mullion-transom joints Ensure here that the clamping feet of the horizontal seal are re-leased around the mullion
bull Mullion seals are butt jointed to the transom seals bull The clamping foot on the transom seal must be dis-
engaged in the area of the mullion-transom joint if wood connectors types RHT 0041 to RHT 0131 are used
bull The seal flaps should be released to a width of 10-15 mm at the mullion joint
Inner seal mullions Inner seal transoms
inner continuous transom seal
inner jointed mullion seal
Seal flap in mullion area released
125
1
1
2
2
Seals - Facade
H_12_007dwg
eg GD 6204eg GD 6202
bull The protruding length of the seal flap should be re-moved at the perforation once glazing is complet-ed
bull In order to safely drain away moisture from tran-soms even at the edges of the facade the inner transom seals must be laid into the released mul-lion seals To release and remove the clamping feet we recommend using our release pliers Z 0078 for System 60 and Z 0077 for System 50
bull Ensure all joints are cleanly and solidly sealed Ex-cess sealant should be removed
S T A B A L U X
Stabalux H Processing notes 310718 31
Stabalux HProcessing notes
125
Seals - Facade
H_12_008dwg
Assemble the inner seal on vertical facade glazing - 1 level join
Release edge mullion seal near transom
The seal flap should always cover the inset ldquoerdquo of the filling element (eg glass panes panels)
Gasket joints
Gasket joints
e gt glass inset
NoteAny joints in the transom seal that are re-quired due to the delivered length should be fitted with an intermediate mullion and put together like in point A
Intermediate mullions
Edge mullions
Transom
Transom
edge mullion seal
around a transom
near transom
B
A
S T A B A L U X
Stabalux H Processing notes 310718 32
Stabalux HProcessing notes
Assembly of the inner seal for vertical facade glazing and facade glazing with an incline of up to 20deg - 2 overlapping sec-tions
bull The 10 mm high seals can be divided across their height to allow a simple overlap at critical transom joints
bull The vertical seals for the mullions (2nd drainage section) are laid continuously
bull The transom seals overlap the mullion sealsbull Moisture and condensation is guided away via the
seal flap of the transom seal (1st drainage section) to the main mullion
bull The seal flap must always cover the inset depth of the glass panes and filling element
Inner seal mullions Inner seal transoms
inner continuous mullion sealinner overlapping transom seal engaged
Seal flap should always cover the filling element
125
1
1
2
2
Seals - Facade
H_12_007dwg
eg GD 6303eg GD 6206
Seal gasket joints
B
bull The protruding length of the seal flap should be re-moved at the perforation once glazing is complet-ed
bull All joints must be sealed Before laying seals we recommend completely coating the support surfac-es and edges with Stabalux connection paste
bull Ensure all joints are cleanly and solidly sealed Ex-cess sealant should be removed Absolutely no un-evenness in the glass support surface must occur from applying sealant too thickly
S T A B A L U X
Stabalux H Processing notes 310718 33
Stabalux HProcessing notes
125
Seals - Facade
H_12_008dwg
Assembly of the inner seal for vertical fa-cade glazing and facade glazing with an in-cline of up to 20deg - 2 overlapping sections
The seal flap should always cover the inset ldquoerdquo of the filling element (eg glass panes panels)
Transom
edge mullion seal around a transom upper section to the width of the transom seal
Transom seal separate lower section at length of the overlap ldquoerdquo
Mullion seals
around a transom upper section
to the width of the transom seal
Transom
Transom seal separate lower section at length of the overlap ldquoerdquo
B
A
e gt glass inset
Seal gasket jointsoverlapping joints
Seal gasket jointsoverlapping joints
e gt glass inset
Intermediate mullions
Edge mullions
S T A B A L U X
Stabalux H Processing notes 310718 34
Stabalux HProcessing notes
Assembly of the inner seal for vertical facade glazing and facade glazing with an incline of up to 20deg - 3 overlapping sec-tions
bull Optionally Stabalux seals with three offset water channels can be used in the facade area which safely drain any moisture or condensation to the outside
bull The 12 mm high seals can be divided across their height to allow a simple overlap at critical second-ary mulliontransom joints andor transompri-mary mullion joints
Inner seal main mullion Inner seal transoms
inner continuous mullion sealinner overlapping transom seal engaged
Seal flap should always cover the filling element
125
1
1
22
Seals - Facade
H_12_007dwg
eg GD 6318eg GD 6314
Seal gasket joints
C
B
Inner seal secondary mullion
Seal gasket joints
3
Secondary mullion seal overlaps the transom seal
3
eg GD 6315
bull The vertical seals for main mullions (3rd drainage section) drainage section) are laid continuously
bull The transom seals overlap the main mullion sealsbull Along a transom seals must be laid continuouslybull Moisture and condensation is guided away via the
seal flap of the transom seal (2nd drainage section) to the main mullion
S T A B A L U X
Stabalux H Processing notes 310718 35
Stabalux HProcessing notes
125
Seals - Facade
H_12_008dwg
Assembly of the inner seal for vertical facade glazing and facade glazing with an incline of up to 20deg - 3 overlapping sections
The seal flap runs continuously through
Transom
Cut secondary mullion seal belowthe lower transom section to the length of the overlap
Transom seal Connection to the secondary mullioncut the uppermost section to width of the transom seal
bull The seal flap must always cover the inset depth of the glass panes and filling element
bull The protruding length of the seal flap should be re-moved at the perforation once glazing is complet-ed
bull Vertical seals on the secondary mullion are butt jointed beneath the upper transom The seal flap of the upper transom runs continuously in the upper part of the joint
bull Drainage of the secondary mullion (1st drainage section) is achieved by overlapping the seals of the secondary mullion with the seal of the upper tran-som
Secondary mullion seal overlaps the transom seal
Secondary mullionTransom
BA
D
Edge mullions
Secondary mullion butt jointedat the topseal gasket joint
Seal gasket jointsoverlapping joints
e gt glass inset e gt
glas
s in
set
S T A B A L U X
Stabalux H Processing notes 310718 36
Stabalux HProcessing notes
125
Seals - Facade
H_12_008dwg
Assembly of the inner seal for vertical fa-cade glazing and facade glazing with an in-cline of up to 20deg - 3 overlapping sections
The seal flap should always cover the inset ldquoerdquo of the filling element (eg glass panes panels)
Main mullionTransom
Main mullion seal around a transom upper section to the width of the transom seal
Transom seal separate lower section along the length of the overlap
bull All joints must be sealed Before laying seals we recommend completely coating the support surfac-es and edges with Stabalux connection paste
bull Ensure all joints are cleanly and solidly sealed Ex-cess sealant should be removed Absolutely no un-evenness in the glass support surface must occur from applying sealant too thickly
C
Seal gasket jointsoverlapping joints
Seal gasket jointsoverlapping joints
e gt glass inset e gt glass inset
S T A B A L U X
Stabalux H Processing notes 310718 37
Stabalux HProcessing notes
125
Seals - Facade
Assembly of the outer seal for vertical glass facades
bull As well as gently clamping the glass in place the outer sealing system has the primary task of pro-tecting the rebate against moisture ingress
bull The outer sealing sections must be completely sealed except for the necessary openings for pres-sure equalisation and condensation dissipation
bull The outer mullion seals are laid continuously and the transom seals are joined
bull Sealant joints are to be laid flat with a slight excess in dimensions Exact specifications depends on the situation in which the system is used
bull Tightly fitted sealant joints can be implemented without fixing the outer seal of the mullion-transom joint in vertical facades
outer continuous mullion sealouter jointed transom seal
eg GD 6054 outer transom seal with different heights of sealing lip
H_12_009dwg
H_12_010dwg
Rod length ℓ
(mm)
Temperature difference
∆T
Longitudinal expansion
∆ℓ (mm)1000 40degC 13000 40degC 31000 60degC 153000 60degC 451000 100degC 253000 100degC 75
Expansion of aluminium profiles
When using the RHT connector take care when fitting screws to ensure that the screws are placed away from the mullion-transom connec-tion
bull The flag for the inner transom joint in combination with the outer seal creates additional safety
bull The seal flap should be separate at its perforations to match the thickness of the glass in order that this is clamped down and concealed under the out-er seal
bull Different heights of sealing lips on the outer seal bridge the height different created by the seal flap in the outer sealing section
bull When mounting the clamping strips be aware of aluminium profile expansion (see section 121 - Material information)
S T A B A L U X
Stabalux H Processing notes 310718 38
Stabalux HProcessing notes
125
Seals - Facade
Assembly of the outer seal for facade glaz-ing with an inwards inclineup to 20deg
bull If the facade is inclined inwards from the vertical (max permitted incline 20deg) the open ends of the outer transom seals must be closed up using Butyl
bull When constructing inwardly inclined facades (up to max 20deg) if flat cover strips are used in the tran-soms (eg DL 5059 DL 6059 DL 5061 DL 6061 DL 5067 DL 6067 DL 5071 DL 6071 DL 6043 DL 6044) and flat pressure and cover profiles (eg UL 6005 with OL 6066) then the central hollows at each end must be sealed with silicone
H_12_009dwg
When using flat cover strips on in-wardly inclined facades (up to max 20deg) the central hollow at each end should be sealed with silicone
Seal open ends of the transom seals with Butyl on inwardly inclined facades (up to max 20deg)
Trim the seal to be slightly larger than required
S T A B A L U X
Stabalux H Processing notes 310718 39
Stabalux HProcessing notes
126
Seals - roof
Assemble the inner seal for roof glazing
bull Optionally Stabalux seals with offset water chan-nels can be used in the facade area which safely drain any moisture or condensation to the outside
bull The 10 mm high seals can be divided across their height to allow a simple overlap at critical transom joints
bull The transom seals are geometrically shaped so as to create a condensation channel
bull This channel drains from the overlapping transom joint in the rafters
remove the lower perforated part and the clamping foot on the transom seal of the at around 15 mm
remove the upper perforated part on the rafter seals
length of transom seal = transom length + asymp 13 mm per side
Gasket joints
1
2
3
H_12_011dwg
H_12_012dwg
bull Along a transom seals must be laid continuouslybull All joints must be sealed Before laying transom
seals we recommend completely coating the sup-port surfaces and edges Absolutely no unevenness in the glass support surface must occur from apply-ing sealant too thickly
1
23
S T A B A L U X
Stabalux H Processing notes 310718 40
Stabalux HProcessing notes
Assembly of the outer seal for for glazed roofing
bull These are laid in fundamentally the same way as for vertical glazing Split seals such as GD 1932 are not suitable for transom seals in roofs Split seals can only be installed in mullions in combination with slab insulation Each installation situation will differ to some degree and always check how well sealed it is
bull For cross joints we recommend using our self-ad-hesive stainless steel sealing plates with butyl coat-ing Z 0601 for System 60 and Z 0501 for System 50 The stainless steel sealing plates are 35 mm wide and are attached to the edge of the glass panes parallel to the mullion axis
bull Butyl tape is not suitable as a sealing tape between the glass and the outer seal
bull The outer mullion seals are laid continuously and the transom seals are joined
126
Detail of sealing plate Z 0501 = 35 x 40 mm
Z 0601 = 35 x 50 mm
Attention The sealing plates must be placed central to the transom axis
For glass insets of 15 mm the first screw fittings for the transom cover strip begin 30 mm from the end of the cover strip
Seals - roof
H_12_013dwg
H_12_014dwg
bull Sealant joints are to be laid flat with a slight excess in dimensions Exact specifications depends on the situation in which the system is used
Notebull Horizontal clamping strips prevent the free run off
of rain water and dirtbull Cover strips and upper strips with angled edges re-
duce the build up of water in front of the clamping strip
bull Shorten the clamping strips on the transoms by 5 mm in the area of the transom joins in order to im-prove drainage of water Gasket joints however are to be laid flat with a slight excess in dimensions Open ends of transom clamping strips (upper and cover strips) should be sealed
S T A B A L U X
Stabalux H Processing notes 310718 41
Stabalux HProcessing notes
Assembly of the outer seal for for inclined glazed roofing ge 2deg
bull These are laid in fundamentally the same way as for vertical glazing Split seals around the mullions in roofs such as GD 1932 are only suitable when using in combination with slab insulation Each installa-tion situation will differ to some degree and always check how well sealed it is
bull To ensure free run-off of rain water and dirt on roofs inclined ge 2deg we recommend not using clamping strips in the transoms
bull Instead the rebate spaces should be sealed with all-weather silicone
bull Implementation of the outer sealing section around mullions is done in the same way as conventional roofs with an inclination up to 15deg
126
Seals - roof
H_12_013dwg
Tips for all roof designs
When using aluminium cover strips on roofs take account of the expansion factor as a result of the high degree of heat absorption when selecting the length to use Equal-ly the use of single-piece cover strips should be carefully considered In this case it is recommended that holes for screwing on the cover strip are created with a diameter of d = 9 mm (refer to Section 121 - Material information)
bull At the high point or ridge area of the inclined glaz-ing it is recommended to also install and outer seal-ing section in the transoms with clamping strips
bull Only certified sealing materials may be used for sealing the transom rebate space
bull Pay attention to all information provided by the manufacturer and the sealing work must be carried out by trained persons It is recommended that a licensed and certified specialist contractor is hired for this purpose We further refer you to the DIN 52460 standard and IVD data sheets (Trade Asso-ciation for Sealants)
For wide spans we recommend using concealed screw fittings when selecting the clamping strips (lower + up-per strip) This is the preferred option for rafters Unused holes in the pressure profile must be sealedSome roof areas such as the eaves see the use of sev-eral different materials (glass silicone aluminium sheets ) each with different expansion coefficients To avoid the formation of cracks aluminium sheets should be in-stalled with expansion joints
S T A B A L U X
Stabalux H Processing notes 310718 42
Stabalux HProcessing notes
Assembly of the outer seal for for inclined glazed roofing ge 2deg
bull The compatibility of the materials is particularly important when using all-weather silicone In this case the compatibility of the sealant with the edge bonding of the glass and the backfill of the joints If self-cleaning glass is used the compatibility must be established in advance
bull Glass sealants and edge bonding must be UV-re-sistant The incline of roofs should also be taken into account Information about UV-resistance can be requested from the manufacturer Silicone edge bonding generally provides better UV-resistance than polysulfide-based materials The advantage lies in its high vapour sealing properties which is particularly useful when using more volatile argon fillings
126
Seals - roof
H_12_013dwg
1 Hold-down clamp
2 Silicone washer
3 Silicone sealant seal around the
clamp
4 All weather silicone seal
Transom inclined glazing ge 2deg inclination with all-weather silicone and slab insulation
12
3
6
89
7
Transom inclined glazing ge 2deg inclination with all-weather silicone and round sec-tion rope seal
12
3
6
89
7
bull Highly elastic weatherproof and UV-resistant seals meet the widest range of demands for reliable joints
bull If the silicone joint is created without additional mechanical safety devices ensure that the glass is supported from two sides only Selective installa-tion of holding clamps can be used to achieve all round support for glass edges
bull The clamps are made from stainless steal with silicone washers and are screwed in the same as pressure strips The hold-down clamp should be ad-ditionally sealed around the perimeter with silicone sealant The design is based upon the dimensions of the glass as documented in the glass static anal-ysis
51 Round section rope seal
52 Slab insulation
6 Glass filling element
7 Inner seal 10 mm transom
8 timber profile
9 System screw fittings
4
51
4
52
S T A B A L U X
Stabalux H Processing notes 310718 43
Stabalux HProcessing notes
Assembly of the outer seal for for inclined glazed roofing ge 2deg
bull The joint width and the joint height for Stabalux System H are defined as w x h = 20 mm x 10 mm These measurements should always checked when selecting the sealing material and adapted if neces-sary Generally w h = 2 1 - 35 1
bull PE round section seals or Stabalux slab insulation is suitable as a back fill material
bull Silicone sealant should be applied before laying the mullion seals and cover strips
bull After the specified setting time the seals and screw fittings can be installed in the areas around mullions
126
Seals - roof
Rafters with clamping strips
Transom with clampAll weather silicone seal
and round section rope seal
Transom with clampAll weather silicone seal
and slab insulation
Transom with all-weather silicone and round section rope
seal
Joint design according to manufacturers specificationsgenerally w h = 2 1 - 35 1
bull The mullion-transom joints around the clamps are then sealed
bull Before applying this second layer the joints around transoms must have completely set
S T A B A L U X
Stabalux H Processing notes 310718 44
Stabalux HProcessing notes
Steps for implementing the seal with silicone
bull Test silicone sealant and glass edge bondings and other contact surfaces (eg panels) for suitability
bull Clean edge bonding adhesive impurities from the surfaces to which sealant will be applied following manufacturerrsquos directions
bull Fill the joints as per the joint dimensions using only non-water absorbent closed-cell PE profiles (no damage to the edge bonding)
bull The remaining space in the glass rebate must be large enough that the pressure is able to equalise and a drainage level is available
bull Clean any impurities from the surfaces to which the sealing material is to be applied and any adjacent surfaces according to manufacturerrsquos directions
126
Seals - roof
System screw fittings
Hold-down clamp
Washer made from silicone
Silicone sealant seal
around the clamp
All weather silicone seal
Silicone sealant
Rafter
Transom
bull Be particularly aware of any adjacent metal com-ponents Prime according to manufacturerrsquos direc-tions
bull Seal joints without leaving any cavities or bubbles Mask any adjacent components in advance where necessary
bull Smooth out the filled joints using the manufactur-errsquos smoothing agents and conventional tools with as little water as possible Remove adhesive tape
bull If two or more reactive sealants are used in com-bination the first must completely set before the second is applied
S T A B A L U X
Stabalux H Processing notes 310718 45
Stabalux HProcessing notes
Glass inset
bull Glass industry guidelines must be observedbull The glass inset is generally 15 mmbull An increase to 20 mm has a beneficial effect on the
heat transfer coefficient Uf of the frame structure bull Special conditions such as fire protection glass
must be adhered to the terms are stated in the general building approval
Glass inset and glass support 127
RebateGlass inset
H_12_015dwg
S T A B A L U X
Stabalux H Processing notes 310718 46
Stabalux HProcessing notes
Glass support types and choosing the glass support
The Stabalux H system uses three different types and techniques for attaching glass supports
bull Glass support GH 5053 and GH 5055 with hanger bolts
bull Glass support GH 5053 and GH 5055 with hard-wood cylinders and bolts
bull Crossing point reinforcement RHT with cylinder head screws empty 65 mm Crossing point reinforce-ment are used exclusively on fire-protection glaz-ing The precise details are stated in the general building approval
The glass supports used are determined by the type of wood glass construction and glass weight (see section 9) A rigid mullion-transom connection is required ie no twisting of the transom may occur at the connection that would cause further sinking of the glass support
Glass inset and glass support 127
Mounting the glass supports
bull Positioning the glass supports and glazing accord-ing to glass industry guidelines and guidelines of the Institute for Window Technology
bull The weight of the glass panes is distributed via the glass supports attached to the transoms
bull Glass supports should be attached at a distance of 100 mm from the end of the transom When doing so avoid a collision with the cover strip screw fit-tings at the end of the transom
Glazing blocks
bull Glazing blocks must be compatible with the edge bonding of the insulated glass panes
bull They should be stable under constant pressure and be able to withstand loads aging and temperature changes
bull It is important that the blocks ensure circumferen-tial pressure equalisation and that drainage of con-densation is not obstructed as well as allowing the glass edges to be offset and small design toleranc-es to be accommodated
bull If the length of the glass support is more than 100 mm blocks should be placed along the entire length of the glass support to ensure equal load distribution
H_12_016dwg
Positioning the glass support approx 100 mm from the end of the transom
S T A B A L U X
Stabalux H Processing notes 310718 47
Stabalux HProcessing notes
127
Glass inset and glass support
Glass support GH 5053 Attachment with hanger bolts
A-A
Glass support GH 5053 with hanger bolts
bull The certified system components consist of the glass support GH 5053 and 2 hanger bolts empty 10 mm with a 45 mm wood thread and a shaft of a different length
bull The hanger bolts are screwed directly into the tim-ber at intervals of 80 mm A empty 7 mm hole needs to be pre-drilled for this purpose
bull Screw fittings should be vertical to the transom axis
bull The depth for hanger bolts is at least 45 mm meas-ured from the front edge of the timber
H_12_016dwg
H_12_017dwg
Glass support GH 5053
Block
Block
glass support
Inner seal
Hanger bolt
Minimum screw depth from measured from front edge of timber
Hanger bolts empty 10 mmpre-drilled at empty 7 mm
bull For glass support GH 5053 the required depths are delivered corresponding to the thickness of the glass and placed onto the hanger bolts
bull Blocks must be placed under the glass panes along the entire length of the glass supports
bull Details of the approved pane weights geometries and classification of system components are pro-vided in section 9
S T A B A L U X
Stabalux H Processing notes 310718 48
Stabalux HProcessing notes
127
Glass inset and glass support
Glass support GH 5055 with hanger bolts
bull Based on the test results for the system compo-nent GH 5053 a load bearing model was designed and the suitability of the GH 5055 glass support calculated
bull Installation is done the same way as GH 5053 but using three screws spaced 80 mm apart
bull Details of the approved pane weights geometries and classification of system components are pro-vided in section 9
Glass support GH 5055 Attachment with hanger bolts
A-A
H_12_016dwg
H_12_017dwg
Glass support GH 5055
Block Hanger bolts empty 10 mmpre-drilled at empty 7 mm
Block
glass support
Inner seal
Hanger bolt
Minimum screw depth from measured from front edge of timber
S T A B A L U X
Stabalux H Processing notes 310718 49
Stabalux HProcessing notes
127
Glass inset and glass support
Row
Total glass thickness tGlass (mm)
for vertical glazing
Hanger bolts 2) Glass supports 1)
Inner seal height GH 5053 GH 5055 Depth (mm)
5 mm 10 mm 12 mm1 4 5 6 7 Z 0371 3) Z 0371 4) Z 0371 5) GH 0081 Section 9
2 8 9 Z 0371 3) Z 0371 4) Z 0371 5) Section Section 12
3 10 11 Z 0371 3) Z 0371 4) Z 0371 5) Section Section 144 12 13 Z 0371 3) Z 0371 4) Z 0371 5) Section Section 165 14 15 Z 0371 3) Z 0371 4) Z 0371 Section Section 186 16 17 Z 0371 3) Z 0371 Z 0371 Section Section 207 18 19 20 Z 0371 Z 0371 Z 0371 GH 0082 Section 228 22 23 Z 0371 Z 0371 Z 0372 GH 0083 GH 0851 269 24 25 Z 0371 Z 0372 Z 0372 GH 0084 GH 0852 2810 26 27 Z 0371 Z 0372 Z 0372 GH 0085 GH 0853 3011 28 29 30 Z 0372 Z 0372 Z 0372 GH 0886 GH 0854 3212 31 32 33 Z 0372 Z 0372 Z 0372 GH 0887 GH 0855 3513 34 35 36 Z 0372 Z 0372 Z 0373 GH 0888 GH 0856 3814 37 38 39 Z 0372 Z 0373 Z 0373 GH 0889 GH 0857 4115 40 41 42 Z 0372 Z 0373 Z 0373 GH 0890 GH 0858 4416 43 44 45 Z 0373 Z 0373 Z 0373 GH 0891 GH 0859 4717 46 47 48 Z 0373 Z 0373 Z 0373 GH 0892 GH 0860 5018 49 50 51 Z 0373 Z 0373 Z 0373 GH 0893 GH 0861 5319 52 53 54 Z 0373 Z 0373 - GH 0894 GH 0862 5620 55 56 57 Z 0373 - - Section Section 5921 58 59 60 Z 0373 - - Section Section 6222 61 62 63 Z 0373 - - Section Section 6523 64 Z 0373 - - Section Section 68
Item Total length (mm)
Shaft length (mm)
Thread length (mm)
Z 0371 70 25 45Z 0372 77 32 45
Z 0373 90 45 45
Classification of system components
Table 1 Vertical glazing | System 50 60 80 | Hanger bolts
Hanger bolts
1) Cut from GH 5053 or GH 5055
2) Generally The screw-in depth (ET) for hanger bolts = 45 mm thread length (GL) measured from the front edge of
the timber
For glasses tGlas lt 20 mm observe the permissible visible shaft length from the front edge of the wood
If necessary adjust the visible shaft length over the screw-in depth
3) Permissible visible shaft length from the front edge of the wood = glass thickness tGlas (mm) + 3 mm
4) Permissible visible shaft length from the front edge of the wood = glass thickness tGlas (mm) + 7 mm
5) Permissible visible shaft length from the front edge of the wood = glass thickness tGlas (mm) + 9 mm
TI-H_92_003dwg
Total length
Thread lengthShaft length
S T A B A L U X
Stabalux H Processing notes 310718 50
Stabalux HProcessing notes
127
Glass inset and glass support
RowTotal glass thickness tGlass (mm)
for inclined glazing 1) Hanger bolts 2)Glass supports 3)
GH 5053 GH 5055 Depth (mm)1 16 17 18 Z 0371 GH 0081 Section 92 19 20 Z 0371 Section Section 123 21 22 Z 0372 Section Section 144 23 24 Z 0372 Section Section 165 25 26 Z 0372 Section Section 186 27 28 Z 0372 Section Section 207 29 30 Z 0372 Section Section 228 31 32 Z 0372 GH 0082 Section 249 33 34 Z 0372 GH 0083 GH 0851 2610 35 36 Z 0373 GH 0084 GH 0852 2811 37 38 Z 0373 GH 0085 GH 0853 3012 39 40 41 Z 0373 GH 0886 GH 0854 3213 42 43 44 Z 0373 GH 0887 GH 0855 3514 45 46 47 Z 0373 GH 0888 GH 0856 3815 48 49 50 Z 0373 GH 0889 GH 0857 4116 51 52 53 Z 0373 GH 0890 GH 0858 4417 54 Z 0373 GH 0891 GH 0859 47
Classification of system components
Table 2 Inclined glazing | System 50 60 80 | Hanger bolts
Glass support GH 5053
Glass support GH 5055
1) Accounting for a 10 mm inner seal
2) The depth for hanger bolts = 45 mm thread length measured from the front edge of the timber
3) Cut from GH 5053 or GH 5055
TI-H_92_005dwg
Depth
Depth
S T A B A L U X
Stabalux H Processing notes 310718 51
Stabalux HProcessing notes
127
Glass inset and glass support
Glass support GH 5053 Attachment with bolts and hardwood cylinders
Glass support GH 5053 and GH 5055 with pins and hardwood cylinders
bull Certified system components consist of glass sup-port GH 5053 and GH 5055 with pins and hard-wood cylinders
bull Depending on the width of supports 2 or 3 bolts with a diameter of 10 mm are needed
bull The bolt length should be adapted to the thickness of the glass
bull To anchor the bolts in place 50 mm wooden cylin-ders with a outer diameter of 30 mm and an axial core of empty 10 mm are solidly glued into the timber
H_12_016dwg
H_12_017dwg
A-A
bull Additionally holes with a depth of 50 mm and empty of 30 mm are to be drilled into the transom profile ver-tical to the transom axis with 80 mm spacing
bull The glue or adhesive used must be suitable and must not swell
bull The bolts should be hammered in along the entire cylinder depth of 50 mm
bull For glass supports GH 5053 and GH 5055 the re-quired depths are delivered corresponding to the thickness of the glass and placed onto the hanger bolts
Glass support GH 5053
Bolt empty 10 mmHardwoodcylinder Hardwood
cylinder
Block
Block
glass support
Inner seal
Bolt
Hardwood cylinderInner diameter 10 mmOuter diameter 30 mmfirmly gluedto the transom profile
Hardwood cylinder not grooved removed the sealing base around the cylinder
S T A B A L U X
Stabalux H Processing notes 310718 52
Stabalux HProcessing notes
127
Glass inset and glass support
Glass support GH 5055 Attachment with bolts and hardwood cylinders
Glass support GH 5053 and GH 5055 with pins and hardwood cylinders
bull The central groove in the Stabalux H System must not be milled into the wooden cylinder
bull When fitting the seals the sealing base must there-fore be removed around the cylinder
bull Blocks must be placed under the glass panes along the entire length of the glass supports
bull Details of the approved pane weights geometries and classification of system components are pro-vided in section 9
H_12_016dwg
H_12_017dwg
A-ABolt empty 10 mmHardwood
cylinder Hardwoodcylinder
Block
glass support
Block
Inner seal
Bolt
Hardwood cylinderInner diameter 10 mmOuter diameter 30 mmfirmly gluedto the transom profile
Hardwood cylinder not grooved removed the sealing base around the cylinder
Glass support GH 5055
S T A B A L U X
Stabalux H Processing notes 310718 53
Stabalux HProcessing notes
127
Glass inset and glass support
Row
Total glass thickness tGlass (mm)
for vertical glazing
Hardwood cylinder
Bolt Glass supports 1)
Inner seal heightGH 5053 GH 5055 Depth (mm)
5 mm 10 mm 12 mm1 8 9 Z 0073 - - Z 0047 Section Section 12
2 10 11 Z 0073 - Z 0047 Z 0047 Section Section 14
3 12 13 Z 0073 - Z 0047 Z 0047 Section Section 164 14 15 Z 0073 Z 0047 Z 0047 Z 0047 Section Section 185 16 17 Z 0073 Z 0047 Z 0047 Z 0048 Section Section 206 18 19 Z 0073 Z 0047 Z 0048 Z 0048 Section Section 227 20 21 Z 0073 Z 0047 Z 0048 Z 0048 GH 0082 Section 248 22 23 Z 0073 Z 0047 Z 0048 Z 0048 GH 0083 GH 0851 269 24 25 Z 0073 Z 0048 Z 0048 Z 0048 GH 0084 GH 0852 2810 26 27 Z 0073 Z 0048 Z 0048 Z 0048 GH 0085 GH 0853 3011 28 29 30 Z 0073 Z 0048 Z 0048 Z 0049 GH 0886 GH 0854 3212 31 32 33 Z 0073 Z 0048 Z 0049 Z 0049 GH 0887 GH 0855 3513 34 35 36 Z 0073 Z 0048 Z 0049 Z 0049 GH 0888 GH 0856 3814 37 38 39 Z 0073 Z 0049 Z 0049 Z 0049 GH 0889 GH 0857 4115 40 41 42 Z 0073 Z 0049 Z 0049 Z 0051 GH 0890 GH 0858 4416 43 44 45 Z 0073 Z 0049 Z 0051 Z 0051 GH 0891 GH 0859 4717 46 47 48 Z 0073 Z 0049 Z 0051 Z 0051 GH 0892 GH 0860 5018 49 50 51 Z 0073 Z 0051 Z 0051 Z 0051 GH 0893 GH 0861 5319 52 53 54 Z 0073 Z 0051 Z 0051 - GH 0894 GH 0862 5620 55 56 57 Z 0073 Z 0051 - - Section Section 5921 58 59 60 Z 0073 Z 0051 - - Section Section 6222 61 62 63 Z 0073 Z 0051 - - Section Section 6523 64 Z 0073 Z 0051 - - Section Section 68
Classification of system components
Table 3 Vertical glazing | System 50 60 80 | Hardwood cylinders amp bolts
Bolt
1) Cut from GH 5053 or GH 5055
TI-H_92_005dwg
Hardwood cylinder Z 0073
Item Bolt length (mm)Z 0047 70Z 0048 80Z 0049 90Z 0051 100
S T A B A L U X
Stabalux H Processing notes 310718 54
Stabalux HProcessing notes
127
Glass inset and glass support
RowTotal glass thickness tGlass (mm)
for inclined glazing 1)Hardwood cylinder Bolt
Glass supports 2)
GH 5053 GH 5055 Depth (mm)1 20 21 22 Z 0073 Z 0048 Section Section 14
2 23 24 Z 0073 Z 0048 Section Section 16
3 25 26 Z 0073 Z 0048 Section Section 18
4 27 28 Z 0073 Z 0048 Section Section 20
5 29 30 Z 0073 Z 0049 Section Section 226 31 32 Z 0073 Z 0049 GH 0082 Section 247 33 34 Z 0073 Z 0049 GH 0083 GH 0851 268 35 36 Z 0073 Z 0049 GH 0084 GH 0852 289 37 38 Z 0073 Z 0049 GH 0085 GH 0853 3010 39 40 41 Z 0073 Z 0049 GH 0886 GH 0854 3211 42 43 44 Z 0073 Z 0051 GH 0887 GH 0855 3512 45 46 47 Z 0073 Z 0051 GH 0888 GH 0856 3813 48 49 50 Z 0073 Z 0051 GH 0889 GH 0857 4114 51 52 53 Z 0073 Z 0051 GH 0890 GH 0858 4415 54 Z 0073 Z 0051 GH 0891 GH 0859 47
Classification of system components
Table 4 Inclined glazing | System 50 60 80 | Hardwood cylinders amp bolts
Glass support GH 5055
1) Accounting for a 10 mm inner seal
2) Cut from GH 5053 or GH 5055
TI-H_92_005dwg
Glass support GH 5053
Depth
Depth
S T A B A L U X
Stabalux H Processing notes 310718 55
Stabalux HProcessing notes
Fastenings
bull The fastenings for the Stabalux H system allow fill-ing elements to be easily secured
bull The clamping strips are connected to the wooden profile using Stabalux system screws Stainless steel 14301 DIN EN 10088 is the material used to produce screws for the Stabalux system
bull Depending on the type of screw fittings selected special 4 mm vulcanised EPDM washers are avail-able
bull Screws in suitable lengths are available for all com-mon glass thicknesses The screw length is deter-mined from a table
bull The distance for screw fittings is variable The max-imum distance is a = 250 mm
bull The distance from the edge for the first screw fit-ting should generally be in the region of 30 mm le a le 80 mm The placement of the glass supports and the choice of mullion-transom connection should also be taken into account
bull The clamp connection is exclusively exposed to tensile forces The clamping strips are connect-ed to the wooden profile using Stabalux system screws To determine the stress limit (maximum tensile force) and permitted tensile forces for the connection the conditions in the relevant gener-al building approval and the Eurocode 5 (DIN EN 1995-1) series of standards shall apply
bull Screw fittings are applied using a conventional electric screwdriver with depth stop This guaran-tees uniform application of pressure The depth setting should be chosen so that a sealing washer compression of 15 - 18 mm is achieved
bull An electric screwdriver with adjustable torque can be used as an alternative The required torque is approx 5 Nm The required torque is influenced by the relatively large scatter when dealing with wood and the variable influence of friction due to different drilling depths It is therefore advisable to determine the setting on a test piece and to check compression of the sealing washer
Screw fittings 128
Concealed screw fittings
bull Assembly is facilitated by selecting pre-drilled pres-sure strips (UL 5009-L UL 6009-L and UL 8009-L slot 7 x 10 mm a = 125 mm) with clippable upper strips The remaining pressure strips should be pro-vided with a round hold of d = 8 mm The func-tionality of the clip procedure can be checked after the first upper strip has been pushed against the pressure profile
Note
When using aluminium cover strips on roofs take account of the expansion factor as a result of the high degree of heat absorption when selecting the length to use In this case it is recommended that holes for screwing on the clamping strip are created with a diameter of d = 9 mm Equally the use of single-piece cover strips should be carefully considered
Visible screw fittings
bull Cover strips should be drilling with a round hole of d = 8 mm
Note
(see Note on covered screw fittings)
Visible recessed screw fittings
bull When creating visible recessed screw fittings a stepped bore is required The lower part of the cov-er strip should be drilled with a d = 7 mm diameter The upper part of the cover strip needs a d = 11 mm diameter for the screw head It is recommended to install a washer (PA washer eg Z 0033) with all screw fittings
S T A B A L U X
Stabalux H Processing notes 310718 56
Stabalux HProcessing notes
Fastenings
128
Screw fittings
Concealed screw fittings
Stabalux system screws with cylinder headd = 10 mm und 4 mm sealing gasket
eg Z 0331
Visible screw fittings
Stabalux system screws with cylinder headd = 10 mm und 4 mm sealing gasket
eg Z 0331
Visible recessed screw fittings
Stabalux system screws with cylinder head d = 10 mm with additional PA washer eg Z 731 with Z 33
eg Z 0331 eg Z 0731 with Z 0033
Attention
The calculation to determine screw lengths for the the calculation to determine screw lengths is
Glass thickness - 3 mm + inner seal (5 10 ie 12 mm) + 16 mm + e
e = statically required screw-in depth
Calculating the screw length for DL 5073 DL 6073
H_12_018dwg
H_12_019dwg
H_12_020dwg
S T A B A L U X
Stabalux H Processing notes 310718 57
Stabalux HProcessing notes
128
Calculating the screw length
System width 50 60 mm System width 80 mm 1)
H_12_021dwg
Screw fittings
1) Delivered upon request
Representation and item numbers are examples for System 60 System width 50 are analogous
S T A B A L U X
Stabalux H Processing notes 310718 58
Stabalux HProcessing notes
128
Wood screws for Stabalux H
Z0327 cylinder head screw 65 x 70 mm
Z0329 cylinder head screw 65 x 80 mm
Z0331 cylinder head screw 65 x 90 mm
Z0333 cylinder head screw 65 x 100 mm
Z0335 cylinder head screw 65 x 110 mm
Z0337 cylinder head screw 65 x 120 mm
Z0339 cylinder head screw 65 x 130 mm
Cylinder head screw empty 10 mm with hex socket | without sealing gasket
Z0727 cylinder head screw 65 x 70 mm
Z0729 cylinder head screw 65 x 80 mm
Z0731 cylinder head screw 65 x 90 mm
Z0733 cylinder head screw 65 x 100 mm
Z0735 cylinder head screw 65 x 110 mm
Z0737 cylinder head screw 65 x 120 mm
Z0033 PA washer empty 10 x 15 mm
Cylinder head screw empty 10 mm with hex socket | with sealing gasket
Screw fittings
H_12_019dwg
S T A B A L U X
Stabalux H Processing notes 310718 59
Stabalux HProcessing notes
Tips for laying the cover strip DL 5073 DL 6073
We assume that this cover strip will be used with glass panes that are supported on two sides and the recessed screw head is concealed In this case a cylinder head screw with inner hex is to be used eg Z 731 When cov-ering with a 2 mm cover plug Z 89 a bore depth of 7 mm is calculated
Depending on the precision of the bore it should be de-cided on case by case basis if any slight changes to this depth are necessary The cover plug Z 0089 does not need to be glued in place but may be levelled using lev-elling compound
Coating the cover strip
Profile production (aluminium extrusion moulding) with different mass distribution is extremely difficult Length-wise shadow formation may result Resulting actions are to be taken with the agreement of the coater
Flat cover strip DL 5073 DL 6073 129
glass support
eg GH 5053
+bolts and hardwood
cylinders
H_12_022dwg
Intersections
Due to the special shape of the strip (the material ex-tends into the rebate) there is no closed sealing section available at intersections We therefore recommend plac-ing particular attention to ensure tightness of the joints and fill will Stabalux connecting paste Z 0094
Glass supportsblocking
Special attention should be given to dimensional pro-portions To support the outer pane a sufficiently large glazing block must be installed that can carry the load to safely ensure the glass load is distributed effectively
DL 6073 Cover plug Z 0089GD 6174 Screw eg Z 0731
S T A B A L U X
Stabalux H Processing notes 310718 60
Stabalux HProcessing notes
Use of slab insulation
bull Using insulation blacks significantly reduces heat dissipation
bull The highly effective slab insulation has a perma-nently adhesive HOT-MELT
bull Depending on the situation where they are used insulation blocks can be directly applied to the cov-er strippressure profile or placed into the rebate over the screw fittings and pushed into position with the cover strippressure profile
1210
Slab insulation
Insulation block Width(Rebate)
Height
Z 0605 slab insulation 2042 20 mm 42 mm glass thickness from 44 mm
Z 0606 slab insulation 2026 20 mm 26 mm glass thickness from 28 mm
Z 0607 slab insulation 3042 30 mm 42 mm glass thickness from 44 mm
Z 0608 Insulation block 3026 30 mm 26 mm glass thickness from 28 mm
H_12_023dwg
Note
bull The use of slab insulation with cover strips DL 5073 DL 6073 should be tested for each individual sit-uation
bull 2-piece outer seals are always used with slab insu-lation blocks
bull With system width 80 mm and a 40 mm rebate 2 x 20 mm wide slab insulation blocks can be com-bined (40 mm wide insulation blocks available upon request)
bull for a glass inset of 15 mm outer seal GD 1932 bull for a glass inset of 20 mm outer seal GD 1932
Correctly position the seal flapwhen installing the insulation block
S T A B A L U X
Stabalux H Processing notes 310718 61
Stabalux HProcessing notes
1210
Slab insulation
Examples
H_12_023dwg
Z 0607Insulation block 3042
Z 0608Insulation block 3026
Z 0605Insulation block 2042
Z 0606Insulation block 2026
Z 0605Insulation block 2042
GD 1932
GD 1932
GD 1932
GD 1932
GD 1932
GD 1932
Z 0606Insulation block 2026
S T A B A L U X
Stabalux H Design 310718 62
Stabalux HDesign
Special design
Glass structures that partially refrain from using visible cover strips are considered special designs
These designs do not conform to the intended uses of the system No guarantees are made for eg quality of seals durability and structural stability Responsibility here lies entirely with the company implementing the design
Based on our experience we recommend paying close at-tention to the points made on the following pages during planning and implementation
131
Pane support variants
Mullion-transom structure 2-sided cover strip
H_13_001dwg
Mullion-transom structurewith transom cover strips 1)
1) Seals with 1 2 or 3 sections are possible
2) Use of mullion seals with 1 section in mullions and transoms
Section A-A Section C-C
Section B-B Section D-D
Mullion-transom structurewith mullion cover strips 2)
S T A B A L U X
Stabalux H Design 310718 63
Stabalux HDesign
131
Pane support variants
Transom structure mullion structure 2-sided cover strip
Vapour seal
When using this type of structure it is important to be aware that any loss of contact pressure can affect the room-side permeability There is an increased risk of con-densation build up in the rebate
vertical clamping strips
The glass supports should be placed to below the outer pane and sealed with it
horizontal clamping strips
Ventilation and condensation drainage is achieved via a recess in the lower sealing lip in the centre of the outer seal or at one third intervals
H_13_001dwg
Transom structure
Section A-A Section C-C
Section B-B Section D-D
Mullion structure
S T A B A L U X
Stabalux H Design 310718 64
Stabalux H
Requirements for special designs 1 Vapour seal
The room-side level of glazing must have the best possible vapour seal In this regard the vapour dif-fusion properties of the silicone sealant to be used should be tested Ensure that there are no permea-ble areas around concave cross joints
2 Rebate ventilation pressure equalisation and condensation drainage
Systems with partially sealed rebate represent a limitation to rebate ventilation Check on a case-by-case basis that no damage will be caused by standing condensation It is especially critical that designs with sealed vertical joints are evaluated To allow ventilation of the horizontal rebate we recom-mend installing a suitable vertical ventilation space Alternatively ventilation can be achieved using the outer joints
3 Weatherproofing
The outward facing seals must be watertight In cross joints it is especially important to ensure a firm join between the Stabalux profile seal and the silicone joints We recommend sealing up to the outer edge of the glass before mounting the cover stripsWe would like to once again emphasise that our profile seals will not make a permanent bond with commonly used silicone sealants A seal can only be created at contact points through permanent appli-cation of pressure
4 Mechanical strength screw fittings
Ensure screw fittings are sufficiently planned for Special attention should be given to the effects of wind suction and the reduced support
5 Glass weight distribution
Mechanical distribution of the weight of the glass panes through the structure must be ensured System glass supports can be used for existing horizontal transoms Designs using ldquoonlyrdquo mul-lions require special glass supports which carry the weight of the glass directly into the mullions
6 Glass sizing
Attention should be given to the reduced sup-port of panes when dimensioning the glass For example only the vertical or horizontal cov-er strips are effective in the event of wind suc-tion stresses or stress on the fall protection
7 Material compatibility
Compatibility of the silicone sealants with our profile sealants and the edge bonding of the glass must be ensured We recommend the exclusive use of tested silicone sealants from the whole-glass facades sec-tor Approval is usually given by the silicone manu-facturer
131
Pane support variants
H_13_001dwg
Design
S T A B A L U X
Stabalux H Design 310718 65
Stabalux H
System cross sections 132
Vertical glazing mullionsconcealed screw fittings
Vertical glazing transomsdivided outer seal for height compensation
Vertical glazing transoms visible recessed screw fittings
Vertical glazing mullionsvisible screw fittings
Vertical glazing transoms concealed screw fittingsStainless steel bottom strip fire seals
Vertical glazing transoms visible screw fittingsStainless steel cover stripfire seals
Inclined glazing mullionsconcealed screw fittings
Inclined glazing transomsvisible screw fittings
1
2
3
4
5
6
7
8
1 2
3 4
5 6
7 8
Examples
H_13_002dwg
Design
S T A B A L U X
Stabalux H Design 310718 66
Stabalux H
Creating facade corners
At exposed areas such as glass facade corners it is par-ticularly important to ensure sufficient heat insulation in order to avoid the creation of thermal bridges and pre-vent a build-up of condensation Thermal current calcula-tions provide information about the actual heat loss
133
System details
Special seal allow a polygon shaped arrangement of the facade mullions For convex glass surfaces an angle be-tween 3deg and 15deg can be freely chosen For concave glass surfaces the angle can vary between 3deg and 10deg
Facade polygon
Outer corner Inner corner
Geometrically check the feasibility Recommendation Use for system 60 and above
H_13_003dwg
H_13_004dwg
H_13_005dwg
Design
Calculation of screw length withconsideration of the angle
ATTENTIONAdhere to the minimum glass inset
S T A B A L U X
Stabalux H Design 310718 67
Stabalux H
133
System details
Eaves with glass roof connection
bull Depending on the construction of the transoms a design with or without rain gutters and the choice of stepped glazing or closable cover strips gives us different variants for implementation
bull All options require condensation and moisture to be drained away at the eaves
Design with stepped glazing
bull With a stepped glazing design it is important to se-lect a UV-resistant edge bonding for the glass This edge bonding systems usually silicone-based are quite permeable to gases and are therefore unable to achieve the required high values for sound and heat insulation of conventional systems and require additional sealing around the edges
Example 1
Design with stepped glazing
H_13_006dwg
Design
bull Our thermal calculations show that stepped glass panes compared to covered glass edges have a much less favourable isothermal movement
bull Stepped glass panes must also be statically meas-ured according to their reduced hold against wind suction
bull The additional thermal loads that occur in stepped glass panes should countered by the use of pre-ten-sioned glass (TVG ESG) for the outer panes
bull Stepped glass panes should be preferred for flatter inclined roofs as water can drain away at the eaves unhindered
S T A B A L U X
Stabalux H Design 310718 68
Stabalux HDesign
133
Eaves with glass roof connection Design using cover strips
bull Horizontal pressure strips prevent the free run off of rain water and dirt
bull Cover strips with angled edges reduce the build up of water in front of the cover strip
bull The outer sealing level on glass roofs must also be thoroughly sealed
bull In combination with our butyl clad stainless steel panels glazing with pressure strips on 4 sides achieves a higher level of safety
bull Make sure that the inner sealing section provides guaranteed drainage for condensation
bull To improve drainage and heat-induced expansion cover strips should be shortened by 5 mm at tran-som joints Gasket joints however are to be laid flat with a slight excess in dimensions Open ends of the transom cover strips must be sealed
Note
Due to the increased thermal stresses in the roof we rec-ommend using concealed screw fitting when choosing clamping strips for larger system lengths and in rafters Unused holes in the pressure profile must be sealed
Example 2
Design using cover strips
System details
H_13_007dwg
S T A B A L U X
Stabalux H Design 310718 69
Stabalux HDesign
133
Eaves with glass roof connection Design with gutter
bull The gutter must be able to take its own weight and mounted in such a way that stresses from its own weight water and ice will not lead to deformations and directly apply a load to the glazing
bull Overflowing water must not be able to get inside the structure Alongside the gutter-shaped outer rafter seal the moisture barrier installed over the guide plate also acts to drain away condensation
Example 3
Design with gutter
System details
H_13_008dwg
S T A B A L U X
Stabalux H Design 310718 70
Stabalux H
H_13_009dwg
Design
133
Roof ridge design
bull When designing the ridge cap ensure that the raft-er cover strips are pulled under the ridge cap
System details
S T A B A L U X
Stabalux H Design 310718 71
Stabalux HDesign
134
Structural attachments
Structural attachment film baffles
bull Attachment of glazing to the building structure re-quires a well thought out approach
bull Moisture damage can occur if moisture condenses at any thermal bridges
bull Thermal bridges must be avoided and warm air from the inside spaces must not penetrate too deeply into the structure
bull The required moisture barriers must be installed as deeply as possible into the inner space using impermeable structural film baffles This prevents moisture penetration into the structure via conden-sation from the air inside
bull An additional foil to seal against rainwater must be permeable to moisture Only if this foil has a wa-ter vapour diffusion resistance value μ of max μ = 3000 can a dry structure be guaranteed in the transition zones
S T A B A L U X
Stabalux H Design 310718 72
Stabalux HDesign
134
Structural attachments
Facade base
bull Controlled drainage of the rebate space can only be ensured if the sealing sections overlap in such a way that no moisture can get under the seals and foils
bull Run foils under the transom seal to act as a mois-ture barrier and glue to the wooden structure In accordance with DIN 18195 the seal should be run at least 150 mm above the water-guiding layer
bull Attach foil with moisture barrier in accordance with the requirements of DIN 18195
Example 1
Mounting intermediate mullion to base plate
Drainage of the base area is achieved via the seal flap towards the outside In this case the seal flap around the mullion at the base should not be released For edge mullions ensure there is a corresponding seal placed (continuous transom seal up the to the end point) and a constructive design of the drainage section
H_13_010dwg
S T A B A L U X
Stabalux H Design 310718 73
Stabalux HDesign
134
Facade base
bull Rebate space ventilation is achieved via the open end of the vertical cover strips
bull Ensure the connection is impermeable to vapourbull Mullion mountings must be sufficiently statically
dimensioned Required axis and edge distances for anchoring the base plates and in the building struc-ture must be observed
Example 2
Mounting intermediate mullion to base plate
Where seal flaps are interrupted by joints filler rods in the joint must also be cut
Structural attachments
H_13_011dwg
S T A B A L U X
Stabalux H Design 310718 74
Stabalux HDesign
134
Structural attachments
Facade base
bull Heat insulation around the structural connection should be designed in such as way as to prevent cold bridges forming
bull Steel parts should also be provided with sufficient protection against corrosion even in concealed ar-eas
bull Weather-protection sheets should be used depend-ing on the requirements of the construction Suffi-cient rear ventilation must be ensured
Example 3
Attaching intermediate mullions at base plates
H_13_012dwg
S T A B A L U X
Stabalux H Design 310718 75
Stabalux HDesign
134
Structural attachments
Connection before intermediate floors
bull Depending on requirements mullions are designed as continuous multi-span transoms or separated at each floor
bull Reasons for separating mullions can include eg building settlement fire protection sound insula-tion etc
bull If the separation joint is intended to absorb expan-sion then as well as the required degree of freedom for mullions the ability for movement of integrated elements must also be ensured
bull The constructive design of the mullion joint and mounting should be chosen according to the stat-ically calculated base system and determines the
Example
Mullions separated at each floor
In this example distribution of horizontal and vertical loads is achieved at each floor through the existing floor structure
H_13_013dwg
choice and arrangement of fixed and movable bear-ings type of screw fittings structural connection parts and attachment to the concrete floor
bull With continuous mullions and a corresponding mount the multi-span support principle is in effect Sagging due to horizontal effects is lower The re-quired moment of inertia reduces for 2-span sup-ports with the same span length compared to the 1-span support by a factor of 0415 However a ten-sion and stability analysis should be carried out
S T A B A L U X
Stabalux H Design 310718 76
Stabalux HDesign
134
Ceiling connection
bull Structural connections should take account of any movement that may occur
bull As well as temperature induced expansion in the facade all longitudinal expansions and movements of the affected components must be considered
bull Additional stresses from restraints must be avoid-ed
Structural attachments
H_13_014dwg
S T A B A L U X
Stabalux H Design 310718 77
Stabalux HDesign
134
Structural attachments
Facade connection to parapets
H_13_015dwg
S T A B A L U X
Stabalux H Design 310718 78
Stabalux HDesign
134
Structural attachments
Connection to structural eaves
bull This connection is suitable for glass roofs that are being installed as skylights in the structure These may be gabled roofs single pitch roofs pyramids or arched roofs
H_13_016dwg
S T A B A L U X
Stabalux H Design 310718 79
Stabalux HDesign
134
Structural attachments
Ridge connection to walls
bull When making ridge connections to walls permea-bility to moisture is particularly important Warm air with a high level of moisture gets into cooler zones of the inner sealing section where the design is not sufficiently sealed and can cause structural dam-age from penetrating into the connecting structure
bull Joint seals made from butyl-clad stainless steel plates (Z 0501 Z 0601) must be installed on the outside of joint areas
H_13_017dwg
S T A B A L U X
Stabalux H Design 310718 80
Stabalux HDesign
134
Structural attachments
Horizontal wall connection to heat insulation bonding system
H_13_018dwg
S T A B A L U X
Stabalux H Design 310718 81
Stabalux HDesign
135
Installing windows and doors
Mullion and transom facades and glass roofs from Stabalux are neutral with regards to the selection of in-sert elements All commonly available window and door systems made from steel aluminium wood or plastic can be used Frame profiles from the window and door man-ufacturerrsquos should be selected to match the chosen glass thickness If no profiles with a suitable insert rebate are available mountings may be used as shown in the fol-lowing examples Like with glass elements windows are set into the facade on glass supports padded and then secured against slippage
Insert window transom sectionSystem HUECK Series Lambda WS 075 IS
Insert window mullion sectionSystem HUECK Series Lambda WS 075 IS
H_13_019dwg
S T A B A L U X
Stabalux H Design 310718 82
Stabalux HDesign
135
Installing windows and doors
H_13_020dwg
Insert window transom sectionSystem HUECKSeries Lambda WS 075
Insert window mullion sectionSystem HUECKSeries Lambda WS 075
S T A B A L U X
Stabalux H Design 310718 83
Stabalux HDesign
135
Installing windows and doors
H_13_021dwg
Insert door outward transom sectionSystem HUECKSeries Lambda DS 075
Insert door outward transom sectionSystem HUECKSeries Lambda DS 075
Insert window mullion sectionSystem HUECKSeries Lambda WS 075
S T A B A L U X
Stabalux H Design 310718 84
Stabalux HDesign
135
Installing windows and doors
H_13_022dwg
Insert door inward in the transom sectionSystem HUECKSeries Lambda DS 075
Insert door inward in the transom sectionSystem HUECKSeries Lambda DS 075
S T A B A L U X
Stabalux H Design 310718 85
Stabalux HDesign
135
Installing windows and doors
H_13_023dwg
Insert door inward in the transom sectionSystem HUECKSeries Lambda DS 075
Insert-top-hung window mullion section System HUECKSeries Lambda 110
Insert-top-hung window transom section System HUECKSeries Lambda 110
S T A B A L U X
Stabalux H Design 310718 86
Stabalux HDesign
135
Installing windows and doors
H_13_024dwg
Sliding system mullion section System HUECKSeries Volato M
Sliding system transom sectionSystem HUECKSerie sVolato M
S T A B A L U X
Stabalux H Design 310718 87
Stabalux HDesign
135
Installing windows and doors
H_13_025dwg
Flush roof surface windowSystem HUECK-HARTMANNSeries 85E
Powered according tosystem specifications
S T A B A L U X
Stabalux H Design 310718 88
Stabalux HDesign
135
Installing windows and doors
H_13_027dwg
Insert window - transom sections wood windows
Insert window - mullion sectionwood windows
- Stabalux H
-
- System
-
- System properties
- System cross sections and inner seals - facade
- System cross sections and inner seals - roof
- Cover strips and outer seals
-
- Processing notes
-
- Material information
- Profile design
- Mullion-transom joint
- Tips for laying seals
- Seals - Facade
- Seals - roof
- Glass inset and glass support
- Screw fittings
- Flat cover strip DL 5073 DL 6073
- Slab insulation
-
- Design
-
- Pane support variants
- System cross sections
- System details
- Structural attachments
- Installing windows and doors
-

S T A B A L U X
Stabalux H System 310718 6
Stabalux H
Stabalux SOL sun protection (Section 6)
Alongside the usual measures to prevent glare and excessive energy irradiation we offer a spe-cially developed system of outside lamellae Particular attention has been paid here to ensure attach-ment and assembly of these can be done easily with Stabalux systems whilst meeting architectural and cli-matic requirements Glass panes and clamping strips are not subject to any load from application of the sun pro-tection Assembly and sealing are simple and efficient
System properties 111
H_11_002dwg
System
S T A B A L U X
Stabalux H System 310718 7
Stabalux HSystem
1 Cover strip
2 Pressure profile
3 Outer seal
31 Outer seal convex polygonal glazing
32 Outer seal concave polygonal glazing
4 Glass panel
Vertical glazing transomVertical glazing mullion
System cross sections and inner seals - facade
12
3
4
5
6
7
1
2
3 4 51
6
7
112
12
31
4
52
6
7
5 Inner seal
51 Inner sealing using a seal flap
52 Inner seal convex polygonal glazing
53 Inner seal concave polygonal glazing
6 System screw fittings
7 Timber profile
Inner seal 5 mm tall 1 drainage level
Polygonal glazing mullions - concave 3deg - 10degPolygonal glazing mullions - convex 3deg - 15deg
H_11_003dwg
12
32
4
53
6
7
S T A B A L U X
Stabalux H System 310718 8
Stabalux HSystem
System cross sections and inner seals - facade 112
Inner seal 5 mm tall 1 drainage level
eg GD 5204
eg GD 6204
GD 8202 GD 8204
seals for different requirements have the same geometries They are distinguished by their different designations eg G30 or F30 to match the corresponding classifications and fire-resistant glass
System 50 mm
System 60 mm
System 80 mm
Mullion
Mullion
Mullion
Transom
Transom
TransomH_11_004dwg
GD 5201
GD 6210 Polygonalconvex
eg GD 6202
GD 6211 Polygonalconcave
S T A B A L U X
Stabalux H System 310718 9
Stabalux HSystem
1 Cover strip
2 Pressure profile
3 Outer seal
4 Glass panel
Vertical glazing transom -1st levelVertical glazing mullion - 2nd level
System cross sections and inner seals - facade
12
3
4
5
6
7
1
2
3 4 51
6
7
112
5 Inner seal 10 mm
51 Inner sealing using a seal flap 10 mm
6 System screw fittings
7 Timber profile
Inner seal 10 mm tall 2 overlapping drainage levels
H_11_003dwg
tested system for vertical facades and facades with an incline up to 20deg
S T A B A L U X
Stabalux H System 310718 10
Stabalux HSystem
System cross sections and inner seals - facade 112
Inner seal 10 mm tall 2 overlapping drainage levels
System 50 mm upon request
System 50 mm
System 60 mm
System 80 mm
Mullions - 2nd level
Mullions - 2nd level
Mullions - 2nd level
Transom - 1st level
Transom - 1st level
Transom - 1st level
H_11_004dwg
GD 5205
GD 6206 GD 6303
GD 8303GD 8206
S T A B A L U X
Stabalux H System 310718 11
Stabalux HSystem
112
1 Cover strip
2 Pressure profile
3 Outer seal
4 Glass panel
Vertical glazing transom - 2nd levelVertical glazing main mullion - 3rd level
System cross sections and inner seals - facade
12
3
4
5
6
7
1
2
3 4 51
6
7
12
3
4
52
6
7
5 Inner seal 12 mm main mullion
51 Inner seal using a seal flap
52 Inner seal 12 mm secondary mullion
6 System screw fittings
7 Timber profile
Inner seal 12 mm tall 3 overlapping drainage levels
Vertical glazing secondary mullion - 1st level
H_11_003dwg
tested system for vertical facades and facades with an incline up to 20deg
S T A B A L U X
Stabalux H System 310718 12
Stabalux HSystem
System 50 mm
System cross sections and inner seals - facade 112
Inner seal 12 mm tall 3 overlapping drainage levels
Transom - 2nd level
System 60 mm
Main mullion - 3rd level Secondary mullion - 1st level
System 80 mm
Transom - 2nd levelMain mullion - 3rd level Secondary mullion - 1st level
Transom - 2nd levelMain mullion - 3rd level Secondary mullion - 1st level
System 80 mm upon request H_11_004dwg
GD 5314 GD 5315 GD 5317
GD 6314 GD 6315 GD 6318
GD 8314 GD 8315 GD 8318
S T A B A L U X
Stabalux H System 310718 13
Stabalux HSystem
113
1 Cover strip
2 Pressure profile
3 Outer seal
4 Glass panel
5 Inner seal 10 mm rafter
51 Inner seal 10 mm transom
Angled glazing transomInclined glazing rafter
12
3
4
5
6
7
1
2
3
4
516
7
6 System screw fittings
7 Timber profile
8 Hold-down clamp
9 Washer
10 All weather silicone seal
11 Rope seal
Inner seal 10 mm tall 2 overlapping levels
H_11_003dwg
System cross sections and inner seals - roof
Angled glazing transom ge 2deg inclinationAngled glazing rafter ge 2deg inclination1
2
3
4
5
6
7
89
4
51
67
11
10
S T A B A L U X
Stabalux H System 310718 14
Stabalux HSystem
System cross sections and inner seals - roof 113
Inner seal 10 mm tall 2 overlapping levels
Transom - 1st levelRafter - 2nd level
Rafter - 2nd level
Rafter - 2nd level
Transom - 1st level
Transom - 1st level
System 50 mm
System 60 mm
System 80 mm
H_11_004dwg
GD 5205
GD 6206
GD 5207
GD 6208
GD 8208GD 8206
S T A B A L U X
Stabalux H System 310718 16
Stabalux HSystem
Cover strips and outer seals
Aluminium - concealed screw fittings
114
Seals for stainless steel pressure or cover strips satisfy different requirements with the same geometry Refer to the designation eg G30F30 fire protection WK burglar resistance
1)
2)
3)
4)
5)
The corresponding sections ie the general building approval must be adhered to if specific requirements are placed in the facade in regard to fire protection burglar resistance
Use screws without sealing washerOL 5022 possibly with PA washer Z 0033
System 80 mm upon request
The geometry of the clipping process is different for the 50 60 and 80 mm widths
H_11_005dwg
S T A B A L U X
Stabalux H System 310718 17
Stabalux HSystem
Cover strips and outer seals
Stainless steel - concealed screw fittings
114
Aluminium - visiblescrew fittings
Stainless steel - visiblescrew fittings
Flat cover stripDL 5073DL 6073
H_11_005dwg
S T A B A L U X
Stabalux H System 310718 18
Stabalux HSystem
Cover strips and outer seals
Wood covering strips
114
H_11_006dwg
System 60 System 80
Wooden cover strips can be easily mounted to mullions and transoms using aluminium top or lower bars The pressure profile UL5003UL6003UL8003 acts as a clamping stripAssembly apply the two-piece GD 1903 outer seal to the upper strip attach to the system using screws Divide the OL 1903 into 80 mm long pieces and attached cen-trally using 3 screws to the wooden cover strip at 300 mm intervals and then clip to the upper strip
(Please see section 125 on assembling the outer seal)
Transom
Mullion
Set the wooden upper strip in the transom with an in-cline of 5deg
Example System 50 mm
UL5003
GD1903 (2-teilig)
OL1903
UL6003
UL8003
System 50
S T A B A L U X
Stabalux H Processing notes 310718 19
Stabalux HProcessing notes
Wood type and quality
The wooden load-bearing substructure is used for mount-ing the glazing and must meet all load and suitability re-quirements The profile dimensions and choice of mate-rials are key The type of wood chosen depends on the client architect andor processor
All wood materials are produced using wood types per-mitted by the current Eurocode 5 (DIN EN 1995-1) stand-ard Alongside the mature solid wood sections and lam-inated solid timbers facade construction is increasingly using a multi-layer construction method Due to its stabil-ity against deformations we recommend using plywood sections The following minimum requirements must be met for all wooden materialsbull Softwood strength class C24bull Laminated timber strength class GL24hbull For fireproof glazing pay attention to the specifica-
tions given in the relevant authorisationsThe use of comparable hardwoods is also permitted
Spruce fir C16 800
Pine larch spruce fir C24 1100
Douglas fir southern pine C30 1200
Western Hemlock C35 1300
Yellow Cedar C40 1400
Oak teak keruing D30 1100
Beech D35 1200
Beech azalea intsia D40 1300
Angelique (Basralocus) D40 1300
Azobeacute (Bongossi) D60 1700
Laminated timber made using wood from class
C24 GL24h 1160
C30 GL28h 1260
C35 GL32h 1370
C40 GL36h 1470
Laminated veneer
Kerto Q 1000-1050
Kerto S 1380
Kerto T 1000
Multiplex sheets
(plywood) 900-1600
The woods and values mentioned here are examples for guidance only
Exact values for your choice should be determined with the supplier and
according to applicable standards
Material information 121
Wood typeStrength class Elastic modulus
E0mean [kNcm2]
Seal profiles
Stabalux seals are organic natural rubber materials based on EPDM and conform to the DIN 7863 standard non-cellular elastomer sealing profiles for window and facade construction Compatibility with contact media should tested by the processor particularly when using plastic glazing and making structural joints with non-Stabalux products Fire seals are special products their specific data are filed with DIBt (German Centre of Com-petence for Construction)Sealing the rebate with all weather silicone seal is pos-sible
All weather silicone seal
Only certified materials may be used for sealing the re-bate with all-weather silicone Pay attention to all infor-mation provided by the manufacturer and the sealing work must be carried out by trained persons It is recom-mended that a licensed and certified specialist contrac-tor is hired for this purpose We further refer you to the DIN 52460 standard and IVD data sheets (Trade Associ-ation for Sealants)The compatibility of the materials is particularly impor-tant when using all-weather silicone In this case the compatibility of the sealant with the edge bonding of the glass and the backfill of the joints If self-cleaning glass is used the compatibility must be established in advance Glass sealants and edge bonding must be UV-resistant The incline of roofs should also be taken into account Information about UV-resistance can be requested from the manufacturer Silicone edge bonding generally pro-vides better UV-resistance than polysulfide-based ma-terials The advantage of silicone lies in its high vapour sealing properties which is particularly useful when using more volatile argon fillings Highly elastic weatherproof and UV-resistant seals meet the widest range of demands for reliable joints
Aluminium profiles
The aluminium profiles we supply are generally made from EN AW 6060 according to DIN EN 573-3 T66 ac-cording to DIN EN 755-2
S T A B A L U X
Stabalux H Processing notes 310718 20
Stabalux HProcessing notes
Material information 121
Coating the aluminium
Alongside anodic oxidation with the corresponding pre-treatment conventional coating methods such as air-drying multi-layer coating systems (wet coating) or thermosetting coatings (stove enamelling powder-coat-ing) can be used By using different mass distribution longitudinal shadow formation is possible with cover strips DL 5073 and DL 6073 Resulting actions are to be taken with the agreement of the coater
Longitudinal expansions in aluminium pro-files exposed to temperature stress
When cutting the cover and pressure profiles from alu-minium allowance should be made for temperature-in-duced longitudinal expansion The theoretical rod lengths ℓ should be shortened by
∆ℓ = αT ∆T ℓ
Example
∆ℓ = 24 10-6 40 1000 = 096 asymp 10 mm
αT asymp 24 10-6 1K Coefficient of thermal expansion for aluminium
∆T = 40 K Assumed temperature difference of al-uminium dependent on the colour and amount of solar radiation
ℓ = 1000 mm Rod length
∆ℓ asymp 1 mm Longitudinal expansion
further examples
∆ℓ = 24 10-6 60 1000 = 144 asymp 15 mm∆ℓ = 24 10-6 100 1000 = 24 asymp 25 mm
A rod with a system length of ℓ = 1000 mm should be shortened by 1 mm for a temperature difference of ∆T = 40 degC A rod of length ℓ = 3000 mm should be shortened by 3 mm For ∆T = 100 degC (often occurs in roof areas and south-facing facades) a rod of length ℓ = 1000 should be shortened by 25 mm
Rod length ℓ (mm) Temperature differ-
ence ∆T
Longitudinal expan-
sion ∆ℓ (mm)
1000 40degC 1
3000 40degC 3
1000 60degC 15
3000 60degC 45
1000 100degC 25
3000 100degC 75
Note
We recommend shortening the pressure profile by asymp 25 mm per ℓ = 1000 mm of length When doing so ensure to use the correct length of the outer seal When using cover strips in roof area it is recommended that holes for screwing on the cover strip are created with a diameter of d = 9 mm
Stainless steel profile
Pressure profiles and bottom sections of cover strips are made from 14301 stainless steel for visible screw fit-tings The surface conforms to classification 2B accord-ing to DIN EN 10088-2Cover strips using 14401 stainless steel The surface has a ground finish (grain 220 DIN EN 10088-2) The upper parts of the cover strip are made from 14571 stainless steel with ground finish (grain 240 DIN EN 10088-2) To protect the surface a film has been applied to one side whose edge can be seen on narrow side
Other items
All system items are produced according to applicable standards
Maintenance and care
The information sheets WP01 ndash WP05 from the Associa-tion of Window and Facade Producers (VFF) must be ob-served The address can be found in the address section Further information can be found in section 90 - Cleaning Maintenance
S T A B A L U X
Stabalux H Processing notes 310718 21
Stabalux H
System with direct screw fittings in the central groove
The type of wood chosen depends on the client architect and processor according to the following considerations
bull Softwood strength class C24bull Laminated timber strength class GL24hbull For fireproof glazing pay attention to the specifica-
tions given in the relevant authorisations
The use of comparable hardwoods is also permitted
We prescribe the necessary geometry around the seal support and in regard to the screw fittings required for our systems
Profile design 122
H_12_001dwg
Processing notes
Note
Worked grooves and edges must be free of shavings and imperfections
When using hardwood cylinders for glass supports GH 5053 and GH 5055 you must not make a groove in the cylinder The sealing base is removed around the cylinder
System 50
Profile processing Profile processing Profile processing
System 60 System 80
S T A B A L U X
Stabalux H Processing notes 310718 22
Stabalux H
Mullion-transom joint 123
Principle
bull Attachment of the transoms to the mullions must match the static base system of the mullion-tran-som design selected
bull Load bearing capacity and suitability are to be stat-ically demonstrated on site In doing so the design and technical processing experiences of the pro-cessor can be considered
bull Designs are to be chosen that can be considered regular joints for the intended purpose and meet the standards of the Eurocode 5 (DIN EN 1995) or are covered by general building approvals
bull The solutions presented by us are purely examples A range of designs are possible depending on the shape of the wood and different jointing options
H_12_002dwg
H_12_003dwg
Processing notes
S T A B A L U X
Stabalux H Processing notes 310718 23
Stabalux H
Stabalux AK-H S T A B A L U X
Riegelverbinder fuumlr HolzsystemeTypen
AK-H_32_005-1
Processing notes
RHT transom connector for wood systems
bull The RHT links wooden mullion and transom con-structions with a visible width of 50ndash80 mm
bull The two identical connector parts are mounted to mullions and transoms and linked with one another by pushing together the transoms
bull A connecting screw locks the connection in all three dimensions
bull The clamping foot on the transom inner seal must be disengaged in the area of the mullion-transom joint
Transom assembly
Mullion assembly
123
1
1
2
2
Mullion-transom joint
Central connecting bolt3
3
Transoms pushed together
Transom assembly Mullion assembly
The connecting bolt tensions the transom holder in all three dimen-sions
H_12_005dwg
H_12_004dwg
bull When attaching the clamping strips to the system take care to place the screws outside of the mul-lion-transom connection in order to avoid a colli-sion with the RHT connector screw fittings
bull The central wooden groove in the transom should begin approx 80 mm before the end of the tran-som
bull The glass support should be mounted approx 100 mm from the end of the transom to prevent any collision between the RHT screws in the transom
S T A B A L U X
Stabalux H Processing notes 310718 24
Stabalux HProcessing notes
RHT for wood systems - types
bull The range comprises 7 RHT types with different lengths and therefore different load-bearing capac-ities
bull The screw group comprising a larger number of screws (shown in the diagram) is positioned toward the front edge of the mullion and transom (glass side)
123
Mullion-transom joint
H_12_004dwg
Connector typesStandard screw fittings
Front edge profile
S T A B A L U X
Stabalux H Processing notes 310718 25
Stabalux HProcessing notes
Assembly on the mullion
bull The front edge of the connector lies 6 mm behind the front edge of the mullion
bull Z 0126 screws in length 550 are always used for attaching to horizontal timbers (mullions)
123
Mullion-transom joint
H_12_004dwg
Mullion assembly
Fron
t edg
e pr
ofile
Front edge profile
Left mullion with connector eg RHT 8094
Screw fittings mullion Z 0126
Right mullion with connector eg RHT 8094
bull When using hard woods or when working near the edge of the wood a hole of 3 mm diameter should be pre-drilled
bull The number of screws varies for standard screw fit-tings depending on the connector type (Refer to the previous page)
bull A combination of screws can be used and calculat-ed case-by-case
S T A B A L U X
Stabalux H Processing notes 310718 26
Stabalux H
Assembly on the transom
bull A recess with 12-125 mm depth is milled into the (front of the) transom
bull The milling dimensions are With x length x depth 40 x (RHT length + 6) x 12-125 (mm)bull The milling can be carried out using a standard
hand routerbull The front edge of the connector lies 6 mm behind
the front edge of the transom
123
Mullion-transom joint
H_12_004dwg
Connector type Transom
depth
R (mm)
Milling di-
mensions
L (mm)
RHT 8040 55-73 46
RHT 8058 74-91 64
RHT 8076 92-109 82
RHT 8094 110-145 100
RHT 8130 146-181 136
RHT 8166 182-235 172
RHT 8220 236-300 226
Transom assembly
Processing notes
Screw fitting transom Z 0127
Front edge profile
Fron
t edg
e pr
ofile
Transom with connector left front side eg RHT 8094
Transom with connector right front side eg RHT 8094
Front-side transom groove depth 12-125 mm
Transom depth R
Milling dimensions L
12 - 125
bull Z 0127 screws in length 580 are always used for attaching to longitudinal timbers (transoms)
bull When using hard woods or when working near the edge of the wood a hole of 3 mm diameter should be pre-drilled
bull The number of screws varies for standard screw fit-tings depending on the connector type (Refer to the previous page)
bull A combination of screws can be used and calculat-ed case-by-case
S T A B A L U X
Stabalux H Processing notes 310718 27
Stabalux HProcessing notes
123
Mullion-transom joint
Constructing the timber joint
bull The transom is pushed in from the inside to the outside
bull Screwing in the greased connecting screw allows the locked mullion-transom joint to be released in all three dimensions if necessary This tightens the transom evenly to the mullion along the entire depth
Example RHT 8130 top and side views
H_12_004dwg
Linked connectors
bull If the transom depth is over 300 mm 2 connectors can be used along the entire length to improve ten-sioning of the mullion-transom joint
bull The connector type RHT 8220 is always used on the front edge of the profile Another connector can be fitted on the RHT 8220 as required
bull A peg is inserted and positioned correctly by the into the connecting screw in order to improve ten-sioning of the second connector
bull The maximum load-bearing capacity of the RHT 8220 applies in regard to resilience
bull By request a connector longer than 220mm can be produced The maximum load-bearing capacity of the RHT 8220 is also valid hereSelf-tapping screws 50 x
50 mm Self-tapping screws 50 x 80 mm
Tran
som
dep
th
Metal threaded screw 55 x 120 mm
S T A B A L U X
Stabalux H Processing notes 310718 28
Stabalux HProcessing notes
Sealing system principle general information about glazing seals
The Stabalux sealing system consists of the outer and inner sealing sections
bull The outer sealing section has the primary function of preventing the ingress of moisture At the same time the sealing section provides a flexible support for the glass panes
bull The inner sealing section acts to protect the inner space water guiding section and elastic glass sup-ports from moisture and vapour
Both sealing sections must perform this function over a long period of time
Seals should be adapted at the building site but can be pre-cut to length in the factory and inserted into the sup-port profiles ie the camping strips with proper consid-eration of the assembly instructions for the seals Always ensure that seals are not bearing any loads once installed and are firmly pressed onto joints All joints should be sealed as per the following descriptions
Fire seals
Like all organic materials elastomers are combustible if they are exposed to high temperatures for a sufficient period in the presence of oxygen Inorganic substances are added to the seals in order to reduce their combus-tibility The proportion of inorganic substances positively influences the flame-retardant properties but they also make the products harder and reduce their mechanical strength It is therefore imperative when fitting fire seals to ensure that the structure is absolutely flat and that the sealant joints connect preciselyDepending on their geometry it may be necessary to stretch fire seals into a mountable form ie to leave them to settle into their mountable form once they have been removed from their rolled packaging Warm temperatures also make the seals more malleable and therefore facili-tate installation
Pressure equalisation and controlled drainage
Pressure equalisation is generally achieved via openings at the base head and ridge points Should additional ven-tilation be required in the area of the transom (eg where panes are only supported on 2 sides or where transom length is ℓ ge 2 m) then this ventilation should be created by placing holes into the cover strip andor using notch-es on the lower sealing lips of the outer seal
The pressure equalisation openings also serve toextract moisture The inner sealing section is formed in such a way that when the joints are properly sealed any moisture that occurs and does not dissipate via the rebate ventilation will drain away downwards In facades water is guided via the seal flap into the mullions There is a choice between using tested sealing systems with between 1 and 3 levels With inclined glazing with 2 drainage levels the higher sealing section of the transom overlaps the lower mullion seal These principles must be consistently implemented down to the lowest point of the glazing so that the water-guiding level of the structure carries moisture to the outside Film is placed beneath the seals accordingly It must be ensured that the film will last for a long time
Tips for laying seals 124
H_12_009dwg
S T A B A L U X
Stabalux H Processing notes 310718 29
Stabalux HProcessing notes
Inner sealing section
The structure of the inner sealing section is different for vertical facades and facades with an inward incline up to 20deg as well as roof glazing
Inner sealing for vertical glazing and glazing with an inward incline up to 20deg
bull 5 mm high butt jointed seals with a drainage sec-tion for vertical facades (α=0deg)
bull 10 mm high seals with two drainage sections to safely guide away any moisture or condensation to the outside These seals are created by overlapping the seal joints in which the higher sealing section of the transom goes underneath the lower level of the mullion These seals can be used for vertical facades and facades with an incline up to 20deg
bull 12 mm high seals follow the same principle but allow an additional third drainage section for an in-termediate mullion
bull The shaped seal flap protects the vulnerable area of the rebate and ensures that moisture is drained away via the vertical or up to 20deg inwards inclined mullions
Inner seals for glazed roofs
bull A special seal geometry for glazed roofs also allows for two-level stepped drainage The 10 mm high seals are laid with overlapping joints
Some basic information for sealing and sticking down Stabalux seals
bull All joints and seal penetrations must be water-proofed with the exception of the Stabalux screw fittings
bull Gasket joints should always be sealed using Stabalux sealant regardless of whether they are butt joints or overlapping (We recommend Stabalux connecting paste Z 0094 Pay attention to the directions provided by the manufacturer)
bull For difficult to seal places we recommend first us-ing a fixing adhesive such as the Stabalux quick fix-ing glue Z 0055
bull Before gluing ensure all surfaces are free from moisture dirt and grease
bull Weather conditions such as snow and rain prevent an effective seal
bull Temperatures below +5 degC are not suitable for fix-ing seals
bull The hardened connecting paste should not prevent level support of glass
124
Tips for laying seals
S T A B A L U X
Stabalux H Processing notes 310718 30
Stabalux HProcessing notes
Assemble the inner seal on vertical facade glazing - 1 level join
bull The horizontal transom seals are laid continuous-ly across the mullion-transom joints Ensure here that the clamping feet of the horizontal seal are re-leased around the mullion
bull Mullion seals are butt jointed to the transom seals bull The clamping foot on the transom seal must be dis-
engaged in the area of the mullion-transom joint if wood connectors types RHT 0041 to RHT 0131 are used
bull The seal flaps should be released to a width of 10-15 mm at the mullion joint
Inner seal mullions Inner seal transoms
inner continuous transom seal
inner jointed mullion seal
Seal flap in mullion area released
125
1
1
2
2
Seals - Facade
H_12_007dwg
eg GD 6204eg GD 6202
bull The protruding length of the seal flap should be re-moved at the perforation once glazing is complet-ed
bull In order to safely drain away moisture from tran-soms even at the edges of the facade the inner transom seals must be laid into the released mul-lion seals To release and remove the clamping feet we recommend using our release pliers Z 0078 for System 60 and Z 0077 for System 50
bull Ensure all joints are cleanly and solidly sealed Ex-cess sealant should be removed
S T A B A L U X
Stabalux H Processing notes 310718 31
Stabalux HProcessing notes
125
Seals - Facade
H_12_008dwg
Assemble the inner seal on vertical facade glazing - 1 level join
Release edge mullion seal near transom
The seal flap should always cover the inset ldquoerdquo of the filling element (eg glass panes panels)
Gasket joints
Gasket joints
e gt glass inset
NoteAny joints in the transom seal that are re-quired due to the delivered length should be fitted with an intermediate mullion and put together like in point A
Intermediate mullions
Edge mullions
Transom
Transom
edge mullion seal
around a transom
near transom
B
A
S T A B A L U X
Stabalux H Processing notes 310718 32
Stabalux HProcessing notes
Assembly of the inner seal for vertical facade glazing and facade glazing with an incline of up to 20deg - 2 overlapping sec-tions
bull The 10 mm high seals can be divided across their height to allow a simple overlap at critical transom joints
bull The vertical seals for the mullions (2nd drainage section) are laid continuously
bull The transom seals overlap the mullion sealsbull Moisture and condensation is guided away via the
seal flap of the transom seal (1st drainage section) to the main mullion
bull The seal flap must always cover the inset depth of the glass panes and filling element
Inner seal mullions Inner seal transoms
inner continuous mullion sealinner overlapping transom seal engaged
Seal flap should always cover the filling element
125
1
1
2
2
Seals - Facade
H_12_007dwg
eg GD 6303eg GD 6206
Seal gasket joints
B
bull The protruding length of the seal flap should be re-moved at the perforation once glazing is complet-ed
bull All joints must be sealed Before laying seals we recommend completely coating the support surfac-es and edges with Stabalux connection paste
bull Ensure all joints are cleanly and solidly sealed Ex-cess sealant should be removed Absolutely no un-evenness in the glass support surface must occur from applying sealant too thickly
S T A B A L U X
Stabalux H Processing notes 310718 33
Stabalux HProcessing notes
125
Seals - Facade
H_12_008dwg
Assembly of the inner seal for vertical fa-cade glazing and facade glazing with an in-cline of up to 20deg - 2 overlapping sections
The seal flap should always cover the inset ldquoerdquo of the filling element (eg glass panes panels)
Transom
edge mullion seal around a transom upper section to the width of the transom seal
Transom seal separate lower section at length of the overlap ldquoerdquo
Mullion seals
around a transom upper section
to the width of the transom seal
Transom
Transom seal separate lower section at length of the overlap ldquoerdquo
B
A
e gt glass inset
Seal gasket jointsoverlapping joints
Seal gasket jointsoverlapping joints
e gt glass inset
Intermediate mullions
Edge mullions
S T A B A L U X
Stabalux H Processing notes 310718 34
Stabalux HProcessing notes
Assembly of the inner seal for vertical facade glazing and facade glazing with an incline of up to 20deg - 3 overlapping sec-tions
bull Optionally Stabalux seals with three offset water channels can be used in the facade area which safely drain any moisture or condensation to the outside
bull The 12 mm high seals can be divided across their height to allow a simple overlap at critical second-ary mulliontransom joints andor transompri-mary mullion joints
Inner seal main mullion Inner seal transoms
inner continuous mullion sealinner overlapping transom seal engaged
Seal flap should always cover the filling element
125
1
1
22
Seals - Facade
H_12_007dwg
eg GD 6318eg GD 6314
Seal gasket joints
C
B
Inner seal secondary mullion
Seal gasket joints
3
Secondary mullion seal overlaps the transom seal
3
eg GD 6315
bull The vertical seals for main mullions (3rd drainage section) drainage section) are laid continuously
bull The transom seals overlap the main mullion sealsbull Along a transom seals must be laid continuouslybull Moisture and condensation is guided away via the
seal flap of the transom seal (2nd drainage section) to the main mullion
S T A B A L U X
Stabalux H Processing notes 310718 35
Stabalux HProcessing notes
125
Seals - Facade
H_12_008dwg
Assembly of the inner seal for vertical facade glazing and facade glazing with an incline of up to 20deg - 3 overlapping sections
The seal flap runs continuously through
Transom
Cut secondary mullion seal belowthe lower transom section to the length of the overlap
Transom seal Connection to the secondary mullioncut the uppermost section to width of the transom seal
bull The seal flap must always cover the inset depth of the glass panes and filling element
bull The protruding length of the seal flap should be re-moved at the perforation once glazing is complet-ed
bull Vertical seals on the secondary mullion are butt jointed beneath the upper transom The seal flap of the upper transom runs continuously in the upper part of the joint
bull Drainage of the secondary mullion (1st drainage section) is achieved by overlapping the seals of the secondary mullion with the seal of the upper tran-som
Secondary mullion seal overlaps the transom seal
Secondary mullionTransom
BA
D
Edge mullions
Secondary mullion butt jointedat the topseal gasket joint
Seal gasket jointsoverlapping joints
e gt glass inset e gt
glas
s in
set
S T A B A L U X
Stabalux H Processing notes 310718 36
Stabalux HProcessing notes
125
Seals - Facade
H_12_008dwg
Assembly of the inner seal for vertical fa-cade glazing and facade glazing with an in-cline of up to 20deg - 3 overlapping sections
The seal flap should always cover the inset ldquoerdquo of the filling element (eg glass panes panels)
Main mullionTransom
Main mullion seal around a transom upper section to the width of the transom seal
Transom seal separate lower section along the length of the overlap
bull All joints must be sealed Before laying seals we recommend completely coating the support surfac-es and edges with Stabalux connection paste
bull Ensure all joints are cleanly and solidly sealed Ex-cess sealant should be removed Absolutely no un-evenness in the glass support surface must occur from applying sealant too thickly
C
Seal gasket jointsoverlapping joints
Seal gasket jointsoverlapping joints
e gt glass inset e gt glass inset
S T A B A L U X
Stabalux H Processing notes 310718 37
Stabalux HProcessing notes
125
Seals - Facade
Assembly of the outer seal for vertical glass facades
bull As well as gently clamping the glass in place the outer sealing system has the primary task of pro-tecting the rebate against moisture ingress
bull The outer sealing sections must be completely sealed except for the necessary openings for pres-sure equalisation and condensation dissipation
bull The outer mullion seals are laid continuously and the transom seals are joined
bull Sealant joints are to be laid flat with a slight excess in dimensions Exact specifications depends on the situation in which the system is used
bull Tightly fitted sealant joints can be implemented without fixing the outer seal of the mullion-transom joint in vertical facades
outer continuous mullion sealouter jointed transom seal
eg GD 6054 outer transom seal with different heights of sealing lip
H_12_009dwg
H_12_010dwg
Rod length ℓ
(mm)
Temperature difference
∆T
Longitudinal expansion
∆ℓ (mm)1000 40degC 13000 40degC 31000 60degC 153000 60degC 451000 100degC 253000 100degC 75
Expansion of aluminium profiles
When using the RHT connector take care when fitting screws to ensure that the screws are placed away from the mullion-transom connec-tion
bull The flag for the inner transom joint in combination with the outer seal creates additional safety
bull The seal flap should be separate at its perforations to match the thickness of the glass in order that this is clamped down and concealed under the out-er seal
bull Different heights of sealing lips on the outer seal bridge the height different created by the seal flap in the outer sealing section
bull When mounting the clamping strips be aware of aluminium profile expansion (see section 121 - Material information)
S T A B A L U X
Stabalux H Processing notes 310718 38
Stabalux HProcessing notes
125
Seals - Facade
Assembly of the outer seal for facade glaz-ing with an inwards inclineup to 20deg
bull If the facade is inclined inwards from the vertical (max permitted incline 20deg) the open ends of the outer transom seals must be closed up using Butyl
bull When constructing inwardly inclined facades (up to max 20deg) if flat cover strips are used in the tran-soms (eg DL 5059 DL 6059 DL 5061 DL 6061 DL 5067 DL 6067 DL 5071 DL 6071 DL 6043 DL 6044) and flat pressure and cover profiles (eg UL 6005 with OL 6066) then the central hollows at each end must be sealed with silicone
H_12_009dwg
When using flat cover strips on in-wardly inclined facades (up to max 20deg) the central hollow at each end should be sealed with silicone
Seal open ends of the transom seals with Butyl on inwardly inclined facades (up to max 20deg)
Trim the seal to be slightly larger than required
S T A B A L U X
Stabalux H Processing notes 310718 39
Stabalux HProcessing notes
126
Seals - roof
Assemble the inner seal for roof glazing
bull Optionally Stabalux seals with offset water chan-nels can be used in the facade area which safely drain any moisture or condensation to the outside
bull The 10 mm high seals can be divided across their height to allow a simple overlap at critical transom joints
bull The transom seals are geometrically shaped so as to create a condensation channel
bull This channel drains from the overlapping transom joint in the rafters
remove the lower perforated part and the clamping foot on the transom seal of the at around 15 mm
remove the upper perforated part on the rafter seals
length of transom seal = transom length + asymp 13 mm per side
Gasket joints
1
2
3
H_12_011dwg
H_12_012dwg
bull Along a transom seals must be laid continuouslybull All joints must be sealed Before laying transom
seals we recommend completely coating the sup-port surfaces and edges Absolutely no unevenness in the glass support surface must occur from apply-ing sealant too thickly
1
23
S T A B A L U X
Stabalux H Processing notes 310718 40
Stabalux HProcessing notes
Assembly of the outer seal for for glazed roofing
bull These are laid in fundamentally the same way as for vertical glazing Split seals such as GD 1932 are not suitable for transom seals in roofs Split seals can only be installed in mullions in combination with slab insulation Each installation situation will differ to some degree and always check how well sealed it is
bull For cross joints we recommend using our self-ad-hesive stainless steel sealing plates with butyl coat-ing Z 0601 for System 60 and Z 0501 for System 50 The stainless steel sealing plates are 35 mm wide and are attached to the edge of the glass panes parallel to the mullion axis
bull Butyl tape is not suitable as a sealing tape between the glass and the outer seal
bull The outer mullion seals are laid continuously and the transom seals are joined
126
Detail of sealing plate Z 0501 = 35 x 40 mm
Z 0601 = 35 x 50 mm
Attention The sealing plates must be placed central to the transom axis
For glass insets of 15 mm the first screw fittings for the transom cover strip begin 30 mm from the end of the cover strip
Seals - roof
H_12_013dwg
H_12_014dwg
bull Sealant joints are to be laid flat with a slight excess in dimensions Exact specifications depends on the situation in which the system is used
Notebull Horizontal clamping strips prevent the free run off
of rain water and dirtbull Cover strips and upper strips with angled edges re-
duce the build up of water in front of the clamping strip
bull Shorten the clamping strips on the transoms by 5 mm in the area of the transom joins in order to im-prove drainage of water Gasket joints however are to be laid flat with a slight excess in dimensions Open ends of transom clamping strips (upper and cover strips) should be sealed
S T A B A L U X
Stabalux H Processing notes 310718 41
Stabalux HProcessing notes
Assembly of the outer seal for for inclined glazed roofing ge 2deg
bull These are laid in fundamentally the same way as for vertical glazing Split seals around the mullions in roofs such as GD 1932 are only suitable when using in combination with slab insulation Each installa-tion situation will differ to some degree and always check how well sealed it is
bull To ensure free run-off of rain water and dirt on roofs inclined ge 2deg we recommend not using clamping strips in the transoms
bull Instead the rebate spaces should be sealed with all-weather silicone
bull Implementation of the outer sealing section around mullions is done in the same way as conventional roofs with an inclination up to 15deg
126
Seals - roof
H_12_013dwg
Tips for all roof designs
When using aluminium cover strips on roofs take account of the expansion factor as a result of the high degree of heat absorption when selecting the length to use Equal-ly the use of single-piece cover strips should be carefully considered In this case it is recommended that holes for screwing on the cover strip are created with a diameter of d = 9 mm (refer to Section 121 - Material information)
bull At the high point or ridge area of the inclined glaz-ing it is recommended to also install and outer seal-ing section in the transoms with clamping strips
bull Only certified sealing materials may be used for sealing the transom rebate space
bull Pay attention to all information provided by the manufacturer and the sealing work must be carried out by trained persons It is recommended that a licensed and certified specialist contractor is hired for this purpose We further refer you to the DIN 52460 standard and IVD data sheets (Trade Asso-ciation for Sealants)
For wide spans we recommend using concealed screw fittings when selecting the clamping strips (lower + up-per strip) This is the preferred option for rafters Unused holes in the pressure profile must be sealedSome roof areas such as the eaves see the use of sev-eral different materials (glass silicone aluminium sheets ) each with different expansion coefficients To avoid the formation of cracks aluminium sheets should be in-stalled with expansion joints
S T A B A L U X
Stabalux H Processing notes 310718 42
Stabalux HProcessing notes
Assembly of the outer seal for for inclined glazed roofing ge 2deg
bull The compatibility of the materials is particularly important when using all-weather silicone In this case the compatibility of the sealant with the edge bonding of the glass and the backfill of the joints If self-cleaning glass is used the compatibility must be established in advance
bull Glass sealants and edge bonding must be UV-re-sistant The incline of roofs should also be taken into account Information about UV-resistance can be requested from the manufacturer Silicone edge bonding generally provides better UV-resistance than polysulfide-based materials The advantage lies in its high vapour sealing properties which is particularly useful when using more volatile argon fillings
126
Seals - roof
H_12_013dwg
1 Hold-down clamp
2 Silicone washer
3 Silicone sealant seal around the
clamp
4 All weather silicone seal
Transom inclined glazing ge 2deg inclination with all-weather silicone and slab insulation
12
3
6
89
7
Transom inclined glazing ge 2deg inclination with all-weather silicone and round sec-tion rope seal
12
3
6
89
7
bull Highly elastic weatherproof and UV-resistant seals meet the widest range of demands for reliable joints
bull If the silicone joint is created without additional mechanical safety devices ensure that the glass is supported from two sides only Selective installa-tion of holding clamps can be used to achieve all round support for glass edges
bull The clamps are made from stainless steal with silicone washers and are screwed in the same as pressure strips The hold-down clamp should be ad-ditionally sealed around the perimeter with silicone sealant The design is based upon the dimensions of the glass as documented in the glass static anal-ysis
51 Round section rope seal
52 Slab insulation
6 Glass filling element
7 Inner seal 10 mm transom
8 timber profile
9 System screw fittings
4
51
4
52
S T A B A L U X
Stabalux H Processing notes 310718 43
Stabalux HProcessing notes
Assembly of the outer seal for for inclined glazed roofing ge 2deg
bull The joint width and the joint height for Stabalux System H are defined as w x h = 20 mm x 10 mm These measurements should always checked when selecting the sealing material and adapted if neces-sary Generally w h = 2 1 - 35 1
bull PE round section seals or Stabalux slab insulation is suitable as a back fill material
bull Silicone sealant should be applied before laying the mullion seals and cover strips
bull After the specified setting time the seals and screw fittings can be installed in the areas around mullions
126
Seals - roof
Rafters with clamping strips
Transom with clampAll weather silicone seal
and round section rope seal
Transom with clampAll weather silicone seal
and slab insulation
Transom with all-weather silicone and round section rope
seal
Joint design according to manufacturers specificationsgenerally w h = 2 1 - 35 1
bull The mullion-transom joints around the clamps are then sealed
bull Before applying this second layer the joints around transoms must have completely set
S T A B A L U X
Stabalux H Processing notes 310718 44
Stabalux HProcessing notes
Steps for implementing the seal with silicone
bull Test silicone sealant and glass edge bondings and other contact surfaces (eg panels) for suitability
bull Clean edge bonding adhesive impurities from the surfaces to which sealant will be applied following manufacturerrsquos directions
bull Fill the joints as per the joint dimensions using only non-water absorbent closed-cell PE profiles (no damage to the edge bonding)
bull The remaining space in the glass rebate must be large enough that the pressure is able to equalise and a drainage level is available
bull Clean any impurities from the surfaces to which the sealing material is to be applied and any adjacent surfaces according to manufacturerrsquos directions
126
Seals - roof
System screw fittings
Hold-down clamp
Washer made from silicone
Silicone sealant seal
around the clamp
All weather silicone seal
Silicone sealant
Rafter
Transom
bull Be particularly aware of any adjacent metal com-ponents Prime according to manufacturerrsquos direc-tions
bull Seal joints without leaving any cavities or bubbles Mask any adjacent components in advance where necessary
bull Smooth out the filled joints using the manufactur-errsquos smoothing agents and conventional tools with as little water as possible Remove adhesive tape
bull If two or more reactive sealants are used in com-bination the first must completely set before the second is applied
S T A B A L U X
Stabalux H Processing notes 310718 45
Stabalux HProcessing notes
Glass inset
bull Glass industry guidelines must be observedbull The glass inset is generally 15 mmbull An increase to 20 mm has a beneficial effect on the
heat transfer coefficient Uf of the frame structure bull Special conditions such as fire protection glass
must be adhered to the terms are stated in the general building approval
Glass inset and glass support 127
RebateGlass inset
H_12_015dwg
S T A B A L U X
Stabalux H Processing notes 310718 46
Stabalux HProcessing notes
Glass support types and choosing the glass support
The Stabalux H system uses three different types and techniques for attaching glass supports
bull Glass support GH 5053 and GH 5055 with hanger bolts
bull Glass support GH 5053 and GH 5055 with hard-wood cylinders and bolts
bull Crossing point reinforcement RHT with cylinder head screws empty 65 mm Crossing point reinforce-ment are used exclusively on fire-protection glaz-ing The precise details are stated in the general building approval
The glass supports used are determined by the type of wood glass construction and glass weight (see section 9) A rigid mullion-transom connection is required ie no twisting of the transom may occur at the connection that would cause further sinking of the glass support
Glass inset and glass support 127
Mounting the glass supports
bull Positioning the glass supports and glazing accord-ing to glass industry guidelines and guidelines of the Institute for Window Technology
bull The weight of the glass panes is distributed via the glass supports attached to the transoms
bull Glass supports should be attached at a distance of 100 mm from the end of the transom When doing so avoid a collision with the cover strip screw fit-tings at the end of the transom
Glazing blocks
bull Glazing blocks must be compatible with the edge bonding of the insulated glass panes
bull They should be stable under constant pressure and be able to withstand loads aging and temperature changes
bull It is important that the blocks ensure circumferen-tial pressure equalisation and that drainage of con-densation is not obstructed as well as allowing the glass edges to be offset and small design toleranc-es to be accommodated
bull If the length of the glass support is more than 100 mm blocks should be placed along the entire length of the glass support to ensure equal load distribution
H_12_016dwg
Positioning the glass support approx 100 mm from the end of the transom
S T A B A L U X
Stabalux H Processing notes 310718 47
Stabalux HProcessing notes
127
Glass inset and glass support
Glass support GH 5053 Attachment with hanger bolts
A-A
Glass support GH 5053 with hanger bolts
bull The certified system components consist of the glass support GH 5053 and 2 hanger bolts empty 10 mm with a 45 mm wood thread and a shaft of a different length
bull The hanger bolts are screwed directly into the tim-ber at intervals of 80 mm A empty 7 mm hole needs to be pre-drilled for this purpose
bull Screw fittings should be vertical to the transom axis
bull The depth for hanger bolts is at least 45 mm meas-ured from the front edge of the timber
H_12_016dwg
H_12_017dwg
Glass support GH 5053
Block
Block
glass support
Inner seal
Hanger bolt
Minimum screw depth from measured from front edge of timber
Hanger bolts empty 10 mmpre-drilled at empty 7 mm
bull For glass support GH 5053 the required depths are delivered corresponding to the thickness of the glass and placed onto the hanger bolts
bull Blocks must be placed under the glass panes along the entire length of the glass supports
bull Details of the approved pane weights geometries and classification of system components are pro-vided in section 9
S T A B A L U X
Stabalux H Processing notes 310718 48
Stabalux HProcessing notes
127
Glass inset and glass support
Glass support GH 5055 with hanger bolts
bull Based on the test results for the system compo-nent GH 5053 a load bearing model was designed and the suitability of the GH 5055 glass support calculated
bull Installation is done the same way as GH 5053 but using three screws spaced 80 mm apart
bull Details of the approved pane weights geometries and classification of system components are pro-vided in section 9
Glass support GH 5055 Attachment with hanger bolts
A-A
H_12_016dwg
H_12_017dwg
Glass support GH 5055
Block Hanger bolts empty 10 mmpre-drilled at empty 7 mm
Block
glass support
Inner seal
Hanger bolt
Minimum screw depth from measured from front edge of timber
S T A B A L U X
Stabalux H Processing notes 310718 49
Stabalux HProcessing notes
127
Glass inset and glass support
Row
Total glass thickness tGlass (mm)
for vertical glazing
Hanger bolts 2) Glass supports 1)
Inner seal height GH 5053 GH 5055 Depth (mm)
5 mm 10 mm 12 mm1 4 5 6 7 Z 0371 3) Z 0371 4) Z 0371 5) GH 0081 Section 9
2 8 9 Z 0371 3) Z 0371 4) Z 0371 5) Section Section 12
3 10 11 Z 0371 3) Z 0371 4) Z 0371 5) Section Section 144 12 13 Z 0371 3) Z 0371 4) Z 0371 5) Section Section 165 14 15 Z 0371 3) Z 0371 4) Z 0371 Section Section 186 16 17 Z 0371 3) Z 0371 Z 0371 Section Section 207 18 19 20 Z 0371 Z 0371 Z 0371 GH 0082 Section 228 22 23 Z 0371 Z 0371 Z 0372 GH 0083 GH 0851 269 24 25 Z 0371 Z 0372 Z 0372 GH 0084 GH 0852 2810 26 27 Z 0371 Z 0372 Z 0372 GH 0085 GH 0853 3011 28 29 30 Z 0372 Z 0372 Z 0372 GH 0886 GH 0854 3212 31 32 33 Z 0372 Z 0372 Z 0372 GH 0887 GH 0855 3513 34 35 36 Z 0372 Z 0372 Z 0373 GH 0888 GH 0856 3814 37 38 39 Z 0372 Z 0373 Z 0373 GH 0889 GH 0857 4115 40 41 42 Z 0372 Z 0373 Z 0373 GH 0890 GH 0858 4416 43 44 45 Z 0373 Z 0373 Z 0373 GH 0891 GH 0859 4717 46 47 48 Z 0373 Z 0373 Z 0373 GH 0892 GH 0860 5018 49 50 51 Z 0373 Z 0373 Z 0373 GH 0893 GH 0861 5319 52 53 54 Z 0373 Z 0373 - GH 0894 GH 0862 5620 55 56 57 Z 0373 - - Section Section 5921 58 59 60 Z 0373 - - Section Section 6222 61 62 63 Z 0373 - - Section Section 6523 64 Z 0373 - - Section Section 68
Item Total length (mm)
Shaft length (mm)
Thread length (mm)
Z 0371 70 25 45Z 0372 77 32 45
Z 0373 90 45 45
Classification of system components
Table 1 Vertical glazing | System 50 60 80 | Hanger bolts
Hanger bolts
1) Cut from GH 5053 or GH 5055
2) Generally The screw-in depth (ET) for hanger bolts = 45 mm thread length (GL) measured from the front edge of
the timber
For glasses tGlas lt 20 mm observe the permissible visible shaft length from the front edge of the wood
If necessary adjust the visible shaft length over the screw-in depth
3) Permissible visible shaft length from the front edge of the wood = glass thickness tGlas (mm) + 3 mm
4) Permissible visible shaft length from the front edge of the wood = glass thickness tGlas (mm) + 7 mm
5) Permissible visible shaft length from the front edge of the wood = glass thickness tGlas (mm) + 9 mm
TI-H_92_003dwg
Total length
Thread lengthShaft length
S T A B A L U X
Stabalux H Processing notes 310718 50
Stabalux HProcessing notes
127
Glass inset and glass support
RowTotal glass thickness tGlass (mm)
for inclined glazing 1) Hanger bolts 2)Glass supports 3)
GH 5053 GH 5055 Depth (mm)1 16 17 18 Z 0371 GH 0081 Section 92 19 20 Z 0371 Section Section 123 21 22 Z 0372 Section Section 144 23 24 Z 0372 Section Section 165 25 26 Z 0372 Section Section 186 27 28 Z 0372 Section Section 207 29 30 Z 0372 Section Section 228 31 32 Z 0372 GH 0082 Section 249 33 34 Z 0372 GH 0083 GH 0851 2610 35 36 Z 0373 GH 0084 GH 0852 2811 37 38 Z 0373 GH 0085 GH 0853 3012 39 40 41 Z 0373 GH 0886 GH 0854 3213 42 43 44 Z 0373 GH 0887 GH 0855 3514 45 46 47 Z 0373 GH 0888 GH 0856 3815 48 49 50 Z 0373 GH 0889 GH 0857 4116 51 52 53 Z 0373 GH 0890 GH 0858 4417 54 Z 0373 GH 0891 GH 0859 47
Classification of system components
Table 2 Inclined glazing | System 50 60 80 | Hanger bolts
Glass support GH 5053
Glass support GH 5055
1) Accounting for a 10 mm inner seal
2) The depth for hanger bolts = 45 mm thread length measured from the front edge of the timber
3) Cut from GH 5053 or GH 5055
TI-H_92_005dwg
Depth
Depth
S T A B A L U X
Stabalux H Processing notes 310718 51
Stabalux HProcessing notes
127
Glass inset and glass support
Glass support GH 5053 Attachment with bolts and hardwood cylinders
Glass support GH 5053 and GH 5055 with pins and hardwood cylinders
bull Certified system components consist of glass sup-port GH 5053 and GH 5055 with pins and hard-wood cylinders
bull Depending on the width of supports 2 or 3 bolts with a diameter of 10 mm are needed
bull The bolt length should be adapted to the thickness of the glass
bull To anchor the bolts in place 50 mm wooden cylin-ders with a outer diameter of 30 mm and an axial core of empty 10 mm are solidly glued into the timber
H_12_016dwg
H_12_017dwg
A-A
bull Additionally holes with a depth of 50 mm and empty of 30 mm are to be drilled into the transom profile ver-tical to the transom axis with 80 mm spacing
bull The glue or adhesive used must be suitable and must not swell
bull The bolts should be hammered in along the entire cylinder depth of 50 mm
bull For glass supports GH 5053 and GH 5055 the re-quired depths are delivered corresponding to the thickness of the glass and placed onto the hanger bolts
Glass support GH 5053
Bolt empty 10 mmHardwoodcylinder Hardwood
cylinder
Block
Block
glass support
Inner seal
Bolt
Hardwood cylinderInner diameter 10 mmOuter diameter 30 mmfirmly gluedto the transom profile
Hardwood cylinder not grooved removed the sealing base around the cylinder
S T A B A L U X
Stabalux H Processing notes 310718 52
Stabalux HProcessing notes
127
Glass inset and glass support
Glass support GH 5055 Attachment with bolts and hardwood cylinders
Glass support GH 5053 and GH 5055 with pins and hardwood cylinders
bull The central groove in the Stabalux H System must not be milled into the wooden cylinder
bull When fitting the seals the sealing base must there-fore be removed around the cylinder
bull Blocks must be placed under the glass panes along the entire length of the glass supports
bull Details of the approved pane weights geometries and classification of system components are pro-vided in section 9
H_12_016dwg
H_12_017dwg
A-ABolt empty 10 mmHardwood
cylinder Hardwoodcylinder
Block
glass support
Block
Inner seal
Bolt
Hardwood cylinderInner diameter 10 mmOuter diameter 30 mmfirmly gluedto the transom profile
Hardwood cylinder not grooved removed the sealing base around the cylinder
Glass support GH 5055
S T A B A L U X
Stabalux H Processing notes 310718 53
Stabalux HProcessing notes
127
Glass inset and glass support
Row
Total glass thickness tGlass (mm)
for vertical glazing
Hardwood cylinder
Bolt Glass supports 1)
Inner seal heightGH 5053 GH 5055 Depth (mm)
5 mm 10 mm 12 mm1 8 9 Z 0073 - - Z 0047 Section Section 12
2 10 11 Z 0073 - Z 0047 Z 0047 Section Section 14
3 12 13 Z 0073 - Z 0047 Z 0047 Section Section 164 14 15 Z 0073 Z 0047 Z 0047 Z 0047 Section Section 185 16 17 Z 0073 Z 0047 Z 0047 Z 0048 Section Section 206 18 19 Z 0073 Z 0047 Z 0048 Z 0048 Section Section 227 20 21 Z 0073 Z 0047 Z 0048 Z 0048 GH 0082 Section 248 22 23 Z 0073 Z 0047 Z 0048 Z 0048 GH 0083 GH 0851 269 24 25 Z 0073 Z 0048 Z 0048 Z 0048 GH 0084 GH 0852 2810 26 27 Z 0073 Z 0048 Z 0048 Z 0048 GH 0085 GH 0853 3011 28 29 30 Z 0073 Z 0048 Z 0048 Z 0049 GH 0886 GH 0854 3212 31 32 33 Z 0073 Z 0048 Z 0049 Z 0049 GH 0887 GH 0855 3513 34 35 36 Z 0073 Z 0048 Z 0049 Z 0049 GH 0888 GH 0856 3814 37 38 39 Z 0073 Z 0049 Z 0049 Z 0049 GH 0889 GH 0857 4115 40 41 42 Z 0073 Z 0049 Z 0049 Z 0051 GH 0890 GH 0858 4416 43 44 45 Z 0073 Z 0049 Z 0051 Z 0051 GH 0891 GH 0859 4717 46 47 48 Z 0073 Z 0049 Z 0051 Z 0051 GH 0892 GH 0860 5018 49 50 51 Z 0073 Z 0051 Z 0051 Z 0051 GH 0893 GH 0861 5319 52 53 54 Z 0073 Z 0051 Z 0051 - GH 0894 GH 0862 5620 55 56 57 Z 0073 Z 0051 - - Section Section 5921 58 59 60 Z 0073 Z 0051 - - Section Section 6222 61 62 63 Z 0073 Z 0051 - - Section Section 6523 64 Z 0073 Z 0051 - - Section Section 68
Classification of system components
Table 3 Vertical glazing | System 50 60 80 | Hardwood cylinders amp bolts
Bolt
1) Cut from GH 5053 or GH 5055
TI-H_92_005dwg
Hardwood cylinder Z 0073
Item Bolt length (mm)Z 0047 70Z 0048 80Z 0049 90Z 0051 100
S T A B A L U X
Stabalux H Processing notes 310718 54
Stabalux HProcessing notes
127
Glass inset and glass support
RowTotal glass thickness tGlass (mm)
for inclined glazing 1)Hardwood cylinder Bolt
Glass supports 2)
GH 5053 GH 5055 Depth (mm)1 20 21 22 Z 0073 Z 0048 Section Section 14
2 23 24 Z 0073 Z 0048 Section Section 16
3 25 26 Z 0073 Z 0048 Section Section 18
4 27 28 Z 0073 Z 0048 Section Section 20
5 29 30 Z 0073 Z 0049 Section Section 226 31 32 Z 0073 Z 0049 GH 0082 Section 247 33 34 Z 0073 Z 0049 GH 0083 GH 0851 268 35 36 Z 0073 Z 0049 GH 0084 GH 0852 289 37 38 Z 0073 Z 0049 GH 0085 GH 0853 3010 39 40 41 Z 0073 Z 0049 GH 0886 GH 0854 3211 42 43 44 Z 0073 Z 0051 GH 0887 GH 0855 3512 45 46 47 Z 0073 Z 0051 GH 0888 GH 0856 3813 48 49 50 Z 0073 Z 0051 GH 0889 GH 0857 4114 51 52 53 Z 0073 Z 0051 GH 0890 GH 0858 4415 54 Z 0073 Z 0051 GH 0891 GH 0859 47
Classification of system components
Table 4 Inclined glazing | System 50 60 80 | Hardwood cylinders amp bolts
Glass support GH 5055
1) Accounting for a 10 mm inner seal
2) Cut from GH 5053 or GH 5055
TI-H_92_005dwg
Glass support GH 5053
Depth
Depth
S T A B A L U X
Stabalux H Processing notes 310718 55
Stabalux HProcessing notes
Fastenings
bull The fastenings for the Stabalux H system allow fill-ing elements to be easily secured
bull The clamping strips are connected to the wooden profile using Stabalux system screws Stainless steel 14301 DIN EN 10088 is the material used to produce screws for the Stabalux system
bull Depending on the type of screw fittings selected special 4 mm vulcanised EPDM washers are avail-able
bull Screws in suitable lengths are available for all com-mon glass thicknesses The screw length is deter-mined from a table
bull The distance for screw fittings is variable The max-imum distance is a = 250 mm
bull The distance from the edge for the first screw fit-ting should generally be in the region of 30 mm le a le 80 mm The placement of the glass supports and the choice of mullion-transom connection should also be taken into account
bull The clamp connection is exclusively exposed to tensile forces The clamping strips are connect-ed to the wooden profile using Stabalux system screws To determine the stress limit (maximum tensile force) and permitted tensile forces for the connection the conditions in the relevant gener-al building approval and the Eurocode 5 (DIN EN 1995-1) series of standards shall apply
bull Screw fittings are applied using a conventional electric screwdriver with depth stop This guaran-tees uniform application of pressure The depth setting should be chosen so that a sealing washer compression of 15 - 18 mm is achieved
bull An electric screwdriver with adjustable torque can be used as an alternative The required torque is approx 5 Nm The required torque is influenced by the relatively large scatter when dealing with wood and the variable influence of friction due to different drilling depths It is therefore advisable to determine the setting on a test piece and to check compression of the sealing washer
Screw fittings 128
Concealed screw fittings
bull Assembly is facilitated by selecting pre-drilled pres-sure strips (UL 5009-L UL 6009-L and UL 8009-L slot 7 x 10 mm a = 125 mm) with clippable upper strips The remaining pressure strips should be pro-vided with a round hold of d = 8 mm The func-tionality of the clip procedure can be checked after the first upper strip has been pushed against the pressure profile
Note
When using aluminium cover strips on roofs take account of the expansion factor as a result of the high degree of heat absorption when selecting the length to use In this case it is recommended that holes for screwing on the clamping strip are created with a diameter of d = 9 mm Equally the use of single-piece cover strips should be carefully considered
Visible screw fittings
bull Cover strips should be drilling with a round hole of d = 8 mm
Note
(see Note on covered screw fittings)
Visible recessed screw fittings
bull When creating visible recessed screw fittings a stepped bore is required The lower part of the cov-er strip should be drilled with a d = 7 mm diameter The upper part of the cover strip needs a d = 11 mm diameter for the screw head It is recommended to install a washer (PA washer eg Z 0033) with all screw fittings
S T A B A L U X
Stabalux H Processing notes 310718 56
Stabalux HProcessing notes
Fastenings
128
Screw fittings
Concealed screw fittings
Stabalux system screws with cylinder headd = 10 mm und 4 mm sealing gasket
eg Z 0331
Visible screw fittings
Stabalux system screws with cylinder headd = 10 mm und 4 mm sealing gasket
eg Z 0331
Visible recessed screw fittings
Stabalux system screws with cylinder head d = 10 mm with additional PA washer eg Z 731 with Z 33
eg Z 0331 eg Z 0731 with Z 0033
Attention
The calculation to determine screw lengths for the the calculation to determine screw lengths is
Glass thickness - 3 mm + inner seal (5 10 ie 12 mm) + 16 mm + e
e = statically required screw-in depth
Calculating the screw length for DL 5073 DL 6073
H_12_018dwg
H_12_019dwg
H_12_020dwg
S T A B A L U X
Stabalux H Processing notes 310718 57
Stabalux HProcessing notes
128
Calculating the screw length
System width 50 60 mm System width 80 mm 1)
H_12_021dwg
Screw fittings
1) Delivered upon request
Representation and item numbers are examples for System 60 System width 50 are analogous
S T A B A L U X
Stabalux H Processing notes 310718 58
Stabalux HProcessing notes
128
Wood screws for Stabalux H
Z0327 cylinder head screw 65 x 70 mm
Z0329 cylinder head screw 65 x 80 mm
Z0331 cylinder head screw 65 x 90 mm
Z0333 cylinder head screw 65 x 100 mm
Z0335 cylinder head screw 65 x 110 mm
Z0337 cylinder head screw 65 x 120 mm
Z0339 cylinder head screw 65 x 130 mm
Cylinder head screw empty 10 mm with hex socket | without sealing gasket
Z0727 cylinder head screw 65 x 70 mm
Z0729 cylinder head screw 65 x 80 mm
Z0731 cylinder head screw 65 x 90 mm
Z0733 cylinder head screw 65 x 100 mm
Z0735 cylinder head screw 65 x 110 mm
Z0737 cylinder head screw 65 x 120 mm
Z0033 PA washer empty 10 x 15 mm
Cylinder head screw empty 10 mm with hex socket | with sealing gasket
Screw fittings
H_12_019dwg
S T A B A L U X
Stabalux H Processing notes 310718 59
Stabalux HProcessing notes
Tips for laying the cover strip DL 5073 DL 6073
We assume that this cover strip will be used with glass panes that are supported on two sides and the recessed screw head is concealed In this case a cylinder head screw with inner hex is to be used eg Z 731 When cov-ering with a 2 mm cover plug Z 89 a bore depth of 7 mm is calculated
Depending on the precision of the bore it should be de-cided on case by case basis if any slight changes to this depth are necessary The cover plug Z 0089 does not need to be glued in place but may be levelled using lev-elling compound
Coating the cover strip
Profile production (aluminium extrusion moulding) with different mass distribution is extremely difficult Length-wise shadow formation may result Resulting actions are to be taken with the agreement of the coater
Flat cover strip DL 5073 DL 6073 129
glass support
eg GH 5053
+bolts and hardwood
cylinders
H_12_022dwg
Intersections
Due to the special shape of the strip (the material ex-tends into the rebate) there is no closed sealing section available at intersections We therefore recommend plac-ing particular attention to ensure tightness of the joints and fill will Stabalux connecting paste Z 0094
Glass supportsblocking
Special attention should be given to dimensional pro-portions To support the outer pane a sufficiently large glazing block must be installed that can carry the load to safely ensure the glass load is distributed effectively
DL 6073 Cover plug Z 0089GD 6174 Screw eg Z 0731
S T A B A L U X
Stabalux H Processing notes 310718 60
Stabalux HProcessing notes
Use of slab insulation
bull Using insulation blacks significantly reduces heat dissipation
bull The highly effective slab insulation has a perma-nently adhesive HOT-MELT
bull Depending on the situation where they are used insulation blocks can be directly applied to the cov-er strippressure profile or placed into the rebate over the screw fittings and pushed into position with the cover strippressure profile
1210
Slab insulation
Insulation block Width(Rebate)
Height
Z 0605 slab insulation 2042 20 mm 42 mm glass thickness from 44 mm
Z 0606 slab insulation 2026 20 mm 26 mm glass thickness from 28 mm
Z 0607 slab insulation 3042 30 mm 42 mm glass thickness from 44 mm
Z 0608 Insulation block 3026 30 mm 26 mm glass thickness from 28 mm
H_12_023dwg
Note
bull The use of slab insulation with cover strips DL 5073 DL 6073 should be tested for each individual sit-uation
bull 2-piece outer seals are always used with slab insu-lation blocks
bull With system width 80 mm and a 40 mm rebate 2 x 20 mm wide slab insulation blocks can be com-bined (40 mm wide insulation blocks available upon request)
bull for a glass inset of 15 mm outer seal GD 1932 bull for a glass inset of 20 mm outer seal GD 1932
Correctly position the seal flapwhen installing the insulation block
S T A B A L U X
Stabalux H Processing notes 310718 61
Stabalux HProcessing notes
1210
Slab insulation
Examples
H_12_023dwg
Z 0607Insulation block 3042
Z 0608Insulation block 3026
Z 0605Insulation block 2042
Z 0606Insulation block 2026
Z 0605Insulation block 2042
GD 1932
GD 1932
GD 1932
GD 1932
GD 1932
GD 1932
Z 0606Insulation block 2026
S T A B A L U X
Stabalux H Design 310718 62
Stabalux HDesign
Special design
Glass structures that partially refrain from using visible cover strips are considered special designs
These designs do not conform to the intended uses of the system No guarantees are made for eg quality of seals durability and structural stability Responsibility here lies entirely with the company implementing the design
Based on our experience we recommend paying close at-tention to the points made on the following pages during planning and implementation
131
Pane support variants
Mullion-transom structure 2-sided cover strip
H_13_001dwg
Mullion-transom structurewith transom cover strips 1)
1) Seals with 1 2 or 3 sections are possible
2) Use of mullion seals with 1 section in mullions and transoms
Section A-A Section C-C
Section B-B Section D-D
Mullion-transom structurewith mullion cover strips 2)
S T A B A L U X
Stabalux H Design 310718 63
Stabalux HDesign
131
Pane support variants
Transom structure mullion structure 2-sided cover strip
Vapour seal
When using this type of structure it is important to be aware that any loss of contact pressure can affect the room-side permeability There is an increased risk of con-densation build up in the rebate
vertical clamping strips
The glass supports should be placed to below the outer pane and sealed with it
horizontal clamping strips
Ventilation and condensation drainage is achieved via a recess in the lower sealing lip in the centre of the outer seal or at one third intervals
H_13_001dwg
Transom structure
Section A-A Section C-C
Section B-B Section D-D
Mullion structure
S T A B A L U X
Stabalux H Design 310718 64
Stabalux H
Requirements for special designs 1 Vapour seal
The room-side level of glazing must have the best possible vapour seal In this regard the vapour dif-fusion properties of the silicone sealant to be used should be tested Ensure that there are no permea-ble areas around concave cross joints
2 Rebate ventilation pressure equalisation and condensation drainage
Systems with partially sealed rebate represent a limitation to rebate ventilation Check on a case-by-case basis that no damage will be caused by standing condensation It is especially critical that designs with sealed vertical joints are evaluated To allow ventilation of the horizontal rebate we recom-mend installing a suitable vertical ventilation space Alternatively ventilation can be achieved using the outer joints
3 Weatherproofing
The outward facing seals must be watertight In cross joints it is especially important to ensure a firm join between the Stabalux profile seal and the silicone joints We recommend sealing up to the outer edge of the glass before mounting the cover stripsWe would like to once again emphasise that our profile seals will not make a permanent bond with commonly used silicone sealants A seal can only be created at contact points through permanent appli-cation of pressure
4 Mechanical strength screw fittings
Ensure screw fittings are sufficiently planned for Special attention should be given to the effects of wind suction and the reduced support
5 Glass weight distribution
Mechanical distribution of the weight of the glass panes through the structure must be ensured System glass supports can be used for existing horizontal transoms Designs using ldquoonlyrdquo mul-lions require special glass supports which carry the weight of the glass directly into the mullions
6 Glass sizing
Attention should be given to the reduced sup-port of panes when dimensioning the glass For example only the vertical or horizontal cov-er strips are effective in the event of wind suc-tion stresses or stress on the fall protection
7 Material compatibility
Compatibility of the silicone sealants with our profile sealants and the edge bonding of the glass must be ensured We recommend the exclusive use of tested silicone sealants from the whole-glass facades sec-tor Approval is usually given by the silicone manu-facturer
131
Pane support variants
H_13_001dwg
Design
S T A B A L U X
Stabalux H Design 310718 65
Stabalux H
System cross sections 132
Vertical glazing mullionsconcealed screw fittings
Vertical glazing transomsdivided outer seal for height compensation
Vertical glazing transoms visible recessed screw fittings
Vertical glazing mullionsvisible screw fittings
Vertical glazing transoms concealed screw fittingsStainless steel bottom strip fire seals
Vertical glazing transoms visible screw fittingsStainless steel cover stripfire seals
Inclined glazing mullionsconcealed screw fittings
Inclined glazing transomsvisible screw fittings
1
2
3
4
5
6
7
8
1 2
3 4
5 6
7 8
Examples
H_13_002dwg
Design
S T A B A L U X
Stabalux H Design 310718 66
Stabalux H
Creating facade corners
At exposed areas such as glass facade corners it is par-ticularly important to ensure sufficient heat insulation in order to avoid the creation of thermal bridges and pre-vent a build-up of condensation Thermal current calcula-tions provide information about the actual heat loss
133
System details
Special seal allow a polygon shaped arrangement of the facade mullions For convex glass surfaces an angle be-tween 3deg and 15deg can be freely chosen For concave glass surfaces the angle can vary between 3deg and 10deg
Facade polygon
Outer corner Inner corner
Geometrically check the feasibility Recommendation Use for system 60 and above
H_13_003dwg
H_13_004dwg
H_13_005dwg
Design
Calculation of screw length withconsideration of the angle
ATTENTIONAdhere to the minimum glass inset
S T A B A L U X
Stabalux H Design 310718 67
Stabalux H
133
System details
Eaves with glass roof connection
bull Depending on the construction of the transoms a design with or without rain gutters and the choice of stepped glazing or closable cover strips gives us different variants for implementation
bull All options require condensation and moisture to be drained away at the eaves
Design with stepped glazing
bull With a stepped glazing design it is important to se-lect a UV-resistant edge bonding for the glass This edge bonding systems usually silicone-based are quite permeable to gases and are therefore unable to achieve the required high values for sound and heat insulation of conventional systems and require additional sealing around the edges
Example 1
Design with stepped glazing
H_13_006dwg
Design
bull Our thermal calculations show that stepped glass panes compared to covered glass edges have a much less favourable isothermal movement
bull Stepped glass panes must also be statically meas-ured according to their reduced hold against wind suction
bull The additional thermal loads that occur in stepped glass panes should countered by the use of pre-ten-sioned glass (TVG ESG) for the outer panes
bull Stepped glass panes should be preferred for flatter inclined roofs as water can drain away at the eaves unhindered
S T A B A L U X
Stabalux H Design 310718 68
Stabalux HDesign
133
Eaves with glass roof connection Design using cover strips
bull Horizontal pressure strips prevent the free run off of rain water and dirt
bull Cover strips with angled edges reduce the build up of water in front of the cover strip
bull The outer sealing level on glass roofs must also be thoroughly sealed
bull In combination with our butyl clad stainless steel panels glazing with pressure strips on 4 sides achieves a higher level of safety
bull Make sure that the inner sealing section provides guaranteed drainage for condensation
bull To improve drainage and heat-induced expansion cover strips should be shortened by 5 mm at tran-som joints Gasket joints however are to be laid flat with a slight excess in dimensions Open ends of the transom cover strips must be sealed
Note
Due to the increased thermal stresses in the roof we rec-ommend using concealed screw fitting when choosing clamping strips for larger system lengths and in rafters Unused holes in the pressure profile must be sealed
Example 2
Design using cover strips
System details
H_13_007dwg
S T A B A L U X
Stabalux H Design 310718 69
Stabalux HDesign
133
Eaves with glass roof connection Design with gutter
bull The gutter must be able to take its own weight and mounted in such a way that stresses from its own weight water and ice will not lead to deformations and directly apply a load to the glazing
bull Overflowing water must not be able to get inside the structure Alongside the gutter-shaped outer rafter seal the moisture barrier installed over the guide plate also acts to drain away condensation
Example 3
Design with gutter
System details
H_13_008dwg
S T A B A L U X
Stabalux H Design 310718 70
Stabalux H
H_13_009dwg
Design
133
Roof ridge design
bull When designing the ridge cap ensure that the raft-er cover strips are pulled under the ridge cap
System details
S T A B A L U X
Stabalux H Design 310718 71
Stabalux HDesign
134
Structural attachments
Structural attachment film baffles
bull Attachment of glazing to the building structure re-quires a well thought out approach
bull Moisture damage can occur if moisture condenses at any thermal bridges
bull Thermal bridges must be avoided and warm air from the inside spaces must not penetrate too deeply into the structure
bull The required moisture barriers must be installed as deeply as possible into the inner space using impermeable structural film baffles This prevents moisture penetration into the structure via conden-sation from the air inside
bull An additional foil to seal against rainwater must be permeable to moisture Only if this foil has a wa-ter vapour diffusion resistance value μ of max μ = 3000 can a dry structure be guaranteed in the transition zones
S T A B A L U X
Stabalux H Design 310718 72
Stabalux HDesign
134
Structural attachments
Facade base
bull Controlled drainage of the rebate space can only be ensured if the sealing sections overlap in such a way that no moisture can get under the seals and foils
bull Run foils under the transom seal to act as a mois-ture barrier and glue to the wooden structure In accordance with DIN 18195 the seal should be run at least 150 mm above the water-guiding layer
bull Attach foil with moisture barrier in accordance with the requirements of DIN 18195
Example 1
Mounting intermediate mullion to base plate
Drainage of the base area is achieved via the seal flap towards the outside In this case the seal flap around the mullion at the base should not be released For edge mullions ensure there is a corresponding seal placed (continuous transom seal up the to the end point) and a constructive design of the drainage section
H_13_010dwg
S T A B A L U X
Stabalux H Design 310718 73
Stabalux HDesign
134
Facade base
bull Rebate space ventilation is achieved via the open end of the vertical cover strips
bull Ensure the connection is impermeable to vapourbull Mullion mountings must be sufficiently statically
dimensioned Required axis and edge distances for anchoring the base plates and in the building struc-ture must be observed
Example 2
Mounting intermediate mullion to base plate
Where seal flaps are interrupted by joints filler rods in the joint must also be cut
Structural attachments
H_13_011dwg
S T A B A L U X
Stabalux H Design 310718 74
Stabalux HDesign
134
Structural attachments
Facade base
bull Heat insulation around the structural connection should be designed in such as way as to prevent cold bridges forming
bull Steel parts should also be provided with sufficient protection against corrosion even in concealed ar-eas
bull Weather-protection sheets should be used depend-ing on the requirements of the construction Suffi-cient rear ventilation must be ensured
Example 3
Attaching intermediate mullions at base plates
H_13_012dwg
S T A B A L U X
Stabalux H Design 310718 75
Stabalux HDesign
134
Structural attachments
Connection before intermediate floors
bull Depending on requirements mullions are designed as continuous multi-span transoms or separated at each floor
bull Reasons for separating mullions can include eg building settlement fire protection sound insula-tion etc
bull If the separation joint is intended to absorb expan-sion then as well as the required degree of freedom for mullions the ability for movement of integrated elements must also be ensured
bull The constructive design of the mullion joint and mounting should be chosen according to the stat-ically calculated base system and determines the
Example
Mullions separated at each floor
In this example distribution of horizontal and vertical loads is achieved at each floor through the existing floor structure
H_13_013dwg
choice and arrangement of fixed and movable bear-ings type of screw fittings structural connection parts and attachment to the concrete floor
bull With continuous mullions and a corresponding mount the multi-span support principle is in effect Sagging due to horizontal effects is lower The re-quired moment of inertia reduces for 2-span sup-ports with the same span length compared to the 1-span support by a factor of 0415 However a ten-sion and stability analysis should be carried out
S T A B A L U X
Stabalux H Design 310718 76
Stabalux HDesign
134
Ceiling connection
bull Structural connections should take account of any movement that may occur
bull As well as temperature induced expansion in the facade all longitudinal expansions and movements of the affected components must be considered
bull Additional stresses from restraints must be avoid-ed
Structural attachments
H_13_014dwg
S T A B A L U X
Stabalux H Design 310718 77
Stabalux HDesign
134
Structural attachments
Facade connection to parapets
H_13_015dwg
S T A B A L U X
Stabalux H Design 310718 78
Stabalux HDesign
134
Structural attachments
Connection to structural eaves
bull This connection is suitable for glass roofs that are being installed as skylights in the structure These may be gabled roofs single pitch roofs pyramids or arched roofs
H_13_016dwg
S T A B A L U X
Stabalux H Design 310718 79
Stabalux HDesign
134
Structural attachments
Ridge connection to walls
bull When making ridge connections to walls permea-bility to moisture is particularly important Warm air with a high level of moisture gets into cooler zones of the inner sealing section where the design is not sufficiently sealed and can cause structural dam-age from penetrating into the connecting structure
bull Joint seals made from butyl-clad stainless steel plates (Z 0501 Z 0601) must be installed on the outside of joint areas
H_13_017dwg
S T A B A L U X
Stabalux H Design 310718 80
Stabalux HDesign
134
Structural attachments
Horizontal wall connection to heat insulation bonding system
H_13_018dwg
S T A B A L U X
Stabalux H Design 310718 81
Stabalux HDesign
135
Installing windows and doors
Mullion and transom facades and glass roofs from Stabalux are neutral with regards to the selection of in-sert elements All commonly available window and door systems made from steel aluminium wood or plastic can be used Frame profiles from the window and door man-ufacturerrsquos should be selected to match the chosen glass thickness If no profiles with a suitable insert rebate are available mountings may be used as shown in the fol-lowing examples Like with glass elements windows are set into the facade on glass supports padded and then secured against slippage
Insert window transom sectionSystem HUECK Series Lambda WS 075 IS
Insert window mullion sectionSystem HUECK Series Lambda WS 075 IS
H_13_019dwg
S T A B A L U X
Stabalux H Design 310718 82
Stabalux HDesign
135
Installing windows and doors
H_13_020dwg
Insert window transom sectionSystem HUECKSeries Lambda WS 075
Insert window mullion sectionSystem HUECKSeries Lambda WS 075
S T A B A L U X
Stabalux H Design 310718 83
Stabalux HDesign
135
Installing windows and doors
H_13_021dwg
Insert door outward transom sectionSystem HUECKSeries Lambda DS 075
Insert door outward transom sectionSystem HUECKSeries Lambda DS 075
Insert window mullion sectionSystem HUECKSeries Lambda WS 075
S T A B A L U X
Stabalux H Design 310718 84
Stabalux HDesign
135
Installing windows and doors
H_13_022dwg
Insert door inward in the transom sectionSystem HUECKSeries Lambda DS 075
Insert door inward in the transom sectionSystem HUECKSeries Lambda DS 075
S T A B A L U X
Stabalux H Design 310718 85
Stabalux HDesign
135
Installing windows and doors
H_13_023dwg
Insert door inward in the transom sectionSystem HUECKSeries Lambda DS 075
Insert-top-hung window mullion section System HUECKSeries Lambda 110
Insert-top-hung window transom section System HUECKSeries Lambda 110
S T A B A L U X
Stabalux H Design 310718 86
Stabalux HDesign
135
Installing windows and doors
H_13_024dwg
Sliding system mullion section System HUECKSeries Volato M
Sliding system transom sectionSystem HUECKSerie sVolato M
S T A B A L U X
Stabalux H Design 310718 87
Stabalux HDesign
135
Installing windows and doors
H_13_025dwg
Flush roof surface windowSystem HUECK-HARTMANNSeries 85E
Powered according tosystem specifications
S T A B A L U X
Stabalux H Design 310718 88
Stabalux HDesign
135
Installing windows and doors
H_13_027dwg
Insert window - transom sections wood windows
Insert window - mullion sectionwood windows
- Stabalux H
-
- System
-
- System properties
- System cross sections and inner seals - facade
- System cross sections and inner seals - roof
- Cover strips and outer seals
-
- Processing notes
-
- Material information
- Profile design
- Mullion-transom joint
- Tips for laying seals
- Seals - Facade
- Seals - roof
- Glass inset and glass support
- Screw fittings
- Flat cover strip DL 5073 DL 6073
- Slab insulation
-
- Design
-
- Pane support variants
- System cross sections
- System details
- Structural attachments
- Installing windows and doors
-
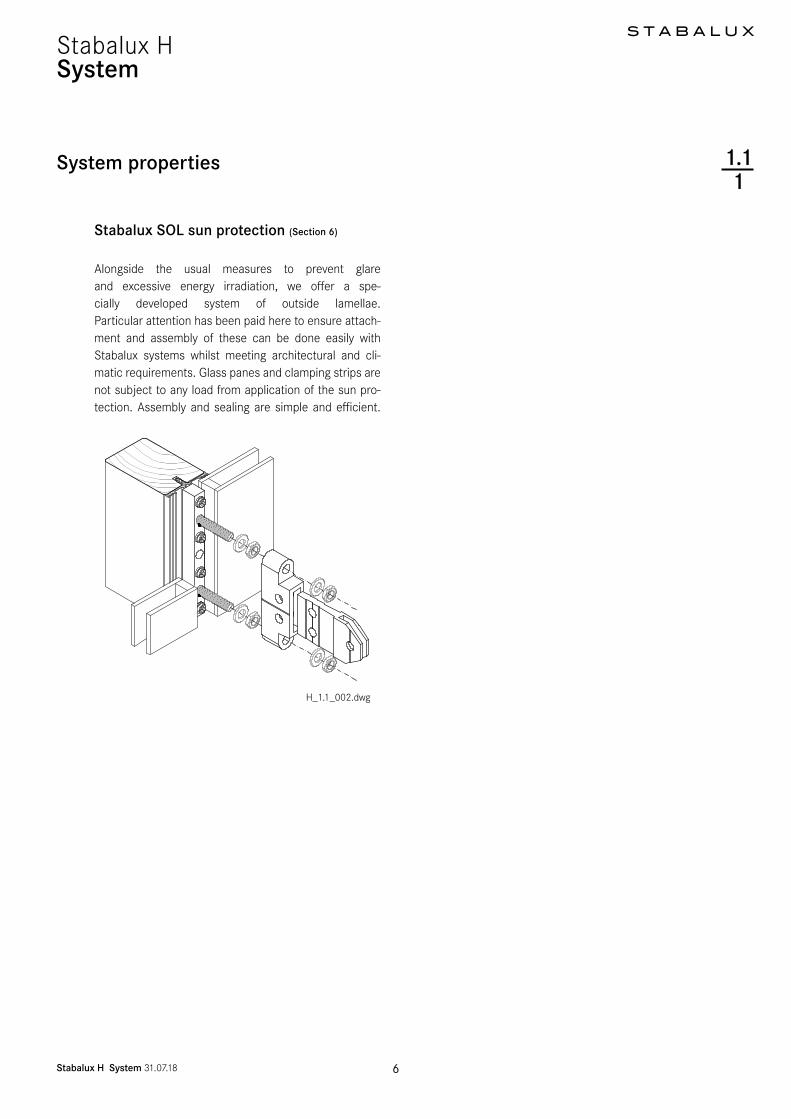
S T A B A L U X
Stabalux H System 310718 17
Stabalux HSystem
Cover strips and outer seals
Stainless steel - concealed screw fittings
114
Aluminium - visiblescrew fittings
Stainless steel - visiblescrew fittings
Flat cover stripDL 5073DL 6073
H_11_005dwg
S T A B A L U X
Stabalux H System 310718 18
Stabalux HSystem
Cover strips and outer seals
Wood covering strips
114
H_11_006dwg
System 60 System 80
Wooden cover strips can be easily mounted to mullions and transoms using aluminium top or lower bars The pressure profile UL5003UL6003UL8003 acts as a clamping stripAssembly apply the two-piece GD 1903 outer seal to the upper strip attach to the system using screws Divide the OL 1903 into 80 mm long pieces and attached cen-trally using 3 screws to the wooden cover strip at 300 mm intervals and then clip to the upper strip
(Please see section 125 on assembling the outer seal)
Transom
Mullion
Set the wooden upper strip in the transom with an in-cline of 5deg
Example System 50 mm
UL5003
GD1903 (2-teilig)
OL1903
UL6003
UL8003
System 50
S T A B A L U X
Stabalux H Processing notes 310718 19
Stabalux HProcessing notes
Wood type and quality
The wooden load-bearing substructure is used for mount-ing the glazing and must meet all load and suitability re-quirements The profile dimensions and choice of mate-rials are key The type of wood chosen depends on the client architect andor processor
All wood materials are produced using wood types per-mitted by the current Eurocode 5 (DIN EN 1995-1) stand-ard Alongside the mature solid wood sections and lam-inated solid timbers facade construction is increasingly using a multi-layer construction method Due to its stabil-ity against deformations we recommend using plywood sections The following minimum requirements must be met for all wooden materialsbull Softwood strength class C24bull Laminated timber strength class GL24hbull For fireproof glazing pay attention to the specifica-
tions given in the relevant authorisationsThe use of comparable hardwoods is also permitted
Spruce fir C16 800
Pine larch spruce fir C24 1100
Douglas fir southern pine C30 1200
Western Hemlock C35 1300
Yellow Cedar C40 1400
Oak teak keruing D30 1100
Beech D35 1200
Beech azalea intsia D40 1300
Angelique (Basralocus) D40 1300
Azobeacute (Bongossi) D60 1700
Laminated timber made using wood from class
C24 GL24h 1160
C30 GL28h 1260
C35 GL32h 1370
C40 GL36h 1470
Laminated veneer
Kerto Q 1000-1050
Kerto S 1380
Kerto T 1000
Multiplex sheets
(plywood) 900-1600
The woods and values mentioned here are examples for guidance only
Exact values for your choice should be determined with the supplier and
according to applicable standards
Material information 121
Wood typeStrength class Elastic modulus
E0mean [kNcm2]
Seal profiles
Stabalux seals are organic natural rubber materials based on EPDM and conform to the DIN 7863 standard non-cellular elastomer sealing profiles for window and facade construction Compatibility with contact media should tested by the processor particularly when using plastic glazing and making structural joints with non-Stabalux products Fire seals are special products their specific data are filed with DIBt (German Centre of Com-petence for Construction)Sealing the rebate with all weather silicone seal is pos-sible
All weather silicone seal
Only certified materials may be used for sealing the re-bate with all-weather silicone Pay attention to all infor-mation provided by the manufacturer and the sealing work must be carried out by trained persons It is recom-mended that a licensed and certified specialist contrac-tor is hired for this purpose We further refer you to the DIN 52460 standard and IVD data sheets (Trade Associ-ation for Sealants)The compatibility of the materials is particularly impor-tant when using all-weather silicone In this case the compatibility of the sealant with the edge bonding of the glass and the backfill of the joints If self-cleaning glass is used the compatibility must be established in advance Glass sealants and edge bonding must be UV-resistant The incline of roofs should also be taken into account Information about UV-resistance can be requested from the manufacturer Silicone edge bonding generally pro-vides better UV-resistance than polysulfide-based ma-terials The advantage of silicone lies in its high vapour sealing properties which is particularly useful when using more volatile argon fillings Highly elastic weatherproof and UV-resistant seals meet the widest range of demands for reliable joints
Aluminium profiles
The aluminium profiles we supply are generally made from EN AW 6060 according to DIN EN 573-3 T66 ac-cording to DIN EN 755-2
S T A B A L U X
Stabalux H Processing notes 310718 20
Stabalux HProcessing notes
Material information 121
Coating the aluminium
Alongside anodic oxidation with the corresponding pre-treatment conventional coating methods such as air-drying multi-layer coating systems (wet coating) or thermosetting coatings (stove enamelling powder-coat-ing) can be used By using different mass distribution longitudinal shadow formation is possible with cover strips DL 5073 and DL 6073 Resulting actions are to be taken with the agreement of the coater
Longitudinal expansions in aluminium pro-files exposed to temperature stress
When cutting the cover and pressure profiles from alu-minium allowance should be made for temperature-in-duced longitudinal expansion The theoretical rod lengths ℓ should be shortened by
∆ℓ = αT ∆T ℓ
Example
∆ℓ = 24 10-6 40 1000 = 096 asymp 10 mm
αT asymp 24 10-6 1K Coefficient of thermal expansion for aluminium
∆T = 40 K Assumed temperature difference of al-uminium dependent on the colour and amount of solar radiation
ℓ = 1000 mm Rod length
∆ℓ asymp 1 mm Longitudinal expansion
further examples
∆ℓ = 24 10-6 60 1000 = 144 asymp 15 mm∆ℓ = 24 10-6 100 1000 = 24 asymp 25 mm
A rod with a system length of ℓ = 1000 mm should be shortened by 1 mm for a temperature difference of ∆T = 40 degC A rod of length ℓ = 3000 mm should be shortened by 3 mm For ∆T = 100 degC (often occurs in roof areas and south-facing facades) a rod of length ℓ = 1000 should be shortened by 25 mm
Rod length ℓ (mm) Temperature differ-
ence ∆T
Longitudinal expan-
sion ∆ℓ (mm)
1000 40degC 1
3000 40degC 3
1000 60degC 15
3000 60degC 45
1000 100degC 25
3000 100degC 75
Note
We recommend shortening the pressure profile by asymp 25 mm per ℓ = 1000 mm of length When doing so ensure to use the correct length of the outer seal When using cover strips in roof area it is recommended that holes for screwing on the cover strip are created with a diameter of d = 9 mm
Stainless steel profile
Pressure profiles and bottom sections of cover strips are made from 14301 stainless steel for visible screw fit-tings The surface conforms to classification 2B accord-ing to DIN EN 10088-2Cover strips using 14401 stainless steel The surface has a ground finish (grain 220 DIN EN 10088-2) The upper parts of the cover strip are made from 14571 stainless steel with ground finish (grain 240 DIN EN 10088-2) To protect the surface a film has been applied to one side whose edge can be seen on narrow side
Other items
All system items are produced according to applicable standards
Maintenance and care
The information sheets WP01 ndash WP05 from the Associa-tion of Window and Facade Producers (VFF) must be ob-served The address can be found in the address section Further information can be found in section 90 - Cleaning Maintenance
S T A B A L U X
Stabalux H Processing notes 310718 21
Stabalux H
System with direct screw fittings in the central groove
The type of wood chosen depends on the client architect and processor according to the following considerations
bull Softwood strength class C24bull Laminated timber strength class GL24hbull For fireproof glazing pay attention to the specifica-
tions given in the relevant authorisations
The use of comparable hardwoods is also permitted
We prescribe the necessary geometry around the seal support and in regard to the screw fittings required for our systems
Profile design 122
H_12_001dwg
Processing notes
Note
Worked grooves and edges must be free of shavings and imperfections
When using hardwood cylinders for glass supports GH 5053 and GH 5055 you must not make a groove in the cylinder The sealing base is removed around the cylinder
System 50
Profile processing Profile processing Profile processing
System 60 System 80
S T A B A L U X
Stabalux H Processing notes 310718 22
Stabalux H
Mullion-transom joint 123
Principle
bull Attachment of the transoms to the mullions must match the static base system of the mullion-tran-som design selected
bull Load bearing capacity and suitability are to be stat-ically demonstrated on site In doing so the design and technical processing experiences of the pro-cessor can be considered
bull Designs are to be chosen that can be considered regular joints for the intended purpose and meet the standards of the Eurocode 5 (DIN EN 1995) or are covered by general building approvals
bull The solutions presented by us are purely examples A range of designs are possible depending on the shape of the wood and different jointing options
H_12_002dwg
H_12_003dwg
Processing notes
S T A B A L U X
Stabalux H Processing notes 310718 23
Stabalux H
Stabalux AK-H S T A B A L U X
Riegelverbinder fuumlr HolzsystemeTypen
AK-H_32_005-1
Processing notes
RHT transom connector for wood systems
bull The RHT links wooden mullion and transom con-structions with a visible width of 50ndash80 mm
bull The two identical connector parts are mounted to mullions and transoms and linked with one another by pushing together the transoms
bull A connecting screw locks the connection in all three dimensions
bull The clamping foot on the transom inner seal must be disengaged in the area of the mullion-transom joint
Transom assembly
Mullion assembly
123
1
1
2
2
Mullion-transom joint
Central connecting bolt3
3
Transoms pushed together
Transom assembly Mullion assembly
The connecting bolt tensions the transom holder in all three dimen-sions
H_12_005dwg
H_12_004dwg
bull When attaching the clamping strips to the system take care to place the screws outside of the mul-lion-transom connection in order to avoid a colli-sion with the RHT connector screw fittings
bull The central wooden groove in the transom should begin approx 80 mm before the end of the tran-som
bull The glass support should be mounted approx 100 mm from the end of the transom to prevent any collision between the RHT screws in the transom
S T A B A L U X
Stabalux H Processing notes 310718 24
Stabalux HProcessing notes
RHT for wood systems - types
bull The range comprises 7 RHT types with different lengths and therefore different load-bearing capac-ities
bull The screw group comprising a larger number of screws (shown in the diagram) is positioned toward the front edge of the mullion and transom (glass side)
123
Mullion-transom joint
H_12_004dwg
Connector typesStandard screw fittings
Front edge profile
S T A B A L U X
Stabalux H Processing notes 310718 25
Stabalux HProcessing notes
Assembly on the mullion
bull The front edge of the connector lies 6 mm behind the front edge of the mullion
bull Z 0126 screws in length 550 are always used for attaching to horizontal timbers (mullions)
123
Mullion-transom joint
H_12_004dwg
Mullion assembly
Fron
t edg
e pr
ofile
Front edge profile
Left mullion with connector eg RHT 8094
Screw fittings mullion Z 0126
Right mullion with connector eg RHT 8094
bull When using hard woods or when working near the edge of the wood a hole of 3 mm diameter should be pre-drilled
bull The number of screws varies for standard screw fit-tings depending on the connector type (Refer to the previous page)
bull A combination of screws can be used and calculat-ed case-by-case
S T A B A L U X
Stabalux H Processing notes 310718 26
Stabalux H
Assembly on the transom
bull A recess with 12-125 mm depth is milled into the (front of the) transom
bull The milling dimensions are With x length x depth 40 x (RHT length + 6) x 12-125 (mm)bull The milling can be carried out using a standard
hand routerbull The front edge of the connector lies 6 mm behind
the front edge of the transom
123
Mullion-transom joint
H_12_004dwg
Connector type Transom
depth
R (mm)
Milling di-
mensions
L (mm)
RHT 8040 55-73 46
RHT 8058 74-91 64
RHT 8076 92-109 82
RHT 8094 110-145 100
RHT 8130 146-181 136
RHT 8166 182-235 172
RHT 8220 236-300 226
Transom assembly
Processing notes
Screw fitting transom Z 0127
Front edge profile
Fron
t edg
e pr
ofile
Transom with connector left front side eg RHT 8094
Transom with connector right front side eg RHT 8094
Front-side transom groove depth 12-125 mm
Transom depth R
Milling dimensions L
12 - 125
bull Z 0127 screws in length 580 are always used for attaching to longitudinal timbers (transoms)
bull When using hard woods or when working near the edge of the wood a hole of 3 mm diameter should be pre-drilled
bull The number of screws varies for standard screw fit-tings depending on the connector type (Refer to the previous page)
bull A combination of screws can be used and calculat-ed case-by-case
S T A B A L U X
Stabalux H Processing notes 310718 27
Stabalux HProcessing notes
123
Mullion-transom joint
Constructing the timber joint
bull The transom is pushed in from the inside to the outside
bull Screwing in the greased connecting screw allows the locked mullion-transom joint to be released in all three dimensions if necessary This tightens the transom evenly to the mullion along the entire depth
Example RHT 8130 top and side views
H_12_004dwg
Linked connectors
bull If the transom depth is over 300 mm 2 connectors can be used along the entire length to improve ten-sioning of the mullion-transom joint
bull The connector type RHT 8220 is always used on the front edge of the profile Another connector can be fitted on the RHT 8220 as required
bull A peg is inserted and positioned correctly by the into the connecting screw in order to improve ten-sioning of the second connector
bull The maximum load-bearing capacity of the RHT 8220 applies in regard to resilience
bull By request a connector longer than 220mm can be produced The maximum load-bearing capacity of the RHT 8220 is also valid hereSelf-tapping screws 50 x
50 mm Self-tapping screws 50 x 80 mm
Tran
som
dep
th
Metal threaded screw 55 x 120 mm
S T A B A L U X
Stabalux H Processing notes 310718 28
Stabalux HProcessing notes
Sealing system principle general information about glazing seals
The Stabalux sealing system consists of the outer and inner sealing sections
bull The outer sealing section has the primary function of preventing the ingress of moisture At the same time the sealing section provides a flexible support for the glass panes
bull The inner sealing section acts to protect the inner space water guiding section and elastic glass sup-ports from moisture and vapour
Both sealing sections must perform this function over a long period of time
Seals should be adapted at the building site but can be pre-cut to length in the factory and inserted into the sup-port profiles ie the camping strips with proper consid-eration of the assembly instructions for the seals Always ensure that seals are not bearing any loads once installed and are firmly pressed onto joints All joints should be sealed as per the following descriptions
Fire seals
Like all organic materials elastomers are combustible if they are exposed to high temperatures for a sufficient period in the presence of oxygen Inorganic substances are added to the seals in order to reduce their combus-tibility The proportion of inorganic substances positively influences the flame-retardant properties but they also make the products harder and reduce their mechanical strength It is therefore imperative when fitting fire seals to ensure that the structure is absolutely flat and that the sealant joints connect preciselyDepending on their geometry it may be necessary to stretch fire seals into a mountable form ie to leave them to settle into their mountable form once they have been removed from their rolled packaging Warm temperatures also make the seals more malleable and therefore facili-tate installation
Pressure equalisation and controlled drainage
Pressure equalisation is generally achieved via openings at the base head and ridge points Should additional ven-tilation be required in the area of the transom (eg where panes are only supported on 2 sides or where transom length is ℓ ge 2 m) then this ventilation should be created by placing holes into the cover strip andor using notch-es on the lower sealing lips of the outer seal
The pressure equalisation openings also serve toextract moisture The inner sealing section is formed in such a way that when the joints are properly sealed any moisture that occurs and does not dissipate via the rebate ventilation will drain away downwards In facades water is guided via the seal flap into the mullions There is a choice between using tested sealing systems with between 1 and 3 levels With inclined glazing with 2 drainage levels the higher sealing section of the transom overlaps the lower mullion seal These principles must be consistently implemented down to the lowest point of the glazing so that the water-guiding level of the structure carries moisture to the outside Film is placed beneath the seals accordingly It must be ensured that the film will last for a long time
Tips for laying seals 124
H_12_009dwg
S T A B A L U X
Stabalux H Processing notes 310718 29
Stabalux HProcessing notes
Inner sealing section
The structure of the inner sealing section is different for vertical facades and facades with an inward incline up to 20deg as well as roof glazing
Inner sealing for vertical glazing and glazing with an inward incline up to 20deg
bull 5 mm high butt jointed seals with a drainage sec-tion for vertical facades (α=0deg)
bull 10 mm high seals with two drainage sections to safely guide away any moisture or condensation to the outside These seals are created by overlapping the seal joints in which the higher sealing section of the transom goes underneath the lower level of the mullion These seals can be used for vertical facades and facades with an incline up to 20deg
bull 12 mm high seals follow the same principle but allow an additional third drainage section for an in-termediate mullion
bull The shaped seal flap protects the vulnerable area of the rebate and ensures that moisture is drained away via the vertical or up to 20deg inwards inclined mullions
Inner seals for glazed roofs
bull A special seal geometry for glazed roofs also allows for two-level stepped drainage The 10 mm high seals are laid with overlapping joints
Some basic information for sealing and sticking down Stabalux seals
bull All joints and seal penetrations must be water-proofed with the exception of the Stabalux screw fittings
bull Gasket joints should always be sealed using Stabalux sealant regardless of whether they are butt joints or overlapping (We recommend Stabalux connecting paste Z 0094 Pay attention to the directions provided by the manufacturer)
bull For difficult to seal places we recommend first us-ing a fixing adhesive such as the Stabalux quick fix-ing glue Z 0055
bull Before gluing ensure all surfaces are free from moisture dirt and grease
bull Weather conditions such as snow and rain prevent an effective seal
bull Temperatures below +5 degC are not suitable for fix-ing seals
bull The hardened connecting paste should not prevent level support of glass
124
Tips for laying seals
S T A B A L U X
Stabalux H Processing notes 310718 30
Stabalux HProcessing notes
Assemble the inner seal on vertical facade glazing - 1 level join
bull The horizontal transom seals are laid continuous-ly across the mullion-transom joints Ensure here that the clamping feet of the horizontal seal are re-leased around the mullion
bull Mullion seals are butt jointed to the transom seals bull The clamping foot on the transom seal must be dis-
engaged in the area of the mullion-transom joint if wood connectors types RHT 0041 to RHT 0131 are used
bull The seal flaps should be released to a width of 10-15 mm at the mullion joint
Inner seal mullions Inner seal transoms
inner continuous transom seal
inner jointed mullion seal
Seal flap in mullion area released
125
1
1
2
2
Seals - Facade
H_12_007dwg
eg GD 6204eg GD 6202
bull The protruding length of the seal flap should be re-moved at the perforation once glazing is complet-ed
bull In order to safely drain away moisture from tran-soms even at the edges of the facade the inner transom seals must be laid into the released mul-lion seals To release and remove the clamping feet we recommend using our release pliers Z 0078 for System 60 and Z 0077 for System 50
bull Ensure all joints are cleanly and solidly sealed Ex-cess sealant should be removed
S T A B A L U X
Stabalux H Processing notes 310718 31
Stabalux HProcessing notes
125
Seals - Facade
H_12_008dwg
Assemble the inner seal on vertical facade glazing - 1 level join
Release edge mullion seal near transom
The seal flap should always cover the inset ldquoerdquo of the filling element (eg glass panes panels)
Gasket joints
Gasket joints
e gt glass inset
NoteAny joints in the transom seal that are re-quired due to the delivered length should be fitted with an intermediate mullion and put together like in point A
Intermediate mullions
Edge mullions
Transom
Transom
edge mullion seal
around a transom
near transom
B
A
S T A B A L U X
Stabalux H Processing notes 310718 32
Stabalux HProcessing notes
Assembly of the inner seal for vertical facade glazing and facade glazing with an incline of up to 20deg - 2 overlapping sec-tions
bull The 10 mm high seals can be divided across their height to allow a simple overlap at critical transom joints
bull The vertical seals for the mullions (2nd drainage section) are laid continuously
bull The transom seals overlap the mullion sealsbull Moisture and condensation is guided away via the
seal flap of the transom seal (1st drainage section) to the main mullion
bull The seal flap must always cover the inset depth of the glass panes and filling element
Inner seal mullions Inner seal transoms
inner continuous mullion sealinner overlapping transom seal engaged
Seal flap should always cover the filling element
125
1
1
2
2
Seals - Facade
H_12_007dwg
eg GD 6303eg GD 6206
Seal gasket joints
B
bull The protruding length of the seal flap should be re-moved at the perforation once glazing is complet-ed
bull All joints must be sealed Before laying seals we recommend completely coating the support surfac-es and edges with Stabalux connection paste
bull Ensure all joints are cleanly and solidly sealed Ex-cess sealant should be removed Absolutely no un-evenness in the glass support surface must occur from applying sealant too thickly
S T A B A L U X
Stabalux H Processing notes 310718 33
Stabalux HProcessing notes
125
Seals - Facade
H_12_008dwg
Assembly of the inner seal for vertical fa-cade glazing and facade glazing with an in-cline of up to 20deg - 2 overlapping sections
The seal flap should always cover the inset ldquoerdquo of the filling element (eg glass panes panels)
Transom
edge mullion seal around a transom upper section to the width of the transom seal
Transom seal separate lower section at length of the overlap ldquoerdquo
Mullion seals
around a transom upper section
to the width of the transom seal
Transom
Transom seal separate lower section at length of the overlap ldquoerdquo
B
A
e gt glass inset
Seal gasket jointsoverlapping joints
Seal gasket jointsoverlapping joints
e gt glass inset
Intermediate mullions
Edge mullions
S T A B A L U X
Stabalux H Processing notes 310718 34
Stabalux HProcessing notes
Assembly of the inner seal for vertical facade glazing and facade glazing with an incline of up to 20deg - 3 overlapping sec-tions
bull Optionally Stabalux seals with three offset water channels can be used in the facade area which safely drain any moisture or condensation to the outside
bull The 12 mm high seals can be divided across their height to allow a simple overlap at critical second-ary mulliontransom joints andor transompri-mary mullion joints
Inner seal main mullion Inner seal transoms
inner continuous mullion sealinner overlapping transom seal engaged
Seal flap should always cover the filling element
125
1
1
22
Seals - Facade
H_12_007dwg
eg GD 6318eg GD 6314
Seal gasket joints
C
B
Inner seal secondary mullion
Seal gasket joints
3
Secondary mullion seal overlaps the transom seal
3
eg GD 6315
bull The vertical seals for main mullions (3rd drainage section) drainage section) are laid continuously
bull The transom seals overlap the main mullion sealsbull Along a transom seals must be laid continuouslybull Moisture and condensation is guided away via the
seal flap of the transom seal (2nd drainage section) to the main mullion
S T A B A L U X
Stabalux H Processing notes 310718 35
Stabalux HProcessing notes
125
Seals - Facade
H_12_008dwg
Assembly of the inner seal for vertical facade glazing and facade glazing with an incline of up to 20deg - 3 overlapping sections
The seal flap runs continuously through
Transom
Cut secondary mullion seal belowthe lower transom section to the length of the overlap
Transom seal Connection to the secondary mullioncut the uppermost section to width of the transom seal
bull The seal flap must always cover the inset depth of the glass panes and filling element
bull The protruding length of the seal flap should be re-moved at the perforation once glazing is complet-ed
bull Vertical seals on the secondary mullion are butt jointed beneath the upper transom The seal flap of the upper transom runs continuously in the upper part of the joint
bull Drainage of the secondary mullion (1st drainage section) is achieved by overlapping the seals of the secondary mullion with the seal of the upper tran-som
Secondary mullion seal overlaps the transom seal
Secondary mullionTransom
BA
D
Edge mullions
Secondary mullion butt jointedat the topseal gasket joint
Seal gasket jointsoverlapping joints
e gt glass inset e gt
glas
s in
set
S T A B A L U X
Stabalux H Processing notes 310718 36
Stabalux HProcessing notes
125
Seals - Facade
H_12_008dwg
Assembly of the inner seal for vertical fa-cade glazing and facade glazing with an in-cline of up to 20deg - 3 overlapping sections
The seal flap should always cover the inset ldquoerdquo of the filling element (eg glass panes panels)
Main mullionTransom
Main mullion seal around a transom upper section to the width of the transom seal
Transom seal separate lower section along the length of the overlap
bull All joints must be sealed Before laying seals we recommend completely coating the support surfac-es and edges with Stabalux connection paste
bull Ensure all joints are cleanly and solidly sealed Ex-cess sealant should be removed Absolutely no un-evenness in the glass support surface must occur from applying sealant too thickly
C
Seal gasket jointsoverlapping joints
Seal gasket jointsoverlapping joints
e gt glass inset e gt glass inset
S T A B A L U X
Stabalux H Processing notes 310718 37
Stabalux HProcessing notes
125
Seals - Facade
Assembly of the outer seal for vertical glass facades
bull As well as gently clamping the glass in place the outer sealing system has the primary task of pro-tecting the rebate against moisture ingress
bull The outer sealing sections must be completely sealed except for the necessary openings for pres-sure equalisation and condensation dissipation
bull The outer mullion seals are laid continuously and the transom seals are joined
bull Sealant joints are to be laid flat with a slight excess in dimensions Exact specifications depends on the situation in which the system is used
bull Tightly fitted sealant joints can be implemented without fixing the outer seal of the mullion-transom joint in vertical facades
outer continuous mullion sealouter jointed transom seal
eg GD 6054 outer transom seal with different heights of sealing lip
H_12_009dwg
H_12_010dwg
Rod length ℓ
(mm)
Temperature difference
∆T
Longitudinal expansion
∆ℓ (mm)1000 40degC 13000 40degC 31000 60degC 153000 60degC 451000 100degC 253000 100degC 75
Expansion of aluminium profiles
When using the RHT connector take care when fitting screws to ensure that the screws are placed away from the mullion-transom connec-tion
bull The flag for the inner transom joint in combination with the outer seal creates additional safety
bull The seal flap should be separate at its perforations to match the thickness of the glass in order that this is clamped down and concealed under the out-er seal
bull Different heights of sealing lips on the outer seal bridge the height different created by the seal flap in the outer sealing section
bull When mounting the clamping strips be aware of aluminium profile expansion (see section 121 - Material information)
S T A B A L U X
Stabalux H Processing notes 310718 38
Stabalux HProcessing notes
125
Seals - Facade
Assembly of the outer seal for facade glaz-ing with an inwards inclineup to 20deg
bull If the facade is inclined inwards from the vertical (max permitted incline 20deg) the open ends of the outer transom seals must be closed up using Butyl
bull When constructing inwardly inclined facades (up to max 20deg) if flat cover strips are used in the tran-soms (eg DL 5059 DL 6059 DL 5061 DL 6061 DL 5067 DL 6067 DL 5071 DL 6071 DL 6043 DL 6044) and flat pressure and cover profiles (eg UL 6005 with OL 6066) then the central hollows at each end must be sealed with silicone
H_12_009dwg
When using flat cover strips on in-wardly inclined facades (up to max 20deg) the central hollow at each end should be sealed with silicone
Seal open ends of the transom seals with Butyl on inwardly inclined facades (up to max 20deg)
Trim the seal to be slightly larger than required
S T A B A L U X
Stabalux H Processing notes 310718 39
Stabalux HProcessing notes
126
Seals - roof
Assemble the inner seal for roof glazing
bull Optionally Stabalux seals with offset water chan-nels can be used in the facade area which safely drain any moisture or condensation to the outside
bull The 10 mm high seals can be divided across their height to allow a simple overlap at critical transom joints
bull The transom seals are geometrically shaped so as to create a condensation channel
bull This channel drains from the overlapping transom joint in the rafters
remove the lower perforated part and the clamping foot on the transom seal of the at around 15 mm
remove the upper perforated part on the rafter seals
length of transom seal = transom length + asymp 13 mm per side
Gasket joints
1
2
3
H_12_011dwg
H_12_012dwg
bull Along a transom seals must be laid continuouslybull All joints must be sealed Before laying transom
seals we recommend completely coating the sup-port surfaces and edges Absolutely no unevenness in the glass support surface must occur from apply-ing sealant too thickly
1
23
S T A B A L U X
Stabalux H Processing notes 310718 40
Stabalux HProcessing notes
Assembly of the outer seal for for glazed roofing
bull These are laid in fundamentally the same way as for vertical glazing Split seals such as GD 1932 are not suitable for transom seals in roofs Split seals can only be installed in mullions in combination with slab insulation Each installation situation will differ to some degree and always check how well sealed it is
bull For cross joints we recommend using our self-ad-hesive stainless steel sealing plates with butyl coat-ing Z 0601 for System 60 and Z 0501 for System 50 The stainless steel sealing plates are 35 mm wide and are attached to the edge of the glass panes parallel to the mullion axis
bull Butyl tape is not suitable as a sealing tape between the glass and the outer seal
bull The outer mullion seals are laid continuously and the transom seals are joined
126
Detail of sealing plate Z 0501 = 35 x 40 mm
Z 0601 = 35 x 50 mm
Attention The sealing plates must be placed central to the transom axis
For glass insets of 15 mm the first screw fittings for the transom cover strip begin 30 mm from the end of the cover strip
Seals - roof
H_12_013dwg
H_12_014dwg
bull Sealant joints are to be laid flat with a slight excess in dimensions Exact specifications depends on the situation in which the system is used
Notebull Horizontal clamping strips prevent the free run off
of rain water and dirtbull Cover strips and upper strips with angled edges re-
duce the build up of water in front of the clamping strip
bull Shorten the clamping strips on the transoms by 5 mm in the area of the transom joins in order to im-prove drainage of water Gasket joints however are to be laid flat with a slight excess in dimensions Open ends of transom clamping strips (upper and cover strips) should be sealed
S T A B A L U X
Stabalux H Processing notes 310718 41
Stabalux HProcessing notes
Assembly of the outer seal for for inclined glazed roofing ge 2deg
bull These are laid in fundamentally the same way as for vertical glazing Split seals around the mullions in roofs such as GD 1932 are only suitable when using in combination with slab insulation Each installa-tion situation will differ to some degree and always check how well sealed it is
bull To ensure free run-off of rain water and dirt on roofs inclined ge 2deg we recommend not using clamping strips in the transoms
bull Instead the rebate spaces should be sealed with all-weather silicone
bull Implementation of the outer sealing section around mullions is done in the same way as conventional roofs with an inclination up to 15deg
126
Seals - roof
H_12_013dwg
Tips for all roof designs
When using aluminium cover strips on roofs take account of the expansion factor as a result of the high degree of heat absorption when selecting the length to use Equal-ly the use of single-piece cover strips should be carefully considered In this case it is recommended that holes for screwing on the cover strip are created with a diameter of d = 9 mm (refer to Section 121 - Material information)
bull At the high point or ridge area of the inclined glaz-ing it is recommended to also install and outer seal-ing section in the transoms with clamping strips
bull Only certified sealing materials may be used for sealing the transom rebate space
bull Pay attention to all information provided by the manufacturer and the sealing work must be carried out by trained persons It is recommended that a licensed and certified specialist contractor is hired for this purpose We further refer you to the DIN 52460 standard and IVD data sheets (Trade Asso-ciation for Sealants)
For wide spans we recommend using concealed screw fittings when selecting the clamping strips (lower + up-per strip) This is the preferred option for rafters Unused holes in the pressure profile must be sealedSome roof areas such as the eaves see the use of sev-eral different materials (glass silicone aluminium sheets ) each with different expansion coefficients To avoid the formation of cracks aluminium sheets should be in-stalled with expansion joints
S T A B A L U X
Stabalux H Processing notes 310718 42
Stabalux HProcessing notes
Assembly of the outer seal for for inclined glazed roofing ge 2deg
bull The compatibility of the materials is particularly important when using all-weather silicone In this case the compatibility of the sealant with the edge bonding of the glass and the backfill of the joints If self-cleaning glass is used the compatibility must be established in advance
bull Glass sealants and edge bonding must be UV-re-sistant The incline of roofs should also be taken into account Information about UV-resistance can be requested from the manufacturer Silicone edge bonding generally provides better UV-resistance than polysulfide-based materials The advantage lies in its high vapour sealing properties which is particularly useful when using more volatile argon fillings
126
Seals - roof
H_12_013dwg
1 Hold-down clamp
2 Silicone washer
3 Silicone sealant seal around the
clamp
4 All weather silicone seal
Transom inclined glazing ge 2deg inclination with all-weather silicone and slab insulation
12
3
6
89
7
Transom inclined glazing ge 2deg inclination with all-weather silicone and round sec-tion rope seal
12
3
6
89
7
bull Highly elastic weatherproof and UV-resistant seals meet the widest range of demands for reliable joints
bull If the silicone joint is created without additional mechanical safety devices ensure that the glass is supported from two sides only Selective installa-tion of holding clamps can be used to achieve all round support for glass edges
bull The clamps are made from stainless steal with silicone washers and are screwed in the same as pressure strips The hold-down clamp should be ad-ditionally sealed around the perimeter with silicone sealant The design is based upon the dimensions of the glass as documented in the glass static anal-ysis
51 Round section rope seal
52 Slab insulation
6 Glass filling element
7 Inner seal 10 mm transom
8 timber profile
9 System screw fittings
4
51
4
52
S T A B A L U X
Stabalux H Processing notes 310718 43
Stabalux HProcessing notes
Assembly of the outer seal for for inclined glazed roofing ge 2deg
bull The joint width and the joint height for Stabalux System H are defined as w x h = 20 mm x 10 mm These measurements should always checked when selecting the sealing material and adapted if neces-sary Generally w h = 2 1 - 35 1
bull PE round section seals or Stabalux slab insulation is suitable as a back fill material
bull Silicone sealant should be applied before laying the mullion seals and cover strips
bull After the specified setting time the seals and screw fittings can be installed in the areas around mullions
126
Seals - roof
Rafters with clamping strips
Transom with clampAll weather silicone seal
and round section rope seal
Transom with clampAll weather silicone seal
and slab insulation
Transom with all-weather silicone and round section rope
seal
Joint design according to manufacturers specificationsgenerally w h = 2 1 - 35 1
bull The mullion-transom joints around the clamps are then sealed
bull Before applying this second layer the joints around transoms must have completely set
S T A B A L U X
Stabalux H Processing notes 310718 44
Stabalux HProcessing notes
Steps for implementing the seal with silicone
bull Test silicone sealant and glass edge bondings and other contact surfaces (eg panels) for suitability
bull Clean edge bonding adhesive impurities from the surfaces to which sealant will be applied following manufacturerrsquos directions
bull Fill the joints as per the joint dimensions using only non-water absorbent closed-cell PE profiles (no damage to the edge bonding)
bull The remaining space in the glass rebate must be large enough that the pressure is able to equalise and a drainage level is available
bull Clean any impurities from the surfaces to which the sealing material is to be applied and any adjacent surfaces according to manufacturerrsquos directions
126
Seals - roof
System screw fittings
Hold-down clamp
Washer made from silicone
Silicone sealant seal
around the clamp
All weather silicone seal
Silicone sealant
Rafter
Transom
bull Be particularly aware of any adjacent metal com-ponents Prime according to manufacturerrsquos direc-tions
bull Seal joints without leaving any cavities or bubbles Mask any adjacent components in advance where necessary
bull Smooth out the filled joints using the manufactur-errsquos smoothing agents and conventional tools with as little water as possible Remove adhesive tape
bull If two or more reactive sealants are used in com-bination the first must completely set before the second is applied
S T A B A L U X
Stabalux H Processing notes 310718 45
Stabalux HProcessing notes
Glass inset
bull Glass industry guidelines must be observedbull The glass inset is generally 15 mmbull An increase to 20 mm has a beneficial effect on the
heat transfer coefficient Uf of the frame structure bull Special conditions such as fire protection glass
must be adhered to the terms are stated in the general building approval
Glass inset and glass support 127
RebateGlass inset
H_12_015dwg
S T A B A L U X
Stabalux H Processing notes 310718 46
Stabalux HProcessing notes
Glass support types and choosing the glass support
The Stabalux H system uses three different types and techniques for attaching glass supports
bull Glass support GH 5053 and GH 5055 with hanger bolts
bull Glass support GH 5053 and GH 5055 with hard-wood cylinders and bolts
bull Crossing point reinforcement RHT with cylinder head screws empty 65 mm Crossing point reinforce-ment are used exclusively on fire-protection glaz-ing The precise details are stated in the general building approval
The glass supports used are determined by the type of wood glass construction and glass weight (see section 9) A rigid mullion-transom connection is required ie no twisting of the transom may occur at the connection that would cause further sinking of the glass support
Glass inset and glass support 127
Mounting the glass supports
bull Positioning the glass supports and glazing accord-ing to glass industry guidelines and guidelines of the Institute for Window Technology
bull The weight of the glass panes is distributed via the glass supports attached to the transoms
bull Glass supports should be attached at a distance of 100 mm from the end of the transom When doing so avoid a collision with the cover strip screw fit-tings at the end of the transom
Glazing blocks
bull Glazing blocks must be compatible with the edge bonding of the insulated glass panes
bull They should be stable under constant pressure and be able to withstand loads aging and temperature changes
bull It is important that the blocks ensure circumferen-tial pressure equalisation and that drainage of con-densation is not obstructed as well as allowing the glass edges to be offset and small design toleranc-es to be accommodated
bull If the length of the glass support is more than 100 mm blocks should be placed along the entire length of the glass support to ensure equal load distribution
H_12_016dwg
Positioning the glass support approx 100 mm from the end of the transom
S T A B A L U X
Stabalux H Processing notes 310718 47
Stabalux HProcessing notes
127
Glass inset and glass support
Glass support GH 5053 Attachment with hanger bolts
A-A
Glass support GH 5053 with hanger bolts
bull The certified system components consist of the glass support GH 5053 and 2 hanger bolts empty 10 mm with a 45 mm wood thread and a shaft of a different length
bull The hanger bolts are screwed directly into the tim-ber at intervals of 80 mm A empty 7 mm hole needs to be pre-drilled for this purpose
bull Screw fittings should be vertical to the transom axis
bull The depth for hanger bolts is at least 45 mm meas-ured from the front edge of the timber
H_12_016dwg
H_12_017dwg
Glass support GH 5053
Block
Block
glass support
Inner seal
Hanger bolt
Minimum screw depth from measured from front edge of timber
Hanger bolts empty 10 mmpre-drilled at empty 7 mm
bull For glass support GH 5053 the required depths are delivered corresponding to the thickness of the glass and placed onto the hanger bolts
bull Blocks must be placed under the glass panes along the entire length of the glass supports
bull Details of the approved pane weights geometries and classification of system components are pro-vided in section 9
S T A B A L U X
Stabalux H Processing notes 310718 48
Stabalux HProcessing notes
127
Glass inset and glass support
Glass support GH 5055 with hanger bolts
bull Based on the test results for the system compo-nent GH 5053 a load bearing model was designed and the suitability of the GH 5055 glass support calculated
bull Installation is done the same way as GH 5053 but using three screws spaced 80 mm apart
bull Details of the approved pane weights geometries and classification of system components are pro-vided in section 9
Glass support GH 5055 Attachment with hanger bolts
A-A
H_12_016dwg
H_12_017dwg
Glass support GH 5055
Block Hanger bolts empty 10 mmpre-drilled at empty 7 mm
Block
glass support
Inner seal
Hanger bolt
Minimum screw depth from measured from front edge of timber
S T A B A L U X
Stabalux H Processing notes 310718 49
Stabalux HProcessing notes
127
Glass inset and glass support
Row
Total glass thickness tGlass (mm)
for vertical glazing
Hanger bolts 2) Glass supports 1)
Inner seal height GH 5053 GH 5055 Depth (mm)
5 mm 10 mm 12 mm1 4 5 6 7 Z 0371 3) Z 0371 4) Z 0371 5) GH 0081 Section 9
2 8 9 Z 0371 3) Z 0371 4) Z 0371 5) Section Section 12
3 10 11 Z 0371 3) Z 0371 4) Z 0371 5) Section Section 144 12 13 Z 0371 3) Z 0371 4) Z 0371 5) Section Section 165 14 15 Z 0371 3) Z 0371 4) Z 0371 Section Section 186 16 17 Z 0371 3) Z 0371 Z 0371 Section Section 207 18 19 20 Z 0371 Z 0371 Z 0371 GH 0082 Section 228 22 23 Z 0371 Z 0371 Z 0372 GH 0083 GH 0851 269 24 25 Z 0371 Z 0372 Z 0372 GH 0084 GH 0852 2810 26 27 Z 0371 Z 0372 Z 0372 GH 0085 GH 0853 3011 28 29 30 Z 0372 Z 0372 Z 0372 GH 0886 GH 0854 3212 31 32 33 Z 0372 Z 0372 Z 0372 GH 0887 GH 0855 3513 34 35 36 Z 0372 Z 0372 Z 0373 GH 0888 GH 0856 3814 37 38 39 Z 0372 Z 0373 Z 0373 GH 0889 GH 0857 4115 40 41 42 Z 0372 Z 0373 Z 0373 GH 0890 GH 0858 4416 43 44 45 Z 0373 Z 0373 Z 0373 GH 0891 GH 0859 4717 46 47 48 Z 0373 Z 0373 Z 0373 GH 0892 GH 0860 5018 49 50 51 Z 0373 Z 0373 Z 0373 GH 0893 GH 0861 5319 52 53 54 Z 0373 Z 0373 - GH 0894 GH 0862 5620 55 56 57 Z 0373 - - Section Section 5921 58 59 60 Z 0373 - - Section Section 6222 61 62 63 Z 0373 - - Section Section 6523 64 Z 0373 - - Section Section 68
Item Total length (mm)
Shaft length (mm)
Thread length (mm)
Z 0371 70 25 45Z 0372 77 32 45
Z 0373 90 45 45
Classification of system components
Table 1 Vertical glazing | System 50 60 80 | Hanger bolts
Hanger bolts
1) Cut from GH 5053 or GH 5055
2) Generally The screw-in depth (ET) for hanger bolts = 45 mm thread length (GL) measured from the front edge of
the timber
For glasses tGlas lt 20 mm observe the permissible visible shaft length from the front edge of the wood
If necessary adjust the visible shaft length over the screw-in depth
3) Permissible visible shaft length from the front edge of the wood = glass thickness tGlas (mm) + 3 mm
4) Permissible visible shaft length from the front edge of the wood = glass thickness tGlas (mm) + 7 mm
5) Permissible visible shaft length from the front edge of the wood = glass thickness tGlas (mm) + 9 mm
TI-H_92_003dwg
Total length
Thread lengthShaft length
S T A B A L U X
Stabalux H Processing notes 310718 50
Stabalux HProcessing notes
127
Glass inset and glass support
RowTotal glass thickness tGlass (mm)
for inclined glazing 1) Hanger bolts 2)Glass supports 3)
GH 5053 GH 5055 Depth (mm)1 16 17 18 Z 0371 GH 0081 Section 92 19 20 Z 0371 Section Section 123 21 22 Z 0372 Section Section 144 23 24 Z 0372 Section Section 165 25 26 Z 0372 Section Section 186 27 28 Z 0372 Section Section 207 29 30 Z 0372 Section Section 228 31 32 Z 0372 GH 0082 Section 249 33 34 Z 0372 GH 0083 GH 0851 2610 35 36 Z 0373 GH 0084 GH 0852 2811 37 38 Z 0373 GH 0085 GH 0853 3012 39 40 41 Z 0373 GH 0886 GH 0854 3213 42 43 44 Z 0373 GH 0887 GH 0855 3514 45 46 47 Z 0373 GH 0888 GH 0856 3815 48 49 50 Z 0373 GH 0889 GH 0857 4116 51 52 53 Z 0373 GH 0890 GH 0858 4417 54 Z 0373 GH 0891 GH 0859 47
Classification of system components
Table 2 Inclined glazing | System 50 60 80 | Hanger bolts
Glass support GH 5053
Glass support GH 5055
1) Accounting for a 10 mm inner seal
2) The depth for hanger bolts = 45 mm thread length measured from the front edge of the timber
3) Cut from GH 5053 or GH 5055
TI-H_92_005dwg
Depth
Depth
S T A B A L U X
Stabalux H Processing notes 310718 51
Stabalux HProcessing notes
127
Glass inset and glass support
Glass support GH 5053 Attachment with bolts and hardwood cylinders
Glass support GH 5053 and GH 5055 with pins and hardwood cylinders
bull Certified system components consist of glass sup-port GH 5053 and GH 5055 with pins and hard-wood cylinders
bull Depending on the width of supports 2 or 3 bolts with a diameter of 10 mm are needed
bull The bolt length should be adapted to the thickness of the glass
bull To anchor the bolts in place 50 mm wooden cylin-ders with a outer diameter of 30 mm and an axial core of empty 10 mm are solidly glued into the timber
H_12_016dwg
H_12_017dwg
A-A
bull Additionally holes with a depth of 50 mm and empty of 30 mm are to be drilled into the transom profile ver-tical to the transom axis with 80 mm spacing
bull The glue or adhesive used must be suitable and must not swell
bull The bolts should be hammered in along the entire cylinder depth of 50 mm
bull For glass supports GH 5053 and GH 5055 the re-quired depths are delivered corresponding to the thickness of the glass and placed onto the hanger bolts
Glass support GH 5053
Bolt empty 10 mmHardwoodcylinder Hardwood
cylinder
Block
Block
glass support
Inner seal
Bolt
Hardwood cylinderInner diameter 10 mmOuter diameter 30 mmfirmly gluedto the transom profile
Hardwood cylinder not grooved removed the sealing base around the cylinder
S T A B A L U X
Stabalux H Processing notes 310718 52
Stabalux HProcessing notes
127
Glass inset and glass support
Glass support GH 5055 Attachment with bolts and hardwood cylinders
Glass support GH 5053 and GH 5055 with pins and hardwood cylinders
bull The central groove in the Stabalux H System must not be milled into the wooden cylinder
bull When fitting the seals the sealing base must there-fore be removed around the cylinder
bull Blocks must be placed under the glass panes along the entire length of the glass supports
bull Details of the approved pane weights geometries and classification of system components are pro-vided in section 9
H_12_016dwg
H_12_017dwg
A-ABolt empty 10 mmHardwood
cylinder Hardwoodcylinder
Block
glass support
Block
Inner seal
Bolt
Hardwood cylinderInner diameter 10 mmOuter diameter 30 mmfirmly gluedto the transom profile
Hardwood cylinder not grooved removed the sealing base around the cylinder
Glass support GH 5055
S T A B A L U X
Stabalux H Processing notes 310718 53
Stabalux HProcessing notes
127
Glass inset and glass support
Row
Total glass thickness tGlass (mm)
for vertical glazing
Hardwood cylinder
Bolt Glass supports 1)
Inner seal heightGH 5053 GH 5055 Depth (mm)
5 mm 10 mm 12 mm1 8 9 Z 0073 - - Z 0047 Section Section 12
2 10 11 Z 0073 - Z 0047 Z 0047 Section Section 14
3 12 13 Z 0073 - Z 0047 Z 0047 Section Section 164 14 15 Z 0073 Z 0047 Z 0047 Z 0047 Section Section 185 16 17 Z 0073 Z 0047 Z 0047 Z 0048 Section Section 206 18 19 Z 0073 Z 0047 Z 0048 Z 0048 Section Section 227 20 21 Z 0073 Z 0047 Z 0048 Z 0048 GH 0082 Section 248 22 23 Z 0073 Z 0047 Z 0048 Z 0048 GH 0083 GH 0851 269 24 25 Z 0073 Z 0048 Z 0048 Z 0048 GH 0084 GH 0852 2810 26 27 Z 0073 Z 0048 Z 0048 Z 0048 GH 0085 GH 0853 3011 28 29 30 Z 0073 Z 0048 Z 0048 Z 0049 GH 0886 GH 0854 3212 31 32 33 Z 0073 Z 0048 Z 0049 Z 0049 GH 0887 GH 0855 3513 34 35 36 Z 0073 Z 0048 Z 0049 Z 0049 GH 0888 GH 0856 3814 37 38 39 Z 0073 Z 0049 Z 0049 Z 0049 GH 0889 GH 0857 4115 40 41 42 Z 0073 Z 0049 Z 0049 Z 0051 GH 0890 GH 0858 4416 43 44 45 Z 0073 Z 0049 Z 0051 Z 0051 GH 0891 GH 0859 4717 46 47 48 Z 0073 Z 0049 Z 0051 Z 0051 GH 0892 GH 0860 5018 49 50 51 Z 0073 Z 0051 Z 0051 Z 0051 GH 0893 GH 0861 5319 52 53 54 Z 0073 Z 0051 Z 0051 - GH 0894 GH 0862 5620 55 56 57 Z 0073 Z 0051 - - Section Section 5921 58 59 60 Z 0073 Z 0051 - - Section Section 6222 61 62 63 Z 0073 Z 0051 - - Section Section 6523 64 Z 0073 Z 0051 - - Section Section 68
Classification of system components
Table 3 Vertical glazing | System 50 60 80 | Hardwood cylinders amp bolts
Bolt
1) Cut from GH 5053 or GH 5055
TI-H_92_005dwg
Hardwood cylinder Z 0073
Item Bolt length (mm)Z 0047 70Z 0048 80Z 0049 90Z 0051 100
S T A B A L U X
Stabalux H Processing notes 310718 54
Stabalux HProcessing notes
127
Glass inset and glass support
RowTotal glass thickness tGlass (mm)
for inclined glazing 1)Hardwood cylinder Bolt
Glass supports 2)
GH 5053 GH 5055 Depth (mm)1 20 21 22 Z 0073 Z 0048 Section Section 14
2 23 24 Z 0073 Z 0048 Section Section 16
3 25 26 Z 0073 Z 0048 Section Section 18
4 27 28 Z 0073 Z 0048 Section Section 20
5 29 30 Z 0073 Z 0049 Section Section 226 31 32 Z 0073 Z 0049 GH 0082 Section 247 33 34 Z 0073 Z 0049 GH 0083 GH 0851 268 35 36 Z 0073 Z 0049 GH 0084 GH 0852 289 37 38 Z 0073 Z 0049 GH 0085 GH 0853 3010 39 40 41 Z 0073 Z 0049 GH 0886 GH 0854 3211 42 43 44 Z 0073 Z 0051 GH 0887 GH 0855 3512 45 46 47 Z 0073 Z 0051 GH 0888 GH 0856 3813 48 49 50 Z 0073 Z 0051 GH 0889 GH 0857 4114 51 52 53 Z 0073 Z 0051 GH 0890 GH 0858 4415 54 Z 0073 Z 0051 GH 0891 GH 0859 47
Classification of system components
Table 4 Inclined glazing | System 50 60 80 | Hardwood cylinders amp bolts
Glass support GH 5055
1) Accounting for a 10 mm inner seal
2) Cut from GH 5053 or GH 5055
TI-H_92_005dwg
Glass support GH 5053
Depth
Depth
S T A B A L U X
Stabalux H Processing notes 310718 55
Stabalux HProcessing notes
Fastenings
bull The fastenings for the Stabalux H system allow fill-ing elements to be easily secured
bull The clamping strips are connected to the wooden profile using Stabalux system screws Stainless steel 14301 DIN EN 10088 is the material used to produce screws for the Stabalux system
bull Depending on the type of screw fittings selected special 4 mm vulcanised EPDM washers are avail-able
bull Screws in suitable lengths are available for all com-mon glass thicknesses The screw length is deter-mined from a table
bull The distance for screw fittings is variable The max-imum distance is a = 250 mm
bull The distance from the edge for the first screw fit-ting should generally be in the region of 30 mm le a le 80 mm The placement of the glass supports and the choice of mullion-transom connection should also be taken into account
bull The clamp connection is exclusively exposed to tensile forces The clamping strips are connect-ed to the wooden profile using Stabalux system screws To determine the stress limit (maximum tensile force) and permitted tensile forces for the connection the conditions in the relevant gener-al building approval and the Eurocode 5 (DIN EN 1995-1) series of standards shall apply
bull Screw fittings are applied using a conventional electric screwdriver with depth stop This guaran-tees uniform application of pressure The depth setting should be chosen so that a sealing washer compression of 15 - 18 mm is achieved
bull An electric screwdriver with adjustable torque can be used as an alternative The required torque is approx 5 Nm The required torque is influenced by the relatively large scatter when dealing with wood and the variable influence of friction due to different drilling depths It is therefore advisable to determine the setting on a test piece and to check compression of the sealing washer
Screw fittings 128
Concealed screw fittings
bull Assembly is facilitated by selecting pre-drilled pres-sure strips (UL 5009-L UL 6009-L and UL 8009-L slot 7 x 10 mm a = 125 mm) with clippable upper strips The remaining pressure strips should be pro-vided with a round hold of d = 8 mm The func-tionality of the clip procedure can be checked after the first upper strip has been pushed against the pressure profile
Note
When using aluminium cover strips on roofs take account of the expansion factor as a result of the high degree of heat absorption when selecting the length to use In this case it is recommended that holes for screwing on the clamping strip are created with a diameter of d = 9 mm Equally the use of single-piece cover strips should be carefully considered
Visible screw fittings
bull Cover strips should be drilling with a round hole of d = 8 mm
Note
(see Note on covered screw fittings)
Visible recessed screw fittings
bull When creating visible recessed screw fittings a stepped bore is required The lower part of the cov-er strip should be drilled with a d = 7 mm diameter The upper part of the cover strip needs a d = 11 mm diameter for the screw head It is recommended to install a washer (PA washer eg Z 0033) with all screw fittings
S T A B A L U X
Stabalux H Processing notes 310718 56
Stabalux HProcessing notes
Fastenings
128
Screw fittings
Concealed screw fittings
Stabalux system screws with cylinder headd = 10 mm und 4 mm sealing gasket
eg Z 0331
Visible screw fittings
Stabalux system screws with cylinder headd = 10 mm und 4 mm sealing gasket
eg Z 0331
Visible recessed screw fittings
Stabalux system screws with cylinder head d = 10 mm with additional PA washer eg Z 731 with Z 33
eg Z 0331 eg Z 0731 with Z 0033
Attention
The calculation to determine screw lengths for the the calculation to determine screw lengths is
Glass thickness - 3 mm + inner seal (5 10 ie 12 mm) + 16 mm + e
e = statically required screw-in depth
Calculating the screw length for DL 5073 DL 6073
H_12_018dwg
H_12_019dwg
H_12_020dwg
S T A B A L U X
Stabalux H Processing notes 310718 57
Stabalux HProcessing notes
128
Calculating the screw length
System width 50 60 mm System width 80 mm 1)
H_12_021dwg
Screw fittings
1) Delivered upon request
Representation and item numbers are examples for System 60 System width 50 are analogous
S T A B A L U X
Stabalux H Processing notes 310718 58
Stabalux HProcessing notes
128
Wood screws for Stabalux H
Z0327 cylinder head screw 65 x 70 mm
Z0329 cylinder head screw 65 x 80 mm
Z0331 cylinder head screw 65 x 90 mm
Z0333 cylinder head screw 65 x 100 mm
Z0335 cylinder head screw 65 x 110 mm
Z0337 cylinder head screw 65 x 120 mm
Z0339 cylinder head screw 65 x 130 mm
Cylinder head screw empty 10 mm with hex socket | without sealing gasket
Z0727 cylinder head screw 65 x 70 mm
Z0729 cylinder head screw 65 x 80 mm
Z0731 cylinder head screw 65 x 90 mm
Z0733 cylinder head screw 65 x 100 mm
Z0735 cylinder head screw 65 x 110 mm
Z0737 cylinder head screw 65 x 120 mm
Z0033 PA washer empty 10 x 15 mm
Cylinder head screw empty 10 mm with hex socket | with sealing gasket
Screw fittings
H_12_019dwg
S T A B A L U X
Stabalux H Processing notes 310718 59
Stabalux HProcessing notes
Tips for laying the cover strip DL 5073 DL 6073
We assume that this cover strip will be used with glass panes that are supported on two sides and the recessed screw head is concealed In this case a cylinder head screw with inner hex is to be used eg Z 731 When cov-ering with a 2 mm cover plug Z 89 a bore depth of 7 mm is calculated
Depending on the precision of the bore it should be de-cided on case by case basis if any slight changes to this depth are necessary The cover plug Z 0089 does not need to be glued in place but may be levelled using lev-elling compound
Coating the cover strip
Profile production (aluminium extrusion moulding) with different mass distribution is extremely difficult Length-wise shadow formation may result Resulting actions are to be taken with the agreement of the coater
Flat cover strip DL 5073 DL 6073 129
glass support
eg GH 5053
+bolts and hardwood
cylinders
H_12_022dwg
Intersections
Due to the special shape of the strip (the material ex-tends into the rebate) there is no closed sealing section available at intersections We therefore recommend plac-ing particular attention to ensure tightness of the joints and fill will Stabalux connecting paste Z 0094
Glass supportsblocking
Special attention should be given to dimensional pro-portions To support the outer pane a sufficiently large glazing block must be installed that can carry the load to safely ensure the glass load is distributed effectively
DL 6073 Cover plug Z 0089GD 6174 Screw eg Z 0731
S T A B A L U X
Stabalux H Processing notes 310718 60
Stabalux HProcessing notes
Use of slab insulation
bull Using insulation blacks significantly reduces heat dissipation
bull The highly effective slab insulation has a perma-nently adhesive HOT-MELT
bull Depending on the situation where they are used insulation blocks can be directly applied to the cov-er strippressure profile or placed into the rebate over the screw fittings and pushed into position with the cover strippressure profile
1210
Slab insulation
Insulation block Width(Rebate)
Height
Z 0605 slab insulation 2042 20 mm 42 mm glass thickness from 44 mm
Z 0606 slab insulation 2026 20 mm 26 mm glass thickness from 28 mm
Z 0607 slab insulation 3042 30 mm 42 mm glass thickness from 44 mm
Z 0608 Insulation block 3026 30 mm 26 mm glass thickness from 28 mm
H_12_023dwg
Note
bull The use of slab insulation with cover strips DL 5073 DL 6073 should be tested for each individual sit-uation
bull 2-piece outer seals are always used with slab insu-lation blocks
bull With system width 80 mm and a 40 mm rebate 2 x 20 mm wide slab insulation blocks can be com-bined (40 mm wide insulation blocks available upon request)
bull for a glass inset of 15 mm outer seal GD 1932 bull for a glass inset of 20 mm outer seal GD 1932
Correctly position the seal flapwhen installing the insulation block
S T A B A L U X
Stabalux H Processing notes 310718 61
Stabalux HProcessing notes
1210
Slab insulation
Examples
H_12_023dwg
Z 0607Insulation block 3042
Z 0608Insulation block 3026
Z 0605Insulation block 2042
Z 0606Insulation block 2026
Z 0605Insulation block 2042
GD 1932
GD 1932
GD 1932
GD 1932
GD 1932
GD 1932
Z 0606Insulation block 2026
S T A B A L U X
Stabalux H Design 310718 62
Stabalux HDesign
Special design
Glass structures that partially refrain from using visible cover strips are considered special designs
These designs do not conform to the intended uses of the system No guarantees are made for eg quality of seals durability and structural stability Responsibility here lies entirely with the company implementing the design
Based on our experience we recommend paying close at-tention to the points made on the following pages during planning and implementation
131
Pane support variants
Mullion-transom structure 2-sided cover strip
H_13_001dwg
Mullion-transom structurewith transom cover strips 1)
1) Seals with 1 2 or 3 sections are possible
2) Use of mullion seals with 1 section in mullions and transoms
Section A-A Section C-C
Section B-B Section D-D
Mullion-transom structurewith mullion cover strips 2)
S T A B A L U X
Stabalux H Design 310718 63
Stabalux HDesign
131
Pane support variants
Transom structure mullion structure 2-sided cover strip
Vapour seal
When using this type of structure it is important to be aware that any loss of contact pressure can affect the room-side permeability There is an increased risk of con-densation build up in the rebate
vertical clamping strips
The glass supports should be placed to below the outer pane and sealed with it
horizontal clamping strips
Ventilation and condensation drainage is achieved via a recess in the lower sealing lip in the centre of the outer seal or at one third intervals
H_13_001dwg
Transom structure
Section A-A Section C-C
Section B-B Section D-D
Mullion structure
S T A B A L U X
Stabalux H Design 310718 64
Stabalux H
Requirements for special designs 1 Vapour seal
The room-side level of glazing must have the best possible vapour seal In this regard the vapour dif-fusion properties of the silicone sealant to be used should be tested Ensure that there are no permea-ble areas around concave cross joints
2 Rebate ventilation pressure equalisation and condensation drainage
Systems with partially sealed rebate represent a limitation to rebate ventilation Check on a case-by-case basis that no damage will be caused by standing condensation It is especially critical that designs with sealed vertical joints are evaluated To allow ventilation of the horizontal rebate we recom-mend installing a suitable vertical ventilation space Alternatively ventilation can be achieved using the outer joints
3 Weatherproofing
The outward facing seals must be watertight In cross joints it is especially important to ensure a firm join between the Stabalux profile seal and the silicone joints We recommend sealing up to the outer edge of the glass before mounting the cover stripsWe would like to once again emphasise that our profile seals will not make a permanent bond with commonly used silicone sealants A seal can only be created at contact points through permanent appli-cation of pressure
4 Mechanical strength screw fittings
Ensure screw fittings are sufficiently planned for Special attention should be given to the effects of wind suction and the reduced support
5 Glass weight distribution
Mechanical distribution of the weight of the glass panes through the structure must be ensured System glass supports can be used for existing horizontal transoms Designs using ldquoonlyrdquo mul-lions require special glass supports which carry the weight of the glass directly into the mullions
6 Glass sizing
Attention should be given to the reduced sup-port of panes when dimensioning the glass For example only the vertical or horizontal cov-er strips are effective in the event of wind suc-tion stresses or stress on the fall protection
7 Material compatibility
Compatibility of the silicone sealants with our profile sealants and the edge bonding of the glass must be ensured We recommend the exclusive use of tested silicone sealants from the whole-glass facades sec-tor Approval is usually given by the silicone manu-facturer
131
Pane support variants
H_13_001dwg
Design
S T A B A L U X
Stabalux H Design 310718 65
Stabalux H
System cross sections 132
Vertical glazing mullionsconcealed screw fittings
Vertical glazing transomsdivided outer seal for height compensation
Vertical glazing transoms visible recessed screw fittings
Vertical glazing mullionsvisible screw fittings
Vertical glazing transoms concealed screw fittingsStainless steel bottom strip fire seals
Vertical glazing transoms visible screw fittingsStainless steel cover stripfire seals
Inclined glazing mullionsconcealed screw fittings
Inclined glazing transomsvisible screw fittings
1
2
3
4
5
6
7
8
1 2
3 4
5 6
7 8
Examples
H_13_002dwg
Design
S T A B A L U X
Stabalux H Design 310718 66
Stabalux H
Creating facade corners
At exposed areas such as glass facade corners it is par-ticularly important to ensure sufficient heat insulation in order to avoid the creation of thermal bridges and pre-vent a build-up of condensation Thermal current calcula-tions provide information about the actual heat loss
133
System details
Special seal allow a polygon shaped arrangement of the facade mullions For convex glass surfaces an angle be-tween 3deg and 15deg can be freely chosen For concave glass surfaces the angle can vary between 3deg and 10deg
Facade polygon
Outer corner Inner corner
Geometrically check the feasibility Recommendation Use for system 60 and above
H_13_003dwg
H_13_004dwg
H_13_005dwg
Design
Calculation of screw length withconsideration of the angle
ATTENTIONAdhere to the minimum glass inset
S T A B A L U X
Stabalux H Design 310718 67
Stabalux H
133
System details
Eaves with glass roof connection
bull Depending on the construction of the transoms a design with or without rain gutters and the choice of stepped glazing or closable cover strips gives us different variants for implementation
bull All options require condensation and moisture to be drained away at the eaves
Design with stepped glazing
bull With a stepped glazing design it is important to se-lect a UV-resistant edge bonding for the glass This edge bonding systems usually silicone-based are quite permeable to gases and are therefore unable to achieve the required high values for sound and heat insulation of conventional systems and require additional sealing around the edges
Example 1
Design with stepped glazing
H_13_006dwg
Design
bull Our thermal calculations show that stepped glass panes compared to covered glass edges have a much less favourable isothermal movement
bull Stepped glass panes must also be statically meas-ured according to their reduced hold against wind suction
bull The additional thermal loads that occur in stepped glass panes should countered by the use of pre-ten-sioned glass (TVG ESG) for the outer panes
bull Stepped glass panes should be preferred for flatter inclined roofs as water can drain away at the eaves unhindered
S T A B A L U X
Stabalux H Design 310718 68
Stabalux HDesign
133
Eaves with glass roof connection Design using cover strips
bull Horizontal pressure strips prevent the free run off of rain water and dirt
bull Cover strips with angled edges reduce the build up of water in front of the cover strip
bull The outer sealing level on glass roofs must also be thoroughly sealed
bull In combination with our butyl clad stainless steel panels glazing with pressure strips on 4 sides achieves a higher level of safety
bull Make sure that the inner sealing section provides guaranteed drainage for condensation
bull To improve drainage and heat-induced expansion cover strips should be shortened by 5 mm at tran-som joints Gasket joints however are to be laid flat with a slight excess in dimensions Open ends of the transom cover strips must be sealed
Note
Due to the increased thermal stresses in the roof we rec-ommend using concealed screw fitting when choosing clamping strips for larger system lengths and in rafters Unused holes in the pressure profile must be sealed
Example 2
Design using cover strips
System details
H_13_007dwg
S T A B A L U X
Stabalux H Design 310718 69
Stabalux HDesign
133
Eaves with glass roof connection Design with gutter
bull The gutter must be able to take its own weight and mounted in such a way that stresses from its own weight water and ice will not lead to deformations and directly apply a load to the glazing
bull Overflowing water must not be able to get inside the structure Alongside the gutter-shaped outer rafter seal the moisture barrier installed over the guide plate also acts to drain away condensation
Example 3
Design with gutter
System details
H_13_008dwg
S T A B A L U X
Stabalux H Design 310718 70
Stabalux H
H_13_009dwg
Design
133
Roof ridge design
bull When designing the ridge cap ensure that the raft-er cover strips are pulled under the ridge cap
System details
S T A B A L U X
Stabalux H Design 310718 71
Stabalux HDesign
134
Structural attachments
Structural attachment film baffles
bull Attachment of glazing to the building structure re-quires a well thought out approach
bull Moisture damage can occur if moisture condenses at any thermal bridges
bull Thermal bridges must be avoided and warm air from the inside spaces must not penetrate too deeply into the structure
bull The required moisture barriers must be installed as deeply as possible into the inner space using impermeable structural film baffles This prevents moisture penetration into the structure via conden-sation from the air inside
bull An additional foil to seal against rainwater must be permeable to moisture Only if this foil has a wa-ter vapour diffusion resistance value μ of max μ = 3000 can a dry structure be guaranteed in the transition zones
S T A B A L U X
Stabalux H Design 310718 72
Stabalux HDesign
134
Structural attachments
Facade base
bull Controlled drainage of the rebate space can only be ensured if the sealing sections overlap in such a way that no moisture can get under the seals and foils
bull Run foils under the transom seal to act as a mois-ture barrier and glue to the wooden structure In accordance with DIN 18195 the seal should be run at least 150 mm above the water-guiding layer
bull Attach foil with moisture barrier in accordance with the requirements of DIN 18195
Example 1
Mounting intermediate mullion to base plate
Drainage of the base area is achieved via the seal flap towards the outside In this case the seal flap around the mullion at the base should not be released For edge mullions ensure there is a corresponding seal placed (continuous transom seal up the to the end point) and a constructive design of the drainage section
H_13_010dwg
S T A B A L U X
Stabalux H Design 310718 73
Stabalux HDesign
134
Facade base
bull Rebate space ventilation is achieved via the open end of the vertical cover strips
bull Ensure the connection is impermeable to vapourbull Mullion mountings must be sufficiently statically
dimensioned Required axis and edge distances for anchoring the base plates and in the building struc-ture must be observed
Example 2
Mounting intermediate mullion to base plate
Where seal flaps are interrupted by joints filler rods in the joint must also be cut
Structural attachments
H_13_011dwg
S T A B A L U X
Stabalux H Design 310718 74
Stabalux HDesign
134
Structural attachments
Facade base
bull Heat insulation around the structural connection should be designed in such as way as to prevent cold bridges forming
bull Steel parts should also be provided with sufficient protection against corrosion even in concealed ar-eas
bull Weather-protection sheets should be used depend-ing on the requirements of the construction Suffi-cient rear ventilation must be ensured
Example 3
Attaching intermediate mullions at base plates
H_13_012dwg
S T A B A L U X
Stabalux H Design 310718 75
Stabalux HDesign
134
Structural attachments
Connection before intermediate floors
bull Depending on requirements mullions are designed as continuous multi-span transoms or separated at each floor
bull Reasons for separating mullions can include eg building settlement fire protection sound insula-tion etc
bull If the separation joint is intended to absorb expan-sion then as well as the required degree of freedom for mullions the ability for movement of integrated elements must also be ensured
bull The constructive design of the mullion joint and mounting should be chosen according to the stat-ically calculated base system and determines the
Example
Mullions separated at each floor
In this example distribution of horizontal and vertical loads is achieved at each floor through the existing floor structure
H_13_013dwg
choice and arrangement of fixed and movable bear-ings type of screw fittings structural connection parts and attachment to the concrete floor
bull With continuous mullions and a corresponding mount the multi-span support principle is in effect Sagging due to horizontal effects is lower The re-quired moment of inertia reduces for 2-span sup-ports with the same span length compared to the 1-span support by a factor of 0415 However a ten-sion and stability analysis should be carried out
S T A B A L U X
Stabalux H Design 310718 76
Stabalux HDesign
134
Ceiling connection
bull Structural connections should take account of any movement that may occur
bull As well as temperature induced expansion in the facade all longitudinal expansions and movements of the affected components must be considered
bull Additional stresses from restraints must be avoid-ed
Structural attachments
H_13_014dwg
S T A B A L U X
Stabalux H Design 310718 77
Stabalux HDesign
134
Structural attachments
Facade connection to parapets
H_13_015dwg
S T A B A L U X
Stabalux H Design 310718 78
Stabalux HDesign
134
Structural attachments
Connection to structural eaves
bull This connection is suitable for glass roofs that are being installed as skylights in the structure These may be gabled roofs single pitch roofs pyramids or arched roofs
H_13_016dwg
S T A B A L U X
Stabalux H Design 310718 79
Stabalux HDesign
134
Structural attachments
Ridge connection to walls
bull When making ridge connections to walls permea-bility to moisture is particularly important Warm air with a high level of moisture gets into cooler zones of the inner sealing section where the design is not sufficiently sealed and can cause structural dam-age from penetrating into the connecting structure
bull Joint seals made from butyl-clad stainless steel plates (Z 0501 Z 0601) must be installed on the outside of joint areas
H_13_017dwg
S T A B A L U X
Stabalux H Design 310718 80
Stabalux HDesign
134
Structural attachments
Horizontal wall connection to heat insulation bonding system
H_13_018dwg
S T A B A L U X
Stabalux H Design 310718 81
Stabalux HDesign
135
Installing windows and doors
Mullion and transom facades and glass roofs from Stabalux are neutral with regards to the selection of in-sert elements All commonly available window and door systems made from steel aluminium wood or plastic can be used Frame profiles from the window and door man-ufacturerrsquos should be selected to match the chosen glass thickness If no profiles with a suitable insert rebate are available mountings may be used as shown in the fol-lowing examples Like with glass elements windows are set into the facade on glass supports padded and then secured against slippage
Insert window transom sectionSystem HUECK Series Lambda WS 075 IS
Insert window mullion sectionSystem HUECK Series Lambda WS 075 IS
H_13_019dwg
S T A B A L U X
Stabalux H Design 310718 82
Stabalux HDesign
135
Installing windows and doors
H_13_020dwg
Insert window transom sectionSystem HUECKSeries Lambda WS 075
Insert window mullion sectionSystem HUECKSeries Lambda WS 075
S T A B A L U X
Stabalux H Design 310718 83
Stabalux HDesign
135
Installing windows and doors
H_13_021dwg
Insert door outward transom sectionSystem HUECKSeries Lambda DS 075
Insert door outward transom sectionSystem HUECKSeries Lambda DS 075
Insert window mullion sectionSystem HUECKSeries Lambda WS 075
S T A B A L U X
Stabalux H Design 310718 84
Stabalux HDesign
135
Installing windows and doors
H_13_022dwg
Insert door inward in the transom sectionSystem HUECKSeries Lambda DS 075
Insert door inward in the transom sectionSystem HUECKSeries Lambda DS 075
S T A B A L U X
Stabalux H Design 310718 85
Stabalux HDesign
135
Installing windows and doors
H_13_023dwg
Insert door inward in the transom sectionSystem HUECKSeries Lambda DS 075
Insert-top-hung window mullion section System HUECKSeries Lambda 110
Insert-top-hung window transom section System HUECKSeries Lambda 110
S T A B A L U X
Stabalux H Design 310718 86
Stabalux HDesign
135
Installing windows and doors
H_13_024dwg
Sliding system mullion section System HUECKSeries Volato M
Sliding system transom sectionSystem HUECKSerie sVolato M
S T A B A L U X
Stabalux H Design 310718 87
Stabalux HDesign
135
Installing windows and doors
H_13_025dwg
Flush roof surface windowSystem HUECK-HARTMANNSeries 85E
Powered according tosystem specifications
S T A B A L U X
Stabalux H Design 310718 88
Stabalux HDesign
135
Installing windows and doors
H_13_027dwg
Insert window - transom sections wood windows
Insert window - mullion sectionwood windows
- Stabalux H
-
- System
-
- System properties
- System cross sections and inner seals - facade
- System cross sections and inner seals - roof
- Cover strips and outer seals
-
- Processing notes
-
- Material information
- Profile design
- Mullion-transom joint
- Tips for laying seals
- Seals - Facade
- Seals - roof
- Glass inset and glass support
- Screw fittings
- Flat cover strip DL 5073 DL 6073
- Slab insulation
-
- Design
-
- Pane support variants
- System cross sections
- System details
- Structural attachments
- Installing windows and doors
-
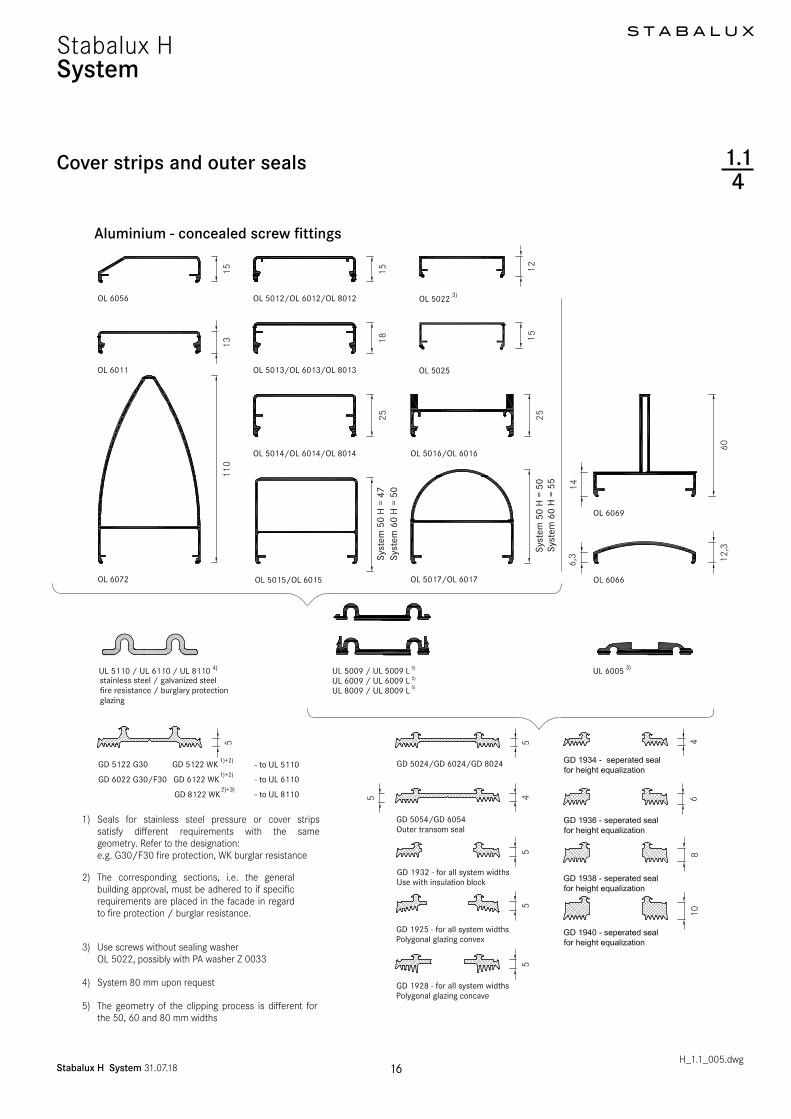
S T A B A L U X
Stabalux H Processing notes 310718 35
Stabalux HProcessing notes
125
Seals - Facade
H_12_008dwg
Assembly of the inner seal for vertical facade glazing and facade glazing with an incline of up to 20deg - 3 overlapping sections
The seal flap runs continuously through
Transom
Cut secondary mullion seal belowthe lower transom section to the length of the overlap
Transom seal Connection to the secondary mullioncut the uppermost section to width of the transom seal
bull The seal flap must always cover the inset depth of the glass panes and filling element
bull The protruding length of the seal flap should be re-moved at the perforation once glazing is complet-ed
bull Vertical seals on the secondary mullion are butt jointed beneath the upper transom The seal flap of the upper transom runs continuously in the upper part of the joint
bull Drainage of the secondary mullion (1st drainage section) is achieved by overlapping the seals of the secondary mullion with the seal of the upper tran-som
Secondary mullion seal overlaps the transom seal
Secondary mullionTransom
BA
D
Edge mullions
Secondary mullion butt jointedat the topseal gasket joint
Seal gasket jointsoverlapping joints
e gt glass inset e gt
glas
s in
set
S T A B A L U X
Stabalux H Processing notes 310718 36
Stabalux HProcessing notes
125
Seals - Facade
H_12_008dwg
Assembly of the inner seal for vertical fa-cade glazing and facade glazing with an in-cline of up to 20deg - 3 overlapping sections
The seal flap should always cover the inset ldquoerdquo of the filling element (eg glass panes panels)
Main mullionTransom
Main mullion seal around a transom upper section to the width of the transom seal
Transom seal separate lower section along the length of the overlap
bull All joints must be sealed Before laying seals we recommend completely coating the support surfac-es and edges with Stabalux connection paste
bull Ensure all joints are cleanly and solidly sealed Ex-cess sealant should be removed Absolutely no un-evenness in the glass support surface must occur from applying sealant too thickly
C
Seal gasket jointsoverlapping joints
Seal gasket jointsoverlapping joints
e gt glass inset e gt glass inset
S T A B A L U X
Stabalux H Processing notes 310718 37
Stabalux HProcessing notes
125
Seals - Facade
Assembly of the outer seal for vertical glass facades
bull As well as gently clamping the glass in place the outer sealing system has the primary task of pro-tecting the rebate against moisture ingress
bull The outer sealing sections must be completely sealed except for the necessary openings for pres-sure equalisation and condensation dissipation
bull The outer mullion seals are laid continuously and the transom seals are joined
bull Sealant joints are to be laid flat with a slight excess in dimensions Exact specifications depends on the situation in which the system is used
bull Tightly fitted sealant joints can be implemented without fixing the outer seal of the mullion-transom joint in vertical facades
outer continuous mullion sealouter jointed transom seal
eg GD 6054 outer transom seal with different heights of sealing lip
H_12_009dwg
H_12_010dwg
Rod length ℓ
(mm)
Temperature difference
∆T
Longitudinal expansion
∆ℓ (mm)1000 40degC 13000 40degC 31000 60degC 153000 60degC 451000 100degC 253000 100degC 75
Expansion of aluminium profiles
When using the RHT connector take care when fitting screws to ensure that the screws are placed away from the mullion-transom connec-tion
bull The flag for the inner transom joint in combination with the outer seal creates additional safety
bull The seal flap should be separate at its perforations to match the thickness of the glass in order that this is clamped down and concealed under the out-er seal
bull Different heights of sealing lips on the outer seal bridge the height different created by the seal flap in the outer sealing section
bull When mounting the clamping strips be aware of aluminium profile expansion (see section 121 - Material information)
S T A B A L U X
Stabalux H Processing notes 310718 38
Stabalux HProcessing notes
125
Seals - Facade
Assembly of the outer seal for facade glaz-ing with an inwards inclineup to 20deg
bull If the facade is inclined inwards from the vertical (max permitted incline 20deg) the open ends of the outer transom seals must be closed up using Butyl
bull When constructing inwardly inclined facades (up to max 20deg) if flat cover strips are used in the tran-soms (eg DL 5059 DL 6059 DL 5061 DL 6061 DL 5067 DL 6067 DL 5071 DL 6071 DL 6043 DL 6044) and flat pressure and cover profiles (eg UL 6005 with OL 6066) then the central hollows at each end must be sealed with silicone
H_12_009dwg
When using flat cover strips on in-wardly inclined facades (up to max 20deg) the central hollow at each end should be sealed with silicone
Seal open ends of the transom seals with Butyl on inwardly inclined facades (up to max 20deg)
Trim the seal to be slightly larger than required
S T A B A L U X
Stabalux H Processing notes 310718 39
Stabalux HProcessing notes
126
Seals - roof
Assemble the inner seal for roof glazing
bull Optionally Stabalux seals with offset water chan-nels can be used in the facade area which safely drain any moisture or condensation to the outside
bull The 10 mm high seals can be divided across their height to allow a simple overlap at critical transom joints
bull The transom seals are geometrically shaped so as to create a condensation channel
bull This channel drains from the overlapping transom joint in the rafters
remove the lower perforated part and the clamping foot on the transom seal of the at around 15 mm
remove the upper perforated part on the rafter seals
length of transom seal = transom length + asymp 13 mm per side
Gasket joints
1
2
3
H_12_011dwg
H_12_012dwg
bull Along a transom seals must be laid continuouslybull All joints must be sealed Before laying transom
seals we recommend completely coating the sup-port surfaces and edges Absolutely no unevenness in the glass support surface must occur from apply-ing sealant too thickly
1
23
S T A B A L U X
Stabalux H Processing notes 310718 40
Stabalux HProcessing notes
Assembly of the outer seal for for glazed roofing
bull These are laid in fundamentally the same way as for vertical glazing Split seals such as GD 1932 are not suitable for transom seals in roofs Split seals can only be installed in mullions in combination with slab insulation Each installation situation will differ to some degree and always check how well sealed it is
bull For cross joints we recommend using our self-ad-hesive stainless steel sealing plates with butyl coat-ing Z 0601 for System 60 and Z 0501 for System 50 The stainless steel sealing plates are 35 mm wide and are attached to the edge of the glass panes parallel to the mullion axis
bull Butyl tape is not suitable as a sealing tape between the glass and the outer seal
bull The outer mullion seals are laid continuously and the transom seals are joined
126
Detail of sealing plate Z 0501 = 35 x 40 mm
Z 0601 = 35 x 50 mm
Attention The sealing plates must be placed central to the transom axis
For glass insets of 15 mm the first screw fittings for the transom cover strip begin 30 mm from the end of the cover strip
Seals - roof
H_12_013dwg
H_12_014dwg
bull Sealant joints are to be laid flat with a slight excess in dimensions Exact specifications depends on the situation in which the system is used
Notebull Horizontal clamping strips prevent the free run off
of rain water and dirtbull Cover strips and upper strips with angled edges re-
duce the build up of water in front of the clamping strip
bull Shorten the clamping strips on the transoms by 5 mm in the area of the transom joins in order to im-prove drainage of water Gasket joints however are to be laid flat with a slight excess in dimensions Open ends of transom clamping strips (upper and cover strips) should be sealed
S T A B A L U X
Stabalux H Processing notes 310718 41
Stabalux HProcessing notes
Assembly of the outer seal for for inclined glazed roofing ge 2deg
bull These are laid in fundamentally the same way as for vertical glazing Split seals around the mullions in roofs such as GD 1932 are only suitable when using in combination with slab insulation Each installa-tion situation will differ to some degree and always check how well sealed it is
bull To ensure free run-off of rain water and dirt on roofs inclined ge 2deg we recommend not using clamping strips in the transoms
bull Instead the rebate spaces should be sealed with all-weather silicone
bull Implementation of the outer sealing section around mullions is done in the same way as conventional roofs with an inclination up to 15deg
126
Seals - roof
H_12_013dwg
Tips for all roof designs
When using aluminium cover strips on roofs take account of the expansion factor as a result of the high degree of heat absorption when selecting the length to use Equal-ly the use of single-piece cover strips should be carefully considered In this case it is recommended that holes for screwing on the cover strip are created with a diameter of d = 9 mm (refer to Section 121 - Material information)
bull At the high point or ridge area of the inclined glaz-ing it is recommended to also install and outer seal-ing section in the transoms with clamping strips
bull Only certified sealing materials may be used for sealing the transom rebate space
bull Pay attention to all information provided by the manufacturer and the sealing work must be carried out by trained persons It is recommended that a licensed and certified specialist contractor is hired for this purpose We further refer you to the DIN 52460 standard and IVD data sheets (Trade Asso-ciation for Sealants)
For wide spans we recommend using concealed screw fittings when selecting the clamping strips (lower + up-per strip) This is the preferred option for rafters Unused holes in the pressure profile must be sealedSome roof areas such as the eaves see the use of sev-eral different materials (glass silicone aluminium sheets ) each with different expansion coefficients To avoid the formation of cracks aluminium sheets should be in-stalled with expansion joints
S T A B A L U X
Stabalux H Processing notes 310718 42
Stabalux HProcessing notes
Assembly of the outer seal for for inclined glazed roofing ge 2deg
bull The compatibility of the materials is particularly important when using all-weather silicone In this case the compatibility of the sealant with the edge bonding of the glass and the backfill of the joints If self-cleaning glass is used the compatibility must be established in advance
bull Glass sealants and edge bonding must be UV-re-sistant The incline of roofs should also be taken into account Information about UV-resistance can be requested from the manufacturer Silicone edge bonding generally provides better UV-resistance than polysulfide-based materials The advantage lies in its high vapour sealing properties which is particularly useful when using more volatile argon fillings
126
Seals - roof
H_12_013dwg
1 Hold-down clamp
2 Silicone washer
3 Silicone sealant seal around the
clamp
4 All weather silicone seal
Transom inclined glazing ge 2deg inclination with all-weather silicone and slab insulation
12
3
6
89
7
Transom inclined glazing ge 2deg inclination with all-weather silicone and round sec-tion rope seal
12
3
6
89
7
bull Highly elastic weatherproof and UV-resistant seals meet the widest range of demands for reliable joints
bull If the silicone joint is created without additional mechanical safety devices ensure that the glass is supported from two sides only Selective installa-tion of holding clamps can be used to achieve all round support for glass edges
bull The clamps are made from stainless steal with silicone washers and are screwed in the same as pressure strips The hold-down clamp should be ad-ditionally sealed around the perimeter with silicone sealant The design is based upon the dimensions of the glass as documented in the glass static anal-ysis
51 Round section rope seal
52 Slab insulation
6 Glass filling element
7 Inner seal 10 mm transom
8 timber profile
9 System screw fittings
4
51
4
52
S T A B A L U X
Stabalux H Processing notes 310718 43
Stabalux HProcessing notes
Assembly of the outer seal for for inclined glazed roofing ge 2deg
bull The joint width and the joint height for Stabalux System H are defined as w x h = 20 mm x 10 mm These measurements should always checked when selecting the sealing material and adapted if neces-sary Generally w h = 2 1 - 35 1
bull PE round section seals or Stabalux slab insulation is suitable as a back fill material
bull Silicone sealant should be applied before laying the mullion seals and cover strips
bull After the specified setting time the seals and screw fittings can be installed in the areas around mullions
126
Seals - roof
Rafters with clamping strips
Transom with clampAll weather silicone seal
and round section rope seal
Transom with clampAll weather silicone seal
and slab insulation
Transom with all-weather silicone and round section rope
seal
Joint design according to manufacturers specificationsgenerally w h = 2 1 - 35 1
bull The mullion-transom joints around the clamps are then sealed
bull Before applying this second layer the joints around transoms must have completely set
S T A B A L U X
Stabalux H Processing notes 310718 44
Stabalux HProcessing notes
Steps for implementing the seal with silicone
bull Test silicone sealant and glass edge bondings and other contact surfaces (eg panels) for suitability
bull Clean edge bonding adhesive impurities from the surfaces to which sealant will be applied following manufacturerrsquos directions
bull Fill the joints as per the joint dimensions using only non-water absorbent closed-cell PE profiles (no damage to the edge bonding)
bull The remaining space in the glass rebate must be large enough that the pressure is able to equalise and a drainage level is available
bull Clean any impurities from the surfaces to which the sealing material is to be applied and any adjacent surfaces according to manufacturerrsquos directions
126
Seals - roof
System screw fittings
Hold-down clamp
Washer made from silicone
Silicone sealant seal
around the clamp
All weather silicone seal
Silicone sealant
Rafter
Transom
bull Be particularly aware of any adjacent metal com-ponents Prime according to manufacturerrsquos direc-tions
bull Seal joints without leaving any cavities or bubbles Mask any adjacent components in advance where necessary
bull Smooth out the filled joints using the manufactur-errsquos smoothing agents and conventional tools with as little water as possible Remove adhesive tape
bull If two or more reactive sealants are used in com-bination the first must completely set before the second is applied
S T A B A L U X
Stabalux H Processing notes 310718 45
Stabalux HProcessing notes
Glass inset
bull Glass industry guidelines must be observedbull The glass inset is generally 15 mmbull An increase to 20 mm has a beneficial effect on the
heat transfer coefficient Uf of the frame structure bull Special conditions such as fire protection glass
must be adhered to the terms are stated in the general building approval
Glass inset and glass support 127
RebateGlass inset
H_12_015dwg
S T A B A L U X
Stabalux H Processing notes 310718 46
Stabalux HProcessing notes
Glass support types and choosing the glass support
The Stabalux H system uses three different types and techniques for attaching glass supports
bull Glass support GH 5053 and GH 5055 with hanger bolts
bull Glass support GH 5053 and GH 5055 with hard-wood cylinders and bolts
bull Crossing point reinforcement RHT with cylinder head screws empty 65 mm Crossing point reinforce-ment are used exclusively on fire-protection glaz-ing The precise details are stated in the general building approval
The glass supports used are determined by the type of wood glass construction and glass weight (see section 9) A rigid mullion-transom connection is required ie no twisting of the transom may occur at the connection that would cause further sinking of the glass support
Glass inset and glass support 127
Mounting the glass supports
bull Positioning the glass supports and glazing accord-ing to glass industry guidelines and guidelines of the Institute for Window Technology
bull The weight of the glass panes is distributed via the glass supports attached to the transoms
bull Glass supports should be attached at a distance of 100 mm from the end of the transom When doing so avoid a collision with the cover strip screw fit-tings at the end of the transom
Glazing blocks
bull Glazing blocks must be compatible with the edge bonding of the insulated glass panes
bull They should be stable under constant pressure and be able to withstand loads aging and temperature changes
bull It is important that the blocks ensure circumferen-tial pressure equalisation and that drainage of con-densation is not obstructed as well as allowing the glass edges to be offset and small design toleranc-es to be accommodated
bull If the length of the glass support is more than 100 mm blocks should be placed along the entire length of the glass support to ensure equal load distribution
H_12_016dwg
Positioning the glass support approx 100 mm from the end of the transom
S T A B A L U X
Stabalux H Processing notes 310718 47
Stabalux HProcessing notes
127
Glass inset and glass support
Glass support GH 5053 Attachment with hanger bolts
A-A
Glass support GH 5053 with hanger bolts
bull The certified system components consist of the glass support GH 5053 and 2 hanger bolts empty 10 mm with a 45 mm wood thread and a shaft of a different length
bull The hanger bolts are screwed directly into the tim-ber at intervals of 80 mm A empty 7 mm hole needs to be pre-drilled for this purpose
bull Screw fittings should be vertical to the transom axis
bull The depth for hanger bolts is at least 45 mm meas-ured from the front edge of the timber
H_12_016dwg
H_12_017dwg
Glass support GH 5053
Block
Block
glass support
Inner seal
Hanger bolt
Minimum screw depth from measured from front edge of timber
Hanger bolts empty 10 mmpre-drilled at empty 7 mm
bull For glass support GH 5053 the required depths are delivered corresponding to the thickness of the glass and placed onto the hanger bolts
bull Blocks must be placed under the glass panes along the entire length of the glass supports
bull Details of the approved pane weights geometries and classification of system components are pro-vided in section 9
S T A B A L U X
Stabalux H Processing notes 310718 48
Stabalux HProcessing notes
127
Glass inset and glass support
Glass support GH 5055 with hanger bolts
bull Based on the test results for the system compo-nent GH 5053 a load bearing model was designed and the suitability of the GH 5055 glass support calculated
bull Installation is done the same way as GH 5053 but using three screws spaced 80 mm apart
bull Details of the approved pane weights geometries and classification of system components are pro-vided in section 9
Glass support GH 5055 Attachment with hanger bolts
A-A
H_12_016dwg
H_12_017dwg
Glass support GH 5055
Block Hanger bolts empty 10 mmpre-drilled at empty 7 mm
Block
glass support
Inner seal
Hanger bolt
Minimum screw depth from measured from front edge of timber
S T A B A L U X
Stabalux H Processing notes 310718 49
Stabalux HProcessing notes
127
Glass inset and glass support
Row
Total glass thickness tGlass (mm)
for vertical glazing
Hanger bolts 2) Glass supports 1)
Inner seal height GH 5053 GH 5055 Depth (mm)
5 mm 10 mm 12 mm1 4 5 6 7 Z 0371 3) Z 0371 4) Z 0371 5) GH 0081 Section 9
2 8 9 Z 0371 3) Z 0371 4) Z 0371 5) Section Section 12
3 10 11 Z 0371 3) Z 0371 4) Z 0371 5) Section Section 144 12 13 Z 0371 3) Z 0371 4) Z 0371 5) Section Section 165 14 15 Z 0371 3) Z 0371 4) Z 0371 Section Section 186 16 17 Z 0371 3) Z 0371 Z 0371 Section Section 207 18 19 20 Z 0371 Z 0371 Z 0371 GH 0082 Section 228 22 23 Z 0371 Z 0371 Z 0372 GH 0083 GH 0851 269 24 25 Z 0371 Z 0372 Z 0372 GH 0084 GH 0852 2810 26 27 Z 0371 Z 0372 Z 0372 GH 0085 GH 0853 3011 28 29 30 Z 0372 Z 0372 Z 0372 GH 0886 GH 0854 3212 31 32 33 Z 0372 Z 0372 Z 0372 GH 0887 GH 0855 3513 34 35 36 Z 0372 Z 0372 Z 0373 GH 0888 GH 0856 3814 37 38 39 Z 0372 Z 0373 Z 0373 GH 0889 GH 0857 4115 40 41 42 Z 0372 Z 0373 Z 0373 GH 0890 GH 0858 4416 43 44 45 Z 0373 Z 0373 Z 0373 GH 0891 GH 0859 4717 46 47 48 Z 0373 Z 0373 Z 0373 GH 0892 GH 0860 5018 49 50 51 Z 0373 Z 0373 Z 0373 GH 0893 GH 0861 5319 52 53 54 Z 0373 Z 0373 - GH 0894 GH 0862 5620 55 56 57 Z 0373 - - Section Section 5921 58 59 60 Z 0373 - - Section Section 6222 61 62 63 Z 0373 - - Section Section 6523 64 Z 0373 - - Section Section 68
Item Total length (mm)
Shaft length (mm)
Thread length (mm)
Z 0371 70 25 45Z 0372 77 32 45
Z 0373 90 45 45
Classification of system components
Table 1 Vertical glazing | System 50 60 80 | Hanger bolts
Hanger bolts
1) Cut from GH 5053 or GH 5055
2) Generally The screw-in depth (ET) for hanger bolts = 45 mm thread length (GL) measured from the front edge of
the timber
For glasses tGlas lt 20 mm observe the permissible visible shaft length from the front edge of the wood
If necessary adjust the visible shaft length over the screw-in depth
3) Permissible visible shaft length from the front edge of the wood = glass thickness tGlas (mm) + 3 mm
4) Permissible visible shaft length from the front edge of the wood = glass thickness tGlas (mm) + 7 mm
5) Permissible visible shaft length from the front edge of the wood = glass thickness tGlas (mm) + 9 mm
TI-H_92_003dwg
Total length
Thread lengthShaft length
S T A B A L U X
Stabalux H Processing notes 310718 50
Stabalux HProcessing notes
127
Glass inset and glass support
RowTotal glass thickness tGlass (mm)
for inclined glazing 1) Hanger bolts 2)Glass supports 3)
GH 5053 GH 5055 Depth (mm)1 16 17 18 Z 0371 GH 0081 Section 92 19 20 Z 0371 Section Section 123 21 22 Z 0372 Section Section 144 23 24 Z 0372 Section Section 165 25 26 Z 0372 Section Section 186 27 28 Z 0372 Section Section 207 29 30 Z 0372 Section Section 228 31 32 Z 0372 GH 0082 Section 249 33 34 Z 0372 GH 0083 GH 0851 2610 35 36 Z 0373 GH 0084 GH 0852 2811 37 38 Z 0373 GH 0085 GH 0853 3012 39 40 41 Z 0373 GH 0886 GH 0854 3213 42 43 44 Z 0373 GH 0887 GH 0855 3514 45 46 47 Z 0373 GH 0888 GH 0856 3815 48 49 50 Z 0373 GH 0889 GH 0857 4116 51 52 53 Z 0373 GH 0890 GH 0858 4417 54 Z 0373 GH 0891 GH 0859 47
Classification of system components
Table 2 Inclined glazing | System 50 60 80 | Hanger bolts
Glass support GH 5053
Glass support GH 5055
1) Accounting for a 10 mm inner seal
2) The depth for hanger bolts = 45 mm thread length measured from the front edge of the timber
3) Cut from GH 5053 or GH 5055
TI-H_92_005dwg
Depth
Depth
S T A B A L U X
Stabalux H Processing notes 310718 51
Stabalux HProcessing notes
127
Glass inset and glass support
Glass support GH 5053 Attachment with bolts and hardwood cylinders
Glass support GH 5053 and GH 5055 with pins and hardwood cylinders
bull Certified system components consist of glass sup-port GH 5053 and GH 5055 with pins and hard-wood cylinders
bull Depending on the width of supports 2 or 3 bolts with a diameter of 10 mm are needed
bull The bolt length should be adapted to the thickness of the glass
bull To anchor the bolts in place 50 mm wooden cylin-ders with a outer diameter of 30 mm and an axial core of empty 10 mm are solidly glued into the timber
H_12_016dwg
H_12_017dwg
A-A
bull Additionally holes with a depth of 50 mm and empty of 30 mm are to be drilled into the transom profile ver-tical to the transom axis with 80 mm spacing
bull The glue or adhesive used must be suitable and must not swell
bull The bolts should be hammered in along the entire cylinder depth of 50 mm
bull For glass supports GH 5053 and GH 5055 the re-quired depths are delivered corresponding to the thickness of the glass and placed onto the hanger bolts
Glass support GH 5053
Bolt empty 10 mmHardwoodcylinder Hardwood
cylinder
Block
Block
glass support
Inner seal
Bolt
Hardwood cylinderInner diameter 10 mmOuter diameter 30 mmfirmly gluedto the transom profile
Hardwood cylinder not grooved removed the sealing base around the cylinder
S T A B A L U X
Stabalux H Processing notes 310718 52
Stabalux HProcessing notes
127
Glass inset and glass support
Glass support GH 5055 Attachment with bolts and hardwood cylinders
Glass support GH 5053 and GH 5055 with pins and hardwood cylinders
bull The central groove in the Stabalux H System must not be milled into the wooden cylinder
bull When fitting the seals the sealing base must there-fore be removed around the cylinder
bull Blocks must be placed under the glass panes along the entire length of the glass supports
bull Details of the approved pane weights geometries and classification of system components are pro-vided in section 9
H_12_016dwg
H_12_017dwg
A-ABolt empty 10 mmHardwood
cylinder Hardwoodcylinder
Block
glass support
Block
Inner seal
Bolt
Hardwood cylinderInner diameter 10 mmOuter diameter 30 mmfirmly gluedto the transom profile
Hardwood cylinder not grooved removed the sealing base around the cylinder
Glass support GH 5055
S T A B A L U X
Stabalux H Processing notes 310718 53
Stabalux HProcessing notes
127
Glass inset and glass support
Row
Total glass thickness tGlass (mm)
for vertical glazing
Hardwood cylinder
Bolt Glass supports 1)
Inner seal heightGH 5053 GH 5055 Depth (mm)
5 mm 10 mm 12 mm1 8 9 Z 0073 - - Z 0047 Section Section 12
2 10 11 Z 0073 - Z 0047 Z 0047 Section Section 14
3 12 13 Z 0073 - Z 0047 Z 0047 Section Section 164 14 15 Z 0073 Z 0047 Z 0047 Z 0047 Section Section 185 16 17 Z 0073 Z 0047 Z 0047 Z 0048 Section Section 206 18 19 Z 0073 Z 0047 Z 0048 Z 0048 Section Section 227 20 21 Z 0073 Z 0047 Z 0048 Z 0048 GH 0082 Section 248 22 23 Z 0073 Z 0047 Z 0048 Z 0048 GH 0083 GH 0851 269 24 25 Z 0073 Z 0048 Z 0048 Z 0048 GH 0084 GH 0852 2810 26 27 Z 0073 Z 0048 Z 0048 Z 0048 GH 0085 GH 0853 3011 28 29 30 Z 0073 Z 0048 Z 0048 Z 0049 GH 0886 GH 0854 3212 31 32 33 Z 0073 Z 0048 Z 0049 Z 0049 GH 0887 GH 0855 3513 34 35 36 Z 0073 Z 0048 Z 0049 Z 0049 GH 0888 GH 0856 3814 37 38 39 Z 0073 Z 0049 Z 0049 Z 0049 GH 0889 GH 0857 4115 40 41 42 Z 0073 Z 0049 Z 0049 Z 0051 GH 0890 GH 0858 4416 43 44 45 Z 0073 Z 0049 Z 0051 Z 0051 GH 0891 GH 0859 4717 46 47 48 Z 0073 Z 0049 Z 0051 Z 0051 GH 0892 GH 0860 5018 49 50 51 Z 0073 Z 0051 Z 0051 Z 0051 GH 0893 GH 0861 5319 52 53 54 Z 0073 Z 0051 Z 0051 - GH 0894 GH 0862 5620 55 56 57 Z 0073 Z 0051 - - Section Section 5921 58 59 60 Z 0073 Z 0051 - - Section Section 6222 61 62 63 Z 0073 Z 0051 - - Section Section 6523 64 Z 0073 Z 0051 - - Section Section 68
Classification of system components
Table 3 Vertical glazing | System 50 60 80 | Hardwood cylinders amp bolts
Bolt
1) Cut from GH 5053 or GH 5055
TI-H_92_005dwg
Hardwood cylinder Z 0073
Item Bolt length (mm)Z 0047 70Z 0048 80Z 0049 90Z 0051 100
S T A B A L U X
Stabalux H Processing notes 310718 54
Stabalux HProcessing notes
127
Glass inset and glass support
RowTotal glass thickness tGlass (mm)
for inclined glazing 1)Hardwood cylinder Bolt
Glass supports 2)
GH 5053 GH 5055 Depth (mm)1 20 21 22 Z 0073 Z 0048 Section Section 14
2 23 24 Z 0073 Z 0048 Section Section 16
3 25 26 Z 0073 Z 0048 Section Section 18
4 27 28 Z 0073 Z 0048 Section Section 20
5 29 30 Z 0073 Z 0049 Section Section 226 31 32 Z 0073 Z 0049 GH 0082 Section 247 33 34 Z 0073 Z 0049 GH 0083 GH 0851 268 35 36 Z 0073 Z 0049 GH 0084 GH 0852 289 37 38 Z 0073 Z 0049 GH 0085 GH 0853 3010 39 40 41 Z 0073 Z 0049 GH 0886 GH 0854 3211 42 43 44 Z 0073 Z 0051 GH 0887 GH 0855 3512 45 46 47 Z 0073 Z 0051 GH 0888 GH 0856 3813 48 49 50 Z 0073 Z 0051 GH 0889 GH 0857 4114 51 52 53 Z 0073 Z 0051 GH 0890 GH 0858 4415 54 Z 0073 Z 0051 GH 0891 GH 0859 47
Classification of system components
Table 4 Inclined glazing | System 50 60 80 | Hardwood cylinders amp bolts
Glass support GH 5055
1) Accounting for a 10 mm inner seal
2) Cut from GH 5053 or GH 5055
TI-H_92_005dwg
Glass support GH 5053
Depth
Depth
S T A B A L U X
Stabalux H Processing notes 310718 55
Stabalux HProcessing notes
Fastenings
bull The fastenings for the Stabalux H system allow fill-ing elements to be easily secured
bull The clamping strips are connected to the wooden profile using Stabalux system screws Stainless steel 14301 DIN EN 10088 is the material used to produce screws for the Stabalux system
bull Depending on the type of screw fittings selected special 4 mm vulcanised EPDM washers are avail-able
bull Screws in suitable lengths are available for all com-mon glass thicknesses The screw length is deter-mined from a table
bull The distance for screw fittings is variable The max-imum distance is a = 250 mm
bull The distance from the edge for the first screw fit-ting should generally be in the region of 30 mm le a le 80 mm The placement of the glass supports and the choice of mullion-transom connection should also be taken into account
bull The clamp connection is exclusively exposed to tensile forces The clamping strips are connect-ed to the wooden profile using Stabalux system screws To determine the stress limit (maximum tensile force) and permitted tensile forces for the connection the conditions in the relevant gener-al building approval and the Eurocode 5 (DIN EN 1995-1) series of standards shall apply
bull Screw fittings are applied using a conventional electric screwdriver with depth stop This guaran-tees uniform application of pressure The depth setting should be chosen so that a sealing washer compression of 15 - 18 mm is achieved
bull An electric screwdriver with adjustable torque can be used as an alternative The required torque is approx 5 Nm The required torque is influenced by the relatively large scatter when dealing with wood and the variable influence of friction due to different drilling depths It is therefore advisable to determine the setting on a test piece and to check compression of the sealing washer
Screw fittings 128
Concealed screw fittings
bull Assembly is facilitated by selecting pre-drilled pres-sure strips (UL 5009-L UL 6009-L and UL 8009-L slot 7 x 10 mm a = 125 mm) with clippable upper strips The remaining pressure strips should be pro-vided with a round hold of d = 8 mm The func-tionality of the clip procedure can be checked after the first upper strip has been pushed against the pressure profile
Note
When using aluminium cover strips on roofs take account of the expansion factor as a result of the high degree of heat absorption when selecting the length to use In this case it is recommended that holes for screwing on the clamping strip are created with a diameter of d = 9 mm Equally the use of single-piece cover strips should be carefully considered
Visible screw fittings
bull Cover strips should be drilling with a round hole of d = 8 mm
Note
(see Note on covered screw fittings)
Visible recessed screw fittings
bull When creating visible recessed screw fittings a stepped bore is required The lower part of the cov-er strip should be drilled with a d = 7 mm diameter The upper part of the cover strip needs a d = 11 mm diameter for the screw head It is recommended to install a washer (PA washer eg Z 0033) with all screw fittings
S T A B A L U X
Stabalux H Processing notes 310718 56
Stabalux HProcessing notes
Fastenings
128
Screw fittings
Concealed screw fittings
Stabalux system screws with cylinder headd = 10 mm und 4 mm sealing gasket
eg Z 0331
Visible screw fittings
Stabalux system screws with cylinder headd = 10 mm und 4 mm sealing gasket
eg Z 0331
Visible recessed screw fittings
Stabalux system screws with cylinder head d = 10 mm with additional PA washer eg Z 731 with Z 33
eg Z 0331 eg Z 0731 with Z 0033
Attention
The calculation to determine screw lengths for the the calculation to determine screw lengths is
Glass thickness - 3 mm + inner seal (5 10 ie 12 mm) + 16 mm + e
e = statically required screw-in depth
Calculating the screw length for DL 5073 DL 6073
H_12_018dwg
H_12_019dwg
H_12_020dwg
S T A B A L U X
Stabalux H Processing notes 310718 57
Stabalux HProcessing notes
128
Calculating the screw length
System width 50 60 mm System width 80 mm 1)
H_12_021dwg
Screw fittings
1) Delivered upon request
Representation and item numbers are examples for System 60 System width 50 are analogous
S T A B A L U X
Stabalux H Processing notes 310718 58
Stabalux HProcessing notes
128
Wood screws for Stabalux H
Z0327 cylinder head screw 65 x 70 mm
Z0329 cylinder head screw 65 x 80 mm
Z0331 cylinder head screw 65 x 90 mm
Z0333 cylinder head screw 65 x 100 mm
Z0335 cylinder head screw 65 x 110 mm
Z0337 cylinder head screw 65 x 120 mm
Z0339 cylinder head screw 65 x 130 mm
Cylinder head screw empty 10 mm with hex socket | without sealing gasket
Z0727 cylinder head screw 65 x 70 mm
Z0729 cylinder head screw 65 x 80 mm
Z0731 cylinder head screw 65 x 90 mm
Z0733 cylinder head screw 65 x 100 mm
Z0735 cylinder head screw 65 x 110 mm
Z0737 cylinder head screw 65 x 120 mm
Z0033 PA washer empty 10 x 15 mm
Cylinder head screw empty 10 mm with hex socket | with sealing gasket
Screw fittings
H_12_019dwg
S T A B A L U X
Stabalux H Processing notes 310718 59
Stabalux HProcessing notes
Tips for laying the cover strip DL 5073 DL 6073
We assume that this cover strip will be used with glass panes that are supported on two sides and the recessed screw head is concealed In this case a cylinder head screw with inner hex is to be used eg Z 731 When cov-ering with a 2 mm cover plug Z 89 a bore depth of 7 mm is calculated
Depending on the precision of the bore it should be de-cided on case by case basis if any slight changes to this depth are necessary The cover plug Z 0089 does not need to be glued in place but may be levelled using lev-elling compound
Coating the cover strip
Profile production (aluminium extrusion moulding) with different mass distribution is extremely difficult Length-wise shadow formation may result Resulting actions are to be taken with the agreement of the coater
Flat cover strip DL 5073 DL 6073 129
glass support
eg GH 5053
+bolts and hardwood
cylinders
H_12_022dwg
Intersections
Due to the special shape of the strip (the material ex-tends into the rebate) there is no closed sealing section available at intersections We therefore recommend plac-ing particular attention to ensure tightness of the joints and fill will Stabalux connecting paste Z 0094
Glass supportsblocking
Special attention should be given to dimensional pro-portions To support the outer pane a sufficiently large glazing block must be installed that can carry the load to safely ensure the glass load is distributed effectively
DL 6073 Cover plug Z 0089GD 6174 Screw eg Z 0731
S T A B A L U X
Stabalux H Processing notes 310718 60
Stabalux HProcessing notes
Use of slab insulation
bull Using insulation blacks significantly reduces heat dissipation
bull The highly effective slab insulation has a perma-nently adhesive HOT-MELT
bull Depending on the situation where they are used insulation blocks can be directly applied to the cov-er strippressure profile or placed into the rebate over the screw fittings and pushed into position with the cover strippressure profile
1210
Slab insulation
Insulation block Width(Rebate)
Height
Z 0605 slab insulation 2042 20 mm 42 mm glass thickness from 44 mm
Z 0606 slab insulation 2026 20 mm 26 mm glass thickness from 28 mm
Z 0607 slab insulation 3042 30 mm 42 mm glass thickness from 44 mm
Z 0608 Insulation block 3026 30 mm 26 mm glass thickness from 28 mm
H_12_023dwg
Note
bull The use of slab insulation with cover strips DL 5073 DL 6073 should be tested for each individual sit-uation
bull 2-piece outer seals are always used with slab insu-lation blocks
bull With system width 80 mm and a 40 mm rebate 2 x 20 mm wide slab insulation blocks can be com-bined (40 mm wide insulation blocks available upon request)
bull for a glass inset of 15 mm outer seal GD 1932 bull for a glass inset of 20 mm outer seal GD 1932
Correctly position the seal flapwhen installing the insulation block
S T A B A L U X
Stabalux H Processing notes 310718 61
Stabalux HProcessing notes
1210
Slab insulation
Examples
H_12_023dwg
Z 0607Insulation block 3042
Z 0608Insulation block 3026
Z 0605Insulation block 2042
Z 0606Insulation block 2026
Z 0605Insulation block 2042
GD 1932
GD 1932
GD 1932
GD 1932
GD 1932
GD 1932
Z 0606Insulation block 2026
S T A B A L U X
Stabalux H Design 310718 62
Stabalux HDesign
Special design
Glass structures that partially refrain from using visible cover strips are considered special designs
These designs do not conform to the intended uses of the system No guarantees are made for eg quality of seals durability and structural stability Responsibility here lies entirely with the company implementing the design
Based on our experience we recommend paying close at-tention to the points made on the following pages during planning and implementation
131
Pane support variants
Mullion-transom structure 2-sided cover strip
H_13_001dwg
Mullion-transom structurewith transom cover strips 1)
1) Seals with 1 2 or 3 sections are possible
2) Use of mullion seals with 1 section in mullions and transoms
Section A-A Section C-C
Section B-B Section D-D
Mullion-transom structurewith mullion cover strips 2)
S T A B A L U X
Stabalux H Design 310718 63
Stabalux HDesign
131
Pane support variants
Transom structure mullion structure 2-sided cover strip
Vapour seal
When using this type of structure it is important to be aware that any loss of contact pressure can affect the room-side permeability There is an increased risk of con-densation build up in the rebate
vertical clamping strips
The glass supports should be placed to below the outer pane and sealed with it
horizontal clamping strips
Ventilation and condensation drainage is achieved via a recess in the lower sealing lip in the centre of the outer seal or at one third intervals
H_13_001dwg
Transom structure
Section A-A Section C-C
Section B-B Section D-D
Mullion structure
S T A B A L U X
Stabalux H Design 310718 64
Stabalux H
Requirements for special designs 1 Vapour seal
The room-side level of glazing must have the best possible vapour seal In this regard the vapour dif-fusion properties of the silicone sealant to be used should be tested Ensure that there are no permea-ble areas around concave cross joints
2 Rebate ventilation pressure equalisation and condensation drainage
Systems with partially sealed rebate represent a limitation to rebate ventilation Check on a case-by-case basis that no damage will be caused by standing condensation It is especially critical that designs with sealed vertical joints are evaluated To allow ventilation of the horizontal rebate we recom-mend installing a suitable vertical ventilation space Alternatively ventilation can be achieved using the outer joints
3 Weatherproofing
The outward facing seals must be watertight In cross joints it is especially important to ensure a firm join between the Stabalux profile seal and the silicone joints We recommend sealing up to the outer edge of the glass before mounting the cover stripsWe would like to once again emphasise that our profile seals will not make a permanent bond with commonly used silicone sealants A seal can only be created at contact points through permanent appli-cation of pressure
4 Mechanical strength screw fittings
Ensure screw fittings are sufficiently planned for Special attention should be given to the effects of wind suction and the reduced support
5 Glass weight distribution
Mechanical distribution of the weight of the glass panes through the structure must be ensured System glass supports can be used for existing horizontal transoms Designs using ldquoonlyrdquo mul-lions require special glass supports which carry the weight of the glass directly into the mullions
6 Glass sizing
Attention should be given to the reduced sup-port of panes when dimensioning the glass For example only the vertical or horizontal cov-er strips are effective in the event of wind suc-tion stresses or stress on the fall protection
7 Material compatibility
Compatibility of the silicone sealants with our profile sealants and the edge bonding of the glass must be ensured We recommend the exclusive use of tested silicone sealants from the whole-glass facades sec-tor Approval is usually given by the silicone manu-facturer
131
Pane support variants
H_13_001dwg
Design
S T A B A L U X
Stabalux H Design 310718 65
Stabalux H
System cross sections 132
Vertical glazing mullionsconcealed screw fittings
Vertical glazing transomsdivided outer seal for height compensation
Vertical glazing transoms visible recessed screw fittings
Vertical glazing mullionsvisible screw fittings
Vertical glazing transoms concealed screw fittingsStainless steel bottom strip fire seals
Vertical glazing transoms visible screw fittingsStainless steel cover stripfire seals
Inclined glazing mullionsconcealed screw fittings
Inclined glazing transomsvisible screw fittings
1
2
3
4
5
6
7
8
1 2
3 4
5 6
7 8
Examples
H_13_002dwg
Design
S T A B A L U X
Stabalux H Design 310718 66
Stabalux H
Creating facade corners
At exposed areas such as glass facade corners it is par-ticularly important to ensure sufficient heat insulation in order to avoid the creation of thermal bridges and pre-vent a build-up of condensation Thermal current calcula-tions provide information about the actual heat loss
133
System details
Special seal allow a polygon shaped arrangement of the facade mullions For convex glass surfaces an angle be-tween 3deg and 15deg can be freely chosen For concave glass surfaces the angle can vary between 3deg and 10deg
Facade polygon
Outer corner Inner corner
Geometrically check the feasibility Recommendation Use for system 60 and above
H_13_003dwg
H_13_004dwg
H_13_005dwg
Design
Calculation of screw length withconsideration of the angle
ATTENTIONAdhere to the minimum glass inset
S T A B A L U X
Stabalux H Design 310718 67
Stabalux H
133
System details
Eaves with glass roof connection
bull Depending on the construction of the transoms a design with or without rain gutters and the choice of stepped glazing or closable cover strips gives us different variants for implementation
bull All options require condensation and moisture to be drained away at the eaves
Design with stepped glazing
bull With a stepped glazing design it is important to se-lect a UV-resistant edge bonding for the glass This edge bonding systems usually silicone-based are quite permeable to gases and are therefore unable to achieve the required high values for sound and heat insulation of conventional systems and require additional sealing around the edges
Example 1
Design with stepped glazing
H_13_006dwg
Design
bull Our thermal calculations show that stepped glass panes compared to covered glass edges have a much less favourable isothermal movement
bull Stepped glass panes must also be statically meas-ured according to their reduced hold against wind suction
bull The additional thermal loads that occur in stepped glass panes should countered by the use of pre-ten-sioned glass (TVG ESG) for the outer panes
bull Stepped glass panes should be preferred for flatter inclined roofs as water can drain away at the eaves unhindered
S T A B A L U X
Stabalux H Design 310718 68
Stabalux HDesign
133
Eaves with glass roof connection Design using cover strips
bull Horizontal pressure strips prevent the free run off of rain water and dirt
bull Cover strips with angled edges reduce the build up of water in front of the cover strip
bull The outer sealing level on glass roofs must also be thoroughly sealed
bull In combination with our butyl clad stainless steel panels glazing with pressure strips on 4 sides achieves a higher level of safety
bull Make sure that the inner sealing section provides guaranteed drainage for condensation
bull To improve drainage and heat-induced expansion cover strips should be shortened by 5 mm at tran-som joints Gasket joints however are to be laid flat with a slight excess in dimensions Open ends of the transom cover strips must be sealed
Note
Due to the increased thermal stresses in the roof we rec-ommend using concealed screw fitting when choosing clamping strips for larger system lengths and in rafters Unused holes in the pressure profile must be sealed
Example 2
Design using cover strips
System details
H_13_007dwg
S T A B A L U X
Stabalux H Design 310718 69
Stabalux HDesign
133
Eaves with glass roof connection Design with gutter
bull The gutter must be able to take its own weight and mounted in such a way that stresses from its own weight water and ice will not lead to deformations and directly apply a load to the glazing
bull Overflowing water must not be able to get inside the structure Alongside the gutter-shaped outer rafter seal the moisture barrier installed over the guide plate also acts to drain away condensation
Example 3
Design with gutter
System details
H_13_008dwg
S T A B A L U X
Stabalux H Design 310718 70
Stabalux H
H_13_009dwg
Design
133
Roof ridge design
bull When designing the ridge cap ensure that the raft-er cover strips are pulled under the ridge cap
System details
S T A B A L U X
Stabalux H Design 310718 71
Stabalux HDesign
134
Structural attachments
Structural attachment film baffles
bull Attachment of glazing to the building structure re-quires a well thought out approach
bull Moisture damage can occur if moisture condenses at any thermal bridges
bull Thermal bridges must be avoided and warm air from the inside spaces must not penetrate too deeply into the structure
bull The required moisture barriers must be installed as deeply as possible into the inner space using impermeable structural film baffles This prevents moisture penetration into the structure via conden-sation from the air inside
bull An additional foil to seal against rainwater must be permeable to moisture Only if this foil has a wa-ter vapour diffusion resistance value μ of max μ = 3000 can a dry structure be guaranteed in the transition zones
S T A B A L U X
Stabalux H Design 310718 72
Stabalux HDesign
134
Structural attachments
Facade base
bull Controlled drainage of the rebate space can only be ensured if the sealing sections overlap in such a way that no moisture can get under the seals and foils
bull Run foils under the transom seal to act as a mois-ture barrier and glue to the wooden structure In accordance with DIN 18195 the seal should be run at least 150 mm above the water-guiding layer
bull Attach foil with moisture barrier in accordance with the requirements of DIN 18195
Example 1
Mounting intermediate mullion to base plate
Drainage of the base area is achieved via the seal flap towards the outside In this case the seal flap around the mullion at the base should not be released For edge mullions ensure there is a corresponding seal placed (continuous transom seal up the to the end point) and a constructive design of the drainage section
H_13_010dwg
S T A B A L U X
Stabalux H Design 310718 73
Stabalux HDesign
134
Facade base
bull Rebate space ventilation is achieved via the open end of the vertical cover strips
bull Ensure the connection is impermeable to vapourbull Mullion mountings must be sufficiently statically
dimensioned Required axis and edge distances for anchoring the base plates and in the building struc-ture must be observed
Example 2
Mounting intermediate mullion to base plate
Where seal flaps are interrupted by joints filler rods in the joint must also be cut
Structural attachments
H_13_011dwg
S T A B A L U X
Stabalux H Design 310718 74
Stabalux HDesign
134
Structural attachments
Facade base
bull Heat insulation around the structural connection should be designed in such as way as to prevent cold bridges forming
bull Steel parts should also be provided with sufficient protection against corrosion even in concealed ar-eas
bull Weather-protection sheets should be used depend-ing on the requirements of the construction Suffi-cient rear ventilation must be ensured
Example 3
Attaching intermediate mullions at base plates
H_13_012dwg
S T A B A L U X
Stabalux H Design 310718 75
Stabalux HDesign
134
Structural attachments
Connection before intermediate floors
bull Depending on requirements mullions are designed as continuous multi-span transoms or separated at each floor
bull Reasons for separating mullions can include eg building settlement fire protection sound insula-tion etc
bull If the separation joint is intended to absorb expan-sion then as well as the required degree of freedom for mullions the ability for movement of integrated elements must also be ensured
bull The constructive design of the mullion joint and mounting should be chosen according to the stat-ically calculated base system and determines the
Example
Mullions separated at each floor
In this example distribution of horizontal and vertical loads is achieved at each floor through the existing floor structure
H_13_013dwg
choice and arrangement of fixed and movable bear-ings type of screw fittings structural connection parts and attachment to the concrete floor
bull With continuous mullions and a corresponding mount the multi-span support principle is in effect Sagging due to horizontal effects is lower The re-quired moment of inertia reduces for 2-span sup-ports with the same span length compared to the 1-span support by a factor of 0415 However a ten-sion and stability analysis should be carried out
S T A B A L U X
Stabalux H Design 310718 76
Stabalux HDesign
134
Ceiling connection
bull Structural connections should take account of any movement that may occur
bull As well as temperature induced expansion in the facade all longitudinal expansions and movements of the affected components must be considered
bull Additional stresses from restraints must be avoid-ed
Structural attachments
H_13_014dwg
S T A B A L U X
Stabalux H Design 310718 77
Stabalux HDesign
134
Structural attachments
Facade connection to parapets
H_13_015dwg
S T A B A L U X
Stabalux H Design 310718 78
Stabalux HDesign
134
Structural attachments
Connection to structural eaves
bull This connection is suitable for glass roofs that are being installed as skylights in the structure These may be gabled roofs single pitch roofs pyramids or arched roofs
H_13_016dwg
S T A B A L U X
Stabalux H Design 310718 79
Stabalux HDesign
134
Structural attachments
Ridge connection to walls
bull When making ridge connections to walls permea-bility to moisture is particularly important Warm air with a high level of moisture gets into cooler zones of the inner sealing section where the design is not sufficiently sealed and can cause structural dam-age from penetrating into the connecting structure
bull Joint seals made from butyl-clad stainless steel plates (Z 0501 Z 0601) must be installed on the outside of joint areas
H_13_017dwg
S T A B A L U X
Stabalux H Design 310718 80
Stabalux HDesign
134
Structural attachments
Horizontal wall connection to heat insulation bonding system
H_13_018dwg
S T A B A L U X
Stabalux H Design 310718 81
Stabalux HDesign
135
Installing windows and doors
Mullion and transom facades and glass roofs from Stabalux are neutral with regards to the selection of in-sert elements All commonly available window and door systems made from steel aluminium wood or plastic can be used Frame profiles from the window and door man-ufacturerrsquos should be selected to match the chosen glass thickness If no profiles with a suitable insert rebate are available mountings may be used as shown in the fol-lowing examples Like with glass elements windows are set into the facade on glass supports padded and then secured against slippage
Insert window transom sectionSystem HUECK Series Lambda WS 075 IS
Insert window mullion sectionSystem HUECK Series Lambda WS 075 IS
H_13_019dwg
S T A B A L U X
Stabalux H Design 310718 82
Stabalux HDesign
135
Installing windows and doors
H_13_020dwg
Insert window transom sectionSystem HUECKSeries Lambda WS 075
Insert window mullion sectionSystem HUECKSeries Lambda WS 075
S T A B A L U X
Stabalux H Design 310718 83
Stabalux HDesign
135
Installing windows and doors
H_13_021dwg
Insert door outward transom sectionSystem HUECKSeries Lambda DS 075
Insert door outward transom sectionSystem HUECKSeries Lambda DS 075
Insert window mullion sectionSystem HUECKSeries Lambda WS 075
S T A B A L U X
Stabalux H Design 310718 84
Stabalux HDesign
135
Installing windows and doors
H_13_022dwg
Insert door inward in the transom sectionSystem HUECKSeries Lambda DS 075
Insert door inward in the transom sectionSystem HUECKSeries Lambda DS 075
S T A B A L U X
Stabalux H Design 310718 85
Stabalux HDesign
135
Installing windows and doors
H_13_023dwg
Insert door inward in the transom sectionSystem HUECKSeries Lambda DS 075
Insert-top-hung window mullion section System HUECKSeries Lambda 110
Insert-top-hung window transom section System HUECKSeries Lambda 110
S T A B A L U X
Stabalux H Design 310718 86
Stabalux HDesign
135
Installing windows and doors
H_13_024dwg
Sliding system mullion section System HUECKSeries Volato M
Sliding system transom sectionSystem HUECKSerie sVolato M
S T A B A L U X
Stabalux H Design 310718 87
Stabalux HDesign
135
Installing windows and doors
H_13_025dwg
Flush roof surface windowSystem HUECK-HARTMANNSeries 85E
Powered according tosystem specifications
S T A B A L U X
Stabalux H Design 310718 88
Stabalux HDesign
135
Installing windows and doors
H_13_027dwg
Insert window - transom sections wood windows
Insert window - mullion sectionwood windows
- Stabalux H
-
- System
-
- System properties
- System cross sections and inner seals - facade
- System cross sections and inner seals - roof
- Cover strips and outer seals
-
- Processing notes
-
- Material information
- Profile design
- Mullion-transom joint
- Tips for laying seals
- Seals - Facade
- Seals - roof
- Glass inset and glass support
- Screw fittings
- Flat cover strip DL 5073 DL 6073
- Slab insulation
-
- Design
-
- Pane support variants
- System cross sections
- System details
- Structural attachments
- Installing windows and doors
-
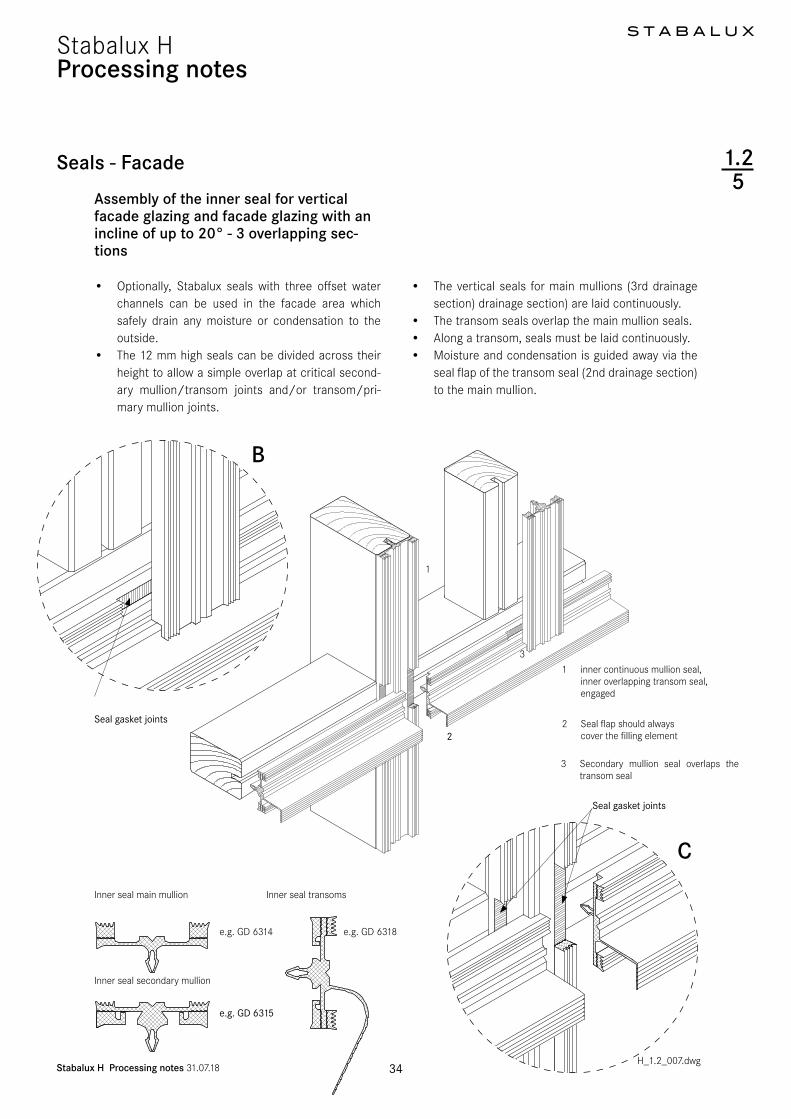
S T A B A L U X
Stabalux H Processing notes 310718 37
Stabalux HProcessing notes
125
Seals - Facade
Assembly of the outer seal for vertical glass facades
bull As well as gently clamping the glass in place the outer sealing system has the primary task of pro-tecting the rebate against moisture ingress
bull The outer sealing sections must be completely sealed except for the necessary openings for pres-sure equalisation and condensation dissipation
bull The outer mullion seals are laid continuously and the transom seals are joined
bull Sealant joints are to be laid flat with a slight excess in dimensions Exact specifications depends on the situation in which the system is used
bull Tightly fitted sealant joints can be implemented without fixing the outer seal of the mullion-transom joint in vertical facades
outer continuous mullion sealouter jointed transom seal
eg GD 6054 outer transom seal with different heights of sealing lip
H_12_009dwg
H_12_010dwg
Rod length ℓ
(mm)
Temperature difference
∆T
Longitudinal expansion
∆ℓ (mm)1000 40degC 13000 40degC 31000 60degC 153000 60degC 451000 100degC 253000 100degC 75
Expansion of aluminium profiles
When using the RHT connector take care when fitting screws to ensure that the screws are placed away from the mullion-transom connec-tion
bull The flag for the inner transom joint in combination with the outer seal creates additional safety
bull The seal flap should be separate at its perforations to match the thickness of the glass in order that this is clamped down and concealed under the out-er seal
bull Different heights of sealing lips on the outer seal bridge the height different created by the seal flap in the outer sealing section
bull When mounting the clamping strips be aware of aluminium profile expansion (see section 121 - Material information)
S T A B A L U X
Stabalux H Processing notes 310718 38
Stabalux HProcessing notes
125
Seals - Facade
Assembly of the outer seal for facade glaz-ing with an inwards inclineup to 20deg
bull If the facade is inclined inwards from the vertical (max permitted incline 20deg) the open ends of the outer transom seals must be closed up using Butyl
bull When constructing inwardly inclined facades (up to max 20deg) if flat cover strips are used in the tran-soms (eg DL 5059 DL 6059 DL 5061 DL 6061 DL 5067 DL 6067 DL 5071 DL 6071 DL 6043 DL 6044) and flat pressure and cover profiles (eg UL 6005 with OL 6066) then the central hollows at each end must be sealed with silicone
H_12_009dwg
When using flat cover strips on in-wardly inclined facades (up to max 20deg) the central hollow at each end should be sealed with silicone
Seal open ends of the transom seals with Butyl on inwardly inclined facades (up to max 20deg)
Trim the seal to be slightly larger than required
S T A B A L U X
Stabalux H Processing notes 310718 39
Stabalux HProcessing notes
126
Seals - roof
Assemble the inner seal for roof glazing
bull Optionally Stabalux seals with offset water chan-nels can be used in the facade area which safely drain any moisture or condensation to the outside
bull The 10 mm high seals can be divided across their height to allow a simple overlap at critical transom joints
bull The transom seals are geometrically shaped so as to create a condensation channel
bull This channel drains from the overlapping transom joint in the rafters
remove the lower perforated part and the clamping foot on the transom seal of the at around 15 mm
remove the upper perforated part on the rafter seals
length of transom seal = transom length + asymp 13 mm per side
Gasket joints
1
2
3
H_12_011dwg
H_12_012dwg
bull Along a transom seals must be laid continuouslybull All joints must be sealed Before laying transom
seals we recommend completely coating the sup-port surfaces and edges Absolutely no unevenness in the glass support surface must occur from apply-ing sealant too thickly
1
23
S T A B A L U X
Stabalux H Processing notes 310718 40
Stabalux HProcessing notes
Assembly of the outer seal for for glazed roofing
bull These are laid in fundamentally the same way as for vertical glazing Split seals such as GD 1932 are not suitable for transom seals in roofs Split seals can only be installed in mullions in combination with slab insulation Each installation situation will differ to some degree and always check how well sealed it is
bull For cross joints we recommend using our self-ad-hesive stainless steel sealing plates with butyl coat-ing Z 0601 for System 60 and Z 0501 for System 50 The stainless steel sealing plates are 35 mm wide and are attached to the edge of the glass panes parallel to the mullion axis
bull Butyl tape is not suitable as a sealing tape between the glass and the outer seal
bull The outer mullion seals are laid continuously and the transom seals are joined
126
Detail of sealing plate Z 0501 = 35 x 40 mm
Z 0601 = 35 x 50 mm
Attention The sealing plates must be placed central to the transom axis
For glass insets of 15 mm the first screw fittings for the transom cover strip begin 30 mm from the end of the cover strip
Seals - roof
H_12_013dwg
H_12_014dwg
bull Sealant joints are to be laid flat with a slight excess in dimensions Exact specifications depends on the situation in which the system is used
Notebull Horizontal clamping strips prevent the free run off
of rain water and dirtbull Cover strips and upper strips with angled edges re-
duce the build up of water in front of the clamping strip
bull Shorten the clamping strips on the transoms by 5 mm in the area of the transom joins in order to im-prove drainage of water Gasket joints however are to be laid flat with a slight excess in dimensions Open ends of transom clamping strips (upper and cover strips) should be sealed
S T A B A L U X
Stabalux H Processing notes 310718 41
Stabalux HProcessing notes
Assembly of the outer seal for for inclined glazed roofing ge 2deg
bull These are laid in fundamentally the same way as for vertical glazing Split seals around the mullions in roofs such as GD 1932 are only suitable when using in combination with slab insulation Each installa-tion situation will differ to some degree and always check how well sealed it is
bull To ensure free run-off of rain water and dirt on roofs inclined ge 2deg we recommend not using clamping strips in the transoms
bull Instead the rebate spaces should be sealed with all-weather silicone
bull Implementation of the outer sealing section around mullions is done in the same way as conventional roofs with an inclination up to 15deg
126
Seals - roof
H_12_013dwg
Tips for all roof designs
When using aluminium cover strips on roofs take account of the expansion factor as a result of the high degree of heat absorption when selecting the length to use Equal-ly the use of single-piece cover strips should be carefully considered In this case it is recommended that holes for screwing on the cover strip are created with a diameter of d = 9 mm (refer to Section 121 - Material information)
bull At the high point or ridge area of the inclined glaz-ing it is recommended to also install and outer seal-ing section in the transoms with clamping strips
bull Only certified sealing materials may be used for sealing the transom rebate space
bull Pay attention to all information provided by the manufacturer and the sealing work must be carried out by trained persons It is recommended that a licensed and certified specialist contractor is hired for this purpose We further refer you to the DIN 52460 standard and IVD data sheets (Trade Asso-ciation for Sealants)
For wide spans we recommend using concealed screw fittings when selecting the clamping strips (lower + up-per strip) This is the preferred option for rafters Unused holes in the pressure profile must be sealedSome roof areas such as the eaves see the use of sev-eral different materials (glass silicone aluminium sheets ) each with different expansion coefficients To avoid the formation of cracks aluminium sheets should be in-stalled with expansion joints
S T A B A L U X
Stabalux H Processing notes 310718 42
Stabalux HProcessing notes
Assembly of the outer seal for for inclined glazed roofing ge 2deg
bull The compatibility of the materials is particularly important when using all-weather silicone In this case the compatibility of the sealant with the edge bonding of the glass and the backfill of the joints If self-cleaning glass is used the compatibility must be established in advance
bull Glass sealants and edge bonding must be UV-re-sistant The incline of roofs should also be taken into account Information about UV-resistance can be requested from the manufacturer Silicone edge bonding generally provides better UV-resistance than polysulfide-based materials The advantage lies in its high vapour sealing properties which is particularly useful when using more volatile argon fillings
126
Seals - roof
H_12_013dwg
1 Hold-down clamp
2 Silicone washer
3 Silicone sealant seal around the
clamp
4 All weather silicone seal
Transom inclined glazing ge 2deg inclination with all-weather silicone and slab insulation
12
3
6
89
7
Transom inclined glazing ge 2deg inclination with all-weather silicone and round sec-tion rope seal
12
3
6
89
7
bull Highly elastic weatherproof and UV-resistant seals meet the widest range of demands for reliable joints
bull If the silicone joint is created without additional mechanical safety devices ensure that the glass is supported from two sides only Selective installa-tion of holding clamps can be used to achieve all round support for glass edges
bull The clamps are made from stainless steal with silicone washers and are screwed in the same as pressure strips The hold-down clamp should be ad-ditionally sealed around the perimeter with silicone sealant The design is based upon the dimensions of the glass as documented in the glass static anal-ysis
51 Round section rope seal
52 Slab insulation
6 Glass filling element
7 Inner seal 10 mm transom
8 timber profile
9 System screw fittings
4
51
4
52
S T A B A L U X
Stabalux H Processing notes 310718 43
Stabalux HProcessing notes
Assembly of the outer seal for for inclined glazed roofing ge 2deg
bull The joint width and the joint height for Stabalux System H are defined as w x h = 20 mm x 10 mm These measurements should always checked when selecting the sealing material and adapted if neces-sary Generally w h = 2 1 - 35 1
bull PE round section seals or Stabalux slab insulation is suitable as a back fill material
bull Silicone sealant should be applied before laying the mullion seals and cover strips
bull After the specified setting time the seals and screw fittings can be installed in the areas around mullions
126
Seals - roof
Rafters with clamping strips
Transom with clampAll weather silicone seal
and round section rope seal
Transom with clampAll weather silicone seal
and slab insulation
Transom with all-weather silicone and round section rope
seal
Joint design according to manufacturers specificationsgenerally w h = 2 1 - 35 1
bull The mullion-transom joints around the clamps are then sealed
bull Before applying this second layer the joints around transoms must have completely set
S T A B A L U X
Stabalux H Processing notes 310718 44
Stabalux HProcessing notes
Steps for implementing the seal with silicone
bull Test silicone sealant and glass edge bondings and other contact surfaces (eg panels) for suitability
bull Clean edge bonding adhesive impurities from the surfaces to which sealant will be applied following manufacturerrsquos directions
bull Fill the joints as per the joint dimensions using only non-water absorbent closed-cell PE profiles (no damage to the edge bonding)
bull The remaining space in the glass rebate must be large enough that the pressure is able to equalise and a drainage level is available
bull Clean any impurities from the surfaces to which the sealing material is to be applied and any adjacent surfaces according to manufacturerrsquos directions
126
Seals - roof
System screw fittings
Hold-down clamp
Washer made from silicone
Silicone sealant seal
around the clamp
All weather silicone seal
Silicone sealant
Rafter
Transom
bull Be particularly aware of any adjacent metal com-ponents Prime according to manufacturerrsquos direc-tions
bull Seal joints without leaving any cavities or bubbles Mask any adjacent components in advance where necessary
bull Smooth out the filled joints using the manufactur-errsquos smoothing agents and conventional tools with as little water as possible Remove adhesive tape
bull If two or more reactive sealants are used in com-bination the first must completely set before the second is applied
S T A B A L U X
Stabalux H Processing notes 310718 45
Stabalux HProcessing notes
Glass inset
bull Glass industry guidelines must be observedbull The glass inset is generally 15 mmbull An increase to 20 mm has a beneficial effect on the
heat transfer coefficient Uf of the frame structure bull Special conditions such as fire protection glass
must be adhered to the terms are stated in the general building approval
Glass inset and glass support 127
RebateGlass inset
H_12_015dwg
S T A B A L U X
Stabalux H Processing notes 310718 46
Stabalux HProcessing notes
Glass support types and choosing the glass support
The Stabalux H system uses three different types and techniques for attaching glass supports
bull Glass support GH 5053 and GH 5055 with hanger bolts
bull Glass support GH 5053 and GH 5055 with hard-wood cylinders and bolts
bull Crossing point reinforcement RHT with cylinder head screws empty 65 mm Crossing point reinforce-ment are used exclusively on fire-protection glaz-ing The precise details are stated in the general building approval
The glass supports used are determined by the type of wood glass construction and glass weight (see section 9) A rigid mullion-transom connection is required ie no twisting of the transom may occur at the connection that would cause further sinking of the glass support
Glass inset and glass support 127
Mounting the glass supports
bull Positioning the glass supports and glazing accord-ing to glass industry guidelines and guidelines of the Institute for Window Technology
bull The weight of the glass panes is distributed via the glass supports attached to the transoms
bull Glass supports should be attached at a distance of 100 mm from the end of the transom When doing so avoid a collision with the cover strip screw fit-tings at the end of the transom
Glazing blocks
bull Glazing blocks must be compatible with the edge bonding of the insulated glass panes
bull They should be stable under constant pressure and be able to withstand loads aging and temperature changes
bull It is important that the blocks ensure circumferen-tial pressure equalisation and that drainage of con-densation is not obstructed as well as allowing the glass edges to be offset and small design toleranc-es to be accommodated
bull If the length of the glass support is more than 100 mm blocks should be placed along the entire length of the glass support to ensure equal load distribution
H_12_016dwg
Positioning the glass support approx 100 mm from the end of the transom
S T A B A L U X
Stabalux H Processing notes 310718 47
Stabalux HProcessing notes
127
Glass inset and glass support
Glass support GH 5053 Attachment with hanger bolts
A-A
Glass support GH 5053 with hanger bolts
bull The certified system components consist of the glass support GH 5053 and 2 hanger bolts empty 10 mm with a 45 mm wood thread and a shaft of a different length
bull The hanger bolts are screwed directly into the tim-ber at intervals of 80 mm A empty 7 mm hole needs to be pre-drilled for this purpose
bull Screw fittings should be vertical to the transom axis
bull The depth for hanger bolts is at least 45 mm meas-ured from the front edge of the timber
H_12_016dwg
H_12_017dwg
Glass support GH 5053
Block
Block
glass support
Inner seal
Hanger bolt
Minimum screw depth from measured from front edge of timber
Hanger bolts empty 10 mmpre-drilled at empty 7 mm
bull For glass support GH 5053 the required depths are delivered corresponding to the thickness of the glass and placed onto the hanger bolts
bull Blocks must be placed under the glass panes along the entire length of the glass supports
bull Details of the approved pane weights geometries and classification of system components are pro-vided in section 9
S T A B A L U X
Stabalux H Processing notes 310718 48
Stabalux HProcessing notes
127
Glass inset and glass support
Glass support GH 5055 with hanger bolts
bull Based on the test results for the system compo-nent GH 5053 a load bearing model was designed and the suitability of the GH 5055 glass support calculated
bull Installation is done the same way as GH 5053 but using three screws spaced 80 mm apart
bull Details of the approved pane weights geometries and classification of system components are pro-vided in section 9
Glass support GH 5055 Attachment with hanger bolts
A-A
H_12_016dwg
H_12_017dwg
Glass support GH 5055
Block Hanger bolts empty 10 mmpre-drilled at empty 7 mm
Block
glass support
Inner seal
Hanger bolt
Minimum screw depth from measured from front edge of timber
S T A B A L U X
Stabalux H Processing notes 310718 49
Stabalux HProcessing notes
127
Glass inset and glass support
Row
Total glass thickness tGlass (mm)
for vertical glazing
Hanger bolts 2) Glass supports 1)
Inner seal height GH 5053 GH 5055 Depth (mm)
5 mm 10 mm 12 mm1 4 5 6 7 Z 0371 3) Z 0371 4) Z 0371 5) GH 0081 Section 9
2 8 9 Z 0371 3) Z 0371 4) Z 0371 5) Section Section 12
3 10 11 Z 0371 3) Z 0371 4) Z 0371 5) Section Section 144 12 13 Z 0371 3) Z 0371 4) Z 0371 5) Section Section 165 14 15 Z 0371 3) Z 0371 4) Z 0371 Section Section 186 16 17 Z 0371 3) Z 0371 Z 0371 Section Section 207 18 19 20 Z 0371 Z 0371 Z 0371 GH 0082 Section 228 22 23 Z 0371 Z 0371 Z 0372 GH 0083 GH 0851 269 24 25 Z 0371 Z 0372 Z 0372 GH 0084 GH 0852 2810 26 27 Z 0371 Z 0372 Z 0372 GH 0085 GH 0853 3011 28 29 30 Z 0372 Z 0372 Z 0372 GH 0886 GH 0854 3212 31 32 33 Z 0372 Z 0372 Z 0372 GH 0887 GH 0855 3513 34 35 36 Z 0372 Z 0372 Z 0373 GH 0888 GH 0856 3814 37 38 39 Z 0372 Z 0373 Z 0373 GH 0889 GH 0857 4115 40 41 42 Z 0372 Z 0373 Z 0373 GH 0890 GH 0858 4416 43 44 45 Z 0373 Z 0373 Z 0373 GH 0891 GH 0859 4717 46 47 48 Z 0373 Z 0373 Z 0373 GH 0892 GH 0860 5018 49 50 51 Z 0373 Z 0373 Z 0373 GH 0893 GH 0861 5319 52 53 54 Z 0373 Z 0373 - GH 0894 GH 0862 5620 55 56 57 Z 0373 - - Section Section 5921 58 59 60 Z 0373 - - Section Section 6222 61 62 63 Z 0373 - - Section Section 6523 64 Z 0373 - - Section Section 68
Item Total length (mm)
Shaft length (mm)
Thread length (mm)
Z 0371 70 25 45Z 0372 77 32 45
Z 0373 90 45 45
Classification of system components
Table 1 Vertical glazing | System 50 60 80 | Hanger bolts
Hanger bolts
1) Cut from GH 5053 or GH 5055
2) Generally The screw-in depth (ET) for hanger bolts = 45 mm thread length (GL) measured from the front edge of
the timber
For glasses tGlas lt 20 mm observe the permissible visible shaft length from the front edge of the wood
If necessary adjust the visible shaft length over the screw-in depth
3) Permissible visible shaft length from the front edge of the wood = glass thickness tGlas (mm) + 3 mm
4) Permissible visible shaft length from the front edge of the wood = glass thickness tGlas (mm) + 7 mm
5) Permissible visible shaft length from the front edge of the wood = glass thickness tGlas (mm) + 9 mm
TI-H_92_003dwg
Total length
Thread lengthShaft length
S T A B A L U X
Stabalux H Processing notes 310718 50
Stabalux HProcessing notes
127
Glass inset and glass support
RowTotal glass thickness tGlass (mm)
for inclined glazing 1) Hanger bolts 2)Glass supports 3)
GH 5053 GH 5055 Depth (mm)1 16 17 18 Z 0371 GH 0081 Section 92 19 20 Z 0371 Section Section 123 21 22 Z 0372 Section Section 144 23 24 Z 0372 Section Section 165 25 26 Z 0372 Section Section 186 27 28 Z 0372 Section Section 207 29 30 Z 0372 Section Section 228 31 32 Z 0372 GH 0082 Section 249 33 34 Z 0372 GH 0083 GH 0851 2610 35 36 Z 0373 GH 0084 GH 0852 2811 37 38 Z 0373 GH 0085 GH 0853 3012 39 40 41 Z 0373 GH 0886 GH 0854 3213 42 43 44 Z 0373 GH 0887 GH 0855 3514 45 46 47 Z 0373 GH 0888 GH 0856 3815 48 49 50 Z 0373 GH 0889 GH 0857 4116 51 52 53 Z 0373 GH 0890 GH 0858 4417 54 Z 0373 GH 0891 GH 0859 47
Classification of system components
Table 2 Inclined glazing | System 50 60 80 | Hanger bolts
Glass support GH 5053
Glass support GH 5055
1) Accounting for a 10 mm inner seal
2) The depth for hanger bolts = 45 mm thread length measured from the front edge of the timber
3) Cut from GH 5053 or GH 5055
TI-H_92_005dwg
Depth
Depth
S T A B A L U X
Stabalux H Processing notes 310718 51
Stabalux HProcessing notes
127
Glass inset and glass support
Glass support GH 5053 Attachment with bolts and hardwood cylinders
Glass support GH 5053 and GH 5055 with pins and hardwood cylinders
bull Certified system components consist of glass sup-port GH 5053 and GH 5055 with pins and hard-wood cylinders
bull Depending on the width of supports 2 or 3 bolts with a diameter of 10 mm are needed
bull The bolt length should be adapted to the thickness of the glass
bull To anchor the bolts in place 50 mm wooden cylin-ders with a outer diameter of 30 mm and an axial core of empty 10 mm are solidly glued into the timber
H_12_016dwg
H_12_017dwg
A-A
bull Additionally holes with a depth of 50 mm and empty of 30 mm are to be drilled into the transom profile ver-tical to the transom axis with 80 mm spacing
bull The glue or adhesive used must be suitable and must not swell
bull The bolts should be hammered in along the entire cylinder depth of 50 mm
bull For glass supports GH 5053 and GH 5055 the re-quired depths are delivered corresponding to the thickness of the glass and placed onto the hanger bolts
Glass support GH 5053
Bolt empty 10 mmHardwoodcylinder Hardwood
cylinder
Block
Block
glass support
Inner seal
Bolt
Hardwood cylinderInner diameter 10 mmOuter diameter 30 mmfirmly gluedto the transom profile
Hardwood cylinder not grooved removed the sealing base around the cylinder
S T A B A L U X
Stabalux H Processing notes 310718 52
Stabalux HProcessing notes
127
Glass inset and glass support
Glass support GH 5055 Attachment with bolts and hardwood cylinders
Glass support GH 5053 and GH 5055 with pins and hardwood cylinders
bull The central groove in the Stabalux H System must not be milled into the wooden cylinder
bull When fitting the seals the sealing base must there-fore be removed around the cylinder
bull Blocks must be placed under the glass panes along the entire length of the glass supports
bull Details of the approved pane weights geometries and classification of system components are pro-vided in section 9
H_12_016dwg
H_12_017dwg
A-ABolt empty 10 mmHardwood
cylinder Hardwoodcylinder
Block
glass support
Block
Inner seal
Bolt
Hardwood cylinderInner diameter 10 mmOuter diameter 30 mmfirmly gluedto the transom profile
Hardwood cylinder not grooved removed the sealing base around the cylinder
Glass support GH 5055
S T A B A L U X
Stabalux H Processing notes 310718 53
Stabalux HProcessing notes
127
Glass inset and glass support
Row
Total glass thickness tGlass (mm)
for vertical glazing
Hardwood cylinder
Bolt Glass supports 1)
Inner seal heightGH 5053 GH 5055 Depth (mm)
5 mm 10 mm 12 mm1 8 9 Z 0073 - - Z 0047 Section Section 12
2 10 11 Z 0073 - Z 0047 Z 0047 Section Section 14
3 12 13 Z 0073 - Z 0047 Z 0047 Section Section 164 14 15 Z 0073 Z 0047 Z 0047 Z 0047 Section Section 185 16 17 Z 0073 Z 0047 Z 0047 Z 0048 Section Section 206 18 19 Z 0073 Z 0047 Z 0048 Z 0048 Section Section 227 20 21 Z 0073 Z 0047 Z 0048 Z 0048 GH 0082 Section 248 22 23 Z 0073 Z 0047 Z 0048 Z 0048 GH 0083 GH 0851 269 24 25 Z 0073 Z 0048 Z 0048 Z 0048 GH 0084 GH 0852 2810 26 27 Z 0073 Z 0048 Z 0048 Z 0048 GH 0085 GH 0853 3011 28 29 30 Z 0073 Z 0048 Z 0048 Z 0049 GH 0886 GH 0854 3212 31 32 33 Z 0073 Z 0048 Z 0049 Z 0049 GH 0887 GH 0855 3513 34 35 36 Z 0073 Z 0048 Z 0049 Z 0049 GH 0888 GH 0856 3814 37 38 39 Z 0073 Z 0049 Z 0049 Z 0049 GH 0889 GH 0857 4115 40 41 42 Z 0073 Z 0049 Z 0049 Z 0051 GH 0890 GH 0858 4416 43 44 45 Z 0073 Z 0049 Z 0051 Z 0051 GH 0891 GH 0859 4717 46 47 48 Z 0073 Z 0049 Z 0051 Z 0051 GH 0892 GH 0860 5018 49 50 51 Z 0073 Z 0051 Z 0051 Z 0051 GH 0893 GH 0861 5319 52 53 54 Z 0073 Z 0051 Z 0051 - GH 0894 GH 0862 5620 55 56 57 Z 0073 Z 0051 - - Section Section 5921 58 59 60 Z 0073 Z 0051 - - Section Section 6222 61 62 63 Z 0073 Z 0051 - - Section Section 6523 64 Z 0073 Z 0051 - - Section Section 68
Classification of system components
Table 3 Vertical glazing | System 50 60 80 | Hardwood cylinders amp bolts
Bolt
1) Cut from GH 5053 or GH 5055
TI-H_92_005dwg
Hardwood cylinder Z 0073
Item Bolt length (mm)Z 0047 70Z 0048 80Z 0049 90Z 0051 100
S T A B A L U X
Stabalux H Processing notes 310718 54
Stabalux HProcessing notes
127
Glass inset and glass support
RowTotal glass thickness tGlass (mm)
for inclined glazing 1)Hardwood cylinder Bolt
Glass supports 2)
GH 5053 GH 5055 Depth (mm)1 20 21 22 Z 0073 Z 0048 Section Section 14
2 23 24 Z 0073 Z 0048 Section Section 16
3 25 26 Z 0073 Z 0048 Section Section 18
4 27 28 Z 0073 Z 0048 Section Section 20
5 29 30 Z 0073 Z 0049 Section Section 226 31 32 Z 0073 Z 0049 GH 0082 Section 247 33 34 Z 0073 Z 0049 GH 0083 GH 0851 268 35 36 Z 0073 Z 0049 GH 0084 GH 0852 289 37 38 Z 0073 Z 0049 GH 0085 GH 0853 3010 39 40 41 Z 0073 Z 0049 GH 0886 GH 0854 3211 42 43 44 Z 0073 Z 0051 GH 0887 GH 0855 3512 45 46 47 Z 0073 Z 0051 GH 0888 GH 0856 3813 48 49 50 Z 0073 Z 0051 GH 0889 GH 0857 4114 51 52 53 Z 0073 Z 0051 GH 0890 GH 0858 4415 54 Z 0073 Z 0051 GH 0891 GH 0859 47
Classification of system components
Table 4 Inclined glazing | System 50 60 80 | Hardwood cylinders amp bolts
Glass support GH 5055
1) Accounting for a 10 mm inner seal
2) Cut from GH 5053 or GH 5055
TI-H_92_005dwg
Glass support GH 5053
Depth
Depth
S T A B A L U X
Stabalux H Processing notes 310718 55
Stabalux HProcessing notes
Fastenings
bull The fastenings for the Stabalux H system allow fill-ing elements to be easily secured
bull The clamping strips are connected to the wooden profile using Stabalux system screws Stainless steel 14301 DIN EN 10088 is the material used to produce screws for the Stabalux system
bull Depending on the type of screw fittings selected special 4 mm vulcanised EPDM washers are avail-able
bull Screws in suitable lengths are available for all com-mon glass thicknesses The screw length is deter-mined from a table
bull The distance for screw fittings is variable The max-imum distance is a = 250 mm
bull The distance from the edge for the first screw fit-ting should generally be in the region of 30 mm le a le 80 mm The placement of the glass supports and the choice of mullion-transom connection should also be taken into account
bull The clamp connection is exclusively exposed to tensile forces The clamping strips are connect-ed to the wooden profile using Stabalux system screws To determine the stress limit (maximum tensile force) and permitted tensile forces for the connection the conditions in the relevant gener-al building approval and the Eurocode 5 (DIN EN 1995-1) series of standards shall apply
bull Screw fittings are applied using a conventional electric screwdriver with depth stop This guaran-tees uniform application of pressure The depth setting should be chosen so that a sealing washer compression of 15 - 18 mm is achieved
bull An electric screwdriver with adjustable torque can be used as an alternative The required torque is approx 5 Nm The required torque is influenced by the relatively large scatter when dealing with wood and the variable influence of friction due to different drilling depths It is therefore advisable to determine the setting on a test piece and to check compression of the sealing washer
Screw fittings 128
Concealed screw fittings
bull Assembly is facilitated by selecting pre-drilled pres-sure strips (UL 5009-L UL 6009-L and UL 8009-L slot 7 x 10 mm a = 125 mm) with clippable upper strips The remaining pressure strips should be pro-vided with a round hold of d = 8 mm The func-tionality of the clip procedure can be checked after the first upper strip has been pushed against the pressure profile
Note
When using aluminium cover strips on roofs take account of the expansion factor as a result of the high degree of heat absorption when selecting the length to use In this case it is recommended that holes for screwing on the clamping strip are created with a diameter of d = 9 mm Equally the use of single-piece cover strips should be carefully considered
Visible screw fittings
bull Cover strips should be drilling with a round hole of d = 8 mm
Note
(see Note on covered screw fittings)
Visible recessed screw fittings
bull When creating visible recessed screw fittings a stepped bore is required The lower part of the cov-er strip should be drilled with a d = 7 mm diameter The upper part of the cover strip needs a d = 11 mm diameter for the screw head It is recommended to install a washer (PA washer eg Z 0033) with all screw fittings
S T A B A L U X
Stabalux H Processing notes 310718 56
Stabalux HProcessing notes
Fastenings
128
Screw fittings
Concealed screw fittings
Stabalux system screws with cylinder headd = 10 mm und 4 mm sealing gasket
eg Z 0331
Visible screw fittings
Stabalux system screws with cylinder headd = 10 mm und 4 mm sealing gasket
eg Z 0331
Visible recessed screw fittings
Stabalux system screws with cylinder head d = 10 mm with additional PA washer eg Z 731 with Z 33
eg Z 0331 eg Z 0731 with Z 0033
Attention
The calculation to determine screw lengths for the the calculation to determine screw lengths is
Glass thickness - 3 mm + inner seal (5 10 ie 12 mm) + 16 mm + e
e = statically required screw-in depth
Calculating the screw length for DL 5073 DL 6073
H_12_018dwg
H_12_019dwg
H_12_020dwg
S T A B A L U X
Stabalux H Processing notes 310718 57
Stabalux HProcessing notes
128
Calculating the screw length
System width 50 60 mm System width 80 mm 1)
H_12_021dwg
Screw fittings
1) Delivered upon request
Representation and item numbers are examples for System 60 System width 50 are analogous
S T A B A L U X
Stabalux H Processing notes 310718 58
Stabalux HProcessing notes
128
Wood screws for Stabalux H
Z0327 cylinder head screw 65 x 70 mm
Z0329 cylinder head screw 65 x 80 mm
Z0331 cylinder head screw 65 x 90 mm
Z0333 cylinder head screw 65 x 100 mm
Z0335 cylinder head screw 65 x 110 mm
Z0337 cylinder head screw 65 x 120 mm
Z0339 cylinder head screw 65 x 130 mm
Cylinder head screw empty 10 mm with hex socket | without sealing gasket
Z0727 cylinder head screw 65 x 70 mm
Z0729 cylinder head screw 65 x 80 mm
Z0731 cylinder head screw 65 x 90 mm
Z0733 cylinder head screw 65 x 100 mm
Z0735 cylinder head screw 65 x 110 mm
Z0737 cylinder head screw 65 x 120 mm
Z0033 PA washer empty 10 x 15 mm
Cylinder head screw empty 10 mm with hex socket | with sealing gasket
Screw fittings
H_12_019dwg
S T A B A L U X
Stabalux H Processing notes 310718 59
Stabalux HProcessing notes
Tips for laying the cover strip DL 5073 DL 6073
We assume that this cover strip will be used with glass panes that are supported on two sides and the recessed screw head is concealed In this case a cylinder head screw with inner hex is to be used eg Z 731 When cov-ering with a 2 mm cover plug Z 89 a bore depth of 7 mm is calculated
Depending on the precision of the bore it should be de-cided on case by case basis if any slight changes to this depth are necessary The cover plug Z 0089 does not need to be glued in place but may be levelled using lev-elling compound
Coating the cover strip
Profile production (aluminium extrusion moulding) with different mass distribution is extremely difficult Length-wise shadow formation may result Resulting actions are to be taken with the agreement of the coater
Flat cover strip DL 5073 DL 6073 129
glass support
eg GH 5053
+bolts and hardwood
cylinders
H_12_022dwg
Intersections
Due to the special shape of the strip (the material ex-tends into the rebate) there is no closed sealing section available at intersections We therefore recommend plac-ing particular attention to ensure tightness of the joints and fill will Stabalux connecting paste Z 0094
Glass supportsblocking
Special attention should be given to dimensional pro-portions To support the outer pane a sufficiently large glazing block must be installed that can carry the load to safely ensure the glass load is distributed effectively
DL 6073 Cover plug Z 0089GD 6174 Screw eg Z 0731
S T A B A L U X
Stabalux H Processing notes 310718 60
Stabalux HProcessing notes
Use of slab insulation
bull Using insulation blacks significantly reduces heat dissipation
bull The highly effective slab insulation has a perma-nently adhesive HOT-MELT
bull Depending on the situation where they are used insulation blocks can be directly applied to the cov-er strippressure profile or placed into the rebate over the screw fittings and pushed into position with the cover strippressure profile
1210
Slab insulation
Insulation block Width(Rebate)
Height
Z 0605 slab insulation 2042 20 mm 42 mm glass thickness from 44 mm
Z 0606 slab insulation 2026 20 mm 26 mm glass thickness from 28 mm
Z 0607 slab insulation 3042 30 mm 42 mm glass thickness from 44 mm
Z 0608 Insulation block 3026 30 mm 26 mm glass thickness from 28 mm
H_12_023dwg
Note
bull The use of slab insulation with cover strips DL 5073 DL 6073 should be tested for each individual sit-uation
bull 2-piece outer seals are always used with slab insu-lation blocks
bull With system width 80 mm and a 40 mm rebate 2 x 20 mm wide slab insulation blocks can be com-bined (40 mm wide insulation blocks available upon request)
bull for a glass inset of 15 mm outer seal GD 1932 bull for a glass inset of 20 mm outer seal GD 1932
Correctly position the seal flapwhen installing the insulation block
S T A B A L U X
Stabalux H Processing notes 310718 61
Stabalux HProcessing notes
1210
Slab insulation
Examples
H_12_023dwg
Z 0607Insulation block 3042
Z 0608Insulation block 3026
Z 0605Insulation block 2042
Z 0606Insulation block 2026
Z 0605Insulation block 2042
GD 1932
GD 1932
GD 1932
GD 1932
GD 1932
GD 1932
Z 0606Insulation block 2026
S T A B A L U X
Stabalux H Design 310718 62
Stabalux HDesign
Special design
Glass structures that partially refrain from using visible cover strips are considered special designs
These designs do not conform to the intended uses of the system No guarantees are made for eg quality of seals durability and structural stability Responsibility here lies entirely with the company implementing the design
Based on our experience we recommend paying close at-tention to the points made on the following pages during planning and implementation
131
Pane support variants
Mullion-transom structure 2-sided cover strip
H_13_001dwg
Mullion-transom structurewith transom cover strips 1)
1) Seals with 1 2 or 3 sections are possible
2) Use of mullion seals with 1 section in mullions and transoms
Section A-A Section C-C
Section B-B Section D-D
Mullion-transom structurewith mullion cover strips 2)
S T A B A L U X
Stabalux H Design 310718 63
Stabalux HDesign
131
Pane support variants
Transom structure mullion structure 2-sided cover strip
Vapour seal
When using this type of structure it is important to be aware that any loss of contact pressure can affect the room-side permeability There is an increased risk of con-densation build up in the rebate
vertical clamping strips
The glass supports should be placed to below the outer pane and sealed with it
horizontal clamping strips
Ventilation and condensation drainage is achieved via a recess in the lower sealing lip in the centre of the outer seal or at one third intervals
H_13_001dwg
Transom structure
Section A-A Section C-C
Section B-B Section D-D
Mullion structure
S T A B A L U X
Stabalux H Design 310718 64
Stabalux H
Requirements for special designs 1 Vapour seal
The room-side level of glazing must have the best possible vapour seal In this regard the vapour dif-fusion properties of the silicone sealant to be used should be tested Ensure that there are no permea-ble areas around concave cross joints
2 Rebate ventilation pressure equalisation and condensation drainage
Systems with partially sealed rebate represent a limitation to rebate ventilation Check on a case-by-case basis that no damage will be caused by standing condensation It is especially critical that designs with sealed vertical joints are evaluated To allow ventilation of the horizontal rebate we recom-mend installing a suitable vertical ventilation space Alternatively ventilation can be achieved using the outer joints
3 Weatherproofing
The outward facing seals must be watertight In cross joints it is especially important to ensure a firm join between the Stabalux profile seal and the silicone joints We recommend sealing up to the outer edge of the glass before mounting the cover stripsWe would like to once again emphasise that our profile seals will not make a permanent bond with commonly used silicone sealants A seal can only be created at contact points through permanent appli-cation of pressure
4 Mechanical strength screw fittings
Ensure screw fittings are sufficiently planned for Special attention should be given to the effects of wind suction and the reduced support
5 Glass weight distribution
Mechanical distribution of the weight of the glass panes through the structure must be ensured System glass supports can be used for existing horizontal transoms Designs using ldquoonlyrdquo mul-lions require special glass supports which carry the weight of the glass directly into the mullions
6 Glass sizing
Attention should be given to the reduced sup-port of panes when dimensioning the glass For example only the vertical or horizontal cov-er strips are effective in the event of wind suc-tion stresses or stress on the fall protection
7 Material compatibility
Compatibility of the silicone sealants with our profile sealants and the edge bonding of the glass must be ensured We recommend the exclusive use of tested silicone sealants from the whole-glass facades sec-tor Approval is usually given by the silicone manu-facturer
131
Pane support variants
H_13_001dwg
Design
S T A B A L U X
Stabalux H Design 310718 65
Stabalux H
System cross sections 132
Vertical glazing mullionsconcealed screw fittings
Vertical glazing transomsdivided outer seal for height compensation
Vertical glazing transoms visible recessed screw fittings
Vertical glazing mullionsvisible screw fittings
Vertical glazing transoms concealed screw fittingsStainless steel bottom strip fire seals
Vertical glazing transoms visible screw fittingsStainless steel cover stripfire seals
Inclined glazing mullionsconcealed screw fittings
Inclined glazing transomsvisible screw fittings
1
2
3
4
5
6
7
8
1 2
3 4
5 6
7 8
Examples
H_13_002dwg
Design
S T A B A L U X
Stabalux H Design 310718 66
Stabalux H
Creating facade corners
At exposed areas such as glass facade corners it is par-ticularly important to ensure sufficient heat insulation in order to avoid the creation of thermal bridges and pre-vent a build-up of condensation Thermal current calcula-tions provide information about the actual heat loss
133
System details
Special seal allow a polygon shaped arrangement of the facade mullions For convex glass surfaces an angle be-tween 3deg and 15deg can be freely chosen For concave glass surfaces the angle can vary between 3deg and 10deg
Facade polygon
Outer corner Inner corner
Geometrically check the feasibility Recommendation Use for system 60 and above
H_13_003dwg
H_13_004dwg
H_13_005dwg
Design
Calculation of screw length withconsideration of the angle
ATTENTIONAdhere to the minimum glass inset
S T A B A L U X
Stabalux H Design 310718 67
Stabalux H
133
System details
Eaves with glass roof connection
bull Depending on the construction of the transoms a design with or without rain gutters and the choice of stepped glazing or closable cover strips gives us different variants for implementation
bull All options require condensation and moisture to be drained away at the eaves
Design with stepped glazing
bull With a stepped glazing design it is important to se-lect a UV-resistant edge bonding for the glass This edge bonding systems usually silicone-based are quite permeable to gases and are therefore unable to achieve the required high values for sound and heat insulation of conventional systems and require additional sealing around the edges
Example 1
Design with stepped glazing
H_13_006dwg
Design
bull Our thermal calculations show that stepped glass panes compared to covered glass edges have a much less favourable isothermal movement
bull Stepped glass panes must also be statically meas-ured according to their reduced hold against wind suction
bull The additional thermal loads that occur in stepped glass panes should countered by the use of pre-ten-sioned glass (TVG ESG) for the outer panes
bull Stepped glass panes should be preferred for flatter inclined roofs as water can drain away at the eaves unhindered
S T A B A L U X
Stabalux H Design 310718 68
Stabalux HDesign
133
Eaves with glass roof connection Design using cover strips
bull Horizontal pressure strips prevent the free run off of rain water and dirt
bull Cover strips with angled edges reduce the build up of water in front of the cover strip
bull The outer sealing level on glass roofs must also be thoroughly sealed
bull In combination with our butyl clad stainless steel panels glazing with pressure strips on 4 sides achieves a higher level of safety
bull Make sure that the inner sealing section provides guaranteed drainage for condensation
bull To improve drainage and heat-induced expansion cover strips should be shortened by 5 mm at tran-som joints Gasket joints however are to be laid flat with a slight excess in dimensions Open ends of the transom cover strips must be sealed
Note
Due to the increased thermal stresses in the roof we rec-ommend using concealed screw fitting when choosing clamping strips for larger system lengths and in rafters Unused holes in the pressure profile must be sealed
Example 2
Design using cover strips
System details
H_13_007dwg
S T A B A L U X
Stabalux H Design 310718 69
Stabalux HDesign
133
Eaves with glass roof connection Design with gutter
bull The gutter must be able to take its own weight and mounted in such a way that stresses from its own weight water and ice will not lead to deformations and directly apply a load to the glazing
bull Overflowing water must not be able to get inside the structure Alongside the gutter-shaped outer rafter seal the moisture barrier installed over the guide plate also acts to drain away condensation
Example 3
Design with gutter
System details
H_13_008dwg
S T A B A L U X
Stabalux H Design 310718 70
Stabalux H
H_13_009dwg
Design
133
Roof ridge design
bull When designing the ridge cap ensure that the raft-er cover strips are pulled under the ridge cap
System details
S T A B A L U X
Stabalux H Design 310718 71
Stabalux HDesign
134
Structural attachments
Structural attachment film baffles
bull Attachment of glazing to the building structure re-quires a well thought out approach
bull Moisture damage can occur if moisture condenses at any thermal bridges
bull Thermal bridges must be avoided and warm air from the inside spaces must not penetrate too deeply into the structure
bull The required moisture barriers must be installed as deeply as possible into the inner space using impermeable structural film baffles This prevents moisture penetration into the structure via conden-sation from the air inside
bull An additional foil to seal against rainwater must be permeable to moisture Only if this foil has a wa-ter vapour diffusion resistance value μ of max μ = 3000 can a dry structure be guaranteed in the transition zones
S T A B A L U X
Stabalux H Design 310718 72
Stabalux HDesign
134
Structural attachments
Facade base
bull Controlled drainage of the rebate space can only be ensured if the sealing sections overlap in such a way that no moisture can get under the seals and foils
bull Run foils under the transom seal to act as a mois-ture barrier and glue to the wooden structure In accordance with DIN 18195 the seal should be run at least 150 mm above the water-guiding layer
bull Attach foil with moisture barrier in accordance with the requirements of DIN 18195
Example 1
Mounting intermediate mullion to base plate
Drainage of the base area is achieved via the seal flap towards the outside In this case the seal flap around the mullion at the base should not be released For edge mullions ensure there is a corresponding seal placed (continuous transom seal up the to the end point) and a constructive design of the drainage section
H_13_010dwg
S T A B A L U X
Stabalux H Design 310718 73
Stabalux HDesign
134
Facade base
bull Rebate space ventilation is achieved via the open end of the vertical cover strips
bull Ensure the connection is impermeable to vapourbull Mullion mountings must be sufficiently statically
dimensioned Required axis and edge distances for anchoring the base plates and in the building struc-ture must be observed
Example 2
Mounting intermediate mullion to base plate
Where seal flaps are interrupted by joints filler rods in the joint must also be cut
Structural attachments
H_13_011dwg
S T A B A L U X
Stabalux H Design 310718 74
Stabalux HDesign
134
Structural attachments
Facade base
bull Heat insulation around the structural connection should be designed in such as way as to prevent cold bridges forming
bull Steel parts should also be provided with sufficient protection against corrosion even in concealed ar-eas
bull Weather-protection sheets should be used depend-ing on the requirements of the construction Suffi-cient rear ventilation must be ensured
Example 3
Attaching intermediate mullions at base plates
H_13_012dwg
S T A B A L U X
Stabalux H Design 310718 75
Stabalux HDesign
134
Structural attachments
Connection before intermediate floors
bull Depending on requirements mullions are designed as continuous multi-span transoms or separated at each floor
bull Reasons for separating mullions can include eg building settlement fire protection sound insula-tion etc
bull If the separation joint is intended to absorb expan-sion then as well as the required degree of freedom for mullions the ability for movement of integrated elements must also be ensured
bull The constructive design of the mullion joint and mounting should be chosen according to the stat-ically calculated base system and determines the
Example
Mullions separated at each floor
In this example distribution of horizontal and vertical loads is achieved at each floor through the existing floor structure
H_13_013dwg
choice and arrangement of fixed and movable bear-ings type of screw fittings structural connection parts and attachment to the concrete floor
bull With continuous mullions and a corresponding mount the multi-span support principle is in effect Sagging due to horizontal effects is lower The re-quired moment of inertia reduces for 2-span sup-ports with the same span length compared to the 1-span support by a factor of 0415 However a ten-sion and stability analysis should be carried out
S T A B A L U X
Stabalux H Design 310718 76
Stabalux HDesign
134
Ceiling connection
bull Structural connections should take account of any movement that may occur
bull As well as temperature induced expansion in the facade all longitudinal expansions and movements of the affected components must be considered
bull Additional stresses from restraints must be avoid-ed
Structural attachments
H_13_014dwg
S T A B A L U X
Stabalux H Design 310718 77
Stabalux HDesign
134
Structural attachments
Facade connection to parapets
H_13_015dwg
S T A B A L U X
Stabalux H Design 310718 78
Stabalux HDesign
134
Structural attachments
Connection to structural eaves
bull This connection is suitable for glass roofs that are being installed as skylights in the structure These may be gabled roofs single pitch roofs pyramids or arched roofs
H_13_016dwg
S T A B A L U X
Stabalux H Design 310718 79
Stabalux HDesign
134
Structural attachments
Ridge connection to walls
bull When making ridge connections to walls permea-bility to moisture is particularly important Warm air with a high level of moisture gets into cooler zones of the inner sealing section where the design is not sufficiently sealed and can cause structural dam-age from penetrating into the connecting structure
bull Joint seals made from butyl-clad stainless steel plates (Z 0501 Z 0601) must be installed on the outside of joint areas
H_13_017dwg
S T A B A L U X
Stabalux H Design 310718 80
Stabalux HDesign
134
Structural attachments
Horizontal wall connection to heat insulation bonding system
H_13_018dwg
S T A B A L U X
Stabalux H Design 310718 81
Stabalux HDesign
135
Installing windows and doors
Mullion and transom facades and glass roofs from Stabalux are neutral with regards to the selection of in-sert elements All commonly available window and door systems made from steel aluminium wood or plastic can be used Frame profiles from the window and door man-ufacturerrsquos should be selected to match the chosen glass thickness If no profiles with a suitable insert rebate are available mountings may be used as shown in the fol-lowing examples Like with glass elements windows are set into the facade on glass supports padded and then secured against slippage
Insert window transom sectionSystem HUECK Series Lambda WS 075 IS
Insert window mullion sectionSystem HUECK Series Lambda WS 075 IS
H_13_019dwg
S T A B A L U X
Stabalux H Design 310718 82
Stabalux HDesign
135
Installing windows and doors
H_13_020dwg
Insert window transom sectionSystem HUECKSeries Lambda WS 075
Insert window mullion sectionSystem HUECKSeries Lambda WS 075
S T A B A L U X
Stabalux H Design 310718 83
Stabalux HDesign
135
Installing windows and doors
H_13_021dwg
Insert door outward transom sectionSystem HUECKSeries Lambda DS 075
Insert door outward transom sectionSystem HUECKSeries Lambda DS 075
Insert window mullion sectionSystem HUECKSeries Lambda WS 075
S T A B A L U X
Stabalux H Design 310718 84
Stabalux HDesign
135
Installing windows and doors
H_13_022dwg
Insert door inward in the transom sectionSystem HUECKSeries Lambda DS 075
Insert door inward in the transom sectionSystem HUECKSeries Lambda DS 075
S T A B A L U X
Stabalux H Design 310718 85
Stabalux HDesign
135
Installing windows and doors
H_13_023dwg
Insert door inward in the transom sectionSystem HUECKSeries Lambda DS 075
Insert-top-hung window mullion section System HUECKSeries Lambda 110
Insert-top-hung window transom section System HUECKSeries Lambda 110
S T A B A L U X
Stabalux H Design 310718 86
Stabalux HDesign
135
Installing windows and doors
H_13_024dwg
Sliding system mullion section System HUECKSeries Volato M
Sliding system transom sectionSystem HUECKSerie sVolato M
S T A B A L U X
Stabalux H Design 310718 87
Stabalux HDesign
135
Installing windows and doors
H_13_025dwg
Flush roof surface windowSystem HUECK-HARTMANNSeries 85E
Powered according tosystem specifications
S T A B A L U X
Stabalux H Design 310718 88
Stabalux HDesign
135
Installing windows and doors
H_13_027dwg
Insert window - transom sections wood windows
Insert window - mullion sectionwood windows
- Stabalux H
-
- System
-
- System properties
- System cross sections and inner seals - facade
- System cross sections and inner seals - roof
- Cover strips and outer seals
-
- Processing notes
-
- Material information
- Profile design
- Mullion-transom joint
- Tips for laying seals
- Seals - Facade
- Seals - roof
- Glass inset and glass support
- Screw fittings
- Flat cover strip DL 5073 DL 6073
- Slab insulation
-
- Design
-
- Pane support variants
- System cross sections
- System details
- Structural attachments
- Installing windows and doors
-
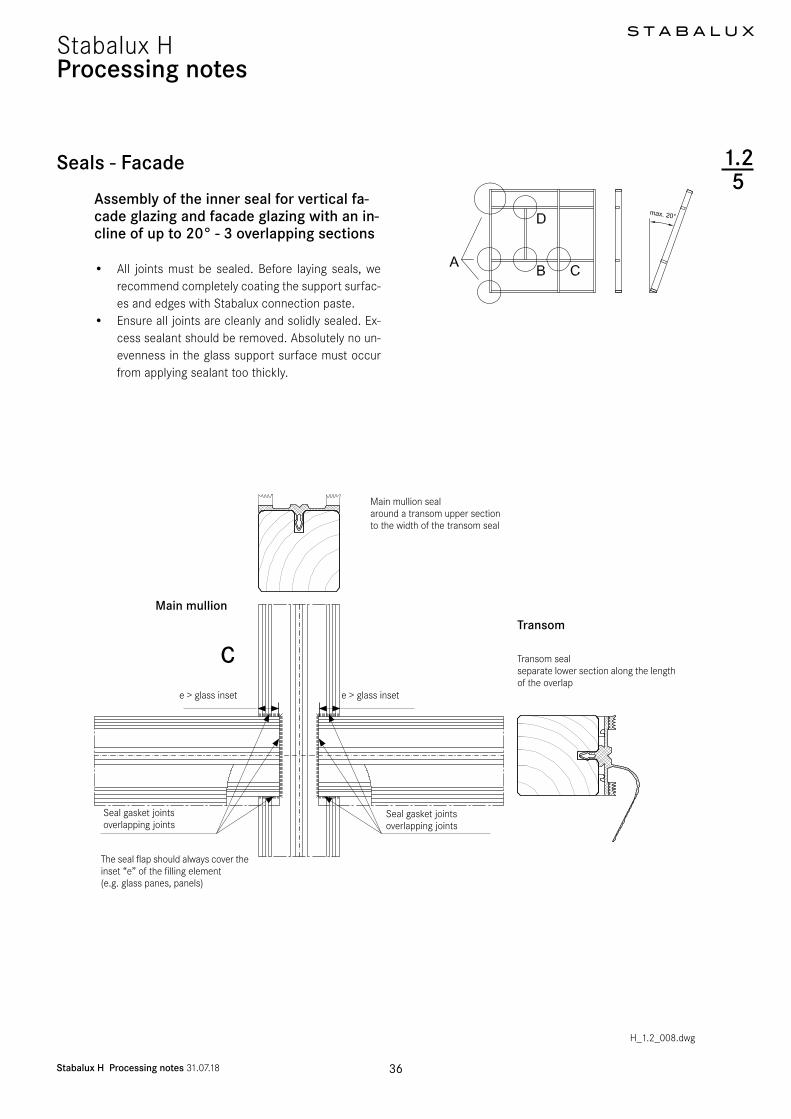
S T A B A L U X
Stabalux H Processing notes 310718 41
Stabalux HProcessing notes
Assembly of the outer seal for for inclined glazed roofing ge 2deg
bull These are laid in fundamentally the same way as for vertical glazing Split seals around the mullions in roofs such as GD 1932 are only suitable when using in combination with slab insulation Each installa-tion situation will differ to some degree and always check how well sealed it is
bull To ensure free run-off of rain water and dirt on roofs inclined ge 2deg we recommend not using clamping strips in the transoms
bull Instead the rebate spaces should be sealed with all-weather silicone
bull Implementation of the outer sealing section around mullions is done in the same way as conventional roofs with an inclination up to 15deg
126
Seals - roof
H_12_013dwg
Tips for all roof designs
When using aluminium cover strips on roofs take account of the expansion factor as a result of the high degree of heat absorption when selecting the length to use Equal-ly the use of single-piece cover strips should be carefully considered In this case it is recommended that holes for screwing on the cover strip are created with a diameter of d = 9 mm (refer to Section 121 - Material information)
bull At the high point or ridge area of the inclined glaz-ing it is recommended to also install and outer seal-ing section in the transoms with clamping strips
bull Only certified sealing materials may be used for sealing the transom rebate space
bull Pay attention to all information provided by the manufacturer and the sealing work must be carried out by trained persons It is recommended that a licensed and certified specialist contractor is hired for this purpose We further refer you to the DIN 52460 standard and IVD data sheets (Trade Asso-ciation for Sealants)
For wide spans we recommend using concealed screw fittings when selecting the clamping strips (lower + up-per strip) This is the preferred option for rafters Unused holes in the pressure profile must be sealedSome roof areas such as the eaves see the use of sev-eral different materials (glass silicone aluminium sheets ) each with different expansion coefficients To avoid the formation of cracks aluminium sheets should be in-stalled with expansion joints
S T A B A L U X
Stabalux H Processing notes 310718 42
Stabalux HProcessing notes
Assembly of the outer seal for for inclined glazed roofing ge 2deg
bull The compatibility of the materials is particularly important when using all-weather silicone In this case the compatibility of the sealant with the edge bonding of the glass and the backfill of the joints If self-cleaning glass is used the compatibility must be established in advance
bull Glass sealants and edge bonding must be UV-re-sistant The incline of roofs should also be taken into account Information about UV-resistance can be requested from the manufacturer Silicone edge bonding generally provides better UV-resistance than polysulfide-based materials The advantage lies in its high vapour sealing properties which is particularly useful when using more volatile argon fillings
126
Seals - roof
H_12_013dwg
1 Hold-down clamp
2 Silicone washer
3 Silicone sealant seal around the
clamp
4 All weather silicone seal
Transom inclined glazing ge 2deg inclination with all-weather silicone and slab insulation
12
3
6
89
7
Transom inclined glazing ge 2deg inclination with all-weather silicone and round sec-tion rope seal
12
3
6
89
7
bull Highly elastic weatherproof and UV-resistant seals meet the widest range of demands for reliable joints
bull If the silicone joint is created without additional mechanical safety devices ensure that the glass is supported from two sides only Selective installa-tion of holding clamps can be used to achieve all round support for glass edges
bull The clamps are made from stainless steal with silicone washers and are screwed in the same as pressure strips The hold-down clamp should be ad-ditionally sealed around the perimeter with silicone sealant The design is based upon the dimensions of the glass as documented in the glass static anal-ysis
51 Round section rope seal
52 Slab insulation
6 Glass filling element
7 Inner seal 10 mm transom
8 timber profile
9 System screw fittings
4
51
4
52
S T A B A L U X
Stabalux H Processing notes 310718 43
Stabalux HProcessing notes
Assembly of the outer seal for for inclined glazed roofing ge 2deg
bull The joint width and the joint height for Stabalux System H are defined as w x h = 20 mm x 10 mm These measurements should always checked when selecting the sealing material and adapted if neces-sary Generally w h = 2 1 - 35 1
bull PE round section seals or Stabalux slab insulation is suitable as a back fill material
bull Silicone sealant should be applied before laying the mullion seals and cover strips
bull After the specified setting time the seals and screw fittings can be installed in the areas around mullions
126
Seals - roof
Rafters with clamping strips
Transom with clampAll weather silicone seal
and round section rope seal
Transom with clampAll weather silicone seal
and slab insulation
Transom with all-weather silicone and round section rope
seal
Joint design according to manufacturers specificationsgenerally w h = 2 1 - 35 1
bull The mullion-transom joints around the clamps are then sealed
bull Before applying this second layer the joints around transoms must have completely set
S T A B A L U X
Stabalux H Processing notes 310718 44
Stabalux HProcessing notes
Steps for implementing the seal with silicone
bull Test silicone sealant and glass edge bondings and other contact surfaces (eg panels) for suitability
bull Clean edge bonding adhesive impurities from the surfaces to which sealant will be applied following manufacturerrsquos directions
bull Fill the joints as per the joint dimensions using only non-water absorbent closed-cell PE profiles (no damage to the edge bonding)
bull The remaining space in the glass rebate must be large enough that the pressure is able to equalise and a drainage level is available
bull Clean any impurities from the surfaces to which the sealing material is to be applied and any adjacent surfaces according to manufacturerrsquos directions
126
Seals - roof
System screw fittings
Hold-down clamp
Washer made from silicone
Silicone sealant seal
around the clamp
All weather silicone seal
Silicone sealant
Rafter
Transom
bull Be particularly aware of any adjacent metal com-ponents Prime according to manufacturerrsquos direc-tions
bull Seal joints without leaving any cavities or bubbles Mask any adjacent components in advance where necessary
bull Smooth out the filled joints using the manufactur-errsquos smoothing agents and conventional tools with as little water as possible Remove adhesive tape
bull If two or more reactive sealants are used in com-bination the first must completely set before the second is applied
S T A B A L U X
Stabalux H Processing notes 310718 45
Stabalux HProcessing notes
Glass inset
bull Glass industry guidelines must be observedbull The glass inset is generally 15 mmbull An increase to 20 mm has a beneficial effect on the
heat transfer coefficient Uf of the frame structure bull Special conditions such as fire protection glass
must be adhered to the terms are stated in the general building approval
Glass inset and glass support 127
RebateGlass inset
H_12_015dwg
S T A B A L U X
Stabalux H Processing notes 310718 46
Stabalux HProcessing notes
Glass support types and choosing the glass support
The Stabalux H system uses three different types and techniques for attaching glass supports
bull Glass support GH 5053 and GH 5055 with hanger bolts
bull Glass support GH 5053 and GH 5055 with hard-wood cylinders and bolts
bull Crossing point reinforcement RHT with cylinder head screws empty 65 mm Crossing point reinforce-ment are used exclusively on fire-protection glaz-ing The precise details are stated in the general building approval
The glass supports used are determined by the type of wood glass construction and glass weight (see section 9) A rigid mullion-transom connection is required ie no twisting of the transom may occur at the connection that would cause further sinking of the glass support
Glass inset and glass support 127
Mounting the glass supports
bull Positioning the glass supports and glazing accord-ing to glass industry guidelines and guidelines of the Institute for Window Technology
bull The weight of the glass panes is distributed via the glass supports attached to the transoms
bull Glass supports should be attached at a distance of 100 mm from the end of the transom When doing so avoid a collision with the cover strip screw fit-tings at the end of the transom
Glazing blocks
bull Glazing blocks must be compatible with the edge bonding of the insulated glass panes
bull They should be stable under constant pressure and be able to withstand loads aging and temperature changes
bull It is important that the blocks ensure circumferen-tial pressure equalisation and that drainage of con-densation is not obstructed as well as allowing the glass edges to be offset and small design toleranc-es to be accommodated
bull If the length of the glass support is more than 100 mm blocks should be placed along the entire length of the glass support to ensure equal load distribution
H_12_016dwg
Positioning the glass support approx 100 mm from the end of the transom
S T A B A L U X
Stabalux H Processing notes 310718 47
Stabalux HProcessing notes
127
Glass inset and glass support
Glass support GH 5053 Attachment with hanger bolts
A-A
Glass support GH 5053 with hanger bolts
bull The certified system components consist of the glass support GH 5053 and 2 hanger bolts empty 10 mm with a 45 mm wood thread and a shaft of a different length
bull The hanger bolts are screwed directly into the tim-ber at intervals of 80 mm A empty 7 mm hole needs to be pre-drilled for this purpose
bull Screw fittings should be vertical to the transom axis
bull The depth for hanger bolts is at least 45 mm meas-ured from the front edge of the timber
H_12_016dwg
H_12_017dwg
Glass support GH 5053
Block
Block
glass support
Inner seal
Hanger bolt
Minimum screw depth from measured from front edge of timber
Hanger bolts empty 10 mmpre-drilled at empty 7 mm
bull For glass support GH 5053 the required depths are delivered corresponding to the thickness of the glass and placed onto the hanger bolts
bull Blocks must be placed under the glass panes along the entire length of the glass supports
bull Details of the approved pane weights geometries and classification of system components are pro-vided in section 9
S T A B A L U X
Stabalux H Processing notes 310718 48
Stabalux HProcessing notes
127
Glass inset and glass support
Glass support GH 5055 with hanger bolts
bull Based on the test results for the system compo-nent GH 5053 a load bearing model was designed and the suitability of the GH 5055 glass support calculated
bull Installation is done the same way as GH 5053 but using three screws spaced 80 mm apart
bull Details of the approved pane weights geometries and classification of system components are pro-vided in section 9
Glass support GH 5055 Attachment with hanger bolts
A-A
H_12_016dwg
H_12_017dwg
Glass support GH 5055
Block Hanger bolts empty 10 mmpre-drilled at empty 7 mm
Block
glass support
Inner seal
Hanger bolt
Minimum screw depth from measured from front edge of timber
S T A B A L U X
Stabalux H Processing notes 310718 49
Stabalux HProcessing notes
127
Glass inset and glass support
Row
Total glass thickness tGlass (mm)
for vertical glazing
Hanger bolts 2) Glass supports 1)
Inner seal height GH 5053 GH 5055 Depth (mm)
5 mm 10 mm 12 mm1 4 5 6 7 Z 0371 3) Z 0371 4) Z 0371 5) GH 0081 Section 9
2 8 9 Z 0371 3) Z 0371 4) Z 0371 5) Section Section 12
3 10 11 Z 0371 3) Z 0371 4) Z 0371 5) Section Section 144 12 13 Z 0371 3) Z 0371 4) Z 0371 5) Section Section 165 14 15 Z 0371 3) Z 0371 4) Z 0371 Section Section 186 16 17 Z 0371 3) Z 0371 Z 0371 Section Section 207 18 19 20 Z 0371 Z 0371 Z 0371 GH 0082 Section 228 22 23 Z 0371 Z 0371 Z 0372 GH 0083 GH 0851 269 24 25 Z 0371 Z 0372 Z 0372 GH 0084 GH 0852 2810 26 27 Z 0371 Z 0372 Z 0372 GH 0085 GH 0853 3011 28 29 30 Z 0372 Z 0372 Z 0372 GH 0886 GH 0854 3212 31 32 33 Z 0372 Z 0372 Z 0372 GH 0887 GH 0855 3513 34 35 36 Z 0372 Z 0372 Z 0373 GH 0888 GH 0856 3814 37 38 39 Z 0372 Z 0373 Z 0373 GH 0889 GH 0857 4115 40 41 42 Z 0372 Z 0373 Z 0373 GH 0890 GH 0858 4416 43 44 45 Z 0373 Z 0373 Z 0373 GH 0891 GH 0859 4717 46 47 48 Z 0373 Z 0373 Z 0373 GH 0892 GH 0860 5018 49 50 51 Z 0373 Z 0373 Z 0373 GH 0893 GH 0861 5319 52 53 54 Z 0373 Z 0373 - GH 0894 GH 0862 5620 55 56 57 Z 0373 - - Section Section 5921 58 59 60 Z 0373 - - Section Section 6222 61 62 63 Z 0373 - - Section Section 6523 64 Z 0373 - - Section Section 68
Item Total length (mm)
Shaft length (mm)
Thread length (mm)
Z 0371 70 25 45Z 0372 77 32 45
Z 0373 90 45 45
Classification of system components
Table 1 Vertical glazing | System 50 60 80 | Hanger bolts
Hanger bolts
1) Cut from GH 5053 or GH 5055
2) Generally The screw-in depth (ET) for hanger bolts = 45 mm thread length (GL) measured from the front edge of
the timber
For glasses tGlas lt 20 mm observe the permissible visible shaft length from the front edge of the wood
If necessary adjust the visible shaft length over the screw-in depth
3) Permissible visible shaft length from the front edge of the wood = glass thickness tGlas (mm) + 3 mm
4) Permissible visible shaft length from the front edge of the wood = glass thickness tGlas (mm) + 7 mm
5) Permissible visible shaft length from the front edge of the wood = glass thickness tGlas (mm) + 9 mm
TI-H_92_003dwg
Total length
Thread lengthShaft length
S T A B A L U X
Stabalux H Processing notes 310718 50
Stabalux HProcessing notes
127
Glass inset and glass support
RowTotal glass thickness tGlass (mm)
for inclined glazing 1) Hanger bolts 2)Glass supports 3)
GH 5053 GH 5055 Depth (mm)1 16 17 18 Z 0371 GH 0081 Section 92 19 20 Z 0371 Section Section 123 21 22 Z 0372 Section Section 144 23 24 Z 0372 Section Section 165 25 26 Z 0372 Section Section 186 27 28 Z 0372 Section Section 207 29 30 Z 0372 Section Section 228 31 32 Z 0372 GH 0082 Section 249 33 34 Z 0372 GH 0083 GH 0851 2610 35 36 Z 0373 GH 0084 GH 0852 2811 37 38 Z 0373 GH 0085 GH 0853 3012 39 40 41 Z 0373 GH 0886 GH 0854 3213 42 43 44 Z 0373 GH 0887 GH 0855 3514 45 46 47 Z 0373 GH 0888 GH 0856 3815 48 49 50 Z 0373 GH 0889 GH 0857 4116 51 52 53 Z 0373 GH 0890 GH 0858 4417 54 Z 0373 GH 0891 GH 0859 47
Classification of system components
Table 2 Inclined glazing | System 50 60 80 | Hanger bolts
Glass support GH 5053
Glass support GH 5055
1) Accounting for a 10 mm inner seal
2) The depth for hanger bolts = 45 mm thread length measured from the front edge of the timber
3) Cut from GH 5053 or GH 5055
TI-H_92_005dwg
Depth
Depth
S T A B A L U X
Stabalux H Processing notes 310718 51
Stabalux HProcessing notes
127
Glass inset and glass support
Glass support GH 5053 Attachment with bolts and hardwood cylinders
Glass support GH 5053 and GH 5055 with pins and hardwood cylinders
bull Certified system components consist of glass sup-port GH 5053 and GH 5055 with pins and hard-wood cylinders
bull Depending on the width of supports 2 or 3 bolts with a diameter of 10 mm are needed
bull The bolt length should be adapted to the thickness of the glass
bull To anchor the bolts in place 50 mm wooden cylin-ders with a outer diameter of 30 mm and an axial core of empty 10 mm are solidly glued into the timber
H_12_016dwg
H_12_017dwg
A-A
bull Additionally holes with a depth of 50 mm and empty of 30 mm are to be drilled into the transom profile ver-tical to the transom axis with 80 mm spacing
bull The glue or adhesive used must be suitable and must not swell
bull The bolts should be hammered in along the entire cylinder depth of 50 mm
bull For glass supports GH 5053 and GH 5055 the re-quired depths are delivered corresponding to the thickness of the glass and placed onto the hanger bolts
Glass support GH 5053
Bolt empty 10 mmHardwoodcylinder Hardwood
cylinder
Block
Block
glass support
Inner seal
Bolt
Hardwood cylinderInner diameter 10 mmOuter diameter 30 mmfirmly gluedto the transom profile
Hardwood cylinder not grooved removed the sealing base around the cylinder
S T A B A L U X
Stabalux H Processing notes 310718 52
Stabalux HProcessing notes
127
Glass inset and glass support
Glass support GH 5055 Attachment with bolts and hardwood cylinders
Glass support GH 5053 and GH 5055 with pins and hardwood cylinders
bull The central groove in the Stabalux H System must not be milled into the wooden cylinder
bull When fitting the seals the sealing base must there-fore be removed around the cylinder
bull Blocks must be placed under the glass panes along the entire length of the glass supports
bull Details of the approved pane weights geometries and classification of system components are pro-vided in section 9
H_12_016dwg
H_12_017dwg
A-ABolt empty 10 mmHardwood
cylinder Hardwoodcylinder
Block
glass support
Block
Inner seal
Bolt
Hardwood cylinderInner diameter 10 mmOuter diameter 30 mmfirmly gluedto the transom profile
Hardwood cylinder not grooved removed the sealing base around the cylinder
Glass support GH 5055
S T A B A L U X
Stabalux H Processing notes 310718 53
Stabalux HProcessing notes
127
Glass inset and glass support
Row
Total glass thickness tGlass (mm)
for vertical glazing
Hardwood cylinder
Bolt Glass supports 1)
Inner seal heightGH 5053 GH 5055 Depth (mm)
5 mm 10 mm 12 mm1 8 9 Z 0073 - - Z 0047 Section Section 12
2 10 11 Z 0073 - Z 0047 Z 0047 Section Section 14
3 12 13 Z 0073 - Z 0047 Z 0047 Section Section 164 14 15 Z 0073 Z 0047 Z 0047 Z 0047 Section Section 185 16 17 Z 0073 Z 0047 Z 0047 Z 0048 Section Section 206 18 19 Z 0073 Z 0047 Z 0048 Z 0048 Section Section 227 20 21 Z 0073 Z 0047 Z 0048 Z 0048 GH 0082 Section 248 22 23 Z 0073 Z 0047 Z 0048 Z 0048 GH 0083 GH 0851 269 24 25 Z 0073 Z 0048 Z 0048 Z 0048 GH 0084 GH 0852 2810 26 27 Z 0073 Z 0048 Z 0048 Z 0048 GH 0085 GH 0853 3011 28 29 30 Z 0073 Z 0048 Z 0048 Z 0049 GH 0886 GH 0854 3212 31 32 33 Z 0073 Z 0048 Z 0049 Z 0049 GH 0887 GH 0855 3513 34 35 36 Z 0073 Z 0048 Z 0049 Z 0049 GH 0888 GH 0856 3814 37 38 39 Z 0073 Z 0049 Z 0049 Z 0049 GH 0889 GH 0857 4115 40 41 42 Z 0073 Z 0049 Z 0049 Z 0051 GH 0890 GH 0858 4416 43 44 45 Z 0073 Z 0049 Z 0051 Z 0051 GH 0891 GH 0859 4717 46 47 48 Z 0073 Z 0049 Z 0051 Z 0051 GH 0892 GH 0860 5018 49 50 51 Z 0073 Z 0051 Z 0051 Z 0051 GH 0893 GH 0861 5319 52 53 54 Z 0073 Z 0051 Z 0051 - GH 0894 GH 0862 5620 55 56 57 Z 0073 Z 0051 - - Section Section 5921 58 59 60 Z 0073 Z 0051 - - Section Section 6222 61 62 63 Z 0073 Z 0051 - - Section Section 6523 64 Z 0073 Z 0051 - - Section Section 68
Classification of system components
Table 3 Vertical glazing | System 50 60 80 | Hardwood cylinders amp bolts
Bolt
1) Cut from GH 5053 or GH 5055
TI-H_92_005dwg
Hardwood cylinder Z 0073
Item Bolt length (mm)Z 0047 70Z 0048 80Z 0049 90Z 0051 100
S T A B A L U X
Stabalux H Processing notes 310718 54
Stabalux HProcessing notes
127
Glass inset and glass support
RowTotal glass thickness tGlass (mm)
for inclined glazing 1)Hardwood cylinder Bolt
Glass supports 2)
GH 5053 GH 5055 Depth (mm)1 20 21 22 Z 0073 Z 0048 Section Section 14
2 23 24 Z 0073 Z 0048 Section Section 16
3 25 26 Z 0073 Z 0048 Section Section 18
4 27 28 Z 0073 Z 0048 Section Section 20
5 29 30 Z 0073 Z 0049 Section Section 226 31 32 Z 0073 Z 0049 GH 0082 Section 247 33 34 Z 0073 Z 0049 GH 0083 GH 0851 268 35 36 Z 0073 Z 0049 GH 0084 GH 0852 289 37 38 Z 0073 Z 0049 GH 0085 GH 0853 3010 39 40 41 Z 0073 Z 0049 GH 0886 GH 0854 3211 42 43 44 Z 0073 Z 0051 GH 0887 GH 0855 3512 45 46 47 Z 0073 Z 0051 GH 0888 GH 0856 3813 48 49 50 Z 0073 Z 0051 GH 0889 GH 0857 4114 51 52 53 Z 0073 Z 0051 GH 0890 GH 0858 4415 54 Z 0073 Z 0051 GH 0891 GH 0859 47
Classification of system components
Table 4 Inclined glazing | System 50 60 80 | Hardwood cylinders amp bolts
Glass support GH 5055
1) Accounting for a 10 mm inner seal
2) Cut from GH 5053 or GH 5055
TI-H_92_005dwg
Glass support GH 5053
Depth
Depth
S T A B A L U X
Stabalux H Processing notes 310718 55
Stabalux HProcessing notes
Fastenings
bull The fastenings for the Stabalux H system allow fill-ing elements to be easily secured
bull The clamping strips are connected to the wooden profile using Stabalux system screws Stainless steel 14301 DIN EN 10088 is the material used to produce screws for the Stabalux system
bull Depending on the type of screw fittings selected special 4 mm vulcanised EPDM washers are avail-able
bull Screws in suitable lengths are available for all com-mon glass thicknesses The screw length is deter-mined from a table
bull The distance for screw fittings is variable The max-imum distance is a = 250 mm
bull The distance from the edge for the first screw fit-ting should generally be in the region of 30 mm le a le 80 mm The placement of the glass supports and the choice of mullion-transom connection should also be taken into account
bull The clamp connection is exclusively exposed to tensile forces The clamping strips are connect-ed to the wooden profile using Stabalux system screws To determine the stress limit (maximum tensile force) and permitted tensile forces for the connection the conditions in the relevant gener-al building approval and the Eurocode 5 (DIN EN 1995-1) series of standards shall apply
bull Screw fittings are applied using a conventional electric screwdriver with depth stop This guaran-tees uniform application of pressure The depth setting should be chosen so that a sealing washer compression of 15 - 18 mm is achieved
bull An electric screwdriver with adjustable torque can be used as an alternative The required torque is approx 5 Nm The required torque is influenced by the relatively large scatter when dealing with wood and the variable influence of friction due to different drilling depths It is therefore advisable to determine the setting on a test piece and to check compression of the sealing washer
Screw fittings 128
Concealed screw fittings
bull Assembly is facilitated by selecting pre-drilled pres-sure strips (UL 5009-L UL 6009-L and UL 8009-L slot 7 x 10 mm a = 125 mm) with clippable upper strips The remaining pressure strips should be pro-vided with a round hold of d = 8 mm The func-tionality of the clip procedure can be checked after the first upper strip has been pushed against the pressure profile
Note
When using aluminium cover strips on roofs take account of the expansion factor as a result of the high degree of heat absorption when selecting the length to use In this case it is recommended that holes for screwing on the clamping strip are created with a diameter of d = 9 mm Equally the use of single-piece cover strips should be carefully considered
Visible screw fittings
bull Cover strips should be drilling with a round hole of d = 8 mm
Note
(see Note on covered screw fittings)
Visible recessed screw fittings
bull When creating visible recessed screw fittings a stepped bore is required The lower part of the cov-er strip should be drilled with a d = 7 mm diameter The upper part of the cover strip needs a d = 11 mm diameter for the screw head It is recommended to install a washer (PA washer eg Z 0033) with all screw fittings
S T A B A L U X
Stabalux H Processing notes 310718 56
Stabalux HProcessing notes
Fastenings
128
Screw fittings
Concealed screw fittings
Stabalux system screws with cylinder headd = 10 mm und 4 mm sealing gasket
eg Z 0331
Visible screw fittings
Stabalux system screws with cylinder headd = 10 mm und 4 mm sealing gasket
eg Z 0331
Visible recessed screw fittings
Stabalux system screws with cylinder head d = 10 mm with additional PA washer eg Z 731 with Z 33
eg Z 0331 eg Z 0731 with Z 0033
Attention
The calculation to determine screw lengths for the the calculation to determine screw lengths is
Glass thickness - 3 mm + inner seal (5 10 ie 12 mm) + 16 mm + e
e = statically required screw-in depth
Calculating the screw length for DL 5073 DL 6073
H_12_018dwg
H_12_019dwg
H_12_020dwg
S T A B A L U X
Stabalux H Processing notes 310718 57
Stabalux HProcessing notes
128
Calculating the screw length
System width 50 60 mm System width 80 mm 1)
H_12_021dwg
Screw fittings
1) Delivered upon request
Representation and item numbers are examples for System 60 System width 50 are analogous
S T A B A L U X
Stabalux H Processing notes 310718 58
Stabalux HProcessing notes
128
Wood screws for Stabalux H
Z0327 cylinder head screw 65 x 70 mm
Z0329 cylinder head screw 65 x 80 mm
Z0331 cylinder head screw 65 x 90 mm
Z0333 cylinder head screw 65 x 100 mm
Z0335 cylinder head screw 65 x 110 mm
Z0337 cylinder head screw 65 x 120 mm
Z0339 cylinder head screw 65 x 130 mm
Cylinder head screw empty 10 mm with hex socket | without sealing gasket
Z0727 cylinder head screw 65 x 70 mm
Z0729 cylinder head screw 65 x 80 mm
Z0731 cylinder head screw 65 x 90 mm
Z0733 cylinder head screw 65 x 100 mm
Z0735 cylinder head screw 65 x 110 mm
Z0737 cylinder head screw 65 x 120 mm
Z0033 PA washer empty 10 x 15 mm
Cylinder head screw empty 10 mm with hex socket | with sealing gasket
Screw fittings
H_12_019dwg
S T A B A L U X
Stabalux H Processing notes 310718 59
Stabalux HProcessing notes
Tips for laying the cover strip DL 5073 DL 6073
We assume that this cover strip will be used with glass panes that are supported on two sides and the recessed screw head is concealed In this case a cylinder head screw with inner hex is to be used eg Z 731 When cov-ering with a 2 mm cover plug Z 89 a bore depth of 7 mm is calculated
Depending on the precision of the bore it should be de-cided on case by case basis if any slight changes to this depth are necessary The cover plug Z 0089 does not need to be glued in place but may be levelled using lev-elling compound
Coating the cover strip
Profile production (aluminium extrusion moulding) with different mass distribution is extremely difficult Length-wise shadow formation may result Resulting actions are to be taken with the agreement of the coater
Flat cover strip DL 5073 DL 6073 129
glass support
eg GH 5053
+bolts and hardwood
cylinders
H_12_022dwg
Intersections
Due to the special shape of the strip (the material ex-tends into the rebate) there is no closed sealing section available at intersections We therefore recommend plac-ing particular attention to ensure tightness of the joints and fill will Stabalux connecting paste Z 0094
Glass supportsblocking
Special attention should be given to dimensional pro-portions To support the outer pane a sufficiently large glazing block must be installed that can carry the load to safely ensure the glass load is distributed effectively
DL 6073 Cover plug Z 0089GD 6174 Screw eg Z 0731
S T A B A L U X
Stabalux H Processing notes 310718 60
Stabalux HProcessing notes
Use of slab insulation
bull Using insulation blacks significantly reduces heat dissipation
bull The highly effective slab insulation has a perma-nently adhesive HOT-MELT
bull Depending on the situation where they are used insulation blocks can be directly applied to the cov-er strippressure profile or placed into the rebate over the screw fittings and pushed into position with the cover strippressure profile
1210
Slab insulation
Insulation block Width(Rebate)
Height
Z 0605 slab insulation 2042 20 mm 42 mm glass thickness from 44 mm
Z 0606 slab insulation 2026 20 mm 26 mm glass thickness from 28 mm
Z 0607 slab insulation 3042 30 mm 42 mm glass thickness from 44 mm
Z 0608 Insulation block 3026 30 mm 26 mm glass thickness from 28 mm
H_12_023dwg
Note
bull The use of slab insulation with cover strips DL 5073 DL 6073 should be tested for each individual sit-uation
bull 2-piece outer seals are always used with slab insu-lation blocks
bull With system width 80 mm and a 40 mm rebate 2 x 20 mm wide slab insulation blocks can be com-bined (40 mm wide insulation blocks available upon request)
bull for a glass inset of 15 mm outer seal GD 1932 bull for a glass inset of 20 mm outer seal GD 1932
Correctly position the seal flapwhen installing the insulation block
S T A B A L U X
Stabalux H Processing notes 310718 61
Stabalux HProcessing notes
1210
Slab insulation
Examples
H_12_023dwg
Z 0607Insulation block 3042
Z 0608Insulation block 3026
Z 0605Insulation block 2042
Z 0606Insulation block 2026
Z 0605Insulation block 2042
GD 1932
GD 1932
GD 1932
GD 1932
GD 1932
GD 1932
Z 0606Insulation block 2026
S T A B A L U X
Stabalux H Design 310718 62
Stabalux HDesign
Special design
Glass structures that partially refrain from using visible cover strips are considered special designs
These designs do not conform to the intended uses of the system No guarantees are made for eg quality of seals durability and structural stability Responsibility here lies entirely with the company implementing the design
Based on our experience we recommend paying close at-tention to the points made on the following pages during planning and implementation
131
Pane support variants
Mullion-transom structure 2-sided cover strip
H_13_001dwg
Mullion-transom structurewith transom cover strips 1)
1) Seals with 1 2 or 3 sections are possible
2) Use of mullion seals with 1 section in mullions and transoms
Section A-A Section C-C
Section B-B Section D-D
Mullion-transom structurewith mullion cover strips 2)
S T A B A L U X
Stabalux H Design 310718 63
Stabalux HDesign
131
Pane support variants
Transom structure mullion structure 2-sided cover strip
Vapour seal
When using this type of structure it is important to be aware that any loss of contact pressure can affect the room-side permeability There is an increased risk of con-densation build up in the rebate
vertical clamping strips
The glass supports should be placed to below the outer pane and sealed with it
horizontal clamping strips
Ventilation and condensation drainage is achieved via a recess in the lower sealing lip in the centre of the outer seal or at one third intervals
H_13_001dwg
Transom structure
Section A-A Section C-C
Section B-B Section D-D
Mullion structure
S T A B A L U X
Stabalux H Design 310718 64
Stabalux H
Requirements for special designs 1 Vapour seal
The room-side level of glazing must have the best possible vapour seal In this regard the vapour dif-fusion properties of the silicone sealant to be used should be tested Ensure that there are no permea-ble areas around concave cross joints
2 Rebate ventilation pressure equalisation and condensation drainage
Systems with partially sealed rebate represent a limitation to rebate ventilation Check on a case-by-case basis that no damage will be caused by standing condensation It is especially critical that designs with sealed vertical joints are evaluated To allow ventilation of the horizontal rebate we recom-mend installing a suitable vertical ventilation space Alternatively ventilation can be achieved using the outer joints
3 Weatherproofing
The outward facing seals must be watertight In cross joints it is especially important to ensure a firm join between the Stabalux profile seal and the silicone joints We recommend sealing up to the outer edge of the glass before mounting the cover stripsWe would like to once again emphasise that our profile seals will not make a permanent bond with commonly used silicone sealants A seal can only be created at contact points through permanent appli-cation of pressure
4 Mechanical strength screw fittings
Ensure screw fittings are sufficiently planned for Special attention should be given to the effects of wind suction and the reduced support
5 Glass weight distribution
Mechanical distribution of the weight of the glass panes through the structure must be ensured System glass supports can be used for existing horizontal transoms Designs using ldquoonlyrdquo mul-lions require special glass supports which carry the weight of the glass directly into the mullions
6 Glass sizing
Attention should be given to the reduced sup-port of panes when dimensioning the glass For example only the vertical or horizontal cov-er strips are effective in the event of wind suc-tion stresses or stress on the fall protection
7 Material compatibility
Compatibility of the silicone sealants with our profile sealants and the edge bonding of the glass must be ensured We recommend the exclusive use of tested silicone sealants from the whole-glass facades sec-tor Approval is usually given by the silicone manu-facturer
131
Pane support variants
H_13_001dwg
Design
S T A B A L U X
Stabalux H Design 310718 65
Stabalux H
System cross sections 132
Vertical glazing mullionsconcealed screw fittings
Vertical glazing transomsdivided outer seal for height compensation
Vertical glazing transoms visible recessed screw fittings
Vertical glazing mullionsvisible screw fittings
Vertical glazing transoms concealed screw fittingsStainless steel bottom strip fire seals
Vertical glazing transoms visible screw fittingsStainless steel cover stripfire seals
Inclined glazing mullionsconcealed screw fittings
Inclined glazing transomsvisible screw fittings
1
2
3
4
5
6
7
8
1 2
3 4
5 6
7 8
Examples
H_13_002dwg
Design
S T A B A L U X
Stabalux H Design 310718 66
Stabalux H
Creating facade corners
At exposed areas such as glass facade corners it is par-ticularly important to ensure sufficient heat insulation in order to avoid the creation of thermal bridges and pre-vent a build-up of condensation Thermal current calcula-tions provide information about the actual heat loss
133
System details
Special seal allow a polygon shaped arrangement of the facade mullions For convex glass surfaces an angle be-tween 3deg and 15deg can be freely chosen For concave glass surfaces the angle can vary between 3deg and 10deg
Facade polygon
Outer corner Inner corner
Geometrically check the feasibility Recommendation Use for system 60 and above
H_13_003dwg
H_13_004dwg
H_13_005dwg
Design
Calculation of screw length withconsideration of the angle
ATTENTIONAdhere to the minimum glass inset
S T A B A L U X
Stabalux H Design 310718 67
Stabalux H
133
System details
Eaves with glass roof connection
bull Depending on the construction of the transoms a design with or without rain gutters and the choice of stepped glazing or closable cover strips gives us different variants for implementation
bull All options require condensation and moisture to be drained away at the eaves
Design with stepped glazing
bull With a stepped glazing design it is important to se-lect a UV-resistant edge bonding for the glass This edge bonding systems usually silicone-based are quite permeable to gases and are therefore unable to achieve the required high values for sound and heat insulation of conventional systems and require additional sealing around the edges
Example 1
Design with stepped glazing
H_13_006dwg
Design
bull Our thermal calculations show that stepped glass panes compared to covered glass edges have a much less favourable isothermal movement
bull Stepped glass panes must also be statically meas-ured according to their reduced hold against wind suction
bull The additional thermal loads that occur in stepped glass panes should countered by the use of pre-ten-sioned glass (TVG ESG) for the outer panes
bull Stepped glass panes should be preferred for flatter inclined roofs as water can drain away at the eaves unhindered
S T A B A L U X
Stabalux H Design 310718 68
Stabalux HDesign
133
Eaves with glass roof connection Design using cover strips
bull Horizontal pressure strips prevent the free run off of rain water and dirt
bull Cover strips with angled edges reduce the build up of water in front of the cover strip
bull The outer sealing level on glass roofs must also be thoroughly sealed
bull In combination with our butyl clad stainless steel panels glazing with pressure strips on 4 sides achieves a higher level of safety
bull Make sure that the inner sealing section provides guaranteed drainage for condensation
bull To improve drainage and heat-induced expansion cover strips should be shortened by 5 mm at tran-som joints Gasket joints however are to be laid flat with a slight excess in dimensions Open ends of the transom cover strips must be sealed
Note
Due to the increased thermal stresses in the roof we rec-ommend using concealed screw fitting when choosing clamping strips for larger system lengths and in rafters Unused holes in the pressure profile must be sealed
Example 2
Design using cover strips
System details
H_13_007dwg
S T A B A L U X
Stabalux H Design 310718 69
Stabalux HDesign
133
Eaves with glass roof connection Design with gutter
bull The gutter must be able to take its own weight and mounted in such a way that stresses from its own weight water and ice will not lead to deformations and directly apply a load to the glazing
bull Overflowing water must not be able to get inside the structure Alongside the gutter-shaped outer rafter seal the moisture barrier installed over the guide plate also acts to drain away condensation
Example 3
Design with gutter
System details
H_13_008dwg
S T A B A L U X
Stabalux H Design 310718 70
Stabalux H
H_13_009dwg
Design
133
Roof ridge design
bull When designing the ridge cap ensure that the raft-er cover strips are pulled under the ridge cap
System details
S T A B A L U X
Stabalux H Design 310718 71
Stabalux HDesign
134
Structural attachments
Structural attachment film baffles
bull Attachment of glazing to the building structure re-quires a well thought out approach
bull Moisture damage can occur if moisture condenses at any thermal bridges
bull Thermal bridges must be avoided and warm air from the inside spaces must not penetrate too deeply into the structure
bull The required moisture barriers must be installed as deeply as possible into the inner space using impermeable structural film baffles This prevents moisture penetration into the structure via conden-sation from the air inside
bull An additional foil to seal against rainwater must be permeable to moisture Only if this foil has a wa-ter vapour diffusion resistance value μ of max μ = 3000 can a dry structure be guaranteed in the transition zones
S T A B A L U X
Stabalux H Design 310718 72
Stabalux HDesign
134
Structural attachments
Facade base
bull Controlled drainage of the rebate space can only be ensured if the sealing sections overlap in such a way that no moisture can get under the seals and foils
bull Run foils under the transom seal to act as a mois-ture barrier and glue to the wooden structure In accordance with DIN 18195 the seal should be run at least 150 mm above the water-guiding layer
bull Attach foil with moisture barrier in accordance with the requirements of DIN 18195
Example 1
Mounting intermediate mullion to base plate
Drainage of the base area is achieved via the seal flap towards the outside In this case the seal flap around the mullion at the base should not be released For edge mullions ensure there is a corresponding seal placed (continuous transom seal up the to the end point) and a constructive design of the drainage section
H_13_010dwg
S T A B A L U X
Stabalux H Design 310718 73
Stabalux HDesign
134
Facade base
bull Rebate space ventilation is achieved via the open end of the vertical cover strips
bull Ensure the connection is impermeable to vapourbull Mullion mountings must be sufficiently statically
dimensioned Required axis and edge distances for anchoring the base plates and in the building struc-ture must be observed
Example 2
Mounting intermediate mullion to base plate
Where seal flaps are interrupted by joints filler rods in the joint must also be cut
Structural attachments
H_13_011dwg
S T A B A L U X
Stabalux H Design 310718 74
Stabalux HDesign
134
Structural attachments
Facade base
bull Heat insulation around the structural connection should be designed in such as way as to prevent cold bridges forming
bull Steel parts should also be provided with sufficient protection against corrosion even in concealed ar-eas
bull Weather-protection sheets should be used depend-ing on the requirements of the construction Suffi-cient rear ventilation must be ensured
Example 3
Attaching intermediate mullions at base plates
H_13_012dwg
S T A B A L U X
Stabalux H Design 310718 75
Stabalux HDesign
134
Structural attachments
Connection before intermediate floors
bull Depending on requirements mullions are designed as continuous multi-span transoms or separated at each floor
bull Reasons for separating mullions can include eg building settlement fire protection sound insula-tion etc
bull If the separation joint is intended to absorb expan-sion then as well as the required degree of freedom for mullions the ability for movement of integrated elements must also be ensured
bull The constructive design of the mullion joint and mounting should be chosen according to the stat-ically calculated base system and determines the
Example
Mullions separated at each floor
In this example distribution of horizontal and vertical loads is achieved at each floor through the existing floor structure
H_13_013dwg
choice and arrangement of fixed and movable bear-ings type of screw fittings structural connection parts and attachment to the concrete floor
bull With continuous mullions and a corresponding mount the multi-span support principle is in effect Sagging due to horizontal effects is lower The re-quired moment of inertia reduces for 2-span sup-ports with the same span length compared to the 1-span support by a factor of 0415 However a ten-sion and stability analysis should be carried out
S T A B A L U X
Stabalux H Design 310718 76
Stabalux HDesign
134
Ceiling connection
bull Structural connections should take account of any movement that may occur
bull As well as temperature induced expansion in the facade all longitudinal expansions and movements of the affected components must be considered
bull Additional stresses from restraints must be avoid-ed
Structural attachments
H_13_014dwg
S T A B A L U X
Stabalux H Design 310718 77
Stabalux HDesign
134
Structural attachments
Facade connection to parapets
H_13_015dwg
S T A B A L U X
Stabalux H Design 310718 78
Stabalux HDesign
134
Structural attachments
Connection to structural eaves
bull This connection is suitable for glass roofs that are being installed as skylights in the structure These may be gabled roofs single pitch roofs pyramids or arched roofs
H_13_016dwg
S T A B A L U X
Stabalux H Design 310718 79
Stabalux HDesign
134
Structural attachments
Ridge connection to walls
bull When making ridge connections to walls permea-bility to moisture is particularly important Warm air with a high level of moisture gets into cooler zones of the inner sealing section where the design is not sufficiently sealed and can cause structural dam-age from penetrating into the connecting structure
bull Joint seals made from butyl-clad stainless steel plates (Z 0501 Z 0601) must be installed on the outside of joint areas
H_13_017dwg
S T A B A L U X
Stabalux H Design 310718 80
Stabalux HDesign
134
Structural attachments
Horizontal wall connection to heat insulation bonding system
H_13_018dwg
S T A B A L U X
Stabalux H Design 310718 81
Stabalux HDesign
135
Installing windows and doors
Mullion and transom facades and glass roofs from Stabalux are neutral with regards to the selection of in-sert elements All commonly available window and door systems made from steel aluminium wood or plastic can be used Frame profiles from the window and door man-ufacturerrsquos should be selected to match the chosen glass thickness If no profiles with a suitable insert rebate are available mountings may be used as shown in the fol-lowing examples Like with glass elements windows are set into the facade on glass supports padded and then secured against slippage
Insert window transom sectionSystem HUECK Series Lambda WS 075 IS
Insert window mullion sectionSystem HUECK Series Lambda WS 075 IS
H_13_019dwg
S T A B A L U X
Stabalux H Design 310718 82
Stabalux HDesign
135
Installing windows and doors
H_13_020dwg
Insert window transom sectionSystem HUECKSeries Lambda WS 075
Insert window mullion sectionSystem HUECKSeries Lambda WS 075
S T A B A L U X
Stabalux H Design 310718 83
Stabalux HDesign
135
Installing windows and doors
H_13_021dwg
Insert door outward transom sectionSystem HUECKSeries Lambda DS 075
Insert door outward transom sectionSystem HUECKSeries Lambda DS 075
Insert window mullion sectionSystem HUECKSeries Lambda WS 075
S T A B A L U X
Stabalux H Design 310718 84
Stabalux HDesign
135
Installing windows and doors
H_13_022dwg
Insert door inward in the transom sectionSystem HUECKSeries Lambda DS 075
Insert door inward in the transom sectionSystem HUECKSeries Lambda DS 075
S T A B A L U X
Stabalux H Design 310718 85
Stabalux HDesign
135
Installing windows and doors
H_13_023dwg
Insert door inward in the transom sectionSystem HUECKSeries Lambda DS 075
Insert-top-hung window mullion section System HUECKSeries Lambda 110
Insert-top-hung window transom section System HUECKSeries Lambda 110
S T A B A L U X
Stabalux H Design 310718 86
Stabalux HDesign
135
Installing windows and doors
H_13_024dwg
Sliding system mullion section System HUECKSeries Volato M
Sliding system transom sectionSystem HUECKSerie sVolato M
S T A B A L U X
Stabalux H Design 310718 87
Stabalux HDesign
135
Installing windows and doors
H_13_025dwg
Flush roof surface windowSystem HUECK-HARTMANNSeries 85E
Powered according tosystem specifications
S T A B A L U X
Stabalux H Design 310718 88
Stabalux HDesign
135
Installing windows and doors
H_13_027dwg
Insert window - transom sections wood windows
Insert window - mullion sectionwood windows
- Stabalux H
-
- System
-
- System properties
- System cross sections and inner seals - facade
- System cross sections and inner seals - roof
- Cover strips and outer seals
-
- Processing notes
-
- Material information
- Profile design
- Mullion-transom joint
- Tips for laying seals
- Seals - Facade
- Seals - roof
- Glass inset and glass support
- Screw fittings
- Flat cover strip DL 5073 DL 6073
- Slab insulation
-
- Design
-
- Pane support variants
- System cross sections
- System details
- Structural attachments
- Installing windows and doors
-
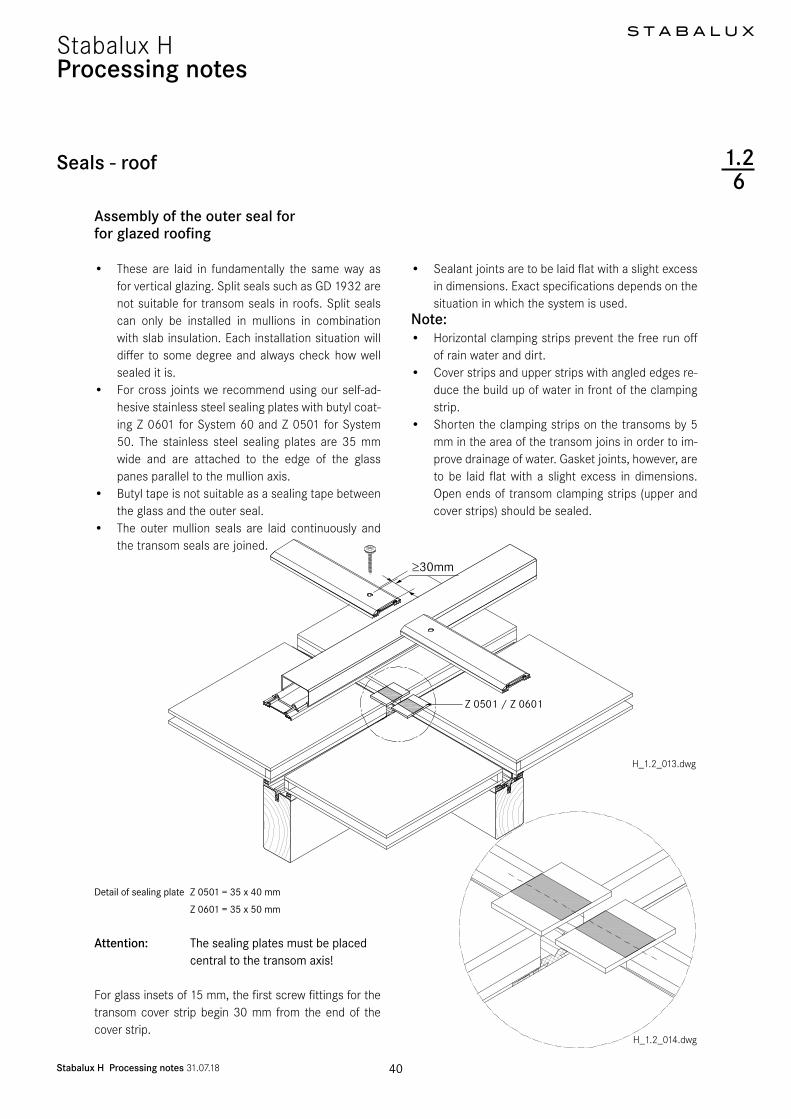
S T A B A L U X
Stabalux H Design 310718 76
Stabalux HDesign
134
Ceiling connection
bull Structural connections should take account of any movement that may occur
bull As well as temperature induced expansion in the facade all longitudinal expansions and movements of the affected components must be considered
bull Additional stresses from restraints must be avoid-ed
Structural attachments
H_13_014dwg
S T A B A L U X
Stabalux H Design 310718 77
Stabalux HDesign
134
Structural attachments
Facade connection to parapets
H_13_015dwg
S T A B A L U X
Stabalux H Design 310718 78
Stabalux HDesign
134
Structural attachments
Connection to structural eaves
bull This connection is suitable for glass roofs that are being installed as skylights in the structure These may be gabled roofs single pitch roofs pyramids or arched roofs
H_13_016dwg
S T A B A L U X
Stabalux H Design 310718 79
Stabalux HDesign
134
Structural attachments
Ridge connection to walls
bull When making ridge connections to walls permea-bility to moisture is particularly important Warm air with a high level of moisture gets into cooler zones of the inner sealing section where the design is not sufficiently sealed and can cause structural dam-age from penetrating into the connecting structure
bull Joint seals made from butyl-clad stainless steel plates (Z 0501 Z 0601) must be installed on the outside of joint areas
H_13_017dwg
S T A B A L U X
Stabalux H Design 310718 80
Stabalux HDesign
134
Structural attachments
Horizontal wall connection to heat insulation bonding system
H_13_018dwg
S T A B A L U X
Stabalux H Design 310718 81
Stabalux HDesign
135
Installing windows and doors
Mullion and transom facades and glass roofs from Stabalux are neutral with regards to the selection of in-sert elements All commonly available window and door systems made from steel aluminium wood or plastic can be used Frame profiles from the window and door man-ufacturerrsquos should be selected to match the chosen glass thickness If no profiles with a suitable insert rebate are available mountings may be used as shown in the fol-lowing examples Like with glass elements windows are set into the facade on glass supports padded and then secured against slippage
Insert window transom sectionSystem HUECK Series Lambda WS 075 IS
Insert window mullion sectionSystem HUECK Series Lambda WS 075 IS
H_13_019dwg
S T A B A L U X
Stabalux H Design 310718 82
Stabalux HDesign
135
Installing windows and doors
H_13_020dwg
Insert window transom sectionSystem HUECKSeries Lambda WS 075
Insert window mullion sectionSystem HUECKSeries Lambda WS 075
S T A B A L U X
Stabalux H Design 310718 83
Stabalux HDesign
135
Installing windows and doors
H_13_021dwg
Insert door outward transom sectionSystem HUECKSeries Lambda DS 075
Insert door outward transom sectionSystem HUECKSeries Lambda DS 075
Insert window mullion sectionSystem HUECKSeries Lambda WS 075
S T A B A L U X
Stabalux H Design 310718 84
Stabalux HDesign
135
Installing windows and doors
H_13_022dwg
Insert door inward in the transom sectionSystem HUECKSeries Lambda DS 075
Insert door inward in the transom sectionSystem HUECKSeries Lambda DS 075
S T A B A L U X
Stabalux H Design 310718 85
Stabalux HDesign
135
Installing windows and doors
H_13_023dwg
Insert door inward in the transom sectionSystem HUECKSeries Lambda DS 075
Insert-top-hung window mullion section System HUECKSeries Lambda 110
Insert-top-hung window transom section System HUECKSeries Lambda 110
S T A B A L U X
Stabalux H Design 310718 86
Stabalux HDesign
135
Installing windows and doors
H_13_024dwg
Sliding system mullion section System HUECKSeries Volato M
Sliding system transom sectionSystem HUECKSerie sVolato M
S T A B A L U X
Stabalux H Design 310718 87
Stabalux HDesign
135
Installing windows and doors
H_13_025dwg
Flush roof surface windowSystem HUECK-HARTMANNSeries 85E
Powered according tosystem specifications
S T A B A L U X
Stabalux H Design 310718 88
Stabalux HDesign
135
Installing windows and doors
H_13_027dwg
Insert window - transom sections wood windows
Insert window - mullion sectionwood windows
- Stabalux H
-
- System
-
- System properties
- System cross sections and inner seals - facade
- System cross sections and inner seals - roof
- Cover strips and outer seals
-
- Processing notes
-
- Material information
- Profile design
- Mullion-transom joint
- Tips for laying seals
- Seals - Facade
- Seals - roof
- Glass inset and glass support
- Screw fittings
- Flat cover strip DL 5073 DL 6073
- Slab insulation
-
- Design
-
- Pane support variants
- System cross sections
- System details
- Structural attachments
- Installing windows and doors
-
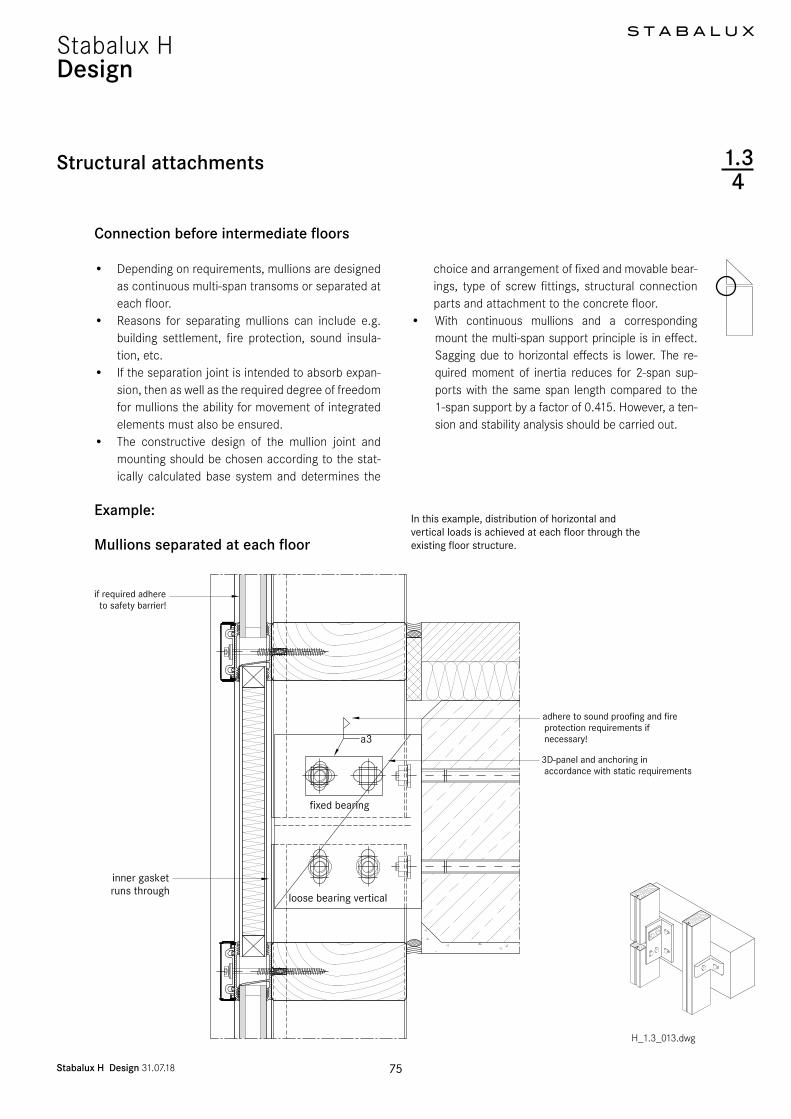
S T A B A L U X
Stabalux H Design 310718 77
Stabalux HDesign
134
Structural attachments
Facade connection to parapets
H_13_015dwg
S T A B A L U X
Stabalux H Design 310718 78
Stabalux HDesign
134
Structural attachments
Connection to structural eaves
bull This connection is suitable for glass roofs that are being installed as skylights in the structure These may be gabled roofs single pitch roofs pyramids or arched roofs
H_13_016dwg
S T A B A L U X
Stabalux H Design 310718 79
Stabalux HDesign
134
Structural attachments
Ridge connection to walls
bull When making ridge connections to walls permea-bility to moisture is particularly important Warm air with a high level of moisture gets into cooler zones of the inner sealing section where the design is not sufficiently sealed and can cause structural dam-age from penetrating into the connecting structure
bull Joint seals made from butyl-clad stainless steel plates (Z 0501 Z 0601) must be installed on the outside of joint areas
H_13_017dwg
S T A B A L U X
Stabalux H Design 310718 80
Stabalux HDesign
134
Structural attachments
Horizontal wall connection to heat insulation bonding system
H_13_018dwg
S T A B A L U X
Stabalux H Design 310718 81
Stabalux HDesign
135
Installing windows and doors
Mullion and transom facades and glass roofs from Stabalux are neutral with regards to the selection of in-sert elements All commonly available window and door systems made from steel aluminium wood or plastic can be used Frame profiles from the window and door man-ufacturerrsquos should be selected to match the chosen glass thickness If no profiles with a suitable insert rebate are available mountings may be used as shown in the fol-lowing examples Like with glass elements windows are set into the facade on glass supports padded and then secured against slippage
Insert window transom sectionSystem HUECK Series Lambda WS 075 IS
Insert window mullion sectionSystem HUECK Series Lambda WS 075 IS
H_13_019dwg
S T A B A L U X
Stabalux H Design 310718 82
Stabalux HDesign
135
Installing windows and doors
H_13_020dwg
Insert window transom sectionSystem HUECKSeries Lambda WS 075
Insert window mullion sectionSystem HUECKSeries Lambda WS 075
S T A B A L U X
Stabalux H Design 310718 83
Stabalux HDesign
135
Installing windows and doors
H_13_021dwg
Insert door outward transom sectionSystem HUECKSeries Lambda DS 075
Insert door outward transom sectionSystem HUECKSeries Lambda DS 075
Insert window mullion sectionSystem HUECKSeries Lambda WS 075
S T A B A L U X
Stabalux H Design 310718 84
Stabalux HDesign
135
Installing windows and doors
H_13_022dwg
Insert door inward in the transom sectionSystem HUECKSeries Lambda DS 075
Insert door inward in the transom sectionSystem HUECKSeries Lambda DS 075
S T A B A L U X
Stabalux H Design 310718 85
Stabalux HDesign
135
Installing windows and doors
H_13_023dwg
Insert door inward in the transom sectionSystem HUECKSeries Lambda DS 075
Insert-top-hung window mullion section System HUECKSeries Lambda 110
Insert-top-hung window transom section System HUECKSeries Lambda 110
S T A B A L U X
Stabalux H Design 310718 86
Stabalux HDesign
135
Installing windows and doors
H_13_024dwg
Sliding system mullion section System HUECKSeries Volato M
Sliding system transom sectionSystem HUECKSerie sVolato M
S T A B A L U X
Stabalux H Design 310718 87
Stabalux HDesign
135
Installing windows and doors
H_13_025dwg
Flush roof surface windowSystem HUECK-HARTMANNSeries 85E
Powered according tosystem specifications
S T A B A L U X
Stabalux H Design 310718 88
Stabalux HDesign
135
Installing windows and doors
H_13_027dwg
Insert window - transom sections wood windows
Insert window - mullion sectionwood windows
- Stabalux H
-
- System
-
- System properties
- System cross sections and inner seals - facade
- System cross sections and inner seals - roof
- Cover strips and outer seals
-
- Processing notes
-
- Material information
- Profile design
- Mullion-transom joint
- Tips for laying seals
- Seals - Facade
- Seals - roof
- Glass inset and glass support
- Screw fittings
- Flat cover strip DL 5073 DL 6073
- Slab insulation
-
- Design
-
- Pane support variants
- System cross sections
- System details
- Structural attachments
- Installing windows and doors
-
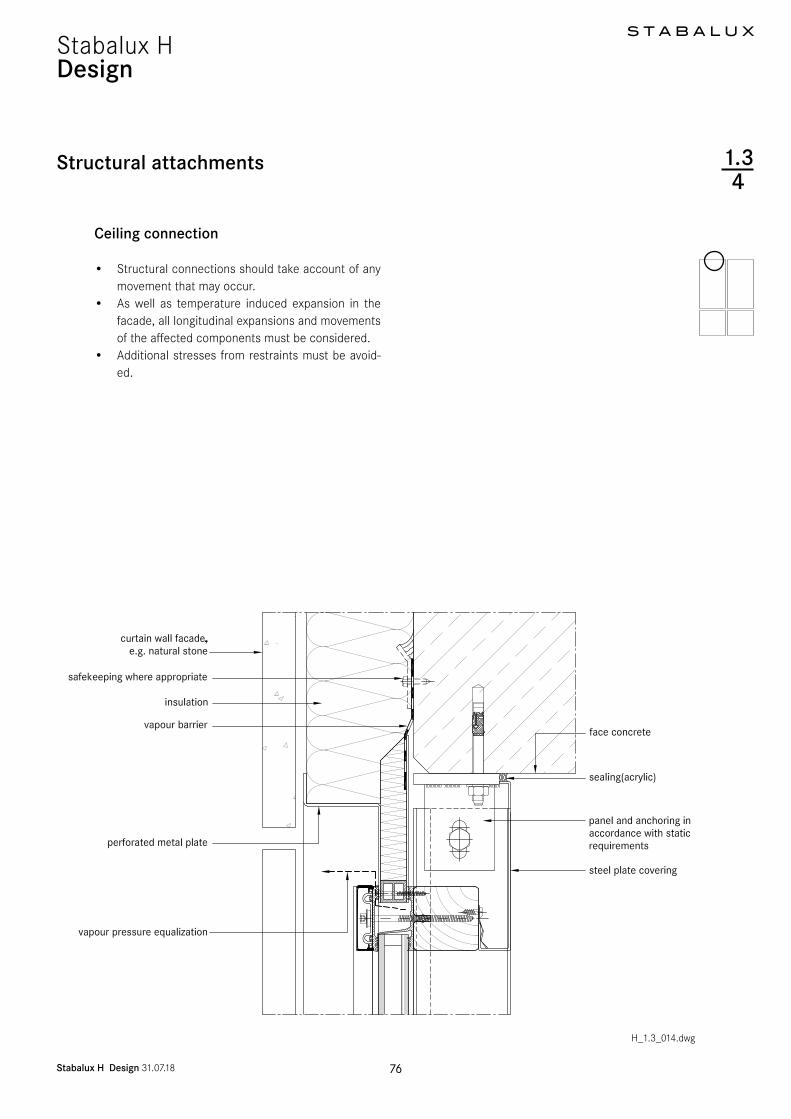
S T A B A L U X
Stabalux H Design 310718 88
Stabalux HDesign
135
Installing windows and doors
H_13_027dwg
Insert window - transom sections wood windows
Insert window - mullion sectionwood windows
- Stabalux H
-
- System
-
- System properties
- System cross sections and inner seals - facade
- System cross sections and inner seals - roof
- Cover strips and outer seals
-
- Processing notes
-
- Material information
- Profile design
- Mullion-transom joint
- Tips for laying seals
- Seals - Facade
- Seals - roof
- Glass inset and glass support
- Screw fittings
- Flat cover strip DL 5073 DL 6073
- Slab insulation
-
- Design
-
- Pane support variants
- System cross sections
- System details
- Structural attachments
- Installing windows and doors
-
Related Documents


