AnyConnect VPN (SSL) Client on IOS Router with CCP Configuration Example Document ID: 110608 Contents Introduction Prerequisites Requirements Components Used Conventions Network Diagram Preconfiguration Tasks Configure Anyconnect VPN on IOS Step 1. Install and Enable the Anyconnect VPN Software on the IOS Router Step 2. Configure a SSLVPN Context and SSLVPN Gateway with the CCP Wizard Step 3. Configure the User Database for Anyconnect VPN Users Step 4. Configure the Anyconnect Full Tunnel CLI Configuration Establish the AnyConnect VPN Client Connection Verify Commands Troubleshoot SSL Connectivity Issue Error: SSLVPN Package SSL-VPN-Client : installed Error: Disk Troubleshooting Commands Related Information Introduction This document describes how to set up a Cisco IOS ® router to perform SSL VPN on a stick with Cisco AnyConnect VPN client using Cisco Configuration Professional (CCP). This setup applies to a specific case where the Router does not allow split tunneling, and users connect directly to the Router before they are permitted to go to the Internet. SSL VPN or WebVPN technology is supported on these IOS router platforms: 870, 1811, 1841, 2801, 2811, 2821, 2851 • 3725, 3745, 3825, 3845, 7200, and 7301 • CCP is a GUI-based device management tool that allows you to configure Cisco IOS-based access routers, including Cisco integrated services routers, Cisco 7200 series routers, and the Cisco 7301 router. CCP is installed on a PC and simplifies router, security, unified communications, wireless, WAN, and basic LAN configuration through GUI-based, easy-to-use wizards. Routers that are ordered with CCP are shipped with Cisco Configuration Professional Express (CCP Express) installed in router flash memory. CCP Express is a lightweight version of CCP. You can use CCP Express to configure basic security features on the router's LAN and WAN interfaces. CCP Express is available on the router flash memory.

Welcome message from author
This document is posted to help you gain knowledge. Please leave a comment to let me know what you think about it! Share it to your friends and learn new things together.
Transcript

AnyConnect VPN (SSL) Client on IOS Router withCCP Configuration Example
Document ID: 110608
Contents
IntroductionPrerequisites Requirements Components Used Conventions Network Diagram Preconfiguration TasksConfigure Anyconnect VPN on IOS Step 1. Install and Enable the Anyconnect VPN Software on the IOS Router Step 2. Configure a SSLVPN Context and SSLVPN Gateway with the CCP Wizard Step 3. Configure the User Database for Anyconnect VPN Users Step 4. Configure the Anyconnect Full Tunnel CLI Configuration Establish the AnyConnect VPN Client ConnectionVerify CommandsTroubleshoot SSL Connectivity Issue Error: SSLVPN Package SSL−VPN−Client : installed Error: Disk Troubleshooting CommandsRelated Information
Introduction
This document describes how to set up a Cisco IOS® router to perform SSL VPN on a stick with CiscoAnyConnect VPN client using Cisco Configuration Professional (CCP). This setup applies to a specific casewhere the Router does not allow split tunneling, and users connect directly to the Router before they arepermitted to go to the Internet.
SSL VPN or WebVPN technology is supported on these IOS router platforms:
870, 1811, 1841, 2801, 2811, 2821, 2851• 3725, 3745, 3825, 3845, 7200, and 7301•
CCP is a GUI−based device management tool that allows you to configure Cisco IOS−based access routers,including Cisco integrated services routers, Cisco 7200 series routers, and the Cisco 7301 router. CCP isinstalled on a PC and simplifies router, security, unified communications, wireless, WAN, and basic LANconfiguration through GUI−based, easy−to−use wizards.
Routers that are ordered with CCP are shipped with Cisco Configuration Professional Express (CCP Express)installed in router flash memory. CCP Express is a lightweight version of CCP. You can use CCP Express toconfigure basic security features on the router's LAN and WAN interfaces. CCP Express is available on therouter flash memory.

Prerequisites
Requirements
Ensure that you meet these requirements before you attempt this configuration:
Microsoft Windows 2000 or XP• Web Browser with SUN JRE 1.4 or later or an ActiveX controlled browser• Local administrative privileges on the client• Cisco IOS Router with Advanced Security image −12.4(20)T or later• Cisco Configuration Professional 1.3
If the Cisco Configuration Professional is not already loaded on your computer, you can obtain a freecopy of the software and install the .exe (cisco−config−pro−k9−pkg−1_3−en.zip) file from SoftwareDownload. For detailed information on the installation and configuration of CCP, refer to CiscoConfiguration Professional Quick Start Guide.
•
Components Used
The information in this document is based on these software and hardware versions:
Cisco IOS Series 1841 Router with software version 12.4(24)T• Cisco Configuration Professional (CCP) 1.3• Cisco AnyConnect SSL VPN Client version for Windows 2.3.2016•
Note: The information in this document was created from devices in a specific lab environment. All of thedevices used in this document started with a cleared (default) configuration. If your network is live, make surethat you understand the potential impact of any command.
Conventions
Refer to the Cisco Technical Tips Conventions for more information on document conventions.
Network Diagram
This document uses this network setup:
Preconfiguration Tasks
You must configure the router for CCP.1.

Routers with the appropriate security bundle license already have the CCP application loaded in flash.Refer to Cisco Configuration Professional Quick Start Guide to obtain and configure the software.Download a copy of the Anyconnect VPN .pkg file to your management PC.2.
Configure Anyconnect VPN on IOS
In this section, you are presented with the steps necessary to configure the features described in thisdocument. This example configuration uses the CCP Wizard to enable the operation of the Anyconnect VPNon the IOS router.
Complete these steps in order to configure Anyconnect VPN on the Cisco IOS router:
Install and Enable the Anyconnect VPN Software on the Cisco IOS Router1. Configure a SSL VPN Context and SSL VPN Gateway with the CCP Wizard2. Configure the User Database for Anyconnect VPN Users3. Configure the Resources to Expose to Users4.
Step 1. Install and Enable the Anyconnect VPN Software on the IOSRouter
To install and enable the Anyconnect VPN software on the IOS router, complete these steps:
Open the CCP application, go to Configure > Security, and then click VPN.1. Expand SSLVPN, and choose Packages.2.
In the Cisco SSLVPN client software, click Browse.
The Install SSL VPN Client Package dialog box appears.
3.

Specify the location of the Cisco Anyconnect VPN client image.
If the Cisco Anyconnect VPN client image is in the router's flash, click the Router FileSystem radio button dialog box, and click Browse.
♦
If the Cisco Anyconnect VPN client image is not in the router's flash, click the MyComputer radio dialog box, and click Browse.
♦
The File Selection dialog box appears.
4.
Select the client image that you want to install, and click OK.5.

Once you specify the location of the client image, click Install.6. Click Yes, and then click OK.7. Once the client image is successfully installed, you receive this message:8.
Click OK to continue.9.
Step 2. Configure a SSLVPN Context and SSLVPN Gateway with the CCPWizard
Complete these steps in order to configure a SSL VPN context and SSL VPN gateway:
Go to Configure > Security > VPN, and then click SSL VPN.1. Click SSL VPN Manager, and click the Create SSL VPN tab.2.
Check the Create a New SSL VPN radio button, and then click Launch the selected task.
The SSL VPN Wizard dialog box appears.
3.

Click Next.4.
Enter the IP Address of the new SSL VPN gateway, and enter a unique name for this SSL VPNcontext.
5.

You can create different SSL VPN contexts for the same IP address (SSL VPN gateway), but eachname must be unique. This example uses this IP address: https://172.16.1.1/Click Next, and continue to Step 3.6.
Step 3. Configure the User Database for Anyconnect VPN Users
For authentication, you can use an AAA Server, local users, or both. This configuration example uses locallycreated users for authentication.
Complete these steps in order to configure the user database for Anyconnect VPN users:
After you complete Step 2, click the Locally on this router radio button located in the SSL VPNWizard User Authentication dialog box.
This dialog box allows you to add users to the local database.
1.
Click Add, and enter user information.2.

Click OK, and add additional users as necessary.3. After you add the necessary users, click Next, and continue to Step 4.4.
Step 4. Configure the Anyconnect Full Tunnel
Complete these steps in order to configure the Anyconnect full tunnel and pool of ip addresses for the users:
As Anyconnect gives the direct access to corporate intranet resources, the URL list is not needed toconfigure. Click the Next button located in the Configure Intranet Websites dialog box.
1.

Verify that the Enable Full Tunnel check box is checked.2.
Create a pool of IP addresses that clients of this SSL VPN context can use.
The pool of addresses must correspond to addresses available and routable on your Intranet.
3.
Click the ellipses (...) next to the IP Address Pool field, and choose Create a new IP Pool.4.

In the Add IP Local Pool dialog box, enter a namefor the pool (for example, new), and click Add.5.
In the Add IP address range dialog box, enter the address pool range for the Anyconnect VPN clients,and click OK.
Note: Before 12.4(20)T, the IP address pool should be in a range of an interface directly connected tothe router. If you want to use a different pool range, you can create a loopback address associated withyour new pool to satisfy this requirement. .
6.
Click OK.7. Make sure to check the Install Full Tunnel Client check box.8.
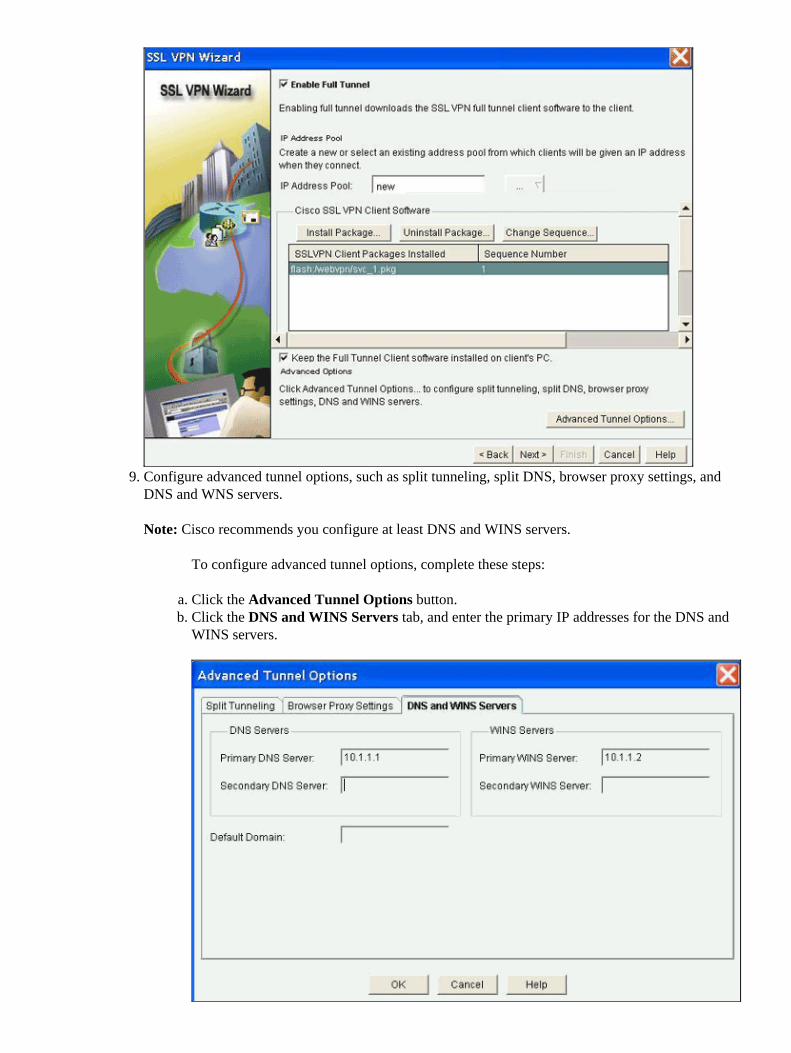
Configure advanced tunnel options, such as split tunneling, split DNS, browser proxy settings, andDNS and WNS servers.
Note: Cisco recommends you configure at least DNS and WINS servers.
To configure advanced tunnel options, complete these steps:
Click the Advanced Tunnel Options button.a. Click the DNS and WINS Servers tab, and enter the primary IP addresses for the DNS andWINS servers.
b.
9.

To configure split tunneling, click the Split Tunneling tab.
The ability to transmit both secured and unsecured traffic on the same interface is known assplit tunneling. Split tunneling requires that you specify exactly which traffic is secured andwhat the destination of that traffic is, so that only the specified traffic enters the tunnel whilethe rest is transmitted unencrypted across the public network (Internet).
For example, refer to ASA 8.x : Allow Split Tunneling for AnyConnect VPN Client on theASA Configuration Example which provides step−by−step instructions on how to allowCisco AnyConnect VPN client access to the Internet while they are tunneled into a CiscoAdaptive Security Appliance (ASA) 8.0.2.
c.
After you configure the necessary options, click Next.10. Customize the SSL VPN Portal Page or select the default values.
The Customize SSL VPN Portal Page allows you to customize how the SSL VPN Portal Page appearsto your customers.
11.

After you customize the SSL VPN portal page, click Next.12. Click Finish.13.
Click Deliver in order to save your configuration, and then click OK.
The SSL VPN Wizard submits tour commands to the router.
14.

Note: If you receive an error message, the SSL VPN license may be incorrect.
To correct a license issue, complete these steps:
Go to Configure > Security > VPN, and then click SSL VPN.a. Click SSL VPN Manager, and then click the Edit SSL VPN tab in the right hand side.b.
Highlight your newly created context, and click the Edit button.c.

In the Maximum Number of users field, enter the correct number of users for your license.d. Click OK, and then click Deliver.
Your commands are written to the configuration file.
e.
CLI Configuration
CCP creates these command−line configurations:
Router
Router#show runBuilding configuration...
Current configuration : 4110 bytes!version 12.4service timestamps debug datetime msecservice timestamps log datetime msecno service password−encryption!hostname Router!boot−start−markerboot−end−marker!logging message−counter syslogno logging bufferedenable password cisco!aaa new−model!

!aaa authentication login default localaaa authentication login ciscocp_vpn_xauth_ml_1 localaaa authorization exec default local!!aaa session−id common!crypto pki trustpoint TP−self−signed−1951692551 enrollment selfsigned subject−name cn=IOS−Self−Signed−Certificate−1951692551 revocation−check none rsakeypair TP−self−signed−1951692551!!crypto pki certificate chain TP−self−signed−1951692551 certificate self−signed 02 3082023E 308201A7 A0030201 02020102 300D0609 2A864886 F70D0101 04050030 31312F30 2D060355 04031326 494F532D 53656C66 2D536967 6E65642D 43657274 69666963 6174652D 31393531 36393235 3531301E 170D3039 30383037 31303538 33345A17 0D323030 31303130 30303030 305A3031 312F302D 06035504 03132649 4F532D53 656C662D 5369676E 65642D43 65727469 66696361 74652D31 39353136 39323535 3130819F 300D0609 2A864886 F70D0101 01050003 818D0030 81890281 8100CD40 156E21C4 4F84401A F5674319 CC05B708 72A79C69 90997D30 6F556A37 75FC53DA AB0B43AF 70E7DBC2 C9416C4B 009C3695 67C20847 4F0BC7B0 715F0518 5E558DFC 13A20167 5D169C47 3BC083C9 A2B66790 79B83814 5008EBF6 169FA897 6D955F46 2BDADBB0 5275F07E C124CCF3 64DD9CE1 1B6F5744 282E4EA5 A0840385 5FD90203 010001A3 66306430 0F060355 1D130101 FF040530 030101FF 30110603 551D1104 0A300882 06526F75 74657230 1F060355 1D230418 30168014 05F279A9 C556AF46 C5F7A1F0 2ADD2D22 F75BF7B7 301D0603 551D0E04 16041405 F279A9C5 56AF46C5 F7A1F02A DD2D22F7 5BF7B730 0D06092A 864886F7 0D010104 05000381 81004886 D666121E 42862509 CA7FDACC 9C57C8BE EB6745FC 533A8C08 FEF2C007 274374EE 803823FB 79CFD135 2B116544 88B5CFB1 B7BB03E2 F3D65A62 B0EE050A 924D3168 98357A5B E1F15449 5C9C22D0 577FB036 A3D8BB08 5507C574 18F2F48F 0694F21C 0983F254 6620FCD7 8E460D29 B09B87E8 ADC3D589 F4D74659 A5CEA30F 1A9C quitdot11 syslogip source−route!!!!ip cef!multilink bundle−name authenticated!!!username test privilege 15 password 0 testusername tsweb privilege 15 password 0 tsweb!!!archive log config hidekeys!!!!!!interface FastEthernet0/0 ip address 10.77.241.111 255.255.255.192 duplex auto speed auto

!interface FastEthernet0/1 description $ES_LAN$ ip address 172.16.1.1 255.255.255.0 ip virtual−reassembly duplex auto speed auto!interface FastEthernet0/1/0!interface FastEthernet0/1/1!interface FastEthernet0/1/2!interface FastEthernet0/1/3!interface ATM0/0/0 no ip address shutdown no atm ilmi−keepalive!interface Vlan1 no ip address!ip local pool new 192.168.10.1 192.168.10.10ip forward−protocol ndip route 10.20.10.0 255.255.255.0 172.16.1.2ip route 10.77.233.0 255.255.255.0 10.77.241.65ip http serverip http authentication localip http secure−server!!!!!!!!control−plane!!line con 0line aux 0line vty 0 4 password cisco transport input telnet ssh transport output telnet!scheduler allocate 20000 1000!webvpn gateway gateway_1 ip address 172.16.1.1 port 443 http−redirect port 80 ssl trustpoint TP−self−signed−1951692551 inservice !webvpn install svc flash:/webvpn/svc_1.pkg sequence 1 !webvpn context sales secondary−color white title−color #CCCC66 text−color black ssl authenticate verify all
!
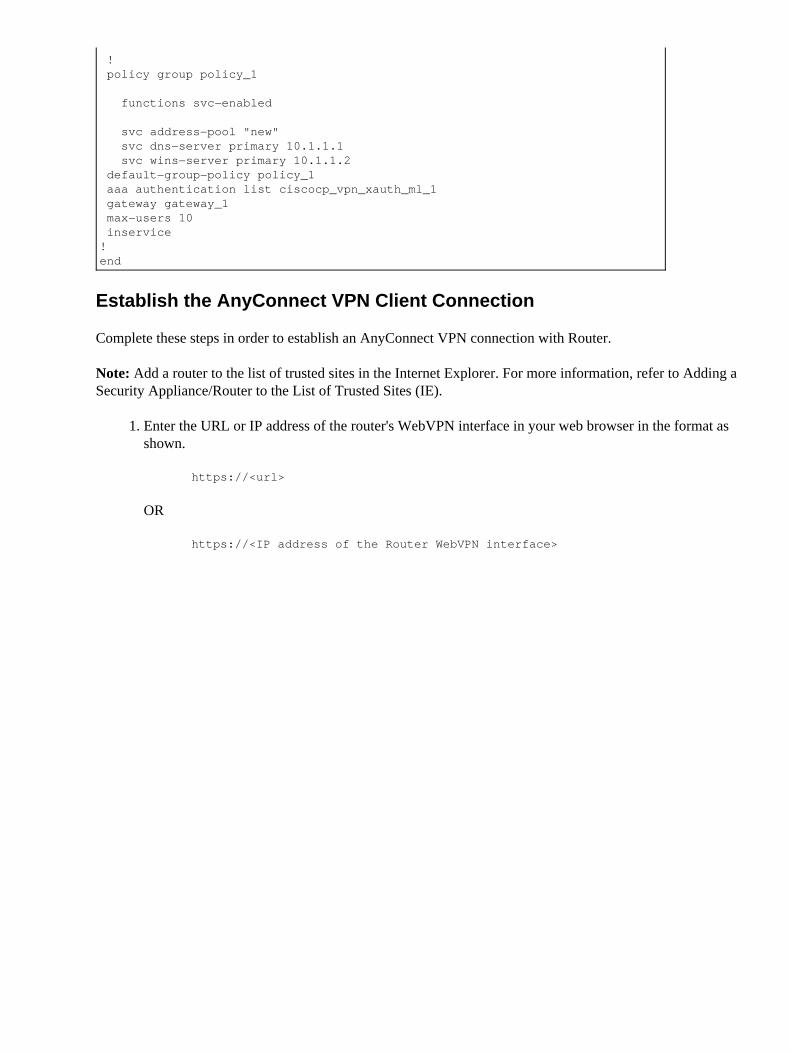
! policy group policy_1
functions svc−enabled
svc address−pool "new" svc dns−server primary 10.1.1.1 svc wins−server primary 10.1.1.2 default−group−policy policy_1 aaa authentication list ciscocp_vpn_xauth_ml_1 gateway gateway_1 max−users 10 inservice!end
Establish the AnyConnect VPN Client Connection
Complete these steps in order to establish an AnyConnect VPN connection with Router.
Note: Add a router to the list of trusted sites in the Internet Explorer. For more information, refer to Adding aSecurity Appliance/Router to the List of Trusted Sites (IE).
Enter the URL or IP address of the router's WebVPN interface in your web browser in the format asshown.
https://<url>
OR
https://<IP address of the Router WebVPN interface>
1.

Enter your user name and password.2.
Click the start button to initiate the Anyconnect VPN Tunnel Connection.3.
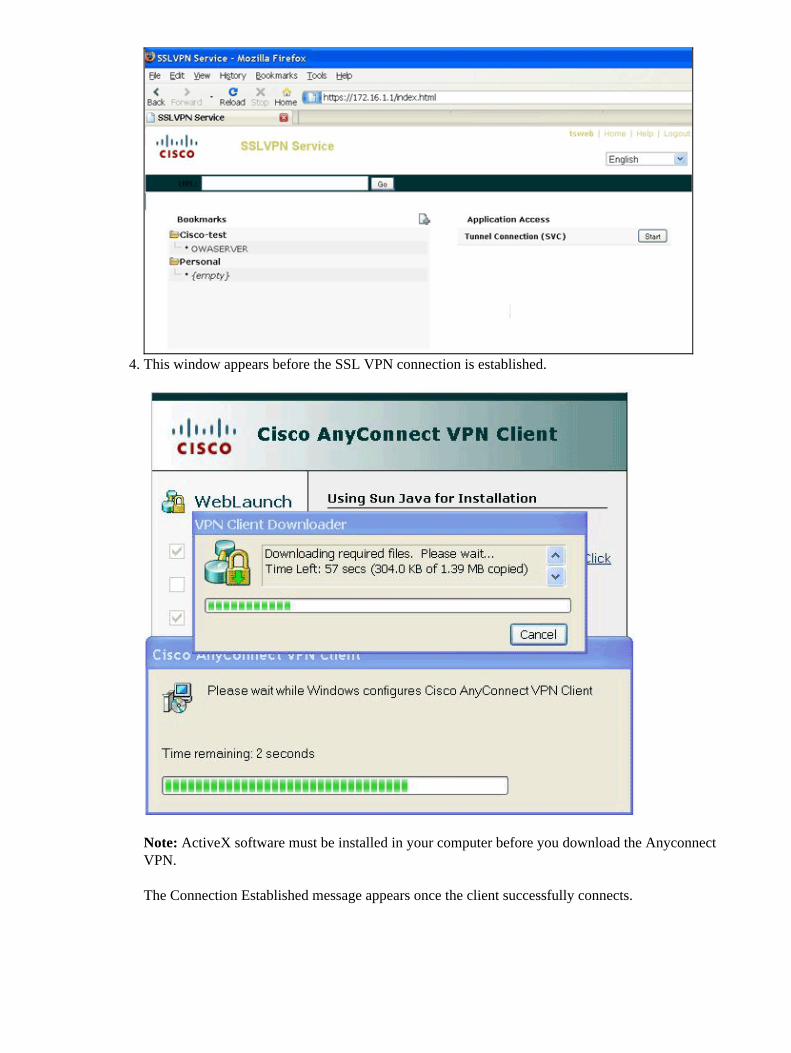
This window appears before the SSL VPN connection is established.
Note: ActiveX software must be installed in your computer before you download the AnyconnectVPN.
The Connection Established message appears once the client successfully connects.
4.

Once the connection is successfully established, click the Statistics tab.
The Statistics tab displays information about the SSL connection.
5.
Click Details.6.

The Cisco AnyConnect VPN Client: Statistics Detail dialog box appears.
The Statistics Details dialog box displays detailed connection statistical information, including thetunnel state and mode, the duration of the connection, the number of bytes and frames sent andreceived, address information, transport information, and Cisco Secure Desktop posture assessmentstatus. The Reset button on this tab resets the transmission statistics. The Export button allows you toexport the current statistics, interface, and routing table to a text file. The AnyConnect client promptsyou for a name and location for the text file. The default name is AnyConnect−ExportedStats.txt, andthe default location is on the desktop.In the Cisco AnyConnect VPN Client dialog box, click the About tab.
This tab displays the Cisco AnyConnect VPN Client Version information.
7.

Verify
Use this section to confirm that your configuration works properly.
Commands
Several show commands are associated with WebVPN. You can execute these commands at thecommand−line interface (CLI) to show statistics and other information. For detailed information about showcommands, refer to Verifying WebVPN Configuration.
Note: The Output Interpreter Tool (registered customers only) (OIT) supports certain show commands. Usethe OIT to view an analysis of show command output.
Router#show webvpn session context allWebVPN context name: salesClient_Login_Name Client_IP_Address No_of_Connections Created Last_Usedtest 10.20.10.2 3 00:03:10 00:02:56
•
Router#show webvpn session user test context salesWebVPN user name = test ; IP address = 10.20.10.2 ; context = sales No of connections: 0 Created 00:26:05, Last−used 00:25:24 User Policy Parameters Group name = policy_1 Group Policy Parameters url list name = "webserver" idle timeout = 2100 sec session timeout = Disabled functions = mask−urls svc−enabled
•

citrix disabled address pool name = "new" dpd client timeout = 300 sec dpd gateway timeout = 300 sec keepalive interval = 30 sec SSLVPN Full Tunnel mtu size = 1406 bytes keep sslvpn client installed = enabled rekey interval = 3600 sec rekey method = lease duration = 43200 secRouter#show webvpn statsUser session statistics:
Active user sessions : 1 AAA pending reqs : 0 Peak user sessions : 2 Peak time : 00:00:52 Active user TCP conns : 0 Terminated user sessions : 2 Session alloc failures : 0 Authentication failures : 1 VPN session timeout : 0 VPN idle timeout : 0 User cleared VPN sessions: 0 Exceeded ctx user limit : 0 Exceeded total user limit: 0 Client process rcvd pkts : 108 Server process rcvd pkts : 0 Client process sent pkts : 589 Server process sent pkts : 0 Client CEF received pkts : 76 Server CEF received pkts : 0 Client CEF rcv punt pkts : 0 Server CEF rcv punt pkts : 0 Client CEF sent pkts : 0 Server CEF sent pkts : 0 Client CEF sent punt pkts: 0 Server CEF sent punt pkts: 0
SSLVPN appl bufs inuse : 0 SSLVPN eng bufs inuse : 0 Active server TCP conns : 0
Mangling statistics: Relative urls : 0 Absolute urls : 0 Non−http(s) absolute urls: 0 Non−standard path urls : 0 Interesting tags : 0 Uninteresting tags : 0 Interesting attributes : 0 Uninteresting attributes : 0 Embedded script statement: 0 Embedded style statement : 0 Inline scripts : 0 Inline styles : 0 HTML comments : 0 HTTP/1.0 requests : 0 HTTP/1.1 requests : 9 Unknown HTTP version : 0 GET requests : 9 POST requests : 0 CONNECT requests : 0 Other request methods : 0 Through requests : 0 Gateway requests : 9 Pipelined requests : 0 Req with header size >1K : 0 Processed req hdr bytes : 2475 Processed req body bytes : 0 HTTP/1.0 responses : 0 HTTP/1.1 responses : 0 HTML responses : 0 CSS responses : 0 XML responses : 0 JS responses : 0 Other content type resp : 0 Chunked encoding resp : 0 Resp with encoded content: 0 Resp with content length : 0 Close after response : 0 Resp with header size >1K: 0 Processed resp hdr size : 0 Processed resp body bytes: 0 Backend https response : 0 Chunked encoding requests: 0
HTTP Authentication stats : Successful NTLM Auth : 0 Failed NTLM Auth : 0 Successful Basic Auth : 0 Failed Basic Auth : 0 Unsupported Auth : 0 Unsup Basic HTTP Method : 0 NTLM srv kp alive disabld: 0 NTLM Negotiation Error : 0 Oversize NTLM Type3 cred : 0 Internal Error : 0 Num 401 responses : 0 Num non−401 responses : 0 Num Basic forms served : 0 Num NTLM forms served : 0 Num Basic Auth sent : 0 Num NTLM Auth sent : 0
CIFS statistics: SMB related Per Context: TCP VC's : 0 UDP VC's : 0 Active VC's : 0 Active Contexts : 0
•

Aborted Conns : 0 NetBIOS related Per Context: Name Queries : 0 Name Replies : 0 NB DGM Requests : 0 NB DGM Replies : 0 NB TCP Connect Fails : 0 NB Name Resolution Fails : 0 SMB related Global: Sessions in use : 0 Mbufs in use : 0 Mbuf Chains in use : 0 Active VC's : 0 Active Contexts : 0 Browse Errors : 0 Empty Browser List : 0 NetServEnum Errors : 0 Empty Server List : 0 NBNS Config Errors : 0 NetShareEnum Errors : 0 HTTP related Per Context: Requests : 0 Request Bytes RX : 0 Request Packets RX : 0 Response Bytes TX : 26286 Response Packets TX : 33 Active Connections : 0 Active CIFS context : 0 Requests Dropped : 0 HTTP related Global: Server User data : 0 CIFS User data : 0 Net Handles : 0 Active CIFS context : 0 Authentication Fails : 0 Operations Aborted : 0 Timers Expired : 0 Pending Close : 0 Net Handles Pending SMB : 0 File Open Fails : 0 Browse Network Ops : 0 Browse Network Fails : 0 Browse Domain Ops : 0 Browse Domain Fails : 0 Browse Server Ops : 0 Browse Server Fails : 0 Browse Share Ops : 0 Browse Share Fails : 0 Browse Dir Ops : 0 Browse Network Fails : 0 File Read Ops : 0 File Read Fails : 0 File Write Ops : 0 File Write Fails : 0 Folder Create Ops : 0 Folder Create Fails : 0 File Delete Ops : 0 File Delete Fails : 0 File Rename Ops : 0 File Rename Fails : 0 URL List Access OK : 0 URL List Access Fails : 0
Socket statistics: Sockets in use : 1 Sock Usr Blocks in use : 1 Sock Data Buffers in use : 0 Sock Buf desc in use : 0 Select timers in use : 1 Sock Select Timeouts : 0 Sock Tx Blocked : 0 Sock Tx Unblocked : 0 Sock Rx Blocked : 0 Sock Rx Unblocked : 0 Sock UDP Connects : 0 Sock UDP Disconnects : 0 Sock Premature Close : 0 Sock Pipe Errors : 12 Sock Select Timeout Errs : 0
Port Forward statistics: Client Server proc pkts : 0 proc pkts : 0 proc bytes : 0 proc bytes : 0 cef pkts : 0 cef pkts : 0 cef bytes : 0 cef bytes : 0
WEBVPN Citrix statistics:
Server Client Packets in : 0 0 Packets out : 0 0 Bytes in : 0 0 Bytes out : 0 0
ACL statistics: Permit web request : 0 Deny web request : 0 Permit cifs request : 0 Deny cifs request : 0 Permit without ACL : 0 Deny without match ACL : 0 Permit with match ACL : 0 Deny with match ACL : 0
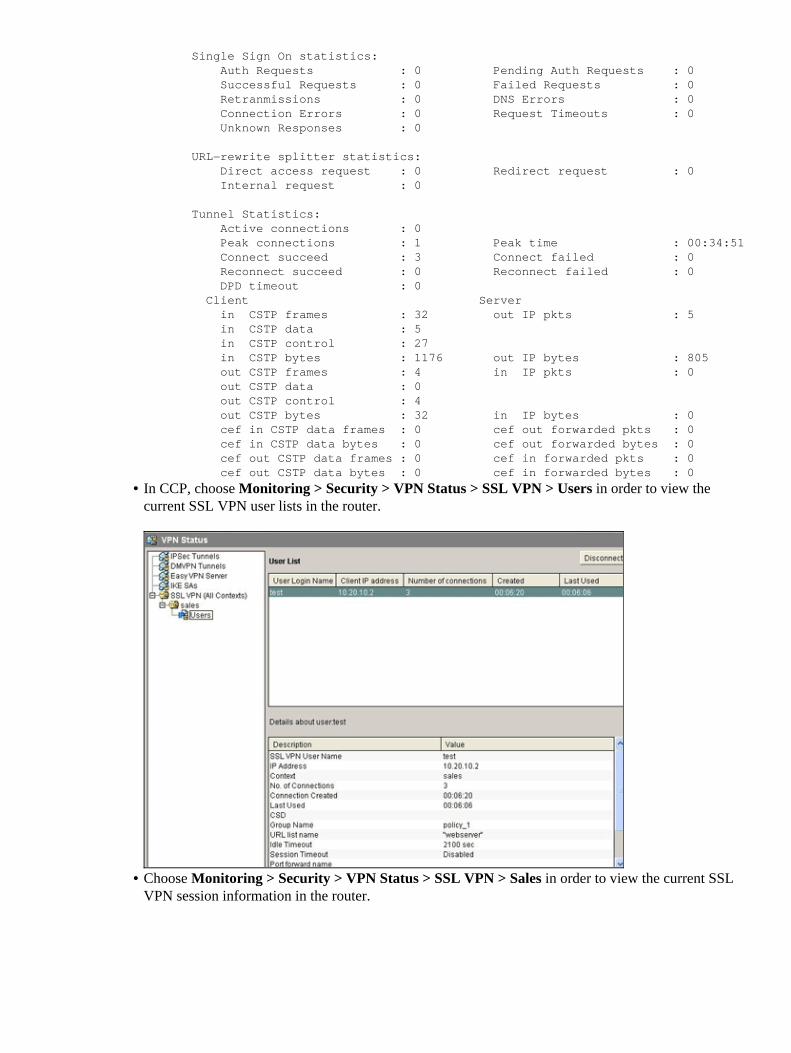
Single Sign On statistics: Auth Requests : 0 Pending Auth Requests : 0 Successful Requests : 0 Failed Requests : 0 Retranmissions : 0 DNS Errors : 0 Connection Errors : 0 Request Timeouts : 0 Unknown Responses : 0
URL−rewrite splitter statistics: Direct access request : 0 Redirect request : 0 Internal request : 0
Tunnel Statistics: Active connections : 0 Peak connections : 1 Peak time : 00:34:51 Connect succeed : 3 Connect failed : 0 Reconnect succeed : 0 Reconnect failed : 0 DPD timeout : 0 Client Server in CSTP frames : 32 out IP pkts : 5 in CSTP data : 5 in CSTP control : 27 in CSTP bytes : 1176 out IP bytes : 805 out CSTP frames : 4 in IP pkts : 0 out CSTP data : 0 out CSTP control : 4 out CSTP bytes : 32 in IP bytes : 0 cef in CSTP data frames : 0 cef out forwarded pkts : 0 cef in CSTP data bytes : 0 cef out forwarded bytes : 0 cef out CSTP data frames : 0 cef in forwarded pkts : 0 cef out CSTP data bytes : 0 cef in forwarded bytes : 0
In CCP, choose Monitoring > Security > VPN Status > SSL VPN > Users in order to view thecurrent SSL VPN user lists in the router.
•
Choose Monitoring > Security > VPN Status > SSL VPN > Sales in order to view the current SSLVPN session information in the router.
•

Troubleshoot
Use this section to troubleshoot your configuration.
SSL Connectivity Issue
Problem: SSL VPN clients are unable to connect the router.
Solution: Insufficient IP addresses in the IP address pool might cause this issue. Increase the number of IPaddresses in the pool of IP addresses on the router in order to resolve this issue.
For more information on Troubleshooting AnyConnect VPN Client, refer to AnyConnect VPN Client FAQ.
Error: SSLVPN Package SSL−VPN−Client : installed Error: Disk
Problem: You receive this error when you install the SVC package on a router: SSLVPN PackageSSL−VPN−Client : installed Error: Disk.
Solution: This error can be resolved by reformatting the flash.
Troubleshooting Commands
Several clear commands are associated with WebVPN. For detailed information about these commands, referto Using WebVPN Clear Commands.
Several debug commands are associated with WebVPN. For detailed information about these commands,refer to Using WebVPN Debug Commands.
Note: The use of debug commands can adversely impact your Cisco device. Before you use debugcommands, refer to Important Information on Debug Commands.

Related Information
Cisco IOS SSLVPN• AnyConnect VPN Client FAQ• Cisco AnyConnect VPN Client Administrator Guide, Release 2.3• SSL VPN − WebVPN• Clientless SSL VPN (WebVPN) on Cisco IOS with SDM Configuration Example• Thin−Client SSL VPN (WebVPN) IOS Configuration Example with SDM• WebVPN and DMVPN Convergence Deployment Guide• Technical Support & Documentation − Cisco Systems•
Contacts & Feedback | Help | Site Map© 2010 − 2011 Cisco Systems, Inc. All rights reserved. Terms & Conditions | Privacy Statement | Cookie Policy | Trademarks ofCisco Systems, Inc.
Updated: Aug 28, 2009 Document ID: 110608
Related Documents