SRI VENKATESWARA COLLEGE OF ENGINEERING AND TECHNOLOGY DEPT. OF ECE IV B.Tech ECE I Sem – Microwave & Optical Communication Lab List of Experiments Cycle Wise Cycle – 1 1. Characteristics of Reflex Klystron Oscillator. 2. Attenuation Measurements. 3. VSWR Measurements. 4. Frequency& wavelenth Measurements. 5. Characteristics of LED. 6. Characteristics of LASER diode. Cycle – 2 7. Directional Coupler Characteristics. 8. Wave guide Parameters & Measurements. 9. Scattering Parameters of Circulators. 10. Scattering Parameters of Magic -Tee. 11. Design of Fibre Optic Digital Link. 12. Gunn diode Characteristics. Design Based Experiments: 1.Intensity Modulation of LASER output through an Optical Fibre. 2. Magic – Tee as a Mixer.

Welcome message from author
This document is posted to help you gain knowledge. Please leave a comment to let me know what you think about it! Share it to your friends and learn new things together.
Transcript

SRI VENKATESWARA COLLEGE OF ENGINEERING AND TECHNOLOGYDEPT. OF ECE
IV B.Tech ECE I Sem – Microwave & Optical Communication Lab
List of Experiments Cycle Wise
Cycle – 1
1. Characteristics of Reflex Klystron Oscillator.
2. Attenuation Measurements.
3. VSWR Measurements.
4. Frequency& wavelenth Measurements.
5. Characteristics of LED.
6. Characteristics of LASER diode.
Cycle – 2
7. Directional Coupler Characteristics.
8. Wave guide Parameters & Measurements.
9. Scattering Parameters of Circulators.
10.Scattering Parameters of Magic -Tee.
11.Design of Fibre Optic Digital Link.
12.Gunn diode Characteristics.
Design Based Experiments:
1. Intensity Modulation of LASER output through an Optical Fibre.
2. Magic – Tee as a Mixer.
3. Circulator as a Duplexer.
Lab – Incharge HOD, ECE

SRI VENKATESWARA COLLEGE OF ENGINEERING AND TECHNOLOGYDEPT. OF ECE
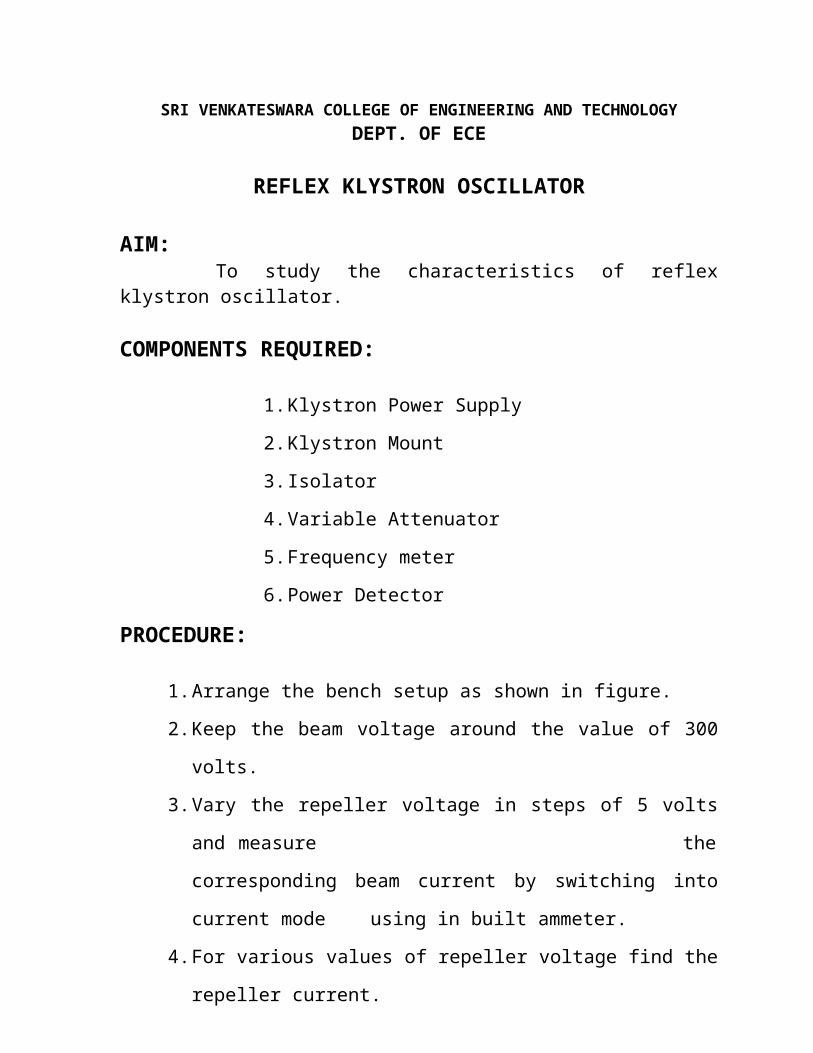
REFLEX KLYSTRON OSCILLATOR
AIM: To study the characteristics of reflex klystron oscillator.
COMPONENTS REQUIRED:
1. Klystron Power Supply
2. Klystron Mount
3. Isolator
4. Variable Attenuator
5. Frequency meter
6. Power Detector
PROCEDURE:
1. Arrange the bench setup as shown in figure.
2. Keep the beam voltage around the value of 300 volts.
3. Vary the repeller voltage in steps of 5 volts and measure
the corresponding beam current by switching into current mode
using in built ammeter.
4. For various values of repeller voltage find the repeller current.
5. To measure the frequency adjust the frequency meter (rolling in either
up or down direction) until minimum dip is obtained in the detector.
6. At this value of dip measure the frequency of incoming signal.
RESULT:
Thus the characteristics of reflex klystron was found and verified and the graph is plotted for Repeller Voltage versus Output Power.
TABULAR COLUMN:
S.No. REPELLER VOLTAGE in Volts
OUTPUT POWERin m Watts
MODEL GRAPH:
Output Power in mWatts
O Repeller Voltage in Volts

BENCH SETUP DIAGRAM OF REFLEX KLYSTRON OSCILLATOR:
KLYSTRON
POWER SUPPLY
KLYSTRON MOUNT ISOLATOR
VARIABLEATTENUATOR
FREQUENCY METER
POWER DETECTOR

SRI VENKATESWARA COLLEGE OF ENGINEERING AND TECHNOLOGYDEPT. OF ECE
ATTENUATION MEASUREMENT
AIM:To measure the attenuation introduced by the given wave guide.
COMPONENTS REQUIRED:
1. Microwave source (klystron power supply)
2. Klystron Mount
3. Isolator
4. Variable Attenuator
5. Frequency meter
6. DUT (Fixed Attenuator)
7. Power Detector
FORMULA:
Attenuation = 20 log (V1 / V2) db
PROCEDURE:
1. Arrange the bench setup as shown in figure 1 and measure the input
power entering into the wave guide (P1).
2. Reconnect the circuit as shown in the figure 2 and find the power
(P2) at the output of the given wave guide.
3. Using formula find the attenuation introduced by the wave guide.
RESULT:Thus the attenuation introduced by the given wave guide was found
and verified.

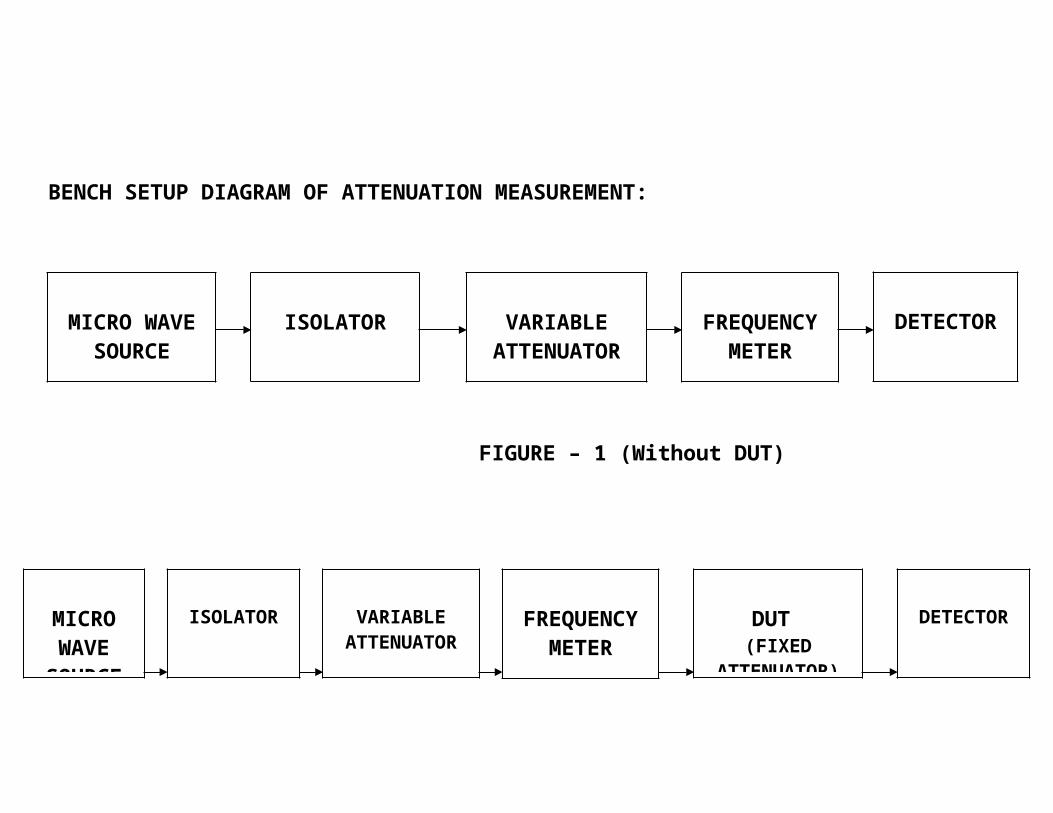
BENCH SETUP DIAGRAM OF ATTENUATION MEASUREMENT:
V1
FIGURE – 1 (Without DUT)
V1 V2
FIGURE – 2 (With DUT)
MICRO WAVE SOURCE
ISOLATOR VARIABLEATTENUATOR
FREQUENCYMETER
DETECTOR
MICRO WAVE
SOURCE
ISOLATOR VARIABLEATTENUATOR
DUT(FIXED
ATTENUATOR)
DETECTORFREQUENCYMETER

SRI VENKATESWARA COLLEGE OF ENGINEERING AND TECHNOLOGYDEPT. OF ECE
VSWR MEASUREMENT
AIM:
To measure VSWR introduced by the wave guide in dominant mode of propagation.
COMPONENTS REQUIRED:
1. Microwave source (klystron power supply)
2. Klystron Mount
3. Isolator
4. Variable Attenuator
5. Slotted section
6. Matched Termination
7. VSWR meter (or) CRO
FORMULA:VSWR = V max / V min
PROCEDURE:
1. Arrange the bench setup as shown in figure.
2. Adjust the probe carriage to measure V max and note the readings.
3. Adjust the probe carriage to measure V min and note the readings.
4. Use the formula to find VSWR.
RESULT:Thus the VSWR introduced by the wave guide in dominant mode of
propagation was determined and verified.

BENCH SETUP DIAGRAM OF VSWR MEASUREMENT:
MICRO WAVE
SOURCEISOLATOR
VARIABLEATTENUATOR
FREQUENCYMETER
VSWR METER
SLOTTEDSECTION
MATCHED TERMINATIO
N
SRI VENKATESWARA COLLEGE OF ENGINEERING AND TECHNOLOGYDEPT. OF ECE
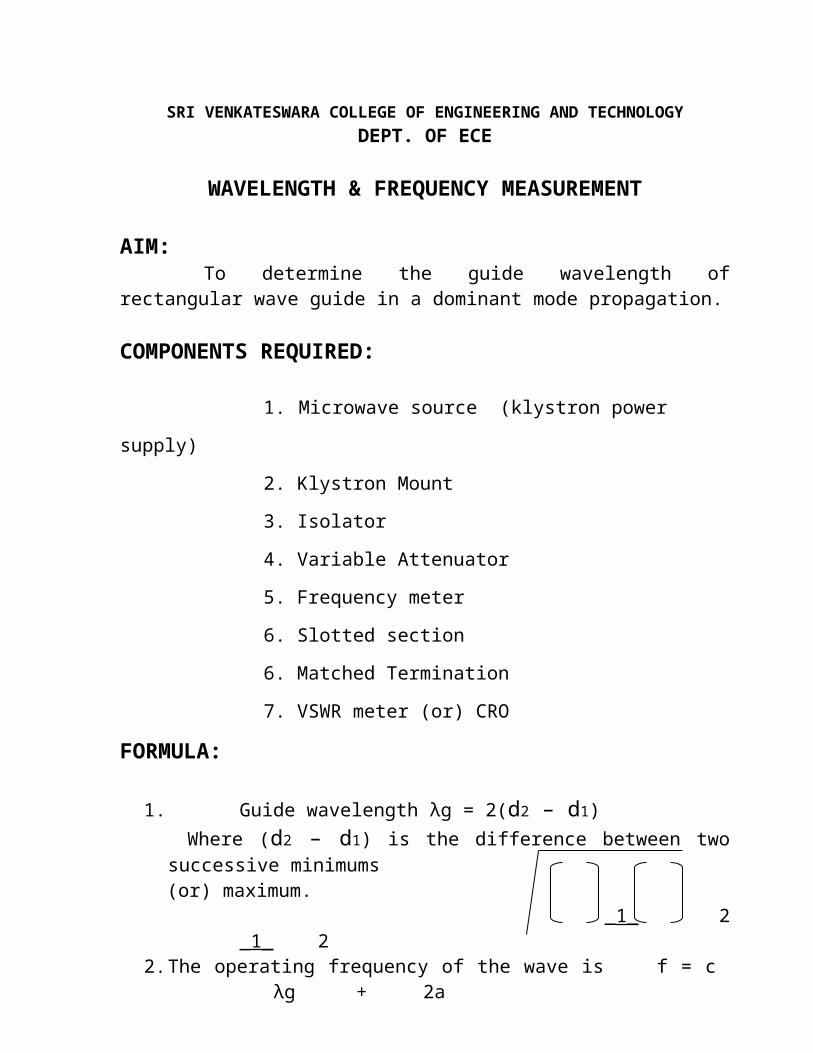
WAVELENGTH & FREQUENCY MEASUREMENT
AIM:To determine the guide wavelength of rectangular wave guide in a
dominant mode propagation.
COMPONENTS REQUIRED:
1. Microwave source (klystron power supply)
2. Klystron Mount
3. Isolator
4. Variable Attenuator
5. Frequency meter
6. Slotted section
6. Matched Termination
7. VSWR meter (or) CRO
FORMULA:
1. Guide wavelength λg = 2(d2 – d1) Where (d2 – d1) is the difference between two successive minimums (or) maximum.
_1_ 2 _1_ 2 2. The operating frequency of the wave is f = c λg + 2a
Where a = 2 . 3 cms for X band.
3. The guide wavelength (λg) is related to free space wavelength (λo) by λo 2
λg = Where λc = _λo_ 2 _m 2 _n_ 2
1 - λc a + b

PROCEDURE:
1. Arrange the bench setup as shown in figure.
2. Switch on the microwave source and adjust the attenuator, frequency
meter, etc to get maximum power.
3. Move the carriage probe in the slotted section in particular direction
until there is a minimum deflection in the indicating meter is obtained
note this distance as d1.
4. Once again move the carriage probe from its position d1 in particular
direction in order to get minimum deflection on the indication meter.
Note this distance as d2.
5. Calculate the guide wave length using formula 1, also find frequency
of the wave using formula 2 and verify it with frequency meter.
RESULT:Thus the wavelength & frequency of the wave is determined.

BENCH SETUP DIAGRAM OF WAVELENGTH & FREQUENCY MEASUREMENT:
MICRO WAVE
SOURCEISOLATOR
VARIABLEATTENUATOR
FREQUENCYMETER
VSWR METER
SLOTTEDSECTION
MATCHED TERMINATIO
N

SRI VENKATESWARA COLLEGE OF ENGINEERING AND TECHNOLOGYDEPT. OF ECE
LED CHARACTERISTICS
AIM:
To find the VI characteristics of given LED.
COMPONENTS REQUIRED:
1. Optical trainer kit
2. Ammeter
3. Voltmeter
PROCEDURE:
1. Make the jumper settings as shown in figure.
2. Insert the sockets to connect the jumpers JP17 & JP16 as shown in figure.
3. Keep the potentiometer Pr 10 to its minimum position.
4. By varying slowly Pr 10 to clock wise direction note down the readings between voltage and current.
5. Plot the graph VF Vs IF.
RESULT:
Thus the VI characteristics of LED were found and graph was plotted.

SEP UP DIAGRAM OF LED CHARACTERISTICS:
Jp 16 Jp 17
TABULAR COLUMN:
MODEL GRAPH:
IF in mA
O VF in Volts
. 1
. 2
. 3
. 4
1 .
2 .
3 .V
A
S.No. FORWARD VOLTAGE (VF in Volts)
FORWARD CURRENT (IF in mA)
SRI VENKATESWARA COLLEGE OF ENGINEERING AND TECHNOLOGYDEPT. OF ECE
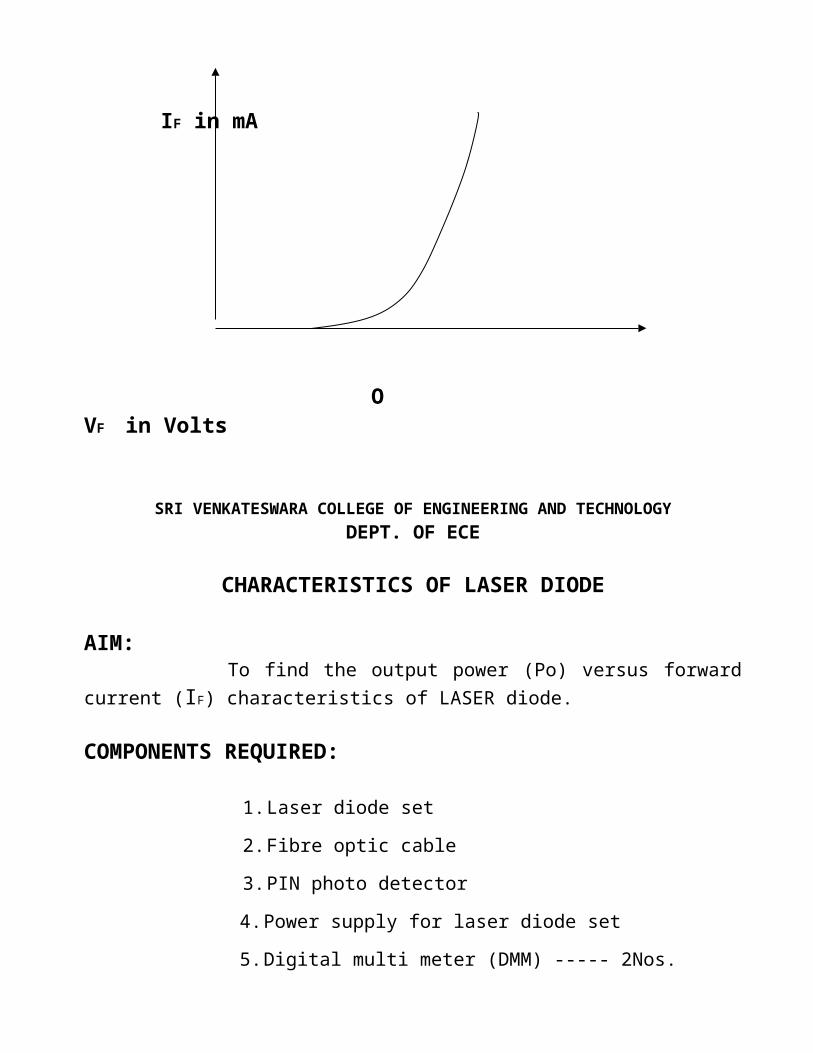
CHARACTERISTICS OF LASER DIODE
AIM: To find the output power (Po) versus forward current (IF) characteristics of LASER diode.
COMPONENTS REQUIRED:
1. Laser diode set
2. Fibre optic cable
3. PIN photo detector
4. Power supply for laser diode set
5. Digital multi meter (DMM) ----- 2Nos.
PROCEDURE:1. Connect the fibre optic cable to TX unit and couple the laser light to the
power meter on the RX unit. Select ACC mode of operation in the TX unit.
2. Set DMM to the 20V DC range and connect the DMM probes to the Vout and ground points on the RX unit. Now power meter is ready for use Po = (reading)/10dBm.
3. Set DMM to the 20V DC range and connect the DMM probes to the Vin and ground points on the TX unit. On the Tx unit. IF = Vo/(50).
4. Adjust the SET 1 of the TX knob to the extreme anti-clock wise position to reduce IF to zero.
5. Slowly turn the SET 1 knob clockwise to increase IF and Po readings. Take closer readings prior to and above the laser Threshold.
6. Plot the graph Po Vs IF on a semi log graph
RESULT: Thus the characteristics of LASER diode was found and graph was plotted.

SEP UP DIAGRAM LASER DIODE CHARACTERISTICS:
SET UP FOR ACC MODE
TABULAR COLUMN:
S.No. Vi IF = Vi / 50 Vo IP = Vo / 50 Po (dbm) = 10 log IP
MODEL GRAPH:
Output Power (Po)
O Forward Current (IF)
TX UNIT ACC MODE
APC MODE
DMM
RXUNITOFC
CABLE
DMM

SRI VENKATESWARA COLLEGE OF ENGINEERING AND TECHNOLOGYDEPT. OF ECE
DIRECTIONAL COUPLER CHARACTERISTICS
AIM:
To find the characteristics of given directional coupler.
COMPONENTS REQUIRED:
1. Micro wave source
2. Klystron Mount
3. Isolator
4. Variable Attenuator
5. Directional coupler
6. Power Detector
7. Matched termination ----- 1 No
FORMULA:
1. Coupling factor of directional coupler C = 10 log (V1 / V3)
2. Directivity of directional coupler D = 10 log (V3 / V4)
3. Isolation of directional coupler I = 10 log (V1 / V4)

PROCEDURE:
1. Arrange the bench setup with out connecting directional
coupler and measure the input power.
2. Now connect the directional coupler and note down the output
power at port 2, port 3 & port 4.
3. Using the measured value find the characteristics of given
directional coupler.
SCATTERING MATRIX:
0 S12 0 S14
S12 0 S23 0
S = 0 S23 0 S34
S14 0 S34 0
RESULT:Thus the characteristics of given directional coupler was found and verified.

BENCH SETUP DIAGRAM OF DIRECTIONAL COUPLER CHARACTERISTICS:
3
4
1 DIRECTIONAL 2 COUPLER
MICRO WAVE
SOURCEISOLATOR VARIABLE
ATTENUATOR
MATCHED TERMINATION
(or) DETECTOR
DETECTOR(or)
MATCHED TERMINATION

SRI VENKATESWARA COLLEGE OF ENGINEERING AND TECHNOLOGYDEPT. OF ECE
WAVE GUIDE PARAMETERS MEASUREMENT
AIM:To measure the Q – factor of the given wave guide.
COMPONENTS REQUIRED:
1. Microwave source (klystron power supply)
2. Klystron Mount
3. Isolator
4. Variable Attenuator
5. Frequency meter
6. DUT
7. Power Detector
PROCEDURE:
1. Arrange the bench setup as shown in figure.
2. Vary the signal frequency in such a way that the maximum output is
obtained in the detector.
3. This is due to the fact that DUT is having resonant frequency fo.
4. Now vary the frequency to obtain to obtain the half power frequency
by varying the frequency of the signal.
5. In the similar way find other frequency end.
6. Using lower and upper cut – off frequencies calculate the bandwidth
and Q – factor using the below equation.
Q = fo / bandwidth
RESULT:Thus the Q – factor of the given cavity was determined and verified.
BENCH SETUP DIAGRAM OF WAVE GUIDE PARAMETERS MEASUREMENT:
MICRO WAVE
SOURCEISOLATOR
VARIABLEATTENUATOR
FREQUENCYMETER DUT DETECTOR
SRI VENKATESWARA COLLEGE OF ENGINEERING AND TECHNOLOGYDEPT. OF ECE
FERRITE DEVICES
AIM:
To find the characteristics of ferrite device – circulator.
COMPONENTS REQUIRED:
1. Microwave source (klystron power supply)
2. Klystron Mount
3. Isolator
4. Variable Attenuator
5. Frequency meter
6. Circulator
7. Power Detector
8. Matched termination ----- 1 No
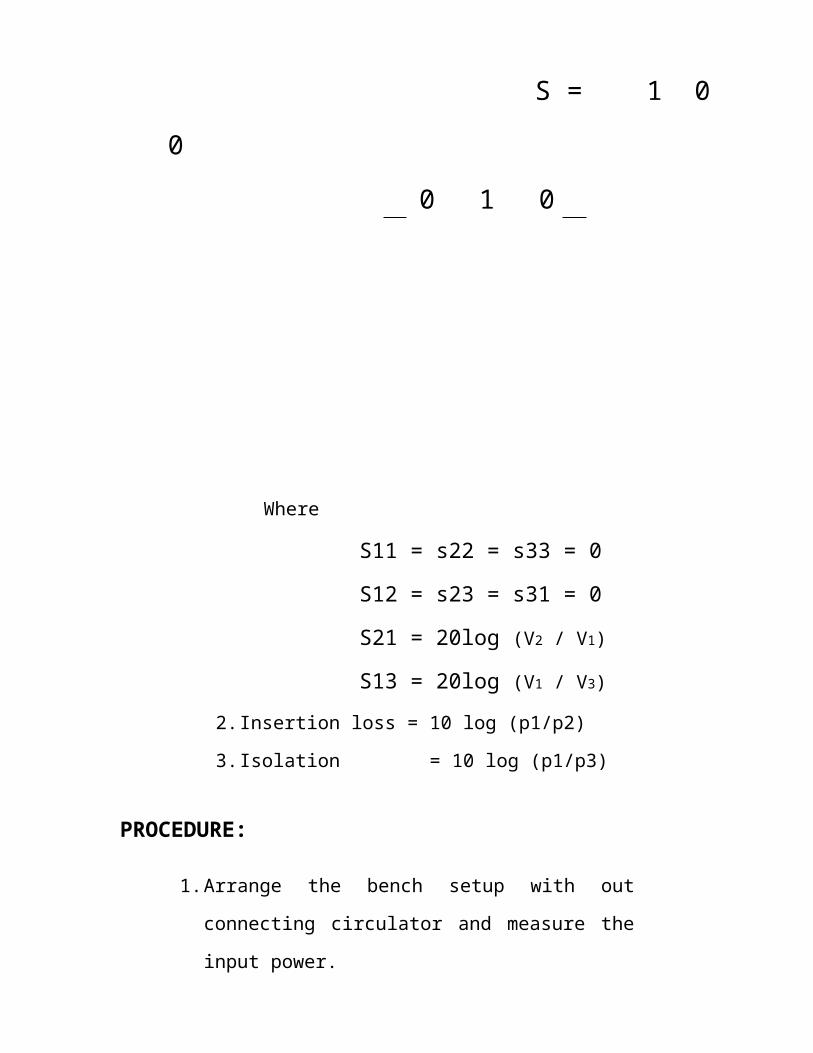
FORMULA:1. The S – matrix of 3 – port circulator is
0 0 1
S = 1 0 0
0 1 0

Where
S11 = s22 = s33 = 0
S12 = s23 = s31 = 0
S21 = 20log (V2 / V1)
S13 = 20log (V1 / V3)
2. Insertion loss = 10 log (p1/p2)
3. Isolation = 10 log (p1/p3)
PROCEDURE:
1. Arrange the bench setup with out connecting circulator
and measure the input power.
2. Now connect the circulator and note down the output
power at port 2 & port 3.
3. Substitute the values to estimate the S – matrix of
circulator.
RESULT:Thus the characteristics of given 3 – port circulator was obtained and
verified.

BENCH SETUP DIAGRAM OF FERRITE DEVICES:
1 2
3
MICRO WAVE
SOURCEISOLATOR
VARIABLEATTENUATOR
FREQUENCYMETER
DETECTOR(or)
MATCHED TERMINATION
CIRCULATOR
MATCHED TERMINATION
(or) DETECTOR

SRI VENKATESWARA COLLEGE OF ENGINEERING AND TECHNOLOGYDEPT. OF ECE
MAGIC – TEE CHARACTERISTICS
AIM:
To find the characteristics of given Magic – Tee.
COMPONENTS REQUIRED:
1. Micro wave source(klystron power supply)
2. Klystron Mount
3. Isolator
4. Variable Attenuator
5. Frequency meter
6. Magic – Tee
7. Power Detector
8. Matched termination ----- 2 No’s
FORMULA: 0 0 1 1
0 0 1 -1
The S – matrix of the magic – tee is S =1/√ 2 1 1 0 0
1 -1 0 0
Where S13 = √ V1/V3
S14 = √ V1/V4
S23 = √ V2/V3
S24 = √ V2/V4

PROCEDURE:
1. Arrange the bench setup with out connecting magic – tee and
measure the input power.
2. Now connect the magic – tee and note down the output power
at port 2, port 3 & port 4.
3. Substitute the value of the port currents to obtain the scattering
parameters of given magic – tee.
4. For various values of input power find the scattering matrix.
RESULT:Thus the characteristics of given Magic – Tee was found and verified.

BENCH SETUP DIAGRAM OF MAGIC – TEE CHARACTERISTICS:
3
1 2
4
MICRO WAVE
SOURCEISOLATOR VARIABLE
ATTENUATOR
MATCHED TERMINATION
(or) DETECTOR
DETECTOR(or)
MATCHED TERMINATION
MATCHED TERMINATION
(or) DETECTOR
FREQUENCYMETER
MAGIC
TEE
SRI VENKATESWARA COLLEGE OF ENGINEERING AND TECHNOLOGYDEPT. OF ECE
INTENSITY MODULATION OF LASER OUTPUT THROUGH OPTICAL FIBRE
AIM: To study the following characteristics of an intensity modulation of LASER output through optical fibre.
COMPONENTS REQUIRED:
1. Laser diode set
2. Fibre optic cable
3. Power supply for laser diode set
4. Function Generator
5. C R O
PROCEDURE:
1. Connect the fibre optic cable to TX unit and couple the laser light to the power meter on the RX unit. Select ACC mode of operation.
2. Take output from Function Generator (FG) and connect to the input of TX unit as well as to CH 2 of CRO.
3. Connect the output from RX unit to CH 1 of CRO.
4. Both the TX & RX knobs are kept in maximum position and vary the frequency from FG .
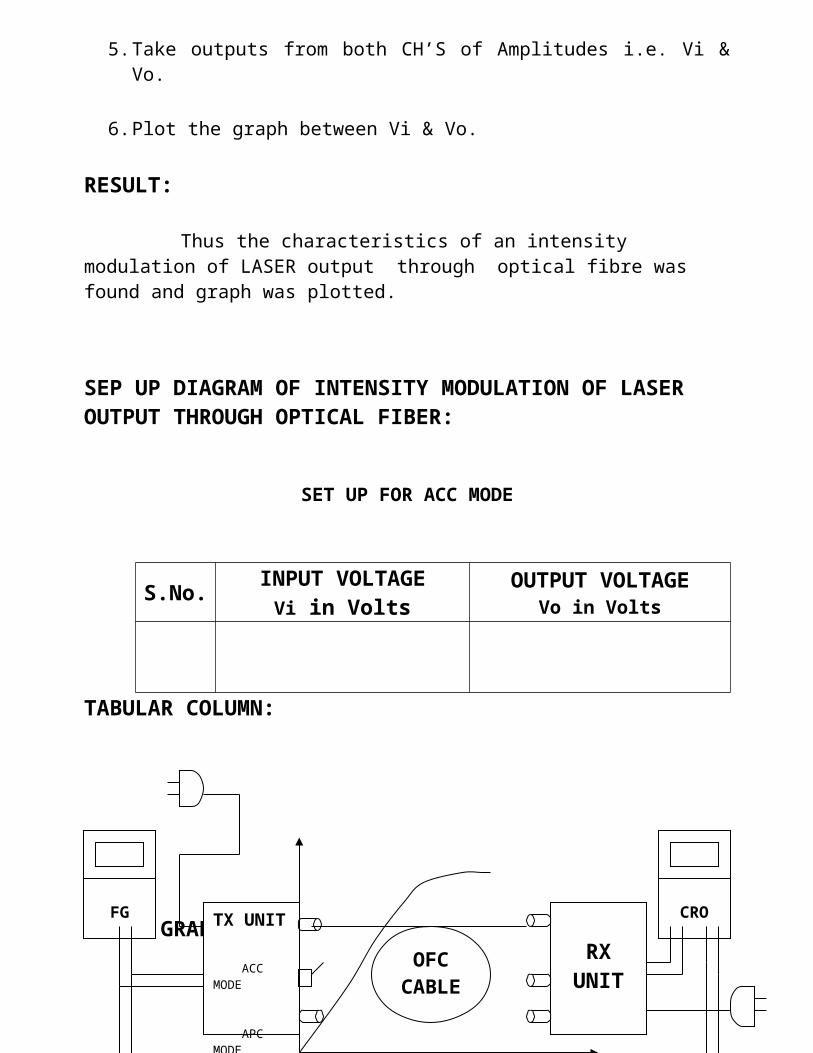
5. Take outputs from both CH’S of Amplitudes i.e. Vi & Vo.
6. Plot the graph between Vi & Vo.
RESULT:
Thus the characteristics of an intensity modulation of LASER output through optical fibre was found and graph was plotted.

SEP UP DIAGRAM OF INTENSITY MODULATION OF LASER OUTPUT THROUGH OPTICAL FIBER:
SET UP FOR ACC MODE
TABULAR COLUMN:
MODEL GRAPH:
Vo in Volts
TX UNIT ACC MODE
APC MODE
CRO
RXUNITOFC
CABLE
FG
S.No. INPUT VOLTAGE Vi in Volts
OUTPUT VOLTAGE Vo in Volts

0 Vi in Volts
SRI VENKATESWARA COLLEGE OF ENGINEERING AND TECHNOLOGYDEPT. OF ECE
GUNN DIODE CHARACTERISTICSAIM:
To study the characteristics of Gunn Diode.
COMPONENTS REQUIRED:
1. Gunn Diode Power Supply
2. Gunn Diode
3. Pin Modulator
4. Isolator
5. Variable Attenuator
6. Frequency meter
7. Power Detector
PROCEDURE:
1. Arrange the bench setup as shown in figure.
2. Switch on the gunn power supply.
3. Initially give some gunn bias voltage, fix the attenuation and adjust the
frequency meter to give maximum output.
4. Now keep the gunn bias in minimum position around 0.5V and increase it
slowly.
5. For difference values of voltage measure the gunn diode current.

6. From the tabulation observed, plot the V-I characteristics.
RESULT:
Thus the characteristics of Gunn diode was found and verified and graph was
plotted.
TABULAR COLUMN:
MODEL GRAPH:
I in mA
S.No. GUNN BIAS VOLTAGE (V in Volts)
OUTPUT CURRENT(I in mA)
O V in Volts
BENCH SETUP DIAGRAM OF GUNN DIODE CHARACTERISTICS:
GUNN POWER SUPPLY
GUNN DIOD
EISOLATOR
VARIABLEATTENUATOR
FREQUENCY METER
POWER DETECTO
R
PIN MODULATO
R

SRI VENKATESWARA COLLEGE OF ENGINEERING AND TECHNOLOGYDEPT. OF ECE
FIBRE OPTIC DIGITAL LINK
AIM:
To study the fibre optic digital link.
COMPONENTS REQUIRED:
1. Digital trainer kit
2. Fibre cable
3. Dual trace CRO
4. Function Generator
PROCEDURE:
1. Make the jumper settings as shown in figure.
2. Insert the fibre into IR LED SRH 450v loop.
3. Now short the jumpers JP15, JP16, JP17 & JP20.
4. Connect the power cord to the kit and switch on the power supply.
5. Feed the power end to function generator to connector labeled as
Ext – TTL using connecting cables provided with kit.
6. Connect the circuit and observe the received signal.
7. Vary the frequency of the signal and observe the output.
RESULT:Thus the fibre optic digital link was studied.

BLOCK DIAGRAM FOR DIGITAL FIBRE CABLE:
OPTICAL FIBRECABLE
LASER AVALANCHE DIODE PHOTE DIODE
SEP UP DIAGRAM OF FIBRE OPTIC DIGITAL LINK:
Pr 10 Emitter Ground
Terminal of Q2 Amp Base Digital Output of Q1 buffer output JP 18 JP 20
ENCODERLASER DRIVE
CIRCUIT
DIGITALINFORMATION
SOURCE
AMPLIFIER DECODER
ORIGINALDIGITAL
FORM

SRI VENKATESWARA COLLEGE OF ENGINEERING AND TECHNOLOGYDEPT. OF ECE
MAGIC – TEE AS MIXER
AIM:
To construct a Mixer using Magic - Tee.
COMPONENTS REQUIRED:
1. Micro wave source ------ 2 No’s
2. Klystron Mount ---------- 2 No’s
3. Isolator -------------------- 2 No’s
4. Variable Attenuator ----- 2 No’s
5. Magic – Tee -------------- 1 No
6. Matched termination ----- 1 No
PROCEDURE:
1. Arrange the bench setup as shown in fig.
2. Apply the signal 1 at port 4, signal 2 at port 3 of the
Magic – Tee.
3. Measure the output signal at port 2.
4. From the output verify the Mixer operation.
RESULT:Thus Mixer using Magic – Tee was constructed and verified.

BENCH SETUP DIAGRAM OF MIXER:
Signal 1
S1 4 E – ARM
1 2 MIXED OUTPUT SIGNAL
H – ARM S2 3
Signal 2
ISOLATORMICRO WAVE
SOURCE – 1
VARIABLEATTENUATOR
MATCHED TERMINATION
MAGIC TEE
VARIABLEATTENUATORISOLATOR
MICRO WAVE
SOURCE – 2

SRI VENKATESWARA COLLEGE OF ENGINEERING AND TECHNOLOGYDEPT. OF ECE
CIRCULATOR AS MIXER
AIM:
To construct a Mixer using Circulator.
COMPONENTS REQUIRED:
1. Micro wave source ------ 2 No’s
2. Klystron Mount ---------- 2 No’s
3. Isolator -------------------- 2 No’s
4. Variable Attenuator ----- 2 No’s
5. Circulator ----------------- 1 No
6. Power Detector ---------- 1 No’s
PROCEDURE:
1. Arrange the bench setup as shown in fig.
2. Apply the signal 1 at port 1 and signal 2 at port 3 of the
circulator.
3. Measure the output signal at port 2.
4. From the output verify the Mixer operation.
RESULT:Thus Mixer using Circulator was constructed and verified.

BENCH SETUP DIAGRAM OF CIRCULATOR AS DUPLEXER:
Signal 1
1
2
3
Signal 2
ISOLATOR 1
MICRO WAVE
SOURCE – 1
VARIABLEATTENUATOR
2
CIRCULATOR DETECTOR
VARIABLEATTENUATOR
1
ISOLATOR 2
MICRO WAVE
SOURCE – 2
Related Documents