Spring Security Reference Ben Alex, Luke Taylor, Rob Winch, Gunnar Hillert, Joe Grandja, Jay Bryant, Eddú Meléndez, Josh Cummings, Dave Syer Version 5.3.13.RELEASE

Welcome message from author
This document is posted to help you gain knowledge. Please leave a comment to let me know what you think about it! Share it to your friends and learn new things together.
Transcript
Spring Security ReferenceBen Alex, Luke Taylor, Rob Winch, Gunnar Hillert, Joe Grandja, Jay Bryant, Eddú
Meléndez, Josh Cummings, Dave Syer
Version 5.3.13.RELEASE
Table of ContentsPreface. . . . . . . . . . . . . . . . . . . . . . . . . . . . . . . . . . . . . . . . . . . . . . . . . . . . . . . . . . . . . . . . . . . . . . . . . . . . . . . . . . . . . 2
1. Prerequisites . . . . . . . . . . . . . . . . . . . . . . . . . . . . . . . . . . . . . . . . . . . . . . . . . . . . . . . . . . . . . . . . . . . . . . . . . . . 3
2. Spring Security Community . . . . . . . . . . . . . . . . . . . . . . . . . . . . . . . . . . . . . . . . . . . . . . . . . . . . . . . . . . . . . 4
2.1. Getting Help. . . . . . . . . . . . . . . . . . . . . . . . . . . . . . . . . . . . . . . . . . . . . . . . . . . . . . . . . . . . . . . . . . . . . . . . 4
2.2. Becoming Involved . . . . . . . . . . . . . . . . . . . . . . . . . . . . . . . . . . . . . . . . . . . . . . . . . . . . . . . . . . . . . . . . . 4
2.3. Source Code . . . . . . . . . . . . . . . . . . . . . . . . . . . . . . . . . . . . . . . . . . . . . . . . . . . . . . . . . . . . . . . . . . . . . . . . 4
2.4. Apache 2 License . . . . . . . . . . . . . . . . . . . . . . . . . . . . . . . . . . . . . . . . . . . . . . . . . . . . . . . . . . . . . . . . . . . 4
2.5. Social Media. . . . . . . . . . . . . . . . . . . . . . . . . . . . . . . . . . . . . . . . . . . . . . . . . . . . . . . . . . . . . . . . . . . . . . . . 4
3. What’s New in Spring Security 5.3. . . . . . . . . . . . . . . . . . . . . . . . . . . . . . . . . . . . . . . . . . . . . . . . . . . . . . . . 5
3.1. Documentation Updates . . . . . . . . . . . . . . . . . . . . . . . . . . . . . . . . . . . . . . . . . . . . . . . . . . . . . . . . . . . . . 5
3.2. Servlet . . . . . . . . . . . . . . . . . . . . . . . . . . . . . . . . . . . . . . . . . . . . . . . . . . . . . . . . . . . . . . . . . . . . . . . . . . . . . 5
3.3. WebFlux . . . . . . . . . . . . . . . . . . . . . . . . . . . . . . . . . . . . . . . . . . . . . . . . . . . . . . . . . . . . . . . . . . . . . . . . . . . 6
3.4. RSocket . . . . . . . . . . . . . . . . . . . . . . . . . . . . . . . . . . . . . . . . . . . . . . . . . . . . . . . . . . . . . . . . . . . . . . . . . . . . 6
3.5. Additional Updates. . . . . . . . . . . . . . . . . . . . . . . . . . . . . . . . . . . . . . . . . . . . . . . . . . . . . . . . . . . . . . . . . . 6
3.6. Build Changes . . . . . . . . . . . . . . . . . . . . . . . . . . . . . . . . . . . . . . . . . . . . . . . . . . . . . . . . . . . . . . . . . . . . . . 6
4. Getting Spring Security. . . . . . . . . . . . . . . . . . . . . . . . . . . . . . . . . . . . . . . . . . . . . . . . . . . . . . . . . . . . . . . . . . 7
4.1. Release Numbering . . . . . . . . . . . . . . . . . . . . . . . . . . . . . . . . . . . . . . . . . . . . . . . . . . . . . . . . . . . . . . . . . 7
4.2. Usage with Maven . . . . . . . . . . . . . . . . . . . . . . . . . . . . . . . . . . . . . . . . . . . . . . . . . . . . . . . . . . . . . . . . . . 7
4.3. Gradle . . . . . . . . . . . . . . . . . . . . . . . . . . . . . . . . . . . . . . . . . . . . . . . . . . . . . . . . . . . . . . . . . . . . . . . . . . . . 10
5. Features . . . . . . . . . . . . . . . . . . . . . . . . . . . . . . . . . . . . . . . . . . . . . . . . . . . . . . . . . . . . . . . . . . . . . . . . . . . . . . 14
5.1. Authentication . . . . . . . . . . . . . . . . . . . . . . . . . . . . . . . . . . . . . . . . . . . . . . . . . . . . . . . . . . . . . . . . . . . . 14
5.2. Protection Against Exploits . . . . . . . . . . . . . . . . . . . . . . . . . . . . . . . . . . . . . . . . . . . . . . . . . . . . . . . . . 22
6. Project Modules . . . . . . . . . . . . . . . . . . . . . . . . . . . . . . . . . . . . . . . . . . . . . . . . . . . . . . . . . . . . . . . . . . . . . . . 39
6.1. Core — spring-security-core.jar . . . . . . . . . . . . . . . . . . . . . . . . . . . . . . . . . . . . . . . . . . . . . . . . . . . . 39
6.2. Remoting — spring-security-remoting.jar . . . . . . . . . . . . . . . . . . . . . . . . . . . . . . . . . . . . . . . . . . . 39
6.3. Web — spring-security-web.jar . . . . . . . . . . . . . . . . . . . . . . . . . . . . . . . . . . . . . . . . . . . . . . . . . . . . . 39
6.4. Config — spring-security-config.jar . . . . . . . . . . . . . . . . . . . . . . . . . . . . . . . . . . . . . . . . . . . . . . . . 39
6.5. LDAP — spring-security-ldap.jar . . . . . . . . . . . . . . . . . . . . . . . . . . . . . . . . . . . . . . . . . . . . . . . . . . . 39
6.6. OAuth 2.0 Core — spring-security-oauth2-core.jar . . . . . . . . . . . . . . . . . . . . . . . . . . . . . . . . . . . 40
6.7. OAuth 2.0 Client — spring-security-oauth2-client.jar . . . . . . . . . . . . . . . . . . . . . . . . . . . . . . . . 40
6.8. OAuth 2.0 JOSE — spring-security-oauth2-jose.jar . . . . . . . . . . . . . . . . . . . . . . . . . . . . . . . . . . . 40
6.9. OAuth 2.0 Resource Server — spring-security-oauth2-resource-server.jar . . . . . . . . . . . . . 40
6.10. ACL — spring-security-acl.jar . . . . . . . . . . . . . . . . . . . . . . . . . . . . . . . . . . . . . . . . . . . . . . . . . . . . 40
6.11. CAS — spring-security-cas.jar . . . . . . . . . . . . . . . . . . . . . . . . . . . . . . . . . . . . . . . . . . . . . . . . . . . . 41
6.12. OpenID — spring-security-openid.jar . . . . . . . . . . . . . . . . . . . . . . . . . . . . . . . . . . . . . . . . . . . . . . 41
6.13. Test — spring-security-test.jar . . . . . . . . . . . . . . . . . . . . . . . . . . . . . . . . . . . . . . . . . . . . . . . . . . . 41
7. Samples . . . . . . . . . . . . . . . . . . . . . . . . . . . . . . . . . . . . . . . . . . . . . . . . . . . . . . . . . . . . . . . . . . . . . . . . . . . . . . 42
Servlet Applications . . . . . . . . . . . . . . . . . . . . . . . . . . . . . . . . . . . . . . . . . . . . . . . . . . . . . . . . . . . . . . . . . . . . . . . . 43
8. Hello Spring Security . . . . . . . . . . . . . . . . . . . . . . . . . . . . . . . . . . . . . . . . . . . . . . . . . . . . . . . . . . . . . . . . . . 44
8.1. Updating Dependencies . . . . . . . . . . . . . . . . . . . . . . . . . . . . . . . . . . . . . . . . . . . . . . . . . . . . . . . . . . . . 44
8.2. Starting Hello Spring Security Boot . . . . . . . . . . . . . . . . . . . . . . . . . . . . . . . . . . . . . . . . . . . . . . . . . . 44
8.3. Spring Boot Auto Configuration . . . . . . . . . . . . . . . . . . . . . . . . . . . . . . . . . . . . . . . . . . . . . . . . . . . . . 44
9. Servlet Security: The Big Picture . . . . . . . . . . . . . . . . . . . . . . . . . . . . . . . . . . . . . . . . . . . . . . . . . . . . . . . . 46
9.1. A Review of Filters . . . . . . . . . . . . . . . . . . . . . . . . . . . . . . . . . . . . . . . . . . . . . . . . . . . . . . . . . . . . . . . . 46
9.2. DelegatingFilterProxy . . . . . . . . . . . . . . . . . . . . . . . . . . . . . . . . . . . . . . . . . . . . . . . . . . . . . . . . . . . . . . 47
9.3. FilterChainProxy . . . . . . . . . . . . . . . . . . . . . . . . . . . . . . . . . . . . . . . . . . . . . . . . . . . . . . . . . . . . . . . . . . 49
9.4. SecurityFilterChain . . . . . . . . . . . . . . . . . . . . . . . . . . . . . . . . . . . . . . . . . . . . . . . . . . . . . . . . . . . . . . . . 49
9.5. Security Filters . . . . . . . . . . . . . . . . . . . . . . . . . . . . . . . . . . . . . . . . . . . . . . . . . . . . . . . . . . . . . . . . . . . . 51
9.6. Handling Security Exceptions . . . . . . . . . . . . . . . . . . . . . . . . . . . . . . . . . . . . . . . . . . . . . . . . . . . . . . . 52
10. Authentication . . . . . . . . . . . . . . . . . . . . . . . . . . . . . . . . . . . . . . . . . . . . . . . . . . . . . . . . . . . . . . . . . . . . . . . 55
10.1. SecurityContextHolder . . . . . . . . . . . . . . . . . . . . . . . . . . . . . . . . . . . . . . . . . . . . . . . . . . . . . . . . . . . . 56
10.2. SecurityContext . . . . . . . . . . . . . . . . . . . . . . . . . . . . . . . . . . . . . . . . . . . . . . . . . . . . . . . . . . . . . . . . . . 57
10.3. Authentication . . . . . . . . . . . . . . . . . . . . . . . . . . . . . . . . . . . . . . . . . . . . . . . . . . . . . . . . . . . . . . . . . . . 57
10.4. GrantedAuthority. . . . . . . . . . . . . . . . . . . . . . . . . . . . . . . . . . . . . . . . . . . . . . . . . . . . . . . . . . . . . . . . . 58
10.5. AuthenticationManager . . . . . . . . . . . . . . . . . . . . . . . . . . . . . . . . . . . . . . . . . . . . . . . . . . . . . . . . . . . 58
10.6. ProviderManager. . . . . . . . . . . . . . . . . . . . . . . . . . . . . . . . . . . . . . . . . . . . . . . . . . . . . . . . . . . . . . . . . 58
10.7. AuthenticationProvider . . . . . . . . . . . . . . . . . . . . . . . . . . . . . . . . . . . . . . . . . . . . . . . . . . . . . . . . . . . 60
10.8. Request Credentials with AuthenticationEntryPoint . . . . . . . . . . . . . . . . . . . . . . . . . . . . . . . . . . 60
10.9. AbstractAuthenticationProcessingFilter . . . . . . . . . . . . . . . . . . . . . . . . . . . . . . . . . . . . . . . . . . . . 61
10.10. Username/Password Authentication. . . . . . . . . . . . . . . . . . . . . . . . . . . . . . . . . . . . . . . . . . . . . . . 62
10.11. Session Management . . . . . . . . . . . . . . . . . . . . . . . . . . . . . . . . . . . . . . . . . . . . . . . . . . . . . . . . . . . . 98
10.12. Remember-Me Authentication . . . . . . . . . . . . . . . . . . . . . . . . . . . . . . . . . . . . . . . . . . . . . . . . . . . 104
10.13. OpenID Support . . . . . . . . . . . . . . . . . . . . . . . . . . . . . . . . . . . . . . . . . . . . . . . . . . . . . . . . . . . . . . . . 107
10.14. Anonymous Authentication . . . . . . . . . . . . . . . . . . . . . . . . . . . . . . . . . . . . . . . . . . . . . . . . . . . . . 108
10.15. Pre-Authentication Scenarios . . . . . . . . . . . . . . . . . . . . . . . . . . . . . . . . . . . . . . . . . . . . . . . . . . . . 112
10.16. Java Authentication and Authorization Service (JAAS) Provider . . . . . . . . . . . . . . . . . . . . 115
10.17. CAS Authentication . . . . . . . . . . . . . . . . . . . . . . . . . . . . . . . . . . . . . . . . . . . . . . . . . . . . . . . . . . . . . 119
10.18. X.509 Authentication . . . . . . . . . . . . . . . . . . . . . . . . . . . . . . . . . . . . . . . . . . . . . . . . . . . . . . . . . . . 130
10.19. Run-As Authentication Replacement . . . . . . . . . . . . . . . . . . . . . . . . . . . . . . . . . . . . . . . . . . . . . 132
10.20. Handling Logouts . . . . . . . . . . . . . . . . . . . . . . . . . . . . . . . . . . . . . . . . . . . . . . . . . . . . . . . . . . . . . . 133
10.21. Authentication Events . . . . . . . . . . . . . . . . . . . . . . . . . . . . . . . . . . . . . . . . . . . . . . . . . . . . . . . . . . 136
11. Authorization . . . . . . . . . . . . . . . . . . . . . . . . . . . . . . . . . . . . . . . . . . . . . . . . . . . . . . . . . . . . . . . . . . . . . . . 138
11.1. Authorization Architecture . . . . . . . . . . . . . . . . . . . . . . . . . . . . . . . . . . . . . . . . . . . . . . . . . . . . . . . 138
11.2. Authorize HttpServletRequest with FilterSecurityInterceptor. . . . . . . . . . . . . . . . . . . . . . . . 143
11.3. Expression-Based Access Control. . . . . . . . . . . . . . . . . . . . . . . . . . . . . . . . . . . . . . . . . . . . . . . . . . 146
11.4. Secure Object Implementations . . . . . . . . . . . . . . . . . . . . . . . . . . . . . . . . . . . . . . . . . . . . . . . . . . . 154
11.5. Method Security . . . . . . . . . . . . . . . . . . . . . . . . . . . . . . . . . . . . . . . . . . . . . . . . . . . . . . . . . . . . . . . . . 157
11.6. Domain Object Security (ACLs). . . . . . . . . . . . . . . . . . . . . . . . . . . . . . . . . . . . . . . . . . . . . . . . . . . . 161
12. OAuth2 . . . . . . . . . . . . . . . . . . . . . . . . . . . . . . . . . . . . . . . . . . . . . . . . . . . . . . . . . . . . . . . . . . . . . . . . . . . . . 166
12.1. OAuth 2.0 Login . . . . . . . . . . . . . . . . . . . . . . . . . . . . . . . . . . . . . . . . . . . . . . . . . . . . . . . . . . . . . . . . . 166
12.2. OAuth 2.0 Client . . . . . . . . . . . . . . . . . . . . . . . . . . . . . . . . . . . . . . . . . . . . . . . . . . . . . . . . . . . . . . . . . 199
12.3. OAuth 2.0 Resource Server . . . . . . . . . . . . . . . . . . . . . . . . . . . . . . . . . . . . . . . . . . . . . . . . . . . . . . . 233
13. SAML2 . . . . . . . . . . . . . . . . . . . . . . . . . . . . . . . . . . . . . . . . . . . . . . . . . . . . . . . . . . . . . . . . . . . . . . . . . . . . . 284
13.1. SAML 2.0 Login. . . . . . . . . . . . . . . . . . . . . . . . . . . . . . . . . . . . . . . . . . . . . . . . . . . . . . . . . . . . . . . . . . 284
14. Protection Against Exploits . . . . . . . . . . . . . . . . . . . . . . . . . . . . . . . . . . . . . . . . . . . . . . . . . . . . . . . . . . . 294
14.1. Cross Site Request Forgery (CSRF) for Servlet Environments. . . . . . . . . . . . . . . . . . . . . . . . . 294
14.2. Security HTTP Response Headers . . . . . . . . . . . . . . . . . . . . . . . . . . . . . . . . . . . . . . . . . . . . . . . . . 302
14.3. HTTP . . . . . . . . . . . . . . . . . . . . . . . . . . . . . . . . . . . . . . . . . . . . . . . . . . . . . . . . . . . . . . . . . . . . . . . . . . . 319
14.4. HttpFirewall . . . . . . . . . . . . . . . . . . . . . . . . . . . . . . . . . . . . . . . . . . . . . . . . . . . . . . . . . . . . . . . . . . . . 320
15. Integrations. . . . . . . . . . . . . . . . . . . . . . . . . . . . . . . . . . . . . . . . . . . . . . . . . . . . . . . . . . . . . . . . . . . . . . . . . 324
15.1. Servlet API integration . . . . . . . . . . . . . . . . . . . . . . . . . . . . . . . . . . . . . . . . . . . . . . . . . . . . . . . . . . . 324
15.2. Spring Data Integration . . . . . . . . . . . . . . . . . . . . . . . . . . . . . . . . . . . . . . . . . . . . . . . . . . . . . . . . . . 328
15.3. Concurrency Support . . . . . . . . . . . . . . . . . . . . . . . . . . . . . . . . . . . . . . . . . . . . . . . . . . . . . . . . . . . . 329
15.4. Jackson Support . . . . . . . . . . . . . . . . . . . . . . . . . . . . . . . . . . . . . . . . . . . . . . . . . . . . . . . . . . . . . . . . . 333
15.5. Localization. . . . . . . . . . . . . . . . . . . . . . . . . . . . . . . . . . . . . . . . . . . . . . . . . . . . . . . . . . . . . . . . . . . . . 333
15.6. Spring MVC Integration . . . . . . . . . . . . . . . . . . . . . . . . . . . . . . . . . . . . . . . . . . . . . . . . . . . . . . . . . . 334
15.7. WebSocket Security . . . . . . . . . . . . . . . . . . . . . . . . . . . . . . . . . . . . . . . . . . . . . . . . . . . . . . . . . . . . . . 342
15.8. CORS . . . . . . . . . . . . . . . . . . . . . . . . . . . . . . . . . . . . . . . . . . . . . . . . . . . . . . . . . . . . . . . . . . . . . . . . . . . 351
15.9. JSP Tag Libraries . . . . . . . . . . . . . . . . . . . . . . . . . . . . . . . . . . . . . . . . . . . . . . . . . . . . . . . . . . . . . . . . 353
16. Java Configuration . . . . . . . . . . . . . . . . . . . . . . . . . . . . . . . . . . . . . . . . . . . . . . . . . . . . . . . . . . . . . . . . . . 358
16.1. Hello Web Security Java Configuration . . . . . . . . . . . . . . . . . . . . . . . . . . . . . . . . . . . . . . . . . . . . 358
16.2. HttpSecurity . . . . . . . . . . . . . . . . . . . . . . . . . . . . . . . . . . . . . . . . . . . . . . . . . . . . . . . . . . . . . . . . . . . . 361
16.3. Multiple HttpSecurity . . . . . . . . . . . . . . . . . . . . . . . . . . . . . . . . . . . . . . . . . . . . . . . . . . . . . . . . . . . . 361
16.4. Custom DSLs . . . . . . . . . . . . . . . . . . . . . . . . . . . . . . . . . . . . . . . . . . . . . . . . . . . . . . . . . . . . . . . . . . . . 363
16.5. Post Processing Configured Objects . . . . . . . . . . . . . . . . . . . . . . . . . . . . . . . . . . . . . . . . . . . . . . . 364
17. Kotlin Configuration . . . . . . . . . . . . . . . . . . . . . . . . . . . . . . . . . . . . . . . . . . . . . . . . . . . . . . . . . . . . . . . . . 366
17.1. HttpSecurity . . . . . . . . . . . . . . . . . . . . . . . . . . . . . . . . . . . . . . . . . . . . . . . . . . . . . . . . . . . . . . . . . . . . 366
17.2. Multiple HttpSecurity . . . . . . . . . . . . . . . . . . . . . . . . . . . . . . . . . . . . . . . . . . . . . . . . . . . . . . . . . . . . 366
18. Security Namespace Configuration. . . . . . . . . . . . . . . . . . . . . . . . . . . . . . . . . . . . . . . . . . . . . . . . . . . . 369
18.1. Introduction . . . . . . . . . . . . . . . . . . . . . . . . . . . . . . . . . . . . . . . . . . . . . . . . . . . . . . . . . . . . . . . . . . . . 369
18.2. Getting Started with Security Namespace Configuration . . . . . . . . . . . . . . . . . . . . . . . . . . . . 370
18.3. Advanced Web Features. . . . . . . . . . . . . . . . . . . . . . . . . . . . . . . . . . . . . . . . . . . . . . . . . . . . . . . . . . 374
18.4. Method Security . . . . . . . . . . . . . . . . . . . . . . . . . . . . . . . . . . . . . . . . . . . . . . . . . . . . . . . . . . . . . . . . . 376
18.5. The Default AccessDecisionManager . . . . . . . . . . . . . . . . . . . . . . . . . . . . . . . . . . . . . . . . . . . . . . 376
19. Testing . . . . . . . . . . . . . . . . . . . . . . . . . . . . . . . . . . . . . . . . . . . . . . . . . . . . . . . . . . . . . . . . . . . . . . . . . . . . . 378
19.1. Testing Method Security. . . . . . . . . . . . . . . . . . . . . . . . . . . . . . . . . . . . . . . . . . . . . . . . . . . . . . . . . . 378
19.2. Spring MVC Test Integration . . . . . . . . . . . . . . . . . . . . . . . . . . . . . . . . . . . . . . . . . . . . . . . . . . . . . . 385
20. Spring Security Crypto Module . . . . . . . . . . . . . . . . . . . . . . . . . . . . . . . . . . . . . . . . . . . . . . . . . . . . . . . 405
20.1. Introduction . . . . . . . . . . . . . . . . . . . . . . . . . . . . . . . . . . . . . . . . . . . . . . . . . . . . . . . . . . . . . . . . . . . . 405
20.2. Encryptors . . . . . . . . . . . . . . . . . . . . . . . . . . . . . . . . . . . . . . . . . . . . . . . . . . . . . . . . . . . . . . . . . . . . . . 405
20.3. Key Generators . . . . . . . . . . . . . . . . . . . . . . . . . . . . . . . . . . . . . . . . . . . . . . . . . . . . . . . . . . . . . . . . . . 406
20.4. Password Encoding . . . . . . . . . . . . . . . . . . . . . . . . . . . . . . . . . . . . . . . . . . . . . . . . . . . . . . . . . . . . . . 407
21. Appendix . . . . . . . . . . . . . . . . . . . . . . . . . . . . . . . . . . . . . . . . . . . . . . . . . . . . . . . . . . . . . . . . . . . . . . . . . . . 408
21.1. Security Database Schema. . . . . . . . . . . . . . . . . . . . . . . . . . . . . . . . . . . . . . . . . . . . . . . . . . . . . . . . 408
21.2. The Security Namespace . . . . . . . . . . . . . . . . . . . . . . . . . . . . . . . . . . . . . . . . . . . . . . . . . . . . . . . . . 416
21.3. Spring Security Dependencies . . . . . . . . . . . . . . . . . . . . . . . . . . . . . . . . . . . . . . . . . . . . . . . . . . . . 454
21.4. Spring Security FAQ . . . . . . . . . . . . . . . . . . . . . . . . . . . . . . . . . . . . . . . . . . . . . . . . . . . . . . . . . . . . . 459
Reactive Applications . . . . . . . . . . . . . . . . . . . . . . . . . . . . . . . . . . . . . . . . . . . . . . . . . . . . . . . . . . . . . . . . . . . . . 474
22. WebFlux Security . . . . . . . . . . . . . . . . . . . . . . . . . . . . . . . . . . . . . . . . . . . . . . . . . . . . . . . . . . . . . . . . . . . 475
22.1. Minimal WebFlux Security Configuration. . . . . . . . . . . . . . . . . . . . . . . . . . . . . . . . . . . . . . . . . . 475
22.2. Explicit WebFlux Security Configuration. . . . . . . . . . . . . . . . . . . . . . . . . . . . . . . . . . . . . . . . . . . 475
23. Protection Against Exploits . . . . . . . . . . . . . . . . . . . . . . . . . . . . . . . . . . . . . . . . . . . . . . . . . . . . . . . . . . . 477
23.1. Cross Site Request Forgery (CSRF) for WebFlux Environments . . . . . . . . . . . . . . . . . . . . . . . 477
23.2. Security HTTP Response Headers . . . . . . . . . . . . . . . . . . . . . . . . . . . . . . . . . . . . . . . . . . . . . . . . . 483
23.3. HTTP . . . . . . . . . . . . . . . . . . . . . . . . . . . . . . . . . . . . . . . . . . . . . . . . . . . . . . . . . . . . . . . . . . . . . . . . . . . 490
24. OAuth2 WebFlux . . . . . . . . . . . . . . . . . . . . . . . . . . . . . . . . . . . . . . . . . . . . . . . . . . . . . . . . . . . . . . . . . . . . 492
24.1. OAuth 2.0 Login . . . . . . . . . . . . . . . . . . . . . . . . . . . . . . . . . . . . . . . . . . . . . . . . . . . . . . . . . . . . . . . . . 492
24.2. OAuth2 Client . . . . . . . . . . . . . . . . . . . . . . . . . . . . . . . . . . . . . . . . . . . . . . . . . . . . . . . . . . . . . . . . . . . 495
24.3. OAuth 2.0 Resource Server . . . . . . . . . . . . . . . . . . . . . . . . . . . . . . . . . . . . . . . . . . . . . . . . . . . . . . . 496
25. @RegisteredOAuth2AuthorizedClient . . . . . . . . . . . . . . . . . . . . . . . . . . . . . . . . . . . . . . . . . . . . . . . . . 522
26. Reactive X.509 Authentication . . . . . . . . . . . . . . . . . . . . . . . . . . . . . . . . . . . . . . . . . . . . . . . . . . . . . . . . 523
27. WebClient . . . . . . . . . . . . . . . . . . . . . . . . . . . . . . . . . . . . . . . . . . . . . . . . . . . . . . . . . . . . . . . . . . . . . . . . . . 525
27.1. WebClient OAuth2 Setup . . . . . . . . . . . . . . . . . . . . . . . . . . . . . . . . . . . . . . . . . . . . . . . . . . . . . . . . . 525
27.2. Implicit OAuth2AuthorizedClient . . . . . . . . . . . . . . . . . . . . . . . . . . . . . . . . . . . . . . . . . . . . . . . . . 526
27.3. Explicit OAuth2AuthorizedClient. . . . . . . . . . . . . . . . . . . . . . . . . . . . . . . . . . . . . . . . . . . . . . . . . . 526
27.4. clientRegistrationId. . . . . . . . . . . . . . . . . . . . . . . . . . . . . . . . . . . . . . . . . . . . . . . . . . . . . . . . . . . . . . 526
28. EnableReactiveMethodSecurity . . . . . . . . . . . . . . . . . . . . . . . . . . . . . . . . . . . . . . . . . . . . . . . . . . . . . . . 527
29. Reactive Test Support . . . . . . . . . . . . . . . . . . . . . . . . . . . . . . . . . . . . . . . . . . . . . . . . . . . . . . . . . . . . . . . . 530
29.1. Testing Reactive Method Security . . . . . . . . . . . . . . . . . . . . . . . . . . . . . . . . . . . . . . . . . . . . . . . . . 530
29.2. WebTestClientSupport . . . . . . . . . . . . . . . . . . . . . . . . . . . . . . . . . . . . . . . . . . . . . . . . . . . . . . . . . . . 530
30. RSocket Security . . . . . . . . . . . . . . . . . . . . . . . . . . . . . . . . . . . . . . . . . . . . . . . . . . . . . . . . . . . . . . . . . . . . 545
30.1. Minimal RSocket Security Configuration. . . . . . . . . . . . . . . . . . . . . . . . . . . . . . . . . . . . . . . . . . . 545
30.2. Adding SecuritySocketAcceptorInterceptor . . . . . . . . . . . . . . . . . . . . . . . . . . . . . . . . . . . . . . . . 545
30.3. RSocket Authentication . . . . . . . . . . . . . . . . . . . . . . . . . . . . . . . . . . . . . . . . . . . . . . . . . . . . . . . . . . 546
30.4. RSocket Authorization . . . . . . . . . . . . . . . . . . . . . . . . . . . . . . . . . . . . . . . . . . . . . . . . . . . . . . . . . . . 549
Spring Security is a framework that provides authentication, authorization, andprotection against common attacks. With first class support for both imperativeand reactive applications, it is the de-facto standard for securing Spring-basedapplications.
1
PrefaceThis section discusses the logistics of Spring Security.
2
Chapter 1. PrerequisitesSpring Security requires a Java 8 or higher Runtime Environment.
As Spring Security aims to operate in a self-contained manner, you do not need to place any specialconfiguration files in your Java Runtime Environment. In particular, you need not configure aspecial Java Authentication and Authorization Service (JAAS) policy file or place Spring Securityinto common classpath locations.
Similarly, if you use an EJB Container or Servlet Container, you need not put any specialconfiguration files anywhere nor include Spring Security in a server classloader. All the requiredfiles are contained within your application.
This design offers maximum deployment time flexibility, as you can copy your target artifact (be it aJAR, WAR, or EAR) from one system to another and it immediately works.
3
Chapter 2. Spring Security CommunityWelcome to the Spring Security Community! This section discusses how you can make the most ofour vast community.
2.1. Getting HelpIf you need help with Spring Security, we are here to help. The following are some of the best waysto get help:
• Read through this documentation.
• Try one of our many sample applications.
• Ask a question on https://stackoverflow.com with the spring-security tag.
• Report bugs and enhancement requests at https://github.com/spring-projects/spring-security/issues
2.2. Becoming InvolvedWe welcome your involvement in the Spring Security project. There are many ways to contribute,including answering questions on StackOverflow, writing new code, improving existing code,assisting with documentation, developing samples or tutorials, reporting bugs, or simply makingsuggestions. For more information, see our Contributing documentation.
2.3. Source CodeYou can find Spring Security’s source code on GitHub at https://github.com/spring-projects/spring-security/
2.4. Apache 2 LicenseSpring Security is Open Source software released under the Apache 2.0 license.
2.5. Social MediaYou can follow @SpringSecurity and the Spring Security team on Twitter to stay up to date with thelatest news. You can also follow @SpringCentral to keep up to date with the entire Spring portfolio.
4
Chapter 3. What’s New in Spring Security 5.3Spring Security 5.3 provides a number of new features. Below are the highlights of the release.
3.1. Documentation UpdatesWe will continue our effort to rewrite the documentation.
Here’s what you’ll see in this release:
• Added Servlet Security: The Big Picture
• Updated Servlet Authentication
◦ Rewrote
◦ Added how things work, including diagrams
• Added Kotlin samples
• Reskinned
◦ Added scrolling menu
◦ Added toggle
◦ Updated styles
3.2. Servlet• Added Kotlin DSL
• OAuth 2.0 Client
◦ Added Test support for OAuth 2.0 Client, OAuth 2.0 Login, and OIDC Login
◦ Improved customizing the OAuth 2.0 Authorization Request
◦ Enhanced OIDC logout success handler to support {baseUrl}
◦ Added OAuth2Authorization success and failure handlers
◦ Added XML support
◦ Added JDBC support for storing OAuth 2.0 tokens
◦ Added JSON serialization support for OAuth 2.0 tokens
• OAuth 2.0 Resource Server
◦ Added support for multiple issuers
◦ Added test support for Opaque Tokens
◦ Added generic claim validator
◦ Added XML support
◦ Improved bearer token error handling for JWT and Opaque Token
• SAML 2.0
5
◦ Added AuthenticationManager configuration
◦ Added support for AuthNRequest signatures
◦ Added support for AuthNRequest POST binding
3.3. WebFlux• Added DSL support for custom header writers
• OAuth 2.0 Client
◦ Added Test support for OAuth 2.0 Client, OAuth 2.0 Login, and OIDC Login
◦ Enhanced OIDC logout success handler to support {baseUrl}
◦ Added OAuth2Authorization success and failure handlers
◦ Added JSON serialization support for OAuth 2.0 tokens
◦ Added ReactiveOAuth2AuthorizedClientManager integration with AuthorizedClientService
• OAuth 2.0 Resource Server
◦ Added support for multiple issuers
◦ Added test support for Opaque Tokens
◦ Improved bearer token error handling for JWT and Opaque Token
3.4. RSocket• Added support for RSocket Authentication extension
3.5. Additional Updates• Enhanced Authentication Event Publisher support
◦ Updated configuration support
◦ Added default event and Map-based exception mapping
• Improved integration with Spring Data
• Added support to BCrypt to hash byte arrays
3.6. Build Changes• Changed build to use version ranges
• Removed dependency on Groovy
6
Chapter 4. Getting Spring SecurityThis section discusses all you need to know about getting the Spring Security binaries. See SourceCode for how to obtain the source code.
4.1. Release NumberingSpring Security versions are formatted as MAJOR.MINOR.PATCH such that:
• MAJOR versions may contain breaking changes. Typically, these are done to provide improvedsecurity to match modern security practices.
• MINOR versions contain enhancements but are considered passive updates
• PATCH level should be perfectly compatible, forwards and backwards, with the possibleexception of changes that fix bugs.
4.2. Usage with MavenAs most open source projects, Spring Security deploys its dependencies as Maven artifacts. Thetopics in this section provide detail on how to consume Spring Security when using Maven.
4.2.1. Spring Boot with Maven
Spring Boot provides a spring-boot-starter-security starter that aggregates Spring Security-relateddependencies together. The simplest and preferred way to use the starter is to use Spring Initializrby using an IDE integration (Eclipse, IntelliJ, NetBeans) or through https://start.spring.io.
Alternatively, you can manually add the starter, as the following example shows:
Example 1. pom.xml
<dependencies> <!-- ... other dependency elements ... --> <dependency> <groupId>org.springframework.boot</groupId> <artifactId>spring-boot-starter-security</artifactId> </dependency></dependencies>
Since Spring Boot provides a Maven BOM to manage dependency versions, you do not need tospecify a version. If you wish to override the Spring Security version, you may do so by providing aMaven property, as the following example shows:
7
Example 2. pom.xml
<properties> <!-- ... --> <spring-security.version>5.3.13.RELEASE</spring-security.version></dependencies>
Since Spring Security makes breaking changes only in major releases, it is safe to use a newerversion of Spring Security with Spring Boot. However, at times, you may need to update the versionof Spring Framework as well. You can do so by adding a Maven property, as the following exampleshows:
Example 3. pom.xml
<properties> <!-- ... --> <spring.version>5.2.19.RELEASE</spring.version></dependencies>
If you use additional features (such as LDAP, OpenID, and others), you need to also include theappropriate Project Modules.
4.2.2. Maven Without Spring Boot
When you use Spring Security without Spring Boot, the preferred way is to use Spring Security’sBOM to ensure a consistent version of Spring Security is used throughout the entire project. Thefollowing example shows how to do so:
Example 4. pom.xml
<dependencyManagement> <dependencies> <!-- ... other dependency elements ... --> <dependency> <groupId>org.springframework.security</groupId> <artifactId>spring-security-bom</artifactId> <version>{spring-security-version}</version> <type>pom</type> <scope>import</scope> </dependency> </dependencies></dependencyManagement>
A minimal Spring Security Maven set of dependencies typically looks like the following:
8
Example 5. pom.xml
<dependencies> <!-- ... other dependency elements ... --> <dependency> <groupId>org.springframework.security</groupId> <artifactId>spring-security-web</artifactId> </dependency> <dependency> <groupId>org.springframework.security</groupId> <artifactId>spring-security-config</artifactId> </dependency></dependencies>
If you use additional features (such as LDAP, OpenID, and others), you need to also include theappropriate Project Modules.
Spring Security builds against Spring Framework 5.2.19.RELEASE but should generally work withany newer version of Spring Framework 5.x. Many users are likely to run afoul of the fact thatSpring Security’s transitive dependencies resolve Spring Framework 5.2.19.RELEASE, which cancause strange classpath problems. The easiest way to resolve this is to use the spring-framework-bomwithin the <dependencyManagement> section of your pom.xml as the following example shows:
Example 6. pom.xml
<dependencyManagement> <dependencies> <!-- ... other dependency elements ... --> <dependency> <groupId>org.springframework</groupId> <artifactId>spring-framework-bom</artifactId> <version>5.2.19.RELEASE</version> <type>pom</type> <scope>import</scope> </dependency> </dependencies></dependencyManagement>
The preceding example ensures that all the transitive dependencies of Spring Security use theSpring 5.2.19.RELEASE modules.
This approach uses Maven’s “bill of materials” (BOM) concept and is only availablein Maven 2.0.9+. For additional details about how dependencies are resolved, seeMaven’s Introduction to the Dependency Mechanism documentation.
9
4.2.3. Maven Repositories
All GA releases (that is, versions ending in .RELEASE) are deployed to Maven Central, so noadditional Maven repositories need to be declared in your pom.
If you use a SNAPSHOT version, you need to ensure that you have the Spring Snapshot repositorydefined, as the following example shows:
Example 7. pom.xml
<repositories> <!-- ... possibly other repository elements ... --> <repository> <id>spring-snapshot</id> <name>Spring Snapshot Repository</name> <url>https://repo.spring.io/snapshot</url> </repository></repositories>
If you use a milestone or release candidate version, you need to ensure that you have the SpringMilestone repository defined, as the following example shows:
Example 8. pom.xml
<repositories> <!-- ... possibly other repository elements ... --> <repository> <id>spring-milestone</id> <name>Spring Milestone Repository</name> <url>https://repo.spring.io/milestone</url> </repository></repositories>
4.3. GradleAs most open source projects, Spring Security deploys its dependencies as Maven artifacts, whichallows for first-class Gradle support. The following topics provide detail on how to consume SpringSecurity when using Gradle.
4.3.1. Spring Boot with Gradle
Spring Boot provides a spring-boot-starter-security starter that aggregates Spring Security relateddependencies together. The simplest and preferred method to use the starter is to use SpringInitializr by using an IDE integration (Eclipse, IntelliJ, NetBeans) or through https://start.spring.io.
Alternatively, you can manually add the starter, as the following example shows:
10
Example 9. build.gradle
dependencies { compile "org.springframework.boot:spring-boot-starter-security"}
Since Spring Boot provides a Maven BOM to manage dependency versions, you need not specify aversion. If you wish to override the Spring Security version, you may do so by providing a Gradleproperty, as the following example shows:
Example 10. build.gradle
ext['spring-security.version']='5.3.13.RELEASE'
Since Spring Security makes breaking changes only in major releases, it is safe to use a newerversion of Spring Security with Spring Boot. However, at times, you may need to update the versionof Spring Framework as well. You can do so by adding a Gradle property, as the following exampleshows:
Example 11. build.gradle
ext['spring.version']='5.2.19.RELEASE'
If you use additional features (such as LDAP, OpenID, and others), you need to also include theappropriate Project Modules.
4.3.2. Gradle Without Spring Boot
When you use Spring Security without Spring Boot, the preferred way is to use Spring Security’sBOM to ensure a consistent version of Spring Security is used throughout the entire project. You cando so by using the Dependency Management Plugin, as the following example shows:
11
Example 12. build.gradle
plugins { id "io.spring.dependency-management" version "1.0.6.RELEASE"}
dependencyManagement { imports { mavenBom 'org.springframework.security:spring-security-bom:5.3.13.RELEASE' }}
A minimal Spring Security Maven set of dependencies typically looks like the following:
Example 13. build.gradle
dependencies { compile "org.springframework.security:spring-security-web" compile "org.springframework.security:spring-security-config"}
If you use additional features (such as LDAP, OpenID, and others), you need to also include theappropriate Project Modules.
Spring Security builds against Spring Framework 5.2.19.RELEASE but should generally work withany newer version of Spring Framework 5.x. Many users are likely to run afoul of the fact thatSpring Security’s transitive dependencies resolve Spring Framework 5.2.19.RELEASE, which cancause strange classpath problems. The easiest way to resolve this is to use the spring-framework-bomwithin your <dependencyManagement> section of your pom.xml. You can do so by using the DependencyManagement Plugin, as the following example shows:
Example 14. build.gradle
plugins { id "io.spring.dependency-management" version "1.0.6.RELEASE"}
dependencyManagement { imports { mavenBom 'org.springframework:spring-framework-bom:5.2.19.RELEASE' }}
The preceding example ensures that all the transitive dependencies of Spring Security use the
12
Spring 5.2.19.RELEASE modules.
4.3.3. Gradle Repositories
All GA releases (that is, versions ending in .RELEASE) are deployed to Maven Central, so using themavenCentral() repository is sufficient for GA releases. The following example shows how to do so:
Example 15. build.gradle
repositories { mavenCentral()}
If you use a SNAPSHOT version, you need to ensure you have the Spring Snapshot repositorydefined, as the following example shows:
Example 16. build.gradle
repositories { maven { url 'https://repo.spring.io/snapshot' }}
If you use a milestone or release candidate version, you need to ensure that you have the SpringMilestone repository defined, as the following example shows:
Example 17. build.gradle
repositories { maven { url 'https://repo.spring.io/milestone' }}
13
Chapter 5. FeaturesSpring Security provides comprehensive support for authentication, authorization, and protectionagainst common exploits. It also provides integration with other libraries to simplify its usage.
5.1. AuthenticationSpring Security provides comprehensive support for authentication. Authentication is how weverify the identity of who is trying to access a particular resource. A common way to authenticateusers is by requiring the user to enter a username and password. Once authentication is performedwe know the identity and can perform authorization.
5.1.1. Authentication Support
Spring Security provides built in support for authenticating users. Refer to the sections onauthentication for Servlet and WebFlux for details on what is supported for each stack.
5.1.2. Password Storage
Spring Security’s PasswordEncoder interface is used to perform a one way transformation of apassword to allow the password to be stored securely. Given PasswordEncoder is a one waytransformation, it is not intended when the password transformation needs to be two way (i.e.storing credentials used to authenticate to a database). Typically PasswordEncoder is used for storinga password that needs to be compared to a user provided password at the time of authentication.
Password Storage History
Throughout the years the standard mechanism for storing passwords has evolved. In the beginningpasswords were stored in plain text. The passwords were assumed to be safe because the data storethe passwords were saved in required credentials to access it. However, malicious users were ableto find ways to get large "data dumps" of usernames and passwords using attacks like SQL Injection.As more and more user credentials became public security experts realized we needed to do moreto protect users' passwords.
Developers were then encouraged to store passwords after running them through a one way hashsuch as SHA-256. When a user tried to authenticate, the hashed password would be compared tothe hash of the password that they typed. This meant that the system only needed to store the oneway hash of the password. If a breach occurred, then only the one way hashes of the passwordswere exposed. Since the hashes were one way and it was computationally difficult to guess thepasswords given the hash, it would not be worth the effort to figure out each password in thesystem. To defeat this new system malicious users decided to create lookup tables known asRainbow Tables. Rather than doing the work of guessing each password every time, they computedthe password once and stored it in a lookup table.
To mitigate the effectiveness of Rainbow Tables, developers were encouraged to use saltedpasswords. Instead of using just the password as input to the hash function, random bytes (knownas salt) would be generated for every users' password. The salt and the user’s password would beran through the hash function which produced a unique hash. The salt would be stored alongside
14
the user’s password in clear text. Then when a user tried to authenticate, the hashed passwordwould be compared to the hash of the stored salt and the password that they typed. The unique saltmeant that Rainbow Tables were no longer effective because the hash was different for every saltand password combination.
In modern times we realize that cryptographic hashes (like SHA-256) are no longer secure. Thereason is that with modern hardware we can perform billions of hash calculations a second. Thismeans that we can crack each password individually with ease.
Developers are now encouraged to leverage adaptive one-way functions to store a password.Validation of passwords with adaptive one-way functions are intentionally resource (i.e. CPU,memory, etc) intensive. An adaptive one-way function allows configuring a "work factor" which cangrow as hardware gets better. It is recommended that the "work factor" be tuned to take about 1second to verify a password on your system. This trade off is to make it difficult for attackers tocrack the password, but not so costly it puts excessive burden on your own system. Spring Securityhas attempted to provide a good starting point for the "work factor", but users are encouraged tocustomize the "work factor" for their own system since the performance will vary drastically fromsystem to system. Examples of adaptive one-way functions that should be used include bcrypt,PBKDF2, scrypt, and argon2.
Because adaptive one-way functions are intentionally resource intensive, validating a usernameand password for every request will degrade performance of an application significantly. There isnothing Spring Security (or any other library) can do to speed up the validation of the passwordsince security is gained by making the validation resource intensive. Users are encouraged toexchange the long term credentials (i.e. username and password) for a short term credential (i.e.session, OAuth Token, etc). The short term credential can be validated quickly without any loss insecurity.
DelegatingPasswordEncoder
Prior to Spring Security 5.0 the default PasswordEncoder was NoOpPasswordEncoder which requiredplain text passwords. Based upon the Password History section you might expect that the defaultPasswordEncoder is now something like BCryptPasswordEncoder. However, this ignores three realworld problems:
• There are many applications using old password encodings that cannot easily migrate
• The best practice for password storage will change again.
• As a framework Spring Security cannot make breaking changes frequently
Instead Spring Security introduces DelegatingPasswordEncoder which solves all of the problems by:
• Ensuring that passwords are encoded using the current password storage recommendations
• Allowing for validating passwords in modern and legacy formats
• Allowing for upgrading the encoding in the future
You can easily construct an instance of DelegatingPasswordEncoder using PasswordEncoderFactories.
15
Example 18. Create Default DelegatingPasswordEncoder
PasswordEncoder passwordEncoder = PasswordEncoderFactories.createDelegatingPasswordEncoder();
Alternatively, you may create your own custom instance. For example:
Example 19. Create Custom DelegatingPasswordEncoder
String idForEncode = "bcrypt";Map encoders = new HashMap<>();encoders.put(idForEncode, new BCryptPasswordEncoder());encoders.put("noop", NoOpPasswordEncoder.getInstance());encoders.put("pbkdf2", new Pbkdf2PasswordEncoder());encoders.put("scrypt", new SCryptPasswordEncoder());encoders.put("sha256", new StandardPasswordEncoder());
PasswordEncoder passwordEncoder = new DelegatingPasswordEncoder(idForEncode, encoders);
Password Storage Format
The general format for a password is:
Example 20. DelegatingPasswordEncoder Storage Format
{id}encodedPassword
Such that id is an identifier used to look up which PasswordEncoder should be used andencodedPassword is the original encoded password for the selected PasswordEncoder. The id must be atthe beginning of the password, start with { and end with }. If the id cannot be found, the id will benull. For example, the following might be a list of passwords encoded using different id. All of theoriginal passwords are "password".
16
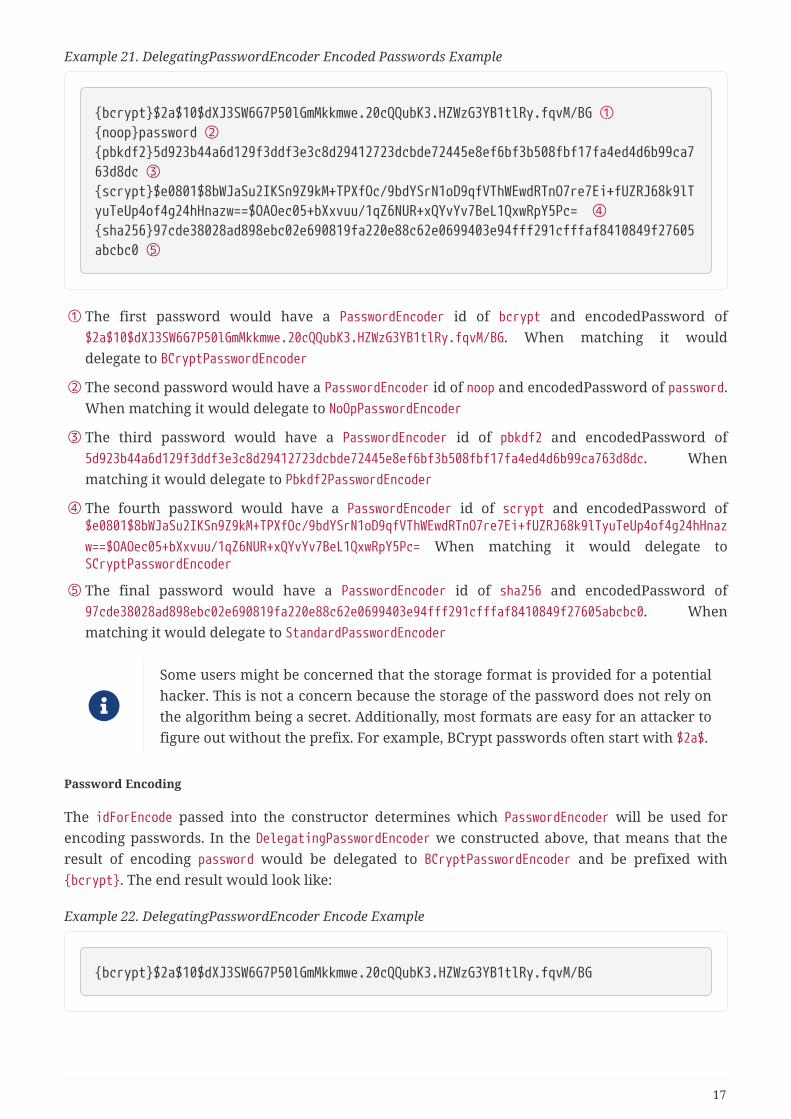
Example 21. DelegatingPasswordEncoder Encoded Passwords Example
{bcrypt}$2a$10$dXJ3SW6G7P50lGmMkkmwe.20cQQubK3.HZWzG3YB1tlRy.fqvM/BG ①{noop}password ②{pbkdf2}5d923b44a6d129f3ddf3e3c8d29412723dcbde72445e8ef6bf3b508fbf17fa4ed4d6b99ca763d8dc ③{scrypt}$e0801$8bWJaSu2IKSn9Z9kM+TPXfOc/9bdYSrN1oD9qfVThWEwdRTnO7re7Ei+fUZRJ68k9lTyuTeUp4of4g24hHnazw==$OAOec05+bXxvuu/1qZ6NUR+xQYvYv7BeL1QxwRpY5Pc= ④{sha256}97cde38028ad898ebc02e690819fa220e88c62e0699403e94fff291cfffaf8410849f27605abcbc0 ⑤
① The first password would have a PasswordEncoder id of bcrypt and encodedPassword of$2a$10$dXJ3SW6G7P50lGmMkkmwe.20cQQubK3.HZWzG3YB1tlRy.fqvM/BG. When matching it woulddelegate to BCryptPasswordEncoder
② The second password would have a PasswordEncoder id of noop and encodedPassword of password.When matching it would delegate to NoOpPasswordEncoder
③ The third password would have a PasswordEncoder id of pbkdf2 and encodedPassword of5d923b44a6d129f3ddf3e3c8d29412723dcbde72445e8ef6bf3b508fbf17fa4ed4d6b99ca763d8dc. Whenmatching it would delegate to Pbkdf2PasswordEncoder
④ The fourth password would have a PasswordEncoder id of scrypt and encodedPassword of$e0801$8bWJaSu2IKSn9Z9kM+TPXfOc/9bdYSrN1oD9qfVThWEwdRTnO7re7Ei+fUZRJ68k9lTyuTeUp4of4g24hHnazw==$OAOec05+bXxvuu/1qZ6NUR+xQYvYv7BeL1QxwRpY5Pc= When matching it would delegate toSCryptPasswordEncoder
⑤ The final password would have a PasswordEncoder id of sha256 and encodedPassword of97cde38028ad898ebc02e690819fa220e88c62e0699403e94fff291cfffaf8410849f27605abcbc0. Whenmatching it would delegate to StandardPasswordEncoder
Some users might be concerned that the storage format is provided for a potentialhacker. This is not a concern because the storage of the password does not rely onthe algorithm being a secret. Additionally, most formats are easy for an attacker tofigure out without the prefix. For example, BCrypt passwords often start with $2a$.
Password Encoding
The idForEncode passed into the constructor determines which PasswordEncoder will be used forencoding passwords. In the DelegatingPasswordEncoder we constructed above, that means that theresult of encoding password would be delegated to BCryptPasswordEncoder and be prefixed with{bcrypt}. The end result would look like:
Example 22. DelegatingPasswordEncoder Encode Example
{bcrypt}$2a$10$dXJ3SW6G7P50lGmMkkmwe.20cQQubK3.HZWzG3YB1tlRy.fqvM/BG
17
Password Matching
Matching is done based upon the {id} and the mapping of the id to the PasswordEncoder provided inthe constructor. Our example in Password Storage Format provides a working example of how thisis done. By default, the result of invoking matches(CharSequence, String) with a password and an idthat is not mapped (including a null id) will result in an IllegalArgumentException. This behaviorcan be customized usingDelegatingPasswordEncoder.setDefaultPasswordEncoderForMatches(PasswordEncoder).
By using the id we can match on any password encoding, but encode passwords using the mostmodern password encoding. This is important, because unlike encryption, password hashes aredesigned so that there is no simple way to recover the plaintext. Since there is no way to recoverthe plaintext, it makes it difficult to migrate the passwords. While it is simple for users to migrateNoOpPasswordEncoder, we chose to include it by default to make it simple for the getting startedexperience.
Getting Started Experience
If you are putting together a demo or a sample, it is a bit cumbersome to take time to hash thepasswords of your users. There are convenience mechanisms to make this easier, but this is still notintended for production.
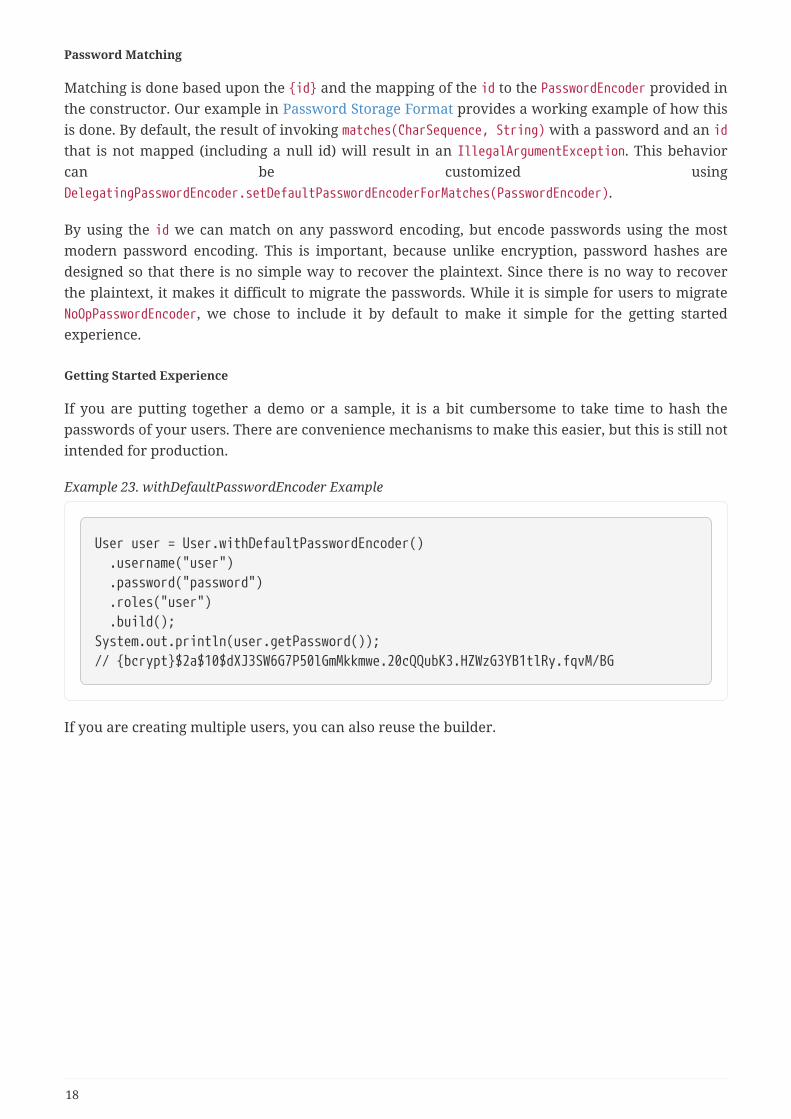
Example 23. withDefaultPasswordEncoder Example
User user = User.withDefaultPasswordEncoder() .username("user") .password("password") .roles("user") .build();System.out.println(user.getPassword());// {bcrypt}$2a$10$dXJ3SW6G7P50lGmMkkmwe.20cQQubK3.HZWzG3YB1tlRy.fqvM/BG
If you are creating multiple users, you can also reuse the builder.
18
Example 24. withDefaultPasswordEncoder Reusing the Builder
UserBuilder users = User.withDefaultPasswordEncoder();User user = users .username("user") .password("password") .roles("USER") .build();User admin = users .username("admin") .password("password") .roles("USER","ADMIN") .build();
This does hash the password that is stored, but the passwords are still exposed in memory and inthe compiled source code. Therefore, it is still not considered secure for a production environment.For production, you should hash your passwords externally.
Encode with Spring Boot CLI
The easiest way to properly encode your password is to use the Spring Boot CLI.
For example, the following will encode the password of password for use withDelegatingPasswordEncoder:
Example 25. Spring Boot CLI encodepassword Example
spring encodepassword password{bcrypt}$2a$10$X5wFBtLrL/kHcmrOGGTrGufsBX8CJ0WpQpF3pgeuxBB/H73BK1DW6
Troubleshooting
The following error occurs when one of the passwords that are stored has no id as described inPassword Storage Format.
java.lang.IllegalArgumentException: There is no PasswordEncoder mapped for the id"null" atorg.springframework.security.crypto.password.DelegatingPasswordEncoder$UnmappedIdPasswordEncoder.matches(DelegatingPasswordEncoder.java:233) atorg.springframework.security.crypto.password.DelegatingPasswordEncoder.matches(DelegatingPasswordEncoder.java:196)
The easiest way to resolve the error is to switch to explicitly provide the PasswordEncoder that you
19

passwords are encoded with. The easiest way to resolve it is to figure out how your passwords arecurrently being stored and explicitly provide the correct PasswordEncoder.
If you are migrating from Spring Security 4.2.x you can revert to the previous behavior by exposinga NoOpPasswordEncoder bean.
Alternatively, you can prefix all of your passwords with the correct id and continue to useDelegatingPasswordEncoder. For example, if you are using BCrypt, you would migrate your passwordfrom something like:
$2a$10$dXJ3SW6G7P50lGmMkkmwe.20cQQubK3.HZWzG3YB1tlRy.fqvM/BG
to
{bcrypt}$2a$10$dXJ3SW6G7P50lGmMkkmwe.20cQQubK3.HZWzG3YB1tlRy.fqvM/BG
For a complete listing of the mappings refer to the Javadoc on PasswordEncoderFactories.
BCryptPasswordEncoder
The BCryptPasswordEncoder implementation uses the widely supported bcrypt algorithm to hash thepasswords. In order to make it more resistent to password cracking, bcrypt is deliberately slow.Like other adaptive one-way functions, it should be tuned to take about 1 second to verify apassword on your system. The default implementation of BCryptPasswordEncoder uses strength 10 asmentioned in the Javadoc of BCryptPasswordEncoder. You are encouraged to tune and test thestrength parameter on your own system so that it takes roughly 1 second to verify a password.
// Create an encoder with strength 16BCryptPasswordEncoder encoder = new BCryptPasswordEncoder(16);String result = encoder.encode("myPassword");assertTrue(encoder.matches("myPassword", result));
Argon2PasswordEncoder
The Argon2PasswordEncoder implementation uses the Argon2 algorithm to hash the passwords.Argon2 is the winner of the Password Hashing Competition. In order to defeat password crackingon custom hardware, Argon2 is a deliberately slow algorithm that requires large amounts ofmemory. Like other adaptive one-way functions, it should be tuned to take about 1 second to verifya password on your system. The current implementation if the Argon2PasswordEncoder requiresBouncyCastle.
// Create an encoder with all the defaultsArgon2PasswordEncoder encoder = new Argon2PasswordEncoder();String result = encoder.encode("myPassword");assertTrue(encoder.matches("myPassword", result));
20
Pbkdf2PasswordEncoder
The Pbkdf2PasswordEncoder implementation uses the PBKDF2 algorithm to hash the passwords. Inorder to defeat password cracking PBKDF2 is a deliberately slow algorithm. Like other adaptiveone-way functions, it should be tuned to take about 1 second to verify a password on your system.This algorithm is a good choice when FIPS certification is required.
// Create an encoder with all the defaultsPbkdf2PasswordEncoder encoder = new Pbkdf2PasswordEncoder();String result = encoder.encode("myPassword");assertTrue(encoder.matches("myPassword", result));
SCryptPasswordEncoder
The SCryptPasswordEncoder implementation uses scrypt algorithm to hash the passwords. In order todefeat password cracking on custom hardware scrypt is a deliberately slow algorithm that requireslarge amounts of memory. Like other adaptive one-way functions, it should be tuned to take about 1second to verify a password on your system.
// Create an encoder with all the defaultsSCryptPasswordEncoder encoder = new SCryptPasswordEncoder();String result = encoder.encode("myPassword");assertTrue(encoder.matches("myPassword", result));
Other PasswordEncoders
There are a significant number of other PasswordEncoder implementations that exist entirely forbackward compatibility. They are all deprecated to indicate that they are no longer consideredsecure. However, there are no plans to remove them since it is difficult to migrate existing legacysystems.
Password Storage Configuration
Spring Security uses DelegatingPasswordEncoder by default. However, this can be customized byexposing a PasswordEncoder as a Spring bean.
If you are migrating from Spring Security 4.2.x you can revert to the previous behavior by exposinga NoOpPasswordEncoder bean.
Reverting to NoOpPasswordEncoder is not considered to be secure. You should insteadmigrate to using DelegatingPasswordEncoder to support secure password encoding.
21

Example 26. NoOpPasswordEncoder
Java
@Beanpublic static NoOpPasswordEncoder passwordEncoder() { return NoOpPasswordEncoder.getInstance();}
XML
<b:bean id="passwordEncoder" class="org.springframework.security.crypto.password.NoOpPasswordEncoder"factory-method="getInstance"/>
Kotlin
@Beanfun passwordEncoder(): PasswordEncoder { return NoOpPasswordEncoder.getInstance();}
XML Configuration requires the NoOpPasswordEncoder bean name to bepasswordEncoder.
5.2. Protection Against ExploitsSpring Security provides protection against common exploits. Whenever possible, the protection isenabled by default. Below you will find high level description of the various exploits that SpringSecurity protects against.
5.2.1. Cross Site Request Forgery (CSRF)
Spring provides comprehensive support for protecting against Cross Site Request Forgery (CSRF)attacks. In the following sections we will explore:
• What is a CSRF Attack?
• Protecting Against CSRF Attacks
• CSRF Considerations
This portion of the documentation discusses the general topic of CSRF protection.Refer to the relevant sections for specific information on CSRF protection forservlet and WebFlux based applications.
22
What is a CSRF Attack?
The best way to understand a CSRF attack is by taking a look at a concrete example.
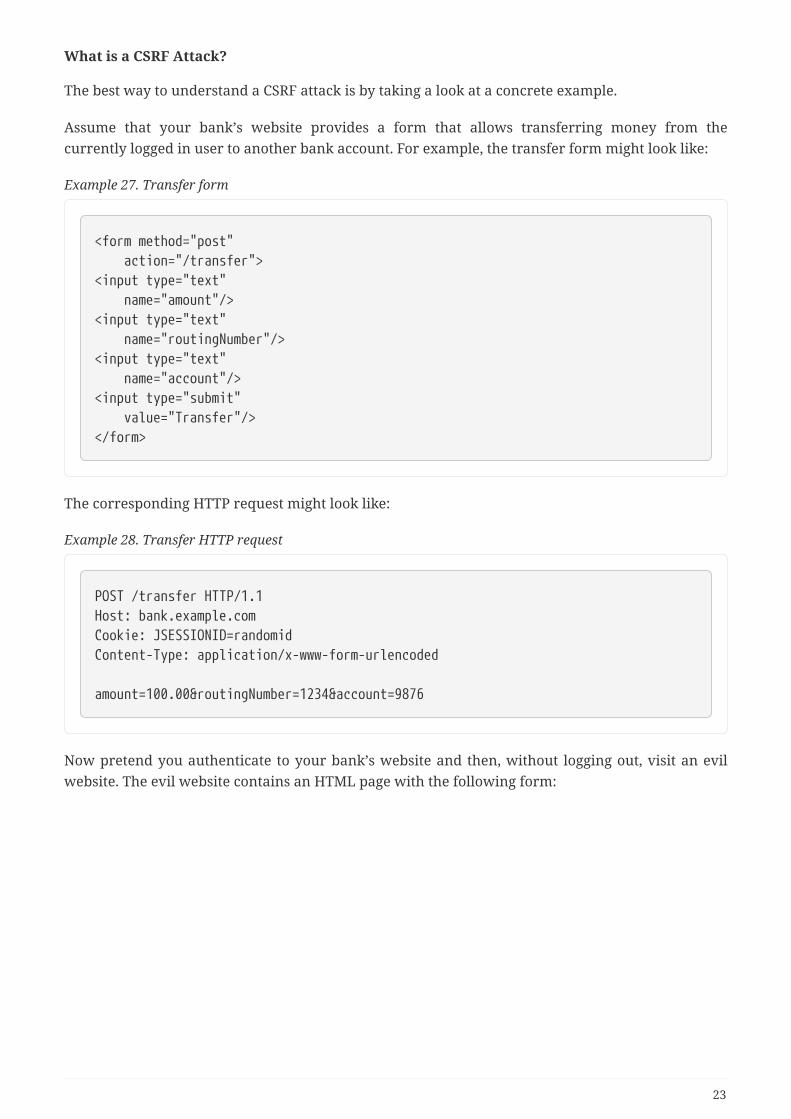
Assume that your bank’s website provides a form that allows transferring money from thecurrently logged in user to another bank account. For example, the transfer form might look like:
Example 27. Transfer form
<form method="post" action="/transfer"><input type="text" name="amount"/><input type="text" name="routingNumber"/><input type="text" name="account"/><input type="submit" value="Transfer"/></form>
The corresponding HTTP request might look like:
Example 28. Transfer HTTP request
POST /transfer HTTP/1.1Host: bank.example.comCookie: JSESSIONID=randomidContent-Type: application/x-www-form-urlencoded
amount=100.00&routingNumber=1234&account=9876
Now pretend you authenticate to your bank’s website and then, without logging out, visit an evilwebsite. The evil website contains an HTML page with the following form:
23
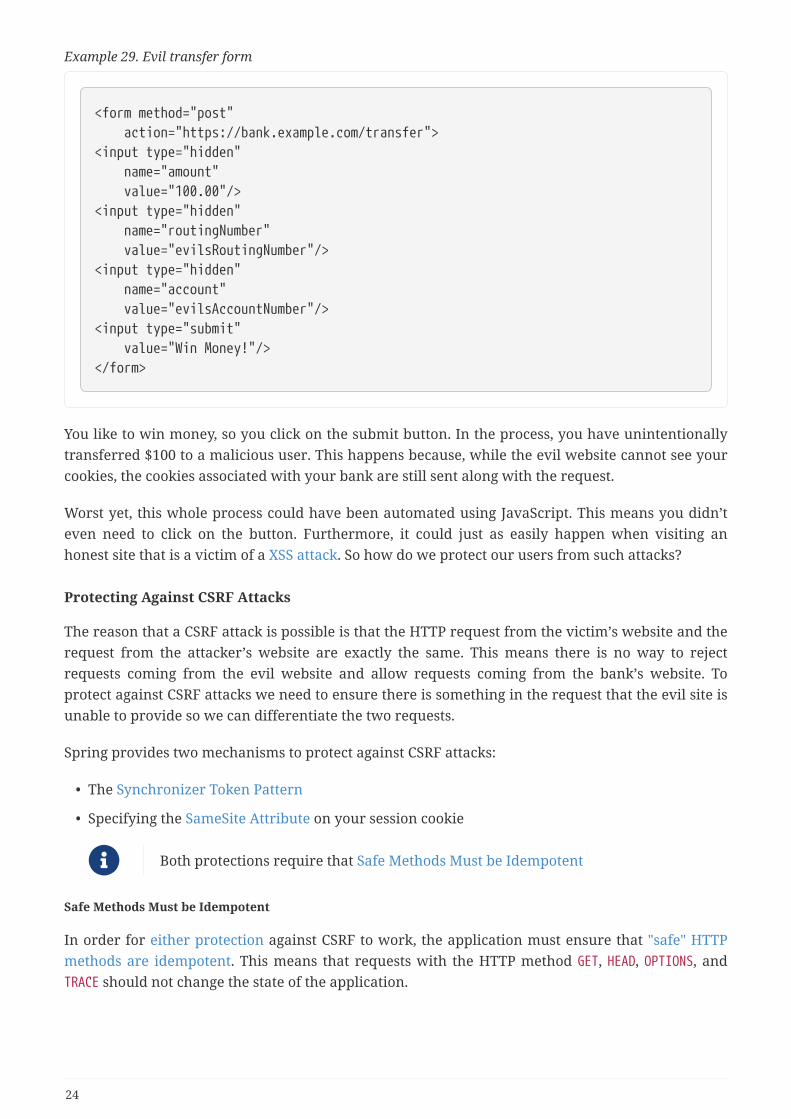
Example 29. Evil transfer form
<form method="post" action="https://bank.example.com/transfer"><input type="hidden" name="amount" value="100.00"/><input type="hidden" name="routingNumber" value="evilsRoutingNumber"/><input type="hidden" name="account" value="evilsAccountNumber"/><input type="submit" value="Win Money!"/></form>
You like to win money, so you click on the submit button. In the process, you have unintentionallytransferred $100 to a malicious user. This happens because, while the evil website cannot see yourcookies, the cookies associated with your bank are still sent along with the request.
Worst yet, this whole process could have been automated using JavaScript. This means you didn’teven need to click on the button. Furthermore, it could just as easily happen when visiting anhonest site that is a victim of a XSS attack. So how do we protect our users from such attacks?
Protecting Against CSRF Attacks
The reason that a CSRF attack is possible is that the HTTP request from the victim’s website and therequest from the attacker’s website are exactly the same. This means there is no way to rejectrequests coming from the evil website and allow requests coming from the bank’s website. Toprotect against CSRF attacks we need to ensure there is something in the request that the evil site isunable to provide so we can differentiate the two requests.
Spring provides two mechanisms to protect against CSRF attacks:
• The Synchronizer Token Pattern
• Specifying the SameSite Attribute on your session cookie
Both protections require that Safe Methods Must be Idempotent
Safe Methods Must be Idempotent
In order for either protection against CSRF to work, the application must ensure that "safe" HTTPmethods are idempotent. This means that requests with the HTTP method GET, HEAD, OPTIONS, andTRACE should not change the state of the application.
24
Synchronizer Token Pattern
The predominant and most comprehensive way to protect against CSRF attacks is to use theSynchronizer Token Pattern. This solution is to ensure that each HTTP request requires, in additionto our session cookie, a secure random generated value called a CSRF token must be present in theHTTP request.
When an HTTP request is submitted, the server must look up the expected CSRF token and compareit against the actual CSRF token in the HTTP request. If the values do not match, the HTTP requestshould be rejected.
The key to this working is that the actual CSRF token should be in a part of the HTTP request that isnot automatically included by the browser. For example, requiring the actual CSRF token in anHTTP parameter or an HTTP header will protect against CSRF attacks. Requiring the actual CSRFtoken in a cookie does not work because cookies are automatically included in the HTTP request bythe browser.
We can relax the expectations to only require the actual CSRF token for each HTTP request thatupdates state of the application. For that to work, our application must ensure that safe HTTPmethods are idempotent. This improves usability since we want to allow linking to our websiteusing links from external sites. Additionally, we do not want to include the random token in HTTPGET as this can cause the tokens to be leaked.
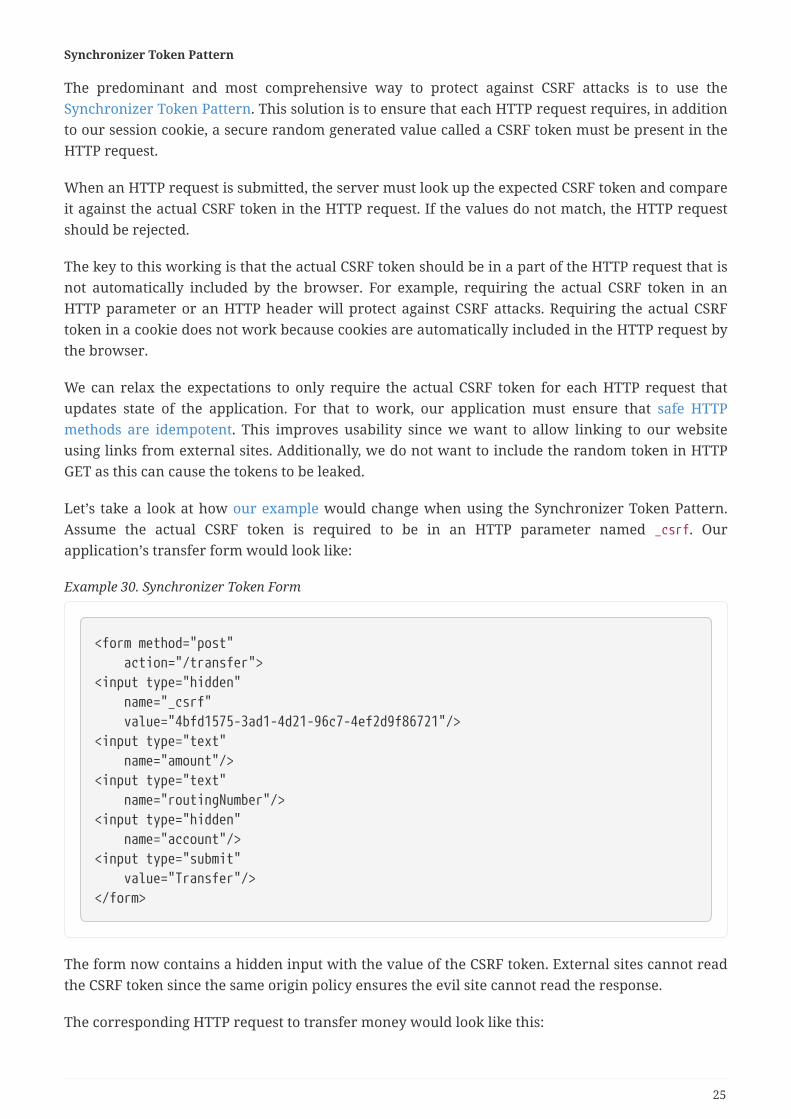
Let’s take a look at how our example would change when using the Synchronizer Token Pattern.Assume the actual CSRF token is required to be in an HTTP parameter named _csrf. Ourapplication’s transfer form would look like:
Example 30. Synchronizer Token Form
<form method="post" action="/transfer"><input type="hidden" name="_csrf" value="4bfd1575-3ad1-4d21-96c7-4ef2d9f86721"/><input type="text" name="amount"/><input type="text" name="routingNumber"/><input type="hidden" name="account"/><input type="submit" value="Transfer"/></form>
The form now contains a hidden input with the value of the CSRF token. External sites cannot readthe CSRF token since the same origin policy ensures the evil site cannot read the response.
The corresponding HTTP request to transfer money would look like this:
25
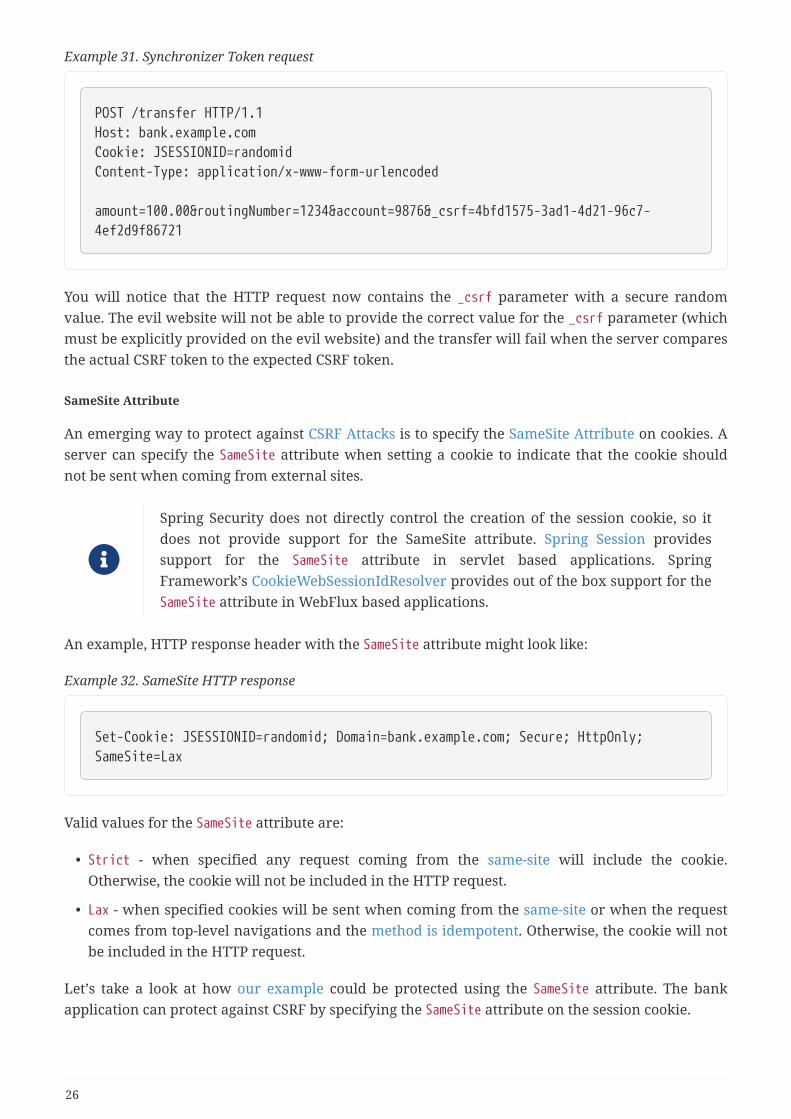
Example 31. Synchronizer Token request
POST /transfer HTTP/1.1Host: bank.example.comCookie: JSESSIONID=randomidContent-Type: application/x-www-form-urlencoded
amount=100.00&routingNumber=1234&account=9876&_csrf=4bfd1575-3ad1-4d21-96c7-4ef2d9f86721
You will notice that the HTTP request now contains the _csrf parameter with a secure randomvalue. The evil website will not be able to provide the correct value for the _csrf parameter (whichmust be explicitly provided on the evil website) and the transfer will fail when the server comparesthe actual CSRF token to the expected CSRF token.
SameSite Attribute
An emerging way to protect against CSRF Attacks is to specify the SameSite Attribute on cookies. Aserver can specify the SameSite attribute when setting a cookie to indicate that the cookie shouldnot be sent when coming from external sites.
Spring Security does not directly control the creation of the session cookie, so itdoes not provide support for the SameSite attribute. Spring Session providessupport for the SameSite attribute in servlet based applications. SpringFramework’s CookieWebSessionIdResolver provides out of the box support for theSameSite attribute in WebFlux based applications.
An example, HTTP response header with the SameSite attribute might look like:
Example 32. SameSite HTTP response
Set-Cookie: JSESSIONID=randomid; Domain=bank.example.com; Secure; HttpOnly;SameSite=Lax
Valid values for the SameSite attribute are:
• Strict - when specified any request coming from the same-site will include the cookie.Otherwise, the cookie will not be included in the HTTP request.
• Lax - when specified cookies will be sent when coming from the same-site or when the requestcomes from top-level navigations and the method is idempotent. Otherwise, the cookie will notbe included in the HTTP request.
Let’s take a look at how our example could be protected using the SameSite attribute. The bankapplication can protect against CSRF by specifying the SameSite attribute on the session cookie.
26
With the SameSite attribute set on our session cookie, the browser will continue to send theJSESSIONID cookie with requests coming from the banking website. However, the browser will nolonger send the JSESSIONID cookie with a transfer request coming from the evil website. Since thesession is no longer present in the transfer request coming from the evil website, the application isprotected from the CSRF attack.
There are some important considerations that one should be aware about when using SameSiteattribute to protect against CSRF attacks.
Setting the SameSite attribute to Strict provides a stronger defense but can confuse users. Considera user that stays logged into a social media site hosted at https://social.example.com. The userreceives an email at https://email.example.org that includes a link to the social media site. If theuser clicks on the link, they would rightfully expect to be authenticated to the social media site.However, if the SameSite attribute is Strict the cookie would not be sent and so the user would notbe authenticated.
We could improve the protection and usability of SameSite protection against CSRFattacks by implementing gh-7537.
Another obvious consideration is that in order for the SameSite attribute to protect users, thebrowser must support the SameSite attribute. Most modern browsers do support the SameSiteattribute. However, older browsers that are still in use may not.
For this reason, it is generally recommended to use the SameSite attribute as a defense in depthrather than the sole protection against CSRF attacks.
When to use CSRF protection
When should you use CSRF protection? Our recommendation is to use CSRF protection for anyrequest that could be processed by a browser by normal users. If you are only creating a servicethat is used by non-browser clients, you will likely want to disable CSRF protection.
CSRF protection and JSON
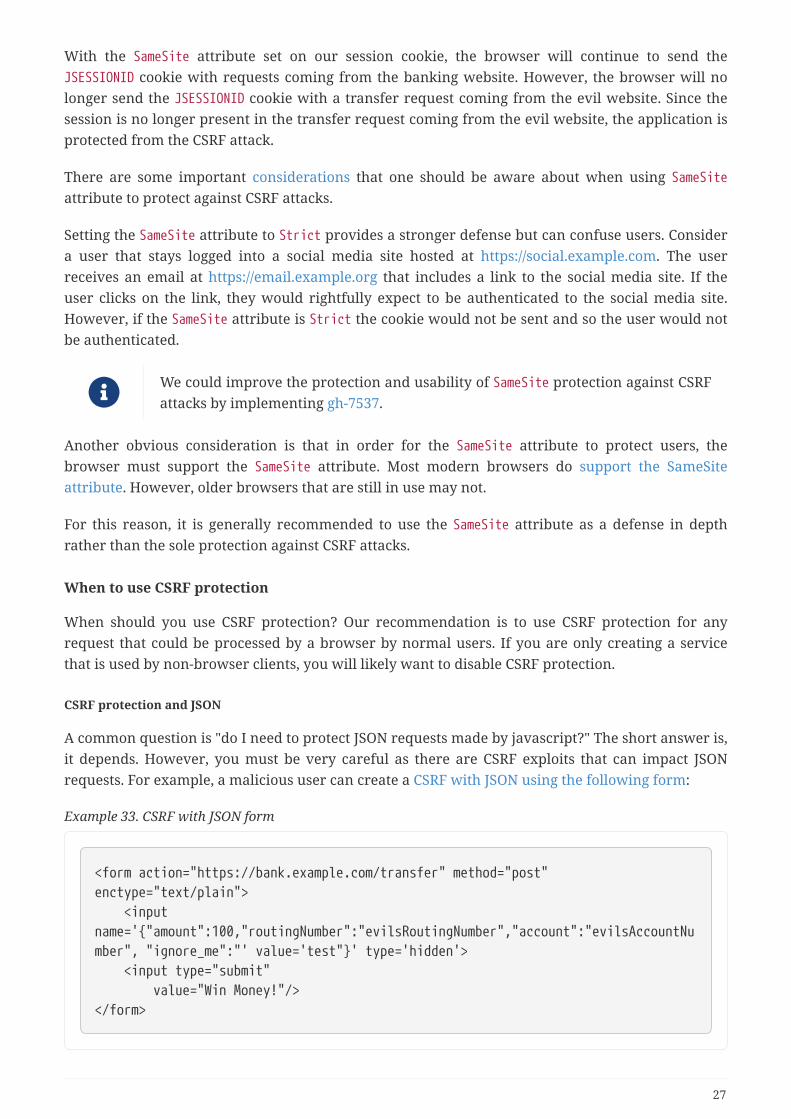
A common question is "do I need to protect JSON requests made by javascript?" The short answer is,it depends. However, you must be very careful as there are CSRF exploits that can impact JSONrequests. For example, a malicious user can create a CSRF with JSON using the following form:
Example 33. CSRF with JSON form
<form action="https://bank.example.com/transfer" method="post"enctype="text/plain"> <inputname='{"amount":100,"routingNumber":"evilsRoutingNumber","account":"evilsAccountNumber", "ignore_me":"' value='test"}' type='hidden'> <input type="submit" value="Win Money!"/></form>
27
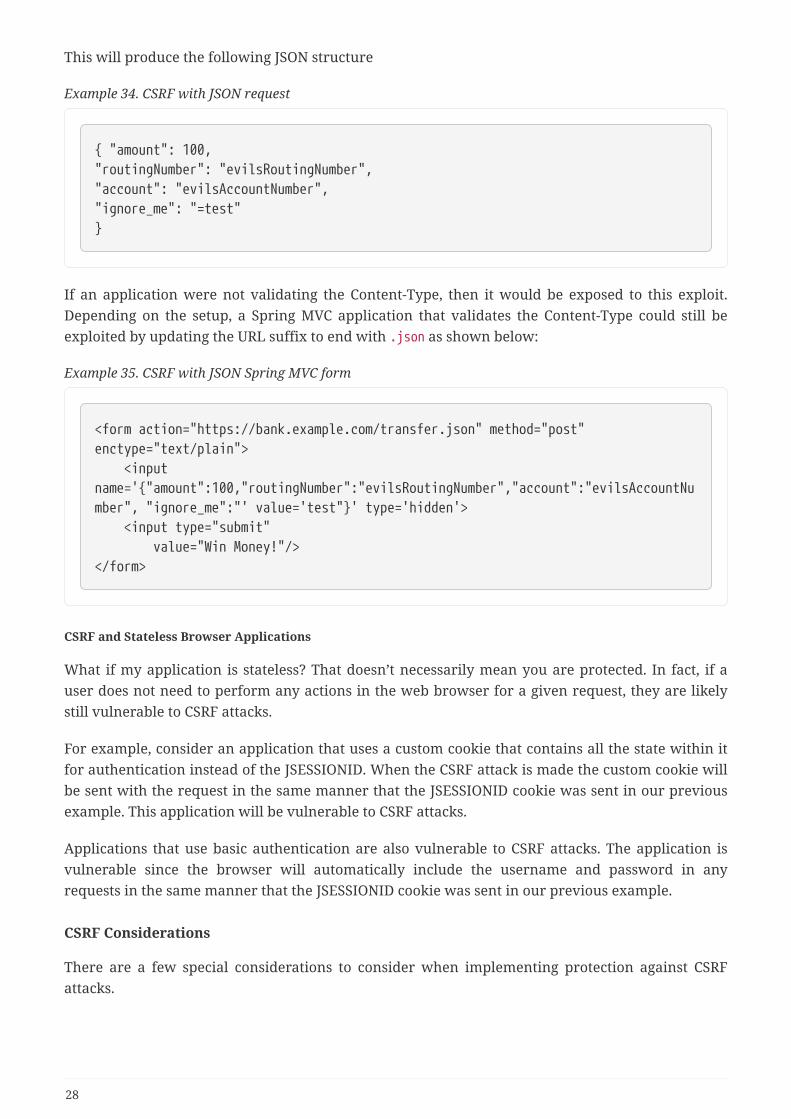
This will produce the following JSON structure
Example 34. CSRF with JSON request
{ "amount": 100,"routingNumber": "evilsRoutingNumber","account": "evilsAccountNumber","ignore_me": "=test"}
If an application were not validating the Content-Type, then it would be exposed to this exploit.Depending on the setup, a Spring MVC application that validates the Content-Type could still beexploited by updating the URL suffix to end with .json as shown below:
Example 35. CSRF with JSON Spring MVC form
<form action="https://bank.example.com/transfer.json" method="post"enctype="text/plain"> <inputname='{"amount":100,"routingNumber":"evilsRoutingNumber","account":"evilsAccountNumber", "ignore_me":"' value='test"}' type='hidden'> <input type="submit" value="Win Money!"/></form>
CSRF and Stateless Browser Applications
What if my application is stateless? That doesn’t necessarily mean you are protected. In fact, if auser does not need to perform any actions in the web browser for a given request, they are likelystill vulnerable to CSRF attacks.
For example, consider an application that uses a custom cookie that contains all the state within itfor authentication instead of the JSESSIONID. When the CSRF attack is made the custom cookie willbe sent with the request in the same manner that the JSESSIONID cookie was sent in our previousexample. This application will be vulnerable to CSRF attacks.
Applications that use basic authentication are also vulnerable to CSRF attacks. The application isvulnerable since the browser will automatically include the username and password in anyrequests in the same manner that the JSESSIONID cookie was sent in our previous example.
CSRF Considerations
There are a few special considerations to consider when implementing protection against CSRFattacks.
28
Logging In
In order to protect against forging log in requests the log in HTTP request should be protectedagainst CSRF attacks. Protecting against forging log in requests is necessary so that a malicious usercannot read a victim’s sensitive information. The attack is executed by:
• A malicious user performs a CSRF log in using the malicious user’s credentials. The victim isnow authenticated as the malicious user.
• The malicious user then tricks the victim to visit the compromised website and enter sensitiveinformation
• The information is associated to the malicious user’s account so the malicious user can log inwith their own credentials and view the vicitim’s sensitive information
A possible complication to ensuring log in HTTP requests are protected against CSRF attacks is thatthe user might experience a session timeout that causes the request to be rejected. A sessiontimeout is surprising to users who do not expect to need to have a session in order to log in. Formore information refer to CSRF and Session Timeouts.
Logging Out
In order to protect against forging log out requests, the log out HTTP request should be protectedagainst CSRF attacks. Protecting against forging log out requests is necessary so a malicious usercannot read a victim’s sensitive information. For details on the attack refer to this blog post.
A possible complication to ensuring log out HTTP requests are protected against CSRF attacks is thatthe user might experience a session timeout that causes the request to be rejected. A sessiontimeout is surprising to users who do not expect to need to have a session in order to log out. Formore information refer to CSRF and Session Timeouts.
CSRF and Session Timeouts
More often than not, the expected CSRF token is stored in the session. This means that as soon asthe session expires the server will not find an expected CSRF token and reject the HTTP request.There are a number of options to solve timeouts each of which come with trade offs.
• The best way to mitigate the timeout is by using JavaScript to request a CSRF token on formsubmission. The form is then updated with the CSRF token and submitted.
• Another option is to have some JavaScript that lets the user know their session is about toexpire. The user can click a button to continue and refresh the session.
• Finally, the expected CSRF token could be stored in a cookie. This allows the expected CSRFtoken to outlive the session.
One might ask why the expected CSRF token isn’t stored in a cookie by default. This is becausethere are known exploits in which headers (i.e. specify the cookies) can be set by anotherdomain. This is the same reason Ruby on Rails no longer skips CSRF checks when the header X-Requested-With is present. See this webappsec.org thread for details on how to perform theexploit. Another disadvantage is that by removing the state (i.e. the timeout) you lose the abilityto forcibly terminate the token if it is compromised.
29
Multipart (file upload)
Protecting multipart requests (file uploads) from CSRF attacks causes a chicken and the eggproblem. In order to prevent a CSRF attack from occurring, the body of the HTTP request must beread to obtain actual CSRF token. However, reading the body means that the file will be uploadedwhich means an external site can upload a file.
There are two options to using CSRF protection with multipart/form-data. Each option has its trade-offs.
• Place CSRF Token in the Body
• Place CSRF Token in the URL
Before you integrate Spring Security’s CSRF protection with multipart file upload,ensure that you can upload without the CSRF protection first. More informationabout using multipart forms with Spring can be found within the 1.1.11. MultipartResolver section of the Spring reference and the MultipartFilter javadoc.
Place CSRF Token in the Body
The first option is to include the actual CSRF token in the body of the request. By placing the CSRFtoken in the body, the body will be read before authorization is performed. This means that anyonecan place temporary files on your server. However, only authorized users will be able to submit aFile that is processed by your application. In general, this is the recommended approach becausethe temporary file upload should have a negligible impact on most servers.
Include CSRF Token in URL
If allowing unauthorized users to upload temporary files is not acceptable, an alternative is toinclude the expected CSRF token as a query parameter in the action attribute of the form. Thedisadvantage to this approach is that query parameters can be leaked. More generally, it isconsidered best practice to place sensitive data within the body or headers to ensure it is notleaked. Additional information can be found in RFC 2616 Section 15.1.3 Encoding SensitiveInformation in URI’s.
HiddenHttpMethodFilter
In some applications a form parameter can be used to override the HTTP method. For example, theform below could be used to treat the HTTP method as a delete rather than a post.
30
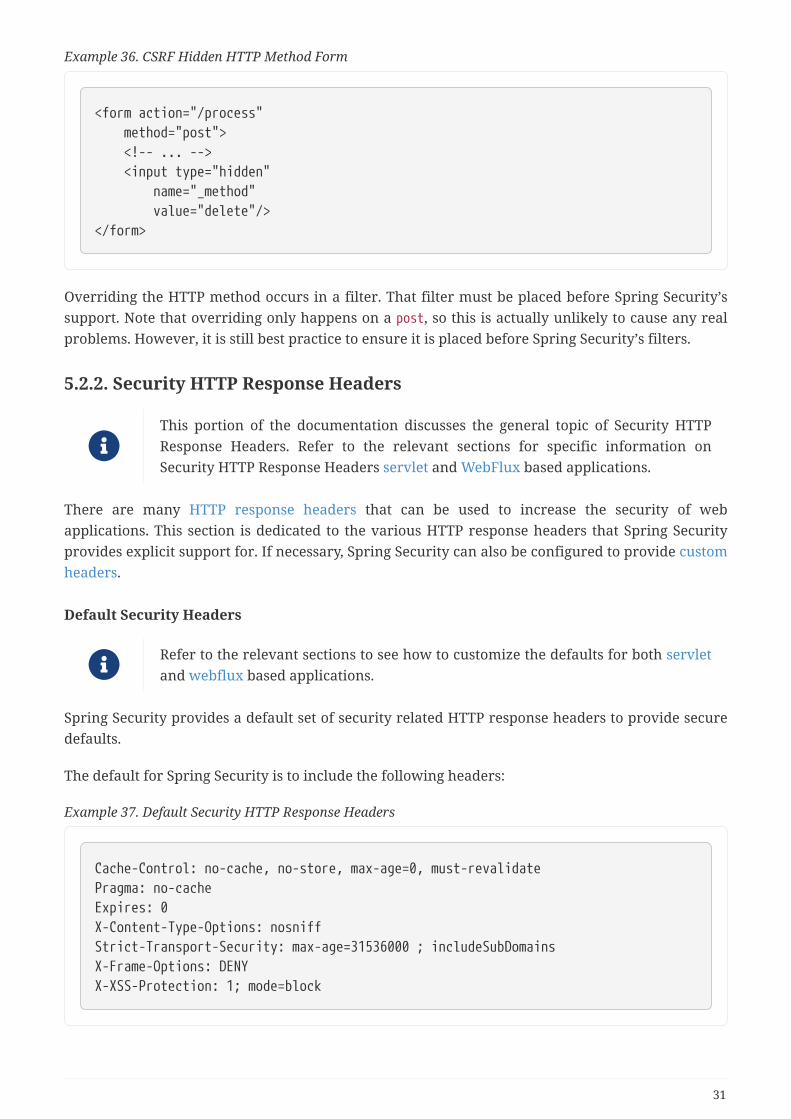
Example 36. CSRF Hidden HTTP Method Form
<form action="/process" method="post"> <!-- ... --> <input type="hidden" name="_method" value="delete"/></form>
Overriding the HTTP method occurs in a filter. That filter must be placed before Spring Security’ssupport. Note that overriding only happens on a post, so this is actually unlikely to cause any realproblems. However, it is still best practice to ensure it is placed before Spring Security’s filters.
5.2.2. Security HTTP Response Headers
This portion of the documentation discusses the general topic of Security HTTPResponse Headers. Refer to the relevant sections for specific information onSecurity HTTP Response Headers servlet and WebFlux based applications.
There are many HTTP response headers that can be used to increase the security of webapplications. This section is dedicated to the various HTTP response headers that Spring Securityprovides explicit support for. If necessary, Spring Security can also be configured to provide customheaders.
Default Security Headers
Refer to the relevant sections to see how to customize the defaults for both servletand webflux based applications.
Spring Security provides a default set of security related HTTP response headers to provide securedefaults.
The default for Spring Security is to include the following headers:
Example 37. Default Security HTTP Response Headers
Cache-Control: no-cache, no-store, max-age=0, must-revalidatePragma: no-cacheExpires: 0X-Content-Type-Options: nosniffStrict-Transport-Security: max-age=31536000 ; includeSubDomainsX-Frame-Options: DENYX-XSS-Protection: 1; mode=block
31
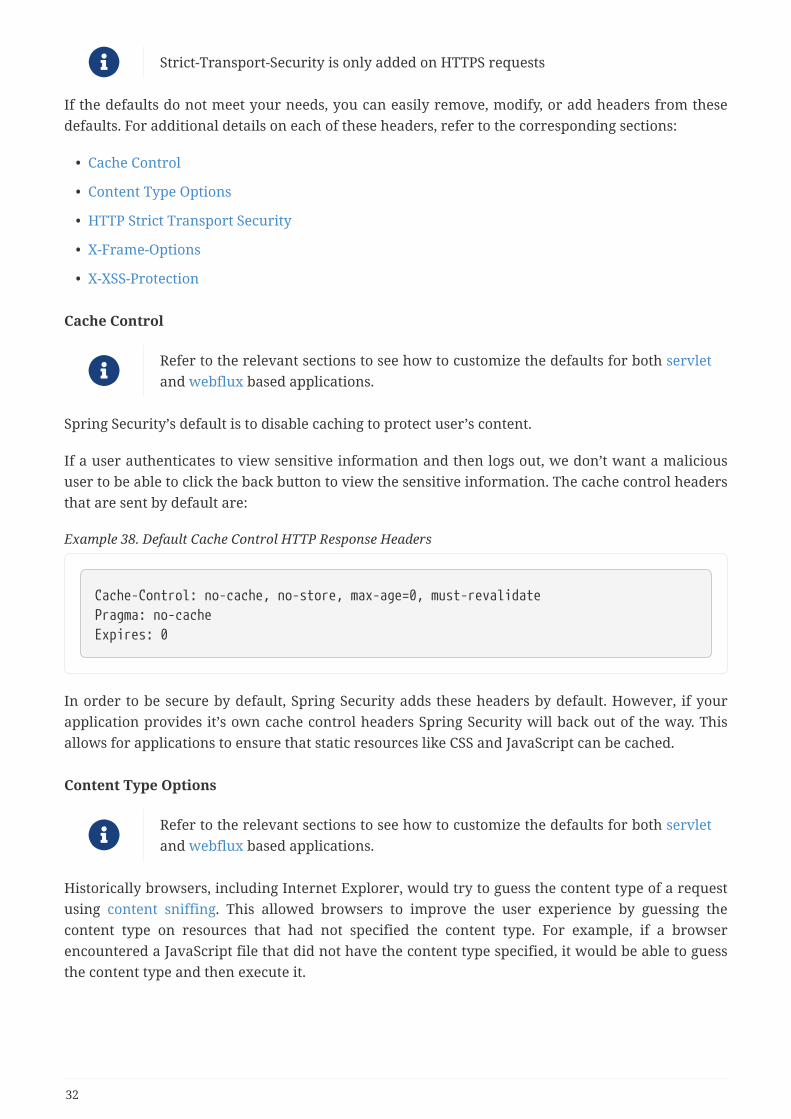
Strict-Transport-Security is only added on HTTPS requests
If the defaults do not meet your needs, you can easily remove, modify, or add headers from thesedefaults. For additional details on each of these headers, refer to the corresponding sections:
• Cache Control
• Content Type Options
• HTTP Strict Transport Security
• X-Frame-Options
• X-XSS-Protection
Cache Control
Refer to the relevant sections to see how to customize the defaults for both servletand webflux based applications.
Spring Security’s default is to disable caching to protect user’s content.
If a user authenticates to view sensitive information and then logs out, we don’t want a malicioususer to be able to click the back button to view the sensitive information. The cache control headersthat are sent by default are:
Example 38. Default Cache Control HTTP Response Headers
Cache-Control: no-cache, no-store, max-age=0, must-revalidatePragma: no-cacheExpires: 0
In order to be secure by default, Spring Security adds these headers by default. However, if yourapplication provides it’s own cache control headers Spring Security will back out of the way. Thisallows for applications to ensure that static resources like CSS and JavaScript can be cached.
Content Type Options
Refer to the relevant sections to see how to customize the defaults for both servletand webflux based applications.
Historically browsers, including Internet Explorer, would try to guess the content type of a requestusing content sniffing. This allowed browsers to improve the user experience by guessing thecontent type on resources that had not specified the content type. For example, if a browserencountered a JavaScript file that did not have the content type specified, it would be able to guessthe content type and then execute it.
32
There are many additional things one should do (i.e. only display the document ina distinct domain, ensure Content-Type header is set, sanitize the document, etc)when allowing content to be uploaded. However, these measures are out of thescope of what Spring Security provides. It is also important to point out whendisabling content sniffing, you must specify the content type in order for things towork properly.
The problem with content sniffing is that this allowed malicious users to use polyglots (i.e. a filethat is valid as multiple content types) to execute XSS attacks. For example, some sites may allowusers to submit a valid postscript document to a website and view it. A malicious user might createa postscript document that is also a valid JavaScript file and execute a XSS attack with it.
Spring Security disables content sniffing by default by adding the following header to HTTPresponses:
Example 39. nosniff HTTP Response Header
X-Content-Type-Options: nosniff
HTTP Strict Transport Security (HSTS)
Refer to the relevant sections to see how to customize the defaults for both servletand webflux based applications.
When you type in your bank’s website, do you enter mybank.example.com or do you enterhttps://mybank.example.com? If you omit the https protocol, you are potentially vulnerable to Manin the Middle attacks. Even if the website performs a redirect to https://mybank.example.com amalicious user could intercept the initial HTTP request and manipulate the response (i.e. redirect tohttps://mibank.example.com and steal their credentials).
Many users omit the https protocol and this is why HTTP Strict Transport Security (HSTS) wascreated. Once mybank.example.com is added as a HSTS host, a browser can know ahead of timethat any request to mybank.example.com should be interpreted as https://mybank.example.com.This greatly reduces the possibility of a Man in the Middle attack occurring.
In accordance with RFC6797, the HSTS header is only injected into HTTPSresponses. In order for the browser to acknowledge the header, the browser mustfirst trust the CA that signed the SSL certificate used to make the connection (notjust the SSL certificate).
One way for a site to be marked as a HSTS host is to have the host preloaded into the browser.Another is to add the Strict-Transport-Security header to the response. For example, SpringSecurity’s default behavior is to add the following header which instructs the browser to treat thedomain as an HSTS host for a year (there are approximately 31536000 seconds in a year):
33
Example 40. Strict Transport Security HTTP Response Header
Strict-Transport-Security: max-age=31536000 ; includeSubDomains ; preload
The optional includeSubDomains directive instructs the browser that subdomains (i.e.secure.mybank.example.com) should also be treated as an HSTS domain.
The optional preload directive instructs the browser that domain should be preloaded in browser asHSTS domain. For more details on HSTS preload please see https://hstspreload.org.
HTTP Public Key Pinning (HPKP)
In order to remain passive Spring Security still provides support for HPKP inservlet environments, but for the reasons listed above HPKP is no longerrecommended by the security team.
HTTP Public Key Pinning (HPKP) specifies to a web client which public key to use with certain webserver to prevent Man in the Middle (MITM) attacks with forged certificates. When used correctly,HPKP could add additional layers of protection against compromised certificates. However, due tothe complexity of HPKP many experts no longer recommend using it and Chrome has evenremoved support for it.
For additional details around why HPKP is no longer recommended read Is HTTP Public KeyPinning Dead? and I’m giving up on HPKP.
X-Frame-Options
Refer to the relevant sections to see how to customize the defaults for both servletand webflux based applications.
Allowing your website to be added to a frame can be a security issue. For example, using clever CSSstyling users could be tricked into clicking on something that they were not intending (video demo).For example, a user that is logged into their bank might click a button that grants access to otherusers. This sort of attack is known as Clickjacking.
Another modern approach to dealing with clickjacking is to use Content SecurityPolicy (CSP).
There are a number ways to mitigate clickjacking attacks. For example, to protect legacy browsersfrom clickjacking attacks you can use frame breaking code. While not perfect, the frame breakingcode is the best you can do for the legacy browsers.
A more modern approach to address clickjacking is to use X-Frame-Options header. By defaultSpring Security disables rendering pages within an iframe using with the following header:
34
X-Frame-Options: DENY
X-XSS-Protection
Refer to the relevant sections to see how to customize the defaults for both servletand webflux based applications.
Some browsers have built in support for filtering out reflected XSS attacks. This is by no meansfoolproof, but does assist in XSS protection.
The filtering is typically enabled by default, so adding the header typically just ensures it is enabledand instructs the browser what to do when a XSS attack is detected. For example, the filter mighttry to change the content in the least invasive way to still render everything. At times, this type ofreplacement can become a XSS vulnerability in itself. Instead, it is best to block the content ratherthan attempt to fix it. By default Spring Security blocks the content using the following header:
X-XSS-Protection: 1; mode=block
Content Security Policy (CSP)
Refer to the relevant sections to see how to configure both servlet and webfluxbased applications.
Content Security Policy (CSP) is a mechanism that web applications can leverage to mitigate contentinjection vulnerabilities, such as cross-site scripting (XSS). CSP is a declarative policy that provides afacility for web application authors to declare and ultimately inform the client (user-agent) aboutthe sources from which the web application expects to load resources.
Content Security Policy is not intended to solve all content injection vulnerabilities.Instead, CSP can be leveraged to help reduce the harm caused by content injectionattacks. As a first line of defense, web application authors should validate theirinput and encode their output.
A web application may employ the use of CSP by including one of the following HTTP headers in theresponse:
• Content-Security-Policy
• Content-Security-Policy-Report-Only
Each of these headers are used as a mechanism to deliver a security policy to the client. A securitypolicy contains a set of security policy directives, each responsible for declaring the restrictions fora particular resource representation.
For example, a web application can declare that it expects to load scripts from specific, trustedsources, by including the following header in the response:
35
Example 41. Content Security Policy Example
Content-Security-Policy: script-src https://trustedscripts.example.com
An attempt to load a script from another source other than what is declared in the script-srcdirective will be blocked by the user-agent. Additionally, if the report-uri directive is declared in thesecurity policy, then the violation will be reported by the user-agent to the declared URL.
For example, if a web application violates the declared security policy, the following responseheader will instruct the user-agent to send violation reports to the URL specified in the policy’sreport-uri directive.
Example 42. Content Security Policy with report-uri
Content-Security-Policy: script-src https://trustedscripts.example.com; report-uri/csp-report-endpoint/
Violation reports are standard JSON structures that can be captured either by the web application’sown API or by a publicly hosted CSP violation reporting service, such as, https://report-uri.io/.
The Content-Security-Policy-Report-Only header provides the capability for web applicationauthors and administrators to monitor security policies, rather than enforce them. This header istypically used when experimenting and/or developing security policies for a site. When a policy isdeemed effective, it can be enforced by using the Content-Security-Policy header field instead.
Given the following response header, the policy declares that scripts may be loaded from one oftwo possible sources.
Example 43. Content Security Policy Report Only
Content-Security-Policy-Report-Only: script-src 'self'https://trustedscripts.example.com; report-uri /csp-report-endpoint/
If the site violates this policy, by attempting to load a script from evil.com, the user-agent will send aviolation report to the declared URL specified by the report-uri directive, but still allow the violatingresource to load nevertheless.
Applying Content Security Policy to a web application is often a non-trivial undertaking. Thefollowing resources may provide further assistance in developing effective security policies foryour site.
An Introduction to Content Security Policy
CSP Guide - Mozilla Developer Network
36
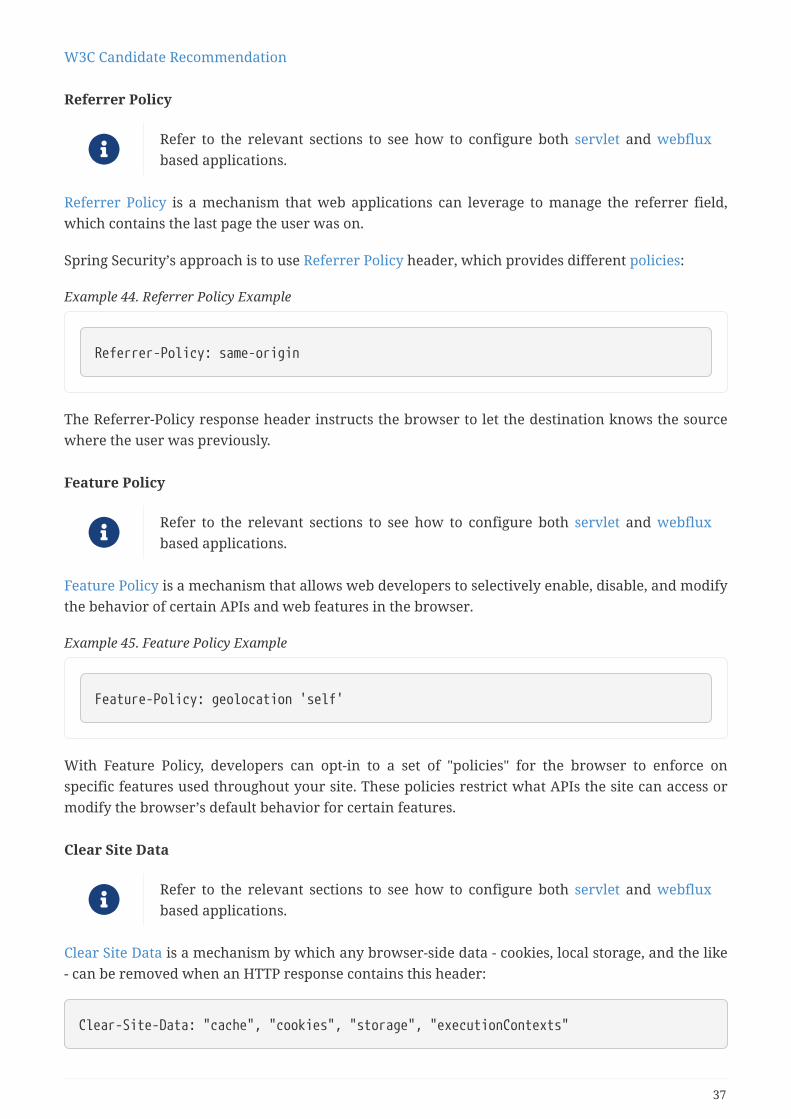
W3C Candidate Recommendation
Referrer Policy
Refer to the relevant sections to see how to configure both servlet and webfluxbased applications.
Referrer Policy is a mechanism that web applications can leverage to manage the referrer field,which contains the last page the user was on.
Spring Security’s approach is to use Referrer Policy header, which provides different policies:
Example 44. Referrer Policy Example
Referrer-Policy: same-origin
The Referrer-Policy response header instructs the browser to let the destination knows the sourcewhere the user was previously.
Feature Policy
Refer to the relevant sections to see how to configure both servlet and webfluxbased applications.
Feature Policy is a mechanism that allows web developers to selectively enable, disable, and modifythe behavior of certain APIs and web features in the browser.
Example 45. Feature Policy Example
Feature-Policy: geolocation 'self'
With Feature Policy, developers can opt-in to a set of "policies" for the browser to enforce onspecific features used throughout your site. These policies restrict what APIs the site can access ormodify the browser’s default behavior for certain features.
Clear Site Data
Refer to the relevant sections to see how to configure both servlet and webfluxbased applications.
Clear Site Data is a mechanism by which any browser-side data - cookies, local storage, and the like- can be removed when an HTTP response contains this header:
Clear-Site-Data: "cache", "cookies", "storage", "executionContexts"
37
This is a nice clean-up action to perform on logout.
Custom Headers
Refer to the relevant sections to see how to configure both servlet basedapplications.
Spring Security has mechanisms to make it convenient to add the more common security headersto your application. However, it also provides hooks to enable adding custom headers.
5.2.3. HTTP
All HTTP based communication, including static resources, should be protected using TLS.
As a framework, Spring Security does not handle HTTP connections and thus does not providesupport for HTTPS directly. However, it does provide a number of features that help with HTTPSusage.
Redirect to HTTPS
When a client uses HTTP, Spring Security can be configured to redirect to HTTPS both Servlet andWebFlux environments.
Strict Transport Security
Spring Security provides support for Strict Transport Security and enables it by default.
Proxy Server Configuration
When using a proxy server it is important to ensure that you have configured your applicationproperly. For example, many applications will have a load balancer that responds to request forhttps://example.com/ by forwarding the request to an application server at https://192.168.1:8080Without proper configuration, the application server will not know that the load balancer existsand treat the request as though https://192.168.1:8080 was requested by the client.
To fix this you can use RFC 7239 to specify that a load balancer is being used. To make theapplication aware of this, you need to either configure your application server aware of the X-Forwarded headers. For example Tomcat uses the RemoteIpValve and Jetty usesForwardedRequestCustomizer. Alternatively, Spring users can leverage ForwardedHeaderFilter.
Spring Boot users may use the server.use-forward-headers property to configure the application.See the Spring Boot documentation for further details.
38
Chapter 6. Project ModulesIn Spring Security 3.0, the codebase was sub-divided into separate jars which more clearly separatedifferent functionality areas and third-party dependencies. If you use Maven to build your project,these are the modules you should add to your pom.xml. Even if you do not use Maven, werecommend that you consult the pom.xml files to get an idea of third-party dependencies andversions. Another good idea is to examine the libraries that are included in the sample applications.
6.1. Core — spring-security-core.jarThis module contains core authentication and access-contol classes and interfaces, remotingsupport, and basic provisioning APIs. It is required by any application that uses Spring Security. Itsupports standalone applications, remote clients, method (service layer) security, and JDBC userprovisioning. It contains the following top-level packages:
• org.springframework.security.core
• org.springframework.security.access
• org.springframework.security.authentication
• org.springframework.security.provisioning
6.2. Remoting — spring-security-remoting.jarThis module provides integration with Spring Remoting. You do not need this unless you arewriting a remote client that uses Spring Remoting. The main package isorg.springframework.security.remoting.
6.3. Web — spring-security-web.jarThis module contains filters and related web-security infrastructure code. It contains anything witha servlet API dependency. You need it if you require Spring Security web authentication servicesand URL-based access-control. The main package is org.springframework.security.web.
6.4. Config — spring-security-config.jarThis module contains the security namespace parsing code and Java configuration code. You need itif you use the Spring Security XML namespace for configuration or Spring Security’s JavaConfiguration support. The main package is org.springframework.security.config. None of theclasses are intended for direct use in an application.
6.5. LDAP — spring-security-ldap.jarThis module provides LDAP authentication and provisioning code. It is required if you need to useLDAP authentication or manage LDAP user entries. The top-level package isorg.springframework.security.ldap.
39
6.6. OAuth 2.0 Core — spring-security-oauth2-core.jarspring-security-oauth2-core.jar contains core classes and interfaces that provide support for theOAuth 2.0 Authorization Framework and for OpenID Connect Core 1.0. It is required by applicationsthat use OAuth 2.0 or OpenID Connect Core 1.0, such as client, resource server, and authorizationserver. The top-level package is org.springframework.security.oauth2.core.
6.7. OAuth 2.0 Client — spring-security-oauth2-client.jarspring-security-oauth2-client.jar contains Spring Security’s client support for OAuth 2.0Authorization Framework and OpenID Connect Core 1.0. It is required by applications that useOAuth 2.0 Login or OAuth Client support. The top-level package isorg.springframework.security.oauth2.client.
6.8. OAuth 2.0 JOSE — spring-security-oauth2-jose.jarspring-security-oauth2-jose.jar contains Spring Security’s support for the JOSE (Javascript ObjectSigning and Encryption) framework. The JOSE framework is intended to provide a method tosecurely transfer claims between parties. It is built from a collection of specifications:
• JSON Web Token (JWT)
• JSON Web Signature (JWS)
• JSON Web Encryption (JWE)
• JSON Web Key (JWK)
It contains the following top-level packages:
• org.springframework.security.oauth2.jwt
• org.springframework.security.oauth2.jose
6.9. OAuth 2.0 Resource Server — spring-security-oauth2-resource-server.jarspring-security-oauth2-resource-server.jar contains Spring Security’s support for OAuth 2.0Resource Servers. It is used to protect APIs via OAuth 2.0 Bearer Tokens. The top-level package isorg.springframework.security.oauth2.server.resource.
6.10. ACL — spring-security-acl.jarThis module contains a specialized domain object ACL implementation. It is used to apply securityto specific domain object instances within your application. The top-level package isorg.springframework.security.acls.
40

6.11. CAS — spring-security-cas.jarThis module contains Spring Security’s CAS client integration. You should use it if you want to useSpring Security web authentication with a CAS single sign-on server. The top-level package isorg.springframework.security.cas.
6.12. OpenID — spring-security-openid.jarThis module contains OpenID web authentication support. It is used to authenticate users againstan external OpenID server. The top-level package is org.springframework.security.openid. Itrequires OpenID4Java.
6.13. Test — spring-security-test.jarThis module contains support for testing with Spring Security.
41

Chapter 7. SamplesSpring Security includes many samples applications.
42
Servlet ApplicationsSpring Security integrates with the Servlet Container by using a standard Servlet Filter. This meansit works with any application that runs in a Servlet Container. More concretely, you do not need touse Spring in your Servlet-based application to take advantage of Spring Security.
43
Chapter 8. Hello Spring SecurityThis section covers the minimum setup for how to use Spring Security with Spring Boot.
The completed application can be found at samples/boot/helloworld For yourconvenience, you can download a minimal Spring Boot + Spring Securityapplication by clicking here.
8.1. Updating DependenciesThe only step you need to do is update the dependencies by using Maven or Gradle.
8.2. Starting Hello Spring Security BootYou can now run the Spring Boot application by using the Maven Plugin’s run goal. The followingexample shows how to do so (and the beginning of the output from doing so):
Example 46. Running Spring Boot Application
$ ./mvn spring-boot:run...INFO 23689 --- [ restartedMain] .s.s.UserDetailsServiceAutoConfiguration :
Using generated security password: 8e557245-73e2-4286-969a-ff57fe326336
...
8.3. Spring Boot Auto ConfigurationSpring Boot automatically:
• Enables Spring Security’s default configuration, which creates a servlet Filter as a bean namedspringSecurityFilterChain. This bean is responsible for all the security (protecting theapplication URLs, validating submitted username and passwords, redirecting to the log in form,and so on) within your application.
• Creates a UserDetailsService bean with a username of user and a randomly generated passwordthat is logged to the console.
• Registers the Filter with a bean named springSecurityFilterChain with the Servlet containerfor every request.
Spring Boot is not configuring much, but it does a lot. A summary of the features follows:
• Require an authenticated user for any interaction with the application
• Generate a default login form for you
44
• Let the user with a username of user and a password that is logged to the console toauthenticate with form-based authentication (in the preceding example, the password is8e557245-73e2-4286-969a-ff57fe326336)
• Protects the password storage with BCrypt
• Lets the user log out
• CSRF attack prevention
• Session Fixation protection
• Security Header integration
◦ HTTP Strict Transport Security for secure requests
◦ X-Content-Type-Options integration
◦ Cache Control (can be overridden later by your application to allow caching of your staticresources)
◦ X-XSS-Protection integration
◦ X-Frame-Options integration to help prevent Clickjacking
• Integrate with the following Servlet API methods:
◦ HttpServletRequest#getRemoteUser()
◦ HttpServletRequest.html#getUserPrincipal()
◦ HttpServletRequest.html#isUserInRole(java.lang.String)
◦ HttpServletRequest.html#login(java.lang.String, java.lang.String)
◦ HttpServletRequest.html#logout()
45
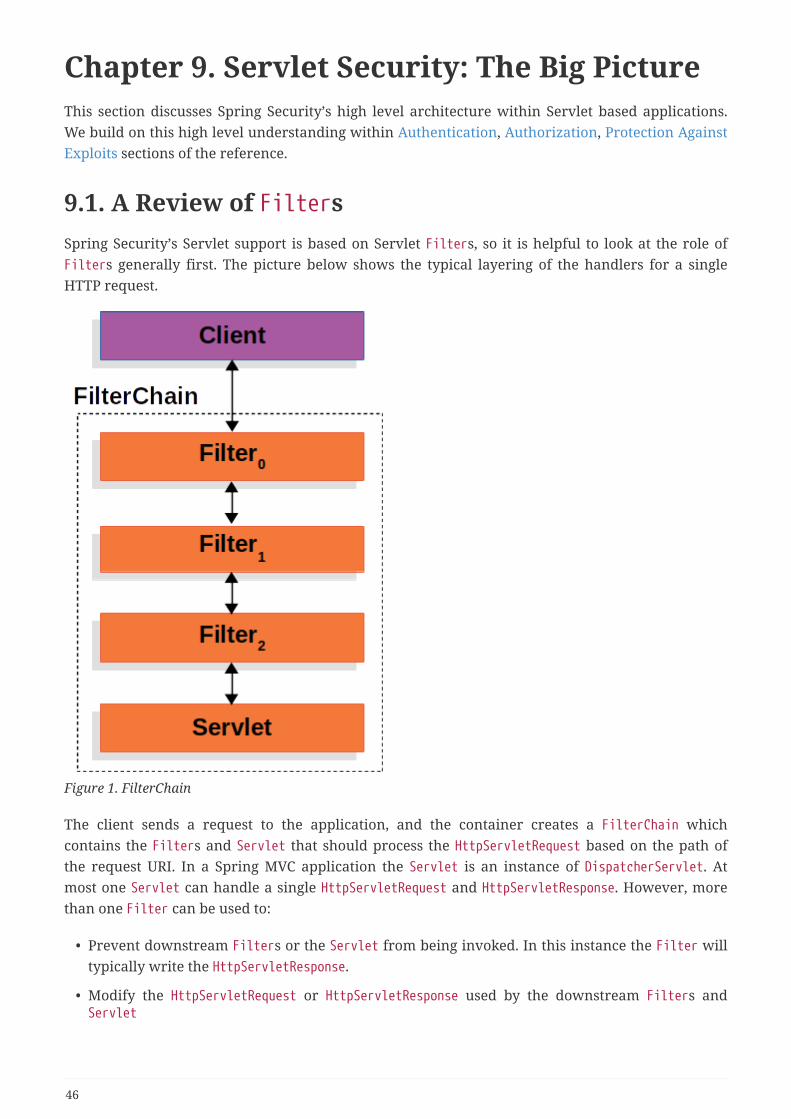
Chapter 9. Servlet Security: The Big PictureThis section discusses Spring Security’s high level architecture within Servlet based applications.We build on this high level understanding within Authentication, Authorization, Protection AgainstExploits sections of the reference.
9.1. A Review of FiltersSpring Security’s Servlet support is based on Servlet Filters, so it is helpful to look at the role ofFilters generally first. The picture below shows the typical layering of the handlers for a singleHTTP request.
Figure 1. FilterChain
The client sends a request to the application, and the container creates a FilterChain whichcontains the Filters and Servlet that should process the HttpServletRequest based on the path ofthe request URI. In a Spring MVC application the Servlet is an instance of DispatcherServlet. Atmost one Servlet can handle a single HttpServletRequest and HttpServletResponse. However, morethan one Filter can be used to:
• Prevent downstream Filters or the Servlet from being invoked. In this instance the Filter willtypically write the HttpServletResponse.
• Modify the HttpServletRequest or HttpServletResponse used by the downstream Filters andServlet
46
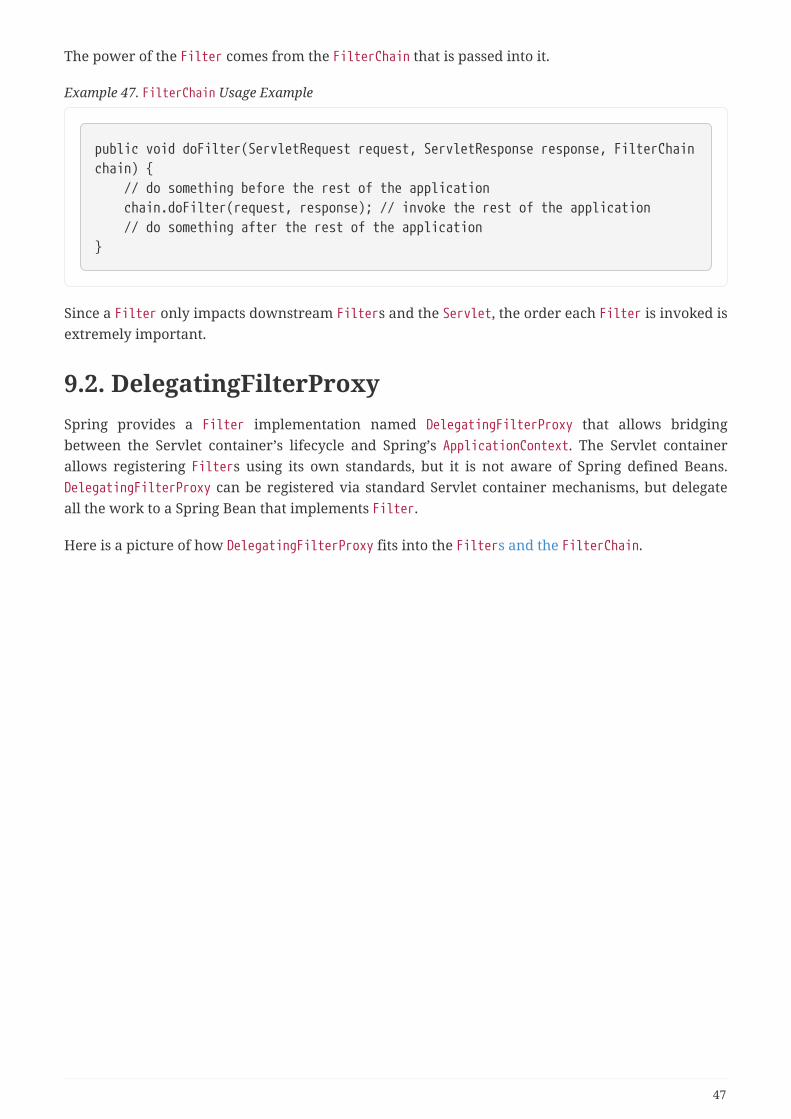
The power of the Filter comes from the FilterChain that is passed into it.
Example 47. FilterChain Usage Example
public void doFilter(ServletRequest request, ServletResponse response, FilterChainchain) { // do something before the rest of the application chain.doFilter(request, response); // invoke the rest of the application // do something after the rest of the application}
Since a Filter only impacts downstream Filters and the Servlet, the order each Filter is invoked isextremely important.
9.2. DelegatingFilterProxySpring provides a Filter implementation named DelegatingFilterProxy that allows bridgingbetween the Servlet container’s lifecycle and Spring’s ApplicationContext. The Servlet containerallows registering Filters using its own standards, but it is not aware of Spring defined Beans.DelegatingFilterProxy can be registered via standard Servlet container mechanisms, but delegateall the work to a Spring Bean that implements Filter.
Here is a picture of how DelegatingFilterProxy fits into the Filters and the FilterChain.
47
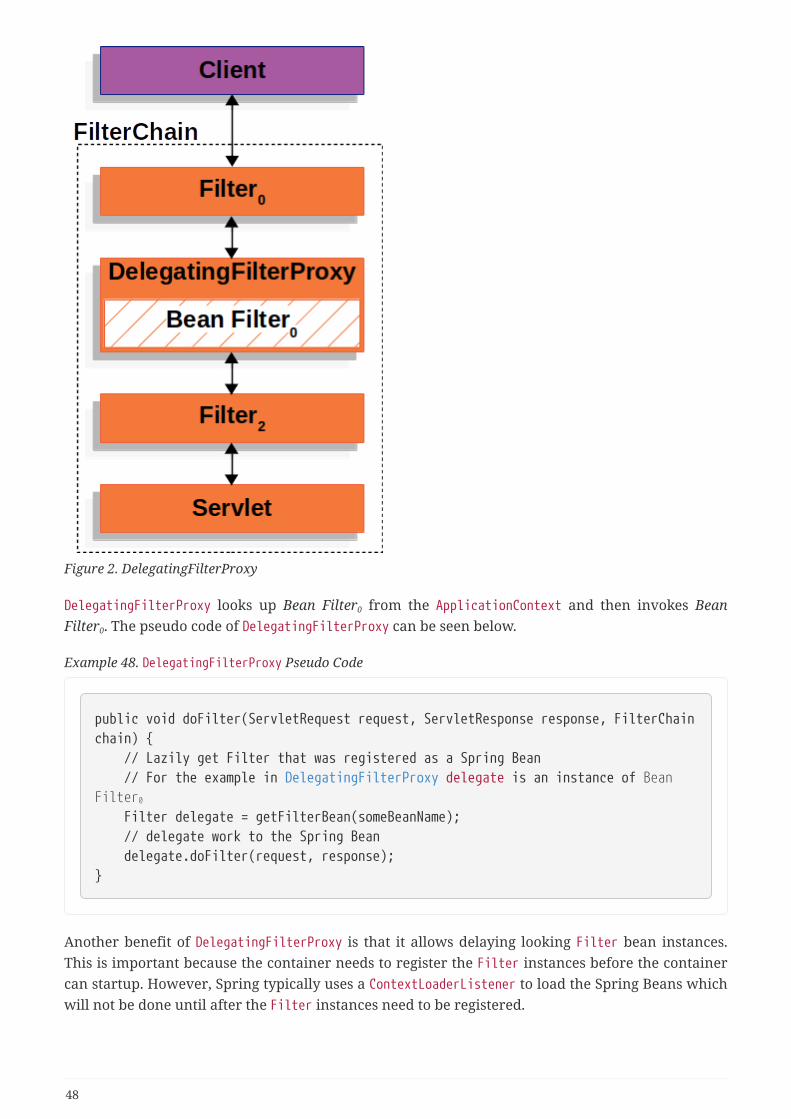
Figure 2. DelegatingFilterProxy
DelegatingFilterProxy looks up Bean Filter0 from the ApplicationContext and then invokes BeanFilter0. The pseudo code of DelegatingFilterProxy can be seen below.
Example 48. DelegatingFilterProxy Pseudo Code
public void doFilter(ServletRequest request, ServletResponse response, FilterChainchain) { // Lazily get Filter that was registered as a Spring Bean // For the example in DelegatingFilterProxy delegate is an instance of BeanFilter0
Filter delegate = getFilterBean(someBeanName); // delegate work to the Spring Bean delegate.doFilter(request, response);}
Another benefit of DelegatingFilterProxy is that it allows delaying looking Filter bean instances.This is important because the container needs to register the Filter instances before the containercan startup. However, Spring typically uses a ContextLoaderListener to load the Spring Beans whichwill not be done until after the Filter instances need to be registered.
48
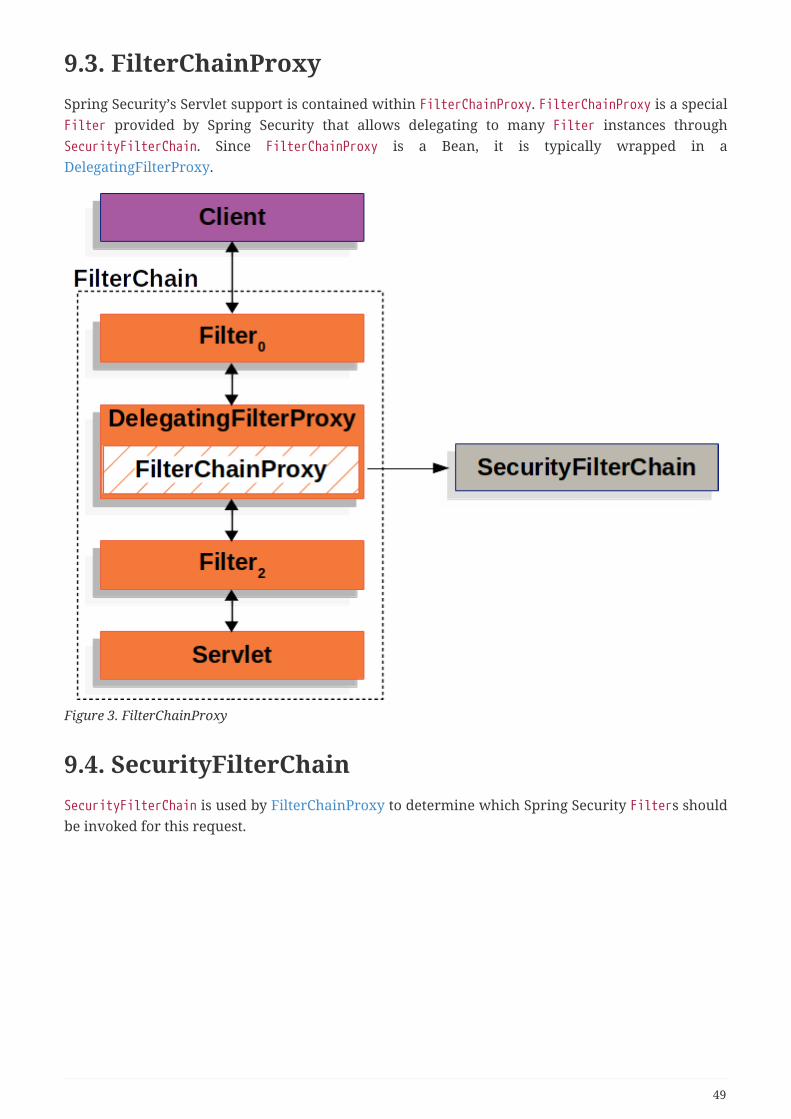
9.3. FilterChainProxySpring Security’s Servlet support is contained within FilterChainProxy. FilterChainProxy is a specialFilter provided by Spring Security that allows delegating to many Filter instances throughSecurityFilterChain. Since FilterChainProxy is a Bean, it is typically wrapped in aDelegatingFilterProxy.
Figure 3. FilterChainProxy
9.4. SecurityFilterChainSecurityFilterChain is used by FilterChainProxy to determine which Spring Security Filters shouldbe invoked for this request.
49
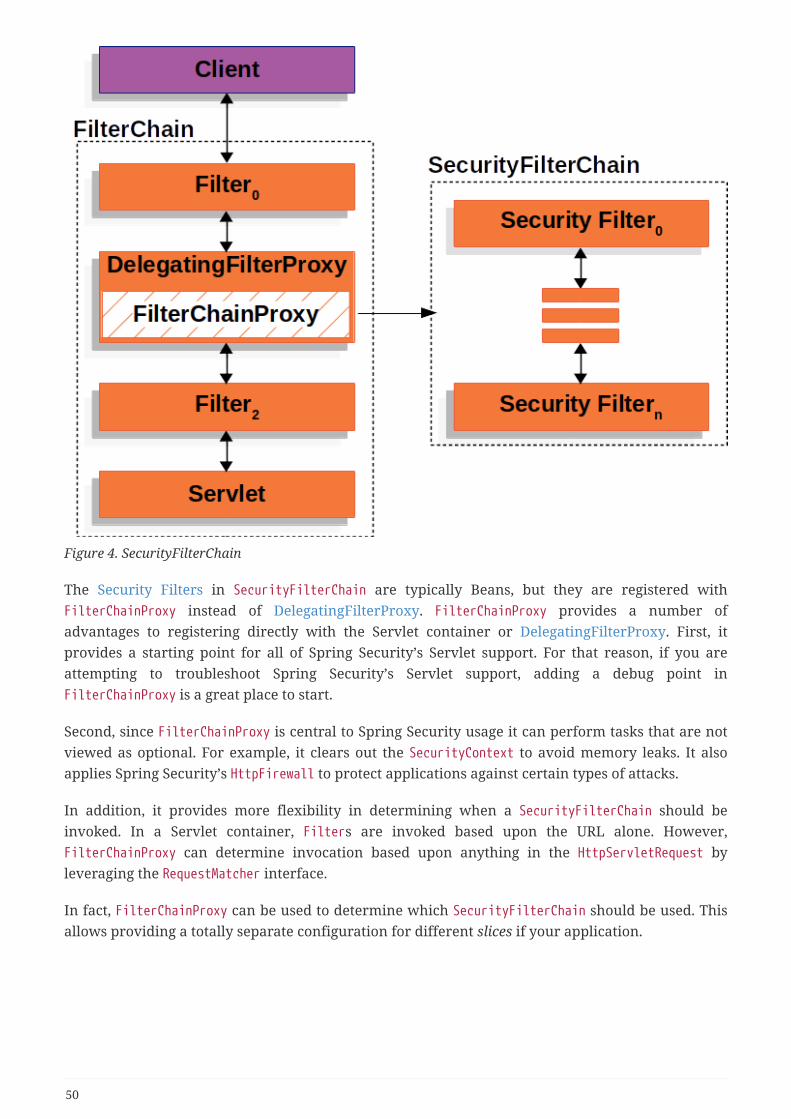
Figure 4. SecurityFilterChain
The Security Filters in SecurityFilterChain are typically Beans, but they are registered withFilterChainProxy instead of DelegatingFilterProxy. FilterChainProxy provides a number ofadvantages to registering directly with the Servlet container or DelegatingFilterProxy. First, itprovides a starting point for all of Spring Security’s Servlet support. For that reason, if you areattempting to troubleshoot Spring Security’s Servlet support, adding a debug point inFilterChainProxy is a great place to start.
Second, since FilterChainProxy is central to Spring Security usage it can perform tasks that are notviewed as optional. For example, it clears out the SecurityContext to avoid memory leaks. It alsoapplies Spring Security’s HttpFirewall to protect applications against certain types of attacks.
In addition, it provides more flexibility in determining when a SecurityFilterChain should beinvoked. In a Servlet container, Filters are invoked based upon the URL alone. However,FilterChainProxy can determine invocation based upon anything in the HttpServletRequest byleveraging the RequestMatcher interface.
In fact, FilterChainProxy can be used to determine which SecurityFilterChain should be used. Thisallows providing a totally separate configuration for different slices if your application.
50
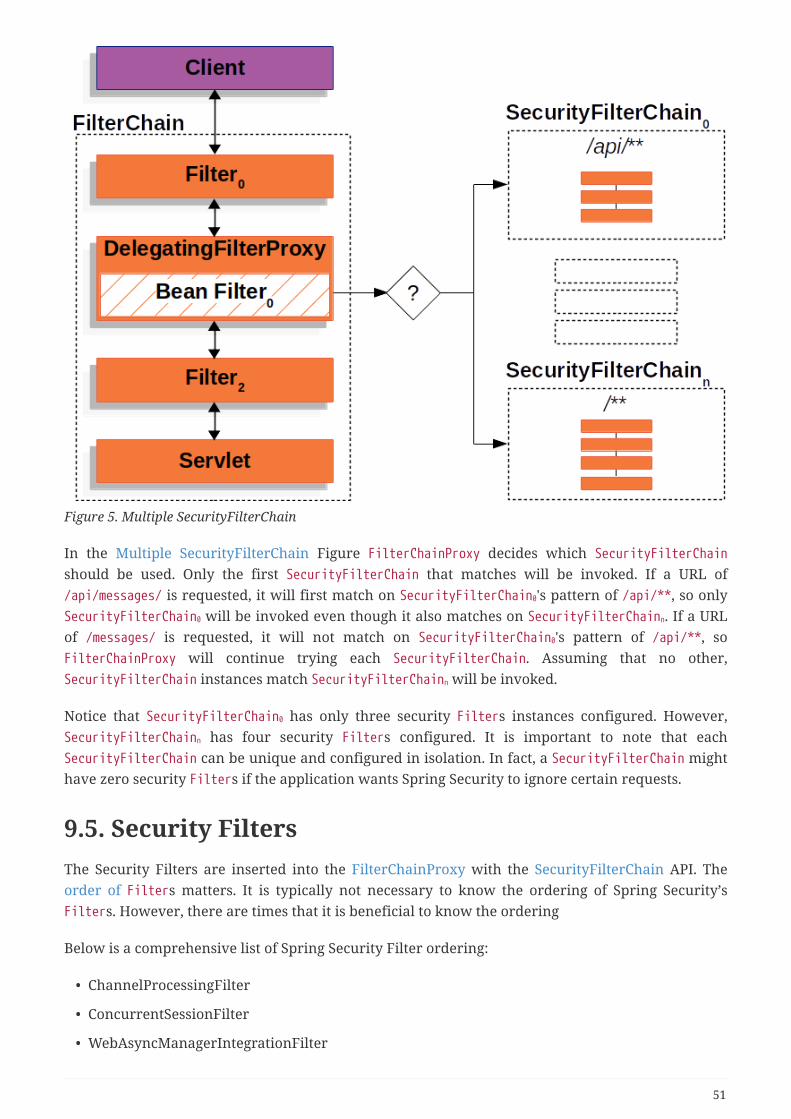
Figure 5. Multiple SecurityFilterChain
In the Multiple SecurityFilterChain Figure FilterChainProxy decides which SecurityFilterChainshould be used. Only the first SecurityFilterChain that matches will be invoked. If a URL of/api/messages/ is requested, it will first match on SecurityFilterChain0's pattern of /api/**, so onlySecurityFilterChain0 will be invoked even though it also matches on SecurityFilterChainn. If a URLof /messages/ is requested, it will not match on SecurityFilterChain0's pattern of /api/**, soFilterChainProxy will continue trying each SecurityFilterChain. Assuming that no other,SecurityFilterChain instances match SecurityFilterChainn will be invoked.
Notice that SecurityFilterChain0 has only three security Filters instances configured. However,SecurityFilterChainn has four security Filters configured. It is important to note that eachSecurityFilterChain can be unique and configured in isolation. In fact, a SecurityFilterChain mighthave zero security Filters if the application wants Spring Security to ignore certain requests.
9.5. Security FiltersThe Security Filters are inserted into the FilterChainProxy with the SecurityFilterChain API. Theorder of Filters matters. It is typically not necessary to know the ordering of Spring Security’sFilters. However, there are times that it is beneficial to know the ordering
Below is a comprehensive list of Spring Security Filter ordering:
• ChannelProcessingFilter
• ConcurrentSessionFilter
• WebAsyncManagerIntegrationFilter
51
• SecurityContextPersistenceFilter
• HeaderWriterFilter
• CorsFilter
• CsrfFilter
• LogoutFilter
• OAuth2AuthorizationRequestRedirectFilter
• Saml2WebSsoAuthenticationRequestFilter
• X509AuthenticationFilter
• AbstractPreAuthenticatedProcessingFilter
• CasAuthenticationFilter
• OAuth2LoginAuthenticationFilter
• Saml2WebSsoAuthenticationFilter
• UsernamePasswordAuthenticationFilter
• ConcurrentSessionFilter
• OpenIDAuthenticationFilter
• DefaultLoginPageGeneratingFilter
• DefaultLogoutPageGeneratingFilter
• DigestAuthenticationFilter
• BearerTokenAuthenticationFilter
• BasicAuthenticationFilter
• RequestCacheAwareFilter
• SecurityContextHolderAwareRequestFilter
• JaasApiIntegrationFilter
• RememberMeAuthenticationFilter
• AnonymousAuthenticationFilter
• OAuth2AuthorizationCodeGrantFilter
• SessionManagementFilter
• ExceptionTranslationFilter
• FilterSecurityInterceptor
• SwitchUserFilter
9.6. Handling Security ExceptionsThe ExceptionTranslationFilter allows translation of AccessDeniedException andAuthenticationException into HTTP responses.
52
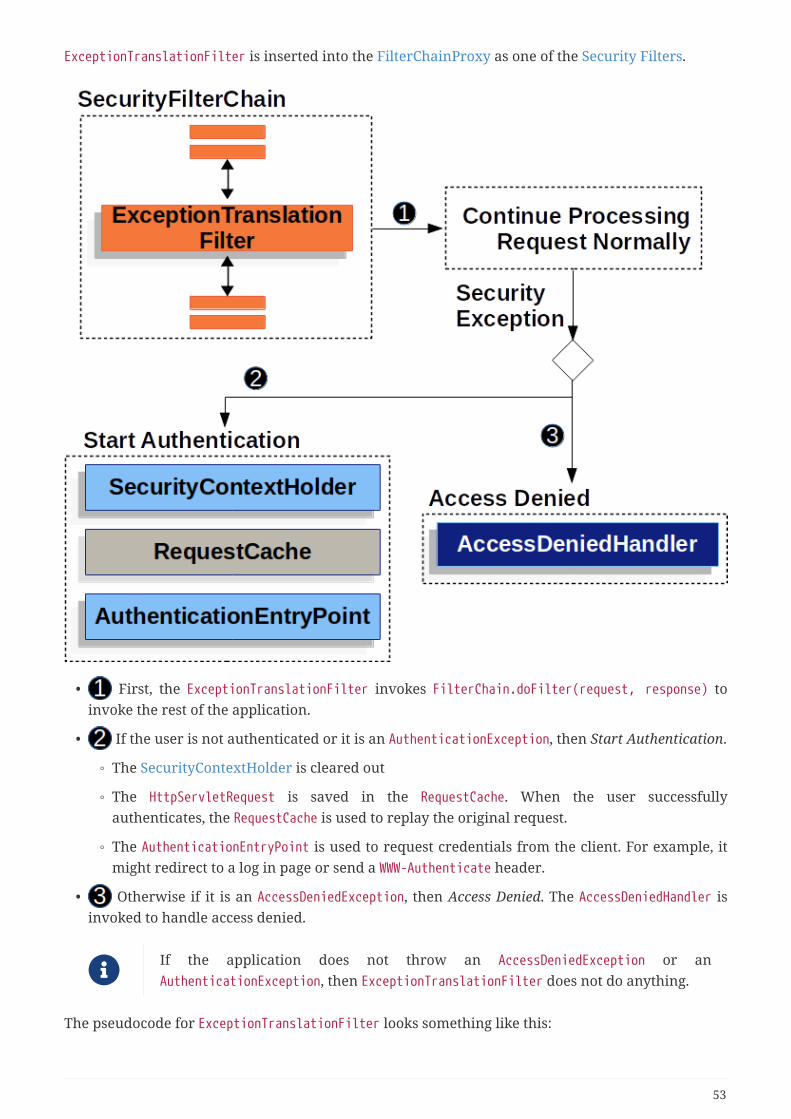
ExceptionTranslationFilter is inserted into the FilterChainProxy as one of the Security Filters.
• First, the ExceptionTranslationFilter invokes FilterChain.doFilter(request, response) toinvoke the rest of the application.
• If the user is not authenticated or it is an AuthenticationException, then Start Authentication.
◦ The SecurityContextHolder is cleared out
◦ The HttpServletRequest is saved in the RequestCache. When the user successfullyauthenticates, the RequestCache is used to replay the original request.
◦ The AuthenticationEntryPoint is used to request credentials from the client. For example, itmight redirect to a log in page or send a WWW-Authenticate header.
• Otherwise if it is an AccessDeniedException, then Access Denied. The AccessDeniedHandler isinvoked to handle access denied.
If the application does not throw an AccessDeniedException or anAuthenticationException, then ExceptionTranslationFilter does not do anything.
The pseudocode for ExceptionTranslationFilter looks something like this:
53
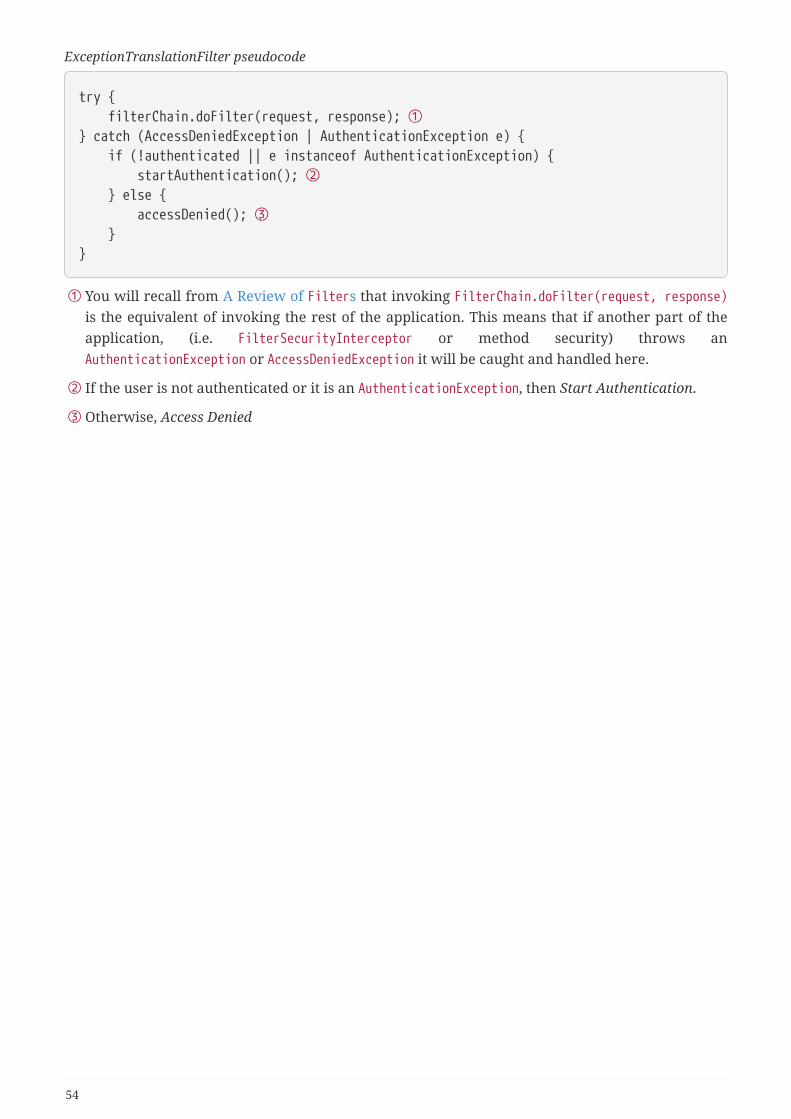
ExceptionTranslationFilter pseudocode
try { filterChain.doFilter(request, response); ①} catch (AccessDeniedException | AuthenticationException e) { if (!authenticated || e instanceof AuthenticationException) { startAuthentication(); ② } else { accessDenied(); ③ }}
① You will recall from A Review of Filters that invoking FilterChain.doFilter(request, response)is the equivalent of invoking the rest of the application. This means that if another part of theapplication, (i.e. FilterSecurityInterceptor or method security) throws anAuthenticationException or AccessDeniedException it will be caught and handled here.
② If the user is not authenticated or it is an AuthenticationException, then Start Authentication.
③ Otherwise, Access Denied
54
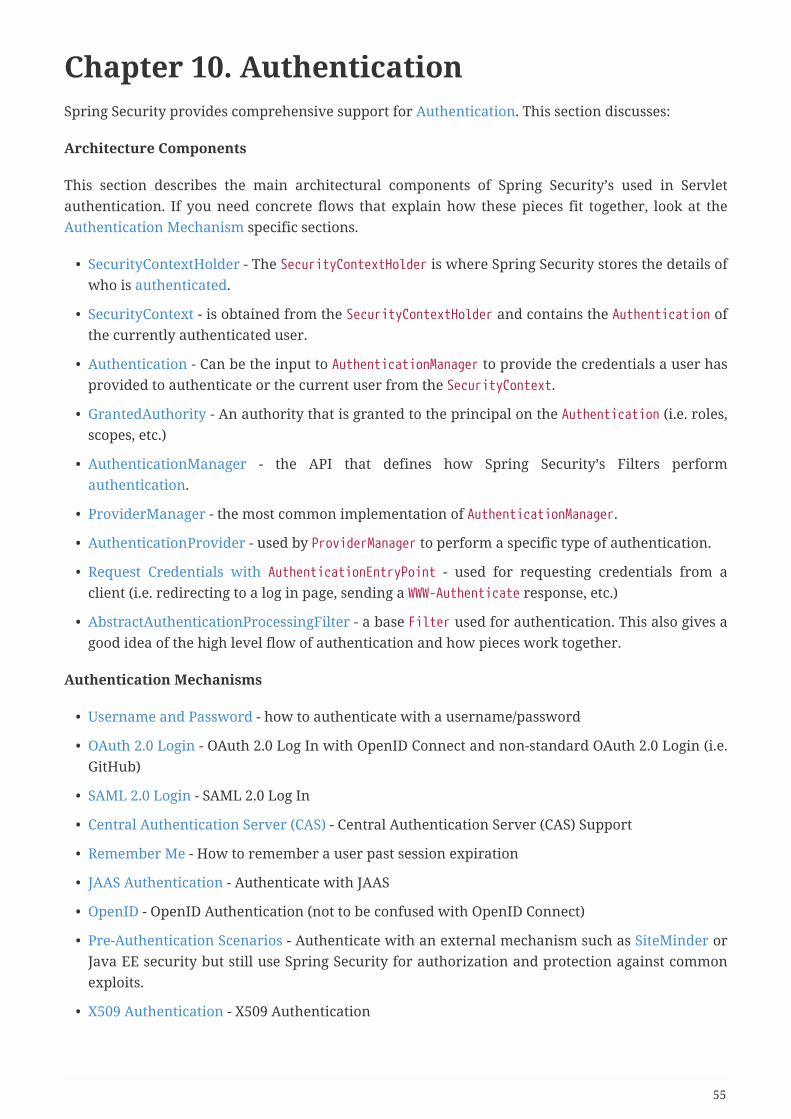
Chapter 10. AuthenticationSpring Security provides comprehensive support for Authentication. This section discusses:
Architecture Components
This section describes the main architectural components of Spring Security’s used in Servletauthentication. If you need concrete flows that explain how these pieces fit together, look at theAuthentication Mechanism specific sections.
• SecurityContextHolder - The SecurityContextHolder is where Spring Security stores the details ofwho is authenticated.
• SecurityContext - is obtained from the SecurityContextHolder and contains the Authentication ofthe currently authenticated user.
• Authentication - Can be the input to AuthenticationManager to provide the credentials a user hasprovided to authenticate or the current user from the SecurityContext.
• GrantedAuthority - An authority that is granted to the principal on the Authentication (i.e. roles,scopes, etc.)
• AuthenticationManager - the API that defines how Spring Security’s Filters performauthentication.
• ProviderManager - the most common implementation of AuthenticationManager.
• AuthenticationProvider - used by ProviderManager to perform a specific type of authentication.
• Request Credentials with AuthenticationEntryPoint - used for requesting credentials from aclient (i.e. redirecting to a log in page, sending a WWW-Authenticate response, etc.)
• AbstractAuthenticationProcessingFilter - a base Filter used for authentication. This also gives agood idea of the high level flow of authentication and how pieces work together.
Authentication Mechanisms
• Username and Password - how to authenticate with a username/password
• OAuth 2.0 Login - OAuth 2.0 Log In with OpenID Connect and non-standard OAuth 2.0 Login (i.e.GitHub)
• SAML 2.0 Login - SAML 2.0 Log In
• Central Authentication Server (CAS) - Central Authentication Server (CAS) Support
• Remember Me - How to remember a user past session expiration
• JAAS Authentication - Authenticate with JAAS
• OpenID - OpenID Authentication (not to be confused with OpenID Connect)
• Pre-Authentication Scenarios - Authenticate with an external mechanism such as SiteMinder orJava EE security but still use Spring Security for authorization and protection against commonexploits.
• X509 Authentication - X509 Authentication
55
10.1. SecurityContextHolderAt the heart of Spring Security’s authentication model is the SecurityContextHolder. It contains theSecurityContext.
The SecurityContextHolder is where Spring Security stores the details of who is authenticated.Spring Security does not care how the SecurityContextHolder is populated. If it contains a value,then it is used as the currently authenticated user.
The simplest way to indicate a user is authenticated is to set the SecurityContextHolder directly.
Example 49. Setting SecurityContextHolder
SecurityContext context = SecurityContextHolder.createEmptyContext(); ①Authentication authentication = new TestingAuthenticationToken("username", "password", "ROLE_USER"); ②context.setAuthentication(authentication);
SecurityContextHolder.setContext(context); ③
① We start by creating an empty SecurityContext. It is important to create a new SecurityContextinstance instead of usingSecurityContextHolder.getContext().setAuthentication(authentication) to avoid race conditionsacross multiple threads.
② Next we create a new Authentication object. Spring Security does not care what type ofAuthentication implementation is set on the SecurityContext. Here we useTestingAuthenticationToken because it is very simple. A more common production scenario isUsernamePasswordAuthenticationToken(userDetails, password, authorities).
③ Finally, we set the SecurityContext on the SecurityContextHolder. Spring Security will use thisinformation for authorization.
If you wish to obtain information about the authenticated principal, you can do so by accessing theSecurityContextHolder.
56
Example 50. Access Currently Authenticated User
SecurityContext context = SecurityContextHolder.getContext();Authentication authentication = context.getAuthentication();String username = authentication.getName();Object principal = authentication.getPrincipal();Collection<? extends GrantedAuthority> authorities =authentication.getAuthorities();
By default the SecurityContextHolder uses a ThreadLocal to store these details, which means that theSecurityContext is always available to methods in the same thread of execution, even if theSecurityContext is not explicitly passed around as an argument to those methods. Using aThreadLocal in this way is quite safe if care is taken to clear the thread after the present principal’srequest is processed. Spring Security’s FilterChainProxy ensures that the SecurityContext is alwayscleared.
Some applications aren’t entirely suitable for using a ThreadLocal, because of the specific way theywork with threads. For example, a Swing client might want all threads in a Java Virtual Machine touse the same security context. SecurityContextHolder can be configured with a strategy on startupto specify how you would like the context to be stored. For a standalone application you would usethe SecurityContextHolder.MODE_GLOBAL strategy. Other applications might want to have threadsspawned by the secure thread also assume the same security identity. This is achieved by usingSecurityContextHolder.MODE_INHERITABLETHREADLOCAL. You can change the mode from the defaultSecurityContextHolder.MODE_THREADLOCAL in two ways. The first is to set a system property, thesecond is to call a static method on SecurityContextHolder. Most applications won’t need to changefrom the default, but if you do, take a look at the JavaDoc for SecurityContextHolder to learn more.
10.2. SecurityContextThe SecurityContext is obtained from the SecurityContextHolder. The SecurityContext contains anAuthentication object.
10.3. AuthenticationThe Authentication serves two main purposes within Spring Security:
• An input to AuthenticationManager to provide the credentials a user has provided toauthenticate. When used in this scenario, isAuthenticated() returns false.
• Represents the currently authenticated user. The current Authentication can be obtained fromthe SecurityContext.
The Authentication contains:
• principal - identifies the user. When authenticating with a username/password this is often aninstance of UserDetails.
• credentials - Often a password. In many cases this will be cleared after the user is authenticated
57
to ensure it is not leaked.
• authorities - the GrantedAuthoritys are high level permissions the user is granted. A fewexamples are roles or scopes.
10.4. GrantedAuthorityGrantedAuthoritys are high level permissions the user is granted. A few examples are roles orscopes.
GrantedAuthoritys can be obtained from the Authentication.getAuthorities() method. This methodprovides a Collection of GrantedAuthority objects. A GrantedAuthority is, not surprisingly, anauthority that is granted to the principal. Such authorities are usually "roles", such asROLE_ADMINISTRATOR or ROLE_HR_SUPERVISOR. These roles are later on configured for webauthorization, method authorization and domain object authorization. Other parts of SpringSecurity are capable of interpreting these authorities, and expect them to be present. When usingusername/password based authentication GrantedAuthoritys are usually loaded by theUserDetailsService.
Usually the GrantedAuthority objects are application-wide permissions. They are not specific to agiven domain object. Thus, you wouldn’t likely have a GrantedAuthority to represent a permission toEmployee object number 54, because if there are thousands of such authorities you would quicklyrun out of memory (or, at the very least, cause the application to take a long time to authenticate auser). Of course, Spring Security is expressly designed to handle this common requirement, butyou’d instead use the project’s domain object security capabilities for this purpose.
10.5. AuthenticationManagerAuthenticationManager is the API that defines how Spring Security’s Filters perform authentication.The Authentication that is returned is then set on the SecurityContextHolder by the controller (i.e.Spring Security’s Filterss) that invoked the AuthenticationManager. If you are not integrating withSpring Security’s Filterss you can set the SecurityContextHolder directly and are not required to usean AuthenticationManager.
While the implementation of AuthenticationManager could be anything, the most commonimplementation is ProviderManager.
10.6. ProviderManagerProviderManager is the most commonly used implementation of AuthenticationManager.ProviderManager delegates to a List of AuthenticationProviders. Each AuthenticationProvider has anopportunity to indicate that authentication should be successful, fail, or indicate it cannot make adecision and allow a downstream AuthenticationProvider to decide. If none of the configuredAuthenticationProviders can authenticate, then authentication will fail with aProviderNotFoundException which is a special AuthenticationException that indicates theProviderManager was not configured support the type of Authentication that was passed into it.
58

In practice each AuthenticationProvider knows how to perform a specific type of authentication.For example, one AuthenticationProvider might be able to validate a username/password, whileanother might be able to authenticate a SAML assertion. This allows each AuthenticationProvider todo a very specific type of authentication, while supporting multiple types of authentication andonly exposing a single AuthenticationManager bean.
ProviderManager also allows configuring an optional parent AuthenticationManager which isconsulted in the event that no AuthenticationProvider can perform authentication. The parent canbe any type of AuthenticationManager, but it is often an instance of ProviderManager.
In fact, multiple ProviderManager instances might share the same parent AuthenticationManager. Thisis somewhat common in scenarios where there are multiple SecurityFilterChain instances thathave some authentication in common (the shared parent AuthenticationManager), but also differentauthentication mechanisms (the different ProviderManager instances).
59
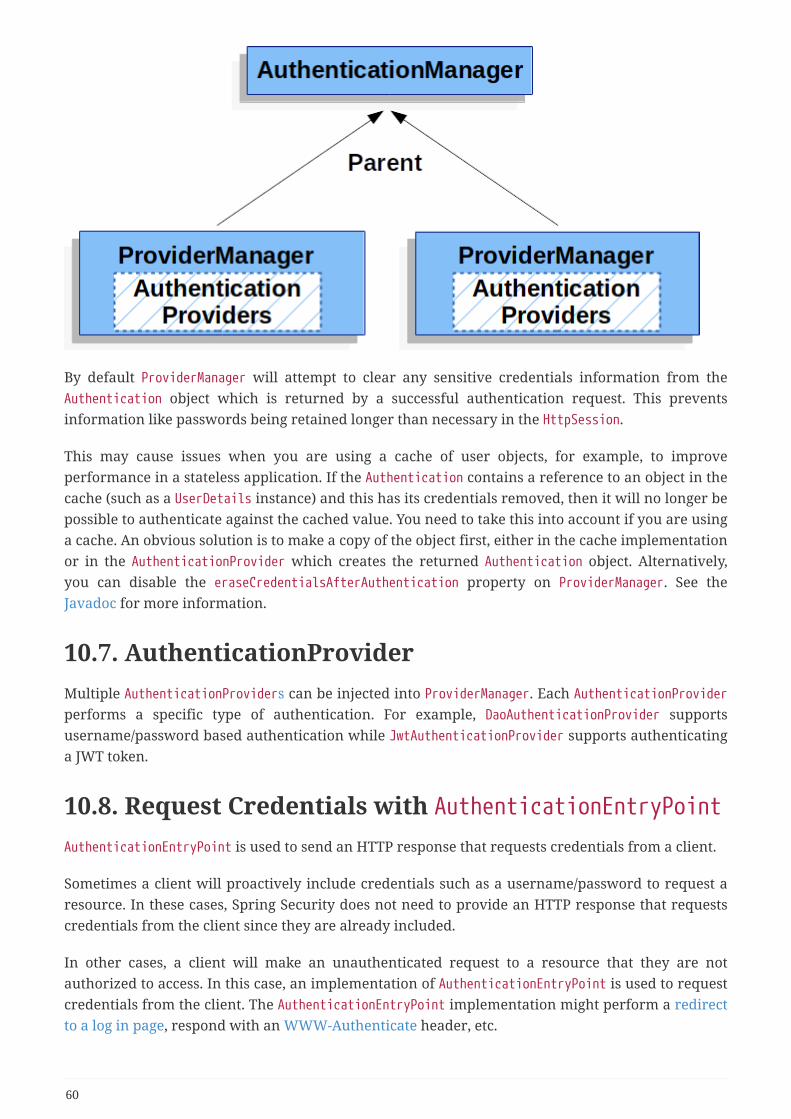
By default ProviderManager will attempt to clear any sensitive credentials information from theAuthentication object which is returned by a successful authentication request. This preventsinformation like passwords being retained longer than necessary in the HttpSession.
This may cause issues when you are using a cache of user objects, for example, to improveperformance in a stateless application. If the Authentication contains a reference to an object in thecache (such as a UserDetails instance) and this has its credentials removed, then it will no longer bepossible to authenticate against the cached value. You need to take this into account if you are usinga cache. An obvious solution is to make a copy of the object first, either in the cache implementationor in the AuthenticationProvider which creates the returned Authentication object. Alternatively,you can disable the eraseCredentialsAfterAuthentication property on ProviderManager. See theJavadoc for more information.
10.7. AuthenticationProviderMultiple AuthenticationProviders can be injected into ProviderManager. Each AuthenticationProviderperforms a specific type of authentication. For example, DaoAuthenticationProvider supportsusername/password based authentication while JwtAuthenticationProvider supports authenticatinga JWT token.
10.8. Request Credentials with AuthenticationEntryPointAuthenticationEntryPoint is used to send an HTTP response that requests credentials from a client.
Sometimes a client will proactively include credentials such as a username/password to request aresource. In these cases, Spring Security does not need to provide an HTTP response that requestscredentials from the client since they are already included.
In other cases, a client will make an unauthenticated request to a resource that they are notauthorized to access. In this case, an implementation of AuthenticationEntryPoint is used to requestcredentials from the client. The AuthenticationEntryPoint implementation might perform a redirectto a log in page, respond with an WWW-Authenticate header, etc.
60
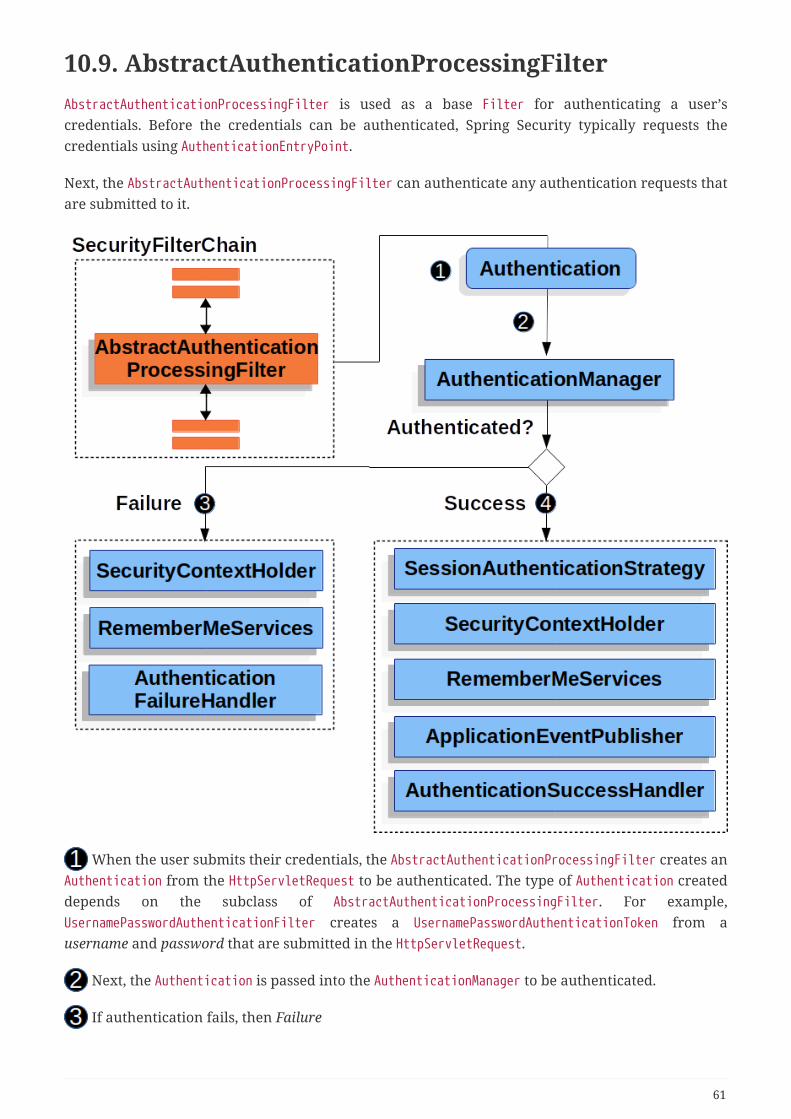
10.9. AbstractAuthenticationProcessingFilterAbstractAuthenticationProcessingFilter is used as a base Filter for authenticating a user’scredentials. Before the credentials can be authenticated, Spring Security typically requests thecredentials using AuthenticationEntryPoint.
Next, the AbstractAuthenticationProcessingFilter can authenticate any authentication requests thatare submitted to it.
When the user submits their credentials, the AbstractAuthenticationProcessingFilter creates anAuthentication from the HttpServletRequest to be authenticated. The type of Authentication createddepends on the subclass of AbstractAuthenticationProcessingFilter. For example,UsernamePasswordAuthenticationFilter creates a UsernamePasswordAuthenticationToken from ausername and password that are submitted in the HttpServletRequest.
Next, the Authentication is passed into the AuthenticationManager to be authenticated.
If authentication fails, then Failure
61
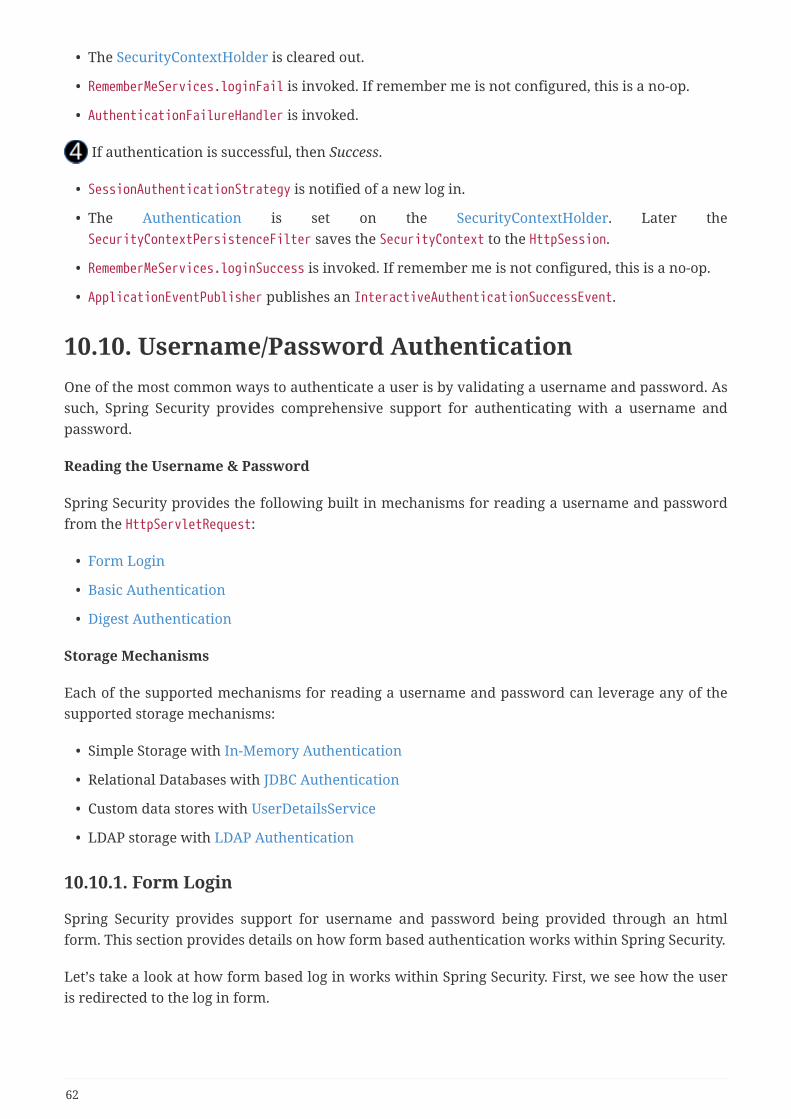
• The SecurityContextHolder is cleared out.
• RememberMeServices.loginFail is invoked. If remember me is not configured, this is a no-op.
• AuthenticationFailureHandler is invoked.
If authentication is successful, then Success.
• SessionAuthenticationStrategy is notified of a new log in.
• The Authentication is set on the SecurityContextHolder. Later theSecurityContextPersistenceFilter saves the SecurityContext to the HttpSession.
• RememberMeServices.loginSuccess is invoked. If remember me is not configured, this is a no-op.
• ApplicationEventPublisher publishes an InteractiveAuthenticationSuccessEvent.
10.10. Username/Password AuthenticationOne of the most common ways to authenticate a user is by validating a username and password. Assuch, Spring Security provides comprehensive support for authenticating with a username andpassword.
Reading the Username & Password
Spring Security provides the following built in mechanisms for reading a username and passwordfrom the HttpServletRequest:
• Form Login
• Basic Authentication
• Digest Authentication
Storage Mechanisms
Each of the supported mechanisms for reading a username and password can leverage any of thesupported storage mechanisms:
• Simple Storage with In-Memory Authentication
• Relational Databases with JDBC Authentication
• Custom data stores with UserDetailsService
• LDAP storage with LDAP Authentication
10.10.1. Form Login
Spring Security provides support for username and password being provided through an htmlform. This section provides details on how form based authentication works within Spring Security.
Let’s take a look at how form based log in works within Spring Security. First, we see how the useris redirected to the log in form.
62
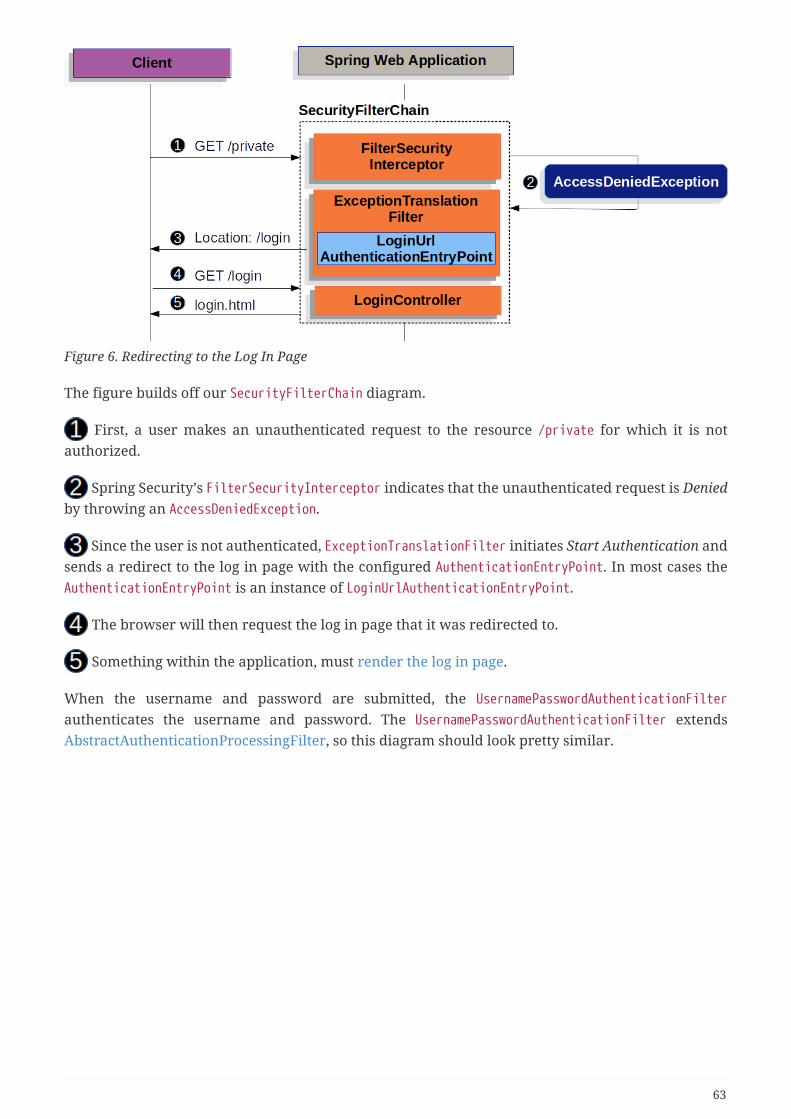
Figure 6. Redirecting to the Log In Page
The figure builds off our SecurityFilterChain diagram.
First, a user makes an unauthenticated request to the resource /private for which it is notauthorized.
Spring Security’s FilterSecurityInterceptor indicates that the unauthenticated request is Deniedby throwing an AccessDeniedException.
Since the user is not authenticated, ExceptionTranslationFilter initiates Start Authentication andsends a redirect to the log in page with the configured AuthenticationEntryPoint. In most cases theAuthenticationEntryPoint is an instance of LoginUrlAuthenticationEntryPoint.
The browser will then request the log in page that it was redirected to.
Something within the application, must render the log in page.
When the username and password are submitted, the UsernamePasswordAuthenticationFilterauthenticates the username and password. The UsernamePasswordAuthenticationFilter extendsAbstractAuthenticationProcessingFilter, so this diagram should look pretty similar.
63
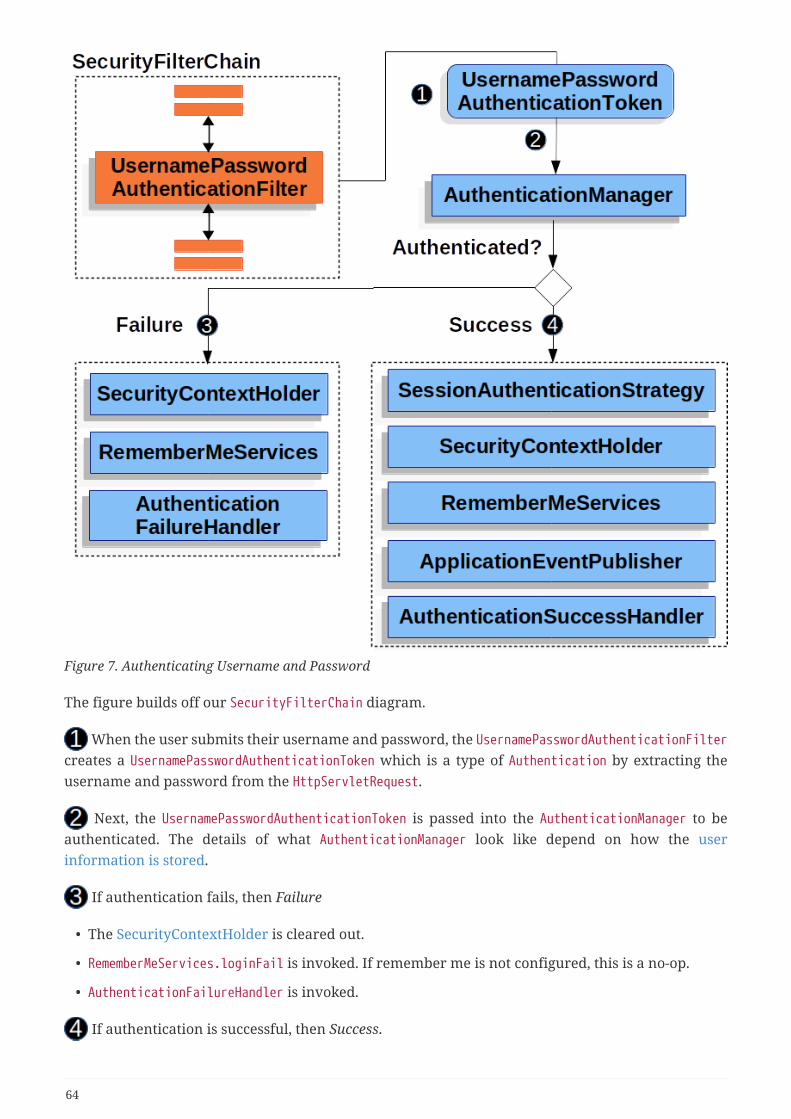
Figure 7. Authenticating Username and Password
The figure builds off our SecurityFilterChain diagram.
When the user submits their username and password, the UsernamePasswordAuthenticationFiltercreates a UsernamePasswordAuthenticationToken which is a type of Authentication by extracting theusername and password from the HttpServletRequest.
Next, the UsernamePasswordAuthenticationToken is passed into the AuthenticationManager to beauthenticated. The details of what AuthenticationManager look like depend on how the userinformation is stored.
If authentication fails, then Failure
• The SecurityContextHolder is cleared out.
• RememberMeServices.loginFail is invoked. If remember me is not configured, this is a no-op.
• AuthenticationFailureHandler is invoked.
If authentication is successful, then Success.
64
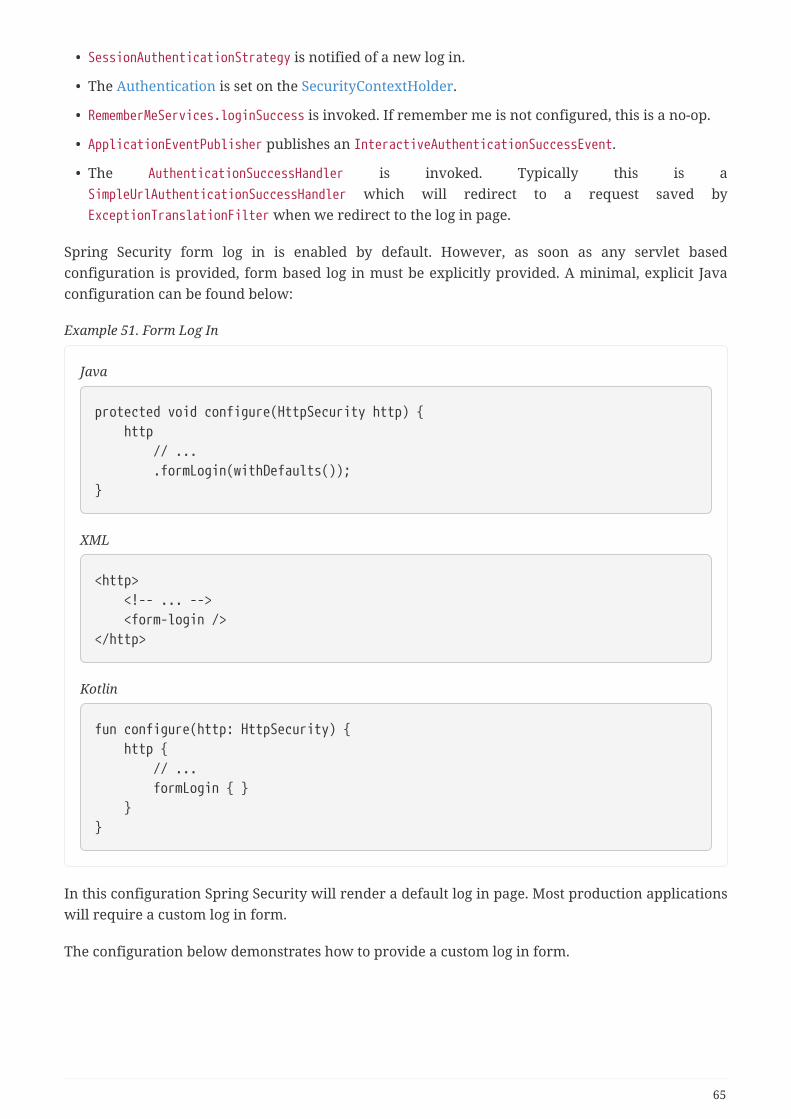
• SessionAuthenticationStrategy is notified of a new log in.
• The Authentication is set on the SecurityContextHolder.
• RememberMeServices.loginSuccess is invoked. If remember me is not configured, this is a no-op.
• ApplicationEventPublisher publishes an InteractiveAuthenticationSuccessEvent.
• The AuthenticationSuccessHandler is invoked. Typically this is aSimpleUrlAuthenticationSuccessHandler which will redirect to a request saved byExceptionTranslationFilter when we redirect to the log in page.
Spring Security form log in is enabled by default. However, as soon as any servlet basedconfiguration is provided, form based log in must be explicitly provided. A minimal, explicit Javaconfiguration can be found below:
Example 51. Form Log In
Java
protected void configure(HttpSecurity http) { http // ... .formLogin(withDefaults());}
XML
<http> <!-- ... --> <form-login /></http>
Kotlin
fun configure(http: HttpSecurity) { http { // ... formLogin { } }}
In this configuration Spring Security will render a default log in page. Most production applicationswill require a custom log in form.
The configuration below demonstrates how to provide a custom log in form.
65
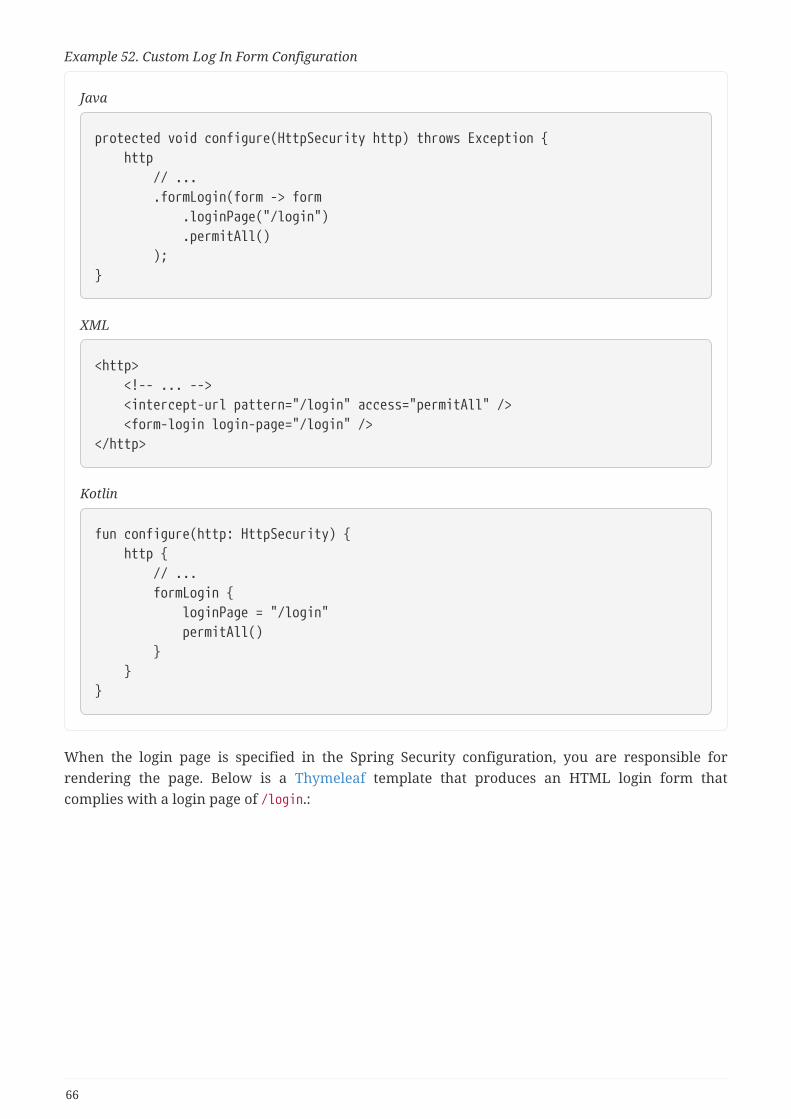
Example 52. Custom Log In Form Configuration
Java
protected void configure(HttpSecurity http) throws Exception { http // ... .formLogin(form -> form .loginPage("/login") .permitAll() );}
XML
<http> <!-- ... --> <intercept-url pattern="/login" access="permitAll" /> <form-login login-page="/login" /></http>
Kotlin
fun configure(http: HttpSecurity) { http { // ... formLogin { loginPage = "/login" permitAll() } }}
When the login page is specified in the Spring Security configuration, you are responsible forrendering the page. Below is a Thymeleaf template that produces an HTML login form thatcomplies with a login page of /login.:
66
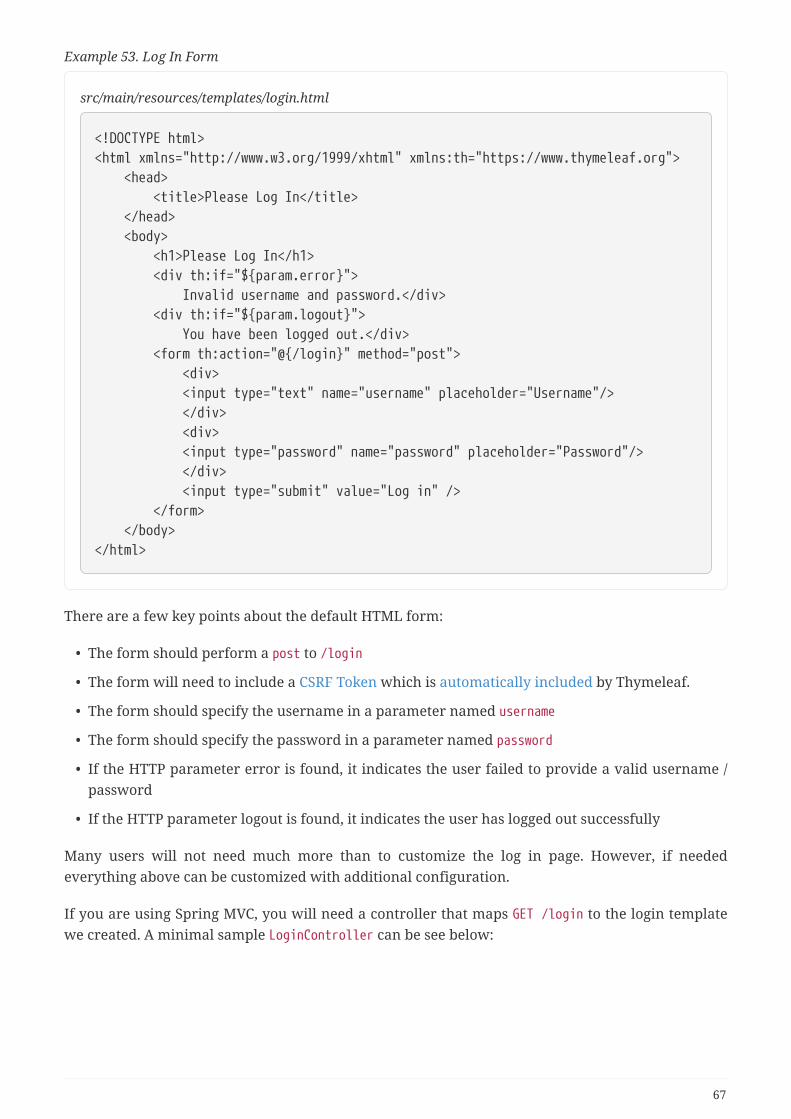
Example 53. Log In Form
src/main/resources/templates/login.html
<!DOCTYPE html><html xmlns="http://www.w3.org/1999/xhtml" xmlns:th="https://www.thymeleaf.org"> <head> <title>Please Log In</title> </head> <body> <h1>Please Log In</h1> <div th:if="${param.error}"> Invalid username and password.</div> <div th:if="${param.logout}"> You have been logged out.</div> <form th:action="@{/login}" method="post"> <div> <input type="text" name="username" placeholder="Username"/> </div> <div> <input type="password" name="password" placeholder="Password"/> </div> <input type="submit" value="Log in" /> </form> </body></html>
There are a few key points about the default HTML form:
• The form should perform a post to /login
• The form will need to include a CSRF Token which is automatically included by Thymeleaf.
• The form should specify the username in a parameter named username
• The form should specify the password in a parameter named password
• If the HTTP parameter error is found, it indicates the user failed to provide a valid username /password
• If the HTTP parameter logout is found, it indicates the user has logged out successfully
Many users will not need much more than to customize the log in page. However, if neededeverything above can be customized with additional configuration.
If you are using Spring MVC, you will need a controller that maps GET /login to the login templatewe created. A minimal sample LoginController can be see below:
67
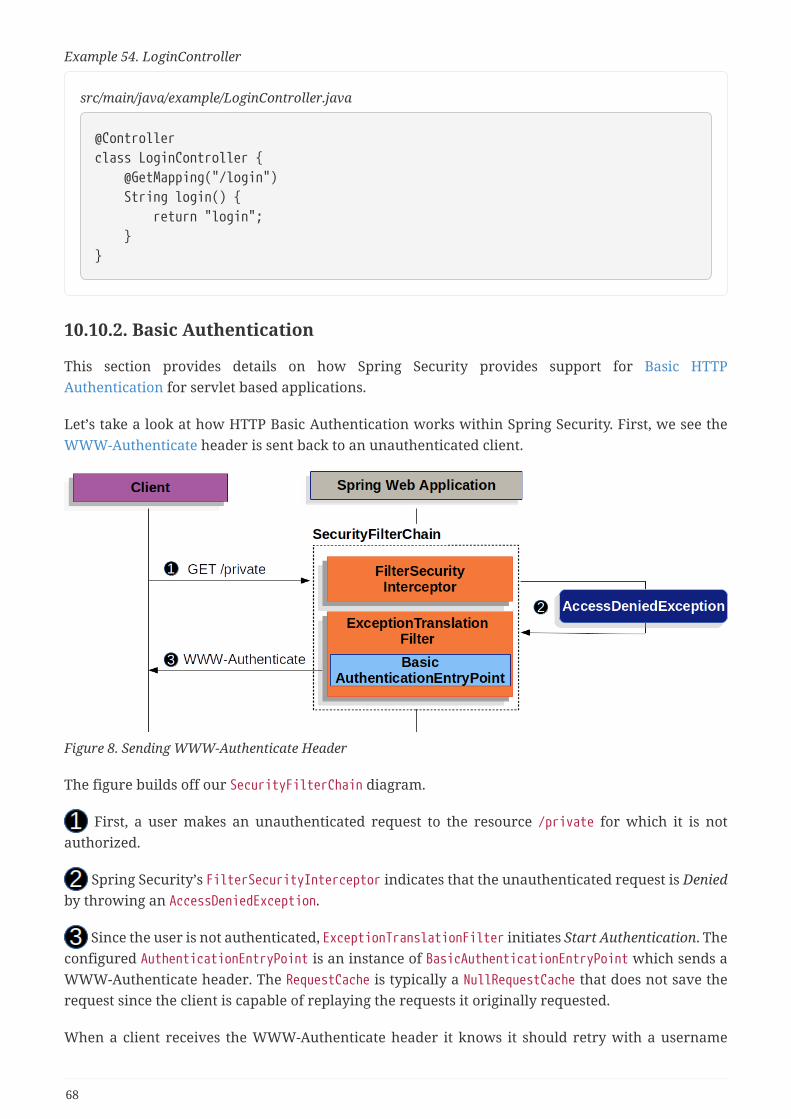
Example 54. LoginController
src/main/java/example/LoginController.java
@Controllerclass LoginController { @GetMapping("/login") String login() { return "login"; }}
10.10.2. Basic Authentication
This section provides details on how Spring Security provides support for Basic HTTPAuthentication for servlet based applications.
Let’s take a look at how HTTP Basic Authentication works within Spring Security. First, we see theWWW-Authenticate header is sent back to an unauthenticated client.
Figure 8. Sending WWW-Authenticate Header
The figure builds off our SecurityFilterChain diagram.
First, a user makes an unauthenticated request to the resource /private for which it is notauthorized.
Spring Security’s FilterSecurityInterceptor indicates that the unauthenticated request is Deniedby throwing an AccessDeniedException.
Since the user is not authenticated, ExceptionTranslationFilter initiates Start Authentication. Theconfigured AuthenticationEntryPoint is an instance of BasicAuthenticationEntryPoint which sends aWWW-Authenticate header. The RequestCache is typically a NullRequestCache that does not save therequest since the client is capable of replaying the requests it originally requested.
When a client receives the WWW-Authenticate header it knows it should retry with a username
68
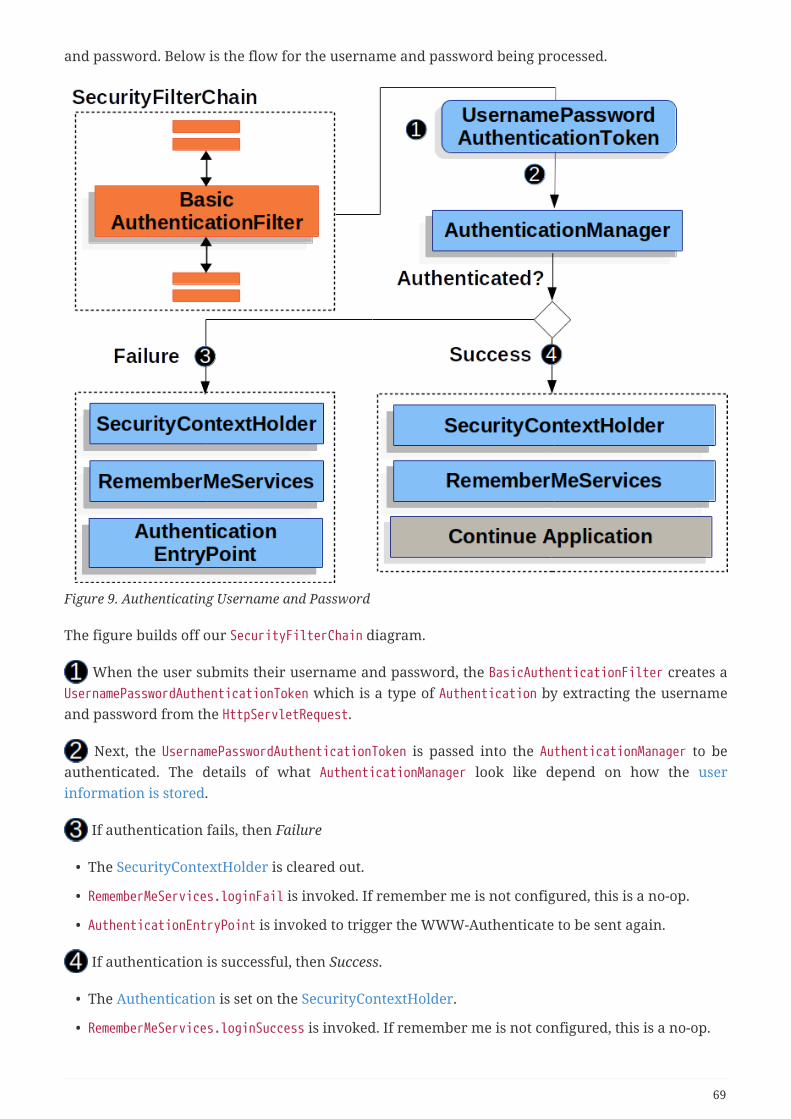
and password. Below is the flow for the username and password being processed.
Figure 9. Authenticating Username and Password
The figure builds off our SecurityFilterChain diagram.
When the user submits their username and password, the BasicAuthenticationFilter creates aUsernamePasswordAuthenticationToken which is a type of Authentication by extracting the usernameand password from the HttpServletRequest.
Next, the UsernamePasswordAuthenticationToken is passed into the AuthenticationManager to beauthenticated. The details of what AuthenticationManager look like depend on how the userinformation is stored.
If authentication fails, then Failure
• The SecurityContextHolder is cleared out.
• RememberMeServices.loginFail is invoked. If remember me is not configured, this is a no-op.
• AuthenticationEntryPoint is invoked to trigger the WWW-Authenticate to be sent again.
If authentication is successful, then Success.
• The Authentication is set on the SecurityContextHolder.
• RememberMeServices.loginSuccess is invoked. If remember me is not configured, this is a no-op.
69
• The BasicAuthenticationFilter invokes FilterChain.doFilter(request,response) to continuewith the rest of the application logic.
Spring Security’s HTTP Basic Authentication support in is enabled by default. However, as soon asany servlet based configuration is provided, HTTP Basic must be explicitly provided.
A minimal, explicit configuration can be found below:
Example 55. Explicit HTTP Basic Configuration
Java
protected void configure(HttpSecurity http) { http // ... .httpBasic(withDefaults());}
XML
<http> <!-- ... --> <http-basic /></http>
Kotlin
fun configure(http: HttpSecurity) { http { // ... httpBasic { } }}
10.10.3. Digest Authentication
This section provides details on how Spring Security provides support for Digest Authenticationwhich is provided DigestAuthenticationFilter.
You should not use Digest Authentication in modern applications because it is notconsidered secure. The most obvious problem is that you must store yourpasswords in plaintext, encrypted, or an MD5 format. All of these storage formatsare considered insecure. Instead, you should store credentials using a one wayadaptive password hash (i.e. bCrypt, PBKDF2, SCrypt, etc) which is not supportedby Digest Authentication.
Digest Authentication attempts to solve many of the weaknesses of Basic authentication, specifically
70
by ensuring credentials are never sent in clear text across the wire. Many browsers support DigestAuthentication.
The standard governing HTTP Digest Authentication is defined by RFC 2617, which updates anearlier version of the Digest Authentication standard prescribed by RFC 2069. Most user agentsimplement RFC 2617. Spring Security’s Digest Authentication support is compatible with the “auth”quality of protection (qop) prescribed by RFC 2617, which also provides backward compatibilitywith RFC 2069. Digest Authentication was seen as a more attractive option if you need to useunencrypted HTTP (i.e. no TLS/HTTPS) and wish to maximise security of the authentication process.However, everyone should use HTTPS.
Central to Digest Authentication is a "nonce". This is a value the server generates. Spring Security’snonce adopts the following format:
Example 56. Digest Syntax
base64(expirationTime + ":" + md5Hex(expirationTime + ":" + key))expirationTime: The date and time when the nonce expires, expressed inmillisecondskey: A private key to prevent modification of the nonce token
You will need to ensure you configure insecure plain text Password Storage usingNoOpPasswordEncoder`. The following provides an example of configuring Digest Authenticationwith Java Configuration:
71
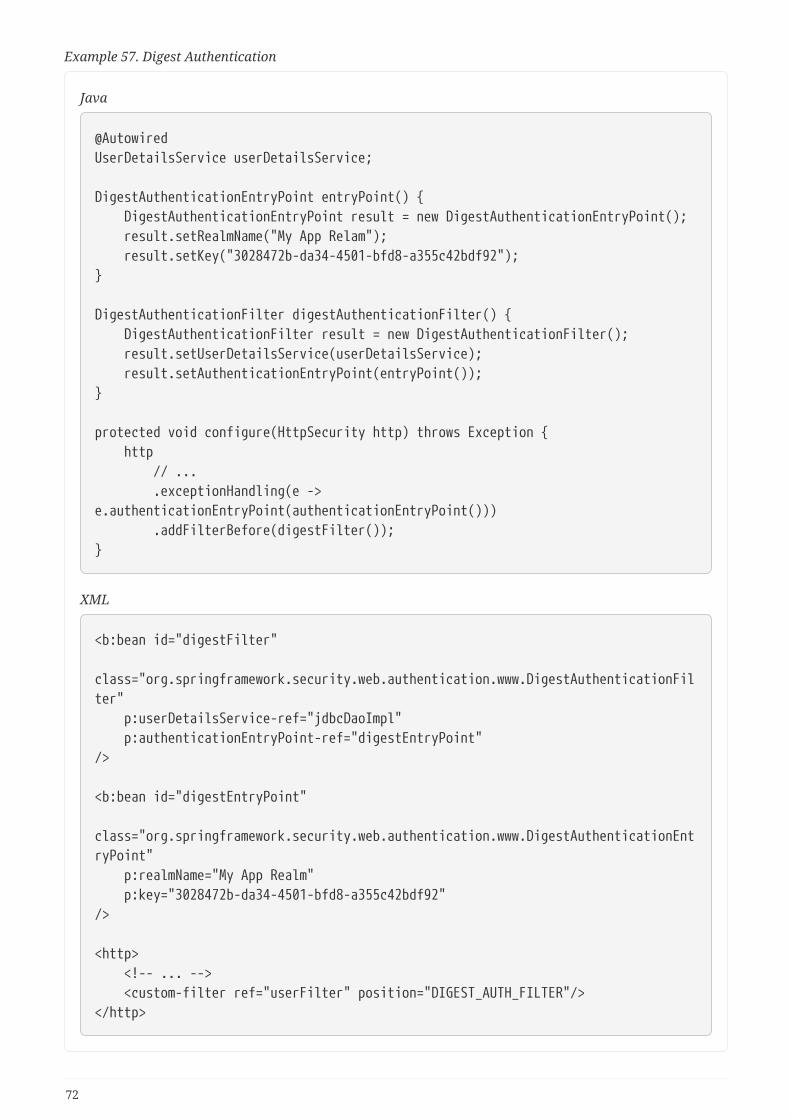
Example 57. Digest Authentication
Java
@AutowiredUserDetailsService userDetailsService;
DigestAuthenticationEntryPoint entryPoint() { DigestAuthenticationEntryPoint result = new DigestAuthenticationEntryPoint(); result.setRealmName("My App Relam"); result.setKey("3028472b-da34-4501-bfd8-a355c42bdf92");}
DigestAuthenticationFilter digestAuthenticationFilter() { DigestAuthenticationFilter result = new DigestAuthenticationFilter(); result.setUserDetailsService(userDetailsService); result.setAuthenticationEntryPoint(entryPoint());}
protected void configure(HttpSecurity http) throws Exception { http // ... .exceptionHandling(e ->e.authenticationEntryPoint(authenticationEntryPoint())) .addFilterBefore(digestFilter());}
XML
<b:bean id="digestFilter" class="org.springframework.security.web.authentication.www.DigestAuthenticationFilter" p:userDetailsService-ref="jdbcDaoImpl" p:authenticationEntryPoint-ref="digestEntryPoint"/>
<b:bean id="digestEntryPoint" class="org.springframework.security.web.authentication.www.DigestAuthenticationEntryPoint" p:realmName="My App Realm" p:key="3028472b-da34-4501-bfd8-a355c42bdf92"/>
<http> <!-- ... --> <custom-filter ref="userFilter" position="DIGEST_AUTH_FILTER"/></http>
72
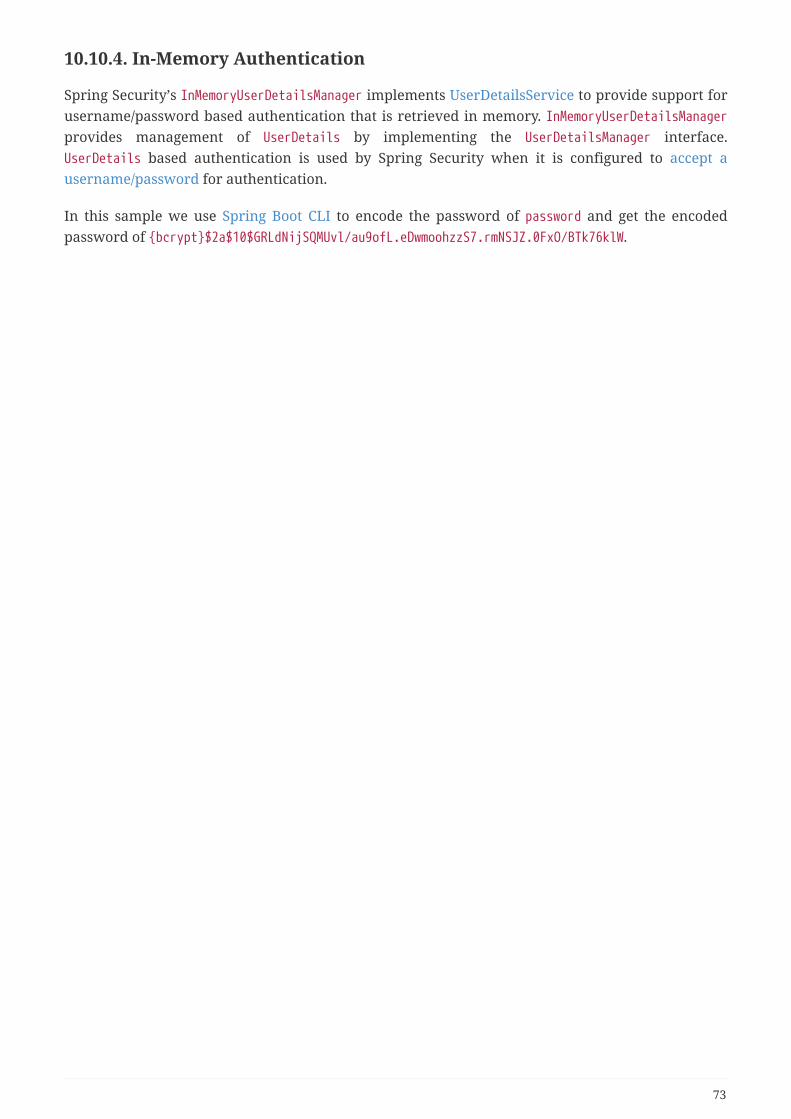
10.10.4. In-Memory Authentication
Spring Security’s InMemoryUserDetailsManager implements UserDetailsService to provide support forusername/password based authentication that is retrieved in memory. InMemoryUserDetailsManagerprovides management of UserDetails by implementing the UserDetailsManager interface.UserDetails based authentication is used by Spring Security when it is configured to accept ausername/password for authentication.
In this sample we use Spring Boot CLI to encode the password of password and get the encodedpassword of {bcrypt}$2a$10$GRLdNijSQMUvl/au9ofL.eDwmoohzzS7.rmNSJZ.0FxO/BTk76klW.
73
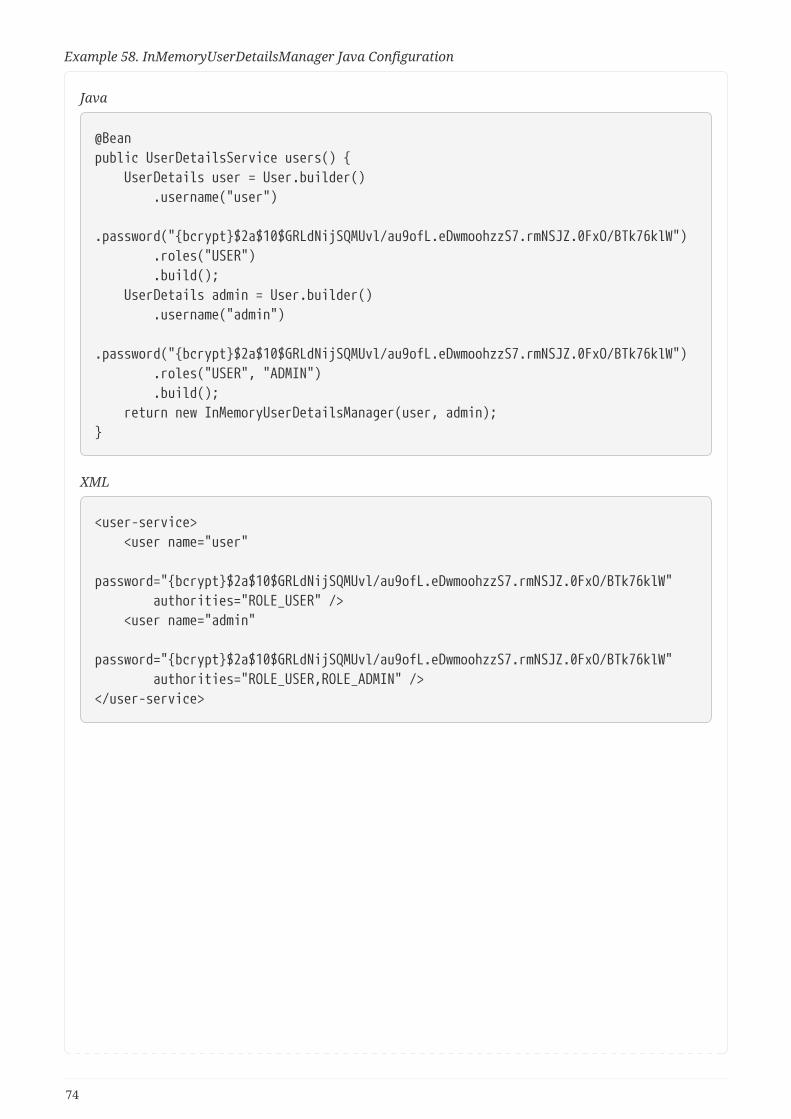
Example 58. InMemoryUserDetailsManager Java Configuration
Java
@Beanpublic UserDetailsService users() { UserDetails user = User.builder() .username("user") .password("{bcrypt}$2a$10$GRLdNijSQMUvl/au9ofL.eDwmoohzzS7.rmNSJZ.0FxO/BTk76klW") .roles("USER") .build(); UserDetails admin = User.builder() .username("admin") .password("{bcrypt}$2a$10$GRLdNijSQMUvl/au9ofL.eDwmoohzzS7.rmNSJZ.0FxO/BTk76klW") .roles("USER", "ADMIN") .build(); return new InMemoryUserDetailsManager(user, admin);}
XML
<user-service> <user name="user" password="{bcrypt}$2a$10$GRLdNijSQMUvl/au9ofL.eDwmoohzzS7.rmNSJZ.0FxO/BTk76klW" authorities="ROLE_USER" /> <user name="admin" password="{bcrypt}$2a$10$GRLdNijSQMUvl/au9ofL.eDwmoohzzS7.rmNSJZ.0FxO/BTk76klW" authorities="ROLE_USER,ROLE_ADMIN" /></user-service>
74
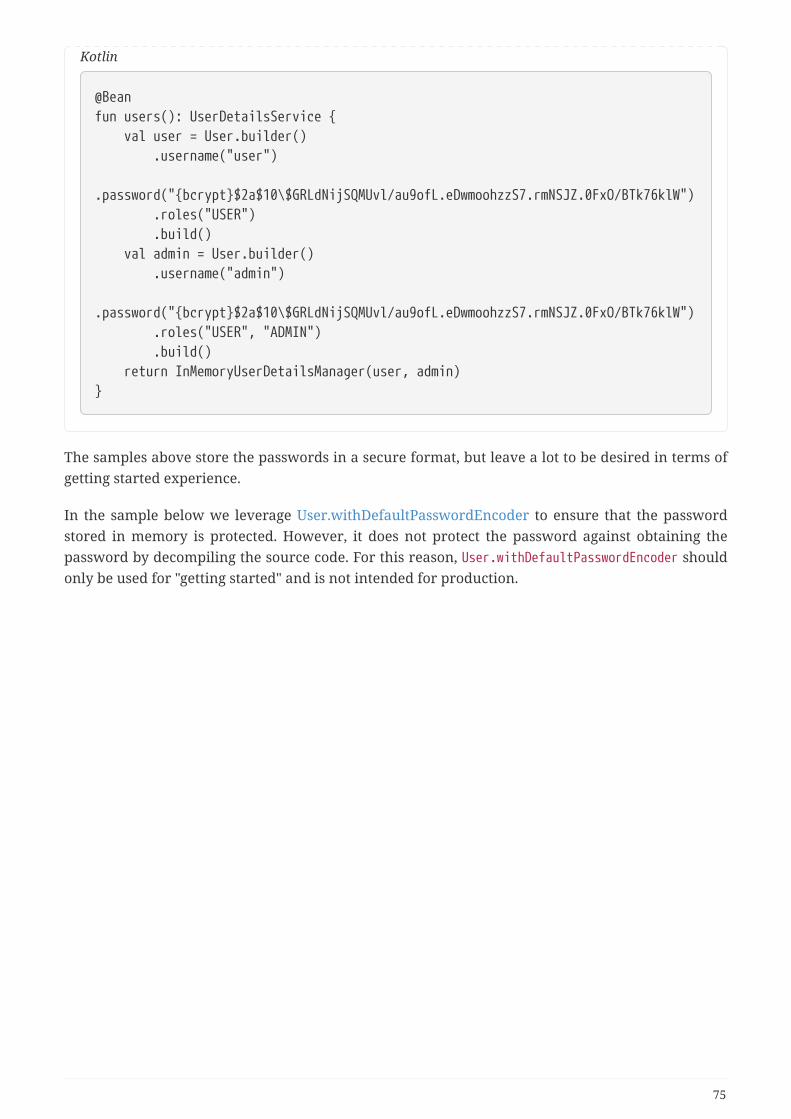
Kotlin
@Beanfun users(): UserDetailsService { val user = User.builder() .username("user") .password("{bcrypt}$2a$10\$GRLdNijSQMUvl/au9ofL.eDwmoohzzS7.rmNSJZ.0FxO/BTk76klW") .roles("USER") .build() val admin = User.builder() .username("admin") .password("{bcrypt}$2a$10\$GRLdNijSQMUvl/au9ofL.eDwmoohzzS7.rmNSJZ.0FxO/BTk76klW") .roles("USER", "ADMIN") .build() return InMemoryUserDetailsManager(user, admin)}
The samples above store the passwords in a secure format, but leave a lot to be desired in terms ofgetting started experience.
In the sample below we leverage User.withDefaultPasswordEncoder to ensure that the passwordstored in memory is protected. However, it does not protect the password against obtaining thepassword by decompiling the source code. For this reason, User.withDefaultPasswordEncoder shouldonly be used for "getting started" and is not intended for production.
75
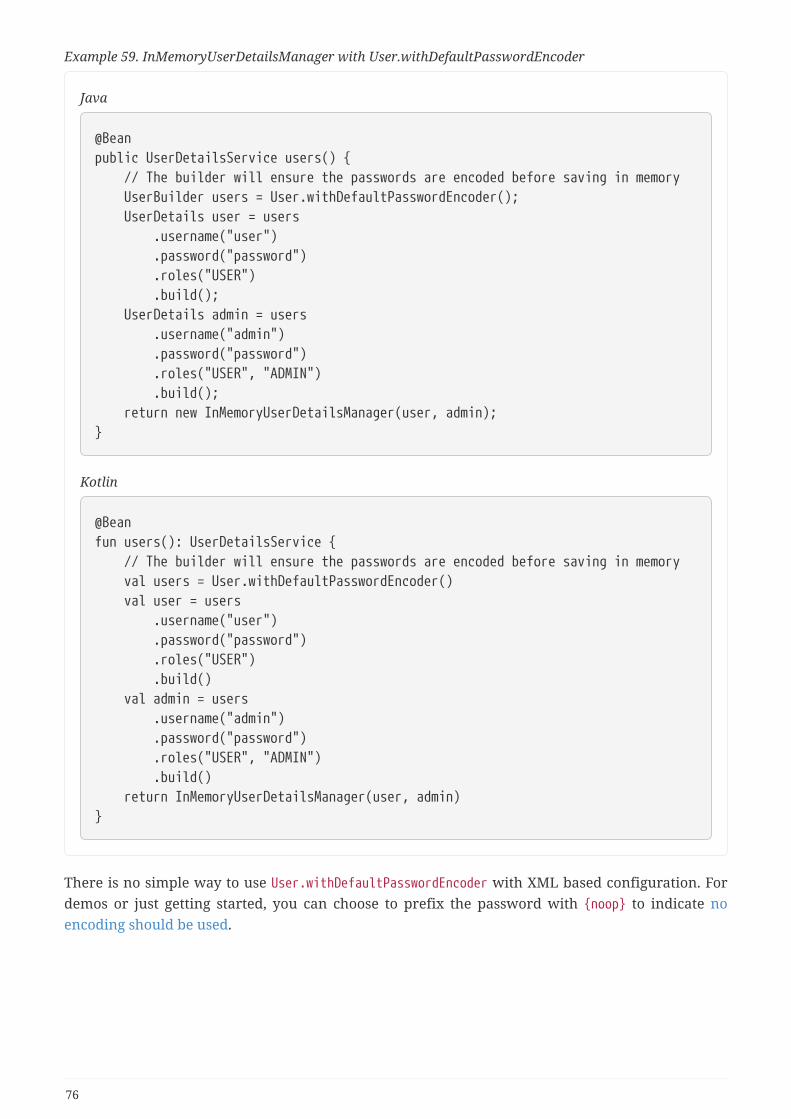
Example 59. InMemoryUserDetailsManager with User.withDefaultPasswordEncoder
Java
@Beanpublic UserDetailsService users() { // The builder will ensure the passwords are encoded before saving in memory UserBuilder users = User.withDefaultPasswordEncoder(); UserDetails user = users .username("user") .password("password") .roles("USER") .build(); UserDetails admin = users .username("admin") .password("password") .roles("USER", "ADMIN") .build(); return new InMemoryUserDetailsManager(user, admin);}
Kotlin
@Beanfun users(): UserDetailsService { // The builder will ensure the passwords are encoded before saving in memory val users = User.withDefaultPasswordEncoder() val user = users .username("user") .password("password") .roles("USER") .build() val admin = users .username("admin") .password("password") .roles("USER", "ADMIN") .build() return InMemoryUserDetailsManager(user, admin)}
There is no simple way to use User.withDefaultPasswordEncoder with XML based configuration. Fordemos or just getting started, you can choose to prefix the password with {noop} to indicate noencoding should be used.
76
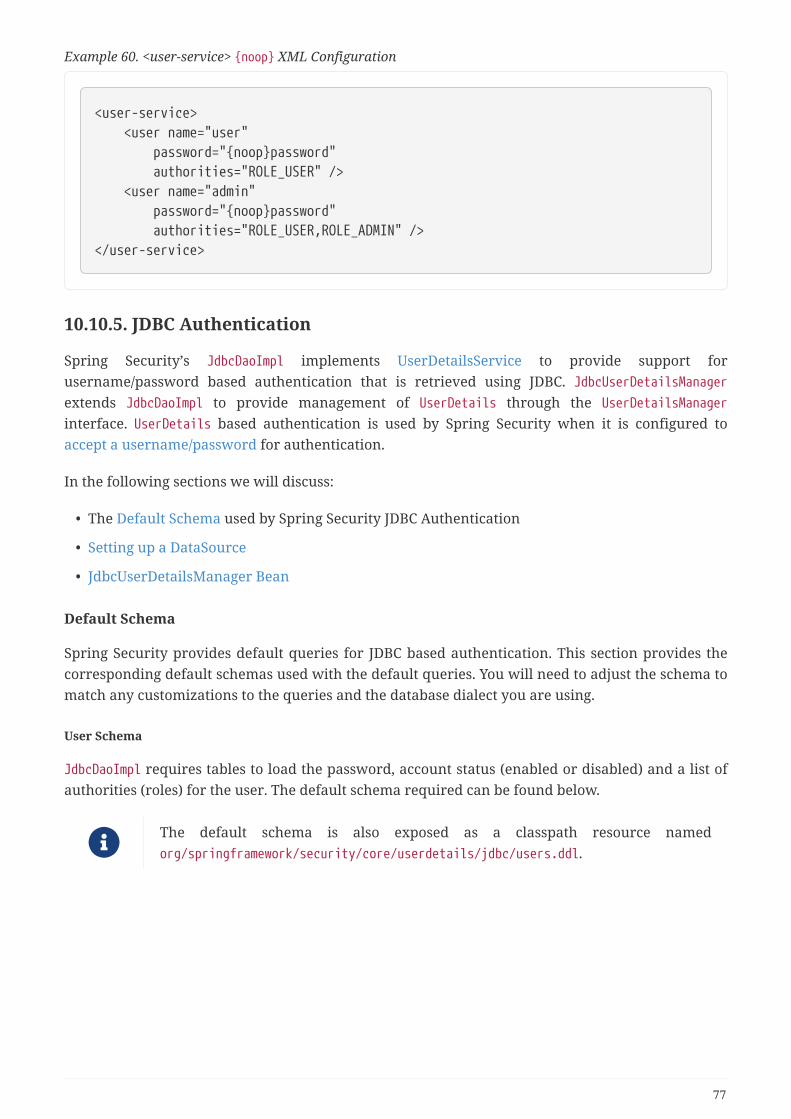
Example 60. <user-service> {noop} XML Configuration
<user-service> <user name="user" password="{noop}password" authorities="ROLE_USER" /> <user name="admin" password="{noop}password" authorities="ROLE_USER,ROLE_ADMIN" /></user-service>
10.10.5. JDBC Authentication
Spring Security’s JdbcDaoImpl implements UserDetailsService to provide support forusername/password based authentication that is retrieved using JDBC. JdbcUserDetailsManagerextends JdbcDaoImpl to provide management of UserDetails through the UserDetailsManagerinterface. UserDetails based authentication is used by Spring Security when it is configured toaccept a username/password for authentication.
In the following sections we will discuss:
• The Default Schema used by Spring Security JDBC Authentication
• Setting up a DataSource
• JdbcUserDetailsManager Bean
Default Schema
Spring Security provides default queries for JDBC based authentication. This section provides thecorresponding default schemas used with the default queries. You will need to adjust the schema tomatch any customizations to the queries and the database dialect you are using.
User Schema
JdbcDaoImpl requires tables to load the password, account status (enabled or disabled) and a list ofauthorities (roles) for the user. The default schema required can be found below.
The default schema is also exposed as a classpath resource namedorg/springframework/security/core/userdetails/jdbc/users.ddl.
77
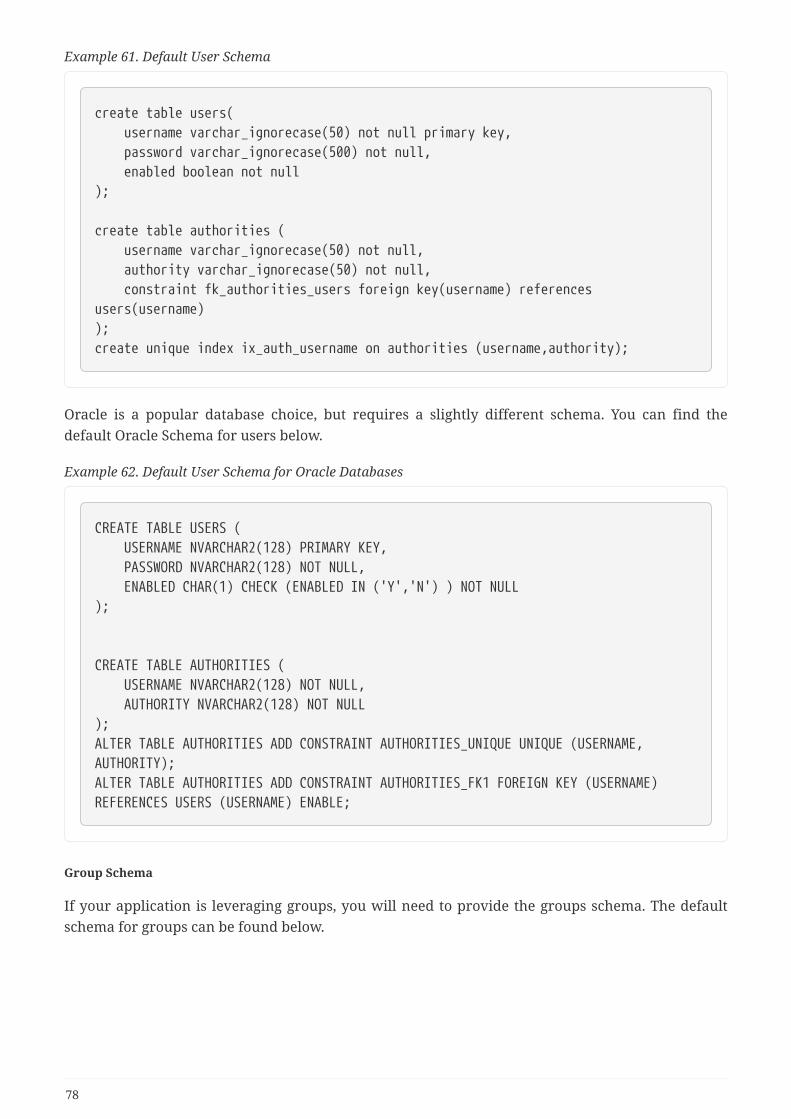
Example 61. Default User Schema
create table users( username varchar_ignorecase(50) not null primary key, password varchar_ignorecase(500) not null, enabled boolean not null);
create table authorities ( username varchar_ignorecase(50) not null, authority varchar_ignorecase(50) not null, constraint fk_authorities_users foreign key(username) referencesusers(username));create unique index ix_auth_username on authorities (username,authority);
Oracle is a popular database choice, but requires a slightly different schema. You can find thedefault Oracle Schema for users below.
Example 62. Default User Schema for Oracle Databases
CREATE TABLE USERS ( USERNAME NVARCHAR2(128) PRIMARY KEY, PASSWORD NVARCHAR2(128) NOT NULL, ENABLED CHAR(1) CHECK (ENABLED IN ('Y','N') ) NOT NULL);
CREATE TABLE AUTHORITIES ( USERNAME NVARCHAR2(128) NOT NULL, AUTHORITY NVARCHAR2(128) NOT NULL);ALTER TABLE AUTHORITIES ADD CONSTRAINT AUTHORITIES_UNIQUE UNIQUE (USERNAME,AUTHORITY);ALTER TABLE AUTHORITIES ADD CONSTRAINT AUTHORITIES_FK1 FOREIGN KEY (USERNAME)REFERENCES USERS (USERNAME) ENABLE;
Group Schema
If your application is leveraging groups, you will need to provide the groups schema. The defaultschema for groups can be found below.
78
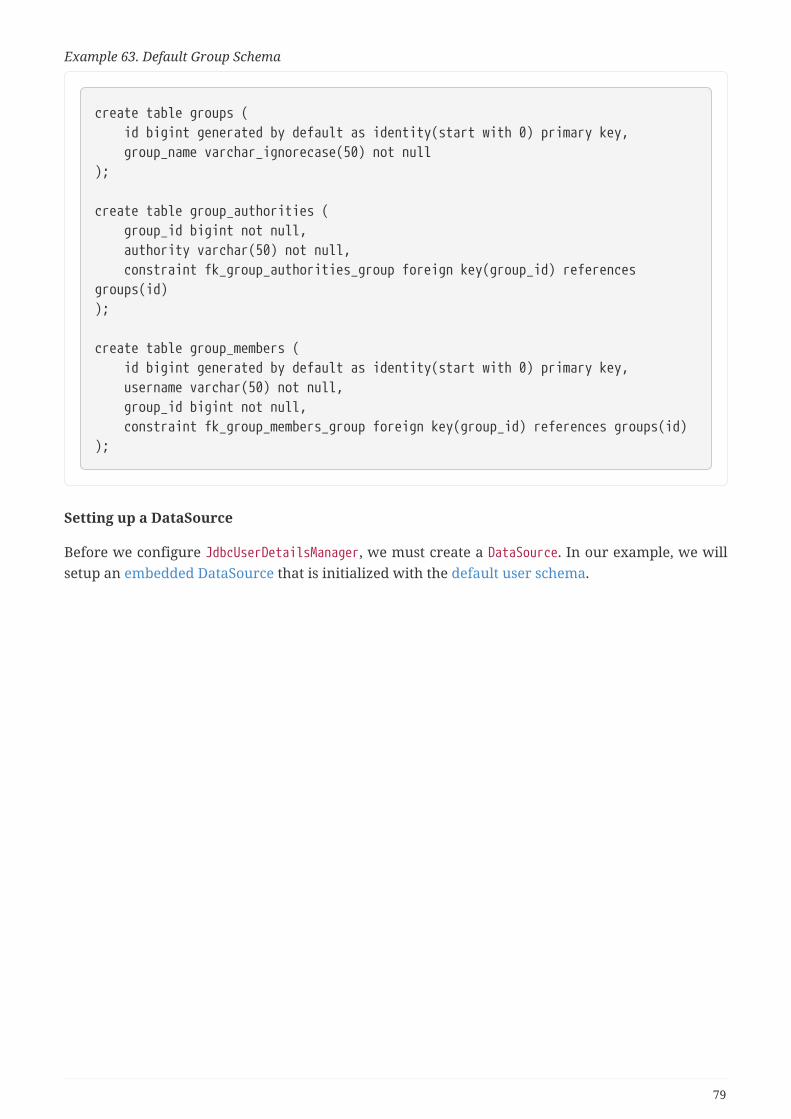
Example 63. Default Group Schema
create table groups ( id bigint generated by default as identity(start with 0) primary key, group_name varchar_ignorecase(50) not null);
create table group_authorities ( group_id bigint not null, authority varchar(50) not null, constraint fk_group_authorities_group foreign key(group_id) referencesgroups(id));
create table group_members ( id bigint generated by default as identity(start with 0) primary key, username varchar(50) not null, group_id bigint not null, constraint fk_group_members_group foreign key(group_id) references groups(id));
Setting up a DataSource
Before we configure JdbcUserDetailsManager, we must create a DataSource. In our example, we willsetup an embedded DataSource that is initialized with the default user schema.
79
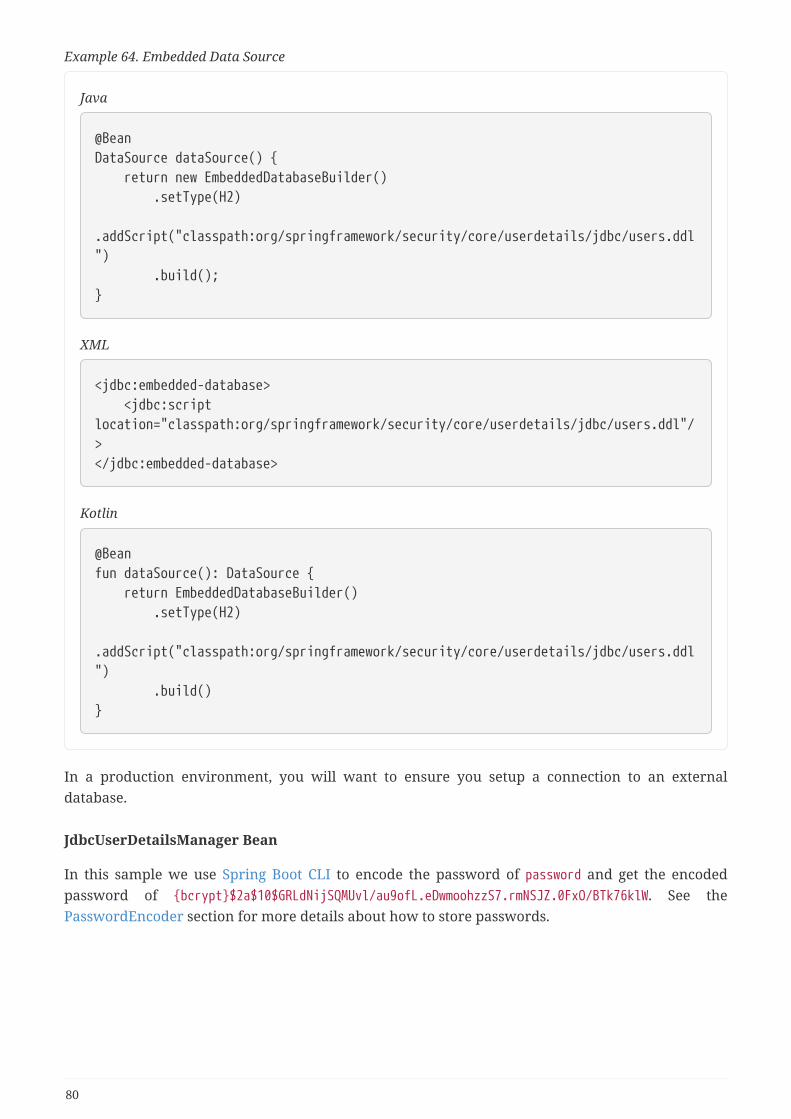
Example 64. Embedded Data Source
Java
@BeanDataSource dataSource() { return new EmbeddedDatabaseBuilder() .setType(H2) .addScript("classpath:org/springframework/security/core/userdetails/jdbc/users.ddl") .build();}
XML
<jdbc:embedded-database> <jdbc:scriptlocation="classpath:org/springframework/security/core/userdetails/jdbc/users.ddl"/></jdbc:embedded-database>
Kotlin
@Beanfun dataSource(): DataSource { return EmbeddedDatabaseBuilder() .setType(H2) .addScript("classpath:org/springframework/security/core/userdetails/jdbc/users.ddl") .build()}
In a production environment, you will want to ensure you setup a connection to an externaldatabase.
JdbcUserDetailsManager Bean
In this sample we use Spring Boot CLI to encode the password of password and get the encodedpassword of {bcrypt}$2a$10$GRLdNijSQMUvl/au9ofL.eDwmoohzzS7.rmNSJZ.0FxO/BTk76klW. See thePasswordEncoder section for more details about how to store passwords.
80
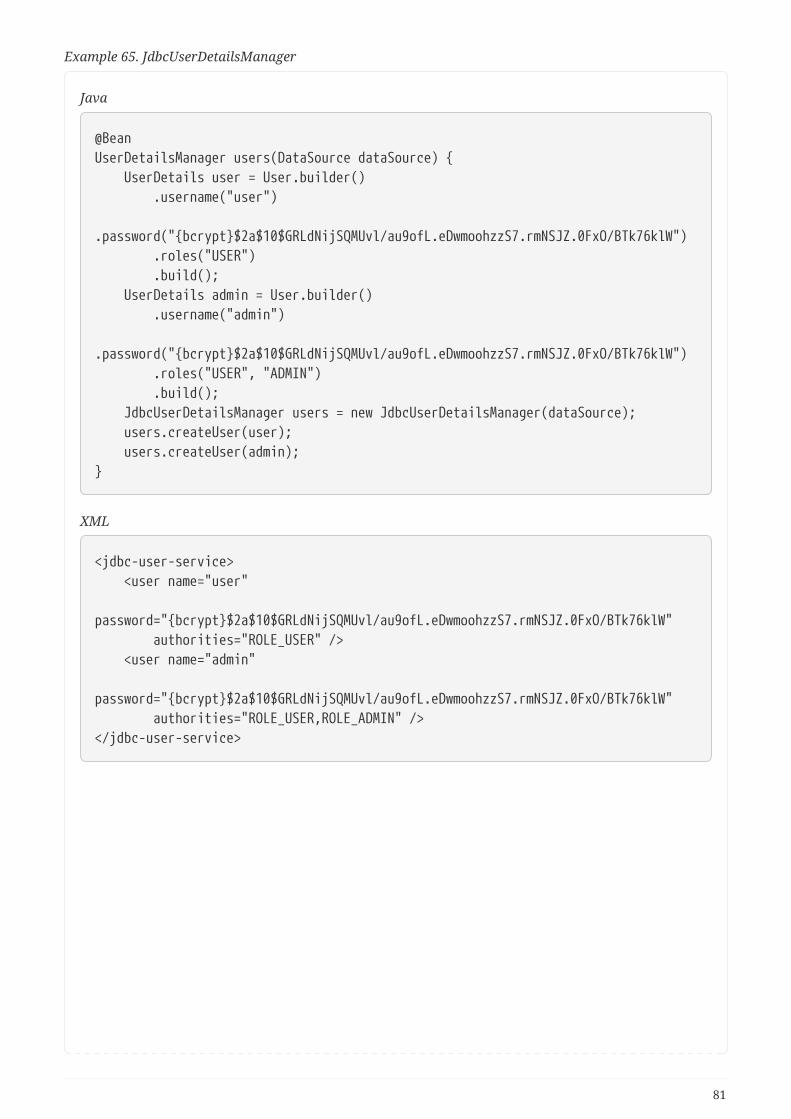
Example 65. JdbcUserDetailsManager
Java
@BeanUserDetailsManager users(DataSource dataSource) { UserDetails user = User.builder() .username("user") .password("{bcrypt}$2a$10$GRLdNijSQMUvl/au9ofL.eDwmoohzzS7.rmNSJZ.0FxO/BTk76klW") .roles("USER") .build(); UserDetails admin = User.builder() .username("admin") .password("{bcrypt}$2a$10$GRLdNijSQMUvl/au9ofL.eDwmoohzzS7.rmNSJZ.0FxO/BTk76klW") .roles("USER", "ADMIN") .build(); JdbcUserDetailsManager users = new JdbcUserDetailsManager(dataSource); users.createUser(user); users.createUser(admin);}
XML
<jdbc-user-service> <user name="user" password="{bcrypt}$2a$10$GRLdNijSQMUvl/au9ofL.eDwmoohzzS7.rmNSJZ.0FxO/BTk76klW" authorities="ROLE_USER" /> <user name="admin" password="{bcrypt}$2a$10$GRLdNijSQMUvl/au9ofL.eDwmoohzzS7.rmNSJZ.0FxO/BTk76klW" authorities="ROLE_USER,ROLE_ADMIN" /></jdbc-user-service>
81
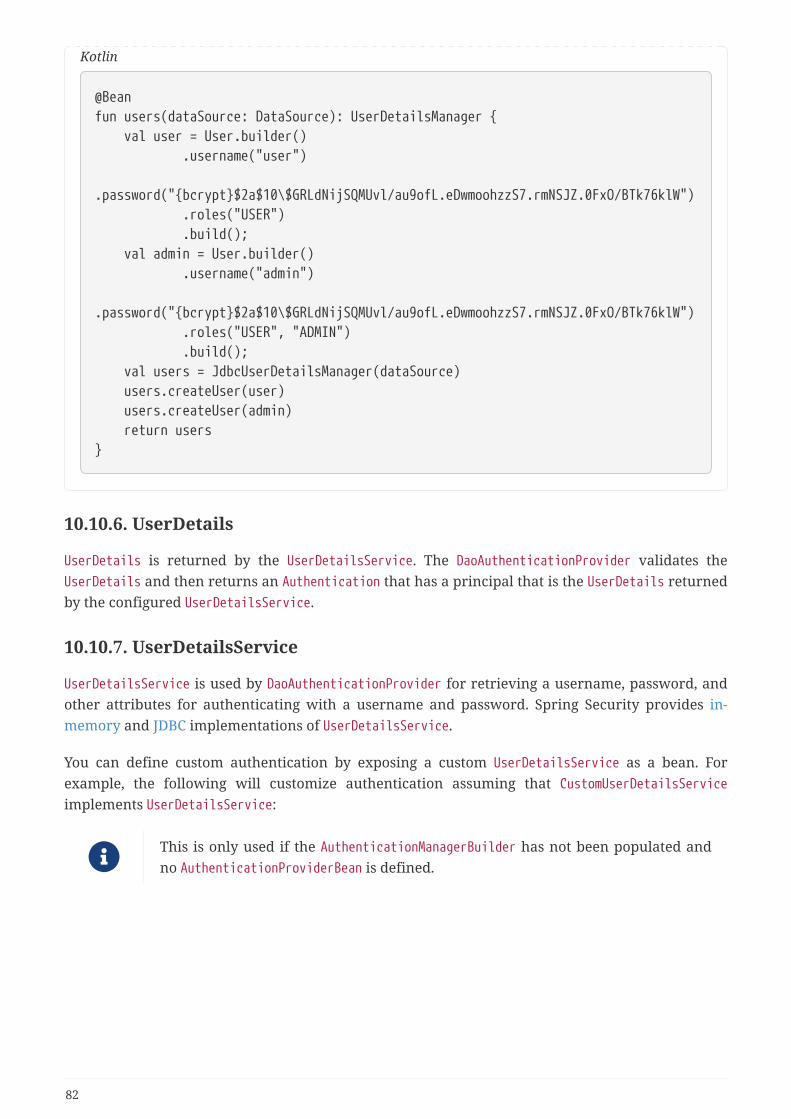
Kotlin
@Beanfun users(dataSource: DataSource): UserDetailsManager { val user = User.builder() .username("user") .password("{bcrypt}$2a$10\$GRLdNijSQMUvl/au9ofL.eDwmoohzzS7.rmNSJZ.0FxO/BTk76klW") .roles("USER") .build(); val admin = User.builder() .username("admin") .password("{bcrypt}$2a$10\$GRLdNijSQMUvl/au9ofL.eDwmoohzzS7.rmNSJZ.0FxO/BTk76klW") .roles("USER", "ADMIN") .build(); val users = JdbcUserDetailsManager(dataSource) users.createUser(user) users.createUser(admin) return users}
10.10.6. UserDetails
UserDetails is returned by the UserDetailsService. The DaoAuthenticationProvider validates theUserDetails and then returns an Authentication that has a principal that is the UserDetails returnedby the configured UserDetailsService.
10.10.7. UserDetailsService
UserDetailsService is used by DaoAuthenticationProvider for retrieving a username, password, andother attributes for authenticating with a username and password. Spring Security provides in-memory and JDBC implementations of UserDetailsService.
You can define custom authentication by exposing a custom UserDetailsService as a bean. Forexample, the following will customize authentication assuming that CustomUserDetailsServiceimplements UserDetailsService:
This is only used if the AuthenticationManagerBuilder has not been populated andno AuthenticationProviderBean is defined.
82

Example 66. Custom UserDetailsService Bean
Java
@BeanCustomUserDetailsService customUserDetailsService() { return new CustomUserDetailsService();}
XML
<b:bean class="example.CustomUserDetailsService"/>
Kotlin
@Beanfun customUserDetailsService() = CustomUserDetailsService()
10.10.8. PasswordEncoder
Spring Security’s servlet support storing passwords securely by integrating with PasswordEncoder.Customizing the PasswordEncoder implementation used by Spring Security can be done by exposinga PasswordEncoder Bean.
10.10.9. DaoAuthenticationProvider
DaoAuthenticationProvider is an AuthenticationProvider implementation that leverages aUserDetailsService and PasswordEncoder to authenticate a username and password.
Let’s take a look at how DaoAuthenticationProvider works within Spring Security. The figureexplains details of how the AuthenticationManager in figures from Reading the Username &Password works.
83

Figure 10. DaoAuthenticationProvider Usage
The authentication Filter from Reading the Username & Password passes aUsernamePasswordAuthenticationToken to the AuthenticationManager which is implemented byProviderManager.
The ProviderManager is configured to use an AuthenticationProvider of typeDaoAuthenticationProvider.
DaoAuthenticationProvider looks up the UserDetails from the UserDetailsService.
DaoAuthenticationProvider then uses the PasswordEncoder to validate the password on theUserDetails returned in the previous step.
When authentication is successful, the Authentication that is returned is of typeUsernamePasswordAuthenticationToken and has a principal that is the UserDetails returned by theconfigured UserDetailsService. Ultimately, the returned UsernamePasswordAuthenticationToken willbe set on the SecurityContextHolder by the authentication Filter.
10.10.10. LDAP Authentication
LDAP is often used by organizations as a central repository for user information and as anauthentication service. It can also be used to store the role information for application users.
Spring Security’s LDAP based authentication is used by Spring Security when it is configured toaccept a username/password for authentication. However, despite leveraging a
84
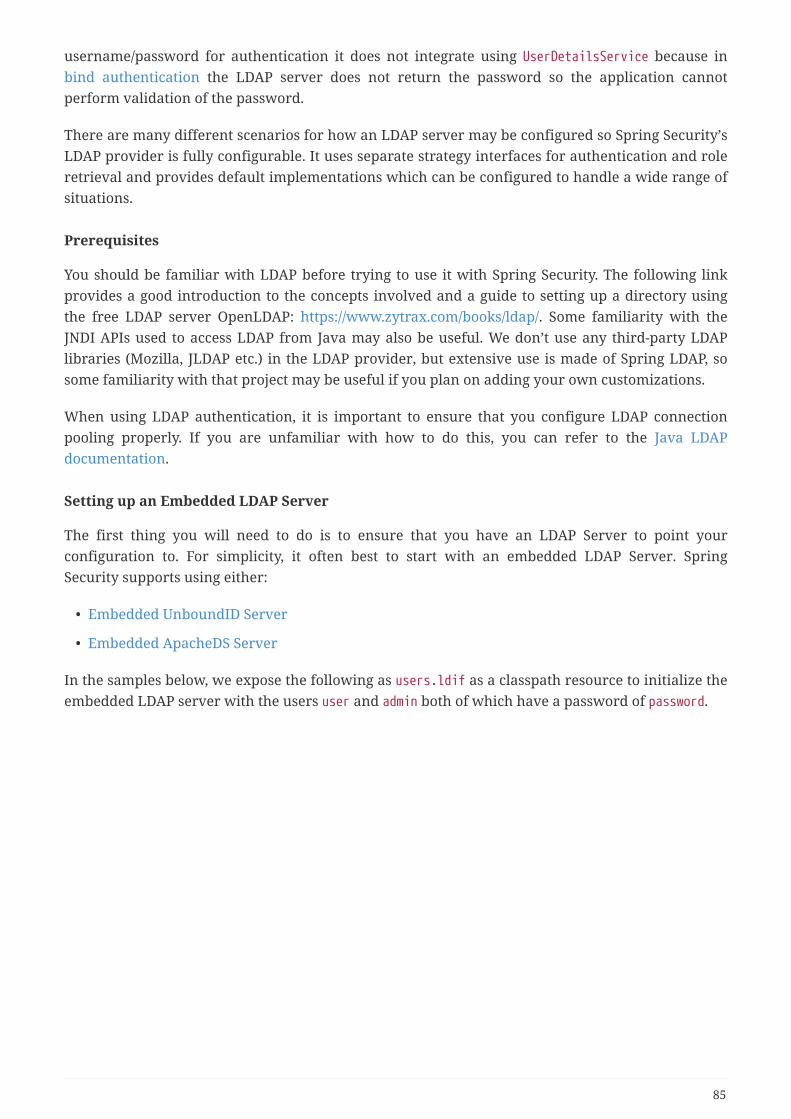
username/password for authentication it does not integrate using UserDetailsService because inbind authentication the LDAP server does not return the password so the application cannotperform validation of the password.
There are many different scenarios for how an LDAP server may be configured so Spring Security’sLDAP provider is fully configurable. It uses separate strategy interfaces for authentication and roleretrieval and provides default implementations which can be configured to handle a wide range ofsituations.
Prerequisites
You should be familiar with LDAP before trying to use it with Spring Security. The following linkprovides a good introduction to the concepts involved and a guide to setting up a directory usingthe free LDAP server OpenLDAP: https://www.zytrax.com/books/ldap/. Some familiarity with theJNDI APIs used to access LDAP from Java may also be useful. We don’t use any third-party LDAPlibraries (Mozilla, JLDAP etc.) in the LDAP provider, but extensive use is made of Spring LDAP, sosome familiarity with that project may be useful if you plan on adding your own customizations.
When using LDAP authentication, it is important to ensure that you configure LDAP connectionpooling properly. If you are unfamiliar with how to do this, you can refer to the Java LDAPdocumentation.
Setting up an Embedded LDAP Server
The first thing you will need to do is to ensure that you have an LDAP Server to point yourconfiguration to. For simplicity, it often best to start with an embedded LDAP Server. SpringSecurity supports using either:
• Embedded UnboundID Server
• Embedded ApacheDS Server
In the samples below, we expose the following as users.ldif as a classpath resource to initialize theembedded LDAP server with the users user and admin both of which have a password of password.
85
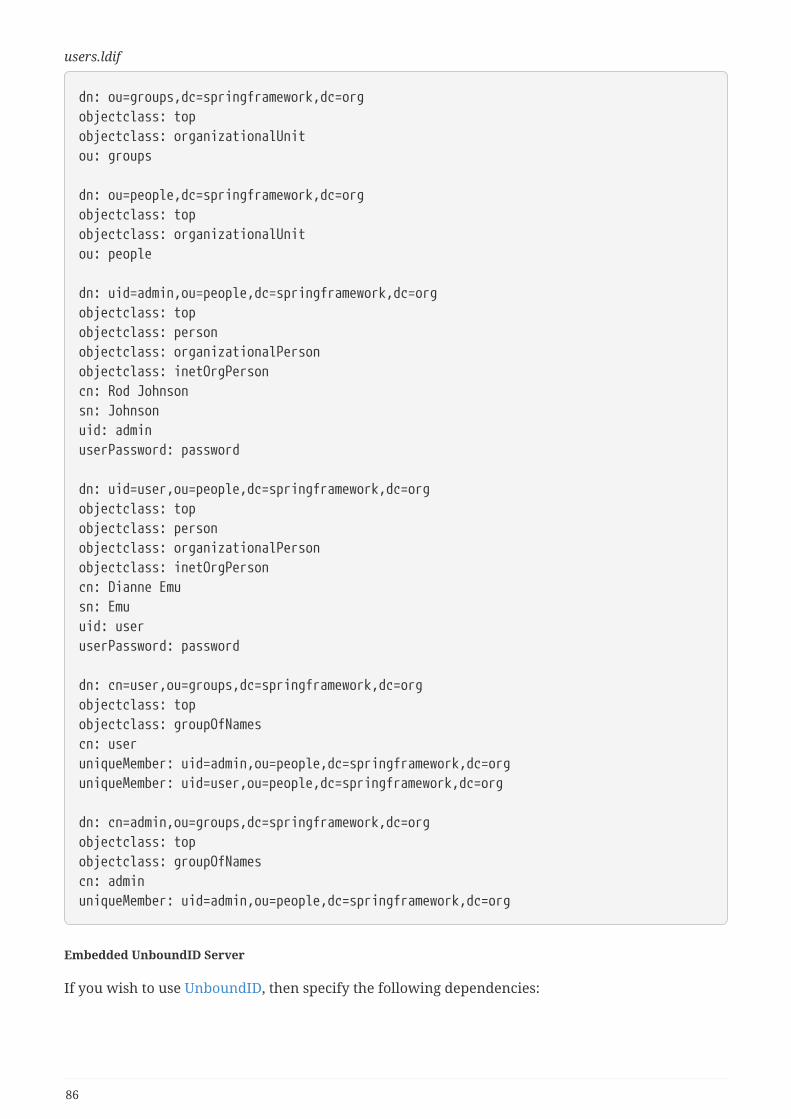
users.ldif
dn: ou=groups,dc=springframework,dc=orgobjectclass: topobjectclass: organizationalUnitou: groups
dn: ou=people,dc=springframework,dc=orgobjectclass: topobjectclass: organizationalUnitou: people
dn: uid=admin,ou=people,dc=springframework,dc=orgobjectclass: topobjectclass: personobjectclass: organizationalPersonobjectclass: inetOrgPersoncn: Rod Johnsonsn: Johnsonuid: adminuserPassword: password
dn: uid=user,ou=people,dc=springframework,dc=orgobjectclass: topobjectclass: personobjectclass: organizationalPersonobjectclass: inetOrgPersoncn: Dianne Emusn: Emuuid: useruserPassword: password
dn: cn=user,ou=groups,dc=springframework,dc=orgobjectclass: topobjectclass: groupOfNamescn: useruniqueMember: uid=admin,ou=people,dc=springframework,dc=orguniqueMember: uid=user,ou=people,dc=springframework,dc=org
dn: cn=admin,ou=groups,dc=springframework,dc=orgobjectclass: topobjectclass: groupOfNamescn: adminuniqueMember: uid=admin,ou=people,dc=springframework,dc=org
Embedded UnboundID Server
If you wish to use UnboundID, then specify the following dependencies:
86
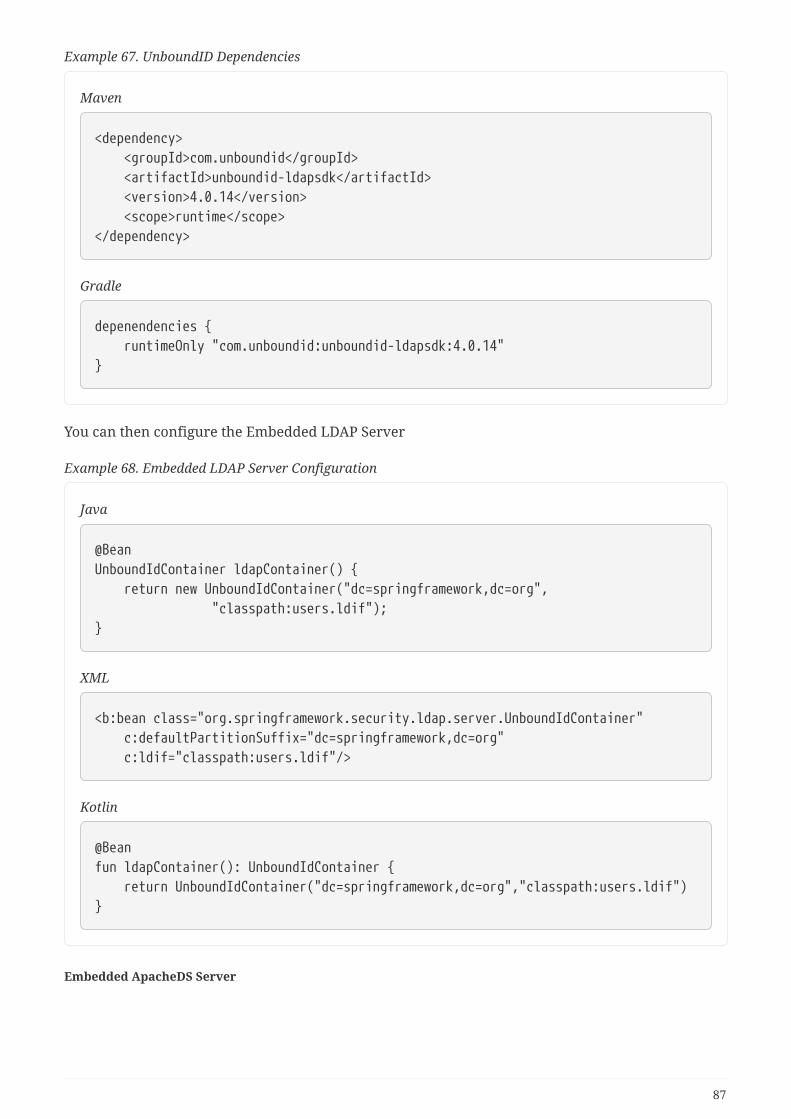
Example 67. UnboundID Dependencies
Maven
<dependency> <groupId>com.unboundid</groupId> <artifactId>unboundid-ldapsdk</artifactId> <version>4.0.14</version> <scope>runtime</scope></dependency>
Gradle
depenendencies { runtimeOnly "com.unboundid:unboundid-ldapsdk:4.0.14"}
You can then configure the Embedded LDAP Server
Example 68. Embedded LDAP Server Configuration
Java
@BeanUnboundIdContainer ldapContainer() { return new UnboundIdContainer("dc=springframework,dc=org", "classpath:users.ldif");}
XML
<b:bean class="org.springframework.security.ldap.server.UnboundIdContainer" c:defaultPartitionSuffix="dc=springframework,dc=org" c:ldif="classpath:users.ldif"/>
Kotlin
@Beanfun ldapContainer(): UnboundIdContainer { return UnboundIdContainer("dc=springframework,dc=org","classpath:users.ldif")}
Embedded ApacheDS Server
87
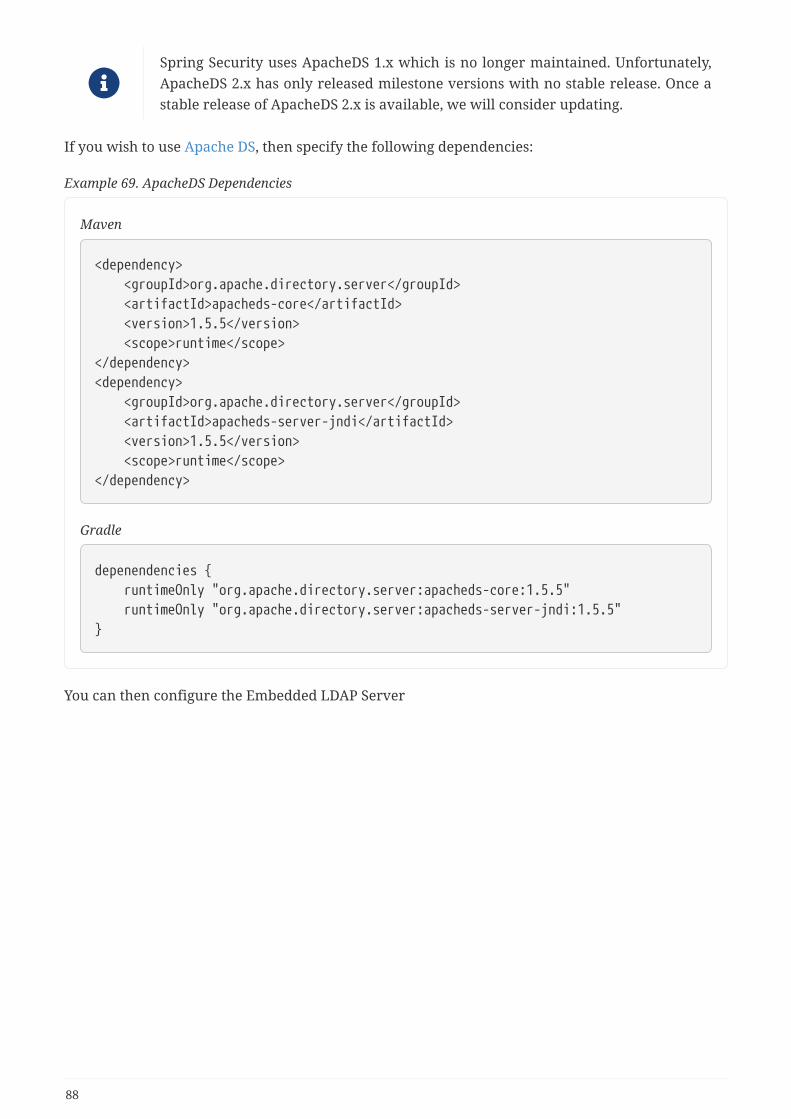
Spring Security uses ApacheDS 1.x which is no longer maintained. Unfortunately,ApacheDS 2.x has only released milestone versions with no stable release. Once astable release of ApacheDS 2.x is available, we will consider updating.
If you wish to use Apache DS, then specify the following dependencies:
Example 69. ApacheDS Dependencies
Maven
<dependency> <groupId>org.apache.directory.server</groupId> <artifactId>apacheds-core</artifactId> <version>1.5.5</version> <scope>runtime</scope></dependency><dependency> <groupId>org.apache.directory.server</groupId> <artifactId>apacheds-server-jndi</artifactId> <version>1.5.5</version> <scope>runtime</scope></dependency>
Gradle
depenendencies { runtimeOnly "org.apache.directory.server:apacheds-core:1.5.5" runtimeOnly "org.apache.directory.server:apacheds-server-jndi:1.5.5"}
You can then configure the Embedded LDAP Server
88
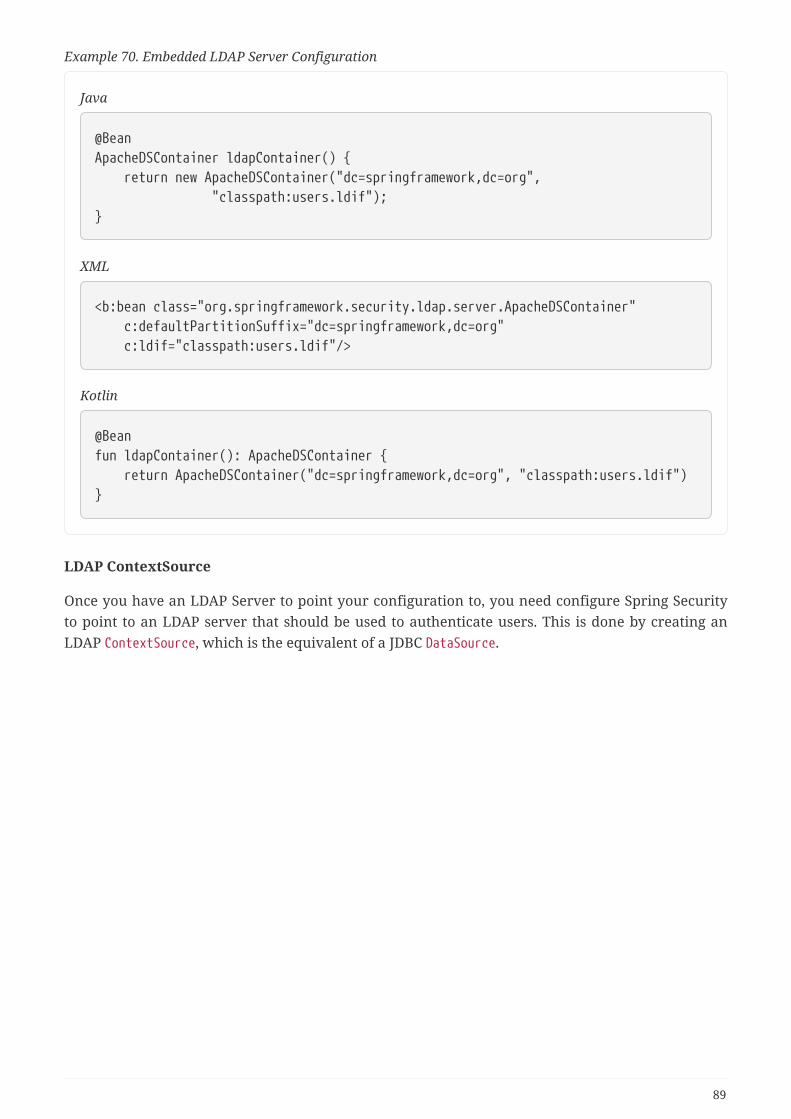
Example 70. Embedded LDAP Server Configuration
Java
@BeanApacheDSContainer ldapContainer() { return new ApacheDSContainer("dc=springframework,dc=org", "classpath:users.ldif");}
XML
<b:bean class="org.springframework.security.ldap.server.ApacheDSContainer" c:defaultPartitionSuffix="dc=springframework,dc=org" c:ldif="classpath:users.ldif"/>
Kotlin
@Beanfun ldapContainer(): ApacheDSContainer { return ApacheDSContainer("dc=springframework,dc=org", "classpath:users.ldif")}
LDAP ContextSource
Once you have an LDAP Server to point your configuration to, you need configure Spring Securityto point to an LDAP server that should be used to authenticate users. This is done by creating anLDAP ContextSource, which is the equivalent of a JDBC DataSource.
89
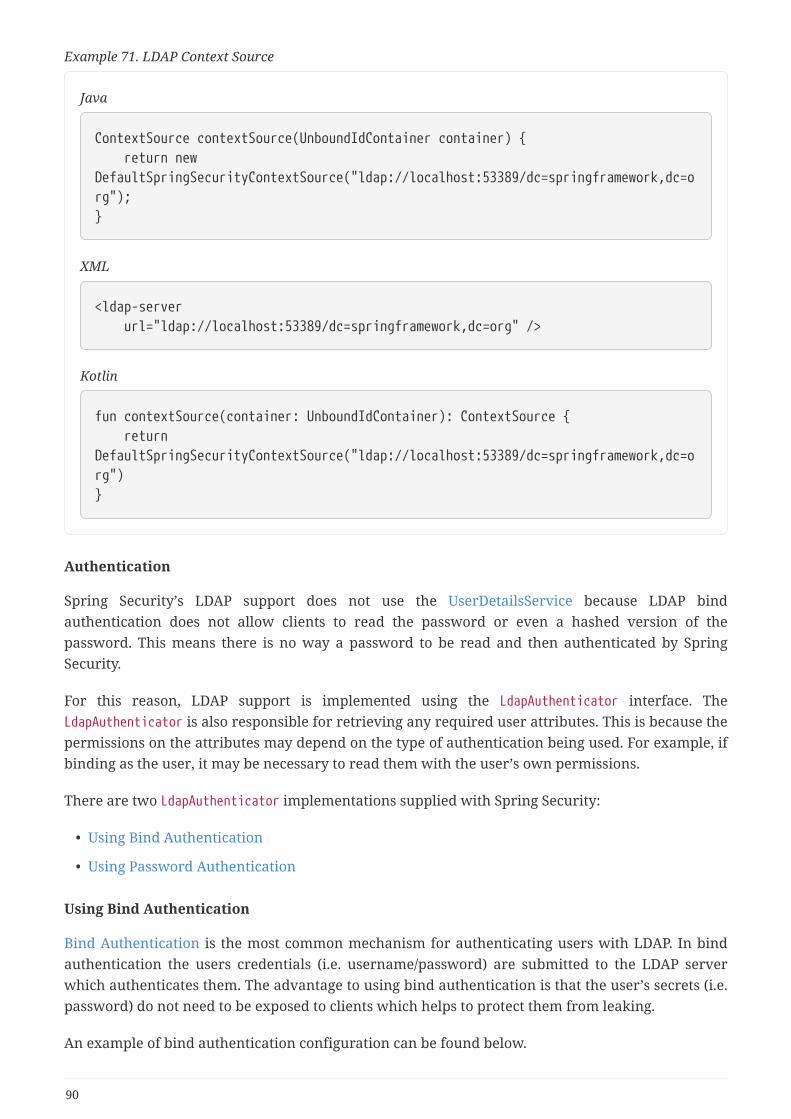
Example 71. LDAP Context Source
Java
ContextSource contextSource(UnboundIdContainer container) { return newDefaultSpringSecurityContextSource("ldap://localhost:53389/dc=springframework,dc=org");}
XML
<ldap-server url="ldap://localhost:53389/dc=springframework,dc=org" />
Kotlin
fun contextSource(container: UnboundIdContainer): ContextSource { returnDefaultSpringSecurityContextSource("ldap://localhost:53389/dc=springframework,dc=org")}
Authentication
Spring Security’s LDAP support does not use the UserDetailsService because LDAP bindauthentication does not allow clients to read the password or even a hashed version of thepassword. This means there is no way a password to be read and then authenticated by SpringSecurity.
For this reason, LDAP support is implemented using the LdapAuthenticator interface. TheLdapAuthenticator is also responsible for retrieving any required user attributes. This is because thepermissions on the attributes may depend on the type of authentication being used. For example, ifbinding as the user, it may be necessary to read them with the user’s own permissions.
There are two LdapAuthenticator implementations supplied with Spring Security:
• Using Bind Authentication
• Using Password Authentication
Using Bind Authentication
Bind Authentication is the most common mechanism for authenticating users with LDAP. In bindauthentication the users credentials (i.e. username/password) are submitted to the LDAP serverwhich authenticates them. The advantage to using bind authentication is that the user’s secrets (i.e.password) do not need to be exposed to clients which helps to protect them from leaking.
An example of bind authentication configuration can be found below.
90
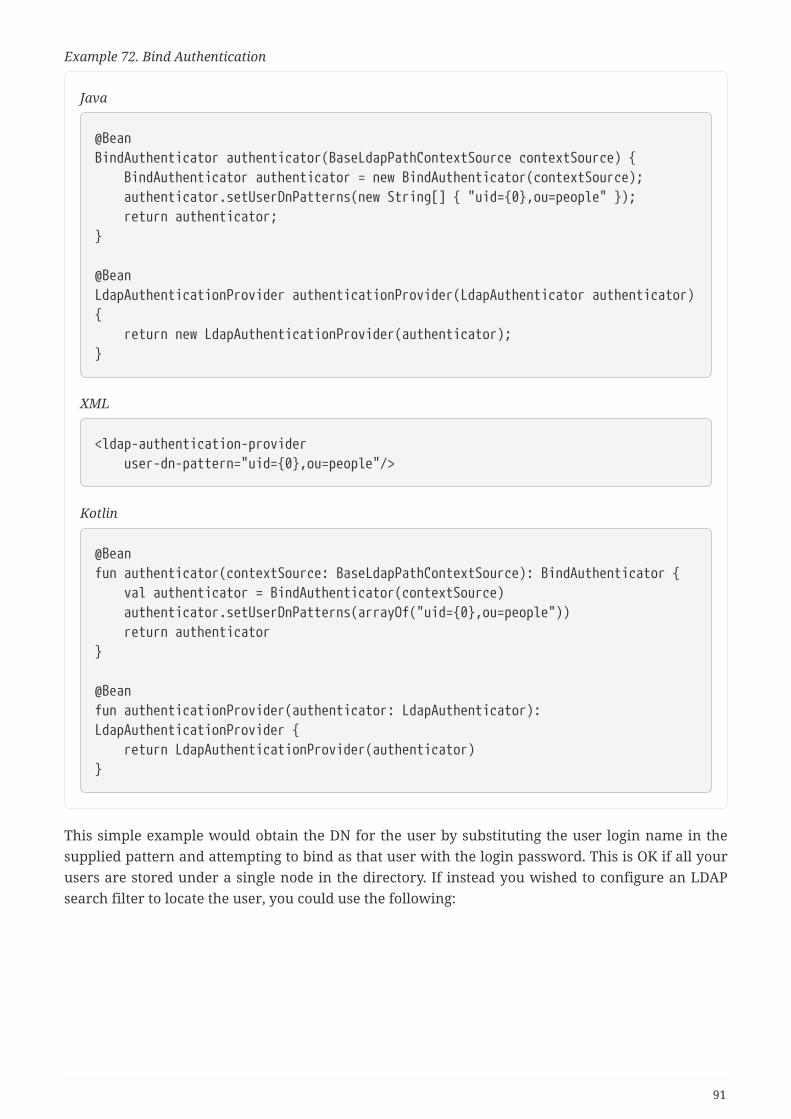
Example 72. Bind Authentication
Java
@BeanBindAuthenticator authenticator(BaseLdapPathContextSource contextSource) { BindAuthenticator authenticator = new BindAuthenticator(contextSource); authenticator.setUserDnPatterns(new String[] { "uid={0},ou=people" }); return authenticator;}
@BeanLdapAuthenticationProvider authenticationProvider(LdapAuthenticator authenticator){ return new LdapAuthenticationProvider(authenticator);}
XML
<ldap-authentication-provider user-dn-pattern="uid={0},ou=people"/>
Kotlin
@Beanfun authenticator(contextSource: BaseLdapPathContextSource): BindAuthenticator { val authenticator = BindAuthenticator(contextSource) authenticator.setUserDnPatterns(arrayOf("uid={0},ou=people")) return authenticator}
@Beanfun authenticationProvider(authenticator: LdapAuthenticator):LdapAuthenticationProvider { return LdapAuthenticationProvider(authenticator)}
This simple example would obtain the DN for the user by substituting the user login name in thesupplied pattern and attempting to bind as that user with the login password. This is OK if all yourusers are stored under a single node in the directory. If instead you wished to configure an LDAPsearch filter to locate the user, you could use the following:
91
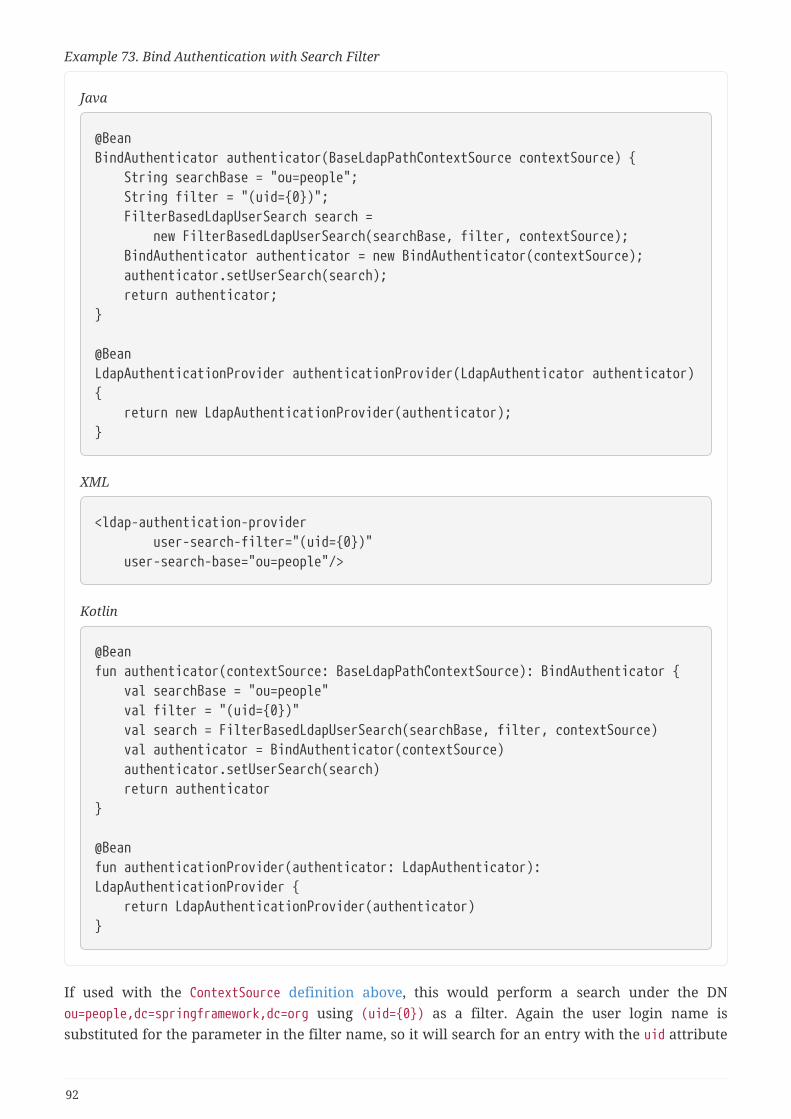
Example 73. Bind Authentication with Search Filter
Java
@BeanBindAuthenticator authenticator(BaseLdapPathContextSource contextSource) { String searchBase = "ou=people"; String filter = "(uid={0})"; FilterBasedLdapUserSearch search = new FilterBasedLdapUserSearch(searchBase, filter, contextSource); BindAuthenticator authenticator = new BindAuthenticator(contextSource); authenticator.setUserSearch(search); return authenticator;}
@BeanLdapAuthenticationProvider authenticationProvider(LdapAuthenticator authenticator){ return new LdapAuthenticationProvider(authenticator);}
XML
<ldap-authentication-provider user-search-filter="(uid={0})" user-search-base="ou=people"/>
Kotlin
@Beanfun authenticator(contextSource: BaseLdapPathContextSource): BindAuthenticator { val searchBase = "ou=people" val filter = "(uid={0})" val search = FilterBasedLdapUserSearch(searchBase, filter, contextSource) val authenticator = BindAuthenticator(contextSource) authenticator.setUserSearch(search) return authenticator}
@Beanfun authenticationProvider(authenticator: LdapAuthenticator):LdapAuthenticationProvider { return LdapAuthenticationProvider(authenticator)}
If used with the ContextSource definition above, this would perform a search under the DNou=people,dc=springframework,dc=org using (uid={0}) as a filter. Again the user login name issubstituted for the parameter in the filter name, so it will search for an entry with the uid attribute
92
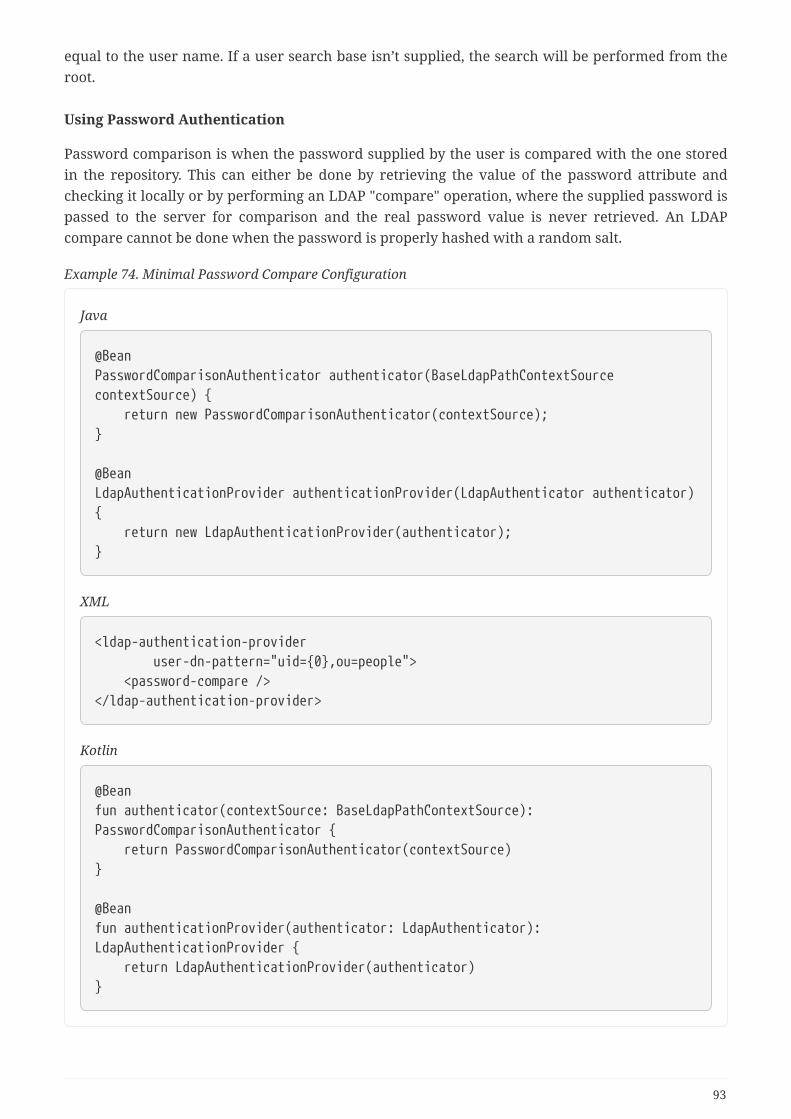
equal to the user name. If a user search base isn’t supplied, the search will be performed from theroot.
Using Password Authentication
Password comparison is when the password supplied by the user is compared with the one storedin the repository. This can either be done by retrieving the value of the password attribute andchecking it locally or by performing an LDAP "compare" operation, where the supplied password ispassed to the server for comparison and the real password value is never retrieved. An LDAPcompare cannot be done when the password is properly hashed with a random salt.
Example 74. Minimal Password Compare Configuration
Java
@BeanPasswordComparisonAuthenticator authenticator(BaseLdapPathContextSourcecontextSource) { return new PasswordComparisonAuthenticator(contextSource);}
@BeanLdapAuthenticationProvider authenticationProvider(LdapAuthenticator authenticator){ return new LdapAuthenticationProvider(authenticator);}
XML
<ldap-authentication-provider user-dn-pattern="uid={0},ou=people"> <password-compare /></ldap-authentication-provider>
Kotlin
@Beanfun authenticator(contextSource: BaseLdapPathContextSource):PasswordComparisonAuthenticator { return PasswordComparisonAuthenticator(contextSource)}
@Beanfun authenticationProvider(authenticator: LdapAuthenticator):LdapAuthenticationProvider { return LdapAuthenticationProvider(authenticator)}
93

A more advanced configuration with some customizations can be found below.
94
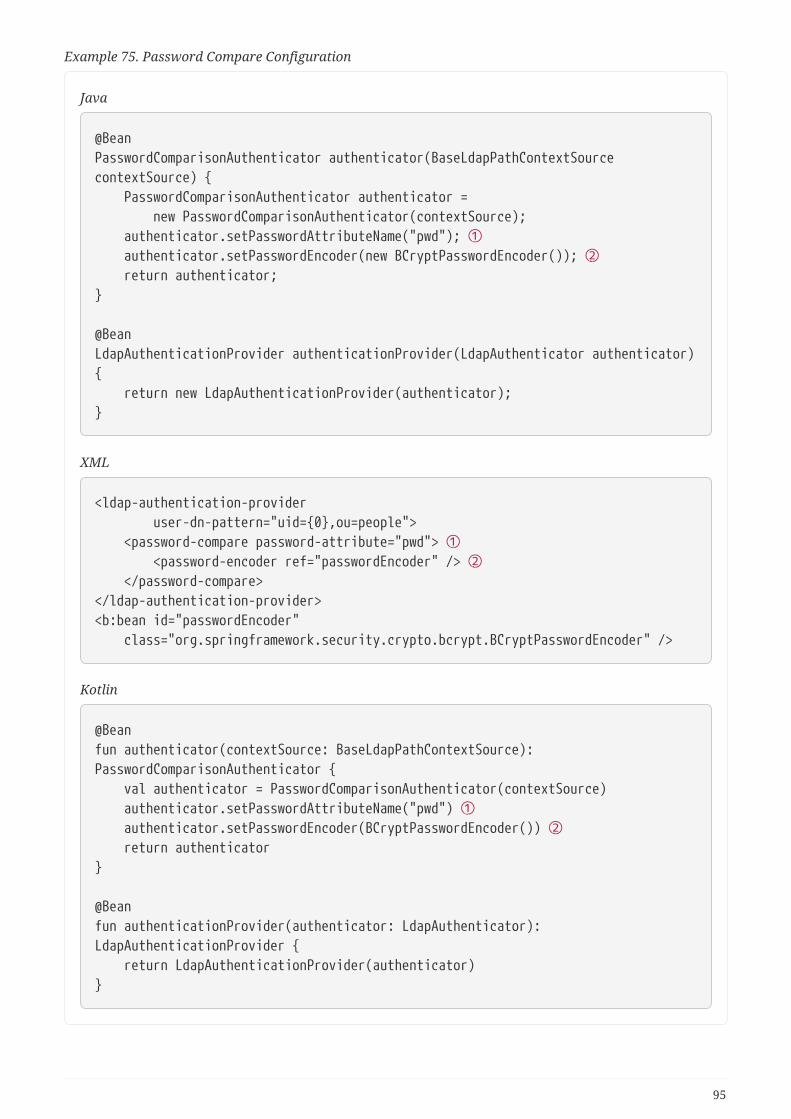
Example 75. Password Compare Configuration
Java
@BeanPasswordComparisonAuthenticator authenticator(BaseLdapPathContextSourcecontextSource) { PasswordComparisonAuthenticator authenticator = new PasswordComparisonAuthenticator(contextSource); authenticator.setPasswordAttributeName("pwd"); ① authenticator.setPasswordEncoder(new BCryptPasswordEncoder()); ② return authenticator;}
@BeanLdapAuthenticationProvider authenticationProvider(LdapAuthenticator authenticator){ return new LdapAuthenticationProvider(authenticator);}
XML
<ldap-authentication-provider user-dn-pattern="uid={0},ou=people"> <password-compare password-attribute="pwd"> ① <password-encoder ref="passwordEncoder" /> ② </password-compare></ldap-authentication-provider><b:bean id="passwordEncoder" class="org.springframework.security.crypto.bcrypt.BCryptPasswordEncoder" />
Kotlin
@Beanfun authenticator(contextSource: BaseLdapPathContextSource):PasswordComparisonAuthenticator { val authenticator = PasswordComparisonAuthenticator(contextSource) authenticator.setPasswordAttributeName("pwd") ① authenticator.setPasswordEncoder(BCryptPasswordEncoder()) ② return authenticator}
@Beanfun authenticationProvider(authenticator: LdapAuthenticator):LdapAuthenticationProvider { return LdapAuthenticationProvider(authenticator)}
95
① Specify the password attribute as pwd
② Use BCryptPasswordEncoder
LdapAuthoritiesPopulator
Spring Security’s LdapAuthoritiesPopulator is used to determine what authorites are returned forthe user.
96
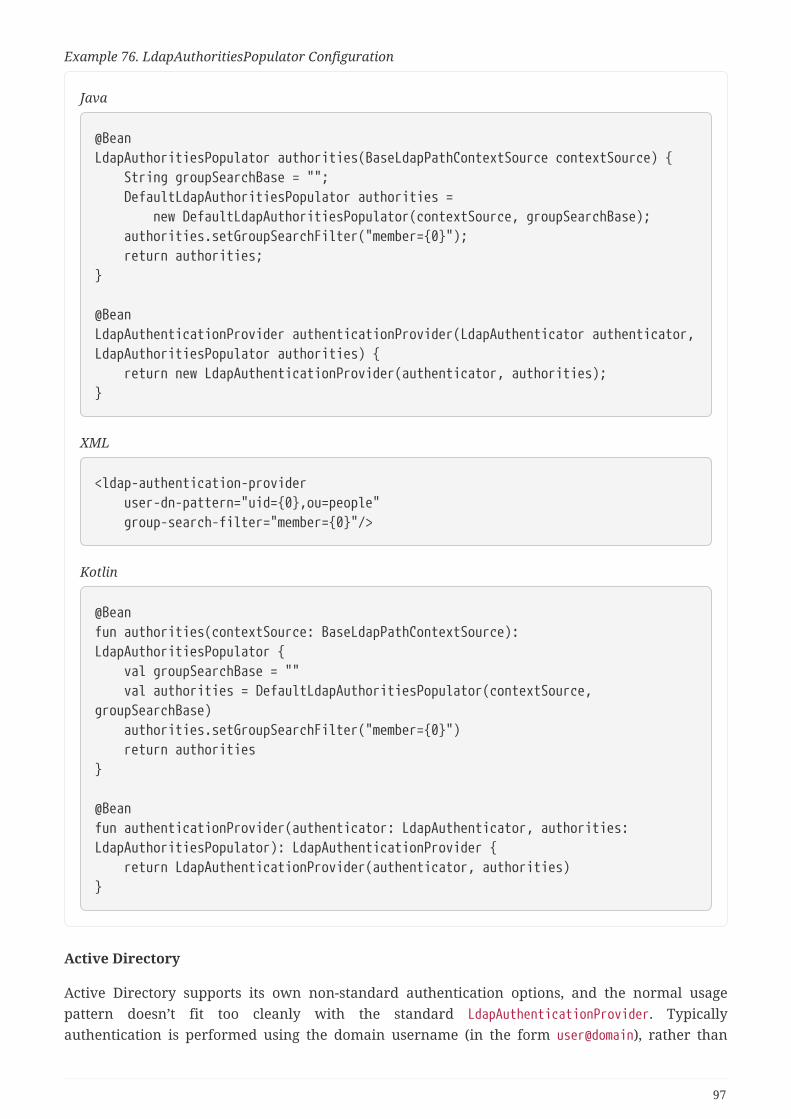
Example 76. LdapAuthoritiesPopulator Configuration
Java
@BeanLdapAuthoritiesPopulator authorities(BaseLdapPathContextSource contextSource) { String groupSearchBase = ""; DefaultLdapAuthoritiesPopulator authorities = new DefaultLdapAuthoritiesPopulator(contextSource, groupSearchBase); authorities.setGroupSearchFilter("member={0}"); return authorities;}
@BeanLdapAuthenticationProvider authenticationProvider(LdapAuthenticator authenticator,LdapAuthoritiesPopulator authorities) { return new LdapAuthenticationProvider(authenticator, authorities);}
XML
<ldap-authentication-provider user-dn-pattern="uid={0},ou=people" group-search-filter="member={0}"/>
Kotlin
@Beanfun authorities(contextSource: BaseLdapPathContextSource):LdapAuthoritiesPopulator { val groupSearchBase = "" val authorities = DefaultLdapAuthoritiesPopulator(contextSource,groupSearchBase) authorities.setGroupSearchFilter("member={0}") return authorities}
@Beanfun authenticationProvider(authenticator: LdapAuthenticator, authorities:LdapAuthoritiesPopulator): LdapAuthenticationProvider { return LdapAuthenticationProvider(authenticator, authorities)}
Active Directory
Active Directory supports its own non-standard authentication options, and the normal usagepattern doesn’t fit too cleanly with the standard LdapAuthenticationProvider. Typicallyauthentication is performed using the domain username (in the form user@domain), rather than
97
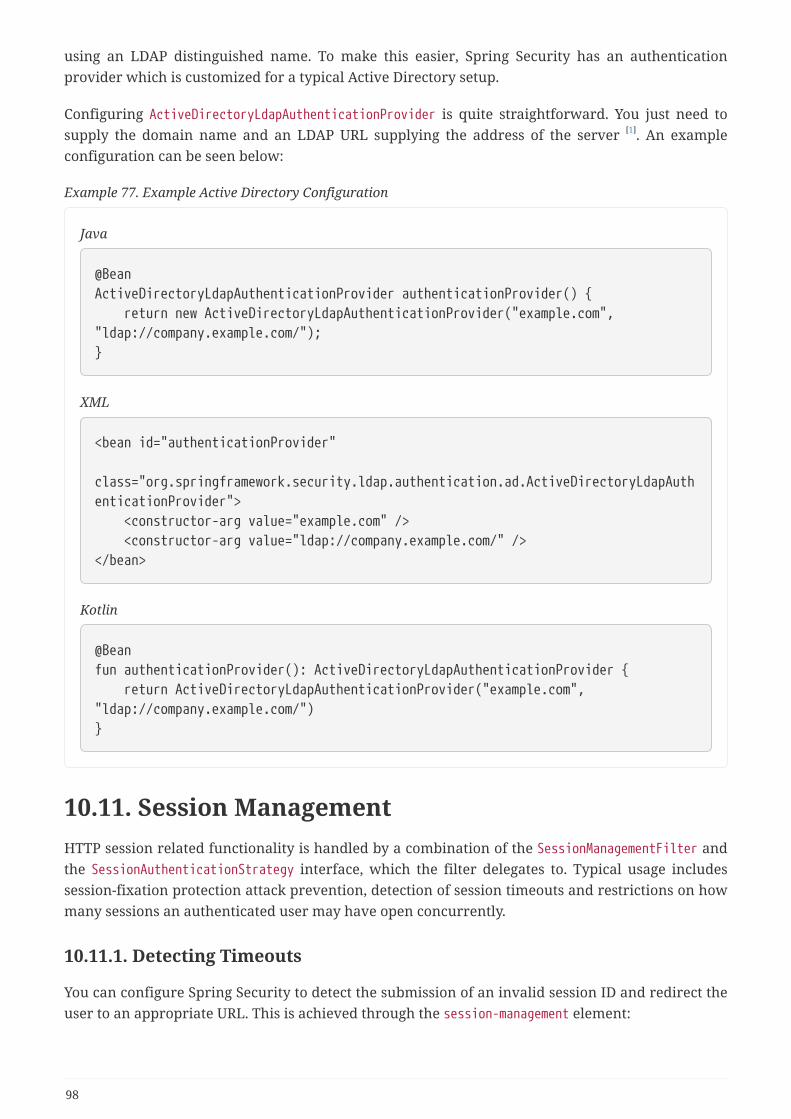
using an LDAP distinguished name. To make this easier, Spring Security has an authenticationprovider which is customized for a typical Active Directory setup.
Configuring ActiveDirectoryLdapAuthenticationProvider is quite straightforward. You just need tosupply the domain name and an LDAP URL supplying the address of the server [1]. An exampleconfiguration can be seen below:
Example 77. Example Active Directory Configuration
Java
@BeanActiveDirectoryLdapAuthenticationProvider authenticationProvider() { return new ActiveDirectoryLdapAuthenticationProvider("example.com","ldap://company.example.com/");}
XML
<bean id="authenticationProvider" class="org.springframework.security.ldap.authentication.ad.ActiveDirectoryLdapAuthenticationProvider"> <constructor-arg value="example.com" /> <constructor-arg value="ldap://company.example.com/" /></bean>
Kotlin
@Beanfun authenticationProvider(): ActiveDirectoryLdapAuthenticationProvider { return ActiveDirectoryLdapAuthenticationProvider("example.com","ldap://company.example.com/")}
10.11. Session ManagementHTTP session related functionality is handled by a combination of the SessionManagementFilter andthe SessionAuthenticationStrategy interface, which the filter delegates to. Typical usage includessession-fixation protection attack prevention, detection of session timeouts and restrictions on howmany sessions an authenticated user may have open concurrently.
10.11.1. Detecting Timeouts
You can configure Spring Security to detect the submission of an invalid session ID and redirect theuser to an appropriate URL. This is achieved through the session-management element:
98
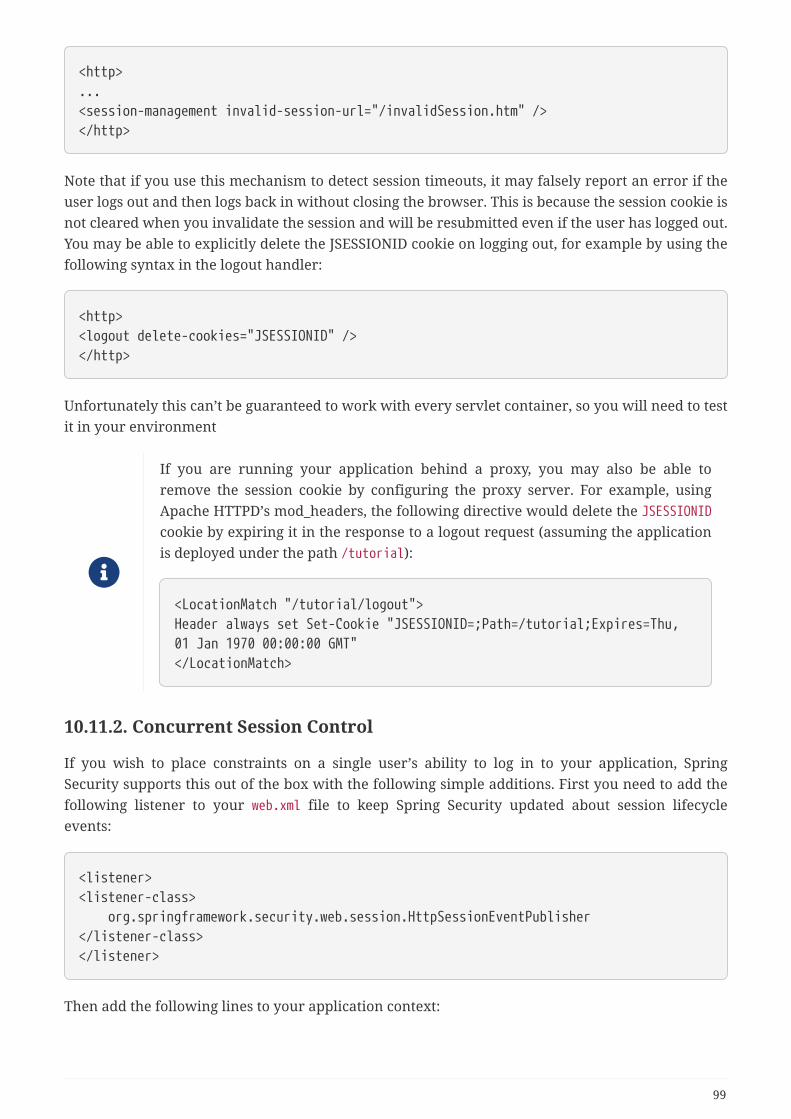
<http>...<session-management invalid-session-url="/invalidSession.htm" /></http>
Note that if you use this mechanism to detect session timeouts, it may falsely report an error if theuser logs out and then logs back in without closing the browser. This is because the session cookie isnot cleared when you invalidate the session and will be resubmitted even if the user has logged out.You may be able to explicitly delete the JSESSIONID cookie on logging out, for example by using thefollowing syntax in the logout handler:
<http><logout delete-cookies="JSESSIONID" /></http>
Unfortunately this can’t be guaranteed to work with every servlet container, so you will need to testit in your environment
If you are running your application behind a proxy, you may also be able toremove the session cookie by configuring the proxy server. For example, usingApache HTTPD’s mod_headers, the following directive would delete the JSESSIONIDcookie by expiring it in the response to a logout request (assuming the applicationis deployed under the path /tutorial):
<LocationMatch "/tutorial/logout">Header always set Set-Cookie "JSESSIONID=;Path=/tutorial;Expires=Thu,01 Jan 1970 00:00:00 GMT"</LocationMatch>
10.11.2. Concurrent Session Control
If you wish to place constraints on a single user’s ability to log in to your application, SpringSecurity supports this out of the box with the following simple additions. First you need to add thefollowing listener to your web.xml file to keep Spring Security updated about session lifecycleevents:
<listener><listener-class> org.springframework.security.web.session.HttpSessionEventPublisher</listener-class></listener>
Then add the following lines to your application context:
99
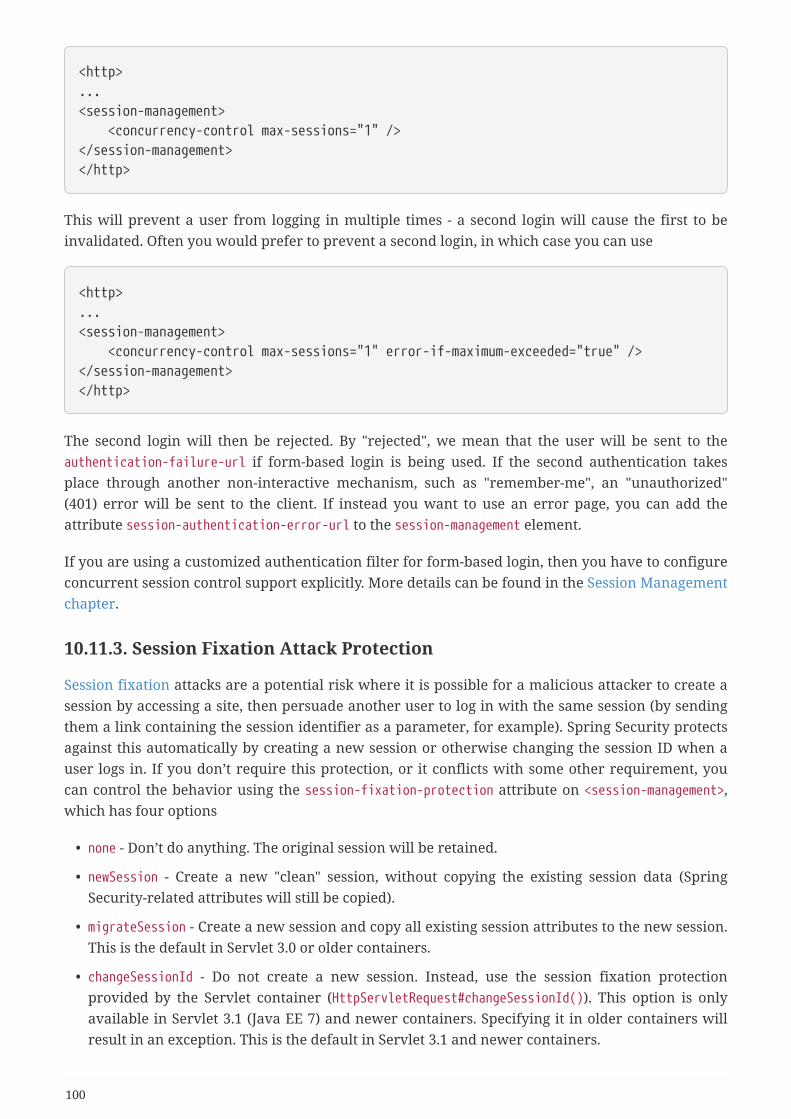
<http>...<session-management> <concurrency-control max-sessions="1" /></session-management></http>
This will prevent a user from logging in multiple times - a second login will cause the first to beinvalidated. Often you would prefer to prevent a second login, in which case you can use
<http>...<session-management> <concurrency-control max-sessions="1" error-if-maximum-exceeded="true" /></session-management></http>
The second login will then be rejected. By "rejected", we mean that the user will be sent to theauthentication-failure-url if form-based login is being used. If the second authentication takesplace through another non-interactive mechanism, such as "remember-me", an "unauthorized"(401) error will be sent to the client. If instead you want to use an error page, you can add theattribute session-authentication-error-url to the session-management element.
If you are using a customized authentication filter for form-based login, then you have to configureconcurrent session control support explicitly. More details can be found in the Session Managementchapter.
10.11.3. Session Fixation Attack Protection
Session fixation attacks are a potential risk where it is possible for a malicious attacker to create asession by accessing a site, then persuade another user to log in with the same session (by sendingthem a link containing the session identifier as a parameter, for example). Spring Security protectsagainst this automatically by creating a new session or otherwise changing the session ID when auser logs in. If you don’t require this protection, or it conflicts with some other requirement, youcan control the behavior using the session-fixation-protection attribute on <session-management>,which has four options
• none - Don’t do anything. The original session will be retained.
• newSession - Create a new "clean" session, without copying the existing session data (SpringSecurity-related attributes will still be copied).
• migrateSession - Create a new session and copy all existing session attributes to the new session.This is the default in Servlet 3.0 or older containers.
• changeSessionId - Do not create a new session. Instead, use the session fixation protectionprovided by the Servlet container (HttpServletRequest#changeSessionId()). This option is onlyavailable in Servlet 3.1 (Java EE 7) and newer containers. Specifying it in older containers willresult in an exception. This is the default in Servlet 3.1 and newer containers.
100
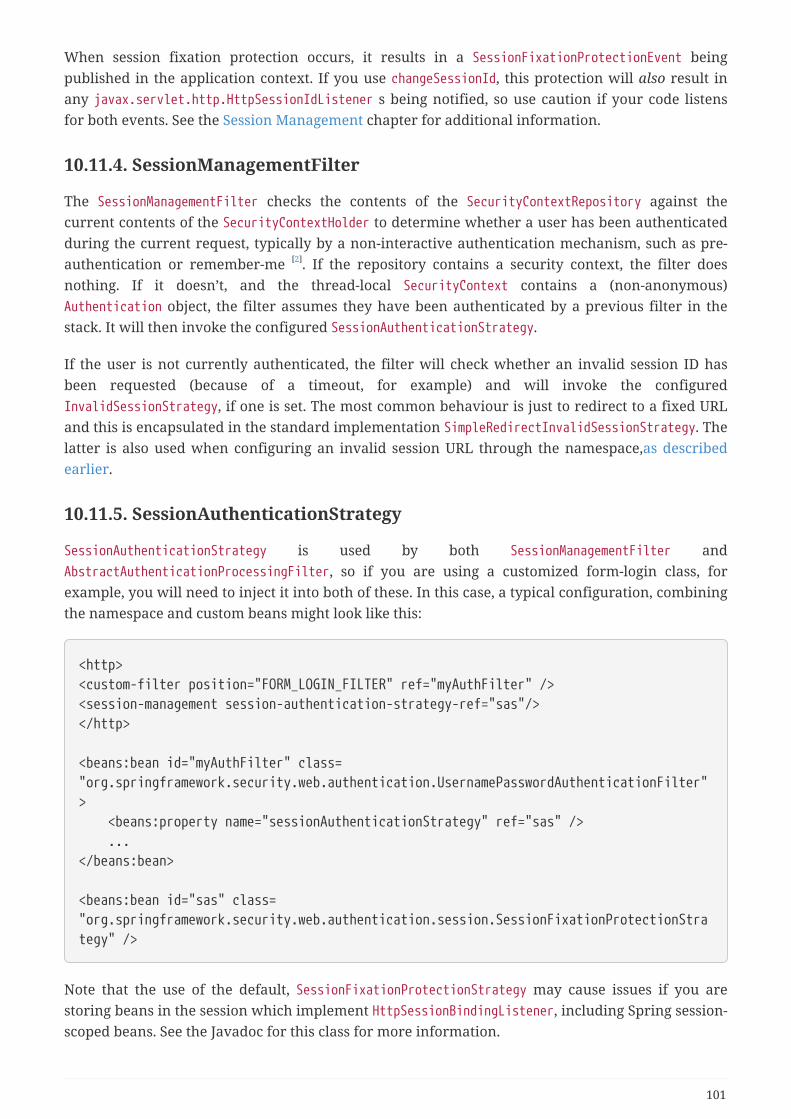
When session fixation protection occurs, it results in a SessionFixationProtectionEvent beingpublished in the application context. If you use changeSessionId, this protection will also result inany javax.servlet.http.HttpSessionIdListener s being notified, so use caution if your code listensfor both events. See the Session Management chapter for additional information.
10.11.4. SessionManagementFilter
The SessionManagementFilter checks the contents of the SecurityContextRepository against thecurrent contents of the SecurityContextHolder to determine whether a user has been authenticatedduring the current request, typically by a non-interactive authentication mechanism, such as pre-authentication or remember-me [2]. If the repository contains a security context, the filter doesnothing. If it doesn’t, and the thread-local SecurityContext contains a (non-anonymous)Authentication object, the filter assumes they have been authenticated by a previous filter in thestack. It will then invoke the configured SessionAuthenticationStrategy.
If the user is not currently authenticated, the filter will check whether an invalid session ID hasbeen requested (because of a timeout, for example) and will invoke the configuredInvalidSessionStrategy, if one is set. The most common behaviour is just to redirect to a fixed URLand this is encapsulated in the standard implementation SimpleRedirectInvalidSessionStrategy. Thelatter is also used when configuring an invalid session URL through the namespace,as describedearlier.
10.11.5. SessionAuthenticationStrategy
SessionAuthenticationStrategy is used by both SessionManagementFilter andAbstractAuthenticationProcessingFilter, so if you are using a customized form-login class, forexample, you will need to inject it into both of these. In this case, a typical configuration, combiningthe namespace and custom beans might look like this:
<http><custom-filter position="FORM_LOGIN_FILTER" ref="myAuthFilter" /><session-management session-authentication-strategy-ref="sas"/></http>
<beans:bean id="myAuthFilter" class="org.springframework.security.web.authentication.UsernamePasswordAuthenticationFilter"> <beans:property name="sessionAuthenticationStrategy" ref="sas" /> ...</beans:bean>
<beans:bean id="sas" class="org.springframework.security.web.authentication.session.SessionFixationProtectionStrategy" />
Note that the use of the default, SessionFixationProtectionStrategy may cause issues if you arestoring beans in the session which implement HttpSessionBindingListener, including Spring session-scoped beans. See the Javadoc for this class for more information.
101
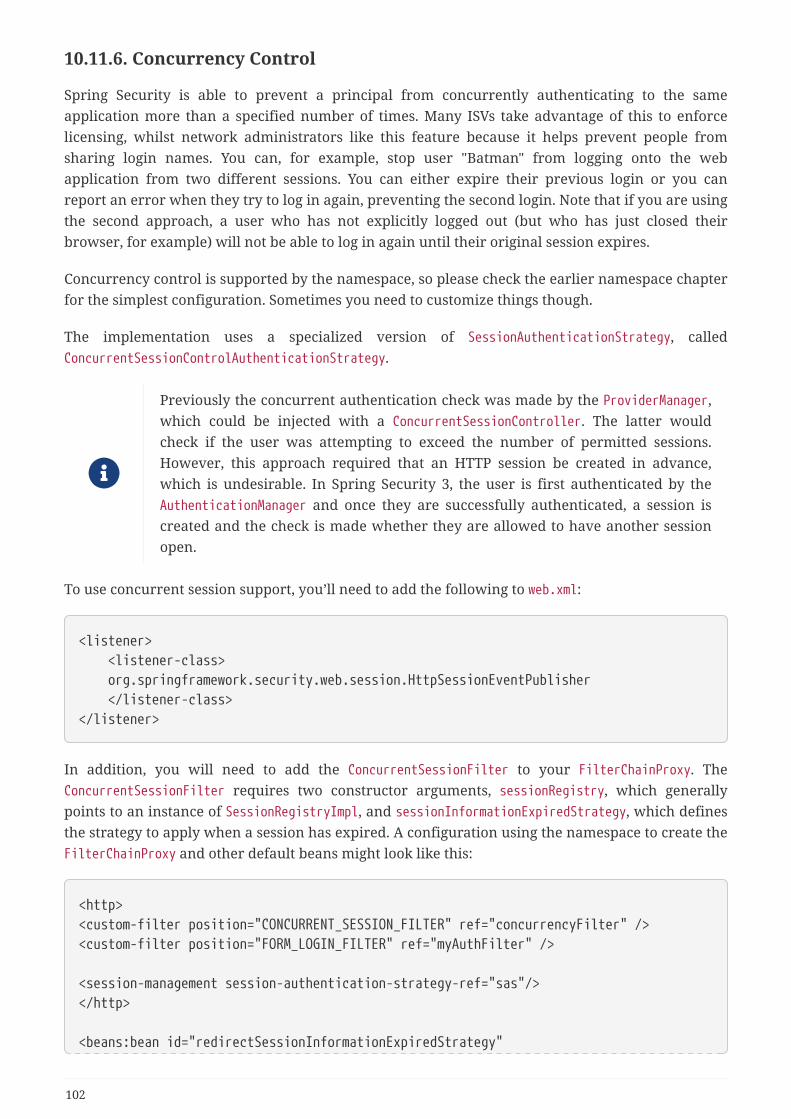
10.11.6. Concurrency Control
Spring Security is able to prevent a principal from concurrently authenticating to the sameapplication more than a specified number of times. Many ISVs take advantage of this to enforcelicensing, whilst network administrators like this feature because it helps prevent people fromsharing login names. You can, for example, stop user "Batman" from logging onto the webapplication from two different sessions. You can either expire their previous login or you canreport an error when they try to log in again, preventing the second login. Note that if you are usingthe second approach, a user who has not explicitly logged out (but who has just closed theirbrowser, for example) will not be able to log in again until their original session expires.
Concurrency control is supported by the namespace, so please check the earlier namespace chapterfor the simplest configuration. Sometimes you need to customize things though.
The implementation uses a specialized version of SessionAuthenticationStrategy, calledConcurrentSessionControlAuthenticationStrategy.
Previously the concurrent authentication check was made by the ProviderManager,which could be injected with a ConcurrentSessionController. The latter wouldcheck if the user was attempting to exceed the number of permitted sessions.However, this approach required that an HTTP session be created in advance,which is undesirable. In Spring Security 3, the user is first authenticated by theAuthenticationManager and once they are successfully authenticated, a session iscreated and the check is made whether they are allowed to have another sessionopen.
To use concurrent session support, you’ll need to add the following to web.xml:
<listener> <listener-class> org.springframework.security.web.session.HttpSessionEventPublisher </listener-class></listener>
In addition, you will need to add the ConcurrentSessionFilter to your FilterChainProxy. TheConcurrentSessionFilter requires two constructor arguments, sessionRegistry, which generallypoints to an instance of SessionRegistryImpl, and sessionInformationExpiredStrategy, which definesthe strategy to apply when a session has expired. A configuration using the namespace to create theFilterChainProxy and other default beans might look like this:
<http><custom-filter position="CONCURRENT_SESSION_FILTER" ref="concurrencyFilter" /><custom-filter position="FORM_LOGIN_FILTER" ref="myAuthFilter" />
<session-management session-authentication-strategy-ref="sas"/></http>
<beans:bean id="redirectSessionInformationExpiredStrategy"
102
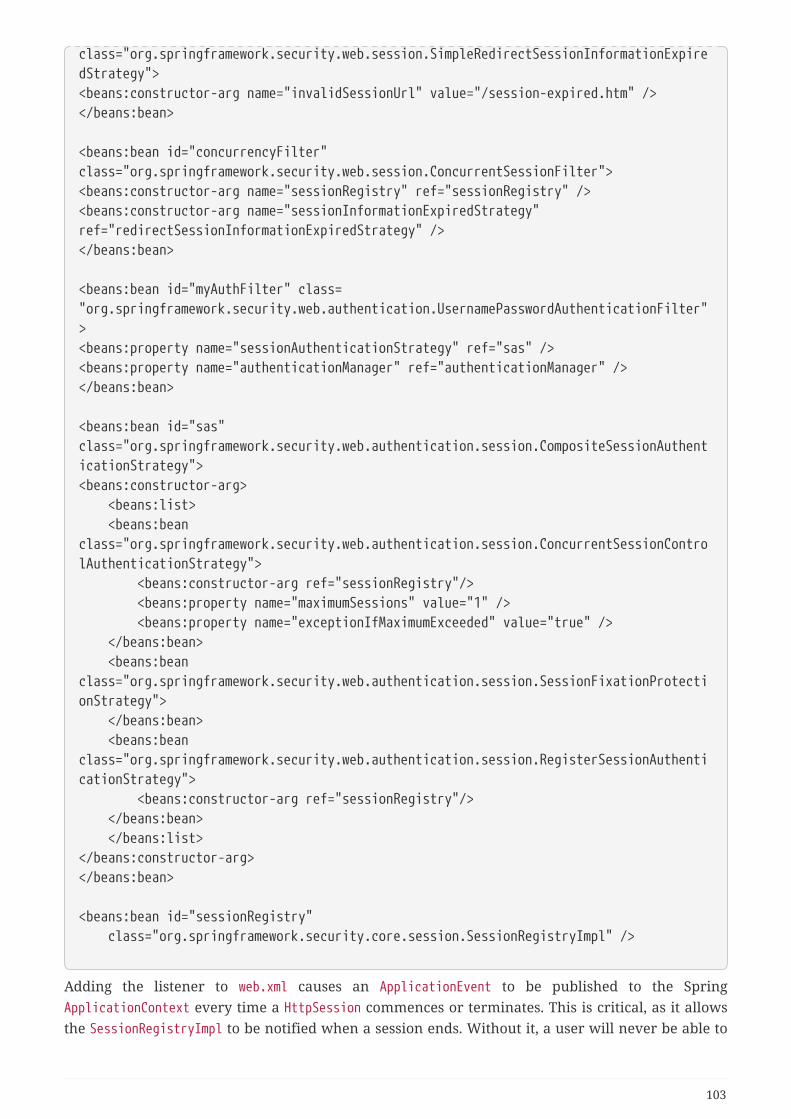
class="org.springframework.security.web.session.SimpleRedirectSessionInformationExpiredStrategy"><beans:constructor-arg name="invalidSessionUrl" value="/session-expired.htm" /></beans:bean>
<beans:bean id="concurrencyFilter"class="org.springframework.security.web.session.ConcurrentSessionFilter"><beans:constructor-arg name="sessionRegistry" ref="sessionRegistry" /><beans:constructor-arg name="sessionInformationExpiredStrategy"ref="redirectSessionInformationExpiredStrategy" /></beans:bean>
<beans:bean id="myAuthFilter" class="org.springframework.security.web.authentication.UsernamePasswordAuthenticationFilter"><beans:property name="sessionAuthenticationStrategy" ref="sas" /><beans:property name="authenticationManager" ref="authenticationManager" /></beans:bean>
<beans:bean id="sas"class="org.springframework.security.web.authentication.session.CompositeSessionAuthenticationStrategy"><beans:constructor-arg> <beans:list> <beans:beanclass="org.springframework.security.web.authentication.session.ConcurrentSessionControlAuthenticationStrategy"> <beans:constructor-arg ref="sessionRegistry"/> <beans:property name="maximumSessions" value="1" /> <beans:property name="exceptionIfMaximumExceeded" value="true" /> </beans:bean> <beans:beanclass="org.springframework.security.web.authentication.session.SessionFixationProtectionStrategy"> </beans:bean> <beans:beanclass="org.springframework.security.web.authentication.session.RegisterSessionAuthenticationStrategy"> <beans:constructor-arg ref="sessionRegistry"/> </beans:bean> </beans:list></beans:constructor-arg></beans:bean>
<beans:bean id="sessionRegistry" class="org.springframework.security.core.session.SessionRegistryImpl" />
Adding the listener to web.xml causes an ApplicationEvent to be published to the SpringApplicationContext every time a HttpSession commences or terminates. This is critical, as it allowsthe SessionRegistryImpl to be notified when a session ends. Without it, a user will never be able to
103
log back in again once they have exceeded their session allowance, even if they log out of anothersession or it times out.
Querying the SessionRegistry for currently authenticated users and their sessions
Setting up concurrency-control, either through the namespace or using plain beans has the usefulside effect of providing you with a reference to the SessionRegistry which you can use directlywithin your application, so even if you don’t want to restrict the number of sessions a user mayhave, it may be worth setting up the infrastructure anyway. You can set the maximumSession propertyto -1 to allow unlimited sessions. If you’re using the namespace, you can set an alias for theinternally-created SessionRegistry using the session-registry-alias attribute, providing areference which you can inject into your own beans.
The getAllPrincipals() method supplies you with a list of the currently authenticated users. Youcan list a user’s sessions by calling the getAllSessions(Object principal, booleanincludeExpiredSessions) method, which returns a list of SessionInformation objects. You can alsoexpire a user’s session by calling expireNow() on a SessionInformation instance. When the userreturns to the application, they will be prevented from proceeding. You may find these methodsuseful in an administration application, for example. Have a look at the Javadoc for moreinformation.
10.12. Remember-Me Authentication
10.12.1. Overview
Remember-me or persistent-login authentication refers to web sites being able to remember theidentity of a principal between sessions. This is typically accomplished by sending a cookie to thebrowser, with the cookie being detected during future sessions and causing automated login to takeplace. Spring Security provides the necessary hooks for these operations to take place, and has twoconcrete remember-me implementations. One uses hashing to preserve the security of cookie-basedtokens and the other uses a database or other persistent storage mechanism to store the generatedtokens.
Note that both implementations require a UserDetailsService. If you are using an authenticationprovider which doesn’t use a UserDetailsService (for example, the LDAP provider) then it won’twork unless you also have a UserDetailsService bean in your application context.
10.12.2. Simple Hash-Based Token Approach
This approach uses hashing to achieve a useful remember-me strategy. In essence a cookie is sent tothe browser upon successful interactive authentication, with the cookie being composed as follows:
104
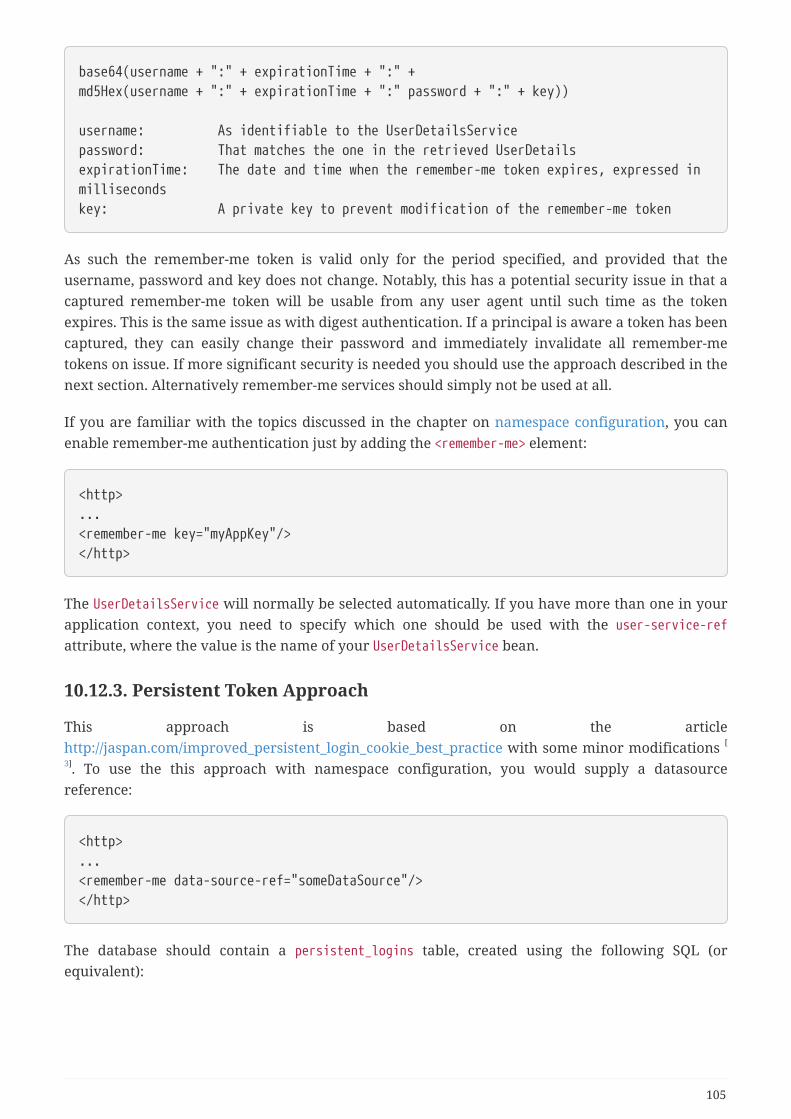
base64(username + ":" + expirationTime + ":" +md5Hex(username + ":" + expirationTime + ":" password + ":" + key))
username: As identifiable to the UserDetailsServicepassword: That matches the one in the retrieved UserDetailsexpirationTime: The date and time when the remember-me token expires, expressed inmillisecondskey: A private key to prevent modification of the remember-me token
As such the remember-me token is valid only for the period specified, and provided that theusername, password and key does not change. Notably, this has a potential security issue in that acaptured remember-me token will be usable from any user agent until such time as the tokenexpires. This is the same issue as with digest authentication. If a principal is aware a token has beencaptured, they can easily change their password and immediately invalidate all remember-metokens on issue. If more significant security is needed you should use the approach described in thenext section. Alternatively remember-me services should simply not be used at all.
If you are familiar with the topics discussed in the chapter on namespace configuration, you canenable remember-me authentication just by adding the <remember-me> element:
<http>...<remember-me key="myAppKey"/></http>
The UserDetailsService will normally be selected automatically. If you have more than one in yourapplication context, you need to specify which one should be used with the user-service-refattribute, where the value is the name of your UserDetailsService bean.
10.12.3. Persistent Token Approach
This approach is based on the articlehttp://jaspan.com/improved_persistent_login_cookie_best_practice with some minor modifications [
3]. To use the this approach with namespace configuration, you would supply a datasourcereference:
<http>...<remember-me data-source-ref="someDataSource"/></http>
The database should contain a persistent_logins table, created using the following SQL (orequivalent):
105
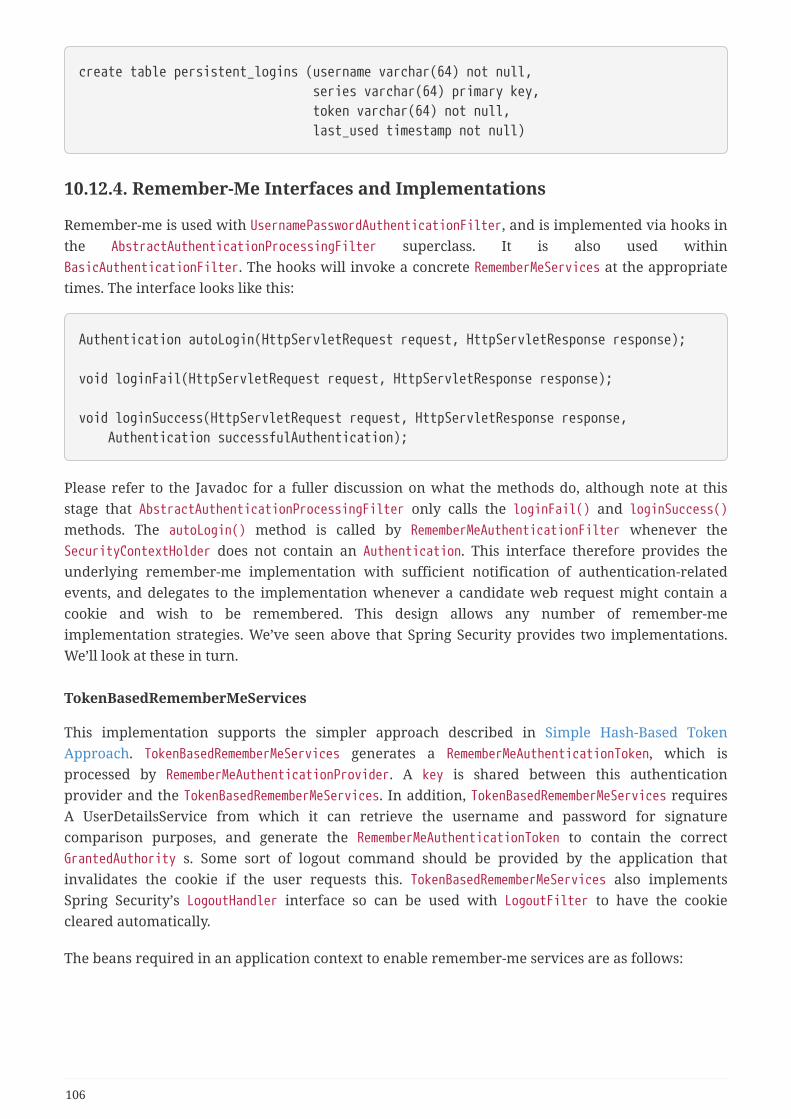
create table persistent_logins (username varchar(64) not null, series varchar(64) primary key, token varchar(64) not null, last_used timestamp not null)
10.12.4. Remember-Me Interfaces and Implementations
Remember-me is used with UsernamePasswordAuthenticationFilter, and is implemented via hooks inthe AbstractAuthenticationProcessingFilter superclass. It is also used withinBasicAuthenticationFilter. The hooks will invoke a concrete RememberMeServices at the appropriatetimes. The interface looks like this:
Authentication autoLogin(HttpServletRequest request, HttpServletResponse response);
void loginFail(HttpServletRequest request, HttpServletResponse response);
void loginSuccess(HttpServletRequest request, HttpServletResponse response, Authentication successfulAuthentication);
Please refer to the Javadoc for a fuller discussion on what the methods do, although note at thisstage that AbstractAuthenticationProcessingFilter only calls the loginFail() and loginSuccess()methods. The autoLogin() method is called by RememberMeAuthenticationFilter whenever theSecurityContextHolder does not contain an Authentication. This interface therefore provides theunderlying remember-me implementation with sufficient notification of authentication-relatedevents, and delegates to the implementation whenever a candidate web request might contain acookie and wish to be remembered. This design allows any number of remember-meimplementation strategies. We’ve seen above that Spring Security provides two implementations.We’ll look at these in turn.
TokenBasedRememberMeServices
This implementation supports the simpler approach described in Simple Hash-Based TokenApproach. TokenBasedRememberMeServices generates a RememberMeAuthenticationToken, which isprocessed by RememberMeAuthenticationProvider. A key is shared between this authenticationprovider and the TokenBasedRememberMeServices. In addition, TokenBasedRememberMeServices requiresA UserDetailsService from which it can retrieve the username and password for signaturecomparison purposes, and generate the RememberMeAuthenticationToken to contain the correctGrantedAuthority s. Some sort of logout command should be provided by the application thatinvalidates the cookie if the user requests this. TokenBasedRememberMeServices also implementsSpring Security’s LogoutHandler interface so can be used with LogoutFilter to have the cookiecleared automatically.
The beans required in an application context to enable remember-me services are as follows:
106
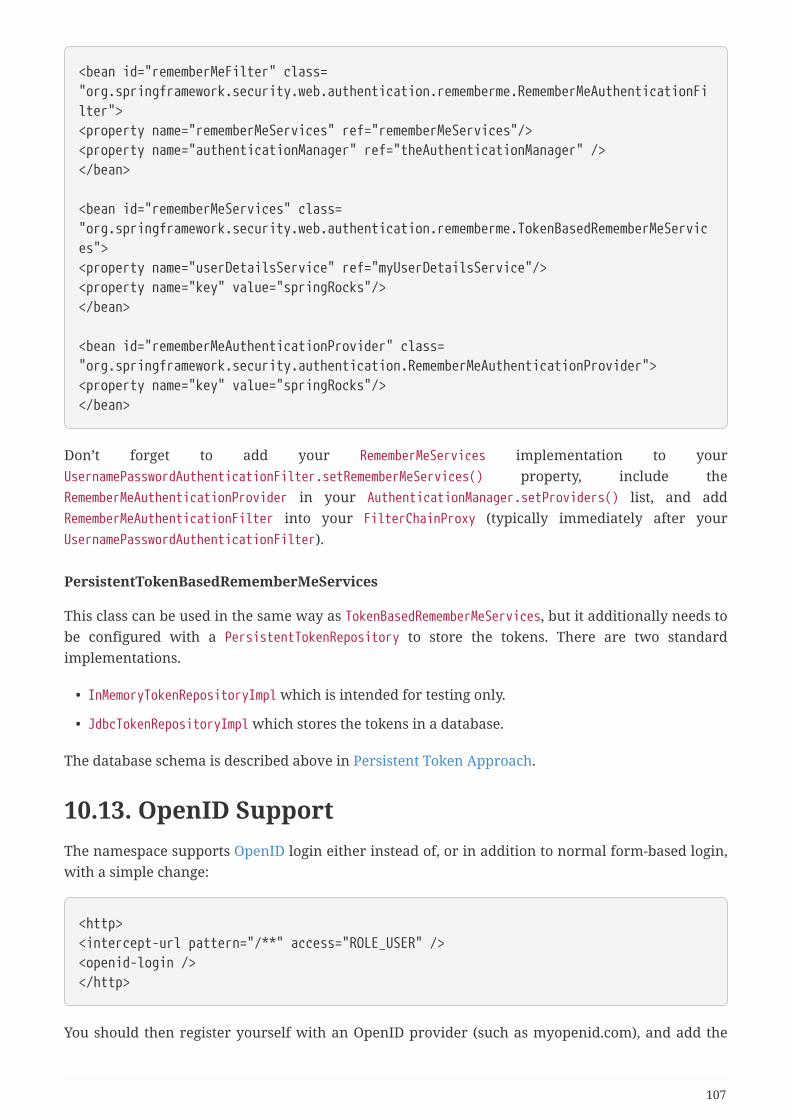
<bean id="rememberMeFilter" class="org.springframework.security.web.authentication.rememberme.RememberMeAuthenticationFilter"><property name="rememberMeServices" ref="rememberMeServices"/><property name="authenticationManager" ref="theAuthenticationManager" /></bean>
<bean id="rememberMeServices" class="org.springframework.security.web.authentication.rememberme.TokenBasedRememberMeServices"><property name="userDetailsService" ref="myUserDetailsService"/><property name="key" value="springRocks"/></bean>
<bean id="rememberMeAuthenticationProvider" class="org.springframework.security.authentication.RememberMeAuthenticationProvider"><property name="key" value="springRocks"/></bean>
Don’t forget to add your RememberMeServices implementation to yourUsernamePasswordAuthenticationFilter.setRememberMeServices() property, include theRememberMeAuthenticationProvider in your AuthenticationManager.setProviders() list, and addRememberMeAuthenticationFilter into your FilterChainProxy (typically immediately after yourUsernamePasswordAuthenticationFilter).
PersistentTokenBasedRememberMeServices
This class can be used in the same way as TokenBasedRememberMeServices, but it additionally needs tobe configured with a PersistentTokenRepository to store the tokens. There are two standardimplementations.
• InMemoryTokenRepositoryImpl which is intended for testing only.
• JdbcTokenRepositoryImpl which stores the tokens in a database.
The database schema is described above in Persistent Token Approach.
10.13. OpenID SupportThe namespace supports OpenID login either instead of, or in addition to normal form-based login,with a simple change:
<http><intercept-url pattern="/**" access="ROLE_USER" /><openid-login /></http>
You should then register yourself with an OpenID provider (such as myopenid.com), and add the
107
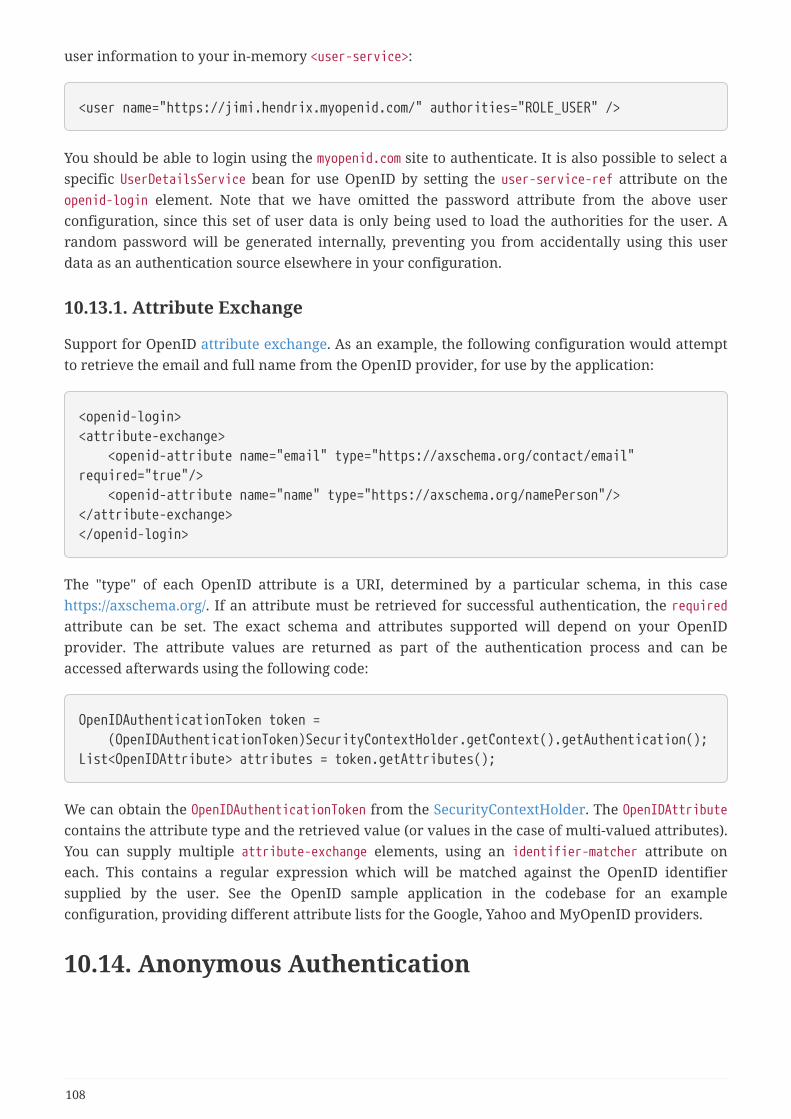
user information to your in-memory <user-service>:
<user name="https://jimi.hendrix.myopenid.com/" authorities="ROLE_USER" />
You should be able to login using the myopenid.com site to authenticate. It is also possible to select aspecific UserDetailsService bean for use OpenID by setting the user-service-ref attribute on theopenid-login element. Note that we have omitted the password attribute from the above userconfiguration, since this set of user data is only being used to load the authorities for the user. Arandom password will be generated internally, preventing you from accidentally using this userdata as an authentication source elsewhere in your configuration.
10.13.1. Attribute Exchange
Support for OpenID attribute exchange. As an example, the following configuration would attemptto retrieve the email and full name from the OpenID provider, for use by the application:
<openid-login><attribute-exchange> <openid-attribute name="email" type="https://axschema.org/contact/email"required="true"/> <openid-attribute name="name" type="https://axschema.org/namePerson"/></attribute-exchange></openid-login>
The "type" of each OpenID attribute is a URI, determined by a particular schema, in this casehttps://axschema.org/. If an attribute must be retrieved for successful authentication, the requiredattribute can be set. The exact schema and attributes supported will depend on your OpenIDprovider. The attribute values are returned as part of the authentication process and can beaccessed afterwards using the following code:
OpenIDAuthenticationToken token = (OpenIDAuthenticationToken)SecurityContextHolder.getContext().getAuthentication();List<OpenIDAttribute> attributes = token.getAttributes();
We can obtain the OpenIDAuthenticationToken from the SecurityContextHolder. The OpenIDAttributecontains the attribute type and the retrieved value (or values in the case of multi-valued attributes).You can supply multiple attribute-exchange elements, using an identifier-matcher attribute oneach. This contains a regular expression which will be matched against the OpenID identifiersupplied by the user. See the OpenID sample application in the codebase for an exampleconfiguration, providing different attribute lists for the Google, Yahoo and MyOpenID providers.
10.14. Anonymous Authentication
108
10.14.1. Overview
It’s generally considered good security practice to adopt a "deny-by-default" where you explicitlyspecify what is allowed and disallow everything else. Defining what is accessible tounauthenticated users is a similar situation, particularly for web applications. Many sites requirethat users must be authenticated for anything other than a few URLs (for example the home andlogin pages). In this case it is easiest to define access configuration attributes for these specific URLsrather than have for every secured resource. Put differently, sometimes it is nice to sayROLE_SOMETHING is required by default and only allow certain exceptions to this rule, such as forlogin, logout and home pages of an application. You could also omit these pages from the filterchain entirely, thus bypassing the access control checks, but this may be undesirable for otherreasons, particularly if the pages behave differently for authenticated users.
This is what we mean by anonymous authentication. Note that there is no real conceptualdifference between a user who is "anonymously authenticated" and an unauthenticated user.Spring Security’s anonymous authentication just gives you a more convenient way to configureyour access-control attributes. Calls to servlet API calls such as getCallerPrincipal, for example, willstill return null even though there is actually an anonymous authentication object in theSecurityContextHolder.
There are other situations where anonymous authentication is useful, such as when an auditinginterceptor queries the SecurityContextHolder to identify which principal was responsible for agiven operation. Classes can be authored more robustly if they know the SecurityContextHolderalways contains an Authentication object, and never null.
10.14.2. Configuration
Anonymous authentication support is provided automatically when using the HTTP configurationSpring Security 3.0 and can be customized (or disabled) using the <anonymous> element. You don’tneed to configure the beans described here unless you are using traditional bean configuration.
Three classes that together provide the anonymous authentication feature.AnonymousAuthenticationToken is an implementation of Authentication, and stores theGrantedAuthority s which apply to the anonymous principal. There is a correspondingAnonymousAuthenticationProvider, which is chained into the ProviderManager so thatAnonymousAuthenticationToken s are accepted. Finally, there is an AnonymousAuthenticationFilter,which is chained after the normal authentication mechanisms and automatically adds anAnonymousAuthenticationToken to the SecurityContextHolder if there is no existing Authenticationheld there. The definition of the filter and authentication provider appears as follows:
109
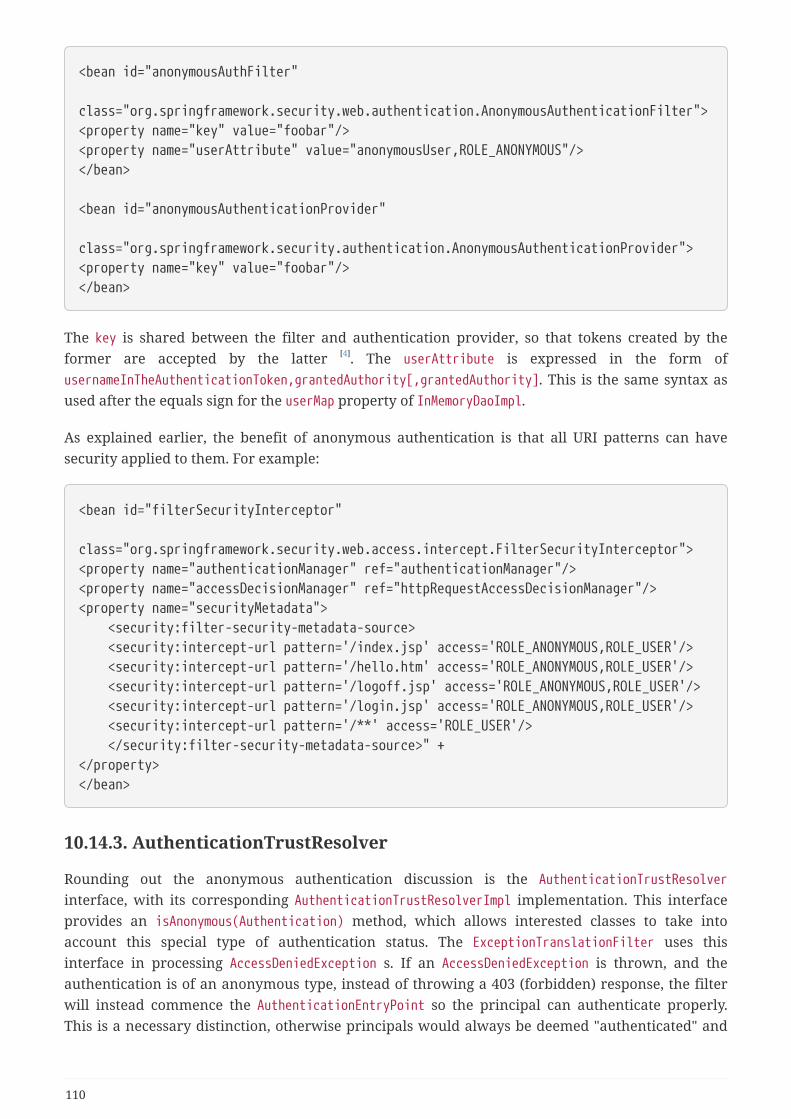
<bean id="anonymousAuthFilter" class="org.springframework.security.web.authentication.AnonymousAuthenticationFilter"><property name="key" value="foobar"/><property name="userAttribute" value="anonymousUser,ROLE_ANONYMOUS"/></bean>
<bean id="anonymousAuthenticationProvider" class="org.springframework.security.authentication.AnonymousAuthenticationProvider"><property name="key" value="foobar"/></bean>
The key is shared between the filter and authentication provider, so that tokens created by theformer are accepted by the latter [4]. The userAttribute is expressed in the form ofusernameInTheAuthenticationToken,grantedAuthority[,grantedAuthority]. This is the same syntax asused after the equals sign for the userMap property of InMemoryDaoImpl.
As explained earlier, the benefit of anonymous authentication is that all URI patterns can havesecurity applied to them. For example:
<bean id="filterSecurityInterceptor" class="org.springframework.security.web.access.intercept.FilterSecurityInterceptor"><property name="authenticationManager" ref="authenticationManager"/><property name="accessDecisionManager" ref="httpRequestAccessDecisionManager"/><property name="securityMetadata"> <security:filter-security-metadata-source> <security:intercept-url pattern='/index.jsp' access='ROLE_ANONYMOUS,ROLE_USER'/> <security:intercept-url pattern='/hello.htm' access='ROLE_ANONYMOUS,ROLE_USER'/> <security:intercept-url pattern='/logoff.jsp' access='ROLE_ANONYMOUS,ROLE_USER'/> <security:intercept-url pattern='/login.jsp' access='ROLE_ANONYMOUS,ROLE_USER'/> <security:intercept-url pattern='/**' access='ROLE_USER'/> </security:filter-security-metadata-source>" +</property></bean>
10.14.3. AuthenticationTrustResolver
Rounding out the anonymous authentication discussion is the AuthenticationTrustResolverinterface, with its corresponding AuthenticationTrustResolverImpl implementation. This interfaceprovides an isAnonymous(Authentication) method, which allows interested classes to take intoaccount this special type of authentication status. The ExceptionTranslationFilter uses thisinterface in processing AccessDeniedException s. If an AccessDeniedException is thrown, and theauthentication is of an anonymous type, instead of throwing a 403 (forbidden) response, the filterwill instead commence the AuthenticationEntryPoint so the principal can authenticate properly.This is a necessary distinction, otherwise principals would always be deemed "authenticated" and
110

never be given an opportunity to login via form, basic, digest or some other normal authenticationmechanism.
You will often see the ROLE_ANONYMOUS attribute in the above interceptor configuration replaced withIS_AUTHENTICATED_ANONYMOUSLY, which is effectively the same thing when defining access controls.This is an example of the use of the AuthenticatedVoter which we will see in the authorizationchapter. It uses an AuthenticationTrustResolver to process this particular configuration attributeand grant access to anonymous users. The AuthenticatedVoter approach is more powerful, since itallows you to differentiate between anonymous, remember-me and fully-authenticated users. Ifyou don’t need this functionality though, then you can stick with ROLE_ANONYMOUS, which will beprocessed by Spring Security’s standard RoleVoter.
10.14.4. Getting Anonymous Authentications with Spring MVC
Spring MViC resolves parameters of type Principal using its own argument resolver.
This means that a construct like this one:
@GetMapping("/")public String method(Authentication authentication) { if (authentication instanceof AnonymousAuthenticationToken) { return "anonymous"; } else { return "not anonymous"; }}
will always return "not anonymous", even for anonymous requests. The reason is that Spring MVCresolves the parameter using HttpServletRequest#getPrincipal, which is null when the request isanonymous.
If you’d like to obtain the Authentication in anonymous requests, use @CurrentSecurityContextinstead:
111
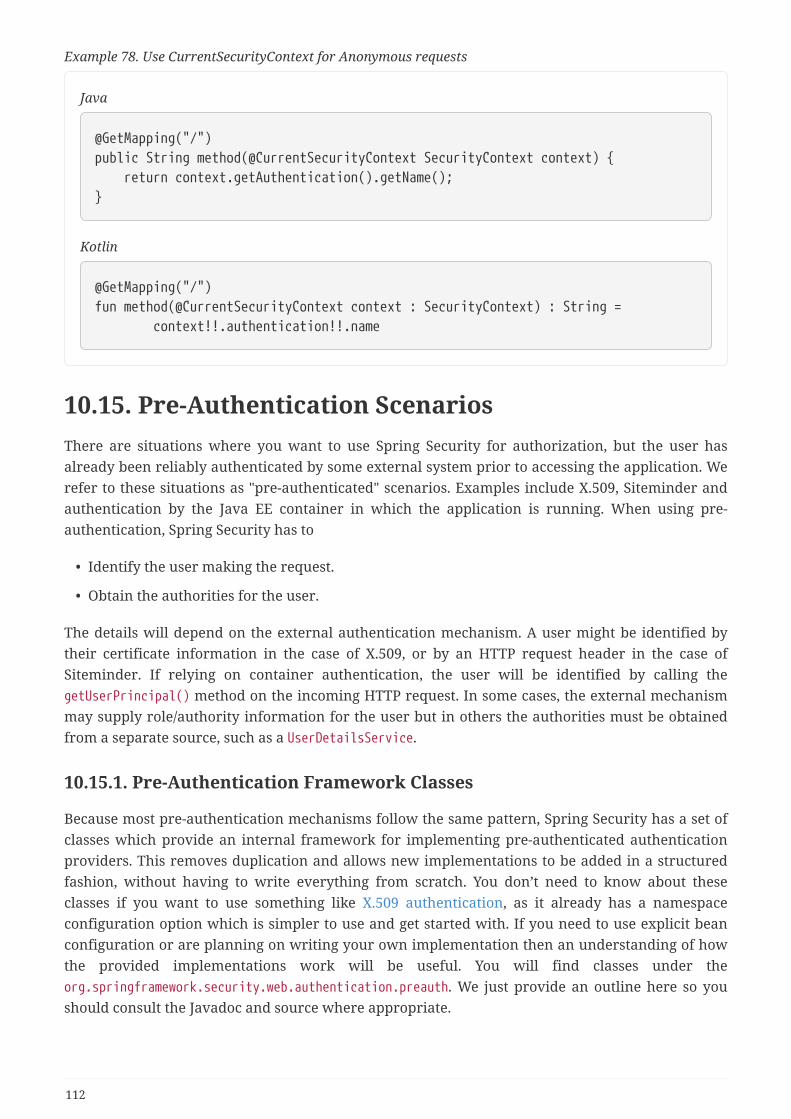
Example 78. Use CurrentSecurityContext for Anonymous requests
Java
@GetMapping("/")public String method(@CurrentSecurityContext SecurityContext context) { return context.getAuthentication().getName();}
Kotlin
@GetMapping("/")fun method(@CurrentSecurityContext context : SecurityContext) : String = context!!.authentication!!.name
10.15. Pre-Authentication ScenariosThere are situations where you want to use Spring Security for authorization, but the user hasalready been reliably authenticated by some external system prior to accessing the application. Werefer to these situations as "pre-authenticated" scenarios. Examples include X.509, Siteminder andauthentication by the Java EE container in which the application is running. When using pre-authentication, Spring Security has to
• Identify the user making the request.
• Obtain the authorities for the user.
The details will depend on the external authentication mechanism. A user might be identified bytheir certificate information in the case of X.509, or by an HTTP request header in the case ofSiteminder. If relying on container authentication, the user will be identified by calling thegetUserPrincipal() method on the incoming HTTP request. In some cases, the external mechanismmay supply role/authority information for the user but in others the authorities must be obtainedfrom a separate source, such as a UserDetailsService.
10.15.1. Pre-Authentication Framework Classes
Because most pre-authentication mechanisms follow the same pattern, Spring Security has a set ofclasses which provide an internal framework for implementing pre-authenticated authenticationproviders. This removes duplication and allows new implementations to be added in a structuredfashion, without having to write everything from scratch. You don’t need to know about theseclasses if you want to use something like X.509 authentication, as it already has a namespaceconfiguration option which is simpler to use and get started with. If you need to use explicit beanconfiguration or are planning on writing your own implementation then an understanding of howthe provided implementations work will be useful. You will find classes under theorg.springframework.security.web.authentication.preauth. We just provide an outline here so youshould consult the Javadoc and source where appropriate.
112
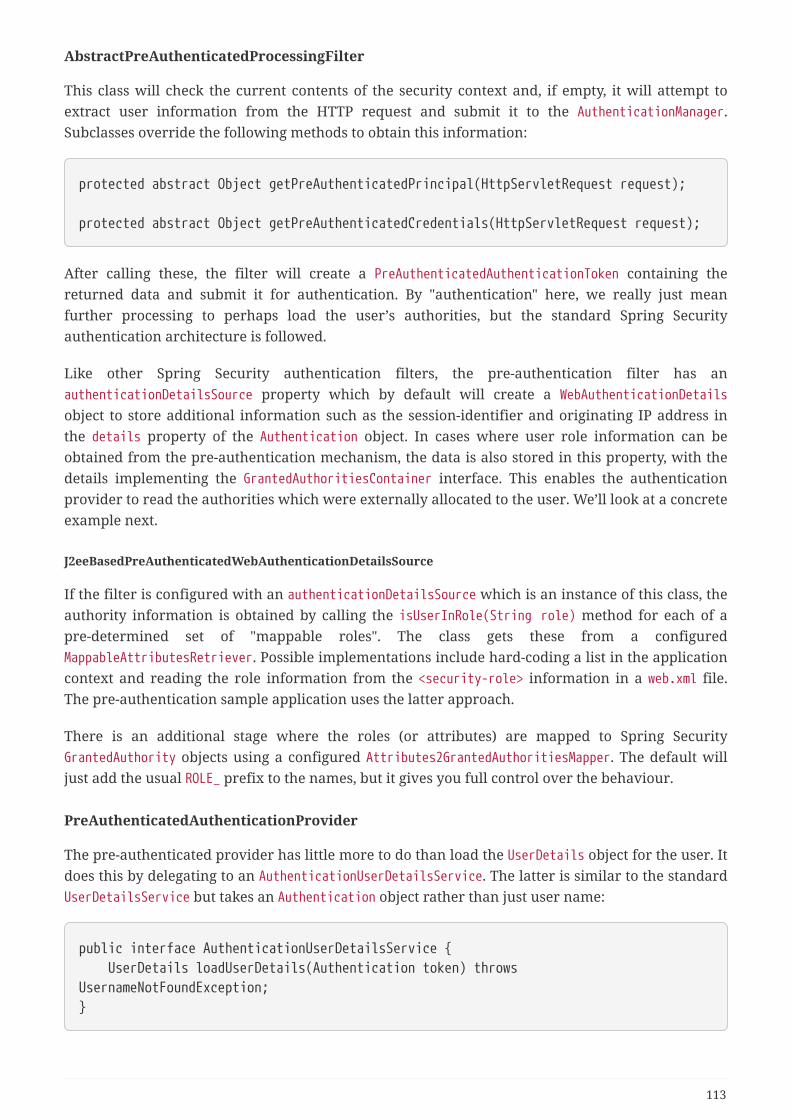
AbstractPreAuthenticatedProcessingFilter
This class will check the current contents of the security context and, if empty, it will attempt toextract user information from the HTTP request and submit it to the AuthenticationManager.Subclasses override the following methods to obtain this information:
protected abstract Object getPreAuthenticatedPrincipal(HttpServletRequest request);
protected abstract Object getPreAuthenticatedCredentials(HttpServletRequest request);
After calling these, the filter will create a PreAuthenticatedAuthenticationToken containing thereturned data and submit it for authentication. By "authentication" here, we really just meanfurther processing to perhaps load the user’s authorities, but the standard Spring Securityauthentication architecture is followed.
Like other Spring Security authentication filters, the pre-authentication filter has anauthenticationDetailsSource property which by default will create a WebAuthenticationDetailsobject to store additional information such as the session-identifier and originating IP address inthe details property of the Authentication object. In cases where user role information can beobtained from the pre-authentication mechanism, the data is also stored in this property, with thedetails implementing the GrantedAuthoritiesContainer interface. This enables the authenticationprovider to read the authorities which were externally allocated to the user. We’ll look at a concreteexample next.
J2eeBasedPreAuthenticatedWebAuthenticationDetailsSource
If the filter is configured with an authenticationDetailsSource which is an instance of this class, theauthority information is obtained by calling the isUserInRole(String role) method for each of apre-determined set of "mappable roles". The class gets these from a configuredMappableAttributesRetriever. Possible implementations include hard-coding a list in the applicationcontext and reading the role information from the <security-role> information in a web.xml file.The pre-authentication sample application uses the latter approach.
There is an additional stage where the roles (or attributes) are mapped to Spring SecurityGrantedAuthority objects using a configured Attributes2GrantedAuthoritiesMapper. The default willjust add the usual ROLE_ prefix to the names, but it gives you full control over the behaviour.
PreAuthenticatedAuthenticationProvider
The pre-authenticated provider has little more to do than load the UserDetails object for the user. Itdoes this by delegating to an AuthenticationUserDetailsService. The latter is similar to the standardUserDetailsService but takes an Authentication object rather than just user name:
public interface AuthenticationUserDetailsService { UserDetails loadUserDetails(Authentication token) throwsUsernameNotFoundException;}
113
This interface may have also other uses but with pre-authentication it allows access to theauthorities which were packaged in the Authentication object, as we saw in the previous section.The PreAuthenticatedGrantedAuthoritiesUserDetailsService class does this. Alternatively, it maydelegate to a standard UserDetailsService via the UserDetailsByNameServiceWrapper implementation.
Http403ForbiddenEntryPoint
The AuthenticationEntryPoint is responsible for kick-starting the authentication process for anunauthenticated user (when they try to access a protected resource), but in the pre-authenticatedcase this doesn’t apply. You would only configure the ExceptionTranslationFilter with an instanceof this class if you aren’t using pre-authentication in combination with other authenticationmechanisms. It will be called if the user is rejected by the AbstractPreAuthenticatedProcessingFilterresulting in a null authentication. It always returns a 403-forbidden response code if called.
10.15.2. Concrete Implementations
X.509 authentication is covered in its own chapter. Here we’ll look at some classes which providesupport for other pre-authenticated scenarios.
Request-Header Authentication (Siteminder)
An external authentication system may supply information to the application by setting specificheaders on the HTTP request. A well-known example of this is Siteminder, which passes theusername in a header called SM_USER. This mechanism is supported by the classRequestHeaderAuthenticationFilter which simply extracts the username from the header. It defaultsto using the name SM_USER as the header name. See the Javadoc for more details.
Note that when using a system like this, the framework performs noauthentication checks at all and it is extremely important that the external systemis configured properly and protects all access to the application. If an attacker isable to forge the headers in their original request without this being detected thenthey could potentially choose any username they wished.
Siteminder Example Configuration
A typical configuration using this filter would look like this:
114
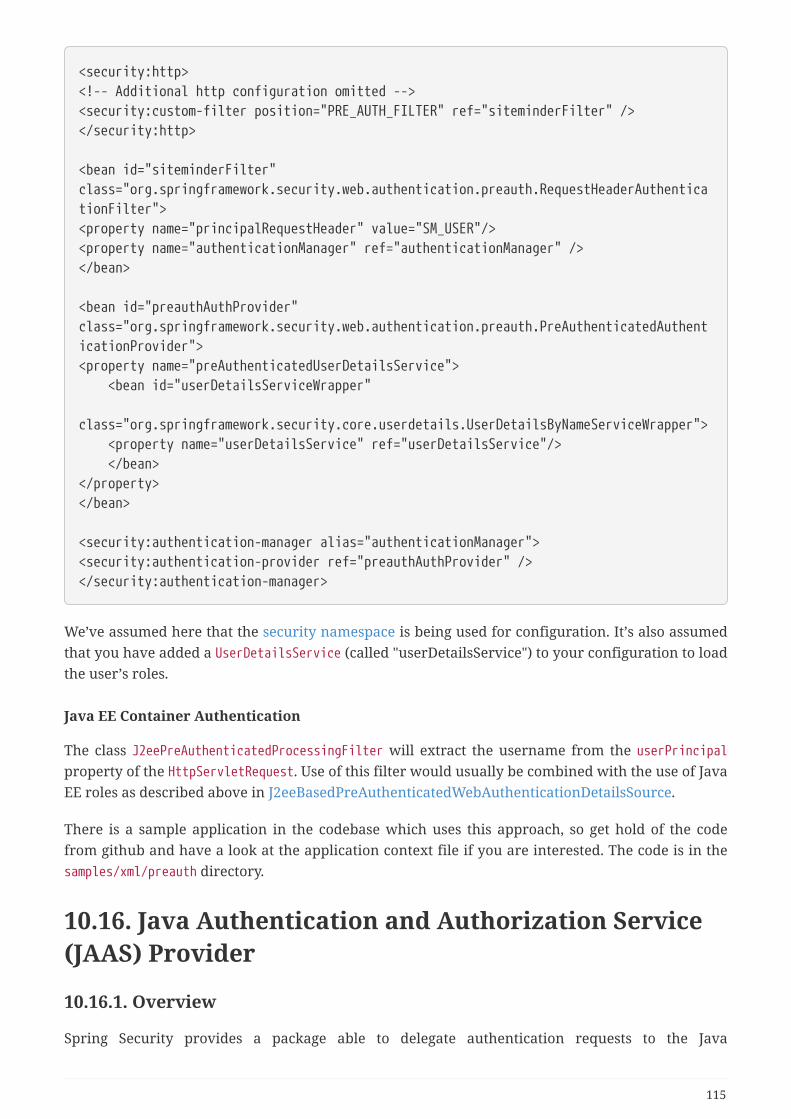
<security:http><!-- Additional http configuration omitted --><security:custom-filter position="PRE_AUTH_FILTER" ref="siteminderFilter" /></security:http>
<bean id="siteminderFilter"class="org.springframework.security.web.authentication.preauth.RequestHeaderAuthenticationFilter"><property name="principalRequestHeader" value="SM_USER"/><property name="authenticationManager" ref="authenticationManager" /></bean>
<bean id="preauthAuthProvider"class="org.springframework.security.web.authentication.preauth.PreAuthenticatedAuthenticationProvider"><property name="preAuthenticatedUserDetailsService"> <bean id="userDetailsServiceWrapper" class="org.springframework.security.core.userdetails.UserDetailsByNameServiceWrapper"> <property name="userDetailsService" ref="userDetailsService"/> </bean></property></bean>
<security:authentication-manager alias="authenticationManager"><security:authentication-provider ref="preauthAuthProvider" /></security:authentication-manager>
We’ve assumed here that the security namespace is being used for configuration. It’s also assumedthat you have added a UserDetailsService (called "userDetailsService") to your configuration to loadthe user’s roles.
Java EE Container Authentication
The class J2eePreAuthenticatedProcessingFilter will extract the username from the userPrincipalproperty of the HttpServletRequest. Use of this filter would usually be combined with the use of JavaEE roles as described above in J2eeBasedPreAuthenticatedWebAuthenticationDetailsSource.
There is a sample application in the codebase which uses this approach, so get hold of the codefrom github and have a look at the application context file if you are interested. The code is in thesamples/xml/preauth directory.
10.16. Java Authentication and Authorization Service(JAAS) Provider
10.16.1. Overview
Spring Security provides a package able to delegate authentication requests to the Java
115
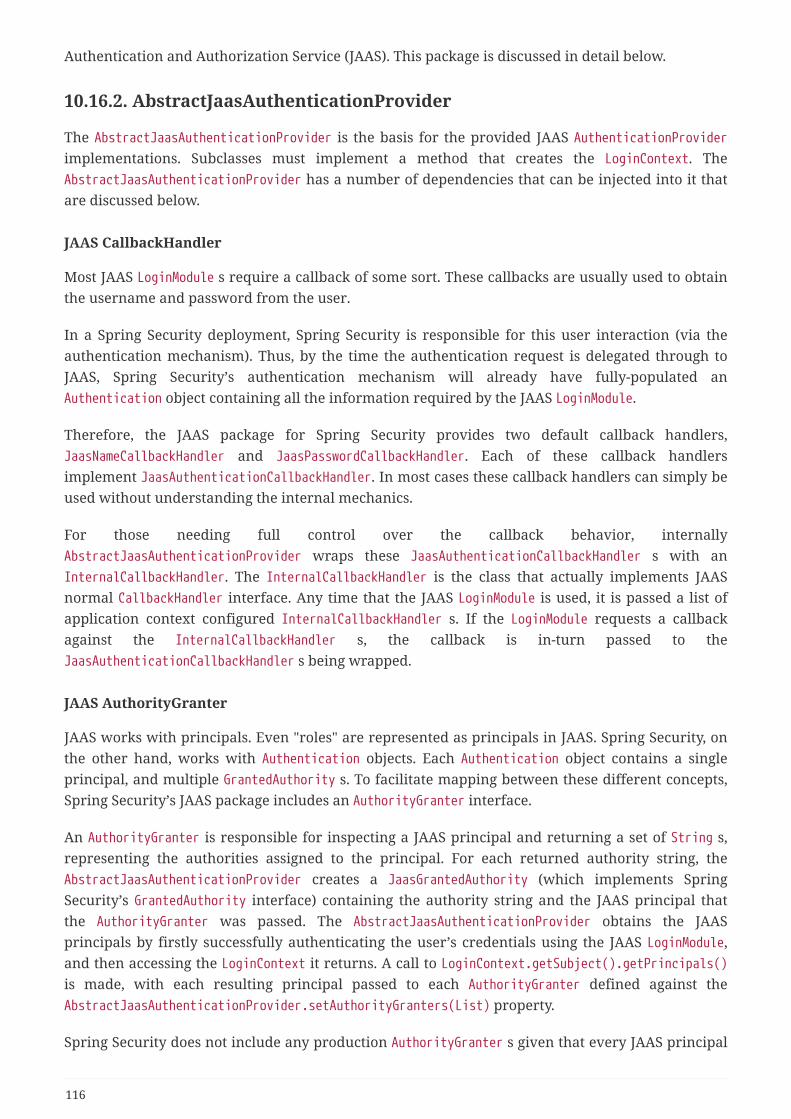
Authentication and Authorization Service (JAAS). This package is discussed in detail below.
10.16.2. AbstractJaasAuthenticationProvider
The AbstractJaasAuthenticationProvider is the basis for the provided JAAS AuthenticationProviderimplementations. Subclasses must implement a method that creates the LoginContext. TheAbstractJaasAuthenticationProvider has a number of dependencies that can be injected into it thatare discussed below.
JAAS CallbackHandler
Most JAAS LoginModule s require a callback of some sort. These callbacks are usually used to obtainthe username and password from the user.
In a Spring Security deployment, Spring Security is responsible for this user interaction (via theauthentication mechanism). Thus, by the time the authentication request is delegated through toJAAS, Spring Security’s authentication mechanism will already have fully-populated anAuthentication object containing all the information required by the JAAS LoginModule.
Therefore, the JAAS package for Spring Security provides two default callback handlers,JaasNameCallbackHandler and JaasPasswordCallbackHandler. Each of these callback handlersimplement JaasAuthenticationCallbackHandler. In most cases these callback handlers can simply beused without understanding the internal mechanics.
For those needing full control over the callback behavior, internallyAbstractJaasAuthenticationProvider wraps these JaasAuthenticationCallbackHandler s with anInternalCallbackHandler. The InternalCallbackHandler is the class that actually implements JAASnormal CallbackHandler interface. Any time that the JAAS LoginModule is used, it is passed a list ofapplication context configured InternalCallbackHandler s. If the LoginModule requests a callbackagainst the InternalCallbackHandler s, the callback is in-turn passed to theJaasAuthenticationCallbackHandler s being wrapped.
JAAS AuthorityGranter
JAAS works with principals. Even "roles" are represented as principals in JAAS. Spring Security, onthe other hand, works with Authentication objects. Each Authentication object contains a singleprincipal, and multiple GrantedAuthority s. To facilitate mapping between these different concepts,Spring Security’s JAAS package includes an AuthorityGranter interface.
An AuthorityGranter is responsible for inspecting a JAAS principal and returning a set of String s,representing the authorities assigned to the principal. For each returned authority string, theAbstractJaasAuthenticationProvider creates a JaasGrantedAuthority (which implements SpringSecurity’s GrantedAuthority interface) containing the authority string and the JAAS principal thatthe AuthorityGranter was passed. The AbstractJaasAuthenticationProvider obtains the JAASprincipals by firstly successfully authenticating the user’s credentials using the JAAS LoginModule,and then accessing the LoginContext it returns. A call to LoginContext.getSubject().getPrincipals()is made, with each resulting principal passed to each AuthorityGranter defined against theAbstractJaasAuthenticationProvider.setAuthorityGranters(List) property.
Spring Security does not include any production AuthorityGranter s given that every JAAS principal
116
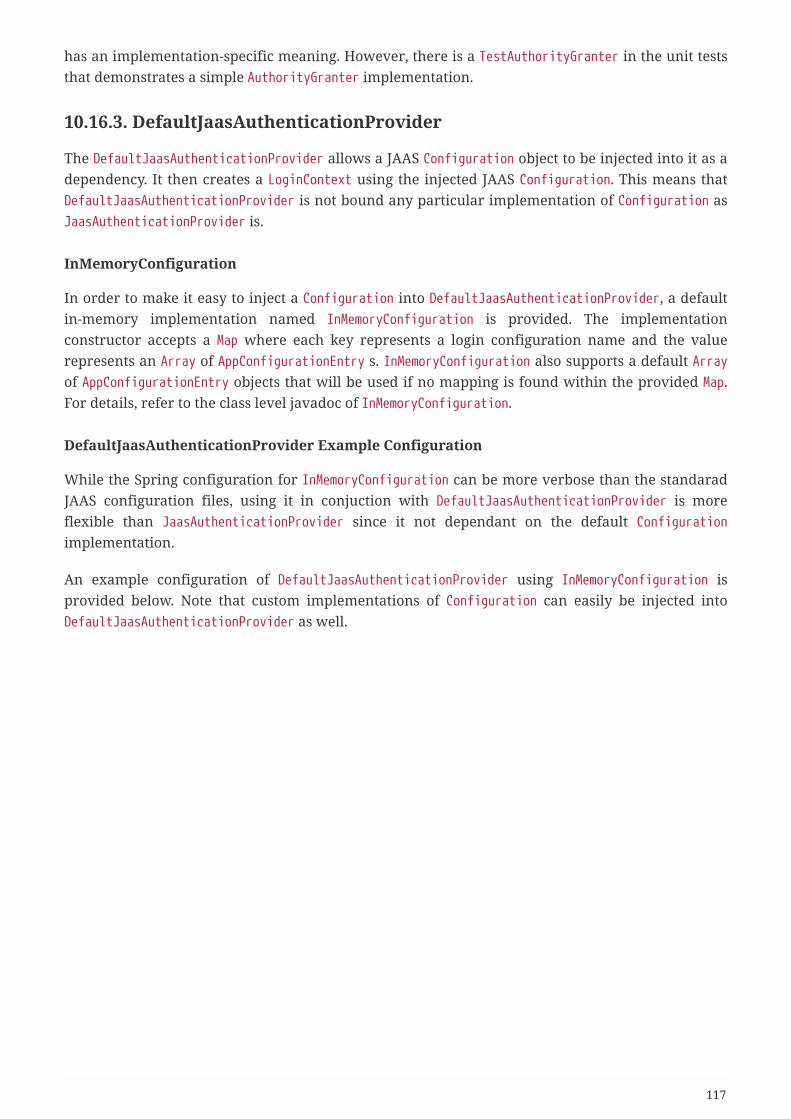
has an implementation-specific meaning. However, there is a TestAuthorityGranter in the unit teststhat demonstrates a simple AuthorityGranter implementation.
10.16.3. DefaultJaasAuthenticationProvider
The DefaultJaasAuthenticationProvider allows a JAAS Configuration object to be injected into it as adependency. It then creates a LoginContext using the injected JAAS Configuration. This means thatDefaultJaasAuthenticationProvider is not bound any particular implementation of Configuration asJaasAuthenticationProvider is.
InMemoryConfiguration
In order to make it easy to inject a Configuration into DefaultJaasAuthenticationProvider, a defaultin-memory implementation named InMemoryConfiguration is provided. The implementationconstructor accepts a Map where each key represents a login configuration name and the valuerepresents an Array of AppConfigurationEntry s. InMemoryConfiguration also supports a default Arrayof AppConfigurationEntry objects that will be used if no mapping is found within the provided Map.For details, refer to the class level javadoc of InMemoryConfiguration.
DefaultJaasAuthenticationProvider Example Configuration
While the Spring configuration for InMemoryConfiguration can be more verbose than the standaradJAAS configuration files, using it in conjuction with DefaultJaasAuthenticationProvider is moreflexible than JaasAuthenticationProvider since it not dependant on the default Configurationimplementation.
An example configuration of DefaultJaasAuthenticationProvider using InMemoryConfiguration isprovided below. Note that custom implementations of Configuration can easily be injected intoDefaultJaasAuthenticationProvider as well.
117
<bean id="jaasAuthProvider"class="org.springframework.security.authentication.jaas.DefaultJaasAuthenticationProvider"><property name="configuration"><beanclass="org.springframework.security.authentication.jaas.memory.InMemoryConfiguration"><constructor-arg> <map> <!-- SPRINGSECURITY is the default loginContextName for AbstractJaasAuthenticationProvider --> <entry key="SPRINGSECURITY"> <array> <bean class="javax.security.auth.login.AppConfigurationEntry"> <constructor-arg value="sample.SampleLoginModule" /> <constructor-arg> <util:constant static-field= "javax.security.auth.login.AppConfigurationEntry$LoginModuleControlFlag.REQUIRED"/> </constructor-arg> <constructor-arg> <map></map> </constructor-arg> </bean> </array> </entry> </map> </constructor-arg></bean></property><property name="authorityGranters"><list> <!-- You will need to write your own implementation of AuthorityGranter --> <beanclass="org.springframework.security.authentication.jaas.TestAuthorityGranter"/></list></property></bean>
10.16.4. JaasAuthenticationProvider
The JaasAuthenticationProvider assumes the default Configuration is an instance of ConfigFile. Thisassumption is made in order to attempt to update the Configuration. TheJaasAuthenticationProvider then uses the default Configuration to create the LoginContext.
Let’s assume we have a JAAS login configuration file, /WEB-INF/login.conf, with the followingcontents:
118
JAASTest { sample.SampleLoginModule required;};
Like all Spring Security beans, the JaasAuthenticationProvider is configured via the applicationcontext. The following definitions would correspond to the above JAAS login configuration file:
<bean id="jaasAuthenticationProvider"class="org.springframework.security.authentication.jaas.JaasAuthenticationProvider"><property name="loginConfig" value="/WEB-INF/login.conf"/><property name="loginContextName" value="JAASTest"/><property name="callbackHandlers"><list><bean class="org.springframework.security.authentication.jaas.JaasNameCallbackHandler"/><bean class="org.springframework.security.authentication.jaas.JaasPasswordCallbackHandler"/></list></property><property name="authorityGranters"> <list> <beanclass="org.springframework.security.authentication.jaas.TestAuthorityGranter"/> </list></property></bean>
10.16.5. Running as a Subject
If configured, the JaasApiIntegrationFilter will attempt to run as the Subject on theJaasAuthenticationToken. This means that the Subject can be accessed using:
Subject subject = Subject.getSubject(AccessController.getContext());
This integration can easily be configured using the jaas-api-provision attribute. This feature isuseful when integrating with legacy or external API’s that rely on the JAAS Subject being populated.
10.17. CAS Authentication
10.17.1. Overview
JA-SIG produces an enterprise-wide single sign on system known as CAS. Unlike other initiatives,JA-SIG’s Central Authentication Service is open source, widely used, simple to understand, platformindependent, and supports proxy capabilities. Spring Security fully supports CAS, and provides aneasy migration path from single-application deployments of Spring Security through to multiple-
119

application deployments secured by an enterprise-wide CAS server.
You can learn more about CAS at https://www.apereo.org. You will also need to visit this site todownload the CAS Server files.
10.17.2. How CAS Works
Whilst the CAS web site contains documents that detail the architecture of CAS, we present thegeneral overview again here within the context of Spring Security. Spring Security 3.x supports CAS3. At the time of writing, the CAS server was at version 3.4.
Somewhere in your enterprise you will need to setup a CAS server. The CAS server is simply astandard WAR file, so there isn’t anything difficult about setting up your server. Inside the WAR fileyou will customise the login and other single sign on pages displayed to users.
When deploying a CAS 3.4 server, you will also need to specify an AuthenticationHandler in thedeployerConfigContext.xml included with CAS. The AuthenticationHandler has a simple method thatreturns a boolean as to whether a given set of Credentials is valid. Your AuthenticationHandlerimplementation will need to link into some type of backend authentication repository, such as anLDAP server or database. CAS itself includes numerous AuthenticationHandler s out of the box toassist with this. When you download and deploy the server war file, it is set up to successfullyauthenticate users who enter a password matching their username, which is useful for testing.
Apart from the CAS server itself, the other key players are of course the secure web applicationsdeployed throughout your enterprise. These web applications are known as "services". There arethree types of services. Those that authenticate service tickets, those that can obtain proxy tickets,and those that authenticate proxy tickets. Authenticating a proxy ticket differs because the list ofproxies must be validated and often times a proxy ticket can be reused.
Spring Security and CAS Interaction Sequence
The basic interaction between a web browser, CAS server and a Spring Security-secured service isas follows:
• The web user is browsing the service’s public pages. CAS or Spring Security is not involved.
• The user eventually requests a page that is either secure or one of the beans it uses is secure.Spring Security’s ExceptionTranslationFilter will detect the AccessDeniedException orAuthenticationException.
• Because the user’s Authentication object (or lack thereof) caused an AuthenticationException,the ExceptionTranslationFilter will call the configured AuthenticationEntryPoint. If using CAS,this will be the CasAuthenticationEntryPoint class.
• The CasAuthenticationEntryPoint will redirect the user’s browser to the CAS server. It will alsoindicate a service parameter, which is the callback URL for the Spring Security service (yourapplication). For example, the URL to which the browser is redirected might behttps://my.company.com/cas/login?service=https%3A%2F%2Fserver3.company.com%2Fwebapp%2Flogin/cas.
• After the user’s browser redirects to CAS, they will be prompted for their username andpassword. If the user presents a session cookie which indicates they’ve previously logged on,
120
they will not be prompted to login again (there is an exception to this procedure, which we’llcover later). CAS will use the PasswordHandler (or AuthenticationHandler if using CAS 3.0)discussed above to decide whether the username and password is valid.
• Upon successful login, CAS will redirect the user’s browser back to the original service. It willalso include a ticket parameter, which is an opaque string representing the "service ticket".Continuing our earlier example, the URL the browser is redirected to might behttps://server3.company.com/webapp/login/cas?ticket=ST-0-ER94xMJmn6pha35CQRoZ.
• Back in the service web application, the CasAuthenticationFilter is always listening for requeststo /login/cas (this is configurable, but we’ll use the defaults in this introduction). The processingfilter will construct a UsernamePasswordAuthenticationToken representing the service ticket. Theprincipal will be equal to CasAuthenticationFilter.CAS_STATEFUL_IDENTIFIER, whilst thecredentials will be the service ticket opaque value. This authentication request will then behanded to the configured AuthenticationManager.
• The AuthenticationManager implementation will be the ProviderManager, which is in turnconfigured with the CasAuthenticationProvider. The CasAuthenticationProvider only responds toUsernamePasswordAuthenticationToken s containing the CAS-specific principal (such asCasAuthenticationFilter.CAS_STATEFUL_IDENTIFIER) and CasAuthenticationToken s (discussedlater).
• CasAuthenticationProvider will validate the service ticket using a TicketValidatorimplementation. This will typically be a Cas20ServiceTicketValidator which is one of the classesincluded in the CAS client library. In the event the application needs to validate proxy tickets,the Cas20ProxyTicketValidator is used. The TicketValidator makes an HTTPS request to the CASserver in order to validate the service ticket. It may also include a proxy callback URL, which isincluded in this example: https://my.company.com/cas/proxyValidate?service=https%3A%2F%2Fserver3.company.com%2Fwebapp%2Flogin/cas&ticket=ST-0-ER94xMJmn6pha35CQRoZ&pgtUrl=https://server3.company.com/webapp/login/cas/proxyreceptor.
• Back on the CAS server, the validation request will be received. If the presented service ticketmatches the service URL the ticket was issued to, CAS will provide an affirmative response inXML indicating the username. If any proxy was involved in the authentication (discussedbelow), the list of proxies is also included in the XML response.
• [OPTIONAL] If the request to the CAS validation service included the proxy callback URL (in thepgtUrl parameter), CAS will include a pgtIou string in the XML response. This pgtIou representsa proxy-granting ticket IOU. The CAS server will then create its own HTTPS connection back tothe pgtUrl. This is to mutually authenticate the CAS server and the claimed service URL. TheHTTPS connection will be used to send a proxy granting ticket to the original web application.For example, https://server3.company.com/webapp/login/cas/proxyreceptor?pgtIou=PGTIOU-0-R0zlgrl4pdAQwBvJWO3vnNpevwqStbSGcq3vKB2SqSFFRnjPHt&pgtId=PGT-1-si9YkkHLrtACBo64rmsi3v2nf7cpCResXg5MpESZFArbaZiOKH.
• The Cas20TicketValidator will parse the XML received from the CAS server. It will return to theCasAuthenticationProvider a TicketResponse, which includes the username (mandatory), proxylist (if any were involved), and proxy-granting ticket IOU (if the proxy callback was requested).
• Next CasAuthenticationProvider will call a configured CasProxyDecider. The CasProxyDeciderindicates whether the proxy list in the TicketResponse is acceptable to the service. Severalimplementations are provided with Spring Security: RejectProxyTickets, AcceptAnyCasProxy and
121
NamedCasProxyDecider. These names are largely self-explanatory, except NamedCasProxyDeciderwhich allows a List of trusted proxies to be provided.
• CasAuthenticationProvider will next request a AuthenticationUserDetailsService to load theGrantedAuthority objects that apply to the user contained in the Assertion.
• If there were no problems, CasAuthenticationProvider constructs a CasAuthenticationTokenincluding the details contained in the TicketResponse and the GrantedAuthoritys.
• Control then returns to CasAuthenticationFilter, which places the createdCasAuthenticationToken in the security context.
• The user’s browser is redirected to the original page that caused the AuthenticationException (ora custom destination depending on the configuration).
It’s good that you’re still here! Let’s now look at how this is configured
10.17.3. Configuration of CAS Client
The web application side of CAS is made easy due to Spring Security. It is assumed you alreadyknow the basics of using Spring Security, so these are not covered again below. We’ll assume anamespace based configuration is being used and add in the CAS beans as required. Each sectionbuilds upon the previous section. A full CAS sample application can be found in the Spring SecuritySamples.
Service Ticket Authentication
This section describes how to setup Spring Security to authenticate Service Tickets. Often times thisis all a web application requires. You will need to add a ServiceProperties bean to your applicationcontext. This represents your CAS service:
<bean id="serviceProperties" class="org.springframework.security.cas.ServiceProperties"><property name="service" value="https://localhost:8443/cas-sample/login/cas"/><property name="sendRenew" value="false"/></bean>
The service must equal a URL that will be monitored by the CasAuthenticationFilter. The sendRenewdefaults to false, but should be set to true if your application is particularly sensitive. What thisparameter does is tell the CAS login service that a single sign on login is unacceptable. Instead, theuser will need to re-enter their username and password in order to gain access to the service.
The following beans should be configured to commence the CAS authentication process (assumingyou’re using a namespace configuration):
122
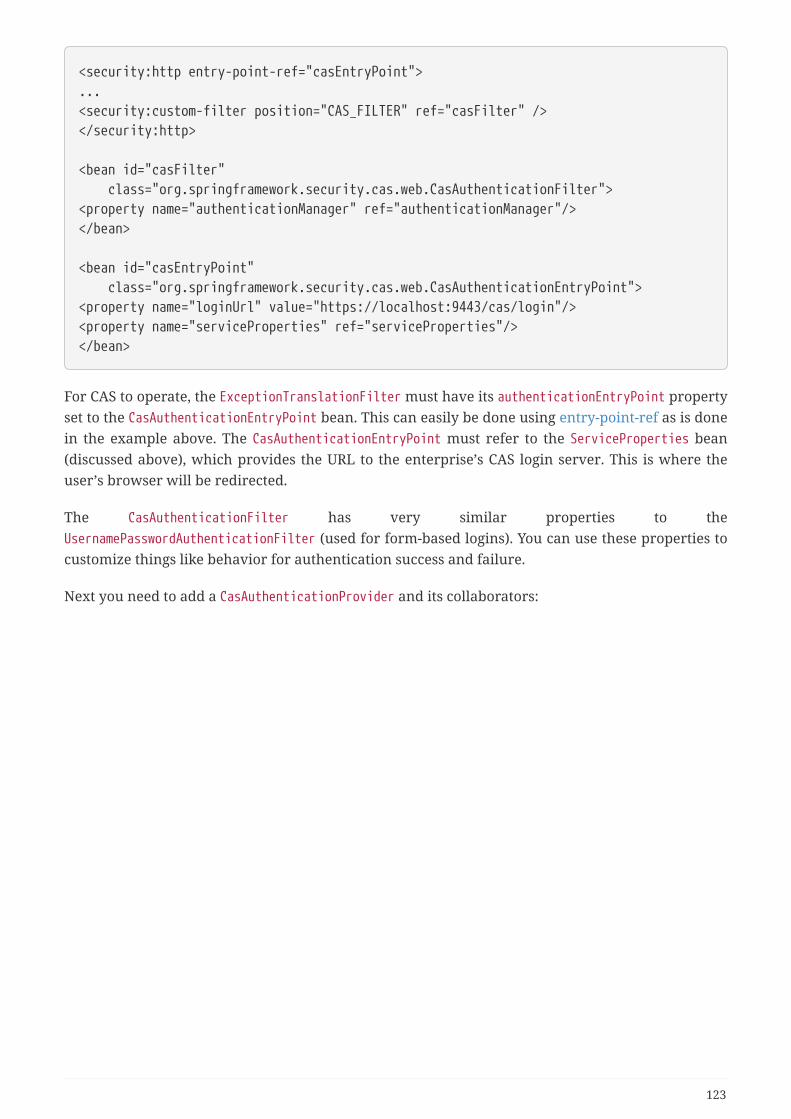
<security:http entry-point-ref="casEntryPoint">...<security:custom-filter position="CAS_FILTER" ref="casFilter" /></security:http>
<bean id="casFilter" class="org.springframework.security.cas.web.CasAuthenticationFilter"><property name="authenticationManager" ref="authenticationManager"/></bean>
<bean id="casEntryPoint" class="org.springframework.security.cas.web.CasAuthenticationEntryPoint"><property name="loginUrl" value="https://localhost:9443/cas/login"/><property name="serviceProperties" ref="serviceProperties"/></bean>
For CAS to operate, the ExceptionTranslationFilter must have its authenticationEntryPoint propertyset to the CasAuthenticationEntryPoint bean. This can easily be done using entry-point-ref as is donein the example above. The CasAuthenticationEntryPoint must refer to the ServiceProperties bean(discussed above), which provides the URL to the enterprise’s CAS login server. This is where theuser’s browser will be redirected.
The CasAuthenticationFilter has very similar properties to theUsernamePasswordAuthenticationFilter (used for form-based logins). You can use these properties tocustomize things like behavior for authentication success and failure.
Next you need to add a CasAuthenticationProvider and its collaborators:
123
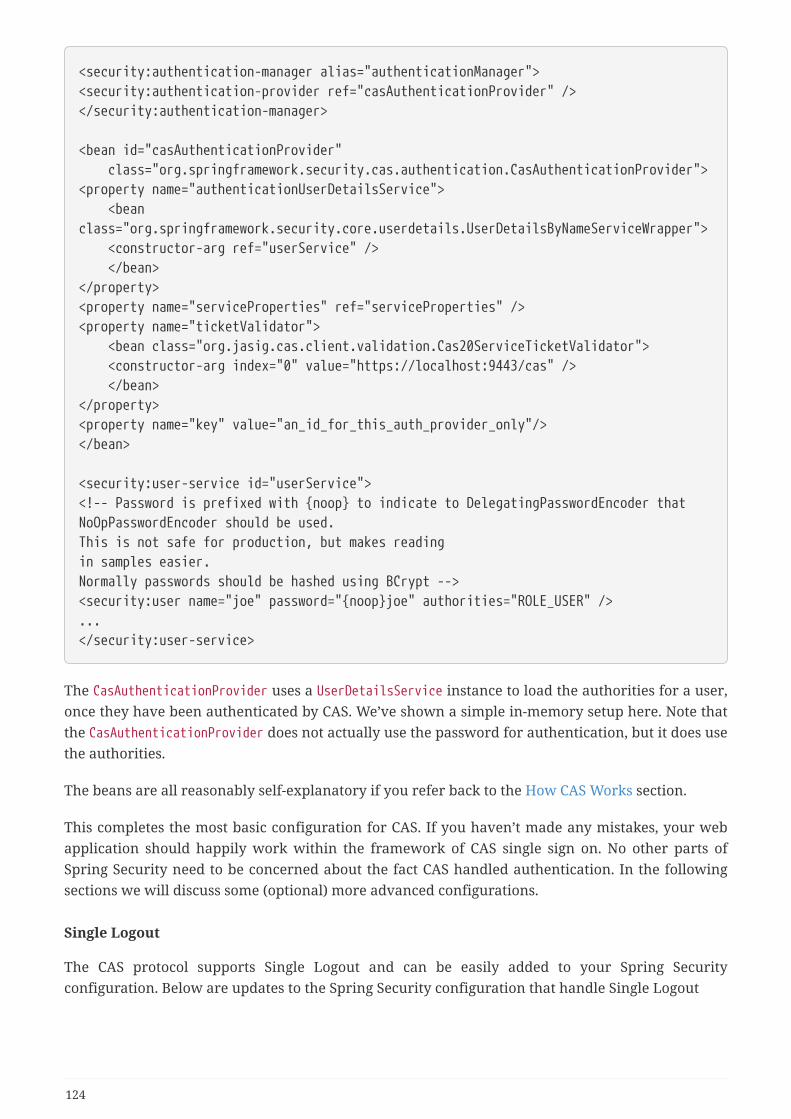
<security:authentication-manager alias="authenticationManager"><security:authentication-provider ref="casAuthenticationProvider" /></security:authentication-manager>
<bean id="casAuthenticationProvider" class="org.springframework.security.cas.authentication.CasAuthenticationProvider"><property name="authenticationUserDetailsService"> <beanclass="org.springframework.security.core.userdetails.UserDetailsByNameServiceWrapper"> <constructor-arg ref="userService" /> </bean></property><property name="serviceProperties" ref="serviceProperties" /><property name="ticketValidator"> <bean class="org.jasig.cas.client.validation.Cas20ServiceTicketValidator"> <constructor-arg index="0" value="https://localhost:9443/cas" /> </bean></property><property name="key" value="an_id_for_this_auth_provider_only"/></bean>
<security:user-service id="userService"><!-- Password is prefixed with {noop} to indicate to DelegatingPasswordEncoder thatNoOpPasswordEncoder should be used.This is not safe for production, but makes readingin samples easier.Normally passwords should be hashed using BCrypt --><security:user name="joe" password="{noop}joe" authorities="ROLE_USER" />...</security:user-service>
The CasAuthenticationProvider uses a UserDetailsService instance to load the authorities for a user,once they have been authenticated by CAS. We’ve shown a simple in-memory setup here. Note thatthe CasAuthenticationProvider does not actually use the password for authentication, but it does usethe authorities.
The beans are all reasonably self-explanatory if you refer back to the How CAS Works section.
This completes the most basic configuration for CAS. If you haven’t made any mistakes, your webapplication should happily work within the framework of CAS single sign on. No other parts ofSpring Security need to be concerned about the fact CAS handled authentication. In the followingsections we will discuss some (optional) more advanced configurations.
Single Logout
The CAS protocol supports Single Logout and can be easily added to your Spring Securityconfiguration. Below are updates to the Spring Security configuration that handle Single Logout
124
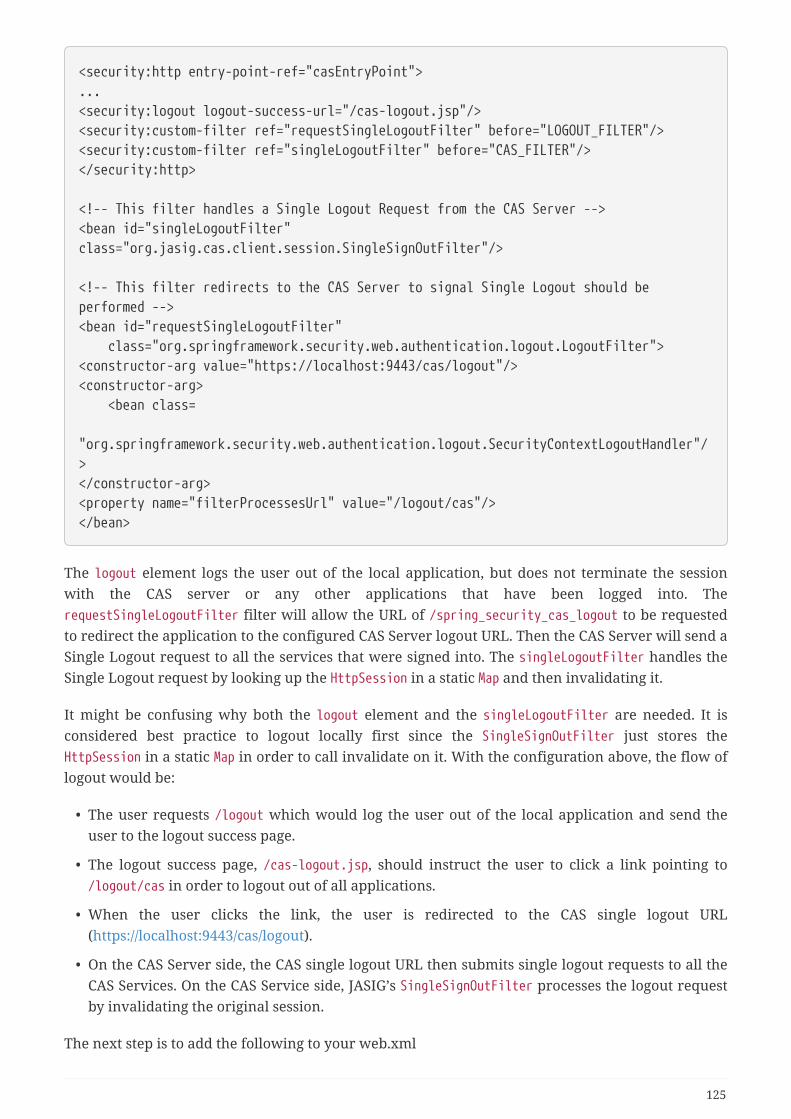
<security:http entry-point-ref="casEntryPoint">...<security:logout logout-success-url="/cas-logout.jsp"/><security:custom-filter ref="requestSingleLogoutFilter" before="LOGOUT_FILTER"/><security:custom-filter ref="singleLogoutFilter" before="CAS_FILTER"/></security:http>
<!-- This filter handles a Single Logout Request from the CAS Server --><bean id="singleLogoutFilter"class="org.jasig.cas.client.session.SingleSignOutFilter"/>
<!-- This filter redirects to the CAS Server to signal Single Logout should beperformed --><bean id="requestSingleLogoutFilter" class="org.springframework.security.web.authentication.logout.LogoutFilter"><constructor-arg value="https://localhost:9443/cas/logout"/><constructor-arg> <bean class= "org.springframework.security.web.authentication.logout.SecurityContextLogoutHandler"/></constructor-arg><property name="filterProcessesUrl" value="/logout/cas"/></bean>
The logout element logs the user out of the local application, but does not terminate the sessionwith the CAS server or any other applications that have been logged into. TherequestSingleLogoutFilter filter will allow the URL of /spring_security_cas_logout to be requestedto redirect the application to the configured CAS Server logout URL. Then the CAS Server will send aSingle Logout request to all the services that were signed into. The singleLogoutFilter handles theSingle Logout request by looking up the HttpSession in a static Map and then invalidating it.
It might be confusing why both the logout element and the singleLogoutFilter are needed. It isconsidered best practice to logout locally first since the SingleSignOutFilter just stores theHttpSession in a static Map in order to call invalidate on it. With the configuration above, the flow oflogout would be:
• The user requests /logout which would log the user out of the local application and send theuser to the logout success page.
• The logout success page, /cas-logout.jsp, should instruct the user to click a link pointing to/logout/cas in order to logout out of all applications.
• When the user clicks the link, the user is redirected to the CAS single logout URL(https://localhost:9443/cas/logout).
• On the CAS Server side, the CAS single logout URL then submits single logout requests to all theCAS Services. On the CAS Service side, JASIG’s SingleSignOutFilter processes the logout requestby invalidating the original session.
The next step is to add the following to your web.xml
125
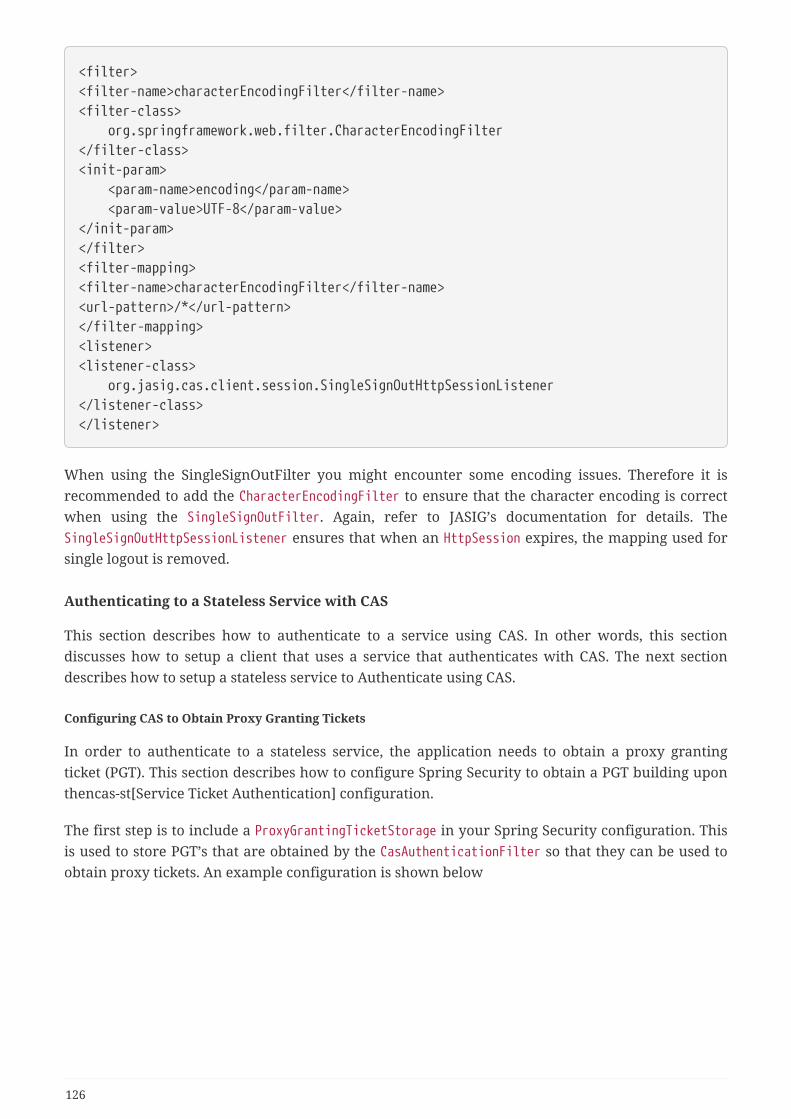
<filter><filter-name>characterEncodingFilter</filter-name><filter-class> org.springframework.web.filter.CharacterEncodingFilter</filter-class><init-param> <param-name>encoding</param-name> <param-value>UTF-8</param-value></init-param></filter><filter-mapping><filter-name>characterEncodingFilter</filter-name><url-pattern>/*</url-pattern></filter-mapping><listener><listener-class> org.jasig.cas.client.session.SingleSignOutHttpSessionListener</listener-class></listener>
When using the SingleSignOutFilter you might encounter some encoding issues. Therefore it isrecommended to add the CharacterEncodingFilter to ensure that the character encoding is correctwhen using the SingleSignOutFilter. Again, refer to JASIG’s documentation for details. TheSingleSignOutHttpSessionListener ensures that when an HttpSession expires, the mapping used forsingle logout is removed.
Authenticating to a Stateless Service with CAS
This section describes how to authenticate to a service using CAS. In other words, this sectiondiscusses how to setup a client that uses a service that authenticates with CAS. The next sectiondescribes how to setup a stateless service to Authenticate using CAS.
Configuring CAS to Obtain Proxy Granting Tickets
In order to authenticate to a stateless service, the application needs to obtain a proxy grantingticket (PGT). This section describes how to configure Spring Security to obtain a PGT building uponthencas-st[Service Ticket Authentication] configuration.
The first step is to include a ProxyGrantingTicketStorage in your Spring Security configuration. Thisis used to store PGT’s that are obtained by the CasAuthenticationFilter so that they can be used toobtain proxy tickets. An example configuration is shown below
126
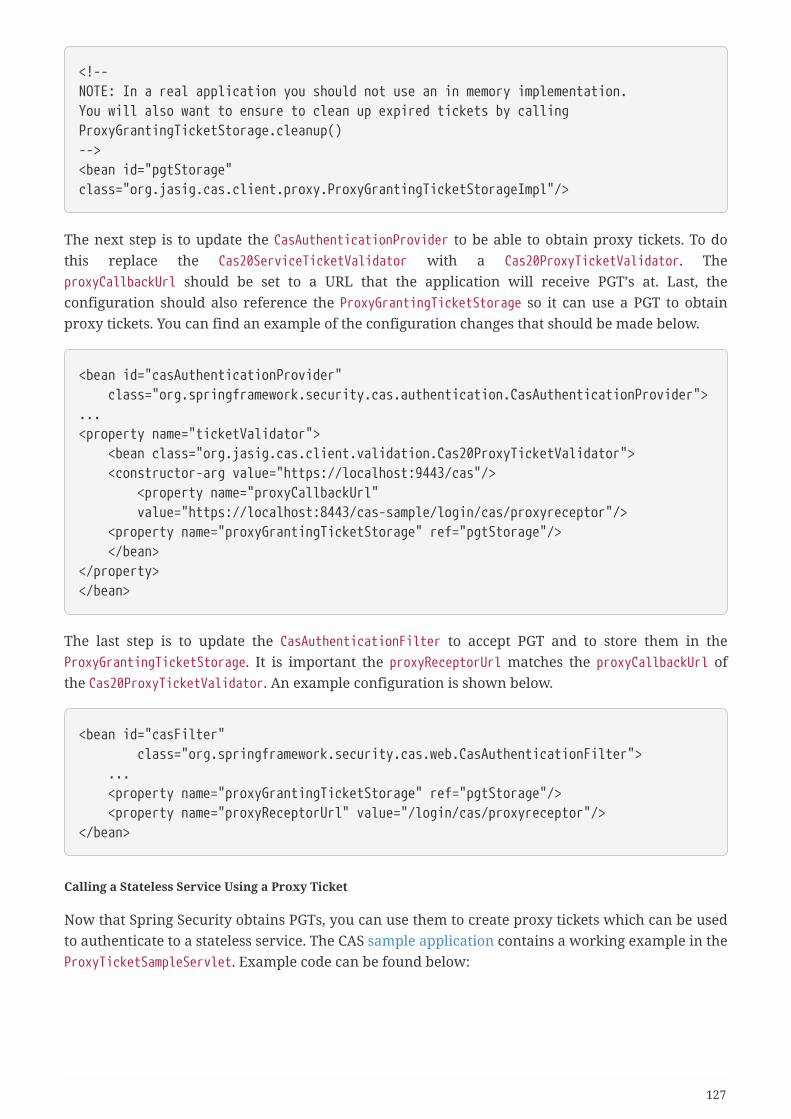
<!--NOTE: In a real application you should not use an in memory implementation.You will also want to ensure to clean up expired tickets by callingProxyGrantingTicketStorage.cleanup()--><bean id="pgtStorage"class="org.jasig.cas.client.proxy.ProxyGrantingTicketStorageImpl"/>
The next step is to update the CasAuthenticationProvider to be able to obtain proxy tickets. To dothis replace the Cas20ServiceTicketValidator with a Cas20ProxyTicketValidator. TheproxyCallbackUrl should be set to a URL that the application will receive PGT’s at. Last, theconfiguration should also reference the ProxyGrantingTicketStorage so it can use a PGT to obtainproxy tickets. You can find an example of the configuration changes that should be made below.
<bean id="casAuthenticationProvider" class="org.springframework.security.cas.authentication.CasAuthenticationProvider">...<property name="ticketValidator"> <bean class="org.jasig.cas.client.validation.Cas20ProxyTicketValidator"> <constructor-arg value="https://localhost:9443/cas"/> <property name="proxyCallbackUrl" value="https://localhost:8443/cas-sample/login/cas/proxyreceptor"/> <property name="proxyGrantingTicketStorage" ref="pgtStorage"/> </bean></property></bean>
The last step is to update the CasAuthenticationFilter to accept PGT and to store them in theProxyGrantingTicketStorage. It is important the proxyReceptorUrl matches the proxyCallbackUrl ofthe Cas20ProxyTicketValidator. An example configuration is shown below.
<bean id="casFilter" class="org.springframework.security.cas.web.CasAuthenticationFilter"> ... <property name="proxyGrantingTicketStorage" ref="pgtStorage"/> <property name="proxyReceptorUrl" value="/login/cas/proxyreceptor"/></bean>
Calling a Stateless Service Using a Proxy Ticket
Now that Spring Security obtains PGTs, you can use them to create proxy tickets which can be usedto authenticate to a stateless service. The CAS sample application contains a working example in theProxyTicketSampleServlet. Example code can be found below:
127
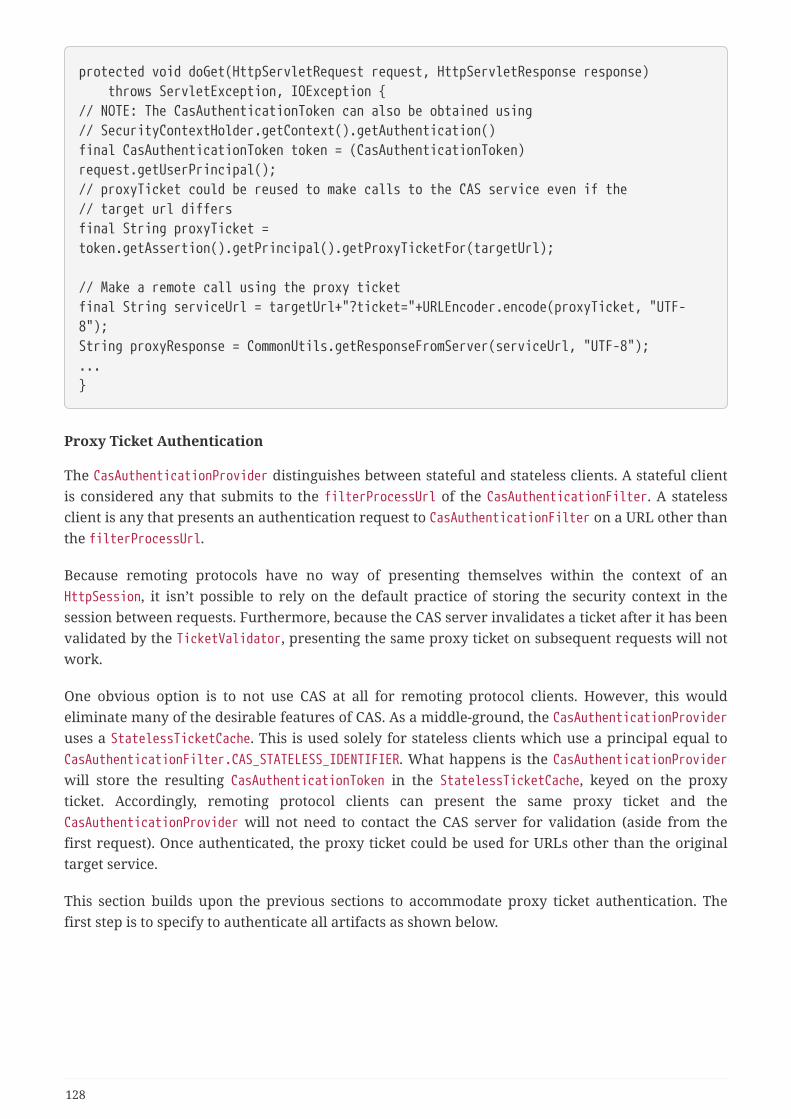
protected void doGet(HttpServletRequest request, HttpServletResponse response) throws ServletException, IOException {// NOTE: The CasAuthenticationToken can also be obtained using// SecurityContextHolder.getContext().getAuthentication()final CasAuthenticationToken token = (CasAuthenticationToken)request.getUserPrincipal();// proxyTicket could be reused to make calls to the CAS service even if the// target url differsfinal String proxyTicket =token.getAssertion().getPrincipal().getProxyTicketFor(targetUrl);
// Make a remote call using the proxy ticketfinal String serviceUrl = targetUrl+"?ticket="+URLEncoder.encode(proxyTicket, "UTF-8");String proxyResponse = CommonUtils.getResponseFromServer(serviceUrl, "UTF-8");...}
Proxy Ticket Authentication
The CasAuthenticationProvider distinguishes between stateful and stateless clients. A stateful clientis considered any that submits to the filterProcessUrl of the CasAuthenticationFilter. A statelessclient is any that presents an authentication request to CasAuthenticationFilter on a URL other thanthe filterProcessUrl.
Because remoting protocols have no way of presenting themselves within the context of anHttpSession, it isn’t possible to rely on the default practice of storing the security context in thesession between requests. Furthermore, because the CAS server invalidates a ticket after it has beenvalidated by the TicketValidator, presenting the same proxy ticket on subsequent requests will notwork.
One obvious option is to not use CAS at all for remoting protocol clients. However, this wouldeliminate many of the desirable features of CAS. As a middle-ground, the CasAuthenticationProvideruses a StatelessTicketCache. This is used solely for stateless clients which use a principal equal toCasAuthenticationFilter.CAS_STATELESS_IDENTIFIER. What happens is the CasAuthenticationProviderwill store the resulting CasAuthenticationToken in the StatelessTicketCache, keyed on the proxyticket. Accordingly, remoting protocol clients can present the same proxy ticket and theCasAuthenticationProvider will not need to contact the CAS server for validation (aside from thefirst request). Once authenticated, the proxy ticket could be used for URLs other than the originaltarget service.
This section builds upon the previous sections to accommodate proxy ticket authentication. Thefirst step is to specify to authenticate all artifacts as shown below.
128
<bean id="serviceProperties" class="org.springframework.security.cas.ServiceProperties">...<property name="authenticateAllArtifacts" value="true"/></bean>
The next step is to specify serviceProperties and the authenticationDetailsSource for theCasAuthenticationFilter. The serviceProperties property instructs the CasAuthenticationFilter toattempt to authenticate all artifacts instead of only ones present on the filterProcessUrl. TheServiceAuthenticationDetailsSource creates a ServiceAuthenticationDetails that ensures thecurrent URL, based upon the HttpServletRequest, is used as the service URL when validating theticket. The method for generating the service URL can be customized by injecting a customAuthenticationDetailsSource that returns a custom ServiceAuthenticationDetails.
<bean id="casFilter" class="org.springframework.security.cas.web.CasAuthenticationFilter">...<property name="serviceProperties" ref="serviceProperties"/><property name="authenticationDetailsSource"> <bean class= "org.springframework.security.cas.web.authentication.ServiceAuthenticationDetailsSource"> <constructor-arg ref="serviceProperties"/> </bean></property></bean>
You will also need to update the CasAuthenticationProvider to handle proxy tickets. To do thisreplace the Cas20ServiceTicketValidator with a Cas20ProxyTicketValidator. You will need toconfigure the statelessTicketCache and which proxies you want to accept. You can find an exampleof the updates required to accept all proxies below.
129
<bean id="casAuthenticationProvider" class="org.springframework.security.cas.authentication.CasAuthenticationProvider">...<property name="ticketValidator"> <bean class="org.jasig.cas.client.validation.Cas20ProxyTicketValidator"> <constructor-arg value="https://localhost:9443/cas"/> <property name="acceptAnyProxy" value="true"/> </bean></property><property name="statelessTicketCache"> <beanclass="org.springframework.security.cas.authentication.EhCacheBasedTicketCache"> <property name="cache"> <bean class="net.sf.ehcache.Cache" init-method="initialise" destroy-method="dispose"> <constructor-arg value="casTickets"/> <constructor-arg value="50"/> <constructor-arg value="true"/> <constructor-arg value="false"/> <constructor-arg value="3600"/> <constructor-arg value="900"/> </bean> </property> </bean></property></bean>
10.18. X.509 Authentication
10.18.1. Overview
The most common use of X.509 certificate authentication is in verifying the identity of a serverwhen using SSL, most commonly when using HTTPS from a browser. The browser willautomatically check that the certificate presented by a server has been issued (ie digitally signed)by one of a list of trusted certificate authorities which it maintains.
You can also use SSL with "mutual authentication"; the server will then request a valid certificatefrom the client as part of the SSL handshake. The server will authenticate the client by checkingthat its certificate is signed by an acceptable authority. If a valid certificate has been provided, itcan be obtained through the servlet API in an application. Spring Security X.509 module extractsthe certificate using a filter. It maps the certificate to an application user and loads that user’s set ofgranted authorities for use with the standard Spring Security infrastructure.
You should be familiar with using certificates and setting up client authentication for your servletcontainer before attempting to use it with Spring Security. Most of the work is in creating andinstalling suitable certificates and keys. For example, if you’re using Tomcat then read theinstructions here https://tomcat.apache.org/tomcat-9.0-doc/ssl-howto.html. It’s important that youget this working before trying it out with Spring Security
130
10.18.2. Adding X.509 Authentication to Your Web Application
Enabling X.509 client authentication is very straightforward. Just add the <x509/> element to yourhttp security namespace configuration.
<http>... <x509 subject-principal-regex="CN=(.*?)," user-service-ref="userService"/>;</http>
The element has two optional attributes:
• subject-principal-regex. The regular expression used to extract a username from thecertificate’s subject name. The default value is shown above. This is the username which will bepassed to the UserDetailsService to load the authorities for the user.
• user-service-ref. This is the bean Id of the UserDetailsService to be used with X.509. It isn’tneeded if there is only one defined in your application context.
The subject-principal-regex should contain a single group. For example the default expression"CN=(.*?)," matches the common name field. So if the subject name in the certificate is "CN=JimiHendrix, OU=…", this will give a user name of "Jimi Hendrix". The matches are case insensitive. So"emailAddress=(.*?)," will match "[email protected],CN=…" giving a user name"[email protected]". If the client presents a certificate and a valid username is successfullyextracted, then there should be a valid Authentication object in the security context. If no certificateis found, or no corresponding user could be found then the security context will remain empty. Thismeans that you can easily use X.509 authentication with other options such as a form-based login.
10.18.3. Setting up SSL in Tomcat
There are some pre-generated certificates in the samples/certificate directory in the SpringSecurity project. You can use these to enable SSL for testing if you don’t want to generate your own.The file server.jks contains the server certificate, private key and the issuing certificate authoritycertificate. There are also some client certificate files for the users from the sample applications.You can install these in your browser to enable SSL client authentication.
To run tomcat with SSL support, drop the server.jks file into the tomcat conf directory and add thefollowing connector to the server.xml file
<Connector port="8443" protocol="HTTP/1.1" SSLEnabled="true" scheme="https"secure="true" clientAuth="true" sslProtocol="TLS" keystoreFile="${catalina.home}/conf/server.jks" keystoreType="JKS" keystorePass="password" truststoreFile="${catalina.home}/conf/server.jks" truststoreType="JKS" truststorePass="password"/>
131
clientAuth can also be set to want if you still want SSL connections to succeed even if the clientdoesn’t provide a certificate. Clients which don’t present a certificate won’t be able to access anyobjects secured by Spring Security unless you use a non-X.509 authentication mechanism, such asform authentication.
10.19. Run-As Authentication Replacement
10.19.1. Overview
The AbstractSecurityInterceptor is able to temporarily replace the Authentication object in theSecurityContext and SecurityContextHolder during the secure object callback phase. This onlyoccurs if the original Authentication object was successfully processed by the AuthenticationManagerand AccessDecisionManager. The RunAsManager will indicate the replacement Authentication object, ifany, that should be used during the SecurityInterceptorCallback.
By temporarily replacing the Authentication object during the secure object callback phase, thesecured invocation will be able to call other objects which require different authentication andauthorization credentials. It will also be able to perform any internal security checks for specificGrantedAuthority objects. Because Spring Security provides a number of helper classes thatautomatically configure remoting protocols based on the contents of the SecurityContextHolder,these run-as replacements are particularly useful when calling remote web services
10.19.2. Configuration
A RunAsManager interface is provided by Spring Security:
Authentication buildRunAs(Authentication authentication, Object object, List<ConfigAttribute> config);
boolean supports(ConfigAttribute attribute);
boolean supports(Class clazz);
The first method returns the Authentication object that should replace the existing Authenticationobject for the duration of the method invocation. If the method returns null, it indicates noreplacement should be made. The second method is used by the AbstractSecurityInterceptor aspart of its startup validation of configuration attributes. The supports(Class) method is called by asecurity interceptor implementation to ensure the configured RunAsManager supports the type ofsecure object that the security interceptor will present.
One concrete implementation of a RunAsManager is provided with Spring Security. TheRunAsManagerImpl class returns a replacement RunAsUserToken if any ConfigAttribute starts withRUN_AS_. If any such ConfigAttribute is found, the replacement RunAsUserToken will contain the sameprincipal, credentials and granted authorities as the original Authentication object, along with anew SimpleGrantedAuthority for each RUN_AS_ ConfigAttribute. Each new SimpleGrantedAuthority willbe prefixed with ROLE_, followed by the RUN_AS ConfigAttribute. For example, a RUN_AS_SERVER willresult in the replacement RunAsUserToken containing a ROLE_RUN_AS_SERVER granted authority.
132
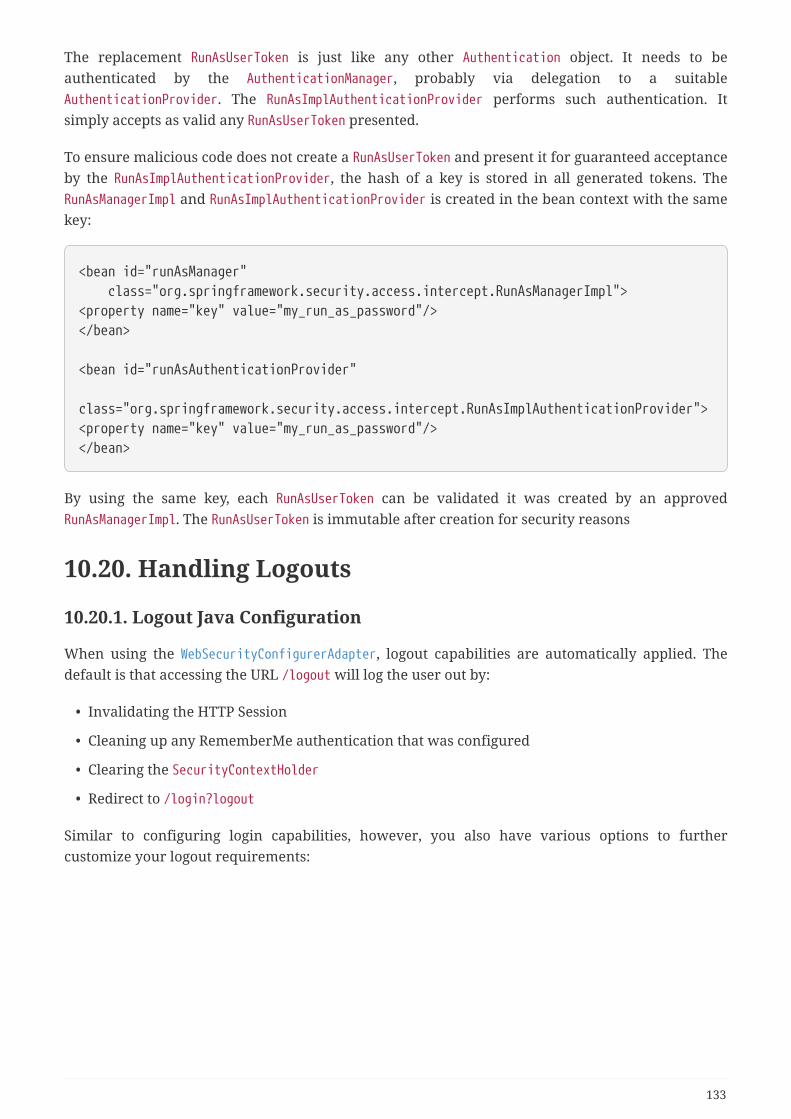
The replacement RunAsUserToken is just like any other Authentication object. It needs to beauthenticated by the AuthenticationManager, probably via delegation to a suitableAuthenticationProvider. The RunAsImplAuthenticationProvider performs such authentication. Itsimply accepts as valid any RunAsUserToken presented.
To ensure malicious code does not create a RunAsUserToken and present it for guaranteed acceptanceby the RunAsImplAuthenticationProvider, the hash of a key is stored in all generated tokens. TheRunAsManagerImpl and RunAsImplAuthenticationProvider is created in the bean context with the samekey:
<bean id="runAsManager" class="org.springframework.security.access.intercept.RunAsManagerImpl"><property name="key" value="my_run_as_password"/></bean>
<bean id="runAsAuthenticationProvider" class="org.springframework.security.access.intercept.RunAsImplAuthenticationProvider"><property name="key" value="my_run_as_password"/></bean>
By using the same key, each RunAsUserToken can be validated it was created by an approvedRunAsManagerImpl. The RunAsUserToken is immutable after creation for security reasons
10.20. Handling Logouts
10.20.1. Logout Java Configuration
When using the WebSecurityConfigurerAdapter, logout capabilities are automatically applied. Thedefault is that accessing the URL /logout will log the user out by:
• Invalidating the HTTP Session
• Cleaning up any RememberMe authentication that was configured
• Clearing the SecurityContextHolder
• Redirect to /login?logout
Similar to configuring login capabilities, however, you also have various options to furthercustomize your logout requirements:
133
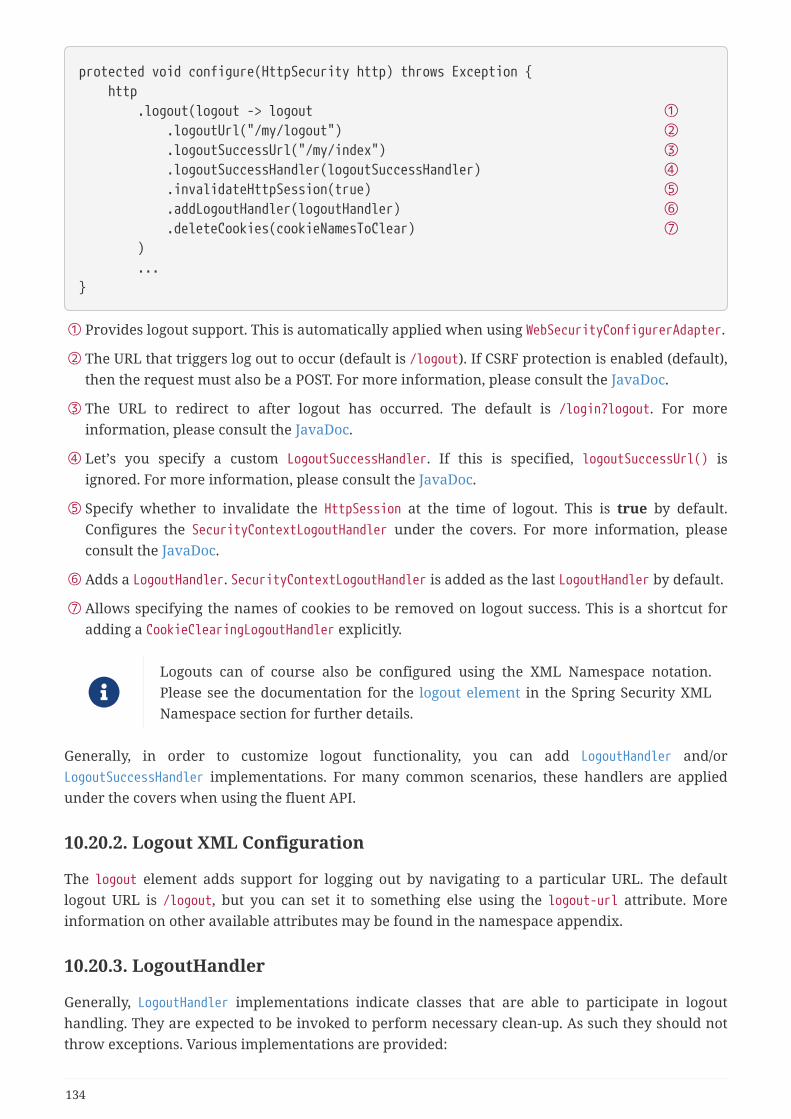
protected void configure(HttpSecurity http) throws Exception { http .logout(logout -> logout ① .logoutUrl("/my/logout") ② .logoutSuccessUrl("/my/index") ③ .logoutSuccessHandler(logoutSuccessHandler) ④ .invalidateHttpSession(true) ⑤ .addLogoutHandler(logoutHandler) ⑥ .deleteCookies(cookieNamesToClear) ⑦ ) ...}
① Provides logout support. This is automatically applied when using WebSecurityConfigurerAdapter.
② The URL that triggers log out to occur (default is /logout). If CSRF protection is enabled (default),then the request must also be a POST. For more information, please consult the JavaDoc.
③ The URL to redirect to after logout has occurred. The default is /login?logout. For moreinformation, please consult the JavaDoc.
④ Let’s you specify a custom LogoutSuccessHandler. If this is specified, logoutSuccessUrl() isignored. For more information, please consult the JavaDoc.
⑤ Specify whether to invalidate the HttpSession at the time of logout. This is true by default.Configures the SecurityContextLogoutHandler under the covers. For more information, pleaseconsult the JavaDoc.
⑥ Adds a LogoutHandler. SecurityContextLogoutHandler is added as the last LogoutHandler by default.
⑦ Allows specifying the names of cookies to be removed on logout success. This is a shortcut foradding a CookieClearingLogoutHandler explicitly.
Logouts can of course also be configured using the XML Namespace notation.Please see the documentation for the logout element in the Spring Security XMLNamespace section for further details.
Generally, in order to customize logout functionality, you can add LogoutHandler and/orLogoutSuccessHandler implementations. For many common scenarios, these handlers are appliedunder the covers when using the fluent API.
10.20.2. Logout XML Configuration
The logout element adds support for logging out by navigating to a particular URL. The defaultlogout URL is /logout, but you can set it to something else using the logout-url attribute. Moreinformation on other available attributes may be found in the namespace appendix.
10.20.3. LogoutHandler
Generally, LogoutHandler implementations indicate classes that are able to participate in logouthandling. They are expected to be invoked to perform necessary clean-up. As such they should notthrow exceptions. Various implementations are provided:
134
• PersistentTokenBasedRememberMeServices
• TokenBasedRememberMeServices
• CookieClearingLogoutHandler
• CsrfLogoutHandler
• SecurityContextLogoutHandler
• HeaderWriterLogoutHandler
Please see Remember-Me Interfaces and Implementations for details.
Instead of providing LogoutHandler implementations directly, the fluent API also provides shortcutsthat provide the respective LogoutHandler implementations under the covers. E.g. deleteCookies()allows specifying the names of one or more cookies to be removed on logout success. This is ashortcut compared to adding a CookieClearingLogoutHandler.
10.20.4. LogoutSuccessHandler
The LogoutSuccessHandler is called after a successful logout by the LogoutFilter, to handle e.g.redirection or forwarding to the appropriate destination. Note that the interface is almost the sameas the LogoutHandler but may raise an exception.
The following implementations are provided:
• SimpleUrlLogoutSuccessHandler
• HttpStatusReturningLogoutSuccessHandler
As mentioned above, you don’t need to specify the SimpleUrlLogoutSuccessHandler directly. Instead,the fluent API provides a shortcut by setting the logoutSuccessUrl(). This will setup theSimpleUrlLogoutSuccessHandler under the covers. The provided URL will be redirected to after alogout has occurred. The default is /login?logout.
The HttpStatusReturningLogoutSuccessHandler can be interesting in REST API type scenarios. Insteadof redirecting to a URL upon the successful logout, this LogoutSuccessHandler allows you to provide aplain HTTP status code to be returned. If not configured a status code 200 will be returned bydefault.
10.20.5. Further Logout-Related References
• Logout Handling
• Testing Logout
• HttpServletRequest.logout()
• Remember-Me Interfaces and Implementations
• Logging Out in section CSRF Caveats
• Section Single Logout (CAS protocol)
• Documentation for the logout element in the Spring Security XML Namespace section
135
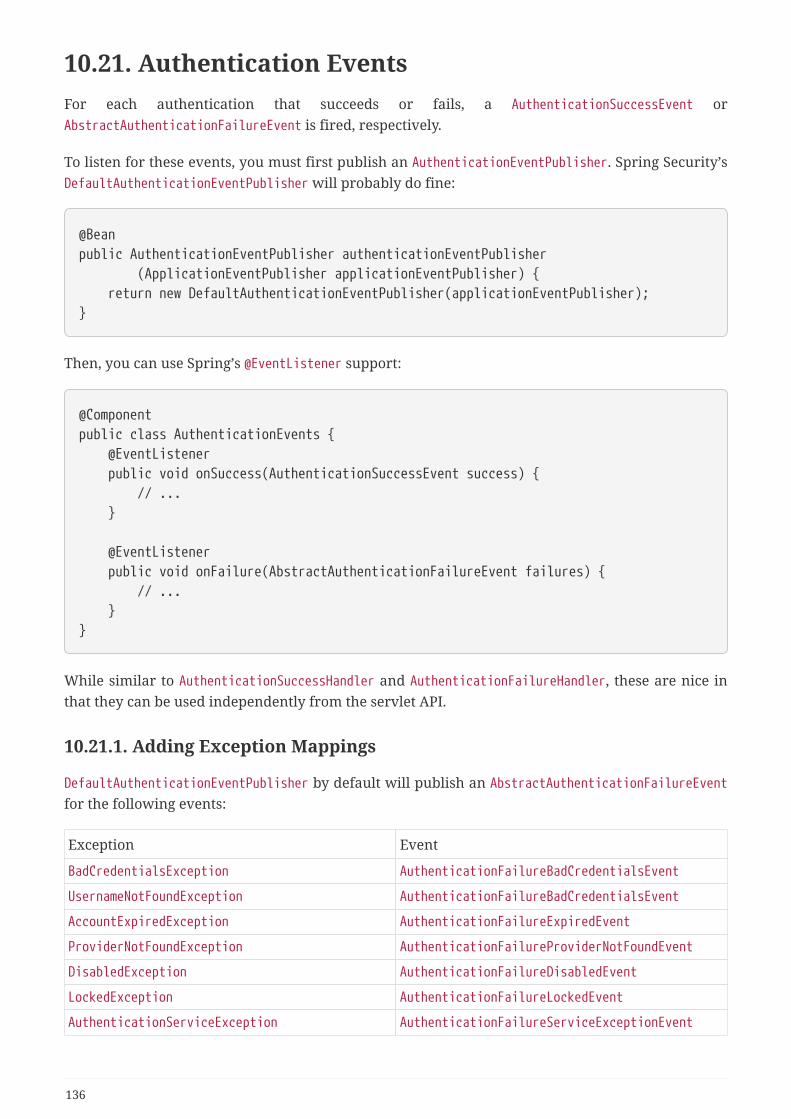
10.21. Authentication EventsFor each authentication that succeeds or fails, a AuthenticationSuccessEvent orAbstractAuthenticationFailureEvent is fired, respectively.
To listen for these events, you must first publish an AuthenticationEventPublisher. Spring Security’sDefaultAuthenticationEventPublisher will probably do fine:
@Beanpublic AuthenticationEventPublisher authenticationEventPublisher (ApplicationEventPublisher applicationEventPublisher) { return new DefaultAuthenticationEventPublisher(applicationEventPublisher);}
Then, you can use Spring’s @EventListener support:
@Componentpublic class AuthenticationEvents { @EventListener public void onSuccess(AuthenticationSuccessEvent success) { // ... }
@EventListener public void onFailure(AbstractAuthenticationFailureEvent failures) { // ... }}
While similar to AuthenticationSuccessHandler and AuthenticationFailureHandler, these are nice inthat they can be used independently from the servlet API.
10.21.1. Adding Exception Mappings
DefaultAuthenticationEventPublisher by default will publish an AbstractAuthenticationFailureEventfor the following events:
Exception Event
BadCredentialsException AuthenticationFailureBadCredentialsEvent
UsernameNotFoundException AuthenticationFailureBadCredentialsEvent
AccountExpiredException AuthenticationFailureExpiredEvent
ProviderNotFoundException AuthenticationFailureProviderNotFoundEvent
DisabledException AuthenticationFailureDisabledEvent
LockedException AuthenticationFailureLockedEvent
AuthenticationServiceException AuthenticationFailureServiceExceptionEvent
136
CredentialsExpiredException AuthenticationFailureCredentialsExpiredEvent
InvalidBearerTokenException AuthenticationFailureBadCredentialsEvent
The publisher does an exact Exception match, which means that sub-classes of these exceptionswon’t also produce events.
To that end, you may want to supply additional mappings to the publisher via thesetAdditionalExceptionMappings method:
@Beanpublic AuthenticationEventPublisher authenticationEventPublisher (ApplicationEventPublisher applicationEventPublisher) { Map<Class<? extends AuthenticationException>, Class<? extends AbstractAuthenticationFailureEvent>> mapping = Collections.singletonMap(FooException.class, FooEvent.class); AuthenticationEventPublisher authenticationEventPublisher = new DefaultAuthenticationEventPublisher(applicationEventPublisher); authenticationEventPublisher.setAdditionalExceptionMappings(mapping); return authenticationEventPublisher;}
10.21.2. Default Event
And, you can supply a catch-all event to fire in the case of any AuthenticationException:
@Beanpublic AuthenticationEventPublisher authenticationEventPublisher (ApplicationEventPublisher applicationEventPublisher) { AuthenticationEventPublisher authenticationEventPublisher = new DefaultAuthenticationEventPublisher(applicationEventPublisher); authenticationEventPublisher.setDefaultAuthenticationFailureEvent (GenericAuthenticationFailureEvent.class); return authenticationEventPublisher;}
[1] It is also possible to obtain the server’s IP address using a DNS lookup. This is not currently supported, but hopefully will be in afuture version.
[2] Authentication by mechanisms which perform a redirect after authenticating (such as form-login) will not be detected bySessionManagementFilter, as the filter will not be invoked during the authenticating request. Session-management functionality hasto be handled separately in these cases.
[3] Essentially, the username is not included in the cookie, to prevent exposing a valid login name unecessarily. There is adiscussion on this in the comments section of this article.
[4] The use of the key property should not be regarded as providing any real security here. It is merely a book-keeping exercise. Ifyou are sharing a ProviderManager which contains an AnonymousAuthenticationProvider in a scenario where it is possible for anauthenticating client to construct the Authentication object (such as with RMI invocations), then a malicious client could submit anAnonymousAuthenticationToken which it had created itself (with chosen username and authority list). If the key is guessable or can befound out, then the token would be accepted by the anonymous provider. This isn’t a problem with normal usage but if you areusing RMI you would be best to use a customized ProviderManager which omits the anonymous provider rather than sharing theone you use for your HTTP authentication mechanisms.
137
Chapter 11. AuthorizationThe advanced authorization capabilities within Spring Security represent one of the mostcompelling reasons for its popularity. Irrespective of how you choose to authenticate - whetherusing a Spring Security-provided mechanism and provider, or integrating with a container or othernon-Spring Security authentication authority - you will find the authorization services can be usedwithin your application in a consistent and simple way.
In this part we’ll explore the different AbstractSecurityInterceptor implementations, which wereintroduced in Part I. We then move on to explore how to fine-tune authorization through use ofdomain access control lists.
11.1. Authorization Architecture
11.1.1. Authorities
Authentication, discusses how all Authentication implementations store a list of GrantedAuthorityobjects. These represent the authorities that have been granted to the principal. theGrantedAuthority objects are inserted into the Authentication object by the AuthenticationManagerand are later read by AccessDecisionManager s when making authorization decisions.
GrantedAuthority is an interface with only one method:
String getAuthority();
This method allows AccessDecisionManager s to obtain a precise String representation of theGrantedAuthority. By returning a representation as a String, a GrantedAuthority can be easily "read"by most AccessDecisionManager s. If a GrantedAuthority cannot be precisely represented as a String,the GrantedAuthority is considered "complex" and getAuthority() must return null.
An example of a "complex" GrantedAuthority would be an implementation that stores a list ofoperations and authority thresholds that apply to different customer account numbers.Representing this complex GrantedAuthority as a String would be quite difficult, and as a result thegetAuthority() method should return null. This will indicate to any AccessDecisionManager that itwill need to specifically support the GrantedAuthority implementation in order to understand itscontents.
Spring Security includes one concrete GrantedAuthority implementation, SimpleGrantedAuthority.This allows any user-specified String to be converted into a GrantedAuthority. AllAuthenticationProvider s included with the security architecture use SimpleGrantedAuthority topopulate the Authentication object.
11.1.2. Pre-Invocation Handling
Spring Security provides interceptors which control access to secure objects such as methodinvocations or web requests. A pre-invocation decision on whether the invocation is allowed toproceed is made by the AccessDecisionManager.
138

The AccessDecisionManager
The AccessDecisionManager is called by the AbstractSecurityInterceptor and is responsible formaking final access control decisions. The AccessDecisionManager interface contains three methods:
void decide(Authentication authentication, Object secureObject, Collection<ConfigAttribute> attrs) throws AccessDeniedException;
boolean supports(ConfigAttribute attribute);
boolean supports(Class clazz);
The AccessDecisionManager's decide method is passed all the relevant information it needs in orderto make an authorization decision. In particular, passing the secure Object enables those argumentscontained in the actual secure object invocation to be inspected. For example, let’s assume thesecure object was a MethodInvocation. It would be easy to query the MethodInvocation for anyCustomer argument, and then implement some sort of security logic in the AccessDecisionManager toensure the principal is permitted to operate on that customer. Implementations are expected tothrow an AccessDeniedException if access is denied.
The supports(ConfigAttribute) method is called by the AbstractSecurityInterceptor at startup timeto determine if the AccessDecisionManager can process the passed ConfigAttribute. Thesupports(Class) method is called by a security interceptor implementation to ensure the configuredAccessDecisionManager supports the type of secure object that the security interceptor will present.
Voting-Based AccessDecisionManager Implementations
Whilst users can implement their own AccessDecisionManager to control all aspects of authorization,Spring Security includes several AccessDecisionManager implementations that are based on voting.Voting Decision Manager illustrates the relevant classes.
Figure 11. Voting Decision Manager
139
Using this approach, a series of AccessDecisionVoter implementations are polled on anauthorization decision. The AccessDecisionManager then decides whether or not to throw anAccessDeniedException based on its assessment of the votes.
The AccessDecisionVoter interface has three methods:
int vote(Authentication authentication, Object object, Collection<ConfigAttribute>attrs);
boolean supports(ConfigAttribute attribute);
boolean supports(Class clazz);
Concrete implementations return an int, with possible values being reflected in theAccessDecisionVoter static fields ACCESS_ABSTAIN, ACCESS_DENIED and ACCESS_GRANTED. A votingimplementation will return ACCESS_ABSTAIN if it has no opinion on an authorization decision. If itdoes have an opinion, it must return either ACCESS_DENIED or ACCESS_GRANTED.
There are three concrete AccessDecisionManager s provided with Spring Security that tally the votes.The ConsensusBased implementation will grant or deny access based on the consensus of non-abstain votes. Properties are provided to control behavior in the event of an equality of votes or ifall votes are abstain. The AffirmativeBased implementation will grant access if one or moreACCESS_GRANTED votes were received (i.e. a deny vote will be ignored, provided there was at least onegrant vote). Like the ConsensusBased implementation, there is a parameter that controls the behaviorif all voters abstain. The UnanimousBased provider expects unanimous ACCESS_GRANTED votes in orderto grant access, ignoring abstains. It will deny access if there is any ACCESS_DENIED vote. Like theother implementations, there is a parameter that controls the behaviour if all voters abstain.
It is possible to implement a custom AccessDecisionManager that tallies votes differently. Forexample, votes from a particular AccessDecisionVoter might receive additional weighting, whilst adeny vote from a particular voter may have a veto effect.
RoleVoter
The most commonly used AccessDecisionVoter provided with Spring Security is the simpleRoleVoter, which treats configuration attributes as simple role names and votes to grant access ifthe user has been assigned that role.
It will vote if any ConfigAttribute begins with the prefix ROLE_. It will vote to grant access if there isa GrantedAuthority which returns a String representation (via the getAuthority() method) exactlyequal to one or more ConfigAttributes starting with the prefix ROLE_. If there is no exact match ofany ConfigAttribute starting with ROLE_, the RoleVoter will vote to deny access. If no ConfigAttributebegins with ROLE_, the voter will abstain.
AuthenticatedVoter
Another voter which we’ve implicitly seen is the AuthenticatedVoter, which can be used todifferentiate between anonymous, fully-authenticated and remember-me authenticated users.Many sites allow certain limited access under remember-me authentication, but require a user to
140
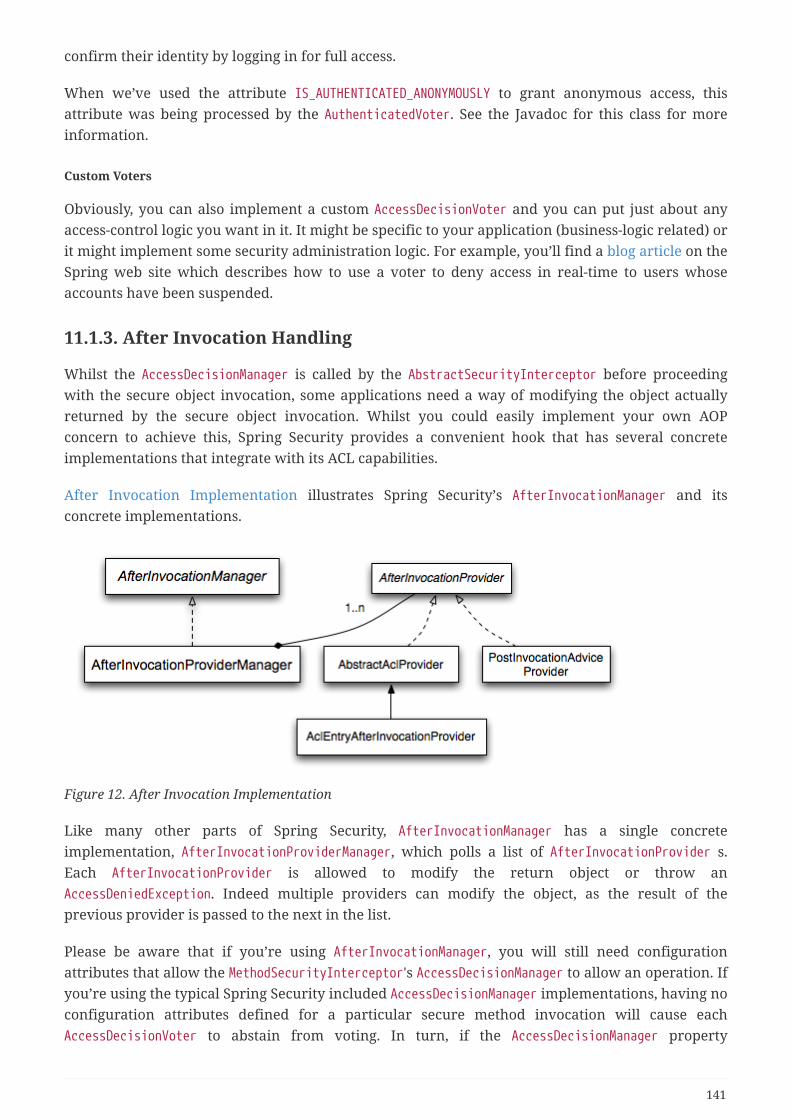
confirm their identity by logging in for full access.
When we’ve used the attribute IS_AUTHENTICATED_ANONYMOUSLY to grant anonymous access, thisattribute was being processed by the AuthenticatedVoter. See the Javadoc for this class for moreinformation.
Custom Voters
Obviously, you can also implement a custom AccessDecisionVoter and you can put just about anyaccess-control logic you want in it. It might be specific to your application (business-logic related) orit might implement some security administration logic. For example, you’ll find a blog article on theSpring web site which describes how to use a voter to deny access in real-time to users whoseaccounts have been suspended.
11.1.3. After Invocation Handling
Whilst the AccessDecisionManager is called by the AbstractSecurityInterceptor before proceedingwith the secure object invocation, some applications need a way of modifying the object actuallyreturned by the secure object invocation. Whilst you could easily implement your own AOPconcern to achieve this, Spring Security provides a convenient hook that has several concreteimplementations that integrate with its ACL capabilities.
After Invocation Implementation illustrates Spring Security’s AfterInvocationManager and itsconcrete implementations.
Figure 12. After Invocation Implementation
Like many other parts of Spring Security, AfterInvocationManager has a single concreteimplementation, AfterInvocationProviderManager, which polls a list of AfterInvocationProvider s.Each AfterInvocationProvider is allowed to modify the return object or throw anAccessDeniedException. Indeed multiple providers can modify the object, as the result of theprevious provider is passed to the next in the list.
Please be aware that if you’re using AfterInvocationManager, you will still need configurationattributes that allow the MethodSecurityInterceptor's AccessDecisionManager to allow an operation. Ifyou’re using the typical Spring Security included AccessDecisionManager implementations, having noconfiguration attributes defined for a particular secure method invocation will cause eachAccessDecisionVoter to abstain from voting. In turn, if the AccessDecisionManager property
141
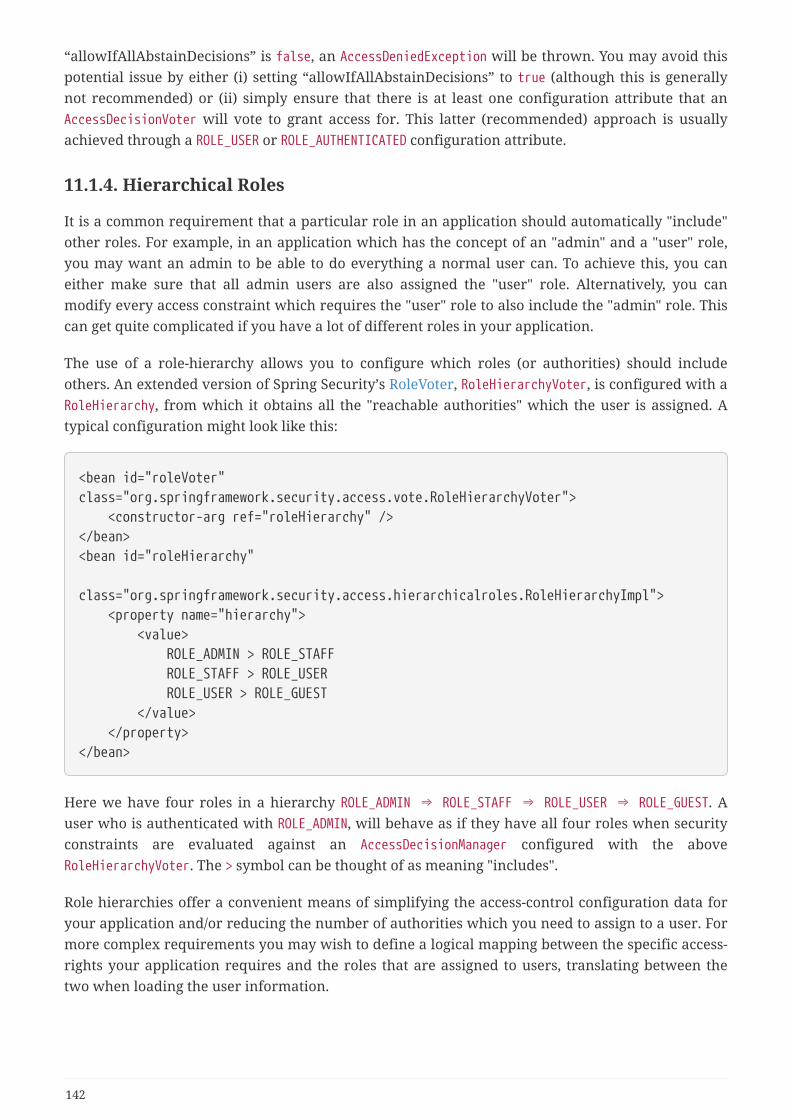
“allowIfAllAbstainDecisions” is false, an AccessDeniedException will be thrown. You may avoid thispotential issue by either (i) setting “allowIfAllAbstainDecisions” to true (although this is generallynot recommended) or (ii) simply ensure that there is at least one configuration attribute that anAccessDecisionVoter will vote to grant access for. This latter (recommended) approach is usuallyachieved through a ROLE_USER or ROLE_AUTHENTICATED configuration attribute.
11.1.4. Hierarchical Roles
It is a common requirement that a particular role in an application should automatically "include"other roles. For example, in an application which has the concept of an "admin" and a "user" role,you may want an admin to be able to do everything a normal user can. To achieve this, you caneither make sure that all admin users are also assigned the "user" role. Alternatively, you canmodify every access constraint which requires the "user" role to also include the "admin" role. Thiscan get quite complicated if you have a lot of different roles in your application.
The use of a role-hierarchy allows you to configure which roles (or authorities) should includeothers. An extended version of Spring Security’s RoleVoter, RoleHierarchyVoter, is configured with aRoleHierarchy, from which it obtains all the "reachable authorities" which the user is assigned. Atypical configuration might look like this:
<bean id="roleVoter"class="org.springframework.security.access.vote.RoleHierarchyVoter"> <constructor-arg ref="roleHierarchy" /></bean><bean id="roleHierarchy" class="org.springframework.security.access.hierarchicalroles.RoleHierarchyImpl"> <property name="hierarchy"> <value> ROLE_ADMIN > ROLE_STAFF ROLE_STAFF > ROLE_USER ROLE_USER > ROLE_GUEST </value> </property></bean>
Here we have four roles in a hierarchy ROLE_ADMIN ⇒ ROLE_STAFF ⇒ ROLE_USER ⇒ ROLE_GUEST. Auser who is authenticated with ROLE_ADMIN, will behave as if they have all four roles when securityconstraints are evaluated against an AccessDecisionManager configured with the aboveRoleHierarchyVoter. The > symbol can be thought of as meaning "includes".
Role hierarchies offer a convenient means of simplifying the access-control configuration data foryour application and/or reducing the number of authorities which you need to assign to a user. Formore complex requirements you may wish to define a logical mapping between the specific access-rights your application requires and the roles that are assigned to users, translating between thetwo when loading the user information.
142
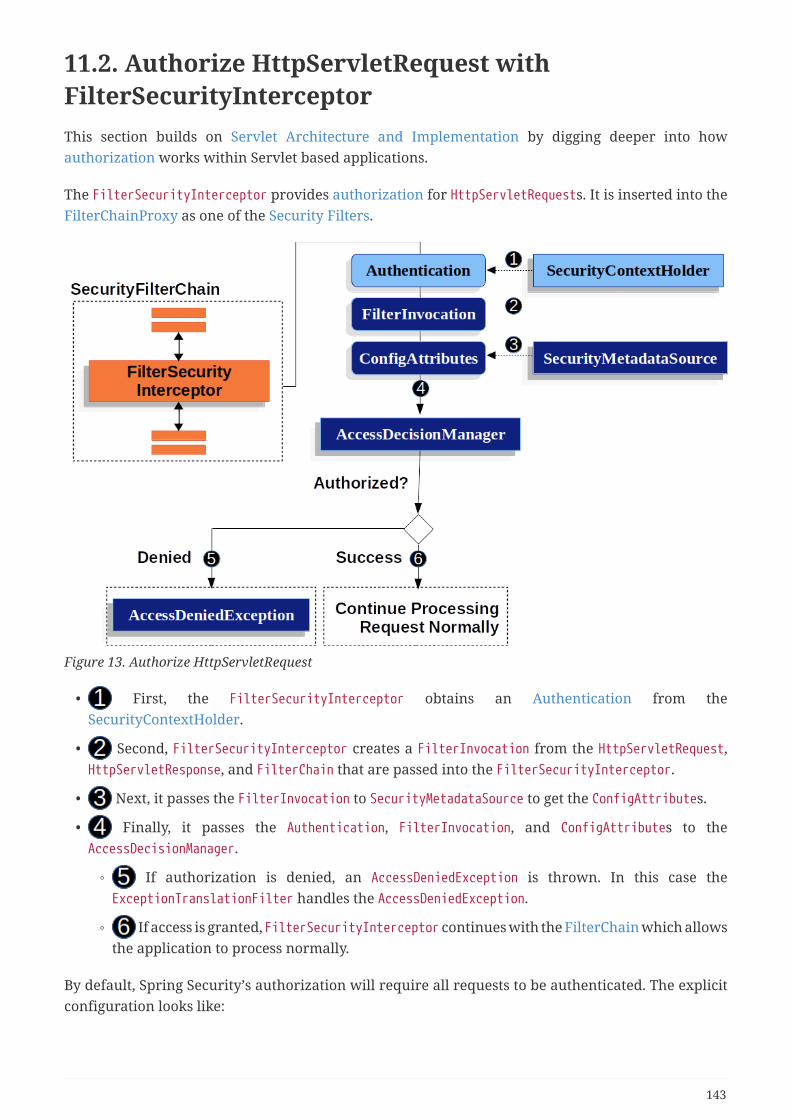
11.2. Authorize HttpServletRequest withFilterSecurityInterceptorThis section builds on Servlet Architecture and Implementation by digging deeper into howauthorization works within Servlet based applications.
The FilterSecurityInterceptor provides authorization for HttpServletRequests. It is inserted into theFilterChainProxy as one of the Security Filters.
Figure 13. Authorize HttpServletRequest
• First, the FilterSecurityInterceptor obtains an Authentication from theSecurityContextHolder.
• Second, FilterSecurityInterceptor creates a FilterInvocation from the HttpServletRequest,HttpServletResponse, and FilterChain that are passed into the FilterSecurityInterceptor.
• Next, it passes the FilterInvocation to SecurityMetadataSource to get the ConfigAttributes.
• Finally, it passes the Authentication, FilterInvocation, and ConfigAttributes to theAccessDecisionManager.
◦ If authorization is denied, an AccessDeniedException is thrown. In this case theExceptionTranslationFilter handles the AccessDeniedException.
◦ If access is granted, FilterSecurityInterceptor continues with the FilterChain which allowsthe application to process normally.
By default, Spring Security’s authorization will require all requests to be authenticated. The explicitconfiguration looks like:
143
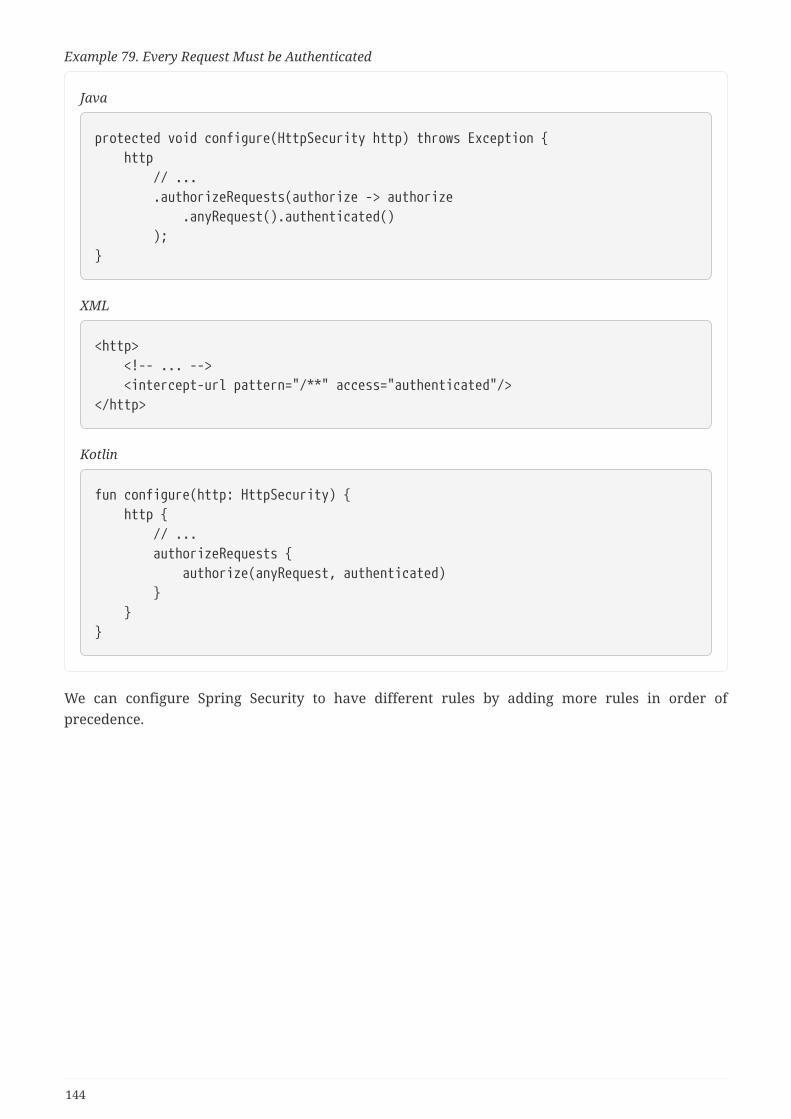
Example 79. Every Request Must be Authenticated
Java
protected void configure(HttpSecurity http) throws Exception { http // ... .authorizeRequests(authorize -> authorize .anyRequest().authenticated() );}
XML
<http> <!-- ... --> <intercept-url pattern="/**" access="authenticated"/></http>
Kotlin
fun configure(http: HttpSecurity) { http { // ... authorizeRequests { authorize(anyRequest, authenticated) } }}
We can configure Spring Security to have different rules by adding more rules in order ofprecedence.
144
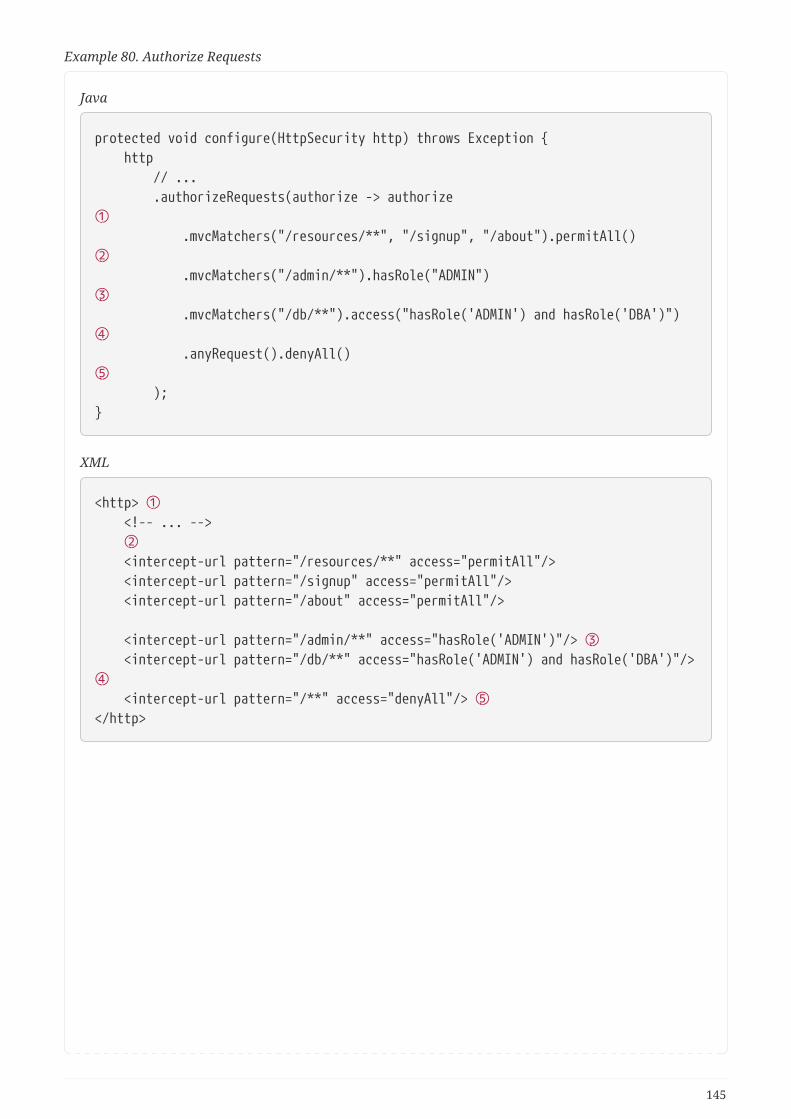
Example 80. Authorize Requests
Java
protected void configure(HttpSecurity http) throws Exception { http // ... .authorizeRequests(authorize -> authorize① .mvcMatchers("/resources/**", "/signup", "/about").permitAll()② .mvcMatchers("/admin/**").hasRole("ADMIN")③ .mvcMatchers("/db/**").access("hasRole('ADMIN') and hasRole('DBA')")④ .anyRequest().denyAll()⑤ );}
XML
<http> ① <!-- ... --> ② <intercept-url pattern="/resources/**" access="permitAll"/> <intercept-url pattern="/signup" access="permitAll"/> <intercept-url pattern="/about" access="permitAll"/>
<intercept-url pattern="/admin/**" access="hasRole('ADMIN')"/> ③ <intercept-url pattern="/db/**" access="hasRole('ADMIN') and hasRole('DBA')"/>④ <intercept-url pattern="/**" access="denyAll"/> ⑤</http>
145
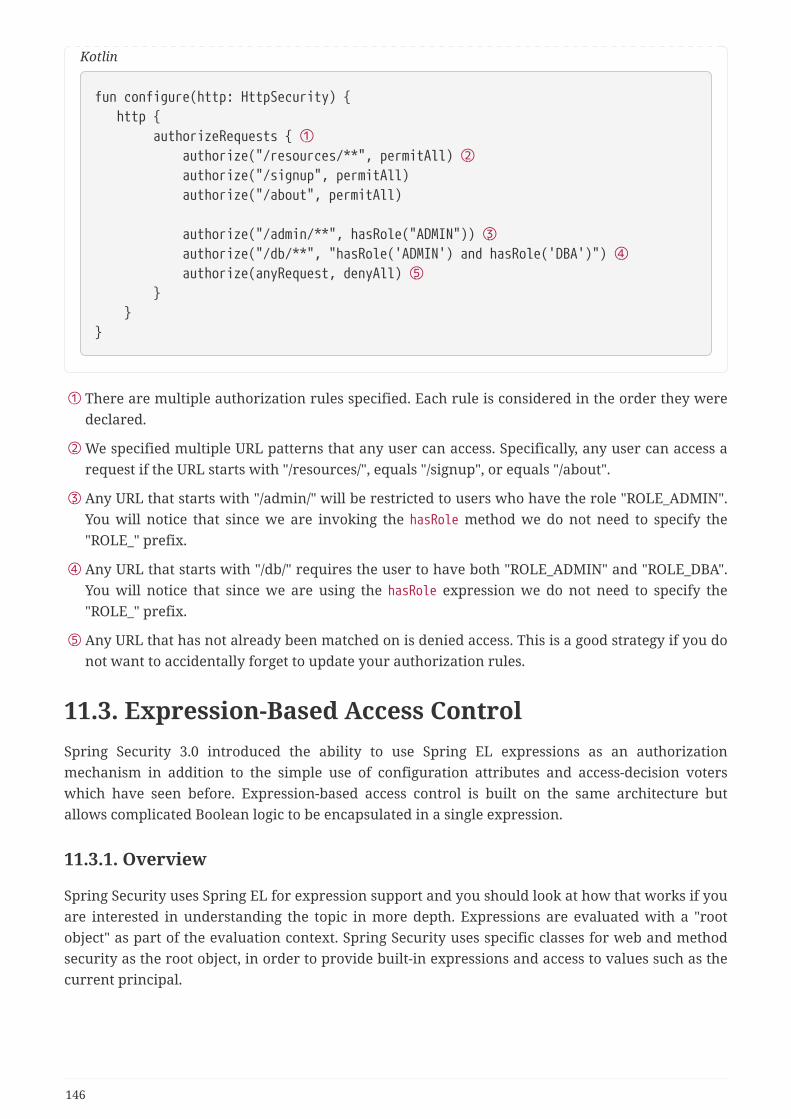
Kotlin
fun configure(http: HttpSecurity) { http { authorizeRequests { ① authorize("/resources/**", permitAll) ② authorize("/signup", permitAll) authorize("/about", permitAll)
authorize("/admin/**", hasRole("ADMIN")) ③ authorize("/db/**", "hasRole('ADMIN') and hasRole('DBA')") ④ authorize(anyRequest, denyAll) ⑤ } }}
① There are multiple authorization rules specified. Each rule is considered in the order they weredeclared.
② We specified multiple URL patterns that any user can access. Specifically, any user can access arequest if the URL starts with "/resources/", equals "/signup", or equals "/about".
③ Any URL that starts with "/admin/" will be restricted to users who have the role "ROLE_ADMIN".You will notice that since we are invoking the hasRole method we do not need to specify the"ROLE_" prefix.
④ Any URL that starts with "/db/" requires the user to have both "ROLE_ADMIN" and "ROLE_DBA".You will notice that since we are using the hasRole expression we do not need to specify the"ROLE_" prefix.
⑤ Any URL that has not already been matched on is denied access. This is a good strategy if you donot want to accidentally forget to update your authorization rules.
11.3. Expression-Based Access ControlSpring Security 3.0 introduced the ability to use Spring EL expressions as an authorizationmechanism in addition to the simple use of configuration attributes and access-decision voterswhich have seen before. Expression-based access control is built on the same architecture butallows complicated Boolean logic to be encapsulated in a single expression.
11.3.1. Overview
Spring Security uses Spring EL for expression support and you should look at how that works if youare interested in understanding the topic in more depth. Expressions are evaluated with a "rootobject" as part of the evaluation context. Spring Security uses specific classes for web and methodsecurity as the root object, in order to provide built-in expressions and access to values such as thecurrent principal.
146

Common Built-In Expressions
The base class for expression root objects is SecurityExpressionRoot. This provides some commonexpressions which are available in both web and method security.
Table 1. Common built-in expressions
Expression Description
hasRole(String role) Returns true if the current principal has thespecified role.
For example, hasRole('admin')
By default if the supplied role does not start with'ROLE_' it will be added. This can be customizedby modifying the defaultRolePrefix onDefaultWebSecurityExpressionHandler.
hasAnyRole(String… roles) Returns true if the current principal has any ofthe supplied roles (given as a comma-separatedlist of strings).
For example, hasAnyRole('admin', 'user')
By default if the supplied role does not start with'ROLE_' it will be added. This can be customizedby modifying the defaultRolePrefix onDefaultWebSecurityExpressionHandler.
hasAuthority(String authority) Returns true if the current principal has thespecified authority.
For example, hasAuthority('read')
hasAnyAuthority(String… authorities) Returns true if the current principal has any ofthe supplied authorities (given as a comma-separated list of strings)
For example, hasAnyAuthority('read', 'write')
principal Allows direct access to the principal objectrepresenting the current user
authentication Allows direct access to the currentAuthentication object obtained from theSecurityContext
permitAll Always evaluates to true
denyAll Always evaluates to false
isAnonymous() Returns true if the current principal is ananonymous user
147
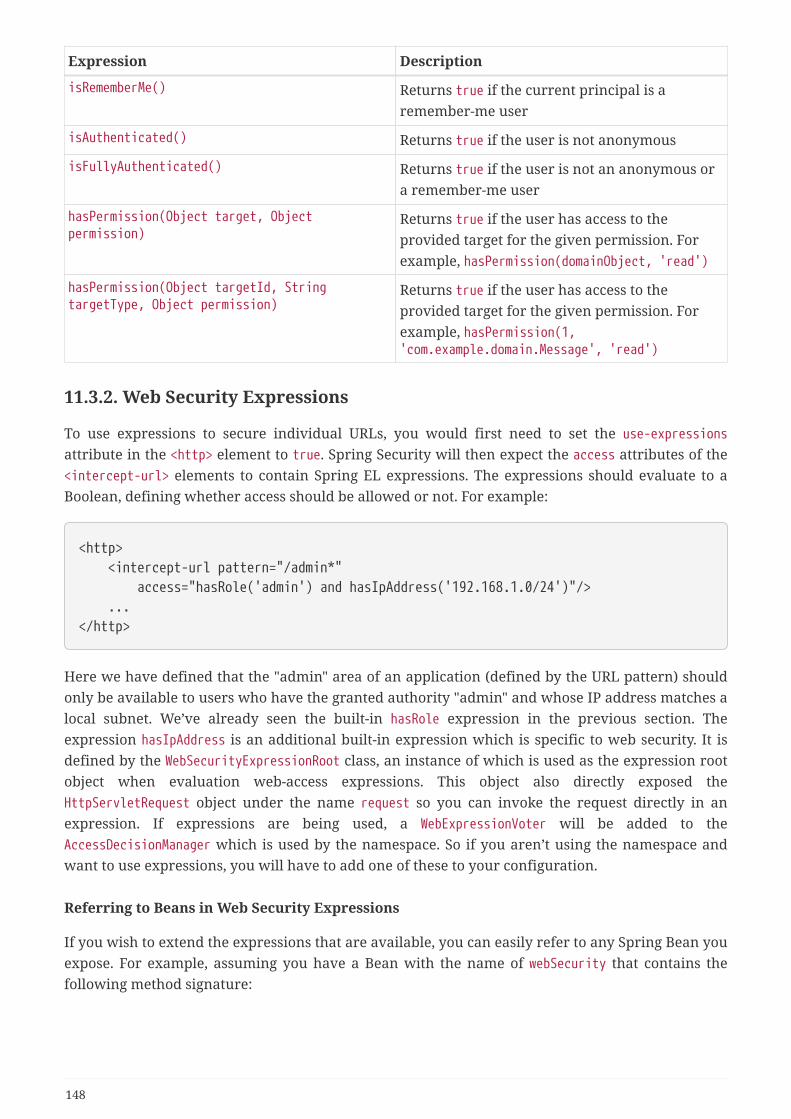
Expression Description
isRememberMe() Returns true if the current principal is aremember-me user
isAuthenticated() Returns true if the user is not anonymous
isFullyAuthenticated() Returns true if the user is not an anonymous ora remember-me user
hasPermission(Object target, Objectpermission)
Returns true if the user has access to theprovided target for the given permission. Forexample, hasPermission(domainObject, 'read')
hasPermission(Object targetId, StringtargetType, Object permission)
Returns true if the user has access to theprovided target for the given permission. Forexample, hasPermission(1,'com.example.domain.Message', 'read')
11.3.2. Web Security Expressions
To use expressions to secure individual URLs, you would first need to set the use-expressionsattribute in the <http> element to true. Spring Security will then expect the access attributes of the<intercept-url> elements to contain Spring EL expressions. The expressions should evaluate to aBoolean, defining whether access should be allowed or not. For example:
<http> <intercept-url pattern="/admin*" access="hasRole('admin') and hasIpAddress('192.168.1.0/24')"/> ...</http>
Here we have defined that the "admin" area of an application (defined by the URL pattern) shouldonly be available to users who have the granted authority "admin" and whose IP address matches alocal subnet. We’ve already seen the built-in hasRole expression in the previous section. Theexpression hasIpAddress is an additional built-in expression which is specific to web security. It isdefined by the WebSecurityExpressionRoot class, an instance of which is used as the expression rootobject when evaluation web-access expressions. This object also directly exposed theHttpServletRequest object under the name request so you can invoke the request directly in anexpression. If expressions are being used, a WebExpressionVoter will be added to theAccessDecisionManager which is used by the namespace. So if you aren’t using the namespace andwant to use expressions, you will have to add one of these to your configuration.
Referring to Beans in Web Security Expressions
If you wish to extend the expressions that are available, you can easily refer to any Spring Bean youexpose. For example, assuming you have a Bean with the name of webSecurity that contains thefollowing method signature:
148

public class WebSecurity { public boolean check(Authentication authentication, HttpServletRequestrequest) { ... }}
You could refer to the method using:
<http> <intercept-url pattern="/user/**" access="@webSecurity.check(authentication,request)"/> ...</http>
or in Java configuration
http .authorizeRequests(authorize -> authorize .antMatchers("/user/**").access("@webSecurity.check(authentication,request)") ... )
Path Variables in Web Security Expressions
At times it is nice to be able to refer to path variables within a URL. For example, consider a RESTfulapplication that looks up a user by id from the URL path in the format /user/{userId}.
You can easily refer to the path variable by placing it in the pattern. For example, if you had a Beanwith the name of webSecurity that contains the following method signature:
public class WebSecurity { public boolean checkUserId(Authentication authentication, int id) { ... }}
You could refer to the method using:
<http> <intercept-url pattern="/user/{userId}/**" access="@webSecurity.checkUserId(authentication,#userId)"/> ...</http>
149
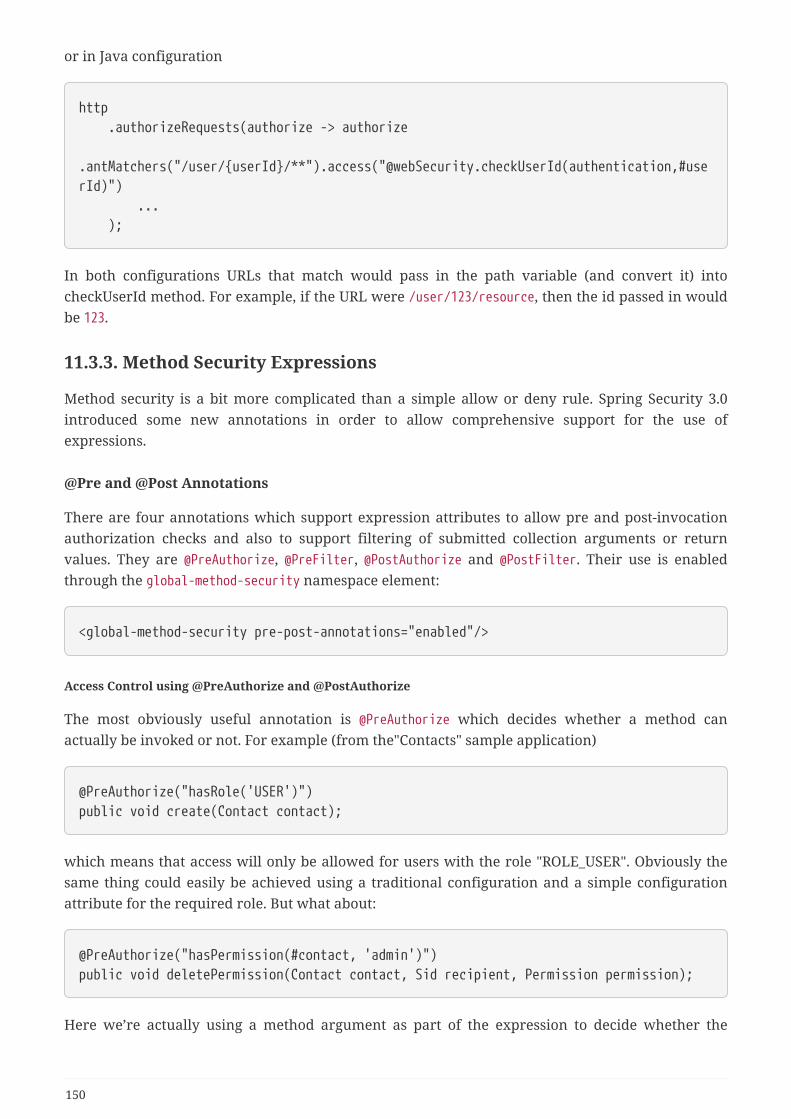
or in Java configuration
http .authorizeRequests(authorize -> authorize .antMatchers("/user/{userId}/**").access("@webSecurity.checkUserId(authentication,#userId)") ... );
In both configurations URLs that match would pass in the path variable (and convert it) intocheckUserId method. For example, if the URL were /user/123/resource, then the id passed in wouldbe 123.
11.3.3. Method Security Expressions
Method security is a bit more complicated than a simple allow or deny rule. Spring Security 3.0introduced some new annotations in order to allow comprehensive support for the use ofexpressions.
@Pre and @Post Annotations
There are four annotations which support expression attributes to allow pre and post-invocationauthorization checks and also to support filtering of submitted collection arguments or returnvalues. They are @PreAuthorize, @PreFilter, @PostAuthorize and @PostFilter. Their use is enabledthrough the global-method-security namespace element:
<global-method-security pre-post-annotations="enabled"/>
Access Control using @PreAuthorize and @PostAuthorize
The most obviously useful annotation is @PreAuthorize which decides whether a method canactually be invoked or not. For example (from the"Contacts" sample application)
@PreAuthorize("hasRole('USER')")public void create(Contact contact);
which means that access will only be allowed for users with the role "ROLE_USER". Obviously thesame thing could easily be achieved using a traditional configuration and a simple configurationattribute for the required role. But what about:
@PreAuthorize("hasPermission(#contact, 'admin')")public void deletePermission(Contact contact, Sid recipient, Permission permission);
Here we’re actually using a method argument as part of the expression to decide whether the
150
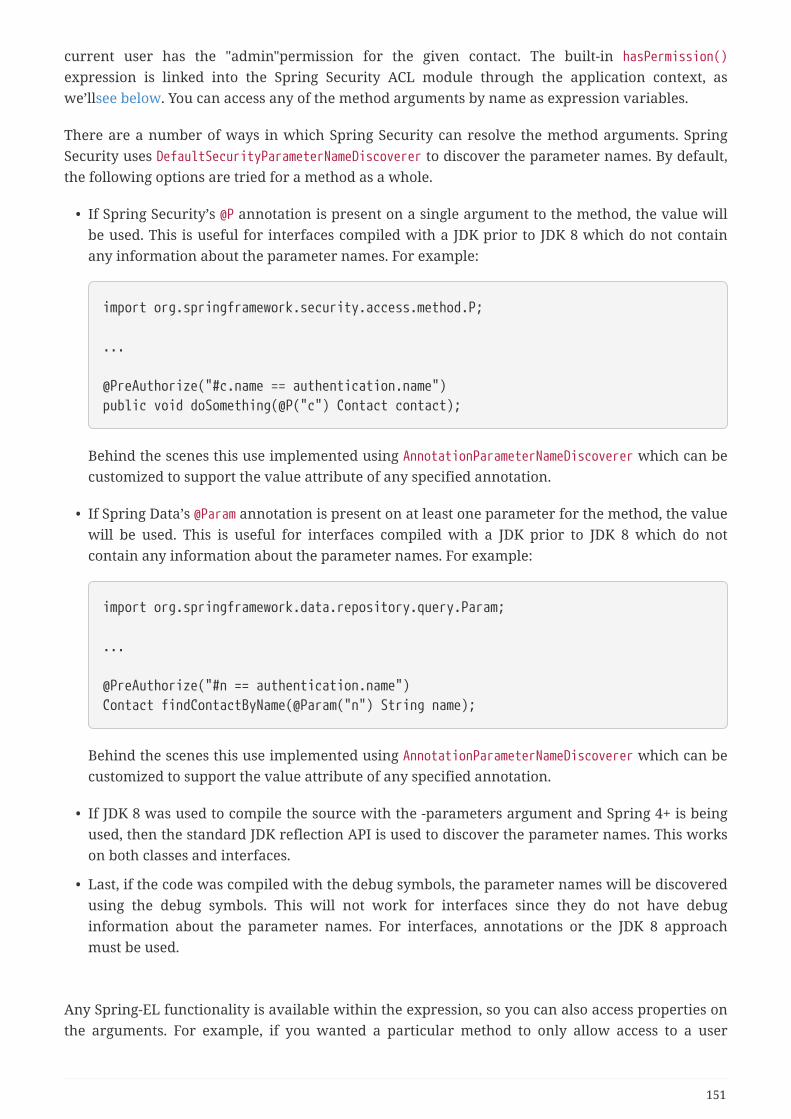
current user has the "admin"permission for the given contact. The built-in hasPermission()expression is linked into the Spring Security ACL module through the application context, aswe’llsee below. You can access any of the method arguments by name as expression variables.
There are a number of ways in which Spring Security can resolve the method arguments. SpringSecurity uses DefaultSecurityParameterNameDiscoverer to discover the parameter names. By default,the following options are tried for a method as a whole.
• If Spring Security’s @P annotation is present on a single argument to the method, the value willbe used. This is useful for interfaces compiled with a JDK prior to JDK 8 which do not containany information about the parameter names. For example:
import org.springframework.security.access.method.P;
...
@PreAuthorize("#c.name == authentication.name")public void doSomething(@P("c") Contact contact);
Behind the scenes this use implemented using AnnotationParameterNameDiscoverer which can becustomized to support the value attribute of any specified annotation.
• If Spring Data’s @Param annotation is present on at least one parameter for the method, the valuewill be used. This is useful for interfaces compiled with a JDK prior to JDK 8 which do notcontain any information about the parameter names. For example:
import org.springframework.data.repository.query.Param;
...
@PreAuthorize("#n == authentication.name")Contact findContactByName(@Param("n") String name);
Behind the scenes this use implemented using AnnotationParameterNameDiscoverer which can becustomized to support the value attribute of any specified annotation.
• If JDK 8 was used to compile the source with the -parameters argument and Spring 4+ is beingused, then the standard JDK reflection API is used to discover the parameter names. This workson both classes and interfaces.
• Last, if the code was compiled with the debug symbols, the parameter names will be discoveredusing the debug symbols. This will not work for interfaces since they do not have debuginformation about the parameter names. For interfaces, annotations or the JDK 8 approachmust be used.
Any Spring-EL functionality is available within the expression, so you can also access properties onthe arguments. For example, if you wanted a particular method to only allow access to a user
151
whose username matched that of the contact, you could write
@PreAuthorize("#contact.name == authentication.name")public void doSomething(Contact contact);
Here we are accessing another built-in expression, authentication, which is the Authenticationstored in the security context. You can also access its "principal" property directly, using theexpression principal. The value will often be a UserDetails instance, so you might use anexpression like principal.username or principal.enabled.
Less commonly, you may wish to perform an access-control check after the method has beeninvoked. This can be achieved using the @PostAuthorize annotation. To access the return value froma method, use the built-in name returnObject in the expression.
Filtering using @PreFilter and @PostFilter
As you may already be aware, Spring Security supports filtering of collections and arrays and thiscan now be achieved using expressions. This is most commonly performed on the return value of amethod. For example:
@PreAuthorize("hasRole('USER')")@PostFilter("hasPermission(filterObject, 'read') or hasPermission(filterObject,'admin')")public List<Contact> getAll();
When using the @PostFilter annotation, Spring Security iterates through the returned collectionand removes any elements for which the supplied expression is false. The name filterObject refersto the current object in the collection. You can also filter before the method call, using @PreFilter,though this is a less common requirement. The syntax is just the same, but if there is more than oneargument which is a collection type then you have to select one by name using the filterTargetproperty of this annotation.
Note that filtering is obviously not a substitute for tuning your data retrieval queries. If you arefiltering large collections and removing many of the entries then this is likely to be inefficient.
Built-In Expressions
There are some built-in expressions which are specific to method security, which we have alreadyseen in use above. The filterTarget and returnValue values are simple enough, but the use of thehasPermission() expression warrants a closer look.
The PermissionEvaluator interface
hasPermission() expressions are delegated to an instance of PermissionEvaluator. It is intended tobridge between the expression system and Spring Security’s ACL system, allowing you to specifyauthorization constraints on domain objects, based on abstract permissions. It has no explicitdependencies on the ACL module, so you could swap that out for an alternative implementation if
152
required. The interface has two methods:
boolean hasPermission(Authentication authentication, Object targetDomainObject, Object permission);
boolean hasPermission(Authentication authentication, Serializable targetId, String targetType, Object permission);
which map directly to the available versions of the expression, with the exception that the firstargument (the Authentication object) is not supplied. The first is used in situations where thedomain object, to which access is being controlled, is already loaded. Then expression will returntrue if the current user has the given permission for that object. The second version is used in caseswhere the object is not loaded, but its identifier is known. An abstract "type" specifier for thedomain object is also required, allowing the correct ACL permissions to be loaded. This hastraditionally been the Java class of the object, but does not have to be as long as it is consistent withhow the permissions are loaded.
To use hasPermission() expressions, you have to explicitly configure a PermissionEvaluator in yourapplication context. This would look something like this:
<security:global-method-security pre-post-annotations="enabled"><security:expression-handler ref="expressionHandler"/></security:global-method-security>
<bean id="expressionHandler" class="org.springframework.security.access.expression.method.DefaultMethodSecurityExpressionHandler"> <property name="permissionEvaluator" ref="myPermissionEvaluator"/></bean>
Where myPermissionEvaluator is the bean which implements PermissionEvaluator. Usually this willbe the implementation from the ACL module which is called AclPermissionEvaluator. See the"Contacts" sample application configuration for more details.
Method Security Meta Annotations
You can make use of meta annotations for method security to make your code more readable. Thisis especially convenient if you find that you are repeating the same complex expression throughoutyour code base. For example, consider the following:
@PreAuthorize("#contact.name == authentication.name")
Instead of repeating this everywhere, we can create a meta annotation that can be used instead.
153
@Retention(RetentionPolicy.RUNTIME)@PreAuthorize("#contact.name == authentication.name")public @interface ContactPermission {}
Meta annotations can be used for any of the Spring Security method security annotations. In orderto remain compliant with the specification JSR-250 annotations do not support meta annotations.
11.4. Secure Object Implementations
11.4.1. AOP Alliance (MethodInvocation) Security Interceptor
Prior to Spring Security 2.0, securing MethodInvocation s needed quite a lot of boiler plateconfiguration. Now the recommended approach for method security is to use namespaceconfiguration. This way the method security infrastructure beans are configured automatically foryou so you don’t really need to know about the implementation classes. We’ll just provide a quickoverview of the classes that are involved here.
Method security is enforced using a MethodSecurityInterceptor, which secures MethodInvocation s.Depending on the configuration approach, an interceptor may be specific to a single bean or sharedbetween multiple beans. The interceptor uses a MethodSecurityMetadataSource instance to obtain theconfiguration attributes that apply to a particular method invocation.MapBasedMethodSecurityMetadataSource is used to store configuration attributes keyed by methodnames (which can be wildcarded) and will be used internally when the attributes are defined in theapplication context using the <intercept-methods> or <protect-point> elements. Otherimplementations will be used to handle annotation-based configuration.
Explicit MethodSecurityInterceptor Configuration
You can of course configure a MethodSecurityInterceptor directly in your application context for usewith one of Spring AOP’s proxying mechanisms:
<bean id="bankManagerSecurity" class= "org.springframework.security.access.intercept.aopalliance.MethodSecurityInterceptor"><property name="authenticationManager" ref="authenticationManager"/><property name="accessDecisionManager" ref="accessDecisionManager"/><property name="afterInvocationManager" ref="afterInvocationManager"/><property name="securityMetadataSource"> <sec:method-security-metadata-source> <sec:protect method="com.mycompany.BankManager.delete*" access="ROLE_SUPERVISOR"/> <sec:protect method="com.mycompany.BankManager.getBalance"access="ROLE_TELLER,ROLE_SUPERVISOR"/> </sec:method-security-metadata-source></property></bean>
154
11.4.2. AspectJ (JoinPoint) Security Interceptor
The AspectJ security interceptor is very similar to the AOP Alliance security interceptor discussed inthe previous section. Indeed we will only discuss the differences in this section.
The AspectJ interceptor is named AspectJSecurityInterceptor. Unlike the AOP Alliance securityinterceptor, which relies on the Spring application context to weave in the security interceptor viaproxying, the AspectJSecurityInterceptor is weaved in via the AspectJ compiler. It would not beuncommon to use both types of security interceptors in the same application, withAspectJSecurityInterceptor being used for domain object instance security and the AOP AllianceMethodSecurityInterceptor being used for services layer security.
Let’s first consider how the AspectJSecurityInterceptor is configured in the Spring applicationcontext:
<bean id="bankManagerSecurity" class= "org.springframework.security.access.intercept.aspectj.AspectJMethodSecurityInterceptor"><property name="authenticationManager" ref="authenticationManager"/><property name="accessDecisionManager" ref="accessDecisionManager"/><property name="afterInvocationManager" ref="afterInvocationManager"/><property name="securityMetadataSource"> <sec:method-security-metadata-source> <sec:protect method="com.mycompany.BankManager.delete*" access="ROLE_SUPERVISOR"/> <sec:protect method="com.mycompany.BankManager.getBalance"access="ROLE_TELLER,ROLE_SUPERVISOR"/> </sec:method-security-metadata-source></property></bean>
As you can see, aside from the class name, the AspectJSecurityInterceptor is exactly the same as theAOP Alliance security interceptor. Indeed the two interceptors can share the samesecurityMetadataSource, as the SecurityMetadataSource works with java.lang.reflect.Method s ratherthan an AOP library-specific class. Of course, your access decisions have access to the relevant AOPlibrary-specific invocation (ie MethodInvocation or JoinPoint) and as such can consider a range ofaddition criteria when making access decisions (such as method arguments).
Next you’ll need to define an AspectJ aspect. For example:
155
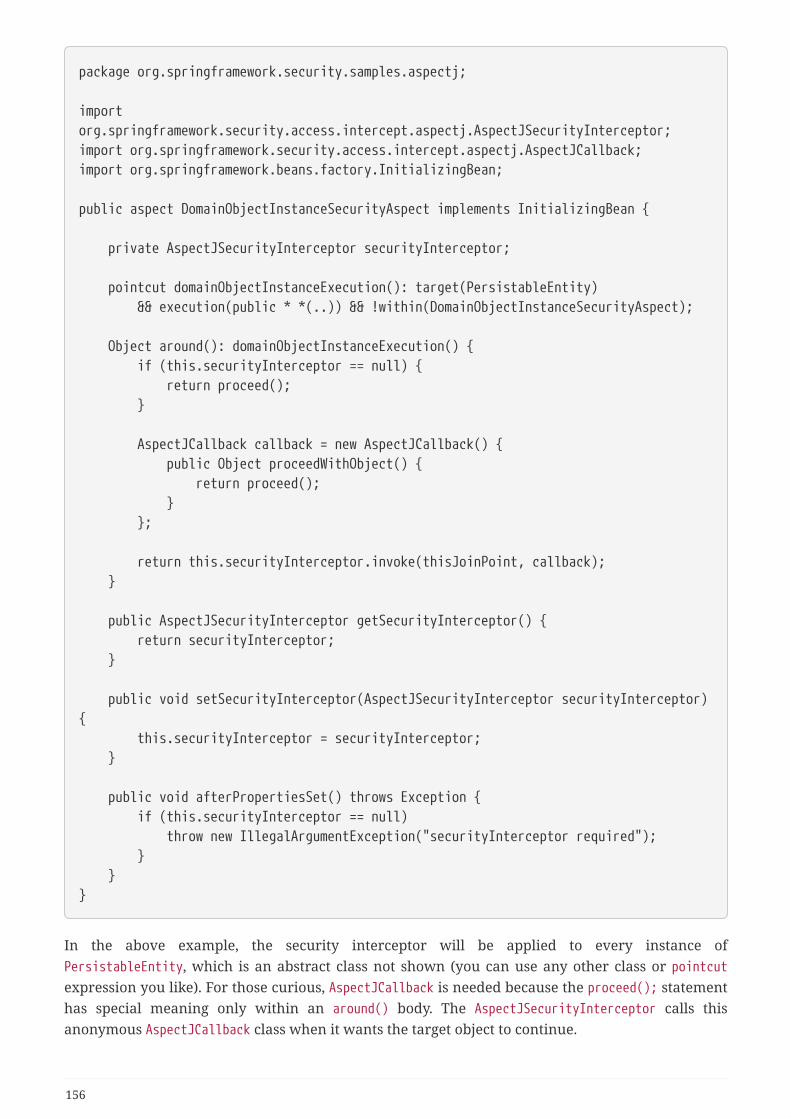
package org.springframework.security.samples.aspectj;
importorg.springframework.security.access.intercept.aspectj.AspectJSecurityInterceptor;import org.springframework.security.access.intercept.aspectj.AspectJCallback;import org.springframework.beans.factory.InitializingBean;
public aspect DomainObjectInstanceSecurityAspect implements InitializingBean {
private AspectJSecurityInterceptor securityInterceptor;
pointcut domainObjectInstanceExecution(): target(PersistableEntity) && execution(public * *(..)) && !within(DomainObjectInstanceSecurityAspect);
Object around(): domainObjectInstanceExecution() { if (this.securityInterceptor == null) { return proceed(); }
AspectJCallback callback = new AspectJCallback() { public Object proceedWithObject() { return proceed(); } };
return this.securityInterceptor.invoke(thisJoinPoint, callback); }
public AspectJSecurityInterceptor getSecurityInterceptor() { return securityInterceptor; }
public void setSecurityInterceptor(AspectJSecurityInterceptor securityInterceptor){ this.securityInterceptor = securityInterceptor; }
public void afterPropertiesSet() throws Exception { if (this.securityInterceptor == null) throw new IllegalArgumentException("securityInterceptor required"); } }}
In the above example, the security interceptor will be applied to every instance ofPersistableEntity, which is an abstract class not shown (you can use any other class or pointcutexpression you like). For those curious, AspectJCallback is needed because the proceed(); statementhas special meaning only within an around() body. The AspectJSecurityInterceptor calls thisanonymous AspectJCallback class when it wants the target object to continue.
156
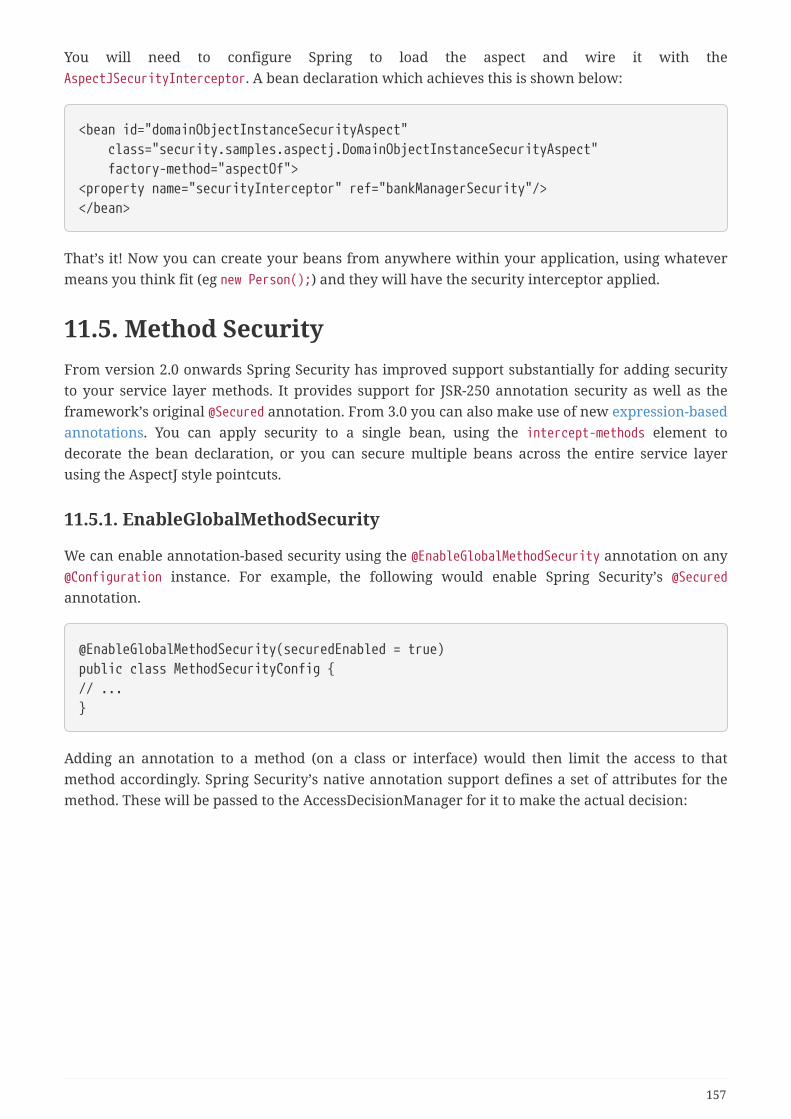
You will need to configure Spring to load the aspect and wire it with theAspectJSecurityInterceptor. A bean declaration which achieves this is shown below:
<bean id="domainObjectInstanceSecurityAspect" class="security.samples.aspectj.DomainObjectInstanceSecurityAspect" factory-method="aspectOf"><property name="securityInterceptor" ref="bankManagerSecurity"/></bean>
That’s it! Now you can create your beans from anywhere within your application, using whatevermeans you think fit (eg new Person();) and they will have the security interceptor applied.
11.5. Method SecurityFrom version 2.0 onwards Spring Security has improved support substantially for adding securityto your service layer methods. It provides support for JSR-250 annotation security as well as theframework’s original @Secured annotation. From 3.0 you can also make use of new expression-basedannotations. You can apply security to a single bean, using the intercept-methods element todecorate the bean declaration, or you can secure multiple beans across the entire service layerusing the AspectJ style pointcuts.
11.5.1. EnableGlobalMethodSecurity
We can enable annotation-based security using the @EnableGlobalMethodSecurity annotation on any@Configuration instance. For example, the following would enable Spring Security’s @Securedannotation.
@EnableGlobalMethodSecurity(securedEnabled = true)public class MethodSecurityConfig {// ...}
Adding an annotation to a method (on a class or interface) would then limit the access to thatmethod accordingly. Spring Security’s native annotation support defines a set of attributes for themethod. These will be passed to the AccessDecisionManager for it to make the actual decision:
157
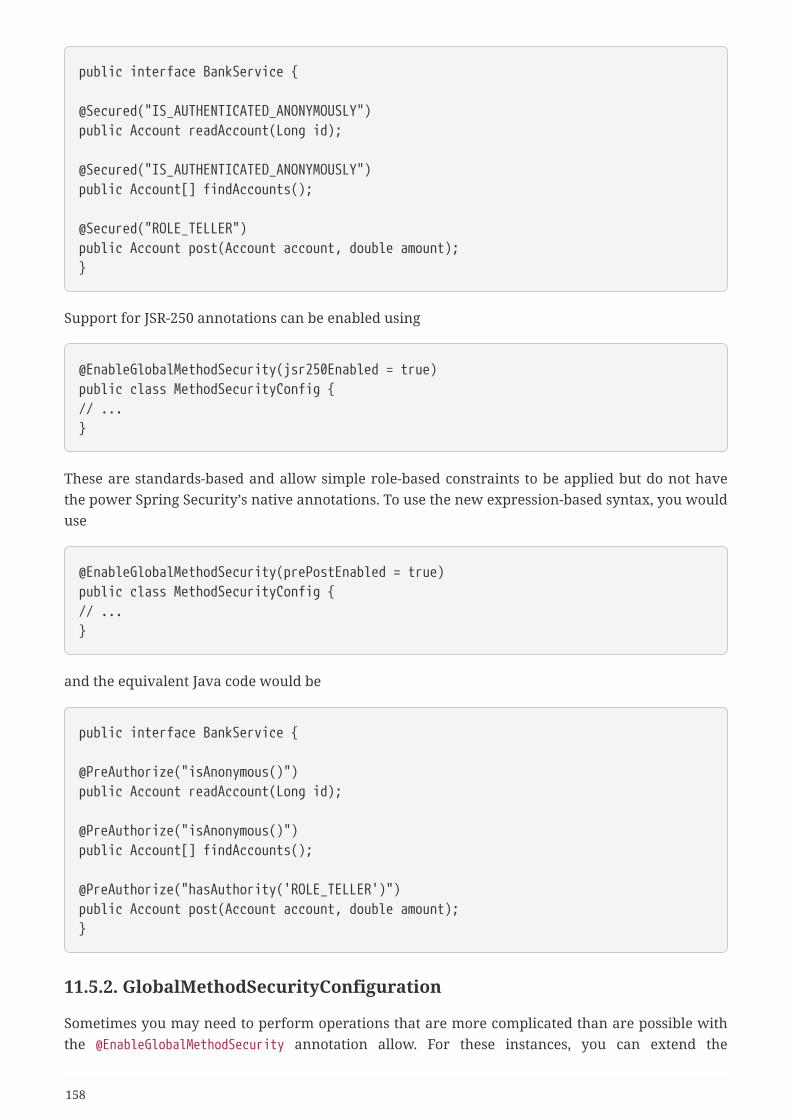
public interface BankService {
@Secured("IS_AUTHENTICATED_ANONYMOUSLY")public Account readAccount(Long id);
@Secured("IS_AUTHENTICATED_ANONYMOUSLY")public Account[] findAccounts();
@Secured("ROLE_TELLER")public Account post(Account account, double amount);}
Support for JSR-250 annotations can be enabled using
@EnableGlobalMethodSecurity(jsr250Enabled = true)public class MethodSecurityConfig {// ...}
These are standards-based and allow simple role-based constraints to be applied but do not havethe power Spring Security’s native annotations. To use the new expression-based syntax, you woulduse
@EnableGlobalMethodSecurity(prePostEnabled = true)public class MethodSecurityConfig {// ...}
and the equivalent Java code would be
public interface BankService {
@PreAuthorize("isAnonymous()")public Account readAccount(Long id);
@PreAuthorize("isAnonymous()")public Account[] findAccounts();
@PreAuthorize("hasAuthority('ROLE_TELLER')")public Account post(Account account, double amount);}
11.5.2. GlobalMethodSecurityConfiguration
Sometimes you may need to perform operations that are more complicated than are possible withthe @EnableGlobalMethodSecurity annotation allow. For these instances, you can extend the
158
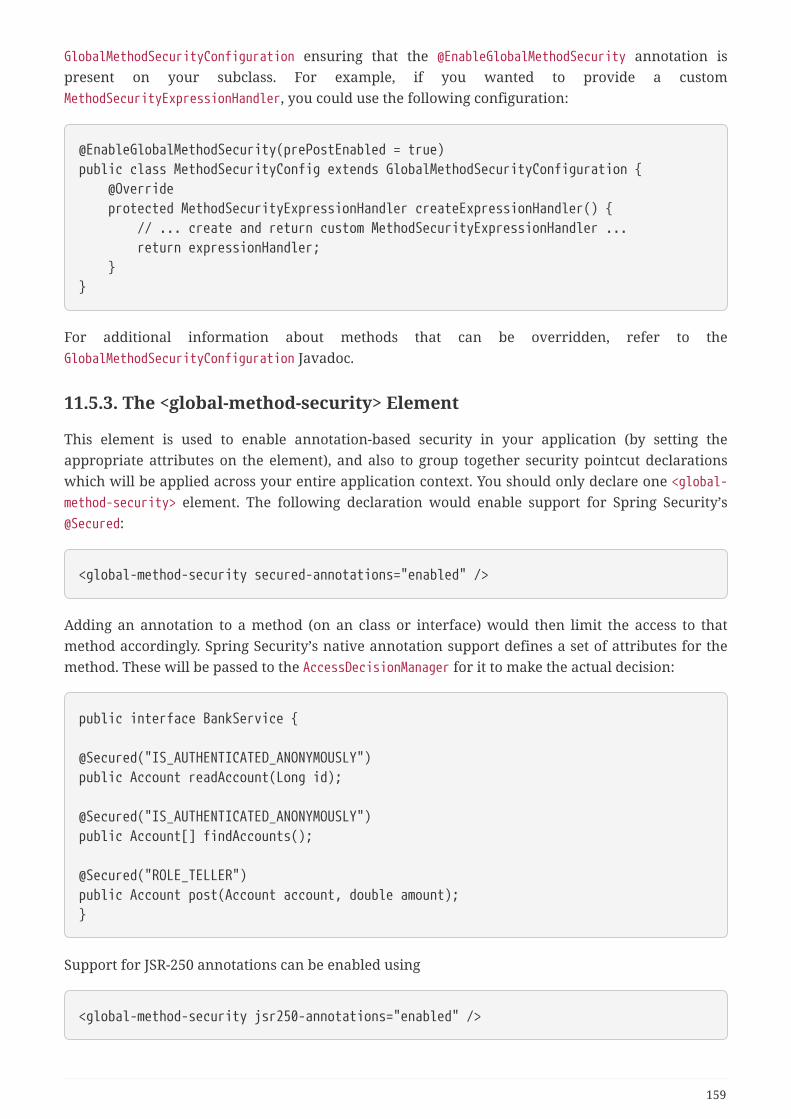
GlobalMethodSecurityConfiguration ensuring that the @EnableGlobalMethodSecurity annotation ispresent on your subclass. For example, if you wanted to provide a customMethodSecurityExpressionHandler, you could use the following configuration:
@EnableGlobalMethodSecurity(prePostEnabled = true)public class MethodSecurityConfig extends GlobalMethodSecurityConfiguration { @Override protected MethodSecurityExpressionHandler createExpressionHandler() { // ... create and return custom MethodSecurityExpressionHandler ... return expressionHandler; }}
For additional information about methods that can be overridden, refer to theGlobalMethodSecurityConfiguration Javadoc.
11.5.3. The <global-method-security> Element
This element is used to enable annotation-based security in your application (by setting theappropriate attributes on the element), and also to group together security pointcut declarationswhich will be applied across your entire application context. You should only declare one <global-method-security> element. The following declaration would enable support for Spring Security’s@Secured:
<global-method-security secured-annotations="enabled" />
Adding an annotation to a method (on an class or interface) would then limit the access to thatmethod accordingly. Spring Security’s native annotation support defines a set of attributes for themethod. These will be passed to the AccessDecisionManager for it to make the actual decision:
public interface BankService {
@Secured("IS_AUTHENTICATED_ANONYMOUSLY")public Account readAccount(Long id);
@Secured("IS_AUTHENTICATED_ANONYMOUSLY")public Account[] findAccounts();
@Secured("ROLE_TELLER")public Account post(Account account, double amount);}
Support for JSR-250 annotations can be enabled using
<global-method-security jsr250-annotations="enabled" />
159
These are standards-based and allow simple role-based constraints to be applied but do not havethe power Spring Security’s native annotations. To use the new expression-based syntax, you woulduse
<global-method-security pre-post-annotations="enabled" />
and the equivalent Java code would be
public interface BankService {
@PreAuthorize("isAnonymous()")public Account readAccount(Long id);
@PreAuthorize("isAnonymous()")public Account[] findAccounts();
@PreAuthorize("hasAuthority('ROLE_TELLER')")public Account post(Account account, double amount);}
Expression-based annotations are a good choice if you need to define simple rules that go beyondchecking the role names against the user’s list of authorities.
The annotated methods will only be secured for instances which are defined asSpring beans (in the same application context in which method-security isenabled). If you want to secure instances which are not created by Spring (usingthe new operator, for example) then you need to use AspectJ.
You can enable more than one type of annotation in the same application, but onlyone type should be used for any interface or class as the behaviour will not bewell-defined otherwise. If two annotations are found which apply to a particularmethod, then only one of them will be applied.
11.5.4. Adding Security Pointcuts using protect-pointcut
The use of protect-pointcut is particularly powerful, as it allows you to apply security to manybeans with only a simple declaration. Consider the following example:
<global-method-security><protect-pointcut expression="execution(* com.mycompany.*Service.*(..))" access="ROLE_USER"/></global-method-security>
This will protect all methods on beans declared in the application context whose classes are in thecom.mycompany package and whose class names end in "Service". Only users with the ROLE_USER role
160
will be able to invoke these methods. As with URL matching, the most specific matches must comefirst in the list of pointcuts, as the first matching expression will be used. Security annotations takeprecedence over pointcuts.
11.6. Domain Object Security (ACLs)
11.6.1. Overview
Complex applications often will find the need to define access permissions not simply at a webrequest or method invocation level. Instead, security decisions need to comprise both who(Authentication), where (MethodInvocation) and what (SomeDomainObject). In other words,authorization decisions also need to consider the actual domain object instance subject of a methodinvocation.
Imagine you’re designing an application for a pet clinic. There will be two main groups of users ofyour Spring-based application: staff of the pet clinic, as well as the pet clinic’s customers. The staffwill have access to all of the data, whilst your customers will only be able to see their own customerrecords. To make it a little more interesting, your customers can allow other users to see theircustomer records, such as their "puppy preschool" mentor or president of their local "Pony Club".Using Spring Security as the foundation, you have several approaches that can be used:
• Write your business methods to enforce the security. You could consult a collection within theCustomer domain object instance to determine which users have access. By using theSecurityContextHolder.getContext().getAuthentication(), you’ll be able to access theAuthentication object.
• Write an AccessDecisionVoter to enforce the security from the GrantedAuthority[] s stored in theAuthentication object. This would mean your AuthenticationManager would need to populate theAuthentication with custom GrantedAuthority[]s representing each of the Customer domainobject instances the principal has access to.
• Write an AccessDecisionVoter to enforce the security and open the target Customer domain objectdirectly. This would mean your voter needs access to a DAO that allows it to retrieve theCustomer object. It would then access the Customer object’s collection of approved users and makethe appropriate decision.
Each one of these approaches is perfectly legitimate. However, the first couples your authorizationchecking to your business code. The main problems with this include the enhanced difficulty ofunit testing and the fact it would be more difficult to reuse the Customer authorization logicelsewhere. Obtaining the GrantedAuthority[] s from the Authentication object is also fine, but willnot scale to large numbers of Customer s. If a user might be able to access 5,000 Customer s (unlikelyin this case, but imagine if it were a popular vet for a large Pony Club!) the amount of memoryconsumed and time required to construct the Authentication object would be undesirable. The finalmethod, opening the Customer directly from external code, is probably the best of the three. Itachieves separation of concerns, and doesn’t misuse memory or CPU cycles, but it is still inefficientin that both the AccessDecisionVoter and the eventual business method itself will perform a call tothe DAO responsible for retrieving the Customer object. Two accesses per method invocation isclearly undesirable. In addition, with every approach listed you’ll need to write your own accesscontrol list (ACL) persistence and business logic from scratch.
161
Fortunately, there is another alternative, which we’ll talk about below.
11.6.2. Key Concepts
Spring Security’s ACL services are shipped in the spring-security-acl-xxx.jar. You will need to addthis JAR to your classpath to use Spring Security’s domain object instance security capabilities.
Spring Security’s domain object instance security capabilities centre on the concept of an accesscontrol list (ACL). Every domain object instance in your system has its own ACL, and the ACLrecords details of who can and can’t work with that domain object. With this in mind, SpringSecurity delivers three main ACL-related capabilities to your application:
• A way of efficiently retrieving ACL entries for all of your domain objects (and modifying thoseACLs)
• A way of ensuring a given principal is permitted to work with your objects, before methods arecalled
• A way of ensuring a given principal is permitted to work with your objects (or something theyreturn), after methods are called
As indicated by the first bullet point, one of the main capabilities of the Spring Security ACL moduleis providing a high-performance way of retrieving ACLs. This ACL repository capability is extremelyimportant, because every domain object instance in your system might have several access controlentries, and each ACL might inherit from other ACLs in a tree-like structure (this is supported out-of-the-box by Spring Security, and is very commonly used). Spring Security’s ACL capability hasbeen carefully designed to provide high performance retrieval of ACLs, together with pluggablecaching, deadlock-minimizing database updates, independence from ORM frameworks (we useJDBC directly), proper encapsulation, and transparent database updating.
Given databases are central to the operation of the ACL module, let’s explore the four main tablesused by default in the implementation. The tables are presented below in order of size in a typicalSpring Security ACL deployment, with the table with the most rows listed last:
• ACL_SID allows us to uniquely identify any principal or authority in the system ("SID" stands for"security identity"). The only columns are the ID, a textual representation of the SID, and a flagto indicate whether the textual representation refers to a principal name or a GrantedAuthority.Thus, there is a single row for each unique principal or GrantedAuthority. When used in thecontext of receiving a permission, a SID is generally called a "recipient".
• ACL_CLASS allows us to uniquely identify any domain object class in the system. The onlycolumns are the ID and the Java class name. Thus, there is a single row for each unique Class wewish to store ACL permissions for.
• ACL_OBJECT_IDENTITY stores information for each unique domain object instance in thesystem. Columns include the ID, a foreign key to the ACL_CLASS table, a unique identifier so weknow which ACL_CLASS instance we’re providing information for, the parent, a foreign key tothe ACL_SID table to represent the owner of the domain object instance, and whether we allowACL entries to inherit from any parent ACL. We have a single row for every domain objectinstance we’re storing ACL permissions for.
• Finally, ACL_ENTRY stores the individual permissions assigned to each recipient. Columns
162
include a foreign key to the ACL_OBJECT_IDENTITY, the recipient (ie a foreign key to ACL_SID),whether we’ll be auditing or not, and the integer bit mask that represents the actual permissionbeing granted or denied. We have a single row for every recipient that receives a permission towork with a domain object.
As mentioned in the last paragraph, the ACL system uses integer bit masking. Don’t worry, you neednot be aware of the finer points of bit shifting to use the ACL system, but suffice to say that we have32 bits we can switch on or off. Each of these bits represents a permission, and by default thepermissions are read (bit 0), write (bit 1), create (bit 2), delete (bit 3) and administer (bit 4). It’s easyto implement your own Permission instance if you wish to use other permissions, and theremainder of the ACL framework will operate without knowledge of your extensions.
It is important to understand that the number of domain objects in your system has absolutely nobearing on the fact we’ve chosen to use integer bit masking. Whilst you have 32 bits available forpermissions, you could have billions of domain object instances (which will mean billions of rowsin ACL_OBJECT_IDENTITY and quite probably ACL_ENTRY). We make this point because we’vefound sometimes people mistakenly believe they need a bit for each potential domain object, whichis not the case.
Now that we’ve provided a basic overview of what the ACL system does, and what it looks like at atable structure, let’s explore the key interfaces. The key interfaces are:
• Acl: Every domain object has one and only one Acl object, which internally holds theAccessControlEntry s as well as knows the owner of the Acl. An Acl does not refer directly to thedomain object, but instead to an ObjectIdentity. The Acl is stored in the ACL_OBJECT_IDENTITYtable.
• AccessControlEntry: An Acl holds multiple AccessControlEntry s, which are often abbreviated asACEs in the framework. Each ACE refers to a specific tuple of Permission, Sid and Acl. An ACEcan also be granting or non-granting and contain audit settings. The ACE is stored in theACL_ENTRY table.
• Permission: A permission represents a particular immutable bit mask, and offers conveniencefunctions for bit masking and outputting information. The basic permissions presented above(bits 0 through 4) are contained in the BasePermission class.
• Sid: The ACL module needs to refer to principals and GrantedAuthority[] s. A level of indirectionis provided by the Sid interface, which is an abbreviation of "security identity". Common classesinclude PrincipalSid (to represent the principal inside an Authentication object) andGrantedAuthoritySid. The security identity information is stored in the ACL_SID table.
• ObjectIdentity: Each domain object is represented internally within the ACL module by anObjectIdentity. The default implementation is called ObjectIdentityImpl.
• AclService: Retrieves the Acl applicable for a given ObjectIdentity. In the includedimplementation (JdbcAclService), retrieval operations are delegated to a LookupStrategy. TheLookupStrategy provides a highly optimized strategy for retrieving ACL information, usingbatched retrievals (BasicLookupStrategy) and supporting custom implementations that leveragematerialized views, hierarchical queries and similar performance-centric, non-ANSI SQLcapabilities.
• MutableAclService: Allows a modified Acl to be presented for persistence. It is not essential to
163
use this interface if you do not wish.
Please note that our out-of-the-box AclService and related database classes all use ANSI SQL. Thisshould therefore work with all major databases. At the time of writing, the system had beensuccessfully tested using Hypersonic SQL, PostgreSQL, Microsoft SQL Server and Oracle.
Two samples ship with Spring Security that demonstrate the ACL module. The first is the ContactsSample, and the other is the Document Management System (DMS) Sample. We suggest taking alook over these for examples.
11.6.3. Getting Started
To get starting using Spring Security’s ACL capability, you will need to store your ACL informationsomewhere. This necessitates the instantiation of a DataSource using Spring. The DataSource is theninjected into a JdbcMutableAclService and BasicLookupStrategy instance. The latter provides high-performance ACL retrieval capabilities, and the former provides mutator capabilities. Refer to oneof the samples that ship with Spring Security for an example configuration. You’ll also need topopulate the database with the four ACL-specific tables listed in the last section (refer to the ACLsamples for the appropriate SQL statements).
Once you’ve created the required schema and instantiated JdbcMutableAclService, you’ll next needto ensure your domain model supports interoperability with the Spring Security ACL package.Hopefully ObjectIdentityImpl will prove sufficient, as it provides a large number of ways in which itcan be used. Most people will have domain objects that contain a public Serializable getId()method. If the return type is long, or compatible with long (eg an int), you will find you need notgive further consideration to ObjectIdentity issues. Many parts of the ACL module rely on longidentifiers. If you’re not using long (or an int, byte etc), there is a very good chance you’ll need toreimplement a number of classes. We do not intend to support non-long identifiers in SpringSecurity’s ACL module, as longs are already compatible with all database sequences, the mostcommon identifier data type, and are of sufficient length to accommodate all common usagescenarios.
The following fragment of code shows how to create an Acl, or modify an existing Acl:
164
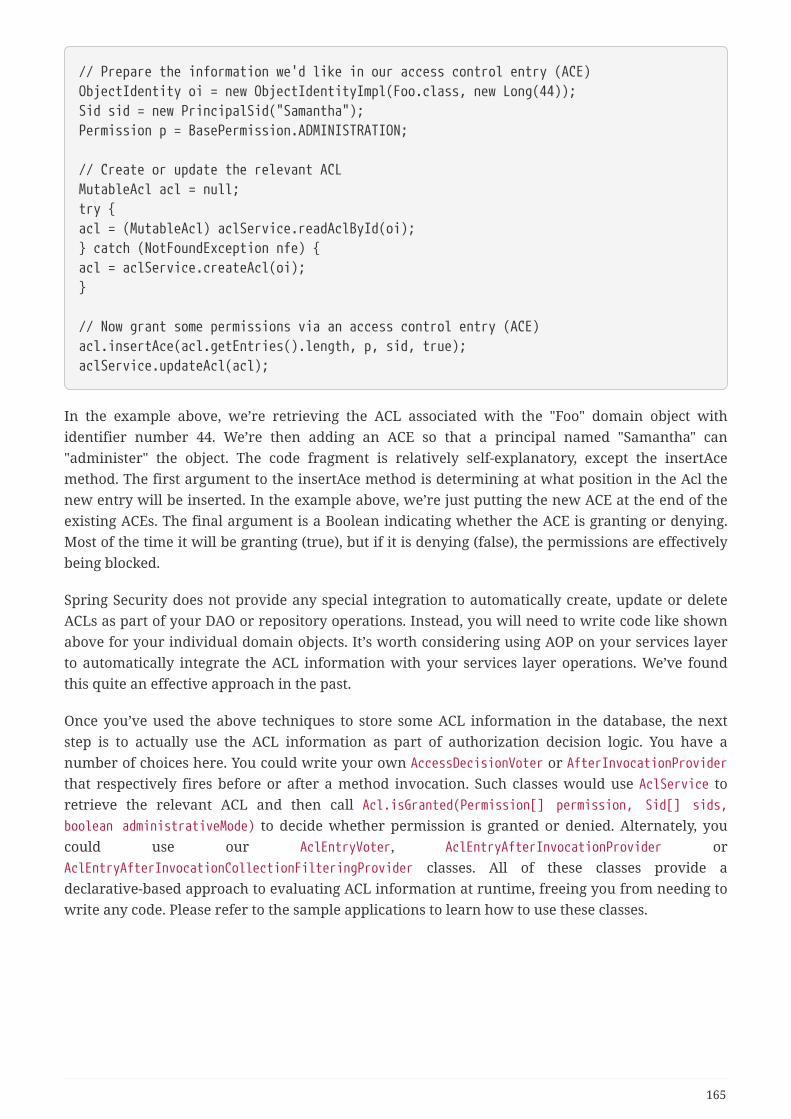
// Prepare the information we'd like in our access control entry (ACE)ObjectIdentity oi = new ObjectIdentityImpl(Foo.class, new Long(44));Sid sid = new PrincipalSid("Samantha");Permission p = BasePermission.ADMINISTRATION;
// Create or update the relevant ACLMutableAcl acl = null;try {acl = (MutableAcl) aclService.readAclById(oi);} catch (NotFoundException nfe) {acl = aclService.createAcl(oi);}
// Now grant some permissions via an access control entry (ACE)acl.insertAce(acl.getEntries().length, p, sid, true);aclService.updateAcl(acl);
In the example above, we’re retrieving the ACL associated with the "Foo" domain object withidentifier number 44. We’re then adding an ACE so that a principal named "Samantha" can"administer" the object. The code fragment is relatively self-explanatory, except the insertAcemethod. The first argument to the insertAce method is determining at what position in the Acl thenew entry will be inserted. In the example above, we’re just putting the new ACE at the end of theexisting ACEs. The final argument is a Boolean indicating whether the ACE is granting or denying.Most of the time it will be granting (true), but if it is denying (false), the permissions are effectivelybeing blocked.
Spring Security does not provide any special integration to automatically create, update or deleteACLs as part of your DAO or repository operations. Instead, you will need to write code like shownabove for your individual domain objects. It’s worth considering using AOP on your services layerto automatically integrate the ACL information with your services layer operations. We’ve foundthis quite an effective approach in the past.
Once you’ve used the above techniques to store some ACL information in the database, the nextstep is to actually use the ACL information as part of authorization decision logic. You have anumber of choices here. You could write your own AccessDecisionVoter or AfterInvocationProviderthat respectively fires before or after a method invocation. Such classes would use AclService toretrieve the relevant ACL and then call Acl.isGranted(Permission[] permission, Sid[] sids,boolean administrativeMode) to decide whether permission is granted or denied. Alternately, youcould use our AclEntryVoter, AclEntryAfterInvocationProvider orAclEntryAfterInvocationCollectionFilteringProvider classes. All of these classes provide adeclarative-based approach to evaluating ACL information at runtime, freeing you from needing towrite any code. Please refer to the sample applications to learn how to use these classes.
165

Chapter 12. OAuth2
12.1. OAuth 2.0 LoginThe OAuth 2.0 Login feature provides an application with the capability to have users log in to theapplication by using their existing account at an OAuth 2.0 Provider (e.g. GitHub) or OpenIDConnect 1.0 Provider (such as Google). OAuth 2.0 Login implements the use cases: "Login withGoogle" or "Login with GitHub".
OAuth 2.0 Login is implemented by using the Authorization Code Grant, asspecified in the OAuth 2.0 Authorization Framework and OpenID Connect Core 1.0.
12.1.1. Spring Boot 2.x Sample
Spring Boot 2.x brings full auto-configuration capabilities for OAuth 2.0 Login.
This section shows how to configure the OAuth 2.0 Login sample using Google as theAuthentication Provider and covers the following topics:
• Initial setup
• Setting the redirect URI
• Configure application.yml
• Boot up the application
Initial setup
To use Google’s OAuth 2.0 authentication system for login, you must set up a project in the GoogleAPI Console to obtain OAuth 2.0 credentials.
Google’s OAuth 2.0 implementation for authentication conforms to the OpenIDConnect 1.0 specification and is OpenID Certified.
Follow the instructions on the OpenID Connect page, starting in the section, "Setting up OAuth 2.0".
After completing the "Obtain OAuth 2.0 credentials" instructions, you should have a new OAuthClient with credentials consisting of a Client ID and a Client Secret.
Setting the redirect URI
The redirect URI is the path in the application that the end-user’s user-agent is redirected back toafter they have authenticated with Google and have granted access to the OAuth Client (created inthe previous step) on the Consent page.
In the "Set a redirect URI" sub-section, ensure that the Authorized redirect URIs field is set tohttp://localhost:8080/login/oauth2/code/google.
166
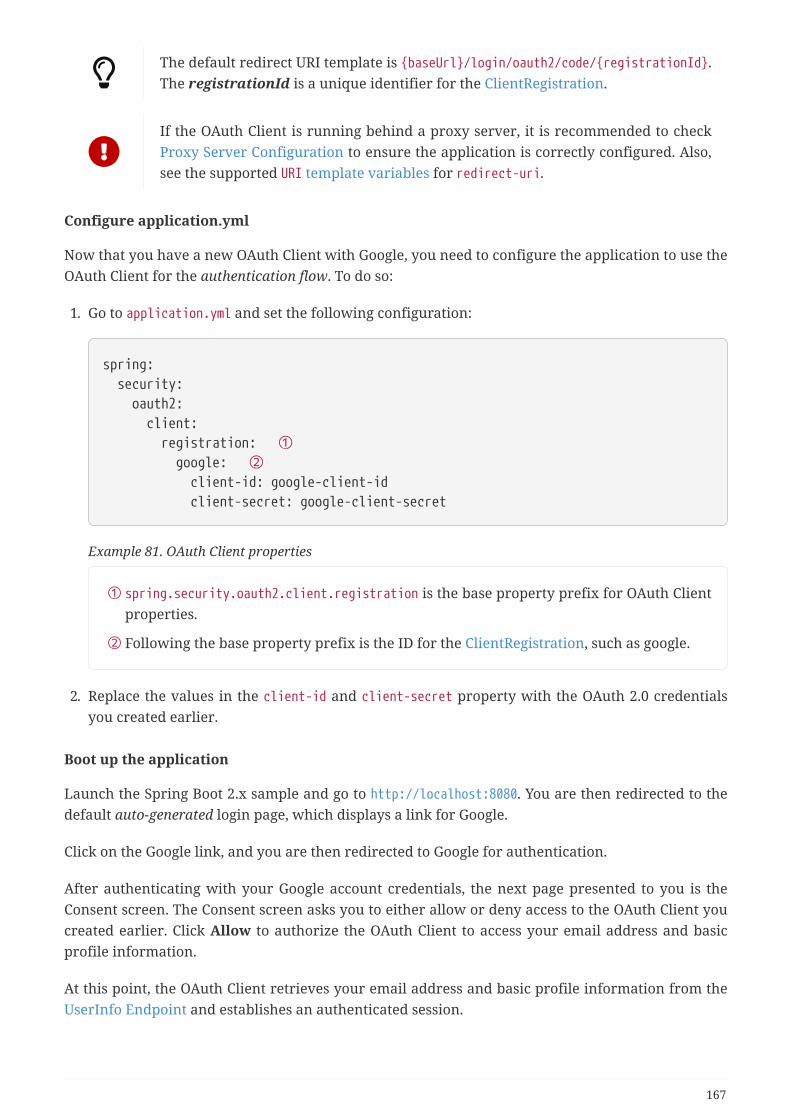
The default redirect URI template is {baseUrl}/login/oauth2/code/{registrationId}.The registrationId is a unique identifier for the ClientRegistration.
If the OAuth Client is running behind a proxy server, it is recommended to checkProxy Server Configuration to ensure the application is correctly configured. Also,see the supported URI template variables for redirect-uri.
Configure application.yml
Now that you have a new OAuth Client with Google, you need to configure the application to use theOAuth Client for the authentication flow. To do so:
1. Go to application.yml and set the following configuration:
spring: security: oauth2: client: registration: ① google: ② client-id: google-client-id client-secret: google-client-secret
Example 81. OAuth Client properties
① spring.security.oauth2.client.registration is the base property prefix for OAuth Clientproperties.
② Following the base property prefix is the ID for the ClientRegistration, such as google.
2. Replace the values in the client-id and client-secret property with the OAuth 2.0 credentialsyou created earlier.
Boot up the application
Launch the Spring Boot 2.x sample and go to http://localhost:8080. You are then redirected to thedefault auto-generated login page, which displays a link for Google.
Click on the Google link, and you are then redirected to Google for authentication.
After authenticating with your Google account credentials, the next page presented to you is theConsent screen. The Consent screen asks you to either allow or deny access to the OAuth Client youcreated earlier. Click Allow to authorize the OAuth Client to access your email address and basicprofile information.
At this point, the OAuth Client retrieves your email address and basic profile information from theUserInfo Endpoint and establishes an authenticated session.
167
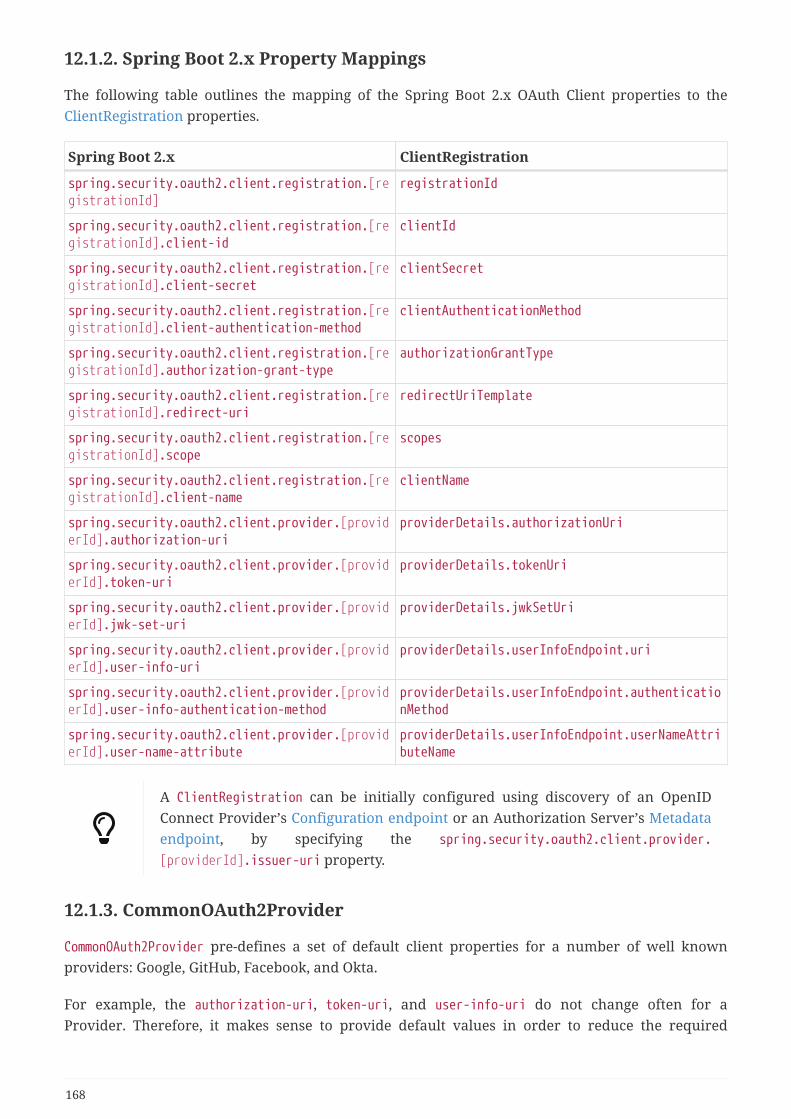
12.1.2. Spring Boot 2.x Property Mappings
The following table outlines the mapping of the Spring Boot 2.x OAuth Client properties to theClientRegistration properties.
Spring Boot 2.x ClientRegistration
spring.security.oauth2.client.registration.[registrationId]
registrationId
spring.security.oauth2.client.registration.[registrationId].client-id
clientId
spring.security.oauth2.client.registration.[registrationId].client-secret
clientSecret
spring.security.oauth2.client.registration.[registrationId].client-authentication-method
clientAuthenticationMethod
spring.security.oauth2.client.registration.[registrationId].authorization-grant-type
authorizationGrantType
spring.security.oauth2.client.registration.[registrationId].redirect-uri
redirectUriTemplate
spring.security.oauth2.client.registration.[registrationId].scope
scopes
spring.security.oauth2.client.registration.[registrationId].client-name
clientName
spring.security.oauth2.client.provider.[providerId].authorization-uri
providerDetails.authorizationUri
spring.security.oauth2.client.provider.[providerId].token-uri
providerDetails.tokenUri
spring.security.oauth2.client.provider.[providerId].jwk-set-uri
providerDetails.jwkSetUri
spring.security.oauth2.client.provider.[providerId].user-info-uri
providerDetails.userInfoEndpoint.uri
spring.security.oauth2.client.provider.[providerId].user-info-authentication-method
providerDetails.userInfoEndpoint.authenticationMethod
spring.security.oauth2.client.provider.[providerId].user-name-attribute
providerDetails.userInfoEndpoint.userNameAttributeName
A ClientRegistration can be initially configured using discovery of an OpenIDConnect Provider’s Configuration endpoint or an Authorization Server’s Metadataendpoint, by specifying the spring.security.oauth2.client.provider.[providerId].issuer-uri property.
12.1.3. CommonOAuth2Provider
CommonOAuth2Provider pre-defines a set of default client properties for a number of well knownproviders: Google, GitHub, Facebook, and Okta.
For example, the authorization-uri, token-uri, and user-info-uri do not change often for aProvider. Therefore, it makes sense to provide default values in order to reduce the required
168
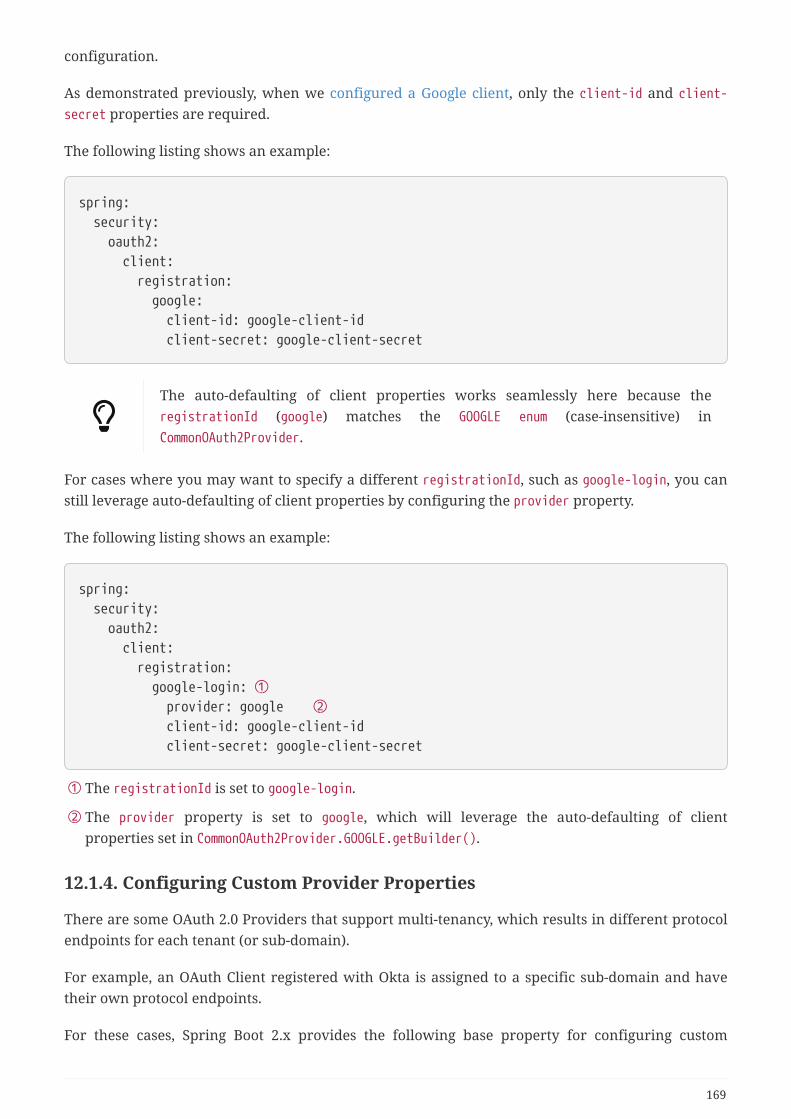
configuration.
As demonstrated previously, when we configured a Google client, only the client-id and client-secret properties are required.
The following listing shows an example:
spring: security: oauth2: client: registration: google: client-id: google-client-id client-secret: google-client-secret
The auto-defaulting of client properties works seamlessly here because theregistrationId (google) matches the GOOGLE enum (case-insensitive) inCommonOAuth2Provider.
For cases where you may want to specify a different registrationId, such as google-login, you canstill leverage auto-defaulting of client properties by configuring the provider property.
The following listing shows an example:
spring: security: oauth2: client: registration: google-login: ① provider: google ② client-id: google-client-id client-secret: google-client-secret
① The registrationId is set to google-login.
② The provider property is set to google, which will leverage the auto-defaulting of clientproperties set in CommonOAuth2Provider.GOOGLE.getBuilder().
12.1.4. Configuring Custom Provider Properties
There are some OAuth 2.0 Providers that support multi-tenancy, which results in different protocolendpoints for each tenant (or sub-domain).
For example, an OAuth Client registered with Okta is assigned to a specific sub-domain and havetheir own protocol endpoints.
For these cases, Spring Boot 2.x provides the following base property for configuring custom
169
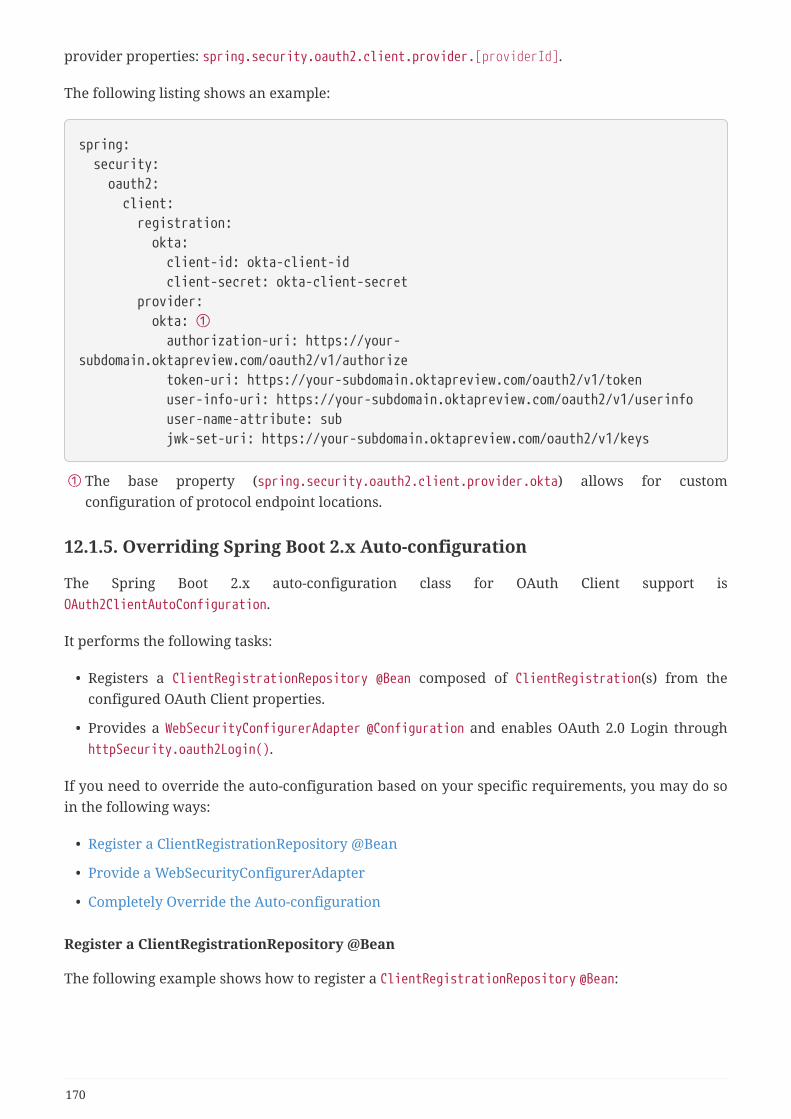
provider properties: spring.security.oauth2.client.provider.[providerId].
The following listing shows an example:
spring: security: oauth2: client: registration: okta: client-id: okta-client-id client-secret: okta-client-secret provider: okta: ① authorization-uri: https://your-subdomain.oktapreview.com/oauth2/v1/authorize token-uri: https://your-subdomain.oktapreview.com/oauth2/v1/token user-info-uri: https://your-subdomain.oktapreview.com/oauth2/v1/userinfo user-name-attribute: sub jwk-set-uri: https://your-subdomain.oktapreview.com/oauth2/v1/keys
① The base property (spring.security.oauth2.client.provider.okta) allows for customconfiguration of protocol endpoint locations.
12.1.5. Overriding Spring Boot 2.x Auto-configuration
The Spring Boot 2.x auto-configuration class for OAuth Client support isOAuth2ClientAutoConfiguration.
It performs the following tasks:
• Registers a ClientRegistrationRepository @Bean composed of ClientRegistration(s) from theconfigured OAuth Client properties.
• Provides a WebSecurityConfigurerAdapter @Configuration and enables OAuth 2.0 Login throughhttpSecurity.oauth2Login().
If you need to override the auto-configuration based on your specific requirements, you may do soin the following ways:
• Register a ClientRegistrationRepository @Bean
• Provide a WebSecurityConfigurerAdapter
• Completely Override the Auto-configuration
Register a ClientRegistrationRepository @Bean
The following example shows how to register a ClientRegistrationRepository @Bean:
170
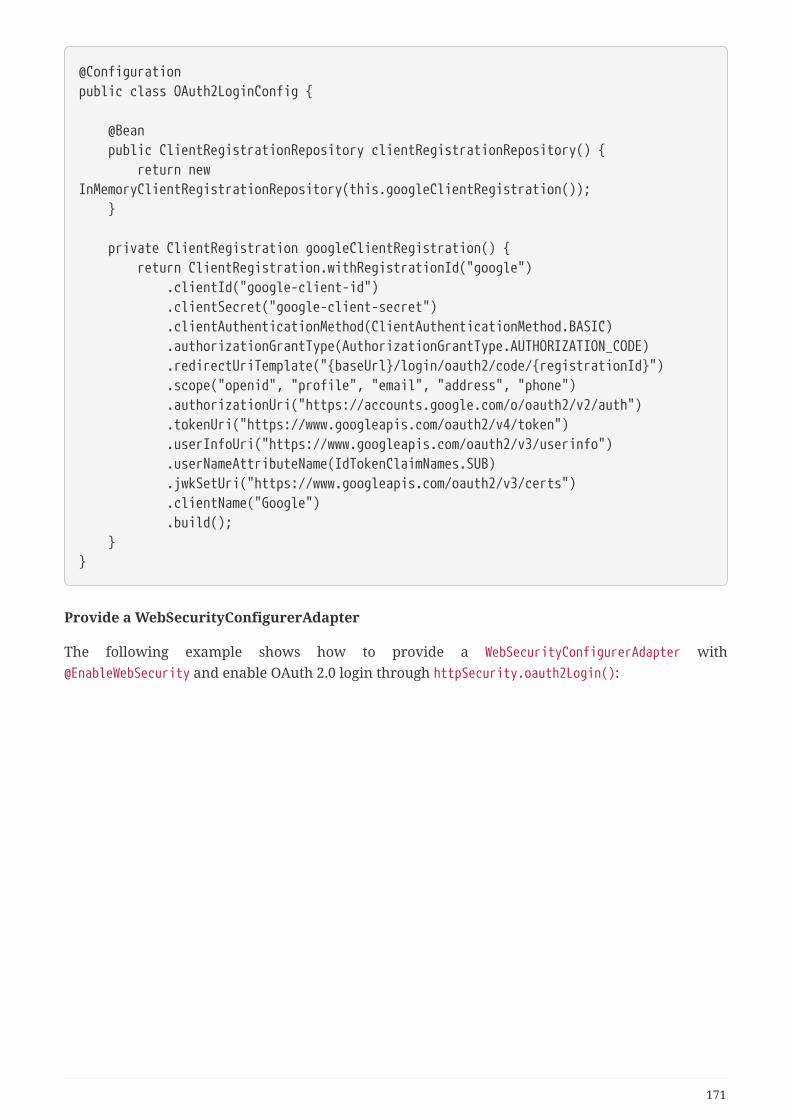
@Configurationpublic class OAuth2LoginConfig {
@Bean public ClientRegistrationRepository clientRegistrationRepository() { return newInMemoryClientRegistrationRepository(this.googleClientRegistration()); }
private ClientRegistration googleClientRegistration() { return ClientRegistration.withRegistrationId("google") .clientId("google-client-id") .clientSecret("google-client-secret") .clientAuthenticationMethod(ClientAuthenticationMethod.BASIC) .authorizationGrantType(AuthorizationGrantType.AUTHORIZATION_CODE) .redirectUriTemplate("{baseUrl}/login/oauth2/code/{registrationId}") .scope("openid", "profile", "email", "address", "phone") .authorizationUri("https://accounts.google.com/o/oauth2/v2/auth") .tokenUri("https://www.googleapis.com/oauth2/v4/token") .userInfoUri("https://www.googleapis.com/oauth2/v3/userinfo") .userNameAttributeName(IdTokenClaimNames.SUB) .jwkSetUri("https://www.googleapis.com/oauth2/v3/certs") .clientName("Google") .build(); }}
Provide a WebSecurityConfigurerAdapter
The following example shows how to provide a WebSecurityConfigurerAdapter with@EnableWebSecurity and enable OAuth 2.0 login through httpSecurity.oauth2Login():
171
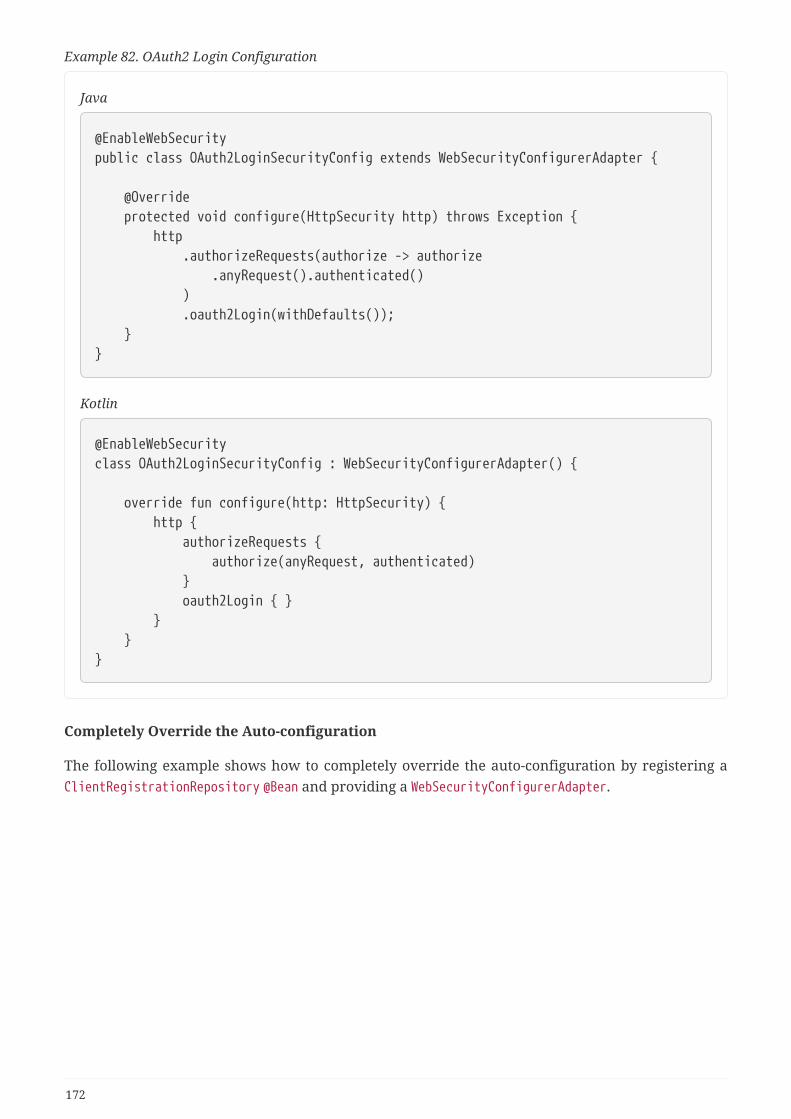
Example 82. OAuth2 Login Configuration
Java
@EnableWebSecuritypublic class OAuth2LoginSecurityConfig extends WebSecurityConfigurerAdapter {
@Override protected void configure(HttpSecurity http) throws Exception { http .authorizeRequests(authorize -> authorize .anyRequest().authenticated() ) .oauth2Login(withDefaults()); }}
Kotlin
@EnableWebSecurityclass OAuth2LoginSecurityConfig : WebSecurityConfigurerAdapter() {
override fun configure(http: HttpSecurity) { http { authorizeRequests { authorize(anyRequest, authenticated) } oauth2Login { } } }}
Completely Override the Auto-configuration
The following example shows how to completely override the auto-configuration by registering aClientRegistrationRepository @Bean and providing a WebSecurityConfigurerAdapter.
172
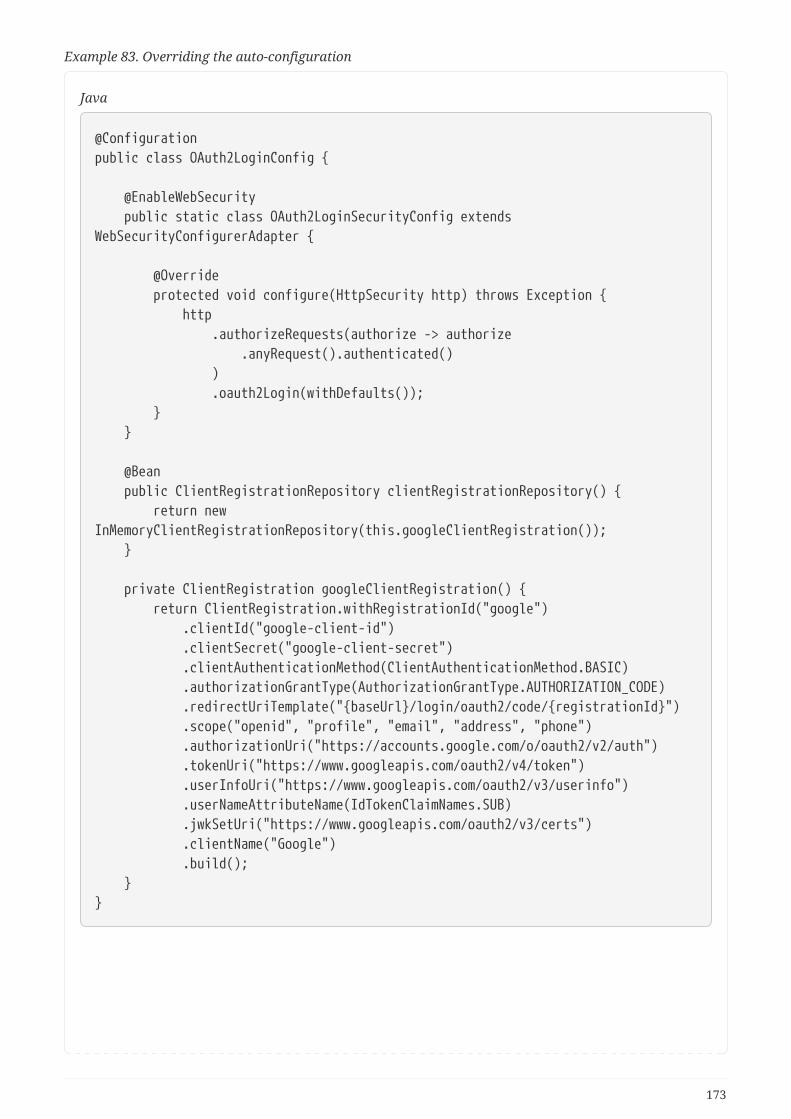
Example 83. Overriding the auto-configuration
Java
@Configurationpublic class OAuth2LoginConfig {
@EnableWebSecurity public static class OAuth2LoginSecurityConfig extendsWebSecurityConfigurerAdapter {
@Override protected void configure(HttpSecurity http) throws Exception { http .authorizeRequests(authorize -> authorize .anyRequest().authenticated() ) .oauth2Login(withDefaults()); } }
@Bean public ClientRegistrationRepository clientRegistrationRepository() { return newInMemoryClientRegistrationRepository(this.googleClientRegistration()); }
private ClientRegistration googleClientRegistration() { return ClientRegistration.withRegistrationId("google") .clientId("google-client-id") .clientSecret("google-client-secret") .clientAuthenticationMethod(ClientAuthenticationMethod.BASIC) .authorizationGrantType(AuthorizationGrantType.AUTHORIZATION_CODE) .redirectUriTemplate("{baseUrl}/login/oauth2/code/{registrationId}") .scope("openid", "profile", "email", "address", "phone") .authorizationUri("https://accounts.google.com/o/oauth2/v2/auth") .tokenUri("https://www.googleapis.com/oauth2/v4/token") .userInfoUri("https://www.googleapis.com/oauth2/v3/userinfo") .userNameAttributeName(IdTokenClaimNames.SUB) .jwkSetUri("https://www.googleapis.com/oauth2/v3/certs") .clientName("Google") .build(); }}
173
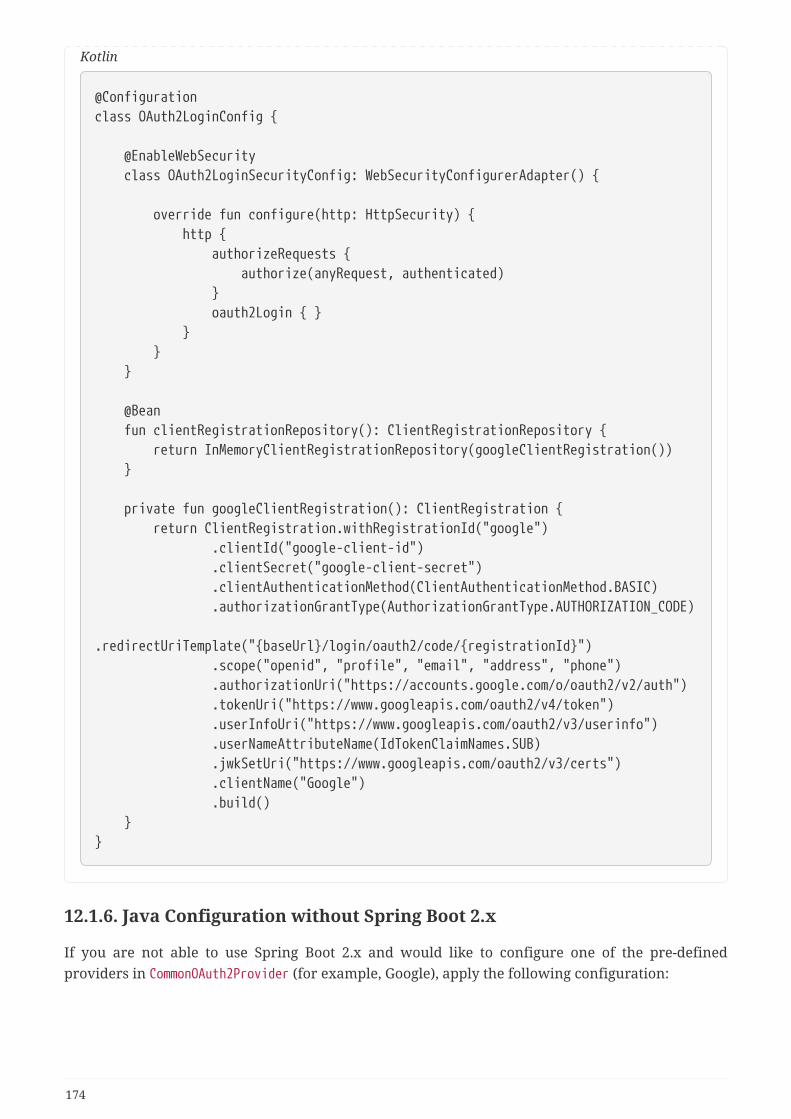
Kotlin
@Configurationclass OAuth2LoginConfig {
@EnableWebSecurity class OAuth2LoginSecurityConfig: WebSecurityConfigurerAdapter() {
override fun configure(http: HttpSecurity) { http { authorizeRequests { authorize(anyRequest, authenticated) } oauth2Login { } } } }
@Bean fun clientRegistrationRepository(): ClientRegistrationRepository { return InMemoryClientRegistrationRepository(googleClientRegistration()) }
private fun googleClientRegistration(): ClientRegistration { return ClientRegistration.withRegistrationId("google") .clientId("google-client-id") .clientSecret("google-client-secret") .clientAuthenticationMethod(ClientAuthenticationMethod.BASIC) .authorizationGrantType(AuthorizationGrantType.AUTHORIZATION_CODE) .redirectUriTemplate("{baseUrl}/login/oauth2/code/{registrationId}") .scope("openid", "profile", "email", "address", "phone") .authorizationUri("https://accounts.google.com/o/oauth2/v2/auth") .tokenUri("https://www.googleapis.com/oauth2/v4/token") .userInfoUri("https://www.googleapis.com/oauth2/v3/userinfo") .userNameAttributeName(IdTokenClaimNames.SUB) .jwkSetUri("https://www.googleapis.com/oauth2/v3/certs") .clientName("Google") .build() }}
12.1.6. Java Configuration without Spring Boot 2.x
If you are not able to use Spring Boot 2.x and would like to configure one of the pre-definedproviders in CommonOAuth2Provider (for example, Google), apply the following configuration:
174
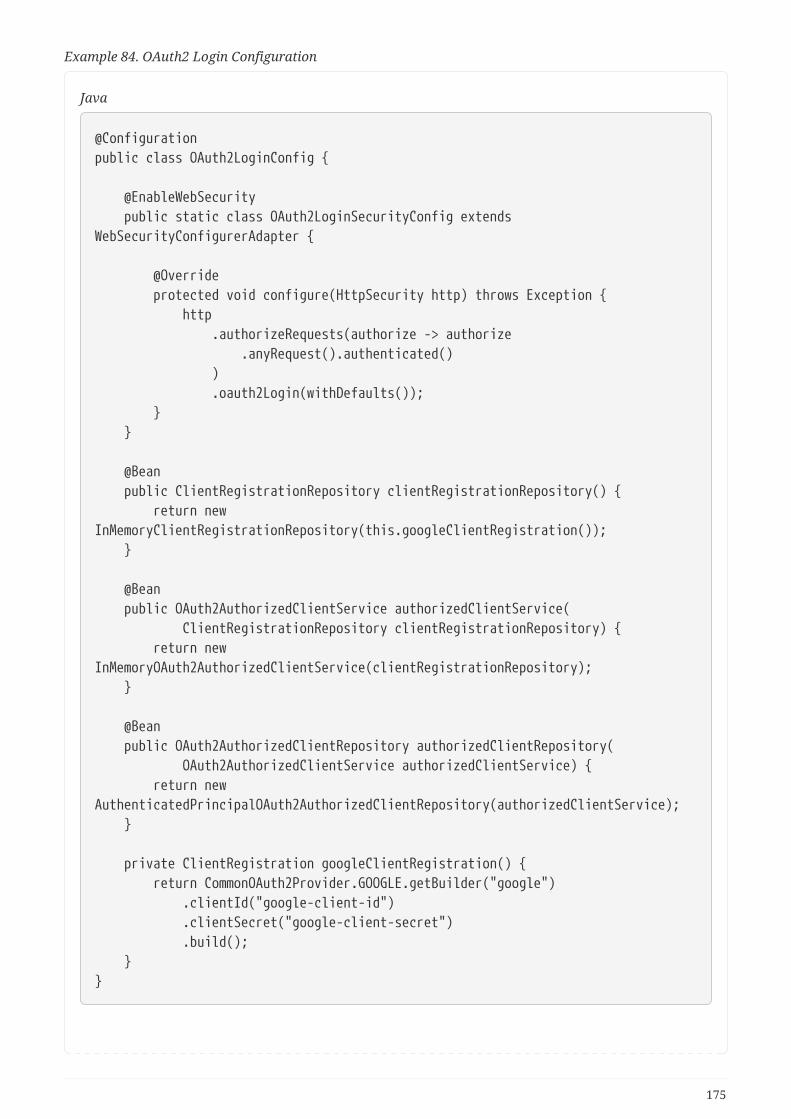
Example 84. OAuth2 Login Configuration
Java
@Configurationpublic class OAuth2LoginConfig {
@EnableWebSecurity public static class OAuth2LoginSecurityConfig extendsWebSecurityConfigurerAdapter {
@Override protected void configure(HttpSecurity http) throws Exception { http .authorizeRequests(authorize -> authorize .anyRequest().authenticated() ) .oauth2Login(withDefaults()); } }
@Bean public ClientRegistrationRepository clientRegistrationRepository() { return newInMemoryClientRegistrationRepository(this.googleClientRegistration()); }
@Bean public OAuth2AuthorizedClientService authorizedClientService( ClientRegistrationRepository clientRegistrationRepository) { return newInMemoryOAuth2AuthorizedClientService(clientRegistrationRepository); }
@Bean public OAuth2AuthorizedClientRepository authorizedClientRepository( OAuth2AuthorizedClientService authorizedClientService) { return newAuthenticatedPrincipalOAuth2AuthorizedClientRepository(authorizedClientService); }
private ClientRegistration googleClientRegistration() { return CommonOAuth2Provider.GOOGLE.getBuilder("google") .clientId("google-client-id") .clientSecret("google-client-secret") .build(); }}
175
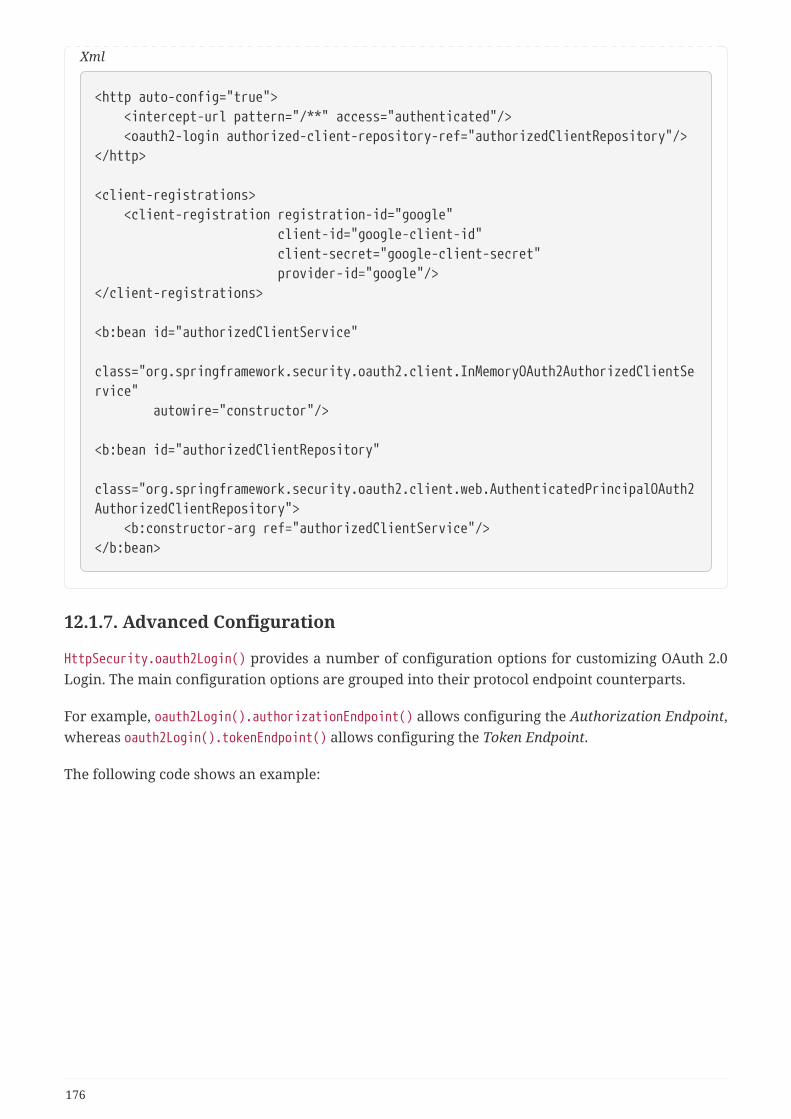
Xml
<http auto-config="true"> <intercept-url pattern="/**" access="authenticated"/> <oauth2-login authorized-client-repository-ref="authorizedClientRepository"/></http>
<client-registrations> <client-registration registration-id="google" client-id="google-client-id" client-secret="google-client-secret" provider-id="google"/></client-registrations>
<b:bean id="authorizedClientService" class="org.springframework.security.oauth2.client.InMemoryOAuth2AuthorizedClientService" autowire="constructor"/>
<b:bean id="authorizedClientRepository" class="org.springframework.security.oauth2.client.web.AuthenticatedPrincipalOAuth2AuthorizedClientRepository"> <b:constructor-arg ref="authorizedClientService"/></b:bean>
12.1.7. Advanced Configuration
HttpSecurity.oauth2Login() provides a number of configuration options for customizing OAuth 2.0Login. The main configuration options are grouped into their protocol endpoint counterparts.
For example, oauth2Login().authorizationEndpoint() allows configuring the Authorization Endpoint,whereas oauth2Login().tokenEndpoint() allows configuring the Token Endpoint.
The following code shows an example:
176
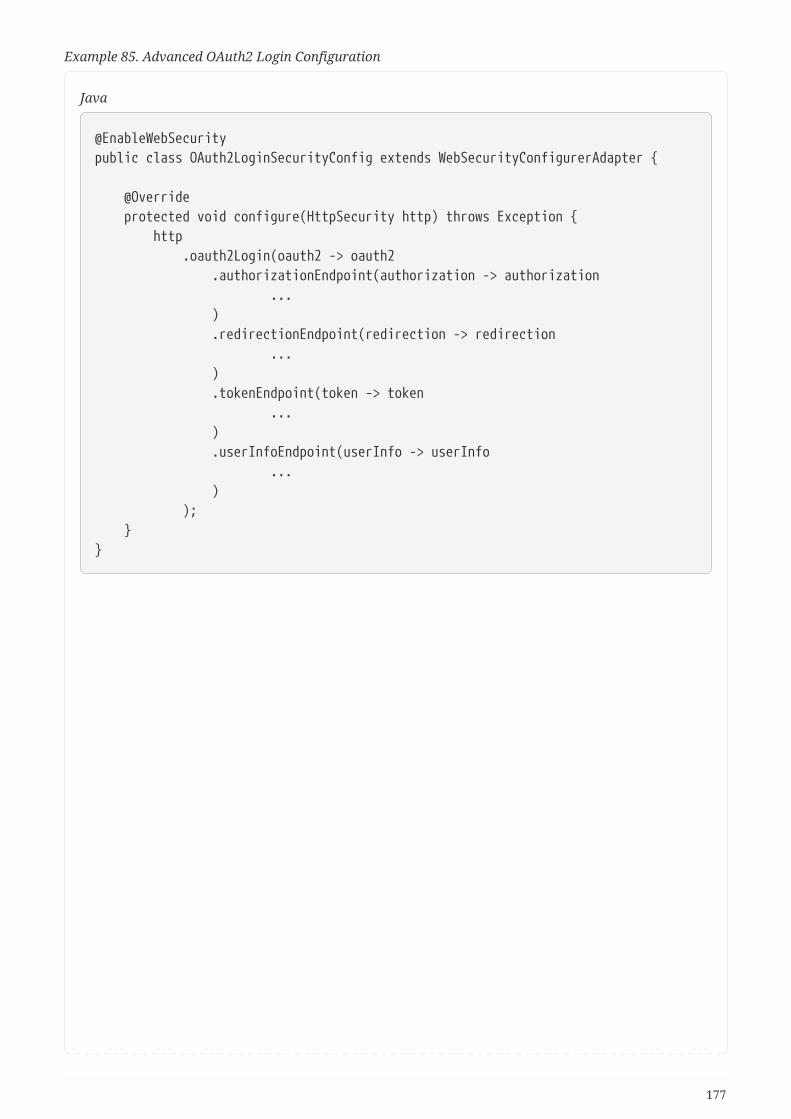
Example 85. Advanced OAuth2 Login Configuration
Java
@EnableWebSecuritypublic class OAuth2LoginSecurityConfig extends WebSecurityConfigurerAdapter {
@Override protected void configure(HttpSecurity http) throws Exception { http .oauth2Login(oauth2 -> oauth2 .authorizationEndpoint(authorization -> authorization ... ) .redirectionEndpoint(redirection -> redirection ... ) .tokenEndpoint(token -> token ... ) .userInfoEndpoint(userInfo -> userInfo ... ) ); }}
177
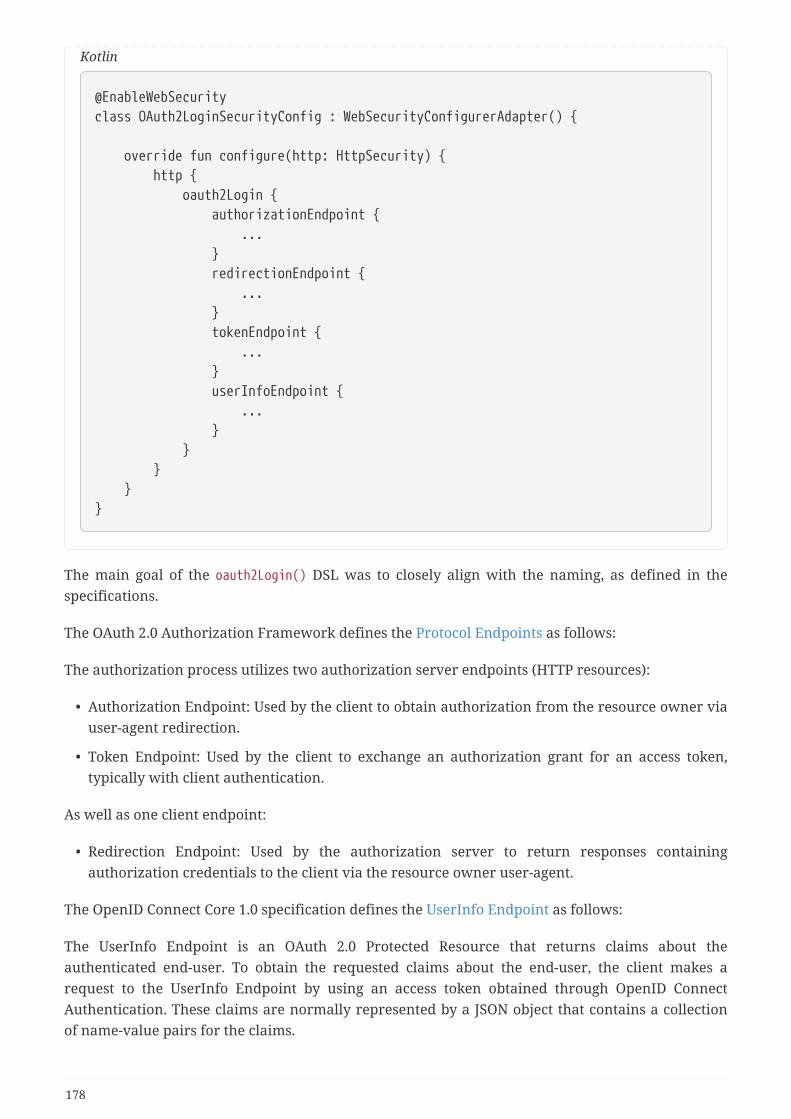
Kotlin
@EnableWebSecurityclass OAuth2LoginSecurityConfig : WebSecurityConfigurerAdapter() {
override fun configure(http: HttpSecurity) { http { oauth2Login { authorizationEndpoint { ... } redirectionEndpoint { ... } tokenEndpoint { ... } userInfoEndpoint { ... } } } }}
The main goal of the oauth2Login() DSL was to closely align with the naming, as defined in thespecifications.
The OAuth 2.0 Authorization Framework defines the Protocol Endpoints as follows:
The authorization process utilizes two authorization server endpoints (HTTP resources):
• Authorization Endpoint: Used by the client to obtain authorization from the resource owner viauser-agent redirection.
• Token Endpoint: Used by the client to exchange an authorization grant for an access token,typically with client authentication.
As well as one client endpoint:
• Redirection Endpoint: Used by the authorization server to return responses containingauthorization credentials to the client via the resource owner user-agent.
The OpenID Connect Core 1.0 specification defines the UserInfo Endpoint as follows:
The UserInfo Endpoint is an OAuth 2.0 Protected Resource that returns claims about theauthenticated end-user. To obtain the requested claims about the end-user, the client makes arequest to the UserInfo Endpoint by using an access token obtained through OpenID ConnectAuthentication. These claims are normally represented by a JSON object that contains a collectionof name-value pairs for the claims.
178

The following code shows the complete configuration options available for the oauth2Login() DSL:
179
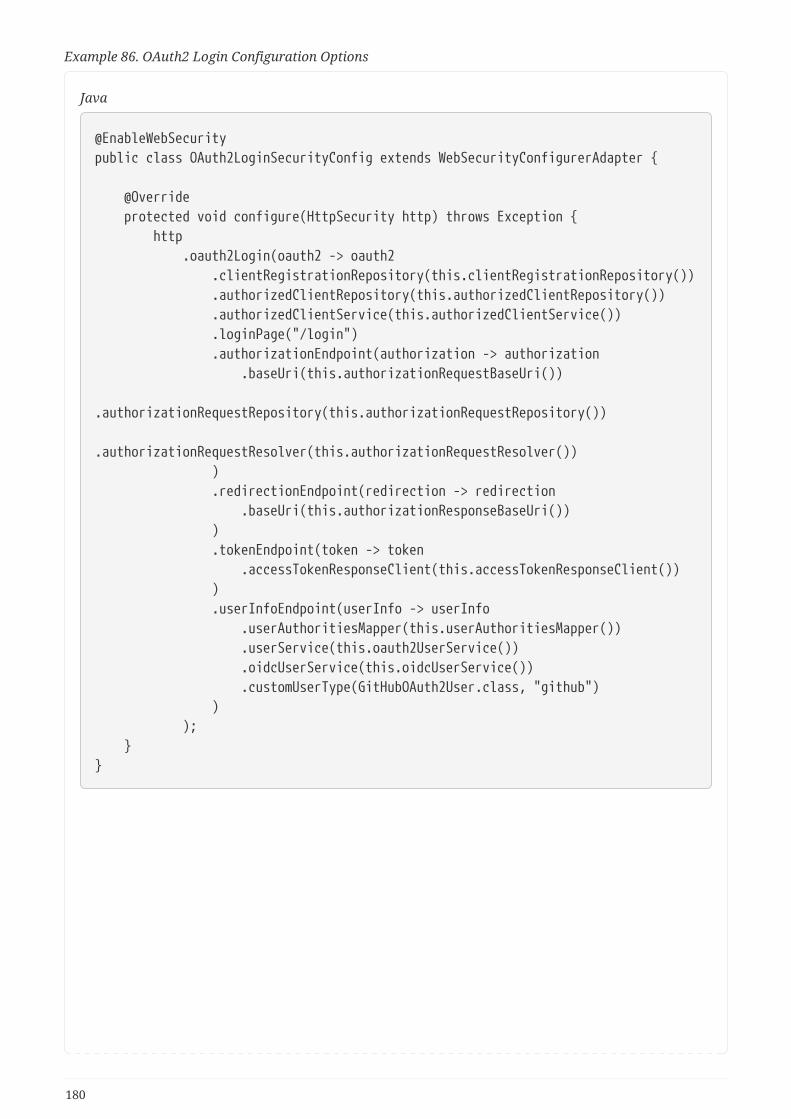
Example 86. OAuth2 Login Configuration Options
Java
@EnableWebSecuritypublic class OAuth2LoginSecurityConfig extends WebSecurityConfigurerAdapter {
@Override protected void configure(HttpSecurity http) throws Exception { http .oauth2Login(oauth2 -> oauth2 .clientRegistrationRepository(this.clientRegistrationRepository()) .authorizedClientRepository(this.authorizedClientRepository()) .authorizedClientService(this.authorizedClientService()) .loginPage("/login") .authorizationEndpoint(authorization -> authorization .baseUri(this.authorizationRequestBaseUri()) .authorizationRequestRepository(this.authorizationRequestRepository()) .authorizationRequestResolver(this.authorizationRequestResolver()) ) .redirectionEndpoint(redirection -> redirection .baseUri(this.authorizationResponseBaseUri()) ) .tokenEndpoint(token -> token .accessTokenResponseClient(this.accessTokenResponseClient()) ) .userInfoEndpoint(userInfo -> userInfo .userAuthoritiesMapper(this.userAuthoritiesMapper()) .userService(this.oauth2UserService()) .oidcUserService(this.oidcUserService()) .customUserType(GitHubOAuth2User.class, "github") ) ); }}
180
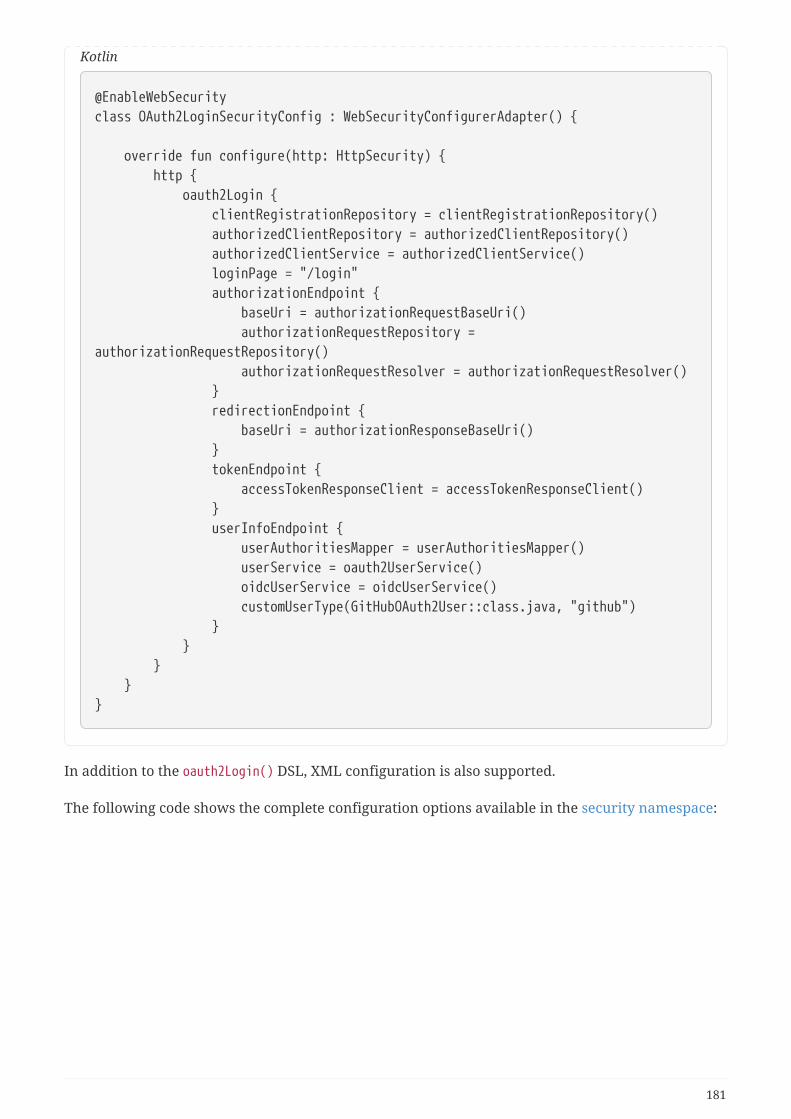
Kotlin
@EnableWebSecurityclass OAuth2LoginSecurityConfig : WebSecurityConfigurerAdapter() {
override fun configure(http: HttpSecurity) { http { oauth2Login { clientRegistrationRepository = clientRegistrationRepository() authorizedClientRepository = authorizedClientRepository() authorizedClientService = authorizedClientService() loginPage = "/login" authorizationEndpoint { baseUri = authorizationRequestBaseUri() authorizationRequestRepository =authorizationRequestRepository() authorizationRequestResolver = authorizationRequestResolver() } redirectionEndpoint { baseUri = authorizationResponseBaseUri() } tokenEndpoint { accessTokenResponseClient = accessTokenResponseClient() } userInfoEndpoint { userAuthoritiesMapper = userAuthoritiesMapper() userService = oauth2UserService() oidcUserService = oidcUserService() customUserType(GitHubOAuth2User::class.java, "github") } } } }}
In addition to the oauth2Login() DSL, XML configuration is also supported.
The following code shows the complete configuration options available in the security namespace:
181
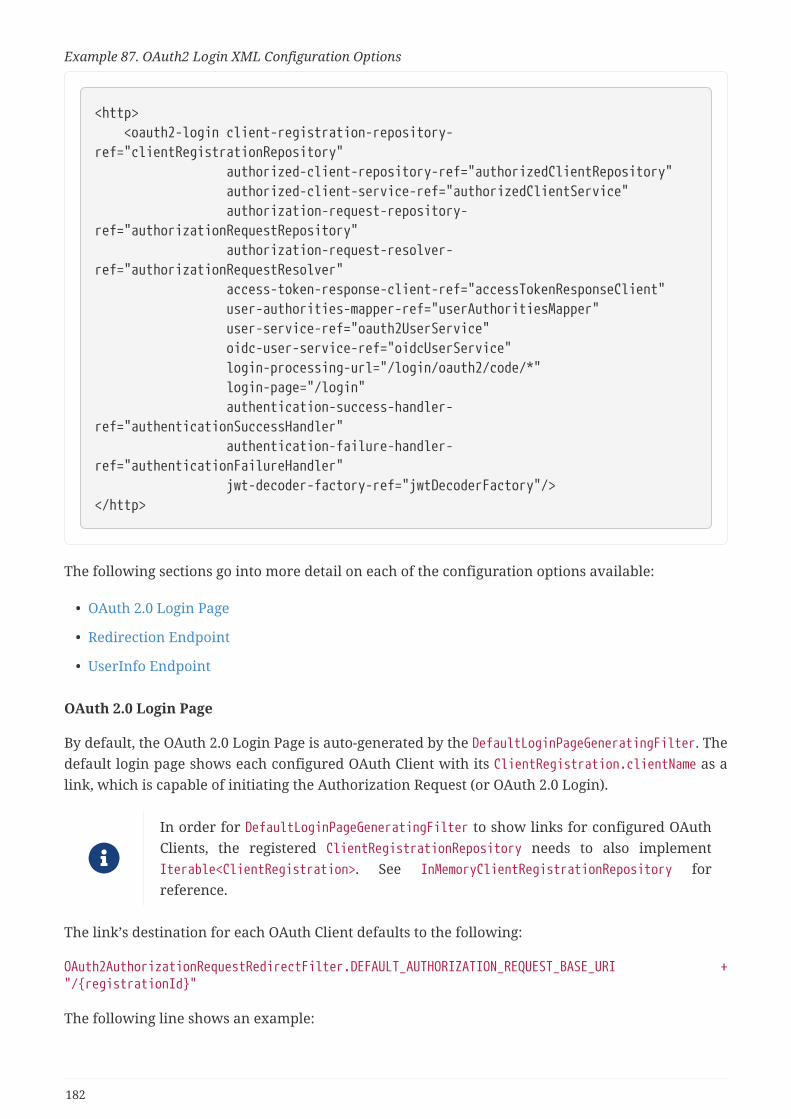
Example 87. OAuth2 Login XML Configuration Options
<http> <oauth2-login client-registration-repository-ref="clientRegistrationRepository" authorized-client-repository-ref="authorizedClientRepository" authorized-client-service-ref="authorizedClientService" authorization-request-repository-ref="authorizationRequestRepository" authorization-request-resolver-ref="authorizationRequestResolver" access-token-response-client-ref="accessTokenResponseClient" user-authorities-mapper-ref="userAuthoritiesMapper" user-service-ref="oauth2UserService" oidc-user-service-ref="oidcUserService" login-processing-url="/login/oauth2/code/*" login-page="/login" authentication-success-handler-ref="authenticationSuccessHandler" authentication-failure-handler-ref="authenticationFailureHandler" jwt-decoder-factory-ref="jwtDecoderFactory"/></http>
The following sections go into more detail on each of the configuration options available:
• OAuth 2.0 Login Page
• Redirection Endpoint
• UserInfo Endpoint
OAuth 2.0 Login Page
By default, the OAuth 2.0 Login Page is auto-generated by the DefaultLoginPageGeneratingFilter. Thedefault login page shows each configured OAuth Client with its ClientRegistration.clientName as alink, which is capable of initiating the Authorization Request (or OAuth 2.0 Login).
In order for DefaultLoginPageGeneratingFilter to show links for configured OAuthClients, the registered ClientRegistrationRepository needs to also implementIterable<ClientRegistration>. See InMemoryClientRegistrationRepository forreference.
The link’s destination for each OAuth Client defaults to the following:
OAuth2AuthorizationRequestRedirectFilter.DEFAULT_AUTHORIZATION_REQUEST_BASE_URI +"/{registrationId}"
The following line shows an example:
182
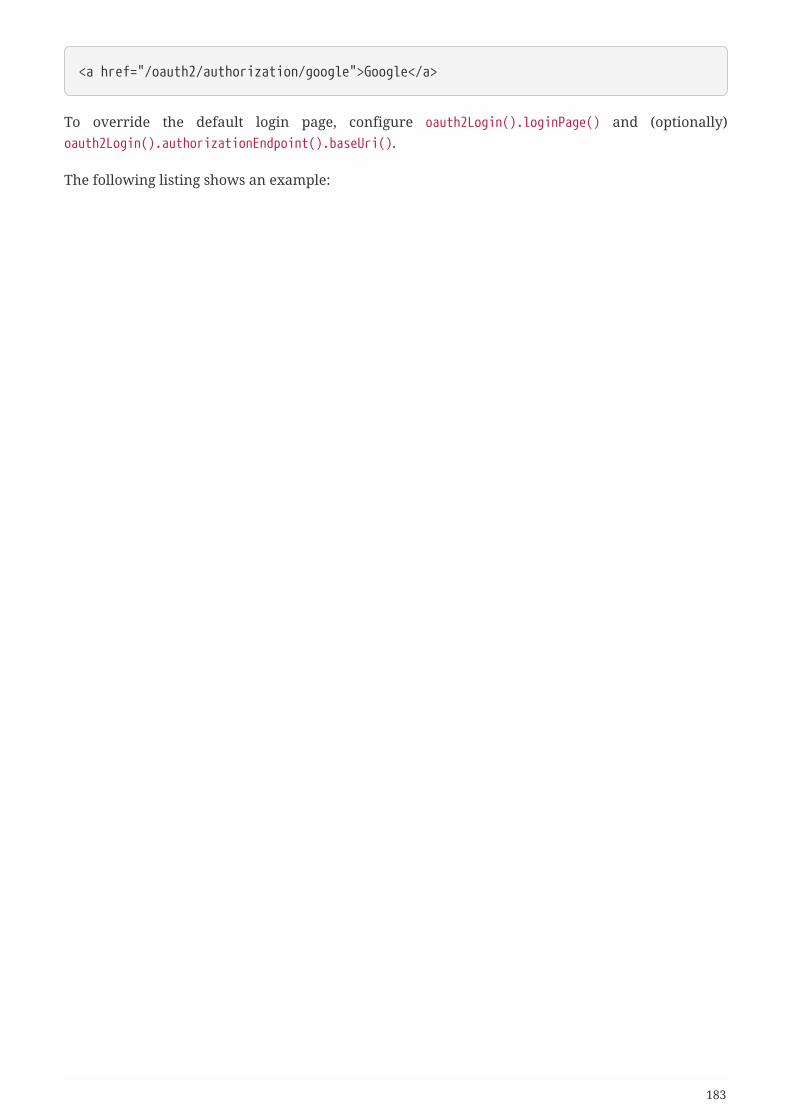
<a href="/oauth2/authorization/google">Google</a>
To override the default login page, configure oauth2Login().loginPage() and (optionally)oauth2Login().authorizationEndpoint().baseUri().
The following listing shows an example:
183
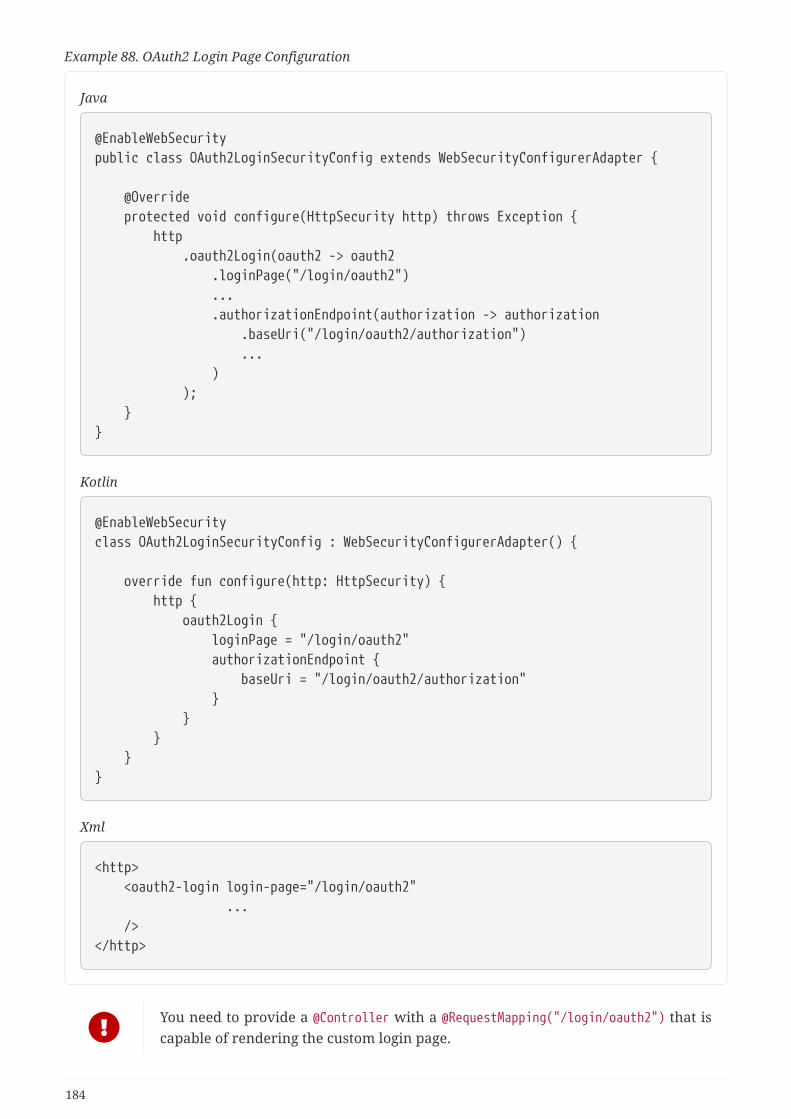
Example 88. OAuth2 Login Page Configuration
Java
@EnableWebSecuritypublic class OAuth2LoginSecurityConfig extends WebSecurityConfigurerAdapter {
@Override protected void configure(HttpSecurity http) throws Exception { http .oauth2Login(oauth2 -> oauth2 .loginPage("/login/oauth2") ... .authorizationEndpoint(authorization -> authorization .baseUri("/login/oauth2/authorization") ... ) ); }}
Kotlin
@EnableWebSecurityclass OAuth2LoginSecurityConfig : WebSecurityConfigurerAdapter() {
override fun configure(http: HttpSecurity) { http { oauth2Login { loginPage = "/login/oauth2" authorizationEndpoint { baseUri = "/login/oauth2/authorization" } } } }}
Xml
<http> <oauth2-login login-page="/login/oauth2" ... /></http>
You need to provide a @Controller with a @RequestMapping("/login/oauth2") that iscapable of rendering the custom login page.
184
As noted earlier, configuring oauth2Login().authorizationEndpoint().baseUri() isoptional. However, if you choose to customize it, ensure the link to each OAuthClient matches the authorizationEndpoint().baseUri().
The following line shows an example:
<a href="/login/oauth2/authorization/google">Google</a>
Redirection Endpoint
The Redirection Endpoint is used by the Authorization Server for returning the AuthorizationResponse (which contains the authorization credentials) to the client via the Resource Owner user-agent.
OAuth 2.0 Login leverages the Authorization Code Grant. Therefore, theauthorization credential is the authorization code.
The default Authorization Response baseUri (redirection endpoint) is /login/oauth2/code/*, which isdefined in OAuth2LoginAuthenticationFilter.DEFAULT_FILTER_PROCESSES_URI.
If you would like to customize the Authorization Response baseUri, configure it as shown in thefollowing example:
185
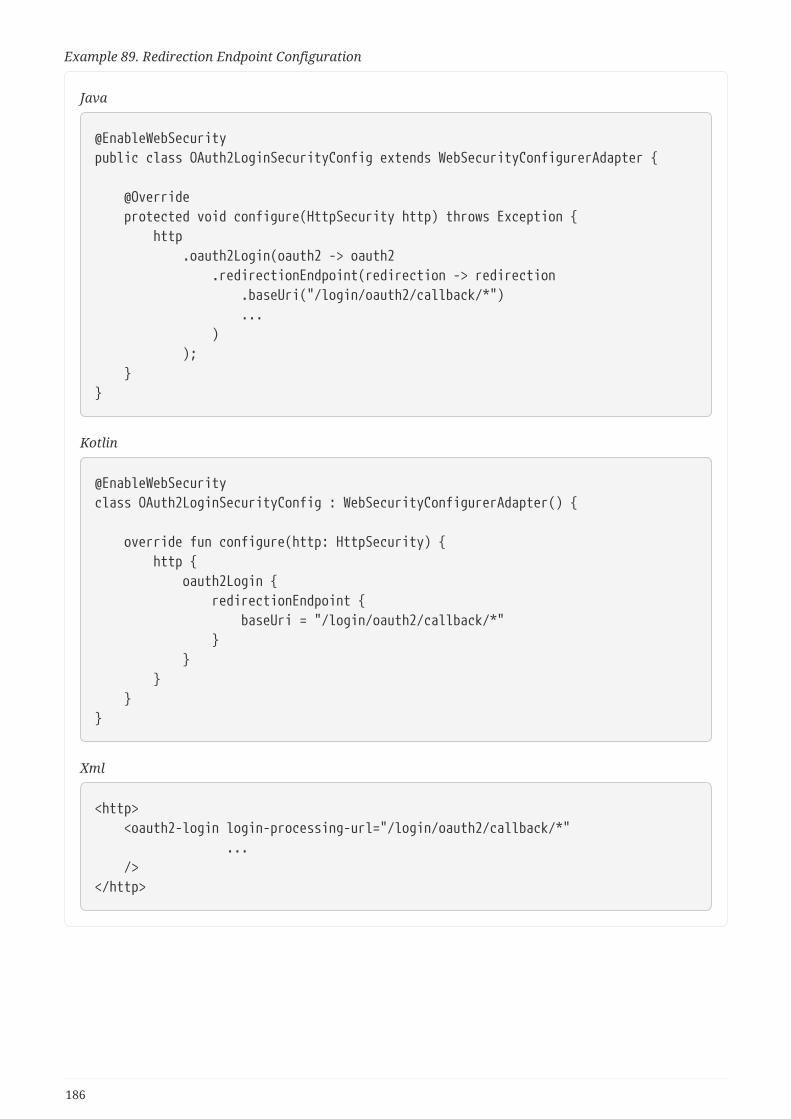
Example 89. Redirection Endpoint Configuration
Java
@EnableWebSecuritypublic class OAuth2LoginSecurityConfig extends WebSecurityConfigurerAdapter {
@Override protected void configure(HttpSecurity http) throws Exception { http .oauth2Login(oauth2 -> oauth2 .redirectionEndpoint(redirection -> redirection .baseUri("/login/oauth2/callback/*") ... ) ); }}
Kotlin
@EnableWebSecurityclass OAuth2LoginSecurityConfig : WebSecurityConfigurerAdapter() {
override fun configure(http: HttpSecurity) { http { oauth2Login { redirectionEndpoint { baseUri = "/login/oauth2/callback/*" } } } }}
Xml
<http> <oauth2-login login-processing-url="/login/oauth2/callback/*" ... /></http>
186
You also need to ensure the ClientRegistration.redirectUriTemplate matches thecustom Authorization Response baseUri.
The following listing shows an example:
return CommonOAuth2Provider.GOOGLE.getBuilder("google") .clientId("google-client-id") .clientSecret("google-client-secret") .redirectUriTemplate("{baseUrl}/login/oauth2/callback/{registrationId}") .build();
UserInfo Endpoint
The UserInfo Endpoint includes a number of configuration options, as described in the followingsub-sections:
• Mapping User Authorities
• Configuring a Custom OAuth2User
• OAuth 2.0 UserService
• OpenID Connect 1.0 UserService
Mapping User Authorities
After the user successfully authenticates with the OAuth 2.0 Provider, theOAuth2User.getAuthorities() (or OidcUser.getAuthorities()) may be mapped to a new set ofGrantedAuthority instances, which will be supplied to OAuth2AuthenticationToken when completingthe authentication.
OAuth2AuthenticationToken.getAuthorities() is used for authorizing requests, suchas in hasRole('USER') or hasRole('ADMIN').
There are a couple of options to choose from when mapping user authorities:
• Using a GrantedAuthoritiesMapper
• Delegation-based strategy with OAuth2UserService
Using a GrantedAuthoritiesMapper
Provide an implementation of GrantedAuthoritiesMapper and configure it as shown in the followingexample:
187
Example 90. Granted Authorities Mapper Configuration
188
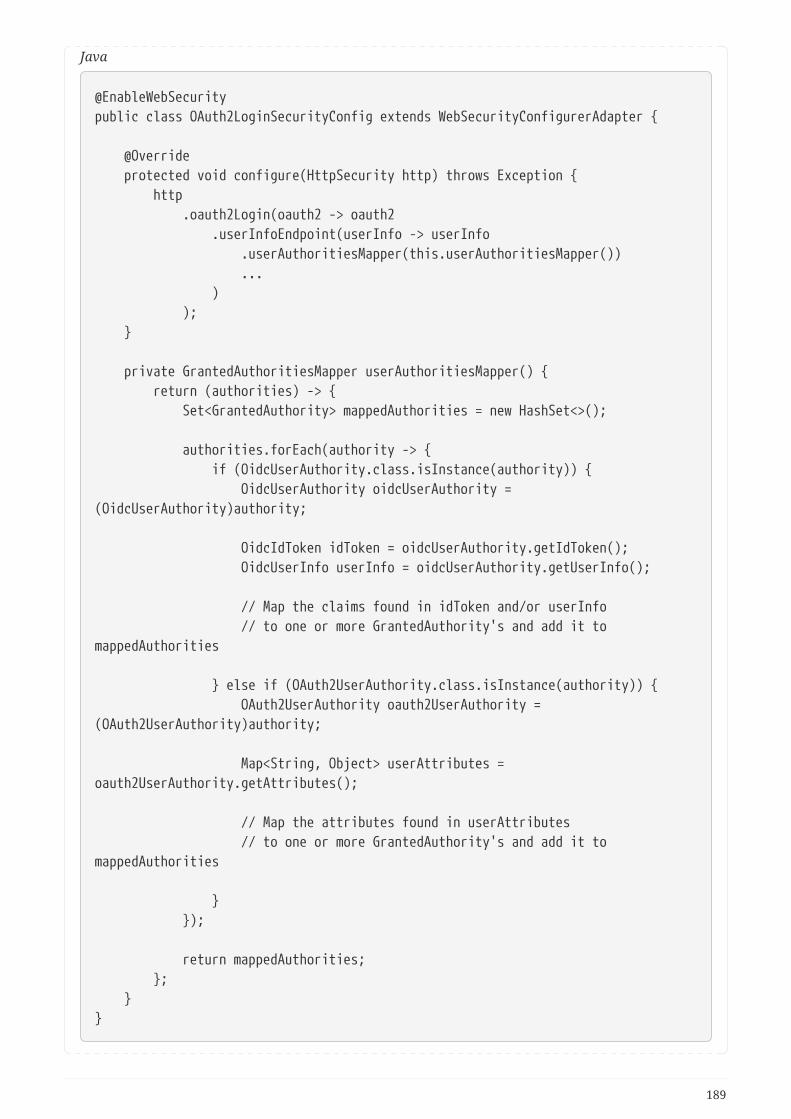
Java
@EnableWebSecuritypublic class OAuth2LoginSecurityConfig extends WebSecurityConfigurerAdapter {
@Override protected void configure(HttpSecurity http) throws Exception { http .oauth2Login(oauth2 -> oauth2 .userInfoEndpoint(userInfo -> userInfo .userAuthoritiesMapper(this.userAuthoritiesMapper()) ... ) ); }
private GrantedAuthoritiesMapper userAuthoritiesMapper() { return (authorities) -> { Set<GrantedAuthority> mappedAuthorities = new HashSet<>();
authorities.forEach(authority -> { if (OidcUserAuthority.class.isInstance(authority)) { OidcUserAuthority oidcUserAuthority =(OidcUserAuthority)authority;
OidcIdToken idToken = oidcUserAuthority.getIdToken(); OidcUserInfo userInfo = oidcUserAuthority.getUserInfo();
// Map the claims found in idToken and/or userInfo // to one or more GrantedAuthority's and add it tomappedAuthorities
} else if (OAuth2UserAuthority.class.isInstance(authority)) { OAuth2UserAuthority oauth2UserAuthority =(OAuth2UserAuthority)authority;
Map<String, Object> userAttributes =oauth2UserAuthority.getAttributes();
// Map the attributes found in userAttributes // to one or more GrantedAuthority's and add it tomappedAuthorities
} });
return mappedAuthorities; }; }}
189
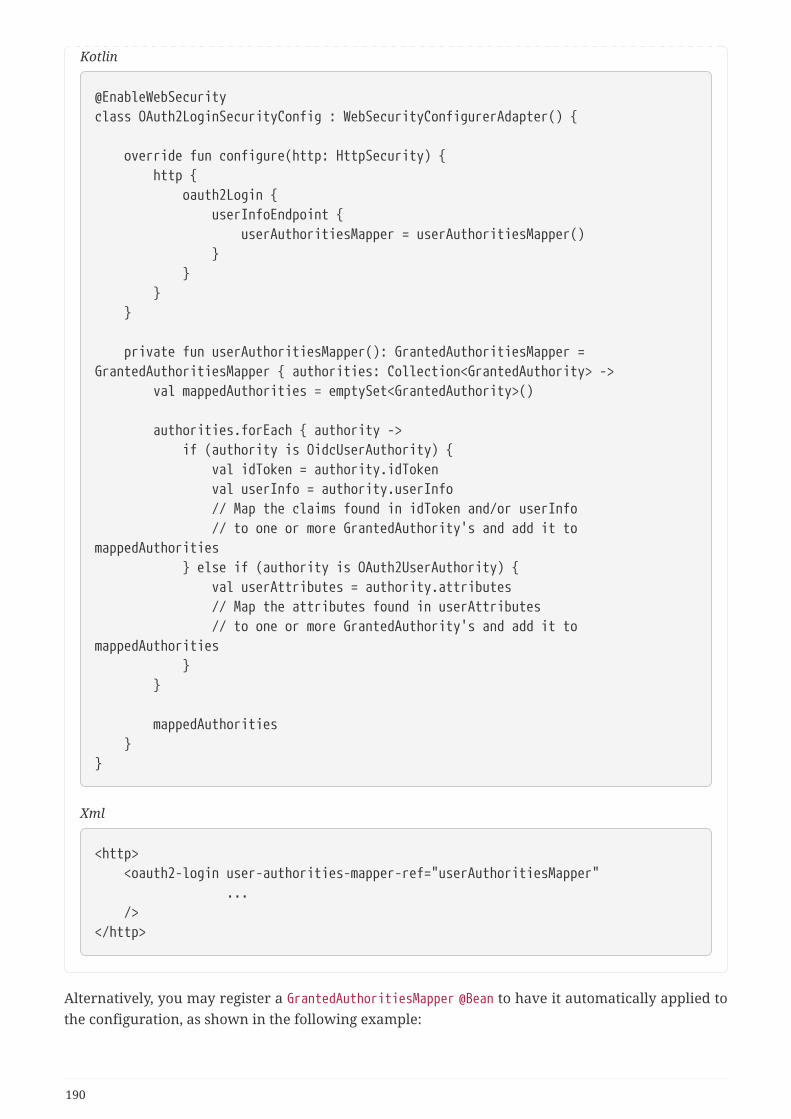
Kotlin
@EnableWebSecurityclass OAuth2LoginSecurityConfig : WebSecurityConfigurerAdapter() {
override fun configure(http: HttpSecurity) { http { oauth2Login { userInfoEndpoint { userAuthoritiesMapper = userAuthoritiesMapper() } } } }
private fun userAuthoritiesMapper(): GrantedAuthoritiesMapper =GrantedAuthoritiesMapper { authorities: Collection<GrantedAuthority> -> val mappedAuthorities = emptySet<GrantedAuthority>()
authorities.forEach { authority -> if (authority is OidcUserAuthority) { val idToken = authority.idToken val userInfo = authority.userInfo // Map the claims found in idToken and/or userInfo // to one or more GrantedAuthority's and add it tomappedAuthorities } else if (authority is OAuth2UserAuthority) { val userAttributes = authority.attributes // Map the attributes found in userAttributes // to one or more GrantedAuthority's and add it tomappedAuthorities } }
mappedAuthorities }}
Xml
<http> <oauth2-login user-authorities-mapper-ref="userAuthoritiesMapper" ... /></http>
Alternatively, you may register a GrantedAuthoritiesMapper @Bean to have it automatically applied tothe configuration, as shown in the following example:
190

Example 91. Granted Authorities Mapper Bean Configuration
Java
@EnableWebSecuritypublic class OAuth2LoginSecurityConfig extends WebSecurityConfigurerAdapter {
@Override protected void configure(HttpSecurity http) throws Exception { http .oauth2Login(withDefaults()); }
@Bean public GrantedAuthoritiesMapper userAuthoritiesMapper() { ... }}
Kotlin
@EnableWebSecurityclass OAuth2LoginSecurityConfig : WebSecurityConfigurerAdapter() {
override fun configure(http: HttpSecurity) { http { oauth2Login { } } }
@Bean fun userAuthoritiesMapper(): GrantedAuthoritiesMapper { ... }}
Delegation-based strategy with OAuth2UserService
This strategy is advanced compared to using a GrantedAuthoritiesMapper, however, it’s also moreflexible as it gives you access to the OAuth2UserRequest and OAuth2User (when using an OAuth 2.0UserService) or OidcUserRequest and OidcUser (when using an OpenID Connect 1.0 UserService).
The OAuth2UserRequest (and OidcUserRequest) provides you access to the associatedOAuth2AccessToken, which is very useful in the cases where the delegator needs to fetch authorityinformation from a protected resource before it can map the custom authorities for the user.
The following example shows how to implement and configure a delegation-based strategy usingan OpenID Connect 1.0 UserService:
191
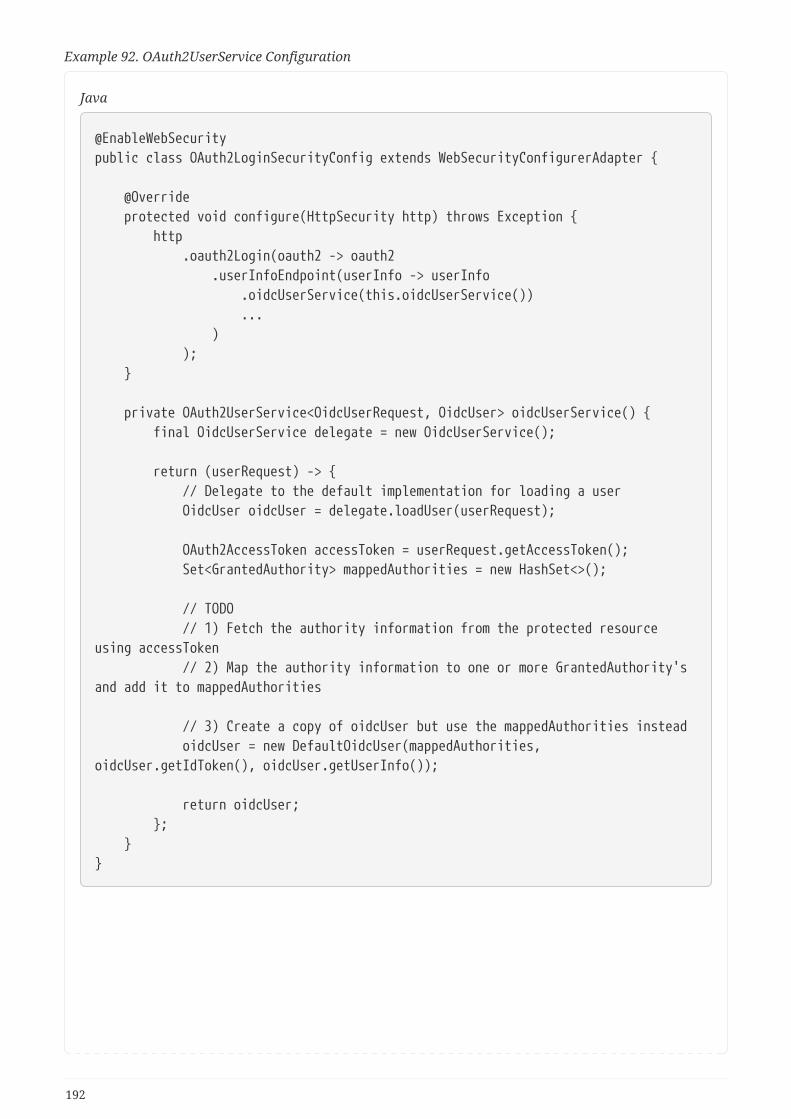
Example 92. OAuth2UserService Configuration
Java
@EnableWebSecuritypublic class OAuth2LoginSecurityConfig extends WebSecurityConfigurerAdapter {
@Override protected void configure(HttpSecurity http) throws Exception { http .oauth2Login(oauth2 -> oauth2 .userInfoEndpoint(userInfo -> userInfo .oidcUserService(this.oidcUserService()) ... ) ); }
private OAuth2UserService<OidcUserRequest, OidcUser> oidcUserService() { final OidcUserService delegate = new OidcUserService();
return (userRequest) -> { // Delegate to the default implementation for loading a user OidcUser oidcUser = delegate.loadUser(userRequest);
OAuth2AccessToken accessToken = userRequest.getAccessToken(); Set<GrantedAuthority> mappedAuthorities = new HashSet<>();
// TODO // 1) Fetch the authority information from the protected resourceusing accessToken // 2) Map the authority information to one or more GrantedAuthority'sand add it to mappedAuthorities
// 3) Create a copy of oidcUser but use the mappedAuthorities instead oidcUser = new DefaultOidcUser(mappedAuthorities,oidcUser.getIdToken(), oidcUser.getUserInfo());
return oidcUser; }; }}
192
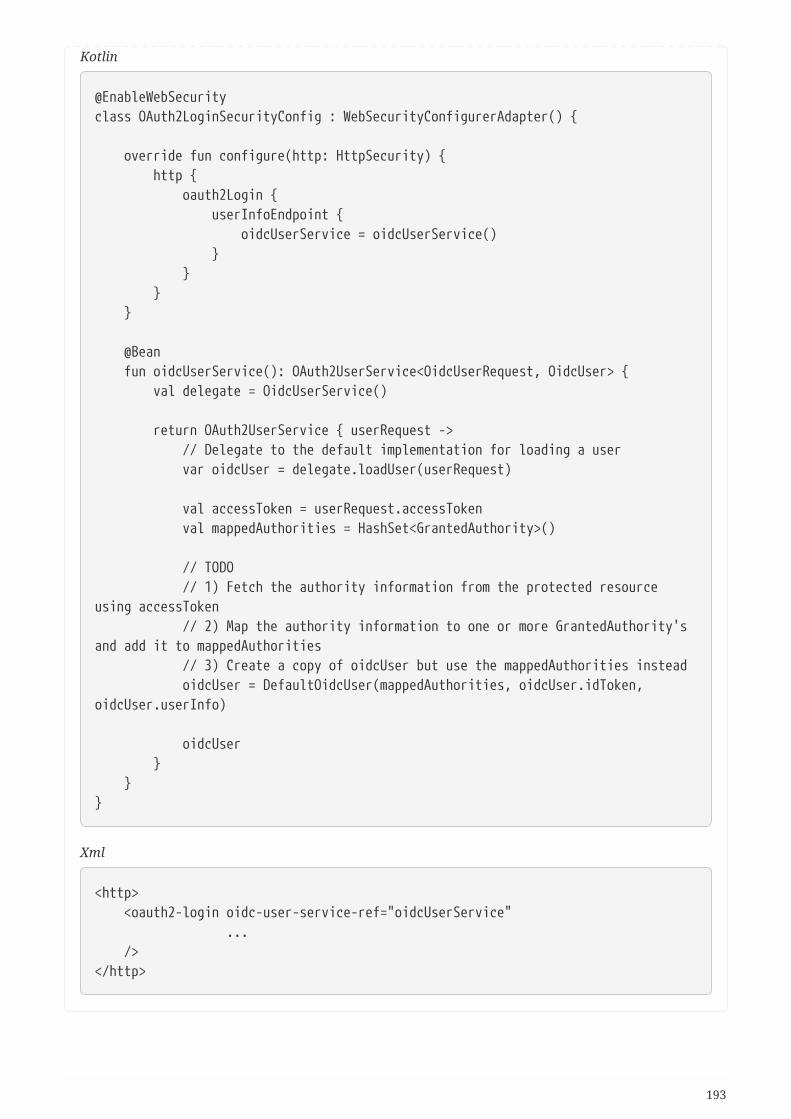
Kotlin
@EnableWebSecurityclass OAuth2LoginSecurityConfig : WebSecurityConfigurerAdapter() {
override fun configure(http: HttpSecurity) { http { oauth2Login { userInfoEndpoint { oidcUserService = oidcUserService() } } } }
@Bean fun oidcUserService(): OAuth2UserService<OidcUserRequest, OidcUser> { val delegate = OidcUserService()
return OAuth2UserService { userRequest -> // Delegate to the default implementation for loading a user var oidcUser = delegate.loadUser(userRequest)
val accessToken = userRequest.accessToken val mappedAuthorities = HashSet<GrantedAuthority>()
// TODO // 1) Fetch the authority information from the protected resourceusing accessToken // 2) Map the authority information to one or more GrantedAuthority'sand add it to mappedAuthorities // 3) Create a copy of oidcUser but use the mappedAuthorities instead oidcUser = DefaultOidcUser(mappedAuthorities, oidcUser.idToken,oidcUser.userInfo)
oidcUser } }}
Xml
<http> <oauth2-login oidc-user-service-ref="oidcUserService" ... /></http>
193
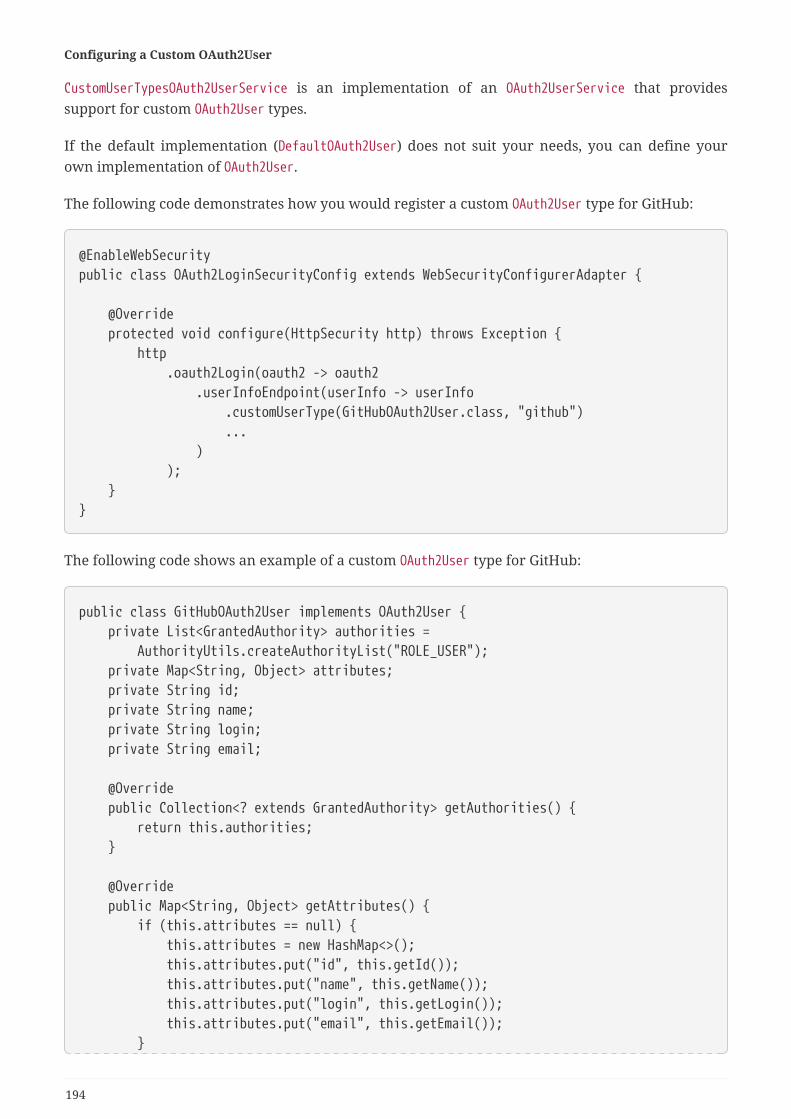
Configuring a Custom OAuth2User
CustomUserTypesOAuth2UserService is an implementation of an OAuth2UserService that providessupport for custom OAuth2User types.
If the default implementation (DefaultOAuth2User) does not suit your needs, you can define yourown implementation of OAuth2User.
The following code demonstrates how you would register a custom OAuth2User type for GitHub:
@EnableWebSecuritypublic class OAuth2LoginSecurityConfig extends WebSecurityConfigurerAdapter {
@Override protected void configure(HttpSecurity http) throws Exception { http .oauth2Login(oauth2 -> oauth2 .userInfoEndpoint(userInfo -> userInfo .customUserType(GitHubOAuth2User.class, "github") ... ) ); }}
The following code shows an example of a custom OAuth2User type for GitHub:
public class GitHubOAuth2User implements OAuth2User { private List<GrantedAuthority> authorities = AuthorityUtils.createAuthorityList("ROLE_USER"); private Map<String, Object> attributes; private String id; private String name; private String login; private String email;
@Override public Collection<? extends GrantedAuthority> getAuthorities() { return this.authorities; }
@Override public Map<String, Object> getAttributes() { if (this.attributes == null) { this.attributes = new HashMap<>(); this.attributes.put("id", this.getId()); this.attributes.put("name", this.getName()); this.attributes.put("login", this.getLogin()); this.attributes.put("email", this.getEmail()); }
194
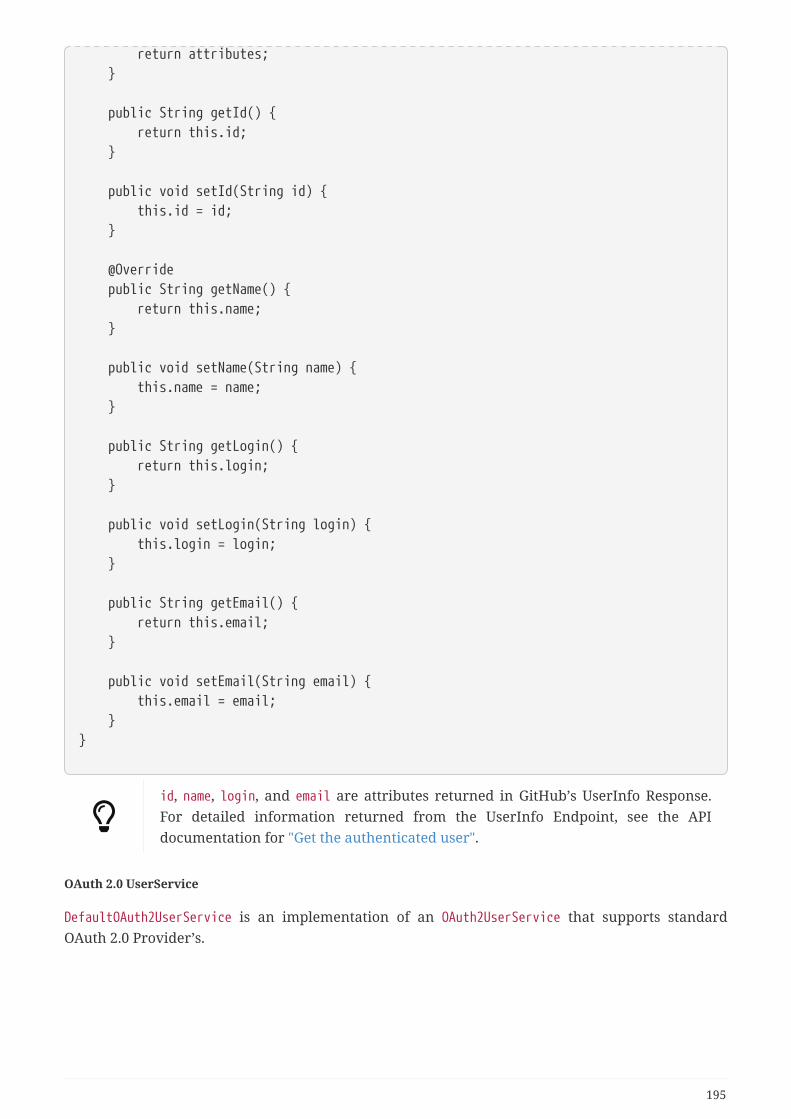
return attributes; }
public String getId() { return this.id; }
public void setId(String id) { this.id = id; }
@Override public String getName() { return this.name; }
public void setName(String name) { this.name = name; }
public String getLogin() { return this.login; }
public void setLogin(String login) { this.login = login; }
public String getEmail() { return this.email; }
public void setEmail(String email) { this.email = email; }}
id, name, login, and email are attributes returned in GitHub’s UserInfo Response.For detailed information returned from the UserInfo Endpoint, see the APIdocumentation for "Get the authenticated user".
OAuth 2.0 UserService
DefaultOAuth2UserService is an implementation of an OAuth2UserService that supports standardOAuth 2.0 Provider’s.
195
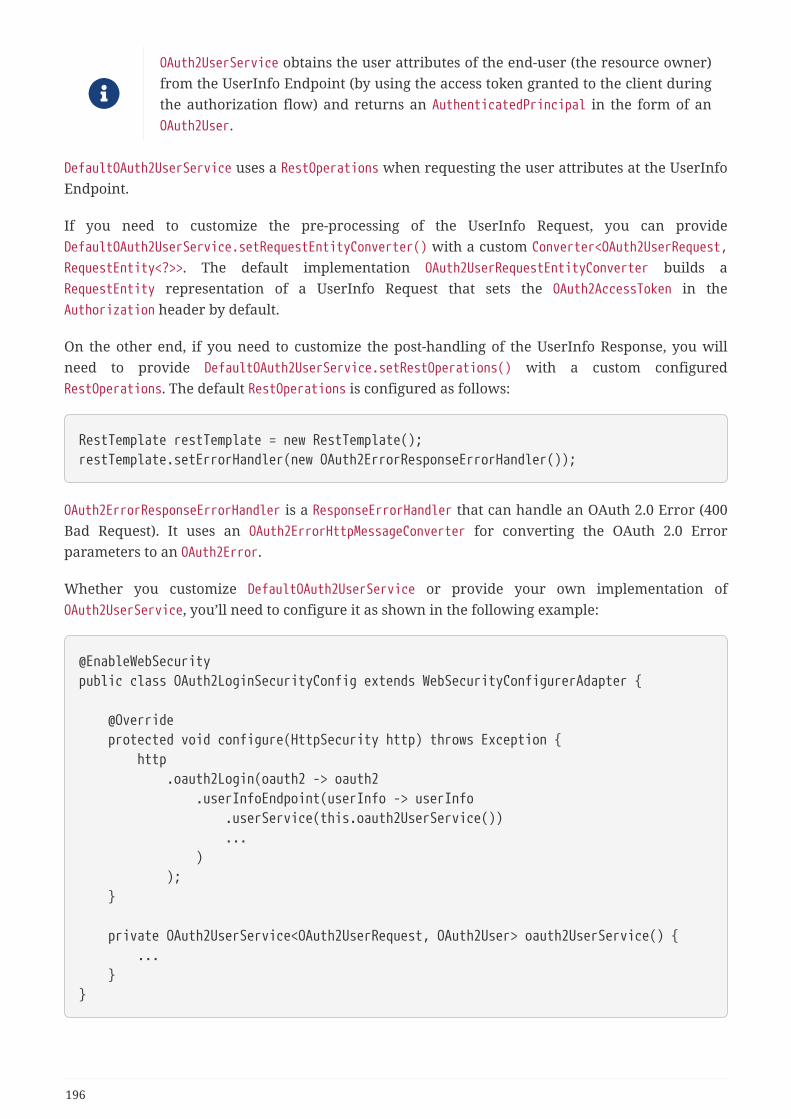
OAuth2UserService obtains the user attributes of the end-user (the resource owner)from the UserInfo Endpoint (by using the access token granted to the client duringthe authorization flow) and returns an AuthenticatedPrincipal in the form of anOAuth2User.
DefaultOAuth2UserService uses a RestOperations when requesting the user attributes at the UserInfoEndpoint.
If you need to customize the pre-processing of the UserInfo Request, you can provideDefaultOAuth2UserService.setRequestEntityConverter() with a custom Converter<OAuth2UserRequest,RequestEntity<?>>. The default implementation OAuth2UserRequestEntityConverter builds aRequestEntity representation of a UserInfo Request that sets the OAuth2AccessToken in theAuthorization header by default.
On the other end, if you need to customize the post-handling of the UserInfo Response, you willneed to provide DefaultOAuth2UserService.setRestOperations() with a custom configuredRestOperations. The default RestOperations is configured as follows:
RestTemplate restTemplate = new RestTemplate();restTemplate.setErrorHandler(new OAuth2ErrorResponseErrorHandler());
OAuth2ErrorResponseErrorHandler is a ResponseErrorHandler that can handle an OAuth 2.0 Error (400Bad Request). It uses an OAuth2ErrorHttpMessageConverter for converting the OAuth 2.0 Errorparameters to an OAuth2Error.
Whether you customize DefaultOAuth2UserService or provide your own implementation ofOAuth2UserService, you’ll need to configure it as shown in the following example:
@EnableWebSecuritypublic class OAuth2LoginSecurityConfig extends WebSecurityConfigurerAdapter {
@Override protected void configure(HttpSecurity http) throws Exception { http .oauth2Login(oauth2 -> oauth2 .userInfoEndpoint(userInfo -> userInfo .userService(this.oauth2UserService()) ... ) ); }
private OAuth2UserService<OAuth2UserRequest, OAuth2User> oauth2UserService() { ... }}
196
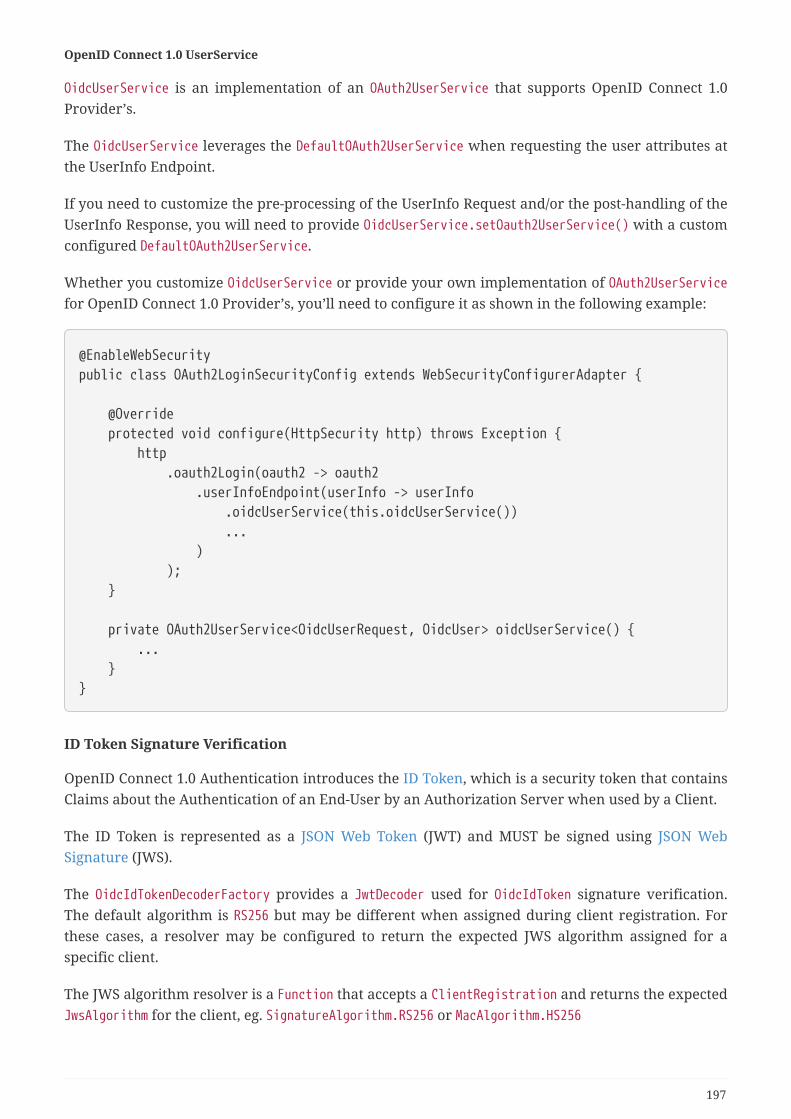
OpenID Connect 1.0 UserService
OidcUserService is an implementation of an OAuth2UserService that supports OpenID Connect 1.0Provider’s.
The OidcUserService leverages the DefaultOAuth2UserService when requesting the user attributes atthe UserInfo Endpoint.
If you need to customize the pre-processing of the UserInfo Request and/or the post-handling of theUserInfo Response, you will need to provide OidcUserService.setOauth2UserService() with a customconfigured DefaultOAuth2UserService.
Whether you customize OidcUserService or provide your own implementation of OAuth2UserServicefor OpenID Connect 1.0 Provider’s, you’ll need to configure it as shown in the following example:
@EnableWebSecuritypublic class OAuth2LoginSecurityConfig extends WebSecurityConfigurerAdapter {
@Override protected void configure(HttpSecurity http) throws Exception { http .oauth2Login(oauth2 -> oauth2 .userInfoEndpoint(userInfo -> userInfo .oidcUserService(this.oidcUserService()) ... ) ); }
private OAuth2UserService<OidcUserRequest, OidcUser> oidcUserService() { ... }}
ID Token Signature Verification
OpenID Connect 1.0 Authentication introduces the ID Token, which is a security token that containsClaims about the Authentication of an End-User by an Authorization Server when used by a Client.
The ID Token is represented as a JSON Web Token (JWT) and MUST be signed using JSON WebSignature (JWS).
The OidcIdTokenDecoderFactory provides a JwtDecoder used for OidcIdToken signature verification.The default algorithm is RS256 but may be different when assigned during client registration. Forthese cases, a resolver may be configured to return the expected JWS algorithm assigned for aspecific client.
The JWS algorithm resolver is a Function that accepts a ClientRegistration and returns the expectedJwsAlgorithm for the client, eg. SignatureAlgorithm.RS256 or MacAlgorithm.HS256
197
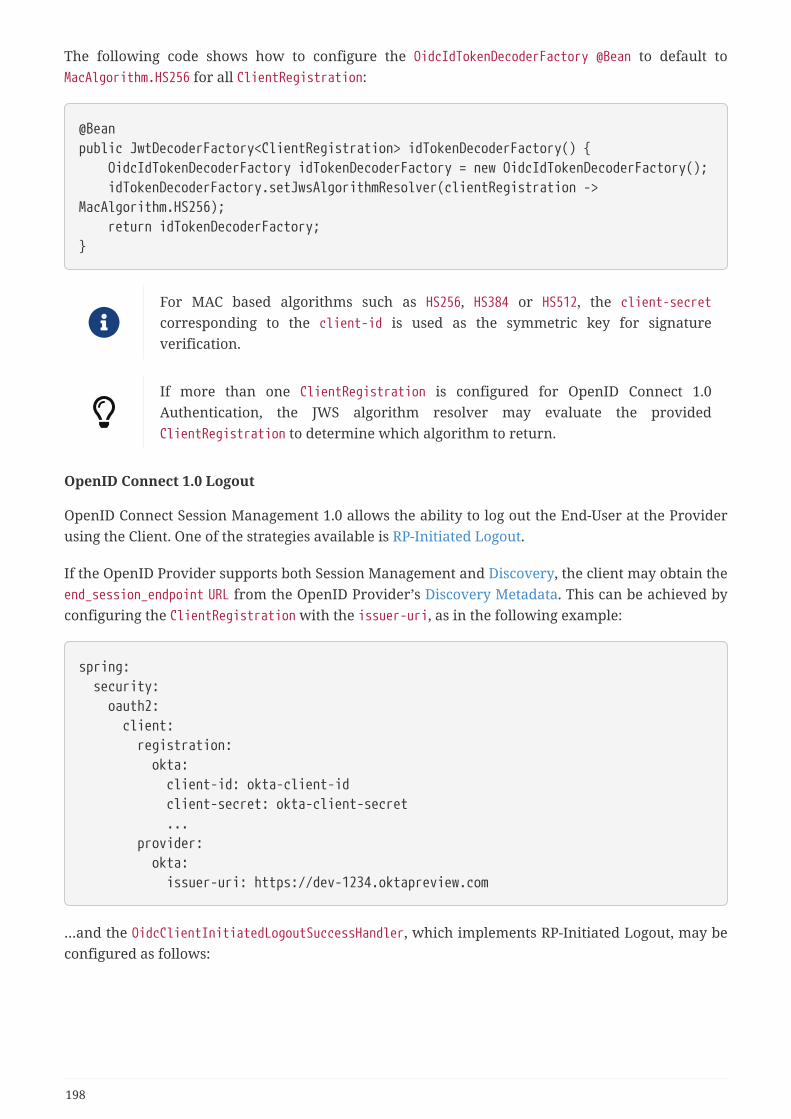
The following code shows how to configure the OidcIdTokenDecoderFactory @Bean to default toMacAlgorithm.HS256 for all ClientRegistration:
@Beanpublic JwtDecoderFactory<ClientRegistration> idTokenDecoderFactory() { OidcIdTokenDecoderFactory idTokenDecoderFactory = new OidcIdTokenDecoderFactory(); idTokenDecoderFactory.setJwsAlgorithmResolver(clientRegistration ->MacAlgorithm.HS256); return idTokenDecoderFactory;}
For MAC based algorithms such as HS256, HS384 or HS512, the client-secretcorresponding to the client-id is used as the symmetric key for signatureverification.
If more than one ClientRegistration is configured for OpenID Connect 1.0Authentication, the JWS algorithm resolver may evaluate the providedClientRegistration to determine which algorithm to return.
OpenID Connect 1.0 Logout
OpenID Connect Session Management 1.0 allows the ability to log out the End-User at the Providerusing the Client. One of the strategies available is RP-Initiated Logout.
If the OpenID Provider supports both Session Management and Discovery, the client may obtain theend_session_endpoint URL from the OpenID Provider’s Discovery Metadata. This can be achieved byconfiguring the ClientRegistration with the issuer-uri, as in the following example:
spring: security: oauth2: client: registration: okta: client-id: okta-client-id client-secret: okta-client-secret ... provider: okta: issuer-uri: https://dev-1234.oktapreview.com
…and the OidcClientInitiatedLogoutSuccessHandler, which implements RP-Initiated Logout, may beconfigured as follows:
198
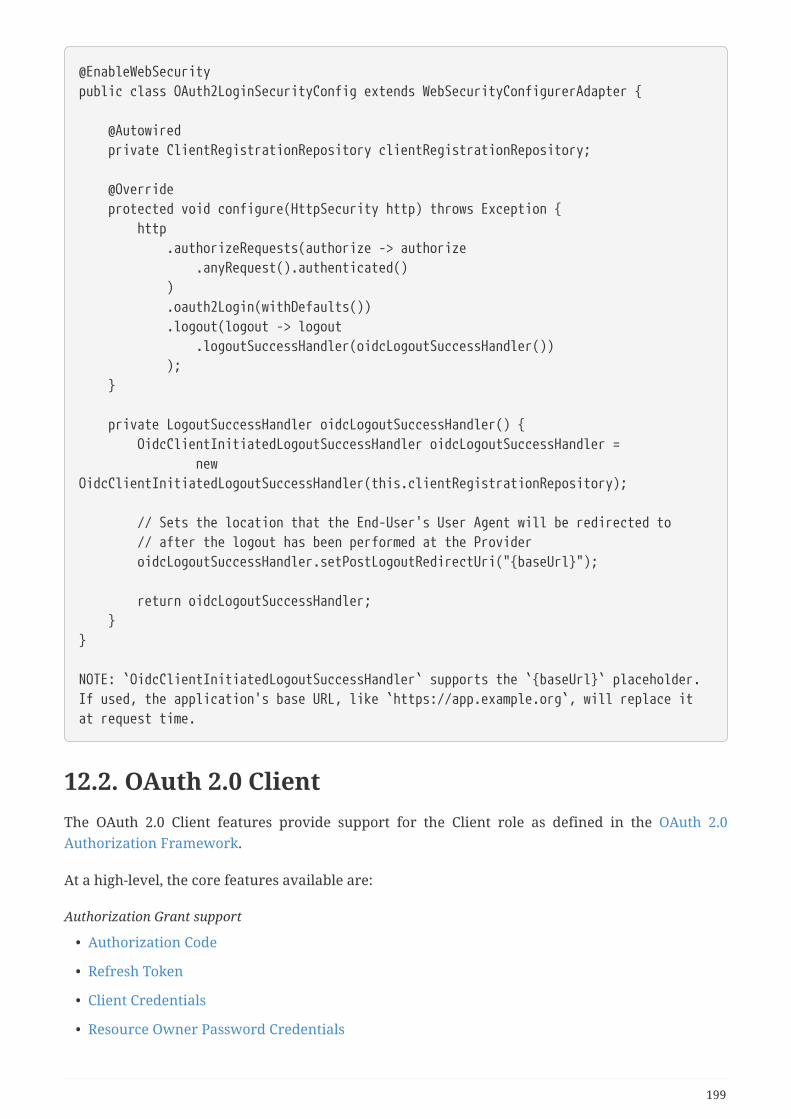
@EnableWebSecuritypublic class OAuth2LoginSecurityConfig extends WebSecurityConfigurerAdapter {
@Autowired private ClientRegistrationRepository clientRegistrationRepository;
@Override protected void configure(HttpSecurity http) throws Exception { http .authorizeRequests(authorize -> authorize .anyRequest().authenticated() ) .oauth2Login(withDefaults()) .logout(logout -> logout .logoutSuccessHandler(oidcLogoutSuccessHandler()) ); }
private LogoutSuccessHandler oidcLogoutSuccessHandler() { OidcClientInitiatedLogoutSuccessHandler oidcLogoutSuccessHandler = newOidcClientInitiatedLogoutSuccessHandler(this.clientRegistrationRepository);
// Sets the location that the End-User's User Agent will be redirected to // after the logout has been performed at the Provider oidcLogoutSuccessHandler.setPostLogoutRedirectUri("{baseUrl}");
return oidcLogoutSuccessHandler; }}
NOTE: `OidcClientInitiatedLogoutSuccessHandler` supports the `{baseUrl}` placeholder.If used, the application's base URL, like `https://app.example.org`, will replace itat request time.
12.2. OAuth 2.0 ClientThe OAuth 2.0 Client features provide support for the Client role as defined in the OAuth 2.0Authorization Framework.
At a high-level, the core features available are:
Authorization Grant support
• Authorization Code
• Refresh Token
• Client Credentials
• Resource Owner Password Credentials
199
HTTP Client support
• WebClient integration for Servlet Environments (for requesting protected resources)
The HttpSecurity.oauth2Client() DSL provides a number of configuration options for customizingthe core components used by OAuth 2.0 Client. In addition,HttpSecurity.oauth2Client().authorizationCodeGrant() enables the customization of theAuthorization Code grant.
The following code shows the complete configuration options provided by theHttpSecurity.oauth2Client() DSL:
200
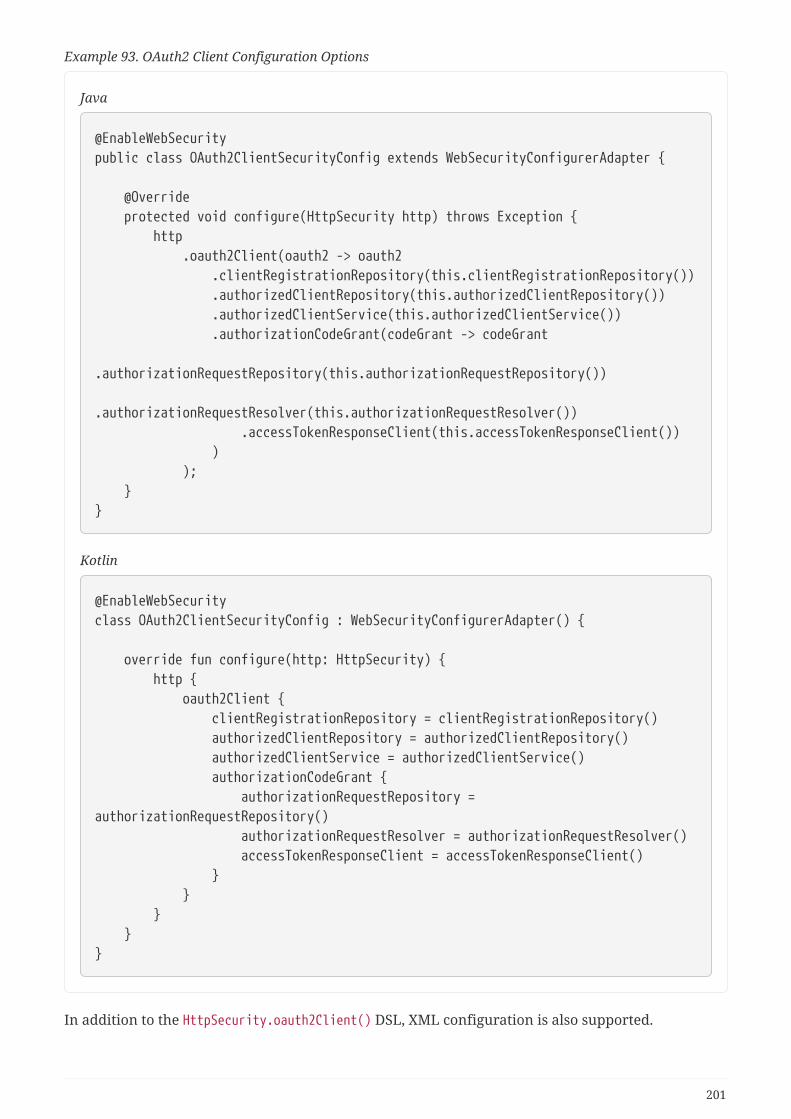
Example 93. OAuth2 Client Configuration Options
Java
@EnableWebSecuritypublic class OAuth2ClientSecurityConfig extends WebSecurityConfigurerAdapter {
@Override protected void configure(HttpSecurity http) throws Exception { http .oauth2Client(oauth2 -> oauth2 .clientRegistrationRepository(this.clientRegistrationRepository()) .authorizedClientRepository(this.authorizedClientRepository()) .authorizedClientService(this.authorizedClientService()) .authorizationCodeGrant(codeGrant -> codeGrant .authorizationRequestRepository(this.authorizationRequestRepository()) .authorizationRequestResolver(this.authorizationRequestResolver()) .accessTokenResponseClient(this.accessTokenResponseClient()) ) ); }}
Kotlin
@EnableWebSecurityclass OAuth2ClientSecurityConfig : WebSecurityConfigurerAdapter() {
override fun configure(http: HttpSecurity) { http { oauth2Client { clientRegistrationRepository = clientRegistrationRepository() authorizedClientRepository = authorizedClientRepository() authorizedClientService = authorizedClientService() authorizationCodeGrant { authorizationRequestRepository =authorizationRequestRepository() authorizationRequestResolver = authorizationRequestResolver() accessTokenResponseClient = accessTokenResponseClient() } } } }}
In addition to the HttpSecurity.oauth2Client() DSL, XML configuration is also supported.
201
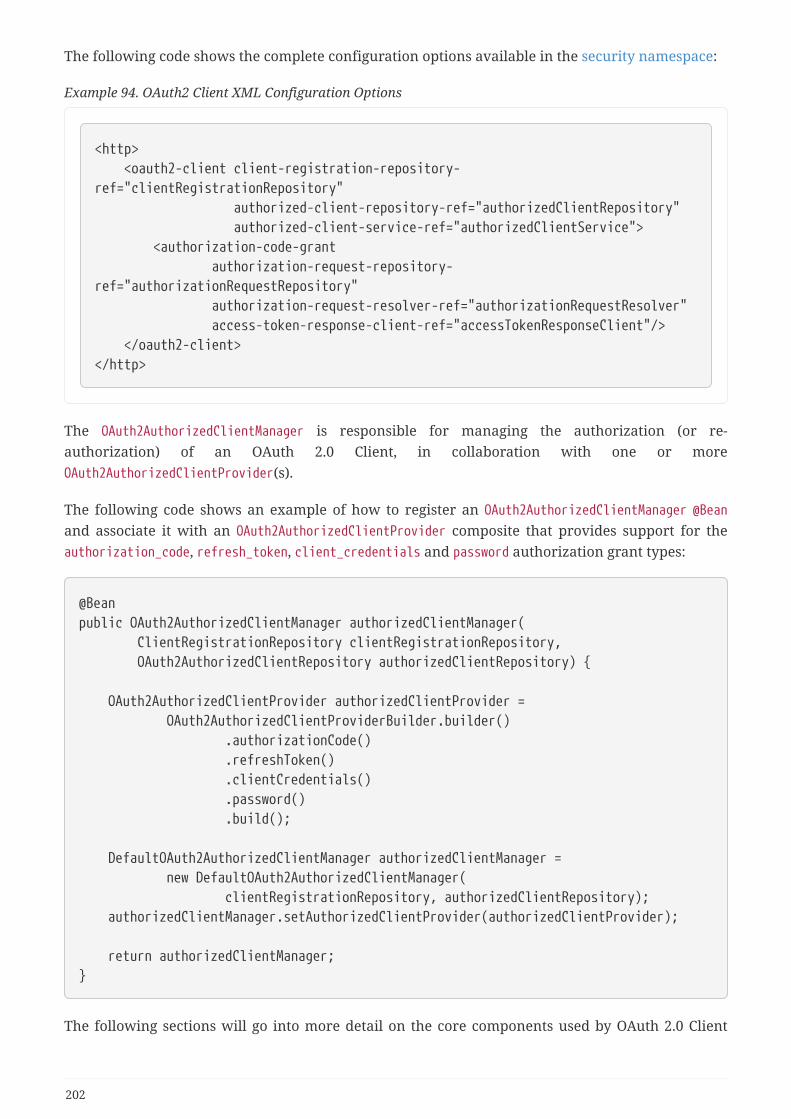
The following code shows the complete configuration options available in the security namespace:
Example 94. OAuth2 Client XML Configuration Options
<http> <oauth2-client client-registration-repository-ref="clientRegistrationRepository" authorized-client-repository-ref="authorizedClientRepository" authorized-client-service-ref="authorizedClientService"> <authorization-code-grant authorization-request-repository-ref="authorizationRequestRepository" authorization-request-resolver-ref="authorizationRequestResolver" access-token-response-client-ref="accessTokenResponseClient"/> </oauth2-client></http>
The OAuth2AuthorizedClientManager is responsible for managing the authorization (or re-authorization) of an OAuth 2.0 Client, in collaboration with one or moreOAuth2AuthorizedClientProvider(s).
The following code shows an example of how to register an OAuth2AuthorizedClientManager @Beanand associate it with an OAuth2AuthorizedClientProvider composite that provides support for theauthorization_code, refresh_token, client_credentials and password authorization grant types:
@Beanpublic OAuth2AuthorizedClientManager authorizedClientManager( ClientRegistrationRepository clientRegistrationRepository, OAuth2AuthorizedClientRepository authorizedClientRepository) {
OAuth2AuthorizedClientProvider authorizedClientProvider = OAuth2AuthorizedClientProviderBuilder.builder() .authorizationCode() .refreshToken() .clientCredentials() .password() .build();
DefaultOAuth2AuthorizedClientManager authorizedClientManager = new DefaultOAuth2AuthorizedClientManager( clientRegistrationRepository, authorizedClientRepository); authorizedClientManager.setAuthorizedClientProvider(authorizedClientProvider);
return authorizedClientManager;}
The following sections will go into more detail on the core components used by OAuth 2.0 Client
202
and the configuration options available:
• Core Interfaces / Classes
◦ ClientRegistration
◦ ClientRegistrationRepository
◦ OAuth2AuthorizedClient
◦ OAuth2AuthorizedClientRepository / OAuth2AuthorizedClientService
◦ OAuth2AuthorizedClientManager / OAuth2AuthorizedClientProvider
• Authorization Grant Support
◦ Authorization Code
◦ Refresh Token
◦ Client Credentials
◦ Resource Owner Password Credentials
• Additional Features
◦ Resolving an Authorized Client
• WebClient integration for Servlet Environments
12.2.1. Core Interfaces / Classes
ClientRegistration
ClientRegistration is a representation of a client registered with an OAuth 2.0 or OpenID Connect1.0 Provider.
A client registration holds information, such as client id, client secret, authorization grant type,redirect URI, scope(s), authorization URI, token URI, and other details.
ClientRegistration and its properties are defined as follows:
203
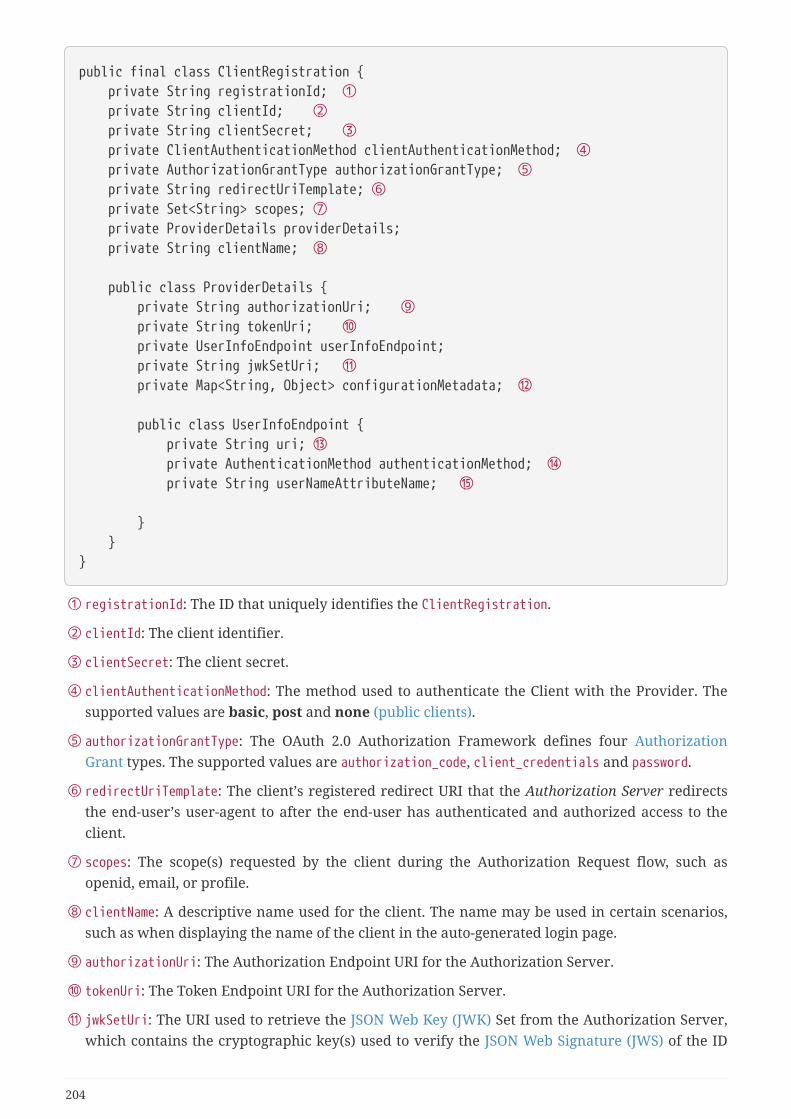
public final class ClientRegistration { private String registrationId; ① private String clientId; ② private String clientSecret; ③ private ClientAuthenticationMethod clientAuthenticationMethod; ④ private AuthorizationGrantType authorizationGrantType; ⑤ private String redirectUriTemplate; ⑥ private Set<String> scopes; ⑦ private ProviderDetails providerDetails; private String clientName; ⑧
public class ProviderDetails { private String authorizationUri; ⑨ private String tokenUri; ⑩ private UserInfoEndpoint userInfoEndpoint; private String jwkSetUri; ⑪ private Map<String, Object> configurationMetadata; ⑫
public class UserInfoEndpoint { private String uri; ⑬ private AuthenticationMethod authenticationMethod; ⑭ private String userNameAttributeName; ⑮
} }}
① registrationId: The ID that uniquely identifies the ClientRegistration.
② clientId: The client identifier.
③ clientSecret: The client secret.
④ clientAuthenticationMethod: The method used to authenticate the Client with the Provider. Thesupported values are basic, post and none (public clients).
⑤ authorizationGrantType: The OAuth 2.0 Authorization Framework defines four AuthorizationGrant types. The supported values are authorization_code, client_credentials and password.
⑥ redirectUriTemplate: The client’s registered redirect URI that the Authorization Server redirectsthe end-user’s user-agent to after the end-user has authenticated and authorized access to theclient.
⑦ scopes: The scope(s) requested by the client during the Authorization Request flow, such asopenid, email, or profile.
⑧ clientName: A descriptive name used for the client. The name may be used in certain scenarios,such as when displaying the name of the client in the auto-generated login page.
⑨ authorizationUri: The Authorization Endpoint URI for the Authorization Server.
⑩ tokenUri: The Token Endpoint URI for the Authorization Server.
⑪ jwkSetUri: The URI used to retrieve the JSON Web Key (JWK) Set from the Authorization Server,which contains the cryptographic key(s) used to verify the JSON Web Signature (JWS) of the ID
204
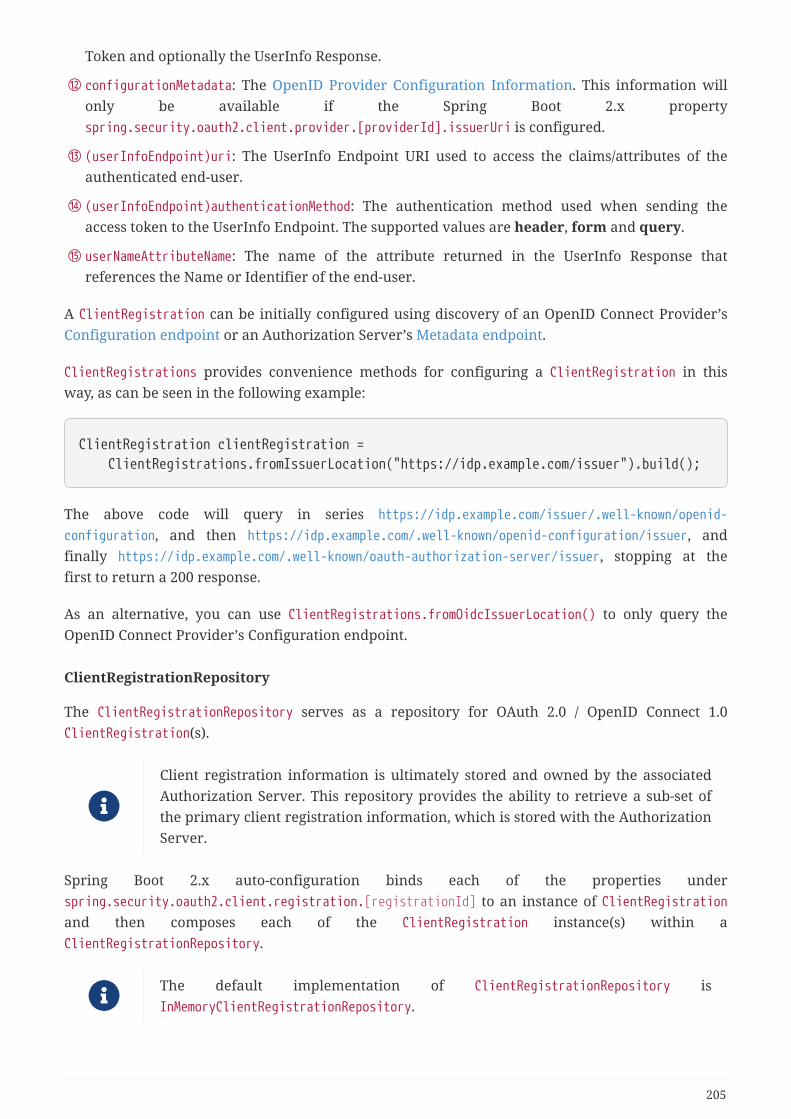
Token and optionally the UserInfo Response.
⑫ configurationMetadata: The OpenID Provider Configuration Information. This information willonly be available if the Spring Boot 2.x propertyspring.security.oauth2.client.provider.[providerId].issuerUri is configured.
⑬ (userInfoEndpoint)uri: The UserInfo Endpoint URI used to access the claims/attributes of theauthenticated end-user.
⑭ (userInfoEndpoint)authenticationMethod: The authentication method used when sending theaccess token to the UserInfo Endpoint. The supported values are header, form and query.
⑮ userNameAttributeName: The name of the attribute returned in the UserInfo Response thatreferences the Name or Identifier of the end-user.
A ClientRegistration can be initially configured using discovery of an OpenID Connect Provider’sConfiguration endpoint or an Authorization Server’s Metadata endpoint.
ClientRegistrations provides convenience methods for configuring a ClientRegistration in thisway, as can be seen in the following example:
ClientRegistration clientRegistration = ClientRegistrations.fromIssuerLocation("https://idp.example.com/issuer").build();
The above code will query in series https://idp.example.com/issuer/.well-known/openid-configuration, and then https://idp.example.com/.well-known/openid-configuration/issuer, andfinally https://idp.example.com/.well-known/oauth-authorization-server/issuer, stopping at thefirst to return a 200 response.
As an alternative, you can use ClientRegistrations.fromOidcIssuerLocation() to only query theOpenID Connect Provider’s Configuration endpoint.
ClientRegistrationRepository
The ClientRegistrationRepository serves as a repository for OAuth 2.0 / OpenID Connect 1.0ClientRegistration(s).
Client registration information is ultimately stored and owned by the associatedAuthorization Server. This repository provides the ability to retrieve a sub-set ofthe primary client registration information, which is stored with the AuthorizationServer.
Spring Boot 2.x auto-configuration binds each of the properties underspring.security.oauth2.client.registration.[registrationId] to an instance of ClientRegistrationand then composes each of the ClientRegistration instance(s) within aClientRegistrationRepository.
The default implementation of ClientRegistrationRepository isInMemoryClientRegistrationRepository.
205
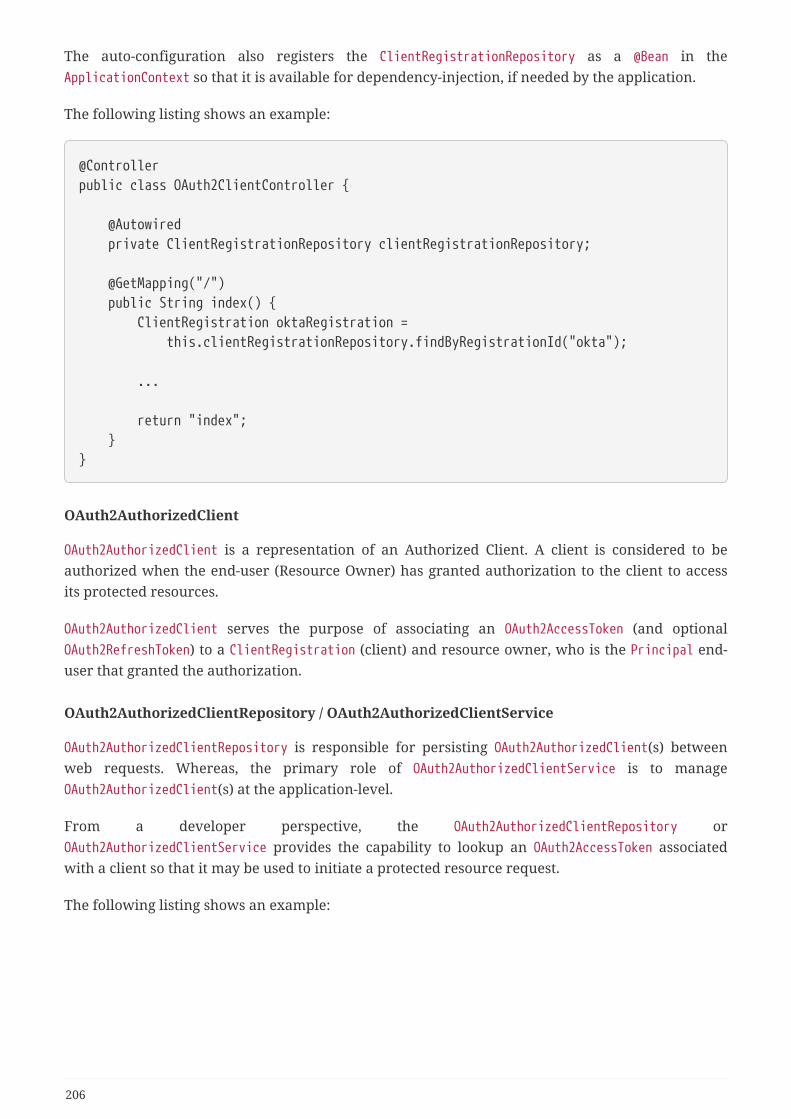
The auto-configuration also registers the ClientRegistrationRepository as a @Bean in theApplicationContext so that it is available for dependency-injection, if needed by the application.
The following listing shows an example:
@Controllerpublic class OAuth2ClientController {
@Autowired private ClientRegistrationRepository clientRegistrationRepository;
@GetMapping("/") public String index() { ClientRegistration oktaRegistration = this.clientRegistrationRepository.findByRegistrationId("okta");
...
return "index"; }}
OAuth2AuthorizedClient
OAuth2AuthorizedClient is a representation of an Authorized Client. A client is considered to beauthorized when the end-user (Resource Owner) has granted authorization to the client to accessits protected resources.
OAuth2AuthorizedClient serves the purpose of associating an OAuth2AccessToken (and optionalOAuth2RefreshToken) to a ClientRegistration (client) and resource owner, who is the Principal end-user that granted the authorization.
OAuth2AuthorizedClientRepository / OAuth2AuthorizedClientService
OAuth2AuthorizedClientRepository is responsible for persisting OAuth2AuthorizedClient(s) betweenweb requests. Whereas, the primary role of OAuth2AuthorizedClientService is to manageOAuth2AuthorizedClient(s) at the application-level.
From a developer perspective, the OAuth2AuthorizedClientRepository orOAuth2AuthorizedClientService provides the capability to lookup an OAuth2AccessToken associatedwith a client so that it may be used to initiate a protected resource request.
The following listing shows an example:
206
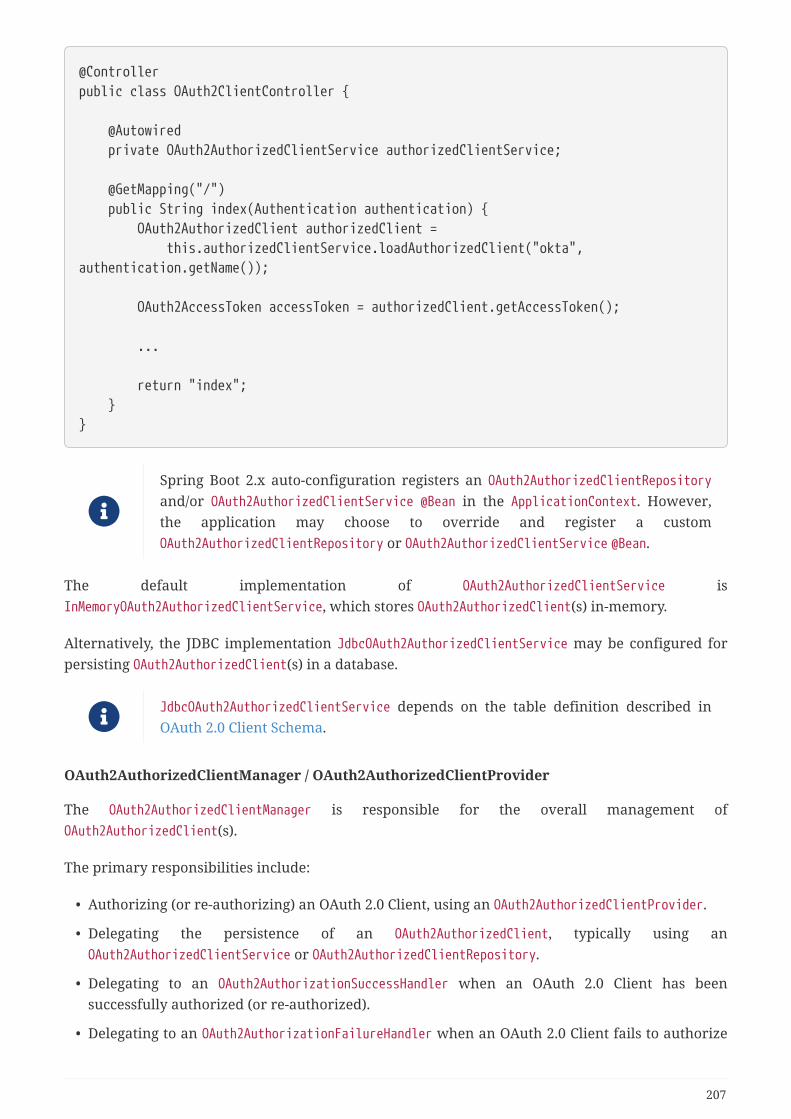
@Controllerpublic class OAuth2ClientController {
@Autowired private OAuth2AuthorizedClientService authorizedClientService;
@GetMapping("/") public String index(Authentication authentication) { OAuth2AuthorizedClient authorizedClient = this.authorizedClientService.loadAuthorizedClient("okta",authentication.getName());
OAuth2AccessToken accessToken = authorizedClient.getAccessToken();
...
return "index"; }}
Spring Boot 2.x auto-configuration registers an OAuth2AuthorizedClientRepositoryand/or OAuth2AuthorizedClientService @Bean in the ApplicationContext. However,the application may choose to override and register a customOAuth2AuthorizedClientRepository or OAuth2AuthorizedClientService @Bean.
The default implementation of OAuth2AuthorizedClientService isInMemoryOAuth2AuthorizedClientService, which stores OAuth2AuthorizedClient(s) in-memory.
Alternatively, the JDBC implementation JdbcOAuth2AuthorizedClientService may be configured forpersisting OAuth2AuthorizedClient(s) in a database.
JdbcOAuth2AuthorizedClientService depends on the table definition described inOAuth 2.0 Client Schema.
OAuth2AuthorizedClientManager / OAuth2AuthorizedClientProvider
The OAuth2AuthorizedClientManager is responsible for the overall management ofOAuth2AuthorizedClient(s).
The primary responsibilities include:
• Authorizing (or re-authorizing) an OAuth 2.0 Client, using an OAuth2AuthorizedClientProvider.
• Delegating the persistence of an OAuth2AuthorizedClient, typically using anOAuth2AuthorizedClientService or OAuth2AuthorizedClientRepository.
• Delegating to an OAuth2AuthorizationSuccessHandler when an OAuth 2.0 Client has beensuccessfully authorized (or re-authorized).
• Delegating to an OAuth2AuthorizationFailureHandler when an OAuth 2.0 Client fails to authorize
207
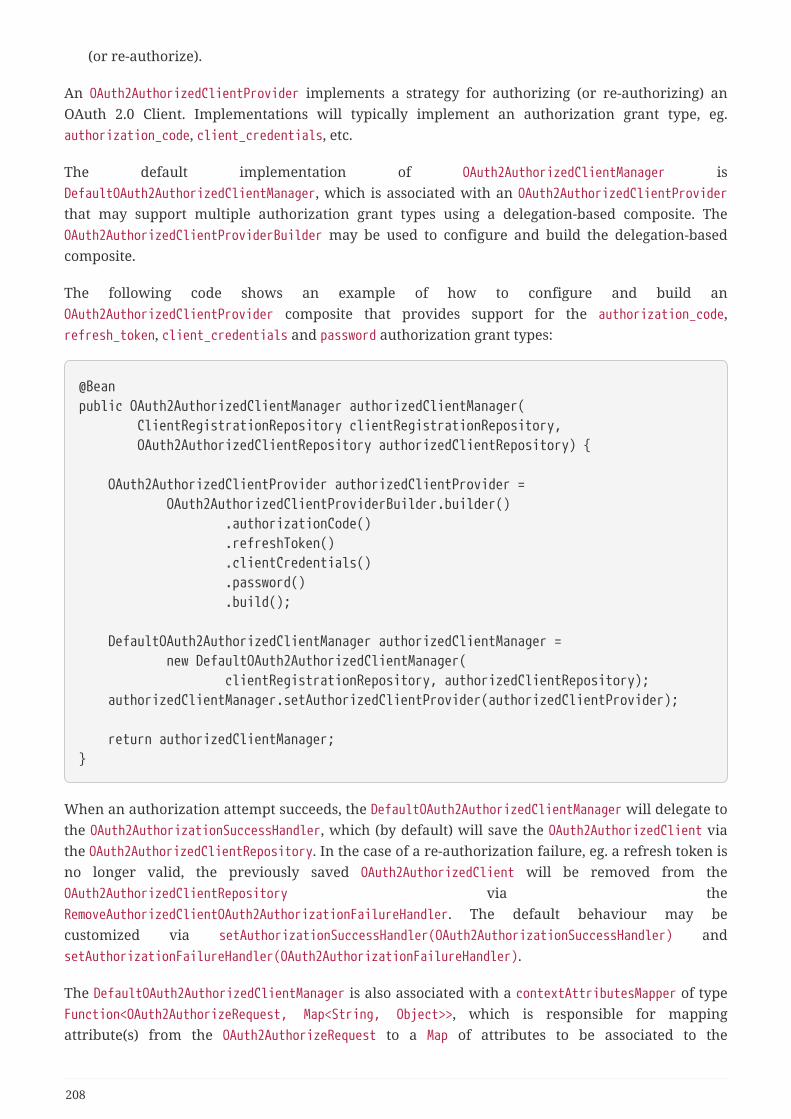
(or re-authorize).
An OAuth2AuthorizedClientProvider implements a strategy for authorizing (or re-authorizing) anOAuth 2.0 Client. Implementations will typically implement an authorization grant type, eg.authorization_code, client_credentials, etc.
The default implementation of OAuth2AuthorizedClientManager isDefaultOAuth2AuthorizedClientManager, which is associated with an OAuth2AuthorizedClientProviderthat may support multiple authorization grant types using a delegation-based composite. TheOAuth2AuthorizedClientProviderBuilder may be used to configure and build the delegation-basedcomposite.
The following code shows an example of how to configure and build anOAuth2AuthorizedClientProvider composite that provides support for the authorization_code,refresh_token, client_credentials and password authorization grant types:
@Beanpublic OAuth2AuthorizedClientManager authorizedClientManager( ClientRegistrationRepository clientRegistrationRepository, OAuth2AuthorizedClientRepository authorizedClientRepository) {
OAuth2AuthorizedClientProvider authorizedClientProvider = OAuth2AuthorizedClientProviderBuilder.builder() .authorizationCode() .refreshToken() .clientCredentials() .password() .build();
DefaultOAuth2AuthorizedClientManager authorizedClientManager = new DefaultOAuth2AuthorizedClientManager( clientRegistrationRepository, authorizedClientRepository); authorizedClientManager.setAuthorizedClientProvider(authorizedClientProvider);
return authorizedClientManager;}
When an authorization attempt succeeds, the DefaultOAuth2AuthorizedClientManager will delegate tothe OAuth2AuthorizationSuccessHandler, which (by default) will save the OAuth2AuthorizedClient viathe OAuth2AuthorizedClientRepository. In the case of a re-authorization failure, eg. a refresh token isno longer valid, the previously saved OAuth2AuthorizedClient will be removed from theOAuth2AuthorizedClientRepository via theRemoveAuthorizedClientOAuth2AuthorizationFailureHandler. The default behaviour may becustomized via setAuthorizationSuccessHandler(OAuth2AuthorizationSuccessHandler) andsetAuthorizationFailureHandler(OAuth2AuthorizationFailureHandler).
The DefaultOAuth2AuthorizedClientManager is also associated with a contextAttributesMapper of typeFunction<OAuth2AuthorizeRequest, Map<String, Object>>, which is responsible for mappingattribute(s) from the OAuth2AuthorizeRequest to a Map of attributes to be associated to the
208
OAuth2AuthorizationContext. This can be useful when you need to supply anOAuth2AuthorizedClientProvider with required (supported) attribute(s), eg. thePasswordOAuth2AuthorizedClientProvider requires the resource owner’s username and password to beavailable in OAuth2AuthorizationContext.getAttributes().
The following code shows an example of the contextAttributesMapper:
209
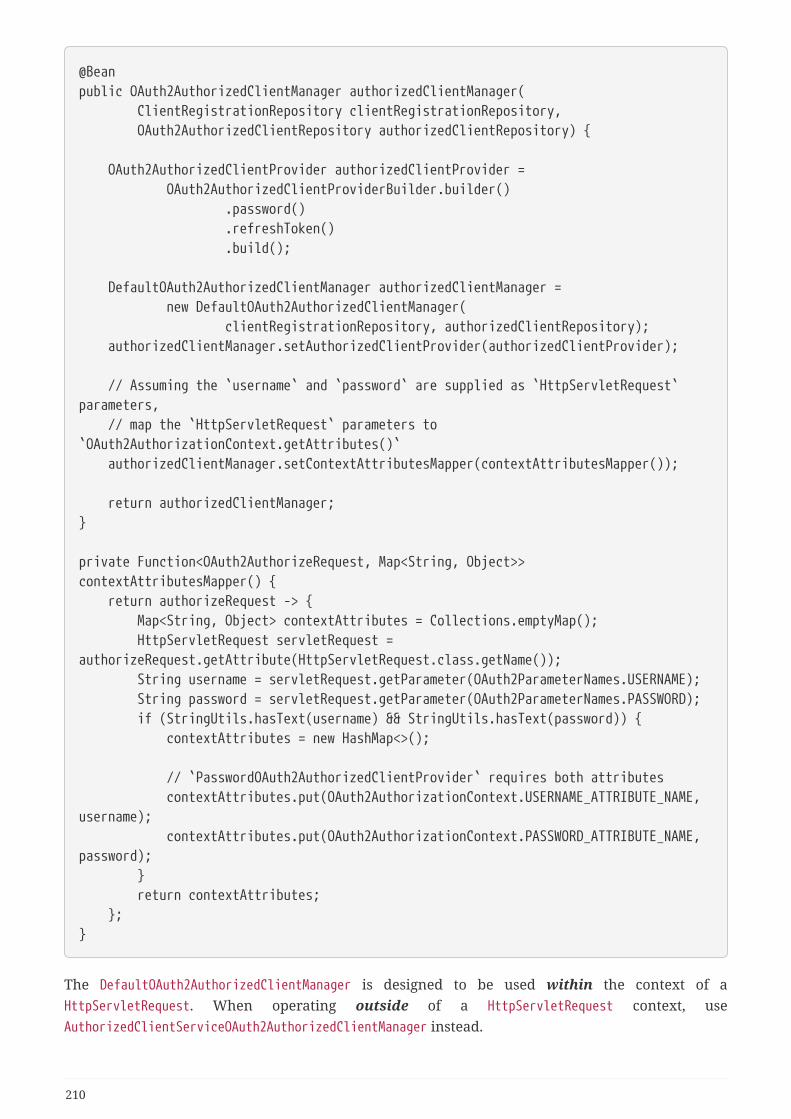
@Beanpublic OAuth2AuthorizedClientManager authorizedClientManager( ClientRegistrationRepository clientRegistrationRepository, OAuth2AuthorizedClientRepository authorizedClientRepository) {
OAuth2AuthorizedClientProvider authorizedClientProvider = OAuth2AuthorizedClientProviderBuilder.builder() .password() .refreshToken() .build();
DefaultOAuth2AuthorizedClientManager authorizedClientManager = new DefaultOAuth2AuthorizedClientManager( clientRegistrationRepository, authorizedClientRepository); authorizedClientManager.setAuthorizedClientProvider(authorizedClientProvider);
// Assuming the `username` and `password` are supplied as `HttpServletRequest`parameters, // map the `HttpServletRequest` parameters to`OAuth2AuthorizationContext.getAttributes()` authorizedClientManager.setContextAttributesMapper(contextAttributesMapper());
return authorizedClientManager;}
private Function<OAuth2AuthorizeRequest, Map<String, Object>>contextAttributesMapper() { return authorizeRequest -> { Map<String, Object> contextAttributes = Collections.emptyMap(); HttpServletRequest servletRequest =authorizeRequest.getAttribute(HttpServletRequest.class.getName()); String username = servletRequest.getParameter(OAuth2ParameterNames.USERNAME); String password = servletRequest.getParameter(OAuth2ParameterNames.PASSWORD); if (StringUtils.hasText(username) && StringUtils.hasText(password)) { contextAttributes = new HashMap<>();
// `PasswordOAuth2AuthorizedClientProvider` requires both attributes contextAttributes.put(OAuth2AuthorizationContext.USERNAME_ATTRIBUTE_NAME,username); contextAttributes.put(OAuth2AuthorizationContext.PASSWORD_ATTRIBUTE_NAME,password); } return contextAttributes; };}
The DefaultOAuth2AuthorizedClientManager is designed to be used within the context of aHttpServletRequest. When operating outside of a HttpServletRequest context, useAuthorizedClientServiceOAuth2AuthorizedClientManager instead.
210
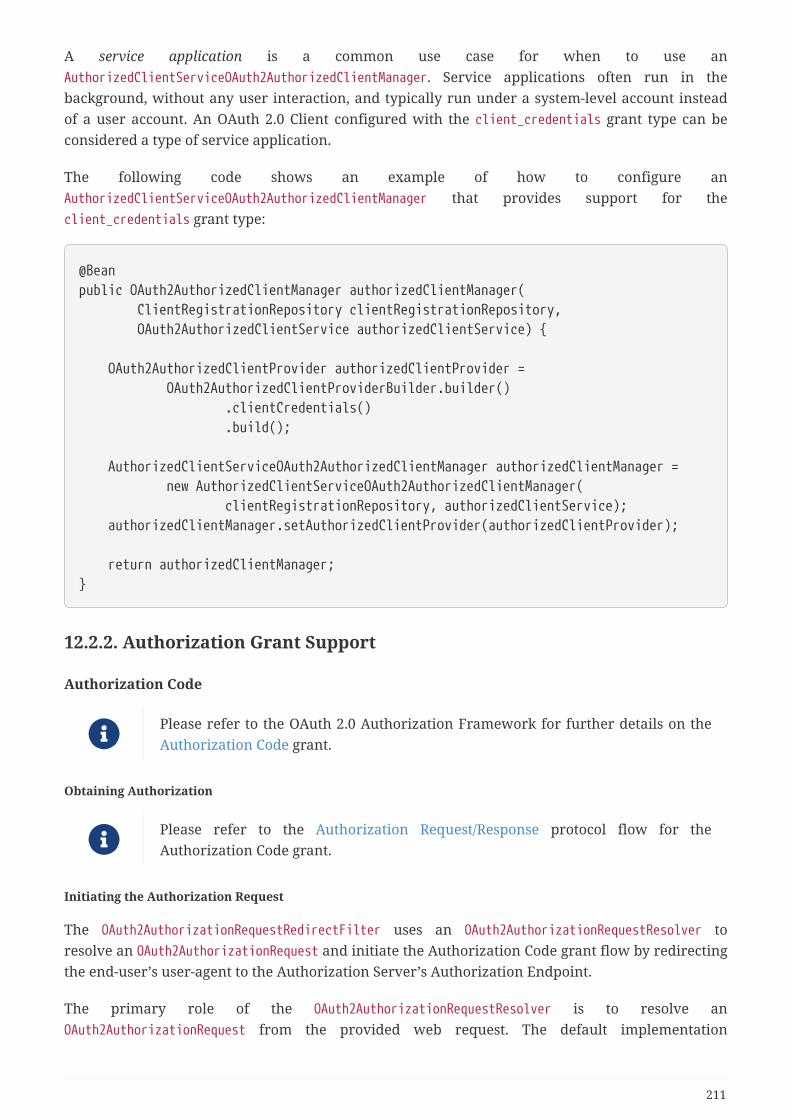
A service application is a common use case for when to use anAuthorizedClientServiceOAuth2AuthorizedClientManager. Service applications often run in thebackground, without any user interaction, and typically run under a system-level account insteadof a user account. An OAuth 2.0 Client configured with the client_credentials grant type can beconsidered a type of service application.
The following code shows an example of how to configure anAuthorizedClientServiceOAuth2AuthorizedClientManager that provides support for theclient_credentials grant type:
@Beanpublic OAuth2AuthorizedClientManager authorizedClientManager( ClientRegistrationRepository clientRegistrationRepository, OAuth2AuthorizedClientService authorizedClientService) {
OAuth2AuthorizedClientProvider authorizedClientProvider = OAuth2AuthorizedClientProviderBuilder.builder() .clientCredentials() .build();
AuthorizedClientServiceOAuth2AuthorizedClientManager authorizedClientManager = new AuthorizedClientServiceOAuth2AuthorizedClientManager( clientRegistrationRepository, authorizedClientService); authorizedClientManager.setAuthorizedClientProvider(authorizedClientProvider);
return authorizedClientManager;}
12.2.2. Authorization Grant Support
Authorization Code
Please refer to the OAuth 2.0 Authorization Framework for further details on theAuthorization Code grant.
Obtaining Authorization
Please refer to the Authorization Request/Response protocol flow for theAuthorization Code grant.
Initiating the Authorization Request
The OAuth2AuthorizationRequestRedirectFilter uses an OAuth2AuthorizationRequestResolver toresolve an OAuth2AuthorizationRequest and initiate the Authorization Code grant flow by redirectingthe end-user’s user-agent to the Authorization Server’s Authorization Endpoint.
The primary role of the OAuth2AuthorizationRequestResolver is to resolve anOAuth2AuthorizationRequest from the provided web request. The default implementation
211
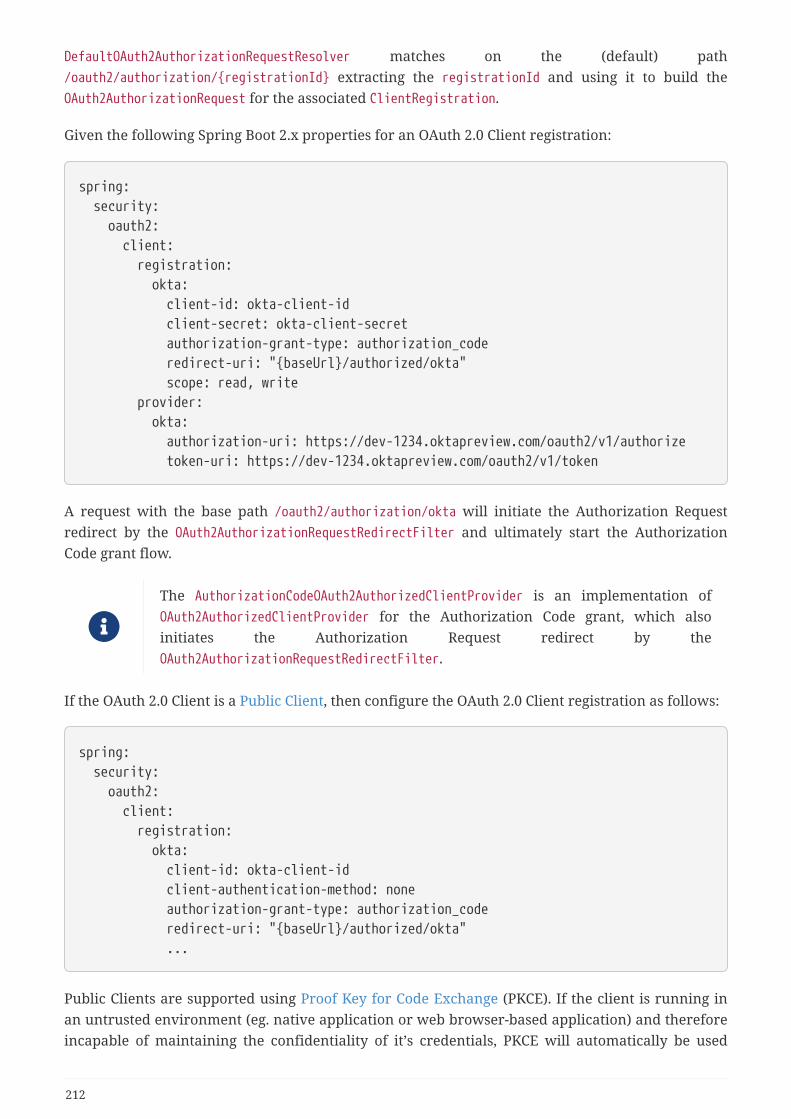
DefaultOAuth2AuthorizationRequestResolver matches on the (default) path/oauth2/authorization/{registrationId} extracting the registrationId and using it to build theOAuth2AuthorizationRequest for the associated ClientRegistration.
Given the following Spring Boot 2.x properties for an OAuth 2.0 Client registration:
spring: security: oauth2: client: registration: okta: client-id: okta-client-id client-secret: okta-client-secret authorization-grant-type: authorization_code redirect-uri: "{baseUrl}/authorized/okta" scope: read, write provider: okta: authorization-uri: https://dev-1234.oktapreview.com/oauth2/v1/authorize token-uri: https://dev-1234.oktapreview.com/oauth2/v1/token
A request with the base path /oauth2/authorization/okta will initiate the Authorization Requestredirect by the OAuth2AuthorizationRequestRedirectFilter and ultimately start the AuthorizationCode grant flow.
The AuthorizationCodeOAuth2AuthorizedClientProvider is an implementation ofOAuth2AuthorizedClientProvider for the Authorization Code grant, which alsoinitiates the Authorization Request redirect by theOAuth2AuthorizationRequestRedirectFilter.
If the OAuth 2.0 Client is a Public Client, then configure the OAuth 2.0 Client registration as follows:
spring: security: oauth2: client: registration: okta: client-id: okta-client-id client-authentication-method: none authorization-grant-type: authorization_code redirect-uri: "{baseUrl}/authorized/okta" ...
Public Clients are supported using Proof Key for Code Exchange (PKCE). If the client is running inan untrusted environment (eg. native application or web browser-based application) and thereforeincapable of maintaining the confidentiality of it’s credentials, PKCE will automatically be used
212
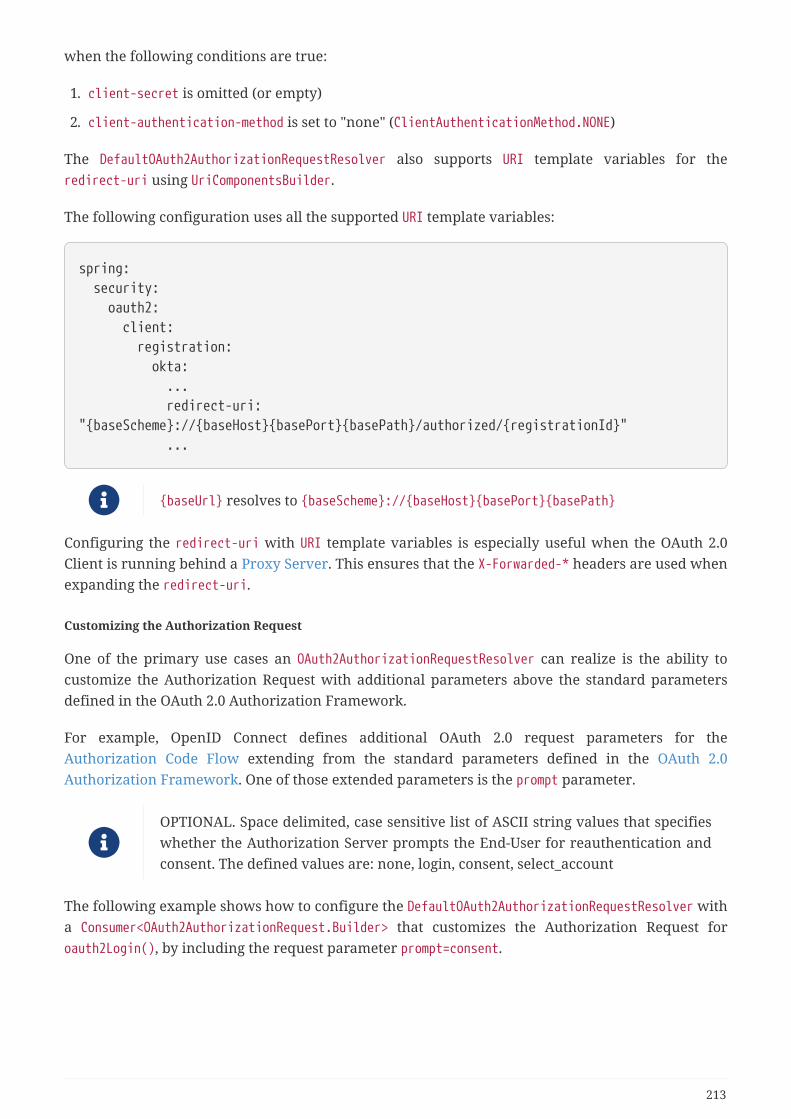
when the following conditions are true:
1. client-secret is omitted (or empty)
2. client-authentication-method is set to "none" (ClientAuthenticationMethod.NONE)
The DefaultOAuth2AuthorizationRequestResolver also supports URI template variables for theredirect-uri using UriComponentsBuilder.
The following configuration uses all the supported URI template variables:
spring: security: oauth2: client: registration: okta: ... redirect-uri:"{baseScheme}://{baseHost}{basePort}{basePath}/authorized/{registrationId}" ...
{baseUrl} resolves to {baseScheme}://{baseHost}{basePort}{basePath}
Configuring the redirect-uri with URI template variables is especially useful when the OAuth 2.0Client is running behind a Proxy Server. This ensures that the X-Forwarded-* headers are used whenexpanding the redirect-uri.
Customizing the Authorization Request
One of the primary use cases an OAuth2AuthorizationRequestResolver can realize is the ability tocustomize the Authorization Request with additional parameters above the standard parametersdefined in the OAuth 2.0 Authorization Framework.
For example, OpenID Connect defines additional OAuth 2.0 request parameters for theAuthorization Code Flow extending from the standard parameters defined in the OAuth 2.0Authorization Framework. One of those extended parameters is the prompt parameter.
OPTIONAL. Space delimited, case sensitive list of ASCII string values that specifieswhether the Authorization Server prompts the End-User for reauthentication andconsent. The defined values are: none, login, consent, select_account
The following example shows how to configure the DefaultOAuth2AuthorizationRequestResolver witha Consumer<OAuth2AuthorizationRequest.Builder> that customizes the Authorization Request foroauth2Login(), by including the request parameter prompt=consent.
213
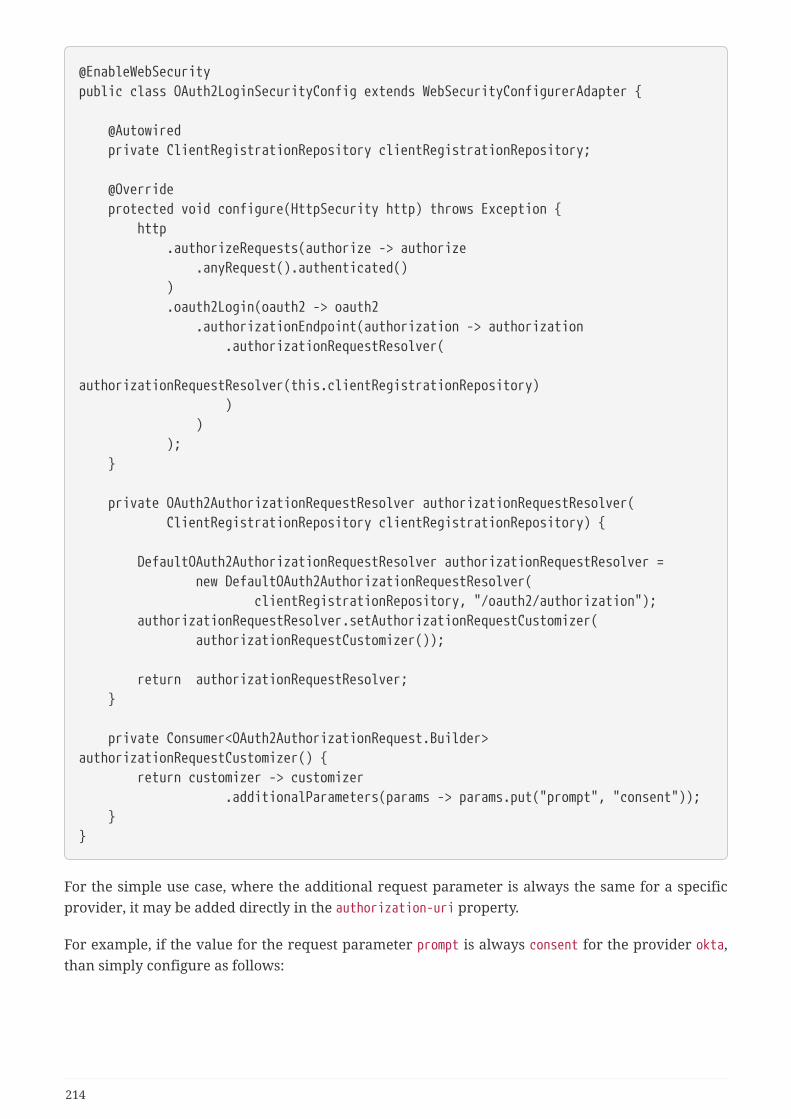
@EnableWebSecuritypublic class OAuth2LoginSecurityConfig extends WebSecurityConfigurerAdapter {
@Autowired private ClientRegistrationRepository clientRegistrationRepository;
@Override protected void configure(HttpSecurity http) throws Exception { http .authorizeRequests(authorize -> authorize .anyRequest().authenticated() ) .oauth2Login(oauth2 -> oauth2 .authorizationEndpoint(authorization -> authorization .authorizationRequestResolver( authorizationRequestResolver(this.clientRegistrationRepository) ) ) ); }
private OAuth2AuthorizationRequestResolver authorizationRequestResolver( ClientRegistrationRepository clientRegistrationRepository) {
DefaultOAuth2AuthorizationRequestResolver authorizationRequestResolver = new DefaultOAuth2AuthorizationRequestResolver( clientRegistrationRepository, "/oauth2/authorization"); authorizationRequestResolver.setAuthorizationRequestCustomizer( authorizationRequestCustomizer());
return authorizationRequestResolver; }
private Consumer<OAuth2AuthorizationRequest.Builder>authorizationRequestCustomizer() { return customizer -> customizer .additionalParameters(params -> params.put("prompt", "consent")); }}
For the simple use case, where the additional request parameter is always the same for a specificprovider, it may be added directly in the authorization-uri property.
For example, if the value for the request parameter prompt is always consent for the provider okta,than simply configure as follows:
214
spring: security: oauth2: client: provider: okta: authorization-uri: https://dev-1234.oktapreview.com/oauth2/v1/authorize?prompt=consent
The preceding example shows the common use case of adding a custom parameter on top of thestandard parameters. Alternatively, if your requirements are more advanced, you can take fullcontrol in building the Authorization Request URI by simply overriding theOAuth2AuthorizationRequest.authorizationRequestUri property.
OAuth2AuthorizationRequest.Builder.build() constructs theOAuth2AuthorizationRequest.authorizationRequestUri, which represents theAuthorization Request URI including all query parameters using theapplication/x-www-form-urlencoded format.
The following example shows a variation of authorizationRequestCustomizer() from the precedingexample, and instead overrides the OAuth2AuthorizationRequest.authorizationRequestUri property.
private Consumer<OAuth2AuthorizationRequest.Builder> authorizationRequestCustomizer(){ return customizer -> customizer .authorizationRequestUri(uriBuilder -> uriBuilder .queryParam("prompt", "consent").build());}
Storing the Authorization Request
The AuthorizationRequestRepository is responsible for the persistence of theOAuth2AuthorizationRequest from the time the Authorization Request is initiated to the time theAuthorization Response is received (the callback).
The OAuth2AuthorizationRequest is used to correlate and validate the AuthorizationResponse.
The default implementation of AuthorizationRequestRepository isHttpSessionOAuth2AuthorizationRequestRepository, which stores the OAuth2AuthorizationRequest inthe HttpSession.
If you have a custom implementation of AuthorizationRequestRepository, you may configure it asshown in the following example:
215
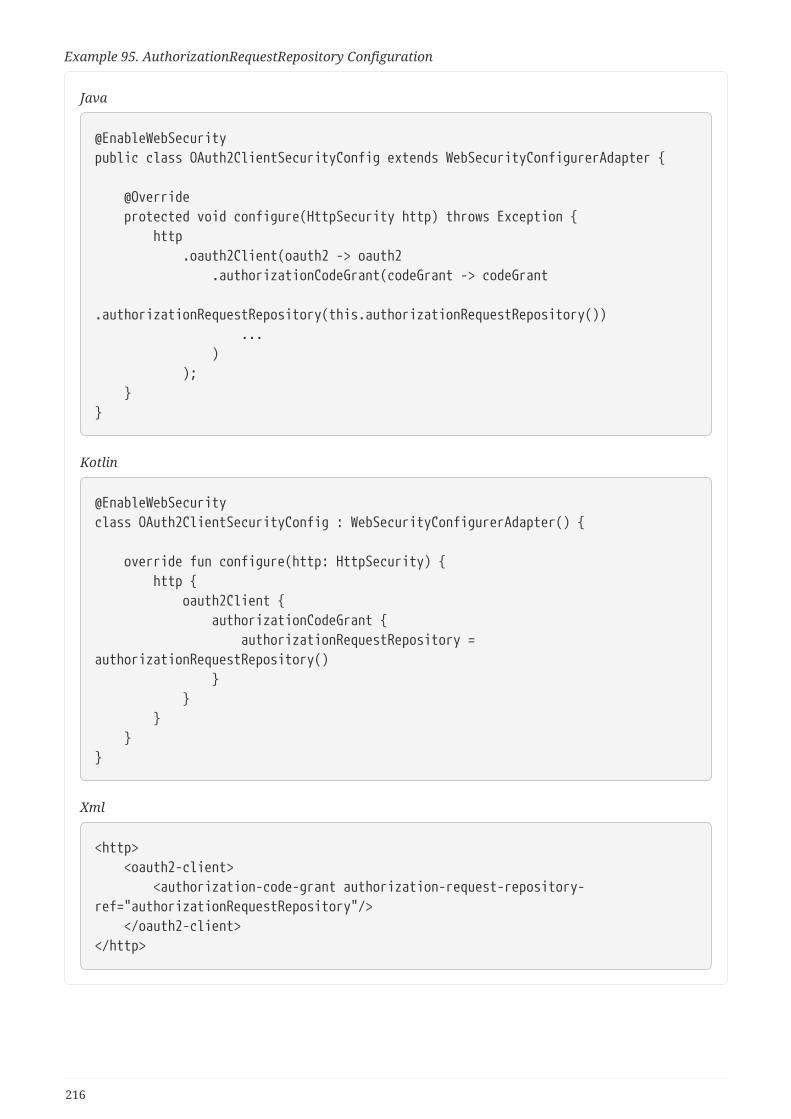
Example 95. AuthorizationRequestRepository Configuration
Java
@EnableWebSecuritypublic class OAuth2ClientSecurityConfig extends WebSecurityConfigurerAdapter {
@Override protected void configure(HttpSecurity http) throws Exception { http .oauth2Client(oauth2 -> oauth2 .authorizationCodeGrant(codeGrant -> codeGrant .authorizationRequestRepository(this.authorizationRequestRepository()) ... ) ); }}
Kotlin
@EnableWebSecurityclass OAuth2ClientSecurityConfig : WebSecurityConfigurerAdapter() {
override fun configure(http: HttpSecurity) { http { oauth2Client { authorizationCodeGrant { authorizationRequestRepository =authorizationRequestRepository() } } } }}
Xml
<http> <oauth2-client> <authorization-code-grant authorization-request-repository-ref="authorizationRequestRepository"/> </oauth2-client></http>
216
Requesting an Access Token
Please refer to the Access Token Request/Response protocol flow for theAuthorization Code grant.
The default implementation of OAuth2AccessTokenResponseClient for the Authorization Code grant isDefaultAuthorizationCodeTokenResponseClient, which uses a RestOperations for exchanging anauthorization code for an access token at the Authorization Server’s Token Endpoint.
The DefaultAuthorizationCodeTokenResponseClient is quite flexible as it allows you to customize thepre-processing of the Token Request and/or post-handling of the Token Response.
Customizing the Access Token Request
If you need to customize the pre-processing of the Token Request, you can provideDefaultAuthorizationCodeTokenResponseClient.setRequestEntityConverter() with a customConverter<OAuth2AuthorizationCodeGrantRequest, RequestEntity<?>>. The default implementationOAuth2AuthorizationCodeGrantRequestEntityConverter builds a RequestEntity representation of astandard OAuth 2.0 Access Token Request. However, providing a custom Converter, would allow youto extend the standard Token Request and add custom parameter(s).
The custom Converter must return a valid RequestEntity representation of anOAuth 2.0 Access Token Request that is understood by the intended OAuth 2.0Provider.
Customizing the Access Token Response
On the other end, if you need to customize the post-handling of the Token Response, you will needto provide DefaultAuthorizationCodeTokenResponseClient.setRestOperations() with a customconfigured RestOperations. The default RestOperations is configured as follows:
RestTemplate restTemplate = new RestTemplate(Arrays.asList( new FormHttpMessageConverter(), new OAuth2AccessTokenResponseHttpMessageConverter()));
restTemplate.setErrorHandler(new OAuth2ErrorResponseErrorHandler());
Spring MVC FormHttpMessageConverter is required as it’s used when sending theOAuth 2.0 Access Token Request.
OAuth2AccessTokenResponseHttpMessageConverter is a HttpMessageConverter for an OAuth 2.0 AccessToken Response. You can provideOAuth2AccessTokenResponseHttpMessageConverter.setTokenResponseConverter() with a customConverter<Map<String, String>, OAuth2AccessTokenResponse> that is used for converting the OAuth2.0 Access Token Response parameters to an OAuth2AccessTokenResponse.
OAuth2ErrorResponseErrorHandler is a ResponseErrorHandler that can handle an OAuth 2.0 Error, eg.400 Bad Request. It uses an OAuth2ErrorHttpMessageConverter for converting the OAuth 2.0 Error
217
parameters to an OAuth2Error.
Whether you customize DefaultAuthorizationCodeTokenResponseClient or provide your ownimplementation of OAuth2AccessTokenResponseClient, you’ll need to configure it as shown in thefollowing example:
218
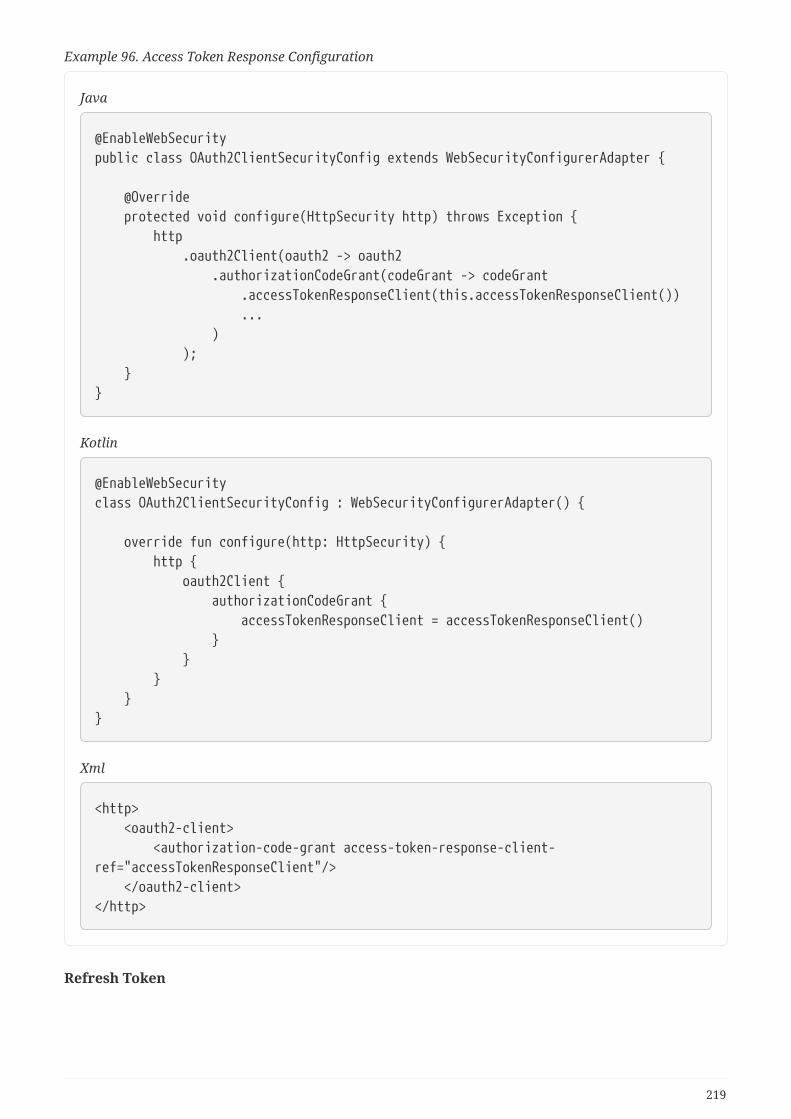
Example 96. Access Token Response Configuration
Java
@EnableWebSecuritypublic class OAuth2ClientSecurityConfig extends WebSecurityConfigurerAdapter {
@Override protected void configure(HttpSecurity http) throws Exception { http .oauth2Client(oauth2 -> oauth2 .authorizationCodeGrant(codeGrant -> codeGrant .accessTokenResponseClient(this.accessTokenResponseClient()) ... ) ); }}
Kotlin
@EnableWebSecurityclass OAuth2ClientSecurityConfig : WebSecurityConfigurerAdapter() {
override fun configure(http: HttpSecurity) { http { oauth2Client { authorizationCodeGrant { accessTokenResponseClient = accessTokenResponseClient() } } } }}
Xml
<http> <oauth2-client> <authorization-code-grant access-token-response-client-ref="accessTokenResponseClient"/> </oauth2-client></http>
Refresh Token
219
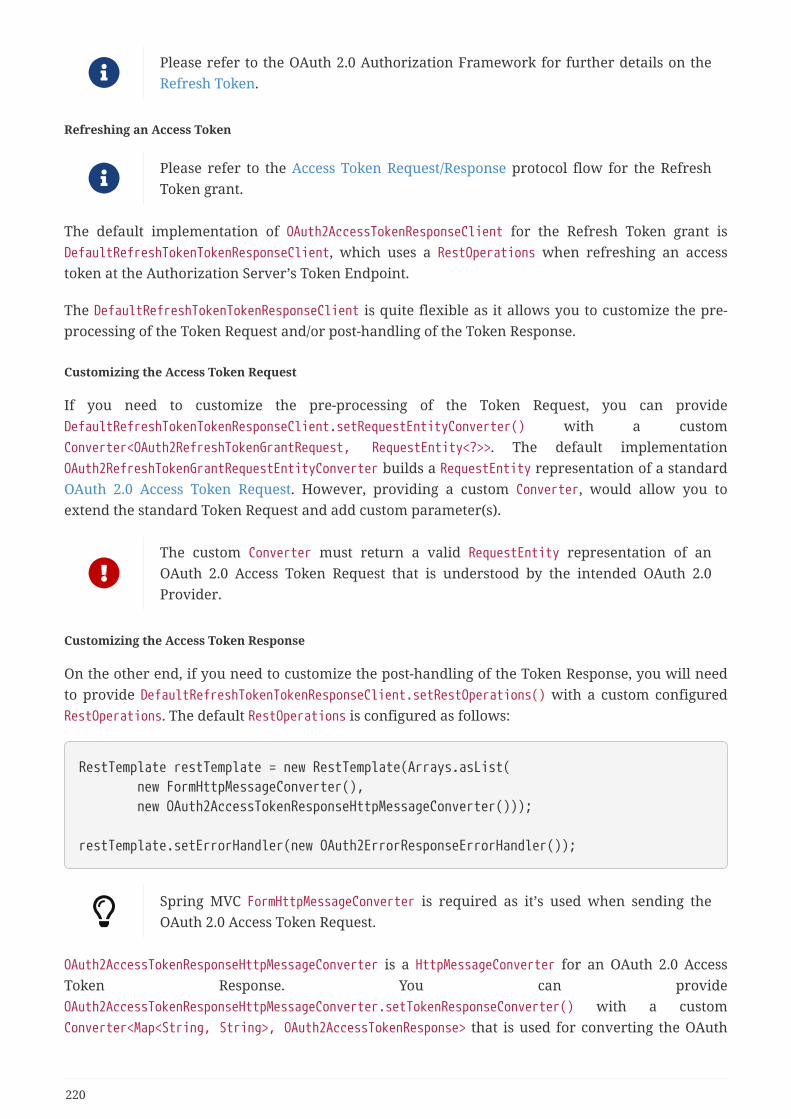
Please refer to the OAuth 2.0 Authorization Framework for further details on theRefresh Token.
Refreshing an Access Token
Please refer to the Access Token Request/Response protocol flow for the RefreshToken grant.
The default implementation of OAuth2AccessTokenResponseClient for the Refresh Token grant isDefaultRefreshTokenTokenResponseClient, which uses a RestOperations when refreshing an accesstoken at the Authorization Server’s Token Endpoint.
The DefaultRefreshTokenTokenResponseClient is quite flexible as it allows you to customize the pre-processing of the Token Request and/or post-handling of the Token Response.
Customizing the Access Token Request
If you need to customize the pre-processing of the Token Request, you can provideDefaultRefreshTokenTokenResponseClient.setRequestEntityConverter() with a customConverter<OAuth2RefreshTokenGrantRequest, RequestEntity<?>>. The default implementationOAuth2RefreshTokenGrantRequestEntityConverter builds a RequestEntity representation of a standardOAuth 2.0 Access Token Request. However, providing a custom Converter, would allow you toextend the standard Token Request and add custom parameter(s).
The custom Converter must return a valid RequestEntity representation of anOAuth 2.0 Access Token Request that is understood by the intended OAuth 2.0Provider.
Customizing the Access Token Response
On the other end, if you need to customize the post-handling of the Token Response, you will needto provide DefaultRefreshTokenTokenResponseClient.setRestOperations() with a custom configuredRestOperations. The default RestOperations is configured as follows:
RestTemplate restTemplate = new RestTemplate(Arrays.asList( new FormHttpMessageConverter(), new OAuth2AccessTokenResponseHttpMessageConverter()));
restTemplate.setErrorHandler(new OAuth2ErrorResponseErrorHandler());
Spring MVC FormHttpMessageConverter is required as it’s used when sending theOAuth 2.0 Access Token Request.
OAuth2AccessTokenResponseHttpMessageConverter is a HttpMessageConverter for an OAuth 2.0 AccessToken Response. You can provideOAuth2AccessTokenResponseHttpMessageConverter.setTokenResponseConverter() with a customConverter<Map<String, String>, OAuth2AccessTokenResponse> that is used for converting the OAuth
220
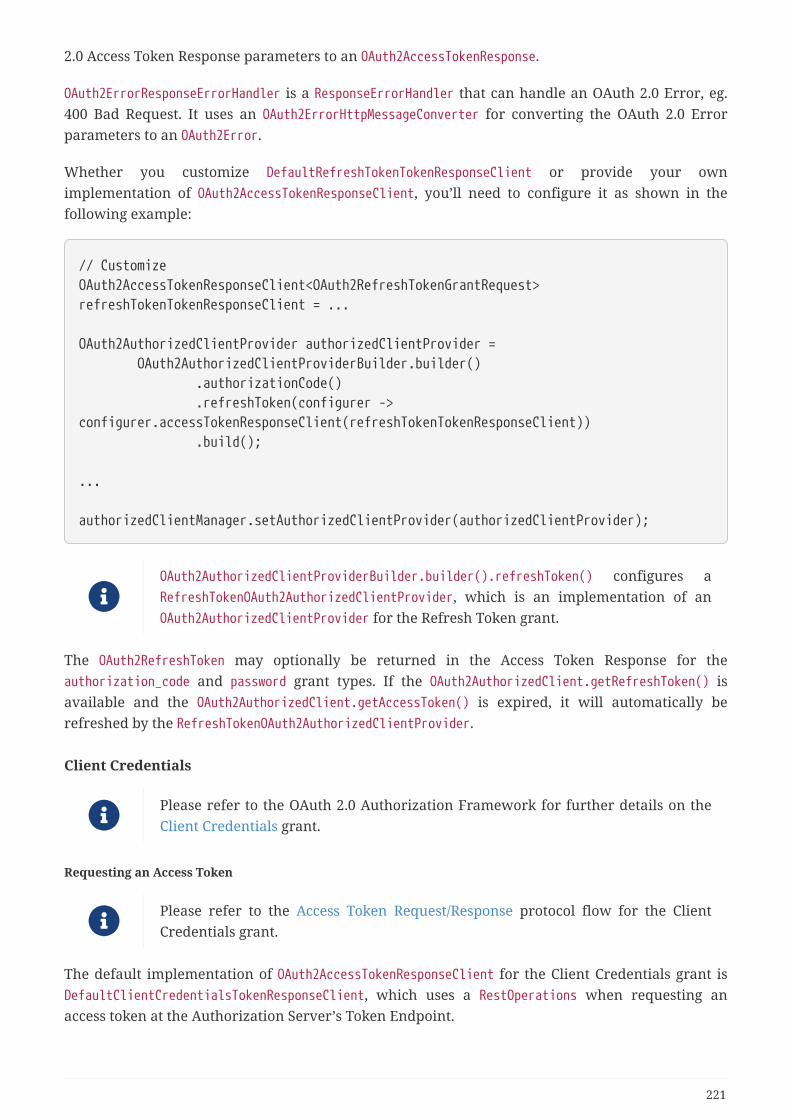
2.0 Access Token Response parameters to an OAuth2AccessTokenResponse.
OAuth2ErrorResponseErrorHandler is a ResponseErrorHandler that can handle an OAuth 2.0 Error, eg.400 Bad Request. It uses an OAuth2ErrorHttpMessageConverter for converting the OAuth 2.0 Errorparameters to an OAuth2Error.
Whether you customize DefaultRefreshTokenTokenResponseClient or provide your ownimplementation of OAuth2AccessTokenResponseClient, you’ll need to configure it as shown in thefollowing example:
// CustomizeOAuth2AccessTokenResponseClient<OAuth2RefreshTokenGrantRequest>refreshTokenTokenResponseClient = ...
OAuth2AuthorizedClientProvider authorizedClientProvider = OAuth2AuthorizedClientProviderBuilder.builder() .authorizationCode() .refreshToken(configurer ->configurer.accessTokenResponseClient(refreshTokenTokenResponseClient)) .build();
...
authorizedClientManager.setAuthorizedClientProvider(authorizedClientProvider);
OAuth2AuthorizedClientProviderBuilder.builder().refreshToken() configures aRefreshTokenOAuth2AuthorizedClientProvider, which is an implementation of anOAuth2AuthorizedClientProvider for the Refresh Token grant.
The OAuth2RefreshToken may optionally be returned in the Access Token Response for theauthorization_code and password grant types. If the OAuth2AuthorizedClient.getRefreshToken() isavailable and the OAuth2AuthorizedClient.getAccessToken() is expired, it will automatically berefreshed by the RefreshTokenOAuth2AuthorizedClientProvider.
Client Credentials
Please refer to the OAuth 2.0 Authorization Framework for further details on theClient Credentials grant.
Requesting an Access Token
Please refer to the Access Token Request/Response protocol flow for the ClientCredentials grant.
The default implementation of OAuth2AccessTokenResponseClient for the Client Credentials grant isDefaultClientCredentialsTokenResponseClient, which uses a RestOperations when requesting anaccess token at the Authorization Server’s Token Endpoint.
221
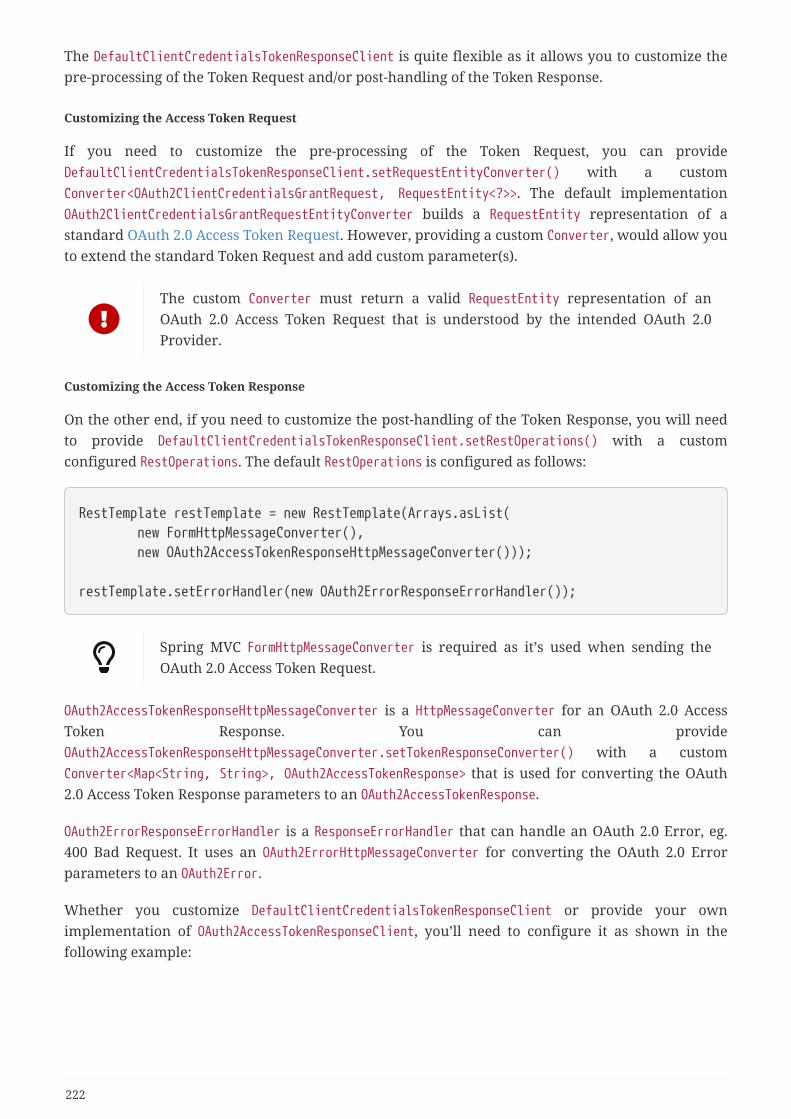
The DefaultClientCredentialsTokenResponseClient is quite flexible as it allows you to customize thepre-processing of the Token Request and/or post-handling of the Token Response.
Customizing the Access Token Request
If you need to customize the pre-processing of the Token Request, you can provideDefaultClientCredentialsTokenResponseClient.setRequestEntityConverter() with a customConverter<OAuth2ClientCredentialsGrantRequest, RequestEntity<?>>. The default implementationOAuth2ClientCredentialsGrantRequestEntityConverter builds a RequestEntity representation of astandard OAuth 2.0 Access Token Request. However, providing a custom Converter, would allow youto extend the standard Token Request and add custom parameter(s).
The custom Converter must return a valid RequestEntity representation of anOAuth 2.0 Access Token Request that is understood by the intended OAuth 2.0Provider.
Customizing the Access Token Response
On the other end, if you need to customize the post-handling of the Token Response, you will needto provide DefaultClientCredentialsTokenResponseClient.setRestOperations() with a customconfigured RestOperations. The default RestOperations is configured as follows:
RestTemplate restTemplate = new RestTemplate(Arrays.asList( new FormHttpMessageConverter(), new OAuth2AccessTokenResponseHttpMessageConverter()));
restTemplate.setErrorHandler(new OAuth2ErrorResponseErrorHandler());
Spring MVC FormHttpMessageConverter is required as it’s used when sending theOAuth 2.0 Access Token Request.
OAuth2AccessTokenResponseHttpMessageConverter is a HttpMessageConverter for an OAuth 2.0 AccessToken Response. You can provideOAuth2AccessTokenResponseHttpMessageConverter.setTokenResponseConverter() with a customConverter<Map<String, String>, OAuth2AccessTokenResponse> that is used for converting the OAuth2.0 Access Token Response parameters to an OAuth2AccessTokenResponse.
OAuth2ErrorResponseErrorHandler is a ResponseErrorHandler that can handle an OAuth 2.0 Error, eg.400 Bad Request. It uses an OAuth2ErrorHttpMessageConverter for converting the OAuth 2.0 Errorparameters to an OAuth2Error.
Whether you customize DefaultClientCredentialsTokenResponseClient or provide your ownimplementation of OAuth2AccessTokenResponseClient, you’ll need to configure it as shown in thefollowing example:
222
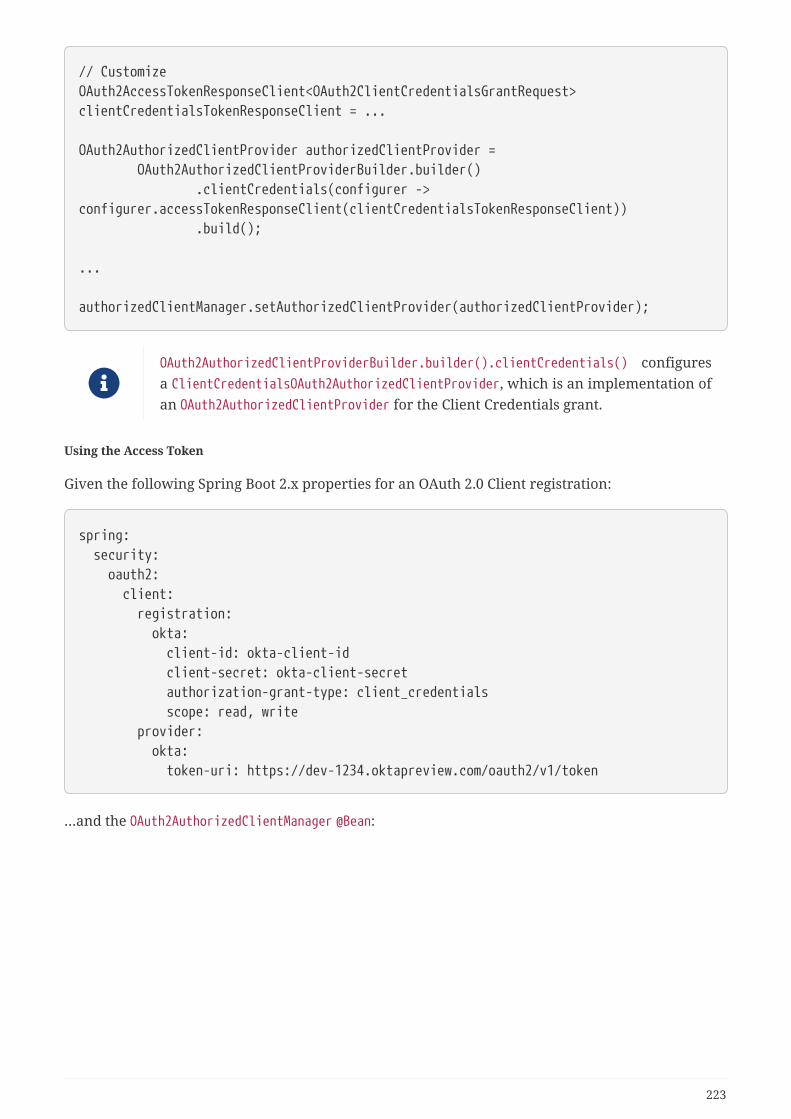
// CustomizeOAuth2AccessTokenResponseClient<OAuth2ClientCredentialsGrantRequest>clientCredentialsTokenResponseClient = ...
OAuth2AuthorizedClientProvider authorizedClientProvider = OAuth2AuthorizedClientProviderBuilder.builder() .clientCredentials(configurer ->configurer.accessTokenResponseClient(clientCredentialsTokenResponseClient)) .build();
...
authorizedClientManager.setAuthorizedClientProvider(authorizedClientProvider);
OAuth2AuthorizedClientProviderBuilder.builder().clientCredentials() configuresa ClientCredentialsOAuth2AuthorizedClientProvider, which is an implementation ofan OAuth2AuthorizedClientProvider for the Client Credentials grant.
Using the Access Token
Given the following Spring Boot 2.x properties for an OAuth 2.0 Client registration:
spring: security: oauth2: client: registration: okta: client-id: okta-client-id client-secret: okta-client-secret authorization-grant-type: client_credentials scope: read, write provider: okta: token-uri: https://dev-1234.oktapreview.com/oauth2/v1/token
…and the OAuth2AuthorizedClientManager @Bean:
223
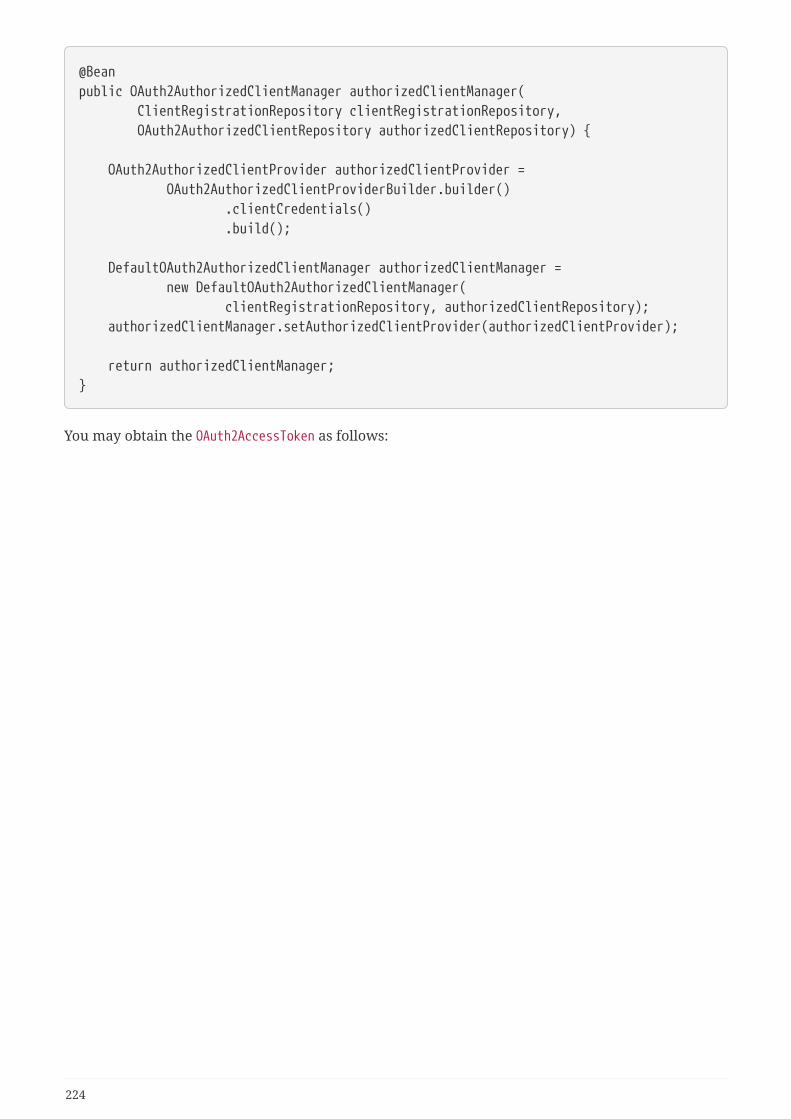
@Beanpublic OAuth2AuthorizedClientManager authorizedClientManager( ClientRegistrationRepository clientRegistrationRepository, OAuth2AuthorizedClientRepository authorizedClientRepository) {
OAuth2AuthorizedClientProvider authorizedClientProvider = OAuth2AuthorizedClientProviderBuilder.builder() .clientCredentials() .build();
DefaultOAuth2AuthorizedClientManager authorizedClientManager = new DefaultOAuth2AuthorizedClientManager( clientRegistrationRepository, authorizedClientRepository); authorizedClientManager.setAuthorizedClientProvider(authorizedClientProvider);
return authorizedClientManager;}
You may obtain the OAuth2AccessToken as follows:
224
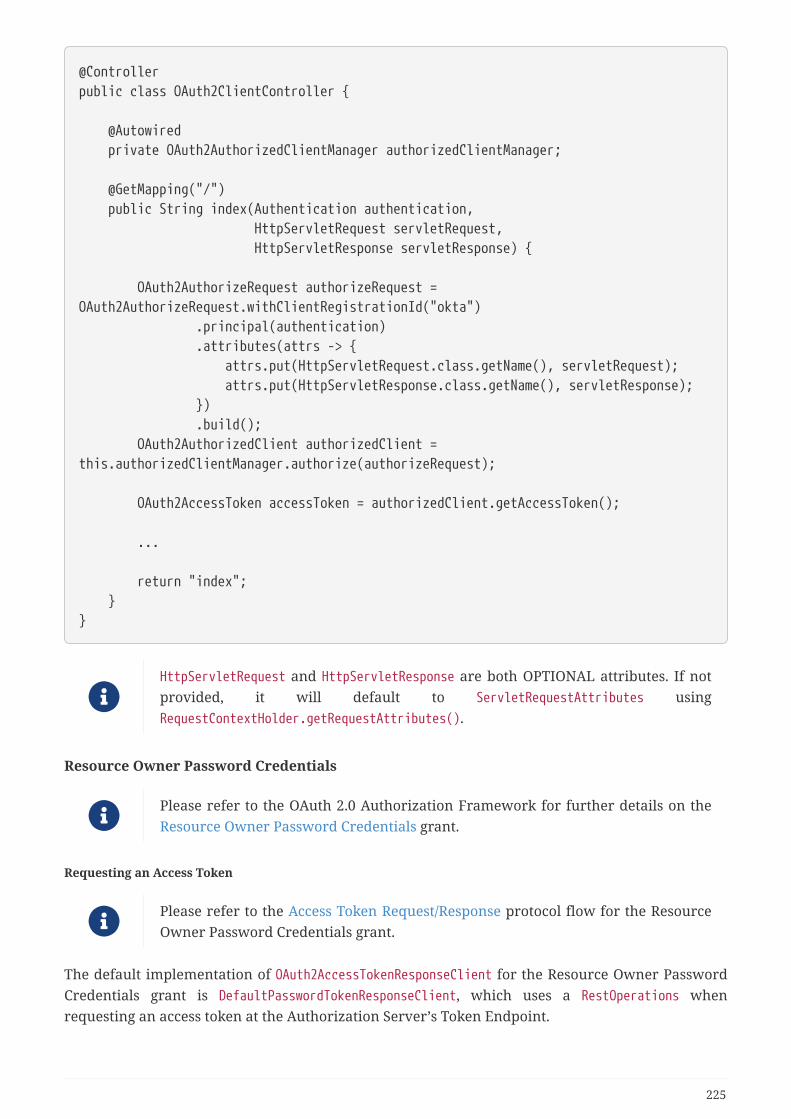
@Controllerpublic class OAuth2ClientController {
@Autowired private OAuth2AuthorizedClientManager authorizedClientManager;
@GetMapping("/") public String index(Authentication authentication, HttpServletRequest servletRequest, HttpServletResponse servletResponse) {
OAuth2AuthorizeRequest authorizeRequest =OAuth2AuthorizeRequest.withClientRegistrationId("okta") .principal(authentication) .attributes(attrs -> { attrs.put(HttpServletRequest.class.getName(), servletRequest); attrs.put(HttpServletResponse.class.getName(), servletResponse); }) .build(); OAuth2AuthorizedClient authorizedClient =this.authorizedClientManager.authorize(authorizeRequest);
OAuth2AccessToken accessToken = authorizedClient.getAccessToken();
...
return "index"; }}
HttpServletRequest and HttpServletResponse are both OPTIONAL attributes. If notprovided, it will default to ServletRequestAttributes usingRequestContextHolder.getRequestAttributes().
Resource Owner Password Credentials
Please refer to the OAuth 2.0 Authorization Framework for further details on theResource Owner Password Credentials grant.
Requesting an Access Token
Please refer to the Access Token Request/Response protocol flow for the ResourceOwner Password Credentials grant.
The default implementation of OAuth2AccessTokenResponseClient for the Resource Owner PasswordCredentials grant is DefaultPasswordTokenResponseClient, which uses a RestOperations whenrequesting an access token at the Authorization Server’s Token Endpoint.
225
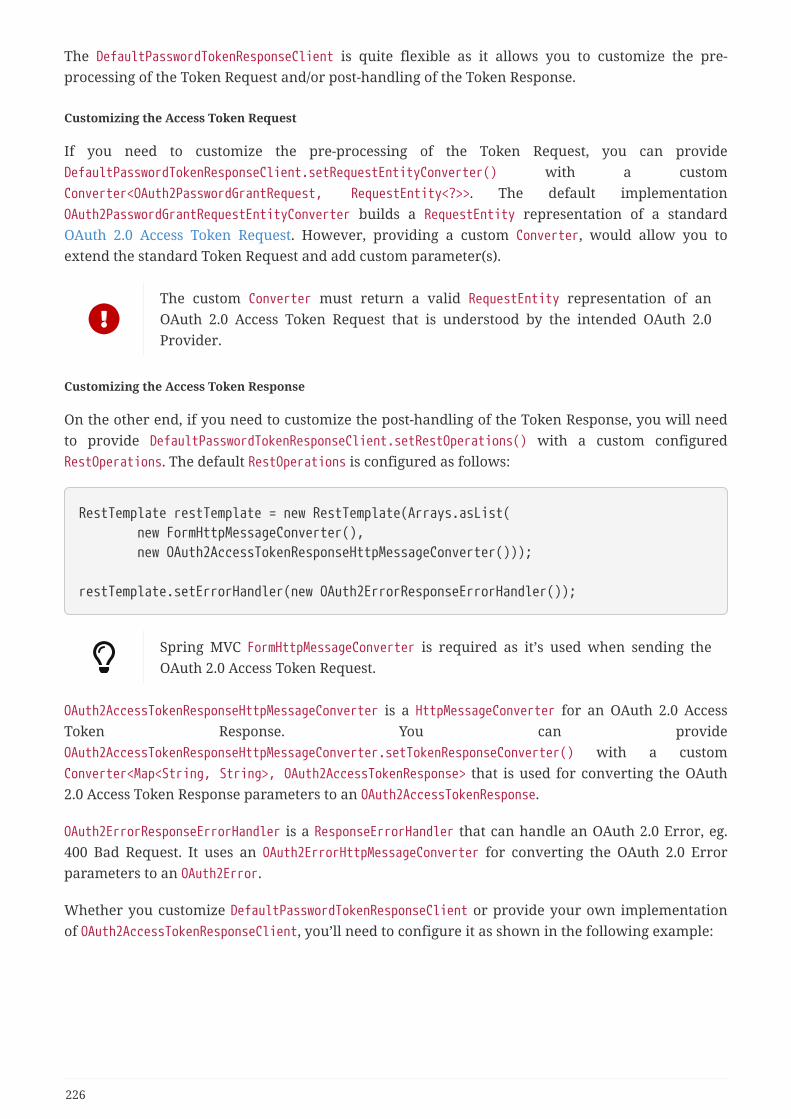
The DefaultPasswordTokenResponseClient is quite flexible as it allows you to customize the pre-processing of the Token Request and/or post-handling of the Token Response.
Customizing the Access Token Request
If you need to customize the pre-processing of the Token Request, you can provideDefaultPasswordTokenResponseClient.setRequestEntityConverter() with a customConverter<OAuth2PasswordGrantRequest, RequestEntity<?>>. The default implementationOAuth2PasswordGrantRequestEntityConverter builds a RequestEntity representation of a standardOAuth 2.0 Access Token Request. However, providing a custom Converter, would allow you toextend the standard Token Request and add custom parameter(s).
The custom Converter must return a valid RequestEntity representation of anOAuth 2.0 Access Token Request that is understood by the intended OAuth 2.0Provider.
Customizing the Access Token Response
On the other end, if you need to customize the post-handling of the Token Response, you will needto provide DefaultPasswordTokenResponseClient.setRestOperations() with a custom configuredRestOperations. The default RestOperations is configured as follows:
RestTemplate restTemplate = new RestTemplate(Arrays.asList( new FormHttpMessageConverter(), new OAuth2AccessTokenResponseHttpMessageConverter()));
restTemplate.setErrorHandler(new OAuth2ErrorResponseErrorHandler());
Spring MVC FormHttpMessageConverter is required as it’s used when sending theOAuth 2.0 Access Token Request.
OAuth2AccessTokenResponseHttpMessageConverter is a HttpMessageConverter for an OAuth 2.0 AccessToken Response. You can provideOAuth2AccessTokenResponseHttpMessageConverter.setTokenResponseConverter() with a customConverter<Map<String, String>, OAuth2AccessTokenResponse> that is used for converting the OAuth2.0 Access Token Response parameters to an OAuth2AccessTokenResponse.
OAuth2ErrorResponseErrorHandler is a ResponseErrorHandler that can handle an OAuth 2.0 Error, eg.400 Bad Request. It uses an OAuth2ErrorHttpMessageConverter for converting the OAuth 2.0 Errorparameters to an OAuth2Error.
Whether you customize DefaultPasswordTokenResponseClient or provide your own implementationof OAuth2AccessTokenResponseClient, you’ll need to configure it as shown in the following example:
226
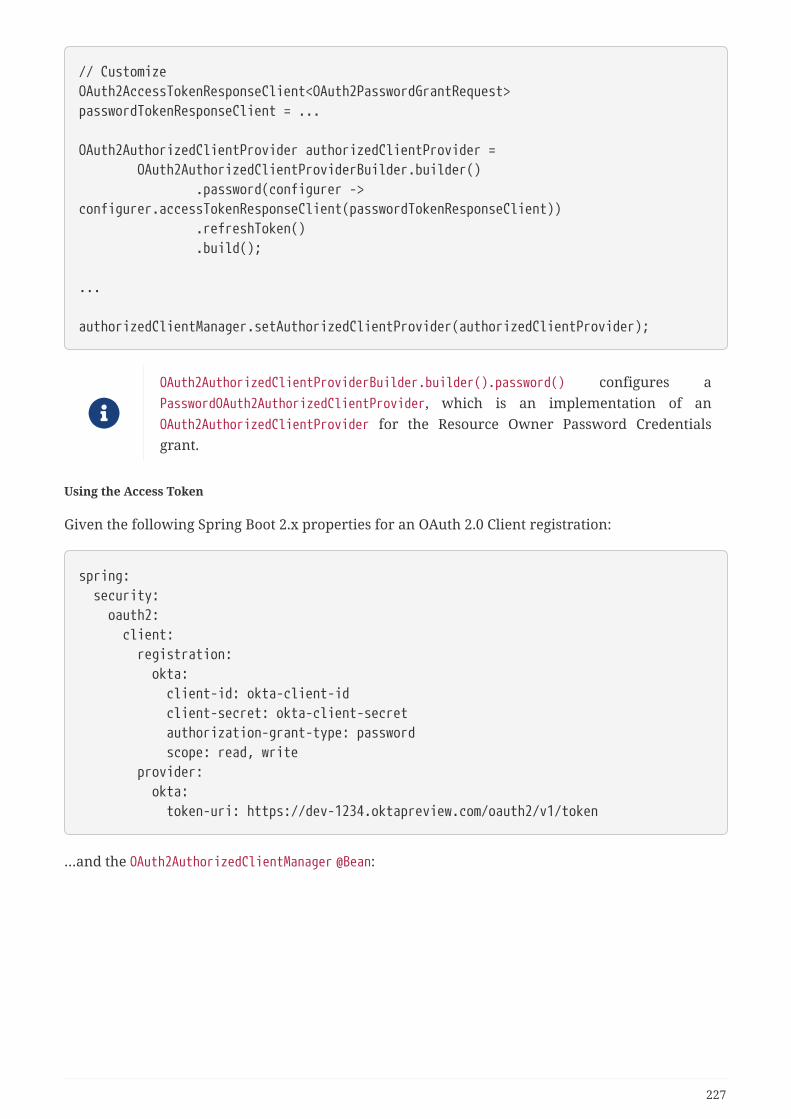
// CustomizeOAuth2AccessTokenResponseClient<OAuth2PasswordGrantRequest>passwordTokenResponseClient = ...
OAuth2AuthorizedClientProvider authorizedClientProvider = OAuth2AuthorizedClientProviderBuilder.builder() .password(configurer ->configurer.accessTokenResponseClient(passwordTokenResponseClient)) .refreshToken() .build();
...
authorizedClientManager.setAuthorizedClientProvider(authorizedClientProvider);
OAuth2AuthorizedClientProviderBuilder.builder().password() configures aPasswordOAuth2AuthorizedClientProvider, which is an implementation of anOAuth2AuthorizedClientProvider for the Resource Owner Password Credentialsgrant.
Using the Access Token
Given the following Spring Boot 2.x properties for an OAuth 2.0 Client registration:
spring: security: oauth2: client: registration: okta: client-id: okta-client-id client-secret: okta-client-secret authorization-grant-type: password scope: read, write provider: okta: token-uri: https://dev-1234.oktapreview.com/oauth2/v1/token
…and the OAuth2AuthorizedClientManager @Bean:
227
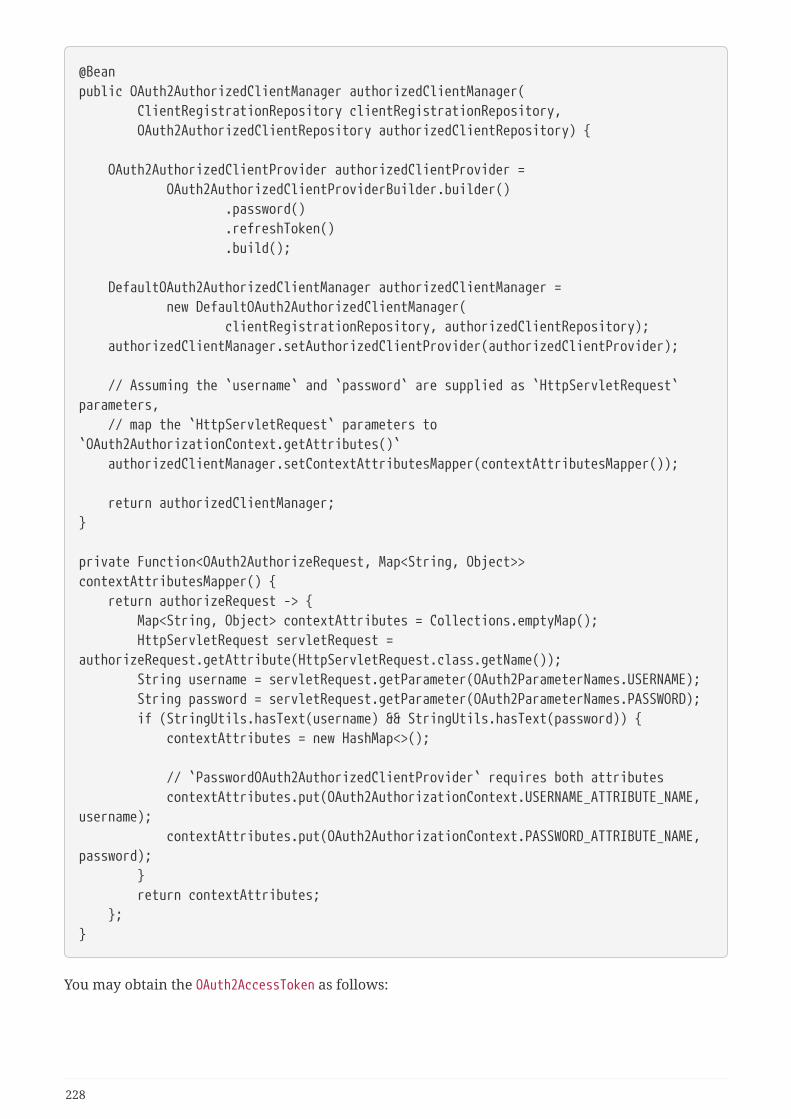
@Beanpublic OAuth2AuthorizedClientManager authorizedClientManager( ClientRegistrationRepository clientRegistrationRepository, OAuth2AuthorizedClientRepository authorizedClientRepository) {
OAuth2AuthorizedClientProvider authorizedClientProvider = OAuth2AuthorizedClientProviderBuilder.builder() .password() .refreshToken() .build();
DefaultOAuth2AuthorizedClientManager authorizedClientManager = new DefaultOAuth2AuthorizedClientManager( clientRegistrationRepository, authorizedClientRepository); authorizedClientManager.setAuthorizedClientProvider(authorizedClientProvider);
// Assuming the `username` and `password` are supplied as `HttpServletRequest`parameters, // map the `HttpServletRequest` parameters to`OAuth2AuthorizationContext.getAttributes()` authorizedClientManager.setContextAttributesMapper(contextAttributesMapper());
return authorizedClientManager;}
private Function<OAuth2AuthorizeRequest, Map<String, Object>>contextAttributesMapper() { return authorizeRequest -> { Map<String, Object> contextAttributes = Collections.emptyMap(); HttpServletRequest servletRequest =authorizeRequest.getAttribute(HttpServletRequest.class.getName()); String username = servletRequest.getParameter(OAuth2ParameterNames.USERNAME); String password = servletRequest.getParameter(OAuth2ParameterNames.PASSWORD); if (StringUtils.hasText(username) && StringUtils.hasText(password)) { contextAttributes = new HashMap<>();
// `PasswordOAuth2AuthorizedClientProvider` requires both attributes contextAttributes.put(OAuth2AuthorizationContext.USERNAME_ATTRIBUTE_NAME,username); contextAttributes.put(OAuth2AuthorizationContext.PASSWORD_ATTRIBUTE_NAME,password); } return contextAttributes; };}
You may obtain the OAuth2AccessToken as follows:
228
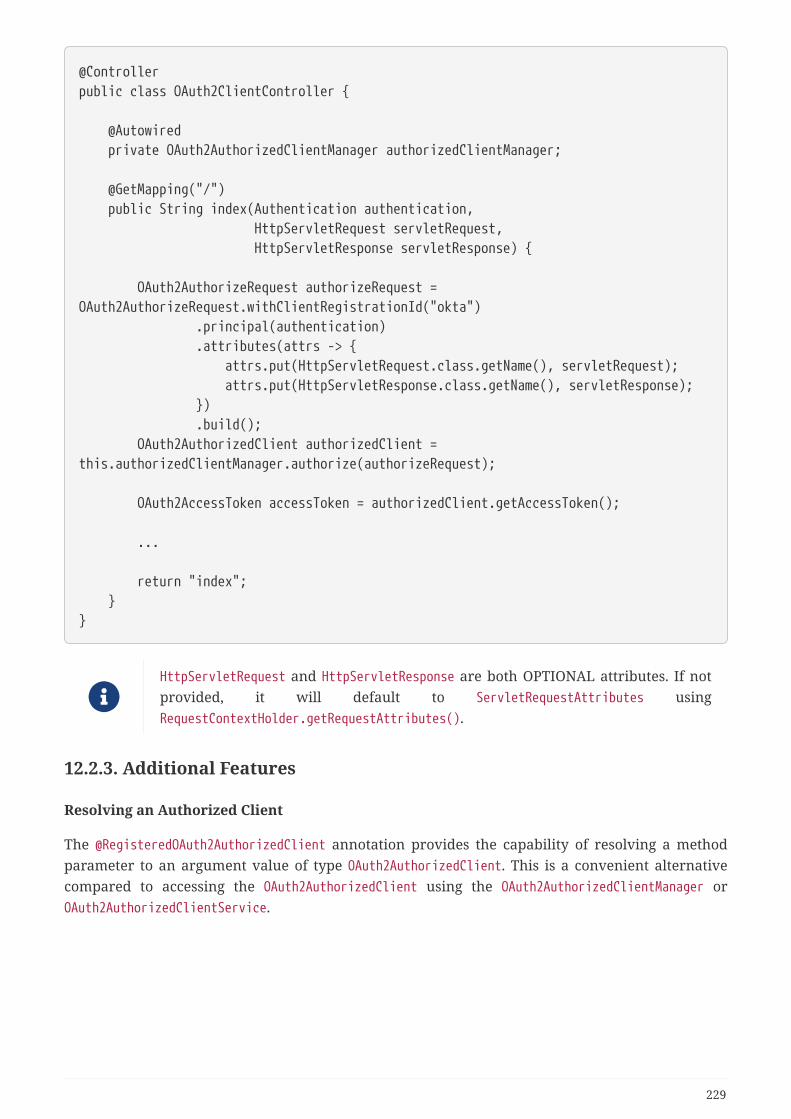
@Controllerpublic class OAuth2ClientController {
@Autowired private OAuth2AuthorizedClientManager authorizedClientManager;
@GetMapping("/") public String index(Authentication authentication, HttpServletRequest servletRequest, HttpServletResponse servletResponse) {
OAuth2AuthorizeRequest authorizeRequest =OAuth2AuthorizeRequest.withClientRegistrationId("okta") .principal(authentication) .attributes(attrs -> { attrs.put(HttpServletRequest.class.getName(), servletRequest); attrs.put(HttpServletResponse.class.getName(), servletResponse); }) .build(); OAuth2AuthorizedClient authorizedClient =this.authorizedClientManager.authorize(authorizeRequest);
OAuth2AccessToken accessToken = authorizedClient.getAccessToken();
...
return "index"; }}
HttpServletRequest and HttpServletResponse are both OPTIONAL attributes. If notprovided, it will default to ServletRequestAttributes usingRequestContextHolder.getRequestAttributes().
12.2.3. Additional Features
Resolving an Authorized Client
The @RegisteredOAuth2AuthorizedClient annotation provides the capability of resolving a methodparameter to an argument value of type OAuth2AuthorizedClient. This is a convenient alternativecompared to accessing the OAuth2AuthorizedClient using the OAuth2AuthorizedClientManager orOAuth2AuthorizedClientService.
229
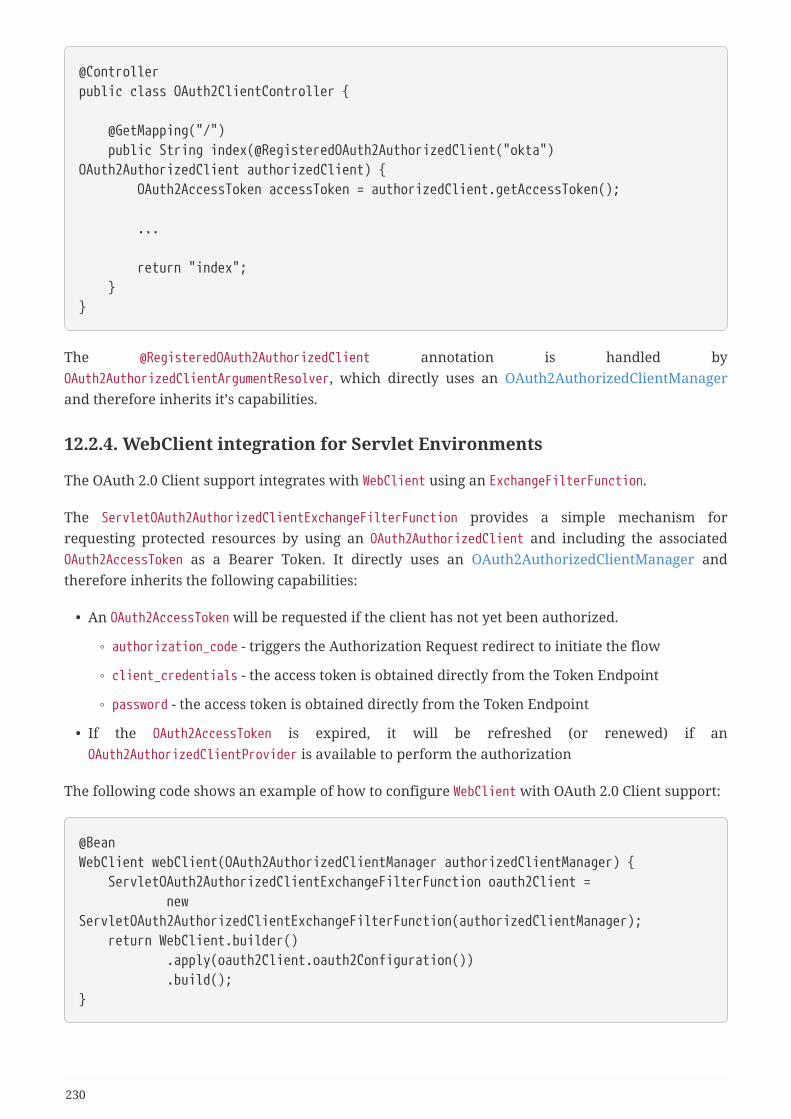
@Controllerpublic class OAuth2ClientController {
@GetMapping("/") public String index(@RegisteredOAuth2AuthorizedClient("okta")OAuth2AuthorizedClient authorizedClient) { OAuth2AccessToken accessToken = authorizedClient.getAccessToken();
...
return "index"; }}
The @RegisteredOAuth2AuthorizedClient annotation is handled byOAuth2AuthorizedClientArgumentResolver, which directly uses an OAuth2AuthorizedClientManagerand therefore inherits it’s capabilities.
12.2.4. WebClient integration for Servlet Environments
The OAuth 2.0 Client support integrates with WebClient using an ExchangeFilterFunction.
The ServletOAuth2AuthorizedClientExchangeFilterFunction provides a simple mechanism forrequesting protected resources by using an OAuth2AuthorizedClient and including the associatedOAuth2AccessToken as a Bearer Token. It directly uses an OAuth2AuthorizedClientManager andtherefore inherits the following capabilities:
• An OAuth2AccessToken will be requested if the client has not yet been authorized.
◦ authorization_code - triggers the Authorization Request redirect to initiate the flow
◦ client_credentials - the access token is obtained directly from the Token Endpoint
◦ password - the access token is obtained directly from the Token Endpoint
• If the OAuth2AccessToken is expired, it will be refreshed (or renewed) if anOAuth2AuthorizedClientProvider is available to perform the authorization
The following code shows an example of how to configure WebClient with OAuth 2.0 Client support:
@BeanWebClient webClient(OAuth2AuthorizedClientManager authorizedClientManager) { ServletOAuth2AuthorizedClientExchangeFilterFunction oauth2Client = newServletOAuth2AuthorizedClientExchangeFilterFunction(authorizedClientManager); return WebClient.builder() .apply(oauth2Client.oauth2Configuration()) .build();}
230
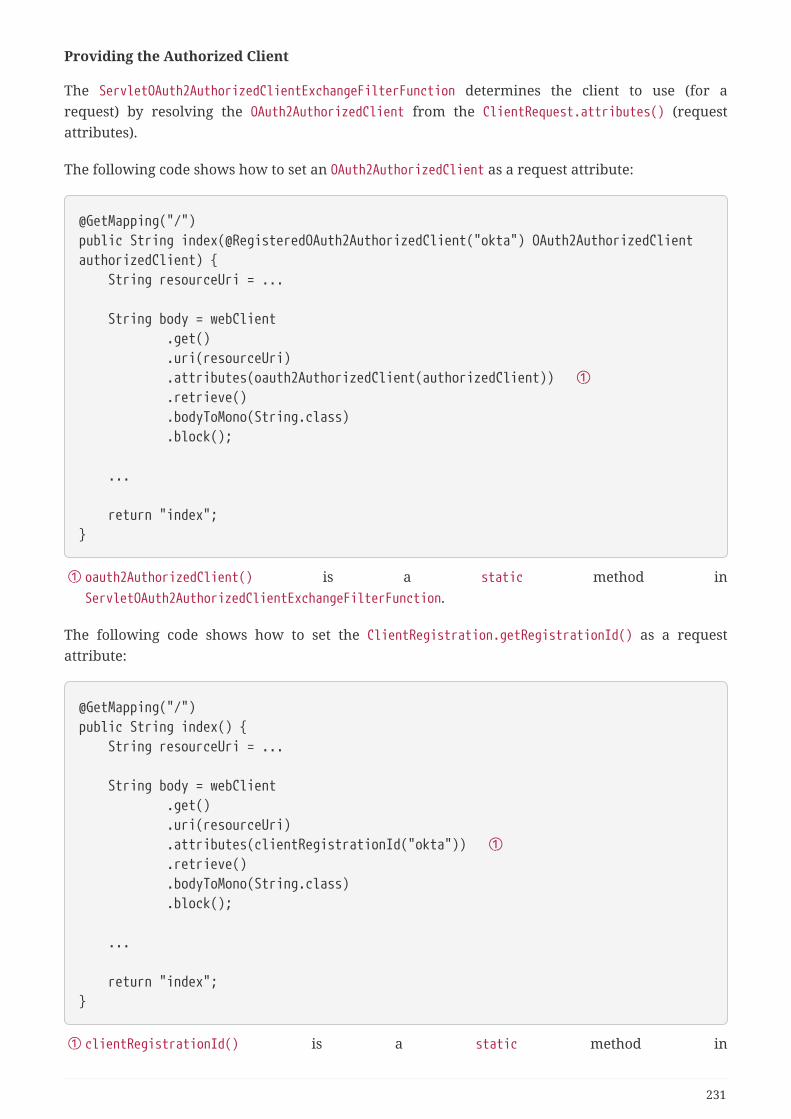
Providing the Authorized Client
The ServletOAuth2AuthorizedClientExchangeFilterFunction determines the client to use (for arequest) by resolving the OAuth2AuthorizedClient from the ClientRequest.attributes() (requestattributes).
The following code shows how to set an OAuth2AuthorizedClient as a request attribute:
@GetMapping("/")public String index(@RegisteredOAuth2AuthorizedClient("okta") OAuth2AuthorizedClientauthorizedClient) { String resourceUri = ...
String body = webClient .get() .uri(resourceUri) .attributes(oauth2AuthorizedClient(authorizedClient)) ① .retrieve() .bodyToMono(String.class) .block();
...
return "index";}
① oauth2AuthorizedClient() is a static method inServletOAuth2AuthorizedClientExchangeFilterFunction.
The following code shows how to set the ClientRegistration.getRegistrationId() as a requestattribute:
@GetMapping("/")public String index() { String resourceUri = ...
String body = webClient .get() .uri(resourceUri) .attributes(clientRegistrationId("okta")) ① .retrieve() .bodyToMono(String.class) .block();
...
return "index";}
① clientRegistrationId() is a static method in
231
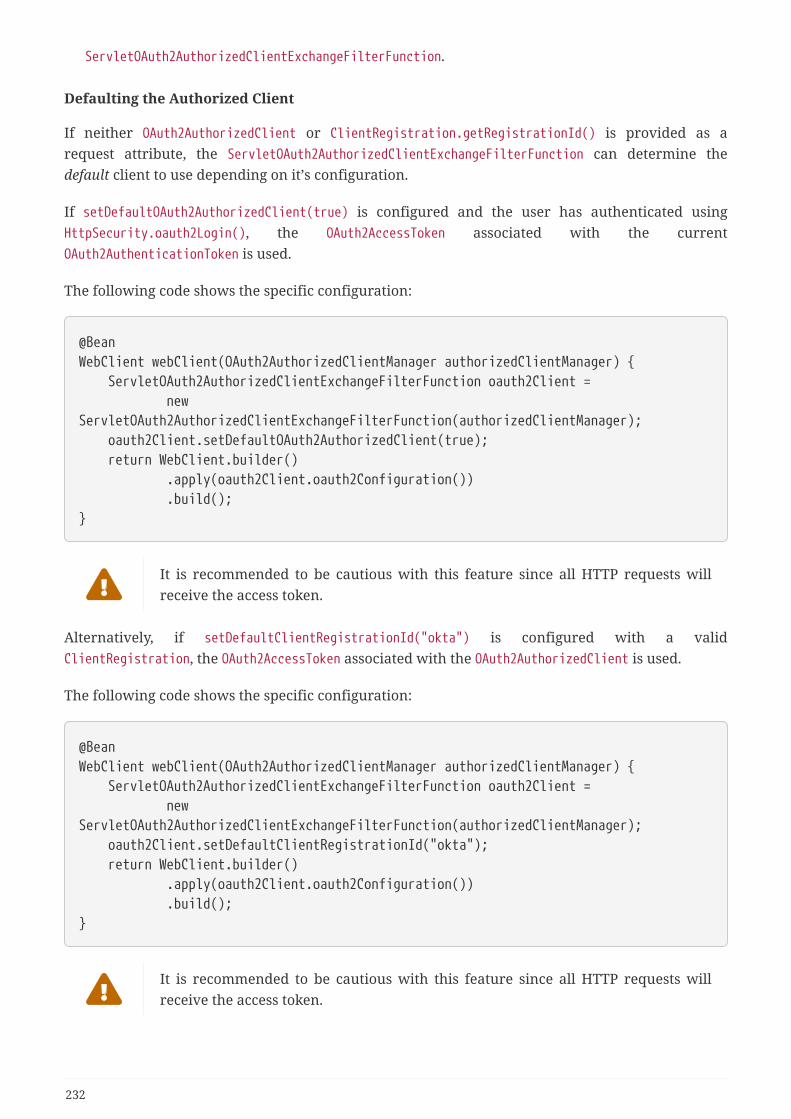
ServletOAuth2AuthorizedClientExchangeFilterFunction.
Defaulting the Authorized Client
If neither OAuth2AuthorizedClient or ClientRegistration.getRegistrationId() is provided as arequest attribute, the ServletOAuth2AuthorizedClientExchangeFilterFunction can determine thedefault client to use depending on it’s configuration.
If setDefaultOAuth2AuthorizedClient(true) is configured and the user has authenticated usingHttpSecurity.oauth2Login(), the OAuth2AccessToken associated with the currentOAuth2AuthenticationToken is used.
The following code shows the specific configuration:
@BeanWebClient webClient(OAuth2AuthorizedClientManager authorizedClientManager) { ServletOAuth2AuthorizedClientExchangeFilterFunction oauth2Client = newServletOAuth2AuthorizedClientExchangeFilterFunction(authorizedClientManager); oauth2Client.setDefaultOAuth2AuthorizedClient(true); return WebClient.builder() .apply(oauth2Client.oauth2Configuration()) .build();}
It is recommended to be cautious with this feature since all HTTP requests willreceive the access token.
Alternatively, if setDefaultClientRegistrationId("okta") is configured with a validClientRegistration, the OAuth2AccessToken associated with the OAuth2AuthorizedClient is used.
The following code shows the specific configuration:
@BeanWebClient webClient(OAuth2AuthorizedClientManager authorizedClientManager) { ServletOAuth2AuthorizedClientExchangeFilterFunction oauth2Client = newServletOAuth2AuthorizedClientExchangeFilterFunction(authorizedClientManager); oauth2Client.setDefaultClientRegistrationId("okta"); return WebClient.builder() .apply(oauth2Client.oauth2Configuration()) .build();}
It is recommended to be cautious with this feature since all HTTP requests willreceive the access token.
232
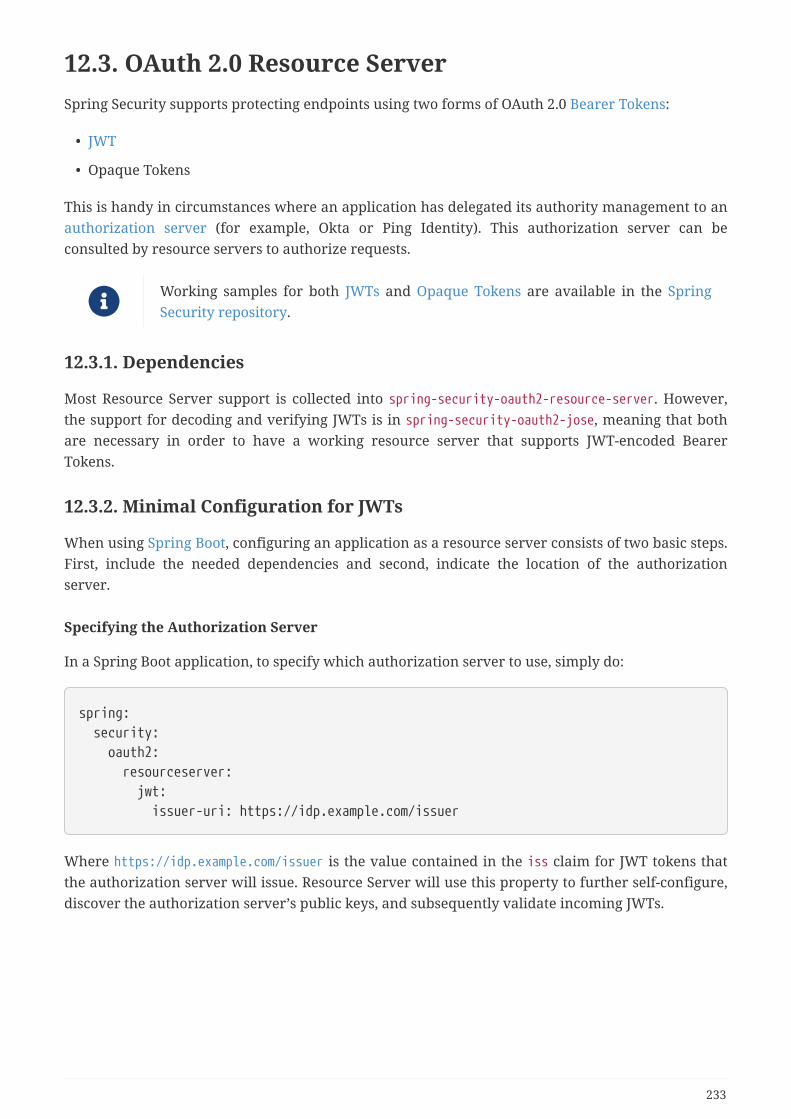
12.3. OAuth 2.0 Resource ServerSpring Security supports protecting endpoints using two forms of OAuth 2.0 Bearer Tokens:
• JWT
• Opaque Tokens
This is handy in circumstances where an application has delegated its authority management to anauthorization server (for example, Okta or Ping Identity). This authorization server can beconsulted by resource servers to authorize requests.
Working samples for both JWTs and Opaque Tokens are available in the SpringSecurity repository.
12.3.1. Dependencies
Most Resource Server support is collected into spring-security-oauth2-resource-server. However,the support for decoding and verifying JWTs is in spring-security-oauth2-jose, meaning that bothare necessary in order to have a working resource server that supports JWT-encoded BearerTokens.
12.3.2. Minimal Configuration for JWTs
When using Spring Boot, configuring an application as a resource server consists of two basic steps.First, include the needed dependencies and second, indicate the location of the authorizationserver.
Specifying the Authorization Server
In a Spring Boot application, to specify which authorization server to use, simply do:
spring: security: oauth2: resourceserver: jwt: issuer-uri: https://idp.example.com/issuer
Where https://idp.example.com/issuer is the value contained in the iss claim for JWT tokens thatthe authorization server will issue. Resource Server will use this property to further self-configure,discover the authorization server’s public keys, and subsequently validate incoming JWTs.
233
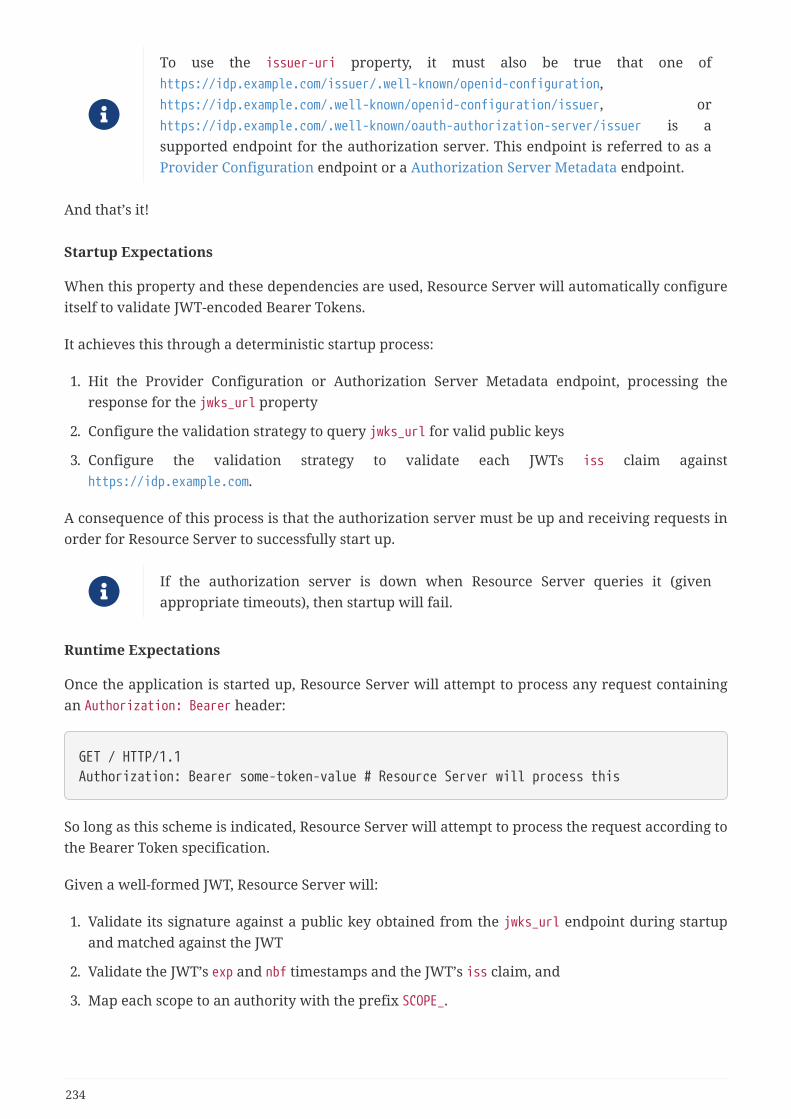
To use the issuer-uri property, it must also be true that one ofhttps://idp.example.com/issuer/.well-known/openid-configuration,https://idp.example.com/.well-known/openid-configuration/issuer, orhttps://idp.example.com/.well-known/oauth-authorization-server/issuer is asupported endpoint for the authorization server. This endpoint is referred to as aProvider Configuration endpoint or a Authorization Server Metadata endpoint.
And that’s it!
Startup Expectations
When this property and these dependencies are used, Resource Server will automatically configureitself to validate JWT-encoded Bearer Tokens.
It achieves this through a deterministic startup process:
1. Hit the Provider Configuration or Authorization Server Metadata endpoint, processing theresponse for the jwks_url property
2. Configure the validation strategy to query jwks_url for valid public keys
3. Configure the validation strategy to validate each JWTs iss claim againsthttps://idp.example.com.
A consequence of this process is that the authorization server must be up and receiving requests inorder for Resource Server to successfully start up.
If the authorization server is down when Resource Server queries it (givenappropriate timeouts), then startup will fail.
Runtime Expectations
Once the application is started up, Resource Server will attempt to process any request containingan Authorization: Bearer header:
GET / HTTP/1.1Authorization: Bearer some-token-value # Resource Server will process this
So long as this scheme is indicated, Resource Server will attempt to process the request according tothe Bearer Token specification.
Given a well-formed JWT, Resource Server will:
1. Validate its signature against a public key obtained from the jwks_url endpoint during startupand matched against the JWT
2. Validate the JWT’s exp and nbf timestamps and the JWT’s iss claim, and
3. Map each scope to an authority with the prefix SCOPE_.
234
As the authorization server makes available new keys, Spring Security willautomatically rotate the keys used to validate JWTs.
The resulting Authentication#getPrincipal, by default, is a Spring Security Jwt object, andAuthentication#getName maps to the JWT’s sub property, if one is present.
From here, consider jumping to:
How to Configure without Tying Resource Server startup to an authorization server’s availability
How to Configure without Spring Boot
12.3.3. Specifying the Authorization Server JWK Set Uri Directly
If the authorization server doesn’t support any configuration endpoints, or if Resource Server mustbe able to start up independently from the authorization server, then the jwk-set-uri can besupplied as well:
spring: security: oauth2: resourceserver: jwt: issuer-uri: https://idp.example.com jwk-set-uri: https://idp.example.com/.well-known/jwks.json
The JWK Set uri is not standardized, but can typically be found in theauthorization server’s documentation
Consequently, Resource Server will not ping the authorization server at startup. We still specify theissuer-uri so that Resource Server still validates the iss claim on incoming JWTs.
This property can also be supplied directly on the DSL.
12.3.4. Overriding or Replacing Boot Auto Configuration
There are two @Bean s that Spring Boot generates on Resource Server’s behalf.
The first is a WebSecurityConfigurerAdapter that configures the app as a resource server. Whenincluding spring-security-oauth2-jose, this WebSecurityConfigurerAdapter looks like:
235
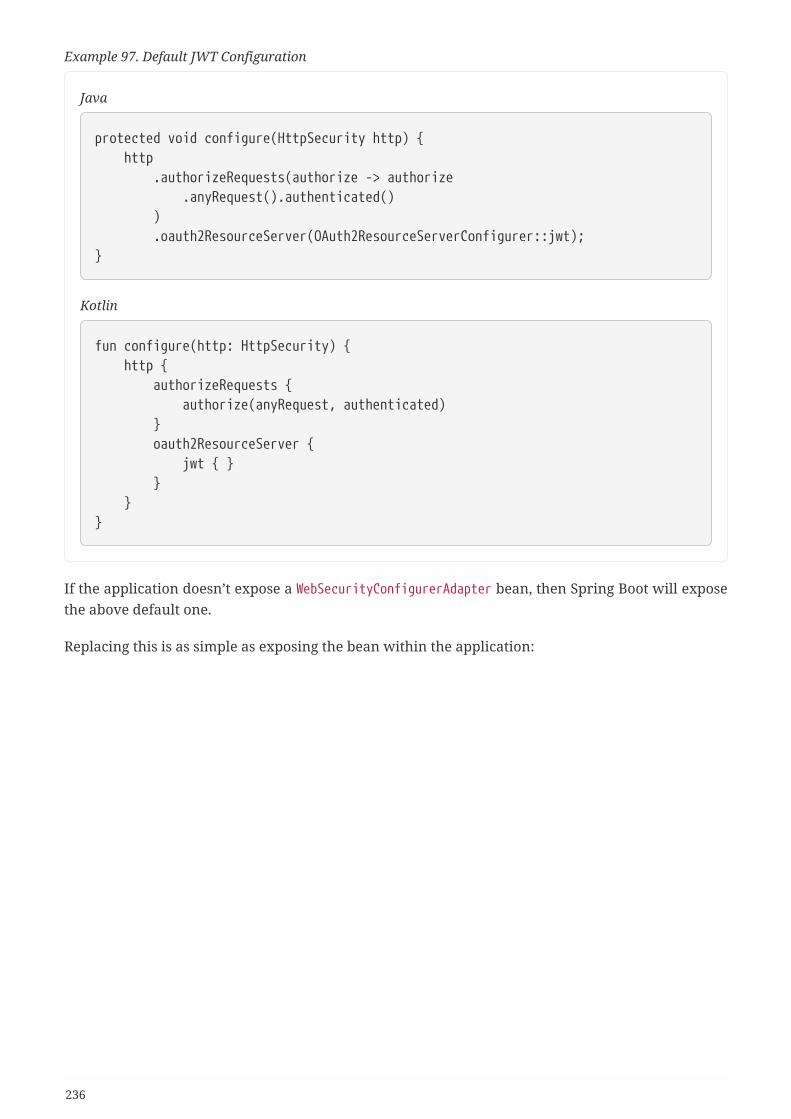
Example 97. Default JWT Configuration
Java
protected void configure(HttpSecurity http) { http .authorizeRequests(authorize -> authorize .anyRequest().authenticated() ) .oauth2ResourceServer(OAuth2ResourceServerConfigurer::jwt);}
Kotlin
fun configure(http: HttpSecurity) { http { authorizeRequests { authorize(anyRequest, authenticated) } oauth2ResourceServer { jwt { } } }}
If the application doesn’t expose a WebSecurityConfigurerAdapter bean, then Spring Boot will exposethe above default one.
Replacing this is as simple as exposing the bean within the application:
236
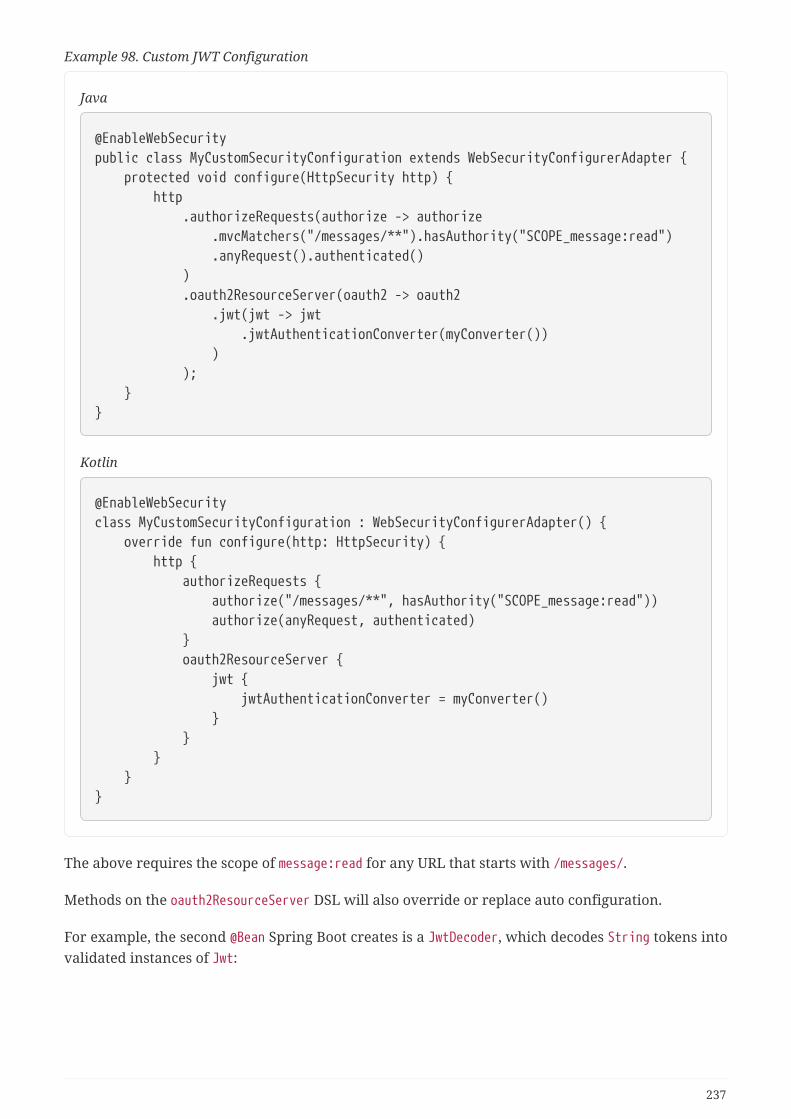
Example 98. Custom JWT Configuration
Java
@EnableWebSecuritypublic class MyCustomSecurityConfiguration extends WebSecurityConfigurerAdapter { protected void configure(HttpSecurity http) { http .authorizeRequests(authorize -> authorize .mvcMatchers("/messages/**").hasAuthority("SCOPE_message:read") .anyRequest().authenticated() ) .oauth2ResourceServer(oauth2 -> oauth2 .jwt(jwt -> jwt .jwtAuthenticationConverter(myConverter()) ) ); }}
Kotlin
@EnableWebSecurityclass MyCustomSecurityConfiguration : WebSecurityConfigurerAdapter() { override fun configure(http: HttpSecurity) { http { authorizeRequests { authorize("/messages/**", hasAuthority("SCOPE_message:read")) authorize(anyRequest, authenticated) } oauth2ResourceServer { jwt { jwtAuthenticationConverter = myConverter() } } } }}
The above requires the scope of message:read for any URL that starts with /messages/.
Methods on the oauth2ResourceServer DSL will also override or replace auto configuration.
For example, the second @Bean Spring Boot creates is a JwtDecoder, which decodes String tokens intovalidated instances of Jwt:
237
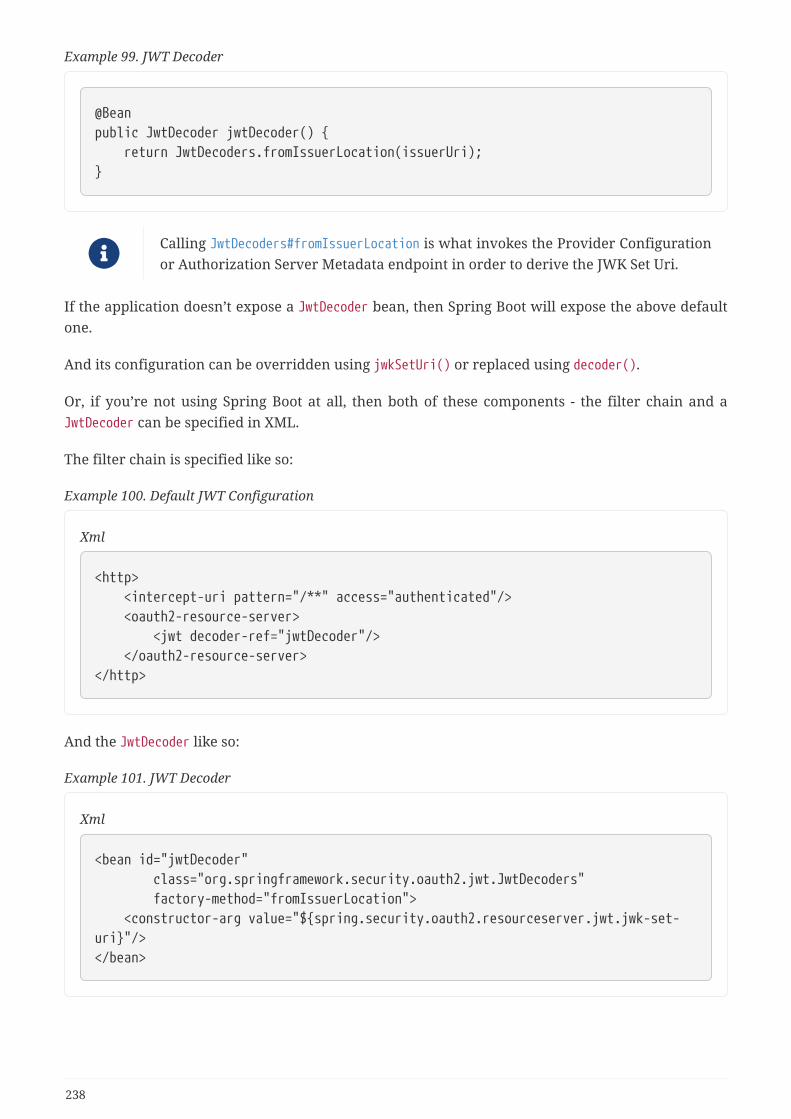
Example 99. JWT Decoder
@Beanpublic JwtDecoder jwtDecoder() { return JwtDecoders.fromIssuerLocation(issuerUri);}
Calling JwtDecoders#fromIssuerLocation is what invokes the Provider Configurationor Authorization Server Metadata endpoint in order to derive the JWK Set Uri.
If the application doesn’t expose a JwtDecoder bean, then Spring Boot will expose the above defaultone.
And its configuration can be overridden using jwkSetUri() or replaced using decoder().
Or, if you’re not using Spring Boot at all, then both of these components - the filter chain and aJwtDecoder can be specified in XML.
The filter chain is specified like so:
Example 100. Default JWT Configuration
Xml
<http> <intercept-uri pattern="/**" access="authenticated"/> <oauth2-resource-server> <jwt decoder-ref="jwtDecoder"/> </oauth2-resource-server></http>
And the JwtDecoder like so:
Example 101. JWT Decoder
Xml
<bean id="jwtDecoder" class="org.springframework.security.oauth2.jwt.JwtDecoders" factory-method="fromIssuerLocation"> <constructor-arg value="${spring.security.oauth2.resourceserver.jwt.jwk-set-uri}"/></bean>
238

Using jwkSetUri()
An authorization server’s JWK Set Uri can be configured as a configuration property or it can besupplied in the DSL:
239
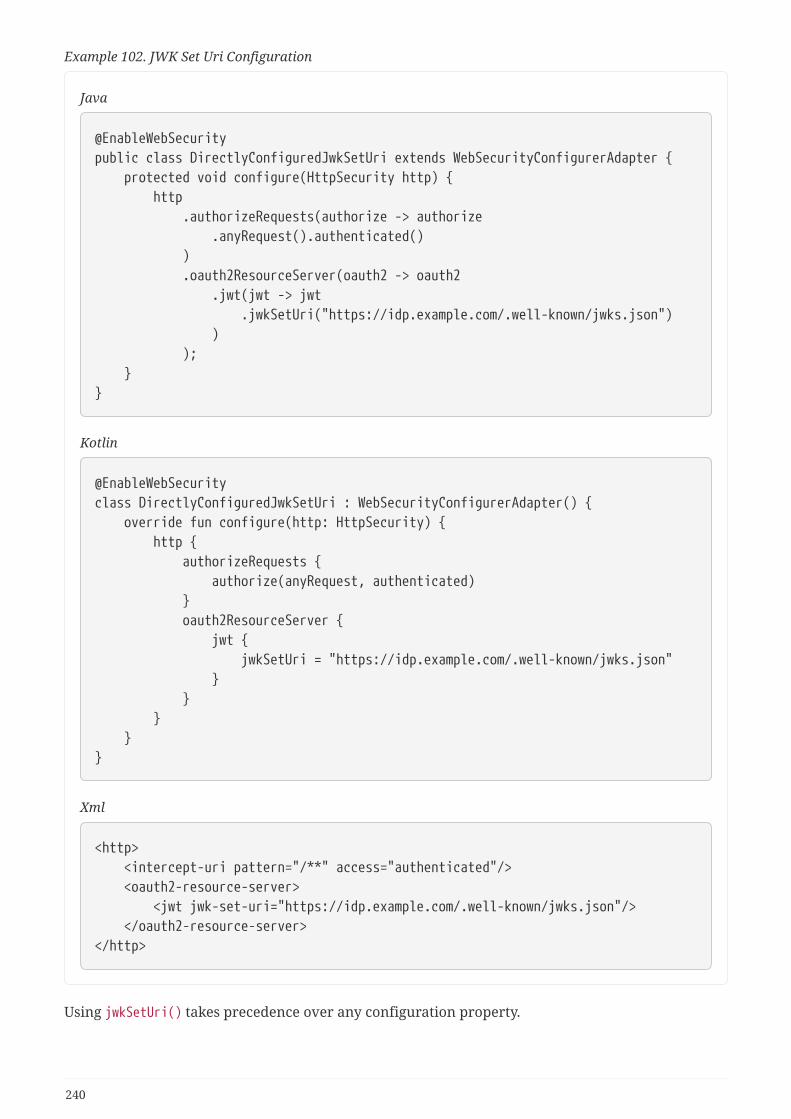
Example 102. JWK Set Uri Configuration
Java
@EnableWebSecuritypublic class DirectlyConfiguredJwkSetUri extends WebSecurityConfigurerAdapter { protected void configure(HttpSecurity http) { http .authorizeRequests(authorize -> authorize .anyRequest().authenticated() ) .oauth2ResourceServer(oauth2 -> oauth2 .jwt(jwt -> jwt .jwkSetUri("https://idp.example.com/.well-known/jwks.json") ) ); }}
Kotlin
@EnableWebSecurityclass DirectlyConfiguredJwkSetUri : WebSecurityConfigurerAdapter() { override fun configure(http: HttpSecurity) { http { authorizeRequests { authorize(anyRequest, authenticated) } oauth2ResourceServer { jwt { jwkSetUri = "https://idp.example.com/.well-known/jwks.json" } } } }}
Xml
<http> <intercept-uri pattern="/**" access="authenticated"/> <oauth2-resource-server> <jwt jwk-set-uri="https://idp.example.com/.well-known/jwks.json"/> </oauth2-resource-server></http>
Using jwkSetUri() takes precedence over any configuration property.
240
Using decoder()
More powerful than jwkSetUri() is decoder(), which will completely replace any Boot autoconfiguration of JwtDecoder:
241
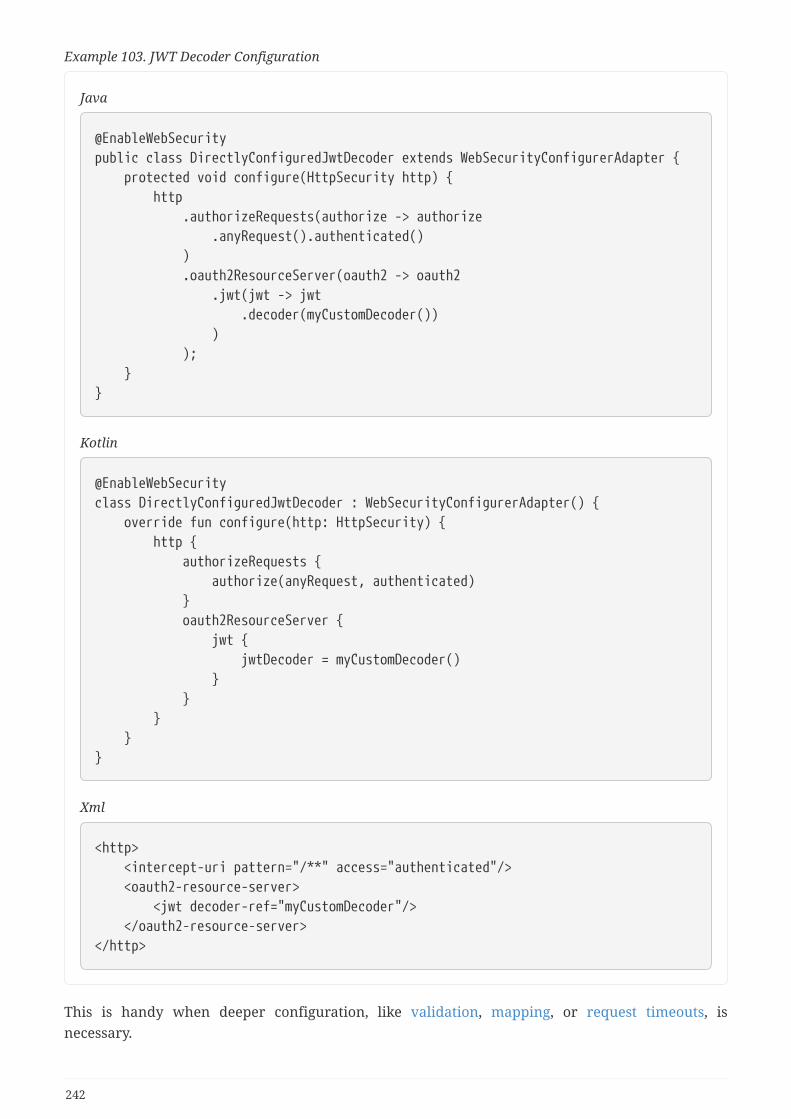
Example 103. JWT Decoder Configuration
Java
@EnableWebSecuritypublic class DirectlyConfiguredJwtDecoder extends WebSecurityConfigurerAdapter { protected void configure(HttpSecurity http) { http .authorizeRequests(authorize -> authorize .anyRequest().authenticated() ) .oauth2ResourceServer(oauth2 -> oauth2 .jwt(jwt -> jwt .decoder(myCustomDecoder()) ) ); }}
Kotlin
@EnableWebSecurityclass DirectlyConfiguredJwtDecoder : WebSecurityConfigurerAdapter() { override fun configure(http: HttpSecurity) { http { authorizeRequests { authorize(anyRequest, authenticated) } oauth2ResourceServer { jwt { jwtDecoder = myCustomDecoder() } } } }}
Xml
<http> <intercept-uri pattern="/**" access="authenticated"/> <oauth2-resource-server> <jwt decoder-ref="myCustomDecoder"/> </oauth2-resource-server></http>
This is handy when deeper configuration, like validation, mapping, or request timeouts, isnecessary.
242
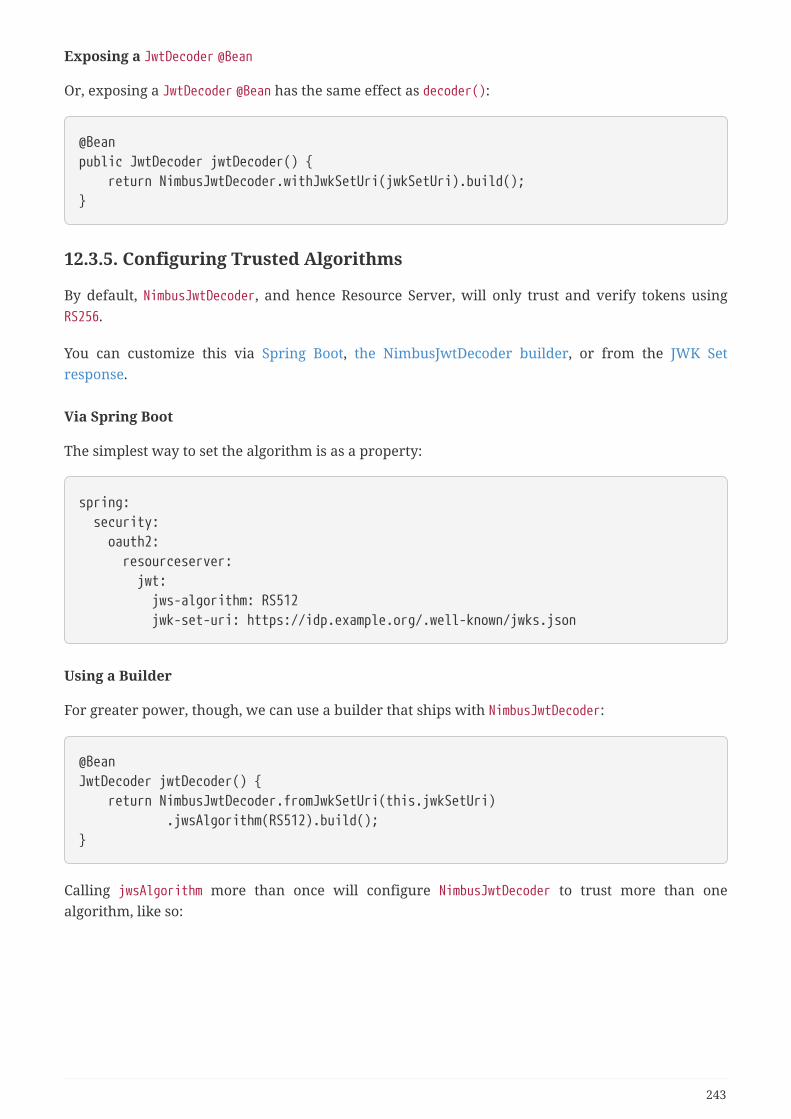
Exposing a JwtDecoder @Bean
Or, exposing a JwtDecoder @Bean has the same effect as decoder():
@Beanpublic JwtDecoder jwtDecoder() { return NimbusJwtDecoder.withJwkSetUri(jwkSetUri).build();}
12.3.5. Configuring Trusted Algorithms
By default, NimbusJwtDecoder, and hence Resource Server, will only trust and verify tokens usingRS256.
You can customize this via Spring Boot, the NimbusJwtDecoder builder, or from the JWK Setresponse.
Via Spring Boot
The simplest way to set the algorithm is as a property:
spring: security: oauth2: resourceserver: jwt: jws-algorithm: RS512 jwk-set-uri: https://idp.example.org/.well-known/jwks.json
Using a Builder
For greater power, though, we can use a builder that ships with NimbusJwtDecoder:
@BeanJwtDecoder jwtDecoder() { return NimbusJwtDecoder.fromJwkSetUri(this.jwkSetUri) .jwsAlgorithm(RS512).build();}
Calling jwsAlgorithm more than once will configure NimbusJwtDecoder to trust more than onealgorithm, like so:
243
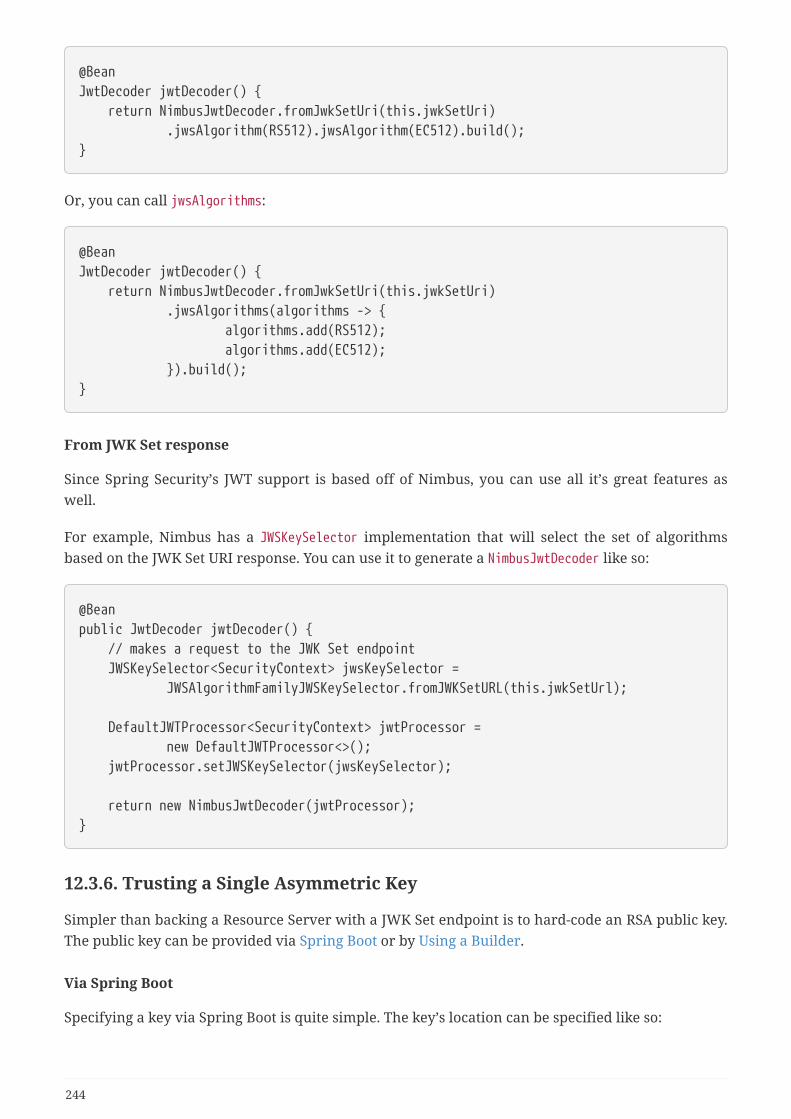
@BeanJwtDecoder jwtDecoder() { return NimbusJwtDecoder.fromJwkSetUri(this.jwkSetUri) .jwsAlgorithm(RS512).jwsAlgorithm(EC512).build();}
Or, you can call jwsAlgorithms:
@BeanJwtDecoder jwtDecoder() { return NimbusJwtDecoder.fromJwkSetUri(this.jwkSetUri) .jwsAlgorithms(algorithms -> { algorithms.add(RS512); algorithms.add(EC512); }).build();}
From JWK Set response
Since Spring Security’s JWT support is based off of Nimbus, you can use all it’s great features aswell.
For example, Nimbus has a JWSKeySelector implementation that will select the set of algorithmsbased on the JWK Set URI response. You can use it to generate a NimbusJwtDecoder like so:
@Beanpublic JwtDecoder jwtDecoder() { // makes a request to the JWK Set endpoint JWSKeySelector<SecurityContext> jwsKeySelector = JWSAlgorithmFamilyJWSKeySelector.fromJWKSetURL(this.jwkSetUrl);
DefaultJWTProcessor<SecurityContext> jwtProcessor = new DefaultJWTProcessor<>(); jwtProcessor.setJWSKeySelector(jwsKeySelector);
return new NimbusJwtDecoder(jwtProcessor);}
12.3.6. Trusting a Single Asymmetric Key
Simpler than backing a Resource Server with a JWK Set endpoint is to hard-code an RSA public key.The public key can be provided via Spring Boot or by Using a Builder.
Via Spring Boot
Specifying a key via Spring Boot is quite simple. The key’s location can be specified like so:
244
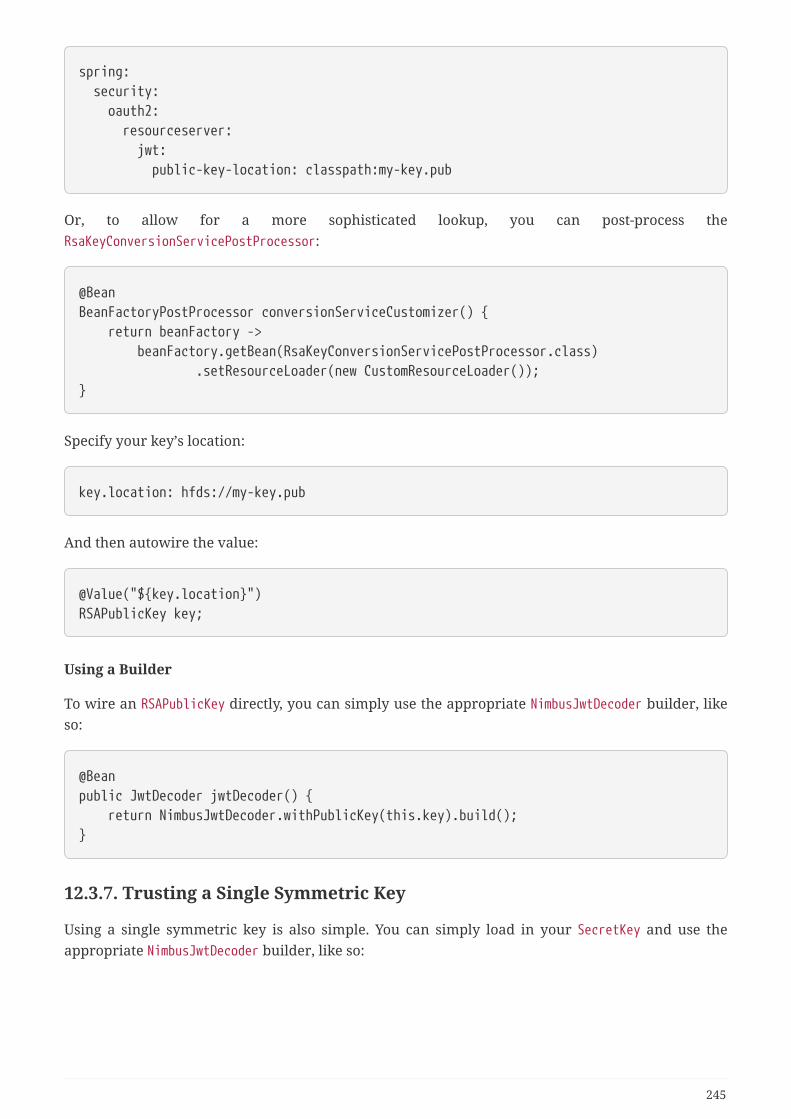
spring: security: oauth2: resourceserver: jwt: public-key-location: classpath:my-key.pub
Or, to allow for a more sophisticated lookup, you can post-process theRsaKeyConversionServicePostProcessor:
@BeanBeanFactoryPostProcessor conversionServiceCustomizer() { return beanFactory -> beanFactory.getBean(RsaKeyConversionServicePostProcessor.class) .setResourceLoader(new CustomResourceLoader());}
Specify your key’s location:
key.location: hfds://my-key.pub
And then autowire the value:
@Value("${key.location}")RSAPublicKey key;
Using a Builder
To wire an RSAPublicKey directly, you can simply use the appropriate NimbusJwtDecoder builder, likeso:
@Beanpublic JwtDecoder jwtDecoder() { return NimbusJwtDecoder.withPublicKey(this.key).build();}
12.3.7. Trusting a Single Symmetric Key
Using a single symmetric key is also simple. You can simply load in your SecretKey and use theappropriate NimbusJwtDecoder builder, like so:
245
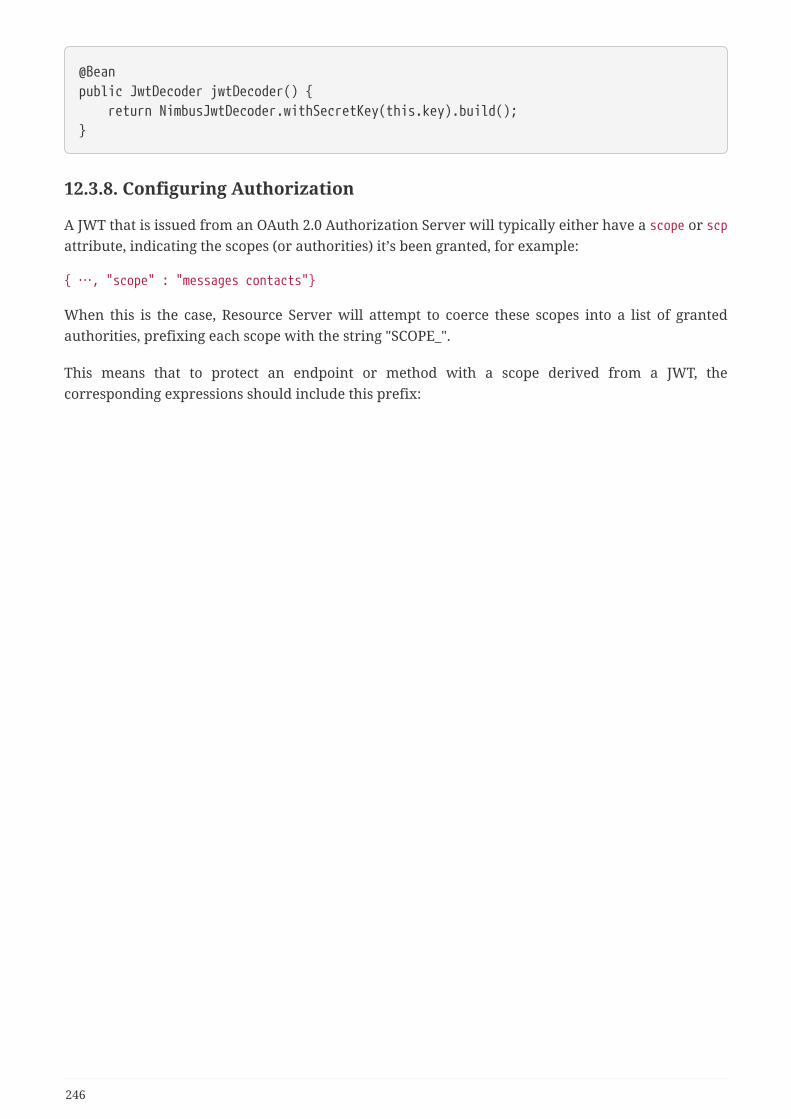
@Beanpublic JwtDecoder jwtDecoder() { return NimbusJwtDecoder.withSecretKey(this.key).build();}
12.3.8. Configuring Authorization
A JWT that is issued from an OAuth 2.0 Authorization Server will typically either have a scope or scpattribute, indicating the scopes (or authorities) it’s been granted, for example:
{ …, "scope" : "messages contacts"}
When this is the case, Resource Server will attempt to coerce these scopes into a list of grantedauthorities, prefixing each scope with the string "SCOPE_".
This means that to protect an endpoint or method with a scope derived from a JWT, thecorresponding expressions should include this prefix:
246
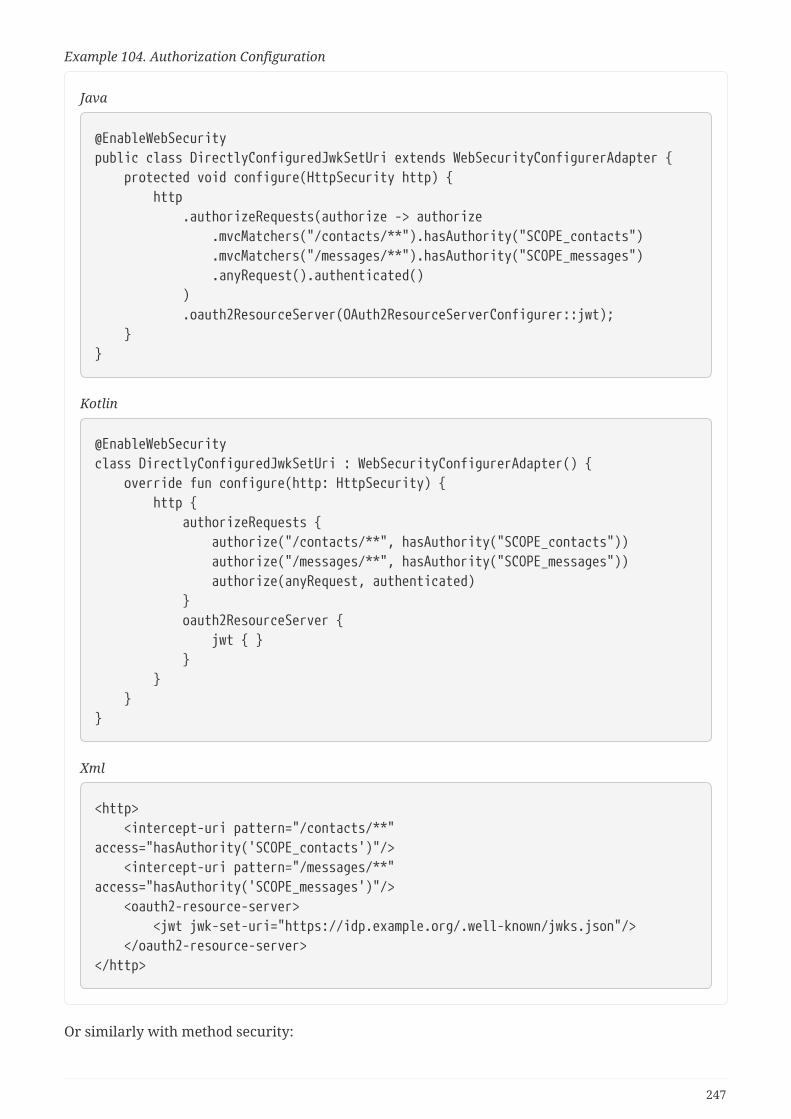
Example 104. Authorization Configuration
Java
@EnableWebSecuritypublic class DirectlyConfiguredJwkSetUri extends WebSecurityConfigurerAdapter { protected void configure(HttpSecurity http) { http .authorizeRequests(authorize -> authorize .mvcMatchers("/contacts/**").hasAuthority("SCOPE_contacts") .mvcMatchers("/messages/**").hasAuthority("SCOPE_messages") .anyRequest().authenticated() ) .oauth2ResourceServer(OAuth2ResourceServerConfigurer::jwt); }}
Kotlin
@EnableWebSecurityclass DirectlyConfiguredJwkSetUri : WebSecurityConfigurerAdapter() { override fun configure(http: HttpSecurity) { http { authorizeRequests { authorize("/contacts/**", hasAuthority("SCOPE_contacts")) authorize("/messages/**", hasAuthority("SCOPE_messages")) authorize(anyRequest, authenticated) } oauth2ResourceServer { jwt { } } } }}
Xml
<http> <intercept-uri pattern="/contacts/**"access="hasAuthority('SCOPE_contacts')"/> <intercept-uri pattern="/messages/**"access="hasAuthority('SCOPE_messages')"/> <oauth2-resource-server> <jwt jwk-set-uri="https://idp.example.org/.well-known/jwks.json"/> </oauth2-resource-server></http>
Or similarly with method security:
247
@PreAuthorize("hasAuthority('SCOPE_messages')")public List<Message> getMessages(...) {}
Extracting Authorities Manually
However, there are a number of circumstances where this default is insufficient. For example,some authorization servers don’t use the scope attribute, but instead have their own customattribute. Or, at other times, the resource server may need to adapt the attribute or a compositionof attributes into internalized authorities.
To this end, the DSL exposes jwtAuthenticationConverter(), which is responsible for converting aJwt into an Authentication.
As part of its configuration, we can supply a subsidiary converter to go from Jwt to a Collection ofgranted authorities. Let’s say that that your authorization server communicates authorities in acustom claim called authorities. In that case, you can configure the claim thatJwtAuthenticationConverter should inspect, like so:
248
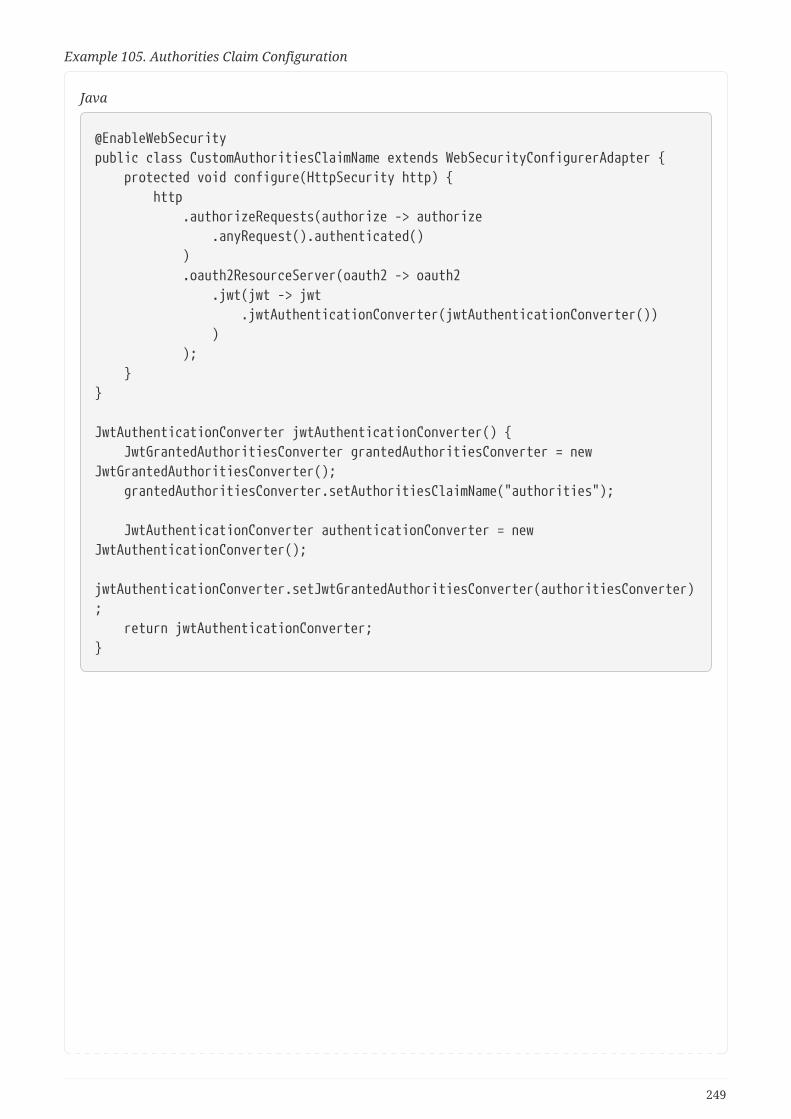
Example 105. Authorities Claim Configuration
Java
@EnableWebSecuritypublic class CustomAuthoritiesClaimName extends WebSecurityConfigurerAdapter { protected void configure(HttpSecurity http) { http .authorizeRequests(authorize -> authorize .anyRequest().authenticated() ) .oauth2ResourceServer(oauth2 -> oauth2 .jwt(jwt -> jwt .jwtAuthenticationConverter(jwtAuthenticationConverter()) ) ); }}
JwtAuthenticationConverter jwtAuthenticationConverter() { JwtGrantedAuthoritiesConverter grantedAuthoritiesConverter = newJwtGrantedAuthoritiesConverter(); grantedAuthoritiesConverter.setAuthoritiesClaimName("authorities");
JwtAuthenticationConverter authenticationConverter = newJwtAuthenticationConverter(); jwtAuthenticationConverter.setJwtGrantedAuthoritiesConverter(authoritiesConverter); return jwtAuthenticationConverter;}
249
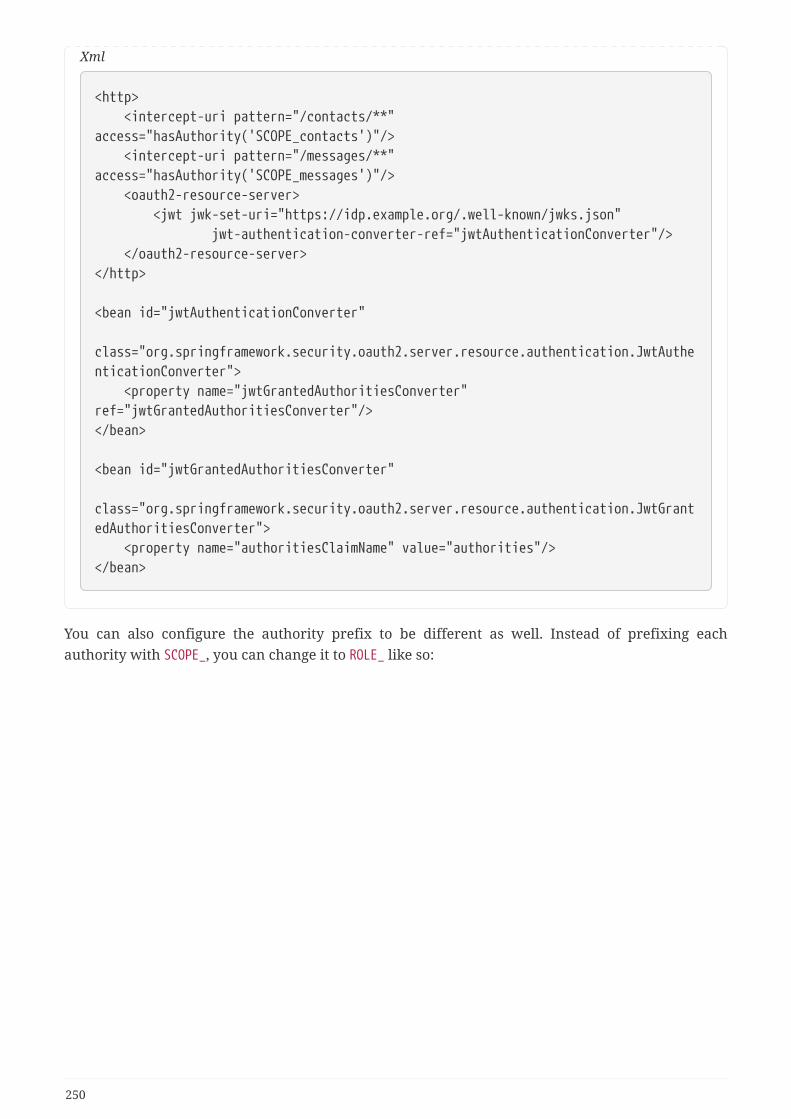
Xml
<http> <intercept-uri pattern="/contacts/**"access="hasAuthority('SCOPE_contacts')"/> <intercept-uri pattern="/messages/**"access="hasAuthority('SCOPE_messages')"/> <oauth2-resource-server> <jwt jwk-set-uri="https://idp.example.org/.well-known/jwks.json" jwt-authentication-converter-ref="jwtAuthenticationConverter"/> </oauth2-resource-server></http>
<bean id="jwtAuthenticationConverter" class="org.springframework.security.oauth2.server.resource.authentication.JwtAuthenticationConverter"> <property name="jwtGrantedAuthoritiesConverter"ref="jwtGrantedAuthoritiesConverter"/></bean>
<bean id="jwtGrantedAuthoritiesConverter" class="org.springframework.security.oauth2.server.resource.authentication.JwtGrantedAuthoritiesConverter"> <property name="authoritiesClaimName" value="authorities"/></bean>
You can also configure the authority prefix to be different as well. Instead of prefixing eachauthority with SCOPE_, you can change it to ROLE_ like so:
250
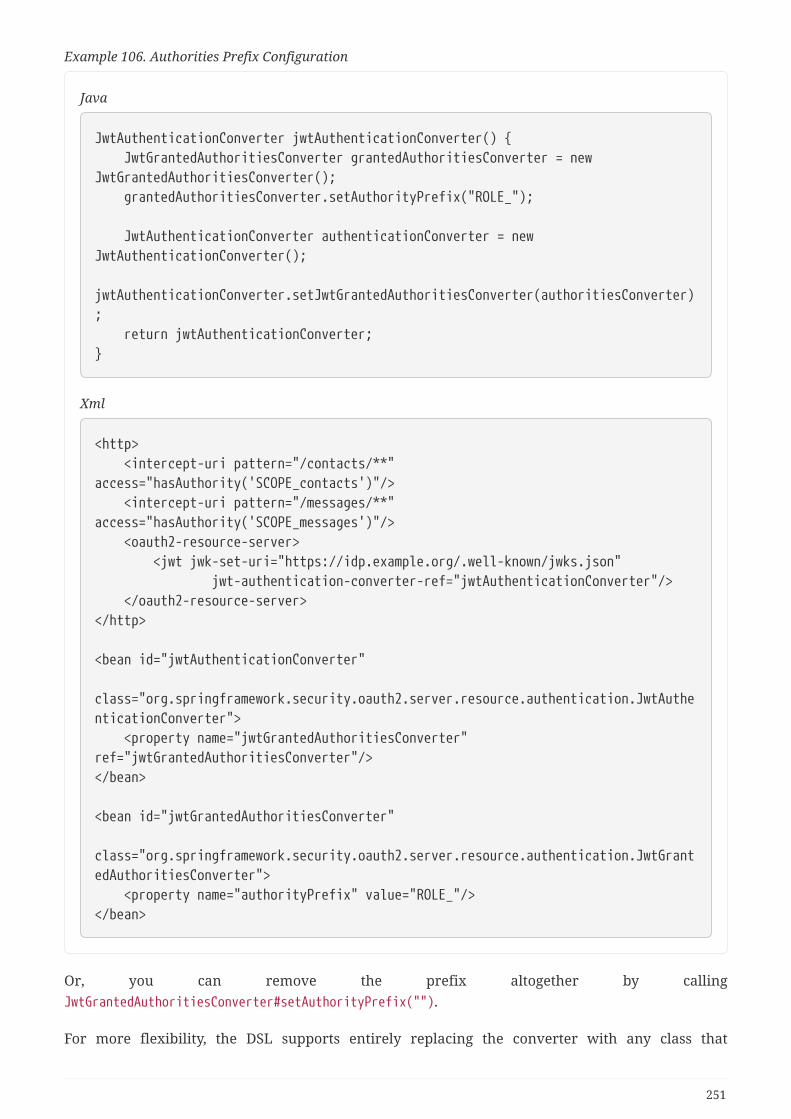
Example 106. Authorities Prefix Configuration
Java
JwtAuthenticationConverter jwtAuthenticationConverter() { JwtGrantedAuthoritiesConverter grantedAuthoritiesConverter = newJwtGrantedAuthoritiesConverter(); grantedAuthoritiesConverter.setAuthorityPrefix("ROLE_");
JwtAuthenticationConverter authenticationConverter = newJwtAuthenticationConverter(); jwtAuthenticationConverter.setJwtGrantedAuthoritiesConverter(authoritiesConverter); return jwtAuthenticationConverter;}
Xml
<http> <intercept-uri pattern="/contacts/**"access="hasAuthority('SCOPE_contacts')"/> <intercept-uri pattern="/messages/**"access="hasAuthority('SCOPE_messages')"/> <oauth2-resource-server> <jwt jwk-set-uri="https://idp.example.org/.well-known/jwks.json" jwt-authentication-converter-ref="jwtAuthenticationConverter"/> </oauth2-resource-server></http>
<bean id="jwtAuthenticationConverter" class="org.springframework.security.oauth2.server.resource.authentication.JwtAuthenticationConverter"> <property name="jwtGrantedAuthoritiesConverter"ref="jwtGrantedAuthoritiesConverter"/></bean>
<bean id="jwtGrantedAuthoritiesConverter" class="org.springframework.security.oauth2.server.resource.authentication.JwtGrantedAuthoritiesConverter"> <property name="authorityPrefix" value="ROLE_"/></bean>
Or, you can remove the prefix altogether by callingJwtGrantedAuthoritiesConverter#setAuthorityPrefix("").
For more flexibility, the DSL supports entirely replacing the converter with any class that
251
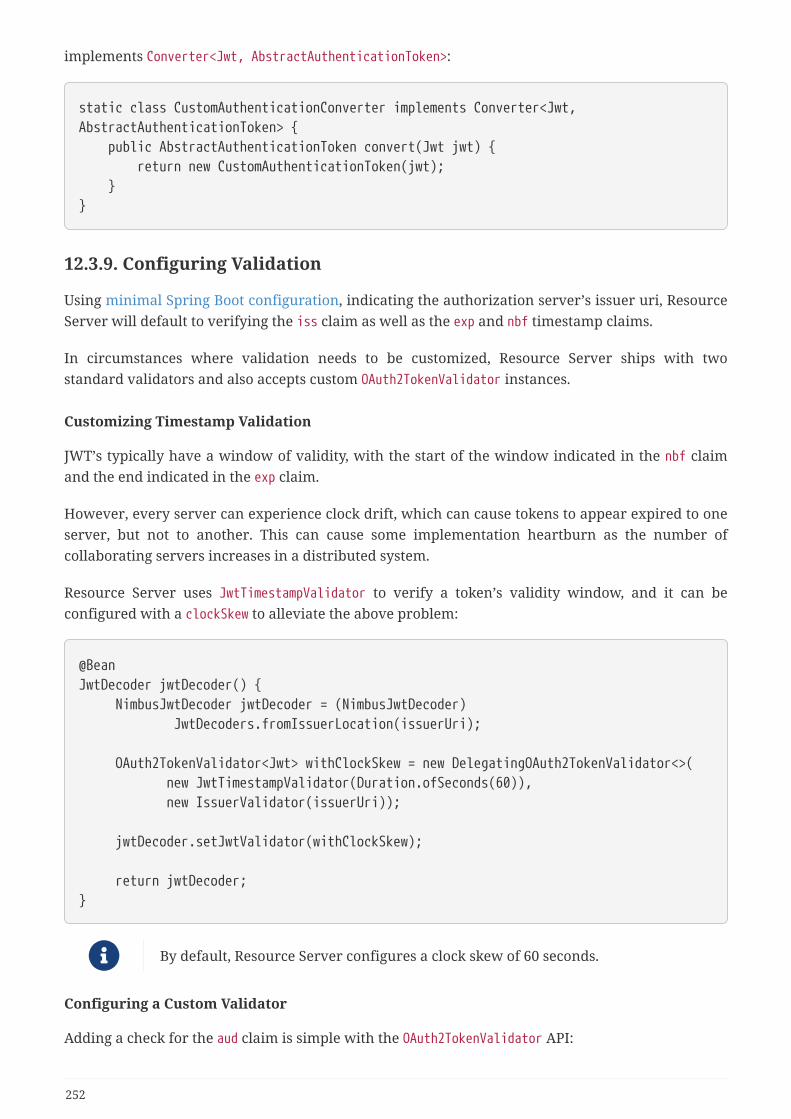
implements Converter<Jwt, AbstractAuthenticationToken>:
static class CustomAuthenticationConverter implements Converter<Jwt,AbstractAuthenticationToken> { public AbstractAuthenticationToken convert(Jwt jwt) { return new CustomAuthenticationToken(jwt); }}
12.3.9. Configuring Validation
Using minimal Spring Boot configuration, indicating the authorization server’s issuer uri, ResourceServer will default to verifying the iss claim as well as the exp and nbf timestamp claims.
In circumstances where validation needs to be customized, Resource Server ships with twostandard validators and also accepts custom OAuth2TokenValidator instances.
Customizing Timestamp Validation
JWT’s typically have a window of validity, with the start of the window indicated in the nbf claimand the end indicated in the exp claim.
However, every server can experience clock drift, which can cause tokens to appear expired to oneserver, but not to another. This can cause some implementation heartburn as the number ofcollaborating servers increases in a distributed system.
Resource Server uses JwtTimestampValidator to verify a token’s validity window, and it can beconfigured with a clockSkew to alleviate the above problem:
@BeanJwtDecoder jwtDecoder() { NimbusJwtDecoder jwtDecoder = (NimbusJwtDecoder) JwtDecoders.fromIssuerLocation(issuerUri);
OAuth2TokenValidator<Jwt> withClockSkew = new DelegatingOAuth2TokenValidator<>( new JwtTimestampValidator(Duration.ofSeconds(60)), new IssuerValidator(issuerUri));
jwtDecoder.setJwtValidator(withClockSkew);
return jwtDecoder;}
By default, Resource Server configures a clock skew of 60 seconds.
Configuring a Custom Validator
Adding a check for the aud claim is simple with the OAuth2TokenValidator API:
252
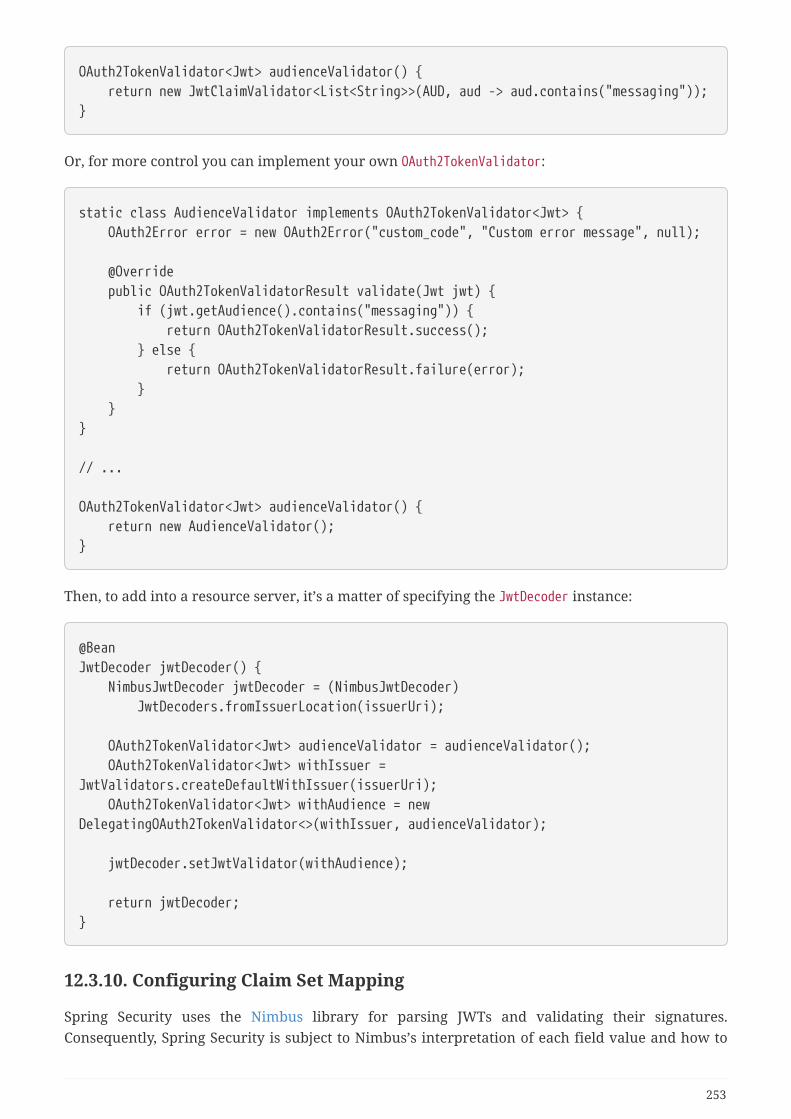
OAuth2TokenValidator<Jwt> audienceValidator() { return new JwtClaimValidator<List<String>>(AUD, aud -> aud.contains("messaging"));}
Or, for more control you can implement your own OAuth2TokenValidator:
static class AudienceValidator implements OAuth2TokenValidator<Jwt> { OAuth2Error error = new OAuth2Error("custom_code", "Custom error message", null);
@Override public OAuth2TokenValidatorResult validate(Jwt jwt) { if (jwt.getAudience().contains("messaging")) { return OAuth2TokenValidatorResult.success(); } else { return OAuth2TokenValidatorResult.failure(error); } }}
// ...
OAuth2TokenValidator<Jwt> audienceValidator() { return new AudienceValidator();}
Then, to add into a resource server, it’s a matter of specifying the JwtDecoder instance:
@BeanJwtDecoder jwtDecoder() { NimbusJwtDecoder jwtDecoder = (NimbusJwtDecoder) JwtDecoders.fromIssuerLocation(issuerUri);
OAuth2TokenValidator<Jwt> audienceValidator = audienceValidator(); OAuth2TokenValidator<Jwt> withIssuer =JwtValidators.createDefaultWithIssuer(issuerUri); OAuth2TokenValidator<Jwt> withAudience = newDelegatingOAuth2TokenValidator<>(withIssuer, audienceValidator);
jwtDecoder.setJwtValidator(withAudience);
return jwtDecoder;}
12.3.10. Configuring Claim Set Mapping
Spring Security uses the Nimbus library for parsing JWTs and validating their signatures.Consequently, Spring Security is subject to Nimbus’s interpretation of each field value and how to
253
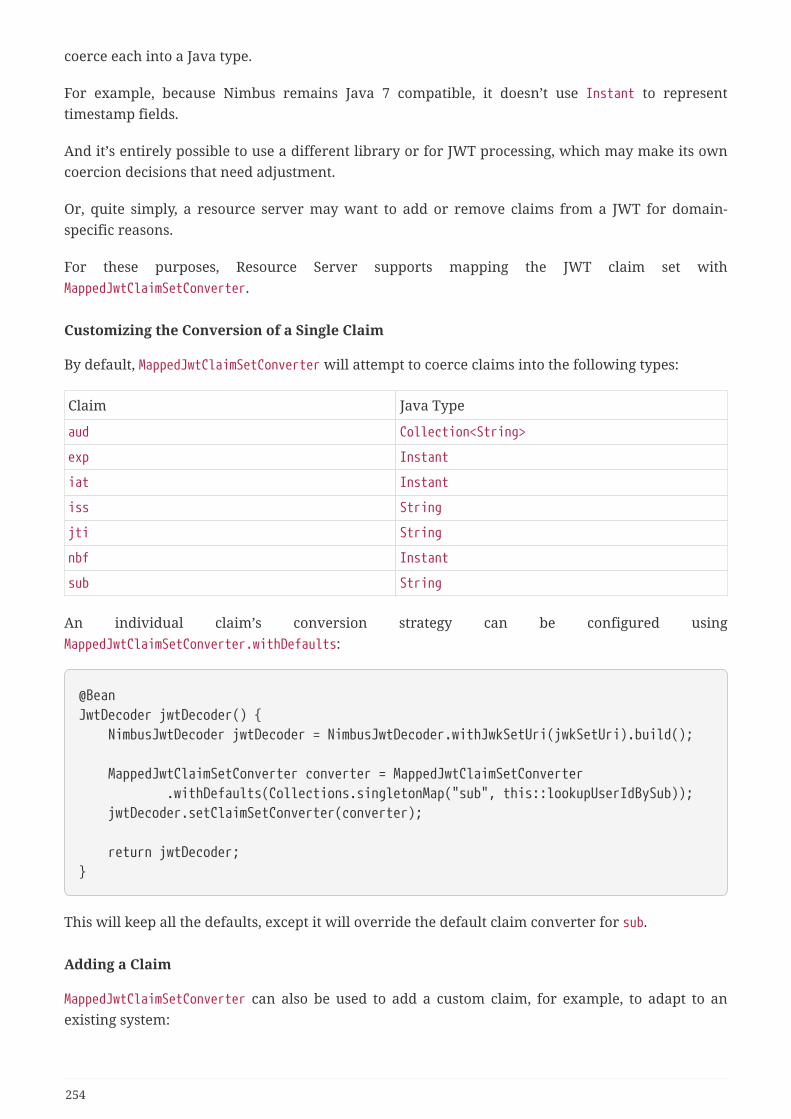
coerce each into a Java type.
For example, because Nimbus remains Java 7 compatible, it doesn’t use Instant to representtimestamp fields.
And it’s entirely possible to use a different library or for JWT processing, which may make its owncoercion decisions that need adjustment.
Or, quite simply, a resource server may want to add or remove claims from a JWT for domain-specific reasons.
For these purposes, Resource Server supports mapping the JWT claim set withMappedJwtClaimSetConverter.
Customizing the Conversion of a Single Claim
By default, MappedJwtClaimSetConverter will attempt to coerce claims into the following types:
Claim Java Type
aud Collection<String>
exp Instant
iat Instant
iss String
jti String
nbf Instant
sub String
An individual claim’s conversion strategy can be configured usingMappedJwtClaimSetConverter.withDefaults:
@BeanJwtDecoder jwtDecoder() { NimbusJwtDecoder jwtDecoder = NimbusJwtDecoder.withJwkSetUri(jwkSetUri).build();
MappedJwtClaimSetConverter converter = MappedJwtClaimSetConverter .withDefaults(Collections.singletonMap("sub", this::lookupUserIdBySub)); jwtDecoder.setClaimSetConverter(converter);
return jwtDecoder;}
This will keep all the defaults, except it will override the default claim converter for sub.
Adding a Claim
MappedJwtClaimSetConverter can also be used to add a custom claim, for example, to adapt to anexisting system:
254
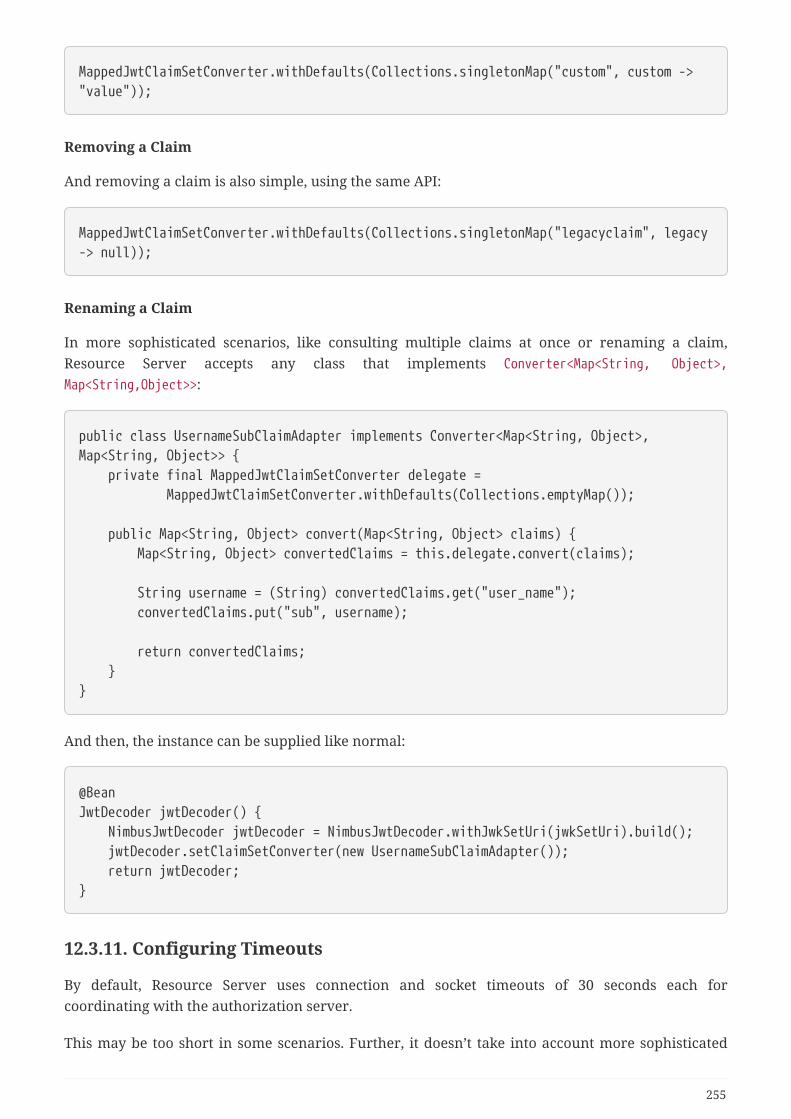
MappedJwtClaimSetConverter.withDefaults(Collections.singletonMap("custom", custom ->"value"));
Removing a Claim
And removing a claim is also simple, using the same API:
MappedJwtClaimSetConverter.withDefaults(Collections.singletonMap("legacyclaim", legacy-> null));
Renaming a Claim
In more sophisticated scenarios, like consulting multiple claims at once or renaming a claim,Resource Server accepts any class that implements Converter<Map<String, Object>,Map<String,Object>>:
public class UsernameSubClaimAdapter implements Converter<Map<String, Object>,Map<String, Object>> { private final MappedJwtClaimSetConverter delegate = MappedJwtClaimSetConverter.withDefaults(Collections.emptyMap());
public Map<String, Object> convert(Map<String, Object> claims) { Map<String, Object> convertedClaims = this.delegate.convert(claims);
String username = (String) convertedClaims.get("user_name"); convertedClaims.put("sub", username);
return convertedClaims; }}
And then, the instance can be supplied like normal:
@BeanJwtDecoder jwtDecoder() { NimbusJwtDecoder jwtDecoder = NimbusJwtDecoder.withJwkSetUri(jwkSetUri).build(); jwtDecoder.setClaimSetConverter(new UsernameSubClaimAdapter()); return jwtDecoder;}
12.3.11. Configuring Timeouts
By default, Resource Server uses connection and socket timeouts of 30 seconds each forcoordinating with the authorization server.
This may be too short in some scenarios. Further, it doesn’t take into account more sophisticated
255

patterns like back-off and discovery.
To adjust the way in which Resource Server connects to the authorization server, NimbusJwtDecoderaccepts an instance of RestOperations:
@Beanpublic JwtDecoder jwtDecoder(RestTemplateBuilder builder) { RestOperations rest = builder .setConnectionTimeout(60000) .setReadTimeout(60000) .build();
NimbusJwtDecoder jwtDecoder =NimbusJwtDecoder.withJwkSetUri(jwkSetUri).restOperations(rest).build(); return jwtDecoder;}
12.3.12. Minimal Configuration for Introspection
Typically, an opaque token can be verified via an OAuth 2.0 Introspection Endpoint, hosted by theauthorization server. This can be handy when revocation is a requirement.
When using Spring Boot, configuring an application as a resource server that uses introspectionconsists of two basic steps. First, include the needed dependencies and second, indicate theintrospection endpoint details.
Specifying the Authorization Server
To specify where the introspection endpoint is, simply do:
security: oauth2: resourceserver: opaque-token: introspection-uri: https://idp.example.com/introspect client-id: client client-secret: secret
Where https://idp.example.com/introspect is the introspection endpoint hosted by yourauthorization server and client-id and client-secret are the credentials needed to hit thatendpoint.
Resource Server will use these properties to further self-configure and subsequently validateincoming JWTs.
When using introspection, the authorization server’s word is the law. If theauthorization server responses that the token is valid, then it is.
256
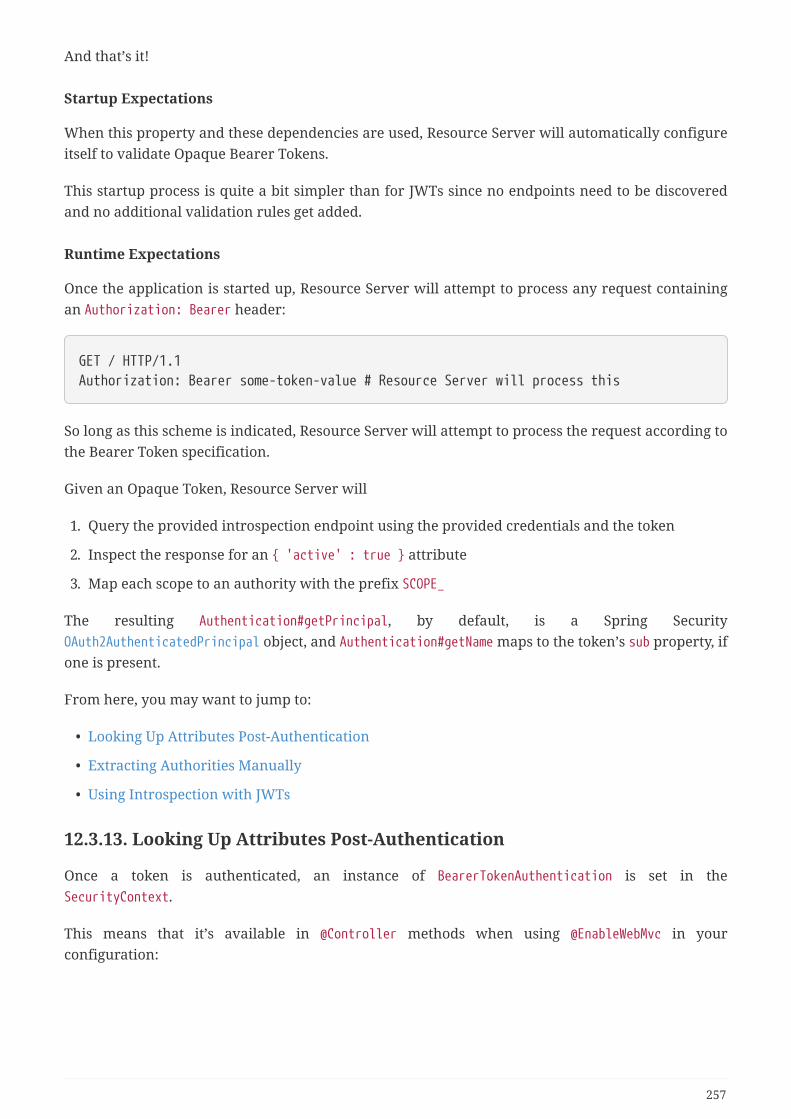
And that’s it!
Startup Expectations
When this property and these dependencies are used, Resource Server will automatically configureitself to validate Opaque Bearer Tokens.
This startup process is quite a bit simpler than for JWTs since no endpoints need to be discoveredand no additional validation rules get added.
Runtime Expectations
Once the application is started up, Resource Server will attempt to process any request containingan Authorization: Bearer header:
GET / HTTP/1.1Authorization: Bearer some-token-value # Resource Server will process this
So long as this scheme is indicated, Resource Server will attempt to process the request according tothe Bearer Token specification.
Given an Opaque Token, Resource Server will
1. Query the provided introspection endpoint using the provided credentials and the token
2. Inspect the response for an { 'active' : true } attribute
3. Map each scope to an authority with the prefix SCOPE_
The resulting Authentication#getPrincipal, by default, is a Spring SecurityOAuth2AuthenticatedPrincipal object, and Authentication#getName maps to the token’s sub property, ifone is present.
From here, you may want to jump to:
• Looking Up Attributes Post-Authentication
• Extracting Authorities Manually
• Using Introspection with JWTs
12.3.13. Looking Up Attributes Post-Authentication
Once a token is authenticated, an instance of BearerTokenAuthentication is set in theSecurityContext.
This means that it’s available in @Controller methods when using @EnableWebMvc in yourconfiguration:
257
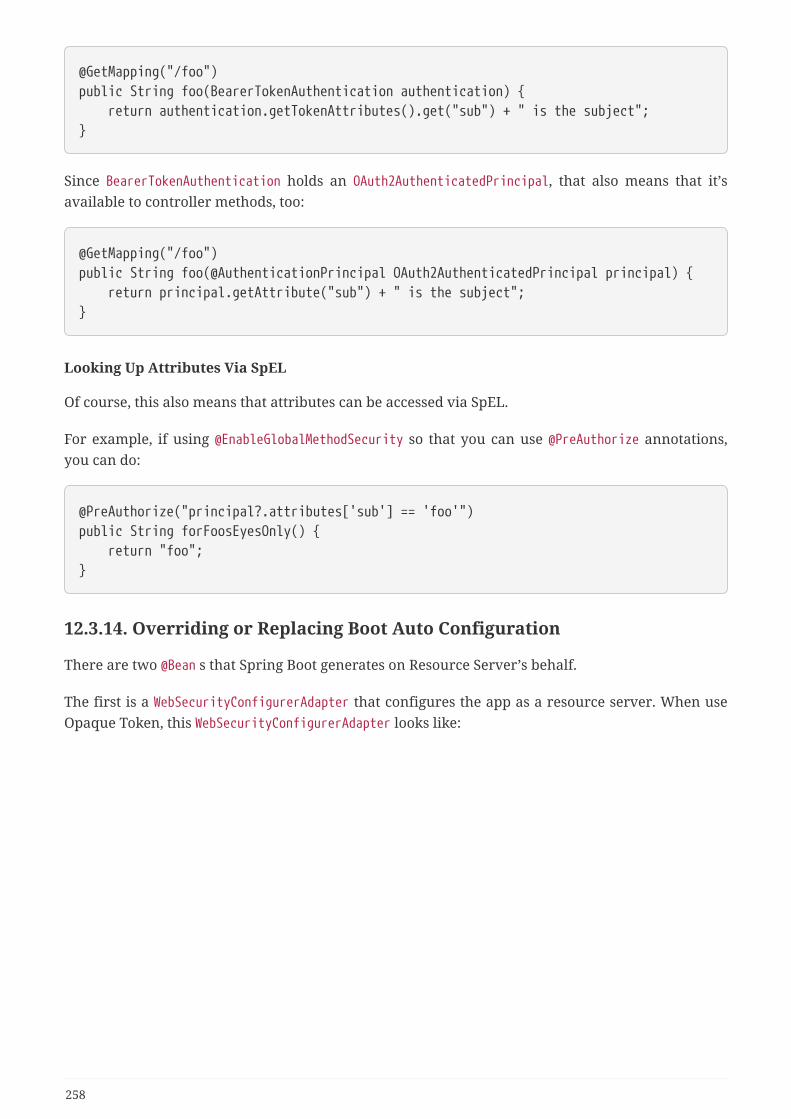
@GetMapping("/foo")public String foo(BearerTokenAuthentication authentication) { return authentication.getTokenAttributes().get("sub") + " is the subject";}
Since BearerTokenAuthentication holds an OAuth2AuthenticatedPrincipal, that also means that it’savailable to controller methods, too:
@GetMapping("/foo")public String foo(@AuthenticationPrincipal OAuth2AuthenticatedPrincipal principal) { return principal.getAttribute("sub") + " is the subject";}
Looking Up Attributes Via SpEL
Of course, this also means that attributes can be accessed via SpEL.
For example, if using @EnableGlobalMethodSecurity so that you can use @PreAuthorize annotations,you can do:
@PreAuthorize("principal?.attributes['sub'] == 'foo'")public String forFoosEyesOnly() { return "foo";}
12.3.14. Overriding or Replacing Boot Auto Configuration
There are two @Bean s that Spring Boot generates on Resource Server’s behalf.
The first is a WebSecurityConfigurerAdapter that configures the app as a resource server. When useOpaque Token, this WebSecurityConfigurerAdapter looks like:
258
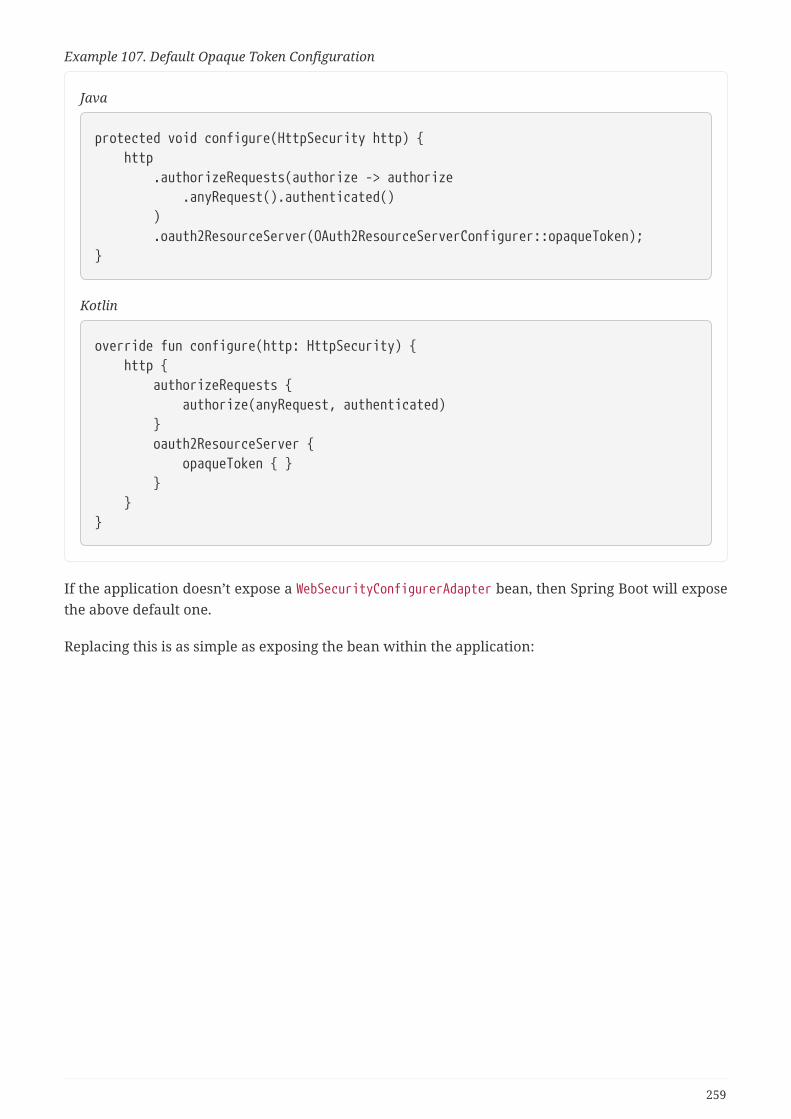
Example 107. Default Opaque Token Configuration
Java
protected void configure(HttpSecurity http) { http .authorizeRequests(authorize -> authorize .anyRequest().authenticated() ) .oauth2ResourceServer(OAuth2ResourceServerConfigurer::opaqueToken);}
Kotlin
override fun configure(http: HttpSecurity) { http { authorizeRequests { authorize(anyRequest, authenticated) } oauth2ResourceServer { opaqueToken { } } }}
If the application doesn’t expose a WebSecurityConfigurerAdapter bean, then Spring Boot will exposethe above default one.
Replacing this is as simple as exposing the bean within the application:
259
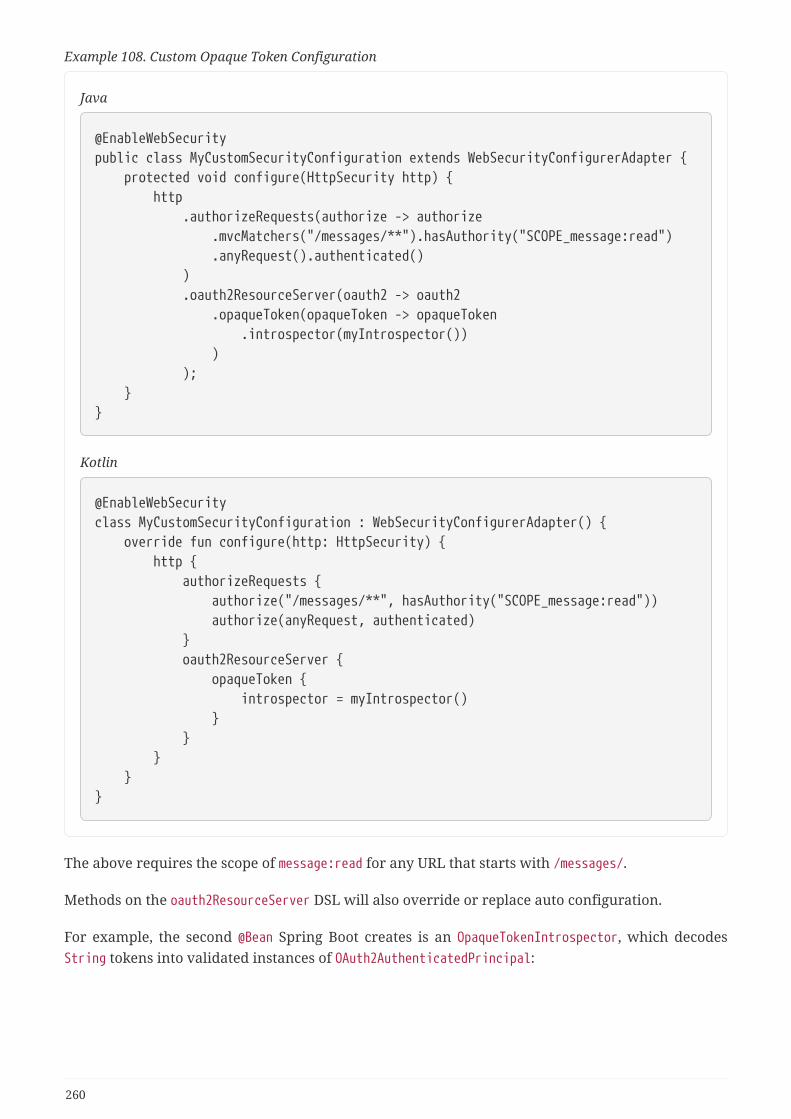
Example 108. Custom Opaque Token Configuration
Java
@EnableWebSecuritypublic class MyCustomSecurityConfiguration extends WebSecurityConfigurerAdapter { protected void configure(HttpSecurity http) { http .authorizeRequests(authorize -> authorize .mvcMatchers("/messages/**").hasAuthority("SCOPE_message:read") .anyRequest().authenticated() ) .oauth2ResourceServer(oauth2 -> oauth2 .opaqueToken(opaqueToken -> opaqueToken .introspector(myIntrospector()) ) ); }}
Kotlin
@EnableWebSecurityclass MyCustomSecurityConfiguration : WebSecurityConfigurerAdapter() { override fun configure(http: HttpSecurity) { http { authorizeRequests { authorize("/messages/**", hasAuthority("SCOPE_message:read")) authorize(anyRequest, authenticated) } oauth2ResourceServer { opaqueToken { introspector = myIntrospector() } } } }}
The above requires the scope of message:read for any URL that starts with /messages/.
Methods on the oauth2ResourceServer DSL will also override or replace auto configuration.
For example, the second @Bean Spring Boot creates is an OpaqueTokenIntrospector, which decodesString tokens into validated instances of OAuth2AuthenticatedPrincipal:
260
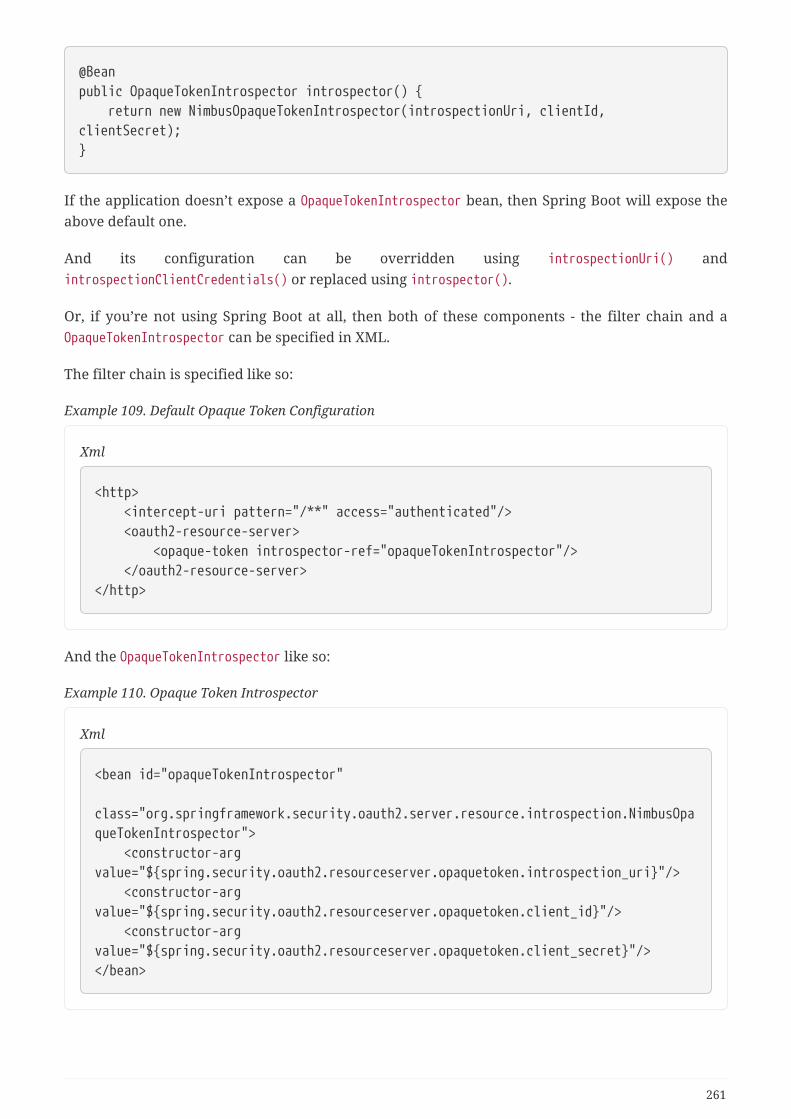
@Beanpublic OpaqueTokenIntrospector introspector() { return new NimbusOpaqueTokenIntrospector(introspectionUri, clientId,clientSecret);}
If the application doesn’t expose a OpaqueTokenIntrospector bean, then Spring Boot will expose theabove default one.
And its configuration can be overridden using introspectionUri() andintrospectionClientCredentials() or replaced using introspector().
Or, if you’re not using Spring Boot at all, then both of these components - the filter chain and aOpaqueTokenIntrospector can be specified in XML.
The filter chain is specified like so:
Example 109. Default Opaque Token Configuration
Xml
<http> <intercept-uri pattern="/**" access="authenticated"/> <oauth2-resource-server> <opaque-token introspector-ref="opaqueTokenIntrospector"/> </oauth2-resource-server></http>
And the OpaqueTokenIntrospector like so:
Example 110. Opaque Token Introspector
Xml
<bean id="opaqueTokenIntrospector" class="org.springframework.security.oauth2.server.resource.introspection.NimbusOpaqueTokenIntrospector"> <constructor-argvalue="${spring.security.oauth2.resourceserver.opaquetoken.introspection_uri}"/> <constructor-argvalue="${spring.security.oauth2.resourceserver.opaquetoken.client_id}"/> <constructor-argvalue="${spring.security.oauth2.resourceserver.opaquetoken.client_secret}"/></bean>
261
Using introspectionUri()
An authorization server’s Introspection Uri can be configured as a configuration property or it canbe supplied in the DSL:
262
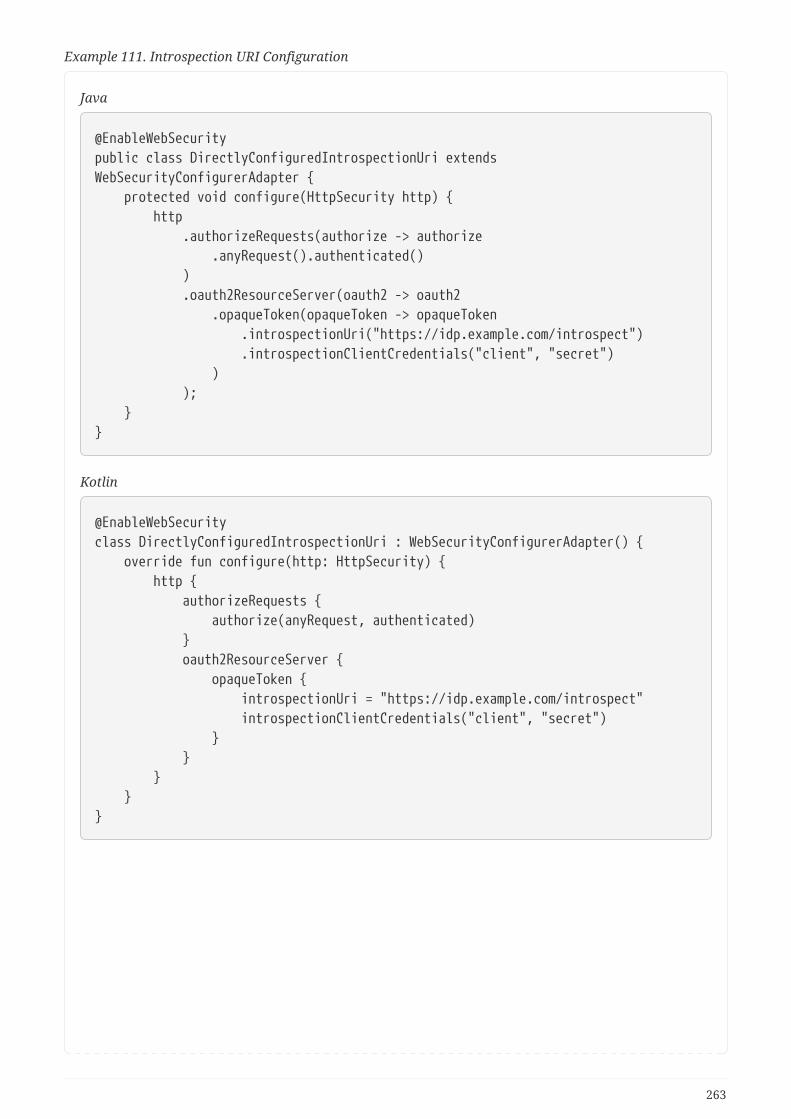
Example 111. Introspection URI Configuration
Java
@EnableWebSecuritypublic class DirectlyConfiguredIntrospectionUri extendsWebSecurityConfigurerAdapter { protected void configure(HttpSecurity http) { http .authorizeRequests(authorize -> authorize .anyRequest().authenticated() ) .oauth2ResourceServer(oauth2 -> oauth2 .opaqueToken(opaqueToken -> opaqueToken .introspectionUri("https://idp.example.com/introspect") .introspectionClientCredentials("client", "secret") ) ); }}
Kotlin
@EnableWebSecurityclass DirectlyConfiguredIntrospectionUri : WebSecurityConfigurerAdapter() { override fun configure(http: HttpSecurity) { http { authorizeRequests { authorize(anyRequest, authenticated) } oauth2ResourceServer { opaqueToken { introspectionUri = "https://idp.example.com/introspect" introspectionClientCredentials("client", "secret") } } } }}
263
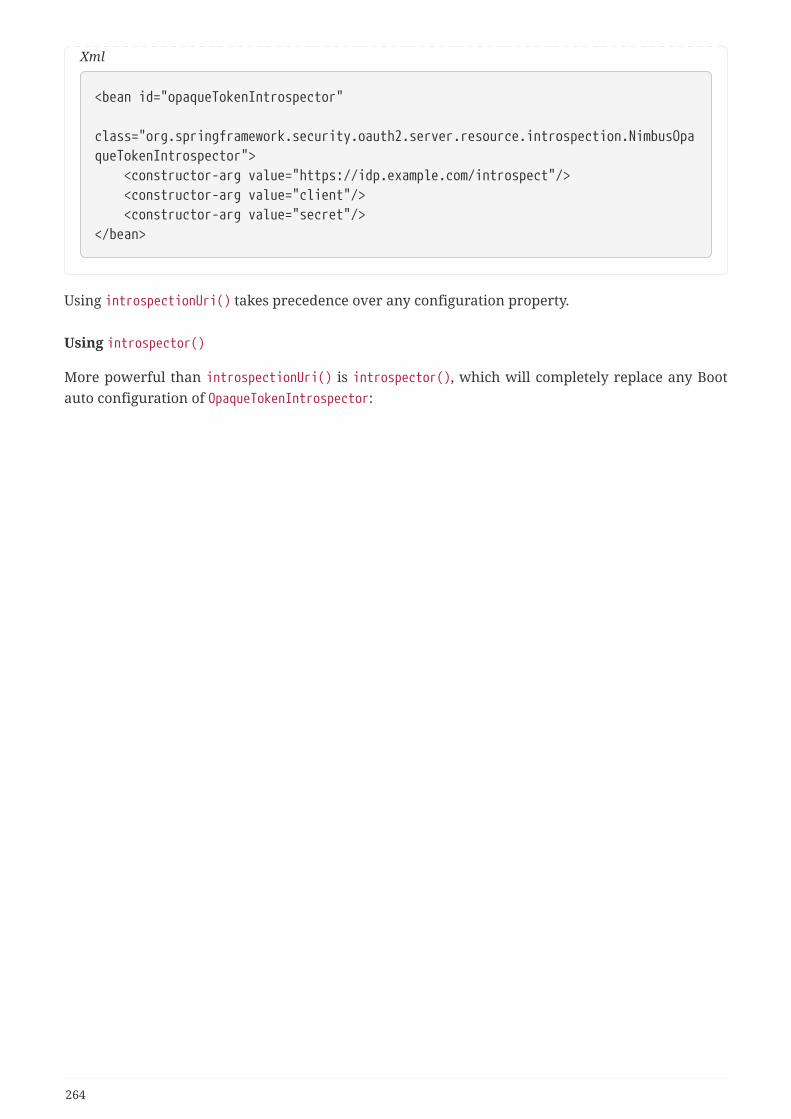
Xml
<bean id="opaqueTokenIntrospector" class="org.springframework.security.oauth2.server.resource.introspection.NimbusOpaqueTokenIntrospector"> <constructor-arg value="https://idp.example.com/introspect"/> <constructor-arg value="client"/> <constructor-arg value="secret"/></bean>
Using introspectionUri() takes precedence over any configuration property.
Using introspector()
More powerful than introspectionUri() is introspector(), which will completely replace any Bootauto configuration of OpaqueTokenIntrospector:
264
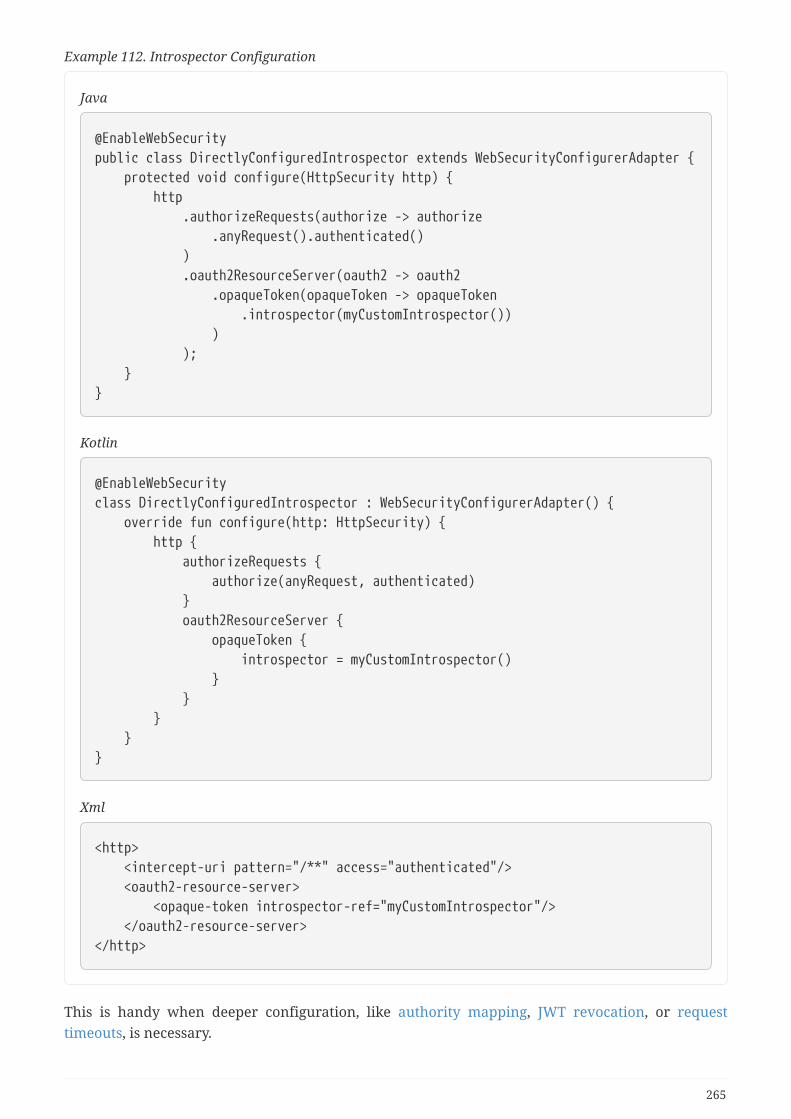
Example 112. Introspector Configuration
Java
@EnableWebSecuritypublic class DirectlyConfiguredIntrospector extends WebSecurityConfigurerAdapter { protected void configure(HttpSecurity http) { http .authorizeRequests(authorize -> authorize .anyRequest().authenticated() ) .oauth2ResourceServer(oauth2 -> oauth2 .opaqueToken(opaqueToken -> opaqueToken .introspector(myCustomIntrospector()) ) ); }}
Kotlin
@EnableWebSecurityclass DirectlyConfiguredIntrospector : WebSecurityConfigurerAdapter() { override fun configure(http: HttpSecurity) { http { authorizeRequests { authorize(anyRequest, authenticated) } oauth2ResourceServer { opaqueToken { introspector = myCustomIntrospector() } } } }}
Xml
<http> <intercept-uri pattern="/**" access="authenticated"/> <oauth2-resource-server> <opaque-token introspector-ref="myCustomIntrospector"/> </oauth2-resource-server></http>
This is handy when deeper configuration, like authority mapping, JWT revocation, or requesttimeouts, is necessary.
265
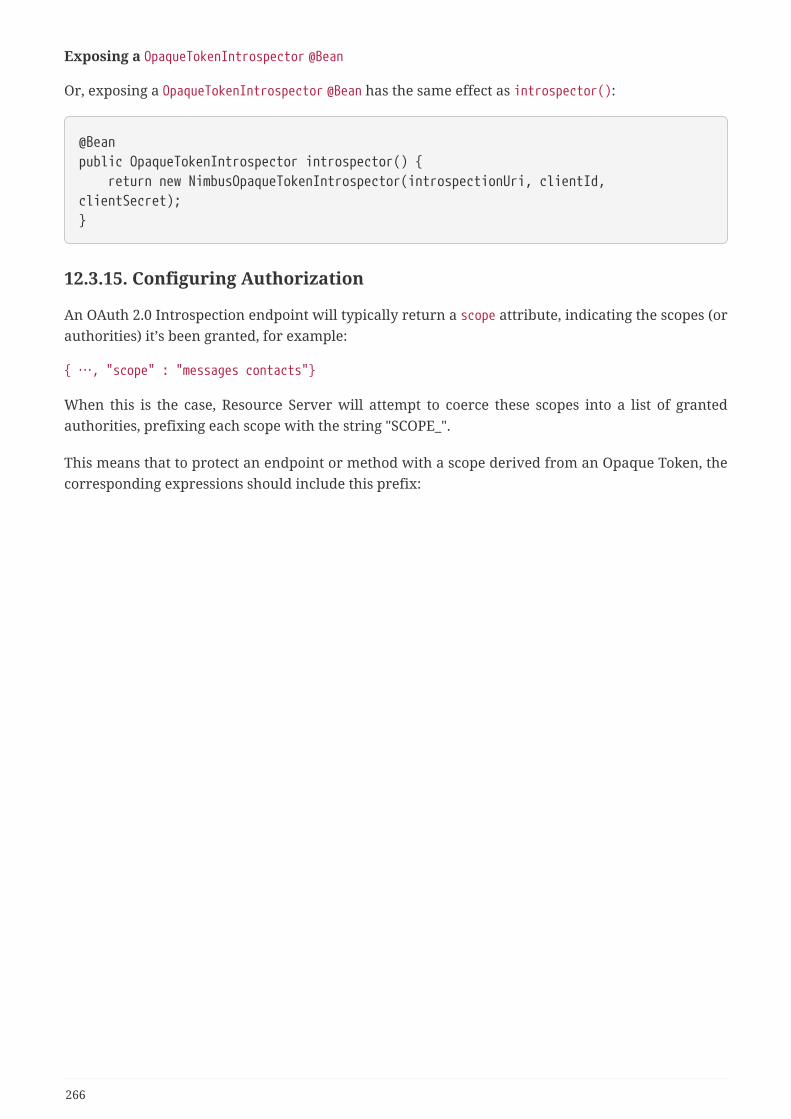
Exposing a OpaqueTokenIntrospector @Bean
Or, exposing a OpaqueTokenIntrospector @Bean has the same effect as introspector():
@Beanpublic OpaqueTokenIntrospector introspector() { return new NimbusOpaqueTokenIntrospector(introspectionUri, clientId,clientSecret);}
12.3.15. Configuring Authorization
An OAuth 2.0 Introspection endpoint will typically return a scope attribute, indicating the scopes (orauthorities) it’s been granted, for example:
{ …, "scope" : "messages contacts"}
When this is the case, Resource Server will attempt to coerce these scopes into a list of grantedauthorities, prefixing each scope with the string "SCOPE_".
This means that to protect an endpoint or method with a scope derived from an Opaque Token, thecorresponding expressions should include this prefix:
266
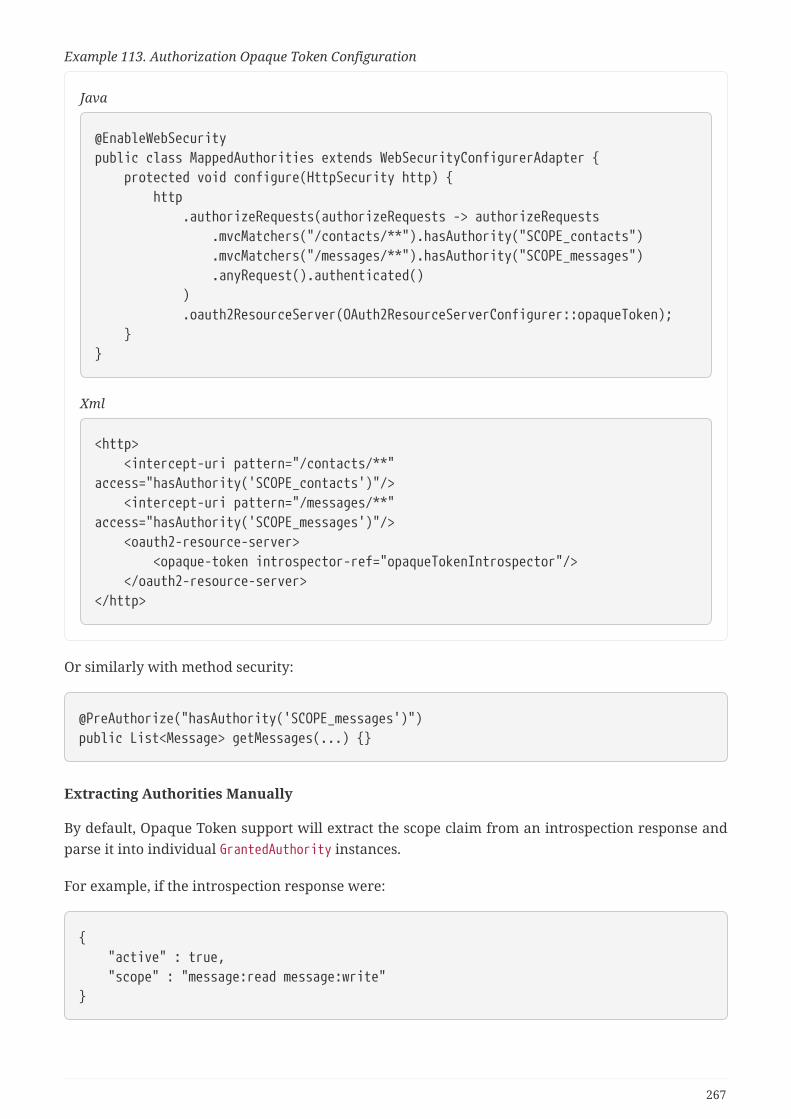
Example 113. Authorization Opaque Token Configuration
Java
@EnableWebSecuritypublic class MappedAuthorities extends WebSecurityConfigurerAdapter { protected void configure(HttpSecurity http) { http .authorizeRequests(authorizeRequests -> authorizeRequests .mvcMatchers("/contacts/**").hasAuthority("SCOPE_contacts") .mvcMatchers("/messages/**").hasAuthority("SCOPE_messages") .anyRequest().authenticated() ) .oauth2ResourceServer(OAuth2ResourceServerConfigurer::opaqueToken); }}
Xml
<http> <intercept-uri pattern="/contacts/**"access="hasAuthority('SCOPE_contacts')"/> <intercept-uri pattern="/messages/**"access="hasAuthority('SCOPE_messages')"/> <oauth2-resource-server> <opaque-token introspector-ref="opaqueTokenIntrospector"/> </oauth2-resource-server></http>
Or similarly with method security:
@PreAuthorize("hasAuthority('SCOPE_messages')")public List<Message> getMessages(...) {}
Extracting Authorities Manually
By default, Opaque Token support will extract the scope claim from an introspection response andparse it into individual GrantedAuthority instances.
For example, if the introspection response were:
{ "active" : true, "scope" : "message:read message:write"}
267
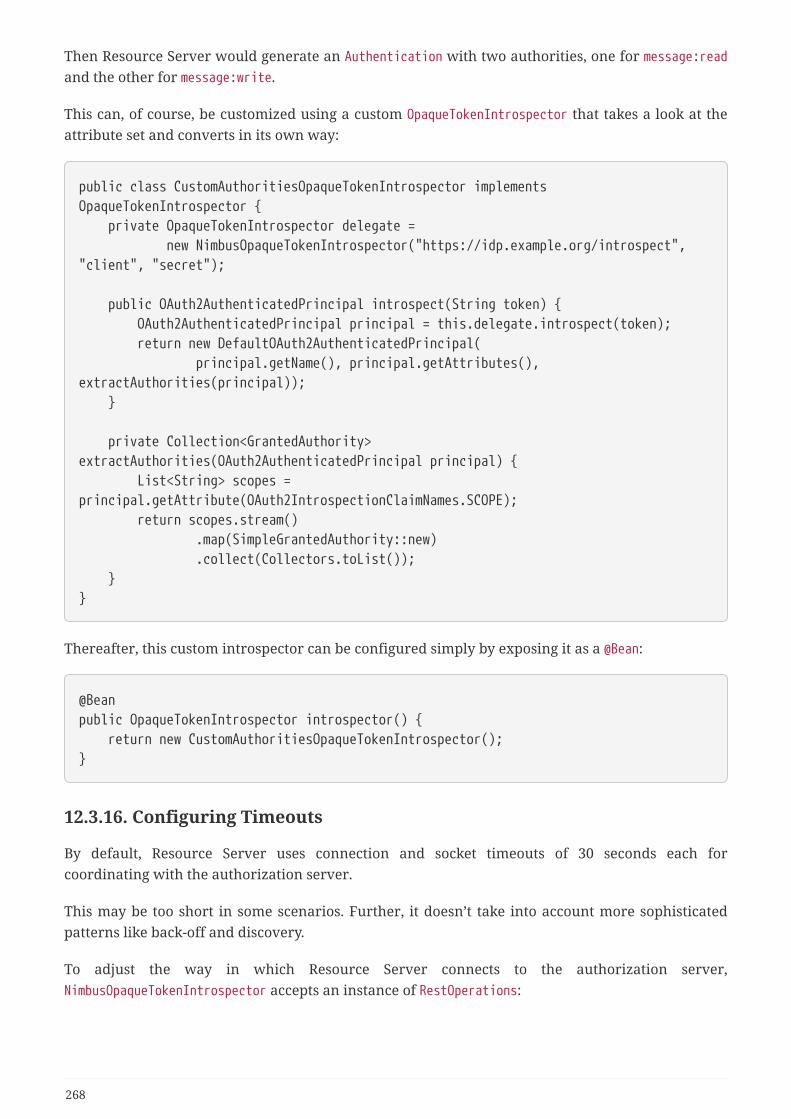
Then Resource Server would generate an Authentication with two authorities, one for message:readand the other for message:write.
This can, of course, be customized using a custom OpaqueTokenIntrospector that takes a look at theattribute set and converts in its own way:
public class CustomAuthoritiesOpaqueTokenIntrospector implementsOpaqueTokenIntrospector { private OpaqueTokenIntrospector delegate = new NimbusOpaqueTokenIntrospector("https://idp.example.org/introspect","client", "secret");
public OAuth2AuthenticatedPrincipal introspect(String token) { OAuth2AuthenticatedPrincipal principal = this.delegate.introspect(token); return new DefaultOAuth2AuthenticatedPrincipal( principal.getName(), principal.getAttributes(),extractAuthorities(principal)); }
private Collection<GrantedAuthority>extractAuthorities(OAuth2AuthenticatedPrincipal principal) { List<String> scopes =principal.getAttribute(OAuth2IntrospectionClaimNames.SCOPE); return scopes.stream() .map(SimpleGrantedAuthority::new) .collect(Collectors.toList()); }}
Thereafter, this custom introspector can be configured simply by exposing it as a @Bean:
@Beanpublic OpaqueTokenIntrospector introspector() { return new CustomAuthoritiesOpaqueTokenIntrospector();}
12.3.16. Configuring Timeouts
By default, Resource Server uses connection and socket timeouts of 30 seconds each forcoordinating with the authorization server.
This may be too short in some scenarios. Further, it doesn’t take into account more sophisticatedpatterns like back-off and discovery.
To adjust the way in which Resource Server connects to the authorization server,NimbusOpaqueTokenIntrospector accepts an instance of RestOperations:
268
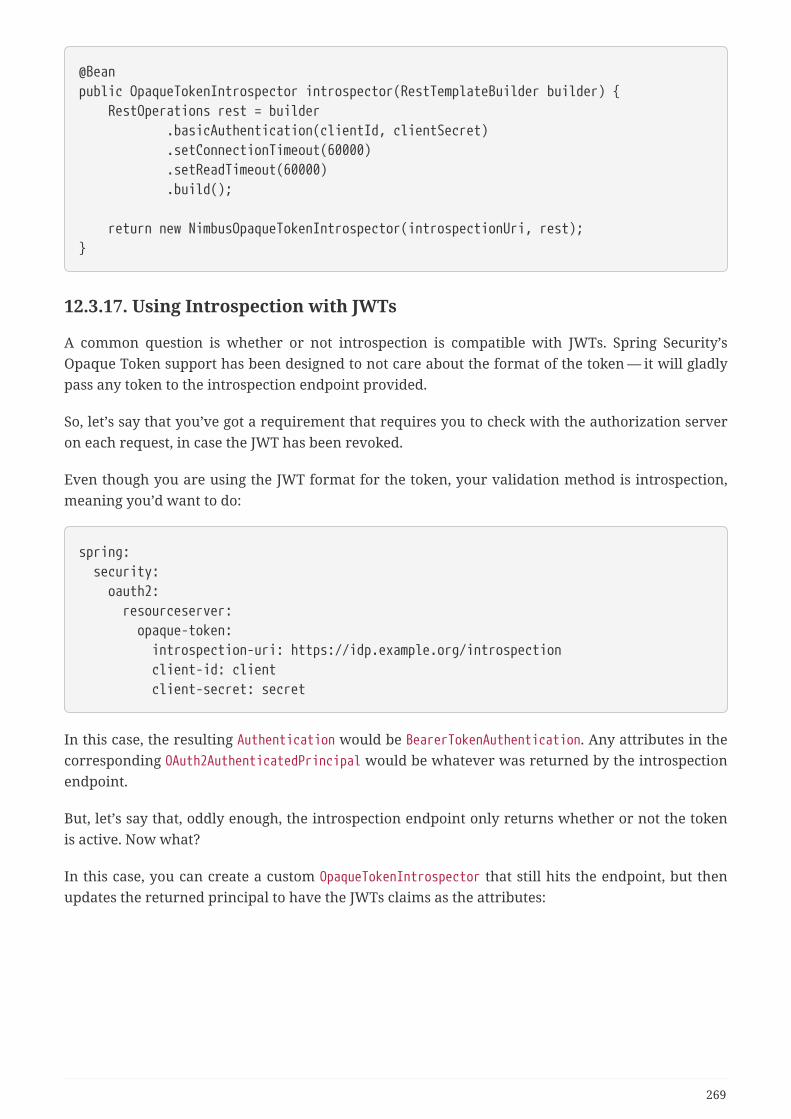
@Beanpublic OpaqueTokenIntrospector introspector(RestTemplateBuilder builder) { RestOperations rest = builder .basicAuthentication(clientId, clientSecret) .setConnectionTimeout(60000) .setReadTimeout(60000) .build();
return new NimbusOpaqueTokenIntrospector(introspectionUri, rest);}
12.3.17. Using Introspection with JWTs
A common question is whether or not introspection is compatible with JWTs. Spring Security’sOpaque Token support has been designed to not care about the format of the token — it will gladlypass any token to the introspection endpoint provided.
So, let’s say that you’ve got a requirement that requires you to check with the authorization serveron each request, in case the JWT has been revoked.
Even though you are using the JWT format for the token, your validation method is introspection,meaning you’d want to do:
spring: security: oauth2: resourceserver: opaque-token: introspection-uri: https://idp.example.org/introspection client-id: client client-secret: secret
In this case, the resulting Authentication would be BearerTokenAuthentication. Any attributes in thecorresponding OAuth2AuthenticatedPrincipal would be whatever was returned by the introspectionendpoint.
But, let’s say that, oddly enough, the introspection endpoint only returns whether or not the tokenis active. Now what?
In this case, you can create a custom OpaqueTokenIntrospector that still hits the endpoint, but thenupdates the returned principal to have the JWTs claims as the attributes:
269
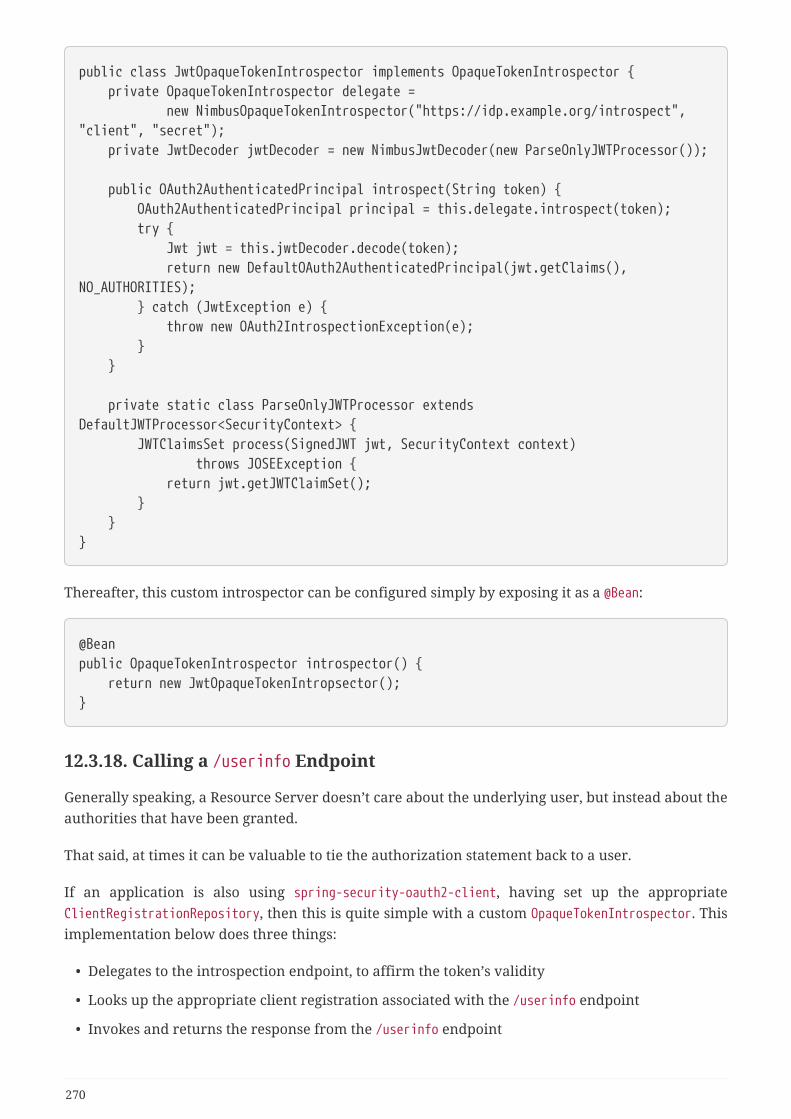
public class JwtOpaqueTokenIntrospector implements OpaqueTokenIntrospector { private OpaqueTokenIntrospector delegate = new NimbusOpaqueTokenIntrospector("https://idp.example.org/introspect","client", "secret"); private JwtDecoder jwtDecoder = new NimbusJwtDecoder(new ParseOnlyJWTProcessor());
public OAuth2AuthenticatedPrincipal introspect(String token) { OAuth2AuthenticatedPrincipal principal = this.delegate.introspect(token); try { Jwt jwt = this.jwtDecoder.decode(token); return new DefaultOAuth2AuthenticatedPrincipal(jwt.getClaims(),NO_AUTHORITIES); } catch (JwtException e) { throw new OAuth2IntrospectionException(e); } }
private static class ParseOnlyJWTProcessor extendsDefaultJWTProcessor<SecurityContext> { JWTClaimsSet process(SignedJWT jwt, SecurityContext context) throws JOSEException { return jwt.getJWTClaimSet(); } }}
Thereafter, this custom introspector can be configured simply by exposing it as a @Bean:
@Beanpublic OpaqueTokenIntrospector introspector() { return new JwtOpaqueTokenIntropsector();}
12.3.18. Calling a /userinfo Endpoint
Generally speaking, a Resource Server doesn’t care about the underlying user, but instead about theauthorities that have been granted.
That said, at times it can be valuable to tie the authorization statement back to a user.
If an application is also using spring-security-oauth2-client, having set up the appropriateClientRegistrationRepository, then this is quite simple with a custom OpaqueTokenIntrospector. Thisimplementation below does three things:
• Delegates to the introspection endpoint, to affirm the token’s validity
• Looks up the appropriate client registration associated with the /userinfo endpoint
• Invokes and returns the response from the /userinfo endpoint
270
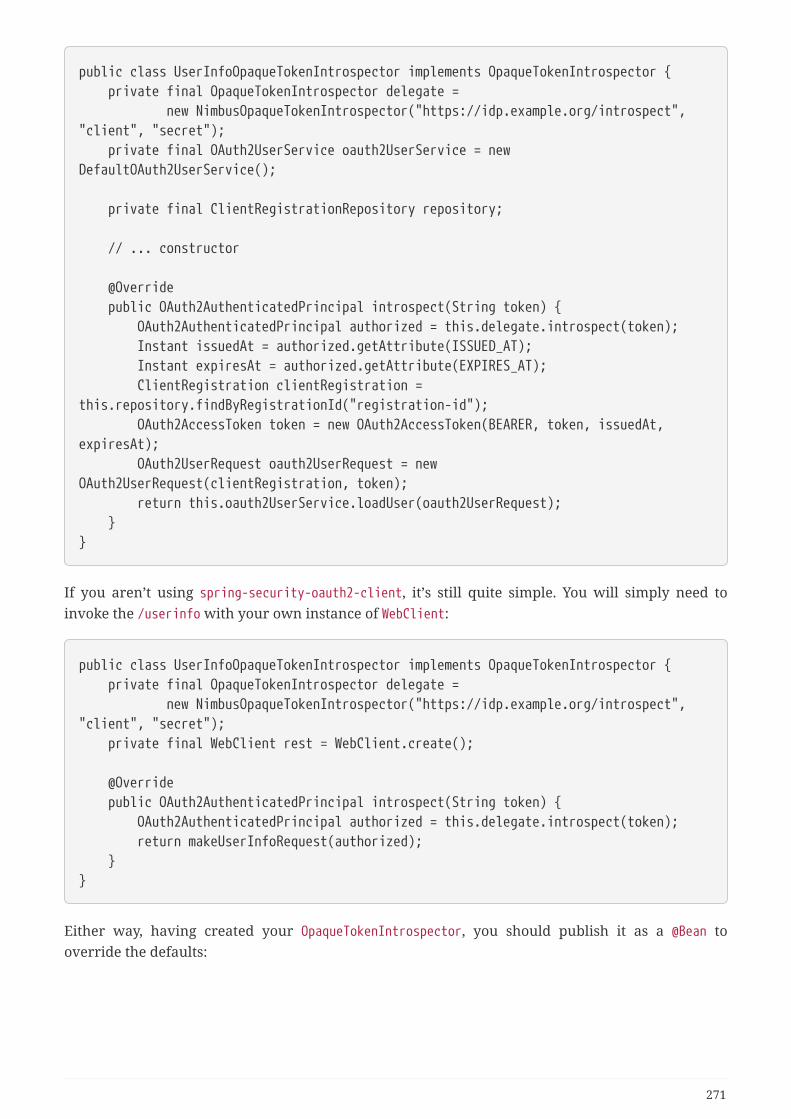
public class UserInfoOpaqueTokenIntrospector implements OpaqueTokenIntrospector { private final OpaqueTokenIntrospector delegate = new NimbusOpaqueTokenIntrospector("https://idp.example.org/introspect","client", "secret"); private final OAuth2UserService oauth2UserService = newDefaultOAuth2UserService();
private final ClientRegistrationRepository repository;
// ... constructor
@Override public OAuth2AuthenticatedPrincipal introspect(String token) { OAuth2AuthenticatedPrincipal authorized = this.delegate.introspect(token); Instant issuedAt = authorized.getAttribute(ISSUED_AT); Instant expiresAt = authorized.getAttribute(EXPIRES_AT); ClientRegistration clientRegistration =this.repository.findByRegistrationId("registration-id"); OAuth2AccessToken token = new OAuth2AccessToken(BEARER, token, issuedAt,expiresAt); OAuth2UserRequest oauth2UserRequest = newOAuth2UserRequest(clientRegistration, token); return this.oauth2UserService.loadUser(oauth2UserRequest); }}
If you aren’t using spring-security-oauth2-client, it’s still quite simple. You will simply need toinvoke the /userinfo with your own instance of WebClient:
public class UserInfoOpaqueTokenIntrospector implements OpaqueTokenIntrospector { private final OpaqueTokenIntrospector delegate = new NimbusOpaqueTokenIntrospector("https://idp.example.org/introspect","client", "secret"); private final WebClient rest = WebClient.create();
@Override public OAuth2AuthenticatedPrincipal introspect(String token) { OAuth2AuthenticatedPrincipal authorized = this.delegate.introspect(token); return makeUserInfoRequest(authorized); }}
Either way, having created your OpaqueTokenIntrospector, you should publish it as a @Bean tooverride the defaults:
271
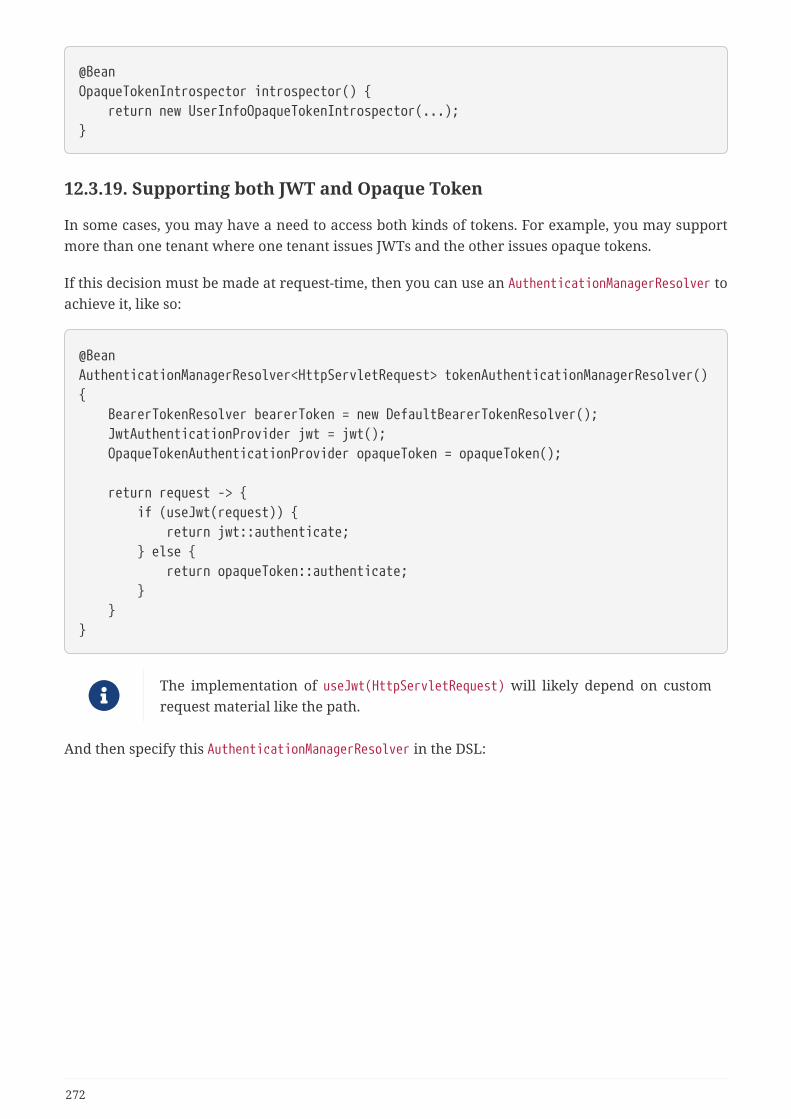
@BeanOpaqueTokenIntrospector introspector() { return new UserInfoOpaqueTokenIntrospector(...);}
12.3.19. Supporting both JWT and Opaque Token
In some cases, you may have a need to access both kinds of tokens. For example, you may supportmore than one tenant where one tenant issues JWTs and the other issues opaque tokens.
If this decision must be made at request-time, then you can use an AuthenticationManagerResolver toachieve it, like so:
@BeanAuthenticationManagerResolver<HttpServletRequest> tokenAuthenticationManagerResolver(){ BearerTokenResolver bearerToken = new DefaultBearerTokenResolver(); JwtAuthenticationProvider jwt = jwt(); OpaqueTokenAuthenticationProvider opaqueToken = opaqueToken();
return request -> { if (useJwt(request)) { return jwt::authenticate; } else { return opaqueToken::authenticate; } }}
The implementation of useJwt(HttpServletRequest) will likely depend on customrequest material like the path.
And then specify this AuthenticationManagerResolver in the DSL:
272
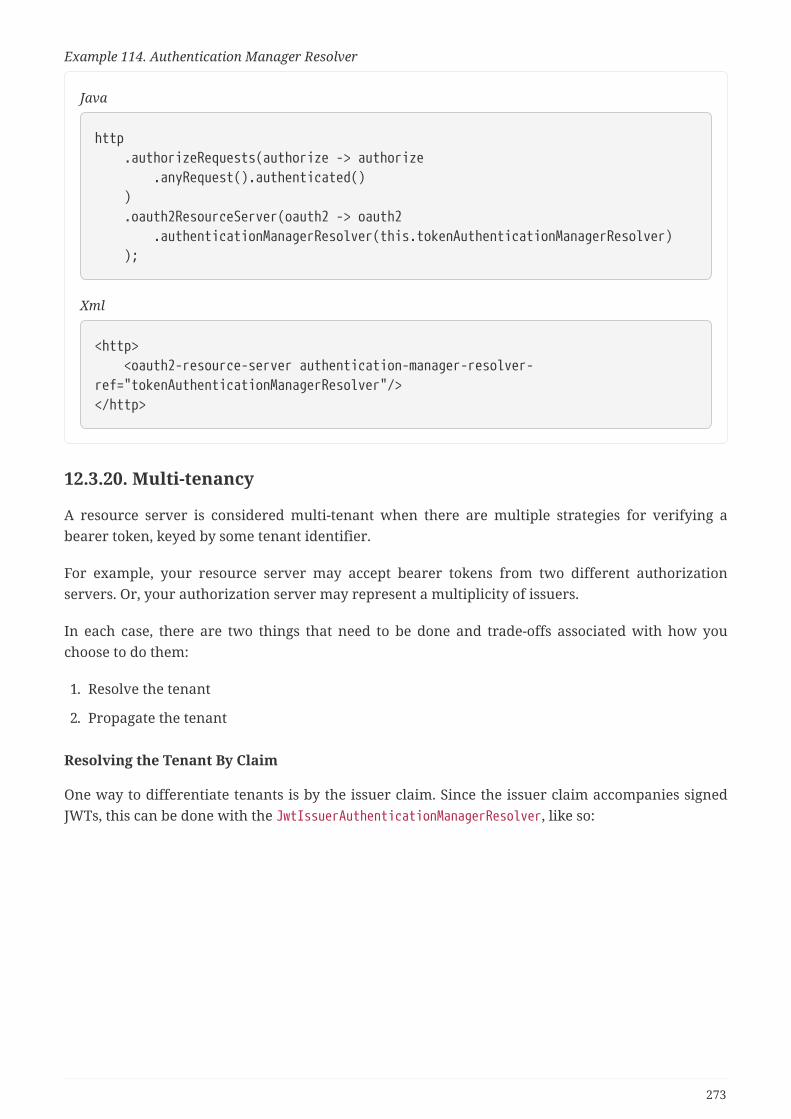
Example 114. Authentication Manager Resolver
Java
http .authorizeRequests(authorize -> authorize .anyRequest().authenticated() ) .oauth2ResourceServer(oauth2 -> oauth2 .authenticationManagerResolver(this.tokenAuthenticationManagerResolver) );
Xml
<http> <oauth2-resource-server authentication-manager-resolver-ref="tokenAuthenticationManagerResolver"/></http>
12.3.20. Multi-tenancy
A resource server is considered multi-tenant when there are multiple strategies for verifying abearer token, keyed by some tenant identifier.
For example, your resource server may accept bearer tokens from two different authorizationservers. Or, your authorization server may represent a multiplicity of issuers.
In each case, there are two things that need to be done and trade-offs associated with how youchoose to do them:
1. Resolve the tenant
2. Propagate the tenant
Resolving the Tenant By Claim
One way to differentiate tenants is by the issuer claim. Since the issuer claim accompanies signedJWTs, this can be done with the JwtIssuerAuthenticationManagerResolver, like so:
273
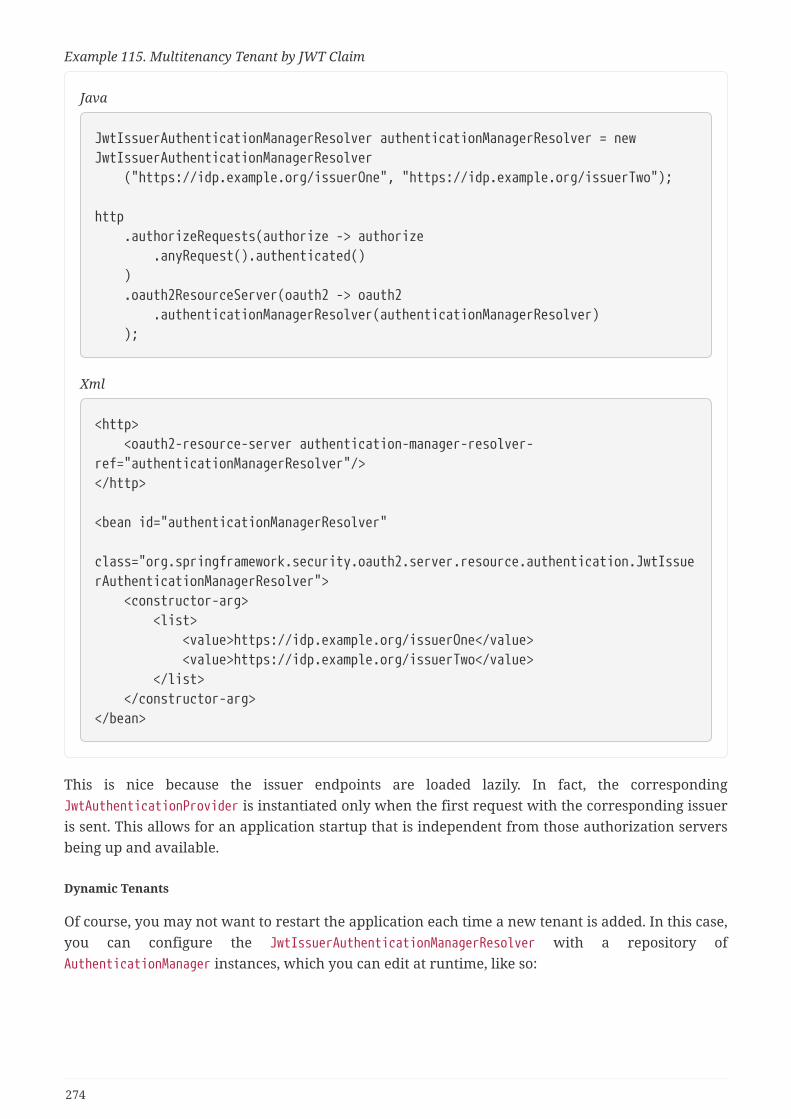
Example 115. Multitenancy Tenant by JWT Claim
Java
JwtIssuerAuthenticationManagerResolver authenticationManagerResolver = newJwtIssuerAuthenticationManagerResolver ("https://idp.example.org/issuerOne", "https://idp.example.org/issuerTwo");
http .authorizeRequests(authorize -> authorize .anyRequest().authenticated() ) .oauth2ResourceServer(oauth2 -> oauth2 .authenticationManagerResolver(authenticationManagerResolver) );
Xml
<http> <oauth2-resource-server authentication-manager-resolver-ref="authenticationManagerResolver"/></http>
<bean id="authenticationManagerResolver" class="org.springframework.security.oauth2.server.resource.authentication.JwtIssuerAuthenticationManagerResolver"> <constructor-arg> <list> <value>https://idp.example.org/issuerOne</value> <value>https://idp.example.org/issuerTwo</value> </list> </constructor-arg></bean>
This is nice because the issuer endpoints are loaded lazily. In fact, the correspondingJwtAuthenticationProvider is instantiated only when the first request with the corresponding issueris sent. This allows for an application startup that is independent from those authorization serversbeing up and available.
Dynamic Tenants
Of course, you may not want to restart the application each time a new tenant is added. In this case,you can configure the JwtIssuerAuthenticationManagerResolver with a repository ofAuthenticationManager instances, which you can edit at runtime, like so:
274
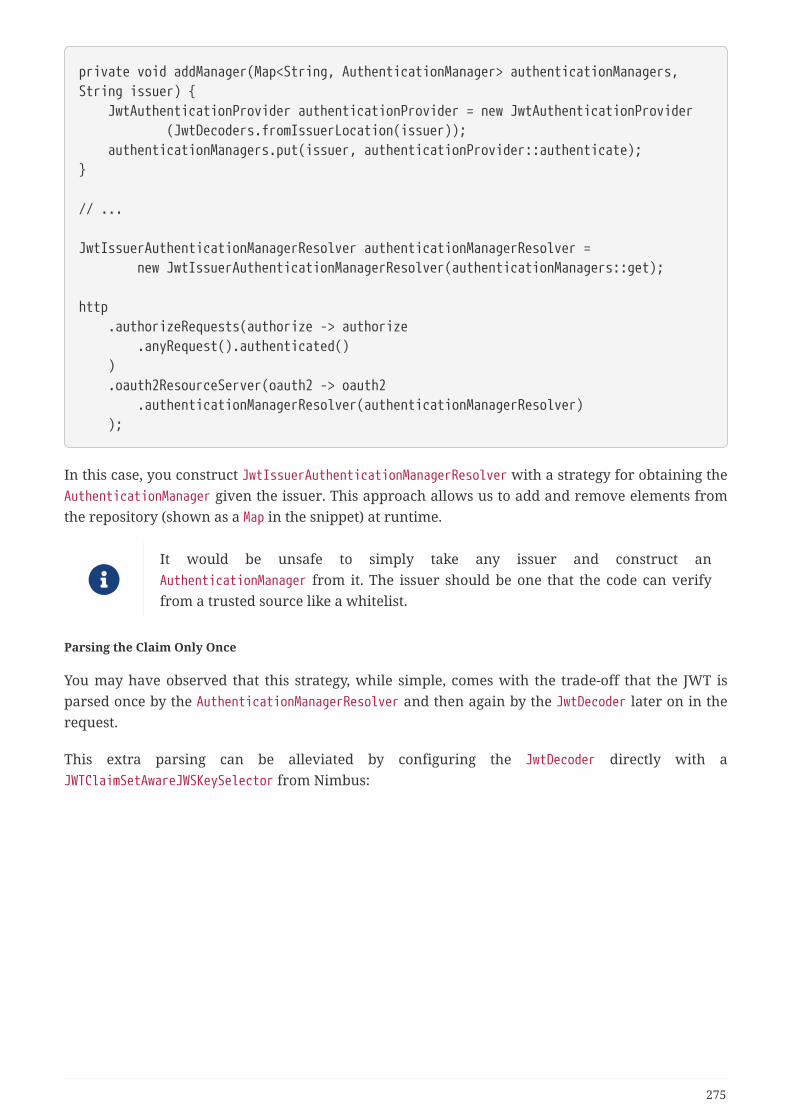
private void addManager(Map<String, AuthenticationManager> authenticationManagers,String issuer) { JwtAuthenticationProvider authenticationProvider = new JwtAuthenticationProvider (JwtDecoders.fromIssuerLocation(issuer)); authenticationManagers.put(issuer, authenticationProvider::authenticate);}
// ...
JwtIssuerAuthenticationManagerResolver authenticationManagerResolver = new JwtIssuerAuthenticationManagerResolver(authenticationManagers::get);
http .authorizeRequests(authorize -> authorize .anyRequest().authenticated() ) .oauth2ResourceServer(oauth2 -> oauth2 .authenticationManagerResolver(authenticationManagerResolver) );
In this case, you construct JwtIssuerAuthenticationManagerResolver with a strategy for obtaining theAuthenticationManager given the issuer. This approach allows us to add and remove elements fromthe repository (shown as a Map in the snippet) at runtime.
It would be unsafe to simply take any issuer and construct anAuthenticationManager from it. The issuer should be one that the code can verifyfrom a trusted source like a whitelist.
Parsing the Claim Only Once
You may have observed that this strategy, while simple, comes with the trade-off that the JWT isparsed once by the AuthenticationManagerResolver and then again by the JwtDecoder later on in therequest.
This extra parsing can be alleviated by configuring the JwtDecoder directly with aJWTClaimSetAwareJWSKeySelector from Nimbus:
275
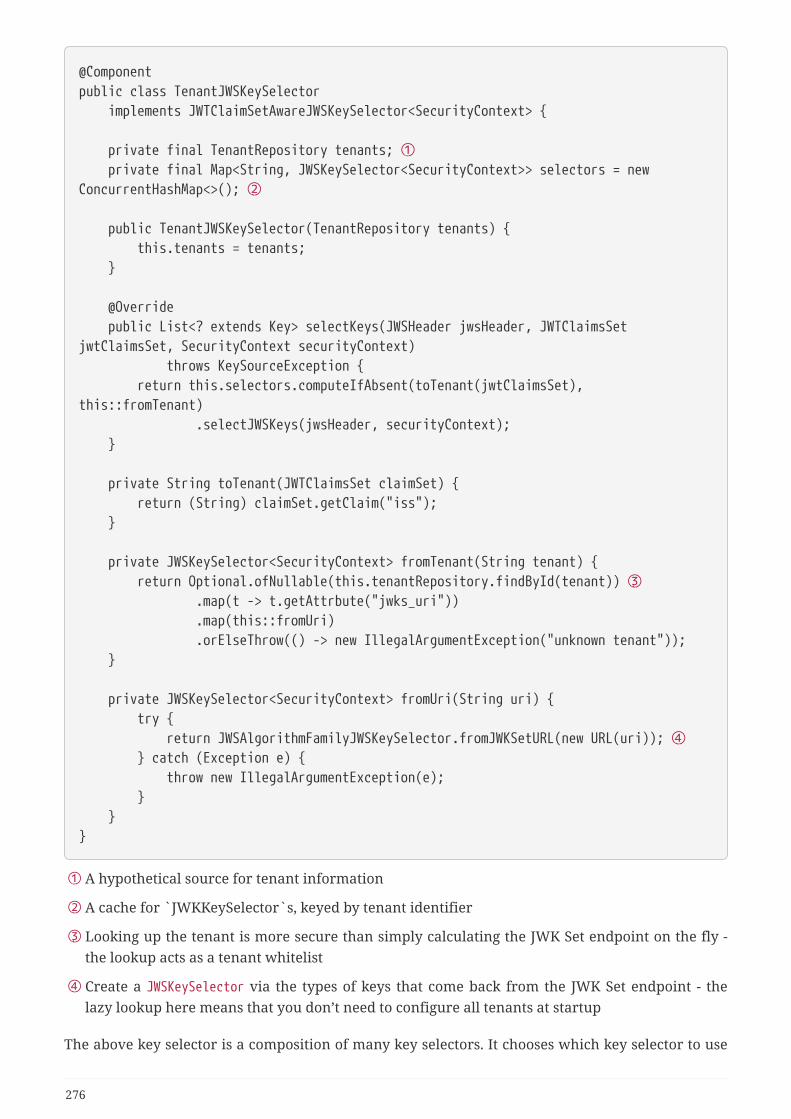
@Componentpublic class TenantJWSKeySelector implements JWTClaimSetAwareJWSKeySelector<SecurityContext> {
private final TenantRepository tenants; ① private final Map<String, JWSKeySelector<SecurityContext>> selectors = newConcurrentHashMap<>(); ②
public TenantJWSKeySelector(TenantRepository tenants) { this.tenants = tenants; }
@Override public List<? extends Key> selectKeys(JWSHeader jwsHeader, JWTClaimsSetjwtClaimsSet, SecurityContext securityContext) throws KeySourceException { return this.selectors.computeIfAbsent(toTenant(jwtClaimsSet),this::fromTenant) .selectJWSKeys(jwsHeader, securityContext); }
private String toTenant(JWTClaimsSet claimSet) { return (String) claimSet.getClaim("iss"); }
private JWSKeySelector<SecurityContext> fromTenant(String tenant) { return Optional.ofNullable(this.tenantRepository.findById(tenant)) ③ .map(t -> t.getAttrbute("jwks_uri")) .map(this::fromUri) .orElseThrow(() -> new IllegalArgumentException("unknown tenant")); }
private JWSKeySelector<SecurityContext> fromUri(String uri) { try { return JWSAlgorithmFamilyJWSKeySelector.fromJWKSetURL(new URL(uri)); ④ } catch (Exception e) { throw new IllegalArgumentException(e); } }}
① A hypothetical source for tenant information
② A cache for `JWKKeySelector`s, keyed by tenant identifier
③ Looking up the tenant is more secure than simply calculating the JWK Set endpoint on the fly -the lookup acts as a tenant whitelist
④ Create a JWSKeySelector via the types of keys that come back from the JWK Set endpoint - thelazy lookup here means that you don’t need to configure all tenants at startup
The above key selector is a composition of many key selectors. It chooses which key selector to use
276
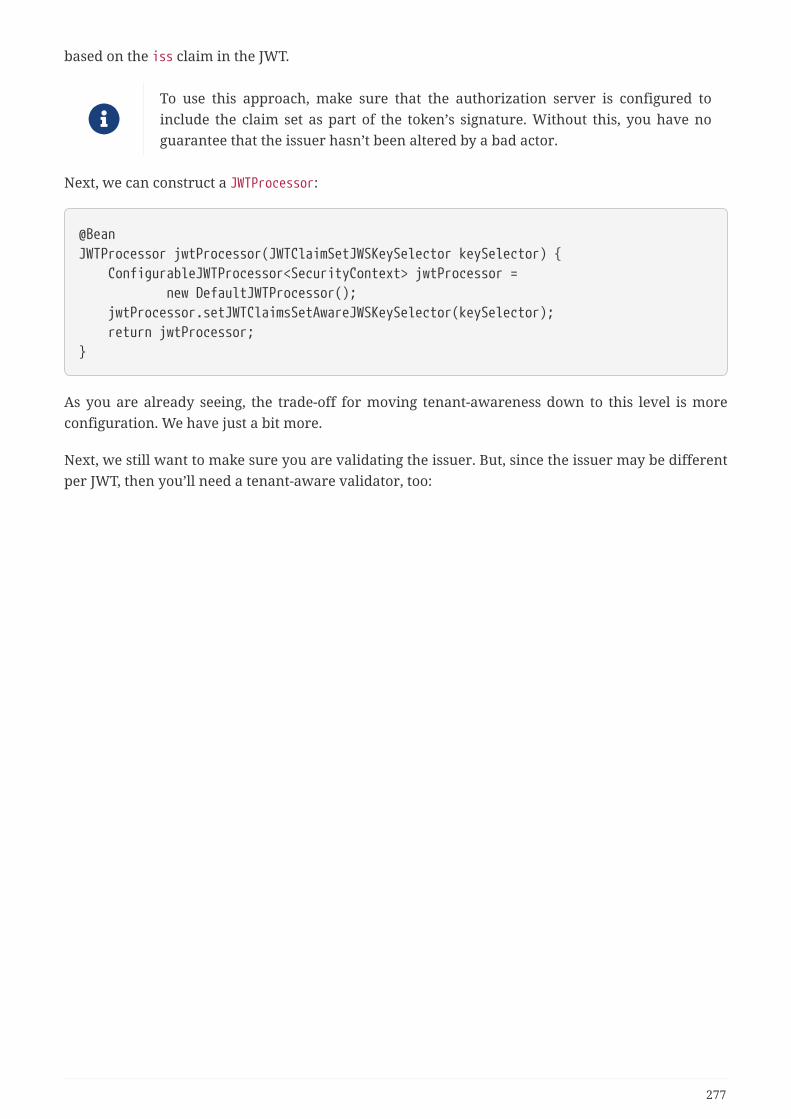
based on the iss claim in the JWT.
To use this approach, make sure that the authorization server is configured toinclude the claim set as part of the token’s signature. Without this, you have noguarantee that the issuer hasn’t been altered by a bad actor.
Next, we can construct a JWTProcessor:
@BeanJWTProcessor jwtProcessor(JWTClaimSetJWSKeySelector keySelector) { ConfigurableJWTProcessor<SecurityContext> jwtProcessor = new DefaultJWTProcessor(); jwtProcessor.setJWTClaimsSetAwareJWSKeySelector(keySelector); return jwtProcessor;}
As you are already seeing, the trade-off for moving tenant-awareness down to this level is moreconfiguration. We have just a bit more.
Next, we still want to make sure you are validating the issuer. But, since the issuer may be differentper JWT, then you’ll need a tenant-aware validator, too:
277
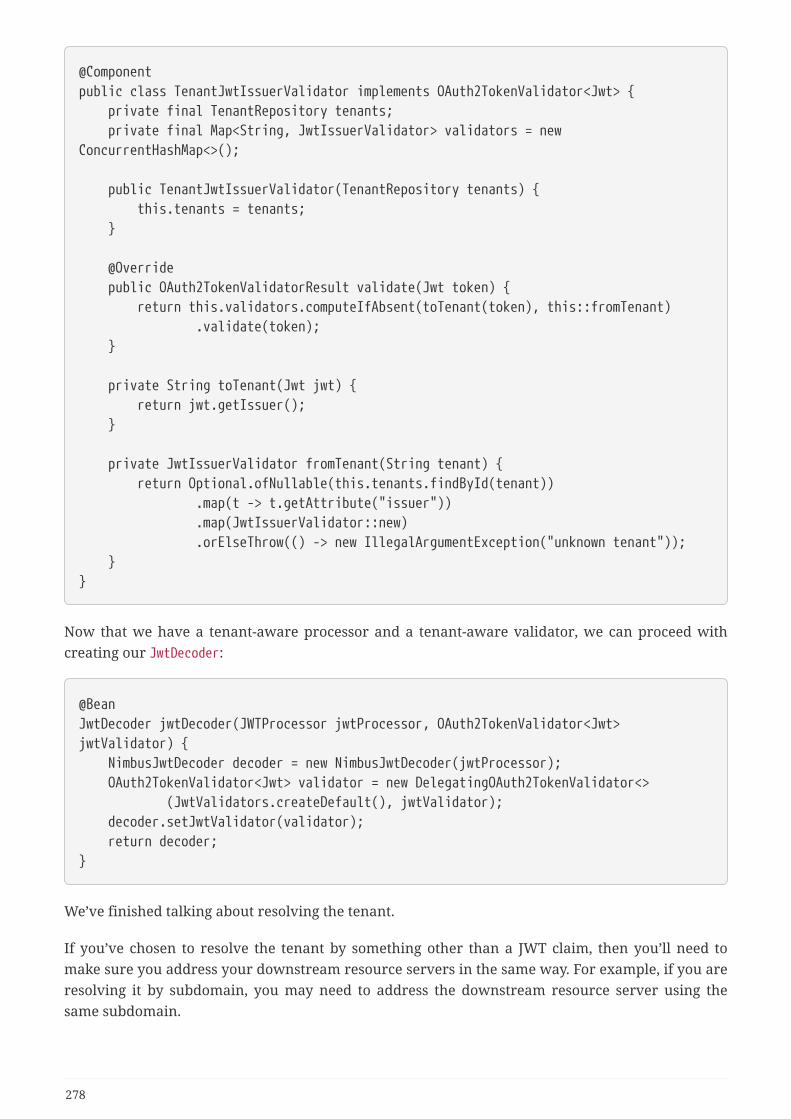
@Componentpublic class TenantJwtIssuerValidator implements OAuth2TokenValidator<Jwt> { private final TenantRepository tenants; private final Map<String, JwtIssuerValidator> validators = newConcurrentHashMap<>();
public TenantJwtIssuerValidator(TenantRepository tenants) { this.tenants = tenants; }
@Override public OAuth2TokenValidatorResult validate(Jwt token) { return this.validators.computeIfAbsent(toTenant(token), this::fromTenant) .validate(token); }
private String toTenant(Jwt jwt) { return jwt.getIssuer(); }
private JwtIssuerValidator fromTenant(String tenant) { return Optional.ofNullable(this.tenants.findById(tenant)) .map(t -> t.getAttribute("issuer")) .map(JwtIssuerValidator::new) .orElseThrow(() -> new IllegalArgumentException("unknown tenant")); }}
Now that we have a tenant-aware processor and a tenant-aware validator, we can proceed withcreating our JwtDecoder:
@BeanJwtDecoder jwtDecoder(JWTProcessor jwtProcessor, OAuth2TokenValidator<Jwt>jwtValidator) { NimbusJwtDecoder decoder = new NimbusJwtDecoder(jwtProcessor); OAuth2TokenValidator<Jwt> validator = new DelegatingOAuth2TokenValidator<> (JwtValidators.createDefault(), jwtValidator); decoder.setJwtValidator(validator); return decoder;}
We’ve finished talking about resolving the tenant.
If you’ve chosen to resolve the tenant by something other than a JWT claim, then you’ll need tomake sure you address your downstream resource servers in the same way. For example, if you areresolving it by subdomain, you may need to address the downstream resource server using thesame subdomain.
278
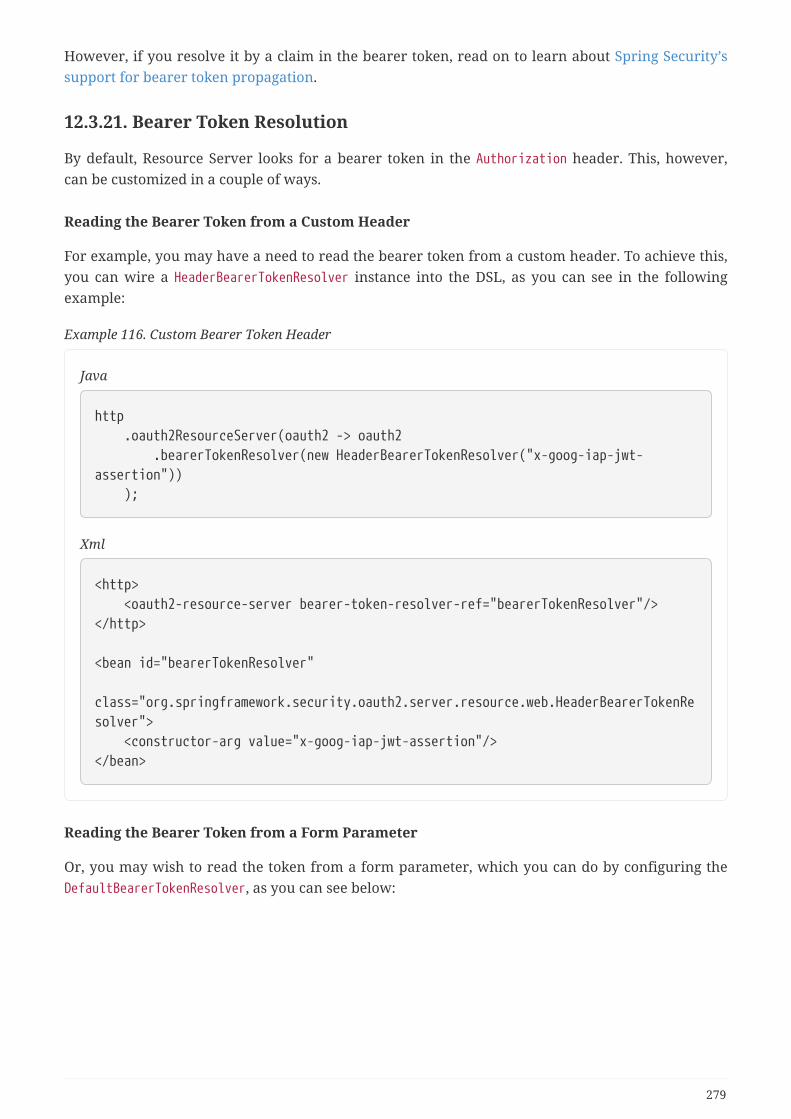
However, if you resolve it by a claim in the bearer token, read on to learn about Spring Security’ssupport for bearer token propagation.
12.3.21. Bearer Token Resolution
By default, Resource Server looks for a bearer token in the Authorization header. This, however,can be customized in a couple of ways.
Reading the Bearer Token from a Custom Header
For example, you may have a need to read the bearer token from a custom header. To achieve this,you can wire a HeaderBearerTokenResolver instance into the DSL, as you can see in the followingexample:
Example 116. Custom Bearer Token Header
Java
http .oauth2ResourceServer(oauth2 -> oauth2 .bearerTokenResolver(new HeaderBearerTokenResolver("x-goog-iap-jwt-assertion")) );
Xml
<http> <oauth2-resource-server bearer-token-resolver-ref="bearerTokenResolver"/></http>
<bean id="bearerTokenResolver" class="org.springframework.security.oauth2.server.resource.web.HeaderBearerTokenResolver"> <constructor-arg value="x-goog-iap-jwt-assertion"/></bean>
Reading the Bearer Token from a Form Parameter
Or, you may wish to read the token from a form parameter, which you can do by configuring theDefaultBearerTokenResolver, as you can see below:
279

Example 117. Form Parameter Bearer Token
Java
DefaultBearerTokenResolver resolver = new DefaultBearerTokenResolver();resolver.setAllowFormEncodedBodyParameter(true);http .oauth2ResourceServer(oauth2 -> oauth2 .bearerTokenResolver(resolver) );
Xml
<http> <oauth2-resource-server bearer-token-resolver-ref="bearerTokenResolver"/></http>
<bean id="bearerTokenResolver" class="org.springframework.security.oauth2.server.resource.web.HeaderBearerTokenResolver"> <property name="allowFormEncodedBodyParameter" value="true"/></bean>
12.3.22. Bearer Token Propagation
Now that you’re resource server has validated the token, it might be handy to pass it todownstream services. This is quite simple with ServletBearerExchangeFilterFunction, which you cansee in the following example:
@Beanpublic WebClient rest() { return WebClient.builder() .filter(new ServletBearerExchangeFilterFunction()) .build();}
When the above WebClient is used to perform requests, Spring Security will look up the currentAuthentication and extract any AbstractOAuth2Token credential. Then, it will propagate that token inthe Authorization header.
For example:
280
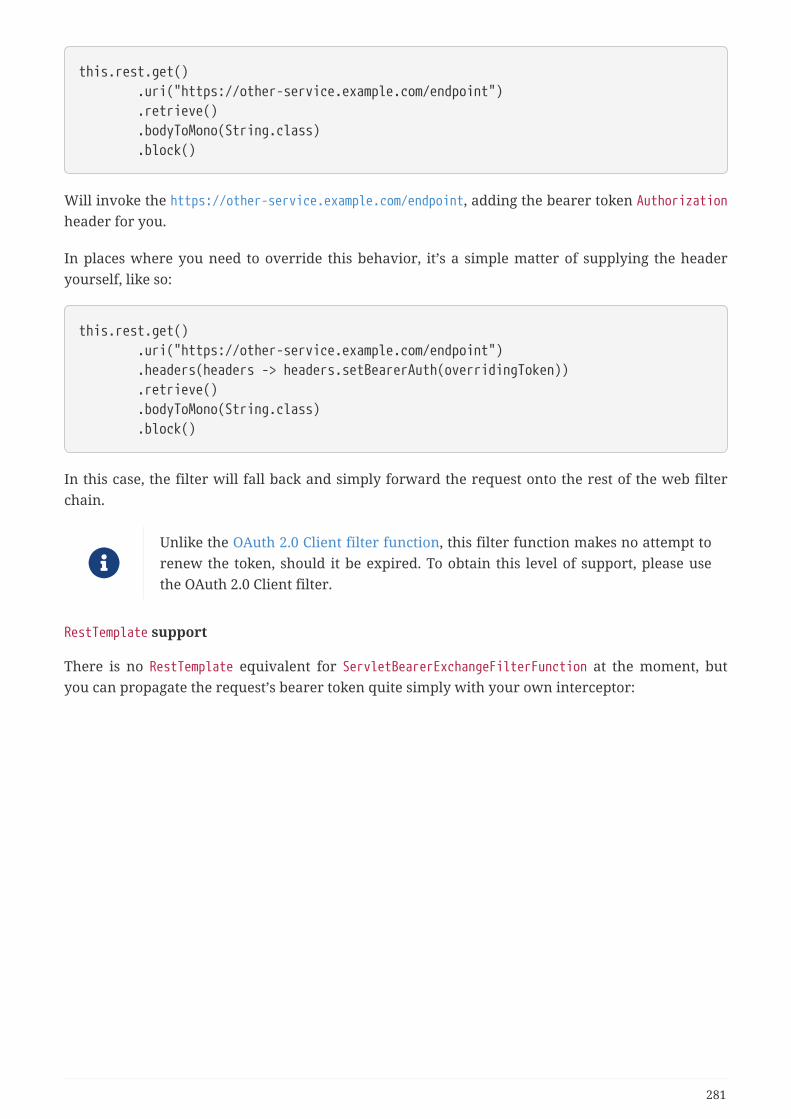
this.rest.get() .uri("https://other-service.example.com/endpoint") .retrieve() .bodyToMono(String.class) .block()
Will invoke the https://other-service.example.com/endpoint, adding the bearer token Authorizationheader for you.
In places where you need to override this behavior, it’s a simple matter of supplying the headeryourself, like so:
this.rest.get() .uri("https://other-service.example.com/endpoint") .headers(headers -> headers.setBearerAuth(overridingToken)) .retrieve() .bodyToMono(String.class) .block()
In this case, the filter will fall back and simply forward the request onto the rest of the web filterchain.
Unlike the OAuth 2.0 Client filter function, this filter function makes no attempt torenew the token, should it be expired. To obtain this level of support, please usethe OAuth 2.0 Client filter.
RestTemplate support
There is no RestTemplate equivalent for ServletBearerExchangeFilterFunction at the moment, butyou can propagate the request’s bearer token quite simply with your own interceptor:
281
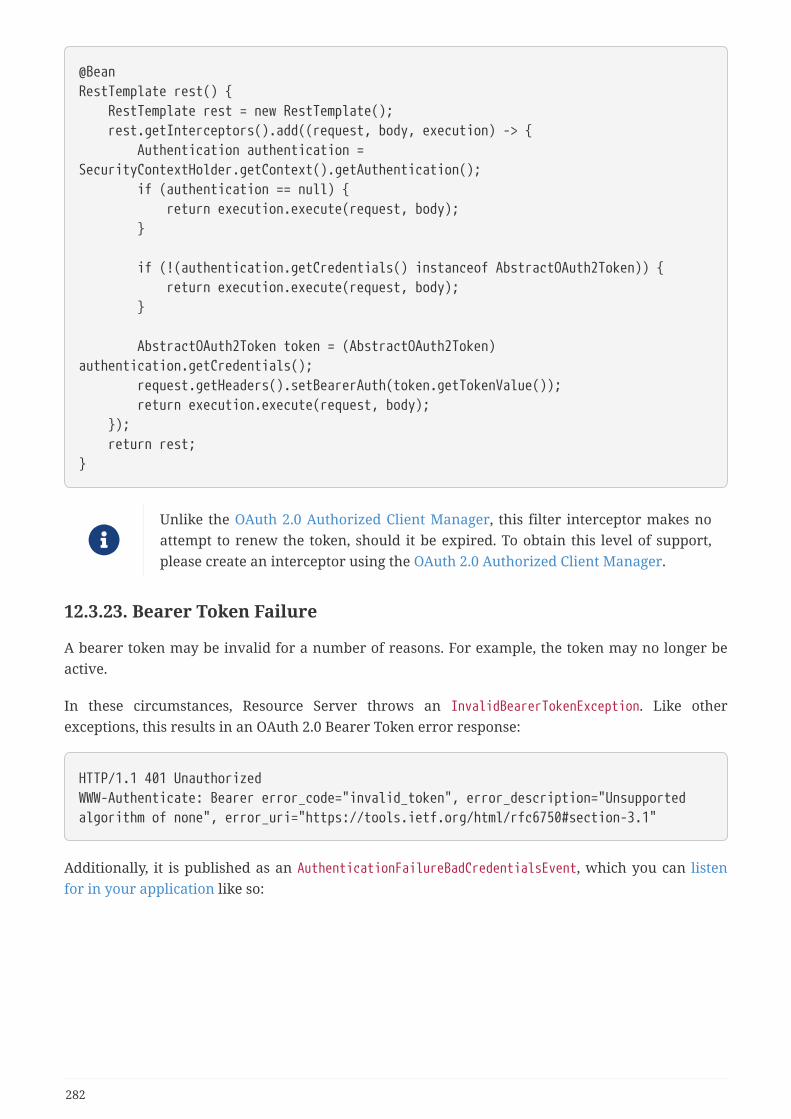
@BeanRestTemplate rest() { RestTemplate rest = new RestTemplate(); rest.getInterceptors().add((request, body, execution) -> { Authentication authentication =SecurityContextHolder.getContext().getAuthentication(); if (authentication == null) { return execution.execute(request, body); }
if (!(authentication.getCredentials() instanceof AbstractOAuth2Token)) { return execution.execute(request, body); }
AbstractOAuth2Token token = (AbstractOAuth2Token)authentication.getCredentials(); request.getHeaders().setBearerAuth(token.getTokenValue()); return execution.execute(request, body); }); return rest;}
Unlike the OAuth 2.0 Authorized Client Manager, this filter interceptor makes noattempt to renew the token, should it be expired. To obtain this level of support,please create an interceptor using the OAuth 2.0 Authorized Client Manager.
12.3.23. Bearer Token Failure
A bearer token may be invalid for a number of reasons. For example, the token may no longer beactive.
In these circumstances, Resource Server throws an InvalidBearerTokenException. Like otherexceptions, this results in an OAuth 2.0 Bearer Token error response:
HTTP/1.1 401 UnauthorizedWWW-Authenticate: Bearer error_code="invalid_token", error_description="Unsupportedalgorithm of none", error_uri="https://tools.ietf.org/html/rfc6750#section-3.1"
Additionally, it is published as an AuthenticationFailureBadCredentialsEvent, which you can listenfor in your application like so:
282
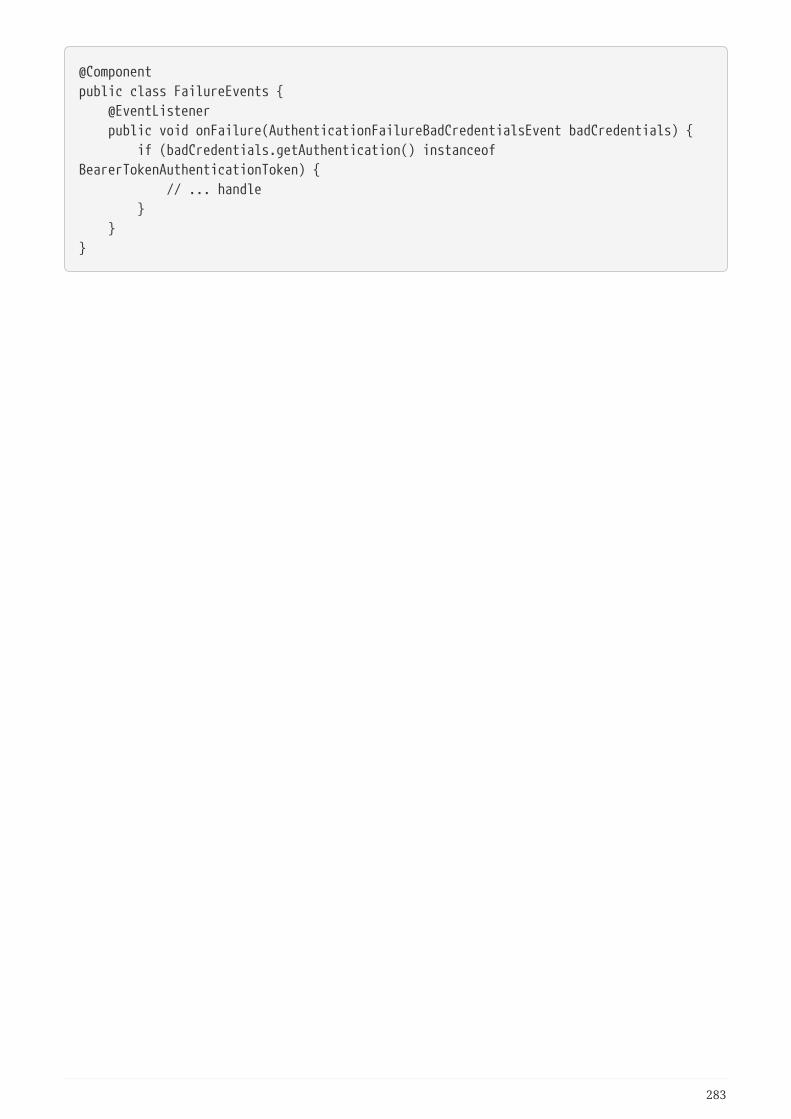
@Componentpublic class FailureEvents { @EventListener public void onFailure(AuthenticationFailureBadCredentialsEvent badCredentials) { if (badCredentials.getAuthentication() instanceofBearerTokenAuthenticationToken) { // ... handle } }}
283
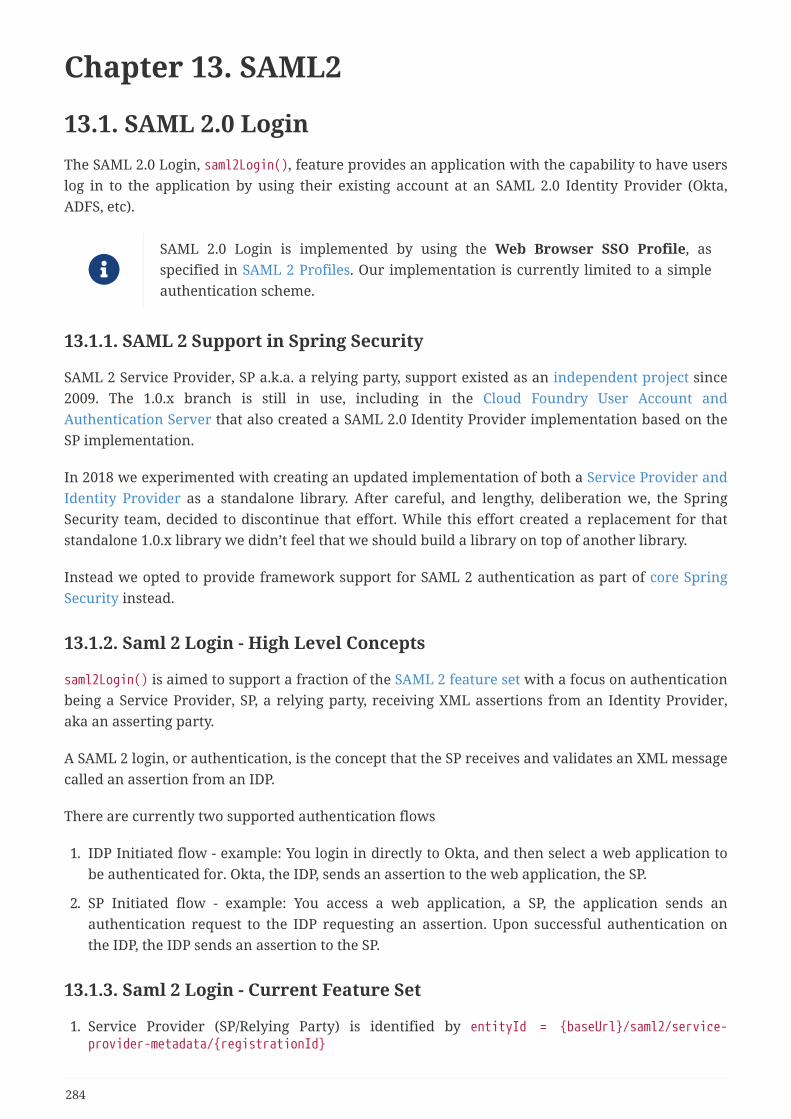
Chapter 13. SAML2
13.1. SAML 2.0 LoginThe SAML 2.0 Login, saml2Login(), feature provides an application with the capability to have userslog in to the application by using their existing account at an SAML 2.0 Identity Provider (Okta,ADFS, etc).
SAML 2.0 Login is implemented by using the Web Browser SSO Profile, asspecified in SAML 2 Profiles. Our implementation is currently limited to a simpleauthentication scheme.
13.1.1. SAML 2 Support in Spring Security
SAML 2 Service Provider, SP a.k.a. a relying party, support existed as an independent project since2009. The 1.0.x branch is still in use, including in the Cloud Foundry User Account andAuthentication Server that also created a SAML 2.0 Identity Provider implementation based on theSP implementation.
In 2018 we experimented with creating an updated implementation of both a Service Provider andIdentity Provider as a standalone library. After careful, and lengthy, deliberation we, the SpringSecurity team, decided to discontinue that effort. While this effort created a replacement for thatstandalone 1.0.x library we didn’t feel that we should build a library on top of another library.
Instead we opted to provide framework support for SAML 2 authentication as part of core SpringSecurity instead.
13.1.2. Saml 2 Login - High Level Concepts
saml2Login() is aimed to support a fraction of the SAML 2 feature set with a focus on authenticationbeing a Service Provider, SP, a relying party, receiving XML assertions from an Identity Provider,aka an asserting party.
A SAML 2 login, or authentication, is the concept that the SP receives and validates an XML messagecalled an assertion from an IDP.
There are currently two supported authentication flows
1. IDP Initiated flow - example: You login in directly to Okta, and then select a web application tobe authenticated for. Okta, the IDP, sends an assertion to the web application, the SP.
2. SP Initiated flow - example: You access a web application, a SP, the application sends anauthentication request to the IDP requesting an assertion. Upon successful authentication onthe IDP, the IDP sends an assertion to the SP.
13.1.3. Saml 2 Login - Current Feature Set
1. Service Provider (SP/Relying Party) is identified by entityId = {baseUrl}/saml2/service-provider-metadata/{registrationId}
284

2. Receive assertion embedded in a SAML response via Http-POST or Http-Redirect at{baseUrl}/login/saml2/sso/{registrationId}
3. Requires the assertion to be signed, unless the response is signed
4. Supports encrypted assertions
5. Supports encrypted NameId elements
6. Allows for extraction of assertion attributes into authorities using a Converter<Assertion,Collection<? extends GrantedAuthority>>
7. Allows mapping and white listing of authorities using a GrantedAuthoritiesMapper
8. Public keys in java.security.cert.X509Certificate format.
9. SP Initiated Authentication via an AuthNRequest
Saml 2 Login - Not Yet Supported
1. Mappings assertion conditions and attributes to session features (timeout, tracking, etc)
2. Single logout
3. Dynamic metadata generation
4. Receiving and validating standalone assertion (not wrapped in a response object)
13.1.4. Saml 2 Login - Introduction to Java Configuration
To add saml2Login() to a Spring Security filter chain, the minimal Java configuration requires aconfiguration repository, the RelyingPartyRegistrationRepository, that contains the SAMLconfiguration and the invocation of the HttpSecurity.saml2Login() method:
@EnableWebSecuritypublic class SecurityConfig extends WebSecurityConfigurerAdapter {
@Bean public RelyingPartyRegistrationRepository relyingPartyRegistrationRepository() { //SAML configuration //Mapping this application to one or more Identity Providers return new InMemoryRelyingPartyRegistrationRepository(...); }
@Override protected void configure(HttpSecurity http) throws Exception { http .authorizeRequests(authorize -> authorize .anyRequest().authenticated() ) .saml2Login(withDefaults()) ; }}
285
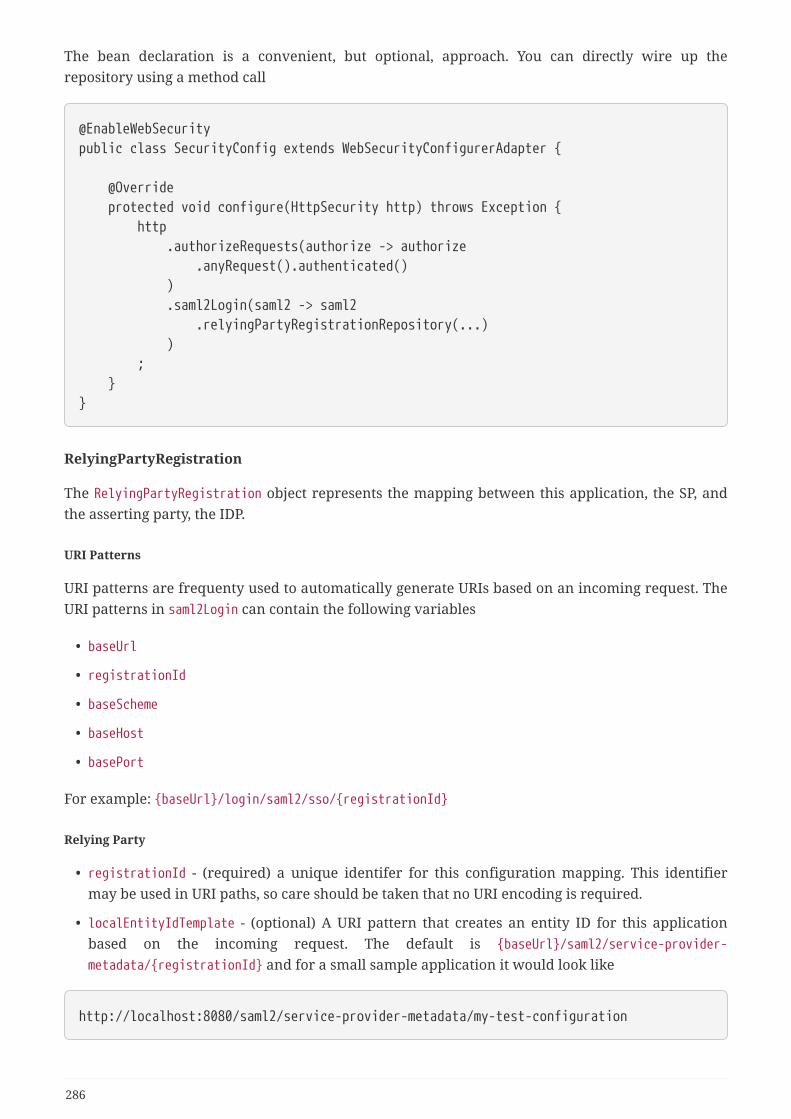
The bean declaration is a convenient, but optional, approach. You can directly wire up therepository using a method call
@EnableWebSecuritypublic class SecurityConfig extends WebSecurityConfigurerAdapter {
@Override protected void configure(HttpSecurity http) throws Exception { http .authorizeRequests(authorize -> authorize .anyRequest().authenticated() ) .saml2Login(saml2 -> saml2 .relyingPartyRegistrationRepository(...) ) ; }}
RelyingPartyRegistration
The RelyingPartyRegistration object represents the mapping between this application, the SP, andthe asserting party, the IDP.
URI Patterns
URI patterns are frequenty used to automatically generate URIs based on an incoming request. TheURI patterns in saml2Login can contain the following variables
• baseUrl
• registrationId
• baseScheme
• baseHost
• basePort
For example: {baseUrl}/login/saml2/sso/{registrationId}
Relying Party
• registrationId - (required) a unique identifer for this configuration mapping. This identifiermay be used in URI paths, so care should be taken that no URI encoding is required.
• localEntityIdTemplate - (optional) A URI pattern that creates an entity ID for this applicationbased on the incoming request. The default is {baseUrl}/saml2/service-provider-metadata/{registrationId} and for a small sample application it would look like
http://localhost:8080/saml2/service-provider-metadata/my-test-configuration
286
There is no requirement that this configuration option is a pattern, it can be a fixed URI value.
• assertionConsumerServiceUrlTemplate - (optional) A URI pattern that denotes the assertionconsumer service URI to be sent with any AuthNRequest from the SP to the IDP during the SPinitiated flow. While this can be a pattern the actual URI must resolve to the ACS endpoint onthe SP. The default value is {baseUrl}/login/saml2/sso/{registrationId} and maps directly to theSaml2WebSsoAuthenticationFilter endpoint
• credentials - A list of credentials, private keys and x509 certificates, used for message signing,verification, encryption and decryption. This list can contain redundant credentials to allow foreasy rotation of credentials. For example
◦ [0] - X509Certificate{VERIFICATION,ENCRYPTION} - The IDP’s first public key used forverification and encryption.
◦ [1] - X509Certificate/{VERIFICATION,ENCRYPTION} - The IDP’s second verification key usedfor verification. Encryption is always done using the first ENCRYPTION key in the list.
◦ [2] - PrivateKey/X509Certificate{SIGNING,DECRYPTION} - The SP’s first signing anddecryption credential.
◦ [3] - PrivateKey/X509Certificate{SIGNING,DECRYPTION} - The SP’s second decryptioncredential. Signing is always done using the first SIGNING key in the list.
• ProviderDetails#entityId - (required) the entity ID of the Identity Provider. Always a fixed URIvalue or string, no patterns allowed.
• ProviderDetails#webSsoUrl - (required) a fixed URI value for the IDP Single Sign On endpointwhere the SP sends the AuthNRequest messages.
• ProviderDetails#signAuthNRequest - A boolean indicating whether or not to sign the AuthNRequestwith the SP’s private key, defaults to true
• ProviderDetails#binding - A Saml2MessageBinding indicating what kind of binding to use for theAuthNRequest, whether that be REDIRECT or POST, defaults to REDIRECT
When an incoming message is received, signatures are always required, the system will firstattempt to validate the signature using the certificate at index [0] and only move to the secondcredential if the first one fails.
In a similar fashion, the SP configured private keys are used for decryption and attempted in thesame order. The first SP credential (type=SIGNING) will be used when messages to the IDP are signed.
Duplicated Relying Party Configurations
In the use case where an application uses multiple identity providers it becomes obvious that someconfiguration is duplicated between two RelyingPartyRegistration objects
• localEntityIdTemplate
• credentials (all SP credentials, IDP credentials change)
• assertionConsumerServiceUrlTemplate
While there is some drawback in duplicating configuration values the back end configurationrepository does not need to replicate this data storage model.
287
There is a benefit that comes with this setup. Credentials may be more easily rotated for someidentity providers vs others. This object model can ensure that there is no disruption whenconfiguration is changed in a multi IDP use case and you’re not able to rotate credentials on all theidentity providers.
Service Provider Metadata
The Spring Security SAML 2 implementation does not yet provide an endpoint for downloading SPmetadata in XML format. The minimal pieces that are exchanged
• entity ID - defaults to {baseUrl}/saml2/service-provider-metadata/{registrationId} Otherknown configuration names that also use this same value
◦ Audience Restriction
• single signon URL - defaults to {baseUrl}/login/saml2/sso/{registrationId} Other knownconfiguration names that also use this same value
◦ Recipient URL
◦ Destination URL
◦ Assertion Consumer Service URL
• X509Certificate - the certificate that you configure as part of your {SIGNING,DECRYPTION}credentials must be shared with the Identity Provider
Authentication Requests - SP Initiated Flow
To initiate an authentication from the web application, you can redirect to:
{baseUrl}/saml2/authenticate/{registrationId}
This endpoint will generate an AuthNRequest either as a Redirect or POST depending on yourRelyingPartyRegistration.
Customizing the AuthNRequest
To adjust the AuthNRequest, you can publish an instance of Saml2AuthenticationRequestFactory.
For example, if you wanted to configure the AuthNRequest to request the IDP to send the SAMLAssertion by REDIRECT, you could do:
@Beanpublic Saml2AuthenticationRequestFactory authenticationRequestFactory() { OpenSamlAuthenticationRequestFactory authenticationRequestFactory = new OpenSamlAuthenticationRequestFactory(); authenticationRequestFactory.setProtocolBinding("urn:oasis:names:tc:SAML:2.0:bindings:HTTP-Redirect"); return authenticationRequestFactory;}
288
Delegating to an AuthenticationRequestFactory
Or, in circumstances where you need more control over what is sent as parameters to theAuthenticationRequestFactory, you can use delegation:
@Componentpublic class IssuerSaml2AuthenticationRequestFactory implementsSaml2AuthenticationRequestFactory { private OpenSamlAuthenticationRequestFactory delegate = newOpenSamlAuthenticationRequestFactory();
@Override public String createAuthenticationRequest(Saml2AuthenticationRequest request) { return this.delegate.createAuthenticationRequest(request); }
@Override public Saml2PostAuthenticationRequest createPostAuthenticationRequest (Saml2AuthenticationRequestContext context) {
String issuer = // ... calculate issuer
Saml2AuthenticationRequestContext customIssuer =Saml2AuthenticationRequestContext.builder() .assertionConsumerServiceUrl(context.getAssertionConsumerServiceUrl()) .issuer(issuer) .relayState(context.getRelayState()) .relyingPartyRegistration(context.getRelyingPartyRegistration()) .build();
return this.delegate.createPostAuthenticationRequest(customIssuer); }
@Override public Saml2RedirectAuthenticationRequest createRedirectAuthenticationRequest (Saml2AuthenticationRequestContext context) {
throw new UnsupportedOperationException("unsupported"); }}
13.1.5. Customizing Authentication Logic
By default Spring Security configures the OpenSamlAuthenticationProvider to validate and parse theSAML 2 response and assertions that are received. This provider has three configuration options
1. An authorities extractor - extract group information from the assertion
2. An authorities mapper - map extracted group information to internal authorities
3. Response time validation duration - the built in tolerances for timestamp validation should be
289
used when there may be a time synchronization issue.
One customization strategy is to use an ObjectPostProcessor, which allows you to modify the objectscreated by the implementation. Another option is to override the authentication manager for thefilter that intercepts the SAMLResponse.
OpenSamlAuthenticationProvider ObjectPostProcessor
@EnableWebSecuritypublic class SecurityConfig extends WebSecurityConfigurerAdapter {
@Override protected void configure(HttpSecurity http) throws Exception { ObjectPostProcessor<OpenSamlAuthenticationProvider> processor = newObjectPostProcessor<>() { @Override public <O extends OpenSamlAuthenticationProvider> O postProcess(Oprovider) { provider.setResponseTimeValidationSkew(RESPONSE_TIME_VALIDATION_SKEW); provider.setAuthoritiesMapper(AUTHORITIES_MAPPER); provider.setAuthoritiesExtractor(AUTHORITIES_EXTRACTOR); return provider; } };
http .authorizeRequests(authorize -> authorize .anyRequest().authenticated() ) .saml2Login(saml2 -> saml2 .addObjectPostProcessor(processor) ) ; }}
Configure OpenSamlAuthenticationProvider as an Authentication Manager
We can leverage the same method, authenticationManager, to override and customize the defaultOpenSamlAuthenticationProvider.
290
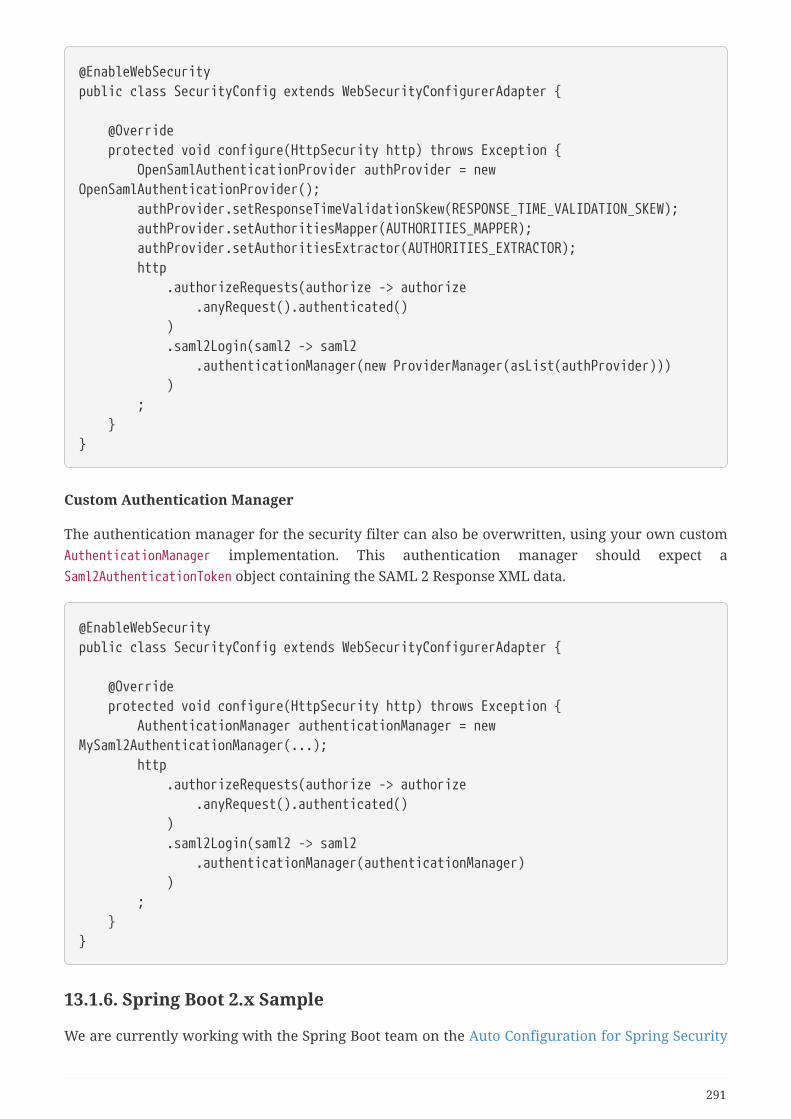
@EnableWebSecuritypublic class SecurityConfig extends WebSecurityConfigurerAdapter {
@Override protected void configure(HttpSecurity http) throws Exception { OpenSamlAuthenticationProvider authProvider = newOpenSamlAuthenticationProvider(); authProvider.setResponseTimeValidationSkew(RESPONSE_TIME_VALIDATION_SKEW); authProvider.setAuthoritiesMapper(AUTHORITIES_MAPPER); authProvider.setAuthoritiesExtractor(AUTHORITIES_EXTRACTOR); http .authorizeRequests(authorize -> authorize .anyRequest().authenticated() ) .saml2Login(saml2 -> saml2 .authenticationManager(new ProviderManager(asList(authProvider))) ) ; }}
Custom Authentication Manager
The authentication manager for the security filter can also be overwritten, using your own customAuthenticationManager implementation. This authentication manager should expect aSaml2AuthenticationToken object containing the SAML 2 Response XML data.
@EnableWebSecuritypublic class SecurityConfig extends WebSecurityConfigurerAdapter {
@Override protected void configure(HttpSecurity http) throws Exception { AuthenticationManager authenticationManager = newMySaml2AuthenticationManager(...); http .authorizeRequests(authorize -> authorize .anyRequest().authenticated() ) .saml2Login(saml2 -> saml2 .authenticationManager(authenticationManager) ) ; }}
13.1.6. Spring Boot 2.x Sample
We are currently working with the Spring Boot team on the Auto Configuration for Spring Security
291

SAML Login. In the meantime, we have provided a Spring Boot sample that supports a Yamlconfiguration.
To run the sample, follow these three steps
1. Launch the Spring Boot application
◦ ./gradlew :spring-security-samples-boot-saml2login:bootRun
2. Open a browser
◦ http://localhost:8080/
3. This will take you to an identity provider, log in using:
◦ User: user
◦ Password: password
Multiple Identity Provider Sample
It’s very simple to use multiple providers, but there are some defaults that may trip you up if youdon’t pay attention. In our SAML configuration of RelyingPartyRegistration objects, we default anSP entity ID to {baseUrl}/saml2/service-provider-metadata/{registrationId}
That means in our two provider configuration, our system would look like
registration-1 (Identity Provider 1) - Our local SP Entity ID is:http://localhost:8080/saml2/service-provider-metadata/registration-1
registration-2 (Identity Provider 2) - Our local SP Entity ID is:http://localhost:8080/saml2/service-provider-metadata/registration-2
In this configuration, illustrated in the sample below, to the outside world, we have actually createdtwo virtual Service Provider identities hosted within the same application.
292
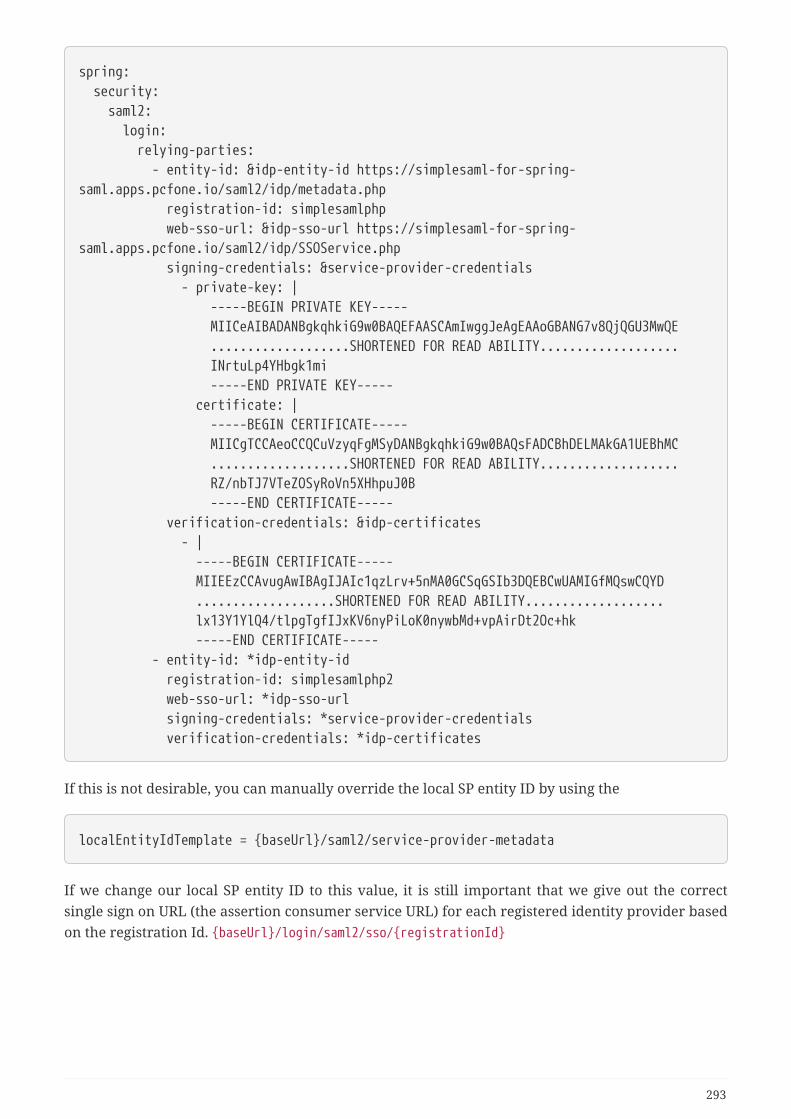
spring: security: saml2: login: relying-parties: - entity-id: &idp-entity-id https://simplesaml-for-spring-saml.apps.pcfone.io/saml2/idp/metadata.php registration-id: simplesamlphp web-sso-url: &idp-sso-url https://simplesaml-for-spring-saml.apps.pcfone.io/saml2/idp/SSOService.php signing-credentials: &service-provider-credentials - private-key: | -----BEGIN PRIVATE KEY----- MIICeAIBADANBgkqhkiG9w0BAQEFAASCAmIwggJeAgEAAoGBANG7v8QjQGU3MwQE ...................SHORTENED FOR READ ABILITY................... INrtuLp4YHbgk1mi -----END PRIVATE KEY----- certificate: | -----BEGIN CERTIFICATE----- MIICgTCCAeoCCQCuVzyqFgMSyDANBgkqhkiG9w0BAQsFADCBhDELMAkGA1UEBhMC ...................SHORTENED FOR READ ABILITY................... RZ/nbTJ7VTeZOSyRoVn5XHhpuJ0B -----END CERTIFICATE----- verification-credentials: &idp-certificates - | -----BEGIN CERTIFICATE----- MIIEEzCCAvugAwIBAgIJAIc1qzLrv+5nMA0GCSqGSIb3DQEBCwUAMIGfMQswCQYD ...................SHORTENED FOR READ ABILITY................... lx13Y1YlQ4/tlpgTgfIJxKV6nyPiLoK0nywbMd+vpAirDt2Oc+hk -----END CERTIFICATE----- - entity-id: *idp-entity-id registration-id: simplesamlphp2 web-sso-url: *idp-sso-url signing-credentials: *service-provider-credentials verification-credentials: *idp-certificates
If this is not desirable, you can manually override the local SP entity ID by using the
localEntityIdTemplate = {baseUrl}/saml2/service-provider-metadata
If we change our local SP entity ID to this value, it is still important that we give out the correctsingle sign on URL (the assertion consumer service URL) for each registered identity provider basedon the registration Id. {baseUrl}/login/saml2/sso/{registrationId}
293
Chapter 14. Protection Against Exploits
14.1. Cross Site Request Forgery (CSRF) for ServletEnvironmentsThis section discusses Spring Security’s Cross Site Request Forgery (CSRF) support for servletenvironments.
14.1.1. Using Spring Security CSRF Protection
The steps to using Spring Security’s CSRF protection are outlined below:
• Use proper HTTP verbs
• Configure CSRF Protection
• Include the CSRF Token
Use proper HTTP verbs
The first step to protecting against CSRF attacks is to ensure your website uses proper HTTP verbs.This is covered in detail in Safe Methods Must be Idempotent.
Configure CSRF Protection
The next step is to configure Spring Security’s CSRF protection within your application. SpringSecurity’s CSRF protection is enabled by default, but you may need to customize the configuration.Below are a few common customizations.
Custom CsrfTokenRepository
By default Spring Security stores the expected CSRF token in the HttpSession usingHttpSessionCsrfTokenRepository. There can be cases where users will want to configure a customCsrfTokenRepository. For example, it might be desirable to persist the CsrfToken in a cookie tosupport a JavaScript based application.
By default the CookieCsrfTokenRepository will write to a cookie named XSRF-TOKEN and read it from aheader named X-XSRF-TOKEN or the HTTP parameter _csrf. These defaults come from AngularJS
You can configure CookieCsrfTokenRepository in XML using the following:
294
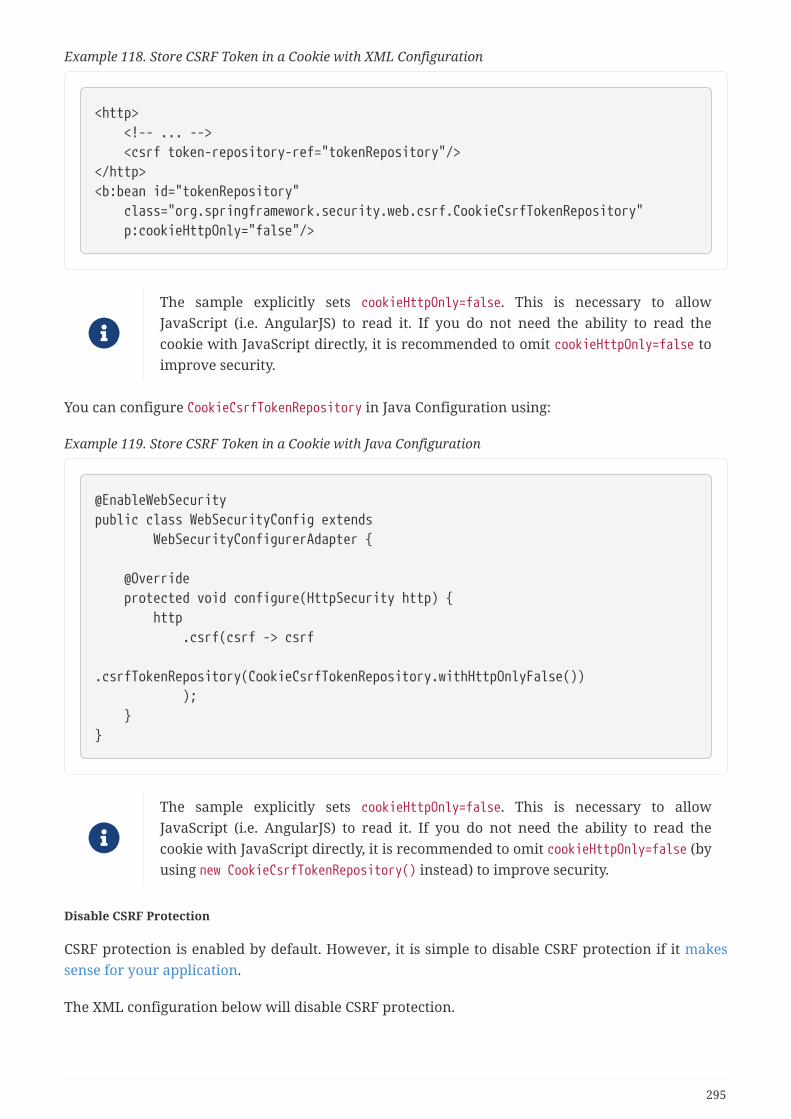
Example 118. Store CSRF Token in a Cookie with XML Configuration
<http> <!-- ... --> <csrf token-repository-ref="tokenRepository"/></http><b:bean id="tokenRepository" class="org.springframework.security.web.csrf.CookieCsrfTokenRepository" p:cookieHttpOnly="false"/>
The sample explicitly sets cookieHttpOnly=false. This is necessary to allowJavaScript (i.e. AngularJS) to read it. If you do not need the ability to read thecookie with JavaScript directly, it is recommended to omit cookieHttpOnly=false toimprove security.
You can configure CookieCsrfTokenRepository in Java Configuration using:
Example 119. Store CSRF Token in a Cookie with Java Configuration
@EnableWebSecuritypublic class WebSecurityConfig extends WebSecurityConfigurerAdapter {
@Override protected void configure(HttpSecurity http) { http .csrf(csrf -> csrf .csrfTokenRepository(CookieCsrfTokenRepository.withHttpOnlyFalse()) ); }}
The sample explicitly sets cookieHttpOnly=false. This is necessary to allowJavaScript (i.e. AngularJS) to read it. If you do not need the ability to read thecookie with JavaScript directly, it is recommended to omit cookieHttpOnly=false (byusing new CookieCsrfTokenRepository() instead) to improve security.
Disable CSRF Protection
CSRF protection is enabled by default. However, it is simple to disable CSRF protection if it makessense for your application.
The XML configuration below will disable CSRF protection.
295
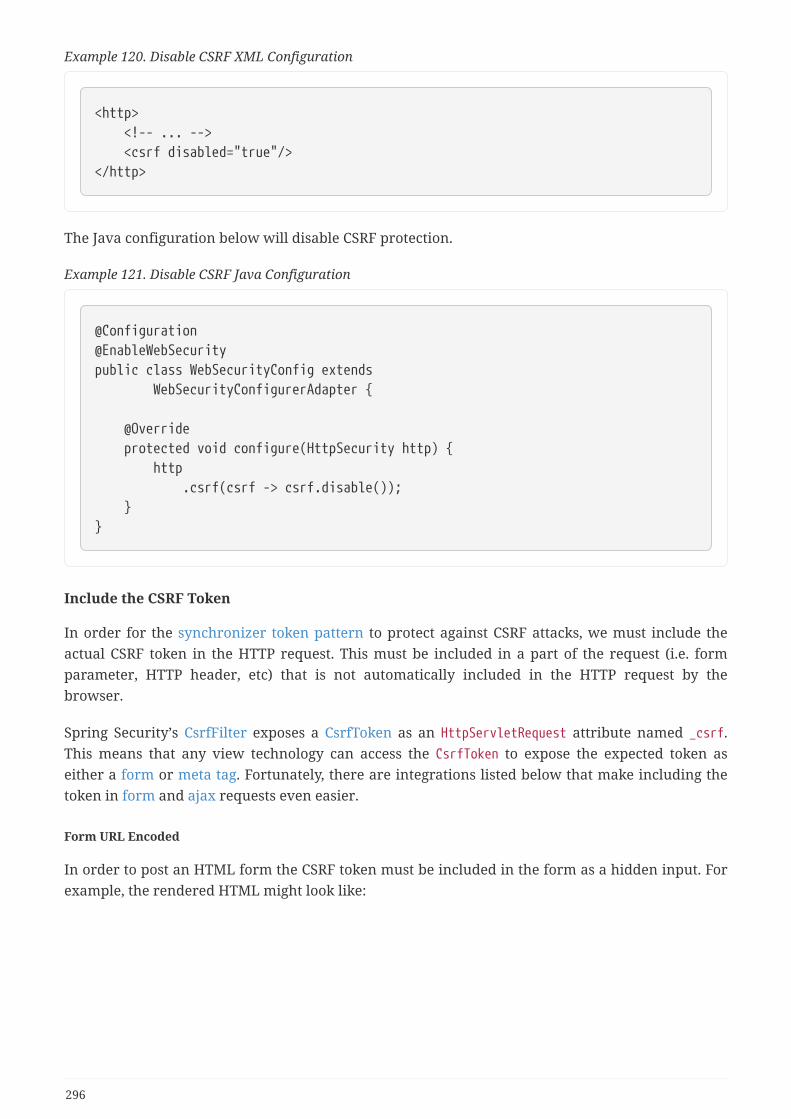
Example 120. Disable CSRF XML Configuration
<http> <!-- ... --> <csrf disabled="true"/></http>
The Java configuration below will disable CSRF protection.
Example 121. Disable CSRF Java Configuration
@Configuration@EnableWebSecuritypublic class WebSecurityConfig extends WebSecurityConfigurerAdapter {
@Override protected void configure(HttpSecurity http) { http .csrf(csrf -> csrf.disable()); }}
Include the CSRF Token
In order for the synchronizer token pattern to protect against CSRF attacks, we must include theactual CSRF token in the HTTP request. This must be included in a part of the request (i.e. formparameter, HTTP header, etc) that is not automatically included in the HTTP request by thebrowser.
Spring Security’s CsrfFilter exposes a CsrfToken as an HttpServletRequest attribute named _csrf.This means that any view technology can access the CsrfToken to expose the expected token aseither a form or meta tag. Fortunately, there are integrations listed below that make including thetoken in form and ajax requests even easier.
Form URL Encoded
In order to post an HTML form the CSRF token must be included in the form as a hidden input. Forexample, the rendered HTML might look like:
296
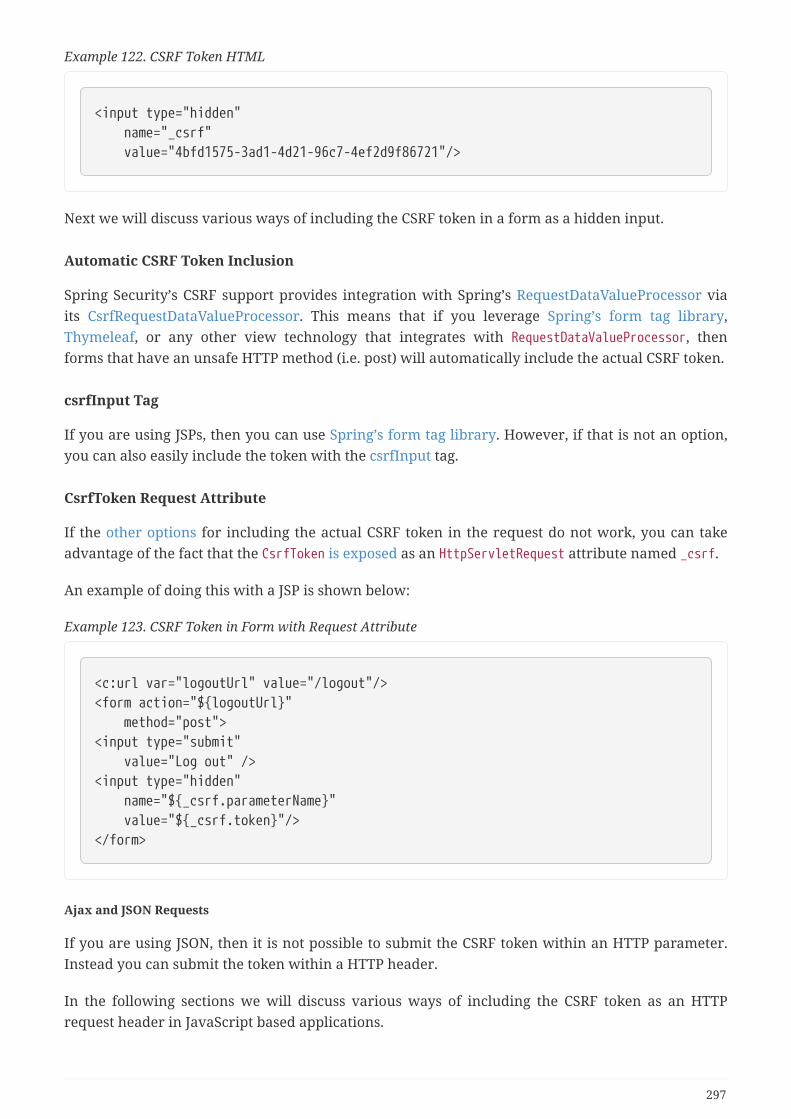
Example 122. CSRF Token HTML
<input type="hidden" name="_csrf" value="4bfd1575-3ad1-4d21-96c7-4ef2d9f86721"/>
Next we will discuss various ways of including the CSRF token in a form as a hidden input.
Automatic CSRF Token Inclusion
Spring Security’s CSRF support provides integration with Spring’s RequestDataValueProcessor viaits CsrfRequestDataValueProcessor. This means that if you leverage Spring’s form tag library,Thymeleaf, or any other view technology that integrates with RequestDataValueProcessor, thenforms that have an unsafe HTTP method (i.e. post) will automatically include the actual CSRF token.
csrfInput Tag
If you are using JSPs, then you can use Spring’s form tag library. However, if that is not an option,you can also easily include the token with the csrfInput tag.
CsrfToken Request Attribute
If the other options for including the actual CSRF token in the request do not work, you can takeadvantage of the fact that the CsrfToken is exposed as an HttpServletRequest attribute named _csrf.
An example of doing this with a JSP is shown below:
Example 123. CSRF Token in Form with Request Attribute
<c:url var="logoutUrl" value="/logout"/><form action="${logoutUrl}" method="post"><input type="submit" value="Log out" /><input type="hidden" name="${_csrf.parameterName}" value="${_csrf.token}"/></form>
Ajax and JSON Requests
If you are using JSON, then it is not possible to submit the CSRF token within an HTTP parameter.Instead you can submit the token within a HTTP header.
In the following sections we will discuss various ways of including the CSRF token as an HTTPrequest header in JavaScript based applications.
297
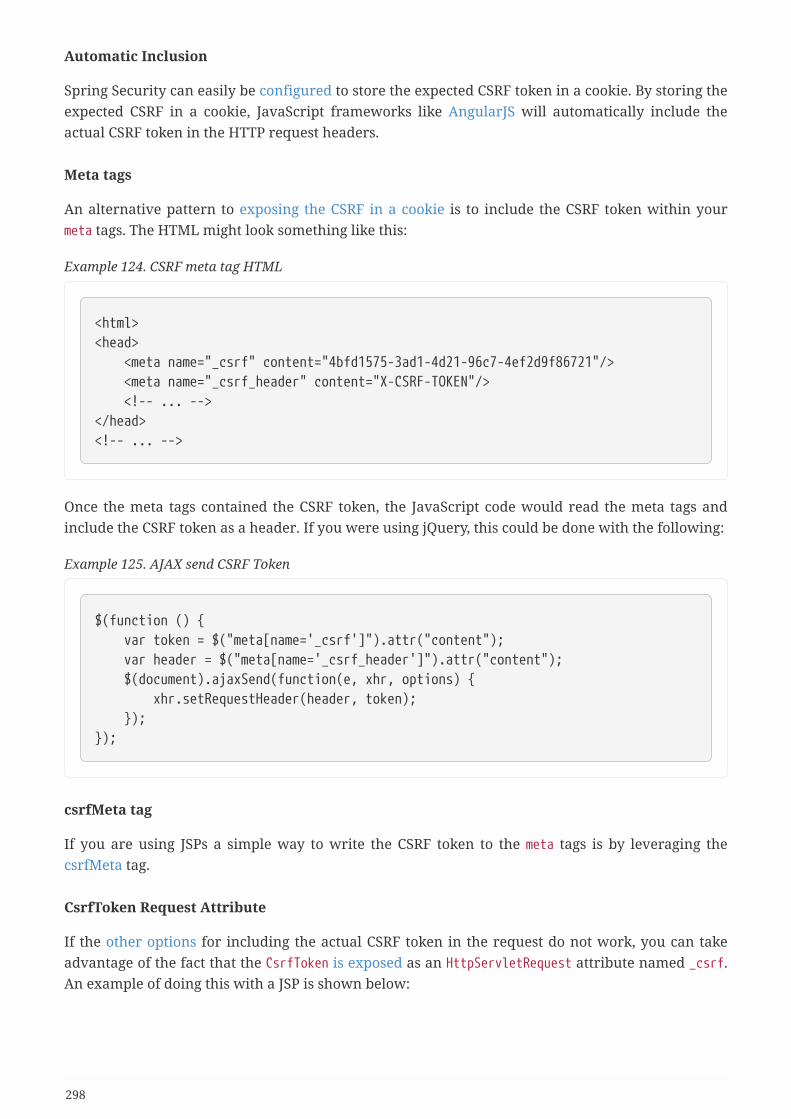
Automatic Inclusion
Spring Security can easily be configured to store the expected CSRF token in a cookie. By storing theexpected CSRF in a cookie, JavaScript frameworks like AngularJS will automatically include theactual CSRF token in the HTTP request headers.
Meta tags
An alternative pattern to exposing the CSRF in a cookie is to include the CSRF token within yourmeta tags. The HTML might look something like this:
Example 124. CSRF meta tag HTML
<html><head> <meta name="_csrf" content="4bfd1575-3ad1-4d21-96c7-4ef2d9f86721"/> <meta name="_csrf_header" content="X-CSRF-TOKEN"/> <!-- ... --></head><!-- ... -->
Once the meta tags contained the CSRF token, the JavaScript code would read the meta tags andinclude the CSRF token as a header. If you were using jQuery, this could be done with the following:
Example 125. AJAX send CSRF Token
$(function () { var token = $("meta[name='_csrf']").attr("content"); var header = $("meta[name='_csrf_header']").attr("content"); $(document).ajaxSend(function(e, xhr, options) { xhr.setRequestHeader(header, token); });});
csrfMeta tag
If you are using JSPs a simple way to write the CSRF token to the meta tags is by leveraging thecsrfMeta tag.
CsrfToken Request Attribute
If the other options for including the actual CSRF token in the request do not work, you can takeadvantage of the fact that the CsrfToken is exposed as an HttpServletRequest attribute named _csrf.An example of doing this with a JSP is shown below:
298
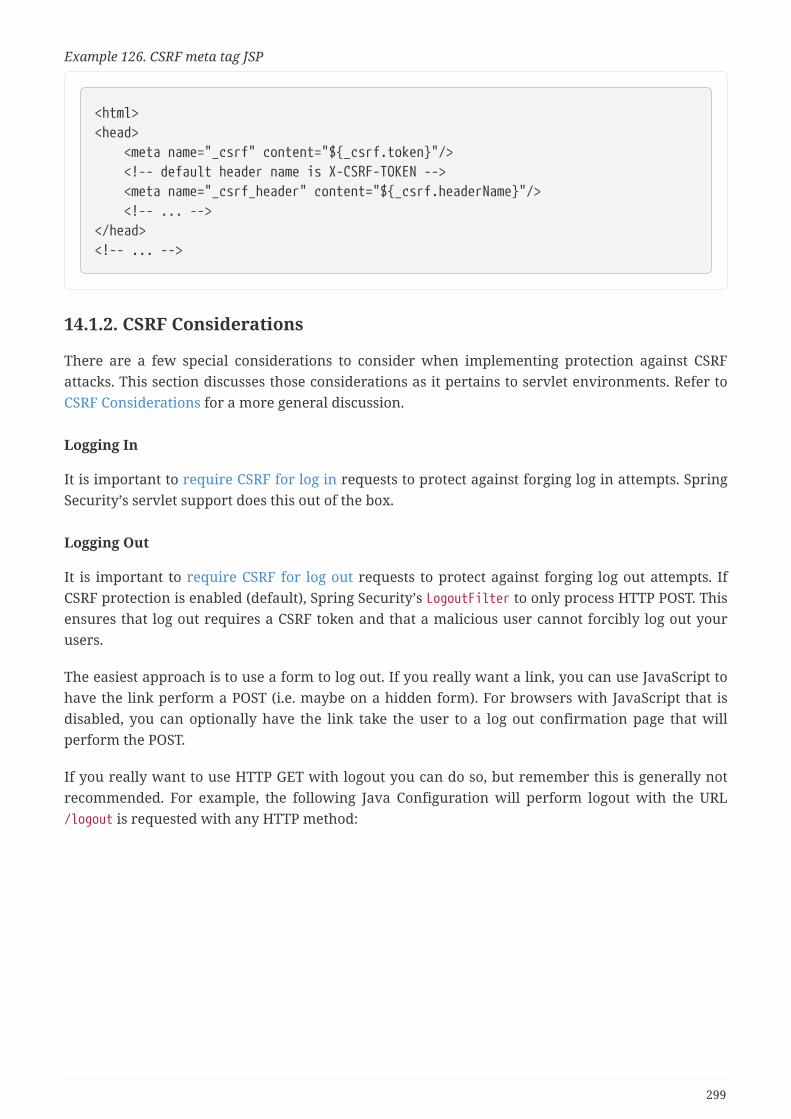
Example 126. CSRF meta tag JSP
<html><head> <meta name="_csrf" content="${_csrf.token}"/> <!-- default header name is X-CSRF-TOKEN --> <meta name="_csrf_header" content="${_csrf.headerName}"/> <!-- ... --></head><!-- ... -->
14.1.2. CSRF Considerations
There are a few special considerations to consider when implementing protection against CSRFattacks. This section discusses those considerations as it pertains to servlet environments. Refer toCSRF Considerations for a more general discussion.
Logging In
It is important to require CSRF for log in requests to protect against forging log in attempts. SpringSecurity’s servlet support does this out of the box.
Logging Out
It is important to require CSRF for log out requests to protect against forging log out attempts. IfCSRF protection is enabled (default), Spring Security’s LogoutFilter to only process HTTP POST. Thisensures that log out requires a CSRF token and that a malicious user cannot forcibly log out yourusers.
The easiest approach is to use a form to log out. If you really want a link, you can use JavaScript tohave the link perform a POST (i.e. maybe on a hidden form). For browsers with JavaScript that isdisabled, you can optionally have the link take the user to a log out confirmation page that willperform the POST.
If you really want to use HTTP GET with logout you can do so, but remember this is generally notrecommended. For example, the following Java Configuration will perform logout with the URL/logout is requested with any HTTP method:
299
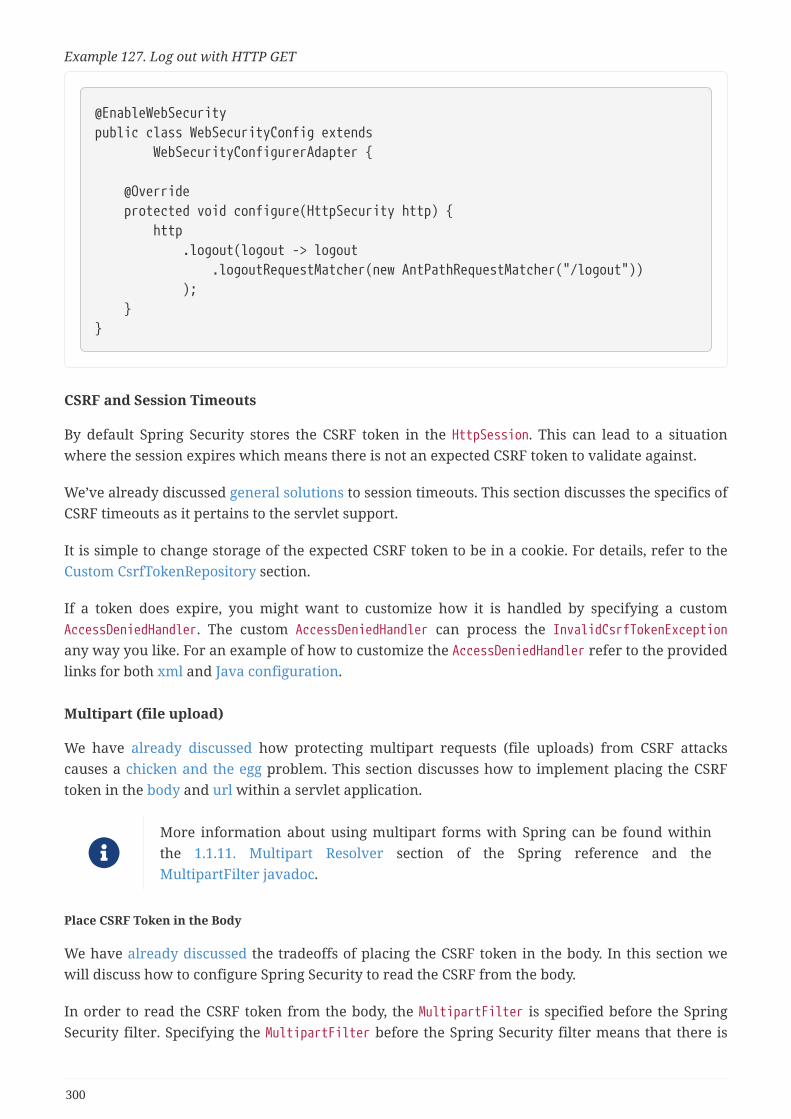
Example 127. Log out with HTTP GET
@EnableWebSecuritypublic class WebSecurityConfig extends WebSecurityConfigurerAdapter {
@Override protected void configure(HttpSecurity http) { http .logout(logout -> logout .logoutRequestMatcher(new AntPathRequestMatcher("/logout")) ); }}
CSRF and Session Timeouts
By default Spring Security stores the CSRF token in the HttpSession. This can lead to a situationwhere the session expires which means there is not an expected CSRF token to validate against.
We’ve already discussed general solutions to session timeouts. This section discusses the specifics ofCSRF timeouts as it pertains to the servlet support.
It is simple to change storage of the expected CSRF token to be in a cookie. For details, refer to theCustom CsrfTokenRepository section.
If a token does expire, you might want to customize how it is handled by specifying a customAccessDeniedHandler. The custom AccessDeniedHandler can process the InvalidCsrfTokenExceptionany way you like. For an example of how to customize the AccessDeniedHandler refer to the providedlinks for both xml and Java configuration.
Multipart (file upload)
We have already discussed how protecting multipart requests (file uploads) from CSRF attackscauses a chicken and the egg problem. This section discusses how to implement placing the CSRFtoken in the body and url within a servlet application.
More information about using multipart forms with Spring can be found withinthe 1.1.11. Multipart Resolver section of the Spring reference and theMultipartFilter javadoc.
Place CSRF Token in the Body
We have already discussed the tradeoffs of placing the CSRF token in the body. In this section wewill discuss how to configure Spring Security to read the CSRF from the body.
In order to read the CSRF token from the body, the MultipartFilter is specified before the SpringSecurity filter. Specifying the MultipartFilter before the Spring Security filter means that there is
300
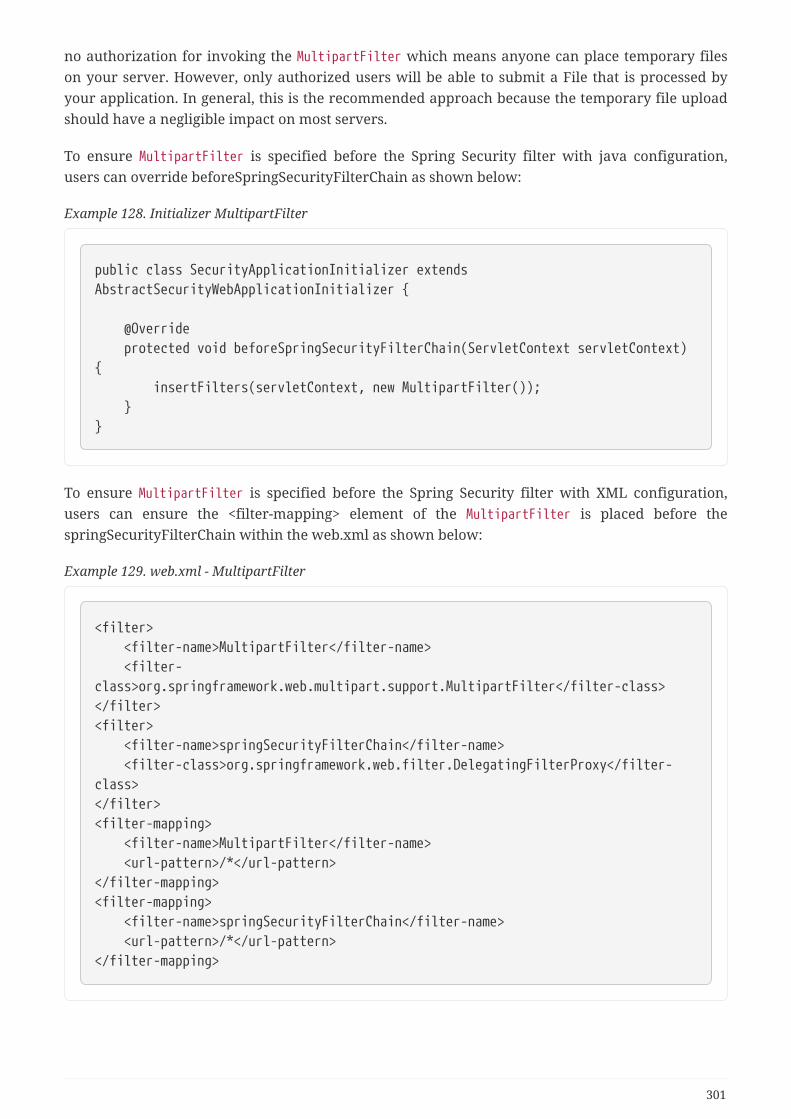
no authorization for invoking the MultipartFilter which means anyone can place temporary fileson your server. However, only authorized users will be able to submit a File that is processed byyour application. In general, this is the recommended approach because the temporary file uploadshould have a negligible impact on most servers.
To ensure MultipartFilter is specified before the Spring Security filter with java configuration,users can override beforeSpringSecurityFilterChain as shown below:
Example 128. Initializer MultipartFilter
public class SecurityApplicationInitializer extendsAbstractSecurityWebApplicationInitializer {
@Override protected void beforeSpringSecurityFilterChain(ServletContext servletContext){ insertFilters(servletContext, new MultipartFilter()); }}
To ensure MultipartFilter is specified before the Spring Security filter with XML configuration,users can ensure the <filter-mapping> element of the MultipartFilter is placed before thespringSecurityFilterChain within the web.xml as shown below:
Example 129. web.xml - MultipartFilter
<filter> <filter-name>MultipartFilter</filter-name> <filter-class>org.springframework.web.multipart.support.MultipartFilter</filter-class></filter><filter> <filter-name>springSecurityFilterChain</filter-name> <filter-class>org.springframework.web.filter.DelegatingFilterProxy</filter-class></filter><filter-mapping> <filter-name>MultipartFilter</filter-name> <url-pattern>/*</url-pattern></filter-mapping><filter-mapping> <filter-name>springSecurityFilterChain</filter-name> <url-pattern>/*</url-pattern></filter-mapping>
301
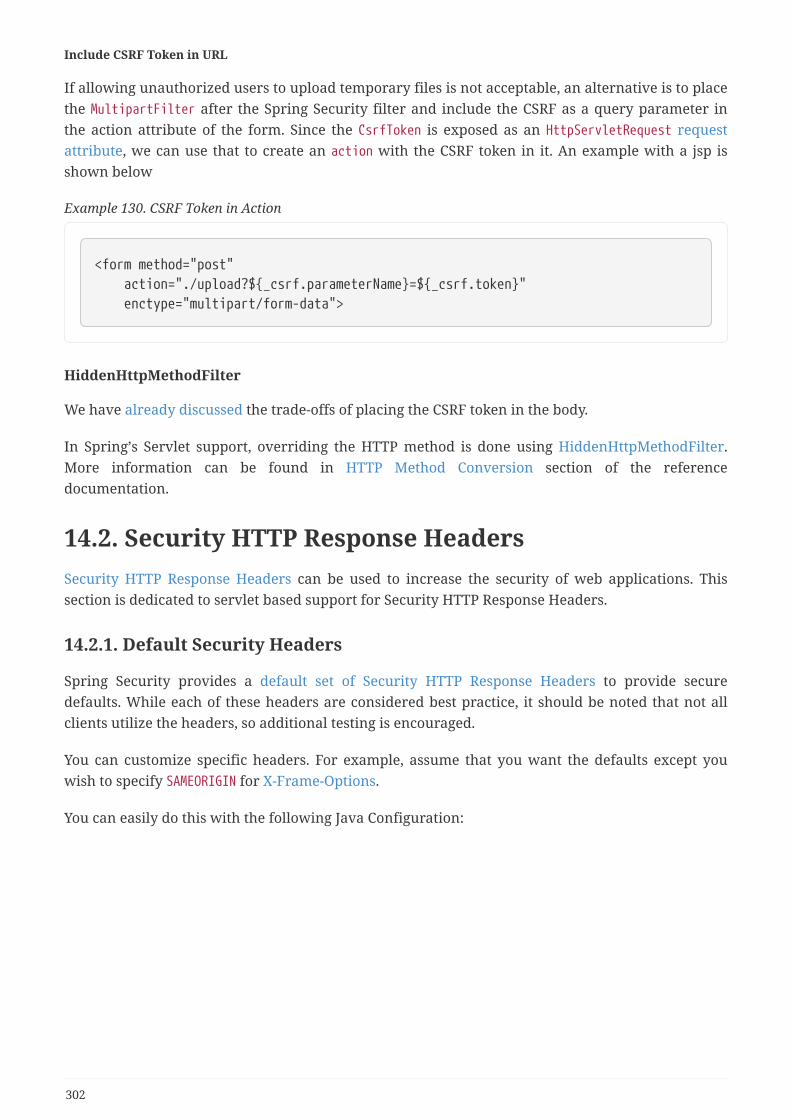
Include CSRF Token in URL
If allowing unauthorized users to upload temporary files is not acceptable, an alternative is to placethe MultipartFilter after the Spring Security filter and include the CSRF as a query parameter inthe action attribute of the form. Since the CsrfToken is exposed as an HttpServletRequest requestattribute, we can use that to create an action with the CSRF token in it. An example with a jsp isshown below
Example 130. CSRF Token in Action
<form method="post" action="./upload?${_csrf.parameterName}=${_csrf.token}" enctype="multipart/form-data">
HiddenHttpMethodFilter
We have already discussed the trade-offs of placing the CSRF token in the body.
In Spring’s Servlet support, overriding the HTTP method is done using HiddenHttpMethodFilter.More information can be found in HTTP Method Conversion section of the referencedocumentation.
14.2. Security HTTP Response HeadersSecurity HTTP Response Headers can be used to increase the security of web applications. Thissection is dedicated to servlet based support for Security HTTP Response Headers.
14.2.1. Default Security Headers
Spring Security provides a default set of Security HTTP Response Headers to provide securedefaults. While each of these headers are considered best practice, it should be noted that not allclients utilize the headers, so additional testing is encouraged.
You can customize specific headers. For example, assume that you want the defaults except youwish to specify SAMEORIGIN for X-Frame-Options.
You can easily do this with the following Java Configuration:
302
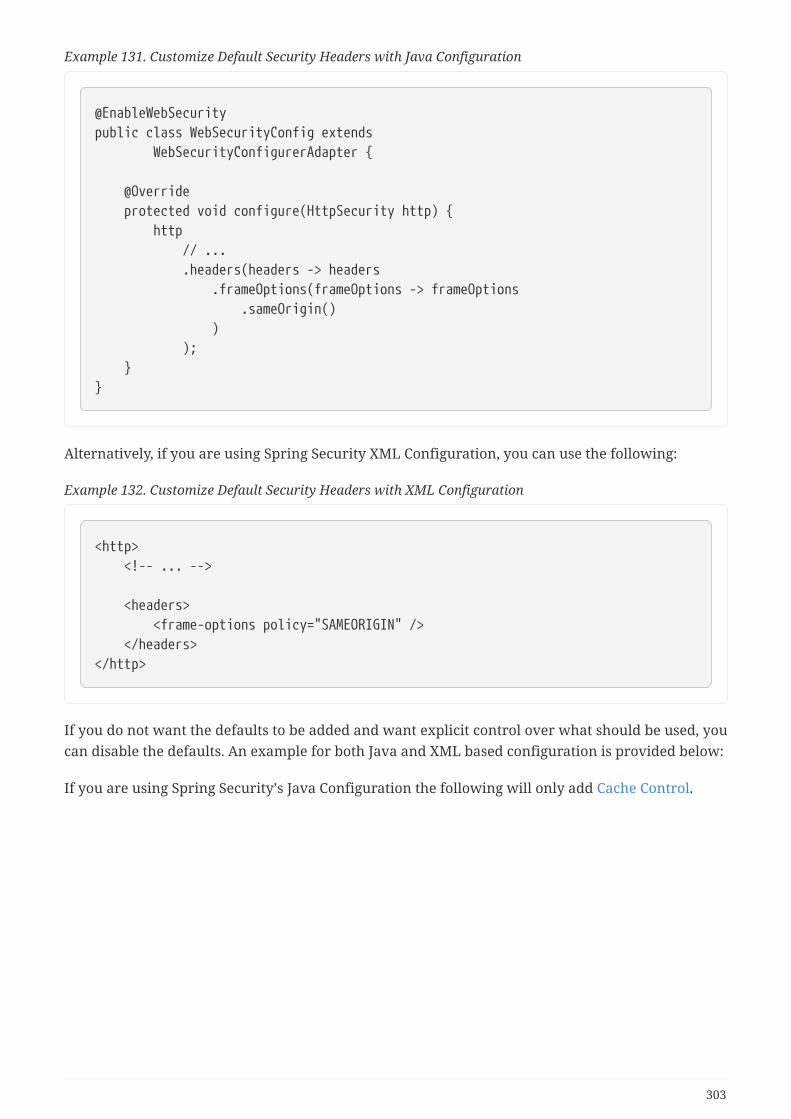
Example 131. Customize Default Security Headers with Java Configuration
@EnableWebSecuritypublic class WebSecurityConfig extends WebSecurityConfigurerAdapter {
@Override protected void configure(HttpSecurity http) { http // ... .headers(headers -> headers .frameOptions(frameOptions -> frameOptions .sameOrigin() ) ); }}
Alternatively, if you are using Spring Security XML Configuration, you can use the following:
Example 132. Customize Default Security Headers with XML Configuration
<http> <!-- ... -->
<headers> <frame-options policy="SAMEORIGIN" /> </headers></http>
If you do not want the defaults to be added and want explicit control over what should be used, youcan disable the defaults. An example for both Java and XML based configuration is provided below:
If you are using Spring Security’s Java Configuration the following will only add Cache Control.
303
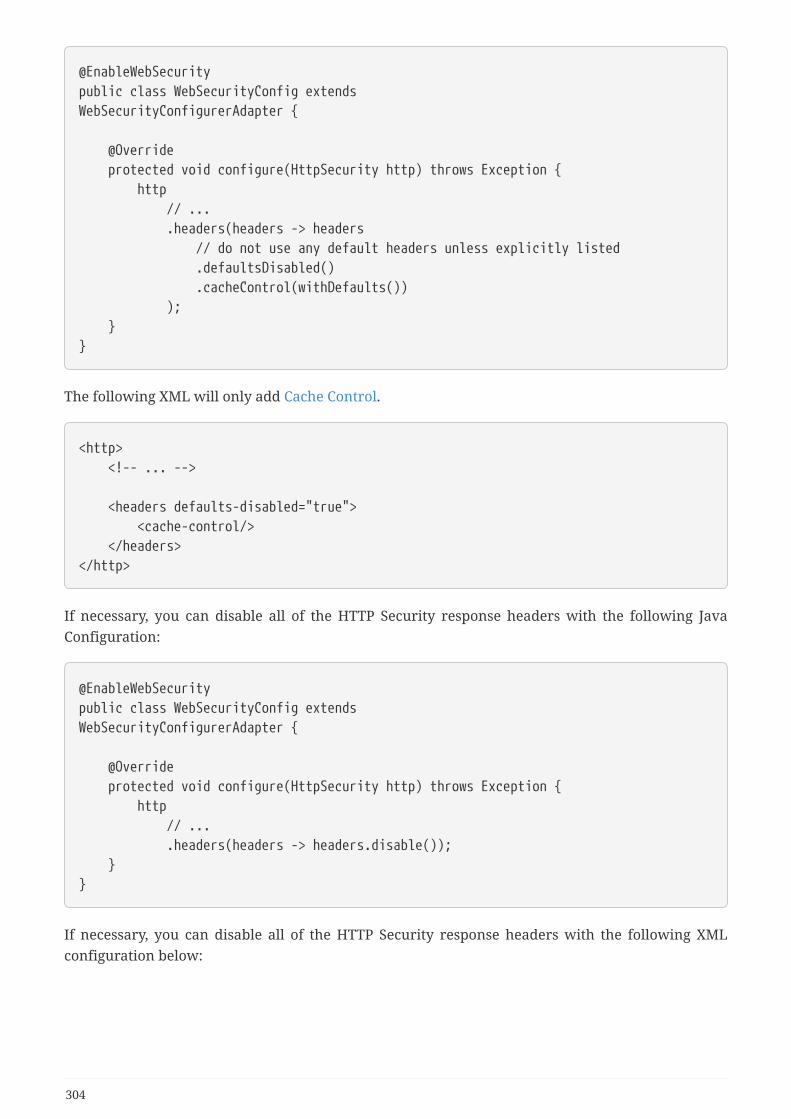
@EnableWebSecuritypublic class WebSecurityConfig extendsWebSecurityConfigurerAdapter {
@Override protected void configure(HttpSecurity http) throws Exception { http // ... .headers(headers -> headers // do not use any default headers unless explicitly listed .defaultsDisabled() .cacheControl(withDefaults()) ); }}
The following XML will only add Cache Control.
<http> <!-- ... -->
<headers defaults-disabled="true"> <cache-control/> </headers></http>
If necessary, you can disable all of the HTTP Security response headers with the following JavaConfiguration:
@EnableWebSecuritypublic class WebSecurityConfig extendsWebSecurityConfigurerAdapter {
@Override protected void configure(HttpSecurity http) throws Exception { http // ... .headers(headers -> headers.disable()); }}
If necessary, you can disable all of the HTTP Security response headers with the following XMLconfiguration below:
304
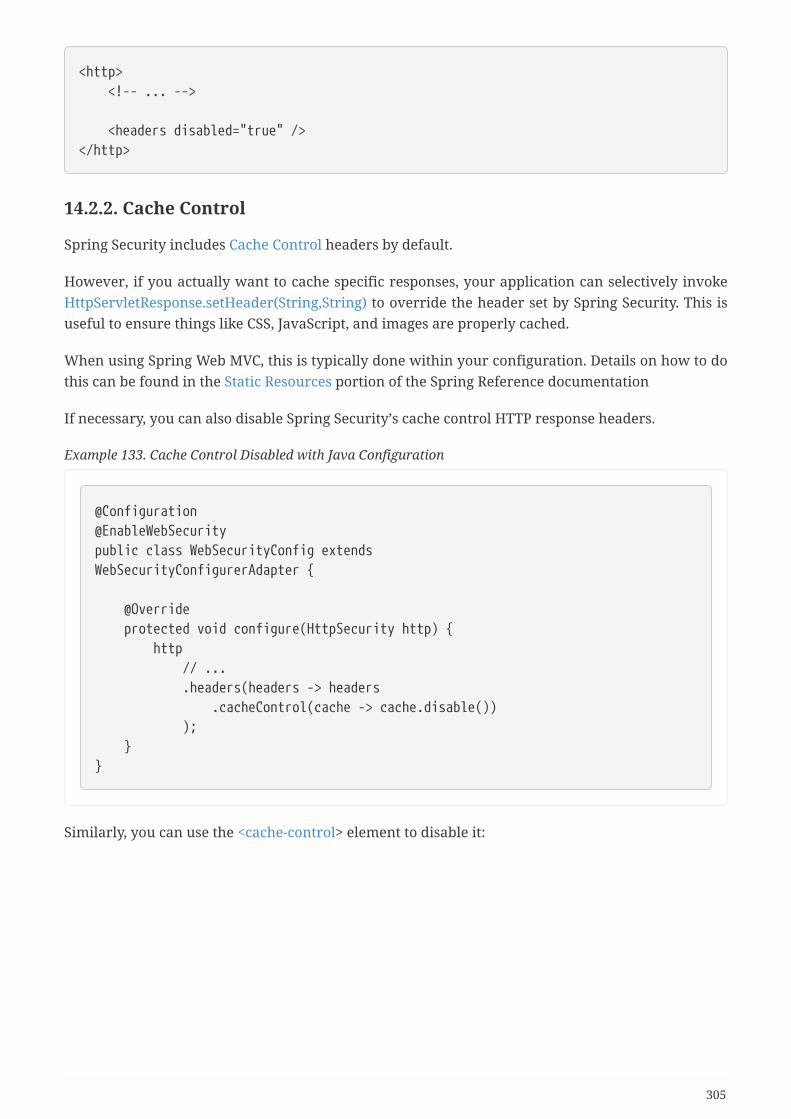
<http> <!-- ... -->
<headers disabled="true" /></http>
14.2.2. Cache Control
Spring Security includes Cache Control headers by default.
However, if you actually want to cache specific responses, your application can selectively invokeHttpServletResponse.setHeader(String,String) to override the header set by Spring Security. This isuseful to ensure things like CSS, JavaScript, and images are properly cached.
When using Spring Web MVC, this is typically done within your configuration. Details on how to dothis can be found in the Static Resources portion of the Spring Reference documentation
If necessary, you can also disable Spring Security’s cache control HTTP response headers.
Example 133. Cache Control Disabled with Java Configuration
@Configuration@EnableWebSecuritypublic class WebSecurityConfig extendsWebSecurityConfigurerAdapter {
@Override protected void configure(HttpSecurity http) { http // ... .headers(headers -> headers .cacheControl(cache -> cache.disable()) ); }}
Similarly, you can use the <cache-control> element to disable it:
305

Example 134. Cache Control Disabled with XML
<http> <!-- ... -->
<headers> <cache-control disabled="true"/> </headers></http>
14.2.3. Content Type Options
Spring Security includes Content-Type headers by default. However, you can disable it in JavaConfiguration with:
Example 135. Content Type Options Disabled with Java Configuration
@Configuration@EnableWebSecuritypublic class WebSecurityConfig extends WebSecurityConfigurerAdapter {
@Override protected void configure(HttpSecurity http) { http // ... .headers(headers -> headers .contentTypeOptions(contentTypeOptions ->contentTypeOptions.disable()) ); }}
Similarly, you can use the <content-type-options> element to disable it:
Example 136. Content Type Options Disabled with XML
<http> <!-- ... -->
<headers> <content-type-options disabled="true"/> </headers></http>
306
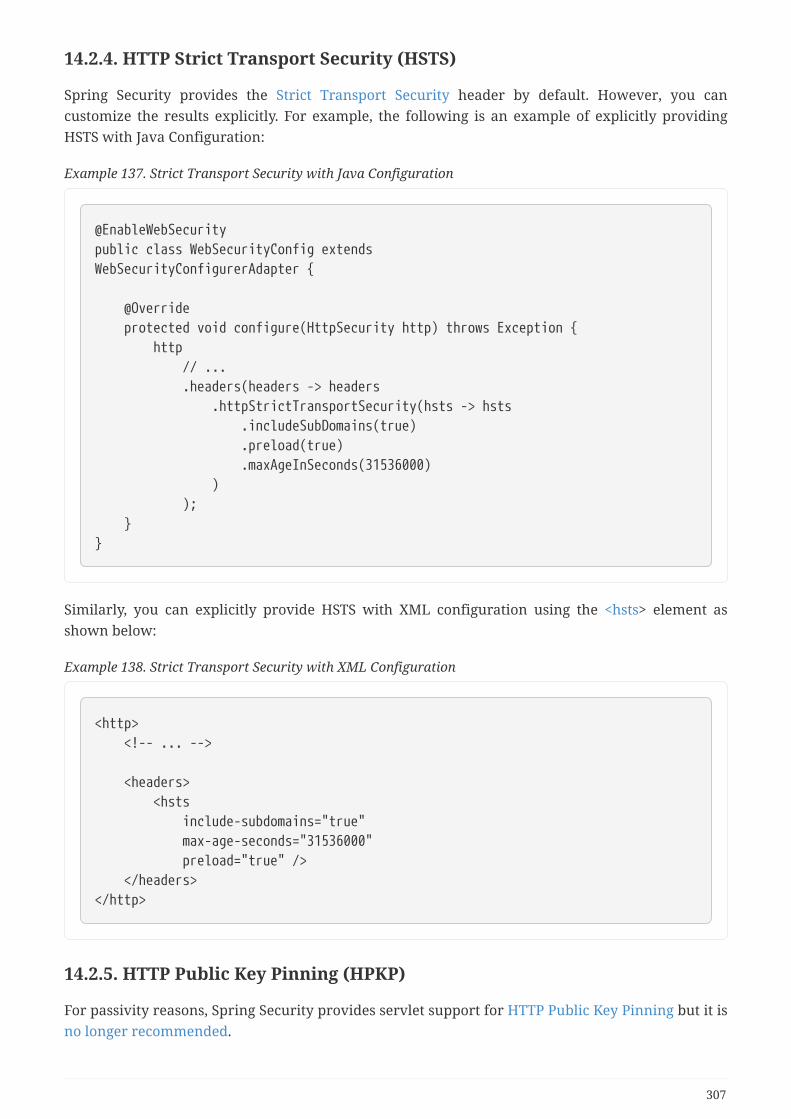
14.2.4. HTTP Strict Transport Security (HSTS)
Spring Security provides the Strict Transport Security header by default. However, you cancustomize the results explicitly. For example, the following is an example of explicitly providingHSTS with Java Configuration:
Example 137. Strict Transport Security with Java Configuration
@EnableWebSecuritypublic class WebSecurityConfig extendsWebSecurityConfigurerAdapter {
@Override protected void configure(HttpSecurity http) throws Exception { http // ... .headers(headers -> headers .httpStrictTransportSecurity(hsts -> hsts .includeSubDomains(true) .preload(true) .maxAgeInSeconds(31536000) ) ); }}
Similarly, you can explicitly provide HSTS with XML configuration using the <hsts> element asshown below:
Example 138. Strict Transport Security with XML Configuration
<http> <!-- ... -->
<headers> <hsts include-subdomains="true" max-age-seconds="31536000" preload="true" /> </headers></http>
14.2.5. HTTP Public Key Pinning (HPKP)
For passivity reasons, Spring Security provides servlet support for HTTP Public Key Pinning but it isno longer recommended.
307
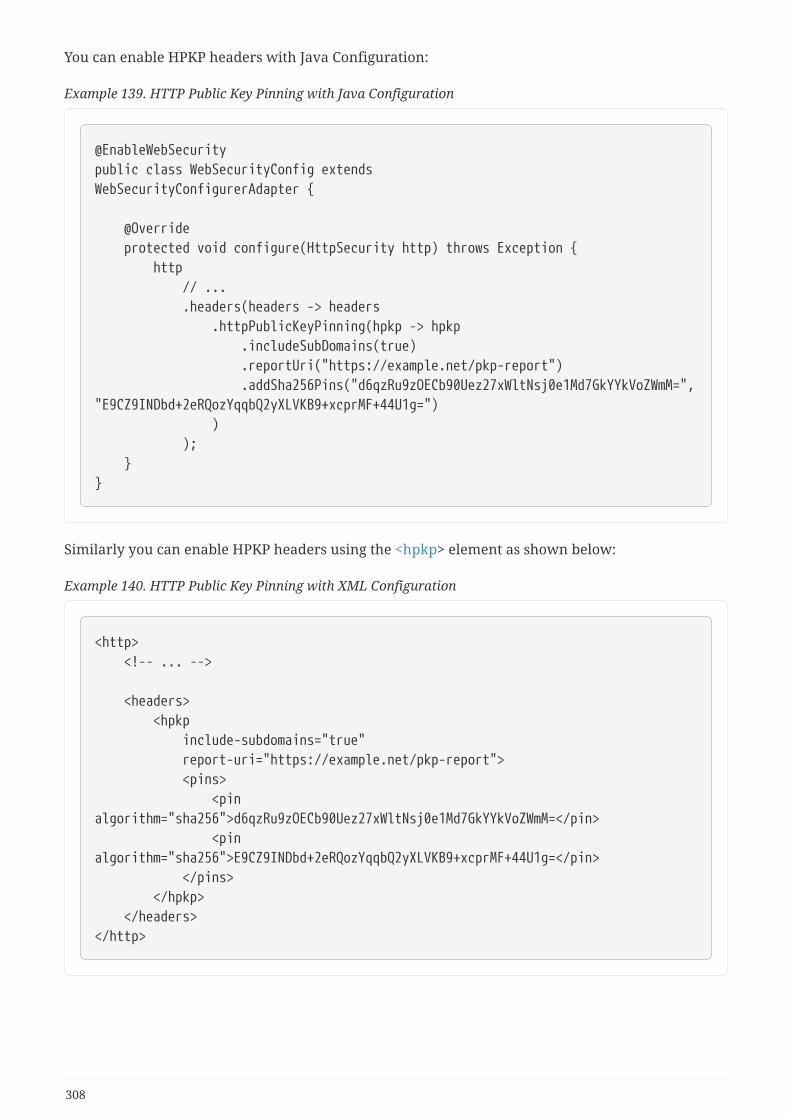
You can enable HPKP headers with Java Configuration:
Example 139. HTTP Public Key Pinning with Java Configuration
@EnableWebSecuritypublic class WebSecurityConfig extendsWebSecurityConfigurerAdapter {
@Override protected void configure(HttpSecurity http) throws Exception { http // ... .headers(headers -> headers .httpPublicKeyPinning(hpkp -> hpkp .includeSubDomains(true) .reportUri("https://example.net/pkp-report") .addSha256Pins("d6qzRu9zOECb90Uez27xWltNsj0e1Md7GkYYkVoZWmM=","E9CZ9INDbd+2eRQozYqqbQ2yXLVKB9+xcprMF+44U1g=") ) ); }}
Similarly you can enable HPKP headers using the <hpkp> element as shown below:
Example 140. HTTP Public Key Pinning with XML Configuration
<http> <!-- ... -->
<headers> <hpkp include-subdomains="true" report-uri="https://example.net/pkp-report"> <pins> <pinalgorithm="sha256">d6qzRu9zOECb90Uez27xWltNsj0e1Md7GkYYkVoZWmM=</pin> <pinalgorithm="sha256">E9CZ9INDbd+2eRQozYqqbQ2yXLVKB9+xcprMF+44U1g=</pin> </pins> </hpkp> </headers></http>
308
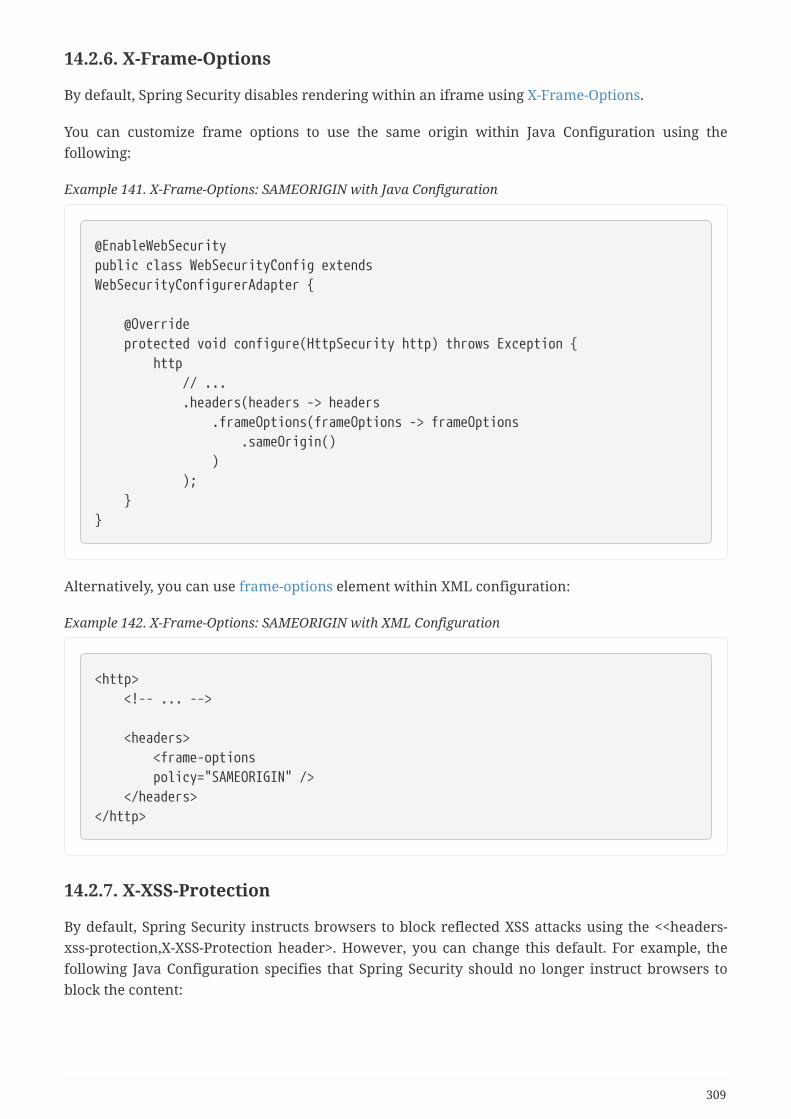
14.2.6. X-Frame-Options
By default, Spring Security disables rendering within an iframe using X-Frame-Options.
You can customize frame options to use the same origin within Java Configuration using thefollowing:
Example 141. X-Frame-Options: SAMEORIGIN with Java Configuration
@EnableWebSecuritypublic class WebSecurityConfig extendsWebSecurityConfigurerAdapter {
@Override protected void configure(HttpSecurity http) throws Exception { http // ... .headers(headers -> headers .frameOptions(frameOptions -> frameOptions .sameOrigin() ) ); }}
Alternatively, you can use frame-options element within XML configuration:
Example 142. X-Frame-Options: SAMEORIGIN with XML Configuration
<http> <!-- ... -->
<headers> <frame-options policy="SAMEORIGIN" /> </headers></http>
14.2.7. X-XSS-Protection
By default, Spring Security instructs browsers to block reflected XSS attacks using the <<headers-xss-protection,X-XSS-Protection header>. However, you can change this default. For example, thefollowing Java Configuration specifies that Spring Security should no longer instruct browsers toblock the content:
309
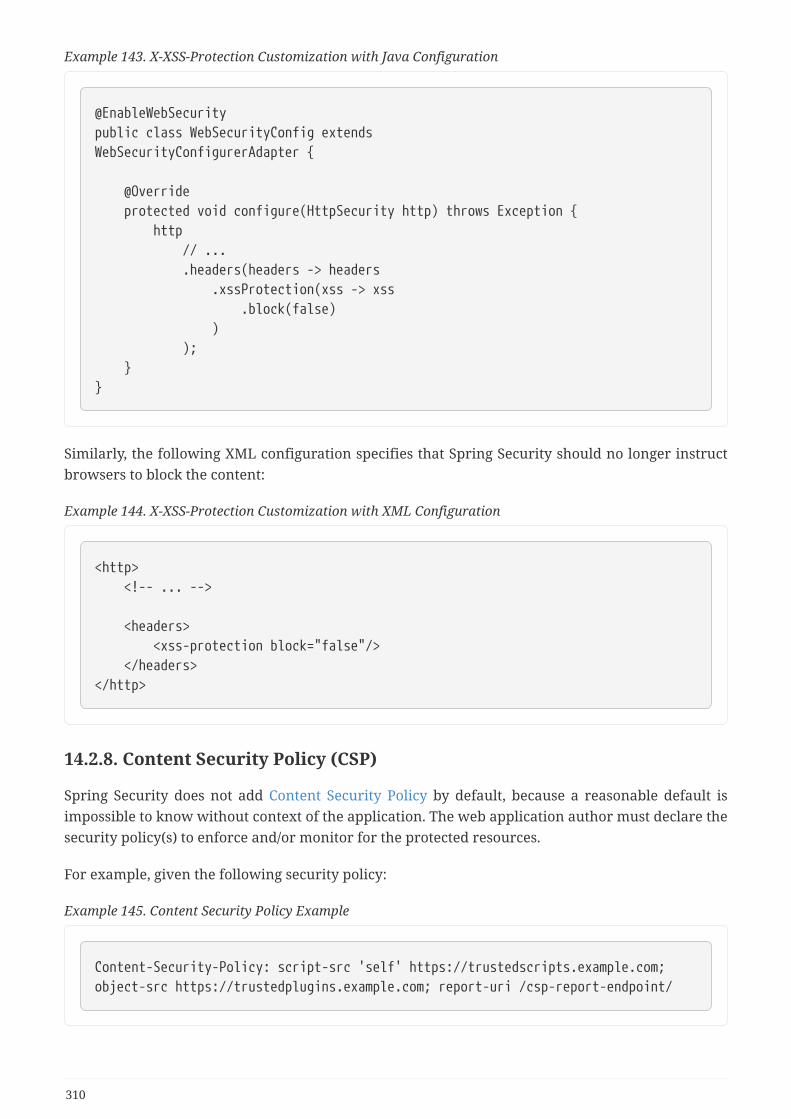
Example 143. X-XSS-Protection Customization with Java Configuration
@EnableWebSecuritypublic class WebSecurityConfig extendsWebSecurityConfigurerAdapter {
@Override protected void configure(HttpSecurity http) throws Exception { http // ... .headers(headers -> headers .xssProtection(xss -> xss .block(false) ) ); }}
Similarly, the following XML configuration specifies that Spring Security should no longer instructbrowsers to block the content:
Example 144. X-XSS-Protection Customization with XML Configuration
<http> <!-- ... -->
<headers> <xss-protection block="false"/> </headers></http>
14.2.8. Content Security Policy (CSP)
Spring Security does not add Content Security Policy by default, because a reasonable default isimpossible to know without context of the application. The web application author must declare thesecurity policy(s) to enforce and/or monitor for the protected resources.
For example, given the following security policy:
Example 145. Content Security Policy Example
Content-Security-Policy: script-src 'self' https://trustedscripts.example.com;object-src https://trustedplugins.example.com; report-uri /csp-report-endpoint/
310
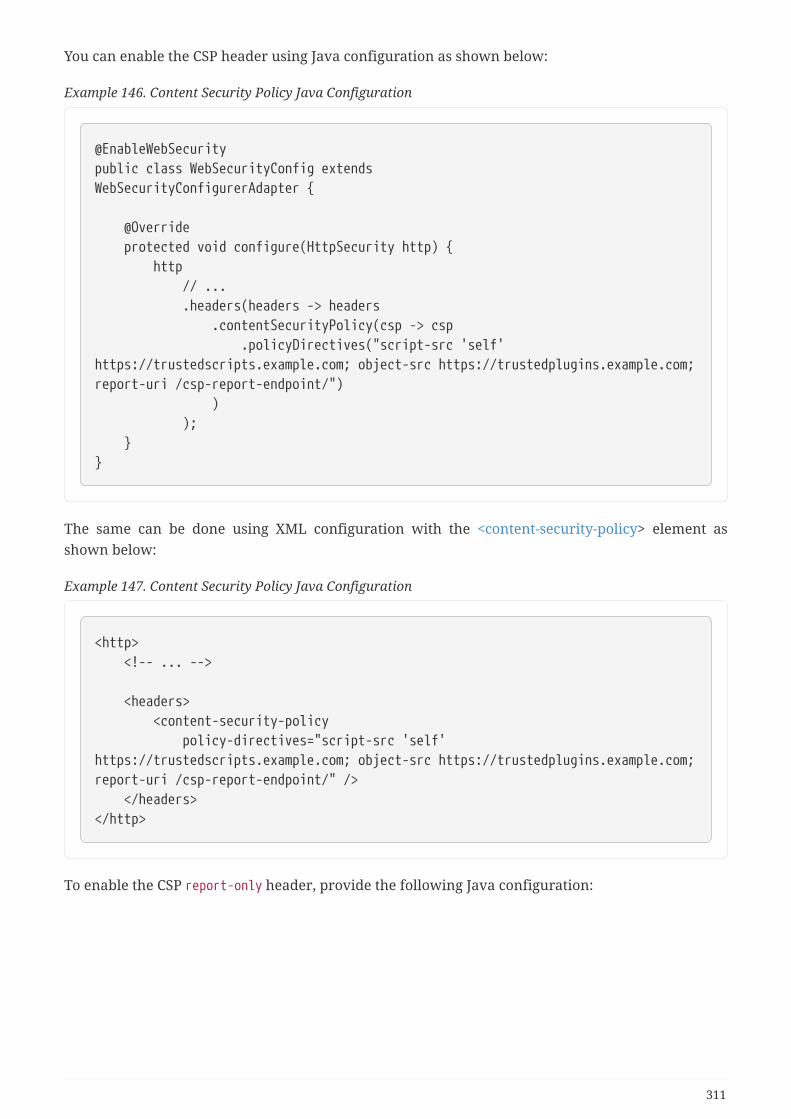
You can enable the CSP header using Java configuration as shown below:
Example 146. Content Security Policy Java Configuration
@EnableWebSecuritypublic class WebSecurityConfig extendsWebSecurityConfigurerAdapter {
@Override protected void configure(HttpSecurity http) { http // ... .headers(headers -> headers .contentSecurityPolicy(csp -> csp .policyDirectives("script-src 'self'https://trustedscripts.example.com; object-src https://trustedplugins.example.com;report-uri /csp-report-endpoint/") ) ); }}
The same can be done using XML configuration with the <content-security-policy> element asshown below:
Example 147. Content Security Policy Java Configuration
<http> <!-- ... -->
<headers> <content-security-policy policy-directives="script-src 'self'https://trustedscripts.example.com; object-src https://trustedplugins.example.com;report-uri /csp-report-endpoint/" /> </headers></http>
To enable the CSP report-only header, provide the following Java configuration:
311

Example 148. Content Security Policy Report Only Java Configuration
@EnableWebSecuritypublic class WebSecurityConfig extends WebSecurityConfigurerAdapter {
@Override protected void configure(HttpSecurity http) throws Exception { http // ... .headers(headers -> headers .contentSecurityPolicy(csp -> csp .policyDirectives("script-src 'self'https://trustedscripts.example.com; object-src https://trustedplugins.example.com;report-uri /csp-report-endpoint/") .reportOnly() ) ); }}
The same can be achieved with XML configuration using:
Example 149. Content Security Policy XML Configuration
<http> <!-- ... -->
<headers> <content-security-policy policy-directives="script-src 'self'https://trustedscripts.example.com; object-src https://trustedplugins.example.com;report-uri /csp-report-endpoint/" report-only="true" /> </headers></http>
14.2.9. Referrer Policy
Spring Security does not add Referrer Policy headers by default. You can enable the Referrer Policyheader using Java configuration as shown below:
312
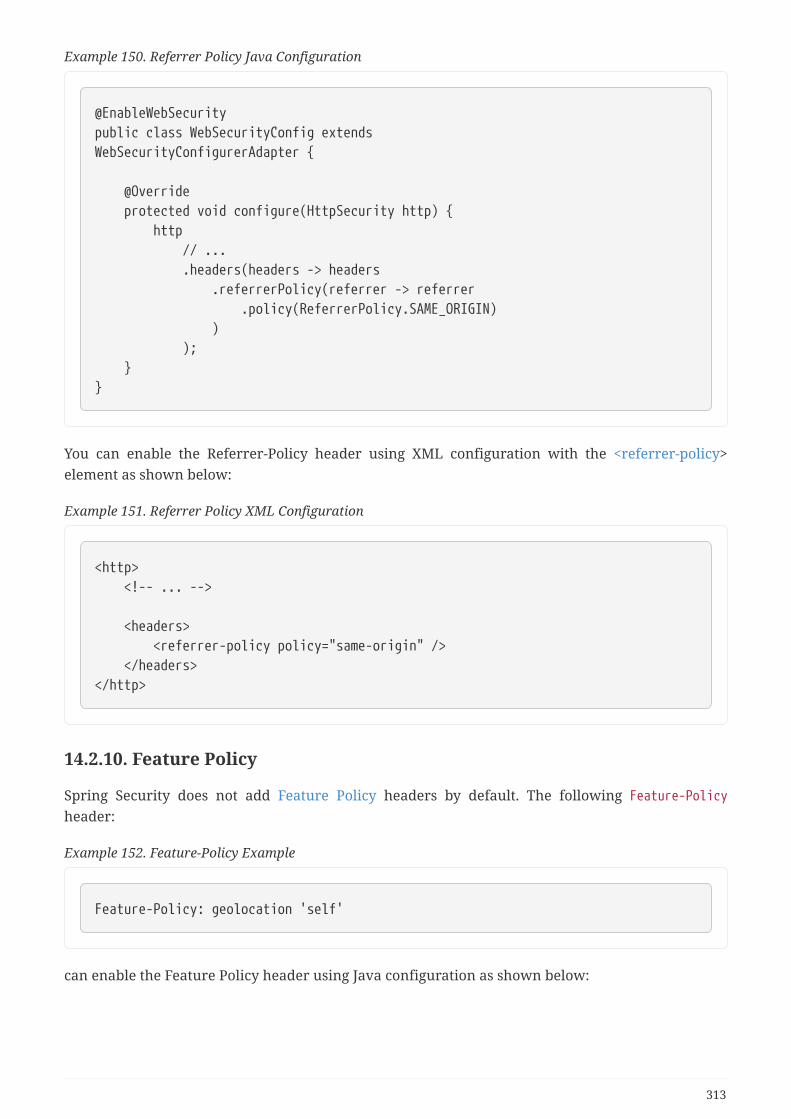
Example 150. Referrer Policy Java Configuration
@EnableWebSecuritypublic class WebSecurityConfig extendsWebSecurityConfigurerAdapter {
@Override protected void configure(HttpSecurity http) { http // ... .headers(headers -> headers .referrerPolicy(referrer -> referrer .policy(ReferrerPolicy.SAME_ORIGIN) ) ); }}
You can enable the Referrer-Policy header using XML configuration with the <referrer-policy>element as shown below:
Example 151. Referrer Policy XML Configuration
<http> <!-- ... -->
<headers> <referrer-policy policy="same-origin" /> </headers></http>
14.2.10. Feature Policy
Spring Security does not add Feature Policy headers by default. The following Feature-Policyheader:
Example 152. Feature-Policy Example
Feature-Policy: geolocation 'self'
can enable the Feature Policy header using Java configuration as shown below:
313
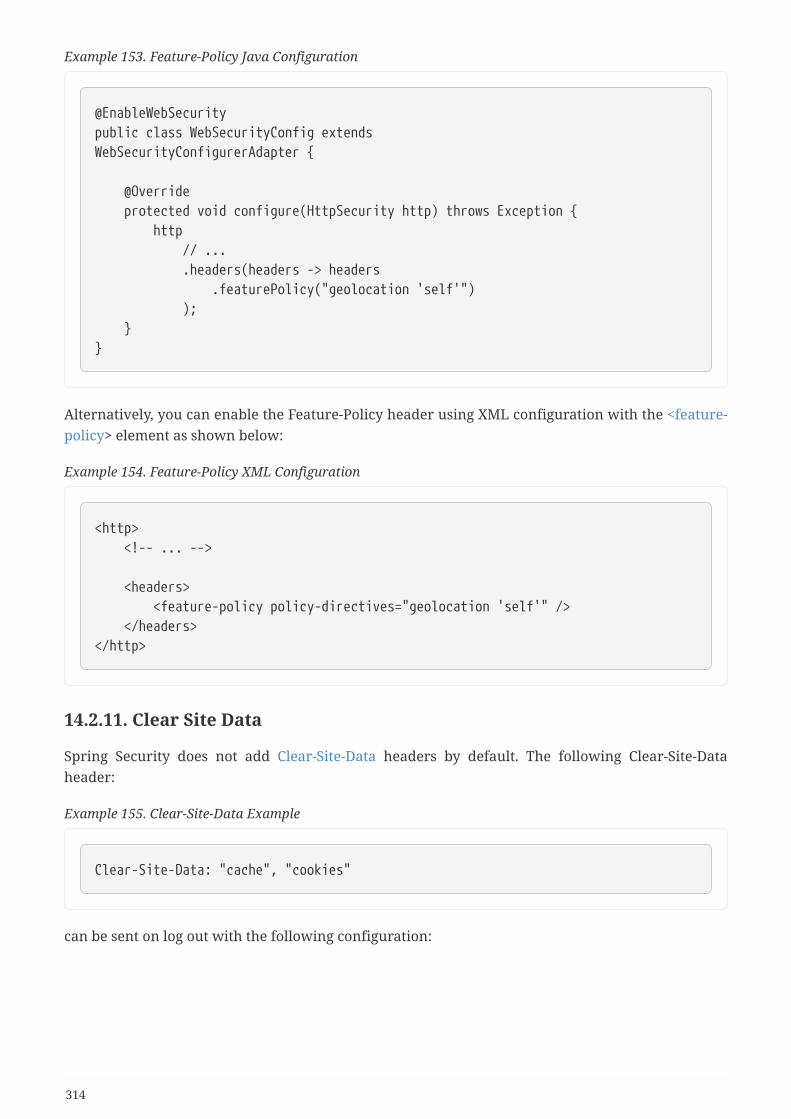
Example 153. Feature-Policy Java Configuration
@EnableWebSecuritypublic class WebSecurityConfig extendsWebSecurityConfigurerAdapter {
@Override protected void configure(HttpSecurity http) throws Exception { http // ... .headers(headers -> headers .featurePolicy("geolocation 'self'") ); }}
Alternatively, you can enable the Feature-Policy header using XML configuration with the <feature-policy> element as shown below:
Example 154. Feature-Policy XML Configuration
<http> <!-- ... -->
<headers> <feature-policy policy-directives="geolocation 'self'" /> </headers></http>
14.2.11. Clear Site Data
Spring Security does not add Clear-Site-Data headers by default. The following Clear-Site-Dataheader:
Example 155. Clear-Site-Data Example
Clear-Site-Data: "cache", "cookies"
can be sent on log out with the following configuration:
314
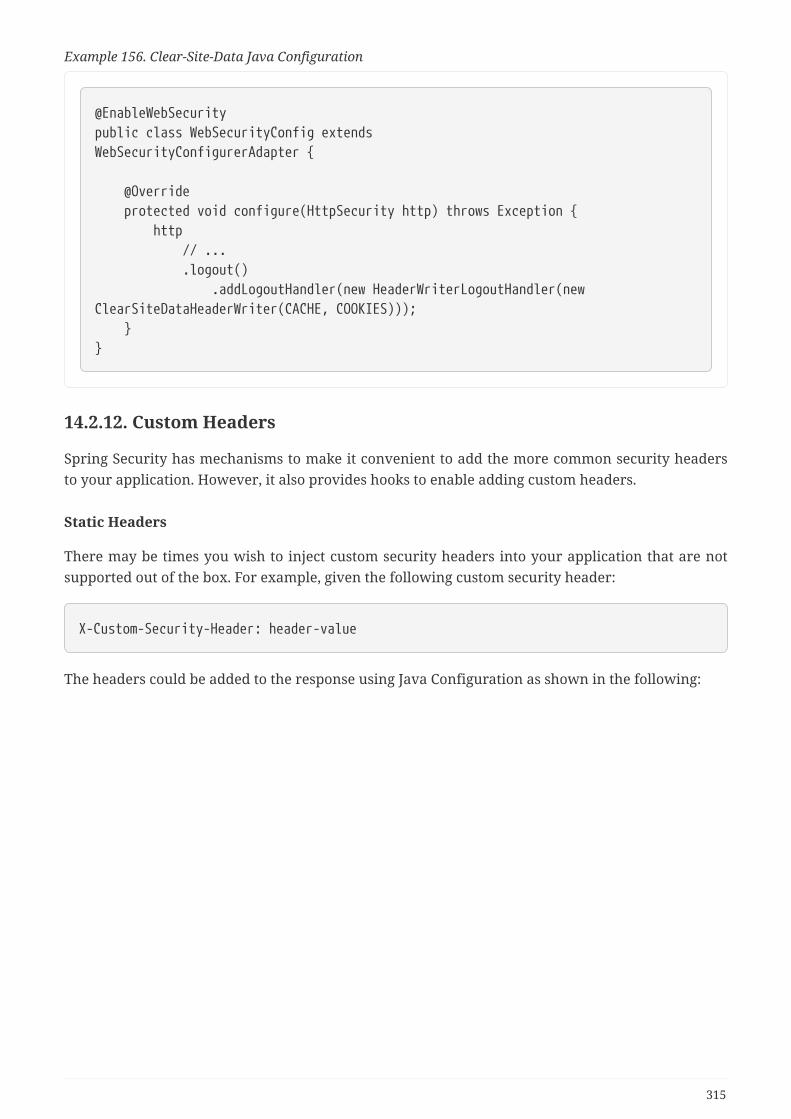
Example 156. Clear-Site-Data Java Configuration
@EnableWebSecuritypublic class WebSecurityConfig extendsWebSecurityConfigurerAdapter {
@Override protected void configure(HttpSecurity http) throws Exception { http // ... .logout() .addLogoutHandler(new HeaderWriterLogoutHandler(newClearSiteDataHeaderWriter(CACHE, COOKIES))); }}
14.2.12. Custom Headers
Spring Security has mechanisms to make it convenient to add the more common security headersto your application. However, it also provides hooks to enable adding custom headers.
Static Headers
There may be times you wish to inject custom security headers into your application that are notsupported out of the box. For example, given the following custom security header:
X-Custom-Security-Header: header-value
The headers could be added to the response using Java Configuration as shown in the following:
315
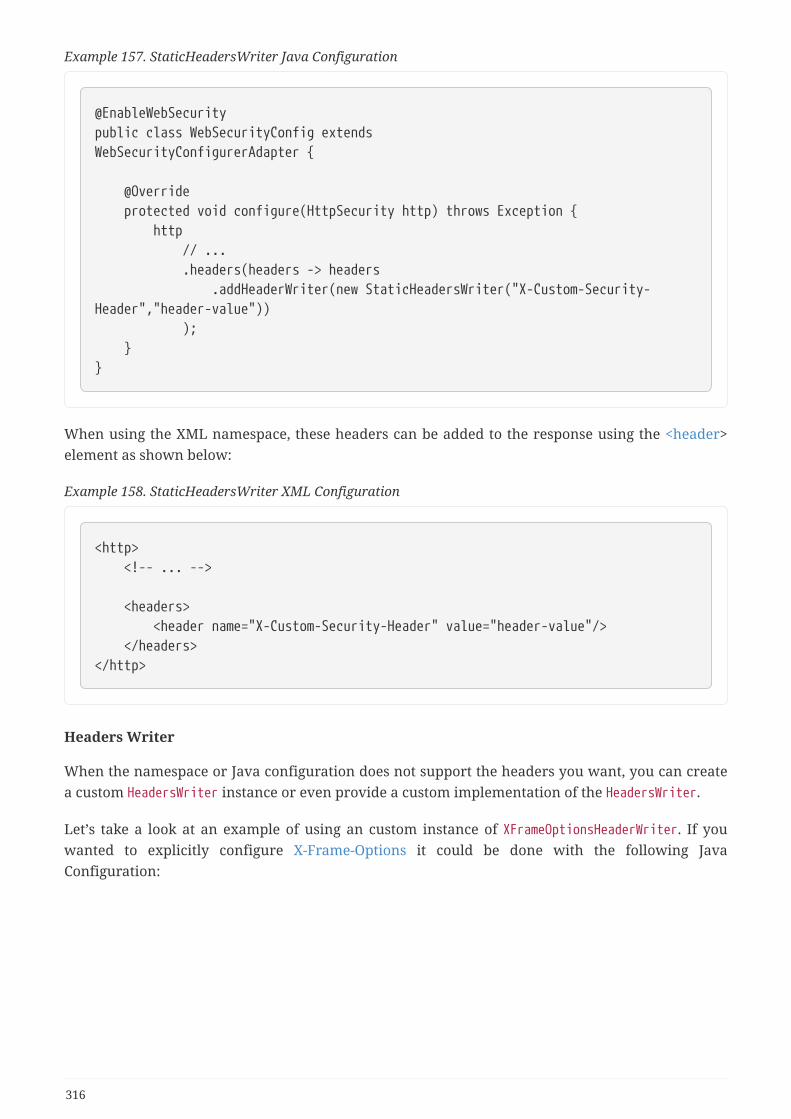
Example 157. StaticHeadersWriter Java Configuration
@EnableWebSecuritypublic class WebSecurityConfig extendsWebSecurityConfigurerAdapter {
@Override protected void configure(HttpSecurity http) throws Exception { http // ... .headers(headers -> headers .addHeaderWriter(new StaticHeadersWriter("X-Custom-Security-Header","header-value")) ); }}
When using the XML namespace, these headers can be added to the response using the <header>element as shown below:
Example 158. StaticHeadersWriter XML Configuration
<http> <!-- ... -->
<headers> <header name="X-Custom-Security-Header" value="header-value"/> </headers></http>
Headers Writer
When the namespace or Java configuration does not support the headers you want, you can createa custom HeadersWriter instance or even provide a custom implementation of the HeadersWriter.
Let’s take a look at an example of using an custom instance of XFrameOptionsHeaderWriter. If youwanted to explicitly configure X-Frame-Options it could be done with the following JavaConfiguration:
316
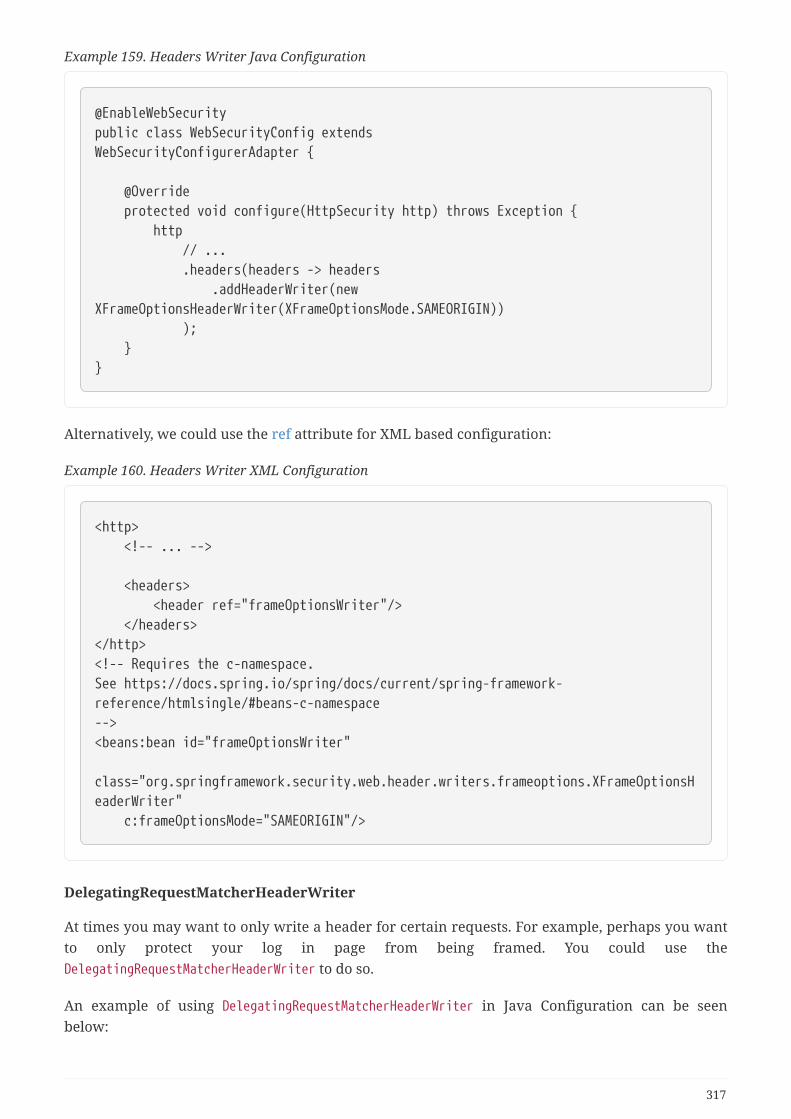
Example 159. Headers Writer Java Configuration
@EnableWebSecuritypublic class WebSecurityConfig extendsWebSecurityConfigurerAdapter {
@Override protected void configure(HttpSecurity http) throws Exception { http // ... .headers(headers -> headers .addHeaderWriter(newXFrameOptionsHeaderWriter(XFrameOptionsMode.SAMEORIGIN)) ); }}
Alternatively, we could use the ref attribute for XML based configuration:
Example 160. Headers Writer XML Configuration
<http> <!-- ... -->
<headers> <header ref="frameOptionsWriter"/> </headers></http><!-- Requires the c-namespace.See https://docs.spring.io/spring/docs/current/spring-framework-reference/htmlsingle/#beans-c-namespace--><beans:bean id="frameOptionsWriter" class="org.springframework.security.web.header.writers.frameoptions.XFrameOptionsHeaderWriter" c:frameOptionsMode="SAMEORIGIN"/>
DelegatingRequestMatcherHeaderWriter
At times you may want to only write a header for certain requests. For example, perhaps you wantto only protect your log in page from being framed. You could use theDelegatingRequestMatcherHeaderWriter to do so.
An example of using DelegatingRequestMatcherHeaderWriter in Java Configuration can be seenbelow:
317
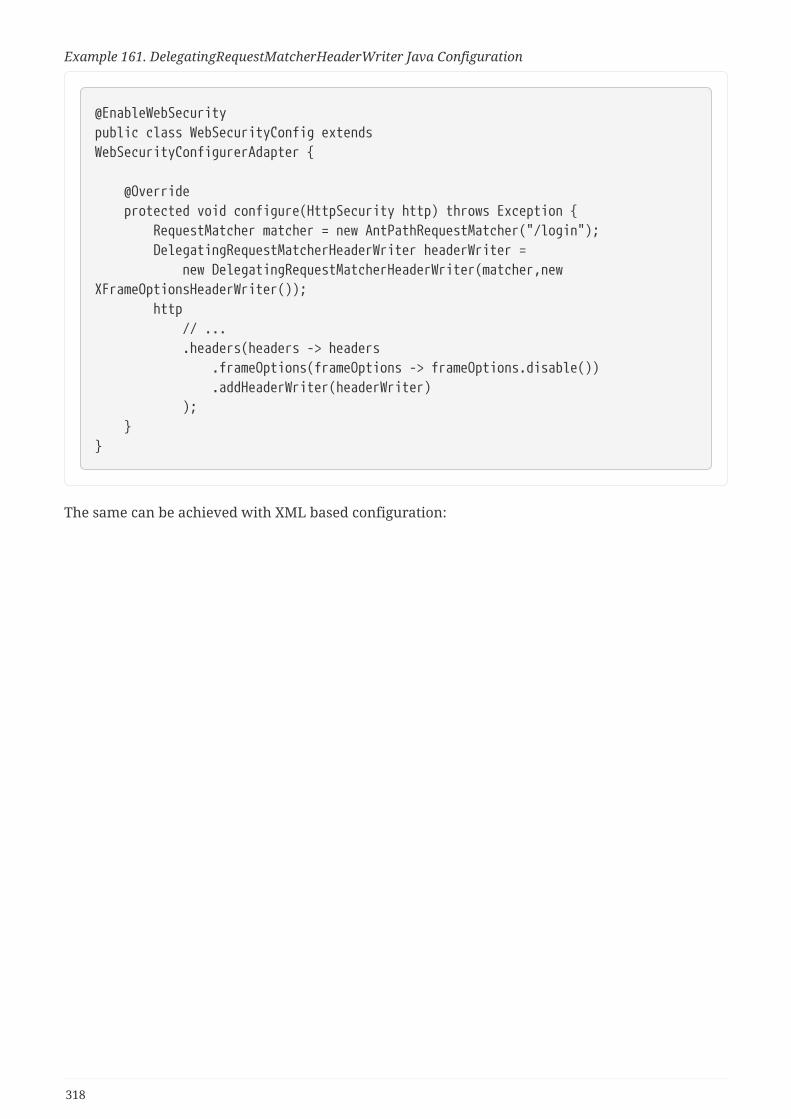
Example 161. DelegatingRequestMatcherHeaderWriter Java Configuration
@EnableWebSecuritypublic class WebSecurityConfig extendsWebSecurityConfigurerAdapter {
@Override protected void configure(HttpSecurity http) throws Exception { RequestMatcher matcher = new AntPathRequestMatcher("/login"); DelegatingRequestMatcherHeaderWriter headerWriter = new DelegatingRequestMatcherHeaderWriter(matcher,newXFrameOptionsHeaderWriter()); http // ... .headers(headers -> headers .frameOptions(frameOptions -> frameOptions.disable()) .addHeaderWriter(headerWriter) ); }}
The same can be achieved with XML based configuration:
318
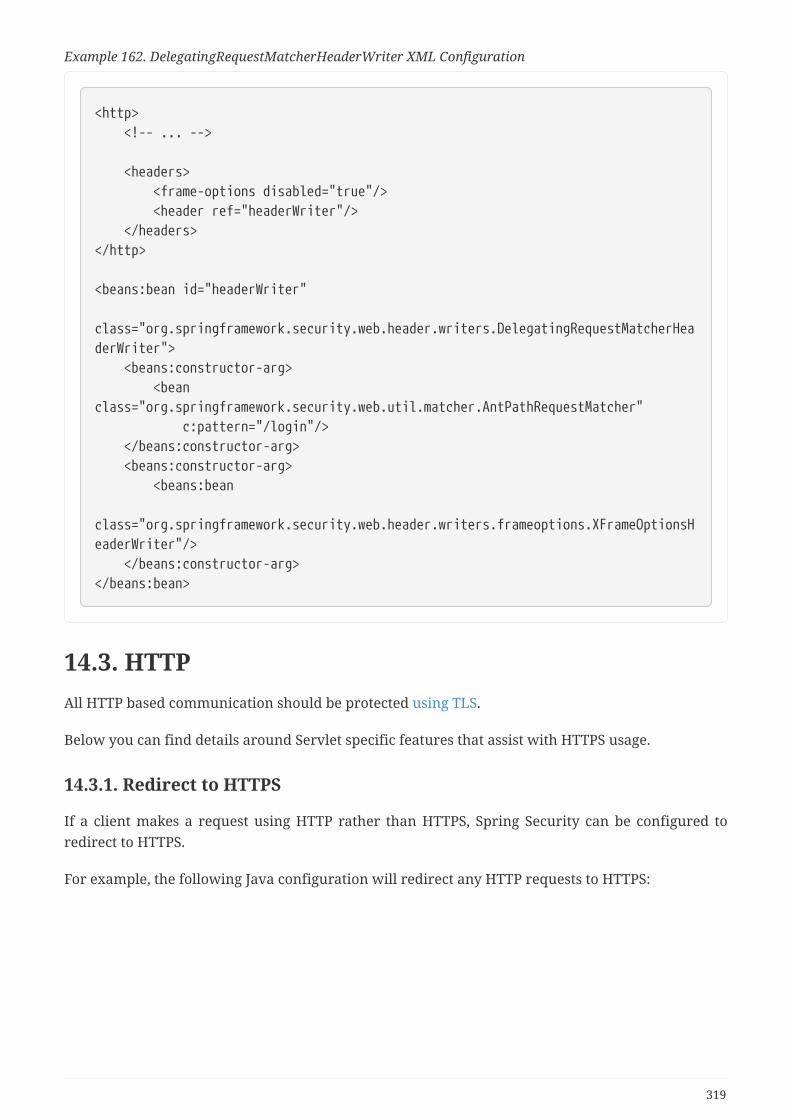
Example 162. DelegatingRequestMatcherHeaderWriter XML Configuration
<http> <!-- ... -->
<headers> <frame-options disabled="true"/> <header ref="headerWriter"/> </headers></http>
<beans:bean id="headerWriter" class="org.springframework.security.web.header.writers.DelegatingRequestMatcherHeaderWriter"> <beans:constructor-arg> <beanclass="org.springframework.security.web.util.matcher.AntPathRequestMatcher" c:pattern="/login"/> </beans:constructor-arg> <beans:constructor-arg> <beans:bean class="org.springframework.security.web.header.writers.frameoptions.XFrameOptionsHeaderWriter"/> </beans:constructor-arg></beans:bean>
14.3. HTTPAll HTTP based communication should be protected using TLS.
Below you can find details around Servlet specific features that assist with HTTPS usage.
14.3.1. Redirect to HTTPS
If a client makes a request using HTTP rather than HTTPS, Spring Security can be configured toredirect to HTTPS.
For example, the following Java configuration will redirect any HTTP requests to HTTPS:
319

Example 163. Redirect to HTTPS with Java Configuration
@Configuration@EnableWebSecuritypublic class WebSecurityConfig extends WebSecurityConfigurerAdapter {
@Override protected void configure(HttpSecurity http) { http // ... .requiresChannel(channel -> channel .anyRequest().requiresSecure() ); }}
The following XML configuration will redirect all HTTP requests to HTTPS
Example 164. Redirect to HTTPS with XML Configuration
<http> <intercept-url pattern="/**" access="ROLE_USER" requires-channel="https"/>...</http>
14.3.2. Strict Transport Security
Spring Security provides support for Strict Transport Security and enables it by default.
14.3.3. Proxy Server Configuration
Spring Security integrates with proxy servers.
14.4. HttpFirewallSpring Security has several areas where patterns you have defined are tested against incomingrequests in order to decide how the request should be handled. This occurs when theFilterChainProxy decides which filter chain a request should be passed through and also when theFilterSecurityInterceptor decides which security constraints apply to a request. It’s important tounderstand what the mechanism is and what URL value is used when testing against the patternsthat you define.
The Servlet Specification defines several properties for the HttpServletRequest which are accessiblevia getter methods, and which we might want to match against. These are the contextPath,
320
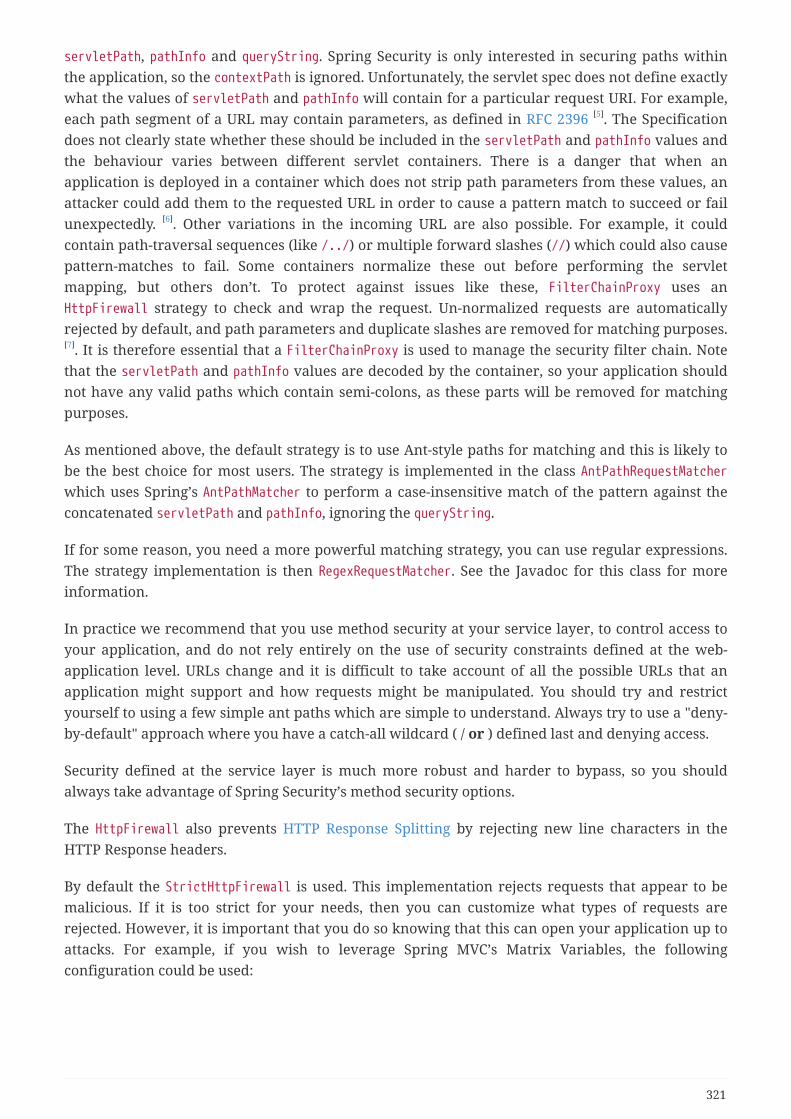
servletPath, pathInfo and queryString. Spring Security is only interested in securing paths withinthe application, so the contextPath is ignored. Unfortunately, the servlet spec does not define exactlywhat the values of servletPath and pathInfo will contain for a particular request URI. For example,each path segment of a URL may contain parameters, as defined in RFC 2396 [5]. The Specificationdoes not clearly state whether these should be included in the servletPath and pathInfo values andthe behaviour varies between different servlet containers. There is a danger that when anapplication is deployed in a container which does not strip path parameters from these values, anattacker could add them to the requested URL in order to cause a pattern match to succeed or failunexpectedly. [6]. Other variations in the incoming URL are also possible. For example, it couldcontain path-traversal sequences (like /../) or multiple forward slashes (//) which could also causepattern-matches to fail. Some containers normalize these out before performing the servletmapping, but others don’t. To protect against issues like these, FilterChainProxy uses anHttpFirewall strategy to check and wrap the request. Un-normalized requests are automaticallyrejected by default, and path parameters and duplicate slashes are removed for matching purposes.[7]. It is therefore essential that a FilterChainProxy is used to manage the security filter chain. Notethat the servletPath and pathInfo values are decoded by the container, so your application shouldnot have any valid paths which contain semi-colons, as these parts will be removed for matchingpurposes.
As mentioned above, the default strategy is to use Ant-style paths for matching and this is likely tobe the best choice for most users. The strategy is implemented in the class AntPathRequestMatcherwhich uses Spring’s AntPathMatcher to perform a case-insensitive match of the pattern against theconcatenated servletPath and pathInfo, ignoring the queryString.
If for some reason, you need a more powerful matching strategy, you can use regular expressions.The strategy implementation is then RegexRequestMatcher. See the Javadoc for this class for moreinformation.
In practice we recommend that you use method security at your service layer, to control access toyour application, and do not rely entirely on the use of security constraints defined at the web-application level. URLs change and it is difficult to take account of all the possible URLs that anapplication might support and how requests might be manipulated. You should try and restrictyourself to using a few simple ant paths which are simple to understand. Always try to use a "deny-by-default" approach where you have a catch-all wildcard ( / or ) defined last and denying access.
Security defined at the service layer is much more robust and harder to bypass, so you shouldalways take advantage of Spring Security’s method security options.
The HttpFirewall also prevents HTTP Response Splitting by rejecting new line characters in theHTTP Response headers.
By default the StrictHttpFirewall is used. This implementation rejects requests that appear to bemalicious. If it is too strict for your needs, then you can customize what types of requests arerejected. However, it is important that you do so knowing that this can open your application up toattacks. For example, if you wish to leverage Spring MVC’s Matrix Variables, the followingconfiguration could be used:
321
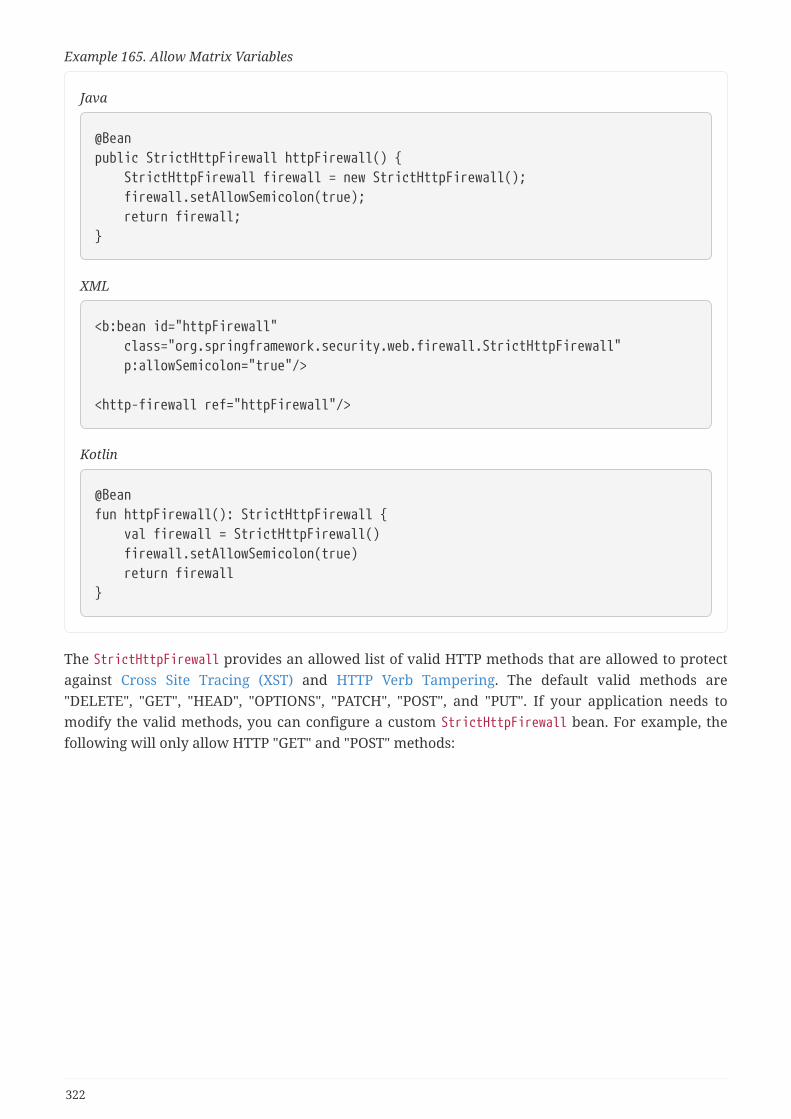
Example 165. Allow Matrix Variables
Java
@Beanpublic StrictHttpFirewall httpFirewall() { StrictHttpFirewall firewall = new StrictHttpFirewall(); firewall.setAllowSemicolon(true); return firewall;}
XML
<b:bean id="httpFirewall" class="org.springframework.security.web.firewall.StrictHttpFirewall" p:allowSemicolon="true"/>
<http-firewall ref="httpFirewall"/>
Kotlin
@Beanfun httpFirewall(): StrictHttpFirewall { val firewall = StrictHttpFirewall() firewall.setAllowSemicolon(true) return firewall}
The StrictHttpFirewall provides an allowed list of valid HTTP methods that are allowed to protectagainst Cross Site Tracing (XST) and HTTP Verb Tampering. The default valid methods are"DELETE", "GET", "HEAD", "OPTIONS", "PATCH", "POST", and "PUT". If your application needs tomodify the valid methods, you can configure a custom StrictHttpFirewall bean. For example, thefollowing will only allow HTTP "GET" and "POST" methods:
322
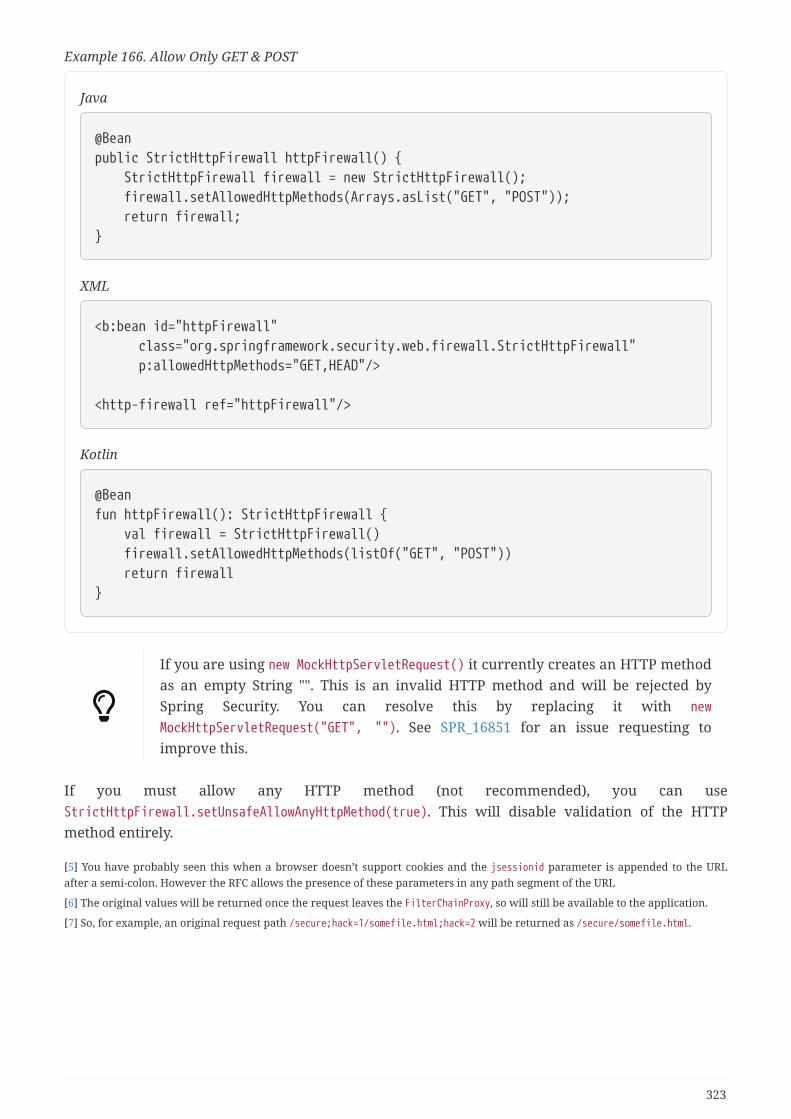
Example 166. Allow Only GET & POST
Java
@Beanpublic StrictHttpFirewall httpFirewall() { StrictHttpFirewall firewall = new StrictHttpFirewall(); firewall.setAllowedHttpMethods(Arrays.asList("GET", "POST")); return firewall;}
XML
<b:bean id="httpFirewall" class="org.springframework.security.web.firewall.StrictHttpFirewall" p:allowedHttpMethods="GET,HEAD"/>
<http-firewall ref="httpFirewall"/>
Kotlin
@Beanfun httpFirewall(): StrictHttpFirewall { val firewall = StrictHttpFirewall() firewall.setAllowedHttpMethods(listOf("GET", "POST")) return firewall}
If you are using new MockHttpServletRequest() it currently creates an HTTP methodas an empty String "". This is an invalid HTTP method and will be rejected bySpring Security. You can resolve this by replacing it with newMockHttpServletRequest("GET", ""). See SPR_16851 for an issue requesting toimprove this.
If you must allow any HTTP method (not recommended), you can useStrictHttpFirewall.setUnsafeAllowAnyHttpMethod(true). This will disable validation of the HTTPmethod entirely.
[5] You have probably seen this when a browser doesn’t support cookies and the jsessionid parameter is appended to the URLafter a semi-colon. However the RFC allows the presence of these parameters in any path segment of the URL
[6] The original values will be returned once the request leaves the FilterChainProxy, so will still be available to the application.
[7] So, for example, an original request path /secure;hack=1/somefile.html;hack=2 will be returned as /secure/somefile.html.
323
Chapter 15. Integrations
15.1. Servlet API integrationThis section describes how Spring Security is integrated with the Servlet API. The servletapi-xmlsample application demonstrates the usage of each of these methods.
15.1.1. Servlet 2.5+ Integration
HttpServletRequest.getRemoteUser()
The HttpServletRequest.getRemoteUser() will return the result ofSecurityContextHolder.getContext().getAuthentication().getName() which is typically the currentusername. This can be useful if you want to display the current username in your application.Additionally, checking if this is null can be used to indicate if a user has authenticated or isanonymous. Knowing if the user is authenticated or not can be useful for determining if certain UIelements should be shown or not (i.e. a log out link should only be displayed if the user isauthenticated).
HttpServletRequest.getUserPrincipal()
The HttpServletRequest.getUserPrincipal() will return the result ofSecurityContextHolder.getContext().getAuthentication(). This means it is an Authentication whichis typically an instance of UsernamePasswordAuthenticationToken when using username andpassword based authentication. This can be useful if you need additional information about youruser. For example, you might have created a custom UserDetailsService that returns a customUserDetails containing a first and last name for your user. You could obtain this information withthe following:
Authentication auth = httpServletRequest.getUserPrincipal();// assume integrated custom UserDetails called MyCustomUserDetails// by default, typically instance of UserDetailsMyCustomUserDetails userDetails = (MyCustomUserDetails) auth.getPrincipal();String firstName = userDetails.getFirstName();String lastName = userDetails.getLastName();
It should be noted that it is typically bad practice to perform so much logicthroughout your application. Instead, one should centralize it to reduce anycoupling of Spring Security and the Servlet API’s.
HttpServletRequest.isUserInRole(String)
The HttpServletRequest.isUserInRole(String) will determine ifSecurityContextHolder.getContext().getAuthentication().getAuthorities() contains aGrantedAuthority with the role passed into isUserInRole(String). Typically users should not pass inthe "ROLE_" prefix into this method since it is added automatically. For example, if you want to
324
determine if the current user has the authority "ROLE_ADMIN", you could use the following:
boolean isAdmin = httpServletRequest.isUserInRole("ADMIN");
This might be useful to determine if certain UI components should be displayed. For example, youmight display admin links only if the current user is an admin.
15.1.2. Servlet 3+ Integration
The following section describes the Servlet 3 methods that Spring Security integrates with.
HttpServletRequest.authenticate(HttpServletRequest,HttpServletResponse)
The HttpServletRequest.authenticate(HttpServletRequest,HttpServletResponse) method can be usedto ensure that a user is authenticated. If they are not authenticated, the configuredAuthenticationEntryPoint will be used to request the user to authenticate (i.e. redirect to the loginpage).
HttpServletRequest.login(String,String)
The HttpServletRequest.login(String,String) method can be used to authenticate the user with thecurrent AuthenticationManager. For example, the following would attempt to authenticate with theusername "user" and password "password":
try {httpServletRequest.login("user","password");} catch(ServletException e) {// fail to authenticate}
It is not necessary to catch the ServletException if you want Spring Security toprocess the failed authentication attempt.
HttpServletRequest.logout()
The HttpServletRequest.logout() method can be used to log the current user out.
Typically this means that the SecurityContextHolder will be cleared out, the HttpSession will beinvalidated, any "Remember Me" authentication will be cleaned up, etc. However, the configuredLogoutHandler implementations will vary depending on your Spring Security configuration. It isimportant to note that after HttpServletRequest.logout() has been invoked, you are still in charge ofwriting a response out. Typically this would involve a redirect to the welcome page.
AsyncContext.start(Runnable)
The AsyncContext.start(Runnable) method that ensures your credentials will be propagated to thenew Thread. Using Spring Security’s concurrency support, Spring Security overrides the
325
AsyncContext.start(Runnable) to ensure that the current SecurityContext is used when processingthe Runnable. For example, the following would output the current user’s Authentication:
final AsyncContext async = httpServletRequest.startAsync();async.start(new Runnable() { public void run() { Authentication authentication =SecurityContextHolder.getContext().getAuthentication(); try { final HttpServletResponse asyncResponse = (HttpServletResponse)async.getResponse(); asyncResponse.setStatus(HttpServletResponse.SC_OK); asyncResponse.getWriter().write(String.valueOf(authentication)); async.complete(); } catch(Exception e) { throw new RuntimeException(e); } }});
Async Servlet Support
If you are using Java Based configuration, you are ready to go. If you are using XML configuration,there are a few updates that are necessary. The first step is to ensure you have updated yourweb.xml to use at least the 3.0 schema as shown below:
<web-app xmlns="http://java.sun.com/xml/ns/javaee"xmlns:xsi="http://www.w3.org/2001/XMLSchema-instance"xsi:schemaLocation="http://java.sun.com/xml/ns/javaeehttps://java.sun.com/xml/ns/javaee/web-app_3_0.xsd"version="3.0">
</web-app>
Next you need to ensure that your springSecurityFilterChain is setup for processing asynchronousrequests.
326
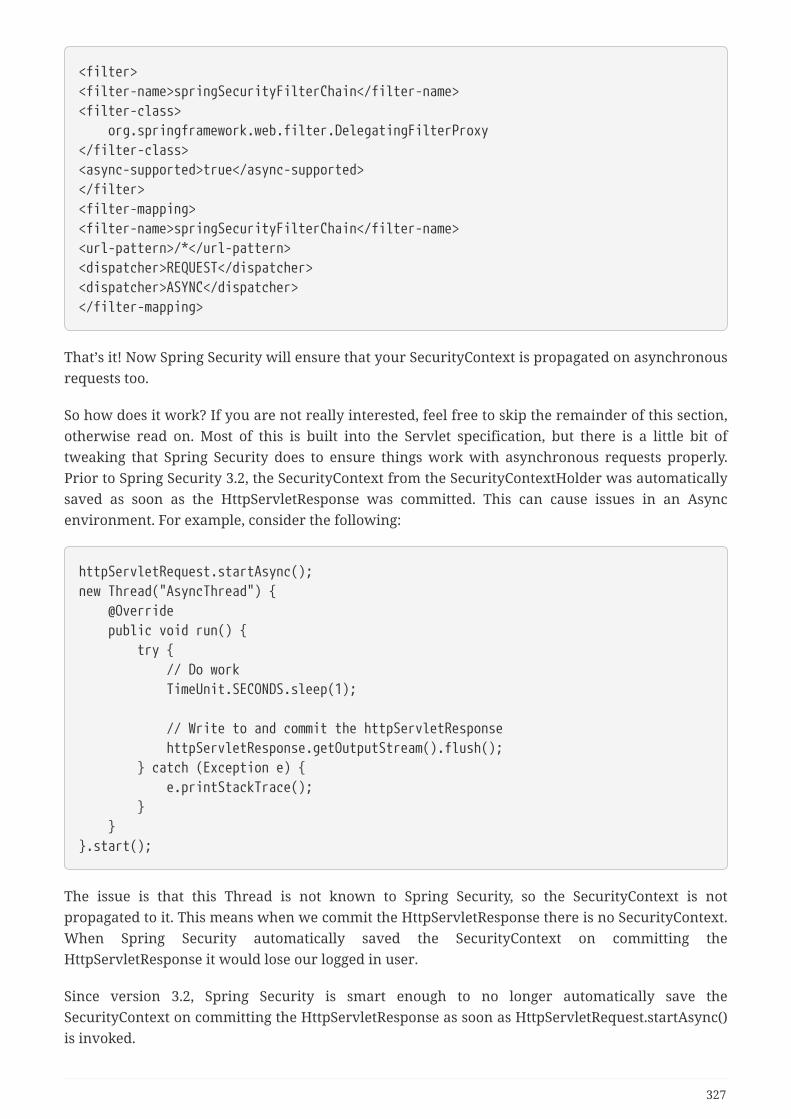
<filter><filter-name>springSecurityFilterChain</filter-name><filter-class> org.springframework.web.filter.DelegatingFilterProxy</filter-class><async-supported>true</async-supported></filter><filter-mapping><filter-name>springSecurityFilterChain</filter-name><url-pattern>/*</url-pattern><dispatcher>REQUEST</dispatcher><dispatcher>ASYNC</dispatcher></filter-mapping>
That’s it! Now Spring Security will ensure that your SecurityContext is propagated on asynchronousrequests too.
So how does it work? If you are not really interested, feel free to skip the remainder of this section,otherwise read on. Most of this is built into the Servlet specification, but there is a little bit oftweaking that Spring Security does to ensure things work with asynchronous requests properly.Prior to Spring Security 3.2, the SecurityContext from the SecurityContextHolder was automaticallysaved as soon as the HttpServletResponse was committed. This can cause issues in an Asyncenvironment. For example, consider the following:
httpServletRequest.startAsync();new Thread("AsyncThread") { @Override public void run() { try { // Do work TimeUnit.SECONDS.sleep(1);
// Write to and commit the httpServletResponse httpServletResponse.getOutputStream().flush(); } catch (Exception e) { e.printStackTrace(); } }}.start();
The issue is that this Thread is not known to Spring Security, so the SecurityContext is notpropagated to it. This means when we commit the HttpServletResponse there is no SecurityContext.When Spring Security automatically saved the SecurityContext on committing theHttpServletResponse it would lose our logged in user.
Since version 3.2, Spring Security is smart enough to no longer automatically save theSecurityContext on committing the HttpServletResponse as soon as HttpServletRequest.startAsync()is invoked.
327
15.1.3. Servlet 3.1+ Integration
The following section describes the Servlet 3.1 methods that Spring Security integrates with.
HttpServletRequest#changeSessionId()
The HttpServletRequest.changeSessionId() is the default method for protecting against SessionFixation attacks in Servlet 3.1 and higher.
15.2. Spring Data IntegrationSpring Security provides Spring Data integration that allows referring to the current user withinyour queries. It is not only useful but necessary to include the user in the queries to support pagedresults since filtering the results afterwards would not scale.
15.2.1. Spring Data & Spring Security Configuration
To use this support, add org.springframework.security:spring-security-data dependency andprovide a bean of type SecurityEvaluationContextExtension. In Java Configuration, this would looklike:
@Beanpublic SecurityEvaluationContextExtension securityEvaluationContextExtension() { return new SecurityEvaluationContextExtension();}
In XML Configuration, this would look like:
<beanclass="org.springframework.security.data.repository.query.SecurityEvaluationContextExtension"/>
15.2.2. Security Expressions within @Query
Now Spring Security can be used within your queries. For example:
@Repositorypublic interface MessageRepository extends PagingAndSortingRepository<Message,Long> { @Query("select m from Message m where m.to.id = ?#{ principal?.id }") Page<Message> findInbox(Pageable pageable);}
This checks to see if the Authentication.getPrincipal().getId() is equal to the recipient of theMessage. Note that this example assumes you have customized the principal to be an Object that hasan id property. By exposing the SecurityEvaluationContextExtension bean, all of the CommonSecurity Expressions are available within the Query.
328
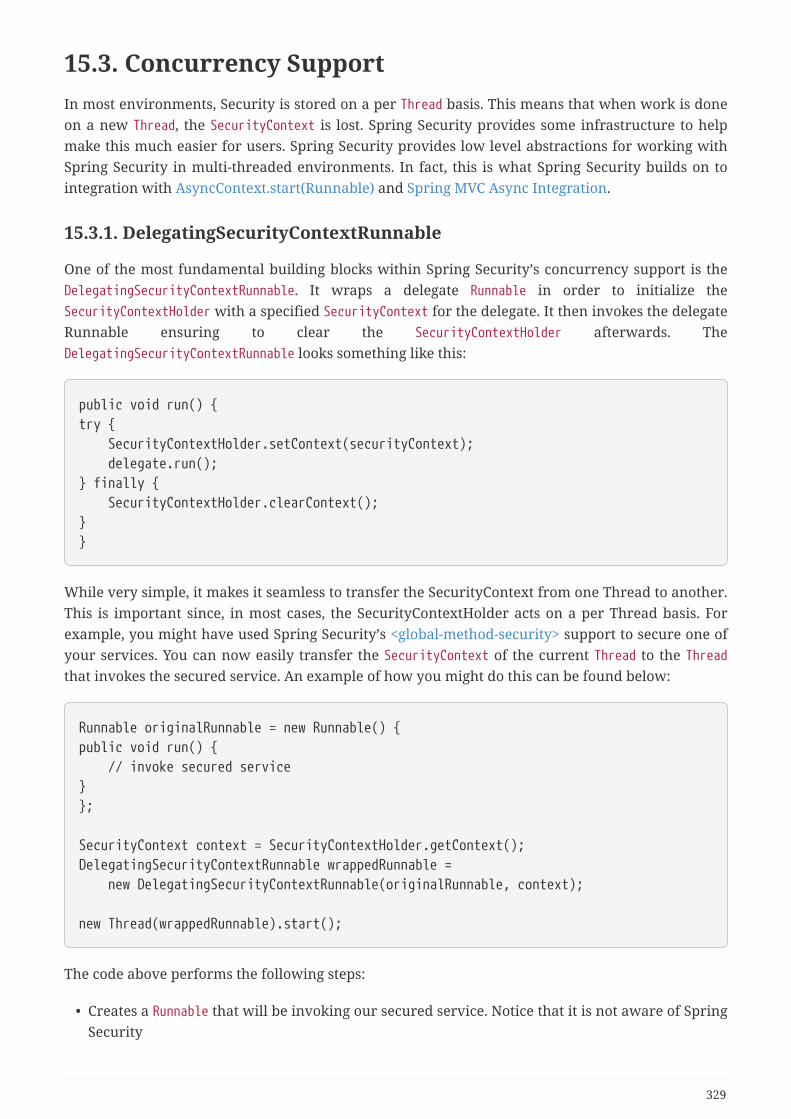
15.3. Concurrency SupportIn most environments, Security is stored on a per Thread basis. This means that when work is doneon a new Thread, the SecurityContext is lost. Spring Security provides some infrastructure to helpmake this much easier for users. Spring Security provides low level abstractions for working withSpring Security in multi-threaded environments. In fact, this is what Spring Security builds on tointegration with AsyncContext.start(Runnable) and Spring MVC Async Integration.
15.3.1. DelegatingSecurityContextRunnable
One of the most fundamental building blocks within Spring Security’s concurrency support is theDelegatingSecurityContextRunnable. It wraps a delegate Runnable in order to initialize theSecurityContextHolder with a specified SecurityContext for the delegate. It then invokes the delegateRunnable ensuring to clear the SecurityContextHolder afterwards. TheDelegatingSecurityContextRunnable looks something like this:
public void run() {try { SecurityContextHolder.setContext(securityContext); delegate.run();} finally { SecurityContextHolder.clearContext();}}
While very simple, it makes it seamless to transfer the SecurityContext from one Thread to another.This is important since, in most cases, the SecurityContextHolder acts on a per Thread basis. Forexample, you might have used Spring Security’s <global-method-security> support to secure one ofyour services. You can now easily transfer the SecurityContext of the current Thread to the Threadthat invokes the secured service. An example of how you might do this can be found below:
Runnable originalRunnable = new Runnable() {public void run() { // invoke secured service}};
SecurityContext context = SecurityContextHolder.getContext();DelegatingSecurityContextRunnable wrappedRunnable = new DelegatingSecurityContextRunnable(originalRunnable, context);
new Thread(wrappedRunnable).start();
The code above performs the following steps:
• Creates a Runnable that will be invoking our secured service. Notice that it is not aware of SpringSecurity
329
• Obtains the SecurityContext that we wish to use from the SecurityContextHolder and initializesthe DelegatingSecurityContextRunnable
• Use the DelegatingSecurityContextRunnable to create a Thread
• Start the Thread we created
Since it is quite common to create a DelegatingSecurityContextRunnable with the SecurityContextfrom the SecurityContextHolder there is a shortcut constructor for it. The following code is the sameas the code above:
Runnable originalRunnable = new Runnable() {public void run() { // invoke secured service}};
DelegatingSecurityContextRunnable wrappedRunnable = new DelegatingSecurityContextRunnable(originalRunnable);
new Thread(wrappedRunnable).start();
The code we have is simple to use, but it still requires knowledge that we are using Spring Security.In the next section we will take a look at how we can utilize DelegatingSecurityContextExecutor tohide the fact that we are using Spring Security.
15.3.2. DelegatingSecurityContextExecutor
In the previous section we found that it was easy to use the DelegatingSecurityContextRunnable, butit was not ideal since we had to be aware of Spring Security in order to use it. Let’s take a look athow DelegatingSecurityContextExecutor can shield our code from any knowledge that we are usingSpring Security.
The design of DelegatingSecurityContextExecutor is very similar to that ofDelegatingSecurityContextRunnable except it accepts a delegate Executor instead of a delegateRunnable. You can see an example of how it might be used below:
330
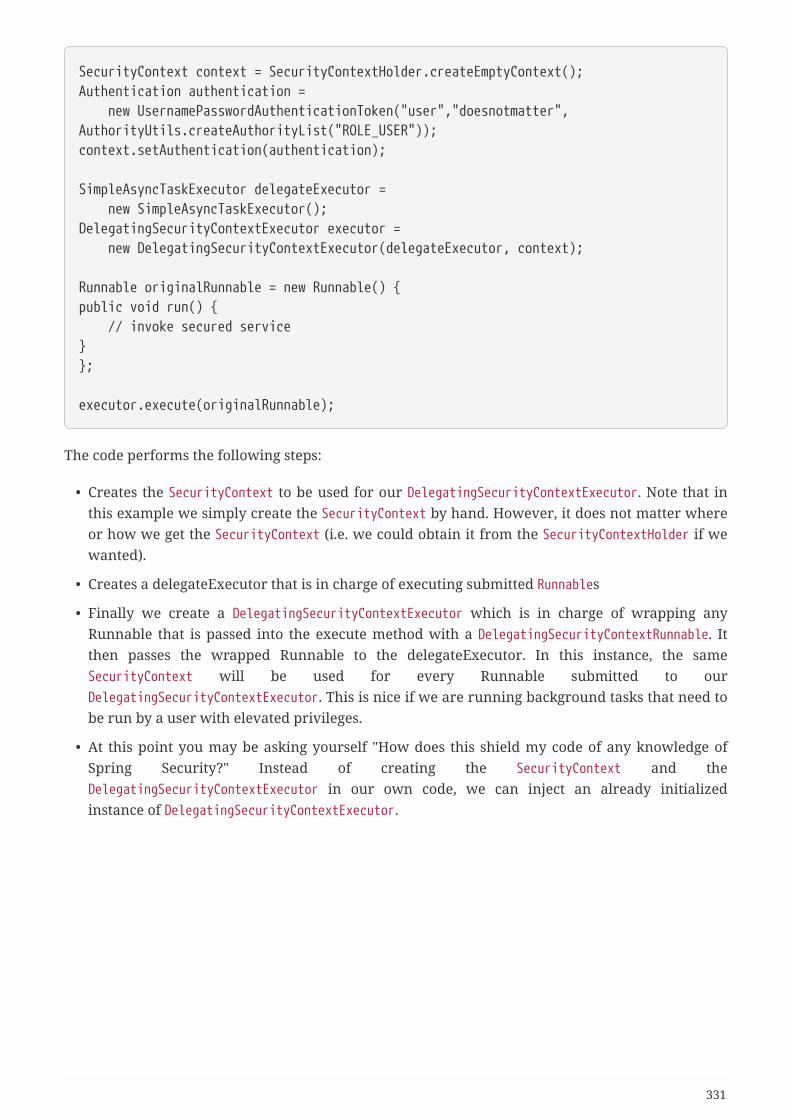
SecurityContext context = SecurityContextHolder.createEmptyContext();Authentication authentication = new UsernamePasswordAuthenticationToken("user","doesnotmatter",AuthorityUtils.createAuthorityList("ROLE_USER"));context.setAuthentication(authentication);
SimpleAsyncTaskExecutor delegateExecutor = new SimpleAsyncTaskExecutor();DelegatingSecurityContextExecutor executor = new DelegatingSecurityContextExecutor(delegateExecutor, context);
Runnable originalRunnable = new Runnable() {public void run() { // invoke secured service}};
executor.execute(originalRunnable);
The code performs the following steps:
• Creates the SecurityContext to be used for our DelegatingSecurityContextExecutor. Note that inthis example we simply create the SecurityContext by hand. However, it does not matter whereor how we get the SecurityContext (i.e. we could obtain it from the SecurityContextHolder if wewanted).
• Creates a delegateExecutor that is in charge of executing submitted Runnables
• Finally we create a DelegatingSecurityContextExecutor which is in charge of wrapping anyRunnable that is passed into the execute method with a DelegatingSecurityContextRunnable. Itthen passes the wrapped Runnable to the delegateExecutor. In this instance, the sameSecurityContext will be used for every Runnable submitted to ourDelegatingSecurityContextExecutor. This is nice if we are running background tasks that need tobe run by a user with elevated privileges.
• At this point you may be asking yourself "How does this shield my code of any knowledge ofSpring Security?" Instead of creating the SecurityContext and theDelegatingSecurityContextExecutor in our own code, we can inject an already initializedinstance of DelegatingSecurityContextExecutor.
331
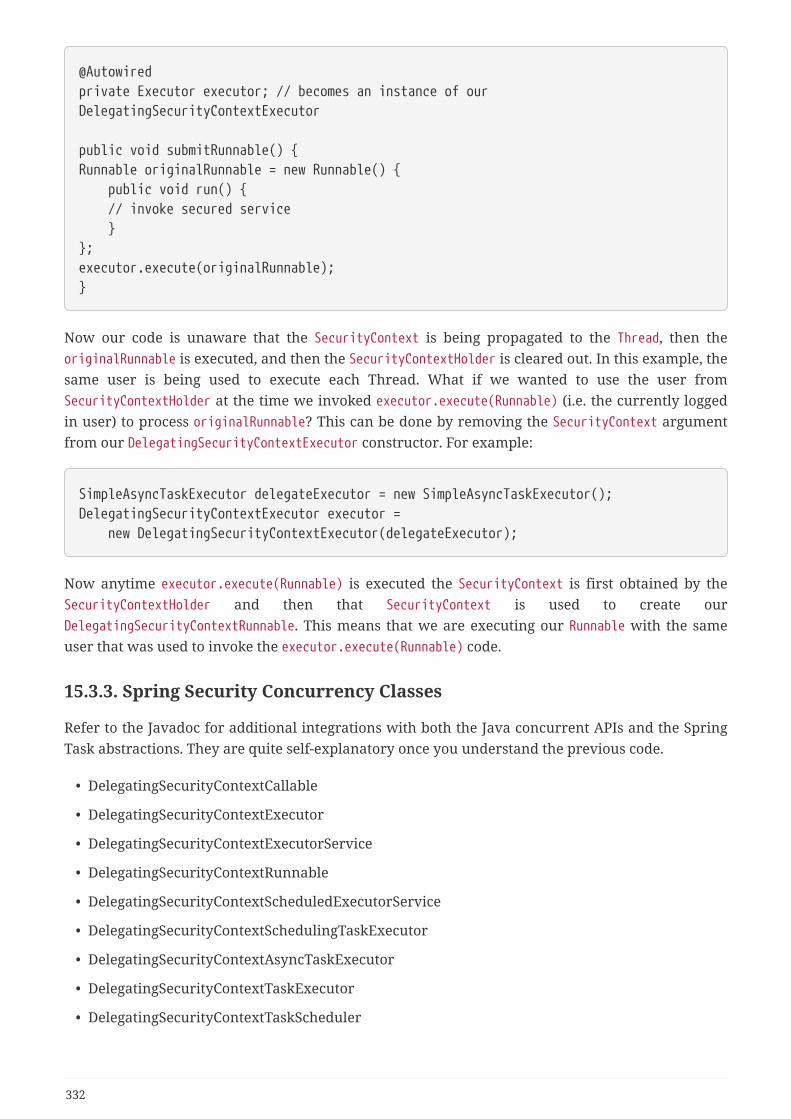
@Autowiredprivate Executor executor; // becomes an instance of ourDelegatingSecurityContextExecutor
public void submitRunnable() {Runnable originalRunnable = new Runnable() { public void run() { // invoke secured service }};executor.execute(originalRunnable);}
Now our code is unaware that the SecurityContext is being propagated to the Thread, then theoriginalRunnable is executed, and then the SecurityContextHolder is cleared out. In this example, thesame user is being used to execute each Thread. What if we wanted to use the user fromSecurityContextHolder at the time we invoked executor.execute(Runnable) (i.e. the currently loggedin user) to process originalRunnable? This can be done by removing the SecurityContext argumentfrom our DelegatingSecurityContextExecutor constructor. For example:
SimpleAsyncTaskExecutor delegateExecutor = new SimpleAsyncTaskExecutor();DelegatingSecurityContextExecutor executor = new DelegatingSecurityContextExecutor(delegateExecutor);
Now anytime executor.execute(Runnable) is executed the SecurityContext is first obtained by theSecurityContextHolder and then that SecurityContext is used to create ourDelegatingSecurityContextRunnable. This means that we are executing our Runnable with the sameuser that was used to invoke the executor.execute(Runnable) code.
15.3.3. Spring Security Concurrency Classes
Refer to the Javadoc for additional integrations with both the Java concurrent APIs and the SpringTask abstractions. They are quite self-explanatory once you understand the previous code.
• DelegatingSecurityContextCallable
• DelegatingSecurityContextExecutor
• DelegatingSecurityContextExecutorService
• DelegatingSecurityContextRunnable
• DelegatingSecurityContextScheduledExecutorService
• DelegatingSecurityContextSchedulingTaskExecutor
• DelegatingSecurityContextAsyncTaskExecutor
• DelegatingSecurityContextTaskExecutor
• DelegatingSecurityContextTaskScheduler
332
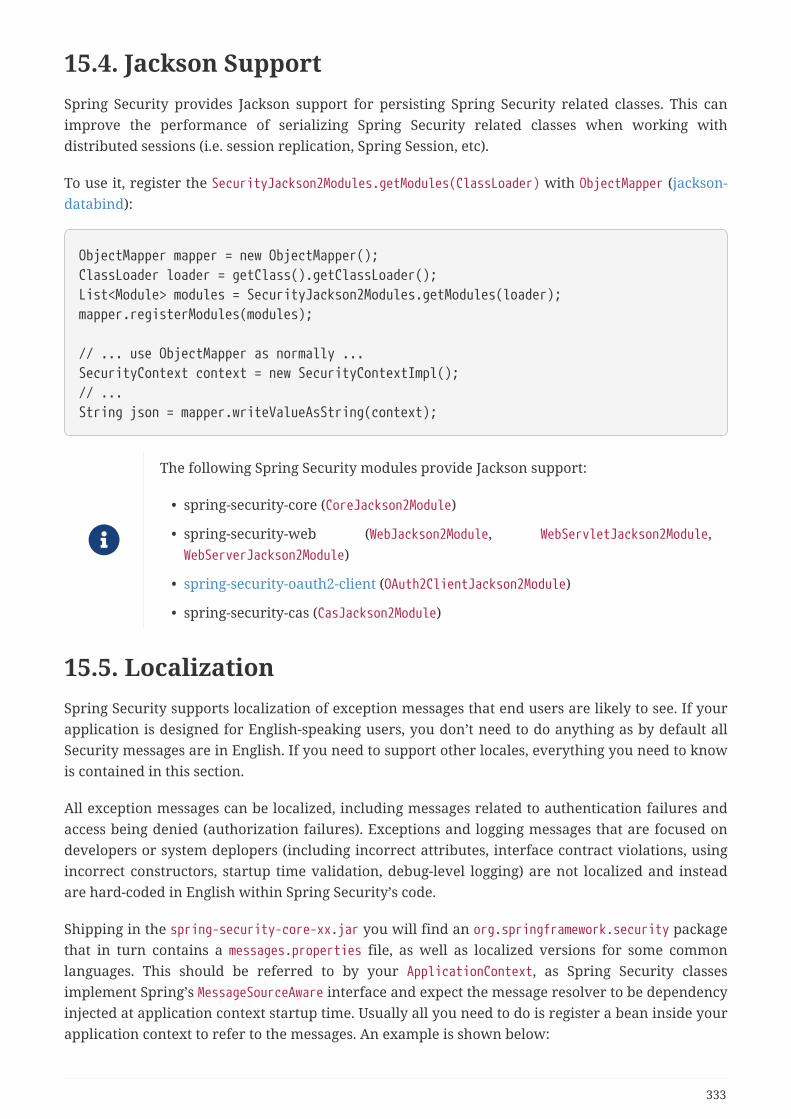
15.4. Jackson SupportSpring Security provides Jackson support for persisting Spring Security related classes. This canimprove the performance of serializing Spring Security related classes when working withdistributed sessions (i.e. session replication, Spring Session, etc).
To use it, register the SecurityJackson2Modules.getModules(ClassLoader) with ObjectMapper (jackson-databind):
ObjectMapper mapper = new ObjectMapper();ClassLoader loader = getClass().getClassLoader();List<Module> modules = SecurityJackson2Modules.getModules(loader);mapper.registerModules(modules);
// ... use ObjectMapper as normally ...SecurityContext context = new SecurityContextImpl();// ...String json = mapper.writeValueAsString(context);
The following Spring Security modules provide Jackson support:
• spring-security-core (CoreJackson2Module)
• spring-security-web (WebJackson2Module, WebServletJackson2Module,WebServerJackson2Module)
• spring-security-oauth2-client (OAuth2ClientJackson2Module)
• spring-security-cas (CasJackson2Module)
15.5. LocalizationSpring Security supports localization of exception messages that end users are likely to see. If yourapplication is designed for English-speaking users, you don’t need to do anything as by default allSecurity messages are in English. If you need to support other locales, everything you need to knowis contained in this section.
All exception messages can be localized, including messages related to authentication failures andaccess being denied (authorization failures). Exceptions and logging messages that are focused ondevelopers or system deplopers (including incorrect attributes, interface contract violations, usingincorrect constructors, startup time validation, debug-level logging) are not localized and insteadare hard-coded in English within Spring Security’s code.
Shipping in the spring-security-core-xx.jar you will find an org.springframework.security packagethat in turn contains a messages.properties file, as well as localized versions for some commonlanguages. This should be referred to by your ApplicationContext, as Spring Security classesimplement Spring’s MessageSourceAware interface and expect the message resolver to be dependencyinjected at application context startup time. Usually all you need to do is register a bean inside yourapplication context to refer to the messages. An example is shown below:
333

<bean id="messageSource" class="org.springframework.context.support.ReloadableResourceBundleMessageSource"><property name="basename" value="classpath:org/springframework/security/messages"/></bean>
The messages.properties is named in accordance with standard resource bundles and representsthe default language supported by Spring Security messages. This default file is in English.
If you wish to customize the messages.properties file, or support other languages, you should copythe file, rename it accordingly, and register it inside the above bean definition. There are not a largenumber of message keys inside this file, so localization should not be considered a major initiative.If you do perform localization of this file, please consider sharing your work with the communityby logging a JIRA task and attaching your appropriately-named localized version ofmessages.properties.
Spring Security relies on Spring’s localization support in order to actually lookup the appropriatemessage. In order for this to work, you have to make sure that the locale from the incoming requestis stored in Spring’s org.springframework.context.i18n.LocaleContextHolder. Spring MVC’sDispatcherServlet does this for your application automatically, but since Spring Security’s filters areinvoked before this, the LocaleContextHolder needs to be set up to contain the correct Locale beforethe filters are called. You can either do this in a filter yourself (which must come before the SpringSecurity filters in web.xml) or you can use Spring’s RequestContextFilter. Please refer to the SpringFramework documentation for further details on using localization with Spring.
The "contacts" sample application is set up to use localized messages.
15.6. Spring MVC IntegrationSpring Security provides a number of optional integrations with Spring MVC. This section coversthe integration in further detail.
15.6.1. @EnableWebMvcSecurity
As of Spring Security 4.0, @EnableWebMvcSecurity is deprecated. The replacement is@EnableWebSecurity which will determine adding the Spring MVC features basedupon the classpath.
To enable Spring Security integration with Spring MVC add the @EnableWebSecurity annotation toyour configuration.
Spring Security provides the configuration using Spring MVC’s WebMvcConfigurer.This means that if you are using more advanced options, like integrating withWebMvcConfigurationSupport directly, then you will need to manually provide theSpring Security configuration.
334
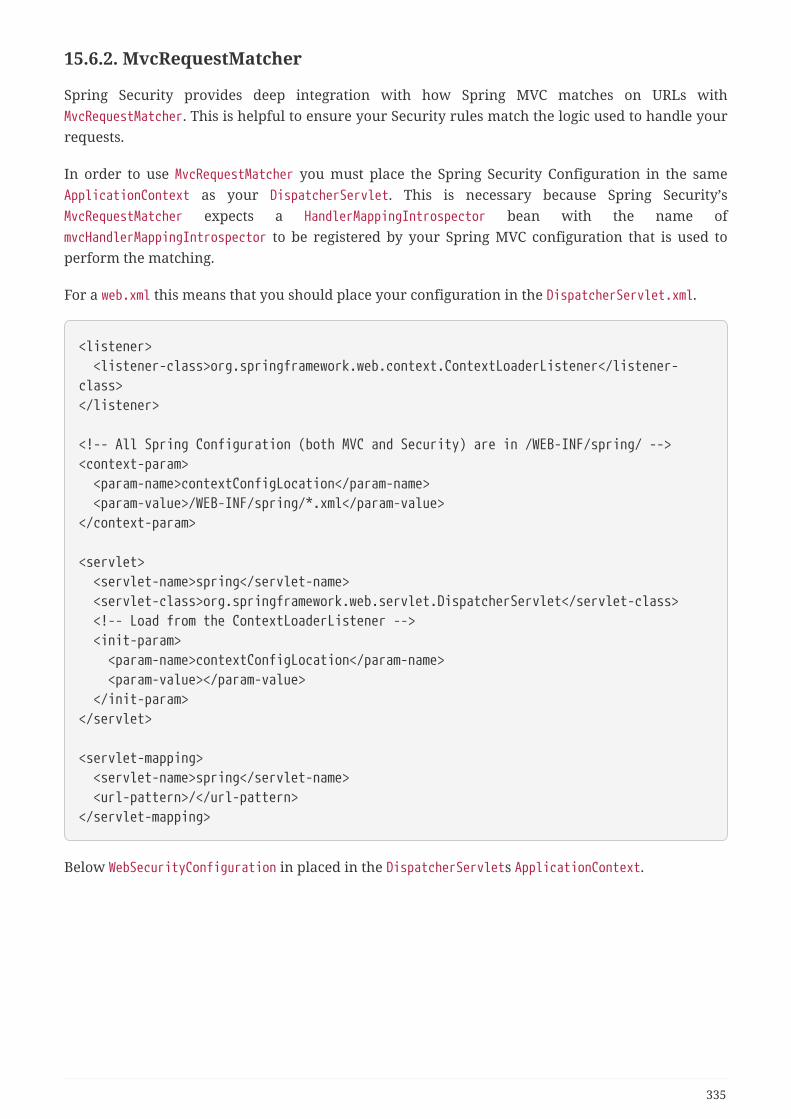
15.6.2. MvcRequestMatcher
Spring Security provides deep integration with how Spring MVC matches on URLs withMvcRequestMatcher. This is helpful to ensure your Security rules match the logic used to handle yourrequests.
In order to use MvcRequestMatcher you must place the Spring Security Configuration in the sameApplicationContext as your DispatcherServlet. This is necessary because Spring Security’sMvcRequestMatcher expects a HandlerMappingIntrospector bean with the name ofmvcHandlerMappingIntrospector to be registered by your Spring MVC configuration that is used toperform the matching.
For a web.xml this means that you should place your configuration in the DispatcherServlet.xml.
<listener> <listener-class>org.springframework.web.context.ContextLoaderListener</listener-class></listener>
<!-- All Spring Configuration (both MVC and Security) are in /WEB-INF/spring/ --><context-param> <param-name>contextConfigLocation</param-name> <param-value>/WEB-INF/spring/*.xml</param-value></context-param>
<servlet> <servlet-name>spring</servlet-name> <servlet-class>org.springframework.web.servlet.DispatcherServlet</servlet-class> <!-- Load from the ContextLoaderListener --> <init-param> <param-name>contextConfigLocation</param-name> <param-value></param-value> </init-param></servlet>
<servlet-mapping> <servlet-name>spring</servlet-name> <url-pattern>/</url-pattern></servlet-mapping>
Below WebSecurityConfiguration in placed in the DispatcherServlets ApplicationContext.
335
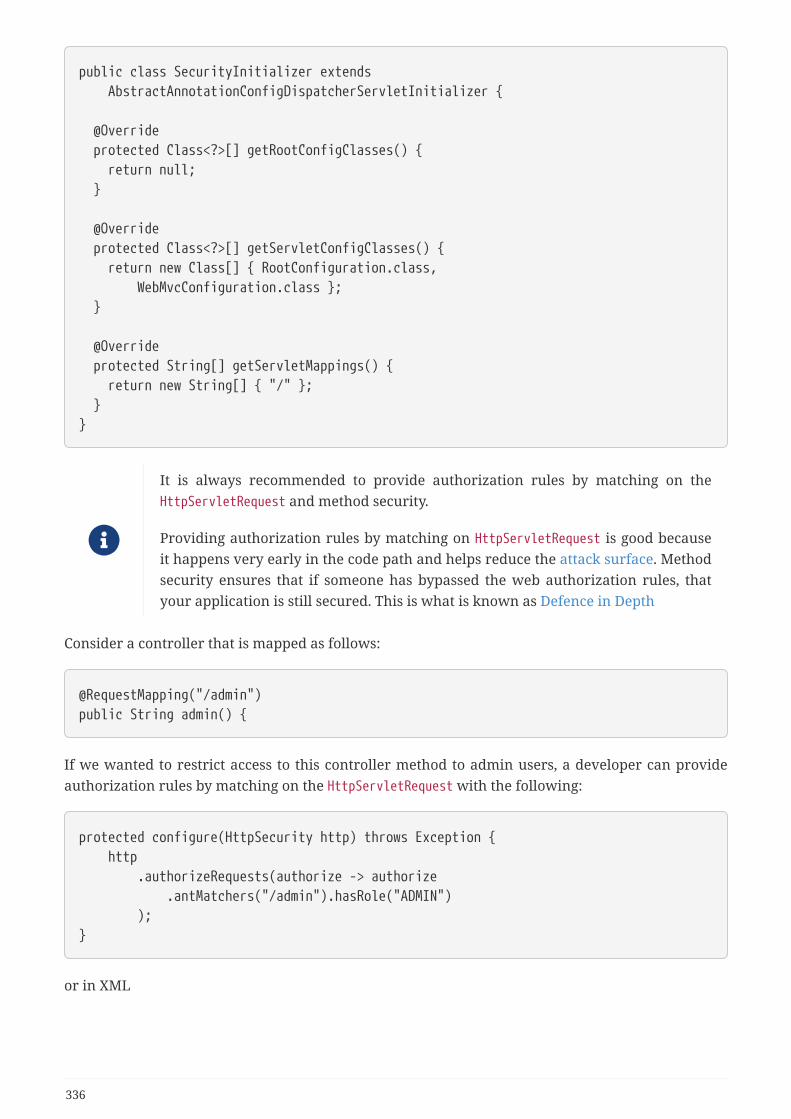
public class SecurityInitializer extends AbstractAnnotationConfigDispatcherServletInitializer {
@Override protected Class<?>[] getRootConfigClasses() { return null; }
@Override protected Class<?>[] getServletConfigClasses() { return new Class[] { RootConfiguration.class, WebMvcConfiguration.class }; }
@Override protected String[] getServletMappings() { return new String[] { "/" }; }}
It is always recommended to provide authorization rules by matching on theHttpServletRequest and method security.
Providing authorization rules by matching on HttpServletRequest is good becauseit happens very early in the code path and helps reduce the attack surface. Methodsecurity ensures that if someone has bypassed the web authorization rules, thatyour application is still secured. This is what is known as Defence in Depth
Consider a controller that is mapped as follows:
@RequestMapping("/admin")public String admin() {
If we wanted to restrict access to this controller method to admin users, a developer can provideauthorization rules by matching on the HttpServletRequest with the following:
protected configure(HttpSecurity http) throws Exception { http .authorizeRequests(authorize -> authorize .antMatchers("/admin").hasRole("ADMIN") );}
or in XML
336
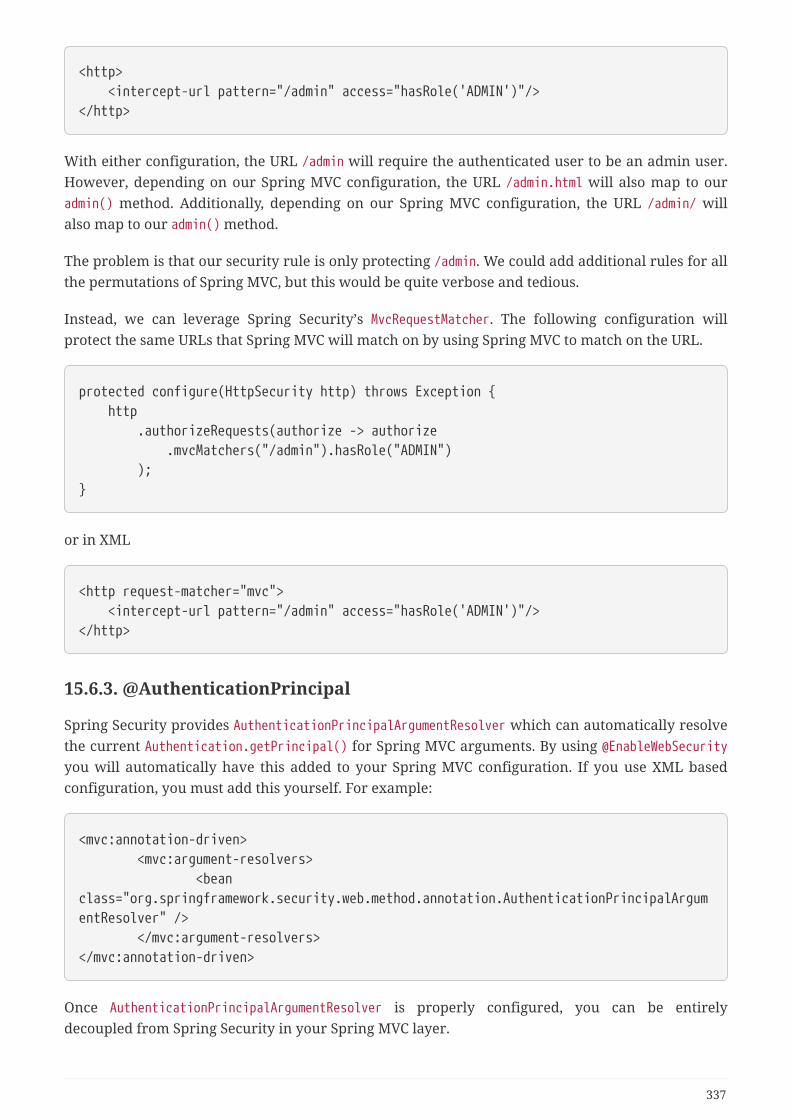
<http> <intercept-url pattern="/admin" access="hasRole('ADMIN')"/></http>
With either configuration, the URL /admin will require the authenticated user to be an admin user.However, depending on our Spring MVC configuration, the URL /admin.html will also map to ouradmin() method. Additionally, depending on our Spring MVC configuration, the URL /admin/ willalso map to our admin() method.
The problem is that our security rule is only protecting /admin. We could add additional rules for allthe permutations of Spring MVC, but this would be quite verbose and tedious.
Instead, we can leverage Spring Security’s MvcRequestMatcher. The following configuration willprotect the same URLs that Spring MVC will match on by using Spring MVC to match on the URL.
protected configure(HttpSecurity http) throws Exception { http .authorizeRequests(authorize -> authorize .mvcMatchers("/admin").hasRole("ADMIN") );}
or in XML
<http request-matcher="mvc"> <intercept-url pattern="/admin" access="hasRole('ADMIN')"/></http>
15.6.3. @AuthenticationPrincipal
Spring Security provides AuthenticationPrincipalArgumentResolver which can automatically resolvethe current Authentication.getPrincipal() for Spring MVC arguments. By using @EnableWebSecurityyou will automatically have this added to your Spring MVC configuration. If you use XML basedconfiguration, you must add this yourself. For example:
<mvc:annotation-driven> <mvc:argument-resolvers> <beanclass="org.springframework.security.web.method.annotation.AuthenticationPrincipalArgumentResolver" /> </mvc:argument-resolvers></mvc:annotation-driven>
Once AuthenticationPrincipalArgumentResolver is properly configured, you can be entirelydecoupled from Spring Security in your Spring MVC layer.
337
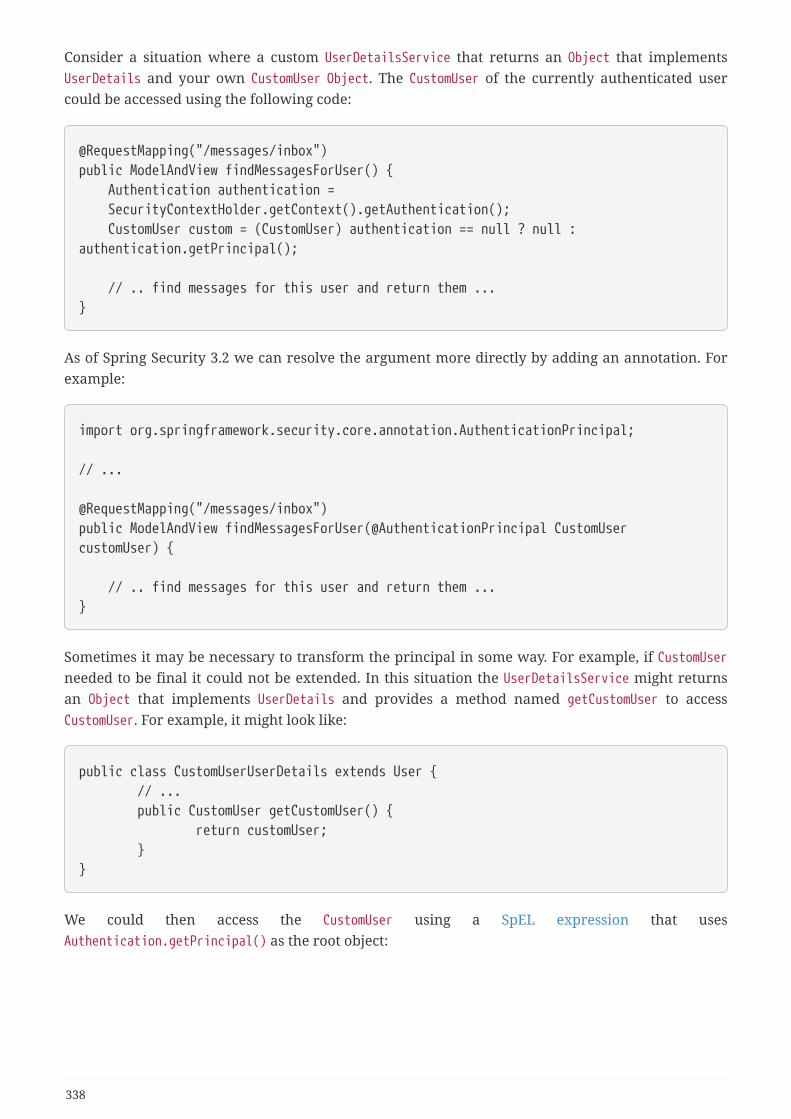
Consider a situation where a custom UserDetailsService that returns an Object that implementsUserDetails and your own CustomUser Object. The CustomUser of the currently authenticated usercould be accessed using the following code:
@RequestMapping("/messages/inbox")public ModelAndView findMessagesForUser() { Authentication authentication = SecurityContextHolder.getContext().getAuthentication(); CustomUser custom = (CustomUser) authentication == null ? null :authentication.getPrincipal();
// .. find messages for this user and return them ...}
As of Spring Security 3.2 we can resolve the argument more directly by adding an annotation. Forexample:
import org.springframework.security.core.annotation.AuthenticationPrincipal;
// ...
@RequestMapping("/messages/inbox")public ModelAndView findMessagesForUser(@AuthenticationPrincipal CustomUsercustomUser) {
// .. find messages for this user and return them ...}
Sometimes it may be necessary to transform the principal in some way. For example, if CustomUserneeded to be final it could not be extended. In this situation the UserDetailsService might returnsan Object that implements UserDetails and provides a method named getCustomUser to accessCustomUser. For example, it might look like:
public class CustomUserUserDetails extends User { // ... public CustomUser getCustomUser() { return customUser; }}
We could then access the CustomUser using a SpEL expression that usesAuthentication.getPrincipal() as the root object:
338

import org.springframework.security.core.annotation.AuthenticationPrincipal;
// ...
@RequestMapping("/messages/inbox")public ModelAndView findMessagesForUser(@AuthenticationPrincipal(expression ="customUser") CustomUser customUser) {
// .. find messages for this user and return them ...}
We can also refer to Beans in our SpEL expressions. For example, the following could be used if wewere using JPA to manage our Users and we wanted to modify and save a property on the currentuser.
import org.springframework.security.core.annotation.AuthenticationPrincipal;
// ...
@PutMapping("/users/self")public ModelAndView updateName(@AuthenticationPrincipal(expression ="@jpaEntityManager.merge(#this)") CustomUser attachedCustomUser, @RequestParam String firstName) {
// change the firstName on an attached instance which will be persisted to thedatabase attachedCustomUser.setFirstName(firstName);
// ...}
We can further remove our dependency on Spring Security by making @AuthenticationPrincipal ameta annotation on our own annotation. Below we demonstrate how we could do this on anannotation named @CurrentUser.
It is important to realize that in order to remove the dependency on SpringSecurity, it is the consuming application that would create @CurrentUser. This stepis not strictly required, but assists in isolating your dependency to Spring Securityto a more central location.
@Target({ElementType.PARAMETER, ElementType.TYPE})@Retention(RetentionPolicy.RUNTIME)@Documented@AuthenticationPrincipalpublic @interface CurrentUser {}
339
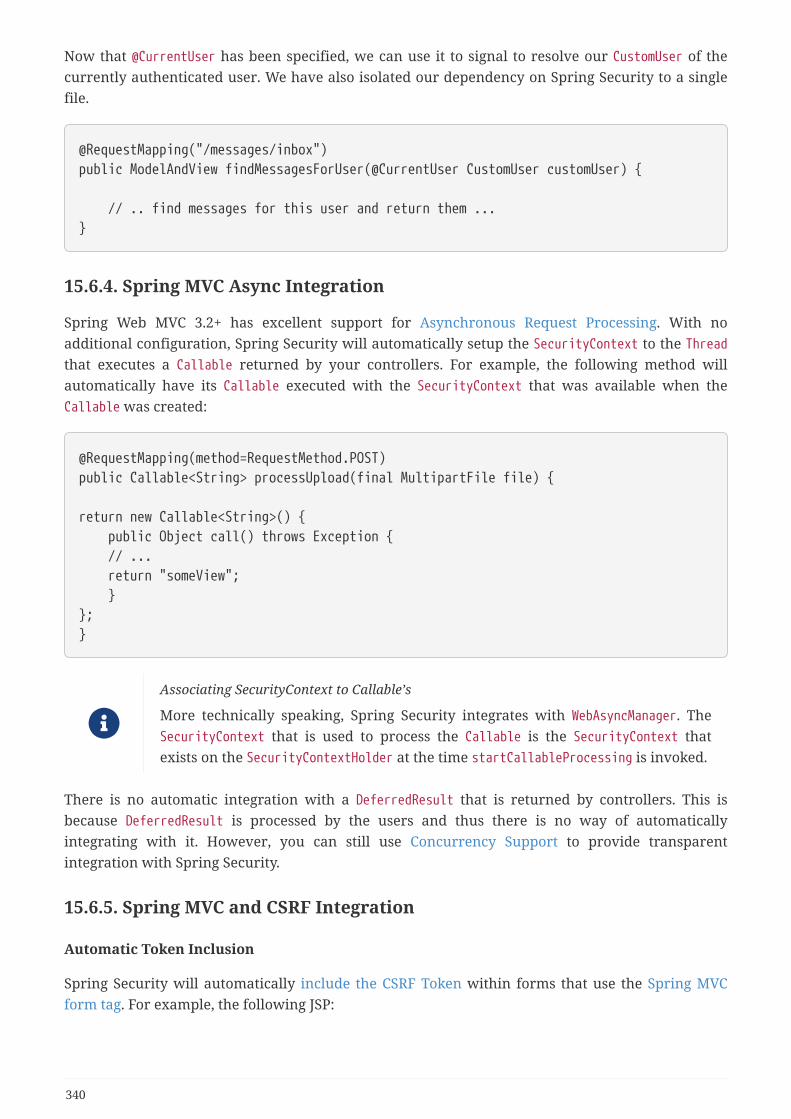
Now that @CurrentUser has been specified, we can use it to signal to resolve our CustomUser of thecurrently authenticated user. We have also isolated our dependency on Spring Security to a singlefile.
@RequestMapping("/messages/inbox")public ModelAndView findMessagesForUser(@CurrentUser CustomUser customUser) {
// .. find messages for this user and return them ...}
15.6.4. Spring MVC Async Integration
Spring Web MVC 3.2+ has excellent support for Asynchronous Request Processing. With noadditional configuration, Spring Security will automatically setup the SecurityContext to the Threadthat executes a Callable returned by your controllers. For example, the following method willautomatically have its Callable executed with the SecurityContext that was available when theCallable was created:
@RequestMapping(method=RequestMethod.POST)public Callable<String> processUpload(final MultipartFile file) {
return new Callable<String>() { public Object call() throws Exception { // ... return "someView"; }};}
Associating SecurityContext to Callable’s
More technically speaking, Spring Security integrates with WebAsyncManager. TheSecurityContext that is used to process the Callable is the SecurityContext thatexists on the SecurityContextHolder at the time startCallableProcessing is invoked.
There is no automatic integration with a DeferredResult that is returned by controllers. This isbecause DeferredResult is processed by the users and thus there is no way of automaticallyintegrating with it. However, you can still use Concurrency Support to provide transparentintegration with Spring Security.
15.6.5. Spring MVC and CSRF Integration
Automatic Token Inclusion
Spring Security will automatically include the CSRF Token within forms that use the Spring MVCform tag. For example, the following JSP:
340
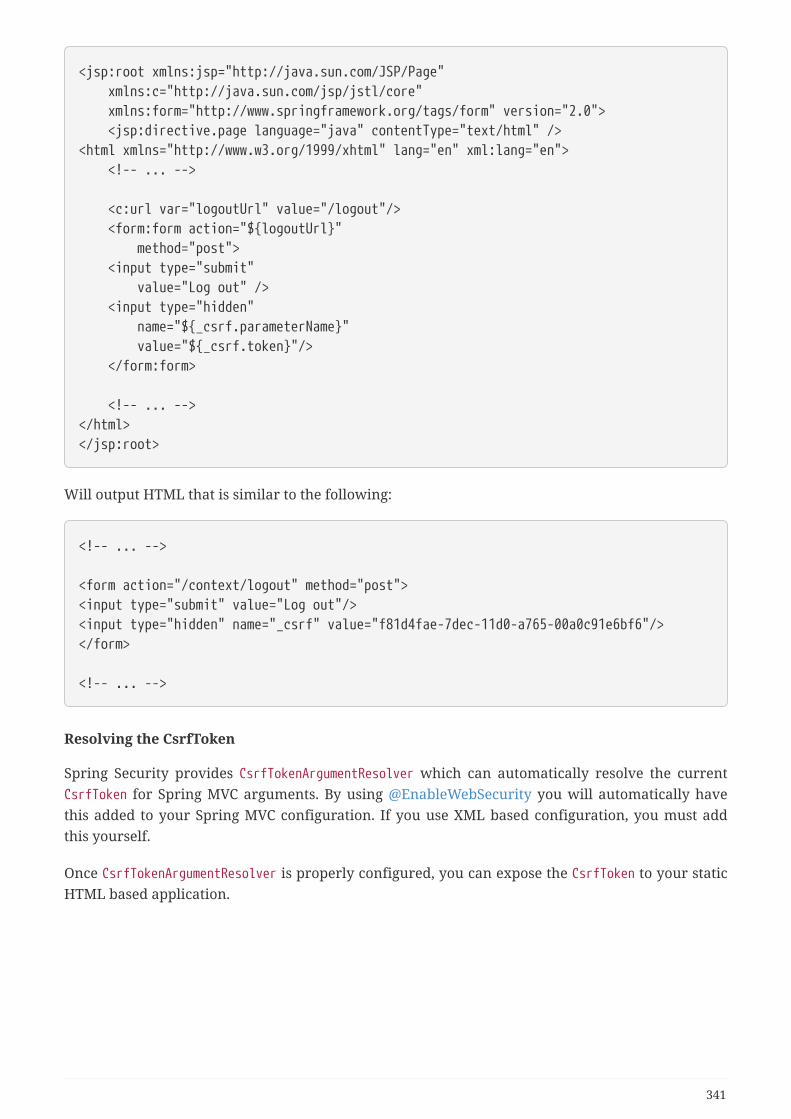
<jsp:root xmlns:jsp="http://java.sun.com/JSP/Page" xmlns:c="http://java.sun.com/jsp/jstl/core" xmlns:form="http://www.springframework.org/tags/form" version="2.0"> <jsp:directive.page language="java" contentType="text/html" /><html xmlns="http://www.w3.org/1999/xhtml" lang="en" xml:lang="en"> <!-- ... -->
<c:url var="logoutUrl" value="/logout"/> <form:form action="${logoutUrl}" method="post"> <input type="submit" value="Log out" /> <input type="hidden" name="${_csrf.parameterName}" value="${_csrf.token}"/> </form:form>
<!-- ... --></html></jsp:root>
Will output HTML that is similar to the following:
<!-- ... -->
<form action="/context/logout" method="post"><input type="submit" value="Log out"/><input type="hidden" name="_csrf" value="f81d4fae-7dec-11d0-a765-00a0c91e6bf6"/></form>
<!-- ... -->
Resolving the CsrfToken
Spring Security provides CsrfTokenArgumentResolver which can automatically resolve the currentCsrfToken for Spring MVC arguments. By using @EnableWebSecurity you will automatically havethis added to your Spring MVC configuration. If you use XML based configuration, you must addthis yourself.
Once CsrfTokenArgumentResolver is properly configured, you can expose the CsrfToken to your staticHTML based application.
341
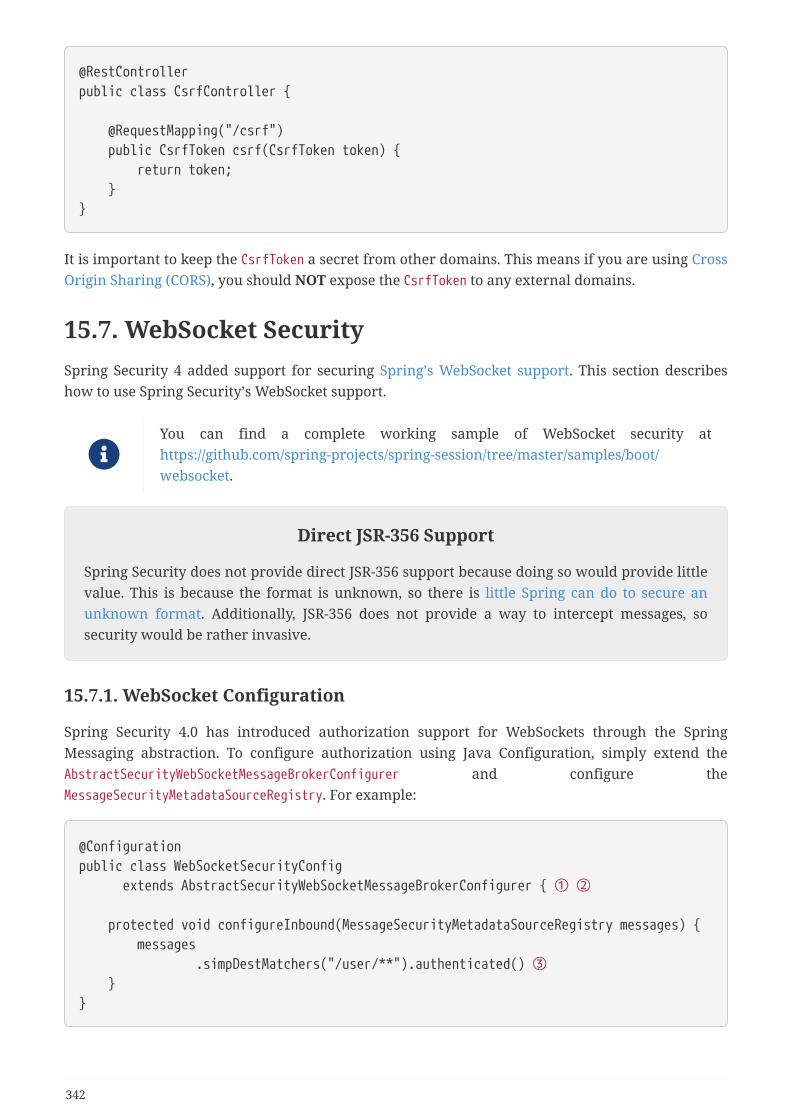
@RestControllerpublic class CsrfController {
@RequestMapping("/csrf") public CsrfToken csrf(CsrfToken token) { return token; }}
It is important to keep the CsrfToken a secret from other domains. This means if you are using CrossOrigin Sharing (CORS), you should NOT expose the CsrfToken to any external domains.
15.7. WebSocket SecuritySpring Security 4 added support for securing Spring’s WebSocket support. This section describeshow to use Spring Security’s WebSocket support.
You can find a complete working sample of WebSocket security athttps://github.com/spring-projects/spring-session/tree/master/samples/boot/websocket.
Direct JSR-356 Support
Spring Security does not provide direct JSR-356 support because doing so would provide littlevalue. This is because the format is unknown, so there is little Spring can do to secure anunknown format. Additionally, JSR-356 does not provide a way to intercept messages, sosecurity would be rather invasive.
15.7.1. WebSocket Configuration
Spring Security 4.0 has introduced authorization support for WebSockets through the SpringMessaging abstraction. To configure authorization using Java Configuration, simply extend theAbstractSecurityWebSocketMessageBrokerConfigurer and configure theMessageSecurityMetadataSourceRegistry. For example:
@Configurationpublic class WebSocketSecurityConfig extends AbstractSecurityWebSocketMessageBrokerConfigurer { ① ②
protected void configureInbound(MessageSecurityMetadataSourceRegistry messages) { messages .simpDestMatchers("/user/**").authenticated() ③ }}
342
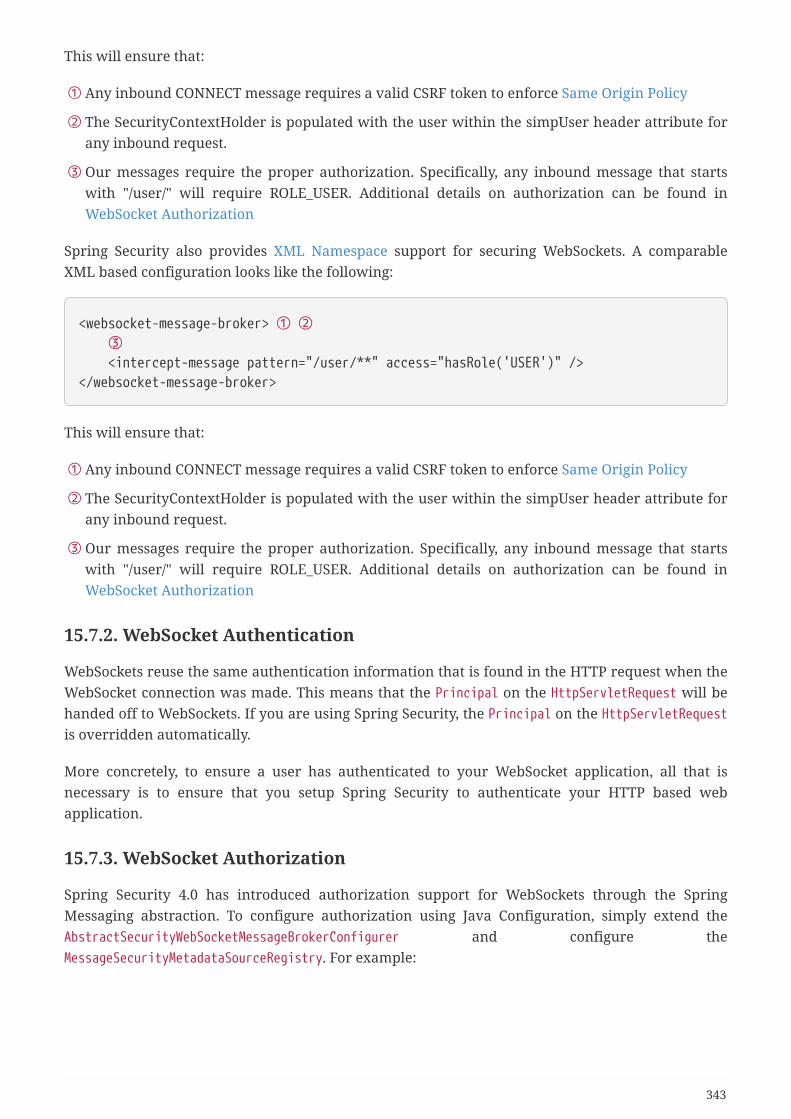
This will ensure that:
① Any inbound CONNECT message requires a valid CSRF token to enforce Same Origin Policy
② The SecurityContextHolder is populated with the user within the simpUser header attribute forany inbound request.
③ Our messages require the proper authorization. Specifically, any inbound message that startswith "/user/" will require ROLE_USER. Additional details on authorization can be found inWebSocket Authorization
Spring Security also provides XML Namespace support for securing WebSockets. A comparableXML based configuration looks like the following:
<websocket-message-broker> ① ② ③ <intercept-message pattern="/user/**" access="hasRole('USER')" /></websocket-message-broker>
This will ensure that:
① Any inbound CONNECT message requires a valid CSRF token to enforce Same Origin Policy
② The SecurityContextHolder is populated with the user within the simpUser header attribute forany inbound request.
③ Our messages require the proper authorization. Specifically, any inbound message that startswith "/user/" will require ROLE_USER. Additional details on authorization can be found inWebSocket Authorization
15.7.2. WebSocket Authentication
WebSockets reuse the same authentication information that is found in the HTTP request when theWebSocket connection was made. This means that the Principal on the HttpServletRequest will behanded off to WebSockets. If you are using Spring Security, the Principal on the HttpServletRequestis overridden automatically.
More concretely, to ensure a user has authenticated to your WebSocket application, all that isnecessary is to ensure that you setup Spring Security to authenticate your HTTP based webapplication.
15.7.3. WebSocket Authorization
Spring Security 4.0 has introduced authorization support for WebSockets through the SpringMessaging abstraction. To configure authorization using Java Configuration, simply extend theAbstractSecurityWebSocketMessageBrokerConfigurer and configure theMessageSecurityMetadataSourceRegistry. For example:
343
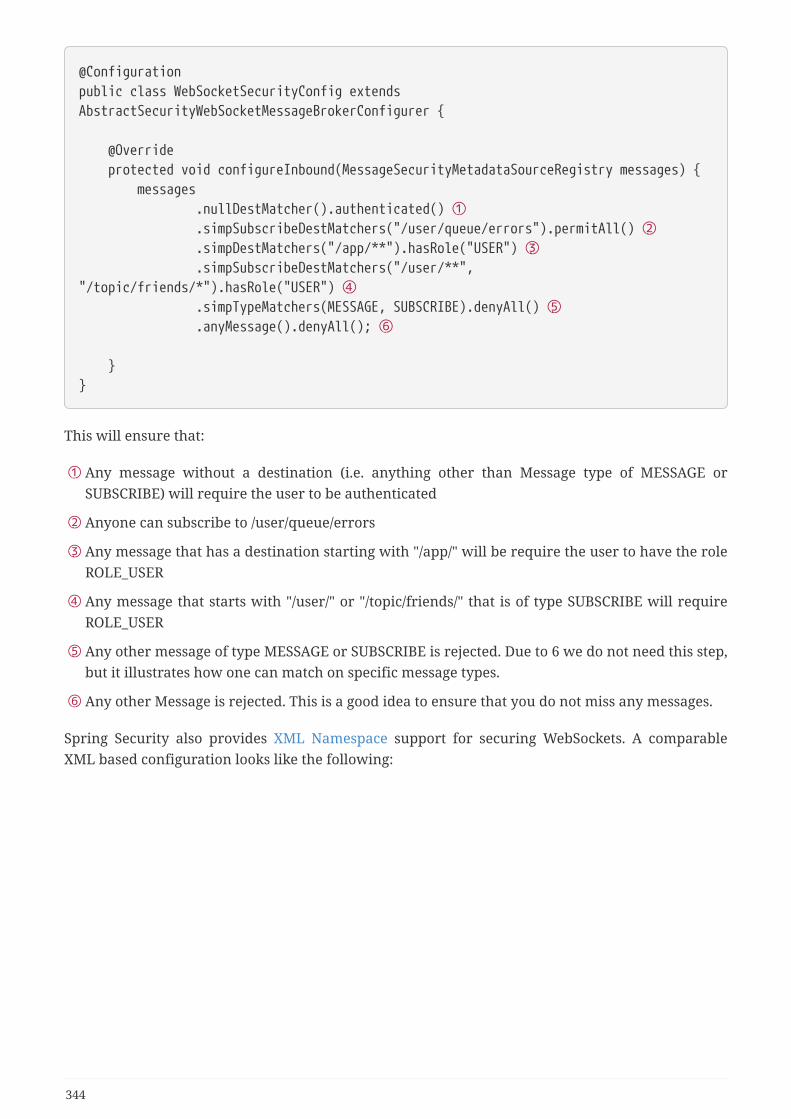
@Configurationpublic class WebSocketSecurityConfig extendsAbstractSecurityWebSocketMessageBrokerConfigurer {
@Override protected void configureInbound(MessageSecurityMetadataSourceRegistry messages) { messages .nullDestMatcher().authenticated() ① .simpSubscribeDestMatchers("/user/queue/errors").permitAll() ② .simpDestMatchers("/app/**").hasRole("USER") ③ .simpSubscribeDestMatchers("/user/**","/topic/friends/*").hasRole("USER") ④ .simpTypeMatchers(MESSAGE, SUBSCRIBE).denyAll() ⑤ .anyMessage().denyAll(); ⑥
}}
This will ensure that:
① Any message without a destination (i.e. anything other than Message type of MESSAGE orSUBSCRIBE) will require the user to be authenticated
② Anyone can subscribe to /user/queue/errors
③ Any message that has a destination starting with "/app/" will be require the user to have the roleROLE_USER
④ Any message that starts with "/user/" or "/topic/friends/" that is of type SUBSCRIBE will requireROLE_USER
⑤ Any other message of type MESSAGE or SUBSCRIBE is rejected. Due to 6 we do not need this step,but it illustrates how one can match on specific message types.
⑥ Any other Message is rejected. This is a good idea to ensure that you do not miss any messages.
Spring Security also provides XML Namespace support for securing WebSockets. A comparableXML based configuration looks like the following:
344
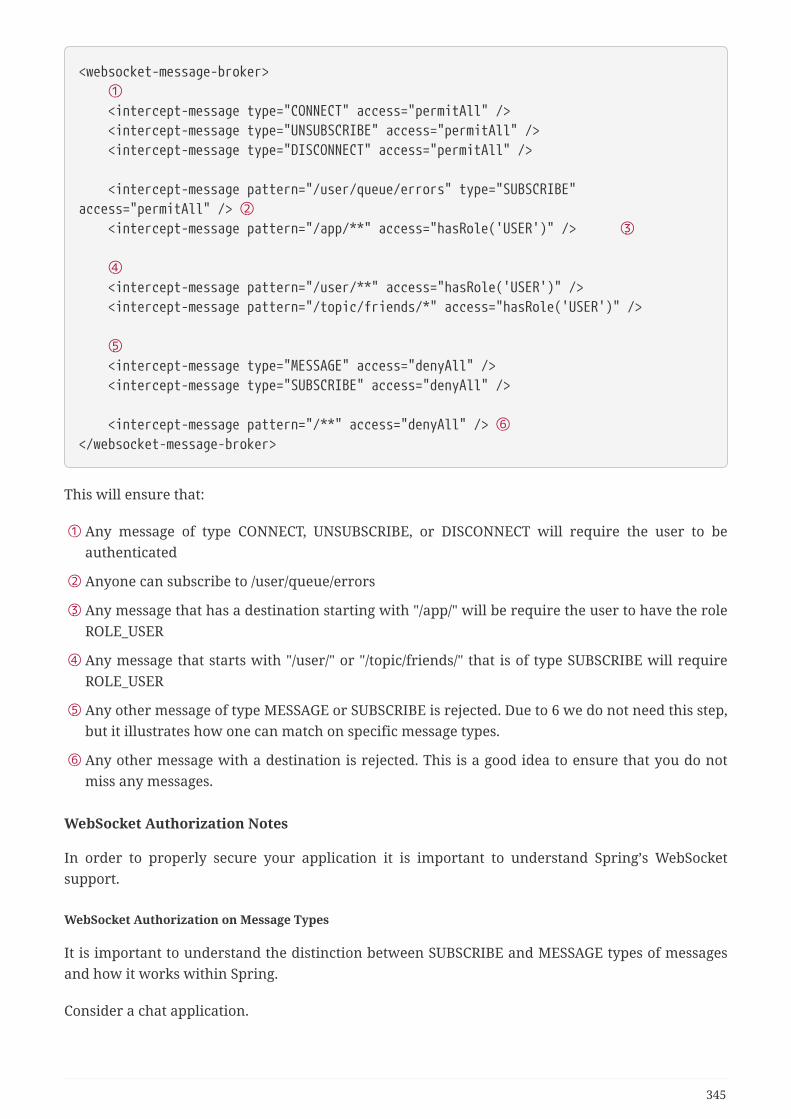
<websocket-message-broker> ① <intercept-message type="CONNECT" access="permitAll" /> <intercept-message type="UNSUBSCRIBE" access="permitAll" /> <intercept-message type="DISCONNECT" access="permitAll" />
<intercept-message pattern="/user/queue/errors" type="SUBSCRIBE"access="permitAll" /> ② <intercept-message pattern="/app/**" access="hasRole('USER')" /> ③
④ <intercept-message pattern="/user/**" access="hasRole('USER')" /> <intercept-message pattern="/topic/friends/*" access="hasRole('USER')" />
⑤ <intercept-message type="MESSAGE" access="denyAll" /> <intercept-message type="SUBSCRIBE" access="denyAll" />
<intercept-message pattern="/**" access="denyAll" /> ⑥</websocket-message-broker>
This will ensure that:
① Any message of type CONNECT, UNSUBSCRIBE, or DISCONNECT will require the user to beauthenticated
② Anyone can subscribe to /user/queue/errors
③ Any message that has a destination starting with "/app/" will be require the user to have the roleROLE_USER
④ Any message that starts with "/user/" or "/topic/friends/" that is of type SUBSCRIBE will requireROLE_USER
⑤ Any other message of type MESSAGE or SUBSCRIBE is rejected. Due to 6 we do not need this step,but it illustrates how one can match on specific message types.
⑥ Any other message with a destination is rejected. This is a good idea to ensure that you do notmiss any messages.
WebSocket Authorization Notes
In order to properly secure your application it is important to understand Spring’s WebSocketsupport.
WebSocket Authorization on Message Types
It is important to understand the distinction between SUBSCRIBE and MESSAGE types of messagesand how it works within Spring.
Consider a chat application.
345
• The system can send notifications MESSAGE to all users through a destination of"/topic/system/notifications"
• Clients can receive notifications by SUBSCRIBE to the "/topic/system/notifications".
While we want clients to be able to SUBSCRIBE to "/topic/system/notifications", we do not want toenable them to send a MESSAGE to that destination. If we allowed sending a MESSAGE to"/topic/system/notifications", then clients could send a message directly to that endpoint andimpersonate the system.
In general, it is common for applications to deny any MESSAGE sent to a destination that starts withthe broker prefix (i.e. "/topic/" or "/queue/").
WebSocket Authorization on Destinations
It is also is important to understand how destinations are transformed.
Consider a chat application.
• Users can send messages to a specific user by sending a message to the destination of"/app/chat".
• The application sees the message, ensures that the "from" attribute is specified as the currentuser (we cannot trust the client).
• The application then sends the message to the recipient usingSimpMessageSendingOperations.convertAndSendToUser("toUser", "/queue/messages", message).
• The message gets turned into the destination of "/queue/user/messages-<sessionid>"
With the application above, we want to allow our client to listen to "/user/queue" which istransformed into "/queue/user/messages-<sessionid>". However, we do not want the client to beable to listen to "/queue/*" because that would allow the client to see messages for every user.
In general, it is common for applications to deny any SUBSCRIBE sent to a message that starts withthe broker prefix (i.e. "/topic/" or "/queue/"). Of course we may provide exceptions to account forthings like
Outbound Messages
Spring contains a section titled Flow of Messages that describes how messages flow through thesystem. It is important to note that Spring Security only secures the clientInboundChannel. SpringSecurity does not attempt to secure the clientOutboundChannel.
The most important reason for this is performance. For every message that goes in, there aretypically many more that go out. Instead of securing the outbound messages, we encouragesecuring the subscription to the endpoints.
15.7.4. Enforcing Same Origin Policy
It is important to emphasize that the browser does not enforce the Same Origin Policy forWebSocket connections. This is an extremely important consideration.
346
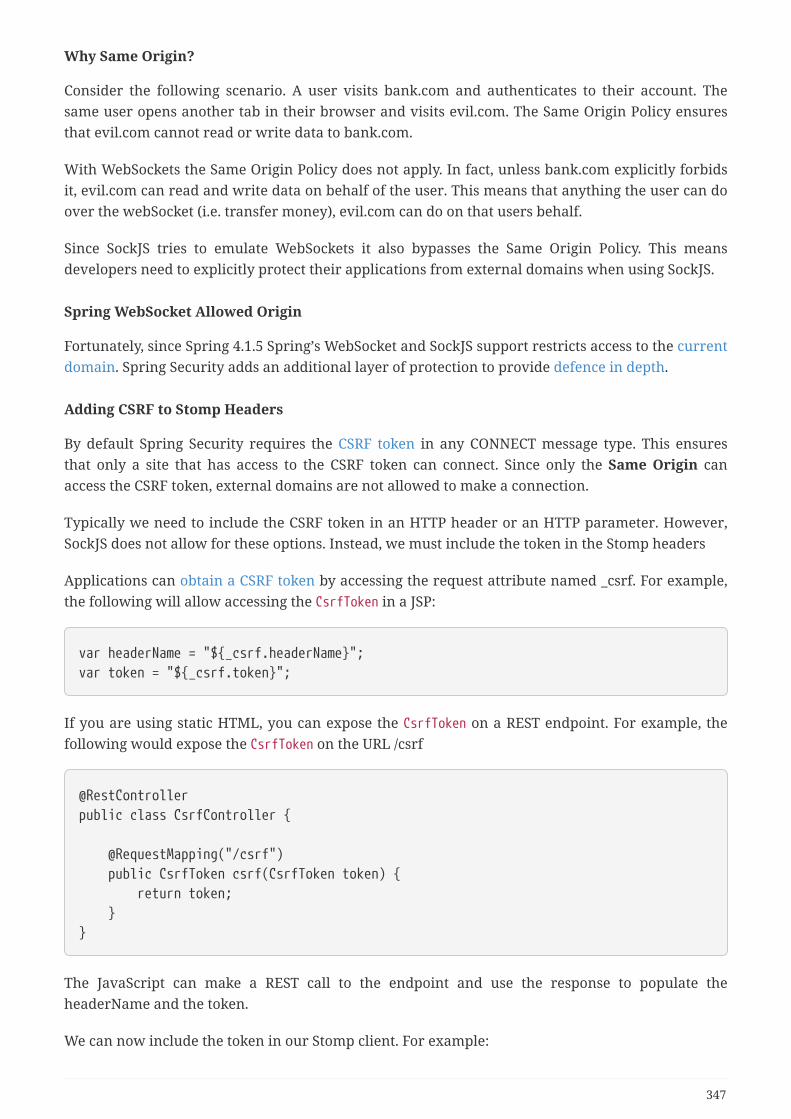
Why Same Origin?
Consider the following scenario. A user visits bank.com and authenticates to their account. Thesame user opens another tab in their browser and visits evil.com. The Same Origin Policy ensuresthat evil.com cannot read or write data to bank.com.
With WebSockets the Same Origin Policy does not apply. In fact, unless bank.com explicitly forbidsit, evil.com can read and write data on behalf of the user. This means that anything the user can doover the webSocket (i.e. transfer money), evil.com can do on that users behalf.
Since SockJS tries to emulate WebSockets it also bypasses the Same Origin Policy. This meansdevelopers need to explicitly protect their applications from external domains when using SockJS.
Spring WebSocket Allowed Origin
Fortunately, since Spring 4.1.5 Spring’s WebSocket and SockJS support restricts access to the currentdomain. Spring Security adds an additional layer of protection to provide defence in depth.
Adding CSRF to Stomp Headers
By default Spring Security requires the CSRF token in any CONNECT message type. This ensuresthat only a site that has access to the CSRF token can connect. Since only the Same Origin canaccess the CSRF token, external domains are not allowed to make a connection.
Typically we need to include the CSRF token in an HTTP header or an HTTP parameter. However,SockJS does not allow for these options. Instead, we must include the token in the Stomp headers
Applications can obtain a CSRF token by accessing the request attribute named _csrf. For example,the following will allow accessing the CsrfToken in a JSP:
var headerName = "${_csrf.headerName}";var token = "${_csrf.token}";
If you are using static HTML, you can expose the CsrfToken on a REST endpoint. For example, thefollowing would expose the CsrfToken on the URL /csrf
@RestControllerpublic class CsrfController {
@RequestMapping("/csrf") public CsrfToken csrf(CsrfToken token) { return token; }}
The JavaScript can make a REST call to the endpoint and use the response to populate theheaderName and the token.
We can now include the token in our Stomp client. For example:
347
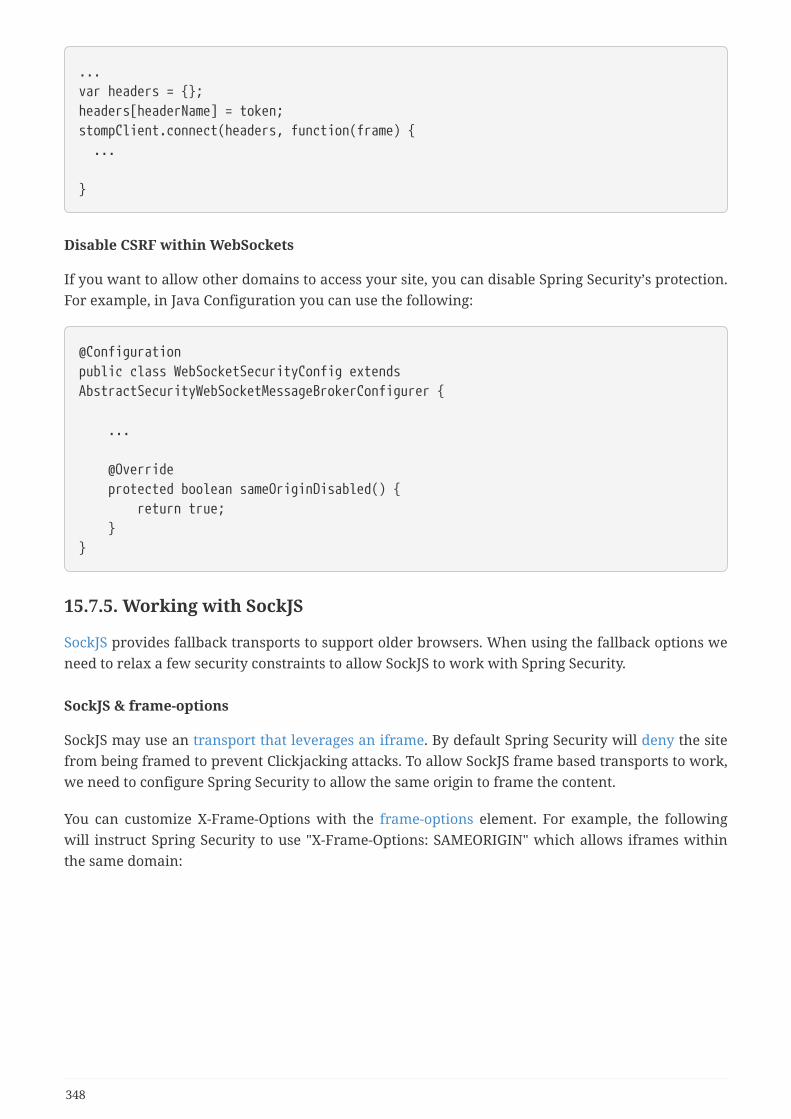
...var headers = {};headers[headerName] = token;stompClient.connect(headers, function(frame) { ...
}
Disable CSRF within WebSockets
If you want to allow other domains to access your site, you can disable Spring Security’s protection.For example, in Java Configuration you can use the following:
@Configurationpublic class WebSocketSecurityConfig extendsAbstractSecurityWebSocketMessageBrokerConfigurer {
...
@Override protected boolean sameOriginDisabled() { return true; }}
15.7.5. Working with SockJS
SockJS provides fallback transports to support older browsers. When using the fallback options weneed to relax a few security constraints to allow SockJS to work with Spring Security.
SockJS & frame-options
SockJS may use an transport that leverages an iframe. By default Spring Security will deny the sitefrom being framed to prevent Clickjacking attacks. To allow SockJS frame based transports to work,we need to configure Spring Security to allow the same origin to frame the content.
You can customize X-Frame-Options with the frame-options element. For example, the followingwill instruct Spring Security to use "X-Frame-Options: SAMEORIGIN" which allows iframes withinthe same domain:
348
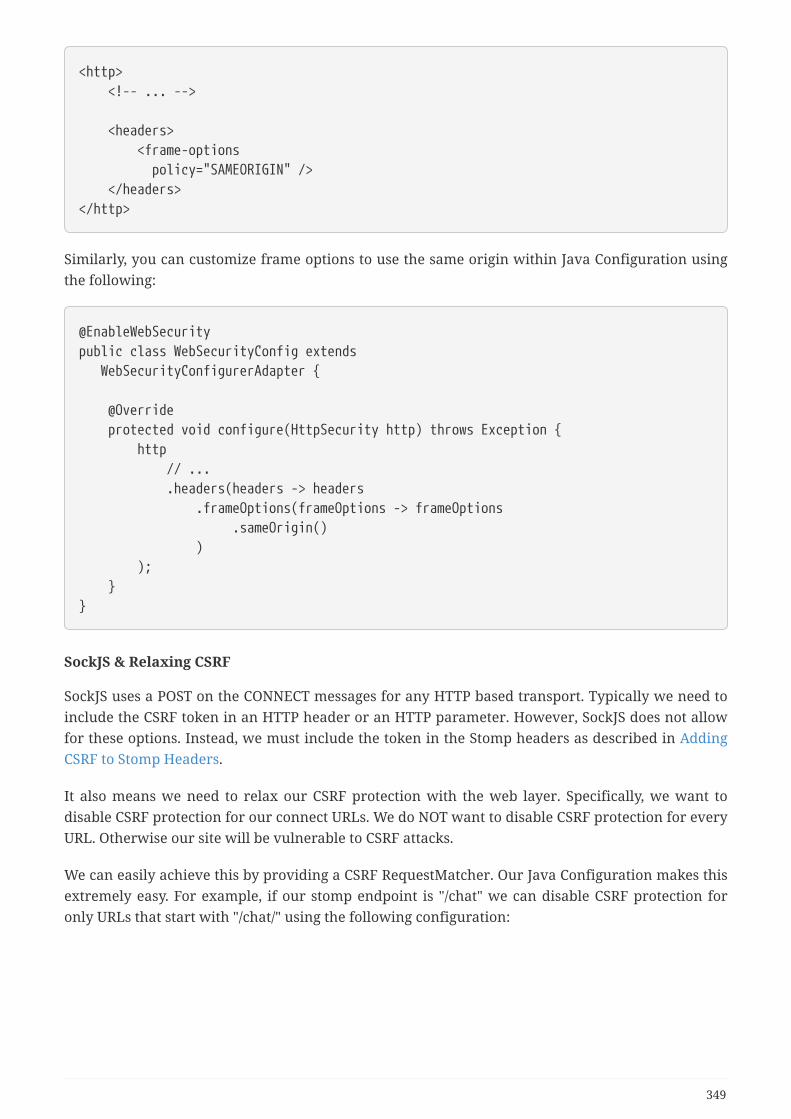
<http> <!-- ... -->
<headers> <frame-options policy="SAMEORIGIN" /> </headers></http>
Similarly, you can customize frame options to use the same origin within Java Configuration usingthe following:
@EnableWebSecuritypublic class WebSecurityConfig extends WebSecurityConfigurerAdapter {
@Override protected void configure(HttpSecurity http) throws Exception { http // ... .headers(headers -> headers .frameOptions(frameOptions -> frameOptions .sameOrigin() ) ); }}
SockJS & Relaxing CSRF
SockJS uses a POST on the CONNECT messages for any HTTP based transport. Typically we need toinclude the CSRF token in an HTTP header or an HTTP parameter. However, SockJS does not allowfor these options. Instead, we must include the token in the Stomp headers as described in AddingCSRF to Stomp Headers.
It also means we need to relax our CSRF protection with the web layer. Specifically, we want todisable CSRF protection for our connect URLs. We do NOT want to disable CSRF protection for everyURL. Otherwise our site will be vulnerable to CSRF attacks.
We can easily achieve this by providing a CSRF RequestMatcher. Our Java Configuration makes thisextremely easy. For example, if our stomp endpoint is "/chat" we can disable CSRF protection foronly URLs that start with "/chat/" using the following configuration:
349
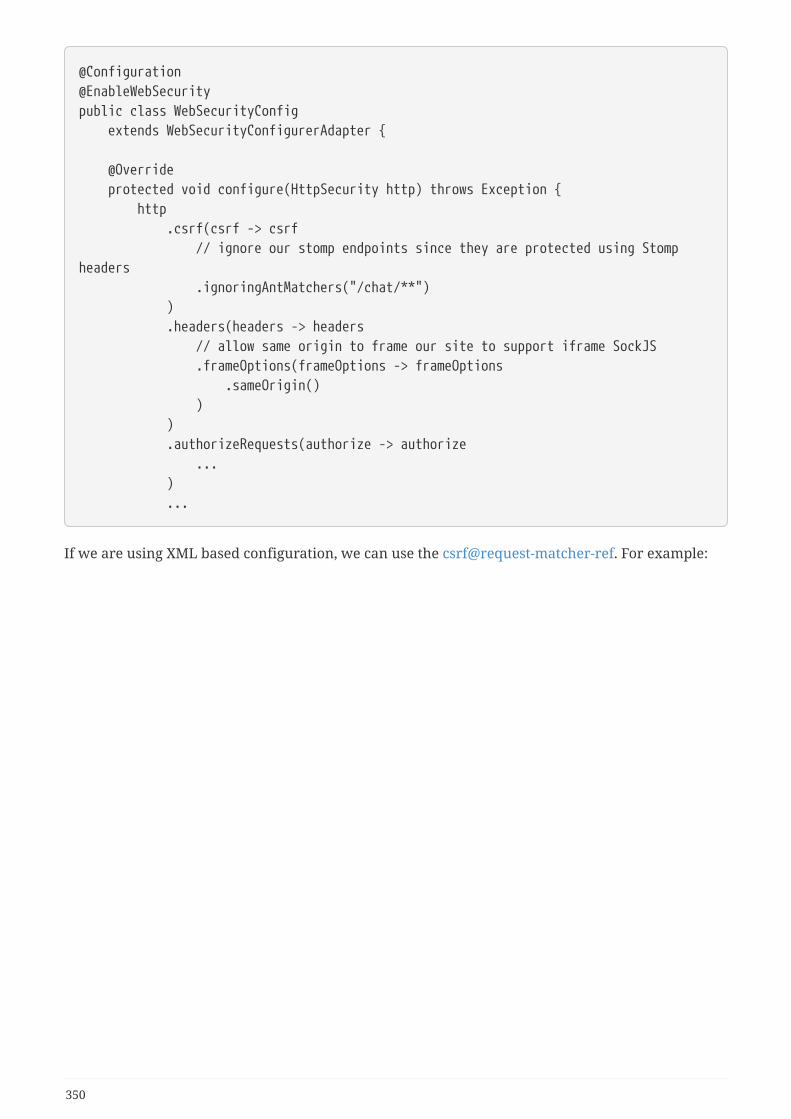
@Configuration@EnableWebSecuritypublic class WebSecurityConfig extends WebSecurityConfigurerAdapter {
@Override protected void configure(HttpSecurity http) throws Exception { http .csrf(csrf -> csrf // ignore our stomp endpoints since they are protected using Stompheaders .ignoringAntMatchers("/chat/**") ) .headers(headers -> headers // allow same origin to frame our site to support iframe SockJS .frameOptions(frameOptions -> frameOptions .sameOrigin() ) ) .authorizeRequests(authorize -> authorize ... ) ...
If we are using XML based configuration, we can use the csrf@request-matcher-ref. For example:
350

<http ...> <csrf request-matcher-ref="csrfMatcher"/>
<headers> <frame-options policy="SAMEORIGIN"/> </headers>
...</http>
<b:bean id="csrfMatcher" class="AndRequestMatcher"> <b:constructor-argvalue="#{T(org.springframework.security.web.csrf.CsrfFilter).DEFAULT_CSRF_MATCHER}"/> <b:constructor-arg> <b:beanclass="org.springframework.security.web.util.matcher.NegatedRequestMatcher"> <b:beanclass="org.springframework.security.web.util.matcher.AntPathRequestMatcher"> <b:constructor-arg value="/chat/**"/> </b:bean> </b:bean> </b:constructor-arg></b:bean>
15.8. CORSSpring Framework provides first class support for CORS. CORS must be processed before SpringSecurity because the pre-flight request will not contain any cookies (i.e. the JSESSIONID). If therequest does not contain any cookies and Spring Security is first, the request will determine theuser is not authenticated (since there are no cookies in the request) and reject it.
The easiest way to ensure that CORS is handled first is to use the CorsFilter. Users can integrate theCorsFilter with Spring Security by providing a CorsConfigurationSource using the following:
351
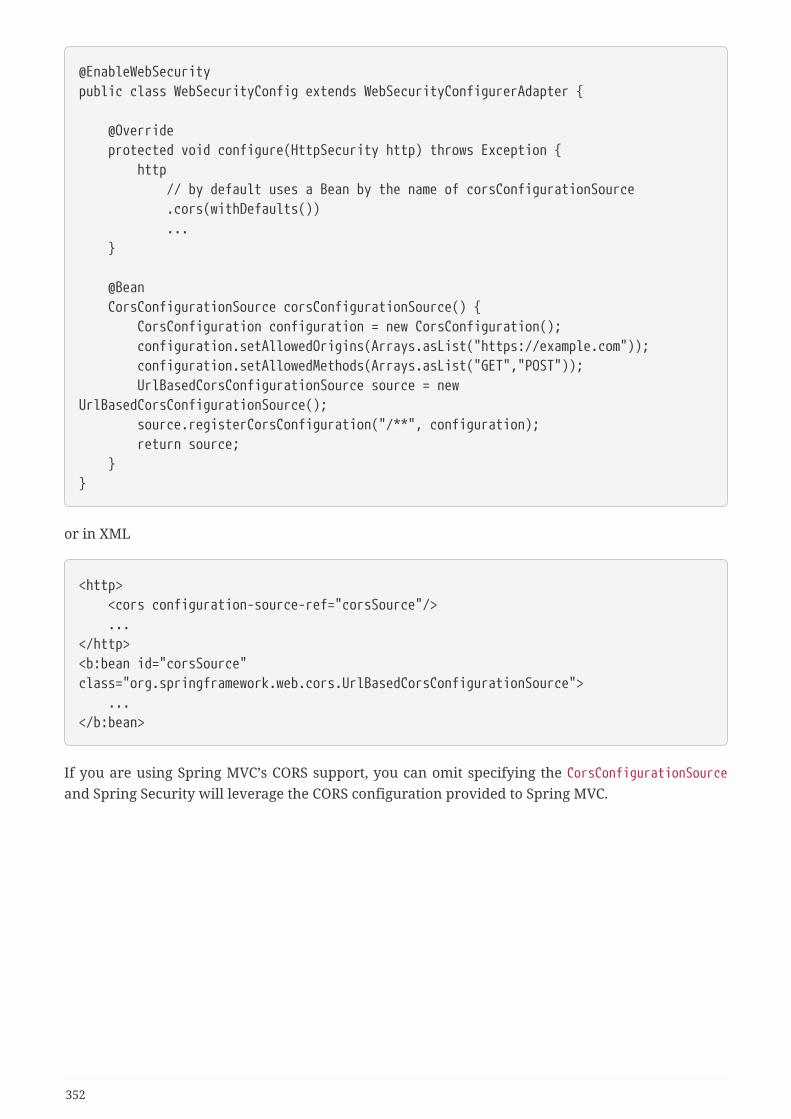
@EnableWebSecuritypublic class WebSecurityConfig extends WebSecurityConfigurerAdapter {
@Override protected void configure(HttpSecurity http) throws Exception { http // by default uses a Bean by the name of corsConfigurationSource .cors(withDefaults()) ... }
@Bean CorsConfigurationSource corsConfigurationSource() { CorsConfiguration configuration = new CorsConfiguration(); configuration.setAllowedOrigins(Arrays.asList("https://example.com")); configuration.setAllowedMethods(Arrays.asList("GET","POST")); UrlBasedCorsConfigurationSource source = newUrlBasedCorsConfigurationSource(); source.registerCorsConfiguration("/**", configuration); return source; }}
or in XML
<http> <cors configuration-source-ref="corsSource"/> ...</http><b:bean id="corsSource"class="org.springframework.web.cors.UrlBasedCorsConfigurationSource"> ...</b:bean>
If you are using Spring MVC’s CORS support, you can omit specifying the CorsConfigurationSourceand Spring Security will leverage the CORS configuration provided to Spring MVC.
352
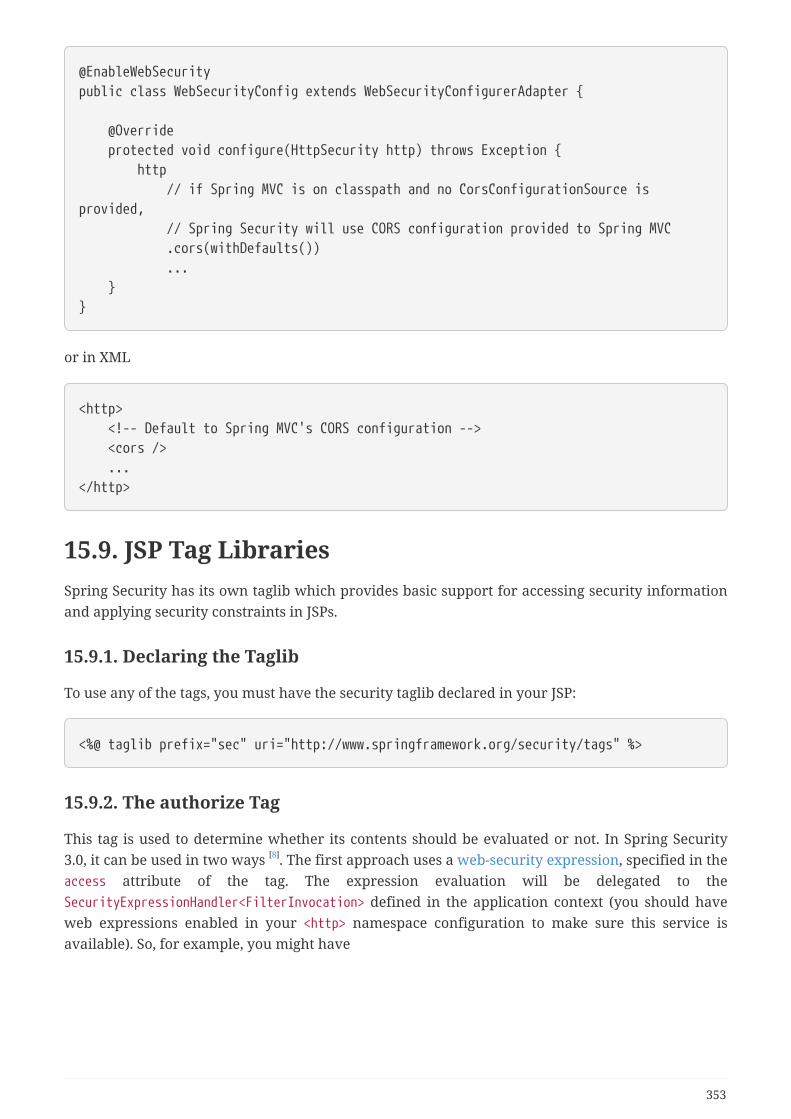
@EnableWebSecuritypublic class WebSecurityConfig extends WebSecurityConfigurerAdapter {
@Override protected void configure(HttpSecurity http) throws Exception { http // if Spring MVC is on classpath and no CorsConfigurationSource isprovided, // Spring Security will use CORS configuration provided to Spring MVC .cors(withDefaults()) ... }}
or in XML
<http> <!-- Default to Spring MVC's CORS configuration --> <cors /> ...</http>
15.9. JSP Tag LibrariesSpring Security has its own taglib which provides basic support for accessing security informationand applying security constraints in JSPs.
15.9.1. Declaring the Taglib
To use any of the tags, you must have the security taglib declared in your JSP:
<%@ taglib prefix="sec" uri="http://www.springframework.org/security/tags" %>
15.9.2. The authorize Tag
This tag is used to determine whether its contents should be evaluated or not. In Spring Security3.0, it can be used in two ways [8]. The first approach uses a web-security expression, specified in theaccess attribute of the tag. The expression evaluation will be delegated to theSecurityExpressionHandler<FilterInvocation> defined in the application context (you should haveweb expressions enabled in your <http> namespace configuration to make sure this service isavailable). So, for example, you might have
353
<sec:authorize access="hasRole('supervisor')">
This content will only be visible to users who have the "supervisor" authority intheir list of <tt>GrantedAuthority</tt>s.
</sec:authorize>
When used in conjunction with Spring Security’s PermissionEvaluator, the tag can also be used tocheck permissions. For example:
<sec:authorize access="hasPermission(#domain,'read') orhasPermission(#domain,'write')">
This content will only be visible to users who have read or write permission to theObject found as a request attribute named "domain".
</sec:authorize>
A common requirement is to only show a particular link, if the user is actually allowed to click it.How can we determine in advance whether something will be allowed? This tag can also operate inan alternative mode which allows you to define a particular URL as an attribute. If the user isallowed to invoke that URL, then the tag body will be evaluated, otherwise it will be skipped. So youmight have something like
<sec:authorize url="/admin">
This content will only be visible to users who are authorized to send requests to the"/admin" URL.
</sec:authorize>
To use this tag there must also be an instance of WebInvocationPrivilegeEvaluator in yourapplication context. If you are using the namespace, one will automatically be registered. This is aninstance of DefaultWebInvocationPrivilegeEvaluator, which creates a dummy web request for thesupplied URL and invokes the security interceptor to see whether the request would succeed or fail.This allows you to delegate to the access-control setup you defined using intercept-url declarationswithin the <http> namespace configuration and saves having to duplicate the information (such asthe required roles) within your JSPs. This approach can also be combined with a method attribute,supplying the HTTP method, for a more specific match.
The Boolean result of evaluating the tag (whether it grants or denies access) can be stored in a pagecontext scope variable by setting the var attribute to the variable name, avoiding the need forduplicating and re-evaluating the condition at other points in the page.
354
Disabling Tag Authorization for Testing
Hiding a link in a page for unauthorized users doesn’t prevent them from accessing the URL. Theycould just type it into their browser directly, for example. As part of your testing process, you maywant to reveal the hidden areas in order to check that links really are secured at the back end. Ifyou set the system property spring.security.disableUISecurity to true, the authorize tag will stillrun but will not hide its contents. By default it will also surround the content with <spanclass="securityHiddenUI">…</span> tags. This allows you to display "hidden" content with aparticular CSS style such as a different background colour. Try running the "tutorial" sampleapplication with this property enabled, for example.
You can also set the properties spring.security.securedUIPrefix andspring.security.securedUISuffix if you want to change surrounding text from the default span tags(or use empty strings to remove it completely).
15.9.3. The authentication Tag
This tag allows access to the current Authentication object stored in the security context. It rendersa property of the object directly in the JSP. So, for example, if the principal property of theAuthentication is an instance of Spring Security’s UserDetails object, then using <sec:authenticationproperty="principal.username" /> will render the name of the current user.
Of course, it isn’t necessary to use JSP tags for this kind of thing and some people prefer to keep aslittle logic as possible in the view. You can access the Authentication object in your MVC controller(by calling SecurityContextHolder.getContext().getAuthentication()) and add the data directly toyour model for rendering by the view.
15.9.4. The accesscontrollist Tag
This tag is only valid when used with Spring Security’s ACL module. It checks a comma-separatedlist of required permissions for a specified domain object. If the current user has all of thosepermissions, then the tag body will be evaluated. If they don’t, it will be skipped. An example mightbe
In general this tag should be considered deprecated. Instead use the The authorizeTag.
<sec:accesscontrollist hasPermission="1,2" domainObject="${someObject}">
This will be shown if the user has all of the permissions represented by the values"1" or "2" on the given object.
</sec:accesscontrollist>
The permissions are passed to the PermissionFactory defined in the application context, convertingthem to ACL Permission instances, so they may be any format which is supported by the factory -they don’t have to be integers, they could be strings like READ or WRITE. If no PermissionFactory isfound, an instance of DefaultPermissionFactory will be used. The AclService from the application
355
context will be used to load the Acl instance for the supplied object. The Acl will be invoked withthe required permissions to check if all of them are granted.
This tag also supports the var attribute, in the same way as the authorize tag.
15.9.5. The csrfInput Tag
If CSRF protection is enabled, this tag inserts a hidden form field with the correct name and valuefor the CSRF protection token. If CSRF protection is not enabled, this tag outputs nothing.
Normally Spring Security automatically inserts a CSRF form field for any <form:form> tags you use,but if for some reason you cannot use <form:form>, csrfInput is a handy replacement.
You should place this tag within an HTML <form></form> block, where you would normally placeother input fields. Do NOT place this tag within a Spring <form:form></form:form> block. SpringSecurity handles Spring forms automatically.
<form method="post" action="/do/something"> <sec:csrfInput /> Name:<br /> <input type="text" name="name" /> ...</form>
15.9.6. The csrfMetaTags Tag
If CSRF protection is enabled, this tag inserts meta tags containing the CSRF protection token formfield and header names and CSRF protection token value. These meta tags are useful for employingCSRF protection within JavaScript in your applications.
You should place csrfMetaTags within an HTML <head></head> block, where you would normallyplace other meta tags. Once you use this tag, you can access the form field name, header name, andtoken value easily using JavaScript. JQuery is used in this example to make the task easier.
<!DOCTYPE html><html> <head> <title>CSRF Protected JavaScript Page</title> <meta name="description" content="This is the description for this page" /> <sec:csrfMetaTags /> <script type="text/javascript" language="javascript">
var csrfParameter = $("meta[name='_csrf_parameter']").attr("content"); var csrfHeader = $("meta[name='_csrf_header']").attr("content"); var csrfToken = $("meta[name='_csrf']").attr("content");
// using XMLHttpRequest directly to send an x-www-form-urlencoded request var ajax = new XMLHttpRequest(); ajax.open("POST", "https://www.example.org/do/something", true);
356
ajax.setRequestHeader("Content-Type", "application/x-www-form-urlencodeddata"); ajax.send(csrfParameter + "=" + csrfToken + "&name=John&...");
// using XMLHttpRequest directly to send a non-x-www-form-urlencodedrequest var ajax = new XMLHttpRequest(); ajax.open("POST", "https://www.example.org/do/something", true); ajax.setRequestHeader(csrfHeader, csrfToken); ajax.send("...");
// using JQuery to send an x-www-form-urlencoded request var data = {}; data[csrfParameter] = csrfToken; data["name"] = "John"; ... $.ajax({ url: "https://www.example.org/do/something", type: "POST", data: data, ... });
// using JQuery to send a non-x-www-form-urlencoded request var headers = {}; headers[csrfHeader] = csrfToken; $.ajax({ url: "https://www.example.org/do/something", type: "POST", headers: headers, ... });
<script> </head> <body> ... </body></html>
If CSRF protection is not enabled, csrfMetaTags outputs nothing.
[8] The legacy options from Spring Security 2.0 are also supported, but discouraged.
357
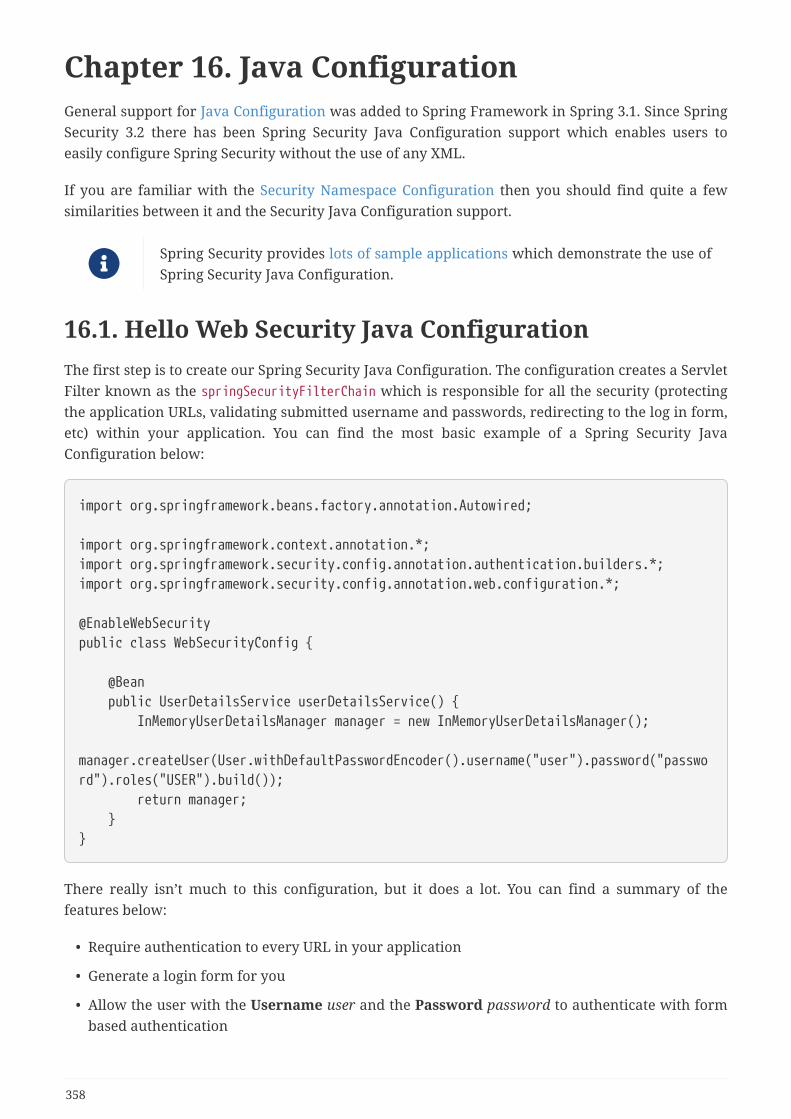
Chapter 16. Java ConfigurationGeneral support for Java Configuration was added to Spring Framework in Spring 3.1. Since SpringSecurity 3.2 there has been Spring Security Java Configuration support which enables users toeasily configure Spring Security without the use of any XML.
If you are familiar with the Security Namespace Configuration then you should find quite a fewsimilarities between it and the Security Java Configuration support.
Spring Security provides lots of sample applications which demonstrate the use ofSpring Security Java Configuration.
16.1. Hello Web Security Java ConfigurationThe first step is to create our Spring Security Java Configuration. The configuration creates a ServletFilter known as the springSecurityFilterChain which is responsible for all the security (protectingthe application URLs, validating submitted username and passwords, redirecting to the log in form,etc) within your application. You can find the most basic example of a Spring Security JavaConfiguration below:
import org.springframework.beans.factory.annotation.Autowired;
import org.springframework.context.annotation.*;import org.springframework.security.config.annotation.authentication.builders.*;import org.springframework.security.config.annotation.web.configuration.*;
@EnableWebSecuritypublic class WebSecurityConfig {
@Bean public UserDetailsService userDetailsService() { InMemoryUserDetailsManager manager = new InMemoryUserDetailsManager(); manager.createUser(User.withDefaultPasswordEncoder().username("user").password("password").roles("USER").build()); return manager; }}
There really isn’t much to this configuration, but it does a lot. You can find a summary of thefeatures below:
• Require authentication to every URL in your application
• Generate a login form for you
• Allow the user with the Username user and the Password password to authenticate with formbased authentication
358
• Allow the user to logout
• CSRF attack prevention
• Session Fixation protection
• Security Header integration
◦ HTTP Strict Transport Security for secure requests
◦ X-Content-Type-Options integration
◦ Cache Control (can be overridden later by your application to allow caching of your staticresources)
◦ X-XSS-Protection integration
◦ X-Frame-Options integration to help prevent Clickjacking
• Integrate with the following Servlet API methods
◦ HttpServletRequest#getRemoteUser()
◦ HttpServletRequest#getUserPrincipal()
◦ HttpServletRequest#isUserInRole(java.lang.String)
◦ HttpServletRequest#login(java.lang.String, java.lang.String)
◦ HttpServletRequest#logout()
16.1.1. AbstractSecurityWebApplicationInitializer
The next step is to register the springSecurityFilterChain with the war. This can be done in JavaConfiguration with Spring’s WebApplicationInitializer support in a Servlet 3.0+ environment. Notsuprisingly, Spring Security provides a base class AbstractSecurityWebApplicationInitializer thatwill ensure the springSecurityFilterChain gets registered for you. The way in which we useAbstractSecurityWebApplicationInitializer differs depending on if we are already using Spring or ifSpring Security is the only Spring component in our application.
• AbstractSecurityWebApplicationInitializer without Existing Spring - Use these instructions ifyou are not using Spring already
• AbstractSecurityWebApplicationInitializer with Spring MVC - Use these instructions if you arealready using Spring
16.1.2. AbstractSecurityWebApplicationInitializer without Existing Spring
If you are not using Spring or Spring MVC, you will need to pass in the WebSecurityConfig into thesuperclass to ensure the configuration is picked up. You can find an example below:
359
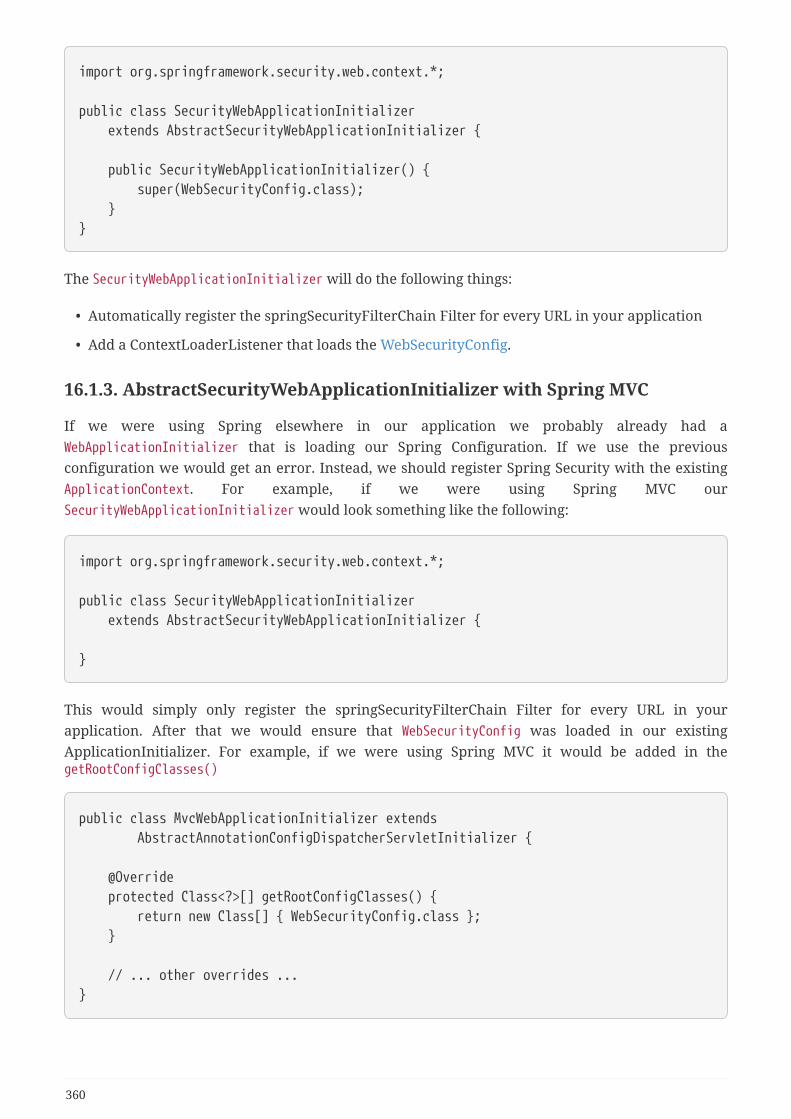
import org.springframework.security.web.context.*;
public class SecurityWebApplicationInitializer extends AbstractSecurityWebApplicationInitializer {
public SecurityWebApplicationInitializer() { super(WebSecurityConfig.class); }}
The SecurityWebApplicationInitializer will do the following things:
• Automatically register the springSecurityFilterChain Filter for every URL in your application
• Add a ContextLoaderListener that loads the WebSecurityConfig.
16.1.3. AbstractSecurityWebApplicationInitializer with Spring MVC
If we were using Spring elsewhere in our application we probably already had aWebApplicationInitializer that is loading our Spring Configuration. If we use the previousconfiguration we would get an error. Instead, we should register Spring Security with the existingApplicationContext. For example, if we were using Spring MVC ourSecurityWebApplicationInitializer would look something like the following:
import org.springframework.security.web.context.*;
public class SecurityWebApplicationInitializer extends AbstractSecurityWebApplicationInitializer {
}
This would simply only register the springSecurityFilterChain Filter for every URL in yourapplication. After that we would ensure that WebSecurityConfig was loaded in our existingApplicationInitializer. For example, if we were using Spring MVC it would be added in thegetRootConfigClasses()
public class MvcWebApplicationInitializer extends AbstractAnnotationConfigDispatcherServletInitializer {
@Override protected Class<?>[] getRootConfigClasses() { return new Class[] { WebSecurityConfig.class }; }
// ... other overrides ...}
360
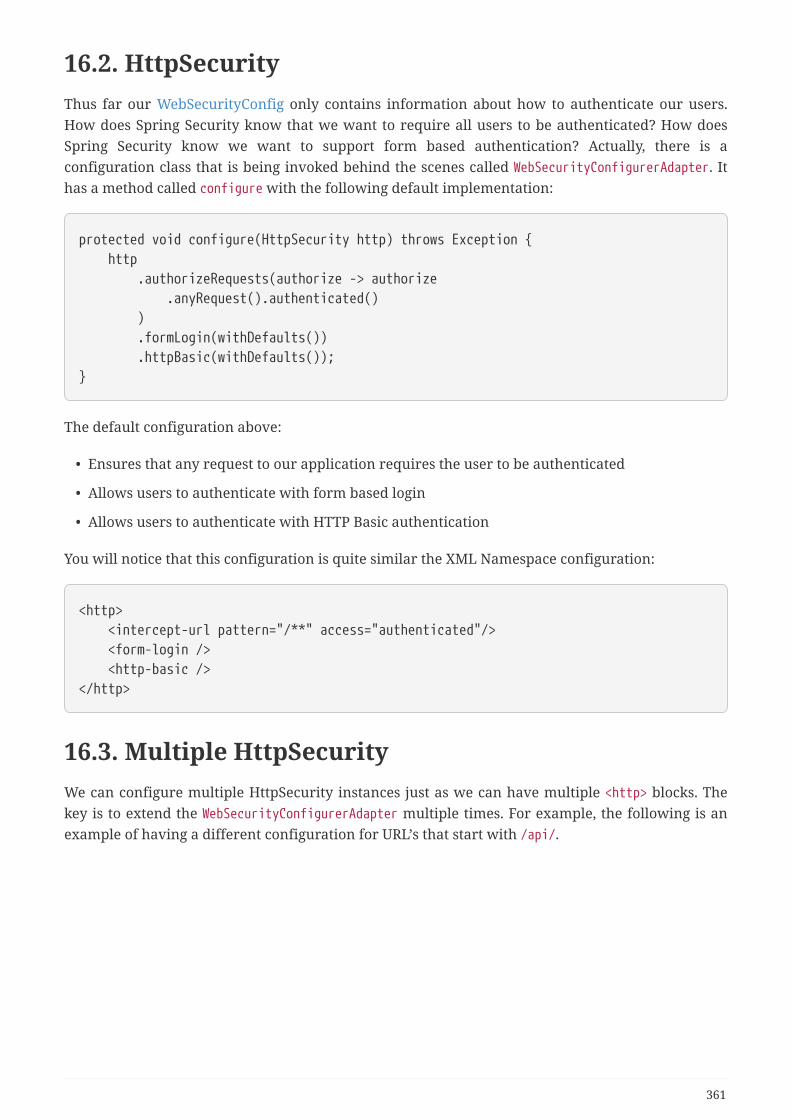
16.2. HttpSecurityThus far our WebSecurityConfig only contains information about how to authenticate our users.How does Spring Security know that we want to require all users to be authenticated? How doesSpring Security know we want to support form based authentication? Actually, there is aconfiguration class that is being invoked behind the scenes called WebSecurityConfigurerAdapter. Ithas a method called configure with the following default implementation:
protected void configure(HttpSecurity http) throws Exception { http .authorizeRequests(authorize -> authorize .anyRequest().authenticated() ) .formLogin(withDefaults()) .httpBasic(withDefaults());}
The default configuration above:
• Ensures that any request to our application requires the user to be authenticated
• Allows users to authenticate with form based login
• Allows users to authenticate with HTTP Basic authentication
You will notice that this configuration is quite similar the XML Namespace configuration:
<http> <intercept-url pattern="/**" access="authenticated"/> <form-login /> <http-basic /></http>
16.3. Multiple HttpSecurityWe can configure multiple HttpSecurity instances just as we can have multiple <http> blocks. Thekey is to extend the WebSecurityConfigurerAdapter multiple times. For example, the following is anexample of having a different configuration for URL’s that start with /api/.
361
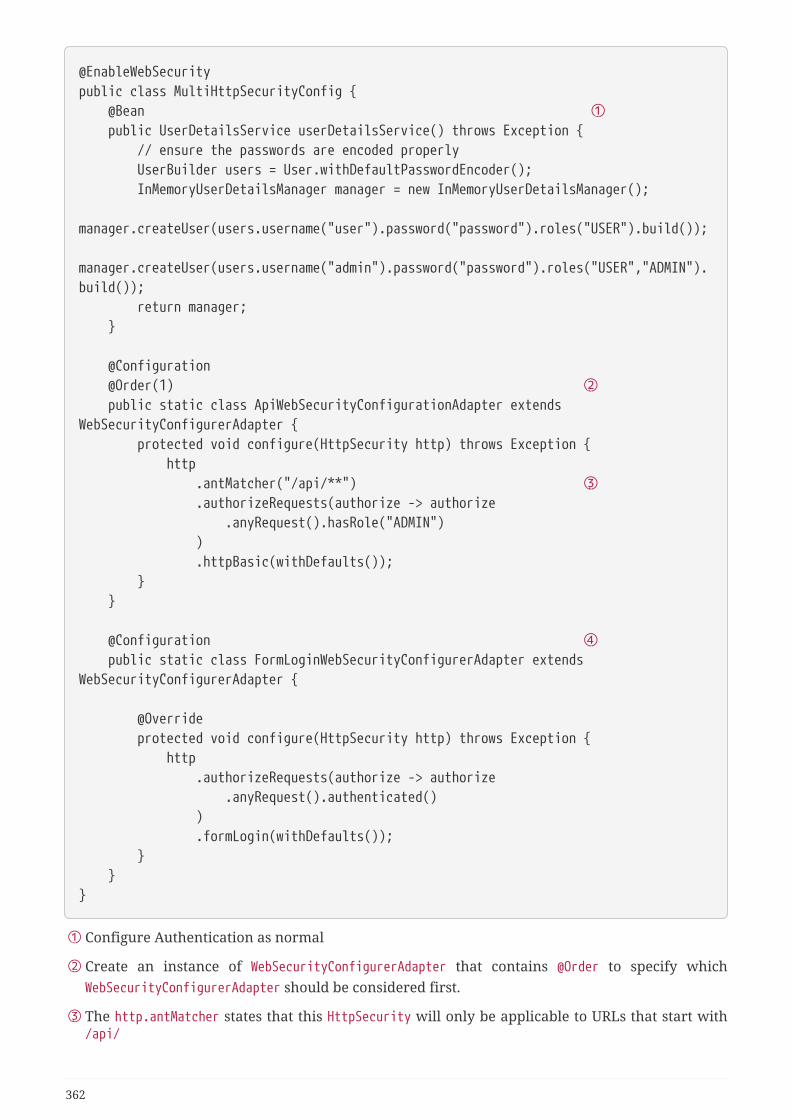
@EnableWebSecuritypublic class MultiHttpSecurityConfig { @Bean ① public UserDetailsService userDetailsService() throws Exception { // ensure the passwords are encoded properly UserBuilder users = User.withDefaultPasswordEncoder(); InMemoryUserDetailsManager manager = new InMemoryUserDetailsManager(); manager.createUser(users.username("user").password("password").roles("USER").build()); manager.createUser(users.username("admin").password("password").roles("USER","ADMIN").build()); return manager; }
@Configuration @Order(1) ② public static class ApiWebSecurityConfigurationAdapter extendsWebSecurityConfigurerAdapter { protected void configure(HttpSecurity http) throws Exception { http .antMatcher("/api/**") ③ .authorizeRequests(authorize -> authorize .anyRequest().hasRole("ADMIN") ) .httpBasic(withDefaults()); } }
@Configuration ④ public static class FormLoginWebSecurityConfigurerAdapter extendsWebSecurityConfigurerAdapter {
@Override protected void configure(HttpSecurity http) throws Exception { http .authorizeRequests(authorize -> authorize .anyRequest().authenticated() ) .formLogin(withDefaults()); } }}
① Configure Authentication as normal
② Create an instance of WebSecurityConfigurerAdapter that contains @Order to specify whichWebSecurityConfigurerAdapter should be considered first.
③ The http.antMatcher states that this HttpSecurity will only be applicable to URLs that start with/api/
362
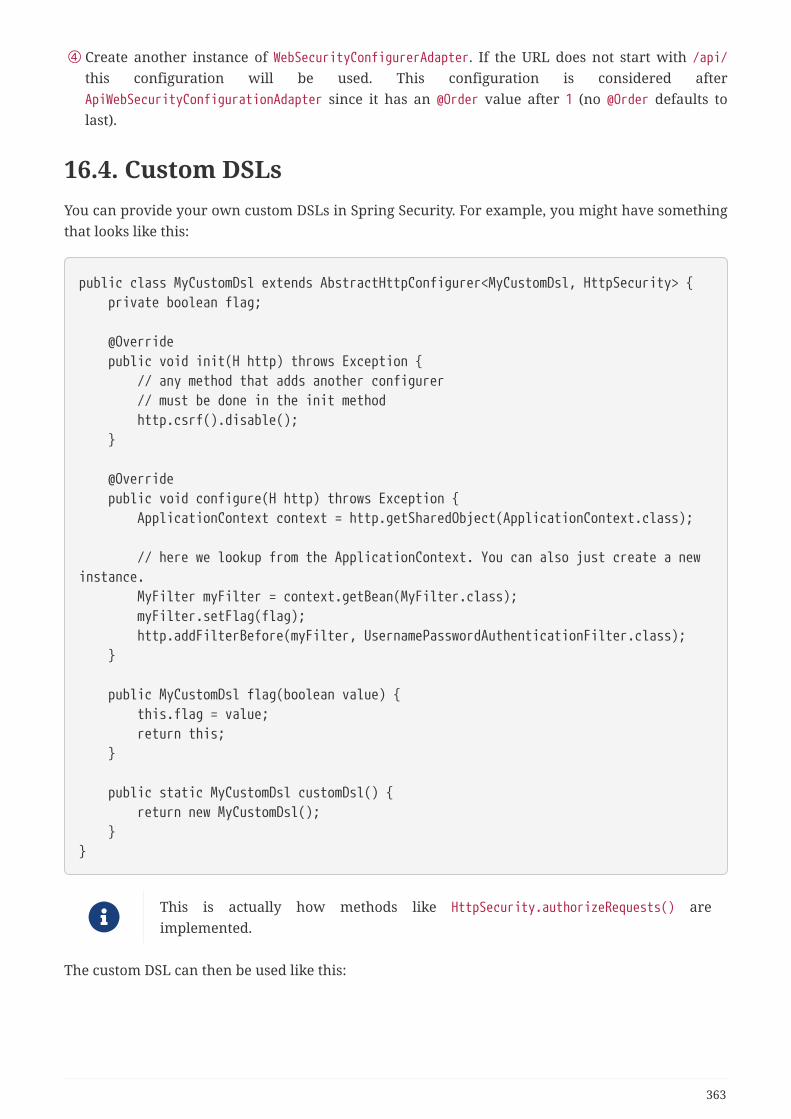
④ Create another instance of WebSecurityConfigurerAdapter. If the URL does not start with /api/this configuration will be used. This configuration is considered afterApiWebSecurityConfigurationAdapter since it has an @Order value after 1 (no @Order defaults tolast).
16.4. Custom DSLsYou can provide your own custom DSLs in Spring Security. For example, you might have somethingthat looks like this:
public class MyCustomDsl extends AbstractHttpConfigurer<MyCustomDsl, HttpSecurity> { private boolean flag;
@Override public void init(H http) throws Exception { // any method that adds another configurer // must be done in the init method http.csrf().disable(); }
@Override public void configure(H http) throws Exception { ApplicationContext context = http.getSharedObject(ApplicationContext.class);
// here we lookup from the ApplicationContext. You can also just create a newinstance. MyFilter myFilter = context.getBean(MyFilter.class); myFilter.setFlag(flag); http.addFilterBefore(myFilter, UsernamePasswordAuthenticationFilter.class); }
public MyCustomDsl flag(boolean value) { this.flag = value; return this; }
public static MyCustomDsl customDsl() { return new MyCustomDsl(); }}
This is actually how methods like HttpSecurity.authorizeRequests() areimplemented.
The custom DSL can then be used like this:
363
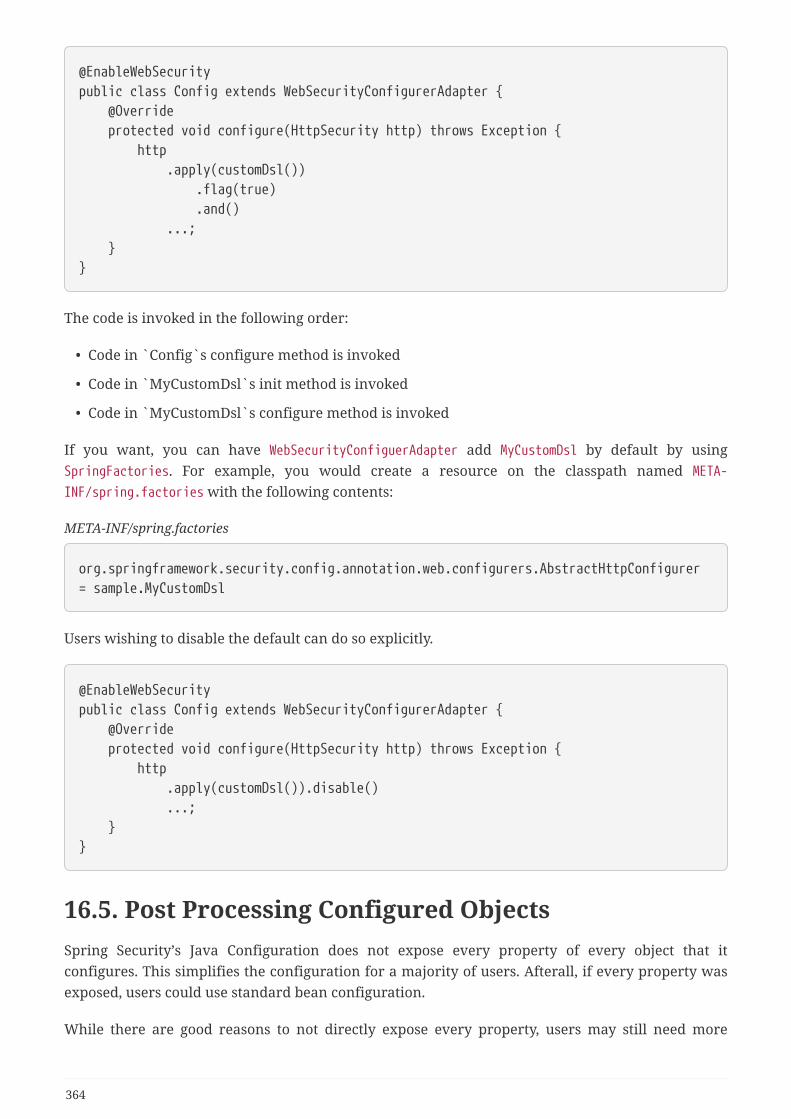
@EnableWebSecuritypublic class Config extends WebSecurityConfigurerAdapter { @Override protected void configure(HttpSecurity http) throws Exception { http .apply(customDsl()) .flag(true) .and() ...; }}
The code is invoked in the following order:
• Code in `Config`s configure method is invoked
• Code in `MyCustomDsl`s init method is invoked
• Code in `MyCustomDsl`s configure method is invoked
If you want, you can have WebSecurityConfiguerAdapter add MyCustomDsl by default by usingSpringFactories. For example, you would create a resource on the classpath named META-INF/spring.factories with the following contents:
META-INF/spring.factories
org.springframework.security.config.annotation.web.configurers.AbstractHttpConfigurer= sample.MyCustomDsl
Users wishing to disable the default can do so explicitly.
@EnableWebSecuritypublic class Config extends WebSecurityConfigurerAdapter { @Override protected void configure(HttpSecurity http) throws Exception { http .apply(customDsl()).disable() ...; }}
16.5. Post Processing Configured ObjectsSpring Security’s Java Configuration does not expose every property of every object that itconfigures. This simplifies the configuration for a majority of users. Afterall, if every property wasexposed, users could use standard bean configuration.
While there are good reasons to not directly expose every property, users may still need more
364
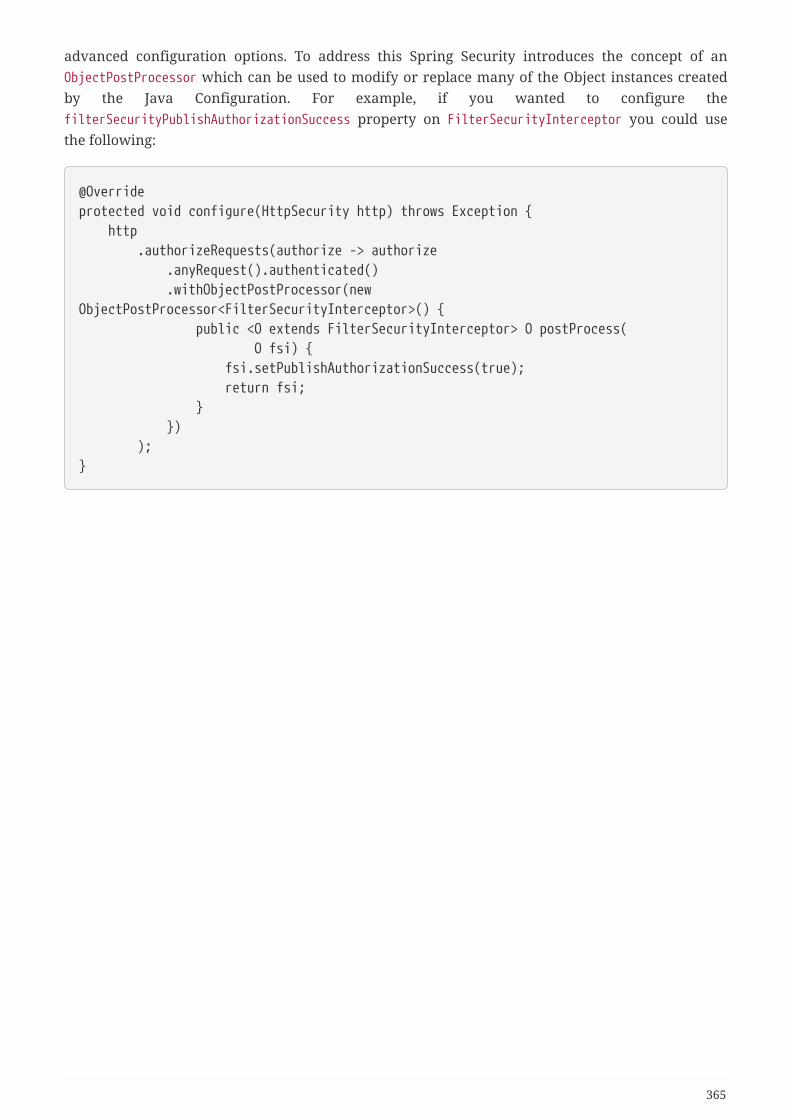
advanced configuration options. To address this Spring Security introduces the concept of anObjectPostProcessor which can be used to modify or replace many of the Object instances createdby the Java Configuration. For example, if you wanted to configure thefilterSecurityPublishAuthorizationSuccess property on FilterSecurityInterceptor you could usethe following:
@Overrideprotected void configure(HttpSecurity http) throws Exception { http .authorizeRequests(authorize -> authorize .anyRequest().authenticated() .withObjectPostProcessor(newObjectPostProcessor<FilterSecurityInterceptor>() { public <O extends FilterSecurityInterceptor> O postProcess( O fsi) { fsi.setPublishAuthorizationSuccess(true); return fsi; } }) );}
365
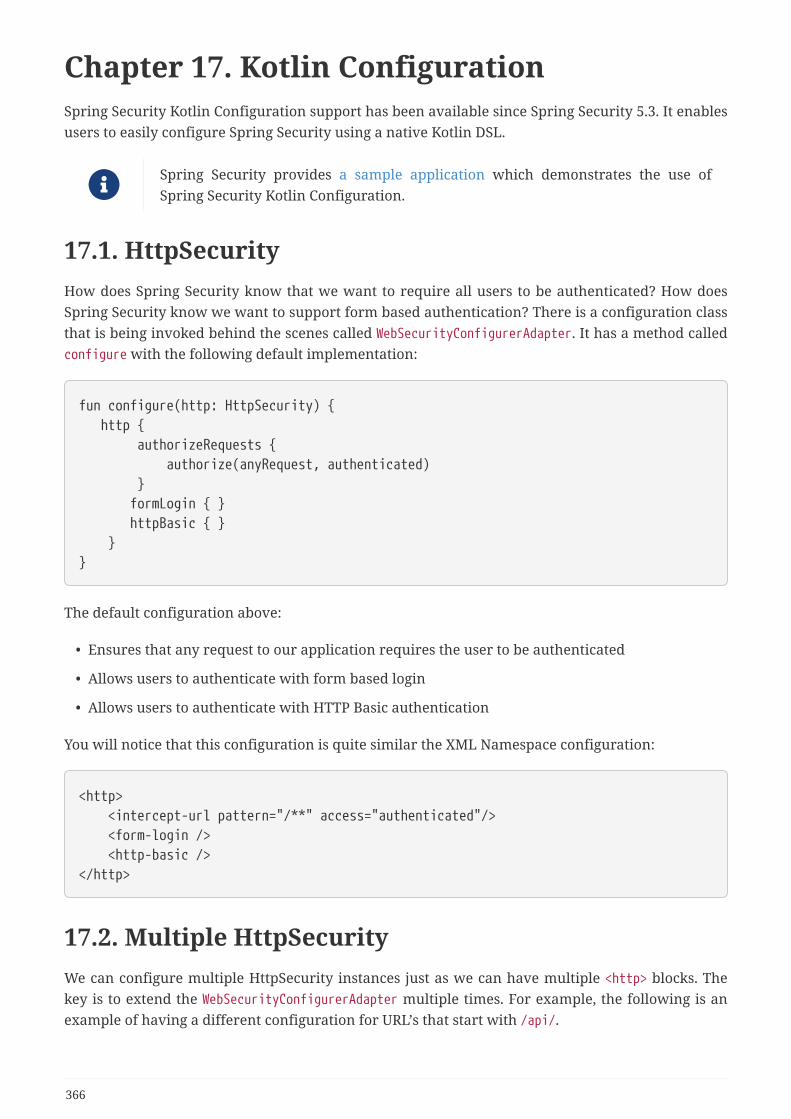
Chapter 17. Kotlin ConfigurationSpring Security Kotlin Configuration support has been available since Spring Security 5.3. It enablesusers to easily configure Spring Security using a native Kotlin DSL.
Spring Security provides a sample application which demonstrates the use ofSpring Security Kotlin Configuration.
17.1. HttpSecurityHow does Spring Security know that we want to require all users to be authenticated? How doesSpring Security know we want to support form based authentication? There is a configuration classthat is being invoked behind the scenes called WebSecurityConfigurerAdapter. It has a method calledconfigure with the following default implementation:
fun configure(http: HttpSecurity) { http { authorizeRequests { authorize(anyRequest, authenticated) } formLogin { } httpBasic { } }}
The default configuration above:
• Ensures that any request to our application requires the user to be authenticated
• Allows users to authenticate with form based login
• Allows users to authenticate with HTTP Basic authentication
You will notice that this configuration is quite similar the XML Namespace configuration:
<http> <intercept-url pattern="/**" access="authenticated"/> <form-login /> <http-basic /></http>
17.2. Multiple HttpSecurityWe can configure multiple HttpSecurity instances just as we can have multiple <http> blocks. Thekey is to extend the WebSecurityConfigurerAdapter multiple times. For example, the following is anexample of having a different configuration for URL’s that start with /api/.
366
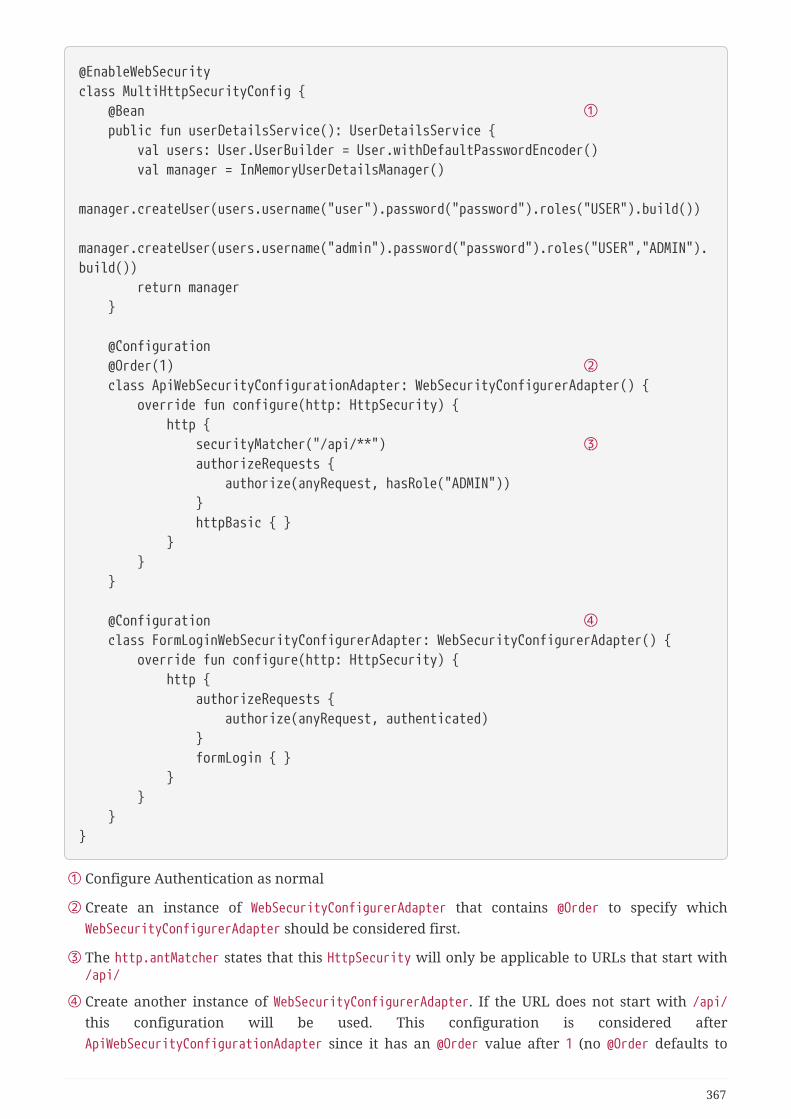
@EnableWebSecurityclass MultiHttpSecurityConfig { @Bean ① public fun userDetailsService(): UserDetailsService { val users: User.UserBuilder = User.withDefaultPasswordEncoder() val manager = InMemoryUserDetailsManager() manager.createUser(users.username("user").password("password").roles("USER").build()) manager.createUser(users.username("admin").password("password").roles("USER","ADMIN").build()) return manager }
@Configuration @Order(1) ② class ApiWebSecurityConfigurationAdapter: WebSecurityConfigurerAdapter() { override fun configure(http: HttpSecurity) { http { securityMatcher("/api/**") ③ authorizeRequests { authorize(anyRequest, hasRole("ADMIN")) } httpBasic { } } } }
@Configuration ④ class FormLoginWebSecurityConfigurerAdapter: WebSecurityConfigurerAdapter() { override fun configure(http: HttpSecurity) { http { authorizeRequests { authorize(anyRequest, authenticated) } formLogin { } } } }}
① Configure Authentication as normal
② Create an instance of WebSecurityConfigurerAdapter that contains @Order to specify whichWebSecurityConfigurerAdapter should be considered first.
③ The http.antMatcher states that this HttpSecurity will only be applicable to URLs that start with/api/
④ Create another instance of WebSecurityConfigurerAdapter. If the URL does not start with /api/this configuration will be used. This configuration is considered afterApiWebSecurityConfigurationAdapter since it has an @Order value after 1 (no @Order defaults to
367

last).
368
Chapter 18. Security NamespaceConfiguration
18.1. IntroductionNamespace configuration has been available since version 2.0 of the Spring Framework. It allowsyou to supplement the traditional Spring beans application context syntax with elements fromadditional XML schema. You can find more information in the Spring Reference Documentation. Anamespace element can be used simply to allow a more concise way of configuring an individualbean or, more powerfully, to define an alternative configuration syntax which more closelymatches the problem domain and hides the underlying complexity from the user. A simple elementmay conceal the fact that multiple beans and processing steps are being added to the applicationcontext. For example, adding the following element from the security namespace to an applicationcontext will start up an embedded LDAP server for testing use within the application:
<security:ldap-server />
This is much simpler than wiring up the equivalent Apache Directory Server beans. The mostcommon alternative configuration requirements are supported by attributes on the ldap-serverelement and the user is isolated from worrying about which beans they need to create and whatthe bean property names are. [9]. Use of a good XML editor while editing the application context fileshould provide information on the attributes and elements that are available. We wouldrecommend that you try out the Spring Tool Suite as it has special features for working withstandard Spring namespaces.
To start using the security namespace in your application context, you need to have the spring-security-config jar on your classpath. Then all you need to do is add the schema declaration to yourapplication context file:
<beans xmlns="http://www.springframework.org/schema/beans"xmlns:security="http://www.springframework.org/schema/security"xmlns:xsi="http://www.w3.org/2001/XMLSchema-instance"xsi:schemaLocation="http://www.springframework.org/schema/beans https://www.springframework.org/schema/beans/spring-beans-3.0.xsd http://www.springframework.org/schema/security https://www.springframework.org/schema/security/spring-security.xsd"> ...</beans>
In many of the examples you will see (and in the sample applications), we will often use "security"as the default namespace rather than "beans", which means we can omit the prefix on all thesecurity namespace elements, making the content easier to read. You may also want to do this ifyou have your application context divided up into separate files and have most of your securityconfiguration in one of them. Your security application context file would then start like this
369
<beans:beans xmlns="http://www.springframework.org/schema/security"xmlns:beans="http://www.springframework.org/schema/beans"xmlns:xsi="http://www.w3.org/2001/XMLSchema-instance"xsi:schemaLocation="http://www.springframework.org/schema/beans https://www.springframework.org/schema/beans/spring-beans-3.0.xsd http://www.springframework.org/schema/security https://www.springframework.org/schema/security/spring-security.xsd"> ...</beans:beans>
We’ll assume this syntax is being used from now on in this chapter.
18.1.1. Design of the Namespace
The namespace is designed to capture the most common uses of the framework and provide asimplified and concise syntax for enabling them within an application. The design is based aroundthe large-scale dependencies within the framework, and can be divided up into the following areas:
• Web/HTTP Security - the most complex part. Sets up the filters and related service beans used toapply the framework authentication mechanisms, to secure URLs, render login and error pagesand much more.
• Business Object (Method) Security - options for securing the service layer.
• AuthenticationManager - handles authentication requests from other parts of the framework.
• AccessDecisionManager - provides access decisions for web and method security. A default onewill be registered, but you can also choose to use a custom one, declared using normal Springbean syntax.
• AuthenticationProviders - mechanisms against which the authentication manager authenticatesusers. The namespace provides supports for several standard options and also a means ofadding custom beans declared using a traditional syntax.
• UserDetailsService - closely related to authentication providers, but often also required by otherbeans.
We’ll see how to configure these in the following sections.
18.2. Getting Started with Security NamespaceConfigurationIn this section, we’ll look at how you can build up a namespace configuration to use some of themain features of the framework. Let’s assume you initially want to get up and running as quickly aspossible and add authentication support and access control to an existing web application, with afew test logins. Then we’ll look at how to change over to authenticating against a database or othersecurity repository. In later sections we’ll introduce more advanced namespace configurationoptions.
370
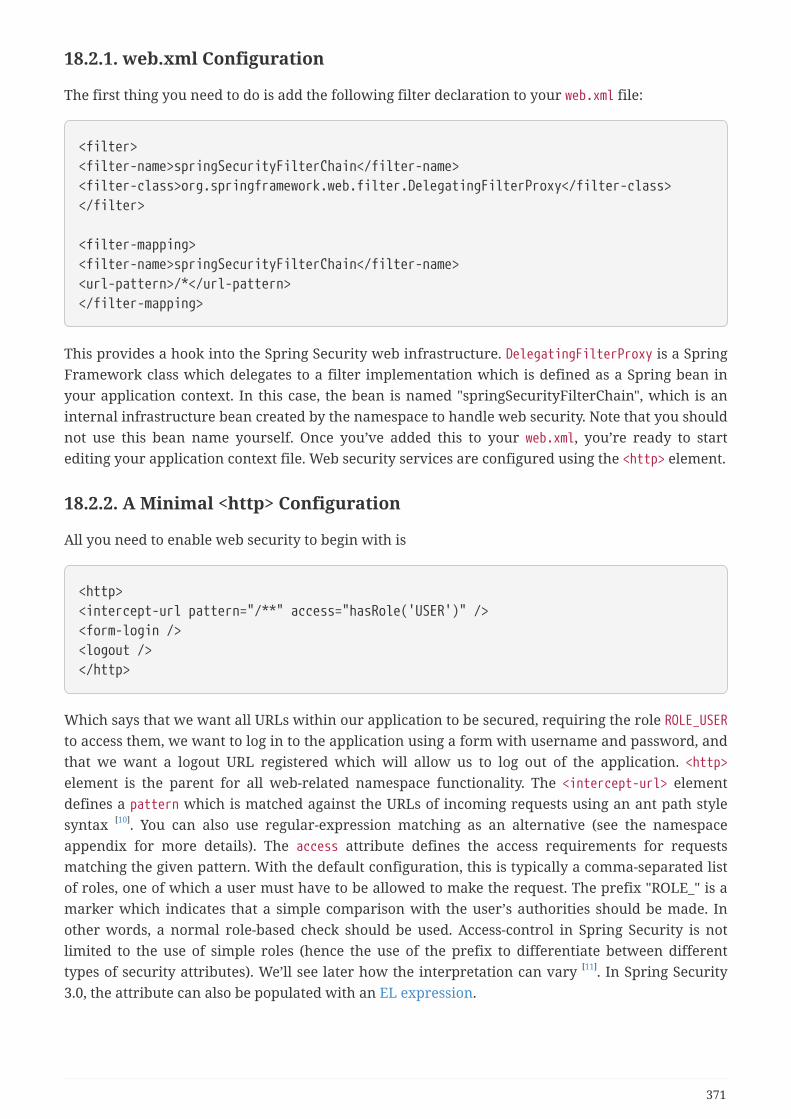
18.2.1. web.xml Configuration
The first thing you need to do is add the following filter declaration to your web.xml file:
<filter><filter-name>springSecurityFilterChain</filter-name><filter-class>org.springframework.web.filter.DelegatingFilterProxy</filter-class></filter>
<filter-mapping><filter-name>springSecurityFilterChain</filter-name><url-pattern>/*</url-pattern></filter-mapping>
This provides a hook into the Spring Security web infrastructure. DelegatingFilterProxy is a SpringFramework class which delegates to a filter implementation which is defined as a Spring bean inyour application context. In this case, the bean is named "springSecurityFilterChain", which is aninternal infrastructure bean created by the namespace to handle web security. Note that you shouldnot use this bean name yourself. Once you’ve added this to your web.xml, you’re ready to startediting your application context file. Web security services are configured using the <http> element.
18.2.2. A Minimal <http> Configuration
All you need to enable web security to begin with is
<http><intercept-url pattern="/**" access="hasRole('USER')" /><form-login /><logout /></http>
Which says that we want all URLs within our application to be secured, requiring the role ROLE_USERto access them, we want to log in to the application using a form with username and password, andthat we want a logout URL registered which will allow us to log out of the application. <http>element is the parent for all web-related namespace functionality. The <intercept-url> elementdefines a pattern which is matched against the URLs of incoming requests using an ant path stylesyntax [10]. You can also use regular-expression matching as an alternative (see the namespaceappendix for more details). The access attribute defines the access requirements for requestsmatching the given pattern. With the default configuration, this is typically a comma-separated listof roles, one of which a user must have to be allowed to make the request. The prefix "ROLE_" is amarker which indicates that a simple comparison with the user’s authorities should be made. Inother words, a normal role-based check should be used. Access-control in Spring Security is notlimited to the use of simple roles (hence the use of the prefix to differentiate between differenttypes of security attributes). We’ll see later how the interpretation can vary [11]. In Spring Security3.0, the attribute can also be populated with an EL expression.
371
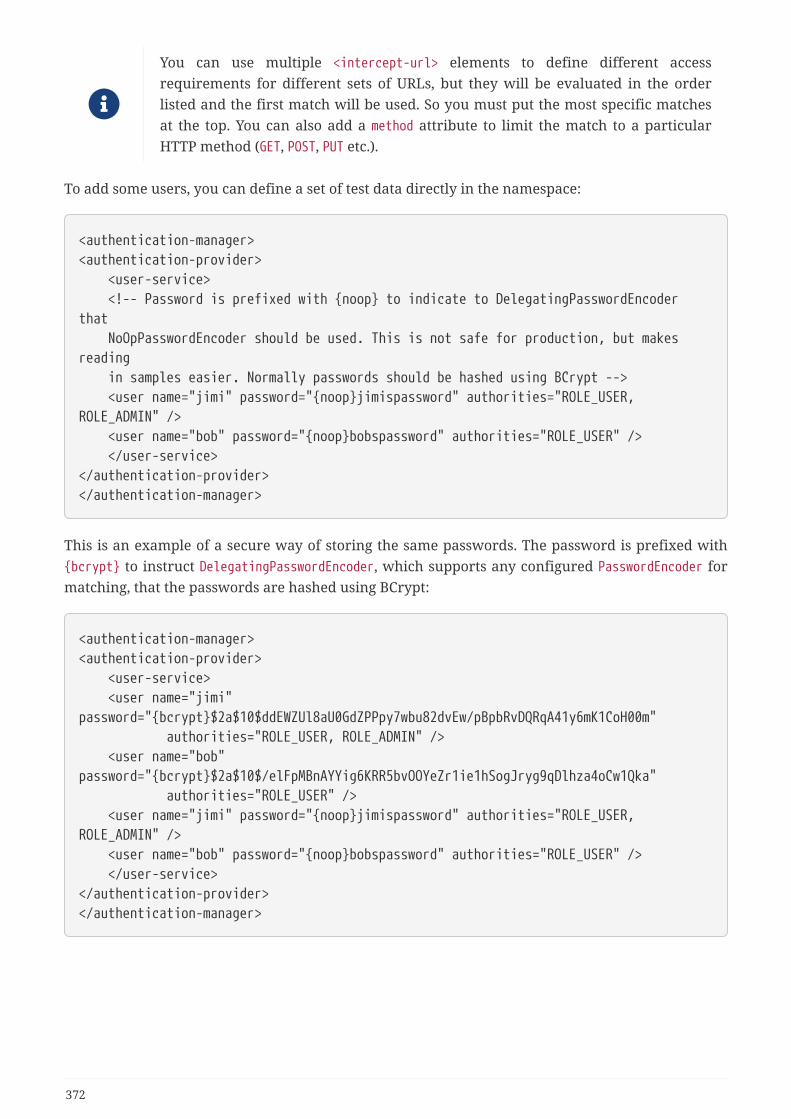
You can use multiple <intercept-url> elements to define different accessrequirements for different sets of URLs, but they will be evaluated in the orderlisted and the first match will be used. So you must put the most specific matchesat the top. You can also add a method attribute to limit the match to a particularHTTP method (GET, POST, PUT etc.).
To add some users, you can define a set of test data directly in the namespace:
<authentication-manager><authentication-provider> <user-service> <!-- Password is prefixed with {noop} to indicate to DelegatingPasswordEncoderthat NoOpPasswordEncoder should be used. This is not safe for production, but makesreading in samples easier. Normally passwords should be hashed using BCrypt --> <user name="jimi" password="{noop}jimispassword" authorities="ROLE_USER,ROLE_ADMIN" /> <user name="bob" password="{noop}bobspassword" authorities="ROLE_USER" /> </user-service></authentication-provider></authentication-manager>
This is an example of a secure way of storing the same passwords. The password is prefixed with{bcrypt} to instruct DelegatingPasswordEncoder, which supports any configured PasswordEncoder formatching, that the passwords are hashed using BCrypt:
<authentication-manager><authentication-provider> <user-service> <user name="jimi"password="{bcrypt}$2a$10$ddEWZUl8aU0GdZPPpy7wbu82dvEw/pBpbRvDQRqA41y6mK1CoH00m" authorities="ROLE_USER, ROLE_ADMIN" /> <user name="bob"password="{bcrypt}$2a$10$/elFpMBnAYYig6KRR5bvOOYeZr1ie1hSogJryg9qDlhza4oCw1Qka" authorities="ROLE_USER" /> <user name="jimi" password="{noop}jimispassword" authorities="ROLE_USER,ROLE_ADMIN" /> <user name="bob" password="{noop}bobspassword" authorities="ROLE_USER" /> </user-service></authentication-provider></authentication-manager>
372
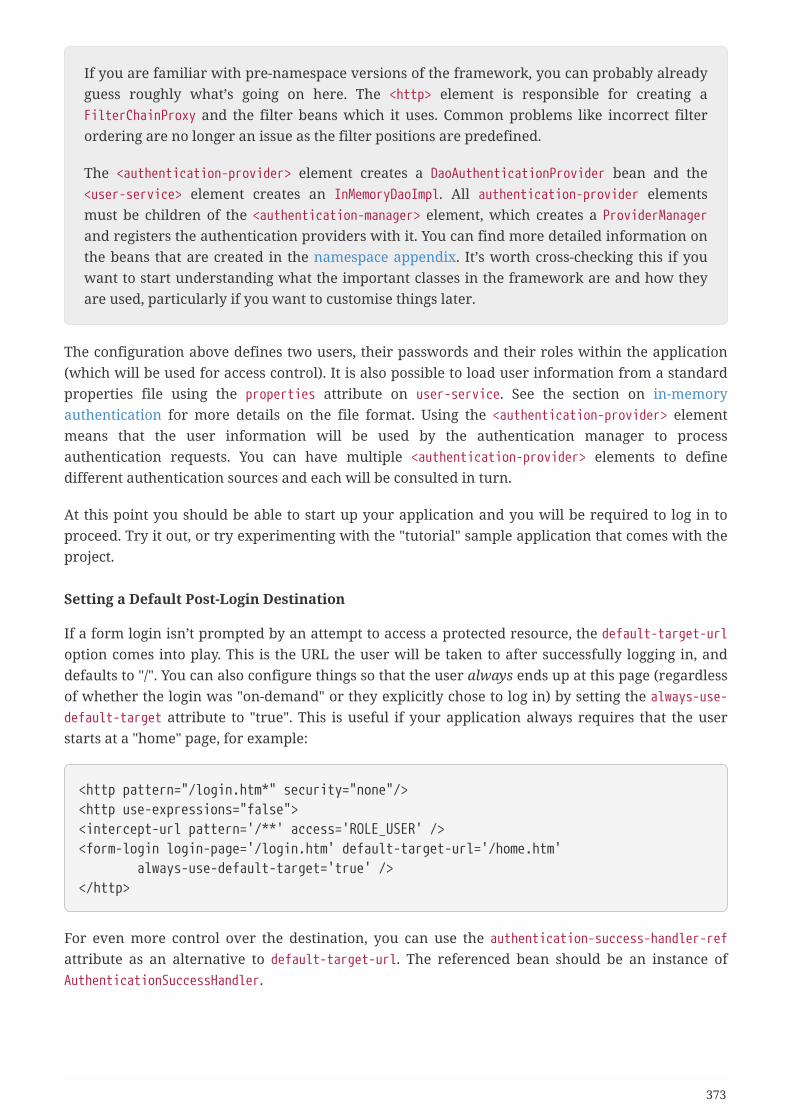
If you are familiar with pre-namespace versions of the framework, you can probably alreadyguess roughly what’s going on here. The <http> element is responsible for creating aFilterChainProxy and the filter beans which it uses. Common problems like incorrect filterordering are no longer an issue as the filter positions are predefined.
The <authentication-provider> element creates a DaoAuthenticationProvider bean and the<user-service> element creates an InMemoryDaoImpl. All authentication-provider elementsmust be children of the <authentication-manager> element, which creates a ProviderManagerand registers the authentication providers with it. You can find more detailed information onthe beans that are created in the namespace appendix. It’s worth cross-checking this if youwant to start understanding what the important classes in the framework are and how theyare used, particularly if you want to customise things later.
The configuration above defines two users, their passwords and their roles within the application(which will be used for access control). It is also possible to load user information from a standardproperties file using the properties attribute on user-service. See the section on in-memoryauthentication for more details on the file format. Using the <authentication-provider> elementmeans that the user information will be used by the authentication manager to processauthentication requests. You can have multiple <authentication-provider> elements to definedifferent authentication sources and each will be consulted in turn.
At this point you should be able to start up your application and you will be required to log in toproceed. Try it out, or try experimenting with the "tutorial" sample application that comes with theproject.
Setting a Default Post-Login Destination
If a form login isn’t prompted by an attempt to access a protected resource, the default-target-urloption comes into play. This is the URL the user will be taken to after successfully logging in, anddefaults to "/". You can also configure things so that the user always ends up at this page (regardlessof whether the login was "on-demand" or they explicitly chose to log in) by setting the always-use-default-target attribute to "true". This is useful if your application always requires that the userstarts at a "home" page, for example:
<http pattern="/login.htm*" security="none"/><http use-expressions="false"><intercept-url pattern='/**' access='ROLE_USER' /><form-login login-page='/login.htm' default-target-url='/home.htm' always-use-default-target='true' /></http>
For even more control over the destination, you can use the authentication-success-handler-refattribute as an alternative to default-target-url. The referenced bean should be an instance ofAuthenticationSuccessHandler.
373
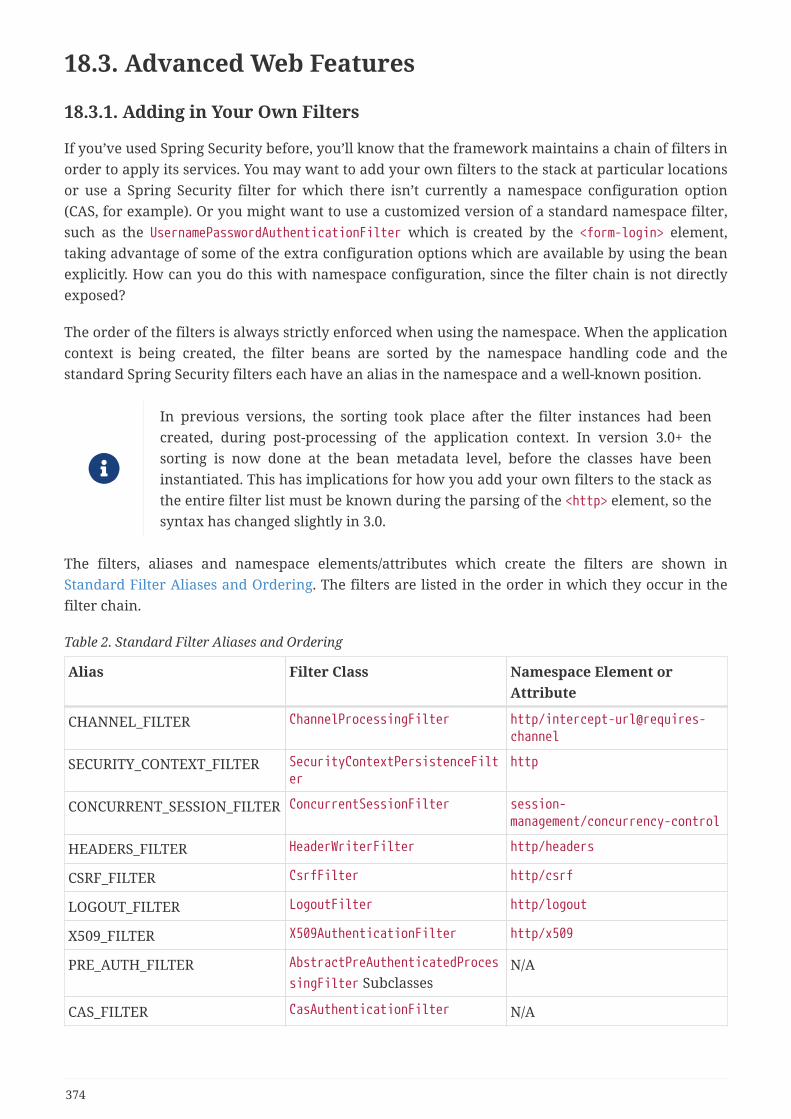
18.3. Advanced Web Features
18.3.1. Adding in Your Own Filters
If you’ve used Spring Security before, you’ll know that the framework maintains a chain of filters inorder to apply its services. You may want to add your own filters to the stack at particular locationsor use a Spring Security filter for which there isn’t currently a namespace configuration option(CAS, for example). Or you might want to use a customized version of a standard namespace filter,such as the UsernamePasswordAuthenticationFilter which is created by the <form-login> element,taking advantage of some of the extra configuration options which are available by using the beanexplicitly. How can you do this with namespace configuration, since the filter chain is not directlyexposed?
The order of the filters is always strictly enforced when using the namespace. When the applicationcontext is being created, the filter beans are sorted by the namespace handling code and thestandard Spring Security filters each have an alias in the namespace and a well-known position.
In previous versions, the sorting took place after the filter instances had beencreated, during post-processing of the application context. In version 3.0+ thesorting is now done at the bean metadata level, before the classes have beeninstantiated. This has implications for how you add your own filters to the stack asthe entire filter list must be known during the parsing of the <http> element, so thesyntax has changed slightly in 3.0.
The filters, aliases and namespace elements/attributes which create the filters are shown inStandard Filter Aliases and Ordering. The filters are listed in the order in which they occur in thefilter chain.
Table 2. Standard Filter Aliases and Ordering
Alias Filter Class Namespace Element orAttribute
CHANNEL_FILTER ChannelProcessingFilter http/intercept-url@requires-channel
SECURITY_CONTEXT_FILTER SecurityContextPersistenceFilter
http
CONCURRENT_SESSION_FILTER ConcurrentSessionFilter session-management/concurrency-control
HEADERS_FILTER HeaderWriterFilter http/headers
CSRF_FILTER CsrfFilter http/csrf
LOGOUT_FILTER LogoutFilter http/logout
X509_FILTER X509AuthenticationFilter http/x509
PRE_AUTH_FILTER AbstractPreAuthenticatedProcessingFilter Subclasses
N/A
CAS_FILTER CasAuthenticationFilter N/A
374
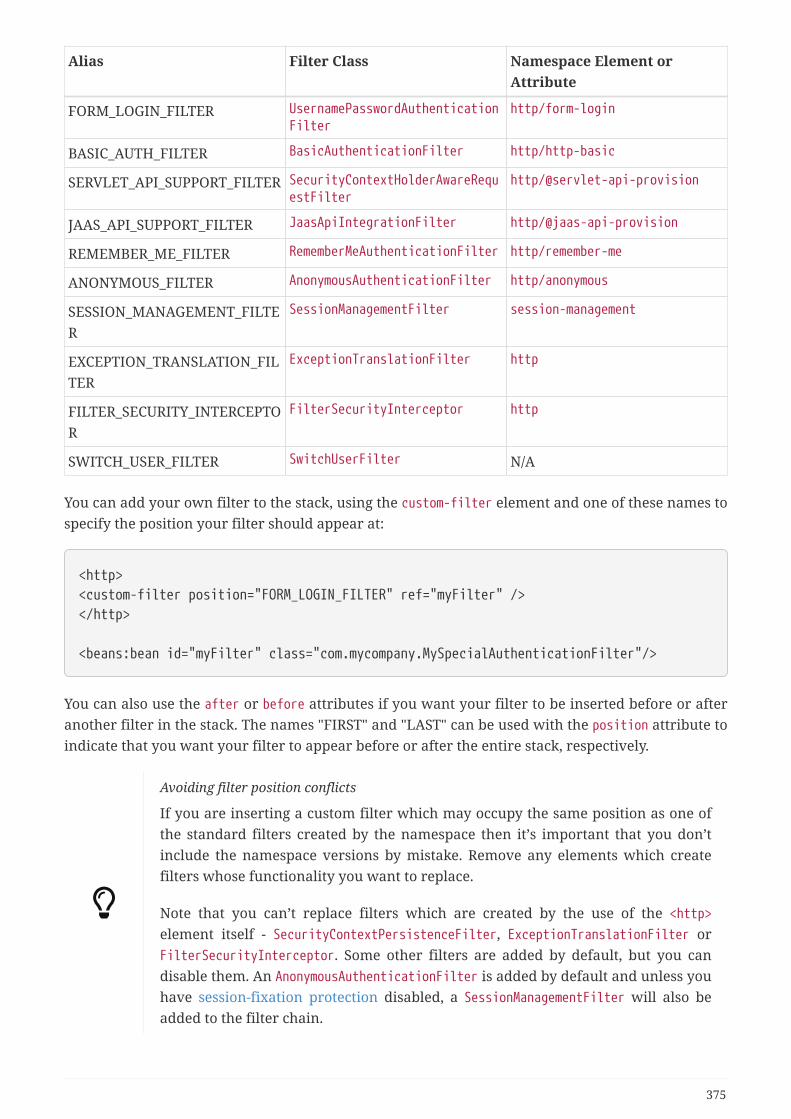
Alias Filter Class Namespace Element orAttribute
FORM_LOGIN_FILTER UsernamePasswordAuthenticationFilter
http/form-login
BASIC_AUTH_FILTER BasicAuthenticationFilter http/http-basic
SERVLET_API_SUPPORT_FILTER SecurityContextHolderAwareRequestFilter
http/@servlet-api-provision
JAAS_API_SUPPORT_FILTER JaasApiIntegrationFilter http/@jaas-api-provision
REMEMBER_ME_FILTER RememberMeAuthenticationFilter http/remember-me
ANONYMOUS_FILTER AnonymousAuthenticationFilter http/anonymous
SESSION_MANAGEMENT_FILTER
SessionManagementFilter session-management
EXCEPTION_TRANSLATION_FILTER
ExceptionTranslationFilter http
FILTER_SECURITY_INTERCEPTOR
FilterSecurityInterceptor http
SWITCH_USER_FILTER SwitchUserFilter N/A
You can add your own filter to the stack, using the custom-filter element and one of these names tospecify the position your filter should appear at:
<http><custom-filter position="FORM_LOGIN_FILTER" ref="myFilter" /></http>
<beans:bean id="myFilter" class="com.mycompany.MySpecialAuthenticationFilter"/>
You can also use the after or before attributes if you want your filter to be inserted before or afteranother filter in the stack. The names "FIRST" and "LAST" can be used with the position attribute toindicate that you want your filter to appear before or after the entire stack, respectively.
Avoiding filter position conflicts
If you are inserting a custom filter which may occupy the same position as one ofthe standard filters created by the namespace then it’s important that you don’tinclude the namespace versions by mistake. Remove any elements which createfilters whose functionality you want to replace.
Note that you can’t replace filters which are created by the use of the <http>element itself - SecurityContextPersistenceFilter, ExceptionTranslationFilter orFilterSecurityInterceptor. Some other filters are added by default, but you candisable them. An AnonymousAuthenticationFilter is added by default and unless youhave session-fixation protection disabled, a SessionManagementFilter will also beadded to the filter chain.
375
If you’re replacing a namespace filter which requires an authentication entry point (i.e. where theauthentication process is triggered by an attempt by an unauthenticated user to access to a securedresource), you will need to add a custom entry point bean too.
18.4. Method SecurityFrom version 2.0 onwards Spring Security has improved support substantially for adding securityto your service layer methods. It provides support for JSR-250 annotation security as well as theframework’s original @Secured annotation. From 3.0 you can also make use of new expression-basedannotations. You can apply security to a single bean, using the intercept-methods element todecorate the bean declaration, or you can secure multiple beans across the entire service layerusing the AspectJ style pointcuts.
18.5. The Default AccessDecisionManagerThis section assumes you have some knowledge of the underlying architecture for access-controlwithin Spring Security. If you don’t you can skip it and come back to it later, as this section is onlyreally relevant for people who need to do some customization in order to use more than simplerole-based security.
When you use a namespace configuration, a default instance of AccessDecisionManager isautomatically registered for you and will be used for making access decisions for methodinvocations and web URL access, based on the access attributes you specify in your intercept-urland protect-pointcut declarations (and in annotations if you are using annotation securedmethods).
The default strategy is to use an AffirmativeBased AccessDecisionManager with a RoleVoter and anAuthenticatedVoter. You can find out more about these in the chapter on authorization.
18.5.1. Customizing the AccessDecisionManager
If you need to use a more complicated access control strategy then it is easy to set an alternative forboth method and web security.
For method security, you do this by setting the access-decision-manager-ref attribute on global-method-security to the id of the appropriate AccessDecisionManager bean in the application context:
<global-method-security access-decision-manager-ref="myAccessDecisionManagerBean">...</global-method-security>
The syntax for web security is the same, but on the http element:
<http access-decision-manager-ref="myAccessDecisionManagerBean">...</http>
376
[9] You can find out more about the use of the ldap-server element in the chapter on LDAP Authentication.
[10] See the section on `HttpFirewall` for more details on how matches are actually performed.
[11] The interpretation of the comma-separated values in the access attribute depends on the implementation of theAccessDecisionManager which is used.
377

Chapter 19. TestingThis section describes the testing support provided by Spring Security.
To use the Spring Security test support, you must include spring-security-test-5.3.13.RELEASE.jar as a dependency of your project.
19.1. Testing Method SecurityThis section demonstrates how to use Spring Security’s Test support to test method based security.We first introduce a MessageService that requires the user to be authenticated in order to access it.
public class HelloMessageService implements MessageService {
@PreAuthorize("authenticated") public String getMessage() { Authentication authentication = SecurityContextHolder.getContext() .getAuthentication(); return "Hello " + authentication; }}
The result of getMessage is a String saying "Hello" to the current Spring Security Authentication. Anexample of the output is displayed below.
Helloorg.springframework.security.authentication.UsernamePasswordAuthenticationToken@ca25360: Principal: org.springframework.security.core.userdetails.User@36ebcb: Username:user; Password: [PROTECTED]; Enabled: true; AccountNonExpired: true;credentialsNonExpired: true; AccountNonLocked: true; Granted Authorities: ROLE_USER;Credentials: [PROTECTED]; Authenticated: true; Details: null; Granted Authorities:ROLE_USER
19.1.1. Security Test Setup
Before we can use Spring Security Test support, we must perform some setup. An example can beseen below:
@RunWith(SpringJUnit4ClassRunner.class) ①@ContextConfiguration ②public class WithMockUserTests {
This is a basic example of how to setup Spring Security Test. The highlights are:
① @RunWith instructs the spring-test module that it should create an ApplicationContext. This is no
378
different than using the existing Spring Test support. For additional information, refer to theSpring Reference
② @ContextConfiguration instructs the spring-test the configuration to use to create theApplicationContext. Since no configuration is specified, the default configuration locations willbe tried. This is no different than using the existing Spring Test support. For additionalinformation, refer to the Spring Reference
Spring Security hooks into Spring Test support using theWithSecurityContextTestExecutionListener which will ensure our tests are ran withthe correct user. It does this by populating the SecurityContextHolder prior torunning our tests. If you are using reactive method security, you will also needReactorContextTestExecutionListener which populatesReactiveSecurityContextHolder. After the test is done, it will clear out theSecurityContextHolder. If you only need Spring Security related support, you canreplace @ContextConfiguration with @SecurityTestExecutionListeners.
Remember we added the @PreAuthorize annotation to our HelloMessageService and so it requires anauthenticated user to invoke it. If we ran the following test, we would expect the following test willpass:
@Test(expected = AuthenticationCredentialsNotFoundException.class)public void getMessageUnauthenticated() { messageService.getMessage();}
19.1.2. @WithMockUser
The question is "How could we most easily run the test as a specific user?" The answer is to use@WithMockUser. The following test will be run as a user with the username "user", the password"password", and the roles "ROLE_USER".
@Test@WithMockUserpublic void getMessageWithMockUser() {String message = messageService.getMessage();...}
Specifically the following is true:
• The user with the username "user" does not have to exist since we are mocking the user
• The Authentication that is populated in the SecurityContext is of typeUsernamePasswordAuthenticationToken
• The principal on the Authentication is Spring Security’s User object
• The User will have the username of "user", the password "password", and a single
379
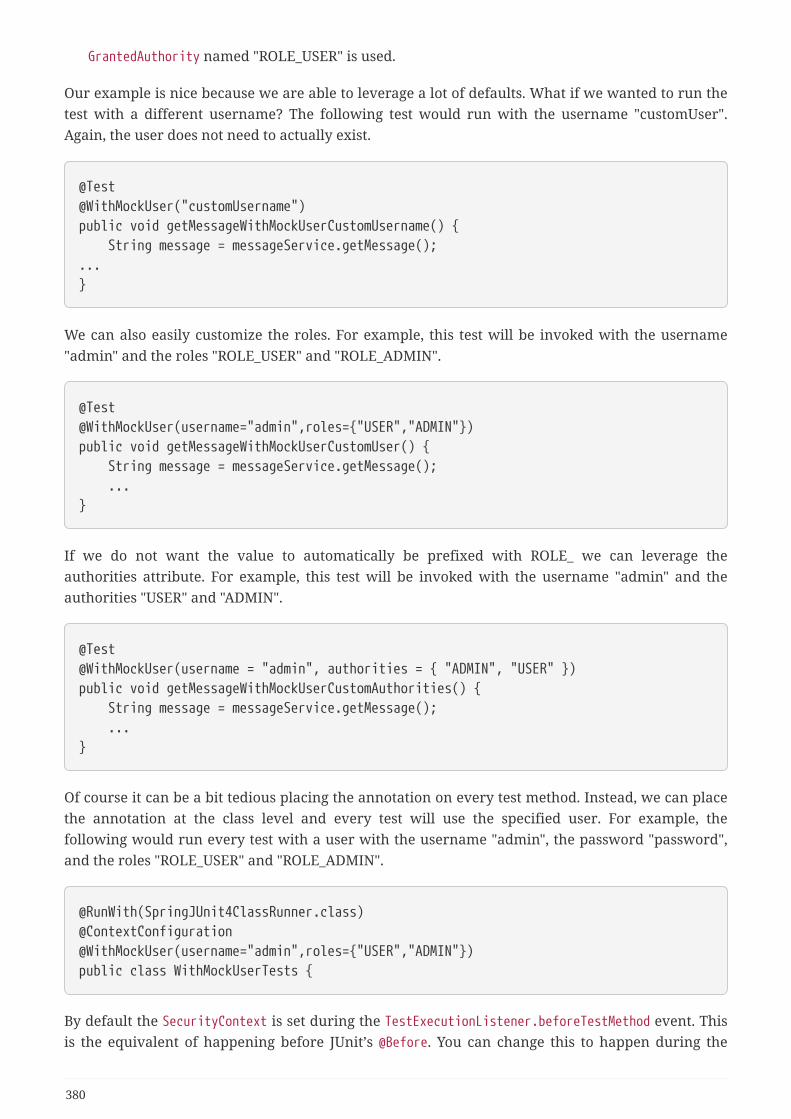
GrantedAuthority named "ROLE_USER" is used.
Our example is nice because we are able to leverage a lot of defaults. What if we wanted to run thetest with a different username? The following test would run with the username "customUser".Again, the user does not need to actually exist.
@Test@WithMockUser("customUsername")public void getMessageWithMockUserCustomUsername() { String message = messageService.getMessage();...}
We can also easily customize the roles. For example, this test will be invoked with the username"admin" and the roles "ROLE_USER" and "ROLE_ADMIN".
@Test@WithMockUser(username="admin",roles={"USER","ADMIN"})public void getMessageWithMockUserCustomUser() { String message = messageService.getMessage(); ...}
If we do not want the value to automatically be prefixed with ROLE_ we can leverage theauthorities attribute. For example, this test will be invoked with the username "admin" and theauthorities "USER" and "ADMIN".
@Test@WithMockUser(username = "admin", authorities = { "ADMIN", "USER" })public void getMessageWithMockUserCustomAuthorities() { String message = messageService.getMessage(); ...}
Of course it can be a bit tedious placing the annotation on every test method. Instead, we can placethe annotation at the class level and every test will use the specified user. For example, thefollowing would run every test with a user with the username "admin", the password "password",and the roles "ROLE_USER" and "ROLE_ADMIN".
@RunWith(SpringJUnit4ClassRunner.class)@ContextConfiguration@WithMockUser(username="admin",roles={"USER","ADMIN"})public class WithMockUserTests {
By default the SecurityContext is set during the TestExecutionListener.beforeTestMethod event. Thisis the equivalent of happening before JUnit’s @Before. You can change this to happen during the
380
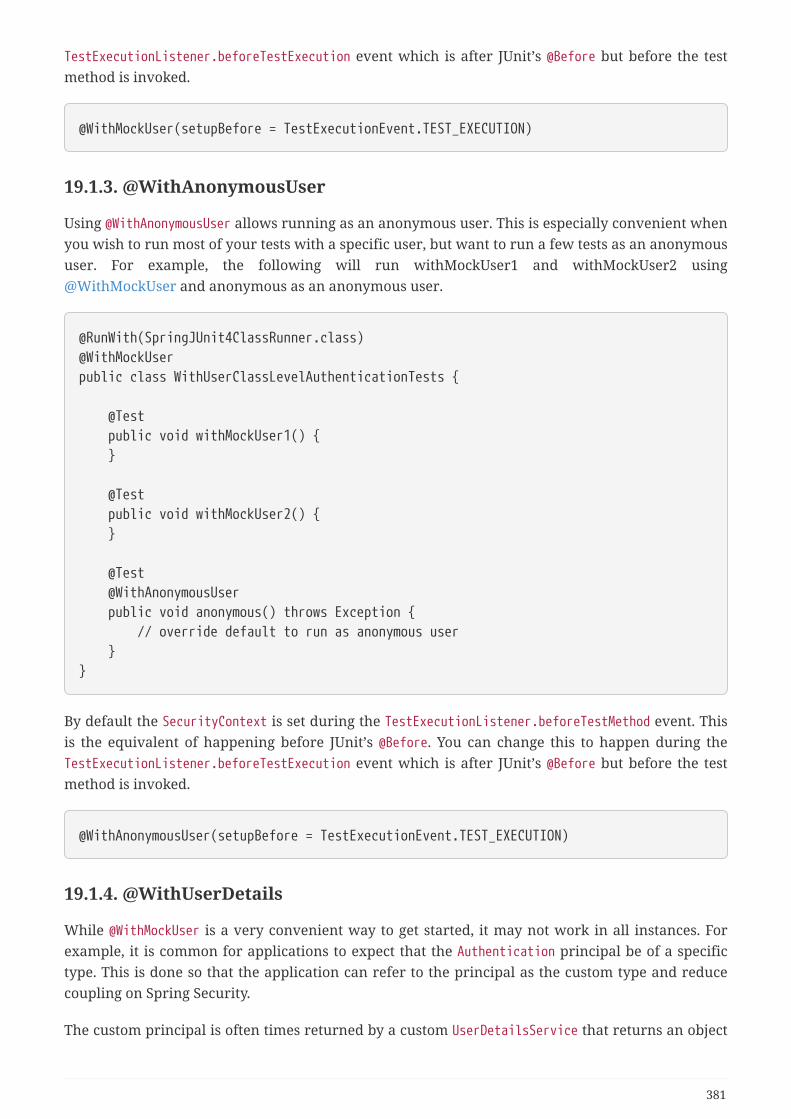
TestExecutionListener.beforeTestExecution event which is after JUnit’s @Before but before the testmethod is invoked.
@WithMockUser(setupBefore = TestExecutionEvent.TEST_EXECUTION)
19.1.3. @WithAnonymousUser
Using @WithAnonymousUser allows running as an anonymous user. This is especially convenient whenyou wish to run most of your tests with a specific user, but want to run a few tests as an anonymoususer. For example, the following will run withMockUser1 and withMockUser2 using@WithMockUser and anonymous as an anonymous user.
@RunWith(SpringJUnit4ClassRunner.class)@WithMockUserpublic class WithUserClassLevelAuthenticationTests {
@Test public void withMockUser1() { }
@Test public void withMockUser2() { }
@Test @WithAnonymousUser public void anonymous() throws Exception { // override default to run as anonymous user }}
By default the SecurityContext is set during the TestExecutionListener.beforeTestMethod event. Thisis the equivalent of happening before JUnit’s @Before. You can change this to happen during theTestExecutionListener.beforeTestExecution event which is after JUnit’s @Before but before the testmethod is invoked.
@WithAnonymousUser(setupBefore = TestExecutionEvent.TEST_EXECUTION)
19.1.4. @WithUserDetails
While @WithMockUser is a very convenient way to get started, it may not work in all instances. Forexample, it is common for applications to expect that the Authentication principal be of a specifictype. This is done so that the application can refer to the principal as the custom type and reducecoupling on Spring Security.
The custom principal is often times returned by a custom UserDetailsService that returns an object
381
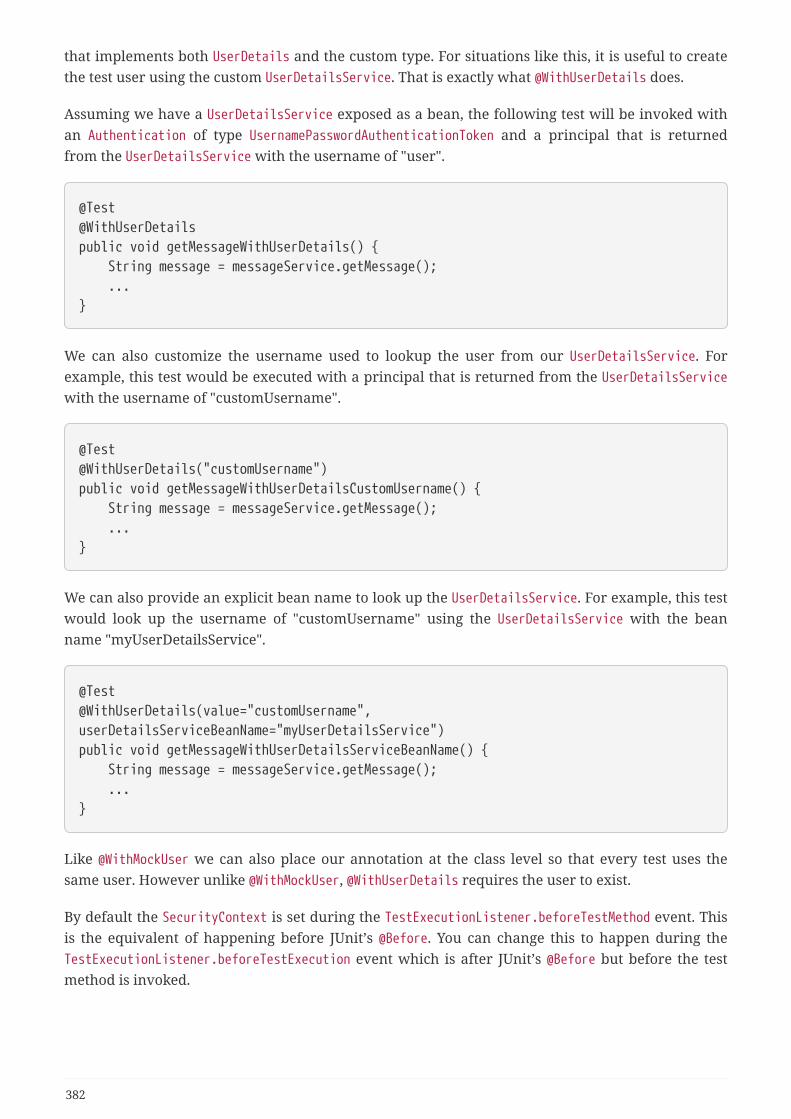
that implements both UserDetails and the custom type. For situations like this, it is useful to createthe test user using the custom UserDetailsService. That is exactly what @WithUserDetails does.
Assuming we have a UserDetailsService exposed as a bean, the following test will be invoked withan Authentication of type UsernamePasswordAuthenticationToken and a principal that is returnedfrom the UserDetailsService with the username of "user".
@Test@WithUserDetailspublic void getMessageWithUserDetails() { String message = messageService.getMessage(); ...}
We can also customize the username used to lookup the user from our UserDetailsService. Forexample, this test would be executed with a principal that is returned from the UserDetailsServicewith the username of "customUsername".
@Test@WithUserDetails("customUsername")public void getMessageWithUserDetailsCustomUsername() { String message = messageService.getMessage(); ...}
We can also provide an explicit bean name to look up the UserDetailsService. For example, this testwould look up the username of "customUsername" using the UserDetailsService with the beanname "myUserDetailsService".
@Test@WithUserDetails(value="customUsername",userDetailsServiceBeanName="myUserDetailsService")public void getMessageWithUserDetailsServiceBeanName() { String message = messageService.getMessage(); ...}
Like @WithMockUser we can also place our annotation at the class level so that every test uses thesame user. However unlike @WithMockUser, @WithUserDetails requires the user to exist.
By default the SecurityContext is set during the TestExecutionListener.beforeTestMethod event. Thisis the equivalent of happening before JUnit’s @Before. You can change this to happen during theTestExecutionListener.beforeTestExecution event which is after JUnit’s @Before but before the testmethod is invoked.
382
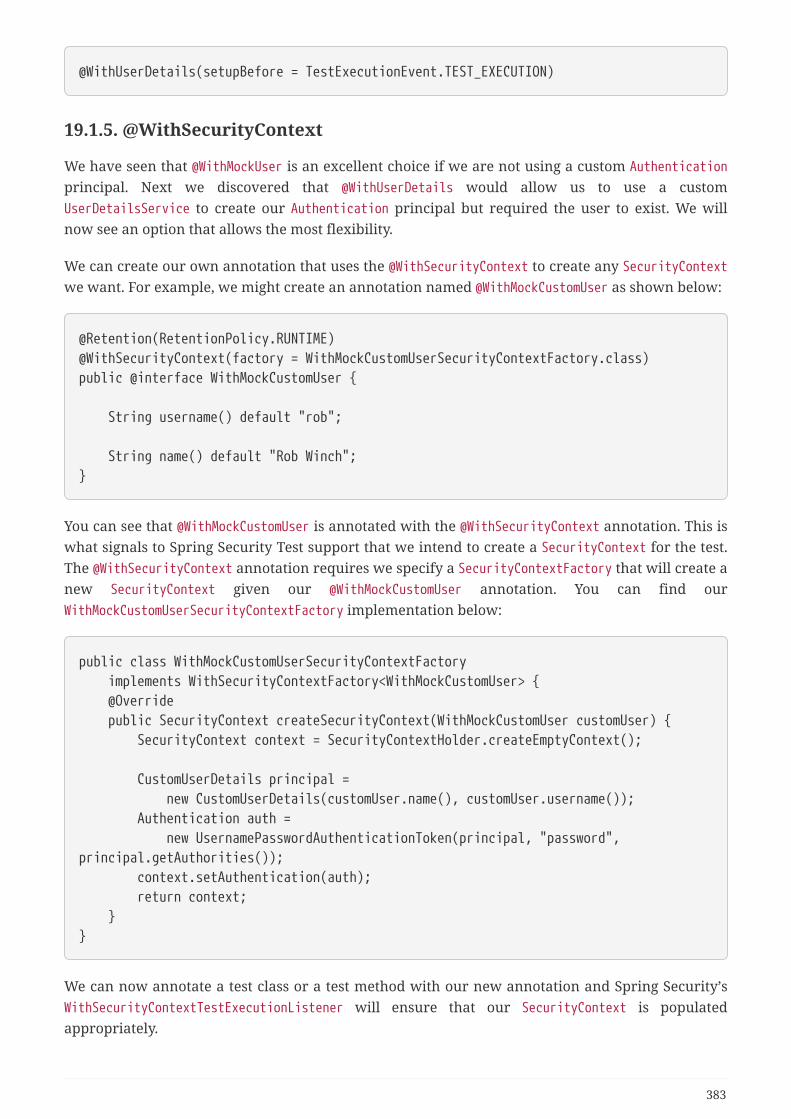
@WithUserDetails(setupBefore = TestExecutionEvent.TEST_EXECUTION)
19.1.5. @WithSecurityContext
We have seen that @WithMockUser is an excellent choice if we are not using a custom Authenticationprincipal. Next we discovered that @WithUserDetails would allow us to use a customUserDetailsService to create our Authentication principal but required the user to exist. We willnow see an option that allows the most flexibility.
We can create our own annotation that uses the @WithSecurityContext to create any SecurityContextwe want. For example, we might create an annotation named @WithMockCustomUser as shown below:
@Retention(RetentionPolicy.RUNTIME)@WithSecurityContext(factory = WithMockCustomUserSecurityContextFactory.class)public @interface WithMockCustomUser {
String username() default "rob";
String name() default "Rob Winch";}
You can see that @WithMockCustomUser is annotated with the @WithSecurityContext annotation. This iswhat signals to Spring Security Test support that we intend to create a SecurityContext for the test.The @WithSecurityContext annotation requires we specify a SecurityContextFactory that will create anew SecurityContext given our @WithMockCustomUser annotation. You can find ourWithMockCustomUserSecurityContextFactory implementation below:
public class WithMockCustomUserSecurityContextFactory implements WithSecurityContextFactory<WithMockCustomUser> { @Override public SecurityContext createSecurityContext(WithMockCustomUser customUser) { SecurityContext context = SecurityContextHolder.createEmptyContext();
CustomUserDetails principal = new CustomUserDetails(customUser.name(), customUser.username()); Authentication auth = new UsernamePasswordAuthenticationToken(principal, "password",principal.getAuthorities()); context.setAuthentication(auth); return context; }}
We can now annotate a test class or a test method with our new annotation and Spring Security’sWithSecurityContextTestExecutionListener will ensure that our SecurityContext is populatedappropriately.
383
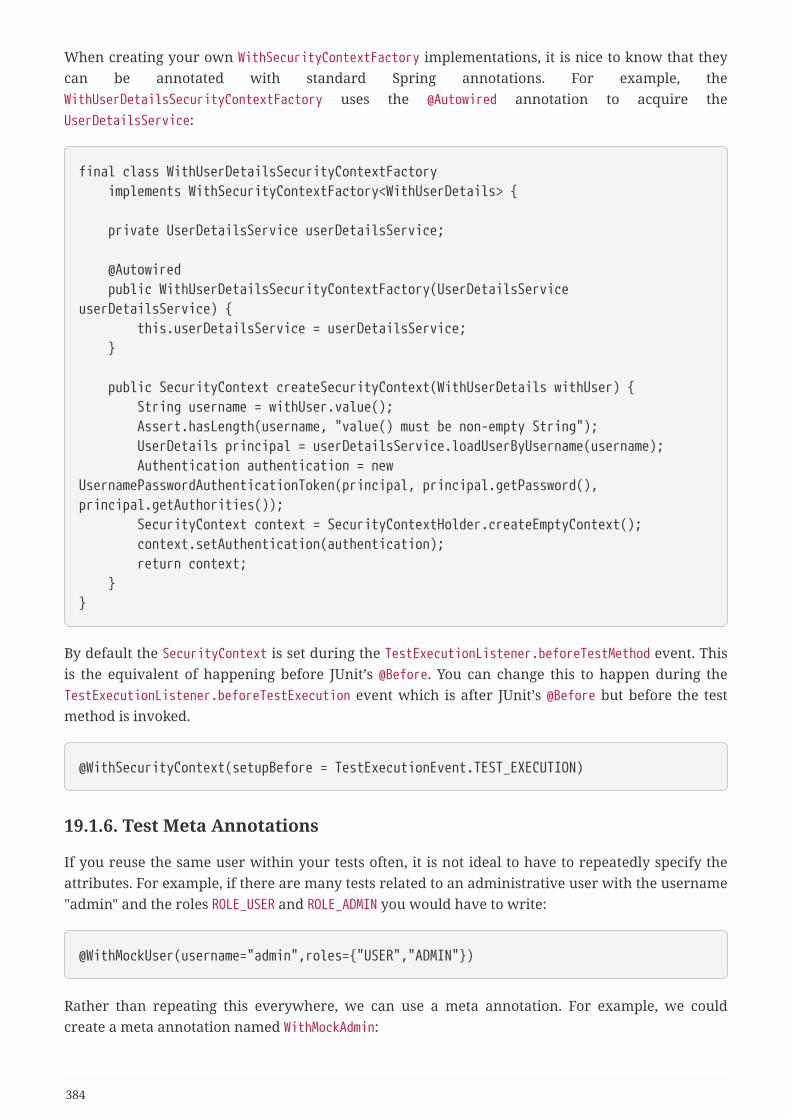
When creating your own WithSecurityContextFactory implementations, it is nice to know that theycan be annotated with standard Spring annotations. For example, theWithUserDetailsSecurityContextFactory uses the @Autowired annotation to acquire theUserDetailsService:
final class WithUserDetailsSecurityContextFactory implements WithSecurityContextFactory<WithUserDetails> {
private UserDetailsService userDetailsService;
@Autowired public WithUserDetailsSecurityContextFactory(UserDetailsServiceuserDetailsService) { this.userDetailsService = userDetailsService; }
public SecurityContext createSecurityContext(WithUserDetails withUser) { String username = withUser.value(); Assert.hasLength(username, "value() must be non-empty String"); UserDetails principal = userDetailsService.loadUserByUsername(username); Authentication authentication = newUsernamePasswordAuthenticationToken(principal, principal.getPassword(),principal.getAuthorities()); SecurityContext context = SecurityContextHolder.createEmptyContext(); context.setAuthentication(authentication); return context; }}
By default the SecurityContext is set during the TestExecutionListener.beforeTestMethod event. Thisis the equivalent of happening before JUnit’s @Before. You can change this to happen during theTestExecutionListener.beforeTestExecution event which is after JUnit’s @Before but before the testmethod is invoked.
@WithSecurityContext(setupBefore = TestExecutionEvent.TEST_EXECUTION)
19.1.6. Test Meta Annotations
If you reuse the same user within your tests often, it is not ideal to have to repeatedly specify theattributes. For example, if there are many tests related to an administrative user with the username"admin" and the roles ROLE_USER and ROLE_ADMIN you would have to write:
@WithMockUser(username="admin",roles={"USER","ADMIN"})
Rather than repeating this everywhere, we can use a meta annotation. For example, we couldcreate a meta annotation named WithMockAdmin:
384
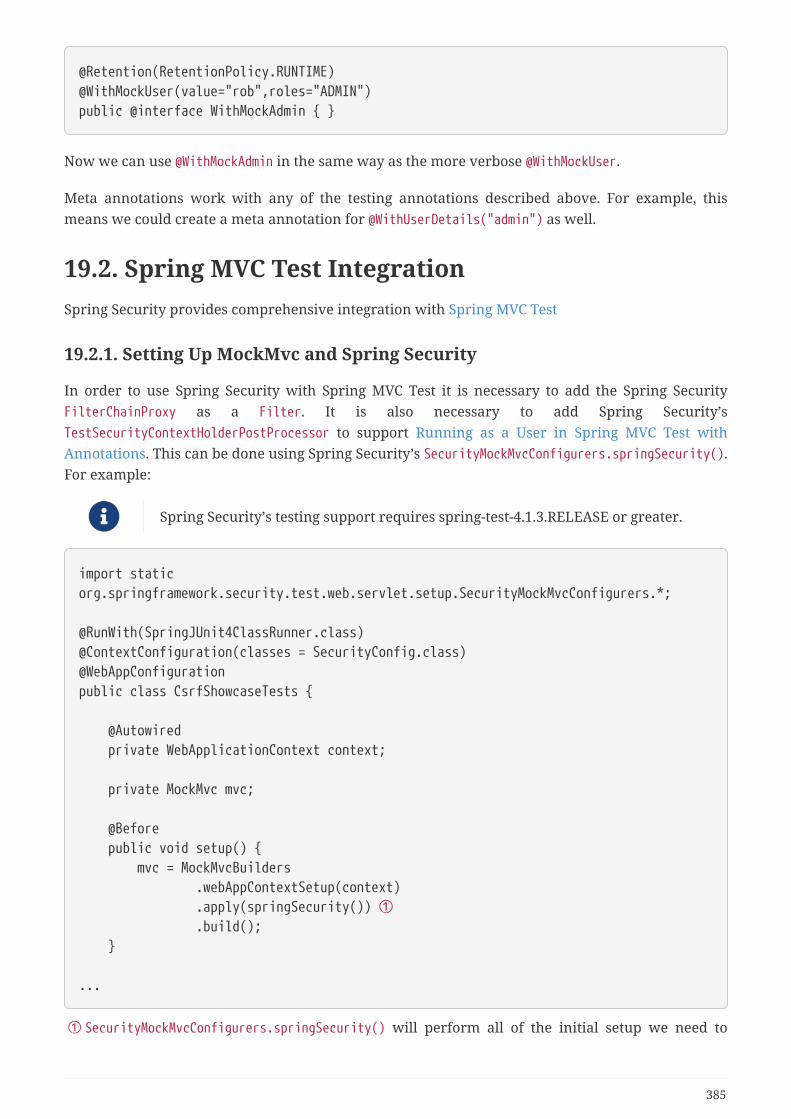
@Retention(RetentionPolicy.RUNTIME)@WithMockUser(value="rob",roles="ADMIN")public @interface WithMockAdmin { }
Now we can use @WithMockAdmin in the same way as the more verbose @WithMockUser.
Meta annotations work with any of the testing annotations described above. For example, thismeans we could create a meta annotation for @WithUserDetails("admin") as well.
19.2. Spring MVC Test IntegrationSpring Security provides comprehensive integration with Spring MVC Test
19.2.1. Setting Up MockMvc and Spring Security
In order to use Spring Security with Spring MVC Test it is necessary to add the Spring SecurityFilterChainProxy as a Filter. It is also necessary to add Spring Security’sTestSecurityContextHolderPostProcessor to support Running as a User in Spring MVC Test withAnnotations. This can be done using Spring Security’s SecurityMockMvcConfigurers.springSecurity().For example:
Spring Security’s testing support requires spring-test-4.1.3.RELEASE or greater.
import staticorg.springframework.security.test.web.servlet.setup.SecurityMockMvcConfigurers.*;
@RunWith(SpringJUnit4ClassRunner.class)@ContextConfiguration(classes = SecurityConfig.class)@WebAppConfigurationpublic class CsrfShowcaseTests {
@Autowired private WebApplicationContext context;
private MockMvc mvc;
@Before public void setup() { mvc = MockMvcBuilders .webAppContextSetup(context) .apply(springSecurity()) ① .build(); }
...
① SecurityMockMvcConfigurers.springSecurity() will perform all of the initial setup we need to
385
integrate Spring Security with Spring MVC Test
19.2.2. SecurityMockMvcRequestPostProcessors
Spring MVC Test provides a convenient interface called a RequestPostProcessor that can be used tomodify a request. Spring Security provides a number of RequestPostProcessor implementations thatmake testing easier. In order to use Spring Security’s RequestPostProcessor implementations ensurethe following static import is used:
import staticorg.springframework.security.test.web.servlet.request.SecurityMockMvcRequestPostProcessors.*;
Testing with CSRF Protection
When testing any non-safe HTTP methods and using Spring Security’s CSRF protection, you must besure to include a valid CSRF Token in the request. To specify a valid CSRF token as a requestparameter using the following:
mvc .perform(post("/").with(csrf()))
If you like you can include CSRF token in the header instead:
mvc .perform(post("/").with(csrf().asHeader()))
You can also test providing an invalid CSRF token using the following:
mvc .perform(post("/").with(csrf().useInvalidToken()))
Running a Test as a User in Spring MVC Test
It is often desirable to run tests as a specific user. There are two simple ways of populating the user:
• Running as a User in Spring MVC Test with RequestPostProcessor
• Running as a User in Spring MVC Test with Annotations
Running as a User in Spring MVC Test with RequestPostProcessor
There are a number of options available to associate a user to the current HttpServletRequest. Forexample, the following will run as a user (which does not need to exist) with the username "user",the password "password", and the role "ROLE_USER":
386
The support works by associating the user to the HttpServletRequest. To associatethe request to the SecurityContextHolder you need to ensure that theSecurityContextPersistenceFilter is associated with the MockMvc instance. A fewways to do this are:
• Invoking apply(springSecurity())
• Adding Spring Security’s FilterChainProxy to MockMvc
• Manually adding SecurityContextPersistenceFilter to the MockMvc instance maymake sense when using MockMvcBuilders.standaloneSetup
mvc .perform(get("/").with(user("user")))
You can easily make customizations. For example, the following will run as a user (which does notneed to exist) with the username "admin", the password "pass", and the roles "ROLE_USER" and"ROLE_ADMIN".
mvc .perform(get("/admin").with(user("admin").password("pass").roles("USER","ADMIN")))
If you have a custom UserDetails that you would like to use, you can easily specify that as well. Forexample, the following will use the specified UserDetails (which does not need to exist) to run witha UsernamePasswordAuthenticationToken that has a principal of the specified UserDetails:
mvc .perform(get("/").with(user(userDetails)))
You can run as anonymous user using the following:
mvc .perform(get("/").with(anonymous()))
This is especially useful if you are running with a default user and wish to execute a few requestsas an anonymous user.
If you want a custom Authentication (which does not need to exist) you can do so using thefollowing:
mvc .perform(get("/").with(authentication(authentication)))
You can even customize the SecurityContext using the following:
387
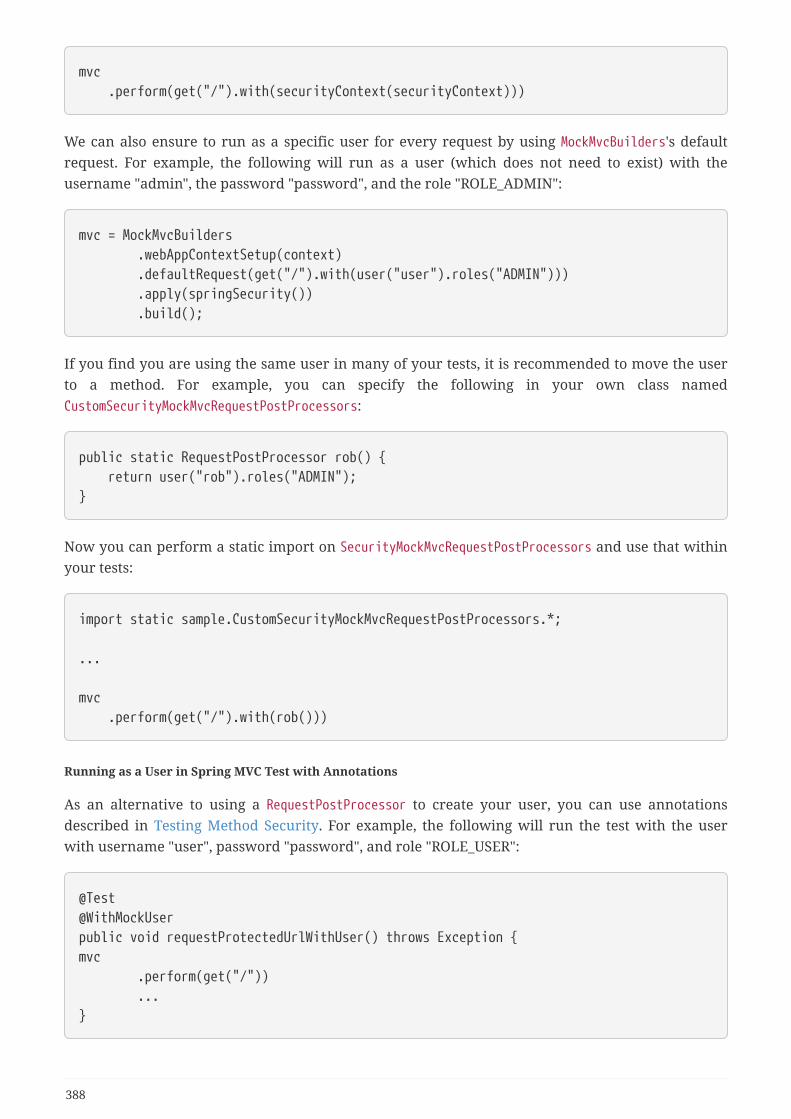
mvc .perform(get("/").with(securityContext(securityContext)))
We can also ensure to run as a specific user for every request by using MockMvcBuilders's defaultrequest. For example, the following will run as a user (which does not need to exist) with theusername "admin", the password "password", and the role "ROLE_ADMIN":
mvc = MockMvcBuilders .webAppContextSetup(context) .defaultRequest(get("/").with(user("user").roles("ADMIN"))) .apply(springSecurity()) .build();
If you find you are using the same user in many of your tests, it is recommended to move the userto a method. For example, you can specify the following in your own class namedCustomSecurityMockMvcRequestPostProcessors:
public static RequestPostProcessor rob() { return user("rob").roles("ADMIN");}
Now you can perform a static import on SecurityMockMvcRequestPostProcessors and use that withinyour tests:
import static sample.CustomSecurityMockMvcRequestPostProcessors.*;
...
mvc .perform(get("/").with(rob()))
Running as a User in Spring MVC Test with Annotations
As an alternative to using a RequestPostProcessor to create your user, you can use annotationsdescribed in Testing Method Security. For example, the following will run the test with the userwith username "user", password "password", and role "ROLE_USER":
@Test@WithMockUserpublic void requestProtectedUrlWithUser() throws Exception {mvc .perform(get("/")) ...}
388
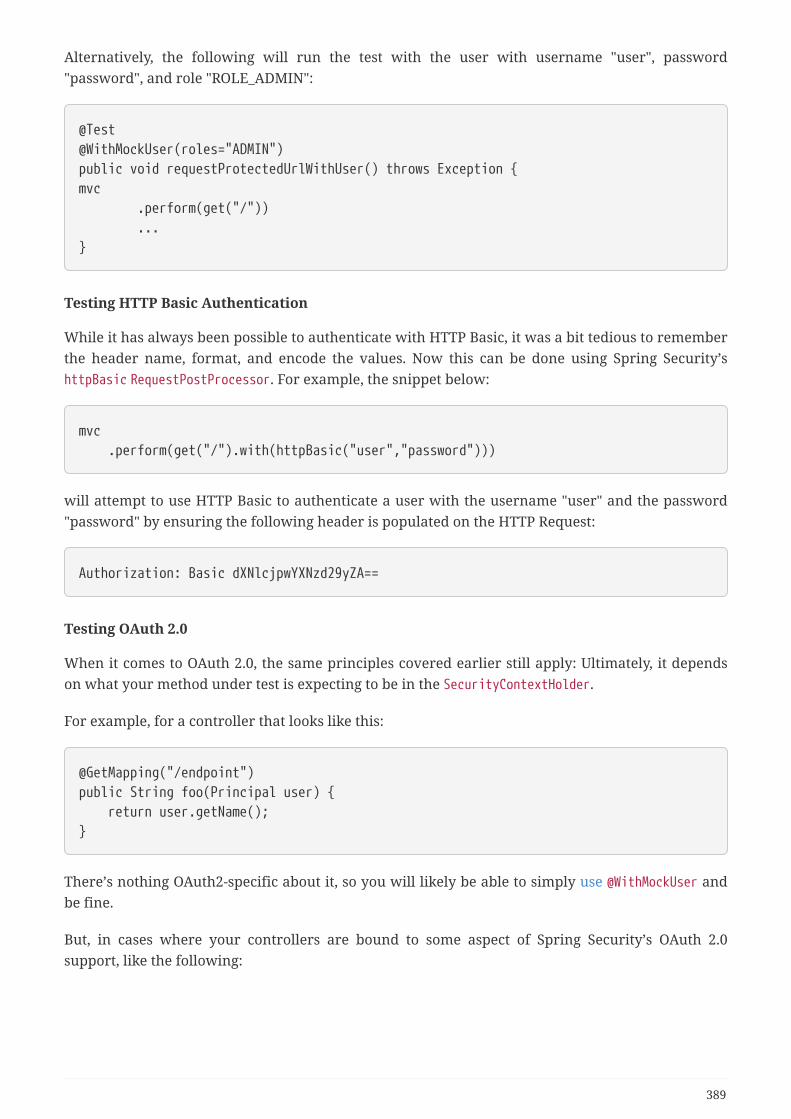
Alternatively, the following will run the test with the user with username "user", password"password", and role "ROLE_ADMIN":
@Test@WithMockUser(roles="ADMIN")public void requestProtectedUrlWithUser() throws Exception {mvc .perform(get("/")) ...}
Testing HTTP Basic Authentication
While it has always been possible to authenticate with HTTP Basic, it was a bit tedious to rememberthe header name, format, and encode the values. Now this can be done using Spring Security’shttpBasic RequestPostProcessor. For example, the snippet below:
mvc .perform(get("/").with(httpBasic("user","password")))
will attempt to use HTTP Basic to authenticate a user with the username "user" and the password"password" by ensuring the following header is populated on the HTTP Request:
Authorization: Basic dXNlcjpwYXNzd29yZA==
Testing OAuth 2.0
When it comes to OAuth 2.0, the same principles covered earlier still apply: Ultimately, it dependson what your method under test is expecting to be in the SecurityContextHolder.
For example, for a controller that looks like this:
@GetMapping("/endpoint")public String foo(Principal user) { return user.getName();}
There’s nothing OAuth2-specific about it, so you will likely be able to simply use @WithMockUser andbe fine.
But, in cases where your controllers are bound to some aspect of Spring Security’s OAuth 2.0support, like the following:
389
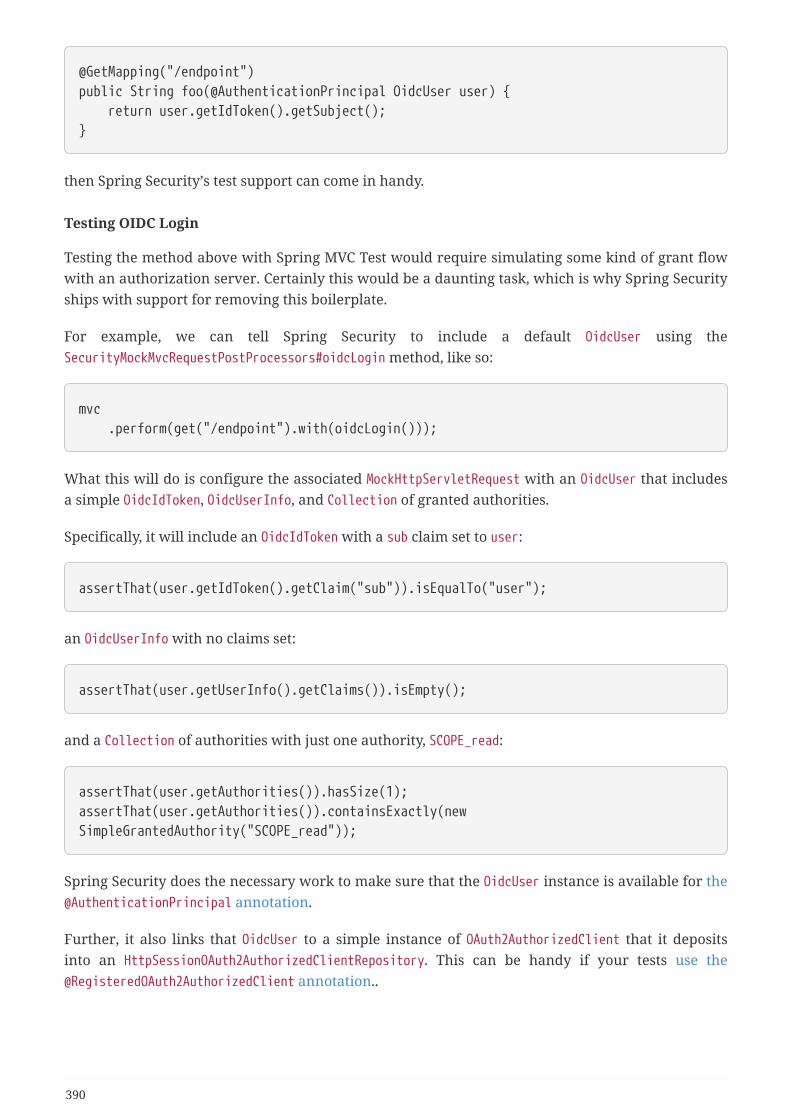
@GetMapping("/endpoint")public String foo(@AuthenticationPrincipal OidcUser user) { return user.getIdToken().getSubject();}
then Spring Security’s test support can come in handy.
Testing OIDC Login
Testing the method above with Spring MVC Test would require simulating some kind of grant flowwith an authorization server. Certainly this would be a daunting task, which is why Spring Securityships with support for removing this boilerplate.
For example, we can tell Spring Security to include a default OidcUser using theSecurityMockMvcRequestPostProcessors#oidcLogin method, like so:
mvc .perform(get("/endpoint").with(oidcLogin()));
What this will do is configure the associated MockHttpServletRequest with an OidcUser that includesa simple OidcIdToken, OidcUserInfo, and Collection of granted authorities.
Specifically, it will include an OidcIdToken with a sub claim set to user:
assertThat(user.getIdToken().getClaim("sub")).isEqualTo("user");
an OidcUserInfo with no claims set:
assertThat(user.getUserInfo().getClaims()).isEmpty();
and a Collection of authorities with just one authority, SCOPE_read:
assertThat(user.getAuthorities()).hasSize(1);assertThat(user.getAuthorities()).containsExactly(newSimpleGrantedAuthority("SCOPE_read"));
Spring Security does the necessary work to make sure that the OidcUser instance is available for the@AuthenticationPrincipal annotation.
Further, it also links that OidcUser to a simple instance of OAuth2AuthorizedClient that it depositsinto an HttpSessionOAuth2AuthorizedClientRepository. This can be handy if your tests use the@RegisteredOAuth2AuthorizedClient annotation..
390

Configuring Authorities
In many circumstances, your method is protected by filter or method security and needs yourAuthentication to have certain granted authorities to allow the request.
In this case, you can supply what granted authorities you need using the authorities() method:
mvc .perform(get("/endpoint") .with(oidcLogin() .authorities(new SimpleGrantedAuthority("SCOPE_message:read")) ) );
Configuring Claims
And while granted authorities are quite common across all of Spring Security, we also have claimsin the case of OAuth 2.0.
Let’s say, for example, that you’ve got a user_id claim that indicates the user’s id in your system.You might access it like so in a controller:
@GetMapping("/endpoint")public String foo(@AuthenticationPrincipal OidcUser oidcUser) { String userId = oidcUser.getIdToken().getClaim("user_id"); // ...}
In that case, you’d want to specify that claim with the idToken() method:
mvc .perform(get("/endpoint") .with(oidcLogin() .idToken(token -> token.claim("user_id", "1234")) ) );
since OidcUser collects its claims from OidcIdToken.
Additional Configurations
There are additional methods, too, for further configuring the authentication; it simply depends onwhat data your controller expects:
• userInfo(OidcUserInfo.Builder) - For configuring the OidcUserInfo instance
• clientRegistration(ClientRegistration) - For configuring the associated OAuth2AuthorizedClientwith a given ClientRegistration
391
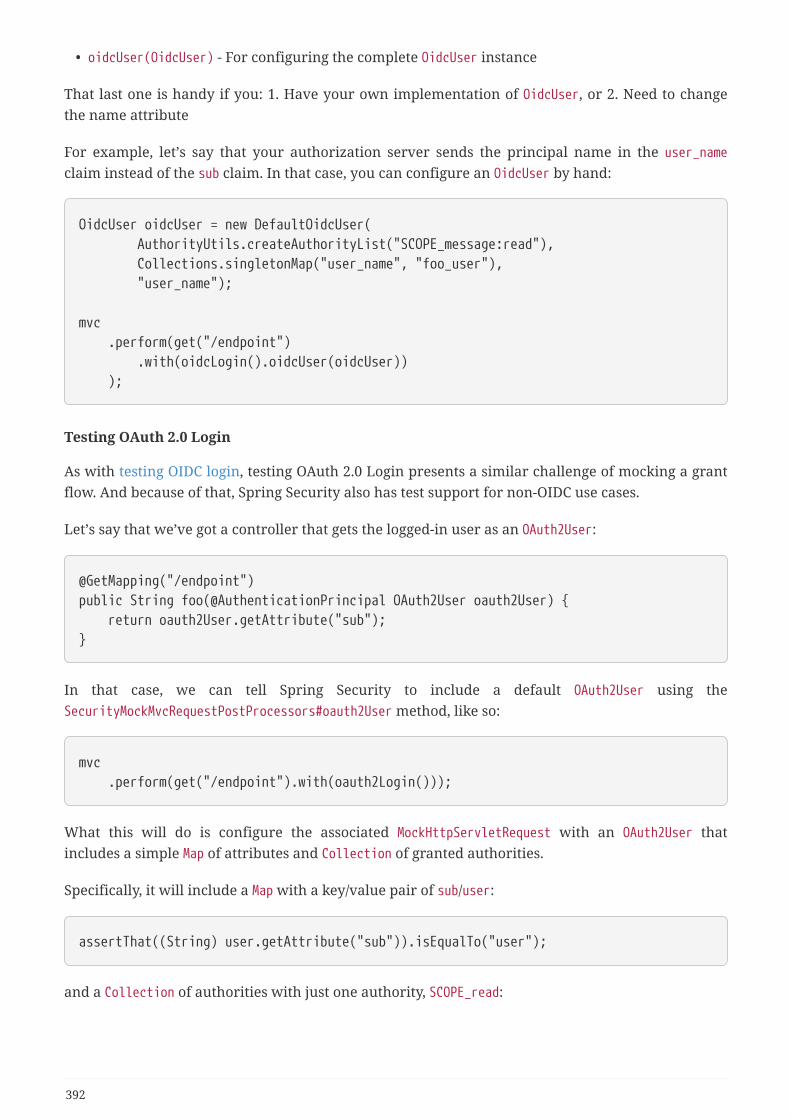
• oidcUser(OidcUser) - For configuring the complete OidcUser instance
That last one is handy if you: 1. Have your own implementation of OidcUser, or 2. Need to changethe name attribute
For example, let’s say that your authorization server sends the principal name in the user_nameclaim instead of the sub claim. In that case, you can configure an OidcUser by hand:
OidcUser oidcUser = new DefaultOidcUser( AuthorityUtils.createAuthorityList("SCOPE_message:read"), Collections.singletonMap("user_name", "foo_user"), "user_name");
mvc .perform(get("/endpoint") .with(oidcLogin().oidcUser(oidcUser)) );
Testing OAuth 2.0 Login
As with testing OIDC login, testing OAuth 2.0 Login presents a similar challenge of mocking a grantflow. And because of that, Spring Security also has test support for non-OIDC use cases.
Let’s say that we’ve got a controller that gets the logged-in user as an OAuth2User:
@GetMapping("/endpoint")public String foo(@AuthenticationPrincipal OAuth2User oauth2User) { return oauth2User.getAttribute("sub");}
In that case, we can tell Spring Security to include a default OAuth2User using theSecurityMockMvcRequestPostProcessors#oauth2User method, like so:
mvc .perform(get("/endpoint").with(oauth2Login()));
What this will do is configure the associated MockHttpServletRequest with an OAuth2User thatincludes a simple Map of attributes and Collection of granted authorities.
Specifically, it will include a Map with a key/value pair of sub/user:
assertThat((String) user.getAttribute("sub")).isEqualTo("user");
and a Collection of authorities with just one authority, SCOPE_read:
392
assertThat(user.getAuthorities()).hasSize(1);assertThat(user.getAuthorities()).containsExactly(newSimpleGrantedAuthority("SCOPE_read"));
Spring Security does the necessary work to make sure that the OAuth2User instance is available forthe @AuthenticationPrincipal annotation.
Further, it also links that OAuth2User to a simple instance of OAuth2AuthorizedClient that it depositsin an HttpSessionOAuth2AuthorizedClientRepository. This can be handy if your tests use the@RegisteredOAuth2AuthorizedClient annotation.
Configuring Authorities
In many circumstances, your method is protected by filter or method security and needs yourAuthentication to have certain granted authorities to allow the request.
In this case, you can supply what granted authorities you need using the authorities() method:
mvc .perform(get("/endpoint") .with(oauth2Login() .authorities(new SimpleGrantedAuthority("SCOPE_message:read")) ) );
Configuring Claims
And while granted authorities are quite common across all of Spring Security, we also have claimsin the case of OAuth 2.0.
Let’s say, for example, that you’ve got a user_id attribute that indicates the user’s id in your system.You might access it like so in a controller:
@GetMapping("/endpoint")public String foo(@AuthenticationPrincipal OAuth2User oauth2User) { String userId = oauth2User.getAttribute("user_id"); // ...}
In that case, you’d want to specify that attribute with the attributes() method:
393
mvc .perform(get("/endpoint") .with(oauth2Login() .attributes(attrs -> attrs.put("user_id", "1234")) ) );
Additional Configurations
There are additional methods, too, for further configuring the authentication; it simply depends onwhat data your controller expects:
• clientRegistration(ClientRegistration) - For configuring the associated OAuth2AuthorizedClientwith a given ClientRegistration
• oauth2User(OAuth2User) - For configuring the complete OAuth2User instance
That last one is handy if you: 1. Have your own implementation of OAuth2User, or 2. Need to changethe name attribute
For example, let’s say that your authorization server sends the principal name in the user_nameclaim instead of the sub claim. In that case, you can configure an OAuth2User by hand:
OAuth2User oauth2User = new DefaultOAuth2User( AuthorityUtils.createAuthorityList("SCOPE_message:read"), Collections.singletonMap("user_name", "foo_user"), "user_name");
mvc .perform(get("/endpoint") .with(oauth2Login().oauth2User(oauth2User)) );
Testing OAuth 2.0 Clients
Independent of how your user authenticates, you may have other tokens and client registrationsthat are in play for the request you are testing. For example, your controller may be relying on theclient credentials grant to get a token that isn’t associated with the user at all:
@GetMapping("/endpoint")public String foo(@RegisteredOAuth2AuthorizedClient("my-app") OAuth2AuthorizedClientauthorizedClient) { return this.webClient.get() .attributes(oauth2AuthorizedClient(authorizedClient)) .retrieve() .bodyToMono(String.class) .block();}
394
Simulating this handshake with the authorization server could be cumbersome. Instead, you canuse SecurityMockMvcRequestPostProcessor#oauth2Client to add a OAuth2AuthorizedClient into anHttpSessionOAuth2AuthorizedClientRepository:
mvc .perform(get("/endpoint").with(oauth2Client("my-app")));
If your application isn’t already using an HttpSessionOAuth2AuthorizedClientRepository, then youcan supply one as a @TestConfiguration:
@TestConfigurationstatic class AuthorizedClientConfig { @Bean OAuth2AuthorizedClientRepository authorizedClientRepository() { return new HttpSessionOAuth2AuthorizedClientRepository(); }}
What this will do is create an OAuth2AuthorizedClient that has a simple ClientRegistration,OAuth2AccessToken, and resource owner name.
Specifically, it will include a ClientRegistration with a client id of "test-client" and client secret of"test-secret":
assertThat(authorizedClient.getClientRegistration().getClientId()).isEqualTo("test-client");assertThat(authorizedClient.getClientRegistration().getClientSecret()).isEqualTo("test-secret");
a resource owner name of "user":
assertThat(authorizedClient.getPrincipalName()).isEqualTo("user");
and an OAuth2AccessToken with just one scope, read:
assertThat(authorizedClient.getAccessToken().getScopes()).hasSize(1);assertThat(authorizedClient.getAccessToken().getScopes()).containsExactly("read");
Spring Security does the necessary work to make sure that the OAuth2AuthorizedClient instance isavailable in the associated HttpSession. That means that it can be retrieved from anHttpSessionOAuth2AuthorizedClientRepository.
Configuring Scopes
In many circumstances, the OAuth 2.0 access token comes with a set of scopes. If your controller
395
inspects these, say like so:
@GetMapping("/endpoint")public String foo(@RegisteredOAuth2AuthorizedClient("my-app") OAuth2AuthorizedClientauthorizedClient) { Set<String> scopes = authorizedClient.getAccessToken().getScopes(); if (scopes.contains("message:read")) { return this.webClient.get() .attributes(oauth2AuthorizedClient(authorizedClient)) .retrieve() .bodyToMono(String.class) .block(); } // ...}
then you can configure the scope using the accessToken() method:
mvc .perform(get("/endpoint") .with(oauth2Client("my-app") .accessToken(new OAuth2AccessToken(BEARER, "token", null, null,Collections.singleton("message:read")))) ) );
Additional Configurations
There are additional methods, too, for further configuring the authentication; it simply depends onwhat data your controller expects:
• principalName(String) - For configuring the resource owner name
• clientRegistration(Consumer<ClientRegistration.Builder>) - For configuring the associatedClientRegistration
• clientRegistration(ClientRegistration) - For configuring the complete ClientRegistration
That last one is handy if you want to use a real ClientRegistration
For example, let’s say that you are wanting to use one of your app’s ClientRegistration definitions,as specified in your application.yml.
In that case, your test can autowire the ClientRegistrationRepository and look up the one your testneeds:
396
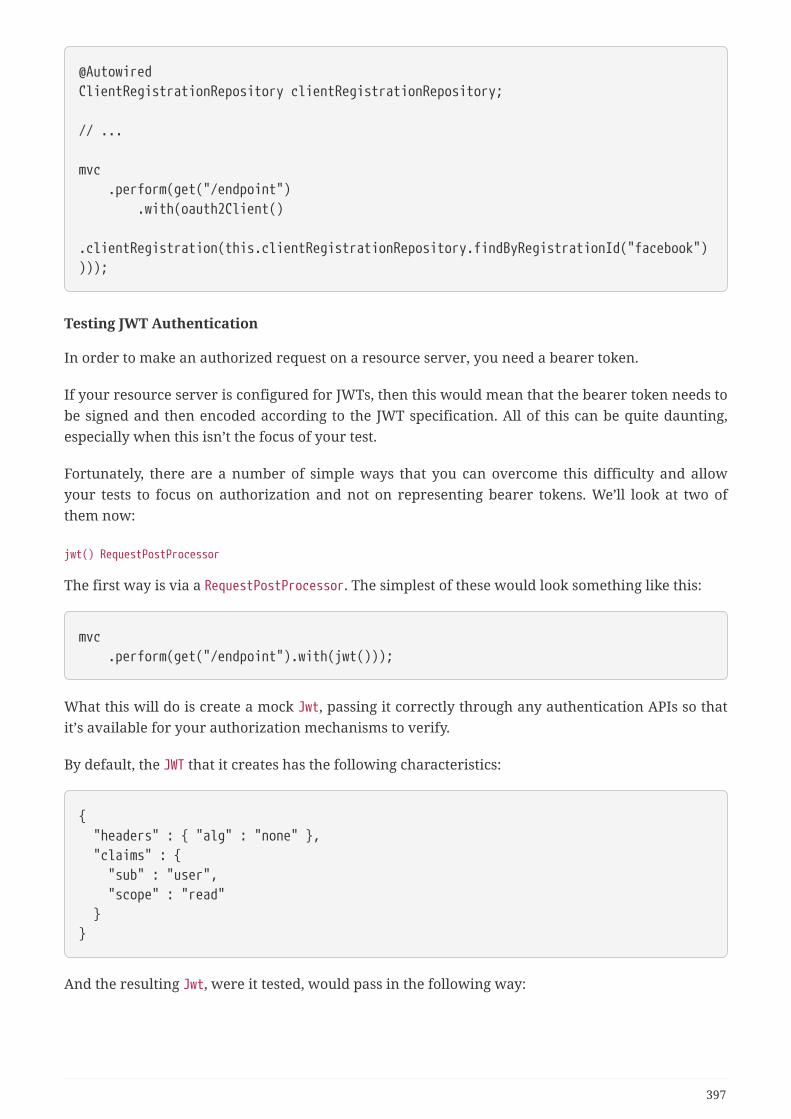
@AutowiredClientRegistrationRepository clientRegistrationRepository;
// ...
mvc .perform(get("/endpoint") .with(oauth2Client() .clientRegistration(this.clientRegistrationRepository.findByRegistrationId("facebook"))));
Testing JWT Authentication
In order to make an authorized request on a resource server, you need a bearer token.
If your resource server is configured for JWTs, then this would mean that the bearer token needs tobe signed and then encoded according to the JWT specification. All of this can be quite daunting,especially when this isn’t the focus of your test.
Fortunately, there are a number of simple ways that you can overcome this difficulty and allowyour tests to focus on authorization and not on representing bearer tokens. We’ll look at two ofthem now:
jwt() RequestPostProcessor
The first way is via a RequestPostProcessor. The simplest of these would look something like this:
mvc .perform(get("/endpoint").with(jwt()));
What this will do is create a mock Jwt, passing it correctly through any authentication APIs so thatit’s available for your authorization mechanisms to verify.
By default, the JWT that it creates has the following characteristics:
{ "headers" : { "alg" : "none" }, "claims" : { "sub" : "user", "scope" : "read" }}
And the resulting Jwt, were it tested, would pass in the following way:
397
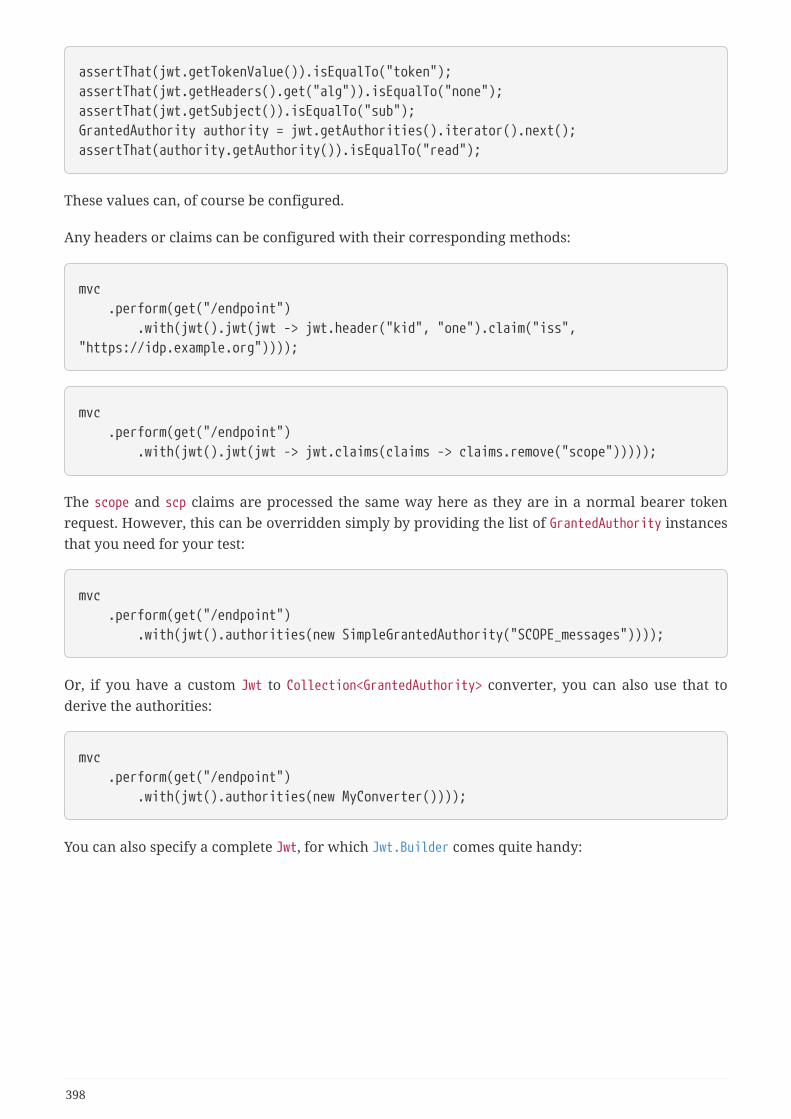
assertThat(jwt.getTokenValue()).isEqualTo("token");assertThat(jwt.getHeaders().get("alg")).isEqualTo("none");assertThat(jwt.getSubject()).isEqualTo("sub");GrantedAuthority authority = jwt.getAuthorities().iterator().next();assertThat(authority.getAuthority()).isEqualTo("read");
These values can, of course be configured.
Any headers or claims can be configured with their corresponding methods:
mvc .perform(get("/endpoint") .with(jwt().jwt(jwt -> jwt.header("kid", "one").claim("iss","https://idp.example.org"))));
mvc .perform(get("/endpoint") .with(jwt().jwt(jwt -> jwt.claims(claims -> claims.remove("scope")))));
The scope and scp claims are processed the same way here as they are in a normal bearer tokenrequest. However, this can be overridden simply by providing the list of GrantedAuthority instancesthat you need for your test:
mvc .perform(get("/endpoint") .with(jwt().authorities(new SimpleGrantedAuthority("SCOPE_messages"))));
Or, if you have a custom Jwt to Collection<GrantedAuthority> converter, you can also use that toderive the authorities:
mvc .perform(get("/endpoint") .with(jwt().authorities(new MyConverter())));
You can also specify a complete Jwt, for which Jwt.Builder comes quite handy:
398
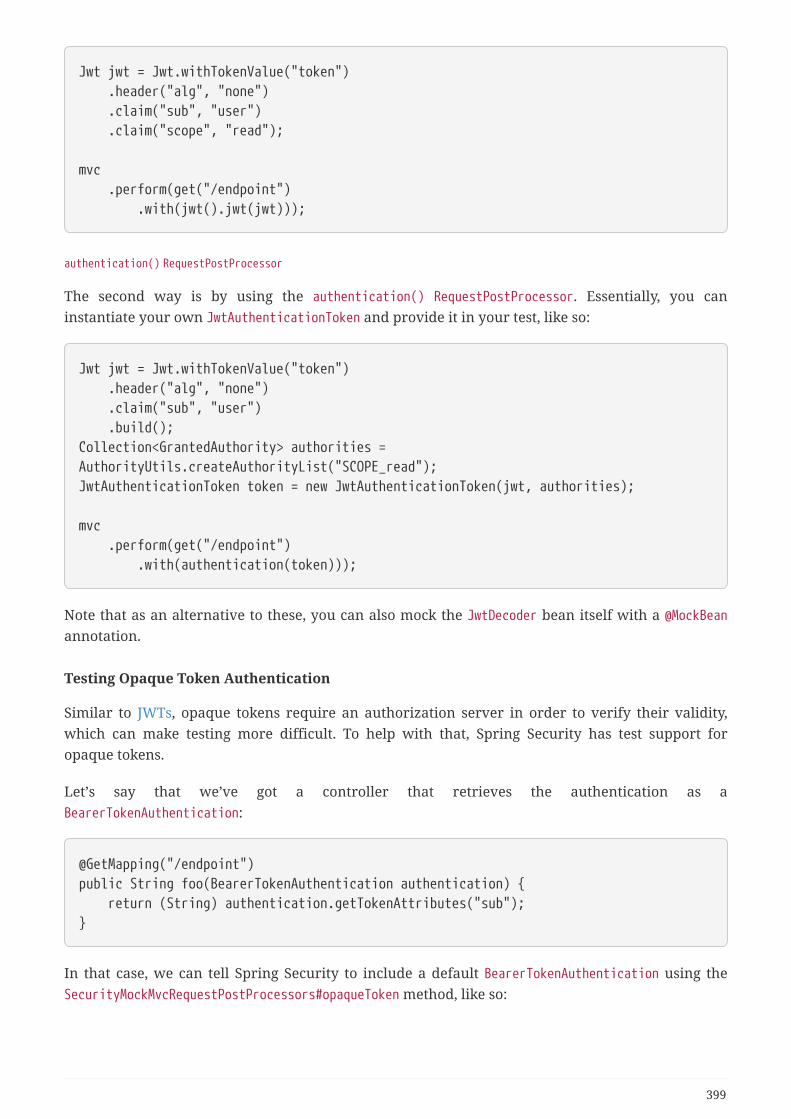
Jwt jwt = Jwt.withTokenValue("token") .header("alg", "none") .claim("sub", "user") .claim("scope", "read");
mvc .perform(get("/endpoint") .with(jwt().jwt(jwt)));
authentication() RequestPostProcessor
The second way is by using the authentication() RequestPostProcessor. Essentially, you caninstantiate your own JwtAuthenticationToken and provide it in your test, like so:
Jwt jwt = Jwt.withTokenValue("token") .header("alg", "none") .claim("sub", "user") .build();Collection<GrantedAuthority> authorities =AuthorityUtils.createAuthorityList("SCOPE_read");JwtAuthenticationToken token = new JwtAuthenticationToken(jwt, authorities);
mvc .perform(get("/endpoint") .with(authentication(token)));
Note that as an alternative to these, you can also mock the JwtDecoder bean itself with a @MockBeanannotation.
Testing Opaque Token Authentication
Similar to JWTs, opaque tokens require an authorization server in order to verify their validity,which can make testing more difficult. To help with that, Spring Security has test support foropaque tokens.
Let’s say that we’ve got a controller that retrieves the authentication as aBearerTokenAuthentication:
@GetMapping("/endpoint")public String foo(BearerTokenAuthentication authentication) { return (String) authentication.getTokenAttributes("sub");}
In that case, we can tell Spring Security to include a default BearerTokenAuthentication using theSecurityMockMvcRequestPostProcessors#opaqueToken method, like so:
399
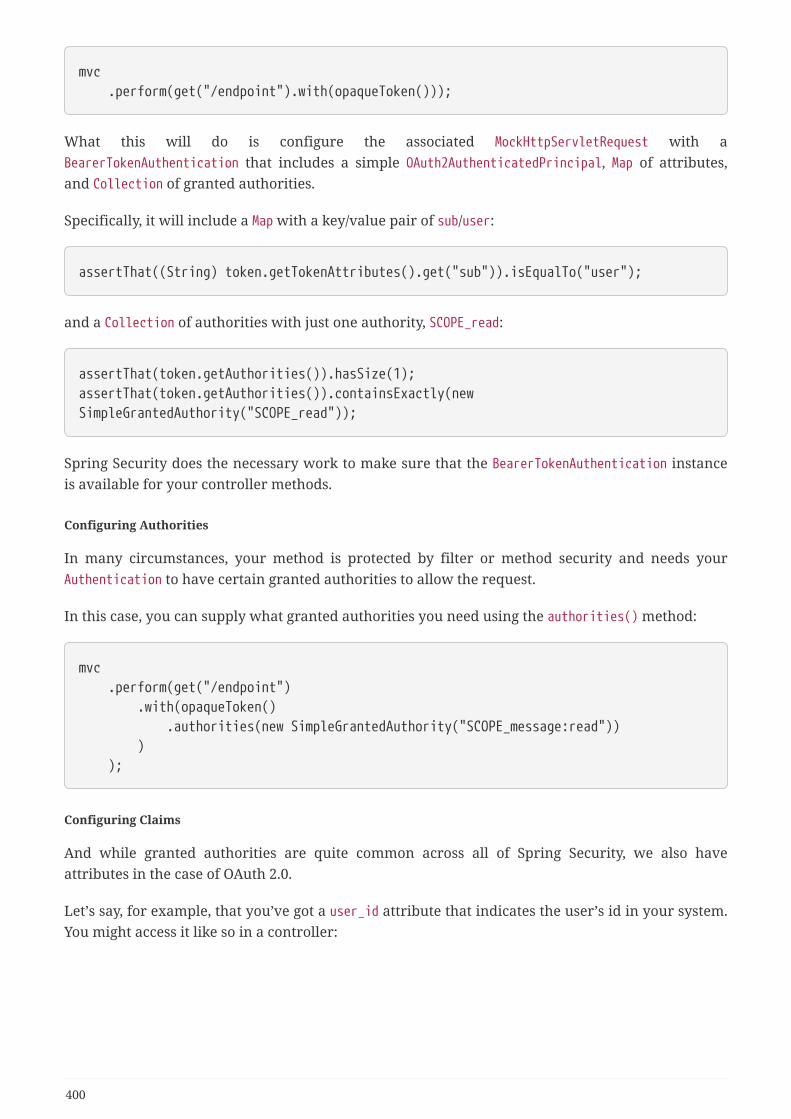
mvc .perform(get("/endpoint").with(opaqueToken()));
What this will do is configure the associated MockHttpServletRequest with aBearerTokenAuthentication that includes a simple OAuth2AuthenticatedPrincipal, Map of attributes,and Collection of granted authorities.
Specifically, it will include a Map with a key/value pair of sub/user:
assertThat((String) token.getTokenAttributes().get("sub")).isEqualTo("user");
and a Collection of authorities with just one authority, SCOPE_read:
assertThat(token.getAuthorities()).hasSize(1);assertThat(token.getAuthorities()).containsExactly(newSimpleGrantedAuthority("SCOPE_read"));
Spring Security does the necessary work to make sure that the BearerTokenAuthentication instanceis available for your controller methods.
Configuring Authorities
In many circumstances, your method is protected by filter or method security and needs yourAuthentication to have certain granted authorities to allow the request.
In this case, you can supply what granted authorities you need using the authorities() method:
mvc .perform(get("/endpoint") .with(opaqueToken() .authorities(new SimpleGrantedAuthority("SCOPE_message:read")) ) );
Configuring Claims
And while granted authorities are quite common across all of Spring Security, we also haveattributes in the case of OAuth 2.0.
Let’s say, for example, that you’ve got a user_id attribute that indicates the user’s id in your system.You might access it like so in a controller:
400
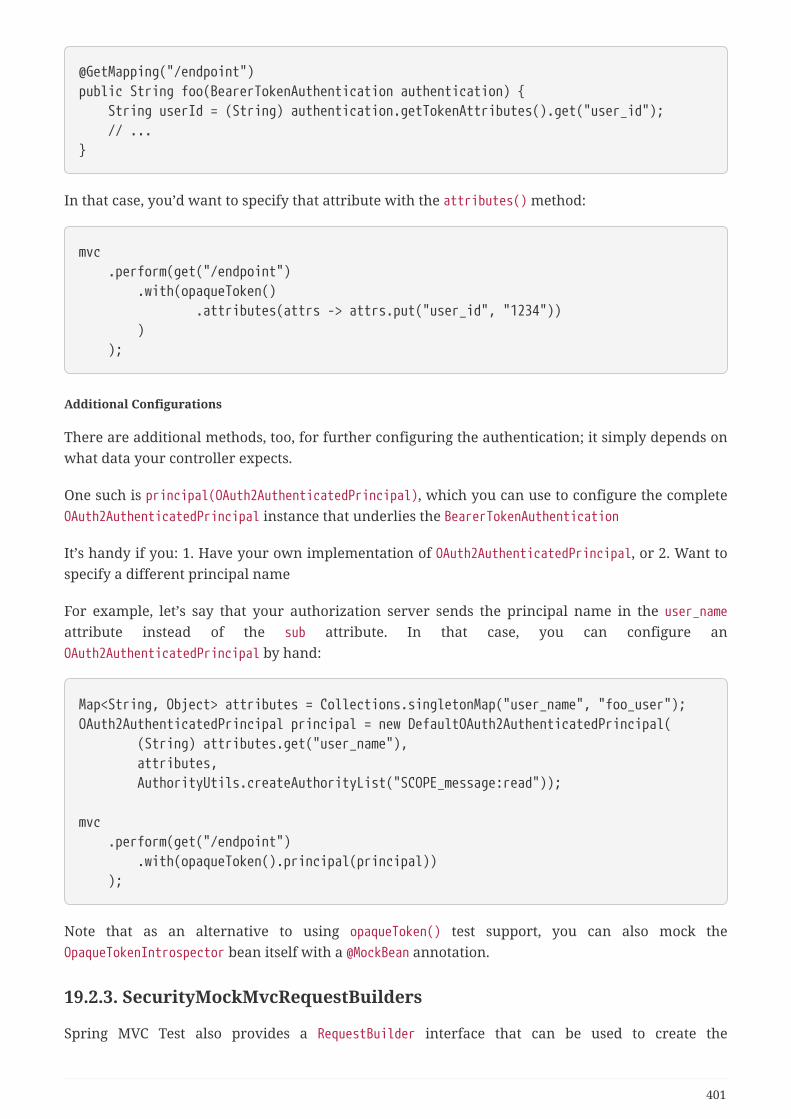
@GetMapping("/endpoint")public String foo(BearerTokenAuthentication authentication) { String userId = (String) authentication.getTokenAttributes().get("user_id"); // ...}
In that case, you’d want to specify that attribute with the attributes() method:
mvc .perform(get("/endpoint") .with(opaqueToken() .attributes(attrs -> attrs.put("user_id", "1234")) ) );
Additional Configurations
There are additional methods, too, for further configuring the authentication; it simply depends onwhat data your controller expects.
One such is principal(OAuth2AuthenticatedPrincipal), which you can use to configure the completeOAuth2AuthenticatedPrincipal instance that underlies the BearerTokenAuthentication
It’s handy if you: 1. Have your own implementation of OAuth2AuthenticatedPrincipal, or 2. Want tospecify a different principal name
For example, let’s say that your authorization server sends the principal name in the user_nameattribute instead of the sub attribute. In that case, you can configure anOAuth2AuthenticatedPrincipal by hand:
Map<String, Object> attributes = Collections.singletonMap("user_name", "foo_user");OAuth2AuthenticatedPrincipal principal = new DefaultOAuth2AuthenticatedPrincipal( (String) attributes.get("user_name"), attributes, AuthorityUtils.createAuthorityList("SCOPE_message:read"));
mvc .perform(get("/endpoint") .with(opaqueToken().principal(principal)) );
Note that as an alternative to using opaqueToken() test support, you can also mock theOpaqueTokenIntrospector bean itself with a @MockBean annotation.
19.2.3. SecurityMockMvcRequestBuilders
Spring MVC Test also provides a RequestBuilder interface that can be used to create the
401
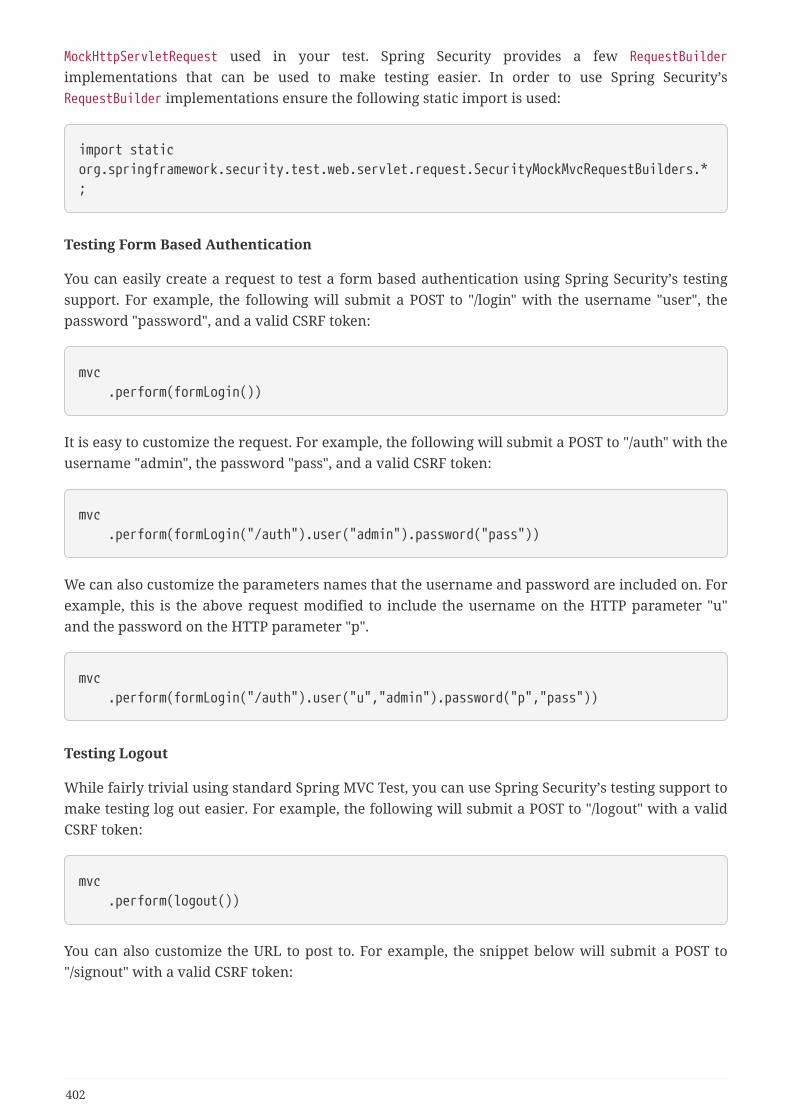
MockHttpServletRequest used in your test. Spring Security provides a few RequestBuilderimplementations that can be used to make testing easier. In order to use Spring Security’sRequestBuilder implementations ensure the following static import is used:
import staticorg.springframework.security.test.web.servlet.request.SecurityMockMvcRequestBuilders.*;
Testing Form Based Authentication
You can easily create a request to test a form based authentication using Spring Security’s testingsupport. For example, the following will submit a POST to "/login" with the username "user", thepassword "password", and a valid CSRF token:
mvc .perform(formLogin())
It is easy to customize the request. For example, the following will submit a POST to "/auth" with theusername "admin", the password "pass", and a valid CSRF token:
mvc .perform(formLogin("/auth").user("admin").password("pass"))
We can also customize the parameters names that the username and password are included on. Forexample, this is the above request modified to include the username on the HTTP parameter "u"and the password on the HTTP parameter "p".
mvc .perform(formLogin("/auth").user("u","admin").password("p","pass"))
Testing Logout
While fairly trivial using standard Spring MVC Test, you can use Spring Security’s testing support tomake testing log out easier. For example, the following will submit a POST to "/logout" with a validCSRF token:
mvc .perform(logout())
You can also customize the URL to post to. For example, the snippet below will submit a POST to"/signout" with a valid CSRF token:
402
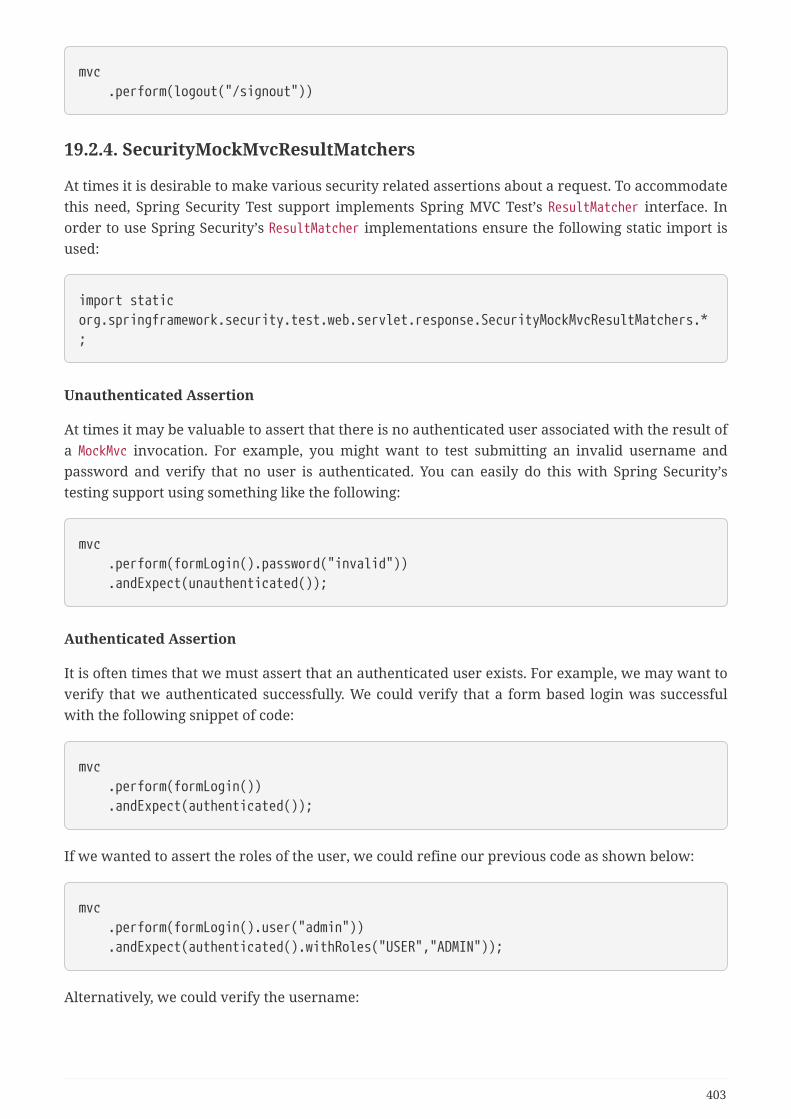
mvc .perform(logout("/signout"))
19.2.4. SecurityMockMvcResultMatchers
At times it is desirable to make various security related assertions about a request. To accommodatethis need, Spring Security Test support implements Spring MVC Test’s ResultMatcher interface. Inorder to use Spring Security’s ResultMatcher implementations ensure the following static import isused:
import staticorg.springframework.security.test.web.servlet.response.SecurityMockMvcResultMatchers.*;
Unauthenticated Assertion
At times it may be valuable to assert that there is no authenticated user associated with the result ofa MockMvc invocation. For example, you might want to test submitting an invalid username andpassword and verify that no user is authenticated. You can easily do this with Spring Security’stesting support using something like the following:
mvc .perform(formLogin().password("invalid")) .andExpect(unauthenticated());
Authenticated Assertion
It is often times that we must assert that an authenticated user exists. For example, we may want toverify that we authenticated successfully. We could verify that a form based login was successfulwith the following snippet of code:
mvc .perform(formLogin()) .andExpect(authenticated());
If we wanted to assert the roles of the user, we could refine our previous code as shown below:
mvc .perform(formLogin().user("admin")) .andExpect(authenticated().withRoles("USER","ADMIN"));
Alternatively, we could verify the username:
403
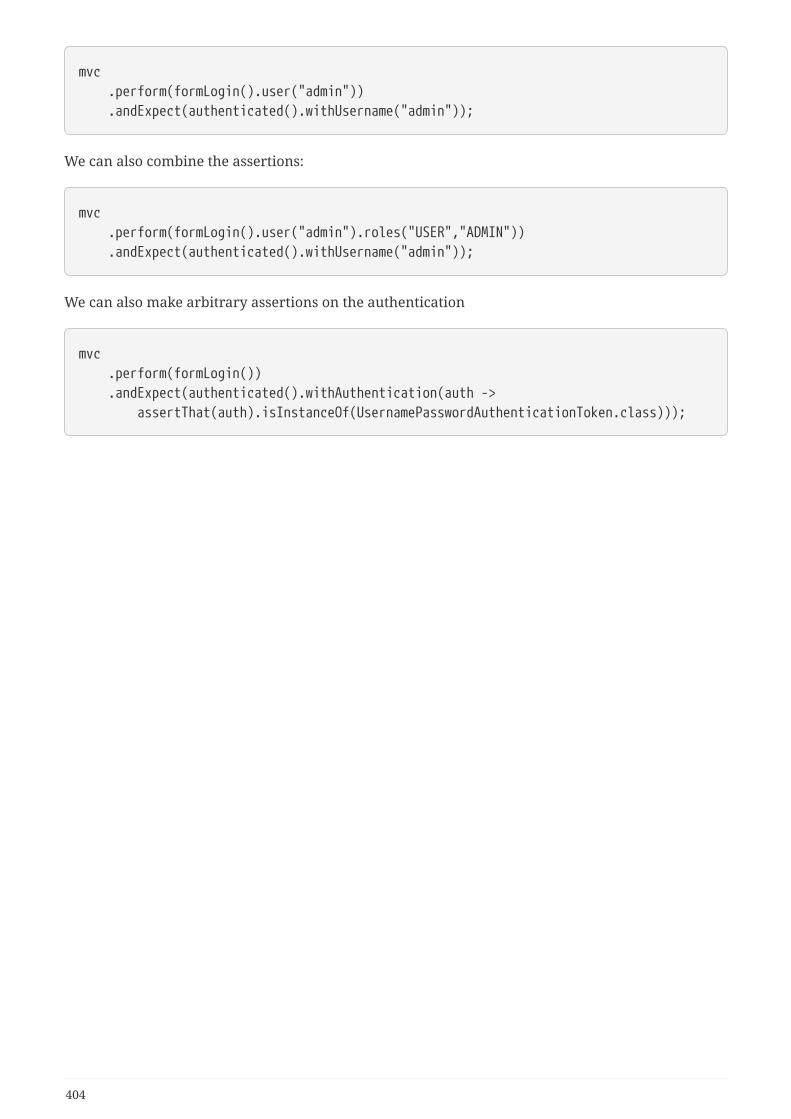
mvc .perform(formLogin().user("admin")) .andExpect(authenticated().withUsername("admin"));
We can also combine the assertions:
mvc .perform(formLogin().user("admin").roles("USER","ADMIN")) .andExpect(authenticated().withUsername("admin"));
We can also make arbitrary assertions on the authentication
mvc .perform(formLogin()) .andExpect(authenticated().withAuthentication(auth -> assertThat(auth).isInstanceOf(UsernamePasswordAuthenticationToken.class)));
404
Chapter 20. Spring Security Crypto Module
20.1. IntroductionThe Spring Security Crypto module provides support for symmetric encryption, key generation, andpassword encoding. The code is distributed as part of the core module but has no dependencies onany other Spring Security (or Spring) code.
20.2. EncryptorsThe Encryptors class provides factory methods for constructing symmetric encryptors. Using thisclass, you can create ByteEncryptors to encrypt data in raw byte[] form. You can also constructTextEncryptors to encrypt text strings. Encryptors are thread-safe.
20.2.1. BytesEncryptor
Use the Encryptors.stronger factory method to construct a BytesEncryptor:
Encryptors.stronger("password", "salt");
The "stronger" encryption method creates an encryptor using 256 bit AES encryption with GaloisCounter Mode (GCM). It derives the secret key using PKCS #5’s PBKDF2 (Password-Based KeyDerivation Function #2). This method requires Java 6. The password used to generate the SecretKeyshould be kept in a secure place and not be shared. The salt is used to prevent dictionary attacksagainst the key in the event your encrypted data is compromised. A 16-byte random initializationvector is also applied so each encrypted message is unique.
The provided salt should be in hex-encoded String form, be random, and be at least 8 bytes inlength. Such a salt may be generated using a KeyGenerator:
String salt = KeyGenerators.string().generateKey(); // generates a random 8-byte saltthat is then hex-encoded
Users may also use the standard encryption method, which is 256-bit AES in Cipher Block Chaining(CBC) Mode. This mode is not authenticated and does not provide any guarantees about theauthenticity of the data. For a more secure alternative, users should prefer Encryptors.stronger.
20.2.2. TextEncryptor
Use the Encryptors.text factory method to construct a standard TextEncryptor:
Encryptors.text("password", "salt");
A TextEncryptor uses a standard BytesEncryptor to encrypt text data. Encrypted results are
405
returned as hex-encoded strings for easy storage on the filesystem or in the database.
Use the Encryptors.queryableText factory method to construct a "queryable" TextEncryptor:
Encryptors.queryableText("password", "salt");
The difference between a queryable TextEncryptor and a standard TextEncryptor has to do withinitialization vector (iv) handling. The iv used in a queryable TextEncryptor#encrypt operation isshared, or constant, and is not randomly generated. This means the same text encrypted multipletimes will always produce the same encryption result. This is less secure, but necessary forencrypted data that needs to be queried against. An example of queryable encrypted text would bean OAuth apiKey.
20.3. Key GeneratorsThe KeyGenerators class provides a number of convenience factory methods for constructingdifferent types of key generators. Using this class, you can create a BytesKeyGenerator to generatebyte[] keys. You can also construct a StringKeyGenerator to generate string keys. KeyGenerators arethread-safe.
20.3.1. BytesKeyGenerator
Use the KeyGenerators.secureRandom factory methods to generate a BytesKeyGenerator backed bya SecureRandom instance:
BytesKeyGenerator generator = KeyGenerators.secureRandom();byte[] key = generator.generateKey();
The default key length is 8 bytes. There is also a KeyGenerators.secureRandom variant thatprovides control over the key length:
KeyGenerators.secureRandom(16);
Use the KeyGenerators.shared factory method to construct a BytesKeyGenerator that alwaysreturns the same key on every invocation:
KeyGenerators.shared(16);
20.3.2. StringKeyGenerator
Use the KeyGenerators.string factory method to construct a 8-byte, SecureRandom KeyGeneratorthat hex-encodes each key as a String:
406
KeyGenerators.string();
20.4. Password EncodingThe password package of the spring-security-crypto module provides support for encodingpasswords. PasswordEncoder is the central service interface and has the following signature:
public interface PasswordEncoder {
String encode(String rawPassword);
boolean matches(String rawPassword, String encodedPassword);}
The matches method returns true if the rawPassword, once encoded, equals the encodedPassword.This method is designed to support password-based authentication schemes.
The BCryptPasswordEncoder implementation uses the widely supported "bcrypt" algorithm to hashthe passwords. Bcrypt uses a random 16 byte salt value and is a deliberately slow algorithm, inorder to hinder password crackers. The amount of work it does can be tuned using the "strength"parameter which takes values from 4 to 31. The higher the value, the more work has to be done tocalculate the hash. The default value is 10. You can change this value in your deployed systemwithout affecting existing passwords, as the value is also stored in the encoded hash.
// Create an encoder with strength 16BCryptPasswordEncoder encoder = new BCryptPasswordEncoder(16);String result = encoder.encode("myPassword");assertTrue(encoder.matches("myPassword", result));
The Pbkdf2PasswordEncoder implementation uses PBKDF2 algorithm to hash the passwords. In orderto defeat password cracking PBKDF2 is a deliberately slow algorithm and should be tuned to takeabout .5 seconds to verify a password on your system.
// Create an encoder with all the defaultsPbkdf2PasswordEncoder encoder = new Pbkdf2PasswordEncoder();String result = encoder.encode("myPassword");assertTrue(encoder.matches("myPassword", result));
407
Chapter 21. Appendix
21.1. Security Database SchemaThere are various database schema used by the framework and this appendix provides a singlereference point to them all. You only need to provide the tables for the areas of functionality yourequire.
DDL statements are given for the HSQLDB database. You can use these as a guideline for definingthe schema for the database you are using.
21.1.1. User Schema
The standard JDBC implementation of the UserDetailsService (JdbcDaoImpl) requires tables to loadthe password, account status (enabled or disabled) and a list of authorities (roles) for the user. Youwill need to adjust this schema to match the database dialect you are using.
create table users( username varchar_ignorecase(50) not null primary key, password varchar_ignorecase(50) not null, enabled boolean not null);
create table authorities ( username varchar_ignorecase(50) not null, authority varchar_ignorecase(50) not null, constraint fk_authorities_users foreign key(username) references users(username));create unique index ix_auth_username on authorities (username,authority);
For Oracle database
408
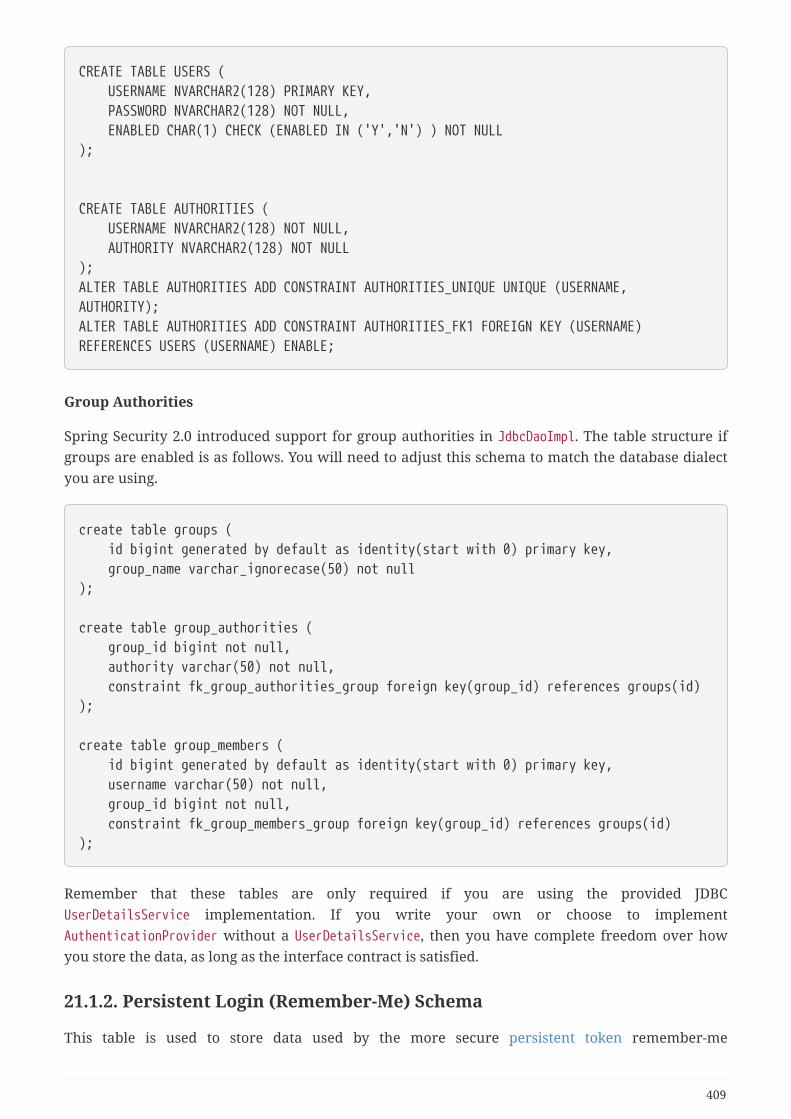
CREATE TABLE USERS ( USERNAME NVARCHAR2(128) PRIMARY KEY, PASSWORD NVARCHAR2(128) NOT NULL, ENABLED CHAR(1) CHECK (ENABLED IN ('Y','N') ) NOT NULL);
CREATE TABLE AUTHORITIES ( USERNAME NVARCHAR2(128) NOT NULL, AUTHORITY NVARCHAR2(128) NOT NULL);ALTER TABLE AUTHORITIES ADD CONSTRAINT AUTHORITIES_UNIQUE UNIQUE (USERNAME,AUTHORITY);ALTER TABLE AUTHORITIES ADD CONSTRAINT AUTHORITIES_FK1 FOREIGN KEY (USERNAME)REFERENCES USERS (USERNAME) ENABLE;
Group Authorities
Spring Security 2.0 introduced support for group authorities in JdbcDaoImpl. The table structure ifgroups are enabled is as follows. You will need to adjust this schema to match the database dialectyou are using.
create table groups ( id bigint generated by default as identity(start with 0) primary key, group_name varchar_ignorecase(50) not null);
create table group_authorities ( group_id bigint not null, authority varchar(50) not null, constraint fk_group_authorities_group foreign key(group_id) references groups(id));
create table group_members ( id bigint generated by default as identity(start with 0) primary key, username varchar(50) not null, group_id bigint not null, constraint fk_group_members_group foreign key(group_id) references groups(id));
Remember that these tables are only required if you are using the provided JDBCUserDetailsService implementation. If you write your own or choose to implementAuthenticationProvider without a UserDetailsService, then you have complete freedom over howyou store the data, as long as the interface contract is satisfied.
21.1.2. Persistent Login (Remember-Me) Schema
This table is used to store data used by the more secure persistent token remember-me
409

implementation. If you are using JdbcTokenRepositoryImpl either directly or through the namespace,then you will need this table. Remember to adjust this schema to match the database dialect youare using.
create table persistent_logins ( username varchar(64) not null, series varchar(64) primary key, token varchar(64) not null, last_used timestamp not null);
21.1.3. ACL Schema
There are four tables used by the Spring Security ACL implementation.
1. acl_sid stores the security identities recognised by the ACL system. These can be uniqueprincipals or authorities which may apply to multiple principals.
2. acl_class defines the domain object types to which ACLs apply. The class column stores the Javaclass name of the object.
3. acl_object_identity stores the object identity definitions of specific domain objects.
4. acl_entry stores the ACL permissions which apply to a specific object identity and securityidentity.
It is assumed that the database will auto-generate the primary keys for each of the identities. TheJdbcMutableAclService has to be able to retrieve these when it has created a new row in the acl_sidor acl_class tables. It has two properties which define the SQL needed to retrieve these valuesclassIdentityQuery and sidIdentityQuery. Both of these default to call identity()
The ACL artifact JAR contains files for creating the ACL schema in HyperSQL (HSQLDB), PostgreSQL,MySQL/MariaDB, Microsoft SQL Server, and Oracle Database. These schemas are also demonstratedin the following sections.
HyperSQL
The default schema works with the embedded HSQLDB database that is used in unit tests within theframework.
410

create table acl_sid( id bigint generated by default as identity(start with 100) not null primary key, principal boolean not null, sid varchar_ignorecase(100) not null, constraint unique_uk_1 unique(sid,principal));
create table acl_class( id bigint generated by default as identity(start with 100) not null primary key, class varchar_ignorecase(100) not null, constraint unique_uk_2 unique(class));
create table acl_object_identity( id bigint generated by default as identity(start with 100) not null primary key, object_id_class bigint not null, object_id_identity varchar_ignorecase(36) not null, parent_object bigint, owner_sid bigint, entries_inheriting boolean not null, constraint unique_uk_3 unique(object_id_class,object_id_identity), constraint foreign_fk_1 foreign key(parent_object)referencesacl_object_identity(id), constraint foreign_fk_2 foreign key(object_id_class)references acl_class(id), constraint foreign_fk_3 foreign key(owner_sid)references acl_sid(id));
create table acl_entry( id bigint generated by default as identity(start with 100) not null primary key, acl_object_identity bigint not null, ace_order int not null, sid bigint not null, mask integer not null, granting boolean not null, audit_success boolean not null, audit_failure boolean not null, constraint unique_uk_4 unique(acl_object_identity,ace_order), constraint foreign_fk_4 foreign key(acl_object_identity) referencesacl_object_identity(id), constraint foreign_fk_5 foreign key(sid) references acl_sid(id));
PostgreSQL
411
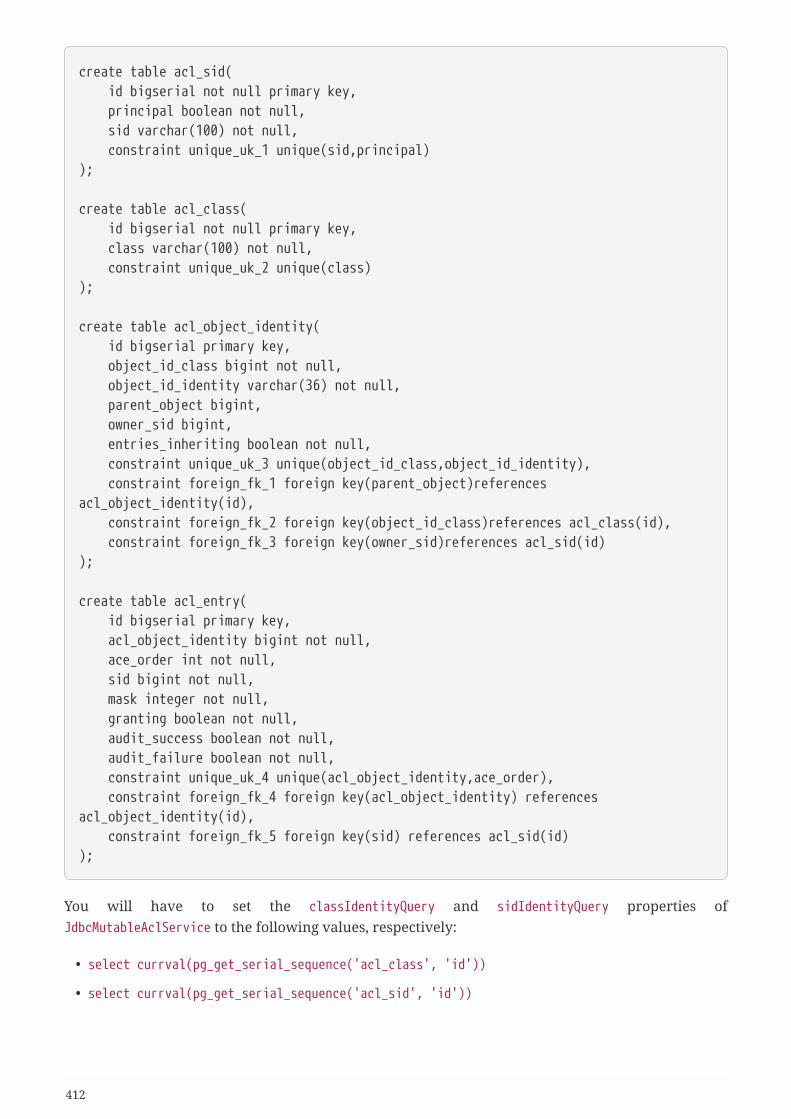
create table acl_sid( id bigserial not null primary key, principal boolean not null, sid varchar(100) not null, constraint unique_uk_1 unique(sid,principal));
create table acl_class( id bigserial not null primary key, class varchar(100) not null, constraint unique_uk_2 unique(class));
create table acl_object_identity( id bigserial primary key, object_id_class bigint not null, object_id_identity varchar(36) not null, parent_object bigint, owner_sid bigint, entries_inheriting boolean not null, constraint unique_uk_3 unique(object_id_class,object_id_identity), constraint foreign_fk_1 foreign key(parent_object)referencesacl_object_identity(id), constraint foreign_fk_2 foreign key(object_id_class)references acl_class(id), constraint foreign_fk_3 foreign key(owner_sid)references acl_sid(id));
create table acl_entry( id bigserial primary key, acl_object_identity bigint not null, ace_order int not null, sid bigint not null, mask integer not null, granting boolean not null, audit_success boolean not null, audit_failure boolean not null, constraint unique_uk_4 unique(acl_object_identity,ace_order), constraint foreign_fk_4 foreign key(acl_object_identity) referencesacl_object_identity(id), constraint foreign_fk_5 foreign key(sid) references acl_sid(id));
You will have to set the classIdentityQuery and sidIdentityQuery properties ofJdbcMutableAclService to the following values, respectively:
• select currval(pg_get_serial_sequence('acl_class', 'id'))
• select currval(pg_get_serial_sequence('acl_sid', 'id'))
412
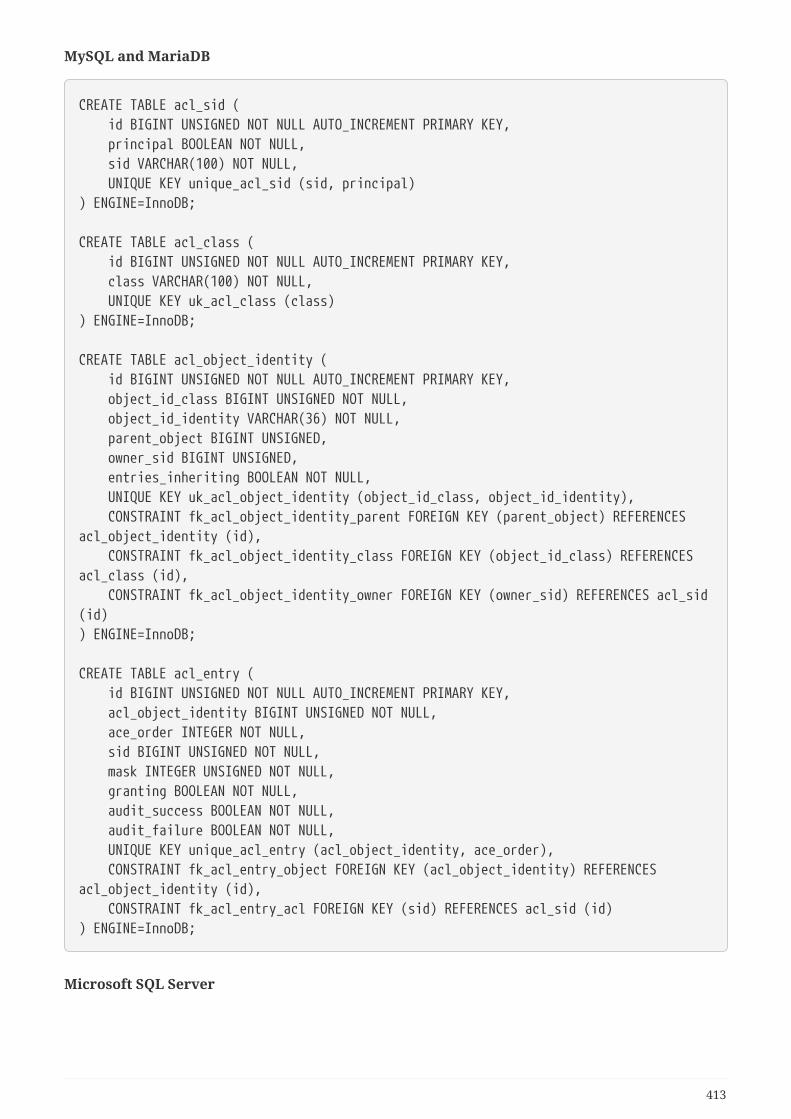
MySQL and MariaDB
CREATE TABLE acl_sid ( id BIGINT UNSIGNED NOT NULL AUTO_INCREMENT PRIMARY KEY, principal BOOLEAN NOT NULL, sid VARCHAR(100) NOT NULL, UNIQUE KEY unique_acl_sid (sid, principal)) ENGINE=InnoDB;
CREATE TABLE acl_class ( id BIGINT UNSIGNED NOT NULL AUTO_INCREMENT PRIMARY KEY, class VARCHAR(100) NOT NULL, UNIQUE KEY uk_acl_class (class)) ENGINE=InnoDB;
CREATE TABLE acl_object_identity ( id BIGINT UNSIGNED NOT NULL AUTO_INCREMENT PRIMARY KEY, object_id_class BIGINT UNSIGNED NOT NULL, object_id_identity VARCHAR(36) NOT NULL, parent_object BIGINT UNSIGNED, owner_sid BIGINT UNSIGNED, entries_inheriting BOOLEAN NOT NULL, UNIQUE KEY uk_acl_object_identity (object_id_class, object_id_identity), CONSTRAINT fk_acl_object_identity_parent FOREIGN KEY (parent_object) REFERENCESacl_object_identity (id), CONSTRAINT fk_acl_object_identity_class FOREIGN KEY (object_id_class) REFERENCESacl_class (id), CONSTRAINT fk_acl_object_identity_owner FOREIGN KEY (owner_sid) REFERENCES acl_sid(id)) ENGINE=InnoDB;
CREATE TABLE acl_entry ( id BIGINT UNSIGNED NOT NULL AUTO_INCREMENT PRIMARY KEY, acl_object_identity BIGINT UNSIGNED NOT NULL, ace_order INTEGER NOT NULL, sid BIGINT UNSIGNED NOT NULL, mask INTEGER UNSIGNED NOT NULL, granting BOOLEAN NOT NULL, audit_success BOOLEAN NOT NULL, audit_failure BOOLEAN NOT NULL, UNIQUE KEY unique_acl_entry (acl_object_identity, ace_order), CONSTRAINT fk_acl_entry_object FOREIGN KEY (acl_object_identity) REFERENCESacl_object_identity (id), CONSTRAINT fk_acl_entry_acl FOREIGN KEY (sid) REFERENCES acl_sid (id)) ENGINE=InnoDB;
Microsoft SQL Server
413
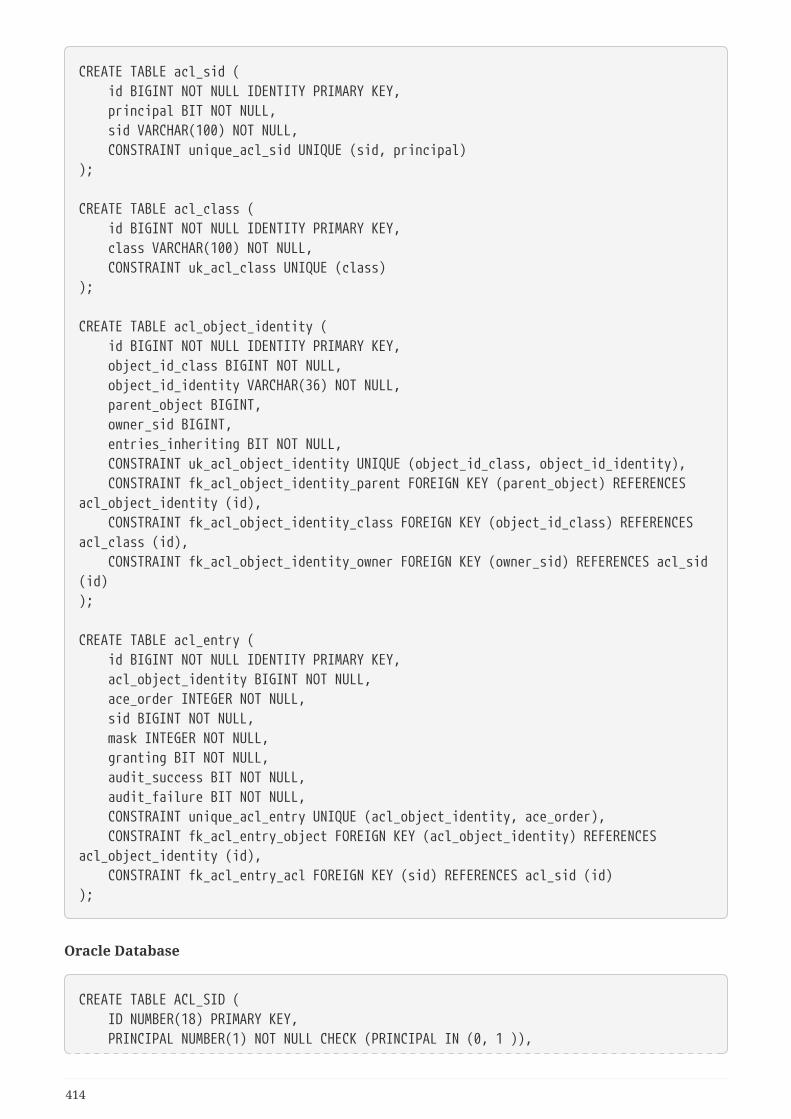
CREATE TABLE acl_sid ( id BIGINT NOT NULL IDENTITY PRIMARY KEY, principal BIT NOT NULL, sid VARCHAR(100) NOT NULL, CONSTRAINT unique_acl_sid UNIQUE (sid, principal));
CREATE TABLE acl_class ( id BIGINT NOT NULL IDENTITY PRIMARY KEY, class VARCHAR(100) NOT NULL, CONSTRAINT uk_acl_class UNIQUE (class));
CREATE TABLE acl_object_identity ( id BIGINT NOT NULL IDENTITY PRIMARY KEY, object_id_class BIGINT NOT NULL, object_id_identity VARCHAR(36) NOT NULL, parent_object BIGINT, owner_sid BIGINT, entries_inheriting BIT NOT NULL, CONSTRAINT uk_acl_object_identity UNIQUE (object_id_class, object_id_identity), CONSTRAINT fk_acl_object_identity_parent FOREIGN KEY (parent_object) REFERENCESacl_object_identity (id), CONSTRAINT fk_acl_object_identity_class FOREIGN KEY (object_id_class) REFERENCESacl_class (id), CONSTRAINT fk_acl_object_identity_owner FOREIGN KEY (owner_sid) REFERENCES acl_sid(id));
CREATE TABLE acl_entry ( id BIGINT NOT NULL IDENTITY PRIMARY KEY, acl_object_identity BIGINT NOT NULL, ace_order INTEGER NOT NULL, sid BIGINT NOT NULL, mask INTEGER NOT NULL, granting BIT NOT NULL, audit_success BIT NOT NULL, audit_failure BIT NOT NULL, CONSTRAINT unique_acl_entry UNIQUE (acl_object_identity, ace_order), CONSTRAINT fk_acl_entry_object FOREIGN KEY (acl_object_identity) REFERENCESacl_object_identity (id), CONSTRAINT fk_acl_entry_acl FOREIGN KEY (sid) REFERENCES acl_sid (id));
Oracle Database
CREATE TABLE ACL_SID ( ID NUMBER(18) PRIMARY KEY, PRINCIPAL NUMBER(1) NOT NULL CHECK (PRINCIPAL IN (0, 1 )),
414
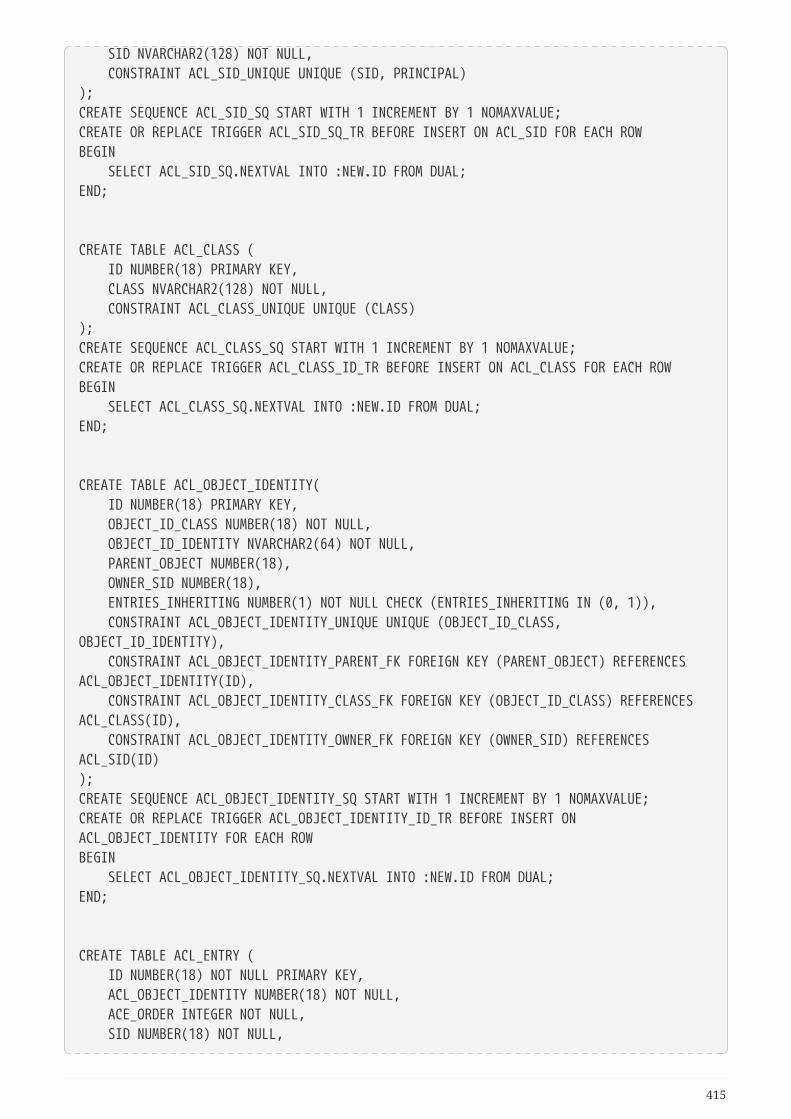
SID NVARCHAR2(128) NOT NULL, CONSTRAINT ACL_SID_UNIQUE UNIQUE (SID, PRINCIPAL));CREATE SEQUENCE ACL_SID_SQ START WITH 1 INCREMENT BY 1 NOMAXVALUE;CREATE OR REPLACE TRIGGER ACL_SID_SQ_TR BEFORE INSERT ON ACL_SID FOR EACH ROWBEGIN SELECT ACL_SID_SQ.NEXTVAL INTO :NEW.ID FROM DUAL;END;
CREATE TABLE ACL_CLASS ( ID NUMBER(18) PRIMARY KEY, CLASS NVARCHAR2(128) NOT NULL, CONSTRAINT ACL_CLASS_UNIQUE UNIQUE (CLASS));CREATE SEQUENCE ACL_CLASS_SQ START WITH 1 INCREMENT BY 1 NOMAXVALUE;CREATE OR REPLACE TRIGGER ACL_CLASS_ID_TR BEFORE INSERT ON ACL_CLASS FOR EACH ROWBEGIN SELECT ACL_CLASS_SQ.NEXTVAL INTO :NEW.ID FROM DUAL;END;
CREATE TABLE ACL_OBJECT_IDENTITY( ID NUMBER(18) PRIMARY KEY, OBJECT_ID_CLASS NUMBER(18) NOT NULL, OBJECT_ID_IDENTITY NVARCHAR2(64) NOT NULL, PARENT_OBJECT NUMBER(18), OWNER_SID NUMBER(18), ENTRIES_INHERITING NUMBER(1) NOT NULL CHECK (ENTRIES_INHERITING IN (0, 1)), CONSTRAINT ACL_OBJECT_IDENTITY_UNIQUE UNIQUE (OBJECT_ID_CLASS,OBJECT_ID_IDENTITY), CONSTRAINT ACL_OBJECT_IDENTITY_PARENT_FK FOREIGN KEY (PARENT_OBJECT) REFERENCESACL_OBJECT_IDENTITY(ID), CONSTRAINT ACL_OBJECT_IDENTITY_CLASS_FK FOREIGN KEY (OBJECT_ID_CLASS) REFERENCESACL_CLASS(ID), CONSTRAINT ACL_OBJECT_IDENTITY_OWNER_FK FOREIGN KEY (OWNER_SID) REFERENCESACL_SID(ID));CREATE SEQUENCE ACL_OBJECT_IDENTITY_SQ START WITH 1 INCREMENT BY 1 NOMAXVALUE;CREATE OR REPLACE TRIGGER ACL_OBJECT_IDENTITY_ID_TR BEFORE INSERT ONACL_OBJECT_IDENTITY FOR EACH ROWBEGIN SELECT ACL_OBJECT_IDENTITY_SQ.NEXTVAL INTO :NEW.ID FROM DUAL;END;
CREATE TABLE ACL_ENTRY ( ID NUMBER(18) NOT NULL PRIMARY KEY, ACL_OBJECT_IDENTITY NUMBER(18) NOT NULL, ACE_ORDER INTEGER NOT NULL, SID NUMBER(18) NOT NULL,
415
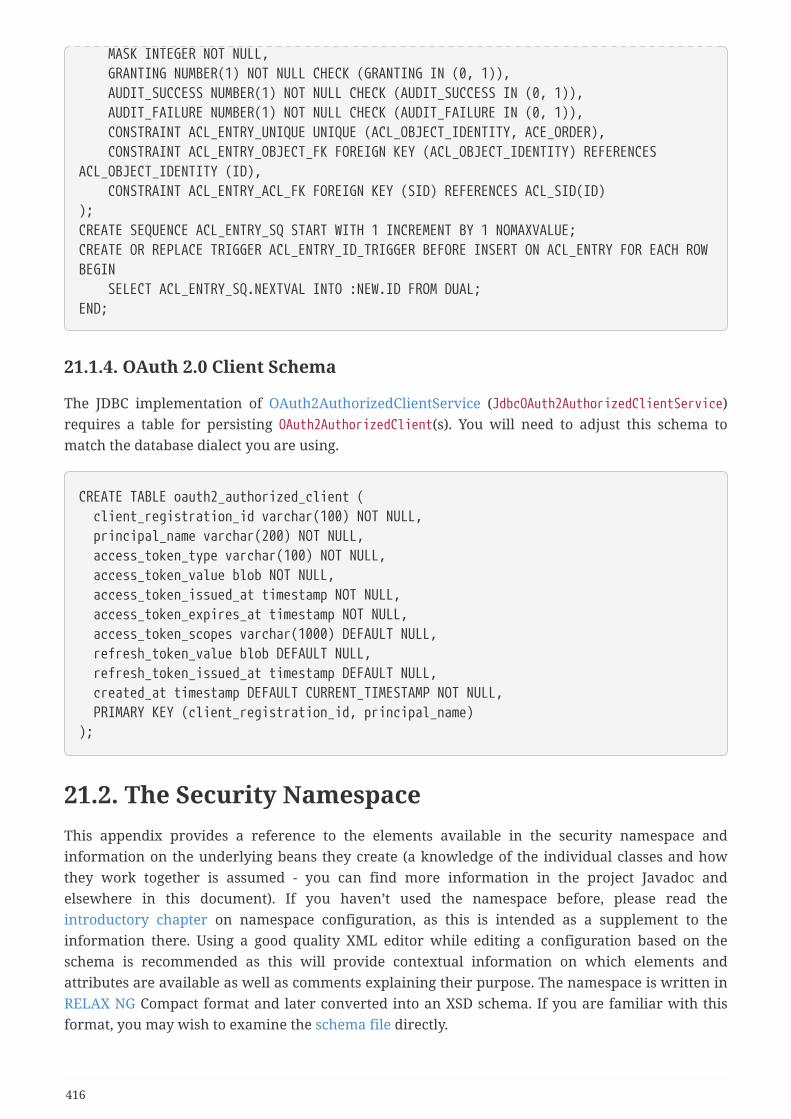
MASK INTEGER NOT NULL, GRANTING NUMBER(1) NOT NULL CHECK (GRANTING IN (0, 1)), AUDIT_SUCCESS NUMBER(1) NOT NULL CHECK (AUDIT_SUCCESS IN (0, 1)), AUDIT_FAILURE NUMBER(1) NOT NULL CHECK (AUDIT_FAILURE IN (0, 1)), CONSTRAINT ACL_ENTRY_UNIQUE UNIQUE (ACL_OBJECT_IDENTITY, ACE_ORDER), CONSTRAINT ACL_ENTRY_OBJECT_FK FOREIGN KEY (ACL_OBJECT_IDENTITY) REFERENCESACL_OBJECT_IDENTITY (ID), CONSTRAINT ACL_ENTRY_ACL_FK FOREIGN KEY (SID) REFERENCES ACL_SID(ID));CREATE SEQUENCE ACL_ENTRY_SQ START WITH 1 INCREMENT BY 1 NOMAXVALUE;CREATE OR REPLACE TRIGGER ACL_ENTRY_ID_TRIGGER BEFORE INSERT ON ACL_ENTRY FOR EACH ROWBEGIN SELECT ACL_ENTRY_SQ.NEXTVAL INTO :NEW.ID FROM DUAL;END;
21.1.4. OAuth 2.0 Client Schema
The JDBC implementation of OAuth2AuthorizedClientService (JdbcOAuth2AuthorizedClientService)requires a table for persisting OAuth2AuthorizedClient(s). You will need to adjust this schema tomatch the database dialect you are using.
CREATE TABLE oauth2_authorized_client ( client_registration_id varchar(100) NOT NULL, principal_name varchar(200) NOT NULL, access_token_type varchar(100) NOT NULL, access_token_value blob NOT NULL, access_token_issued_at timestamp NOT NULL, access_token_expires_at timestamp NOT NULL, access_token_scopes varchar(1000) DEFAULT NULL, refresh_token_value blob DEFAULT NULL, refresh_token_issued_at timestamp DEFAULT NULL, created_at timestamp DEFAULT CURRENT_TIMESTAMP NOT NULL, PRIMARY KEY (client_registration_id, principal_name));
21.2. The Security NamespaceThis appendix provides a reference to the elements available in the security namespace andinformation on the underlying beans they create (a knowledge of the individual classes and howthey work together is assumed - you can find more information in the project Javadoc andelsewhere in this document). If you haven’t used the namespace before, please read theintroductory chapter on namespace configuration, as this is intended as a supplement to theinformation there. Using a good quality XML editor while editing a configuration based on theschema is recommended as this will provide contextual information on which elements andattributes are available as well as comments explaining their purpose. The namespace is written inRELAX NG Compact format and later converted into an XSD schema. If you are familiar with thisformat, you may wish to examine the schema file directly.
416
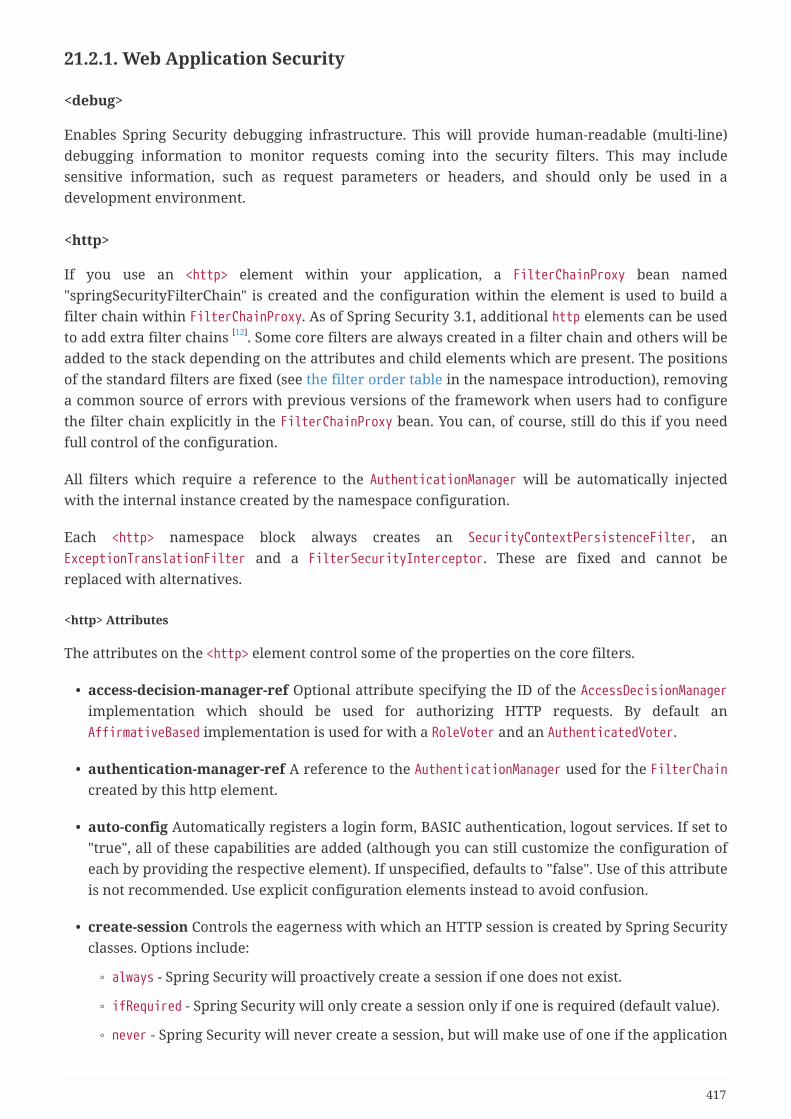
21.2.1. Web Application Security
<debug>
Enables Spring Security debugging infrastructure. This will provide human-readable (multi-line)debugging information to monitor requests coming into the security filters. This may includesensitive information, such as request parameters or headers, and should only be used in adevelopment environment.
<http>
If you use an <http> element within your application, a FilterChainProxy bean named"springSecurityFilterChain" is created and the configuration within the element is used to build afilter chain within FilterChainProxy. As of Spring Security 3.1, additional http elements can be usedto add extra filter chains [12]. Some core filters are always created in a filter chain and others will beadded to the stack depending on the attributes and child elements which are present. The positionsof the standard filters are fixed (see the filter order table in the namespace introduction), removinga common source of errors with previous versions of the framework when users had to configurethe filter chain explicitly in the FilterChainProxy bean. You can, of course, still do this if you needfull control of the configuration.
All filters which require a reference to the AuthenticationManager will be automatically injectedwith the internal instance created by the namespace configuration.
Each <http> namespace block always creates an SecurityContextPersistenceFilter, anExceptionTranslationFilter and a FilterSecurityInterceptor. These are fixed and cannot bereplaced with alternatives.
<http> Attributes
The attributes on the <http> element control some of the properties on the core filters.
• access-decision-manager-ref Optional attribute specifying the ID of the AccessDecisionManagerimplementation which should be used for authorizing HTTP requests. By default anAffirmativeBased implementation is used for with a RoleVoter and an AuthenticatedVoter.
• authentication-manager-ref A reference to the AuthenticationManager used for the FilterChaincreated by this http element.
• auto-config Automatically registers a login form, BASIC authentication, logout services. If set to"true", all of these capabilities are added (although you can still customize the configuration ofeach by providing the respective element). If unspecified, defaults to "false". Use of this attributeis not recommended. Use explicit configuration elements instead to avoid confusion.
• create-session Controls the eagerness with which an HTTP session is created by Spring Securityclasses. Options include:
◦ always - Spring Security will proactively create a session if one does not exist.
◦ ifRequired - Spring Security will only create a session only if one is required (default value).
◦ never - Spring Security will never create a session, but will make use of one if the application
417
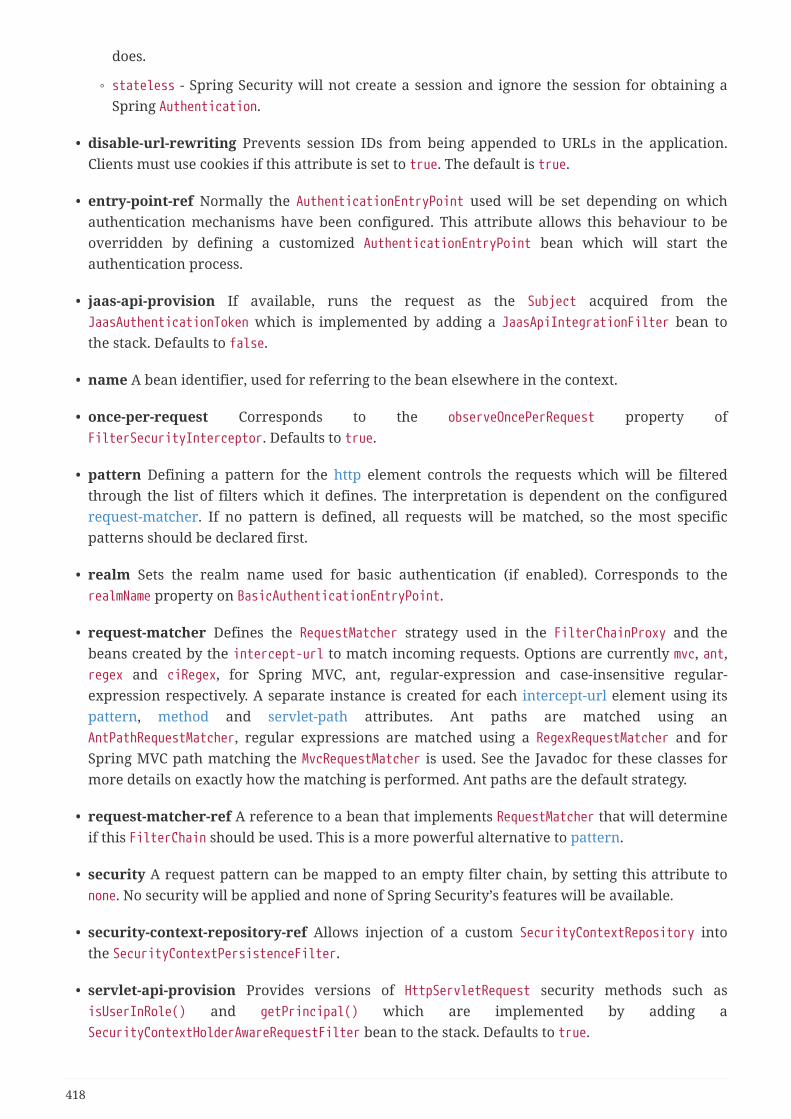
does.
◦ stateless - Spring Security will not create a session and ignore the session for obtaining aSpring Authentication.
• disable-url-rewriting Prevents session IDs from being appended to URLs in the application.Clients must use cookies if this attribute is set to true. The default is true.
• entry-point-ref Normally the AuthenticationEntryPoint used will be set depending on whichauthentication mechanisms have been configured. This attribute allows this behaviour to beoverridden by defining a customized AuthenticationEntryPoint bean which will start theauthentication process.
• jaas-api-provision If available, runs the request as the Subject acquired from theJaasAuthenticationToken which is implemented by adding a JaasApiIntegrationFilter bean tothe stack. Defaults to false.
• name A bean identifier, used for referring to the bean elsewhere in the context.
• once-per-request Corresponds to the observeOncePerRequest property ofFilterSecurityInterceptor. Defaults to true.
• pattern Defining a pattern for the http element controls the requests which will be filteredthrough the list of filters which it defines. The interpretation is dependent on the configuredrequest-matcher. If no pattern is defined, all requests will be matched, so the most specificpatterns should be declared first.
• realm Sets the realm name used for basic authentication (if enabled). Corresponds to therealmName property on BasicAuthenticationEntryPoint.
• request-matcher Defines the RequestMatcher strategy used in the FilterChainProxy and thebeans created by the intercept-url to match incoming requests. Options are currently mvc, ant,regex and ciRegex, for Spring MVC, ant, regular-expression and case-insensitive regular-expression respectively. A separate instance is created for each intercept-url element using itspattern, method and servlet-path attributes. Ant paths are matched using anAntPathRequestMatcher, regular expressions are matched using a RegexRequestMatcher and forSpring MVC path matching the MvcRequestMatcher is used. See the Javadoc for these classes formore details on exactly how the matching is performed. Ant paths are the default strategy.
• request-matcher-ref A reference to a bean that implements RequestMatcher that will determineif this FilterChain should be used. This is a more powerful alternative to pattern.
• security A request pattern can be mapped to an empty filter chain, by setting this attribute tonone. No security will be applied and none of Spring Security’s features will be available.
• security-context-repository-ref Allows injection of a custom SecurityContextRepository intothe SecurityContextPersistenceFilter.
• servlet-api-provision Provides versions of HttpServletRequest security methods such asisUserInRole() and getPrincipal() which are implemented by adding aSecurityContextHolderAwareRequestFilter bean to the stack. Defaults to true.
418
• use-expressions Enables EL-expressions in the access attribute, as described in the chapter onexpression-based access-control. The default value is true.
Child Elements of <http>
• access-denied-handler
• anonymous
• cors
• csrf
• custom-filter
• expression-handler
• form-login
• headers
• http-basic
• intercept-url
• jee
• logout
• oauth2-client
• oauth2-login
• oauth2-resource-server
• openid-login
• port-mappings
• remember-me
• request-cache
• session-management
• x509
<access-denied-handler>
This element allows you to set the errorPage property for the default AccessDeniedHandler used bythe ExceptionTranslationFilter, using the error-page attribute, or to supply your ownimplementation using theref attribute. This is discussed in more detail in the section on theExceptionTranslationFilter.
Parent Elements of <access-denied-handler>
• http
<access-denied-handler> Attributes
• error-page The access denied page that an authenticated user will be redirected to if theyrequest a page which they don’t have the authority to access.
419
• ref Defines a reference to a Spring bean of type AccessDeniedHandler.
<cors>
This element allows for configuring a CorsFilter. If no CorsFilter or CorsConfigurationSource isspecified and Spring MVC is on the classpath, a HandlerMappingIntrospector is used as theCorsConfigurationSource.
<cors> Attributes
The attributes on the <cors> element control the headers element.
• ref Optional attribute that specifies the bean name of a CorsFilter.
• cors-configuration-source-ref Optional attribute that specifies the bean name of aCorsConfigurationSource to be injected into a CorsFilter created by the XML namespace.
Parent Elements of <cors>
• http
<headers>
This element allows for configuring additional (security) headers to be send with the response. Itenables easy configuration for several headers and also allows for setting custom headers throughthe header element. Additional information, can be found in the Security Headers section of thereference.
• Cache-Control, Pragma, and Expires - Can be set using the cache-control element. This ensuresthat the browser does not cache your secured pages.
• Strict-Transport-Security - Can be set using the hsts element. This ensures that the browserautomatically requests HTTPS for future requests.
• X-Frame-Options - Can be set using the frame-options element. The X-Frame-Options header canbe used to prevent clickjacking attacks.
• X-XSS-Protection - Can be set using the xss-protection element. The X-XSS-Protection header canbe used by browser to do basic control.
• X-Content-Type-Options - Can be set using the content-type-options element. The X-Content-Type-Options header prevents Internet Explorer from MIME-sniffing a response away from thedeclared content-type. This also applies to Google Chrome, when downloading extensions.
• Public-Key-Pinning or Public-Key-Pinning-Report-Only - Can be set using the hpkp element. Thisallows HTTPS websites to resist impersonation by attackers using mis-issued or otherwisefraudulent certificates.
• Content-Security-Policy or Content-Security-Policy-Report-Only - Can be set using the content-security-policy element. Content Security Policy (CSP) is a mechanism that web applications canleverage to mitigate content injection vulnerabilities, such as cross-site scripting (XSS).
• Referrer-Policy - Can be set using the referrer-policy element, Referrer-Policy is a mechanismthat web applications can leverage to manage the referrer field, which contains the last page
420
the user was on.
• Feature-Policy - Can be set using the feature-policy element, Feature-Policy is a mechanism thatallows web developers to selectively enable, disable, and modify the behavior of certain APIsand web features in the browser.
<headers> Attributes
The attributes on the <headers> element control the headers element.
• defaults-disabled Optional attribute that specifies to disable the default Spring Security’s HTTPresponse headers. The default is false (the default headers are included).
• disabled Optional attribute that specifies to disable Spring Security’s HTTP response headers.The default is false (the headers are enabled).
Parent Elements of <headers>
• http
Child Elements of <headers>
• cache-control
• content-security-policy
• content-type-options
• feature-policy
• frame-options
• header
• hpkp
• hsts
• referrer-policy
• xss-protection
<cache-control>
Adds Cache-Control, Pragma, and Expires headers to ensure that the browser does not cache yoursecured pages.
<cache-control> Attributes
• disabled Specifies if Cache Control should be disabled. Default false.
Parent Elements of <cache-control>
• headers
421
<hsts>
When enabled adds the Strict-Transport-Security header to the response for any secure request.This allows the server to instruct browsers to automatically use HTTPS for future requests.
<hsts> Attributes
• disabled Specifies if Strict-Transport-Security should be disabled. Default false.
• include-sub-domains Specifies if subdomains should be included. Default true.
• max-age-seconds Specifies the maximum amount of time the host should be considered aKnown HSTS Host. Default one year.
• request-matcher-ref The RequestMatcher instance to be used to determine if the headershould be set. Default is if HttpServletRequest.isSecure() is true.
• preload Specifies if preload should be included. Default false.
Parent Elements of <hsts>
• headers
<hpkp>
When enabled adds the Public Key Pinning Extension for HTTP header to the response for anysecure request. This allows HTTPS websites to resist impersonation by attackers using mis-issued orotherwise fraudulent certificates.
<hpkp> Attributes
• disabled Specifies if HTTP Public Key Pinning (HPKP) should be disabled. Default true.
• include-sub-domains Specifies if subdomains should be included. Default false.
• max-age-seconds Sets the value for the max-age directive of the Public-Key-Pins header.Default 60 days.
• report-only Specifies if the browser should only report pin validation failures. Default true.
• report-uri Specifies the URI to which the browser should report pin validation failures.
Parent Elements of <hpkp>
• headers
<pins>
The list of pins
Child Elements of <pins>
• pin
422
<pin>
A pin is specified using the base64-encoded SPKI fingerprint as value and the cryptographic hashalgorithm as attribute
<pin> Attributes
• algorithm The cryptographic hash algorithm. Default is SHA256.
Parent Elements of <pin>
• pins
<content-security-policy>
When enabled adds the Content Security Policy (CSP) header to the response. CSP is a mechanismthat web applications can leverage to mitigate content injection vulnerabilities, such as cross-sitescripting (XSS).
<content-security-policy> Attributes
• policy-directives The security policy directive(s) for the Content-Security-Policy header or ifreport-only is set to true, then the Content-Security-Policy-Report-Only header is used.
• report-only Set to true, to enable the Content-Security-Policy-Report-Only header for reportingpolicy violations only. Defaults to false.
Parent Elements of <content-security-policy>
• headers
<referrer-policy>
When enabled adds the Referrer Policy header to the response.
<referrer-policy> Attributes
• policy The policy for the Referrer-Policy header. Default "no-referrer".
Parent Elements of <referrer-policy>
• headers
<feature-policy>
When enabled adds the Feature Policy header to the response.
<feature-policy> Attributes
• policy-directives The security policy directive(s) for the Feature-Policy header.
423
Parent Elements of <feature-policy>
• headers
<frame-options>
When enabled adds the X-Frame-Options header to the response, this allows newer browsers to dosome security checks and prevent clickjacking attacks.
<frame-options> Attributes
• disabled If disabled, the X-Frame-Options header will not be included. Default false.
• policy
◦ DENY The page cannot be displayed in a frame, regardless of the site attempting to do so. Thisis the default when frame-options-policy is specified.
◦ SAMEORIGIN The page can only be displayed in a frame on the same origin as the page itself
◦ ALLOW-FROM origin The page can only be displayed in a frame on the specified origin.
In other words, if you specify DENY, not only will attempts to load the page in a frame fail whenloaded from other sites, attempts to do so will fail when loaded from the same site. On the otherhand, if you specify SAMEORIGIN, you can still use the page in a frame as long as the siteincluding it in a frame it is the same as the one serving the page.
• strategy Select the AllowFromStrategy to use when using the ALLOW-FROM policy.
◦ static Use a single static ALLOW-FROM value. The value can be set through the valueattribute.
◦ regexp Use a regular expression to validate incoming requests and if they are allowed. Theregular expression can be set through the value attribute. The request parameter used toretrieve the value to validate can be specified using the from-parameter.
◦ whitelist A comma-separated list containing the allowed domains. The comma-separatedlist can be set through the value attribute. The request parameter used to retrieve the valueto validate can be specified using the from-parameter.
• ref Instead of using one of the predefined strategies it is also possible to use a customAllowFromStrategy. The reference to this bean can be specified through this ref attribute.
• value The value to use when ALLOW-FROM is used a strategy.
• from-parameter Specify the name of the request parameter to use when using regexp orwhitelist for the ALLOW-FROM strategy.
Parent Elements of <frame-options>
• headers
424
<xss-protection>
Adds the X-XSS-Protection header to the response to assist in protecting against reflected / Type-1Cross-Site Scripting (XSS) attacks. This is in no-way a full protection to XSS attacks!
<xss-protection> Attributes
• xss-protection-disabled Do not include the header for reflected / Type-1 Cross-Site Scripting(XSS) protection.
• xss-protection-enabled Explicitly enable or disable reflected / Type-1 Cross-Site Scripting (XSS)protection.
• xss-protection-block When true and xss-protection-enabled is true, adds mode=block to theheader. This indicates to the browser that the page should not be loaded at all. When false andxss-protection-enabled is true, the page will still be rendered when an reflected attack isdetected but the response will be modified to protect against the attack. Note that there aresometimes ways of bypassing this mode which can often times make blocking the page moredesirable.
Parent Elements of <xss-protection>
• headers
<content-type-options>
Add the X-Content-Type-Options header with the value of nosniff to the response. This disablesMIME-sniffing for IE8+ and Chrome extensions.
<content-type-options> Attributes
• disabled Specifies if Content Type Options should be disabled. Default false.
Parent Elements of <content-type-options>
• headers
<header>
Add additional headers to the response, both the name and value need to be specified.
<header-attributes> Attributes
• header-name The name of the header.
• value The value of the header to add.
• ref Reference to a custom implementation of the HeaderWriter interface.
Parent Elements of <header>
• headers
425
<anonymous>
Adds an AnonymousAuthenticationFilter to the stack and an AnonymousAuthenticationProvider.Required if you are using the IS_AUTHENTICATED_ANONYMOUSLY attribute.
Parent Elements of <anonymous>
• http
<anonymous> Attributes
• enabled With the default namespace setup, the anonymous "authentication" facility isautomatically enabled. You can disable it using this property.
• granted-authority The granted authority that should be assigned to the anonymous request.Commonly this is used to assign the anonymous request particular roles, which cansubsequently be used in authorization decisions. If unset, defaults to ROLE_ANONYMOUS.
• key The key shared between the provider and filter. This generally does not need to be set. Ifunset, it will default to a secure randomly generated value. This means setting this value canimprove startup time when using the anonymous functionality since secure random values cantake a while to be generated.
• username The username that should be assigned to the anonymous request. This allows theprincipal to be identified, which may be important for logging and auditing. if unset, defaults toanonymousUser.
<csrf>
This element will add Cross Site Request Forger (CSRF) protection to the application. It also updatesthe default RequestCache to only replay "GET" requests upon successful authentication. Additionalinformation can be found in the Cross Site Request Forgery (CSRF) section of the reference.
Parent Elements of <csrf>
• http
<csrf> Attributes
• disabled Optional attribute that specifies to disable Spring Security’s CSRF protection. Thedefault is false (CSRF protection is enabled). It is highly recommended to leave CSRF protectionenabled.
• token-repository-ref The CsrfTokenRepository to use. The default isHttpSessionCsrfTokenRepository.
• request-matcher-ref The RequestMatcher instance to be used to determine if CSRF should beapplied. Default is any HTTP method except "GET", "TRACE", "HEAD", "OPTIONS".
<custom-filter>
This element is used to add a filter to the filter chain. It doesn’t create any additional beans but is
426

used to select a bean of type javax.servlet.Filter which is already defined in the applicationcontext and add that at a particular position in the filter chain maintained by Spring Security. Fulldetails can be found in the namespace chapter.
Parent Elements of <custom-filter>
• http
<custom-filter> Attributes
• after The filter immediately after which the custom-filter should be placed in the chain. Thisfeature will only be needed by advanced users who wish to mix their own filters into thesecurity filter chain and have some knowledge of the standard Spring Security filters. The filternames map to specific Spring Security implementation filters.
• before The filter immediately before which the custom-filter should be placed in the chain
• position The explicit position at which the custom-filter should be placed in the chain. Use ifyou are replacing a standard filter.
• ref Defines a reference to a Spring bean that implements Filter.
<expression-handler>
Defines the SecurityExpressionHandler instance which will be used if expression-based access-control is enabled. A default implementation (with no ACL support) will be used if not supplied.
Parent Elements of <expression-handler>
• global-method-security
• http
• websocket-message-broker
<expression-handler> Attributes
• ref Defines a reference to a Spring bean that implements SecurityExpressionHandler.
<form-login>
Used to add an UsernamePasswordAuthenticationFilter to the filter stack and anLoginUrlAuthenticationEntryPoint to the application context to provide authentication on demand.This will always take precedence over other namespace-created entry points. If no attributes aresupplied, a login page will be generated automatically at the URL "/login" [13] The behaviour can becustomized using the <form-login> Attributes.
Parent Elements of <form-login>
• http
427
<form-login> Attributes
• always-use-default-target If set to true, the user will always start at the value given by default-target-url, regardless of how they arrived at the login page. Maps to thealwaysUseDefaultTargetUrl property of UsernamePasswordAuthenticationFilter. Default value isfalse.
• authentication-details-source-ref Reference to an AuthenticationDetailsSource which will beused by the authentication filter
• authentication-failure-handler-ref Can be used as an alternative to authentication-failure-url,giving you full control over the navigation flow after an authentication failure. The valueshould be the name of an AuthenticationFailureHandler bean in the application context.
• authentication-failure-url Maps to the authenticationFailureUrl property ofUsernamePasswordAuthenticationFilter. Defines the URL the browser will be redirected to onlogin failure. Defaults to /login?error, which will be automatically handled by the automaticlogin page generator, re-rendering the login page with an error message.
• authentication-success-handler-ref This can be used as an alternative to default-target-url andalways-use-default-target, giving you full control over the navigation flow after a successfulauthentication. The value should be the name of an AuthenticationSuccessHandler bean in theapplication context. By default, an implementation ofSavedRequestAwareAuthenticationSuccessHandler is used and injected with the default-target-url .
• default-target-url Maps to the defaultTargetUrl property ofUsernamePasswordAuthenticationFilter. If not set, the default value is "/" (the application root). Auser will be taken to this URL after logging in, provided they were not asked to login whileattempting to access a secured resource, when they will be taken to the originally requestedURL.
• login-page The URL that should be used to render the login page. Maps to the loginFormUrlproperty of the LoginUrlAuthenticationEntryPoint. Defaults to "/login".
• login-processing-url Maps to the filterProcessesUrl property ofUsernamePasswordAuthenticationFilter. The default value is "/login".
• password-parameter The name of the request parameter which contains the password.Defaults to "password".
• username-parameter The name of the request parameter which contains the username.Defaults to "username".
• authentication-success-forward-url Maps a ForwardAuthenticationSuccessHandler toauthenticationSuccessHandler property of UsernamePasswordAuthenticationFilter.
• authentication-failure-forward-url Maps a ForwardAuthenticationFailureHandler toauthenticationFailureHandler property of UsernamePasswordAuthenticationFilter.
428
<oauth2-login>
The OAuth 2.0 Login feature configures authentication support using an OAuth 2.0 and/or OpenIDConnect 1.0 Provider.
Parent Elements of <oauth2-login>
• http
<oauth2-login> Attributes
• client-registration-repository-ref Reference to the ClientRegistrationRepository.
• authorized-client-repository-ref Reference to the OAuth2AuthorizedClientRepository.
• authorized-client-service-ref Reference to the OAuth2AuthorizedClientService.
• authorization-request-repository-ref Reference to the AuthorizationRequestRepository.
• authorization-request-resolver-ref Reference to the OAuth2AuthorizationRequestResolver.
• access-token-response-client-ref Reference to the OAuth2AccessTokenResponseClient.
• user-authorities-mapper-ref Reference to the GrantedAuthoritiesMapper.
• user-service-ref Reference to the OAuth2UserService.
• oidc-user-service-ref Reference to the OpenID Connect OAuth2UserService.
• login-processing-url The URI where the filter processes authentication requests.
• login-page The URI to send users to login.
• authentication-success-handler-ref Reference to the AuthenticationSuccessHandler.
• authentication-failure-handler-ref Reference to the AuthenticationFailureHandler.
• jwt-decoder-factory-ref Reference to the JwtDecoderFactory used byOidcAuthorizationCodeAuthenticationProvider.
<oauth2-client>
Configures OAuth 2.0 Client support.
Parent Elements of <oauth2-client>
• http
<oauth2-client> Attributes
• client-registration-repository-ref Reference to the ClientRegistrationRepository.
• authorized-client-repository-ref Reference to the OAuth2AuthorizedClientRepository.
429
• authorized-client-service-ref Reference to the OAuth2AuthorizedClientService.
Child Elements of <oauth2-client>
• authorization-code-grant
<authorization-code-grant>
Configures OAuth 2.0 Authorization Code Grant.
Parent Elements of <authorization-code-grant>
• oauth2-client
<authorization-code-grant> Attributes
• authorization-request-repository-ref Reference to the AuthorizationRequestRepository.
• authorization-request-resolver-ref Reference to the OAuth2AuthorizationRequestResolver.
• access-token-response-client-ref Reference to the OAuth2AccessTokenResponseClient.
<client-registrations>
A container element for client(s) registered (ClientRegistration) with an OAuth 2.0 or OpenIDConnect 1.0 Provider.
Child Elements of <client-registrations>
• client-registration
• provider
<client-registration>
Represents a client registered with an OAuth 2.0 or OpenID Connect 1.0 Provider.
Parent Elements of <client-registration>
• client-registrations
<client-registration> Attributes
• registration-id The ID that uniquely identifies the ClientRegistration.
• client-id The client identifier.
• client-secret The client secret.
• client-authentication-method The method used to authenticate the Client with the Provider.The supported values are basic, post and none (public clients).
• authorization-grant-type The OAuth 2.0 Authorization Framework defines four AuthorizationGrant types. The supported values are authorization_code, client_credentials and password.
430
• redirect-uri The client’s registered redirect URI that the Authorization Server redirects the end-user’s user-agent to after the end-user has authenticated and authorized access to the client.
• scope The scope(s) requested by the client during the Authorization Request flow, such asopenid, email, or profile.
• client-name A descriptive name used for the client. The name may be used in certain scenarios,such as when displaying the name of the client in the auto-generated login page.
• provider-id A reference to the associated provider. May reference a <provider> element or useone of the common providers (google, github, facebook, okta).
<provider>
The configuration information for an OAuth 2.0 or OpenID Connect 1.0 Provider.
Parent Elements of <provider>
• client-registrations
<provider> Attributes
• provider-id The ID that uniquely identifies the provider.
• authorization-uri The Authorization Endpoint URI for the Authorization Server.
• token-uri The Token Endpoint URI for the Authorization Server.
• user-info-uri The UserInfo Endpoint URI used to access the claims/attributes of theauthenticated end-user.
• user-info-authentication-method The authentication method used when sending the accesstoken to the UserInfo Endpoint. The supported values are header, form and query.
• user-info-user-name-attribute The name of the attribute returned in the UserInfo Responsethat references the Name or Identifier of the end-user.
• jwk-set-uri The URI used to retrieve the JSON Web Key (JWK) Set from the Authorization Server,which contains the cryptographic key(s) used to verify the JSON Web Signature (JWS) of the IDToken and optionally the UserInfo Response.
• issuer-uri The URI used to initially configure a ClientRegistration using discovery of anOpenID Connect Provider’s Configuration endpoint or an Authorization Server’s Metadataendpoint.
<oauth2-resource-server>
Adds a BearerTokenAuthenticationFilter, BearerTokenAuthenticationEntryPoint, andBearerTokenAccessDeniedHandler to the configuration. In addition, either <jwt> or <opaque-token>must be specified.
431
Parents Elements of <oauth2-resource-server>
• http
Child Elements of <oauth2-resource-server>
• jwt
• opaque-token
<oauth2-resource-server> Attributes
• authentication-manager-resolver-ref Reference to an AuthenticationManagerResolver whichwill resolve the AuthenticationManager at request time
• bearer-token-resolver-ref Reference to a BearerTokenResolver which will retrieve the bearertoken from the request
• entry-point-ref Reference to a AuthenticationEntryPoint which will handle unauthorizedrequests
<jwt>
Represents an OAuth 2.0 Resource Server that will authorize JWTs
Parent Elements of <jwt>
• oauth2-resource-server
<jwt> Attributes
• jwt-authentication-converter-ref Reference to a Converter<Jwt, AbstractAuthenticationToken>
• jwt-decoder-ref Reference to a JwtDecoder. This is a larger component that overrides jwk-set-uri
• jwk-set-uri The JWK Set Uri used to load signing verification keys from an OAuth 2.0Authorization Server
<opaque-token>
Represents an OAuth 2.0 Resource Server that will authorize opaque tokens
Parent Elements of <opaque-token>
• oauth2-resource-server
<opaque-token> Attributes
• introspector-ref Reference to an OpaqueTokenIntrospector. This is a larger component thatoverrides introspection-uri, client-id, and client-secret.
• introspection-uri The Introspection Uri used to introspect the details of an opaque token.Should be accompanied with a client-id and client-secret.
432
• client-id The Client Id to use for client authentication against the provided introspection-uri.
• client-secret The Client Secret to use for client authentication against the providedintrospection-uri.
<http-basic>
Adds a BasicAuthenticationFilter and BasicAuthenticationEntryPoint to the configuration. Thelatter will only be used as the configuration entry point if form-based login is not enabled.
Parent Elements of <http-basic>
• http
<http-basic> Attributes
• authentication-details-source-ref Reference to an AuthenticationDetailsSource which will beused by the authentication filter
• entry-point-ref Sets the AuthenticationEntryPoint which is used by theBasicAuthenticationFilter.
<http-firewall> Element
This is a top-level element which can be used to inject a custom implementation of HttpFirewallinto the FilterChainProxy created by the namespace. The default implementation should be suitablefor most applications.
<http-firewall> Attributes
• ref Defines a reference to a Spring bean that implements HttpFirewall.
<intercept-url>
This element is used to define the set of URL patterns that the application is interested in and toconfigure how they should be handled. It is used to construct theFilterInvocationSecurityMetadataSource used by the FilterSecurityInterceptor. It is alsoresponsible for configuring a ChannelProcessingFilter if particular URLs need to be accessed byHTTPS, for example. When matching the specified patterns against an incoming request, thematching is done in the order in which the elements are declared. So the most specific patternsshould come first and the most general should come last.
Parent Elements of <intercept-url>
• filter-security-metadata-source
• http
<intercept-url> Attributes
• access Lists the access attributes which will be stored in theFilterInvocationSecurityMetadataSource for the defined URL pattern/method combination. This
433
should be a comma-separated list of the security configuration attributes (such as role names).
• method The HTTP Method which will be used in combination with the pattern and servlet path(optional) to match an incoming request. If omitted, any method will match. If an identicalpattern is specified with and without a method, the method-specific match will take precedence.
• pattern The pattern which defines the URL path. The content will depend on the request-matcher attribute from the containing http element, so will default to ant path syntax.
• request-matcher-ref A reference to a RequestMatcher that will be used to determine if this<intercept-url> is used.
• requires-channel Can be "http" or "https" depending on whether a particular URL patternshould be accessed over HTTP or HTTPS respectively. Alternatively the value "any" can be usedwhen there is no preference. If this attribute is present on any <intercept-url> element, then aChannelProcessingFilter will be added to the filter stack and its additional dependencies addedto the application context.
If a <port-mappings> configuration is added, this will be used to by the SecureChannelProcessor andInsecureChannelProcessor beans to determine the ports used for redirecting to HTTP/HTTPS.
This property is invalid for filter-security-metadata-source
• servlet-path The servlet path which will be used in combination with the pattern and HTTPmethod to match an incoming request. This attribute is only applicable when request-matcheris 'mvc'. In addition, the value is only required in the following 2 use cases: 1) There are 2 ormore HttpServlet 's registered in the ServletContext that have mappings starting with '/' andare different; 2) The pattern starts with the same value of a registered HttpServlet path,excluding the default (root) HttpServlet '/'.
This property is invalid for filter-security-metadata-source
<jee>
Adds a J2eePreAuthenticatedProcessingFilter to the filter chain to provide integration withcontainer authentication.
Parent Elements of <jee>
• http
<jee> Attributes
• mappable-roles A comma-separate list of roles to look for in the incoming HttpServletRequest.
• user-service-ref A reference to a user-service (or UserDetailsService bean) Id
<logout>
Adds a LogoutFilter to the filter stack. This is configured with a SecurityContextLogoutHandler.
434
Parent Elements of <logout>
• http
<logout> Attributes
• delete-cookies A comma-separated list of the names of cookies which should be deleted whenthe user logs out.
• invalidate-session Maps to the invalidateHttpSession of the SecurityContextLogoutHandler.Defaults to "true", so the session will be invalidated on logout.
• logout-success-url The destination URL which the user will be taken to after logging out.Defaults to <form-login-login-page>/?logout (i.e. /login?logout)
Setting this attribute will inject the SessionManagementFilter with aSimpleRedirectInvalidSessionStrategy configured with the attribute value. When an invalidsession ID is submitted, the strategy will be invoked, redirecting to the configured URL.
• logout-url The URL which will cause a logout (i.e. which will be processed by the filter).Defaults to "/logout".
• success-handler-ref May be used to supply an instance of LogoutSuccessHandler which will beinvoked to control the navigation after logging out.
<openid-login>
Similar to <form-login> and has the same attributes. The default value for login-processing-url is"/login/openid". An OpenIDAuthenticationFilter and OpenIDAuthenticationProvider will be registered.The latter requires a reference to a UserDetailsService. Again, this can be specified by id, using theuser-service-ref attribute, or will be located automatically in the application context.
Parent Elements of <openid-login>
• http
<openid-login> Attributes
• always-use-default-target Whether the user should always be redirected to the default-target-url after login.
• authentication-details-source-ref Reference to an AuthenticationDetailsSource which will beused by the authentication filter
• authentication-failure-handler-ref Reference to an AuthenticationFailureHandler bean whichshould be used to handle a failed authentication request. Should not be used in combinationwith authentication-failure-url as the implementation should always deal with navigation to thesubsequent destination
• authentication-failure-url The URL for the login failure page. If no login failure URL isspecified, Spring Security will automatically create a failure login URL at /login?login_error and
435
a corresponding filter to render that login failure URL when requested.
• authentication-success-forward-url Maps a ForwardAuthenticationSuccessHandler toauthenticationSuccessHandler property of UsernamePasswordAuthenticationFilter.
• authentication-failure-forward-url Maps a ForwardAuthenticationFailureHandler toauthenticationFailureHandler property of UsernamePasswordAuthenticationFilter.
• authentication-success-handler-ref Reference to an AuthenticationSuccessHandler beanwhich should be used to handle a successful authentication request. Should not be used incombination with default-target-url (or always-use-default-target) as the implementation shouldalways deal with navigation to the subsequent destination
• default-target-url The URL that will be redirected to after successful authentication, if theuser’s previous action could not be resumed. This generally happens if the user visits a loginpage without having first requested a secured operation that triggers authentication. Ifunspecified, defaults to the root of the application.
• login-page The URL for the login page. If no login URL is specified, Spring Security willautomatically create a login URL at /login and a corresponding filter to render that login URLwhen requested.
• login-processing-url The URL that the login form is posted to. If unspecified, it defaults to/login.
• password-parameter The name of the request parameter which contains the password.Defaults to "password".
• user-service-ref A reference to a user-service (or UserDetailsService bean) Id
• username-parameter The name of the request parameter which contains the username.Defaults to "username".
Child Elements of <openid-login>
• attribute-exchange
<attribute-exchange>
The attribute-exchange element defines the list of attributes which should be requested from theidentity provider. An example can be found in the OpenID Support section of the namespaceconfiguration chapter. More than one can be used, in which case each must have an identifier-match attribute, containing a regular expression which is matched against the supplied OpenIDidentifier. This allows different attribute lists to be fetched from different providers (Google, Yahooetc).
Parent Elements of <attribute-exchange>
• openid-login
436
<attribute-exchange> Attributes
• identifier-match A regular expression which will be compared against the claimed identity,when deciding which attribute-exchange configuration to use during authentication.
Child Elements of <attribute-exchange>
• openid-attribute
<openid-attribute>
Attributes used when making an OpenID AX Fetch Request
Parent Elements of <openid-attribute>
• attribute-exchange
<openid-attribute> Attributes
• count Specifies the number of attributes that you wish to get back. For example, return 3emails. The default value is 1.
• name Specifies the name of the attribute that you wish to get back. For example, email.
• required Specifies if this attribute is required to the OP, but does not error out if the OP doesnot return the attribute. Default is false.
• type Specifies the attribute type. For example, https://axschema.org/contact/email. See your OP’sdocumentation for valid attribute types.
<port-mappings>
By default, an instance of PortMapperImpl will be added to the configuration for use in redirecting tosecure and insecure URLs. This element can optionally be used to override the default mappingswhich that class defines. Each child <port-mapping> element defines a pair of HTTP:HTTPS ports. Thedefault mappings are 80:443 and 8080:8443. An example of overriding these can be found inRedirect to HTTPS.
Parent Elements of <port-mappings>
• http
Child Elements of <port-mappings>
• port-mapping
<port-mapping>
Provides a method to map http ports to https ports when forcing a redirect.
Parent Elements of <port-mapping>
• port-mappings
437
<port-mapping> Attributes
• http The http port to use.
• https The https port to use.
<remember-me>
Adds the RememberMeAuthenticationFilter to the stack. This in turn will be configured with either aTokenBasedRememberMeServices, a PersistentTokenBasedRememberMeServices or a user-specified beanimplementing RememberMeServices depending on the attribute settings.
Parent Elements of <remember-me>
• http
<remember-me> Attributes
• authentication-success-handler-ref Sets the authenticationSuccessHandler property on theRememberMeAuthenticationFilter if custom navigation is required. The value should be the nameof a AuthenticationSuccessHandler bean in the application context.
• data-source-ref A reference to a DataSource bean. If this is set,PersistentTokenBasedRememberMeServices will be used and configured with aJdbcTokenRepositoryImpl instance.
• remember-me-parameter The name of the request parameter which toggles remember-meauthentication. Defaults to "remember-me". Maps to the "parameter" property ofAbstractRememberMeServices.
• remember-me-cookie The name of cookie which store the token for remember-meauthentication. Defaults to "remember-me". Maps to the "cookieName" property ofAbstractRememberMeServices.
• key Maps to the "key" property of AbstractRememberMeServices. Should be set to a unique value toensure that remember-me cookies are only valid within the one application [14]. If this is not seta secure random value will be generated. Since generating secure random values can take awhile, setting this value explicitly can help improve startup times when using the remember-mefunctionality.
• services-alias Exports the internally defined RememberMeServices as a bean alias, allowing it tobe used by other beans in the application context.
• services-ref Allows complete control of the RememberMeServices implementation that will beused by the filter. The value should be the id of a bean in the application context whichimplements this interface. Should also implement LogoutHandler if a logout filter is in use.
• token-repository-ref Configures a PersistentTokenBasedRememberMeServices but allows the useof a custom PersistentTokenRepository bean.
• token-validity-seconds Maps to the tokenValiditySeconds property ofAbstractRememberMeServices. Specifies the period in seconds for which the remember-me cookie
438
should be valid. By default it will be valid for 14 days.
• use-secure-cookie It is recommended that remember-me cookies are only submitted overHTTPS and thus should be flagged as "secure". By default, a secure cookie will be used if theconnection over which the login request is made is secure (as it should be). If you set thisproperty to false, secure cookies will not be used. Setting it to true will always set the secureflag on the cookie. This attribute maps to the useSecureCookie property ofAbstractRememberMeServices.
• user-service-ref The remember-me services implementations require access to aUserDetailsService, so there has to be one defined in the application context. If there is onlyone, it will be selected and used automatically by the namespace configuration. If there aremultiple instances, you can specify a bean id explicitly using this attribute.
<request-cache> Element
Sets the RequestCache instance which will be used by the ExceptionTranslationFilter to store requestinformation before invoking an AuthenticationEntryPoint.
Parent Elements of <request-cache>
• http
<request-cache> Attributes
• ref Defines a reference to a Spring bean that is a RequestCache.
<session-management>
Session-management related functionality is implemented by the addition of aSessionManagementFilter to the filter stack.
Parent Elements of <session-management>
• http
<session-management> Attributes
• invalid-session-url Setting this attribute will inject the SessionManagementFilter with aSimpleRedirectInvalidSessionStrategy configured with the attribute value. When an invalidsession ID is submitted, the strategy will be invoked, redirecting to the configured URL.
• invalid-session-url Allows injection of the InvalidSessionStrategy instance used by theSessionManagementFilter. Use either this or the invalid-session-url attribute but not both.
• session-authentication-error-url Defines the URL of the error page which should be shownwhen the SessionAuthenticationStrategy raises an exception. If not set, an unauthorized (401)error code will be returned to the client. Note that this attribute doesn’t apply if the error occursduring a form-based login, where the URL for authentication failure will take precedence.
• session-authentication-strategy-ref Allows injection of the SessionAuthenticationStrategy
439
instance used by the SessionManagementFilter
• session-fixation-protection Indicates how session fixation protection will be applied when auser authenticates. If set to "none", no protection will be applied. "newSession" will create a newempty session, with only Spring Security-related attributes migrated. "migrateSession" willcreate a new session and copy all session attributes to the new session. In Servlet 3.1 (Java EE 7)and newer containers, specifying "changeSessionId" will keep the existing session and use thecontainer-supplied session fixation protection (HttpServletRequest#changeSessionId()). Defaultsto "changeSessionId" in Servlet 3.1 and newer containers, "migrateSession" in older containers.Throws an exception if "changeSessionId" is used in older containers.
If session fixation protection is enabled, the SessionManagementFilter is injected with anappropriately configured DefaultSessionAuthenticationStrategy. See the Javadoc for this classfor more details.
Child Elements of <session-management>
• concurrency-control
<concurrency-control>
Adds support for concurrent session control, allowing limits to be placed on the number of activesessions a user can have. A ConcurrentSessionFilter will be created, and aConcurrentSessionControlAuthenticationStrategy will be used with the SessionManagementFilter. If aform-login element has been declared, the strategy object will also be injected into the createdauthentication filter. An instance of SessionRegistry (a SessionRegistryImpl instance unless the userwishes to use a custom bean) will be created for use by the strategy.
Parent Elements of <concurrency-control>
• session-management
<concurrency-control> Attributes
• error-if-maximum-exceeded If set to "true" a SessionAuthenticationException will be raisedwhen a user attempts to exceed the maximum allowed number of sessions. The defaultbehaviour is to expire the original session.
• expired-url The URL a user will be redirected to if they attempt to use a session which has been"expired" by the concurrent session controller because the user has exceeded the number ofallowed sessions and has logged in again elsewhere. Should be set unless exception-if-maximum-exceeded is set. If no value is supplied, an expiry message will just be written directly back to theresponse.
• expired-url Allows injection of the ExpiredSessionStrategy instance used by theConcurrentSessionFilter
• max-sessions Maps to the maximumSessions property ofConcurrentSessionControlAuthenticationStrategy. Specify -1 as the value to support unlimitedsessions.
440
• session-registry-alias It can also be useful to have a reference to the internal session registryfor use in your own beans or an admin interface. You can expose the internal bean using thesession-registry-alias attribute, giving it a name that you can use elsewhere in yourconfiguration.
• session-registry-ref The user can supply their own SessionRegistry implementation using thesession-registry-ref attribute. The other concurrent session control beans will be wired up touse it.
<x509>
Adds support for X.509 authentication. An X509AuthenticationFilter will be added to the stack andan Http403ForbiddenEntryPoint bean will be created. The latter will only be used if no otherauthentication mechanisms are in use (its only functionality is to return an HTTP 403 error code). APreAuthenticatedAuthenticationProvider will also be created which delegates the loading of userauthorities to a UserDetailsService.
Parent Elements of <x509>
• http
<x509> Attributes
• authentication-details-source-ref A reference to an AuthenticationDetailsSource
• subject-principal-regex Defines a regular expression which will be used to extract theusername from the certificate (for use with the UserDetailsService).
• user-service-ref Allows a specific UserDetailsService to be used with X.509 in the case wheremultiple instances are configured. If not set, an attempt will be made to locate a suitableinstance automatically and use that.
<filter-chain-map>
Used to explicitly configure a FilterChainProxy instance with a FilterChainMap
<filter-chain-map> Attributes
• request-matcher Defines the strategy to use for matching incoming requests. Currently theoptions are 'ant' (for ant path patterns), 'regex' for regular expressions and 'ciRegex' for case-insensitive regular expressions.
Child Elements of <filter-chain-map>
• filter-chain
<filter-chain>
Used within to define a specific URL pattern and the list of filters which apply to the URLs matchingthat pattern. When multiple filter-chain elements are assembled in a list in order to configure aFilterChainProxy, the most specific patterns must be placed at the top of the list, with most general
441
ones at the bottom.
Parent Elements of <filter-chain>
• filter-chain-map
<filter-chain> Attributes
• filters A comma separated list of references to Spring beans that implement Filter. The value"none" means that no Filter should be used for this FilterChain.
• pattern A pattern that creates RequestMatcher in combination with the request-matcher
• request-matcher-ref A reference to a RequestMatcher that will be used to determine if anyFilter from the filters attribute should be invoked.
<filter-security-metadata-source>
Used to explicitly configure a FilterSecurityMetadataSource bean for use with aFilterSecurityInterceptor. Usually only needed if you are configuring a FilterChainProxy explicitly,rather than using the<http> element. The intercept-url elements used should only contain pattern,method and access attributes. Any others will result in a configuration error.
<filter-security-metadata-source> Attributes
• id A bean identifier, used for referring to the bean elsewhere in the context.
• request-matcher Defines the strategy use for matching incoming requests. Currently theoptions are 'ant' (for ant path patterns), 'regex' for regular expressions and 'ciRegex' for case-insensitive regular expressions.
• use-expressions Enables the use of expressions in the 'access' attributes in <intercept-url>elements rather than the traditional list of configuration attributes. Defaults to 'true'. If enabled,each attribute should contain a single Boolean expression. If the expression evaluates to 'true',access will be granted.
Child Elements of <filter-security-metadata-source>
• intercept-url
21.2.2. WebSocket Security
Spring Security 4.0+ provides support for authorizing messages. One concrete example of wherethis is useful is to provide authorization in WebSocket based applications.
<websocket-message-broker>
The websocket-message-broker element has two different modes. If the websocket-message-broker@id is not specified, then it will do the following things:
• Ensure that any SimpAnnotationMethodMessageHandler has theAuthenticationPrincipalArgumentResolver registered as a custom argument resolver. This
442
allows the use of @AuthenticationPrincipal to resolve the principal of the current Authentication
• Ensures that the SecurityContextChannelInterceptor is automatically registered for theclientInboundChannel. This populates the SecurityContextHolder with the user that is found inthe Message
• Ensures that a ChannelSecurityInterceptor is registered with the clientInboundChannel. Thisallows authorization rules to be specified for a message.
• Ensures that a CsrfChannelInterceptor is registered with the clientInboundChannel. Thisensures that only requests from the original domain are enabled.
• Ensures that a CsrfTokenHandshakeInterceptor is registered withWebSocketHttpRequestHandler, TransportHandlingSockJsService, or DefaultSockJsService. Thisensures that the expected CsrfToken from the HttpServletRequest is copied into the WebSocketSession attributes.
If additional control is necessary, the id can be specified and a ChannelSecurityInterceptor will beassigned to the specified id. All the wiring with Spring’s messaging infrastructure can then be donemanually. This is more cumbersome, but provides greater control over the configuration.
<websocket-message-broker> Attributes
• id A bean identifier, used for referring to the ChannelSecurityInterceptor bean elsewhere in thecontext. If specified, Spring Security requires explicit configuration within Spring Messaging. Ifnot specified, Spring Security will automatically integrate with the messaging infrastructure asdescribed in <websocket-message-broker>
• same-origin-disabled Disables the requirement for CSRF token to be present in the Stompheaders (default false). Changing the default is useful if it is necessary to allow other origins tomake SockJS connections.
Child Elements of <websocket-message-broker>
• expression-handler
• intercept-message
<intercept-message>
Defines an authorization rule for a message.
Parent Elements of <intercept-message>
• websocket-message-broker
<intercept-message> Attributes
• pattern An ant based pattern that matches on the Message destination. For example, "/"matches any Message with a destination; "/admin/" matches any Message that has adestination that starts with "/admin/**".
• type The type of message to match on. Valid values are defined in SimpMessageType (i.e.CONNECT, CONNECT_ACK, HEARTBEAT, MESSAGE, SUBSCRIBE, UNSUBSCRIBE, DISCONNECT,
443
DISCONNECT_ACK, OTHER).
• access The expression used to secure the Message. For example, "denyAll" will deny access to allof the matching Messages; "permitAll" will grant access to all of the matching Messages;"hasRole('ADMIN') requires the current user to have the role 'ROLE_ADMIN' for the matchingMessages.
21.2.3. Authentication Services
Before Spring Security 3.0, an AuthenticationManager was automatically registered internally. Nowyou must register one explicitly using the <authentication-manager> element. This creates aninstance of Spring Security’s ProviderManager class, which needs to be configured with a list of oneor more AuthenticationProvider instances. These can either be created using syntax elementsprovided by the namespace, or they can be standard bean definitions, marked for addition to thelist using the authentication-provider element.
<authentication-manager>
Every Spring Security application which uses the namespace must have include this elementsomewhere. It is responsible for registering the AuthenticationManager which providesauthentication services to the application. All elements which create AuthenticationProviderinstances should be children of this element.
<authentication-manager> Attributes
• alias This attribute allows you to define an alias name for the internal instance for use in yourown configuration.
• erase-credentials If set to true, the AuthenticationManager will attempt to clear anycredentials data in the returned Authentication object, once the user has been authenticated.Literally it maps to the eraseCredentialsAfterAuthentication property of the ProviderManager.
• id This attribute allows you to define an id for the internal instance for use in your ownconfiguration. It is the same as the alias element, but provides a more consistent experiencewith elements that use the id attribute.
Child Elements of <authentication-manager>
• authentication-provider
• ldap-authentication-provider
<authentication-provider>
Unless used with a ref attribute, this element is shorthand for configuring aDaoAuthenticationProvider. DaoAuthenticationProvider loads user information from aUserDetailsService and compares the username/password combination with the values supplied atlogin. The UserDetailsService instance can be defined either by using an available namespaceelement (jdbc-user-service or by using the user-service-ref attribute to point to a bean definedelsewhere in the application context).
444
Parent Elements of <authentication-provider>
• authentication-manager
<authentication-provider> Attributes
• ref Defines a reference to a Spring bean that implements AuthenticationProvider.
If you have written your own AuthenticationProvider implementation (or want to configure one ofSpring Security’s own implementations as a traditional bean for some reason, then you can use thefollowing syntax to add it to the internal list of ProviderManager:
<security:authentication-manager><security:authentication-provider ref="myAuthenticationProvider" /></security:authentication-manager><bean id="myAuthenticationProvider" class="com.something.MyAuthenticationProvider"/>
• user-service-ref A reference to a bean that implements UserDetailsService that may be createdusing the standard bean element or the custom user-service element.
Child Elements of <authentication-provider>
• jdbc-user-service
• ldap-user-service
• password-encoder
• user-service
<jdbc-user-service>
Causes creation of a JDBC-based UserDetailsService.
<jdbc-user-service> Attributes
• authorities-by-username-query An SQL statement to query for a user’s granted authoritiesgiven a username.
The default is
select username, authority from authorities where username = ?
• cache-ref Defines a reference to a cache for use with a UserDetailsService.
• data-source-ref The bean ID of the DataSource which provides the required tables.
• group-authorities-by-username-query An SQL statement to query user’s group authoritiesgiven a username. The default is
445
selectg.id, g.group_name, ga.authorityfromgroups g, group_members gm, group_authorities gawheregm.username = ? and g.id = ga.group_id and g.id = gm.group_id
• id A bean identifier, used for referring to the bean elsewhere in the context.
• role-prefix A non-empty string prefix that will be added to role strings loaded from persistentstorage (default is "ROLE_"). Use the value "none" for no prefix in cases where the default is non-empty.
• users-by-username-query An SQL statement to query a username, password, and enabledstatus given a username. The default is
select username, password, enabled from users where username = ?
<password-encoder>
Authentication providers can optionally be configured to use a password encoder as described inthe Password Storage. This will result in the bean being injected with the appropriatePasswordEncoder instance.
Parent Elements of <password-encoder>
• authentication-provider
• password-compare
<password-encoder> Attributes
• hash Defines the hashing algorithm used on user passwords. We recommend strongly againstusing MD4, as it is a very weak hashing algorithm.
• ref Defines a reference to a Spring bean that implements PasswordEncoder.
<user-service>
Creates an in-memory UserDetailsService from a properties file or a list of "user" child elements.Usernames are converted to lower-case internally to allow for case-insensitive lookups, so thisshould not be used if case-sensitivity is required.
<user-service> Attributes
• id A bean identifier, used for referring to the bean elsewhere in the context.
• properties The location of a Properties file where each line is in the format of
446
username=password,grantedAuthority[,grantedAuthority][,enabled|disabled]
Child Elements of <user-service>
• user
<user>
Represents a user in the application.
Parent Elements of <user>
• user-service
<user> Attributes
• authorities One of more authorities granted to the user. Separate authorities with a comma(but no space). For example, "ROLE_USER,ROLE_ADMINISTRATOR"
• disabled Can be set to "true" to mark an account as disabled and unusable.
• locked Can be set to "true" to mark an account as locked and unusable.
• name The username assigned to the user.
• password The password assigned to the user. This may be hashed if the correspondingauthentication provider supports hashing (remember to set the "hash" attribute of the "user-service" element). This attribute be omitted in the case where the data will not be used forauthentication, but only for accessing authorities. If omitted, the namespace will generate arandom value, preventing its accidental use for authentication. Cannot be empty.
21.2.4. Method Security
<global-method-security>
This element is the primary means of adding support for securing methods on Spring Securitybeans. Methods can be secured by the use of annotations (defined at the interface or class level) orby defining a set of pointcuts as child elements, using AspectJ syntax.
<global-method-security> Attributes
• access-decision-manager-ref Method security uses the same AccessDecisionManagerconfiguration as web security, but this can be overridden using this attribute. By default anAffirmativeBased implementation is used for with a RoleVoter and an AuthenticatedVoter.
• authentication-manager-ref A reference to an AuthenticationManager that should be used formethod security.
• jsr250-annotations Specifies whether JSR-250 style attributes are to be used (for example"RolesAllowed"). This will require the javax.annotation.security classes on the classpath. Setting
447
this to true also adds a Jsr250Voter to the AccessDecisionManager, so you need to make sure youdo this if you are using a custom implementation and want to use these annotations.
• metadata-source-ref An external MethodSecurityMetadataSource instance can be supplied whichwill take priority over other sources (such as the default annotations).
• mode This attribute can be set to "aspectj" to specify that AspectJ should be used instead of thedefault Spring AOP. Secured methods must be woven with the AnnotationSecurityAspect fromthe spring-security-aspects module.
It is important to note that AspectJ follows Java’s rule that annotations on interfaces are notinherited. This means that methods that define the Security annotations on the interface will not besecured. Instead, you must place the Security annotation on the class when using AspectJ.
• order Allows the advice "order" to be set for the method security interceptor.
• pre-post-annotations Specifies whether the use of Spring Security’s pre and post invocationannotations (@PreFilter, @PreAuthorize, @PostFilter, @PostAuthorize) should be enabled forthis application context. Defaults to "disabled".
• proxy-target-class If true, class based proxying will be used instead of interface basedproxying.
• run-as-manager-ref A reference to an optional RunAsManager implementation which will beused by the configured MethodSecurityInterceptor
• secured-annotations Specifies whether the use of Spring Security’s @Secured annotationsshould be enabled for this application context. Defaults to "disabled".
Child Elements of <global-method-security>
• after-invocation-provider
• expression-handler
• pre-post-annotation-handling
• protect-pointcut
<after-invocation-provider>
This element can be used to decorate an AfterInvocationProvider for use by the security interceptormaintained by the <global-method-security> namespace. You can define zero or more of thesewithin the global-method-security element, each with a ref attribute pointing to anAfterInvocationProvider bean instance within your application context.
Parent Elements of <after-invocation-provider>
• global-method-security
<after-invocation-provider> Attributes
• ref Defines a reference to a Spring bean that implements AfterInvocationProvider.
448
<pre-post-annotation-handling>
Allows the default expression-based mechanism for handling Spring Security’s pre and postinvocation annotations (@PreFilter, @PreAuthorize, @PostFilter, @PostAuthorize) to be replacedentirely. Only applies if these annotations are enabled.
Parent Elements of <pre-post-annotation-handling>
• global-method-security
Child Elements of <pre-post-annotation-handling>
• invocation-attribute-factory
• post-invocation-advice
• pre-invocation-advice
<invocation-attribute-factory>
Defines the PrePostInvocationAttributeFactory instance which is used to generate pre and postinvocation metadata from the annotated methods.
Parent Elements of <invocation-attribute-factory>
• pre-post-annotation-handling
<invocation-attribute-factory> Attributes
• ref Defines a reference to a Spring bean Id.
<post-invocation-advice>
Customizes the PostInvocationAdviceProvider with the ref as the PostInvocationAuthorizationAdvicefor the <pre-post-annotation-handling> element.
Parent Elements of <post-invocation-advice>
• pre-post-annotation-handling
<post-invocation-advice> Attributes
• ref Defines a reference to a Spring bean Id.
<pre-invocation-advice>
Customizes the PreInvocationAuthorizationAdviceVoter with the ref as thePreInvocationAuthorizationAdviceVoter for the <pre-post-annotation-handling> element.
Parent Elements of <pre-invocation-advice>
• pre-post-annotation-handling
449
<pre-invocation-advice> Attributes
• ref Defines a reference to a Spring bean Id.
Securing Methods using
<protect-pointcut> Rather than defining security attributes on an individual method or class basisusing the @Secured annotation, you can define cross-cutting security constraints across whole sets ofmethods and interfaces in your service layer using the <protect-pointcut> element. You can find anexample in the namespace introduction.
Parent Elements of <protect-pointcut>
• global-method-security
<protect-pointcut> Attributes
• access Access configuration attributes list that applies to all methods matching the pointcut, e.g."ROLE_A,ROLE_B"
• expression An AspectJ expression, including the 'execution' keyword. For example,'execution(int com.foo.TargetObject.countLength(String))' (without the quotes).
<intercept-methods>
Can be used inside a bean definition to add a security interceptor to the bean and set up accessconfiguration attributes for the bean’s methods
<intercept-methods> Attributes
• access-decision-manager-ref Optional AccessDecisionManager bean ID to be used by thecreated method security interceptor.
Child Elements of <intercept-methods>
• protect
<method-security-metadata-source>
Creates a MethodSecurityMetadataSource instance
<method-security-metadata-source> Attributes
• id A bean identifier, used for referring to the bean elsewhere in the context.
• use-expressions Enables the use of expressions in the 'access' attributes in <intercept-url>elements rather than the traditional list of configuration attributes. Defaults to 'false'. If enabled,each attribute should contain a single Boolean expression. If the expression evaluates to 'true',access will be granted.
450

Child Elements of <method-security-metadata-source>
• protect
<protect>
Defines a protected method and the access control configuration attributes that apply to it. Westrongly advise you NOT to mix "protect" declarations with any services provided "global-method-security".
Parent Elements of <protect>
• intercept-methods
• method-security-metadata-source
<protect> Attributes
• access Access configuration attributes list that applies to the method, e.g. "ROLE_A,ROLE_B".
• method A method name
21.2.5. LDAP Namespace Options
LDAP is covered in some details in its own chapter. We will expand on that here with someexplanation of how the namespace options map to Spring beans. The LDAP implementation usesSpring LDAP extensively, so some familiarity with that project’s API may be useful.
Defining the LDAP Server using the
<ldap-server> Element This element sets up a Spring LDAP ContextSource for use by the other LDAPbeans, defining the location of the LDAP server and other information (such as a username andpassword, if it doesn’t allow anonymous access) for connecting to it. It can also be used to create anembedded server for testing. Details of the syntax for both options are covered in the LDAP chapter.The actual ContextSource implementation is DefaultSpringSecurityContextSource which extendsSpring LDAP’s LdapContextSource class. The manager-dn and manager-password attributes map to thelatter’s userDn and password properties respectively.
If you only have one server defined in your application context, the other LDAP namespace-definedbeans will use it automatically. Otherwise, you can give the element an "id" attribute and refer to itfrom other namespace beans using the server-ref attribute. This is actually the bean id of theContextSource instance, if you want to use it in other traditional Spring beans.
<ldap-server> Attributes
• mode Explicitly specifies which embedded ldap server should use. Values are apacheds andunboundid. By default, it will depends if the library is available in the classpath.
• id A bean identifier, used for referring to the bean elsewhere in the context.
• ldif Explicitly specifies an ldif file resource to load into an embedded LDAP server. The ldifshould be a Spring resource pattern (i.e. classpath:init.ldif). The default is classpath*:*.ldif
451
• manager-dn Username (DN) of the "manager" user identity which will be used to authenticateto a (non-embedded) LDAP server. If omitted, anonymous access will be used.
• manager-password The password for the manager DN. This is required if the manager-dn isspecified.
• port Specifies an IP port number. Used to configure an embedded LDAP server, for example.The default value is 33389.
• root Optional root suffix for the embedded LDAP server. Default is"dc=springframework,dc=org"
• url Specifies the ldap server URL when not using the embedded LDAP server.
<ldap-authentication-provider>
This element is shorthand for the creation of an LdapAuthenticationProvider instance. By defaultthis will be configured with a BindAuthenticator instance and a DefaultAuthoritiesPopulator. Aswith all namespace authentication providers, it must be included as a child of the authentication-provider element.
Parent Elements of <ldap-authentication-provider>
• authentication-manager
<ldap-authentication-provider> Attributes
• group-role-attribute The LDAP attribute name which contains the role name which will beused within Spring Security. Maps to the DefaultLdapAuthoritiesPopulator's groupRoleAttributeproperty. Defaults to "cn".
• group-search-base Search base for group membership searches. Maps to theDefaultLdapAuthoritiesPopulator's groupSearchBase constructor argument. Defaults to ""(searching from the root).
• group-search-filter Group search filter. Maps to the DefaultLdapAuthoritiesPopulator'sgroupSearchFilter property. Defaults to (uniqueMember={0}). The substituted parameter is the DNof the user.
• role-prefix A non-empty string prefix that will be added to role strings loaded from persistent.Maps to the DefaultLdapAuthoritiesPopulator's rolePrefix property. Defaults to "ROLE_". Use thevalue "none" for no prefix in cases where the default is non-empty.
• server-ref The optional server to use. If omitted, and a default LDAP server is registered (using<ldap-server> with no Id), that server will be used.
• user-context-mapper-ref Allows explicit customization of the loaded user object by specifyinga UserDetailsContextMapper bean which will be called with the context information from theuser’s directory entry
• user-details-class Allows the objectClass of the user entry to be specified. If set, the framework
452

will attempt to load standard attributes for the defined class into the returned UserDetailsobject
• user-dn-pattern If your users are at a fixed location in the directory (i.e. you can work out theDN directly from the username without doing a directory search), you can use this attribute tomap directly to the DN. It maps directly to the userDnPatterns property ofAbstractLdapAuthenticator. The value is a specific pattern used to build the user’s DN, forexample uid={0},ou=people. The key {0} must be present and will be substituted with theusername.
• user-search-base Search base for user searches. Defaults to "". Only used with a 'user-search-filter'.
If you need to perform a search to locate the user in the directory, then you can set theseattributes to control the search. The BindAuthenticator will be configured with aFilterBasedLdapUserSearch and the attribute values map directly to the first two arguments ofthat bean’s constructor. If these attributes aren’t set and no user-dn-pattern has been suppliedas an alternative, then the default search values of user-search-filter="(uid={0})" and user-search-base="" will be used.
• user-search-filter The LDAP filter used to search for users (optional). For example (uid={0}).The substituted parameter is the user’s login name.
If you need to perform a search to locate the user in the directory, then you can set theseattributes to control the search. The BindAuthenticator will be configured with aFilterBasedLdapUserSearch and the attribute values map directly to the first two arguments ofthat bean’s constructor. If these attributes aren’t set and no user-dn-pattern has been suppliedas an alternative, then the default search values of user-search-filter="(uid={0})" and user-search-base="" will be used.
Child Elements of <ldap-authentication-provider>
• password-compare
<password-compare>
This is used as child element to <ldap-provider> and switches the authentication strategy fromBindAuthenticator to PasswordComparisonAuthenticator.
Parent Elements of <password-compare>
• ldap-authentication-provider
<password-compare> Attributes
• hash Defines the hashing algorithm used on user passwords. We recommend strongly againstusing MD4, as it is a very weak hashing algorithm.
• password-attribute The attribute in the directory which contains the user password. Defaultsto "userPassword".
453
Child Elements of <password-compare>
• password-encoder
<ldap-user-service>
This element configures an LDAP UserDetailsService. The class used is LdapUserDetailsServicewhich is a combination of a FilterBasedLdapUserSearch and a DefaultLdapAuthoritiesPopulator. Theattributes it supports have the same usage as in <ldap-provider>.
<ldap-user-service> Attributes
• cache-ref Defines a reference to a cache for use with a UserDetailsService.
• group-role-attribute The LDAP attribute name which contains the role name which will beused within Spring Security. Defaults to "cn".
• group-search-base Search base for group membership searches. Defaults to "" (searching fromthe root).
• group-search-filter Group search filter. Defaults to (uniqueMember={0}). The substitutedparameter is the DN of the user.
• id A bean identifier, used for referring to the bean elsewhere in the context.
• role-prefix A non-empty string prefix that will be added to role strings loaded from persistentstorage (e.g. "ROLE_"). Use the value "none" for no prefix in cases where the default is non-empty.
• server-ref The optional server to use. If omitted, and a default LDAP server is registered (using<ldap-server> with no Id), that server will be used.
• user-context-mapper-ref Allows explicit customization of the loaded user object by specifyinga UserDetailsContextMapper bean which will be called with the context information from theuser’s directory entry
• user-details-class Allows the objectClass of the user entry to be specified. If set, the frameworkwill attempt to load standard attributes for the defined class into the returned UserDetailsobject
• user-search-base Search base for user searches. Defaults to "". Only used with a 'user-search-filter'.
• user-search-filter The LDAP filter used to search for users (optional). For example (uid={0}).The substituted parameter is the user’s login name.
21.3. Spring Security DependenciesThis appendix provides a reference of the modules in Spring Security and the additionaldependencies that they require in order to function in a running application. We don’t includedependencies that are only used when building or testing Spring Security itself. Nor do we include
454
transitive dependencies which are required by external dependencies.
The version of Spring required is listed on the project website, so the specific versions are omittedfor Spring dependencies below. Note that some of the dependencies listed as "optional" below maystill be required for other non-security functionality in a Spring application. Also dependencieslisted as "optional" may not actually be marked as such in the project’s Maven POM files if they areused in most applications. They are "optional" only in the sense that you don’t need them unlessyou are using the specified functionality.
Where a module depends on another Spring Security module, the non-optional dependencies of themodule it depends on are also assumed to be required and are not listed separately.
21.3.1. spring-security-core
The core module must be included in any project using Spring Security.
Table 3. Core Dependencies
Dependency Version Description
ehcache 1.6.2 Required if the Ehcache-baseduser cache implementation isused (optional).
spring-aop Method security is based onSpring AOP
spring-beans Required for Springconfiguration
spring-expression Required for expression-basedmethod security (optional)
spring-jdbc Required if using a database tostore user data (optional).
spring-tx Required if using a database tostore user data (optional).
aspectjrt 1.6.10 Required if using AspectJsupport (optional).
jsr250-api 1.0 Required if you are using JSR-250 method-securityannotations (optional).
21.3.2. spring-security-remoting
This module is typically required in web applications which use the Servlet API.
Table 4. Remoting Dependencies
Dependency Version Description
spring-security-core
455
Dependency Version Description
spring-web Required for clients which useHTTP remoting support.
21.3.3. spring-security-web
This module is typically required in web applications which use the Servlet API.
Table 5. Web Dependencies
Dependency Version Description
spring-security-core
spring-web Spring web support classes areused extensively.
spring-jdbc Required for JDBC-basedpersistent remember-me tokenrepository (optional).
spring-tx Required by remember-mepersistent token repositoryimplementations (optional).
21.3.4. spring-security-ldap
This module is only required if you are using LDAP authentication.
Table 6. LDAP Dependencies
Dependency Version Description
spring-security-core
spring-ldap-core 1.3.0 LDAP support is based onSpring LDAP.
spring-tx Data exception classes arerequired.
apache-ds [15] 1.5.5 Required if you are using anembedded LDAP server(optional).
shared-ldap 0.9.15 Required if you are using anembedded LDAP server(optional).
ldapsdk 4.1 Mozilla LdapSDK. Used fordecoding LDAP password policycontrols if you are usingpassword-policy functionalitywith OpenLDAP, for example.
456
21.3.5. spring-security-config
This module is required if you are using Spring Security namespace configuration.
Table 7. Config Dependencies
Dependency Version Description
spring-security-core
spring-security-web Required if you are using anyweb-related namespaceconfiguration (optional).
spring-security-ldap Required if you are using theLDAP namespace options(optional).
spring-security-openid Required if you are usingOpenID authentication(optional).
aspectjweaver 1.6.10 Required if using the protect-pointcut namespace syntax(optional).
21.3.6. spring-security-acl
The ACL module.
Table 8. ACL Dependencies
Dependency Version Description
spring-security-core
ehcache 1.6.2 Required if the Ehcache-basedACL cache implementation isused (optional if you are usingyour own implementation).
spring-jdbc Required if you are using thedefault JDBC-based AclService(optional if you implement yourown).
spring-tx Required if you are using thedefault JDBC-based AclService(optional if you implement yourown).
21.3.7. spring-security-cas
The CAS module provides integration with JA-SIG CAS.
457
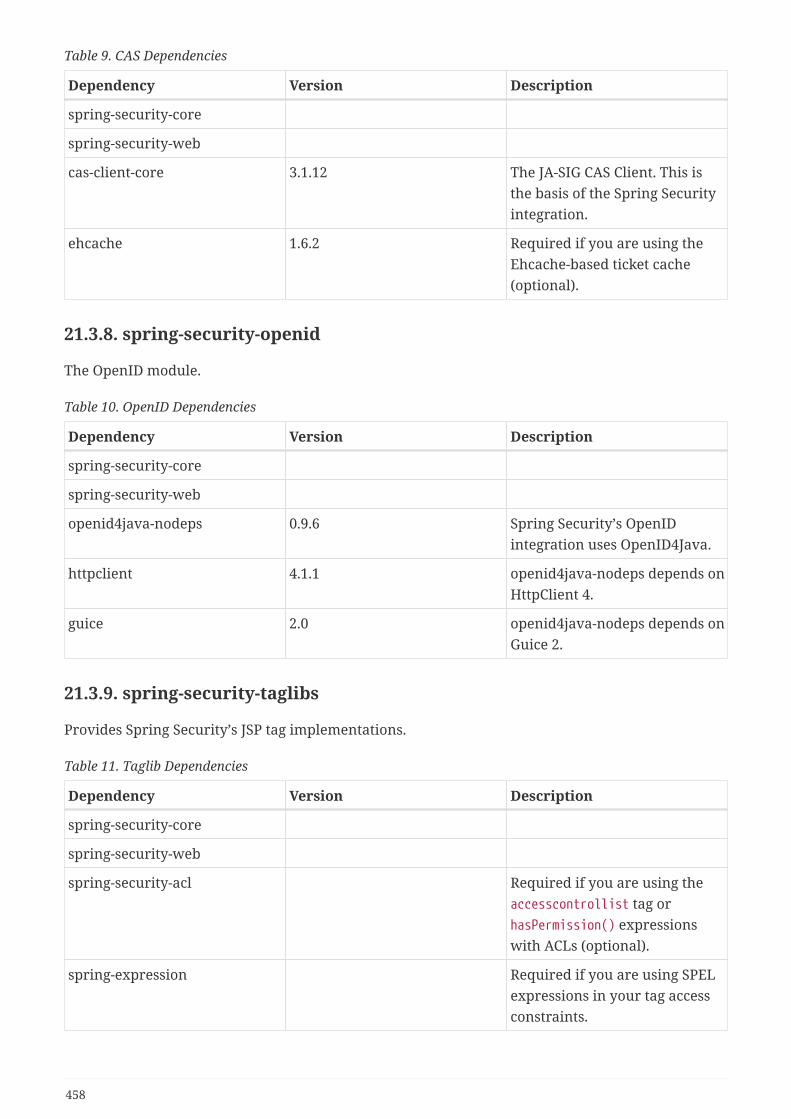
Table 9. CAS Dependencies
Dependency Version Description
spring-security-core
spring-security-web
cas-client-core 3.1.12 The JA-SIG CAS Client. This isthe basis of the Spring Securityintegration.
ehcache 1.6.2 Required if you are using theEhcache-based ticket cache(optional).
21.3.8. spring-security-openid
The OpenID module.
Table 10. OpenID Dependencies
Dependency Version Description
spring-security-core
spring-security-web
openid4java-nodeps 0.9.6 Spring Security’s OpenIDintegration uses OpenID4Java.
httpclient 4.1.1 openid4java-nodeps depends onHttpClient 4.
guice 2.0 openid4java-nodeps depends onGuice 2.
21.3.9. spring-security-taglibs
Provides Spring Security’s JSP tag implementations.
Table 11. Taglib Dependencies
Dependency Version Description
spring-security-core
spring-security-web
spring-security-acl Required if you are using theaccesscontrollist tag orhasPermission() expressionswith ACLs (optional).
spring-expression Required if you are using SPELexpressions in your tag accessconstraints.
458
21.4. Spring Security FAQ• General Questions
• Common Problems
• Spring Security Architecture Questions
• Common "Howto" Requests
21.4.1. General Questions
1. Will Spring Security take care of all my application security requirements?
2. Why not just use web.xml security?
3. What Java and Spring Framework versions are required?
4. I’m new to Spring Security and I need to build an application that supports CAS single sign-onover HTTPS, while allowing Basic authentication locally for certain URLs, authenticating againstmultiple back end user information sources (LDAP and JDBC). I’ve copied some configurationfiles I found but it doesn’t work.
Will Spring Security take care of all my application security requirements?
Spring Security provides you with a very flexible framework for your authentication andauthorization requirements, but there are many other considerations for building a secureapplication that are outside its scope. Web applications are vulnerable to all kinds of attacks whichyou should be familiar with, preferably before you start development so you can design and codewith them in mind from the beginning. Check out thehttp://www.owasp.org/[OWASP web site] forinformation on the major issues facing web application developers and the countermeasures youcan use against them.
Why not just use web.xml security?
Let’s assume you’re developing an enterprise application based on Spring. There are four securityconcerns you typically need to address: authentication, web request security, service layer security(i.e. your methods that implement business logic), and domain object instance security (i.e.different domain objects have different permissions). With these typical requirements in mind:
1. Authentication: The servlet specification provides an approach to authentication. However, youwill need to configure the container to perform authentication which typically requires editingof container-specific "realm" settings. This makes a non-portable configuration, and if you needto write an actual Java class to implement the container’s authentication interface, it becomeseven more non-portable. With Spring Security you achieve complete portability - right down tothe WAR level. Also, Spring Security offers a choice of production-proven authenticationproviders and mechanisms, meaning you can switch your authentication approaches atdeployment time. This is particularly valuable for software vendors writing products that needto work in an unknown target environment.
2. Web request security: The servlet specification provides an approach to secure your requestURIs. However, these URIs can only be expressed in the servlet specification’s own limited URIpath format. Spring Security provides a far more comprehensive approach. For instance, you
459
can use Ant paths or regular expressions, you can consider parts of the URI other than simplythe requested page (e.g. you can consider HTTP GET parameters) and you can implement yourown runtime source of configuration data. This means your web request security can bedynamically changed during the actual execution of your webapp.
3. Service layer and domain object security: The absence of support in the servlet specification forservices layer security or domain object instance security represent serious limitations formulti-tiered applications. Typically developers either ignore these requirements, or implementsecurity logic within their MVC controller code (or even worse, inside the views). There areserious disadvantages with this approach:
a. Separation of concerns: Authorization is a crosscutting concern and should be implementedas such. MVC controllers or views implementing authorization code makes it more difficultto test both the controller and authorization logic, more difficult to debug, and will oftenlead to code duplication.
b. Support for rich clients and web services: If an additional client type must ultimately besupported, any authorization code embedded within the web layer is non-reusable. It shouldbe considered that Spring remoting exporters only export service layer beans (not MVCcontrollers). As such authorization logic needs to be located in the services layer to support amultitude of client types.
c. Layering issues: An MVC controller or view is simply the incorrect architectural layer toimplement authorization decisions concerning services layer methods or domain objectinstances. Whilst the Principal may be passed to the services layer to enable it to make theauthorization decision, doing so would introduce an additional argument on every serviceslayer method. A more elegant approach is to use a ThreadLocal to hold the Principal,although this would likely increase development time to a point where it would becomemore economical (on a cost-benefit basis) to simply use a dedicated security framework.
d. Authorisation code quality: It is often said of web frameworks that they "make it easier to dothe right things, and harder to do the wrong things". Security frameworks are the same,because they are designed in an abstract manner for a wide range of purposes. Writing yourown authorization code from scratch does not provide the "design check" a frameworkwould offer, and in-house authorization code will typically lack the improvements thatemerge from widespread deployment, peer review and new versions.
For simple applications, servlet specification security may just be enough. Although whenconsidered within the context of web container portability, configuration requirements, limitedweb request security flexibility, and non-existent services layer and domain object instancesecurity, it becomes clear why developers often look to alternative solutions.
What Java and Spring Framework versions are required?
Spring Security 3.0 and 3.1 require at least JDK 1.5 and also require Spring 3.0.3 as a minimum.Ideally you should be using the latest release versions to avoid problems.
Spring Security 2.0.x requires a minimum JDK version of 1.4 and is built against Spring 2.0.x. Itshould also be compatible with applications using Spring 2.5.x.
460
I’m new to Spring Security and I need to build an application that supports CAS single sign-onover HTTPS, while allowing Basic authentication locally for certain URLs, authenticatingagainst multiple back end user information sources (LDAP and JDBC). I’ve copied someconfiguration files I found but it doesn’t work.
What could be wrong?
Or substitute an alternative complex scenario…
Realistically, you need an understanding of the technologies you are intending to use before youcan successfully build applications with them. Security is complicated. Setting up a simpleconfiguration using a login form and some hard-coded users using Spring Security’s namespace isreasonably straightforward. Moving to using a backed JDBC database is also easy enough. But if youtry and jump straight to a complicated deployment scenario like this you will almost certainly befrustrated. There is a big jump in the learning curve required to set up systems like CAS, configureLDAP servers and install SSL certificates properly. So you need to take things one step at a time.
From a Spring Security perspective, the first thing you should do is follow the "Getting Started"guide on the web site. This will take you through a series of steps to get up and running and getsome idea of how the framework operates. If you are using other technologies which you aren’tfamiliar with then you should do some research and try to make sure you can use them in isolationbefore combining them in a complex system.
21.4.2. Common Problems
1. Authentication
a. When I try to log in, I get an error message that says "Bad Credentials". What’s wrong?
b. My application goes into an "endless loop" when I try to login, what’s going on?
c. I get an exception with the message "Access is denied (user is anonymous);". What’s wrong?
d. Why can I still see a secured page even after I’ve logged out of my application?
e. I get an exception with the message "An Authentication object was not found in theSecurityContext". What’s wrong?
f. I can’t get LDAP authentication to work.
2. Session Management
a. I’m using Spring Security’s concurrent session control to prevent users from logging in morethan once at a time.
b. Why does the session Id change when I authenticate through Spring Security?
c. I’m using Tomcat (or some other servlet container) and have enabled HTTPS for my loginpage, switching back to HTTP afterwards.
d. I’m trying to use the concurrent session-control support but it won’t let me log back in, evenif I’m sure I’ve logged out and haven’t exceeded the allowed sessions.
e. Spring Security is creating a session somewhere, even though I’ve configured it not to, bysetting the create-session attribute to never.
3. Miscellaneous
461
a. I get a 403 Forbidden when performing a POST
b. I’m forwarding a request to another URL using the RequestDispatcher, but my securityconstraints aren’t being applied.
c. I have added Spring Security’s <global-method-security> element to my application contextbut if I add security annotations to my Spring MVC controller beans (Struts actions etc.) thenthey don’t seem to have an effect.
d. I have a user who has definitely been authenticated, but when I try to access theSecurityContextHolder during some requests, the Authentication is null.
e. The authorize JSP Tag doesn’t respect my method security annotations when using the URLattribute.
When I try to log in, I get an error message that says "Bad Credentials". What’s wrong?
This means that authentication has failed. It doesn’t say why, as it is good practice to avoid givingdetails which might help an attacker guess account names or passwords.
This also means that if you ask this question in the forum, you will not get an answer unless youprovide additional information. As with any issue you should check the output from the debug log,note any exception stacktraces and related messages. Step through the code in a debugger to seewhere the authentication fails and why. Write a test case which exercises your authenticationconfiguration outside of the application. More often than not, the failure is due to a difference inthe password data stored in a database and that entered by the user. If you are using hashedpasswords, make sure the value stored in your database is exactly the same as the value producedby the PasswordEncoder configured in your application.
My application goes into an "endless loop" when I try to login, what’s going on?
A common user problem with infinite loop and redirecting to the login page is caused byaccidentally configuring the login page as a "secured" resource. Make sure your configurationallows anonymous access to the login page, either by excluding it from the security filter chain ormarking it as requiring ROLE_ANONYMOUS.
If your AccessDecisionManager includes an AuthenticatedVoter, you can use the attribute"IS_AUTHENTICATED_ANONYMOUSLY". This is automatically available if you are using thestandard namespace configuration setup.
From Spring Security 2.0.1 onwards, when you are using namespace-based configuration, a checkwill be made on loading the application context and a warning message logged if your login pageappears to be protected.
I get an exception with the message "Access is denied (user is anonymous);". What’s wrong?
This is a debug level message which occurs the first time an anonymous user attempts to access aprotected resource.
462
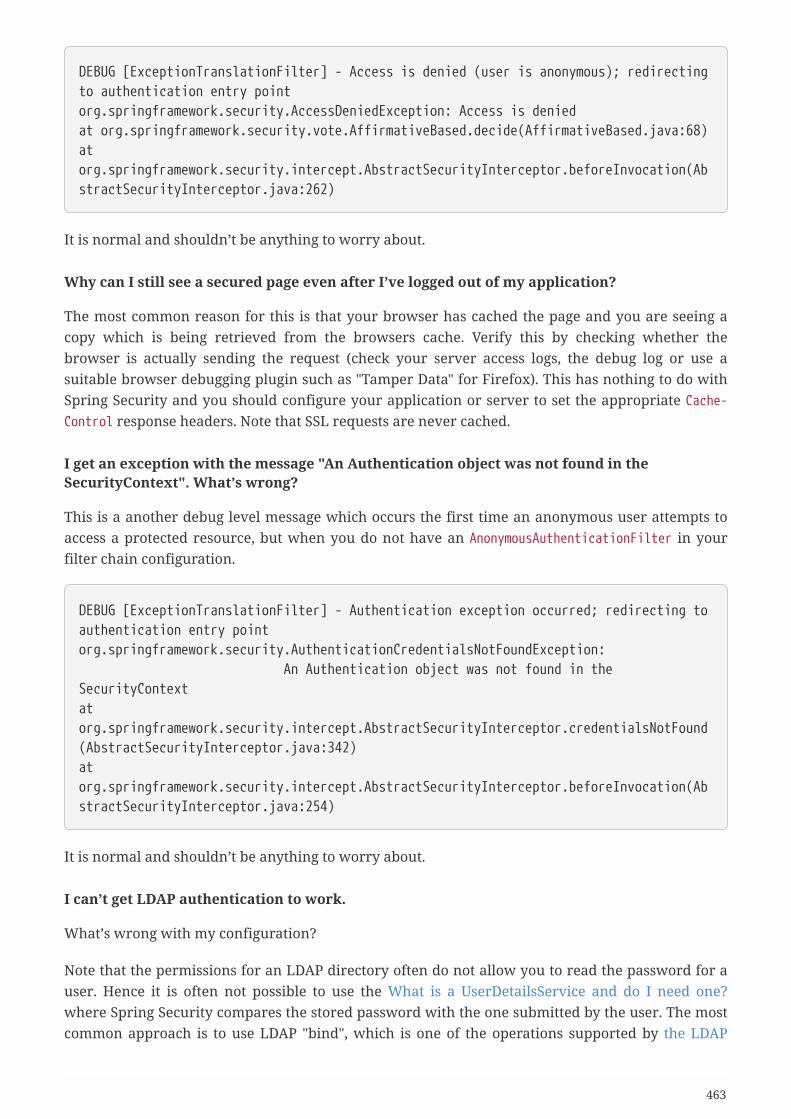
DEBUG [ExceptionTranslationFilter] - Access is denied (user is anonymous); redirectingto authentication entry pointorg.springframework.security.AccessDeniedException: Access is deniedat org.springframework.security.vote.AffirmativeBased.decide(AffirmativeBased.java:68)atorg.springframework.security.intercept.AbstractSecurityInterceptor.beforeInvocation(AbstractSecurityInterceptor.java:262)
It is normal and shouldn’t be anything to worry about.
Why can I still see a secured page even after I’ve logged out of my application?
The most common reason for this is that your browser has cached the page and you are seeing acopy which is being retrieved from the browsers cache. Verify this by checking whether thebrowser is actually sending the request (check your server access logs, the debug log or use asuitable browser debugging plugin such as "Tamper Data" for Firefox). This has nothing to do withSpring Security and you should configure your application or server to set the appropriate Cache-Control response headers. Note that SSL requests are never cached.
I get an exception with the message "An Authentication object was not found in theSecurityContext". What’s wrong?
This is a another debug level message which occurs the first time an anonymous user attempts toaccess a protected resource, but when you do not have an AnonymousAuthenticationFilter in yourfilter chain configuration.
DEBUG [ExceptionTranslationFilter] - Authentication exception occurred; redirecting toauthentication entry pointorg.springframework.security.AuthenticationCredentialsNotFoundException: An Authentication object was not found in theSecurityContextatorg.springframework.security.intercept.AbstractSecurityInterceptor.credentialsNotFound(AbstractSecurityInterceptor.java:342)atorg.springframework.security.intercept.AbstractSecurityInterceptor.beforeInvocation(AbstractSecurityInterceptor.java:254)
It is normal and shouldn’t be anything to worry about.
I can’t get LDAP authentication to work.
What’s wrong with my configuration?
Note that the permissions for an LDAP directory often do not allow you to read the password for auser. Hence it is often not possible to use the What is a UserDetailsService and do I need one?where Spring Security compares the stored password with the one submitted by the user. The mostcommon approach is to use LDAP "bind", which is one of the operations supported by the LDAP
463
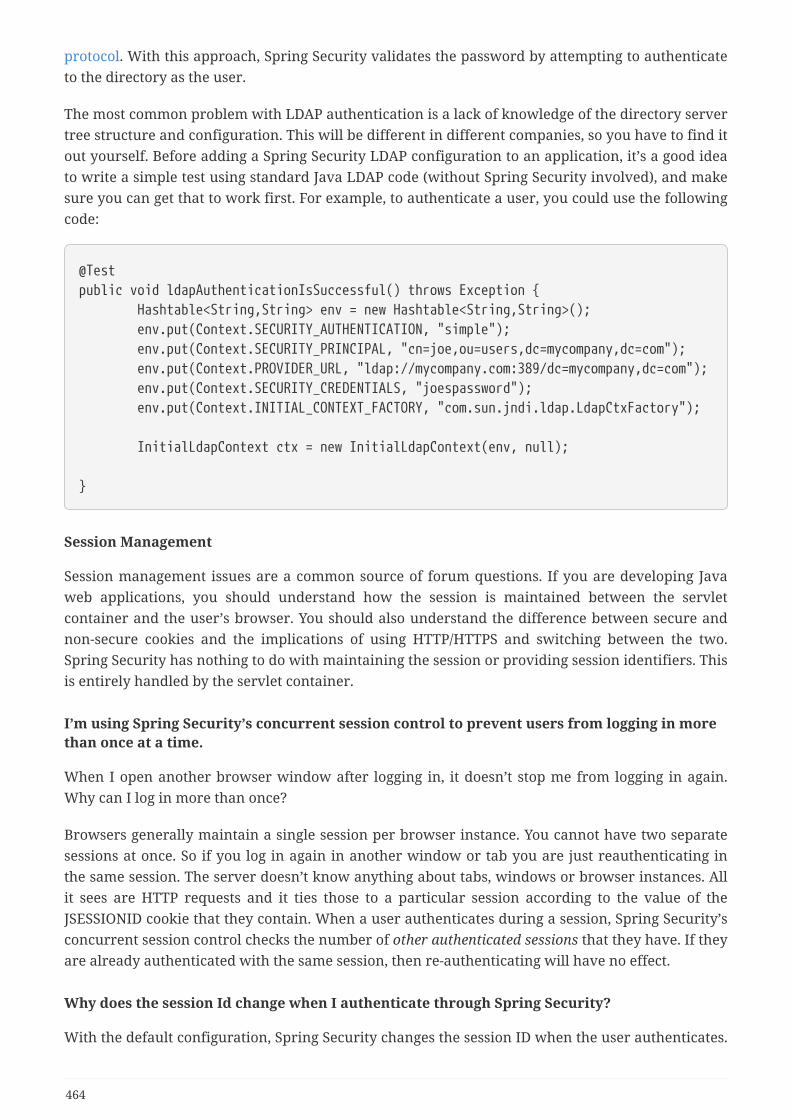
protocol. With this approach, Spring Security validates the password by attempting to authenticateto the directory as the user.
The most common problem with LDAP authentication is a lack of knowledge of the directory servertree structure and configuration. This will be different in different companies, so you have to find itout yourself. Before adding a Spring Security LDAP configuration to an application, it’s a good ideato write a simple test using standard Java LDAP code (without Spring Security involved), and makesure you can get that to work first. For example, to authenticate a user, you could use the followingcode:
@Testpublic void ldapAuthenticationIsSuccessful() throws Exception { Hashtable<String,String> env = new Hashtable<String,String>(); env.put(Context.SECURITY_AUTHENTICATION, "simple"); env.put(Context.SECURITY_PRINCIPAL, "cn=joe,ou=users,dc=mycompany,dc=com"); env.put(Context.PROVIDER_URL, "ldap://mycompany.com:389/dc=mycompany,dc=com"); env.put(Context.SECURITY_CREDENTIALS, "joespassword"); env.put(Context.INITIAL_CONTEXT_FACTORY, "com.sun.jndi.ldap.LdapCtxFactory");
InitialLdapContext ctx = new InitialLdapContext(env, null);
}
Session Management
Session management issues are a common source of forum questions. If you are developing Javaweb applications, you should understand how the session is maintained between the servletcontainer and the user’s browser. You should also understand the difference between secure andnon-secure cookies and the implications of using HTTP/HTTPS and switching between the two.Spring Security has nothing to do with maintaining the session or providing session identifiers. Thisis entirely handled by the servlet container.
I’m using Spring Security’s concurrent session control to prevent users from logging in morethan once at a time.
When I open another browser window after logging in, it doesn’t stop me from logging in again.Why can I log in more than once?
Browsers generally maintain a single session per browser instance. You cannot have two separatesessions at once. So if you log in again in another window or tab you are just reauthenticating inthe same session. The server doesn’t know anything about tabs, windows or browser instances. Allit sees are HTTP requests and it ties those to a particular session according to the value of theJSESSIONID cookie that they contain. When a user authenticates during a session, Spring Security’sconcurrent session control checks the number of other authenticated sessions that they have. If theyare already authenticated with the same session, then re-authenticating will have no effect.
Why does the session Id change when I authenticate through Spring Security?
With the default configuration, Spring Security changes the session ID when the user authenticates.
464
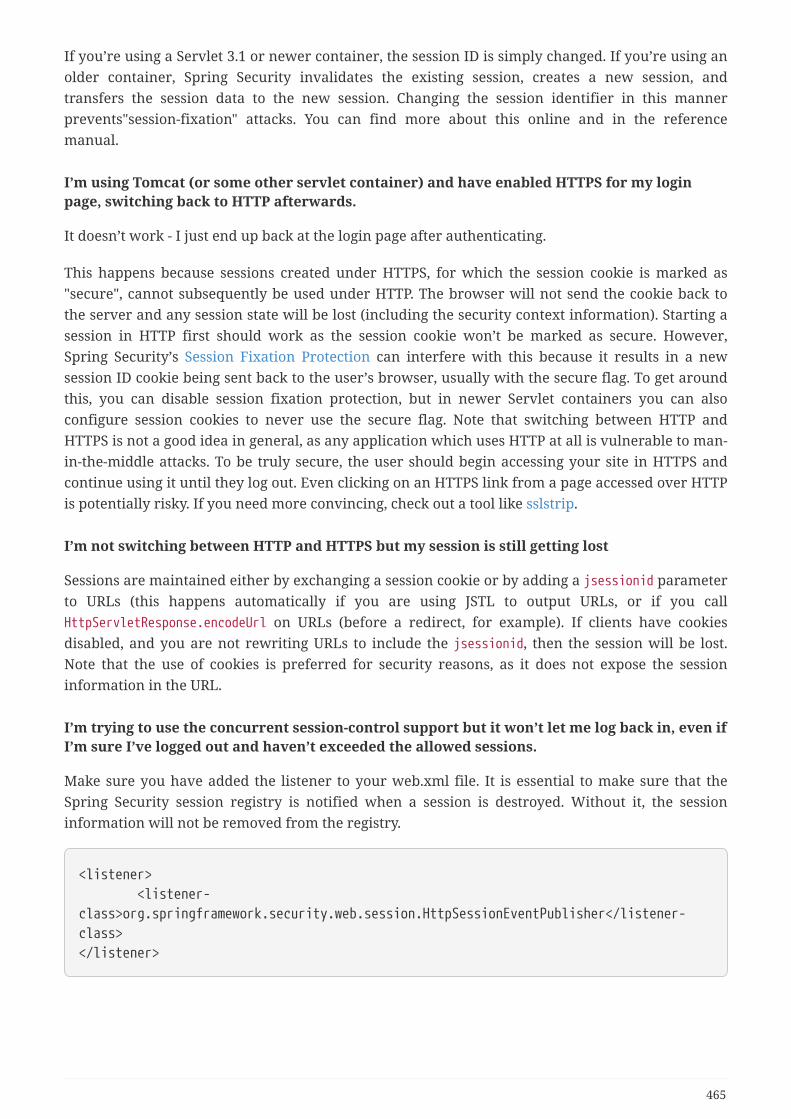
If you’re using a Servlet 3.1 or newer container, the session ID is simply changed. If you’re using anolder container, Spring Security invalidates the existing session, creates a new session, andtransfers the session data to the new session. Changing the session identifier in this mannerprevents"session-fixation" attacks. You can find more about this online and in the referencemanual.
I’m using Tomcat (or some other servlet container) and have enabled HTTPS for my loginpage, switching back to HTTP afterwards.
It doesn’t work - I just end up back at the login page after authenticating.
This happens because sessions created under HTTPS, for which the session cookie is marked as"secure", cannot subsequently be used under HTTP. The browser will not send the cookie back tothe server and any session state will be lost (including the security context information). Starting asession in HTTP first should work as the session cookie won’t be marked as secure. However,Spring Security’s Session Fixation Protection can interfere with this because it results in a newsession ID cookie being sent back to the user’s browser, usually with the secure flag. To get aroundthis, you can disable session fixation protection, but in newer Servlet containers you can alsoconfigure session cookies to never use the secure flag. Note that switching between HTTP andHTTPS is not a good idea in general, as any application which uses HTTP at all is vulnerable to man-in-the-middle attacks. To be truly secure, the user should begin accessing your site in HTTPS andcontinue using it until they log out. Even clicking on an HTTPS link from a page accessed over HTTPis potentially risky. If you need more convincing, check out a tool like sslstrip.
I’m not switching between HTTP and HTTPS but my session is still getting lost
Sessions are maintained either by exchanging a session cookie or by adding a jsessionid parameterto URLs (this happens automatically if you are using JSTL to output URLs, or if you callHttpServletResponse.encodeUrl on URLs (before a redirect, for example). If clients have cookiesdisabled, and you are not rewriting URLs to include the jsessionid, then the session will be lost.Note that the use of cookies is preferred for security reasons, as it does not expose the sessioninformation in the URL.
I’m trying to use the concurrent session-control support but it won’t let me log back in, even ifI’m sure I’ve logged out and haven’t exceeded the allowed sessions.
Make sure you have added the listener to your web.xml file. It is essential to make sure that theSpring Security session registry is notified when a session is destroyed. Without it, the sessioninformation will not be removed from the registry.
<listener> <listener-class>org.springframework.security.web.session.HttpSessionEventPublisher</listener-class></listener>
465
Spring Security is creating a session somewhere, even though I’ve configured it not to, bysetting the create-session attribute to never.
This usually means that the user’s application is creating a session somewhere, but that they aren’taware of it. The most common culprit is a JSP. Many people aren’t aware that JSPs create sessions bydefault. To prevent a JSP from creating a session, add the directive <%@ page session="false" %> tothe top of the page.
If you are having trouble working out where a session is being created, you can add somedebugging code to track down the location(s). One way to do this would be to add ajavax.servlet.http.HttpSessionListener to your application, which calls Thread.dumpStack() in thesessionCreated method.
I get a 403 Forbidden when performing a POST
If an HTTP 403 Forbidden is returned for HTTP POST, but works for HTTP GET then the issue is mostlikely related to CSRF. Either provide the CSRF Token or disable CSRF protection (notrecommended).
I’m forwarding a request to another URL using the RequestDispatcher, but my securityconstraints aren’t being applied.
Filters are not applied by default to forwards or includes. If you really want the security filters to beapplied to forwards and/or includes, then you have to configure these explicitly in your web.xmlusing the <dispatcher> element, a child element of <filter-mapping>.
I have added Spring Security’s <global-method-security> element to my application contextbut if I add security annotations to my Spring MVC controller beans (Struts actions etc.) thenthey don’t seem to have an effect.
In a Spring web application, the application context which holds the Spring MVC beans for thedispatcher servlet is often separate from the main application context. It is often defined in a filecalled myapp-servlet.xml, where "myapp" is the name assigned to the Spring DispatcherServlet inweb.xml. An application can have multiple DispatcherServlets, each with its own isolated applicationcontext. The beans in these "child" contexts are not visible to the rest of the application.The"parent" application context is loaded by the ContextLoaderListener you define in your web.xmland is visible to all the child contexts. This parent context is usually where you define your securityconfiguration, including the <global-method-security> element). As a result any security constraintsapplied to methods in these web beans will not be enforced, since the beans cannot be seen fromthe DispatcherServlet context. You need to either move the <global-method-security> declaration tothe web context or moved the beans you want secured into the main application context.
Generally we would recommend applying method security at the service layer rather than onindividual web controllers.
I have a user who has definitely been authenticated, but when I try to access theSecurityContextHolder during some requests, the Authentication is null.
Why can’t I see the user information?
If you have excluded the request from the security filter chain using the attribute filters='none' in
466
the <intercept-url> element that matches the URL pattern, then the SecurityContextHolder will notbe populated for that request. Check the debug log to see whether the request is passing throughthe filter chain. (You are reading the debug log, right?).
The authorize JSP Tag doesn’t respect my method security annotations when using the URLattribute.
Method security will not hide links when using the url attribute in <sec:authorize> because wecannot readily reverse engineer what URL is mapped to what controller endpoint as controllers canrely on headers, current user, etc to determine what method to invoke.
21.4.3. Spring Security Architecture Questions
1. How do I know which package class X is in?
2. How do the namespace elements map to conventional bean configurations?
3. What does "ROLE_" mean and why do I need it on my role names?
4. How do I know which dependencies to add to my application to work with Spring Security?
5. What dependencies are needed to run an embedded ApacheDS LDAP server?
6. What is a UserDetailsService and do I need one?
How do I know which package class X is in?
The best way of locating classes is by installing the Spring Security source in your IDE. Thedistribution includes source jars for each of the modules the project is divided up into. Add these toyour project source path and you can navigate directly to Spring Security classes (Ctrl-Shift-T inEclipse). This also makes debugging easier and allows you to troubleshoot exceptions by lookingdirectly at the code where they occur to see what’s going on there.
How do the namespace elements map to conventional bean configurations?
There is a general overview of what beans are created by the namespace in the namespaceappendix of the reference guide. There is also a detailed blog article called "Behind the SpringSecurity Namespace" on blog.springsource.com. If want to know the full details then the code is inthe spring-security-config module within the Spring Security 3.0 distribution. You should probablyread the chapters on namespace parsing in the standard Spring Framework referencedocumentation first.
What does "ROLE_" mean and why do I need it on my role names?
Spring Security has a voter-based architecture which means that an access decision is made by aseries of AccessDecisionVoters. The voters act on the "configuration attributes" which are specifiedfor a secured resource (such as a method invocation). With this approach, not all attributes may berelevant to all voters and a voter needs to know when it should ignore an attribute (abstain) andwhen it should vote to grant or deny access based on the attribute value. The most common voter isthe RoleVoter which by default votes whenever it finds an attribute with the "ROLE_" prefix. Itmakes a simple comparison of the attribute (such as "ROLE_USER") with the names of theauthorities which the current user has been assigned. If it finds a match (they have an authority
467
called "ROLE_USER"), it votes to grant access, otherwise it votes to deny access.
The prefix can be changed by setting the rolePrefix property of RoleVoter. If you only need to useroles in your application and have no need for other custom voters, then you can set the prefix to ablank string, in which case the RoleVoter will treat all attributes as roles.
How do I know which dependencies to add to my application to work with Spring Security?
It will depend on what features you are using and what type of application you are developing.With Spring Security 3.0, the project jars are divided into clearly distinct areas of functionality, so itis straightforward to work out which Spring Security jars you need from your applicationrequirements. All applications will need the spring-security-core jar. If you’re developing a webapplication, you need the spring-security-web jar. If you’re using security namespace configurationyou need the spring-security-config jar, for LDAP support you need the spring-security-ldap jarand so on.
For third-party jars the situation isn’t always quite so obvious. A good starting point is to copy thosefrom one of the pre-built sample applications WEB-INF/lib directories. For a basic application, youcan start with the tutorial sample. If you want to use LDAP, with an embedded test server, then usethe LDAP sample as a starting point. The reference manual alsoincludeshttp://static.springsource.org/spring-security/site/docs/3.1.x/reference/springsecurity-single.html#appendix-dependencies[an appendix] listing the first-level dependencies for eachSpring Security module with some information on whether they are optional and what they arerequired for.
If you are building your project with maven, then adding the appropriate Spring Security modulesas dependencies to your pom.xml will automatically pull in the core jars that the frameworkrequires. Any which are marked as "optional" in the Spring Security POM files will have to be addedto your own pom.xml file if you need them.
What dependencies are needed to run an embedded ApacheDS LDAP server?
If you are using Maven, you need to add the following to your pom dependencies:
<dependency> <groupId>org.apache.directory.server</groupId> <artifactId>apacheds-core</artifactId> <version>1.5.5</version> <scope>runtime</scope></dependency><dependency> <groupId>org.apache.directory.server</groupId> <artifactId>apacheds-server-jndi</artifactId> <version>1.5.5</version> <scope>runtime</scope></dependency>
The other required jars should be pulled in transitively.
468

What is a UserDetailsService and do I need one?
UserDetailsService is a DAO interface for loading data that is specific to a user account. It has noother function other to load that data for use by other components within the framework. It is notresponsible for authenticating the user. Authenticating a user with a username/passwordcombination is most commonly performed by the DaoAuthenticationProvider, which is injected witha UserDetailsService to allow it to load the password (and other data) for a user in order tocompare it with the submitted value. Note that if you are using LDAP, this approach may not work.
If you want to customize the authentication process then you should implementAuthenticationProvider yourself. See this blog article for an example integrating Spring Securityauthentication with Google App Engine.
21.4.4. Common "Howto" Requests
1. I need to login in with more information than just the username.
2. How do I apply different intercept-url constraints where only the fragment value of therequested URLs differs (e.g./foo#bar and /foo#blah?
3. How do I access the user’s IP Address (or other web-request data) in a UserDetailsService?
4. How do I access the HttpSession from a UserDetailsService?
5. How do I access the user’s password in a UserDetailsService?
6. How do I define the secured URLs within an application dynamically?
7. How do I authenticate against LDAP but load user roles from a database?
8. I want to modify the property of a bean that is created by the namespace, but there is nothing inthe schema to support it.
I need to login in with more information than just the username.
How do I add support for extra login fields (e.g. a company name)?
This question comes up repeatedly in the Spring Security forum so you will find more informationthere by searching the archives (or through google).
The submitted login information is processed by an instance ofUsernamePasswordAuthenticationFilter. You will need to customize this class to handle the extra datafield(s). One option is to use your own customized authentication token class (rather than thestandard UsernamePasswordAuthenticationToken), another is simply to concatenate the extra fieldswith the username (for example, using a ":" as the separator) and pass them in the usernameproperty of UsernamePasswordAuthenticationToken.
You will also need to customize the actual authentication process. If you are using a customauthentication token class, for example, you will have to write an AuthenticationProvider to handleit (or extend the standard DaoAuthenticationProvider). If you have concatenated the fields, you canimplement your own UserDetailsService which splits them up and loads the appropriate user datafor authentication.
469
How do I apply different intercept-url constraints where only the fragment value of therequested URLs differs (e.g./foo#bar and /foo#blah?
You can’t do this, since the fragment is not transmitted from the browser to the server. The URLsabove are identical from the server’s perspective. This is a common question from GWT users.
How do I access the user’s IP Address (or other web-request data) in a UserDetailsService?
Obviously you can’t (without resorting to something like thread-local variables) since the onlyinformation supplied to the interface is the username. Instead of implementing UserDetailsService,you should implement AuthenticationProvider directly and extract the information from thesupplied Authentication token.
In a standard web setup, the getDetails() method on the Authentication object will return aninstance of WebAuthenticationDetails. If you need additional information, you can inject a customAuthenticationDetailsSource into the authentication filter you are using. If you are using thenamespace, for example with the <form-login> element, then you should remove this element andreplace it with a <custom-filter> declaration pointing to an explicitly configuredUsernamePasswordAuthenticationFilter.
How do I access the HttpSession from a UserDetailsService?
You can’t, since the UserDetailsService has no awareness of the servlet API. If you want to storecustom user data, then you should customize the UserDetails object which is returned. This canthen be accessed at any point, via the thread-local SecurityContextHolder. A call toSecurityContextHolder.getContext().getAuthentication().getPrincipal() will return this customobject.
If you really need to access the session, then it must be done by customizing the web tier.
How do I access the user’s password in a UserDetailsService?
You can’t (and shouldn’t). You are probably misunderstanding its purpose. See "What is aUserDetailsService?" above.
How do I define the secured URLs within an application dynamically?
People often ask about how to store the mapping between secured URLs and security metadataattributes in a database, rather than in the application context.
The first thing you should ask yourself is if you really need to do this. If an application requiressecuring, then it also requires that the security be tested thoroughly based on a defined policy. Itmay require auditing and acceptance testing before being rolled out into a productionenvironment. A security-conscious organization should be aware that the benefits of their diligenttesting process could be wiped out instantly by allowing the security settings to be modified atruntime by changing a row or two in a configuration database. If you have taken this into account(perhaps using multiple layers of security within your application) then Spring Security allows youto fully customize the source of security metadata. You can make it fully dynamic if you choose.
Both method and web security are protected by subclasses of AbstractSecurityInterceptor which is
470
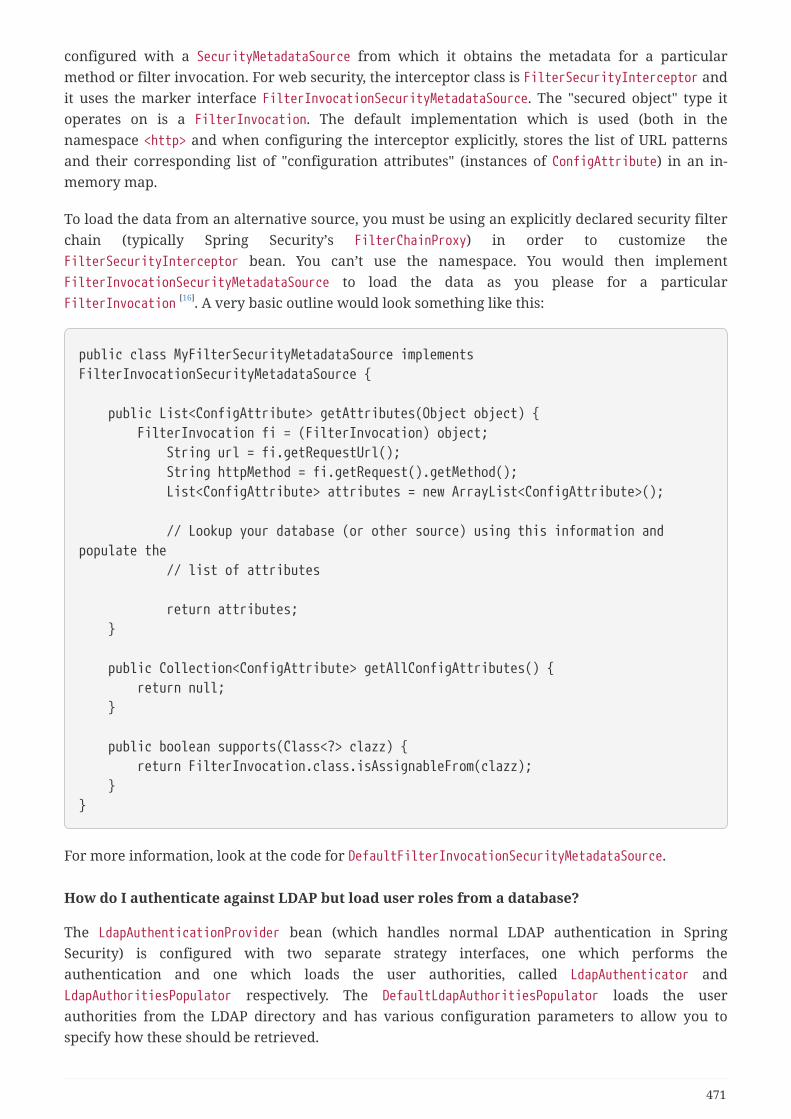
configured with a SecurityMetadataSource from which it obtains the metadata for a particularmethod or filter invocation. For web security, the interceptor class is FilterSecurityInterceptor andit uses the marker interface FilterInvocationSecurityMetadataSource. The "secured object" type itoperates on is a FilterInvocation. The default implementation which is used (both in thenamespace <http> and when configuring the interceptor explicitly, stores the list of URL patternsand their corresponding list of "configuration attributes" (instances of ConfigAttribute) in an in-memory map.
To load the data from an alternative source, you must be using an explicitly declared security filterchain (typically Spring Security’s FilterChainProxy) in order to customize theFilterSecurityInterceptor bean. You can’t use the namespace. You would then implementFilterInvocationSecurityMetadataSource to load the data as you please for a particularFilterInvocation [16]. A very basic outline would look something like this:
public class MyFilterSecurityMetadataSource implementsFilterInvocationSecurityMetadataSource {
public List<ConfigAttribute> getAttributes(Object object) { FilterInvocation fi = (FilterInvocation) object; String url = fi.getRequestUrl(); String httpMethod = fi.getRequest().getMethod(); List<ConfigAttribute> attributes = new ArrayList<ConfigAttribute>();
// Lookup your database (or other source) using this information andpopulate the // list of attributes
return attributes; }
public Collection<ConfigAttribute> getAllConfigAttributes() { return null; }
public boolean supports(Class<?> clazz) { return FilterInvocation.class.isAssignableFrom(clazz); }}
For more information, look at the code for DefaultFilterInvocationSecurityMetadataSource.
How do I authenticate against LDAP but load user roles from a database?
The LdapAuthenticationProvider bean (which handles normal LDAP authentication in SpringSecurity) is configured with two separate strategy interfaces, one which performs theauthentication and one which loads the user authorities, called LdapAuthenticator andLdapAuthoritiesPopulator respectively. The DefaultLdapAuthoritiesPopulator loads the userauthorities from the LDAP directory and has various configuration parameters to allow you tospecify how these should be retrieved.
471
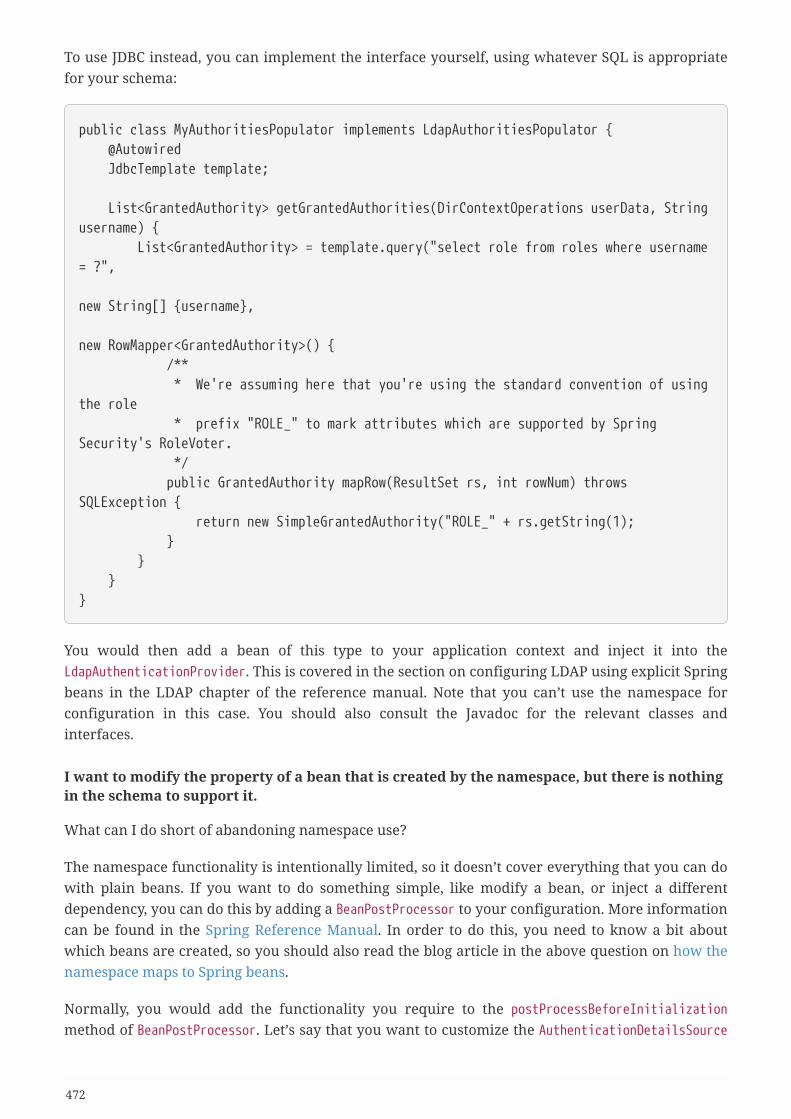
To use JDBC instead, you can implement the interface yourself, using whatever SQL is appropriatefor your schema:
public class MyAuthoritiesPopulator implements LdapAuthoritiesPopulator { @Autowired JdbcTemplate template;
List<GrantedAuthority> getGrantedAuthorities(DirContextOperations userData, Stringusername) { List<GrantedAuthority> = template.query("select role from roles where username= ?", new String[] {username}, new RowMapper<GrantedAuthority>() { /** * We're assuming here that you're using the standard convention of usingthe role * prefix "ROLE_" to mark attributes which are supported by SpringSecurity's RoleVoter. */ public GrantedAuthority mapRow(ResultSet rs, int rowNum) throwsSQLException { return new SimpleGrantedAuthority("ROLE_" + rs.getString(1); } } }}
You would then add a bean of this type to your application context and inject it into theLdapAuthenticationProvider. This is covered in the section on configuring LDAP using explicit Springbeans in the LDAP chapter of the reference manual. Note that you can’t use the namespace forconfiguration in this case. You should also consult the Javadoc for the relevant classes andinterfaces.
I want to modify the property of a bean that is created by the namespace, but there is nothingin the schema to support it.
What can I do short of abandoning namespace use?
The namespace functionality is intentionally limited, so it doesn’t cover everything that you can dowith plain beans. If you want to do something simple, like modify a bean, or inject a differentdependency, you can do this by adding a BeanPostProcessor to your configuration. More informationcan be found in the Spring Reference Manual. In order to do this, you need to know a bit aboutwhich beans are created, so you should also read the blog article in the above question on how thenamespace maps to Spring beans.
Normally, you would add the functionality you require to the postProcessBeforeInitializationmethod of BeanPostProcessor. Let’s say that you want to customize the AuthenticationDetailsSource
472
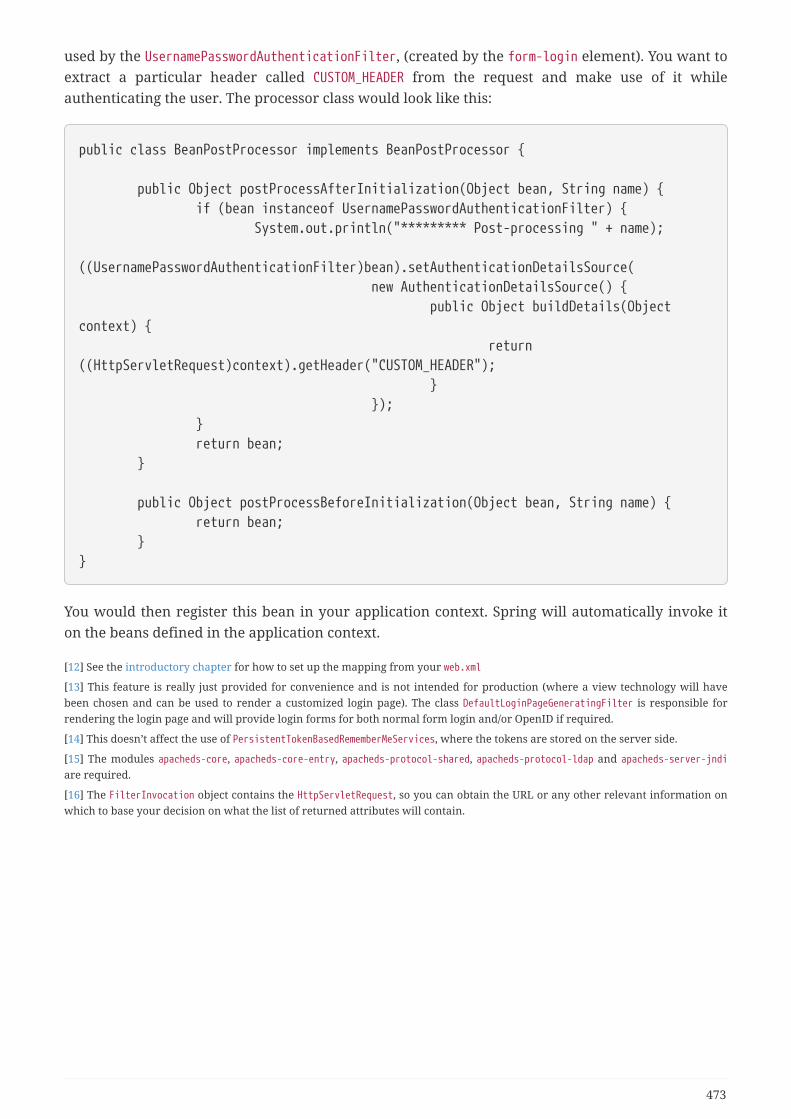
used by the UsernamePasswordAuthenticationFilter, (created by the form-login element). You want toextract a particular header called CUSTOM_HEADER from the request and make use of it whileauthenticating the user. The processor class would look like this:
public class BeanPostProcessor implements BeanPostProcessor {
public Object postProcessAfterInitialization(Object bean, String name) { if (bean instanceof UsernamePasswordAuthenticationFilter) { System.out.println("********* Post-processing " + name); ((UsernamePasswordAuthenticationFilter)bean).setAuthenticationDetailsSource( new AuthenticationDetailsSource() { public Object buildDetails(Objectcontext) { return((HttpServletRequest)context).getHeader("CUSTOM_HEADER"); } }); } return bean; }
public Object postProcessBeforeInitialization(Object bean, String name) { return bean; }}
You would then register this bean in your application context. Spring will automatically invoke iton the beans defined in the application context.
[12] See the introductory chapter for how to set up the mapping from your web.xml
[13] This feature is really just provided for convenience and is not intended for production (where a view technology will havebeen chosen and can be used to render a customized login page). The class DefaultLoginPageGeneratingFilter is responsible forrendering the login page and will provide login forms for both normal form login and/or OpenID if required.
[14] This doesn’t affect the use of PersistentTokenBasedRememberMeServices, where the tokens are stored on the server side.
[15] The modules apacheds-core, apacheds-core-entry, apacheds-protocol-shared, apacheds-protocol-ldap and apacheds-server-jndiare required.
[16] The FilterInvocation object contains the HttpServletRequest, so you can obtain the URL or any other relevant information onwhich to base your decision on what the list of returned attributes will contain.
473
Reactive Applications
474
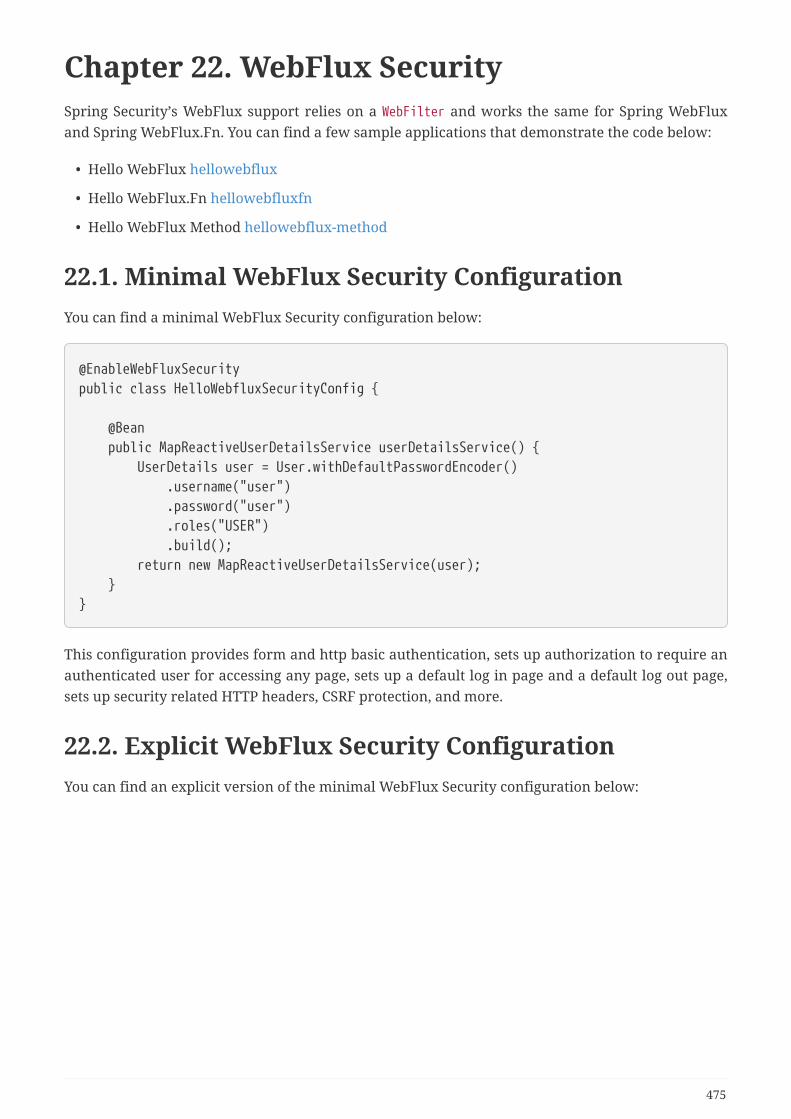
Chapter 22. WebFlux SecuritySpring Security’s WebFlux support relies on a WebFilter and works the same for Spring WebFluxand Spring WebFlux.Fn. You can find a few sample applications that demonstrate the code below:
• Hello WebFlux hellowebflux
• Hello WebFlux.Fn hellowebfluxfn
• Hello WebFlux Method hellowebflux-method
22.1. Minimal WebFlux Security ConfigurationYou can find a minimal WebFlux Security configuration below:
@EnableWebFluxSecuritypublic class HelloWebfluxSecurityConfig {
@Bean public MapReactiveUserDetailsService userDetailsService() { UserDetails user = User.withDefaultPasswordEncoder() .username("user") .password("user") .roles("USER") .build(); return new MapReactiveUserDetailsService(user); }}
This configuration provides form and http basic authentication, sets up authorization to require anauthenticated user for accessing any page, sets up a default log in page and a default log out page,sets up security related HTTP headers, CSRF protection, and more.
22.2. Explicit WebFlux Security ConfigurationYou can find an explicit version of the minimal WebFlux Security configuration below:
475
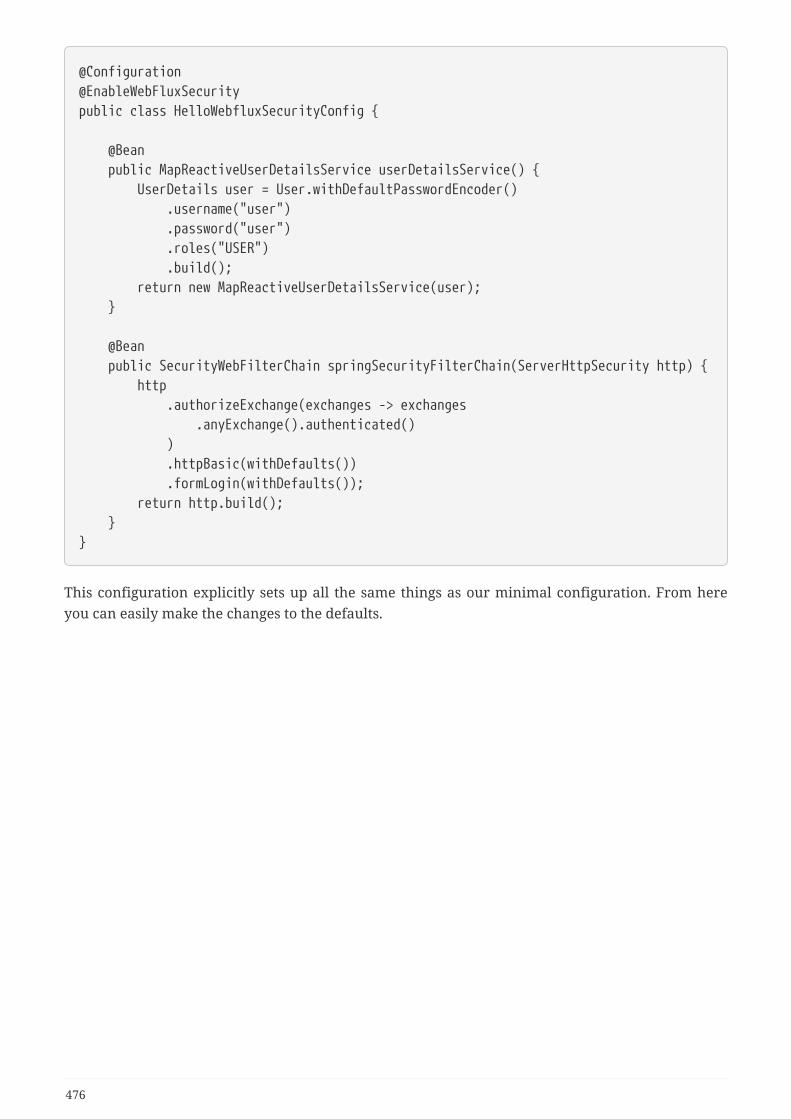
@Configuration@EnableWebFluxSecuritypublic class HelloWebfluxSecurityConfig {
@Bean public MapReactiveUserDetailsService userDetailsService() { UserDetails user = User.withDefaultPasswordEncoder() .username("user") .password("user") .roles("USER") .build(); return new MapReactiveUserDetailsService(user); }
@Bean public SecurityWebFilterChain springSecurityFilterChain(ServerHttpSecurity http) { http .authorizeExchange(exchanges -> exchanges .anyExchange().authenticated() ) .httpBasic(withDefaults()) .formLogin(withDefaults()); return http.build(); }}
This configuration explicitly sets up all the same things as our minimal configuration. From hereyou can easily make the changes to the defaults.
476
Chapter 23. Protection Against Exploits
23.1. Cross Site Request Forgery (CSRF) for WebFluxEnvironmentsThis section discusses Spring Security’s Cross Site Request Forgery (CSRF) support for WebFluxenvironments.
23.1.1. Using Spring Security CSRF Protection
The steps to using Spring Security’s CSRF protection are outlined below:
• Use proper HTTP verbs
• Configure CSRF Protection
• Include the CSRF Token
Use proper HTTP verbs
The first step to protecting against CSRF attacks is to ensure your website uses proper HTTP verbs.This is covered in detail in Safe Methods Must be Idempotent.
Configure CSRF Protection
The next step is to configure Spring Security’s CSRF protection within your application. SpringSecurity’s CSRF protection is enabled by default, but you may need to customize the configuration.Below are a few common customizations.
Custom CsrfTokenRepository
By default Spring Security stores the expected CSRF token in the WebSession usingWebSessionServerCsrfTokenRepository. There can be cases where users will want to configure acustom ServerCsrfTokenRepository. For example, it might be desirable to persist the CsrfToken in acookie to support a JavaScript based application.
By default the CookieServerCsrfTokenRepository will write to a cookie named XSRF-TOKEN and read itfrom a header named X-XSRF-TOKEN or the HTTP parameter _csrf. These defaults come fromAngularJS
You can configure CookieCsrfTokenRepository in Java Configuration using:
477
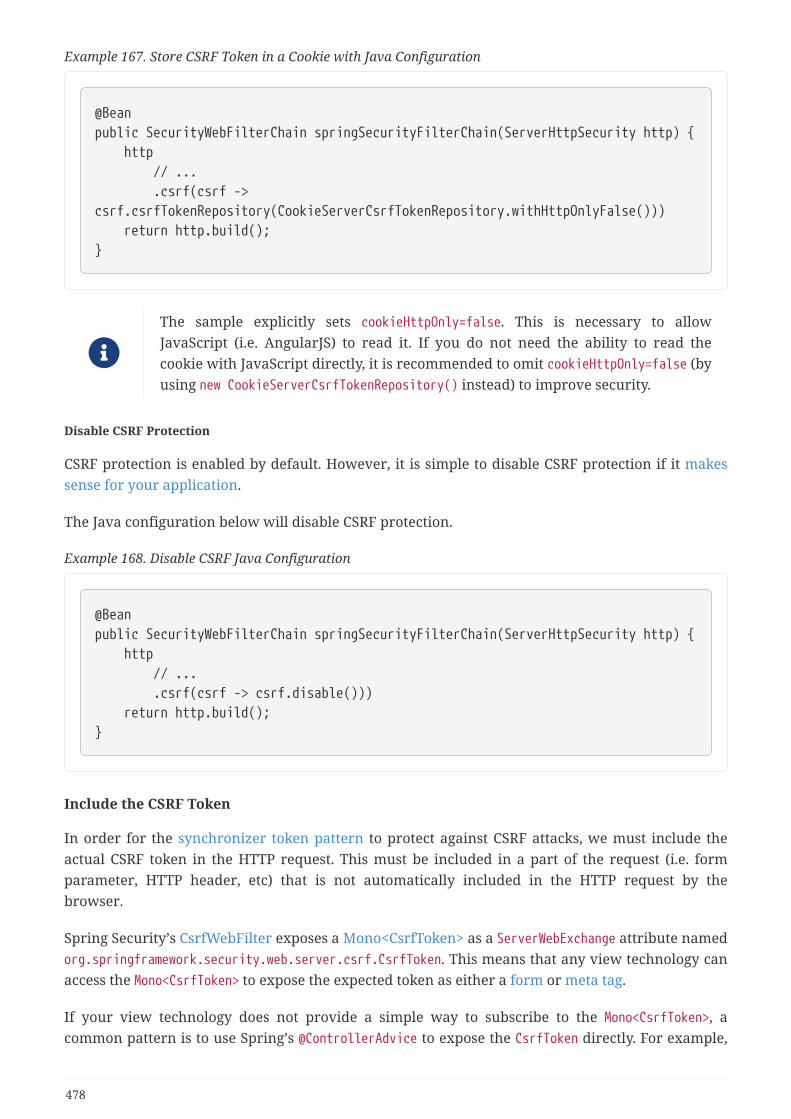
Example 167. Store CSRF Token in a Cookie with Java Configuration
@Beanpublic SecurityWebFilterChain springSecurityFilterChain(ServerHttpSecurity http) { http // ... .csrf(csrf ->csrf.csrfTokenRepository(CookieServerCsrfTokenRepository.withHttpOnlyFalse())) return http.build();}
The sample explicitly sets cookieHttpOnly=false. This is necessary to allowJavaScript (i.e. AngularJS) to read it. If you do not need the ability to read thecookie with JavaScript directly, it is recommended to omit cookieHttpOnly=false (byusing new CookieServerCsrfTokenRepository() instead) to improve security.
Disable CSRF Protection
CSRF protection is enabled by default. However, it is simple to disable CSRF protection if it makessense for your application.
The Java configuration below will disable CSRF protection.
Example 168. Disable CSRF Java Configuration
@Beanpublic SecurityWebFilterChain springSecurityFilterChain(ServerHttpSecurity http) { http // ... .csrf(csrf -> csrf.disable())) return http.build();}
Include the CSRF Token
In order for the synchronizer token pattern to protect against CSRF attacks, we must include theactual CSRF token in the HTTP request. This must be included in a part of the request (i.e. formparameter, HTTP header, etc) that is not automatically included in the HTTP request by thebrowser.
Spring Security’s CsrfWebFilter exposes a Mono<CsrfToken> as a ServerWebExchange attribute namedorg.springframework.security.web.server.csrf.CsrfToken. This means that any view technology canaccess the Mono<CsrfToken> to expose the expected token as either a form or meta tag.
If your view technology does not provide a simple way to subscribe to the Mono<CsrfToken>, acommon pattern is to use Spring’s @ControllerAdvice to expose the CsrfToken directly. For example,
478
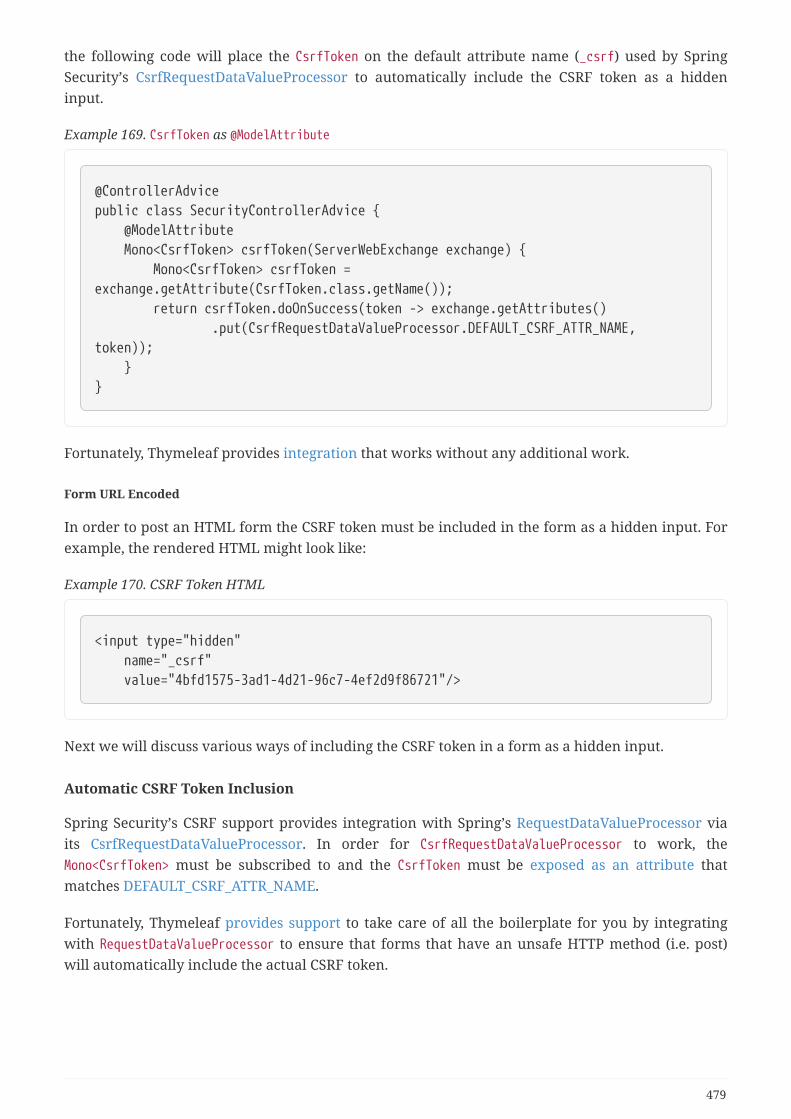
the following code will place the CsrfToken on the default attribute name (_csrf) used by SpringSecurity’s CsrfRequestDataValueProcessor to automatically include the CSRF token as a hiddeninput.
Example 169. CsrfToken as @ModelAttribute
@ControllerAdvicepublic class SecurityControllerAdvice { @ModelAttribute Mono<CsrfToken> csrfToken(ServerWebExchange exchange) { Mono<CsrfToken> csrfToken =exchange.getAttribute(CsrfToken.class.getName()); return csrfToken.doOnSuccess(token -> exchange.getAttributes() .put(CsrfRequestDataValueProcessor.DEFAULT_CSRF_ATTR_NAME,token)); }}
Fortunately, Thymeleaf provides integration that works without any additional work.
Form URL Encoded
In order to post an HTML form the CSRF token must be included in the form as a hidden input. Forexample, the rendered HTML might look like:
Example 170. CSRF Token HTML
<input type="hidden" name="_csrf" value="4bfd1575-3ad1-4d21-96c7-4ef2d9f86721"/>
Next we will discuss various ways of including the CSRF token in a form as a hidden input.
Automatic CSRF Token Inclusion
Spring Security’s CSRF support provides integration with Spring’s RequestDataValueProcessor viaits CsrfRequestDataValueProcessor. In order for CsrfRequestDataValueProcessor to work, theMono<CsrfToken> must be subscribed to and the CsrfToken must be exposed as an attribute thatmatches DEFAULT_CSRF_ATTR_NAME.
Fortunately, Thymeleaf provides support to take care of all the boilerplate for you by integratingwith RequestDataValueProcessor to ensure that forms that have an unsafe HTTP method (i.e. post)will automatically include the actual CSRF token.
479
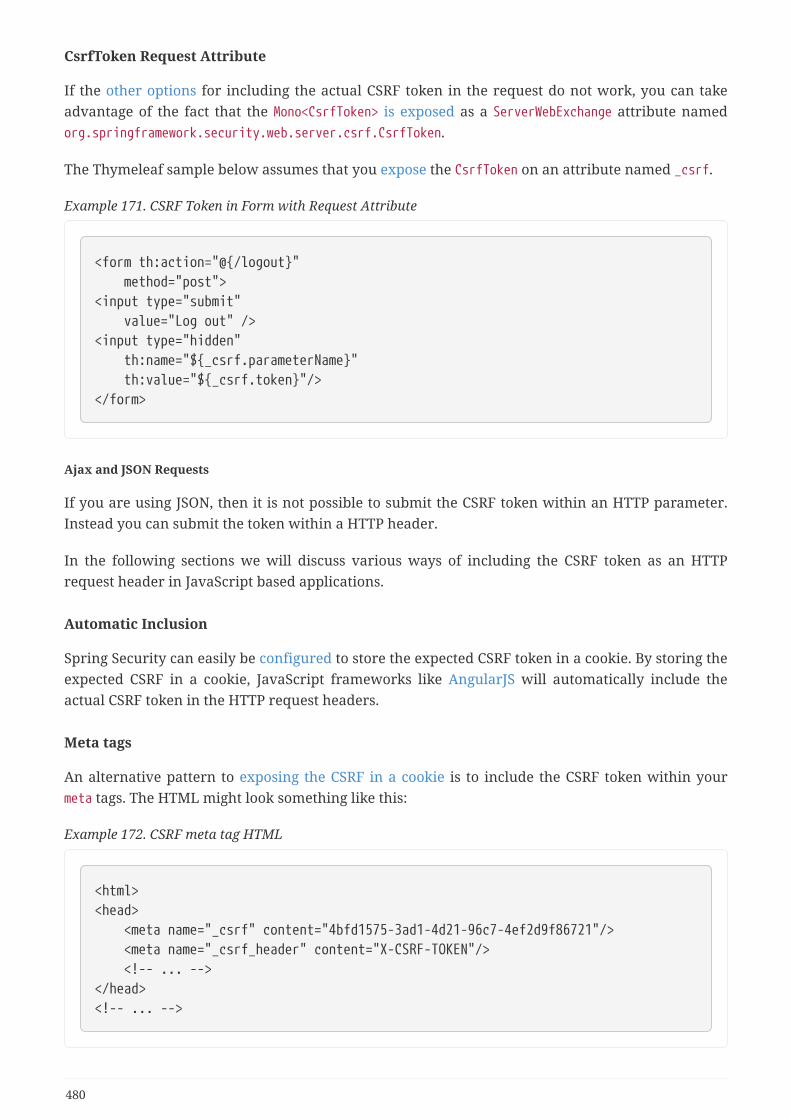
CsrfToken Request Attribute
If the other options for including the actual CSRF token in the request do not work, you can takeadvantage of the fact that the Mono<CsrfToken> is exposed as a ServerWebExchange attribute namedorg.springframework.security.web.server.csrf.CsrfToken.
The Thymeleaf sample below assumes that you expose the CsrfToken on an attribute named _csrf.
Example 171. CSRF Token in Form with Request Attribute
<form th:action="@{/logout}" method="post"><input type="submit" value="Log out" /><input type="hidden" th:name="${_csrf.parameterName}" th:value="${_csrf.token}"/></form>
Ajax and JSON Requests
If you are using JSON, then it is not possible to submit the CSRF token within an HTTP parameter.Instead you can submit the token within a HTTP header.
In the following sections we will discuss various ways of including the CSRF token as an HTTPrequest header in JavaScript based applications.
Automatic Inclusion
Spring Security can easily be configured to store the expected CSRF token in a cookie. By storing theexpected CSRF in a cookie, JavaScript frameworks like AngularJS will automatically include theactual CSRF token in the HTTP request headers.
Meta tags
An alternative pattern to exposing the CSRF in a cookie is to include the CSRF token within yourmeta tags. The HTML might look something like this:
Example 172. CSRF meta tag HTML
<html><head> <meta name="_csrf" content="4bfd1575-3ad1-4d21-96c7-4ef2d9f86721"/> <meta name="_csrf_header" content="X-CSRF-TOKEN"/> <!-- ... --></head><!-- ... -->
480
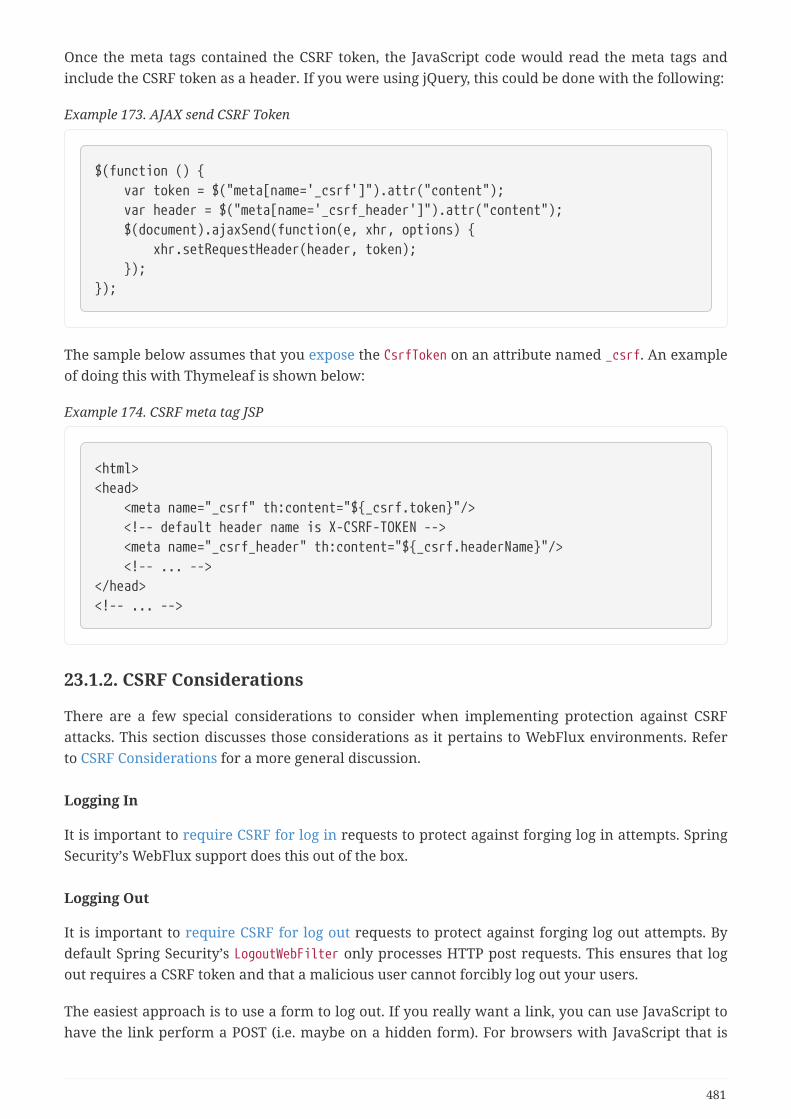
Once the meta tags contained the CSRF token, the JavaScript code would read the meta tags andinclude the CSRF token as a header. If you were using jQuery, this could be done with the following:
Example 173. AJAX send CSRF Token
$(function () { var token = $("meta[name='_csrf']").attr("content"); var header = $("meta[name='_csrf_header']").attr("content"); $(document).ajaxSend(function(e, xhr, options) { xhr.setRequestHeader(header, token); });});
The sample below assumes that you expose the CsrfToken on an attribute named _csrf. An exampleof doing this with Thymeleaf is shown below:
Example 174. CSRF meta tag JSP
<html><head> <meta name="_csrf" th:content="${_csrf.token}"/> <!-- default header name is X-CSRF-TOKEN --> <meta name="_csrf_header" th:content="${_csrf.headerName}"/> <!-- ... --></head><!-- ... -->
23.1.2. CSRF Considerations
There are a few special considerations to consider when implementing protection against CSRFattacks. This section discusses those considerations as it pertains to WebFlux environments. Referto CSRF Considerations for a more general discussion.
Logging In
It is important to require CSRF for log in requests to protect against forging log in attempts. SpringSecurity’s WebFlux support does this out of the box.
Logging Out
It is important to require CSRF for log out requests to protect against forging log out attempts. Bydefault Spring Security’s LogoutWebFilter only processes HTTP post requests. This ensures that logout requires a CSRF token and that a malicious user cannot forcibly log out your users.
The easiest approach is to use a form to log out. If you really want a link, you can use JavaScript tohave the link perform a POST (i.e. maybe on a hidden form). For browsers with JavaScript that is
481
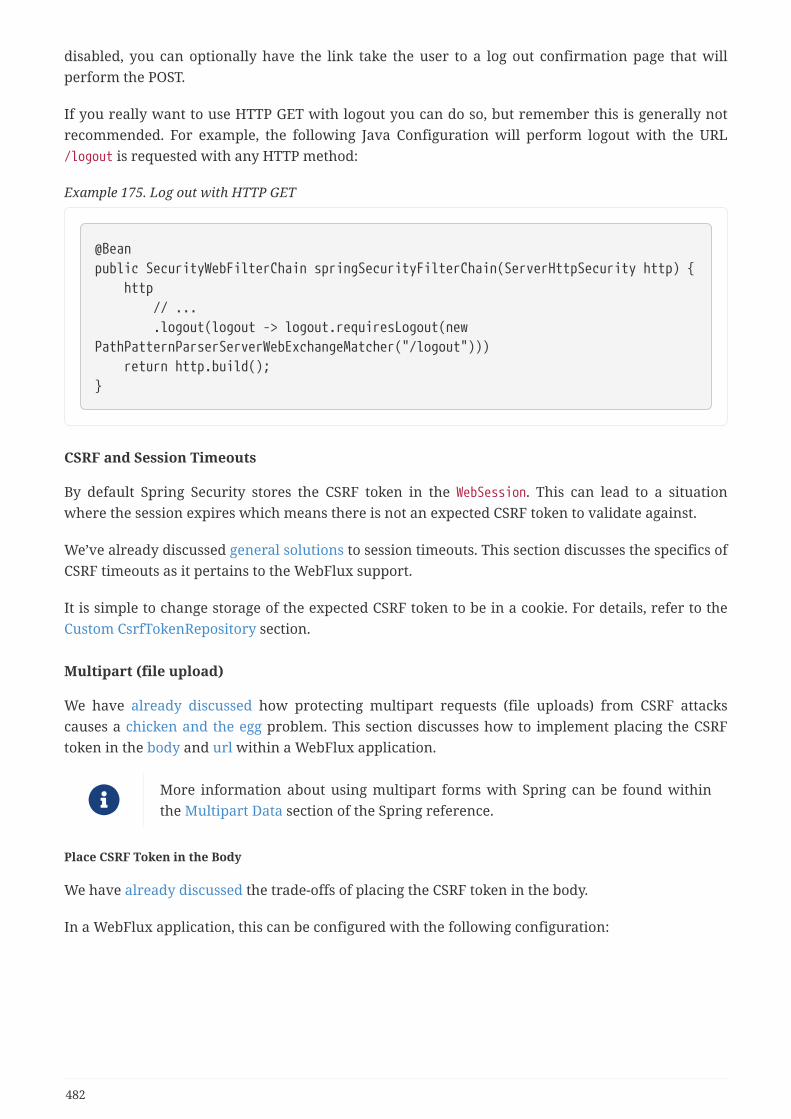
disabled, you can optionally have the link take the user to a log out confirmation page that willperform the POST.
If you really want to use HTTP GET with logout you can do so, but remember this is generally notrecommended. For example, the following Java Configuration will perform logout with the URL/logout is requested with any HTTP method:
Example 175. Log out with HTTP GET
@Beanpublic SecurityWebFilterChain springSecurityFilterChain(ServerHttpSecurity http) { http // ... .logout(logout -> logout.requiresLogout(newPathPatternParserServerWebExchangeMatcher("/logout"))) return http.build();}
CSRF and Session Timeouts
By default Spring Security stores the CSRF token in the WebSession. This can lead to a situationwhere the session expires which means there is not an expected CSRF token to validate against.
We’ve already discussed general solutions to session timeouts. This section discusses the specifics ofCSRF timeouts as it pertains to the WebFlux support.
It is simple to change storage of the expected CSRF token to be in a cookie. For details, refer to theCustom CsrfTokenRepository section.
Multipart (file upload)
We have already discussed how protecting multipart requests (file uploads) from CSRF attackscauses a chicken and the egg problem. This section discusses how to implement placing the CSRFtoken in the body and url within a WebFlux application.
More information about using multipart forms with Spring can be found withinthe Multipart Data section of the Spring reference.
Place CSRF Token in the Body
We have already discussed the trade-offs of placing the CSRF token in the body.
In a WebFlux application, this can be configured with the following configuration:
482

Example 176. Enable obtaining CSRF token from multipart/form-data
@Beanpublic SecurityWebFilterChain springSecurityFilterChain(ServerHttpSecurity http) { http // ... .csrf(csrf -> csrf.tokenFromMultipartDataEnabled(true)) return http.build();}
Include CSRF Token in URL
We have already discussed the trade-offs of placing the CSRF token in the URL. Since the CsrfTokenis exposed as an ServerHttpRequest request attribute, we can use that to create an action with theCSRF token in it. An example with Thymeleaf is shown below:
Example 177. CSRF Token in Action
<form method="post" th:action="@{/upload(${_csrf.parameterName}=${_csrf.token})}" enctype="multipart/form-data">
HiddenHttpMethodFilter
We have already discussed overriding the HTTP method.
In a Spring WebFlux application, overriding the HTTP method is done usingHiddenHttpMethodFilter.
23.2. Security HTTP Response HeadersSecurity HTTP Response Headers can be used to increase the security of web applications. Thissection is dedicated to WebFlux based support for Security HTTP Response Headers.
23.2.1. Default Security Headers
Spring Security provides a default set of Security HTTP Response Headers to provide securedefaults. While each of these headers are considered best practice, it should be noted that not allclients utilize the headers, so additional testing is encouraged.
You can customize specific headers. For example, assume that you want the defaults except youwish to specify SAMEORIGIN for X-Frame-Options.
You can easily do this with the following Java Configuration:
483
Example 178. Customize Default Security Headers with Java Configuration
@BeanSecurityWebFilterChain springSecurityFilterChain(ServerHttpSecurity http) { http // ... .headers(headers -> headers .frameOptions(frameOptions -> frameOptions .mode(Mode.SAMEORIGIN) ) ); return http.build();}
If you do not want the defaults to be added and want explicit control over what should be used, youcan disable the defaults. An example for both Java configuration is provided below:
Example 179. Disable HTTP Security Response Headers
@BeanSecurityWebFilterChain springSecurityFilterChain(ServerHttpSecurity http) { http // ... .headers(headers -> headers.disable()); return http.build();}
23.2.2. Cache Control
Spring Security includes Cache Control headers by default.
However, if you actually want to cache specific responses, your application can selectively addthem to the ServerHttpResponse to override the header set by Spring Security. This is useful toensure things like CSS, JavaScript, and images are properly cached.
When using Spring WebFluxZz, this is typically done within your configuration. Details on how todo this can be found in the Static Resources portion of the Spring Reference documentation
If necessary, you can also disable Spring Security’s cache control HTTP response headers.
484
Example 180. Cache Control Disabled
@BeanSecurityWebFilterChain springSecurityFilterChain(ServerHttpSecurity http) { http // ... .headers(headers -> headers .cache(cache -> cache.disable()) ); return http.build();}
23.2.3. Content Type Options
Spring Security includes Content-Type headers by default. However, you can disable it in JavaConfiguration with:
Example 181. Content Type Options Disabled with Java Configuration
@BeanSecurityWebFilterChain springSecurityFilterChain(ServerHttpSecurity http) { http // ... .headers(headers -> headers .contentTypeOptions(contentTypeOptions ->contentTypeOptions.disable()) ); return http.build();}
23.2.4. HTTP Strict Transport Security (HSTS)
Spring Security provides the Strict Transport Security header by default. However, you cancustomize the results explicitly. For example, the following is an example of explicitly providingHSTS with Java Configuration:
485
Example 182. Strict Transport Security with Java Configuration
@BeanSecurityWebFilterChain springSecurityFilterChain(ServerHttpSecurity http) { http // ... .headers(headers -> headers .hsts(hsts -> hsts .includeSubdomains(true) .preload(true) .maxAge(Duration.ofDays(365)) ) ); return http.build();}
23.2.5. X-Frame-Options
By default, Spring Security disables rendering within an iframe using X-Frame-Options.
You can customize frame options to use the same origin within Java Configuration using thefollowing:
Example 183. X-Frame-Options: SAMEORIGIN
@BeanSecurityWebFilterChain springSecurityFilterChain(ServerHttpSecurity http) { http // ... .headers(headers -> headers .frameOptions(frameOptions -> frameOptions .mode(SAMEORIGIN) ) ); return http.build();}
23.2.6. X-XSS-Protection
By default, Spring Security instructs browsers to block reflected XSS attacks using the <<headers-xss-protection,X-XSS-Protection header>. You can disable X-XSS-Protection with the following JavaConfiguration:
486

Example 184. X-XSS-Protection Customization
@BeanSecurityWebFilterChain springSecurityFilterChain(ServerHttpSecurity http) { http // ... .headers(headers -> headers .xssProtection(xssProtection -> xssProtection.disable()) ); return http.build();}
23.2.7. Content Security Policy (CSP)
Spring Security does not add Content Security Policy by default, because a reasonable default isimpossible to know without context of the application. The web application author must declare thesecurity policy(s) to enforce and/or monitor for the protected resources.
For example, given the following security policy:
Example 185. Content Security Policy Example
Content-Security-Policy: script-src 'self' https://trustedscripts.example.com;object-src https://trustedplugins.example.com; report-uri /csp-report-endpoint/
You can enable the CSP header using Java configuration as shown below:
Example 186. Content Security Policy
@BeanSecurityWebFilterChain springSecurityFilterChain(ServerHttpSecurity http) { http // ... .headers(headers -> headers .contentSecurityPolicy(policy -> policy .policyDirectives("script-src 'self'https://trustedscripts.example.com; object-src https://trustedplugins.example.com;report-uri /csp-report-endpoint/") ) ); return http.build();}
To enable the CSP report-only header, provide the following Java configuration:
487
Example 187. Content Security Policy Report Only
@BeanSecurityWebFilterChain springSecurityFilterChain(ServerHttpSecurity http) { http // ... .headers(headers -> headers .contentSecurityPolicy(policy -> policy .policyDirectives("script-src 'self'https://trustedscripts.example.com; object-src https://trustedplugins.example.com;report-uri /csp-report-endpoint/") .reportOnly() ) ); return http.build();}
23.2.8. Referrer Policy
Spring Security does not add Referrer Policy headers by default. You can enable the Referrer Policyheader using Java configuration as shown below:
Example 188. Referrer Policy Java Configuration
@BeanSecurityWebFilterChain springSecurityFilterChain(ServerHttpSecurity http) { http // ... .headers(headers -> headers .referrerPolicy(referrer -> referrer .policy(ReferrerPolicy.SAME_ORIGIN) ) ); return http.build();}
23.2.9. Feature Policy
Spring Security does not add Feature Policy headers by default. The following Feature-Policyheader:
Example 189. Feature-Policy Example
Feature-Policy: geolocation 'self'
488
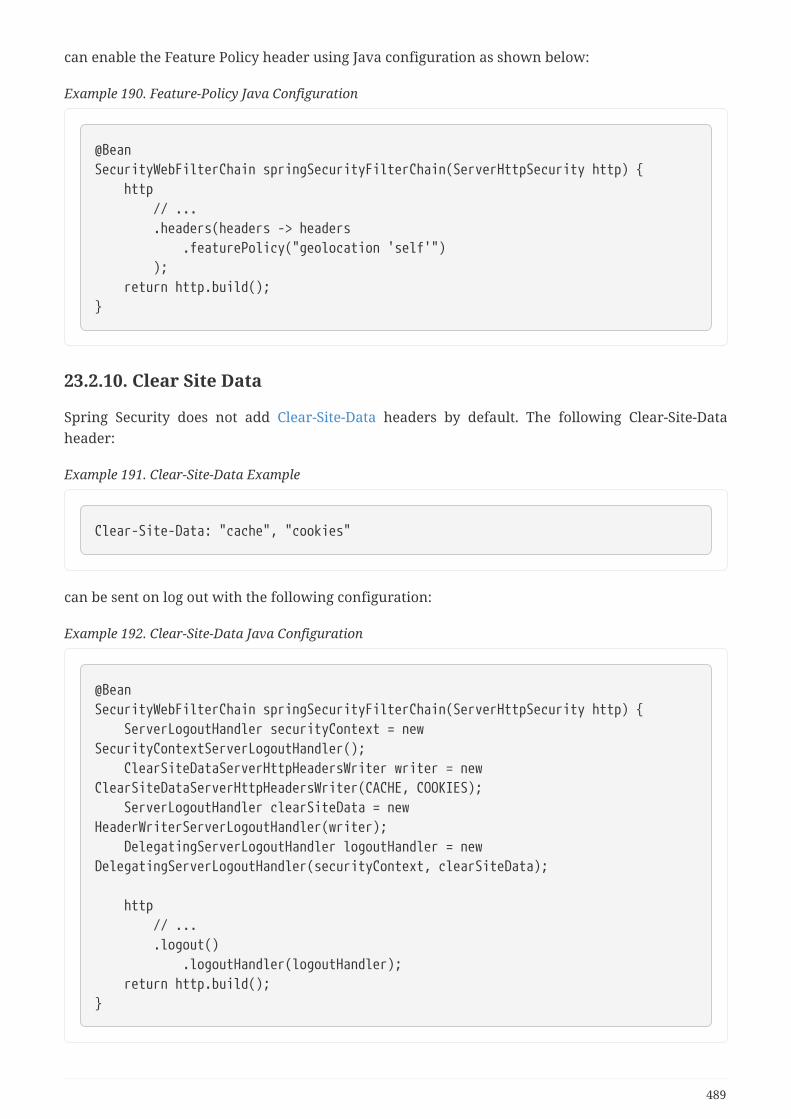
can enable the Feature Policy header using Java configuration as shown below:
Example 190. Feature-Policy Java Configuration
@BeanSecurityWebFilterChain springSecurityFilterChain(ServerHttpSecurity http) { http // ... .headers(headers -> headers .featurePolicy("geolocation 'self'") ); return http.build();}
23.2.10. Clear Site Data
Spring Security does not add Clear-Site-Data headers by default. The following Clear-Site-Dataheader:
Example 191. Clear-Site-Data Example
Clear-Site-Data: "cache", "cookies"
can be sent on log out with the following configuration:
Example 192. Clear-Site-Data Java Configuration
@BeanSecurityWebFilterChain springSecurityFilterChain(ServerHttpSecurity http) { ServerLogoutHandler securityContext = newSecurityContextServerLogoutHandler(); ClearSiteDataServerHttpHeadersWriter writer = newClearSiteDataServerHttpHeadersWriter(CACHE, COOKIES); ServerLogoutHandler clearSiteData = newHeaderWriterServerLogoutHandler(writer); DelegatingServerLogoutHandler logoutHandler = newDelegatingServerLogoutHandler(securityContext, clearSiteData);
http // ... .logout() .logoutHandler(logoutHandler); return http.build();}
489
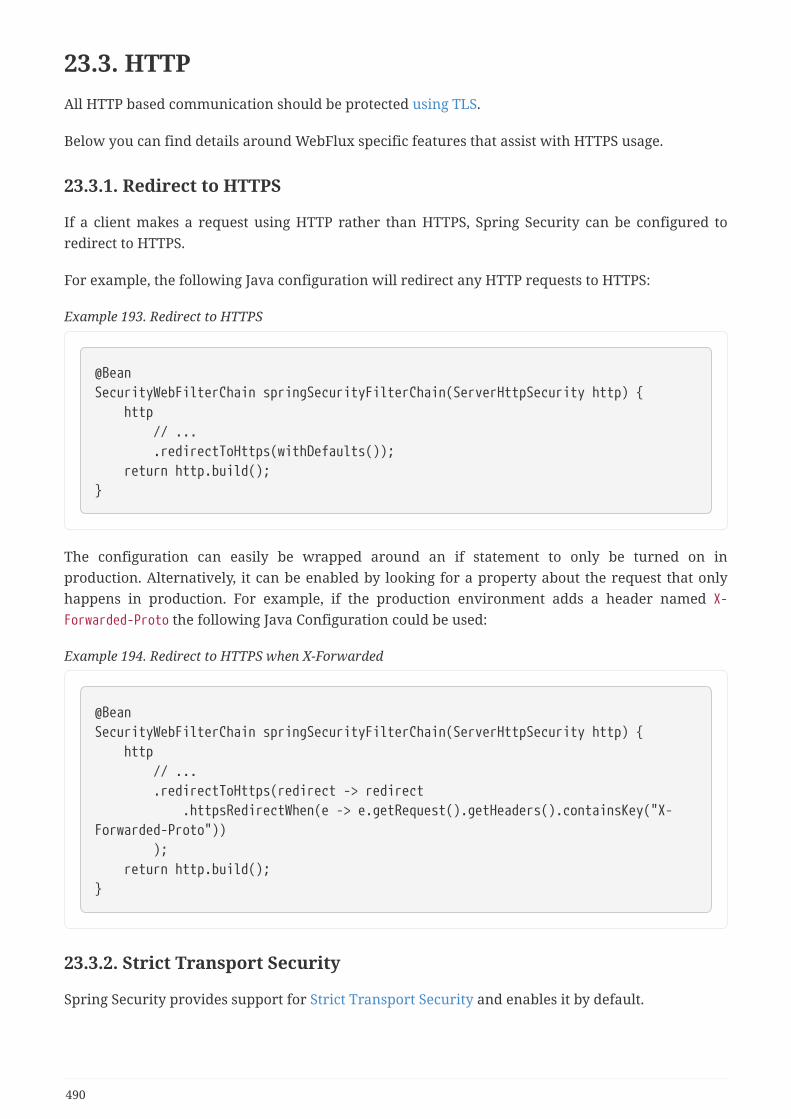
23.3. HTTPAll HTTP based communication should be protected using TLS.
Below you can find details around WebFlux specific features that assist with HTTPS usage.
23.3.1. Redirect to HTTPS
If a client makes a request using HTTP rather than HTTPS, Spring Security can be configured toredirect to HTTPS.
For example, the following Java configuration will redirect any HTTP requests to HTTPS:
Example 193. Redirect to HTTPS
@BeanSecurityWebFilterChain springSecurityFilterChain(ServerHttpSecurity http) { http // ... .redirectToHttps(withDefaults()); return http.build();}
The configuration can easily be wrapped around an if statement to only be turned on inproduction. Alternatively, it can be enabled by looking for a property about the request that onlyhappens in production. For example, if the production environment adds a header named X-Forwarded-Proto the following Java Configuration could be used:
Example 194. Redirect to HTTPS when X-Forwarded
@BeanSecurityWebFilterChain springSecurityFilterChain(ServerHttpSecurity http) { http // ... .redirectToHttps(redirect -> redirect .httpsRedirectWhen(e -> e.getRequest().getHeaders().containsKey("X-Forwarded-Proto")) ); return http.build();}
23.3.2. Strict Transport Security
Spring Security provides support for Strict Transport Security and enables it by default.
490
23.3.3. Proxy Server Configuration
Spring Security integrates with proxy servers.
491
Chapter 24. OAuth2 WebFluxSpring Security provides OAuth2 and WebFlux integration for reactive applications.
24.1. OAuth 2.0 LoginThe OAuth 2.0 Login feature provides an application with the capability to have users log in to theapplication by using their existing account at an OAuth 2.0 Provider (e.g. GitHub) or OpenIDConnect 1.0 Provider (such as Google). OAuth 2.0 Login implements the use cases: "Login withGoogle" or "Login with GitHub".
OAuth 2.0 Login is implemented by using the Authorization Code Grant, asspecified in the OAuth 2.0 Authorization Framework and OpenID Connect Core 1.0.
24.1.1. Spring Boot 2.0 Sample
Spring Boot 2.0 brings full auto-configuration capabilities for OAuth 2.0 Login.
This section shows how to configure the OAuth 2.0 Login WebFlux sample using Google as theAuthentication Provider and covers the following topics:
• Initial setup
• Setting the redirect URI
• Configure application.yml
• Boot up the application
Initial setup
To use Google’s OAuth 2.0 authentication system for login, you must set up a project in the GoogleAPI Console to obtain OAuth 2.0 credentials.
Google’s OAuth 2.0 implementation for authentication conforms to the OpenIDConnect 1.0 specification and is OpenID Certified.
Follow the instructions on the OpenID Connect page, starting in the section, "Setting up OAuth 2.0".
After completing the "Obtain OAuth 2.0 credentials" instructions, you should have a new OAuthClient with credentials consisting of a Client ID and a Client Secret.
Setting the redirect URI
The redirect URI is the path in the application that the end-user’s user-agent is redirected back toafter they have authenticated with Google and have granted access to the OAuth Client (created inthe previous step) on the Consent page.
In the "Set a redirect URI" sub-section, ensure that the Authorized redirect URIs field is set tohttp://localhost:8080/login/oauth2/code/google.
492
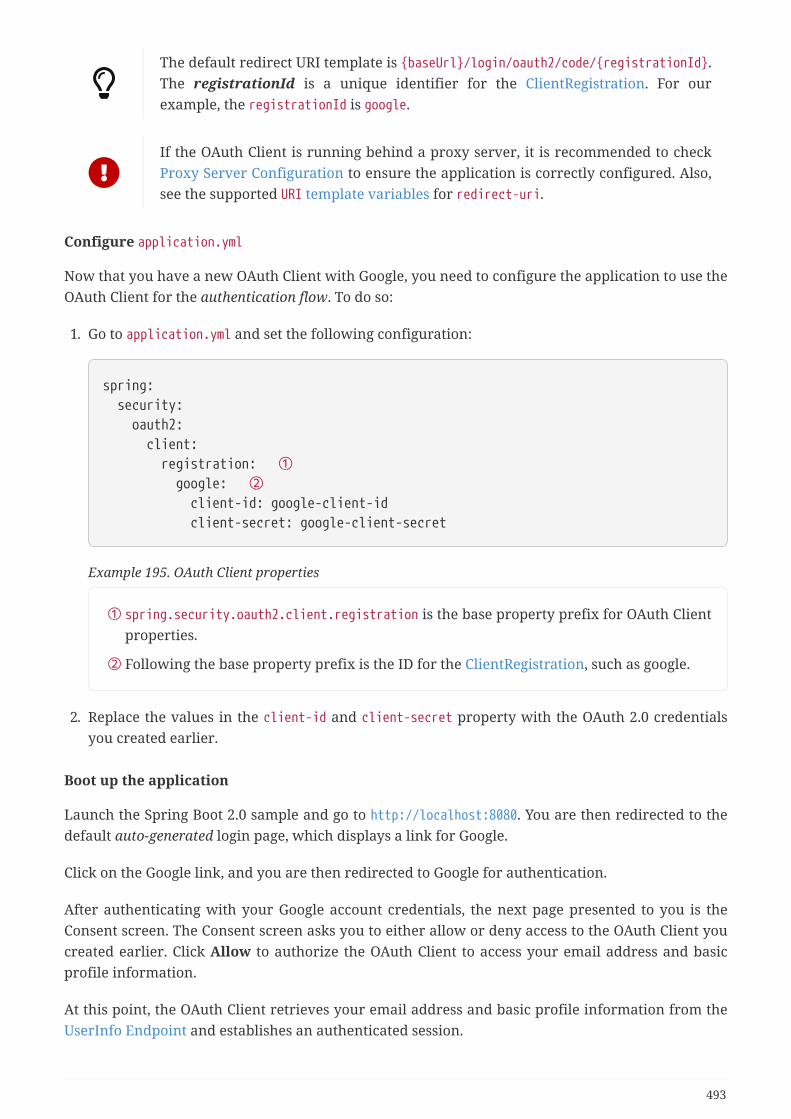
The default redirect URI template is {baseUrl}/login/oauth2/code/{registrationId}.The registrationId is a unique identifier for the ClientRegistration. For ourexample, the registrationId is google.
If the OAuth Client is running behind a proxy server, it is recommended to checkProxy Server Configuration to ensure the application is correctly configured. Also,see the supported URI template variables for redirect-uri.
Configure application.yml
Now that you have a new OAuth Client with Google, you need to configure the application to use theOAuth Client for the authentication flow. To do so:
1. Go to application.yml and set the following configuration:
spring: security: oauth2: client: registration: ① google: ② client-id: google-client-id client-secret: google-client-secret
Example 195. OAuth Client properties
① spring.security.oauth2.client.registration is the base property prefix for OAuth Clientproperties.
② Following the base property prefix is the ID for the ClientRegistration, such as google.
2. Replace the values in the client-id and client-secret property with the OAuth 2.0 credentialsyou created earlier.
Boot up the application
Launch the Spring Boot 2.0 sample and go to http://localhost:8080. You are then redirected to thedefault auto-generated login page, which displays a link for Google.
Click on the Google link, and you are then redirected to Google for authentication.
After authenticating with your Google account credentials, the next page presented to you is theConsent screen. The Consent screen asks you to either allow or deny access to the OAuth Client youcreated earlier. Click Allow to authorize the OAuth Client to access your email address and basicprofile information.
At this point, the OAuth Client retrieves your email address and basic profile information from theUserInfo Endpoint and establishes an authenticated session.
493
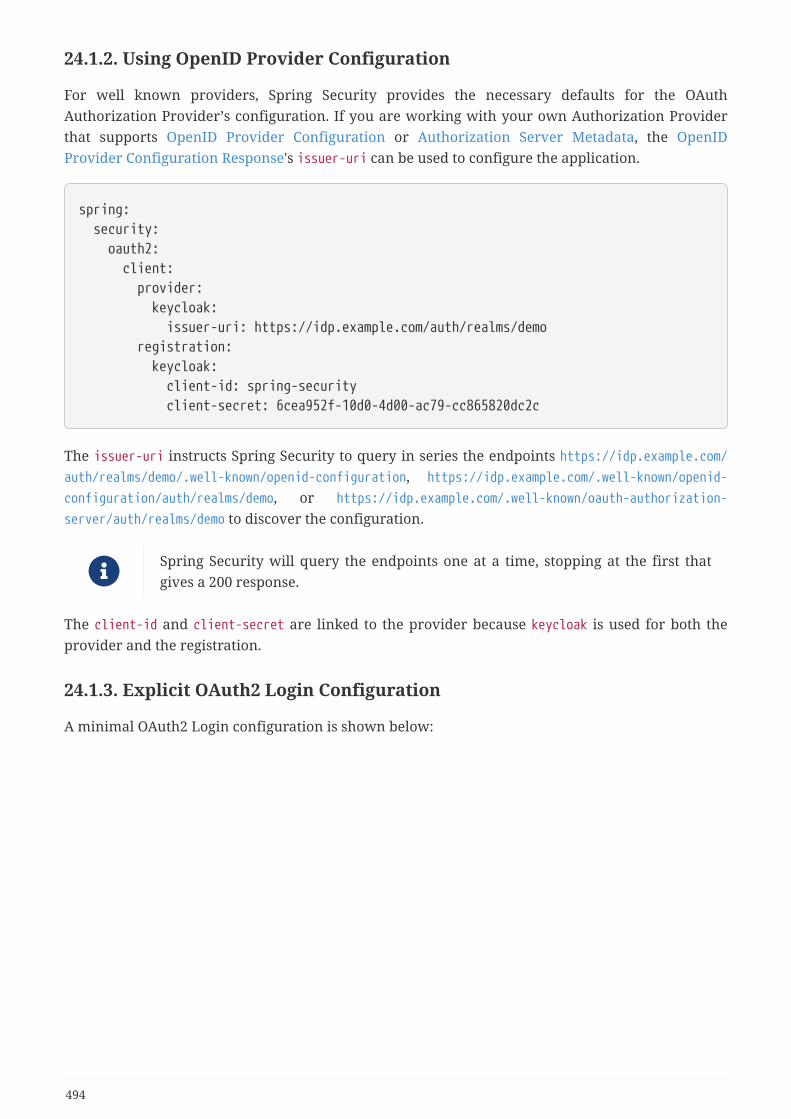
24.1.2. Using OpenID Provider Configuration
For well known providers, Spring Security provides the necessary defaults for the OAuthAuthorization Provider’s configuration. If you are working with your own Authorization Providerthat supports OpenID Provider Configuration or Authorization Server Metadata, the OpenIDProvider Configuration Response's issuer-uri can be used to configure the application.
spring: security: oauth2: client: provider: keycloak: issuer-uri: https://idp.example.com/auth/realms/demo registration: keycloak: client-id: spring-security client-secret: 6cea952f-10d0-4d00-ac79-cc865820dc2c
The issuer-uri instructs Spring Security to query in series the endpoints https://idp.example.com/auth/realms/demo/.well-known/openid-configuration, https://idp.example.com/.well-known/openid-configuration/auth/realms/demo, or https://idp.example.com/.well-known/oauth-authorization-server/auth/realms/demo to discover the configuration.
Spring Security will query the endpoints one at a time, stopping at the first thatgives a 200 response.
The client-id and client-secret are linked to the provider because keycloak is used for both theprovider and the registration.
24.1.3. Explicit OAuth2 Login Configuration
A minimal OAuth2 Login configuration is shown below:
494
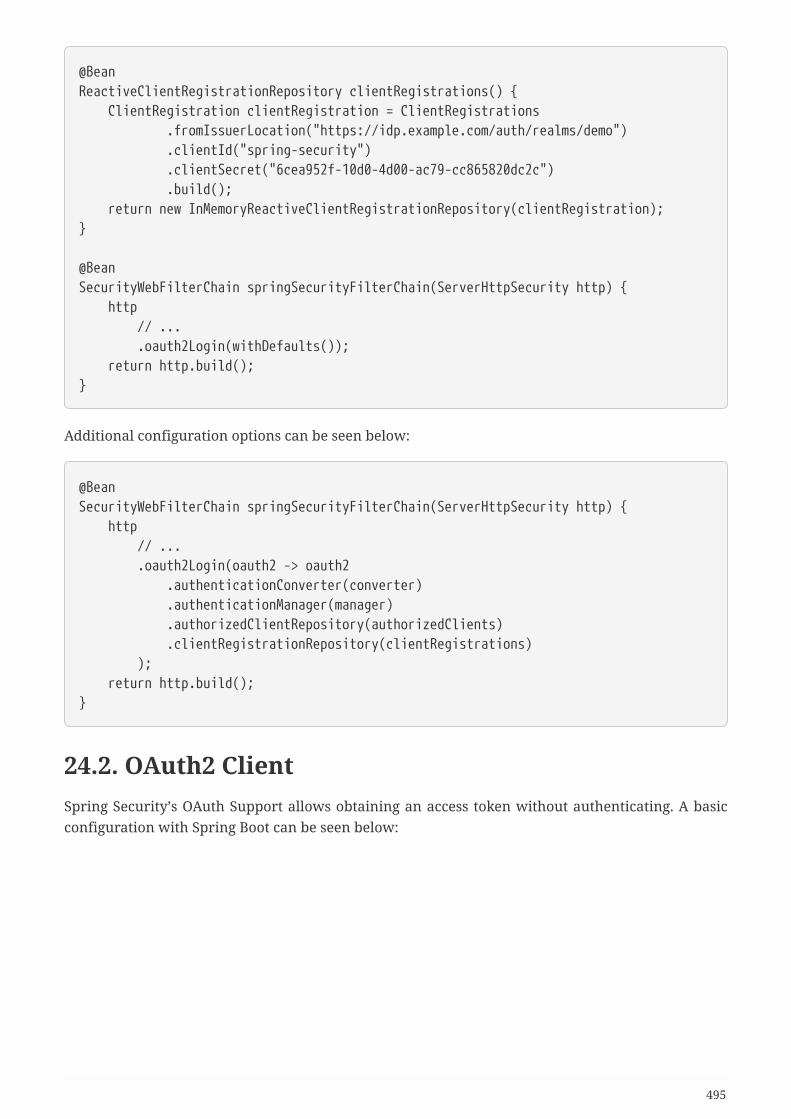
@BeanReactiveClientRegistrationRepository clientRegistrations() { ClientRegistration clientRegistration = ClientRegistrations .fromIssuerLocation("https://idp.example.com/auth/realms/demo") .clientId("spring-security") .clientSecret("6cea952f-10d0-4d00-ac79-cc865820dc2c") .build(); return new InMemoryReactiveClientRegistrationRepository(clientRegistration);}
@BeanSecurityWebFilterChain springSecurityFilterChain(ServerHttpSecurity http) { http // ... .oauth2Login(withDefaults()); return http.build();}
Additional configuration options can be seen below:
@BeanSecurityWebFilterChain springSecurityFilterChain(ServerHttpSecurity http) { http // ... .oauth2Login(oauth2 -> oauth2 .authenticationConverter(converter) .authenticationManager(manager) .authorizedClientRepository(authorizedClients) .clientRegistrationRepository(clientRegistrations) ); return http.build();}
24.2. OAuth2 ClientSpring Security’s OAuth Support allows obtaining an access token without authenticating. A basicconfiguration with Spring Boot can be seen below:
495
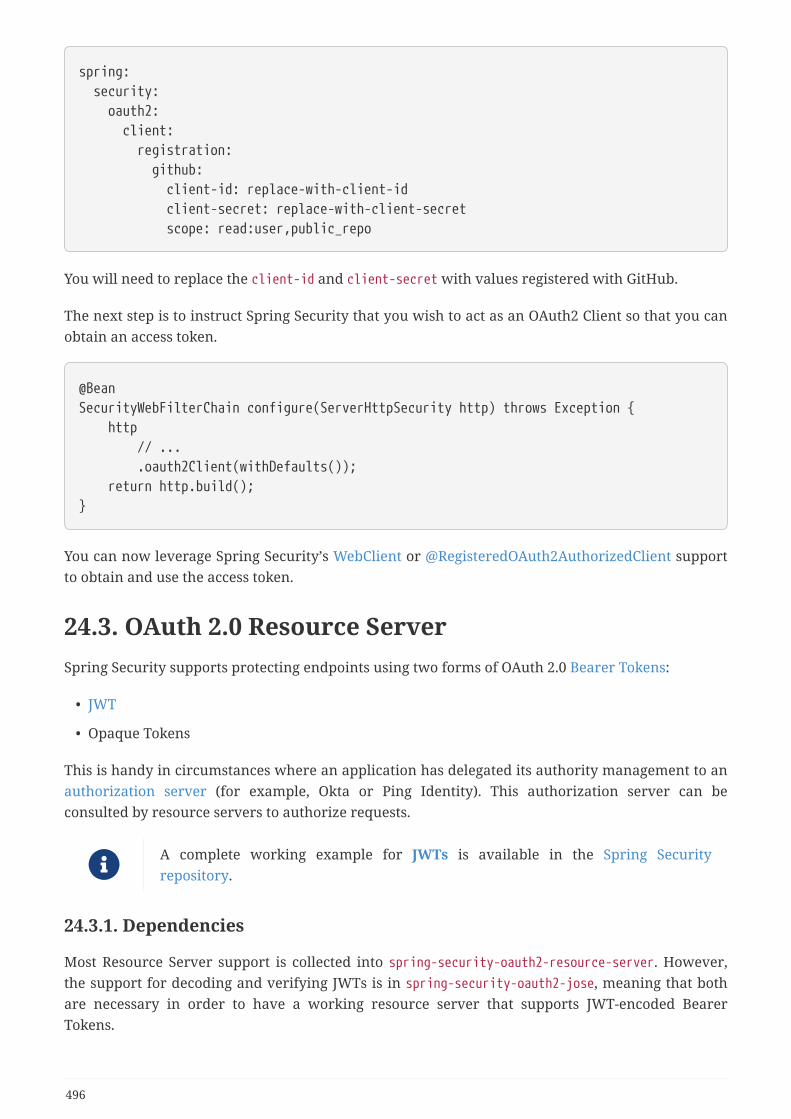
spring: security: oauth2: client: registration: github: client-id: replace-with-client-id client-secret: replace-with-client-secret scope: read:user,public_repo
You will need to replace the client-id and client-secret with values registered with GitHub.
The next step is to instruct Spring Security that you wish to act as an OAuth2 Client so that you canobtain an access token.
@BeanSecurityWebFilterChain configure(ServerHttpSecurity http) throws Exception { http // ... .oauth2Client(withDefaults()); return http.build();}
You can now leverage Spring Security’s WebClient or @RegisteredOAuth2AuthorizedClient supportto obtain and use the access token.
24.3. OAuth 2.0 Resource ServerSpring Security supports protecting endpoints using two forms of OAuth 2.0 Bearer Tokens:
• JWT
• Opaque Tokens
This is handy in circumstances where an application has delegated its authority management to anauthorization server (for example, Okta or Ping Identity). This authorization server can beconsulted by resource servers to authorize requests.
A complete working example for JWTs is available in the Spring Securityrepository.
24.3.1. Dependencies
Most Resource Server support is collected into spring-security-oauth2-resource-server. However,the support for decoding and verifying JWTs is in spring-security-oauth2-jose, meaning that bothare necessary in order to have a working resource server that supports JWT-encoded BearerTokens.
496
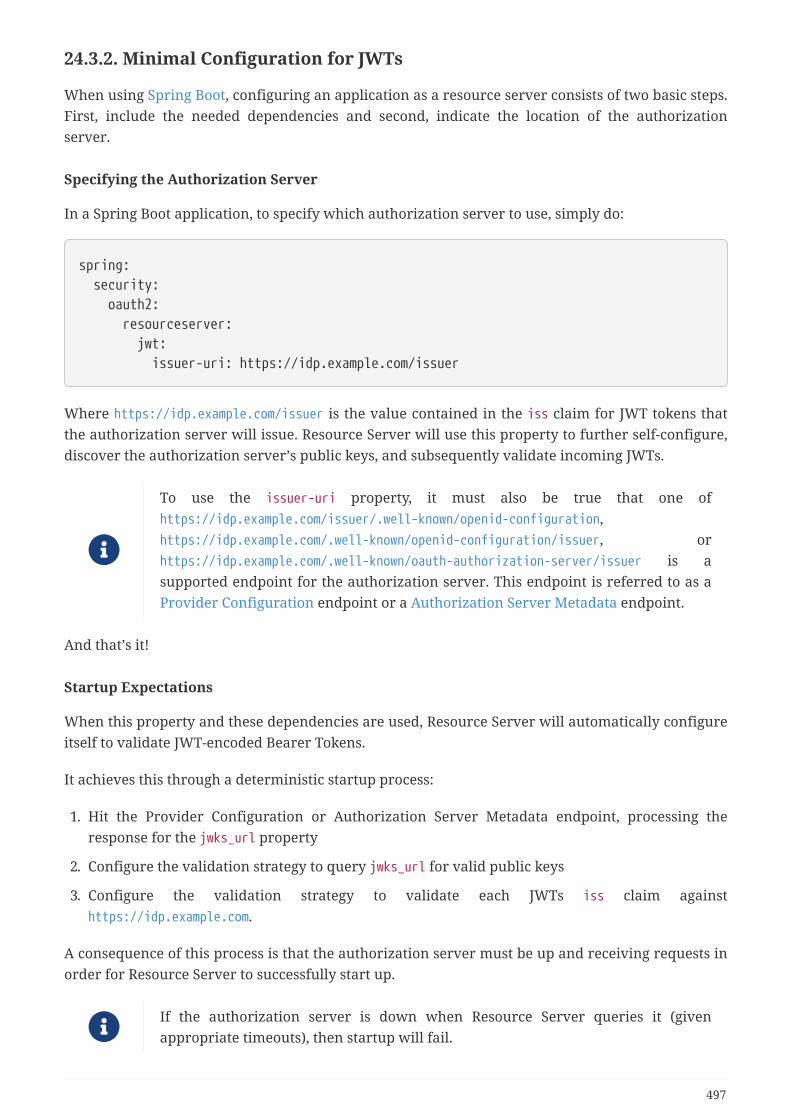
24.3.2. Minimal Configuration for JWTs
When using Spring Boot, configuring an application as a resource server consists of two basic steps.First, include the needed dependencies and second, indicate the location of the authorizationserver.
Specifying the Authorization Server
In a Spring Boot application, to specify which authorization server to use, simply do:
spring: security: oauth2: resourceserver: jwt: issuer-uri: https://idp.example.com/issuer
Where https://idp.example.com/issuer is the value contained in the iss claim for JWT tokens thatthe authorization server will issue. Resource Server will use this property to further self-configure,discover the authorization server’s public keys, and subsequently validate incoming JWTs.
To use the issuer-uri property, it must also be true that one ofhttps://idp.example.com/issuer/.well-known/openid-configuration,https://idp.example.com/.well-known/openid-configuration/issuer, orhttps://idp.example.com/.well-known/oauth-authorization-server/issuer is asupported endpoint for the authorization server. This endpoint is referred to as aProvider Configuration endpoint or a Authorization Server Metadata endpoint.
And that’s it!
Startup Expectations
When this property and these dependencies are used, Resource Server will automatically configureitself to validate JWT-encoded Bearer Tokens.
It achieves this through a deterministic startup process:
1. Hit the Provider Configuration or Authorization Server Metadata endpoint, processing theresponse for the jwks_url property
2. Configure the validation strategy to query jwks_url for valid public keys
3. Configure the validation strategy to validate each JWTs iss claim againsthttps://idp.example.com.
A consequence of this process is that the authorization server must be up and receiving requests inorder for Resource Server to successfully start up.
If the authorization server is down when Resource Server queries it (givenappropriate timeouts), then startup will fail.
497
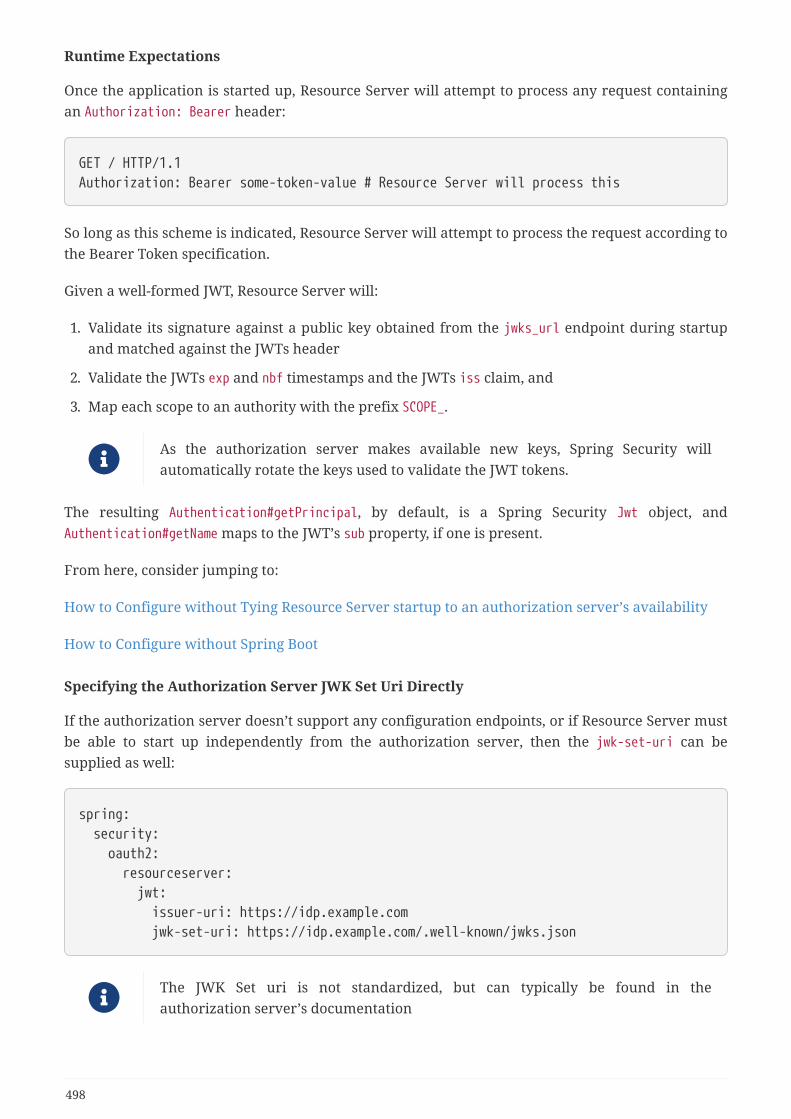
Runtime Expectations
Once the application is started up, Resource Server will attempt to process any request containingan Authorization: Bearer header:
GET / HTTP/1.1Authorization: Bearer some-token-value # Resource Server will process this
So long as this scheme is indicated, Resource Server will attempt to process the request according tothe Bearer Token specification.
Given a well-formed JWT, Resource Server will:
1. Validate its signature against a public key obtained from the jwks_url endpoint during startupand matched against the JWTs header
2. Validate the JWTs exp and nbf timestamps and the JWTs iss claim, and
3. Map each scope to an authority with the prefix SCOPE_.
As the authorization server makes available new keys, Spring Security willautomatically rotate the keys used to validate the JWT tokens.
The resulting Authentication#getPrincipal, by default, is a Spring Security Jwt object, andAuthentication#getName maps to the JWT’s sub property, if one is present.
From here, consider jumping to:
How to Configure without Tying Resource Server startup to an authorization server’s availability
How to Configure without Spring Boot
Specifying the Authorization Server JWK Set Uri Directly
If the authorization server doesn’t support any configuration endpoints, or if Resource Server mustbe able to start up independently from the authorization server, then the jwk-set-uri can besupplied as well:
spring: security: oauth2: resourceserver: jwt: issuer-uri: https://idp.example.com jwk-set-uri: https://idp.example.com/.well-known/jwks.json
The JWK Set uri is not standardized, but can typically be found in theauthorization server’s documentation
498
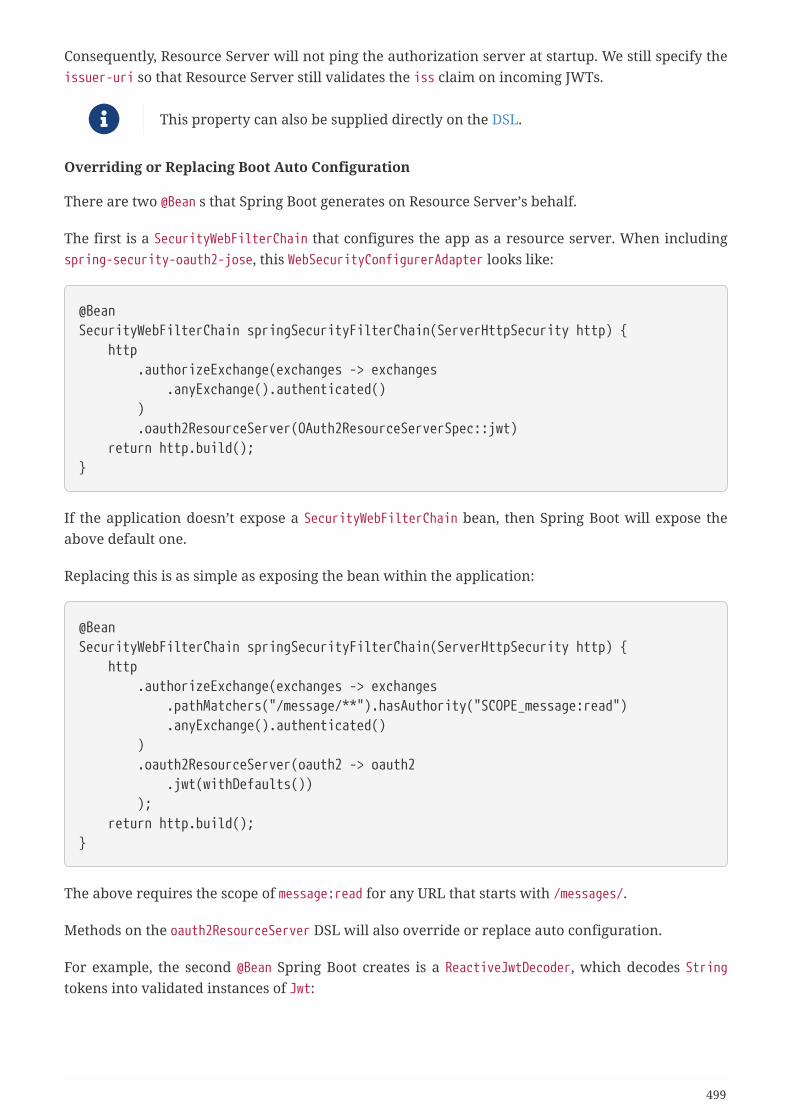
Consequently, Resource Server will not ping the authorization server at startup. We still specify theissuer-uri so that Resource Server still validates the iss claim on incoming JWTs.
This property can also be supplied directly on the DSL.
Overriding or Replacing Boot Auto Configuration
There are two @Bean s that Spring Boot generates on Resource Server’s behalf.
The first is a SecurityWebFilterChain that configures the app as a resource server. When includingspring-security-oauth2-jose, this WebSecurityConfigurerAdapter looks like:
@BeanSecurityWebFilterChain springSecurityFilterChain(ServerHttpSecurity http) { http .authorizeExchange(exchanges -> exchanges .anyExchange().authenticated() ) .oauth2ResourceServer(OAuth2ResourceServerSpec::jwt) return http.build();}
If the application doesn’t expose a SecurityWebFilterChain bean, then Spring Boot will expose theabove default one.
Replacing this is as simple as exposing the bean within the application:
@BeanSecurityWebFilterChain springSecurityFilterChain(ServerHttpSecurity http) { http .authorizeExchange(exchanges -> exchanges .pathMatchers("/message/**").hasAuthority("SCOPE_message:read") .anyExchange().authenticated() ) .oauth2ResourceServer(oauth2 -> oauth2 .jwt(withDefaults()) ); return http.build();}
The above requires the scope of message:read for any URL that starts with /messages/.
Methods on the oauth2ResourceServer DSL will also override or replace auto configuration.
For example, the second @Bean Spring Boot creates is a ReactiveJwtDecoder, which decodes Stringtokens into validated instances of Jwt:
499
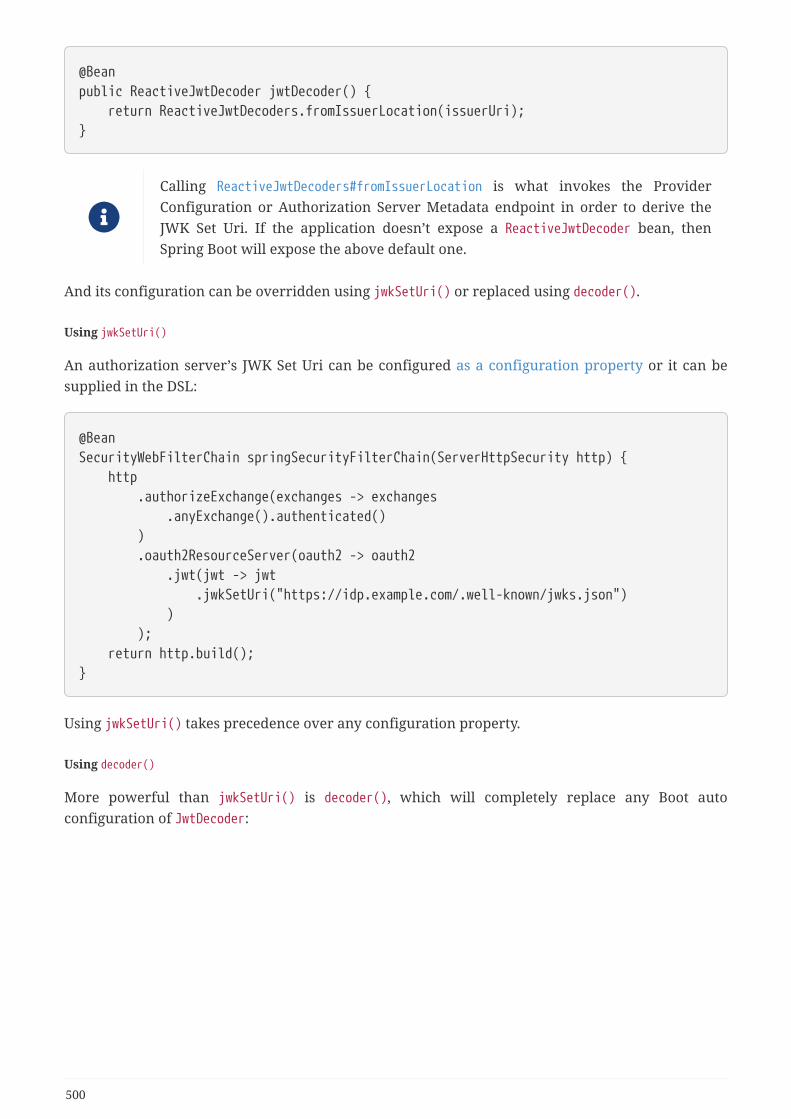
@Beanpublic ReactiveJwtDecoder jwtDecoder() { return ReactiveJwtDecoders.fromIssuerLocation(issuerUri);}
Calling ReactiveJwtDecoders#fromIssuerLocation is what invokes the ProviderConfiguration or Authorization Server Metadata endpoint in order to derive theJWK Set Uri. If the application doesn’t expose a ReactiveJwtDecoder bean, thenSpring Boot will expose the above default one.
And its configuration can be overridden using jwkSetUri() or replaced using decoder().
Using jwkSetUri()
An authorization server’s JWK Set Uri can be configured as a configuration property or it can besupplied in the DSL:
@BeanSecurityWebFilterChain springSecurityFilterChain(ServerHttpSecurity http) { http .authorizeExchange(exchanges -> exchanges .anyExchange().authenticated() ) .oauth2ResourceServer(oauth2 -> oauth2 .jwt(jwt -> jwt .jwkSetUri("https://idp.example.com/.well-known/jwks.json") ) ); return http.build();}
Using jwkSetUri() takes precedence over any configuration property.
Using decoder()
More powerful than jwkSetUri() is decoder(), which will completely replace any Boot autoconfiguration of JwtDecoder:
500
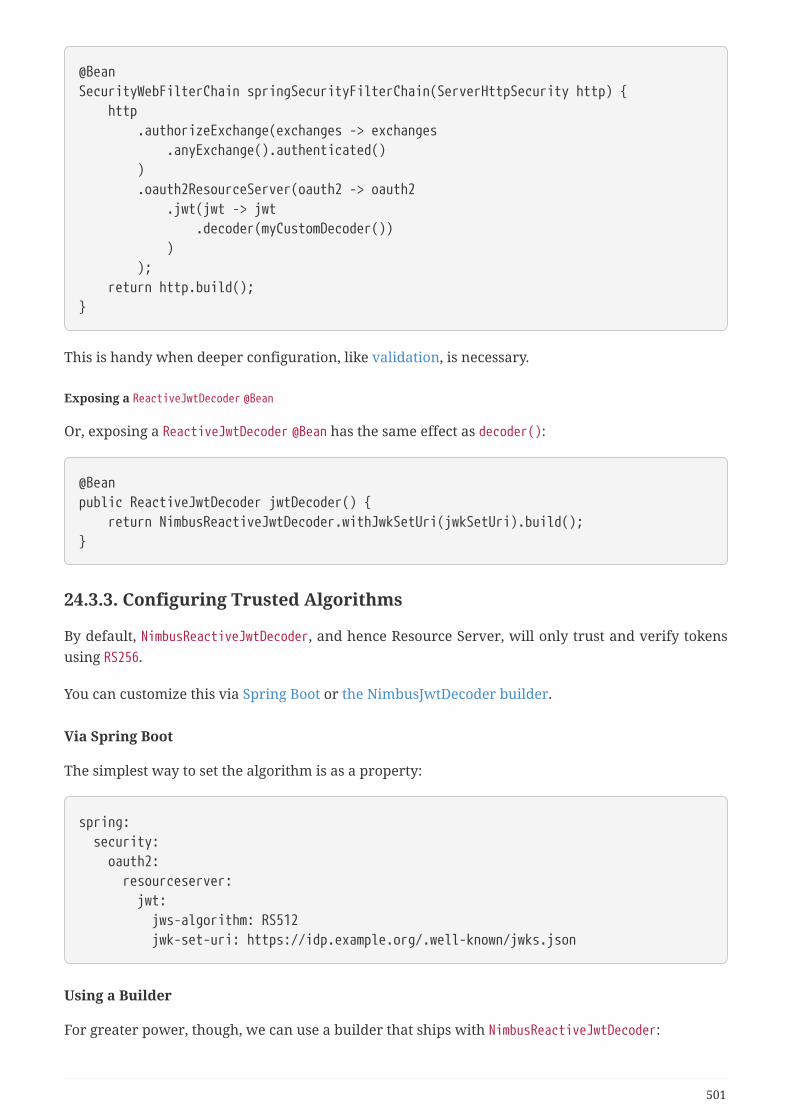
@BeanSecurityWebFilterChain springSecurityFilterChain(ServerHttpSecurity http) { http .authorizeExchange(exchanges -> exchanges .anyExchange().authenticated() ) .oauth2ResourceServer(oauth2 -> oauth2 .jwt(jwt -> jwt .decoder(myCustomDecoder()) ) ); return http.build();}
This is handy when deeper configuration, like validation, is necessary.
Exposing a ReactiveJwtDecoder @Bean
Or, exposing a ReactiveJwtDecoder @Bean has the same effect as decoder():
@Beanpublic ReactiveJwtDecoder jwtDecoder() { return NimbusReactiveJwtDecoder.withJwkSetUri(jwkSetUri).build();}
24.3.3. Configuring Trusted Algorithms
By default, NimbusReactiveJwtDecoder, and hence Resource Server, will only trust and verify tokensusing RS256.
You can customize this via Spring Boot or the NimbusJwtDecoder builder.
Via Spring Boot
The simplest way to set the algorithm is as a property:
spring: security: oauth2: resourceserver: jwt: jws-algorithm: RS512 jwk-set-uri: https://idp.example.org/.well-known/jwks.json
Using a Builder
For greater power, though, we can use a builder that ships with NimbusReactiveJwtDecoder:
501
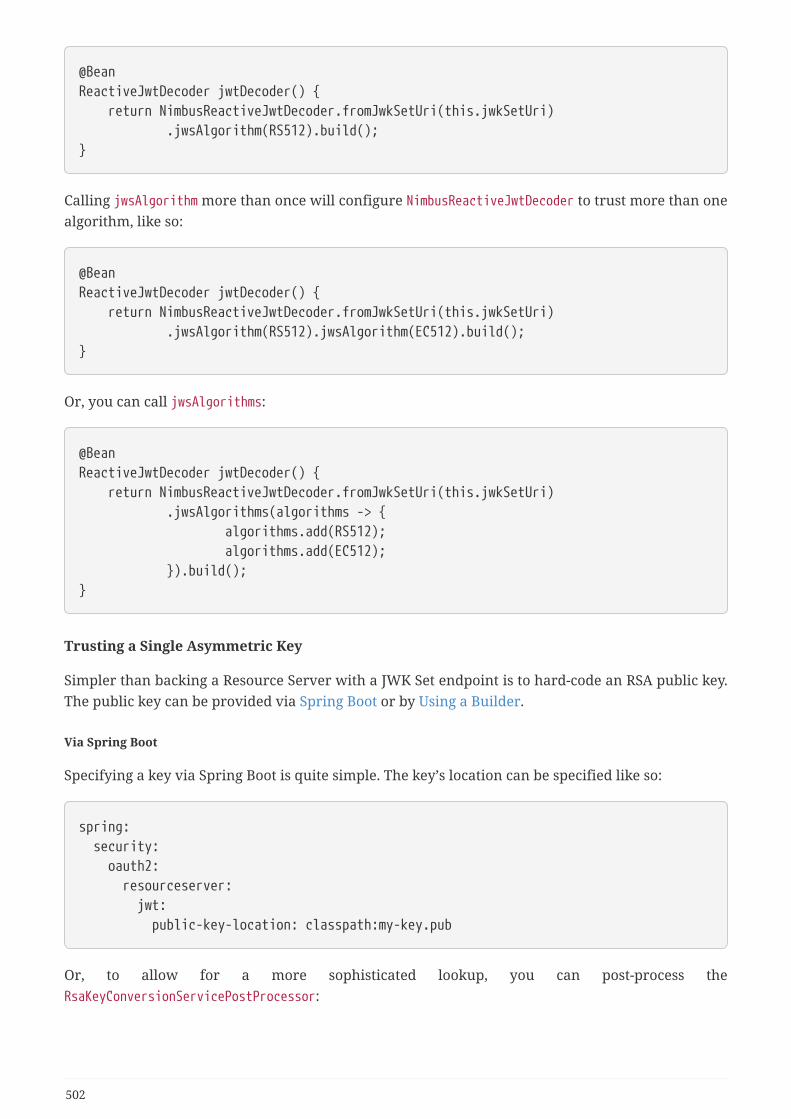
@BeanReactiveJwtDecoder jwtDecoder() { return NimbusReactiveJwtDecoder.fromJwkSetUri(this.jwkSetUri) .jwsAlgorithm(RS512).build();}
Calling jwsAlgorithm more than once will configure NimbusReactiveJwtDecoder to trust more than onealgorithm, like so:
@BeanReactiveJwtDecoder jwtDecoder() { return NimbusReactiveJwtDecoder.fromJwkSetUri(this.jwkSetUri) .jwsAlgorithm(RS512).jwsAlgorithm(EC512).build();}
Or, you can call jwsAlgorithms:
@BeanReactiveJwtDecoder jwtDecoder() { return NimbusReactiveJwtDecoder.fromJwkSetUri(this.jwkSetUri) .jwsAlgorithms(algorithms -> { algorithms.add(RS512); algorithms.add(EC512); }).build();}
Trusting a Single Asymmetric Key
Simpler than backing a Resource Server with a JWK Set endpoint is to hard-code an RSA public key.The public key can be provided via Spring Boot or by Using a Builder.
Via Spring Boot
Specifying a key via Spring Boot is quite simple. The key’s location can be specified like so:
spring: security: oauth2: resourceserver: jwt: public-key-location: classpath:my-key.pub
Or, to allow for a more sophisticated lookup, you can post-process theRsaKeyConversionServicePostProcessor:
502
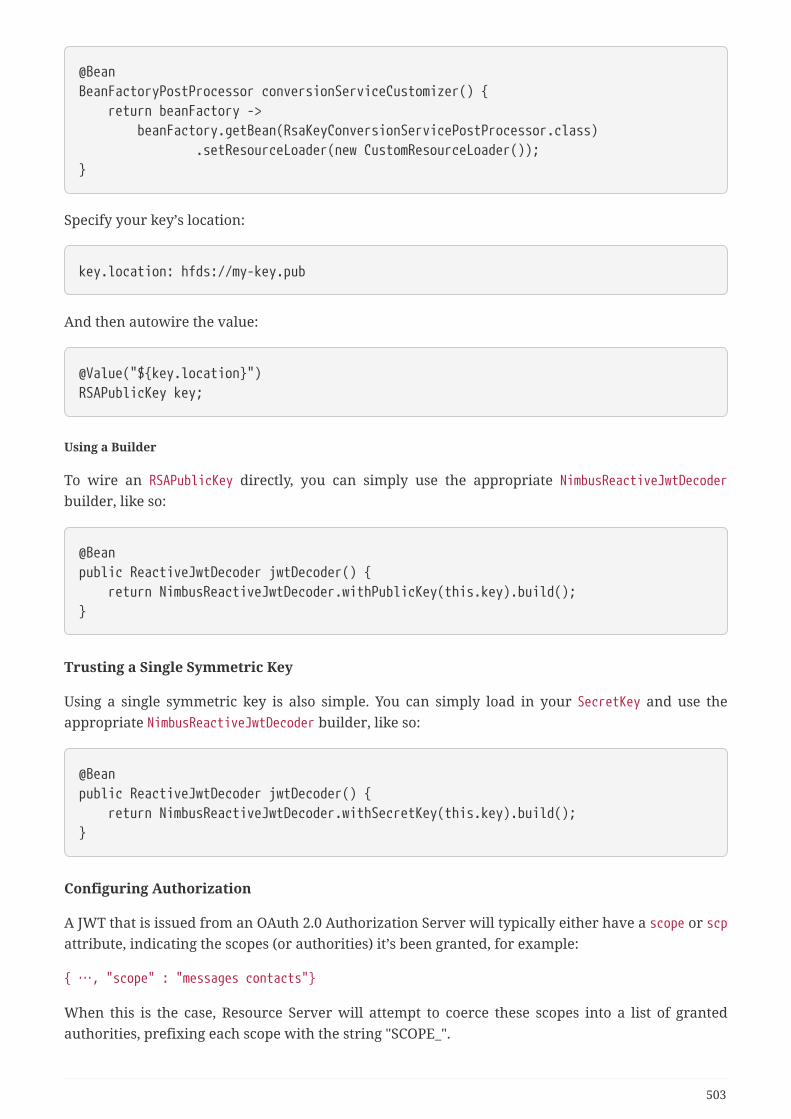
@BeanBeanFactoryPostProcessor conversionServiceCustomizer() { return beanFactory -> beanFactory.getBean(RsaKeyConversionServicePostProcessor.class) .setResourceLoader(new CustomResourceLoader());}
Specify your key’s location:
key.location: hfds://my-key.pub
And then autowire the value:
@Value("${key.location}")RSAPublicKey key;
Using a Builder
To wire an RSAPublicKey directly, you can simply use the appropriate NimbusReactiveJwtDecoderbuilder, like so:
@Beanpublic ReactiveJwtDecoder jwtDecoder() { return NimbusReactiveJwtDecoder.withPublicKey(this.key).build();}
Trusting a Single Symmetric Key
Using a single symmetric key is also simple. You can simply load in your SecretKey and use theappropriate NimbusReactiveJwtDecoder builder, like so:
@Beanpublic ReactiveJwtDecoder jwtDecoder() { return NimbusReactiveJwtDecoder.withSecretKey(this.key).build();}
Configuring Authorization
A JWT that is issued from an OAuth 2.0 Authorization Server will typically either have a scope or scpattribute, indicating the scopes (or authorities) it’s been granted, for example:
{ …, "scope" : "messages contacts"}
When this is the case, Resource Server will attempt to coerce these scopes into a list of grantedauthorities, prefixing each scope with the string "SCOPE_".
503
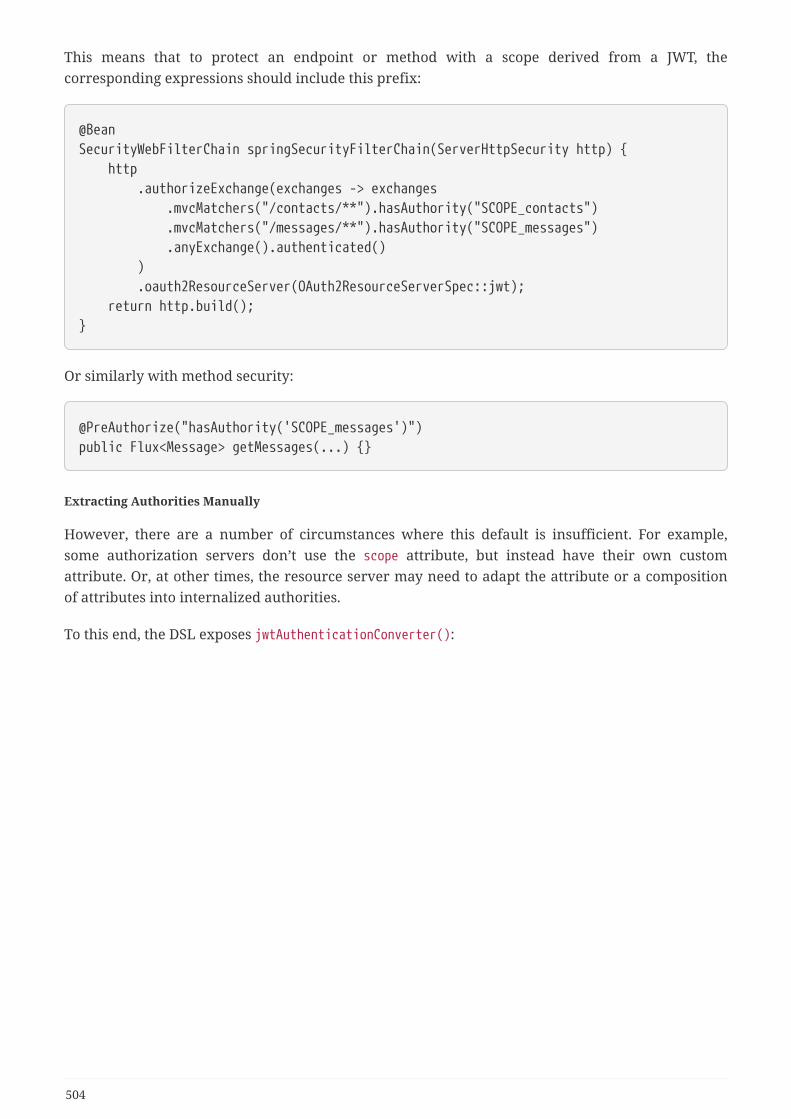
This means that to protect an endpoint or method with a scope derived from a JWT, thecorresponding expressions should include this prefix:
@BeanSecurityWebFilterChain springSecurityFilterChain(ServerHttpSecurity http) { http .authorizeExchange(exchanges -> exchanges .mvcMatchers("/contacts/**").hasAuthority("SCOPE_contacts") .mvcMatchers("/messages/**").hasAuthority("SCOPE_messages") .anyExchange().authenticated() ) .oauth2ResourceServer(OAuth2ResourceServerSpec::jwt); return http.build();}
Or similarly with method security:
@PreAuthorize("hasAuthority('SCOPE_messages')")public Flux<Message> getMessages(...) {}
Extracting Authorities Manually
However, there are a number of circumstances where this default is insufficient. For example,some authorization servers don’t use the scope attribute, but instead have their own customattribute. Or, at other times, the resource server may need to adapt the attribute or a compositionof attributes into internalized authorities.
To this end, the DSL exposes jwtAuthenticationConverter():
504
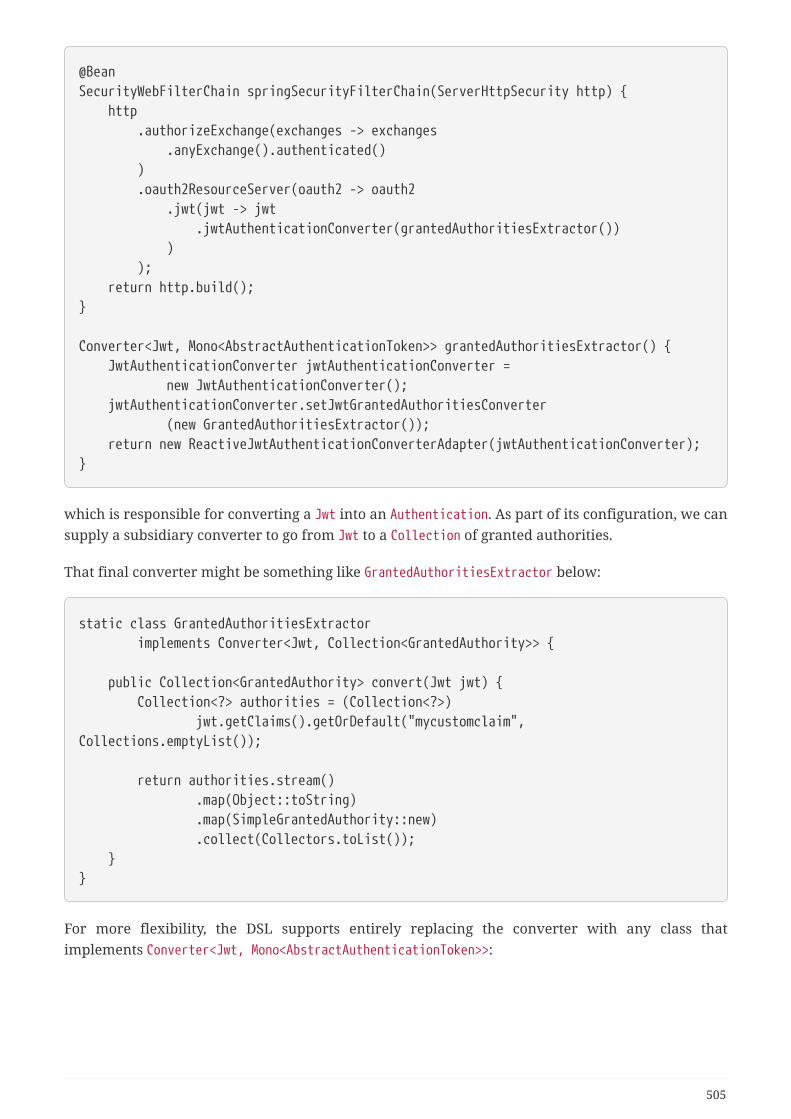
@BeanSecurityWebFilterChain springSecurityFilterChain(ServerHttpSecurity http) { http .authorizeExchange(exchanges -> exchanges .anyExchange().authenticated() ) .oauth2ResourceServer(oauth2 -> oauth2 .jwt(jwt -> jwt .jwtAuthenticationConverter(grantedAuthoritiesExtractor()) ) ); return http.build();}
Converter<Jwt, Mono<AbstractAuthenticationToken>> grantedAuthoritiesExtractor() { JwtAuthenticationConverter jwtAuthenticationConverter = new JwtAuthenticationConverter(); jwtAuthenticationConverter.setJwtGrantedAuthoritiesConverter (new GrantedAuthoritiesExtractor()); return new ReactiveJwtAuthenticationConverterAdapter(jwtAuthenticationConverter);}
which is responsible for converting a Jwt into an Authentication. As part of its configuration, we cansupply a subsidiary converter to go from Jwt to a Collection of granted authorities.
That final converter might be something like GrantedAuthoritiesExtractor below:
static class GrantedAuthoritiesExtractor implements Converter<Jwt, Collection<GrantedAuthority>> {
public Collection<GrantedAuthority> convert(Jwt jwt) { Collection<?> authorities = (Collection<?>) jwt.getClaims().getOrDefault("mycustomclaim",Collections.emptyList());
return authorities.stream() .map(Object::toString) .map(SimpleGrantedAuthority::new) .collect(Collectors.toList()); }}
For more flexibility, the DSL supports entirely replacing the converter with any class thatimplements Converter<Jwt, Mono<AbstractAuthenticationToken>>:
505
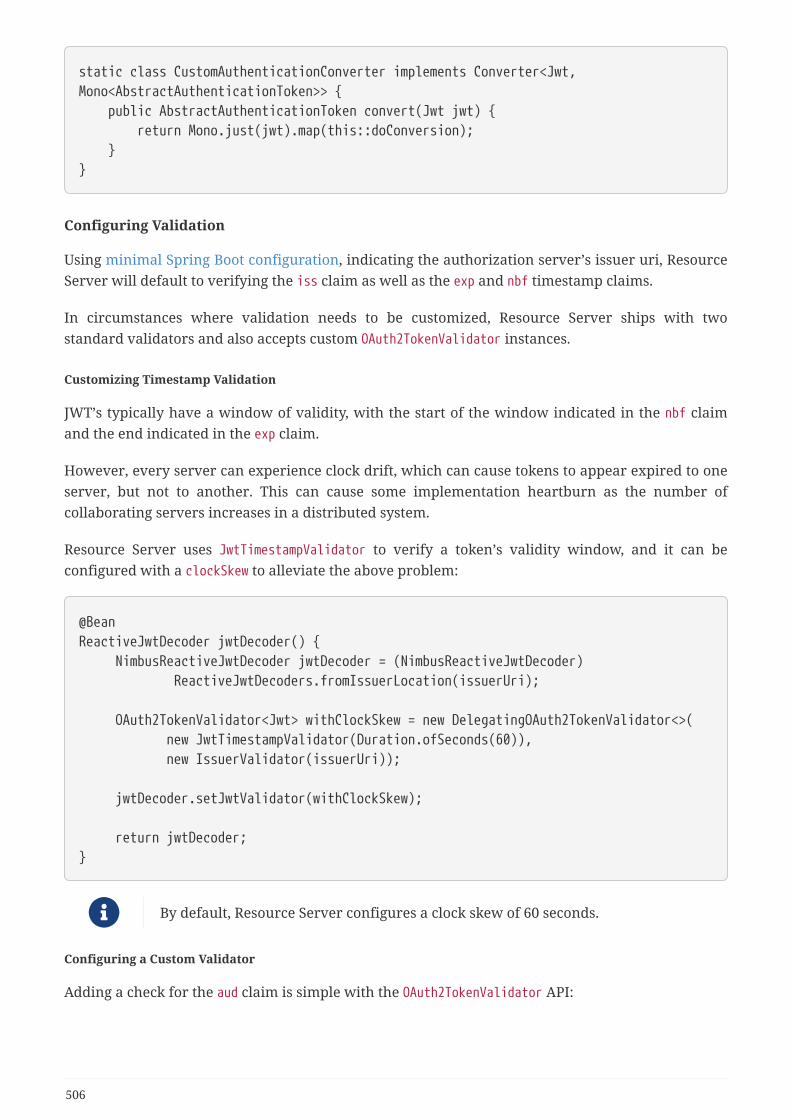
static class CustomAuthenticationConverter implements Converter<Jwt,Mono<AbstractAuthenticationToken>> { public AbstractAuthenticationToken convert(Jwt jwt) { return Mono.just(jwt).map(this::doConversion); }}
Configuring Validation
Using minimal Spring Boot configuration, indicating the authorization server’s issuer uri, ResourceServer will default to verifying the iss claim as well as the exp and nbf timestamp claims.
In circumstances where validation needs to be customized, Resource Server ships with twostandard validators and also accepts custom OAuth2TokenValidator instances.
Customizing Timestamp Validation
JWT’s typically have a window of validity, with the start of the window indicated in the nbf claimand the end indicated in the exp claim.
However, every server can experience clock drift, which can cause tokens to appear expired to oneserver, but not to another. This can cause some implementation heartburn as the number ofcollaborating servers increases in a distributed system.
Resource Server uses JwtTimestampValidator to verify a token’s validity window, and it can beconfigured with a clockSkew to alleviate the above problem:
@BeanReactiveJwtDecoder jwtDecoder() { NimbusReactiveJwtDecoder jwtDecoder = (NimbusReactiveJwtDecoder) ReactiveJwtDecoders.fromIssuerLocation(issuerUri);
OAuth2TokenValidator<Jwt> withClockSkew = new DelegatingOAuth2TokenValidator<>( new JwtTimestampValidator(Duration.ofSeconds(60)), new IssuerValidator(issuerUri));
jwtDecoder.setJwtValidator(withClockSkew);
return jwtDecoder;}
By default, Resource Server configures a clock skew of 60 seconds.
Configuring a Custom Validator
Adding a check for the aud claim is simple with the OAuth2TokenValidator API:
506
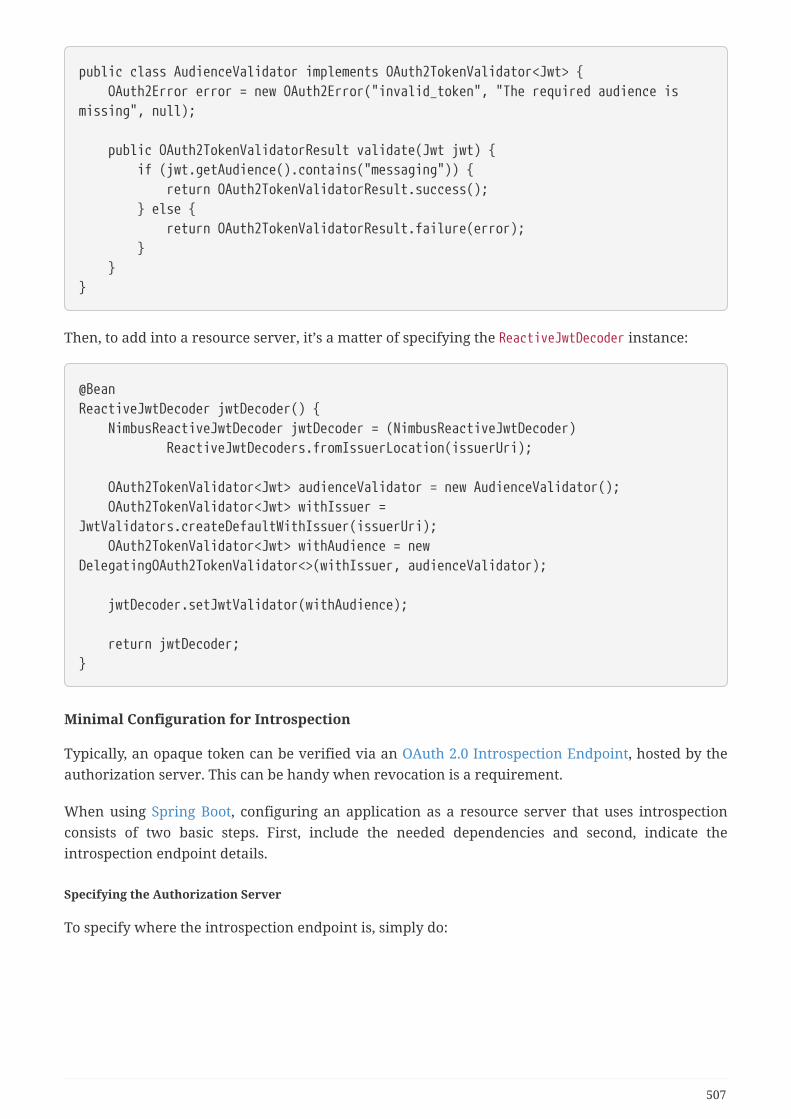
public class AudienceValidator implements OAuth2TokenValidator<Jwt> { OAuth2Error error = new OAuth2Error("invalid_token", "The required audience ismissing", null);
public OAuth2TokenValidatorResult validate(Jwt jwt) { if (jwt.getAudience().contains("messaging")) { return OAuth2TokenValidatorResult.success(); } else { return OAuth2TokenValidatorResult.failure(error); } }}
Then, to add into a resource server, it’s a matter of specifying the ReactiveJwtDecoder instance:
@BeanReactiveJwtDecoder jwtDecoder() { NimbusReactiveJwtDecoder jwtDecoder = (NimbusReactiveJwtDecoder) ReactiveJwtDecoders.fromIssuerLocation(issuerUri);
OAuth2TokenValidator<Jwt> audienceValidator = new AudienceValidator(); OAuth2TokenValidator<Jwt> withIssuer =JwtValidators.createDefaultWithIssuer(issuerUri); OAuth2TokenValidator<Jwt> withAudience = newDelegatingOAuth2TokenValidator<>(withIssuer, audienceValidator);
jwtDecoder.setJwtValidator(withAudience);
return jwtDecoder;}
Minimal Configuration for Introspection
Typically, an opaque token can be verified via an OAuth 2.0 Introspection Endpoint, hosted by theauthorization server. This can be handy when revocation is a requirement.
When using Spring Boot, configuring an application as a resource server that uses introspectionconsists of two basic steps. First, include the needed dependencies and second, indicate theintrospection endpoint details.
Specifying the Authorization Server
To specify where the introspection endpoint is, simply do:
507
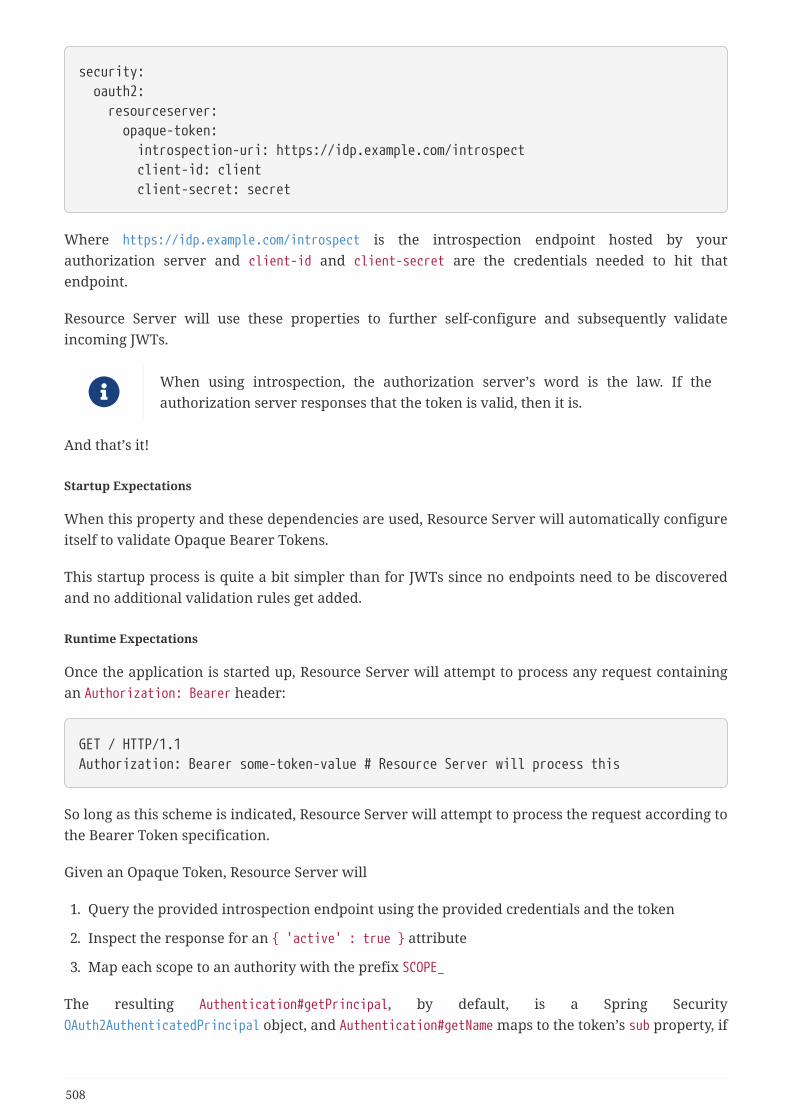
security: oauth2: resourceserver: opaque-token: introspection-uri: https://idp.example.com/introspect client-id: client client-secret: secret
Where https://idp.example.com/introspect is the introspection endpoint hosted by yourauthorization server and client-id and client-secret are the credentials needed to hit thatendpoint.
Resource Server will use these properties to further self-configure and subsequently validateincoming JWTs.
When using introspection, the authorization server’s word is the law. If theauthorization server responses that the token is valid, then it is.
And that’s it!
Startup Expectations
When this property and these dependencies are used, Resource Server will automatically configureitself to validate Opaque Bearer Tokens.
This startup process is quite a bit simpler than for JWTs since no endpoints need to be discoveredand no additional validation rules get added.
Runtime Expectations
Once the application is started up, Resource Server will attempt to process any request containingan Authorization: Bearer header:
GET / HTTP/1.1Authorization: Bearer some-token-value # Resource Server will process this
So long as this scheme is indicated, Resource Server will attempt to process the request according tothe Bearer Token specification.
Given an Opaque Token, Resource Server will
1. Query the provided introspection endpoint using the provided credentials and the token
2. Inspect the response for an { 'active' : true } attribute
3. Map each scope to an authority with the prefix SCOPE_
The resulting Authentication#getPrincipal, by default, is a Spring SecurityOAuth2AuthenticatedPrincipal object, and Authentication#getName maps to the token’s sub property, if
508
one is present.
From here, you may want to jump to:
• Looking Up Attributes Post-Authentication
• Extracting Authorities Manually
• Using Introspection with JWTs
Looking Up Attributes Post-Authentication
Once a token is authenticated, an instance of BearerTokenAuthentication is set in theSecurityContext.
This means that it’s available in @Controller methods when using @EnableWebFlux in yourconfiguration:
@GetMapping("/foo")public Mono<String> foo(BearerTokenAuthentication authentication) { return Mono.just(authentication.getTokenAttributes().get("sub") + " is thesubject");}
Since BearerTokenAuthentication holds an OAuth2AuthenticatedPrincipal, that also means that it’savailable to controller methods, too:
@GetMapping("/foo")public Mono<String> foo(@AuthenticationPrincipal OAuth2AuthenticatedPrincipalprincipal) { return Mono.just(principal.getAttribute("sub") + " is the subject");}
Looking Up Attributes Via SpEL
Of course, this also means that attributes can be accessed via SpEL.
For example, if using @EnableReactiveMethodSecurity so that you can use @PreAuthorize annotations,you can do:
@PreAuthorize("principal?.attributes['sub'] == 'foo'")public Mono<String> forFoosEyesOnly() { return Mono.just("foo");}
Overriding or Replacing Boot Auto Configuration
There are two @Bean s that Spring Boot generates on Resource Server’s behalf.
509
The first is a SecurityWebFilterChain that configures the app as a resource server. When use OpaqueToken, this SecurityWebFilterChain looks like:
@BeanSecurityWebFilterChain springSecurityFilterChain(ServerHttpSecurity http) { http .authorizeExchange(exchanges -> exchanges .anyExchange().authenticated() ) .oauth2ResourceServer(ServerHttpSecurity.OAuth2ResourceServerSpec::opaqueToken) return http.build();}
If the application doesn’t expose a SecurityWebFilterChain bean, then Spring Boot will expose theabove default one.
Replacing this is as simple as exposing the bean within the application:
@EnableWebFluxSecuritypublic class MyCustomSecurityConfiguration { @Bean SecurityWebFilterChain springSecurityFilterChain(ServerHttpSecurity http) { http .authorizeExchange(exchanges -> exchanges .pathMatchers("/messages/**").hasAuthority("SCOPE_message:read") .anyExchange().authenticated() ) .oauth2ResourceServer(oauth2 -> oauth2 .opaqueToken(opaqueToken -> opaqueToken .introspector(myIntrospector()) ) ); return http.build(); }}
The above requires the scope of message:read for any URL that starts with /messages/.
Methods on the oauth2ResourceServer DSL will also override or replace auto configuration.
For example, the second @Bean Spring Boot creates is a ReactiveOpaqueTokenIntrospector, whichdecodes String tokens into validated instances of OAuth2AuthenticatedPrincipal:
510
@Beanpublic ReactiveOpaqueTokenIntrospector introspector() { return new NimbusReactiveOpaqueTokenIntrospector(introspectionUri, clientId,clientSecret);}
If the application doesn’t expose a ReactiveOpaqueTokenIntrospector bean, then Spring Boot willexpose the above default one.
And its configuration can be overridden using introspectionUri() andintrospectionClientCredentials() or replaced using introspector().
Using introspectionUri()
An authorization server’s Introspection Uri can be configured as a configuration property or it canbe supplied in the DSL:
@EnableWebFluxSecuritypublic class DirectlyConfiguredIntrospectionUri { @Bean SecurityWebFilterChain springSecurityFilterChain(ServerHttpSecurity http) { http .authorizeExchange(exchanges -> exchanges .anyExchange().authenticated() ) .oauth2ResourceServer(oauth2 -> oauth2 .opaqueToken(opaqueToken -> opaqueToken .introspectionUri("https://idp.example.com/introspect") .introspectionClientCredentials("client", "secret") ) ); return http.build(); }}
Using introspectionUri() takes precedence over any configuration property.
Using introspector()
More powerful than introspectionUri() is introspector(), which will completely replace any Bootauto configuration of ReactiveOpaqueTokenIntrospector:
511
@EnableWebFluxSecuritypublic class DirectlyConfiguredIntrospector { @Bean SecurityWebFilterChain springSecurityFilterChain(ServerHttpSecurity http) { http .authorizeExchange(exchanges -> exchanges .anyExchange().authenticated() ) .oauth2ResourceServer(oauth2 -> oauth2 .opaqueToken(opaqueToken -> opaqueToken .introspector(myCustomIntrospector()) ) ); return http.build(); }}
This is handy when deeper configuration, like authority mappingor JWT revocation is necessary.
Exposing a ReactiveOpaqueTokenIntrospector @Bean
Or, exposing a ReactiveOpaqueTokenIntrospector @Bean has the same effect as introspector():
@Beanpublic ReactiveOpaqueTokenIntrospector introspector() { return new NimbusOpaqueTokenIntrospector(introspectionUri, clientId,clientSecret);}
Configuring Authorization
An OAuth 2.0 Introspection endpoint will typically return a scope attribute, indicating the scopes (orauthorities) it’s been granted, for example:
{ …, "scope" : "messages contacts"}
When this is the case, Resource Server will attempt to coerce these scopes into a list of grantedauthorities, prefixing each scope with the string "SCOPE_".
This means that to protect an endpoint or method with a scope derived from an Opaque Token, thecorresponding expressions should include this prefix:
512
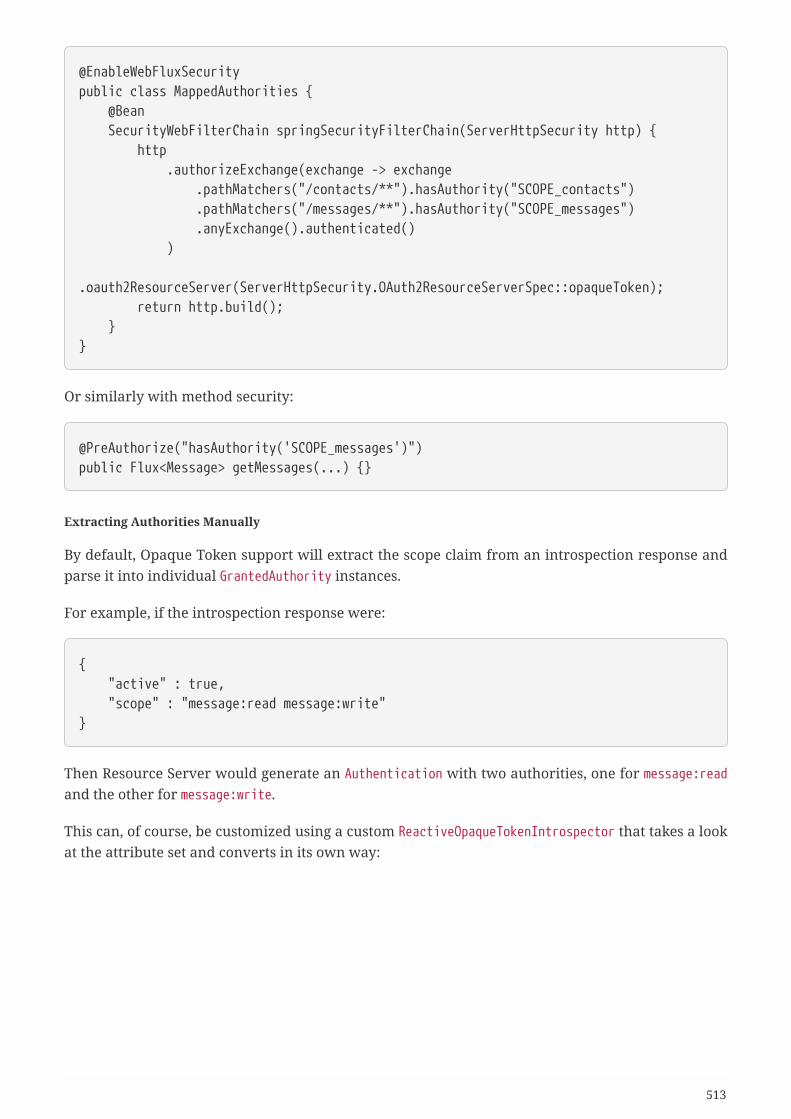
@EnableWebFluxSecuritypublic class MappedAuthorities { @Bean SecurityWebFilterChain springSecurityFilterChain(ServerHttpSecurity http) { http .authorizeExchange(exchange -> exchange .pathMatchers("/contacts/**").hasAuthority("SCOPE_contacts") .pathMatchers("/messages/**").hasAuthority("SCOPE_messages") .anyExchange().authenticated() ) .oauth2ResourceServer(ServerHttpSecurity.OAuth2ResourceServerSpec::opaqueToken); return http.build(); }}
Or similarly with method security:
@PreAuthorize("hasAuthority('SCOPE_messages')")public Flux<Message> getMessages(...) {}
Extracting Authorities Manually
By default, Opaque Token support will extract the scope claim from an introspection response andparse it into individual GrantedAuthority instances.
For example, if the introspection response were:
{ "active" : true, "scope" : "message:read message:write"}
Then Resource Server would generate an Authentication with two authorities, one for message:readand the other for message:write.
This can, of course, be customized using a custom ReactiveOpaqueTokenIntrospector that takes a lookat the attribute set and converts in its own way:
513
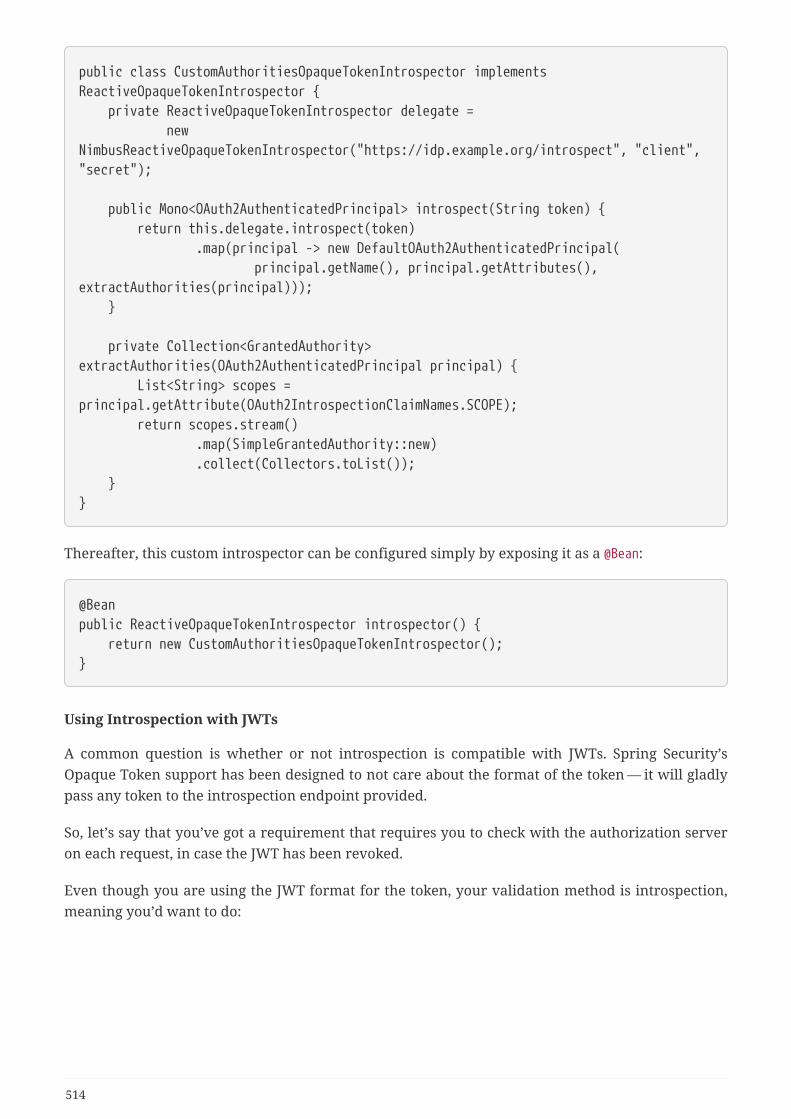
public class CustomAuthoritiesOpaqueTokenIntrospector implementsReactiveOpaqueTokenIntrospector { private ReactiveOpaqueTokenIntrospector delegate = newNimbusReactiveOpaqueTokenIntrospector("https://idp.example.org/introspect", "client","secret");
public Mono<OAuth2AuthenticatedPrincipal> introspect(String token) { return this.delegate.introspect(token) .map(principal -> new DefaultOAuth2AuthenticatedPrincipal( principal.getName(), principal.getAttributes(),extractAuthorities(principal))); }
private Collection<GrantedAuthority>extractAuthorities(OAuth2AuthenticatedPrincipal principal) { List<String> scopes =principal.getAttribute(OAuth2IntrospectionClaimNames.SCOPE); return scopes.stream() .map(SimpleGrantedAuthority::new) .collect(Collectors.toList()); }}
Thereafter, this custom introspector can be configured simply by exposing it as a @Bean:
@Beanpublic ReactiveOpaqueTokenIntrospector introspector() { return new CustomAuthoritiesOpaqueTokenIntrospector();}
Using Introspection with JWTs
A common question is whether or not introspection is compatible with JWTs. Spring Security’sOpaque Token support has been designed to not care about the format of the token — it will gladlypass any token to the introspection endpoint provided.
So, let’s say that you’ve got a requirement that requires you to check with the authorization serveron each request, in case the JWT has been revoked.
Even though you are using the JWT format for the token, your validation method is introspection,meaning you’d want to do:
514
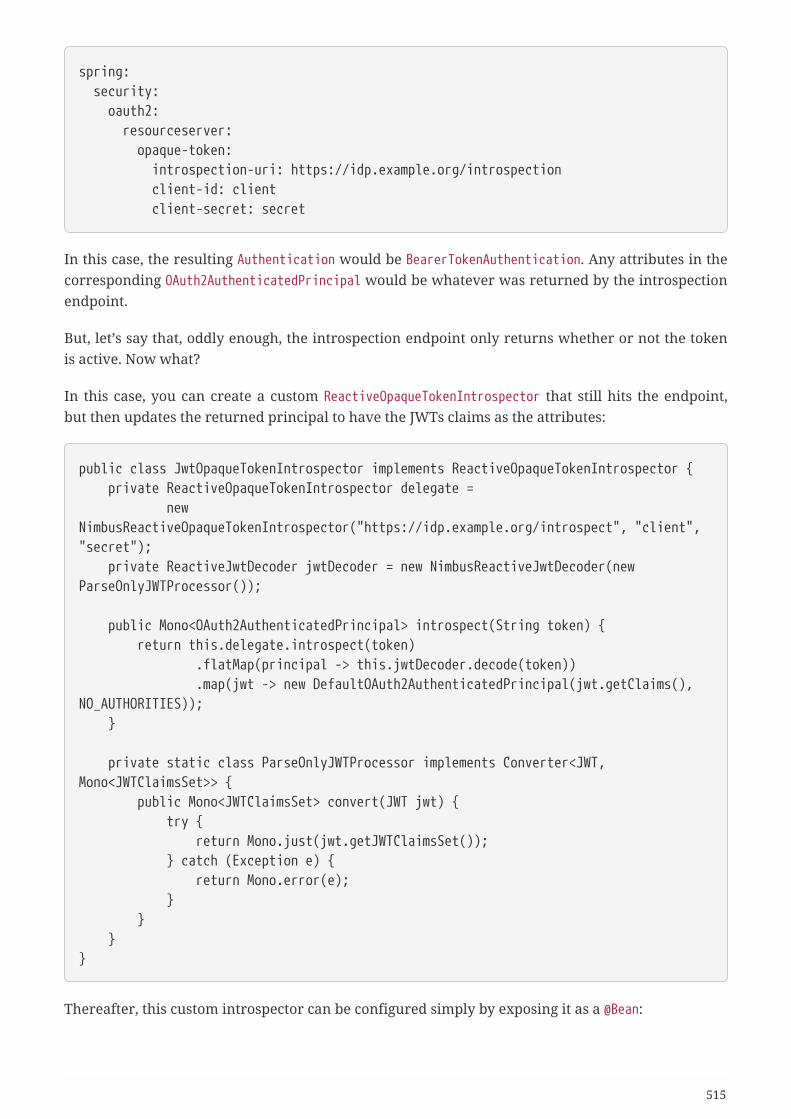
spring: security: oauth2: resourceserver: opaque-token: introspection-uri: https://idp.example.org/introspection client-id: client client-secret: secret
In this case, the resulting Authentication would be BearerTokenAuthentication. Any attributes in thecorresponding OAuth2AuthenticatedPrincipal would be whatever was returned by the introspectionendpoint.
But, let’s say that, oddly enough, the introspection endpoint only returns whether or not the tokenis active. Now what?
In this case, you can create a custom ReactiveOpaqueTokenIntrospector that still hits the endpoint,but then updates the returned principal to have the JWTs claims as the attributes:
public class JwtOpaqueTokenIntrospector implements ReactiveOpaqueTokenIntrospector { private ReactiveOpaqueTokenIntrospector delegate = newNimbusReactiveOpaqueTokenIntrospector("https://idp.example.org/introspect", "client","secret"); private ReactiveJwtDecoder jwtDecoder = new NimbusReactiveJwtDecoder(newParseOnlyJWTProcessor());
public Mono<OAuth2AuthenticatedPrincipal> introspect(String token) { return this.delegate.introspect(token) .flatMap(principal -> this.jwtDecoder.decode(token)) .map(jwt -> new DefaultOAuth2AuthenticatedPrincipal(jwt.getClaims(),NO_AUTHORITIES)); }
private static class ParseOnlyJWTProcessor implements Converter<JWT,Mono<JWTClaimsSet>> { public Mono<JWTClaimsSet> convert(JWT jwt) { try { return Mono.just(jwt.getJWTClaimsSet()); } catch (Exception e) { return Mono.error(e); } } }}
Thereafter, this custom introspector can be configured simply by exposing it as a @Bean:
515
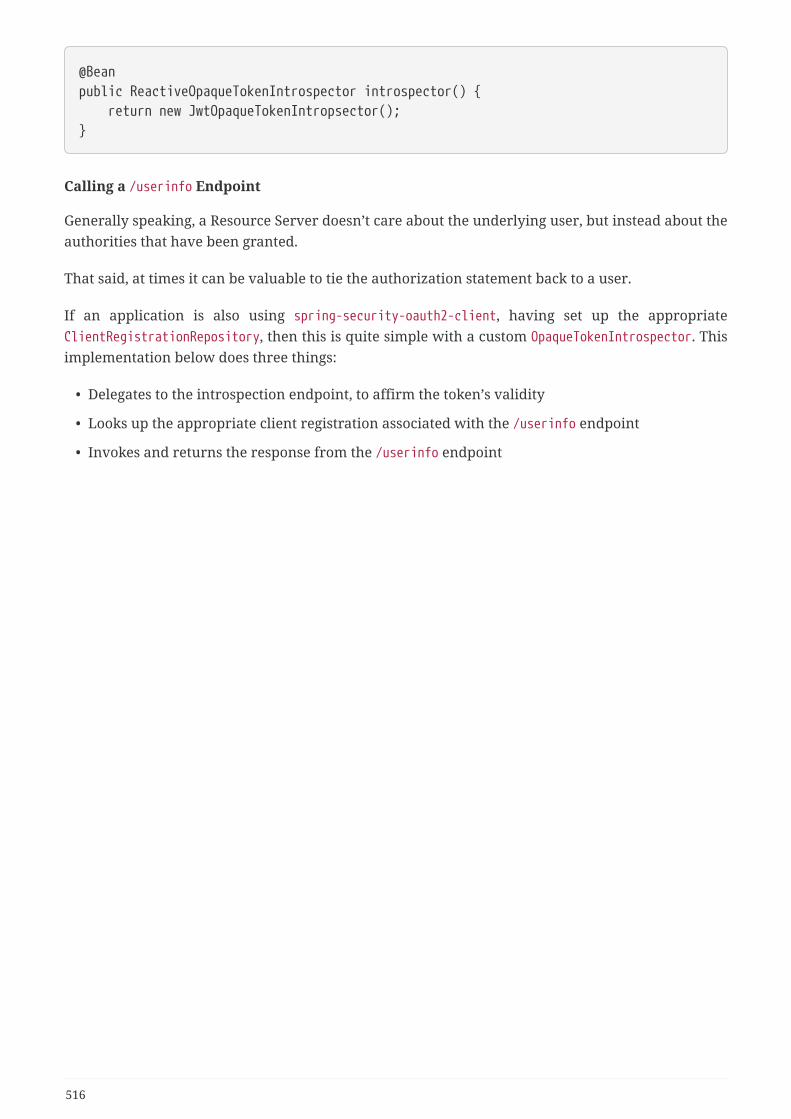
@Beanpublic ReactiveOpaqueTokenIntrospector introspector() { return new JwtOpaqueTokenIntropsector();}
Calling a /userinfo Endpoint
Generally speaking, a Resource Server doesn’t care about the underlying user, but instead about theauthorities that have been granted.
That said, at times it can be valuable to tie the authorization statement back to a user.
If an application is also using spring-security-oauth2-client, having set up the appropriateClientRegistrationRepository, then this is quite simple with a custom OpaqueTokenIntrospector. Thisimplementation below does three things:
• Delegates to the introspection endpoint, to affirm the token’s validity
• Looks up the appropriate client registration associated with the /userinfo endpoint
• Invokes and returns the response from the /userinfo endpoint
516
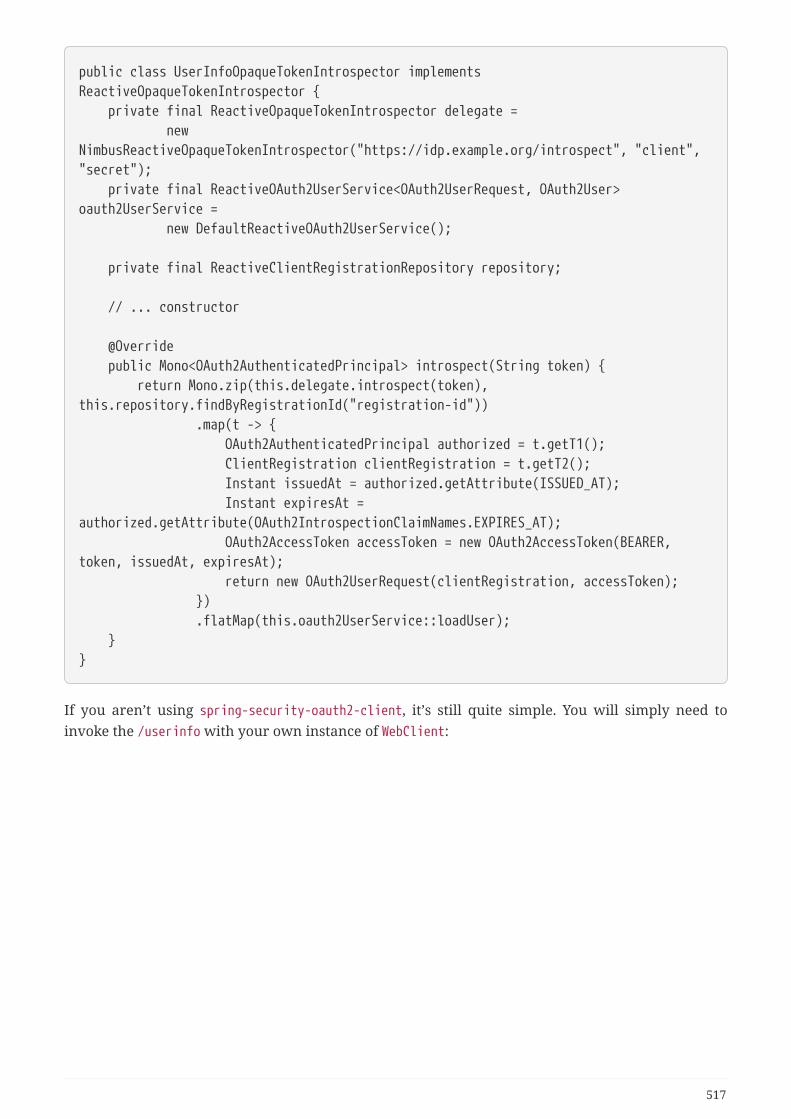
public class UserInfoOpaqueTokenIntrospector implementsReactiveOpaqueTokenIntrospector { private final ReactiveOpaqueTokenIntrospector delegate = newNimbusReactiveOpaqueTokenIntrospector("https://idp.example.org/introspect", "client","secret"); private final ReactiveOAuth2UserService<OAuth2UserRequest, OAuth2User>oauth2UserService = new DefaultReactiveOAuth2UserService();
private final ReactiveClientRegistrationRepository repository;
// ... constructor
@Override public Mono<OAuth2AuthenticatedPrincipal> introspect(String token) { return Mono.zip(this.delegate.introspect(token),this.repository.findByRegistrationId("registration-id")) .map(t -> { OAuth2AuthenticatedPrincipal authorized = t.getT1(); ClientRegistration clientRegistration = t.getT2(); Instant issuedAt = authorized.getAttribute(ISSUED_AT); Instant expiresAt =authorized.getAttribute(OAuth2IntrospectionClaimNames.EXPIRES_AT); OAuth2AccessToken accessToken = new OAuth2AccessToken(BEARER,token, issuedAt, expiresAt); return new OAuth2UserRequest(clientRegistration, accessToken); }) .flatMap(this.oauth2UserService::loadUser); }}
If you aren’t using spring-security-oauth2-client, it’s still quite simple. You will simply need toinvoke the /userinfo with your own instance of WebClient:
517
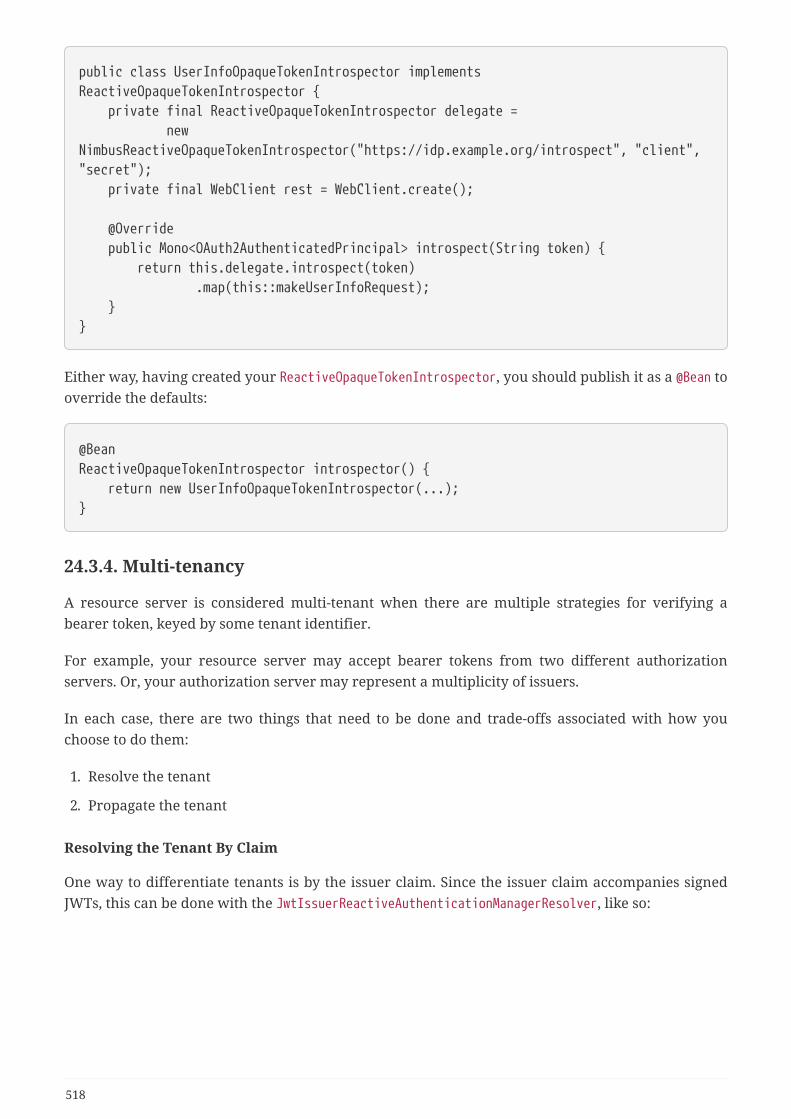
public class UserInfoOpaqueTokenIntrospector implementsReactiveOpaqueTokenIntrospector { private final ReactiveOpaqueTokenIntrospector delegate = newNimbusReactiveOpaqueTokenIntrospector("https://idp.example.org/introspect", "client","secret"); private final WebClient rest = WebClient.create();
@Override public Mono<OAuth2AuthenticatedPrincipal> introspect(String token) { return this.delegate.introspect(token) .map(this::makeUserInfoRequest); }}
Either way, having created your ReactiveOpaqueTokenIntrospector, you should publish it as a @Bean tooverride the defaults:
@BeanReactiveOpaqueTokenIntrospector introspector() { return new UserInfoOpaqueTokenIntrospector(...);}
24.3.4. Multi-tenancy
A resource server is considered multi-tenant when there are multiple strategies for verifying abearer token, keyed by some tenant identifier.
For example, your resource server may accept bearer tokens from two different authorizationservers. Or, your authorization server may represent a multiplicity of issuers.
In each case, there are two things that need to be done and trade-offs associated with how youchoose to do them:
1. Resolve the tenant
2. Propagate the tenant
Resolving the Tenant By Claim
One way to differentiate tenants is by the issuer claim. Since the issuer claim accompanies signedJWTs, this can be done with the JwtIssuerReactiveAuthenticationManagerResolver, like so:
518
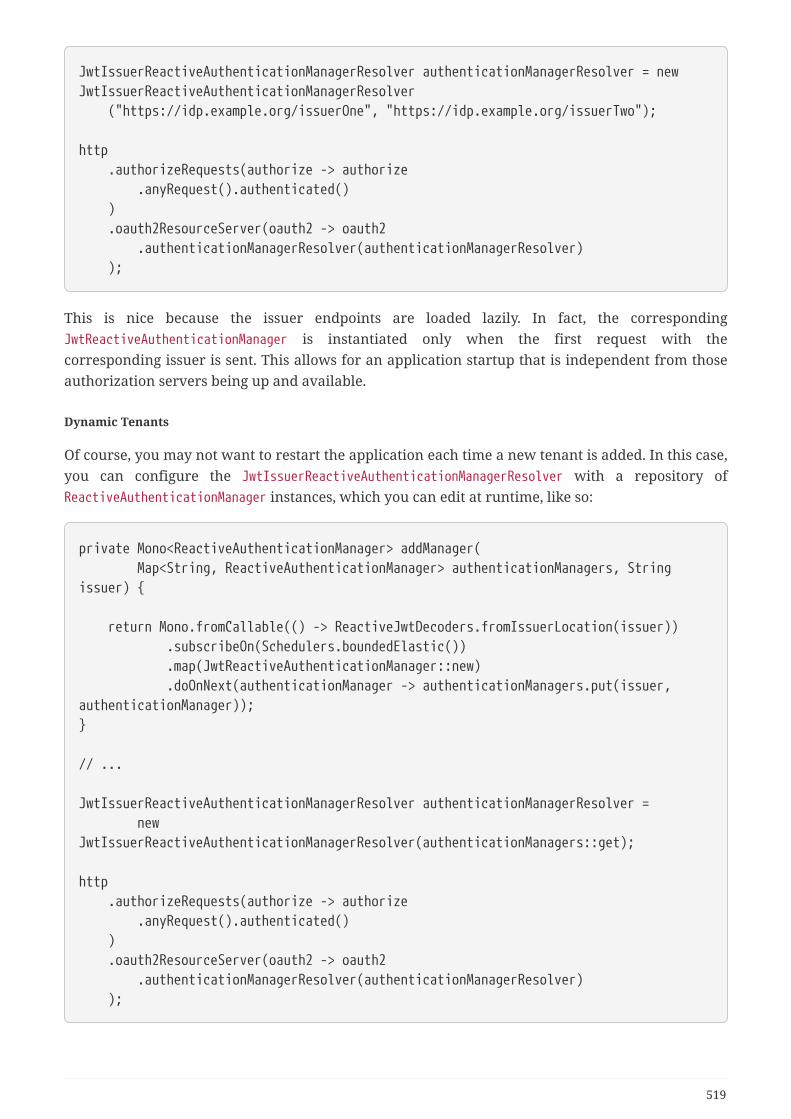
JwtIssuerReactiveAuthenticationManagerResolver authenticationManagerResolver = newJwtIssuerReactiveAuthenticationManagerResolver ("https://idp.example.org/issuerOne", "https://idp.example.org/issuerTwo");
http .authorizeRequests(authorize -> authorize .anyRequest().authenticated() ) .oauth2ResourceServer(oauth2 -> oauth2 .authenticationManagerResolver(authenticationManagerResolver) );
This is nice because the issuer endpoints are loaded lazily. In fact, the correspondingJwtReactiveAuthenticationManager is instantiated only when the first request with thecorresponding issuer is sent. This allows for an application startup that is independent from thoseauthorization servers being up and available.
Dynamic Tenants
Of course, you may not want to restart the application each time a new tenant is added. In this case,you can configure the JwtIssuerReactiveAuthenticationManagerResolver with a repository ofReactiveAuthenticationManager instances, which you can edit at runtime, like so:
private Mono<ReactiveAuthenticationManager> addManager( Map<String, ReactiveAuthenticationManager> authenticationManagers, Stringissuer) {
return Mono.fromCallable(() -> ReactiveJwtDecoders.fromIssuerLocation(issuer)) .subscribeOn(Schedulers.boundedElastic()) .map(JwtReactiveAuthenticationManager::new) .doOnNext(authenticationManager -> authenticationManagers.put(issuer,authenticationManager));}
// ...
JwtIssuerReactiveAuthenticationManagerResolver authenticationManagerResolver = newJwtIssuerReactiveAuthenticationManagerResolver(authenticationManagers::get);
http .authorizeRequests(authorize -> authorize .anyRequest().authenticated() ) .oauth2ResourceServer(oauth2 -> oauth2 .authenticationManagerResolver(authenticationManagerResolver) );
519
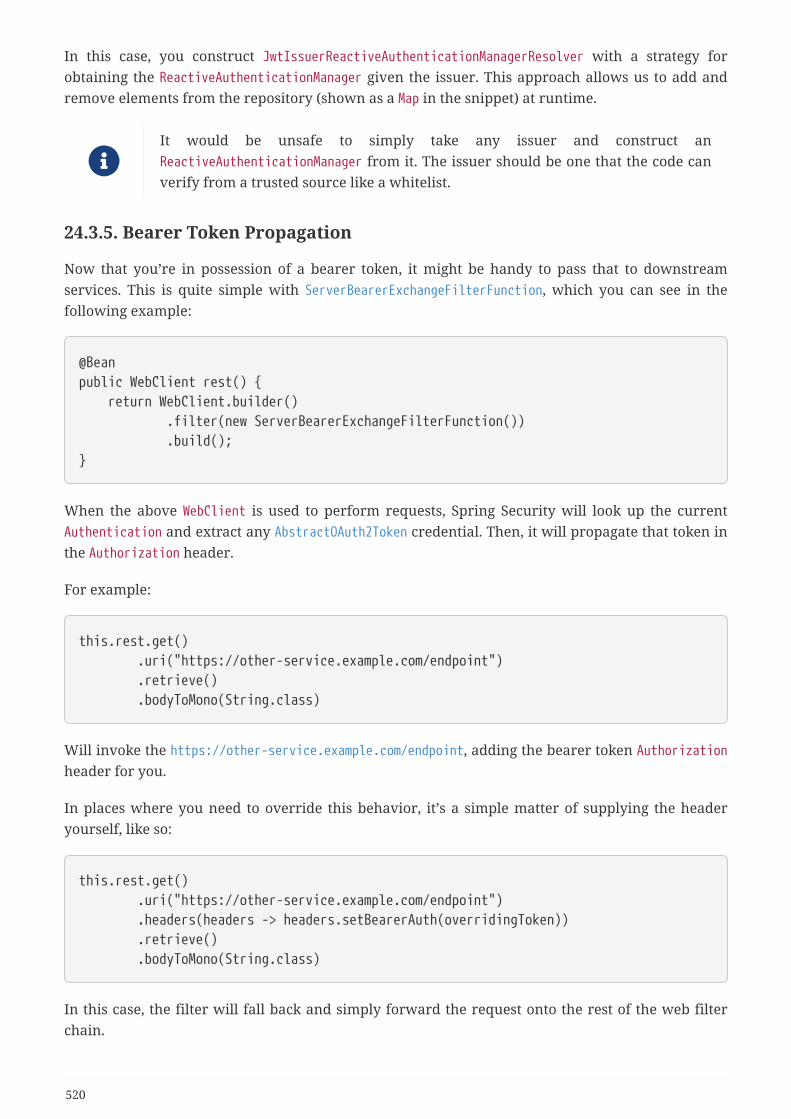
In this case, you construct JwtIssuerReactiveAuthenticationManagerResolver with a strategy forobtaining the ReactiveAuthenticationManager given the issuer. This approach allows us to add andremove elements from the repository (shown as a Map in the snippet) at runtime.
It would be unsafe to simply take any issuer and construct anReactiveAuthenticationManager from it. The issuer should be one that the code canverify from a trusted source like a whitelist.
24.3.5. Bearer Token Propagation
Now that you’re in possession of a bearer token, it might be handy to pass that to downstreamservices. This is quite simple with ServerBearerExchangeFilterFunction, which you can see in thefollowing example:
@Beanpublic WebClient rest() { return WebClient.builder() .filter(new ServerBearerExchangeFilterFunction()) .build();}
When the above WebClient is used to perform requests, Spring Security will look up the currentAuthentication and extract any AbstractOAuth2Token credential. Then, it will propagate that token inthe Authorization header.
For example:
this.rest.get() .uri("https://other-service.example.com/endpoint") .retrieve() .bodyToMono(String.class)
Will invoke the https://other-service.example.com/endpoint, adding the bearer token Authorizationheader for you.
In places where you need to override this behavior, it’s a simple matter of supplying the headeryourself, like so:
this.rest.get() .uri("https://other-service.example.com/endpoint") .headers(headers -> headers.setBearerAuth(overridingToken)) .retrieve() .bodyToMono(String.class)
In this case, the filter will fall back and simply forward the request onto the rest of the web filterchain.
520
Unlike the OAuth 2.0 Client filter function, this filter function makes no attempt torenew the token, should it be expired. To obtain this level of support, please usethe OAuth 2.0 Client filter.
521

Chapter 25.@RegisteredOAuth2AuthorizedClientSpring Security allows resolving an access token using @RegisteredOAuth2AuthorizedClient.
A working example can be found in OAuth 2.0 WebClient WebFlux sample.
After configuring Spring Security for OAuth2 Login or as an OAuth2 Client, anOAuth2AuthorizedClient can be resolved using the following:
@GetMapping("/explicit")Mono<String> explicit(@RegisteredOAuth2AuthorizedClient("client-id")OAuth2AuthorizedClient authorizedClient) { // ...}
This integrates into Spring Security to provide the following features:
• Spring Security will automatically refresh expired tokens (if a refresh token is present)
• If an access token is requested and not present, Spring Security will automatically request theaccess token.
◦ For authorization_code this involves performing the redirect and then replaying the originalrequest
◦ For client_credentials the token is simply requested and saved
If the user authenticated using oauth2Login(), then the client-id is optional. For example, thefollowing would work:
@GetMapping("/implicit")Mono<String> implicit(@RegisteredOAuth2AuthorizedClient OAuth2AuthorizedClientauthorizedClient) { // ...}
This is convenient if the user always authenticates with OAuth2 Login and an access token from thesame authorization server is needed.
522
Chapter 26. Reactive X.509 AuthenticationSimilar to Servlet X.509 authentication, reactive x509 authentication filter allows extracting anauthentication token from a certificate provided by a client.
Below is an example of a reactive x509 security configuration:
@Beanpublic SecurityWebFilterChain securityWebFilterChain(ServerHttpSecurity http) { http .x509(withDefaults()) .authorizeExchange(exchanges -> exchanges .anyExchange().permitAll() ); return http.build();}
In the configuration above, when neither principalExtractor nor authenticationManager is provideddefaults will be used. The default principal extractor is SubjectDnX509PrincipalExtractor whichextracts the CN (common name) field from a certificate provided by a client. The defaultauthentication manager is ReactivePreAuthenticatedAuthenticationManager which performs useraccount validation, checking that user account with a name extracted by principalExtractor existsand it is not locked, disabled, or expired.
The next example demonstrates how these defaults can be overridden.
523
@Beanpublic SecurityWebFilterChain securityWebFilterChain(ServerHttpSecurity http) { SubjectDnX509PrincipalExtractor principalExtractor = new SubjectDnX509PrincipalExtractor();
principalExtractor.setSubjectDnRegex("OU=(.*?)(?:,|$)");
ReactiveAuthenticationManager authenticationManager = authentication -> { authentication.setAuthenticated("Trusted OrgUnit".equals(authentication.getName())); return Mono.just(authentication); };
http .x509(x509 -> x509 .principalExtractor(principalExtractor) .authenticationManager(authenticationManager) ) .authorizeExchange(exchanges -> exchanges .anyExchange().authenticated() ); return http.build();}
In this example, a username is extracted from the OU field of a client certificate instead of CN, andaccount lookup using ReactiveUserDetailsService is not performed at all. Instead, if the providedcertificate issued to an OU named "Trusted Org Unit", a request will be authenticated.
For an example of configuring Netty and WebClient or curl command-line tool to use mutual TLSand enable X.509 authentication, please refer to https://github.com/spring-projects/spring-security/tree/master/samples/boot/webflux-x509.
524
Chapter 27. WebClient
The following documentation is for use within Reactive environments. For Servletenvironments, refer to WebClient for Servlet environments.
Spring Framework has built in support for setting a Bearer token.
webClient.get() .headers(h -> h.setBearerAuth(token)) ...
Spring Security builds on this support to provide additional benefits:
• Spring Security will automatically refresh expired tokens (if a refresh token is present)
• If an access token is requested and not present, Spring Security will automatically request theaccess token.
◦ For authorization_code this involves performing the redirect and then replaying the originalrequest
◦ For client_credentials the token is simply requested and saved
• Support for the ability to transparently include the current OAuth token or explicitly selectwhich token should be used.
27.1. WebClient OAuth2 SetupThe first step is ensuring to setup the WebClient correctly. An example of setting up WebClient in afully reactive environment can be found below:
@BeanWebClient webClient(ReactiveClientRegistrationRepository clientRegistrations, ServerOAuth2AuthorizedClientRepository authorizedClients) { ServerOAuth2AuthorizedClientExchangeFilterFunction oauth = newServerOAuth2AuthorizedClientExchangeFilterFunction(clientRegistrations,authorizedClients); // (optional) explicitly opt into using the oauth2Login to provide an access tokenimplicitly // oauth.setDefaultOAuth2AuthorizedClient(true); // (optional) set a default ClientRegistration.registrationId // oauth.setDefaultClientRegistrationId("client-registration-id"); return WebClient.builder() .filter(oauth) .build();}
525
27.2. Implicit OAuth2AuthorizedClientIf we set defaultOAuth2AuthorizedClient to true in our setup and the user authenticated withoauth2Login (i.e. OIDC), then the current authentication is used to automatically provide the accesstoken. Alternatively, if we set defaultClientRegistrationId to a valid ClientRegistration id, thatregistration is used to provide the access token. This is convenient, but in environments where notall endpoints should get the access token, it is dangerous (you might provide the wrong access tokento an endpoint).
Mono<String> body = this.webClient .get() .uri(this.uri) .retrieve() .bodyToMono(String.class);
27.3. Explicit OAuth2AuthorizedClientThe OAuth2AuthorizedClient can be explicitly provided by setting it on the requests attributes. In theexample below we resolve the OAuth2AuthorizedClient using Spring WebFlux or Spring MVCargument resolver support. However, it does not matter how the OAuth2AuthorizedClient isresolved.
@GetMapping("/explicit")Mono<String> explicit(@RegisteredOAuth2AuthorizedClient("client-id")OAuth2AuthorizedClient authorizedClient) { return this.webClient .get() .uri(this.uri) .attributes(oauth2AuthorizedClient(authorizedClient)) .retrieve() .bodyToMono(String.class);}
27.4. clientRegistrationIdAlternatively, it is possible to specify the clientRegistrationId on the request attributes and theWebClient will attempt to lookup the OAuth2AuthorizedClient. If it is not found, one willautomatically be acquired.
Mono<String> body = this.webClient .get() .uri(this.uri) .attributes(clientRegistrationId("client-id")) .retrieve() .bodyToMono(String.class);
526
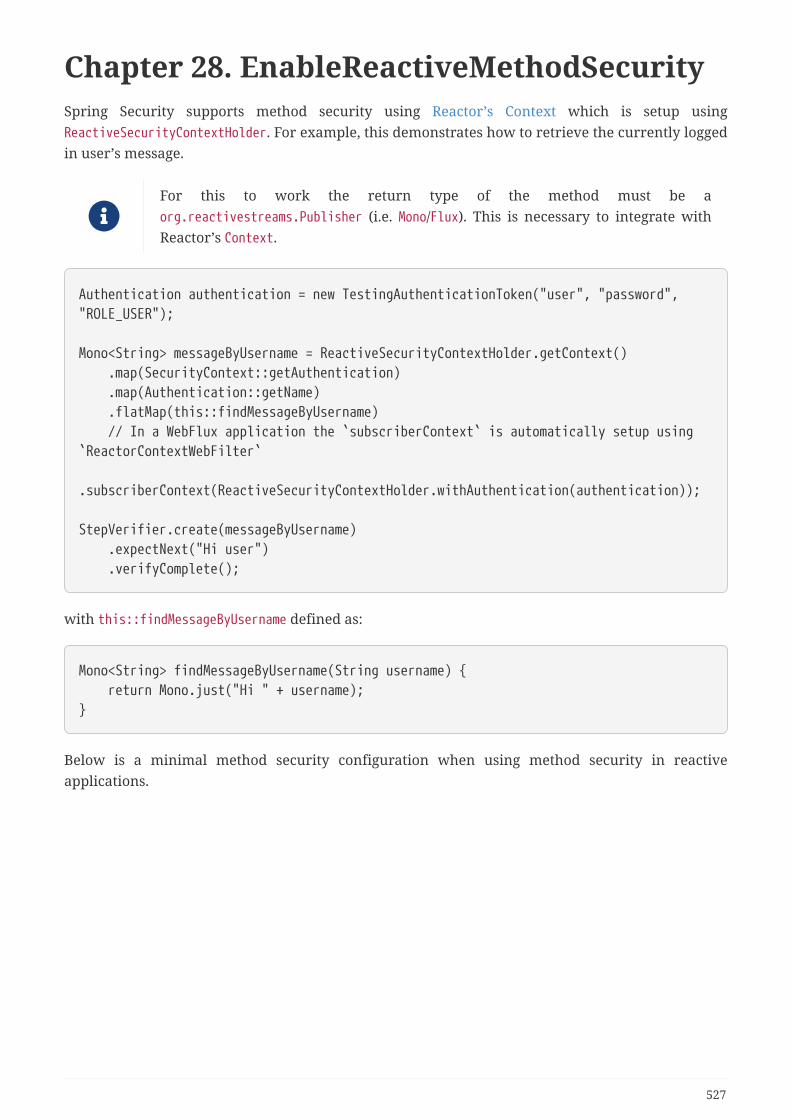
Chapter 28. EnableReactiveMethodSecuritySpring Security supports method security using Reactor’s Context which is setup usingReactiveSecurityContextHolder. For example, this demonstrates how to retrieve the currently loggedin user’s message.
For this to work the return type of the method must be aorg.reactivestreams.Publisher (i.e. Mono/Flux). This is necessary to integrate withReactor’s Context.
Authentication authentication = new TestingAuthenticationToken("user", "password","ROLE_USER");
Mono<String> messageByUsername = ReactiveSecurityContextHolder.getContext() .map(SecurityContext::getAuthentication) .map(Authentication::getName) .flatMap(this::findMessageByUsername) // In a WebFlux application the `subscriberContext` is automatically setup using`ReactorContextWebFilter` .subscriberContext(ReactiveSecurityContextHolder.withAuthentication(authentication));
StepVerifier.create(messageByUsername) .expectNext("Hi user") .verifyComplete();
with this::findMessageByUsername defined as:
Mono<String> findMessageByUsername(String username) { return Mono.just("Hi " + username);}
Below is a minimal method security configuration when using method security in reactiveapplications.
527
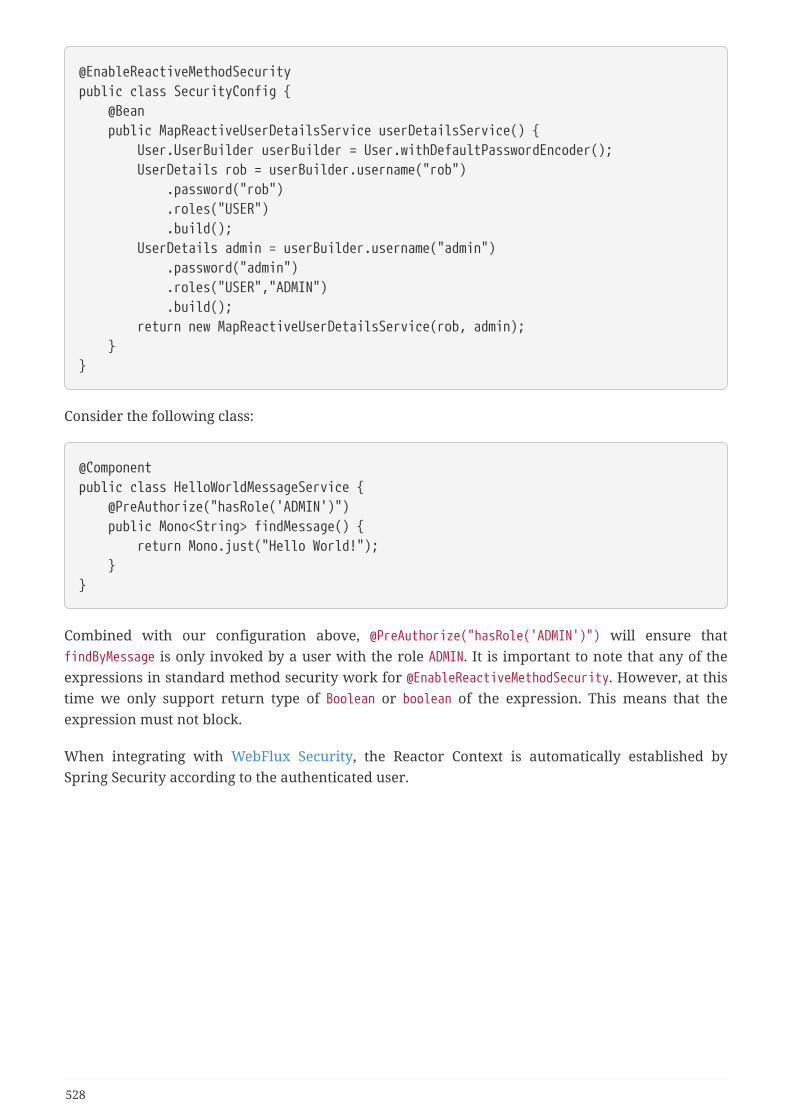
@EnableReactiveMethodSecuritypublic class SecurityConfig { @Bean public MapReactiveUserDetailsService userDetailsService() { User.UserBuilder userBuilder = User.withDefaultPasswordEncoder(); UserDetails rob = userBuilder.username("rob") .password("rob") .roles("USER") .build(); UserDetails admin = userBuilder.username("admin") .password("admin") .roles("USER","ADMIN") .build(); return new MapReactiveUserDetailsService(rob, admin); }}
Consider the following class:
@Componentpublic class HelloWorldMessageService { @PreAuthorize("hasRole('ADMIN')") public Mono<String> findMessage() { return Mono.just("Hello World!"); }}
Combined with our configuration above, @PreAuthorize("hasRole('ADMIN')") will ensure thatfindByMessage is only invoked by a user with the role ADMIN. It is important to note that any of theexpressions in standard method security work for @EnableReactiveMethodSecurity. However, at thistime we only support return type of Boolean or boolean of the expression. This means that theexpression must not block.
When integrating with WebFlux Security, the Reactor Context is automatically established bySpring Security according to the authenticated user.
528
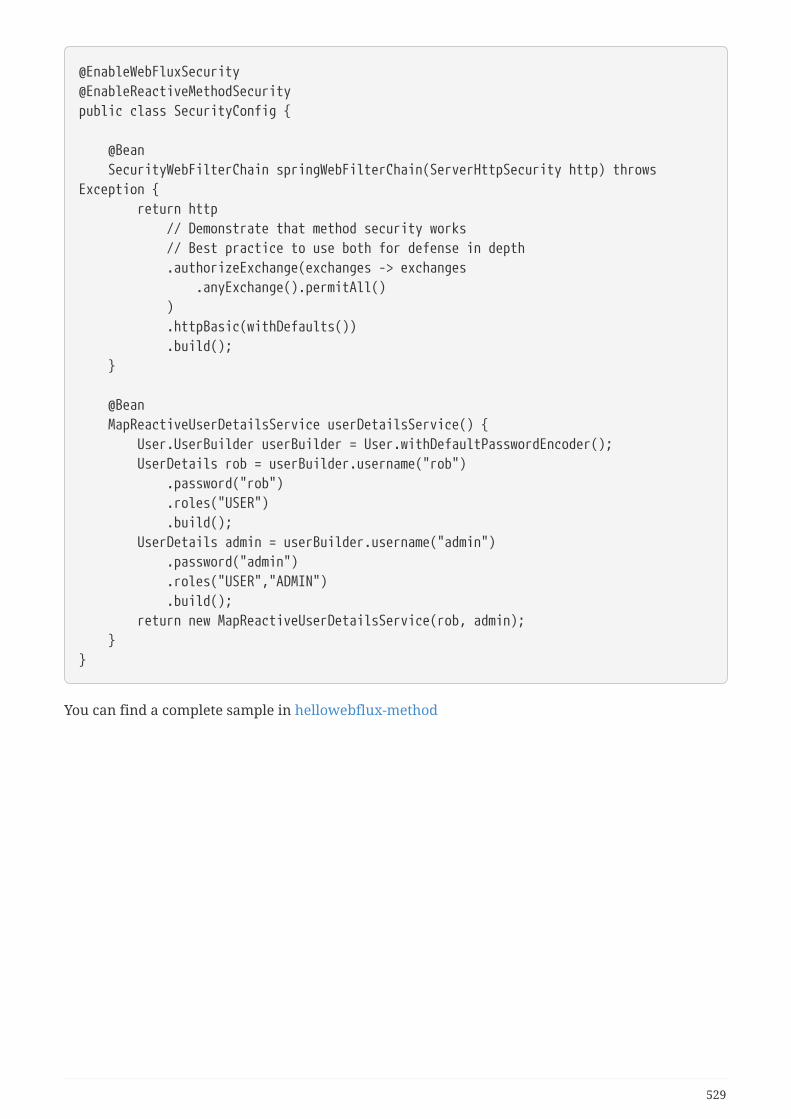
@EnableWebFluxSecurity@EnableReactiveMethodSecuritypublic class SecurityConfig {
@Bean SecurityWebFilterChain springWebFilterChain(ServerHttpSecurity http) throwsException { return http // Demonstrate that method security works // Best practice to use both for defense in depth .authorizeExchange(exchanges -> exchanges .anyExchange().permitAll() ) .httpBasic(withDefaults()) .build(); }
@Bean MapReactiveUserDetailsService userDetailsService() { User.UserBuilder userBuilder = User.withDefaultPasswordEncoder(); UserDetails rob = userBuilder.username("rob") .password("rob") .roles("USER") .build(); UserDetails admin = userBuilder.username("admin") .password("admin") .roles("USER","ADMIN") .build(); return new MapReactiveUserDetailsService(rob, admin); }}
You can find a complete sample in hellowebflux-method
529
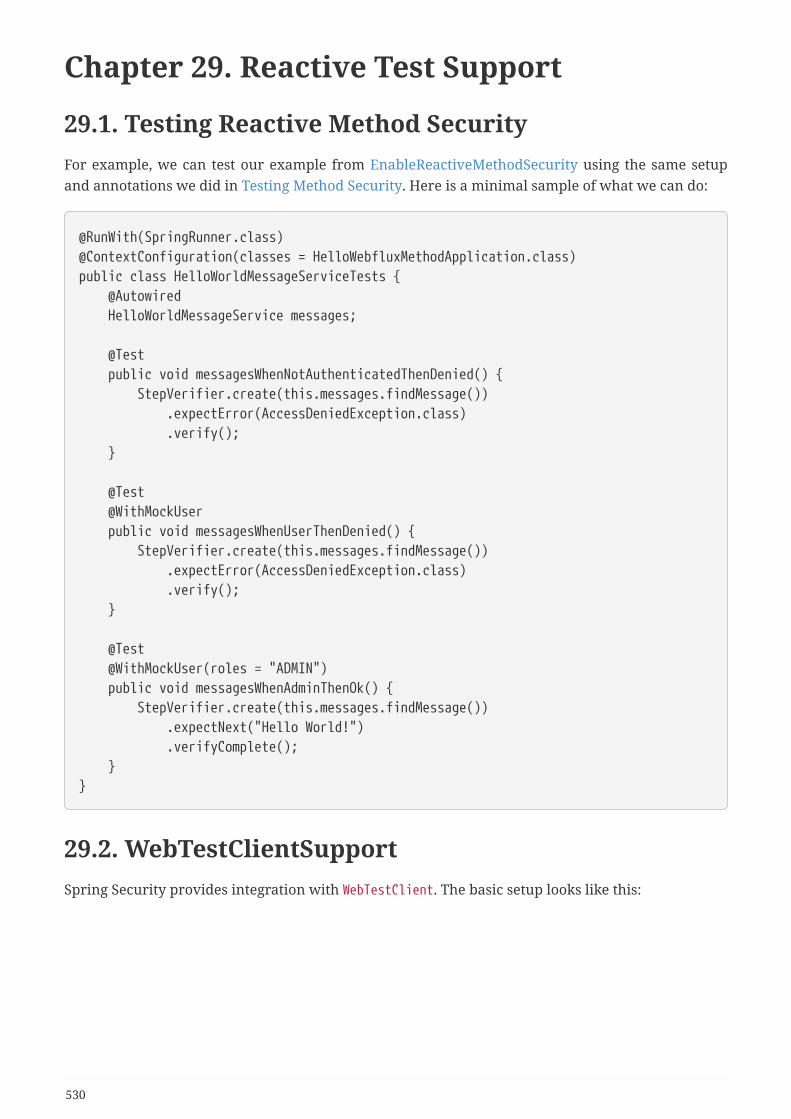
Chapter 29. Reactive Test Support
29.1. Testing Reactive Method SecurityFor example, we can test our example from EnableReactiveMethodSecurity using the same setupand annotations we did in Testing Method Security. Here is a minimal sample of what we can do:
@RunWith(SpringRunner.class)@ContextConfiguration(classes = HelloWebfluxMethodApplication.class)public class HelloWorldMessageServiceTests { @Autowired HelloWorldMessageService messages;
@Test public void messagesWhenNotAuthenticatedThenDenied() { StepVerifier.create(this.messages.findMessage()) .expectError(AccessDeniedException.class) .verify(); }
@Test @WithMockUser public void messagesWhenUserThenDenied() { StepVerifier.create(this.messages.findMessage()) .expectError(AccessDeniedException.class) .verify(); }
@Test @WithMockUser(roles = "ADMIN") public void messagesWhenAdminThenOk() { StepVerifier.create(this.messages.findMessage()) .expectNext("Hello World!") .verifyComplete(); }}
29.2. WebTestClientSupportSpring Security provides integration with WebTestClient. The basic setup looks like this:
530
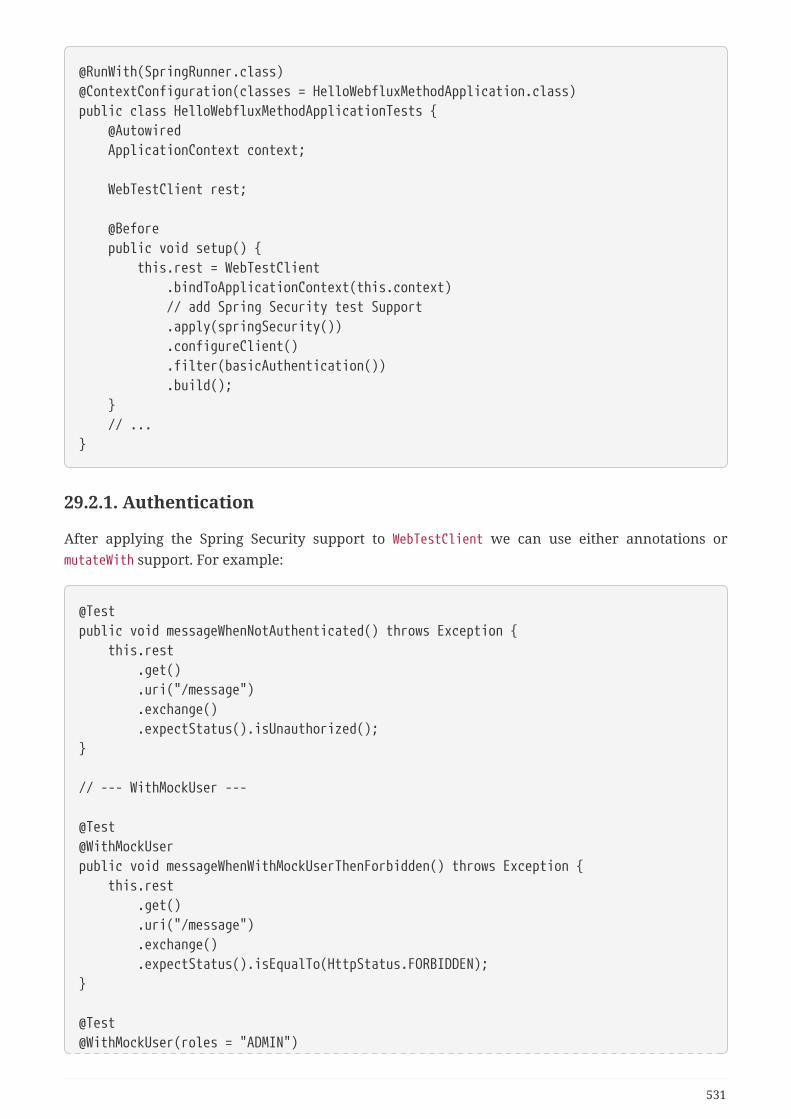
@RunWith(SpringRunner.class)@ContextConfiguration(classes = HelloWebfluxMethodApplication.class)public class HelloWebfluxMethodApplicationTests { @Autowired ApplicationContext context;
WebTestClient rest;
@Before public void setup() { this.rest = WebTestClient .bindToApplicationContext(this.context) // add Spring Security test Support .apply(springSecurity()) .configureClient() .filter(basicAuthentication()) .build(); } // ...}
29.2.1. Authentication
After applying the Spring Security support to WebTestClient we can use either annotations ormutateWith support. For example:
@Testpublic void messageWhenNotAuthenticated() throws Exception { this.rest .get() .uri("/message") .exchange() .expectStatus().isUnauthorized();}
// --- WithMockUser ---
@Test@WithMockUserpublic void messageWhenWithMockUserThenForbidden() throws Exception { this.rest .get() .uri("/message") .exchange() .expectStatus().isEqualTo(HttpStatus.FORBIDDEN);}
@Test@WithMockUser(roles = "ADMIN")
531

public void messageWhenWithMockAdminThenOk() throws Exception { this.rest .get() .uri("/message") .exchange() .expectStatus().isOk() .expectBody(String.class).isEqualTo("Hello World!");}
// --- mutateWith mockUser ---
@Testpublic void messageWhenMutateWithMockUserThenForbidden() throws Exception { this.rest .mutateWith(mockUser()) .get() .uri("/message") .exchange() .expectStatus().isEqualTo(HttpStatus.FORBIDDEN);}
@Testpublic void messageWhenMutateWithMockAdminThenOk() throws Exception { this.rest .mutateWith(mockUser().roles("ADMIN")) .get() .uri("/message") .exchange() .expectStatus().isOk() .expectBody(String.class).isEqualTo("Hello World!");}
29.2.2. CSRF Support
Spring Security also provides support for CSRF testing with WebTestClient. For example:
this.rest // provide a valid CSRF token .mutateWith(csrf()) .post() .uri("/login") ...
29.2.3. Testing OAuth 2.0
When it comes to OAuth 2.0, the same principles covered earlier still apply: Ultimately, it dependson what your method under test is expecting to be in the SecurityContextHolder.
For example, for a controller that looks like this:
532
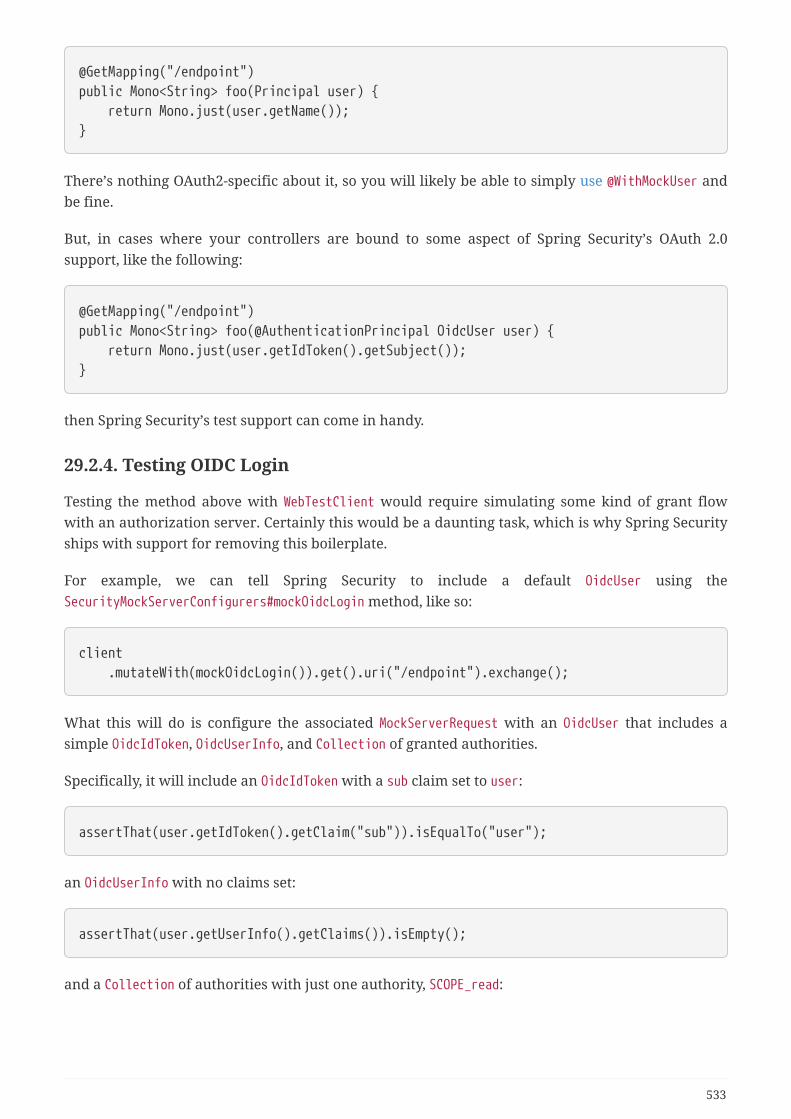
@GetMapping("/endpoint")public Mono<String> foo(Principal user) { return Mono.just(user.getName());}
There’s nothing OAuth2-specific about it, so you will likely be able to simply use @WithMockUser andbe fine.
But, in cases where your controllers are bound to some aspect of Spring Security’s OAuth 2.0support, like the following:
@GetMapping("/endpoint")public Mono<String> foo(@AuthenticationPrincipal OidcUser user) { return Mono.just(user.getIdToken().getSubject());}
then Spring Security’s test support can come in handy.
29.2.4. Testing OIDC Login
Testing the method above with WebTestClient would require simulating some kind of grant flowwith an authorization server. Certainly this would be a daunting task, which is why Spring Securityships with support for removing this boilerplate.
For example, we can tell Spring Security to include a default OidcUser using theSecurityMockServerConfigurers#mockOidcLogin method, like so:
client .mutateWith(mockOidcLogin()).get().uri("/endpoint").exchange();
What this will do is configure the associated MockServerRequest with an OidcUser that includes asimple OidcIdToken, OidcUserInfo, and Collection of granted authorities.
Specifically, it will include an OidcIdToken with a sub claim set to user:
assertThat(user.getIdToken().getClaim("sub")).isEqualTo("user");
an OidcUserInfo with no claims set:
assertThat(user.getUserInfo().getClaims()).isEmpty();
and a Collection of authorities with just one authority, SCOPE_read:
533
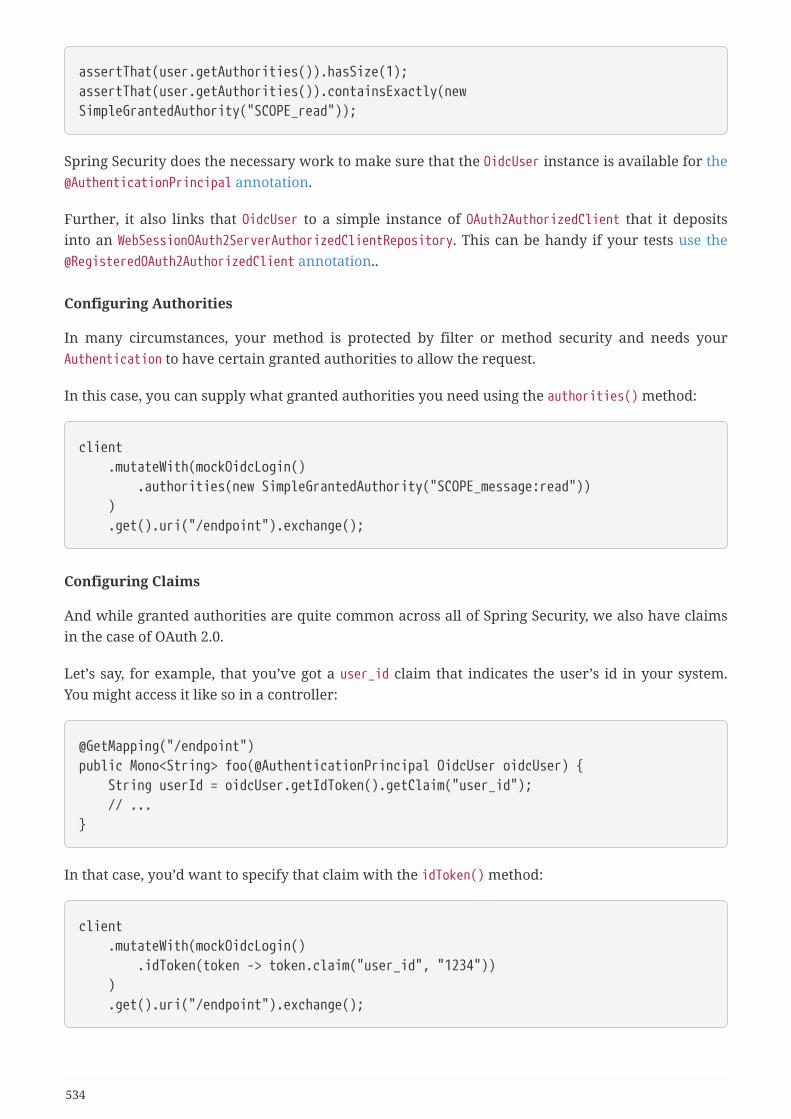
assertThat(user.getAuthorities()).hasSize(1);assertThat(user.getAuthorities()).containsExactly(newSimpleGrantedAuthority("SCOPE_read"));
Spring Security does the necessary work to make sure that the OidcUser instance is available for the@AuthenticationPrincipal annotation.
Further, it also links that OidcUser to a simple instance of OAuth2AuthorizedClient that it depositsinto an WebSessionOAuth2ServerAuthorizedClientRepository. This can be handy if your tests use the@RegisteredOAuth2AuthorizedClient annotation..
Configuring Authorities
In many circumstances, your method is protected by filter or method security and needs yourAuthentication to have certain granted authorities to allow the request.
In this case, you can supply what granted authorities you need using the authorities() method:
client .mutateWith(mockOidcLogin() .authorities(new SimpleGrantedAuthority("SCOPE_message:read")) ) .get().uri("/endpoint").exchange();
Configuring Claims
And while granted authorities are quite common across all of Spring Security, we also have claimsin the case of OAuth 2.0.
Let’s say, for example, that you’ve got a user_id claim that indicates the user’s id in your system.You might access it like so in a controller:
@GetMapping("/endpoint")public Mono<String> foo(@AuthenticationPrincipal OidcUser oidcUser) { String userId = oidcUser.getIdToken().getClaim("user_id"); // ...}
In that case, you’d want to specify that claim with the idToken() method:
client .mutateWith(mockOidcLogin() .idToken(token -> token.claim("user_id", "1234")) ) .get().uri("/endpoint").exchange();
534
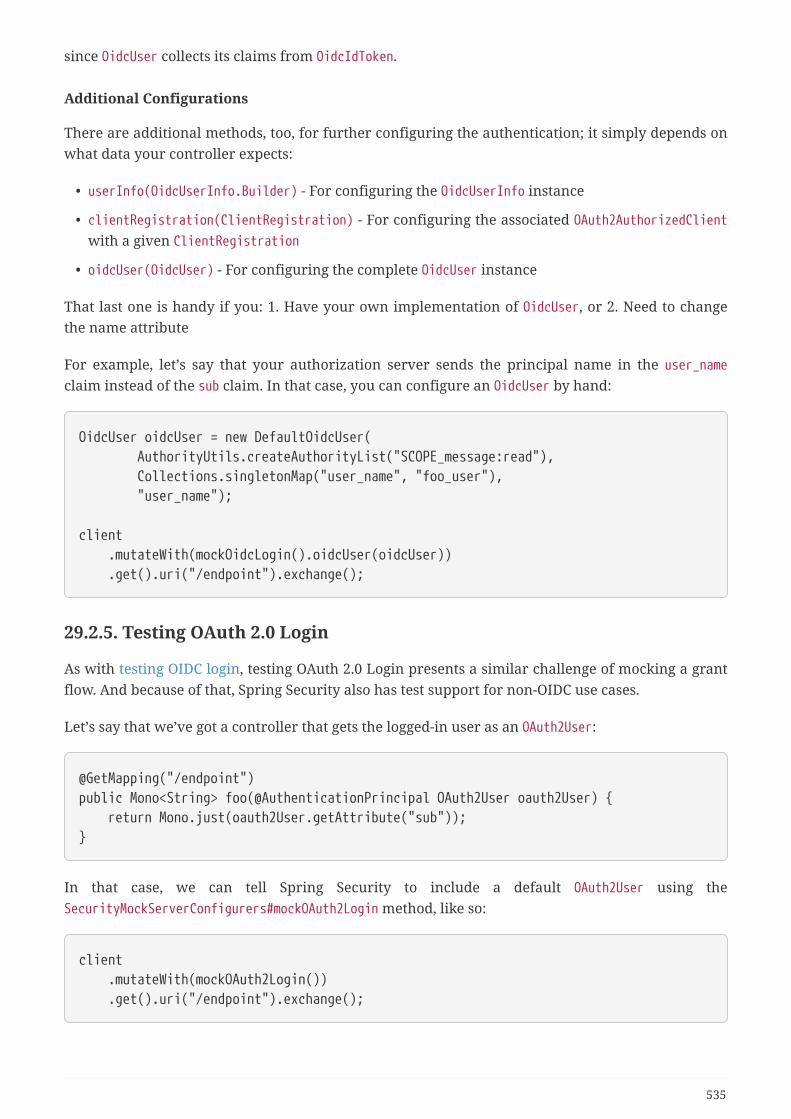
since OidcUser collects its claims from OidcIdToken.
Additional Configurations
There are additional methods, too, for further configuring the authentication; it simply depends onwhat data your controller expects:
• userInfo(OidcUserInfo.Builder) - For configuring the OidcUserInfo instance
• clientRegistration(ClientRegistration) - For configuring the associated OAuth2AuthorizedClientwith a given ClientRegistration
• oidcUser(OidcUser) - For configuring the complete OidcUser instance
That last one is handy if you: 1. Have your own implementation of OidcUser, or 2. Need to changethe name attribute
For example, let’s say that your authorization server sends the principal name in the user_nameclaim instead of the sub claim. In that case, you can configure an OidcUser by hand:
OidcUser oidcUser = new DefaultOidcUser( AuthorityUtils.createAuthorityList("SCOPE_message:read"), Collections.singletonMap("user_name", "foo_user"), "user_name");
client .mutateWith(mockOidcLogin().oidcUser(oidcUser)) .get().uri("/endpoint").exchange();
29.2.5. Testing OAuth 2.0 Login
As with testing OIDC login, testing OAuth 2.0 Login presents a similar challenge of mocking a grantflow. And because of that, Spring Security also has test support for non-OIDC use cases.
Let’s say that we’ve got a controller that gets the logged-in user as an OAuth2User:
@GetMapping("/endpoint")public Mono<String> foo(@AuthenticationPrincipal OAuth2User oauth2User) { return Mono.just(oauth2User.getAttribute("sub"));}
In that case, we can tell Spring Security to include a default OAuth2User using theSecurityMockServerConfigurers#mockOAuth2Login method, like so:
client .mutateWith(mockOAuth2Login()) .get().uri("/endpoint").exchange();
535
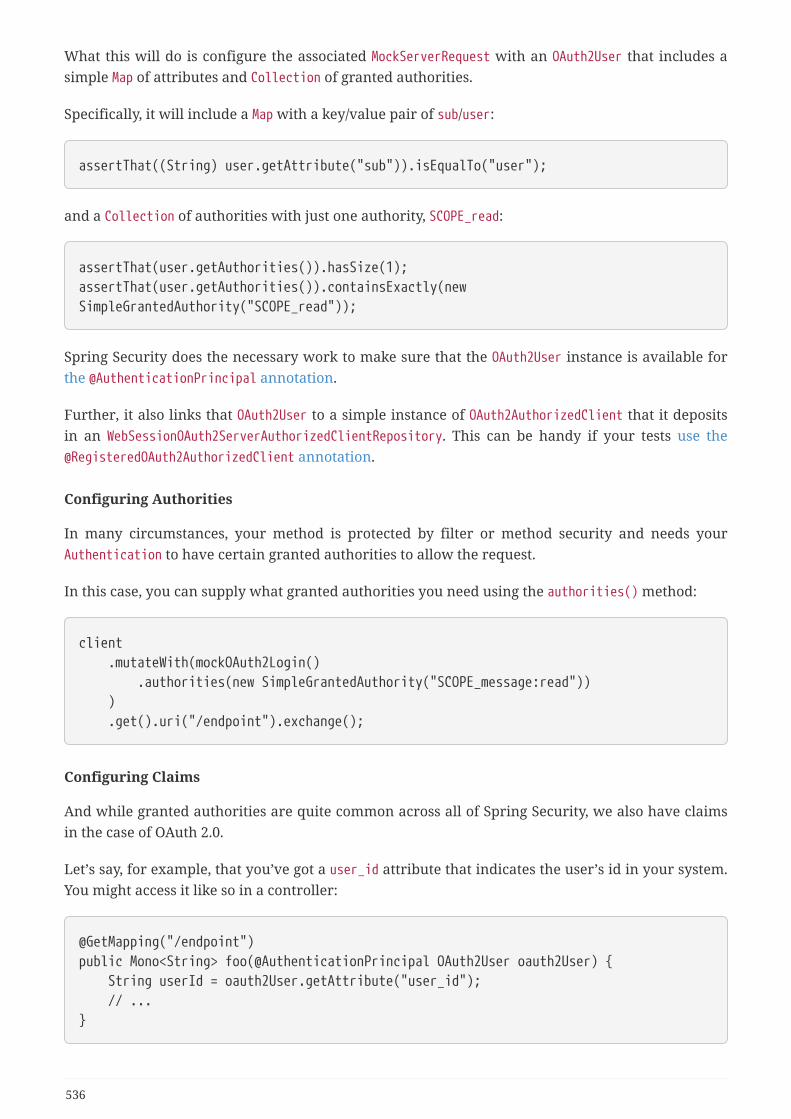
What this will do is configure the associated MockServerRequest with an OAuth2User that includes asimple Map of attributes and Collection of granted authorities.
Specifically, it will include a Map with a key/value pair of sub/user:
assertThat((String) user.getAttribute("sub")).isEqualTo("user");
and a Collection of authorities with just one authority, SCOPE_read:
assertThat(user.getAuthorities()).hasSize(1);assertThat(user.getAuthorities()).containsExactly(newSimpleGrantedAuthority("SCOPE_read"));
Spring Security does the necessary work to make sure that the OAuth2User instance is available forthe @AuthenticationPrincipal annotation.
Further, it also links that OAuth2User to a simple instance of OAuth2AuthorizedClient that it depositsin an WebSessionOAuth2ServerAuthorizedClientRepository. This can be handy if your tests use the@RegisteredOAuth2AuthorizedClient annotation.
Configuring Authorities
In many circumstances, your method is protected by filter or method security and needs yourAuthentication to have certain granted authorities to allow the request.
In this case, you can supply what granted authorities you need using the authorities() method:
client .mutateWith(mockOAuth2Login() .authorities(new SimpleGrantedAuthority("SCOPE_message:read")) ) .get().uri("/endpoint").exchange();
Configuring Claims
And while granted authorities are quite common across all of Spring Security, we also have claimsin the case of OAuth 2.0.
Let’s say, for example, that you’ve got a user_id attribute that indicates the user’s id in your system.You might access it like so in a controller:
@GetMapping("/endpoint")public Mono<String> foo(@AuthenticationPrincipal OAuth2User oauth2User) { String userId = oauth2User.getAttribute("user_id"); // ...}
536

In that case, you’d want to specify that attribute with the attributes() method:
client .mutateWith(mockOAuth2Login() .attributes(attrs -> attrs.put("user_id", "1234")) ) .get().uri("/endpoint").exchange();
Additional Configurations
There are additional methods, too, for further configuring the authentication; it simply depends onwhat data your controller expects:
• clientRegistration(ClientRegistration) - For configuring the associated OAuth2AuthorizedClientwith a given ClientRegistration
• oauth2User(OAuth2User) - For configuring the complete OAuth2User instance
That last one is handy if you: 1. Have your own implementation of OAuth2User, or 2. Need to changethe name attribute
For example, let’s say that your authorization server sends the principal name in the user_nameclaim instead of the sub claim. In that case, you can configure an OAuth2User by hand:
OAuth2User oauth2User = new DefaultOAuth2User( AuthorityUtils.createAuthorityList("SCOPE_message:read"), Collections.singletonMap("user_name", "foo_user"), "user_name");
client .mutateWith(mockOAuth2Login().oauth2User(oauth2User)) .get().uri("/endpoint").exchange();
29.2.6. Testing OAuth 2.0 Clients
Independent of how your user authenticates, you may have other tokens and client registrationsthat are in play for the request you are testing. For example, your controller may be relying on theclient credentials grant to get a token that isn’t associated with the user at all:
@GetMapping("/endpoint")public Mono<String> foo(@RegisteredOAuth2AuthorizedClient("my-app")OAuth2AuthorizedClient authorizedClient) { return this.webClient.get() .attributes(oauth2AuthorizedClient(authorizedClient)) .retrieve() .bodyToMono(String.class);}
537
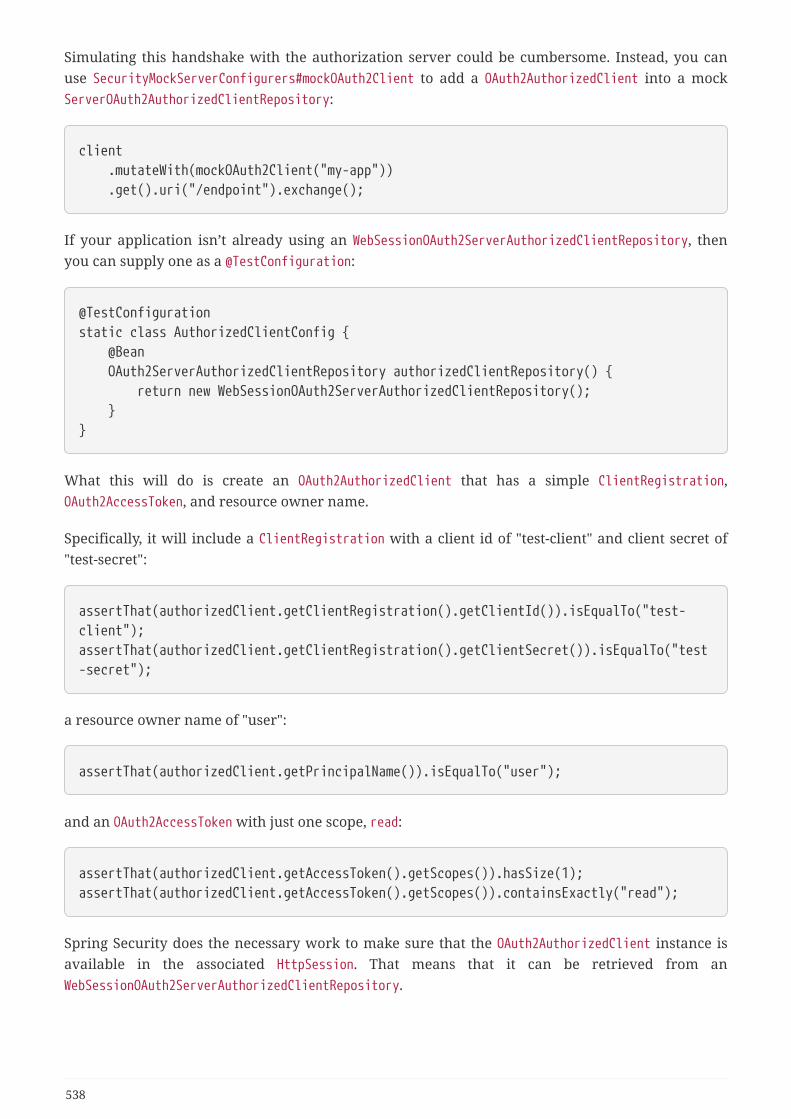
Simulating this handshake with the authorization server could be cumbersome. Instead, you canuse SecurityMockServerConfigurers#mockOAuth2Client to add a OAuth2AuthorizedClient into a mockServerOAuth2AuthorizedClientRepository:
client .mutateWith(mockOAuth2Client("my-app")) .get().uri("/endpoint").exchange();
If your application isn’t already using an WebSessionOAuth2ServerAuthorizedClientRepository, thenyou can supply one as a @TestConfiguration:
@TestConfigurationstatic class AuthorizedClientConfig { @Bean OAuth2ServerAuthorizedClientRepository authorizedClientRepository() { return new WebSessionOAuth2ServerAuthorizedClientRepository(); }}
What this will do is create an OAuth2AuthorizedClient that has a simple ClientRegistration,OAuth2AccessToken, and resource owner name.
Specifically, it will include a ClientRegistration with a client id of "test-client" and client secret of"test-secret":
assertThat(authorizedClient.getClientRegistration().getClientId()).isEqualTo("test-client");assertThat(authorizedClient.getClientRegistration().getClientSecret()).isEqualTo("test-secret");
a resource owner name of "user":
assertThat(authorizedClient.getPrincipalName()).isEqualTo("user");
and an OAuth2AccessToken with just one scope, read:
assertThat(authorizedClient.getAccessToken().getScopes()).hasSize(1);assertThat(authorizedClient.getAccessToken().getScopes()).containsExactly("read");
Spring Security does the necessary work to make sure that the OAuth2AuthorizedClient instance isavailable in the associated HttpSession. That means that it can be retrieved from anWebSessionOAuth2ServerAuthorizedClientRepository.
538
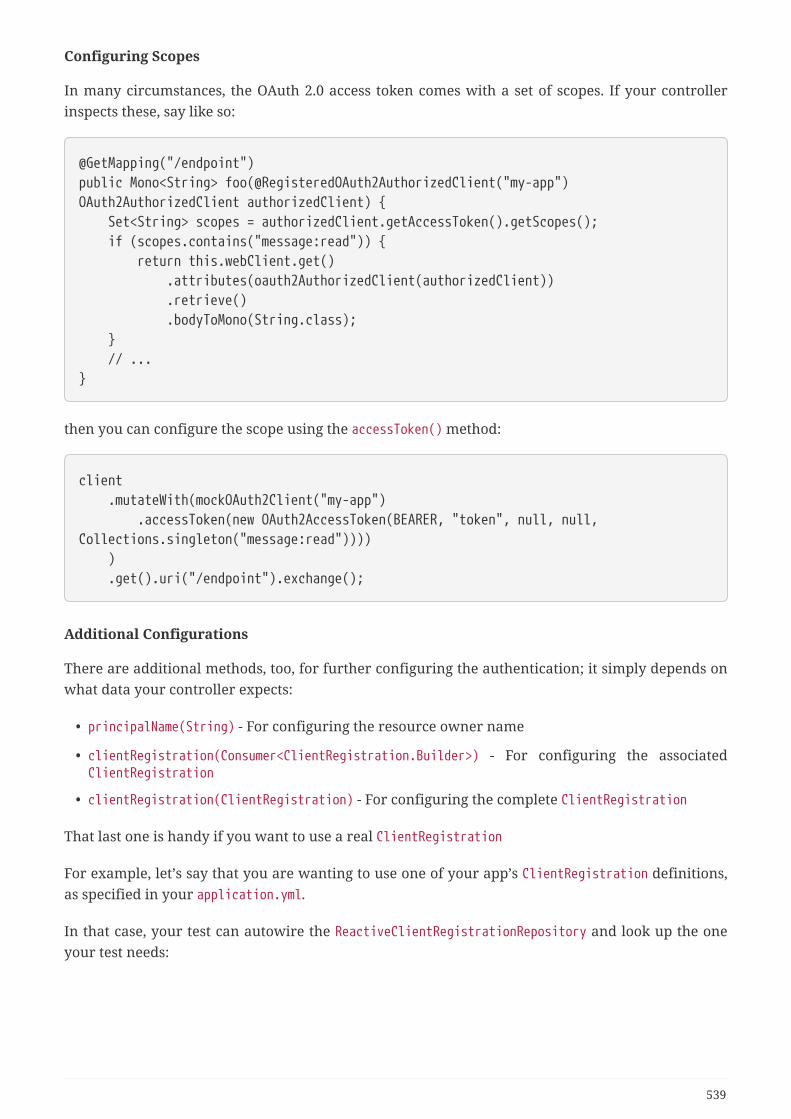
Configuring Scopes
In many circumstances, the OAuth 2.0 access token comes with a set of scopes. If your controllerinspects these, say like so:
@GetMapping("/endpoint")public Mono<String> foo(@RegisteredOAuth2AuthorizedClient("my-app")OAuth2AuthorizedClient authorizedClient) { Set<String> scopes = authorizedClient.getAccessToken().getScopes(); if (scopes.contains("message:read")) { return this.webClient.get() .attributes(oauth2AuthorizedClient(authorizedClient)) .retrieve() .bodyToMono(String.class); } // ...}
then you can configure the scope using the accessToken() method:
client .mutateWith(mockOAuth2Client("my-app") .accessToken(new OAuth2AccessToken(BEARER, "token", null, null,Collections.singleton("message:read")))) ) .get().uri("/endpoint").exchange();
Additional Configurations
There are additional methods, too, for further configuring the authentication; it simply depends onwhat data your controller expects:
• principalName(String) - For configuring the resource owner name
• clientRegistration(Consumer<ClientRegistration.Builder>) - For configuring the associatedClientRegistration
• clientRegistration(ClientRegistration) - For configuring the complete ClientRegistration
That last one is handy if you want to use a real ClientRegistration
For example, let’s say that you are wanting to use one of your app’s ClientRegistration definitions,as specified in your application.yml.
In that case, your test can autowire the ReactiveClientRegistrationRepository and look up the oneyour test needs:
539
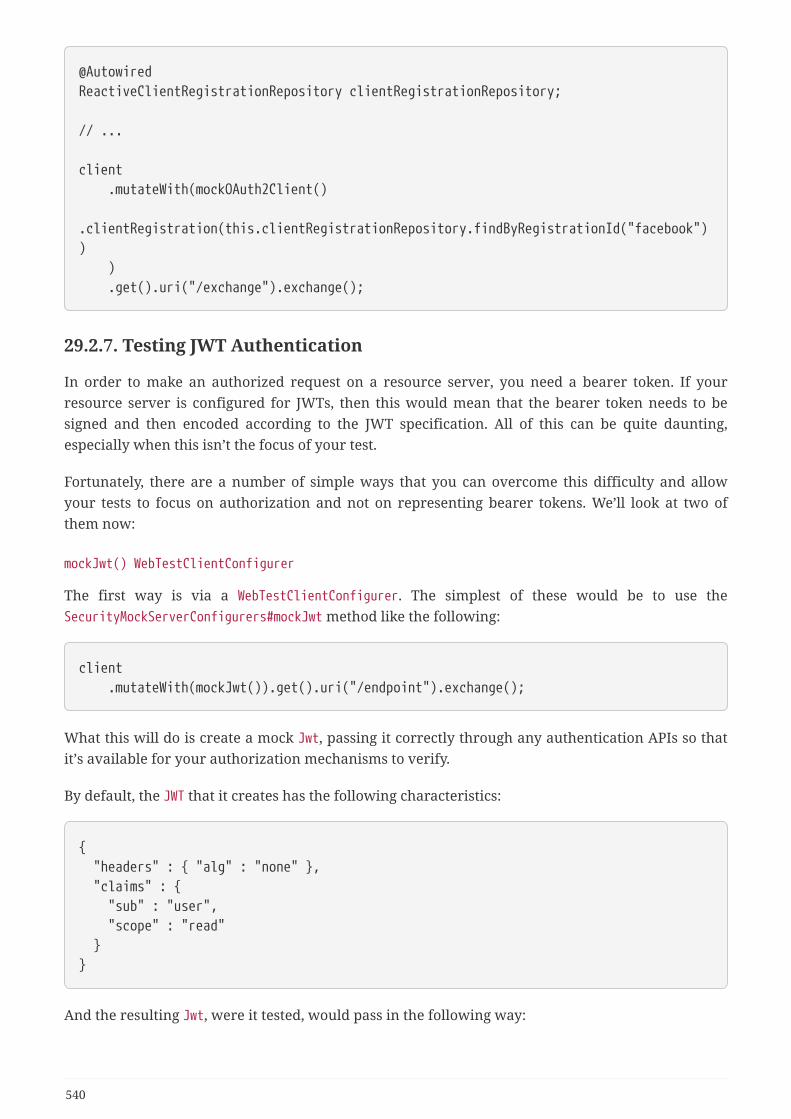
@AutowiredReactiveClientRegistrationRepository clientRegistrationRepository;
// ...
client .mutateWith(mockOAuth2Client() .clientRegistration(this.clientRegistrationRepository.findByRegistrationId("facebook")) ) .get().uri("/exchange").exchange();
29.2.7. Testing JWT Authentication
In order to make an authorized request on a resource server, you need a bearer token. If yourresource server is configured for JWTs, then this would mean that the bearer token needs to besigned and then encoded according to the JWT specification. All of this can be quite daunting,especially when this isn’t the focus of your test.
Fortunately, there are a number of simple ways that you can overcome this difficulty and allowyour tests to focus on authorization and not on representing bearer tokens. We’ll look at two ofthem now:
mockJwt() WebTestClientConfigurer
The first way is via a WebTestClientConfigurer. The simplest of these would be to use theSecurityMockServerConfigurers#mockJwt method like the following:
client .mutateWith(mockJwt()).get().uri("/endpoint").exchange();
What this will do is create a mock Jwt, passing it correctly through any authentication APIs so thatit’s available for your authorization mechanisms to verify.
By default, the JWT that it creates has the following characteristics:
{ "headers" : { "alg" : "none" }, "claims" : { "sub" : "user", "scope" : "read" }}
And the resulting Jwt, were it tested, would pass in the following way:
540
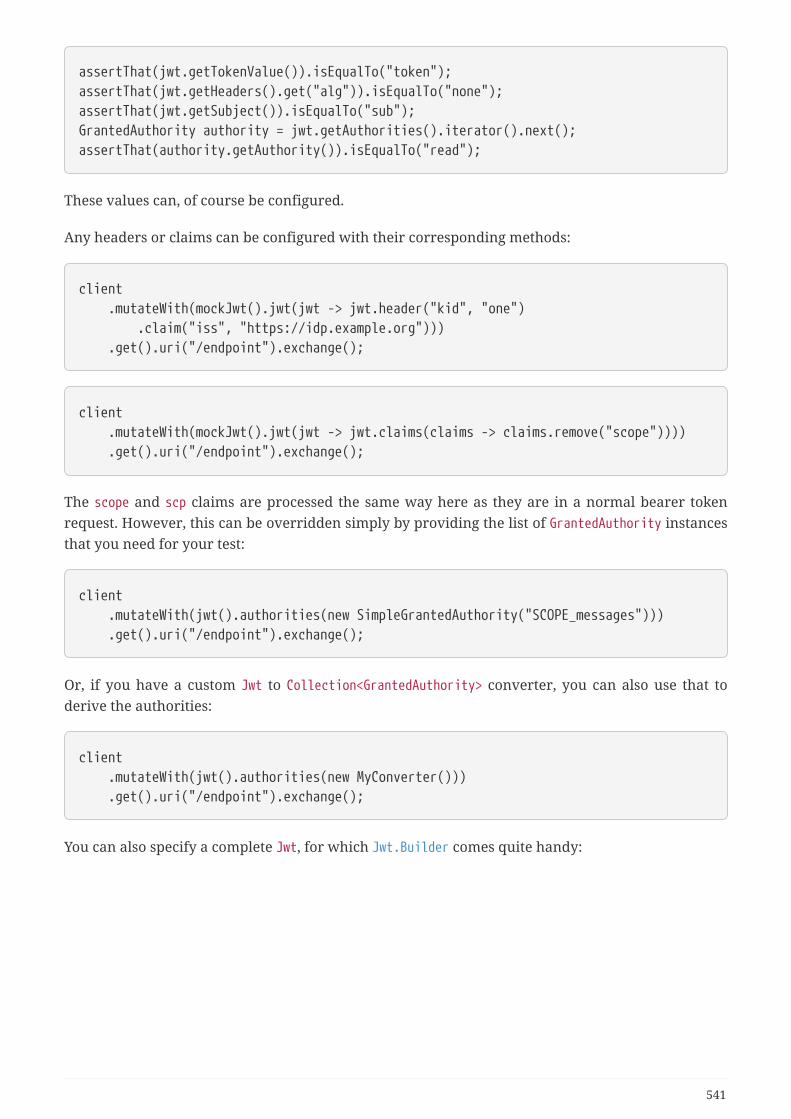
assertThat(jwt.getTokenValue()).isEqualTo("token");assertThat(jwt.getHeaders().get("alg")).isEqualTo("none");assertThat(jwt.getSubject()).isEqualTo("sub");GrantedAuthority authority = jwt.getAuthorities().iterator().next();assertThat(authority.getAuthority()).isEqualTo("read");
These values can, of course be configured.
Any headers or claims can be configured with their corresponding methods:
client .mutateWith(mockJwt().jwt(jwt -> jwt.header("kid", "one") .claim("iss", "https://idp.example.org"))) .get().uri("/endpoint").exchange();
client .mutateWith(mockJwt().jwt(jwt -> jwt.claims(claims -> claims.remove("scope")))) .get().uri("/endpoint").exchange();
The scope and scp claims are processed the same way here as they are in a normal bearer tokenrequest. However, this can be overridden simply by providing the list of GrantedAuthority instancesthat you need for your test:
client .mutateWith(jwt().authorities(new SimpleGrantedAuthority("SCOPE_messages"))) .get().uri("/endpoint").exchange();
Or, if you have a custom Jwt to Collection<GrantedAuthority> converter, you can also use that toderive the authorities:
client .mutateWith(jwt().authorities(new MyConverter())) .get().uri("/endpoint").exchange();
You can also specify a complete Jwt, for which Jwt.Builder comes quite handy:
541
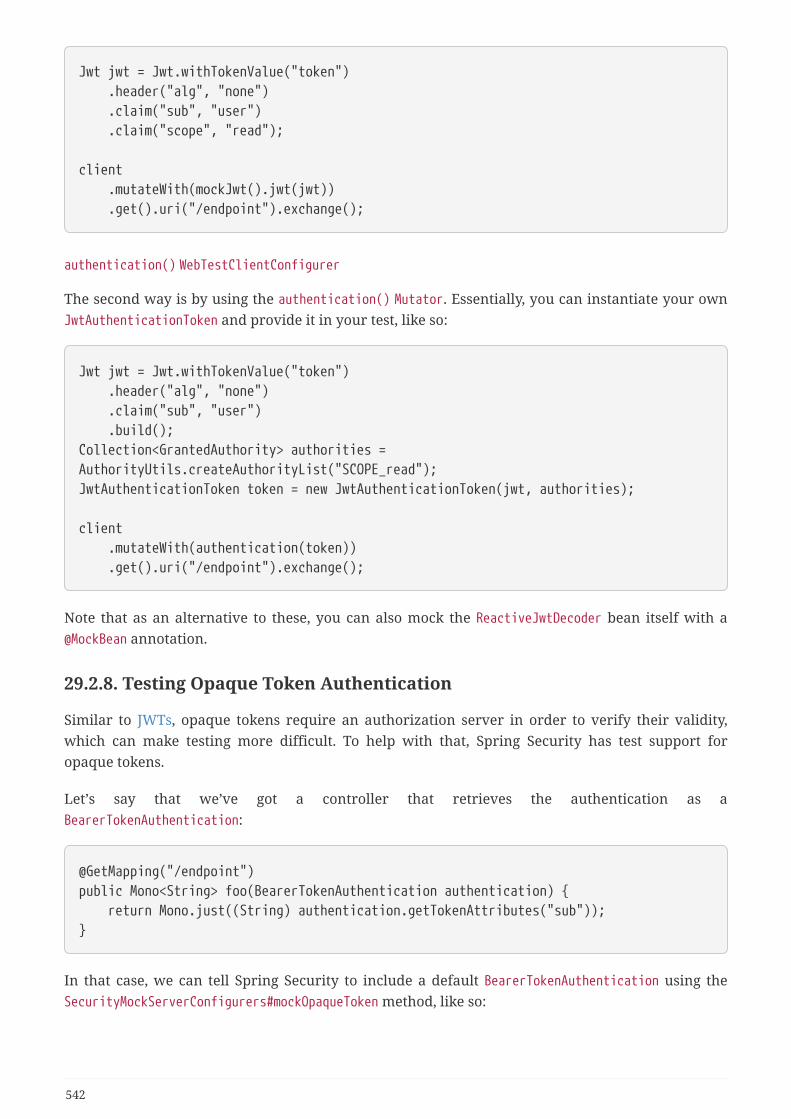
Jwt jwt = Jwt.withTokenValue("token") .header("alg", "none") .claim("sub", "user") .claim("scope", "read");
client .mutateWith(mockJwt().jwt(jwt)) .get().uri("/endpoint").exchange();
authentication() WebTestClientConfigurer
The second way is by using the authentication() Mutator. Essentially, you can instantiate your ownJwtAuthenticationToken and provide it in your test, like so:
Jwt jwt = Jwt.withTokenValue("token") .header("alg", "none") .claim("sub", "user") .build();Collection<GrantedAuthority> authorities =AuthorityUtils.createAuthorityList("SCOPE_read");JwtAuthenticationToken token = new JwtAuthenticationToken(jwt, authorities);
client .mutateWith(authentication(token)) .get().uri("/endpoint").exchange();
Note that as an alternative to these, you can also mock the ReactiveJwtDecoder bean itself with a@MockBean annotation.
29.2.8. Testing Opaque Token Authentication
Similar to JWTs, opaque tokens require an authorization server in order to verify their validity,which can make testing more difficult. To help with that, Spring Security has test support foropaque tokens.
Let’s say that we’ve got a controller that retrieves the authentication as aBearerTokenAuthentication:
@GetMapping("/endpoint")public Mono<String> foo(BearerTokenAuthentication authentication) { return Mono.just((String) authentication.getTokenAttributes("sub"));}
In that case, we can tell Spring Security to include a default BearerTokenAuthentication using theSecurityMockServerConfigurers#mockOpaqueToken method, like so:
542
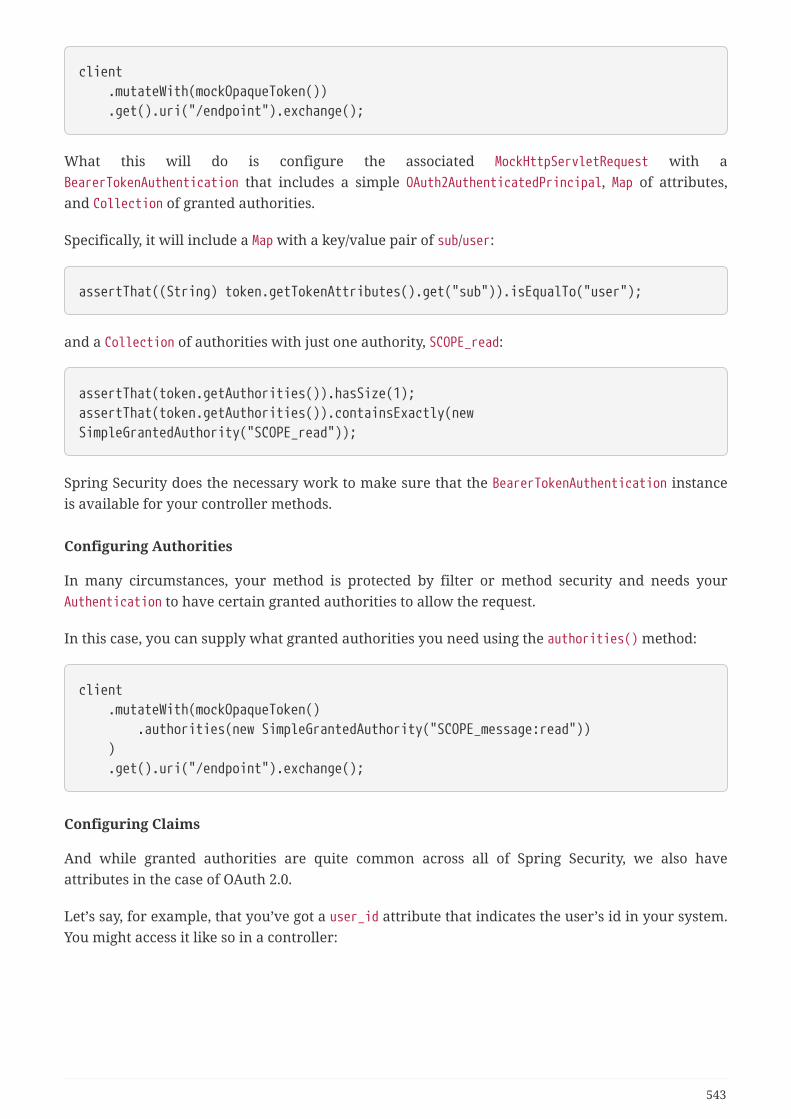
client .mutateWith(mockOpaqueToken()) .get().uri("/endpoint").exchange();
What this will do is configure the associated MockHttpServletRequest with aBearerTokenAuthentication that includes a simple OAuth2AuthenticatedPrincipal, Map of attributes,and Collection of granted authorities.
Specifically, it will include a Map with a key/value pair of sub/user:
assertThat((String) token.getTokenAttributes().get("sub")).isEqualTo("user");
and a Collection of authorities with just one authority, SCOPE_read:
assertThat(token.getAuthorities()).hasSize(1);assertThat(token.getAuthorities()).containsExactly(newSimpleGrantedAuthority("SCOPE_read"));
Spring Security does the necessary work to make sure that the BearerTokenAuthentication instanceis available for your controller methods.
Configuring Authorities
In many circumstances, your method is protected by filter or method security and needs yourAuthentication to have certain granted authorities to allow the request.
In this case, you can supply what granted authorities you need using the authorities() method:
client .mutateWith(mockOpaqueToken() .authorities(new SimpleGrantedAuthority("SCOPE_message:read")) ) .get().uri("/endpoint").exchange();
Configuring Claims
And while granted authorities are quite common across all of Spring Security, we also haveattributes in the case of OAuth 2.0.
Let’s say, for example, that you’ve got a user_id attribute that indicates the user’s id in your system.You might access it like so in a controller:
543
@GetMapping("/endpoint")public Mono<String> foo(BearerTokenAuthentication authentication) { String userId = (String) authentication.getTokenAttributes().get("user_id"); // ...}
In that case, you’d want to specify that attribute with the attributes() method:
client .mutateWith(mockOpaqueToken() .attributes(attrs -> attrs.put("user_id", "1234")) ) .get().uri("/endpoint").exchange();
Additional Configurations
There are additional methods, too, for further configuring the authentication; it simply depends onwhat data your controller expects.
One such is principal(OAuth2AuthenticatedPrincipal), which you can use to configure the completeOAuth2AuthenticatedPrincipal instance that underlies the BearerTokenAuthentication
It’s handy if you: 1. Have your own implementation of OAuth2AuthenticatedPrincipal, or 2. Want tospecify a different principal name
For example, let’s say that your authorization server sends the principal name in the user_nameattribute instead of the sub attribute. In that case, you can configure anOAuth2AuthenticatedPrincipal by hand:
Map<String, Object> attributes = Collections.singletonMap("user_name", "foo_user");OAuth2AuthenticatedPrincipal principal = new DefaultOAuth2AuthenticatedPrincipal( (String) attributes.get("user_name"), attributes, AuthorityUtils.createAuthorityList("SCOPE_message:read"));
client .mutateWith(mockOpaqueToken().principal(principal)) .get().uri("/endpoint").exchange();
Note that as an alternative to using mockOpaqueToken() test support, you can also mock theOpaqueTokenIntrospector bean itself with a @MockBean annotation.
544

Chapter 30. RSocket SecuritySpring Security’s RSocket support relies on a SocketAcceptorInterceptor. The main entry point intosecurity is found in the PayloadSocketAcceptorInterceptor which adapts the RSocket APIs to allowintercepting a PayloadExchange with PayloadInterceptor implementations.
You can find a few sample applications that demonstrate the code below:
• Hello RSocket hellorsocket
• Spring Flights
30.1. Minimal RSocket Security ConfigurationYou can find a minimal RSocket Security configuration below:
@Configuration@EnableRSocketSecuritypublic class HelloRSocketSecurityConfig {
@Bean public MapReactiveUserDetailsService userDetailsService() { UserDetails user = User.withDefaultPasswordEncoder() .username("user") .password("user") .roles("USER") .build(); return new MapReactiveUserDetailsService(user); }}
This configuration enables simple authentication and sets up rsocket-authorization to require anauthenticated user for any request.
30.2. Adding SecuritySocketAcceptorInterceptorFor Spring Security to work we need to apply SecuritySocketAcceptorInterceptor to theServerRSocketFactory. This is what connects our PayloadSocketAcceptorInterceptor we created withthe RSocket infrastructure. In a Spring Boot application this is done automatically usingRSocketSecurityAutoConfiguration with the following code.
@BeanServerRSocketFactoryProcessor springSecurityRSocketSecurity( SecuritySocketAcceptorInterceptor interceptor) { return builder -> builder.addSocketAcceptorPlugin(interceptor);}
545
30.3. RSocket AuthenticationRSocket authentication is performed with AuthenticationPayloadInterceptor which acts as acontroller to invoke a ReactiveAuthenticationManager instance.
30.3.1. Authentication at Setup vs Request Time
Generally, authentication can occur at setup time and/or request time.
Authentication at setup time makes sense in a few scenarios. A common scenarios is when a singleuser (i.e. mobile connection) is leveraging an RSocket connection. In this case only a single user isleveraging the connection, so authentication can be done once at connection time.
In a scenario where the RSocket connection is shared it makes sense to send credentials on eachrequest. For example, a web application that connects to an RSocket server as a downstreamservice would make a single connection that all users leverage. In this case, if the RSocket serverneeds to perform authorization based on the web application’s users credentials per request makessense.
In some scenarios authentication at setup and per request makes sense. Consider a web applicationas described previously. If we need to restrict the connection to the web application itself, we canprovide a credential with a SETUP authority at connection time. Then each user would havedifferent authorities but not the SETUP authority. This means that individual users can makerequests but not make additional connections.
30.3.2. Simple Authentication
Spring Security has support for Simple Authentication Metadata Extension.
Basic Authentication drafts evolved into Simple Authentication and is onlysupported for backward compatibility. SeeRSocketSecurity.basicAuthentication(Customizer) for setting it up.
The RSocket receiver can decode the credentials using AuthenticationPayloadExchangeConverterwhich is automatically setup using the simpleAuthentication portion of the DSL. An explicitconfiguration can be found below.
@BeanPayloadSocketAcceptorInterceptor rsocketInterceptor(RSocketSecurity rsocket) { rsocket .authorizePayload(authorize -> authorize .anyRequest().authenticated() .anyExchange().permitAll() ) .simpleAuthentication(Customizer.withDefaults()); return rsocket.build();}
546
The RSocket sender can send credentials using SimpleAuthenticationEncoder which can be added toSpring’s RSocketStrategies.
RSocketStrategies.Builder strategies = ...;strategies.encoder(new SimpleAuthenticationEncoder());
It can then be used to send a username and password to the receiver in the setup:
MimeType authenticationMimeType = MimeTypeUtils.parseMimeType(WellKnownMimeType.MESSAGE_RSOCKET_AUTHENTICATION.getString());UsernamePasswordMetadata credentials = new UsernamePasswordMetadata("user","password");Mono<RSocketRequester> requester = RSocketRequester.builder() .setupMetadata(credentials, authenticationMimeType) .rsocketStrategies(strategies.build()) .connectTcp(host, port);
Alternatively or additionally, a username and password can be sent in a request.
Mono<RSocketRequester> requester;UsernamePasswordMetadata credentials = new UsernamePasswordMetadata("user","password");
public Mono<AirportLocation> findRadar(String code) { return this.requester.flatMap(req -> req.route("find.radar.{code}", code) .metadata(credentials, authenticationMimeType) .retrieveMono(AirportLocation.class) );}
30.3.3. JWT
Spring Security has support for Bearer Token Authentication Metadata Extension. The supportcomes in the form of authenticating a JWT (determining the JWT is valid) and then using the JWT tomake authorization decisions.
The RSocket receiver can decode the credentials using BearerPayloadExchangeConverter which isautomatically setup using the jwt portion of the DSL. An example configuration can be foundbelow:
547
@BeanPayloadSocketAcceptorInterceptor rsocketInterceptor(RSocketSecurity rsocket) { rsocket .authorizePayload(authorize -> authorize .anyRequest().authenticated() .anyExchange().permitAll() ) .jwt(Customizer.withDefaults()); return rsocket.build();}
The configuration above relies on the existence of a ReactiveJwtDecoder @Bean being present. Anexample of creating one from the issuer can be found below:
@BeanReactiveJwtDecoder jwtDecoder() { return ReactiveJwtDecoders .fromIssuerLocation("https://example.com/auth/realms/demo");}
The RSocket sender does not need to do anything special to send the token because the value is justa simple String. For example, the token can be sent at setup time:
MimeType authenticationMimeType = MimeTypeUtils.parseMimeType(WellKnownMimeType.MESSAGE_RSOCKET_AUTHENTICATION.getString());BearerTokenMetadata token = ...;Mono<RSocketRequester> requester = RSocketRequester.builder() .setupMetadata(token, authenticationMimeType) .connectTcp(host, port);
Alternatively or additionally, the token can be sent in a request.
548
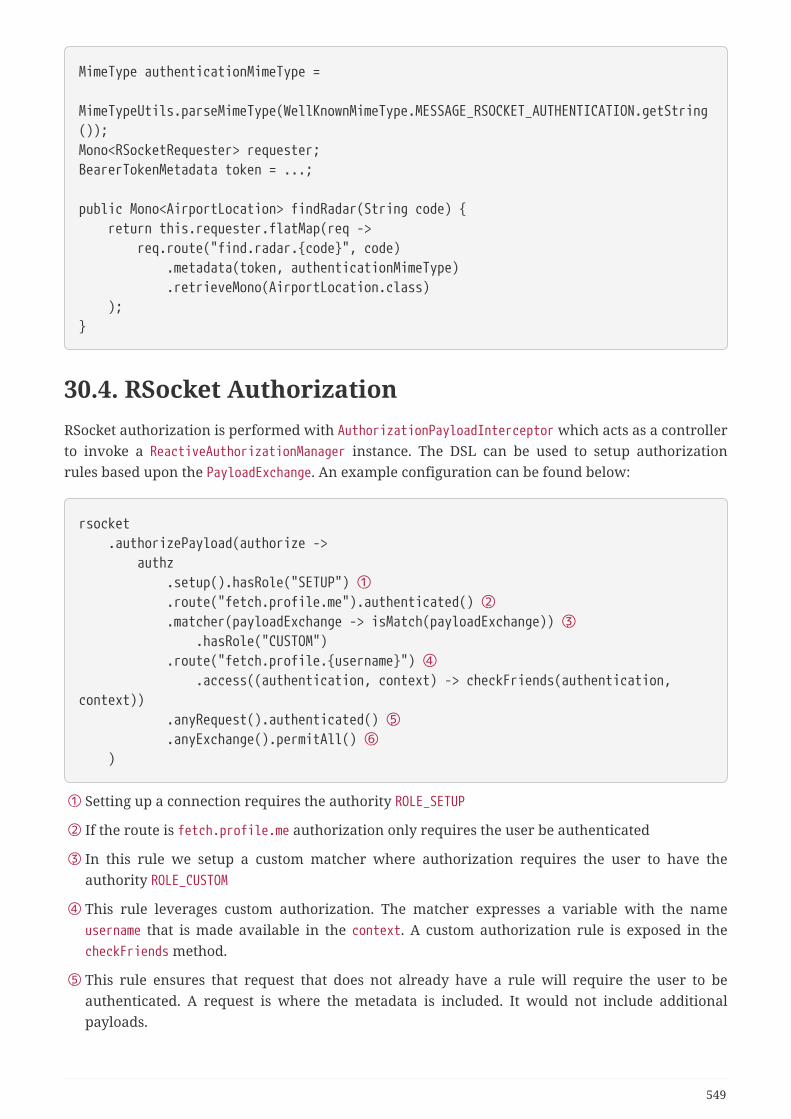
MimeType authenticationMimeType = MimeTypeUtils.parseMimeType(WellKnownMimeType.MESSAGE_RSOCKET_AUTHENTICATION.getString());Mono<RSocketRequester> requester;BearerTokenMetadata token = ...;
public Mono<AirportLocation> findRadar(String code) { return this.requester.flatMap(req -> req.route("find.radar.{code}", code) .metadata(token, authenticationMimeType) .retrieveMono(AirportLocation.class) );}
30.4. RSocket AuthorizationRSocket authorization is performed with AuthorizationPayloadInterceptor which acts as a controllerto invoke a ReactiveAuthorizationManager instance. The DSL can be used to setup authorizationrules based upon the PayloadExchange. An example configuration can be found below:
rsocket .authorizePayload(authorize -> authz .setup().hasRole("SETUP") ① .route("fetch.profile.me").authenticated() ② .matcher(payloadExchange -> isMatch(payloadExchange)) ③ .hasRole("CUSTOM") .route("fetch.profile.{username}") ④ .access((authentication, context) -> checkFriends(authentication,context)) .anyRequest().authenticated() ⑤ .anyExchange().permitAll() ⑥ )
① Setting up a connection requires the authority ROLE_SETUP
② If the route is fetch.profile.me authorization only requires the user be authenticated
③ In this rule we setup a custom matcher where authorization requires the user to have theauthority ROLE_CUSTOM
④ This rule leverages custom authorization. The matcher expresses a variable with the nameusername that is made available in the context. A custom authorization rule is exposed in thecheckFriends method.
⑤ This rule ensures that request that does not already have a rule will require the user to beauthenticated. A request is where the metadata is included. It would not include additionalpayloads.
549
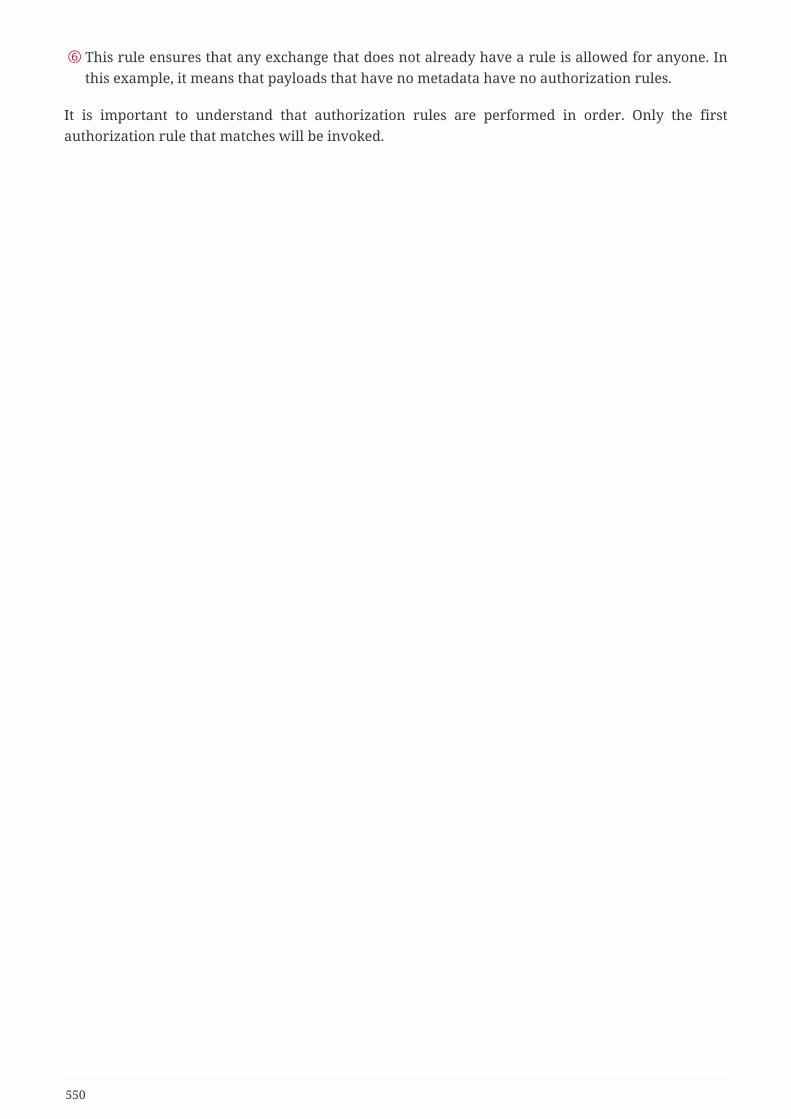
⑥ This rule ensures that any exchange that does not already have a rule is allowed for anyone. Inthis example, it means that payloads that have no metadata have no authorization rules.
It is important to understand that authorization rules are performed in order. Only the firstauthorization rule that matches will be invoked.
550
Related Documents