Sponsor Web/Data Transfer User Guide

Welcome message from author
This document is posted to help you gain knowledge. Please leave a comment to let me know what you think about it! Share it to your friends and learn new things together.
Transcript

Sponsor Web/Data Transfer User Guide
Copyright
Copyright 2009, 2014 Voya Institutional Plan Services, LLC.
All rights reserved. No part of this work may be produced or used in any form or by any means without the express written permission of the copyright owner.
All information in this document has been included for its instructional value. While every precaution has been taken with its preparation, the copyright owner does not offer any warranties or representations, nor does it accept any liability with respect to the information contained herein.
Document Information
This document is maintained by Retirement Services Division of Voya FinancialTM.

Table of Contents
Introduction ..................................................................................................................... 1
Overview .................................................................................................................... 1 Features ............................................................................................................... 1 Hours of Availability .............................................................................................. 1 Gaining Access to Data Transfer .......................................................................... 1
Initial Registration Process ........................................................................................ 2
Logging On to Data Transfer ..................................................................................... 7 Sponsor Web Logon ............................................................................................. 7 Data Transfer Logon ........................................................................................... 11
Accessing Plan Information …………………………………………………………………. 17 Accessing Participant Information … ………………………………………………………. 19 On-Demand Reporting ………………………………………………………………………. 23
Logging Off .................................................................................................................... 25
System Security ............................................................................................................ 26
Summary ................................................................................................................. 26
Security Design ........................................................................................................ 26
Security Monitoring Controls .................................................................................... 26
Sponsor Web/Data Transfer User Guide
10/14/2015 Page 1
Introduction
Overview
The Data Transfer application on the Sponsor web site is used for each Employer to access the Deferral Rate/Loan Feedback Report file along with any other applicable reports the employer might need to access. This file should be downloaded by each Employer on a weekly basis (if the employer is notified by e-mail) and is the only method by which each Employer will be notified by Voya of a new enrollment or a change in a participant’s contribution rate or a change in loan repayment amount.
Some functions shown may not be available depending on your plan’s setup. If you have any questions, please contact your account manager.
Features Data Transfer is easy to use, with clearly-labeled screens. Data Transfer will enable you to perform the following functions:
Feedback Reports (contribution rate changes as well as new loan repayment amounts and loan payoff notifications)
Plan Level reports (if applicable)
Hours of Availability Data Transfer is available during the hours posted on your plan’s Welcome page. Scheduled maintenance may interrupt accessibility.
Gaining Access to Data Transfer Only Authorized Agents (AAs) and Authorized Users (AUs-those designated by the Authorized Agent) will be granted access to Data Transfer. Authorized Agents must complete the Authorized Agent Notification Form and return the form to OMRF. Upon receipt of these forms OMRF will notify Voya and the request for access will be submitted.
If the AA chooses to designate someone other than themselves to act as an agent for the Employer in matters pertaining to the Plan, the AA should complete the Authorized User Notification Form. These Authorized User forms should be return to Voya so that we can request additional access. Please submit these forms by email to [email protected] or fax to 844-206-7965. You will only be able to access plans for which you have permission. Please contact your plan manager if you have any questions regarding access.
To deactivate a user ID and password, please complete the Authorized User form and indicate that access should be deleted and return to Voya. Since Data Transfer allows you to access sensitive data, it is important to notify your recordkeeper immediately if a user ID should be terminated.

Sponsor Web/Data Transfer User Guide
10/14/2015 Page 2
Initial Registration Process
The steps below detail how you will proceed through the initial registration process and establish a profile for the Sponsor Web before you can reach Data Transfer.
1. After Voya submits your request for access you will receive an e-mail which will include a link to the registration site and instructions on how to begin the registration process.
2. A second e-mail will be sent to you that will include the temporary PIN to enter on the registration site.
Sponsor Web/Data Transfer User Guide
10/14/2015 Page 3
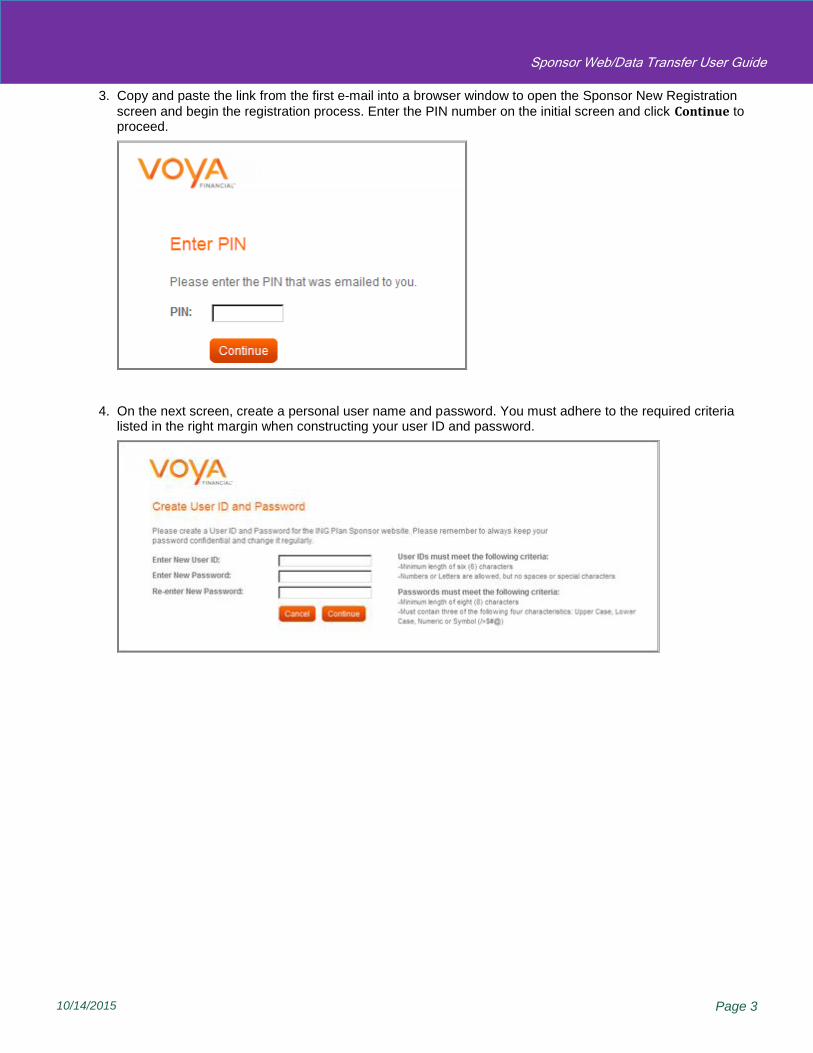
3. Copy and paste the link from the first e-mail into a browser window to open the Sponsor New Registration
screen and begin the registration process. Enter the PIN number on the initial screen and click Continue to proceed.
4. On the next screen, create a personal user name and password. You must adhere to the required criteria listed in the right margin when constructing your user ID and password.

Sponsor Web/Data Transfer User Guide
10/14/2015 Page 4
5. On the next screen, select five security questions from the drop-down options and provide the answer to each question.
6. On this screen, you have the option to register the device you are currently using. If you register this device, you will not have to answer the security questions the next time you log in from that device; only the user ID and password will be needed for access. Non-registered devices will require that security questions be answered correctly upon login.
Sponsor Web/Data Transfer User Guide
10/14/2015 Page 5
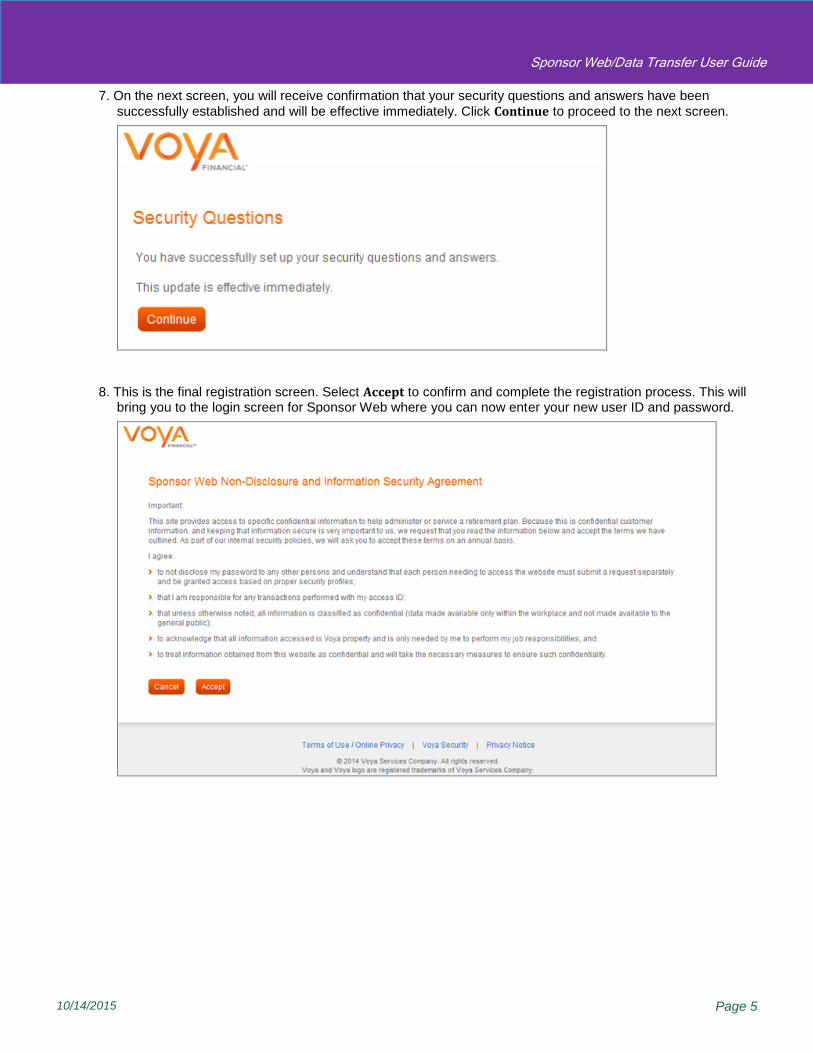
7. On the next screen, you will receive confirmation that your security questions and answers have been
successfully established and will be effective immediately. Click Continue to proceed to the next screen.
8. This is the final registration screen. Select Accept to confirm and complete the registration process. This will bring you to the login screen for Sponsor Web where you can now enter your new user ID and password.

Sponsor Web/Data Transfer User Guide
10/14/2015 Page 6
9. When the registration has been completed, a confirmation e-mail will automatically be sent to your e-mail address on record. It will include the URL that should be used for future access the Sponsor Web.
Note: The URL provided in the registration e-mail should no longer be used once the registration process has been completed.

Sponsor Web/Data Transfer User Guide
10/14/2015 Page 7
Logging On to Data Transfer
Sponsor Web Logon This section describes how you will access the Sponsor Web after the initial registration process has been completed and a user ID, password and security questions have been established. Plan Access is a function of Sponsor Web and requires that you log into this application first. To access Sponsor Web, open an Internet Browser such as Internet Explorer or Chrome.
1. Use the following URL to access Sponsor Web: https://sponsor.voya.com. You will see the Sponsor Web login page.
2. Click on Sponsor Web Login.
3. Enter your user ID and password and then click Go to continue. If you are logging in from a non-registered device you will also be prompted to answer three of your five security questions before entering the site.
Note: Sponsor Web user IDs cannot be shared between users. Each user needs their own unique user ID and password. If you have any questions about logging in, contact your Sponsor Web support staff.
Sponsor Web Login Page
Sponsor Web/Data Transfer User Guide
10/14/2015 Page 8
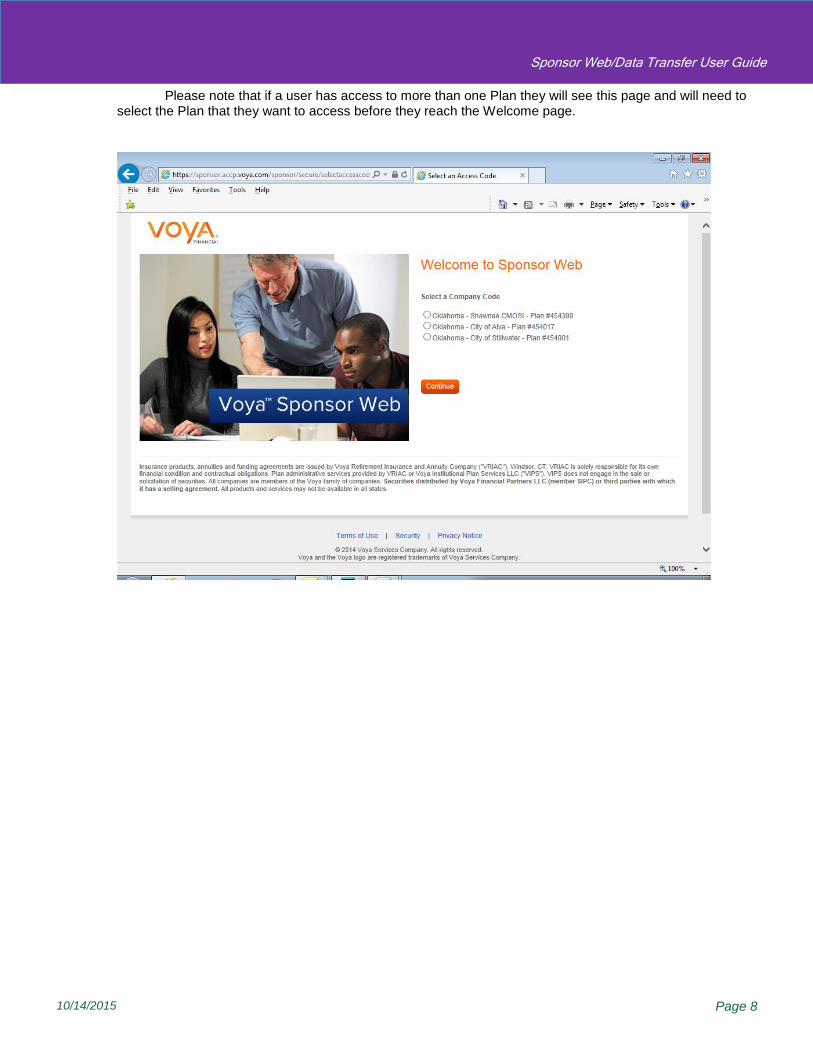
Please note that if a user has access to more than one Plan they will see this page and will need to select the Plan that they want to access before they reach the Welcome page.

Sponsor Web/Data Transfer User Guide
10/14/2015 Page 9
Sponsor Web Home Page

Sponsor Web/Data Transfer User Guide
10/14/2015 Page 10
4. Access a specific plan from the Home page by clicking on the plan name in the Relationship Summary (or My Top Plans) section or performing a quick search using the plan name or number.

Sponsor Web/Data Transfer User Guide
10/14/2015 Page 11
5. After you select the plan you will see the Plan Summary dashboard.

Sponsor Web/Data Transfer User Guide
10/14/2015 Page 12
Data Transfer Logon 1. Select Data Transfer under Quick Links.
Please note that browser popup blockers should be disabled to run the Data Transfer application.
2. Click Launch Data Transfer.

Sponsor Web/Data Transfer User Guide
10/14/2015 Page 13
3. You will see the Data Transfer Welcome Screen.
Data Transfer Welcome Screen
Note: Browser popup blockers should be disabled to run the Data Transfer application. Once in the Data
Transfer application, your user ID and password will determine which retirement plan(s) and division(s) you may access. Contact your Account Manager with any questions regarding login. If you have access to only one plan, you will go directly to your plan’s Welcome screen. If you have access to multiple plans, you must choose one on the Welcome Screen by clicking on it.

Sponsor Web/Data Transfer User Guide
10/14/2015 Page 14
4. Click on Receive Reports & Files.
5. Once the Receive Reports & Files page is displayed, select “Reports” under file type and “Current Month” under activity period, and then click on “Search”. If there are any reports available (feedback, etc.) then they will be displayed in the “File to Download” box.

Sponsor Web/Data Transfer User Guide
10/14/2015 Page 15
6. In order to download the report, click on the applicable file you would like to open, then click the “Download Button”
7. After you click on the “Download” button the actual report document should open, which will allow you to view and/or save the document.
Sponsor Web/Data Transfer User Guide
10/14/2015 Page 16
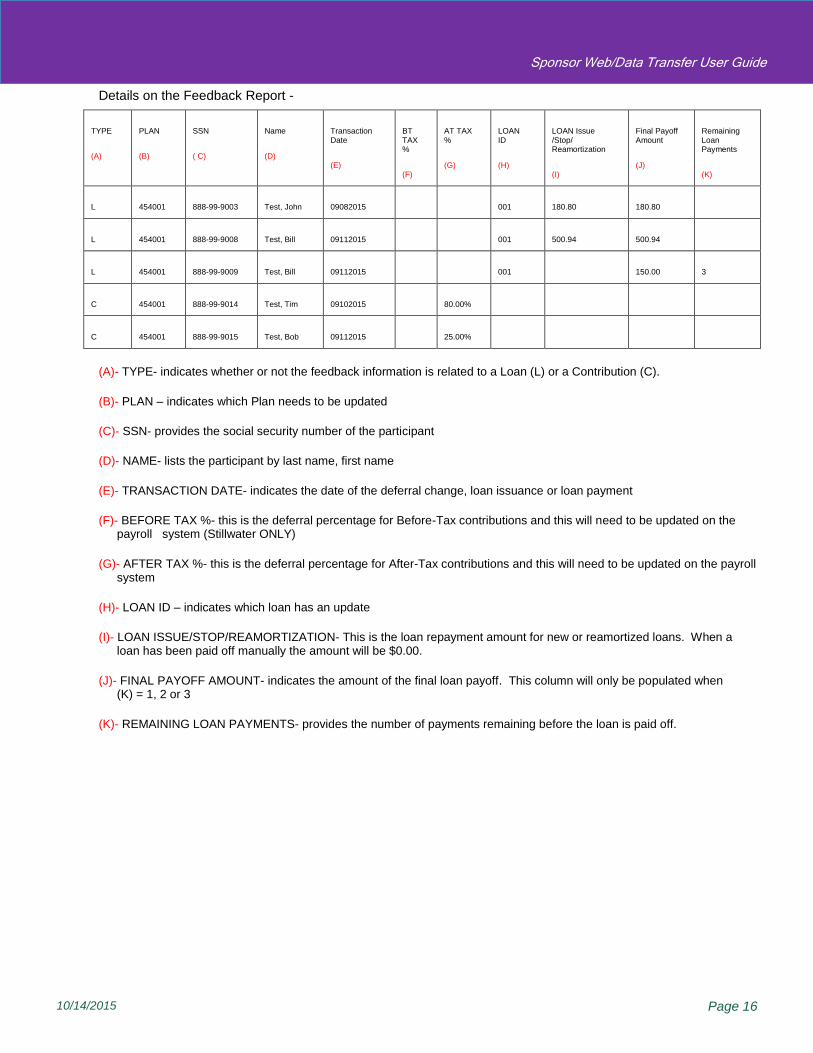
Details on the Feedback Report -
TYPE
(A)
PLAN
(B)
SSN
( C)
Name
(D)
Transaction Date
(E)
BT TAX %
(F)
AT TAX %
(G)
LOAN ID
(H)
LOAN Issue /Stop/ Reamortization
(I)
Final Payoff Amount
(J)
Remaining Loan Payments
(K)
L 454001 888-99-9003 Test, John 09082015 001 180.80 180.80
L 454001 888-99-9008 Test, Bill 09112015 001 500.94 500.94
L 454001 888-99-9009 Test, Bill 09112015 001 150.00 3
C 454001 888-99-9014 Test, Tim 09102015 80.00%
C 454001 888-99-9015 Test, Bob 09112015 25.00%
(A)- TYPE- indicates whether or not the feedback information is related to a Loan (L) or a Contribution (C).
(B)- PLAN – indicates which Plan needs to be updated
(C)- SSN- provides the social security number of the participant
(D)- NAME- lists the participant by last name, first name
(E)- TRANSACTION DATE- indicates the date of the deferral change, loan issuance or loan payment
(F)- BEFORE TAX %- this is the deferral percentage for Before-Tax contributions and this will need to be updated on the payroll system (Stillwater ONLY)
(G)- AFTER TAX %- this is the deferral percentage for After-Tax contributions and this will need to be updated on the payroll system
(H)- LOAN ID – indicates which loan has an update
(I)- LOAN ISSUE/STOP/REAMORTIZATION- This is the loan repayment amount for new or reamortized loans. When a loan has been paid off manually the amount will be $0.00.
(J)- FINAL PAYOFF AMOUNT- indicates the amount of the final loan payoff. This column will only be populated when (K) = 1, 2 or 3
(K)- REMAINING LOAN PAYMENTS- provides the number of payments remaining before the loan is paid off.

Sponsor Web/Data Transfer User Guide
10/14/2015 Page 17
Accessing Plan Information
1- Choose the Plan by clicking on the Plan Name under the orange NAV bar
Sponsor Web/Data Transfer User Guide
10/14/2015 Page 18
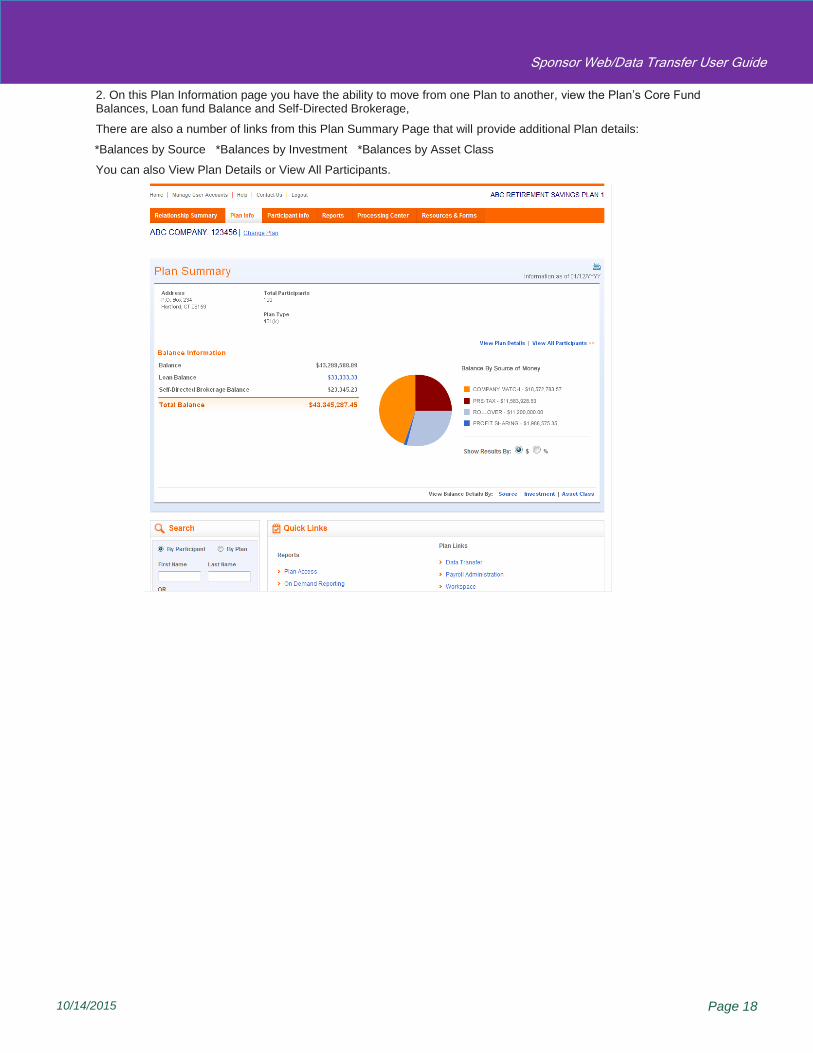
2. On this Plan Information page you have the ability to move from one Plan to another, view the Plan’s Core Fund Balances, Loan fund Balance and Self-Directed Brokerage,
There are also a number of links from this Plan Summary Page that will provide additional Plan details:
*Balances by Source *Balances by Investment *Balances by Asset Class
You can also View Plan Details or View All Participants.

Sponsor Web/Data Transfer User Guide
10/14/2015 Page 19
3. You can View All Participants by clicking on the View All Participants link or using the link ‘Participant Info’ on the top
orange NAV bar.
Once on this page you can search for a Participant by using First Name, Last Name, Last 4 Digits of their SSN, Age Between and Total Balance Between.
To view more details, click on the Participant’s name to get to the Participant Summary Page.

Sponsor Web/Data Transfer User Guide
10/14/2015 Page 20
4. The Participant Summary Page provides the same informaton as the Plan Summary page but the information is limited to
the specific participant.

Sponsor Web/Data Transfer User Guide
10/14/2015 Page 21
5. Click on the Participant’s Loan Balance to bring up this screen that provides the details of the participant’s loan history, including original loan issuance, outstanding loan balance, repayment amount, interest rate, etc.

Sponsor Web/Data Transfer User Guide
10/14/2015 Page 22
6 - By clicking on View More Participant Details- (Link in upper right hand corner) to view even more details on each participant including their deferral rates, investment elections and beneficiary information.

Sponsor Web/Data Transfer User Guide
10/14/2015 Page 23
On-Demand Reporting 1. To access the On-Demand Reporting tool, click on the ‘Reports’ link in the top Orange NAV and Launch On-Demand
Reporting.
Sponsor Web/Data Transfer User Guide
10/14/2015 Page 24
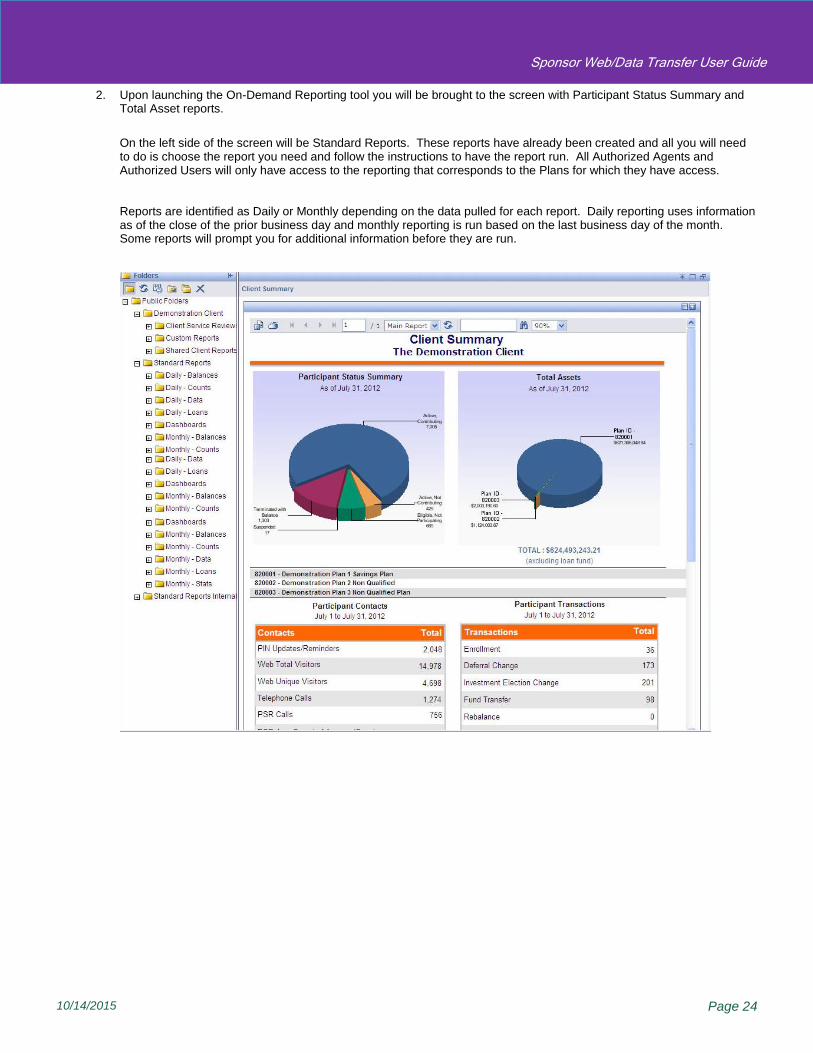
2. Upon launching the On-Demand Reporting tool you will be brought to the screen with Participant Status Summary and Total Asset reports.
On the left side of the screen will be Standard Reports. These reports have already been created and all you will need to do is choose the report you need and follow the instructions to have the report run. All Authorized Agents and Authorized Users will only have access to the reporting that corresponds to the Plans for which they have access.
Reports are identified as Daily or Monthly depending on the data pulled for each report. Daily reporting uses information as of the close of the prior business day and monthly reporting is run based on the last business day of the month. Some reports will prompt you for additional information before they are run.
Sponsor Web/Data Transfer User Guide
10/14/2015 Page 25
Logging Off
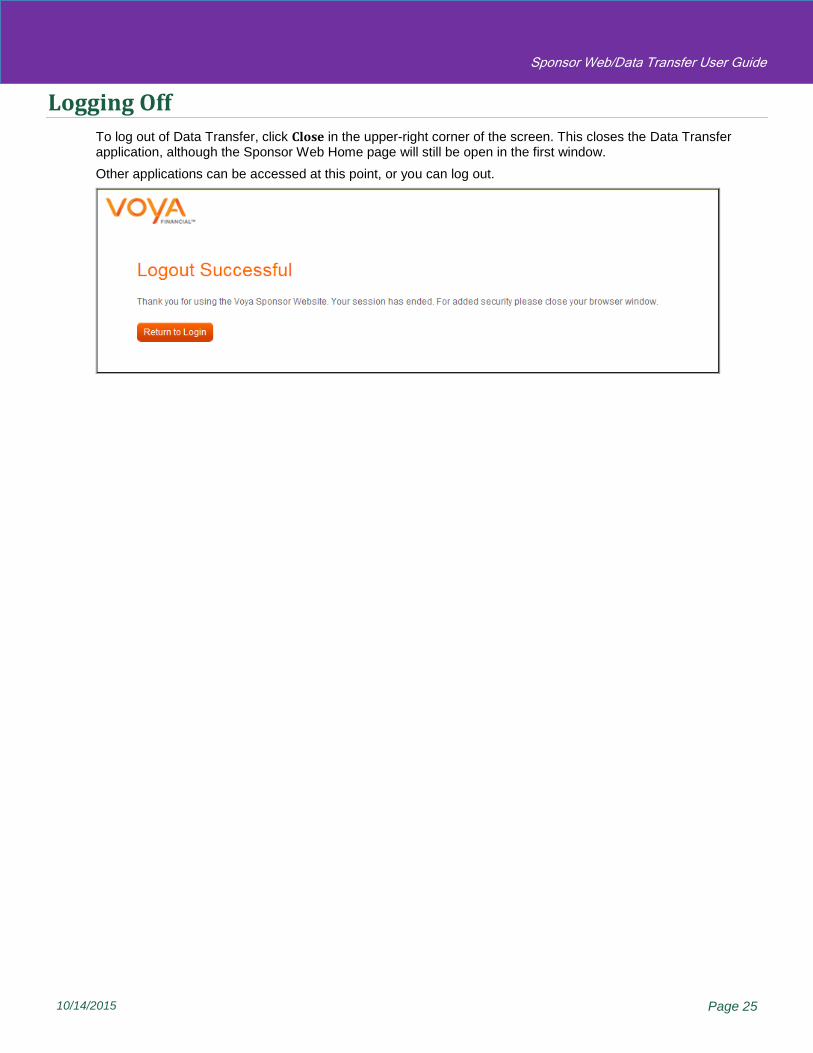
To log out of Data Transfer, click Close in the upper-right corner of the screen. This closes the Data Transfer application, although the Sponsor Web Home page will still be open in the first window.
Other applications can be accessed at this point, or you can log out.
Sponsor Web/Data Transfer User Guide
10/14/2015 Page 26
System Security
Summary
Our Internet security strategy protects corporate and customer assets from unauthorized access at all times and monitors activities of both insiders and outsiders to ensure that customer data is protected from Internet abuse. In recognition of the fact that the Internet is a fast-changing environment and new threats are always emerging, we contract with outside firms for scheduled and as-needed security audits of our Internet security architecture and implementation.
Security Design
All Internet servers are protected by firewalls. The firewalls support a configuration commonly referred to as a “DMZ.” This configuration lets the firewall permit service requests from the Internet to the DMZ and from the DMZ to internal databases. No databases are located in the DMZ. Secure connections using 40 or 128-bit encryption are available.
All servers in the DMZ, both UNIX and NT, are configured according to a standard process that certifies the machines as “production ready” and secured to a standard acceptable to our Corporate Audit department. The certification process enables controlled monitoring of the servers and logging of system administrators’ activities to a centralized log server.
The firewalls themselves are similarly configured. They are monitored and secured according to a certification process customized for firewalls. Today, all firewalls run on UNIX servers that can support up to 16 Ethernet or Fast-Ethernet interfaces. Switches are used in DMZ rather than shared-media hubs, as switches provide not only dedicated access, but also would prevent a compromised machine from being able to “sniff” packets to/from the other machines in the LAN.
Firewall oversight includes 7x24 monitoring of firewall administrative activity (largely the loading of new rule bases) and events logged by the server management processes.
Security Monitoring Controls
The Certification Process
The Certification process is the first step in the process of security monitoring controls.
Certification starts with the configuration of a server for its specific purpose. As the operating system is installed, processes are enabled or disabled. In general, UNIX servers “out-of-the-box” will run any service and have a number of standard accounts set up. The certification process strips the machine down to its bare necessities: required daemons, a cleaned-up version of sundial, minimal, if any, trust relationships to other machines, and deletion of standard user IDs. NT servers are handled similarly at the operating system level, the goal being to run only what is needed and with the latest security patches installed from the start.
Monitoring processes are then installed that will enable 7x24 monitoring of the server’s important processes. In the case of Web servers, the http daemon would be monitored. Each server is supported by on-site and on-call staff identified prior to the server being placed in production. At the top level is the application “owner,” who is responsible for investigating unusual or suspect application problems or activities.

Sponsor Web/Data Transfer User Guide
10/14/2015 Page 27
Intrusion Detection
Voya Financial uses intrusion detection software and has intrusion detection engines in all of our North American Internet access points and DMZ. Alerts are generated to monitoring systems and, depending on the severity, an investigation is begun or remedial action started. We receive updated attack patterns approximately every quarter and sooner if a dangerous attack is released. Intrusion detection is not virus detection, which is handled by the LAN departments. Intrusion detection is a supplement to packet inspection in that it can inspect across multiple packets and into the data portion of a packet.
Intrusion detection is emerging as a powerful security function and we expect to continue to expand the service to other [non-Internet] access points to our network and to use its more advanced remedial action features to respond to network-launched attacks.
Vulnerability Scans
We contract with a top Internet security firm to run vulnerability scans against all firewall interfaces facing the Internet. Scans are run quarterly and reports are presented within a few weeks of the scans.
We also use a commercial product to run our own internal scans and publish Web-readable reports for management and audit reviews. The most significant purpose of the internal scan is to confirm that new firewalls were installed per the certification standard and as a check against new vulnerabilities in previously installed firewalls.
Firewall Log Analysis
Our firewalls are under the auspices of the security certification process. This enables system activity to be logged and reviewed in a timely manner. In addition, this review is conducted independently of the firewall design and installation processes. This separation of duties functions as a control point over the network engineering departments involved in planning, deployment and support.
Session Timeout
The login session will expire after 30 minutes of inactivity. After 25 minutes, the following message appears:
Click OK to continue working or Cancel to allow your session to expire
Related Documents