SAP2000 Tutorial Example Analysis of Spiral Staircase (Metric Units) ACECOMS, AIT

Welcome message from author
This document is posted to help you gain knowledge. Please leave a comment to let me know what you think about it! Share it to your friends and learn new things together.
Transcript

SAP2000 Tutorial Example
Analysis of Spiral Staircase (Metric Units)
ACECOMS, AIT


Table of Content Objective............................................................................................................................4
Problem..............................................................................................................................4
Step by Step.......................................................................................................................7
1. Create Spiral Staircase Model from Template............................................... 7
2. Assign Supports (Restraints) ....................................................................... 11
3. Add New Load Case.................................................................................... 14
4. Assign Uniform Load on Staircase.............................................................. 15
5. Define Staircase Thickness.......................................................................... 17
6. Run Analysis ............................................................................................... 19
7. View Deformed Shape and Moment Data................................................... 21
8. View Reaction in Tabular Form .................................................................. 25

SAP2000 Tutorial Example ACECOMS, AIT
4/27 Modeling and Analysis of Spiral Staircase
Objective
To demonstrate and practice step-by-step on the modeling and analysis of spiral staircase.
Problem Carry out analysis of spiral staircase with the following details
3D View

SAP2000 Tutorial Example ACECOMS, AIT
Modeling and Analysis of Spiral Staircase 5/27
Plan View
Elevation View
3 m
1 m
4.5 m

SAP2000 Tutorial Example ACECOMS, AIT
6/27 Modeling and Analysis of Spiral Staircase
Load Cases
Load Name Load Type Details
DEAD Dead
Self Weight (Calculate automatically by Self Weight Multiplier)
+ 0.20 ton/m2 for Steps and Finishing
(Uniform Area Load on Slab Panels)
LIVE Live 0.4 ton/m2 (Uniform Area Load on Slab Panels)

SAP2000 Tutorial Example ACECOMS, AIT
Modeling and Analysis of Spiral Staircase 7/27
Step by Step
1. Create Spiral Staircase Model from Template
Step 1-1: Start SAP2000 and Select Working Unit Start up screen of SAP2000, select working unit to be “Ton-m” at drop-down menu on the bottom-right of screen and click on New Model button to start new model with template

SAP2000 Tutorial Example ACECOMS, AIT
8/27 Modeling and Analysis of Spiral Staircase
Step 1-2: Select Template and Specify 3D Frame Parameters Select “Staricase” from template list and select “Sprial Staircase
Enter parameters as shown in figure below

SAP2000 Tutorial Example ACECOMS, AIT
Modeling and Analysis of Spiral Staircase 9/27
Note: Click on “Parametric Definition” to see notations for dimension

SAP2000 Tutorial Example ACECOMS, AIT
10/27 Modeling and Analysis of Spiral Staircase
Step 1-3: Create Spiral Staircase Spiral staircase has been created by parameters specified from previous steps.
Note: To Show Shell Panels in Solid Shade
Go to View >> Set Display Options or click on Set Display Options button and select “Fill Object” and “”Apply to All Windows”

SAP2000 Tutorial Example ACECOMS, AIT
Modeling and Analysis of Spiral Staircase 11/27
2. Assign Supports (Restraints)
Step 2-1: Select All Nodes at Bottom of Staircase Activate “X-Y Plan” window by clicking on right window area, make sure that current plan view is at Z = 0 by clicking at the top of this window. (If not using Move Down in List or Move Up in List to change Plan view elevation) and draw the selection rectangular to cover all nodes at bottom of stair as shown in figure below.

SAP2000 Tutorial Example ACECOMS, AIT
12/27 Modeling and Analysis of Spiral Staircase
Step 2-2: Assign Fix Support at Bottom of Staircase Go to Assign >> Joint >> Restraints and select Fix support type as shown in figure below.

SAP2000 Tutorial Example ACECOMS, AIT
Modeling and Analysis of Spiral Staircase 13/27
Step 2-3: Assign Fix Support at Top of Staircase Click on Move Up in List to move plan view to top of the stair and draw the selection rectangular to cover all nodes at top of stair as shown in figure below.
Go to Assign >> Joint >> Restraints and select Fix support type as shown in figure below.

SAP2000 Tutorial Example ACECOMS, AIT
14/27 Modeling and Analysis of Spiral Staircase
3. Add New Load Case
Step 3-1: Add “LIVE” Load Case Go to Define >> Load Cases and enter load case parameters as shown below.
Click on “Add New Load” to add “LIVE” load case in the list
.

SAP2000 Tutorial Example ACECOMS, AIT
Modeling and Analysis of Spiral Staircase 15/27
4. Assign Uniform Load on Staircase
Step 4-1: Assign Uniform Load for “DEAD” Load Case at All Shell Panels
Click on Select All button to select all elements in model and go to Assign >> Area Load >> Uniform (Shell) and enter load parameters as shown in figure below.

SAP2000 Tutorial Example ACECOMS, AIT
16/27 Modeling and Analysis of Spiral Staircase
Step 4-2: Assign Uniform Load for “LIVE” Load Case at All Shell Panels Click on Select All button to select all elements in model and go to Assign >> Area Load >> Uniform (Shell) and enter load parameters as shown in figure below.

SAP2000 Tutorial Example ACECOMS, AIT
Modeling and Analysis of Spiral Staircase 17/27
5. Define Staircase Thickness All staircase panels have been assigned by “ASEC1” shell section property automatically from step 1-2. This step is to specify stair thickness.
Step 5-1: Specify Slab Thickness Go to Define >> Area Sections, select “ASEC1” and click on “Modify/Show Section”

SAP2000 Tutorial Example ACECOMS, AIT
18/27 Modeling and Analysis of Spiral Staircase
Step 5-2: Specify Area Thickness
Enter area thickness as shown in figure below.

SAP2000 Tutorial Example ACECOMS, AIT
Modeling and Analysis of Spiral Staircase 19/27
6. Run Analysis Step 6-1: Start Analysis Go to Analyze >> Run Analysis or click on Run Analysis button and click on “Run Now”
Specify file name and click on “Save” to save model.

SAP2000 Tutorial Example ACECOMS, AIT
20/27 Modeling and Analysis of Spiral Staircase
Step 6-2: View Analysis Details and Check Error Message Wait until analysis status dialogue shows “ANALYSIS COMPLETE and scroll up to check error message.

SAP2000 Tutorial Example ACECOMS, AIT
Modeling and Analysis of Spiral Staircase 21/27
7. View Deformed Shape and Moment Data
Step 7-1: Select Load Case to Display Deformed Shape Go to Display >> Show Deformed Shape or click on Show Deformed Shape button and select desired Case/ Combo Name.

SAP2000 Tutorial Example ACECOMS, AIT
22/27 Modeling and Analysis of Spiral Staircase
Step 7-2: Display Deformed Shape and View Particular Displacement Displacement details at particular node will display when moving cursor close to that node. To view deformed shape in animation, click on “Start Animation” button. Click on or to reduce/increase animation speed. Right click on desired node to view particular displacement value.

SAP2000 Tutorial Example ACECOMS, AIT
Modeling and Analysis of Spiral Staircase 23/27
Step 7-3: Display Moment on Staircase Go to Display >> Show Forces/Stresses >> Shell and select desired “Case/Combo Name” and “Component”. Right mouse click on desired panel to view particular moment
Note: Move mouse cursor over this particular diagram to view moment at particular point
SAP2000 Tutorial Example ACECOMS, AIT
24/27 Modeling and Analysis of Spiral Staircase
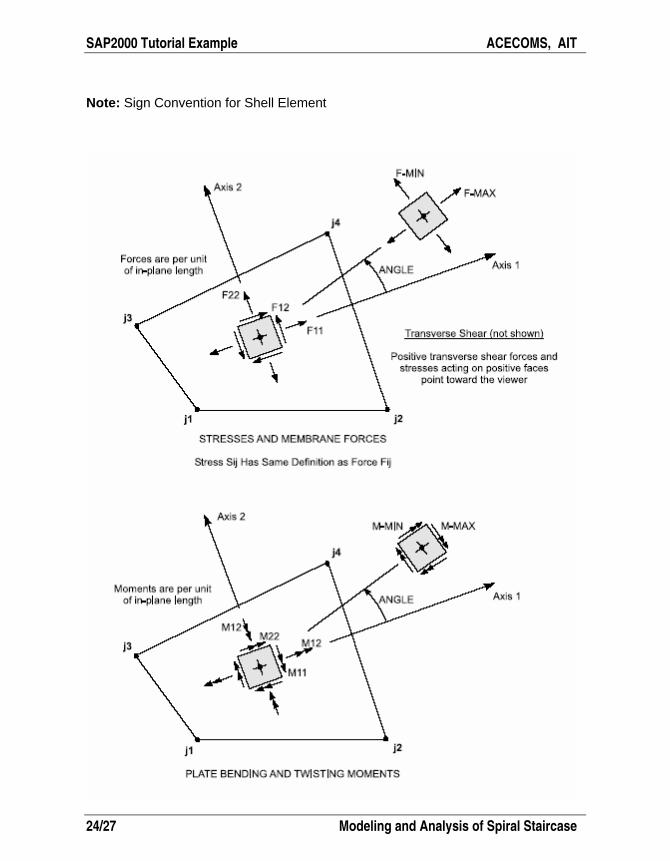
Note: Sign Convention for Shell Element

SAP2000 Tutorial Example ACECOMS, AIT
Modeling and Analysis of Spiral Staircase 25/27
8. View Reaction in Tabular Form
Step 8-1: Select Reaction and Analysis Case to Display in Table Go to Display >> Show Tables, select “Reaction as shown in figure below, click on “Select Analysis Cases” and select only “DEAD” and “LIVE” by clicking on them one by one while holding “Ctrl” button

SAP2000 Tutorial Example ACECOMS, AIT
26/27 Modeling and Analysis of Spiral Staircase
Step 8-2: Display Reaction in Table Go to Display >> Show Deformed Shape or click on Show Deformed Shape button and select desired Case/ Combo Name.
SAP2000 Tutorial Example ACECOMS, AIT
Modeling and Analysis of Spiral Staircase 27/27
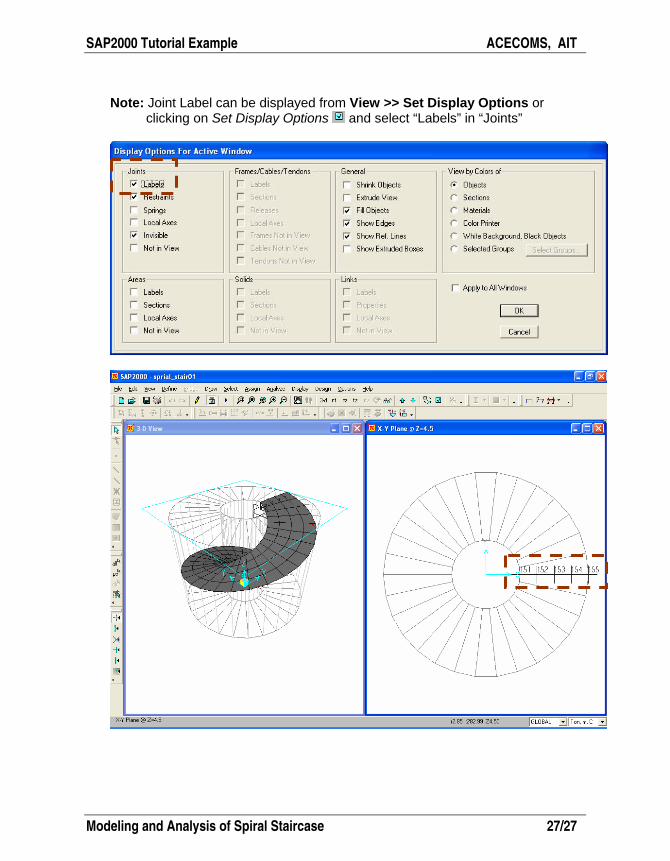
Note: Joint Label can be displayed from View >> Set Display Options or clicking on Set Display Options and select “Labels” in “Joints”
Related Documents