© 2009 SpeedySoft USA, Inc. Speedy Claims CMS 1500 Manual

Welcome message from author
This document is posted to help you gain knowledge. Please leave a comment to let me know what you think about it! Share it to your friends and learn new things together.
Transcript
© 2009 SpeedySoft USA, Inc.
Speedy Claims CMS 1500Manual

Speedy Claims CMS 1500User Manual
by SpeedySoft USA, Inc.
The Speedy Claims for CMS 1500 software is very easy touse.
This manual will show you how to most effectively use it tosave you time.
All rights reserved. No parts of this work may be reproduced in any form or by any means - graphic, electronic, ormechanical, including photocopying, recording, taping, or information storage and retrieval systems - without thewritten permission of the publisher.
Products that are referred to in this document may be either trademarks and/or registered trademarks of therespective owners. The publisher and the author make no claim to these trademarks.
While every precaution has been taken in the preparation of this document, the publisher and the author assume noresponsibility for errors or omissions, or for damages resulting from the use of information contained in thisdocument or from the use of programs and source code that may accompany it. In no event shall the publisher andthe author be liable for any loss of profit or any other commercial damage caused or alleged to have been causeddirectly or indirectly by this document.
Printed: February 2009 in (whereever you are located)
Speedy Claims CMS 1500 Manual
© 2009 SpeedySoft USA, Inc.
PublisherSpecial thanks to:
To our users. Thanks to all of you who have given suggestions overthe years on how to make the software better. It is because of youthat we are now the Market Leader in CMS 1500 Form Fillersoftware.
Managing Editor
Technical Editors
SpeedySoft USA, Inc.
Dan Perrine
T. Paul Szczesniak
Dan Perrine
5Contents
5
© 2009 SpeedySoft USA, Inc.
Table of Contents
Foreword 7
Part I First Steps 10
................................................................................................................................... 101 Registration
................................................................................................................................... 122 Set Up
................................................................................................................................... 133 Backing Up
Part II Using the Vertical Menu 16
................................................................................................................................... 161 Claims Button
.......................................................................................................................................................... 16CMS 1500 Form
.......................................................................................................................................................... 17Claims List
................................................................................................................................... 182 Tables Button
.......................................................................................................................................................... 19Patient Table
.......................................................................................................................................................... 20Facility Table
.......................................................................................................................................................... 22Insurance Table
.......................................................................................................................................................... 24Provider Table
.......................................................................................................................................................... 25Referring Provider Table
................................................................................................................................... 273 Codes Button
.......................................................................................................................................................... 27Diagnosis Code List
.......................................................................................................................................................... 28Procedure Code List
.......................................................................................................................................................... 30Place of Service Code List
................................................................................................................................... 304 Set Up Button
.......................................................................................................................................................... 30Set Up
Part III Printing Claims 34
................................................................................................................................... 341 Printing
................................................................................................................................... 342 Printer Alignment Guide
Part IV Electronic Claims 40
................................................................................................................................... 401 Why Use Electronic Claims
................................................................................................................................... 402 Upgrading to Electronic Claims
................................................................................................................................... 403 Step One - Creating a Batch Folder
................................................................................................................................... 424 Step Two - Creating a Batch File
Part V Support 44
................................................................................................................................... 441 Registration Problems
................................................................................................................................... 442 Deregistering/Moving the Program
Index 47

Foreword
This is just another title pageplaced between table of contents
and topics
7Foreword
© 2009 SpeedySoft USA, Inc.


Top Level IntroThis page is printed before a new
top-level chapter starts
Part
I
Speedy Claims CMS 1500 Manual10
© 2009 SpeedySoft USA, Inc.
1 First Steps
1.1 Registration
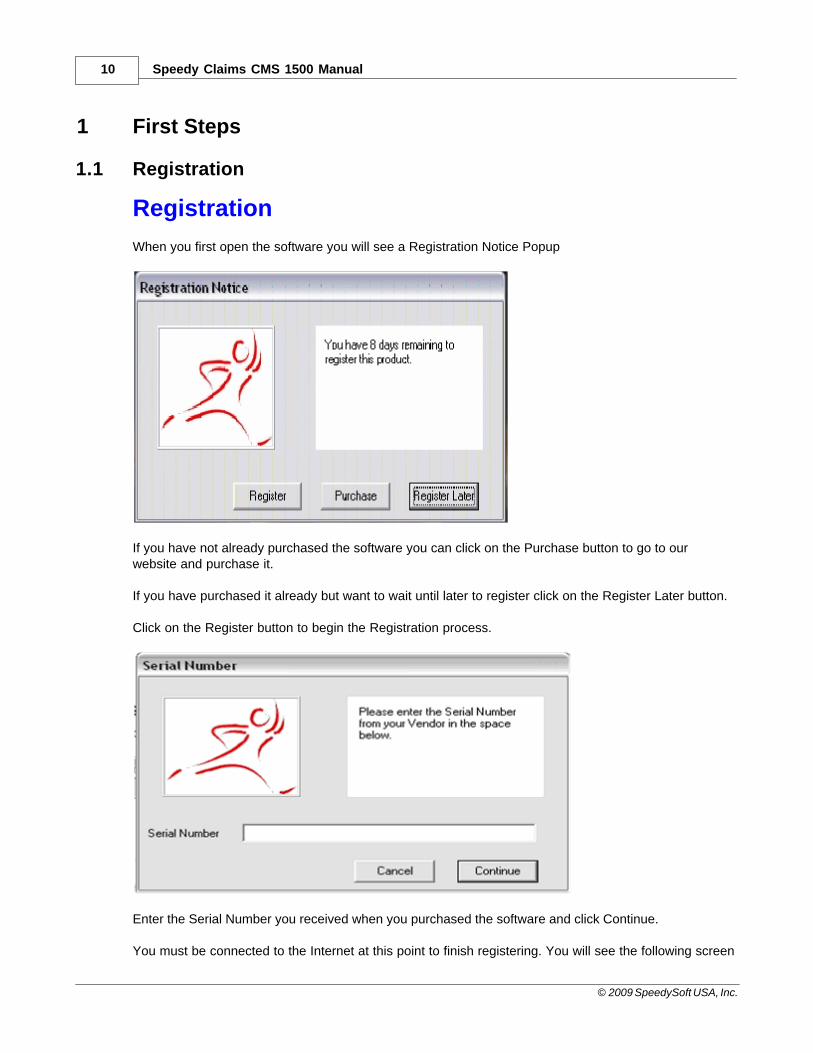
Registration When you first open the software you will see a Registration Notice Popup
If you have not already purchased the software you can click on the Purchase button to go to ourwebsite and purchase it. If you have purchased it already but want to wait until later to register click on the Register Later button. Click on the Register button to begin the Registration process.
Enter the Serial Number you received when you purchased the software and click Continue. You must be connected to the Internet at this point to finish registering. You will see the following screen
First Steps 11
© 2009 SpeedySoft USA, Inc.
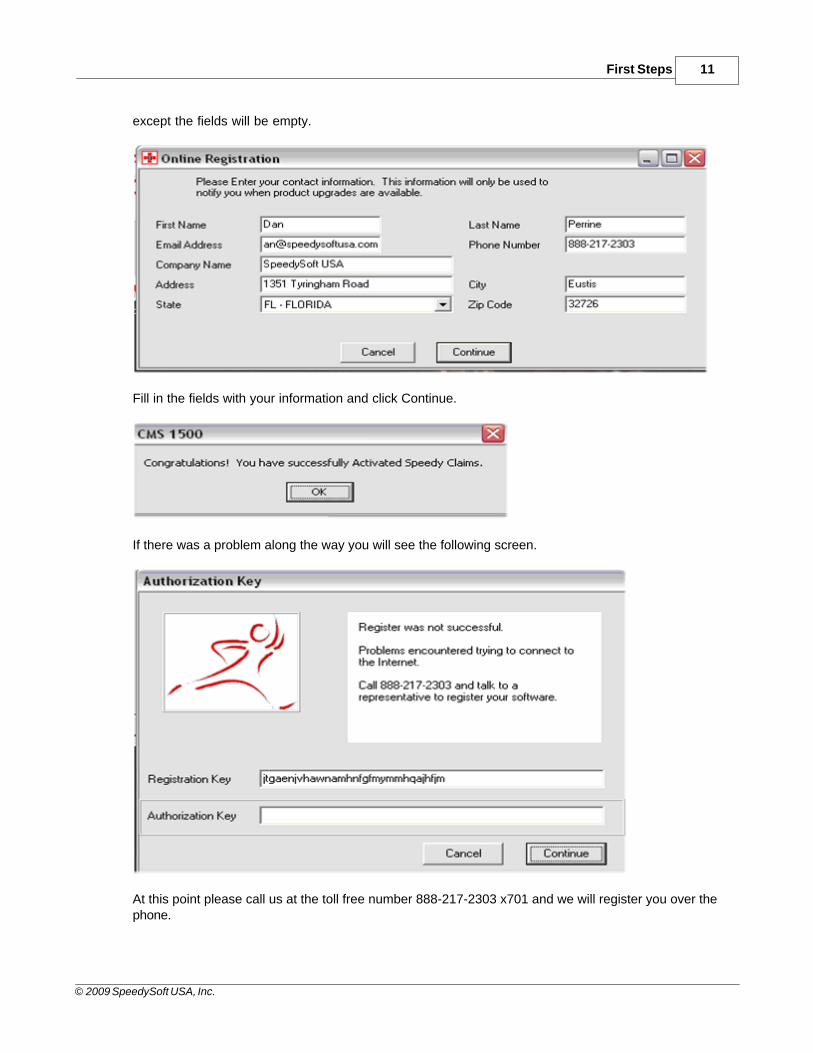
except the fields will be empty.
Fill in the fields with your information and click Continue.
If there was a problem along the way you will see the following screen.
At this point please call us at the toll free number 888-217-2303 x701 and we will register you over thephone.
Speedy Claims CMS 1500 Manual12
© 2009 SpeedySoft USA, Inc.
1.2 Set Up
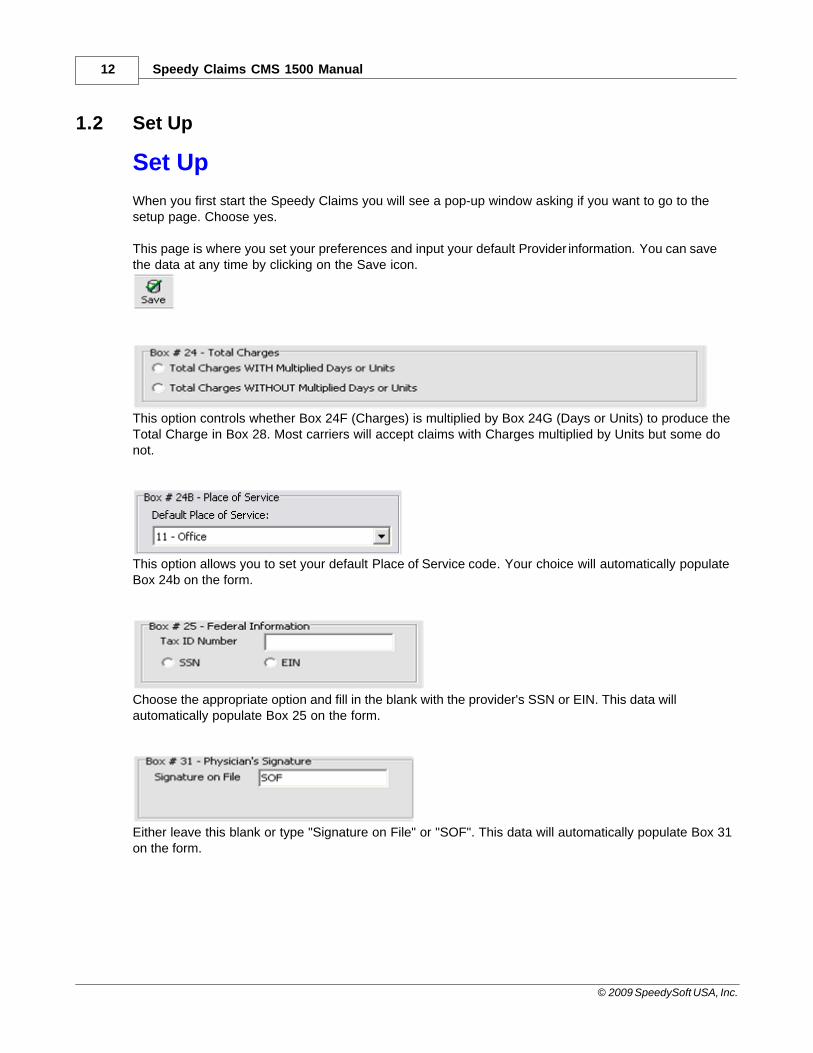
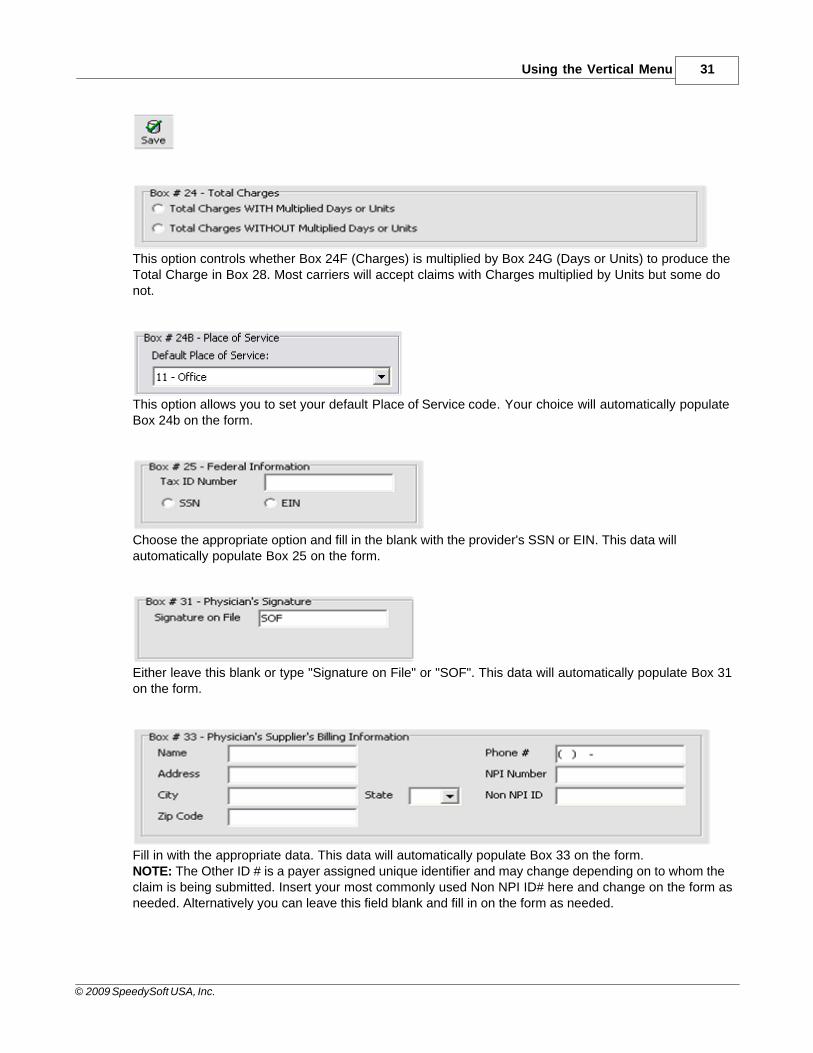
Set Up When you first start the Speedy Claims you will see a pop-up window asking if you want to go to thesetup page. Choose yes. This page is where you set your preferences and input your default Provider information. You can savethe data at any time by clicking on the Save icon.
This option controls whether Box 24F (Charges) is multiplied by Box 24G (Days or Units) to produce theTotal Charge in Box 28. Most carriers will accept claims with Charges multiplied by Units but some donot.
This option allows you to set your default Place of Service code. Your choice will automatically populateBox 24b on the form.
Choose the appropriate option and fill in the blank with the provider's SSN or EIN. This data willautomatically populate Box 25 on the form.
Either leave this blank or type "Signature on File" or "SOF". This data will automatically populate Box 31on the form.
First Steps 13
© 2009 SpeedySoft USA, Inc.
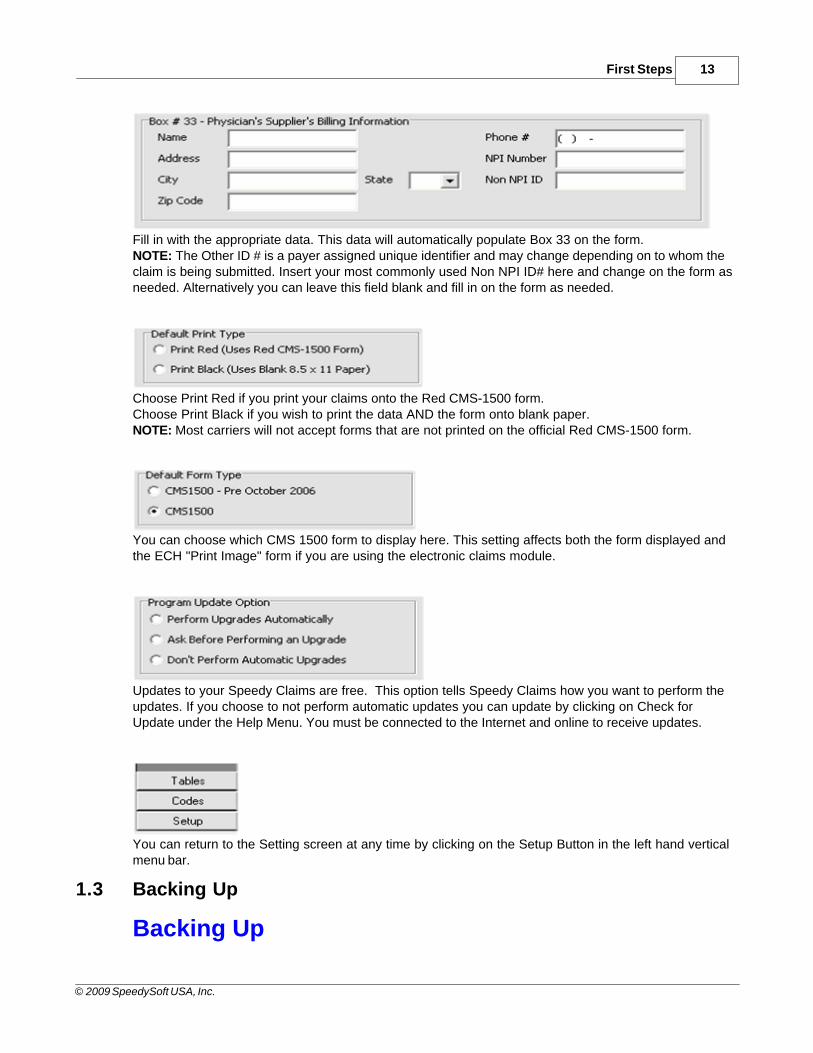
Fill in with the appropriate data. This data will automatically populate Box 33 on the form.NOTE: The Other ID # is a payer assigned unique identifier and may change depending on to whom theclaim is being submitted. Insert your most commonly used Non NPI ID# here and change on the form asneeded. Alternatively you can leave this field blank and fill in on the form as needed.
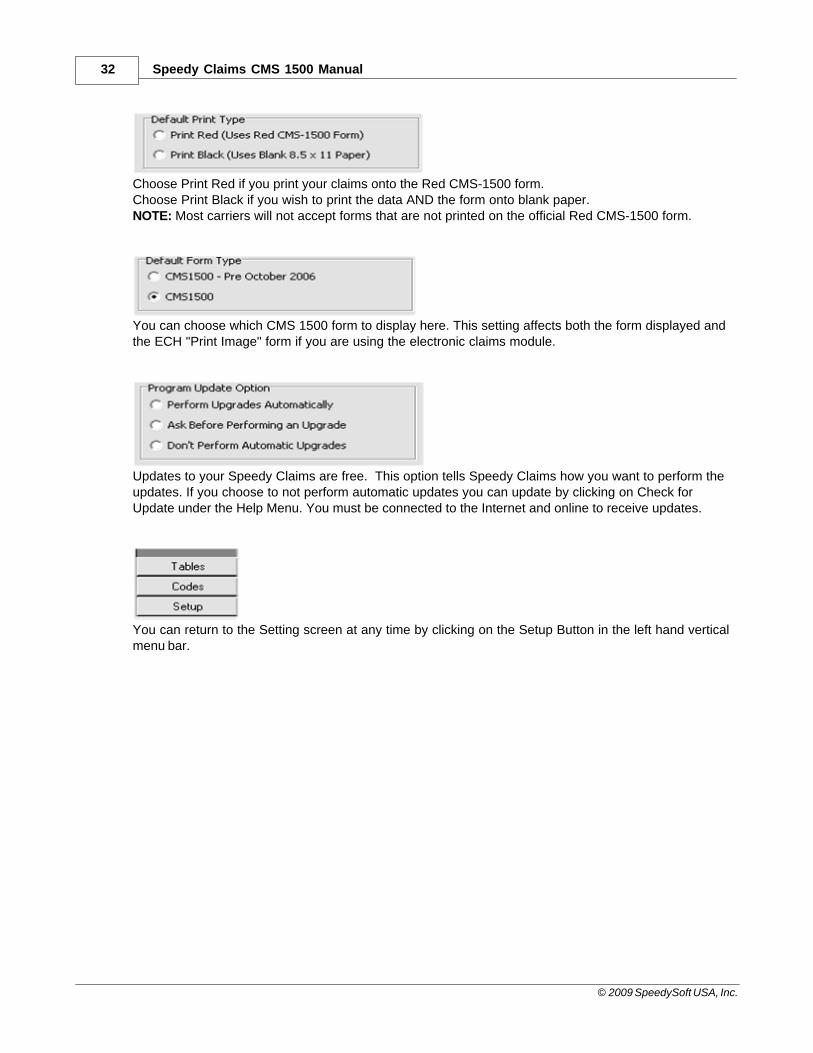
Choose Print Red if you print your claims onto the Red CMS-1500 form.Choose Print Black if you wish to print the data AND the form onto blank paper.NOTE: Most carriers will not accept forms that are not printed on the official Red CMS-1500 form.
You can choose which CMS 1500 form to display here. This setting affects both the form displayed andthe ECH "Print Image" form if you are using the electronic claims module.
Updates to your Speedy Claims are free. This option tells Speedy Claims how you want to perform theupdates. If you choose to not perform automatic updates you can update by clicking on Check forUpdate under the Help Menu. You must be connected to the Internet and online to receive updates.
You can return to the Setting screen at any time by clicking on the Setup Button in the left hand verticalmenu bar.
1.3 Backing Up
Backing Up
Speedy Claims CMS 1500 Manual14
© 2009 SpeedySoft USA, Inc.
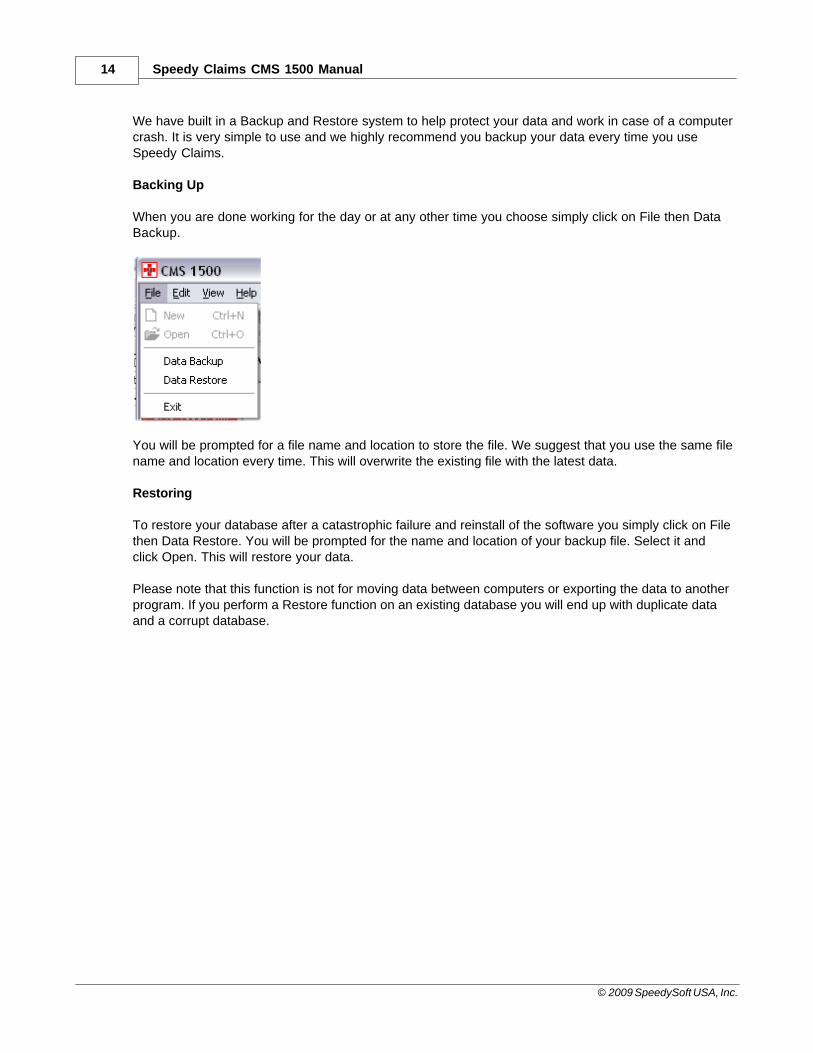
We have built in a Backup and Restore system to help protect your data and work in case of a computercrash. It is very simple to use and we highly recommend you backup your data every time you useSpeedy Claims. Backing Up When you are done working for the day or at any other time you choose simply click on File then DataBackup.
You will be prompted for a file name and location to store the file. We suggest that you use the same filename and location every time. This will overwrite the existing file with the latest data. Restoring To restore your database after a catastrophic failure and reinstall of the software you simply click on Filethen Data Restore. You will be prompted for the name and location of your backup file. Select it andclick Open. This will restore your data. Please note that this function is not for moving data between computers or exporting the data to anotherprogram. If you perform a Restore function on an existing database you will end up with duplicate dataand a corrupt database.

Top Level IntroThis page is printed before a new
top-level chapter starts
Part
II
Speedy Claims CMS 1500 Manual16
© 2009 SpeedySoft USA, Inc.
2 Using the Vertical Menu
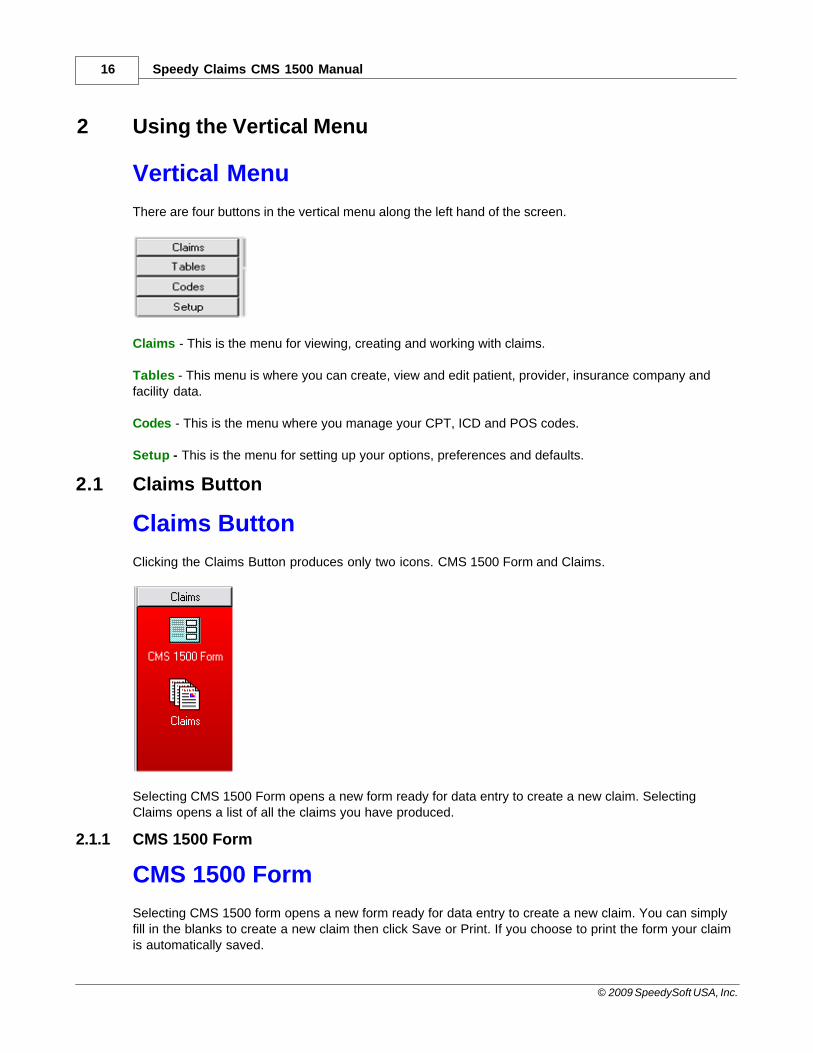
Vertical Menu There are four buttons in the vertical menu along the left hand of the screen.
Claims - This is the menu for viewing, creating and working with claims. Tables - This menu is where you can create, view and edit patient, provider, insurance company andfacility data. Codes - This is the menu where you manage your CPT, ICD and POS codes. Setup - This is the menu for setting up your options, preferences and defaults.
2.1 Claims Button
Claims Button Clicking the Claims Button produces only two icons. CMS 1500 Form and Claims.
Selecting CMS 1500 Form opens a new form ready for data entry to create a new claim. SelectingClaims opens a list of all the claims you have produced.
2.1.1 CMS 1500 Form
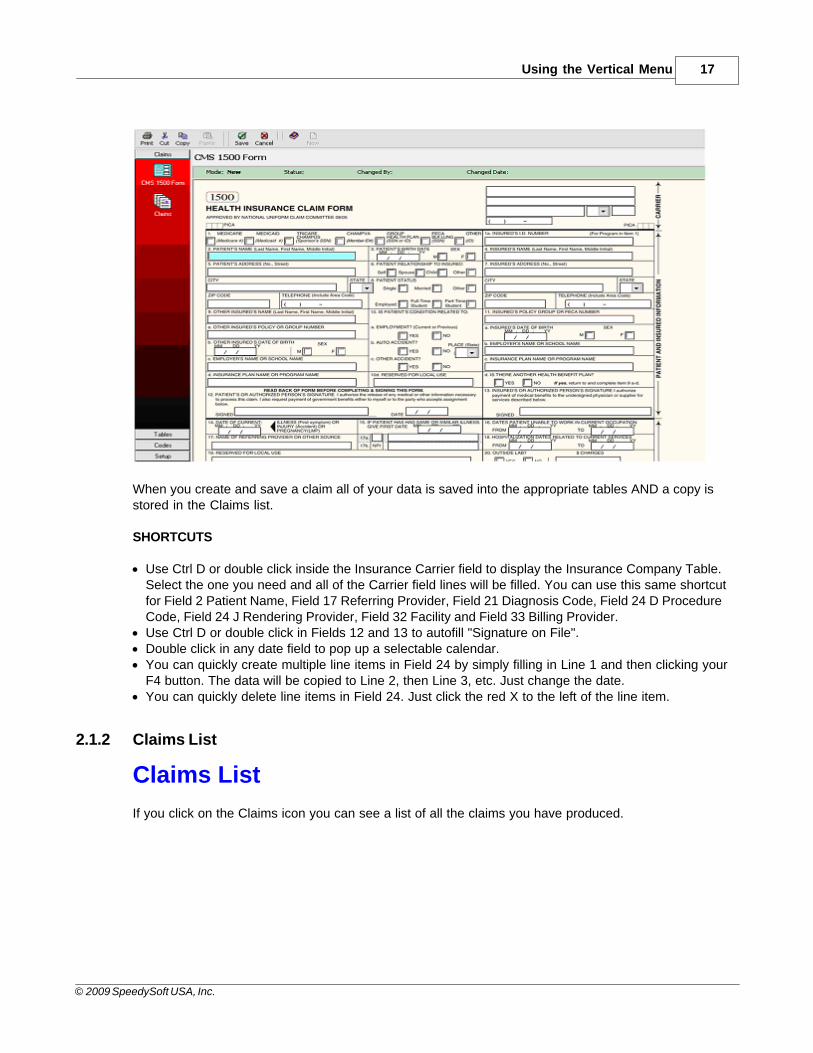
CMS 1500 Form Selecting CMS 1500 form opens a new form ready for data entry to create a new claim. You can simplyfill in the blanks to create a new claim then click Save or Print. If you choose to print the form your claimis automatically saved.
Using the Vertical Menu 17
© 2009 SpeedySoft USA, Inc.
When you create and save a claim all of your data is saved into the appropriate tables AND a copy isstored in the Claims list.
SHORTCUTS
· Use Ctrl D or double click inside the Insurance Carrier field to display the Insurance Company Table.Select the one you need and all of the Carrier field lines will be filled. You can use this same shortcutfor Field 2 Patient Name, Field 17 Referring Provider, Field 21 Diagnosis Code, Field 24 D ProcedureCode, Field 24 J Rendering Provider, Field 32 Facility and Field 33 Billing Provider.
· Use Ctrl D or double click in Fields 12 and 13 to autofill "Signature on File".· Double click in any date field to pop up a selectable calendar.· You can quickly create multiple line items in Field 24 by simply filling in Line 1 and then clicking your
F4 button. The data will be copied to Line 2, then Line 3, etc. Just change the date.· You can quickly delete line items in Field 24. Just click the red X to the left of the line item.
2.1.2 Claims List
Claims List If you click on the Claims icon you can see a list of all the claims you have produced.
Speedy Claims CMS 1500 Manual18
© 2009 SpeedySoft USA, Inc.
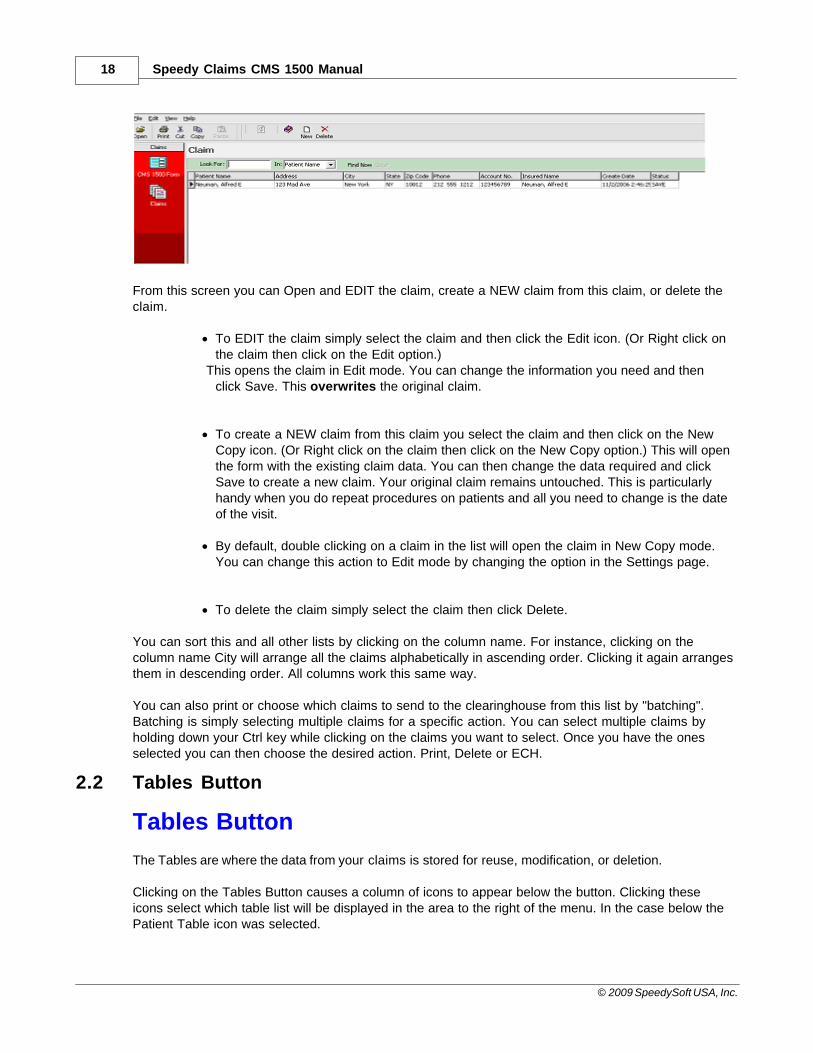
From this screen you can Open and EDIT the claim, create a NEW claim from this claim, or delete theclaim.
· To EDIT the claim simply select the claim and then click the Edit icon. (Or Right click onthe claim then click on the Edit option.)
This opens the claim in Edit mode. You can change the information you need and thenclick Save. This overwrites the original claim.
· To create a NEW claim from this claim you select the claim and then click on the NewCopy icon. (Or Right click on the claim then click on the New Copy option.) This will openthe form with the existing claim data. You can then change the data required and clickSave to create a new claim. Your original claim remains untouched. This is particularlyhandy when you do repeat procedures on patients and all you need to change is the dateof the visit.
· By default, double clicking on a claim in the list will open the claim in New Copy mode.You can change this action to Edit mode by changing the option in the Settings page.
· To delete the claim simply select the claim then click Delete.
You can sort this and all other lists by clicking on the column name. For instance, clicking on thecolumn name City will arrange all the claims alphabetically in ascending order. Clicking it again arrangesthem in descending order. All columns work this same way. You can also print or choose which claims to send to the clearinghouse from this list by "batching".Batching is simply selecting multiple claims for a specific action. You can select multiple claims byholding down your Ctrl key while clicking on the claims you want to select. Once you have the onesselected you can then choose the desired action. Print, Delete or ECH.
2.2 Tables Button
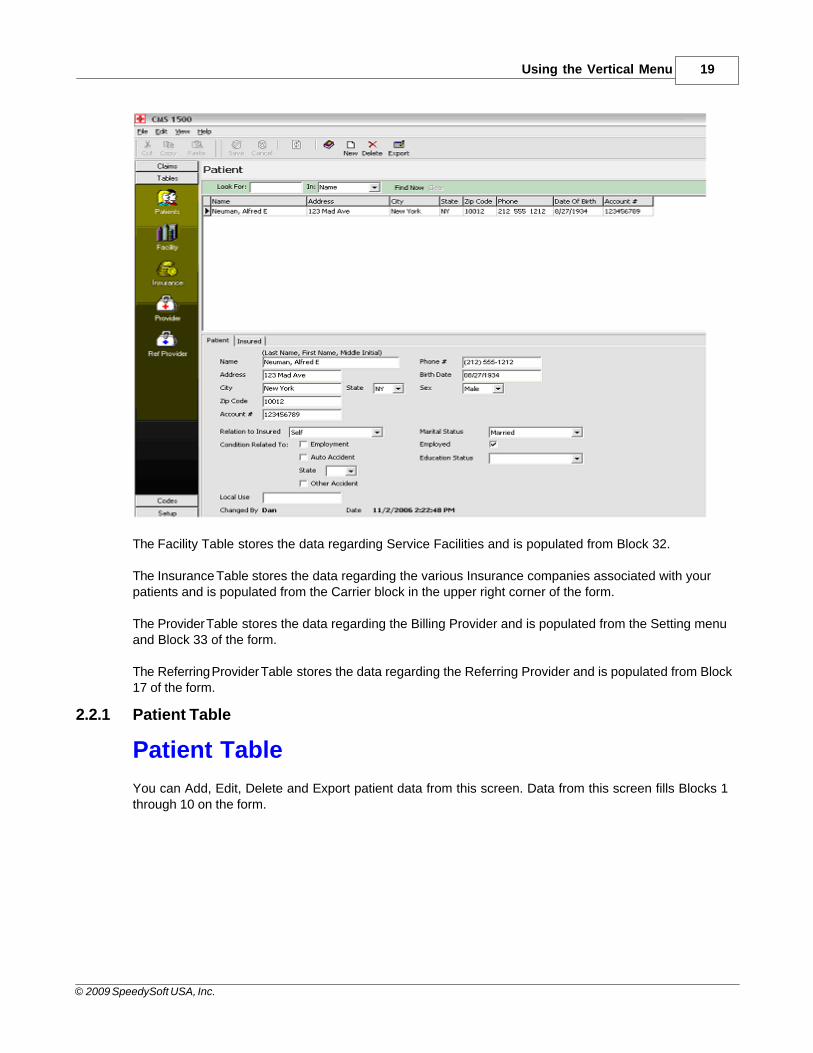
Tables Button The Tables are where the data from your claims is stored for reuse, modification, or deletion. Clicking on the Tables Button causes a column of icons to appear below the button. Clicking theseicons select which table list will be displayed in the area to the right of the menu. In the case below thePatient Table icon was selected.
Using the Vertical Menu 19
© 2009 SpeedySoft USA, Inc.
The Facility Table stores the data regarding Service Facilities and is populated from Block 32. The Insurance Table stores the data regarding the various Insurance companies associated with yourpatients and is populated from the Carrier block in the upper right corner of the form. The Provider Table stores the data regarding the Billing Provider and is populated from the Setting menuand Block 33 of the form. The Referring Provider Table stores the data regarding the Referring Provider and is populated from Block17 of the form.
2.2.1 Patient Table
Patient Table You can Add, Edit, Delete and Export patient data from this screen. Data from this screen fills Blocks 1through 10 on the form.
Speedy Claims CMS 1500 Manual20
© 2009 SpeedySoft USA, Inc.
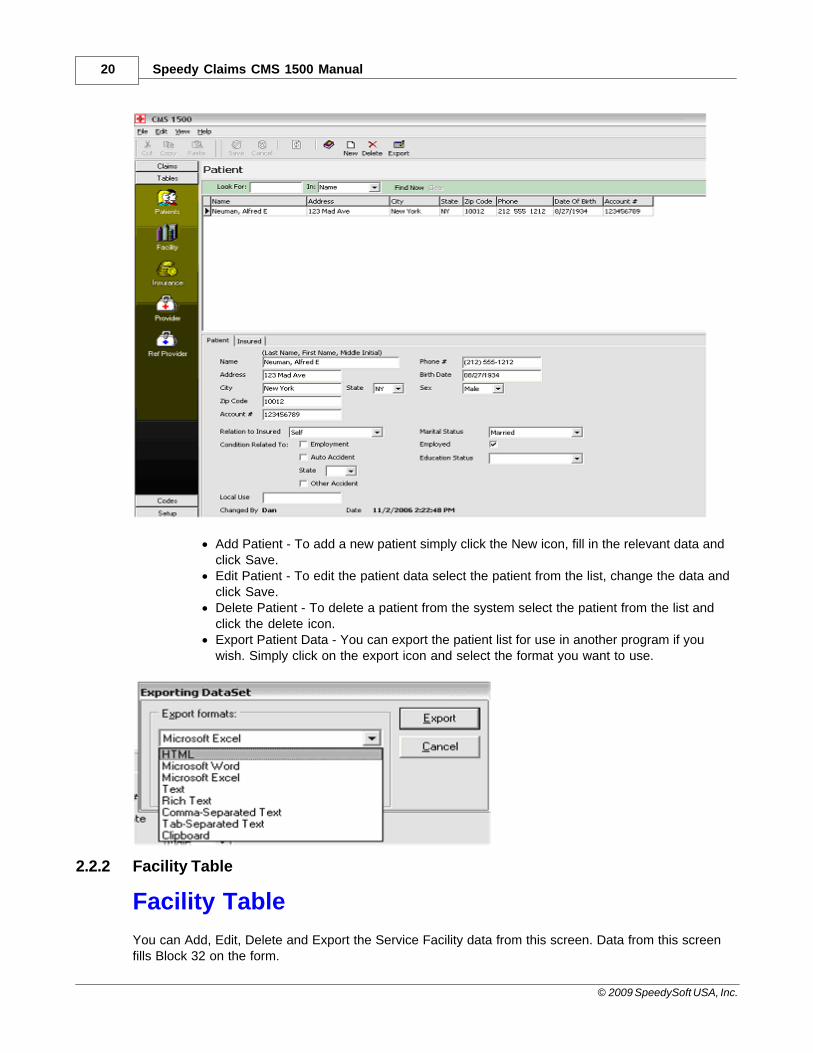
· Add Patient - To add a new patient simply click the New icon, fill in the relevant data and
click Save.· Edit Patient - To edit the patient data select the patient from the list, change the data and
click Save.· Delete Patient - To delete a patient from the system select the patient from the list and
click the delete icon.· Export Patient Data - You can export the patient list for use in another program if you
wish. Simply click on the export icon and select the format you want to use.
2.2.2 Facility Table
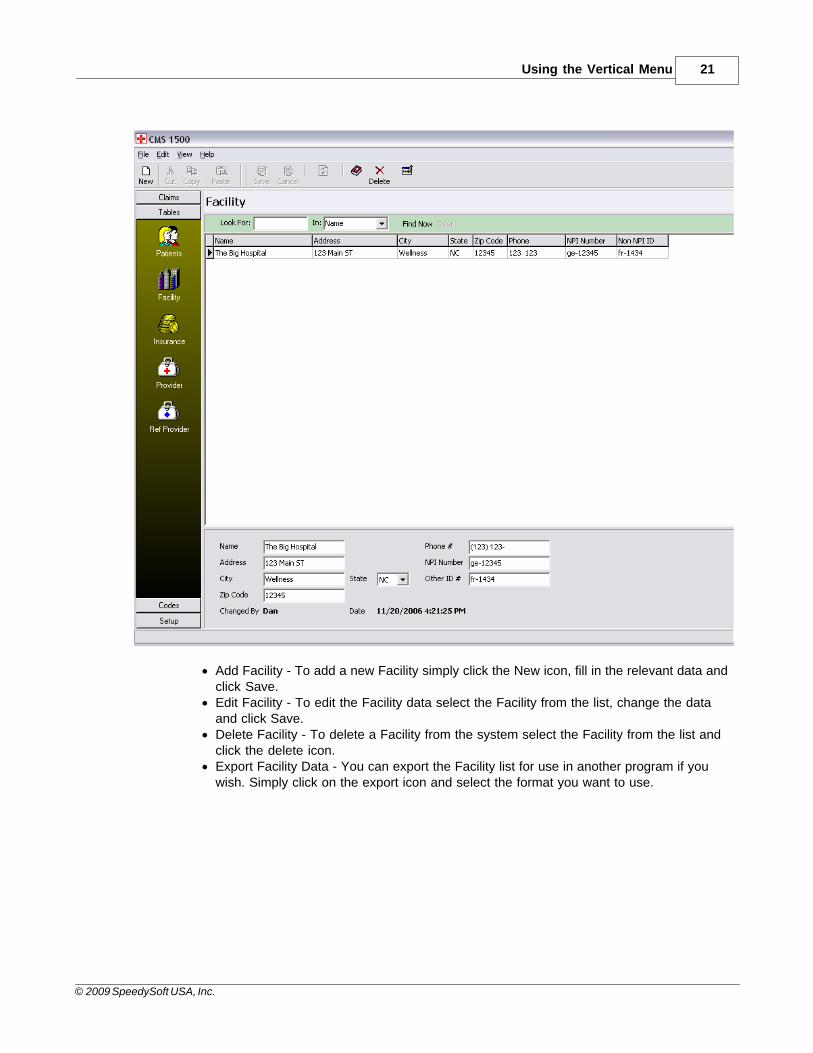
Facility Table You can Add, Edit, Delete and Export the Service Facility data from this screen. Data from this screenfills Block 32 on the form.
Using the Vertical Menu 21
© 2009 SpeedySoft USA, Inc.
· Add Facility - To add a new Facility simply click the New icon, fill in the relevant data and
click Save.· Edit Facility - To edit the Facility data select the Facility from the list, change the data
and click Save.· Delete Facility - To delete a Facility from the system select the Facility from the list and
click the delete icon.· Export Facility Data - You can export the Facility list for use in another program if you
wish. Simply click on the export icon and select the format you want to use.
Speedy Claims CMS 1500 Manual22
© 2009 SpeedySoft USA, Inc.
2.2.3 Insurance Table
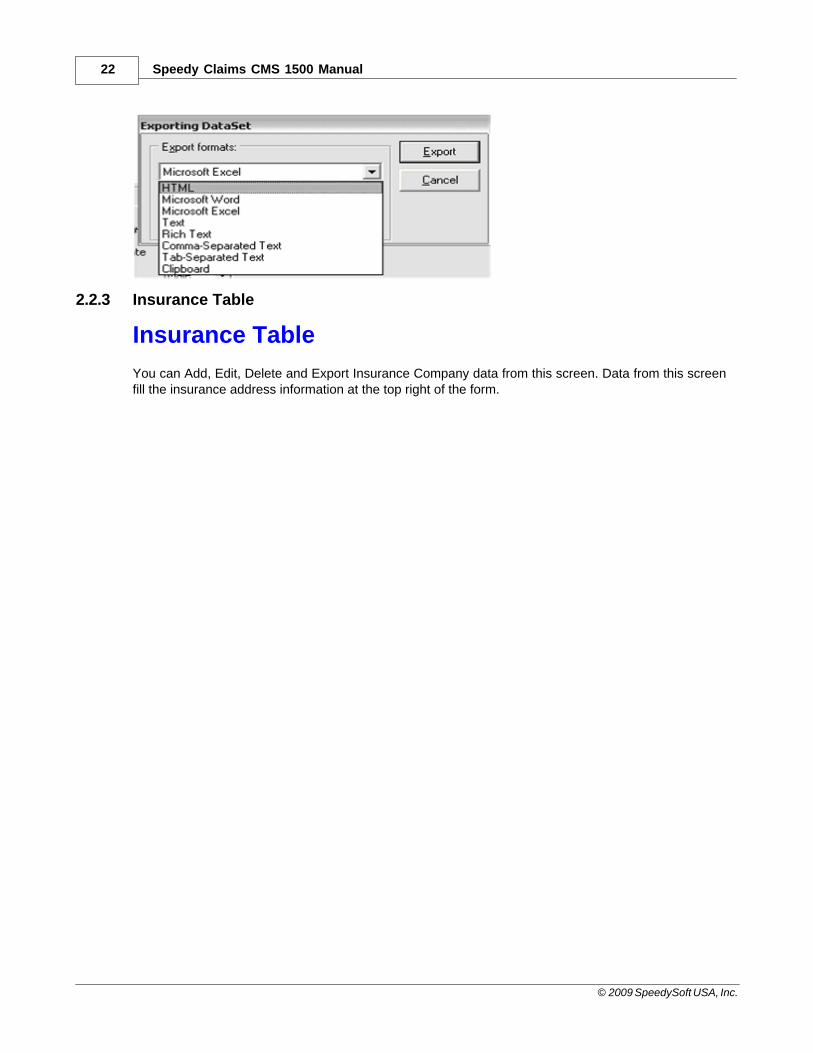
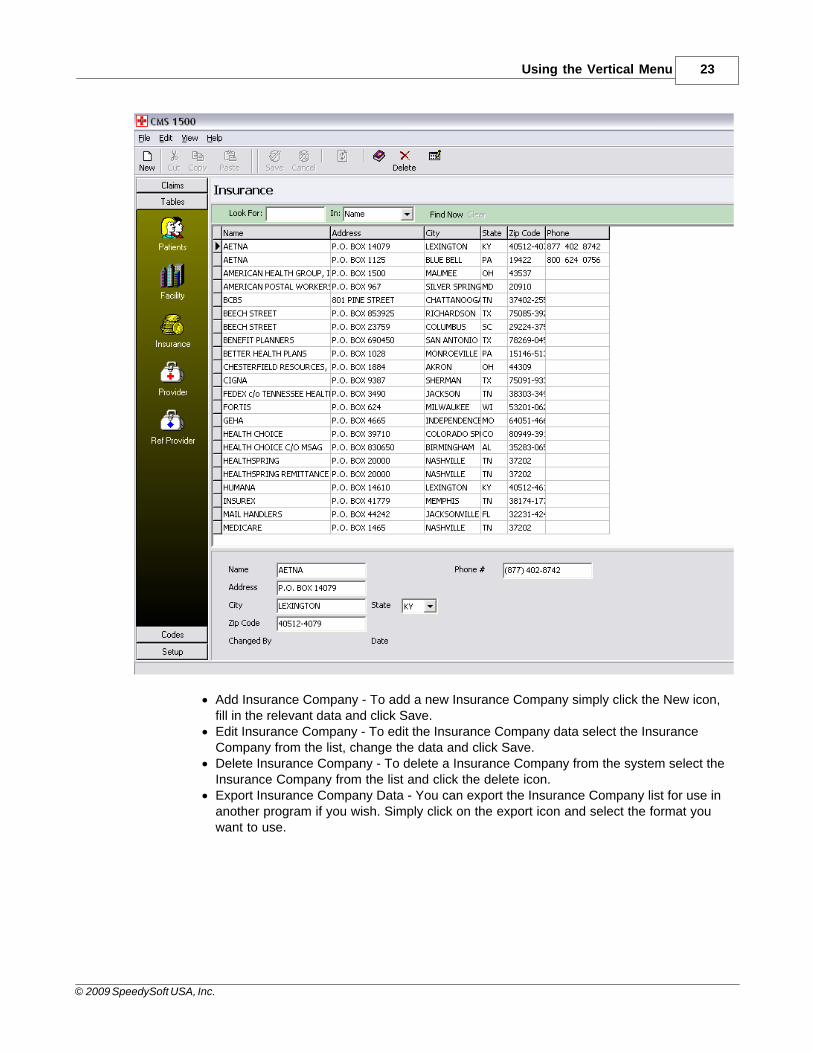
Insurance Table You can Add, Edit, Delete and Export Insurance Company data from this screen. Data from this screenfill the insurance address information at the top right of the form.
Using the Vertical Menu 23
© 2009 SpeedySoft USA, Inc.
· Add Insurance Company - To add a new Insurance Company simply click the New icon,
fill in the relevant data and click Save.· Edit Insurance Company - To edit the Insurance Company data select the Insurance
Company from the list, change the data and click Save.· Delete Insurance Company - To delete a Insurance Company from the system select the
Insurance Company from the list and click the delete icon.· Export Insurance Company Data - You can export the Insurance Company list for use in
another program if you wish. Simply click on the export icon and select the format youwant to use.
Speedy Claims CMS 1500 Manual24
© 2009 SpeedySoft USA, Inc.
2.2.4 Provider Table
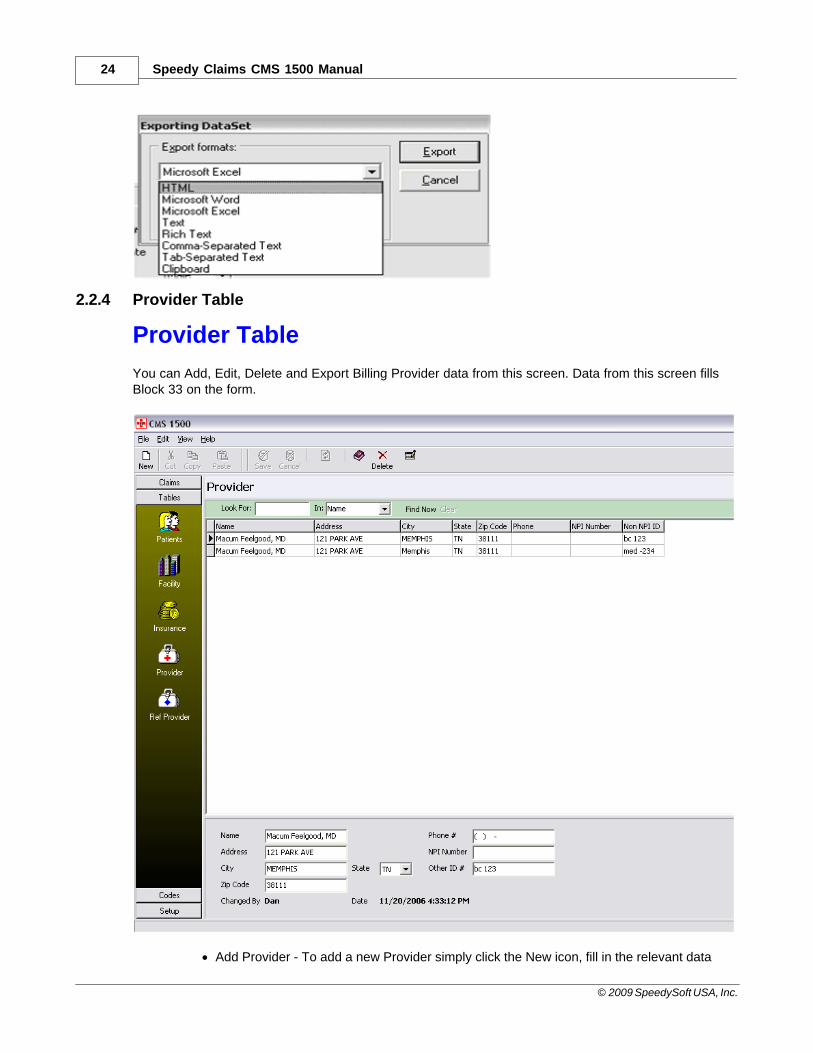
Provider Table You can Add, Edit, Delete and Export Billing Provider data from this screen. Data from this screen fillsBlock 33 on the form.
· Add Provider - To add a new Provider simply click the New icon, fill in the relevant data
Using the Vertical Menu 25
© 2009 SpeedySoft USA, Inc.
and click Save.· Edit Provider - To edit the Provider data select the Provider from the list, change the data
and click Save.· Delete Provider - To delete a Provider from the system select the Provider from the list and
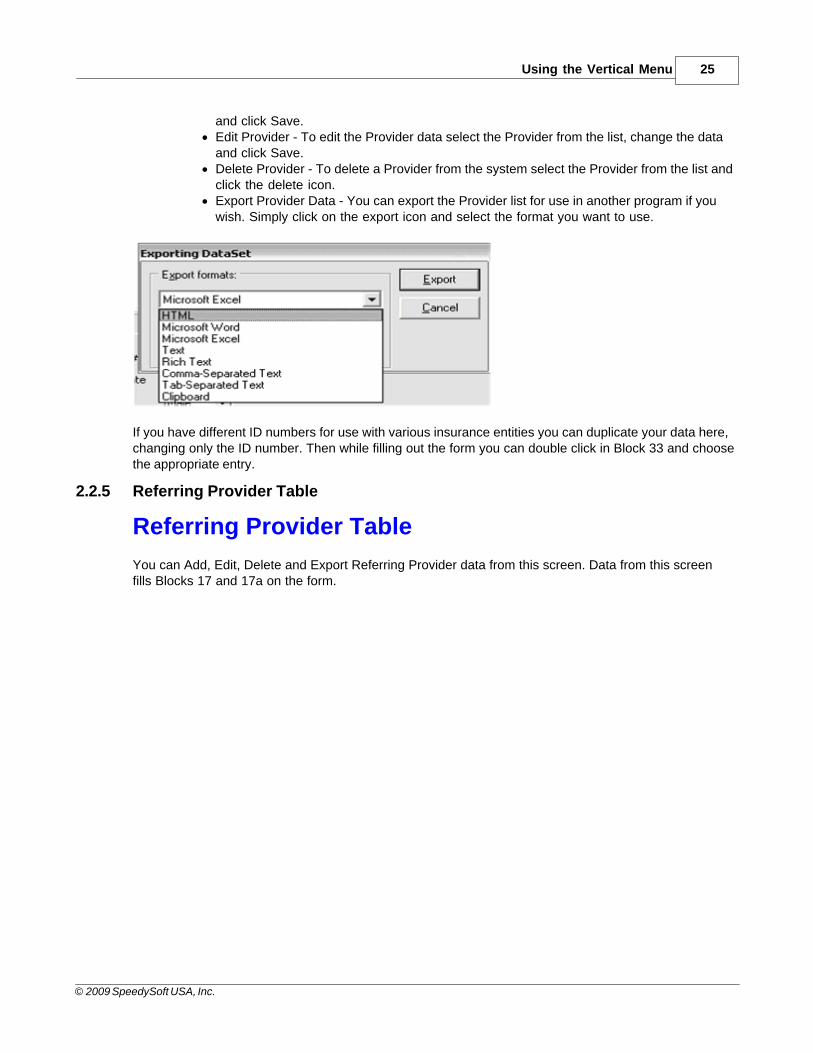
click the delete icon.· Export Provider Data - You can export the Provider list for use in another program if you
wish. Simply click on the export icon and select the format you want to use.
If you have different ID numbers for use with various insurance entities you can duplicate your data here,changing only the ID number. Then while filling out the form you can double click in Block 33 and choosethe appropriate entry.
2.2.5 Referring Provider Table
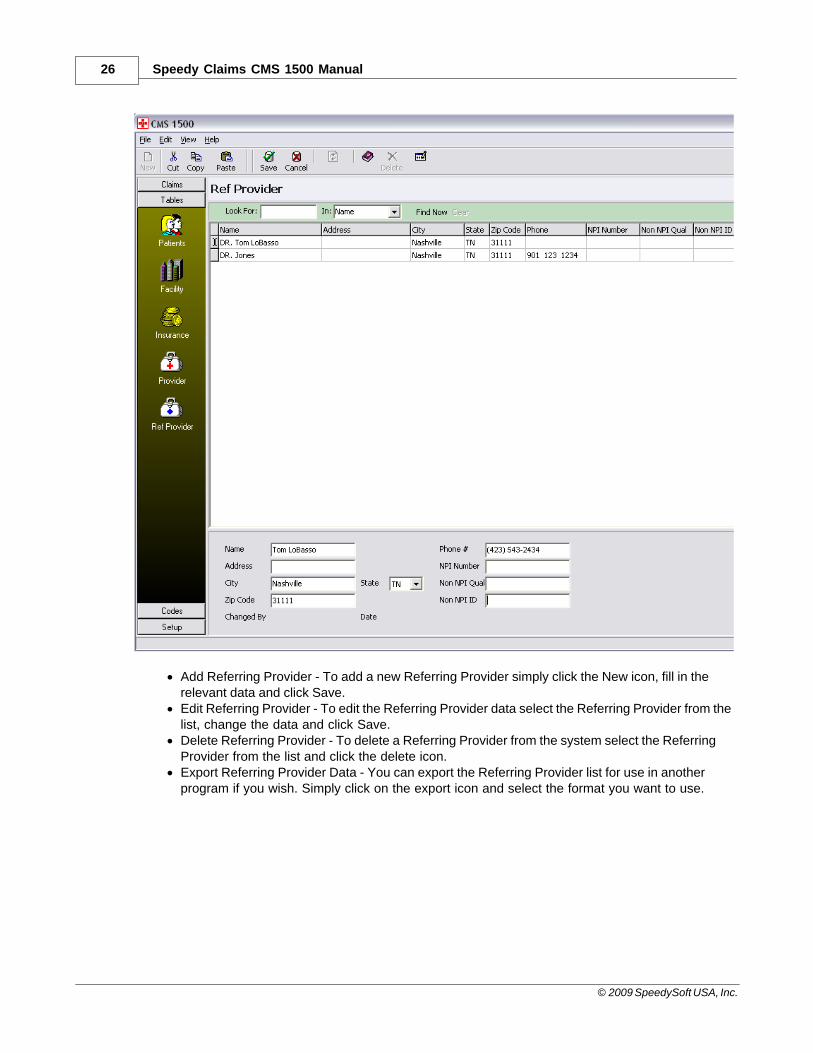
Referring Provider Table You can Add, Edit, Delete and Export Referring Provider data from this screen. Data from this screenfills Blocks 17 and 17a on the form.
Speedy Claims CMS 1500 Manual26
© 2009 SpeedySoft USA, Inc.
· Add Referring Provider - To add a new Referring Provider simply click the New icon, fill in the
relevant data and click Save.· Edit Referring Provider - To edit the Referring Provider data select the Referring Provider from the
list, change the data and click Save.· Delete Referring Provider - To delete a Referring Provider from the system select the Referring
Provider from the list and click the delete icon.· Export Referring Provider Data - You can export the Referring Provider list for use in another
program if you wish. Simply click on the export icon and select the format you want to use.
Using the Vertical Menu 27
© 2009 SpeedySoft USA, Inc.
2.3 Codes Button
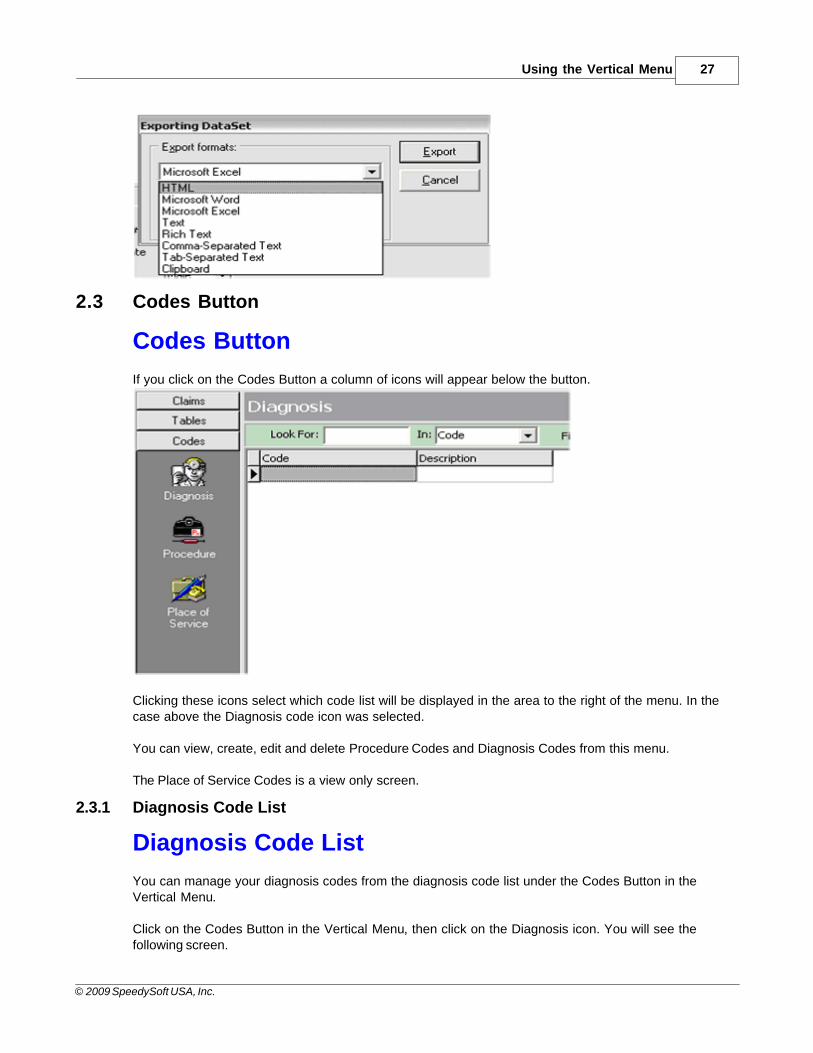
Codes Button If you click on the Codes Button a column of icons will appear below the button.
Clicking these icons select which code list will be displayed in the area to the right of the menu. In thecase above the Diagnosis code icon was selected. You can view, create, edit and delete Procedure Codes and Diagnosis Codes from this menu. The Place of Service Codes is a view only screen.
2.3.1 Diagnosis Code List
Diagnosis Code List You can manage your diagnosis codes from the diagnosis code list under the Codes Button in the Vertical Menu. Click on the Codes Button in the Vertical Menu, then click on the Diagnosis icon. You will see thefollowing screen.
Speedy Claims CMS 1500 Manual28
© 2009 SpeedySoft USA, Inc.
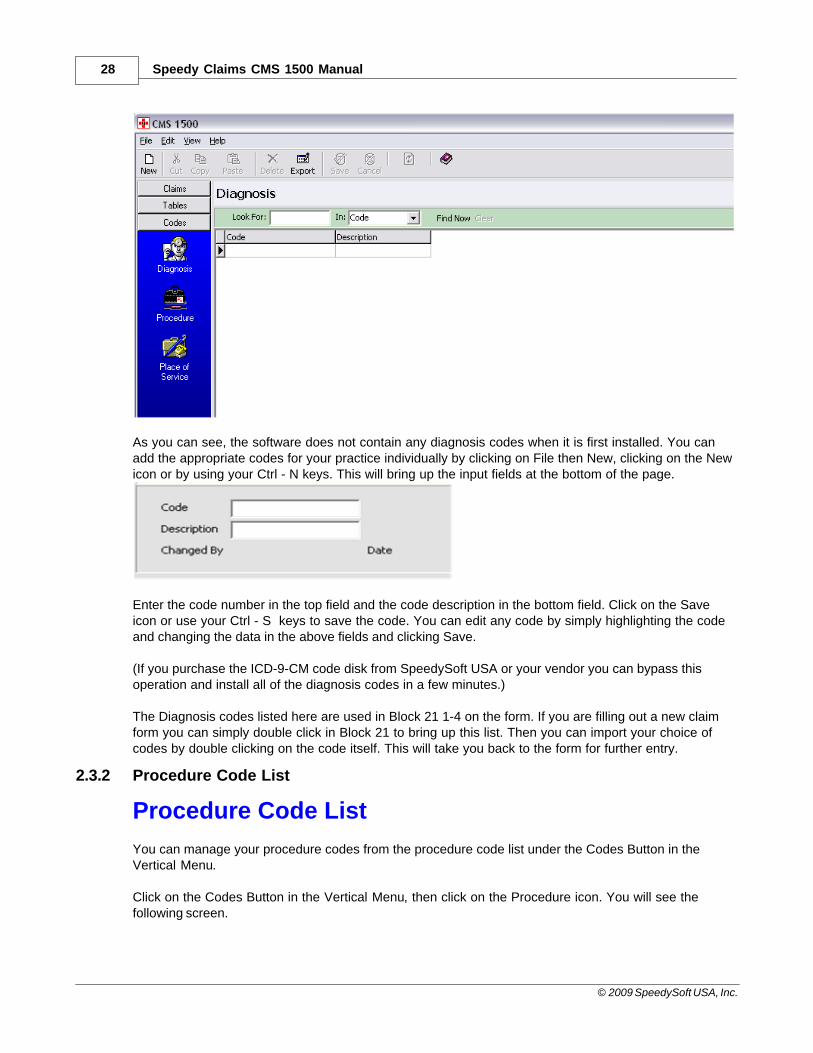
As you can see, the software does not contain any diagnosis codes when it is first installed. You canadd the appropriate codes for your practice individually by clicking on File then New, clicking on the Newicon or by using your Ctrl - N keys. This will bring up the input fields at the bottom of the page.
Enter the code number in the top field and the code description in the bottom field. Click on the Saveicon or use your Ctrl - S keys to save the code. You can edit any code by simply highlighting the codeand changing the data in the above fields and clicking Save. (If you purchase the ICD-9-CM code disk from SpeedySoft USA or your vendor you can bypass thisoperation and install all of the diagnosis codes in a few minutes.) The Diagnosis codes listed here are used in Block 21 1-4 on the form. If you are filling out a new claimform you can simply double click in Block 21 to bring up this list. Then you can import your choice ofcodes by double clicking on the code itself. This will take you back to the form for further entry.
2.3.2 Procedure Code List
Procedure Code List You can manage your procedure codes from the procedure code list under the Codes Button in the Vertical Menu. Click on the Codes Button in the Vertical Menu, then click on the Procedure icon. You will see thefollowing screen.
Using the Vertical Menu 29
© 2009 SpeedySoft USA, Inc.
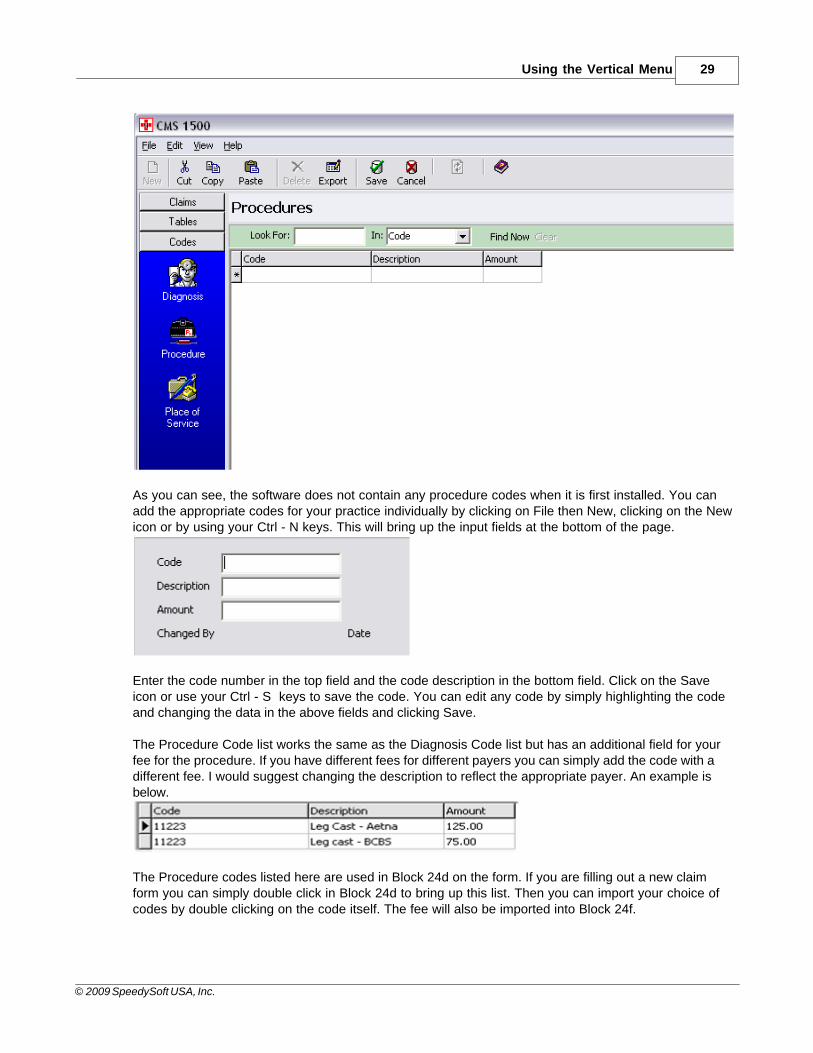
As you can see, the software does not contain any procedure codes when it is first installed. You canadd the appropriate codes for your practice individually by clicking on File then New, clicking on the Newicon or by using your Ctrl - N keys. This will bring up the input fields at the bottom of the page.
Enter the code number in the top field and the code description in the bottom field. Click on the Saveicon or use your Ctrl - S keys to save the code. You can edit any code by simply highlighting the codeand changing the data in the above fields and clicking Save. The Procedure Code list works the same as the Diagnosis Code list but has an additional field for yourfee for the procedure. If you have different fees for different payers you can simply add the code with adifferent fee. I would suggest changing the description to reflect the appropriate payer. An example isbelow.
The Procedure codes listed here are used in Block 24d on the form. If you are filling out a new claimform you can simply double click in Block 24d to bring up this list. Then you can import your choice ofcodes by double clicking on the code itself. The fee will also be imported into Block 24f.

Speedy Claims CMS 1500 Manual30
© 2009 SpeedySoft USA, Inc.
2.3.3 Place of Service Code List
Place of Service Code List Place of Service codes are used in Block 24b of the claim form. This code list will help you determine the correct Place of Service code to use for your practice. Onceyou determine the correct code to use you can set it to fill in Block 24b by default whenever you start anew claim. Default settings are done in the Settings menu under the Set Up button in the Vertical Menu.Alternatively, you can double click inside Block 24b to bring up this list and choose a Place of Service.
2.4 Set Up Button
2.4.1 Set Up
Set Up When you first start the Speedy Claims you will see a pop-up window asking if you want to go to thesetup page. Choose yes. This page is where you set your preferences and input your default Provider information. You can savethe data at any time by clicking on the Save icon.
Using the Vertical Menu 31
© 2009 SpeedySoft USA, Inc.
This option controls whether Box 24F (Charges) is multiplied by Box 24G (Days or Units) to produce theTotal Charge in Box 28. Most carriers will accept claims with Charges multiplied by Units but some donot.
This option allows you to set your default Place of Service code. Your choice will automatically populateBox 24b on the form.
Choose the appropriate option and fill in the blank with the provider's SSN or EIN. This data willautomatically populate Box 25 on the form.
Either leave this blank or type "Signature on File" or "SOF". This data will automatically populate Box 31on the form.
Fill in with the appropriate data. This data will automatically populate Box 33 on the form.NOTE: The Other ID # is a payer assigned unique identifier and may change depending on to whom theclaim is being submitted. Insert your most commonly used Non NPI ID# here and change on the form asneeded. Alternatively you can leave this field blank and fill in on the form as needed.
Speedy Claims CMS 1500 Manual32
© 2009 SpeedySoft USA, Inc.
Choose Print Red if you print your claims onto the Red CMS-1500 form.Choose Print Black if you wish to print the data AND the form onto blank paper.NOTE: Most carriers will not accept forms that are not printed on the official Red CMS-1500 form.
You can choose which CMS 1500 form to display here. This setting affects both the form displayed andthe ECH "Print Image" form if you are using the electronic claims module.
Updates to your Speedy Claims are free. This option tells Speedy Claims how you want to perform theupdates. If you choose to not perform automatic updates you can update by clicking on Check forUpdate under the Help Menu. You must be connected to the Internet and online to receive updates.
You can return to the Setting screen at any time by clicking on the Setup Button in the left hand verticalmenu bar.

Top Level IntroThis page is printed before a new
top-level chapter starts
Part
III
Speedy Claims CMS 1500 Manual34
© 2009 SpeedySoft USA, Inc.
3 Printing Claims
3.1 Printing
Printing You have two options for printing your claims.
· You can print your claims onto the standard OCR red form.· You can print your claims onto plain paper. This option prints the form and the data in black.
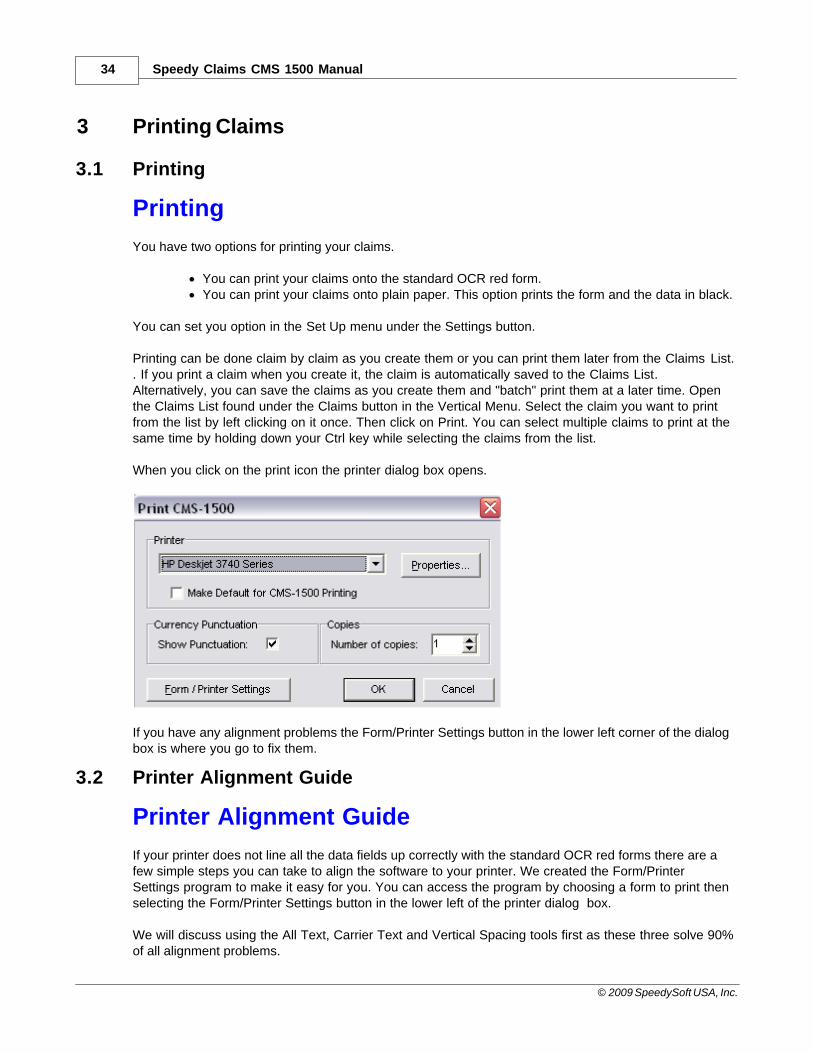
You can set you option in the Set Up menu under the Settings button. Printing can be done claim by claim as you create them or you can print them later from the Claims List.. If you print a claim when you create it, the claim is automatically saved to the Claims List.Alternatively, you can save the claims as you create them and "batch" print them at a later time. Openthe Claims List found under the Claims button in the Vertical Menu. Select the claim you want to printfrom the list by left clicking on it once. Then click on Print. You can select multiple claims to print at thesame time by holding down your Ctrl key while selecting the claims from the list. When you click on the print icon the printer dialog box opens.
If you have any alignment problems the Form/Printer Settings button in the lower left corner of the dialogbox is where you go to fix them.
3.2 Printer Alignment Guide
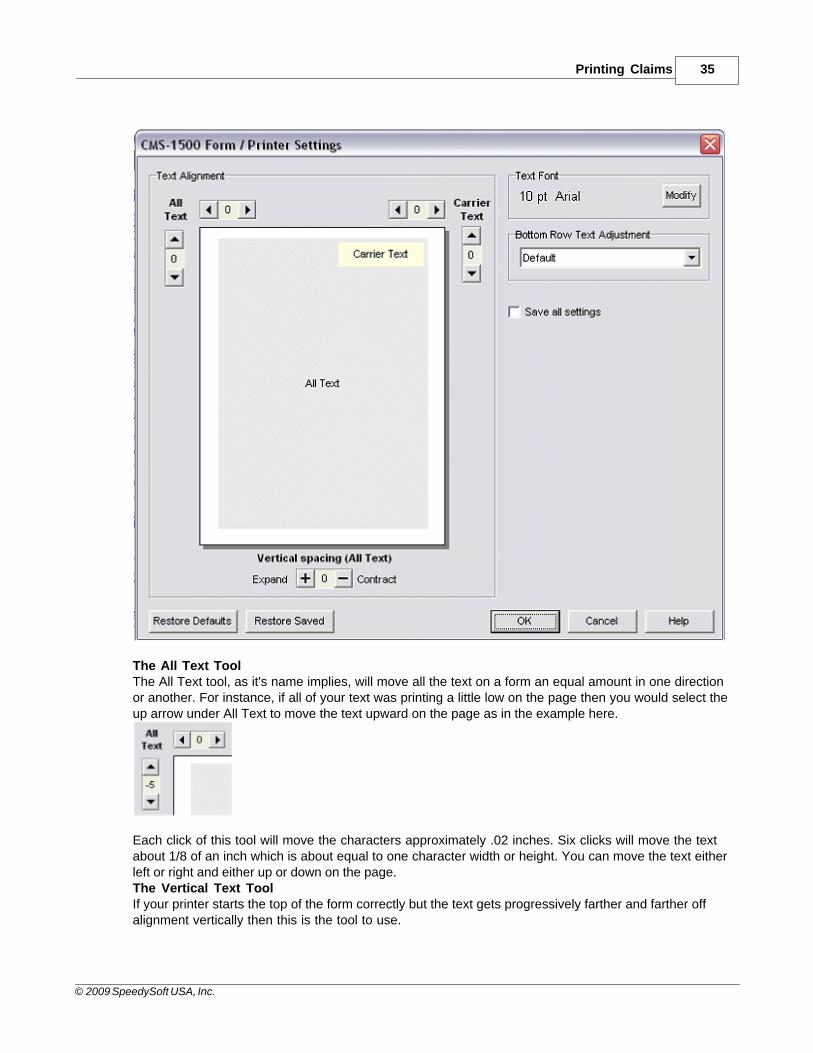
Printer Alignment Guide If your printer does not line all the data fields up correctly with the standard OCR red forms there are afew simple steps you can take to align the software to your printer. We created the Form/PrinterSettings program to make it easy for you. You can access the program by choosing a form to print thenselecting the Form/Printer Settings button in the lower left of the printer dialog box. We will discuss using the All Text, Carrier Text and Vertical Spacing tools first as these three solve 90%of all alignment problems.
Printing Claims 35
© 2009 SpeedySoft USA, Inc.
The All Text ToolThe All Text tool, as it's name implies, will move all the text on a form an equal amount in one directionor another. For instance, if all of your text was printing a little low on the page then you would select theup arrow under All Text to move the text upward on the page as in the example here.
Each click of this tool will move the characters approximately .02 inches. Six clicks will move the textabout 1/8 of an inch which is about equal to one character width or height. You can move the text eitherleft or right and either up or down on the page.The Vertical Text ToolIf your printer starts the top of the form correctly but the text gets progressively farther and farther offalignment vertically then this is the tool to use.
Speedy Claims CMS 1500 Manual36
© 2009 SpeedySoft USA, Inc.
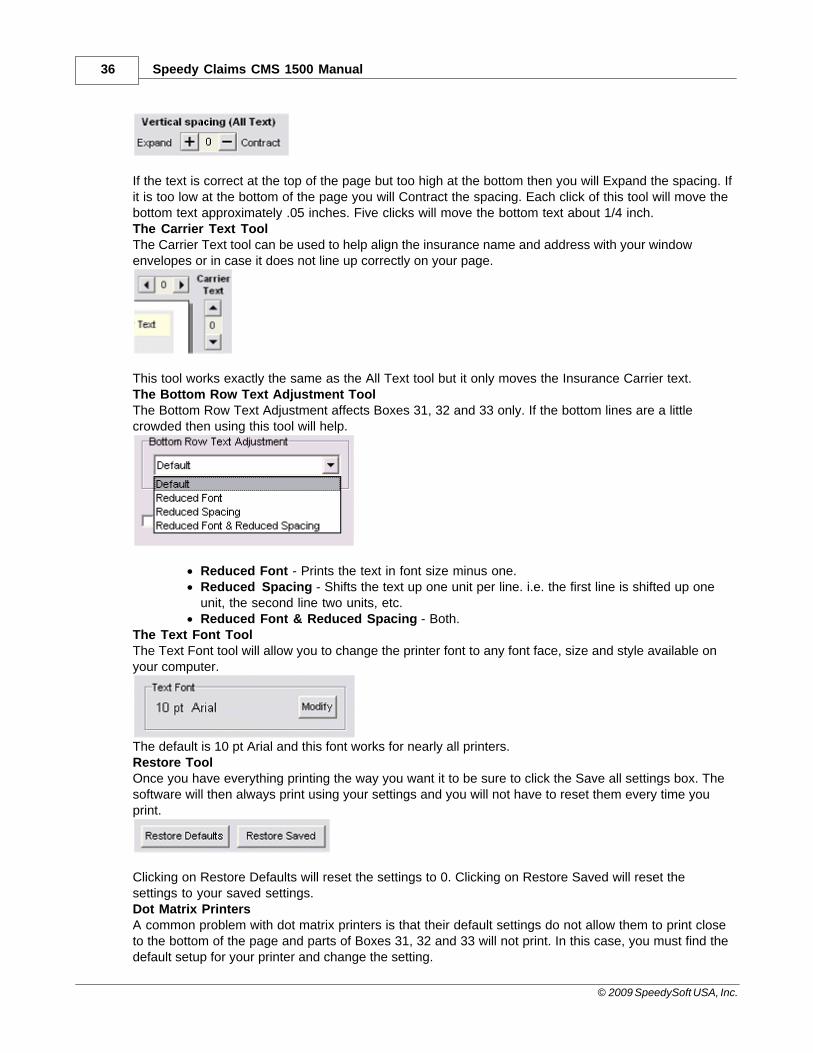
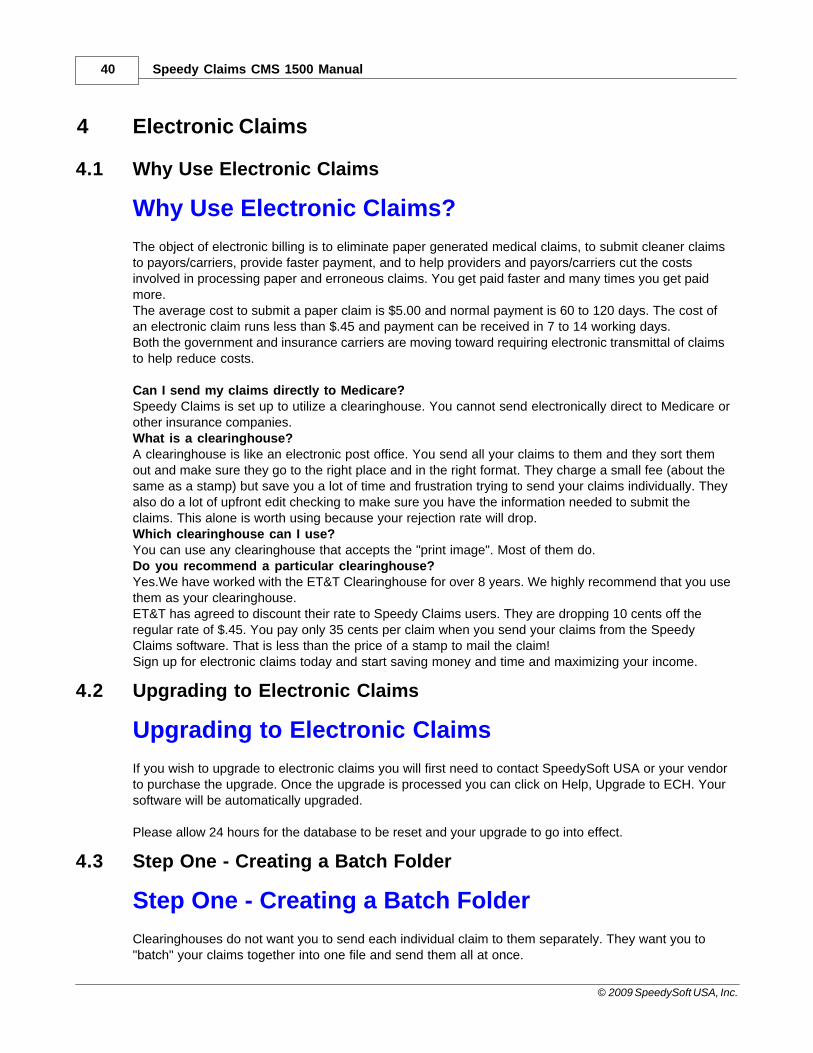
If the text is correct at the top of the page but too high at the bottom then you will Expand the spacing. Ifit is too low at the bottom of the page you will Contract the spacing. Each click of this tool will move thebottom text approximately .05 inches. Five clicks will move the bottom text about 1/4 inch. The Carrier Text ToolThe Carrier Text tool can be used to help align the insurance name and address with your windowenvelopes or in case it does not line up correctly on your page.
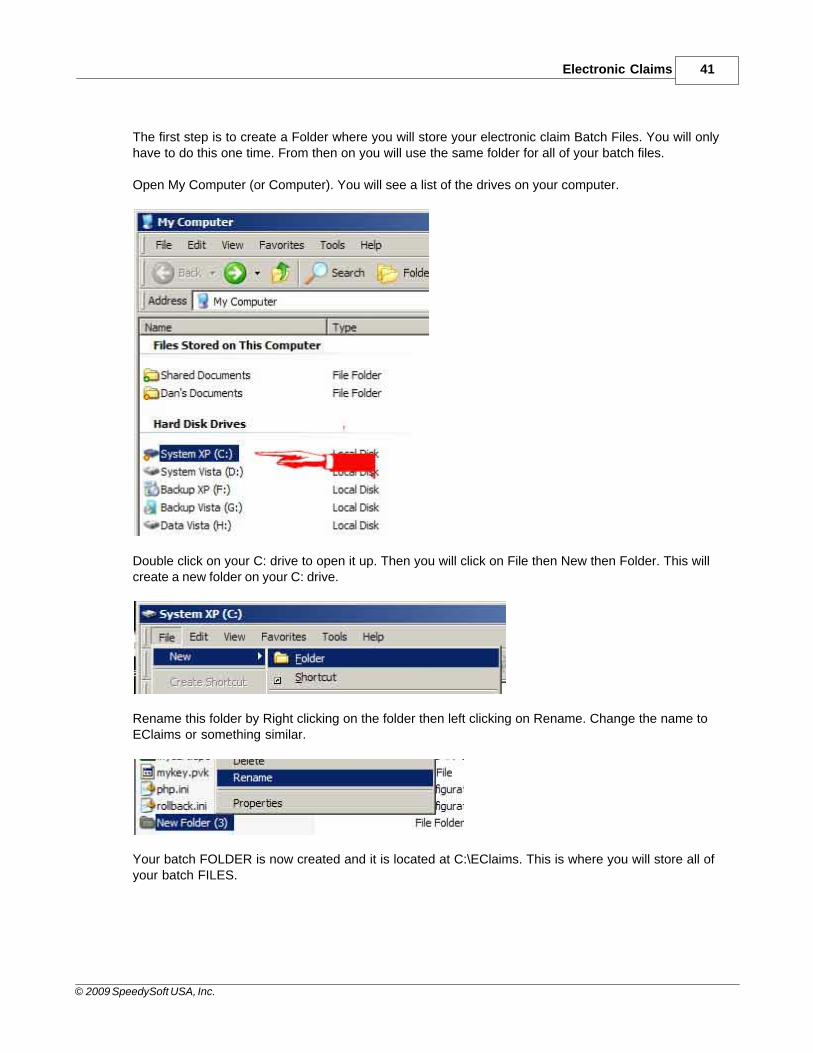
This tool works exactly the same as the All Text tool but it only moves the Insurance Carrier text. The Bottom Row Text Adjustment ToolThe Bottom Row Text Adjustment affects Boxes 31, 32 and 33 only. If the bottom lines are a littlecrowded then using this tool will help.
· Reduced Font - Prints the text in font size minus one. · Reduced Spacing - Shifts the text up one unit per line. i.e. the first line is shifted up one
unit, the second line two units, etc. · Reduced Font & Reduced Spacing - Both.
The Text Font ToolThe Text Font tool will allow you to change the printer font to any font face, size and style available onyour computer.
The default is 10 pt Arial and this font works for nearly all printers.Restore ToolOnce you have everything printing the way you want it to be sure to click the Save all settings box. Thesoftware will then always print using your settings and you will not have to reset them every time youprint.
Clicking on Restore Defaults will reset the settings to 0. Clicking on Restore Saved will reset thesettings to your saved settings. Dot Matrix PrintersA common problem with dot matrix printers is that their default settings do not allow them to print closeto the bottom of the page and parts of Boxes 31, 32 and 33 will not print. In this case, you must find thedefault setup for your printer and change the setting.

Printing Claims 37
© 2009 SpeedySoft USA, Inc.
Occasionally dot matrix printers will override the software settings and use their default font and spacingsettings throwing off the print. In this case again, you must find the setup for your printer and allow it tobe software controlled.


Top Level IntroThis page is printed before a new
top-level chapter starts
Part
IV
Speedy Claims CMS 1500 Manual40
© 2009 SpeedySoft USA, Inc.
4 Electronic Claims
4.1 Why Use Electronic Claims
Why Use Electronic Claims? The object of electronic billing is to eliminate paper generated medical claims, to submit cleaner claimsto payors/carriers, provide faster payment, and to help providers and payors/carriers cut the costsinvolved in processing paper and erroneous claims. You get paid faster and many times you get paidmore.The average cost to submit a paper claim is $5.00 and normal payment is 60 to 120 days. The cost ofan electronic claim runs less than $.45 and payment can be received in 7 to 14 working days. Both the government and insurance carriers are moving toward requiring electronic transmittal of claimsto help reduce costs. Can I send my claims directly to Medicare?Speedy Claims is set up to utilize a clearinghouse. You cannot send electronically direct to Medicare orother insurance companies.What is a clearinghouse?A clearinghouse is like an electronic post office. You send all your claims to them and they sort themout and make sure they go to the right place and in the right format. They charge a small fee (about thesame as a stamp) but save you a lot of time and frustration trying to send your claims individually. Theyalso do a lot of upfront edit checking to make sure you have the information needed to submit theclaims. This alone is worth using because your rejection rate will drop.Which clearinghouse can I use?You can use any clearinghouse that accepts the "print image". Most of them do.Do you recommend a particular clearinghouse?Yes.We have worked with the ET&T Clearinghouse for over 8 years. We highly recommend that you usethem as your clearinghouse.ET&T has agreed to discount their rate to Speedy Claims users. They are dropping 10 cents off theregular rate of $.45. You pay only 35 cents per claim when you send your claims from the SpeedyClaims software. That is less than the price of a stamp to mail the claim!Sign up for electronic claims today and start saving money and time and maximizing your income.
4.2 Upgrading to Electronic Claims
Upgrading to Electronic Claims If you wish to upgrade to electronic claims you will first need to contact SpeedySoft USA or your vendorto purchase the upgrade. Once the upgrade is processed you can click on Help, Upgrade to ECH. Yoursoftware will be automatically upgraded. Please allow 24 hours for the database to be reset and your upgrade to go into effect.
4.3 Step One - Creating a Batch Folder
Step One - Creating a Batch Folder Clearinghouses do not want you to send each individual claim to them separately. They want you to"batch" your claims together into one file and send them all at once.
Electronic Claims 41
© 2009 SpeedySoft USA, Inc.
The first step is to create a Folder where you will store your electronic claim Batch Files. You will onlyhave to do this one time. From then on you will use the same folder for all of your batch files.
Open My Computer (or Computer). You will see a list of the drives on your computer.
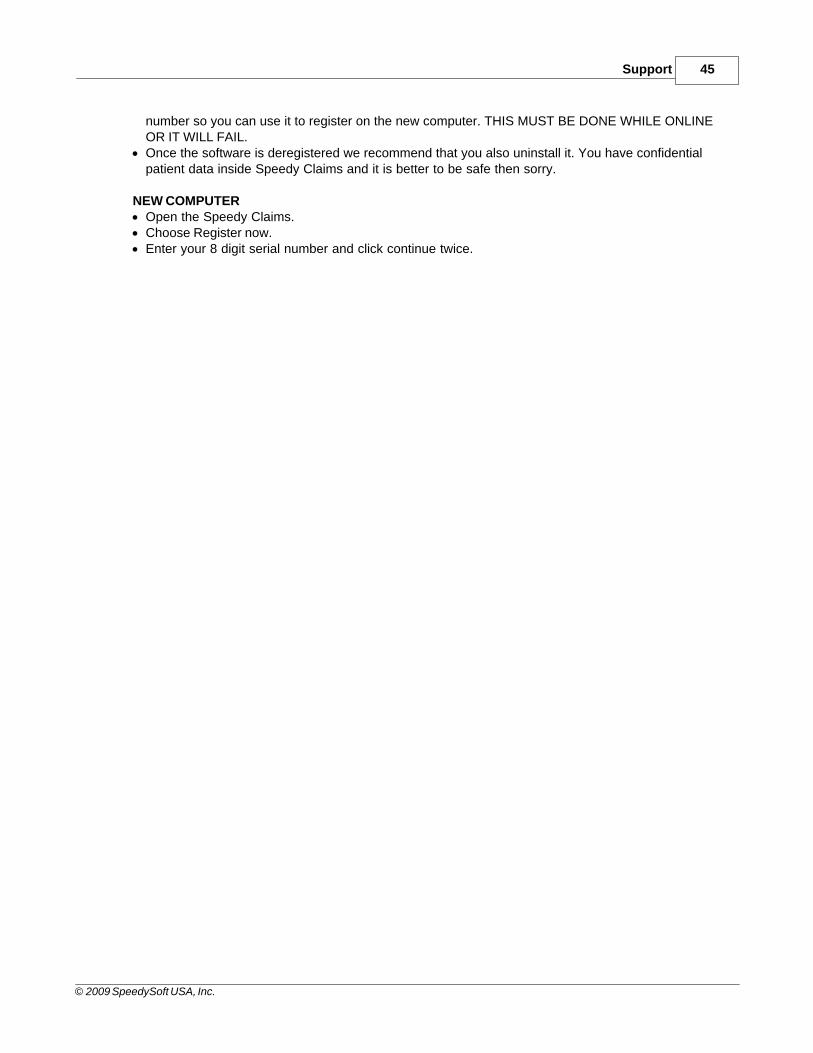
Double click on your C: drive to open it up. Then you will click on File then New then Folder. This willcreate a new folder on your C: drive.
Rename this folder by Right clicking on the folder then left clicking on Rename. Change the name toEClaims or something similar.
Your batch FOLDER is now created and it is located at C:\EClaims. This is where you will store all ofyour batch FILES.

Speedy Claims CMS 1500 Manual42
© 2009 SpeedySoft USA, Inc.
4.4 Step Two - Creating a Batch File
Now that your batch folder is created you are ready to create a Batch File which you can send to theclearinghouse.
There are several different ways to create an electronic claims batch file:
· You can simply create the claim and press the ECH button. Repeat for each claim.
· You can create many claims, saving each one as it is created. Once you are ready to file, openthe Claims List, select the claims you wish to send by holding down your Ctrl key and clickingon multiple claims. Then click on the ECH icon.
When you click on the ECH icon for the first time in any session you will be asked to choose a locationto save the file. You want to browse to your Batch Folder already setup.
You will also be asked to name the file. Check with your clearinghouse to see if they have a particularnaming convention they want you to follow. Otherwise, you might want to choose a name that is daterelative so you easily tell when a particular file was submitted.
Once your batch file is created you simply use the software or portal provided to you by the clearinghouse to send the file to them.

Top Level IntroThis page is printed before a new
top-level chapter starts
Part
V

Speedy Claims CMS 1500 Manual44
© 2009 SpeedySoft USA, Inc.
5 Support
5.1 Registration Problems
Registration Problems Your Speedy Claims License entitles you to install the software on a single computer. If you try to installit on an additional computer you will get the error message that it is already registered. If you need to install the program on more than one computer you can obtain additional licenses fromyour vendor or SpeedySoft USA at a discount. Occasionally a computer will crash and the program will have to be reinstalled. If this happens you willhave to call support at 888-217-2303. The support techs can reset the database to allow you to reinstall. Hopefully, you have been doing daily backups and did not lose all your data during the crash.
5.2 Deregistering/Moving the Program
Your Speedy Claims license allows you to register the program on one computer. If you need to use iton more than one computer you must purchase additional licenses.
You can, however, move the program to a different computer if you need to do so. Lets say you justbought a new computer and you want to use it to do your billing instead of the old clunker. Here is whatyou need to do.
NEW COMPUTER· Go to www.speedysoftusa.com and download the latest version. · You can download and install the 10 day trial because it is the full working version.
OLD COMPUTER· Do a database backup by clicking on File then Backup Data.· Name the file something like speedybackup and save it onto your Desktop.· Click on the Help menu at the top and then click on About.· Write down your 8 digit serial number.· Copy the backup file onto a flash drive or other removable media.
NEW COMPUTER· Plug in the flash drive or other media that contains the backup file.· Open the Speedy Claims.· Click Register Later.· When asked if you want to go to the Setting Page choose No.· Click on File then Data Restore.· When asked whether to overwrite or append select Overwrite.· Browse to the removable media and select the backup file and click open.· Once it is done writing the files to your new Speedy Claims click on the Claims List to make sure your
data has been safely transported.· Close Speedy Claims.
OLD COMPUTER· In Speedy Claims click on the Help menu and then click on Deregister. This will release your serial
Support 45
© 2009 SpeedySoft USA, Inc.
number so you can use it to register on the new computer. THIS MUST BE DONE WHILE ONLINEOR IT WILL FAIL.
· Once the software is deregistered we recommend that you also uninstall it. You have confidentialpatient data inside Speedy Claims and it is better to be safe then sorry.
NEW COMPUTER· Open the Speedy Claims.· Choose Register now.· Enter your 8 digit serial number and click continue twice.

Index 47
© 2009 SpeedySoft USA, Inc.
Index- C -CMS 1500 Form 12, 16, 30
Creating Electronic Claims 40
- P -Printer Alignment Guide 12, 30, 34
- R -Registration Problems 10, 44

Endnotes 2... (after index)
Speedy Claims CMS 1500 Manual48
© 2009 SpeedySoft USA, Inc.

Back Cover
Related Documents