SPEAKER RECOGNITION ACCESS CONTROL SYSTEM A Master's Thesis Submitted to the Faculty of the Escola Tècnica Superior d'Enginyeria de Telecomunicació de Barcelona, Universitat Politècnica de Catalunya and Illinois Institute of Technology, in partial fulfilment of the requirements for the dual-degree of MASTER IN TELECOMMUNICATIONS ENGINEERING and INFORMATION TECHNOLOGY AND MANAGEMENT Author: Beinat Arrieta Co-Advisor at IIT: Jeremy Hajek Co-Advisor at ETSETB: Asunción Moreno Chicago, July 2017

Welcome message from author
This document is posted to help you gain knowledge. Please leave a comment to let me know what you think about it! Share it to your friends and learn new things together.
Transcript

SPEAKER RECOGNITION
ACCESS CONTROL SYSTEM
A Master's Thesis
Submitted to the Faculty of the Escola Tècnica Superior d'Enginyeria de Telecomunicació de
Barcelona, Universitat Politècnica de Catalunya and Illinois Institute of Technology,
in partial fulfilment of the requirements for the dual-degree of
MASTER IN TELECOMMUNICATIONS ENGINEERING and
INFORMATION TECHNOLOGY AND MANAGEMENT
Author: Beinat Arrieta
Co-Advisor at IIT: Jeremy Hajek Co-Advisor at ETSETB: Asunción Moreno
Chicago, July 2017

2
Abstract
The following document will drive the reader through the whole development of a project
consisting in the investigation of the feasibility and development of an access control security
system that uses voice biometrics as its cornerstone to make rooms as safe and controlled as
possible in a two-factor authentication approach using open software.
For that, an initial decision is presented, in which the technology that is going to be used
to make the Speaker Recognition functionality possible is chosen. A detailed explanation of it is
included so that the reader will know and understand the basics to follow the project development.
With this, the document will go step by step through the different stages that I have faced
and the requirements that came up and I had to adapt to, including the integration of the system
that is nowadays up and running at IIT. The User Interface of the final application is presented
together with an explanation of every step that users will have to follow to use the system
correctly.
Last, an estimation of the costs associated to this project is presented, which will give the
reader an idea of how much starting this project from scratch would cost if the same hardware is
used.
Also, for those developers that would like to get some of this functionality in their
systems, a link to a GitHub repository where they can find the code is also given.

3
To my grandparents, uncle and friend Jaume Muixí.

4
Acknowledgements
First of all, I would like to express my gratitude to Jeremy Hajek for his predisposition
to help and offer all the support that I needed throughout the whole project no matter what, from
start to finish. He has been crucial for this project to succeed.
I also have to thank Gregory Makowski for helping me in the last stages of the project
with things he was in charge of that really helped me getting to the point I wanted.
Asunción Moreno, who despite the fact of being in Barcelona, has also shown support
and willingness to help in anything she could.
And last but not least, my family, who have always supported me, may it be related or
not to this project.
Thank you.

5
Revision History and Approval
Revision Date Purpose
0 06/15/2017 Document creation
1 07/05/2017 Document revision
2 07/07/2017 Document revision
3 07/15/2017 Document revision
DOCUMENT DISTRIBUTION LIST
Name e-mail
Beinat Arrieta [email protected]
Jeremy Hajek [email protected]
Asunción Moreno [email protected]
Written by: Review and approved by:
Date 05/13/2017 Date 07/15/2017
Name Beinat Arrieta Name Jeremy Hajek
Position Project Author Position Project Advisor

6
Table of Contents
Abstract.........................................................................................................2
Acknowledgements........................................................................................4
RevisionHistoryandApproval........................................................................5
TableofContents...........................................................................................6
ListofFigures.................................................................................................8
ListofTables..................................................................................................8
1. Introduction................................................................................................9
1.1. Statementofpurpose...................................................................................9
1.2. Requirementsandspecifications.................................................................9
1.3. Methodsandprocedures...........................................................................10
1.4. WorkPlan...................................................................................................11
1.5. Deviationsandincidences..........................................................................11
1.6. Resources...................................................................................................16
2. Stateoftheartofthetechnologyused.....................................................17
3. ProjectDevelopment................................................................................20
3.1. SpeakerRecognitionAPIs...........................................................................20
3.2. DevelopmentEnvironment........................................................................26
3.3. AudioGraph................................................................................................28
3.4. EntityFramework.......................................................................................30
3.5. FirstapproachtoSolution..........................................................................34
3.6. CardScanner...............................................................................................37
3.7. SOAPService...............................................................................................44

7
3.8. DoorSystem...............................................................................................51
3.9. FinalSolution..............................................................................................53
4. CostAssessment.......................................................................................61
5. Results,Conclusionsandfuturedevelopment...........................................62
6. References................................................................................................64
7. Glossary....................................................................................................65

8
List of Figures
Figure 1: Project Gantt Diagram .................................................................................................. 15
Figure 2: Speaker Recognition schema ........................................................................................ 17
Figure 3: Application-API data flow ........................................................................................... 23
Figure 4: Decision Criteria ........................................................................................................... 35
Figure 5 Hawk ID Card front view .............................................................................................. 37
Figure 6: ProxPro II Card Reader ................................................................................................ 38
Figure 7: Card Data Protocol ....................................................................................................... 39
Figure 8: Hawk ID Card rear view .............................................................................................. 40
Figure 9: Binary Data read ........................................................................................................... 40
Figure 10: Card Reader Connection Schematic ........................................................................... 41
Figure 11: 12V Lock-Style Solenoid ........................................................................................... 51
Figure 12: 12V Lock-Style Solenoid Schematic ......................................................................... 52
Figure 13: Main Page ................................................................................................................... 53
Figure 14: Main Page Progress Ring ........................................................................................... 55
Figure 15: Enrollment Page ......................................................................................................... 55
Figure 16: Verification Page ........................................................................................................ 57
Figure 17: Admin Page ................................................................................................................ 59
Figure 18: Admin Dialog ............................................................................................................. 60
List of Tables
Table 1: Cost Assessment ............................................................................................................ 61

9
1. Introduction
1.1. Statement of purpose
This project has been carried out at the department of Information Technology and
Management of the School of Applied Technology at Illinois Institute of Technology and at
Escola Tècnica Superior d’Enginyeria de Telecomunicació de Barcelona (ETSETB) at
Universitat Politècnica de Catalunya (UPC).
Nowadays, IIT controls access to restricted areas through card scanning techniques,
where users are required to use their faculty/student IDs to identify themselves. However, one
could think that this might be a little vulnerable in the sense that it would only require the
impostor to get your card. With this, developing a system in which more sophisticated
techniques were used was of great interest, given the fact that the technology we have access to
offers a lot of possibilities we should take advantage from.
In this case, the method to be used is human voice, given its very unique characteristics
for every single person and how easy it is for us, humans, to accept it as a biometric considering
that it is our main way to communicate and a primary form of identification. Although voice
might not be the most secure of biometrics that can be used for security purposes, its great cost-
performance ratio turns it into a big candidate for two-factor authentication systems.
This said, the overall objective of the following research project is to study by
implementation the feasibility of building a security system that uses voice biometrics to
authenticate users that would eventually try to access those rooms under its control, using open
software available for developers.
1.2. Requirements and specifications
Being this, as far as I know, the very first project in which voice recognition is used for
security purposes at IIT, the requirements and specifications were not very defined at the early

10
stages of the project, since some research had to be done before, so that I could get to know
what the available technologies can offer and how I could use them for our purpose.
What I knew for sure, though, was that the signal processing and algorithms used for
extracting voice metrics and the posterior similarity measurements have nothing to do with this
project. I would use technology that is available for developers to include in their projects and
add intelligence to their systems (open software approach). Once the technology is selected,
specific requirements will come hand in hand. As we will see, there will be specific
requirements in the kind of audio data I am going to be using, which will define the type of
audio processing I will need to program. Also, I will have to keep in mind the model training
that happens behind the scenes so I can build the system based on it.
In terms of the hardware where the system will run on, I want it to be a small,
transportable and powerful device such as a Raspberry Pi.
I also want the system to be scalable, meaning that it will be possible for future
developers to use it as a starting point and take it to a new level without having to make big
modifications to it. For that, modularity of the code will be necessary.
1.3. Methods and procedures
Given the fact that this is the first voice recognition project of this kind developed at the
institution, there is no work that I can take as a starting point, and everything is going to be
started from scratch.
In regards to the signal and voice processing necessary to build such a system, I will use
an open API property of Microsoft, and part of Microsoft Cognitive Services, also called Project
Oxford, where the aim is to enable developers to bring more intelligence to their applications.
Although this project is part of the ITM department, there is nobody else working on it,
so it is only me developing the solution.
11
1.4. Work Plan
The project development can be divided in the following sections:
- Research and API selection: Research of the different technology alternatives
and decision making.
- Voice recording and processing: The basic functionality of the system will be
based on voice, so the first thing I need to do is to be able to take it into the
system.
- API communication: Communication with the service that I will use in order to
know how to bring voice recognition functionality to the system.
- Database requirements and implementation: User information storage will be
needed. Database requirements analysis and implementation has to be done.
- First prototype: A first functional prototype that has the ability to recognize
people through their voice.
- Card Reader implementation and integration: Integration of the actual system
installed at IIT.
- SOAP service: In order to get the most out of the card reader, using a web
service will give the system some very interesting features.
- Final prototype: Implementation of a final Speaker Recognition prototype.
- Project Report: Development of the final document.
1.5. Deviations and incidences
As in almost every project, things change over time, and this project has not been an
exception. In terms of dates, I couldn’t really set any time plan at the beginning since this was a
kind of project that nobody had worked on before, so the requirements that it implied were not
very defined at the beginning, but they would appear throughout the project development.

12
At some point at the beginning of the project, during the research phase, I found myself
between two candidate technologies that could offer what I was looking for, but with a
difference in terms of the methodology used. At that point, I decided to go with what I thought
was the most adequate for my purposes, which implied some changes in my initial thoughts.
At first, I thought of this system as one that would only require users to speak, which
would enable them to get in a room or not depending on just their voice. However, and this is
where the deviation comes, because of the nature of the API that I used, I needed some initial
information in order to be able to use it. That is why, instead of users just talking, they will have
to go through an initial authentication process. Not only this, but also the technology available
for developers nowadays is not as accurate as it should be in order to use voice as a unique form
of authentication.
With this, the system that I have built is a security upgrade to what we have nowadays
at IIT, adding a new security layer that will make it almost unbreakable. So, a two-factor
authentication system has been built.
At the beginning, during the first project meetings, we thought that I would be able to
connect the system to the actual network that controls the secured doors at IIT, specially for the
Smart Lab. However, we figured out that it wouldn’t be possible without affecting the system
that is up and running nowadays. With this, I had to adapt it and build a small door prototype so
that I could make it as realistic as possible.
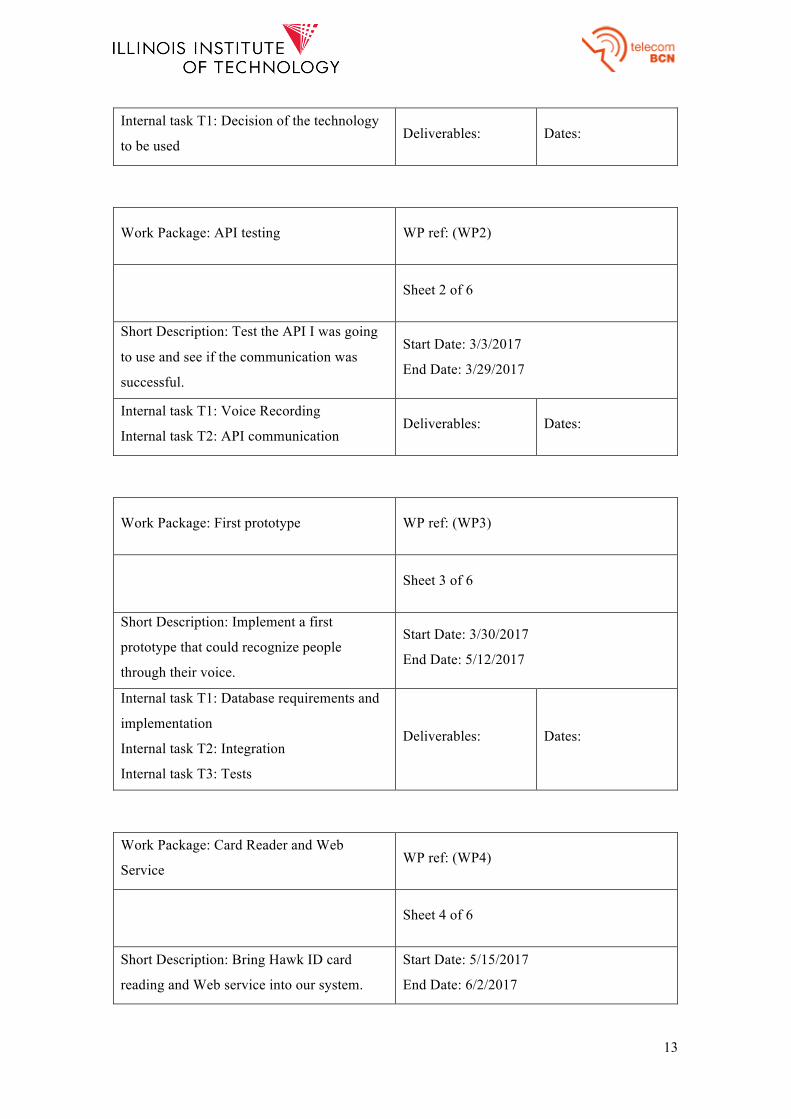
This said, these have been the work packages of the project:
Work Package: Technology Research WP ref: (WP1)
Sheet 1 of 6
Short Description: Research the different
technologies that could fit into our objective.
Start Date: 2/13/2017
End Date: 3/2/2017
13
Internal task T1: Decision of the technology
to be used Deliverables: Dates:
Work Package: API testing WP ref: (WP2)
Sheet 2 of 6
Short Description: Test the API I was going
to use and see if the communication was
successful.
Start Date: 3/3/2017
End Date: 3/29/2017
Internal task T1: Voice Recording
Internal task T2: API communication Deliverables: Dates:
Work Package: First prototype WP ref: (WP3)
Sheet 3 of 6
Short Description: Implement a first
prototype that could recognize people
through their voice.
Start Date: 3/30/2017
End Date: 5/12/2017
Internal task T1: Database requirements and
implementation
Internal task T2: Integration
Internal task T3: Tests
Deliverables: Dates:
Work Package: Card Reader and Web
Service WP ref: (WP4)
Sheet 4 of 6
Short Description: Bring Hawk ID card
reading and Web service into our system.
Start Date: 5/15/2017
End Date: 6/2/2017

14
Internal task T1: Card Reading functionality
Internal task T2: Communication with Web
service
Deliverables: Dates:
Work Package: Final Prototype WP ref: (WP5)
Sheet 5 of 6
Short Description: Implement the final
speaker verification system.
Start Date: 6/5/2017
End Date: 6/29/2017
Internal task T1: New database requirements
and implementation
Internal task T2: Redefine User Interface
Internal task T3: Door and lock building
Internal task T4: Tests
Deliverables: Dates:
Work Package: Project Report WP ref: (WP6)
Sheet 6 of 6
Short Description: Write the Project Report
to be delivered.
Start Date: 06/12/2017
End Date: 07/16/2017
Internal task T1: Delivery of the Project
Report
Deliverables:
Project Report
Dates:
07/17/2017
Milestones:
WP# Task# Short title Deliverable Date (week)
1 1 API decision 3
2 1 Voice Recording 5
15
2 2 API communication 8
3 3 First prototype tests 14
4 1 Card reading 16
4 2 Soap service 17
5 4 Final Prototype tests 20
6 1 Project Report Project Report 23
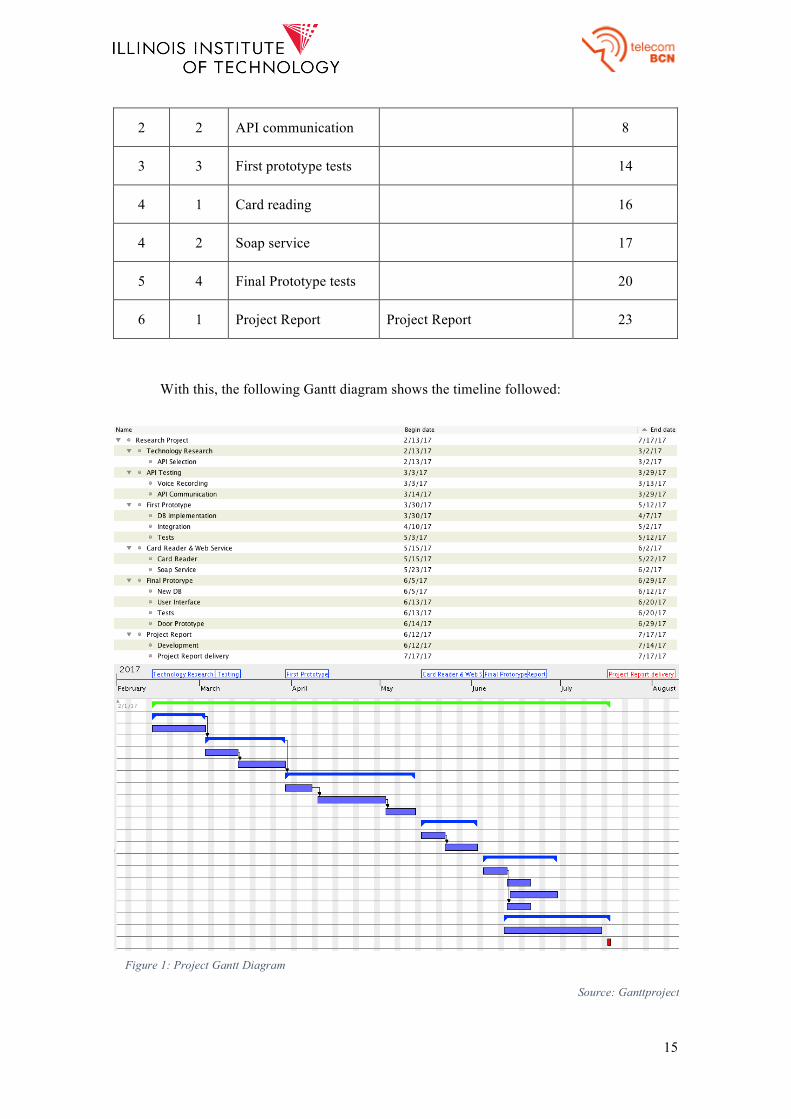
With this, the following Gantt diagram shows the timeline followed:
Figure 1: Project Gantt Diagram
Source: Ganttproject

16
1.6. Resources
All the code developed for this project to which some references are made in this report
can be found in the following GitHub repository:
https://github.com/illinoistech-itm/dave-audio
17
2. State of the art of the technology used
User authentication has always been and will continue to be a great issue in the world
we live in, and it is becoming more important now that a lot of our personal information and
data is stored on the Internet. Similarly, room access authentication techniques are witnessing a
huge evolution in the methods they use to make them as secure and unbreakable as possible.
This is where biometrics come to play, where characteristics of humans are used to
uniquely identify each person, given its difficulty to be replicated. Accepting speech as one of
these biometrics to be used has been considerably easy, given the fact that it is a principal form
of communication among humans as well as a primary form of identification. Given speech’s
dependency on both physical and behavioral aspects of humans, it allows us to discriminate
between speakers.
Over the past years, voice recognition has increased a lot its presence in applications
(e.g. Siri, Cortana), and with it, the algorithms used have evolved as well, making it much
accurate and cheaper. At the same time, Speaker Recognition (SR) has evolved hand in hand,
leading to different solutions that are still under research and development.
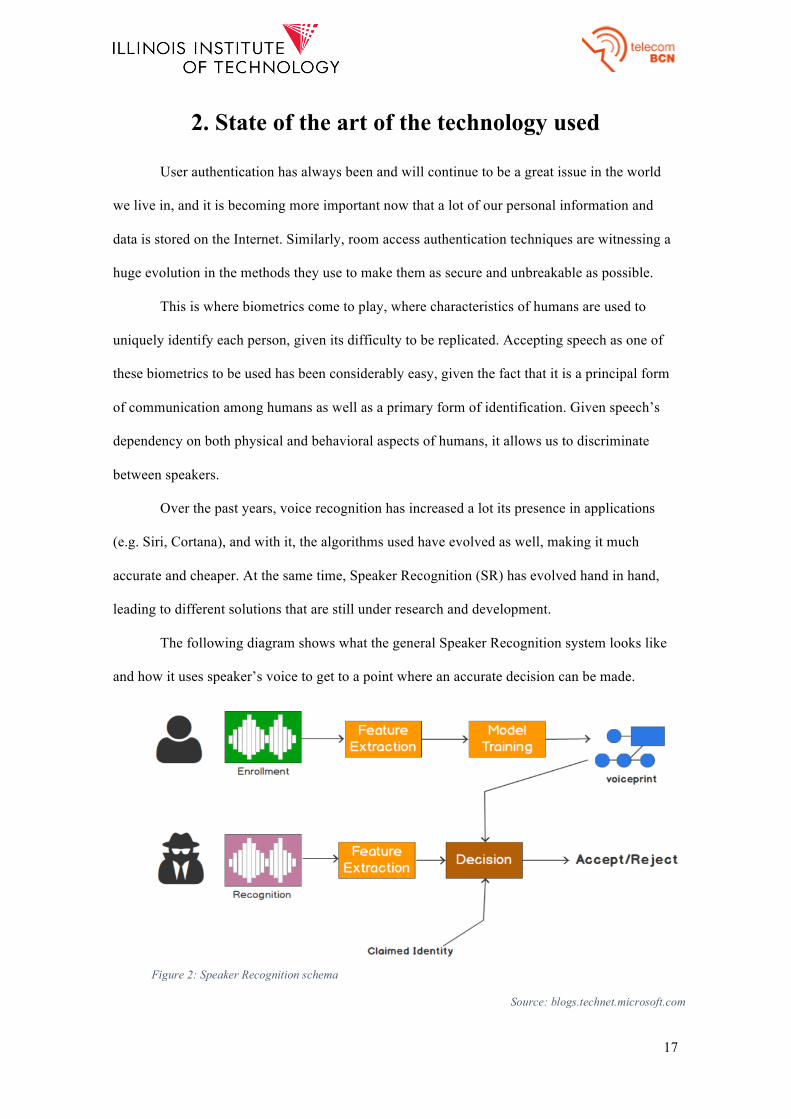
The following diagram shows what the general Speaker Recognition system looks like
and how it uses speaker’s voice to get to a point where an accurate decision can be made.
Figure 2: Speaker Recognition schema
Source: blogs.technet.microsoft.com
18
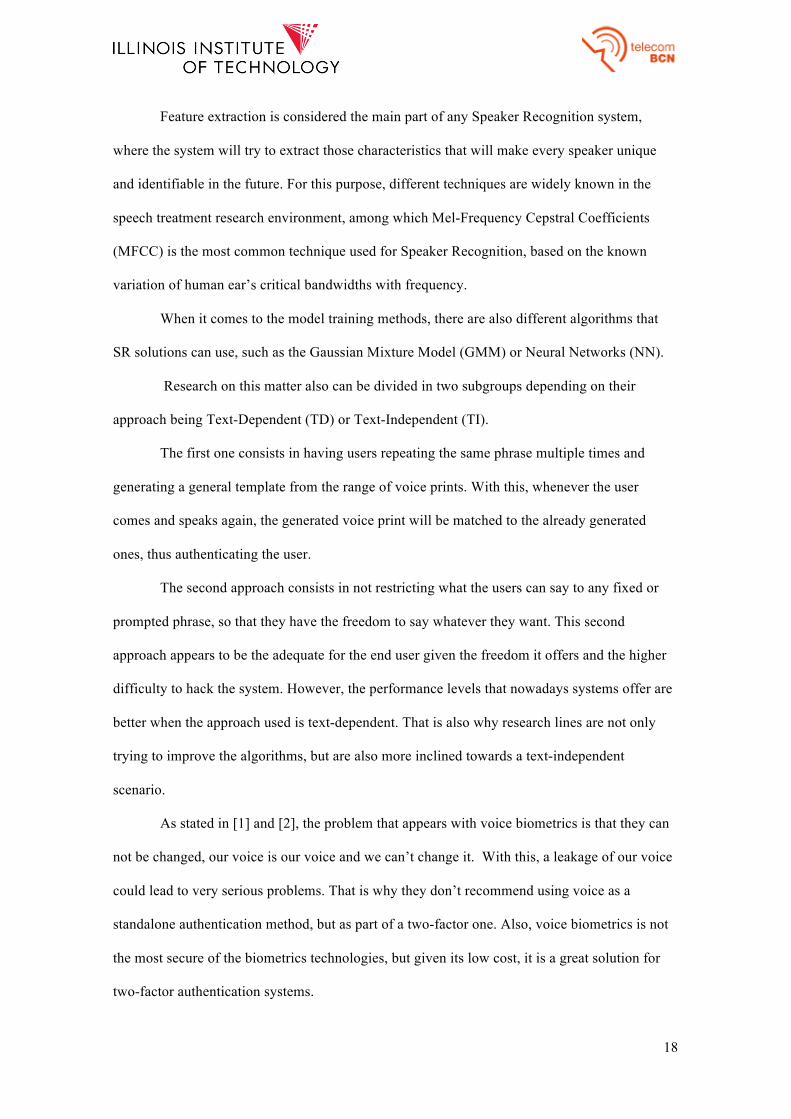
Feature extraction is considered the main part of any Speaker Recognition system,
where the system will try to extract those characteristics that will make every speaker unique
and identifiable in the future. For this purpose, different techniques are widely known in the
speech treatment research environment, among which Mel-Frequency Cepstral Coefficients
(MFCC) is the most common technique used for Speaker Recognition, based on the known
variation of human ear’s critical bandwidths with frequency.
When it comes to the model training methods, there are also different algorithms that
SR solutions can use, such as the Gaussian Mixture Model (GMM) or Neural Networks (NN).
Research on this matter also can be divided in two subgroups depending on their
approach being Text-Dependent (TD) or Text-Independent (TI).
The first one consists in having users repeating the same phrase multiple times and
generating a general template from the range of voice prints. With this, whenever the user
comes and speaks again, the generated voice print will be matched to the already generated
ones, thus authenticating the user.
The second approach consists in not restricting what the users can say to any fixed or
prompted phrase, so that they have the freedom to say whatever they want. This second
approach appears to be the adequate for the end user given the freedom it offers and the higher
difficulty to hack the system. However, the performance levels that nowadays systems offer are
better when the approach used is text-dependent. That is also why research lines are not only
trying to improve the algorithms, but are also more inclined towards a text-independent
scenario.
As stated in [1] and [2], the problem that appears with voice biometrics is that they can
not be changed, our voice is our voice and we can’t change it. With this, a leakage of our voice
could lead to very serious problems. That is why they don’t recommend using voice as a
standalone authentication method, but as part of a two-factor one. Also, voice biometrics is not
the most secure of the biometrics technologies, but given its low cost, it is a great solution for
two-factor authentication systems.

19
When it comes to the open software that is available nowadays for developers to use in
their applications, 3 options appear to be the most widely known in Speaker Recognition.
The first one is Spear, an open source and extensible toolbox for state-of-the art speaker
recognition that is built on top of Bob, a free signal processing and machine learning library.
The toolkit uses Python as its programming language [3].
The second one is Alize, which was considered the strongest competitor for Spear back
in its launch, and is also an open source toolkit for Speaker Recognition purposes. In this case,
the language used is C++ following object oriented programming principles, and it splits its
functionalities between different servers depending on the computations that each one performs
(feature extraction, modeling, statistics) [4].
And last but not least, the most recent open API in the field of Speaker Recognition
comes from Microsoft, included in the Project Oxford and called Speaker Recognition API that
offers a very compact solution using state-of-the-art techniques for developers interested in
adding this features to their projects.

20
3. Project Development
This section will explain the reader how the project has been developed from start to
finish, following the steps that have been made to meet the requirements.
The first thing that I had to do was to select a suitable technology that would enable us
to introduce the main functionality of our system, Speaker Recognition. Not only I needed
something that would recognize human’s voice, but also I needed it to match that voice to a
given real person, so that I could use it as a security system.
Considering the three software alternatives introduced in section 2., I decided to use
Microsoft’s solution, given its compactness and delivery through an API that offered exactly
what I was looking for, and their claim in [6] of its performance being as competitive as others’.
Project Oxford consists in a set of APIs, SDKs and services available to developers to
bring more intelligence to their applications, such as emotion detection, facial and speech
recognition.
In our case, the one that fits the most into our goal is the Speaker Recognition API,
explained in detail in section 3.1.
3.1. Speaker Recognition APIs
3.1.1. API functionality
As its name indicates, it is a set of cloud-based APIs that provide the most advanced
algorithms for both speaker Verification and Identification [5]. They might sound like the same
thing, but they are actually not.
On the one hand, Speaker Identification consists in automatically identifying a person,
whose voice is recorded in an audio file, from a set of prospective speakers who have already
been enrolled in the system.

21
One the other hand, Speaker Verification will also try to identify a person, but in this
case it will accept or reject the claim of the speaker, meaning that the system will know who the
speaker is trying to identify as. In short, the system will check if you are the person you say you
are.
Both scenarios have two separate steps to be followed: Enrollment and
Verification/Recognition. Although both APIs are similar in functionality, we will see that
Speaker Verification gives me exactly what I am looking for.
The Enrollment phase in Speaker Identification is text-independent, meaning that there
are no restrictions in what the speaker says. Based on the user’s recorded voice, a set of features
are extracted and a unique voice signature is created.
With this, the Recognition phase consists in the speaker recording an audio file and
sending it to the API, which will check if there is or not a match with a user registered in the
system. Thinking about its functionality, comparing a user’s voice to a group of people leaves
some room for error, since the probability for a not registered user to get a match increases with
the number of users, offering a security level that should be increased for a high security system
like the one I want to build. We will see that Speaker Verification gives that improvement in
terms of security.
The biggest difference between these two APIs is that Speaker Verification is a 1:1
match, whereas Identification is 1:N. From a speed point of view, we can deduct that
Verification is going to be faster, since only 1 comparison has to be performed, while N
comparisons take place in the Identification process. With this, if security is the objective,
Verification API is more adequate.
Again, there are two steps to follow: Enrollment and Verification. The only difference
during the Enrollment process is that now it is text-dependent, so users will have to select a
phrase from a pool of 10 sentences. Once selected, 3 samples of their voice will be necessary for
the system to extract voice characteristics. The 10 possible phrases to select are:
22
- I am going to make him an offer he cannot refuse.
- Houston we have had a problem.
- My voice is my passport verify me.
- Apple juice tastes funny after tooth paste.
- You can get in without your password.
- You can activate security system now.
- My voice is stronger than passwords.
- My password is not your business.
- My name is unknown to you.
- Be yourself everyone else is already taken.
Whenever users try to verify themselves after Enrollment, they will have to send a
recorded voice sample of the phrase selected during Enrollment, together with a Speaker Id that
will tell the system what voice signature to compare it to. With this, the system’s response will
contain the following three fields:
- Result: The result of the Verification process.
o Accept: Verification accepted.
o Reject: Verification rejected.
- Confidence: The confidence level of the Verification result.
o High
o Normal
o Low
- Phrase: Recognized phrase of the Verification audio file.
Taking this into consideration, developers will have the freedom to be more or less
restrictive in terms of the confidence level needed to accept the result coming from the API. For
example, trusting Accepted results only when the confidence level is High would be very
restrictive as we will see later.

23
The open API that Microsoft offers doesn’t give access to any low level detail
information, meaning that, for example, developers do not have access to the % of match for a
given voice. Instead, the aforementioned three confidence levels are available.
The following diagram shows at a high level how the interaction between the
application and the API works:
One of the constraints that has to be taken into account when coding, which affects both
Enrollment and Verification steps, is the set of requirements that audio files involved in the
whole process have to meet, these being:
- Container: WAV
- Encoding: PCM
- Rate: 16k
- Sample format: 16 bit
- Channels: Mono
Figure 3: Application-API data flow
Source: Own elaboration

24
When it comes to the techniques used for voice feature extraction and model training,
the API uses state-of-the-art techniques. A proprietary version of MFCC is used for feature
extraction and vector generation, and GMM is used for model training [6].
Although we don’t have access to the actual information, Microsoft states that the
results given by their Speaker Verification API are competitive with the best published ones [6].
3.1.2. Typical exceptions/errors
Getting to know how the API works involves getting familiar with the different things
that can go wrong throughout the process too, and that is what this section will try to make clear
for the reader.
The first thing I need to make sure is that the audio files I am trying to send to the API
meet the requirements already mentioned. If not, the service will return an error informing me
about not sending the expected data format. This error is very easy to avoid since I can program
my Recorder to encode our voice using the required format, which is exactly what I will do as
we will see further in this document.
Given the fact that I am using a cloud-based service, I will need the device running the
application to be connected to the Internet. Even if it is connected, things still can go wrong and
it might not be able to connect to the external server, so that HttpRequestExpection
exceptions will appear.
Even if the data format is valid, and I can connect to the API, there are some errors that
can still appear. During both Enrollment and Verification phases, there are two typical
exceptions that can be thrown:
The audio file being too noisy, which usually happens when the speaker has
surrounding noise that may disturb his voice, so that the system will not be able to either
understand what he is saying or extract the desired voice characteristics correctly. It has to be
said that the API documentation says that it includes great noise cancelation algorithms, but
25
sometimes we can still get this error. For example, I got this error a lot of times when recorded
voice coming out of my smartphone was used when testing the system’s vulnerability.
Secondly, the system can struggle to recognize a human’s voice in the audio file.
During testing, this exception was always thrown when I would send recorded audio data of
myself whistling, or just remaining silent.
Specifically, during the Enrollment process, there are two errors that need to be taken
care of. Keeping in mind how the Enrollment process works, the first thing to be done is to
create a user profile that will notify the API about a new user going to be enrolled, returning a
unique identifier to every speaker. This process can fail, and the reason for that is usually
related to failing to connect to the API, as mentioned before. The system would also be unable
to create a new user whenever the maximum number of registered users is reached, specified by
the kind of subscription to the service. The free version of the it allows developers to create up
to one thousand users, which is more than enough for the first prototype I am building.
The other error comes with the nature of the training method used by the service. As
mentioned before, users are required to send three separate audio samples where they say the
phrase they have previously selected. Two different scenarios appear that would throw an
InvalidPhrase exception: If the user says a phrase that doesn’t belong to the list of possible
sentences, or if the user says a different phrase once one or two out of the three needed
enrollments have been already completed.
Once all these errors are known, my job as a developer will be to handle them and
notify users accordingly, so they will know what to do at any given situation.

26
3.2. Development Environment
The most important choice has already been made. Now I need to select the
environment where I will be able to use it and, ultimately, transfer it to the microcontroller
where I want my system to run on, a Raspberry Pi 3.
Keeping in mind the microcontroller and the fact that the technology that I was going to
use is a Microsoft product, I came across an operating system that would theoretically work
perfectly, called Windows IoT (Internet of Things) Core.
The operating system can be seen as an embedded version of the actual Windows 10
that enables developers to turn the Raspberry Pi into a custom device, using familiar Windows
10 programming principles, and also offering access to peripherals connected to it.
Once I decided that the OS would be IoT Core, a constraint that came with it was the
kind of application I had to build in order for it to work on the device. This is where Universal
Windows Platform (UWP) comes to play.
By definition, it is a platform-homogeneous application architecture created by
Microsoft that was first introduced with Windows 10, with the goal of having a software
platform that would enable developers to create applications that would work in different
environments without programmers having to rewrite them depending on the target device. It
turns out that one of these environments is Windows IoT Core, meaning that as long as I build a
UWP application in our Windows 10 computer, the transfer to our microcontroller shouldn’t be
a problem. Every program that works in our computer, should perform exactly the same in our
Raspberry Pi. This has been a huge ease during the project development, in the sense that I have
been able to always work with the computer, leaving the application transfer to the last stages,
when dealing with peripherals was a necessity. If I had to give a sentence that would describe
this advantage, it would be: “Writing the code just once and associating to it the user interfaces
suitable for all devices operating under windows” [7].

27
UWP apps offer developers the possibility to choose the programming language they
want to use among 4 options: C++, C#, Microsoft Visual Basic and JavaScript. Depending on
the requirements and level of expertise, developers will choose one or another. For this project,
C# was my choice.
Now, I needed to choose a development environment where I could put this all to work.
The most widely known IDE for developing Windows programs is Microsoft Visual Studio,
which offers all functionalities that I needed for this project.

28
3.3. AudioGraph
First things first. Now that I know what API I am going to use and what is the
environment where I will put it to work, I can start coding.
The first thing I need to do is make sure my system is capable of recording users’
voices. Although there are a lot of classes that could handle it, we need to keep in mind that I
want it to run on a UWP app that will run on a Raspberry Pi 3 running IoT Core.
Considering this, the three candidate technologies that I had were AudioGraph,
XAudio2 and MediaCapture classes. The biggest problem with XAudio2 is that only C++
supports it, which is not the language that I am using. MediaCapture provides functionality
for capturing photos, audio and video for capture devices, but it has nothing to do with the
processing that developers might need once the data is captured, which is the main reason why I
chose AudioGraph. Not only it can be used in C# environments, but it also takes care of the
whole process of capturing, processing and outputting audio, all in one.
AudioGraph can be seen as a set of interconnected nodes that form a graph and enable
developers to create environments where they can perform audio routing, mixing and
processing.
Graphs can be composed by three kinds of nodes:
- Audio Input Nodes: Supply audio data to the graph coming from an audio
capture device (e.g. microphone).
- Audio Output Nodes: Destination of the audio after being processed by the
graph (e.g. audio file).
- Submix nodes: Intermediate nodes responsible for any processing needed
between input and output.
Keeping in mind my goal here, where I just need my system to record a voice coming
from a microphone and store it in a .wav file, I will only need an Audio Input Node and an

29
Audio Output Node, responsible for recording audio and storing it respectively. Since I want the
audio to come from a device (microphone), the kind of Audio Input Node that I will create will
be a Device Input Node. Similarly, as I want our output to be an audio file, I will create a File
Output Node. Note that if in the future any other processing is needed, adding Submix Nodes
would be the way to go, offering developers a lot of flexibility and customization.
In terms of coding, I created a Recorder class that handles everything that has to do
with audio processing, with three main methods:
- StartRecording(): Whenever the user clicks the button to start recording
his voice, this method will be called. It will create an AudioGraph specifying
the input and output sources. A lot of things can be specified when creating the
graph, like the kind of audio that you will record (speech) or the properties that
you want the recorded audio to have. After setting all these parameters, a call to
the method AudioGraph.Start() will cause the graph to start processing
audio data.
- StopRecording(): Once the user has recorded his voice and clicks the
button to stop recoding, the AudioGraph will stop processing data with a call
to AudioGraph.Stop() and it will be disposed calling
AudioGraph.Dispose() so that resources will be free to be used by future
recordings.
- GetStreamAsync(): Whenever I want to Enroll a new user or Verify an
existing one, the API will need the audio file in a given format (I can’t just send
the .wav file as it is). I need to convert the audio to a set of bytes that the service
will be able to understand, which is exactly what this method will do.
In regards to the hardware, the only thing I need is a microphone. In my case, I am
using a SunFounder USB 2.0 Mini Microphone because of its small dimensions and great
performance when using it with a Raspberry Pi.

30
3.4. Entity Framework
It is obvious that all the information related to users will need to be stored somewhere
so that I can identify them whenever they come back and want to get in the room controlled by
our system. I will need to build my own database and connect it to the application.
For that, there is a framework that shines in the .NET environment, called Entity
Framework (EF). Using it, I can forget about all the ground work that has to be done when
implementing a connection application-database and EF will do it for me.
There are three different development approaches that developers can use to have EF in
their applications: Code-First, Model-First and Database-First. It is something developers will
have to choose depending or their needs. In my case, my approach will be Code-First, where
everything will come from the code I write myself.
Let’s first see what kind of information I needed the database to store so we can then
tackle its modeling.
3.4.1. First database requirements
As mentioned in section 3.1, the Speaker Verification API uses a 1:1 comparison
schema, where a speaker is compared to a given user that has been previously enrolled. The way
to tell the API the user we want to compare to is via what I call the Speaker Id, a GUID (Global
Unique Identifier) that is assigned to a user during the Enrollment phase. With this, during
Verification, I will call the API passing as parameters both an audio stream and a Speaker Id, so
that it will extract speech features from the audio and compare it to the previously computed
ones corresponding to that same Speaker Id.
But, how am I going to know what Speaker Id I need to send to the API? I need a way
to locally match users and their corresponding identifier. I need a kind of “login phase” so that
the system will know who it is “talking” to.
31
Not only this, but I will also need to keep track of the phrase that users select during
Enrollment, so that whenever they want to verify themselves, the system will show them what
phrase they need to say, without them having to remember it.
As a first and simple approach, I created a regular login with username and password.
With this, the fields that I needed for my initial database were:
- Speaker Id
- Phrase
- Username
- Password
Where Speaker Id was the Primary Key (PK) that uniquely identified each user.
Let’s now see how we can actually create the database we want.
3.4.2. Code-First database modeling
The Code-First approach enables developers to focus on the domain design so that they
can start creating classes fulfilling their domain requirements rather than designing the database
first and then creating the classes that match the design. Code-First APIs will create the
database on the fly based on our entity classes and configuration [8].
In the code-first EF approach, you start building the model. It consists of a set of regular
C# class definitions that the framework will use to create the database at runtime. In the class
definitions, it is possible to define the name of the table and columns, primary keys, foreign
keys, etc.
In my case, the class that defines the model is called User. In the first approach, it had
the four attributes mentioned before. Its definition was very similar to the one shown in the
User class found in the GitHub repository.
Although defining the model is necessary, it is not enough, as it is just a class
definition. I also need to create my own DbContext, where I will notify the system which

32
classes will end up in the database schema. The way to specify what entities have to be added is
defining a DbSet<> of that class in the DbContext definition. In my case, DbSet<User> will
tell the system to create a table where I will store information about the users, where each row
will have the columns specified in the Model definition.
A very important method to define in the DbContext is onModelCreating(),which
allows you to refine the physical data model. As an example, the following line of code makes
the phrase attribute required, so that null values will not be accepted (the same as the
conventional NOT NULL used in SQL):
modelBuilder.Entity<User>().Property(u =>
u.phrase).isRequired();
At this stage, the physical database is still not created yet. I need to generate the code
for that, and the database will be created when running the app.
Given the fact that we can assume that the database will change over time, the way to
create the database is by using Migrations. Using the Add-Migration command, the system will
create a snapshot of the current model we have, so that we will know what the system will
create when running our piece of code.
I need to make sure that the end users generate their first version of their local database
when they run the app for the first time, and I also want them to migrate to the new data model
whenever it is available. Both cases will be covered calling Database.Migrate() when the
app starts. The following code will be responsible for that:
using (var database = new UserContext())
{ database.Database.Migrate();}
With this, I will have the database created once the app runs for the first time. However,
the interactions that I will have to make with the database are still to be defined, called CRUD

33
(Create, Read, Update and Delete) operations. These will be explained in section 3.7.4, where
we will see the final database I have built.
3.4.3. SQLite
I also had to decide what kind of database I was going to use. We need to keep in mind
that the prototype that I am trying to build in this project doesn’t need to include a database that
other applications will access to, so the client/server solution is not necessary. Note that if in the
future a system like this was to be built, a centralization of the database should be implemented.
With this, what I needed was local storage for an individual application and device, and
that is exactly what SQLite is thought for. Economy, efficiency, reliability, independence, and
simplicity are what SQLite tries to implement. It is basically an embedded SQL database
engine, so that it reads and writes to ordinary disk files [9].
This said, I decided to use SQLite as my database engine, which has its own package
that can be easily added to a Visual Studio project and start using it together with Entity
Framework.

34
3.5. First approach to Solution
Now that I have the code needed to record users’ voice and a small database where I can
store their information, I can build a first solution for our security system.
Although it is a first approach, this solution enabled me to test the API and have an idea
of how well it fits our requirements.
3.5.1. Functionality
When we run the application, a Welcome Page was shown to the user, where two
buttons appeared depending on what the user wanted to do: enroll if the user was new to the
system, or verify for old users that had already been through the Enrollment process.
For newcomers who clicked the Enrollment button, a new page would open with three
fields to be completed: Username, Password and Confirm Password. The system would make
all the needed checkup and, if everything was okay (username not taken and matching
passwords), a new page for recording their voice would appear, containing a list of the 10
available phrases and three buttons to record, stop recording and enroll. At this point, the user
had to select a phrase, record his voice and send an Enrollment request. This procedure had to
be done three times because of the training method used by the API. Error handling mentioned
in section 3.1.2. had to be taken into account as well. With this, if everything worked as
expected, the user would be added to the database and wouldn’t have to go through this process
again.
Whenever users clicked the Verification button in the first page, they would be asked to
enter a username and a password as a first security layer. If the credentials were valid, a new
page would open with a text showing the phrase they needed to say, and buttons to record, stop
recording and verify.
At this point, users would have to record their voice and send a Verification request to
the API, which would include the audio data and the Speaker Id corresponding to that
35
username. If everything worked fine, I would receive a response including the Result, the
Confidence and the Phrase understood by the system. Depending on this result, I would open or
not the door.
3.5.2. Results and problems encountered
Although this was the first solution I built and was not expected to be the final one, it
enabled me to become familiar with the API’s behavior, and the kind of exceptions/errors that
could appear and had to be considered, as well as some design parameters.
The interaction with the API was as good as expected, enabling me to successfully
introduce all the Speaker Verification components I needed at this point (Enrollment and
Verification). Moreover, the transition of the program to the microcontroller didn’t’ become a
problem due to the UWP app that I built. Also, the built-in capabilities of the Raspberry Pi 3
(Wi-Fi) were performing great in terms of speed.
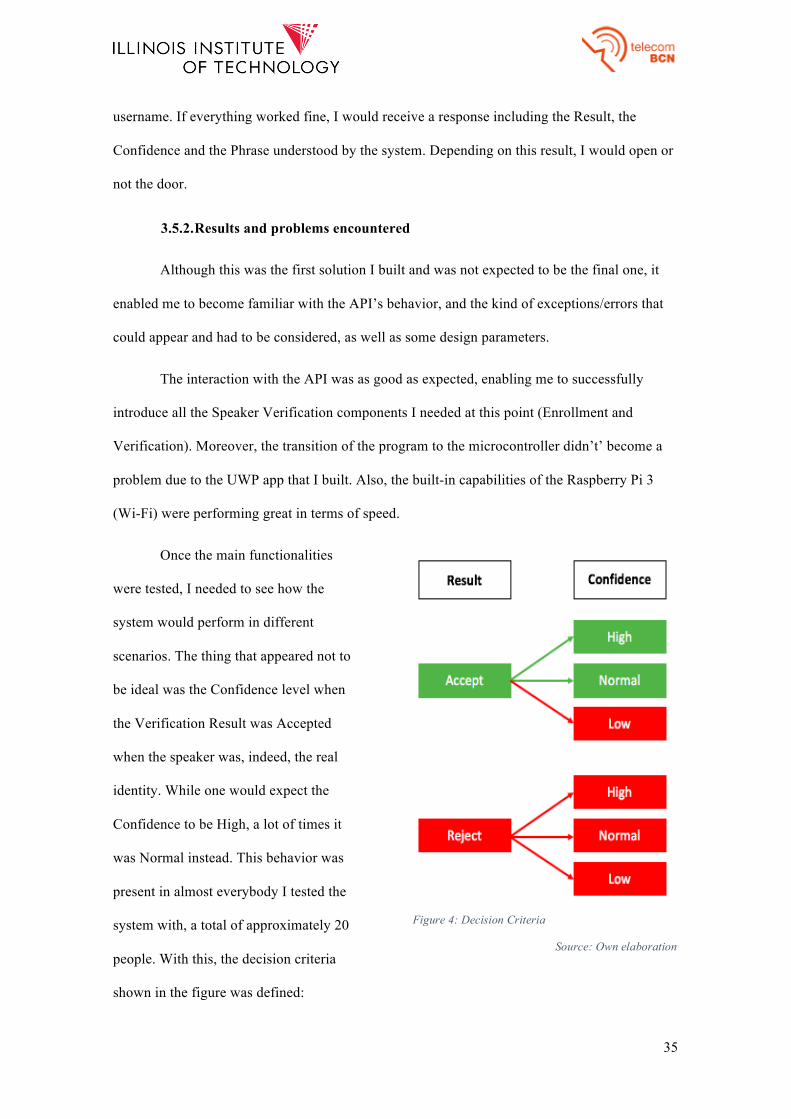
Once the main functionalities
were tested, I needed to see how the
system would perform in different
scenarios. The thing that appeared not to
be ideal was the Confidence level when
the Verification Result was Accepted
when the speaker was, indeed, the real
identity. While one would expect the
Confidence to be High, a lot of times it
was Normal instead. This behavior was
present in almost everybody I tested the
system with, a total of approximately 20
people. With this, the decision criteria
shown in the figure was defined:
Figure 4: Decision Criteria
Source: Own elaboration

36
Note that the green color means that the door would be open, and it would remain
locked otherwise.
This stage was also crucial in regards to the errors and exceptions that could appear and
needed to be handled, and the scenarios that would trigger them. This said, all errors and
exceptions explained in section 3.1.2. were discovered running different tests at this stage.
The overall impression was great as the Speaker Recognition part was working better
than expected, which was a huge milestone of the project. With this, I was able to add a new
feature that would become a key factor in the project, explained in the following section.

37
3.6. Card Scanner
Looking at the first approach to solution in section 3.5. we can see that there is a lot of
user interaction with the system, in the sense that I need users to introduce their username and
password every time they try to identify themselves. This can be very annoying, impractical,
and obviously slower than desired.
However, as I mentioned before, I need a way to match speaker Ids and users, given the
nature of the API. Taking this into account, I thought that trying to integrate the Speaker
Recognition capabilities with the system that is already installed at IIT would be very
interesting, since it would be a lot more practical than the previous approach and I would use a
technology that has been proven to be adequate for security purposes, but adding an extra
security layer to it.
Nowadays, IIT uses a card scanning system to enter restricted rooms, so that depending
on your card number you are allowed in or not.
In order to bring this functionality into my system, I needed the following hardware:
- HID Hawk ID Card
Figure 5 Hawk ID Card front view
Source: Own elaboration

38
- ProxPro II Card Reader
Figure 6: ProxPro II Card Reader
Source: hidglobal.com
For the sake of understanding how the card reader interacts with our system, I need to
introduce the Wiegand Interface, used by our Prox Pro II reader to transfer data coming from
the card to our microcontroller.
3.6.1. Wiegand interface
By definition, it is a de facto wiring standard commonly used to connect card swipe or
scan mechanisms to the rest of an electronic entry system.
In terms of its physical layer, the most important aspects of it are the two cables that
contain the data, called DATA0 (D0) and DATA1 (D1), which carry binary 0s and 1s
respectively.
When no data is being sent, both lines are pulled up to a high voltage level (5V). When
a ‘0’ is sent, D0 is pulled to a low voltage level, and D1 remains high. When a ‘1’ is sent, the
contrary happens.
With this, my code will have to be able to track falling edges in both lines, so that when
a falling edge is detected in either line, a 1 or a 0 will be added accordingly to our binary data
array containing the card information.
39
Looking at our reader, we see that apart from these 2 wires, there are 8 more of them,
from which I only used VDC, Ground and Shield Ground, since the other ones are used for
functionalities I am not interested in at this point.
This is not enough, though. I need to know what this set of bits mean, defined by the
data protocol used by our cards.
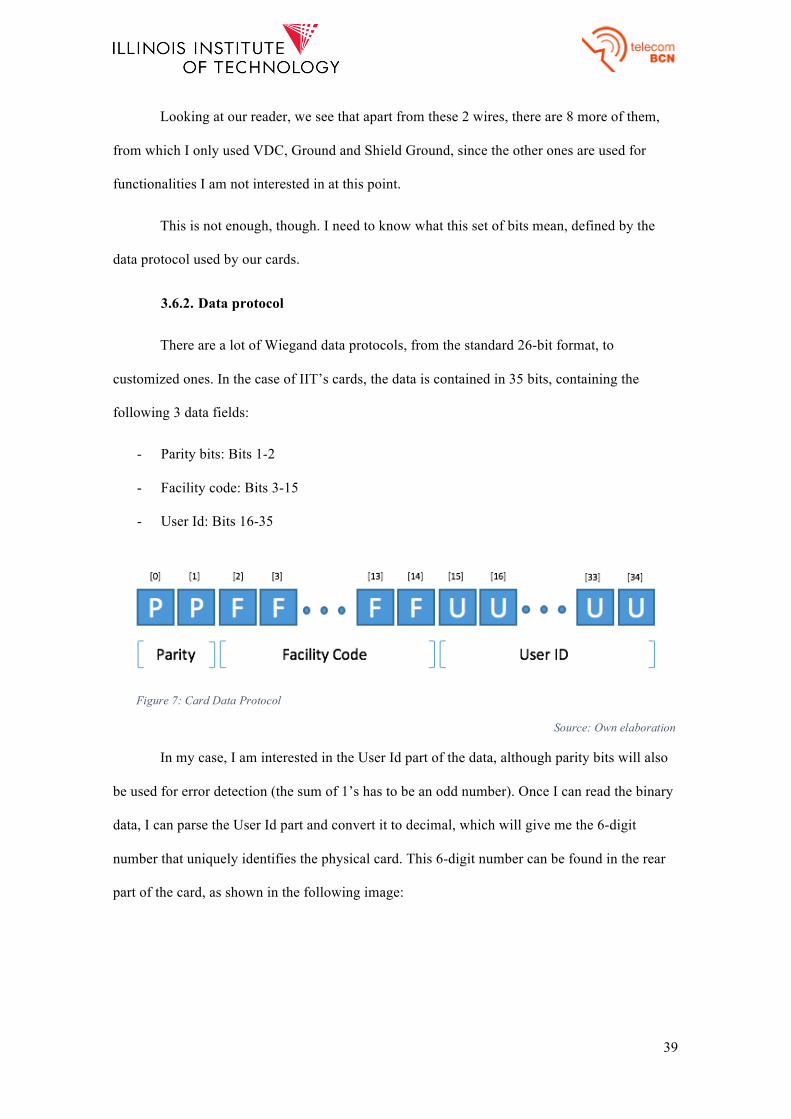
3.6.2. Data protocol
There are a lot of Wiegand data protocols, from the standard 26-bit format, to
customized ones. In the case of IIT’s cards, the data is contained in 35 bits, containing the
following 3 data fields:
- Parity bits: Bits 1-2
- Facility code: Bits 3-15
- User Id: Bits 16-35
In my case, I am interested in the User Id part of the data, although parity bits will also
be used for error detection (the sum of 1’s has to be an odd number). Once I can read the binary
data, I can parse the User Id part and convert it to decimal, which will give me the 6-digit
number that uniquely identifies the physical card. This 6-digit number can be found in the rear
part of the card, as shown in the following image:
Figure 7: Card Data Protocol
Source: Own elaboration

40
So, in my case, the User Id is 102468.
The following screenshot corresponds to the binary data read by my application using
the card scanner connected to the Raspberry Pi when my card is scanned:
Using this number and the Web service introduced in section 3.7. I will have access to
user information such as Student Id, First, Middle and Last Name.
Keep in mind that what I am looking for is a way to uniquely identify each user in my
system, which could be done using the 6-digit number from the card. However, using the Web
service not only I will have access to the Student Id that uniquely identifies each speaker too,
but I will also have access to people’s names, so that I will be able make it all much more
personal (e.g. Welcoming users by name). Moreover, the 6-digit number is specific to the
physical card, which means that if, for whatever reason, the card is no longer usable, it will have
to be changed and so will the 6-digit number, while the Student Id will remain the same. That is
why I decided to use the Student Id as the identifier for each user.
Figure 8: Hawk ID Card rear view
Source: Own elaboration
Figure 9: Binary Data read
Source: Own elaboration

41
3.6.3. Schematic
The connection between the card scanner and the microcontroller is very
straightforward, although we have to keep in mind that the card reader works at 5V, while GPIO
pins do so at 3.3V.
With this, the following schematic shows the connections needed to be able to read card
data.
3.6.4. Code
The code for reading the data transferred from the card reader to the microcontroller is
available in the MainPage.xaml.cs file of the project, but this section will explain it so that
the reader can understand its behavior.
Figure 10: Card Reader Connection Schematic
Source: Own elaboration

42
When it comes to storing the binary data, there are two arrays, called array and
cardNumber, with a length of 100 and 20 respectively. The first one will store all the data that
we read, whereas cardNumber will only store bits 16 to 35.
As mentioned before, what I need to do is to detect the falling edges in both data lines
D0 and D1. GpioPin class includes an event handler called ValueChanged that is called
whenever a change in the GPIO pin value is detected. With this, I use the following two lines of
code to subscribe to the event, meaning that whenever the specified event takes place, the
method on the right side of the += sign will be called.
D0.ValueChanged += D0Pin_ValueChanged;
D1.ValueChanged += D1Pin_ValueChanged;
The definition of the two methods is very similar, with the only difference that one will
add 0s to the data array, and the other one will add 1s. Note that adding 0s is the same as just
increasing the counter that will control the position to which we need to add the bit value in the
array, since arrays are filled with zeroes by default. All I need to do is to check if the event was
caused because of a falling or a rising edge. If it is a falling edge, the corresponding value will
be added to the array and the bit counter will be increased, otherwise, nothing will happen.
Also, I need to detect whenever the data transfer has finished, and the way I have
implemented this feature is using a timer. Whenever a change in either line is detected, the timer
will be started with a call to .Start(), which restarts the timer if it was already running, or it
just starts it otherwise. If the defined time is elapsed, I will consider the data transfer to be over
and will proceed from there.
The first thing the system will do once the time interval finishes is to check the number
of bits that have been counted. If this number is not 35, it will ask the user to scan the card again
because something might have gone wrong. Otherwise, it will copy the card number portion of
the array to the smaller one.

43
Having the card number in binary format, we can convert it to decimal and ideally get
the number in the rear face of the card. Now, I will be able to call the Web service explained in
the following section.
As we will see later, at this point the system will open new pages depending on the card
number read, and it is crucial that it stops processing data that the reader might capture in the
process. For example, imagine that you scan you card and you are redirected to the Verification
Page so that you can record your voice and access the room. For whatever reason, you could
take your card close to the reader so that it would detect it again. I want the system to ignore
these subsequent detections, and the way to do it is by unsubscribing from the events I
subscribed before. The following two lines will do it:
D0.ValueChanged -= D0Pin_ValueChanged;
D1.ValueChanged -= D1Pin_ValueChanged;
This piece of code is included in the OnNavigatedFrom() method that every page
has, which is called whenever we navigate from the actual page to another one.

44
3.7. SOAP Service
3.7.1. Description
Although I am calling it SOAP (Simple Object Access Protocol) service, SOAP only
makes reference to the protocol used for sending Web Services messages over the Internet.
This section will talk about the Web Service that I am going to use, which, as
mentioned before, will enable me to get personal information about the card holders. Student Id,
First Name, Middle Name and Last Name are the parameters I am looking for, shown in the
front side of the card.
In regards to the protocol itself, it uses HTTP and XML to allow messaging between
different programs running in different operating systems, due to the fact that Web protocols are
available across most OS. This way, SOAP enables applications to call functions from other
applications, running on any hardware platform, regardless of different operating systems or
programming languages.
The message is basically an ordinary XML document containing the following
elements:
- Envelope: It is a required element that will define the XML document as a
SOAP message. It defines the begin and the end of the message.
- Header: Provides optional information on authentication, encoding of data, or
how a recipient of a SOAP message should process it. In my case, a very
important parameter is authentication, where a Basic Authentication method is
used and a username and password are required, since I am accessing a private
Web service.
- Body: Is is a required element that contains the actual SOAP message intended
for the ultimate endpoint of the communication. Contains the XML data
comprising the message being sent.

45
The format of the request that I are going to send to the web service is the following:
POST /wsr/auxauthws.asmx HTTP/1.1
Host: mercury.roger.iit.edu
Content-Type: text/xml; charset=utf-8
Content-Length: length
SOAPAction: "https://mercury.roger.iit.edu/wsr/auxauthws.asmx?wsdl/PCSGetbyCardNum"
<?xml version="1.0" encoding="utf-8"?>
<soap:Envelope xmlns:xsi="http://www.w3.org/2001/XMLSchema-instance" xmlns:xsd="http://www.w3.org/2001/XMLSchema" xmlns:soap="http://schemas.xmlsoap.org/soap/envelope/">
<soap:Body>
<PCSGetbyCardNum xmlns="https://mercury.roger.iit.edu/wsr/auxauthws.asmx?wsdl">
<cardNumber>string</cardNumber>
</PCSGetbyCardNum>
</soap:Body>
</soap:Envelope>
Note that in the Body section of the message I am specifying the method that I want to
call (PCSGetbyCardNum), and the parameter sent. The only parameter I need here is the 6-digit
number that the system gets when scanning the card. With this, I will be able to send the request
and get a response with the following format:
HTTP/1.1 200 OK
Content-Type: text/xml; charset=utf-8
Content-Length: length
<?xml version="1.0" encoding="utf-8"?>
<soap:Envelope xmlns:xsi="http://www.w3.org/2001/XMLSchema-instance" xmlns:xsd="http://www.w3.org/2001/XMLSchema" xmlns:soap="http://schemas.xmlsoap.org/soap/envelope/">
<soap:Body>
<PCSGetbyCardNumResponse xmlns="https://mercury.roger.iit.edu/wsr/auxauthws.asmx?wsdl">
<PCSGetbyCardNumResult>string</PCSGetbyCardNumResult>
</PCSGetbyCardNumResponse>
</soap:Body>

46
</soap:Envelope>
Where the string will be a comma-delimited list containing: Last Name, First Name,
Middle Name and Student Id.
In order to test the web service and check that everything was working fine, I used a
Firefox add-on called Poster, a tool for interacting with Web services and other Web resources
that lets you make HTTP requests, and inspect the results.
As long as the authentication credentials are valid for the service I am trying to use and
the Internet connection is working, there are two possible results the system might get based on
the card number.
If, for example, I want to get my personal information, the SOAP request would be:
<?xml version="1.0" encoding="utf-8"?>
<soap:Envelope xmlns:xsi="http://www.w3.org/2001/XMLSchema-instance" xmlns:xsd="http://www.w3.org/2001/XMLSchema" xmlns:soap="http://schemas.xmlsoap.org/soap/envelope/">
<soap:Body>
<PCSGetbyCardNum xmlns="https://mercury.roger.iit.edu/wsr/auxauthws.asmx?wsdl">
<cardNumber>102468</cardNumber>
</PCSGetbyCardNum>
</soap:Body>
</soap:Envelope>
And the response from the Web Service:
<?xml version="1.0" encoding="utf-8"?>
<soap:Envelope xmlns:xsi="http://www.w3.org/2001/XMLSchema-instance" xmlns:xsd="http://www.w3.org/2001/XMLSchema" xmlns:soap="http://schemas.xmlsoap.org/soap/envelope/">
<soap:Body>
<PCSGetbyCardNumResponse xmlns="https://mercury.roger.iit.edu/wsr/auxauthws.asmx?wsdl">
<PCSGetbyCardNumResult>Arrieta,Beinat,,A20387795</PCSGetbyCardNumResult>
</PCSGetbyCardNumResponse>
</soap:Body>
</soap:Envelope>

47
Another possibility that has to be considered is when the card number sent o the Web
Service is not in IIT’s database, most likely because the card was misread. In such cases, the
response will be:
<?xml version="1.0" encoding="utf-8"?>
<soap:Envelope xmlns:xsi="http://www.w3.org/2001/XMLSchema-instance" xmlns:xsd="http://www.w3.org/2001/XMLSchema" xmlns:soap="http://schemas.xmlsoap.org/soap/envelope/">
<soap:Body>
<PCSGetbyCardNumResponse xmlns="https://mercury.roger.iit.edu/wsr/auxauthws.asmx?wsdl">
<PCSGetbyCardNumResult>Not found</PCSGetbyCardNumResult>
</PCSGetbyCardNumResponse>
</soap:Body>
</soap:Envelope>
Either way, the code will have to be able to get the string information contained in the
<PCSGetbyCardNumResult> node, and work with it accordingly.
3.7.2. Code
When it comes to coding, everything that has to do with the interaction with the Web
service is included in the SoapService class of the project.
It has two methods: SendSoapRequest and GetUserInfo. As it can be deducted
from the name, SendSoapRequest will be the one making the actual requests to the Web
service.
1.1.1.1. SendSoapRequest(StringcardNum)
As mentioned before, the one parameter I need when calling the service is the card
number for which I want to get the personal information.
I first define a string whose value will be the the same as the request message shown
before, introducing the card number parameter between the <cardNumber> tags.

48
Then, I generate a HttpWebRequest to the actual URL hosting the service I want to
access, for which I will have to specify the content type, the method (Post), and the credentials
for the Basic authentication method.
Once this is defined, I will be able to make the real request and receive the response that
I will need to be processed by the GetUserInfo method.
Note that this method is defined as private, since I don’t want it to be called from
outside this class.
1.1.1.2. GetUserInfo(StringcardNum)
The first thing that I do in this method definition is to call the SendSoapRequest
method, whose returning value will be a string representation of the response coming from the
Web service, with which I will create an XmlDocument object to process it.
As mentioned before, I need to get the string value contained in the
<PCSGetbyCardNumResult> node. Once I get the string containing the comma separated
personal information, I can split it to have access to each parameter separately.
In this case, the method is defined as public since I want is to be accessible from other
parts of the code. It will return a string array containing the Student Id, First, Middle and Last
Name.
3.7.3. Integration
Introducing the card reading functionality and the SOAP service in the system lead to
some changes that had to be introduced in my code to be able to integrate it with the Speaker
Verification functionality I had already implemented.
Keeping in mind that the objective was to make the user interaction much easier and
comfortable, everything that had to do with the initial login solution had to be substituted.
Hence, the first thing that I had to change was the database itself, which I wanted to store
different information. Now, the information needed was:

49
- Student Id
- Speaker Id
- First Name
- Last Name
- Phrase
- Access
As explained in section 3.4.2, I had to build the model taking into account these
attributes, and define a DbContext. With this, I would create a Migration and add the code
needed for our app to create the physical database.
The Access variable is a boolean value that will represent if the user has access to the
room or not. The only user that will be able to change it will be the Administrator (me), so that
all the power in terms of room access is given to the person in charge of it, as we would like it
to be in reality. With this, the Enrollment process will only be used to get the user’s voice into
the system, it will not grant access to the room at all. It will be the Administrator who will
manage that.
Once the database is created, I can start interacting with it by defining our CRUD
operations, available in section 7.6.3.
3.7.4. CRUD operations
The most important interactions with the database are:
- Add a new user (AddUser)
- Get a user by his Student Id (GetUserByUserId)
- Get a user’s phrase by his Student Id (GetPhraseByUserId)
- Delete user by his Student Id (DeleteUserbyUserId)
- Modify access by StudentId (ModifyAccessByUserId)

50
The AddUser method will be used during the Enrollment phase. Once users have
successfully sent 3 samples of their voice saying the selected phrase, my job will be to add them
to the database so that whenever they come back, they will be redirected to the Verification
Page.
GetUserByUserId will be called during the very first stage of the Verification
process, after the user scans his card and the system gets the StudentId with a call to the Web
service. A call to GetUserByUserId, passing as parameter the the Student Id coming from the
service response, will check if there is a user with that identifier already in the system.
Depending on the result, the Enrollment or Verification page will open.
If the previous call returns a User, the Verification Page will open, and a call to
GetPhraseByUserId will be performed in order to show users what phrase they need to
record in order to verify themselves.
If, for whatever reason, the application administrator decides to delete a certain user, a
call to DeleteUserById will do it.
ModifyAccessByUserId is a method that will only be used by the Administrator, so
that he will be able to give or deny access to the room to any user in the system. By default,
when users are registered, they will not have access until the admin does the necessary
modifications.
51
3.8. Door System
The driving reason for this project to be developed is because the department in charge
is seriously considering such a system to be deployed to control access to one of their facilities,
the Smart Lab. With this, this first prototype that I have built can be considered as a great
candidate for the solution to be deployed.
This said, I was not able to connect my system to the real network that controls the door
opening and closing because it would have meant disconnecting what is already built, which
was not an option.
However, for demo purposes, I built a little (19 inches tall) wooden door that would
simulate the real one and would perfectly show the behavior of the system.
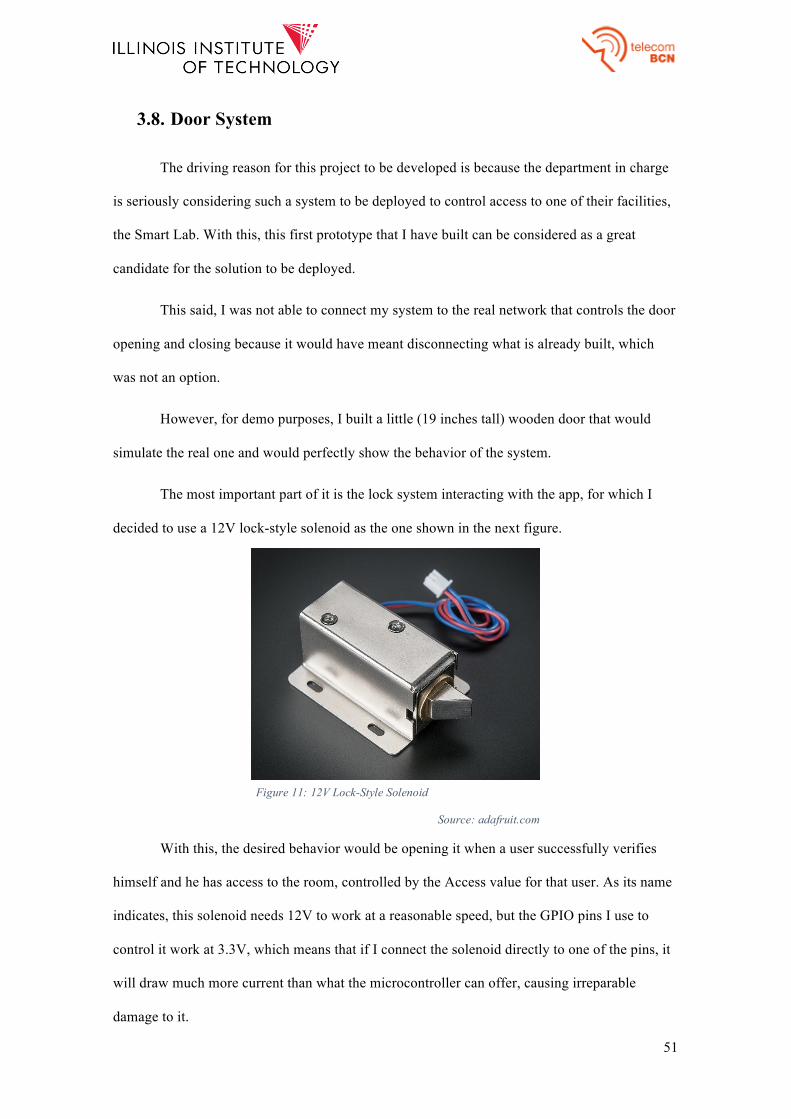
The most important part of it is the lock system interacting with the app, for which I
decided to use a 12V lock-style solenoid as the one shown in the next figure.
With this, the desired behavior would be opening it when a user successfully verifies
himself and he has access to the room, controlled by the Access value for that user. As its name
indicates, this solenoid needs 12V to work at a reasonable speed, but the GPIO pins I use to
control it work at 3.3V, which means that if I connect the solenoid directly to one of the pins, it
will draw much more current than what the microcontroller can offer, causing irreparable
damage to it.
Figure 11: 12V Lock-Style Solenoid
Source: adafruit.com

52
In order to make this connection safe, I had to add a little circuit like the one shown in
the next schematic:
Where the components shown are:
- TIP102 Transistor
- 1kΩ resistor
- 1N4004 diode
With this, the GPIO pin will control its behavior, setting its value to high whenever I
want the lock to open, or low for the door to remain locked.
Figure 12: 12V Lock-Style Solenoid Schematic
Source: Own elaboration

53
3.9. Final Solution
Now that everything that takes part in the system has been explained, it is time to see
what the real behavior of the system is step by step, with the goal of making sure that the reader
understands how the system works and what are the steps that any user will have to follow in
order to use it successfully.
Note that sentences in green are what the user will listen coming out of the speakers.
3.9.1. Card Scanning
Once the application starts, the following screen will appear:
From the image itself, the user should deduct that the system is waiting for a card to be
scanned. Once the card is scanned, two things can happen:
1) The number of bits received from the card reader is different from 35. In this
case, using the Synthesizer class the system will notify the user to scan the
card again because something went wrong.
“Scan your card again”
Figure 13: Main Page
Source: Own elaboration

54
2) The number of bits is 35. Being 35 the value expected, the system will have to
get the User Id portion of the data array and convert it to decimal. If the sum of
1’s in the binary array is an even number, the user will be notified to scan his
card again. If it is an odd number, a call to GetUserInfo defined in the
SoapService class will return a string array object containing the user
information of the card holder. We need to keep in mind the case where
although 35 bits are read and the number of 1’s is odd, some errors in the
reading can still happen, leading to a card number that might not belong to any
user. In such cases, the string array will be null (User not found) and the system
will notify the user to scan the card again.
“Scan your card again”
Otherwise, if the card number corresponds to a real user, the system will need
to check if the user has already been enrolled or not. If the user is not in the
system yet, the Enrollment Page will open. Otherwise, the Verification one will
be shown.
We see that in this second case there is some background work that has to be
done once 35 bits are read. In order to notify the user about it, a progress ring
like the one shown in the following image will appear on the screen.

55
Figure 14: Main Page Progress Ring
Source: Own elaboration
3.9.2. Enrollment
For newcomers, the Enrollment Page shown in the next figure will open.
Figure 15: Enrollment Page
Source: Own elaboration
56
Once the page is opened, the user will hear the instructions to be followed, being
welcomed by name. “Welcome FirstName LastName. I will need you to select one of the
phrases and record your voice.”
For whatever reason, the user might click on the microphone before selecting any of the
phrases. In such cases, the system will notify accordingly. “Select a phrase before recording
your voice.”
Even if the user selects a phrase, he could involuntarily click the Enrollment button
without having recorded his voice first. The message “I need you to record your voice first.”
will be played.
Once the phrase is selected and during the first enrollment, the user might record a
phrase that does not belong to the list. In this case, the message will be: “I am sorry, I couldn’t
recognize a phrase from the list.”
If none of this happens and the system can connect without any problem to the API, the
system will tell the user the number of enrollments left until he can be added to the system. If
we make a successful first enrollment, the message will be “The system needs two more
enrollments. Please repeat the previous step.”
Now that we have made a successful enrollment, the phrase can not be changed. If the
system identifies either a different phrase or a phrase that is not in the list, the user will be
notified accordingly. “I am sorry; I need you to say the same phrase the three times.”
If after an enrollment, the user directly clicks on the enrollment button without
recording his voice again, the message will be “I need a different audio sample. Please repeat
the previous step.”
At any point during the Enrollment process the communication with the API could fail,
and in such cases the user will be asked to try it again. “Something went wrong. Please try
again.”
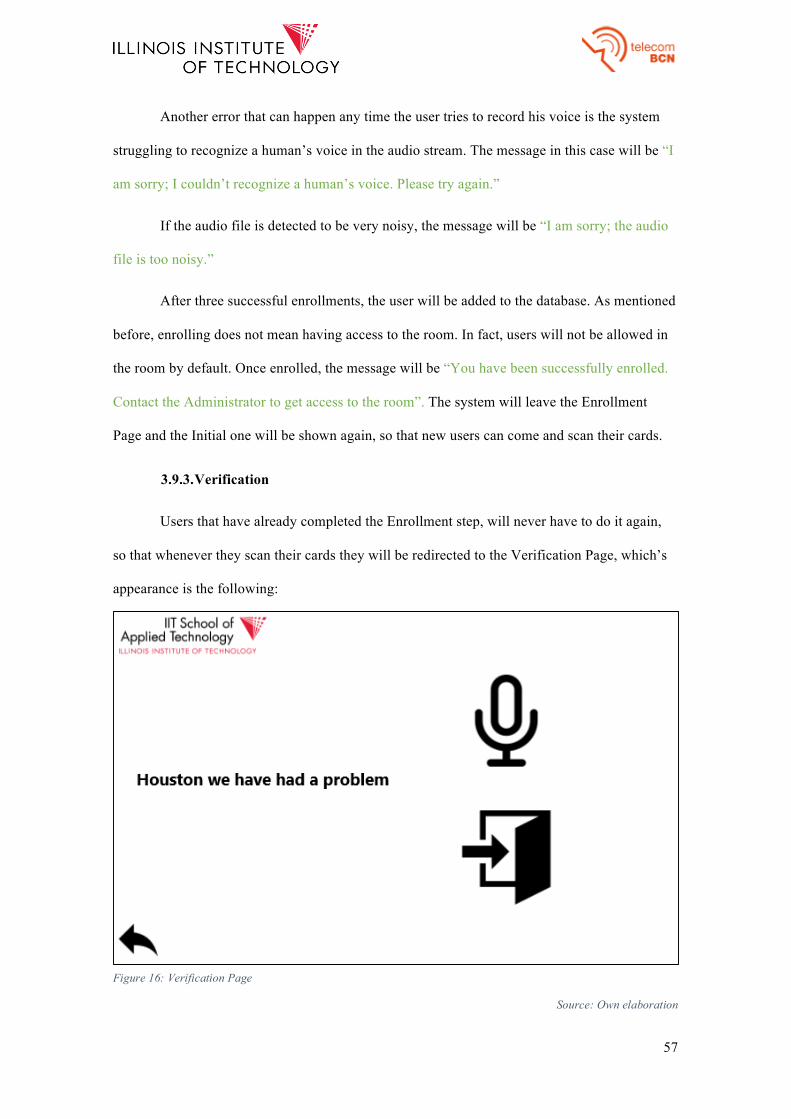
57
Another error that can happen any time the user tries to record his voice is the system
struggling to recognize a human’s voice in the audio stream. The message in this case will be “I
am sorry; I couldn’t recognize a human’s voice. Please try again.”
If the audio file is detected to be very noisy, the message will be “I am sorry; the audio
file is too noisy.”
After three successful enrollments, the user will be added to the database. As mentioned
before, enrolling does not mean having access to the room. In fact, users will not be allowed in
the room by default. Once enrolled, the message will be “You have been successfully enrolled.
Contact the Administrator to get access to the room”. The system will leave the Enrollment
Page and the Initial one will be shown again, so that new users can come and scan their cards.
3.9.3. Verification
Users that have already completed the Enrollment step, will never have to do it again,
so that whenever they scan their cards they will be redirected to the Verification Page, which’s
appearance is the following:
Figure 16: Verification Page
Source: Own elaboration

58
Once the page is opened, the user will hear the following “Welcome. I need to make
sure you are FirstName LastName”, where First and Last Name will correspond to the
theoretical card holder.
The phrase appearing in the screen will correspond to the phrase that the user enrolled
with and is expected to record his voice saying.
Some problems that can happen during the Enrollment process apply here too. If the
user clicks the Verification button before recording his voice, it will be notified “I need you to
record your voice first”.
Also, the connection to the API could fail for whatever reason, in which case the user
will be asked to try it again. “Something went wrong. Please try again.”
Again, the system could fail in recognizing a human’s voice in the audio data sent, and
the message “I am sorry, I couldn’t recognize a human’s voice. Please try again” would be
played.
If the sent audio file is too noisy, the system will notify the user accordingly “I am
sorry; the audio file is too noisy.”
Other than that, the possible results are the user being recognized as the real card holder,
or the user being rejected. If the user is recognized, which means that the result is Accepted with
a Normal or High confidence level, two things can happen:
1) The user doesn’t have access to the room, in which case the message will be “I am
sorry FirstName, you are not allowed in this room. You should contact the
Administrator.
2) The user has access to the room. In this case, the door lock will open and the user
will be welcomed to come in and close the door again. “Please come on in”.
3) There is an other special case in which the user is correctly authenticated, but the
card number corresponds to the Administrator (me), in which case the Admin Page
will open, as we will see later.

59
Otherwise, when the result is either Rejected with any confidence or Accepted with
Low confidence, the door will remain locked and the message will be “I am sorry Dave, I am
afraid I cannot do that”, a famous phrase coming from the film “2001: A Space Odyssey”,
where artificial intelligence and human-machine interaction was introduced and a machine was
in charge of an important special mission, included access to certain rooms, as in my case.
For security purposes, whenever a user fails to verify himself three times in a row, the
system will automatically deny his access to the room. “For security purposes, I have to deny
your access to the room. You should contact the Administrator.”
3.9.4. Administrator Page
As mentioned before, we have a System Administrator responsible for giving or
denying access to users. Whenever the admin successfully authenticates himself, the following
page will open:
Figure 17: Admin Page
Source: Own elaboration

60
We see there are 3 main buttons and two dropdown lists. Users in the system will be
included in one of the lists depending if they are allowed or not in the room. With this, each
button next to the dropdown lists will be used by the admin to either give or deny access to the
selected user. The other button is for room access purposes, which will be pressed whenever the
admin wants to open the door (Admin user has granted access).
Given the importance of giving or denying access to somebody, whenever the admin
user selects any of the two buttons, a dialog will pop up asking the admin if he is sure about
what he is about to do. The following image shows such dialog:
Figure 18: Admin Dialog
Source: Own elaboration
To sum up, the system will let new users enroll in the system as long as they are part of
the IIT network (card holder), for future authentication prior to getting in those rooms that the
system will control. Moreover, an Admin user will be responsible for managing room access,
having the power to give or deny access to users in the system.

61
4. Cost Assessment
The following table includes all the hardware that I have used for the development of
the project and its associated costs so that the reader can get an idea of what it would cost to
build such a system from scratch. In my case, most of the hardware was available at IIT, so very
minor purchases had to be done. Also, a lot of this hardware could be substituted by other
equipment that would still be compatible and cheaper.
Element Cost/unit Num. units Cost
Raspberry Pi 3 $39.95 1 $39.95
GPIO Ribbon cable $2.95 1 $2.95
32 GB micro SD card $23.99 1 $23.99
SunFounder 2.0 USB Microphone $6.99 1 $6.99
Portable Speaker $17.89 1 $17.89
Prox Pro2 Card Reader $134.00 1 $134.00
12V power supply $8.95 1 $8.95
5V power supply $7.50 1 $7.50
12V lock-style solenoid $14.95 1 $14.95
HDMI 7” Display $69.95 1 $69.95
7” Resistive Touchscreen Overlay $14.95 1 $14.95
$342.16
Table 1: Cost Assessment

62
5. Results, Conclusions and future development
Once we have reached the end of the project, it is time to see what I have been able to
achieve, what conclusions I can draw from it and how the project could evolve in the future.
The first thing to point out is the the fact that I have been able to successfully build a
standalone system with speaker recognition capabilities that could perfectly fit in a two-factor
security environment using an open API, which was the main goal of this project.
Not only this, but I have built a solution that could be very easily integrated at IIT,
given the usage of the already installed security system, so that no big modifications would be
necessary it terms of hardware installation. Moreover, the application can successfully run in a
microcontroller such as a Raspberry Pi 3, as we wanted from the beginning given its small
dimensions and easy integration to the network that controls access to IIT’s rooms.
When it comes to the results that I have obtained from the system, the overall
performance of it is very favorable in terms of security, in the sense that during the test phases
the system has never given access to any person claiming for an identity other than their own,
when their real voice was used. However, I have identified a scenario in which the system could
be tricked, and that is when the voice comes from a recorded audio of another person saying
their corresponding verification phrase. In such cases, if the recorded audio has enough quality,
the system is not able to discriminate between real and recorded voice. That is the main reason
why voice biometrics are ideal for two-factor authentication systems when a Text-Dependent
approach is used, since recording the real identity’s voice could be enough for an intruder. In
my case, although this is a possible scenario the system could encounter with, it would be very
remote since not only the intruder would need the other real identity’s voice saying the exact
phrase, but he would also need his Hawk ID Card.
It has to be said that the people I had access to during testing was not a huge crowd that
would enable me to generalize the results. With this, in order to get more accurate results, future
development should try run these tests including a lot more people and variety in terms of

63
gender, age, nationality, etc. Moreover, adding a new feature that would be able to track the
results would enable us to get very accurate and objective results, so that we could keep track of
all True Positives/Negatives, and False Positives/Negatives. This would enable us to see what
we are sacrificing when dealing with the confidence levels needed for each decision we are
making when accepting or rejecting speakers. Note that a lower confidence level required for
Accepted results coming from the API will mean an increase in the number of False Positives.
I have also realized that what I first thought should be the way to go, is not possible
nowadays using open software. As mentioned in the introduction, I first thought of this system
as a one-factor authentication method that would just require users to speak, but I have seen that
the technologies that developers have available today are not as accurate as they should for such
scenarios.
Microsoft Cognitive Services’ Speaker Verification API has been tested in a real system
and has offered great performance, so that we can conclude that it is a great option for those
developers looking for a free (depending on requirements) alternative to add speaker
recognition capabilities to their systems.
Windows IoT Core has been proven to be a great tool for developing applications in the
Windows environment, although it has some flaws that should be considered. The most
important one that I have identified is its huge dependence on the SD card that the
microcontroller uses. Microsoft, in its IoT Core device compatible list include a 16GB micro
SD card that I have tested and doesn’t give good results at all. Changing it to a 32GB one makes
a huge difference that needs to be taken into account.
Although it wouldn’t be too difficult to implement (few modifications in database and
code), a natural next step for this project would be to control as many doors as needed, so that
once users are enrolled, the Administrator will be responsible not only for giving access to
users, but also for specifying those rooms they have, or not, access to.

64
6. References
[1] Annie Shoup, Tanya Talkar, Jodie Chen, Anubhav Jain. “An Overview and Analysis of
Voice Authentication Methods”, 2016. Available:
https://courses.csail.mit.edu/6.857/2016/files/31.pdf
[2] M.N. Nachappa, A.M. Bojamma, C.N. Prasad , Nithya M. “Automatic Speaker
Verification System”, July 2014. Available:
https://www.arcjournals.org/pdfs/ijrscse/v1-i3/5.pdf
[3] Elie Khoury, Laurent El Shafey, Sébastien Marcel. “Spear: An open source toolbox for
speaker recognition based on bob”, 2014. Available:
http://publications.idiap.ch/downloads/papers/2014/Khoury_ICASSP_2014.pdf
[4] Jean-François Bonastre, Frédéric Wils, Sylvain Meignier. “Alize, a free toolkit for
speaker recognition”, May 2005.
doi: 10.1109/ICASSP.2005.1415219
[5] Microsoft. “Cognitive Services”. [Online] Available: https://azure.microsoft.com/en-
us/services/cognitive-services/
[6] Ryan Galgon. “Cortana Intelligence and Machine Learning Blog”, December 2015.
[Online] Available:
https://blogs.technet.microsoft.com/machinelearning/2015/12/14/now-available-
speaker-video-apis-from-microsoft-project-oxford/
[7] Christian Hissibini. “How to choose the right programming languages for my Universal
Windows App project?”, February 2015. [Online] Available:
https://blogs.msdn.microsoft.com/cdndevs/2015/02/23/how-to-choose-the-right-
programming-languages-for-my-universal-windows-app-project/
[8] Entity Framework Tutorial. “What is Code-First?”. [Online] Available:
http://www.entityframeworktutorial.net/code-first/what-is-code-first.aspx
[9] Sqlite.org. “Appropriate uses for Sqlite”. [Online] Available:
https://sqlite.org/whentouse.html

65
7. Glossary
API Application Programming Interface
EF Entity Framework
GMM Gaussian Mixture Model
GUID Global Unique Identifier
HTTP Hypertext Transfer Protocol
IDE Integrated Development Environment
IIT Illinois Institute of Technology
IoT Internet of Things
MFCC Mel-Frequency Cepstral Coefficients
NN Neural Network
OS Operating System
PCM Pulse-Code Modulation
PK Primary Key
SDK Software Development Kit
SOAP Simple Object Access Protocol
SR Speaker Recognition
TD Text-Dependent
TI Text-Independent
URL Uniform Resource Locator
UWP Universal Windows Platform
WAV Waveform Audio Format
XAML Extensible Application Markup Language
XML Extensible Markup Language
Related Documents


![A Speaker Recognition System Using Gaussian Mixture Model ... · parts: speech recognition, speech recognition, and speaker recognition [2]. A. Human Speech Production System Human's](https://static.cupdf.com/doc/110x72/5fbacaa047ec3858c329a5a2/a-speaker-recognition-system-using-gaussian-mixture-model-parts-speech-recognition.jpg)