Installation and Administration Guide Release 6.1

SpatialNET Administration Guide
Dec 26, 2015
SpatialNET Administration Guide
Welcome message from author
This document is posted to help you gain knowledge. Please leave a comment to let me know what you think about it! Share it to your friends and learn new things together.
Transcript

Installation and Administration Guide
Release 6.1

© 1994-2013 SPATIALinfo, Pty. Limited, All Rights Reserved
Proprietary Notice
This Software and Related Documentation are proprietary to and the copyright of SPATIALinfo Pty Limited.
Suite 9 & 10 23-25 Gipps Street Collingwood Vic 3066 Australia
A.B.N. 65 071 977 921
Restricted Rights Legend: Use, duplication or disclosure by the US Government is subject to restrictions as set forth in FAR and DFAR concerning the use of commercial computer software, documentation and data as applicable, including FAR 12.212 and DFAR 227.7202.
This document is provided under license from SPATIALinfo Pty Limited (SPATIALinfo). This document is, and shall remain, the exclusive property of SPATIALinfo. Its use is governed by the terms of the applicable license agreement. Any copying of this document, or disclosure to third parties, except as permitted in the applicable license agreement, is expressly prohibited. The information contained in this document and software functions described are subject to change without notice and should not be construed as a commitment by SPATIALinfo. SPATIALinfo assumes no responsibility for any errors or omissions that may appear in this document.
4 of 69 SPATIALinfo Inc.
Table of Contents Overview and Requirements .................................................................................................... 7
Prerequisites ................................................................................................................................................... 7 Acronyms ........................................................................................................................................................ 7 Related documentation ................................................................................................................................... 7
The spatialNET database ......................................................................................................... 8 Architecture .................................................................................................................................................... 8
Oracle RDBMS releases ........................................................................................................................9 Create the database ........................................................................................................................................9
Create the database table spaces .........................................................................................................9 spatialNET Oracle user roles ............................................................................................................... 10 The spatialNET schema ...................................................................................................................... 12 Create the administrator application user ........................................................................................... 14 Define available spatial reference systems for earth-based spatial coordinates .................................. 15 Create the DBMS configuration file .................................................................................................... 16
spatialNET-supplied scripts ........................................................................................................................... 17 Install spatialNET application and associated software ............................................................. 19
Prerequisites and system requirements ......................................................................................................... 19 Install Oracle client ........................................................................................................................................ 19 Set up tnsnames.ora for new database connections ...................................................................................... 20 Verify the Oracle Connection ......................................................................................................................... 21 Install AutoCAD Map 3D ................................................................................................................................ 21 Install spatialNET .......................................................................................................................................... 21 Copy the license .ini file ................................................................................................................................. 24 Launch spatialNET ........................................................................................................................................ 24 Create a spatialNET Log File .......................................................................................................................... 25 Troubleshooting OS error 127 ........................................................................................................................ 26
Post and publish jobs ............................................................................................................. 27 Publish a job .................................................................................................................................................. 27 Post a job ...................................................................................................................................................... 28
View publish or post conflicts ............................................................................................................. 29 spatialNET Batch Queue Manager (BQM) ................................................................................ 30
Batch Queue Manager components .............................................................................................................. 30 Install Batch Queue Manager (BQM) ............................................................................................................. 31 View batch queue status ................................................................................................................................ 31 Start a queue ................................................................................................................................................. 31 Data Model.................................................................................................................................................... 33
The BATCH_QUEUE table .................................................................................................................. 33 The BATCH_QUEUE_ENTRY table ..................................................................................................... 33
Starting and stopping the BQM ..................................................................................................................... 34 Process Flow ................................................................................................................................................. 34 Security ......................................................................................................................................................... 36 Batch queue logging ...................................................................................................................................... 36

SPATIALinfo Inc. 5 of 69
The BQM as a background service ................................................................................................................. 37 Installation of the Batch Monitor ........................................................................................................ 37 Multiple copies of the Batch Monitor .................................................................................................. 38 Batch Monitor configuration ............................................................................................................... 38 The batch queue process model ......................................................................................................... 40 Batch Monitor log messages ............................................................................................................... 41 Monitor batch queue events ............................................................................................................... 41
Optimize for Oracle Spatial..................................................................................................... 44 Spatial data is object data.............................................................................................................................. 44 SDO_GEOMETRY ......................................................................................................................................... 44 Metadata configuration ................................................................................................................................. 44
USER_SDO_GEOM_METADATA ....................................................................................................... 45 SRID 45 GTYPE 45 Spatial index analysis .......................................................................................................................... 45 Oracle spatial index implementation .................................................................................................. 46
Specifying spatial index table space ............................................................................................................... 46 Errors occurring while creating or rebuilding an index ......................................................................... 46
Direct storage only ........................................................................................................................................ 46 Maintain performance ................................................................................................................................... 46
Maintain database statistics ............................................................................................................... 47 Rebuild R-tree indexes ........................................................................................................................ 47 Rebuild the spatial index ..................................................................................................................... 47 Oracle Cost Based Optimizer settings ................................................................................................. 48
The spatialNET JMS Administration Tool ................................................................................. 50 List all users ................................................................................................................................................... 51 Create a new user .......................................................................................................................................... 51 View user details............................................................................................................................................ 51 Edit user details ............................................................................................................................................. 52 Change a password ....................................................................................................................................... 53 Reset a password ........................................................................................................................................... 53 Delete a user ................................................................................................................................................. 53 User types in the security model .................................................................................................................... 53 Create a security group .................................................................................................................................. 54 Edit a security group ...................................................................................................................................... 55 Delete a security group .................................................................................................................................. 56 Delete removed entities ................................................................................................................................ 57 Remove a JMS job operations lock ................................................................................................................ 57 View information about the current selection ................................................................................................ 58 Debugging tools ............................................................................................................................................ 58 Viewing job type definitions .......................................................................................................................... 58 View user type definitions ............................................................................................................................. 59 Find and edit field Jobs .................................................................................................................................. 59 Job administration ......................................................................................................................................... 59
View all your current jobs .................................................................................................................... 59

6 of 69 SPATIALinfo Inc.
Find a job ............................................................................................................................................ 60 Create a new job ................................................................................................................................. 61 Edit a job 62 View details for a job .......................................................................................................................... 62 Reset a job .......................................................................................................................................... 63
Troubleshooting ................................................................................................................... 64 Cannot open a job because it is already open ................................................................................................. 64 Database shutdown causes batch queue to lock up ....................................................................................... 64 Reset queue where a session has crashed ...................................................................................................... 64 “Missing symbol xxx” appears beside symbols in spatialNET views ................................................................ 64
Table of Figures ..................................................................................................................... 65 Appendix: use Oracle Net Configuration Assistant to set up the tnsnames.ora file ....................... 67

SPATIALinfo Inc. 7 of 69
Overview and Requirements This manual provides guidelines for installation of spatialNET 6.1. and includes descriptions of various Administrator tasks available in the application.
Prerequisites Users of this manual should be advanced users of Oracle Relational Database Management System and Oracle Locator/Spatial. They also should be comfortable using basic Oracle administrative commands and running SQL scripts.
Acronyms Acronym Description
EAM Entity Abstraction Manager JMS Job Management System RDBMS Relational Database Management System SDO Spatial Data Object SQL Structured Query Language
Table 1: Acronyms
Related documentation Document name Description
spatialNET release notes Provides installation and configuration information specific to the accompanying spatialNET release. Details of functional enhancements, fixed problems and known limitations are included in the document.
System hardware and third-party software requirements
Describes supported platforms and system requirements.
spatialNET Access Manager User Manual
Describes the use and configuration of the spatialNET Access Manager for spatialNET licensing.
spatialSUITE License Manager Describes the installation, activation, and use of the Server Access Manager to manage product user licenses.
Table 2: Related documentation

8 of 69 SPATIALinfo Inc.
The spatialNET database The information listed below is necessary to complete the instructions outlined in this chapter.
• Release version of Oracle RDBMS server to host spatialNET
• Release version of Oracle Client installed for spatialNET workstations
• Oracle System Password
• Oracle User for spatialNET schema owner
• The names that you plan to give to table spaces for spatialNET
• spatialNET schema owner password
• Directory location for database table spaces
• Target Geographical Coordinate System for spatialNET schema
Architecture spatialNET uses an Oracle client installation on the PC, with Oracle Net connecting to the Oracle Server.
Figure 1 : Client / server relationship for Oracle Spatial / Locator driver
This client-server configuration requires installation of the following items:
• The spatialNET Windows application on the client PC
• The Oracle Client on the client PC (requires the Administrator or Run-Time installation. See Install Oracle client).
• Oracle Database Server on the Server

SPATIALinfo Inc. 9 of 69
Oracle RDBMS releases The spatialNET Oracle Spatial driver has been tested with the following Oracle RDBMS releases:
• Oracle 11g Release 2 Standard and Enterprise Editions
• Oracle 11g Release 1 Standard and Enterprise Editions
• Oracle 10g Release 2 Standard and Enterprise Editions
For up-to-date system requirements, see the document titled System Hardware and Third-party Software Requirements.
The spatialNET database requires Oracle Locator, which is a standard component of Oracle Standard Edition and Enterprise Edition. It does not require the Oracle Spatial option.
Create the database This section provides instructions for configuring the Oracle RDBMS to support spatialNET. It includes the tasks listed below.
• Create the database table spaces
• Create user roles
• Create the admin role and admin user
• Create the schema
• Create the DBMS config file.
Create the database table spaces If a spatialNET table space does not already exist, create a table space that will include spatialNET database server objects. You can give it any name. Designate it as the default table space for the spatialNET schema.
To create database table spaces, the system administrator must have appropriate Oracle privileges.
NOTE: A database block size of 16K or more is recommended.
Follow these steps to create a tablespace for spatialNET database server objects.
1. Log in to SQL*Plus with the following command, replacing <sys_password> with the password of the system user: sqlplus system/<sys_password>
2. Create the following parameters for the table space:
CREATE TABLE SPACE <table space name> DATAFILE <table space filename> SIZE 2048M AUTOEXTEND ON NEXT 1024M MAXSIZE UNLIMITED;

10 of 69 SPATIALinfo Inc.
NOTE: Replace <table space name> with the name of the table space. Replace <table space filename> with the complete path, filename, and extension (DBF) for the table space.
Depending on the host platform environment and disk storage configuration, it may be helpful to create table spaces for the following object types:
• non-spatial (aspatial) indexes
• spatial indexes
• work table space for construction of spatial indexes
• materialized views or materialized view logs
• external tables
For more information on database sizing, consult your Oracle documentation.
spatialNET Oracle user roles Create user roles after creating table spaces. spatialNET identifies Object and System Grants for four types of Oracle users. Those user types and their roles are as follows:
• Read Access: spatialnet_readaccess
• Write Access: spatialnet_writeaccess
• Schema Owner: spatialnet_administrator
• Developer: spatialnet_developer
These roles must be created only once for any database instance.
Following the Oracle recommended principle of assigning the fewest privileges necessary, table 3 identifies the object and system privileges required for the spatialNET roles.
Oracle user role and type
Object Grants System Grants Privileges
spatialnet_readaccess Query-only
SELECT CREATE SESSION Examine network
spatialnet_writeaccess Designer
• SELECT • INSERT • UPDATE • DELETE • QUOTA UNLIMITED
CREATE SESSION • Examine network Create/cancel jobs
• Add entities and change network information.
spatialnet_administrator • SELECT • INSERT • UPDATE • DELETE • QUOTA UNLIMITED •
• CREATE TABLE • CREATE
PROCEDURE • CREATE SEQUENCE • CREATE VIEW • CREATE TYPE • CREATE SYNONYM • CREATE TRIGGER • CREATE SESSION • ALTER TABLE
• Create Schema Objects • Examine network. • Publish/post/cancel jobs. • User maintenance
spatialnet_developer • READ,WRITE ON • CREATE ANY VIEW
CanezG
Highlight

SPATIALinfo Inc. 11 of 69
DIRECTORY DATA_PUMP_DIR
• QUOTA UNLIMITED
• CREATE INDEXTYPE • CREATE
PROCEDURE • CREATE SEQUENCE • CREATE SESSION • CREATE SYNONYM • CREATE TABLE • CREATE TRIGGER • CREATE TYPE • SELECT ANY
DICTIONARY • ALTER SESSION • AUTOTRACE
Table 3: Oracle role configuration
The spatialnet_administrator role The spatialnet_administrator role is granted to the database user (schema) where the spatialNET server objects, tables, indexes, sequences, and procedures, are created. Other user roles are granted object privileges as appropriate.
The commands for creating the spatialnet_administrator role are listed below
Create the spatialnet_administrator role:
create role spatialnet_administrator not identified; grant create table to spatialnet_administrator; grant create view to spatialnet_administrator; grant create procedure to spatialnet_administrator; grant create sequence to spatialnet_administrator; grant create session to spatialnet_administrator; grant create synonym to spatialnet_administrator; grant create trigger to spatialnet_administrator; grant create type to spatialnet_administrator; grant read,write on directory data_pump_dir to spatialnet_administrator;
Create the spatialNET schema owner:
create user <spatialNET USER> identified by <Password> default tablespace <spatialNET Tablespace> temporary tablespace temp quota unlimited on <spatialNET Tablespace>; grant spatialnet_administrator to <spatialNET USER>; alter user <spatialNET USER> default role spatialnet_administrator;
NOTE: Replace < spatialNET Table space> with the default table space for the spatialNET schema. Replace <Password> with the Oracle password for the spatialNET Oracle User.
CanezG
Highlight
CanezG
Highlight
CanezG
Highlight
CanezG
Highlight
CanezG
Highlight
CanezG
Highlight
CanezG
Highlight
CanezG
Highlight
CanezG
Highlight
CanezG
Highlight
CanezG
Highlight
CanezG
Highlight
CanezG
Highlight
CanezG
Highlight
CanezG
Highlight
CanezG
Highlight
CanezG
Highlight
CanezG
Highlight
CanezG
Highlight
CanezG
Highlight
CanezG
Highlight

12 of 69 SPATIALinfo Inc.
The spatialNET schema Create a schema containing all server-side objects required to support the spatialNET client.
Follow these steps to create the spatialNET schema.
NOTE: Use the full Oracle client for the version of the Oracle server hosting spatialNET.
1. Establish connectivity to the Oracle host.
2. Open a Windows command window (cmd) and navigate to the sql\oraspatial directory in the spatialNET installation directory.
The default location is
\Program Files\SPATIALinfo\SPATIALnet\sql\oraspatial
3. Log in to SQL*Plus as the spatialNET schema owner using the command below:
sqlplus <spatialNET user>/<password>@<OracleService>
NOTE: Replace <spatialNET user> with the spatialNET schema owner username. Replace <password> with the password for the spatialNET schema owner. Replace <OracleService> with the connection string for the Oracle server hosting the SpatialNET schema. This string is usually the tnsname entry that is configured in the tnsnames.ora file. See Set up tnsnames.ora for new database connections.
4. From the SQL> prompt, execute the following scripts:
• @spatialfm_tables.sql • @spatialfm_indices.sql • @spatialfm_views.sql • @create_jms_views.sql • @spatialnet_eam.sql • @create_jms_tables.sql • @spatialnet_jms.sql • @create_jms_triggers.sql
5. Exit SQL*Plus and navigate to the sql\dictionaries directory in the spatialNET installation directory.
6. Log in to SQL*PLUS as the spatialNET schema owner. From the SQL> prompt, execute the following scripts:
• @all_ess.sql • @all_reco.sql
The baseline spatialNET schema has now been created.
CanezG
Highlight
CanezG
Highlight
The 3 temporary tables that need to be deleted if running scripts a second time: SQL> SQL> @create_jms_tables.sql SQL> -- ex:set ts=2 sw=2: <- for vim SQL> -- ---------------------------------------------------------------------- SQL> -- (C) Copyright 1994 - 2012 by SPATIALinfo Pty. Limited SQL> -- A.B.N. 65 071 977 921 SQL> -- SQL> -- All rights reserved SQL> -- SQL> -- This software and related documentation are furnished under a license SQL> -- agreement and shall be used only in accordance with the terms of the SQL> -- agreement. SQL> -- SQL> -- Restricted Rights Legend: Use, duplication, or disclosure by the US SQL> -- Government is subject to restrictions as set forth in FAR and DFAR SQL> -- concerning the use of commercial computer software, documentation and SQL> -- technical data as applicable, including FAR12.212 and DFAR 227.7202. SQL> -- SQL> -- SPATIALinfo Pty. Limited SQL> -- Unit 9, 23 - 25 Gipps Street SQL> -- Collingwood VIC 3066 SQL> -- AUSTRALIA SQL> -- ---------------------------------------------------------------------- SQL> SQL> CREATE GLOBAL TEMPORARY TABLE COPY_JOB_ID_MAPPING ( 2 OLD_ID VARCHAR2(16), 3 NEW_ID VARCHAR2(16) 4 ) on commit delete rows; CREATE GLOBAL TEMPORARY TABLE COPY_JOB_ID_MAPPING ( * ERROR at line 1: ORA-00955: name is already used by an existing object SQL> CREATE GLOBAL TEMPORARY TABLE COPY_JOB_JOURNAL_MAPPING ( 2 OLD_JOURNAL NUMBER(9), 3 NEW_JOURNAL NUMBER(9) 4 ) on commit delete rows; CREATE GLOBAL TEMPORARY TABLE COPY_JOB_JOURNAL_MAPPING ( * ERROR at line 1: ORA-00955: name is already used by an existing object SQL> @spatialnet_eam.sql SQL> -- ex:set ts=2 sw=2: <- for vim SQL> -- ---------------------------------------------------------------------- SQL> -- (C) Copyright 1995 - 2008 by SPATIALinfo Pty. Limited SQL> -- A.B.N. 65 071 977 921 SQL> -- SQL> -- All rights reserved SQL> -- SQL> -- This software and related documentation are furnished under a license SQL> -- agreement and shall be used only in accordance with the terms of the SQL> -- agreement. SQL> -- SQL> -- Restricted Rights Legend: Use, duplication, or disclosure by the US SQL> -- Government is subject to restrictions as set forth in FAR and DFAR SQL> -- concerning the use of commercial computer software, documentation and SQL> -- technical data as applicable, including FAR12.212 and DFAR 227.7202. SQL> -- SQL> -- SPATIALinfo Pty. Limited SQL> -- Unit 9, 23 - 25 Gipps Street SQL> -- Collingwood VIC 3066 SQL> -- AUSTRALIA SQL> -- ---------------------------------------------------------------------- SQL> create table BADCONVERT ( 2 table_name VARCHAR2(256), 3 row_id ROWID, 4 id VARCHAR2(16), 5 sql_code NUMBER 6 ); create table BADCONVERT ( * ERROR at line 1: ORA-00955: name is already used by an existing object
CanezG
Comment on Text
SQL> connect CABLEONE_MAP_ADDRESS_61/Spattstora006
CanezG
Typewritten Text
CanezG
Typewritten Text

SPATIALinfo Inc. 13 of 69
Grant object privileges on the spatialNET schema After the spatialNET schema has been created, you can create object grants to the spatialNET Users Roles spatialnet_readaccess and spatialnet_writeaccess.
spatialNET Oracle objects are owned by the Oracle User which created them and already have full access privileges.
Follow these steps to grant object privileges on the spatialNET schema.
1. Create roles spatialnet_readaccess and spatialnet_writeaccess if you have not already created them.
2. Grant CREATE SESSION to spatialnet_readaccess and spatialnet_writeaccess.
3. Open a Windows command window (cmd) and navigate to the sql\oraspatial directory in the spatialNET installation directory. The default location is:
\Program Files\SPATIALinfo\SPATIALnet\sql\oraspatial
4. Log in to SQL*Plus as the spatialNET schema owner using the command below:
sqlplus <spatialNET user>/<password>@<OracleService>
NOTE: Replace <spatialNET user> with the spatialNET schema owner username. Replace <password> with the password for the spatialNET schema owner. Replace <OracleService> with the connection string for the Oracle server hosting the spatialNET schema.
5. From the SQL> prompt, execute the following script:
@spatialfm_grant_tables.sql
Create the master spatialNET schema (optional) Master spatialNET schemas are configured with materialized view logs. These logs enable the replicate sites to update their data through materialized views.
Follow the instructions below to create a master schema with the appropriate logs.
1. Open a Windows command window (cmd) and navigate to the sql\oraspatial directory in the spatialNET installation directory. The default location is:
\Program Files\SPATIALinfo\SPATIALnet\sql\oraspatial
2. Log in to SQL*Plus as the spatialNET schema owner using the command below:
sqlplus <spatialNET user>/<password>@<OracleService>
NOTE: Replace <spatialNET user> with the spatialNET schema owner username. Replace <password> with the password for the spatialNET schema owner. Replace <OracleService> with the connection string for the Oracle server hosting the SpatialNET schema.
3. From the SQL> prompt, execute the following script:
CanezG
Highlight

14 of 69 SPATIALinfo Inc.
@spatialfm_master.sql <Oracle schema>
NOTE: Replace <Oracle schema> with the Oracle schema that owns the spatialNET objects on that server.
Create the replicate spatialNET schema (optional) spatialNET objects of the replicate site are created as materialized views of the spatialNET objects of the master.
Follow these steps to create a replicate schema.
1. Create an Oracle user to own the replicate schema.
2. Using a Database Link (DB_Link), establish connectivity between the replicate schema (on the server hosting the replicate site) and the spatialNET owner schema (on the server hosting the master site).
3. Open a Windows command window (cmd) and navigate to the sql\oraspatial directory in the spatialNET installation directory. The default location is: \Program Files\SPATIALinfo\SPATIALnet\sql\oraspatial
4. Log in to SQL*Plus as the spatialNET schema owner using the command below:
sqlplus <replicate owner>/<password>@<OracleService>
Note: Replace <replicate owner> with the username for the replicate schema owner. Replace <password> with the password for the replicate schema owner. Replace <OracleService> with the connection string for Oracle server hosting the replicate schema.
5. From the SQL> prompt, execute the following script:
@spatialfm_slave.sql <DB_LINK> <Oracle schema>
NOTE: Replace <DB_Link> with the database link that established connectivity to the master Oracle server. Replace <Oracle schema> with the Oracle schema that owns the spatialNET objects on that server.
Create the administrator application user The spatialNET application has its own user and group definitions that are distinct from Oracle database user and group definitions.
To configure the application, you must create a user admin for the application administrator.
NOTE: This user initially has an empty password. For security reasons, this password should be set as soon as possible.

SPATIALinfo Inc. 15 of 69
Follow these steps to create the user admin for the application administrator.
1. Open a Windows command window (cmd) and navigate to the sql\oraspatial directory in the spatialNET installation directory.
The default location is
\Program Files\SPATIALinfo\SPATIALnet\Program Files\SPATIALinfo\SPATIALnet\sql\oraspatial
2. Log in to SQL*Plus as the spatialNET administrator using the following command:
sqlplus <spatialNET user>/<password>@<OracleService>
NOTE: Replace <spatialNET user> with the spatialNET schema owner username. Replace <password> with the password for the spatialNET schema owner. Replace <OracleService> with the connection string for the Oracle server hosting the SpatialNET schema.
3. From the SQL> prompt, execute the following script:
@spatialfm_scm_init.sql
Define available spatial reference systems for earth-based spatial coordinates
If you will be using earth-based spatial coordinate systems (as opposed to arbitrary x, y coordinates), then you must configure the coordinate systems spatialNET can use. The systems you choose determines both how data is stored and which systems spatialNET displays as an option to your users.
spatialNET displays each of the coordinate systems defined in the SPATIALNET_CS_SRS table.
Follow the steps below to copy Spatial Reference Systems (SRS) definitions from the Oracle-supplied table MDSYS.CS_SRS to the spatialNET table SPATIALNET_CS_SRS.
To copy Spatial Reference Systems definitions to the SPATIALNET_CS_SRS table:
1. Navigate to the sql\dictionaries\ directory of the spatialNET installation directory. The default location is
\Program Files\SPATIALinfo\SPATIALnet\sql\dictionaries\
2. Copy the reco_SPATIALNET_CS_SRS.sql script and save it to a writeable location.
3. Open your copy of the script with a text editor, and edit it to load the coordinate systems you want to be available.
4. Run the script as the spatialNET schema owner.
5. If the data is to be stored in a non-null SRID, update the user_sdo_geom_metadata table to record the chosen SRID:
update user_sdo_geom_metadata set srid =<your chosen SRID>
CanezG
Highlight
CanezG
Comment on Text
Stopped here need coordinates - update user_sdo_geom_metadata set srid=1041002;
CanezG
Typewritten Text
CanezG
Typewritten Text
CanezG
Typewritten Text
CanezG
Typewritten Text
CanezG
Typewritten Text
CanezG
Typewritten Text
CanezG
Typewritten Text
CanezG
Typewritten Text
CanezG
Typewritten Text
CanezG
Highlight
SQL> connect CABLEONE_MAP_ADDRESS_61/Spattstora006 Connected. SQL> @reco_SPATIALNET_CS_SRS_CB1.sql
CanezG
Highlight
SQL> update user_sdo_geom_metadata set srid =1041002; 155 rows updated.

16 of 69 SPATIALinfo Inc.
NOTE: When editing reco_SPATIALNET_CS_SRS.sql, include at least the coordinate system that you want data to be stored in, as well as coordinate system 8307 "Longitude / Latitude (WGS 84)," which supports “view at a point” capability.
For example, if you want to use SRID 41003 "Conformal Projection (North America),” edit the WHERE clause to:
WHERE srid in (8307, 41003)
Create the DBMS configuration file Before creating the configuration file, collect the following information.
• The Oracle TNS name to be used to access the database
• Oracle User / Password for Oracle spatialNET schema owner
To create a DBMS configuration file:
1. Navigate to the bin (or bin64) directory in the spatialNET installation directory. The default location is
\Program Files\SPATIALinfo\SPATIALnet\bin
2. Run (double-click) the file called dbed2.exe. A window appears.
Figure 2: dbed2 utility
3. Enter the appropriate information in the fields, as described in table 4 below.
Field name Description Description Short description to identify the spatialNET schema Data dictionary spatialfm DB driver Select OracleSpatial from the drop down list Host Not enabled for OracleSpatial Socket Not enterable for OracleSpatial Service Connection string to Oracle. TNS name of the service or IP/OracleSID
CanezG
Typewritten Text
CanezG
Typewritten Text
CanezG
Typewritten Text
CanezG
Typewritten Text
CanezG
Typewritten Text
CanezG
Typewritten Text
CanezG
Typewritten Text
CanezG
Typewritten Text

SPATIALinfo Inc. 17 of 69
Schema (Optional) Oracle spatialNET schema owner, which should be the same as the username. This field is used when set up with synonyms to identify the schema owner
Username Oracle spatialNET schema owner
Table 4: dbed utility fields and descriptions
4. Select Encrypted to encrypt the password when distributing the configuration file. If you do not encrypt the password, then the file can be read by a regular user.
5. Click Save As. When prompted to choose a location, choose the dbms folder in the spatialNET installation location. The default location is
\Program Files\SPATIALinfo\SPATIALnet\dbms
spatialNET-supplied scripts Along with the scripts required to create the database, model-independent scripts are located in the sql folder of the spatialNET installation folder.
The default location is:
\Program Files\SPATIALinfo\SPATIALnet\sql
Object creation scripts Path and filename Description oraspatial\spatialfm_tables.sql Creates the base tables for supporting spatialNET oraspatial\spatialfm_views.sq Creates the necessary views on the base tables for supporting
spatialNET oraspatial\spatialfm_indices.sql Creates all indexes on tables supporting spatialNET and sets
the primary key constraints for these tables oraspatial\spatialfm_aspatial_indices.sql Creates indexes for table columns that do not contain spatial
data oraspatial\spatialfm_spatial_indices.sql Creates indexes for table columns that contain spatial data oraspatial\create_jms_views.sql Creates views based on spatialNET tables oraspatial\SpatialNET_eam.sql Creates the spatialnet_eam package oraspatial\create_jms_tables.sql Creates special tables needed by the spatialnet_jms package oraspatial\spatialnet_jms.sql Creates the spatialnet_jms package oraspatial\create_jms_triggers.sql Creates database triggers to support between job locking of
changed entities. oraspatial\spatialfm_scm_init.sql Populates the SCM_USER and SCM_USER2 tables to create a
default admin user for a spatialNET installation
Table 5: Object creation scripts
spatialNET utility scripts Path and filename Description
oraspatial\spatialfm_master.sql Creates materialized view logs on the schema designated to be the master
oraspatial\spatialfm_slave.sql Create the materialized views supporting a spatialNET replicate schema
oraspatial\spatialfm_refresh_slave.sql Uses an Oracle built-in procedure to refresh materialized views in a spatialNET replicate schema

18 of 69 SPATIALinfo Inc.
oraspatial\spatialfm_drop_master.sql Drops the materialized view logs on a spatialNET primary schema
oraspatial\spatialfm_drop_slave.sql Drops the materialized views supporting a spatialNET replicate schema
oraspatial\spatialfm_drop_indices.sql Drops indices created by the spatialnet_indices.sql script
oraspatial\spatialfm_drop_aspatial_indices.sql Drops non-spatial indices created by the spatialnet_aspatial_indices.sql script
oraspatial\spatialfm_drop_spatial_indices.sql Drops spatial indices created by the spatialnet_spatial_indices.sql script
oraspatial\spatialfm_drop_tables.sql Drops tables created by the spatialnet_tables.sql script
oraspatial\spatialfm_drop_views.sql Drops views created by the spatialnet_views.sql script
Table 6: spatialNET utility scripts
spatialNET configuration scripts Path and filename Description
dictionaries\all_ess.sql Populates certain spatialNET dictionary tables with default values
dictionaries\all_reco.sql Populates certain spatialNET dictionary tables with default values
oraspatial\spatialfm_grant_tables.sql Creates appropriate object grants on spatialNET tables to the spatialNET Oracle user roles
Table 7: spatialNET configuration scripts
Optional scripts Path and filename Description
oraspatial\orasp_get_mbr.sql Uses an Oracle procedure to calculate the minimum bounding rectangle for an Oracle Spatial object, not taking arc curvature into account
oraspatial\orasp_gather.sql Uses an Oracle procedure to gather Oracle table/column optimizer statistics. You can customize the individual table’s gather commands to suit your requirements.
oraspatial\check_null_srid_spatial_metadata.sql
Reports the following issues: • registered spatial tables with column name <> 'COORDINATES' • registered spatial tables without <tname>_SPIND spatial index • spatial indexes that are not R-tree indexes • spatial indexes that are invalid (failed during building)
oraspatial\check_spatial_metadata.sql
Reports the following issues: • registered spatial tables with column name <> 'COORDINATES' • registered spatial tables without <tname>_SPIND spatial index • spatial indexes that are not R-tree indexes • tables with COORINATES columns that are not registered • spatial indexes that failed during building
oraspatial\get_all_srid.sql Lists all tables in a spatialNET schema registered in the user_sdo_geom_metadata view
oraspatial\get_srid.sql Reports issues with spatialNET spatial indexes.
CanezG
Typewritten Text
CanezG
Typewritten Text
CanezG
Typewritten Text
CanezG
Typewritten Text
CanezG
Highlight
SPATIALinfo Inc. 19 of 69
oraspatial\set_entity_status.sql Updates the entity status column if it is null or if bits which should be set for published rows are not set.
oraspatial\set_service_status.sql
Sets service status for an existing table when the service status column is newly added.
NOTE: This script sets the GDM bit in the entity status for all newly added entities, but does not do any checking for modified pre-existing entities.
NOTE: This script only updates the service status column when its value is null, so it will not adversely affect any table with existing values.
oraspatial\valgeom.sql Performs an sdo_geom.validate_layer_with_contex() query for a table with a spatial attribute and reports the results
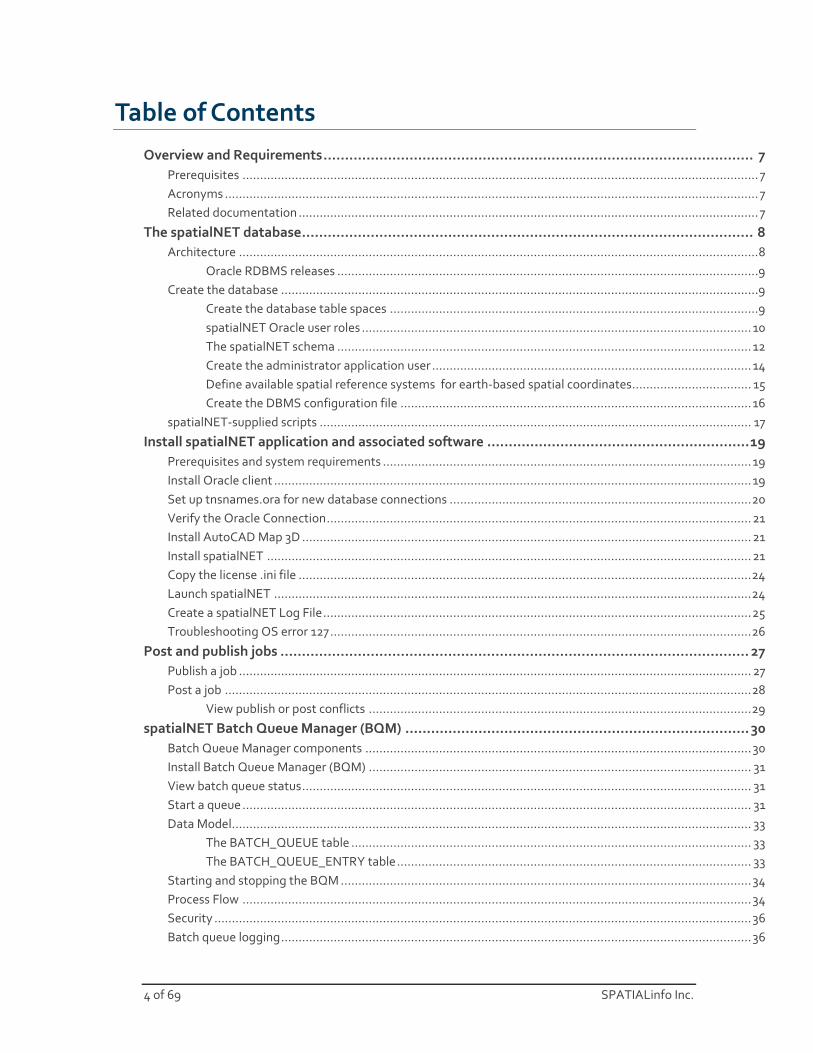
Table 8: Optional scripts
Install spatialNET application and associated software
spatialNET operates on stand-alone PCs that have a network connection to an Oracle database. The installation process includes the tasks listed below.
• Install Oracle Full Client. For up-to-date information about software versions, see the document titled: System hardware and third-party software requirements 2Q 2012.
• Set up the TNSnames.ora file
• Install AutoCAD
• Install spatialNET
• Create a Database .ini file
Prerequisites and system requirements For details about third-party software and client machine requirements, see the document titled System hardware and third-party software requirements.
Install Oracle client
IMPORTANT: DO NOT INSTALL ORACLE TO THE DEFAULT LOCATION. INSTEAD, FOLLOW THE INSTRUCTIONS BELOW TO INSTALL ORACLE TO THE ORACLE FOLDER ON THE C: DRIVE.
To install the Oracle client:
1. Download the Oracle client (11G R2.111.7.20 or higher) from the following location:
http://www.oracle.com/technetwork/database/enterprise-edition/downloads/index.html
2. Choose the appropriate operating system and click See All to access the Client download options.

20 of 69 SPATIALinfo Inc.
3. Download Oracle Client. (Do not download Standard Edition, Standard Edition One, Enterprise Edition, or other special downloads).
4. On the C: drive, create a folder titled Oracle. Oracle will be installed in this folder so that anyone using the machine has access to Oracle.
5. Launch the Oracle installer.
6. Select either Administrator or Run-Time for the installation type.
7. Select the available language and click Next..
8. In the Oracle Base field, enter the C:\Oracle directory created in step 4 as the installation location.
9. Follow the on-screen instructions to complete the installation.
Set up tnsnames.ora for new database connections The tnsnames.ora file is automatically created when the Oracle client is installed with an Administrator or Run-Time installation type.
The default location for this file is: C:\Oracle\product\11.2.0\client_1\NETWORK\ADMIN
Follow the instructions below to set up the file correctly using a text editor. If you would prefer to use the Oracle setup assistant, see Appendix: use Oracle Net Configuration Assistant to set up the tnsnames.ora file
To set up the tnsnames.ora file:
1. Open the tnsnames.ora file in plain text editor (such as Notepad or Wordpad).
2. The relevant part of the file is shown below. Change the BOLD text in the sample below to match your system, and then save the file. (Contact your IT administrator to obtain this information.)
NOTE: If the file doesn’t contain the code below, then copy and paste this code into the file, making sure to edit the parts in bold.
ORA11G_SERVERNAME = (DESCRIPTION = (ADDRESS_LIST = (ADDRESS = (PROTOCOL = TCP)(HOST = 123.456.78.910)(PORT = 1521)) ) (CONNECT_DATA = (SERVICE_NAME = ora11g) ) )

SPATIALinfo Inc. 21 of 69
IF YOU USE WINDOWS 7: Save the file first to a writeable location and then copy it back into the Oracle location (C:\Oracle). Windows 7 security prohibits the creation of certain file types in certain locations.
You can also create this file using the Oracle Net Configuration Assistant. See Manually create a TNSNames file.
Verify the Oracle Connection To verify the Oracle connection, type the following commands into a command line:
> Ping [server address]
> Tnsping [net service name]
If this test fails, review the host name and service name in the tnsnames.ora file to ensure the Oracle server is properly defined.
Install AutoCAD Map 3D Install AutoCAD Map 3D according to the instructions that accompany the software. For information about which AutoCAD version to install, see the document titled System Hardware and Third-party Software Requirements.
Important: You must open AutoCAD Map 3D at least once before opening spatialNET for the first time.
To prepare AutoCAD Map 3D for use with spatialNET:
1. Open AutoCAD Map 3D and choose the workspace settings. Map Classic is recommended.
2. Verify that AutoCAD Map 3D is running properly; then close the application.
Install spatialNET After you have verified that AutoCAD is working properly on the client computer, you can install the spatialNET application.
To install spatialNET:
1. Obtain the spatialNET installation file from the SPATIALinfo Support Portal or from your SPATIALinfo representative.
2. Copy the spatialNET executable file to the computer desktop.
3. Double-click the file icon to open the setup wizard.
4. On the Welcome page, click Next.

22 of 69 SPATIALinfo Inc.
Figure 3: The spatialNET installation Welcome page
5. Read the license agreement. Click I accept the agreement, and then click Next.
Figure 4: License agreement
6. In the User Information window, type the appropriate information and click Next.
7. Select the installation location in the C:\Program Files folder, as shown below, and click Next.

SPATIALinfo Inc. 23 of 69
Figure 5: Select Destination Location
8. Select the components to be installed and click Next.
NOTE: The Start Menu icons for Desktop, Job Administrator and Batch Queue may not be necessary for all users.
Figure 6: Select Components
9. Click Install.

24 of 69 SPATIALinfo Inc.
Figure 7: Ready to Install
10. Click Finish when the installation is complete.
Copy the license .ini file Copy the licence.ini file and, if provided, the licence.key file to the \bin (or bin64) directory within the spatialNET installation directory.
NOTE: The default location is:
C:\Program Files\SPATIALinfo\SPATIALnet\bin
Launch spatialNET Warning: AutoCAD must be opened at least once before spatialNET is opened the first time.
To launch spatialNET:
1. Double-click the spatialNET icon on the desktop, or click the Windows Start button, then click All Programs, spatialNET, and then spatialNET.
2. In the Login dialog box, enter a user name and password for your database.
3. Select the appropriate database to open from the Database drop-down list. The drop-down list is generated from the .ini files in the dbms directory of your spatialNET installation directory.

SPATIALinfo Inc. 25 of 69
Figure 8: Login dialog box
4. Click Logon.
5. Click OK. When the Job Selection window appears, spatialNET has successfully connected to your database.
Create a spatialNET Log File By default, spatialNET displays system messages in a Command prompt window. IT administrators can choose to have these messages written to a log file instead.
To create a log file, perform the following on each machine:
1. Log in as the local administrator.
2. On the desktop, right-click My Computer; then click Properties.
3. From the options on the left, click Advanced System Settings.
Figure 9: My Computer Properties with Advanced system settings highlighted
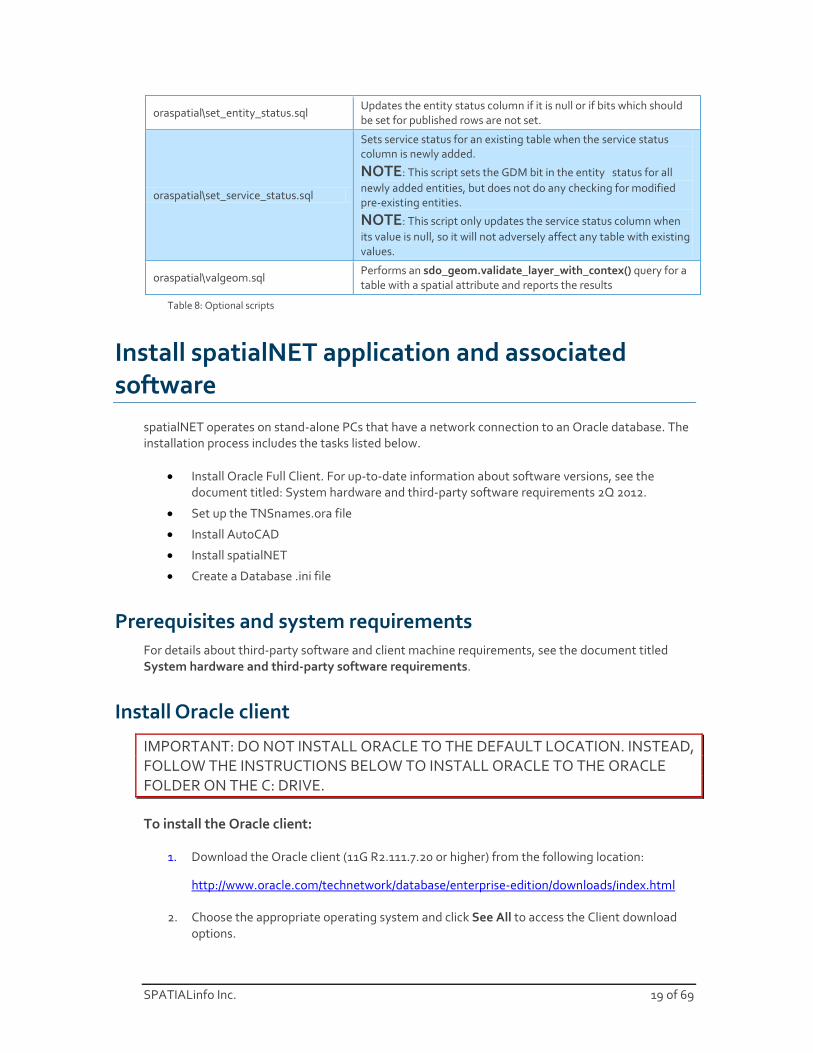
4. From the Advanced tab, click the Environment Variables button. The Environment Variables window appears.
5. Under the System Variables section, click Add (or New) to add a new variable.
26 of 69 SPATIALinfo Inc.
Figure 10: The Environment Variables window
6. In the Variable name field, type: DPRINT_FILENAME
7. In the Variable value field, type the location that you want to save the log file.
NOTE: Windows 7 will not allow you to write to C:\Program Files, so you should choose a location outside of that directory.
Figure 11: System variables
8. Click OK to save the location. spatialNET logs will be stored in the location you chose.
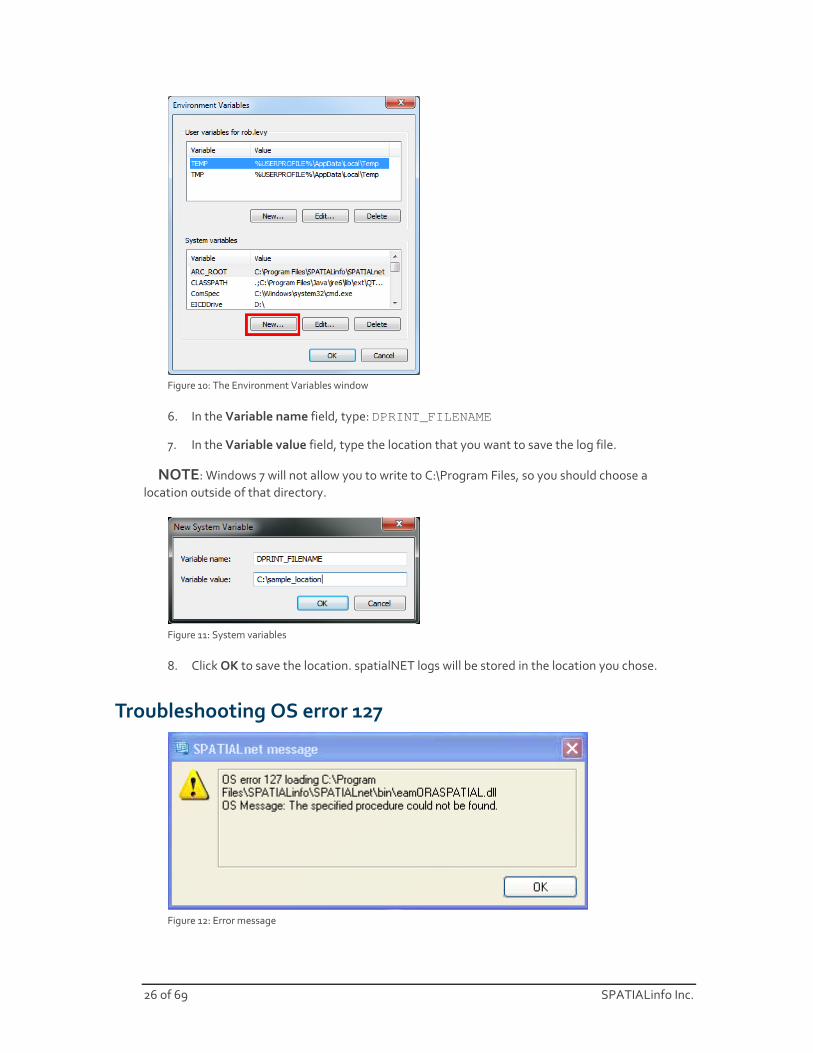
Troubleshooting OS error 127
Figure 12: Error message

SPATIALinfo Inc. 27 of 69
The error message shown above usually appears as a result of one of the following:
• Oracle Client is not installed.
• A 64-bit client is installed on a 32-bit system or vice versa.
• Oracle is installed in the user profile directory of the person who performed the installation.
To verify that Oracle is installed:
1. Bring up a Command prompt and type Path.
2. Review the path to see if there are any references to Oracle and the directory where it is installed.
NOTE: Oracle should be installed in an Oracle file on the C: drive, and NOT in its default location.
Figure 13: Administrator Command Prompt path
Post and publish jobs • Publish a job to make it visible to others using the database. You can continue to make
changes to the job.
• Post a job when you are finished with it. Others using the database can see your work, and you cannot make further changes to it after it has been posted.
NOTE: Depending on he settings for your security group, you may not be able to publish or post a job. To change security group settings, see Edit a security group.
Publish a job To publish a job:
1. Run spatialNET Job Administrator and log on. The JMS Administration Tool window appears.
2. From the spatialNET JMS Administration Tool window, click My Jobs.

28 of 69 SPATIALinfo Inc.
Figure 14: The JMS admin tool with My jobs highlighted
3. Click the job that you want to publish, then click the Publish button, and then click Queue for Publish. The job goes to the batch queue for publishing. See spatialNET Batch Queue Operation.
Warning: Do not choose the Publish option unless you are certain that no one else is logged in to the database. Publishing while others are logged in to the database can seriously damage the database.
Figure 15: The Queue for Publish option
Colored entities spatialNET can display entities in different colors to help you identify whether they have been posted, published in another job, or added or edited in the current job and not published.
Post a job To post a job:
1. Run spatialNET Job Administrator and log on. The JMS Administrator Tool window appears.
2. From the spatialNET JMS Administration Tool window, click My Jobs.

SPATIALinfo Inc. 29 of 69
Figure 16: The JMS admin tool with My jobs highlighted
3. Click the job that you want to publish, then click Post, and then click Queue for Post. The job goes to the batch queue for publishing. See spatialNET Batch Queue Operation.
Warning: Do not choose the Post option unless you are certain that no one else is logged in to the database. Posting while others are logged in to the database can seriously damage the database.
Figure 17: The Queue for Post option
NOTE: A job that has been posted to the spatial database is no longer available for editing by spatialNET users.
View publish or post conflicts Conflicts can arise during the Publish or Post process. For example, a conflict would occur if two people, working in two separate jobs, edit the same entity differently and then publish their jobs.
When such a conflict occurs, the publish command stops, and a spatialNET message panel appears, followed by the JMS Administration Results panel.

30 of 69 SPATIALinfo Inc.
• Expand the items in the list to reveal the source of the conflict, then select an item and click the appropriate button to act on it.
Button Description Save Saves the list, in its current state of expansion, as a text file. Display Shows the Details or Map View menu options.
• Details opens the Details panel for the selected entity. • Map View opens a map, centered on the selected entity.
Edit Brings up a window that allows editing of the selected entity. Delete Deletes the record of the operation for the current job. Delete is only available after
selecting an item under the Operations performed on job heading. Verify Shows the Verify Publish, Verify Post and Verify Cancel menu options.
Choose these options to test whether the current job can be successfully published, posted or cancelled (respectively). Verification results appear as a new list item in the JMS Administration Results panel.
Reset Allows you to clear the “Open” status of the selected job. Close Closes the window.
Figure 18: JMS Administration Results window description of buttons
spatialNET Batch Queue Manager (BQM) To avoid database corruption, spatialNET requires that certain operations be performed one at a time.
The spatialNET Batch Queue Manager (BQM) allows administrators to queue those operations automatically, so that they run only when conflicting operations have finished.
Batch Queue Manager components The spatialNET Batch Queue Manager is implemented as an instance of the regular spatialNET Client software. It uses the same data dictionary, the same customization files, the same format database connection files and so on.
Batch Queue Manager assumes that it is installed in a single directory containing a number of subdirectories.
Customizations are expected to be in the following subdirectories:
Directory Contents bin (or bin64) License files dbms Database connection files icon Icons (.ico)
Image files (.bmp, .jpg) modeler[64] Native code extensions (.dll) param AutoCAD drawing templates (.dwt)
AutoCAD menu files (.mns) python/spatialnet/custom Extension Scripts (.py) symbol AutoCAD symbols (.dwg)
Smart Text symbols (.smt)
Table 9 spatialNET directories

SPATIALinfo Inc. 31 of 69
Subject to the type of jobs to be processed by the batch queue, all of the customization files must be present.
Install Batch Queue Manager (BQM) To install the BQM, run the regular spatialNET installer, then copy the site-specific customization files.
NOTE: Before upgrading spatialNET, shut down the BQM.
The regular spatialNET installer creates a desktop shortcut with the appropriate commands to launch the BQM. This shortcut assumes that the ID of the batch queue is JMSADMIN.
NOTE: This queue is automatically created by the dictionaries\ess_BATCH_QUEUE.sql script that is provided as part of spatialNET and run automatically when you run all_ess.sql.
View batch queue status You can view batch queue status directly from the JMS Administration Tool window. See The spatialNET JMS Administration tool.
To view batch queue status:
1. From the JMS Administration Tool window, click the Batch Queue button. The All batch queues window appears.
2. Select a batch queue, click Display, and then click Details.
Figure 19: The All batch queues window's Display menu
Start a queue You can start or stop a batch queue using the JMS Administration window. See The spatialNET JMS Administration tool.

32 of 69 SPATIALinfo Inc.
To start or stop a batch queue:
1. From the JMS Administration Tool window, click the Batch Queue button. The All batch queues window appears.
2. Select a batch queue and click the Control button. The Queue Control window appears.
Figure 20: The Queue Control window
3. Click Run Queue. (Or click Run Once to process a single job and then stop.)
4. Enter the appropriate details and begin the queue. A progress window appears, showing the status of the BQM.
To stop the queue, click the Stop button on the progress window. The batch manager will stop once the current job is finished.
NOTE: These buttons are running scripts in the bin (or bin64) directory that can be customized if required.
Button Script Run Queue batch.bat Reset Queue resetbatch.bat Run Once singlerunbatch.bat
Table 10 Queue Control buttons and the scripts they run

SPATIALinfo Inc. 33 of 69
Data Model There are a number of database tables associated with managing the batch queues.
Figure 21: The data model
The BATCH_QUEUE table The BATCH_QUEUE table holds the operational times when the batch queue manager is allowed to start sub-processes.
The START_TIME and END_TIME columns are times specified as “number of seconds past midnight”.
The BATCH_QUEUE_ENTRY table The BATCH_QUEUE_ENTRY table holds an entry for each batch job submission.
• The JOB_ID and USER_ID columns hold information about the submitter of the batch job.
• The SHELL_COMMAND holds the operating system command to run.
• The COMMAND_ARGS holds the arguments to pass to the operating system command.
WARNING: If multiple queues are created, their first eight characters in the DESCRIPTION field must not be the same. By default, the batch queue keys use the first eight characters of the DESCRIPTION field as entered by the user.

34 of 69 SPATIALinfo Inc.
Starting and stopping the BQM When the BQM starts, it checks that it is the only instance of the BQM running.
If there is another instance of the BQM running, then it will stop. If no other instance is running, then the BQM will update USER_ID, START_DATE and HOST_NAME.
If the USER_ID field is ever externally changed, the BQM terminates itself cleanly on the next iteration through its main loop.
Process Flow When the BQM is running, it loops around repeating the same process. The following figure is simplified version of how the BQM operates:
Figure 22: BQM process flow
To process BATCH_QUEUE_ENTRY:
1. Retrieve the details from the database entry.
2. Adjust the command (if it begins with “*spatialnet") to reflect the actual installation location of the spatialNET software on the batch server machine. This may be different to the location it is installed on the client machine that submitted the batch request.

SPATIALinfo Inc. 35 of 69
3. Adjust the command (if it begins with “*spatialnet") to reflect the actual installation location of the spatialNET software on the batch server machine. This may be different to the location it is installed on the client machine that submitted the batch request.
4. Load the details of the requested batch operation into a number of named edit buffers.
5. Execute the job by invoking spatialNET BATCH_QUEUE_ENTRY.process.STEPS.
The following editbuffers are loaded:
Name Content queue_current_entry Entity reference to the BATCH_QUEUE_ENTRY being processed queue_current_command Pathname of executable to launch. queue_current_arguments Arguments to pass to executable queue_current_logfile Pathname of logfile to collect output from the batch process
Table 11 Editbuffers related to batch job execution
If the specified executable is the regular spatialNET client (spatialnet.exe), then queue_current_arguments will automatically have the following arguments prepended:
Name Meaning /batch Notifies the client session that it is running in batch mode and should not
display any modal dialogs, error messages, etc. /root=<dir> Notifies the client session of the location of the spatialNET installation. /dd=<filename> Notifies the client session of the data dictionary to use /db=<filename> Notifies the client session of the database connection file to use /u=<username> Notifies the client session of the user to connect as /L:<pathname> Notifies the client session to divert all diagnostic output to the nominated
logfile /security=<token> Security token /nolicencewarning Suppress (modal) warning dialogs from the licensing engine.
Table 12 Switches passed to batch processes
The standard definition of the process.STEPS parameter is as follows:
behaviour process { parameters { STEPS = { "*PRE_STEPS", "*EXECUTE", "*POST_STEPS" }; PRE_STEPS = "gdm$noop"; EXECUTE = "batch$run_queue_entry" " [queue_current_entry]" " [queue_current_logfile]" " [queue_current_command]" " [queue_current_arguments]" ; POST_STEPS = "gdm$noop"; }
You can install a steps hook to intercept the EXECUTE sub-step and replace it, or provide any additional validation prior to allowing it to run.

36 of 69 SPATIALinfo Inc.
from core.gdm import StepHook @StepHook("BATCH_QUEUE_ENTRY", "process", "EXECUTE") def myhook(classname, behaviour, step, stage): if stage==0: ... do additional tests before executing batch subprocess ... else: ... do additional processing after subprocess completes ...
Security The BQM connects to the database using the username and password specified in the database connection file.
The BQM process requires user authentication to initiate its session. That authentication can come from one of the following methods:
• If the process is started manually, then the person who started it must enter authentication details.
• If design dictionary entry ACCEPT_OSLOGIN is set to “Y” and the batch manager user is the same value as the Windows login-id. In this case, the password can be left blank. NOTE: Leaving the password blank allows all users to log in without entering a password if their spatialNET username matches their Windows login.
• If the design dictionary entry BATCH_USERNAMES (a semicolon-separated list of usernames) contains the Windows login-id, and the batch manager user is the same value as the Windows login-id. If so, the password can be left blank. All other users will still have to supply their passwords.
When the sub-process is launched, the sub-process spatialNET session must be established as the user who submitted the job, not as the batch manager user.
The batch queue manager passes a /security=<token> command-line argument along with the other arguments to the sub-process.
This token is a time-stamped one-way hashed signature that is used by the client software to authenticate the spatialNET user connection. The hashes are valid for approximately five minutes.
The actual database user and password (passed to Oracle) are stored in encrypted form in the database connection file. Thus, the sub-process can establish its database connection independently of the spatialNET user authentication.
Batch queue logging The BQM and each sub-process keep their own unique log files. These files are stored in a directory whose name is specified by the design dictionary entry BatchQueueLogDirectory.
If no entry is specified, then the directory named in the system environment variable TEMP is used.
The Batch Queue Manager’s log file is called BatchQueueXXXXX.log where XXXXX is the database key of the corresponding BATCH_QUEUE row for the queue.

SPATIALinfo Inc. 37 of 69
The log file created for the sub-processes is called XXXXX-YYYYY.log where XXXXX is the key of the BATCH_QUEUE row and YYYYY is the key of the BATCH_QUEUE_ENTRY row.
If a batch job fails to launch, or terminates with an error status, a message is added to the SCM_USER_MESSAGES table, linked back to the SCM_USER row corresponding to the user that submitted the job.
The BQM as a background service A separate executable, called spatialNET Batch Monitor, runs as a Windows service and launches the BQM process automatically. The Batch Monitor does not contain any regular spatialNET components and as such is not affected by most upgrade processes.
Installation of the Batch Monitor The Batch Monitor consists of three files, which must be stored together in the same directory.
Filename Purpose snbatchmon.exe Service executable snbatchmon.ini Configuration File snbatchmon.dll Message catalog for Windows Event Viewer
Table 13 Batch Monitor components
To install the service from the command line, type snbatchmon install
You can invoke snbatchmon interactively from the Command Prompt and receive an appropriate usage message.
c:\> snbatchmon usage: snbatchmon.exe <keyword>
where keyword is one of the following words:
install Install the windows service query Show the state of the windows service start Start the windows service pause Pause the windows service continue Continue the windows service stop Stop the windows service delete Delete the windows service

38 of 69 SPATIALinfo Inc.
keyword Action
install Registers the binary with the Windows Service Manager. Installs the message catalog with the Windows Event Viewer.
query Displays the current state of the service, including several of the control values that can be manipulated from the Windows Services panel.
start Start the service, if it is not currently running. All configured queues will be started.
pause Pause the service, if it is running. All configured queues will be notified to stop processing; the service will be “pause pending” until all queues terminate, then it will become “paused”.
continue Continue the service, if it is paused. All configured queues will be restarted.
stop Stop the service, if it is running. All configured queues will be notified to stop processing; the service will be “stop pending” until all queues terminate, then it will become “stopped”.
delete Deregister the binary with the Windows Service Manager. This command leaves the message catalog registered so that existing log messages remain readable.
Table 14 Command line keywords
Multiple copies of the Batch Monitor If more than one copy of the Batch Monitor is installed on the same system, a warning message is printed.
c:\spatialinfo\spatialnet\bin\> snbatchmon query [Warning: possible mismatch of executables] [Command executed from c:\spatialinfo\spatialnet\bin\snbatchmon.exe] [Service configured to use c:\spatialinfo\spatialnet\bin64\snbatchmon.exe]
Service Name: spatialNET Batch Monitor (snbatchmon.exe) Binary: c:\spatialinfo\spatialnet\bin64\snbatchmon.exe Username: LocalSystem Service Type: Own Process Start Type: Requires external start request Error Control: Failure is logged and system startup continues State: The service has not been started.
Batch Monitor configuration The configuration file, snbatchmon.ini,is a standard Windows .ini file containing parameters that must be modified to match local conditions. These parameters are defined in a section called BatchQueueMonitor and are defined as follows:
Parameter Type Meaning
DatabaseSpecifier String This parameter must be specified. It is the name of the spatialNET database specifier file. This file contains details about the Oracle service name, user details, and so on.
Verbose Integer If this parameter is set to non-zero value, the batch monitor will periodically output more diagnostic information to the event log. Defaults to 0.

SPATIALinfo Inc. 39 of 69
Parameter Type Meaning
InstallationDirectory String If specified, it is the name of the directory that contains the spatialNET installation. Defaults to the directory containing snbatchmon.exe
Executable String If specified, it is the name of the main spatialNET executable. Defaults to spatialnet.exe
DataDictionary String If specified, it is the name of the spatialNET data dictionary to use. Defaults to spatialfm
SpatialnetUser String If specified, it is the name of the spatialNET user to connect as. This user must be defined in the spatialNET system. Defaults to the Windows username that the service is run as.
RetryTimeLimit Integer
If specified, it is the time limit between retries of launching the Batch Queue Manager. If the sub-process terminates within this time, the service will issue an appropriate event log entry, and terminate. Specified in seconds, defaults to 60.
LaunchTimeLimit Integer
If specified, it is the amount of time that the service expects the launch process to take. If launch exceeds this time, Windows may terminate the service. Specified in seconds, defaults to 60.
PollTime Integer
If specified, it is the amount of time that the service waits between polling the active queues. The service will generate an event log entry for each queue, each time it polls the sub-process. This entry indicates the status information provided by the Batch Queue Manager. Specified in seconds, defaults to 300.
IdlePollTime Integer
Similar to PollTime, but this is the time the service waits if there are no queues currently running. This parameter is only used when the monitor is paused. Specified in seconds, defaults to 1800 (30 minutes).
Table 15 Batch Monitor configuration parameters
For each configured queue, there must be a corresponding configuration section whose name starts with the literal Queue. For example, Queue1, Queue2.
At service start time, the Service Monitor will scan the configuration and each Queue section that it finds will result in an additional Batch Manager process being run. The parameters for each Queue section are as follows:
Parameter Type Meaning QueueName String This parameter must be specified. It is the name of the spatialNET
batch queue for this process to run. SpatialnetUser String If specified, this parameter is the name of the spatialNET user to
connect as. This user must be defined in the spatialNET system. Defaults to the SpatialnetUser value in the BatchQueueMonitor section.
Table 16 Queue Configuration Parameters
NOTE: Only one process at a time can be processing in a queue, and subsequent attempts to start a batch processor will fail with an appropriate error message.
Most cases where the Batch Queue Manager terminates are unexpected. In most cases, the error condition that caused the crash will still apply and the relaunched process will fail immediately.

40 of 69 SPATIALinfo Inc.
To catch this case, the RetryTimeLimit parameter is used. If the time between launch attempts is less than this limit, the batch monitor will give up on that queue. If multiple queues are being run by the same monitor, the monitor will continue to run until all queues have failed.
The batch queue process model The batch queue process model is as follows.
Figure 23: The batch queue process
Steps of the process
1. The service (snbatchmon.exe) starts.
2. The service reads the configuration file and launches one or more sub-processes (spatialnet.exe) to run as the Batch Queue Manager(s).
3. Each Batch Queue Manager connects independently to Oracle and processes its entries in the BATCH_QUEUE_ENTRY table in the database.
Batch Queue Manager
(spatialnet.exe)
Batch Queue Process
(spatialnet.exe)
Database Database Spec
Batch Queue Monitor
(snbatchmon.exe)
Shared Memory Segment
Configuration
Windows Event Log
Batch Queue Monitor Message Catalogue

SPATIALinfo Inc. 41 of 69
If a Batch Queue Manager process terminates prematurely for any reason, the monitor will register an event message, and then attempt to restart the process.
NOTE: If the process terminates prematurely within the time configured by RetryTimeLimit, then an event message is recorded and the process is not restarted.
If all queues stop, the monitor will issue an event message and enter the “paused” state.
Batch Monitor log messages The Batch Monitor uses a fixed collection of log messages, each of which has an Event ID that can be displayed in the Event Viewer.
You may choose to install Event Log Tasks to particular events to provide additional notifications in the event of failures.
Event ID Meaning 100 Monitor starting up 101 Monitor terminated normally 102 Pause request while not running 103 Continue request while not paused 104 A batch queue manager has terminated and will not be restarted (since the termination
was a result of the monitor pausing/stopping) 105 A batch queue manager has terminated and will be restarted (since the termination was
unexpected) 199 Process status message 200 An unexpected runtime error has occurred.
See the Event message for more information 201 Configuration error. See the Event message for more information 300 Process runaway (two launch attempts within RetryTimeLimit seconds) 301 Monitor stopping since no active queues remain 302 Monitor pausing since no active queues remain
Table 17 Event IDs
• 100 to 199: Information about issues that occur during operation, but do not indicate serious problems.
• 200 to 299: Configuration errors, or operating system failures that cannot be recovered from automatically.
• 300 to 399: Failures in the batch managers themselves.
• 200 through 399: Problems that may not automatically resolve themselves. These issues should be monitored.
Monitor batch queue events You can set up a custom view in Event Viewer to monitor issues in the batch queue.
To set up a custom view in Event Viewer:
1. Launch Event Viewer. (In the Windows Start button search field, type event viewer, then click Event Viewer in the results.

42 of 69 SPATIALinfo Inc.
Figure 24: Search for Event Viewer
2. On the Event Viewer window, click the Action menu and select Create Custom View.
Figure 25: Create a custom view in the Even Viewer
3. In the Event Source field, type snbatchmon.exe.

SPATIALinfo Inc. 43 of 69
4. Enter the ID range of the events that you want to monitor. Events in the 200-399 range should be monitored.
Figure 26: The Create Custom View window
5. Click OK, and then click OK again when the Save Filter window appears. The Event Viewer window appears.
6. In the Actions section of the window, click Attach Task to this Event.
Figure 27: The Event Viewer with Attach Task highlighted

44 of 69 SPATIALinfo Inc.
7. Follow the on-screen instructions to have the Event Monitor email you when an event occurs.
Optimize for Oracle Spatial The introduction of spatial data to an Oracle server can have a significant impact on the administration of the server.
This chapter provides some basic guidelines for using the Oracle Spatial database driver with spatialNET.
Spatial data is object data Unlike the standard data types usually found in a RDBMS, spatial data are a kind of object data called object-relational entities with VARRAY components.
Please refer to Oracle documentation for detailed information about object-relational and Oracle Spatial data.
SDO_GEOMETRY The Oracle data type for spatial information is SDO_GEOMETRY. This data type is defined by the Oracle system owner of spatial data, MDSYS. Spatial data in Oracle has the following structure:
CREATE TYPE sdo_geometry AS OBJECT ( SDO_GTYPE NUMBER , SDO_SRID NUMBER , SDO_POINT SDO_POINT_TYPE , SDO_ELEM_INFO SDO_ELEM_INFO_ARRAY , SDO_ORDINATES SDO_ORDINATE_ARRAY); CREATE TYPE sdo_point_type AS OBJECT ( X NUMBER , Y NUMBER , Z NUMBER); CREATE TYPE sdo_elem_info_array AS VARRAY (1048576) of NUMBER; CREATE TYPE sdo_ordinate_array AS VARRAY (1048576) of NUMBER;
In addition to owning the definition for spatial data, MDSYS also owns the tables and packages which provide the support for spatial data within an Oracle Server.
NOTE: You cannot use “X” and “Y’ for a direct query from Oracle Spatial. Instead, you must reference <tablename>.coordinates.sdo_point.X and you must define a table alias for the table name (the table alias can be the same name as the table name). For example: FROM <tablename> <tablename>,
Metadata configuration Each spatial attribute defined in the data dictionary and included in a table must have a spatial index.

SPATIALinfo Inc. 45 of 69
Oracle Spatial requires an entry in the metadata view USER_SDO_GEOM_METADATA. This view is based on the MDSYS table SDO_GEOM_METADATA_TABLE.
USER_SDO_GEOM_METADATA ( TABLE_NAME VARCHAR2(32), COLUMN_NAME VARCHAR2(32), DIMINFO SDO_DIM_ARRAY, SRID NUMBER );
Each table with a spatial attribute requires an entry in this view for the creation of a spatial index.
• TABLE_NAME: The table to be indexed • COLUMN_NAME: The column with data type SDO_GEOMETRY • DIMINFO: The coordinates for a minimum bounding rectangle (MBR) covering the
extent of the spatial data in the table • SRID: Spatial Reference ID for the table’s spatial data’s coordinate system.
The scripts to create the spatialNET tables will populate this metadata view with the information to support the creation of the required indexes.
SRID • The SRID identifies the coordinate system of the SDO objects within a table column of
type SDO_GEOMETRY. • All SDO objects in a table column must reference the same coordinate system. • The SRID is a foreign key, which must be valid, and references a Coordinate Systems
registered in the MDSYS.CS_SRS table. • To use a coordinate system, spatialNET requires a corresponding entry in the
SPATIALNET_CS_SRS table.
GTYPE spatialNET only supports the following 2D geometries
• 2001 Point • 2002 Line • 2003 Polygon
In a table with SDO data, all geometries must be of the same type.
Spatial index analysis The Oracle data dictionary may be queried to generate a list of spatial indexes within a spatialNET schema:
SELECT TABLE_NAME, INDEX_NAME
FROM USER_INDEXES

46 of 69 SPATIALinfo Inc.
WHERE INDEX_TYPE = ‘DOMAIN’
The status of a ‘DOMAIN’ index is set in the domidx_opstatus column of the USER_INDEXES view. Oracle will set this value to ‘FAILED’ if an exception is generated while building a spatial index.
If a spatial index has been marked as ‘FAILED; the index must be dropped before another attempt is made to generate the index.
For detailed information about DOMAIN type indexes, check your Oracle documentation.
Oracle spatial index implementation Spatial indexes are structured differently from standard indexes. A spatial index is kept in a system-generated table, with a name like MDRT_%. These tables are also associated with a system generated sequence with a name like MDRS_%.
Use metadata view USER_SDO_INDEX_METADATA to query which table supports a specific spatial index.
Specifying spatial index table space A spatial index creation command finishes with a clause PARAMETERS(' … '). To specify a table space for the spatial index, add table space=<table spacename> to the quoted parameter string. Eg.
CREATE INDEX FLOOR_SPIND ON FLOOR(COORDINATES) INDEXTYPE IS MDSYS.SPATIAL_INDEX PARAMETERS('layer_gtype=POLYGON table space=INDX');
NOTE: Spatial indexes may be stored in a different table space from the spatial data.
Errors occurring while creating or rebuilding an index If an error occurs while a spatial index is being created or rebuilt, the result can leave an incomplete index structure. Such incomplete indexes might need to be dropped before recreating the index.
TO DROP AN INDEX: use the following command: DROP INDEX <name> FORCE;
You can see details of the table spaces a spatial index uses from the user_sdo_index_metadata view
Direct storage only Oracle Spatial only supports direct storage of geometry - no indirect link by or link up geometry is supported. Instead, spatialNET can be configured to manage indirect polygons.
Maintain performance Two tasks are needed to maintain database performance:
• Maintain database statistics

SPATIALinfo Inc. 47 of 69
• Rebuild of R-tree indexes
Maintain database statistics You should regularly maintain the database table and index statistics, especially after substantial changes to the data in the database. For best results, leave a mix of posted and non-posted data when the statistics are gathered.
To maintain database statistics:
1. FIRST-TIME ONLY: While the database is under load, execute the following procedure: dbms_stats.gather_system_stats NOTE: This procedure will let the database learn about the performance of the database server hardware. The database will then use this information when optimizing queries.
2. Edit orasp_gather.sql to include any column histograms you want gathered at your site. See Optional scripts for the location of this script.
3. Log in to the database using SQL*Plus as the user owning the tables.
4. Execute the following command: exec orasp_gather.sql
This command gets statistics for tables, indexes, and a column value histogram for journal (so the database knows looking up zero is not useful).
Rebuild R-tree indexes Oracle R-tree indexes build a hierarchy of rectangles that surround indexed objects. The indexes sometimes lose effectiveness as new data is added, so they should be rebuilt from time to time.
Rebuild the spatial index To rebuild all spatial indexes, log in to the database SQL plus as the user owning the tables and execute the following script in a directory that you have write access to:
set linesize 200 feedback off echo off trimspool on pagesize 0 termout off spool x.tmp prompt Alter session set SORT_AREA_SIZE=4096000; select 'alter index ' || index_name ||' rebuild parameters(''' || parameters ||''');' from user_indexes where ityp_name = 'SPATIAL_INDEX' / spool off set heading on pagesize 9999 termout on @x.tmp
Parameters When rebuilding spatial indexes, make sure to include the parameters. Neglecting to include parameters can result in removing the constraint on geometry type.

48 of 69 SPATIALinfo Inc.
• Layer_gtype: Sets a constraint on the valid geometry types for the SDO objects indexed (either Point, Line, or Polygon).
• Work_table space: Directs Oracle to use a specific table space for the working tables it creates during the generation of a spatial index
• Table space: Sets the table space to hold spatial index tables
To move a spatial index to a different table space:
• Add table space=<table spacename> to the parameters string. For example:
select 'alter index ' || index_name ||' rebuild parameters(''' || parameters ||' table space=indx'');' from user_indexes where ityp_name = 'SPATIAL_INDEX'
Verify the geometry constant To make sure that the geometry constraint is not set to DEFAULT:
• Query the SDO_LAYER_GTYPE attribute of the USER_SDO_INDEX_METADATA view.
Row chaining Some SDO objects may contain a large number of coordinates, resulting in the chaining of rows. This chaining requires multiple direct reads to retrieve a single record.
Minimum block size Spatial Indexes can benefit from being placed on table spaces with larger block sizes. Table spaces dedicated to spatial indexes should be created with a minimum block size of 16K.
Oracle Cost Based Optimizer settings Oracle provides several settings to adjust the behavior of the Oracle Cost Based Optimizer (CBO).
OPTIMIZER_INDEX_CACHING This setting allows an administrator to force the CBO to favor nested loops joins and IN-list iterators.
The higher the value of this parameter, the more likely that the optimizer will pick nested loops joins over hash or sort-merge joins. A high value will also force the optimizer to pick indexes using IN-list iterators over other indexes or full table scans.
Adjusting this setting is not required in Oracle 11
Default setting: 0 out of 100
Recommended setting: 0 out of 100
OPTIMIZER_INDEX_COST_ADJ This setting allows an administrator to make the optimizer more or less prone to selecting a full table scan over an index access path.

SPATIALinfo Inc. 49 of 69
The higher the value of this parameter, the more likely that the optimizer will choose a full table scan over an index path.
Adjusting this setting is not required in Oracle 11
Default setting: 100 out of 100
Recommended Setting: 100 out of 100
More information about OPTIMIZER_INDEX_COST_ADJ The default setting of 100 means that the optimizer evaluates index access paths at 100% of their regular cost. Any other setting makes the optimizer evaluate the index access path at that percentage of the regular cost. For example, a setting of 50 makes the index access path look half as expensive as normal.
QUERY_REWRITE_ENABLED This parameter enables the optimizer to query materialized views instead of using the normal views.
Allowing Oracle to rewrite queries with a spatial component can result in inefficient processing when querying spatial data.
Default setting: FALSE
Recommended Setting: FALSE
More information about QUERY_REWRITE_ENABLED
When base tables contain large amount of data, it is time-consuming to compute aggregates or joins between tables. Oracle Database has the capacity to answer queries using materialized views, because materialized views contain precomputed aggregates and joins.
For spatial data, this process can slow response time, because the process must go through a series of checks before running the query.
When it is enabled, Query Rewrite operates on queries and sub-queries in the following types of SQL statements and sub-queries:
• SELECT • CREATE TABLE … AS SELECT • INSERT INTO … SELECT • UNION • UNION ALL • INTERSECT • MINUS • INSERT • DELETE • UPDATE

50 of 69 SPATIALinfo Inc.
The spatialNET JMS Administration Tool The spatialNET JMS Administration Tool manages the spatialNET batch queue, as well as spatialNET users, jobs, and security groups.
To run the JMS Administration Tool:
1. Double-click the spatialNET Job Administrator icon on your desktop, or click the Start button, then click All Programs, then spatialNET, then spatialNET Job Administrator.
2. Enter the appropriate information, including the database that you want to work on.
3. Click Login. The spatialNET JMS Administration Tool window appears.
Figure 28: The JMS Administration Tool window
After logging in, see the appropriate section below for information about using the JMS Administration Tool.

SPATIALinfo Inc. 51 of 69
List all users Click the Users button to see and edit spatialNET users for the database. The All users window appears.
Figure 29: The All users window
The All users window allows you to create a new user, see details about a user, or edit or change a user password.
Create a new user To create a new user:
1. From the JMS Administration tool’s All users window, click the New button. The User Creation window appears.
2. Enter all the required information and then click the Add button.
View user details The User Details panel displays information on the spatialNET user along with all jobs that are assigned to that user.
To view user details:
1. From the JMS Administration tool’s All users window, click a user name and then click the Select button. The User Details window appears, allowing you to view the details.

52 of 69 SPATIALinfo Inc.
Figure 30: User details
Edit user details To edit user details:
1. From the JMS Administration tool’s All users window, click a user name, then click Edit, and then User. The User Modification window appears.
Figure 31: The User Modification window
2. Make the appropriate changes, and then click Apply to save the changes.
3. Click Close to close the window.

SPATIALinfo Inc. 53 of 69
Change a password If a user knows the password, but wants to change it, then follow the procedure below. If the user has forgotten the password, then see Reset a password.
To change a password:
1. From the JMS Administration tool’s All users window, select a user name, then click Edit, and then Password. The Edit password window appears.
2. Complete each field, then click OK to save the new password.
Reset a password If a user has forgotten that password, then use the procedure below to set the password to null. If the user knows the password and wants to change it, see Change a password.
To reset a password:
1. From the JMS Administration tool’s All users window, click a user name, then click Edit, and then click Reset Password.
2. Click Yes to confirm that you want to reset the password. The password is set to null.
Delete a user The following procedure will delete a user from the spatialNET database. A user cannot be deleted if there is a job associated with that user.
To delete a user:
1. From the JMS Administration tool’s All users window, select a user name, and then click the Delete button. The Entities being deleted window appears.
2. Click Confirm to confirm that you want to delete the user.
NOTE: If a job is assigned to a user, you will receive an error message. You will be able to see a list of jobs assigned to the user, so that you can assign them to other users. Once the jobs are no longer assigned to a user, then you can delete that user.
User types in the security model Some spatialNET configurations support a security model containing multiple application user types, such as Administrator, Read/Write, and Read-Only.
NOTE: An Administrator user type is not necessarily a table owner or database administrator.
You can configure spatialNET so that certain menu options appear only for certain user types. For example, only users with spatialNET administrator status have access to all of the commands described in this chapter.

54 of 69 SPATIALinfo Inc.
To examine the availability of menu items for each of the available user types, please consult the Configuration Specification document that came with your spatialNET configuration.
Create a security group To create a new security group:
1. From the JMS Administration tool’s All users window, click the Security Groups button. The All security groups window appears.
2. Click the New button.
Figure 32: The All security groups window
The Security Group Creation window appears.

SPATIALinfo Inc. 55 of 69
Figure 33: The Security Group Creation window
3. Select the appropriate options for each tab of the security group, then click Add. The new security group is created and added to the list in the All security groups window.
Edit a security group To edit a security group:
1. From the JMS Administration tool’s All users window, click the Security Groups button. The All security groups window appears.
2. Click a security group from the list, then click Edit.
Figure 34: The All security groups window

56 of 69 SPATIALinfo Inc.
3. Make appropriate changes to each tab the security group, then click Apply. The security group will be updated.
Figure 35: The Security group modification window
Delete a security group The following procedure will delete a security group. A security group cannot be deleted if there is a user associated with it.
To delete a security group:
1. From the JMS Administration tool’s All users window, click the Security Groups button. The All security groups window appears.
2. Click a security group from the list, then click Delete, and then click Confirm.
Figure 36: All security groups – delete

SPATIALinfo Inc. 57 of 69
Delete removed entities spatialNET allows entities to be removed, rather than deleted. An entity that has been removed remains in the database for reporting purposes.
Once a job has been posted and those entities are no longer needed, you can permanently delete them.
NOTE: You cannot choose which entities to delete. All removed entities will be deleted.
To permanently delete removed entities:
1. On the spatialNET JMS Administration window, click the Cleanup button, and then click Cleanup posted removed entities.
Figure 37: The JMS Administration Tool with Cleanup posted removed entities highlighted
The Cleanup of Posted Removed entities window appears.
2. Optional: Click All removed to see a list of the removed entities. This list can take some time to generate.
3. Choose Cleanup. The removed entities will be deleted.
Figure 38: Cleanup of Posted Removed entities window
Remove a JMS job operations lock Certain JMS administration operations create a job operations lock. That lock should be removed automatically when the operation is finished.

58 of 69 SPATIALinfo Inc.
In the rare case that a job operations lock is not removed automatically, you can remove it yourself.
Warning: Only remove a lock when you are sure that the operation has completed. Running multiple JMS administration operations at the same time can cause network corruption.
To remove a JMS job operations lock:
• On the spatialNET JMS Administration window, click the Cleanup button, and then click Cleanup JMS job operations lock.
Figure 39: The JMS Administration Tool window with Cleanup JMS job operations lock highlighted
View information about the current selection You can open the Current Selection window directly from the JMS Administration window. The functions on the Current Selection window are intended to be used while running the spatialNET client.
To view information about the current selection:
• On the spatialNET JMS Administration window, click the Debug button, and then click Status panel. The spatialNET Current Selection window appears.
Debugging tools There are several debugging tools available under the Debug menu on the JMS Administration Tool window. Except for the Status option (see View information about the current selection), these debugging tools should only be used under direction from a spatialNET support engineer.
Viewing job type definitions The job type definitions define the different job types that a user chooses among when creating new spatialNET job. You can view the Job definitions directly from the JMS Administration Tool window.
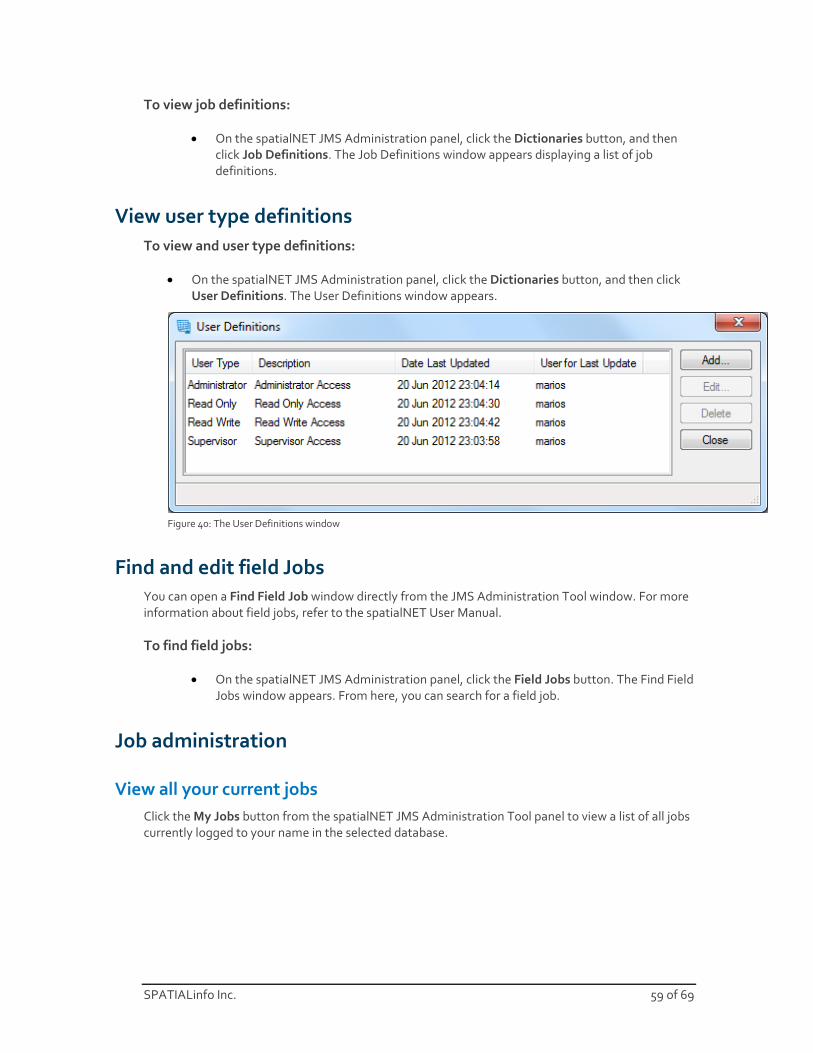
SPATIALinfo Inc. 59 of 69
To view job definitions:
• On the spatialNET JMS Administration panel, click the Dictionaries button, and then click Job Definitions. The Job Definitions window appears displaying a list of job definitions.
View user type definitions To view and user type definitions:
• On the spatialNET JMS Administration panel, click the Dictionaries button, and then click User Definitions. The User Definitions window appears.
Figure 40: The User Definitions window
Find and edit field Jobs You can open a Find Field Job window directly from the JMS Administration Tool window. For more information about field jobs, refer to the spatialNET User Manual.
To find field jobs:
• On the spatialNET JMS Administration panel, click the Field Jobs button. The Find Field Jobs window appears. From here, you can search for a field job.
Job administration
View all your current jobs Click the My Jobs button from the spatialNET JMS Administration Tool panel to view a list of all jobs currently logged to your name in the selected database.

60 of 69 SPATIALinfo Inc.
Figure 41: The All jobs window
Find a job To find a job:
1. Click the Find job button on the spatialNET JMS Administration window.
2. Type a search term in a search fields at the top of the window.
Figure 42: The Find Job window with the Description search field highlighted
3. Click the search operator button to the left of the search field, and then click the appropriate option.

SPATIALinfo Inc. 61 of 69
Figure 43: The Find Job window with search operators
The list of jobs is filtered to match your search.
NOTE: The Find Job window lists up to 256 jobs at a time. To force the window to show more matching jobs, click the Retrieve button.
Create a new job Create a new job from the My jobs or the Find job window. The steps below use the Find Job window.
To create a new job:
1. Click the Find job button on the spatialNET JMS Administration window. The My Job window appears.
2. Click the New button to open the Job Creation window.
Figure 44: Job Creation window

62 of 69 SPATIALinfo Inc.
3. Enter all required details and click the Add button. Click on the Close button to close the window.
Edit a job Edit a job from the My jobs or the Find job window. The steps below use the Find job window.
To edit a job:
1. Click the Find job button on the spatialNET JMS Administration window. The Find job window appears.
2. Search for the job using the search fields at the top of the window.
3. Click a job in the list, then click the Edit button. The Job Modification window appears.
Figure 45: The Job Modification window
4. Make appropriate changes, and then click Apply to save the changes.
5. Click Close to close the window.
View details for a job View details of a job from the My jobs or the Find job window. The steps below use the Find job window.

SPATIALinfo Inc. 63 of 69
To view details for a job:
1. Click the Find job button on the spatialNET JMS Administration window. The Find job window appears.
2. Search for the job using the search fields at the top of the window.
3. Click a job in the list, then click the Details button. The Job Details window appears.
Figure 46: The Job Details window
Reset a job If a spatialNET design session crashes for any reason, the job that was open at the time will continue to be identified as open. That job must be reset before it can be accessed again.
You can reset a job from the My jobs or the Find job window. The steps below use the Find job window.
To reset a job:
1. On the spatialNET JMS Administration window, click the Find job button. The Find job window appears.
2. Search for the job using the search fields at the top of the window.
3. Click a job in the list, then click the Reset button. The job is reset and can be opened.

64 of 69 SPATIALinfo Inc.
Troubleshooting
Cannot open a job because it is already open If a spatialNET design session crashes for any reason, the job will be still identified as open. The job must be reset before it can be accessed again.
• If the user has a Reset button available on the Job Selection window, then the user should click that button. (An administrator can edit the user’s security group to enable the Reset button. See Edit a security group.)
• If the user has no Reset button, an administrator must reset the job. See: Reset a job.
Database shutdown causes batch queue to lock up To maintain queue and database integrity, only one user can run a given batch queue at any one time. An attempt to run a queue that is already running will generate an error message.
If a database shutdown or backup process breaks the connection between the batch queue and the database, the queue will no longer be able to process jobs.
The spatialNET batch queue process must be shut down, reset and restarted so that job processing can recommence.
Reset queue where a session has crashed If a spatialNET queue crashes for any reason, the queue will be still identified as running and the job will still be identified as open. Reset the queue.
It may also be necessary to reset the job that was open at the time of the crash.
“Missing symbol xxx” appears beside symbols in spatialNET views
If the symbol specified in the dictionary for an item type is not in the symbol\smt directory of the current installation (or in a template or the AutoCAD search path), a default symbol and message will appear. Ensure that the dictionary entry refers to a symbol that actually exists.

SPATIALinfo Inc. 65 of 69
Table of Figures Figure 1 : Client / server relationship for Oracle Spatial / Locator driver .............................................. 8 Figure 2: dbed2 utility...................................................................................................................... 16 Figure 3: The spatialNET installation Welcome page ....................................................................... 22 Figure 4: License agreement ........................................................................................................... 22 Figure 5: Select Destination Location .............................................................................................. 23 Figure 6: Select Components ........................................................................................................... 23 Figure 7: Ready to Install ................................................................................................................. 24 Figure 8: Login dialog box ............................................................................................................... 25 Figure 9: My Computer Properties with Advanced system settings highlighted ............................... 25 Figure 10: The Environment Variables window ................................................................................ 26 Figure 11: System variables ............................................................................................................. 26 Figure 12: Error message ................................................................................................................. 26 Figure 13: Administrator Command Prompt path .............................................................................27 Figure 14: The JMS admin tool with My jobs highlighted ................................................................. 28 Figure 15: The Queue for Publish option .......................................................................................... 28 Figure 16: The JMS admin tool with My jobs highlighted ................................................................. 29 Figure 17: The Queue for Post option ............................................................................................... 29 Figure 18: JMS Administration Results window description of buttons ............................................ 30 Figure 19: The All batch queues window's Display menu ................................................................... 31 Figure 20: The Queue Control window ............................................................................................ 32 Figure 21: The data model ................................................................................................................ 33 Figure 22: BQM process flow ........................................................................................................... 34 Figure 23: The batch queue process ................................................................................................. 40 Figure 24: Search for Event Viewer .................................................................................................. 42 Figure 25: Create a custom view in the Even Viewer ........................................................................ 42 Figure 26: The Create Custom View window.................................................................................... 43 Figure 27: The Event Viewer with Attach Task highlighted .............................................................. 43 Figure 28: The JMS Administration Tool window ............................................................................. 50 Figure 29: The All users window ....................................................................................................... 51 Figure 30: User details ..................................................................................................................... 52 Figure 31: The User Modification window ........................................................................................ 52 Figure 32: The All security groups window ....................................................................................... 54 Figure 33: The Security Group Creation window .............................................................................. 55 Figure 34: The All security groups window ....................................................................................... 55 Figure 35: The Security group modification window ........................................................................ 56 Figure 36: All security groups – delete ............................................................................................. 56 Figure 37: The JMS Administration Tool with Cleanup posted removed entities highlighted ............. 57 Figure 38: Cleanup of Posted Removed entities window ................................................................... 57 Figure 39: The JMS Administration Tool window with Cleanup JMS job operations lock highlighted 58 Figure 40: The User Definitions window .......................................................................................... 59 Figure 41: The All jobs window ........................................................................................................ 60 Figure 42: The Find Job window with the Description search field highlighted ................................. 60 Figure 43: The Find Job window with search operators .................................................................... 61

66 of 69 SPATIALinfo Inc.
Figure 44: Job Creation window....................................................................................................... 61 Figure 45: The Job Modification window ......................................................................................... 62 Figure 46: The Job Details window .................................................................................................. 63 Figure 47: Oracle Net Configuration Assistant Welcome window..................................................... 67 Figure 48: Oracle Net Configuration Assistant second window ........................................................ 68 Figure 49: Oracle Net Configuration Assistant fourth window ......................................................... 68 Figure 50: Oracle Net Configuration Assistant sixth window ............................................................ 69 Figure 51: Oracle Net Configuration Assistant seventh window ....................................................... 69

SPATIALinfo Inc. 67 of 69
Appendix: use Oracle Net Configuration Assistant to set up the tnsnames.ora file
During installation of the Oracle client, a tnsnames.ora file was created. To configure that file manually, see Set up tnsnames.ora for new database connections.
If you prefer to set up the file using the Oracle Net Configuration Assistant, then follow the instructions below.
To create a tnsnames.ora file using the Oracle Net Configuration Assistant:
1. Click the Windows Start button, and then click Oracle.
2. Click Configuration and Migration Tools and then click Net Configuration Assistant. The Welcome window appears.
Figure 47: Oracle Net Configuration Assistant Welcome window
3. Select Local Net Service Name configuration, and then click Next.

68 of 69 SPATIALinfo Inc.
4. In the window that appears, select Add, and then click the Next button.
Figure 48: Oracle Net Configuration Assistant second window
5. In the Service Name field, type the global database name that was set up by the IT administrator during the Oracle server install.
6. Click the Next button.
7. Select TCP, and then click Next.
Figure 49: Oracle Net Configuration Assistant fourth window
8. Obtain the IP address of the server from an IT administrator and enter type it in the Host Name field. Keep the standard port number of 1521, then click Next.

SPATIALinfo Inc. 69 of 69
9. Select Yes, perform a test, and then click Next. The test will run.
Figure 50: Oracle Net Configuration Assistant sixth window
10. If the test was successful, click Next, and continue to the next step. If the test was not successful, use the Back button to verify the data entered to this point, then make the necessary corrections and continue to the next step.
NOTE: If the failure is caused by the user name and password, click the Change Login button and enter the SPATIALinfo database administrator user name and password.
Figure 51: Oracle Net Configuration Assistant seventh window
11. Enter the Net Service Name created during the Oracle server installation, followed by the server name. Example: servicename.companyname.net_fullservername

70 of 69 SPATIALinfo Inc.
12. Click Next.
13. In the final window, click Finish.
To test that the file was configured correctly:
1. Locate the tnsname.ora file on the computer and on the server at: c:\oracle\product\11G\client_1\NETWORK\ADMIN
2. Verify that the text in the two tnsname.ora files is identical.
Related Documents