Building a solar kiln for drying green, planked local mber educates children in woodwork, construcon, project management, sustainability and local resources. It allows schools and others to use locally- sourced mber to produce a premium wood product which cannot be bought from mass-suppliers. All of this whilst using a system that is only reliant on solar energy, making it completely environmentally friendly. The value of solar kilns Wood for any indoor construcon project, such as furniture, needs to be dried down to a moisture content of 10% or lower to avoid spling or warping in use. Convenonal kiln drying uses large amounts of energy, usually electricity, and as much as 66% of the energy goes into the drying process. Solar kiln drying uses at least 75% less energy, in fact if the kiln’s circulang fans are run from solar panels the energy costs of the actual drying is reduced to 0%. The value of local mber The High Weald Area of Outstanding Natural Beauty has 27% woodland cover, nearly three mes the naonal average. The woodland has been managed to produce mber for centuries and many rare species such as the dormouse, the pearl bordered frillary and nightjars depend on its connued management. Sourcing and using local mber therefore benefits an important landscape and wildlife feature. The High Weald has large quanes of useful small diameter mber, which is oſten just cut up for firewood. Hardwood species such as sweet chestnut, ash and oak, and soſtwood species such as pine, can easily be dried in a solar kiln during the spring and summer. This guide outlines the process involved in building a solar kiln, based on a design used by The Skinners’ School, Tunbridge Wells. If you would like more informaon and advice on building a solar kiln, please contact Mahew Pis at the High Weald Partnership T: 01424 723011 E: [email protected]. Ma can also help with sourcing planked, green mber and may be able to grant-aid the purchase. We would like to thank Mark Moody and the students from Yr 7, 8, 11 and 12 of Skinners’ School for trialing the design and providing ps for this guide. The project was supported by: Solar Kiln Construcon Guide - Introducon Produced by the High Weald AONB Partnership www.highweald.org

Welcome message from author
This document is posted to help you gain knowledge. Please leave a comment to let me know what you think about it! Share it to your friends and learn new things together.
Transcript

Building a solar kiln for drying green, planked local timber educates children in woodwork, construction, project management, sustainability and local resources. It allows schools and others to use locally-sourced timber to produce a premium wood product which cannot be bought from mass-suppliers. All of this whilst using a system that is only reliant on solar energy, making it completely environmentally friendly.
The value of solar kilnsWood for any indoor construction project, such as furniture, needs to be dried down to a moisture content of 10% or lower to avoid splitting or warping in use. Conventional kiln drying uses large amounts of energy, usually electricity, and as much as 66% of the energy goes into the drying process. Solar kiln drying uses at least 75% less energy, in fact if the kiln’s circulating fans are run from solar panels the energy costs of the actual drying is reduced to 0%.
The value of local timber The High Weald Area of Outstanding Natural Beauty has 27% woodland cover, nearly three times the national average. The woodland has been managed to produce timber for centuries and many rare species such as the dormouse, the pearl bordered fritillary and nightjars depend on its continued management. Sourcing and using local timber therefore benefits an important landscape and wildlife feature.
The High Weald has large quantities of useful small diameter timber, which is often just cut up for firewood. Hardwood species such as sweet chestnut, ash and oak, and softwood species such as pine, can easily be dried in a solar kiln during the spring and summer.
This guide outlines the process involved in building a solar kiln, based on a design used by The Skinners’ School, Tunbridge Wells.
If you would like more information and advice on building a solar kiln, please contact Matthew Pitts at the High Weald Partnership T: 01424 723011 E: [email protected]. Matt can also help with sourcing planked, green timber and may be able to grant-aid the purchase.
We would like to thank Mark Moody and the students from Yr 7, 8, 11 and 12 of Skinners’ School for trialing the design and providing tips for this guide. The project was supported by:
Solar Kiln Construction Guide - Introduction
Produced by the High Weald AONB Partnership www.highweald.org
Kiln capacity A kiln constructed to the specifications in this guide will dry 450 board feet of one-inch-thick hardwood in 6 weeks or less of good weather, or 600 board feet of two-inch hardwood in 15 weeks. Note that solar kilns can only operate effectively for around 7 months of the year in the UK climate (March to September).
Budget It will cost you approximately £800 to buy the materials to build the solar kiln. Filling the kiln with green, planked timber for drying will cost a further £300-£500, depending on your choice of wood.
Choosing the siteA solar kiln must be sited in the sunniest possible location, ideally facing directly south to maximise the amount of sunlight available for drying the timber. Avoid locations near trees and buildings which could cast shade and reduce the efficiency of the solar kiln.
Preparing the siteThe ground at your chosen site must be level, or levelled if necessary. Ideally the kiln should be constructed on foundations to prevent rotting of the kiln itself. Pressure treated softwood sleepers make an ideal foundation. For the kiln dimensions in this guide two sleepers were cut in half and used for the foundations. The sleepers must be level and can be pinned in place if needed.
Constructing the kilnThe easiest way to build the kiln is in sections which are then joined together. The kiln is made from standard sheets of exterior plywood which have been treated with wood preserver. Marine plywood would be an ideal alternative but costs around twice as much.
The walls of the kiln are a double skin of plywood with sheep’s wool insulation sandwiched between them. The whole kiln is insulated to maximise efficiency and reduce the drying time of the timber. Sheep’s wool insulation is safe to handle without any special protective equipment and is more sustainable than using conventional rock wool insulation. The framing of the kiln walls is pressure treated softwood.
1. Solar Kiln Construction Guide - Before You Start
Produced by the High Weald AONB Partnership www.highweald.org2

2. Solar Kiln Construction Guide - Helpful Hints
Produced by the High Weald AONB Partnership www.highweald.org3
Do not use heavier pieces of wood than necessary. Taking this into account, it is possible to make an • effective, streamlined and cheap kiln.
Wood should be accurately pre-measured or pre-cut when ordered to save time and hassle in the • production process.
A metal, attic fan is necessary, anything lighter weight will not withstand the heat.•
Different ages of children can work on the kiln together, as they each bring different skills and will gain • different things from it.
A project manager that doesn’t have 100% of their time committed to teaching is useful, as is having • someone from the High Weald AONB Partnership to sign it off when it is finished.
The project should be finished within a term as students and teachers will become too busy to • complete the project in a new term, particularly if it is after the Summer holidays.
For more information on how to build a solar kiln http://• owic.oregonstate.edu/solarkiln/plans.html, http://forestandwildlifeecology.wisc.edu/sites/default/files/pdfs/publications/60.PDF
Please refer to the solar kiln materials list and construction guide documents for dimensions.
4
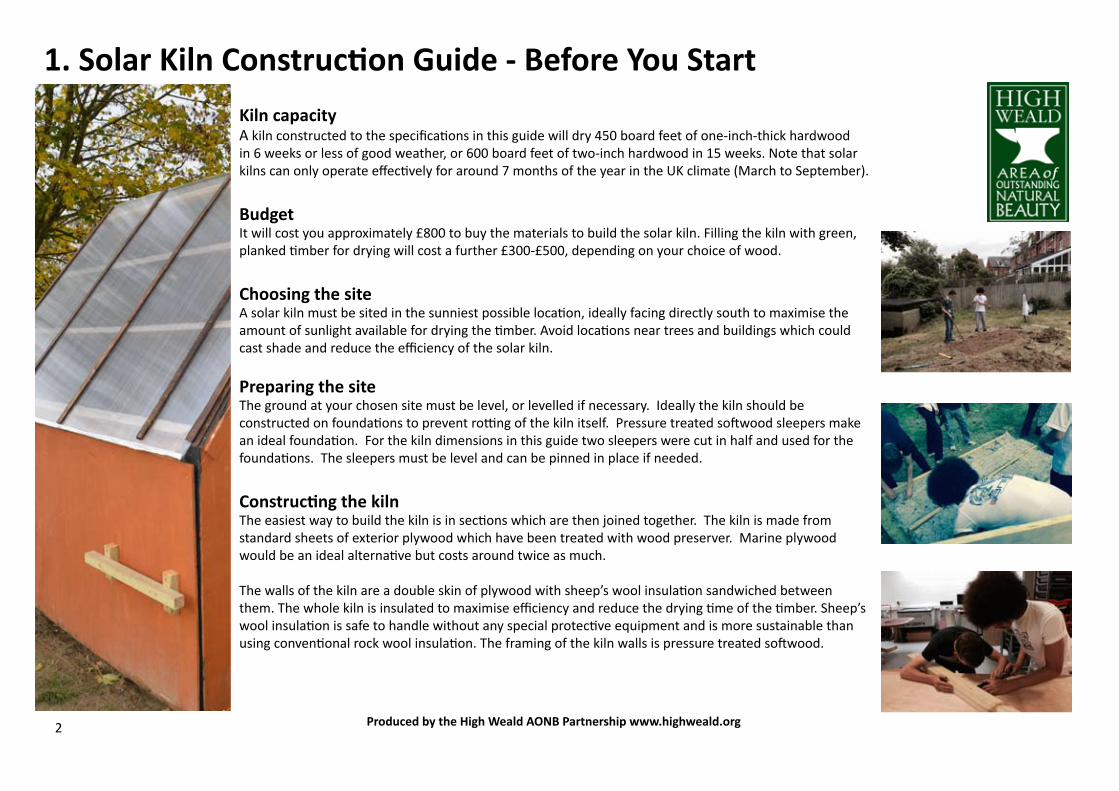
3. Solar Kiln Construc�on Guide: Floor
• Use two sheets of plywood and 3 joists.
• Put insula�on between the joists before the second sheet of plywood is screwed into place.
• Place the floor on top of the sleeper founda�ons.
Sheep’s wool insula�on is placed
between the joists
Produced by the High Weald AONB Partnership www.highweald.org

5
4. Solar Kiln Construc�on Guide: Sides & Front Door
Sheep’s wool insula�on
is placed between the
joists
• Use a circular saw with a fixed guide to cut
the plywood sheets for the sides.
• Construct the two sides of the kiln in the
same way as the floor, apart from using
smaller joists of 45x100mm pressure treated
so(wood.
• Use the same overall construc�on method
for the front door as you would to construct
the sides.
• A+ach handles to each end to allow the door
to be removed for loading and unloading of
the kiln with �mber.
Produced by the High Weald AONB Partnership www.highweald.org
6
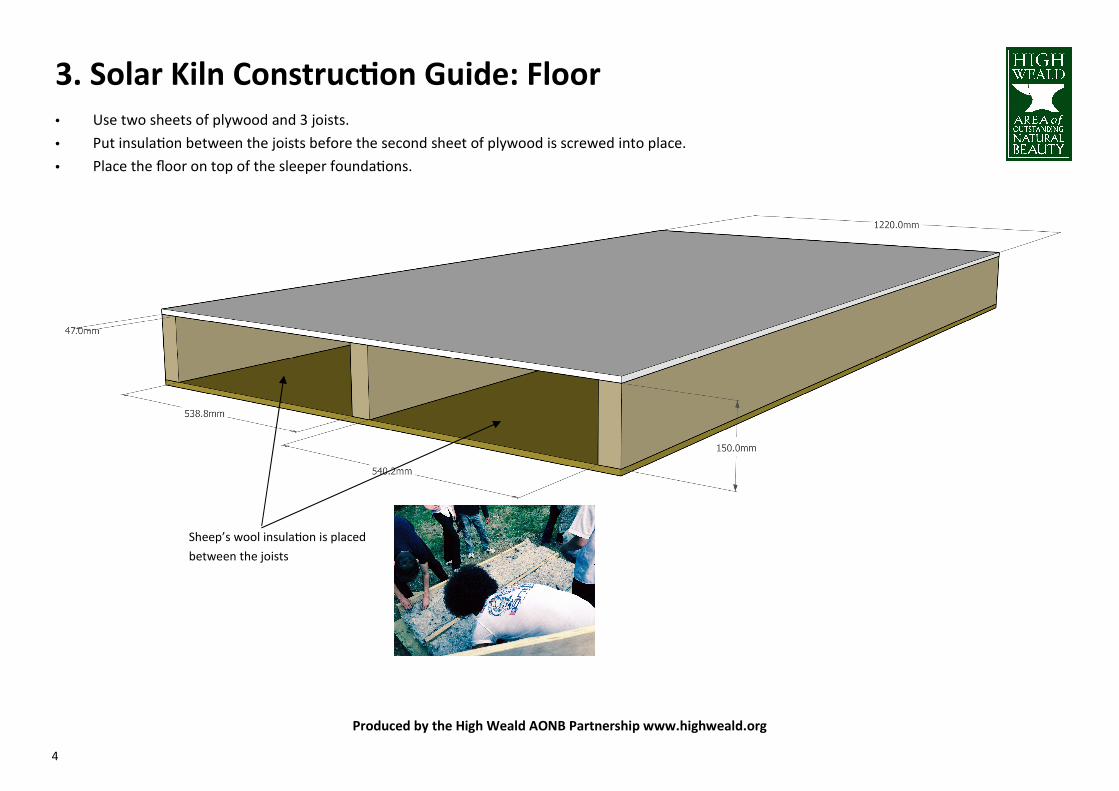
5. Solar Kiln Construc�on Guide: Back Diagram 1
Sheep’s wool
insula�on is
placed between the
joists
• Use the same overall construc�on method for the back of
the kiln as other sec�ons.
• Cut three vent holes into the back of the kiln - two vents
at the bo+om and one at the top. These are designed to
allow air to be drawn into the bo+om of the kiln, up
through the stack of drying wood, and out through the
top of the kiln. You will need to cover the vent holes on
the kiln with something like a plas�c louvre vent.
Vent holes
situated on the
back of the kiln
Produced by the High Weald AONB Partnership www.highweald.org

7
6. Solar Kiln Construc�on Guide: Back Diagram 2
Sheep’s wool insula�on
is placed between the
joists
Produced by the High Weald AONB Partnership www.highweald.org

8
7. Solar Kiln Construc�on Guide: Construc�on of Baffle for
Placement of Solar Fan
• Construct the baffle out of
a smaller, single piece of
plywood with a circular
hole cut right in the
centre.
• Place the solar extractor
fan a+ached to a baffle,
just in front of the top
vent.
• A+ach the solar fan into
this hole.
• Screw the baffle to two
wooden brackets on each
side of the wall of the kiln.
This leaves the fan
suspended in front of the
top vent of the back of
the kiln.
Produced by the High Weald AONB Partnership www.highweald.org
9
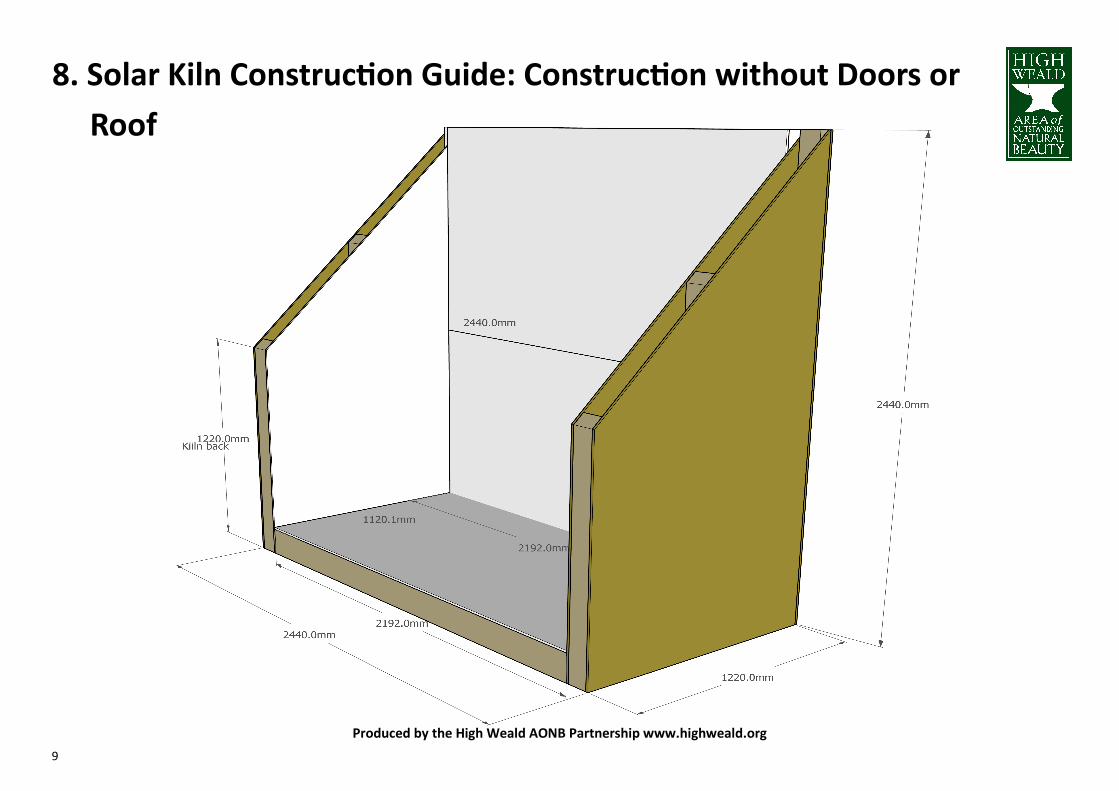
8. Solar Kiln Construc�on Guide: Construc�on without Doors or
Roof
Produced by the High Weald AONB Partnership www.highweald.org

10
9. Solar Kiln Construc�on Guide: Roof & Pain�ng
Construc�ng the Roof • Screw so(wood ba+ens to both sides of the kiln to which the
roof, built from clear polycarbonate roofing sheets, can be
screwed to.
• Screw in the roofing sheets with sheet fixing screws specifically
designed to stop water entering the kiln.
• Once the roof is in place the solar panel can be placed on the top
of the kiln and wired to the fan and a leisure ba+ery.
• The solar panel trickle charges the ba+ery and the fan is run
directly from the ba+ery. A temperature sensor can be added
into the solar panel circuit which controls when the fan switches
on and off.
Pain�ng the Kiln • Once the main structure of the kiln had been
constructed, the en�re inside of the kiln can be painted
with an oil based ma+ black paint. This will stop water
penetra�ng the plywood and helps the kiln absorb more
heat from the sun, improving the efficiency of the kiln.
• Spray the outside of the kiln with several coats of wood
preserver to protect it from the effects of water.

11
Material Item dimension/suppliers Metres
required
Quan�ty Indica�ve
unit price
Indica�ve
Total Cost
Exterior ply sheets 1200 x 2440mm 1/2" thick 14 £16.99 £237.86
Timber 2 x 4" (Metric 47x100mm) 25 lengths of 2.4m & 8 lengths of '1.2m 69.6 £1.57 £109.27
Timber 2x6" 2.4m lengths 7.2 £2.61 £18.79
Ecoroll Thermafleece h+p://www.ecomerchant.co.uk/catalogsearch/result/?
q=ecoroll+sheepswool#sthash.89vkhPgc.dpbs
17.28 2 £47.67 £95.34
Screws 5x50mm h+p://www.screwfix.com/search?search=goldscrew-plus-countersunk; h+p://
www.diy.com/departments/ariel-sheet-fixing-pack-of-10/35451_BQ.prd 1 £4.49 £4.49
Screws 6x90mm h+p://www.screwfix.com/search?search=goldscrew-plus-countersunk 1 £6.27 £6.27
Ma+ black oil paint 2.5 litre h+p://www.amazon.co.uk/Blackfriar-Litre-Metal-Exterior-Interior/dp/B0091CZSNC 2 £19.98 £39.96
SoDwood sleepers h+p://www.tate-fencing.co.uk/products/sleepers.htm measuring 200 x 100 x 2400mm 2 £20.40 £40.80
Clear PVCU corrugated sheet -
3000mm x 700mm
h+p://www.wickes.co.uk/Clear-PVCu-Corrugated-Sheet-3m/p/240154 or www.diy.com/
departments/clear-polycarbonate-roofing-sheet-3000mm-x-700mm/35429_BQ.prd
3M 4 £10.49 £41.96
Solar power gable venGlator fan,
home roof vent cooling & 29W mono
solar panel
h+p://www.ebay.co.uk/itm/Solar-Power-Gable-VenGlator-Fan-Home-Roof-Vent-Cooling-
29W-Mono-solar-panel-/301150386874?ssPageName=ADME:X:AAQ:GB:1123
1 £130.00 £130.00
Wood preserver h+p://www.diy.com/departments/ronseal-wood-preserver-5l/81393_BQ.prd 1 £27.98 £27.98
Metal gate handles h+p://www.ebay.co.uk/itm/Door-Handle-Large-200mm-8-Pull-Garden-Gate-Shed-Black-
Free-P-P-/180927021018
2 £5.99 £11.98
Roofing screws (packet) h+p://www.wickes.co.uk/Wickes-Fixings-For-Corrugated-Sheets-Pack-100/p/164037 1 £17.49 £17.49
Eaves fillers for corrugated sheets
(pack of 6)
h+p://www.wickes.co.uk/search?text=eaves+filler+corrugated+sheets&x=8&y=6 2 £6.49 £12.98
Total costs of building solar kiln £798.55
Stocking the kiln with green wood Purchase from Gmber yards in the High Weald h+p://www.woodnet.org.uk/woodlots/ £300-£500
Louvre vent cover h+p://www.screwfix.com/p/map-vent-gas-louvre-vent-white-229-x-229mm/6204d 2 £1.69 £3.38
Solar Kiln Materials List & Indica�ve Prices (July 2014)
Related Documents