Welcome message from author
This document is posted to help you gain knowledge. Please leave a comment to let me know what you think about it! Share it to your friends and learn new things together.
Transcript
Software Testing using Visual Studio 2012
Learn different testing techniques and features of Visual Studio 2012 with detailed explanations and real-time samples
Satheesh Kumar N
Subashni S
BIRMINGHAM - MUMBAI
Software Testing using Visual Studio 2012
Copyright © 2013 Packt Publishing
All rights reserved. No part of this book may be reproduced, stored in a retrieval system, or transmitted in any form or by any means, without the prior written permission of the publisher, except in the case of brief quotations embedded in critical articles or reviews.
Every effort has been made in the preparation of this book to ensure the accuracy of the information presented. However, the information contained in this book is sold without warranty, either express or implied. Neither the author, nor Packt Publishing, and its dealers and distributors will be held liable for any damages caused or alleged to be caused directly or indirectly by this book.
Packt Publishing has endeavored to provide trademark information about all of the companies and products mentioned in this book by the appropriate use of capitals. However, Packt Publishing cannot guarantee the accuracy of this information.
First published: December 2010
Second Edition: July 2013
Production Reference: 1190713
Published by Packt Publishing Ltd.Livery Place35 Livery StreetBirmingham B3 2PB, UK.
ISBN 978-1-84968-954-0
www.packtpub.com
Cover Image by Artie Ng ([email protected])

Credits
AuthorsSatheesh Kumar N
Subashni S
ReviewersAhmed Ilyas
Ken Tucker
Hulot
Kalyan
Acquisition EditorAnthony Lowe
Lead Technical EditorMayur Hule
Technical EditorsRuchita Bhansali
Krishnaveni Haridas
Pratik More
Anita Nayak
Larissa Pinto
Project CoordinatorAnugya Khurana
ProofreaderDan McMahon
IndexerTejal Soni
Production Coordinator Kyle Albuquerque
Cover WorkKyle Albuquerque

About the Authors
Satheesh Kumar N holds a Bachelor’s degree in Computer Science engineering and has around 17 years of experience in managing the software development life cycle, developing live projects, and program management. He started his career by developing software applications using Borland software products. He worked for multiple organizations in India, the UAE, and the US. His main domain expertise is in retail and he is currently working in Bangalore as a Program Delivery Manager for the top retailer in UK. He is currently handling five agile scrum teams for delivering the website features. His experience also includes implementation and customization of Microsoft Dynamics for an automobile sales company in UAE. He works with the latest Microsoft technologies and has published many articles on LINQ and other features of .NET. He is a certified PMP (Project Management Professional).
He has also authored Software Testing using Visual Studio Team System 2008 and Software Testing using Visual Studio 2010 for Packt Publishing.
I would like to thank my wife for helping me in co-authoring and supporting me in all the ways to complete this book. I would also like to thank my family members and friends for their continuous support in my career and success.
Subashni S holds a Bachelor’s Degree in Computer Science engineering and has around 15 years of experience in software development and testing life cycle, project, and program management. She is a certified PMP (Project Management Professional), CSTM (Certified Software Test Manager), and ITIL V3 Foundation certified. She started her career as a DBA in Oracle 8i technology, and later developed many software applications using Borland software products for a multinational company based in Chennai, and then moved to Bangalore. She is presently working for a multinational company, in the area of Project Management for developing and testing projects. She is also currently working for one of the top multinational companies headquartered at Austin, Texas.
She has also authored Software Testing using Visual Studio Team System 2008 and Software Testing using Visual Studio 2010 for Packt Publishing.
I would like to thank my husband for helping me in co-authoring and supporting me in all the ways to complete this book. I would also like to thank my other family members and friends for their continuous support in my career and success.
About the Reviewers
Ahmed Ilyas has a BENG degree from Napier University in Edinburgh, Scotland, where he majored in software development. He has 15 years of professional experience in software development.
After leaving Microsoft, he has ventured into setting up his consultancy company offering the best possible solutions for a magnitude of industries and providing real world answers to those problems, and only uses the Microsoft stack to build these technologies and be able to bring in the best practices, patterns, and software to his client base to enable long-term stability and compliance in the ever-changing software industry. He has also tried to improve software developers around the globe, pushing the limits in technology.
This went on to being awarded three times the MVP in C# by Microsoft for “providing excellence and independent real world solutions to problems that developers face.”
With the breadth and depth of the knowledge he has obtained not only from his research, but also with the valuable wealth of information and research at Microsoft, the motivation and inspirations come from this, with 90 percent of the world using at least one form of Microsoft technology.
Ahmed Ilyas has worked for a number of clients and employers. With the great reputation that he has, this has resulted in having a large client base for his consultancy company, Sandler Ltd (UK) which includes clients from different industries, from media to medical and beyond. Some clients have included him on their “approved contractors/consultants” list which include ICS Solution Ltd and has been placed on their “DreamTeam” portal and also CODE Consulting/EPS Software (www.codemag.com) (based in USA).
Ahmed Ilyas has also been involved in the past in reviewing books for Packt Publishing and wish to thank them for the great opportunity once again.
I would like to thank the author/publisher of this book for giving me the great honor and privilege in reviewing the book. I would also like to thank my client base and especially Microsoft Corporation and my colleagues over there for enabling me to become a reputable leader as a software developer in the industry, which is my passion.
Ken Tucker is a Microsoft MVP from 2003-2013. He has also worked for Seaworld Parks and Entertainment.
I would like to thank my wife Alice-Marie.
Carlos Hulot has been working in the IT area for more than 20 years in different capabilities, from software development, project management to IT marketing, product development and management. Carlos has worked for multinational companies such as Royal Philips Electronics, PricewaterhouseCoopers, and Microsoft. Currently Carlos is working as an independent IT consultant. Carlos is a Computer Science lecturer in two Brazilian universities. Carlos holds a Ph.D. in Computer Science and Electronics from the University of Southampton, UK, and a B.Sc. in Physics from University of São Paulo, Brazil.
Kalyan Bandarupalli is currently working in Oxford University, UK. His professional career started as a software engineer and then senior software developer and software architect. He is a senior consultant, who uses Microsoft technologies to develop applications. Since 2003, he has been working as a Microsoft technology developer.
He was far more concerned about the technical implementation of software, but in the past few years focus has changed to more architectural implementation of software. He recently (June 2008) started a blog (www.techbubbles.com), because he wanted to share his learning experience to help other people learn about new technologies in Microsoft software. This blog helps IT professionals and developers around the world to develop applications using Microsoft technologies.

www.PacktPub.com
Support files, eBooks, discount offers and moreYou might want to visit www.PacktPub.com for support files and downloads related to your book.
Did you know that Packt offers eBook versions of every book published, with PDF and ePub files available? You can upgrade to the eBook version at www.PacktPub.com and as a print book customer, you are entitled to a discount on the eBook copy. Get in touch with us at [email protected] for more details.
At www.PacktPub.com, you can also read a collection of free technical articles, sign up for a range of free newsletters and receive exclusive discounts and offers on Packt books and eBooks.
TM
http://PacktLib.PacktPub.com
Do you need instant solutions to your IT questions? PacktLib is Packt’s online digital book library. Here, you can access, read, and search across Packt’s entire library of books.
Why Subscribe?• Fully searchable across every book published by Packt• Copy and paste, print and bookmark content• On demand and accessible via web browser
Free Access for Packt account holdersIf you have an account with Packt at www.PacktPub.com, you can use this to access PacktLib today and view nine entirely free books. Simply use your login credentials for immediate access.
Instant Updates on New Packt BooksGet notified! Find out when new books are published by following @PacktEnterprise on Twitter, or the Packt Enterprise Facebook page.

Table of ContentsPreface 1Chapter 1: Visual Studio 2012 Test Types 7
Software testing in Visual Studio 2012 8Testing as part of software development life cycle 9Types of testing 11
Unit testing 12Manual testing 14Exploratory testing 15Web performance tests 16Coded UI test 17Load testing 18Ordered test 20Generic test 21
Test management in Visual Studio 2012 21Introduction to testing tools 22
Test Explorer 25Code coverage results 28
Microsoft Test Manager 28Connecting to Team Project 29Test Plans, Suites, and test cases 30Defining test cases 31Lab Center 32
Summary 33Chapter 2: Test Plan, Test Suite, and Manual Testing 35
Test Plan 36Test Suite and its types 41
Static Test Suites 42Query-based Test Suites 44Requirement-based Test Suites 45
Table of Contents
[ ii ]
Running manual tests 47Action recording 56
Shared steps and action recording for shared steps 59Creating shared steps 59Action recording for shared steps 62
Adding parameters to manual tests 62Summary 66
Chapter 3: Automated Tests 67Coded UI tests from action recordings 68
Files generated for coded UI test 73CodedUITest1.cs 73UIMap.Designer.cs 74UIMap.cs 75UiMap.uitest 76
Data-driven coded UI test 80Adding controls and validation to coded UI test 82
Summary 88Chapter 4: Unit Testing 89
Creating unit tests 90Assert statements 93
Types of Assert statements 94Assert 94StringAsserts 107CollectionAssert 111AssertFailedException 119UnitTestAssertionException 120ExpectedExceptionAttribute 120
Unit Tests and Generics 123Data-driven unit testing 126Unit Testing using Fakes 132
Stubs 132Shims 137Difference between Stubs and Shims 137
Code coverage unit test 138Blocks and lines 140Excluding elements 141
Summary 142Chapter 5: Web Performance Test 143
Creating the web performance test 145Recording a test 146
Adding comments 152Cleaning the recorded tests 153
Table of Contents
[ iii ]
Copying the requests 153Adding loops 153
Web performance test editor 158Web test properties 160Web test request properties 161Other request properties 164
Form POST parameters 164QueryString parameters 165Extraction rules 166Validation rules 171Transactions 174
Conditional rules 176Toolbar properties 181
Add data source 181Setting credentials 184Add recording 185Parameterize web server 186Adding a web test plugin 189
Debugging and running the web test 191Settings in the .testsettings file 192
General 192Roles 194Data and Diagnostics 195Deployment 197Setup and Cleanup Scripts 198Hosts 199Test Timeouts 199Unit test 200Web test 201
Running the test 203Web Browser 204Request 204Response 205Context 205Details 206
Summary 207Chapter 6: Advanced Web Testing 209
Dynamic parameters in web testing 210Coded web test 212
Generating code from a recorded test 213Transactions in coded tests 218Custom code 219Adding a comment 219Running the coded web test 220
Debugging coded web test 222
Table of Contents
[ iv ]
Custom rules 224Extraction rules 224Validation rules 228
Summary 232Chapter 7: Load Testing 233
Creating a Load Test 234Load Test Wizard 236
Specifying a scenario 239Counter sets 248Run settings 250
Editing Load Tests 262Adding context parameters 267
Storing results in the central result store 268Running the Load Test 270Analyzing and exporting Test Results 272
Graphical view 272Summary view 275Tables view 277Detail view 279Exporting to Microsoft Excel 280
Using Test Controller and Test Agents 288Test Controller and Test Agent configuration 289
Summary 296Chapter 8: Ordered and Generic Tests 297
Ordered tests 298Creating an ordered test 298Executing an ordered test 300
Generic tests 301Creating a generic test 302The summary results file 304
Summary 308Chapter 9: Managing and Configuring Tests 309
Using Test settings 310The General option 311The Roles option 312Data and Diagnostics 313The Deployment section 316Setup and Cleanup Scripts 317The Hosts option 318The Test Timeouts option 319The Unit Test option 320
Editing the Test Run configuration file 322
Table of Contents
[ v ]
The Web Test option 324Configuring unit tests using the .runsettings file 325
Summary 326Chapter 10: The Command Line 327
VSTest.Console utility 327Running tests using VSTest.Console 328
The /Tests option 329The /ListTests option 329
MSTest utility 330Running a test from the command line 332
The /testcontainer option 332The /testmetadata option 333The /test option 334The /unique option 335The /noisolation option 336The /testsettings option 336The /resultsfile option 337The /noresults option 337The /nologo option 338The /detail option 338
Publishing Test Results 339The /publish option 339The /publishbuild option 339The /flavour option 340The /platform option 340The /publishresultsfile option 341
TCM command line utility 344Importing tests to a Test Plan 345Running tests in a Test Plan 349
Summary 352Chapter 11: Working with Test Results 353
Test Runs and Test Results 354Test as part of the Team Foundation Server build 358Building reports and Test Results 363
Creating a work item from the result 365Summary 367
Chapter 12: Exploratory Testing and Reporting 369Exploratory testing 371Reports using Team Foundation Server 379
Bug status report 379Test case readiness report 379Status on all iterations 380Other out-of-the-box reports 380
Creating a report definition using Visual Studio 2012 382Summary 390
Chapter 13: Test and Lab Center 391Connecting to Team Project 392Testing Center 394
Testing Center – Plan tab 395Testing Center – Test tab 399Testing Center – Track tab 402Testing Center – Organize tab 405
Lab Center 408Environments 408Deployed environments 410
Summary 413Index 415
PrefaceThe Microsoft Visual Studio 2012 suite contains several features to support the needs of developers, testers, architects, and managers to simplify the development process. Visual Studio 2012 provides different editions of the product such as Professional, Premium, and Ultimate with different set of tools and features. Visual Studio 2012 is tightly integrated with Team Foundation Server, a central repository and configuration management system that provides version control, process guidance and templates, automated builds, automated tests, bug tracking, work item tracking, reporting, and support of the Lab Center and Test Center configurations. The Microsoft Test Manager 2012 is a standalone tool used to organize Test Plans, Manage test cases, and executing manual test cases.
Software Testing using Visual Studio 2012 helps software developers to get familiarized with the Visual Studio tools and techniques to create automated unit tests, and to use automated user interface testing, code analysis and profiling to find out more about the performance and quality of the code. Testers benefit from learning more about the usage of Testing tools, test case management techniques, working with Test Results, and using Test Center and Lab center. This book also covers different types of testing such as web performance test, load test, executing the manual test cases, recording user actions, re-running tests using recording, test case execution, capturing defects, and linking defects with requirements. Testers also get a high level overview on using Lab Center for creating virtual environments for testing multiple users and multiple location scenarios.
Visual Studio 2012 provides user interface tools such as Test Explorer, Test Results, and Test Configuration to create, execute, and maintain the tests and Test Results in integration with Team Foundation Server. This book provides detailed information on all of the tools used for testing the application during the development and testing phases of the project life cycle.
Preface
[ 2 ]
What this book coversChapter 1, Visual Studio 2012 Test Types, provides an overview of different types of testing which helps testing the software applications through different phases of software development. This chapter also introduces the tools and techniques in Visual Studio 2012 for different testing types, Microsoft Test Manager 2012, and its features.
Chapter 2, Test Plan, Test Suite, and Manual Testing, explains the steps involved in creating and managing the Test Plan, Test cases and Test Suite using Test Center in Test Manager. This chapter also explains how to create manual tests by recording the user actions and running the test with data inputs. Sharing the test recording across multiple tests is also covered in this chapter.
Chapter 3, Automated Tests, provides a step-by-step approach to creating Coded UI test from user action recordings. It also explains the steps to execute the coded UI test through data source and adding validation and custom rules to the test.
Chapter 4, Unit Testing, explains the detailed steps involved in creating unit test classes and methods for the code. Different type of assert methods and parameters for testing the code, passing set of data from a data source and testing the code also explained in detail. The mocking framework used for isolating the code and testing it with the help of Shims and Stubs is also explained in detail.
Chapter 5, Web Performance Test, explains the basic way of web testing by recording the user actions and creating a test out of it. Running the test using a data source, adding parameters to the web tests, adding validation and extraction rules, adding looping and branching mechanism to the recorded tests, and here configuring the settings required for the Test Runs are some of the features explained as part of this chapter.
Chapter 6, Advanced Web Testing, explains the way of generating code out of the recorded web tests explained in Chapter 5, Web Performance Test using the Generate Code option. This is very much useful for customizing the test through the code, adding additional logic to the test, adding custom validation and extraction rules.
Chapter 7, Load Testing, helps in simulating various numbers of users, network bandwidths, combination of different web browsers, and different configurations. In the case of web applications it is always necessary to test the stability and performance of the application under huge data load and concurrent users. This chapter explains the steps involved in simulating the real world scenario by using Controllers and Agents. The details of analyzing and exporting the load Test Results are also explained in this chapter.
Preface
[ 3 ]
Chapter 8, Ordered and Generic Tests, explains the way of testing the existing third party tool or service which can also be run using the command line. Visual Studio 2012 provides a feature called ordered test to group all or some of these tests and then execute the tests in the same order. The main advantage of creating the ordered test is to execute multiple tests in an order based on the dependencies. Generic tests are just like any other tests except that it is used for testing an existing third party tool or service.
Chapter 9, Managing and Configuring Tests, explains the details of the test settings file and the tools used for managing tests. The configuration includes deployment details, setup and cleaning scripts, collecting data diagnostics information, unit test and web test settings.
Chapter 10, The Command Line, explains the command line tools such as VSTest.Console, MSTest, and TCM used for running the test with different options, then collecting the output and publishing the results. Each of these commands is used for specific purposes including backwards compatibility.
Chapter 11, Working with Test Results, explains the process of running the tests and publishing the Test Results to the Team Project. Also covered in detail is to integrate the tests as part of Team Foundation Server builds, Build reports and Test Results, Creating work items from Test Results, and publishing the Test Results.
Chapter 12, Exploratory Testing and Reporting, explains the details of testing which happens without any test cases and scripts and by only exploring the application manually. This chapter also explains the details of accessing the Test Results and publishing Test Results and reporting the same in a specific format. Accessing different types of testing reports and creating new test reports are also explained in this chapter.
Chapter 13, Test and Lab Center, is useful for creating and organizing Test Plans and test cases. Test plans can be associated to the requirements using Test Center. The Lab Center helps in creating and configuring different virtual/physical environments for the Test Runs, Test Settings such as defining the roles and configuring the data and diagnostics information for the selected roles, configuring the Test Controllers required for the test, and configuring the test library to store the environment information.
Preface
[ 4 ]
What you need for this bookThis book requires a basic knowledge on any of the versions of Visual Studio and Team Foundation Server. The reader must be familiar with the Visual Studio IDE and have basic knowledge of C#. The following tools are required in order to use the code samples of the chapters in this book:
• Visual Studio 2012 Ultimate• SQL Server Express (OR) SQL Server 2008 or higher version• Team Foundation Server 2010/2012• SQL Server Reporting services
Who this book is forIf you are a software developer, a tester or an architect who wishes to master the amazing range of features offered by Visual Studio 2012 for testing your software applications – then this book is for you.
This book assumes that you have a basic knowledge of testing software applications and have good work experience of using Visual Studio IDE.
ConventionsIn this book, you will find a number of styles of text that distinguish between different kinds of information. Here are some examples of these styles, and an explanation of their meaning.
Code words in text are shown as follows: “All the methods and classes generated for the unit testing are inherited from the Microsoft.VisualStudio.TestTools.UnitTesting namespace.”
A block of code is set as follows:
[DataSource(“Microsoft.VisualStudio.TestTools.DataSource.CSV”, “|DataDirectory|\\data.csv”, “data#csv”, DataAccessMethod.Sequential),
DeploymentItem(“data.csv”), TestMethod]
New terms and important words are shown in bold. Words that you see on the screen, in menus or dialog boxes for example, appear in the text like this: “The Test Runs window displays all the tests based on the results availability at the location”.
Preface
[ 5 ]
Warnings or important notes appear in a box like this.
Tips and tricks appear like this.
Reader feedbackFeedback from our readers is always welcome. Let us know what you think about this book—what you liked or may have disliked. Reader feedback is important for us to develop titles that you really get the most out of.
To send us general feedback, simply send an e-mail to [email protected], and mention the book title via the subject of your message.
If there is a topic that you have expertise in and you are interested in either writing or contributing to a book, see our author guide on www.packtpub.com/authors.
Customer supportNow that you are the proud owner of a Packt book, we have a number of things to help you to get the most from your purchase.
Downloading the example codeYou can download the example code files for all Packt books you have purchased from your account at http://www.packtpub.com. If you purchased this book elsewhere, you can visit http://www.packtpub.com/support and register to have the files e-mailed directly to you.
Preface
[ 6 ]
ErrataAlthough we have taken every care to ensure the accuracy of our content, mistakes do happen. If you find a mistake in one of our books—maybe a mistake in the text or the code—we would be grateful if you would report this to us. By doing so, you can save other readers from frustration and help us improve subsequent versions of this book. If you find any errata, please report them by visiting http://www.packtpub.com/submit-errata, selecting your book, clicking on the errata submission form link, and entering the details of your errata. Once your errata are verified, your submission will be accepted and the errata will be uploaded on our website, or added to any list of existing errata, under the Errata section of that title. Any existing errata can be viewed by selecting your title from http://www.packtpub.com/support.
PiracyPiracy of copyright material on the Internet is an ongoing problem across all media. At Packt, we take the protection of our copyright and licenses very seriously. If you come across any illegal copies of our works, in any form, on the Internet, please provide us with the location address or website name immediately so that we can pursue a remedy.
Please contact us at [email protected] with a link to the suspected pirated material.
We appreciate your help in protecting our authors, and our ability to bring you valuable content.
QuestionsYou can contact us at [email protected] if you are having a problem with any aspect of the book, and we will do our best to address it.
Visual Studio 2012 Test Types
Software testing is one of the most important phases of the software development life cycle (SDLC). Delivery of the software product is based on following good SDLC practices of analysis, design, coding, testing, and by all means meeting the customer requirements. The quality of the product is measured by verifying and validating the product based on the defined functional and non-functional requirements for product. The testing tools and techniques play an important role in simulating the real-life scenarios and the user load required for verifying the stability and reliability of the product. For example, testing a web application with 1,000 concurrent users is a very time consuming and tedious task, if we do it manually considering the required resources. But the testing tools that are part of Visual Studio 2012 can simulate such scenarios and test it with limited resources and without manual intervention during testing. Visual Studio 2012 provides tools to conduct different types of testing, such as Unit testing, Load testing, Web testing, Ordered testing, Generic testing, and Exploratory testing.
This chapter covers the following topics and provides a high-level overview of the testing tools and techniques supported by Visual Studio 2012:
• Testing as part of the software development life cycle• Types of testing• Test management in Visual Studio 2012• Testing tools in Visual Studio 2012
Visual Studio 2012 Test Types
[ 8 ]
Software testing in Visual Studio 2012Before getting into the details of how to perform testing using Visual Studio 2012, let us familiarize different tools provided by Visual Studio 2012 and its usage. Visual Studio provides tools for testing as well as test management such as the Test List Editor and the Test View. The Test Projects and the actual test files are maintained in Team Foundation Server (TFS) for managing the version control of the source and history of changes.
The other aspect of this chapter is exploring the different file types generated in Visual Studio during testing. Most of these files are in the XML format, which are created automatically whenever a new test is created.
For readers new to Visual Studio, there is a brief overview on each window we are going to deal with throughout all or most of the chapters in this book. While we go through the windows and their purposes, we can check the Integrated Development Environment (IDE) and the tools integration with Visual Studio 2012.
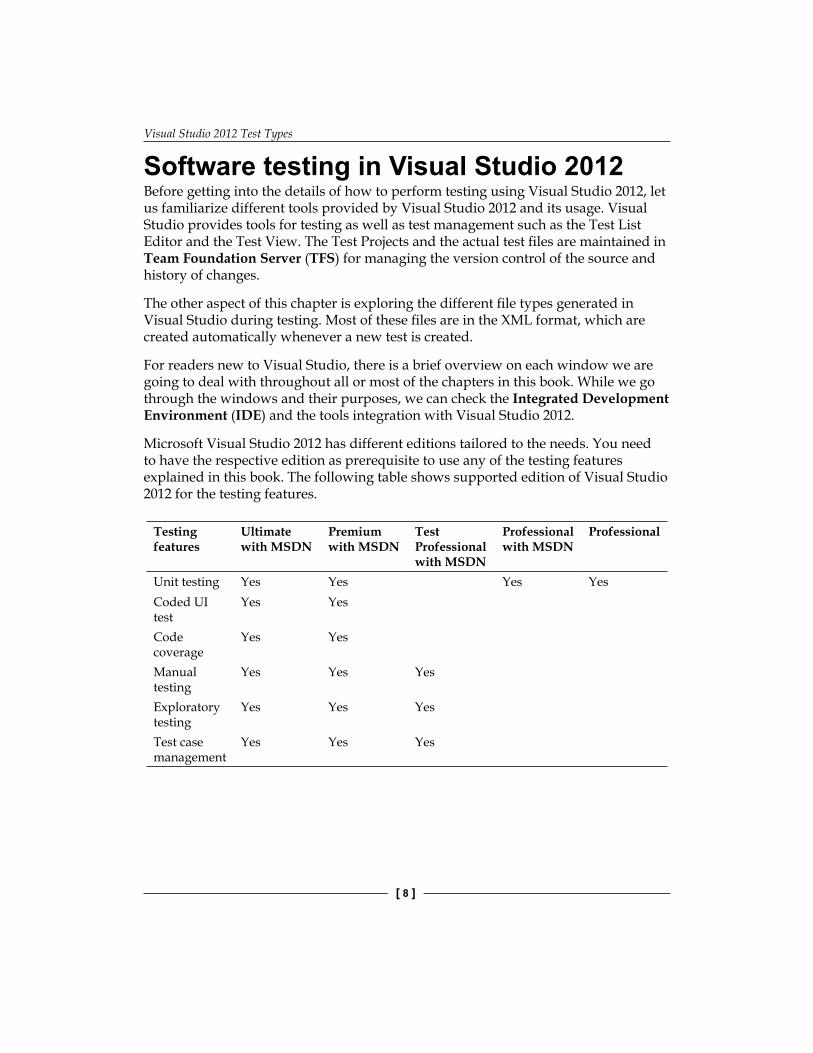
Microsoft Visual Studio 2012 has different editions tailored to the needs. You need to have the respective edition as prerequisite to use any of the testing features explained in this book. The following table shows supported edition of Visual Studio 2012 for the testing features.
Testing features
Ultimate with MSDN
Premium with MSDN
Test Professional with MSDN
Professional with MSDN
Professional
Unit testing Yes Yes Yes YesCoded UI test
Yes Yes
Code coverage
Yes Yes
Manual testing
Yes Yes Yes
Exploratory testing
Yes Yes Yes
Test case management
Yes Yes Yes
Chapter 1
[ 9 ]
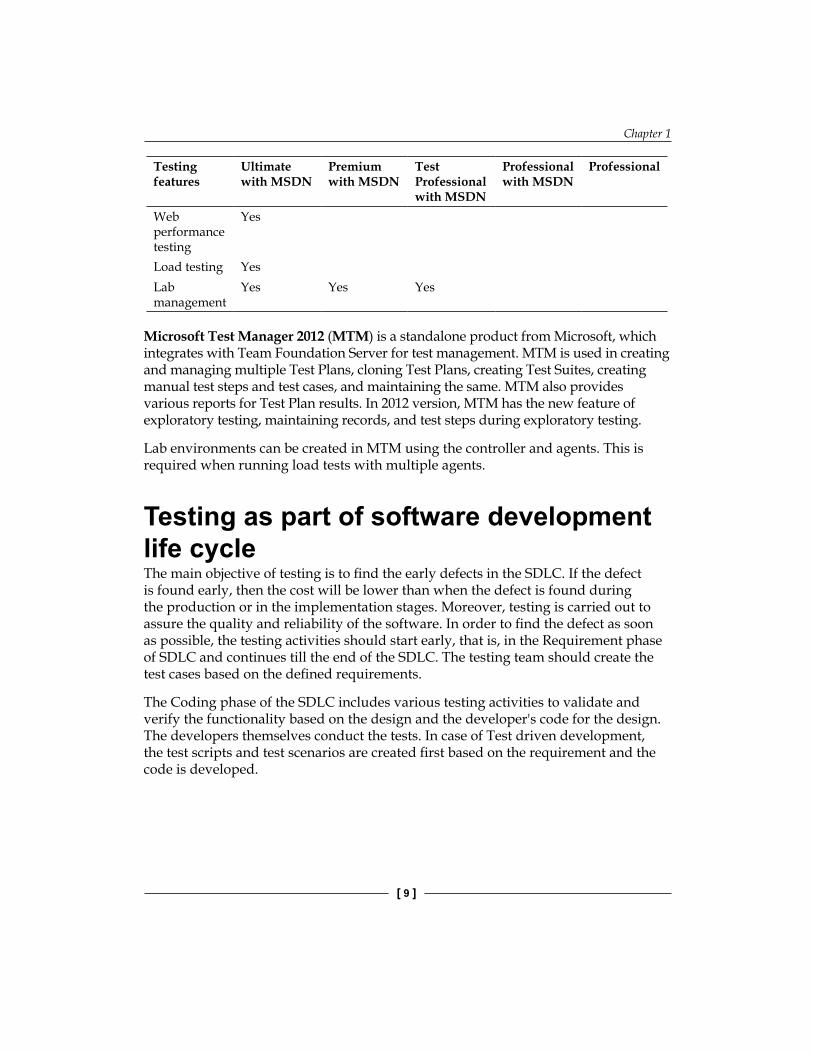
Testing features
Ultimate with MSDN
Premium with MSDN
Test Professional with MSDN
Professional with MSDN
Professional
Web performance testing
Yes
Load testing YesLab management
Yes Yes Yes
Microsoft Test Manager 2012 (MTM) is a standalone product from Microsoft, which integrates with Team Foundation Server for test management. MTM is used in creating and managing multiple Test Plans, cloning Test Plans, creating Test Suites, creating manual test steps and test cases, and maintaining the same. MTM also provides various reports for Test Plan results. In 2012 version, MTM has the new feature of exploratory testing, maintaining records, and test steps during exploratory testing.
Lab environments can be created in MTM using the controller and agents. This is required when running load tests with multiple agents.
Testing as part of software development life cycleThe main objective of testing is to find the early defects in the SDLC. If the defect is found early, then the cost will be lower than when the defect is found during the production or in the implementation stages. Moreover, testing is carried out to assure the quality and reliability of the software. In order to find the defect as soon as possible, the testing activities should start early, that is, in the Requirement phase of SDLC and continues till the end of the SDLC. The testing team should create the test cases based on the defined requirements.
The Coding phase of the SDLC includes various testing activities to validate and verify the functionality based on the design and the developer's code for the design. The developers themselves conduct the tests. In case of Test driven development, the test scripts and test scenarios are created first based on the requirement and the code is developed.
Visual Studio 2012 Test Types
[ 10 ]
As soon as the developer completes the coding, the developer conducts the unit testing
• Unit testing: This is the first level of testing in the SDLC. The developer takes the smallest piece or unit of testable code and determines whether the code behaves exactly as expected. In object-oriented programming, the smallest unit is a method which belongs to a class. The method usually has one or few inputs and one output. Frameworks, drivers, Stubs and mock, or fake objects are used to assist in unit testing.Once the coding is complete for the agreed requirements, all the units are integrated and the product is built as a single package. Then the other phases or forms of testing are executed.
• Integration testing: This type of testing is carried out between two or more modules or functions along with the intent of finding interface defects between them. This testing is completed as a part of unit or functional testing, and sometimes becomes its own standalone test phase. On a larger level, integration testing can involve putting together groups of modules and functions with the goal of completing and verifying that the system meets the system requirements. Defects found are logged and fixed later by the developers. There are different ways of integration testing such as top-down and bottom-up , which are as follows:
° Top-down approach: This is the incremental testing technique which begins with the top level modules followed by low-level modules. The top-down approach helps in early detection of design errors which helps in saving development cost and time as the design errors can be fixed before implementation.
° Bottom-up approach: This is exact opposite to the top-down approach. In this case the low level functionalities are tested and integrated first and then followed by the high level functionalities.
° Umbrella approach: This approach uses both the top-down and bottom-up patterns. The inputs for functions are integrated in bottom-up approach and then the outputs for functions are integrated in the top-down approach.
Chapter 1
[ 11 ]
• System testing: This type of testing is used for comparing or verifying the specifications against the developed system. The system test design is derived from the design documents and is used in this phase for planning and executing the tests. System testing is conducted after all the modules are integrated and completed with Integration testing. To avoid repeating the same process during multiple cycles of system testing, the tests are automated using automation testing tools. Once all the modules are integrated, several errors may arise because of dependencies and various other factors. The defects are usually maintained using a defect tracking tool and the development team prioritizes and fixes the defects. There are different types of testing followed under system testing, but they differ from organization to organization. Here are the common types of tests widely followed in the industry:
° Sanity testing: Whenever there are some defect fixes to the existing product and because of that a new build is created, sanity test is conducted on that build instead of performing full testing on the software. Sanity test is conducted to make sure that the existing functionality of the product is not impacted or broken because of the defect fixes.
° Regression testing: The main objective of this type is to determine if defect fixes or any other changes have been successful and have not introduced any new defects. This is also to verify if the existing functionalities are not affected.
Types of testingVisual Studio provides a range of testing types and tools for testing software applications. The following are some of those types:
• Unit test• Manual test• Exploratory test• Web test• Coded UI test• Load test• Ordered test• Generic test
Visual Studio 2012 Test Types
[ 12 ]
The unit testing tool is integrated along with Visual Studio and developers can use any of the Visual Studio supported language to write the unit testing. The manual test and exploratory test can be used during regression and is integrated with the Test Manager tool to track the test cases and defects when the test is conducted. Web Test and Coded UI Test in Visual Studio is used for system testing to record and playback the test steps. The load test tool is used during system testing cycle for testing performance and stability of the application with user load, and is integrated with Test Manager. The Generic test is again a part of the system testing to test the third-party components and the ordered test is to enable the testing order during Test Runs.
For all of the above testing types, Visual Studio provides tools to manage, order the listing, and execute tests. The next few sections provide details of these testing tools and the supporting tools for managing testing in Visual Studio 2012.
Unit testingUnit testing is one of the earliest phases of testing the application. In this phase the developers have to make sure that the unit of testable code delivers the expected output. It is extremely important to run unit tests to catch defects in the early stage of the software development cycle. The main goal of the unit testing is to isolate each piece of the code or individual functionality and test if individual method is returning the expected result for different sets of parameter values.
A unit test is a functional class method test by calling a method with the appropriate parameters, exercises it and compares the results with the expected outcome to ensure the correctness of the implemented code. Visual Studio 2012 has great support for unit testing through the integrated automated unit test framework, which enables developers to create and execute unit tests.
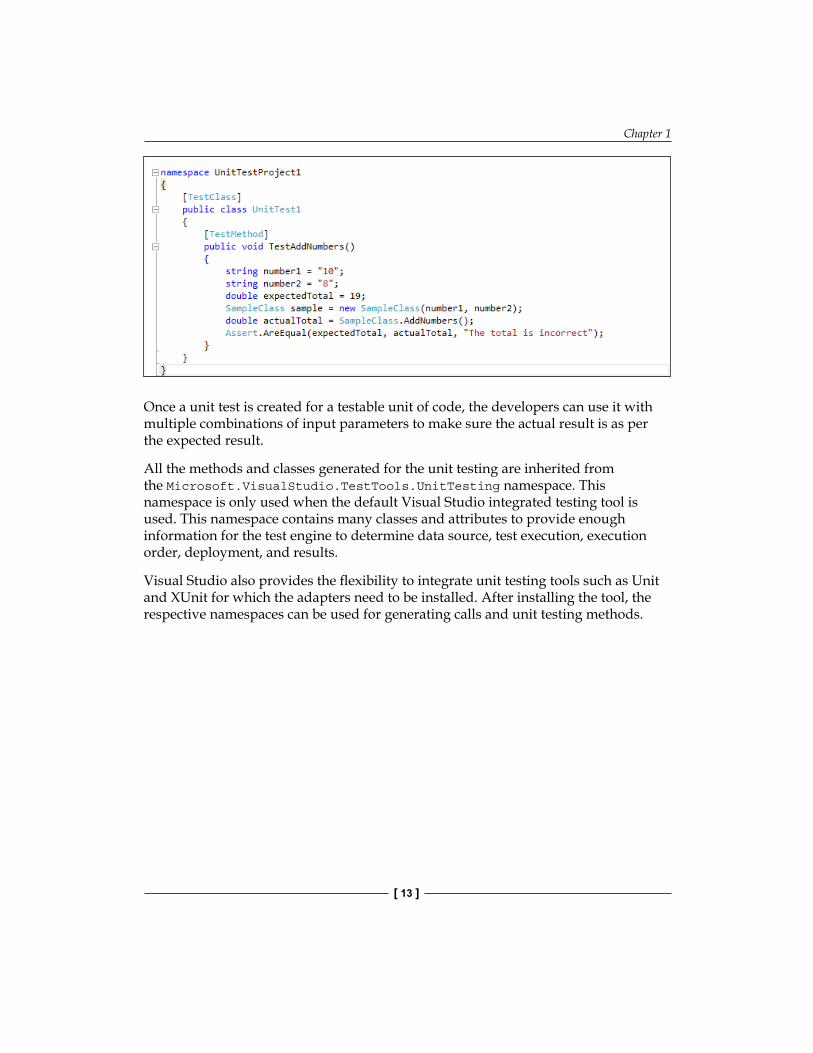
Visual Studio generates the test methods and the base code for the test methods. It is the responsibility of the developer to modify the generated test methods and customize the code for actual testing. The code file contains several attributes to identify the Test Class, Test Method, and Test Project. These attributes are assigned when the unit test code is created for the original source code. Here is the sample of the unit test code:
Chapter 1
[ 13 ]
Once a unit test is created for a testable unit of code, the developers can use it with multiple combinations of input parameters to make sure the actual result is as per the expected result.
All the methods and classes generated for the unit testing are inherited from the Microsoft.VisualStudio.TestTools.UnitTesting namespace. This namespace is only used when the default Visual Studio integrated testing tool is used. This namespace contains many classes and attributes to provide enough information for the test engine to determine data source, test execution, execution order, deployment, and results.
Visual Studio also provides the flexibility to integrate unit testing tools such as Unit and XUnit for which the adapters need to be installed. After installing the tool, the respective namespaces can be used for generating calls and unit testing methods.
Visual Studio 2012 Test Types
[ 14 ]
Manual testingManual testing is the oldest and simplest type of testing, but yet very crucial for software testing. The tester would be writing the test cases based on the functional and non-functional requirements and then test the application based on each written test case. It helps us to validate whether the application meets various standards defined for effective and efficient accessibility and usage.
Manual testing can be an alternative in the following scenarios:
• The tests are more complex or too difficult to convert into automated tests.• There is not enough time to automate the tests.• Automated tests would be time consuming to create and run.• There are not enough skilled resources to automate the tests.
The tested code hasn't stabilized sufficiently for cost effective automation.
We can create manual tests by using Visual Studio 2012 very easily. A very important step in manual testing is to document all the test steps required for the scenario with supporting information in a separate file. Once all the test cases are created, we should add the test cases to the Test Plan in order to run the test and gather the Test Result every time we run the test. The Microsoft Test Manager tool helps us in adding or editing the test cases to the Test Plan. The manual testing features supported by Visual Studio 2012 are as follows:
• Running the manual test multiple times with different data by changing parameters.
• Create multiple test cases using an existing test case and then customize or modify the test.
• Sharing test steps between multiple test cases.• Remove the test cases from the test if no longer required.• Adding or copying test steps from Microsoft Excel or Microsoft
Word or from any other supported tool.• Including multiple lines and rich text in manual test steps.
There are a lot of other manual testing features supported in Visual Studio 2012. We will see those features explained in Chapter 2, Test Plan, Test Suite, and Manual Testing.
Chapter 1
[ 15 ]
Exploratory testingExploratory testing is an open approach to testing without any process and test cases. The only known fact is the user story. The objective of this testing is to test the existing application or feature, and to find any improvements required, defects, broken links, and familiarize with the existing system. This type of testing has been followed for many years, but there was no tool to support the testing and capture the defects and steps. It was a tedious process to document the steps and capture supporting screenshots.
The Microsoft Test Manager (MTM) has the new feature to perform the exploratory testing and capture the screenshots, test steps, test case, comments, attachments, and defects automatically. The testing actions are stored as test cases so that it is easy while retesting.
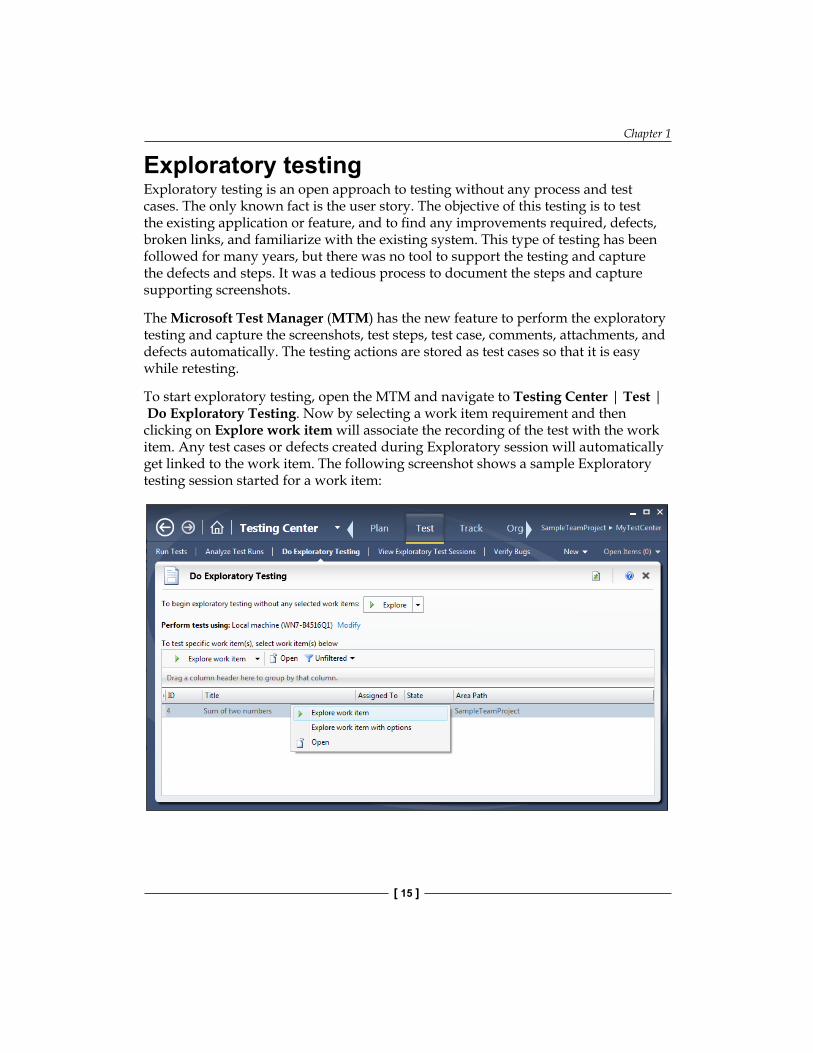
To start exploratory testing, open the MTM and navigate to Testing Center | Test | Do Exploratory Testing. Now by selecting a work item requirement and then clicking on Explore work item will associate the recording of the test with the work item. Any test cases or defects created during Exploratory session will automatically get linked to the work item. The following screenshot shows a sample Exploratory testing session started for a work item:
Visual Studio 2012 Test Types
[ 16 ]
During Exploratory testing, all actions performed on the screen are recorded except the actions performed in MTM and Office applications. To change this setting, configure the settings in the Test Plan properties.
A detailed walk-through the Exploratory testing is covered in Chapter 12, Exploratory Testing and Reporting which talks about Exploratory testing and reporting.
Web performance testsWeb performance tests are used for testing the functionality and performance of the web page, web application, website, web services, and a combination of all of these. Web tests can be created by recording the HTTP requests and events during user interaction with the web application. The recording also captures the web page redirects, validations, view state information, authentication, and all the other activities. All these are possible through manually building the web tests using Web test. Visual Studio 2012 provides Web performance test features, which capture all HTTP requests and events while recording user interaction and generating the test.
There are different validation rules and extraction rules used in Web performance tests. The validation rules are used for validating the form field names, texts, and tags in the requested web page. We can validate the results or values against the expected result as per the business needs. These validation rules are also used for checking the processing time taken for the HTTP request.
Extraction rules in Web performance tests are used for collecting data from the web pages during requests and responses. The collection of these data will help us in testing the functionality and expected result from the response.
Providing sufficient data for the test methods is very important for the success of automated testing. Similarly for web tests we need to have a data source from which the data will be populated to the test methods and the web pages will be tested. The data source could be a database or a spread sheet or an XML data source or any other form of data source. There is a data binding mechanism in Web tests which takes care of fetching data from the source and provides the data to the test methods. For example, a reporting page in a web application definitely needs more data to test it successfully. This is also called the data-driven web test.
Chapter 1
[ 17 ]
Web tests can be classified into Simple Web test and Coded Web test. Both of these are supported by Visual Studio.
• Simple Web tests: This includes generating and executing the test as per the recording with a valid flow of events. Once the test is started, there won't be any intervention and it won't be conditional.
• Coded Web tests: This is more complex, but provides a lot of flexibility. These types of tests are used for conditional execution based on certain values. Coded Web tests can be created manually or generated from a web test recording and languages such as C# or VB.NET can be chosen while generating the code. The generated code can be customized to better control the flow of test events. A coded Web test is a powerful and highly customizable test for the web requests.
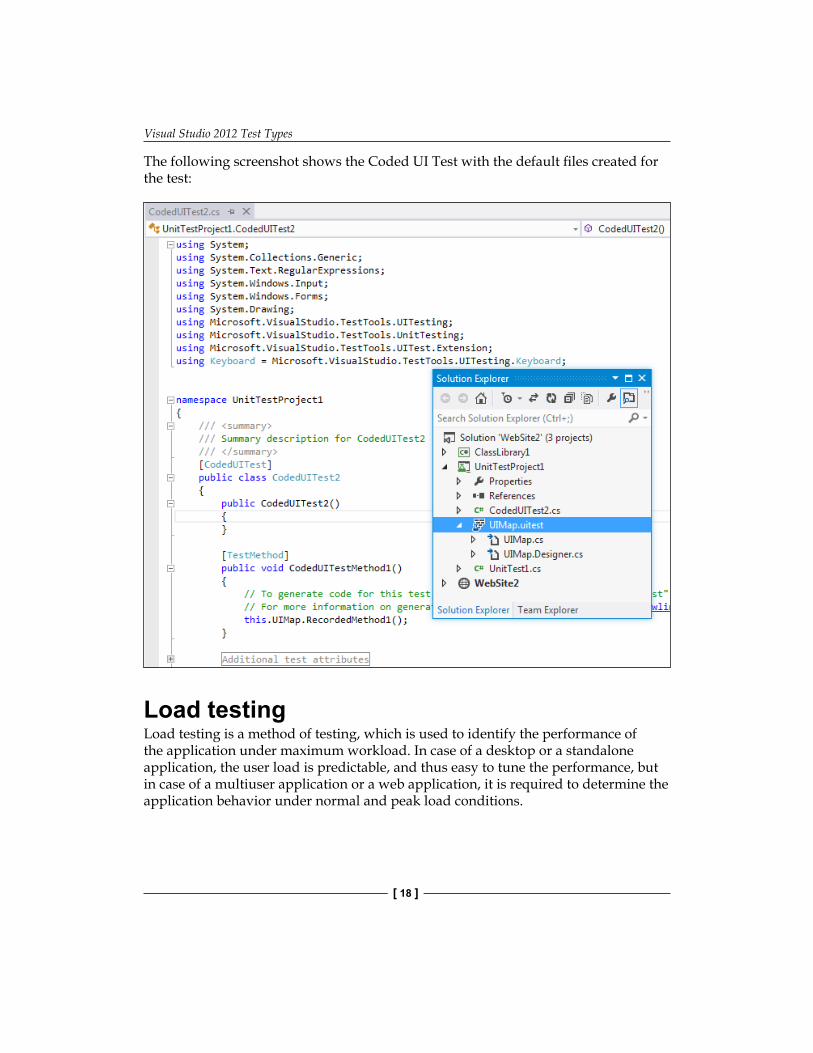
Coded UI TestCoded UI Tests (CUIT) are the automated way of testing the application user interface. In any UI intensive application, the functionality of the application is verified manually through UI and this happens after the development. Next time there is any change to any of the backend functionality, the application should be retested again. CUIT helps us in saving time spent testing through UI multiple times manually. CUIT Builder helps us in recording the UI test step actions and then generates code out of it. After the test is created, we can modify the code and customize the actions and data values captured during recording.
A Coded UI Test generates several supporting files as part of the testing. The UIMap object represents the controls, windows, and assertions. Using these objects and methods we can perform actions to automate the test. The coded UI Test supporting files are as follows:
• CodedUITest.cs: This file contains the test class, test methods, and assertions.• UIMap.uitest: This is the XML model for UIMap class, which contains the
windows, controls, properties, methods, and assertions.• UIMap.Designer.cs: This contains the code for the UIMap.uitest XML file.• UIMap.cs: All customization code for the UI Map would go into this file.
Visual Studio 2012 Test Types
[ 18 ]
The following screenshot shows the Coded UI Test with the default files created for the test:
Load testingLoad testing is a method of testing, which is used to identify the performance of the application under maximum workload. In case of a desktop or a standalone application, the user load is predictable, and thus easy to tune the performance, but in case of a multiuser application or a web application, it is required to determine the application behavior under normal and peak load conditions.
Chapter 1
[ 19 ]
Visual Studio provides a load test feature, which helps in creating and executing load test with multiple scenarios. The following are the parameters set using the load test wizard:
• Load Test Pattern: This defines the number of users and the user load pattern to be followed during the test.
• Test Mix Model: This defines the model to be followed either by number of tests or by number of virtual users, or based on the user pace or by order.
• Test Mix: This includes the tests to be part of the load tests.• Browser Mix and Network Mix: These define the possible browsers and the
networks to follow while testing.• Counter Sets: This defines the performance counters to collect from the load
Test Agents and the system.• Run settings: This defines the duration of the Test Run.
If the application is a public-facing website or one with a huge customer base, then it is better to perform load tests with real or expected scenarios. The Visual Studio load test makes use of the Web test recording or the unit test during load Test Run.
The load test is always driven by the collection of Web and Unit tests. A web test is used to simulate the scenario of concurrent users using the website and making multiple HTTP requests. The load can be configured to start with a minimum number of virtual users and then gradually increase the user count to check the performance at multiple stages of user load until it reaches the peak user load.
A unit test can be included as part of the load test in case of testing the performance of a service or individual method to find out the servicing capacity and threshold for client requests. One good example would be to test the data access service component that calls stored procedure from the backend database and returns the results to the client application.
The load test captures the results of individual tests within the Test Run. This helps us to identify the failed tests and debug and analyze them later. The results of all load tests can be saved in a repository to compare the set of results and then take necessary measures to improve performance.
Visual Studio has the Load test analyzer to provide the summary and details of Test Runs from the load Test Result.
Load testing properties, working with tests, and analyzing the load Test Results are explained in detail later in this book in Chapter 7, Load Testing.
Visual Studio 2012 Test Types
[ 20 ]
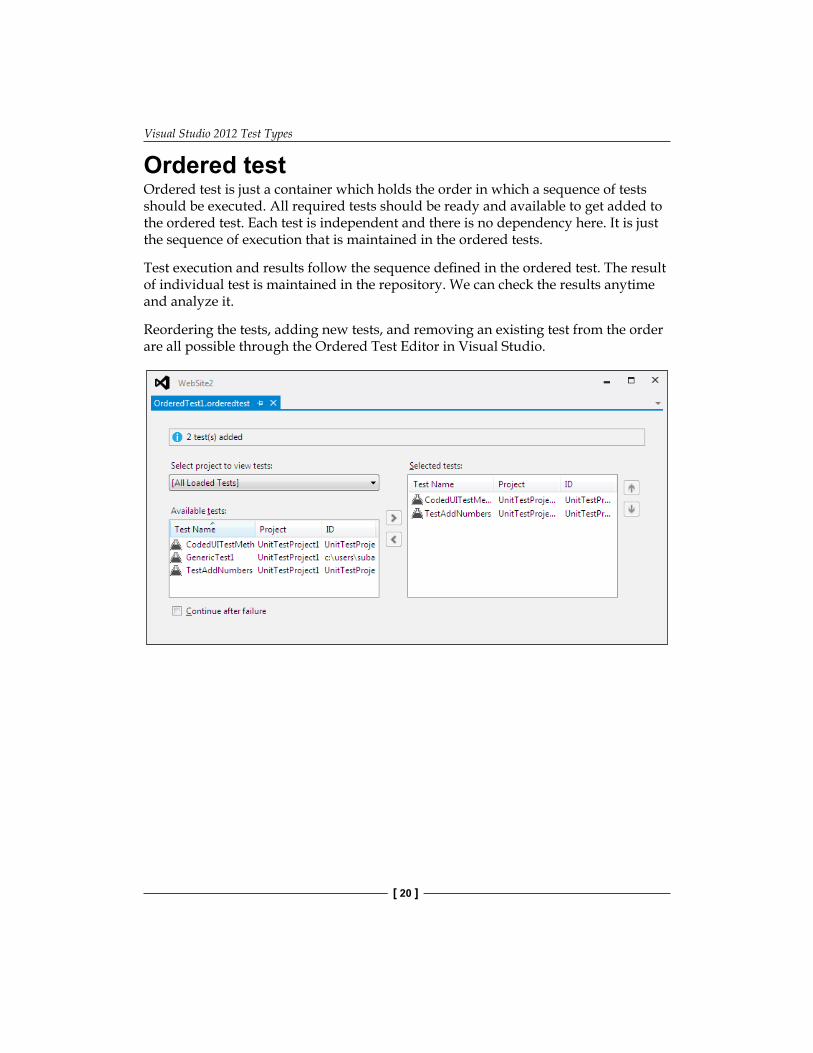
Ordered testOrdered test is just a container which holds the order in which a sequence of tests should be executed. All required tests should be ready and available to get added to the ordered test. Each test is independent and there is no dependency here. It is just the sequence of execution that is maintained in the ordered tests.
Test execution and results follow the sequence defined in the ordered test. The result of individual test is maintained in the repository. We can check the results anytime and analyze it.
Reordering the tests, adding new tests, and removing an existing test from the order are all possible through the Ordered Test Editor in Visual Studio.
Chapter 1
[ 21 ]
An ordered test is the best way of controlling and running several tests in a defined order.
Generic testGeneric test is useful in testing an existing executable file. It's the process of wrapping the executable file as a generic test and then executing it. This type of testing is very useful when testing a third party component without the source code. If the executable requires any additional files for testing, the same can be added as deployment files to the generic test. The test can be run using the Test Explorer or a command-line command.
By using Visual Studio, we can collect the Test Results and gather code coverage data too. We can manage and run the generic tests in Visual Studio just like other tests. In fact, the Test Result output can be published to the Team Foundation Server to link it with the code built used for testing.
Test management in Visual Studio 2012Visual Studio has great testing features and management tools for testing. These features are greatly improved from previous versions of Visual Studio. The Test Impact View is the new test management tool added to the existing tools, such as Test View, Test List Editor, Test Results, Code Coverage Results, and Test Runs from the main IDE.
Visual Studio 2012 Test Types
[ 22 ]
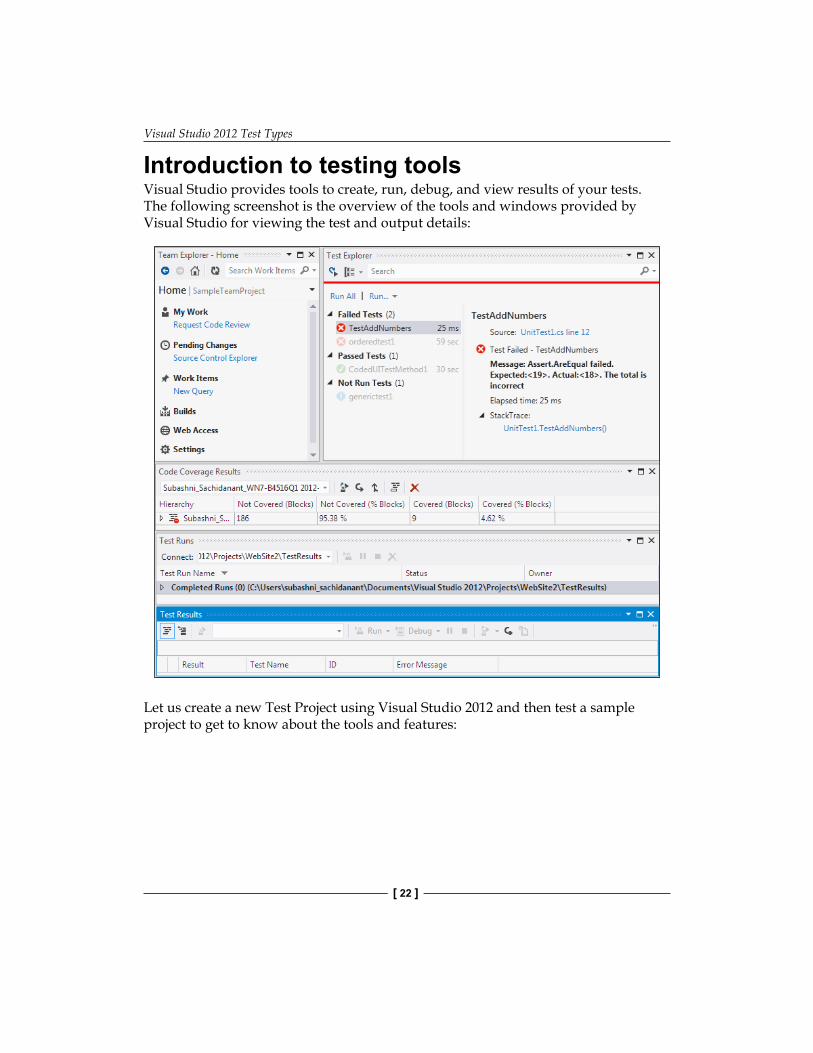
Introduction to testing toolsVisual Studio provides tools to create, run, debug, and view results of your tests. The following screenshot is the overview of the tools and windows provided by Visual Studio for viewing the test and output details:
Let us create a new Test Project using Visual Studio 2012 and then test a sample project to get to know about the tools and features:
Chapter 1
[ 23 ]
Open Visual Studio 2012 and create a new solution. Let's not get into the details of sample application, AddNumbers, but create the Test Project and look at the features of the tools and windows. The application referred throughout this chapter is a very simple application for adding two numbers and showing the result.
Now in a similar way to adding the projects and code files to the solution, create the Test Project and test files and add the Test Project to the solution.
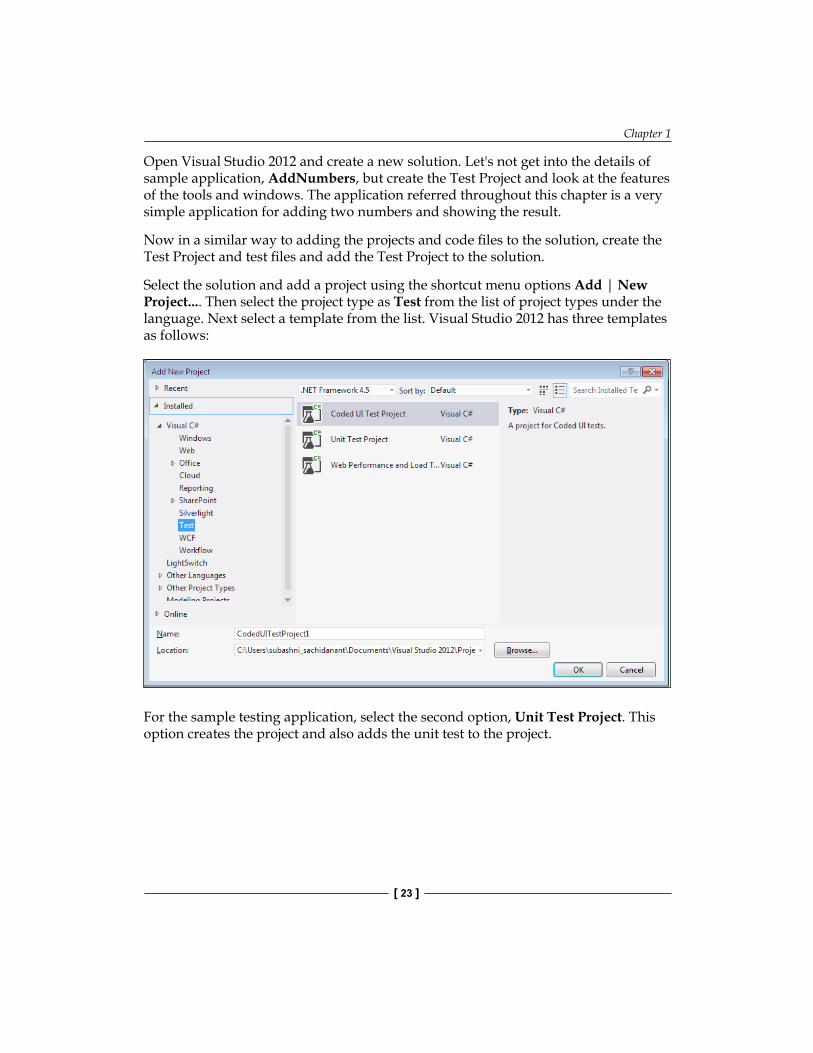
Select the solution and add a project using the shortcut menu options Add | New Project.... Then select the project type as Test from the list of project types under the language. Next select a template from the list. Visual Studio 2012 has three templates as follows:
For the sample testing application, select the second option, Unit Test Project. This option creates the project and also adds the unit test to the project.
Visual Studio 2012 Test Types
[ 24 ]
The first option creates a Coded UI Test to capture the UI actions and controls, and automate the testing by generating and customizing the code. The last option is to record the user actions and re-run the recording to test with validations and verification rules, use the recording to test the performance and stability of the system under multiple user load.
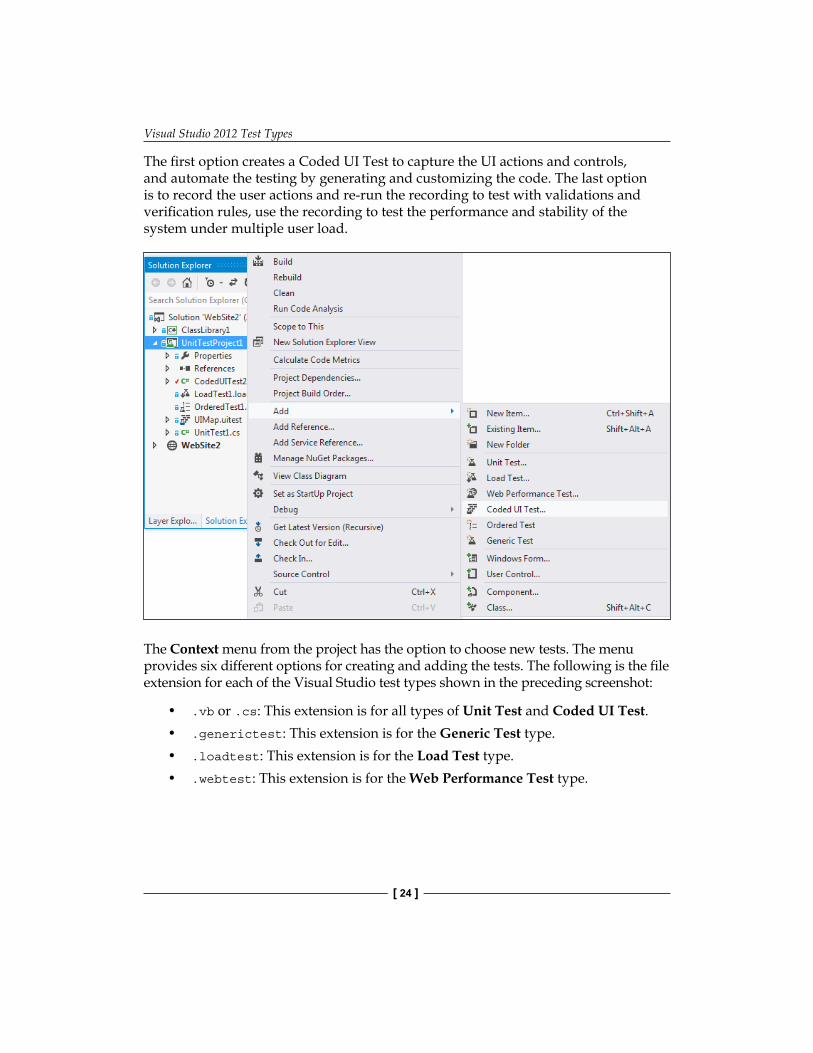
The Context menu from the project has the option to choose new tests. The menu provides six different options for creating and adding the tests. The following is the file extension for each of the Visual Studio test types shown in the preceding screenshot:
• .vb or .cs: This extension is for all types of Unit Test and Coded UI Test.• .generictest: This extension is for the Generic Test type.• .loadtest: This extension is for the Load Test type.• .webtest: This extension is for the Web Performance Test type.
Chapter 1
[ 25 ]
After selecting the test type, the test file gets created and added to the project with a default name and extension. Open the properties and change the name as required.
The next step is to use the Test Explorer window to view and run the tests that are created.
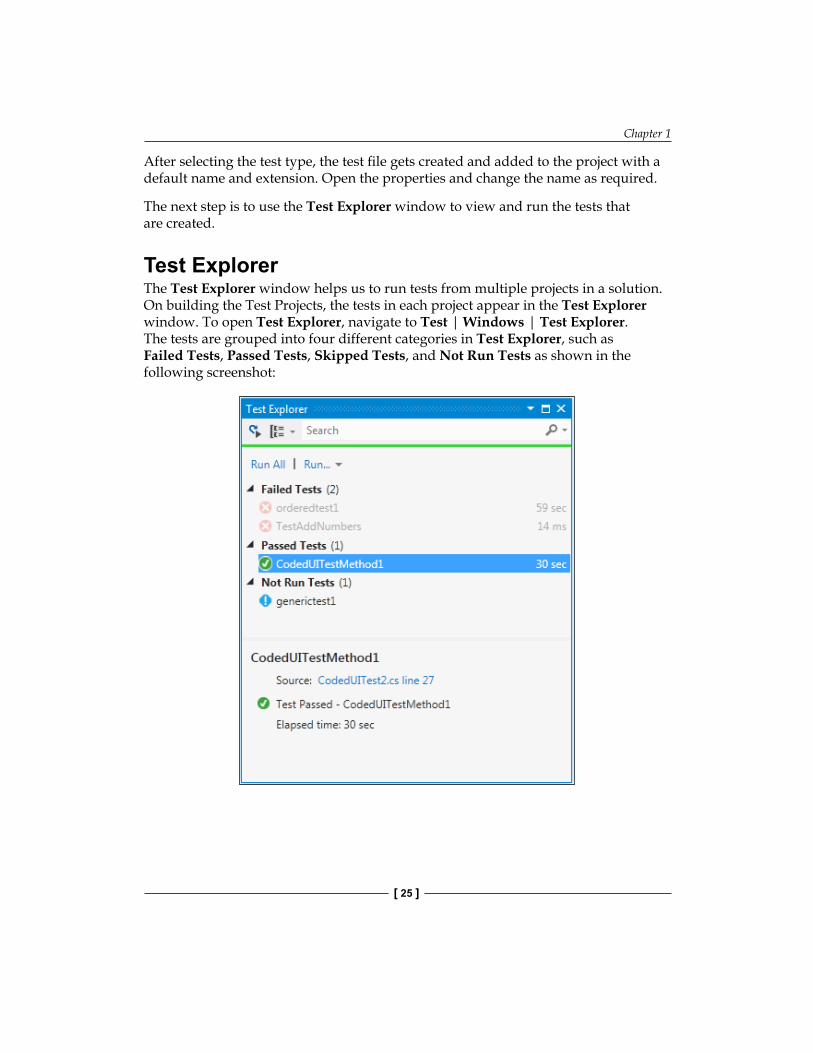
Test ExplorerThe Test Explorer window helps us to run tests from multiple projects in a solution. On building the Test Projects, the tests in each project appear in the Test Explorer window. To open Test Explorer, navigate to Test | Windows | Test Explorer. The tests are grouped into four different categories in Test Explorer, such as Failed Tests, Passed Tests, Skipped Tests, and Not Run Tests as shown in the following screenshot:
Visual Studio 2012 Test Types
[ 26 ]
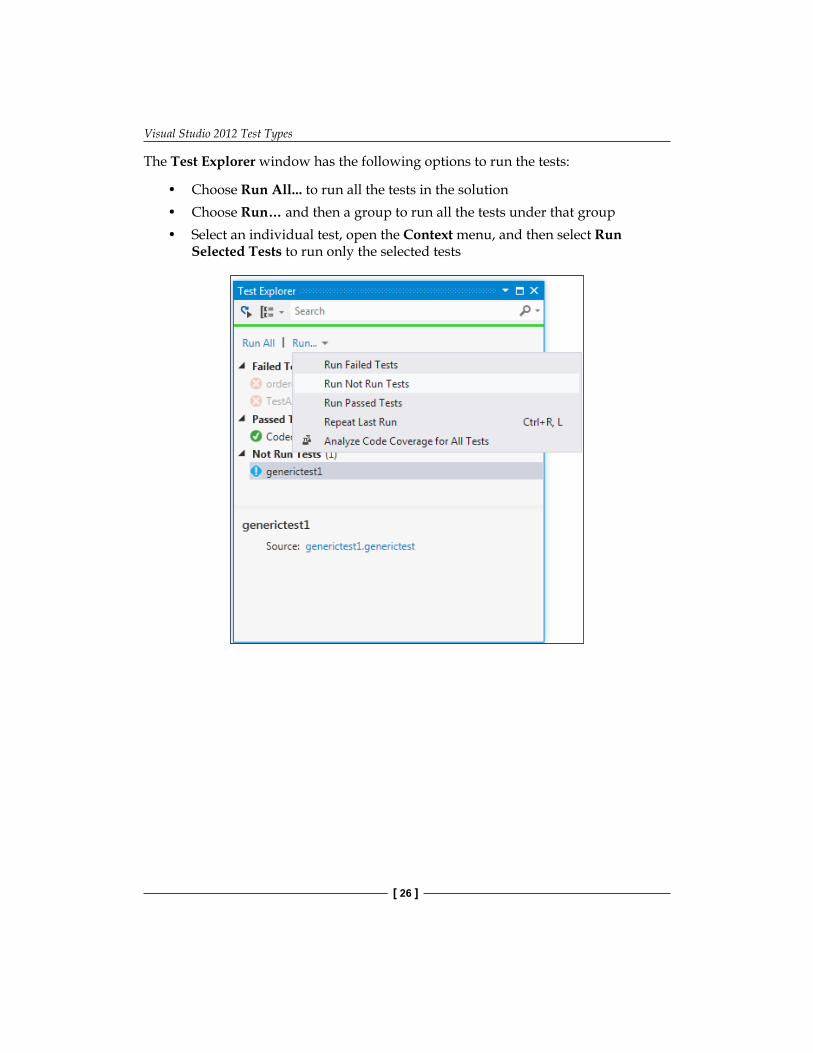
The Test Explorer window has the following options to run the tests:
• Choose Run All... to run all the tests in the solution• Choose Run… and then a group to run all the tests under that group• Select an individual test, open the Context menu, and then select Run
Selected Tests to run only the selected tests
Chapter 1
[ 27 ]
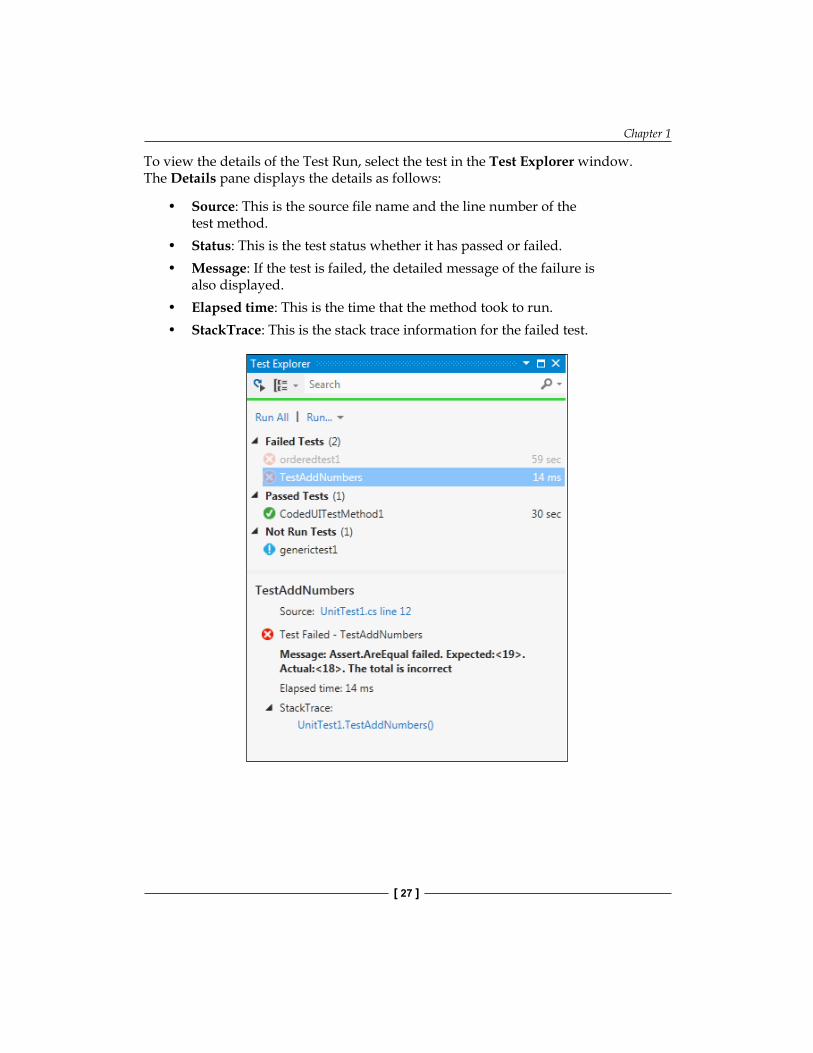
To view the details of the Test Run, select the test in the Test Explorer window. The Details pane displays the details as follows:
• Source: This is the source file name and the line number of the test method.
• Status: This is the test status whether it has passed or failed.• Message: If the test is failed, the detailed message of the failure is
also displayed.• Elapsed time: This is the time that the method took to run.• StackTrace: This is the stack trace information for the failed test.
Visual Studio 2012 Test Types
[ 28 ]
At any time if you double-click on the Test option or select Test and choose Open Test, Visual Studio opens the source code of the selected test. This is very helpful when starting to debug the code.
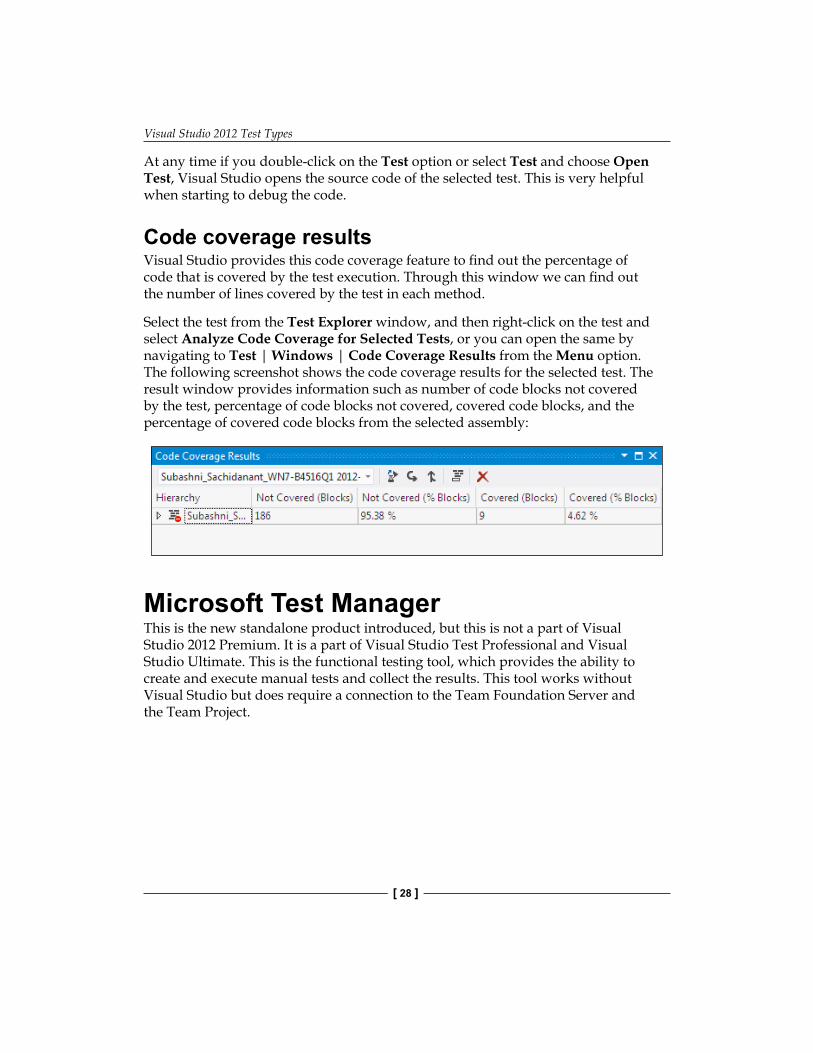
Code coverage resultsVisual Studio provides this code coverage feature to find out the percentage of code that is covered by the test execution. Through this window we can find out the number of lines covered by the test in each method.
Select the test from the Test Explorer window, and then right-click on the test and select Analyze Code Coverage for Selected Tests, or you can open the same by navigating to Test | Windows | Code Coverage Results from the Menu option. The following screenshot shows the code coverage results for the selected test. The result window provides information such as number of code blocks not covered by the test, percentage of code blocks not covered, covered code blocks, and the percentage of covered code blocks from the selected assembly:
Microsoft Test ManagerThis is the new standalone product introduced, but this is not a part of Visual Studio 2012 Premium. It is a part of Visual Studio Test Professional and Visual Studio Ultimate. This is the functional testing tool, which provides the ability to create and execute manual tests and collect the results. This tool works without Visual Studio but does require a connection to the Team Foundation Server and the Team Project.
Chapter 1
[ 29 ]
The Testing Center is used for creating Test Plans and creating Test Suites and test cases for the Test Plans. We can also associate the requirements to the Test Plans. The other features such as running the manual test and capturing the Test Results and defects, tracking the Test Results using existing queries and creating custom queries, organizing the test cases and shared steps for test cases, and maintaining the test configurations , that are supported by Testing Center.
Lab Center is used to set up and create lab environments for the test execution. The environments are created by using the Physical and Virtual machines with set of configurations. Later the environment is deployed so that the test would be conducted using the specified environment.
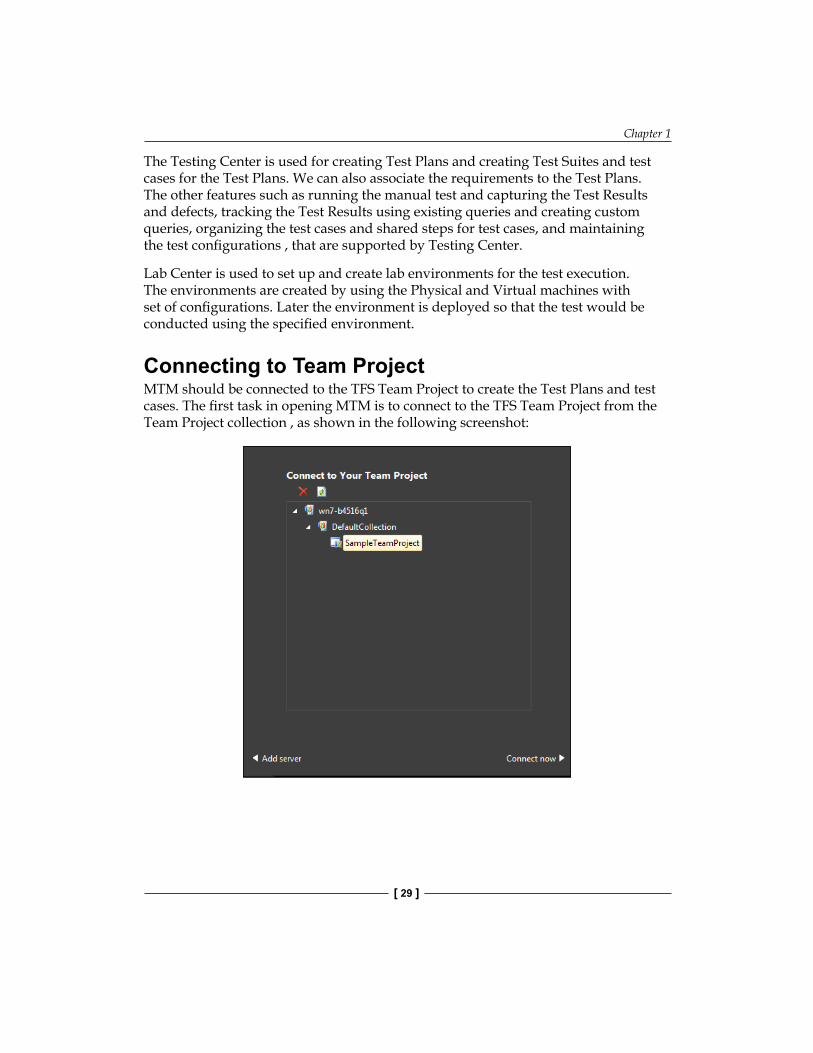
Connecting to Team ProjectMTM should be connected to the TFS Team Project to create the Test Plans and test cases. The first task in opening MTM is to connect to the TFS Team Project from the Team Project collection , as shown in the following screenshot:
Visual Studio 2012 Test Types
[ 30 ]
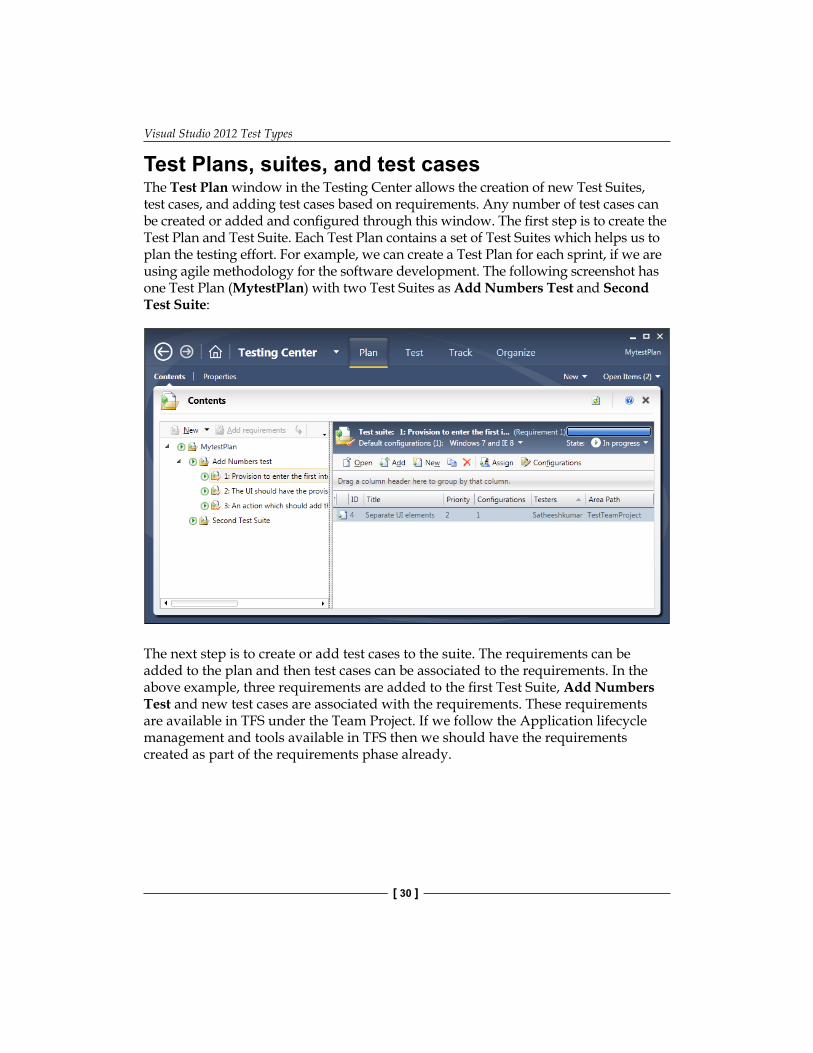
Test Plans, suites, and test casesThe Test Plan window in the Testing Center allows the creation of new Test Suites, test cases, and adding test cases based on requirements. Any number of test cases can be created or added and configured through this window. The first step is to create the Test Plan and Test Suite. Each Test Plan contains a set of Test Suites which helps us to plan the testing effort. For example, we can create a Test Plan for each sprint, if we are using agile methodology for the software development. The following screenshot has one Test Plan (MytestPlan) with two Test Suites as Add Numbers Test and Second Test Suite:
The next step is to create or add test cases to the suite. The requirements can be added to the plan and then test cases can be associated to the requirements. In the above example, three requirements are added to the first Test Suite, Add Numbers Test and new test cases are associated with the requirements. These requirements are available in TFS under the Team Project. If we follow the Application lifecycle management and tools available in TFS then we should have the requirements created as part of the requirements phase already.
Chapter 1
[ 31 ]
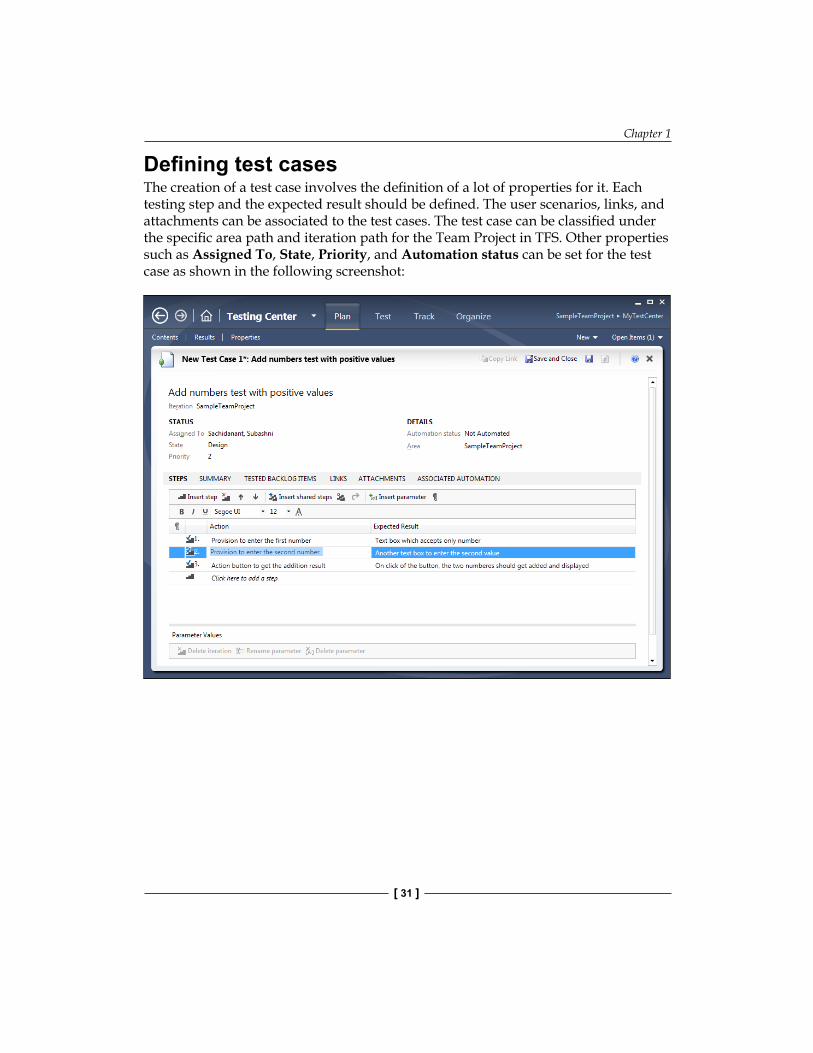
Defining test casesThe creation of a test case involves the definition of a lot of properties for it. Each testing step and the expected result should be defined. The user scenarios, links, and attachments can be associated to the test cases. The test case can be classified under the specific area path and iteration path for the Team Project in TFS. Other properties such as Assigned To, State, Priority, and Automation status can be set for the test case as shown in the following screenshot:
Visual Studio 2012 Test Types
[ 32 ]
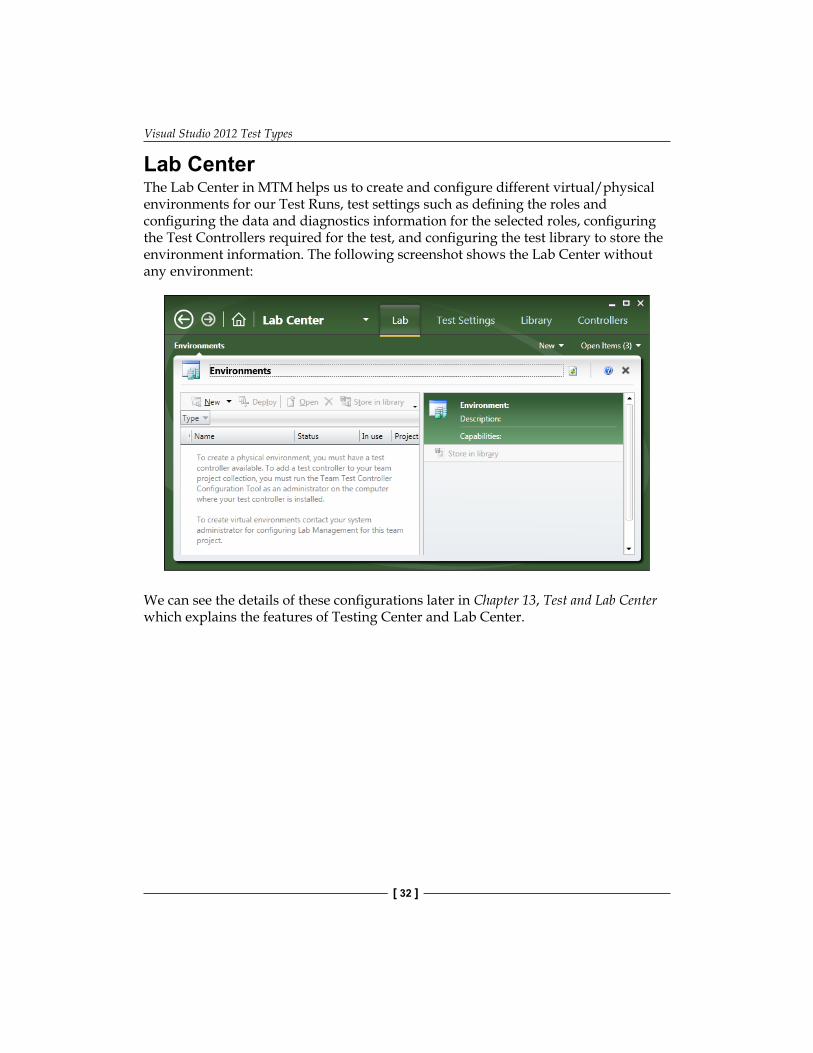
Lab CenterThe Lab Center in MTM helps us to create and configure different virtual/physical environments for our Test Runs, test settings such as defining the roles and configuring the data and diagnostics information for the selected roles, configuring the Test Controllers required for the test, and configuring the test library to store the environment information. The following screenshot shows the Lab Center without any environment:
We can see the details of these configurations later in Chapter 13, Test and Lab Center which explains the features of Testing Center and Lab Center.

Chapter 1
[ 33 ]
SummaryThere are lots of new testing features added to Visual Studio 2012 particularly the coded UI testing, manual testing using the Test Manager Standalone tool. The manual testing is very well structured with lot of options and is handled separately using the MTM tool. The MTM tool contains Testing Center and Lab Center, which helps us to maintain the test cases, test configurations, and testing environments required to simulate actual user load to test the application performance. This chapter provides the high-level information on the tools and techniques available and the new techniques added to Visual Studio 2012. Each of these testing techniques is explained in detail in the coming chapters with detailed examples.
The next chapter explains the details of maintaining the test cases by creating Test Plan, Test Suites, and then the test cases themselves. Action recording and creating test cases for manual tests is also covered in detail in the next chapter.

Test Plan, Test Suite, and Manual Testing
Manual testing is the simplest type of testing carried out by the testers without using any automation tool. Manual test type is the best choice to be selected when the test is too difficult or complex to automate. Cost and time are also the factors to be considered when deciding between manual or automated tests. Tools such as Microsoft Excel and Microsoft Word are very useful to create and manage test cases, but more time is spent in maintaining the documents. The overall time spent in manual testing and maintaining the test cases will be greater—and more expensive as well. If any of the requirements change, new test cases should be created and the new test should be executed including the existing test cases, to make sure the new changes do not break any of the existing features.
Automated tests are good for regression testing to verify that no new defects are introduced, but manual testing is the best way to find new defects. Additional effort and knowledge is always required for automating the tests using scripts or any automation tools. At the same time, the cost involved in re-running manual tests is also high. To minimize these problems and difficulties in maintaining the test cases, Microsoft introduced multiple features for manual testing and test management with a separate testing framework and user interface, known as Microsoft Test Manager (MTM).
MTM is the main entry point for test case authoring, management, execution, and tracking. Maintaining the requirements, test cases, defects, and reports has become much easier; all of this can be done using one single tool. MTM provides an independent testing environment for the testers, without any dependency on Visual Studio; it only needs a connection to the Team Project repository in Team Foundation Server to maintain all information in the central repository. This chapter covers the following topics in detail:
• Creating Test Plans, Test Suites, and test cases• Types of Test Suites
Test Plan, Test Suite, and Manual Testing
[ 36 ]
• Executing manual tests and action recording• Shared-steps creation and action recording for shared steps• Parameterizing the manual test
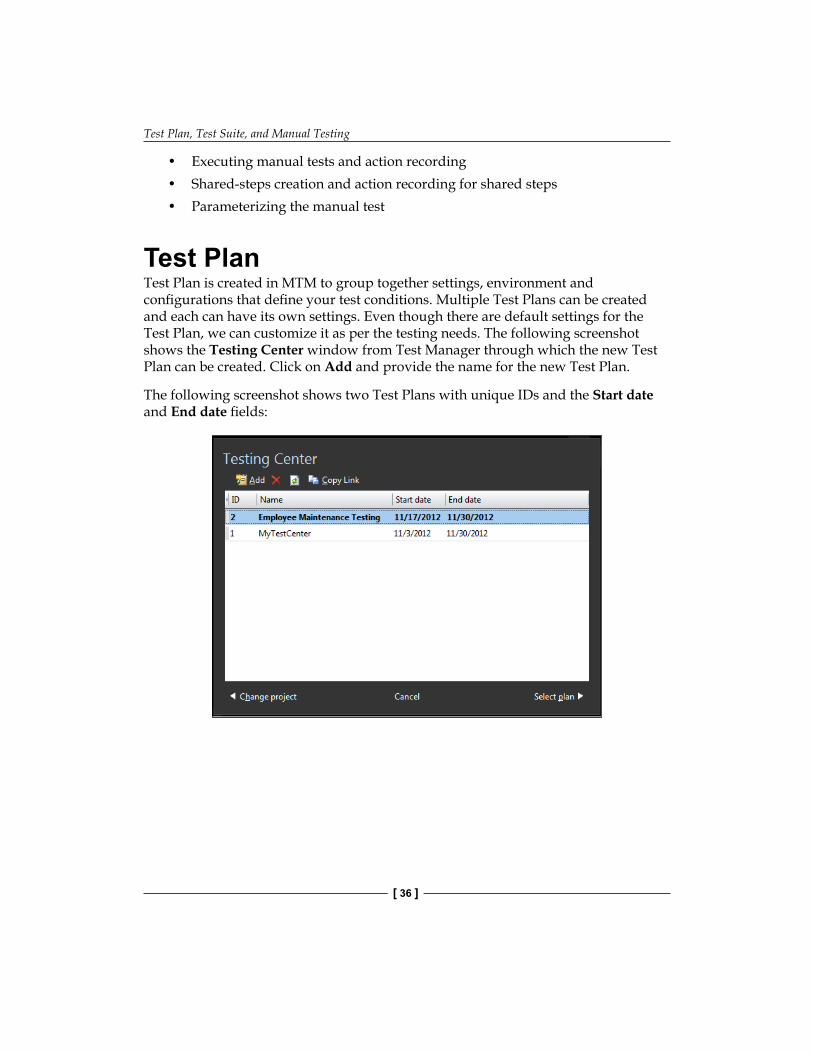
Test PlanTest Plan is created in MTM to group together settings, environment and configurations that define your test conditions. Multiple Test Plans can be created and each can have its own settings. Even though there are default settings for the Test Plan, we can customize it as per the testing needs. The following screenshot shows the Testing Center window from Test Manager through which the new Test Plan can be created. Click on Add and provide the name for the new Test Plan.
The following screenshot shows two Test Plans with unique IDs and the Start date and End date fields:
Chapter 2
[ 37 ]
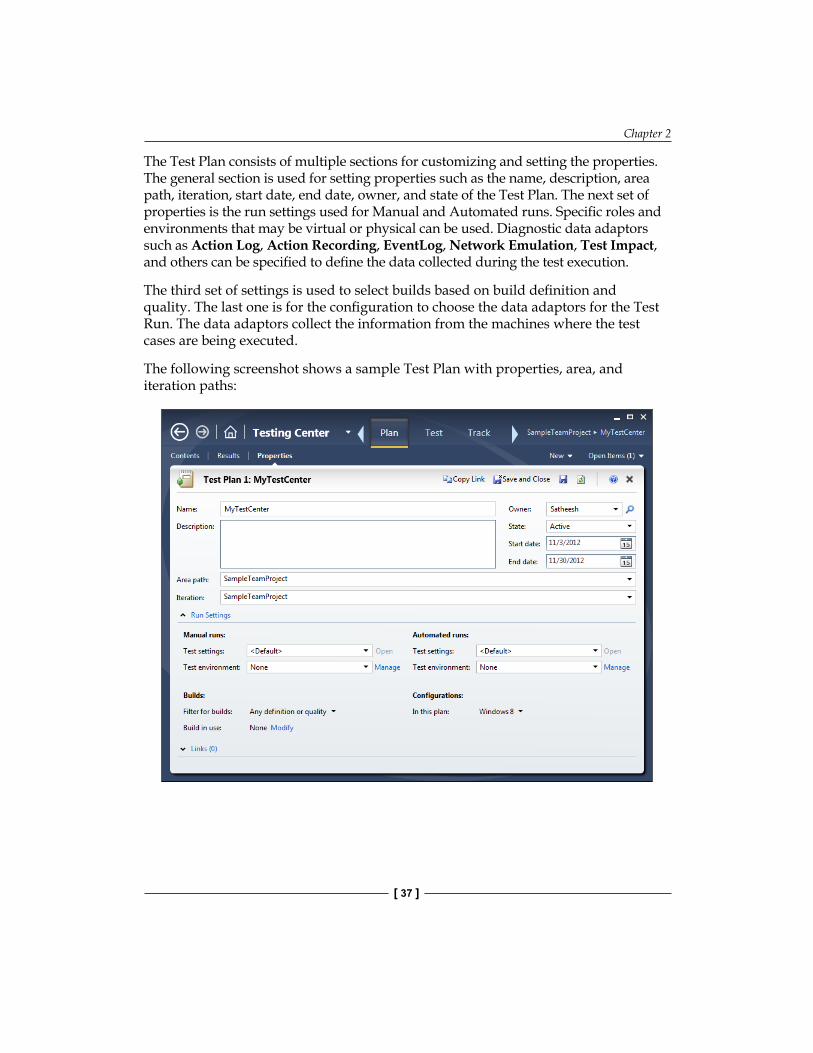
The Test Plan consists of multiple sections for customizing and setting the properties. The general section is used for setting properties such as the name, description, area path, iteration, start date, end date, owner, and state of the Test Plan. The next set of properties is the run settings used for Manual and Automated runs. Specific roles and environments that may be virtual or physical can be used. Diagnostic data adaptors such as Action Log, Action Recording, EventLog, Network Emulation, Test Impact, and others can be specified to define the data collected during the test execution.
The third set of settings is used to select builds based on build definition and quality. The last one is for the configuration to choose the data adaptors for the Test Run. The data adaptors collect the information from the machines where the test cases are being executed.
The following screenshot shows a sample Test Plan with properties, area, and iteration paths:

Test Plan, Test Suite, and Manual Testing
[ 38 ]
The Contents subsection under Plan is used for creating the Test Suite and test cases and associating them with a Test Plan. Multiple Suites and test cases can be associated with a single Test Plan. Requirements can be added to or associated with a Test Plan, so that the test cases within the Test Plan can be related to the requirements to enable easy tracing.
The following screenshot shows a Test Suite and test xase added to the Test Plan:
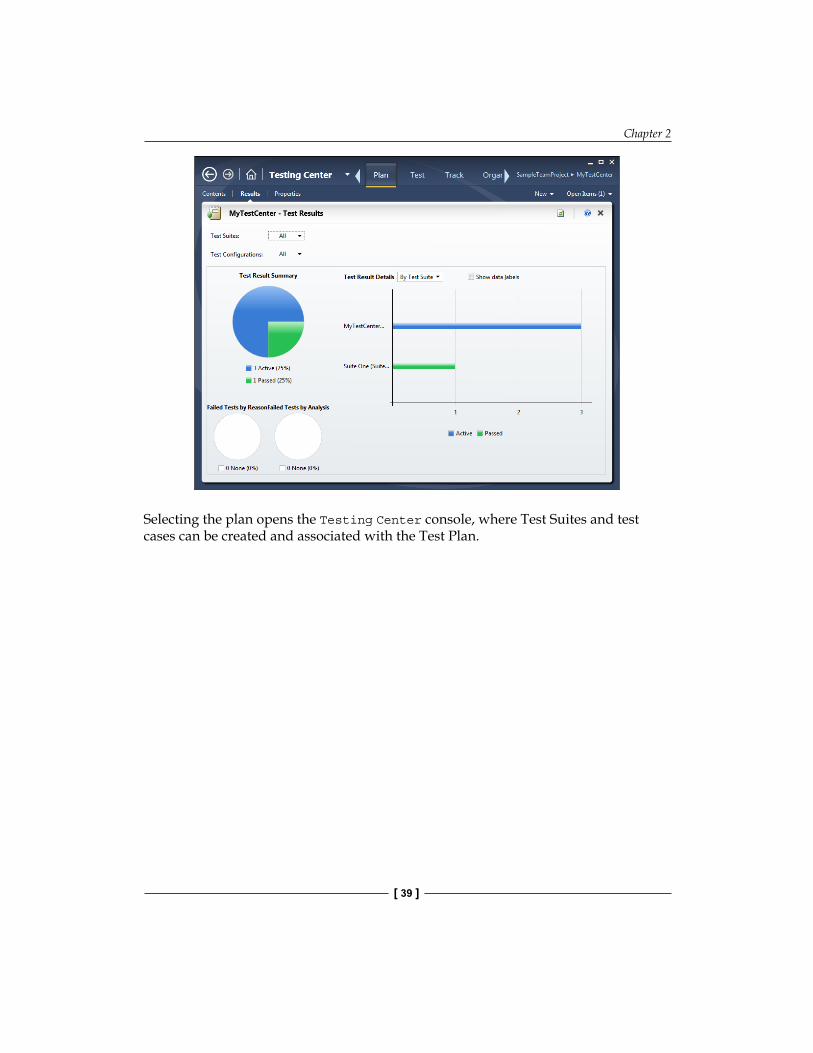
The Test Results subsection under Plan shows the graphical and summary information about the Test Results for the plan. The information includes Test Suite-wise summary of active, passed, and failed tests. The following screenshot shows three active and one passed tests from the result:
Chapter 2
[ 39 ]
Selecting the plan opens the Testing Center console, where Test Suites and test cases can be created and associated with the Test Plan.
Test Plan, Test Suite, and Manual Testing
[ 40 ]
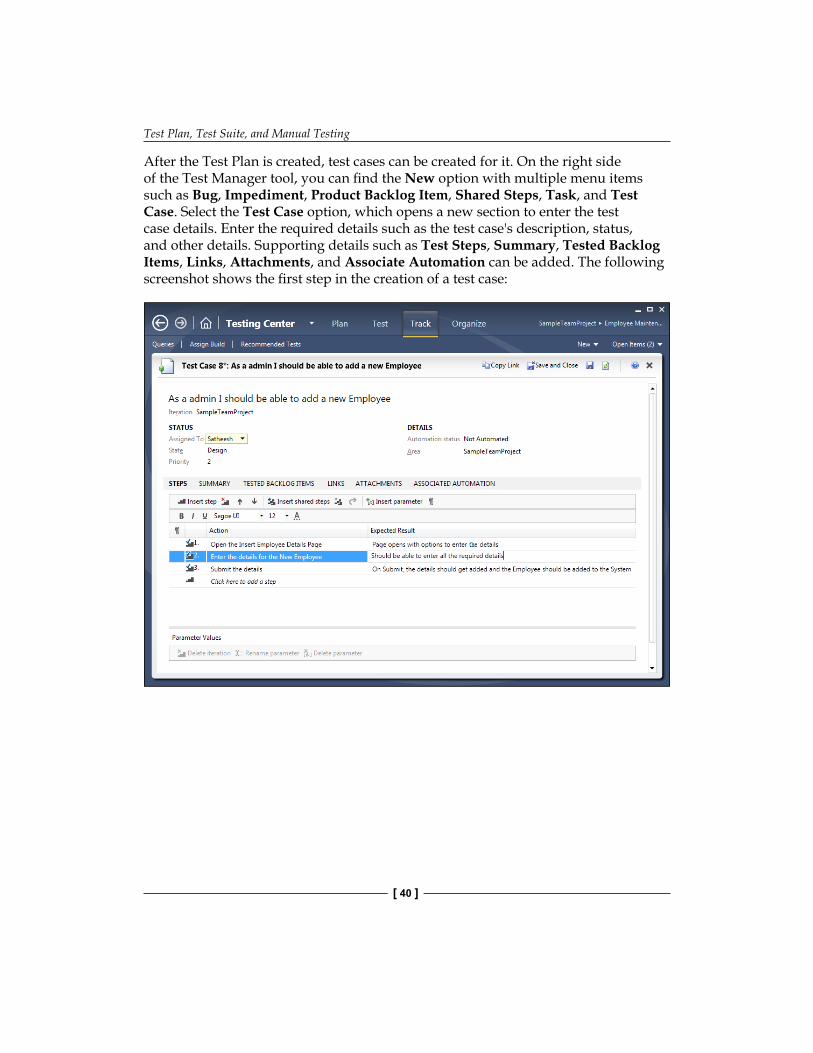
After the Test Plan is created, test cases can be created for it. On the right side of the Test Manager tool, you can find the New option with multiple menu items such as Bug, Impediment, Product Backlog Item, Shared Steps, Task, and Test Case. Select the Test Case option, which opens a new section to enter the test case details. Enter the required details such as the test case's description, status, and other details. Supporting details such as Test Steps, Summary, Tested Backlog Items, Links, Attachments, and Associate Automation can be added. The following screenshot shows the first step in the creation of a test case:
Chapter 2
[ 41 ]
Now the Test Plan and some test cases are ready. Let's look at the different types of Test Suites.
Test Suite and its typesTest Suites are used for grouping and organizing the test cases under a Test Plan. Grouping test cases within a Test Suite may help testers in running and reporting all the tests under Test Suite, and to set the state of a Suite to indicate if it is planned, in progress, or completed. test cases can be added to multiple Test Suites and Test Plans. After creating the Test Plan, a default Test Suite is added as a root node to the plan with the same name as that of Test Plan. This node contains all the other Test Suites.
A new Test Suite can be created in three different ways:
• Static Test Suite• Query-based Test Suite• Requirement-based Test Suite
After creating the Test Suite, we can also customize the order of the test cases within the Test Suite. Test Suites can also be copied from another Test Plan in the Team Project repository. When you copy the Test Suite, the test cases are not copied but the copied Suite references the same test cases.
Test Plan, Test Suite, and Manual Testing
[ 42 ]
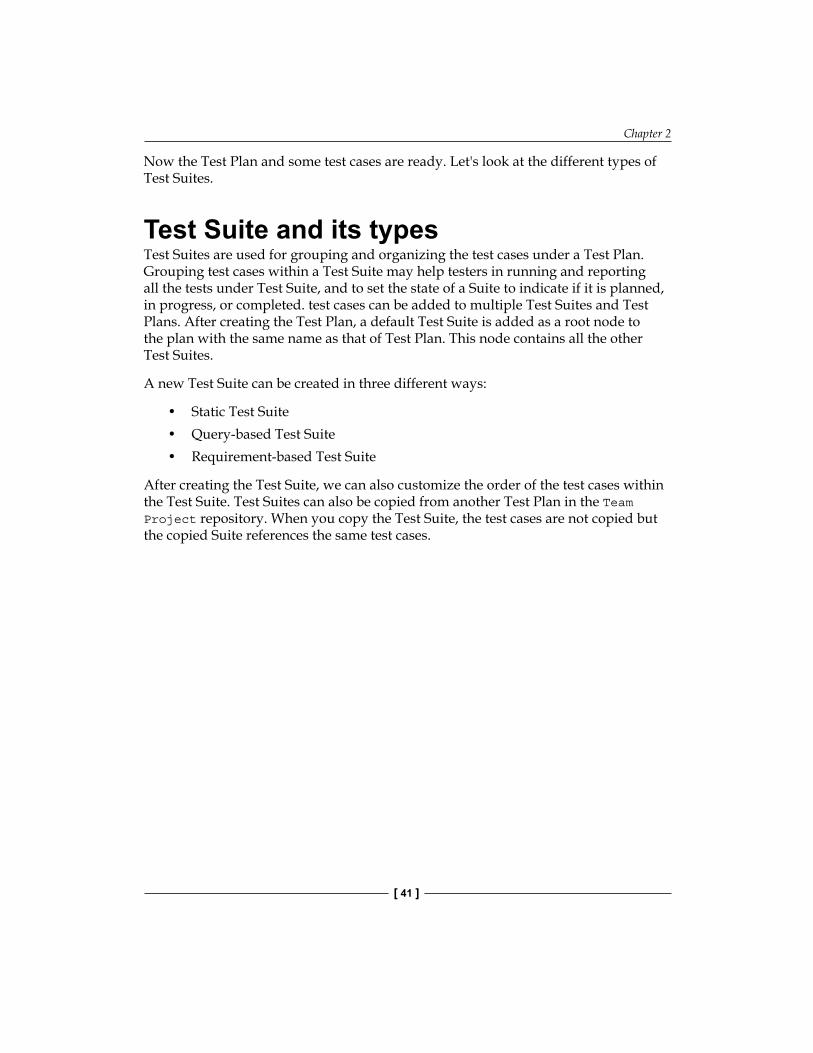
Static Test SuitesThe static Test Suite is like a folder that groups test cases or Test Suites. The root suite itself is a static Test Suite. To create the Test Suite, select the Plan tab in MTM and then the Contents link to view the Test Plan. Right-click on the Test Plan and choose New suite from the context menu, then provide the name for the new static suite.
Chapter 2
[ 43 ]
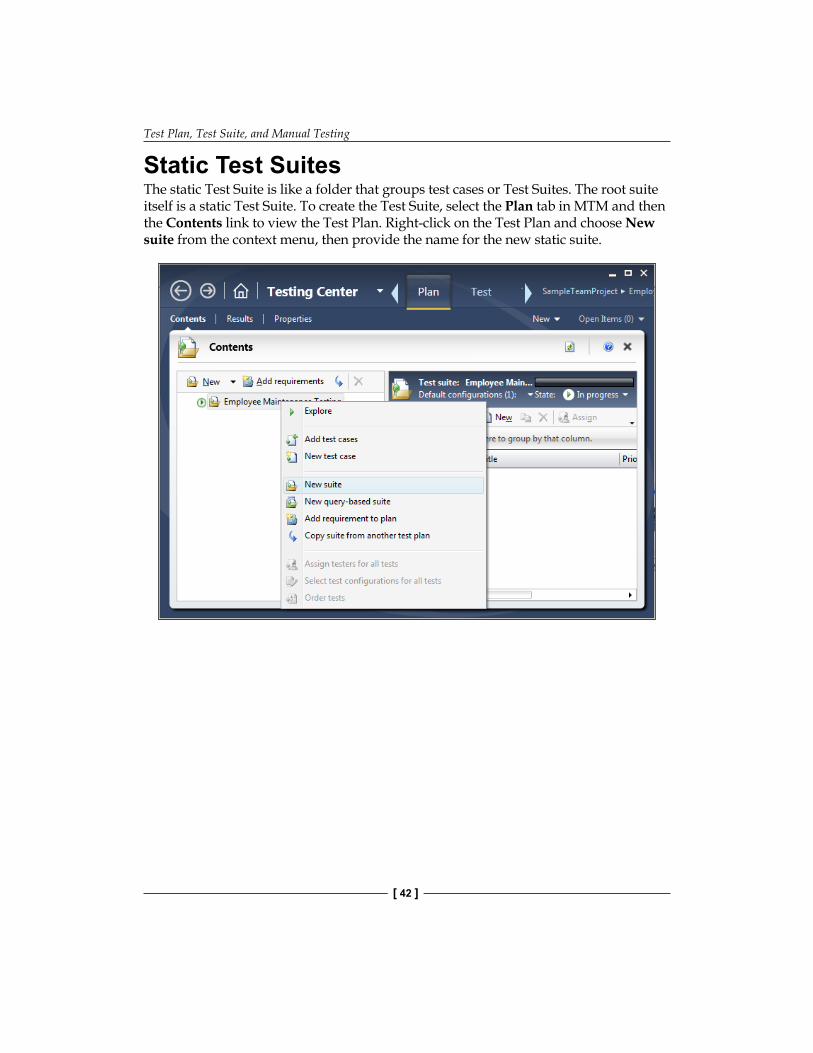
On the right pane, we can see the option to add existing test cases and create new test cases to add to the Test Suite. Choose the option Add as we have the test cases added and available already. This brings up the Add Test Cases to Suite window, which provides the flexibility to search for and choose from our test cases. Select the required Cases from the list and choose the Add Test Cases option to add the selected Cases to the Test Suite.
After adding the test cases to the Test Suite, the Test Suite can be assigned to the testers and the order of test cases can also be changed.

Test Plan, Test Suite, and Manual Testing
[ 44 ]
Query-based Test SuitesQuery-based Test Suite is all about defining the query and adding test cases to the Test Suite based on the query result. Right-click on the Test Plan and select the option Query based Test Suite from the context menu. Now, build a query to fetch all priority 1 test cases from the list of available test cases. In the following screenshot, we have three test cases available for the defined query. Provide a name for the query and then choose the Create Test Suite option.
The test cases from the result are added to the Test Suite and can be assigned to the testers. The query can be, modified at any time, and configurations can also be set. If the query is modified, the test cases added to the Test Suite also get modified, based on the query result.

Chapter 2
[ 45 ]
Requirement-based Test SuitesIn every Team Project, requirements are collected and maintained as product backlogs, user stories, or requirements in the form of work items. A Requirement Test Suite is created to group the test cases related to it and associate the Suite to the requirement or work item.
The following screenshot shows the first step to create or add a requirement or a user story. On the right side of the Test Manager tool, you can find the Product Backlog Item menu option under the New link. Choose that option to open the section for creating the user story or a new backlog item. Enter the details required for the backlog item, such as STATUS, Details, Description, Acceptance Criteria, and other supporting details, as shown in the following screenshot. The acceptance criteria should be well defined because that is the base for the test cases and for testing.
Test Plan, Test Suite, and Manual Testing
[ 46 ]
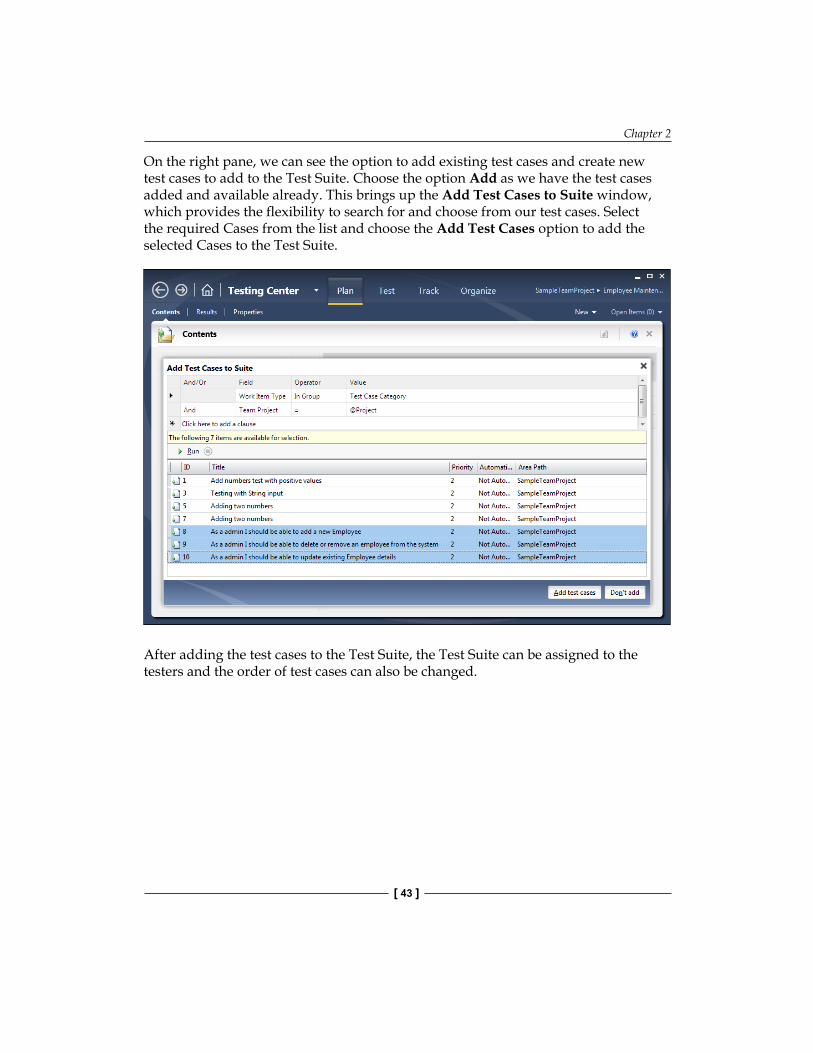
After creating the user story in the form of a product backlog item, go back to the Contents section and click on the Add requirements option, which opens the query-based search section Add existing requirements to this test plan to get the requirements. Define the query to get the correct requirements from the available list. Click on Run to get the requirements based on the query defined. Select the user story or the requirement from the list and click on Add requirements to plan.
Chapter 2
[ 47 ]
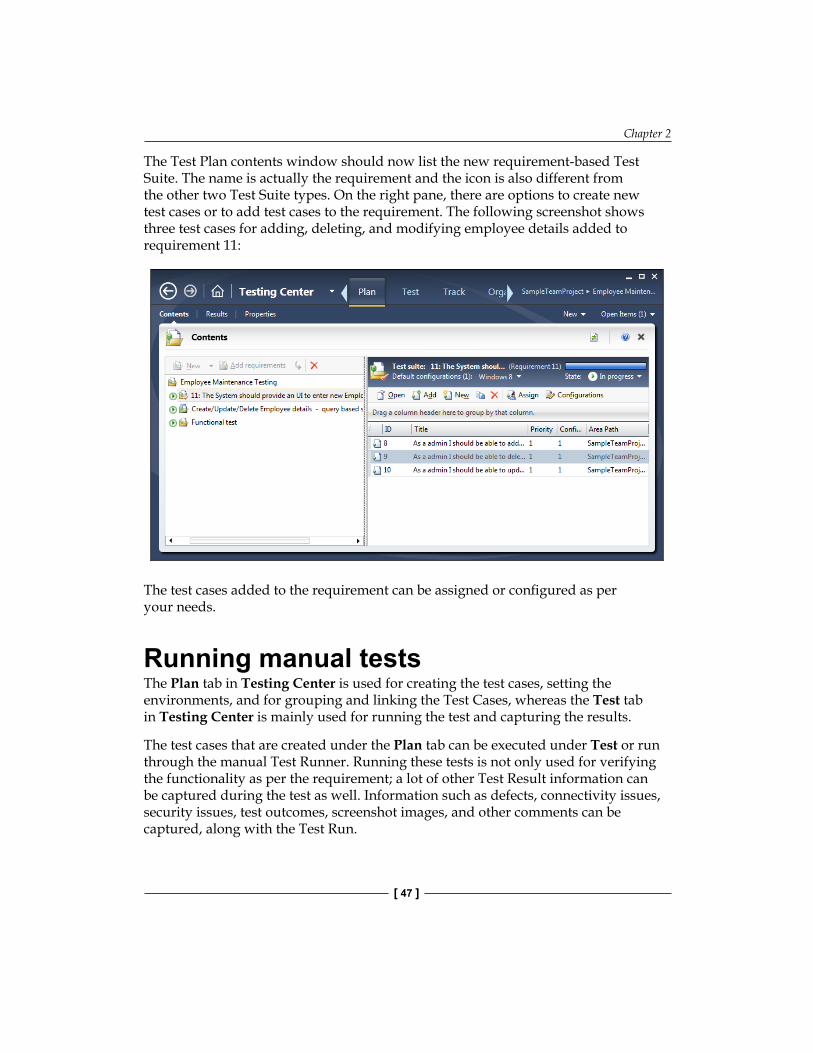
The Test Plan contents window should now list the new requirement-based Test Suite. The name is actually the requirement and the icon is also different from the other two Test Suite types. On the right pane, there are options to create new test cases or to add test cases to the requirement. The following screenshot shows three test cases for adding, deleting, and modifying employee details added to requirement 11:
The test cases added to the requirement can be assigned or configured as per your needs.
Running manual testsThe Plan tab in Testing Center is used for creating the test cases, setting the environments, and for grouping and linking the Test Cases, whereas the Test tab in Testing Center is mainly used for running the test and capturing the results.
The test cases that are created under the Plan tab can be executed under Test or run through the manual Test Runner. Running these tests is not only used for verifying the functionality as per the requirement; a lot of other Test Result information can be captured during the test as well. Information such as defects, connectivity issues, security issues, test outcomes, screenshot images, and other comments can be captured, along with the Test Run.
Test Plan, Test Suite, and Manual Testing
[ 48 ]
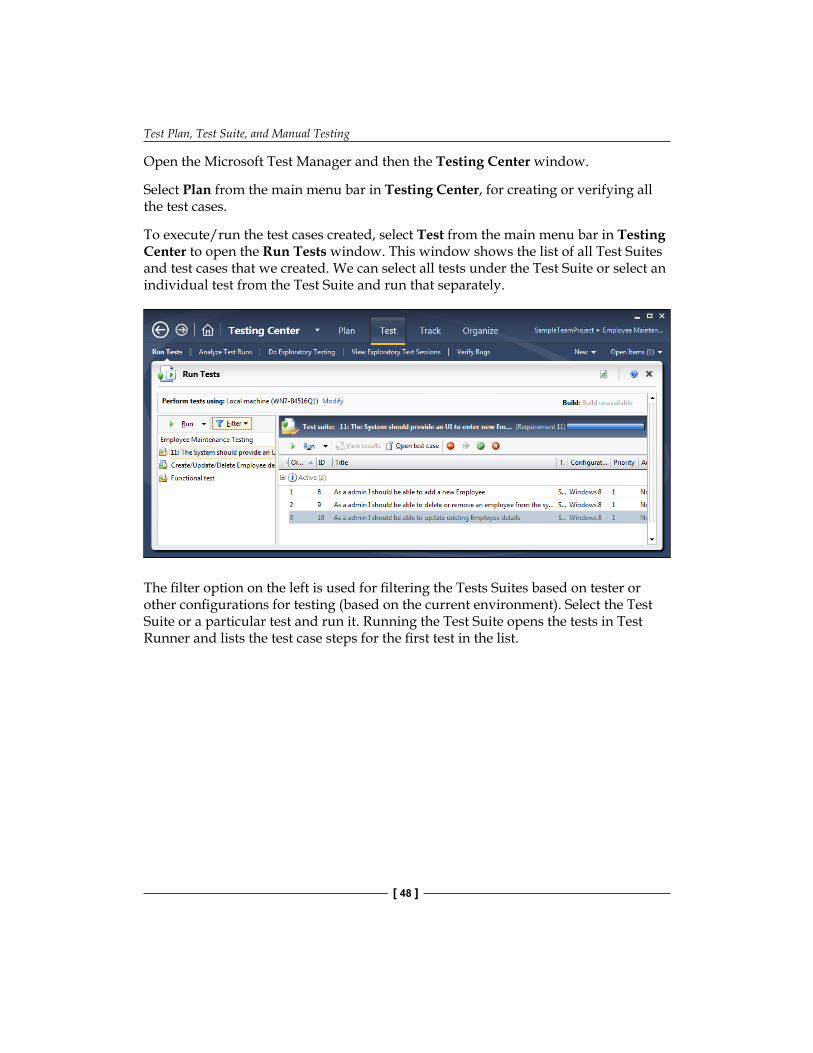
Open the Microsoft Test Manager and then the Testing Center window.
Select Plan from the main menu bar in Testing Center, for creating or verifying all the test cases.
To execute/run the test cases created, select Test from the main menu bar in Testing Center to open the Run Tests window. This window shows the list of all Test Suites and test cases that we created. We can select all tests under the Test Suite or select an individual test from the Test Suite and run that separately.
The filter option on the left is used for filtering the Tests Suites based on tester or other configurations for testing (based on the current environment). Select the Test Suite or a particular test and run it. Running the Test Suite opens the tests in Test Runner and lists the test case steps for the first test in the list.
Chapter 2
[ 49 ]
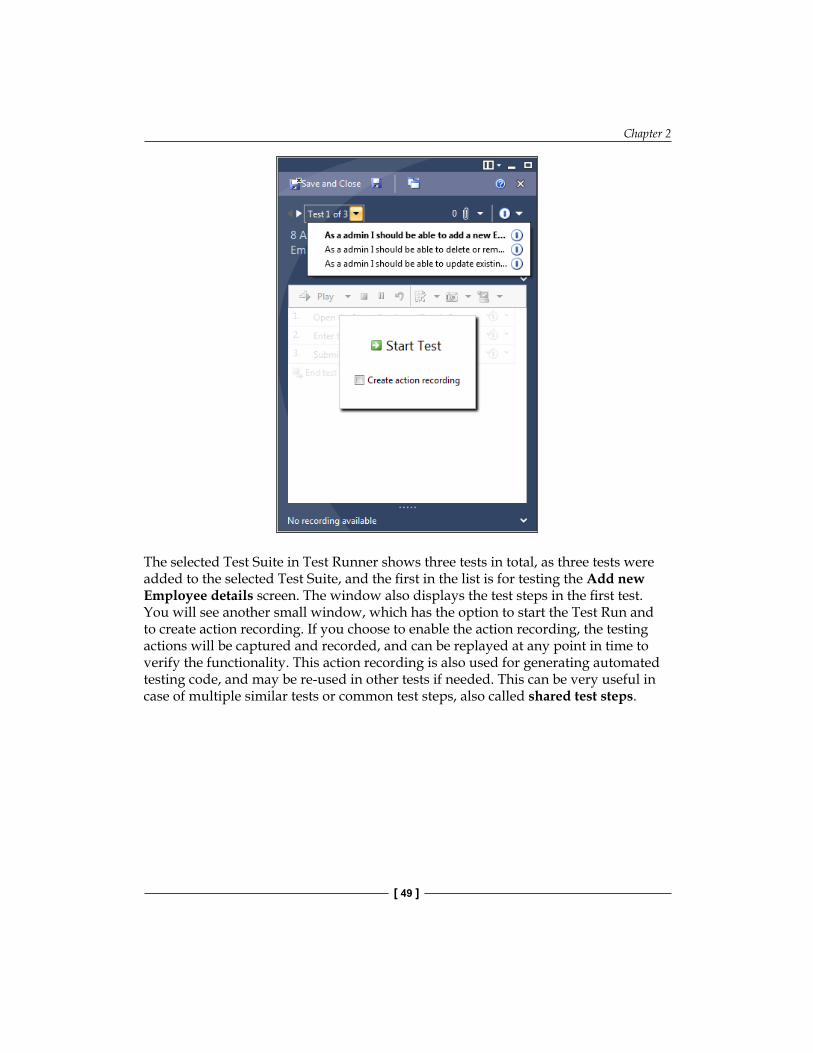
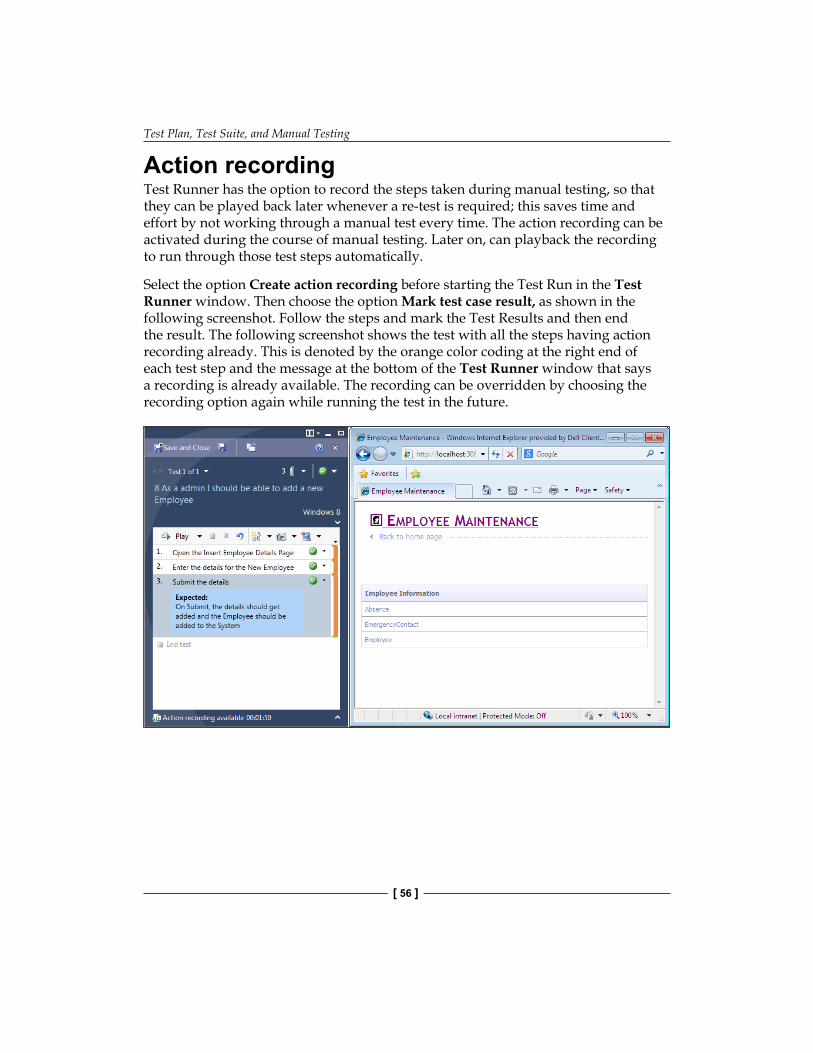
The selected Test Suite in Test Runner shows three tests in total, as three tests were added to the selected Test Suite, and the first in the list is for testing the Add new Employee details screen. The window also displays the test steps in the first test. You will see another small window, which has the option to start the Test Run and to create action recording. If you choose to enable the action recording, the testing actions will be captured and recorded, and can be replayed at any point in time to verify the functionality. This action recording is also used for generating automated testing code, and may be re-used in other tests if needed. This can be very useful in case of multiple similar tests or common test steps, also called shared test steps.
Test Plan, Test Suite, and Manual Testing
[ 50 ]
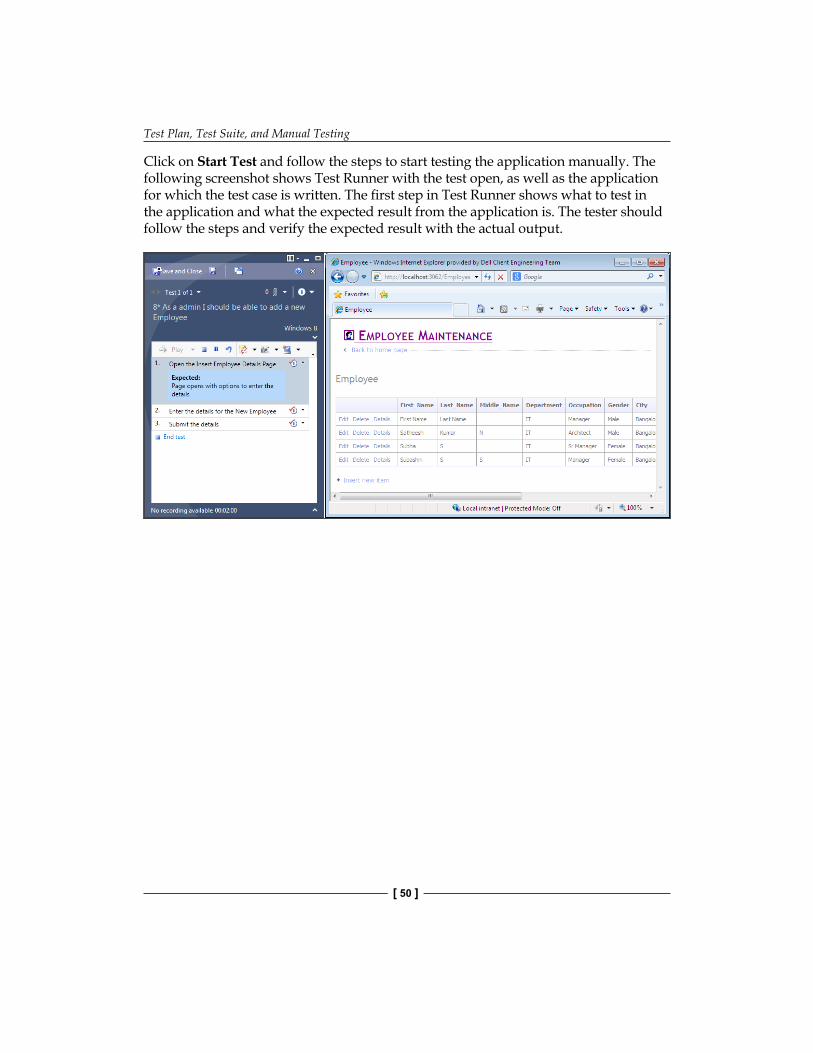
Click on Start Test and follow the steps to start testing the application manually. The following screenshot shows Test Runner with the test open, as well as the application for which the test case is written. The first step in Test Runner shows what to test in the application and what the expected result from the application is. The tester should follow the steps and verify the expected result with the actual output.
Chapter 2
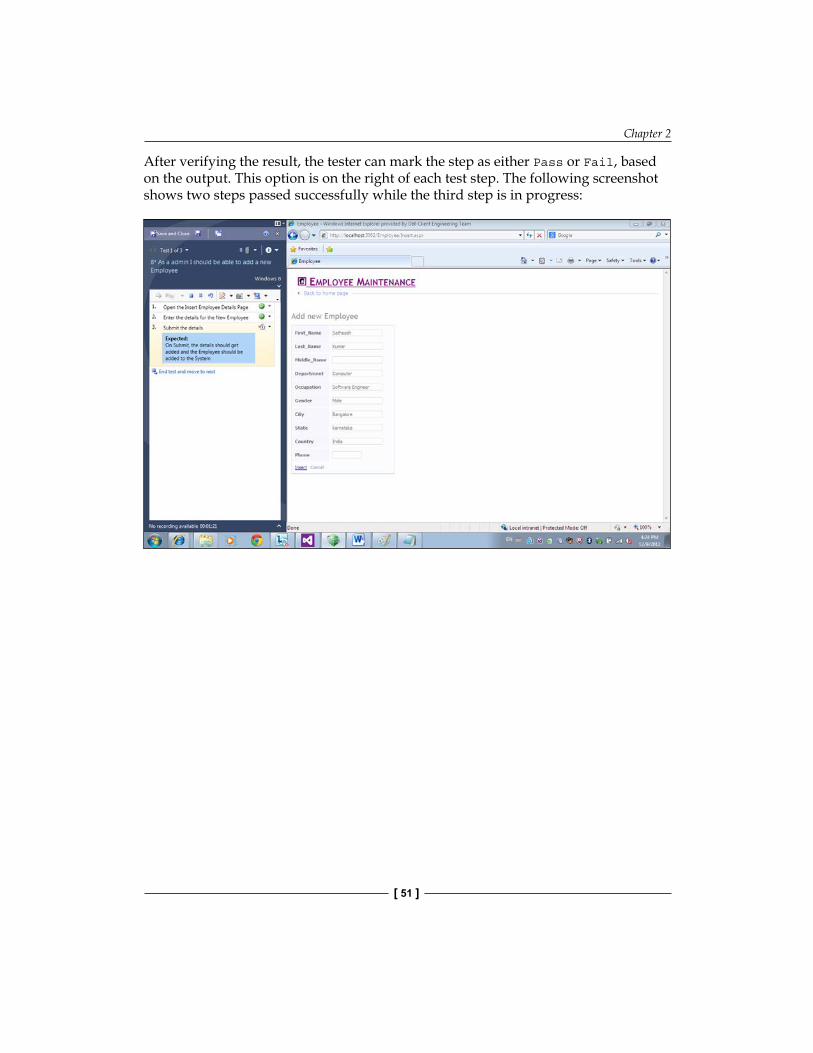
[ 51 ]
After verifying the result, the tester can mark the step as either Pass or Fail, based on the output. This option is on the right of each test step. The following screenshot shows two steps passed successfully while the third step is in progress:
Test Plan, Test Suite, and Manual Testing
[ 52 ]
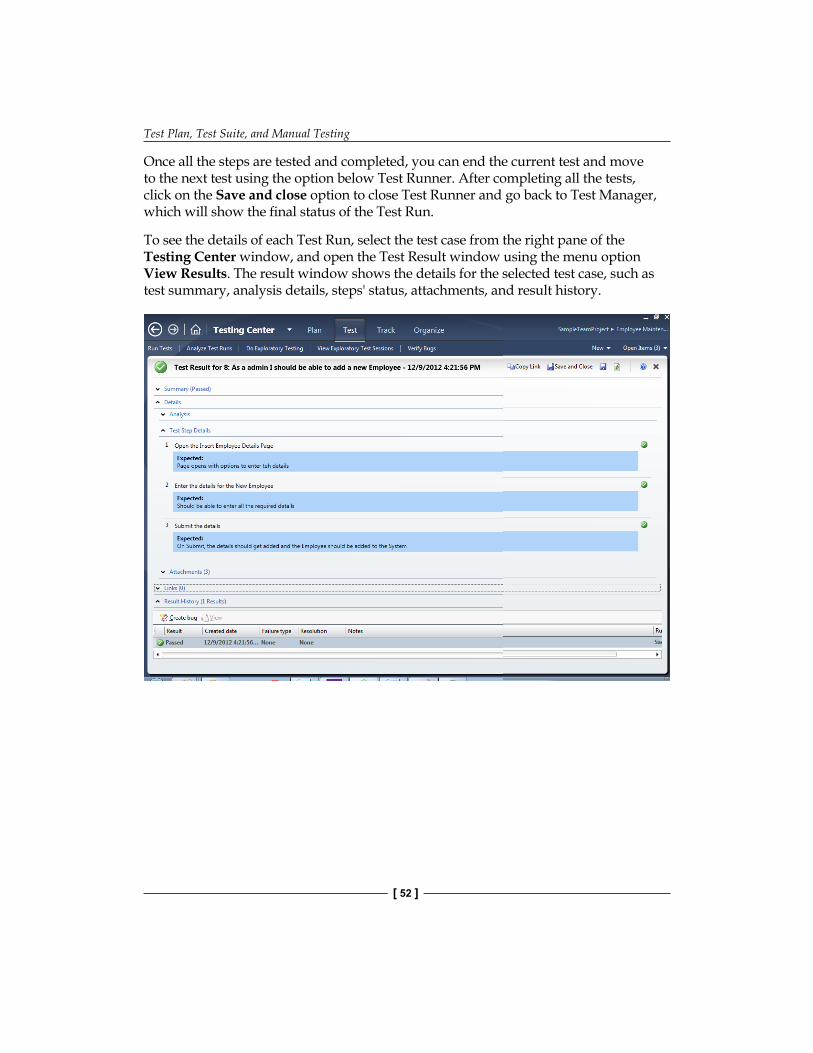
Once all the steps are tested and completed, you can end the current test and move to the next test using the option below Test Runner. After completing all the tests, click on the Save and close option to close Test Runner and go back to Test Manager, which will show the final status of the Test Run.
To see the details of each Test Run, select the test case from the right pane of the Testing Center window, and open the Test Result window using the menu option View Results. The result window shows the details for the selected test case, such as test summary, analysis details, steps' status, attachments, and result history.
Chapter 2
[ 53 ]
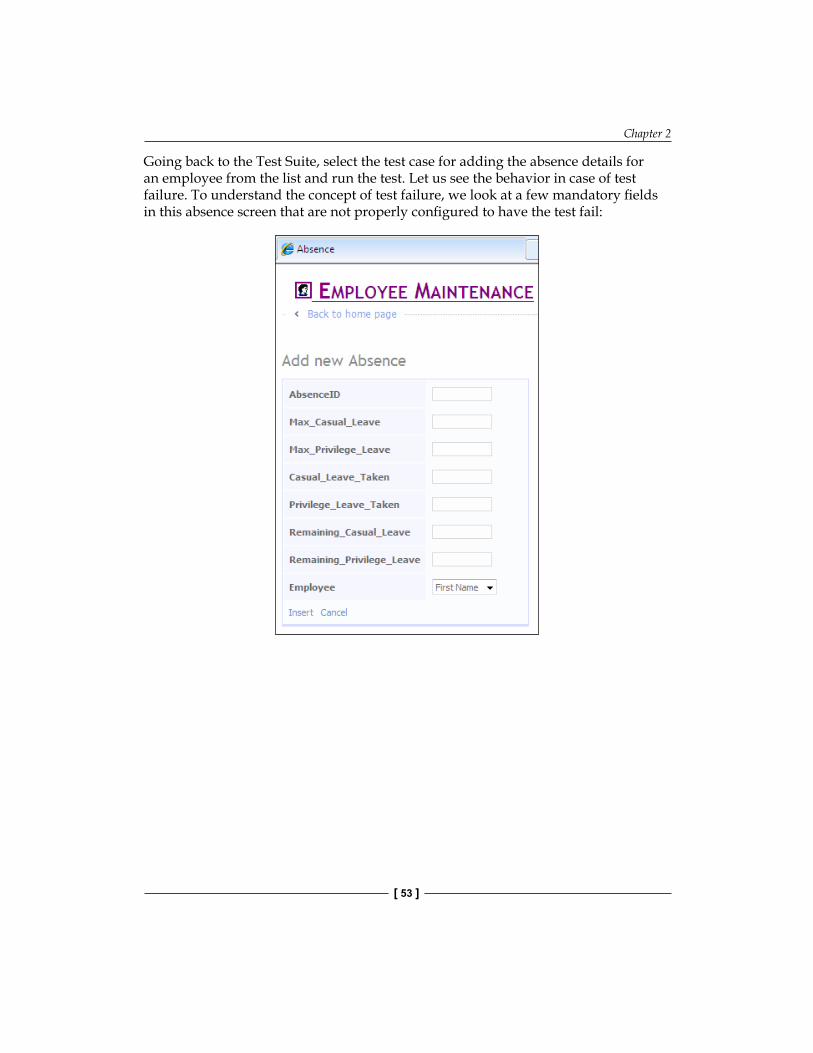
Going back to the Test Suite, select the test case for adding the absence details for an employee from the list and run the test. Let us see the behavior in case of test failure. To understand the concept of test failure, we look at a few mandatory fields in this absence screen that are not properly configured to have the test fail:
Test Plan, Test Suite, and Manual Testing
[ 54 ]
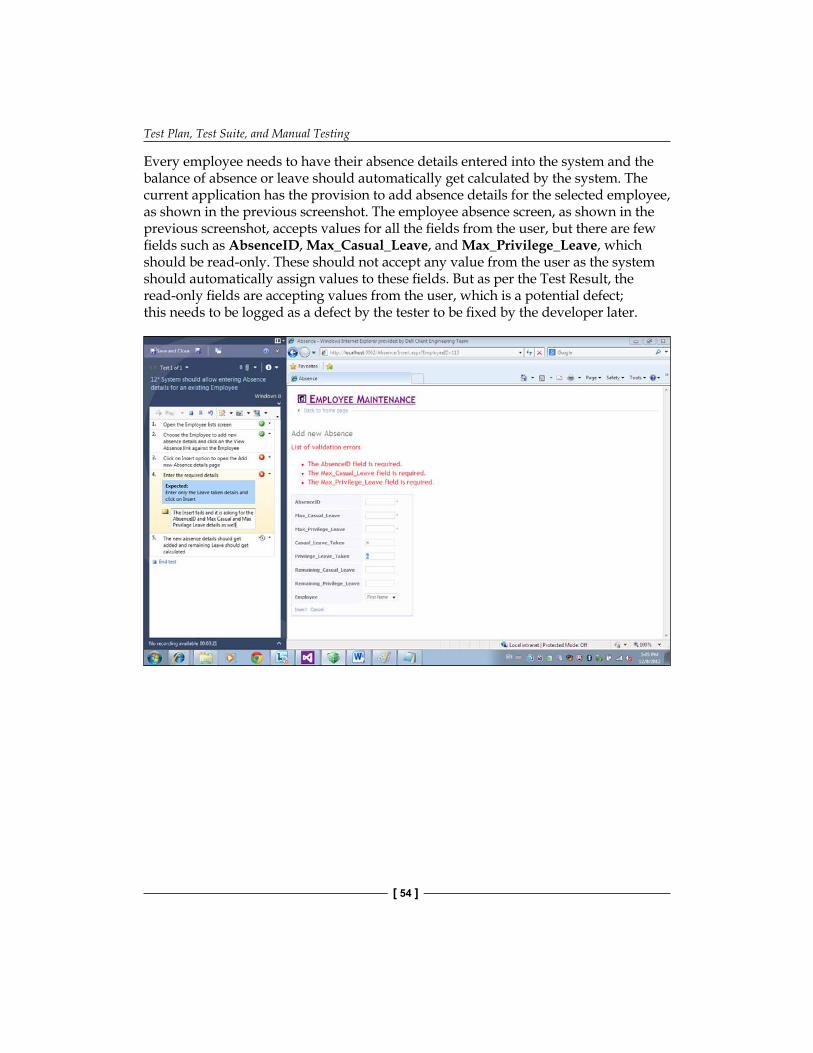
Every employee needs to have their absence details entered into the system and the balance of absence or leave should automatically get calculated by the system. The current application has the provision to add absence details for the selected employee, as shown in the previous screenshot. The employee absence screen, as shown in the previous screenshot, accepts values for all the fields from the user, but there are few fields such as AbsenceID, Max_Casual_Leave, and Max_Privilege_Leave, which should be read-only. These should not accept any value from the user as the system should automatically assign values to these fields. But as per the Test Result, the read-only fields are accepting values from the user, which is a potential defect; this needs to be logged as a defect by the tester to be fixed by the developer later.
Chapter 2
[ 55 ]
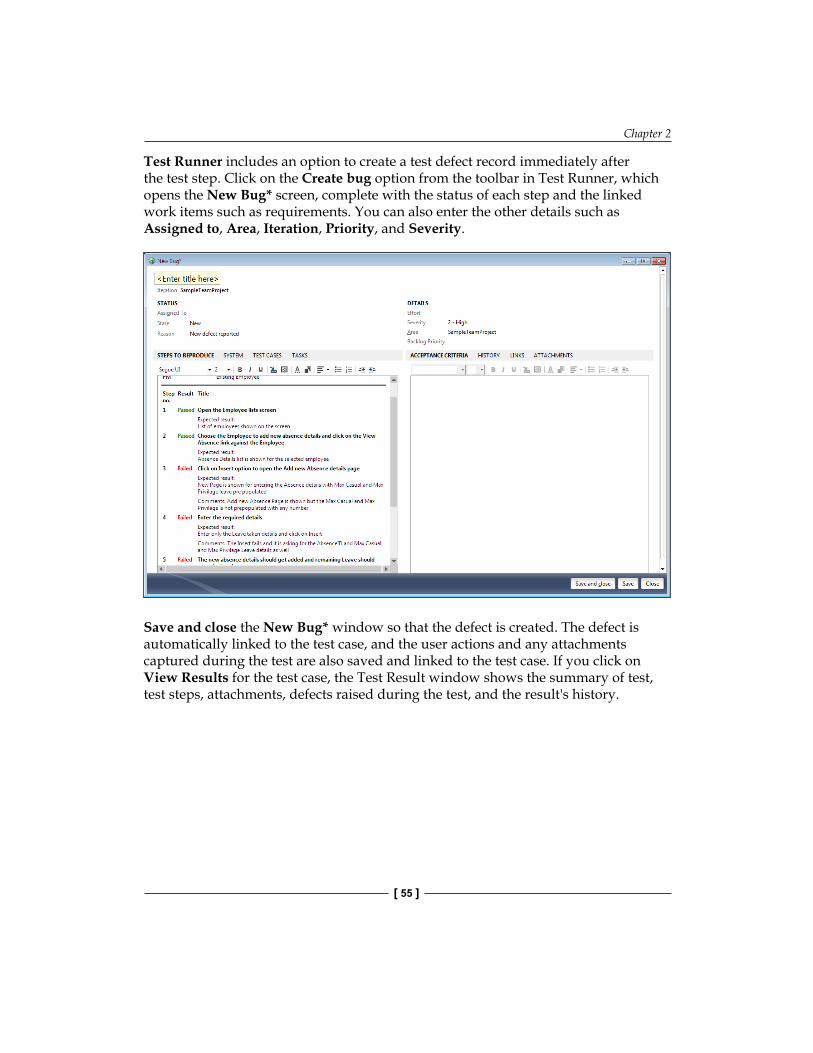
Test Runner includes an option to create a test defect record immediately after the test step. Click on the Create bug option from the toolbar in Test Runner, which opens the New Bug* screen, complete with the status of each step and the linked work items such as requirements. You can also enter the other details such as Assigned to, Area, Iteration, Priority, and Severity.
Save and close the New Bug* window so that the defect is created. The defect is automatically linked to the test case, and the user actions and any attachments captured during the test are also saved and linked to the test case. If you click on View Results for the test case, the Test Result window shows the summary of test, test steps, attachments, defects raised during the test, and the result's history.
Test Plan, Test Suite, and Manual Testing
[ 56 ]
Action recordingTest Runner has the option to record the steps taken during manual testing, so that they can be played back later whenever a re-test is required; this saves time and effort by not working through a manual test every time. The action recording can be activated during the course of manual testing. Later on, can playback the recording to run through those test steps automatically.
Select the option Create action recording before starting the Test Run in the Test Runner window. Then choose the option Mark test case result, as shown in the following screenshot. Follow the steps and mark the Test Results and then end the result. The following screenshot shows the test with all the steps having action recording already. This is denoted by the orange color coding at the right end of each test step and the message at the bottom of the Test Runner window that says a recording is already available. The recording can be overridden by choosing the recording option again while running the test in the future.
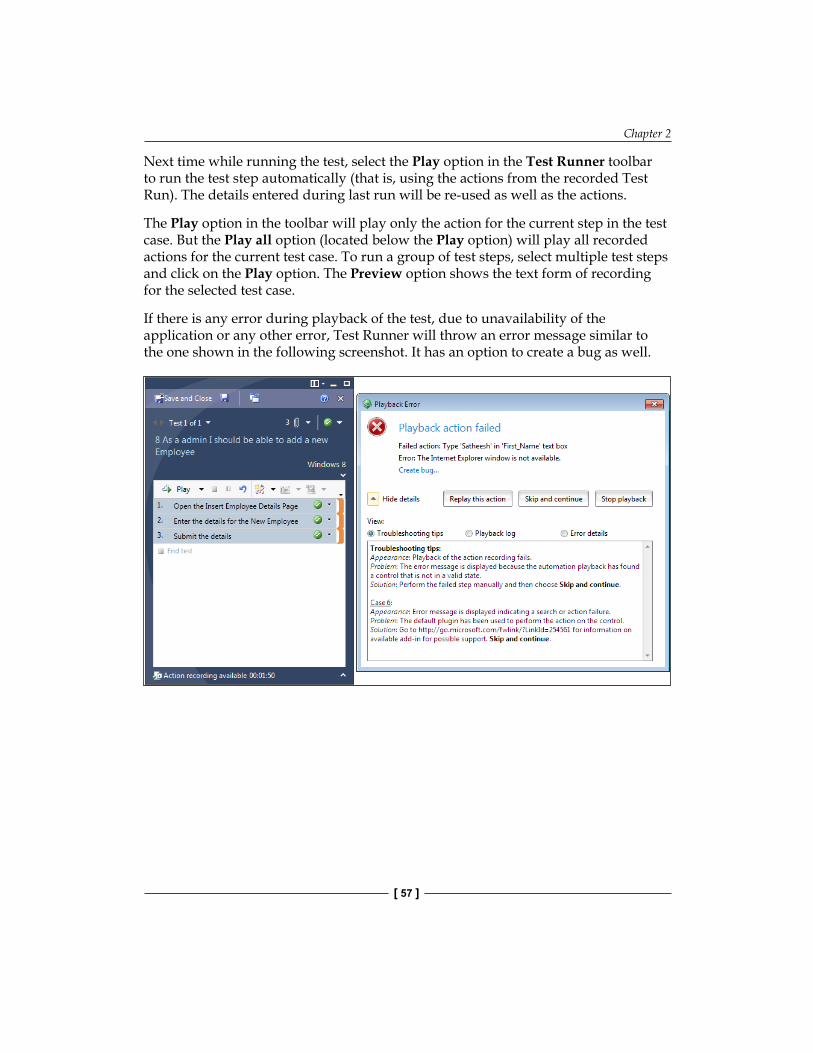
Chapter 2
[ 57 ]
Next time while running the test, select the Play option in the Test Runner toolbar to run the test step automatically (that is, using the actions from the recorded Test Run). The details entered during last run will be re-used as well as the actions.
The Play option in the toolbar will play only the action for the current step in the test case. But the Play all option (located below the Play option) will play all recorded actions for the current test case. To run a group of test steps, select multiple test steps and click on the Play option. The Preview option shows the text form of recording for the selected test case.
If there is any error during playback of the test, due to unavailability of the application or any other error, Test Runner will throw an error message similar to the one shown in the following screenshot. It has an option to create a bug as well.
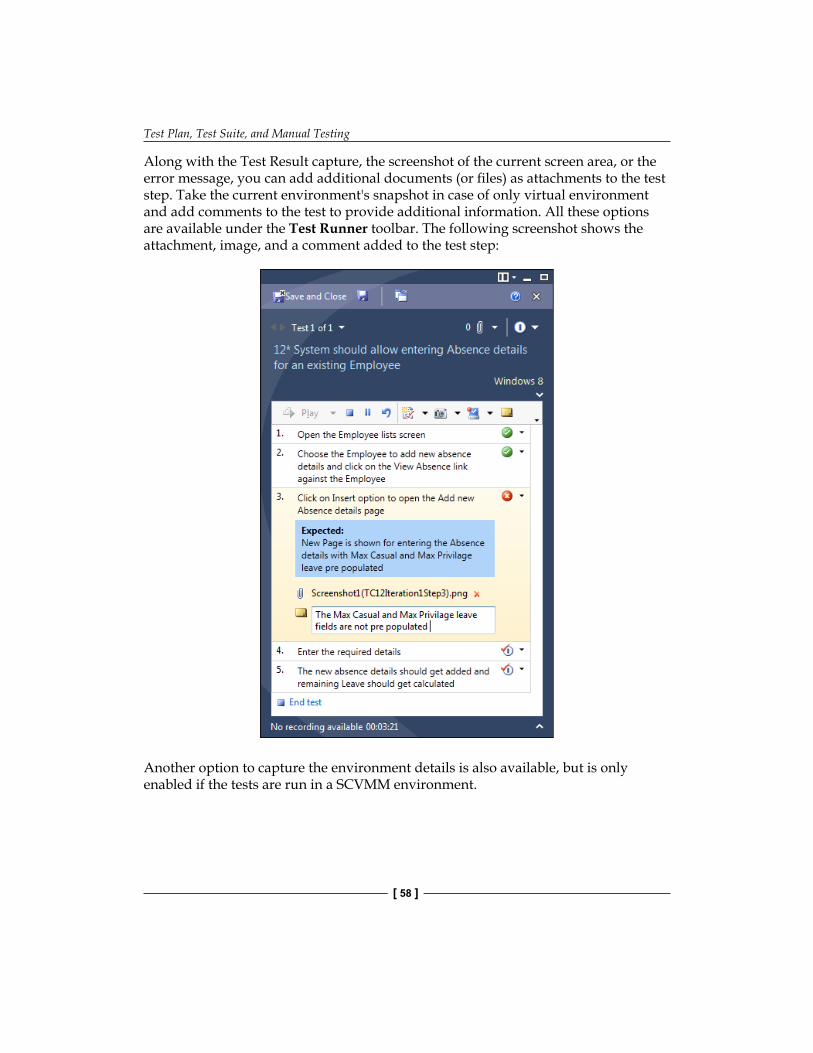
Test Plan, Test Suite, and Manual Testing
[ 58 ]
Along with the Test Result capture, the screenshot of the current screen area, or the error message, you can add additional documents (or files) as attachments to the test step. Take the current environment's snapshot in case of only virtual environment and add comments to the test to provide additional information. All these options are available under the Test Runner toolbar. The following screenshot shows the attachment, image, and a comment added to the test step:
Another option to capture the environment details is also available, but is only enabled if the tests are run in a SCVMM environment.
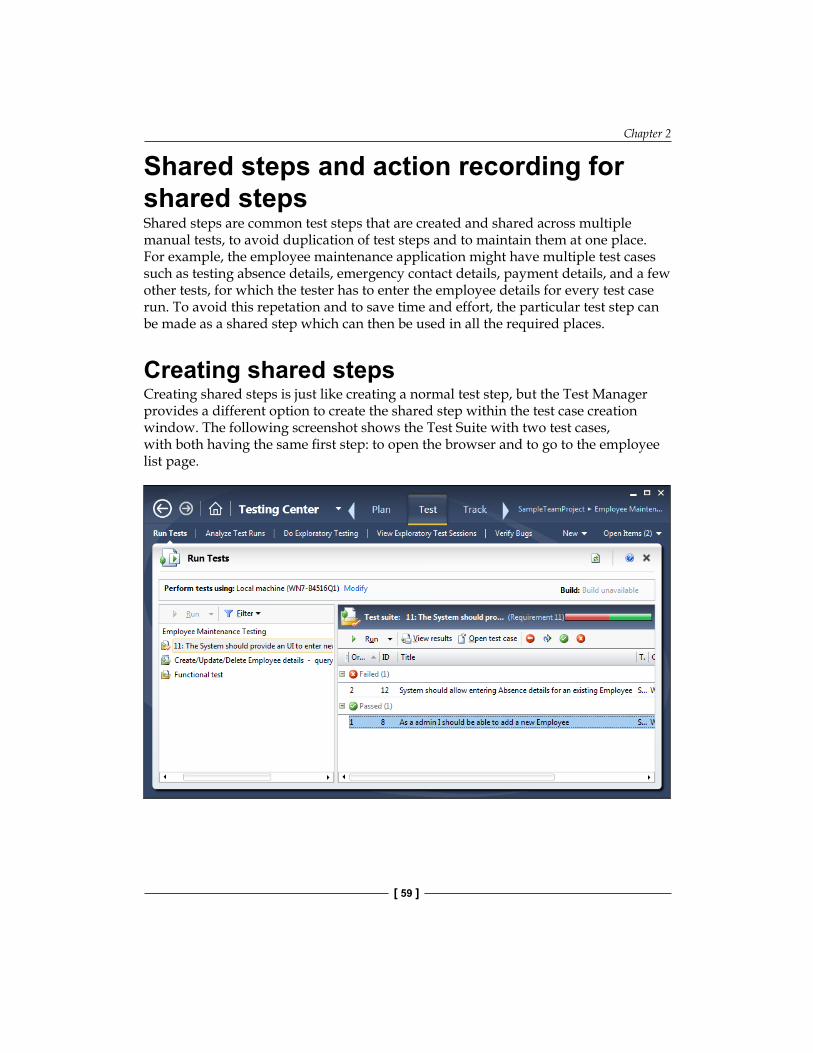
Chapter 2
[ 59 ]
Shared steps and action recording for shared stepsShared steps are common test steps that are created and shared across multiple manual tests, to avoid duplication of test steps and to maintain them at one place. For example, the employee maintenance application might have multiple test cases such as testing absence details, emergency contact details, payment details, and a few other tests, for which the tester has to enter the employee details for every test case run. To avoid this repetation and to save time and effort, the particular test step can be made as a shared step which can then be used in all the required places.
Creating shared stepsCreating shared steps is just like creating a normal test step, but the Test Manager provides a different option to create the shared step within the test case creation window. The following screenshot shows the Test Suite with two test cases, with both having the same first step: to open the browser and to go to the employee list page.
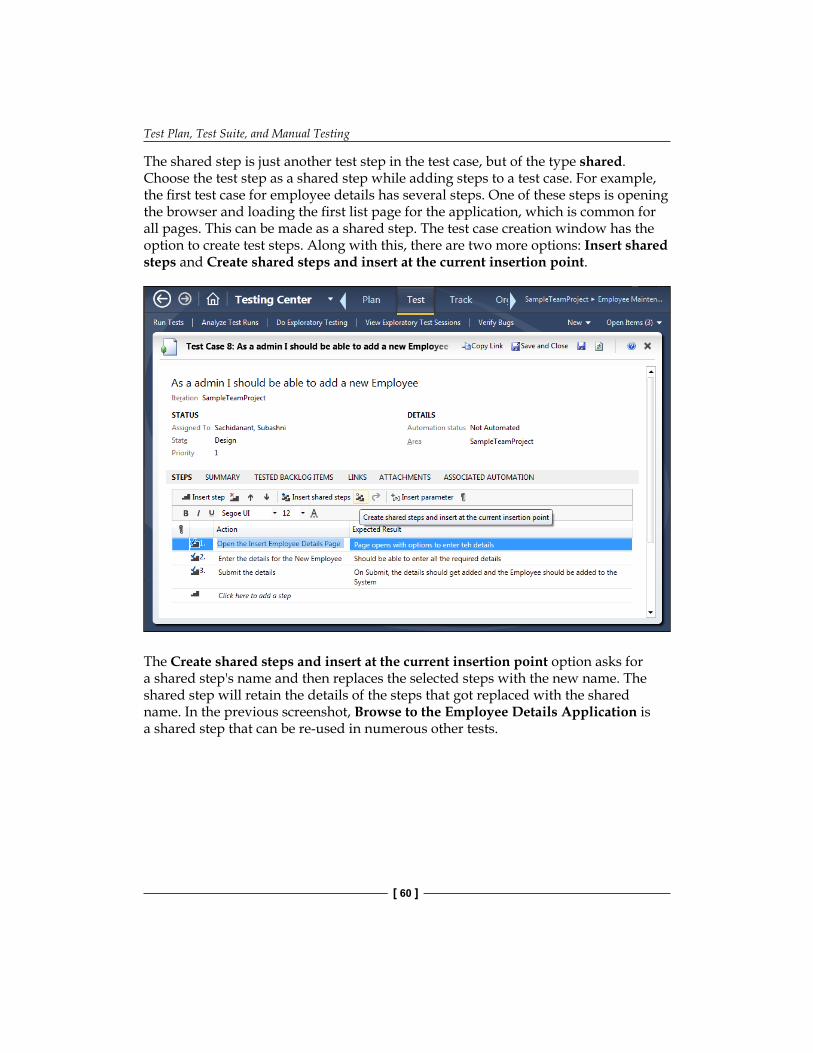
Test Plan, Test Suite, and Manual Testing
[ 60 ]
The shared step is just another test step in the test case, but of the type shared. Choose the test step as a shared step while adding steps to a test case. For example, the first test case for employee details has several steps. One of these steps is opening the browser and loading the first list page for the application, which is common for all pages. This can be made as a shared step. The test case creation window has the option to create test steps. Along with this, there are two more options: Insert shared steps and Create shared steps and insert at the current insertion point.
The Create shared steps and insert at the current insertion point option asks for a shared step's name and then replaces the selected steps with the new name. The shared step will retain the details of the steps that got replaced with the shared name. In the previous screenshot, Browse to the Employee Details Application is a shared step that can be re-used in numerous other tests.
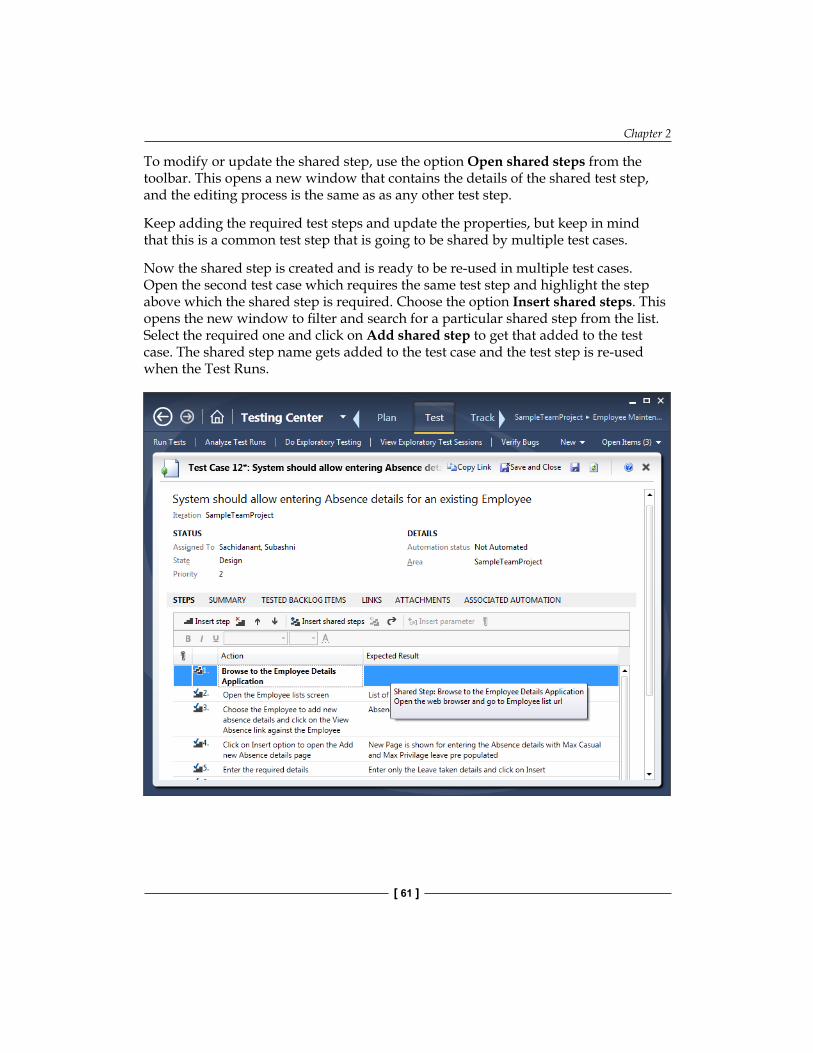
Chapter 2
[ 61 ]
To modify or update the shared step, use the option Open shared steps from the toolbar. This opens a new window that contains the details of the shared test step, and the editing process is the same as as any other test step.
Keep adding the required test steps and update the properties, but keep in mind that this is a common test step that is going to be shared by multiple test cases.
Now the shared step is created and is ready to be re-used in multiple test cases. Open the second test case which requires the same test step and highlight the step above which the shared step is required. Choose the option Insert shared steps. This opens the new window to filter and search for a particular shared step from the list. Select the required one and click on Add shared step to get that added to the test case. The shared step name gets added to the test case and the test step is re-used when the Test Runs.
Test Plan, Test Suite, and Manual Testing
[ 62 ]
Action recording for shared stepsShared step actions are recorded along with the rest of the test case actions. Run the Test Suite or the test case from the Test Manager. Test Runner will load the test steps including the shared step (which is a part of the test). Choose the Create action recording option and then start the test as it was done before in the regular test steps scenario.
The shared step will have two additional steps: one is to start the shared test and the other is to start the test and record it. Choose the second option and enter all the details so that it gets recorded as part of the shared test.
After entering all the details, mark the test as passed and end the shared test recording using the option below the test step. Complete the remaining steps and save the Test Result.
Now, the shared step as well as the shared step recording are ready. This action recording will be available to all the tests that contain this shared test.
Adding parameters to manual testsParameters are useful for running the manual test multiple times—using different sets of data, but without creating multiple copies of the test case. Parameters are added to the actions or expected results for any test step. Select the test step of the test case and keep adding the parameters using the Insert Parameter option. Each set of values for the parameters is run as an individual iteration during the Test Run. The other options available are to rename the parameter and to delete the parameter. The following screenshot shows the test step for which the parameters are added:
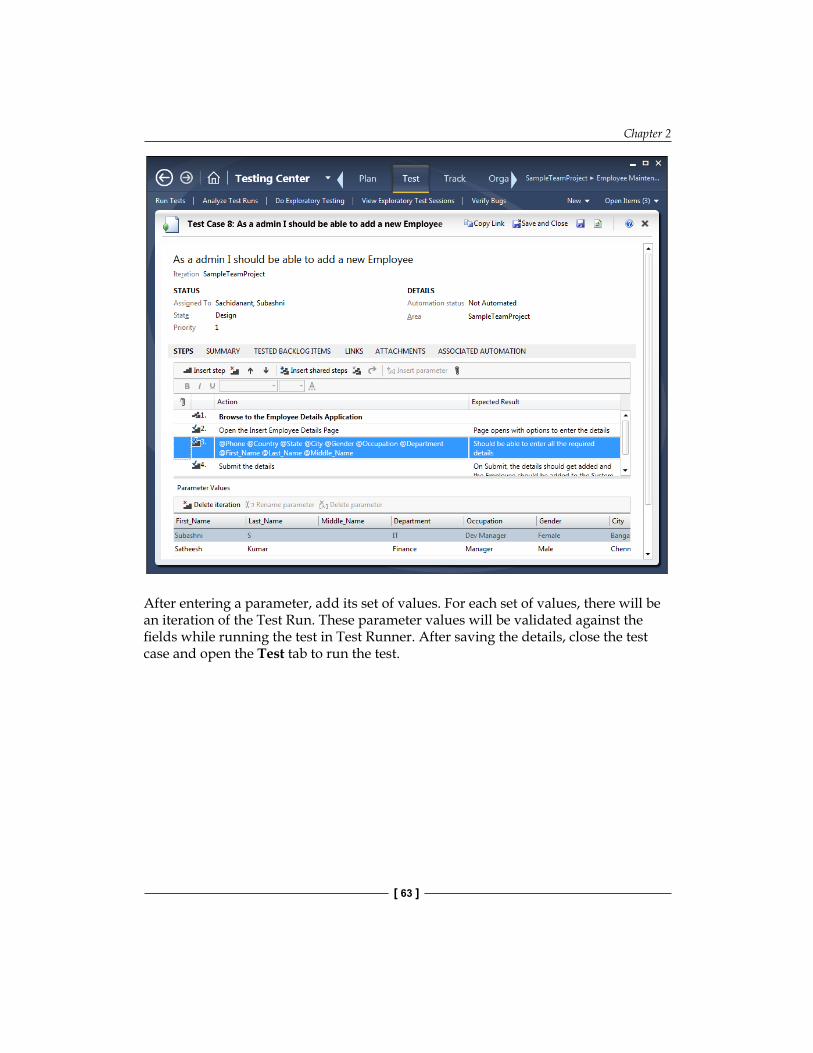
Chapter 2
[ 63 ]
After entering a parameter, add its set of values. For each set of values, there will be an iteration of the Test Run. These parameter values will be validated against the fields while running the test in Test Runner. After saving the details, close the test case and open the Test tab to run the test.
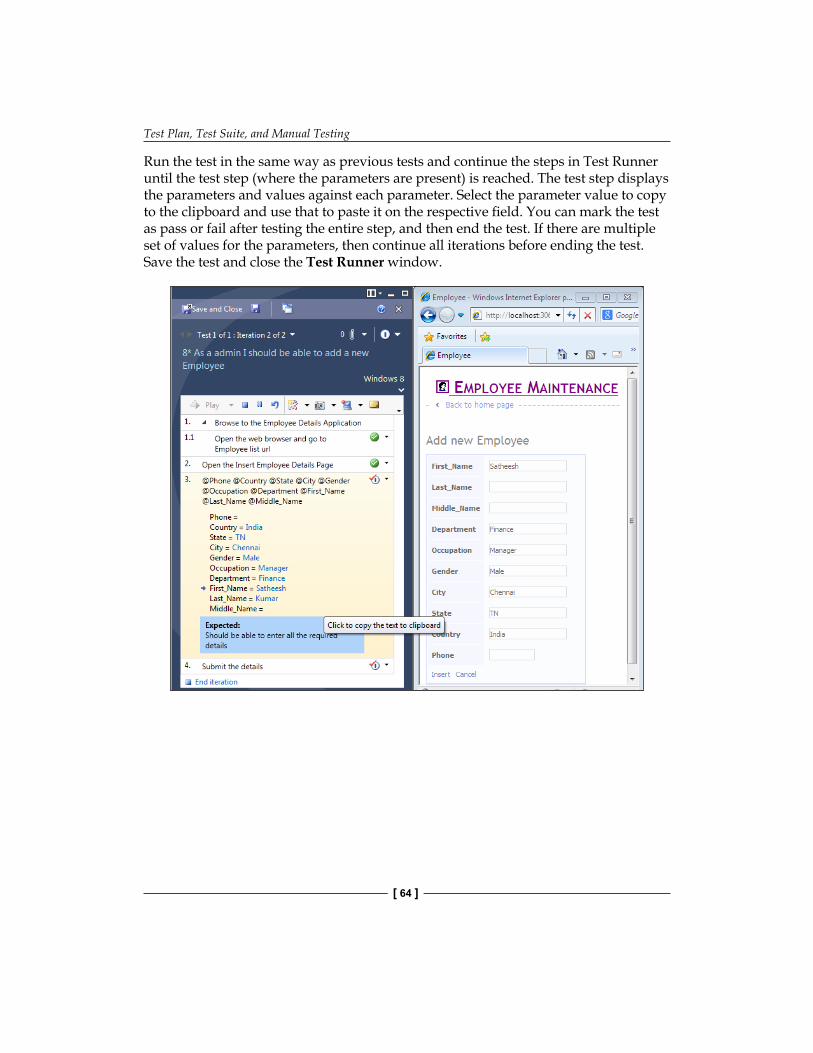
Test Plan, Test Suite, and Manual Testing
[ 64 ]
Run the test in the same way as previous tests and continue the steps in Test Runner until the test step (where the parameters are present) is reached. The test step displays the parameters and values against each parameter. Select the parameter value to copy to the clipboard and use that to paste it on the respective field. You can mark the test as pass or fail after testing the entire step, and then end the test. If there are multiple set of values for the parameters, then continue all iterations before ending the test. Save the test and close the Test Runner window.
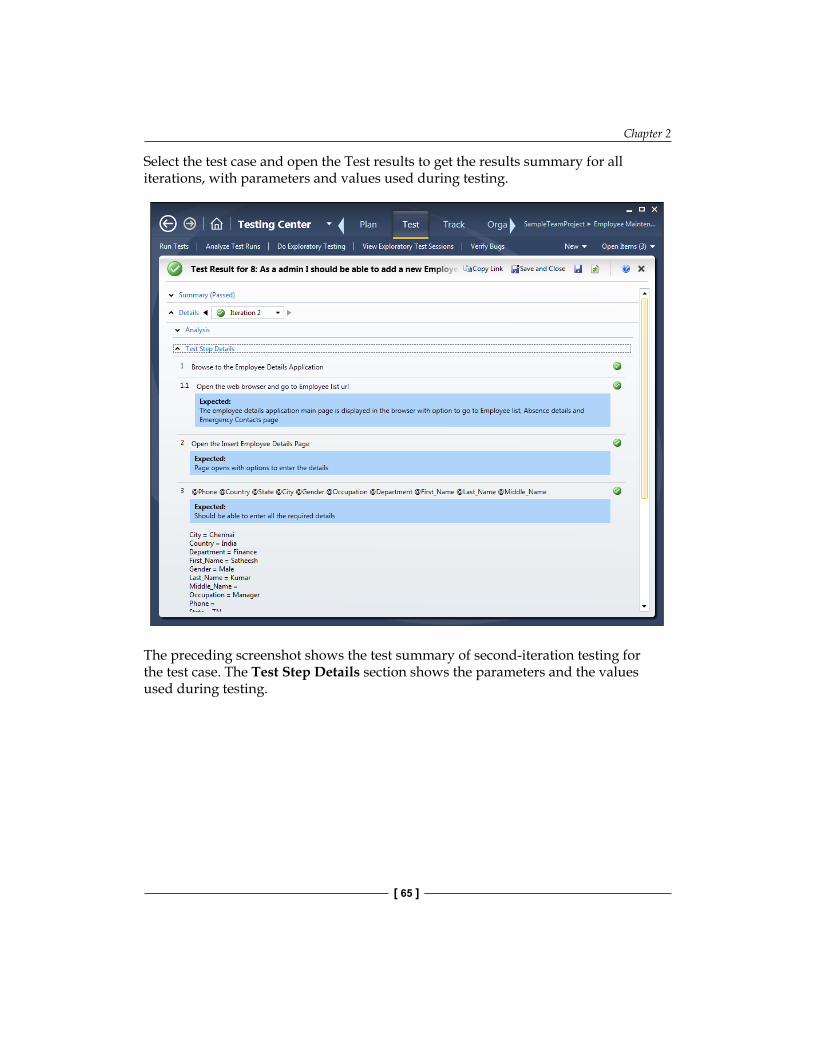
Chapter 2
[ 65 ]
Select the test case and open the Test results to get the results summary for all iterations, with parameters and values used during testing.
The preceding screenshot shows the test summary of second-iteration testing for the test case. The Test Step Details section shows the parameters and the values used during testing.
Test Plan, Test Suite, and Manual Testing
[ 66 ]
SummaryThe new version of manual testing in Test Manager 2012 has addressed a few issues compared to the previous version of Visual Studio and has also added a number of new features. The testers can now use the Microsoft Test Manager application independently and start testing applications even without Visual Studio. Shared steps and test recordings are great advantages for manual tests. As Test Manager is integrated with Team Foundation Server, the Test Plan and test cases can be directly created within Test Manager. Directly creating the defect from the Test Result will make the tester's job easier; maintaining the traceability also becomes easier by linking test cases with requirements or defects.
The next chapter explains the details of recording user actions in the user interface and then generating code out of it. This helps the testers to customize the generated code and automate the testing with parameters and rules. The coded UI Test Builder in Visual Studio 2012 provides features that record the actions and generate the code.
Automated TestsAutomated test is a form of testing to record the manual testing steps and then re-runs the recorded steps without performing the entire test manually again. The other type is to write scripts using programming language to automate the service level testing. Automating user interface (UI) testing was the biggest challenge but nowadays a few tools provide the flexibility to record user actions and create a script out of it. It is made simpler in Microsoft Visual Studio 2012. These tests are also called coded UI tests. The existing manual tests, test cases, and the action recordings of the user interface tests are re-used for generating the automated tests and the code files in the managed code (C# or VB.NET).
The UI controls can be added to the coded UI test and then the properties and values of controls can be verified using the Coded UI Test Builder feature. To conduct the same test multiple times but with different sets of data, the coded UI test can be made as a data-driven test by adding a data source to the test. The test would then be called for each row of data in the data source.
The coded UI test can be run directly from Visual Studio or Microsoft Test Manager and can be linked to the requirements to determine the number of automated tests for each requirement and also to gather the Test Results for the requirement.
Automated Tests
[ 68 ]
Coded UI tests from action recordingsAction recording is a very useful feature for recording user actions and then creating test scripts out of it. The test scripts can be customized or used as is to play back the test instead of repeating the same test manually. Recording of actions is done using the Test Runner. The details of creating and recording the user actions are covered as part of Chapter 2, Test Plan, Test Suite, and Manual Testing which talks about Test Plans and manual testing. This section explains the details of creating a coded UI test from an existing action recording. The following image shows the successful completion of action recording for the manual test.
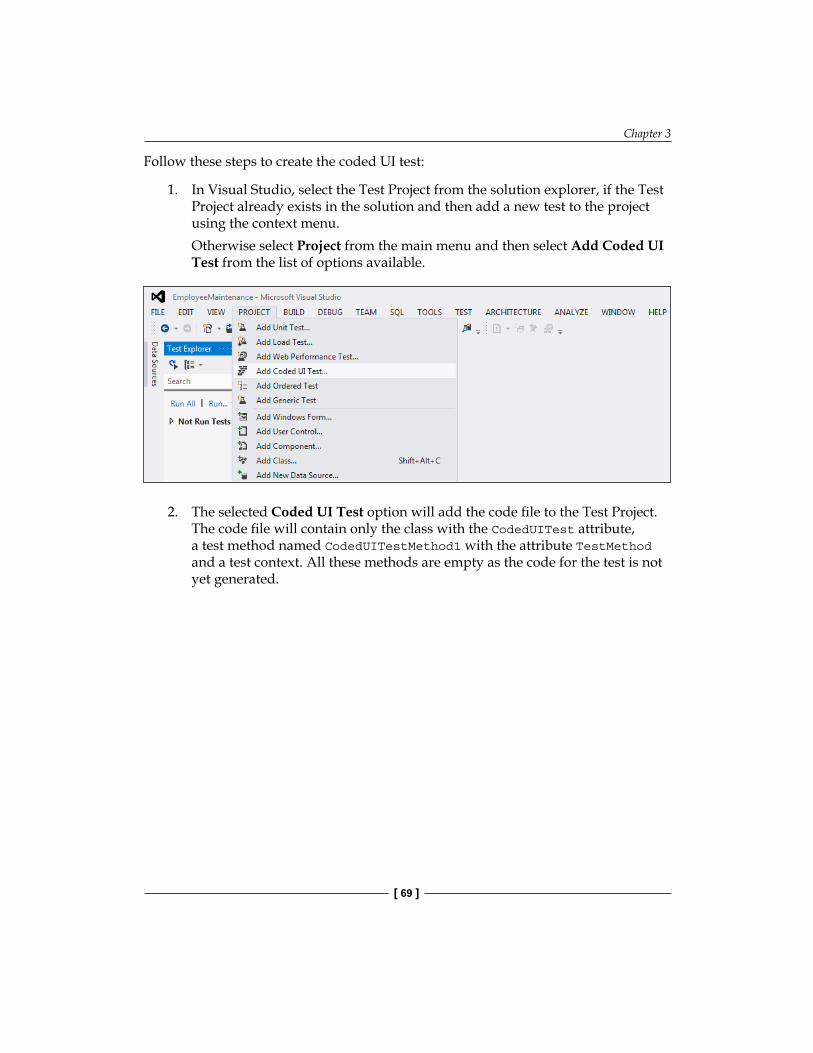
Chapter 3
[ 69 ]
Follow these steps to create the coded UI test:
1. In Visual Studio, select the Test Project from the solution explorer, if the Test Project already exists in the solution and then add a new test to the project using the context menu.Otherwise select Project from the main menu and then select Add Coded UI Test from the list of options available.
2. The selected Coded UI Test option will add the code file to the Test Project. The code file will contain only the class with the CodedUITest attribute, a test method named CodedUITestMethod1 with the attribute TestMethod and a test context. All these methods are empty as the code for the test is not yet generated.
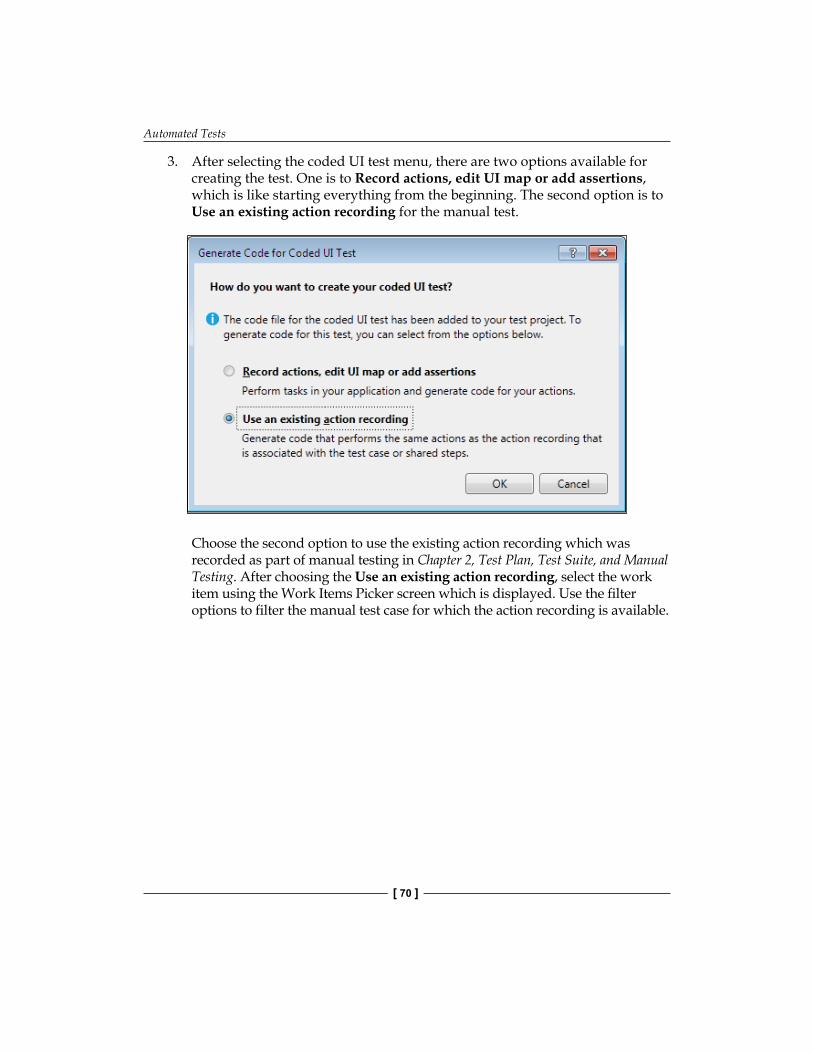
Automated Tests
[ 70 ]
3. After selecting the coded UI test menu, there are two options available for creating the test. One is to Record actions, edit UI map or add assertions, which is like starting everything from the beginning. The second option is to Use an existing action recording for the manual test.
Choose the second option to use the existing action recording which was recorded as part of manual testing in Chapter 2, Test Plan, Test Suite, and Manual Testing. After choosing the Use an existing action recording, select the work item using the Work Items Picker screen which is displayed. Use the filter options to filter the manual test case for which the action recording is available.
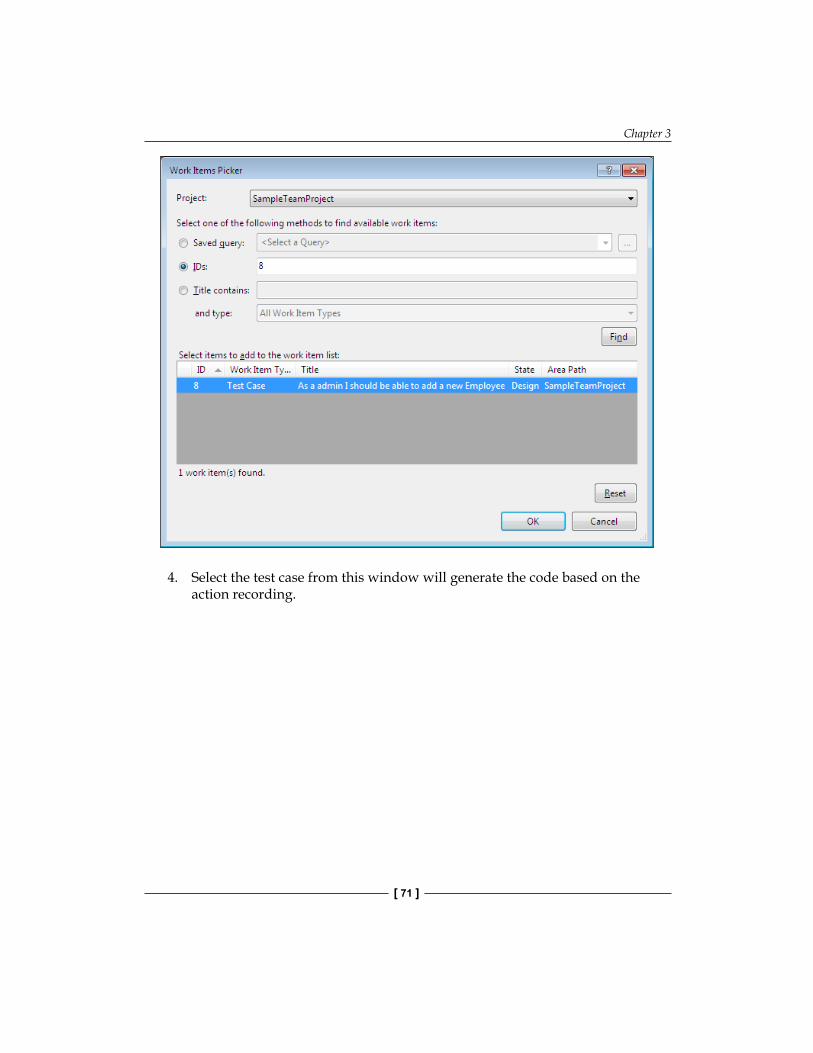
Chapter 3
[ 71 ]
4. Select the test case from this window will generate the code based on the action recording.
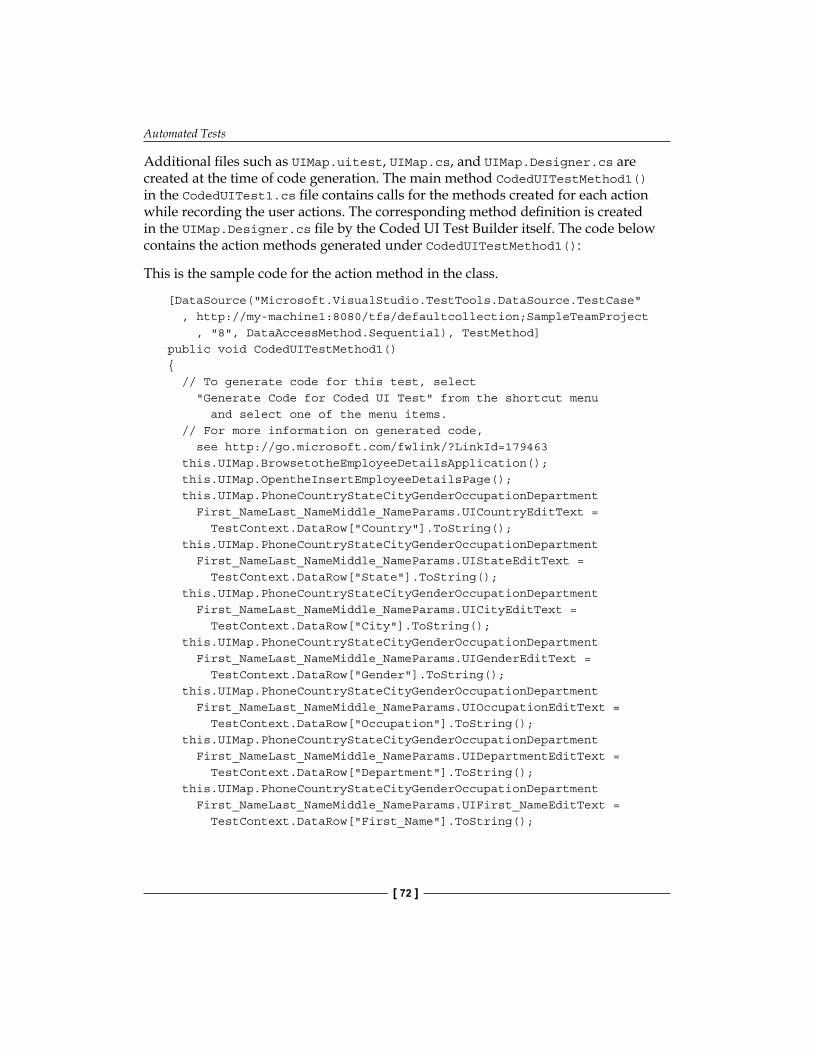
Automated Tests
[ 72 ]
Additional files such as UIMap.uitest, UIMap.cs, and UIMap.Designer.cs are created at the time of code generation. The main method CodedUITestMethod1() in the CodedUITest1.cs file contains calls for the methods created for each action while recording the user actions. The corresponding method definition is created in the UIMap.Designer.cs file by the Coded UI Test Builder itself. The code below contains the action methods generated under CodedUITestMethod1():
This is the sample code for the action method in the class.
[DataSource("Microsoft.VisualStudio.TestTools.DataSource.TestCase" , http://my-machine1:8080/tfs/defaultcollection;SampleTeamProject , "8", DataAccessMethod.Sequential), TestMethod]public void CodedUITestMethod1(){ // To generate code for this test, select "Generate Code for Coded UI Test" from the shortcut menu and select one of the menu items. // For more information on generated code, see http://go.microsoft.com/fwlink/?LinkId=179463 this.UIMap.BrowsetotheEmployeeDetailsApplication(); this.UIMap.OpentheInsertEmployeeDetailsPage(); this.UIMap.PhoneCountryStateCityGenderOccupationDepartment First_NameLast_NameMiddle_NameParams.UICountryEditText = TestContext.DataRow["Country"].ToString(); this.UIMap.PhoneCountryStateCityGenderOccupationDepartment First_NameLast_NameMiddle_NameParams.UIStateEditText = TestContext.DataRow["State"].ToString(); this.UIMap.PhoneCountryStateCityGenderOccupationDepartment First_NameLast_NameMiddle_NameParams.UICityEditText = TestContext.DataRow["City"].ToString(); this.UIMap.PhoneCountryStateCityGenderOccupationDepartment First_NameLast_NameMiddle_NameParams.UIGenderEditText = TestContext.DataRow["Gender"].ToString(); this.UIMap.PhoneCountryStateCityGenderOccupationDepartment First_NameLast_NameMiddle_NameParams.UIOccupationEditText = TestContext.DataRow["Occupation"].ToString(); this.UIMap.PhoneCountryStateCityGenderOccupationDepartment First_NameLast_NameMiddle_NameParams.UIDepartmentEditText = TestContext.DataRow["Department"].ToString(); this.UIMap.PhoneCountryStateCityGenderOccupationDepartment First_NameLast_NameMiddle_NameParams.UIFirst_NameEditText = TestContext.DataRow["First_Name"].ToString();
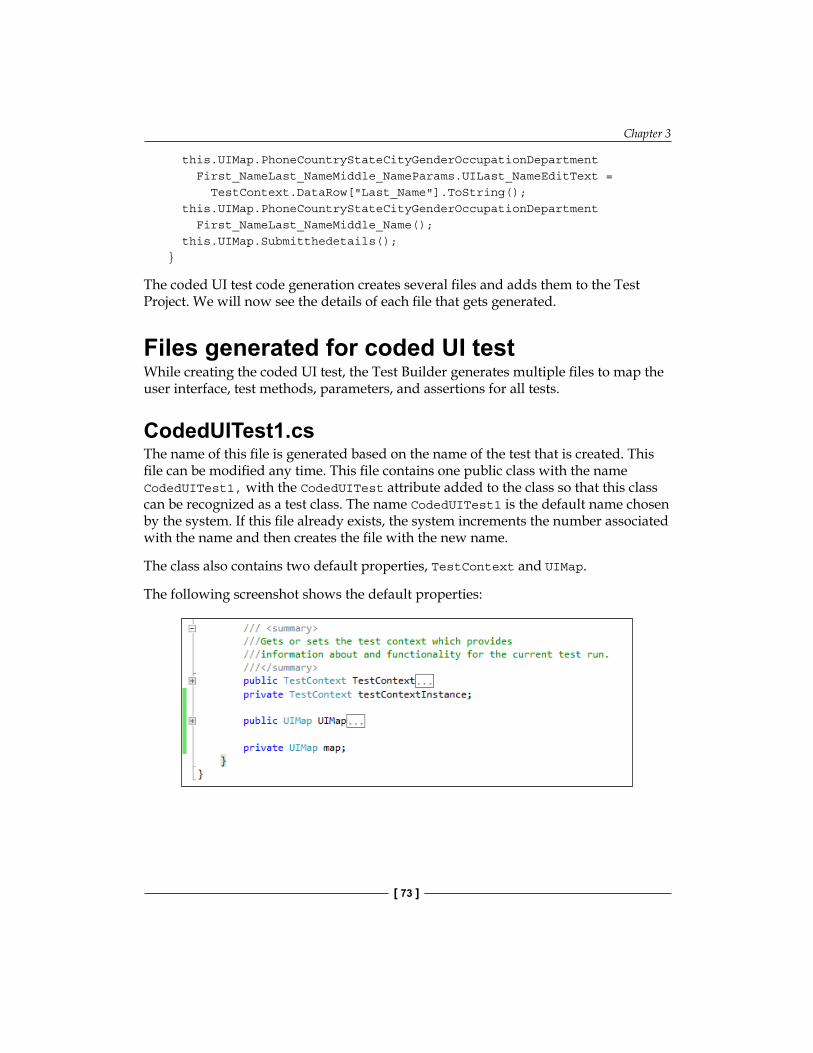
Chapter 3
[ 73 ]
this.UIMap.PhoneCountryStateCityGenderOccupationDepartment First_NameLast_NameMiddle_NameParams.UILast_NameEditText = TestContext.DataRow["Last_Name"].ToString(); this.UIMap.PhoneCountryStateCityGenderOccupationDepartment First_NameLast_NameMiddle_Name(); this.UIMap.Submitthedetails();}
The coded UI test code generation creates several files and adds them to the Test Project. We will now see the details of each file that gets generated.
Files generated for coded UI testWhile creating the coded UI test, the Test Builder generates multiple files to map the user interface, test methods, parameters, and assertions for all tests.
CodedUITest1.csThe name of this file is generated based on the name of the test that is created. This file can be modified any time. This file contains one public class with the name CodedUITest1, with the CodedUITest attribute added to the class so that this class can be recognized as a test class. The name CodedUITest1 is the default name chosen by the system. If this file already exists, the system increments the number associated with the name and then creates the file with the new name.
The class also contains two default properties, TestContext and UIMap.
The following screenshot shows the default properties:
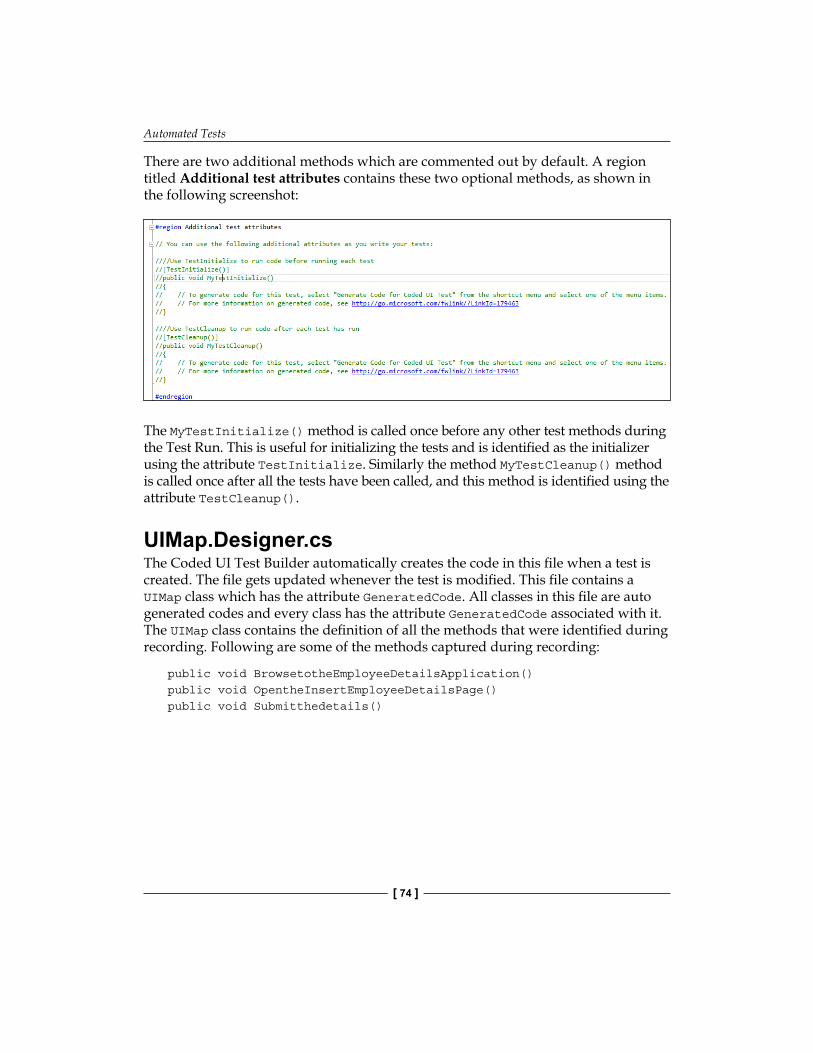
Automated Tests
[ 74 ]
There are two additional methods which are commented out by default. A region titled Additional test attributes contains these two optional methods, as shown in the following screenshot:
The MyTestInitialize() method is called once before any other test methods during the Test Run. This is useful for initializing the tests and is identified as the initializer using the attribute TestInitialize. Similarly the method MyTestCleanup() method is called once after all the tests have been called, and this method is identified using the attribute TestCleanup().
UIMap.Designer.csThe Coded UI Test Builder automatically creates the code in this file when a test is created. The file gets updated whenever the test is modified. This file contains a UIMap class which has the attribute GeneratedCode. All classes in this file are auto generated codes and every class has the attribute GeneratedCode associated with it. The UIMap class contains the definition of all the methods that were identified during recording. Following are some of the methods captured during recording:
public void BrowsetotheEmployeeDetailsApplication()public void OpentheInsertEmployeeDetailsPage()public void Submitthedetails()
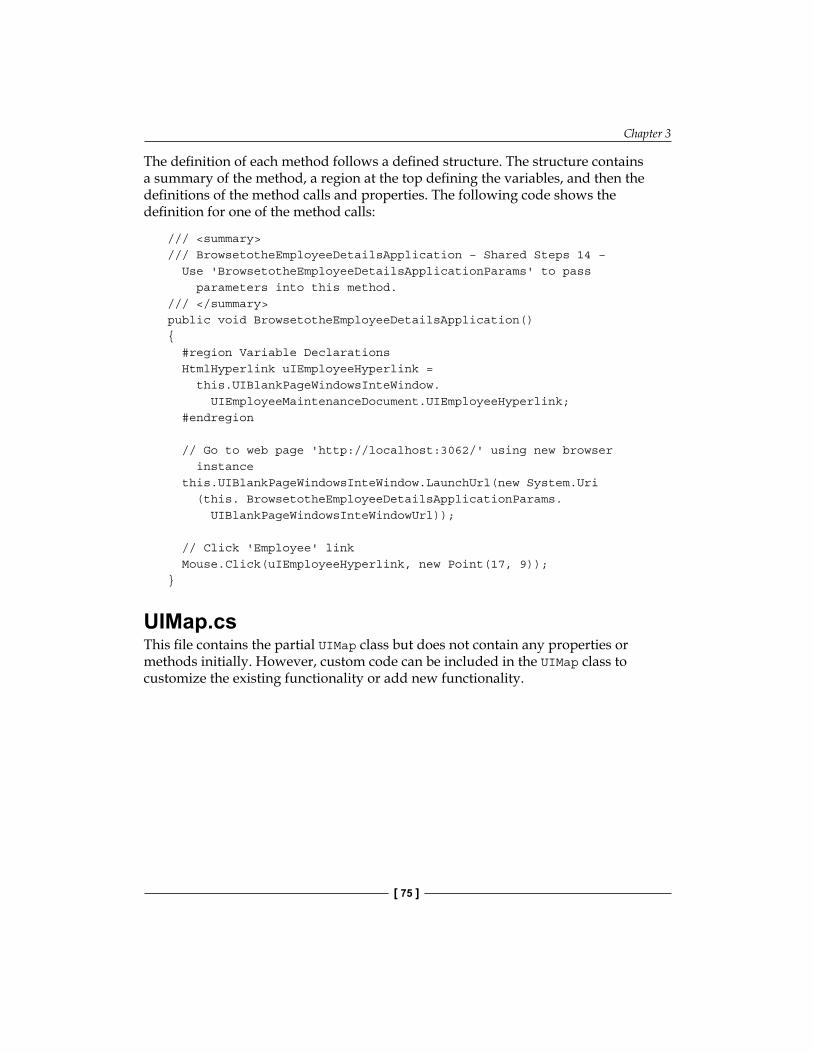
Chapter 3
[ 75 ]
The definition of each method follows a defined structure. The structure contains a summary of the method, a region at the top defining the variables, and then the definitions of the method calls and properties. The following code shows the definition for one of the method calls:
/// <summary>/// BrowsetotheEmployeeDetailsApplication – Shared Steps 14 – Use 'BrowsetotheEmployeeDetailsApplicationParams' to pass parameters into this method./// </summary>public void BrowsetotheEmployeeDetailsApplication(){ #region Variable Declarations HtmlHyperlink uIEmployeeHyperlink = this.UIBlankPageWindowsInteWindow. UIEmployeeMaintenanceDocument.UIEmployeeHyperlink; #endregion
// Go to web page 'http://localhost:3062/' using new browser instance this.UIBlankPageWindowsInteWindow.LaunchUrl(new System.Uri (this. BrowsetotheEmployeeDetailsApplicationParams. UIBlankPageWindowsInteWindowUrl));
// Click 'Employee' link Mouse.Click(uIEmployeeHyperlink, new Point(17, 9));}
UIMap.csThis file contains the partial UIMap class but does not contain any properties or methods initially. However, custom code can be included in the UIMap class to customize the existing functionality or add new functionality.
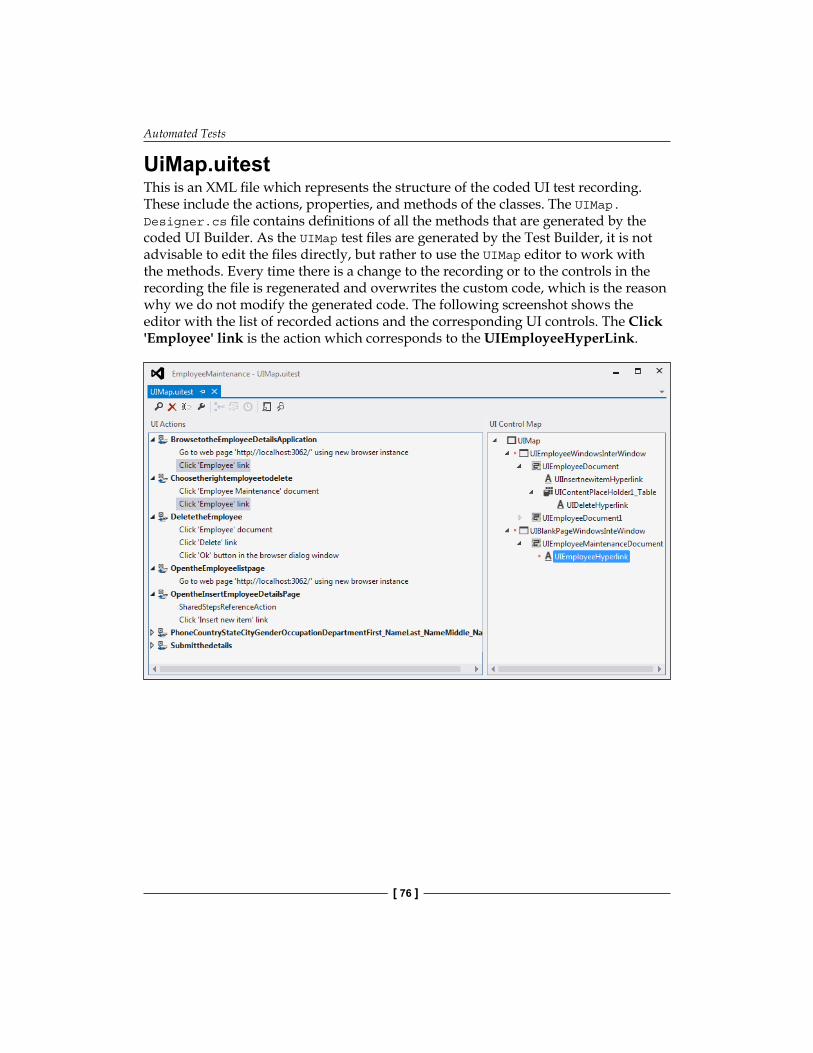
Automated Tests
[ 76 ]
UiMap.uitestThis is an XML file which represents the structure of the coded UI test recording. These include the actions, properties, and methods of the classes. The UIMap.Designer.cs file contains definitions of all the methods that are generated by the coded UI Builder. As the UIMap test files are generated by the Test Builder, it is not advisable to edit the files directly, but rather to use the UIMap editor to work with the methods. Every time there is a change to the recording or to the controls in the recording the file is regenerated and overwrites the custom code, which is the reason why we do not modify the generated code. The following screenshot shows the editor with the list of recorded actions and the corresponding UI controls. The Click 'Employee' link is the action which corresponds to the UIEmployeeHyperLink.
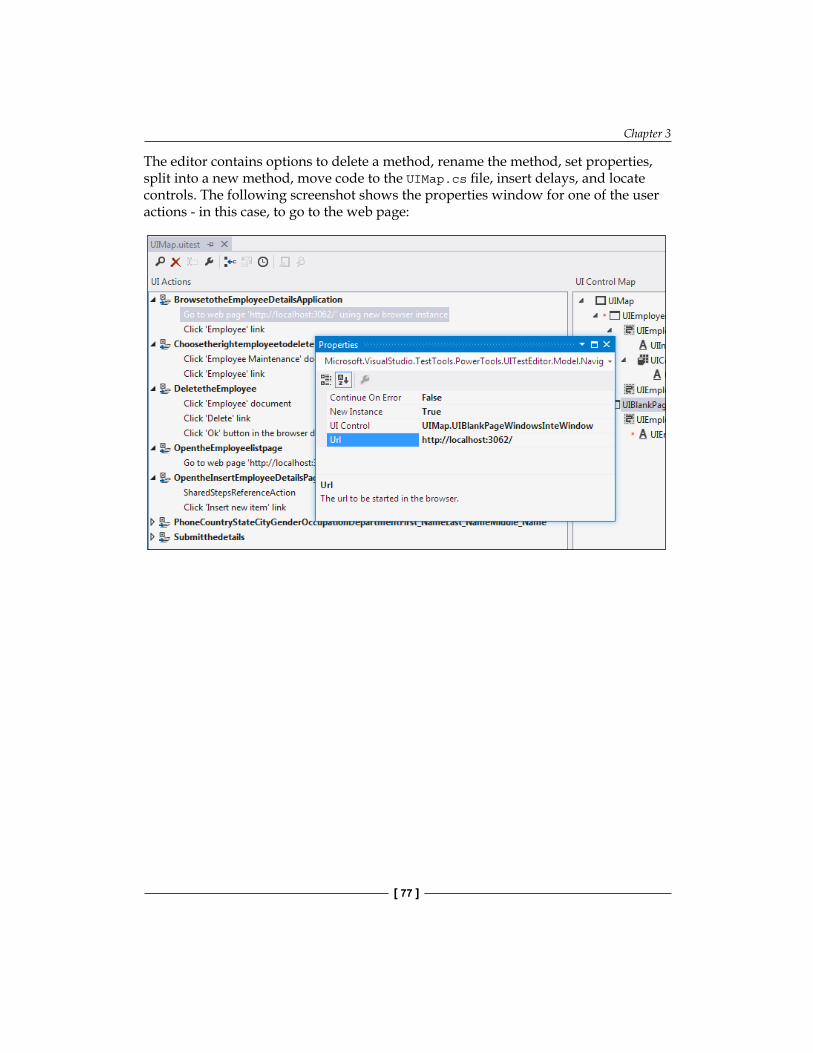
Chapter 3
[ 77 ]
The editor contains options to delete a method, rename the method, set properties, split into a new method, move code to the UIMap.cs file, insert delays, and locate controls. The following screenshot shows the properties window for one of the user actions - in this case, to go to the web page:
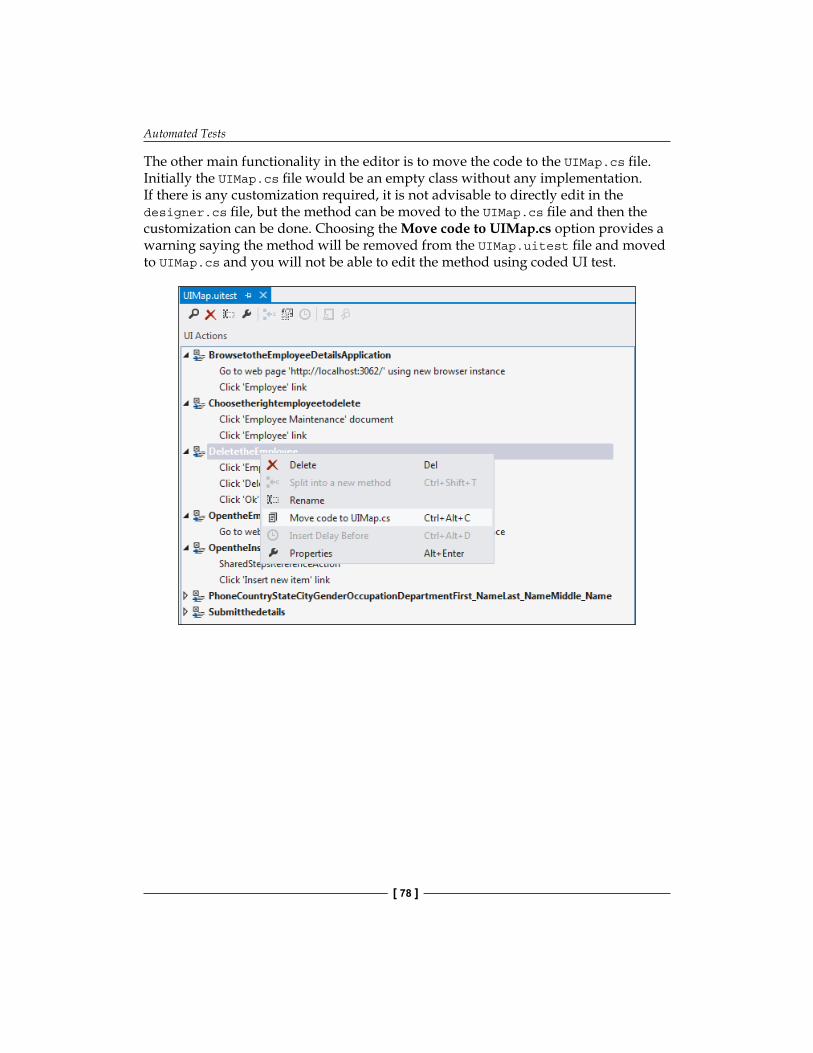
Automated Tests
[ 78 ]
The other main functionality in the editor is to move the code to the UIMap.cs file. Initially the UIMap.cs file would be an empty class without any implementation. If there is any customization required, it is not advisable to directly edit in the designer.cs file, but the method can be moved to the UIMap.cs file and then the customization can be done. Choosing the Move code to UIMap.cs option provides a warning saying the method will be removed from the UIMap.uitest file and moved to UIMap.cs and you will not be able to edit the method using coded UI test.
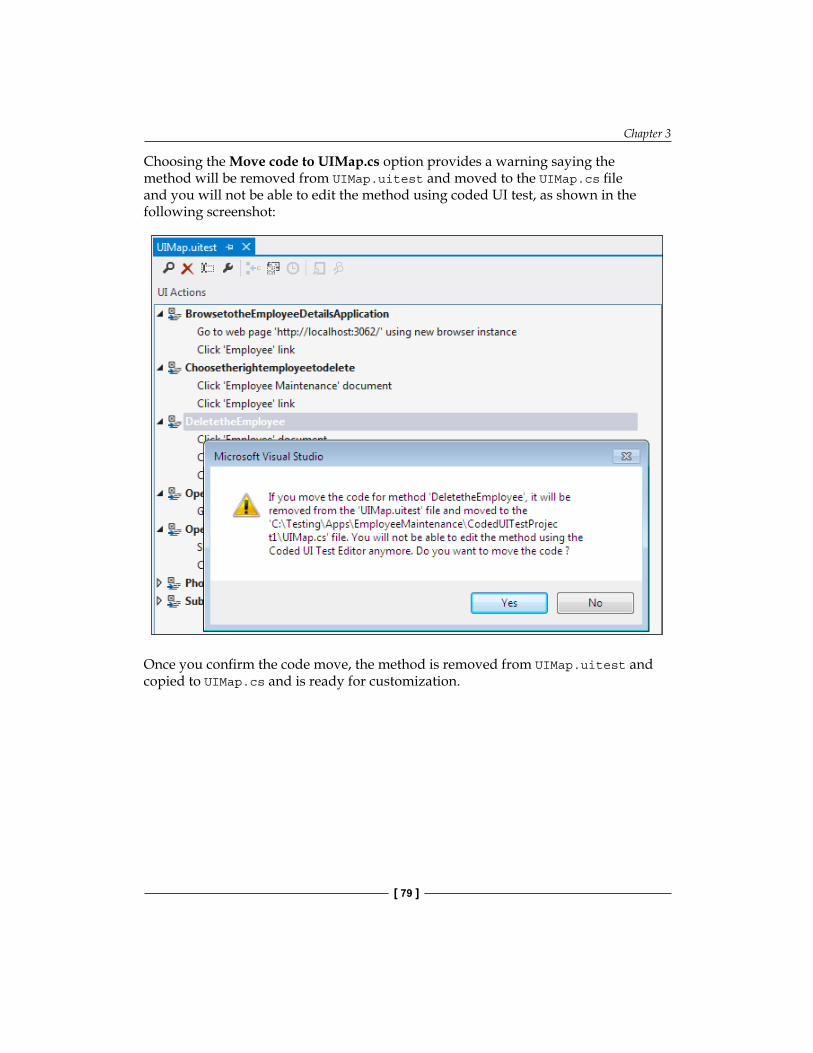
Chapter 3
[ 79 ]
Choosing the Move code to UIMap.cs option provides a warning saying the method will be removed from UIMap.uitest and moved to the UIMap.cs file and you will not be able to edit the method using coded UI test, as shown in the following screenshot:
Once you confirm the code move, the method is removed from UIMap.uitest and copied to UIMap.cs and is ready for customization.

Automated Tests
[ 80 ]
Data-driven coded UI testThe coded UI test that was created previously is for a given set of data captured during test recording. Later on, the test may be required not only for one set of data but for different sets of data and for multiple times. To achieve this, we parameterize each field to get data from a data source during testing. Each row of data in the data source is an iteration of coded UI test. When generating methods or assertions for the coded UI test, all constants in the recorded methods are parameterized into parameter classes. In the previous code example, there is a BrowsetotheEmployeeDetailsApplication method as shown in the following code:
/// <summary>/// BrowsetotheEmployeeDetailsApplication – Shared Steps 14 – Use 'BrowsetotheEmployeeDetailsApplicationParams' to pass parameters into this method./// </summary>public void BrowsetotheEmployeeDetailsApplication(){ #region Variable Declarations HtmlHyperlink uIEmployeeHyperlink = this.UIBlankPageWindowsInteWindow. UIEmployeeMaintenanceDocument.UIEmployeeHyperlink; #endregion
// Go to web page 'http://localhost:3062/' using new browser instance this.UIBlankPageWindowsInteWindow.LaunchUrl(new System.Uri (this. BrowsetotheEmployeeDetailsApplicationParams. UIBlankPageWindowsInteWindowUrl));
// Click 'Employee' link Mouse.Click(uIEmployeeHyperlink, new Point(17, 9));}
For the above method the Coded UI Test Builder creates the class as shown in the following code and adds fields to the class for every constant value used while recording.
public HtmlHyperlink UIEmployeeHyperlink { get { if ((this.mUIEmployeeHyperlink == null))
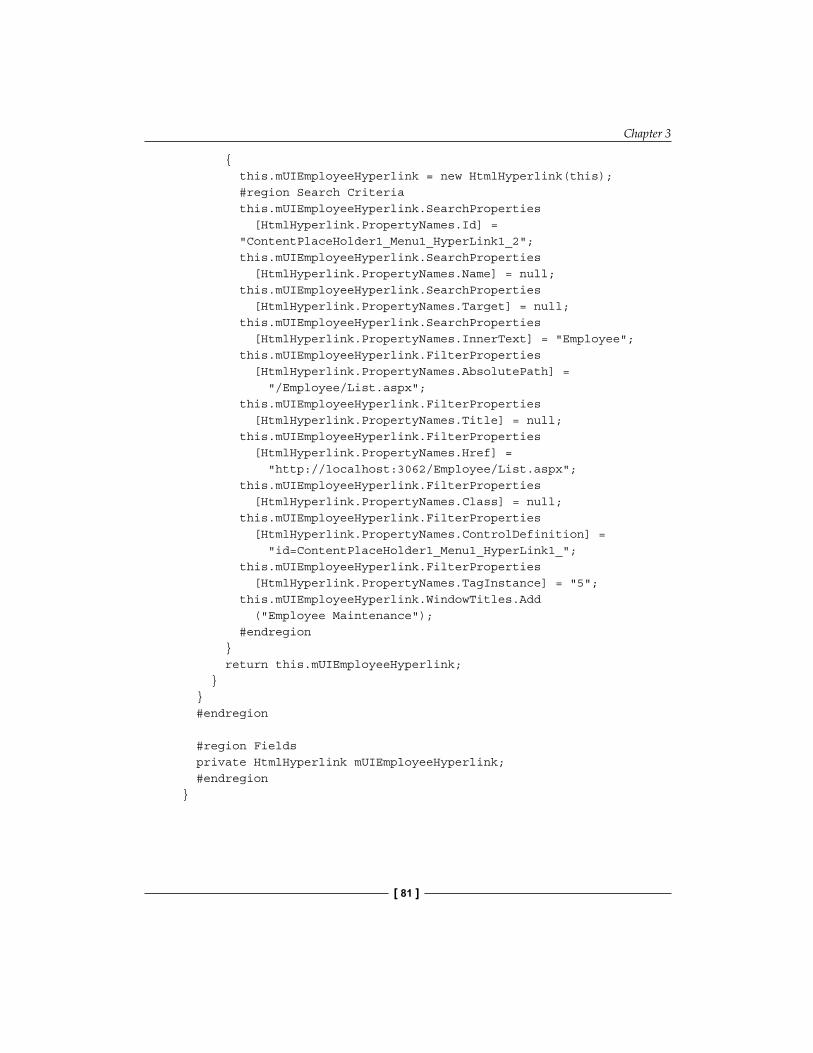
Chapter 3
[ 81 ]
{ this.mUIEmployeeHyperlink = new HtmlHyperlink(this); #region Search Criteria this.mUIEmployeeHyperlink.SearchProperties [HtmlHyperlink.PropertyNames.Id] = "ContentPlaceHolder1_Menu1_HyperLink1_2"; this.mUIEmployeeHyperlink.SearchProperties [HtmlHyperlink.PropertyNames.Name] = null; this.mUIEmployeeHyperlink.SearchProperties [HtmlHyperlink.PropertyNames.Target] = null; this.mUIEmployeeHyperlink.SearchProperties [HtmlHyperlink.PropertyNames.InnerText] = "Employee"; this.mUIEmployeeHyperlink.FilterProperties [HtmlHyperlink.PropertyNames.AbsolutePath] = "/Employee/List.aspx"; this.mUIEmployeeHyperlink.FilterProperties [HtmlHyperlink.PropertyNames.Title] = null; this.mUIEmployeeHyperlink.FilterProperties [HtmlHyperlink.PropertyNames.Href] = "http://localhost:3062/Employee/List.aspx"; this.mUIEmployeeHyperlink.FilterProperties [HtmlHyperlink.PropertyNames.Class] = null; this.mUIEmployeeHyperlink.FilterProperties [HtmlHyperlink.PropertyNames.ControlDefinition] = "id=ContentPlaceHolder1_Menu1_HyperLink1_"; this.mUIEmployeeHyperlink.FilterProperties [HtmlHyperlink.PropertyNames.TagInstance] = "5"; this.mUIEmployeeHyperlink.WindowTitles.Add ("Employee Maintenance"); #endregion } return this.mUIEmployeeHyperlink; } } #endregion #region Fields private HtmlHyperlink mUIEmployeeHyperlink; #endregion }
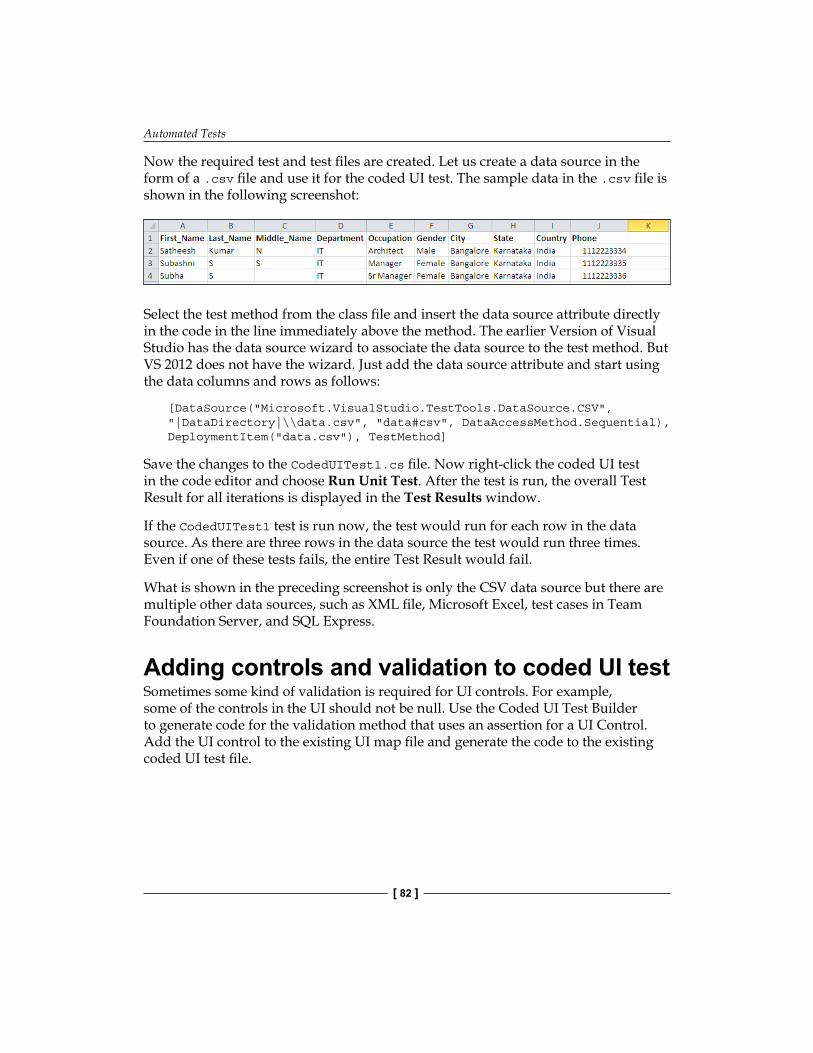
Automated Tests
[ 82 ]
Now the required test and test files are created. Let us create a data source in the form of a .csv file and use it for the coded UI test. The sample data in the .csv file is shown in the following screenshot:
Select the test method from the class file and insert the data source attribute directly in the code in the line immediately above the method. The earlier Version of Visual Studio has the data source wizard to associate the data source to the test method. But VS 2012 does not have the wizard. Just add the data source attribute and start using the data columns and rows as follows:
[DataSource("Microsoft.VisualStudio.TestTools.DataSource.CSV", "|DataDirectory|\\data.csv", "data#csv", DataAccessMethod.Sequential), DeploymentItem("data.csv"), TestMethod]
Save the changes to the CodedUITest1.cs file. Now right-click the coded UI test in the code editor and choose Run Unit Test. After the test is run, the overall Test Result for all iterations is displayed in the Test Results window.
If the CodedUITest1 test is run now, the test would run for each row in the data source. As there are three rows in the data source the test would run three times. Even if one of these tests fails, the entire Test Result would fail.
What is shown in the preceding screenshot is only the CSV data source but there are multiple other data sources, such as XML file, Microsoft Excel, test cases in Team Foundation Server, and SQL Express.
Adding controls and validation to coded UI testSometimes some kind of validation is required for UI controls. For example, some of the controls in the UI should not be null. Use the Coded UI Test Builder to generate code for the validation method that uses an assertion for a UI Control. Add the UI control to the existing UI map file and generate the code to the existing coded UI test file.
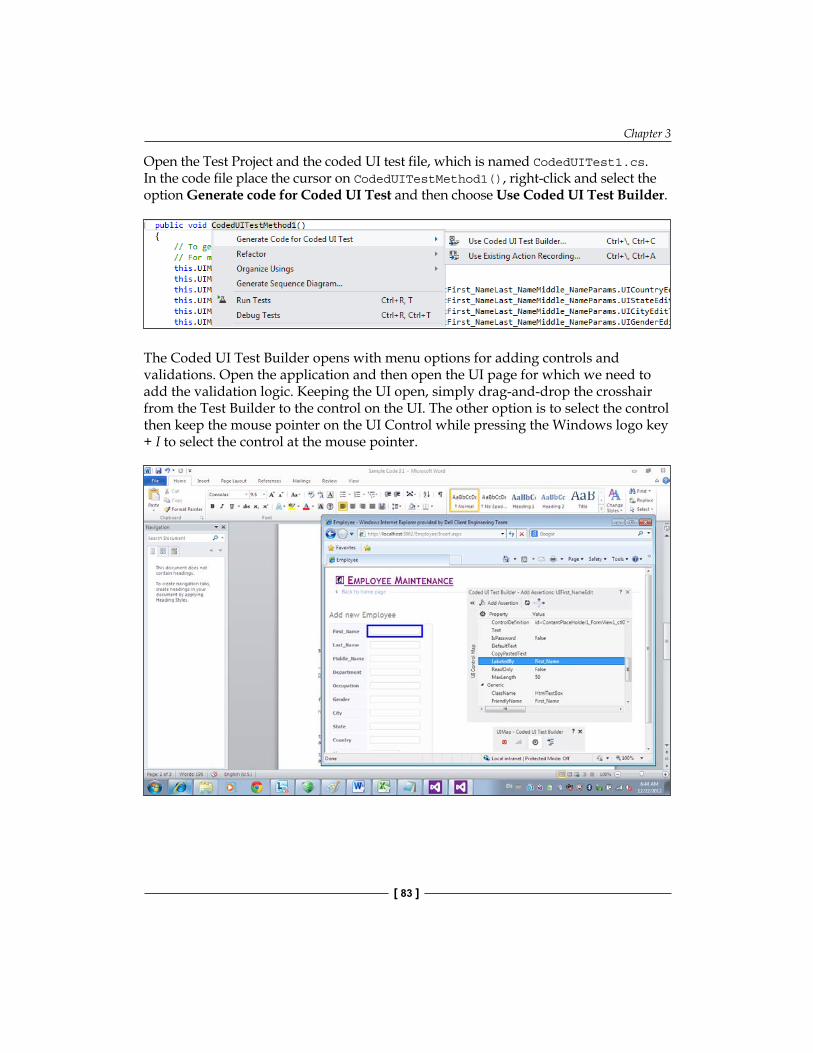
Chapter 3
[ 83 ]
Open the Test Project and the coded UI test file, which is named CodedUITest1.cs. In the code file place the cursor on CodedUITestMethod1(), right-click and select the option Generate code for Coded UI Test and then choose Use Coded UI Test Builder.
The Coded UI Test Builder opens with menu options for adding controls and validations. Open the application and then open the UI page for which we need to add the validation logic. Keeping the UI open, simply drag-and-drop the crosshair from the Test Builder to the control on the UI. The other option is to select the control then keep the mouse pointer on the UI Control while pressing the Windows logo key + I to select the control at the mouse pointer.
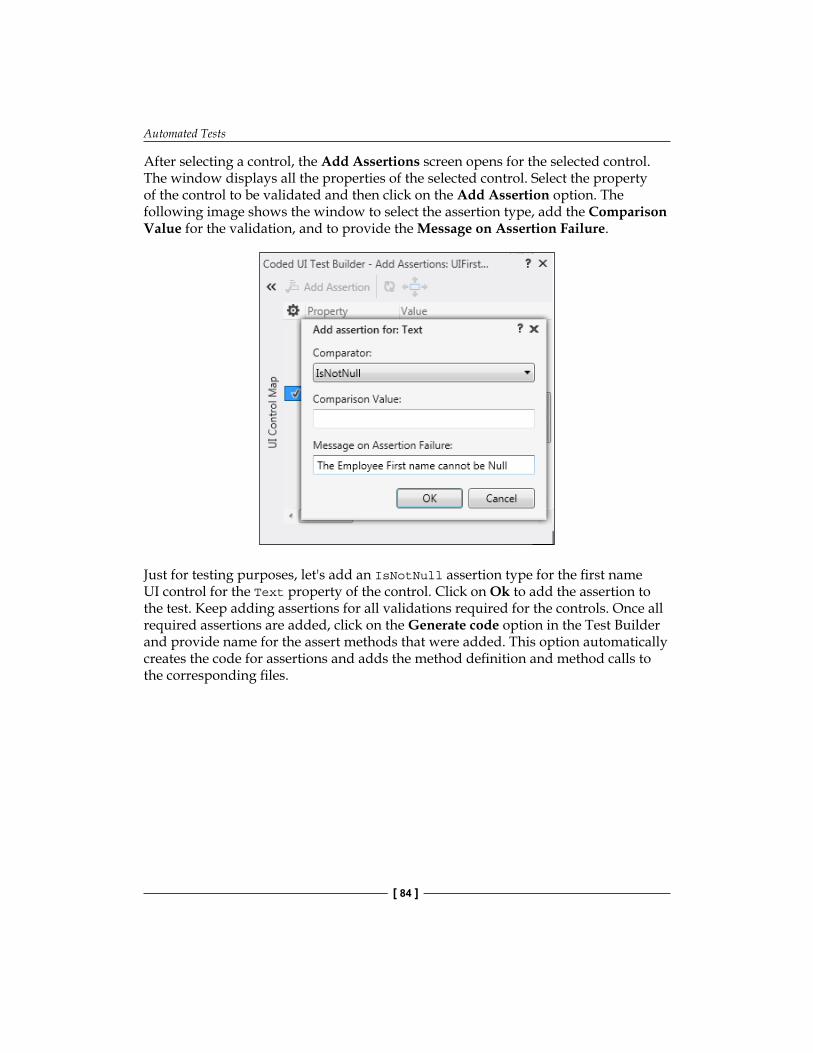
Automated Tests
[ 84 ]
After selecting a control, the Add Assertions screen opens for the selected control. The window displays all the properties of the selected control. Select the property of the control to be validated and then click on the Add Assertion option. The following image shows the window to select the assertion type, add the Comparison Value for the validation, and to provide the Message on Assertion Failure.
Just for testing purposes, let's add an IsNotNull assertion type for the first name UI control for the Text property of the control. Click on Ok to add the assertion to the test. Keep adding assertions for all validations required for the controls. Once all required assertions are added, click on the Generate code option in the Test Builder and provide name for the assert methods that were added. This option automatically creates the code for assertions and adds the method definition and method calls to the corresponding files.
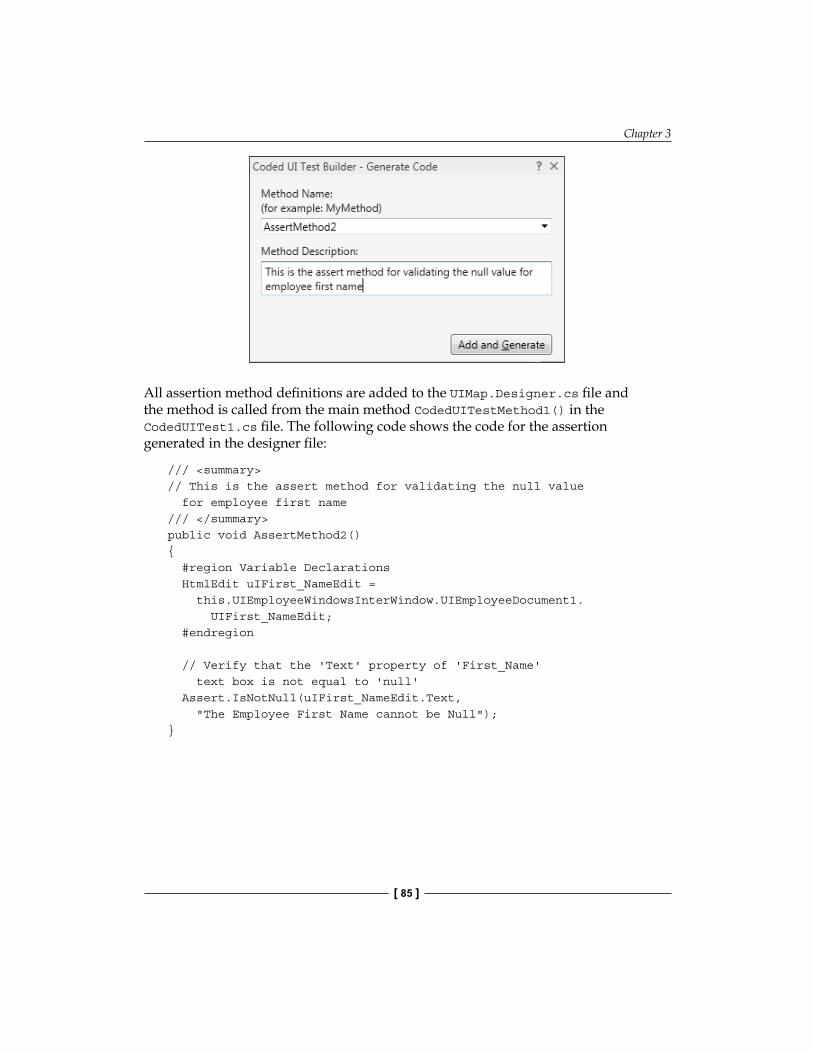
Chapter 3
[ 85 ]
All assertion method definitions are added to the UIMap.Designer.cs file and the method is called from the main method CodedUITestMethod1() in the CodedUITest1.cs file. The following code shows the code for the assertion generated in the designer file:
/// <summary>// This is the assert method for validating the null value for employee first name/// </summary>public void AssertMethod2(){ #region Variable Declarations HtmlEdit uIFirst_NameEdit = this.UIEmployeeWindowsInterWindow.UIEmployeeDocument1. UIFirst_NameEdit; #endregion
// Verify that the 'Text' property of 'First_Name' text box is not equal to 'null' Assert.IsNotNull(uIFirst_NameEdit.Text, "The Employee First Name cannot be Null");}
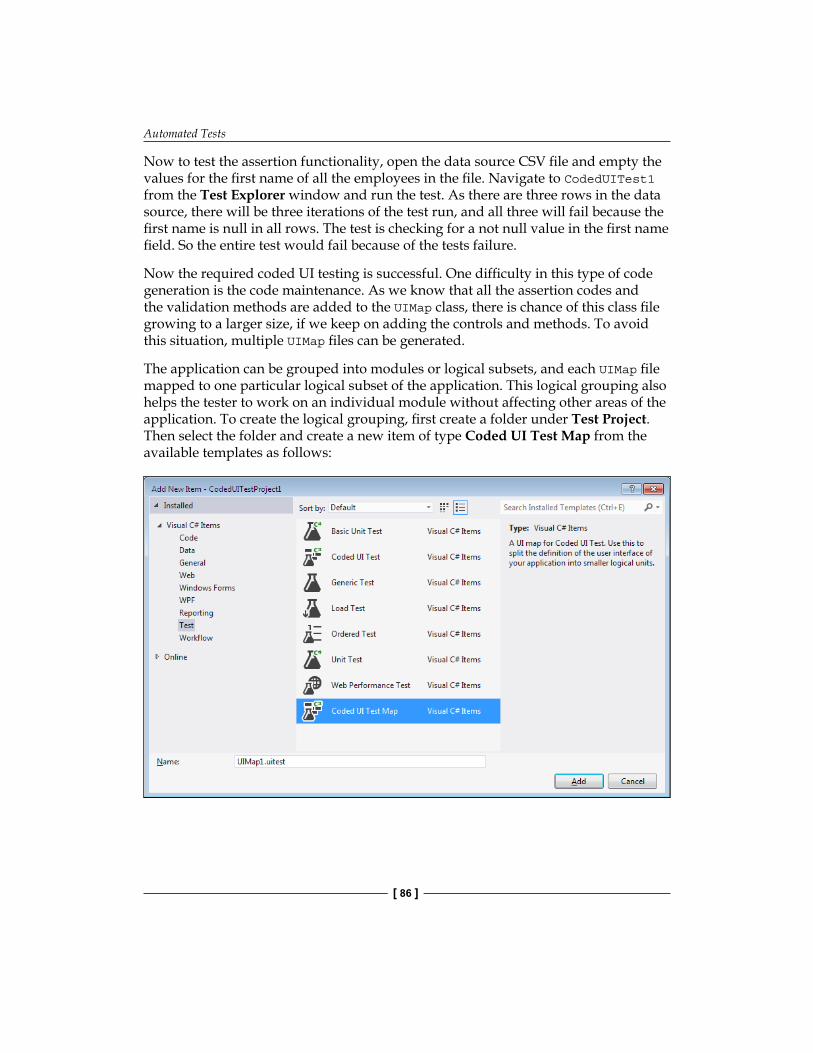
Automated Tests
[ 86 ]
Now to test the assertion functionality, open the data source CSV file and empty the values for the first name of all the employees in the file. Navigate to CodedUITest1 from the Test Explorer window and run the test. As there are three rows in the data source, there will be three iterations of the test run, and all three will fail because the first name is null in all rows. The test is checking for a not null value in the first name field. So the entire test would fail because of the tests failure.
Now the required coded UI testing is successful. One difficulty in this type of code generation is the code maintenance. As we know that all the assertion codes and the validation methods are added to the UIMap class, there is chance of this class file growing to a larger size, if we keep on adding the controls and methods. To avoid this situation, multiple UIMap files can be generated.
The application can be grouped into modules or logical subsets, and each UIMap file mapped to one particular logical subset of the application. This logical grouping also helps the tester to work on an individual module without affecting other areas of the application. To create the logical grouping, first create a folder under Test Project. Then select the folder and create a new item of type Coded UI Test Map from the available templates as follows:
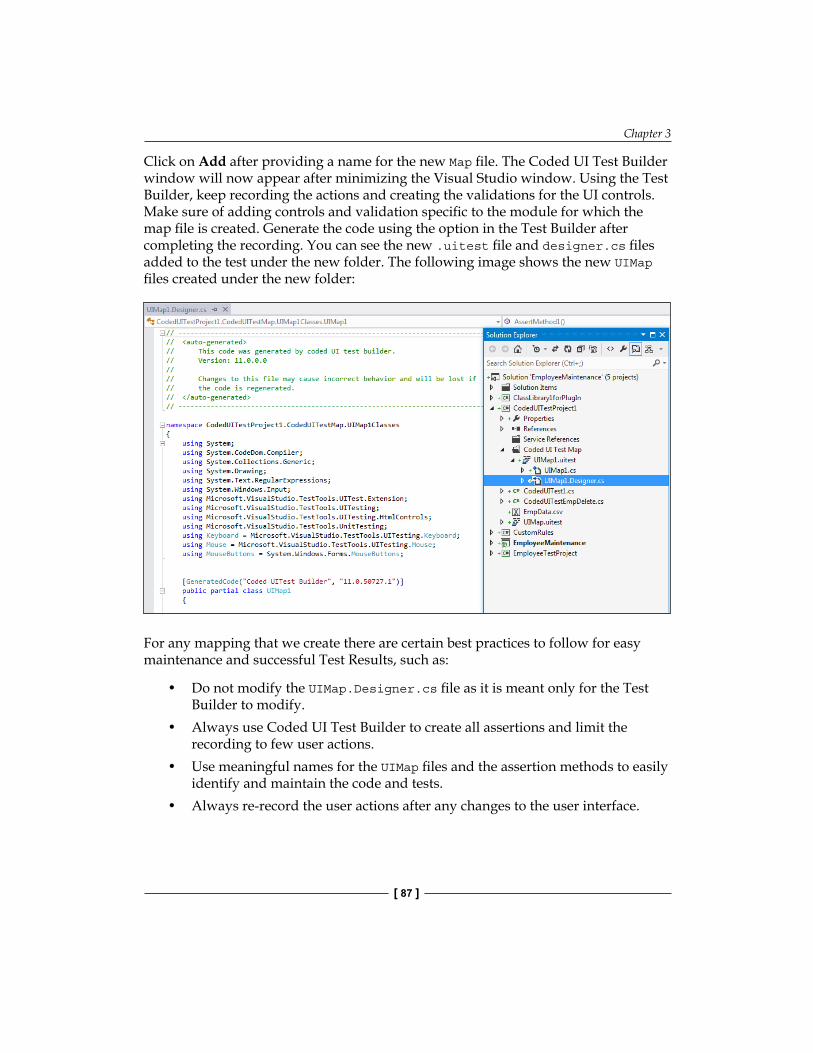
Chapter 3
[ 87 ]
Click on Add after providing a name for the new Map file. The Coded UI Test Builder window will now appear after minimizing the Visual Studio window. Using the Test Builder, keep recording the actions and creating the validations for the UI controls. Make sure of adding controls and validation specific to the module for which the map file is created. Generate the code using the option in the Test Builder after completing the recording. You can see the new .uitest file and designer.cs files added to the test under the new folder. The following image shows the new UIMap files created under the new folder:
For any mapping that we create there are certain best practices to follow for easy maintenance and successful Test Results, such as:
• Do not modify the UIMap.Designer.cs file as it is meant only for the Test Builder to modify.
• Always use Coded UI Test Builder to create all assertions and limit the recording to few user actions.
• Use meaningful names for the UIMap files and the assertion methods to easily identify and maintain the code and tests.
• Always re-record the user actions after any changes to the user interface.

Automated Tests
[ 88 ]
SummaryThis chapter provides information on the new features added to the coded UI test in Visual Studio 2012. The new version has the new editor to edit the UIMap.uitest files, along with a few features to move the code and split the code to the map files. The Test Builder is a very handy tool for selecting the controls, add assertion methods, and generating code. This chapter also explained how to maintain multiple Map files under different folders. The samples also explain having a data source to automate the same test with different sets of data, without re-running the test manually for each set of data.
The next chapter explains the details of testing the smallest piece of testable code isolated from the remaining code. This is called the unit testing type which is normally conducted by the developer to test the code independently.
Unit TestingUnit testing is a type of testing or the technique to take the smallest piece of testable code isolated from the remaining software in the application and then determine whether it behaves as expected. Enterprise software applications usually comprises of multiple methods and functions with multiple lines of code integrated together. Identifying the piece of code that produces the defect is always a time-consuming task and the cost involved is also high. It is always a good practice to test the code in units and confirm the expectations before integrating the code module(s). Requiring all code to pass the unit tests before they can be integrated ensures standards and quality. It is the responsibility of the developer who has written the code to make sure that each unit of code behaves exactly as expected. The code should also be written in such a way that it can be tested independently. Another advantage is that every time a defect is fixed or code is modified, you need not retest the entire module or application. As long as the unit of code is tested and it produces the expected result, it should be fine. Automating the tests would help in re-running the tests whenever there is code change in any unit of code.
Visual Studio has the capability and feature to create, customize, and automate the unit tests, irrespective of type of the method whether it is public or private. Unit tests are just another class file, similar to any other class and method but having additional attributes to define the type as test class and the test method. The unit tests are created either manually by writing the code for class and methods, or by generating the skeleton code using the Create Unit Tests option from the Context menu and then customizing it.
The generated unit test code file contains special attributes assigned to the class and methods in it. Test classes are marked by the TestClass() attribute and each test method is marked with the TestMethod() attribute. Apart from these two, there are many other attributes used for unit testing. After generating the unit test class and methods, the Assert methods are used to verify the produced result with the expected value.
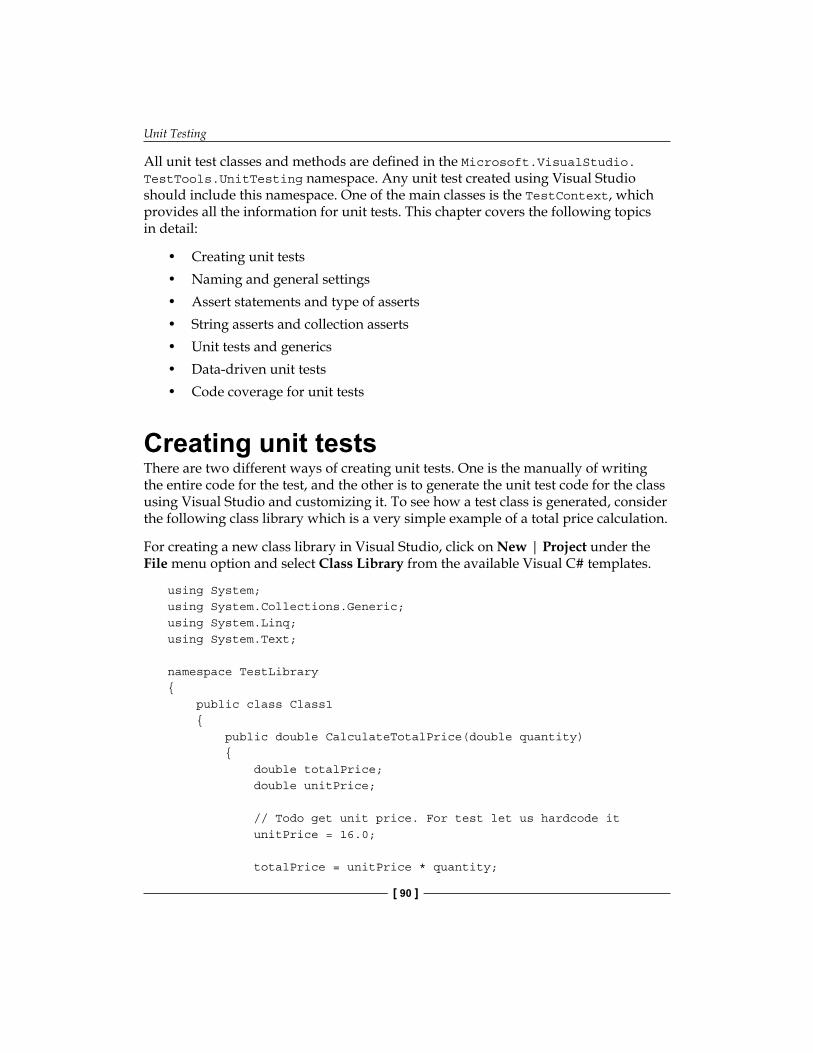
Unit Testing
[ 90 ]
All unit test classes and methods are defined in the Microsoft.VisualStudio.TestTools.UnitTesting namespace. Any unit test created using Visual Studio should include this namespace. One of the main classes is the TestContext, which provides all the information for unit tests. This chapter covers the following topics in detail:
• Creating unit tests• Naming and general settings• Assert statements and type of asserts• String asserts and collection asserts• Unit tests and generics• Data-driven unit tests• Code coverage for unit tests
Creating unit testsThere are two different ways of creating unit tests. One is the manually of writing the entire code for the test, and the other is to generate the unit test code for the class using Visual Studio and customizing it. To see how a test class is generated, consider the following class library which is a very simple example of a total price calculation.
For creating a new class library in Visual Studio, click on New | Project under the File menu option and select Class Library from the available Visual C# templates.
using System;using System.Collections.Generic;using System.Linq;using System.Text;
namespace TestLibrary{ public class Class1 { public double CalculateTotalPrice(double quantity) { double totalPrice; double unitPrice;
// Todo get unit price. For test let us hardcode it unitPrice = 16.0;
totalPrice = unitPrice * quantity;
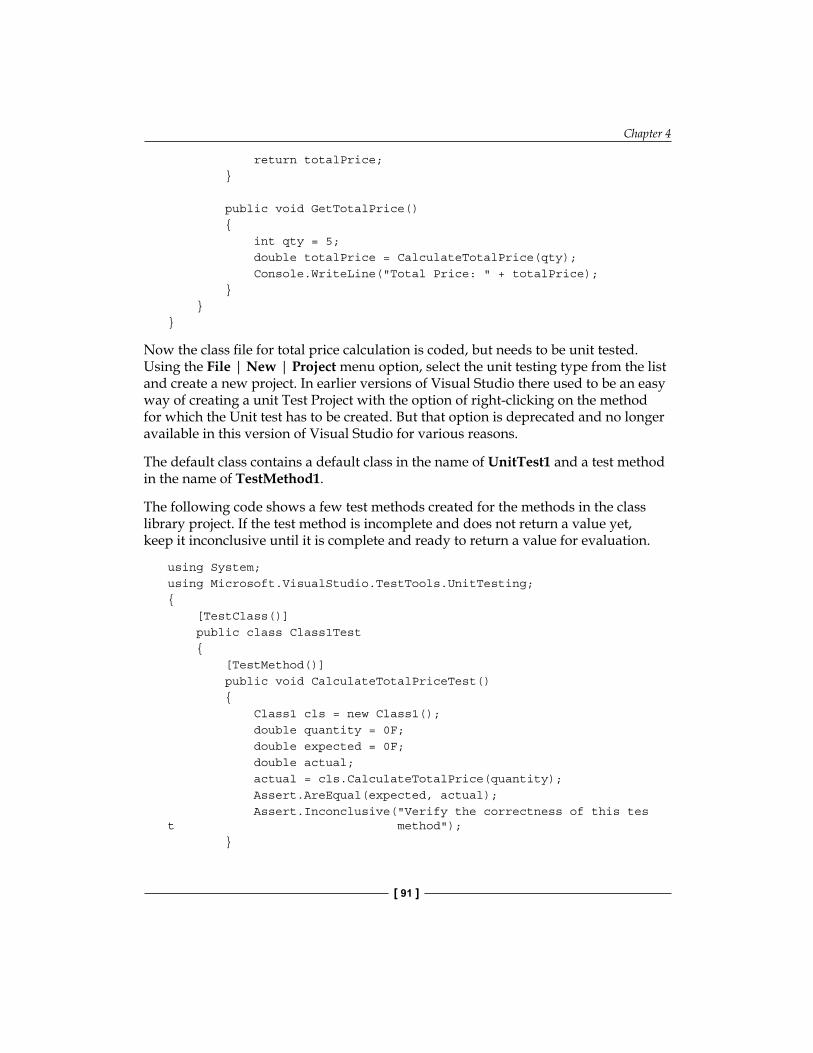
Chapter 4
[ 91 ]
return totalPrice; }
public void GetTotalPrice() { int qty = 5; double totalPrice = CalculateTotalPrice(qty); Console.WriteLine("Total Price: " + totalPrice); } }}
Now the class file for total price calculation is coded, but needs to be unit tested. Using the File | New | Project menu option, select the unit testing type from the list and create a new project. In earlier versions of Visual Studio there used to be an easy way of creating a unit Test Project with the option of right-clicking on the method for which the Unit test has to be created. But that option is deprecated and no longer available in this version of Visual Studio for various reasons.
The default class contains a default class in the name of UnitTest1 and a test method in the name of TestMethod1.
The following code shows a few test methods created for the methods in the class library project. If the test method is incomplete and does not return a value yet, keep it inconclusive until it is complete and ready to return a value for evaluation.
using System;using Microsoft.VisualStudio.TestTools.UnitTesting;{ [TestClass()] public class Class1Test { [TestMethod()] public void CalculateTotalPriceTest() { Class1 cls = new Class1(); double quantity = 0F; double expected = 0F; double actual; actual = cls.CalculateTotalPrice(quantity); Assert.AreEqual(expected, actual); Assert.Inconclusive("Verify the correctness of this test method"); }
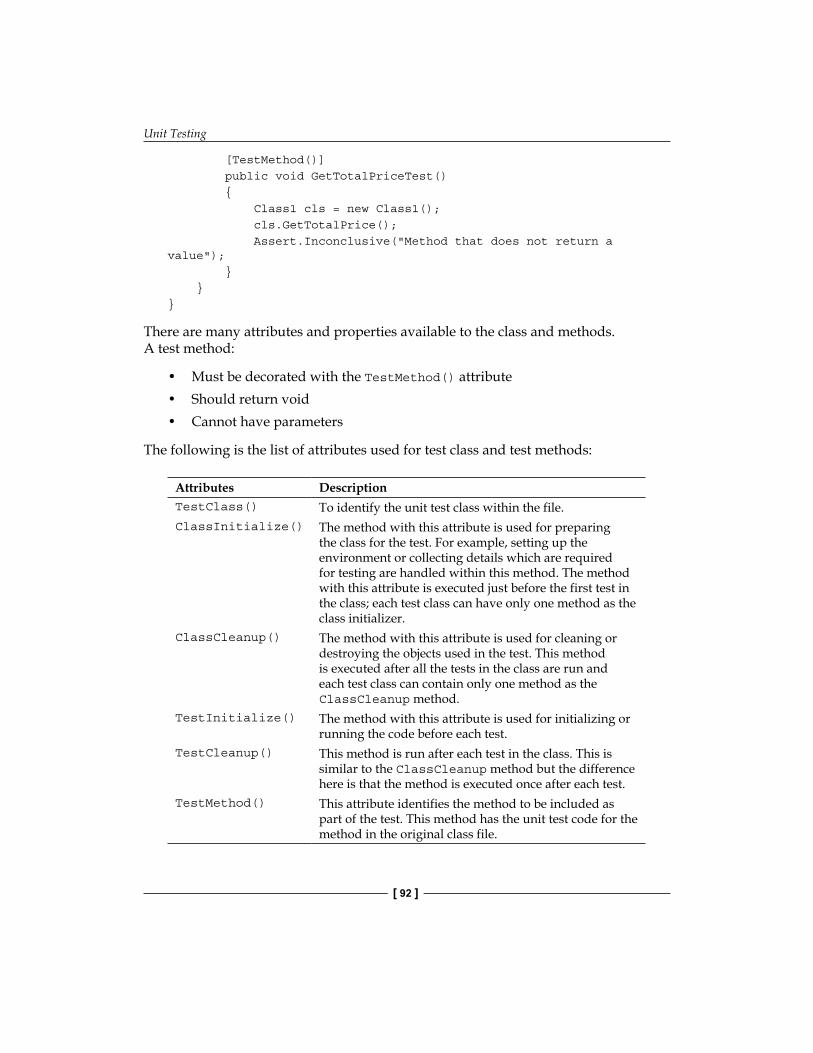
Unit Testing
[ 92 ]
[TestMethod()] public void GetTotalPriceTest() { Class1 cls = new Class1(); cls.GetTotalPrice(); Assert.Inconclusive("Method that does not return a value"); } }}
There are many attributes and properties available to the class and methods. A test method:
• Must be decorated with the TestMethod() attribute• Should return void• Cannot have parameters
The following is the list of attributes used for test class and test methods:
Attributes DescriptionTestClass() To identify the unit test class within the file.ClassInitialize() The method with this attribute is used for preparing
the class for the test. For example, setting up the environment or collecting details which are required for testing are handled within this method. The method with this attribute is executed just before the first test in the class; each test class can have only one method as the class initializer.
ClassCleanup() The method with this attribute is used for cleaning or destroying the objects used in the test. This method is executed after all the tests in the class are run and each test class can contain only one method as the ClassCleanup method.
TestInitialize() The method with this attribute is used for initializing or running the code before each test.
TestCleanup() This method is run after each test in the class. This is similar to the ClassCleanup method but the difference here is that the method is executed once after each test.
TestMethod() This attribute identifies the method to be included as part of the test. This method has the unit test code for the method in the original class file.
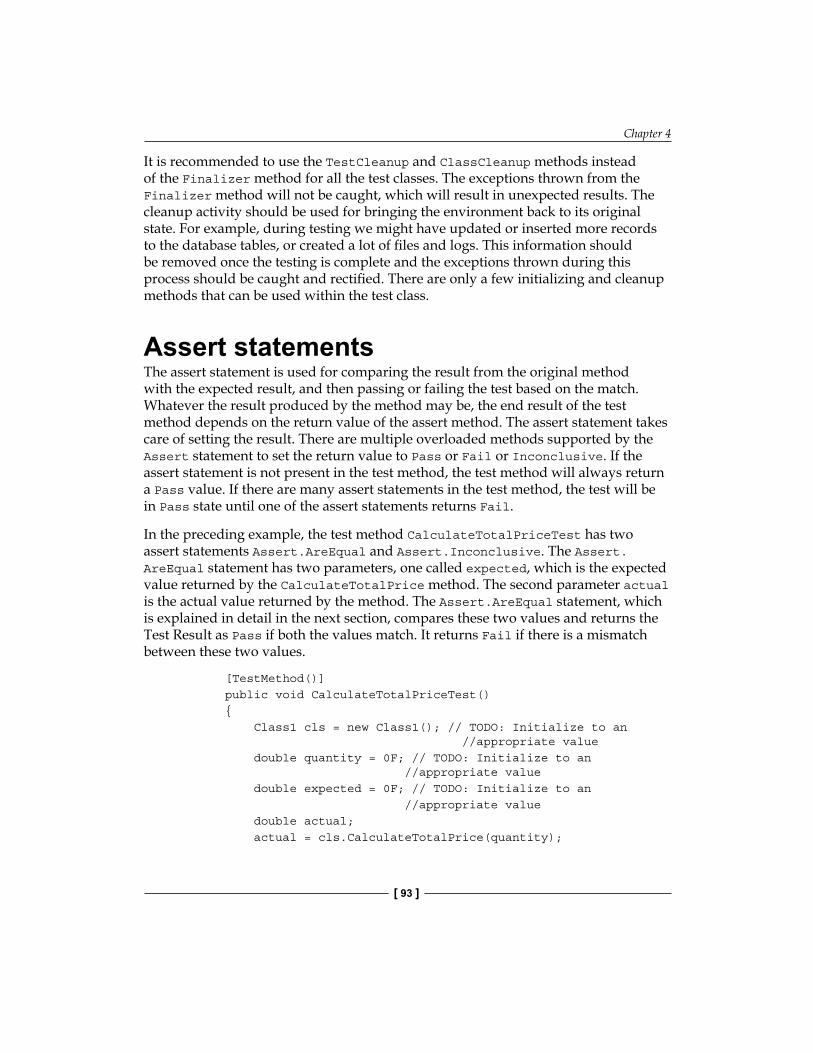
Chapter 4
[ 93 ]
It is recommended to use the TestCleanup and ClassCleanup methods instead of the Finalizer method for all the test classes. The exceptions thrown from the Finalizer method will not be caught, which will result in unexpected results. The cleanup activity should be used for bringing the environment back to its original state. For example, during testing we might have updated or inserted more records to the database tables, or created a lot of files and logs. This information should be removed once the testing is complete and the exceptions thrown during this process should be caught and rectified. There are only a few initializing and cleanup methods that can be used within the test class.
Assert statementsThe assert statement is used for comparing the result from the original method with the expected result, and then passing or failing the test based on the match. Whatever the result produced by the method may be, the end result of the test method depends on the return value of the assert method. The assert statement takes care of setting the result. There are multiple overloaded methods supported by the Assert statement to set the return value to Pass or Fail or Inconclusive. If the assert statement is not present in the test method, the test method will always return a Pass value. If there are many assert statements in the test method, the test will be in Pass state until one of the assert statements returns Fail.
In the preceding example, the test method CalculateTotalPriceTest has two assert statements Assert.AreEqual and Assert.Inconclusive. The Assert.AreEqual statement has two parameters, one called expected, which is the expected value returned by the CalculateTotalPrice method. The second parameter actual is the actual value returned by the method. The Assert.AreEqual statement, which is explained in detail in the next section, compares these two values and returns the Test Result as Pass if both the values match. It returns Fail if there is a mismatch between these two values.
[TestMethod()] public void CalculateTotalPriceTest() { Class1 cls = new Class1(); // TODO: Initialize to an //appropriate value double quantity = 0F; // TODO: Initialize to an //appropriate value double expected = 0F; // TODO: Initialize to an //appropriate value double actual; actual = cls.CalculateTotalPrice(quantity);
Unit Testing
[ 94 ]
Assert.AreEqual(expected, actual); Assert.Inconclusive("Verify the correctness of this test method."); }
The test method also contains the Assert.Inconclusive statement to return the result as Inconclusive if the test method is not complete. Remove this line if the code is complete and returns the result. If the above code is running without setting the value for the variables quantity and expected, the return would be Inconclusive. Now set the value for quantity and expected as:
double quantity = 10F;double expected = 159F;
The returned result would be a Fail value because the actual value returned by the method would be 160, while our expected value is 159. If you change the expected value to 160 then the test would pass. The examples have shown only one Assert type so far. There are many other asserts statements provided by the Visual Studio unit test framework to support and do a complete unit test for various scenarios.
Types of AssertsThe Assert class supports both comparison and conditional testing capabilities. The Microsoft.VisualStudio.TestTools.UnitTesting namespace contains all these assert types. The actual and expected values are compared based on the type of assert used and the result decides the test pass or failure state.
AssertThe assert class has many different overloaded methods for comparing the values. Each method is used for a specific type of comparison. For example, an assert can compare a string with a string, or an object with another object, but not an integer with an object. Overloaded methods are methods with the same name, but with additional or optional parameters added to the method. This is to change the behavior of the method based on the need. For example, the assert method provides an overloaded method to compare the values within a specified accuracy, which is explained in detail when comparing double values.
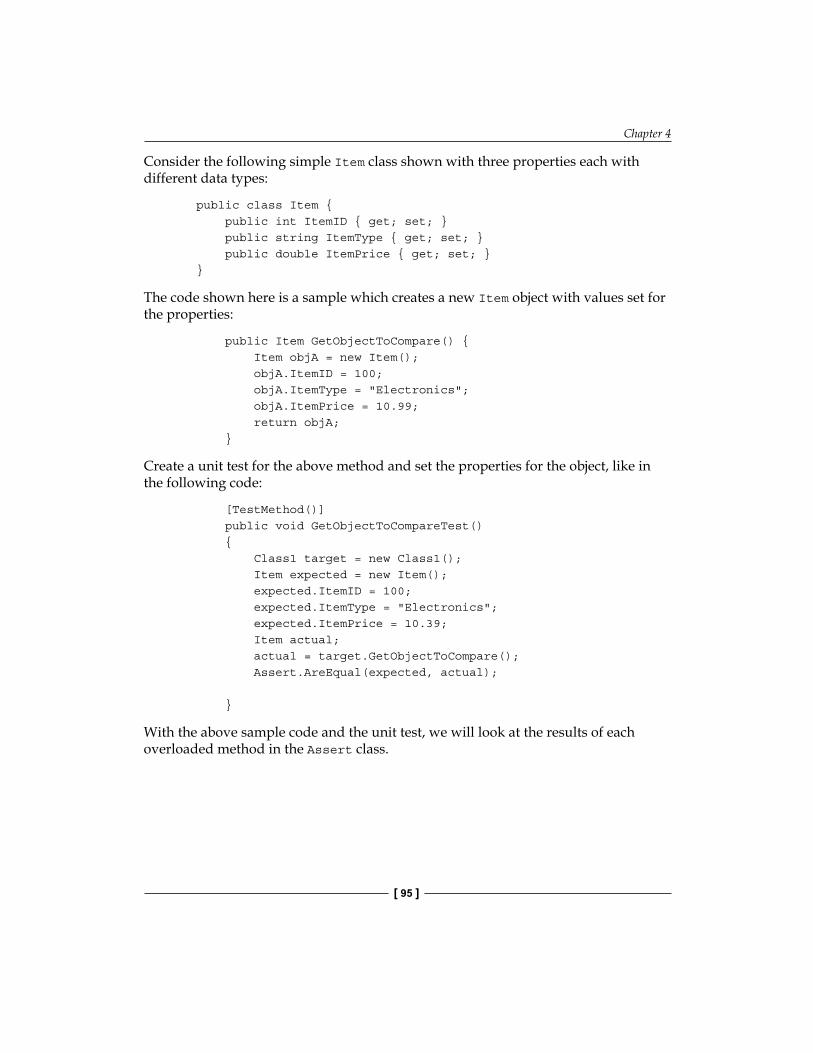
Chapter 4
[ 95 ]
Consider the following simple Item class shown with three properties each with different data types:
public class Item { public int ItemID { get; set; } public string ItemType { get; set; } public double ItemPrice { get; set; } }
The code shown here is a sample which creates a new Item object with values set for the properties:
public Item GetObjectToCompare() { Item objA = new Item(); objA.ItemID = 100; objA.ItemType = "Electronics"; objA.ItemPrice = 10.99; return objA; }
Create a unit test for the above method and set the properties for the object, like in the following code:
[TestMethod()] public void GetObjectToCompareTest() { Class1 target = new Class1(); Item expected = new Item(); expected.ItemID = 100; expected.ItemType = "Electronics"; expected.ItemPrice = 10.39; Item actual; actual = target.GetObjectToCompare(); Assert.AreEqual(expected, actual);
}
With the above sample code and the unit test, we will look at the results of each overloaded method in the Assert class.
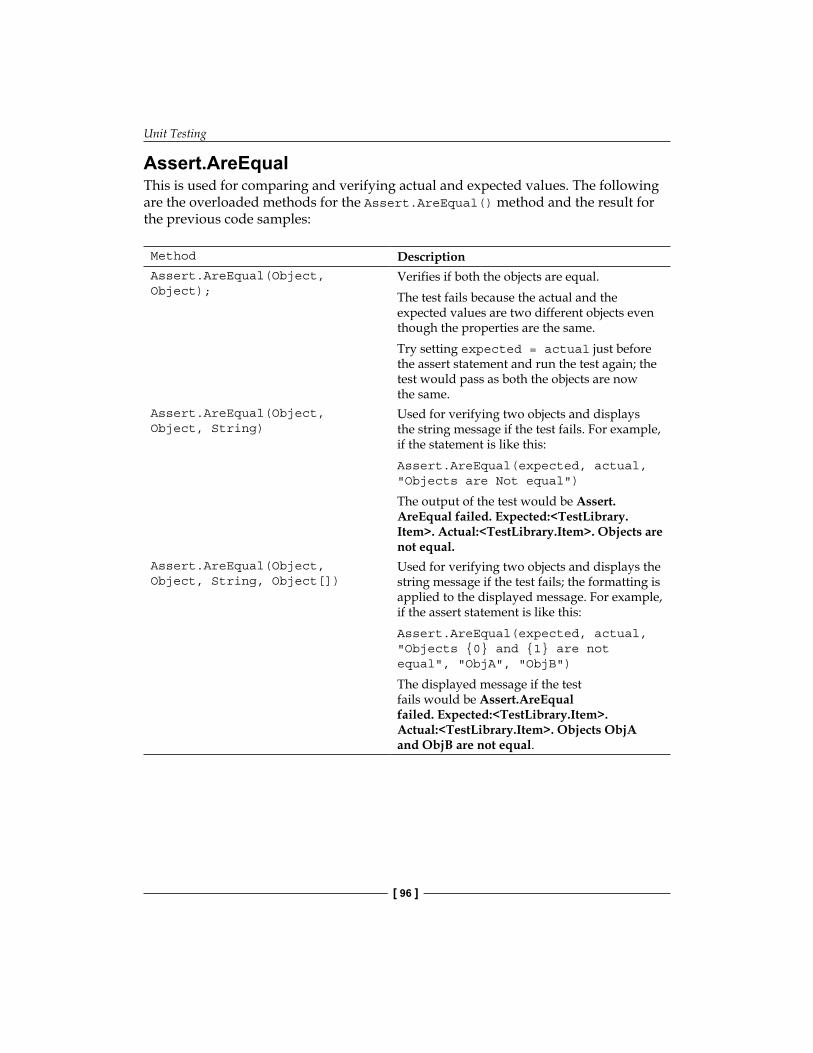
Unit Testing
[ 96 ]
Assert.AreEqualThis is used for comparing and verifying actual and expected values. The following are the overloaded methods for the Assert.AreEqual() method and the result for the previous code samples:
Method DescriptionAssert.AreEqual(Object, Object);
Verifies if both the objects are equal.The test fails because the actual and the expected values are two different objects even though the properties are the same.Try setting expected = actual just before the assert statement and run the test again; the test would pass as both the objects are now the same.
Assert.AreEqual(Object, Object, String)
Used for verifying two objects and displays the string message if the test fails. For example, if the statement is like this:Assert.AreEqual(expected, actual, "Objects are Not equal")
The output of the test would be Assert.AreEqual failed. Expected:<TestLibrary.Item>. Actual:<TestLibrary.Item>. Objects are not equal.
Assert.AreEqual(Object, Object, String, Object[])
Used for verifying two objects and displays the string message if the test fails; the formatting is applied to the displayed message. For example, if the assert statement is like this:Assert.AreEqual(expected, actual, "Objects {0} and {1} are not equal", "ObjA", "ObjB")
The displayed message if the test fails would be Assert.AreEqual failed. Expected:<TestLibrary.Item>. Actual:<TestLibrary.Item>. Objects ObjA and ObjB are not equal.
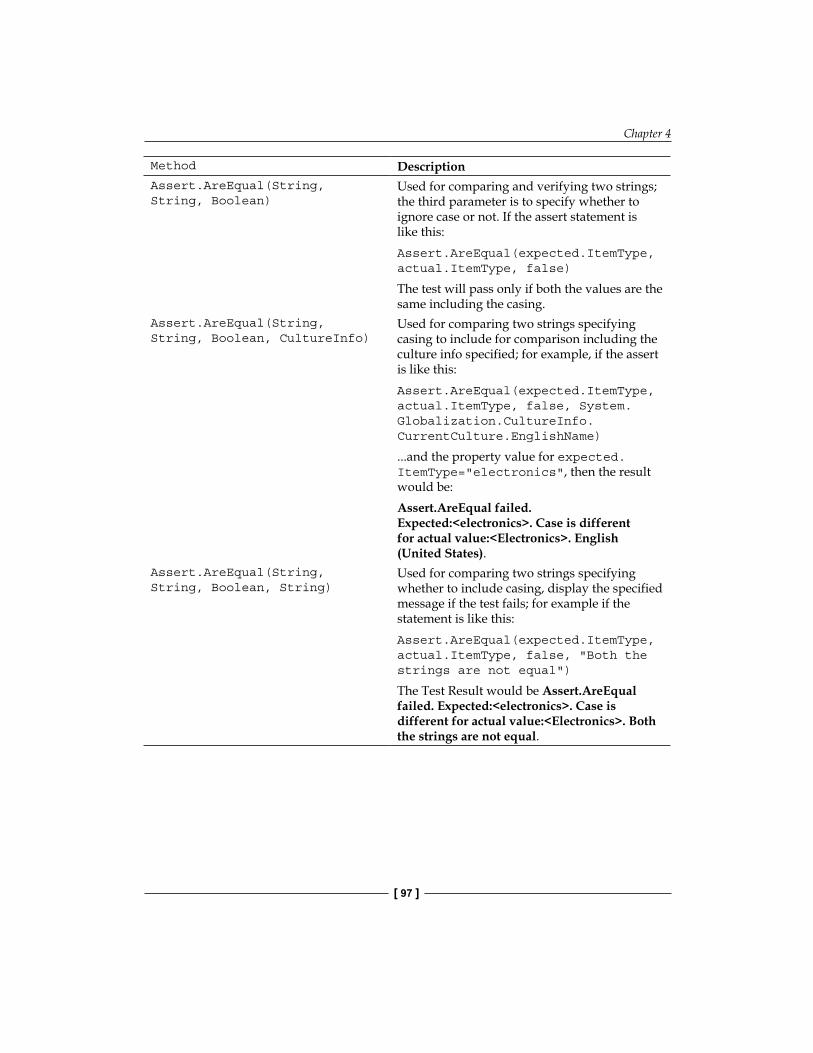
Chapter 4
[ 97 ]
Method DescriptionAssert.AreEqual(String, String, Boolean)
Used for comparing and verifying two strings; the third parameter is to specify whether to ignore case or not. If the assert statement is like this:Assert.AreEqual(expected.ItemType, actual.ItemType, false)
The test will pass only if both the values are the same including the casing.
Assert.AreEqual(String, String, Boolean, CultureInfo)
Used for comparing two strings specifying casing to include for comparison including the culture info specified; for example, if the assert is like this:Assert.AreEqual(expected.ItemType, actual.ItemType, false, System.Globalization.CultureInfo.CurrentCulture.EnglishName)
...and the property value for expected.ItemType="electronics", then the result would be:Assert.AreEqual failed. Expected:<electronics>. Case is different for actual value:<Electronics>. English (United States).
Assert.AreEqual(String, String, Boolean, String)
Used for comparing two strings specifying whether to include casing, display the specified message if the test fails; for example if the statement is like this:Assert.AreEqual(expected.ItemType, actual.ItemType, false, "Both the strings are not equal")
The Test Result would be Assert.AreEqual failed. Expected:<electronics>. Case is different for actual value:<Electronics>. Both the strings are not equal.
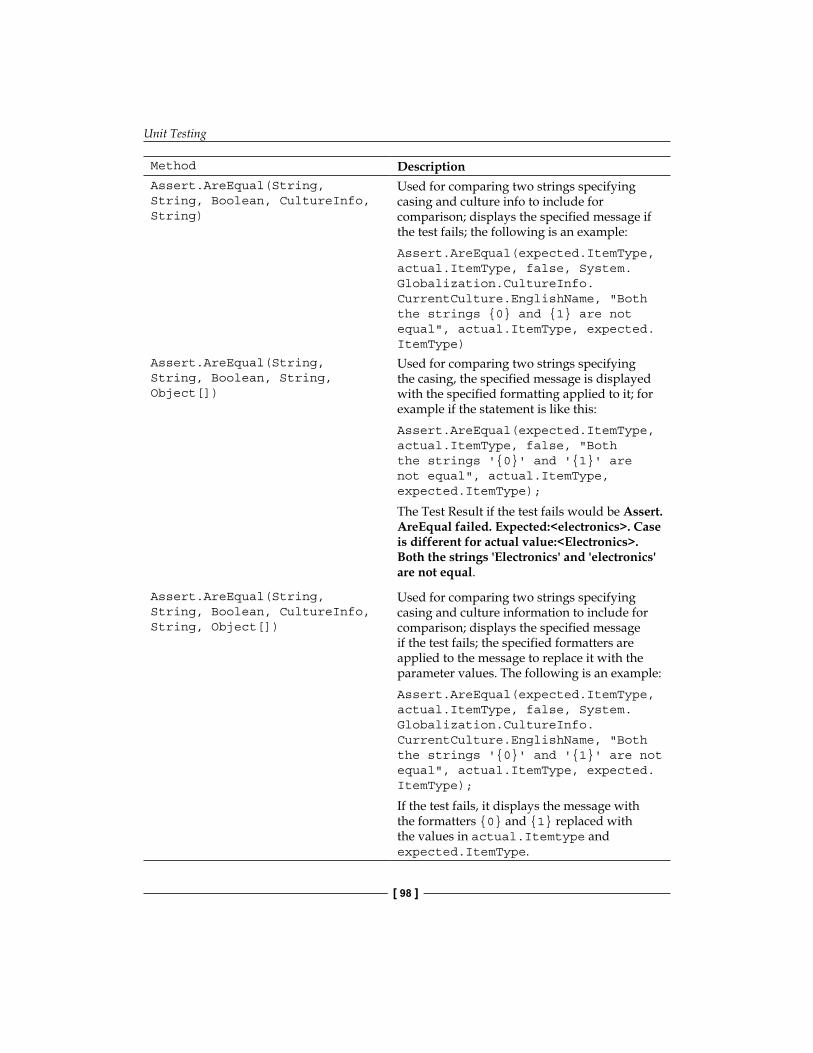
Unit Testing
[ 98 ]
Method DescriptionAssert.AreEqual(String, String, Boolean, CultureInfo, String)
Used for comparing two strings specifying casing and culture info to include for comparison; displays the specified message if the test fails; the following is an example:Assert.AreEqual(expected.ItemType, actual.ItemType, false, System.Globalization.CultureInfo.CurrentCulture.EnglishName, "Both the strings {0} and {1} are not equal", actual.ItemType, expected.ItemType)
Assert.AreEqual(String, String, Boolean, String, Object[])
Used for comparing two strings specifying the casing, the specified message is displayed with the specified formatting applied to it; for example if the statement is like this:Assert.AreEqual(expected.ItemType, actual.ItemType, false, "Both the strings '{0}' and '{1}' are not equal", actual.ItemType, expected.ItemType);
The Test Result if the test fails would be Assert.AreEqual failed. Expected:<electronics>. Case is different for actual value:<Electronics>. Both the strings 'Electronics' and 'electronics' are not equal.
Assert.AreEqual(String, String, Boolean, CultureInfo, String, Object[])
Used for comparing two strings specifying casing and culture information to include for comparison; displays the specified message if the test fails; the specified formatters are applied to the message to replace it with the parameter values. The following is an example:Assert.AreEqual(expected.ItemType, actual.ItemType, false, System.Globalization.CultureInfo.CurrentCulture.EnglishName, "Both the strings '{0}' and '{1}' are not equal", actual.ItemType, expected.ItemType);
If the test fails, it displays the message with the formatters {0} and {1} replaced with the values in actual.Itemtype and expected.ItemType.
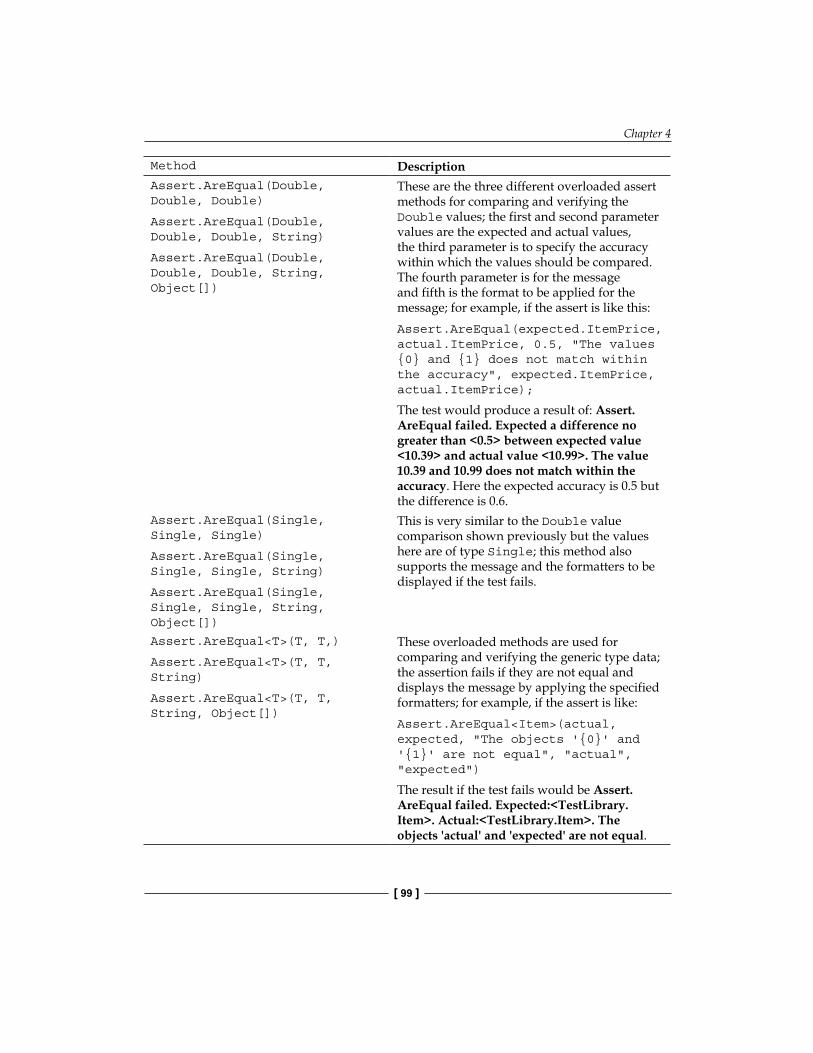
Chapter 4
[ 99 ]
Method DescriptionAssert.AreEqual(Double, Double, Double)
Assert.AreEqual(Double, Double, Double, String)
Assert.AreEqual(Double, Double, Double, String, Object[])
These are the three different overloaded assert methods for comparing and verifying the Double values; the first and second parameter values are the expected and actual values, the third parameter is to specify the accuracy within which the values should be compared. The fourth parameter is for the message and fifth is the format to be applied for the message; for example, if the assert is like this:Assert.AreEqual(expected.ItemPrice, actual.ItemPrice, 0.5, "The values {0} and {1} does not match within the accuracy", expected.ItemPrice, actual.ItemPrice);
The test would produce a result of: Assert.AreEqual failed. Expected a difference no greater than <0.5> between expected value <10.39> and actual value <10.99>. The value 10.39 and 10.99 does not match within the accuracy. Here the expected accuracy is 0.5 but the difference is 0.6.
Assert.AreEqual(Single, Single, Single)
Assert.AreEqual(Single, Single, Single, String)
Assert.AreEqual(Single, Single, Single, String, Object[])
This is very similar to the Double value comparison shown previously but the values here are of type Single; this method also supports the message and the formatters to be displayed if the test fails.
Assert.AreEqual<T>(T, T,)
Assert.AreEqual<T>(T, T, String)
Assert.AreEqual<T>(T, T, String, Object[])
These overloaded methods are used for comparing and verifying the generic type data; the assertion fails if they are not equal and displays the message by applying the specified formatters; for example, if the assert is like:Assert.AreEqual<Item>(actual, expected, "The objects '{0}' and '{1}' are not equal", "actual", "expected")
The result if the test fails would be Assert.AreEqual failed. Expected:<TestLibrary.Item>. Actual:<TestLibrary.Item>. The objects 'actual' and 'expected' are not equal.
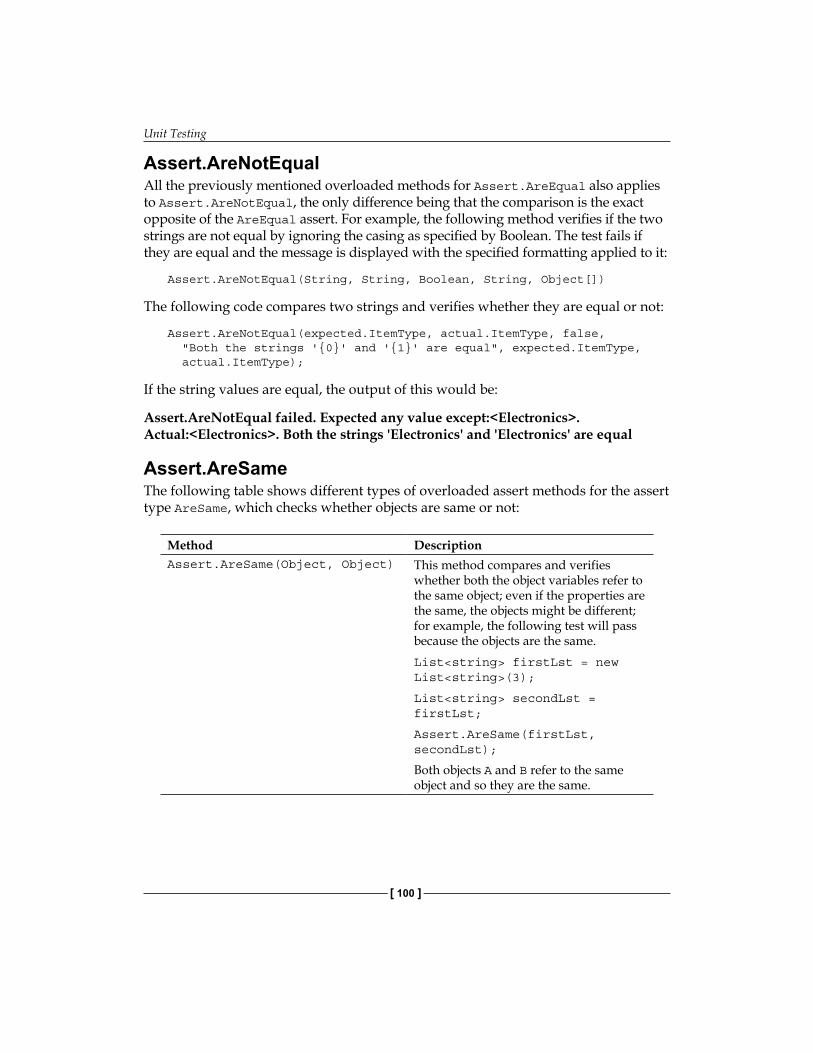
Unit Testing
[ 100 ]
Assert.AreNotEqualAll the previously mentioned overloaded methods for Assert.AreEqual also applies to Assert.AreNotEqual, the only difference being that the comparison is the exact opposite of the AreEqual assert. For example, the following method verifies if the two strings are not equal by ignoring the casing as specified by Boolean. The test fails if they are equal and the message is displayed with the specified formatting applied to it:
Assert.AreNotEqual(String, String, Boolean, String, Object[])
The following code compares two strings and verifies whether they are equal or not:
Assert.AreNotEqual(expected.ItemType, actual.ItemType, false, "Both the strings '{0}' and '{1}' are equal", expected.ItemType, actual.ItemType);
If the string values are equal, the output of this would be:
Assert.AreNotEqual failed. Expected any value except:<Electronics>. Actual:<Electronics>. Both the strings 'Electronics' and 'Electronics' are equal
Assert.AreSameThe following table shows different types of overloaded assert methods for the assert type AreSame, which checks whether objects are same or not:
Method DescriptionAssert.AreSame(Object, Object) This method compares and verifies
whether both the object variables refer to the same object; even if the properties are the same, the objects might be different; for example, the following test will pass because the objects are the same.List<string> firstLst = new List<string>(3);
List<string> secondLst = firstLst;
Assert.AreSame(firstLst, secondLst);
Both objects A and B refer to the same object and so they are the same.
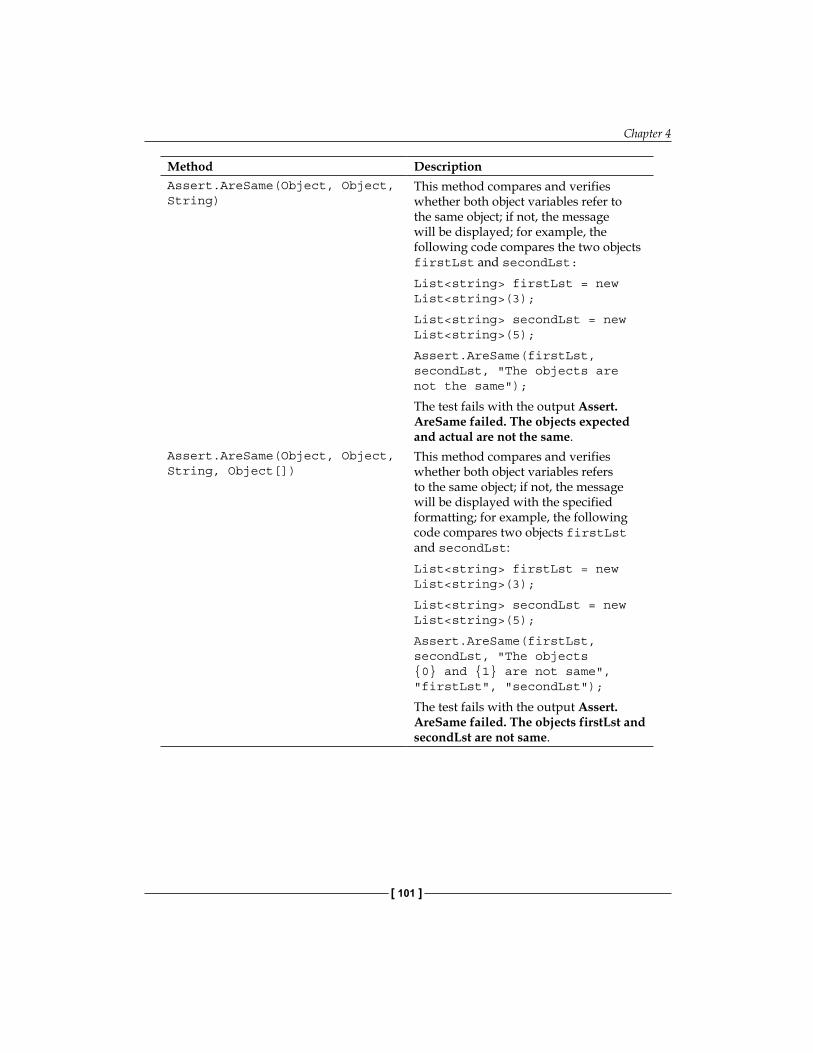
Chapter 4
[ 101 ]
Method DescriptionAssert.AreSame(Object, Object, String)
This method compares and verifies whether both object variables refer to the same object; if not, the message will be displayed; for example, the following code compares the two objects firstLst and secondLst:List<string> firstLst = new List<string>(3);
List<string> secondLst = new List<string>(5);
Assert.AreSame(firstLst, secondLst, "The objects are not the same");
The test fails with the output Assert.AreSame failed. The objects expected and actual are not the same.
Assert.AreSame(Object, Object, String, Object[])
This method compares and verifies whether both object variables refers to the same object; if not, the message will be displayed with the specified formatting; for example, the following code compares two objects firstLst and secondLst:List<string> firstLst = new List<string>(3);
List<string> secondLst = new List<string>(5);
Assert.AreSame(firstLst, secondLst, "The objects {0} and {1} are not same", "firstLst", "secondLst");
The test fails with the output Assert.AreSame failed. The objects firstLst and secondLst are not same.
Unit Testing
[ 102 ]
Assert.AreNotSameThis Assert is used to verify that two objects are not the same. The test fails if the objects are the same. The same overloaded methods for Assert.AreSame apply here, but the comparison is the exact opposite. The following are the three overloaded methods applied to Assert.AreNotSame:
• Assert.AreNotSame(Object, Object)
• Assert.AreNotSame(Object, Object, String)
• Assert.AreNotSame(Object, Object, String, Object[])
For example, the following code verifies if objects firstLst and secondLst are not the same. If they are the same, the test fails with the specified error message with the specified formatting applied to it:
List<string> firstLst = new List<string>(5);List<string> secondLst = firstLst);Assert.AreNotSame(firstLst, secondLst, "The test fails because the objects {0} and {1} are same", "firstLst", "secondLst");
The above test fails with the message Assert.AreNotSame failed. The test fails because the objects firstLst and secondLst are same.
Assert.FailThis assert is used for failing the test without checking any condition. Assert.Fail has three overloaded methods:
Method DescriptionAssert.Fail() Fails the test without checking any condition.Assert.Fail(String) Fails the test without checking any condition
and displays the message.
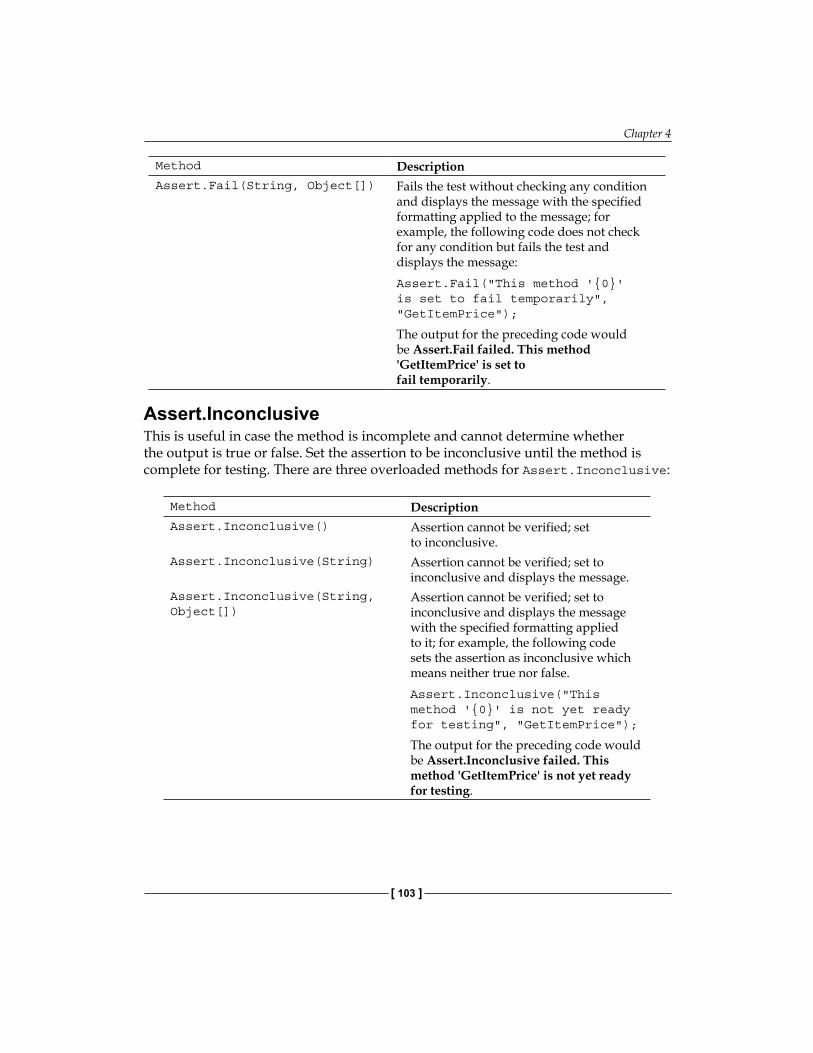
Chapter 4
[ 103 ]
Method DescriptionAssert.Fail(String, Object[]) Fails the test without checking any condition
and displays the message with the specified formatting applied to the message; for example, the following code does not check for any condition but fails the test and displays the message:Assert.Fail("This method '{0}' is set to fail temporarily", "GetItemPrice");
The output for the preceding code would be Assert.Fail failed. This method 'GetItemPrice' is set to fail temporarily.
Assert.InconclusiveThis is useful in case the method is incomplete and cannot determine whether the output is true or false. Set the assertion to be inconclusive until the method is complete for testing. There are three overloaded methods for Assert.Inconclusive:
Method DescriptionAssert.Inconclusive() Assertion cannot be verified; set
to inconclusive.Assert.Inconclusive(String) Assertion cannot be verified; set to
inconclusive and displays the message.Assert.Inconclusive(String, Object[])
Assertion cannot be verified; set to inconclusive and displays the message with the specified formatting applied to it; for example, the following code sets the assertion as inconclusive which means neither true nor false.Assert.Inconclusive("This method '{0}' is not yet ready for testing", "GetItemPrice");
The output for the preceding code would be Assert.Inconclusive failed. This method 'GetItemPrice' is not yet ready for testing.
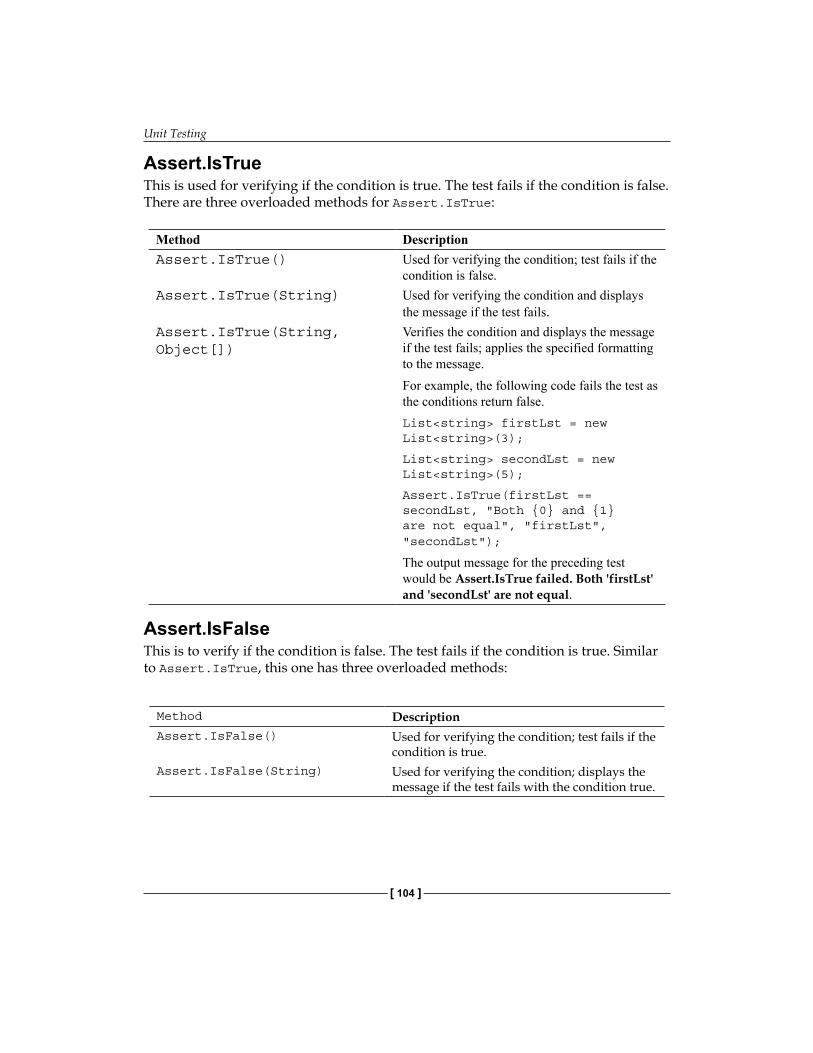
Unit Testing
[ 104 ]
Assert.IsTrueThis is used for verifying if the condition is true. The test fails if the condition is false. There are three overloaded methods for Assert.IsTrue:
Method DescriptionAssert.IsTrue() Used for verifying the condition; test fails if the
condition is false.Assert.IsTrue(String) Used for verifying the condition and displays
the message if the test fails.Assert.IsTrue(String, Object[])
Verifies the condition and displays the message if the test fails; applies the specified formatting to the message.For example, the following code fails the test as the conditions return false.List<string> firstLst = new List<string>(3);
List<string> secondLst = new List<string>(5);
Assert.IsTrue(firstLst == secondLst, "Both {0} and {1} are not equal", "firstLst", "secondLst");
The output message for the preceding test would be Assert.IsTrue failed. Both 'firstLst' and 'secondLst' are not equal.
Assert.IsFalseThis is to verify if the condition is false. The test fails if the condition is true. Similar to Assert.IsTrue, this one has three overloaded methods:
Method DescriptionAssert.IsFalse() Used for verifying the condition; test fails if the
condition is true.Assert.IsFalse(String) Used for verifying the condition; displays the
message if the test fails with the condition true.
Chapter 4
[ 105 ]
Method DescriptionAssert.IsFalse(String, Object[])
Verifies the condition and displays the message if the test fails with the condition true and applies the specified formatting to the message.For example, the following code fails the test as the condition returns true:List<string> firstLst = new List<string>(3);
List<string> secondLst = firstLst;
Assert.IsFalse(firstLst == secondLst, "Both {0} and {1} are equal", "firstLst", "secondLst");
The output message for the above test would be Assert.IsFalse failed. Both ''firstLst'' and ''secondLst'' are equal
Assert.IsNullThis is used to verify whether an object is null. The test fails if the object is not null. Given here are the three overloaded methods for Assert.IsNull.
Method DescriptionAssert.IsNull(Object) Verify if the object is null. Assert.IsNull(Object, String) Verify if the object is null; displays
the message if the object is not null and the test fails.
Assert.IsNull(Object, String, Object[])
Verify if the object is null and display the message if the object is not null; apply the formatting to the message.For example, the following code verifies if the object is null and fails the test if it is not null and displays the formatted message: List<string> firstLst = new List<string>(3);
List<string> secondLst = firstLst;
Assert.IsNull(secondLst, "Object {0} is not null", "secondLst");
The preceding code fails the test and displays the error message Assert.IsNull failed. Object ''secondLst'' is not null.
Unit Testing
[ 106 ]
Assert.IsNotNullThis is to verify if the object is null or not. The test fails if the object is null. This is the exact opposite of the Assert.IsNull and has the same overloaded methods.
Method DescriptionAssert.IsNotNull(Object) Verifies if the object is not null.Assert.IsNotNull(Object, String)
Verifies if the object is not null, and displays the message if the object is null and the test fails.
Assert.IsNotNull(Object, String, Object[])
Verifies if the object is not null and displays the message if the object is null; applies the formatting to the message.For example, the following code verifies if the object is not null and fails the test if it is null and displays the formatted message :List<string> secondLst = null;
Assert.IsNotNull(secondLst, "Object {0} is null", "secondLst");
The preceding code fails the test and displays the error message Assert.IsNotNull failed. Object 'secondLst' is null.
Assert.IsInstanceOfTypeThis method verifies whether the object is of the specified System.Type. The test fails if the type does not match.

Chapter 4
[ 107 ]
Method DescriptionAssert.IsInstanceOfType(Object, Type)
This method is used for verifying whether the object is of the specified System.Type.For example, the following code verifies whether the object is of type ArrayList:Hashtable obj = new Hashtable(); Assert.IsInstanceOfType(obj, typeof(ArrayList));
The test fails as the obj object is not of type ArrayList. The error message returned would be like:Assert.IsInstanceOfType failed. Expected type:<System.Collections.ArrayList>. Actual type:<System.Collections.Hashtable>.
Assert.IsInstanceOfType(Object, Type, String)
This is the overloaded method for the preceding method with an additional parameter; the third parameter is the message to be displayed in case the test fails.
Assert.IsInstanceOfType(Object, Type, String, Object[])
The purpose of this method is same as that of the preceding methods; but the additional parameter is the formatter to be applied on the error message displayed if the test fails.
StringAssertsThis is another Assert class within the Unit test namespace Microsoft.VisualStudio.TestTools.UnitTesting that contains methods for common text-based assertions. StringAssert contains the following methods with additional overloaded methods. Overloaded methods are the methods with the same name but with additional or optional parameters to change the behavior of the method based on the parameter values supplied to the method.
Unit Testing
[ 108 ]
StringAssert.ContainsThis method verifies if the second parameter string is present in the first parameter string. The test fails if the string is not present. There are three overloaded methods for StringAssert.Contains. The third parameter specifies the message to be displayed if the assertion fails, and the fourth parameter specifies the message formatter to be applied on the error message for the assertion failure. The formatters are the placeholders for the parameters values:
• StringAssert.Contains(String, String)
• StringAssert.Contains(String, String, String)
• StringAssert.Contains(String, String, String, Object[])
For example, the following code verifies if the Test string is present in the first string. If not, the message is displayed with the specified format applied to it.
string find = "Testing";StringAssert.Contains("This is the Test for StringAsserts", find, "The string '{0}' is not found in the first parameter value", find);
The assertion fails with the specified error message added to its default message as StringAssert.Contains failed. String 'This is the Test for StringAsserts' does not contain string 'Testing'. The string 'Testing' is not found in the first parameter value.
StringAssert.MatchesAs the name suggests, this method verifies if the first string matches the regular expression specified in the second parameter. These assert methods contain three overloaded methods to display the custom error message and apply formats to the message if the assertion fails:
• StringAssert.Matches(String, Regex)
• StringAssert.Matches(String, Regex, String)
• StringAssert.Matches(String, Regex, String, Object[])
For example, the following code verifies if the string contains any numbers between 0 and 9. If not, the assertion fails with the message specified with the formats.
Regex regEx = new Regex("[0-9]"); StringAssert.Matches("This is first test for StringAssert", regEx, "There are no numbers between {0} and {1} in the string", 0, 9);
Chapter 4
[ 109 ]
The error message would be StringAssert.Matches failed. String ''This is first test for StringAssert'' does not match pattern '[0-9]'. There are no numbers between 0 and 9 in the string.
StringAssert.DoesNotMatchThis is the exact opposite of the StringAssert.Matches method. This assert method verifies whether the first parameter string matches the regular expression specified as the second parameter. The assertion fails if it matches. This assert type has three overloaded methods to display the error message and apply the message formatting to it, which is the place holder for the parameter values in the message:
• StringAssert.DoesNotMatch(String, Regex,)
• StringAssert.DoesNotMatch(String, Regex, String)
• StringAssert.DoesNotMatch(String, Regex, String, Object[])
For example, the following code verifies if the first parameter string does not match with the regular expression specified in the second parameter. The assertion fails if it does match and displays the specified error message with the formatting applied to it.
Regex regEx = new Regex("[0-9]"); StringAssert.DoesNotMatch("This is 1st test for StringAssert", regEx, "There is a number in the string");
The assertion fails with the error message StringAssert.DoesNotMatch failed. String ''This is 1st test for StringAssert'' matches pattern ''[0-9]''. There is a number in the string.
StringAssert.StartsWithThis is to verify whether a string in the first parameter starts with the value in the second parameter. The assertion fails if the string does not start with the second string. There are three overloaded methods to specify the error message to be displayed and to specify the formatting to be applied to the error message:
• StringAssert.StartsWith(String, String)
• StringAssert.StartsWith(String, String, String)
• StringAssert.StartsWith(String, String, String, Object[])
Unit Testing
[ 110 ]
For example, the following code verifies if the first string starts with the specified second parameter value. The assertion fails if it does not, and displays the specified error message with the specified formatting.
string startWith = "First"; StringAssert.StartsWith("This is 1st test for StringAssert", startWith, "The string does not start with '{0}'", startWith);
The assertion fails with the error message StringAssert.StartsWith failed. String ''This is 1st test for StringAssert'' does not start with string ''First''. The string does not start with ''First''.
StringAssert.EndsWithThis is similar to the StringAssert.StartsWith method, but here, it verifies if the first string ends with the string specified in the second parameter. The assertion fails if it does not end with the specified string, and displays the error message. There are three overloaded methods to specify the custom error message and the formatting:
• StringAssert.EndsWith(String, String)
• StringAssert.EndsWith(String, String, String)
• StringAssert.EndsWith(String, String, String, Object[])
For example, the following code verifies whether the first string ends with the specified string as the second parameter. The assertion would fail and display the message with the specified format.
string endsWith = "Testing"; StringAssert.EndsWith("This is 1st test for StringAssert", endsWith, "'{0}' is not the actual ending in the string", endsWith);
The error message displayed would be StringAssert.EndsWith failed. String ''This is 1st test for StringAssert'' does not end with string ''Testing''. ''Testing'' is not the actual ending in the string.
Downloading the example codeYou can download the example code files for all Packt books you have purchased from your account at http://www.packtpub.com. If you purchased this book elsewhere, you can visit http://www.packtpub.com/support and register to have the files e-mailed directly to you.

Chapter 4
[ 111 ]
CollectionAssertVisual Studio provides another type of assert through the namespace Microsoft.VisualStudio.TestTools.UnitTesting, which helps to verify the objects that implement the ICollection interface. The collections might be of the system collection type or the custom collection type. These CollectionAssert compares and verifies whether the objects implementing the ICollection interface returns the contents as expected.
Consider the following lists. These lists are used in all the collection assert samples featured in this section:
List<string> firstLst = new List<string>(3); firstLst.Add("FirstName"); firstLst.Add("LastName");
List<string> secondLst = new List<string>(3); secondLst = firstLst; secondLst.Add("MiddleName");
List<string> thirdLst = new List<string>(3); thirdLst.Add("FirstName"); thirdLst.Add("MiddleName"); thirdLst.Add("LastName");
List<string> fourthLst = new List<string>(3); fourthLst.Add("FirstName"); fourthLst.Add("MiddleName");
The firstLst list has its maximum index as three, but has only two elements added to it.
The secondLst list has its maximum index as three and firstLst is assigned to it with an additional item MiddleName added to it.
The thirdLst list has its maximum index as three and contains three items in the list.
The fourthLst list also has three as its maximum index but contains only two items.
Unit Testing
[ 112 ]
CollectionAssert.AllItemsAreNotNullThese asserts verifies if any of the items in the collection is not null. The following assertion would pass as none of the items is null in firstLst.
CollectionAssert.AllItemsAreNotNull(firstLst)
The assertion fails if a third item is added, like this:
firstLst.Add(null)
There are three overloaded methods to display the custom error message and to specify the formatting for the message, if the assertion fails:
• CollectionAssert.AllItemsAreNotNull(ICollection)
• CollectionAssert.AllItemsAreNotNull(ICollection, String)
• CollectionAssert.AllItemsAreNotNull(ICollection, String, Object[])
CollectionAssert.AreEquivalentThe CollectionAssert.AreEquivalent method verifies if both the collections are equivalent. It means that even if the items are in different order within the collections, the items should match.
CollectionAssert.AreEquivalent(thirdLst, secondLst);
In the example, notice that the MiddleName is the last item in the secondLst but it is the second item in the thirdLst. But both collections have the same items, so the assertion would pass. The following are the overloaded methods for Collectionassert.AreEquivalent:
• CollectionAssert.AreEquivalent (ICollection, ICollection)
• CollectionAssert.AreEquivalent (ICollection, ICollection, String)
• CollectionAssert.AreEquivalent (ICollection, ICollection, String, Object[])
Chapter 4
[ 113 ]
CollectionAssert.AreNotEquivalentThe CollectionAssert.AreNotEquivalent statement verifies if both first and second parameter collections do not contain the same items. It means that the assert fails even if one item in the first collection is not present in the second collection. In the example, if we remove or replace one of the items from any of the two collections secondLst or thirdLst, the assertion will pass as the items will not match.
thirdLst.Remove("MiddleName"); thirdLst.Add("FullName"); CollectionAssert.AreNotEquivalent(thirdLst, secondLst);
The following are the method syntax and the overloaded methods for the CollectionAssert.AreNotEquivalent assert to specify the custom error message and the formatting for the message:
• CollectionAssert.AreNotEquivalent (ICollection, ICollection)
• CollectionAssert.AreNotEquivalent (ICollection, ICollection, String)
• CollectionAssert.AreNotEquivalent (ICollection, ICollection, String, Object[])
CollectionAssert.AllItemsAreInstancesOfTypeThis statement verifies if all the items in the collection are of the type specified in the second parameter. The following code verifies if all the elements of the collection thirdLst are of the string type. The assertion would pass as the items are string:
CollectionAssert.AllItemsAreInstancesOfType(thirdLst, typeof(string))
The following are the syntax and the overloaded methods for the CollectionAssert.AllItemsAreInstacesOfType assert, with parameters for custom error messages and to specify the formats or the placeholders for the parameter values in the message:
• CollectionAssert.AllItemsAreInstancesOfType(ICollection, Type)
• CollectionAssert.AllItemsAreInstancesOfType(ICollection, Type, String)
• CollectionAssert.AllItemsAreInstancesOfType(ICollection, Type, String, Object[])

Unit Testing
[ 114 ]
CollectionAssert.IsSubsetOfThis statement verifies whether the collection in the first parameter contains some or all the elements of the collection in the second parameter. Note that all the items of the first parameter collection should be part of the collection in the second parameter. As per the example, the following assertion will pass as the items in the fourthLst are the subset of items in the thirdLst:
CollectionAssert.IsSubsetOf(fourthLst, thirdLst)
The following are the syntax and the overloaded methods for the CollectionAssert.IsSubsetOf assert:
• CollectionAssert.IsSubsetOf(ICollection, ICollection)
• CollectionAssert.IsSubsetOf(ICollection, ICollection, String)
• CollectionAssert.IsSubsetOf(ICollection, ICollection, String, Object[])
CollectionAssert.IsNotSubsetOfThis statement verifies whether the collection in the first parameter contains at least one element which is not present in the second parameter collection. As per the example, the following assertion would fail as the items in the fourthLst are the subset of items in the thirdLst. It means that there are no items in fourthLst which is not present in thirdLst.
CollectionAssert.IsNotSubsetOf(fourthLst, thirdLst)
Try adding a new element to the fourthLst which is not present in thirdLst such as:
fourthLst.Add("FullName");
Now try the same CollectionAssert statement. The assertion would pass as the fourthLst is not a subset of thirdLst collection.
The following are the syntax and the overloaded methods for the CollectionAssert.IsNotSubsetOf assert to specify the custom error message and the formats for error message:
• CollectionAssert.IsNotSubsetOf(ICollection, ICollection)
• CollectionAssert.IsNotSubsetOf(ICollection, ICollection, String)
• CollectionAssert.IsNotSubsetOf(ICollection, ICollection, String, Object[])
Chapter 4
[ 115 ]
CollectionAssert.AllItemsAreUniqueVerifies whether the items in the collection are unique. The assertion would pass on firstLst. The assertion fails if we add a third item, LastName, which duplicates an existing item:
firstLst.Add("LastName")
The syntax for this method and its two overloaded methods are given here. The additional parameters are to specify the custom error message and formatting for that error message:
• CollectionAssert.AllItemsAreUnique(ICollection)
• CollectionAssert.AllItemsAreUnique(ICollection, String)
• CollectionAssert.AllItemsAreUnique(ICollection, String, Object[])
CollectionAssert.ContainsThis assert verifies if any element of the collection specified as the first parameter contains the element specified as the second parameter. The following assert would pass as the FirstName is an element in the fourthLst collection:
CollectionAssert.Contains(fourthLst, "FirstName")
Custom error messages and formats for the assertion failure can be specified. This assert has two overloaded methods in addition to the default method:
• CollectionAssert.Contains(ICollection, Object)
• CollectionAssert.Contains(ICollection, Object, String)
• CollectionAssert.Contains(ICollection, Object, String, Object[])
CollectionAssert.DoesNotContainThis is the exact opposite of the CollectionAssert.Contains statement. This assert verifies if any of the elements in the first parameter collection does not equal to the value specified as the second parameter:
CollectionAssert.Contains(fourthLst, "Phone Number")
Unit Testing
[ 116 ]
Custom error messages and formatters for the assertion failure can be specified. This assert has two overloaded methods in addition to the default method:
• CollectionAssert.DoesNotContain(ICollection, Object)
• CollectionAssert.DoesNotContain(ICollection, Object, String)
• CollectionAssert.DoesNotContain(ICollection, Object, String, Object[])
CollectionAssert.AreEqualThis method verifies if both collections are equal in size. The following assertion fails as the number of items added to the firstLst is different from the thirdLst:
CollectionAssert.AreEqual(firstLst, thirdLst)
The assertion would pass if we add the same number of items as firstLst to the thirdLst, or assign the firstLst to thirdLst making both the arrays identical:
thirdLst = firstLst;
This assert type has six overloaded methods:
• CollectionAssert.AreEqual(ICollection, ICollection)
• CollectionAssert.AreEqual(ICollection, ICollection, IComparer)
• CollectionAssert.AreEqual(ICollection, ICollection, IComparer, String)
• CollectionAssert.AreEqual(ICollection, ICollection, IComparer, String, Object[])
• CollectionAssert.AreEqual(ICollection, ICollection, String)
• CollectionAssert.AreEqual(ICollection, ICollection, String, Object[])
The parameters String and Object[] and custom formats can be used for custom error messages in case of assertion failure.
IComparer can be used if we have custom objects in the collection and we want to use a particular property of the object for comparison. For example, if a collection contains a list of Employee objects, having the FirstName, LastName, and EmployeeID of each employee, we may want to sort and compare the elements in the collection based on the FirstName of the employees. We may want to compare the two collections containing the employees list based on the FirstName of the employees. To do this, we have to create the custom comparer.
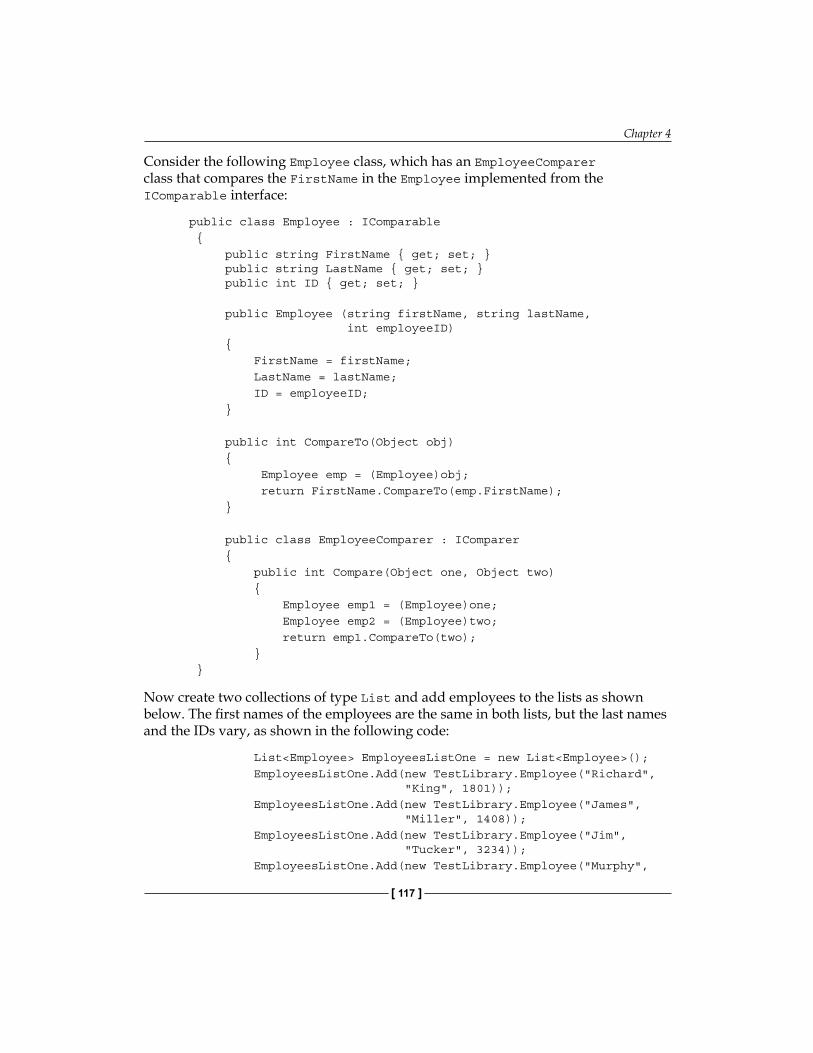
Chapter 4
[ 117 ]
Consider the following Employee class, which has an EmployeeComparer class that compares the FirstName in the Employee implemented from the IComparable interface:
public class Employee : IComparable { public string FirstName { get; set; } public string LastName { get; set; } public int ID { get; set; }
public Employee (string firstName, string lastName, int employeeID) { FirstName = firstName; LastName = lastName; ID = employeeID; }
public int CompareTo(Object obj) { Employee emp = (Employee)obj; return FirstName.CompareTo(emp.FirstName); }
public class EmployeeComparer : IComparer { public int Compare(Object one, Object two) { Employee emp1 = (Employee)one; Employee emp2 = (Employee)two; return emp1.CompareTo(two); } }
Now create two collections of type List and add employees to the lists as shown below. The first names of the employees are the same in both lists, but the last names and the IDs vary, as shown in the following code:
List<Employee> EmployeesListOne = new List<Employee>(); EmployeesListOne.Add(new TestLibrary.Employee("Richard", "King", 1801)); EmployeesListOne.Add(new TestLibrary.Employee("James", "Miller", 1408)); EmployeesListOne.Add(new TestLibrary.Employee("Jim", "Tucker", 3234)); EmployeesListOne.Add(new TestLibrary.Employee("Murphy",

Unit Testing
[ 118 ]
"Young", 3954)); EmployeesListOne.Add(new TestLibrary.Employee("Shelly", "Watts", 7845));
List<Employee> EmployeesListTwo = new List<Employee>(); EmployeesListTwo.Add(new TestLibrary.Employee("Richard", "Smith", 4763)); EmployeesListTwo.Add(new TestLibrary.Employee("James", "Wright", 8732)); EmployeesListTwo.Add(new TestLibrary.Employee("Jim", "White", 1829)); EmployeesListTwo.Add(new TestLibrary.Employee("Murphy", "Adams", 2984)); EmployeesListTwo.Add(new TestLibrary.Employee("Shelly", "Johnson", 1605));
Now in the test method, use CollectionAssert.AreEqual to compare the preceding collections.
CollectionAssert.AreEqual(EmployeesListOne, EmployeesListTwo, "The collections '{0}' and '{1}' are not equal", "EmployeesListOne", "EmployeesListTwo");
This assertion would fail because the objects in the collection are not the same. Even if you update the employee object properties to be the same in both the collections, it will fail because the objects are not the same. The error message would be the specified custom message with the specified formatters.
But we can use the custom comparer we created to compare the collection objects based on the FirstName element which is used in the comparer. We can create the custom comparer on any of the object properties:
TestLibrary.Employee.EmployeeComparer comparer = new TestLibrary.Employee.EmployeeComparer(); CollectionAssert.AreEqual(EmployeesListOne, EmployeesListTwo, comparer, "The collections '{0}' and '{1}' are not equal", "EmployeesListOne", "EmployeesListTwo");
The assertion would pass now as the comparison is done on the first name of the elements in both the collection.
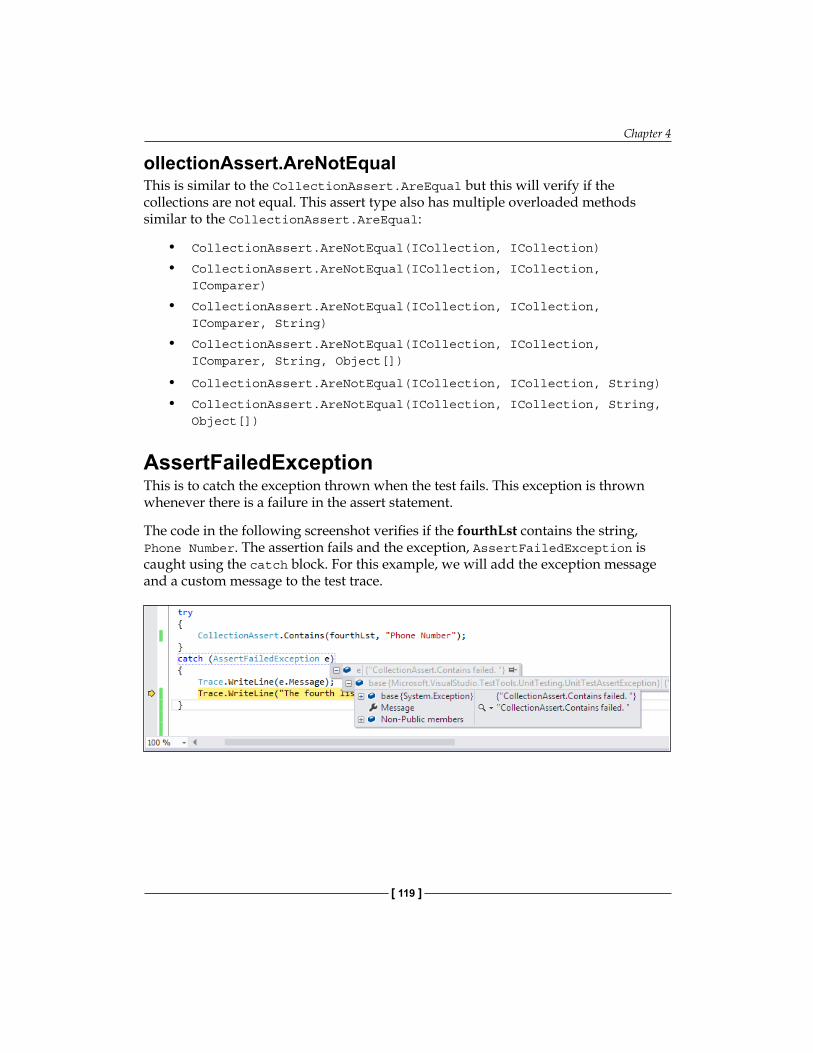
Chapter 4
[ 119 ]
ollectionAssert.AreNotEqualThis is similar to the CollectionAssert.AreEqual but this will verify if the collections are not equal. This assert type also has multiple overloaded methods similar to the CollectionAssert.AreEqual:
• CollectionAssert.AreNotEqual(ICollection, ICollection)
• CollectionAssert.AreNotEqual(ICollection, ICollection, IComparer)
• CollectionAssert.AreNotEqual(ICollection, ICollection, IComparer, String)
• CollectionAssert.AreNotEqual(ICollection, ICollection, IComparer, String, Object[])
• CollectionAssert.AreNotEqual(ICollection, ICollection, String)
• CollectionAssert.AreNotEqual(ICollection, ICollection, String, Object[])
AssertFailedExceptionThis is to catch the exception thrown when the test fails. This exception is thrown whenever there is a failure in the assert statement.
The code in the following screenshot verifies if the fourthLst contains the string, Phone Number. The assertion fails and the exception, AssertFailedException is caught using the catch block. For this example, we will add the exception message and a custom message to the test trace.
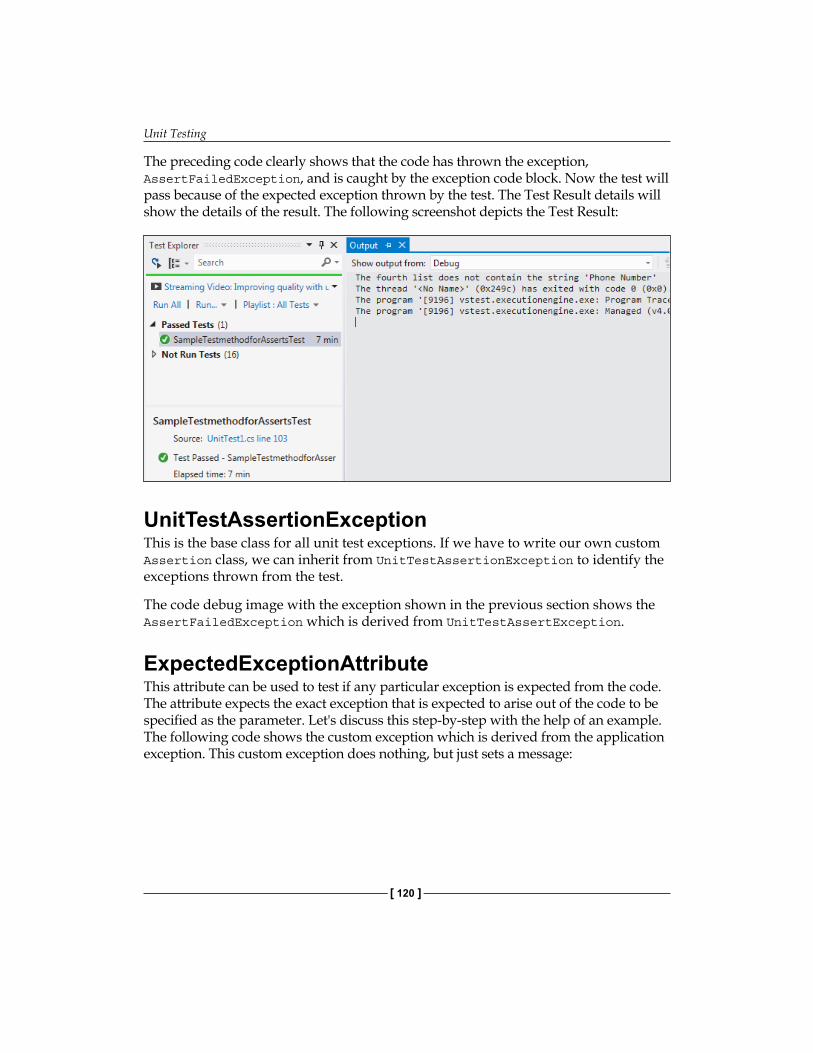
Unit Testing
[ 120 ]
The preceding code clearly shows that the code has thrown the exception, AssertFailedException, and is caught by the exception code block. Now the test will pass because of the expected exception thrown by the test. The Test Result details will show the details of the result. The following screenshot depicts the Test Result:
UnitTestAssertionExceptionThis is the base class for all unit test exceptions. If we have to write our own custom Assertion class, we can inherit from UnitTestAssertionException to identify the exceptions thrown from the test.
The code debug image with the exception shown in the previous section shows the AssertFailedException which is derived from UnitTestAssertException.
ExpectedExceptionAttributeThis attribute can be used to test if any particular exception is expected from the code. The attribute expects the exact exception that is expected to arise out of the code to be specified as the parameter. Let's discuss this step-by-step with the help of an example. The following code shows the custom exception which is derived from the application exception. This custom exception does nothing, but just sets a message:
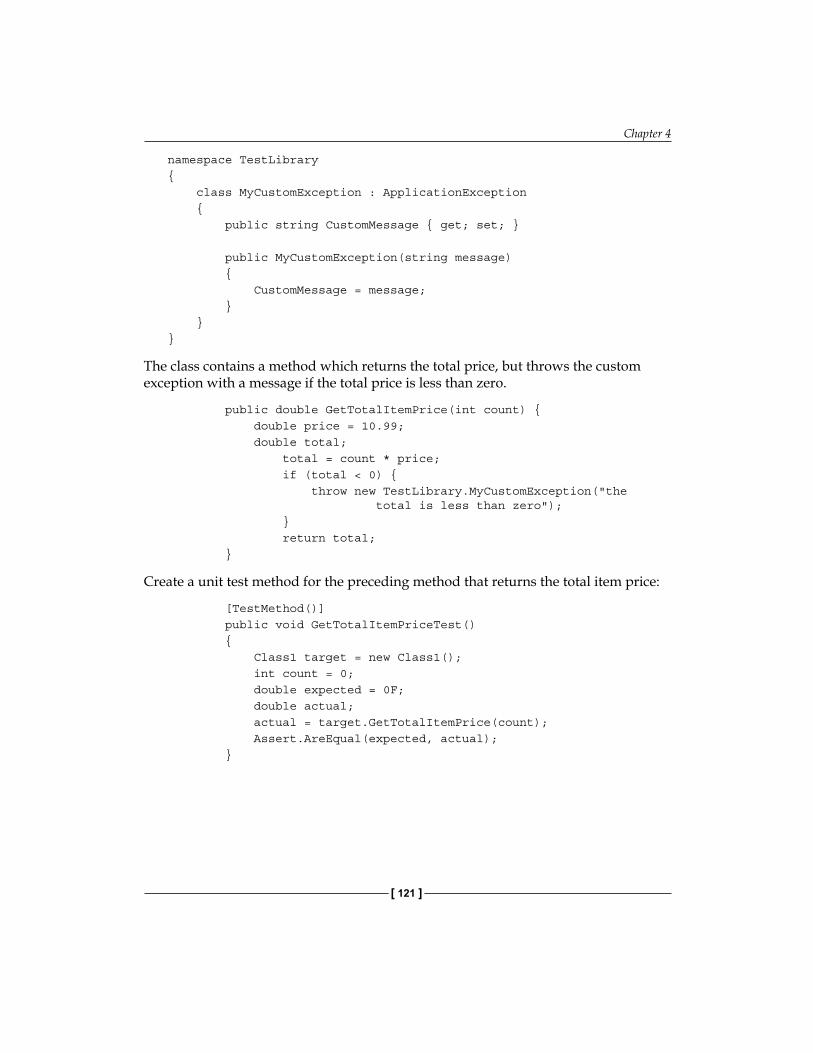
Chapter 4
[ 121 ]
namespace TestLibrary{ class MyCustomException : ApplicationException { public string CustomMessage { get; set; }
public MyCustomException(string message) { CustomMessage = message; } }}
The class contains a method which returns the total price, but throws the custom exception with a message if the total price is less than zero.
public double GetTotalItemPrice(int count) { double price = 10.99; double total; total = count * price; if (total < 0) { throw new TestLibrary.MyCustomException("the total is less than zero"); } return total; }
Create a unit test method for the preceding method that returns the total item price:
[TestMethod()] public void GetTotalItemPriceTest() { Class1 target = new Class1(); int count = 0; double expected = 0F; double actual; actual = target.GetTotalItemPrice(count); Assert.AreEqual(expected, actual); }
Unit Testing
[ 122 ]
To test the preceding method, set the count to a value less than zero and run the test from the Test Explorer window. The assertion will fail. For example, for a value of -1 the assertion will fail with the following message, which says the application thrown by an exception is of type MyCustomException:
The error message was thrown by the original method, not the test method. But the intention here is to test if the original method throws the expected exception. To achieve that, add the ExpectedException attribute to the test method as follows and run the test by setting different values for the variable count:
Chapter 4
[ 123 ]
[TestMethod()] [ExpectedException(typeof(TestLibrary.MyCustomException))] public void GetTotalItemPriceTest() { Class1 target = new Class1(); int count = -1; double expected = 0F; double actual; actual = target.GetTotalItemPrice(count); Assert.AreEqual(expected, actual); }
The preceding test would pass as the method throws MyCustomException, which means that the method resulted in an exception because of its total value, which is less than zero.
Any exception can be included as an attribute to the Test method to verify if the actual method throws the exception. This is very useful in case of very complex methods, where there is a high possibility of getting exceptions such as divide by zero, File IO, or file/folder access permissions.
Unit Tests and GenericsGenerics in .NET Framework help us to design classes and methods without any specific parameter types, allowing us to realize type safety at compile time. It means we can continue working with the class in a type-safe way, but don't have to force it to be of any specific type. Generics help us to re-use code and increase performance. Generics are mostly used in place of collections such as ArrayList, Linked List, Stacks, Queues, and other collections. This is because the collections can hold any type of items, for example, an array list can be a list of integers or it can be a list of strings. The following is an example of a generic method, which just accepts two generic values and copies the first one into the second one:
public static void CopyItems<T>(List<T> srcList, List<T> destList) { foreach (T itm in srcList) { destList.Add(itm); } }
Unit Testing
[ 124 ]
Here, you can notice that the type is not specified anywhere. It is generic, which is denoted by <T>. It can be an integer or string or any type that is identified when the method is called. The following code shows an example using the CopyItems generic method. The first time CopyItems is called, the listSource collection passed as the first parameter contains String items. The second time the CopyItems method is called the listSrc collection contains items of type Employee object:
static void Main(string[] args) { List<string> listSource = new List<string>(); listSource.Add("String1"); listSource.Add("string2"); List<string> listDestination = new List<string>(); Console.WriteLine("Items count in listDestination before copying items: {0} ", listDestination.Count); CopyItems(listSource, listDestination); Console.WriteLine("Items count in listDestination after copying items: {0} ", listDestination.Count); Console.WriteLine(""); List<Employee> listSrc = new List<Employee>(); listSrc.Add(new Employee(1001, "Employee 1001")); listSrc.Add(new Employee(1002, "Employee 1002")); listSrc.Add(new Employee(1003, "Employee 1003")); List<Employee> listDest = new List<Employee>(); Console.WriteLine("Items count in listDest before copying items: {0} ", listDest.Count); CopyItems(listSrc, listDest); Console.WriteLine("Items count in listDest after copying items: {0} ", listDest.Count); }
The result would be the copy of objects in the destination collection, which is the second parameter, using the generic method. The output of the method after calling the generic method will be as shown in the following screenshot:
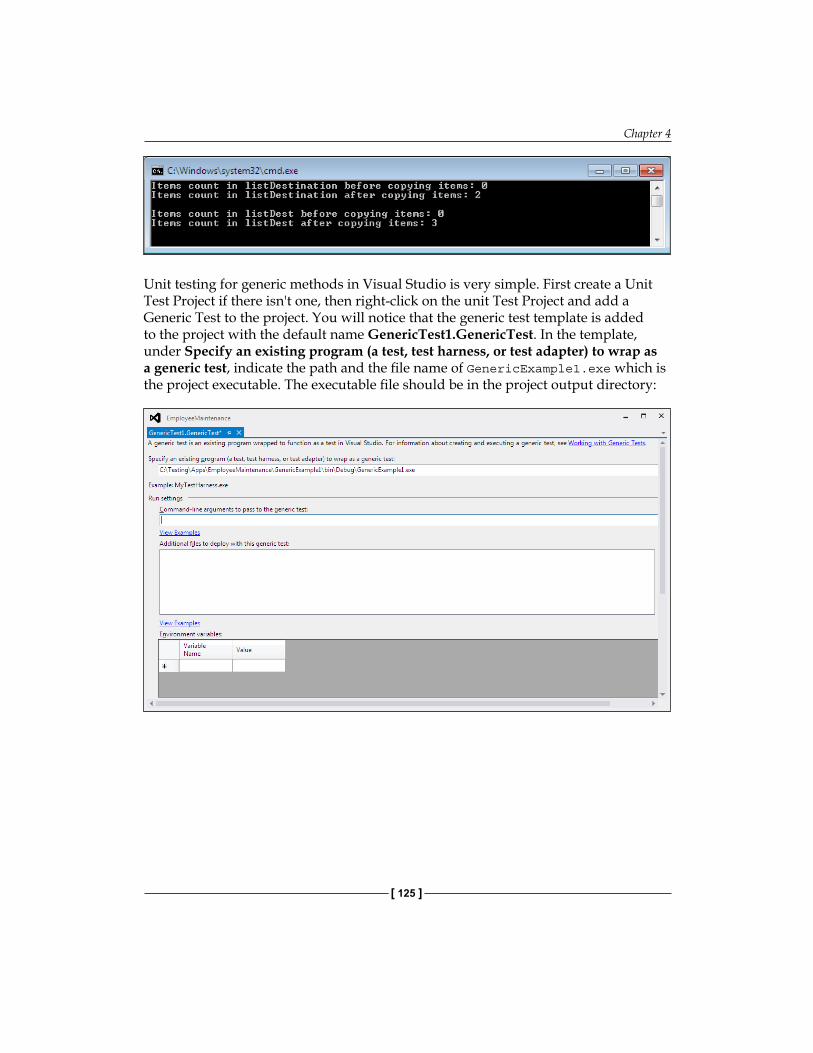
Chapter 4
[ 125 ]
Unit testing for generic methods in Visual Studio is very simple. First create a Unit Test Project if there isn't one, then right-click on the unit Test Project and add a Generic Test to the project. You will notice that the generic test template is added to the project with the default name GenericTest1.GenericTest. In the template, under Specify an existing program (a test, test harness, or test adapter) to wrap as a generic test, indicate the path and the file name of GenericExample1.exe which is the project executable. The executable file should be in the project output directory:
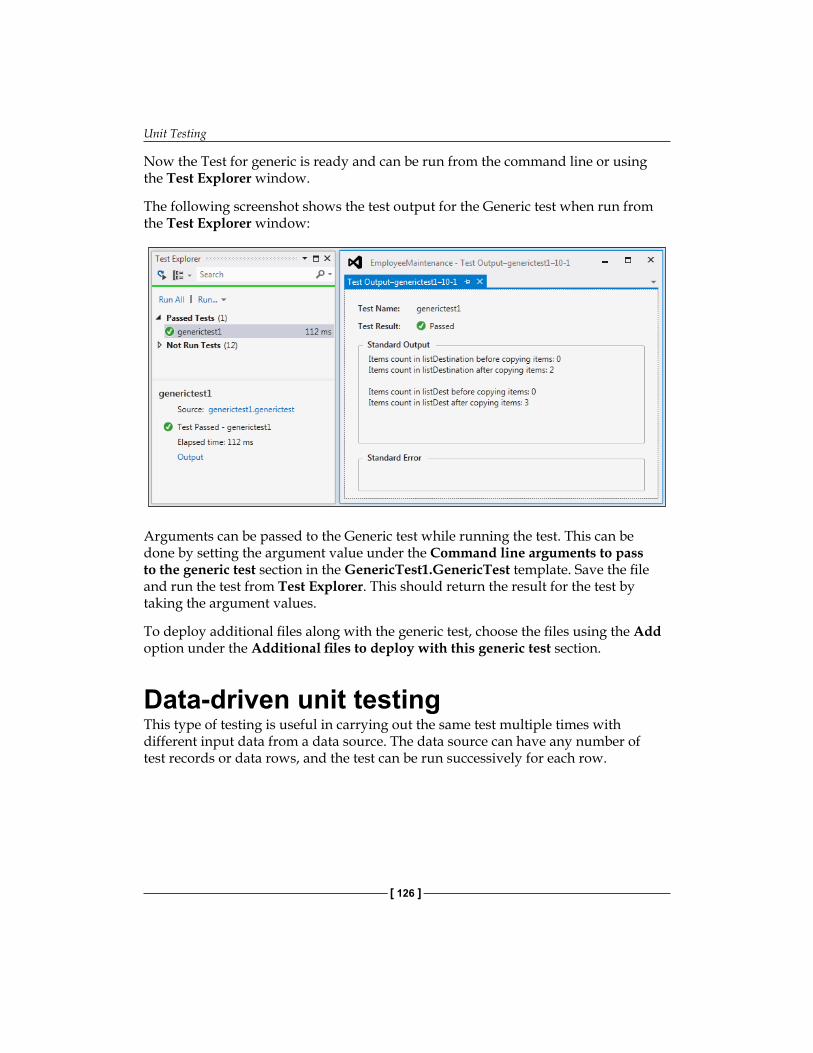
Unit Testing
[ 126 ]
Now the Test for generic is ready and can be run from the command line or using the Test Explorer window.
The following screenshot shows the test output for the Generic test when run from the Test Explorer window:
Arguments can be passed to the Generic test while running the test. This can be done by setting the argument value under the Command line arguments to pass to the generic test section in the GenericTest1.GenericTest template. Save the file and run the test from Test Explorer. This should return the result for the test by taking the argument values.
To deploy additional files along with the generic test, choose the files using the Add option under the Additional files to deploy with this generic test section.
Data-driven unit testingThis type of testing is useful in carrying out the same test multiple times with different input data from a data source. The data source can have any number of test records or data rows, and the test can be run successively for each row.

Chapter 4
[ 127 ]
Instead of passing each data row value to the test application and executing an entire test for each data row, we link the test method to the data source. So when the test is run, the test method is executed for each data row in the source.
This is similar to web testing or load testing, with a data source attached to the web method parameters. This could be used in case of testing multiple user scenarios with different user logins to check the access permission, or to validate the data based on the user roles.
Let's consider one simple example of a method which takes the two parameters of quantity and unit price. The result of the method will be to return the multiplied value of these two values and apply a percentage of tax to it:
public double CalculateTotalPrice(double uPrice, int Qty) { double totalPrice; double tax = 0.125; totalPrice = uPrice * Qty + (uPrice * tax * Qty); // return totalPrice; }
Create a unit test for the preceding example. The unit test code would contain the following code for the preceding method:
[TestMethod()] public void CalculateTotalPriceTest() { Class1 target = new Class1(); double uPrice = 0F; int Qty = 0; double expected = 0F; double actual; actual = target.CalculateTotalPrice(uPrice, Qty); Assert.AreEqual(expected, actual); }
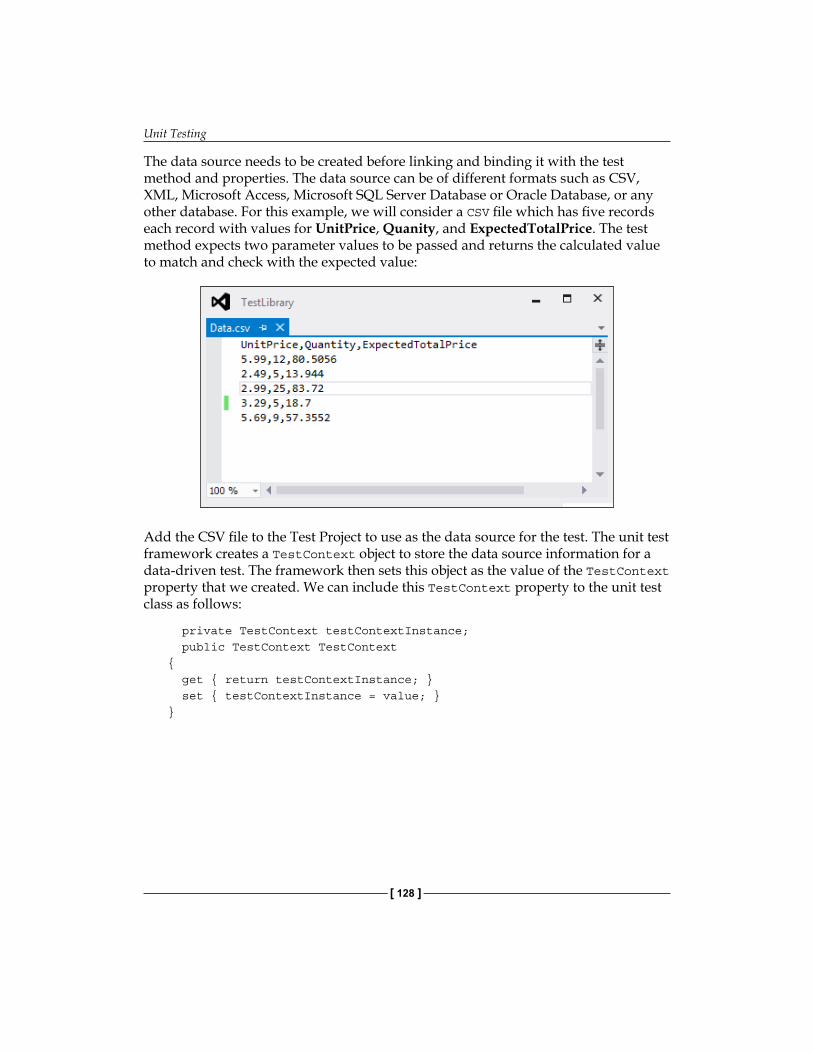
Unit Testing
[ 128 ]
The data source needs to be created before linking and binding it with the test method and properties. The data source can be of different formats such as CSV, XML, Microsoft Access, Microsoft SQL Server Database or Oracle Database, or any other database. For this example, we will consider a CSV file which has five records each record with values for UnitPrice, Quanity, and ExpectedTotalPrice. The test method expects two parameter values to be passed and returns the calculated value to match and check with the expected value:
Add the CSV file to the Test Project to use as the data source for the test. The unit test framework creates a TestContext object to store the data source information for a data-driven test. The framework then sets this object as the value of the TestContext property that we created. We can include this TestContext property to the unit test class as follows:
private TestContext testContextInstance; public TestContext TestContext{ get { return testContextInstance; } set { testContextInstance = value; }}
Chapter 4
[ 129 ]
Add the data source attribute and specify the connection string and the name of the table that you use in the test method. To use the CSV file as the data source, add the Microsoft.VisualStudio.TestTools.DataSource.CSV to the DataSource attribute and specify the connection string followed by the table name. In this case the CSV file name itself is the table name. The third parameter for the attribute is the data access method which can be of the sequential or random type. Select sequential to execute the test method with data rows in the order they are present in the source.
The testContextInstance.DataRow is used to fetch the value from the current row for the current instance of the test. For example, if we have five rows in the data source, there will be five different instances of tests for each row. The column value from the current row is fetched using the testContextInstance.DataRow and assigned to the required test. The following example uses the Assert.AreEqual method to check if the actual value is as per the expected value from the data source. Custom error messages can be used in the Assert method to display a specific message if the test fails:
[DataSource("Microsoft.VisualStudio.TestTools.DataSource.CSV", "|DataDirectory|\\Data.csv", "Data#csv", DataAccessMethod.Sequential), TestMethod()] public void CalculateTotalPriceTest() { Class1 target = new Class1(); double uPrice = 0F; int Qty = 0; double expected = 0F; double actual; expected = Convert.ToDouble(testContextInstance. DataRow["ExpectedTotalPrice"]); actual = target.CalculateTotalPrice(Convert.ToDouble (testContextInstance.DataRow["UnitPrice"]), Convert.ToInt32(testContextInstance. DataRow["Quantity"])); Assert.AreEqual(expected, actual, "The expected value is {0} but the actual value is {1}", expected, actual); Trace.WriteLine("Expected:" + expected + "; Actual:"+ actual); }
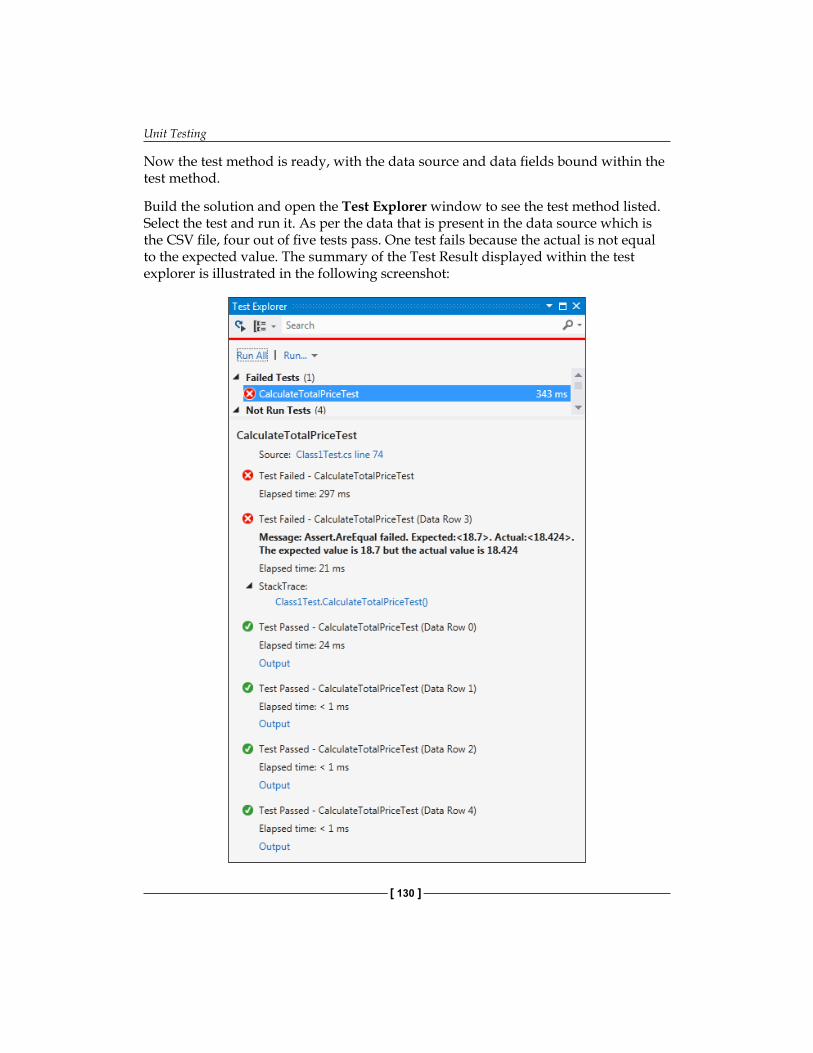
Unit Testing
[ 130 ]
Now the test method is ready, with the data source and data fields bound within the test method.
Build the solution and open the Test Explorer window to see the test method listed. Select the test and run it. As per the data that is present in the data source which is the CSV file, four out of five tests pass. One test fails because the actual is not equal to the expected value. The summary of the Test Result displayed within the test explorer is illustrated in the following screenshot:
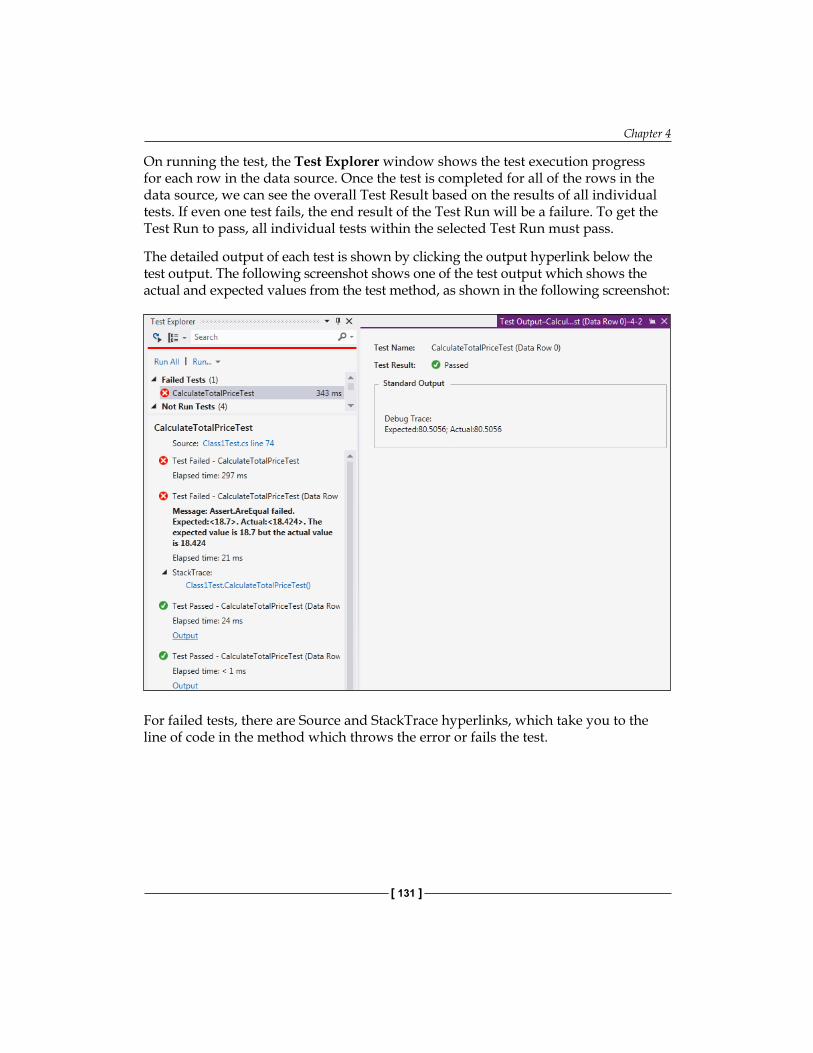
Chapter 4
[ 131 ]
On running the test, the Test Explorer window shows the test execution progress for each row in the data source. Once the test is completed for all of the rows in the data source, we can see the overall Test Result based on the results of all individual tests. If even one test fails, the end result of the Test Run will be a failure. To get the Test Run to pass, all individual tests within the selected Test Run must pass.
The detailed output of each test is shown by clicking the output hyperlink below the test output. The following screenshot shows one of the test output which shows the actual and expected values from the test method, as shown in the following screenshot:
For failed tests, there are Source and StackTrace hyperlinks, which take you to the line of code in the method which throws the error or fails the test.
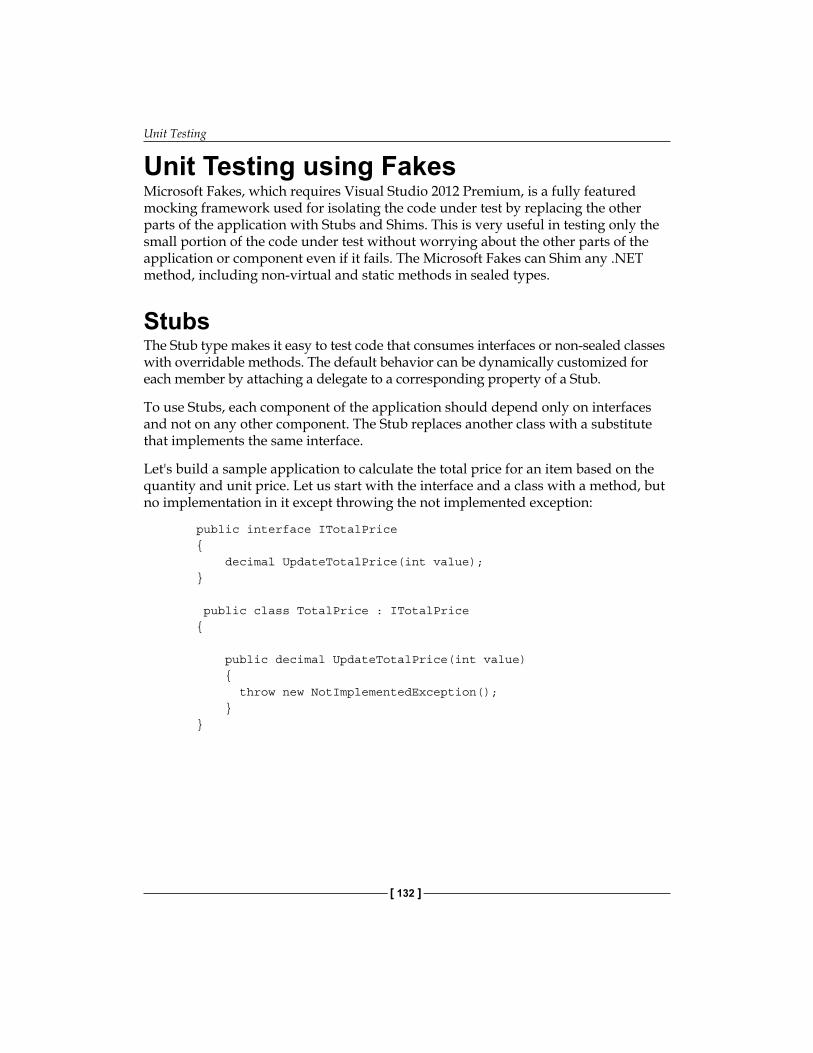
Unit Testing
[ 132 ]
Unit Testing using FakesMicrosoft Fakes, which requires Visual Studio 2012 Premium, is a fully featured mocking framework used for isolating the code under test by replacing the other parts of the application with Stubs and Shims. This is very useful in testing only the small portion of the code under test without worrying about the other parts of the application or component even if it fails. The Microsoft Fakes can Shim any .NET method, including non-virtual and static methods in sealed types.
StubsThe Stub type makes it easy to test code that consumes interfaces or non-sealed classes with overridable methods. The default behavior can be dynamically customized for each member by attaching a delegate to a corresponding property of a Stub.
To use Stubs, each component of the application should depend only on interfaces and not on any other component. The Stub replaces another class with a substitute that implements the same interface.
Let's build a sample application to calculate the total price for an item based on the quantity and unit price. Let us start with the interface and a class with a method, but no implementation in it except throwing the not implemented exception:
public interface ITotalPrice { decimal UpdateTotalPrice(int value); }
public class TotalPrice : ITotalPrice {
public decimal UpdateTotalPrice(int value) { throw new NotImplementedException(); } }
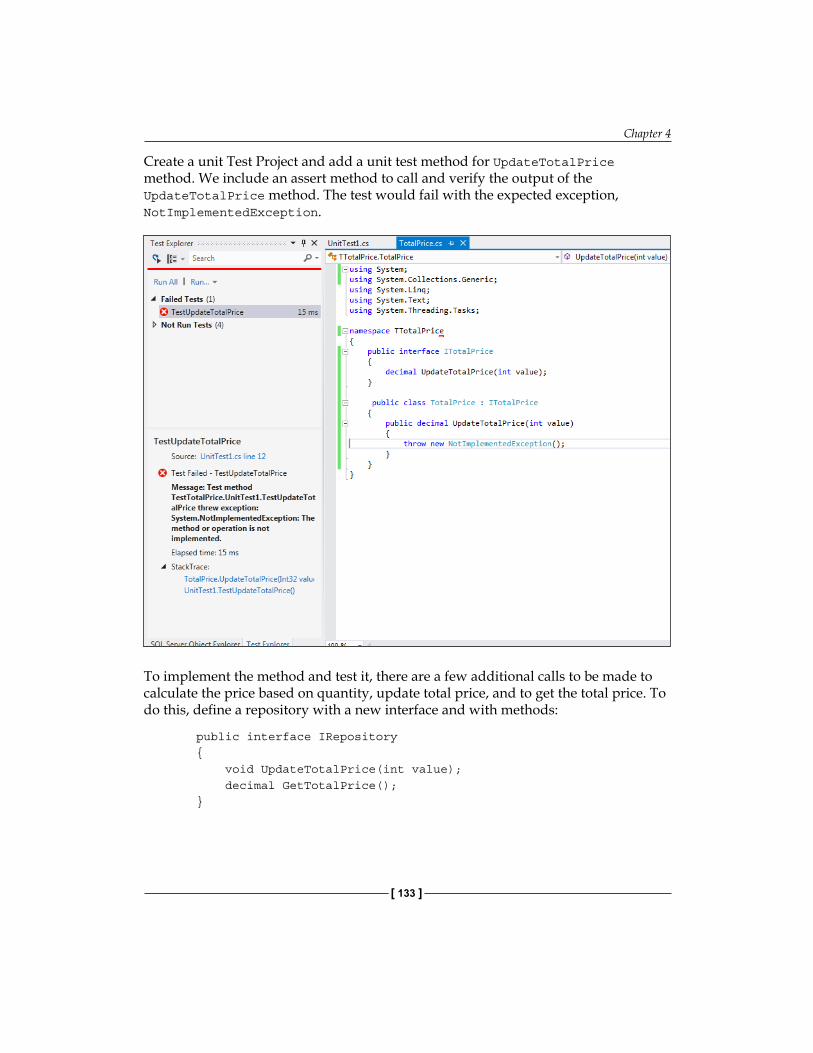
Chapter 4
[ 133 ]
Create a unit Test Project and add a unit test method for UpdateTotalPrice method. We include an assert method to call and verify the output of the UpdateTotalPrice method. The test would fail with the expected exception, NotImplementedException.
To implement the method and test it, there are a few additional calls to be made to calculate the price based on quantity, update total price, and to get the total price. To do this, define a repository with a new interface and with methods:
public interface IRepository { void UpdateTotalPrice(int value); decimal GetTotalPrice(); }
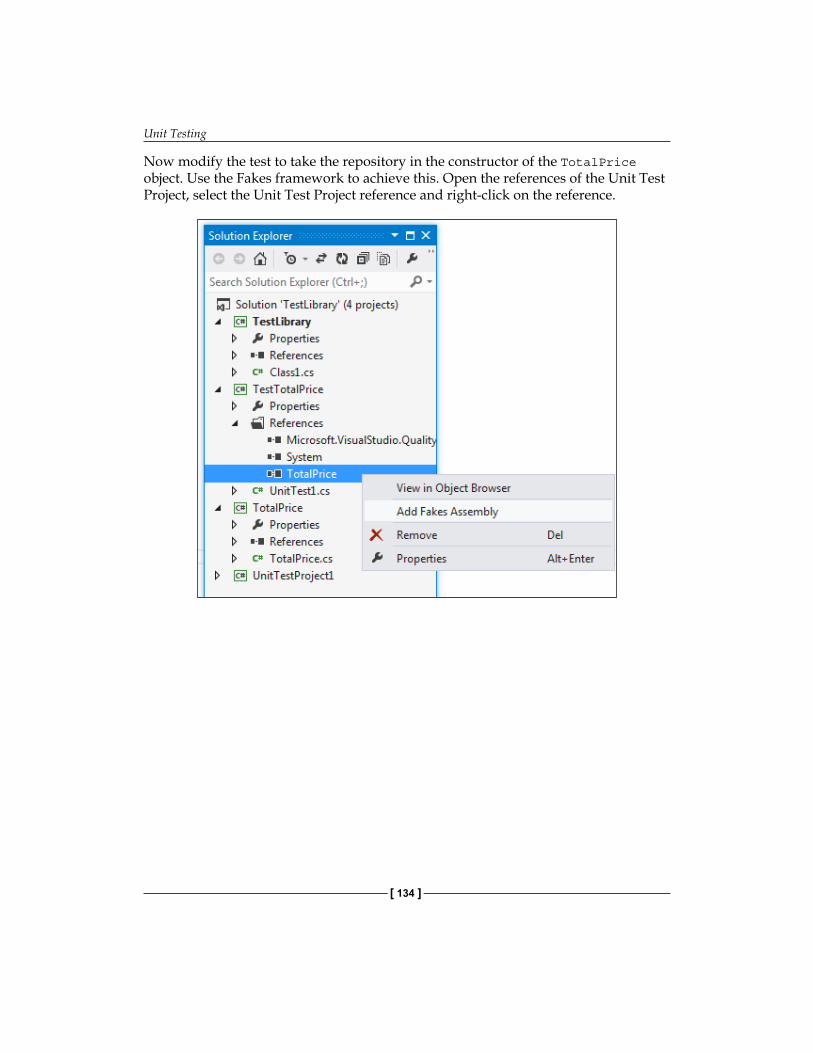
Unit Testing
[ 134 ]
Now modify the test to take the repository in the constructor of the TotalPrice object. Use the Fakes framework to achieve this. Open the references of the Unit Test Project, select the Unit Test Project reference and right-click on the reference.
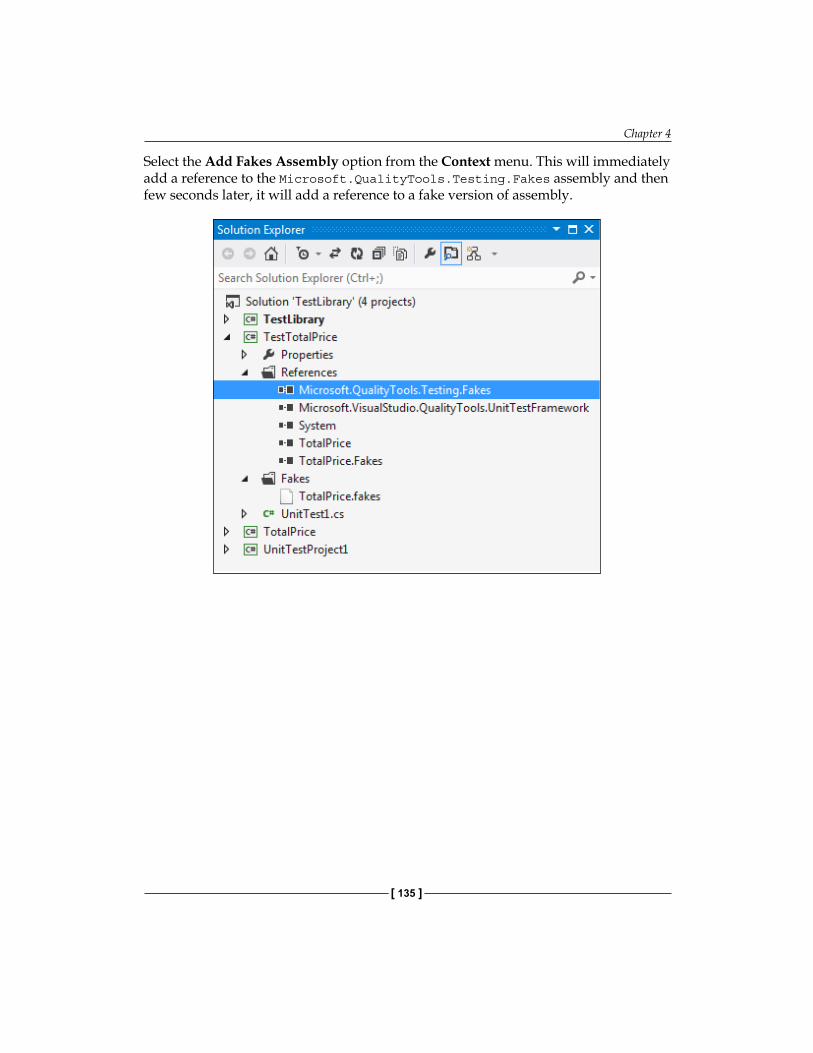
Chapter 4
[ 135 ]
Select the Add Fakes Assembly option from the Context menu. This will immediately add a reference to the Microsoft.QualityTools.Testing.Fakes assembly and then few seconds later, it will add a reference to a fake version of assembly.
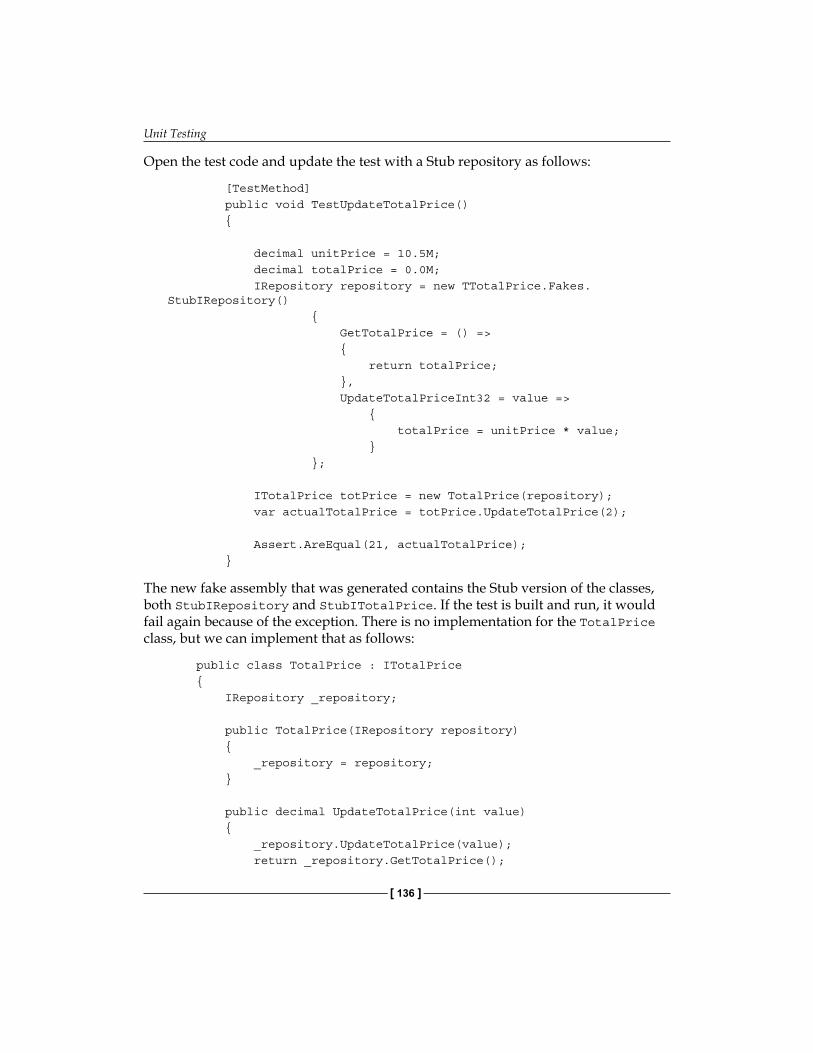
Unit Testing
[ 136 ]
Open the test code and update the test with a Stub repository as follows:
[TestMethod] public void TestUpdateTotalPrice() {
decimal unitPrice = 10.5M; decimal totalPrice = 0.0M; IRepository repository = new TTotalPrice.Fakes.StubIRepository() { GetTotalPrice = () => { return totalPrice; }, UpdateTotalPriceInt32 = value => { totalPrice = unitPrice * value; } };
ITotalPrice totPrice = new TotalPrice(repository); var actualTotalPrice = totPrice.UpdateTotalPrice(2);
Assert.AreEqual(21, actualTotalPrice); }
The new fake assembly that was generated contains the Stub version of the classes, both StubIRepository and StubITotalPrice. If the test is built and run, it would fail again because of the exception. There is no implementation for the TotalPrice class, but we can implement that as follows:
public class TotalPrice : ITotalPrice { IRepository _repository;
public TotalPrice(IRepository repository) { _repository = repository; }
public decimal UpdateTotalPrice(int value) { _repository.UpdateTotalPrice(value); return _repository.GetTotalPrice();
Chapter 4
[ 137 ]
//throw new NotImplementedException(); } }
Now build the project and run the test. The test will pass now as expected.
Although Stub types can be generated for interfaces and non-sealed classes with overridable methods, they cannot be used for static or non-overridable methods. To address these cases, the Fakes framework also generates Shim types.
ShimsA Shim modifies the compiled code at runtime to replace a method call. The method call can be to any of the assemblies that cannot be modified, such as .NET assemblies. We can use Shims to isolate the code from assemblies that are not a part of the solution.
Difference between Stubs and ShimsShims Stubs
Performance Because of rewriting the code at run time, it runs slow.
No performance overhead
Static methods and sealed types
Stubs are used only to implement interfaces. Stub types cannot be used for static methods, non-virtual methods, methods in sealed types, and so on.
Internal types Can be used Can be used
Private methods Can replace calls to private methods if all the types on the method signature are visible.
Can replace only visible methods.
Interfaces and abstract methods
Cannot instrument interfaces and abstract methods.
Provides implementation of interfaces and abstract methods.
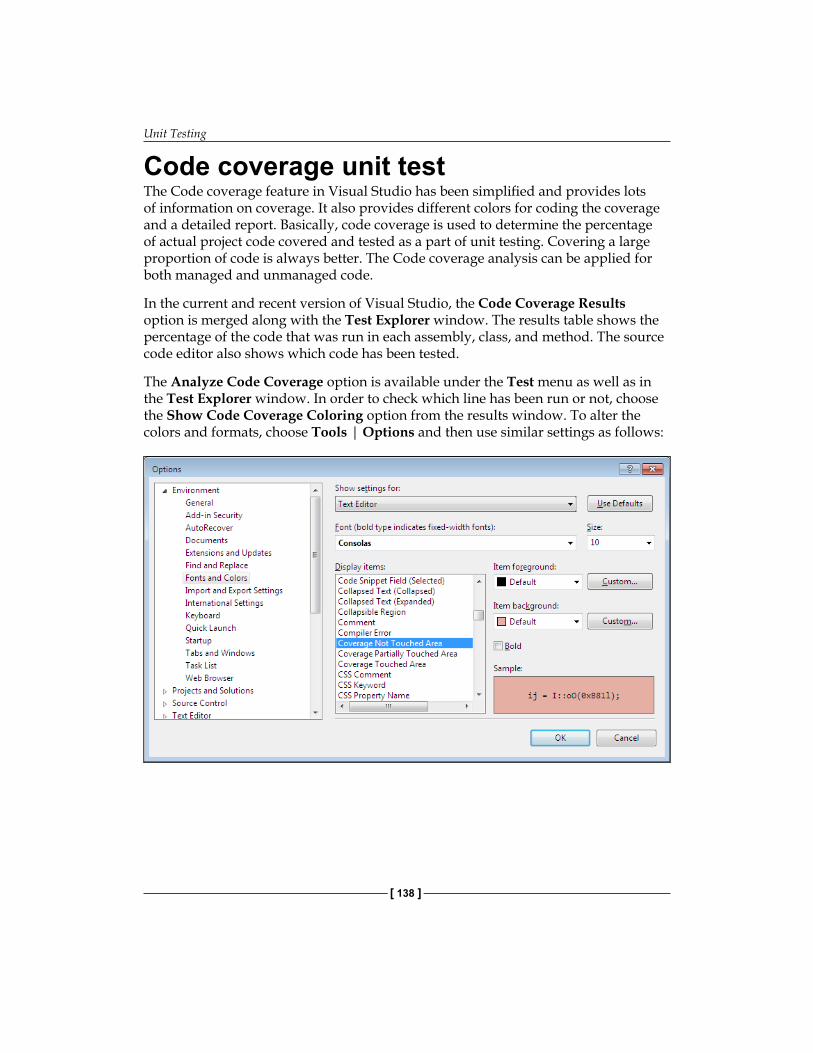
Unit Testing
[ 138 ]
Code coverage unit testThe Code coverage feature in Visual Studio has been simplified and provides lots of information on coverage. It also provides different colors for coding the coverage and a detailed report. Basically, code coverage is used to determine the percentage of actual project code covered and tested as a part of unit testing. Covering a large proportion of code is always better. The Code coverage analysis can be applied for both managed and unmanaged code.
In the current and recent version of Visual Studio, the Code Coverage Results option is merged along with the Test Explorer window. The results table shows the percentage of the code that was run in each assembly, class, and method. The source code editor also shows which code has been tested.
The Analyze Code Coverage option is available under the Test menu as well as in the Test Explorer window. In order to check which line has been run or not, choose the Show Code Coverage Coloring option from the results window. To alter the colors and formats, choose Tools | Options and then use similar settings as follows:
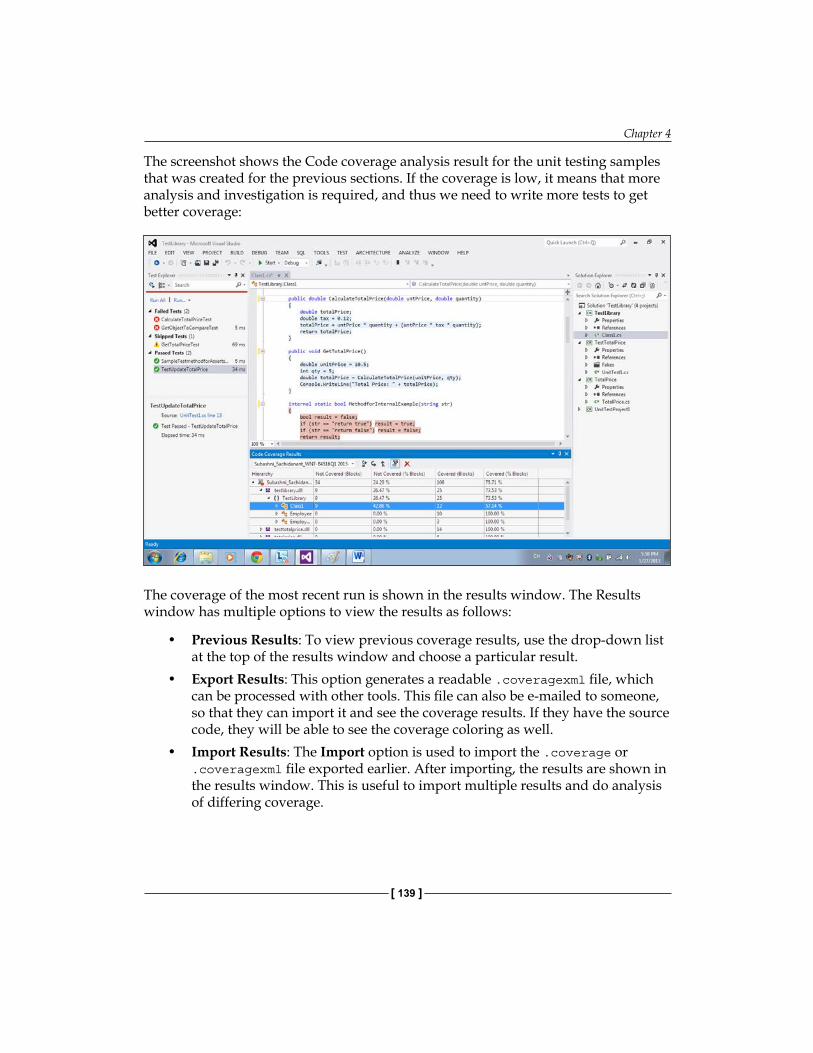
Chapter 4
[ 139 ]
The screenshot shows the Code coverage analysis result for the unit testing samples that was created for the previous sections. If the coverage is low, it means that more analysis and investigation is required, and thus we need to write more tests to get better coverage:
The coverage of the most recent run is shown in the results window. The Results window has multiple options to view the results as follows:
• Previous Results: To view previous coverage results, use the drop-down list at the top of the results window and choose a particular result.
• Export Results: This option generates a readable .coveragexml file, which can be processed with other tools. This file can also be e-mailed to someone, so that they can import it and see the coverage results. If they have the source code, they will be able to see the coverage coloring as well.
• Import Results: The Import option is used to import the .coverage or .coveragexml file exported earlier. After importing, the results are shown in the results window. This is useful to import multiple results and do analysis of differing coverage.
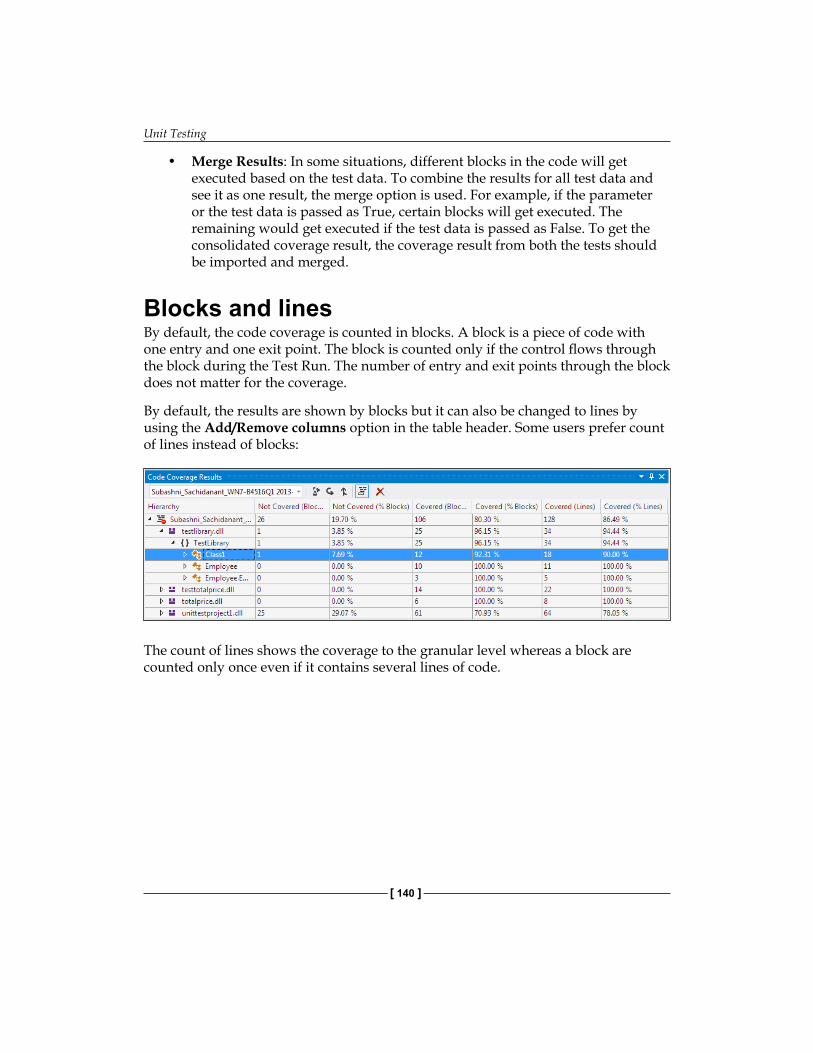
Unit Testing
[ 140 ]
• Merge Results: In some situations, different blocks in the code will get executed based on the test data. To combine the results for all test data and see it as one result, the merge option is used. For example, if the parameter or the test data is passed as True, certain blocks will get executed. The remaining would get executed if the test data is passed as False. To get the consolidated coverage result, the coverage result from both the tests should be imported and merged.
Blocks and linesBy default, the code coverage is counted in blocks. A block is a piece of code with one entry and one exit point. The block is counted only if the control flows through the block during the Test Run. The number of entry and exit points through the block does not matter for the coverage.
By default, the results are shown by blocks but it can also be changed to lines by using the Add/Remove columns option in the table header. Some users prefer count of lines instead of blocks:
The count of lines shows the coverage to the granular level whereas a block are counted only once even if it contains several lines of code.
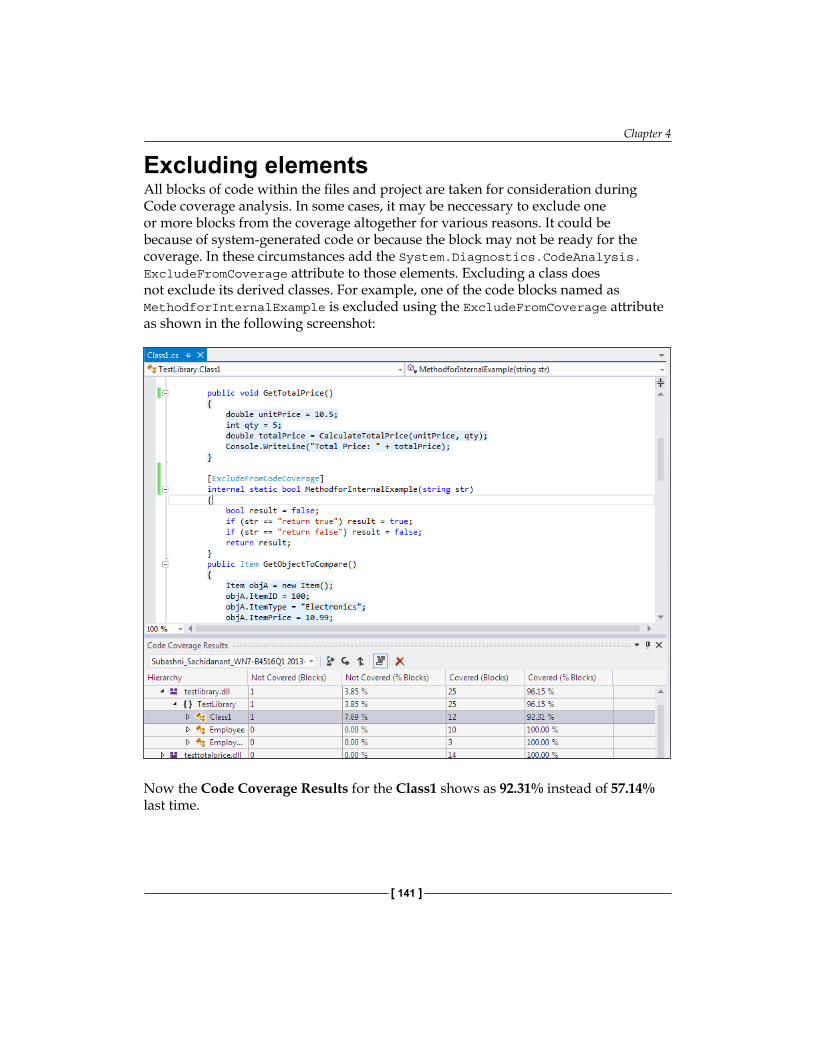
Chapter 4
[ 141 ]
Excluding elementsAll blocks of code within the files and project are taken for consideration during Code coverage analysis. In some cases, it may be neccessary to exclude one or more blocks from the coverage altogether for various reasons. It could be because of system-generated code or because the block may not be ready for the coverage. In these circumstances add the System.Diagnostics.CodeAnalysis.ExcludeFromCoverage attribute to those elements. Excluding a class does not exclude its derived classes. For example, one of the code blocks named as MethodforInternalExample is excluded using the ExcludeFromCoverage attribute as shown in the following screenshot:
Now the Code Coverage Results for the Class1 shows as 92.31% instead of 57.14% last time.

Unit Testing
[ 142 ]
SummaryThis chapter covers lot of new features that have been introduced in the new version of Visual Studio along with assert statements that are used for unit testing. The different ways of unit testing the application and analyzing the Test Results using Test Explorer output summary were addressed. Important features such as the Fakes framework and the usage of Stubs and Shims to isolate the tested code from application was explained in this chapter. Data-driven test is one of the important features to conduct the same test with different inputs without repeating the test manually. There is lot of difference in code coverage feature in the latest version of Visual Studio, which addresses the color coding of coverage, coverage on the basis of number of lines, and import and export of coverage results.
The next chapter explains the recording of user actions and how to create tests out of it. This is very helpful in re-running the test with different inputs using the same recording. The Web Performance Test in Visual Studio not only helps in recording actions but also to add extraction and validation rules for the testing.
Web Performance TestThis chapter explains the different ways of verifying the website responses for each request and the website response in different scenarios such as slow network speed, different browsers, or with different set of users at a given point in time. All these factors affect the website's performance and the response time. Web performance testing helps us to verify whether the website produces the expected result within the expected response time, to identify the problems and rectify them before they happen in an actual production environment, helps in finding out if the hardware can handle the maximum expected requests at a time, or needs additional hardware to handle the traffic and respond to multiple user requests.
Here are some of the main testing highlights that are performed on the web applications for better performance and availability:
• Validation and verification test helps to verify the inputs or the expected entries that satisfy the requirements. For example, if a field requires a date to be entered, the system should check for the date validation and should not allow the user to submit the page until the correct entry is made.
• Web page usability test is the method of simulating the practical user's way of using the application in production and testing the same as per requirements. This could be something like checking the help links, contents in the page, checking the menu options, and their links, think times between the pages, or the message dialogs in the pages.
• Security testing helps us verify the application response for different end users based on the credentials and different other resources required from the local system or a server in the network. For example, this could be writing/reading the log information file in the network share.
• Performance testing verifies the web page responses as per expectations based on the environment. This also includes stress testing and load testing of the application with multiple user scenarios and the volume of data that is explained in detail in Chapter 7, Load Testing.
Web Performance Test
[ 144 ]
• Testing web pages compatibility is the method of testing multiple browsers based on the user requirements. The web page presentation depends on how well the components are used and supported on different browsers that the end users may choose.
• Testing web application using different networks is because of the user location that varies based on from the user is accessing the system. The performance and the accessibility of the applications are based directly on the network involved in providing the web pages to the user. This is also a part of performance testing. For example, it could be a local intranet or an Internet with low network speed.
There are many other types of testing that can be performed as part of web performance testing such as using different operating systems, using different databases, or installing different versions of an operating system.
All these testing types, with many additional capabilities, are supported by Microsoft Visual Studio. The dynamic web pages can be created by any of the supported .NET languages through Visual Studio using the ASP.NET web project and web page templates. Custom services, components, and libraries are used in the web application to get the functionality and make it more dynamic. Other scripting languages and technologies, such as JavaScript, Silverlight, and Flash are used in web pages for validations and better presentation on the client machine. Once the web application is ready, it needs to be deployed and tested to check if the web site functionalities and qualities are satisfied as per requirements. To get to this point, Microsoft Visual Studio provides tools for testing the web applications in different ways. One is to use the user interface to record and then add the validation rules and parameters to make it dynamic. The other way is to record the requests and then create the coded web test for the recorded web test, and customize it using the code.
This chapter explains the basic way of web testing using Visual Studio and using the features, such as adding rules and parameterization of dynamic variables. Microsoft Visual Studio 2012 provides many new features to the web performance testing, such as adding new APIs to the Test Results, keeping web performance Test Results in a separate file, looping and branching, and new validation and extraction rules. This chapter provides detailed information on features given in the following list:
• Creating a new web performance test• Web performance test editor and its properties• Web request properties, validations, and transactions• Toolbar options and properties• Performance session for testing• Debugging and running the web performance test
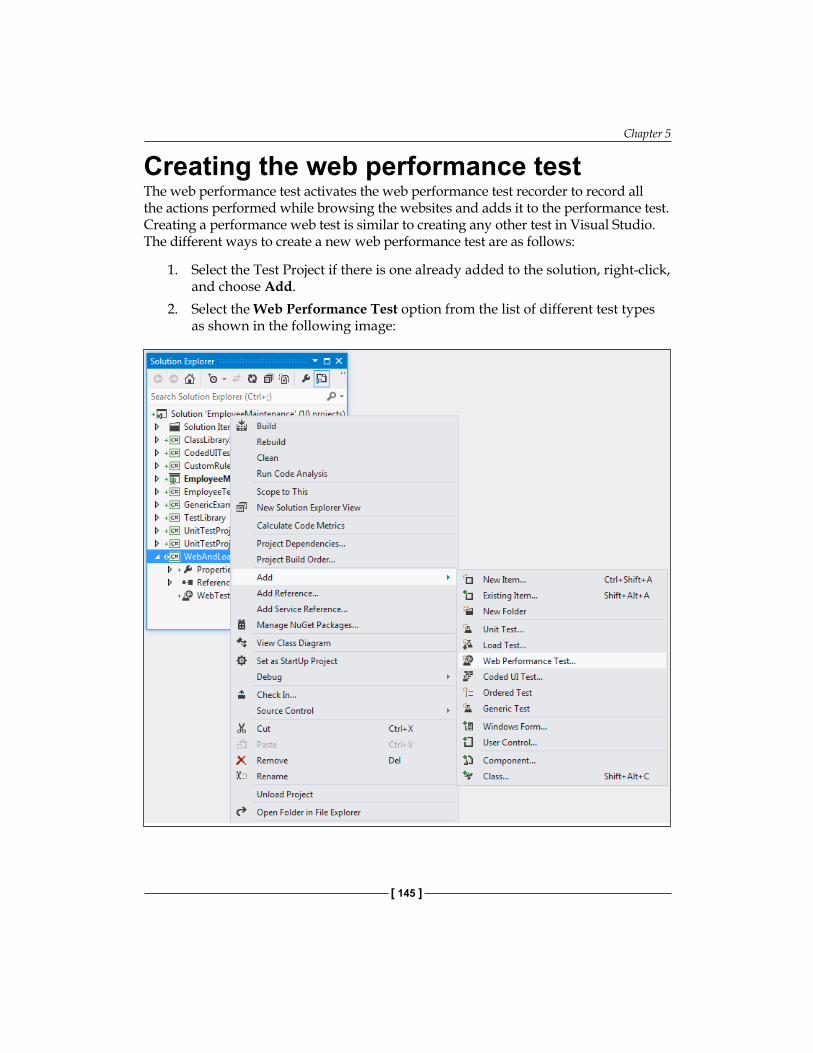
Chapter 5
[ 145 ]
Creating the web performance testThe web performance test activates the web performance test recorder to record all the actions performed while browsing the websites and adds it to the performance test. Creating a performance web test is similar to creating any other test in Visual Studio. The different ways to create a new web performance test are as follows:
1. Select the Test Project if there is one already added to the solution, right-click, and choose Add.
2. Select the Web Performance Test option from the list of different test types as shown in the following image:
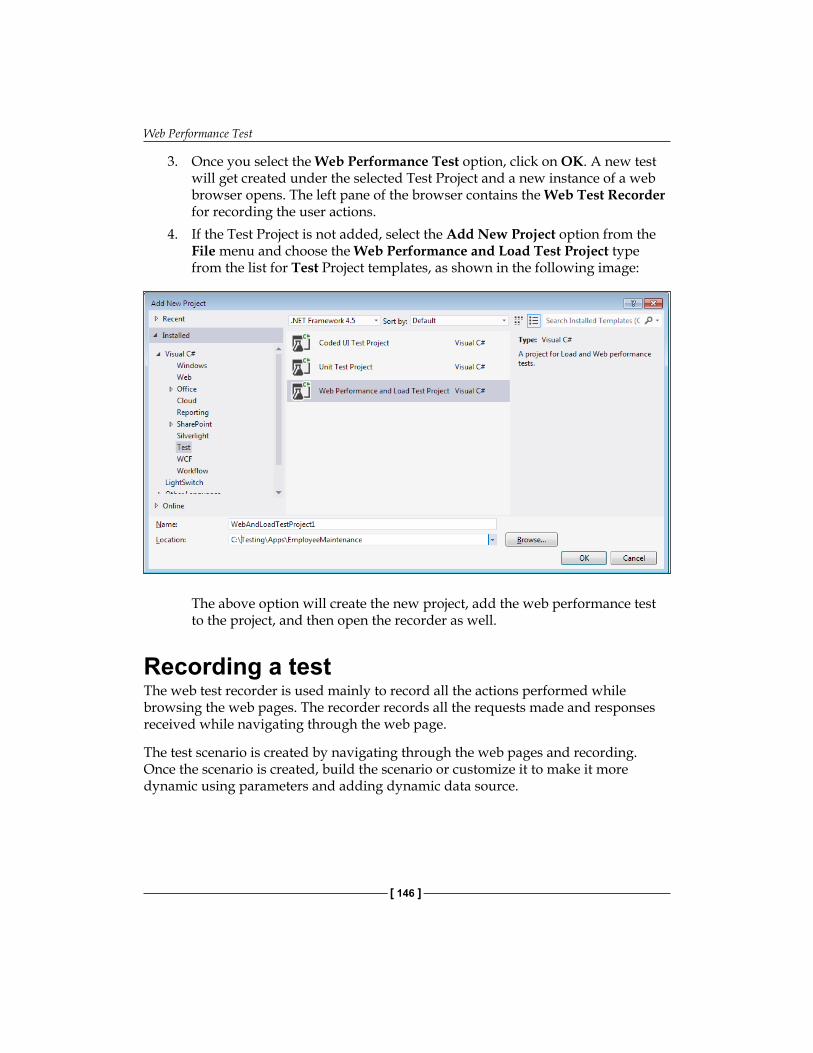
Web Performance Test
[ 146 ]
3. Once you select the Web Performance Test option, click on OK. A new test will get created under the selected Test Project and a new instance of a web browser opens. The left pane of the browser contains the Web Test Recorder for recording the user actions.
4. If the Test Project is not added, select the Add New Project option from the File menu and choose the Web Performance and Load Test Project type from the list for Test Project templates, as shown in the following image:
The above option will create the new project, add the web performance test to the project, and then open the recorder as well.
Recording a testThe web test recorder is used mainly to record all the actions performed while browsing the web pages. The recorder records all the requests made and responses received while navigating through the web page.
The test scenario is created by navigating through the web pages and recording. Once the scenario is created, build the scenario or customize it to make it more dynamic using parameters and adding dynamic data source.
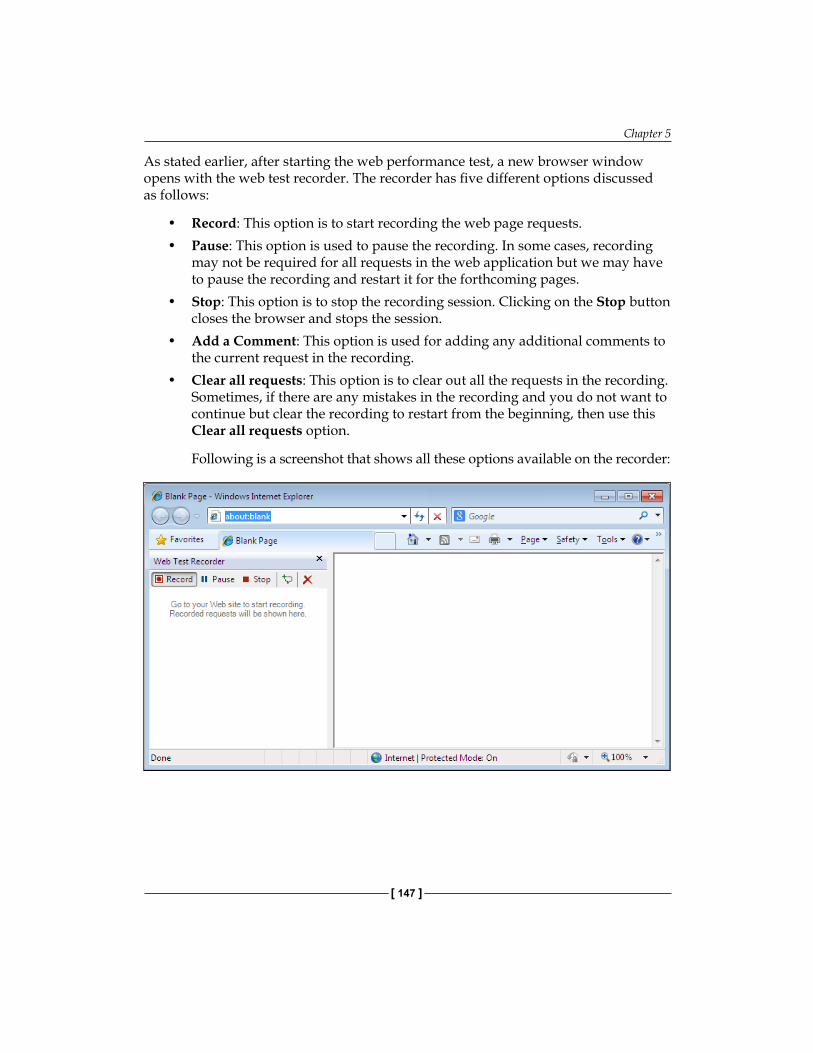
Chapter 5
[ 147 ]
As stated earlier, after starting the web performance test, a new browser window opens with the web test recorder. The recorder has five different options discussed as follows:
• Record: This option is to start recording the web page requests.• Pause: This option is used to pause the recording. In some cases, recording
may not be required for all requests in the web application but we may have to pause the recording and restart it for the forthcoming pages.
• Stop: This option is to stop the recording session. Clicking on the Stop button closes the browser and stops the session.
• Add a Comment: This option is used for adding any additional comments to the current request in the recording.
• Clear all requests: This option is to clear out all the requests in the recording. Sometimes, if there are any mistakes in the recording and you do not want to continue but clear the recording to restart from the beginning, then use this Clear all requests option.
Following is a screenshot that shows all these options available on the recorder:
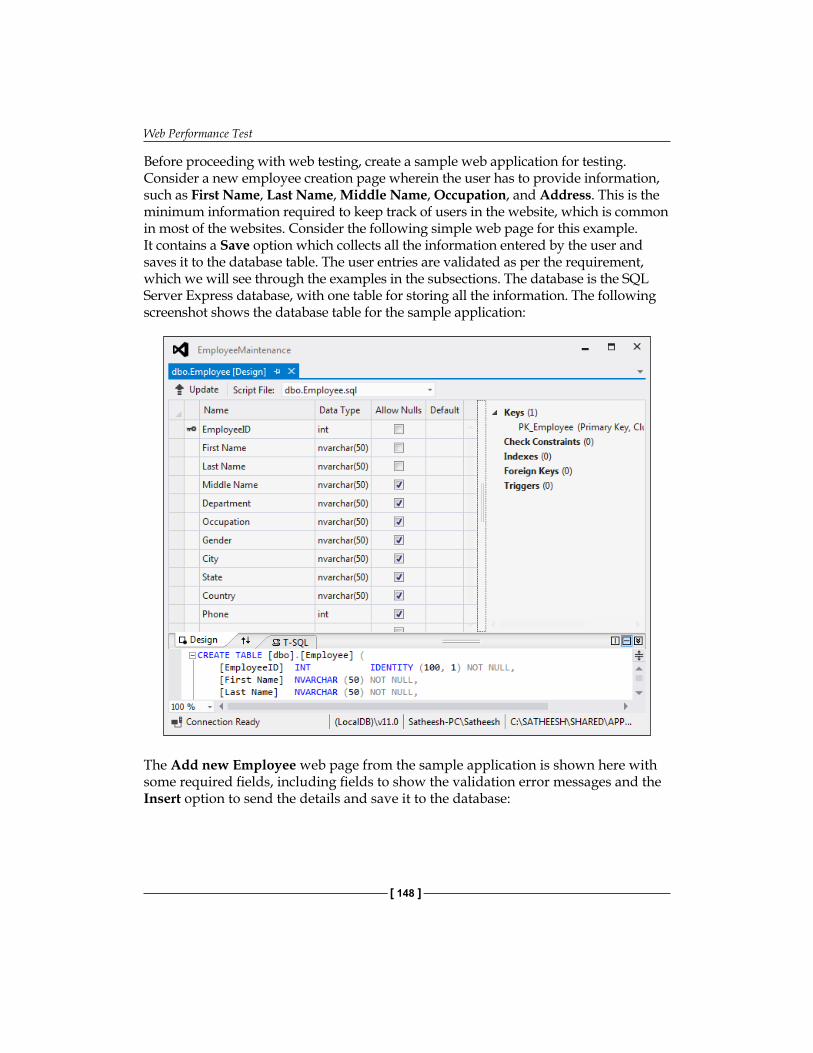
Web Performance Test
[ 148 ]
Before proceeding with web testing, create a sample web application for testing. Consider a new employee creation page wherein the user has to provide information, such as First Name, Last Name, Middle Name, Occupation, and Address. This is the minimum information required to keep track of users in the website, which is common in most of the websites. Consider the following simple web page for this example. It contains a Save option which collects all the information entered by the user and saves it to the database table. The user entries are validated as per the requirement, which we will see through the examples in the subsections. The database is the SQL Server Express database, with one table for storing all the information. The following screenshot shows the database table for the sample application:
The Add new Employee web page from the sample application is shown here with some required fields, including fields to show the validation error messages and the Insert option to send the details and save it to the database:
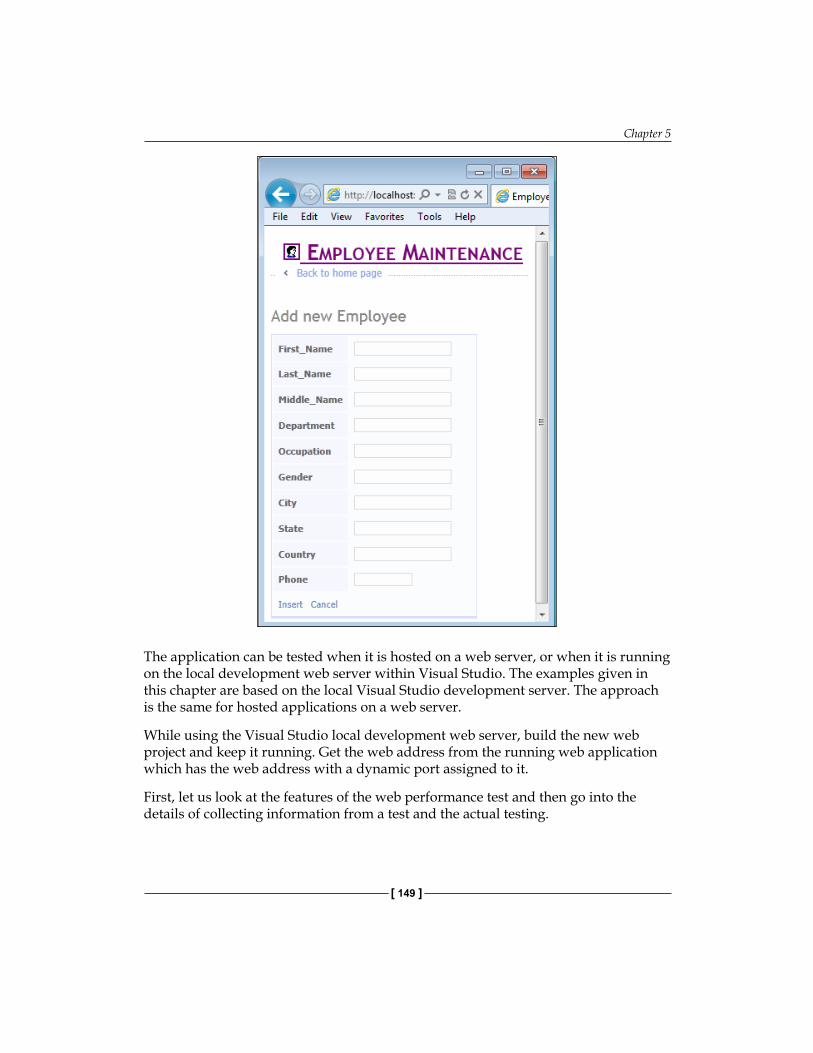
Chapter 5
[ 149 ]
The application can be tested when it is hosted on a web server, or when it is running on the local development web server within Visual Studio. The examples given in this chapter are based on the local Visual Studio development server. The approach is the same for hosted applications on a web server.
While using the Visual Studio local development web server, build the new web project and keep it running. Get the web address from the running web application which has the web address with a dynamic port assigned to it.
First, let us look at the features of the web performance test and then go into the details of collecting information from a test and the actual testing.
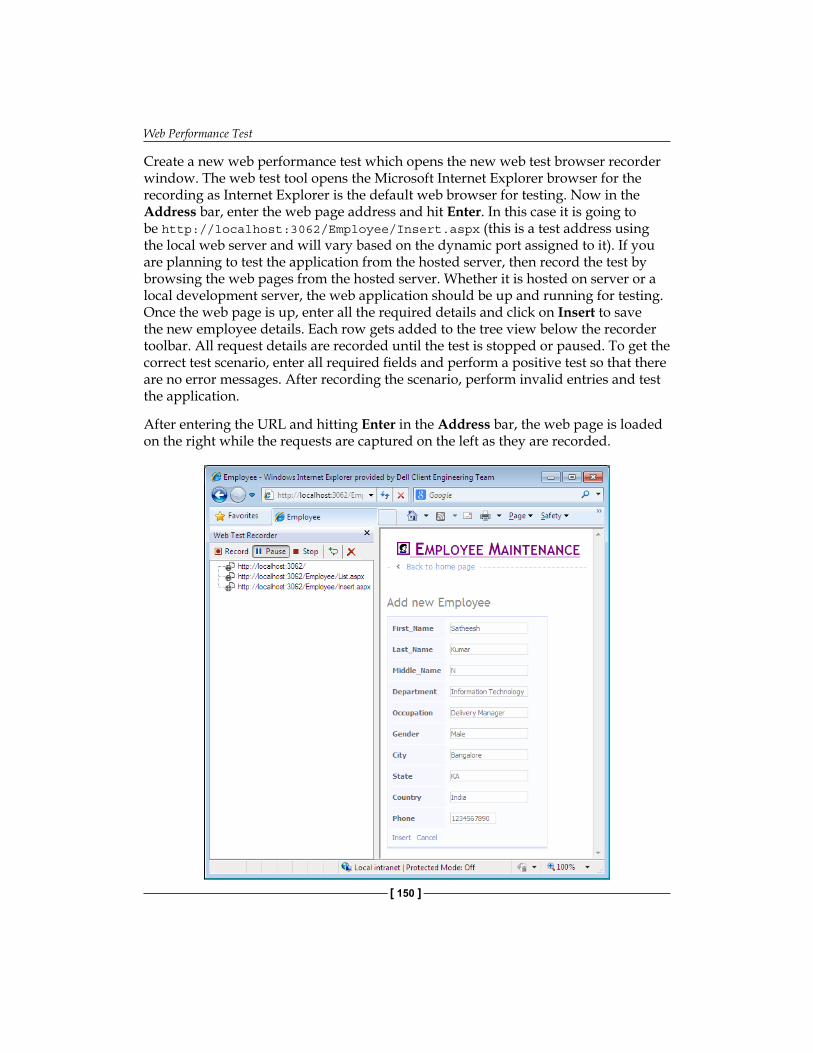
Web Performance Test
[ 150 ]
Create a new web performance test which opens the new web test browser recorder window. The web test tool opens the Microsoft Internet Explorer browser for the recording as Internet Explorer is the default web browser for testing. Now in the Address bar, enter the web page address and hit Enter. In this case it is going to be http://localhost:3062/Employee/Insert.aspx (this is a test address using the local web server and will vary based on the dynamic port assigned to it). If you are planning to test the application from the hosted server, then record the test by browsing the web pages from the hosted server. Whether it is hosted on server or a local development server, the web application should be up and running for testing. Once the web page is up, enter all the required details and click on Insert to save the new employee details. Each row gets added to the tree view below the recorder toolbar. All request details are recorded until the test is stopped or paused. To get the correct test scenario, enter all required fields and perform a positive test so that there are no error messages. After recording the scenario, perform invalid entries and test the application.
After entering the URL and hitting Enter in the Address bar, the web page is loaded on the right while the requests are captured on the left as they are recorded.
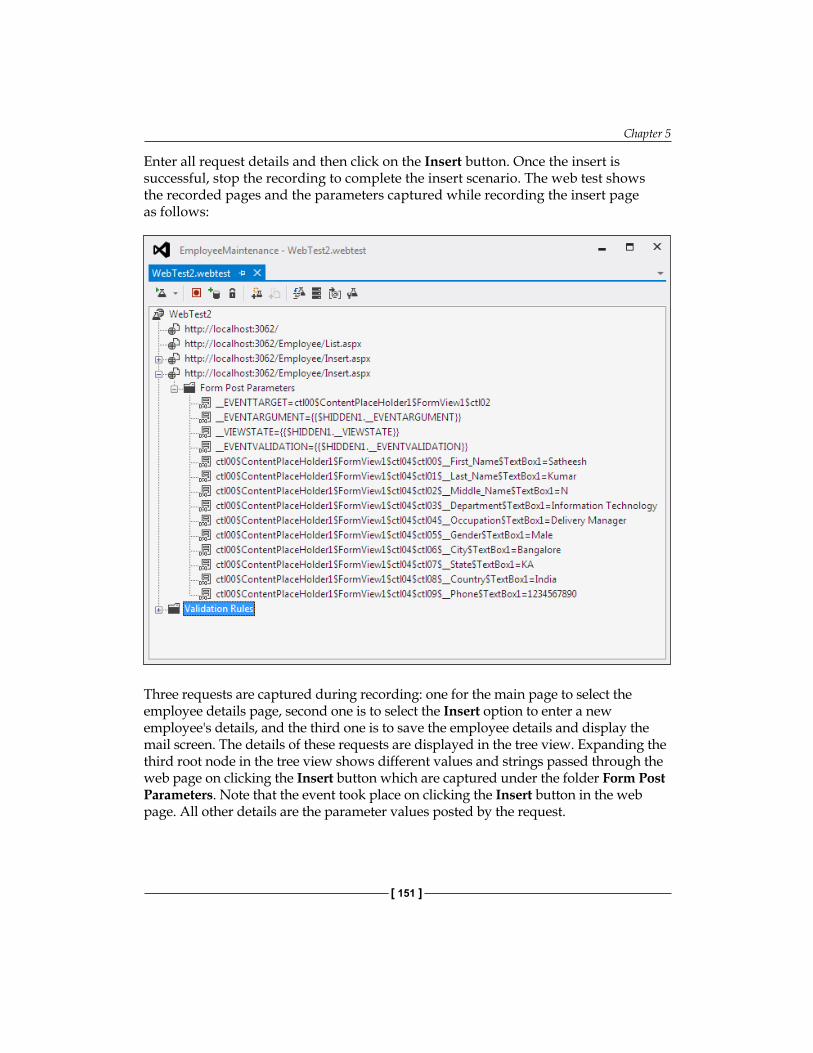
Chapter 5
[ 151 ]
Enter all request details and then click on the Insert button. Once the insert is successful, stop the recording to complete the insert scenario. The web test shows the recorded pages and the parameters captured while recording the insert page as follows:
Three requests are captured during recording: one for the main page to select the employee details page, second one is to select the Insert option to enter a new employee's details, and the third one is to save the employee details and display the mail screen. The details of these requests are displayed in the tree view. Expanding the third root node in the tree view shows different values and strings passed through the web page on clicking the Insert button which are captured under the folder Form Post Parameters. Note that the event took place on clicking the Insert button in the web page. All other details are the parameter values posted by the request.
Web Performance Test
[ 152 ]
There are different protocols used for sending these requests as follows:
• HTTP-GET: Hypertext Transfer Protocol-GET protocol appends the query strings to the URL. The Query string is the name and the value pair that is created out of the parameters and the data.
• HTTP-POST: Hypertext Transfer Protocol-POST protocol passes the name and value pairs in the body of the HTTP request message.
• SOAP protocol is an XML-based protocol used for sending structured information. This is mostly used by web services.
Recording shows that only the independent requests (GET or POST) are recorded, not the dependent requests such as requests for getting images and other such requests. These requests are reported only when the test is run, but during recording, it will neither be shown nor captured.
When the web application is run, it dynamically generates data, such as session ID and is sent through the Query String parameter values and Form Post parameter values. The web performance test uses such generated parameter values by capturing it from the HTTP response using an extraction rule, and then binding it to the HTTP request. This is known as the promotion of dynamic parameters. Detection of dynamic parameters happens immediately after finishing the web performance test recording. On clicking the Stop button in the recorder window, notice a dialog window with the message Detecting Dynamic Parameters and the progress bar. The dialog displays a message as Did not detect any dynamic parameters for our sample site. If the dynamic parameters are detected, a Promote Dynamic Parameters to Web Test Parameters dialog box appears.
Adding commentsWhile recording the web page requests, some additional comments may be required to be added to the recording about the page or the test. This comment could be any text with additional information for reference. This is similar to the comments added to the code during development. Sometimes it is required to add information about the steps to be followed during the test. Basically comments are there to record the information about the additional task required during the test, but could easily forget to do. These comments can be added simply by clicking on the Add Comments button in the Web Test Recorder toolbar.
Chapter 5
[ 153 ]
Cleaning the recorded testsWhile recording the scenario, all user actions are recorded irrespective of the application under test. Sometimes user navigates to other areas which is irrelevant to the current test. The recording should be paused, not to record the request outside of the current test. But, in case it is not paused during the recording, use the Delete option to remove those requests from the recorded details.
Copying the requestsIn some situations, same requests may be required to be tested multiple times, for example, page refresh. To simulate this, copy the recorded request and paste it into the recording list. The same request can be copied any number of times. Select the request from the list from the tree view, right-click and Copy or use (Ctrl + C) and then select the destination folder and right-click and choose Paste.
By copying the requests, the order of testing is also changed. This is an easy way to change the order. Instead of copying, cut and paste the request to a different place just to change the order. But be careful when changing the order in this way, that dependent requests are not affected. For example, if request B is dependent on request A, then do not move request B before A. Take extra care while copying and changing the order of tests.
Adding LoopsLoop logic is very useful in running the same web request multiple times. Conditional rules and properties can be set to verify whether any specified condition is met or not. The loop logic can be added at the web performance test level or at the web request level. The looping should be used to reproduce a user scenario but should not be used to simulate the number of users.
Let's take the scenario of creating multiple temporary users or employees using the user interface. One way of doing this is to create it manually by entering all the details using the user interface and the other way is to use a data driven UI test by feeding the data from the predefined data source with all user details. In either case there is a good amount of manual work involved. The other best option is to use the recording of a single user creation through UI, use the recording, and loop the request for multiple times. Let's see the step-by-step approach of this feature to create four users. The following steps use two context parameters to hold the values and then use the parameters to increment the value and insert employee details:
1. Create the web performance test recording for inserting an employee's details as shown in the previous examples.
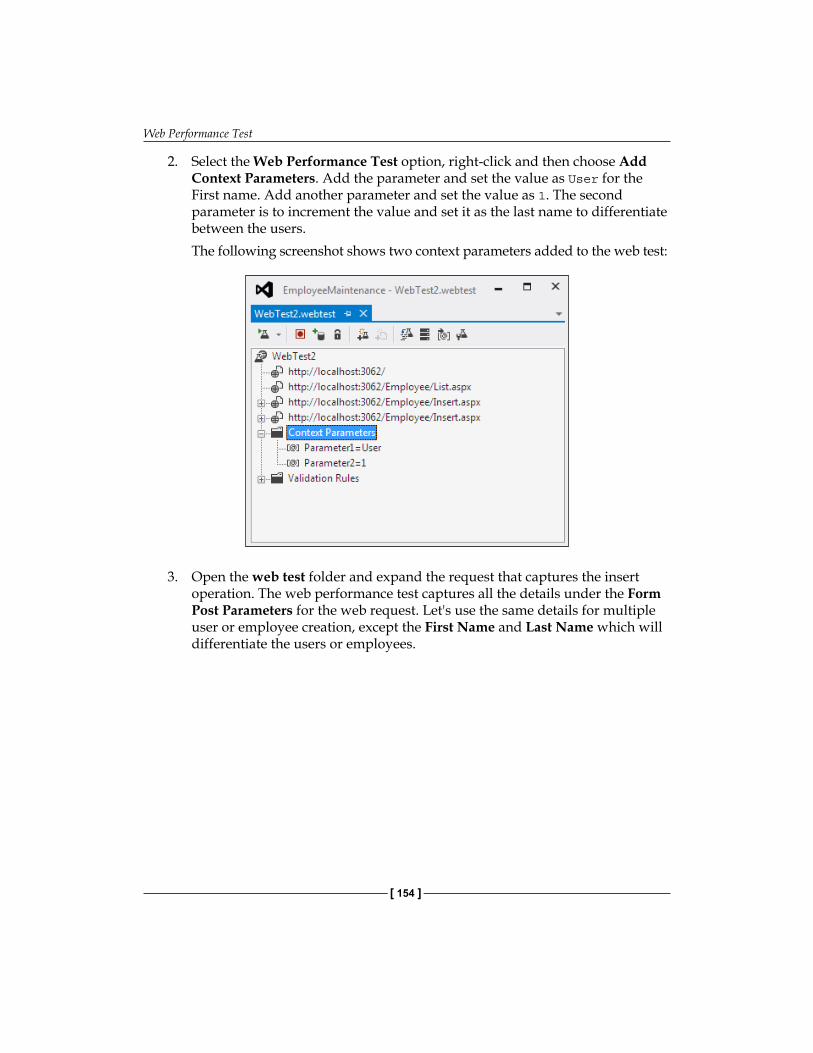
Web Performance Test
[ 154 ]
2. Select the Web Performance Test option, right-click and then choose Add Context Parameters. Add the parameter and set the value as User for the First name. Add another parameter and set the value as 1. The second parameter is to increment the value and set it as the last name to differentiate between the users.The following screenshot shows two context parameters added to the web test:
3. Open the web test folder and expand the request that captures the insert operation. The web performance test captures all the details under the Form Post Parameters for the web request. Let's use the same details for multiple user or employee creation, except the First Name and Last Name which will differentiate the users or employees.
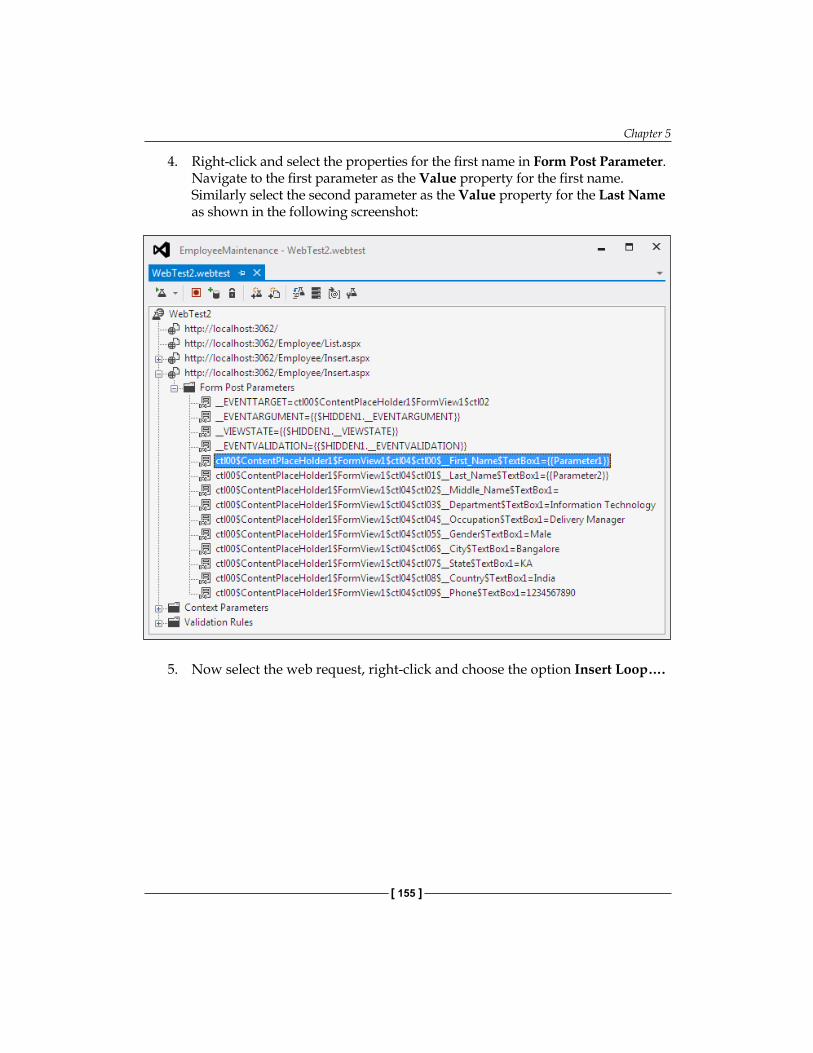
Chapter 5
[ 155 ]
4. Right-click and select the properties for the first name in Form Post Parameter. Navigate to the first parameter as the Value property for the first name. Similarly select the second parameter as the Value property for the Last Name as shown in the following screenshot:
5. Now select the web request, right-click and choose the option Insert Loop….

Web Performance Test
[ 156 ]
6. A new window named Add Conditional Rule and Items to Loop pops up to collect the details for the conditional looping. On the left of the screen there are multiple rules listed and on the right the properties are displayed for the selected rule on the left. Select the rule For Loop and set the properties as following, so that the looping happens four times until the Parameter2 value becomes 5.
7. The looping is now added to the web request with the initialize, increment, and the conditional values as shown in the following screenshot:
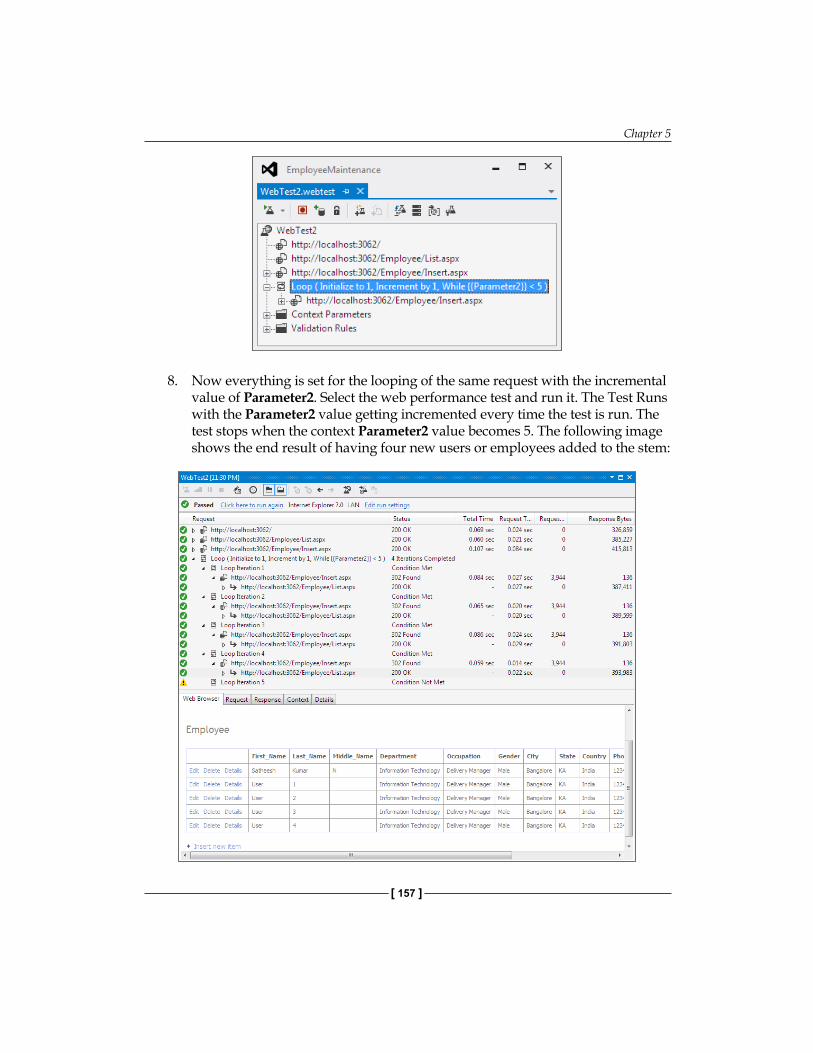
Chapter 5
[ 157 ]
8. Now everything is set for the looping of the same request with the incremental value of Parameter2. Select the web performance test and run it. The Test Runs with the Parameter2 value getting incremented every time the test is run. The test stops when the context Parameter2 value becomes 5. The following image shows the end result of having four new users or employees added to the stem:
Web Performance Test
[ 158 ]
If you check the web requests during the test, you will notice that the same web request is called four times with only the Parameter2 value changing for each iteration.
The following are some of the Conditional rules and items that can be looped:
Conditional rule Rule descriptionContext parameter exists
Test whether or not the specified context parameter exists in the current context.
Cookie exists Test whether or not the specified cookie is set.Cookie value comparison
The condition is met when the provided string matches the value of the specified cookie.
For loop The rule represents a traditional For loop. The context parameter is initialized before the first loop iteration. The loop statements get executed while the content of the context parameter satisfies the comparison with the provided value. The step value is applied at the end of each loop iteration.
Number comparison The condition is met when the value of the context parameter satisfies the comparison with the provided value.
Probability rule Randomly returns pass or fail based on the percentage provided.Counting loop Executes the requests contained in the loop a specified number
of times.String comparison The condition is met when the provided string matches the
content of the provided context parameter.
The Items in loop section in the Add Conditional Rule and Items to Loop window denotes the first and last web request within the loop out of all the recorded requests in the order.
The web performance test that contains loop with a lot of iterations may consume a lot of memory while running the test, as the web Test Results are kept in the memory.When the web performance test in a load test takes a long time to run, it will have an impact on the test mix. The load test engine will treat running the web performance test as a single iteration.
Web performance test editorAfter recording all the requests, click on the Stop option in the Web Recorder pane which stops recording and closes the browser window. Now the Web Test editor window opens and the recorded details are shown in the Web Test editor window as follows:
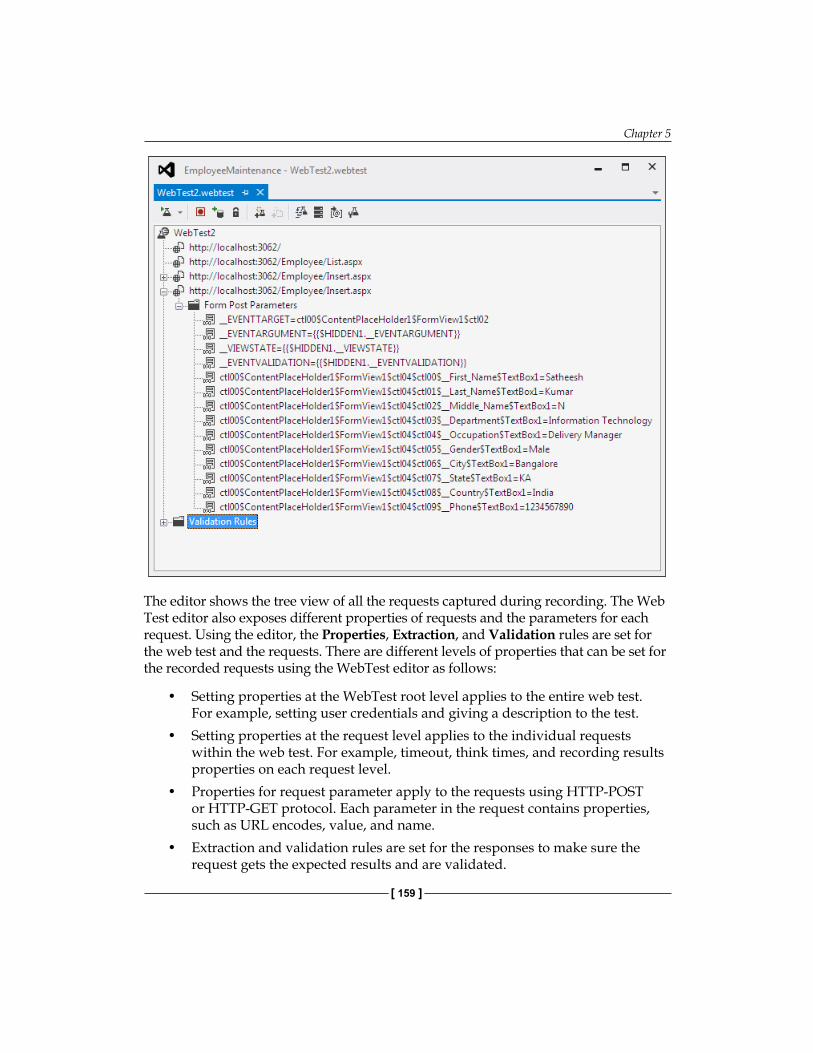
Chapter 5
[ 159 ]
The editor shows the tree view of all the requests captured during recording. The Web Test editor also exposes different properties of requests and the parameters for each request. Using the editor, the Properties, Extraction, and Validation rules are set for the web test and the requests. There are different levels of properties that can be set for the recorded requests using the WebTest editor as follows:
• Setting properties at the WebTest root level applies to the entire web test. For example, setting user credentials and giving a description to the test.
• Setting properties at the request level applies to the individual requests within the web test. For example, timeout, think times, and recording results properties on each request level.
• Properties for request parameter apply to the requests using HTTP-POST or HTTP-GET protocol. Each parameter in the request contains properties, such as URL encodes, value, and name.
• Extraction and validation rules are set for the responses to make sure the request gets the expected results and are validated.
Web Performance Test
[ 160 ]
Apart from all these, the WebTest editor has a toolbar that provides different functionalities, such as running the test, adding a new data source, and setting the credentials and parameters which are explained in detail in the coming sections.
Web test propertiesThe following are the properties that can be set for a web test using the editor:
Property DescriptionDescription Specifies the description for the current test.Name The given name for the current web test.User Name Specifies the name of the user for this test, if predefined
users credentials are to be used, then this is associated with the data source of any type such as a CSV file, XML file, or a Database. A parameter defined within the web test also can be used for user name.
Password Specifies or associates the password that corresponds to the user in the Username field.
PreAuthenticate This is a Boolean field, which indicates whether the page has to be authenticated on every request or not; only if this property is set to True, the authentication header is sent for each request, otherwise headers are sent, if required; the default is True.
Proxy In some cases, the requested web pages in the test might be outside the firewall which has to go through the proxy server; this field is to set the proxy server name to be used by the test.
Test ID The autogenerated, unique ID to identify the test. This ID is generated while creating the test; this can be used to define the test in coded web test. This property gets the unique identifier when implemented in the derived class.
Stop On Error Informs the application whether to stop the test or continue in case of any errors; if this value is true, the execution of the entire test will stop in the first occurrence of the error; default is True.
The following screenshot shows the properties window for the web test file:
Chapter 5
[ 161 ]
Web test request propertiesThe following are the properties of the requests within the web tests. If you select any request from the tree view and open the properties, you can find these properties for each request:
Web Performance Test
[ 162 ]
Property DescriptionCache control Simulates the caching property of the web pages. The value
can be true or false. If it is set to True, caching is on and the dependent requests are retrieved only once for subsequent requests. For example, an image file used in web pages is retrieved from the source only once and kept in the cache and re-used for all the requests.If the caching is turned off, then subsequent requests of the same page is retrieved from the source for every request. If it is an image, then the same image file will be retrieved for every request even though it is the same image. These properties are very useful in testing the performance by turning the caching on and off and then decide whether to keep it on or off.This property is set to the main request, but not to the dependent requests of the main requests.The default value for this property is False.
Encoding Defaults to utf-8 as most of the HTTP requests are utf-8 encoding. It can be changed if a different encoding for the texts is needed.
Expected HTTP status code This is to set the expected status code for the request. For example, if this request is not to be found on the server then set this value to 404. The error code 404 denotes the resource cannot be found. The default is set to 0, which returns pass if the return status is in the 200 or 300 level and returns fail if the return status is in the 400 or 500 level.
Expected response URL Sets the final URL response that is expected after the current request and redirects, if any, are made. This is to validate the response. The expected response is validated using the validation rule.
Follow redirects If set to True, allows page redirects to be made by the request and can be set to False to avoid redirects. If set to True, then the request continues to its redirected web page and verifies if the status is the code entered for the Expected HTTP Status Code field. If it is false, the redirects are not followed.For example, if the values of the Expected HTTP Status Code are set to any value between 200 and 300, and the Follow Redirects are set to True, then the end result status of the request after all redirects should be a success.Status code with the 200 or 300 level is a pass while status level with 400 or 500 is a failure.
Chapter 5
[ 163 ]
Property DescriptionMethod Used to set the request method used for the current
request. It can either be GET or POST.Parse dependent requests Can be set to True or False to parse the dependent
requests within the requested page. For example, we may not be interested in collecting the details for the images loaded in the web page. So we turn off the requests for loading the images by setting this to False. Only the main request details will be collected.There shouldn't be any confusion with this property and the cache control property. Cache disables the loading of the same page during subsequent requests after caching the first occurrence of the request, but this property is to completely set-off the dependent requests or to completely turning them on.
Record results This is a Boolean value to hold true if the performance data has to be collected for this HTTP request. It is false if the data is not required to be collected.
Response time goal (Seconds)
There are situations where the users need the application to respond quickly without any delay. To test this scenario, set this property to the expected maximum response time and then test the pages to find out the ones which do not meet the requirement. This value is specified in seconds. The default value is 0, which means the property is not set.
Think time (Seconds) Sets the think time required by the user between pages. This is not the exact time that the user can spend thinking, but is a rough estimation. Also, this property is not very useful for the normal single user web test. It is however very useful in the case of load test where we can predict the load including the think time of the user between the pages.The recorder automatically records the think times at the time of recording the test.
Timeout (Seconds) The expiry time for the request. This is the maximum time for the request to respond back. If it doesn't return within this limit, then the page gets timed out with the error
Version Sets the HTTP version to use for the request, which can be 1.0 or 1.1. The default is 1.1 which is the normal or the latest of the HTTP versions.
Url This is the URL address for the request.
Web Performance Test
[ 164 ]
Other request propertiesEach request in the web test has its own properties, and each request may have many dependent requests. Properties can be set at the request level and even at the dependent request level. The properties are set based on the request submit method GET or POST used for the requests. The validation and extraction rules can be used to extract information from the request response.
Form POST ParametersThese are the parameters sent along with the request if the method used for the request is POST. Recording of user actions in the form of web requests captures the actual values of the parameters that were sent during request and all the entries are sent to the server as Form POST Parameters.
• Name is generated dynamically during recording, and denotes the name of the component used for collecting the data.
• Recorded Value is a read-only field with the value assigned while recording.• URL Encode is a Boolean value which is set to True by default which
determines whether the Name and Value of the parameter should be URL encoded or not. The default is True.
• Value is the actual parameter value which is set to the same value as the recorded value, but can be changed later. This property also has the flexibility to bind the field to a different data source, such as Database, XML file, or a CSV File which is useful in the case of testing with different sources of information and multiple runs with the different sets of data. The next section covers more on how to add the new data source and map the form fields to the data source fields.
The following screenshot shows the Middle Name field, without any value assigned to it because there wasn't any value assigned while recording. But the tester can change or provide a new value to this parameter by selecting the property and modifying the value field:
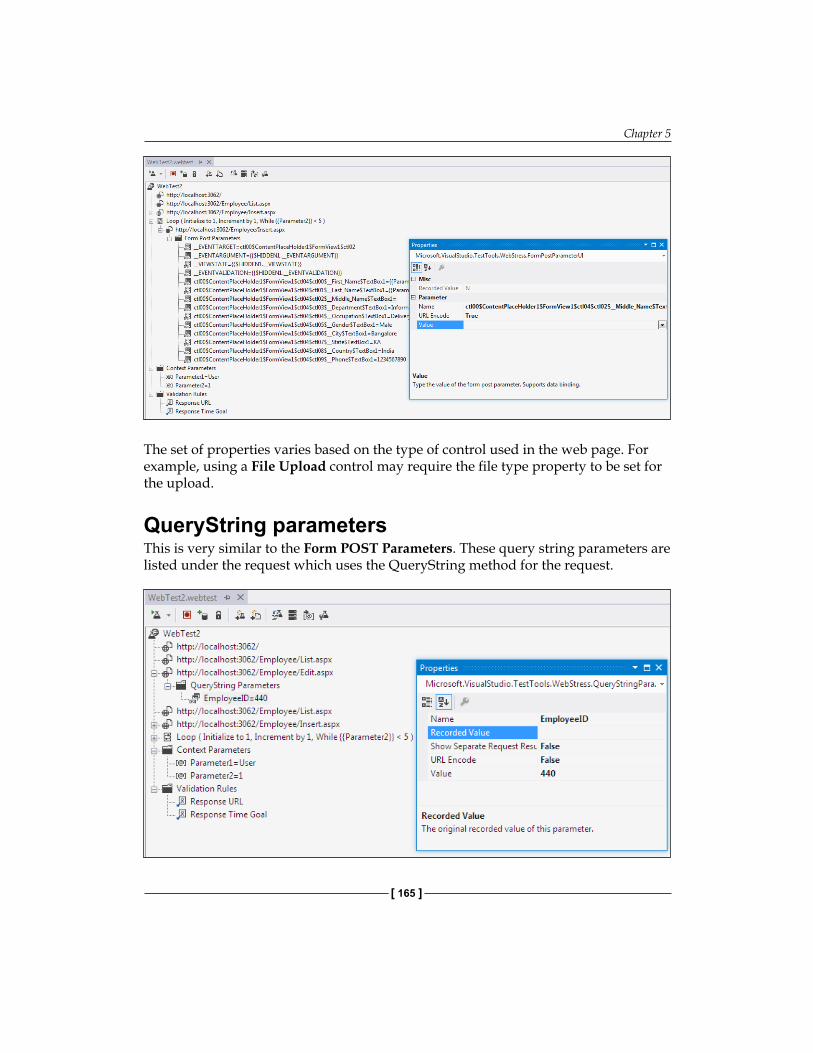
Chapter 5
[ 165 ]
The set of properties varies based on the type of control used in the web page. For example, using a File Upload control may require the file type property to be set for the upload.
QueryString parametersThis is very similar to the Form POST Parameters. These query string parameters are listed under the request which uses the QueryString method for the request.
Web Performance Test
[ 166 ]
Setting properties values and usage of the QueryString parameters are same as the Form POST Parameters properties, except the additional property which is Show Separate Request Result. This is used for grouping the requests based on the value of this query string parameter. This is very useful for load testing for grouping a bunch of requests based on this field value. The default is False.
Extraction rulesNormally in any web applications, most of the web forms are interdependent in which the request is based on the data collected from the previous request's response. Each request from the web client receives the expected response from the server with the expected data within it. The data from the response has to be extracted and then passed on to the next request by passing the values by using query strings or values persisted in the ViewState object or using the Hidden fields. Extraction rules are useful for extracting the data or information from the HTTP response.
The sample application has web pages for new employee creation, selecting existing employee information from a list, absence details of an employee, and a few other web pages. For example, the user selects an employee from the list of available employees to get the detailed information about that employee. In this case, once the user selects a particular employee from the list, there needs to be a validation and then the key values are passed to the next web request like EmployeeDetails page or Absence request or EmergencyContacts details.
The key information is hidden somewhere in the request using the ViewState object or the Hidden fields property of the web page. In this case, use the extraction rules to extract the information and pass it on to the next request. Extract the information and store it in the context parameter and use it globally across all the requests.
Visual Studio provides several built-in types of extraction rules. These rules are helpful in extracting the values based on the HTML tags or based on the type of fields available in the web form. Custom rules can also be built if the default set of rules are not sufficient to extract the information. The following are the existing extraction rule types:
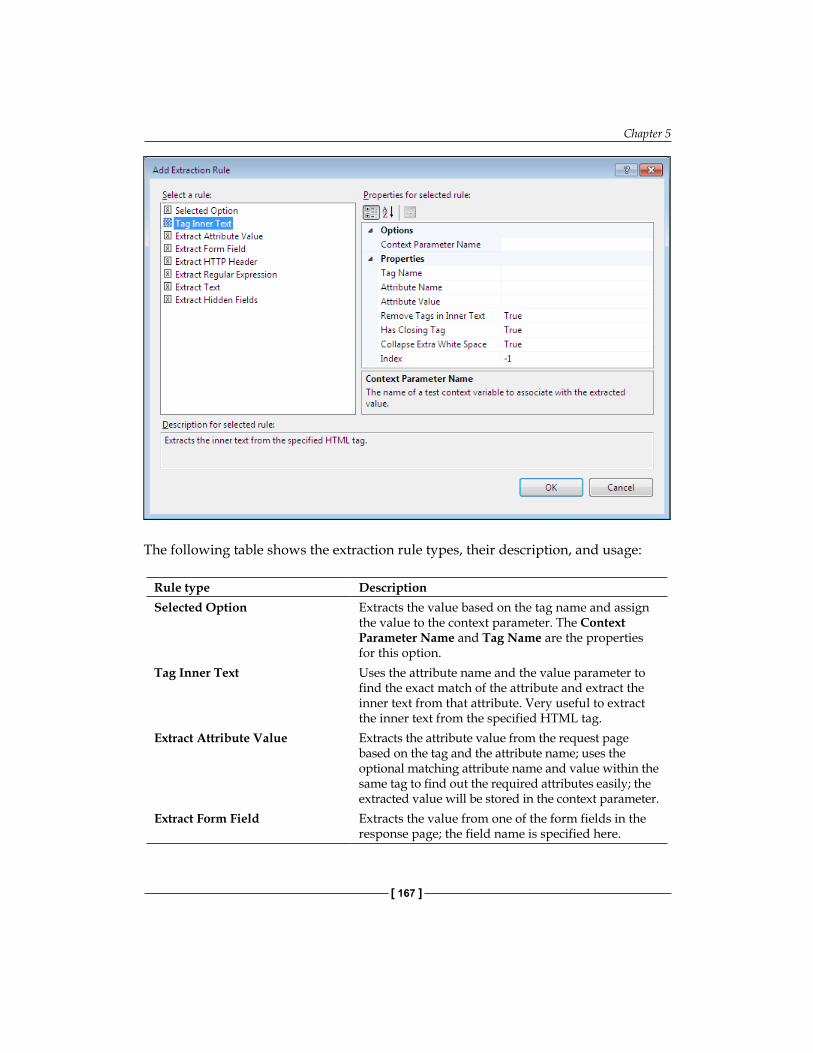
Chapter 5
[ 167 ]
The following table shows the extraction rule types, their description, and usage:
Rule type DescriptionSelected Option Extracts the value based on the tag name and assign
the value to the context parameter. The Context Parameter Name and Tag Name are the properties for this option.
Tag Inner Text Uses the attribute name and the value parameter to find the exact match of the attribute and extract the inner text from that attribute. Very useful to extract the inner text from the specified HTML tag.
Extract Attribute Value Extracts the attribute value from the request page based on the tag and the attribute name; uses the optional matching attribute name and value within the same tag to find out the required attributes easily; the extracted value will be stored in the context parameter.
Extract Form Field Extracts the value from one of the form fields in the response page; the field name is specified here.
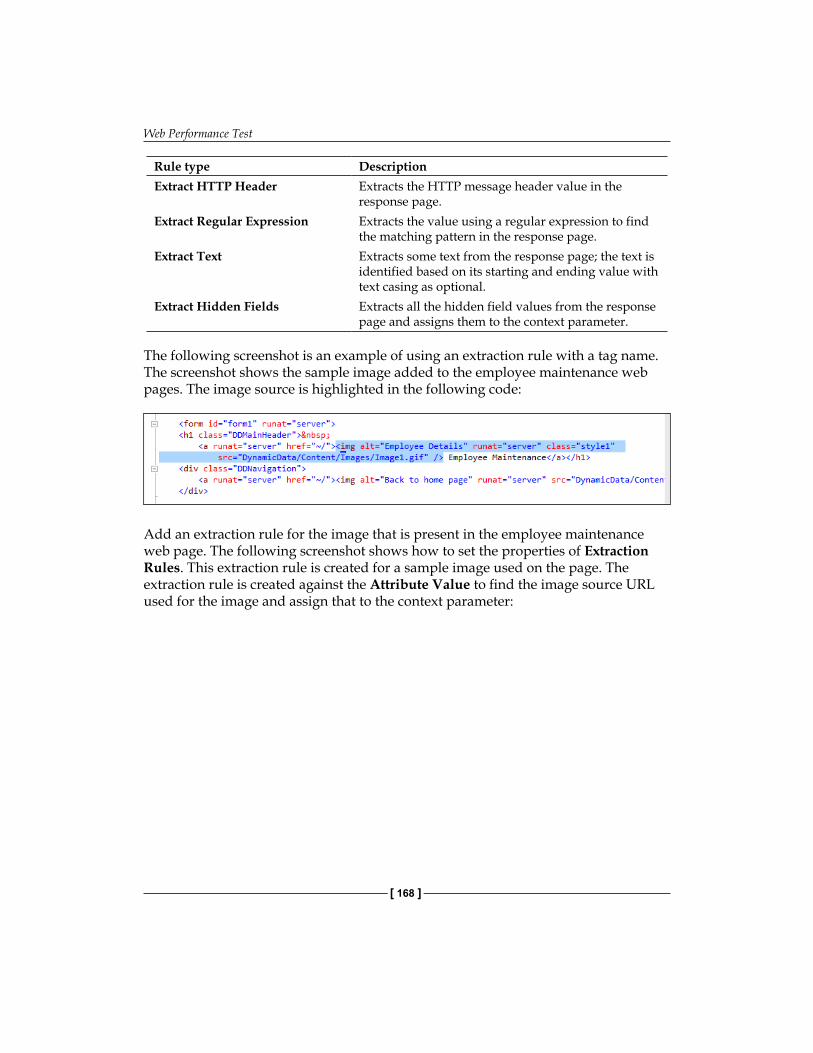
Web Performance Test
[ 168 ]
Rule type DescriptionExtract HTTP Header Extracts the HTTP message header value in the
response page.Extract Regular Expression Extracts the value using a regular expression to find
the matching pattern in the response page.Extract Text Extracts some text from the response page; the text is
identified based on its starting and ending value with text casing as optional.
Extract Hidden Fields Extracts all the hidden field values from the response page and assigns them to the context parameter.
The following screenshot is an example of using an extraction rule with a tag name. The screenshot shows the sample image added to the employee maintenance web pages. The image source is highlighted in the following code:
Add an extraction rule for the image that is present in the employee maintenance web page. The following screenshot shows how to set the properties of Extraction Rules. This extraction rule is created for a sample image used on the page. The extraction rule is created against the Attribute Value to find the image source URL used for the image and assign that to the context parameter:
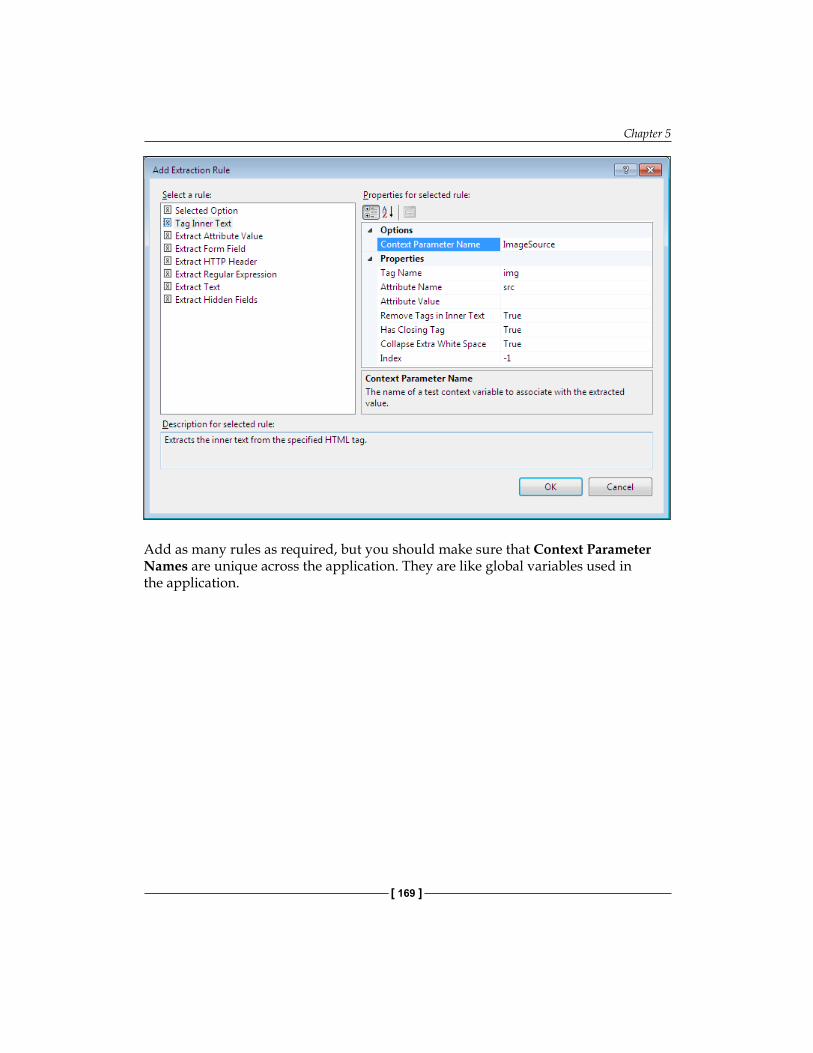
Chapter 5
[ 169 ]
Add as many rules as required, but you should make sure that Context Parameter Names are unique across the application. They are like global variables used in the application.
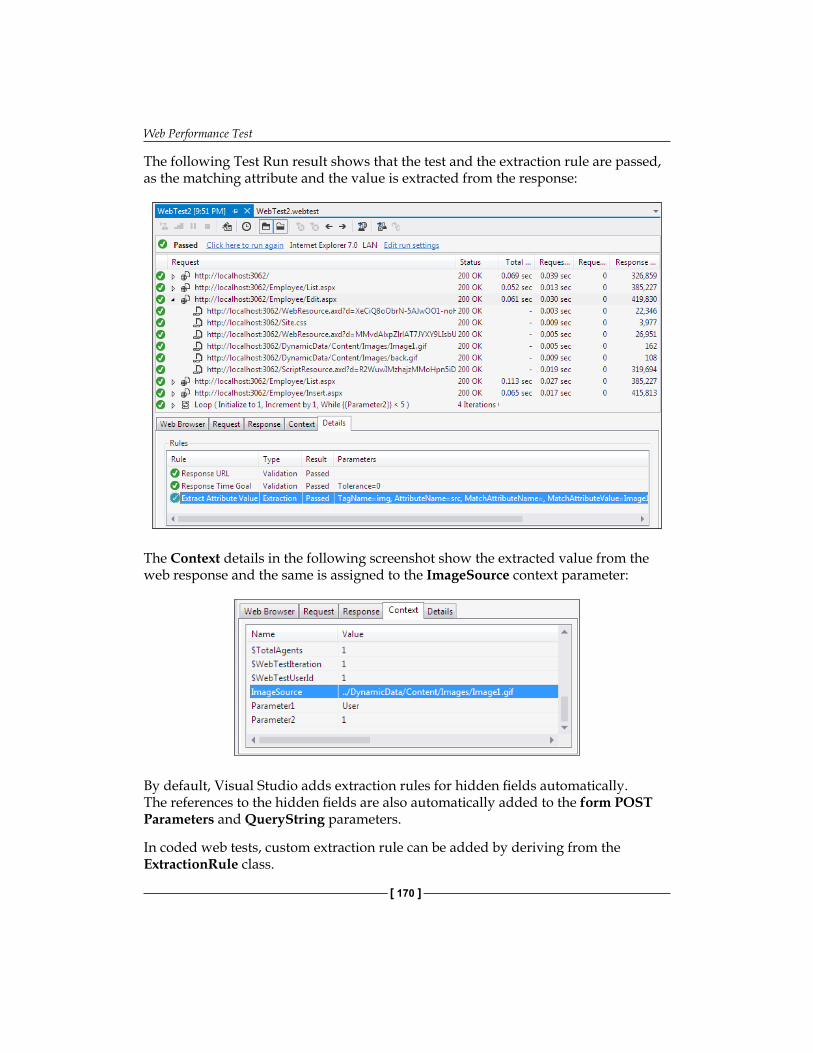
Web Performance Test
[ 170 ]
The following Test Run result shows that the test and the extraction rule are passed, as the matching attribute and the value is extracted from the response:
The Context details in the following screenshot show the extracted value from the web response and the same is assigned to the ImageSource context parameter:
By default, Visual Studio adds extraction rules for hidden fields automatically. The references to the hidden fields are also automatically added to the form POST Parameters and QueryString parameters.
In coded web tests, custom extraction rule can be added by deriving from the ExtractionRule class.
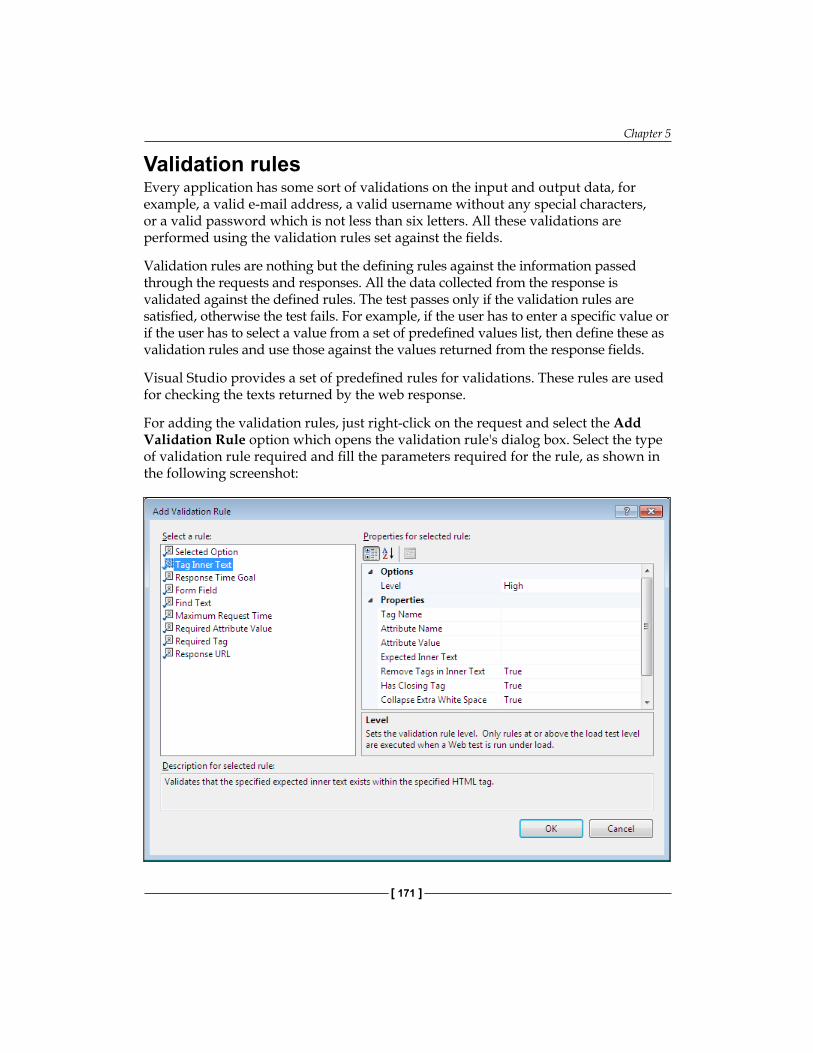
Chapter 5
[ 171 ]
Validation rulesEvery application has some sort of validations on the input and output data, for example, a valid e-mail address, a valid username without any special characters, or a valid password which is not less than six letters. All these validations are performed using the validation rules set against the fields.
Validation rules are nothing but the defining rules against the information passed through the requests and responses. All the data collected from the response is validated against the defined rules. The test passes only if the validation rules are satisfied, otherwise the test fails. For example, if the user has to enter a specific value or if the user has to select a value from a set of predefined values list, then define these as validation rules and use those against the values returned from the response fields.
Visual Studio provides a set of predefined rules for validations. These rules are used for checking the texts returned by the web response.
For adding the validation rules, just right-click on the request and select the Add Validation Rule option which opens the validation rule's dialog box. Select the type of validation rule required and fill the parameters required for the rule, as shown in the following screenshot:
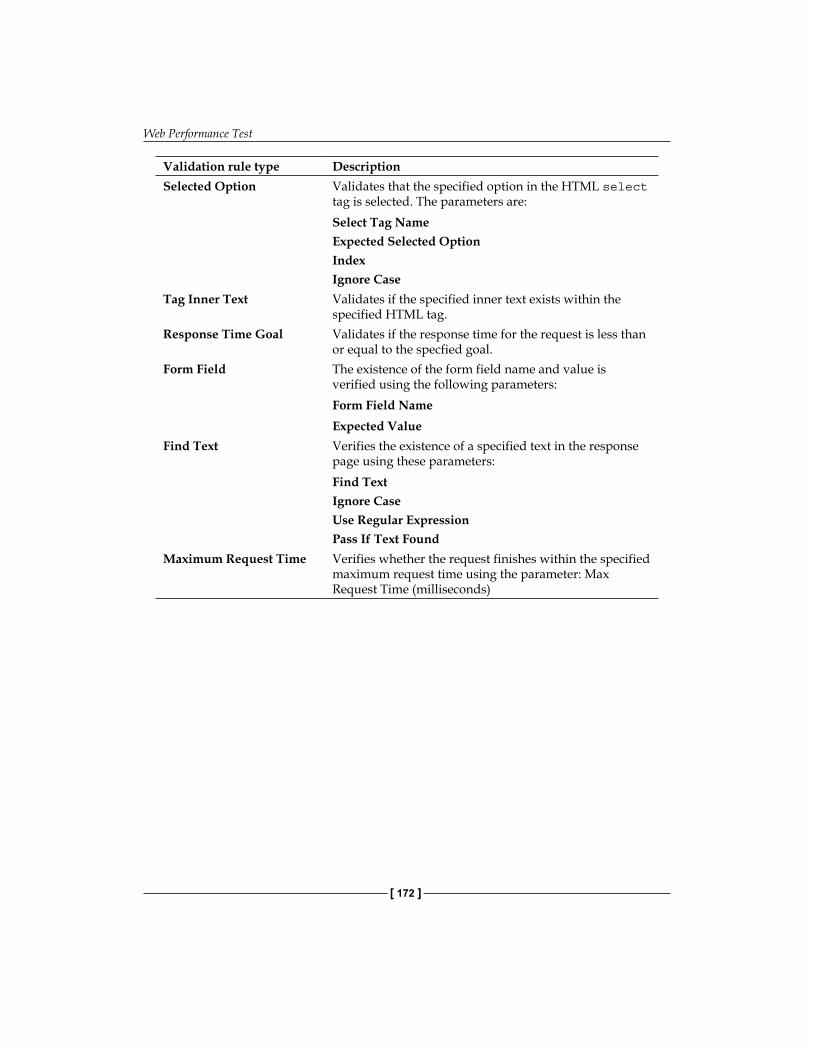
Web Performance Test
[ 172 ]
Validation rule type DescriptionSelected Option Validates that the specified option in the HTML select
tag is selected. The parameters are:Select Tag NameExpected Selected OptionIndexIgnore Case
Tag Inner Text Validates if the specified inner text exists within the specified HTML tag.
Response Time Goal Validates if the response time for the request is less than or equal to the specfied goal.
Form Field The existence of the form field name and value is verified using the following parameters:Form Field NameExpected Value
Find Text Verifies the existence of a specified text in the response page using these parameters:Find TextIgnore CaseUse Regular ExpressionPass If Text Found
Maximum Request Time Verifies whether the request finishes within the specified maximum request time using the parameter: Max Request Time (milliseconds)

Chapter 5
[ 173 ]
Validation rule type DescriptionRequired Attribute Value This is similar to the extraction rules wherein the value
of the specific attribute is extracted using the tag and the other attribute within the tag; but in validation rules, we use the same tag to find whether the attribute is returning the expected value; the parameters are the same as the ones used in extraction rules but with an additional field to specify the expected value. The properties are:Tag NameAttribute NameMatch Attribute NameMatch Attribute ValueExpected ValueIgnore CaseIndexThe string can be validated based on the occurrence using the index value; to check any form field value in the form, set the index value to -1. The test passes if any one match is found.
Required Tag This is used to verify if the specified tag exists in the response; if there is a possibility of getting the same tag a number of times in the response, you can set the minimum occurrence value; the parameters are:Required Tag NameMinimum Occurrences
Response URL This is to verify whether the URL is same as the expected URL; the property is the level for the response URL which can be high, medium, or low.
Keep adding as many validation rules as required. If the number of rules increases, the performance will degrade or the time taken for the test will also increase. Decide which one is important in case of load testing and then add the rules as required.
In all the above rule types, there is a special parameter known as Level that can be set to Low, Medium, or High. Use the Level property to control the execution of rules in a request during the load test. The level does not denote the priority for the rule, but it denotes when it should get executed based on the load test property. The load test also has similar property, such as Low, Medium, or High.
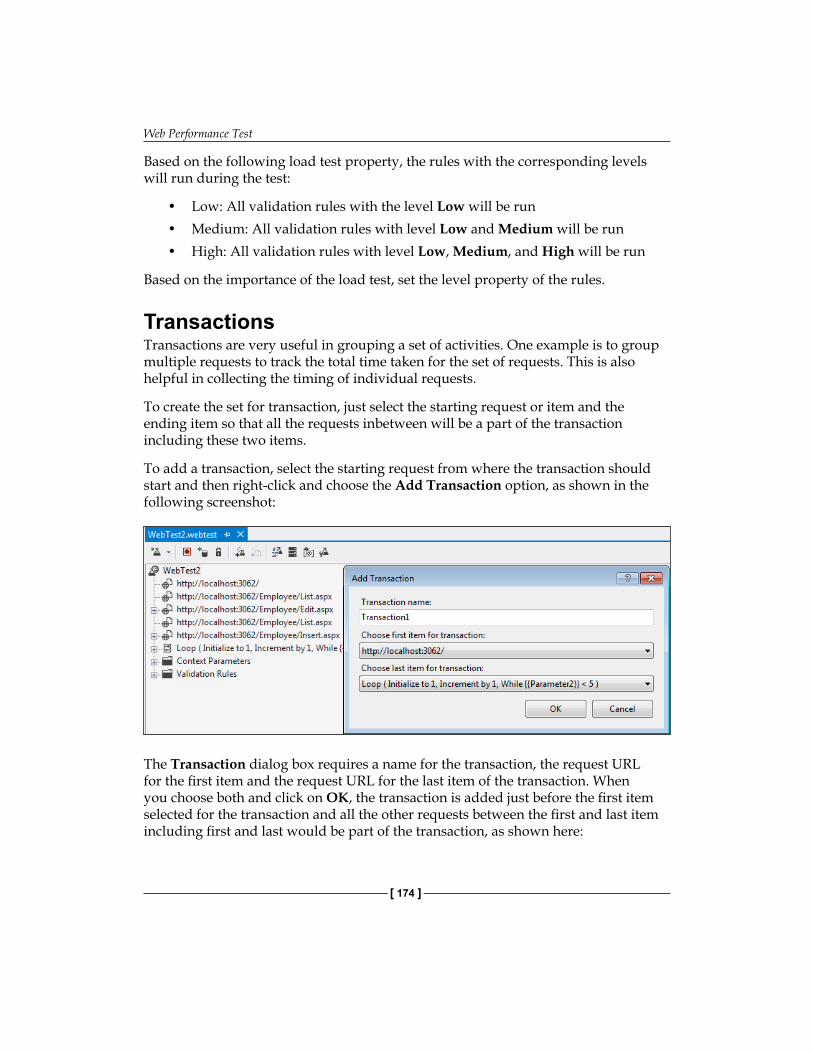
Web Performance Test
[ 174 ]
Based on the following load test property, the rules with the corresponding levels will run during the test:
• Low: All validation rules with the level Low will be run• Medium: All validation rules with level Low and Medium will be run• High: All validation rules with level Low, Medium, and High will be run
Based on the importance of the load test, set the level property of the rules.
TransactionsTransactions are very useful in grouping a set of activities. One example is to group multiple requests to track the total time taken for the set of requests. This is also helpful in collecting the timing of individual requests.
To create the set for transaction, just select the starting request or item and the ending item so that all the requests inbetween will be a part of the transaction including these two items.
To add a transaction, select the starting request from where the transaction should start and then right-click and choose the Add Transaction option, as shown in the following screenshot:
The Transaction dialog box requires a name for the transaction, the request URL for the first item and the request URL for the last item of the transaction. When you choose both and click on OK, the transaction is added just before the first item selected for the transaction and all the other requests between the first and last item including first and last would be part of the transaction, as shown here:
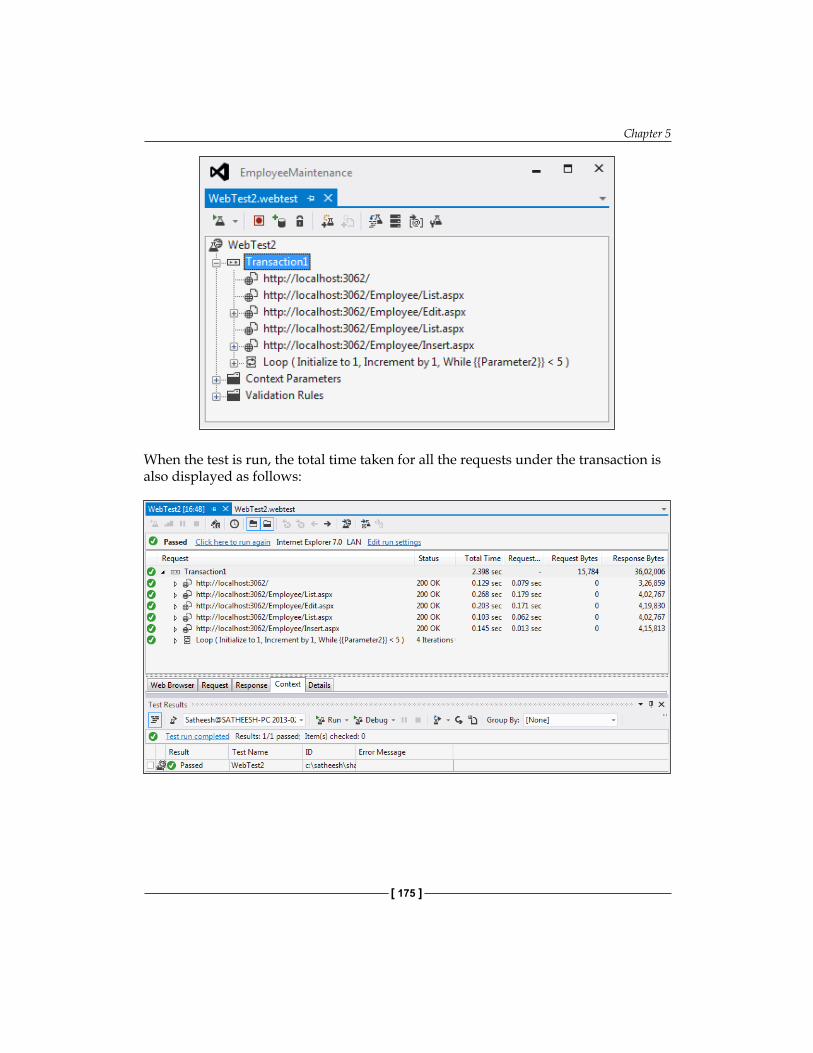
Chapter 5
[ 175 ]
When the test is run, the total time taken for all the requests under the transaction is also displayed as follows:
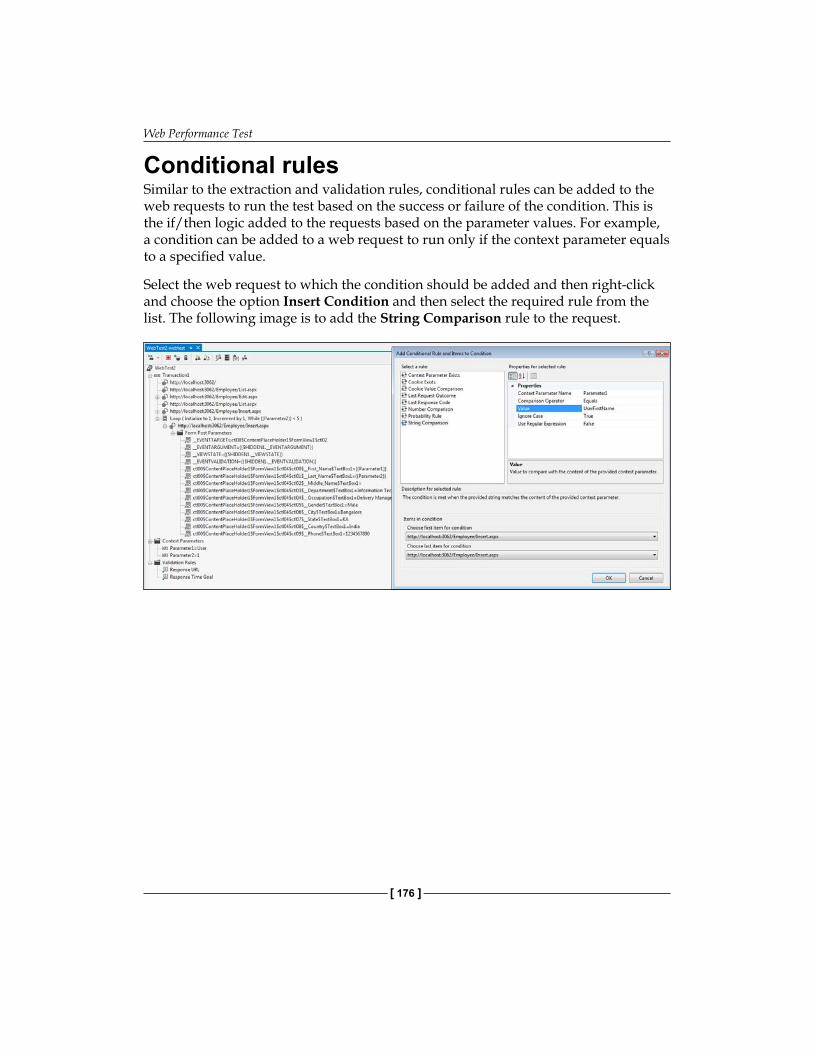
Web Performance Test
[ 176 ]
Conditional rulesSimilar to the extraction and validation rules, conditional rules can be added to the web requests to run the test based on the success or failure of the condition. This is the if/then logic added to the requests based on the parameter values. For example, a condition can be added to a web request to run only if the context parameter equals to a specified value.
Select the web request to which the condition should be added and then right-click and choose the option Insert Condition and then select the required rule from the list. The following image is to add the String Comparison rule to the request.
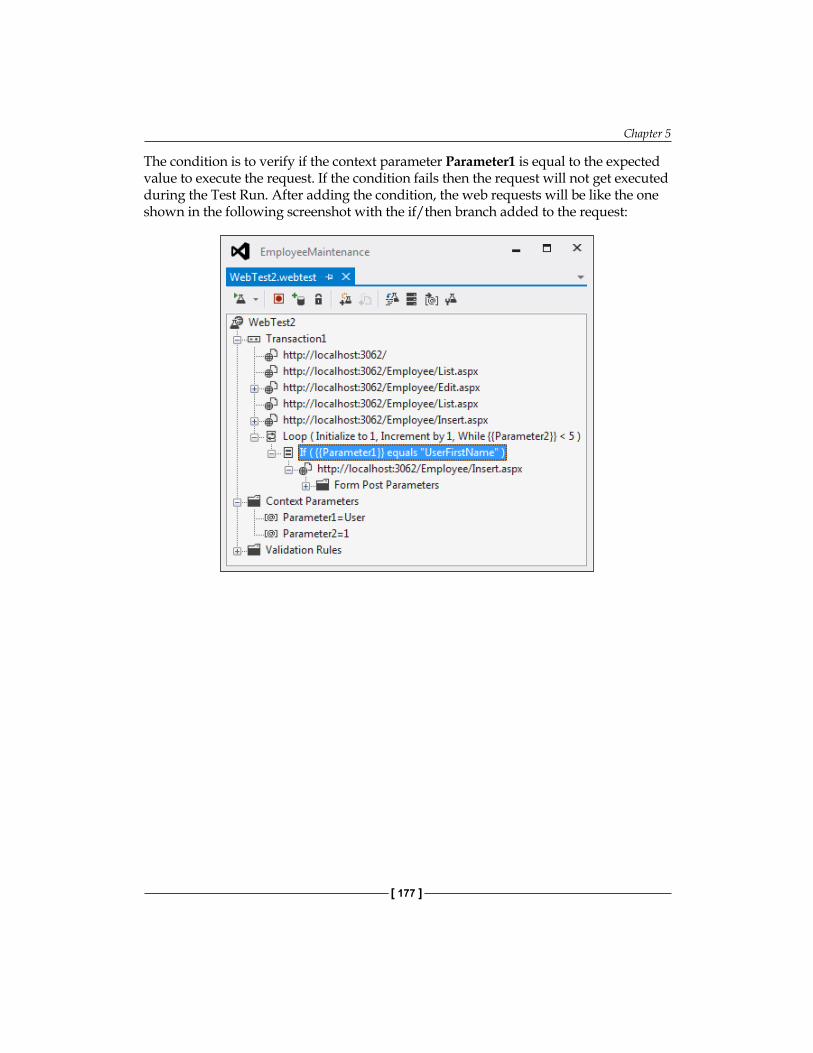
Chapter 5
[ 177 ]
The condition is to verify if the context parameter Parameter1 is equal to the expected value to execute the request. If the condition fails then the request will not get executed during the Test Run. After adding the condition, the web requests will be like the one shown in the following screenshot with the if/then branch added to the request:
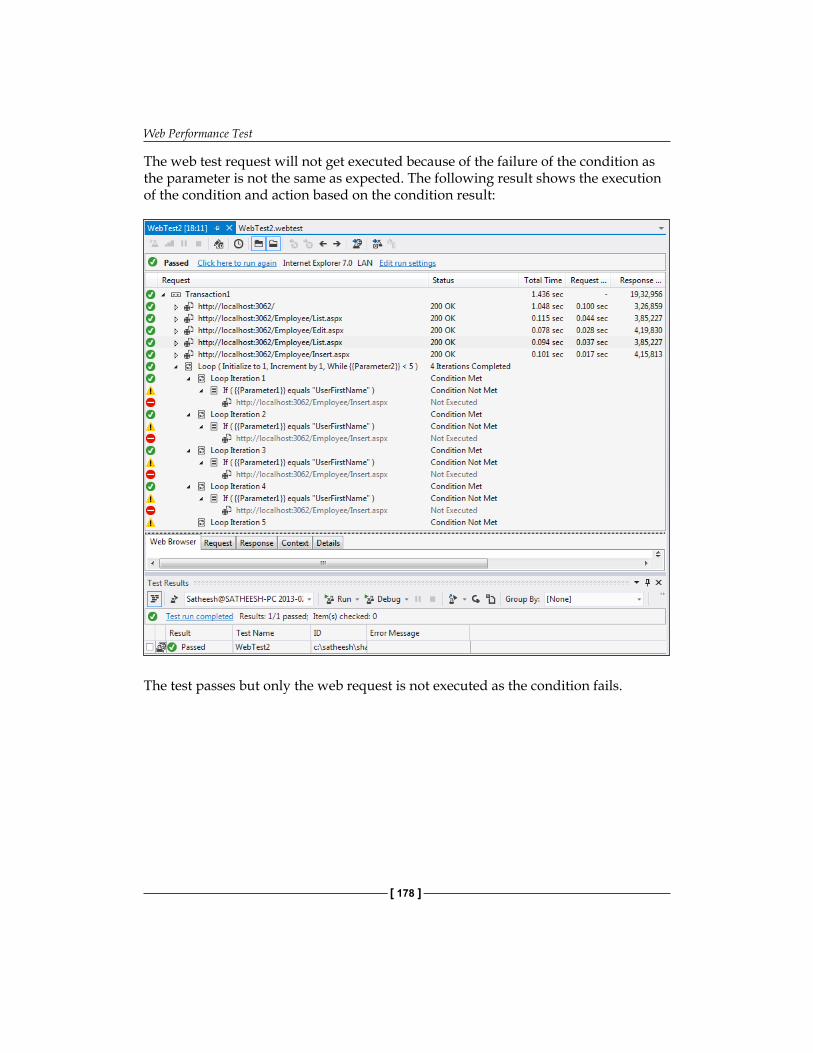
Web Performance Test
[ 178 ]
The web test request will not get executed because of the failure of the condition as the parameter is not the same as expected. The following result shows the execution of the condition and action based on the condition result:
The test passes but only the web request is not executed as the condition fails.
Chapter 5
[ 179 ]
There are multiple other conditional rules which will be useful for the web test execution. The conditional rules are listed in the following table with descriptions:
Conditional rule DescriptionContext Parameter Exists
Test based on the existence of the context parameter. The properties are:Context Parameter NameCheck for Existence
Cookie Exists Test based on the existence of the cookie with the following properties:Web Page URLCookie NameCheck for ExistenceCookie Domain Name (Optional)Cookie Path (Optional)
Cookie Value Comparison
The test execution is based on the matching value of the Cookie. The previous rule is just to check the existence of the cookie, but this rule is based on the following cookie value:Web Page URLCookie NameComparison OperatorValueIgnore CaseUse Regular ExpressionCookie Domain Name (Optional)Cookie Path (Optional)
Last Request Outcome
To execute the current request based on the outcome of the previous request. If the previous request outcome is a failure then the current request would be stopped. Following is the property to set the condition:Request Outcome
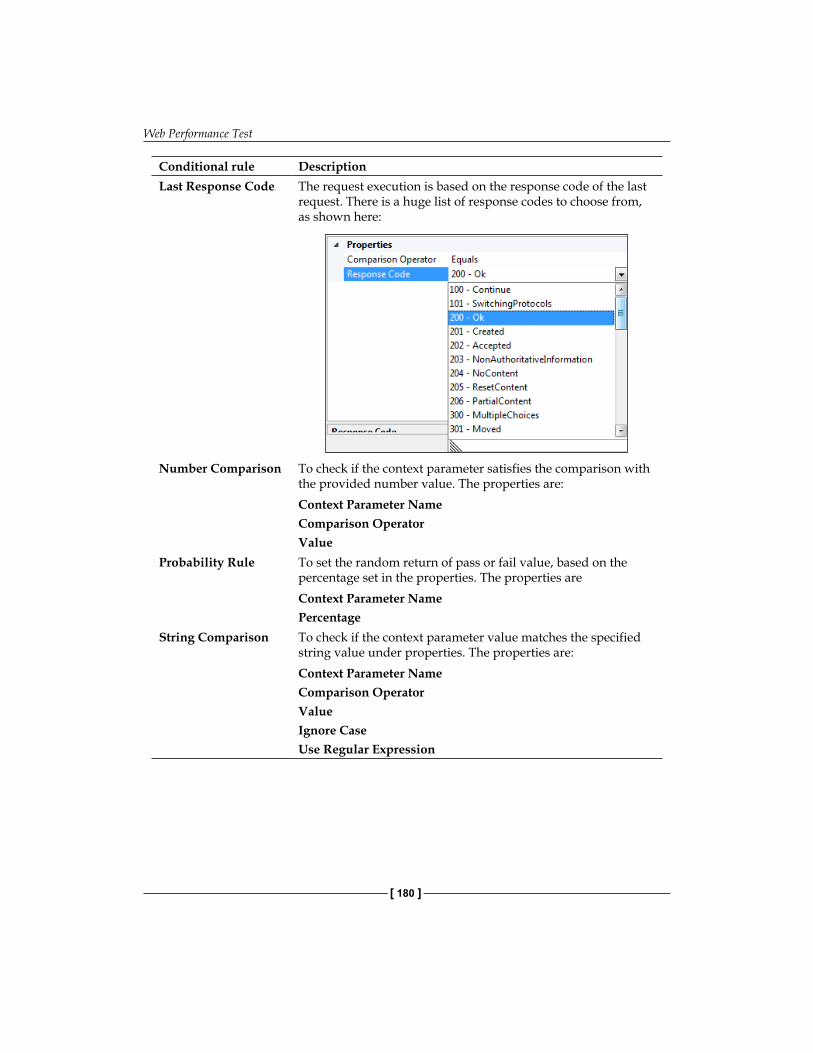
Web Performance Test
[ 180 ]
Conditional rule DescriptionLast Response Code The request execution is based on the response code of the last
request. There is a huge list of response codes to choose from, as shown here:
Number Comparison To check if the context parameter satisfies the comparison with the provided number value. The properties are:Context Parameter NameComparison OperatorValue
Probability Rule To set the random return of pass or fail value, based on the percentage set in the properties. The properties areContext Parameter NamePercentage
String Comparison To check if the context parameter value matches the specified string value under properties. The properties are:Context Parameter NameComparison OperatorValueIgnore CaseUse Regular Expression
Chapter 5
[ 181 ]
There are a few other features, such as adding comments to the condition, adding requests to condition, adding transactions to condition, adding loops to condition, and adding another condition to condition. The condition rules can be added at any level in the web test. Based on the situation and requirement of the test execution, conditions can be utilized.
Toolbar propertiesThe Web Test editor comes along with a toolbar to configure the web tests. There are different options, such as adding a data source, setting credentials, adding a recording, adding plugins to the test, generating code for the web test, and parameterizing web servers.
Add data sourceEarlier sections of this chapter explained the usage of Form POST parameters and QueryString parameters, and setting the value of parameters using the property. Executing the test every time with a different set of data is a tedious process and it requires changing the parameter values every time. If the test is to be conducted with more number of users, it requires more time particularly in case of load and performance testing. Visual Studio provides the feature of adding a data source and binding the parameters to the data source so that the data is picked from the data source for test.
Visual Studio supports different types of data sources, such as CSV file, database, and XML file.
To add a new data source:
1. Select the Add Data Source option from the WebTest editor toolbar which opens the New Test Data Source Wizard.
2. Name the data source and select the type of data source (Database, CSV, or XML file).
Web Performance Test
[ 182 ]
3. Selecting the database type requires a connection which uses the OLE DB, ODBC, SQL Server, or the Oracle data provider. For this example, select the CSV file as the data source and in the next screen select the CSV file from the file location. The following CSV file was created with all the details required for new employee creation and kept ready for the example:
4. Once you select the file you can see the data in the Preview data grid.5. Select Finish so that you can see the data source added to the Test Project.
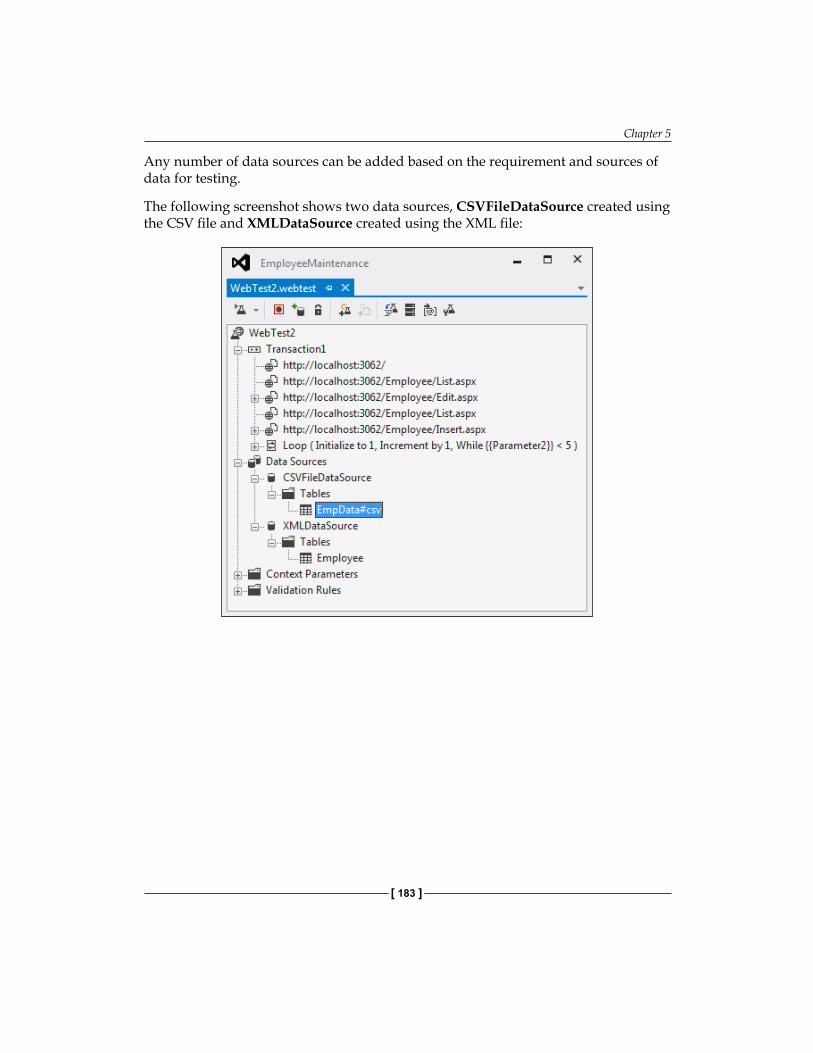
Chapter 5
[ 183 ]
Any number of data sources can be added based on the requirement and sources of data for testing.
The following screenshot shows two data sources, CSVFileDataSource created using the CSV file and XMLDataSource created using the XML file:
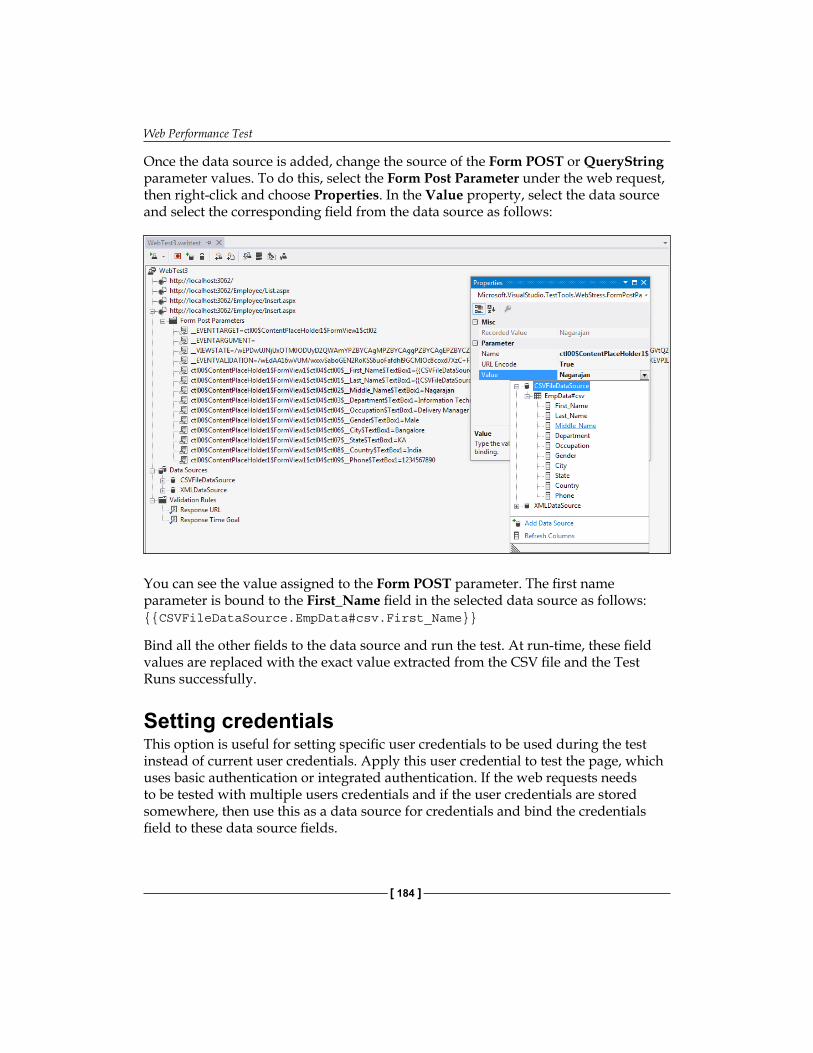
Web Performance Test
[ 184 ]
Once the data source is added, change the source of the Form POST or QueryString parameter values. To do this, select the Form Post Parameter under the web request, then right-click and choose Properties. In the Value property, select the data source and select the corresponding field from the data source as follows:
You can see the value assigned to the Form POST parameter. The first name parameter is bound to the First_Name field in the selected data source as follows: {{CSVFileDataSource.EmpData#csv.First_Name}}
Bind all the other fields to the data source and run the test. At run-time, these field values are replaced with the exact value extracted from the CSV file and the Test Runs successfully.
Setting credentialsThis option is useful for setting specific user credentials to be used during the test instead of current user credentials. Apply this user credential to test the page, which uses basic authentication or integrated authentication. If the web requests needs to be tested with multiple users credentials and if the user credentials are stored somewhere, then use this as a data source for credentials and bind the credentials field to these data source fields.
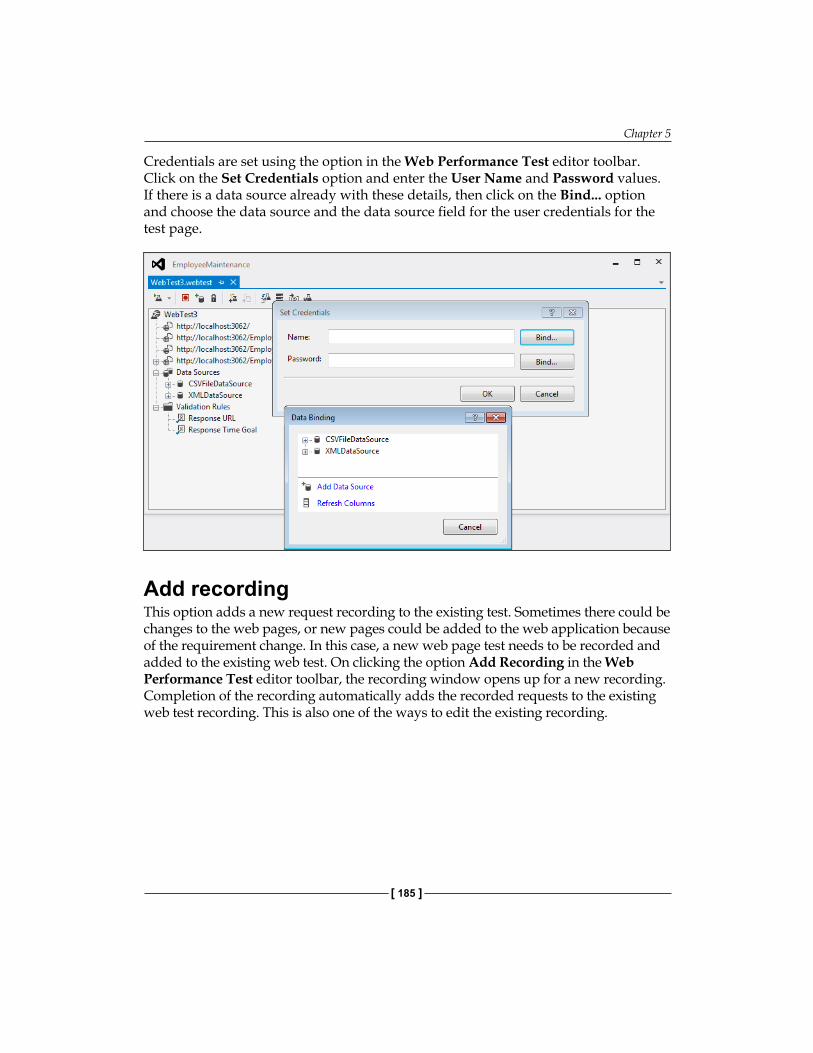
Chapter 5
[ 185 ]
Credentials are set using the option in the Web Performance Test editor toolbar. Click on the Set Credentials option and enter the User Name and Password values. If there is a data source already with these details, then click on the Bind... option and choose the data source and the data source field for the user credentials for the test page.
Add recordingThis option adds a new request recording to the existing test. Sometimes there could be changes to the web pages, or new pages could be added to the web application because of the requirement change. In this case, a new web page test needs to be recorded and added to the existing web test. On clicking the option Add Recording in the Web Performance Test editor toolbar, the recording window opens up for a new recording. Completion of the recording automatically adds the recorded requests to the existing web test recording. This is also one of the ways to edit the existing recording.
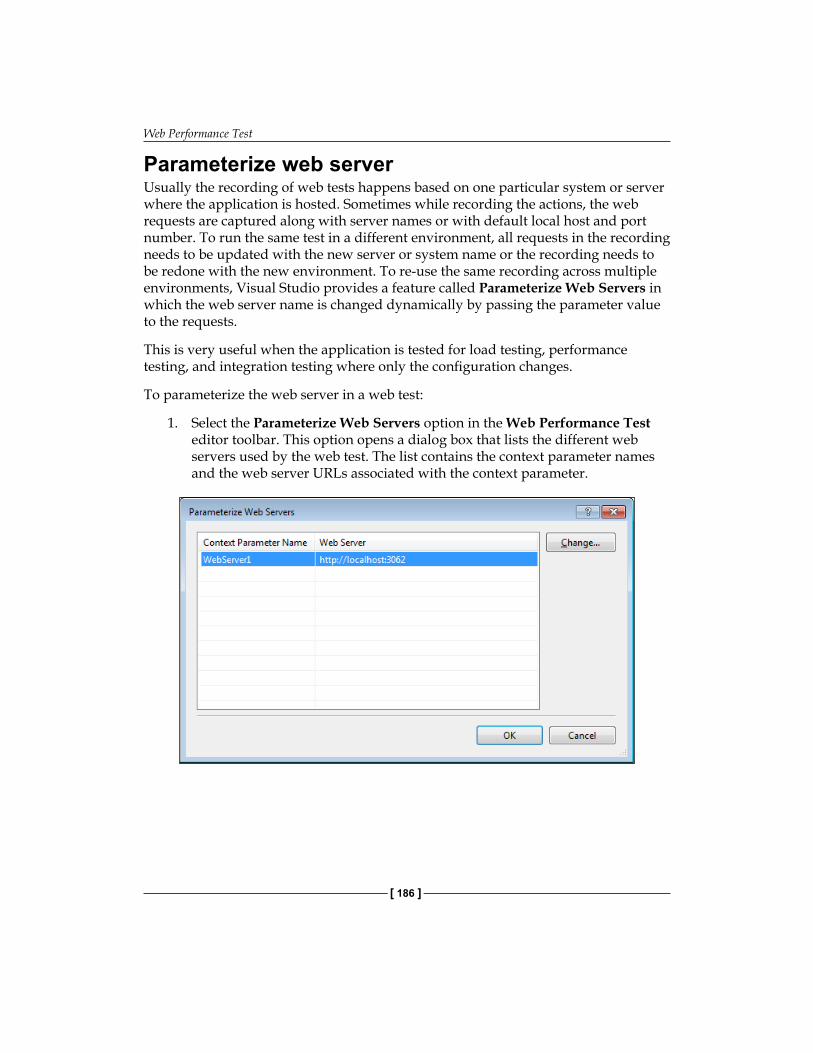
Web Performance Test
[ 186 ]
Parameterize web serverUsually the recording of web tests happens based on one particular system or server where the application is hosted. Sometimes while recording the actions, the web requests are captured along with server names or with default local host and port number. To run the same test in a different environment, all requests in the recording needs to be updated with the new server or system name or the recording needs to be redone with the new environment. To re-use the same recording across multiple environments, Visual Studio provides a feature called Parameterize Web Servers in which the web server name is changed dynamically by passing the parameter value to the requests.
This is very useful when the application is tested for load testing, performance testing, and integration testing where only the configuration changes.
To parameterize the web server in a web test:
1. Select the Parameterize Web Servers option in the Web Performance Test editor toolbar. This option opens a dialog box that lists the different web servers used by the web test. The list contains the context parameter names and the web server URLs associated with the context parameter.
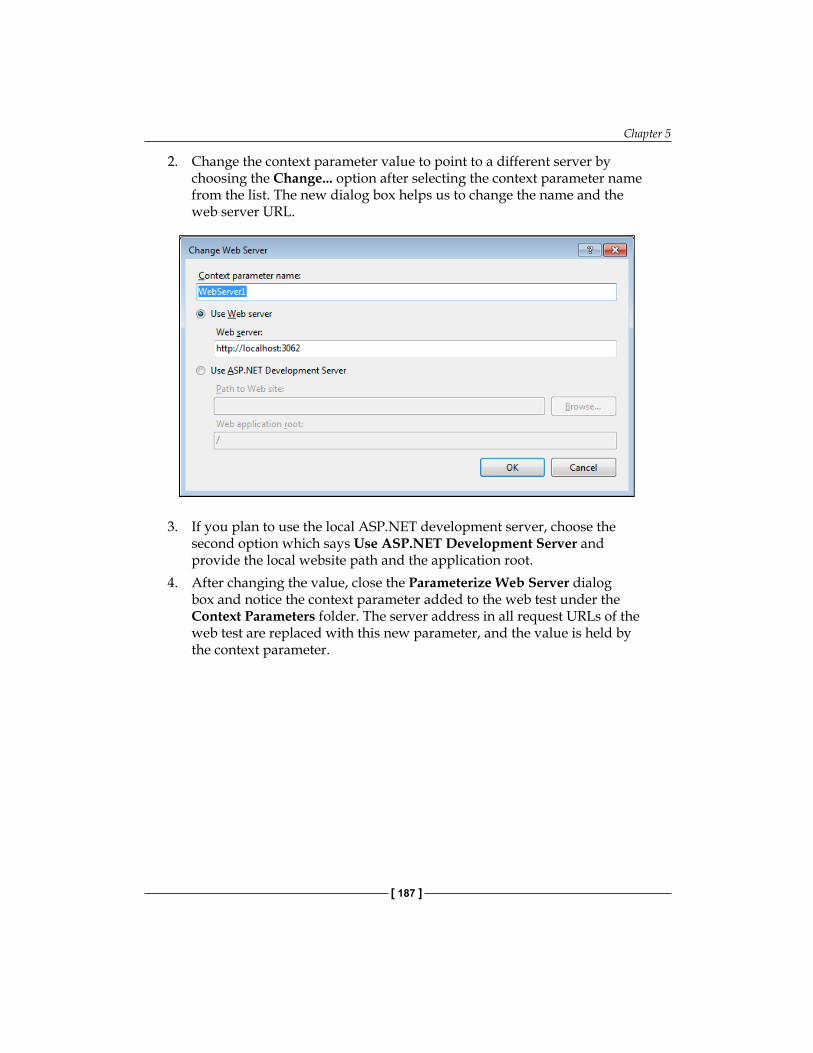
Chapter 5
[ 187 ]
2. Change the context parameter value to point to a different server by choosing the Change... option after selecting the context parameter name from the list. The new dialog box helps us to change the name and the web server URL.
3. If you plan to use the local ASP.NET development server, choose the second option which says Use ASP.NET Development Server and provide the local website path and the application root.
4. After changing the value, close the Parameterize Web Server dialog box and notice the context parameter added to the web test under the Context Parameters folder. The server address in all request URLs of the web test are replaced with this new parameter, and the value is held by the context parameter.
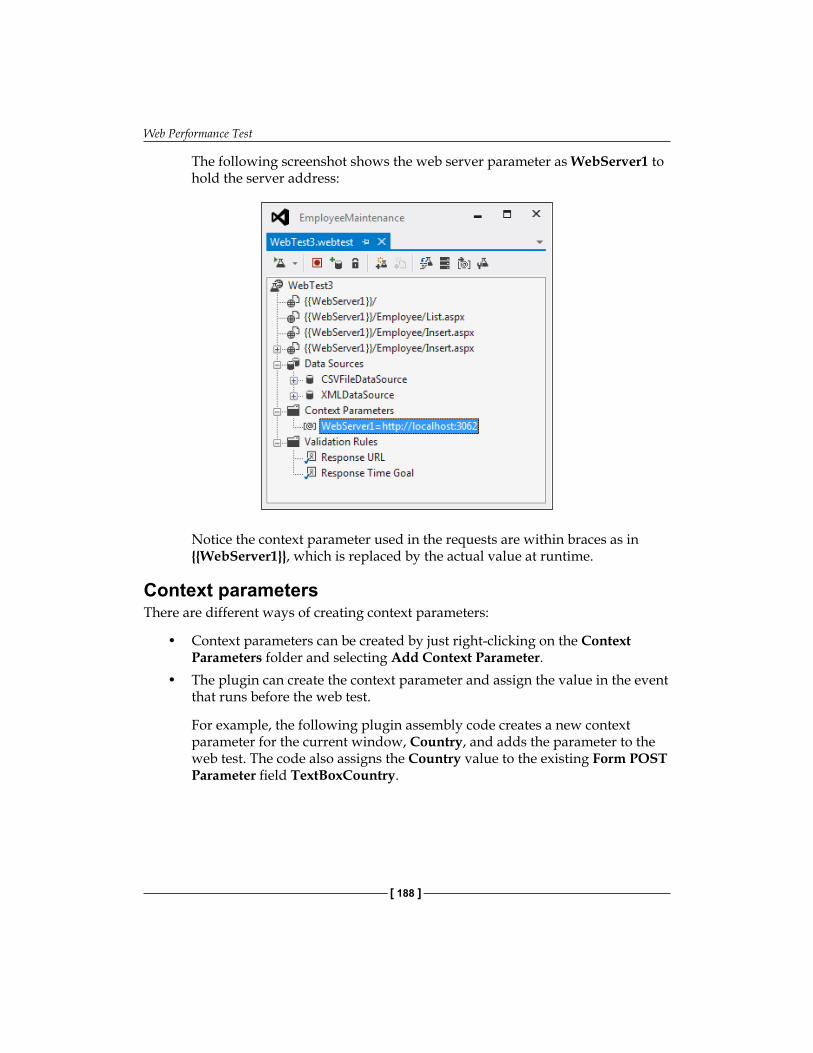
Web Performance Test
[ 188 ]
The following screenshot shows the web server parameter as WebServer1 to hold the server address:
Notice the context parameter used in the requests are within braces as in {{WebServer1}}, which is replaced by the actual value at runtime.
Context parametersThere are different ways of creating context parameters:
• Context parameters can be created by just right-clicking on the Context Parameters folder and selecting Add Context Parameter.
• The plugin can create the context parameter and assign the value in the event that runs before the web test.
For example, the following plugin assembly code creates a new context parameter for the current window, Country, and adds the parameter to the web test. The code also assigns the Country value to the existing Form POST Parameter field TextBoxCountry.
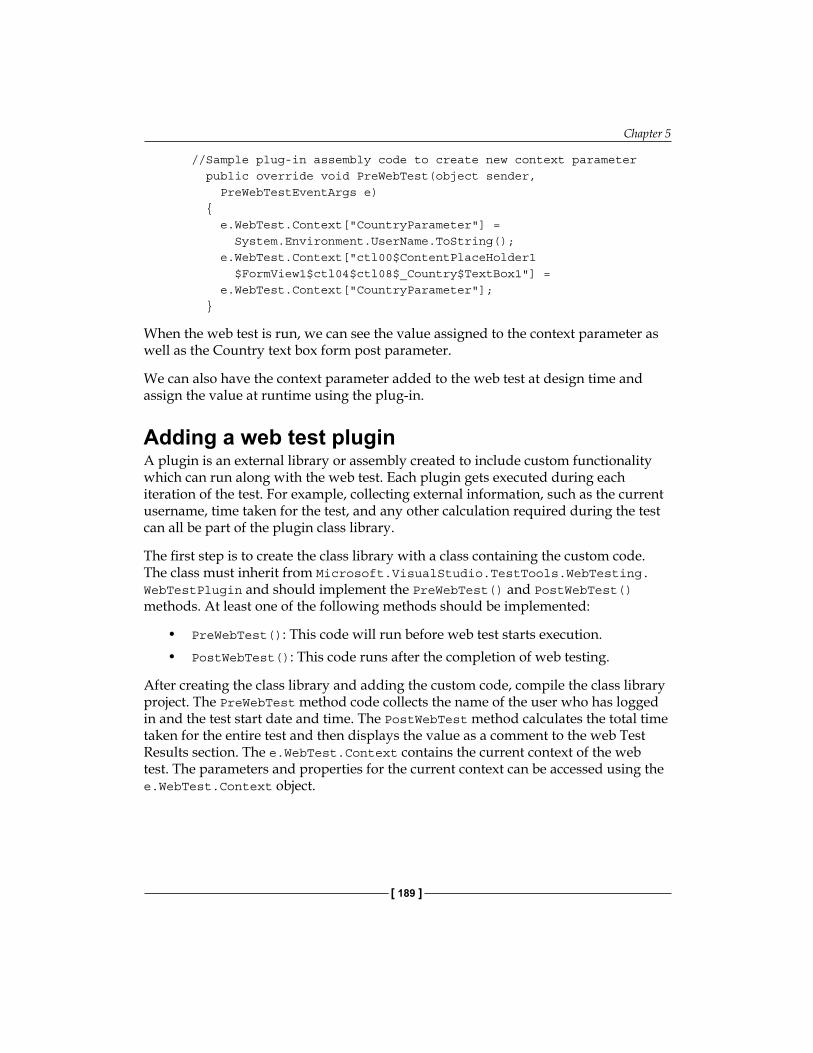
Chapter 5
[ 189 ]
//Sample plug-in assembly code to create new context parameter public override void PreWebTest(object sender, PreWebTestEventArgs e) { e.WebTest.Context["CountryParameter"] = System.Environment.UserName.ToString(); e.WebTest.Context["ctl00$ContentPlaceHolder1 $FormView1$ctl04$ctl08$_Country$TextBox1"] = e.WebTest.Context["CountryParameter"]; }
When the web test is run, we can see the value assigned to the context parameter as well as the Country text box form post parameter.
We can also have the context parameter added to the web test at design time and assign the value at runtime using the plug-in.
Adding a web test pluginA plugin is an external library or assembly created to include custom functionality which can run along with the web test. Each plugin gets executed during each iteration of the test. For example, collecting external information, such as the current username, time taken for the test, and any other calculation required during the test can all be part of the plugin class library.
The first step is to create the class library with a class containing the custom code. The class must inherit from Microsoft.VisualStudio.TestTools.WebTesting.WebTestPlugin and should implement the PreWebTest() and PostWebTest() methods. At least one of the following methods should be implemented:
• PreWebTest(): This code will run before web test starts execution.• PostWebTest(): This code runs after the completion of web testing.
After creating the class library and adding the custom code, compile the class library project. The PreWebTest method code collects the name of the user who has logged in and the test start date and time. The PostWebTest method calculates the total time taken for the entire test and then displays the value as a comment to the web Test Results section. The e.WebTest.Context contains the current context of the web test. The parameters and properties for the current context can be accessed using the e.WebTest.Context object.
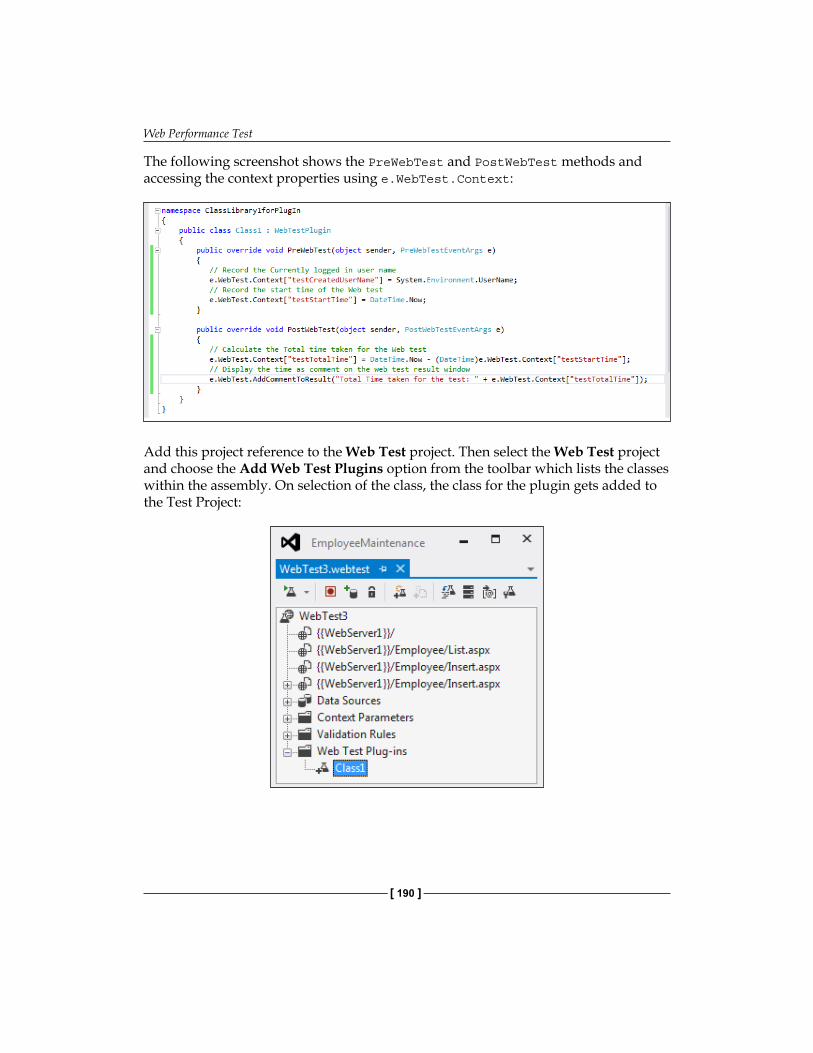
Web Performance Test
[ 190 ]
The following screenshot shows the PreWebTest and PostWebTest methods and accessing the context properties using e.WebTest.Context:
Add this project reference to the Web Test project. Then select the Web Test project and choose the Add Web Test Plugins option from the toolbar which lists the classes within the assembly. On selection of the class, the class for the plugin gets added to the Test Project:
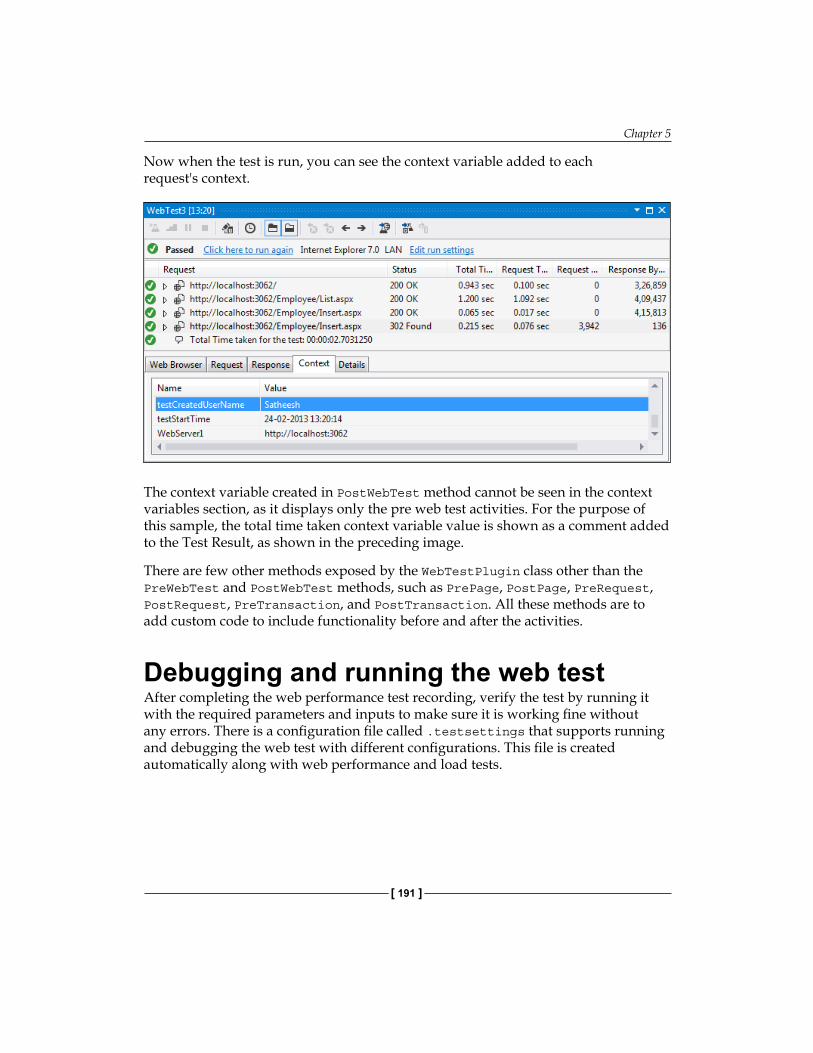
Chapter 5
[ 191 ]
Now when the test is run, you can see the context variable added to each request's context.
The context variable created in PostWebTest method cannot be seen in the context variables section, as it displays only the pre web test activities. For the purpose of this sample, the total time taken context variable value is shown as a comment added to the Test Result, as shown in the preceding image.
There are few other methods exposed by the WebTestPlugin class other than the PreWebTest and PostWebTest methods, such as PrePage, PostPage, PreRequest, PostRequest, PreTransaction, and PostTransaction. All these methods are to add custom code to include functionality before and after the activities.
Debugging and running the web testAfter completing the web performance test recording, verify the test by running it with the required parameters and inputs to make sure it is working fine without any errors. There is a configuration file called .testsettings that supports running and debugging the web test with different configurations. This file is created automatically along with web performance and load tests.
Web Performance Test
[ 192 ]
Settings in the .testsettings fileMost of the assemblies built in .NET are associated with a common configuration file to hold the general settings required for the application. Similarly the web performance Test Project creates a test settings file by default with the extension .testsettings.
Local.testsettings is the default file name given to the test settings file as there is no change to the configurations and there is no data diagnostics yet.
GeneralThe General section in the settings file is used to rename the default file name and to set the user defined scheme for the output file, instead of using the default scheme. Additional details, such as a description about the test settings file can also be set in this section:
• Name: Specifies the name for the settings file.• Description: Provides a short description of the test configuration. In case
of maintaining multiple configuration files, we can use this field to briefly describe the changes from the previous settings.
• Test Run naming scheme: When the test is run, the results are created and stored under a specific name in the application results folder. By default, the name is the current windows user name followed by the @ symbol, the machine name, and the current date and time. The next option is to specify the user defined scheme to use a prefix text and append with date/time stamp. One of these options can be chosen to set the output file name format.
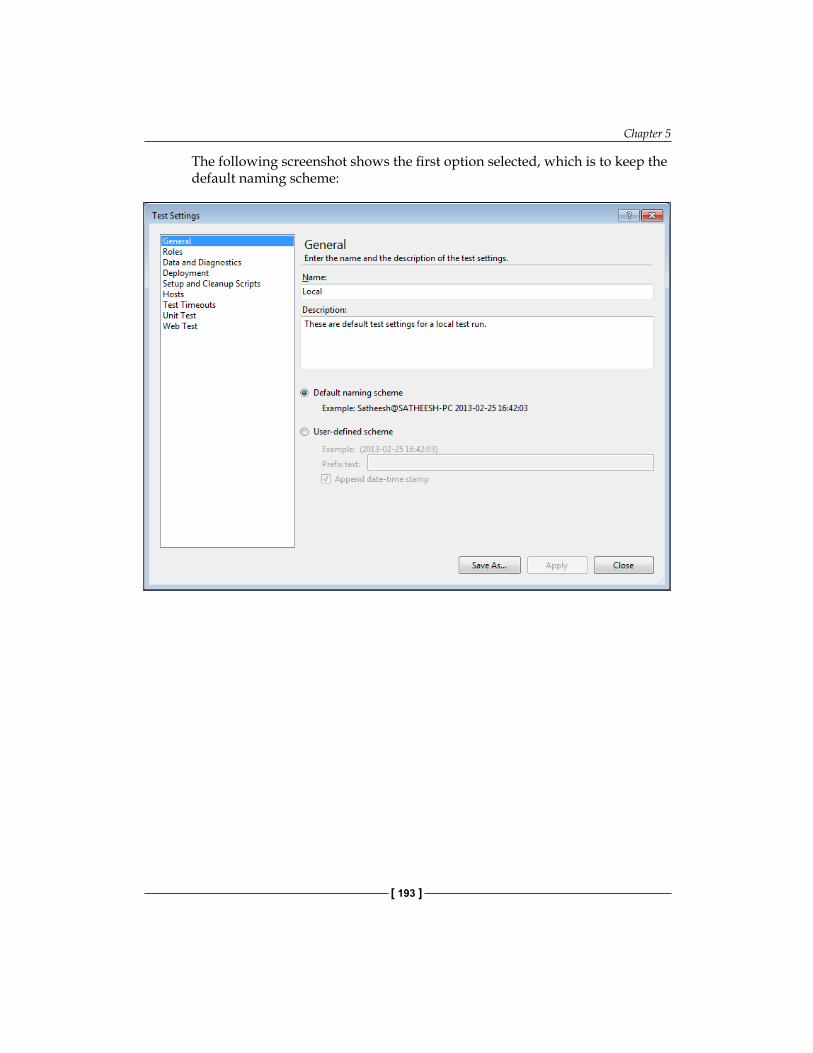
Chapter 5
[ 193 ]
The following screenshot shows the first option selected, which is to keep the default naming scheme:
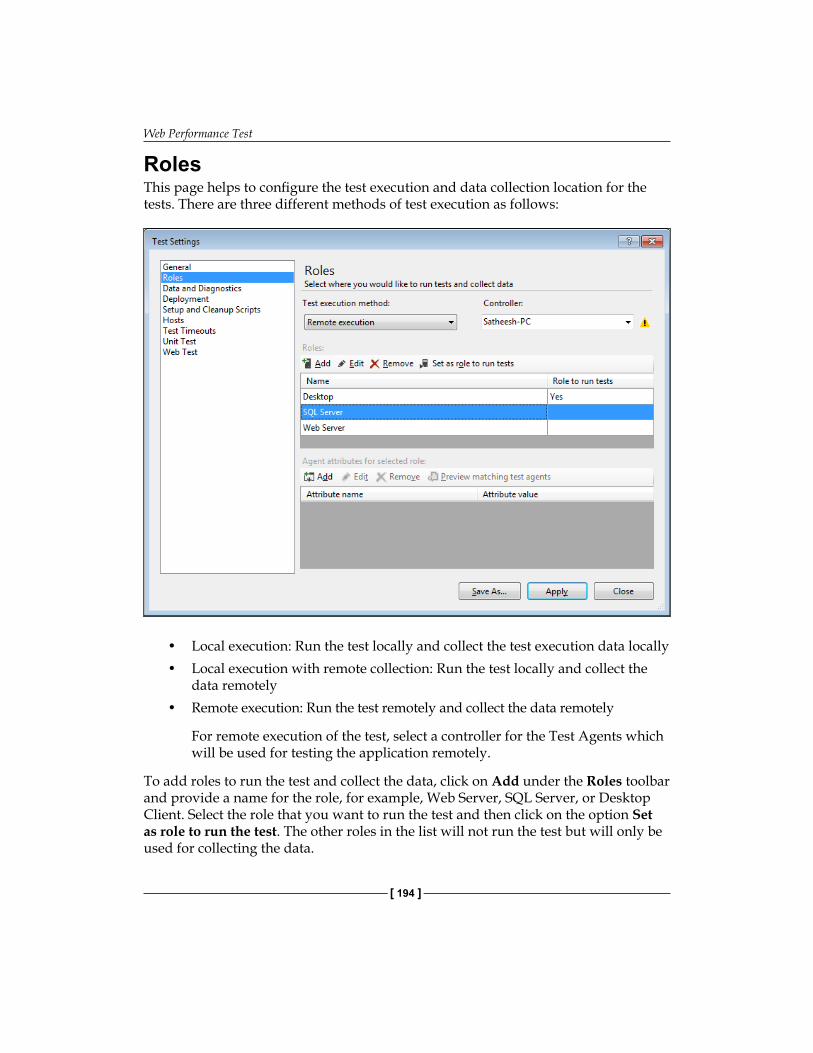
Web Performance Test
[ 194 ]
RolesThis page helps to configure the test execution and data collection location for the tests. There are three different methods of test execution as follows:
• Local execution: Run the test locally and collect the test execution data locally• Local execution with remote collection: Run the test locally and collect the
data remotely• Remote execution: Run the test remotely and collect the data remotely
For remote execution of the test, select a controller for the Test Agents which will be used for testing the application remotely.
To add roles to run the test and collect the data, click on Add under the Roles toolbar and provide a name for the role, for example, Web Server, SQL Server, or Desktop Client. Select the role that you want to run the test and then click on the option Set as role to run the test. The other roles in the list will not run the test but will only be used for collecting the data.
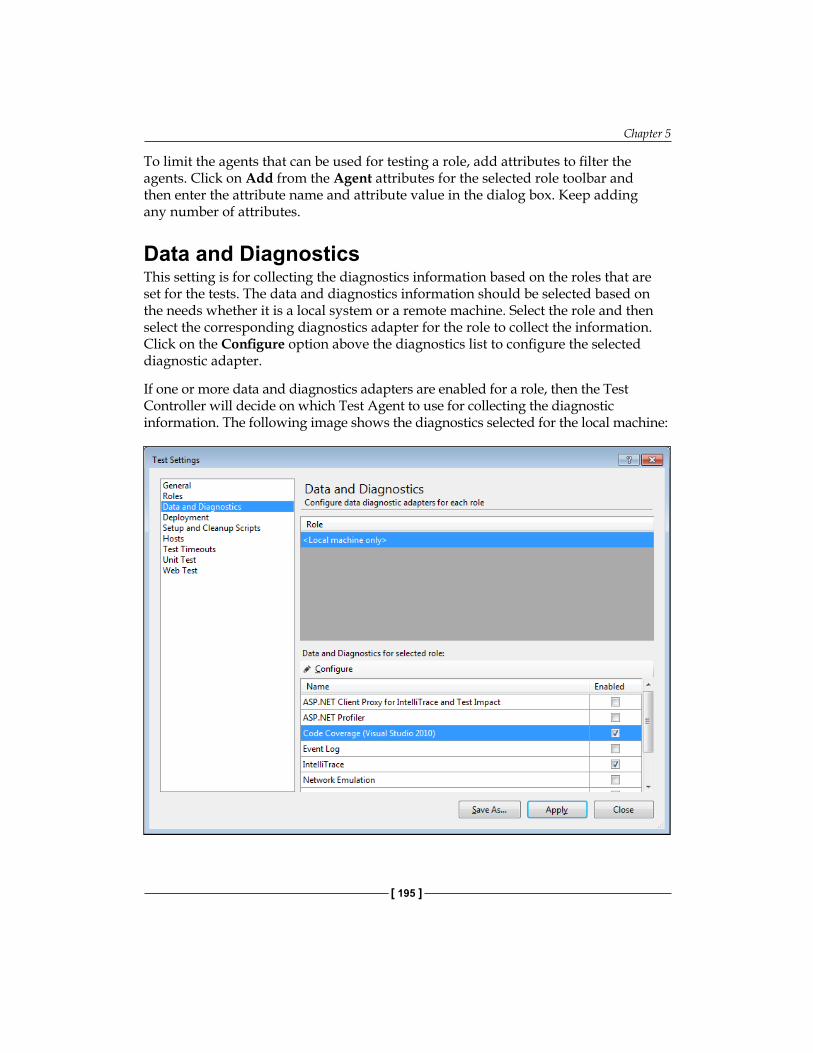
Chapter 5
[ 195 ]
To limit the agents that can be used for testing a role, add attributes to filter the agents. Click on Add from the Agent attributes for the selected role toolbar and then enter the attribute name and attribute value in the dialog box. Keep adding any number of attributes.
Data and DiagnosticsThis setting is for collecting the diagnostics information based on the roles that are set for the tests. The data and diagnostics information should be selected based on the needs whether it is a local system or a remote machine. Select the role and then select the corresponding diagnostics adapter for the role to collect the information. Click on the Configure option above the diagnostics list to configure the selected diagnostic adapter.
If one or more data and diagnostics adapters are enabled for a role, then the Test Controller will decide on which Test Agent to use for collecting the diagnostic information. The following image shows the diagnostics selected for the local machine:
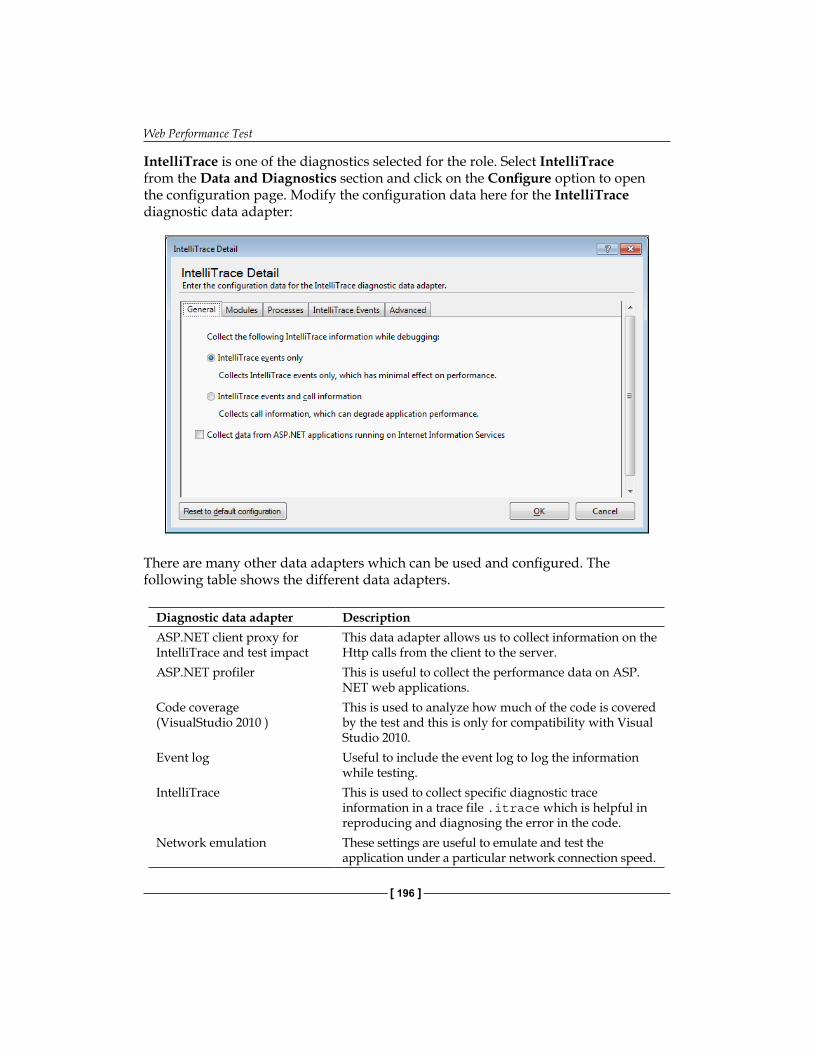
Web Performance Test
[ 196 ]
IntelliTrace is one of the diagnostics selected for the role. Select IntelliTrace from the Data and Diagnostics section and click on the Configure option to open the configuration page. Modify the configuration data here for the IntelliTrace diagnostic data adapter:
There are many other data adapters which can be used and configured. The following table shows the different data adapters.
Diagnostic data adapter DescriptionASP.NET client proxy for IntelliTrace and test impact
This data adapter allows us to collect information on the Http calls from the client to the server.
ASP.NET profiler This is useful to collect the performance data on ASP.NET web applications.
Code coverage (VisualStudio 2010 )
This is used to analyze how much of the code is covered by the test and this is only for compatibility with Visual Studio 2010.
Event log Useful to include the event log to log the information while testing.
IntelliTrace This is used to collect specific diagnostic trace information in a trace file .itrace which is helpful in reproducing and diagnosing the error in the code.
Network emulation These settings are useful to emulate and test the application under a particular network connection speed.
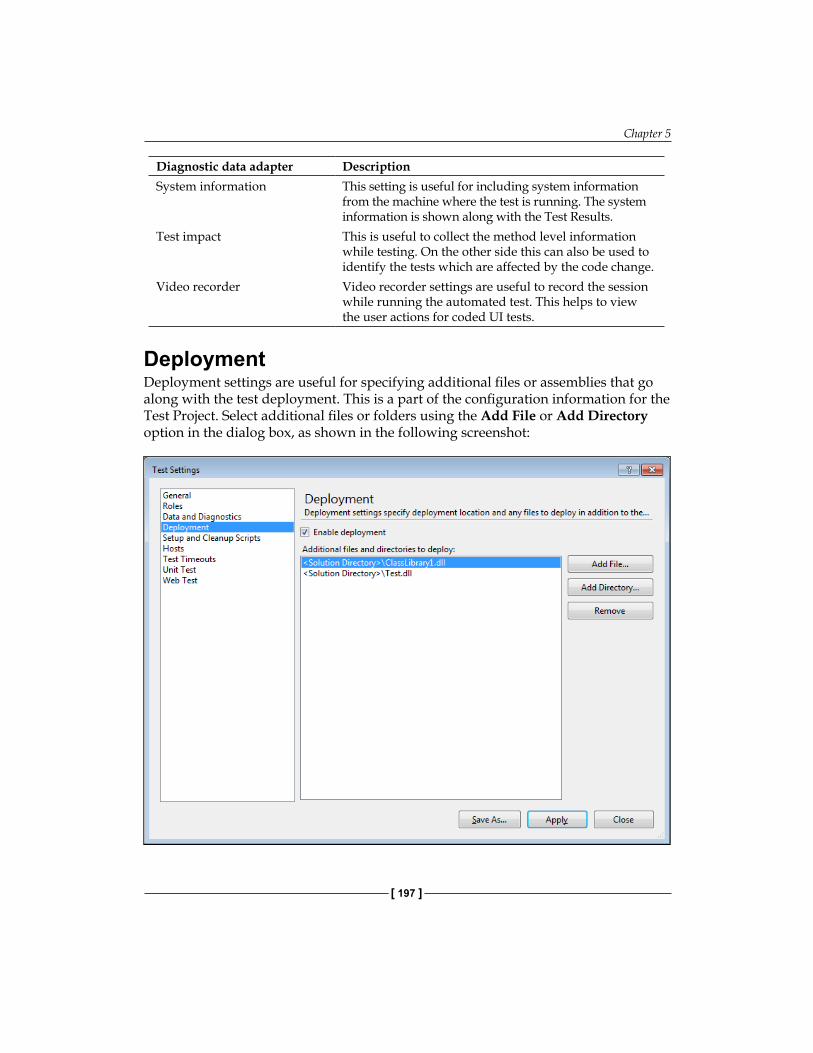
Chapter 5
[ 197 ]
Diagnostic data adapter DescriptionSystem information This setting is useful for including system information
from the machine where the test is running. The system information is shown along with the Test Results.
Test impact This is useful to collect the method level information while testing. On the other side this can also be used to identify the tests which are affected by the code change.
Video recorder Video recorder settings are useful to record the session while running the automated test. This helps to view the user actions for coded UI tests.
DeploymentDeployment settings are useful for specifying additional files or assemblies that go along with the test deployment. This is a part of the configuration information for the Test Project. Select additional files or folders using the Add File or Add Directory option in the dialog box, as shown in the following screenshot:
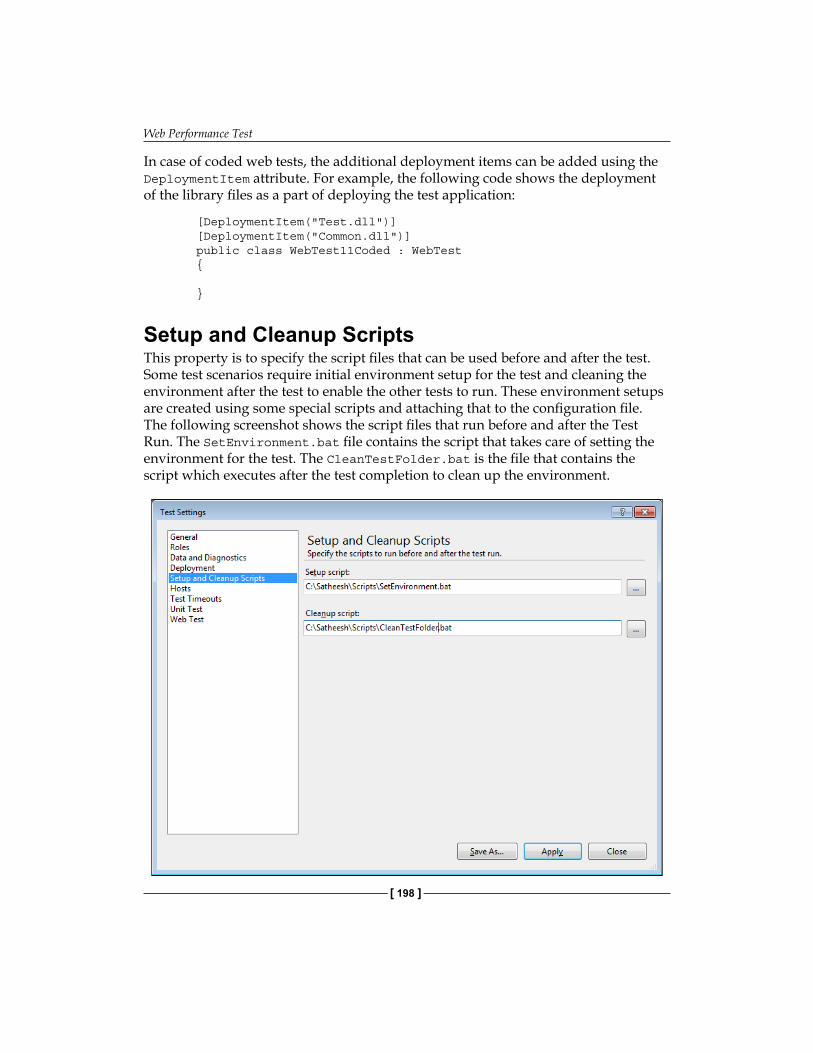
Web Performance Test
[ 198 ]
In case of coded web tests, the additional deployment items can be added using the DeploymentItem attribute. For example, the following code shows the deployment of the library files as a part of deploying the test application:
[DeploymentItem("Test.dll")] [DeploymentItem("Common.dll")] public class WebTest11Coded : WebTest {
}
Setup and Cleanup ScriptsThis property is to specify the script files that can be used before and after the test. Some test scenarios require initial environment setup for the test and cleaning the environment after the test to enable the other tests to run. These environment setups are created using some special scripts and attaching that to the configuration file. The following screenshot shows the script files that run before and after the Test Run. The SetEnvironment.bat file contains the script that takes care of setting the environment for the test. The CleanTestFolder.bat is the file that contains the script which executes after the test completion to clean up the environment.
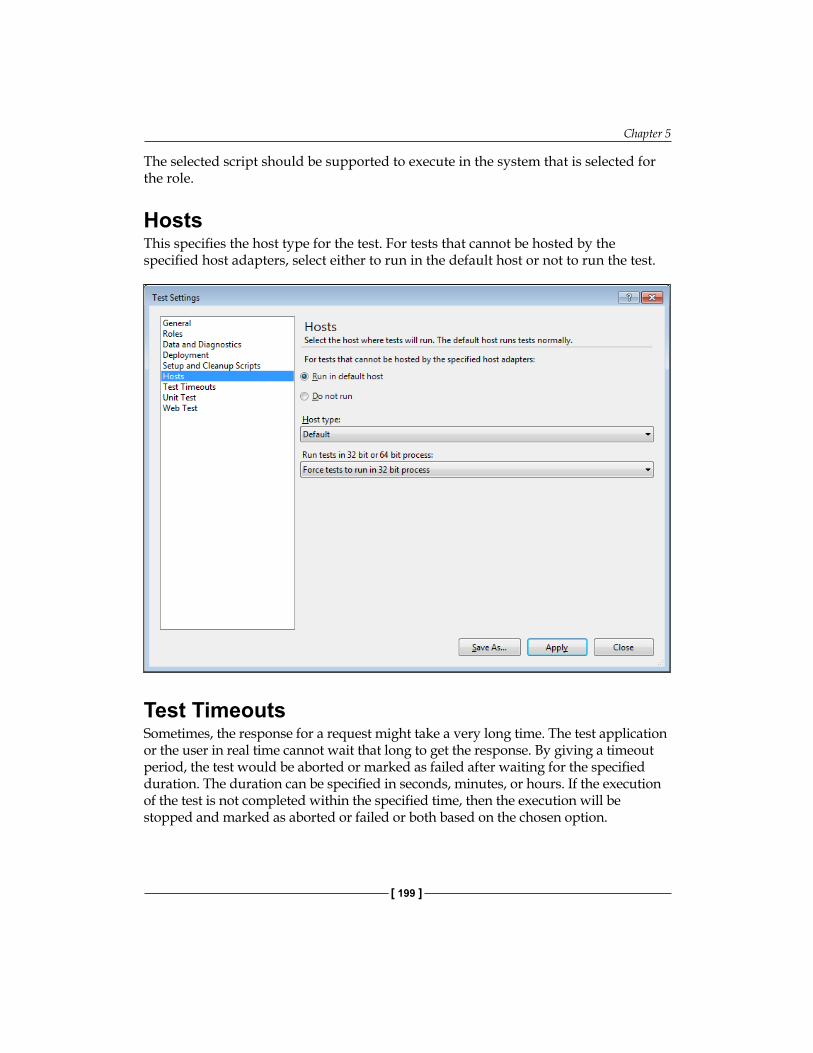
Chapter 5
[ 199 ]
The selected script should be supported to execute in the system that is selected for the role.
HostsThis specifies the host type for the test. For tests that cannot be hosted by the specified host adapters, select either to run in the default host or not to run the test.
Test TimeoutsSometimes, the response for a request might take a very long time. The test application or the user in real time cannot wait that long to get the response. By giving a timeout period, the test would be aborted or marked as failed after waiting for the specified duration. The duration can be specified in seconds, minutes, or hours. If the execution of the test is not completed within the specified time, then the execution will be stopped and marked as aborted or failed or both based on the chosen option.
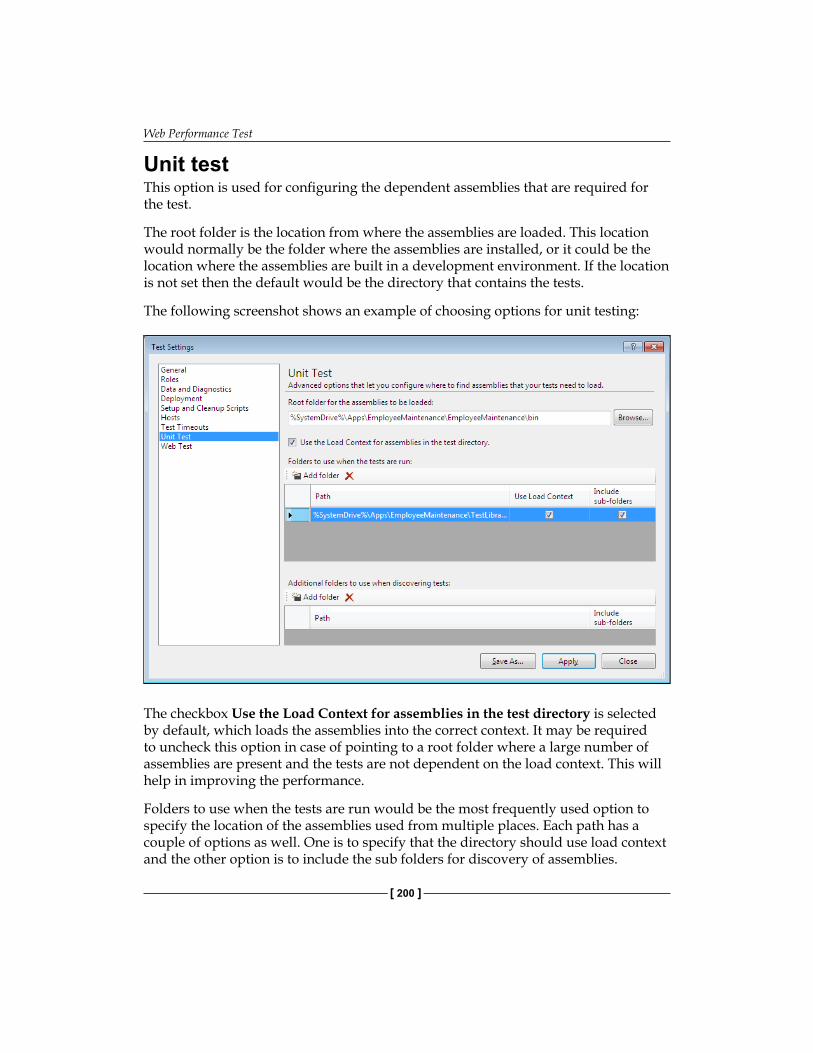
Web Performance Test
[ 200 ]
Unit testThis option is used for configuring the dependent assemblies that are required for the test.
The root folder is the location from where the assemblies are loaded. This location would normally be the folder where the assemblies are installed, or it could be the location where the assemblies are built in a development environment. If the location is not set then the default would be the directory that contains the tests.
The following screenshot shows an example of choosing options for unit testing:
The checkbox Use the Load Context for assemblies in the test directory is selected by default, which loads the assemblies into the correct context. It may be required to uncheck this option in case of pointing to a root folder where a large number of assemblies are present and the tests are not dependent on the load context. This will help in improving the performance.
Folders to use when the tests are run would be the most frequently used option to specify the location of the assemblies used from multiple places. Each path has a couple of options as well. One is to specify that the directory should use load context and the other option is to include the sub folders for discovery of assemblies.
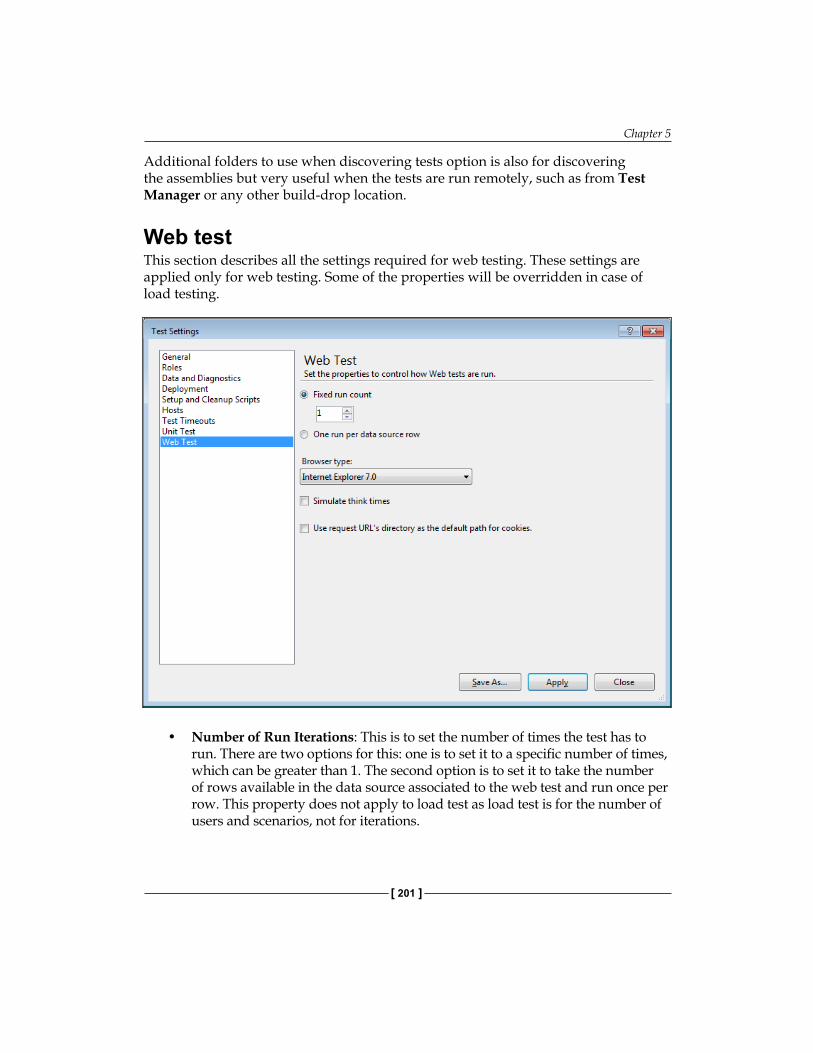
Chapter 5
[ 201 ]
Additional folders to use when discovering tests option is also for discovering the assemblies but very useful when the tests are run remotely, such as from Test Manager or any other build-drop location.
Web testThis section describes all the settings required for web testing. These settings are applied only for web testing. Some of the properties will be overridden in case of load testing.
• Number of Run Iterations: This is to set the number of times the test has to run. There are two options for this: one is to set it to a specific number of times, which can be greater than 1. The second option is to set it to take the number of rows available in the data source associated to the web test and run once per row. This property does not apply to load test as load test is for the number of users and scenarios, not for iterations.
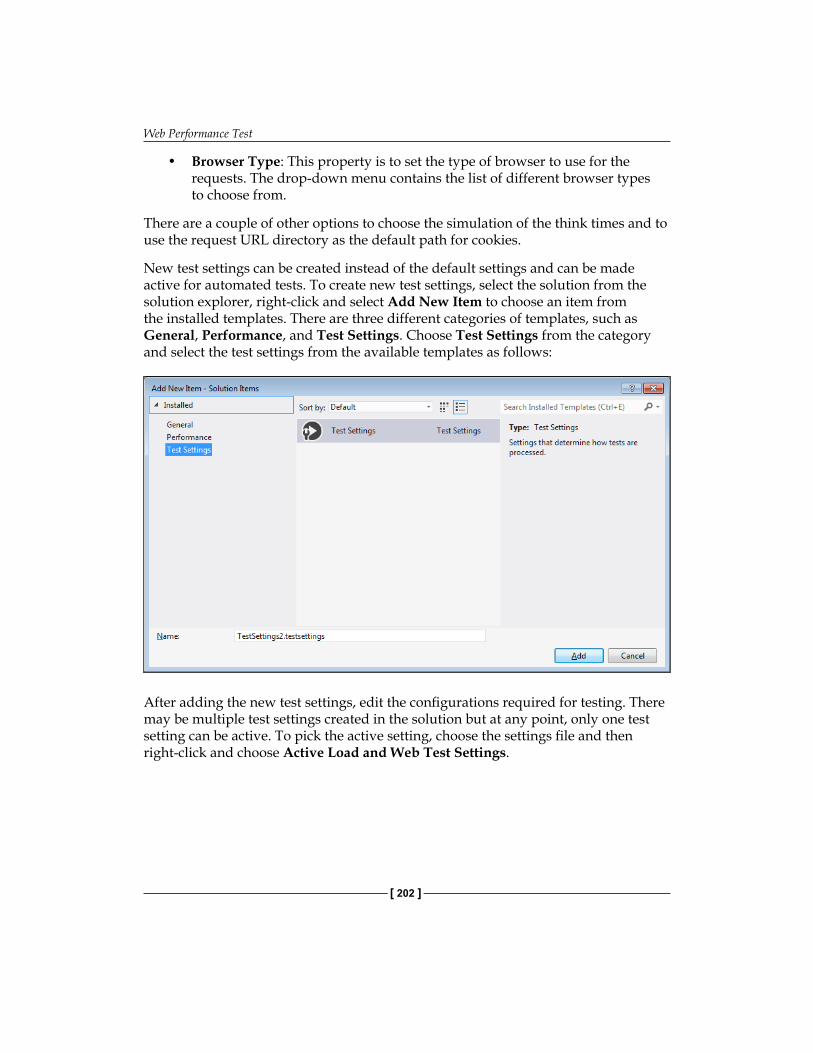
Web Performance Test
[ 202 ]
• Browser Type: This property is to set the type of browser to use for the requests. The drop-down menu contains the list of different browser types to choose from.
There are a couple of other options to choose the simulation of the think times and to use the request URL directory as the default path for cookies.
New test settings can be created instead of the default settings and can be made active for automated tests. To create new test settings, select the solution from the solution explorer, right-click and select Add New Item to choose an item from the installed templates. There are three different categories of templates, such as General, Performance, and Test Settings. Choose Test Settings from the category and select the test settings from the available templates as follows:
After adding the new test settings, edit the configurations required for testing. There may be multiple test settings created in the solution but at any point, only one test setting can be active. To pick the active setting, choose the settings file and then right-click and choose Active Load and Web Test Settings.
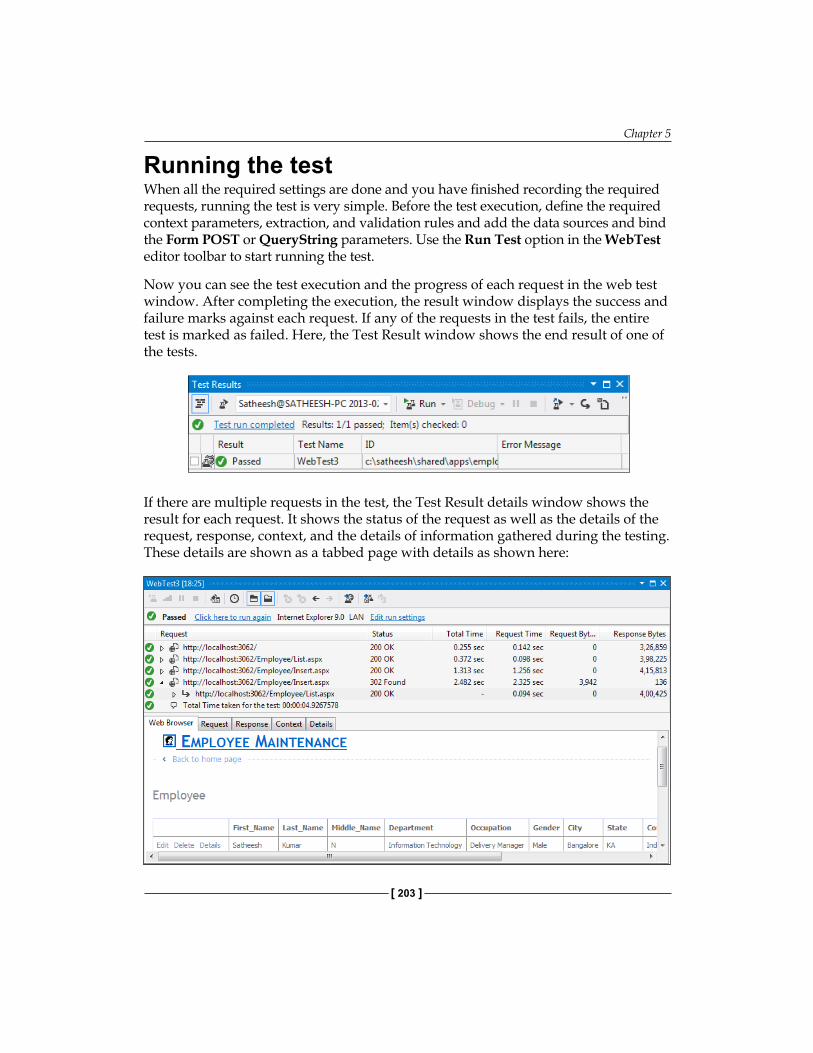
Chapter 5
[ 203 ]
Running the testWhen all the required settings are done and you have finished recording the required requests, running the test is very simple. Before the test execution, define the required context parameters, extraction, and validation rules and add the data sources and bind the Form POST or QueryString parameters. Use the Run Test option in the WebTest editor toolbar to start running the test.
Now you can see the test execution and the progress of each request in the web test window. After completing the execution, the result window displays the success and failure marks against each request. If any of the requests in the test fails, the entire test is marked as failed. Here, the Test Result window shows the end result of one of the tests.
If there are multiple requests in the test, the Test Result details window shows the result for each request. It shows the status of the request as well as the details of the request, response, context, and the details of information gathered during the testing. These details are shown as a tabbed page with details as shown here:
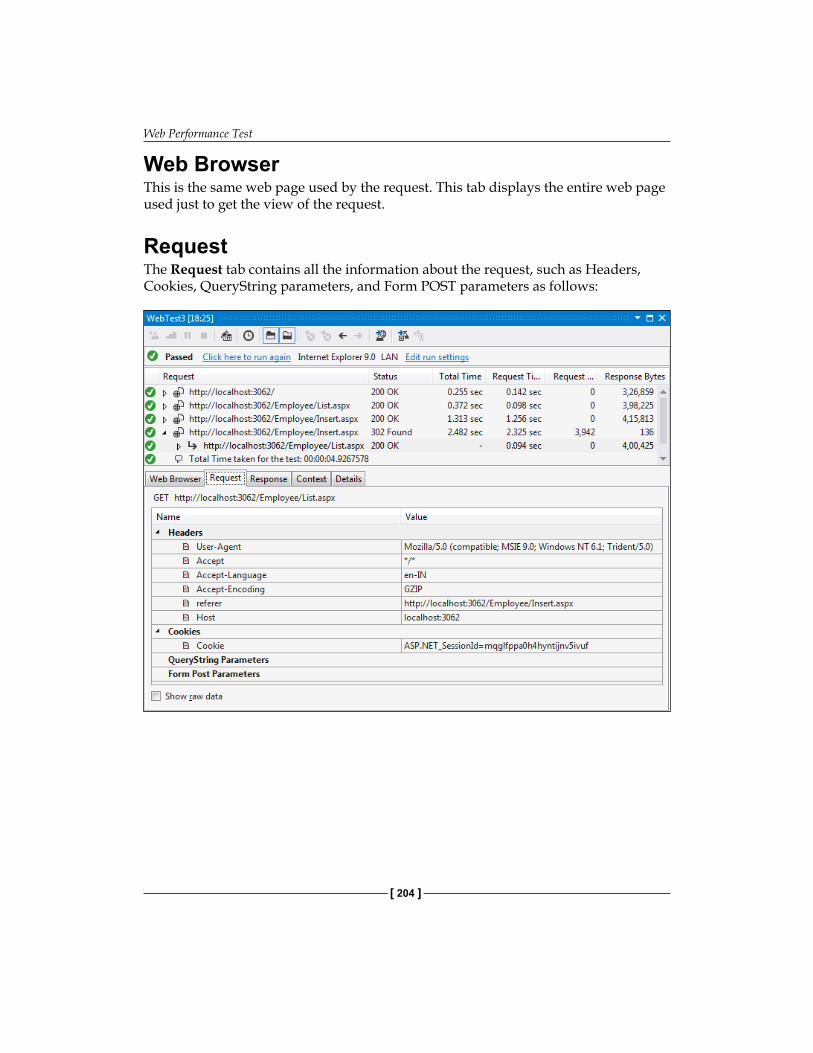
Web Performance Test
[ 204 ]
Web BrowserThis is the same web page used by the request. This tab displays the entire web page used just to get the view of the request.
RequestThe Request tab contains all the information about the request, such as Headers, Cookies, QueryString parameters, and Form POST parameters as follows:
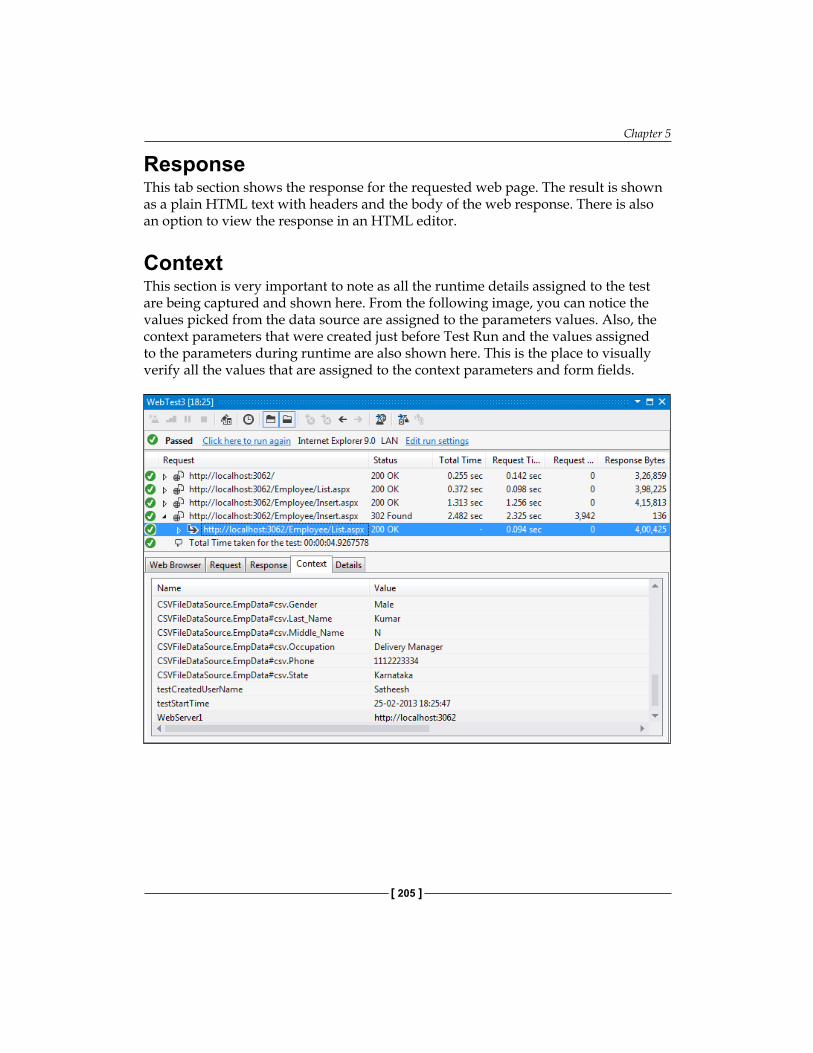
Chapter 5
[ 205 ]
ResponseThis tab section shows the response for the requested web page. The result is shown as a plain HTML text with headers and the body of the web response. There is also an option to view the response in an HTML editor.
ContextThis section is very important to note as all the runtime details assigned to the test are being captured and shown here. From the following image, you can notice the values picked from the data source are assigned to the parameters values. Also, the context parameters that were created just before Test Run and the values assigned to the parameters during runtime are also shown here. This is the place to visually verify all the values that are assigned to the context parameters and form fields.
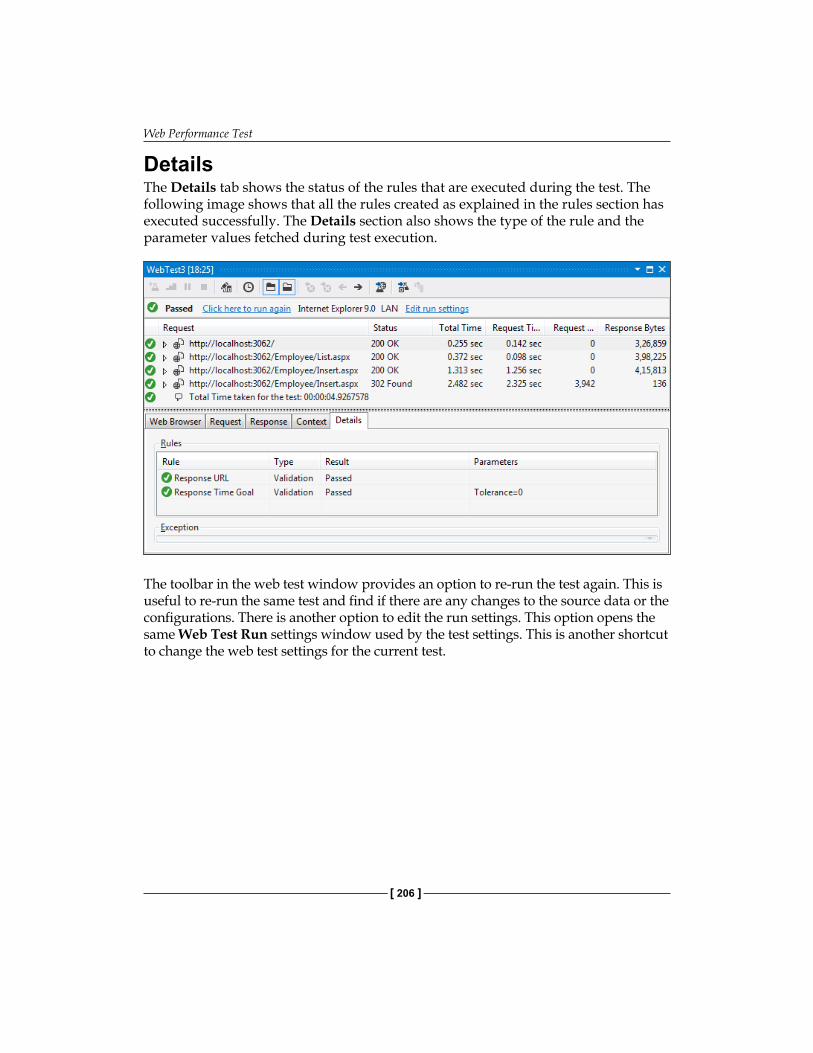
Web Performance Test
[ 206 ]
DetailsThe Details tab shows the status of the rules that are executed during the test. The following image shows that all the rules created as explained in the rules section has executed successfully. The Details section also shows the type of the rule and the parameter values fetched during test execution.
The toolbar in the web test window provides an option to re-run the test again. This is useful to re-run the same test and find if there are any changes to the source data or the configurations. There is another option to edit the run settings. This option opens the same Web Test Run settings window used by the test settings. This is another shortcut to change the web test settings for the current test.
Chapter 5
[ 207 ]
SummaryThis chapter explained in detail about how web performance testing works, and how the recording of web tests takes place for the web applications. We have learned the usage of the different properties of web performance tests including copying the tests, cleaning the unwanted recorded requests, and extracting the details from the request whether it has Form POST parameters or QueryString parameters. This chapter also explained about setting the rules for validating and extracting the details based on certain conditions. The current version of Visual Studio has brought in a few new features, such as adding loops and adding conditions to the requests which are very useful for tests. Transactions are useful to group a set of similar requests and give it a name. We have learnt how to include different data sources and map the fields to the data source fields and also parameterize fields and web server names.
The final section of this chapter explained about executing the tests and collecting the results. Some more advanced web testing features using custom code in tests are covered in detail in the next chapter. The advanced web testing features comprise generating code from the web test recording and then customizing the code as per the need. The other features include debugging and adding custom rules to the code.

Advanced Web TestingThis chapter is a continuation of the previous chapter, which explained web performance testing in detail including the recording and running of a testing scenario based on user actions. There is another way of performing the same web test using Visual Studio: by generating code from the action recording using the Generate Code option in the Web Performance Test toolbar. The coded web performance test is the .NET class that generates the sequence of web requests in the order they were recorded. The class can be written in C# or Visual Basic.
It is possible to create such code by creating a new class file and using the namespace Microsoft.VisualStudio.TestTools.WebTesting, which contains all classes required for creating the web performance test. However, it is too complex to create the test manually, compared to generating the code from the recording. Therefore, it is suggested practice to convert the recorded web performance test. The testing is the same whether it is done using the generated code or through normal web testing using the user interface; the advantage is the flexibility of customizing the test by using the .NET framework language. The generated code can be modified using the language to add looping, conditions and branching, and also to add more requests and to remove existing requests.
This chapter concentrates on explaining how to generate code from a recorded test and then customizing it. The different sections within this chapter cover the following topics:
• Generating code from a recorded test• Adding transactions and comments• Debugging a coded web test• Adding custom rules to the test
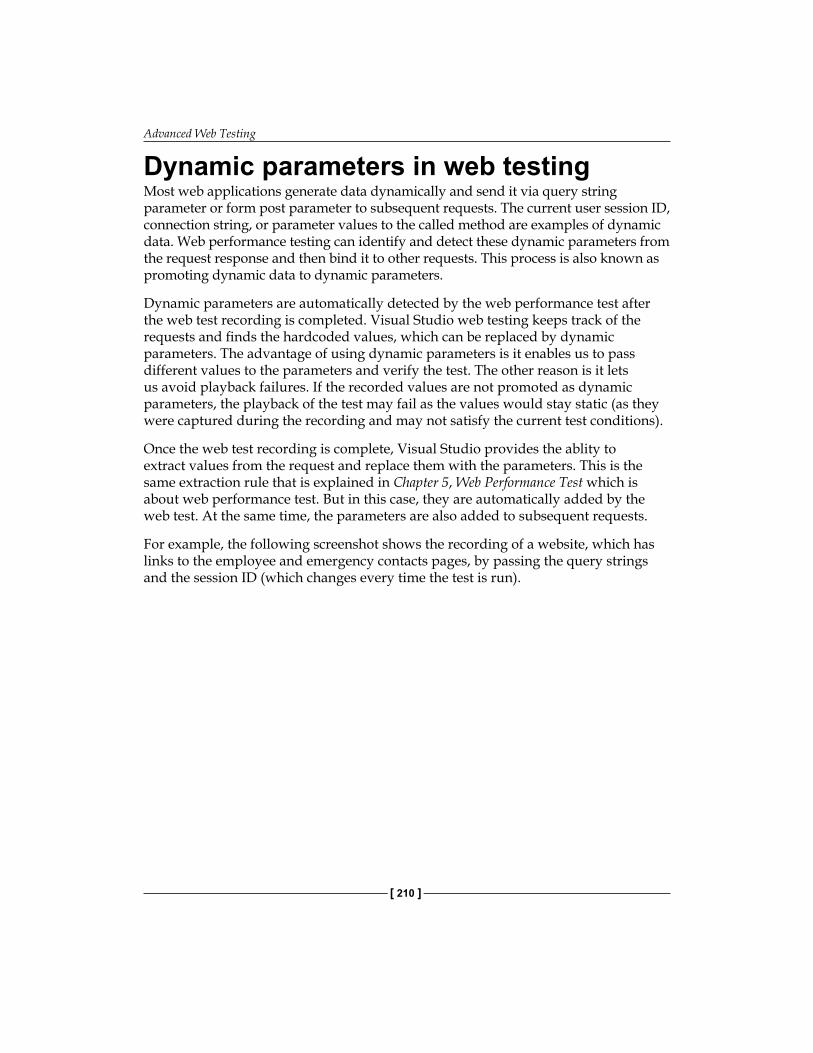
Advanced Web Testing
[ 210 ]
Dynamic parameters in web testingMost web applications generate data dynamically and send it via query string parameter or form post parameter to subsequent requests. The current user session ID, connection string, or parameter values to the called method are examples of dynamic data. Web performance testing can identify and detect these dynamic parameters from the request response and then bind it to other requests. This process is also known as promoting dynamic data to dynamic parameters.
Dynamic parameters are automatically detected by the web performance test after the web test recording is completed. Visual Studio web testing keeps track of the requests and finds the hardcoded values, which can be replaced by dynamic parameters. The advantage of using dynamic parameters is it enables us to pass different values to the parameters and verify the test. The other reason is it lets us avoid playback failures. If the recorded values are not promoted as dynamic parameters, the playback of the test may fail as the values would stay static (as they were captured during the recording and may not satisfy the current test conditions).
Once the web test recording is complete, Visual Studio provides the ablity to extract values from the request and replace them with the parameters. This is the same extraction rule that is explained in Chapter 5, Web Performance Test which is about web performance test. But in this case, they are automatically added by the web test. At the same time, the parameters are also added to subsequent requests.
For example, the following screenshot shows the recording of a website, which has links to the employee and emergency contacts pages, by passing the query strings and the session ID (which changes every time the test is run).
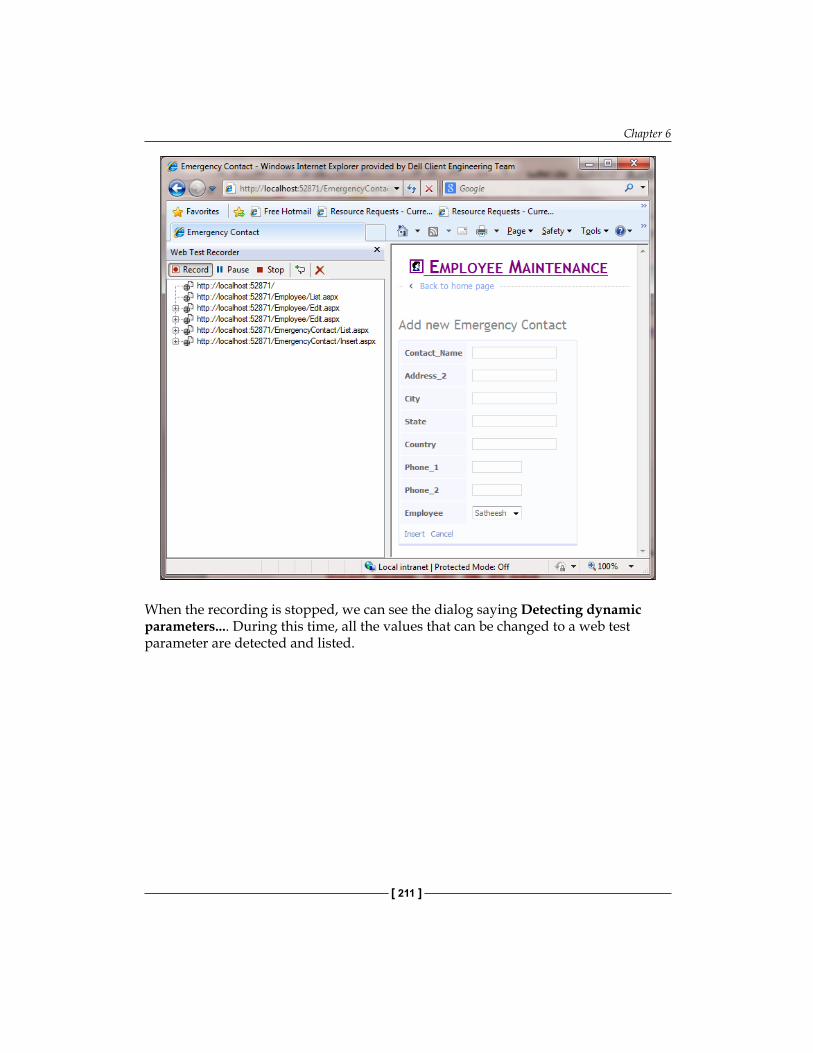
Chapter 6
[ 211 ]
When the recording is stopped, we can see the dialog saying Detecting dynamic parameters.... During this time, all the values that can be changed to a web test parameter are detected and listed.
Advanced Web Testing
[ 212 ]
Visual Studio lists the parameters that can be promoted to web test parameters from normal hardcoded values, and allows the tester (who is recording the test) to choose one. We can either choose OK to promote the parameters, or we can Cancel the suggestion and keep it hardcoded.
Note that if we leave the parameters as is, the next playback of the test might fail because the hardcoded value may not be valid.
Visual Studio also provides the option of detecting dynamic parameters outside the recording, which means that there is an option in the toolbar to promote the parameters after the completion of recording as well.
Coded web testThe coded web test generates the code for the sequence of web-test requests. The main advantage is to add more complex features such as looping, adding more requests, or adding any additional logic to the test using the .NET programming languages C# and Visual Basic. The recorded web test is simple, but the coded web test gives more flexibility.
It is suggested practice that the web test should be recorded and then converted to coded web test by defining the data sources, extraction rules, validation rules, and binding the form post fields to the data source. This can let the tool generate the basic code and concentrate on customizing it with additional features.
The other advantage of coded tests is full control of the test execution. It's just a class file, which is created with the language of our choice (either C# or Visual Basic). Once the class file is created, custom code can be included for the required functionality.
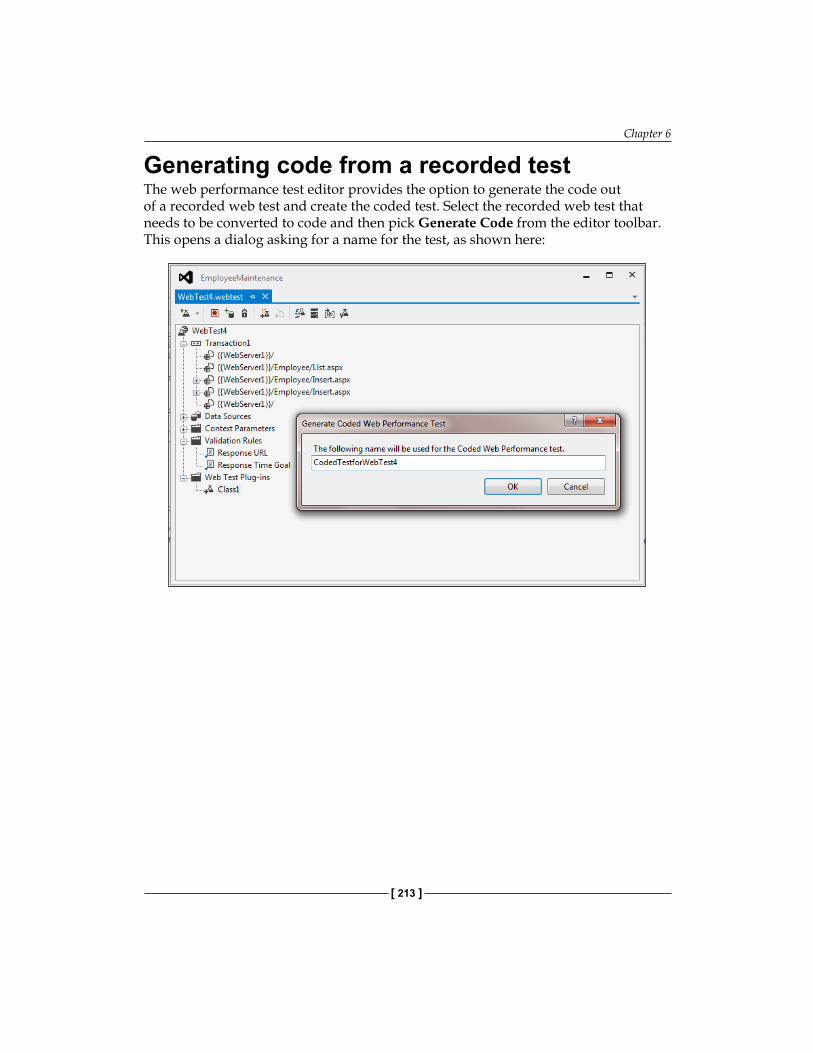
Chapter 6
[ 213 ]
Generating code from a recorded testThe web performance test editor provides the option to generate the code out of a recorded web test and create the coded test. Select the recorded web test that needs to be converted to code and then pick Generate Code from the editor toolbar. This opens a dialog asking for a name for the test, as shown here:
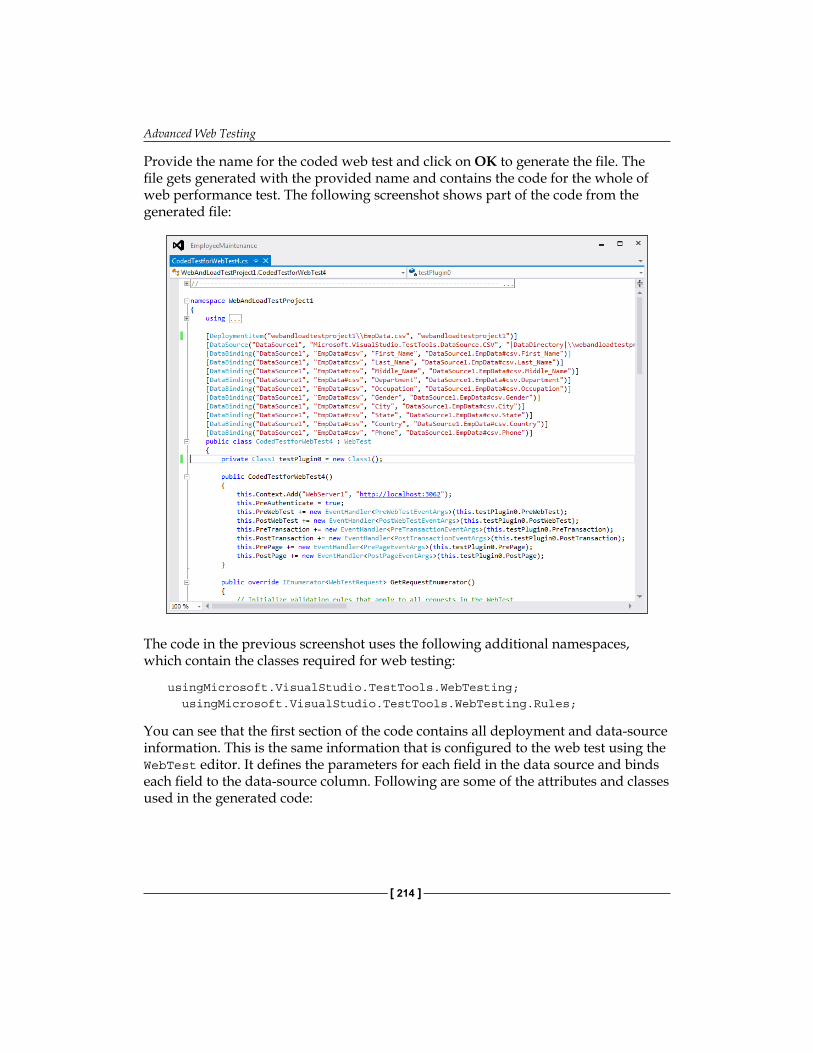
Advanced Web Testing
[ 214 ]
Provide the name for the coded web test and click on OK to generate the file. The file gets generated with the provided name and contains the code for the whole of web performance test. The following screenshot shows part of the code from the generated file:
The code in the previous screenshot uses the following additional namespaces, which contain the classes required for web testing:
usingMicrosoft.VisualStudio.TestTools.WebTesting; usingMicrosoft.VisualStudio.TestTools.WebTesting.Rules;
You can see that the first section of the code contains all deployment and data-source information. This is the same information that is configured to the web test using the WebTest editor. It defines the parameters for each field in the data source and binds each field to the data-source column. Following are some of the attributes and classes used in the generated code:
Chapter 6
[ 215 ]
• DeploymentItem: This specifies whether the additional files should be deployed as part of the deployment. In the previous example, the data source file is added as a deployment item:[DeploymentItem('webandloadtestproject1\\EmpData.csv', 'webandloadtestproject1')]
• DataSource: This attribute specifies any datafile or database that is added as the source of information for the fields. The source can be a CSV, XML, or any other database. The attribute contains the name of the data source, the connection string to access the data source, location, the mode of accessing the data (such as Sequential, Random, or Unique), and the table name to access. In the case of Microsoft Excel, each spreadsheet can represent a table. For example, the following code block shows the data source attribute for a CSV file:[DataSource('DataSource1', 'Microsoft.VisualStudio.TestTools.DataSource.CSV', '|DataDirectory|\\webandloadtestproject1\\EmpData.csv', Microsoft.VisualStudio.TestTools.WebTesting.DataBindingAccessMethod.Sequential, Microsoft.VisualStudio.TestTools.WebTesting.DataBindingSelectColumns.SelectOnlyBoundColumns, 'EmpData#csv')]
• DataBinding: This attribute denotes the field or fields bound to the data-source column in the data-source table. For example, the following code block denotes three fields: First_Name, Last_Name, and Middle_Name. The attribute contains the name of the data source, the table name to refer within the source, the name for the field within the table, and the actual field name in the data source table. [DataBinding('DataSource1', 'EmpData#csv', 'First_Name', 'DataSource1.EmpData#csv.First_Name')] [DataBinding('DataSource1', 'EmpData#csv', 'Last_Name', 'DataSource1.EmpData#csv.Last_Name')][DataBinding('DataSource1', 'EmpData#csv', 'Middle_Name', 'DataSource1.EmpData#csv.Middle_Name')]
• WebTest: This is the base class for all web tests. Coded web tests are directly derived from this base class. In the example, the class WebTest4Coded is derived from this WebTest class.
Advanced Web Testing
[ 216 ]
• Web Test (constructor): This constructor is for initializing a new instance of the class. It includes the context variables for the test, for example the WebServerName. This is the main context variable which is used by all the requests within the test and is replaced by the actual value during the Test Run. The next thing is to set the credentials for the web test to run. It can be set with credentials or pre-authenticated to run the test. All global declarations with respect to the web test are done at the constructor level.
• PreWebTest and PostWebTest (for web tests and requests): These events occur before and after the test. These events are mainly used for setting the environment for the test before the Test Run and for cleaning the environment after the test is completed.this.PreWebTest += newEventHandler<PreWebTestEventArgs>(this.testPlugin0.PreWebTest);this.PostWebTest += newEventHandler<PostWebTestEventArgs>(this.testPlugin0.PostWebTest);
• PreTransaction and PostTransaction: These events are for web transactions. These WebTestPlugin methods handle events before and after the transaction, associated with the web performance test. The PreTransaction callback is called just before starting the transaction in the web performance test and the PostTransaction callback is called just after the transaction is complete in the test.this.PreTransaction += newEventHandler<PreTransactionEventArgs>(this.testPlugin0.PreTransaction);this.PostTransaction += newEventHandler<PostTransactionEventArgs>(this.testPlugin0.PostTransaction);
• PrePage and PostPage: These are the WebtestPlugin methods that handle events before starting and just after completing the web page.this.PrePage += newEventHandler<PrePageEventArgs>(this.testPlugin0.PrePage);this.PostPage += newEventHandler<PostPageEventArgs>(this.testPlugin0.PostPage);
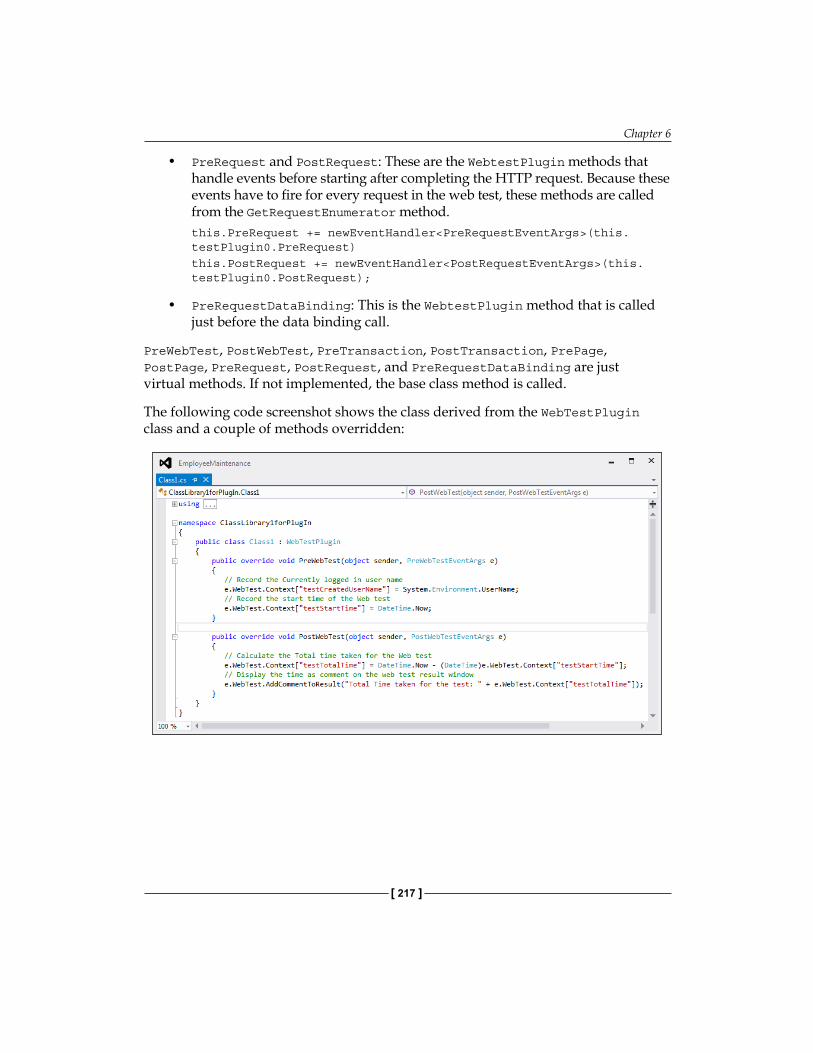
Chapter 6
[ 217 ]
• PreRequest and PostRequest: These are the WebtestPlugin methods that handle events before starting after completing the HTTP request. Because these events have to fire for every request in the web test, these methods are called from the GetRequestEnumerator method.this.PreRequest += newEventHandler<PreRequestEventArgs>(this.testPlugin0.PreRequest)this.PostRequest += newEventHandler<PostRequestEventArgs>(this.testPlugin0.PostRequest);
• PreRequestDataBinding: This is the WebtestPlugin method that is called just before the data binding call.
PreWebTest, PostWebTest, PreTransaction, PostTransaction, PrePage, PostPage, PreRequest, PostRequest, and PreRequestDataBinding are just virtual methods. If not implemented, the base class method is called.
The following code screenshot shows the class derived from the WebTestPlugin class and a couple of methods overridden:
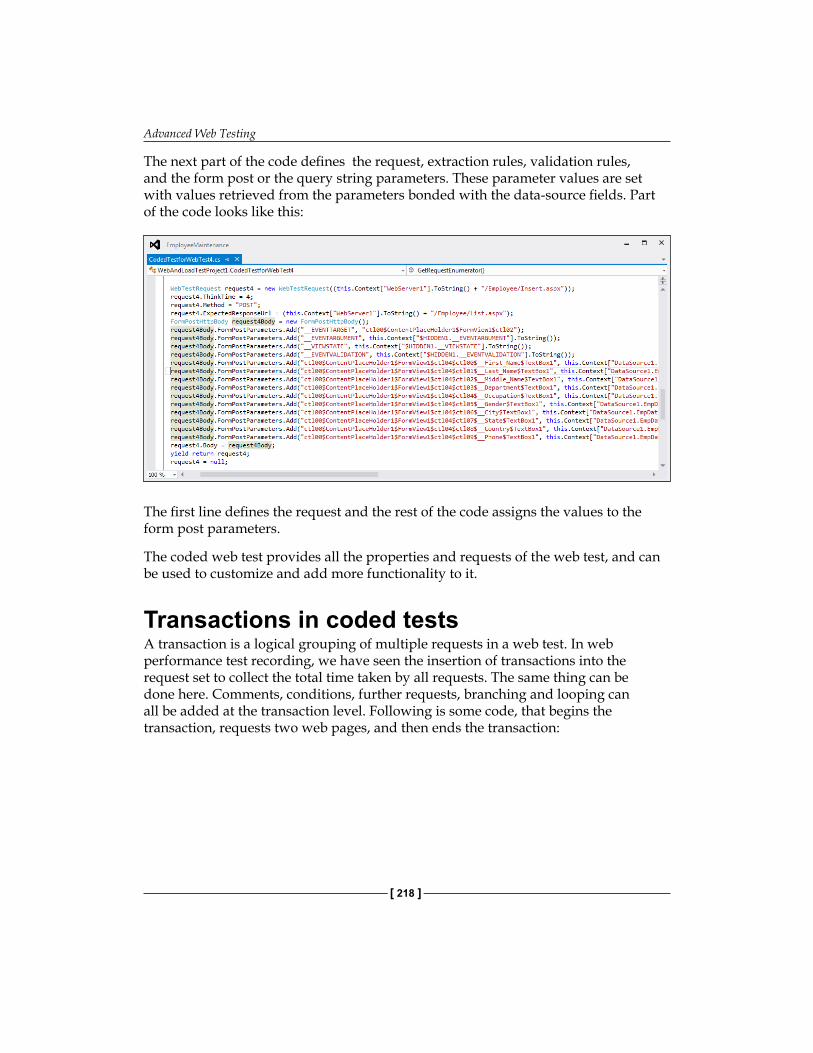
Advanced Web Testing
[ 218 ]
The next part of the code defines the request, extraction rules, validation rules, and the form post or the query string parameters. These parameter values are set with values retrieved from the parameters bonded with the data-source fields. Part of the code looks like this:
The first line defines the request and the rest of the code assigns the values to the form post parameters.
The coded web test provides all the properties and requests of the web test, and can be used to customize and add more functionality to it.
Transactions in coded testsA transaction is a logical grouping of multiple requests in a web test. In web performance test recording, we have seen the insertion of transactions into the request set to collect the total time taken by all requests. The same thing can be done here. Comments, conditions, further requests, branching and looping can all be added at the transaction level. Following is some code, that begins the transaction, requests two web pages, and then ends the transaction:
Chapter 6
[ 219 ]
this.BeginTransaction('Transaction1');
WebTestRequest request1 = newWebTestRequest((this.Context['WebServer1'].ToString() + '/')); request1.ThinkTime = 3;yieldreturn request1; request1 = null;
WebTestRequest request2 = newWebTestRequest((this.Context['WebServer1'].ToString() + '/Employee/List.aspx')); request2.ThinkTime = 2;yieldreturn request2; request2 = null;
this.EndTransaction('Transaction1');
Custom codeThe main advantage of coded web tests is customizing the code generated from a web performance test recording. For example, the following code adds a new web test request with think time and request method to the web test, if the value of the context parameter AddTestRequest is yes.
if (this.Context['AddAbsenceforEmployee'].ToString() == 'Yes') {WebTestRequest request6 = newWebTestRequest((this.Context['WebServerName'].ToString() + '/Absence/Insert.aspx')); request6.ThinkTime = 4;yieldreturn request6; request6 = null; }
Adding a commentThe AddCommentToResult method is used for adding comments to the web test. The code given here is an example for adding a comment to the Test Result from the web test code:
this.AddCommentToResult('Test custom comment added to the Web Test through code');
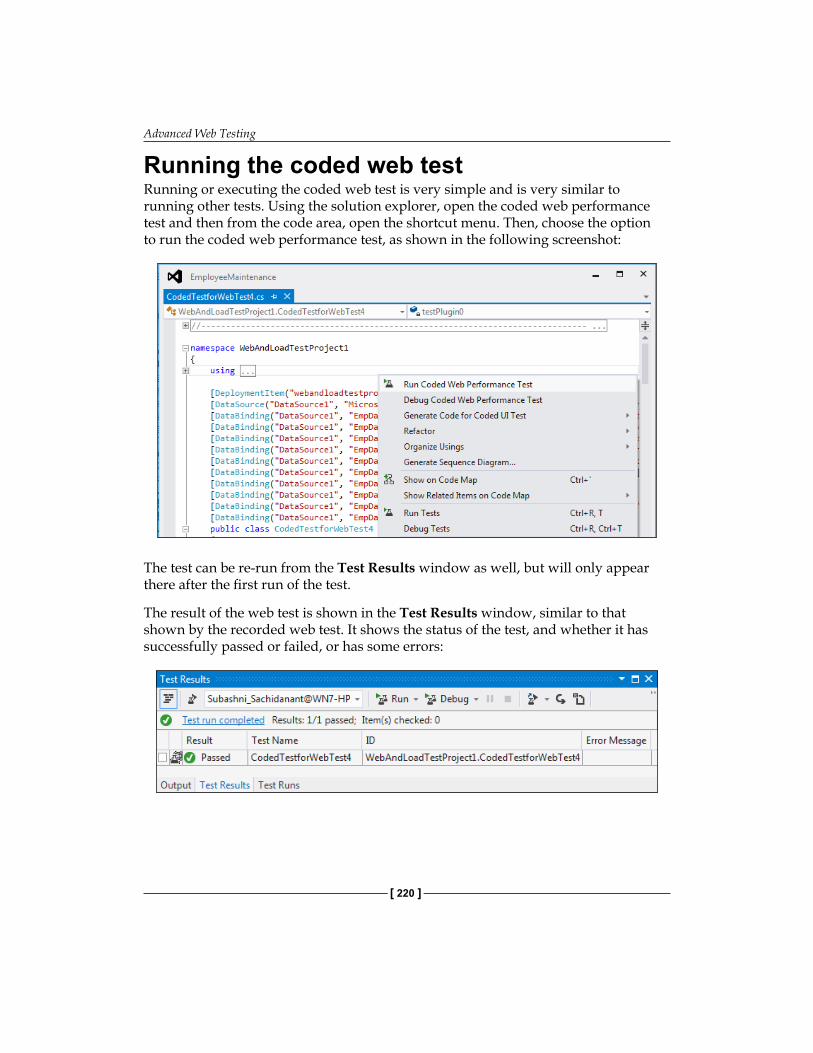
Advanced Web Testing
[ 220 ]
Running the coded web testRunning or executing the coded web test is very simple and is very similar to running other tests. Using the solution explorer, open the coded web performance test and then from the code area, open the shortcut menu. Then, choose the option to run the coded web performance test, as shown in the following screenshot:
The test can be re-run from the Test Results window as well, but will only appear there after the first run of the test.
The result of the web test is shown in the Test Results window, similar to that shown by the recorded web test. It shows the status of the test, and whether it has successfully passed or failed, or has some errors:
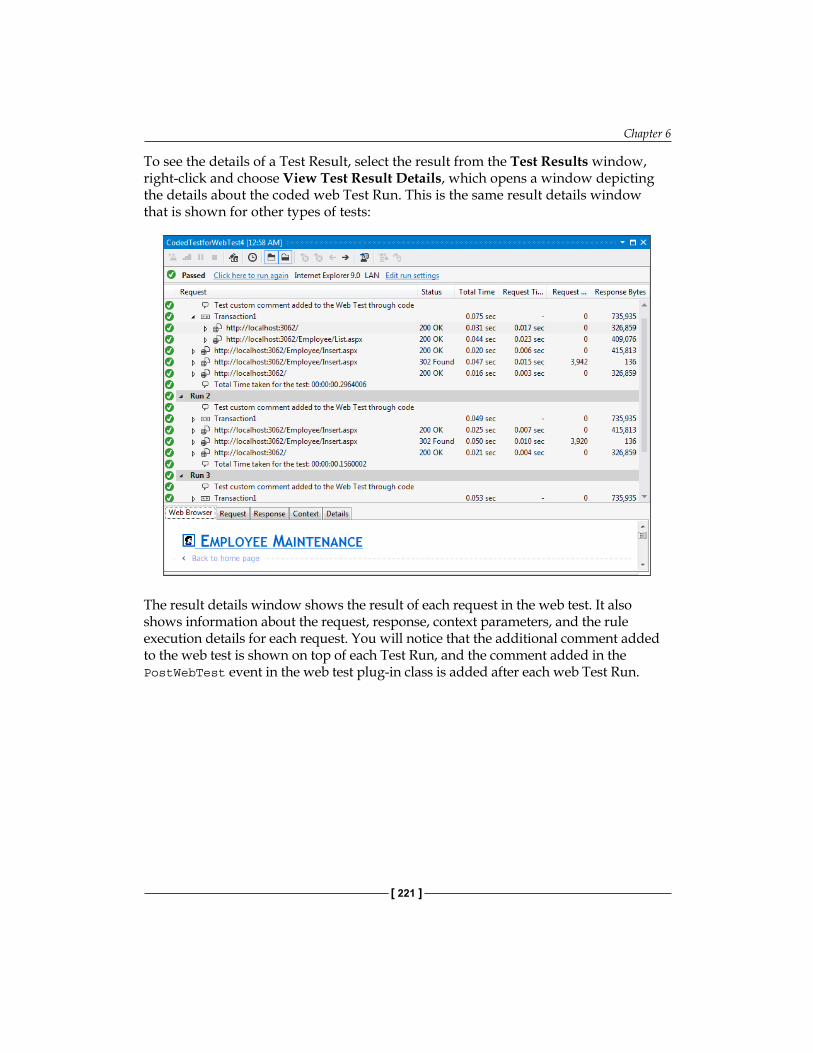
Chapter 6
[ 221 ]
To see the details of a Test Result, select the result from the Test Results window, right-click and choose View Test Result Details, which opens a window depicting the details about the coded web Test Run. This is the same result details window that is shown for other types of tests:
The result details window shows the result of each request in the web test. It also shows information about the request, response, context parameters, and the rule execution details for each request. You will notice that the additional comment added to the web test is shown on top of each Test Run, and the comment added in the PostWebTest event in the web test plug-in class is added after each web Test Run.
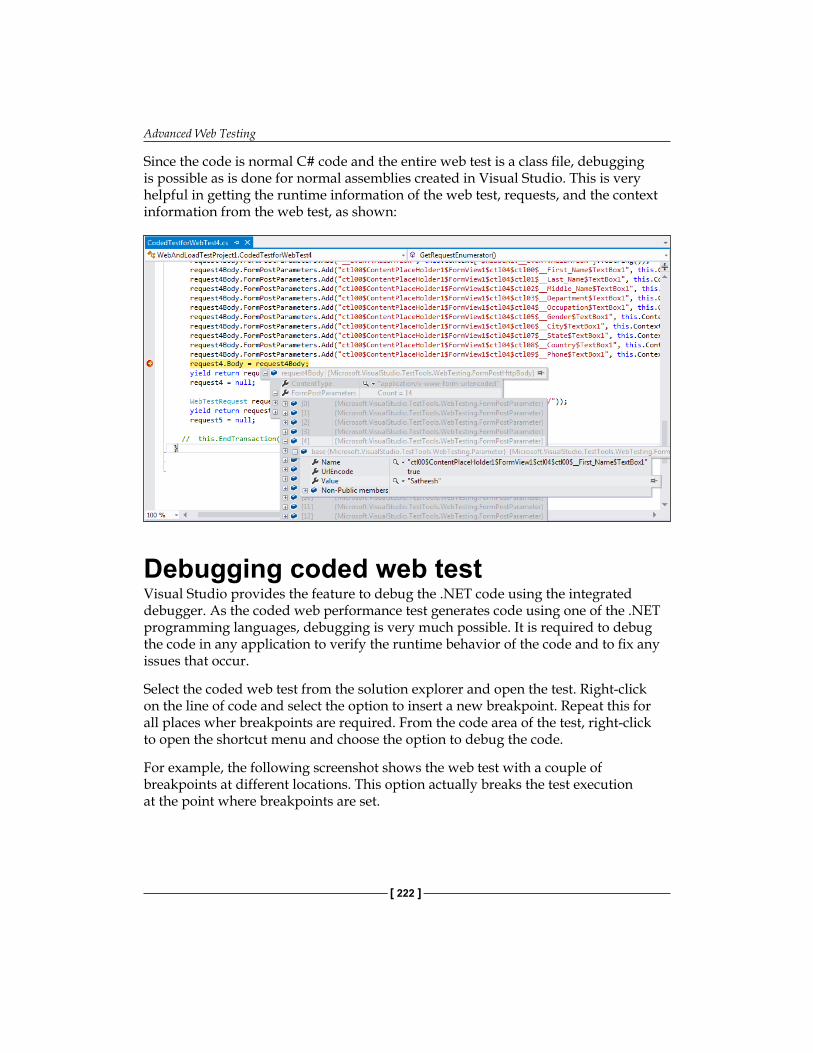
Advanced Web Testing
[ 222 ]
Since the code is normal C# code and the entire web test is a class file, debugging is possible as is done for normal assemblies created in Visual Studio. This is very helpful in getting the runtime information of the web test, requests, and the context information from the web test, as shown:
Debugging coded web testVisual Studio provides the feature to debug the .NET code using the integrated debugger. As the coded web performance test generates code using one of the .NET programming languages, debugging is very much possible. It is required to debug the code in any application to verify the runtime behavior of the code and to fix any issues that occur.
Select the coded web test from the solution explorer and open the test. Right-click on the line of code and select the option to insert a new breakpoint. Repeat this for all places wher breakpoints are required. From the code area of the test, right-click to open the shortcut menu and choose the option to debug the code.
For example, the following screenshot shows the web test with a couple of breakpoints at different locations. This option actually breaks the test execution at the point where breakpoints are set.
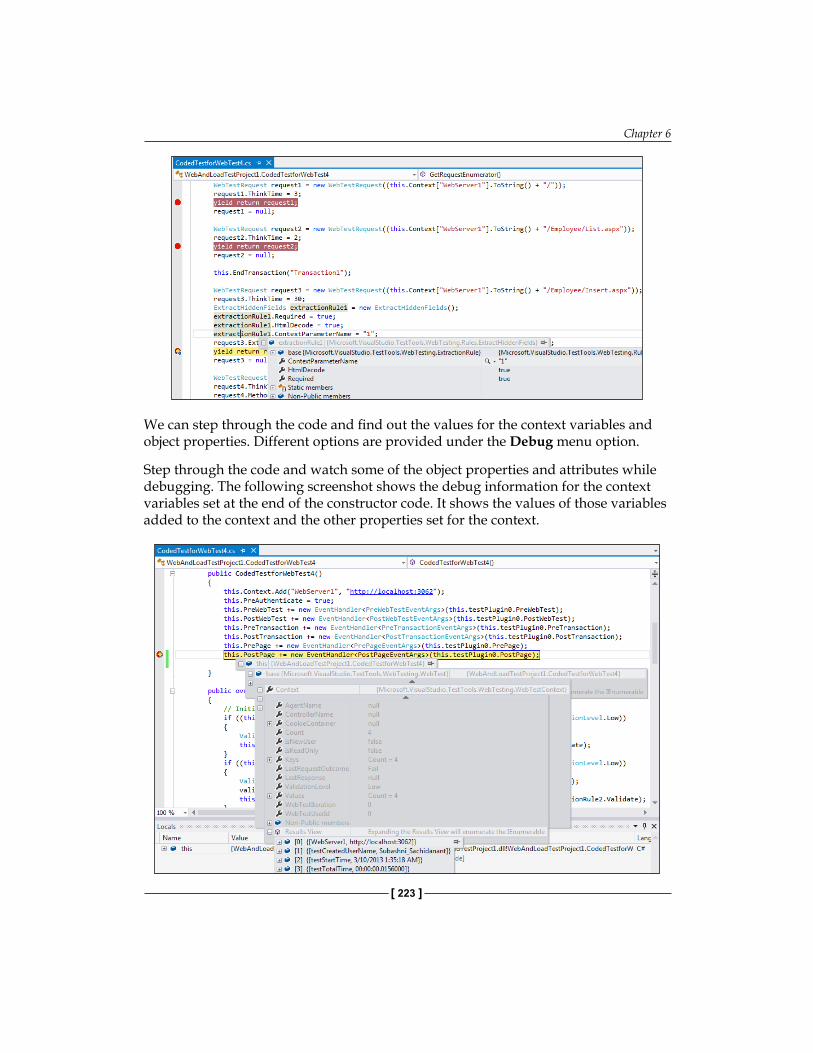
Chapter 6
[ 223 ]
We can step through the code and find out the values for the context variables and object properties. Different options are provided under the Debug menu option.
Step through the code and watch some of the object properties and attributes while debugging. The following screenshot shows the debug information for the context variables set at the end of the constructor code. It shows the values of those variables added to the context and the other properties set for the context.
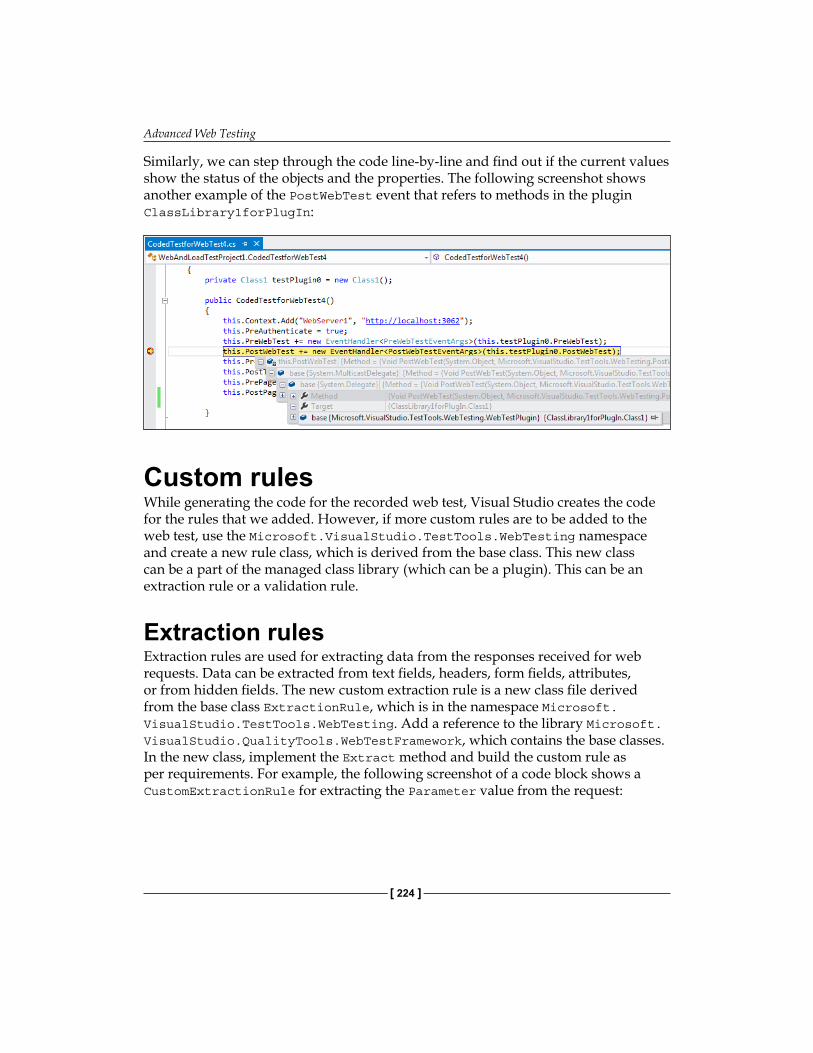
Advanced Web Testing
[ 224 ]
Similarly, we can step through the code line-by-line and find out if the current values show the status of the objects and the properties. The following screenshot shows another example of the PostWebTest event that refers to methods in the plugin ClassLibrary1forPlugIn:
Custom rulesWhile generating the code for the recorded web test, Visual Studio creates the code for the rules that we added. However, if more custom rules are to be added to the web test, use the Microsoft.VisualStudio.TestTools.WebTesting namespace and create a new rule class, which is derived from the base class. This new class can be a part of the managed class library (which can be a plugin). This can be an extraction rule or a validation rule.
Extraction rulesExtraction rules are used for extracting data from the responses received for web requests. Data can be extracted from text fields, headers, form fields, attributes, or from hidden fields. The new custom extraction rule is a new class file derived from the base class ExtractionRule, which is in the namespace Microsoft.VisualStudio.TestTools.WebTesting. Add a reference to the library Microsoft.VisualStudio.QualityTools.WebTestFramework, which contains the base classes. In the new class, implement the Extract method and build the custom rule as per requirements. For example, the following screenshot of a code block shows a CustomExtractionRule for extracting the Parameter value from the request:
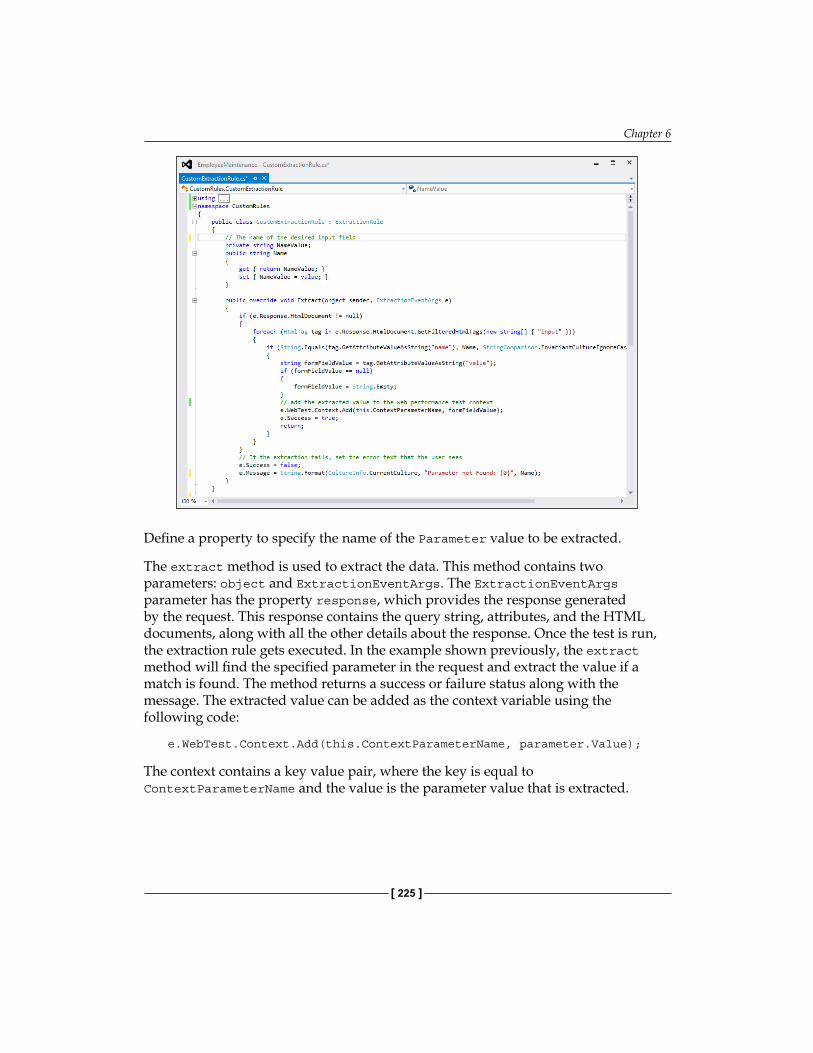
Chapter 6
[ 225 ]
Define a property to specify the name of the Parameter value to be extracted.
The extract method is used to extract the data. This method contains two parameters: object and ExtractionEventArgs. The ExtractionEventArgs parameter has the property response, which provides the response generated by the request. This response contains the query string, attributes, and the HTML documents, along with all the other details about the response. Once the test is run, the extraction rule gets executed. In the example shown previously, the extract method will find the specified parameter in the request and extract the value if a match is found. The method returns a success or failure status along with the message. The extracted value can be added as the context variable using the following code:
e.WebTest.Context.Add(this.ContextParameterName, parameter.Value);
The context contains a key value pair, where the key is equal to ContextParameterName and the value is the parameter value that is extracted.
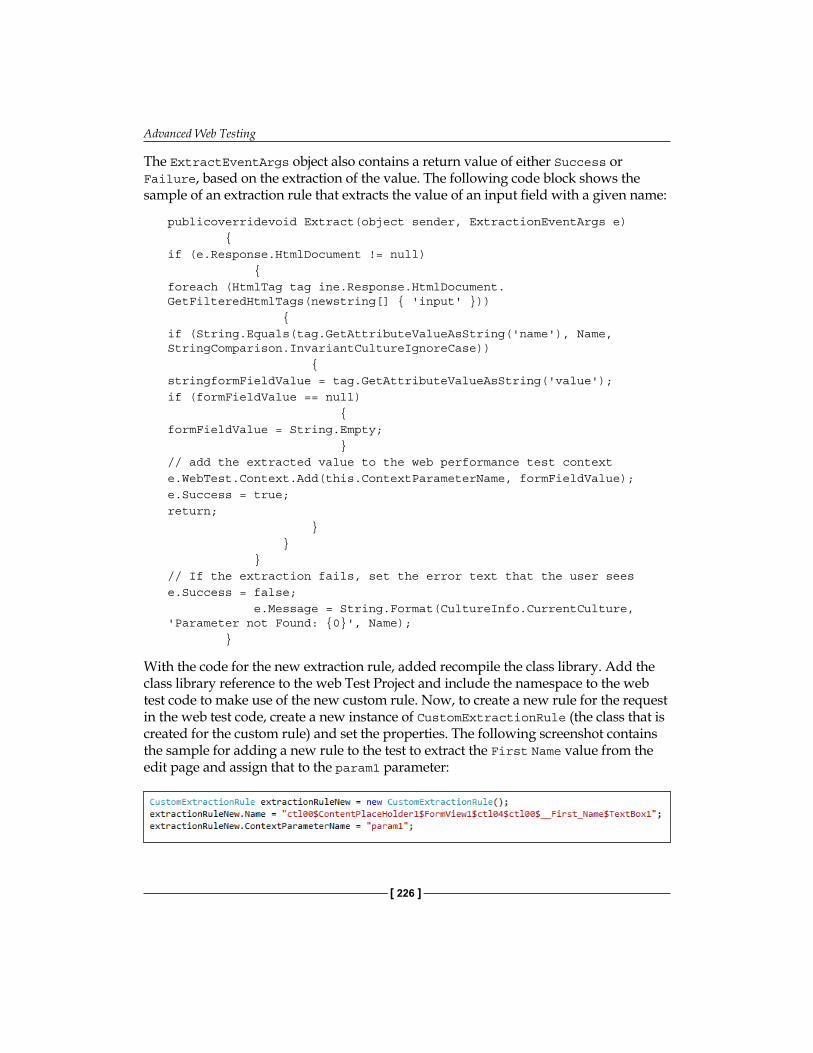
Advanced Web Testing
[ 226 ]
The ExtractEventArgs object also contains a return value of either Success or Failure, based on the extraction of the value. The following code block shows the sample of an extraction rule that extracts the value of an input field with a given name:
publicoverridevoid Extract(object sender, ExtractionEventArgs e) {if (e.Response.HtmlDocument != null) {foreach (HtmlTag tag ine.Response.HtmlDocument.GetFilteredHtmlTags(newstring[] { 'input' })) {if (String.Equals(tag.GetAttributeValueAsString('name'), Name, StringComparison.InvariantCultureIgnoreCase)) {stringformFieldValue = tag.GetAttributeValueAsString('value');if (formFieldValue == null) {formFieldValue = String.Empty; }// add the extracted value to the web performance test contexte.WebTest.Context.Add(this.ContextParameterName, formFieldValue);e.Success = true;return; } } }// If the extraction fails, set the error text that the user seese.Success = false; e.Message = String.Format(CultureInfo.CurrentCulture, 'Parameter not Found: {0}', Name); }
With the code for the new extraction rule, added recompile the class library. Add the class library reference to the web Test Project and include the namespace to the web test code to make use of the new custom rule. Now, to create a new rule for the request in the web test code, create a new instance of CustomExtractionRule (the class that is created for the custom rule) and set the properties. The following screenshot contains the sample for adding a new rule to the test to extract the First Name value from the edit page and assign that to the param1 parameter:

Chapter 6
[ 227 ]
When the coded web test is run, the Test Result window shows the extracted value for the parameter, based on the success or failure of the execution rule during the test. The following screenshots show the execution rule result:
The following screenshot shows the parameter value retrieved during the same Test Run:
The same custom rule can also be used in the recoded web test. To add the custom rule, open the WebTest project and add a reference to the custom rule project.
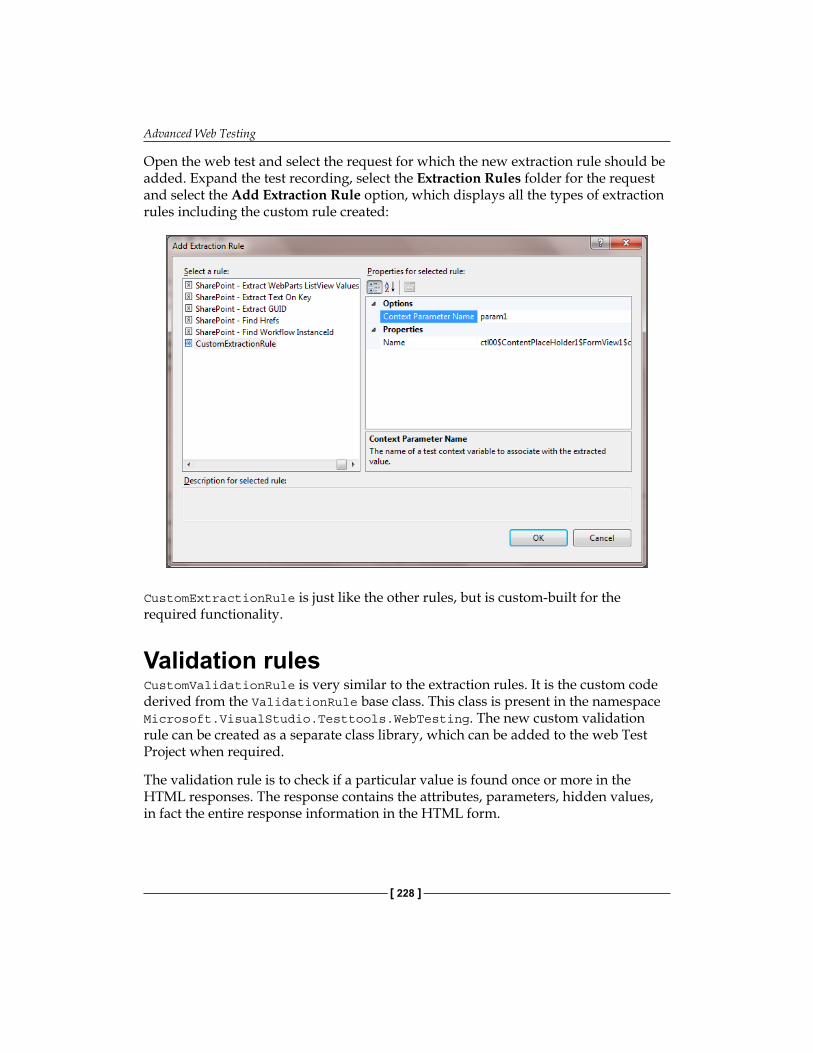
Advanced Web Testing
[ 228 ]
Open the web test and select the request for which the new extraction rule should be added. Expand the test recording, select the Extraction Rules folder for the request and select the Add Extraction Rule option, which displays all the types of extraction rules including the custom rule created:
CustomExtractionRule is just like the other rules, but is custom-built for the required functionality.
Validation rulesCustomValidationRule is very similar to the extraction rules. It is the custom code derived from the ValidationRule base class. This class is present in the namespace Microsoft.VisualStudio.Testtools.WebTesting. The new custom validation rule can be created as a separate class library, which can be added to the web Test Project when required.
The validation rule is to check if a particular value is found once or more in the HTML responses. The response contains the attributes, parameters, hidden values, in fact the entire response information in the HTML form.
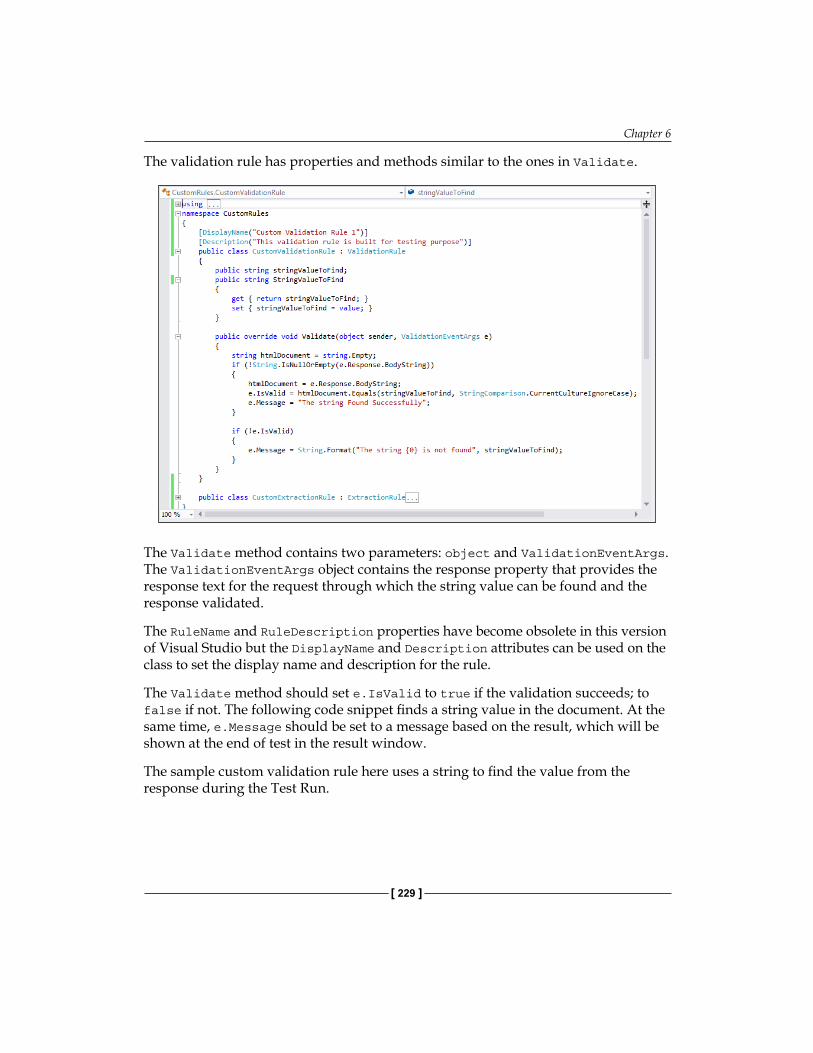
Chapter 6
[ 229 ]
The validation rule has properties and methods similar to the ones in Validate.
The Validate method contains two parameters: object and ValidationEventArgs. The ValidationEventArgs object contains the response property that provides the response text for the request through which the string value can be found and the response validated.
The RuleName and RuleDescription properties have become obsolete in this version of Visual Studio but the DisplayName and Description attributes can be used on the class to set the display name and description for the rule.
The Validate method should set e.IsValid to true if the validation succeeds; to false if not. The following code snippet finds a string value in the document. At the same time, e.Message should be set to a message based on the result, which will be shown at the end of test in the result window.
The sample custom validation rule here uses a string to find the value from the response during the Test Run.
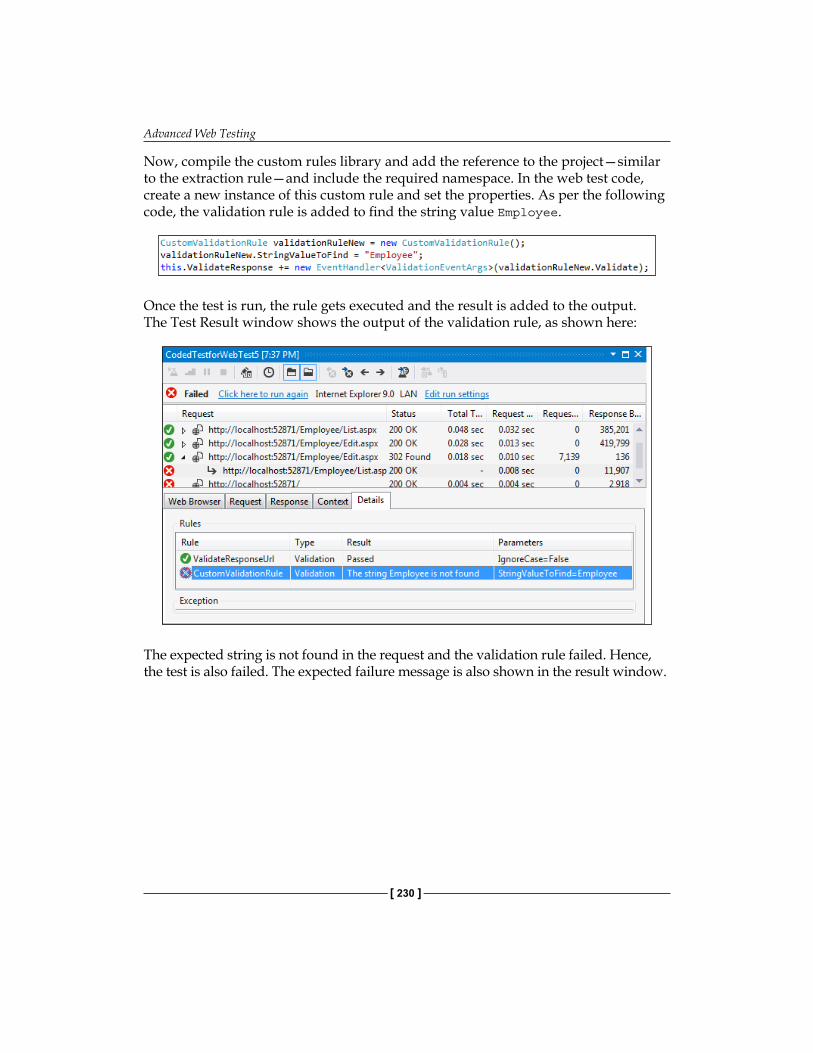
Advanced Web Testing
[ 230 ]
Now, compile the custom rules library and add the reference to the project—similar to the extraction rule—and include the required namespace. In the web test code, create a new instance of this custom rule and set the properties. As per the following code, the validation rule is added to find the string value Employee.
Once the test is run, the rule gets executed and the result is added to the output. The Test Result window shows the output of the validation rule, as shown here:
The expected string is not found in the request and the validation rule failed. Hence, the test is also failed. The expected failure message is also shown in the result window.
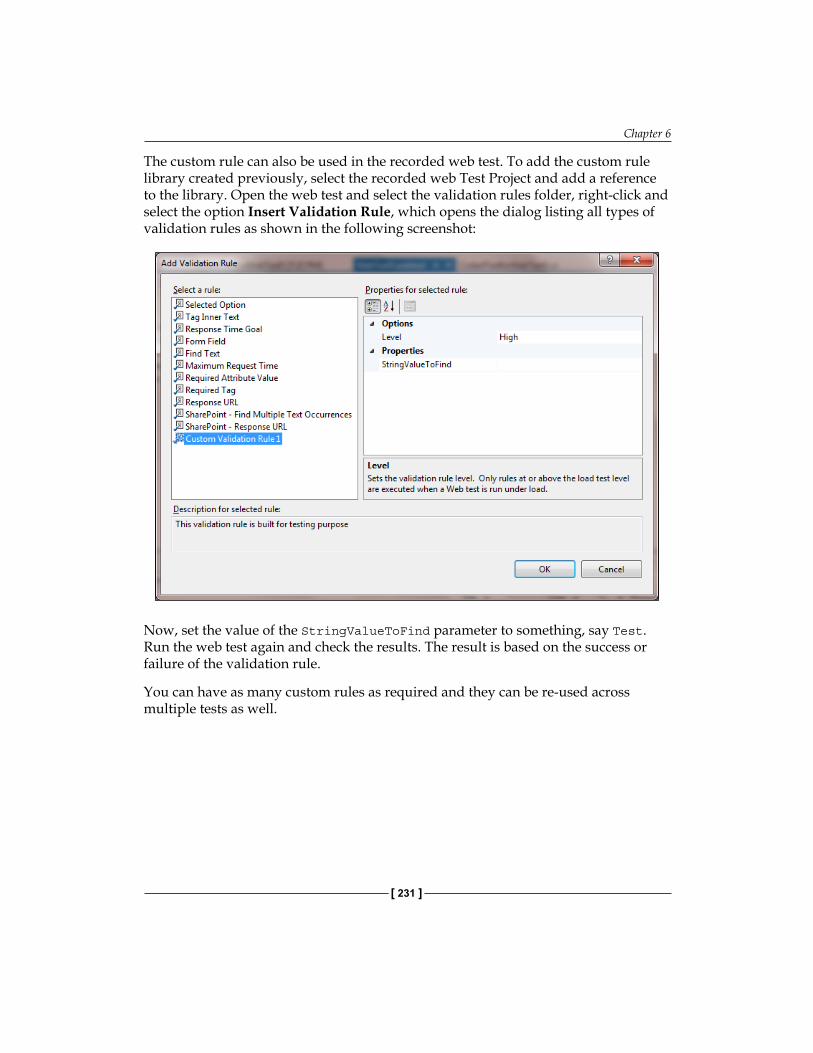
Chapter 6
[ 231 ]
The custom rule can also be used in the recorded web test. To add the custom rule library created previously, select the recorded web Test Project and add a reference to the library. Open the web test and select the validation rules folder, right-click and select the option Insert Validation Rule, which opens the dialog listing all types of validation rules as shown in the following screenshot:
Now, set the value of the StringValueToFind parameter to something, say Test. Run the web test again and check the results. The result is based on the success or failure of the validation rule.
You can have as many custom rules as required and they can be re-used across multiple tests as well.
Advanced Web Testing
[ 232 ]
SummaryThis chapter explained the advanced features of web testing, generating code out of a recorded web test and customizing it based on requirements. The code can be generated in .NET programming languages such as C# and Visual Basic. Custom rules are the extension of built-in extraction and validation rules that come along with web testing. Generating code out of recorded web testing gives more control to the tester to customize. Other features such as looping, calling custom written methods between the requests, adding transactions for requests, and adding additional data sources can be included wherever they are required. Creating a separate class library for the custom rules and making use of that in the web test is very beneficial for customization and re-use.
The next chapter explains how to test an application for load and performance. The load test uses the same recorded user actions, but different loads are configured during testing and performance data is collected for analysis and reporting.
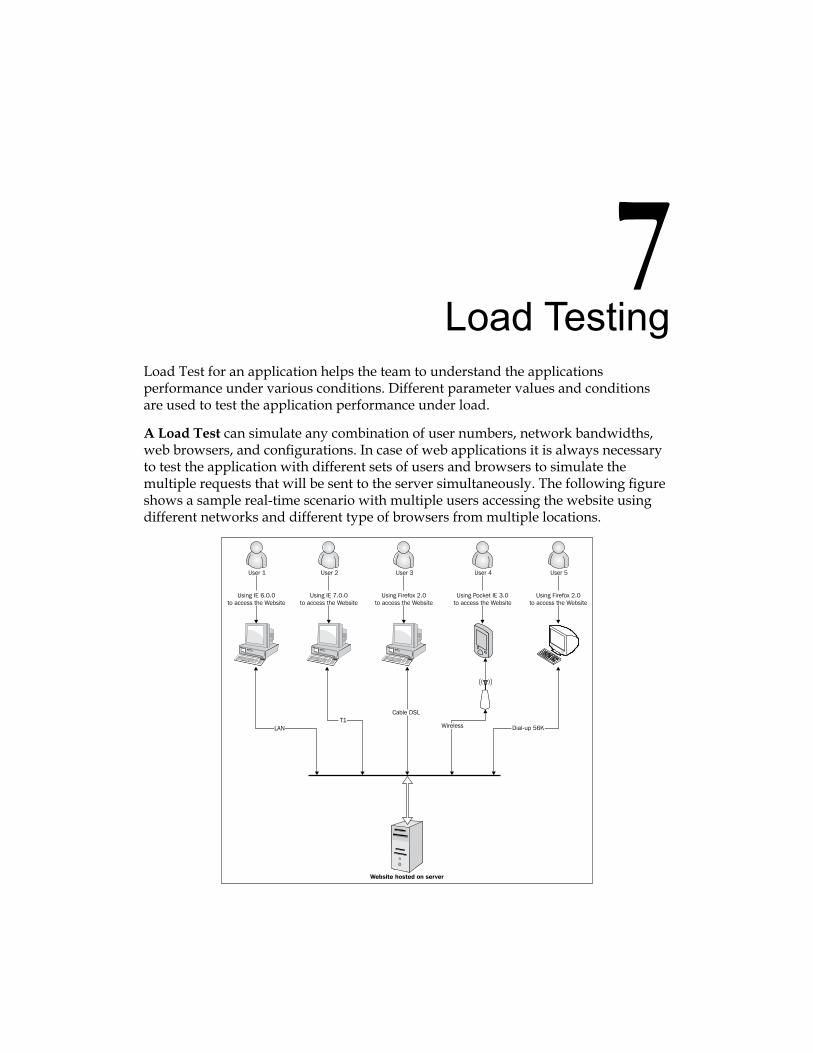
Load TestingLoad Test for an application helps the team to understand the applications performance under various conditions. Different parameter values and conditions are used to test the application performance under load.
A Load Test can simulate any combination of user numbers, network bandwidths, web browsers, and configurations. In case of web applications it is always necessary to test the application with different sets of users and browsers to simulate the multiple requests that will be sent to the server simultaneously. The following figure shows a sample real-time scenario with multiple users accessing the website using different networks and different type of browsers from multiple locations.
Website hosted on server
User 5User 4User 1 User 2 User 3
Using IE 6.0.0to access the Website
Using IE 7.0.0to access the Website
Using Firefox 2.0to access the Website
Using Firefox 2.0to access the Website
Using Pocket IE 3.0to access the Website
LANT1
Cable DSL
Wireless Dial-up 56K
Load Testing
[ 234 ]
Load Tests can also be used for testing the data access performance but not limiting to only web applications. The Load Test helps to identify application performance in various capacities, application performance under light loads for a short duration, performance with heavy loads, and with same load but different durations.
A Load Test uses a set of Controller and multiple agents. These are collectively termed as rig. The agents represent computers at different locations, used for simulating different user requests. The Controller is the central computer which controls multiple agents. The Visual Studio Load Agent in the agent computers generates the actual load for testing. Simulating multiple user logins and accessing the web pages as per the recording and collecting the data from the test is the job of agents. The Test Controller at the central computer controls these agents.
This chapter explains the creation of the Load Test scenarios and Load Testing the application with detailed information on each of these topics:
• Creating a Load Test and using the Load Testing wizard• Patterns and scenarios for Load Testing• Editing a Load Test and adding parameters• Storing Load Test Results• Running a Load Test• Working with Test Results and analyzing them• Exporting Test Results to Microsoft Excel• Using Test Controller and Test Agents• Test Controller and Test Agent Configuration
Creating a Load TestThe Load Tests are created using the Load Test Wizard. Create the Test Project and then add a new Load Test which opens the wizard, and guides with the required configurations and settings to create the test. The test parameters and configuration can be edited later on.
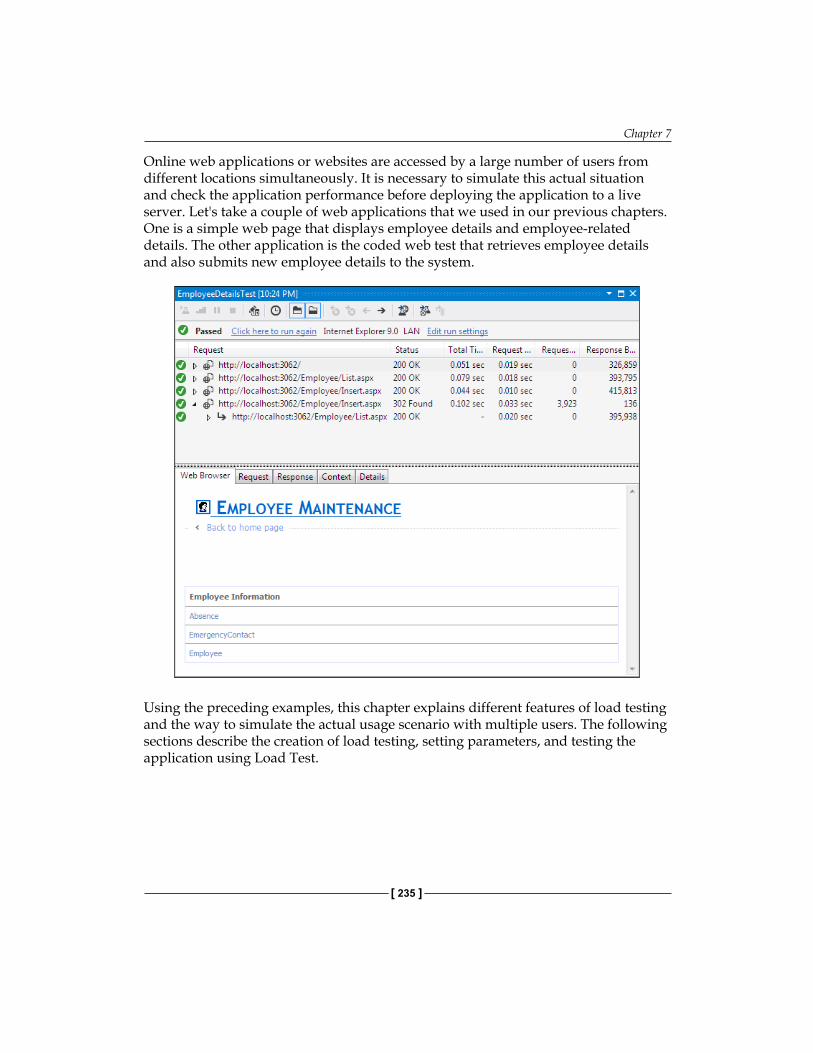
Chapter 7
[ 235 ]
Online web applications or websites are accessed by a large number of users from different locations simultaneously. It is necessary to simulate this actual situation and check the application performance before deploying the application to a live server. Let's take a couple of web applications that we used in our previous chapters. One is a simple web page that displays employee details and employee-related details. The other application is the coded web test that retrieves employee details and also submits new employee details to the system.
Using the preceding examples, this chapter explains different features of load testing and the way to simulate the actual usage scenario with multiple users. The following sections describe the creation of load testing, setting parameters, and testing the application using Load Test.
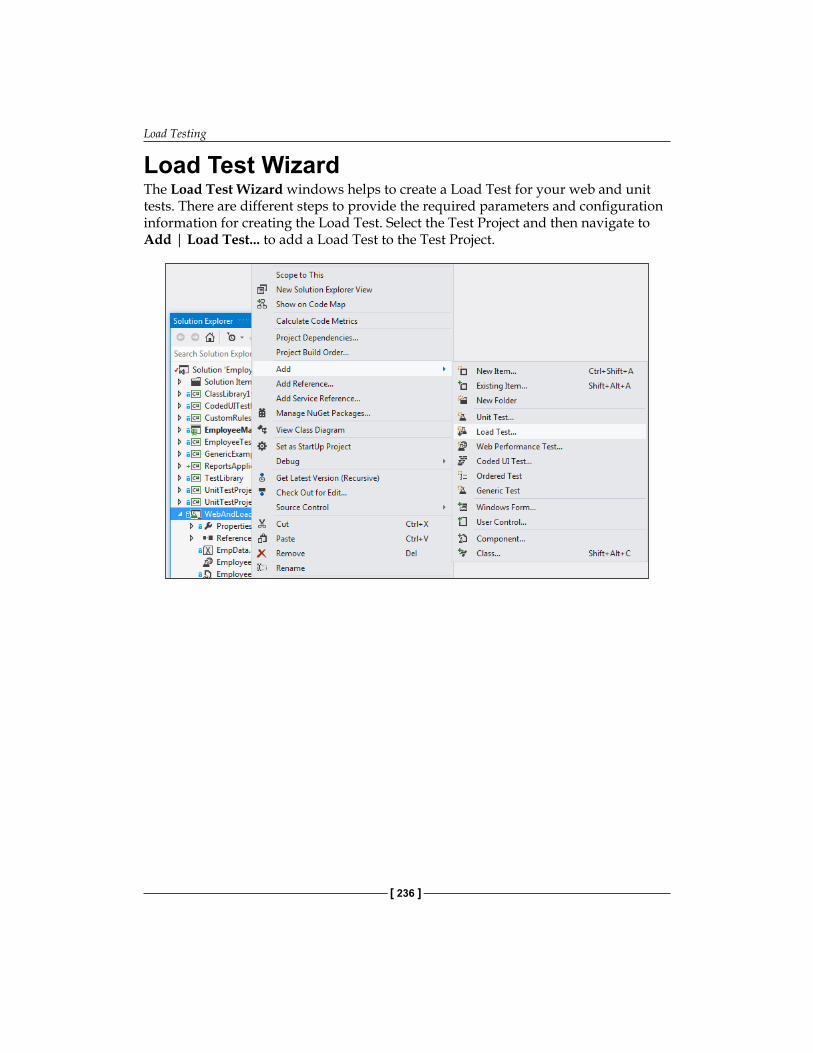
Load Testing
[ 236 ]
Load Test WizardThe Load Test Wizard windows helps to create a Load Test for your web and unit tests. There are different steps to provide the required parameters and configuration information for creating the Load Test. Select the Test Project and then navigate to Add | Load Test... to add a Load Test to the Test Project.
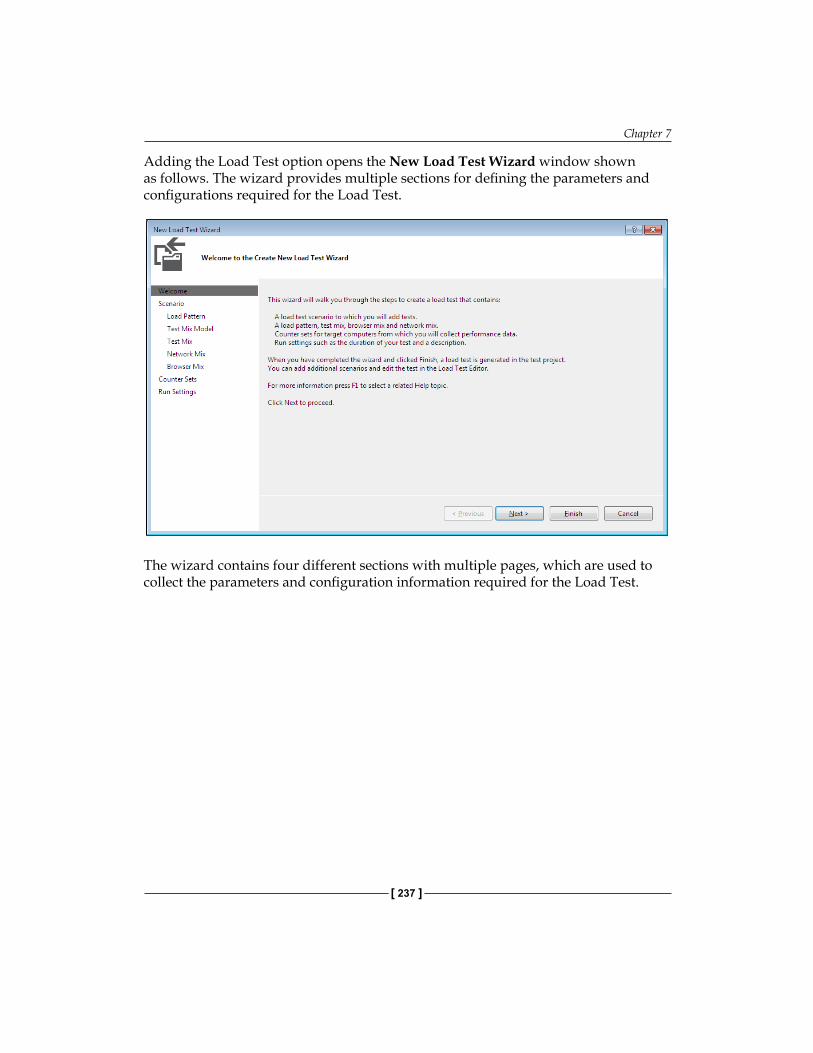
Chapter 7
[ 237 ]
Adding the Load Test option opens the New Load Test Wizard window shown as follows. The wizard provides multiple sections for defining the parameters and configurations required for the Load Test.
The wizard contains four different sections with multiple pages, which are used to collect the parameters and configuration information required for the Load Test.
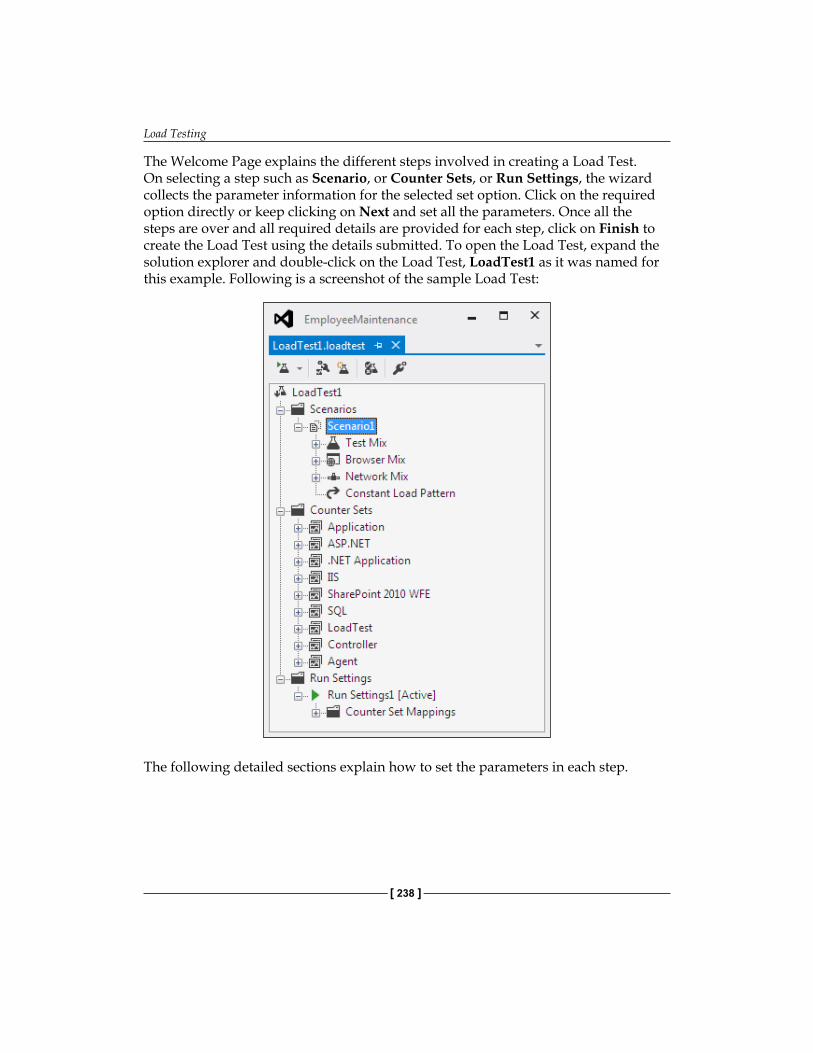
Load Testing
[ 238 ]
The Welcome Page explains the different steps involved in creating a Load Test. On selecting a step such as Scenario, or Counter Sets, or Run Settings, the wizard collects the parameter information for the selected set option. Click on the required option directly or keep clicking on Next and set all the parameters. Once all the steps are over and all required details are provided for each step, click on Finish to create the Load Test using the details submitted. To open the Load Test, expand the solution explorer and double-click on the Load Test, LoadTest1 as it was named for this example. Following is a screenshot of the sample Load Test:
The following detailed sections explain how to set the parameters in each step.
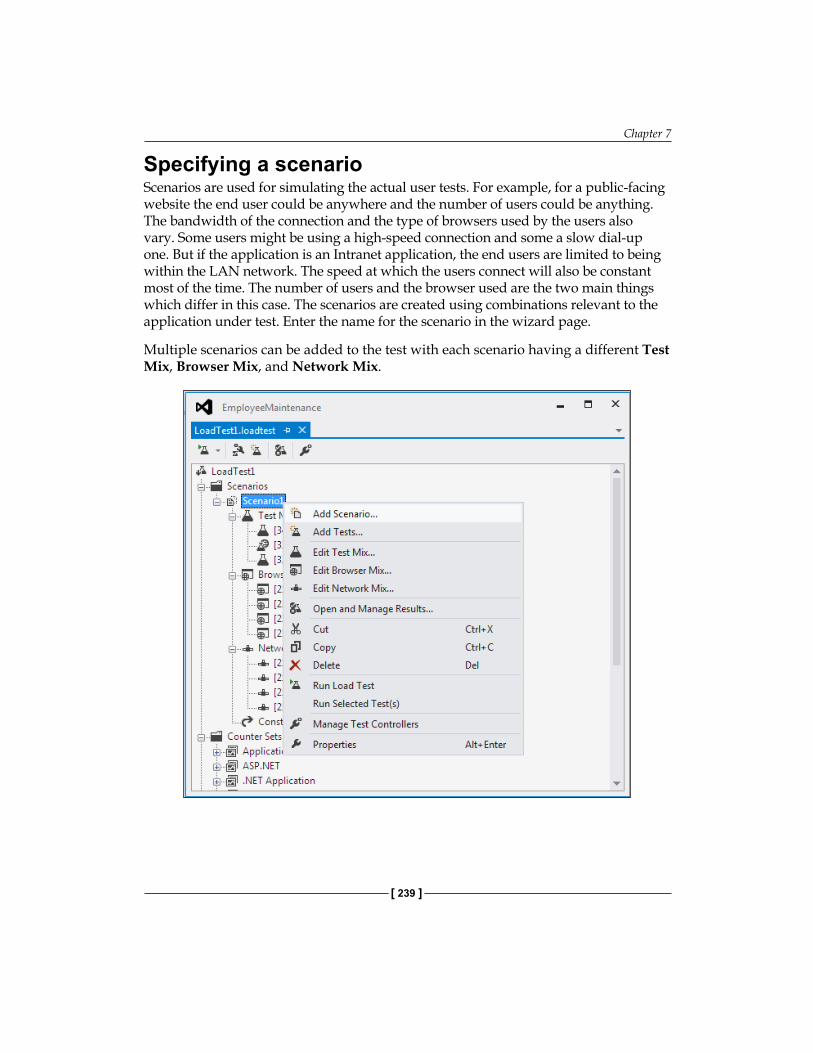
Chapter 7
[ 239 ]
Specifying a scenarioScenarios are used for simulating the actual user tests. For example, for a public-facing website the end user could be anywhere and the number of users could be anything. The bandwidth of the connection and the type of browsers used by the users also vary. Some users might be using a high-speed connection and some a slow dial-up one. But if the application is an Intranet application, the end users are limited to being within the LAN network. The speed at which the users connect will also be constant most of the time. The number of users and the browser used are the two main things which differ in this case. The scenarios are created using combinations relevant to the application under test. Enter the name for the scenario in the wizard page.
Multiple scenarios can be added to the test with each scenario having a different Test Mix, Browser Mix, and Network Mix.
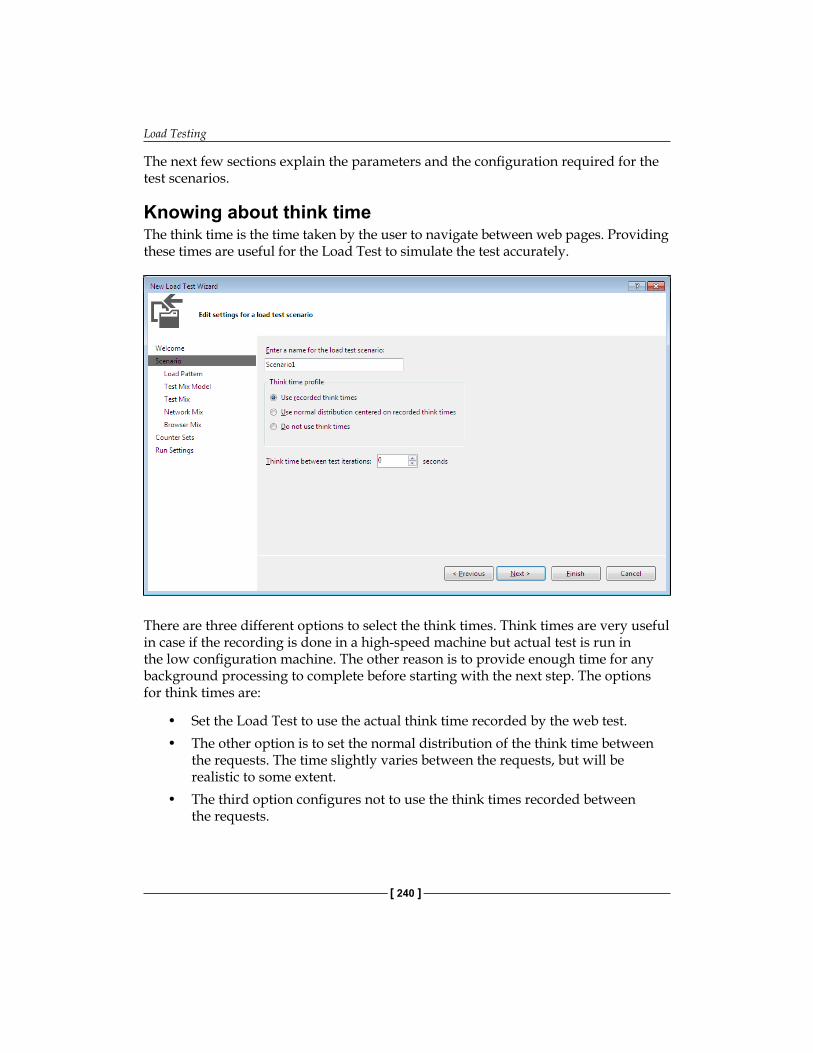
Load Testing
[ 240 ]
The next few sections explain the parameters and the configuration required for the test scenarios.
Knowing about think timeThe think time is the time taken by the user to navigate between web pages. Providing these times are useful for the Load Test to simulate the test accurately.
There are three different options to select the think times. Think times are very useful in case if the recording is done in a high-speed machine but actual test is run in the low configuration machine. The other reason is to provide enough time for any background processing to complete before starting with the next step. The options for think times are:
• Set the Load Test to use the actual think time recorded by the web test.• The other option is to set the normal distribution of the think time between
the requests. The time slightly varies between the requests, but will be realistic to some extent.
• The third option configures not to use the think times recorded between the requests.
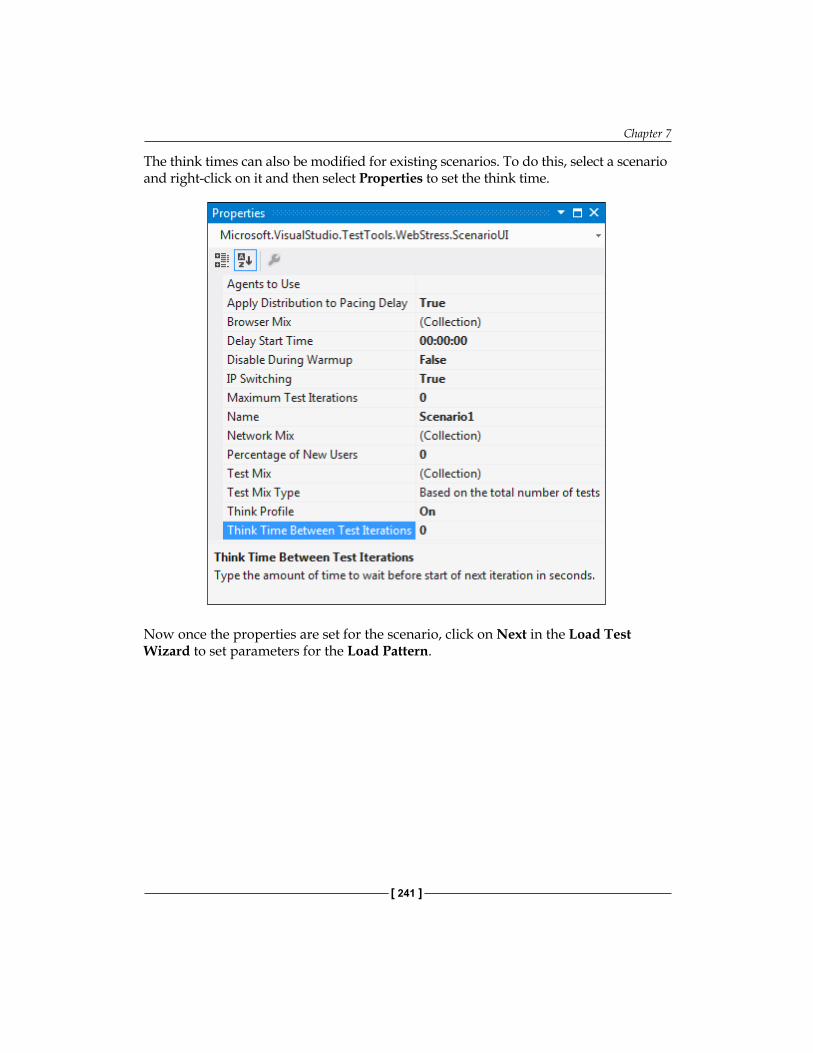
Chapter 7
[ 241 ]
The think times can also be modified for existing scenarios. To do this, select a scenario and right-click on it and then select Properties to set the think time.
Now once the properties are set for the scenario, click on Next in the Load Test Wizard to set parameters for the Load Pattern.
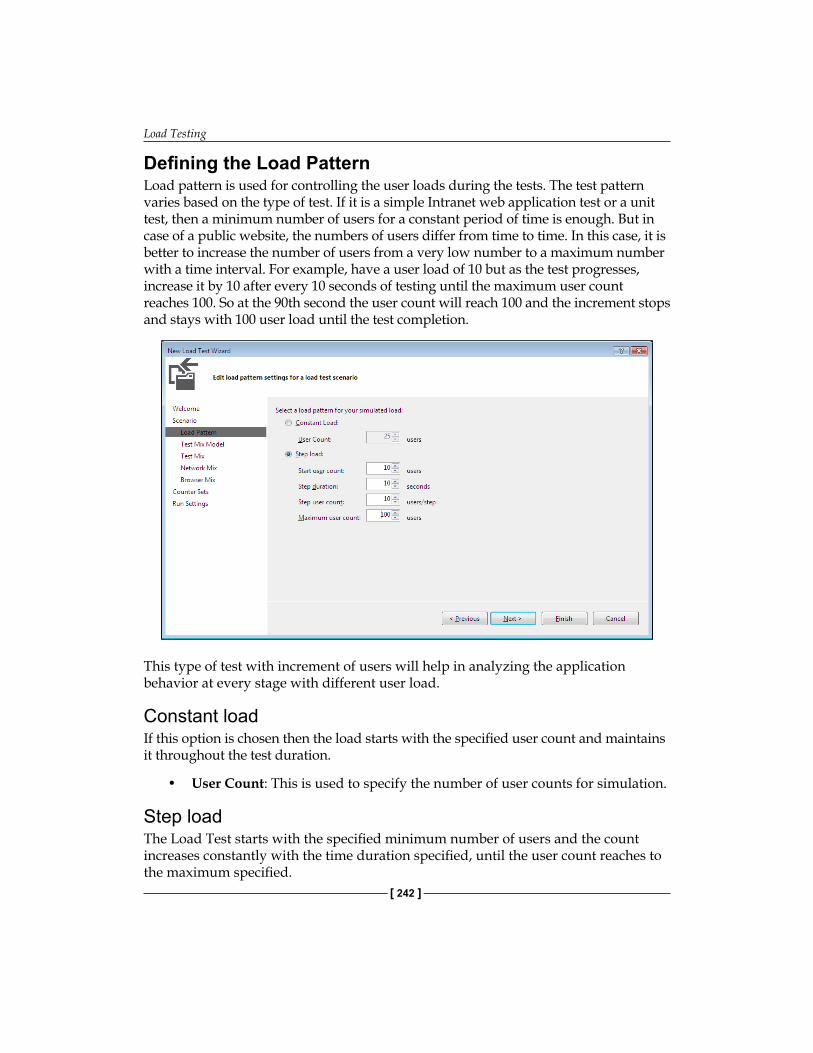
Load Testing
[ 242 ]
Defining the Load PatternLoad pattern is used for controlling the user loads during the tests. The test pattern varies based on the type of test. If it is a simple Intranet web application test or a unit test, then a minimum number of users for a constant period of time is enough. But in case of a public website, the numbers of users differ from time to time. In this case, it is better to increase the number of users from a very low number to a maximum number with a time interval. For example, have a user load of 10 but as the test progresses, increase it by 10 after every 10 seconds of testing until the maximum user count reaches 100. So at the 90th second the user count will reach 100 and the increment stops and stays with 100 user load until the test completion.
This type of test with increment of users will help in analyzing the application behavior at every stage with different user load.
Constant loadIf this option is chosen then the load starts with the specified user count and maintains it throughout the test duration.
• User Count: This is used to specify the number of user counts for simulation.
Step loadThe Load Test starts with the specified minimum number of users and the count increases constantly with the time duration specified, until the user count reaches to the maximum specified.
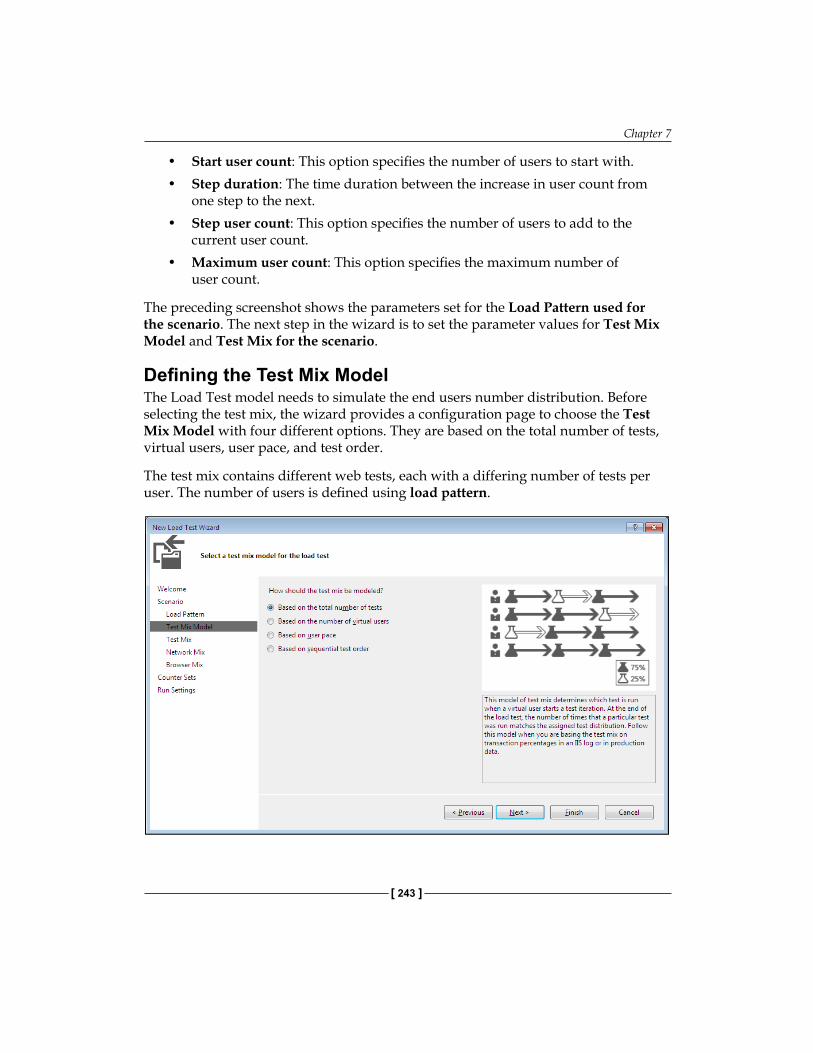
Chapter 7
[ 243 ]
• Start user count: This option specifies the number of users to start with.• Step duration: The time duration between the increase in user count from
one step to the next.• Step user count: This option specifies the number of users to add to the
current user count.• Maximum user count: This option specifies the maximum number of
user count.
The preceding screenshot shows the parameters set for the Load Pattern used for the scenario. The next step in the wizard is to set the parameter values for Test Mix Model and Test Mix for the scenario.
Defining the Test Mix ModelThe Load Test model needs to simulate the end users number distribution. Before selecting the test mix, the wizard provides a configuration page to choose the Test Mix Model with four different options. They are based on the total number of tests, virtual users, user pace, and test order.
The test mix contains different web tests, each with a differing number of tests per user. The number of users is defined using load pattern.
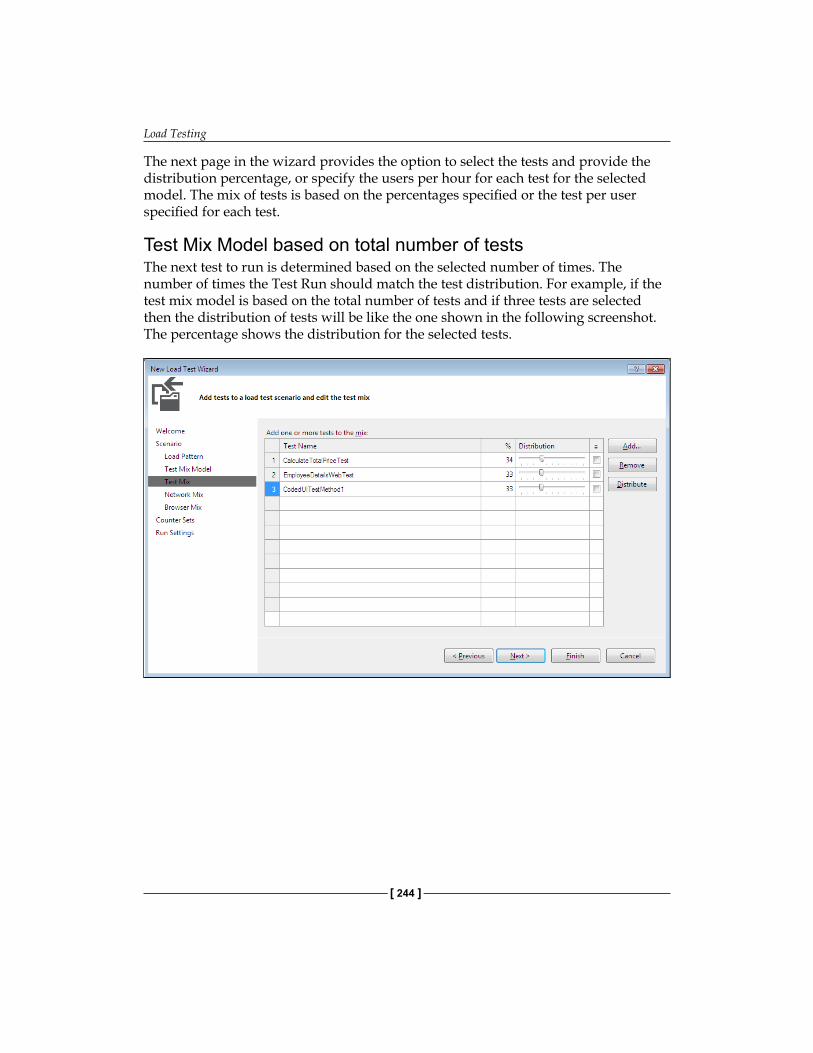
Load Testing
[ 244 ]
The next page in the wizard provides the option to select the tests and provide the distribution percentage, or specify the users per hour for each test for the selected model. The mix of tests is based on the percentages specified or the test per user specified for each test.
Test Mix Model based on total number of testsThe next test to run is determined based on the selected number of times. The number of times the Test Run should match the test distribution. For example, if the test mix model is based on the total number of tests and if three tests are selected then the distribution of tests will be like the one shown in the following screenshot. The percentage shows the distribution for the selected tests.
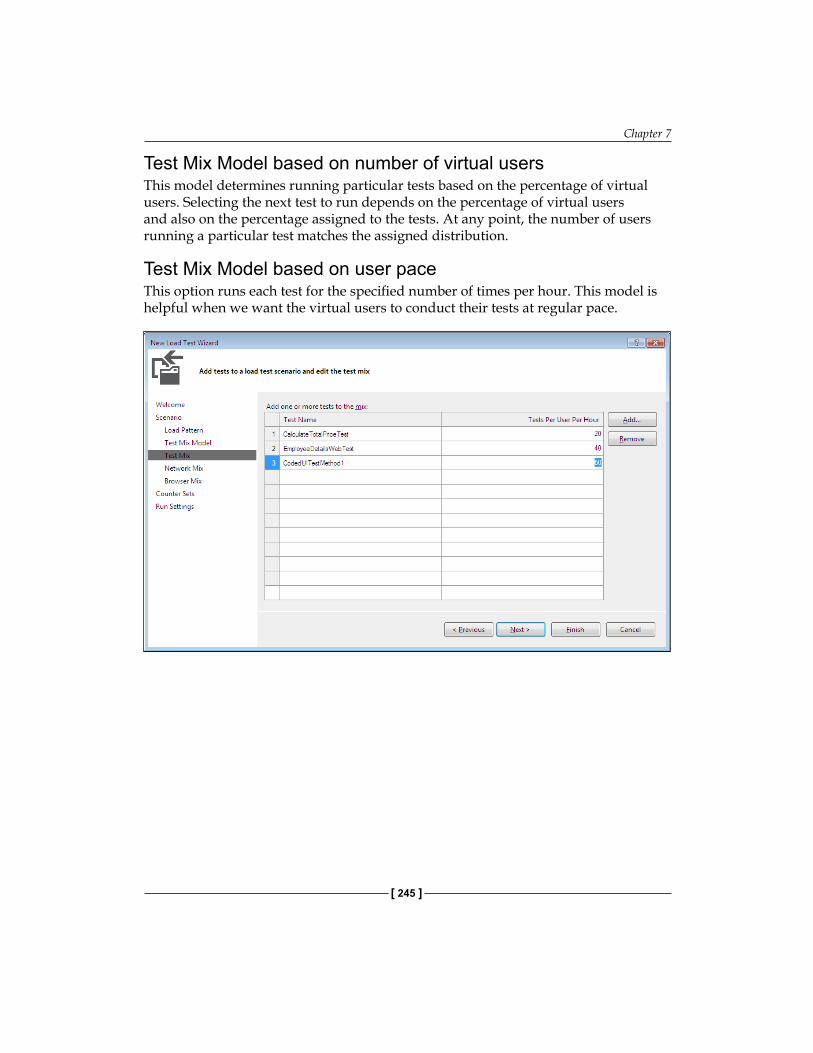
Chapter 7
[ 245 ]
Test Mix Model based on number of virtual usersThis model determines running particular tests based on the percentage of virtual users. Selecting the next test to run depends on the percentage of virtual users and also on the percentage assigned to the tests. At any point, the number of users running a particular test matches the assigned distribution.
Test Mix Model based on user paceThis option runs each test for the specified number of times per hour. This model is helpful when we want the virtual users to conduct their tests at regular pace.
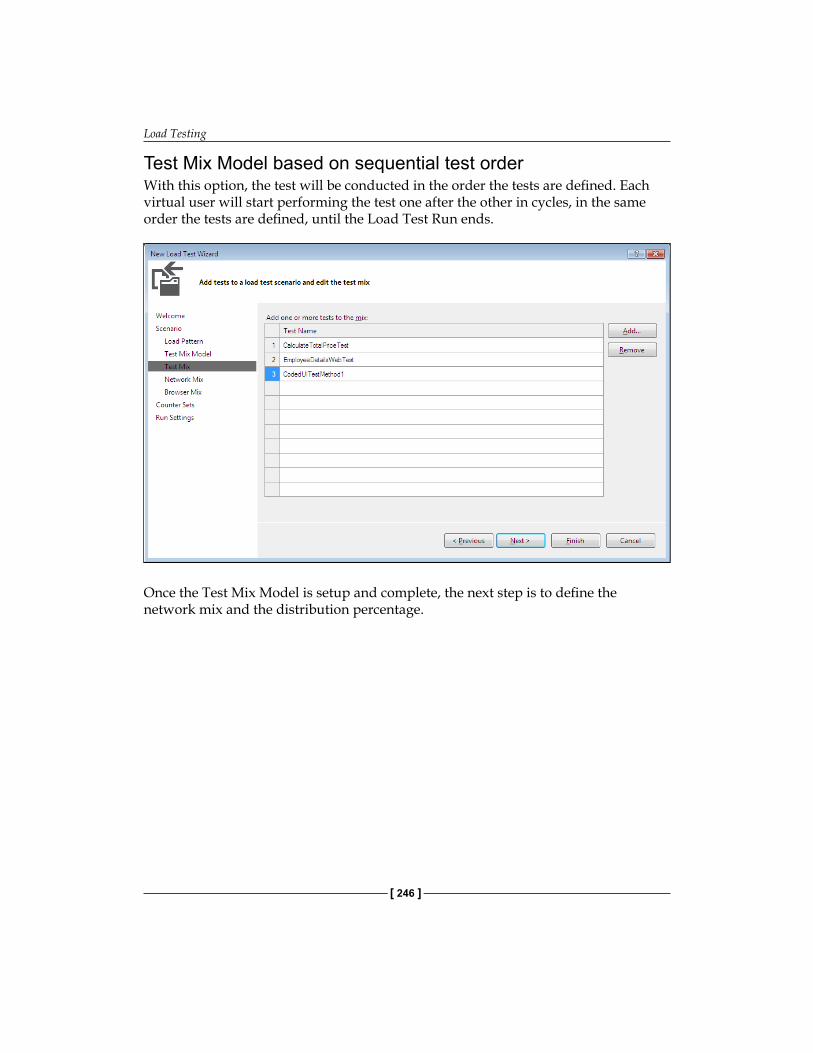
Load Testing
[ 246 ]
Test Mix Model based on sequential test orderWith this option, the test will be conducted in the order the tests are defined. Each virtual user will start performing the test one after the other in cycles, in the same order the tests are defined, until the Load Test Run ends.
Once the Test Mix Model is setup and complete, the next step is to define the network mix and the distribution percentage.
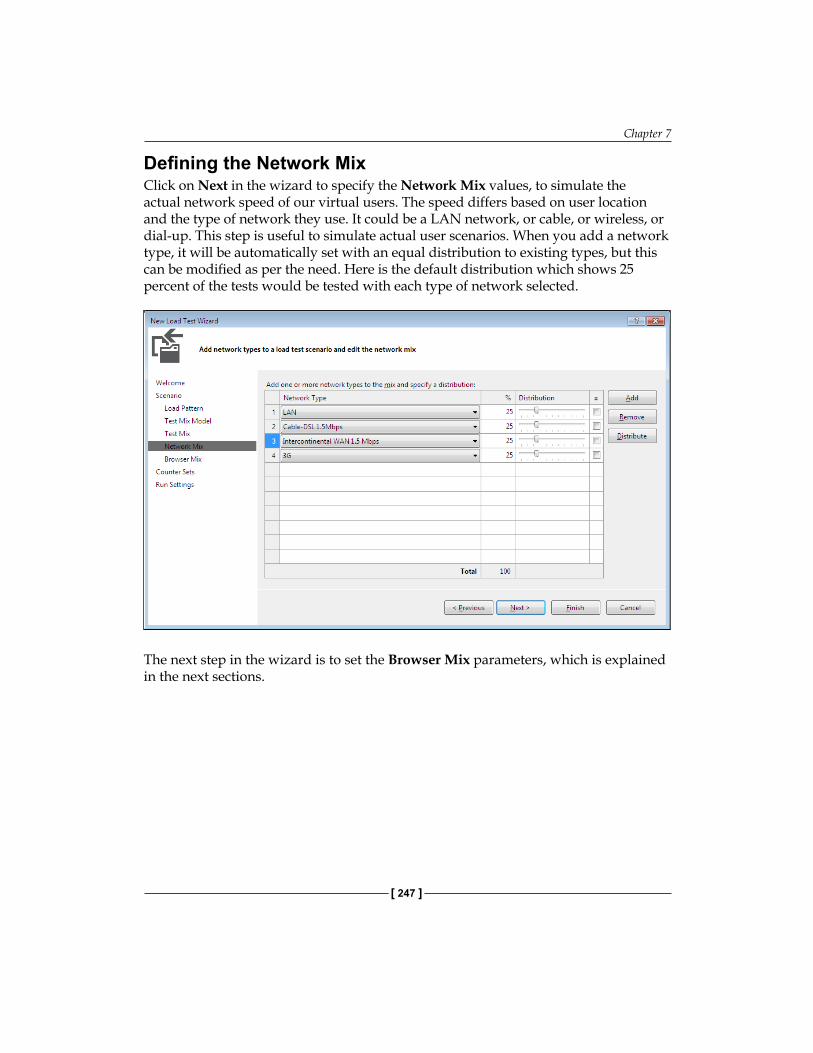
Chapter 7
[ 247 ]
Defining the Network MixClick on Next in the wizard to specify the Network Mix values, to simulate the actual network speed of our virtual users. The speed differs based on user location and the type of network they use. It could be a LAN network, or cable, or wireless, or dial-up. This step is useful to simulate actual user scenarios. When you add a network type, it will be automatically set with an equal distribution to existing types, but this can be modified as per the need. Here is the default distribution which shows 25 percent of the tests would be tested with each type of network selected.
The next step in the wizard is to set the Browser Mix parameters, which is explained in the next sections.
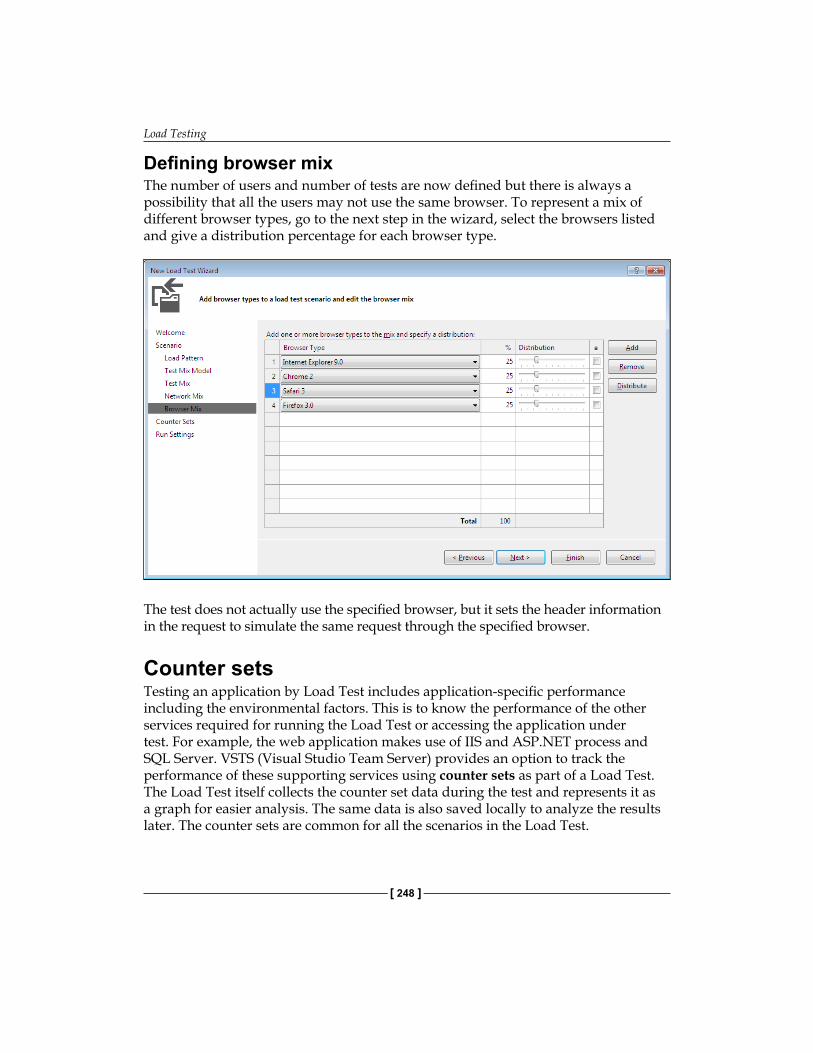
Load Testing
[ 248 ]
Defining browser mixThe number of users and number of tests are now defined but there is always a possibility that all the users may not use the same browser. To represent a mix of different browser types, go to the next step in the wizard, select the browsers listed and give a distribution percentage for each browser type.
The test does not actually use the specified browser, but it sets the header information in the request to simulate the same request through the specified browser.
Counter setsTesting an application by Load Test includes application-specific performance including the environmental factors. This is to know the performance of the other services required for running the Load Test or accessing the application under test. For example, the web application makes use of IIS and ASP.NET process and SQL Server. VSTS (Visual Studio Team Server) provides an option to track the performance of these supporting services using counter sets as part of a Load Test. The Load Test itself collects the counter set data during the test and represents it as a graph for easier analysis. The same data is also saved locally to analyze the results later. The counter sets are common for all the scenarios in the Load Test.
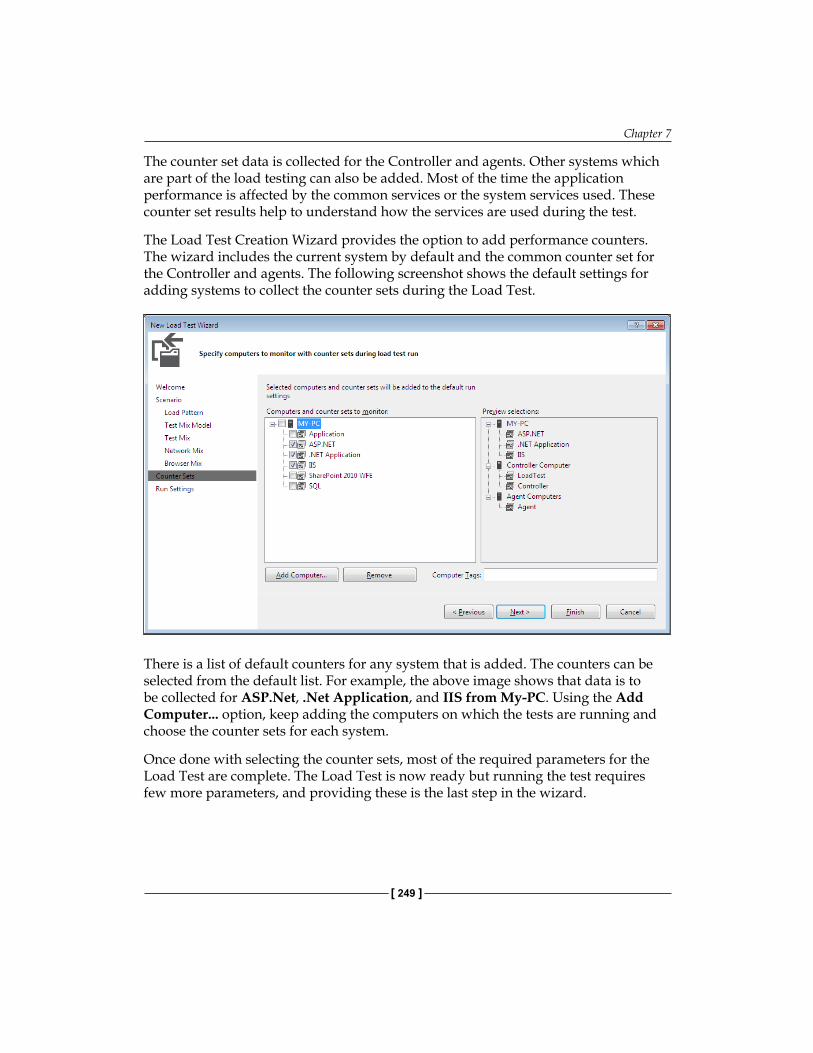
Chapter 7
[ 249 ]
The counter set data is collected for the Controller and agents. Other systems which are part of the load testing can also be added. Most of the time the application performance is affected by the common services or the system services used. These counter set results help to understand how the services are used during the test.
The Load Test Creation Wizard provides the option to add performance counters. The wizard includes the current system by default and the common counter set for the Controller and agents. The following screenshot shows the default settings for adding systems to collect the counter sets during the Load Test.
There is a list of default counters for any system that is added. The counters can be selected from the default list. For example, the above image shows that data is to be collected for ASP.Net, .Net Application, and IIS from My-PC. Using the Add Computer... option, keep adding the computers on which the tests are running and choose the counter sets for each system.
Once done with selecting the counter sets, most of the required parameters for the Load Test are complete. The Load Test is now ready but running the test requires few more parameters, and providing these is the last step in the wizard.

Load Testing
[ 250 ]
Run SettingsThese settings are basically for controlling the Load Test Run to specify the maximum duration for the test and the time period for collecting the data about the tests. The following screenshot shows the options and the sample setting.
There are two options for the Test Run. One is to control it by a maximum time limit and the other is to provide a maximum test iteration number. The Test Run will stop once it reaches the maximum as per the option selected. For example, the following screenshot shows a test set to run for 5 minutes.
The Details section is used to specify the rate at which the test data should be collected, namely the Sampling rate, the Description, the Save Log on Test Failure boolean, and the Validation level option. The Validation level option specifies the rules that should be considered during the test. This is based on the level that is set while creating the rules.
The Save Log on Test Failure option is used to capture and save the individual Test Run details within the Load Test for the failed web or unit tests. This will help in identifying the problems that occur while running the test within the Load Test but not outside the context of Load Test.
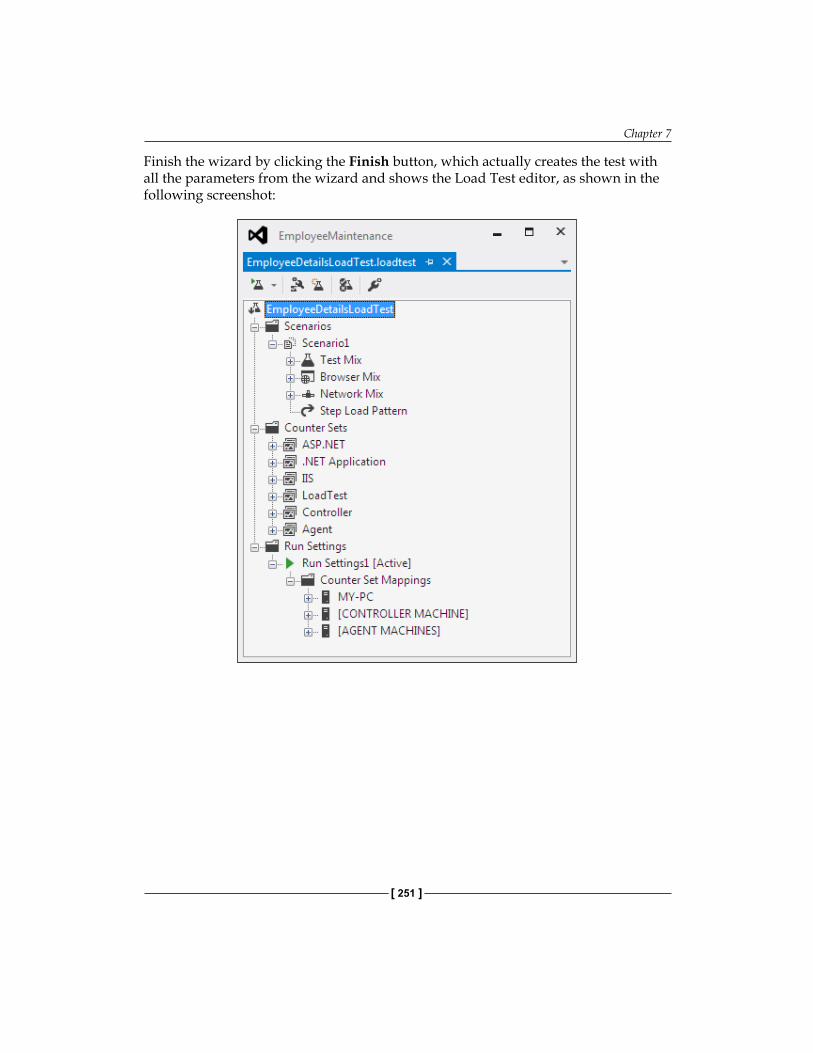
Chapter 7
[ 251 ]
Finish the wizard by clicking the Finish button, which actually creates the test with all the parameters from the wizard and shows the Load Test editor, as shown in the following screenshot:
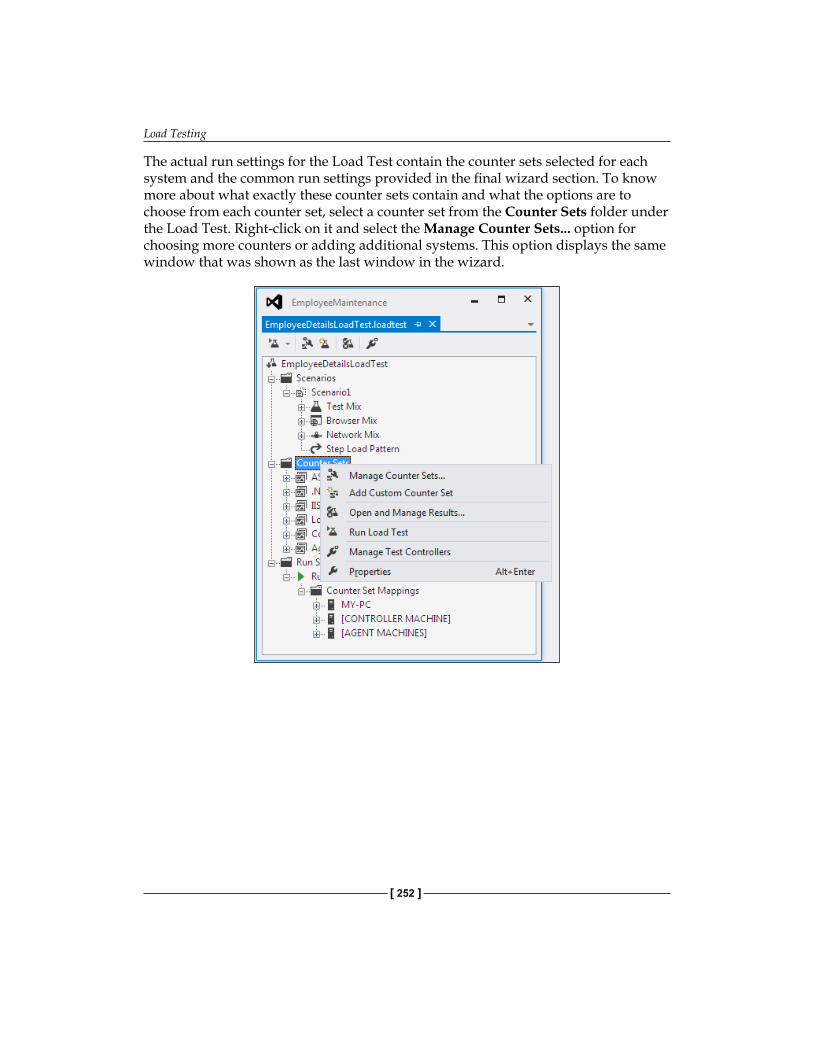
Load Testing
[ 252 ]
The actual run settings for the Load Test contain the counter sets selected for each system and the common run settings provided in the final wizard section. To know more about what exactly these counter sets contain and what the options are to choose from each counter set, select a counter set from the Counter Sets folder under the Load Test. Right-click on it and select the Manage Counter Sets... option for choosing more counters or adding additional systems. This option displays the same window that was shown as the last window in the wizard.
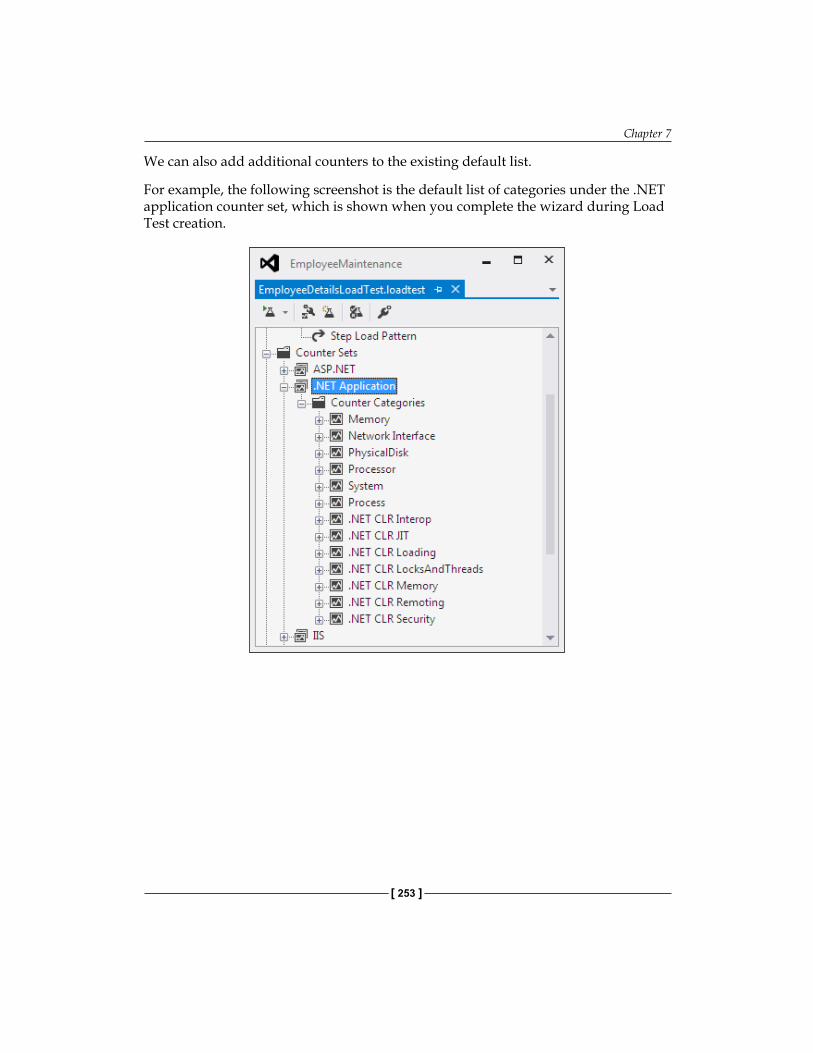
Chapter 7
[ 253 ]
We can also add additional counters to the existing default list.
For example, the following screenshot is the default list of categories under the .NET application counter set, which is shown when you complete the wizard during Load Test creation.
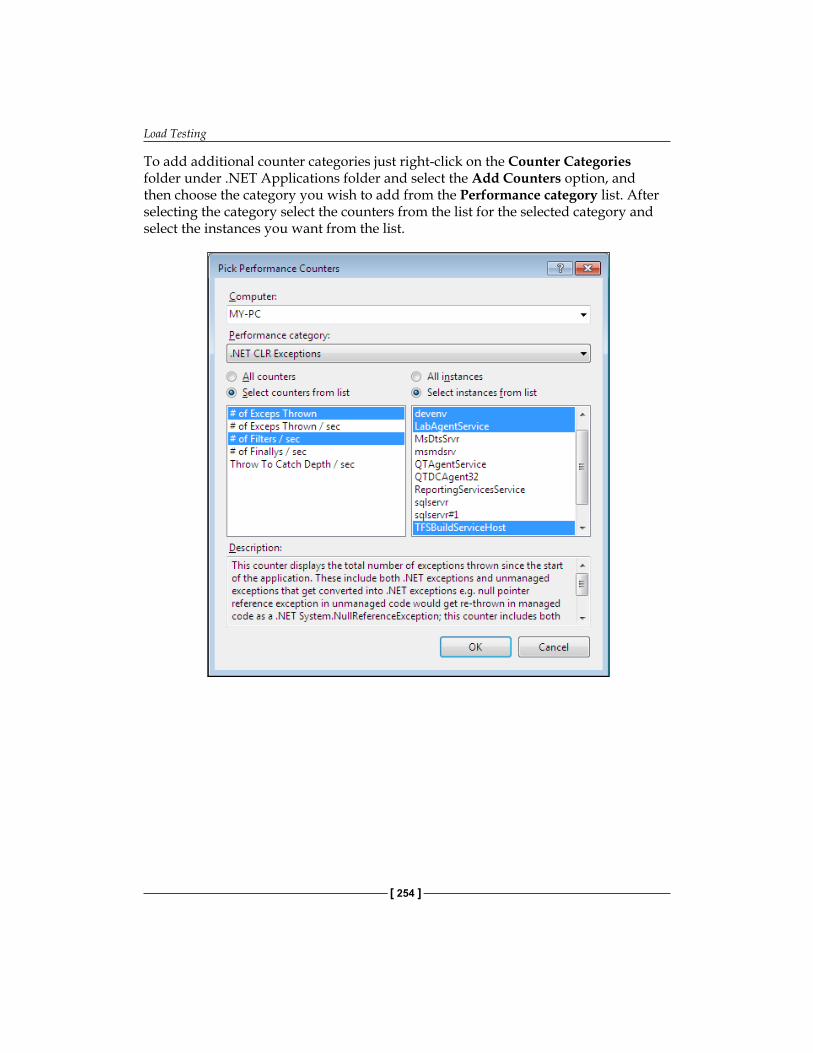
Load Testing
[ 254 ]
To add additional counter categories just right-click on the Counter Categories folder under .NET Applications folder and select the Add Counters option, and then choose the category you wish to add from the Performance category list. After selecting the category select the counters from the list for the selected category and select the instances you want from the list.

Chapter 7
[ 255 ]
The preceding image shows the .NET CLR Exceptions category selected, along with counters such as number of exceptions thrown and number of Filters per second. The counter instances selected are devenv, LabAgentService, TFSBuildServiceHost, and TFSJobAgent. After selecting the additional counters, click on OK, which adds the selected counters to the existing list for the test. The additional counters added are for the specific computer selected. There are many other performance categories which you can choose from the Performance category drop-down as shown in the following screenshot:
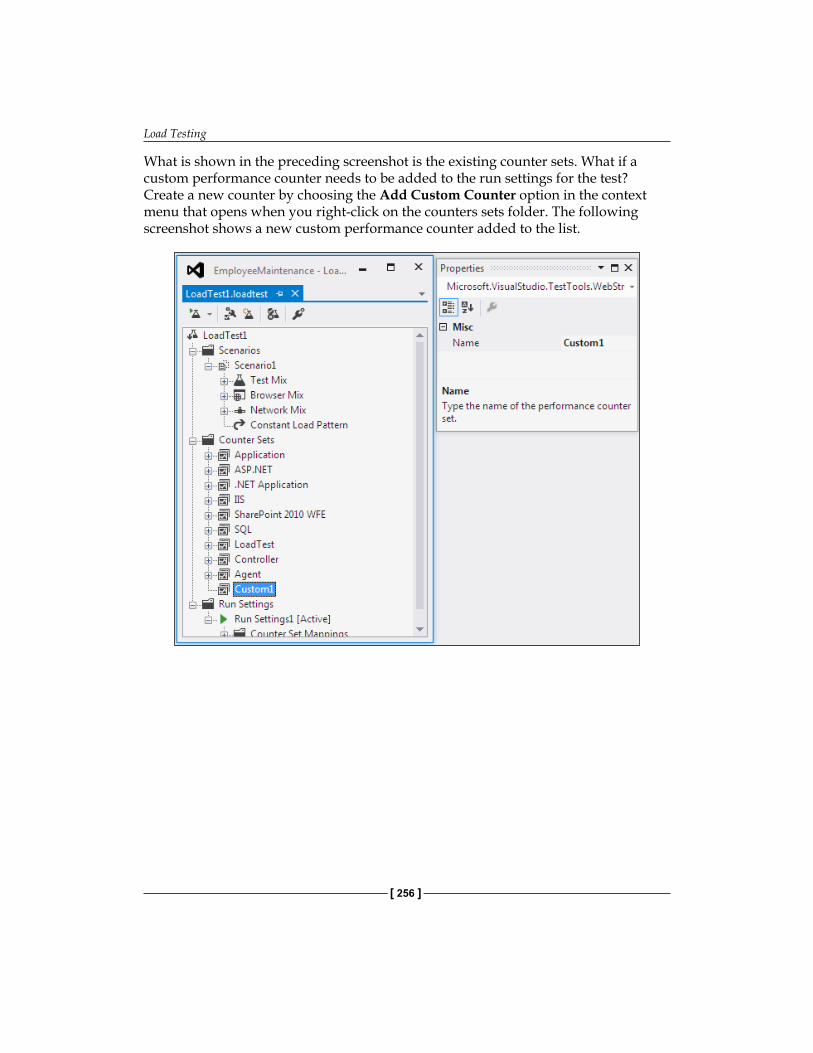
Load Testing
[ 256 ]
What is shown in the preceding screenshot is the existing counter sets. What if a custom performance counter needs to be added to the run settings for the test? Create a new counter by choosing the Add Custom Counter option in the context menu that opens when you right-click on the counters sets folder. The following screenshot shows a new custom performance counter added to the list.
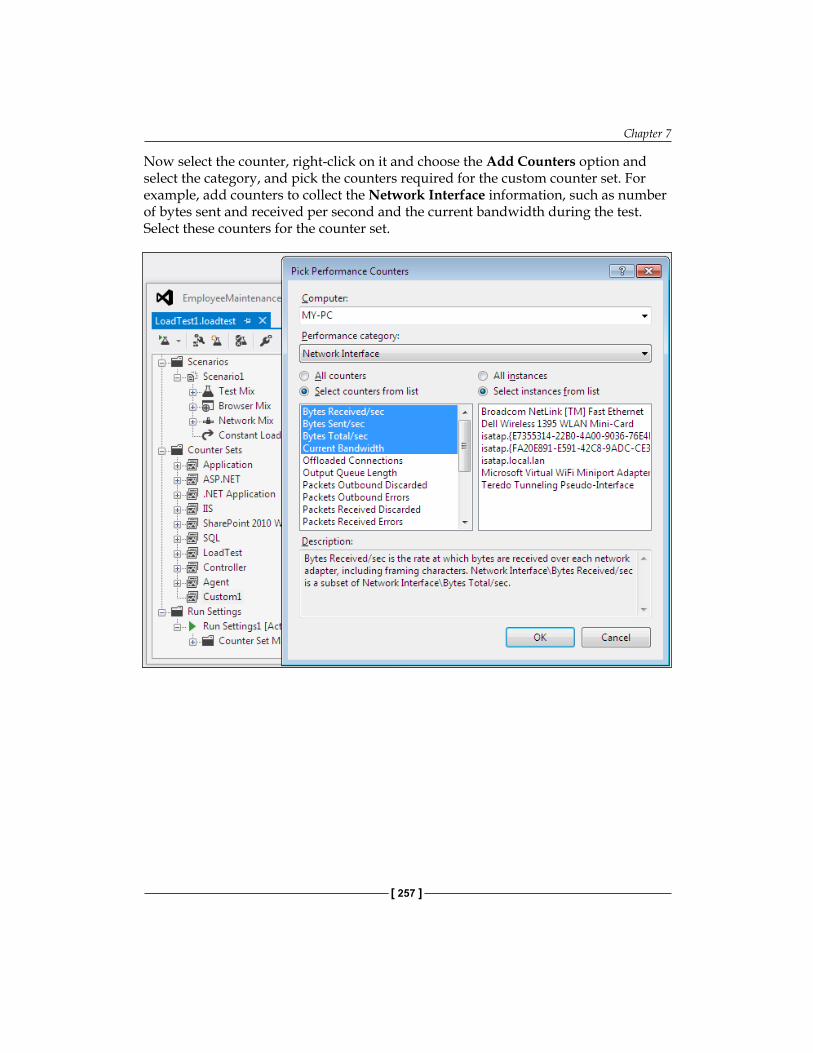
Chapter 7
[ 257 ]
Now select the counter, right-click on it and choose the Add Counters option and select the category, and pick the counters required for the custom counter set. For example, add counters to collect the Network Interface information, such as number of bytes sent and received per second and the current bandwidth during the test. Select these counters for the counter set.
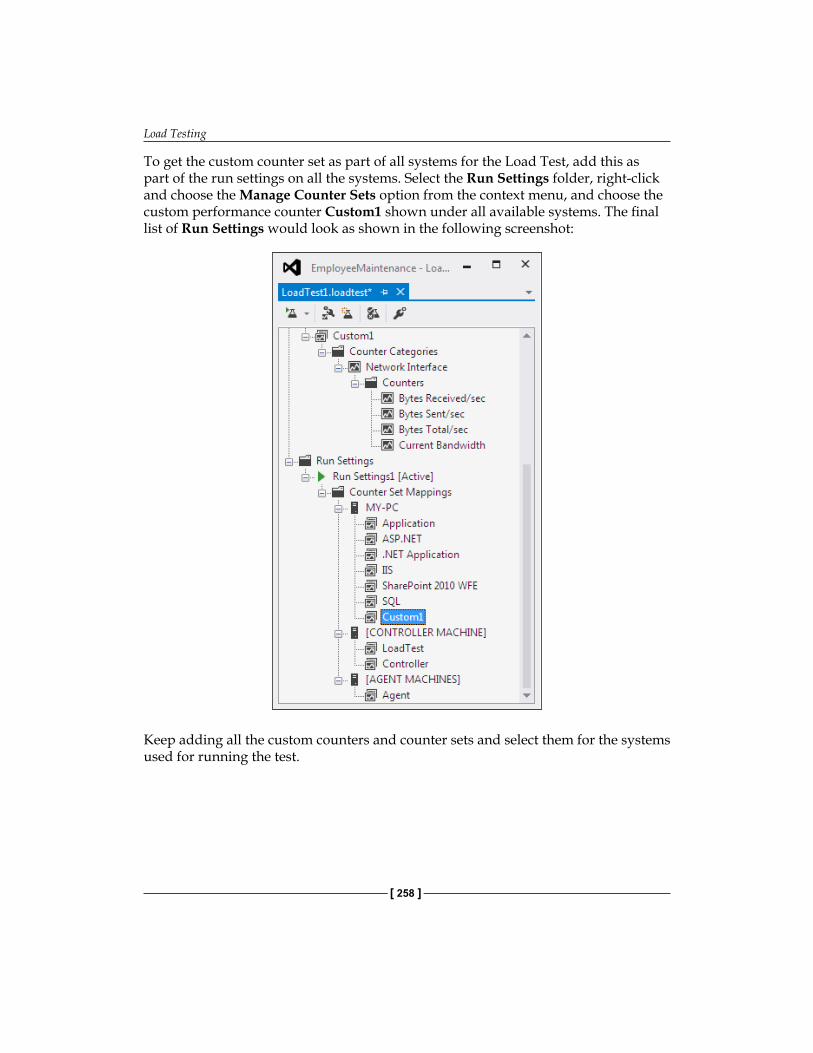
Load Testing
[ 258 ]
To get the custom counter set as part of all systems for the Load Test, add this as part of the run settings on all the systems. Select the Run Settings folder, right-click and choose the Manage Counter Sets option from the context menu, and choose the custom performance counter Custom1 shown under all available systems. The final list of Run Settings would look as shown in the following screenshot:
Keep adding all the custom counters and counter sets and select them for the systems used for running the test.
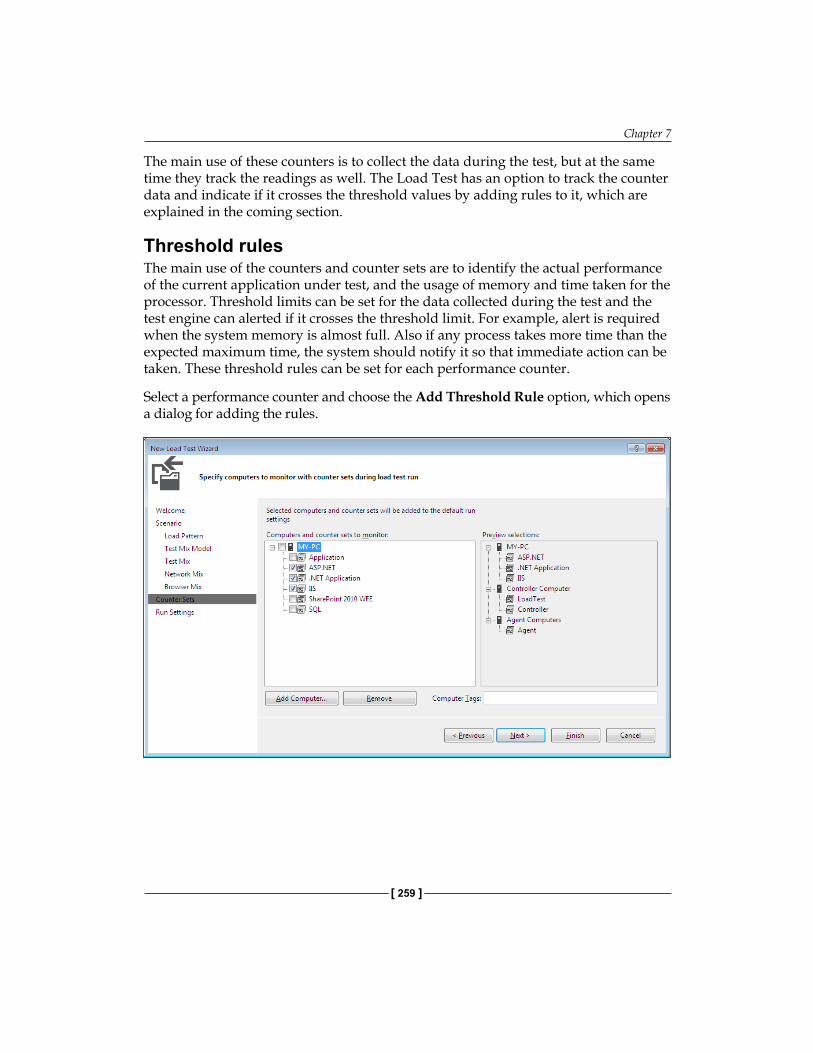
Chapter 7
[ 259 ]
The main use of these counters is to collect the data during the test, but at the same time they track the readings as well. The Load Test has an option to track the counter data and indicate if it crosses the threshold values by adding rules to it, which are explained in the coming section.
Threshold rulesThe main use of the counters and counter sets are to identify the actual performance of the current application under test, and the usage of memory and time taken for the processor. Threshold limits can be set for the data collected during the test and the test engine can alerted if it crosses the threshold limit. For example, alert is required when the system memory is almost full. Also if any process takes more time than the expected maximum time, the system should notify it so that immediate action can be taken. These threshold rules can be set for each performance counter.
Select a performance counter and choose the Add Threshold Rule option, which opens a dialog for adding the rules.
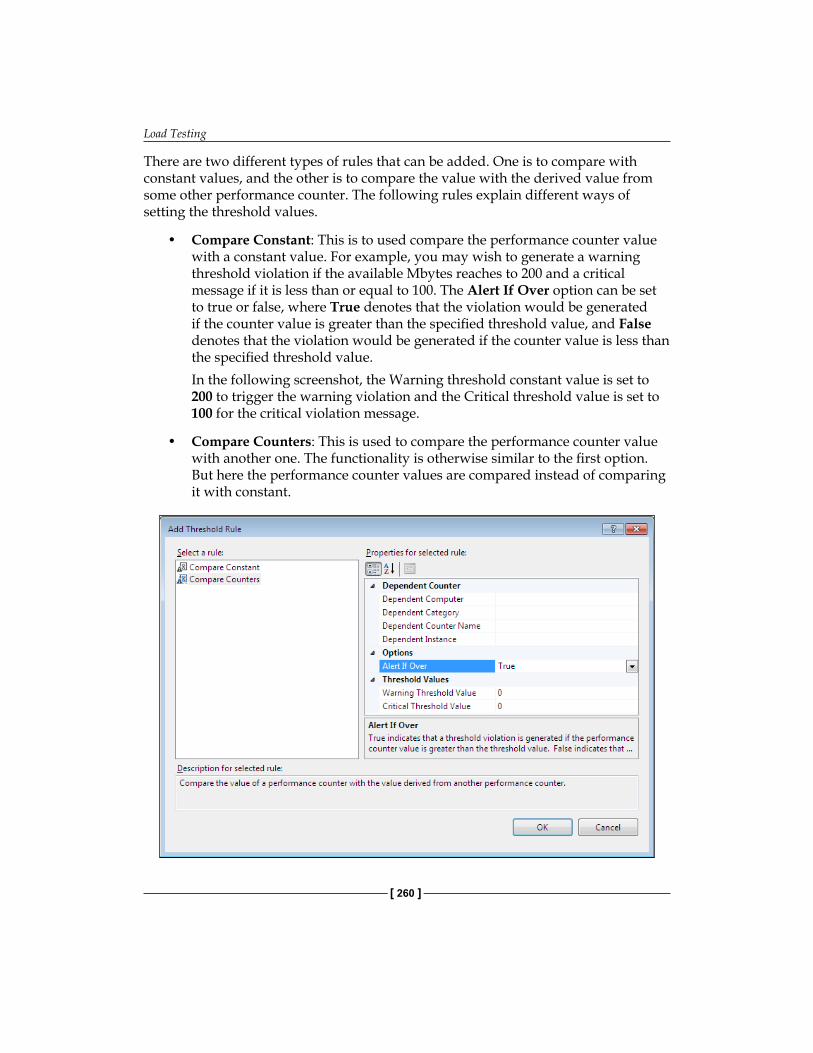
Load Testing
[ 260 ]
There are two different types of rules that can be added. One is to compare with constant values, and the other is to compare the value with the derived value from some other performance counter. The following rules explain different ways of setting the threshold values.
• Compare Constant: This is to used compare the performance counter value with a constant value. For example, you may wish to generate a warning threshold violation if the available Mbytes reaches to 200 and a critical message if it is less than or equal to 100. The Alert If Over option can be set to true or false, where True denotes that the violation would be generated if the counter value is greater than the specified threshold value, and False denotes that the violation would be generated if the counter value is less than the specified threshold value.In the following screenshot, the Warning threshold constant value is set to 200 to trigger the warning violation and the Critical threshold value is set to 100 for the critical violation message.
• Compare Counters: This is used to compare the performance counter value with another one. The functionality is otherwise similar to the first option. But here the performance counter values are compared instead of comparing it with constant.
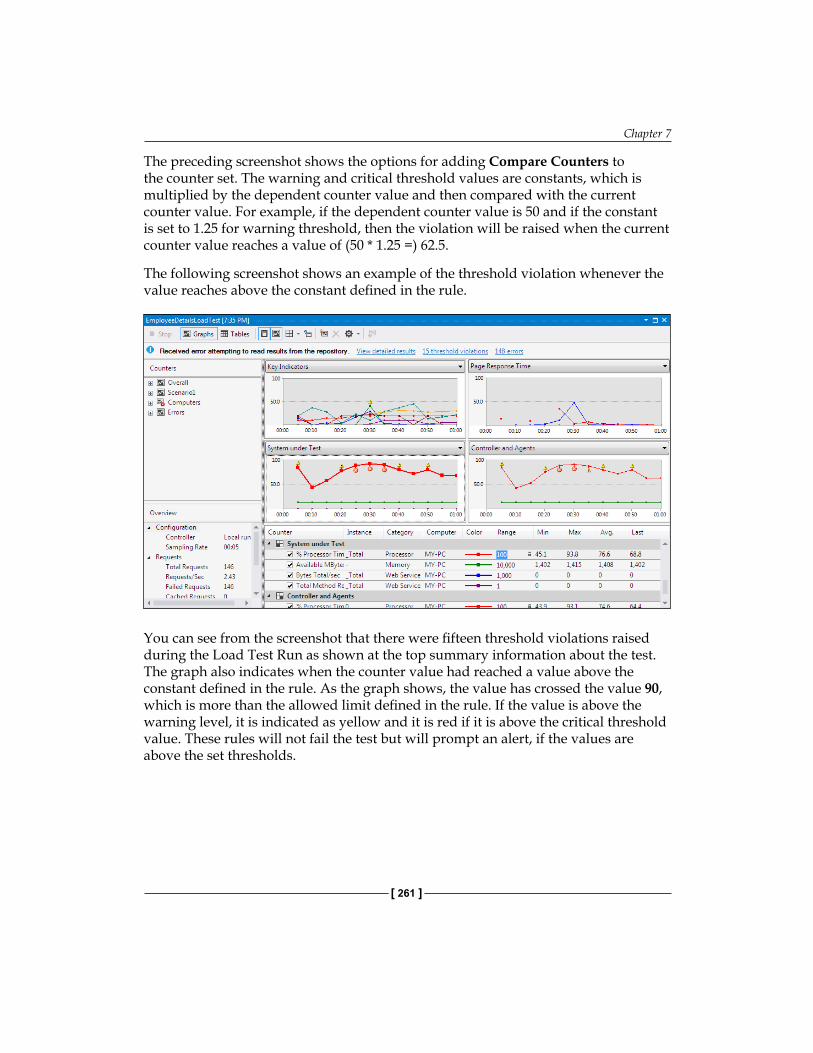
Chapter 7
[ 261 ]
The preceding screenshot shows the options for adding Compare Counters to the counter set. The warning and critical threshold values are constants, which is multiplied by the dependent counter value and then compared with the current counter value. For example, if the dependent counter value is 50 and if the constant is set to 1.25 for warning threshold, then the violation will be raised when the current counter value reaches a value of (50 * 1.25 =) 62.5.
The following screenshot shows an example of the threshold violation whenever the value reaches above the constant defined in the rule.
You can see from the screenshot that there were fifteen threshold violations raised during the Load Test Run as shown at the top summary information about the test. The graph also indicates when the counter value had reached a value above the constant defined in the rule. As the graph shows, the value has crossed the value 90, which is more than the allowed limit defined in the rule. If the value is above the warning level, it is indicated as yellow and it is red if it is above the critical threshold value. These rules will not fail the test but will prompt an alert, if the values are above the set thresholds.
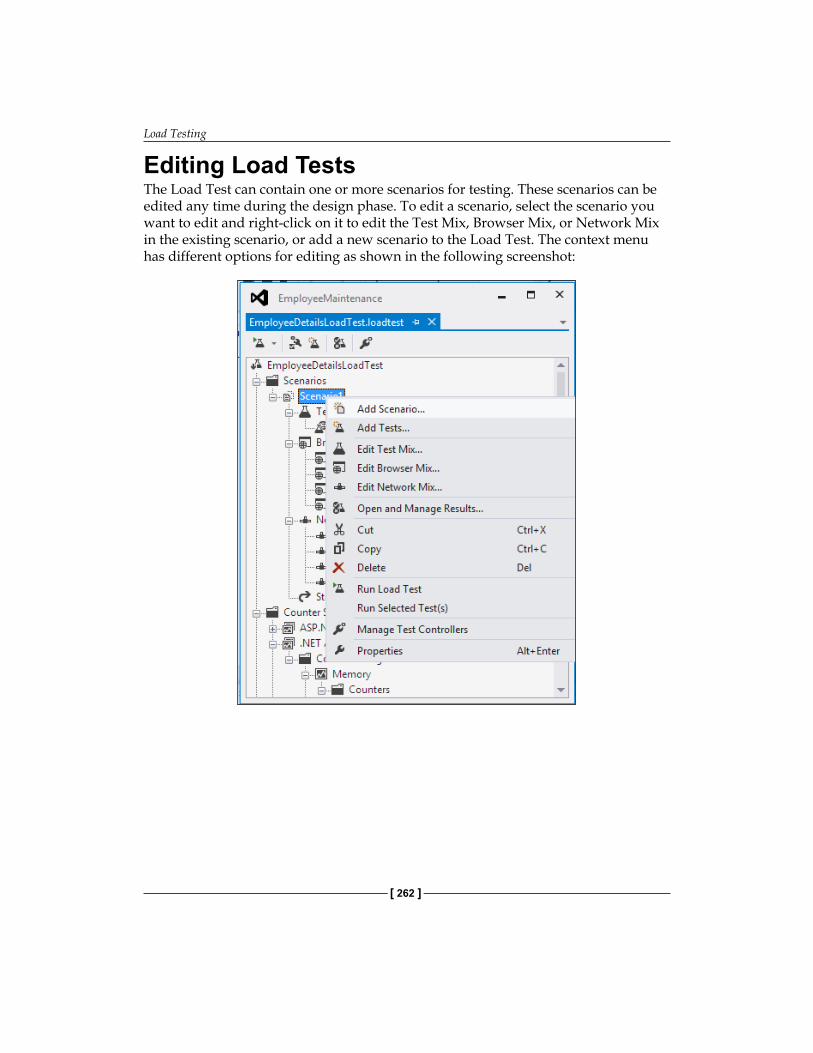
Load Testing
[ 262 ]
Editing Load TestsThe Load Test can contain one or more scenarios for testing. These scenarios can be edited any time during the design phase. To edit a scenario, select the scenario you want to edit and right-click on it to edit the Test Mix, Browser Mix, or Network Mix in the existing scenario, or add a new scenario to the Load Test. The context menu has different options for editing as shown in the following screenshot:
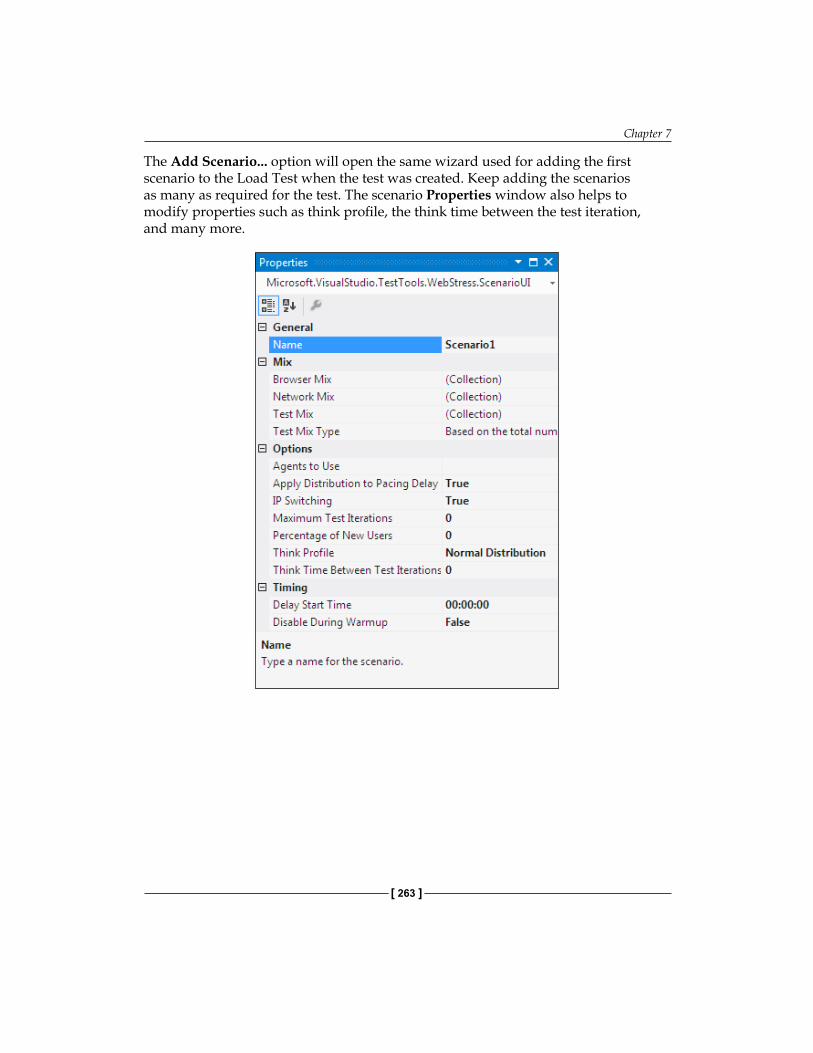
Chapter 7
[ 263 ]
The Add Scenario... option will open the same wizard used for adding the first scenario to the Load Test when the test was created. Keep adding the scenarios as many as required for the test. The scenario Properties window also helps to modify properties such as think profile, the think time between the test iteration, and many more.
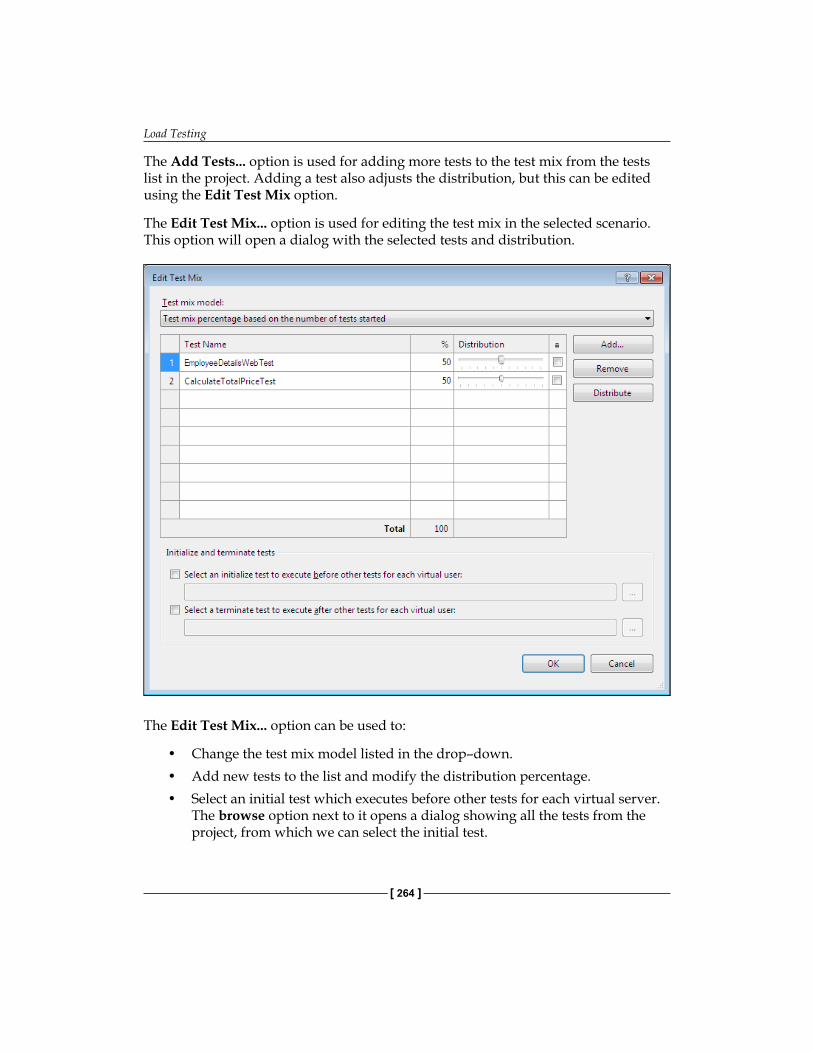
Load Testing
[ 264 ]
The Add Tests... option is used for adding more tests to the test mix from the tests list in the project. Adding a test also adjusts the distribution, but this can be edited using the Edit Test Mix option.
The Edit Test Mix... option is used for editing the test mix in the selected scenario. This option will open a dialog with the selected tests and distribution.
The Edit Test Mix... option can be used to:
• Change the test mix model listed in the drop–down.• Add new tests to the list and modify the distribution percentage.• Select an initial test which executes before other tests for each virtual server.
The browse option next to it opens a dialog showing all the tests from the project, from which we can select the initial test.
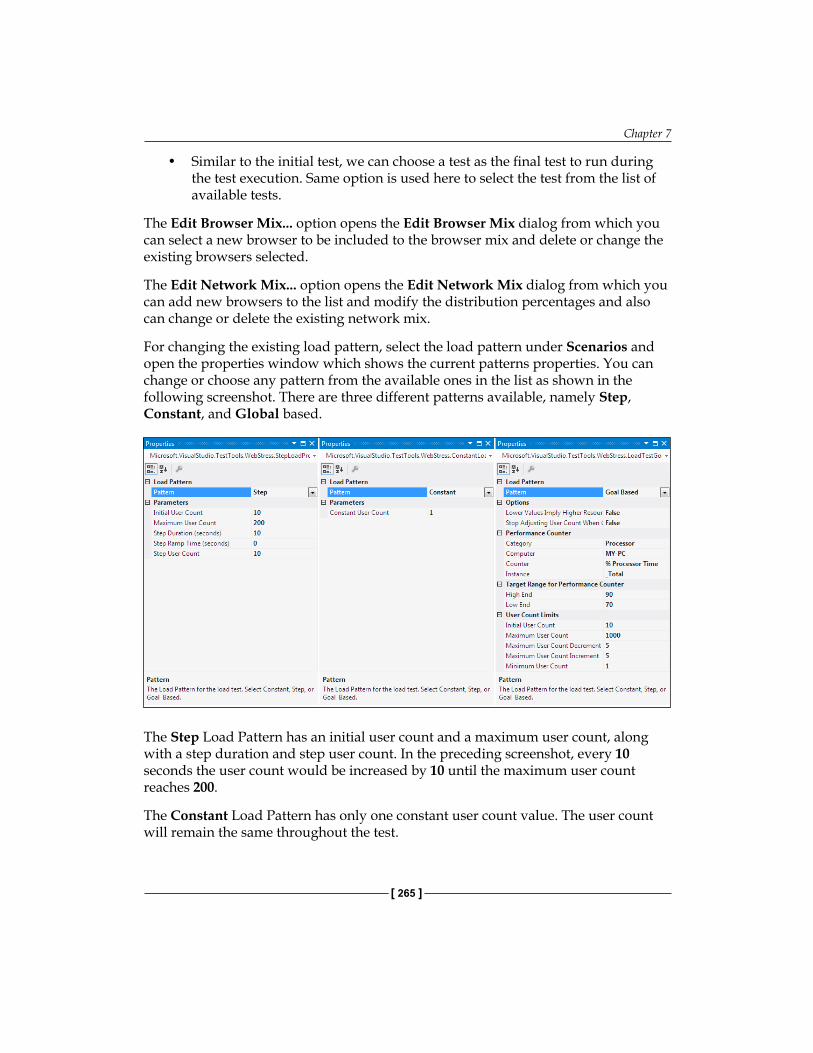
Chapter 7
[ 265 ]
• Similar to the initial test, we can choose a test as the final test to run during the test execution. Same option is used here to select the test from the list of available tests.
The Edit Browser Mix... option opens the Edit Browser Mix dialog from which you can select a new browser to be included to the browser mix and delete or change the existing browsers selected.
The Edit Network Mix... option opens the Edit Network Mix dialog from which you can add new browsers to the list and modify the distribution percentages and also can change or delete the existing network mix.
For changing the existing load pattern, select the load pattern under Scenarios and open the properties window which shows the current patterns properties. You can change or choose any pattern from the available ones in the list as shown in the following screenshot. There are three different patterns available, namely Step, Constant, and Global based.
The Step Load Pattern has an initial user count and a maximum user count, along with a step duration and step user count. In the preceding screenshot, every 10 seconds the user count would be increased by 10 until the maximum user count reaches 200.
The Constant Load Pattern has only one constant user count value. The user count will remain the same throughout the test.
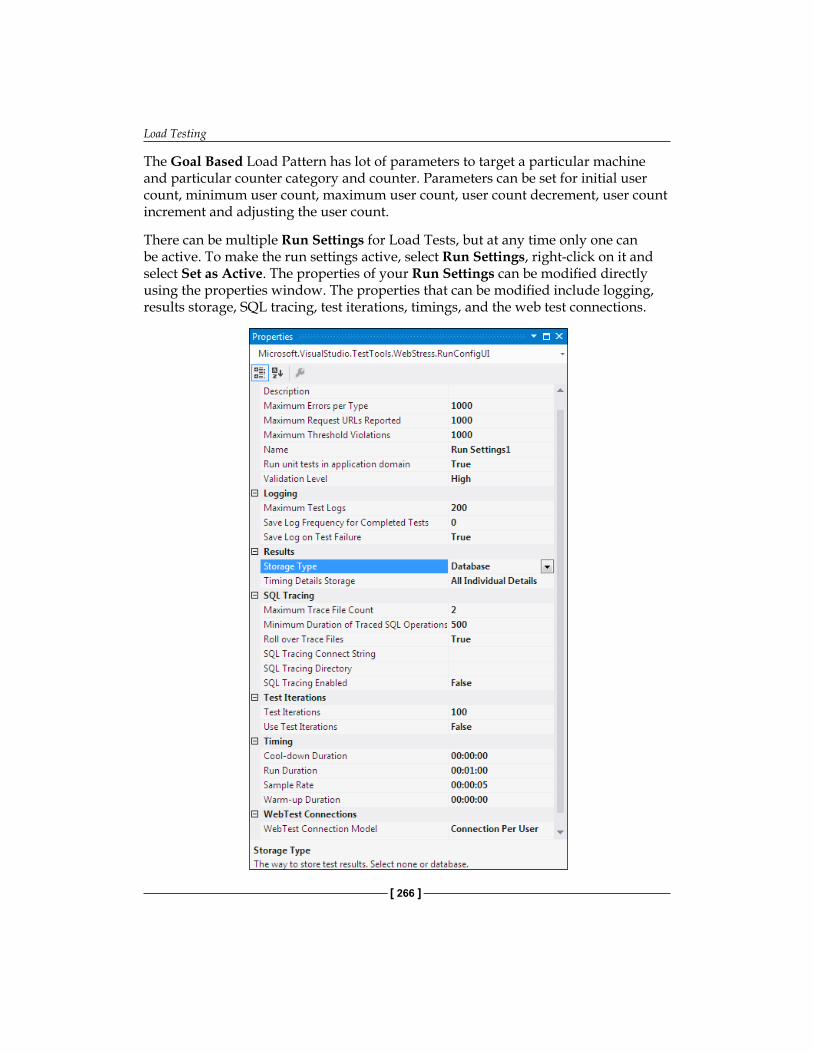
Load Testing
[ 266 ]
The Goal Based Load Pattern has lot of parameters to target a particular machine and particular counter category and counter. Parameters can be set for initial user count, minimum user count, maximum user count, user count decrement, user count increment and adjusting the user count.
There can be multiple Run Settings for Load Tests, but at any time only one can be active. To make the run settings active, select Run Settings, right-click on it and select Set as Active. The properties of your Run Settings can be modified directly using the properties window. The properties that can be modified include logging, results storage, SQL tracing, test iterations, timings, and the web test connections.
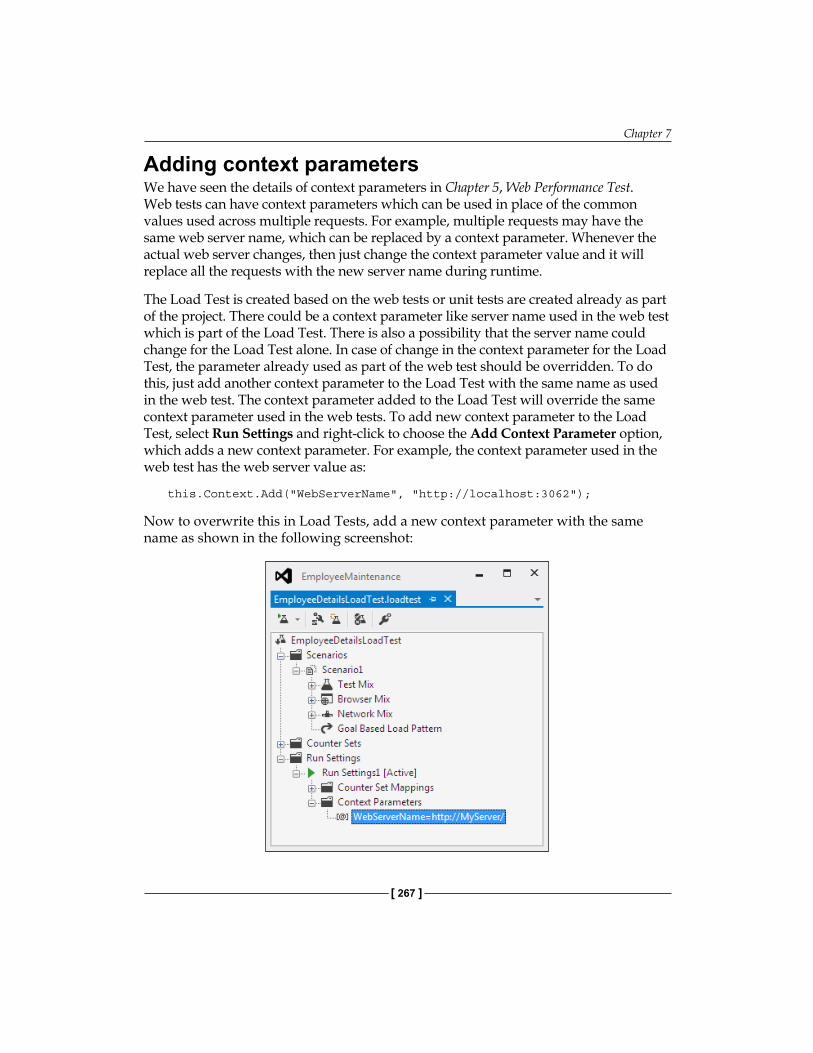
Chapter 7
[ 267 ]
Adding context parametersWe have seen the details of context parameters in Chapter 5, Web Performance Test. Web tests can have context parameters which can be used in place of the common values used across multiple requests. For example, multiple requests may have the same web server name, which can be replaced by a context parameter. Whenever the actual web server changes, then just change the context parameter value and it will replace all the requests with the new server name during runtime.
The Load Test is created based on the web tests or unit tests are created already as part of the project. There could be a context parameter like server name used in the web test which is part of the Load Test. There is also a possibility that the server name could change for the Load Test alone. In case of change in the context parameter for the Load Test, the parameter already used as part of the web test should be overridden. To do this, just add another context parameter to the Load Test with the same name as used in the web test. The context parameter added to the Load Test will override the same context parameter used in the web tests. To add new context parameter to the Load Test, select Run Settings and right-click to choose the Add Context Parameter option, which adds a new context parameter. For example, the context parameter used in the web test has the web server value as:
this.Context.Add("WebServerName", "http://localhost:3062");
Now to overwrite this in Load Tests, add a new context parameter with the same name as shown in the following screenshot:
Load Testing
[ 268 ]
Storing results in central result storeAll information collected during a Load Test Run is stored in the central result store. The Load Test Results store contains all the data collected by the performance counters and the violation information and errors that occurred during the Load Test. The result store is the SQL server database created using the script loadtestresultsrepository.sql which contains all the SQL queries to create the objects required for the result store.
If there are no controllers involved in the test and if it is the local test, we can create the result store SQL database using SQL Express. Running the script creates the store using SQL Express. Running this script once on the local machine is enough for creating the result store. This is a global central store for all the Load Tests in the local machine. To create the store, open the Visual Studio Command Prompt and run the command with the actual drive where you have installed the Visual Studio.
cd c:\Program Files\Microsoft Visual Studio 10.0\Common7\IDE
In the same folder run the following command which creates the database store:
SQLCMD /S localhost\sqlexpress -i loadtestresultsrepository.sql
If you have any other SQL Server and if you want to use that to have the result store then you can run the script on that server and use that server in connection parameters for the Load Test. For example, if you have the SQL Server name as SQLServer1 and if the result store has to be created in that store then run the command as follows:
SQLCMD /S SQLServer1 -U <user name> -P <password> -i loadtestresultsrepository.sql
All of these above commands create the result store database in the SQL Server.
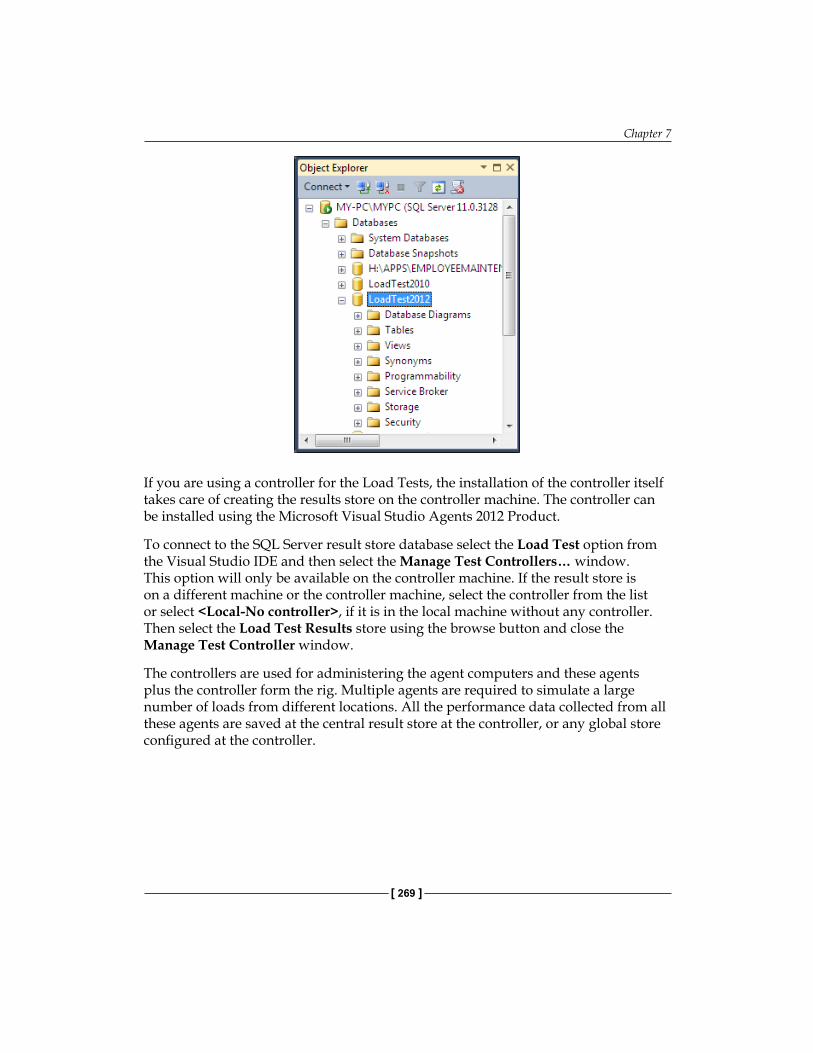
Chapter 7
[ 269 ]
If you are using a controller for the Load Tests, the installation of the controller itself takes care of creating the results store on the controller machine. The controller can be installed using the Microsoft Visual Studio Agents 2012 Product.
To connect to the SQL Server result store database select the Load Test option from the Visual Studio IDE and then select the Manage Test Controllers… window. This option will only be available on the controller machine. If the result store is on a different machine or the controller machine, select the controller from the list or select <Local-No controller>, if it is in the local machine without any controller. Then select the Load Test Results store using the browse button and close the Manage Test Controller window.
The controllers are used for administering the agent computers and these agents plus the controller form the rig. Multiple agents are required to simulate a large number of loads from different locations. All the performance data collected from all these agents are saved at the central result store at the controller, or any global store configured at the controller.
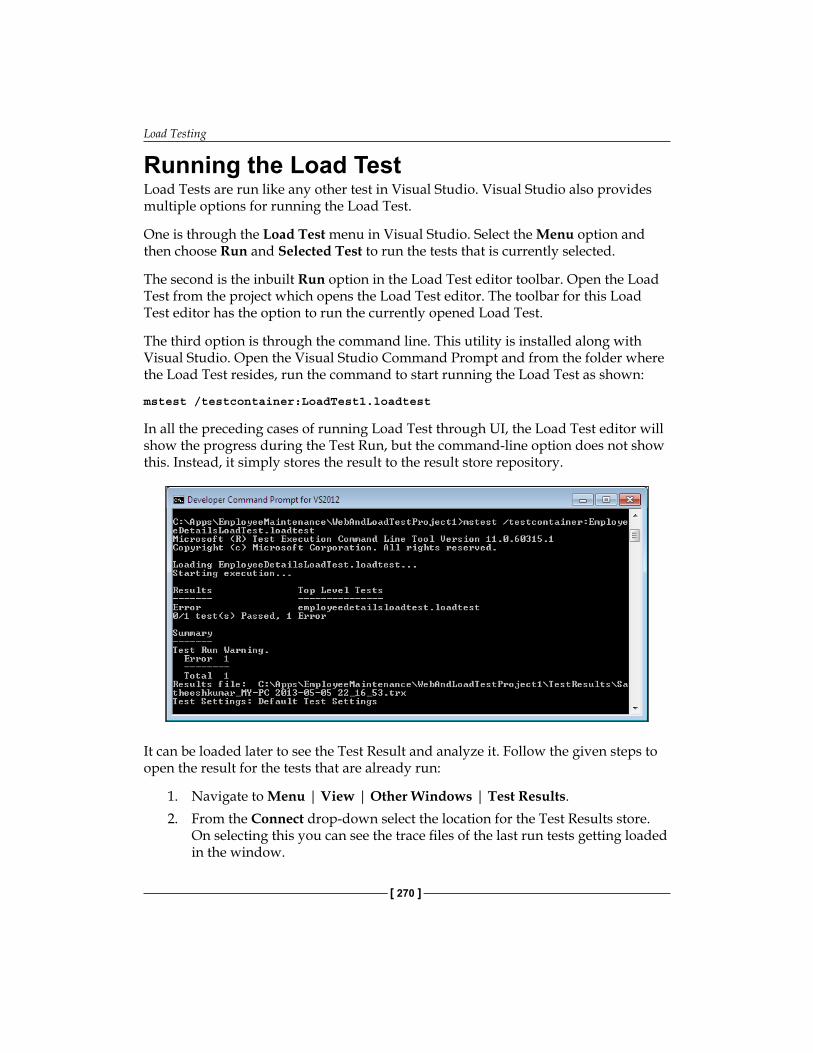
Load Testing
[ 270 ]
Running the Load TestLoad Tests are run like any other test in Visual Studio. Visual Studio also provides multiple options for running the Load Test.
One is through the Load Test menu in Visual Studio. Select the Menu option and then choose Run and Selected Test to run the tests that is currently selected.
The second is the inbuilt Run option in the Load Test editor toolbar. Open the Load Test from the project which opens the Load Test editor. The toolbar for this Load Test editor has the option to run the currently opened Load Test.
The third option is through the command line. This utility is installed along with Visual Studio. Open the Visual Studio Command Prompt and from the folder where the Load Test resides, run the command to start running the Load Test as shown:
mstest /testcontainer:LoadTest1.loadtest
In all the preceding cases of running Load Test through UI, the Load Test editor will show the progress during the Test Run, but the command-line option does not show this. Instead, it simply stores the result to the result store repository.
It can be loaded later to see the Test Result and analyze it. Follow the given steps to open the result for the tests that are already run:
1. Navigate to Menu | View | Other Windows | Test Results.2. From the Connect drop-down select the location for the Test Results store.
On selecting this you can see the trace files of the last run tests getting loaded in the window.
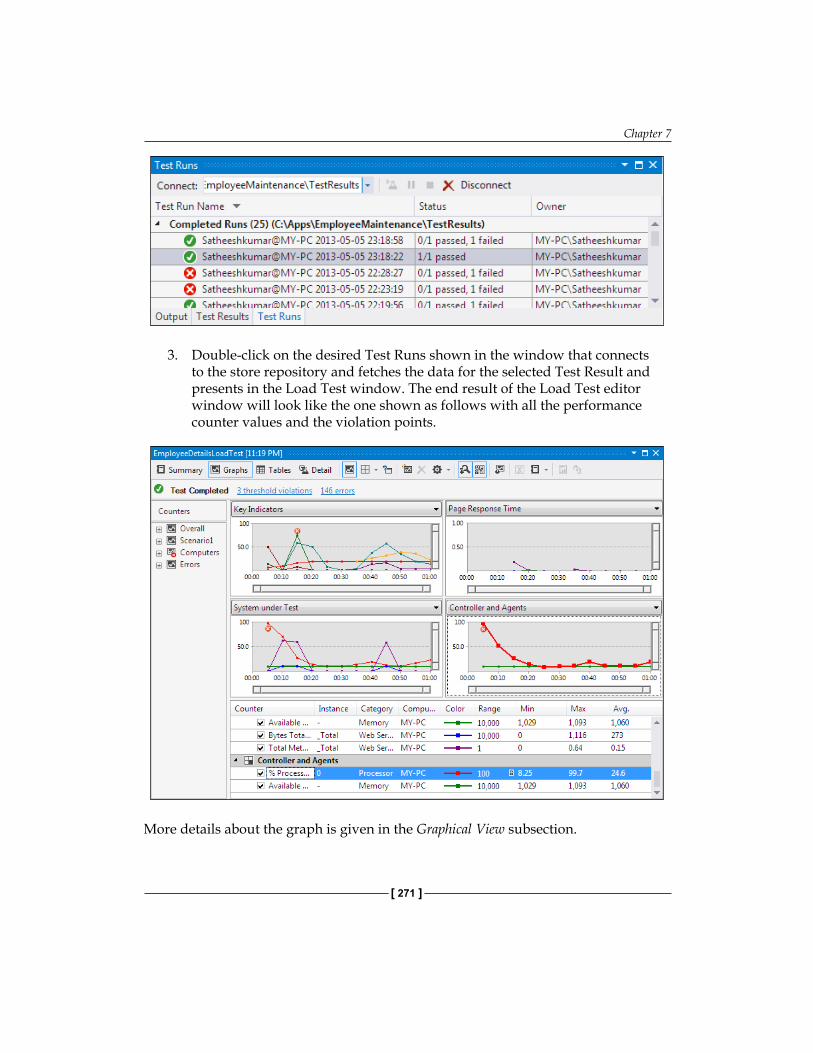
Chapter 7
[ 271 ]
3. Double-click on the desired Test Runs shown in the window that connects to the store repository and fetches the data for the selected Test Result and presents in the Load Test window. The end result of the Load Test editor window will look like the one shown as follows with all the performance counter values and the violation points.
More details about the graph is given in the Graphical View subsection.
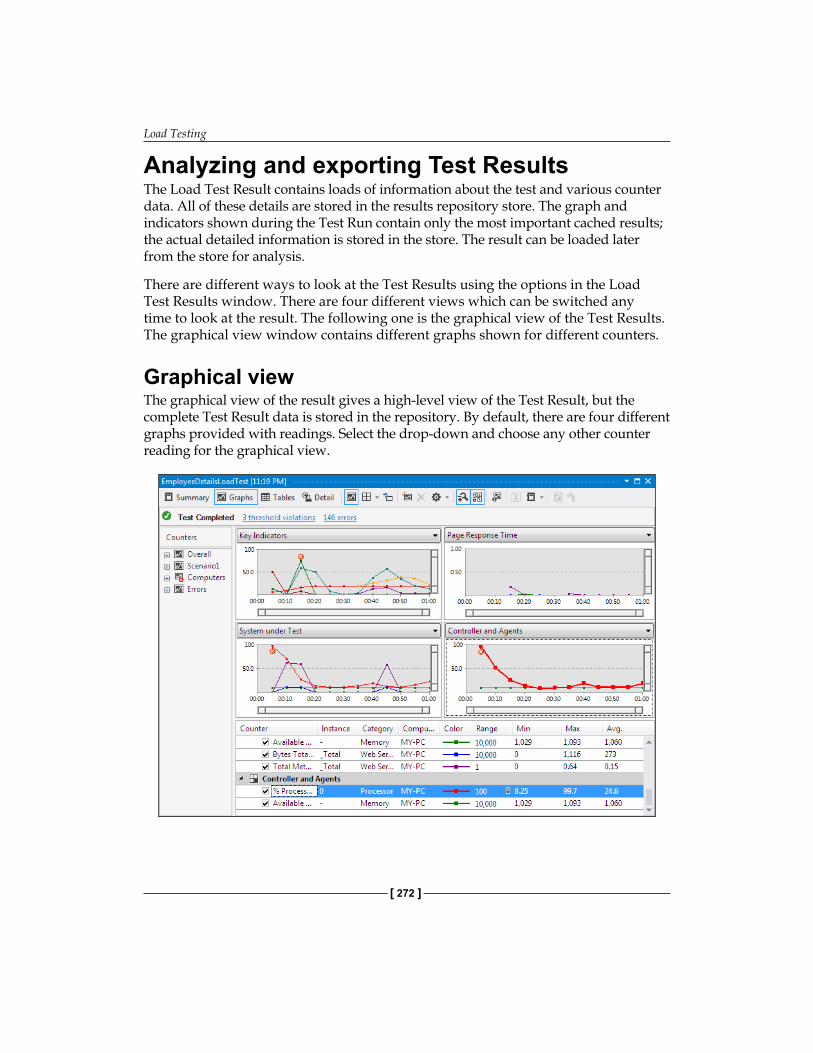
Load Testing
[ 272 ]
Analyzing and exporting Test ResultsThe Load Test Result contains loads of information about the test and various counter data. All of these details are stored in the results repository store. The graph and indicators shown during the Test Run contain only the most important cached results; the actual detailed information is stored in the store. The result can be loaded later from the store for analysis.
There are different ways to look at the Test Results using the options in the Load Test Results window. There are four different views which can be switched any time to look at the result. The following one is the graphical view of the Test Results. The graphical view window contains different graphs shown for different counters.
Graphical viewThe graphical view of the result gives a high-level view of the Test Result, but the complete Test Result data is stored in the repository. By default, there are four different graphs provided with readings. Select the drop-down and choose any other counter reading for the graphical view.
Chapter 7
[ 273 ]
• Key Indicators: This graph shows the data collected for average response time, JIT percentage, threshold violations per second, errors per second, and the user load. The details about the graph are given below the four graphs section, which describes the actual counter data collected during the test with the corresponding color coding with minimum, maximum, and average value for the counter.
• Page Response Time: This graph explains how long the response for each request took in different URLs. The details are given below the graphs.
• System under Test: This is the graph, which presents the data about different computers or agents used in test. The data includes readings such as the available memory and the processing time.
• Controller and Agents: The last graph presents the details about the system or machine involved in Load Test. The data collected would be the processor time and the available memory.
The color coded lines in the graph has corresponding summary information in the grid below the graphs area with the color legends. The details contain information such as the counter name, category, range, min, max, and average readings for each counter. The legends grid can be made visible or invisible using the option in the toolbar.
For example, in the preceding image you can see the graph Key Indicators on the top-left of all the graphs. Different types of readings are plotted in different colors in the graphs. The counters from this counter set are also presented in the table below the graphs, with all the counters and the corresponding colors for the counter used in the graph.
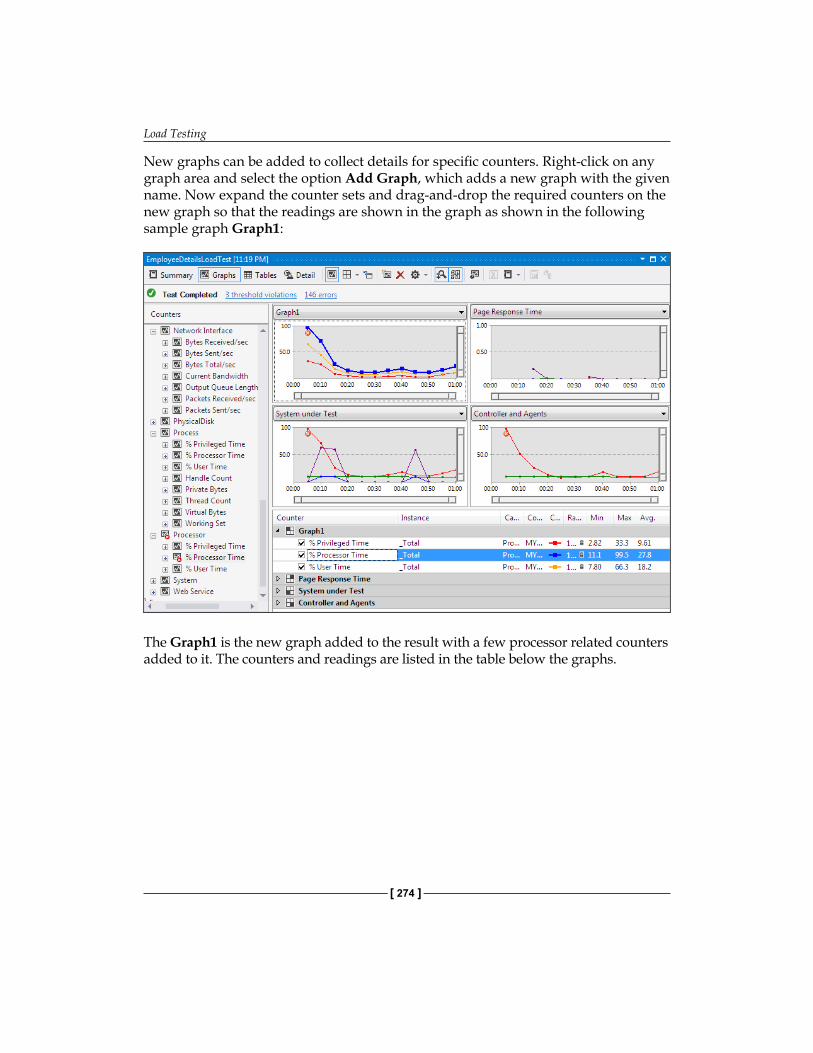
Load Testing
[ 274 ]
New graphs can be added to collect details for specific counters. Right-click on any graph area and select the option Add Graph, which adds a new graph with the given name. Now expand the counter sets and drag-and-drop the required counters on the new graph so that the readings are shown in the graph as shown in the following sample graph Graph1:
The Graph1 is the new graph added to the result with a few processor related counters added to it. The counters and readings are listed in the table below the graphs.
Chapter 7
[ 275 ]
Summary viewThe Summary view option in the Load Test editor window toolbar presents more information on the overall Load Testing.
The most important information is the top five slowest pages and the top slowest tests. The tests are ordered based on the average test time taken for each test and the time taken for each page request.
• Test Run Information: This section provides the overall Test Run details like start date and time, end date and time, test duration, number of agents used for the test and the settings used for the entire test.
• Overall Results: Provides information such as the maximum user load, number of tests per second, request count, pages per second and the average response time during the Test Run.
• Test Results: This section shows status information such as the number of tests conducted for each test selected for Load Testing. For example, out of 100 tests run for the web test selected for Load Testing, the number of tests passed and the number of tests failed.
• Page Results: This section reports information about the different URLs used during the test. This result gives the number of times a page is requested and the average time taken for each page. The detail includes the test name to which the URL belongs.
• Transaction Results: The transaction is the set of tasks in the test. This section in the Summary view shows information such as scenario name, test name, the elapsed time for testing each transaction tests, and the number of times this transaction is tested.
• System under Test Resources: This section reports information about systems involved in testing, the processor time for the test, and the amount of memory available at the end of test completion.
• Controller and Agents Resources: This section provides details of the machines used as controller and agents for the test. Details such as processor time percentage and the available memory after the test completion are also displayed.
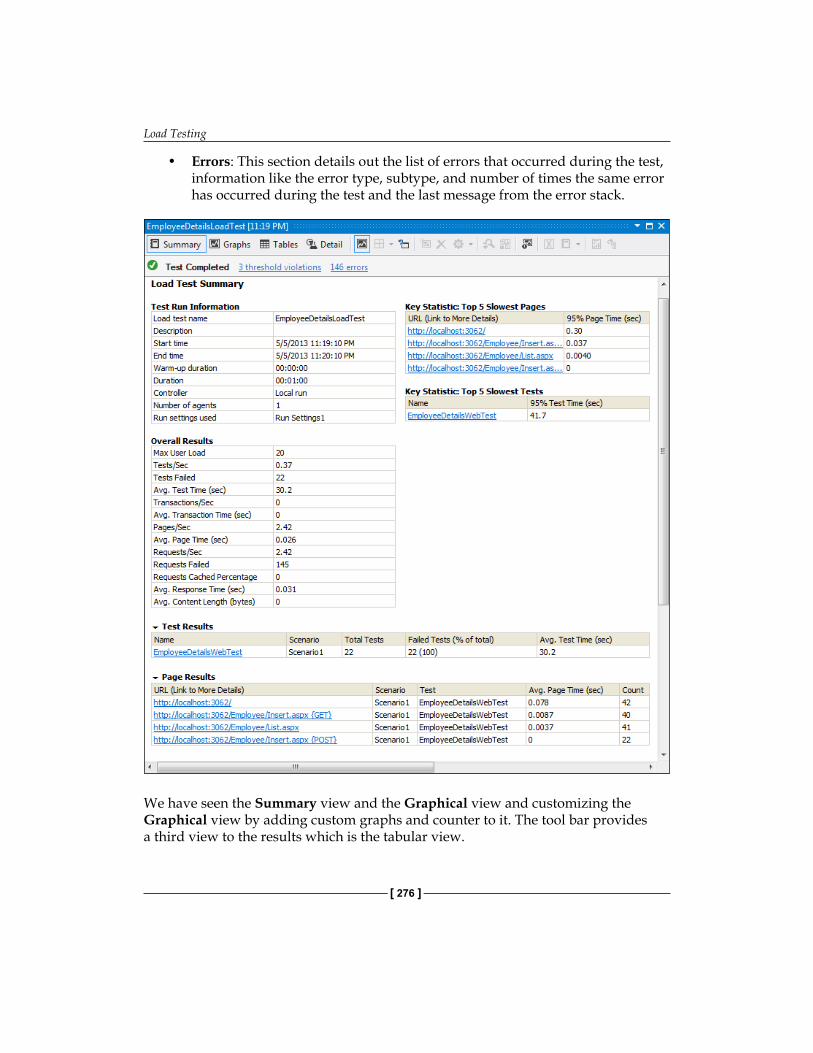
Load Testing
[ 276 ]
• Errors: This section details out the list of errors that occurred during the test, information like the error type, subtype, and number of times the same error has occurred during the test and the last message from the error stack.
We have seen the Summary view and the Graphical view and customizing the Graphical view by adding custom graphs and counter to it. The tool bar provides a third view to the results which is the tabular view.
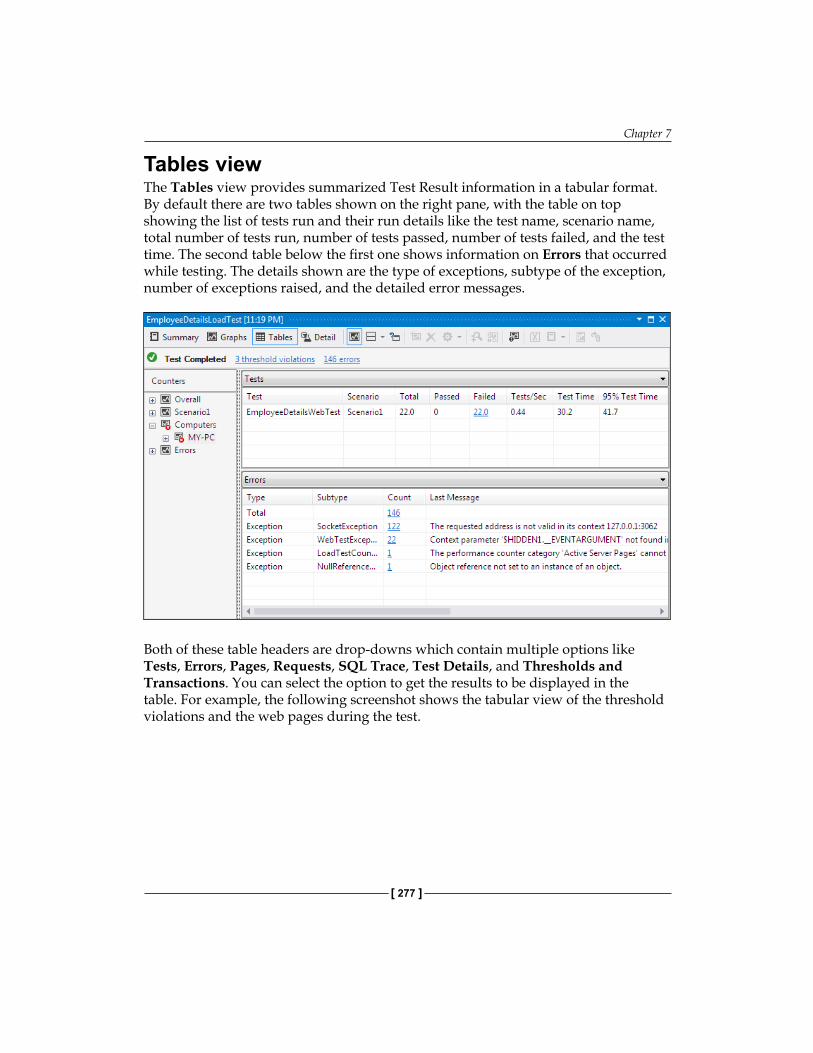
Chapter 7
[ 277 ]
Tables viewThe Tables view provides summarized Test Result information in a tabular format. By default there are two tables shown on the right pane, with the table on top showing the list of tests run and their run details like the test name, scenario name, total number of tests run, number of tests passed, number of tests failed, and the test time. The second table below the first one shows information on Errors that occurred while testing. The details shown are the type of exceptions, subtype of the exception, number of exceptions raised, and the detailed error messages.
Both of these table headers are drop-downs which contain multiple options like Tests, Errors, Pages, Requests, SQL Trace, Test Details, and Thresholds and Transactions. You can select the option to get the results to be displayed in the table. For example, the following screenshot shows the tabular view of the threshold violations and the web pages during the test.
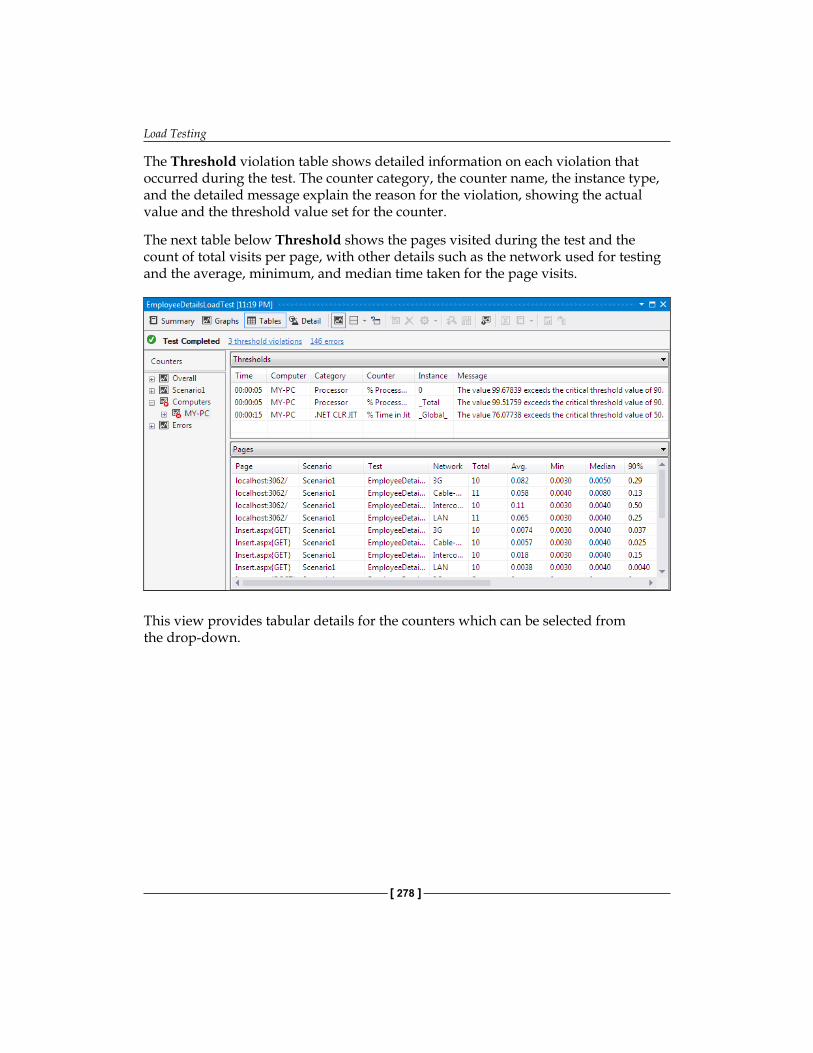
Load Testing
[ 278 ]
The Threshold violation table shows detailed information on each violation that occurred during the test. The counter category, the counter name, the instance type, and the detailed message explain the reason for the violation, showing the actual value and the threshold value set for the counter.
The next table below Threshold shows the pages visited during the test and the count of total visits per page, with other details such as the network used for testing and the average, minimum, and median time taken for the page visits.
This view provides tabular details for the counters which can be selected from the drop-down.
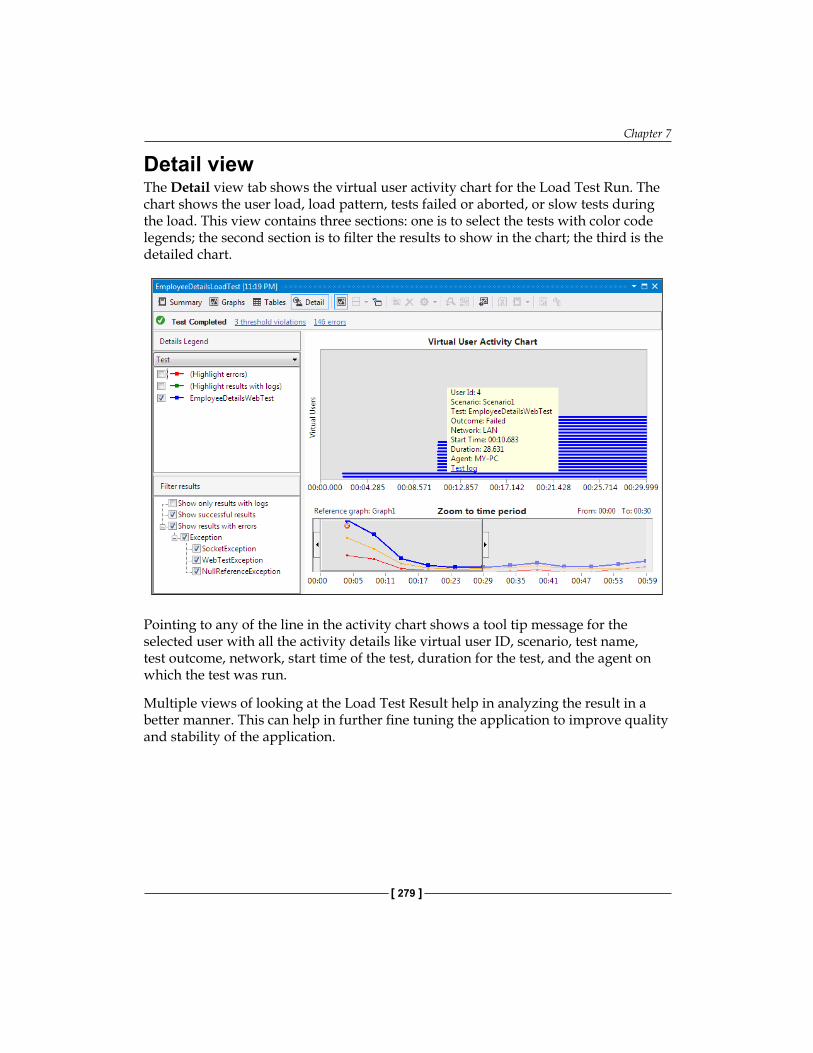
Chapter 7
[ 279 ]
Detail viewThe Detail view tab shows the virtual user activity chart for the Load Test Run. The chart shows the user load, load pattern, tests failed or aborted, or slow tests during the load. This view contains three sections: one is to select the tests with color code legends; the second section is to filter the results to show in the chart; the third is the detailed chart.
Pointing to any of the line in the activity chart shows a tool tip message for the selected user with all the activity details like virtual user ID, scenario, test name, test outcome, network, start time of the test, duration for the test, and the agent on which the test was run.
Multiple views of looking at the Load Test Result help in analyzing the result in a better manner. This can help in further fine tuning the application to improve quality and stability of the application.
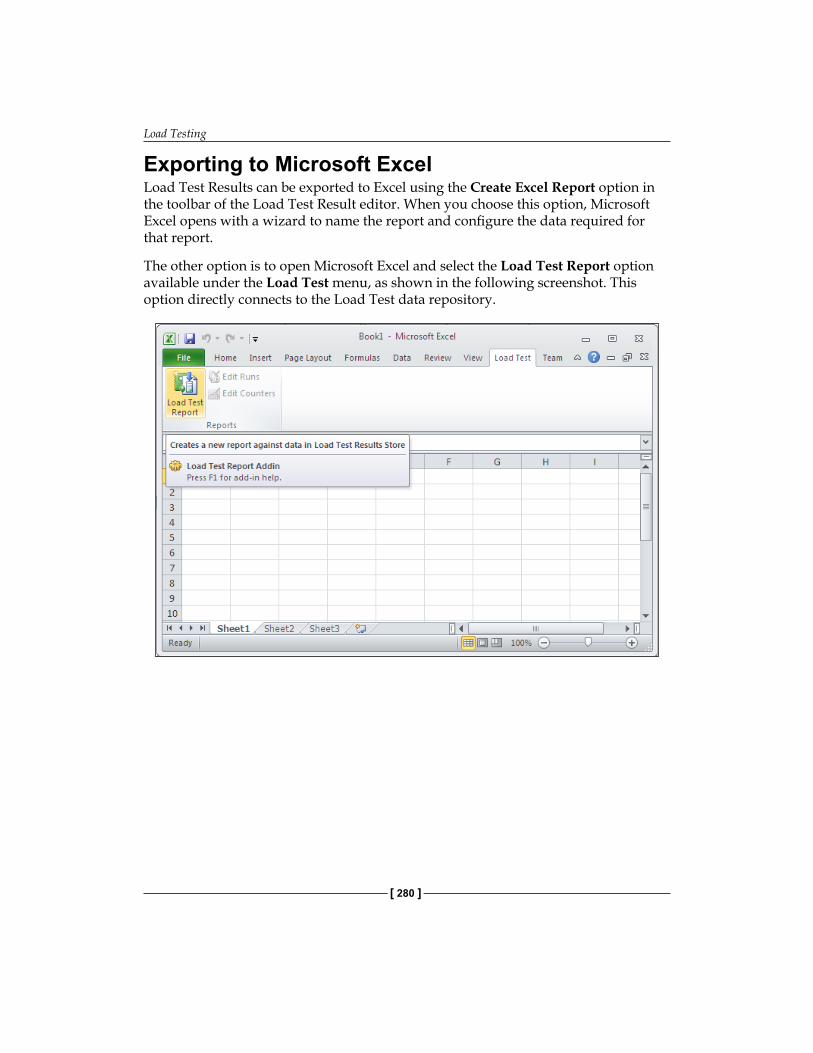
Load Testing
[ 280 ]
Exporting to Microsoft ExcelLoad Test Results can be exported to Excel using the Create Excel Report option in the toolbar of the Load Test Result editor. When you choose this option, Microsoft Excel opens with a wizard to name the report and configure the data required for that report.
The other option is to open Microsoft Excel and select the Load Test Report option available under the Load Test menu, as shown in the following screenshot. This option directly connects to the Load Test data repository.
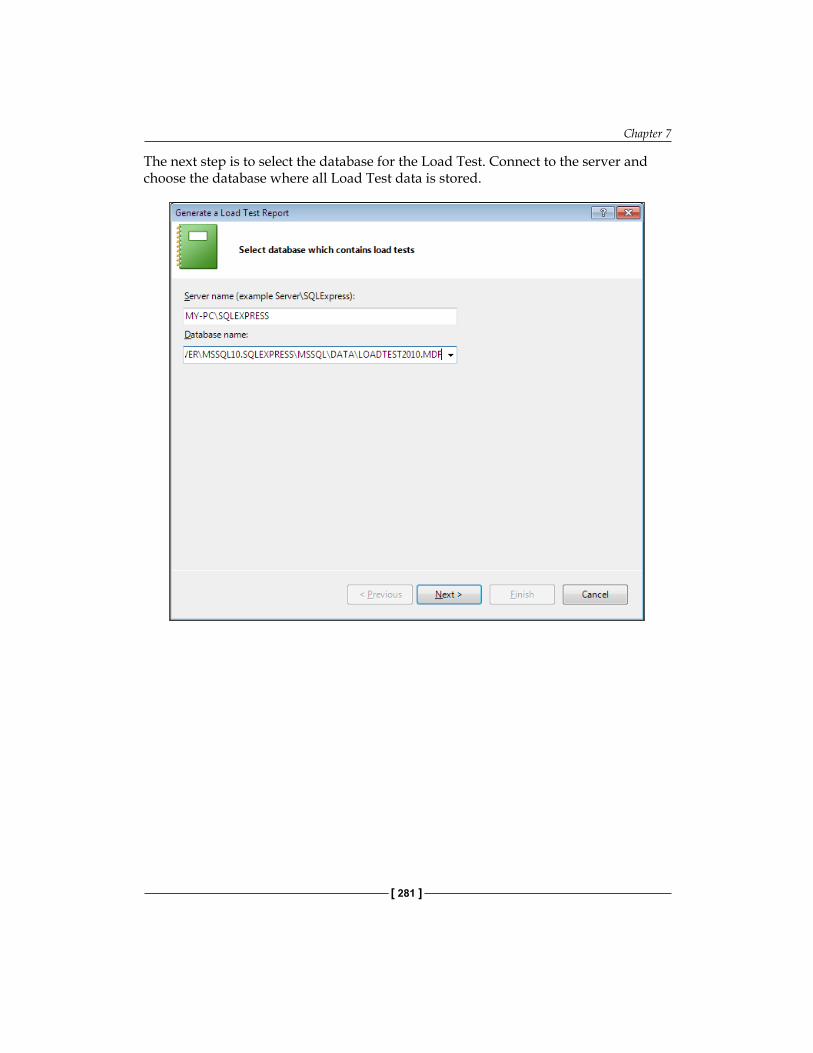
Chapter 7
[ 281 ]
The next step is to select the database for the Load Test. Connect to the server and choose the database where all Load Test data is stored.
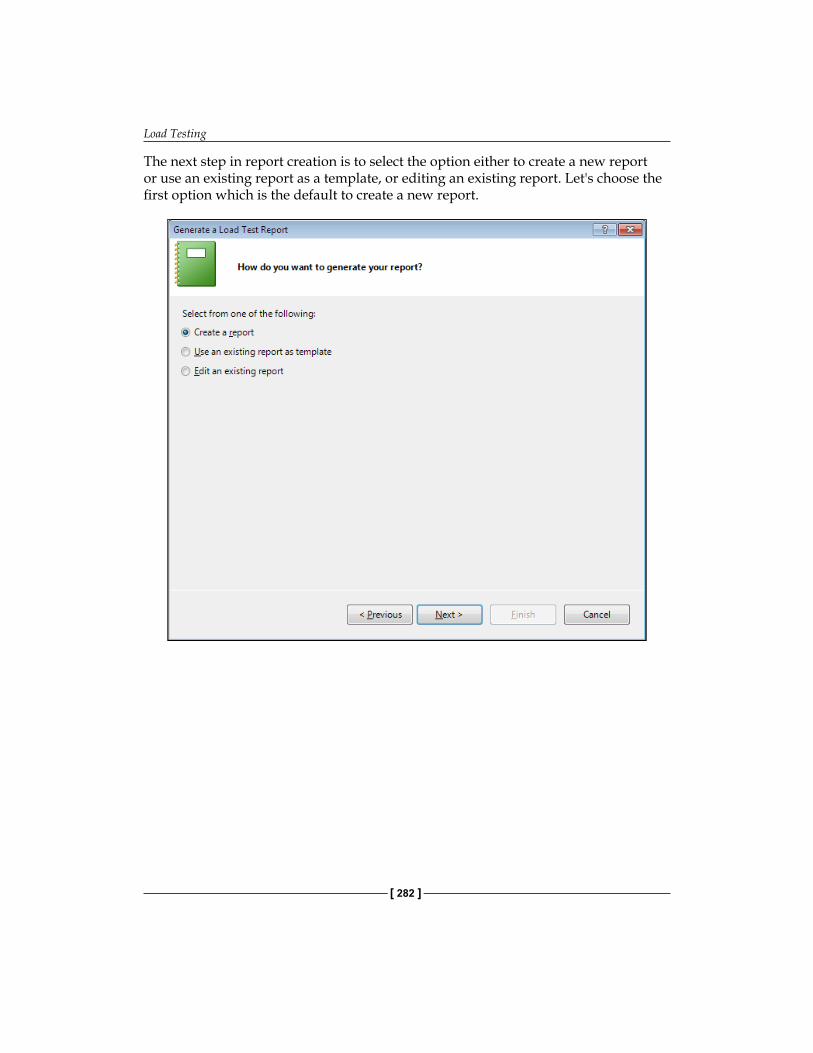
Load Testing
[ 282 ]
The next step in report creation is to select the option either to create a new report or use an existing report as a template, or editing an existing report. Let's choose the first option which is the default to create a new report.
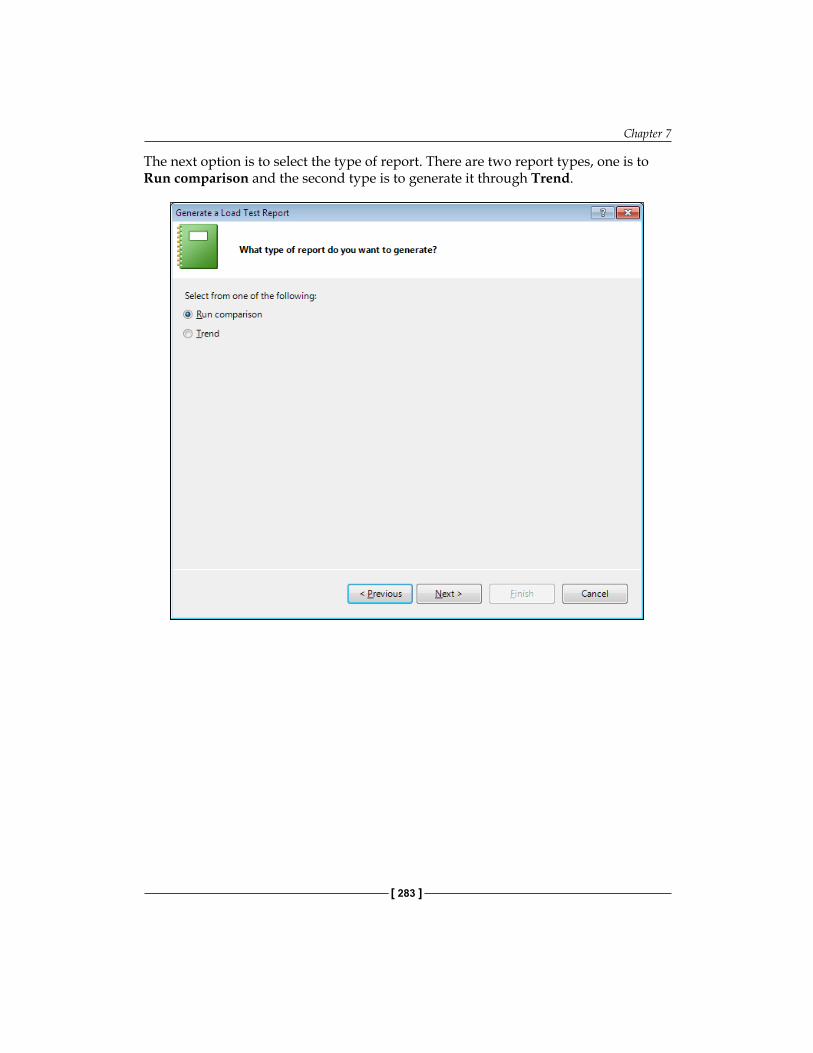
Chapter 7
[ 283 ]
The next option is to select the type of report. There are two report types, one is to Run comparison and the second type is to generate it through Trend.
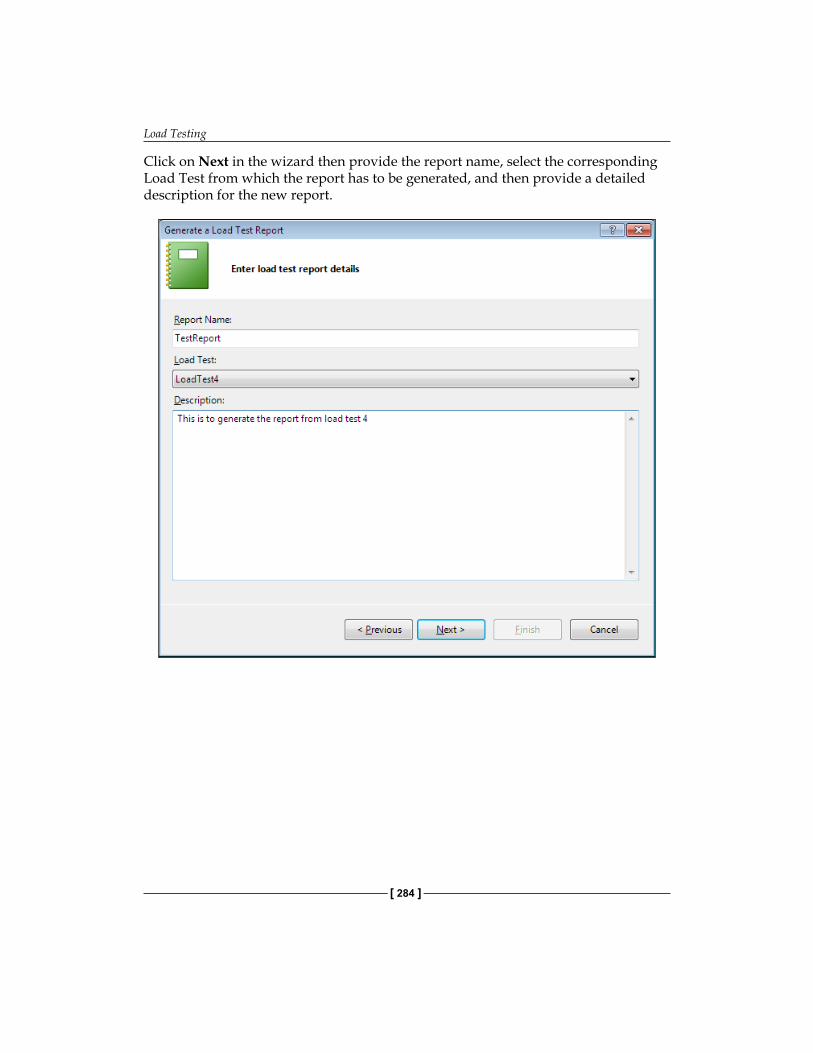
Load Testing
[ 284 ]
Click on Next in the wizard then provide the report name, select the corresponding Load Test from which the report has to be generated, and then provide a detailed description for the new report.
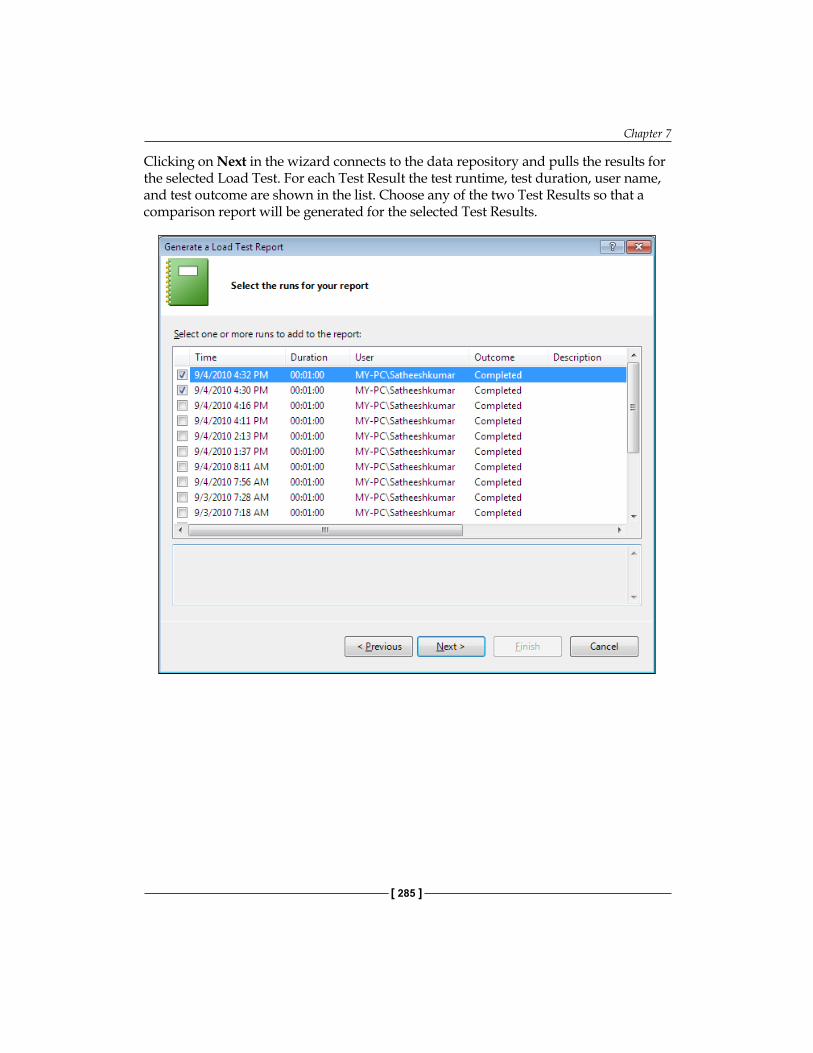
Chapter 7
[ 285 ]
Clicking on Next in the wizard connects to the data repository and pulls the results for the selected Load Test. For each Test Result the test runtime, test duration, user name, and test outcome are shown in the list. Choose any of the two Test Results so that a comparison report will be generated for the selected Test Results.
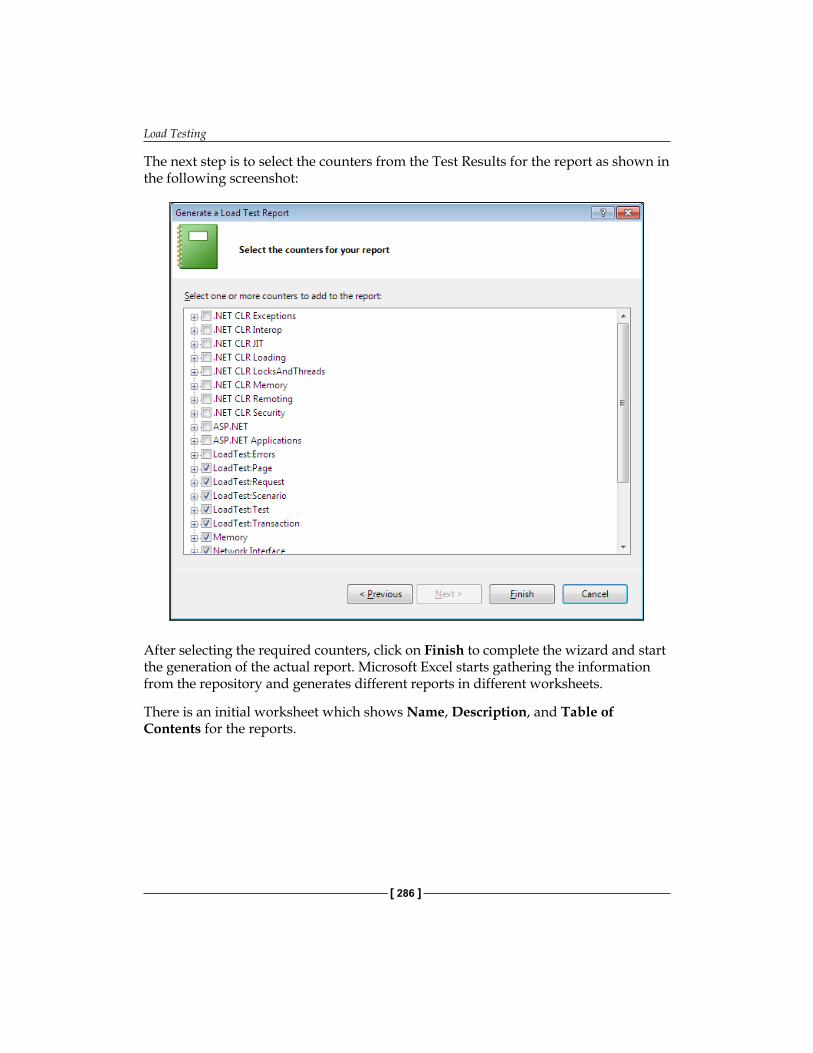
Load Testing
[ 286 ]
The next step is to select the counters from the Test Results for the report as shown in the following screenshot:
After selecting the required counters, click on Finish to complete the wizard and start the generation of the actual report. Microsoft Excel starts gathering the information from the repository and generates different reports in different worksheets.
There is an initial worksheet which shows Name, Description, and Table of Contents for the reports.

Chapter 7
[ 287 ]
The first report page following the Table of Contents page is the Runs sheet, which shows two Test Results and indicates the type of the results. The first one is considered as the baseline type and the second is the comparison run.
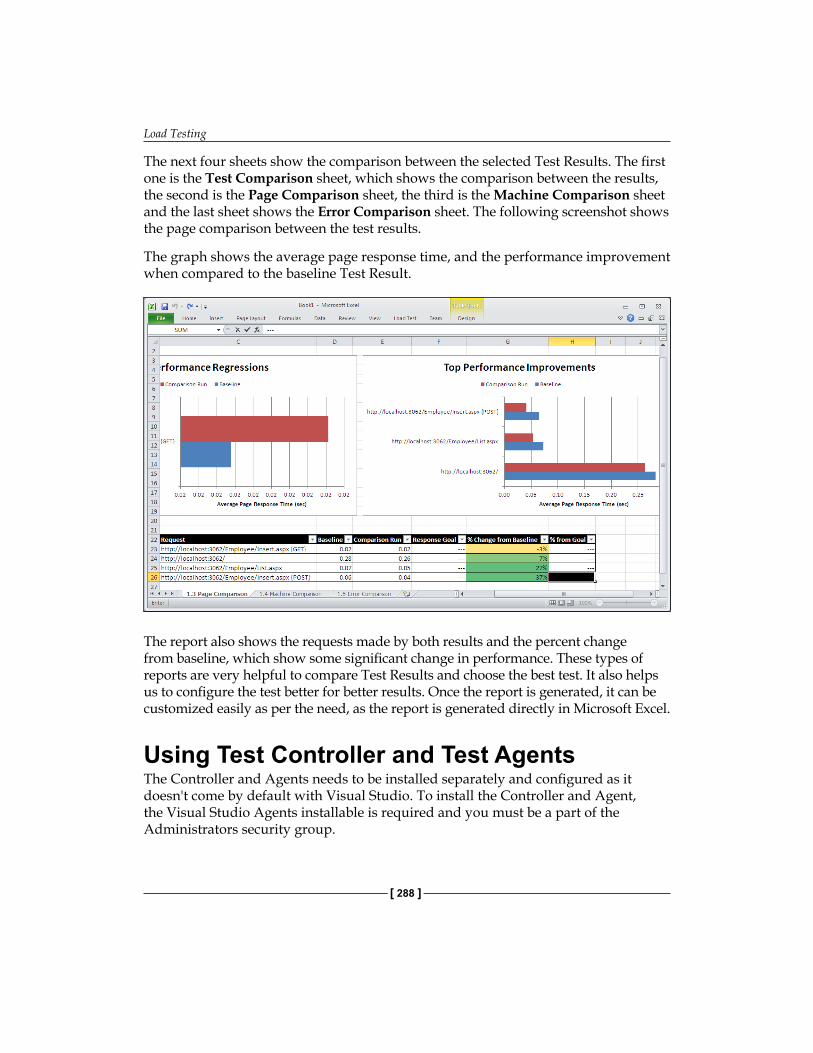
Load Testing
[ 288 ]
The next four sheets show the comparison between the selected Test Results. The first one is the Test Comparison sheet, which shows the comparison between the results, the second is the Page Comparison sheet, the third is the Machine Comparison sheet and the last sheet shows the Error Comparison sheet. The following screenshot shows the page comparison between the test results.
The graph shows the average page response time, and the performance improvement when compared to the baseline Test Result.
The report also shows the requests made by both results and the percent change from baseline, which show some significant change in performance. These types of reports are very helpful to compare Test Results and choose the best test. It also helps us to configure the test better for better results. Once the report is generated, it can be customized easily as per the need, as the report is generated directly in Microsoft Excel.
Using Test Controller and Test AgentsThe Controller and Agents needs to be installed separately and configured as it doesn't come by default with Visual Studio. To install the Controller and Agent, the Visual Studio Agents installable is required and you must be a part of the Administrators security group.

Chapter 7
[ 289 ]
Test Controller and Agent can be installed on the same machine where you have Visual Studio Ultimate, or you can install in different machines and then configure the settings appropriately.
Test Controller and Test Agent ConfigurationInstall Visual Studio Test Controller using the Visual Studio Agent installable. Provide all the details and then finish the installation. Once the installation is complete, select the Configure test controller now option to start configuration for the controller. The Configure Test Controller dialog is displayed:
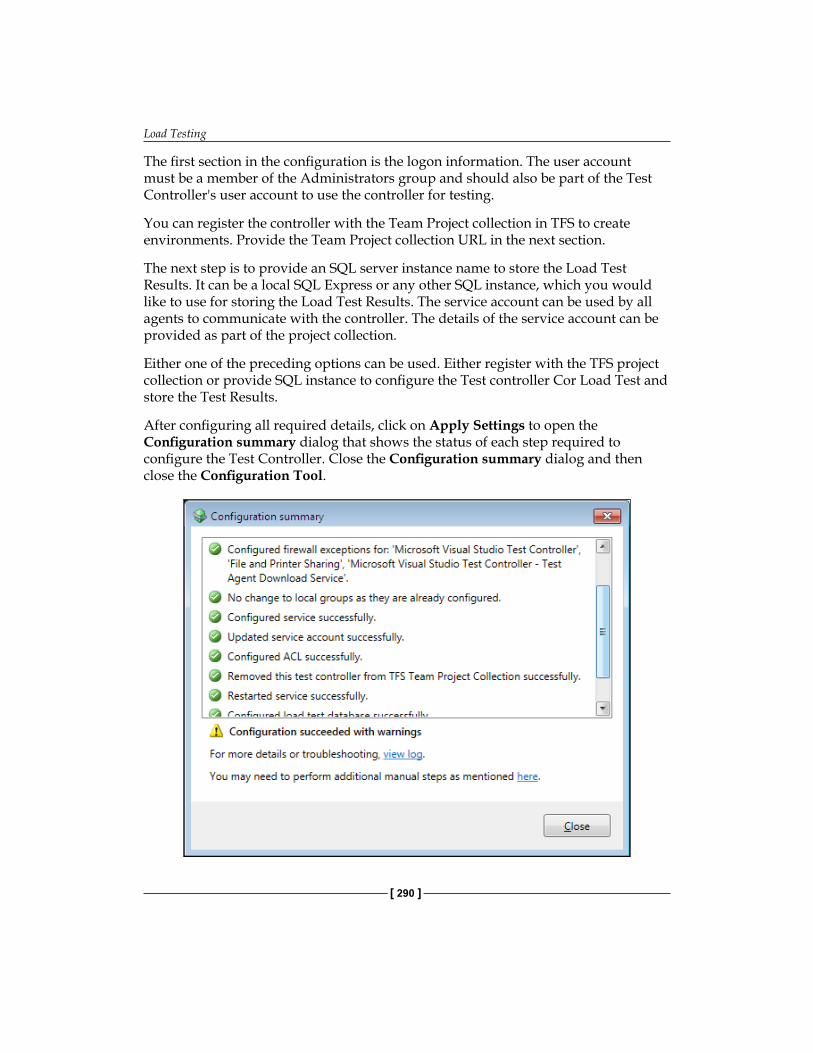
Load Testing
[ 290 ]
The first section in the configuration is the logon information. The user account must be a member of the Administrators group and should also be part of the Test Controller's user account to use the controller for testing.
You can register the controller with the Team Project collection in TFS to create environments. Provide the Team Project collection URL in the next section.
The next step is to provide an SQL server instance name to store the Load Test Results. It can be a local SQL Express or any other SQL instance, which you would like to use for storing the Load Test Results. The service account can be used by all agents to communicate with the controller. The details of the service account can be provided as part of the project collection.
Either one of the preceding options can be used. Either register with the TFS project collection or provide SQL instance to configure the Test controller Cor Load Test and store the Test Results.
After configuring all required details, click on Apply Settings to open the Configuration summary dialog that shows the status of each step required to configure the Test Controller. Close the Configuration summary dialog and then close the Configuration Tool.

Chapter 7
[ 291 ]
Configuring Test Controller creates the data store in the selected SQL Server instance. The next step is to install the agents using Visual Studio Agents 2012 setup.
Once the installation of Test Agent is complete, the Configure Test Agent dialog is displayed. In the first section, provide the user details with which the service will run.

Load Testing
[ 292 ]
In case if the tests like coded UI test has to interact with the desktop, click on Run Options and then select the run option as Interactive process. In this mode, you can run the automated tests that interact with the desktop such as coded UI tests.
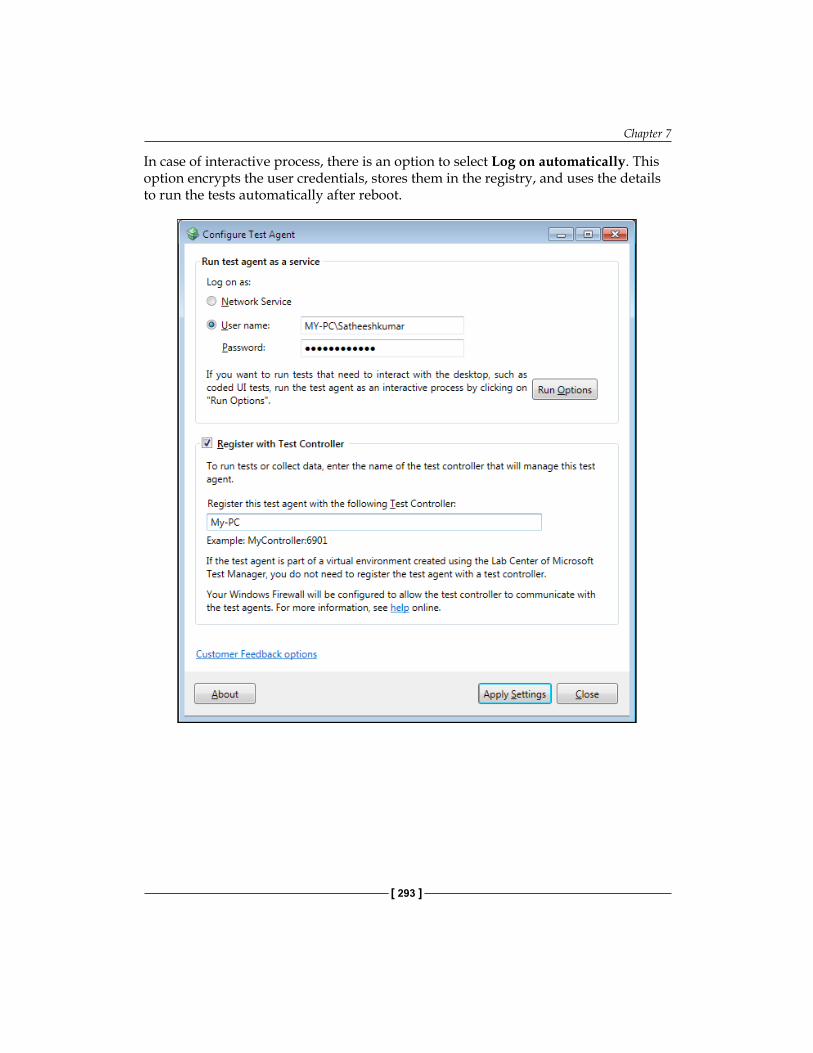
Chapter 7
[ 293 ]
In case of interactive process, there is an option to select Log on automatically. This option encrypts the user credentials, stores them in the registry, and uses the details to run the tests automatically after reboot.
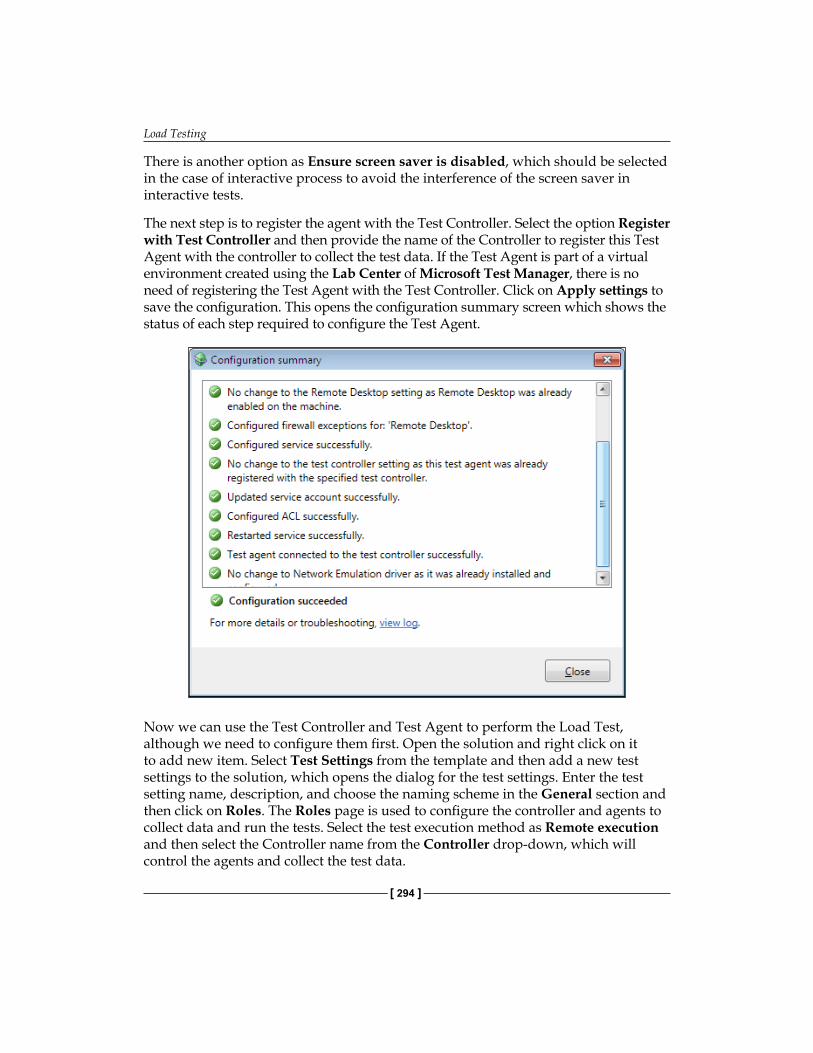
Load Testing
[ 294 ]
There is another option as Ensure screen saver is disabled, which should be selected in the case of interactive process to avoid the interference of the screen saver in interactive tests.
The next step is to register the agent with the Test Controller. Select the option Register with Test Controller and then provide the name of the Controller to register this Test Agent with the controller to collect the test data. If the Test Agent is part of a virtual environment created using the Lab Center of Microsoft Test Manager, there is no need of registering the Test Agent with the Test Controller. Click on Apply settings to save the configuration. This opens the configuration summary screen which shows the status of each step required to configure the Test Agent.
Now we can use the Test Controller and Test Agent to perform the Load Test, although we need to configure them first. Open the solution and right click on it to add new item. Select Test Settings from the template and then add a new test settings to the solution, which opens the dialog for the test settings. Enter the test setting name, description, and choose the naming scheme in the General section and then click on Roles. The Roles page is used to configure the controller and agents to collect data and run the tests. Select the test execution method as Remote execution and then select the Controller name from the Controller drop-down, which will control the agents and collect the test data.
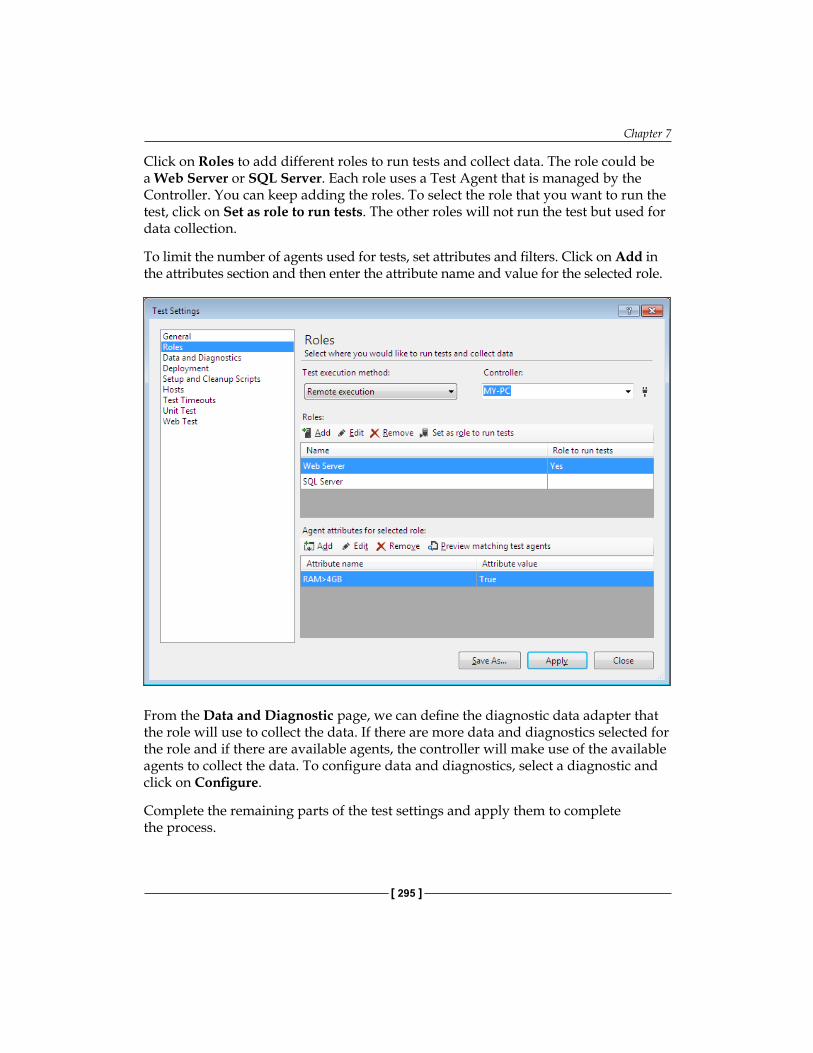
Chapter 7
[ 295 ]
Click on Roles to add different roles to run tests and collect data. The role could be a Web Server or SQL Server. Each role uses a Test Agent that is managed by the Controller. You can keep adding the roles. To select the role that you want to run the test, click on Set as role to run tests. The other roles will not run the test but used for data collection.
To limit the number of agents used for tests, set attributes and filters. Click on Add in the attributes section and then enter the attribute name and value for the selected role.
From the Data and Diagnostic page, we can define the diagnostic data adapter that the role will use to collect the data. If there are more data and diagnostics selected for the role and if there are available agents, the controller will make use of the available agents to collect the data. To configure data and diagnostics, select a diagnostic and click on Configure.
Complete the remaining parts of the test settings and apply them to complete the process.
Load Testing
[ 296 ]
Now start creating the Load Test using the new test settings and then run the Load Test. To load the Test Results collected by the controller, open the Load Test and from the toolbar choose the Open and Manage Load Test Results option. After selecting the options you can see the Test Results collected by the controller. To see the details of each Test Result, double click on it which opens the Load Test analyzer and show the details of the Test Result. The other option available is to import the existing result from the trace file into the controller repository and to export the results to a trace file repository from the controller.
SummaryThis chapter explained the steps involved in creating a Load Test using sample web tests and to set each parameter values in each step in the creation wizard. There is always a chance to go back and edit the test to change the parameters set or add additional counters and scenarios, which is explained in this chapter. Creating custom performance counters, and including the same for load testing for different systems and setting the threshold rules for counters are some of the other topics covered. This chapter also explained different methods of running the tests and collecting the test results. There are multiple ways of looking at the results using Summary view, Graphical view, Tabular view, and Details view and it is useful to analyze the Test Results. All these results can be stored in test repository created in SQL Server. This chapter also explained the configuration of Controller and Agents for the Load Test. Visual Studio also provides for the creation of Excel reports from the Test Result repository which we have seen in detail in this chapter.
The next chapter explains the details of ordering the tests and introduces the Generic test to test external components used in applications. Ordering the tests is useful in case of multiple tests to be run and there is any dependency between the tests.
Ordered and Generic TestsThis chapter explains the details of creating and using the ordered and generic tests. Previous chapters explained the creation of many tests including unit tests, manual tests, web performance tests, coded web performance tests, and load tests. Visual Studio provides the additional feature of grouping and ordering some or all of these tests and then execute them in order; this is called an ordered test. The main advantage of creating ordered tests is that it enables us to execute tests in an order based on the dependencies. For example, a web test may be dependent on the results produced by executing the unit test. So the unit test needs to be executed before executing the web performance test.
Generic tests are just like any other tests except that they are used for running the existing third-party tool or program that can also be run using the command line. Let us create the sample tests in this chapter and see the usage of both generic and ordered tests. This chapter covers the following sections:
• Creating an ordered test• Executing an ordered test• Creating a generic test• Results file for a generic test
Ordered and Generic Tests
[ 298 ]
Ordered testsThe following screenshot shows the list of all the tests that are created under the Test Project. The tests are independent and there is no link between the tests, but the output of one test may be required for the other test to start.
There are different types of tests, such as unit test and web performance test, under the Test Project. Creating an ordered test and placing some of the dependent tests in an order will help the test execution to happen in that order, without breaking any dependencies.
Creating an ordered testTo create an ordered test, follow these steps:
1. Select the Test Project from Solution Explorer.2. Right-click and select Add Ordered Test.3. Select an ordered test from the types of tests listed.4. Save the ordered test by choosing the Save option within the File menu.
Chapter 8
[ 299 ]
The ordered test will get created under the Test Project and the ordered test window is shown, where we will select from the existing tests and put them in order. The following screenshot shows different options for ordering the tests:
The first line is the status bar, which shows the number of tests selected for the ordered test.
The Select project to view tests drop-down list has the option to choose any particular Test Project, to display tests within it. This drop-down list has the default value /All Loaded Tests, which displays all available tests under all projects.
The Available tests list displays all the tests from the selected Test Project in the Projects drop-down list.
The Selected tests list contains the tests that are selected from the available tests list, to be placed in order.
The two right and left arrows are used for selecting and unselecting the tests from the Available tests list to the Selected tests list. Multiple tests can be selected by pressing the Ctrl key and selecting the tests.
The up-down arrows on the right of the Selected Tests list are used for moving the test up or down and setting the order for the testing.
Ordered and Generic Tests
[ 300 ]
The last option, the Continue after failure checkbox at the bottom of the window, is to override the default behavior of the ordered tests, which is to abort the execution on failure of any test. If the option Continue after failure is unchecked and if any test in the order fails, then all remaining tests will get aborted.
Executing an ordered testAn ordered test can be run like any other test. Open the Test Explorer window and select the ordered test from the list, then right-click and choose the Run Selected Test option. Once the option is selected, the test execution starts, working through the tests in the order in which they are placed. After the execution completes, the Test Explorer window shows the status of the ordered tests. If any of the individual tests in the list fail, the ordered test status would be Failed. The summary of Test Run statuses for all tests in the ordered test is shown in following screenshot. The sample application had three tests within the ordered test, but two of them failed and one has passed. Overall, the ordered test's status is failed because of two test failures.
Chapter 8
[ 301 ]
The Test Explorer window also provides detailed information about the tests run. Select a test that is being run in the explorer to see it. This information includes the link to the source code where the test fails, followed by test name and the message from the test method for failure, the elapsed time for the test, and stack trace for the test. The total duration of the ordered test is also shown next to the ordered test failure status under the failed tests section.
Generic testsGeneric tests are a way to integrate external tests into Visual Studio. There could be applications that use external components or services, which need to be tested as part of the whole system testing. In this case, the external component details are not exposed and the internal logic is also unknown. In order to test these third-party components, generic tests in Visual Studio act as wrappers for testing these external components within the boundary of Visual Studio. Once it is wrapped, the generic tests run just like any other test, through Visual Studio IDE.
The external component test should adhere to the following conditions, to be categorized under generic tests in Visual Studio:
• It must be run from the command line• The component must return a Boolean value of either True or False when
executed in the command line• It should return detailed results for internal tests within the component
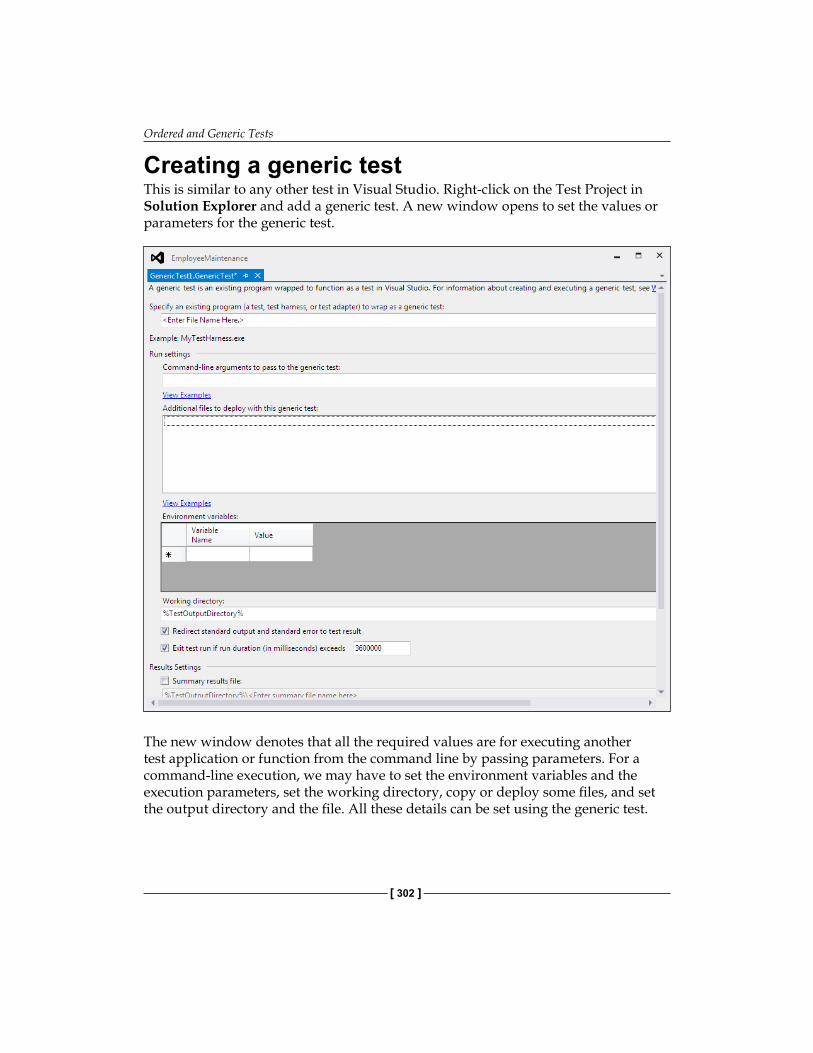
Ordered and Generic Tests
[ 302 ]
Creating a generic testThis is similar to any other test in Visual Studio. Right-click on the Test Project in Solution Explorer and add a generic test. A new window opens to set the values or parameters for the generic test.
The new window denotes that all the required values are for executing another test application or function from the command line by passing parameters. For a command-line execution, we may have to set the environment variables and the execution parameters, set the working directory, copy or deploy some files, and set the output directory and the file. All these details can be set using the generic test.
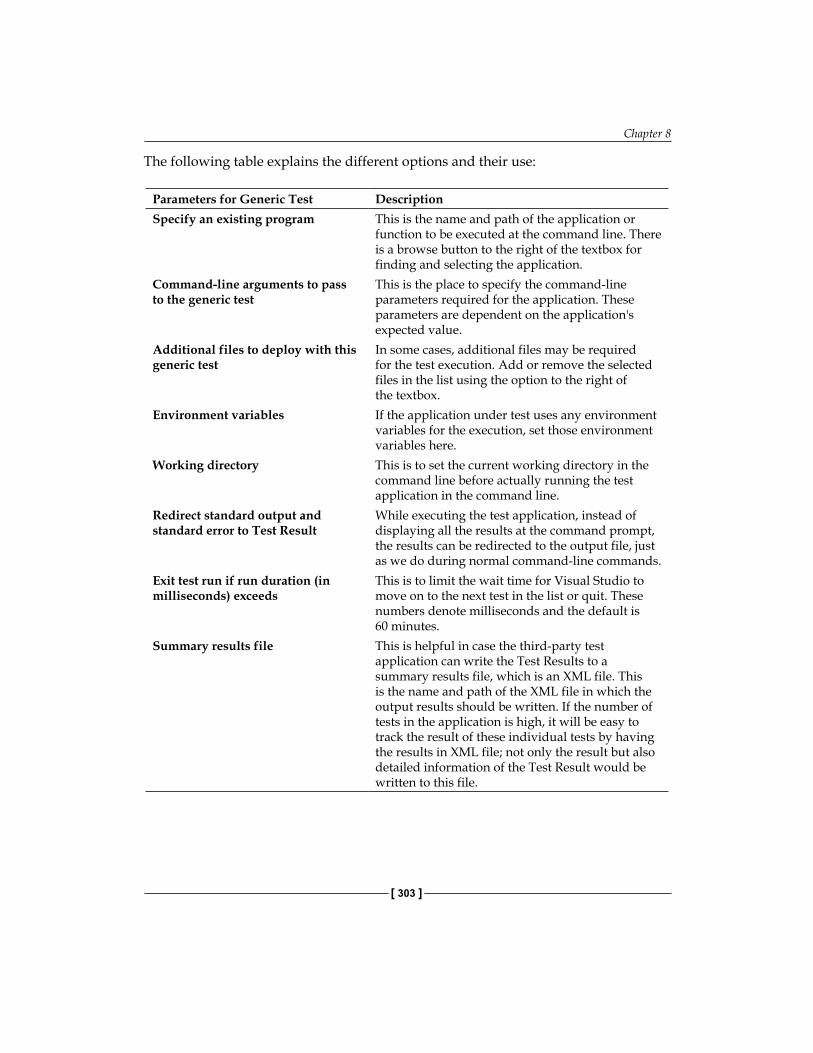
Chapter 8
[ 303 ]
The following table explains the different options and their use:
Parameters for Generic Test DescriptionSpecify an existing program This is the name and path of the application or
function to be executed at the command line. There is a browse button to the right of the textbox for finding and selecting the application.
Command-line arguments to pass to the generic test
This is the place to specify the command-line parameters required for the application. These parameters are dependent on the application's expected value.
Additional files to deploy with this generic test
In some cases, additional files may be required for the test execution. Add or remove the selected files in the list using the option to the right of the textbox.
Environment variables If the application under test uses any environment variables for the execution, set those environment variables here.
Working directory This is to set the current working directory in the command line before actually running the test application in the command line.
Redirect standard output and standard error to Test Result
While executing the test application, instead of displaying all the results at the command prompt, the results can be redirected to the output file, just as we do during normal command-line commands.
Exit test run if run duration (in milliseconds) exceeds
This is to limit the wait time for Visual Studio to move on to the next test in the list or quit. These numbers denote milliseconds and the default is 60 minutes.
Summary results file This is helpful in case the third-party test application can write the Test Results to a summary results file, which is an XML file. This is the name and path of the XML file in which the output results should be written. If the number of tests in the application is high, it will be easy to track the result of these individual tests by having the results in XML file; not only the result but also detailed information of the Test Result would be written to this file.
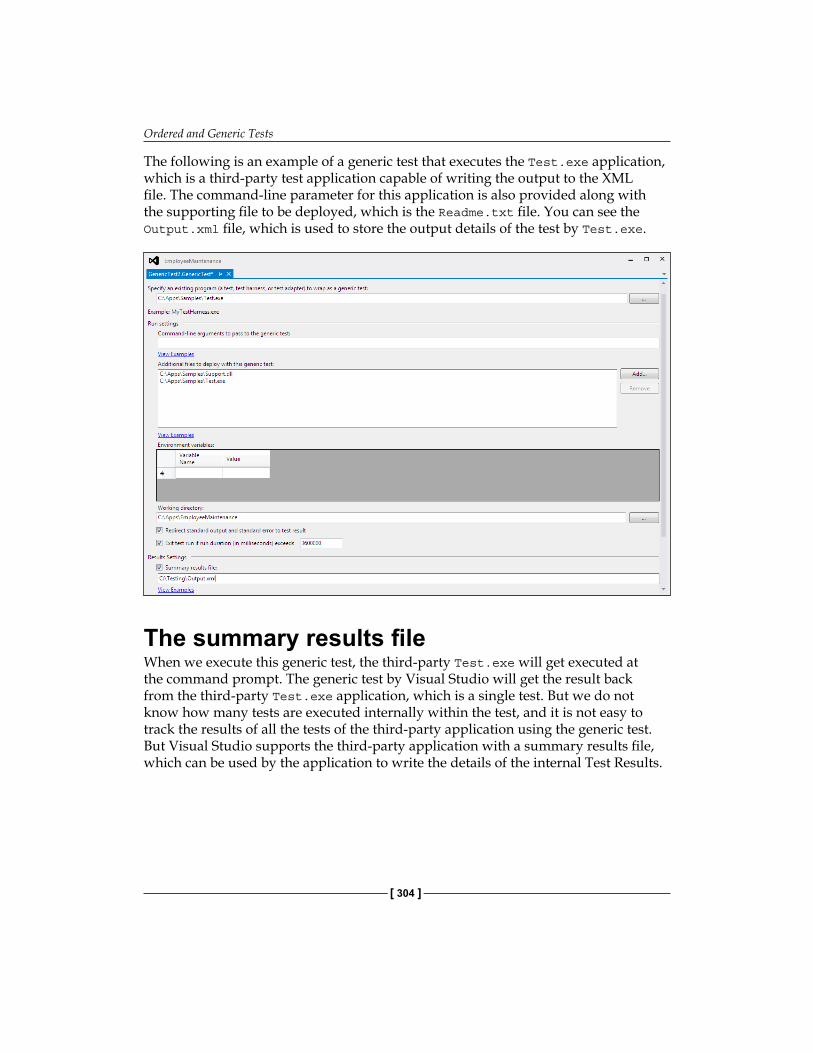
Ordered and Generic Tests
[ 304 ]
The following is an example of a generic test that executes the Test.exe application, which is a third-party test application capable of writing the output to the XML file. The command-line parameter for this application is also provided along with the supporting file to be deployed, which is the Readme.txt file. You can see the Output.xml file, which is used to store the output details of the test by Test.exe.
The summary results fileWhen we execute this generic test, the third-party Test.exe will get executed at the command prompt. The generic test by Visual Studio will get the result back from the third-party Test.exe application, which is a single test. But we do not know how many tests are executed internally within the test, and it is not easy to track the results of all the tests of the third-party application using the generic test. But Visual Studio supports the third-party application with a summary results file, which can be used by the application to write the details of the internal Test Results.
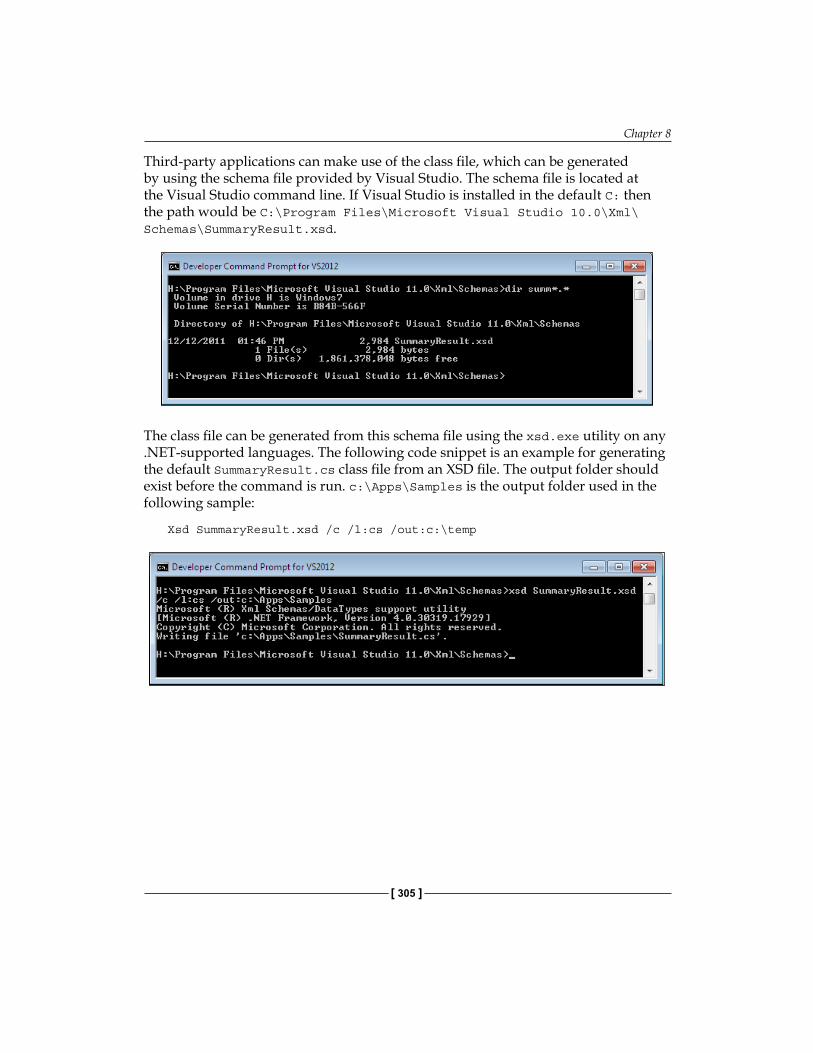
Chapter 8
[ 305 ]
Third-party applications can make use of the class file, which can be generated by using the schema file provided by Visual Studio. The schema file is located at the Visual Studio command line. If Visual Studio is installed in the default C: then the path would be C:\Program Files\Microsoft Visual Studio 10.0\Xml\Schemas\SummaryResult.xsd.
The class file can be generated from this schema file using the xsd.exe utility on any .NET-supported languages. The following code snippet is an example for generating the default SummaryResult.cs class file from an XSD file. The output folder should exist before the command is run. c:\Apps\Samples is the output folder used in the following sample:
Xsd SummaryResult.xsd /c /l:cs /out:c:\temp
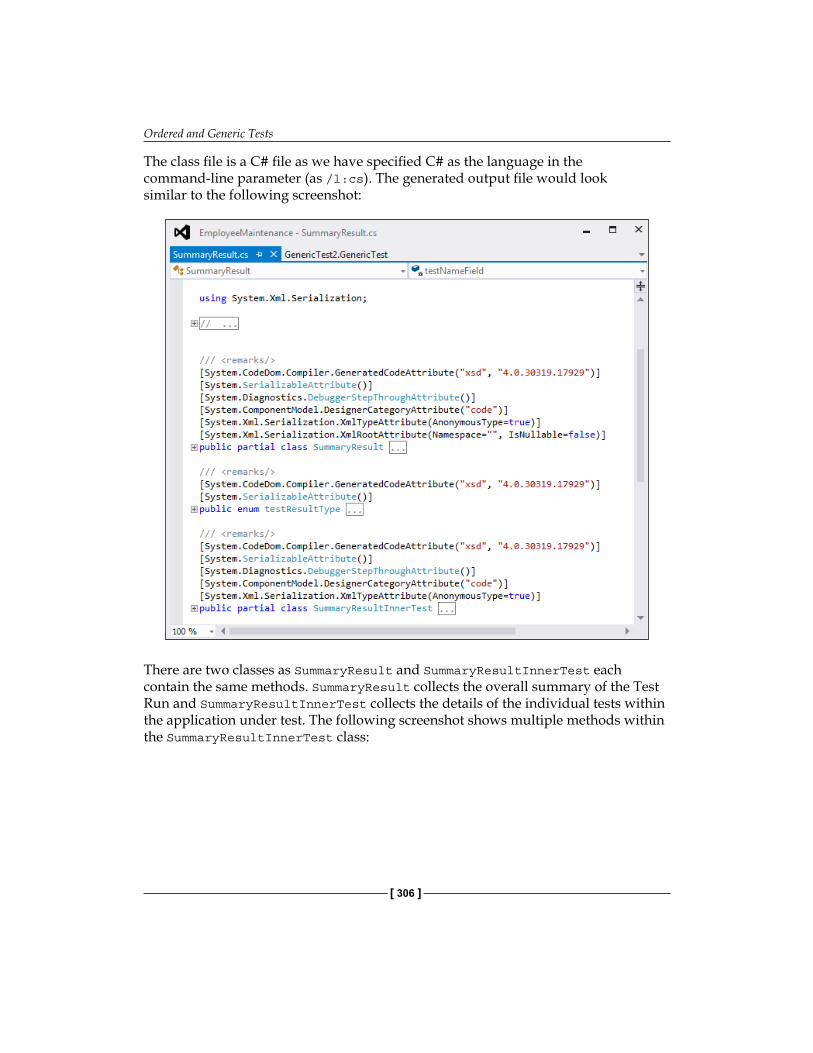
Ordered and Generic Tests
[ 306 ]
The class file is a C# file as we have specified C# as the language in the command-line parameter (as /l:cs). The generated output file would look similar to the following screenshot:
There are two classes as SummaryResult and SummaryResultInnerTest each contain the same methods. SummaryResult collects the overall summary of the Test Run and SummaryResultInnerTest collects the details of the individual tests within the application under test. The following screenshot shows multiple methods within the SummaryResultInnerTest class:
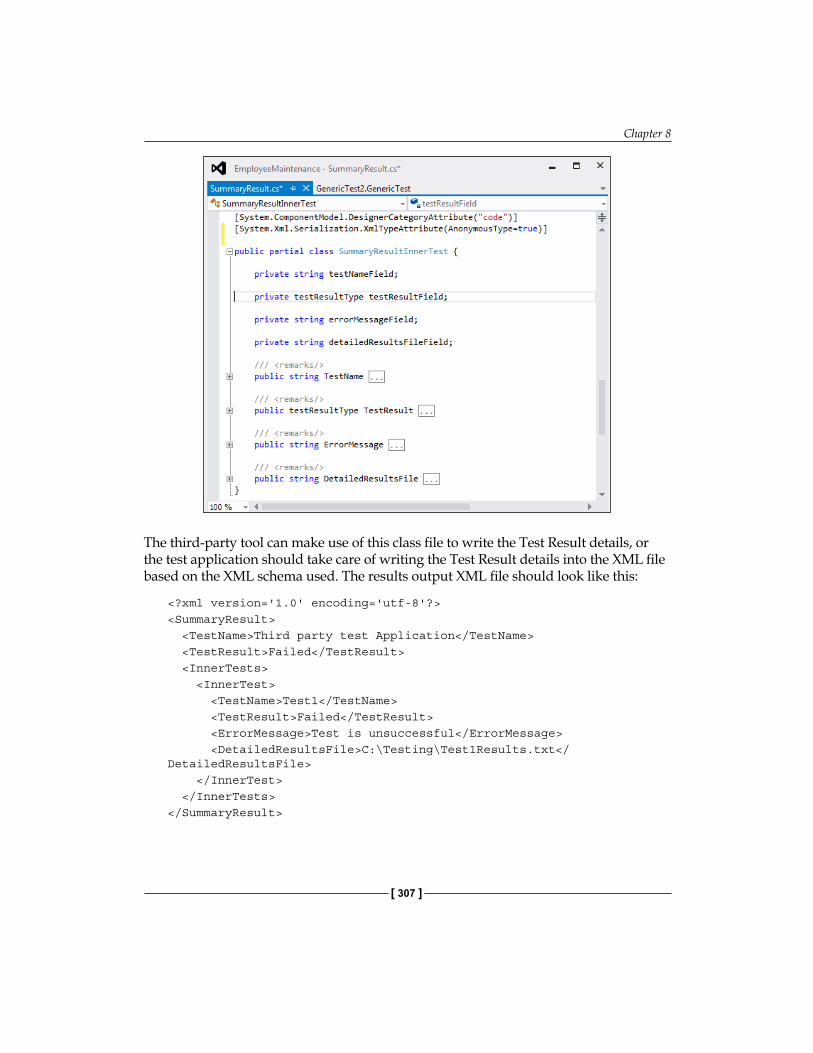
Chapter 8
[ 307 ]
The third-party tool can make use of this class file to write the Test Result details, or the test application should take care of writing the Test Result details into the XML file based on the XML schema used. The results output XML file should look like this:
<?xml version='1.0' encoding='utf-8'?><SummaryResult> <TestName>Third party test Application</TestName> <TestResult>Failed</TestResult> <InnerTests> <InnerTest> <TestName>Test1</TestName> <TestResult>Failed</TestResult> <ErrorMessage>Test is unsuccessful</ErrorMessage> <DetailedResultsFile>C:\Testing\Test1Results.txt</DetailedResultsFile> </InnerTest> </InnerTests></SummaryResult>
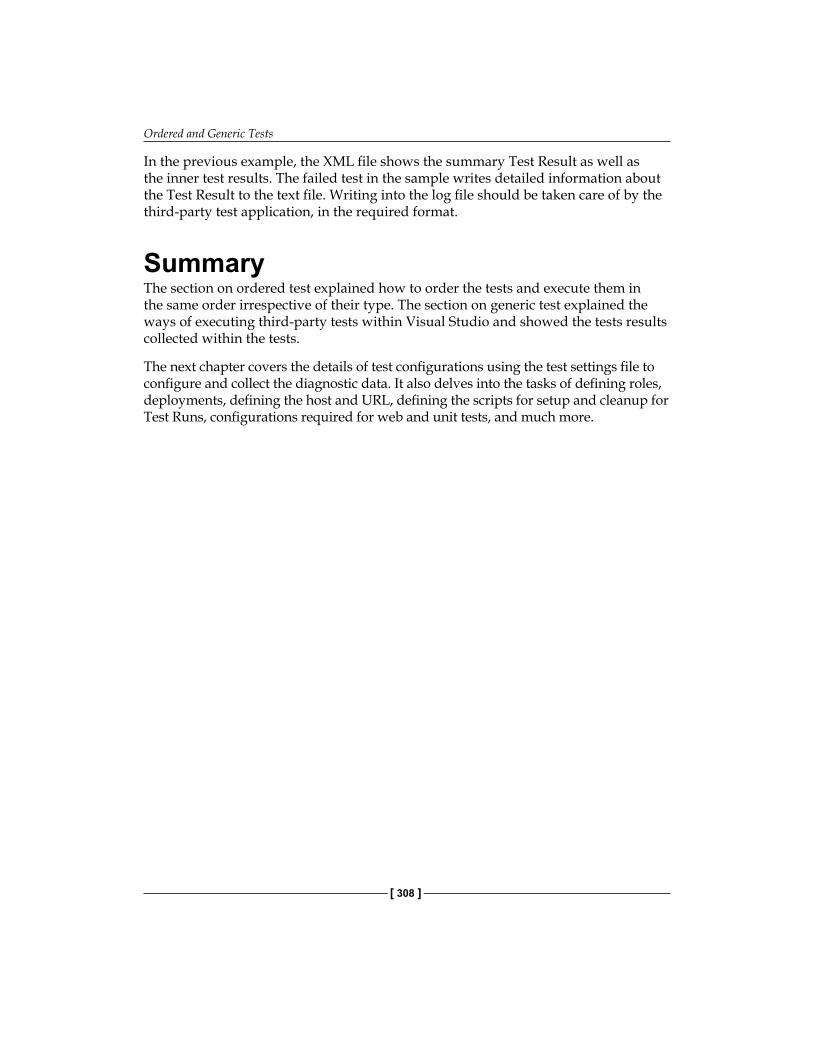
Ordered and Generic Tests
[ 308 ]
In the previous example, the XML file shows the summary Test Result as well as the inner test results. The failed test in the sample writes detailed information about the Test Result to the text file. Writing into the log file should be taken care of by the third-party test application, in the required format.
SummaryThe section on ordered test explained how to order the tests and execute them in the same order irrespective of their type. The section on generic test explained the ways of executing third-party tests within Visual Studio and showed the tests results collected within the tests.
The next chapter covers the details of test configurations using the test settings file to configure and collect the diagnostic data. It also delves into the tasks of defining roles, deployments, defining the host and URL, defining the scripts for setup and cleanup for Test Runs, configurations required for web and unit tests, and much more.
Managing and Configuring Tests
In Visual Studio, the solution uses the default environment and common configuration for all the tests under the solution. The configuration is used for controlling the test execution based on multiple factors. All the time, it is less likely that the test would be executed based on a single configuration file. For example, automated tests running in a different machine may have to use data adapters to collect different data. The network configuration varies based on system configuration and network speed. During these times, the settings can be customized and configured using a file with the extension as testsettings in Visual Studio 2012.
The testsettings file is used to define the roles to be used for a Test Run, configure to collect diagnostic data during Test Run, and to control Test Runs on multiple machines.
In Visual Studio 2012, the testsettings file is no longer used for unit tests; rather, runsettings is used for custom configurations. runsettings is used for Test Runs to configure settings such as deployment directory and code-coverage analysis.
The testsettings file must be used for web performance tests, load tests, and coded UI tests. Use runsettings for unit tests to configure deployment and code coverage. This chapter covers the following sections under test settings file for different test types:
• General• Roles• Data and Diagnostics• Deployment• Setup and Cleanup Scripts• Hosts
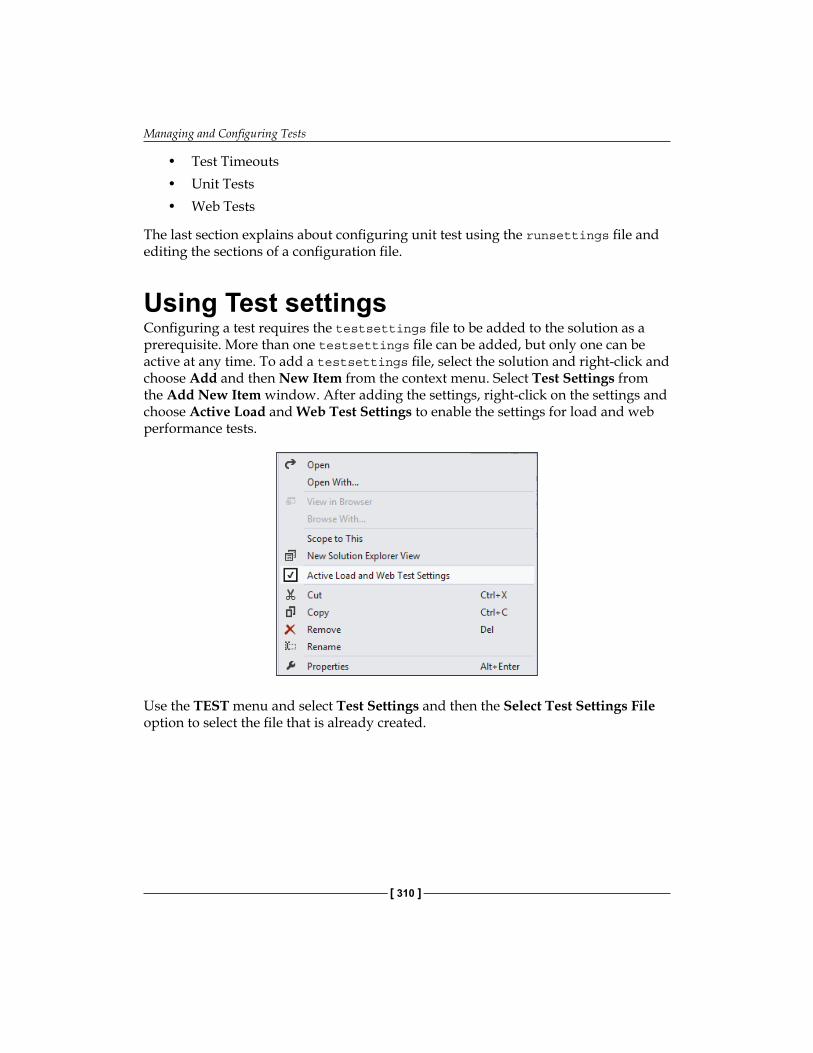
Managing and Configuring Tests
[ 310 ]
• Test Timeouts• Unit Tests• Web Tests
The last section explains about configuring unit test using the runsettings file and editing the sections of a configuration file.
Using Test settingsConfiguring a test requires the testsettings file to be added to the solution as a prerequisite. More than one testsettings file can be added, but only one can be active at any time. To add a testsettings file, select the solution and right-click and choose Add and then New Item from the context menu. Select Test Settings from the Add New Item window. After adding the settings, right-click on the settings and choose Active Load and Web Test Settings to enable the settings for load and web performance tests.
Use the TEST menu and select Test Settings and then the Select Test Settings File option to select the file that is already created.
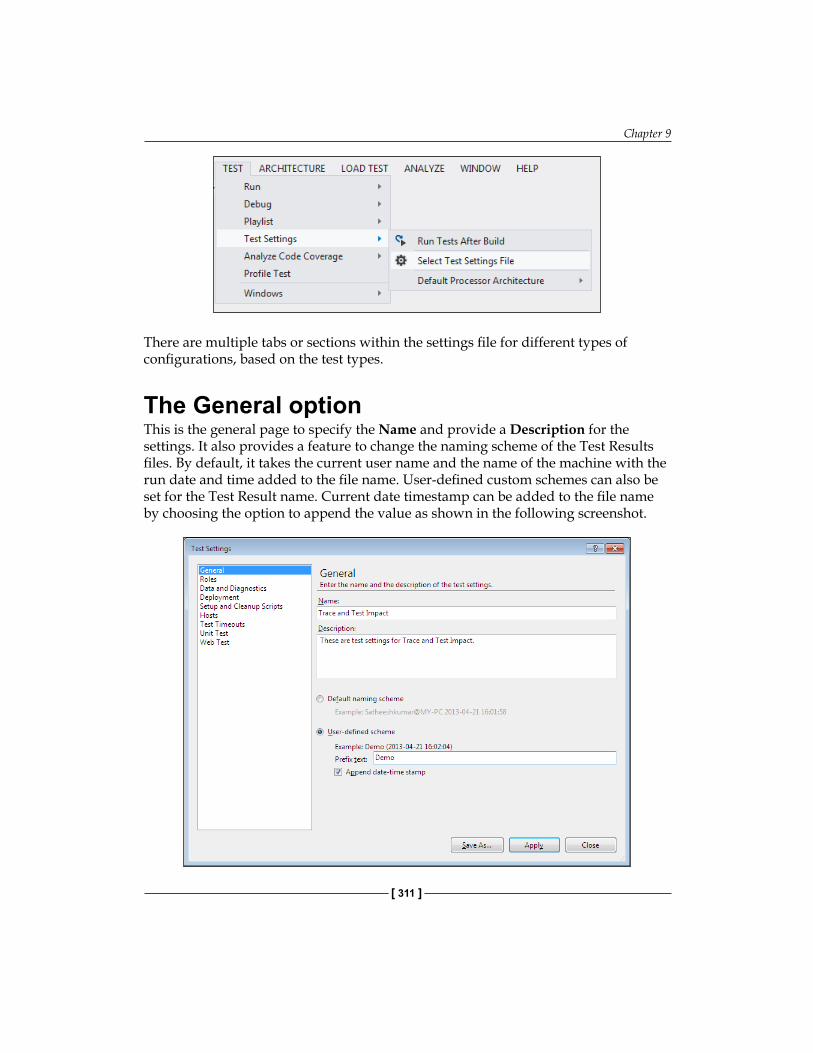
Chapter 9
[ 311 ]
There are multiple tabs or sections within the settings file for different types of configurations, based on the test types.
The General optionThis is the general page to specify the Name and provide a Description for the settings. It also provides a feature to change the naming scheme of the Test Results files. By default, it takes the current user name and the name of the machine with the run date and time added to the file name. User-defined custom schemes can also be set for the Test Result name. Current date timestamp can be added to the file name by choosing the option to append the value as shown in the following screenshot.
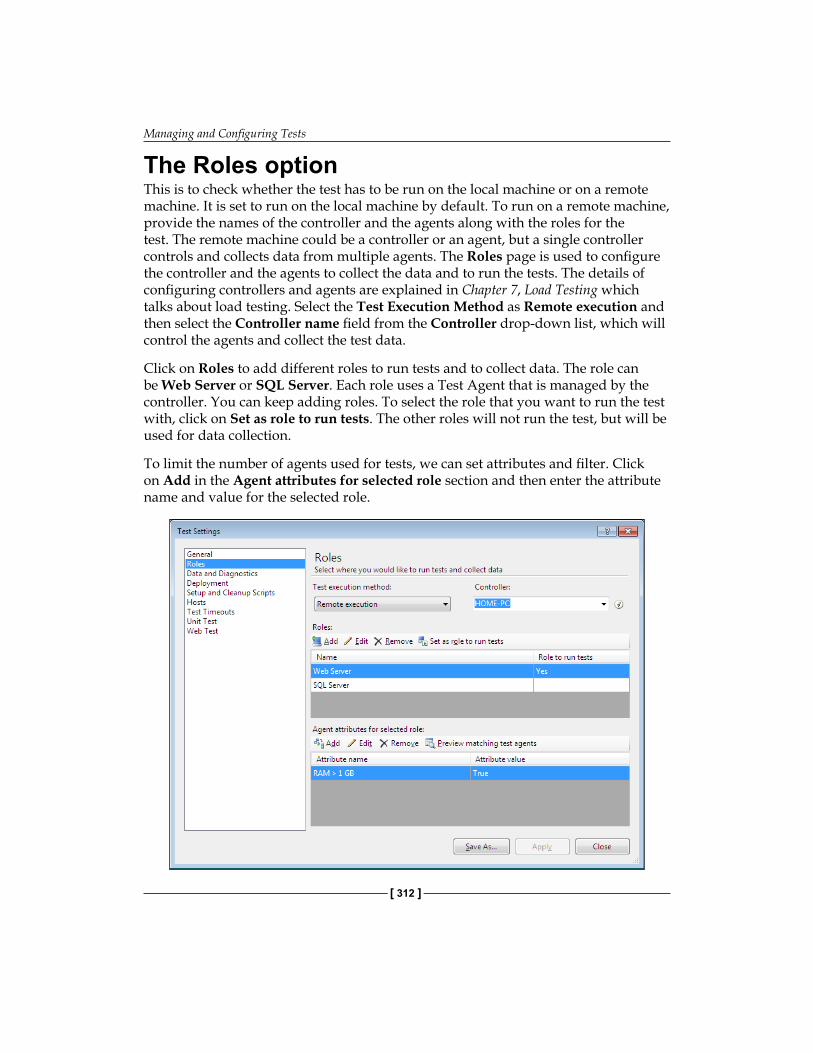
Managing and Configuring Tests
[ 312 ]
The Roles optionThis is to check whether the test has to be run on the local machine or on a remote machine. It is set to run on the local machine by default. To run on a remote machine, provide the names of the controller and the agents along with the roles for the test. The remote machine could be a controller or an agent, but a single controller controls and collects data from multiple agents. The Roles page is used to configure the controller and the agents to collect the data and to run the tests. The details of configuring controllers and agents are explained in Chapter 7, Load Testing which talks about load testing. Select the Test Execution Method as Remote execution and then select the Controller name field from the Controller drop-down list, which will control the agents and collect the test data.
Click on Roles to add different roles to run tests and to collect data. The role can be Web Server or SQL Server. Each role uses a Test Agent that is managed by the controller. You can keep adding roles. To select the role that you want to run the test with, click on Set as role to run tests. The other roles will not run the test, but will be used for data collection.
To limit the number of agents used for tests, we can set attributes and filter. Click on Add in the Agent attributes for selected role section and then enter the attribute name and value for the selected role.
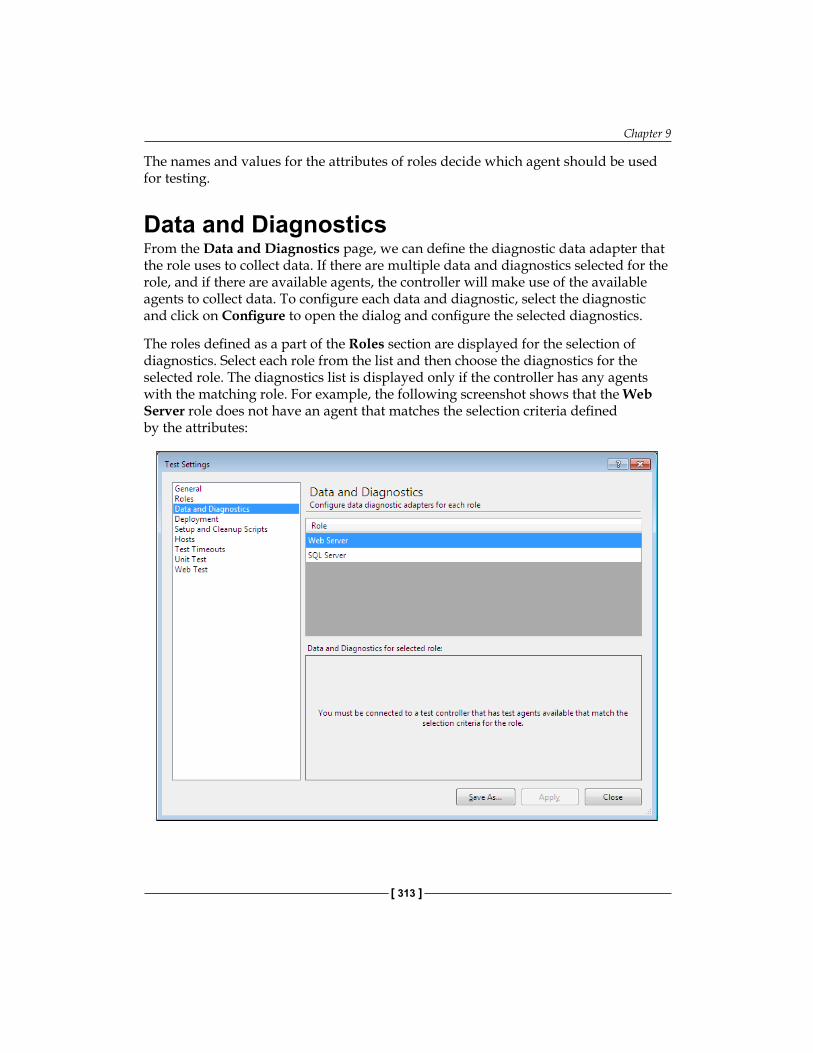
Chapter 9
[ 313 ]
The names and values for the attributes of roles decide which agent should be used for testing.
Data and DiagnosticsFrom the Data and Diagnostics page, we can define the diagnostic data adapter that the role uses to collect data. If there are multiple data and diagnostics selected for the role, and if there are available agents, the controller will make use of the available agents to collect data. To configure each data and diagnostic, select the diagnostic and click on Configure to open the dialog and configure the selected diagnostics.
The roles defined as a part of the Roles section are displayed for the selection of diagnostics. Select each role from the list and then choose the diagnostics for the selected role. The diagnostics list is displayed only if the controller has any agents with the matching role. For example, the following screenshot shows that the Web Server role does not have an agent that matches the selection criteria defined by the attributes:
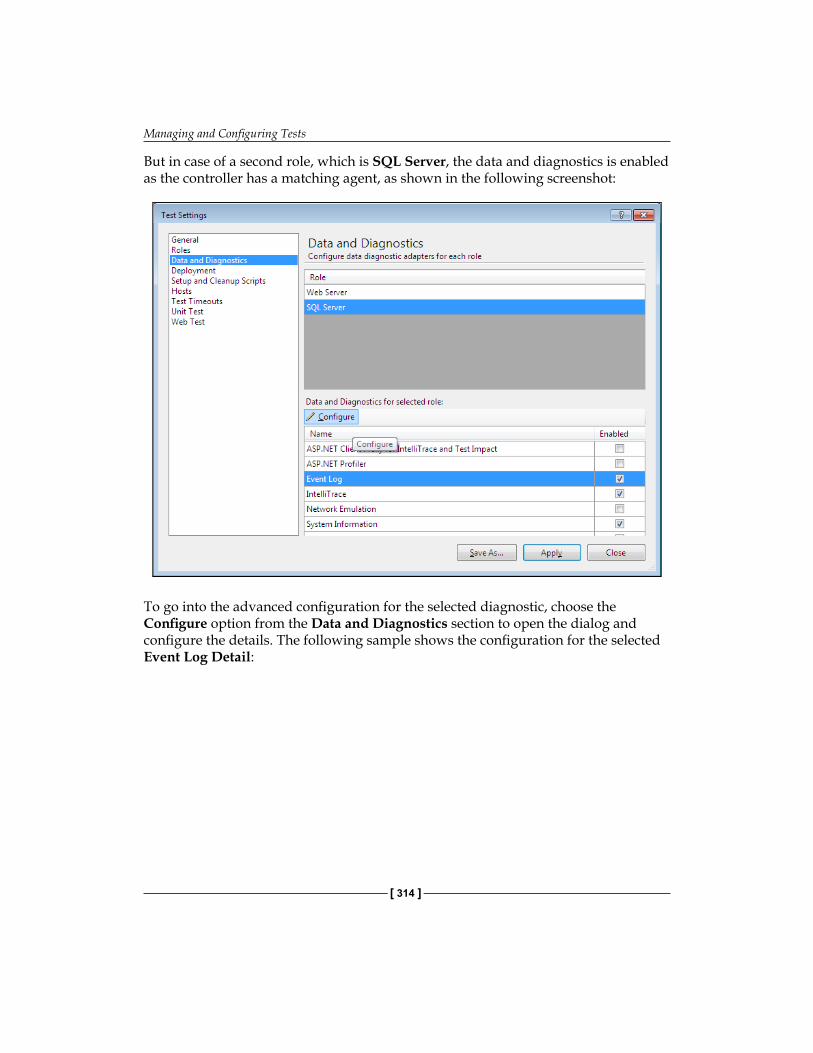
Managing and Configuring Tests
[ 314 ]
But in case of a second role, which is SQL Server, the data and diagnostics is enabled as the controller has a matching agent, as shown in the following screenshot:
To go into the advanced configuration for the selected diagnostic, choose the Configure option from the Data and Diagnostics section to open the dialog and configure the details. The following sample shows the configuration for the selected Event Log Detail:
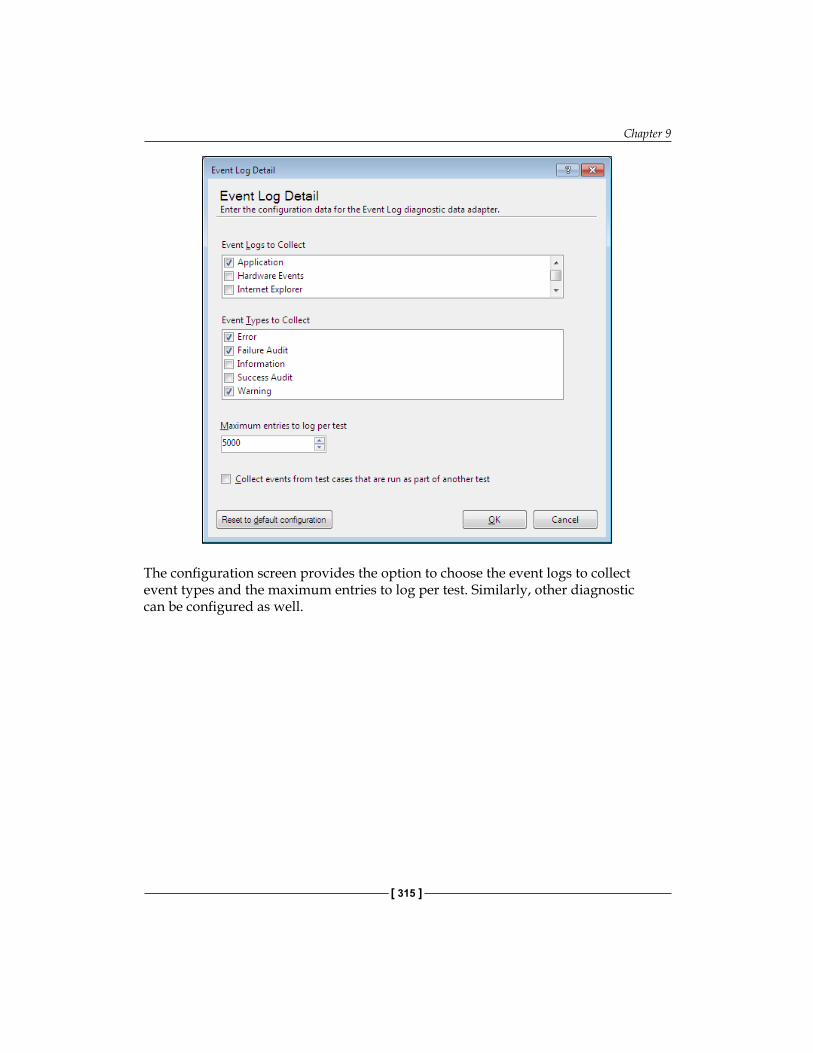
Chapter 9
[ 315 ]
The configuration screen provides the option to choose the event logs to collect event types and the maximum entries to log per test. Similarly, other diagnostic can be configured as well.
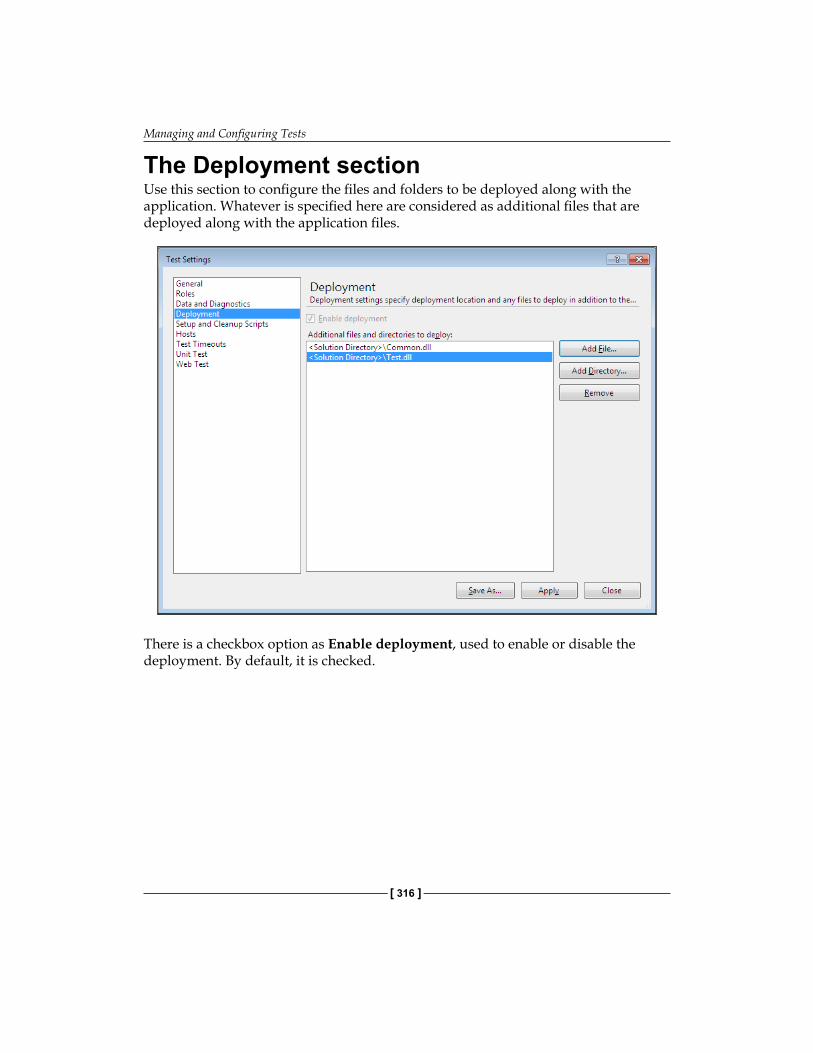
Managing and Configuring Tests
[ 316 ]
The Deployment sectionUse this section to configure the files and folders to be deployed along with the application. Whatever is specified here are considered as additional files that are deployed along with the application files.
There is a checkbox option as Enable deployment, used to enable or disable the deployment. By default, it is checked.
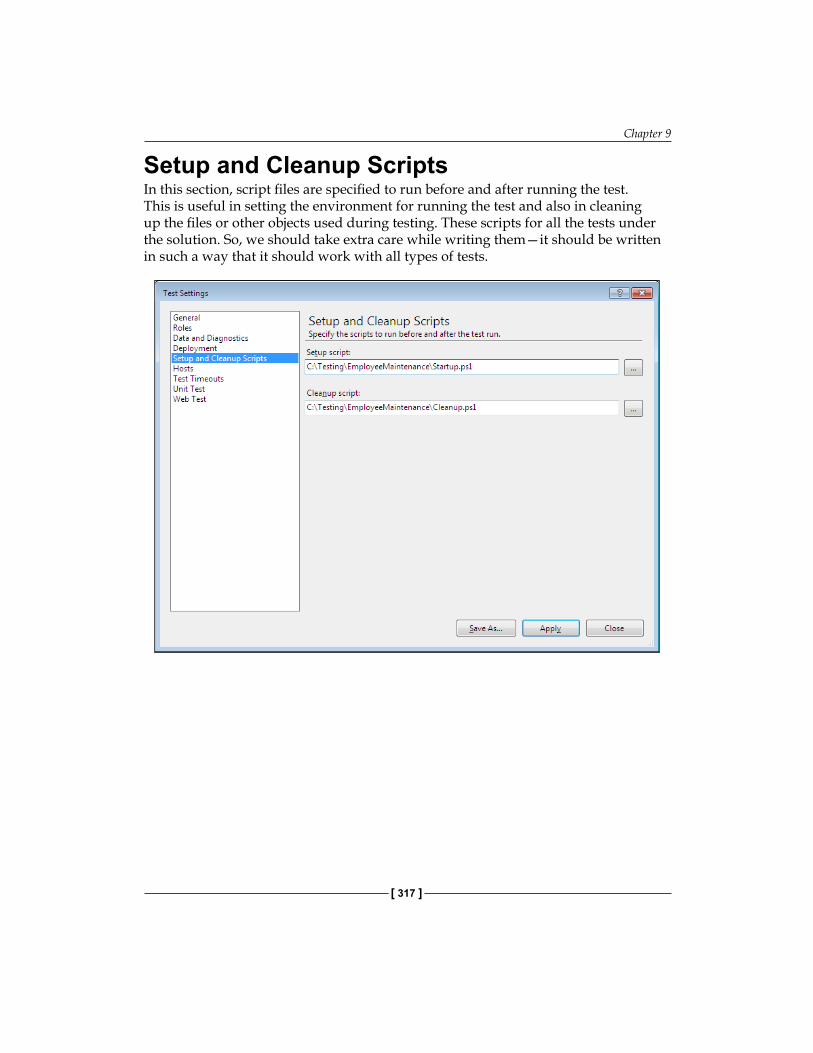
Chapter 9
[ 317 ]
Setup and Cleanup ScriptsIn this section, script files are specified to run before and after running the test. This is useful in setting the environment for running the test and also in cleaning up the files or other objects used during testing. These scripts for all the tests under the solution. So, we should take extra care while writing them—it should be written in such a way that it should work with all types of tests.
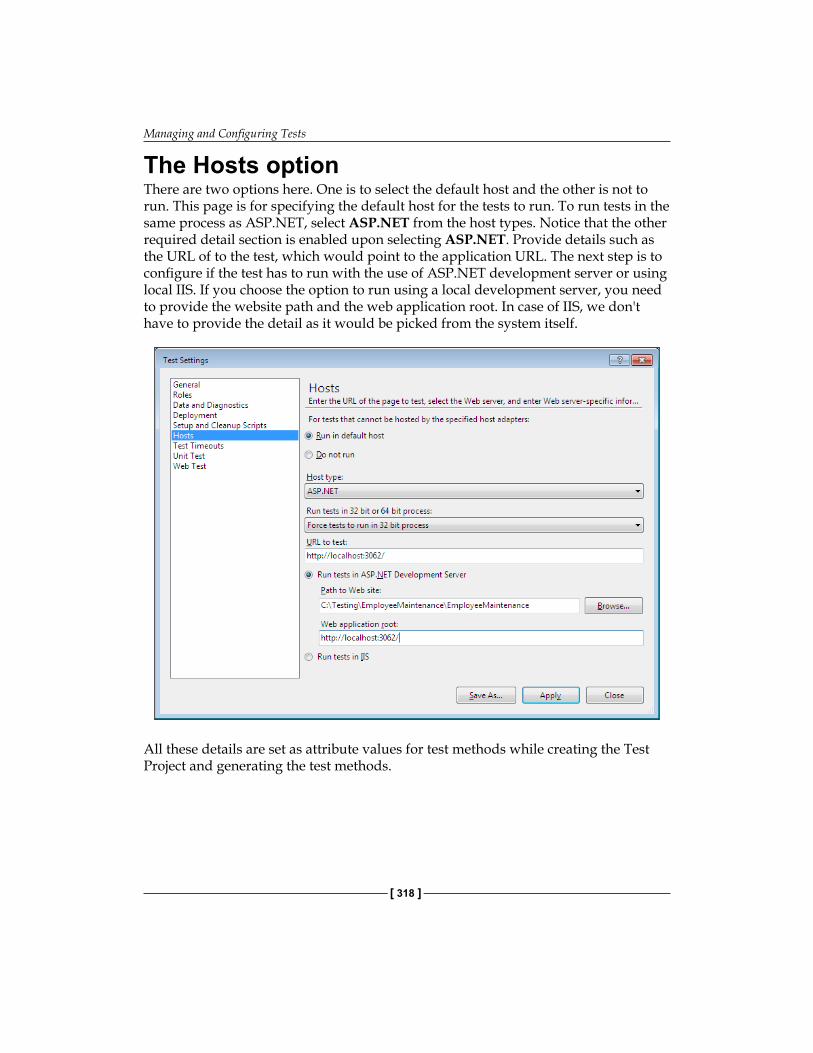
Managing and Configuring Tests
[ 318 ]
The Hosts optionThere are two options here. One is to select the default host and the other is not to run. This page is for specifying the default host for the tests to run. To run tests in the same process as ASP.NET, select ASP.NET from the host types. Notice that the other required detail section is enabled upon selecting ASP.NET. Provide details such as the URL of to the test, which would point to the application URL. The next step is to configure if the test has to run with the use of ASP.NET development server or using local IIS. If you choose the option to run using a local development server, you need to provide the website path and the web application root. In case of IIS, we don't have to provide the detail as it would be picked from the system itself.
All these details are set as attribute values for test methods while creating the Test Project and generating the test methods.
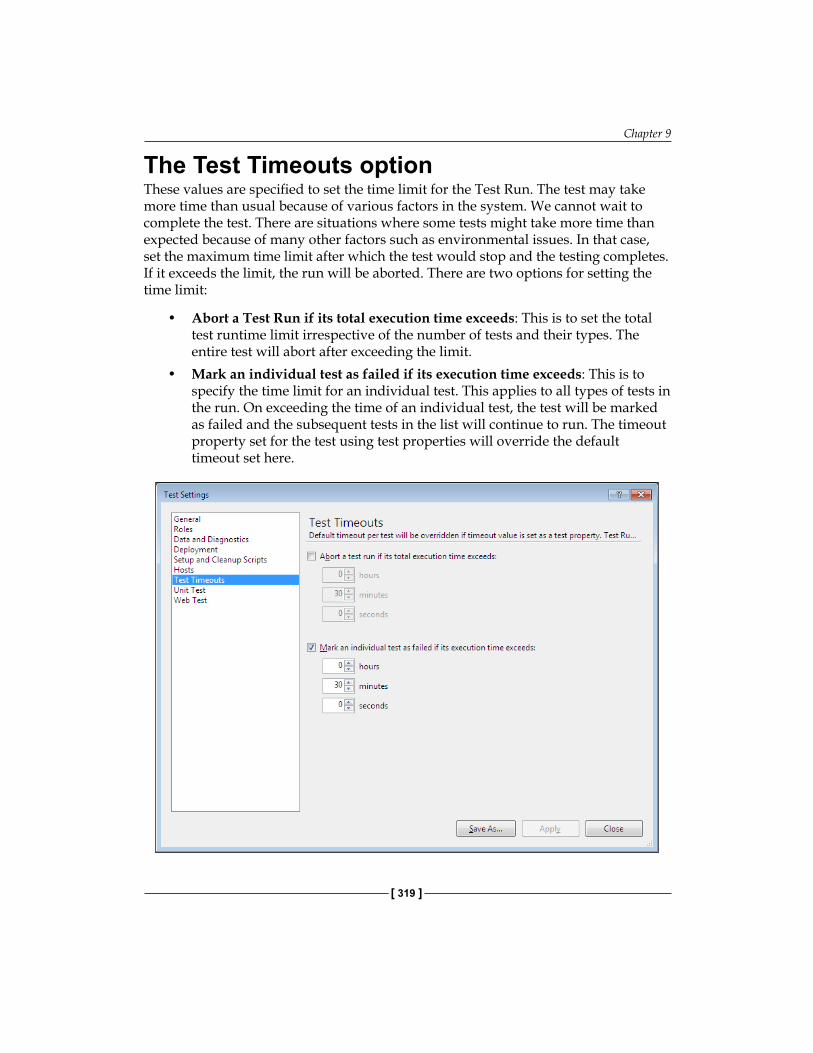
Chapter 9
[ 319 ]
The Test Timeouts optionThese values are specified to set the time limit for the Test Run. The test may take more time than usual because of various factors in the system. We cannot wait to complete the test. There are situations where some tests might take more time than expected because of many other factors such as environmental issues. In that case, set the maximum time limit after which the test would stop and the testing completes. If it exceeds the limit, the run will be aborted. There are two options for setting the time limit:
• Abort a Test Run if its total execution time exceeds: This is to set the total test runtime limit irrespective of the number of tests and their types. The entire test will abort after exceeding the limit.
• Mark an individual test as failed if its execution time exceeds: This is to specify the time limit for an individual test. This applies to all types of tests in the run. On exceeding the time of an individual test, the test will be marked as failed and the subsequent tests in the list will continue to run. The timeout property set for the test using test properties will override the default timeout set here.
Managing and Configuring Tests
[ 320 ]
The time limit can be specified in hours, minutes, and seconds, or all three. The time limit includes the Setup and Cleanups Scripts used in the Test Run. These are the tests with the attributes AssemblyInitializeAttribute, ClassInitializeAttribute, AssemblyCleanUpAttribute, and ClassCleanUpAttribute specified for the assembly or a class within the assembly.
The Unit Test optionThis is where you configure the folders where the assemblies reside for the unit test and the folder to use when the Test Runs. There is another option to configure the additional folders for tests.
In the Root folder for the assemblies to be loaded section, select the folder where the environment variables and other additional assemblies that are required for the unit test are present. This is the base folder where the unit test will look for any additional information required for the testing.
The Use the Load Context for assemblies in the test directory. option is checked by default, which is used to load all assemblies in load context. This option can be unchecked in case there are many assemblies and it is not required to load all assemblies with load context and the test is also not dependent on loading them with load context.
The Folders to use when the tests are run option is used to specify additional folders to look for any assemblies during the execution of tests. There are two additional options along with the folder path. Use Load Context is the first option, which is a checkbox to specify if the directory should use load context for the assemblies. The second option is to include subfolders to find the assemblies during test execution. The following screenshot shows the sample unit test configuration:
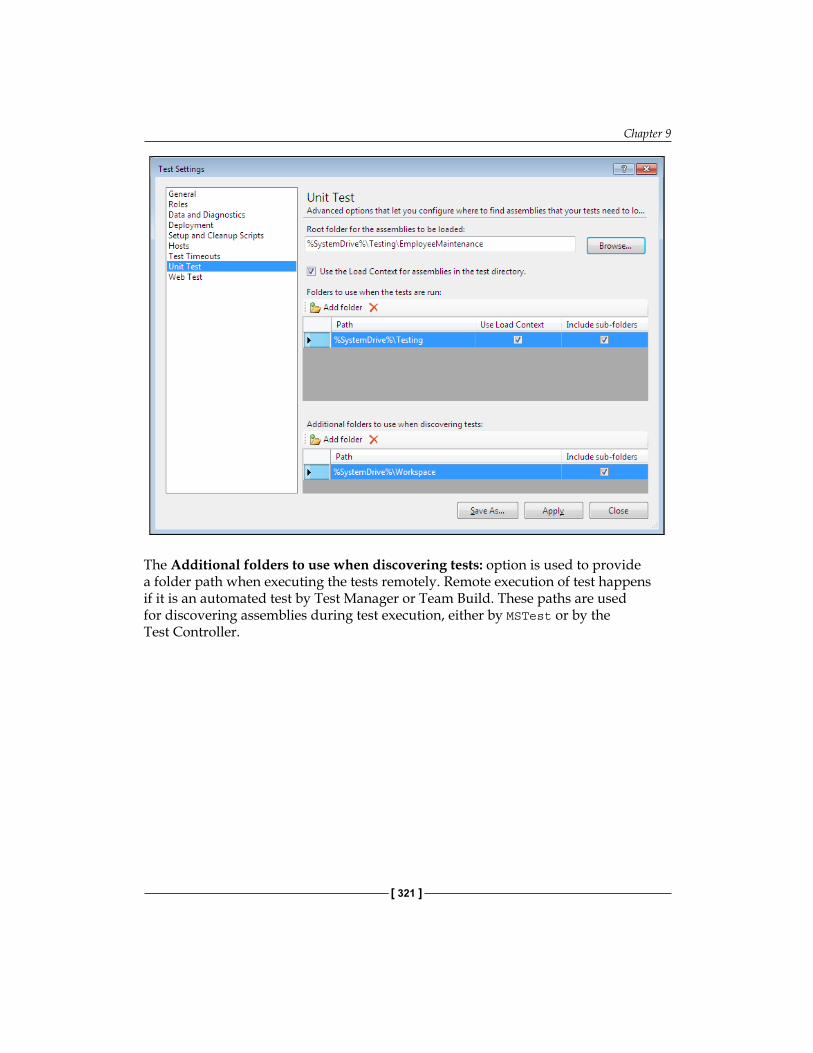
Chapter 9
[ 321 ]
The Additional folders to use when discovering tests: option is used to provide a folder path when executing the tests remotely. Remote execution of test happens if it is an automated test by Test Manager or Team Build. These paths are used for discovering assemblies during test execution, either by MSTest or by the Test Controller.
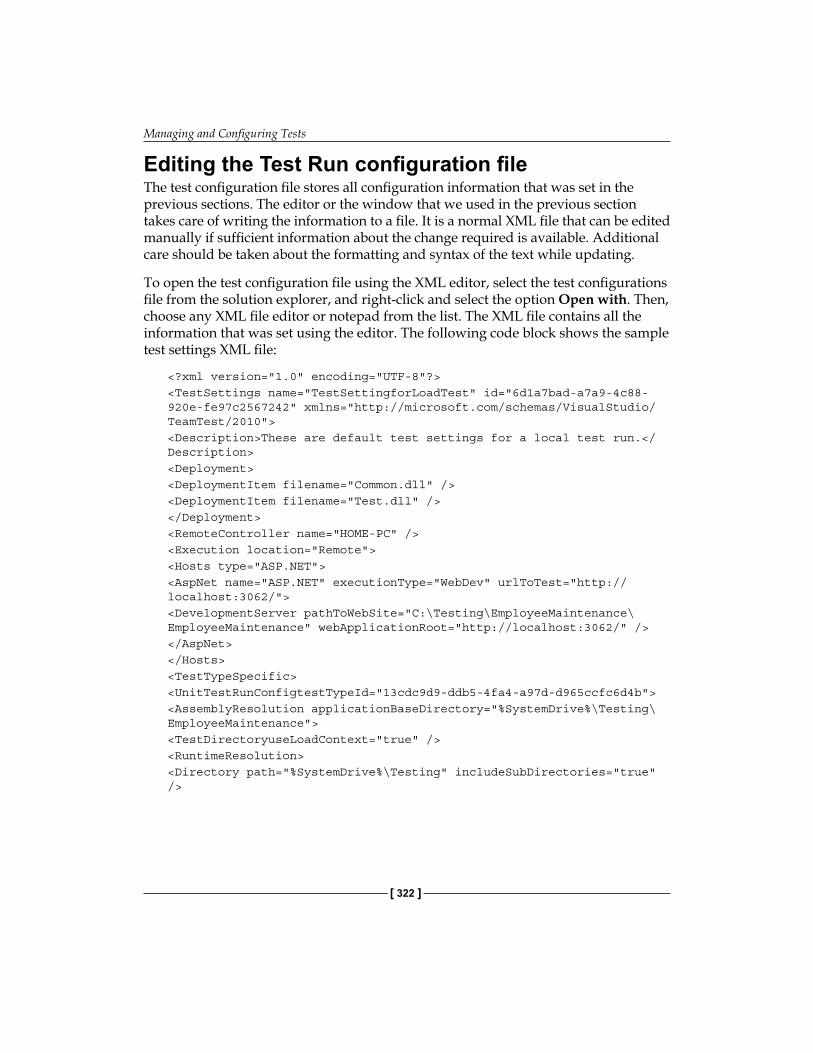
Managing and Configuring Tests
[ 322 ]
Editing the Test Run configuration fileThe test configuration file stores all configuration information that was set in the previous sections. The editor or the window that we used in the previous section takes care of writing the information to a file. It is a normal XML file that can be edited manually if sufficient information about the change required is available. Additional care should be taken about the formatting and syntax of the text while updating.
To open the test configuration file using the XML editor, select the test configurations file from the solution explorer, and right-click and select the option Open with. Then, choose any XML file editor or notepad from the list. The XML file contains all the information that was set using the editor. The following code block shows the sample test settings XML file:
<?xml version="1.0" encoding="UTF-8"?><TestSettings name="TestSettingforLoadTest" id="6d1a7bad-a7a9-4c88-920e-fe97c2567242" xmlns="http://microsoft.com/schemas/VisualStudio/TeamTest/2010"><Description>These are default test settings for a local test run.</Description><Deployment><DeploymentItem filename="Common.dll" /><DeploymentItem filename="Test.dll" /></Deployment><RemoteController name="HOME-PC" /><Execution location="Remote"><Hosts type="ASP.NET"><AspNet name="ASP.NET" executionType="WebDev" urlToTest="http://localhost:3062/"><DevelopmentServer pathToWebSite="C:\Testing\EmployeeMaintenance\EmployeeMaintenance" webApplicationRoot="http://localhost:3062/" /></AspNet></Hosts><TestTypeSpecific><UnitTestRunConfigtestTypeId="13cdc9d9-ddb5-4fa4-a97d-d965ccfc6d4b"><AssemblyResolution applicationBaseDirectory="%SystemDrive%\Testing\EmployeeMaintenance"><TestDirectoryuseLoadContext="true" /><RuntimeResolution><Directory path="%SystemDrive%\Testing" includeSubDirectories="true" />
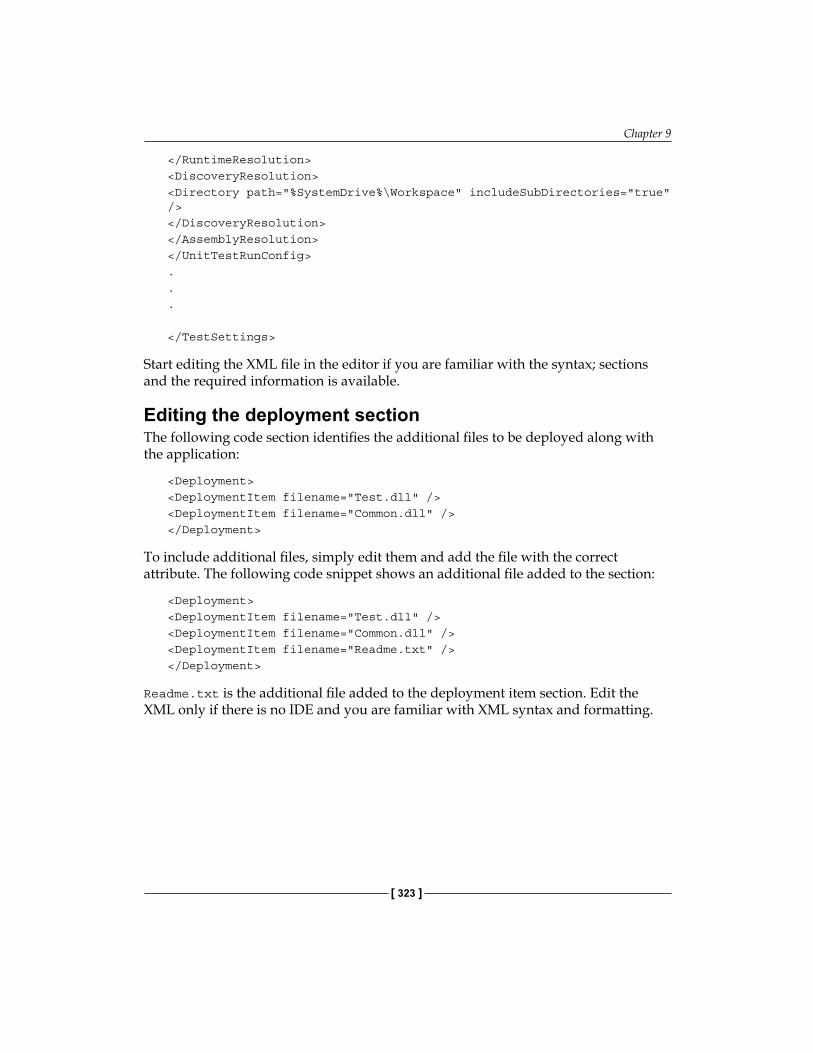
Chapter 9
[ 323 ]
</RuntimeResolution><DiscoveryResolution><Directory path="%SystemDrive%\Workspace" includeSubDirectories="true" /></DiscoveryResolution></AssemblyResolution></UnitTestRunConfig>...
</TestSettings>
Start editing the XML file in the editor if you are familiar with the syntax; sections and the required information is available.
Editing the deployment sectionThe following code section identifies the additional files to be deployed along with the application:
<Deployment><DeploymentItem filename="Test.dll" /><DeploymentItem filename="Common.dll" /></Deployment>
To include additional files, simply edit them and add the file with the correct attribute. The following code snippet shows an additional file added to the section:
<Deployment><DeploymentItem filename="Test.dll" /><DeploymentItem filename="Common.dll" /><DeploymentItem filename="Readme.txt" /></Deployment>
Readme.txt is the additional file added to the deployment item section. Edit the XML only if there is no IDE and you are familiar with XML syntax and formatting.
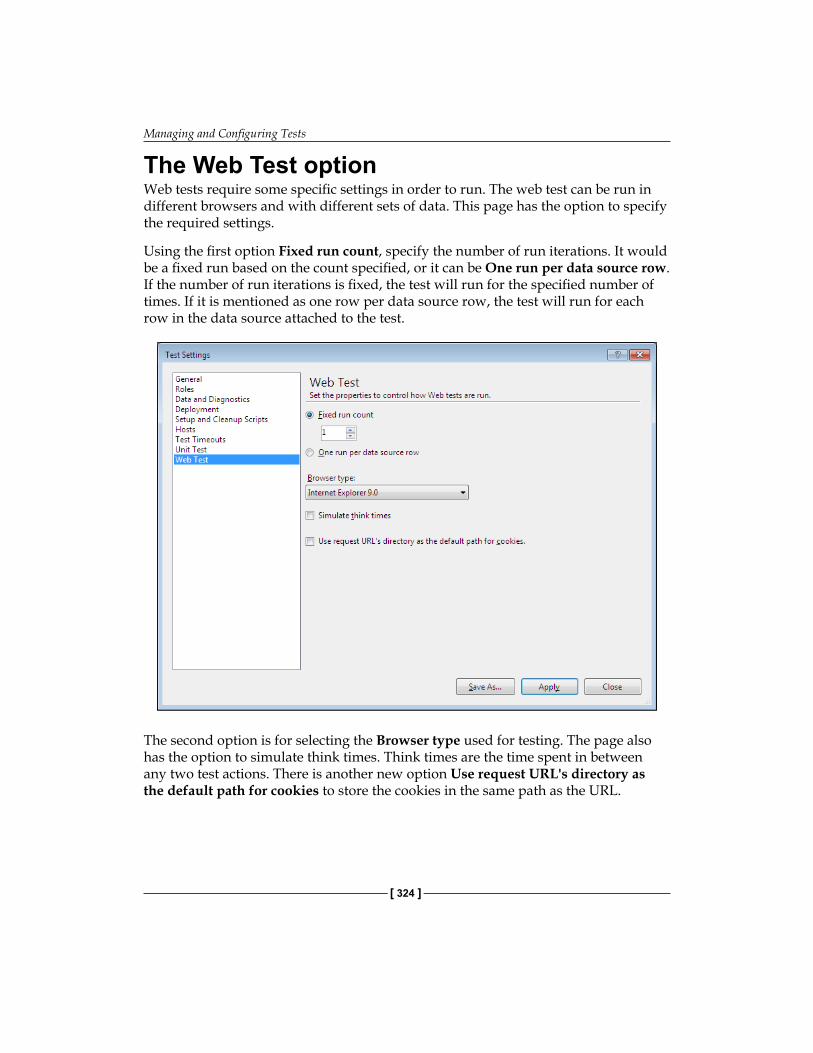
Managing and Configuring Tests
[ 324 ]
The Web Test optionWeb tests require some specific settings in order to run. The web test can be run in different browsers and with different sets of data. This page has the option to specify the required settings.
Using the first option Fixed run count, specify the number of run iterations. It would be a fixed run based on the count specified, or it can be One run per data source row. If the number of run iterations is fixed, the test will run for the specified number of times. If it is mentioned as one row per data source row, the test will run for each row in the data source attached to the test.
The second option is for selecting the Browser type used for testing. The page also has the option to simulate think times. Think times are the time spent in between any two test actions. There is another new option Use request URL's directory as the default path for cookies to store the cookies in the same path as the URL.
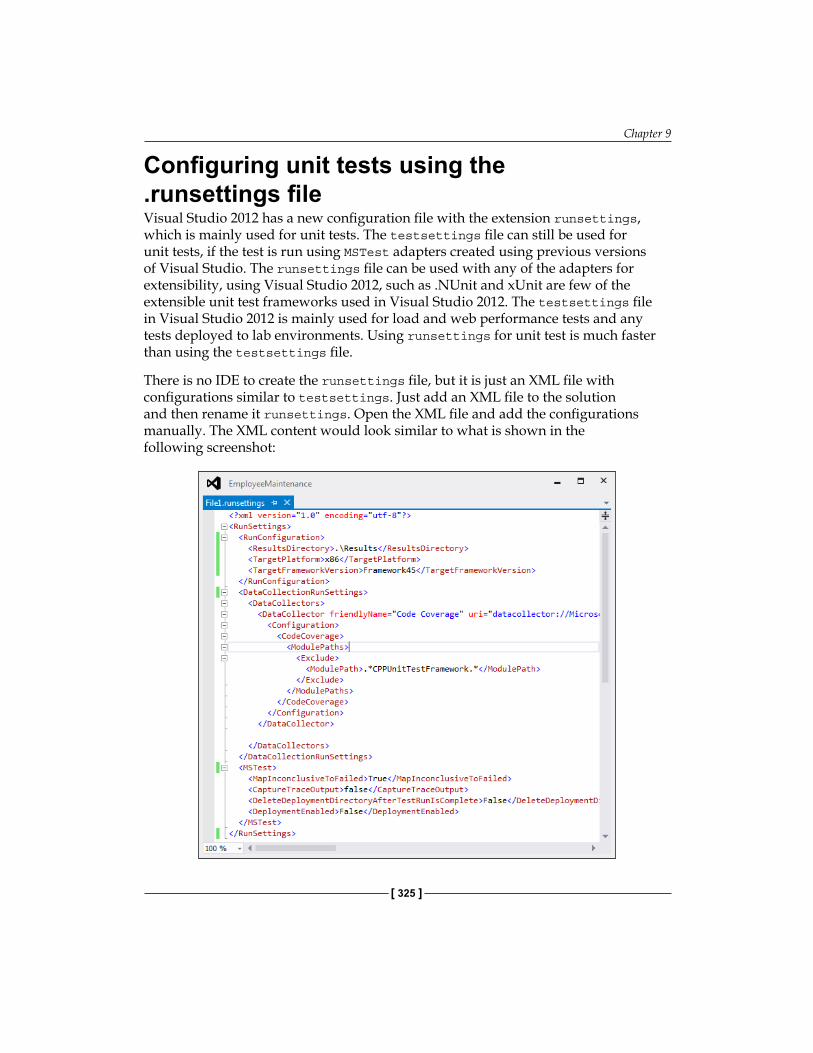
Chapter 9
[ 325 ]
Configuring unit tests using the .runsettings fileVisual Studio 2012 has a new configuration file with the extension runsettings, which is mainly used for unit tests. The testsettings file can still be used for unit tests, if the test is run using MSTest adapters created using previous versions of Visual Studio. The runsettings file can be used with any of the adapters for extensibility, using Visual Studio 2012, such as .NUnit and xUnit are few of the extensible unit test frameworks used in Visual Studio 2012. The testsettings file in Visual Studio 2012 is mainly used for load and web performance tests and any tests deployed to lab environments. Using runsettings for unit test is much faster than using the testsettings file.
There is no IDE to create the runsettings file, but it is just an XML file with configurations similar to testsettings. Just add an XML file to the solution and then rename it runsettings. Open the XML file and add the configurations manually. The XML content would look similar to what is shown in the following screenshot:
Managing and Configuring Tests
[ 326 ]
There are different sections within the runsettings file:
• ResultsDirectory is used to specify the directory where the Test Results would be placed.
• The TargetFrameworkVersion section is used to specify the version of the framework that is used for executing the tests.
• TargetPlatform is used to specify if it is a x86 or a x64 platform.• TreatTestAdapterErrorsAsWarnings is a Boolean value that is set to true
or false, to show any errors as warnings.• The DataCollectors section is used to specify the settings for diagnostic
data adapters. Diagnostic data adapters are used to collect additional information about the system, environment, and the application under test.
• The Code coverage data collector is used to create a log with information on application code covered by test. This is the only adapter that can be customized using runsettings.
SummaryThis chapter explained about editing the test configuration using the configuration editor supported by Visual Studio 2012. There are multiple configuration options for different types of tests. This chapter also explained the new runsettings file for unit testing. This file was introduced in Visual Studio 2012 and can be edited like a normal XML file. There are multiple adapters and data collectors that can be specified in the runsettings file, to collect diagnostic data information and code coverage data during testing.
The next chapter explains the command-line commands and the tools to run and publish the tests without using the Visual Studio IDE. Command-line instructions are very useful in scheduling tests and running the tests in batch.
The Command Line Visual Studio supports many testing features, and provides an IDE for testing and running the tests as explained in previous chapters. It is very simple to run tests from Test Explorer user interface and view the results, or re-run the test from the Test Results window. Other than the IDE support, Visual Studio provides command line options to execute or run the tests that were created using the IDE. This option is very handy when executing the tests from other applications, or scheduling automated testing.
In this chapter, multiple command line tools are explained in detail to use for running the tests with different options and then collecting the output. Visual Studio 2012 provides three different command line utilities to execute the tests and they are as follows:
• VSTest.Console: This command line utility is for running the automated unit tests and coded UI tests from the command line.
• MSTest: This command line utility is for running the automated tests, viewing Test Results from Test Runs, and saving the results to Team Foundation Server. MSTest is also used for the compatibility with Visual Studio 2010.
• TCM: This command line utility is used for importing automated tests into Test Plan, running tests from Test Plan, and viewing lists of test items.
VSTest.Console utilityIn Visual Studio 2012, the VSTest.Console command line utility is used for running the automated unit test and coded UI test. VSTest.Console is an optimized replacement for MSTest in Visual Studio 2012.
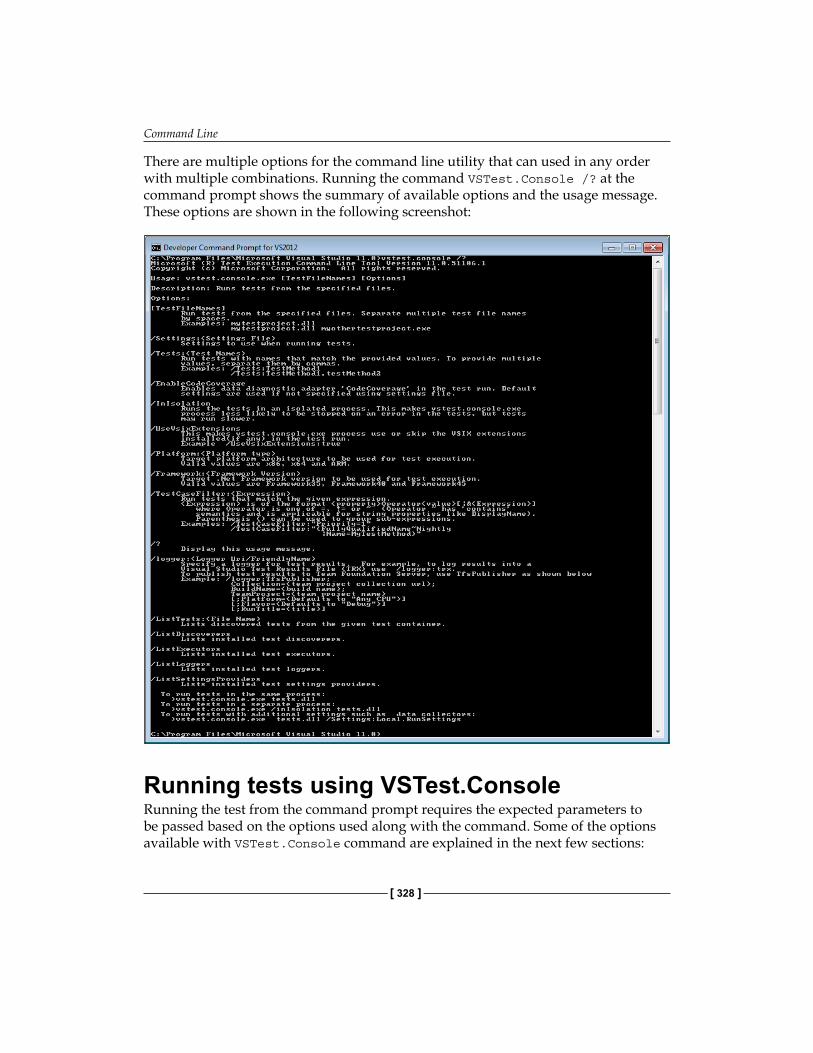
Command Line
[ 328 ]
There are multiple options for the command line utility that can used in any order with multiple combinations. Running the command VSTest.Console /? at the command prompt shows the summary of available options and the usage message. These options are shown in the following screenshot:
Running tests using VSTest.ConsoleRunning the test from the command prompt requires the expected parameters to be passed based on the options used along with the command. Some of the options available with VSTest.Console command are explained in the next few sections:
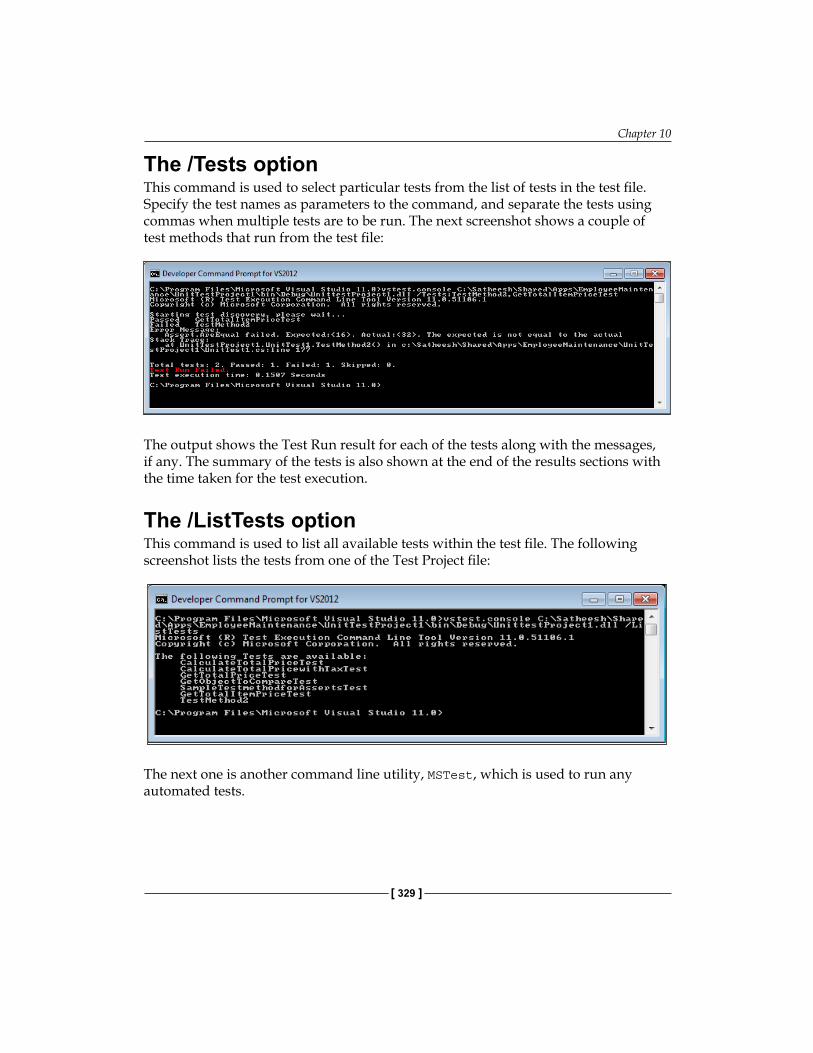
Chapter 10
[ 329 ]
The /Tests option This command is used to select particular tests from the list of tests in the test file. Specify the test names as parameters to the command, and separate the tests using commas when multiple tests are to be run. The next screenshot shows a couple of test methods that run from the test file:
The output shows the Test Run result for each of the tests along with the messages, if any. The summary of the tests is also shown at the end of the results sections with the time taken for the test execution.
The /ListTests optionThis command is used to list all available tests within the test file. The following screenshot lists the tests from one of the Test Project file:
The next one is another command line utility, MSTest, which is used to run any automated tests.
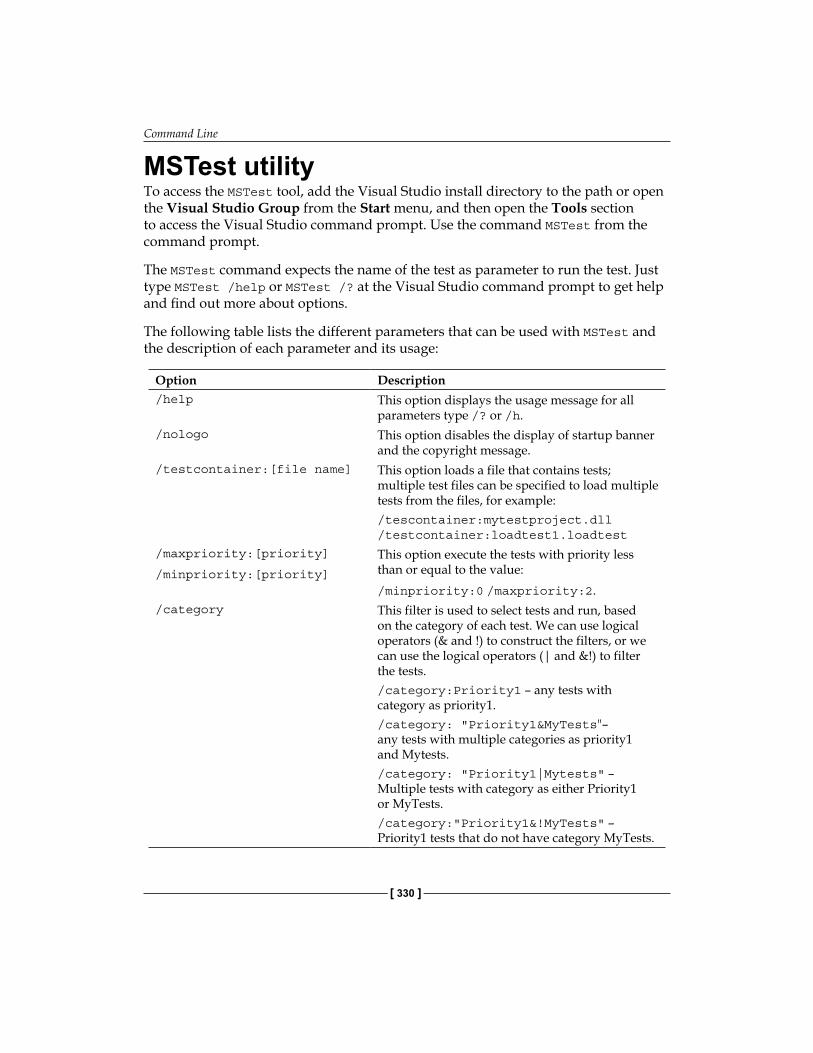
Command Line
[ 330 ]
MSTest utilityTo access the MSTest tool, add the Visual Studio install directory to the path or open the Visual Studio Group from the Start menu, and then open the Tools section to access the Visual Studio command prompt. Use the command MSTest from the command prompt.
The MSTest command expects the name of the test as parameter to run the test. Just type MSTest /help or MSTest /? at the Visual Studio command prompt to get help and find out more about options.
The following table lists the different parameters that can be used with MSTest and the description of each parameter and its usage:
Option Description/help This option displays the usage message for all
parameters type /? or /h./nologo This option disables the display of startup banner
and the copyright message./testcontainer:[file name] This option loads a file that contains tests;
multiple test files can be specified to load multiple tests from the files, for example:/tescontainer:mytestproject.dll/testcontainer:loadtest1.loadtest
/maxpriority:[priority]
/minpriority:[priority]
This option execute the tests with priority less than or equal to the value:/minpriority:0 /maxpriority:2.
/category This filter is used to select tests and run, based on the category of each test. We can use logical operators (& and !) to construct the filters, or we can use the logical operators (| and &!) to filter the tests./category:Priority1 – any tests with category as priority1./category: "Priority1&MyTests"– any tests with multiple categories as priority1 and Mytests./category: "Priority1|Mytests" – Multiple tests with category as either Priority1 or MyTests./category:"Priority1&!MyTests" – Priority1 tests that do not have category MyTests.
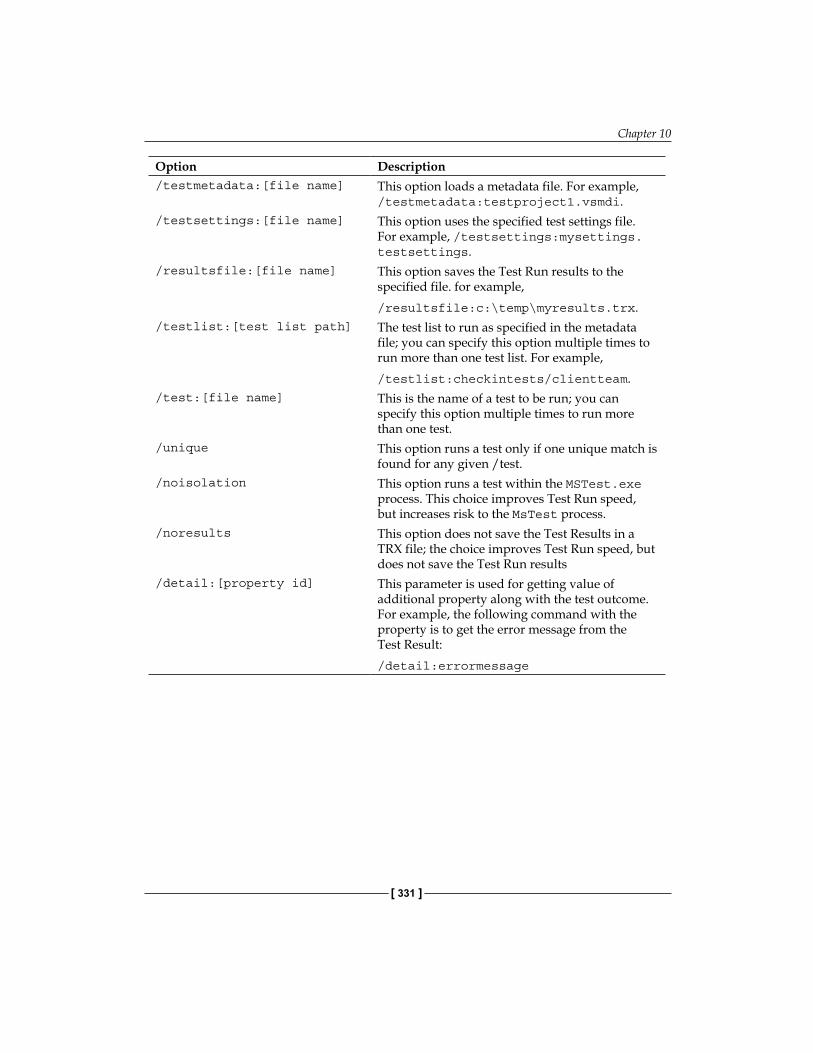
Chapter 10
[ 331 ]
Option Description/testmetadata:[file name] This option loads a metadata file. For example,
/testmetadata:testproject1.vsmdi./testsettings:[file name] This option uses the specified test settings file.
For example, /testsettings:mysettings.testsettings.
/resultsfile:[file name] This option saves the Test Run results to the specified file. for example, /resultsfile:c:\temp\myresults.trx.
/testlist:[test list path] The test list to run as specified in the metadata file; you can specify this option multiple times to run more than one test list. For example, /testlist:checkintests/clientteam.
/test:[file name] This is the name of a test to be run; you can specify this option multiple times to run more than one test.
/unique This option runs a test only if one unique match is found for any given /test.
/noisolation This option runs a test within the MSTest.exe process. This choice improves Test Run speed, but increases risk to the MsTest process.
/noresults This option does not save the Test Results in a TRX file; the choice improves Test Run speed, but does not save the Test Run results
/detail:[property id] This parameter is used for getting value of additional property along with the test outcome. For example, the following command with the property is to get the error message from the Test Result:/detail:errormessage
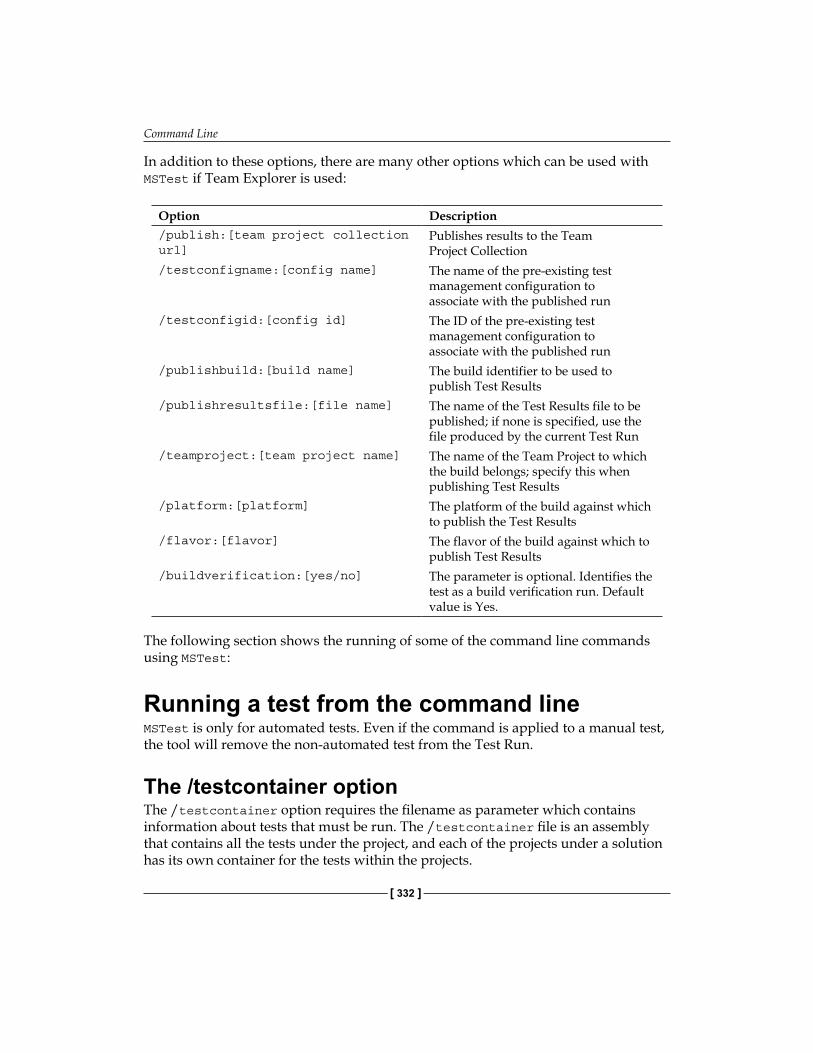
Command Line
[ 332 ]
In addition to these options, there are many other options which can be used with MSTest if Team Explorer is used:
Option Description/publish:[team project collection url]
Publishes results to the Team Project Collection
/testconfigname:[config name] The name of the pre-existing test management configuration to associate with the published run
/testconfigid:[config id] The ID of the pre-existing test management configuration to associate with the published run
/publishbuild:[build name] The build identifier to be used to publish Test Results
/publishresultsfile:[file name] The name of the Test Results file to be published; if none is specified, use the file produced by the current Test Run
/teamproject:[team project name] The name of the Team Project to which the build belongs; specify this when publishing Test Results
/platform:[platform] The platform of the build against which to publish the Test Results
/flavor:[flavor] The flavor of the build against which to publish Test Results
/buildverification:[yes/no] The parameter is optional. Identifies the test as a build verification run. Default value is Yes.
The following section shows the running of some of the command line commands using MSTest:
Running a test from the command lineMSTest is only for automated tests. Even if the command is applied to a manual test, the tool will remove the non-automated test from the Test Run.
The /testcontainer optionThe /testcontainer option requires the filename as parameter which contains information about tests that must be run. The /testcontainer file is an assembly that contains all the tests under the project, and each of the projects under a solution has its own container for the tests within the projects.
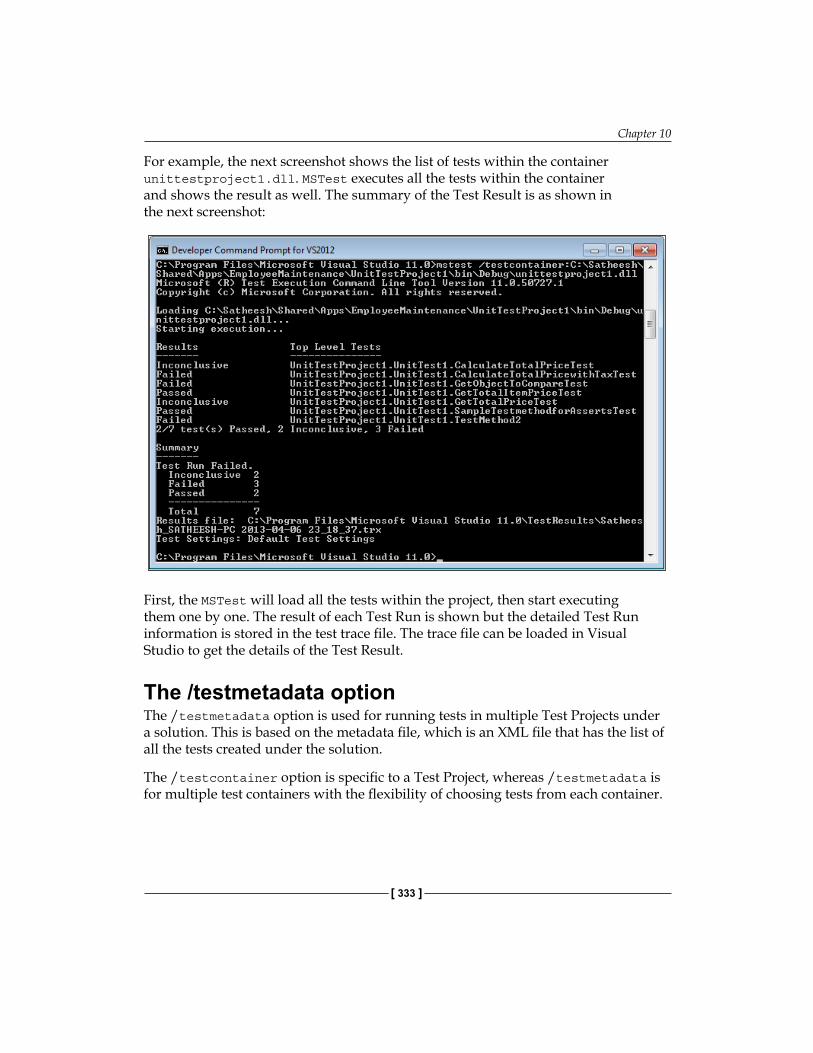
Chapter 10
[ 333 ]
For example, the next screenshot shows the list of tests within the container unittestproject1.dll. MSTest executes all the tests within the container and shows the result as well. The summary of the Test Result is as shown in the next screenshot:
First, the MSTest will load all the tests within the project, then start executing them one by one. The result of each Test Run is shown but the detailed Test Run information is stored in the test trace file. The trace file can be loaded in Visual Studio to get the details of the Test Result.
The /testmetadata optionThe /testmetadata option is used for running tests in multiple Test Projects under a solution. This is based on the metadata file, which is an XML file that has the list of all the tests created under the solution.
The /testcontainer option is specific to a Test Project, whereas /testmetadata is for multiple test containers with the flexibility of choosing tests from each container.
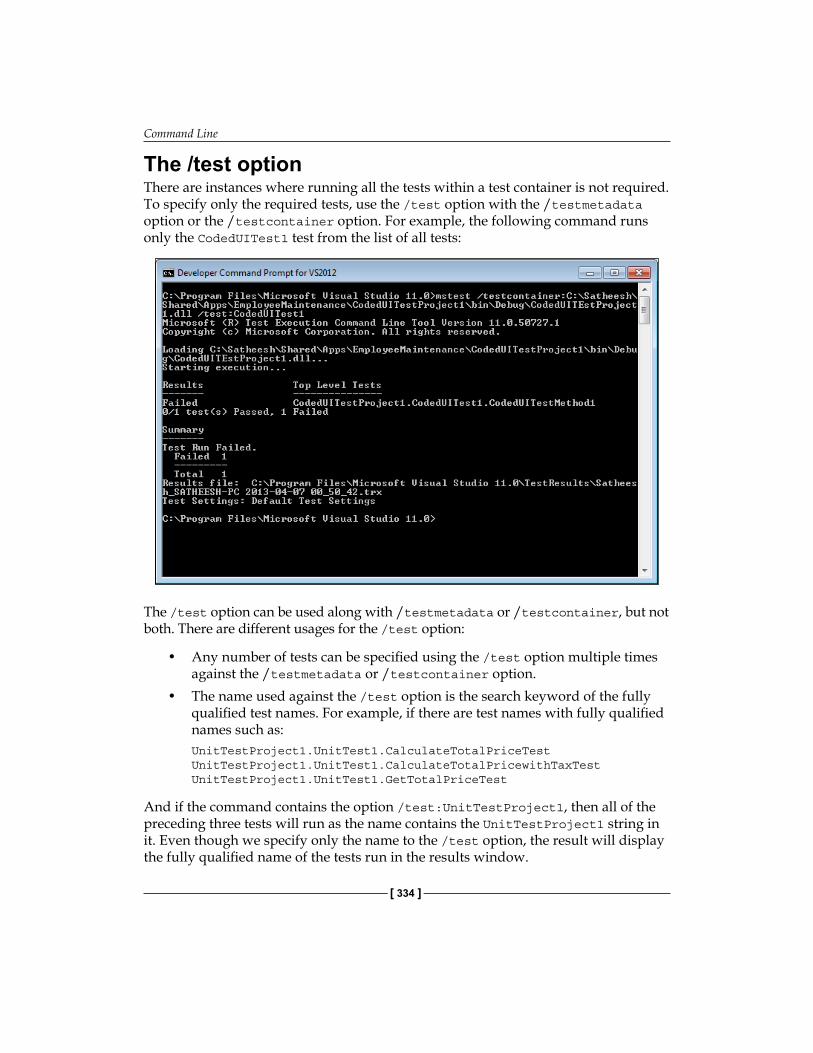
Command Line
[ 334 ]
The /test optionThere are instances where running all the tests within a test container is not required. To specify only the required tests, use the /test option with the /testmetadata option or the /testcontainer option. For example, the following command runs only the CodedUITest1 test from the list of all tests:
The /test option can be used along with /testmetadata or /testcontainer, but not both. There are different usages for the /test option:
• Any number of tests can be specified using the /test option multiple times against the /testmetadata or /testcontainer option.
• The name used against the /test option is the search keyword of the fully qualified test names. For example, if there are test names with fully qualified names such as:UnitTestProject1.UnitTest1.CalculateTotalPriceTest UnitTestProject1.UnitTest1.CalculateTotalPricewithTaxTest UnitTestProject1.UnitTest1.GetTotalPriceTest
And if the command contains the option /test:UnitTestProject1, then all of the preceding three tests will run as the name contains the UnitTestProject1 string in it. Even though we specify only the name to the /test option, the result will display the fully qualified name of the tests run in the results window.
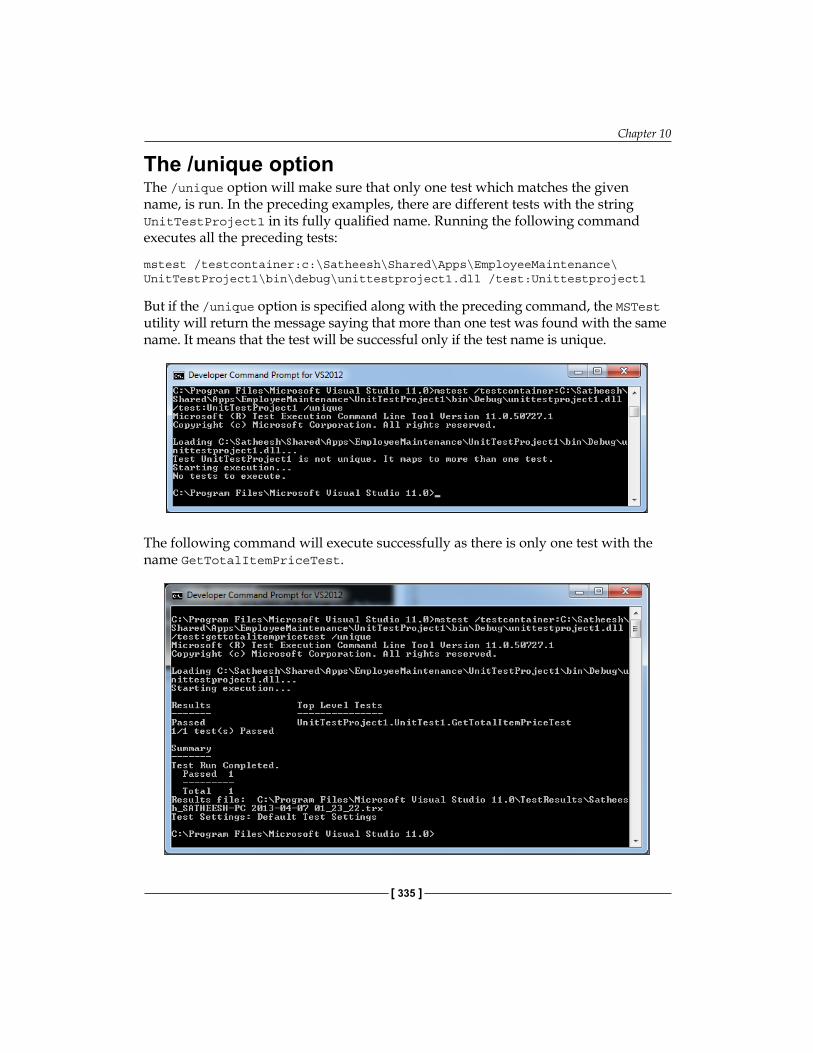
Chapter 10
[ 335 ]
The /unique optionThe /unique option will make sure that only one test which matches the given name, is run. In the preceding examples, there are different tests with the string UnitTestProject1 in its fully qualified name. Running the following command executes all the preceding tests:
mstest /testcontainer:c:\Satheesh\Shared\Apps\EmployeeMaintenance\UnitTestProject1\bin\debug\unittestproject1.dll /test:Unittestproject1
But if the /unique option is specified along with the preceding command, the MSTest utility will return the message saying that more than one test was found with the same name. It means that the test will be successful only if the test name is unique.
The following command will execute successfully as there is only one test with the name GetTotalItemPriceTest.
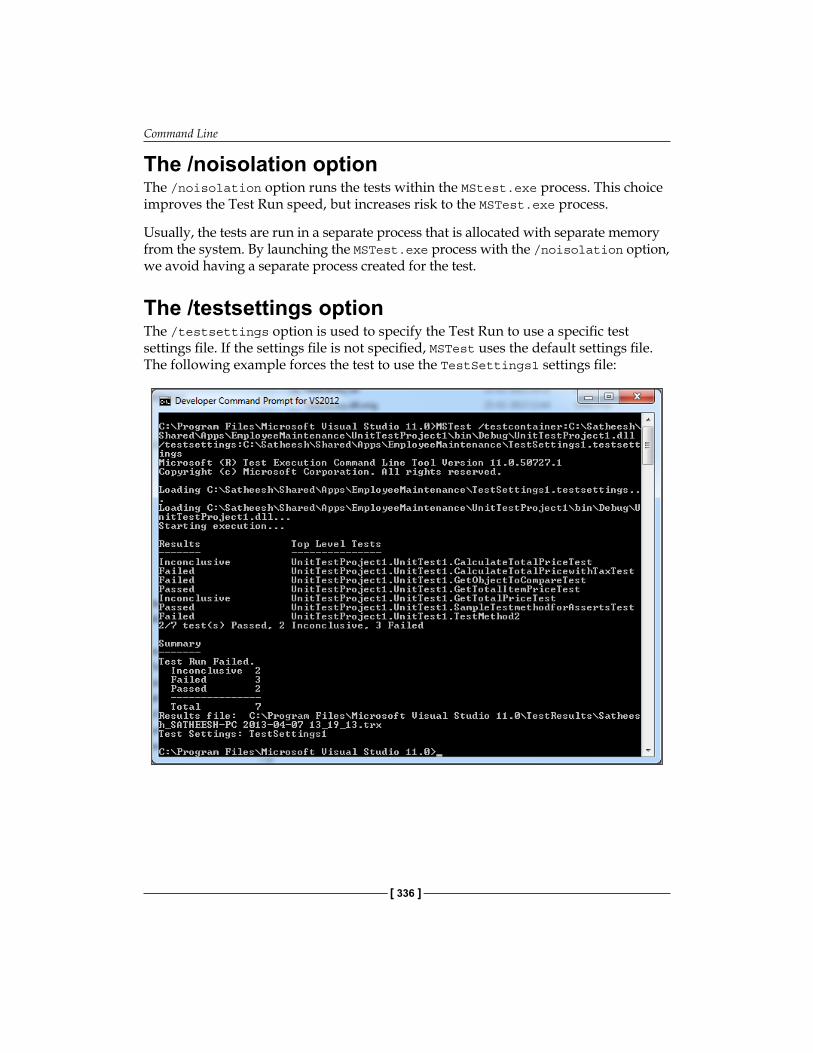
Command Line
[ 336 ]
The /noisolation optionThe /noisolation option runs the tests within the MStest.exe process. This choice improves the Test Run speed, but increases risk to the MSTest.exe process.
Usually, the tests are run in a separate process that is allocated with separate memory from the system. By launching the MSTest.exe process with the /noisolation option, we avoid having a separate process created for the test.
The /testsettings optionThe /testsettings option is used to specify the Test Run to use a specific test settings file. If the settings file is not specified, MSTest uses the default settings file. The following example forces the test to use the TestSettings1 settings file:
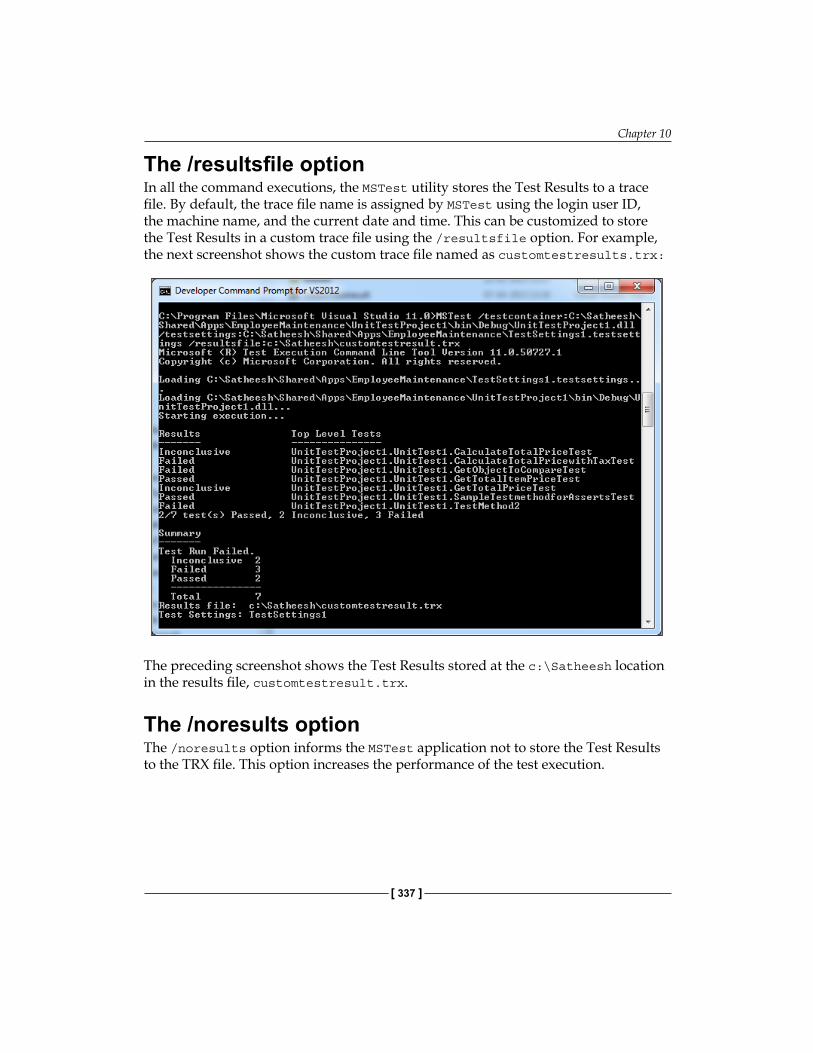
Chapter 10
[ 337 ]
The /resultsfile optionIn all the command executions, the MSTest utility stores the Test Results to a trace file. By default, the trace file name is assigned by MSTest using the login user ID, the machine name, and the current date and time. This can be customized to store the Test Results in a custom trace file using the /resultsfile option. For example, the next screenshot shows the custom trace file named as customtestresults.trx:
The preceding screenshot shows the Test Results stored at the c:\Satheesh location in the results file, customtestresult.trx.
The /noresults optionThe /noresults option informs the MSTest application not to store the Test Results to the TRX file. This option increases the performance of the test execution.
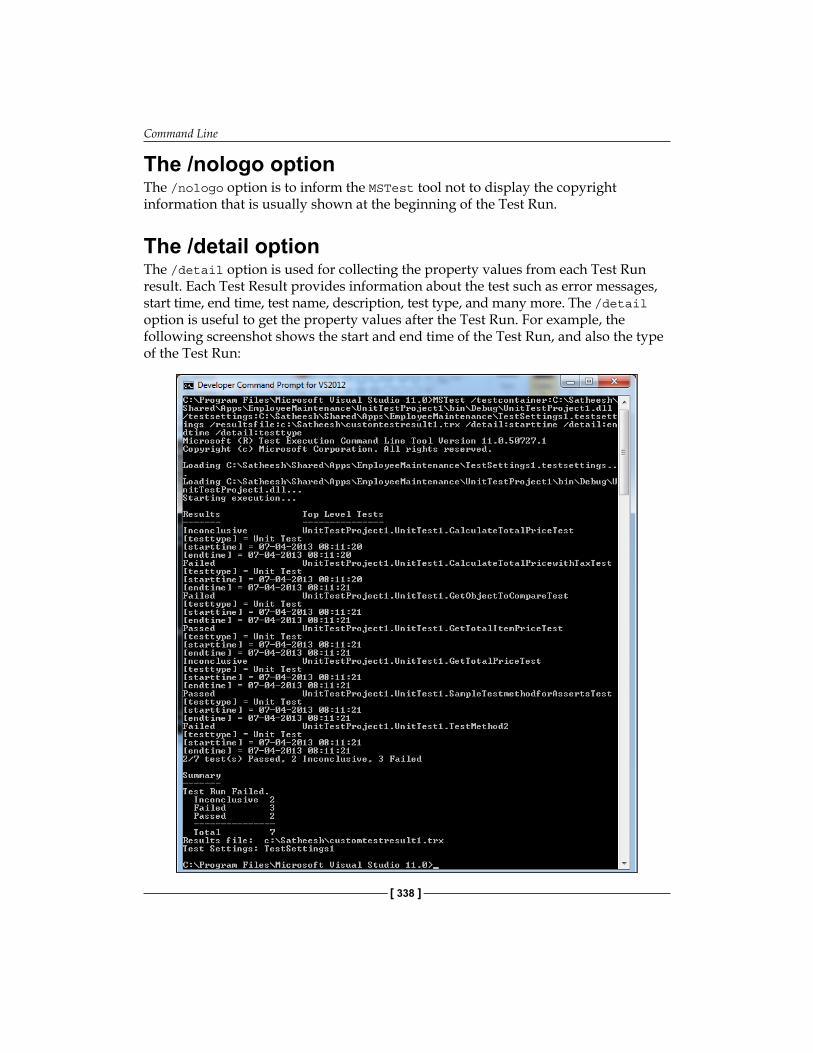
Command Line
[ 338 ]
The /nologo optionThe /nologo option is to inform the MSTest tool not to display the copyright information that is usually shown at the beginning of the Test Run.
The /detail option The /detail option is used for collecting the property values from each Test Run result. Each Test Result provides information about the test such as error messages, start time, end time, test name, description, test type, and many more. The /detail option is useful to get the property values after the Test Run. For example, the following screenshot shows the start and end time of the Test Run, and also the type of the Test Run:
Chapter 10
[ 339 ]
The /detail option can be specified multiple times to get multiple property values after the Test Run.
Publishing Test ResultsPublishing Test Results is valid only if Team Explorer is installed, and if Visual Studio is connected to the Team Foundation Server (TFS). This is to publish the test data and results to the TFS Team Project. Please refer to Microsoft Developer Network (MSDN) for more information on installing and configuring TFS and Team Explorer.
Test Results can be published using the command line utility and the various options along with the utility. The /publish option with MSTest will first run the test, and then set the flavor and platform for the test before publishing the data to the TFS. Some of these options are mandatory for publishing the Test Run details.
The following are the different publishing options for the command line MSTest tool:
The /publish optionThe /publish option should be followed by the uniform resource identifier (URI) of the TFS, if the TFS is not registered in the client. If it is registered, just use the name of the server to which the Test Result has to be published, as shown in the following command:
/publish:[server name]
Refer to the following examples:
• If the TFS Server is not registered in the client, then:/publish:http://MyTFSServer()
• If the TFS Server is registered with the client, then:
/publish:MyTFSServer
The /publishbuild optionThe /publishbuild option is used for publishing the builds. The parameter value is the unique name that identifies the build from the list of scheduled builds.
Command Line
[ 340 ]
The /flavour optionPublishing the Test Rresults to TFS requires /flavor as mandatory. Flavor is a string value that is used in combination with the platform name, and should match with the completed build that can be identified by the /publishbuild option. The MSTest command will run the test, and then set the flavor and platform properties, before publishing the Test Run results to the TFS:
/flavour:[flavour string value]
For example:
• /flavor:Release
• /flavor:Debug
The /platform optionThis is a mandatory string value used in combination with the /flavor option which should match the build option.
/platform:[string value]
For example:
• /platform:Mixed Platforms
• /platform:NET
• /platform:Win32
The /publishresultsfile optionMSTest stores all the Test Results in the default trace files with the extension .trx. Using the /publishresultsfile option, the Test Results file can be published to TFS using the output/trace option. The name of the file is the input to this option. If the value is not specified, MSTest will publish the current Test Run trace file to TFS.
/publishresultsfile:[file name string]
For example, to publish the current Test Run trace file, use the /publishresultsfile option.
To publish the Test Result, one can use a combination of different options we saw in previous sections, along with the option /publishresultsfile.
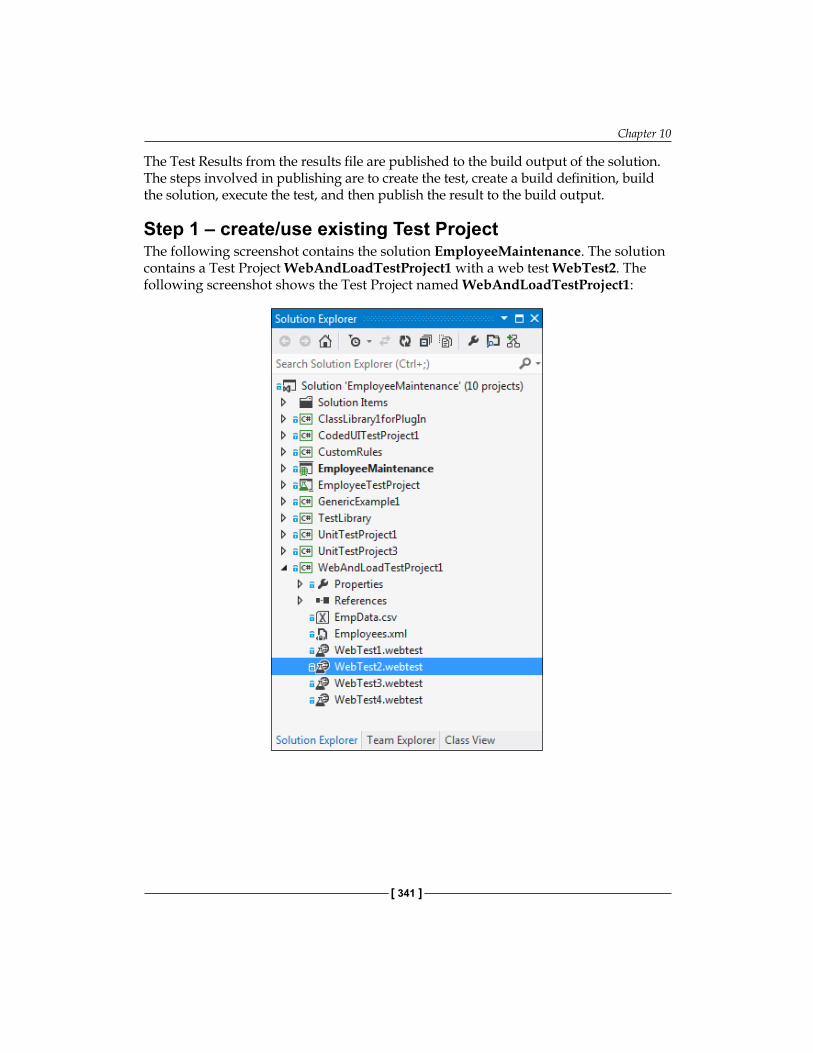
Chapter 10
[ 341 ]
The Test Results from the results file are published to the build output of the solution. The steps involved in publishing are to create the test, create a build definition, build the solution, execute the test, and then publish the result to the build output.
Step 1 – create/use existing Test ProjectThe following screenshot contains the solution EmployeeMaintenance. The solution contains a Test Project WebAndLoadTestProject1 with a web test WebTest2. The following screenshot shows the Test Project named WebAndLoadTestProject1:
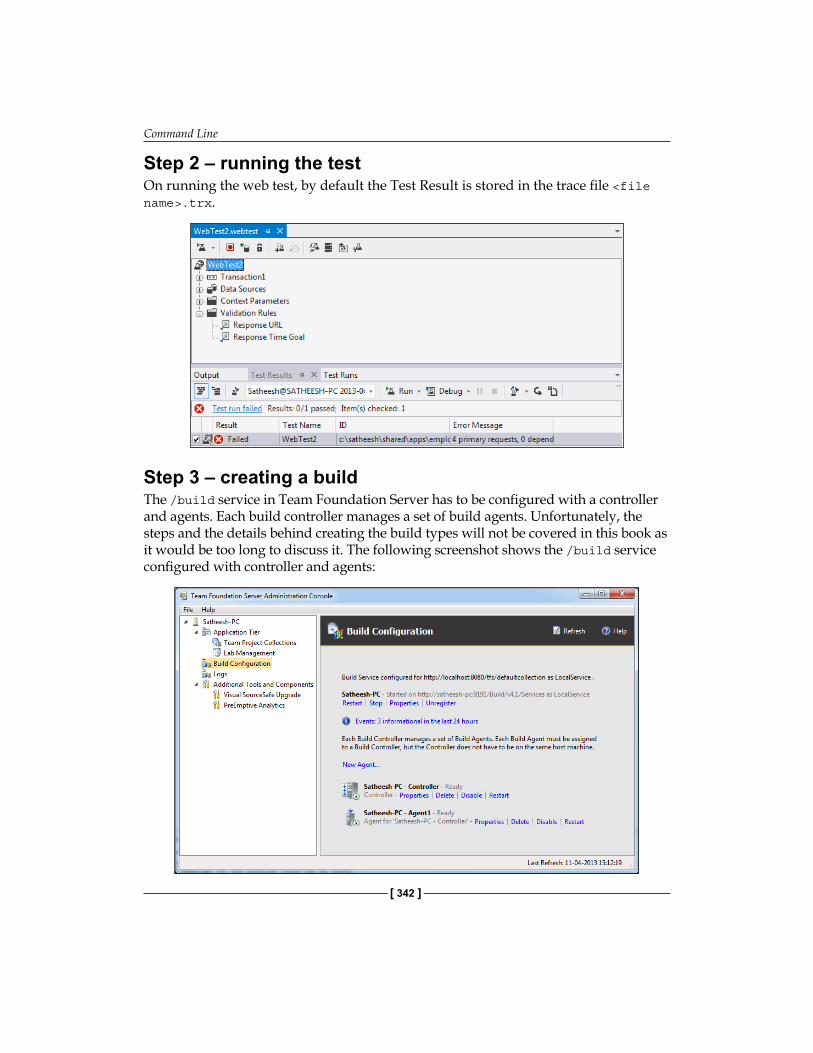
Command Line
[ 342 ]
Step 2 – running the testOn running the web test, by default the Test Result is stored in the trace file <file name>.trx.
Step 3 – creating a build The /build service in Team Foundation Server has to be configured with a controller and agents. Each build controller manages a set of build agents. Unfortunately, the steps and the details behind creating the build types will not be covered in this book as it would be too long to discuss it. The following screenshot shows the /build service configured with controller and agents:
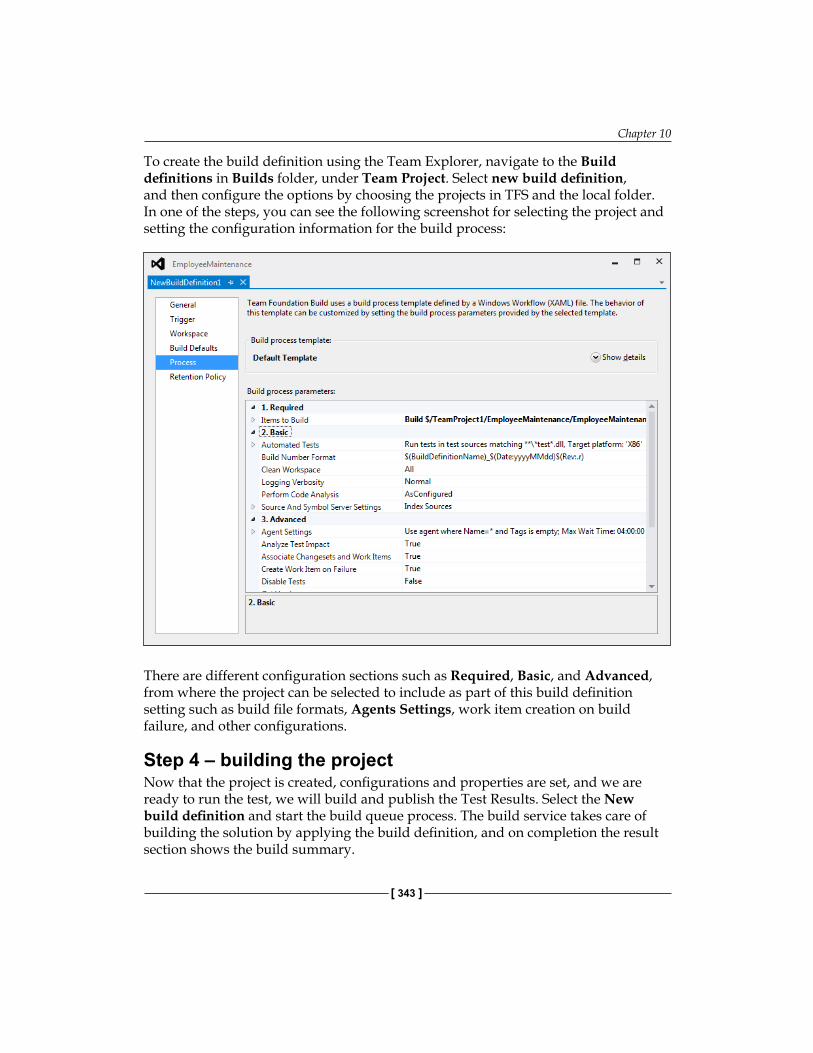
Chapter 10
[ 343 ]
To create the build definition using the Team Explorer, navigate to the Build definitions in Builds folder, under Team Project. Select new build definition, and then configure the options by choosing the projects in TFS and the local folder. In one of the steps, you can see the following screenshot for selecting the project and setting the configuration information for the build process:
There are different configuration sections such as Required, Basic, and Advanced, from where the project can be selected to include as part of this build definition setting such as build file formats, Agents Settings, work item creation on build failure, and other configurations.
Step 4 – building the projectNow that the project is created, configurations and properties are set, and we are ready to run the test, we will build and publish the Test Results. Select the New build definition and start the build queue process. The build service takes care of building the solution by applying the build definition, and on completion the result section shows the build summary.
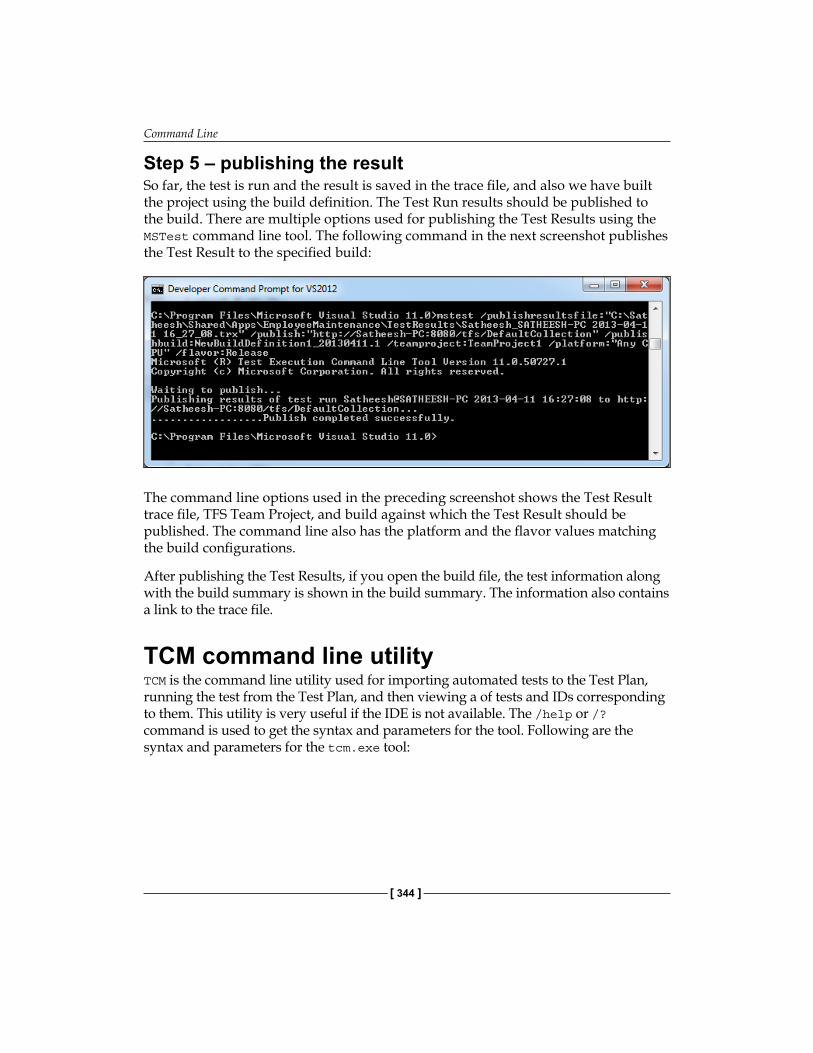
Command Line
[ 344 ]
Step 5 – publishing the resultSo far, the test is run and the result is saved in the trace file, and also we have built the project using the build definition. The Test Run results should be published to the build. There are multiple options used for publishing the Test Results using the MSTest command line tool. The following command in the next screenshot publishes the Test Result to the specified build:
The command line options used in the preceding screenshot shows the Test Result trace file, TFS Team Project, and build against which the Test Result should be published. The command line also has the platform and the flavor values matching the build configurations.
After publishing the Test Results, if you open the build file, the test information along with the build summary is shown in the build summary. The information also contains a link to the trace file.
TCM command line utilityTCM is the command line utility used for importing automated tests to the Test Plan, running the test from the Test Plan, and then viewing a of tests and IDs corresponding to them. This utility is very useful if the IDE is not available. The /help or /? command is used to get the syntax and parameters for the tool. Following are the syntax and parameters for the tcm.exe tool:
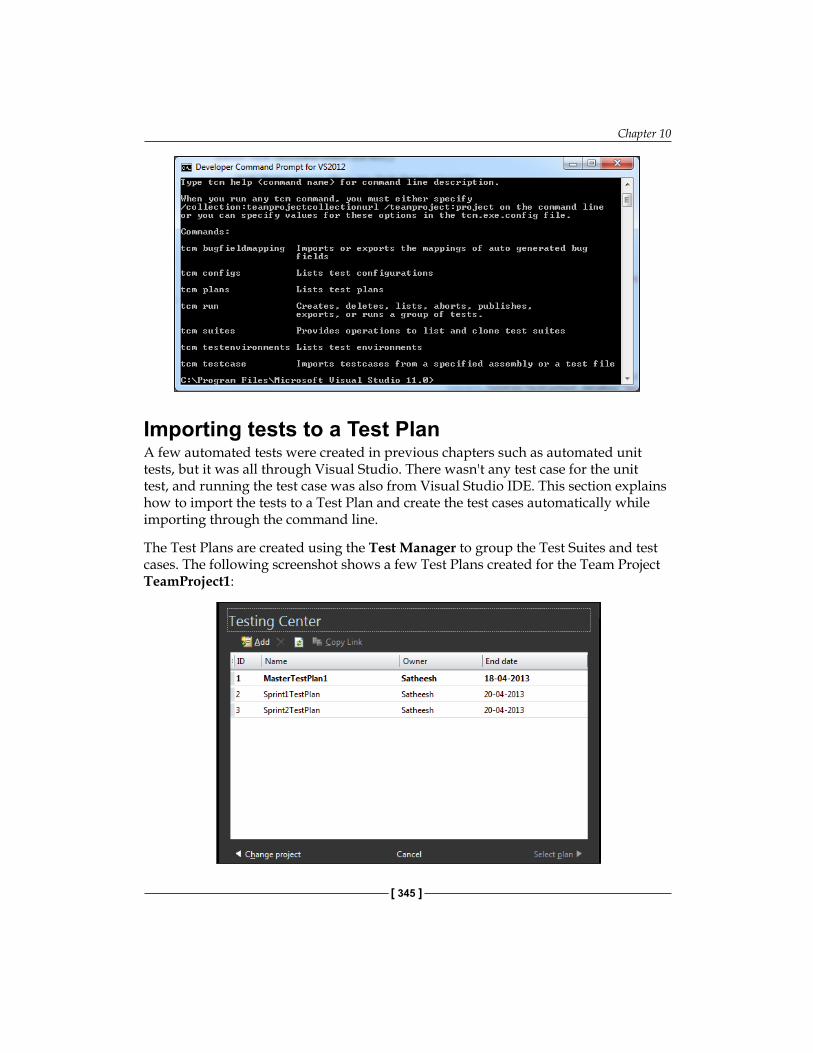
Chapter 10
[ 345 ]
Importing tests to a Test PlanA few automated tests were created in previous chapters such as automated unit tests, but it was all through Visual Studio. There wasn't any test case for the unit test, and running the test case was also from Visual Studio IDE. This section explains how to import the tests to a Test Plan and create the test cases automatically while importing through the command line.
The Test Plans are created using the Test Manager to group the Test Suites and test cases. The following screenshot shows a few Test Plans created for the Team Project TeamProject1:

Command Line
[ 346 ]
The EmployeeMaintenance solution contains the unit Test Project UnitTestProject1 with a few methods out of which there are methods such as CalculateTotalPriceTest() and CalculateTotalPricewithTaxTest() with their category defined as TotalPrice. So far there are no test cases defined in any of the Test Plans in the Test Manger for these tests. Refer to the following screenshot:
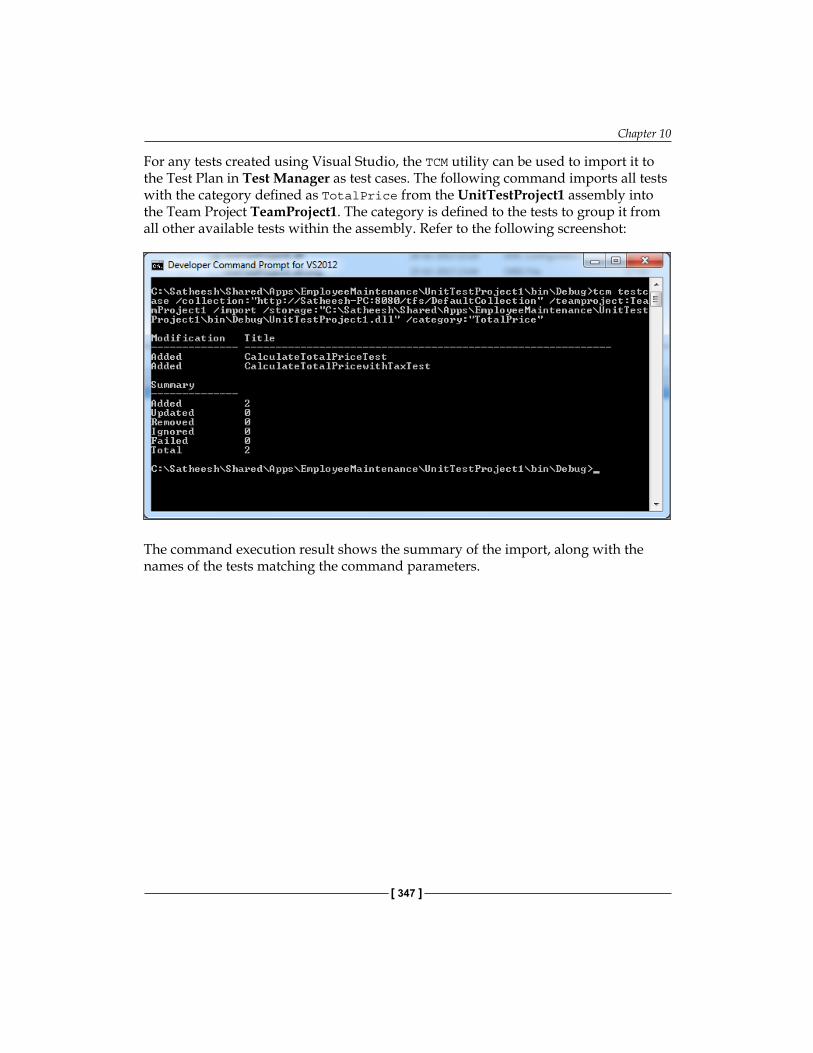
Chapter 10
[ 347 ]
For any tests created using Visual Studio, the TCM utility can be used to import it to the Test Plan in Test Manager as test cases. The following command imports all tests with the category defined as TotalPrice from the UnitTestProject1 assembly into the Team Project TeamProject1. The category is defined to the tests to group it from all other available tests within the assembly. Refer to the following screenshot:
The command execution result shows the summary of the import, along with the names of the tests matching the command parameters.
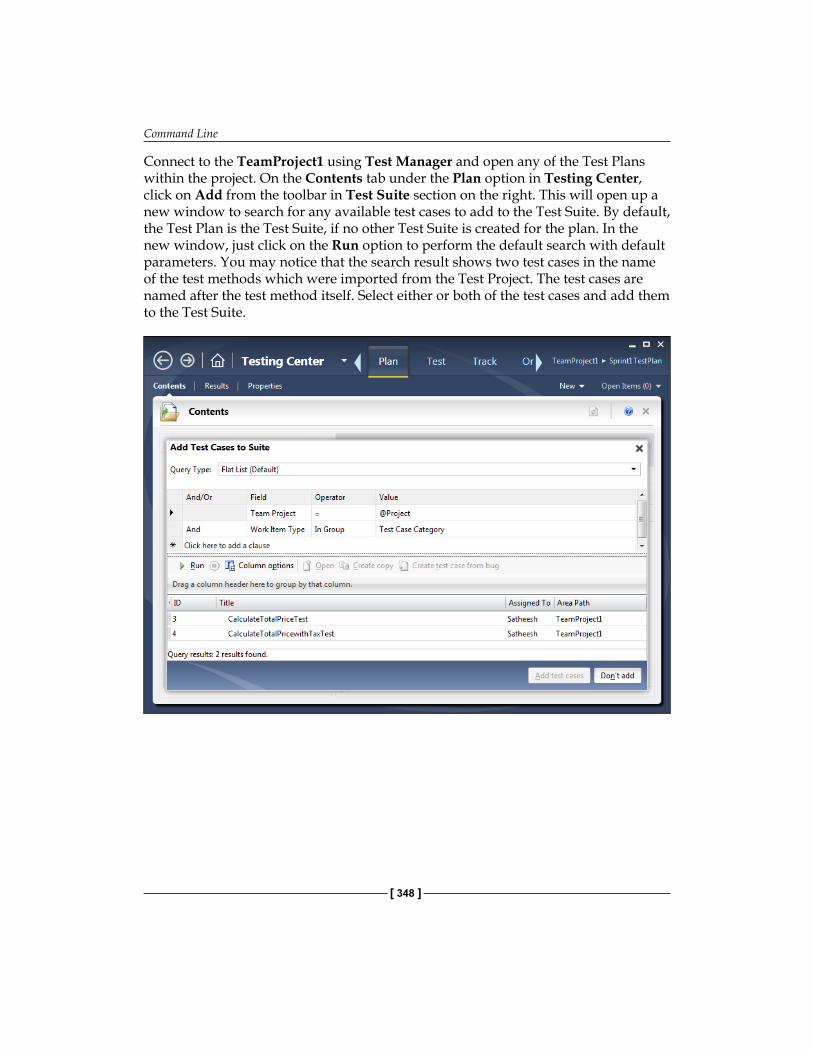
Command Line
[ 348 ]
Connect to the TeamProject1 using Test Manager and open any of the Test Plans within the project. On the Contents tab under the Plan option in Testing Center, click on Add from the toolbar in Test Suite section on the right. This will open up a new window to search for any available test cases to add to the Test Suite. By default, the Test Plan is the Test Suite, if no other Test Suite is created for the plan. In the new window, just click on the Run option to perform the default search with default parameters. You may notice that the search result shows two test cases in the name of the test methods which were imported from the Test Project. The test cases are named after the test method itself. Select either or both of the test cases and add them to the Test Suite.
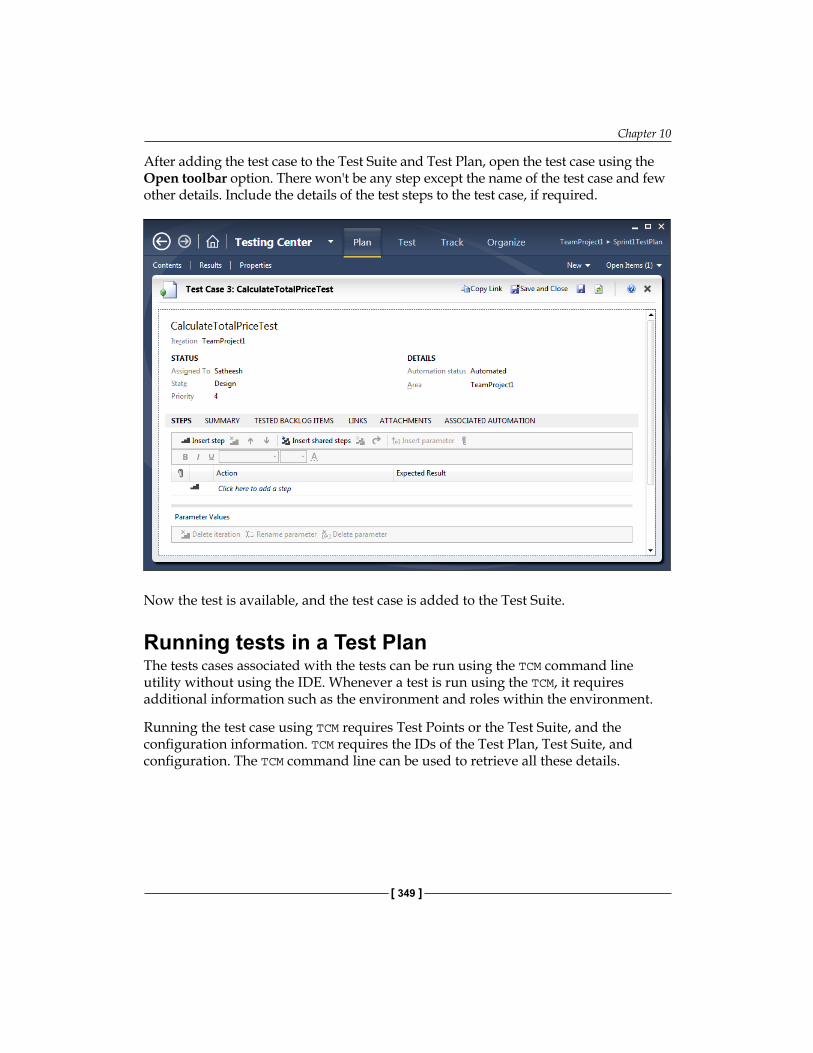
Chapter 10
[ 349 ]
After adding the test case to the Test Suite and Test Plan, open the test case using the Open toolbar option. There won't be any step except the name of the test case and few other details. Include the details of the test steps to the test case, if required.
Now the test is available, and the test case is added to the Test Suite.
Running tests in a Test PlanThe tests cases associated with the tests can be run using the TCM command line utility without using the IDE. Whenever a test is run using the TCM, it requires additional information such as the environment and roles within the environment.
Running the test case using TCM requires Test Points or the Test Suite, and the configuration information. TCM requires the IDs of the Test Plan, Test Suite, and configuration. The TCM command line can be used to retrieve all these details.
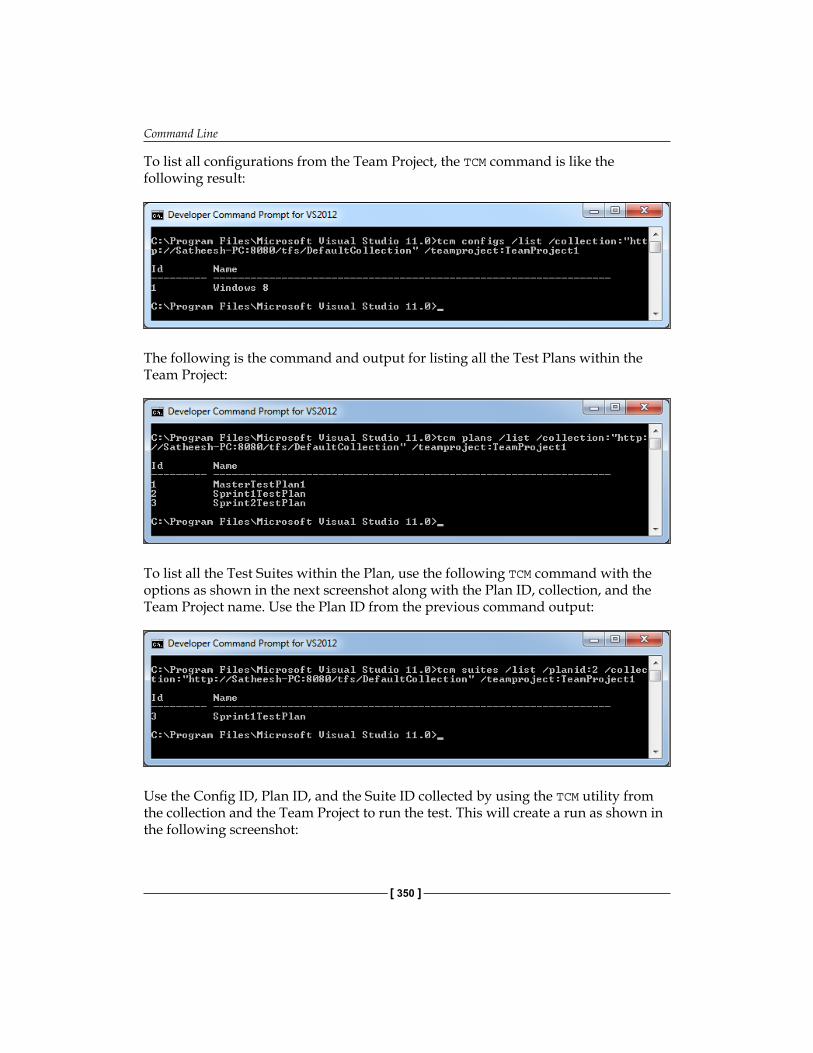
Command Line
[ 350 ]
To list all configurations from the Team Project, the TCM command is like the following result:
The following is the command and output for listing all the Test Plans within the Team Project:
To list all the Test Suites within the Plan, use the following TCM command with the options as shown in the next screenshot along with the Plan ID, collection, and the Team Project name. Use the Plan ID from the previous command output:
Use the Config ID, Plan ID, and the Suite ID collected by using the TCM utility from the collection and the Team Project to run the test. This will create a run as shown in the following screenshot:
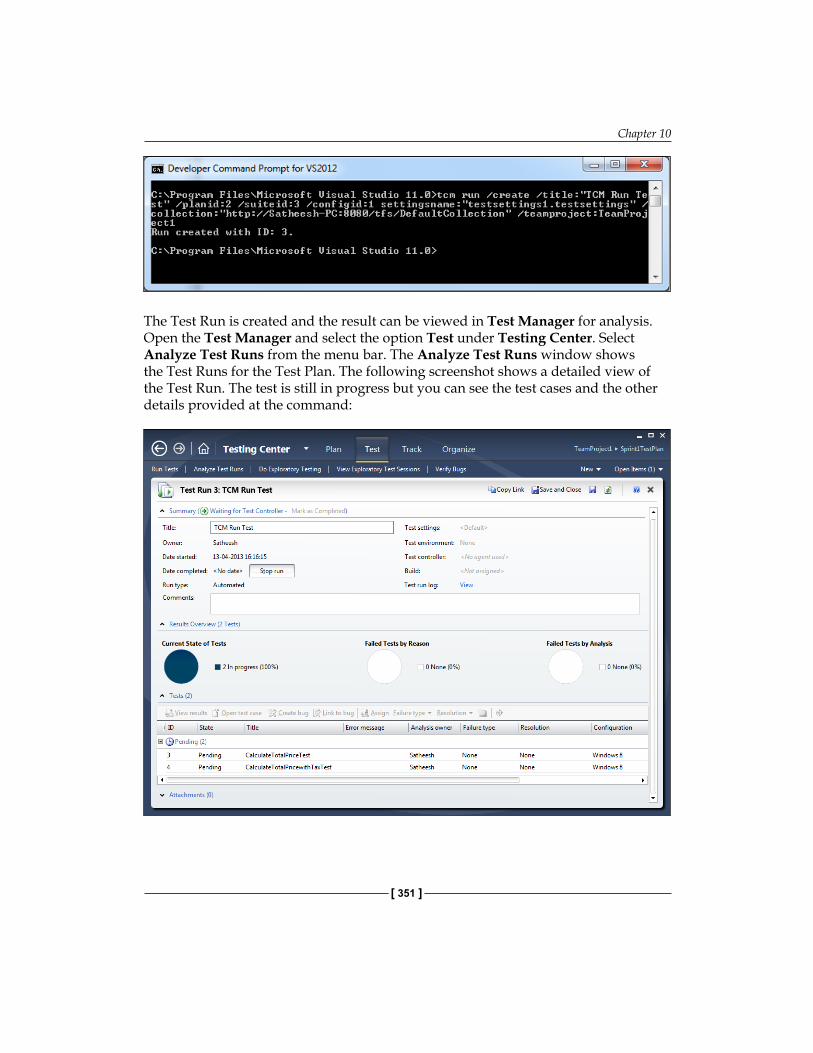
Chapter 10
[ 351 ]
The Test Run is created and the result can be viewed in Test Manager for analysis. Open the Test Manager and select the option Test under Testing Center. Select Analyze Test Runs from the menu bar. The Analyze Test Runs window shows the Test Runs for the Test Plan. The following screenshot shows a detailed view of the Test Run. The test is still in progress but you can see the test cases and the other details provided at the command:
Command Line
[ 352 ]
The Test Agent needs to be set up to run as a process instead of a service to run the automated tests to interact with desktop.
SummaryThis chapter explained the use of multiple command line utilities such as VSTest.Console, MSTest, and TCM for running the tests. These tools are very handy when there is no IDE. Lots of features are covered using the command line utility when compared to the earlier versions of Visual Studio. The VSTest.Console utility comes with multiple options to run automated tests such as unit tests and Coded UI tests. The MSTest utility provides options for backward compatibility along with multiple options to run automated tests and publish the results to the Team Foundation Server. The TCM utility is used for importing tests and creating test cases automatically to Test Plans. This utility is very useful, and saves lot of manual activities with Test Manager. Overall these utilities provide lot of features at the command line, and remove the IDE dependency.
The next chapter explains the details of running the test with multiple options and using the results window to get the details of Test Run.
Working with Test ResultsVisual Studio 2012 provides multiple options to run the tests and collect the results. One is through the command-line utilities, and the other is through the IDE features such as the Test Explorer, Test Runs, and Test Results windows. The Test Explorer window lists the available tests and helps in running the tests, as well as getting the summary result of a recent test. The Test Runs window connects to the controller, and then collects the summary of all Test Runs. The Test Runs window displays all the tests based on the results availability at the location. To get the detailed result information, the Test Run result should be connected, and on double-click of the Test Run, the results are displayed in the Test Results window. Opening the Test Run from the results window provides detailed information of the test.
The Test Result can be added as part of the Team Foundation Server (TFS) 2012 automated build, so that the automated build after the new code check-in can be verified against the existing functionality. The build process takes care of compiling the latest checked-in code, and creating the project output files and deployment files. If the tests are included as part of the build, the build service will run the tests after building the code, and then produce the Test Results in a similar fashion to the Test Run and Test Explorer. The Test Results are stored separately in trace files under the test results folder.
The Test Results window helps in creating defects based on the test output, and then adds to the TFS as a work item of type defect. The overall Test Result can also be published directly to the TFS, and associated to the code builds available in the Team Foundation Server. Following are the main topics that would be covered in this chapter:
• Testing as part of Team Foundation Server build• Building reports and Test Result• Creating work item from Test Result• Publishing Test Results
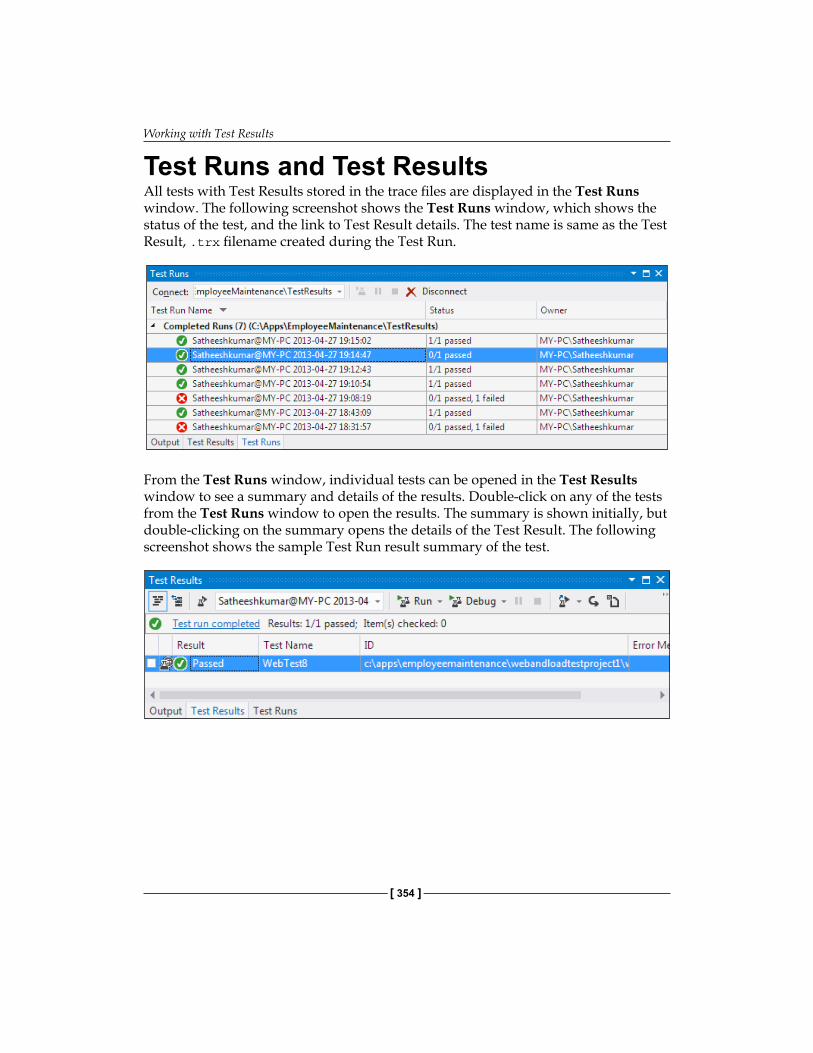
Working with Test Results
[ 354 ]
Test Runs and Test ResultsAll tests with Test Results stored in the trace files are displayed in the Test Runs window. The following screenshot shows the Test Runs window, which shows the status of the test, and the link to Test Result details. The test name is same as the Test Result, .trx filename created during the Test Run.
From the Test Runs window, individual tests can be opened in the Test Results window to see a summary and details of the results. Double-click on any of the tests from the Test Runs window to open the results. The summary is shown initially, but double-clicking on the summary opens the details of the Test Result. The following screenshot shows the sample Test Run result summary of the test.
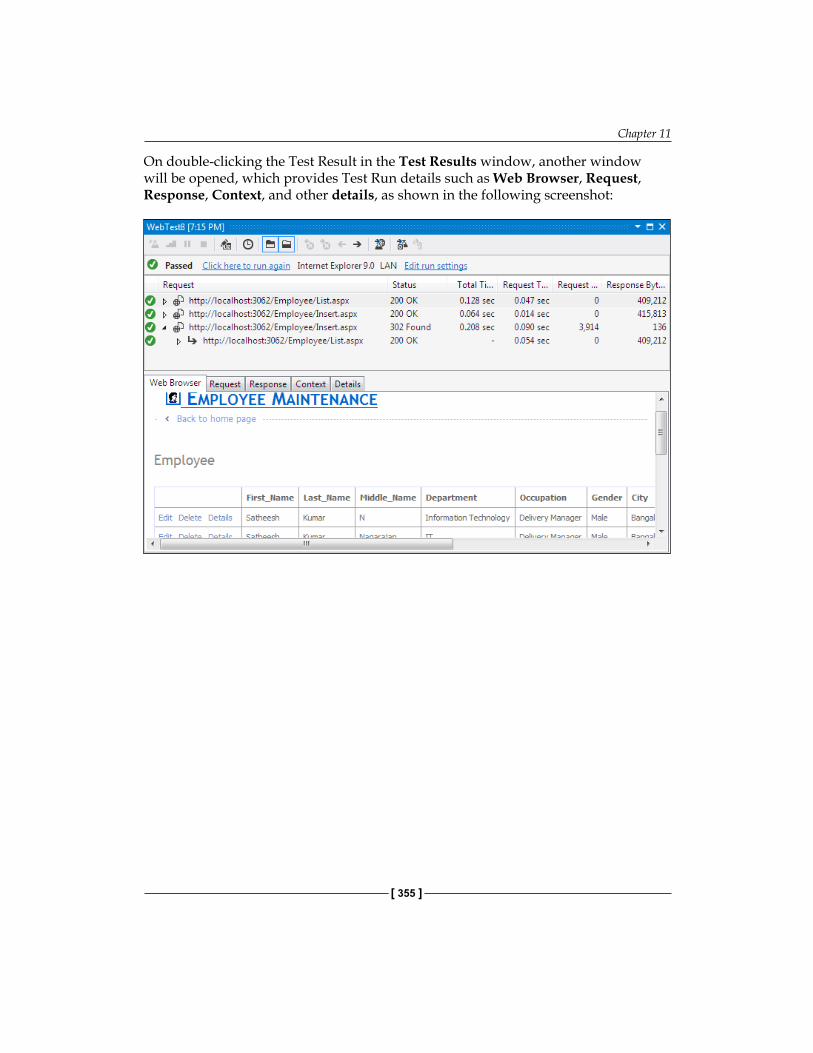
Chapter 11
[ 355 ]
On double-clicking the Test Result in the Test Results window, another window will be opened, which provides Test Run details such as Web Browser, Request, Response, Context, and other details, as shown in the following screenshot:
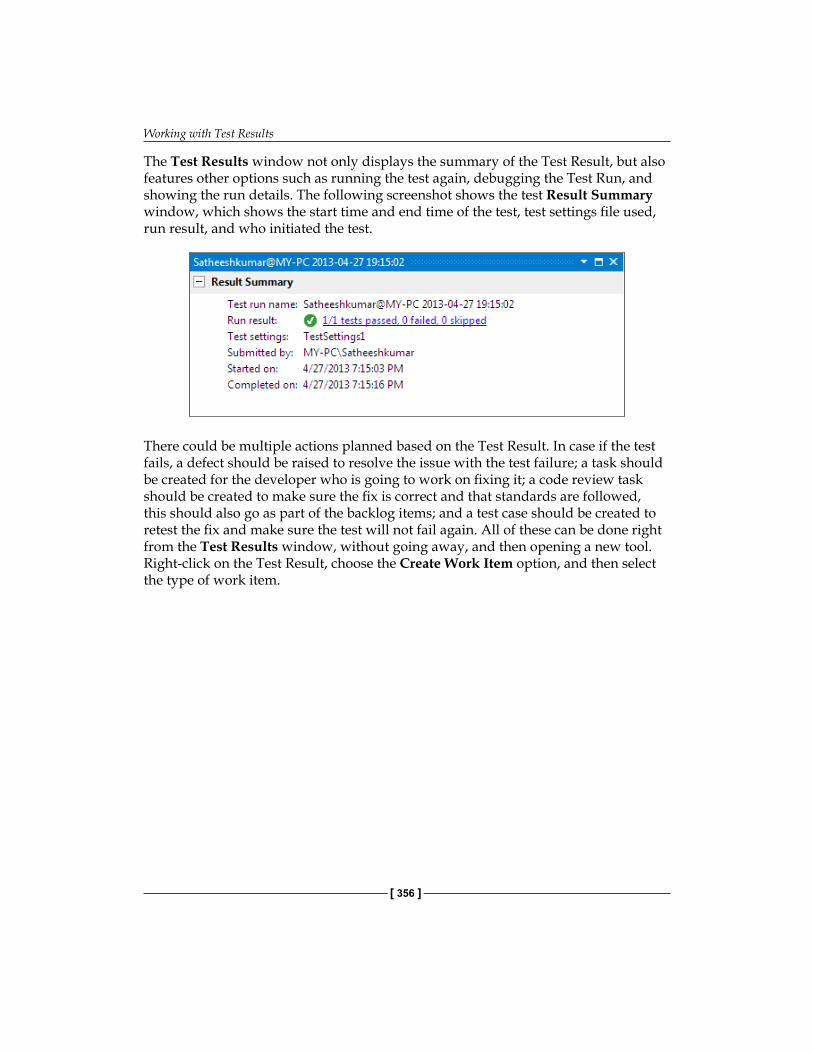
Working with Test Results
[ 356 ]
The Test Results window not only displays the summary of the Test Result, but also features other options such as running the test again, debugging the Test Run, and showing the run details. The following screenshot shows the test Result Summary window, which shows the start time and end time of the test, test settings file used, run result, and who initiated the test.
There could be multiple actions planned based on the Test Result. In case if the test fails, a defect should be raised to resolve the issue with the test failure; a task should be created for the developer who is going to work on fixing it; a code review task should be created to make sure the fix is correct and that standards are followed, this should also go as part of the backlog items; and a test case should be created to retest the fix and make sure the test will not fail again. All of these can be done right from the Test Results window, without going away, and then opening a new tool. Right-click on the Test Result, choose the Create Work Item option, and then select the type of work item.
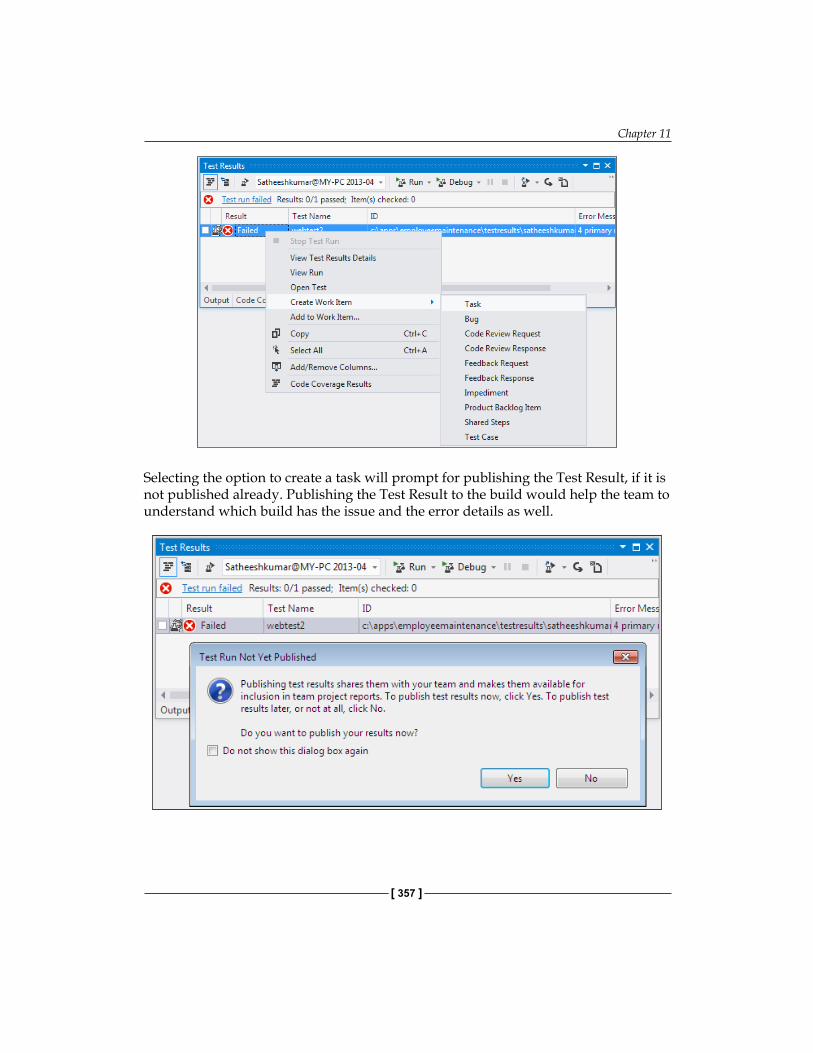
Chapter 11
[ 357 ]
Selecting the option to create a task will prompt for publishing the Test Result, if it is not published already. Publishing the Test Result to the build would help the team to understand which build has the issue and the error details as well.
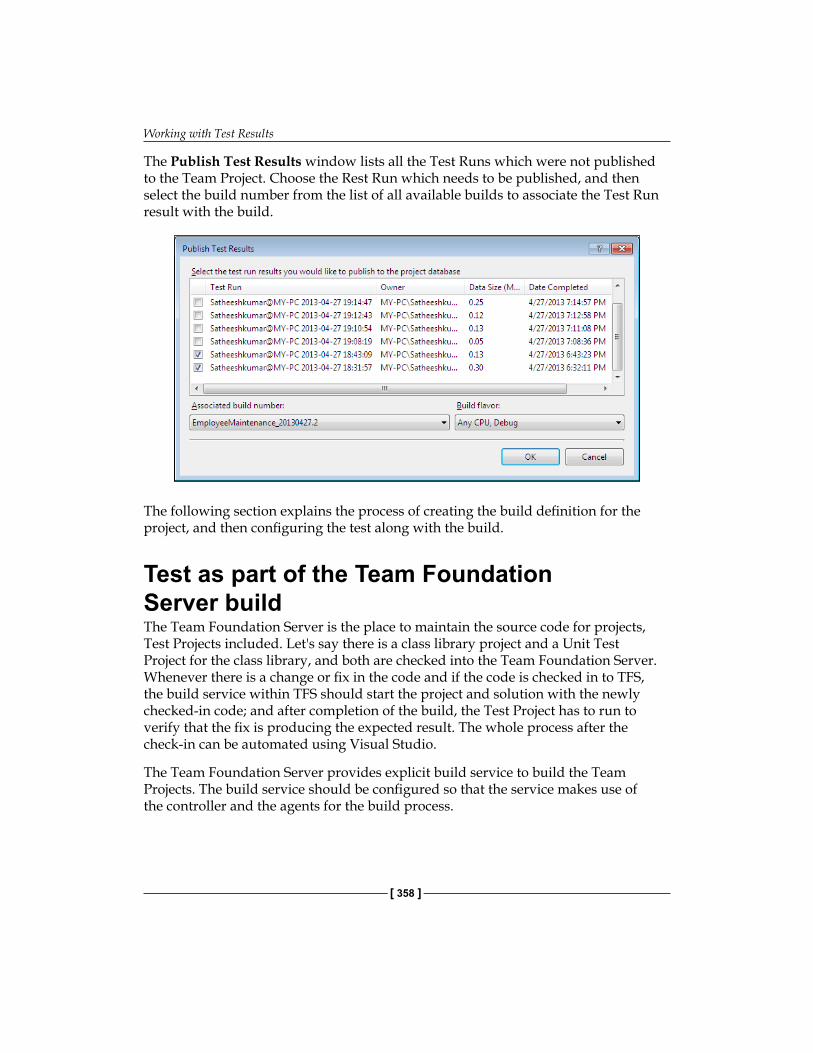
Working with Test Results
[ 358 ]
The Publish Test Results window lists all the Test Runs which were not published to the Team Project. Choose the Rest Run which needs to be published, and then select the build number from the list of all available builds to associate the Test Run result with the build.
The following section explains the process of creating the build definition for the project, and then configuring the test along with the build.
Test as part of the Team Foundation Server buildThe Team Foundation Server is the place to maintain the source code for projects, Test Projects included. Let's say there is a class library project and a Unit Test Project for the class library, and both are checked into the Team Foundation Server. Whenever there is a change or fix in the code and if the code is checked in to TFS, the build service within TFS should start the project and solution with the newly checked-in code; and after completion of the build, the Test Project has to run to verify that the fix is producing the expected result. The whole process after the check-in can be automated using Visual Studio.
The Team Foundation Server provides explicit build service to build the Team Projects. The build service should be configured so that the service makes use of the controller and the agents for the build process.
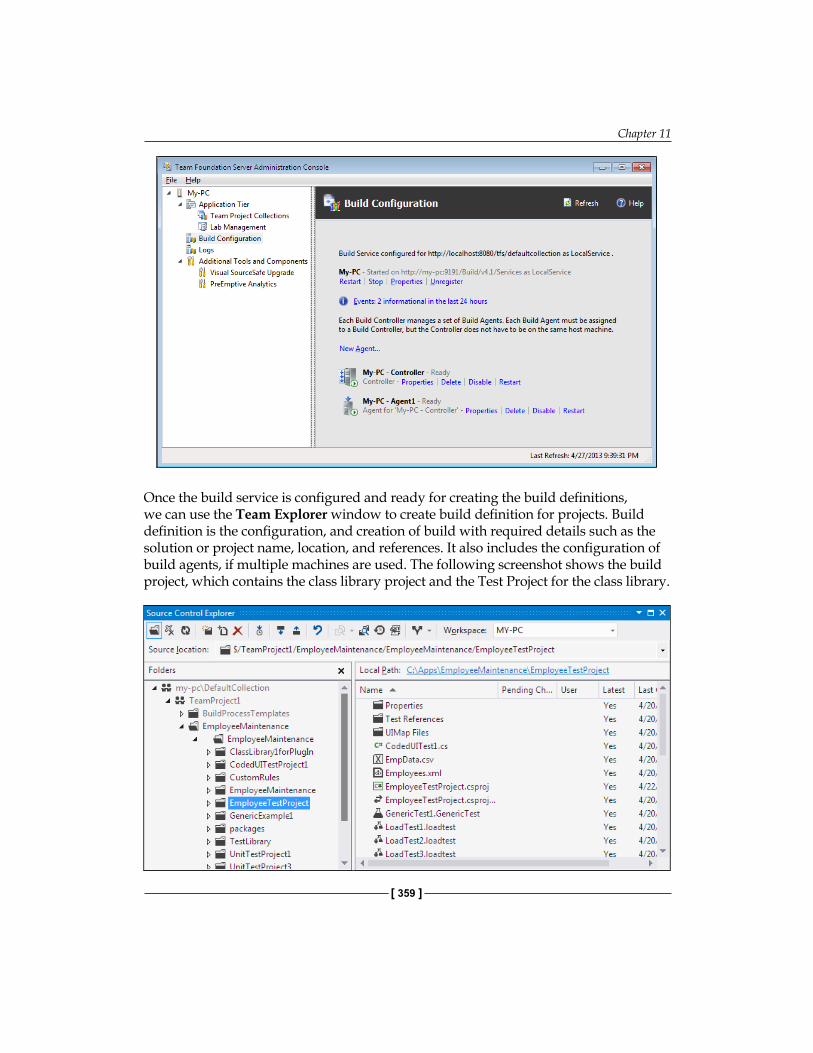
Chapter 11
[ 359 ]
Once the build service is configured and ready for creating the build definitions, we can use the Team Explorer window to create build definition for projects. Build definition is the configuration, and creation of build with required details such as the solution or project name, location, and references. It also includes the configuration of build agents, if multiple machines are used. The following screenshot shows the build project, which contains the class library project and the Test Project for the class library.
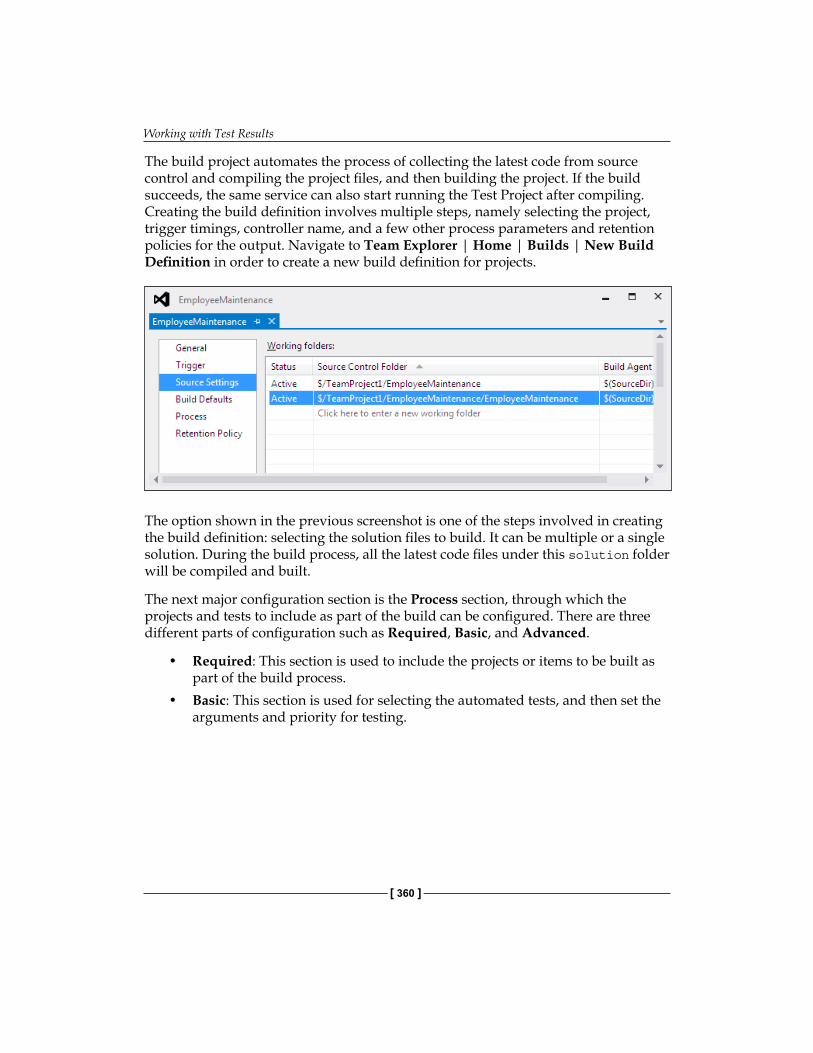
Working with Test Results
[ 360 ]
The build project automates the process of collecting the latest code from source control and compiling the project files, and then building the project. If the build succeeds, the same service can also start running the Test Project after compiling. Creating the build definition involves multiple steps, namely selecting the project, trigger timings, controller name, and a few other process parameters and retention policies for the output. Navigate to Team Explorer | Home | Builds | New Build Definition in order to create a new build definition for projects.
The option shown in the previous screenshot is one of the steps involved in creating the build definition: selecting the solution files to build. It can be multiple or a single solution. During the build process, all the latest code files under this solution folder will be compiled and built.
The next major configuration section is the Process section, through which the projects and tests to include as part of the build can be configured. There are three different parts of configuration such as Required, Basic, and Advanced.
• Required: This section is used to include the projects or items to be built as part of the build process.
• Basic: This section is used for selecting the automated tests, and then set the arguments and priority for testing.
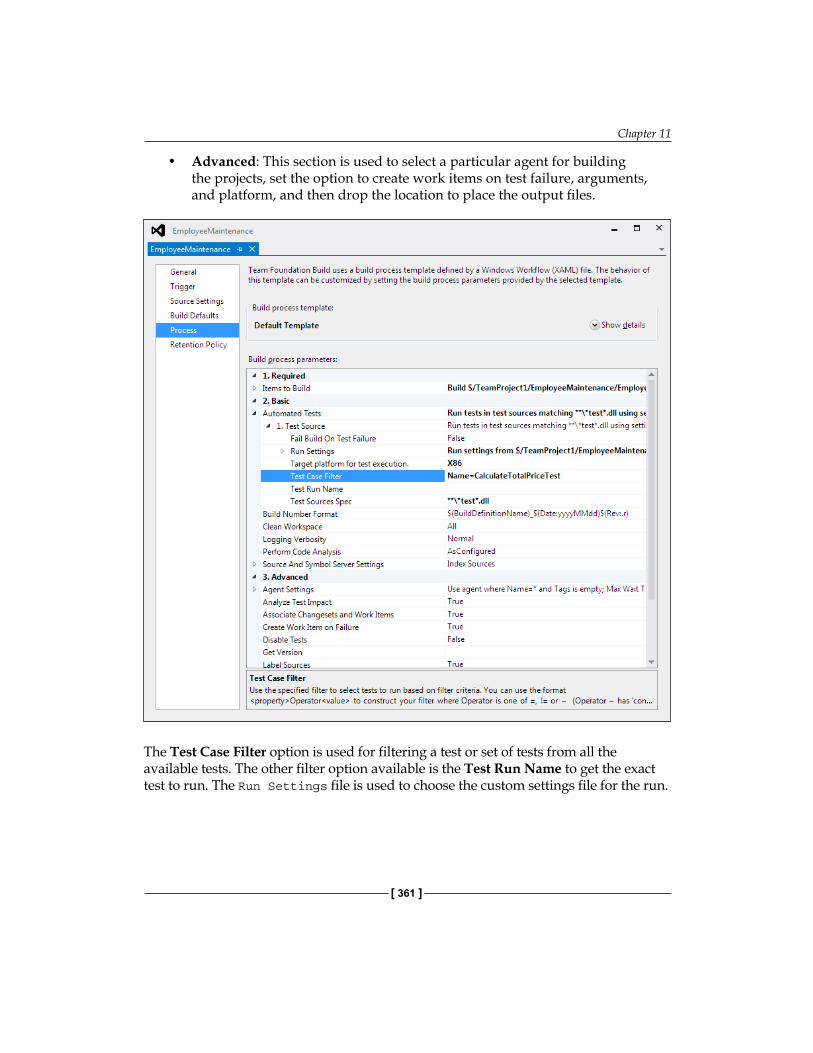
Chapter 11
[ 361 ]
• Advanced: This section is used to select a particular agent for building the projects, set the option to create work items on test failure, arguments, and platform, and then drop the location to place the output files.
The Test Case Filter option is used for filtering a test or set of tests from all the available tests. The other filter option available is the Test Run Name to get the exact test to run. The Run Settings file is used to choose the custom settings file for the run.
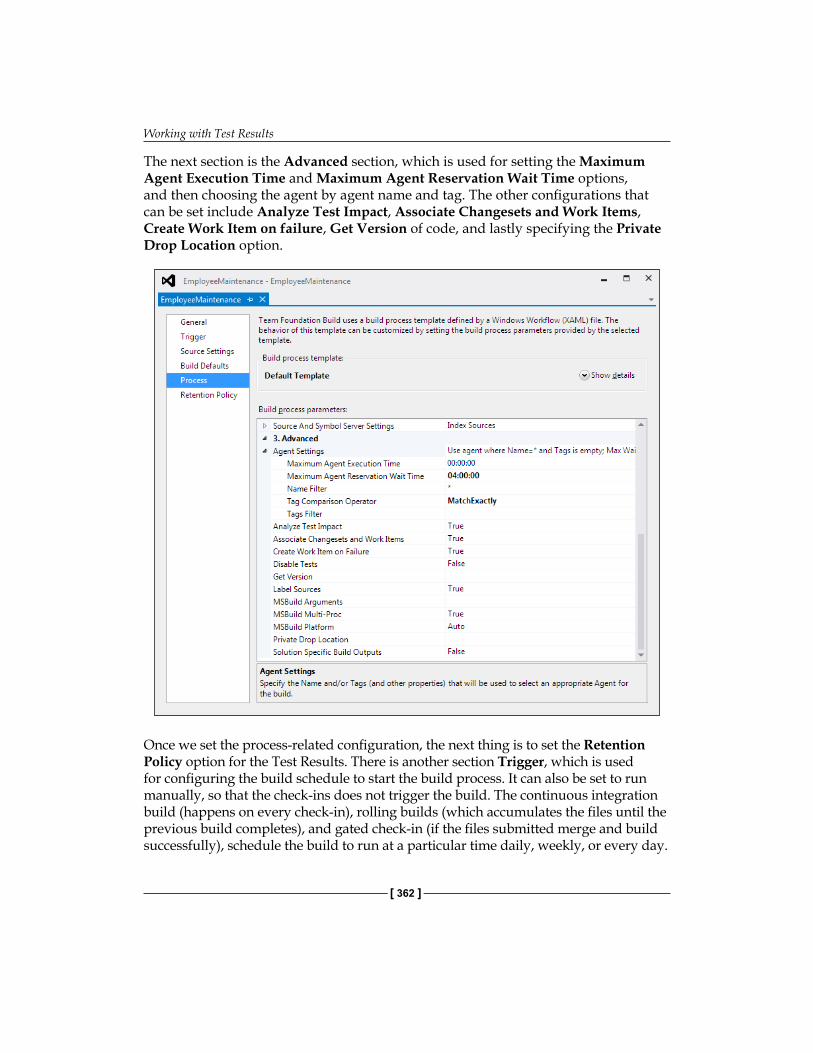
Working with Test Results
[ 362 ]
The next section is the Advanced section, which is used for setting the Maximum Agent Execution Time and Maximum Agent Reservation Wait Time options, and then choosing the agent by agent name and tag. The other configurations that can be set include Analyze Test Impact, Associate Changesets and Work Items, Create Work Item on failure, Get Version of code, and lastly specifying the Private Drop Location option.
Once we set the process-related configuration, the next thing is to set the Retention Policy option for the Test Results. There is another section Trigger, which is used for configuring the build schedule to start the build process. It can also be set to run manually, so that the check-ins does not trigger the build. The continuous integration build (happens on every check-in), rolling builds (which accumulates the files until the previous build completes), and gated check-in (if the files submitted merge and build successfully), schedule the build to run at a particular time daily, weekly, or every day.
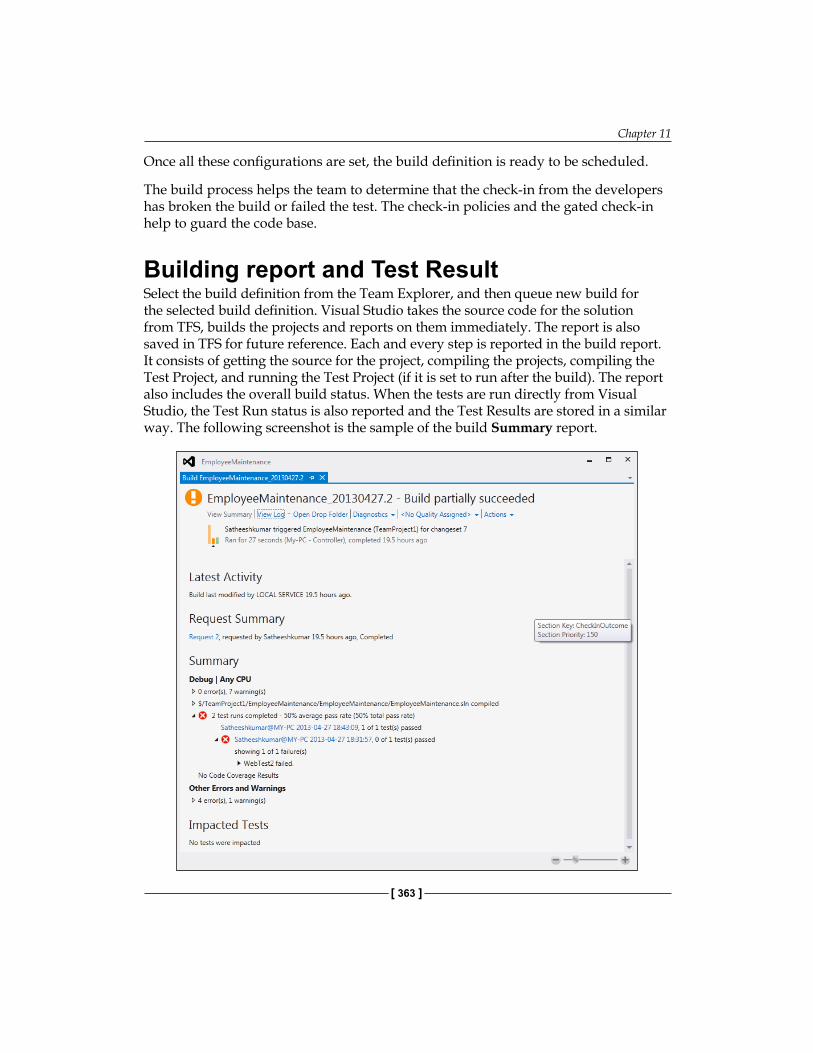
Chapter 11
[ 363 ]
Once all these configurations are set, the build definition is ready to be scheduled.
The build process helps the team to determine that the check-in from the developers has broken the build or failed the test. The check-in policies and the gated check-in help to guard the code base.
Building report and Test ResultSelect the build definition from the Team Explorer, and then queue new build for the selected build definition. Visual Studio takes the source code for the solution from TFS, builds the projects and reports on them immediately. The report is also saved in TFS for future reference. Each and every step is reported in the build report. It consists of getting the source for the project, compiling the projects, compiling the Test Project, and running the Test Project (if it is set to run after the build). The report also includes the overall build status. When the tests are run directly from Visual Studio, the Test Run status is also reported and the Test Results are stored in a similar way. The following screenshot is the sample of the build Summary report.
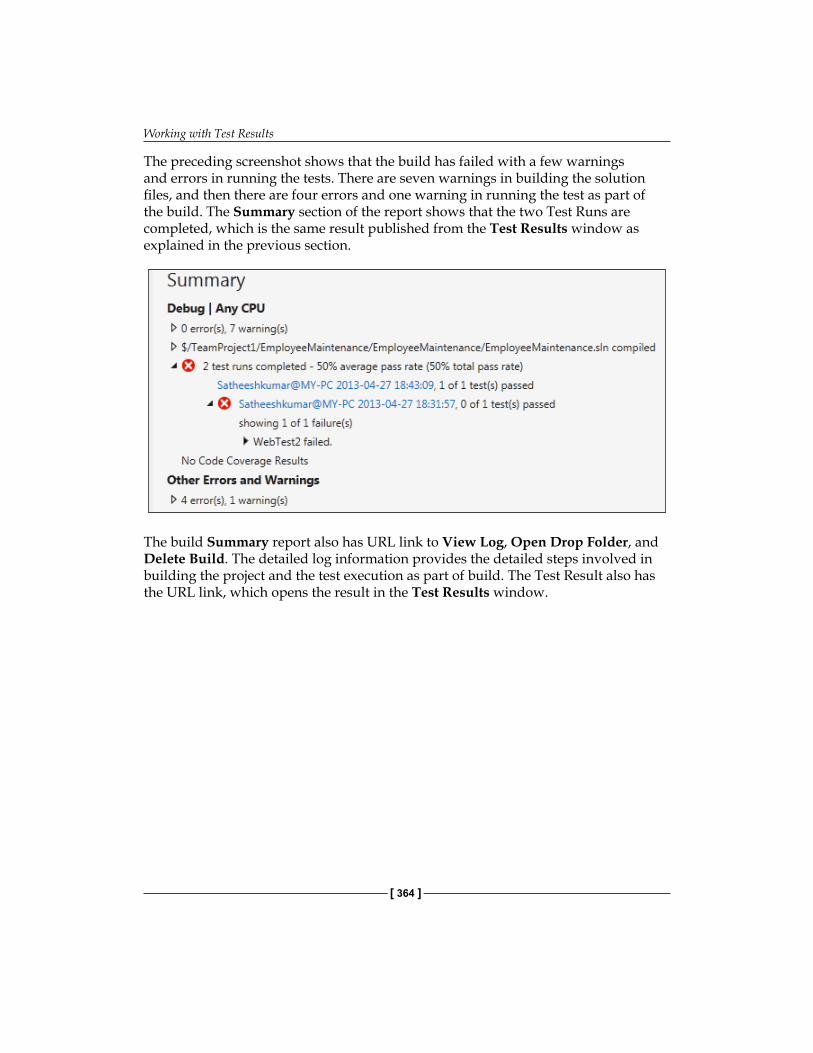
Working with Test Results
[ 364 ]
The preceding screenshot shows that the build has failed with a few warnings and errors in running the tests. There are seven warnings in building the solution files, and then there are four errors and one warning in running the test as part of the build. The Summary section of the report shows that the two Test Runs are completed, which is the same result published from the Test Results window as explained in the previous section.
The build Summary report also has URL link to View Log, Open Drop Folder, and Delete Build. The detailed log information provides the detailed steps involved in building the project and the test execution as part of build. The Test Result also has the URL link, which opens the result in the Test Results window.
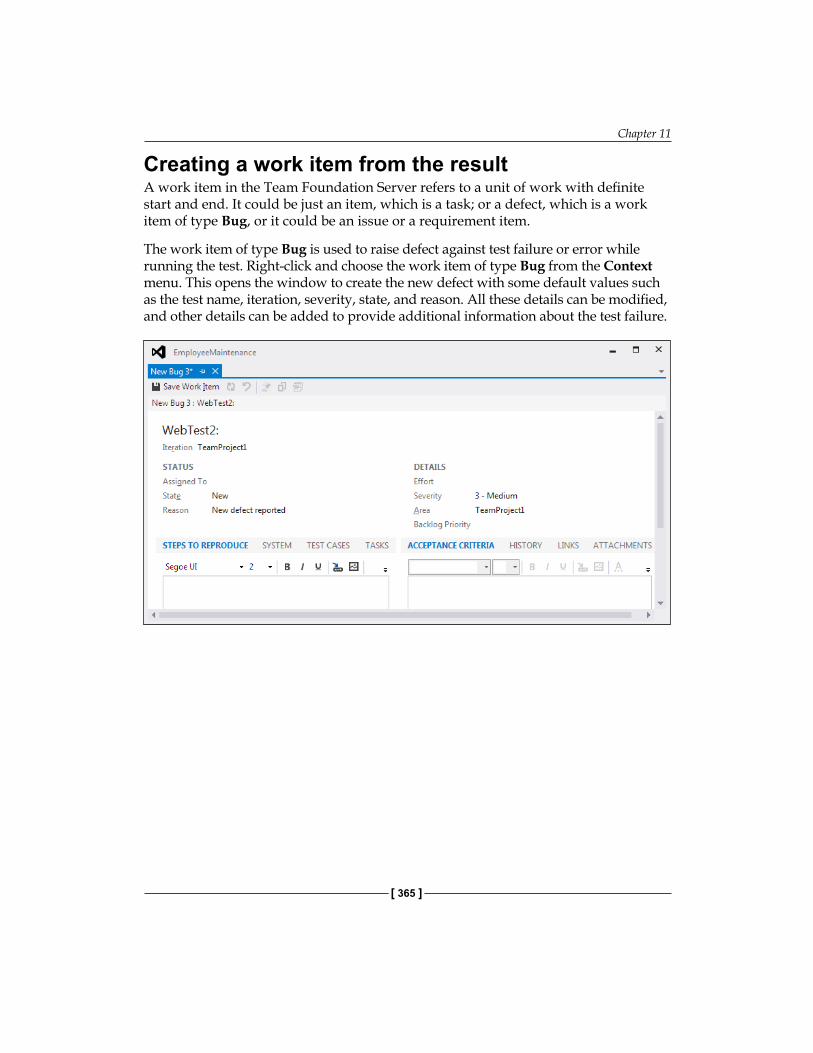
Chapter 11
[ 365 ]
Creating a work item from the resultA work item in the Team Foundation Server refers to a unit of work with definite start and end. It could be just an item, which is a task; or a defect, which is a work item of type Bug, or it could be an issue or a requirement item.
The work item of type Bug is used to raise defect against test failure or error while running the test. Right-click and choose the work item of type Bug from the Context menu. This opens the window to create the new defect with some default values such as the test name, iteration, severity, state, and reason. All these details can be modified, and other details can be added to provide additional information about the test failure.
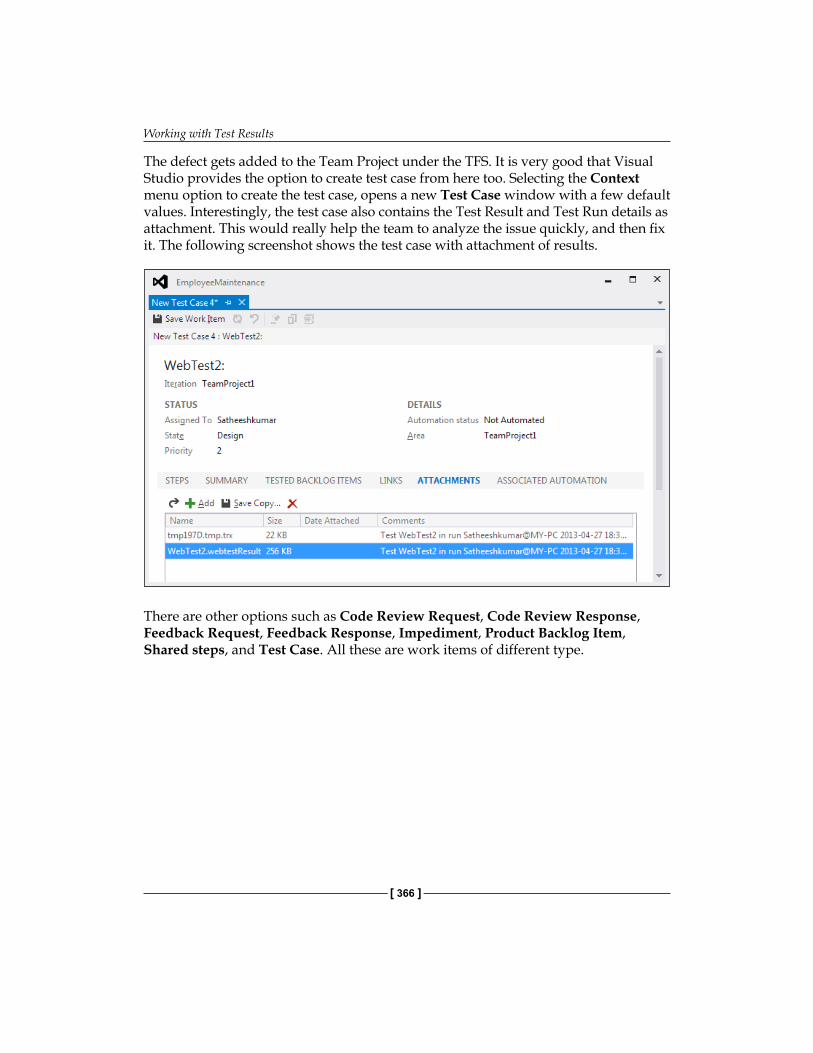
Working with Test Results
[ 366 ]
The defect gets added to the Team Project under the TFS. It is very good that Visual Studio provides the option to create test case from here too. Selecting the Context menu option to create the test case, opens a new Test Case window with a few default values. Interestingly, the test case also contains the Test Result and Test Run details as attachment. This would really help the team to analyze the issue quickly, and then fix it. The following screenshot shows the test case with attachment of results.
There are other options such as Code Review Request, Code Review Response, Feedback Request, Feedback Response, Impediment, Product Backlog Item, Shared steps, and Test Case. All these are work items of different type.
Chapter 11
[ 367 ]
SummaryThe Test Run and Test Results windows provide the summary and detailed view of every Test Run. The Test Results window has different options to import, export, and publish the test to the Team Foundation Server, and then run the details window to get more information about the Test Run. The Test Result window also provides the option to look at the details of the Test Run with error messages and stack trace for the failed tests. Visual Studio provides the feature to directly log the defect in the TFS. The result can be published and associated to the build report, so that the team can get the details of the test along with the build. This would be easy for the team to analyze and identify the issue for the test failure. Multiple work items can be created directly from the Test Results window, which is an added advantage.
The next chapter explains the new exploratory testing feature introduced in Test Manager 2012. This testing is a free flow of testing conducted on the application without any predefined test cases. It also covers predefined reporting, and creating new reports to look at the Test Results.

Exploratory Testing and Reporting
The previous chapter, Working with Test Results, explained about different types of testing methods and running these tests using Visual Studio 2012. There is one other new type of testing in Visual Studio, which helps testers to work without any dependency on test cases or tools, which is called exploratory testing. Exploring the application and testing on your own is called the exploratory testing. This type of testing is a free flow of testing the application without any predefined test steps or scripts. Test Manager 2012 provides the option to perform exploratory testing and capture actions, steps, and screenshots to track activities. The only drawback of exploratory testing was reproducing the steps and actions, but with the use of Test Manager 2012, this can be automated, which helps the test steps to be reproducible. Test case is automatically created using the recording. This is very helpful when redoing the test later if there are any code fixes.
The Test Results and Test Run windows in Visual Studio are used in getting details of the Test Results. The Test Result summary window provides the summary of results summary for the selected test after the Test Run. But how do we get the collective information about all the tests run based on specific parameters? Visual Studio 2012 integrated with Team Foundation Server 2012 provides built-in reports to get collective information on all the tests run. There are several reports to get information about the work items, Team Project builds, and task level status of the project. These reports are very useful in analyzing the project quality and status at any time.
Exploratory Testing and Reporting
[ 370 ]
The most recent version of Team Foundation Server (TFS) comes with different process templates, such as Visual Studio Scrum 2.1, Microsoft Solutions Framework (MSF) for Agile Software Development v6.1, and MSF for Capability Maturity Model Integration (CMMI) Process Improvement v6.1 that can be used for the Team Project. Each of these process templates contains a number of predefined reports. The Team Project is the central data store for multiple projects. The data store maintains all information about projects including source code, build details, and tests. The Team Explorer is the user interface for getting details about the work items, Test Results, and builds.
TFS and Visual Studio 2012 integrate with the SQL Server reporting/analysis services to create and manage reports. SQL Server is the default data store used by TFS 2012 to maintain all information about projects, including the source code, tests, reports, documents, and build information. Whenever a new Team Project is created, a set of predefined reports from the selected process template is created and viewed under the Reports folder in Team Explorer. All these reports can be customized based on your needs. Alternatively, new reports can be created and shared to the other projects.
Creating reports for Team Project can be done by using any tool that connects to a relational database or analysis database, such as Microsoft Excel or Visual Studio Report Designer. Excel is easier to use, but provides less functionality compared to Report Designer. Some of the important features provided by Report Designer are:
• Detailed reporting• Sharing reports using Team Explorer• Updating existing reports• Faster report retrieval and management
All these reports include a feature to export and print the current report. The report can be exported in different formats such as XML, CSV, TIFF, PDF, and Excel files. They also have a print option that comes along with the report to print the current report result for the selected parameters.

Chapter 12
[ 371 ]
This chapter provides detailed information on the following features that can be used along with TFS integration with Visual Studio 2012.
• Exploratory testing using Test Manager• Reports available from Team Foundation Server• Creating report definitions using Visual Studio 2012
Exploratory testingThe Testing Center in Microsoft Test Manager contains two new features to do the exploratory testing and to view exploratory sessions that have already been. To begin exploratory testing there are few options.
One is to just start exploring the application without selecting any work items. Simply click on the Explore option in the Do Exploratory Testing window. This is appropriate in the case of there being no backlog stories or requirement work items created. The exploratory test session will not be associated to any of the existing requirements in this case.
The second option is to start exploring the application by selecting a work item. This will associate the actions, recordings, test cases, images, and errors to the selected work item. Any task in software development is associated with a requirement in the form of a work item or requirement backlog. This is mainly to link and track the defects, test cases, comments, code fixes along with requirement. Select a work item from the list and click on Explore work item to start the testing.
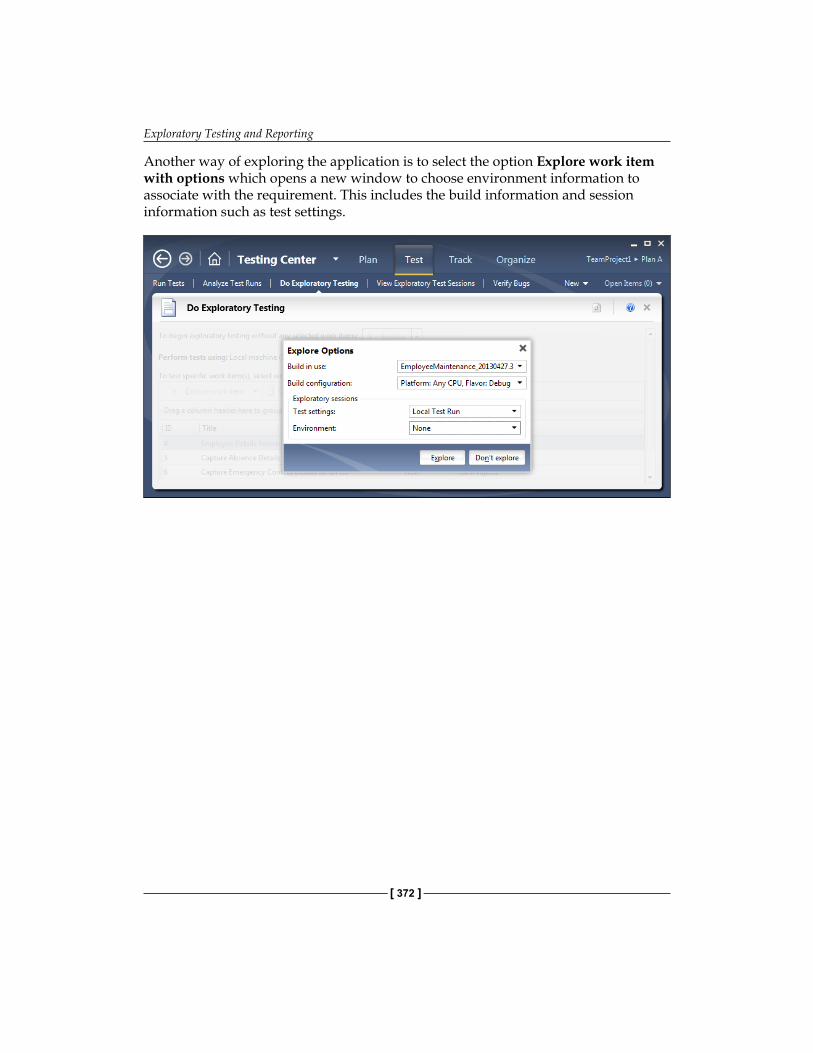
Exploratory Testing and Reporting
[ 372 ]
Another way of exploring the application is to select the option Explore work item with options which opens a new window to choose environment information to associate with the requirement. This includes the build information and session information such as test settings.
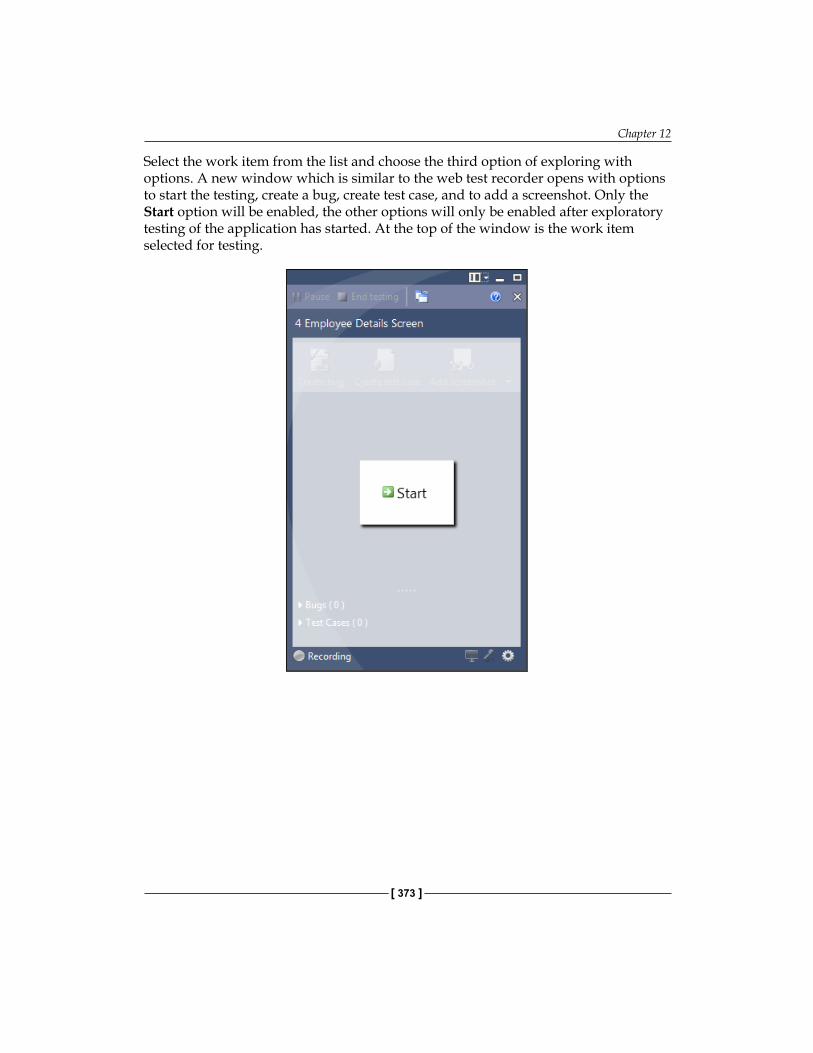
Chapter 12
[ 373 ]
Select the work item from the list and choose the third option of exploring with options. A new window which is similar to the web test recorder opens with options to start the testing, create a bug, create test case, and to add a screenshot. Only the Start option will be enabled, the other options will only be enabled after exploratory testing of the application has started. At the top of the window is the work item selected for testing.
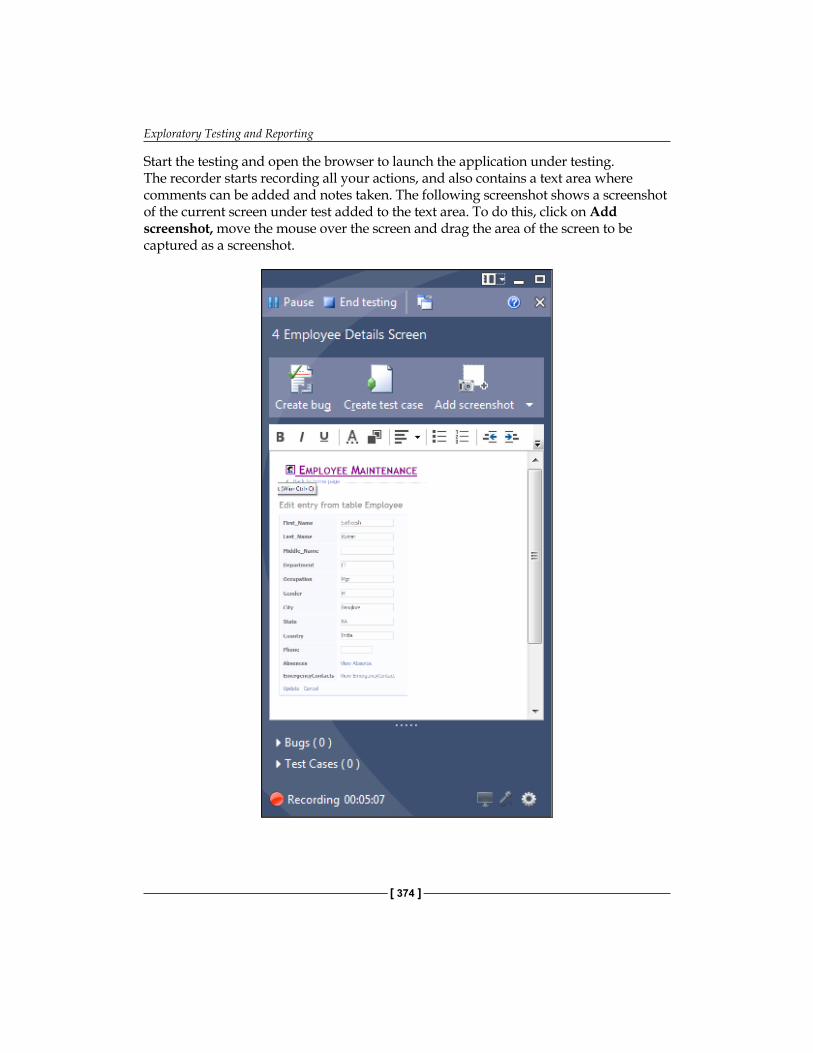
Exploratory Testing and Reporting
[ 374 ]
Start the testing and open the browser to launch the application under testing. The recorder starts recording all your actions, and also contains a text area where comments can be added and notes taken. The following screenshot shows a screenshot of the current screen under test added to the text area. To do this, click on Add screenshot, move the mouse over the screen and drag the area of the screen to be captured as a screenshot.
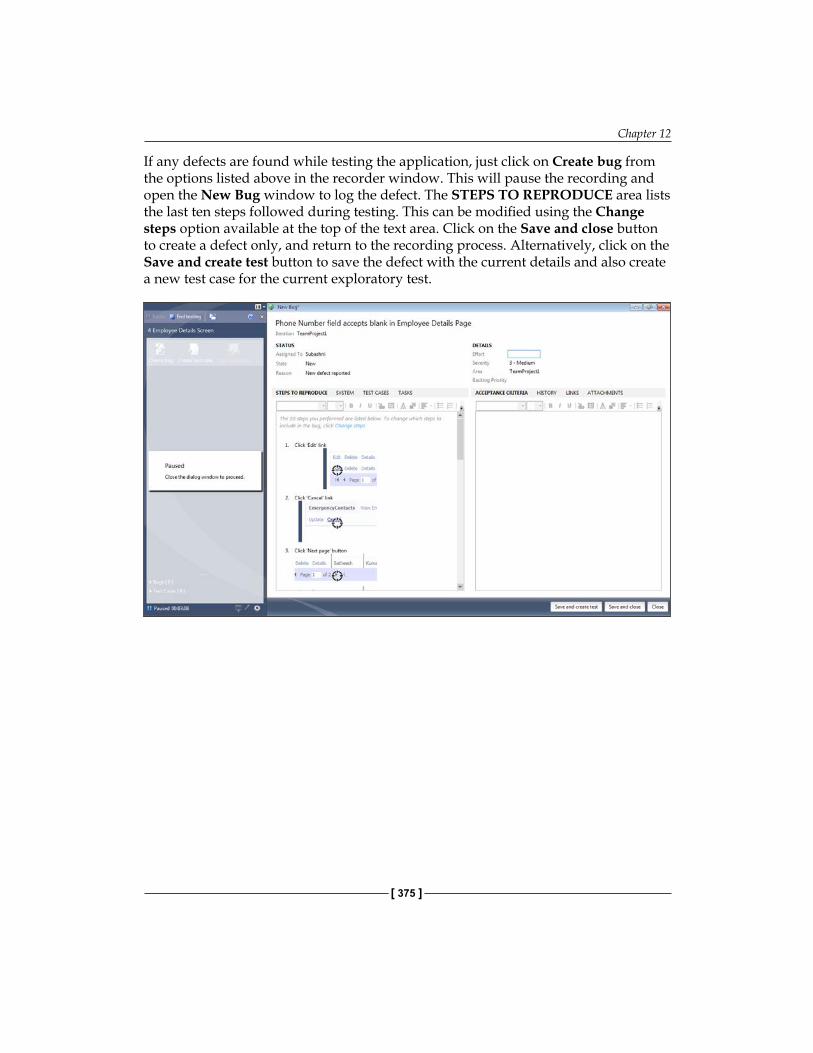
Chapter 12
[ 375 ]
If any defects are found while testing the application, just click on Create bug from the options listed above in the recorder window. This will pause the recording and open the New Bug window to log the defect. The STEPS TO REPRODUCE area lists the last ten steps followed during testing. This can be modified using the Change steps option available at the top of the text area. Click on the Save and close button to create a defect only, and return to the recording process. Alternatively, click on the Save and create test button to save the defect with the current details and also create a new test case for the current exploratory test.
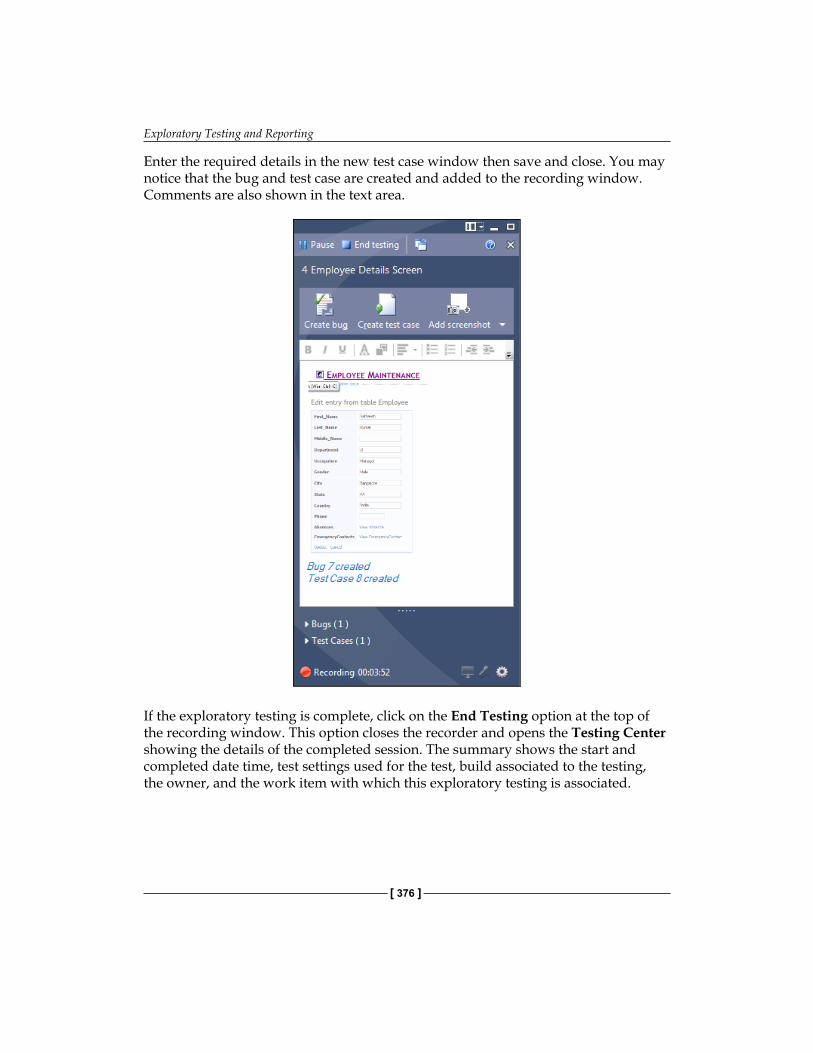
Exploratory Testing and Reporting
[ 376 ]
Enter the required details in the new test case window then save and close. You may notice that the bug and test case are created and added to the recording window. Comments are also shown in the text area.
If the exploratory testing is complete, click on the End Testing option at the top of the recording window. This option closes the recorder and opens the Testing Center showing the details of the completed session. The summary shows the start and completed date time, test settings used for the test, build associated to the testing, the owner, and the work item with which this exploratory testing is associated.
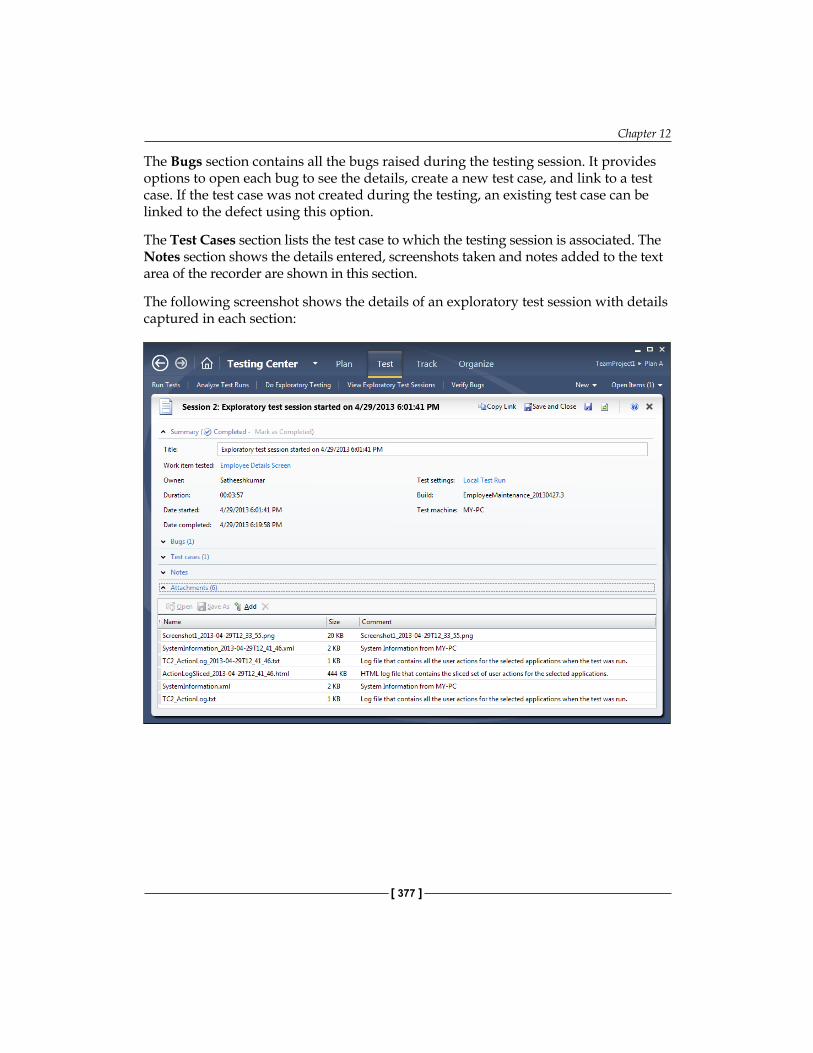
Chapter 12
[ 377 ]
The Bugs section contains all the bugs raised during the testing session. It provides options to open each bug to see the details, create a new test case, and link to a test case. If the test case was not created during the testing, an existing test case can be linked to the defect using this option.
The Test Cases section lists the test case to which the testing session is associated. The Notes section shows the details entered, screenshots taken and notes added to the text area of the recorder are shown in this section.
The following screenshot shows the details of an exploratory test session with details captured in each section:
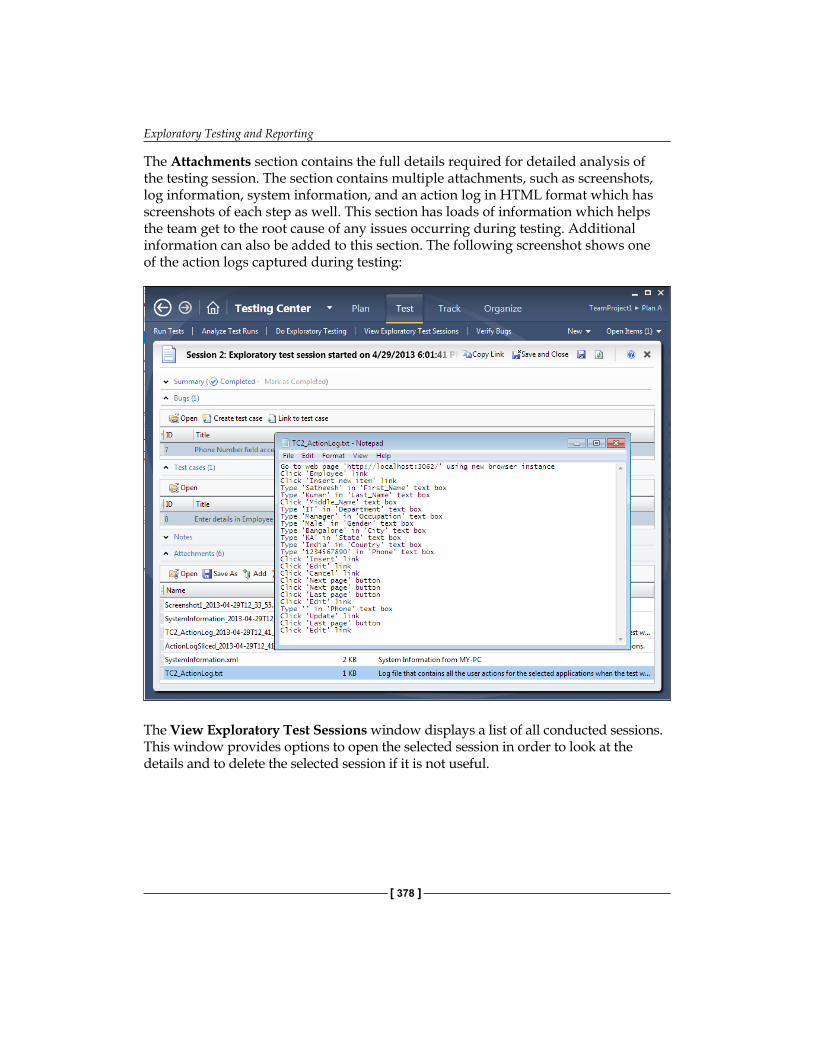
Exploratory Testing and Reporting
[ 378 ]
The Attachments section contains the full details required for detailed analysis of the testing session. The section contains multiple attachments, such as screenshots, log information, system information, and an action log in HTML format which has screenshots of each step as well. This section has loads of information which helps the team get to the root cause of any issues occurring during testing. Additional information can also be added to this section. The following screenshot shows one of the action logs captured during testing:
The View Exploratory Test Sessions window displays a list of all conducted sessions. This window provides options to open the selected session in order to look at the details and to delete the selected session if it is not useful.
Chapter 12
[ 379 ]
Reports using Team Foundation ServerTFS has several built-in reports readily available for the selected process template. Some of these reports are specific to defects, and some are specific to testing while others are common to work items. These reports collect metrics based on the work items, Test Results, and builds. Each report has filter options to select the iteration, area, time period, work item types, and states. The following sections explain a few of the out-of-the-box reports available in TFS.
Bug status reportThis report is used to track progress in the overall bug status, such as new bugs, resolved bugs, and closed bugs. The report shows the cumulative count of bugs based on priority, severity, and state of the bugs. The details for the report can be filtered using start and end dates, iteration and area paths, bug state, priority, and severity.
This report is very useful to get an overview of the status of the testing phase, such as how soon defects are getting fixed and tested, the priority of defects being fixed and closed, the defects count based on severity and priority, and the module which is showing the most defects which can be useful in determining the quality of work.
The report provides a detailed graphical view by plotting the number of active, closed, and resolved defects against a timeline. At a given time the report will show the total count of defects based on the state.
The other pie chart displays active bugs by priority or severity with legends that show the priority/severity values.
Active/Resolved Bugs by Assignment is a horizontal bar chart that displays the total bugs assigned to team members and the total bugs resolved by them.
Test case readiness reportThis report is useful to determine the readiness of the test cases for execution. This report can be generated once the team starts defining the test cases. A test case has three different states, Design, Ready, and Closed. The test case is directly assigned with Design status once a team member starts defining the test. It becomes ready only when the test case is complete, reviewed, and approved by the team. It gets closed only after the testing. The Design and Ready statuses of the test case provides information on how quickly the team is creating test cases and getting them ready for execution.
Exploratory Testing and Reporting
[ 380 ]
This report contains an area graph to show the number of test cases in Design and Ready status over a period of time. The main objective of this report is to show how many test cases are ready to be run, how many are still incomplete, when would the test cases be ready, and would that be before the end of the iteration.
This report also provides filters to generate the report based on iteration date range, area, priority, and state.
Status on all iterationsThis report is very useful to track the progress through projects with multiple iterations. This report provides a graphical view of the number of stories closed, progress in hours for each iteration, and number of bugs per iteration. To get accurate reports, the project team should plan the iterations, user stories, area and defect logging in such a way that everything is tracked and on time.
The number of stories denotes user stories that are closed.
The progress in hours shows horizontal bars which show the original estimate, actual hours, and then the hours remaining based on the roll-up of hours defined for tasks. The tasks are created during the project schedule, and include the duration and start and end date planned for completion. This report is generated based on the task allocation and the tasks planned for each iteration.
The bugs with the numeric values and bars denote the number of active, resolved, and closed defects within each iteration for the project.
These reports help us to determine the health of the project at any time. For example, an unhealthy project is one in which the user stories are not closed within the iteration, or if there is a wide difference between the estimated and actual hours, or the number of defects and defect rate are not decreasing after multiple iterations. A healthy project would be the one with better progress on all of the iterations and within the estimated schedule.
Other out-of-the-box reportsThese are the reports readily available for determining the project status and quality:
• Bug status report: This report provides the total bug count based on the severity, priority, and state to track progress in resolving and closing bugs.
Chapter 12
[ 381 ]
• Bug trends report: This report is used for tracking the bugs that are discovered and resolved over time. This is very useful in larger teams working towards discovering new bugs, and resolving and closing bugs.
• Reactivations report: It is used to determine how effectively the team is fixing the bugs. Reactivation refers to reopened bugs that were resolved or fixed prematurely.
• Build quality indicators report: It is used to collect the test coverage, code churn, and bug counts for a specific build. This is helpful to find the quality of a build before releasing the code.
• Build success over time report: It summarizes the build and Test Results for a set of build definitions for one or more projects over time. The reports provide day-by-day information for builds failed, builds succeeded with no tests, tests failed, tests passed with low coverage, and builds passed.
• Build summary report: It provides information about Test Results, test coverage, code churn, and other details of each build.
• Burn down and burn rate report: It shows the trend of how much work is completed and how much remains over a period of time. Burn rate specifies the rate at which the work is completed and the required rate for remaining work.
• Remaining work report: It is useful to track the progress of work and identify if the task completion is on track or is there any delay.
• Stories overview report: It lists all user stories and how much work each story requires. Also provides the completed work status, status of tests for the story, and bugs raised against each story.
• Stories progress report: It shows the status and progress of tasks defined to implement the story.
• Unplanned work report: It determines the work that is added at a later point to the iteration after the start of an iteration. These works are called unplanned work to distinguish them from work and tasks planned before the start of the iteration. The work could be a new requirement or test case, or any type of new work item.
• Test case readiness report: It is to identify how many test cases are defined and ready to execute.
• Test Plan progress report: It is used to determine how much of the testing is complete and how much remains to be done. Also provides information on how many tests have passed, failed, and blocked. This report is useful to find out if the testing will be complete on time or not.
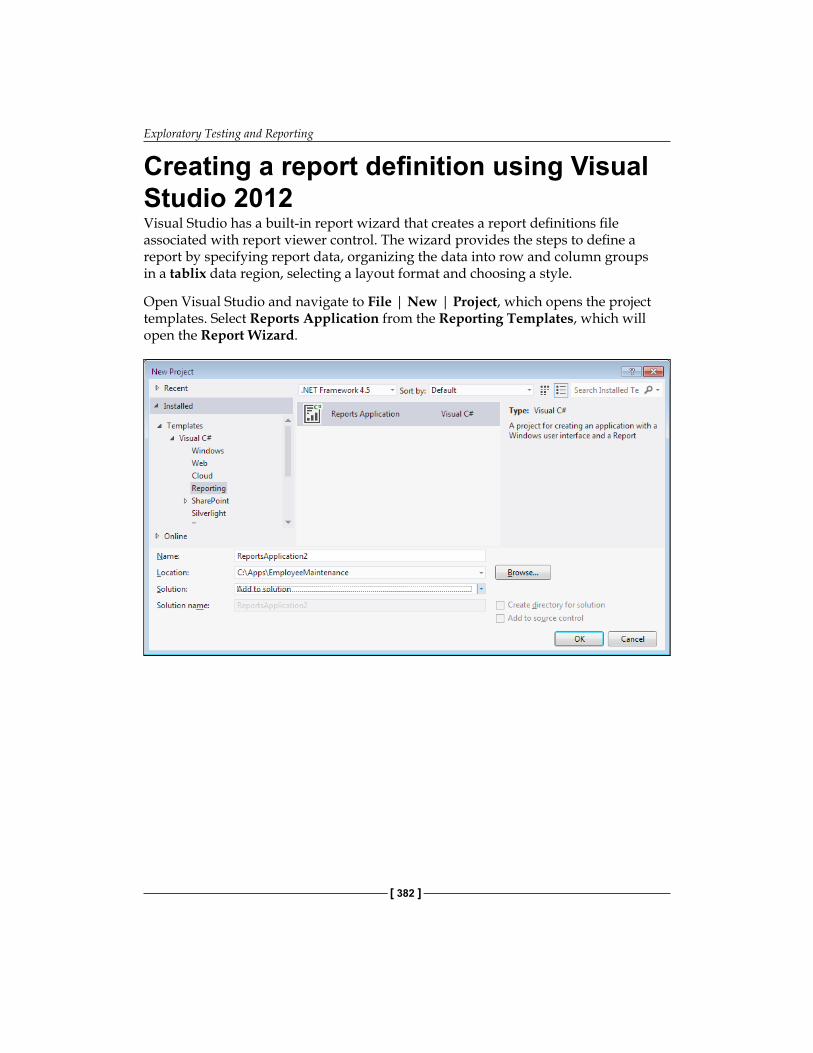
Exploratory Testing and Reporting
[ 382 ]
Creating a report definition using Visual Studio 2012Visual Studio has a built-in report wizard that creates a report definitions file associated with report viewer control. The wizard provides the steps to define a report by specifying report data, organizing the data into row and column groups in a tablix data region, selecting a layout format and choosing a style.
Open Visual Studio and navigate to File | New | Project, which opens the project templates. Select Reports Application from the Reporting Templates, which will open the Report Wizard.
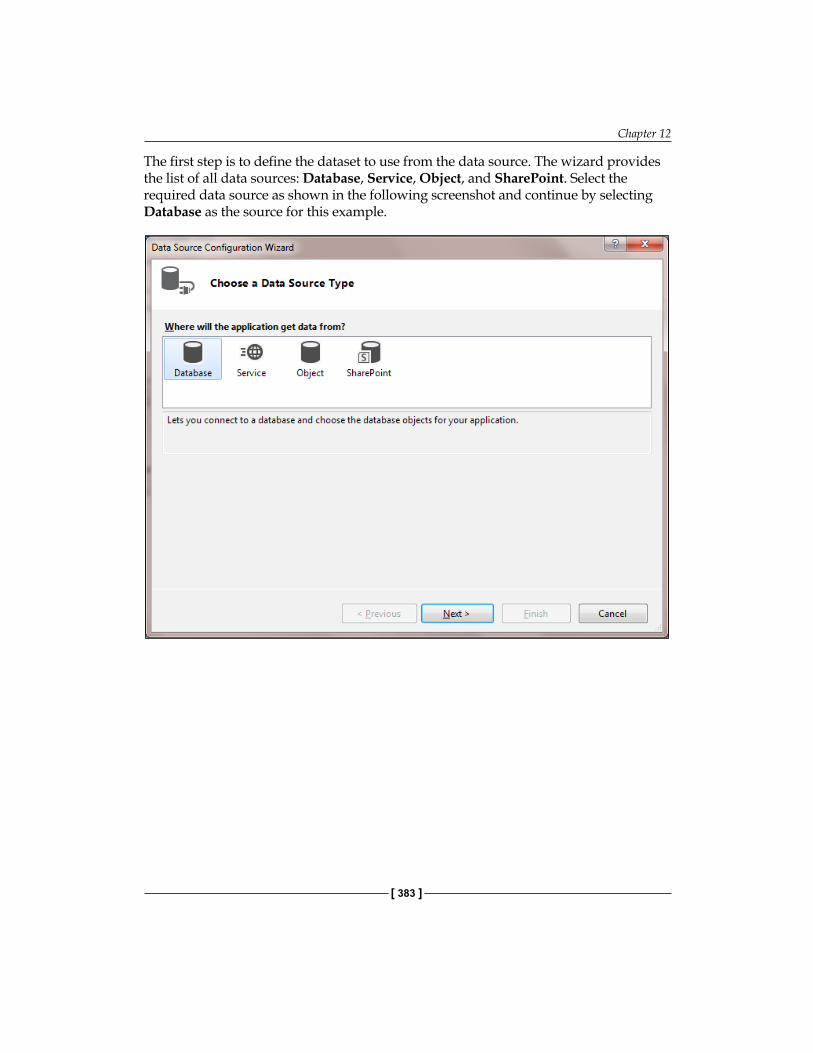
Chapter 12
[ 383 ]
The first step is to define the dataset to use from the data source. The wizard provides the list of all data sources: Database, Service, Object, and SharePoint. Select the required data source as shown in the following screenshot and continue by selecting Database as the source for this example.

Exploratory Testing and Reporting
[ 384 ]
The next step is to select the database model which could be a Dataset or Entity Data Model to determine the type of data objects to be used by the application, as shown in the following screenshot. Select Dataset and click on Next as shown in the following screenshot:
Next, we must select or create a new connection to be used by the application to connect to the database. The selection of database is based on the information that is required for the report. In this case, the database would be the TFS database where the Test Results are stored. Based on the selection, the corresponding connection string will be added to the application configuration. There will be a confirmation message with the connection string name to save to the application configuration file. The connection string would look like the one shown in the following screenshot:
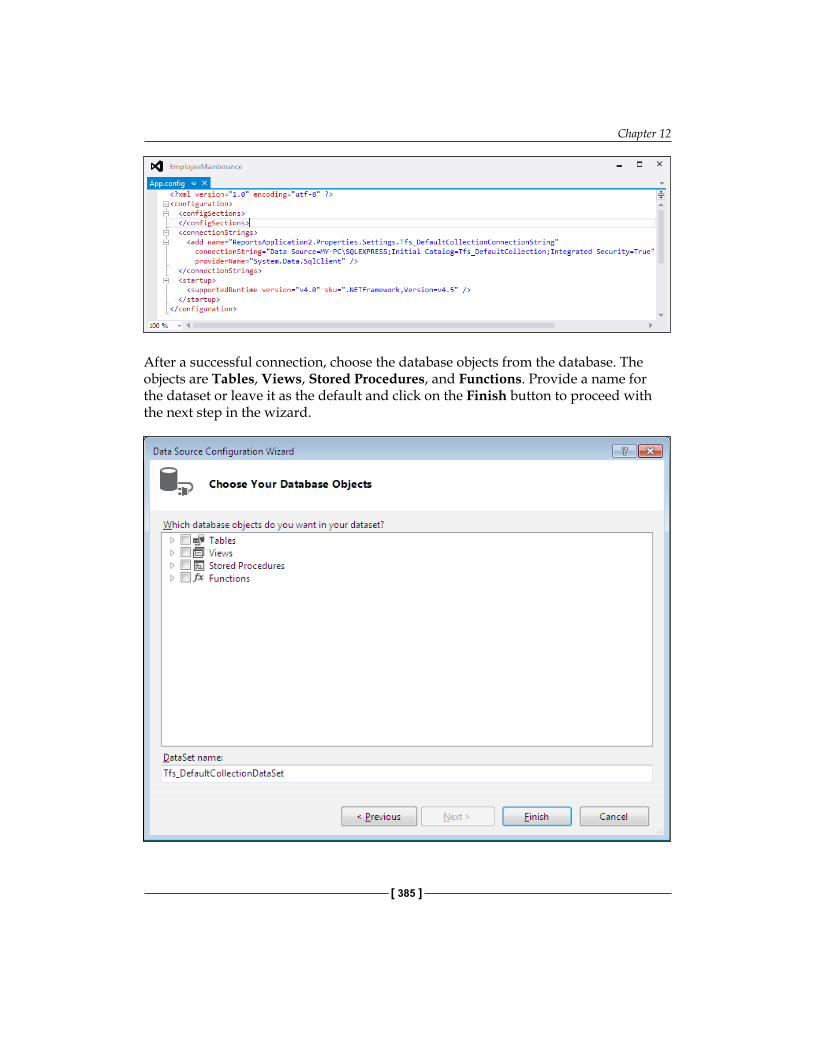
Chapter 12
[ 385 ]
After a successful connection, choose the database objects from the database. The objects are Tables, Views, Stored Procedures, and Functions. Provide a name for the dataset or leave it as the default and click on the Finish button to proceed with the next step in the wizard.
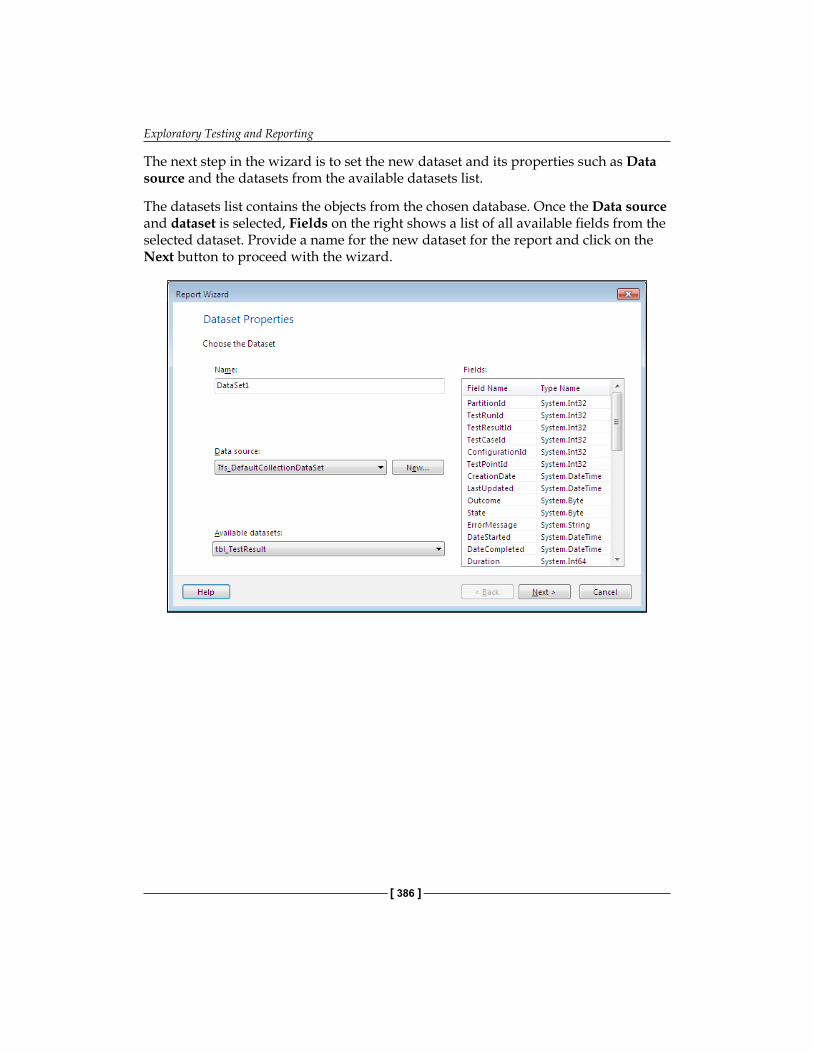
Exploratory Testing and Reporting
[ 386 ]
The next step in the wizard is to set the new dataset and its properties such as Data source and the datasets from the available datasets list.
The datasets list contains the objects from the chosen database. Once the Data source and dataset is selected, Fields on the right shows a list of all available fields from the selected dataset. Provide a name for the new dataset for the report and click on the Next button to proceed with the wizard.
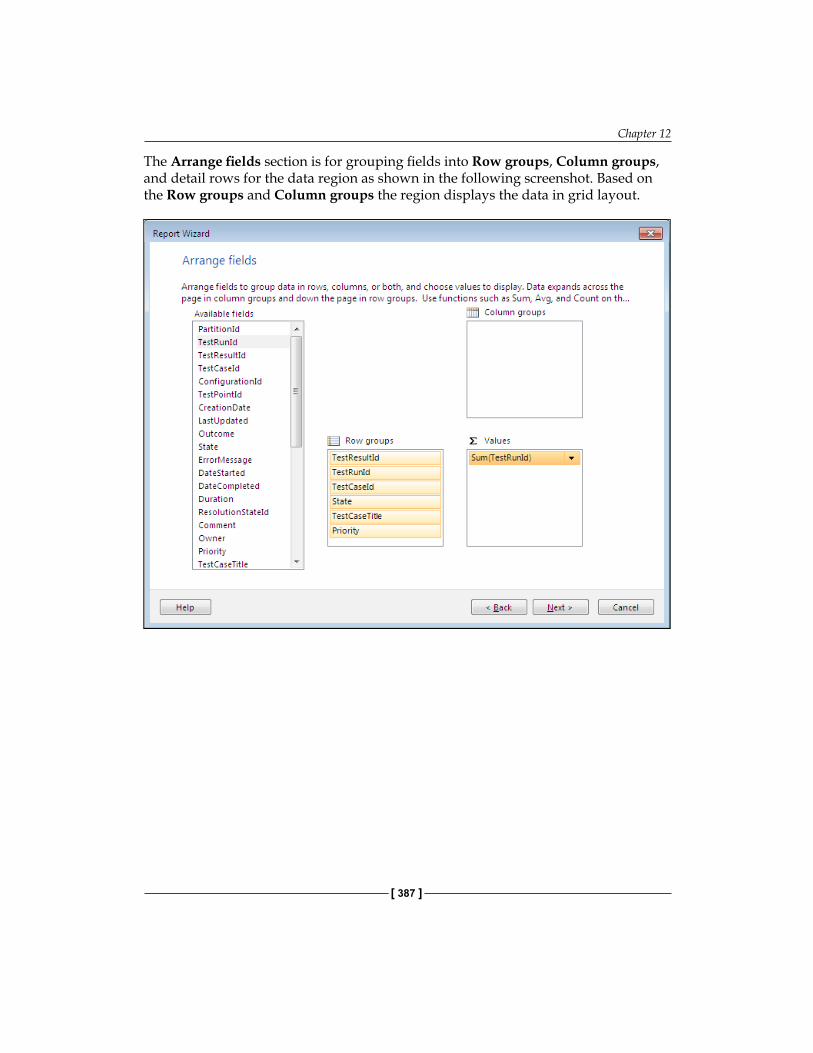
Chapter 12
[ 387 ]
The Arrange fields section is for grouping fields into Row groups, Column groups, and detail rows for the data region as shown in the following screenshot. Based on the Row groups and Column groups the region displays the data in grid layout.
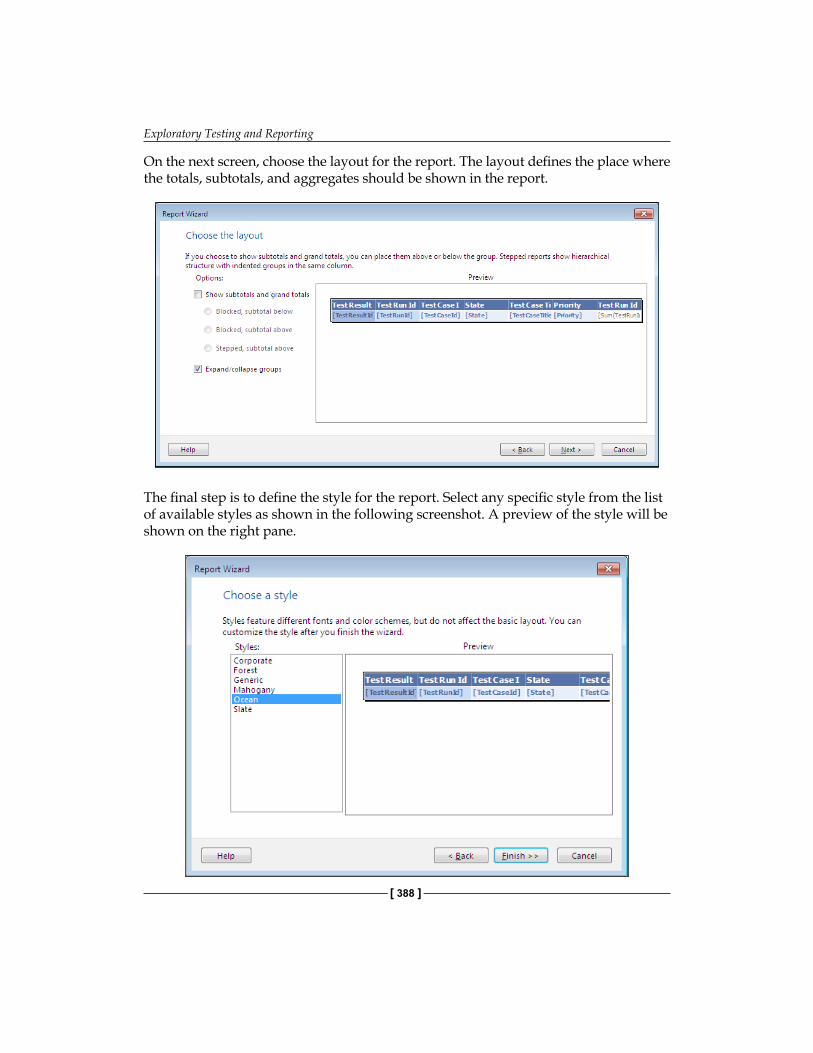
Exploratory Testing and Reporting
[ 388 ]
On the next screen, choose the layout for the report. The layout defines the place where the totals, subtotals, and aggregates should be shown in the report.
The final step is to define the style for the report. Select any specific style from the list of available styles as shown in the following screenshot. A preview of the style will be shown on the right pane.
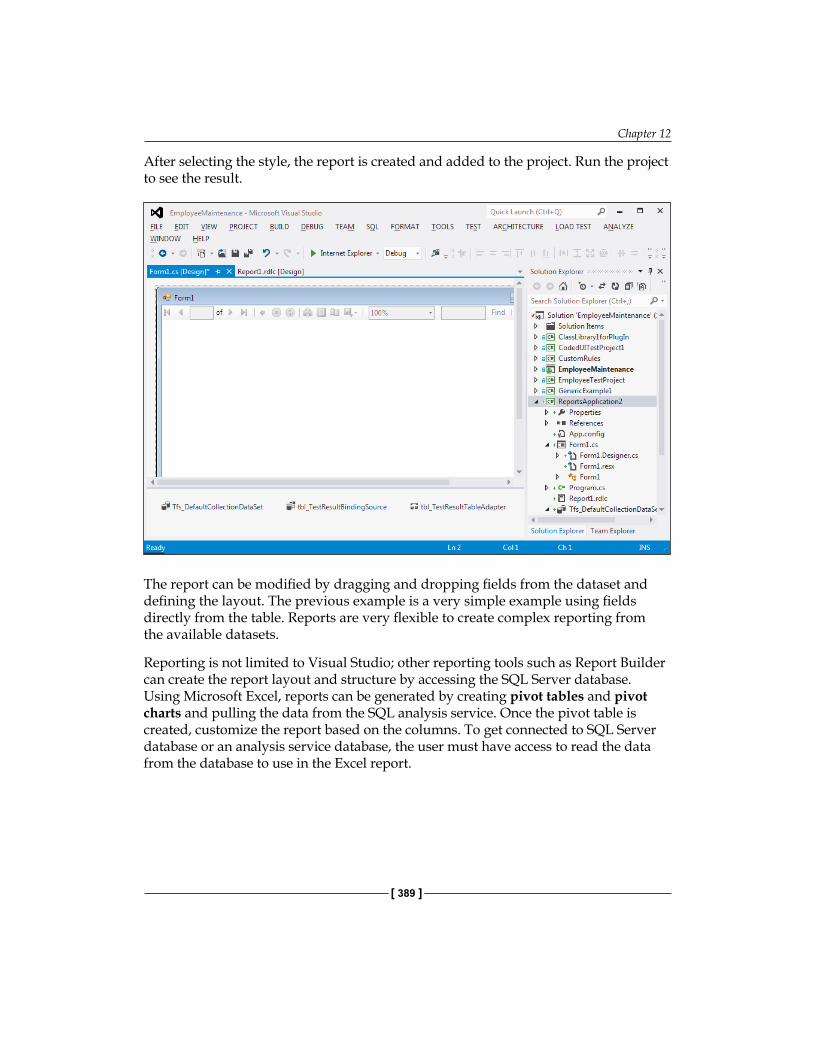
Chapter 12
[ 389 ]
After selecting the style, the report is created and added to the project. Run the project to see the result.
The report can be modified by dragging and dropping fields from the dataset and defining the layout. The previous example is a very simple example using fields directly from the table. Reports are very flexible to create complex reporting from the available datasets.
Reporting is not limited to Visual Studio; other reporting tools such as Report Builder can create the report layout and structure by accessing the SQL Server database. Using Microsoft Excel, reports can be generated by creating pivot tables and pivot charts and pulling the data from the SQL analysis service. Once the pivot table is created, customize the report based on the columns. To get connected to SQL Server database or an analysis service database, the user must have access to read the data from the database to use in the Excel report.
Exploratory Testing and Reporting
[ 390 ]
SummaryThis chapter explained some of the new exploratory testing features in Microsoft Test Manager 2012. This is very useful if the team does not have any test cases defined. Exploratory testing also helps the tester to capture screenshots, log defects, and create test cases while testing. The exploratory session recording is very useful in retesting the defect area of the application after any code fix. Visual Studio in combination with TFS has built-in reports and queries to get the details from the TFS data store. Using a SQL Server reporting service and Visual Studio 2012, it is very easy to create and customize reports. The SQL Server analysis service is useful to create the historical data store and based on that the reports are created easily. Even if the user does not have Visual Studio or reporting services installed on the machine, the report can easily be created and customized using Microsoft Excel. New reports can also be deployed to the reporting server so that the reports are available for the other project team members.
The next chapter explains the Testing Center and Lab Center features in Microsoft Test Manager 2012. The Testing Center is useful for creating and maintaining the test cases under Test Plans and Test Suites, whereas the Lab Center is useful in simulating environments for testing.
Test and Lab CenterMicrosoft Test Manager 2012 is a standalone test management tool from Microsoft. Compared to its previous version, the latest one contains multiple new features. The Test Manager works along with the Team Foundation Server to associate the test activities with the Team Projects. Test Manager contains two activity centers such as Test Center and Lab Center. Any number of Test Plans can be created for a Team Project. All activities within the Test Manager are associated with a Test Plan.
The Testing Center is useful in creating and managing test cases for manual and automated tests. Test Manager is useful in planning the testing effort which includes creating Test Plans, Test Suites, Test Configurations, and test cases with test steps. These Test Plans and test cases can be created and used for both manual and automated tests.
The Lab Center is useful in working with the Physical and Virtual testing labs to simulate the actual environment to test the application. To create Test Plans, test cases, and Lab Environments, the Test Manager tool has to be connected to the Team Project in Team Foundation Server.
The following topics are covered in detail in this chapter:
• Connecting to Team Project• Testing Center – Plan, Test, Track, and Organize• Lab Center – Simulating environments for load testing
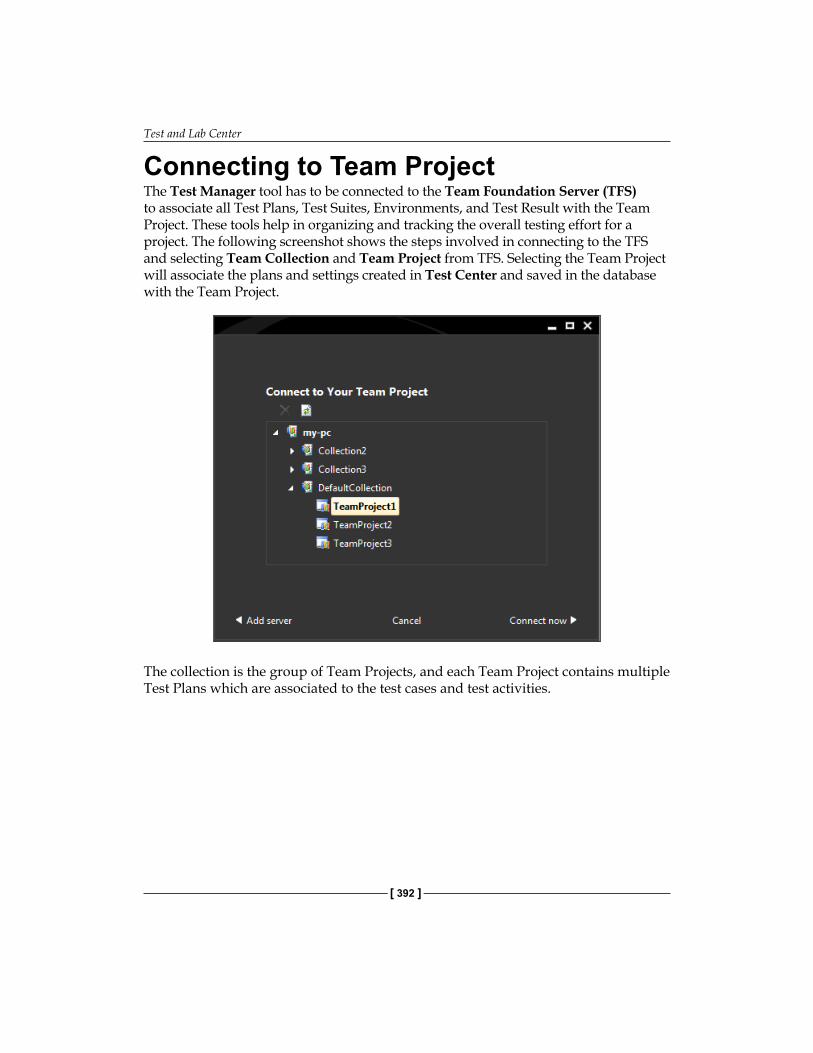
Test and Lab Center
[ 392 ]
Connecting to Team ProjectThe Test Manager tool has to be connected to the Team Foundation Server (TFS) to associate all Test Plans, Test Suites, Environments, and Test Result with the Team Project. These tools help in organizing and tracking the overall testing effort for a project. The following screenshot shows the steps involved in connecting to the TFS and selecting Team Collection and Team Project from TFS. Selecting the Team Project will associate the plans and settings created in Test Center and saved in the database with the Team Project.
The collection is the group of Team Projects, and each Team Project contains multiple Test Plans which are associated to the test cases and test activities.
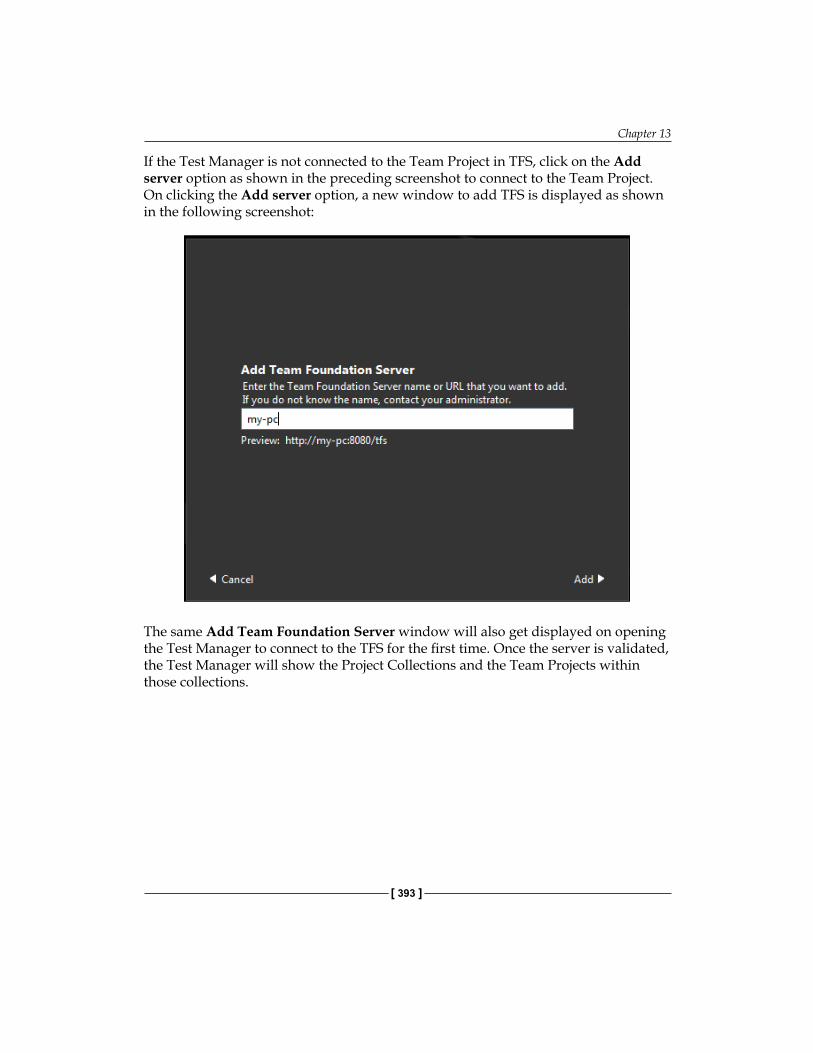
Chapter 13
[ 393 ]
If the Test Manager is not connected to the Team Project in TFS, click on the Add server option as shown in the preceding screenshot to connect to the Team Project. On clicking the Add server option, a new window to add TFS is displayed as shown in the following screenshot:
The same Add Team Foundation Server window will also get displayed on opening the Test Manager to connect to the TFS for the first time. Once the server is validated, the Test Manager will show the Project Collections and the Team Projects within those collections.
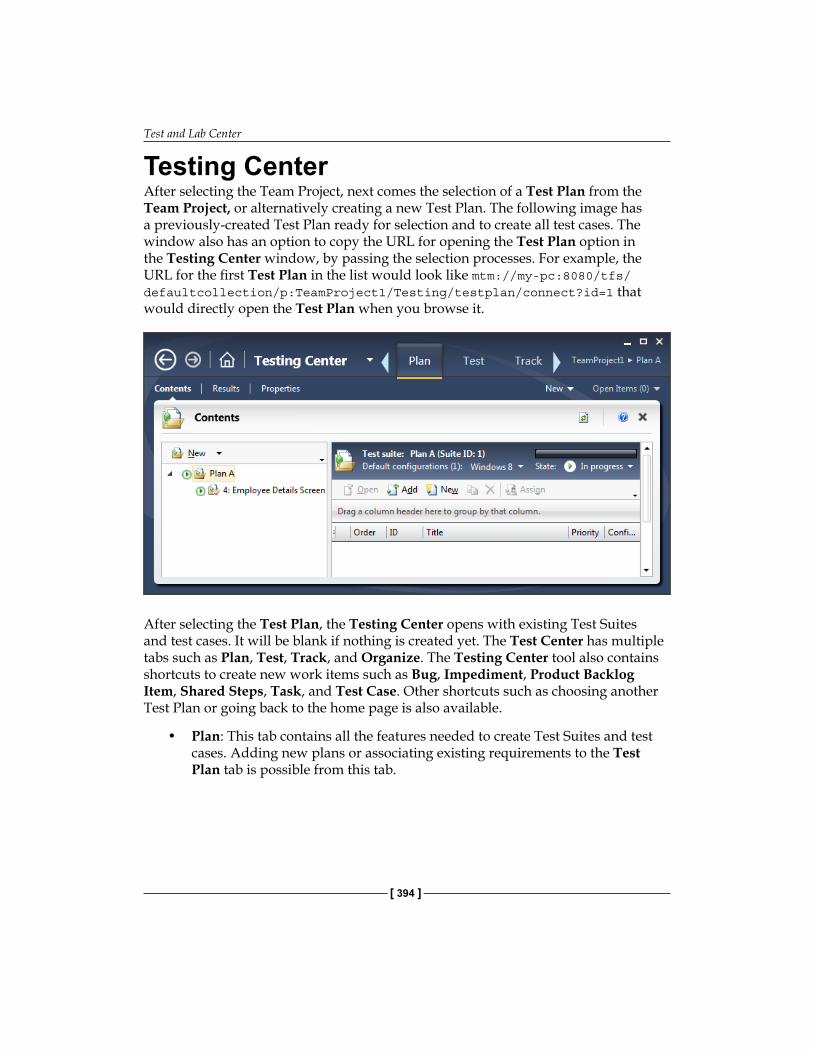
Test and Lab Center
[ 394 ]
Testing CenterAfter selecting the Team Project, next comes the selection of a Test Plan from the Team Project, or alternatively creating a new Test Plan. The following image has a previously-created Test Plan ready for selection and to create all test cases. The window also has an option to copy the URL for opening the Test Plan option in the Testing Center window, by passing the selection processes. For example, the URL for the first Test Plan in the list would look like mtm://my-pc:8080/tfs/defaultcollection/p:TeamProject1/Testing/testplan/connect?id=1 that would directly open the Test Plan when you browse it.
After selecting the Test Plan, the Testing Center opens with existing Test Suites and test cases. It will be blank if nothing is created yet. The Test Center has multiple tabs such as Plan, Test, Track, and Organize. The Testing Center tool also contains shortcuts to create new work items such as Bug, Impediment, Product Backlog Item, Shared Steps, Task, and Test Case. Other shortcuts such as choosing another Test Plan or going back to the home page is also available.
• Plan: This tab contains all the features needed to create Test Suites and test cases. Adding new plans or associating existing requirements to the Test Plan tab is possible from this tab.
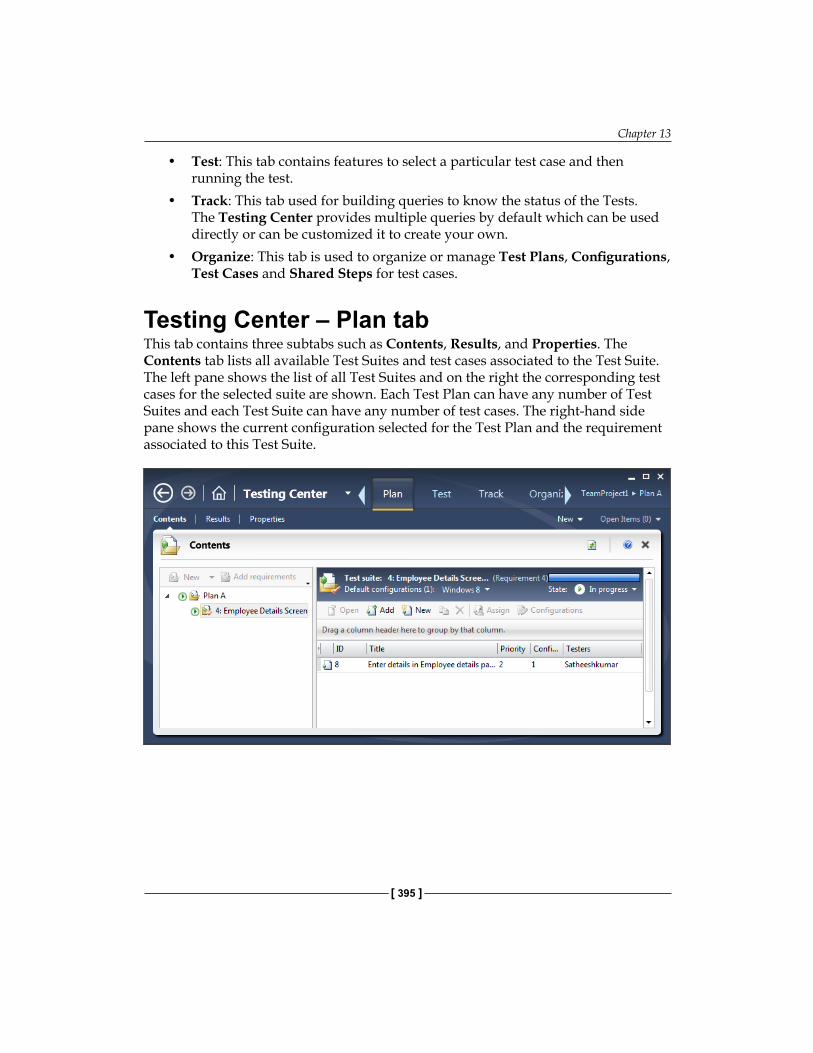
Chapter 13
[ 395 ]
• Test: This tab contains features to select a particular test case and then running the test.
• Track: This tab used for building queries to know the status of the Tests. The Testing Center provides multiple queries by default which can be used directly or can be customized it to create your own.
• Organize: This tab is used to organize or manage Test Plans, Configurations, Test Cases and Shared Steps for test cases.
Testing Center – Plan tabThis tab contains three subtabs such as Contents, Results, and Properties. The Contents tab lists all available Test Suites and test cases associated to the Test Suite. The left pane shows the list of all Test Suites and on the right the corresponding test cases for the selected suite are shown. Each Test Plan can have any number of Test Suites and each Test Suite can have any number of test cases. The right-hand side pane shows the current configuration selected for the Test Plan and the requirement associated to this Test Suite.
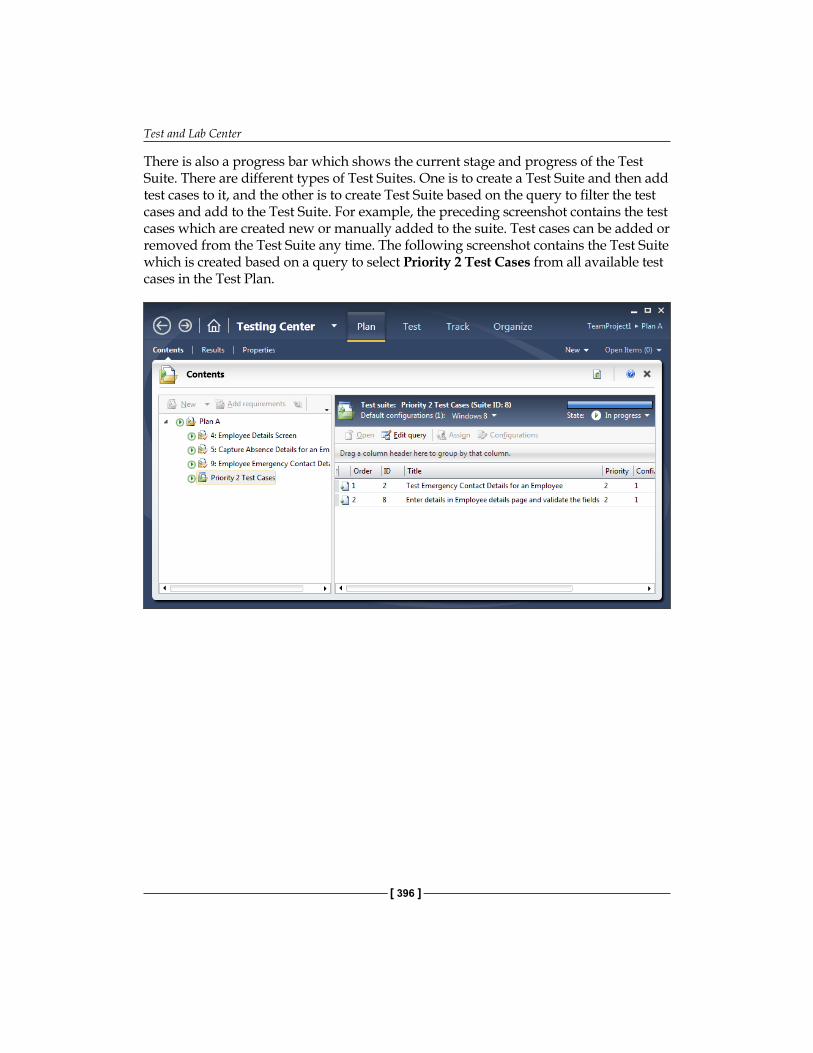
Test and Lab Center
[ 396 ]
There is also a progress bar which shows the current stage and progress of the Test Suite. There are different types of Test Suites. One is to create a Test Suite and then add test cases to it, and the other is to create Test Suite based on the query to filter the test cases and add to the Test Suite. For example, the preceding screenshot contains the test cases which are created new or manually added to the suite. Test cases can be added or removed from the Test Suite any time. The following screenshot contains the Test Suite which is created based on a query to select Priority 2 Test Cases from all available test cases in the Test Plan.
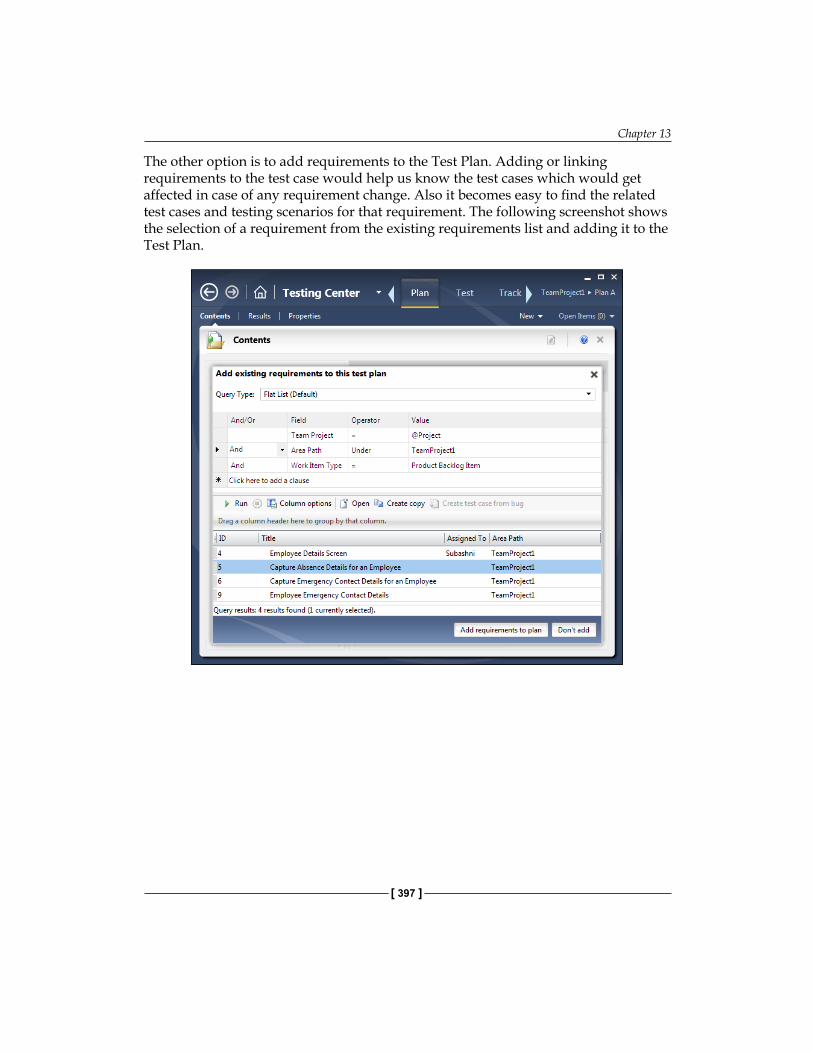
Chapter 13
[ 397 ]
The other option is to add requirements to the Test Plan. Adding or linking requirements to the test case would help us know the test cases which would get affected in case of any requirement change. Also it becomes easy to find the related test cases and testing scenarios for that requirement. The following screenshot shows the selection of a requirement from the existing requirements list and adding it to the Test Plan.
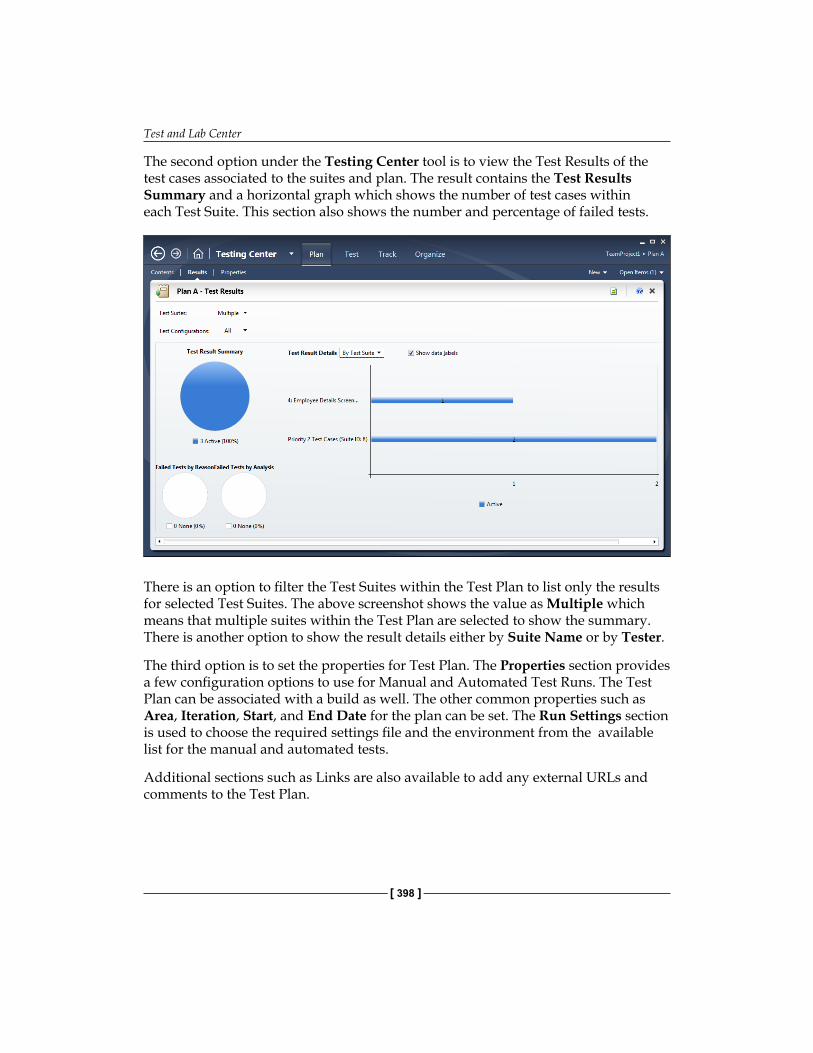
Test and Lab Center
[ 398 ]
The second option under the Testing Center tool is to view the Test Results of the test cases associated to the suites and plan. The result contains the Test Results Summary and a horizontal graph which shows the number of test cases within each Test Suite. This section also shows the number and percentage of failed tests.
There is an option to filter the Test Suites within the Test Plan to list only the results for selected Test Suites. The above screenshot shows the value as Multiple which means that multiple suites within the Test Plan are selected to show the summary. There is another option to show the result details either by Suite Name or by Tester.
The third option is to set the properties for Test Plan. The Properties section provides a few configuration options to use for Manual and Automated Test Runs. The Test Plan can be associated with a build as well. The other common properties such as Area, Iteration, Start, and End Date for the plan can be set. The Run Settings section is used to choose the required settings file and the environment from the available list for the manual and automated tests.
Additional sections such as Links are also available to add any external URLs and comments to the Test Plan.
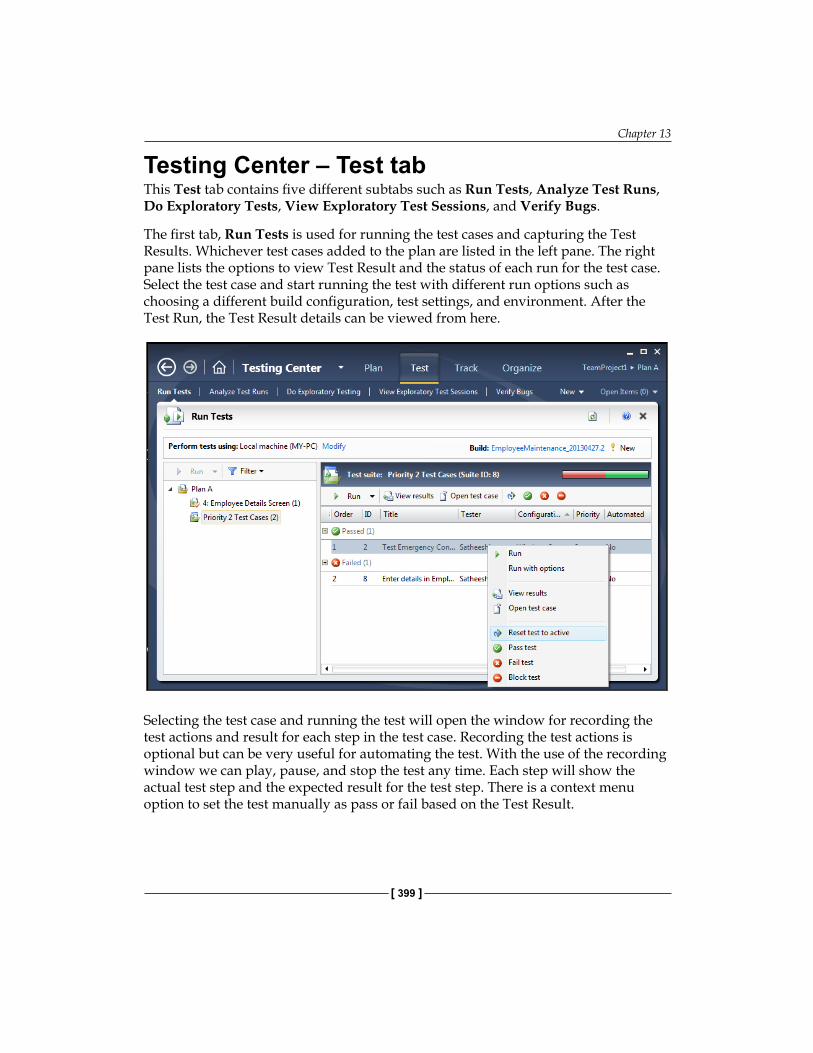
Chapter 13
[ 399 ]
Testing Center – Test tabThis Test tab contains five different subtabs such as Run Tests, Analyze Test Runs, Do Exploratory Tests, View Exploratory Test Sessions, and Verify Bugs.
The first tab, Run Tests is used for running the test cases and capturing the Test Results. Whichever test cases added to the plan are listed in the left pane. The right pane lists the options to view Test Result and the status of each run for the test case. Select the test case and start running the test with different run options such as choosing a different build configuration, test settings, and environment. After the Test Run, the Test Result details can be viewed from here.
Selecting the test case and running the test will open the window for recording the test actions and result for each step in the test case. Recording the test actions is optional but can be very useful for automating the test. With the use of the recording window we can play, pause, and stop the test any time. Each step will show the actual test step and the expected result for the test step. There is a context menu option to set the test manually as pass or fail based on the Test Result.
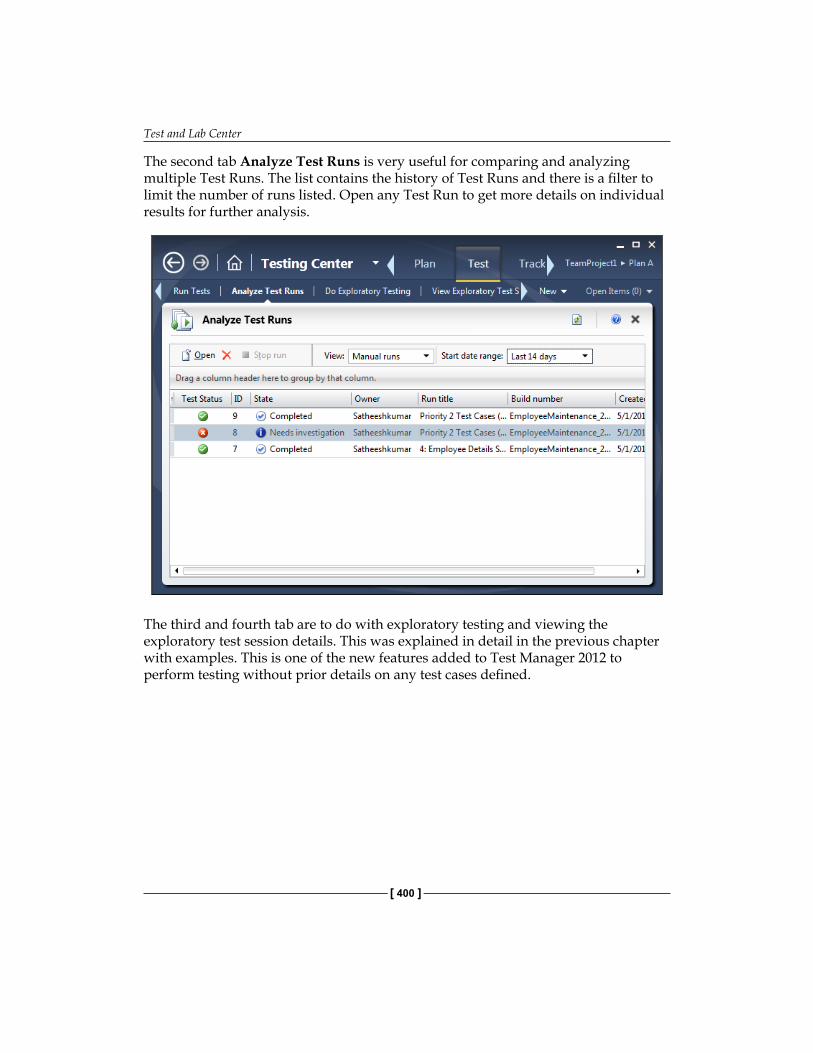
Test and Lab Center
[ 400 ]
The second tab Analyze Test Runs is very useful for comparing and analyzing multiple Test Runs. The list contains the history of Test Runs and there is a filter to limit the number of runs listed. Open any Test Run to get more details on individual results for further analysis.
The third and fourth tab are to do with exploratory testing and viewing the exploratory test session details. This was explained in detail in the previous chapter with examples. This is one of the new features added to Test Manager 2012 to perform testing without prior details on any test cases defined.
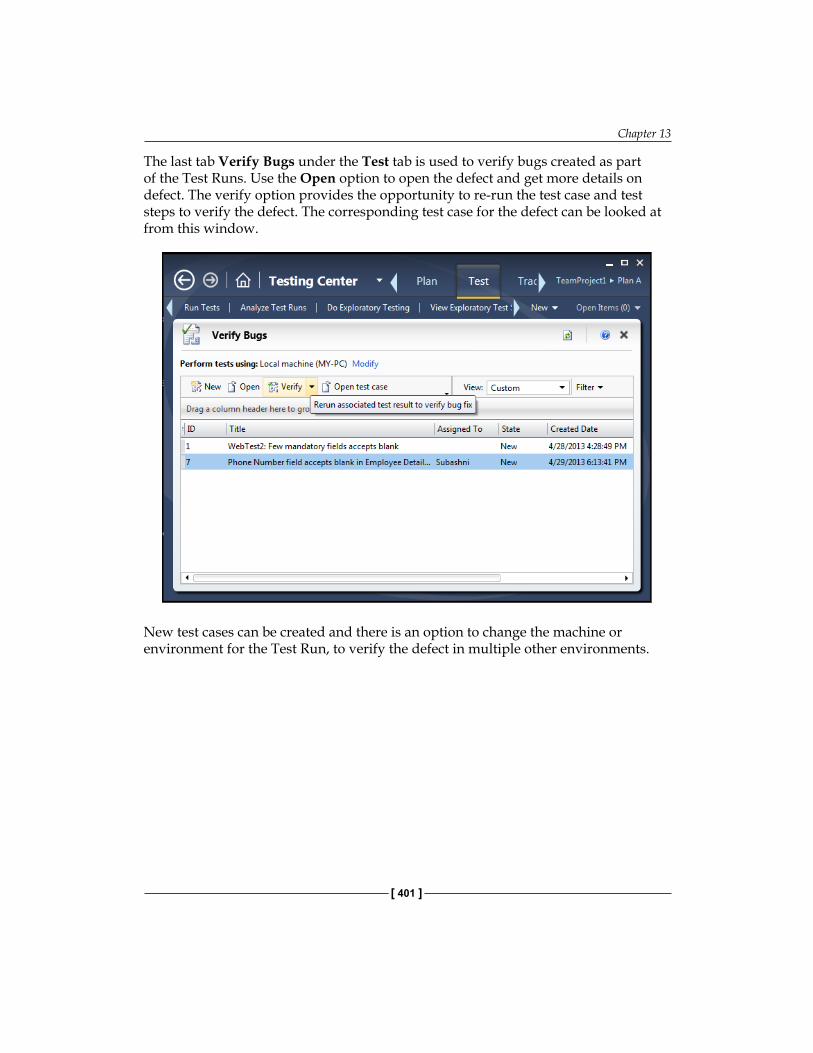
Chapter 13
[ 401 ]
The last tab Verify Bugs under the Test tab is used to verify bugs created as part of the Test Runs. Use the Open option to open the defect and get more details on defect. The verify option provides the opportunity to re-run the test case and test steps to verify the defect. The corresponding test case for the defect can be looked at from this window.
New test cases can be created and there is an option to change the machine or environment for the Test Run, to verify the defect in multiple other environments.
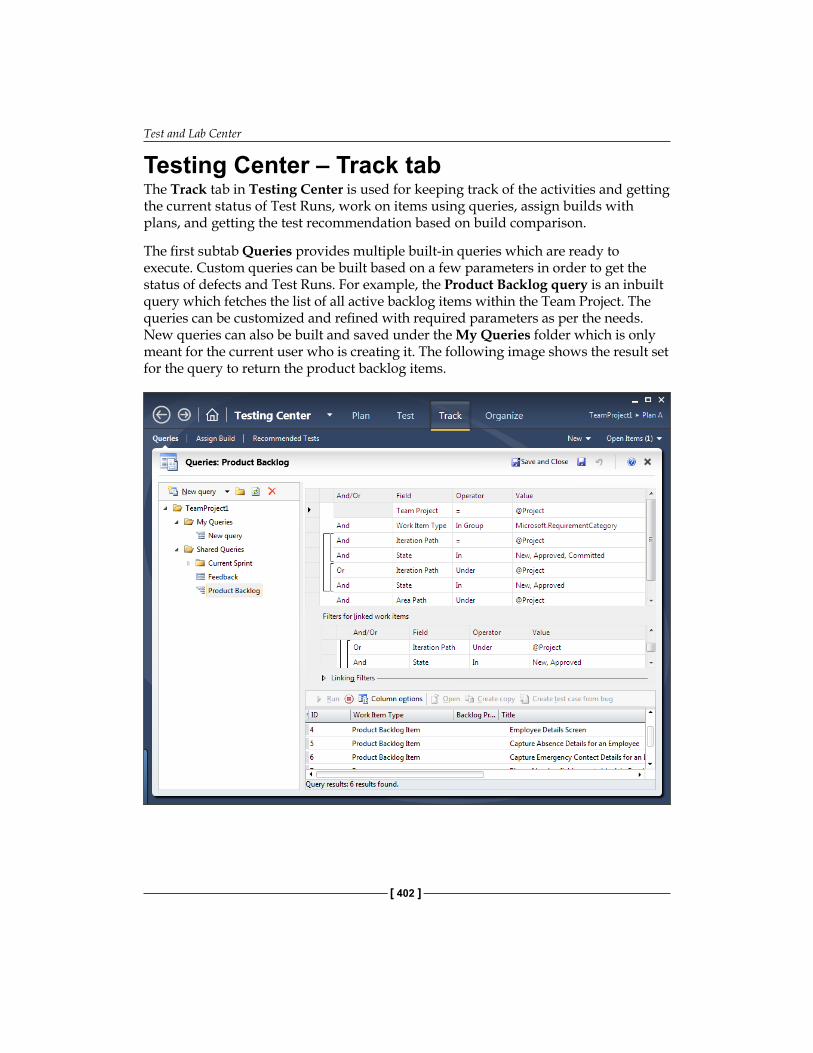
Test and Lab Center
[ 402 ]
Testing Center – Track tabThe Track tab in Testing Center is used for keeping track of the activities and getting the current status of Test Runs, work on items using queries, assign builds with plans, and getting the test recommendation based on build comparison.
The first subtab Queries provides multiple built-in queries which are ready to execute. Custom queries can be built based on a few parameters in order to get the status of defects and Test Runs. For example, the Product Backlog query is an inbuilt query which fetches the list of all active backlog items within the Team Project. The queries can be customized and refined with required parameters as per the needs. New queries can also be built and saved under the My Queries folder which is only meant for the current user who is creating it. The following image shows the result set for the query to return the product backlog items.
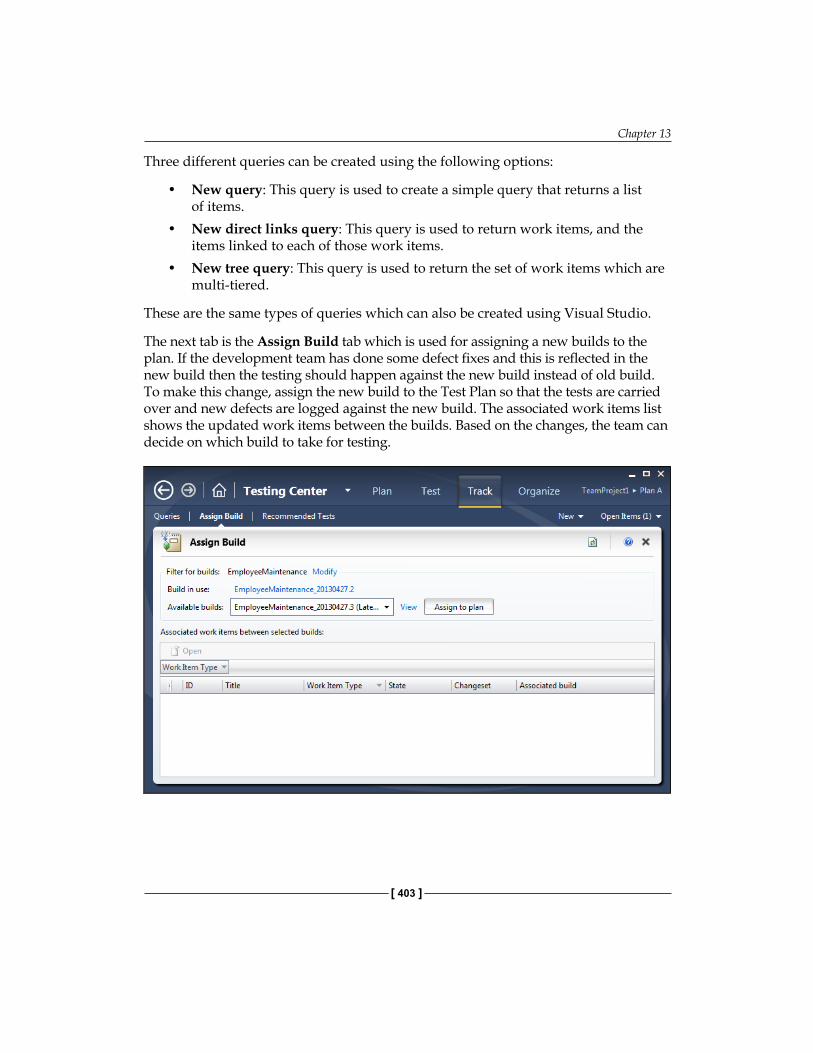
Chapter 13
[ 403 ]
Three different queries can be created using the following options:
• New query: This query is used to create a simple query that returns a list of items.
• New direct links query: This query is used to return work items, and the items linked to each of those work items.
• New tree query: This query is used to return the set of work items which are multi-tiered.
These are the same types of queries which can also be created using Visual Studio.
The next tab is the Assign Build tab which is used for assigning a new builds to the plan. If the development team has done some defect fixes and this is reflected in the new build then the testing should happen against the new build instead of old build. To make this change, assign the new build to the Test Plan so that the tests are carried over and new defects are logged against the new build. The associated work items list shows the updated work items between the builds. Based on the changes, the team can decide on which build to take for testing.
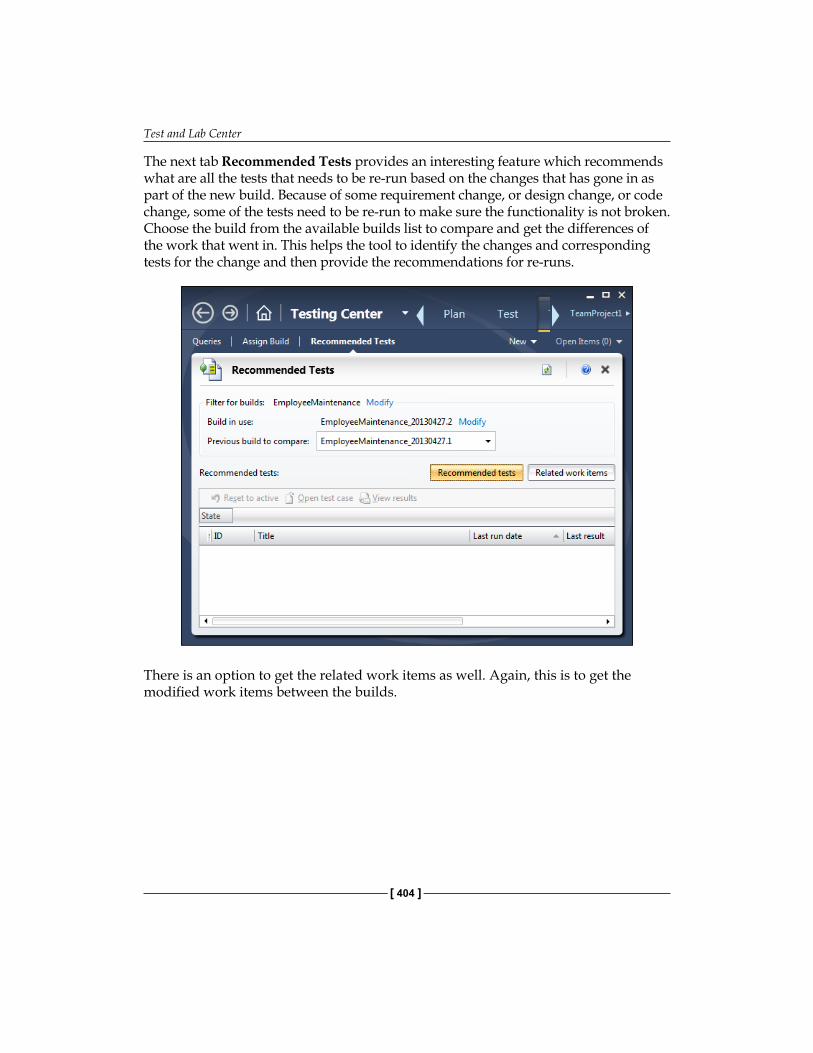
Test and Lab Center
[ 404 ]
The next tab Recommended Tests provides an interesting feature which recommends what are all the tests that needs to be re-run based on the changes that has gone in as part of the new build. Because of some requirement change, or design change, or code change, some of the tests need to be re-run to make sure the functionality is not broken. Choose the build from the available builds list to compare and get the differences of the work that went in. This helps the tool to identify the changes and corresponding tests for the change and then provide the recommendations for re-runs.
There is an option to get the related work items as well. Again, this is to get the modified work items between the builds.
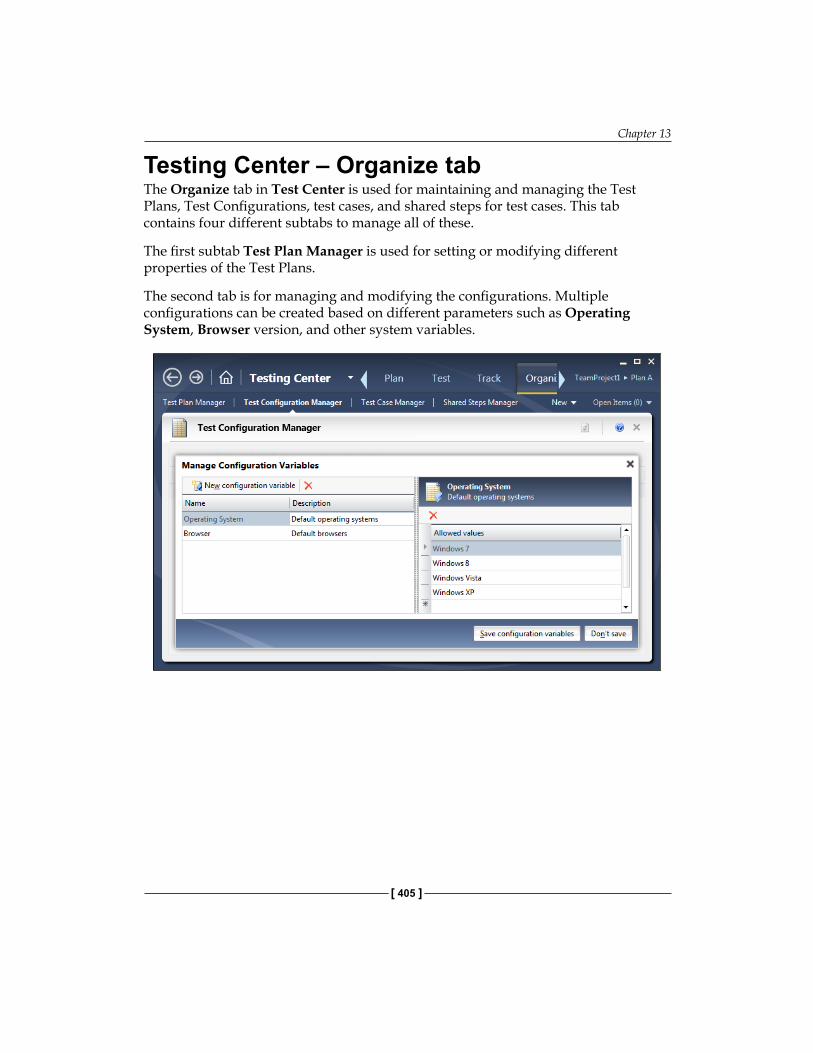
Chapter 13
[ 405 ]
Testing Center – Organize tabThe Organize tab in Test Center is used for maintaining and managing the Test Plans, Test Configurations, test cases, and shared steps for test cases. This tab contains four different subtabs to manage all of these.
The first subtab Test Plan Manager is used for setting or modifying different properties of the Test Plans.
The second tab is for managing and modifying the configurations. Multiple configurations can be created based on different parameters such as Operating System, Browser version, and other system variables.
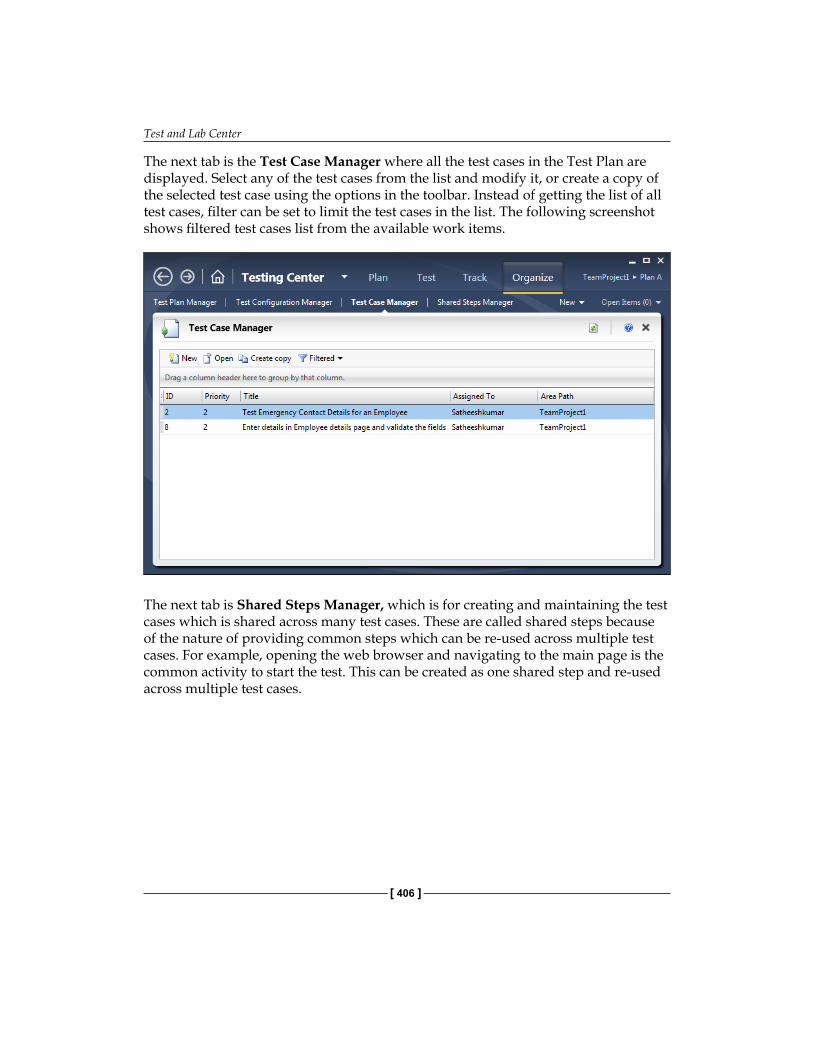
Test and Lab Center
[ 406 ]
The next tab is the Test Case Manager where all the test cases in the Test Plan are displayed. Select any of the test cases from the list and modify it, or create a copy of the selected test case using the options in the toolbar. Instead of getting the list of all test cases, filter can be set to limit the test cases in the list. The following screenshot shows filtered test cases list from the available work items.
The next tab is Shared Steps Manager, which is for creating and maintaining the test cases which is shared across many test cases. These are called shared steps because of the nature of providing common steps which can be re-used across multiple test cases. For example, opening the web browser and navigating to the main page is the common activity to start the test. This can be created as one shared step and re-used across multiple test cases.
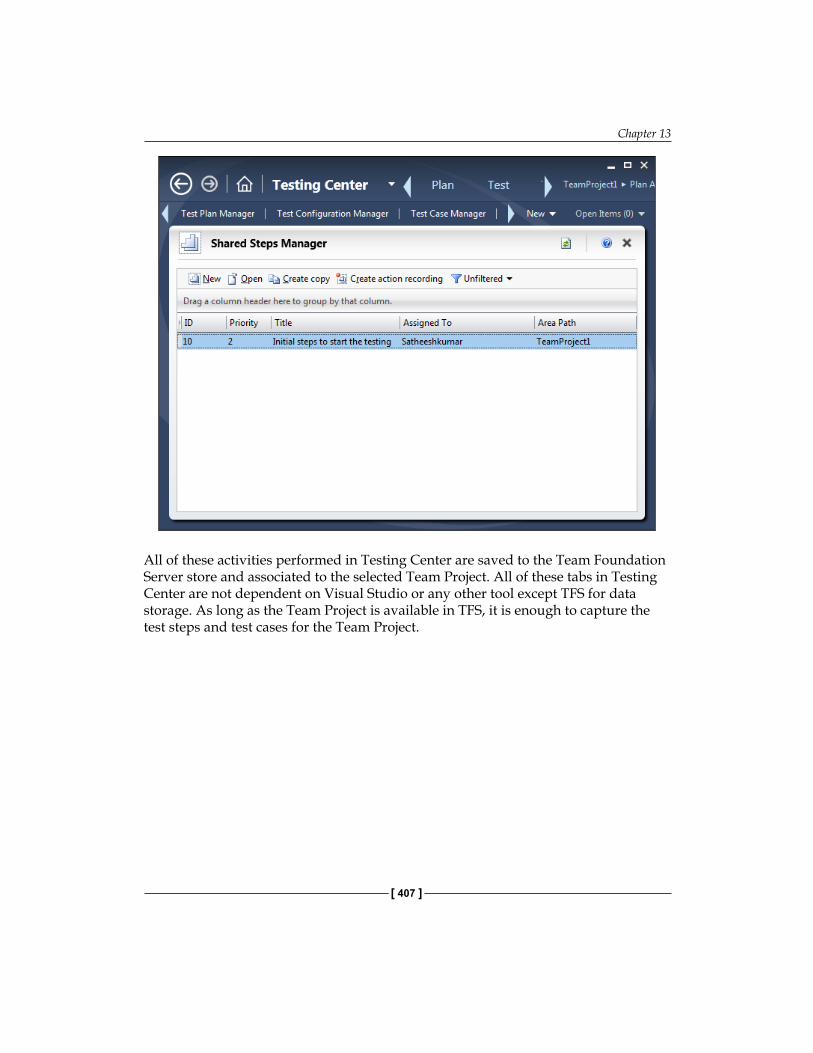
Chapter 13
[ 407 ]
All of these activities performed in Testing Center are saved to the Team Foundation Server store and associated to the selected Team Project. All of these tabs in Testing Center are not dependent on Visual Studio or any other tool except TFS for data storage. As long as the Team Project is available in TFS, it is enough to capture the test steps and test cases for the Team Project.
Test and Lab Center
[ 408 ]
Lab CenterMicrosoft Test Manager even provides features for managing and using virtual machines for testing applications. The Lab Center in Test Manager is used for managing the Test environments, Test Settings, and Controllers for testing. The Lab Management in Visual Studio is integrated with System Center Virtual Machine Manager (SCVMM) to manage multiple physical computers that host virtual machines. Each environment consists of one or more virtual machines for each role required for the application. The Lab Management tool can be used to deploy the application to these environments and then to run the tests.
EnvironmentsCreating a collection of Virtual machines created and managed within the lab is called a virtual environment. The integration of Lab Management with the SCVMM enables us to deploy and test our applications on these virtual machines. TFS builds can be scheduled to build the application and deploy and test on these environments.
In Microsoft Test Manager, the Lab tab in Lab Center provides access to the virtual environments deployed on the host groups of a Team Project. A host group is a collection of physical computers on which virtual environments can be created.
The new environment option opens a wizard to configure the machines with roles to create the environment. The image below shows the process of adding new machines and assigning a role to the machine. There are multiple roles available as shown in the image. The wizard also helps in setting some properties to the machine which help during environment creation and application deployment. Once the wizard is complete, the last step verifies the connection to the actual machines and validates the requirement.
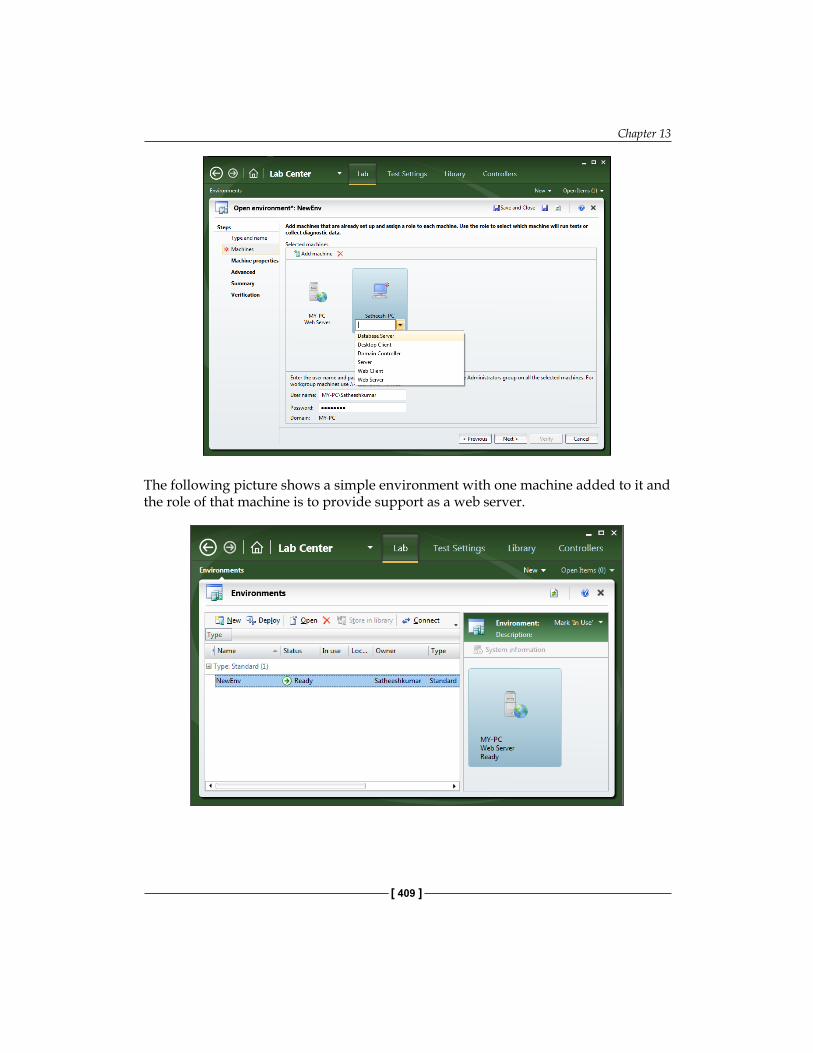
Chapter 13
[ 409 ]
The following picture shows a simple environment with one machine added to it and the role of that machine is to provide support as a web server.
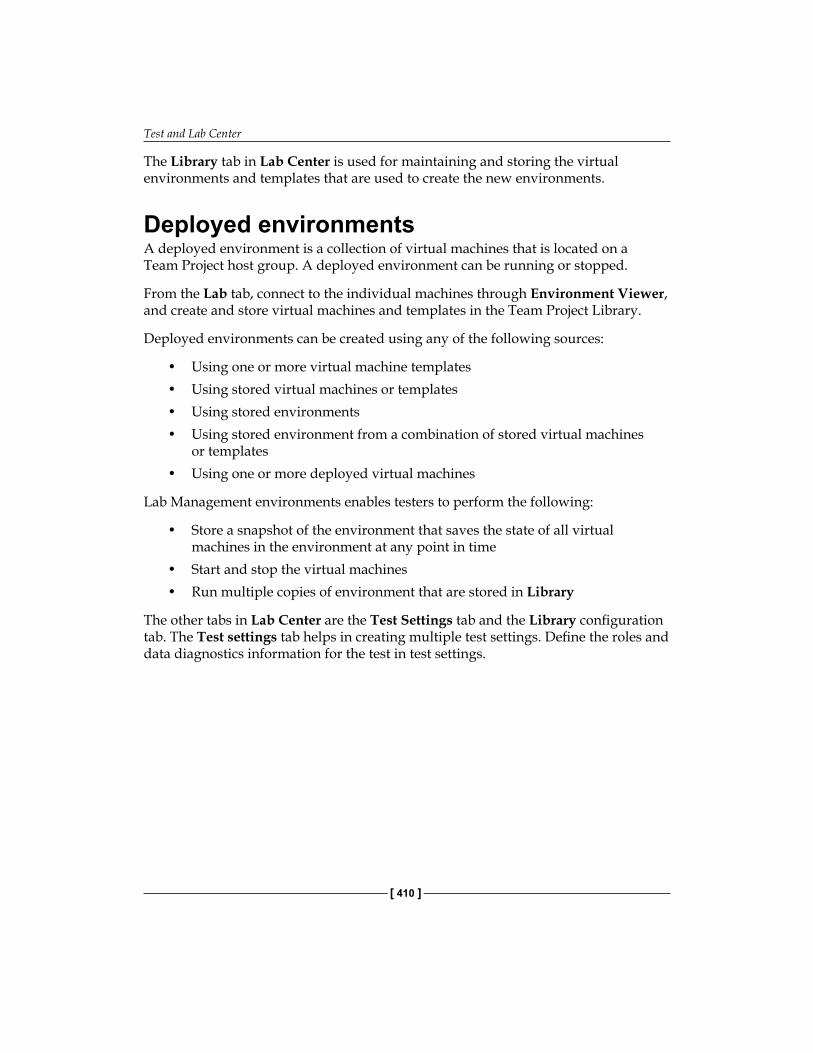
Test and Lab Center
[ 410 ]
The Library tab in Lab Center is used for maintaining and storing the virtual environments and templates that are used to create the new environments.
Deployed environmentsA deployed environment is a collection of virtual machines that is located on a Team Project host group. A deployed environment can be running or stopped.
From the Lab tab, connect to the individual machines through Environment Viewer, and create and store virtual machines and templates in the Team Project Library.
Deployed environments can be created using any of the following sources:
• Using one or more virtual machine templates• Using stored virtual machines or templates• Using stored environments• Using stored environment from a combination of stored virtual machines
or templates• Using one or more deployed virtual machines
Lab Management environments enables testers to perform the following:
• Store a snapshot of the environment that saves the state of all virtual machines in the environment at any point in time
• Start and stop the virtual machines• Run multiple copies of environment that are stored in Library
The other tabs in Lab Center are the Test Settings tab and the Library configuration tab. The Test settings tab helps in creating multiple test settings. Define the roles and data diagnostics information for the test in test settings.
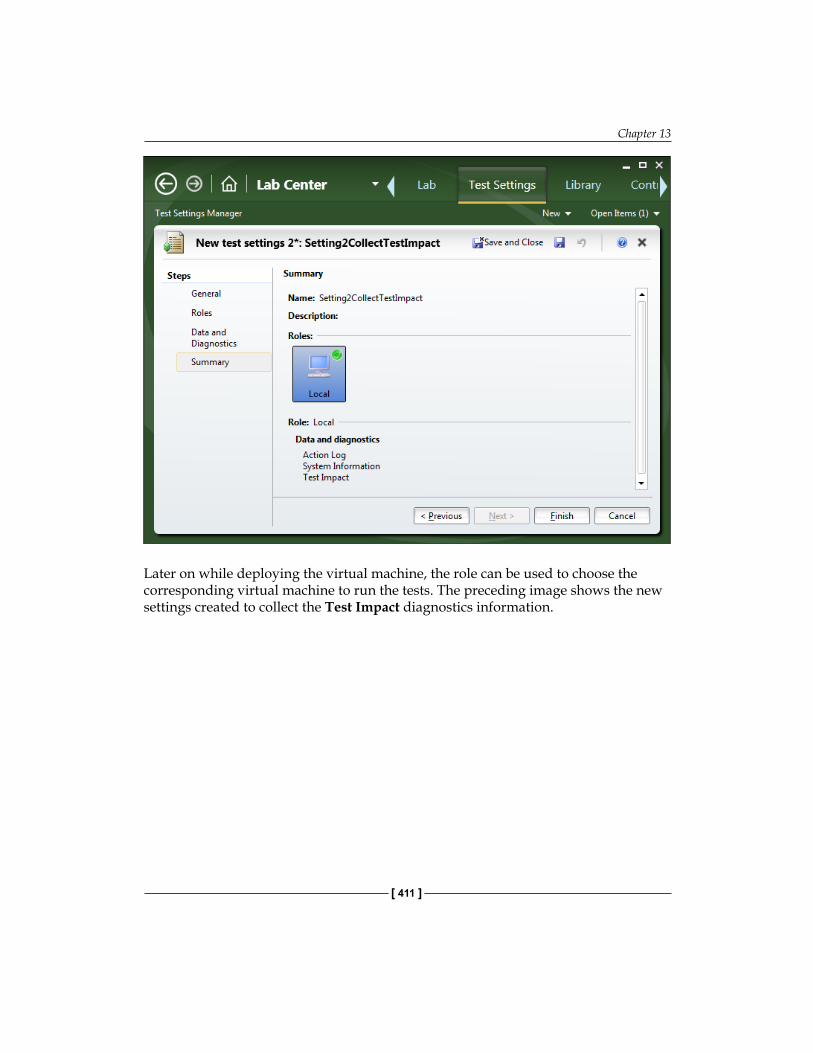
Chapter 13
[ 411 ]
Later on while deploying the virtual machine, the role can be used to choose the corresponding virtual machine to run the tests. The preceding image shows the new settings created to collect the Test Impact diagnostics information.
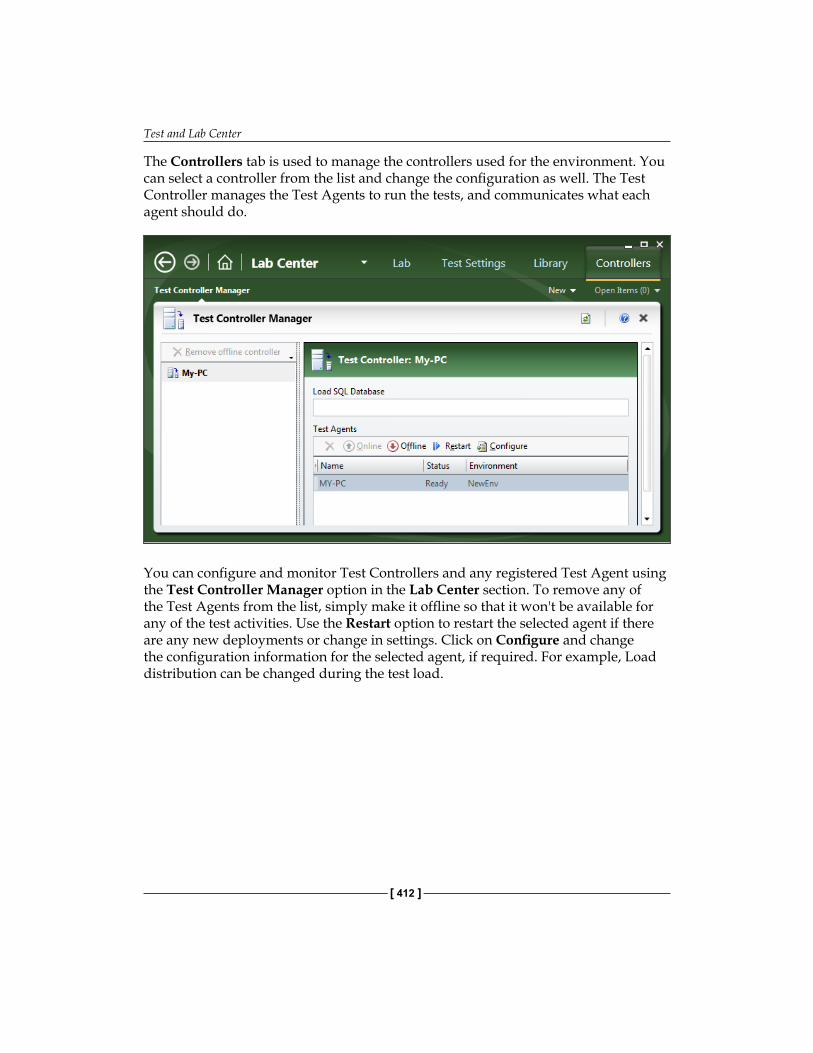
Test and Lab Center
[ 412 ]
The Controllers tab is used to manage the controllers used for the environment. You can select a controller from the list and change the configuration as well. The Test Controller manages the Test Agents to run the tests, and communicates what each agent should do.
You can configure and monitor Test Controllers and any registered Test Agent using the Test Controller Manager option in the Lab Center section. To remove any of the Test Agents from the list, simply make it offline so that it won't be available for any of the test activities. Use the Restart option to restart the selected agent if there are any new deployments or change in settings. Click on Configure and change the configuration information for the selected agent, if required. For example, Load distribution can be changed during the test load.
Chapter 13
[ 413 ]
SummaryThe Test Center and Lab Center have a few new additions in Test Manager 2012. Test Center is very useful in managing Test Plans, Test Suites, configurations, and test cases; running the tests; and creating and maintaining shared steps. Any Test Plan can be cloned as it is and then customized without modifying the original plan. Analyzing the Test Runs and verifying the test by re-running it can be very useful for the testers as there is no dependency and it can be done within the Testing Center itself. Queries are an added advantage to get the status and progress from Test Manager itself.
The Lab Center is very useful in creating and configuring multiple environments using the Physical and Virtual Machines and deploying the environments for testing purposes. All these tools work without the support of Visual Studio but do require a connection to the TFS. This helps the testers to have independent test tool to carry out all test activities.
With this chapter the book comes to an end. Overall, the chapters in this book started explaining the basics of testing, including multiple new features added to Visual Studio 2012 from its previous version. A couple of new features such as Coded UI test and exploratory testing are very good additions to Visual Studio 2012 and are also explained well in this book. The Test Manager is the standalone testing tool which is used for managing the Test Plan, Test Suites, and Test Cases, and Test Executions as well. Integrating Visual Studio 2012 with TFS and maintaining the configuration has also been explained, along with publishing the Test Results. Overall this book has covered the end-to-end testing of applications and managing the Test Results as well.

IndexSymbols/detail option 338/flavour option 340/ListTests option 329/noisolation option 336/nologo option 338/platform option 340/publishbuild option 339/publish option 339/publishresultsfile option
about 340build, creating 342, 343existing Test Project, creating 341existing Test Project, using 341project, building 343result, publishing 344test, running 342
/resultsfile option 337.runsettings file
used, for configuring unit tests 325, 326/testcontainer option 332/testmetadata option 333/test option 334.testsettings file
settings 192/testsettings option 336/Tests option 329/unique option 335
Aaction recording, coded UI test 68-73AddCommentToResult method 219Assert 94
Assert.AreEqualabout 96overloaded methods 96-99
Assert.AreNotEqual 100Assert.AreNotSame
about 102overloaded methods 102
Assert.AreSameabout 100overloaded methods 100, 101
Assert class 94Assert.Fail
about 102overloaded methods 103
AssertFailedException 119, 120Assert.Inconclusive
about 103overloaded method 103
Assert.IsFalseabout 104overloaded methods 104
Assert.IsInstanceOfTypeabout 106overloaded methods 107
Assert.IsNotNullabout 106overloaded methods 106
Assert.IsNullabout 105overloaded methods 105
Assert.IsTrueabout 104overloaded methods 104
assert statements 93, 94automated tests 35, 67
[ 416 ]
Bbrowser mix
defining 248bug status report 379, 380bug trends report 381build quality indicators report 381build success over time report 381build summary report 381burn down and burn rate report 381
CC# 17Capability Maturity Model
Integration (CMMI) 370ClassCleanup() method 92, 93ClassInitialize() method 92code
generating, from recorded test 213-217code coverage
about 8, 28, 138, 139blocks 140elements, excluding 141lines 140
coded testtransactions 218
coded UI testCodedUITest1.cs file 73, 74Coded UI Test Builder 67CodedUITest.cs file 17Coded UI Tests (CUIT)
about 8, 17, 67creating 69, 72, 73controls, adding 82-87files 73from action recording 68-73supported files 17validations, adding 82-87
coded web testabout 17, 212advantage 219debugging 222-224running 220, 221
coding phase 9CollectionAssert 111CollectionAssert.AllItemsAreIn-
stancesOfType
about 113overloaded methods 113
CollectionAssert.AllItemsAreNotNullabout 112overloaded methods 112
CollectionAssert.AllItemsAreUniqueabout 115overloaded methods 115
CollectionAssert.AreEqualabout 116overloaded methods 116, 117
CollectionAssert.AreEquivalentabout 112overloaded methods 112
CollectionAssert.AreNotEqualabout 119overloaded methods 119
CollectionAssert.AreNotEquivalentabout 113overloaded methods 113
CollectionAssert.Containsabout 115overloaded methods 115
CollectionAssert.DoesNotContainabout 115overloaded methods 116
CollectionAssert.IsNotSubsetOfabout 114overloaded methods 114
CollectionAssert.IsSubsetOfabout 114overloaded methods 114
commentsadding, to recording 152adding, to web test 219
conditional rulesabout 176-178Context Parameter Exists 179Cookie Exists 179Cookie Value Comparison 179Last request Outcome 179Last Response Code 180Number Comparison 180Probability Rule 180String Comparison 180
Constant load option 242Constant Load Pattern 265
[ 417 ]
context parametersadding 267creating 188, 189
Controller 234controls
adding, to coded UI test 82-87counter sets, Load Test Wizard 248custom rules
about 224extraction rules 224-228validation rules 228-231
DData and Diagnostics setting, .testsettings
file 195-197Data and Diagnostics, test settings 313-315DataBinding attribute 215data driven coded UI test 80, 82data-driven unit testing 126-131DataSource attribute 215data sources
adding 181, 184deployed environment 410, 412DeploymentItem attribute 215Deployment section, test settings 316Deployment setting, .testsettings file 197detail view, Test Results 279dynamic parameters, web testing 210, 211
EExpectedExceptionAttribute 120, 122, 123exploratory testing
about 8, 15, 16, 369-378drawback 369
extraction rules about 166, 224, 227, 228Extract Attribute Value 167Extract Form Field 167Extract Hidden Fields 168Extract HTTP Header 168Extract Regular Expression 168Extract Text 168Selected Option 167Tag Inner Text 167
extract method 225
FFakes
about 132used, for unit testing 132
files, Coded UI Tests (CUIT)CodedUITest1.cs file 73, 74UIMap.cs file 75UIMap.Designer.cs file 74UiMap.uitest file 76-78
Finalizer method 93Form POST Parameters 164, 165
GGeneral option, test settings 311General section, .testsettings file 192, 193generics
about 123and unit tests 123-126
generic tests about 21, 297, 301creating 302, 304parameters 303summary results file 304-308
Goal Based Load Pattern 266graphical view, Test Results
about 272Controller and Agents 273Key Indicators 273Page Response Time 273System under Test 273
HHosts option, Test settings 318Hosts, .testsettings file 199Hypertext Transfer Protocol-GET (HTTP-
GET) 152Hypertext Transfer Protocol-POST (HTTP-
POST) 152
IICollection interface 111IComparer 116Integrated Development
Environment (IDE) 8
[ 418 ]
integration testingabout 10bottom-up approach 10top-down approach 10umbrella approach 10
LLab Center
about 29, 32, 391, 408deployed environment 410, 412environments 408, 410
lab management 9Lab Management environments 410Load Pattern
about 242constant load 242defining 242step load 242
Load Testabout 233, 234context parameters, adding 267creating 234, 235editing 262-265running 270
load testing 9, 18, 19Load Test Wizard
about 236, 238counter sets 248, 249Run Settings 250-259scenarios, specifying 239
loop logic 153
Mmanual testing 8, 14, 35manual tests
action recording 56-58parameters, adding 62-65running 47-55
Microsoft Developer Network (MSDN) 339Microsoft Excel
about 35Test Results, exporting to 280-288
Microsoft Solutions Framework (MSF) 370Microsoft Test Manager 2012 (MTM) 9, 391Microsoft Test Manager (MTM)
about 15, 28, 35connecting, to TFS project 29
Microsoft.VisualStudio.TestTools.UnitTest-ing namespace 13, 90
Microsoft.VisualStudio.TestTools.WebTest-ing namespace 209
Microsoft Word 35MSTest utility
/noisolation option 336/nologo option 338options 330, 331, 332/platform option 340/publishbuild option 339/publish option 339/publishresultsfile option 340/resultsfile option 337/testcontainer option 332/testmetadata option 333/test option 334/testsettings option 336/unique option 335about 327, 330used, for running tests 332
MyTestCleanup() method 74MyTestInitialize() method 74
NNetwork Mix
defining 247
Oordered tests
about 20, 298creating 298-300executing 300, 301
Organize tab, Testing Center 405-407out-of-box reports
about 380bug status report 380bug trends report 381build quality indicators report 381build success over time report 381build summary report 381burn down and burn rate report 381reactivations report 381
[ 419 ]
remaining work report 381stories overview report 381stories progress report 381test case readiness report 381Test Plan progress report 381unplanned work report 381
overloaded method, Assert classAssert.AreEqual 96-99Assert.AreNotEqual 100Assert.AreNotSame 102Assert.AreSame 100, 101Assert.Fail 102Assert.Inconclusive 103Assert.IsFalse 104Assert.IsInstanceOfType 106, 107Assert.IsNotNull 106Assert.IsNull 105Assert.IsTrue 104
overloaded methods, CollectionAssertCollectionAssert.AllItemsAreIn-
stancesOfType 113CollectionAssert.AllItemsAreNotNull 112CollectionAssert.AreEqual 116-118CollectionAssert.AreEquivalent 112CollectionAssert.AreNotEqual 119CollectionAssert.AreNotEquivalent 113CollectionAssert.Contains 115CollectionAssert.DoesNotContain 115CollectionAssert.IsNotSubsetOf 114CollectionAssert.IsSubsetOf 114
overloaded methods, StringAssertsStringAssert.Contains 108StringAssert.DoesNotMatch 109StringAssert.EndsWith 110StringAssert.Matches 108StringAssert.StartsWith 109
Pparameters
adding, to manual tests 62-65parameters, generic tests 303Pivot chart 389Pivot table 389Plan tab, Testing Center 395-398PostPage method 216PostRequest method 217
PostTransaction event 216PostWebTest event 216PrePage method 216PreRequestDataBinding method 217PreRequest method 217PreTransaction event 216PreWebTest event 216
QQuery-based Test Suite 44QueryString parameters 165, 166
Rreactivations report 381recorded request
copying 153recorded test
code, generating from 213-218recorded tests
cleaning 153recording
comments, adding to 152regression testing 11remaining work report 381report
building 363, 364report definition
creating, Visual Studio 2012 used 383-89Report Designer
features 370Requirement-based Test Suites 45-47Result store 268, 269Roles option, test settings 312, 313Roles setting, .testsettings file 194runsettings file 309Run Settings, Load Test Wizard
about 250-259threshold rules 259-261
Ssanity testing 11scenarios, Load Test Wizard
browser mix, defining 248Load Pattern, defining 242
[ 420 ]
Network Mix, defining 247specifying 239Test Mix Model, defining 243-246think time 240, 241
SDLC 7, 9settings, .testsettings file
Data and Diagnostics 195-197Deployment 197General section 192, 193Hosts 199Roles 194Setup and Cleanup Scripts 198Test Timeouts 199Unit Test 200Web Test 201, 202
Setup and Cleanup Scripts section, test set-tings 317
Setup and Cleanup Scripts setting, .testset-tings file 198
shared stepsabout 59action, recording 59, 62creating 59-61
shared test steps 49Shims
about 137versus Stubs 137
Simple Web tests 17SOAP protocol 152Software Development Life Cycle. See
SDLCsoftware testing 8, 9Static Test Suite 42, 43Status on all iterations report 380Step load option 242Step Load Pattern 265stories overview report 381stories progress report 381StringAssert.Contains
about 108overloaded methods 108
StringAssert.DoesNotMatch 109StringAssert.EndsWith 110StringAssert.Matches 108StringAsserts 107StringAssert.StartsWith 109Stubs
about 132-137versus Shims 137
summary results file, generic tests 304-308summary view, Test Results
about 275Controller and Agents Resources 275Errors 276Page Results 275System under Test Resources 275Test Results 275Test Run Information 275Transaction Results 275
System Center Virtual Machine Manager (SCVMM) 408
system testing 11
Ttables view, Test Results 277, 278TCM 327, 344tcm.exe tool 344Team Foundation Server 2012 369Team Foundation Server (TFS)
about 8, 339, 353, 358, 359, 370, 392built-in reports 379
Team ProjectTest Manager tool, connecting to 392, 393
testrecording 146-151running 203-206
Test Agentsconfiguring 289-295using 288
test case about 369adding, to Test Plan 38defining 31
test case management 8test case readiness report 379, 381Test Center 391TestClass() method 92TestCleanup() method 92, 93Test Controller
about 234configuring 289-295using 288
Test Explorer 25-27, 353
[ 421 ]
Test Impact View 21testing
about 9highlights 143, 144
Testing Centerabout 394Organize tab 405-407Plan tab 397, 398Test tab 399-401Track tab 402-404
testing tools 22testing types
about 11, 12Coded UI Tests (CUIT) 17exploratory testing 15, 16generic test 21load testing 18, 19manual testing 14ordered test 20unit testing 12, 13web performance tests 16
TestInitialize() method 92Test List Editor 8test management 21Test Manager 2012 369Test Manager tool
about 392connecting, to Team Project 392, 393
TestMethod() method 92Test Mix Model
based on number of virtual users 245based on sequential test order 246based on total number of tests 244based on user pace 245defining 243
Test Planabout 30, 36, 37Test Case, adding 38, 40tests, importing to 345-349tests, running in 349-351Test Suite, adding 38-40
Test Plan progress report 381Test Project
creating, Visual Studio 2012 used 22-24Test Results
about 353-358analyzing 272
building 363, 364detail view 279exporting 272exporting, to Microsoft Excel 280-288graphical view 272-274publishing 339summary view 275, 276tables view 277, 278work item, creating from 365, 366
Test Run configuration file 322, 323Test Runner 68Test Runs 353-358tests
as part of Team Foundation Server build 358-363
importing, to Test Plan 345-349recorded request, copying 153running, in Test Plan 349-351running, MSTest utility used 332running, VSTest.Console used 328
Test settingsData and Diagnostics page 313-315Deployment section 316General option 311Hosts option 318Roles option 313Setup and Cleanup Scripts section 317Test Timeouts option 319, 320Unit Test option 320, 321using 310, 311Web Test option 324
testsettings file 309Test Suite
about 30, 41adding, to Test Plan 38Query-based Test Suites 44Requirement-based Test Suites 45-47Static Test Suites 42types 41
Test tab, Testing Center 399-401Test Timeouts option, Test settings 319, 320Test Timeouts, .testsettings file 199Test View 8TFS project
MTM, connecting to 29think time 240threshold rules 259-261
[ 422 ]
toolbar properties, web performance test editor
about 181data source, adding 181, 184parameterize web server 186recording, adding 185user credentials, setting 184web test plug-in, adding 190, 191
Track tab, Testing Center 402-404transactions 174
UUIMap.cs file 17, 75UIMap.Designer.cs file 17, 74UIMap.uitest 17UiMap.uitest file 76-79uniform resource identifier (URI) 339UnitTestAssertionException 120unit testing
about 8, 10, 12, 13, 89Fakes used 132
unit testing, FakesShims 137Stubs 132-137
Unit Test option, Test settings 320, 321unit tests
and generics 123-126configuring, .runsettings file used 325, 326creating 90-92
Unit Test, .testsettings file 200unplanned work report 381
VValidate method 229validation rules
about 171, 228-231Find Text 172Form Field 172Maximum Request Time 172Required Attribute Value 173Required Tag 173Response Time Goal 172Response URL 173Selected Option 172Tag Inner Text 172
validationsadding, to coded UI test 82-87
VB.NET 17virtual environment 408Visual Studio 2012
software testing 8, 9testing features 8, 9test manamgement 21Test Project, creating 22-24used, for creating report definition 382-389
Visual Studio Load Agent 234VSTest.Console utility
/ListTests option 329/Tests option 329about 327, 328used, for running tests 328
Wweb performance test editor
about 158, 159conditional rules 176-180toolbar properties 181
web performance testing 9web performance tests
about 16, 145creating 145, 146loops, adding 153-158
Web Performance Test toolbar 209web server
parameterizing, in web test 186, 188WebTest class 215WebTest constructor 216web testing
dynamic parameters 210, 211Web Test option, test settings 324web test plug-in
adding 189-191web test recorder
about 146Add a Comment option 147Clear all requests option 147Pause option 147Record option 147Stop option 147
web test request propertiesabout 161
[ 423 ]
Expected HTTP status code 162extraction rules 166-170Follow redirects 162Form POST Parameters 164, 165QueryString parameters 165, 166Record results 163Response time goal(Seconds) 163transactions 174Url 163validation rules 171, 173
Web testsCoded Web tests 17comment, adding 219debugging 191properties, setting for 160running 191Simple Web tests 17
Web Test, .testsettings file 201, 202work item
creating, from Test Results 365, 366
Xxsd.exe utility 305

Thank you for buying Software Testing using Visual Studio 2012
About Packt PublishingPackt, pronounced 'packed', published its first book "Mastering phpMyAdmin for Effective MySQL Management" in April 2004 and subsequently continued to specialize in publishing highly focused books on specific technologies and solutions.
Our books and publications share the experiences of your fellow IT professionals in adapting and customizing today's systems, applications, and frameworks. Our solution based books give you the knowledge and power to customize the software and technologies you're using to get the job done. Packt books are more specific and less general than the IT books you have seen in the past. Our unique business model allows us to bring you more focused information, giving you more of what you need to know, and less of what you don't.
Packt is a modern, yet unique publishing company, which focuses on producing quality, cutting-edge books for communities of developers, administrators, and newbies alike. For more information, please visit our website: www.packtpub.com.
About Packt EnterpriseIn 2010, Packt launched two new brands, Packt Enterprise and Packt Open Source, in order to continue its focus on specialization. This book is part of the Packt Enterprise brand, home to books published on enterprise software – software created by major vendors, including (but not limited to) IBM, Microsoft and Oracle, often for use in other corporations. Its titles will offer information relevant to a range of users of this software, including administrators, developers, architects, and end users.
Writing for PacktWe welcome all inquiries from people who are interested in authoring. Book proposals should be sent to [email protected]. If your book idea is still at an early stage and you would like to discuss it first before writing a formal book proposal, contact us; one of our commissioning editors will get in touch with you.
We're not just looking for published authors; if you have strong technical skills but no writing experience, our experienced editors can help you develop a writing career, or simply get some additional reward for your expertise.
Visual Studio 2012 CookbookISBN: 978-1-84968-652-5 Paperback: 272 pages
50 simple but incredibly effective recipes to immediately get you working with the exciting features of Visual Studio 2012
1. Take advantage of all of the new features of Visual Studio 2012, no matter what your programming language specialty is!
2. Get to grips with Windows 8 Store App development, .NET 4.5, asynchronous coding and new team development changes in this book and e-book
3. A concise and practical First Look Cookbook to immediately get you coding with Visual Studio 2012
Microsoft Visual Studio LightSwitch Business Application DevelopmentISBN: 978-1-84968-286-2 Paperback: 384 pages
A jump-start guide to application development with Microsoft's Visual Studio LightSwitch
1. A hands-on guide, packed with screenshots and step-by-step instructions and relevant background information—making it easy to build your own application with this book and ebook
2. Easily connect to various data sources with practical examples and easy-to-follow instructions
3. Create entities and screens both from scratch and using built-in templates
Please check www.PacktPub.com for information on our titles

Visual Studio 2012 and .NET 4.5 Expert Development CookbookISBN: 978-1-84968-670-9 Paperback: 380 pages
Over 40 recipes for successfully mixing the powerful capabilities of .NET 4.5 and Visual Studio 2012
1. Step-by-step instructions to learn the power of .NET development with Visual Studio 2012
2. Filled with examples that clearly illustrate how to integrate with the technologies and frameworks of your choice
3. Each sample demonstrates key conceptsto build your knowledge of the architecture in a practical and incremental way
Visual Studio 2010 Best PracticesISBN: 978-1-84968-716-4 Paperback: 280 pages
Learn and implement recommended practices for the complete software development lifecycle with Visul Studio 2010
1. This book and e-book detail a large breadth of recommended practices in Visual Studio
2. Consolidated reference of varied practices including background and detailed implementations, great for inexperienced and experience developers alike
3. A guidelines-based set of practices for all aspects of software development from architecture to specific technologies to deployment
Please check www.PacktPub.com for information on our titles
Related Documents