software rip solutions version 14 Reference Manual

Welcome message from author
This document is posted to help you gain knowledge. Please leave a comment to let me know what you think about it! Share it to your friends and learn new things together.
Transcript

software rip solutions version 14
Reference Manual

Reference Manual

3
Introduction .................................................................................................................................................... 11 Installation ....................................................................................................................................................... 12
Select Installer Language.................................................................................................................... 12 Installation Wizard ................................................................................................................................ 12 License Agreement ............................................................................................................................... 13 Choose Location for Program ........................................................................................................... 13 Select Setup Type ................................................................................................................................. 13 Choose Start Menu Folder ................................................................................................................. 13 Choose User Data Folder.................................................................................................................... 14 Completing Installation ....................................................................................................................... 14
First Start.......................................................................................................................................................... 15 Entering the License ............................................................................................................................. 15 Creating Print Environment ............................................................................................................... 15 Using a Predefined Print Environment ........................................................................................... 16 Creating a New Print Environment .................................................................................................. 16 Print Environment Settings ................................................................................................................ 17
Quality Tab ...................................................................................................................................... 17 Printer and Port Tab ..................................................................................................................... 17 Creating Printer Configuration ................................................................................................. 18 Printing Ink Assignment Tab ..................................................................................................... 19 Device Options Tab ...................................................................................................................... 19 Closing the Print Settings Dialog ............................................................................................. 19
Printing with ErgoSoft RIP.......................................................................................................................... 20 Basics of Printing ................................................................................................................................... 20 Printing Directly to the Port............................................................................................................... 22 Printing Using a Print Client .............................................................................................................. 24
RIP Modules.................................................................................................................................................... 26 JobComposer ......................................................................................................................................... 26 JobCenter ................................................................................................................................................ 26 RIP Server ................................................................................................................................................ 26 Album ....................................................................................................................................................... 26 Preview Server ........................................................................................................................................ 26 Print and Cut Clients ............................................................................................................................ 26
Setting up and Using a Print or Cut Client ........................................................................... 26 User Interface ................................................................................................................................................. 27
Workspaces ............................................................................................................................................. 27 Creating a New Workspace ....................................................................................................... 27 Using a Predefined Workspace ................................................................................................ 27
Integrated Job Queue.......................................................................................................................... 27 Properties and Preview Windows .................................................................................................... 27 Design Program Window ................................................................................................................... 27
4
Toolbar ............................................................................................................................................. 27 Status Bar......................................................................................................................................... 28 Activating the Status Bar ............................................................................................................ 28 Rulers ................................................................................................................................................ 28 Activate the rulers ......................................................................................................................... 28
Job Zooming Functions ...................................................................................................................... 29 Zoom In ............................................................................................................................................ 29 Zoom Out ........................................................................................................................................ 29 Zoom to width ............................................................................................................................... 29 Zoom to height ............................................................................................................................. 29
Guide Lines ............................................................................................................................................. 29 Activate guide lines ...................................................................................................................... 29
Print Environment ......................................................................................................................................... 30 Using and Creating Print Environments ........................................................................................ 30
Access to the Print Environment Dialog ................................................................................ 30 Using a Predefined Print Environment ................................................................................... 30 Importing a Print Environment ................................................................................................. 30 Creating a New Print Environment.......................................................................................... 30 Removing a Print Environment................................................................................................. 30 Saving a Print Environment ....................................................................................................... 30 Modifying a Print Environment ................................................................................................ 30 Manage Write protection ........................................................................................................... 30 Tree Structure................................................................................................................................. 31
Print Environment Settings ................................................................................................................ 31 The General Tab ............................................................................................................................ 31 The Quality Tab ............................................................................................................................. 31 The Printer and Port Tab ............................................................................................................ 31 The Extra Tab .................................................................................................................................. 31 Printing Ink Assignment Tab ..................................................................................................... 31 The Ink Control Tab...................................................................................................................... 31 Media Size Tab .............................................................................................................................. 32 Ink Cost Tab .................................................................................................................................... 32 Device Options Tab ...................................................................................................................... 32
Job ..................................................................................................................................................................... 33 Job Handling .......................................................................................................................................... 33
Creating a New job ...................................................................................................................... 33 Specifying the Job Size ............................................................................................................... 33 Opening an Existing Job ............................................................................................................. 33 Opening a Recent Job ................................................................................................................. 33 Multi Page Jobs ............................................................................................................................. 33 Saving a Job .................................................................................................................................... 33

5
Closing a Job .................................................................................................................................. 33 Closing All Jobs .............................................................................................................................. 33
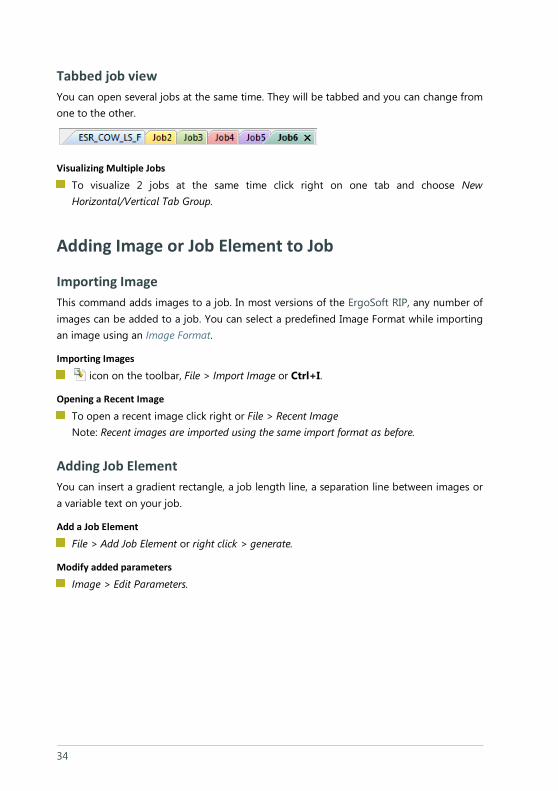
Tabbed job view .................................................................................................................................... 34 Visualizing Multiple Jobs ............................................................................................................ 34
Adding Image or Job Element to Job..................................................................................................... 34 Importing Image ................................................................................................................................... 34
Importing Images.......................................................................................................................... 34 Opening a Recent Image ............................................................................................................ 34
Adding Job Element ............................................................................................................................. 34 Add a Job Element ........................................................................................................................ 34 Modify added parameters.......................................................................................................... 34
Editing Job ...................................................................................................................................................... 35 Selecting Images ................................................................................................................................... 35
Selecting One Image .................................................................................................................... 35 Selecting Several Images ............................................................................................................ 35 Selecting Successive Images ..................................................................................................... 35 Selecting All Images on the Job ............................................................................................... 35
Positioning Images ............................................................................................................................... 35 Numerical Input ............................................................................................................................. 35 Simple Positioning ........................................................................................................................ 35 Positioning Adjoining another Image .................................................................................... 35 Activating Overlay Mode ............................................................................................................ 35 Split overlaid images .................................................................................................................... 35 Alignment Functions .................................................................................................................... 35 Grouping Images .......................................................................................................................... 36 Moving an Image to another Job ............................................................................................ 36 Cancel Moving ............................................................................................................................... 36
Rotating Images .................................................................................................................................... 36 Rotating Images ............................................................................................................................ 36 Rotating Image Parts ................................................................................................................... 36
Mirroring Images .................................................................................................................................. 36 Mirroring Images........................................................................................................................... 36
Duplicating Images .............................................................................................................................. 36 Duplicating Images....................................................................................................................... 36
Image Layout.................................................................................................................................................. 37 Scaling Images ....................................................................................................................................... 37
Access to the Scaling Dialog ..................................................................................................... 37 Numerical Scaling ......................................................................................................................... 37 Manual Scaling............................................................................................................................... 37
Cropping Image .................................................................................................................................... 37 Access to the Cropping Dialog ................................................................................................. 37
6
Numerical Cropping..................................................................................................................... 37 Manual Cropping .......................................................................................................................... 37
Tiling Images .......................................................................................................................................... 37 Manual Tiling.................................................................................................................................. 37 Disconnect Parts............................................................................................................................ 37
More Image Layout Functions .......................................................................................................... 38 Print Marks ...................................................................................................................................... 38 Undo/Redo ..................................................................................................................................... 38 Center ............................................................................................................................................... 38 Group ................................................................................................................................................ 38 Export................................................................................................................................................ 38 Edit ..................................................................................................................................................... 38 View ................................................................................................................................................... 38
Printing a Job ................................................................................................................................................. 38 Print directly or with a Print Client .................................................................................................. 38
Printing with Print Client ............................................................................................................ 38 Printing without Print Client ...................................................................................................... 38
Image Preset .................................................................................................................................................. 39 Use Image Preset .................................................................................................................................. 39
Image Preset for Import ............................................................................................................. 39 Use or Change Image Preset on Already Imported Images ........................................... 39
Create Image Preset............................................................................................................................. 39 Create new Image Preset ........................................................................................................... 39
Image Preset Settings ......................................................................................................................... 39 Edit ..................................................................................................................................................... 39 Color Management ...................................................................................................................... 39 PostScript/PDF ............................................................................................................................... 40
List Manager ........................................................................................................................................... 40 Composite Presets........................................................................................................................................ 40
Default Presets ....................................................................................................................................... 40 Image Color Control .................................................................................................................................... 41
Color Management .............................................................................................................................. 41 Input Profile .................................................................................................................................... 41 Rendering intent ........................................................................................................................... 41
Color Replacement ............................................................................................................................... 41 Access to Color Replacement ................................................................................................... 41
Global Color Replacement ................................................................................................................. 42 Access to Global Color Replacement ..................................................................................... 42
Tune .......................................................................................................................................................... 42 Access to Tune ............................................................................................................................... 42
7
Pure Colors .............................................................................................................................................. 42 Access to Pure Colors .................................................................................................................. 42
Color Tools ...................................................................................................................................................... 43 Generate Colorbooks ........................................................................................................................... 43
Generate a New Color Book ...................................................................................................... 43 Colorbook Options ....................................................................................................................... 43 Generation of Many Different Color Tones .......................................................................... 43
Test Color Accuracy .............................................................................................................................. 43 Access to Test Color Accuracy .................................................................................................. 43
Swatch Book ........................................................................................................................................... 43 Access to Swatch Book Dialog .................................................................................................. 43
Named Colors ........................................................................................................................................ 44 Access to Named Colors ............................................................................................................. 44 Add New Colors ............................................................................................................................ 44 Print Similar Colors ....................................................................................................................... 44
Measure Colors ...................................................................................................................................... 44 Access to Measure Colors .......................................................................................................... 44
White Ink/Finish/Varnish .................................................................................................................... 44 Naming ............................................................................................................................................. 44 Density Linearization .................................................................................................................... 44 Generate Pixels .............................................................................................................................. 44
Configuration ................................................................................................................................................. 45 Application Defaults ............................................................................................................................. 45
Access to application defaults .................................................................................................. 45 Preferences ...................................................................................................................................... 45 Image ................................................................................................................................................ 45 Color Management ...................................................................................................................... 45 PostScript/PDF ............................................................................................................................... 45 Job...................................................................................................................................................... 45 Application ...................................................................................................................................... 45 Spectrophotometer ...................................................................................................................... 46 User Interface Preferences ......................................................................................................... 46
Special features ............................................................................................................................................. 46 Color Combine ....................................................................................................................................... 46
Access to Color Combine ........................................................................................................... 46 Coloration Tab ............................................................................................................................... 46 Step & Repeat Tab ....................................................................................................................... 47 Halftone Screening Tab............................................................................................................... 47 Options Tab .................................................................................................................................... 47
Cutting Job .............................................................................................................................................. 47 Access to Cutting Option ........................................................................................................... 47
8
HP Artist ................................................................................................................................................... 47 Access to HP Artist ....................................................................................................................... 47
Linearization and Profile Tools ................................................................................................................. 48 Density Linearization ........................................................................................................................... 48
Creating New Density Linearization........................................................................................ 48 Density Relinearization ....................................................................................................................... 48
Realizing a Density Relinearization ......................................................................................... 48 ColorGPS.................................................................................................................................................. 49
Access to Color GPS ..................................................................................................................... 49 Color Boost ..................................................................................................................................... 49
Test Images ............................................................................................................................................. 49 Other Tools ..................................................................................................................................................... 50
Variable Data .......................................................................................................................................... 50 Creating a Variable Data Template ......................................................................................... 50 Using a Variable Data Template............................................................................................... 50
Picture Package ..................................................................................................................................... 50 Creating a Picture Package Template .................................................................................... 50 Using a Picture Package Template .......................................................................................... 50
Position Template ................................................................................................................................. 50 Creating a Position Template.................................................................................................... 50 Using a Position Template ......................................................................................................... 50
Separation Printing .............................................................................................................................. 51 Hot Folder ............................................................................................................................................... 51
General Tab..................................................................................................................................... 51 Job Tab ............................................................................................................................................. 52 Image Import Tab ......................................................................................................................... 52 Contour Cut Tab ............................................................................................................................ 52
Preflight ................................................................................................................................................... 52 Manual Preflight ............................................................................................................................ 52 Automatic Preflight ...................................................................................................................... 52 Soft Proofing .................................................................................................................................. 52 Print Proofing ................................................................................................................................. 52
RGB Profiling and Printing ................................................................................................................. 53 Calibrating for RGB Output ....................................................................................................... 53
User Level ................................................................................................................................................ 53 Change User Level ........................................................................................................................ 53
Scan and Twain Source ....................................................................................................................... 53 Access to Scan and Twain Source ........................................................................................... 53

9
Maintenance Tool ......................................................................................................................................... 54 Configuration ......................................................................................................................................... 54
Select UI Language ....................................................................................................................... 54 Set User Data Path ........................................................................................................................ 54 Automatically Start Program ..................................................................................................... 54 Shutdown ErgoSoft RIP ............................................................................................................... 54
Distributed Setup .................................................................................................................................. 54 Configure Remote Server ........................................................................................................... 54 Configure Remote Client ............................................................................................................ 54
Troubleshooting .................................................................................................................................... 54 Register COM Interfaces ............................................................................................................. 54 Reset Current Print Environment ............................................................................................. 54 Empty Snapshot Folder List ....................................................................................................... 55 Create Support Data ZIP File ..................................................................................................... 55
Help Functions ............................................................................................................................................... 55 License Info ............................................................................................................................................. 55
License Code and Dongle Number ......................................................................................... 55 The License Details ....................................................................................................................... 55
Enter License........................................................................................................................................... 55 Documentation ...................................................................................................................................... 55 About ........................................................................................................................................................ 55 ErgoSoft on the Web ........................................................................................................................... 55

10
11
Introduction The purpose of this document is to give you a complete overview of the functions and features of the ErgoSoft RIP. Depending on the software package you acquired, not all features are included in your license. For more information how to handle specific functions please refer to the according application note. You can find these application notes on the product CD, upload them on the help tab in the program, or download on our website. The ErgoSoft RIP is available in different editions. Therefore the description of available features in this document does not necessarily reflect the license details of your edition of the ErgoSoft RIP. For information on the features included in your edition of the ErgoSoft RIPs refer to the ErgoSoft homepage or contact your dealer.
12
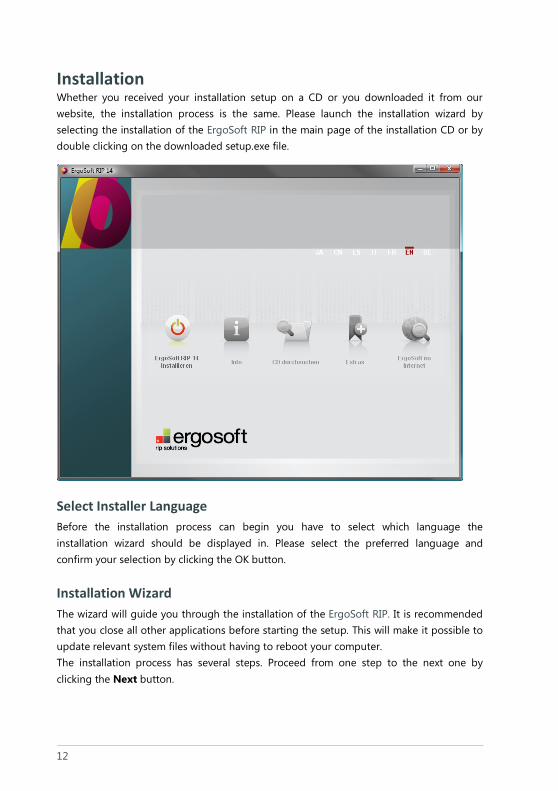
Installation Whether you received your installation setup on a CD or you downloaded it from our website, the installation process is the same. Please launch the installation wizard by selecting the installation of the ErgoSoft RIP in the main page of the installation CD or by double clicking on the downloaded setup.exe file.
Select Installer Language Before the installation process can begin you have to select which language the installation wizard should be displayed in. Please select the preferred language and confirm your selection by clicking the OK button.
Installation Wizard The wizard will guide you through the installation of the ErgoSoft RIP. It is recommended that you close all other applications before starting the setup. This will make it possible to update relevant system files without having to reboot your computer. The installation process has several steps. Proceed from one step to the next one by clicking the Next button.
13
License Agreement Please review the license terms before installing the ErgoSoft RIP. You must accept the agreement before installation will begin. To accept the terms of the agreement, click I Agree and continue the installation.
Choose Location for Program Choose the folder in which to install the ErgoSoft RIP. We suggest installing the software in the recommended Destination Folder. To install in a different folder, click Browse and select it.
Please note, that in this step you specify the installation folder. The folder for the User Data can be defined later in the installation progress.
Select Setup Type Select the setup type of the ErgoSoft RIP. Setup type “Dongle Version (Codemeter)” is the setup type for the retail version requiring a dongle (Codemeter) as well as a license. Setup type “Trial Version” is meant for a test version installation without dongle but will still require a license.
Choose Start Menu Folder Choose the Start Menu folder for the ErgoSoft RIP shortcuts. We suggest installing the shortcuts into the recommended folder. Once you specified the Start Menu folder you can start the installation of the software by clicking Install. The installation of the software might take some time so please be patient.

14
Choose User Data Folder During the installation, a dialog will be displayed which allows you to choose the location of the User Data Folder in which all User Data will be saved. If you change the suggested folder please make sure that you do not use the same directory as for any previous version. As you can see on the suggested folder it is possible to use a subfolder of the previous versions user folder EsRip.
Click OK to confirm the selected folder. When a previous version has been installed on the same system, the installation offers the possibility to copy the user settings from this version.
Completing Installation Please follow the instructions given by the installation wizard. Plug in the USB dongle as soon as the wizard asks you to do so. It is important to make sure that the dongle has been recognized by the system properly before you continue. Continue the installation until the Completing the Setup Wizard window is shown in which you click the Finish button to finish the installation.

15
First Start
Entering the License Launch the ErgoSoft RIP. This will open the License dialog. Type your license code into the field labeled License Code or import it by clicking the From File button.
Now select the desired *.eslic file which you should have received from your reseller and press OK. The license will now be displayed in the License Code field. Click OK.
Creating Print Environment After having licensed your product, the ErgoSoft RIP will ask you to make a print environment available. Import or download a print environment or create a new one.
The print environment is the cornerstone of the ErgoSoft RIP. It allows you to define all the necessary information and settings to print on a particular printer/media/ink combination. It contains the printer driver, the dithering method, the linearization of the printer, the output profile, the total ink limit, the port used, and other device settings.

16
Using a Predefined Print Environment The ErgoSoft RIP offers a number of predefined print environments available on the web. To download these print environments you have to start the Print Environments dialog. To do this select from the menu bar Tools > Print Environments. In this dialog click Download to connect to the print environments server. Select the print environment which fits best to your actual combination of printer, ink, and media. If you want to import a print environment from another place, please click on the Import button in the Print Environment dialog and navigate to the target folder.
Creating a New Print Environment From the Print Environments dialog select Add to open the Add Print Environment dialog. The list shown here contains all devices supported in the ErgoSoft RIP. To select a specific device driver, click on the “+” in front of the particular manufacturer to display the list of available devices. Select the device driver you want to use and edit the Name according to your needs. Confirm the device driver selection by clicking the OK button. If the selected driver supports different sizes or models of the selected device, please specify the size or model in the Printer Model dialog that appears and confirm your selection by clicking the OK button.

17
Print Environment Settings The Print Settings dialog for the new print environment should now open. Please read on for a brief description of the available and required settings.
Quality Tab
1) First, specify the Resolution to be used. 2) When selecting the Dithering Method, Smooth Diffusion is usually the best choice because it produces the highest quality results. Alternatively Stochastic3e is available, which processes faster but will produce results with slightly lower quality. For now, you can leave the settings for Density Linearization, Printer Profile and Total Ink limit as set by default.
Printer and Port Tab
The Printer and Port tab allows you to set up a printer or printer/cutter configuration which determines how the data is sent to a specific printer or printer/cutter. Once created, this configuration file can be selected whenever you create a new print environment for this printer or printer/cutter.
18
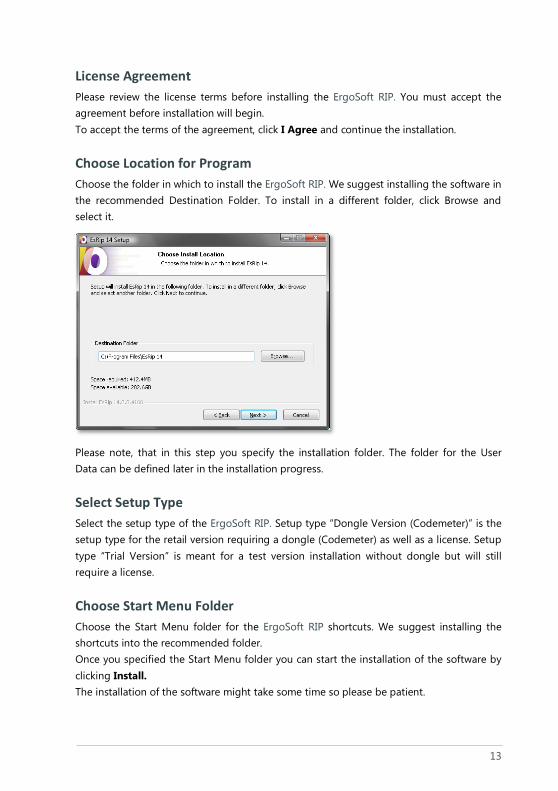
Creating Printer Configuration
To specify the required information, such as the printer port to be used and the spool folder, create a new printer configuration by clicking the New button. In the displayed Edit Printer Settings dialog, you create the printer configuration. When closing the dialog with OK, you are prompted to enter a name for the current printer configuration. Once you have created a printer configuration, you can edit, delete or rename it using the respective buttons.
Specify Printer The displayed dialog Edit Printer Settings allows you to specify the above mentioned settings. In order to specify the port of your printer, click on the Add button. Select the required port in the Add Port dialog. Specify Folder for Spool Files If your copy of the ErgoSoft RIP is licensed for using Print Clients (module for spooling of print jobs as opposed to printing directly to the printer) you also need to set up a spool folder in which the spooled data will be saved. In order to specify the spool folder click on Browse in the Folder for Spool Files section. Select or create a spool folder in the “Browse for folder” dialog.

19
Printing Ink Assignment Tab
The Printing Ink Assignment tab gives you control of the ink’s positions in the printer, as well as light ink blending settings. If you are not sure which slot an ink is located in, simply select Print Ink Assignment Chart from menu Tools > Linearization & Profile Tools which will automatically print out each color along with a number which indicates the corresponding slot.
Device Options Tab
In this tab you can choose the device specific options you want to use. Among these settings are – depending on your printer – print direction, number of passes, dot size, dry time, etc. If you use a predefined print environment, please keep in mind that these settings have influence on the quality of the final printout.
Closing the Print Settings Dialog
After having completed the settings, close the dialog Print Settings by clicking the OK button. For best results, you should also complete the following steps: 1. Create a Density Linearization 2. Find and set the maximum amount of applied ink 3. Create a printer profile. For more information about the print environment configuration please refer to the according application note.
20
[ Im
age
Impo
rt]
[ Preview Creation ]
[Prin
t Com
man
d]
[Prin
t dire
ctly
from
RIP
Ser
ver]
[Prin
t]
[Pr
int D
ata
]
[ RIP Data ]
[Prin
t Com
man
d]
[ Progress Report ]
[ Progress Report ]
[ RIP Command ]
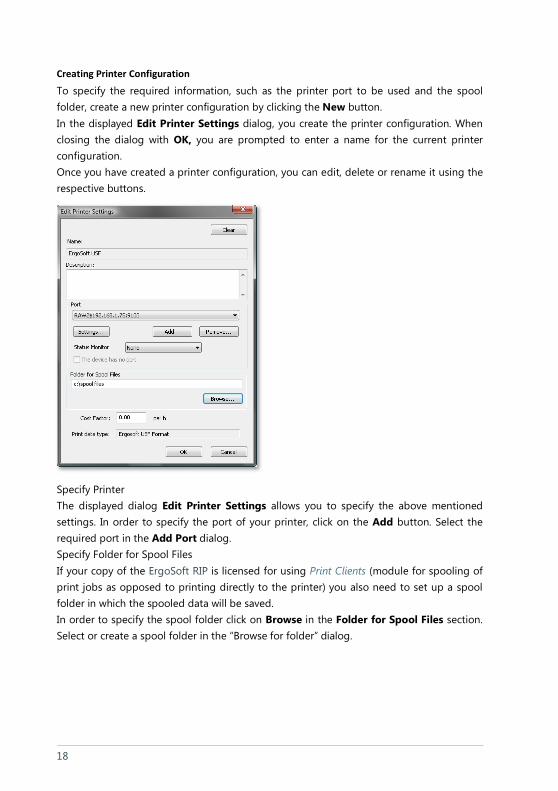
Preview ServerCreates previews of im-ages during the importprocess.
Print/Cut ClientHosts spool data andprint queue for a specificprinter. Sends all data tothe printer.
RIP ServerRip engine
JobCenterDisplay interface for Job-QueueServer
JobComposerMain module. Layoutingand job make-ready in-terface.
JQ-ServerBackground task. Man-ages all communicationbetween the differentmodules.
Spool FolderCommon Windows foldercontaining ripped data forthe Print Client.
Printing with ErgoSoft RIP
Basics of Printing

21
Basically, the data flow when having launched the Print command is the same for all possibilities: The JobComposer (main program you are working with to create your jobs) forwards the print command including all necessary data and information to the JobQueueServer which shows its processes in the JobCenter parts of which are displayed in the JobComposer windows Waiting, Done, Preview, Details, and Journal. The JobQueueServer controls data ripping in the RIP Server and forwards the ripped data either directly to the printer or into a Print Client that controls the printer.

22
[Prin
t Com
man
d]
[Prin
t dire
ctly
from
RIP
Ser
ver]
[ Progress Report ]
[ RIP Command ]
RIP ServerRip engine
JobCenterDisplay interface for Job-QueueServer
JobComposerMain module. Layoutingand job make-ready in-terface.
JQ-ServerBackground task. Man-ages all communicationbetween the differentmodules.
Printing Directly to the Port

23
To print directly to the port, the option Skip Print Client (Print directly to port) must be checked in the Print dialog.
When having launched the print command, the JobQueueServer sends the job data to the RIP Server for ripping. The RIP Server returns the ripped data to the JobQueueServer that sends the ripped data to the printer. Since the ripped data is sent directly to the printer, ripping can be just as fast as the printer is able to capture the data. To avoid problems with mixing two printouts we strongly recommend using just one RIP Server to rip jobs for the same printer.
24
[Prin
t Com
man
d]
[Prin
t]
[P
rint D
ata
]
[ RIP Data ]
[Prin
t Com
man
d]
[ Progress Report ]
[ Progress Report ]
[ RIP Command ]
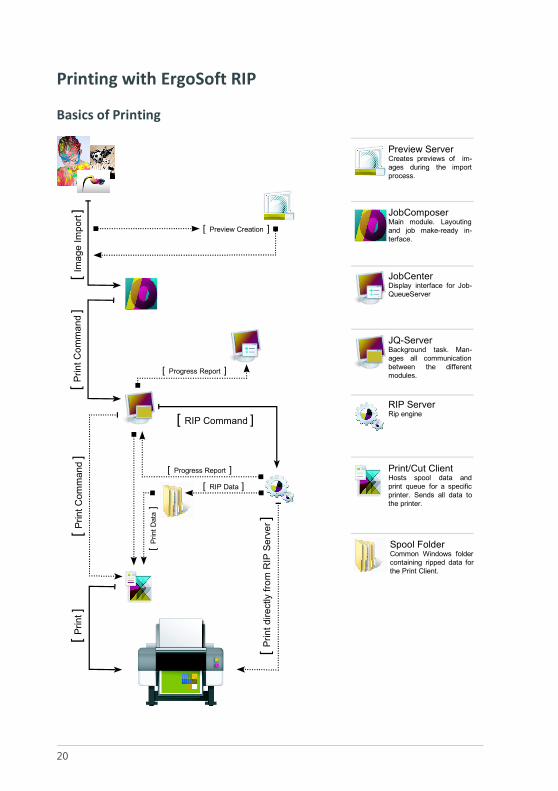
Print/Cut ClientHosts spool data andprint queue for a specificprinter. Sends data to theprinter.
RIP ServerRip engine
JobCenterDisplay interface for Job-QueueServer
JobComposerMain module. Layoutingand job make-ready in-terface.
JQ-ServerBackground task. Man-ages all communicationbetween the differentmodules.
Spool FolderCommon Windows fol-dercontaining ripped data forthe Print Client.
Printing Using a Print Client

25
To print using a Print Client, the option Skip Print Client (Print directly to port) must not be checked in the Print dialog. Please note that Print Client usage requires also a spool folder being specified in the print environment.
When having launched the print command, the JobQueueServer sends the job data to the RIP Server for ripping. The RIP Server returns the ripped data to the JobQueueServer that sends the ripped data to the Print Client that sends the ripped data to the printer. Since the ripped data is captured in the Print Client, ripping can be faster than the printer is able to capture the data. The Print Client also controls which job is sent to the printer; thus you can rip several jobs simultaneously in several RIP Servers.

26
RIP Modules
JobComposer The JobComposer is the heart of the ErgoSoft RIP. It is used to create, layout and print all your jobs.
JobCenter The JobCenter allows specifying global rules for deleting and archiving done jobs; it manages and gives information about printed jobs
RIP Server The RIP Server is used to track the rasterization and ripping process as well as to configure the PostScript interpreter.
Album The Album allows managing the previews of the images that are displayed in the job.
Preview Server The Preview Server updates previews and creates snapshots. Snapshots are automatically created and used for the display in the job and image editing functions instead of the large, high-resolution original image file.
Print and Cut Clients The Print Client controls the data transfer of ripped files from a certain folder to a certain printer; the Cut Client controls the data transfer to a cutter. Further the print client gives information about the ripping progress, the files which are waiting for print, the printed files as well as the errors occurred. It allows you to see the costs for your printing as well as the ink consumption. The details, the journal and the preview are displayed on the right side of the print client and allow you some additional information. Note: During the printing process you still have the possibility to change the number of copies.
Setting up and Using a Print or Cut Client
/ icon in the toolbar or Tools > Print/Cut Clients > Setup or Printer and Port tab respectively Cutter Device tab in print environment or cut environment settings.
27
User Interface
Workspaces The ErgoSoft RIP offers a variable workspace; the standard, edit or custom workspace. Depending on what you are doing you can adept the workspace. The edit workspace enlarges for example the preview window given that you work on it for several manipulations. You can create your own workspace.
Creating a New Workspace
View > Workspaces > Copy to > New
Using a Predefined Workspace
View > Workspaces > Standard, Edit or Custom
Integrated Job Queue Integrated in the JobComposer window, the integrated job queue allows you to check the printing progress, the done jobs as well as their details and preview while you are editing a new job. Additionally it shows you the status of the Properties and Preview windows. This permits you to optimize your working time and organization. The 4 first windows concern the printing process and can be opened if necessary.
Properties and Preview Windows You have the possibility to display, to hide, to separate and to resize all different windows. It is advisable to keep the Properties window always displayed since it offers the access to many functions. The preview window offers also many options and it is recommended to keep it open while editing your job.
Design Program Window The different bars allow a quick access or information to all basic functions.
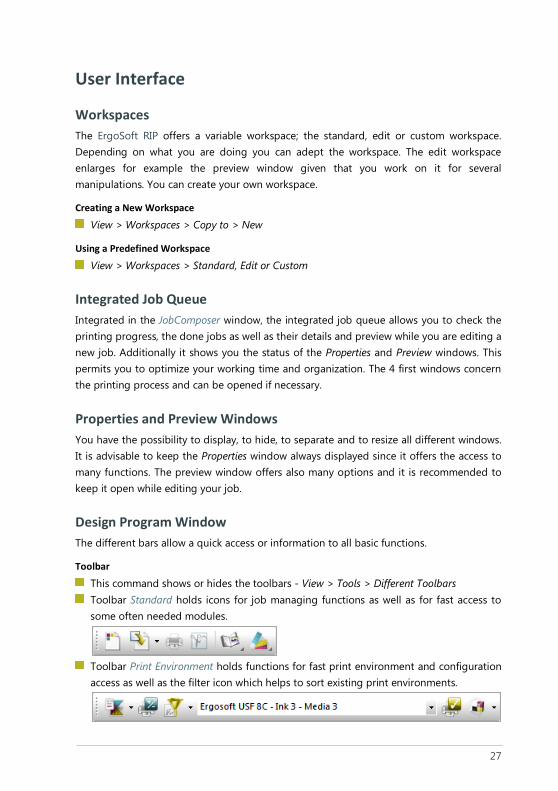
Toolbar
This command shows or hides the toolbars - View > Tools > Different Toolbars Toolbar Standard holds icons for job managing functions as well as for fast access to
some often needed modules.
Toolbar Print Environment holds functions for fast print environment and configuration
access as well as the filter icon which helps to sort existing print environments.

28
The toolbar ImagePreset holds the icon for fast image preset and configuration access
Toolbar Cut Environment holds functions for fast cut environment and cut configuration
access.
Toolbar Position holds functions for fast image scaling and positioning.
Toolbar View holds icons for job zooming functions, also in View.
Toolbar Image holds functions for image editing and handling.
Toolbar Tools holds icons for color management functions.
Note: You can move and replace all toolbars by holding the mouse on it until appears. Slide the toolbar to the place you want and release the mouse button.
Status Bar
This command shows or hides the status bar. The status bar is located at the lower border of the JobComposer window. It is used to display information about the current program status, the selected image, messages, and short help texts to the selected menu item.
Activating the Status Bar
View > Status bar
Rulers
This command shows or hides the rulers in the job window. When necessary, both rulers can be shown at the upper and left border of the job window. These can help when designing the job.
Activate the rulers
View > Rulers
29
Job Zooming Functions The job zooming functions allow zooming in, out, to width or to height.
Zoom In
magnify the output on the screen - Zoom In - Ctrl++
Zoom Out
reduce the output on the screen - Zoom Out – Ctrl--
Zoom to width
zoom the view to the width of the job - Zoom to Width - Ctrl+0
Zoom to height
zoom the view to the height of the job - Zoom to Height - Ctrl+1
Guide Lines The new guidelines in the ErgoSoft RIP job window are handled in the same way as in the current graphic programs by Adobe Inc. To insert guidelines you need to activate the rulers. Drag down from the upper ruler to get a horizontal guideline; for a vertical guideline drag from the right guideline.
Activate guide lines
Edit > Guide Lines

30
Print Environment
Using and Creating Print Environments The Print Environment is the cornerstone of ErgoSoft RIPs. It allows you to define all the necessary information and settings to print on a particular printer/media/ink combination. It contains the printer driver, the dithering method, the linearization of the printer, the output profile, the total ink limit, the port used, and other device settings. Every printer needs different print environments related to the ink and the media to get the best printing result. You must create a specific profile for each medium.
Access to the Print Environment Dialog
icon on the toolbar or Tools > Print Environments…
Using a Predefined Print Environment
ErgoSoft RIPs offer a number of predefined print environments available on the web. To download these print environments click on Download to connect to the Print Environments Server. Select one which fits best to your actual combination of printer, ink, and media.
Importing a Print Environment
If you want to import a print environment from another place, please click on Import and navigate to the target folder.
Creating a New Print Environment
Press Add to create a new print environment. The list shown here contains all drivers supported by the ErgoSoft RIP.
Removing a Print Environment
Hit the Remove button. Be careful! A removed print environment is deleted if you did not save it somewhere else before.
Saving a Print Environment
Click on Export and save it in a new folder.
Modifying a Print Environment
It is advisable to copy an existing print environment for modifying the settings. Press Copy and change the name of the copied print environment. If you want to keep the same settings and only change the name of a print environment click on Rename.
Manage Write protection
If you only want to read a print environment, tick the Manage write protection case and select all print environments you want to protect. A lock next to the name indicates the protection. This option allows you to see all the settings but it is impossible to change them. This gives you a certain security protecting good profiles.
31
Tree Structure
You can either show all of the already existing print environments in a list or group them by names. To get this grouped order, check the Tree Structure checkbox.
Print Environment Settings All print environment settings can be set and modified as long as no printer profile is activated. After the inclusion of the profile nothing should be changes anymore. The following tabs contain the print environment settings:
The General Tab
Here you can change the name, give a general description, specify media (for cost calculation) and indicate the printer model.
The Quality Tab
Allows you to specify the resolution and the dithering method, to adjust light ink settings and dot sizes, to limit the ink amount and to use a density linearization and printer profile.
The Printer and Port Tab
Allows you to set up a printer configuration which determines how the data is sent to a specific printer. Once created, this configuration can be selected whenever you create a new print environment for this printer. The Print Client can also be activated and set here.
The Extra Tab
Contains the legacy ink control strips, job mirroring, automatic size change consideration, target printer simulation and the Named Colors Profile.
Printing Ink Assignment Tab
Gives you a control of the ink’s positions in the printer. If you are not sure in which slot an ink is located in, go to Tools >Linearization & Profile Tools > Print Ink Assignment Chart, which will automatically print out each color in all dot sizes available with the number that indicates the corresponding slot from left to right.
The Ink Control Tab
Allows keeping a control over all inks in the printer. The production stripes can be set by side, width, horizontal distance, stripes count and coverage. Attention! Coverage is set for each ink, 4 inks each with 100% coverage means 400% ink on your media! The visual control stripes show more in detail the evolution of the ink during the printing process. You can select the side, the width and height with the corresponding distance, the shade count and the mode (one column, dot sizes in row or continuous) with all dot sizes or just the biggest one.

32
Media Size Tab
To set up a specific media size which should always be used for a specific print en-vironment, check the option Use as default for this Print Environment and select or add the default media size you want to use for the printer. Some printers have this information in the printer driver and transmit it to the program. The media size is handled in the global options by default, located in the menu bar Tools > Options > Preferences > Job > Job Default Settings > Media Size.
Ink Cost Tab
Shows you the consumption of ink per dot for each dot size. It is possible that for a specific printer you have to enter yourself the values given by the printer reseller. This information does not have any influence on the printing behavior, but they are necessary to calculate the printing cost. Further allows specifying the ink for cost calculation.
Device Options Tab
You can choose the device specific options you want to use. Among these settings – depending on your printer and your medium – are print direction, number of passes, dot size, dry time, etc. If you use a predefined print environment, please keep in mind that these settings have an influence on the quality of the final printout and changing them is not recommended.
33
Job
Job Handling A job basically displays the media which is in your printer. Multiple jobs can be edited at the same time in multiple windows. The job size (usually=media size) including margins can be set for each job any time.
Creating a New job
Click the icon in the toolbar, Ctrl+N, File > New.
Specifying the Job Size
Click the icon in the Properties window or Tools > Options > Preferences > Job > Job Default Settings > Media Size – either basic settings or ask for every new job.
Opening an Existing Job
An existing job can be opened with all settings – File > Open.
Opening a Recent Job
To open a recent job – File > Open a recent job.
Multi Page Jobs
To get several pages per job click right on an image and choose Page per Image.
Saving a Job
A job can either been saved under its current name or under a new name – File > Save or Save as…, Ctrl+S.
Closing a Job
To close a job click either on the x on the right top corner of the job or File > Close.
Closing All Jobs
To close all jobs at once – Window > Close All Documents Note: You see the name of all opened jobs listed in the window menu.
34
Tabbed job view You can open several jobs at the same time. They will be tabbed and you can change from one to the other.
Visualizing Multiple Jobs
To visualize 2 jobs at the same time click right on one tab and choose New Horizontal/Vertical Tab Group.
Adding Image or Job Element to Job
Importing Image This command adds images to a job. In most versions of the ErgoSoft RIP, any number of images can be added to a job. You can select a predefined Image Format while importing an image using an Image Format.
Importing Images
icon on the toolbar, File > Import Image or Ctrl+I.
Opening a Recent Image
To open a recent image click right or File > Recent Image Note: Recent images are imported using the same import format as before.
Adding Job Element You can insert a gradient rectangle, a job length line, a separation line between images or a variable text on your job.
Add a Job Element
File > Add Job Element or right click > generate.
Modify added parameters
Image > Edit Parameters.
35
Editing Job The job window shows you the imported images that you can edit now. The ErgoSoft RIP allows you to format your images in an easy and intuitive way. To arrange the image on your job window you have several options like positioning, rotating etc.
Selecting Images To modify an image it must be selected. You can either select one or several images. The blue squares in the image corners indicate which images are selected and which one is active (bigger blue square).
Selecting One Image
Mouse click on image, to move from one to the other tab key.
Selecting Several Images
Ctrl key while mouse click on selected images.
Selecting Successive Images
Drag rectangle with the mouse on selected images or Shift key and mouse click on first and last image.
Selecting All Images on the Job
Ctrl+A or Edit > Select All.
Positioning Images It can be important to position your image on a certain place on the job; e.g. to save media, to print the image on an exact distance to another image, or for any other reason.
Numerical Input
icon on the Properties window and the toolbar, V key.
Simple Positioning
Drag image with the mouse.
Positioning Adjoining another Image
Drag image with the mouse, hold down Shift key while releasing left mouse button.
Activating Overlay Mode
Edit > Overlay Mode, you can overlay all images.
Split overlaid images
Image > Split Overlay or right click > Split Overlay.
Alignment Functions
Image > Center
36
Grouping Images
Image > Group or right click > Group.
Moving an Image to another Job
Drag with the mouse. Keeps all image formats (get paneled if job is smaller).
Cancel Moving
Press Esc while moving, Ctrl+Z, Edit > Undo.
Rotating Images Rotating images is often useful to save media, diversify the print direction on a structured media etc. Attention: Printing rotated images consumes more calculation time and therefore can reduce the output speed!!
Rotating Images
By 90°, 180° or 270° - icon on the Properties window, R key or Image > Rotate.
Rotating Image Parts
By 90° - icon on the toolbar, Alt+Ctrl+R, or Image > Rotate Part.
Mirroring Images Allows you to mirror complete images or image parts horizontally.
Mirroring Images
icon on the Properties window or icon on the toolbar, Ctrl+M or Image > Mirror.
Duplicating Images This option creates copies of the selected image. You can either create one copy of the image or generate a grid of duplicated images.
Duplicating Images
icon on the Properties window and the toolbar, Ctrl+D, Image > Duplicate, Ctrl+hold left mouse button, duplicate and position next to another image using Shift+Ctrl.

37
Image Layout
Scaling Images Extends or shrinks the selected image to any size.
Access to the Scaling Dialog
icon on the Properties window and the toolbar, S-key.
Numerical Scaling
Can be done by changing the size in selected unit or by absolute or relative %.
Manual Scaling
Proportional scaling by dragging one corner of the image while pressing the Shift key, distorted scaling by dragging one of the corner points.
Cropping Image This command allows that only a part of the current image is used and the rest is discarded.
Access to the Cropping Dialog
icon on the Properties window and the toolbar, C key.
Numerical Cropping
In the Properties window in selected unit on left, right, top or bottom side.
Manual Cropping
In the Preview window.
Tiling Images When importing an image that is wider than the job, the image gets automatically tiled. Manual tiling allows you to define the size of the different tiles. You can separate the image in horizontal and vertical cut tiles, as well as rotate one of two or print every tile on a separate page what allows you to easily reprint one specific tile of the job.
Manual Tiling
icon on the Properties window, Ctrl+T.
Disconnect Parts
To treat each tile individually you need to disconnect parts – Image > Disconnect parts
38
More Image Layout Functions In addition to the basic image layout function some special functions are available with the ErgoSoft RIP.
Print Marks
To have some information on your printout you can set print marks – icon in Properties window, right click > Print Marks or Image > Print Marks. Note: You can edit print mark presets, use a predefined one or create a new one.
Undo/Redo
Allows you to cancel or to restore a manipulation.
Center
Centers the image precisely in the job or media (width).
Group
Allows you to group several images. All manipulations are done for the whole group.
Export
Allows you to export an image including color management to any folder.
Edit
Available when a program for image editing is specified in the options.
View
Available when a program for image viewing is specified in the options.
Printing a Job
Print directly or with a Print Client This command controls the job output. You can print directly or handle it manually by using a Print Client.
Printing with Print Client
To handle printing jobs manually, use the Print Client. It helps you to manage your printing jobs and to avoid errors.
Printing without Print Client
Automatic printing by skipping the Print Client. Check the checkbox in the printing dialog or in the printer and port tab in the print environments settings.

39
Image Preset
Use Image Preset The Image Preset function allows you to save the main image settings. You can generate different pre-settings and choose the one you desire for each job no matter how many images are in there. This function helps you to save time due to the fact that you do not have to repeat basic settings for each image. For detailed information about handling image presets please refer to the concerning application note.
Image Preset for Import
Select the desired Image Preset in the dropdown menu of the toolbar. The Image Preset will automatically be applied to all imported images.
Use or Change Image Preset on Already Imported Images
To apply or change an Image Preset on an already imported image Right Click on the desired image > ImagePreset > select desired image preset.
Create Image Preset For detailed information about handling image presets please refer to the concerning application note.
Create new Image Preset
Click the New button in the Image Preset toolbar to create a new Image Preset based on the selected one.
Image Preset Settings The main settings of the image preset are identical to the global job settings.
Edit
Image format - scale, fit and alignment, rotate and mirror. Print marks - crop marks, register marks, image label. Image AddOns - company logo, dashed cut line, seam extension, canvas mounting
extension, eyelets, and others. Image margin – predefined margin or personal margins, rotate margins with image.
Color Management
Input profiles – select color profiles to be used for images as default input profile – RGB images, CMYK images, Lab images with respective rendering intent.
PostScript/PDF - use named colors profile for spot color replacement, input profile for CMYK data - chose profile and rendering intent, input profiles for RGB data – choose profile and rendering intent.

40
PostScript/PDF
Parameters - automatic raster resolution reduction, minimum resolution, raster resolution reduced by factor, use external image files for OPI images, treat DCS as separate file.
List Manager The image preset list manager allows you to edit, delete or rename the different parameters of the image preset or to choose a predefined one. Modifying an existing image preset is only possible in the list manager.
Composite Presets
Default Presets The default presets allow an access to the application defaults. You can either change settings in an existing preset ( ), delete it ( ), rename it ( ) or create a new one ( ). Note: For the image presets you have the same functions. For further information see in chapter Image Presets.

41
Image Color Control
Color Management Color management describes a controlled conversion between the colors of various color devices such as scanners, digital cameras, monitors, printers, and corresponding media. The primary goal of color management is to obtain a good match across color devices. For instance, imagine an image which should look the same on all media printed with any printer. Color management helps to achieve the same appearance on all media and printers, provided the device is capable of delivering the needed color intensities. Therefore some rules must be respected.
Input Profile
Controls the conversion from the image color space to Lab. The color profile characterizes the source of the image data. Select the color profile in the list that corresponds to the source of the image data. When a monitor profile has been selected, the effects of the selected color profile can be seen in the preview window.
icon in the Properties window or Tools > Options > Preferences > Image > Color Management.
Rendering intent
The rendering intent specifies how out-of-gamut colors of the device-independent Lab color space are to be converted into the printer gamut. This conversion is necessary because the Lab color space holds much more colors than the printer gamut. Select the Rendering intent to be used for printing the selected image. icon in the Properties window or Tools > Options > Preferences > Image > Color Management.
Color Replacement The color replacement function allows customizing the ink mixture of certain colors in the images according to your needs and letting the color management control the ink mixtures of the rest of the image.
Access to Color Replacement
icon in the Properties window. Note: To see the colors of your selected image, click on “Show Colors”.
42
Global Color Replacement The global color replacement has a list of RGB and/or CMYK values that are automatically replaced by the specified device color values. Thus, when the global color replacement is activated, all image colors that are in this list are automatically replaced.
Access to Global Color Replacement
Tools > Global Replace Colors.
Tune The tune function allows setting the brightness and contrast, the color balance and the gradation. In the Preview window you can display either only the preview, the original image and the preview, the printer preview, the pixel color information as well as all colors out of the printer gamut.
Access to Tune
icon in the Properties window.
Pure Colors While selecting one of the colors in the pure colors dialog, this color will not be modified by the color management if it contains only this color in the original image. This function allows avoiding visible dots of another color.
Access to Pure Colors
icon in the Properties window.

43
Color Tools
Generate Colorbooks This command creates a job containing Lab or RGB colorbook.
Generate a New Color Book
Tools > Color & Special Features > Generate Colorbooks.
Colorbook Options
In the Options you can define the patches size, the title, the label and a comment as well as the resolution of the printing.
Generation of Many Different Color Tones
Often, desired colors are not printed in the colorbook because they are between the colors representing the selected hue distance and number of lines. The smaller the distance and the more lines per page are printed in the colorbook the more different color tones are printed.
Test Color Accuracy This tool allows controlling color matching. You can print a color chart, measure it with a spectrometer and compare it to the expected value. This test gives you the Δe value of each patch.
Access to Test Color Accuracy
Tools > Color & Special Features > Test Color Accuracy.
Swatch Book The Swatch Book tool provides the possibility to manage colors in so called swatches and selectively use them for example for color replacement. Before a swatch can be used for color replacement, it needs to be defined in the Swatch Books dialog.
Access to Swatch Book Dialog
Tools > Color & Special Features > Swatch Books.

44
Named Colors The Named Colors function allows saving colors you need for a special product what can be very useful for colors that absolutely have to match every time they are used (for example for a logo).
Access to Named Colors
Tools > Color & Special Features > Named Colors.
Add New Colors
To add new colors you can choose them by color picker, add from a swatch book or measure a color on a substratum.
Print Similar Colors
The icon Print Similar Colors allows finding the best fitting color for the human eye. The created job generates a chart with all named colors and their CMYK value.
Measure Colors This function can help you to find the Lab values of a color. After a color was measured, the dialog Add Color automatically pops up. The Add Color dialog lets you add a name to the measured color and adds it to the currently active color tool.
Access to Measure Colors
Tools > Color & Special Features > Measure Colors.
White Ink/Finish/Varnish Usually white ink or finish/varnish does not react like color inks. Therefore you can change several factors in the ink settings.
Naming
You can name the separation color.
Density Linearization
Since the measurement of white ink or finish/varnish is impossible for many spectrophotometers, you can exclude it from the density linearization, use the density linearization of the black ink or a default density linearization.
Generate Pixels
White ink or finish/varnish is often used in separate layers. You can generate pixels on the complete image background, only where something is printed or where nothing is printed. It is also possible to use an image transparency mask and generate the ink density. To avoid or to accentuate the special ink flash at the borders you can reduce or increase the printed surface by pixels.

45
Configuration
Application Defaults In the Application Defaults dialog you find all basic settings that can be globally fixed.
Access to application defaults
Tools > Options.
Preferences
For general presets you can load one in the preferences list or create a new one. The short description gives you the main information about the settings.
Image
Image Format – predefined format or scale, fit and alignment, rotate and mirror. Print marks – predefined, crop marks, register marks or image label. AddOns – predefined, eyelets, company logo, seam extension, canvas mounting
extension, dashed cut line, and others – you can install different AddOns if they are not in the list.
Image Margin – predefined, left, right, bottom, top, rotate margins together with image.
Color Management
Input Profiles – Select color profiles to be used for images as default input profile – RGB images, CMYK images, Lab images with respective rendering intent.
PostScript/PDF - Use named colors profile for spot color replacement, input profile for CMYK data - chose profile and rendering intent, input profiles for RGB data – choose profile and rendering intent.
PostScript/PDF
Automatic raster resolution reduction, minimum resolution. Raster resolution reduced by factor X. Use external image files for OPI images. Treat DCS as separate file.
Job
Job default settings - ask for every new job or global settings for media size, margins and job processing policy.
Extras – outer margin, image center mode, auto tiling and Fotoba marks.
Application
Display – monitor profile, units, images, tree view option. Snapshots – store all snapshots in a common local folder, update automatically, image
folders in use, snapshot display options.
46
PostScript/PDF interpreter – temporary raster files, PostScript RIP, compression of raster data, PostScript buffer size.
Spectrophotometer
Type of spectrophotometer. Measurement specification (CIE Illuminant/Observer). Calibration charts – print marks.
User Interface Preferences
Selection context menu. Automatic apply discard. Job double click action.
Special features
Color Combine This option allows an image built by layers/separations to be imported and colored. The layers can be of format Bitmap TIFF (only black and white) and Grayscale TIFF. By this means, grayscale separations created e.g. for cylinder printing can be colored correctly and combined to the image for digital textile printing.
Access to Color Combine
icon in the toolbar, right click > Color Combine or Tools > Color & Special Features > Color Combine.
Coloration Tab
You can change the order of the layers, remove the selected layers from the list or add a new one.
The preview button allows displaying a preview of the current coloration. The color info button gives you some color information for the selected layer. The raster info button opens a window with some raster information for the selected
layer. The color picker allows you to select the color visually in another dialog box. The named colors button opens another dialog box to choose the color for the
selected layer from the named colors profiles that is selected in the current print envi-ronment.
The measure button opens another dialog box to directly measure the color and assign the values to the selected layer. Please note that this function requires a spec-trophotometer which can not only measure color strips, but any color from any source.
The opacity of the layers can be set to control the mixing with the colors of the other layers.

47
You can save ( ) the colors as swatch book. You can export ( ) all the information to a file.
Step & Repeat Tab
This command allows importing a pattern to repeat it several times in both horizontal and vertical direction. Mirroring and shifting the pattern are also included. The pattern must be saved as a TIFF or BMP image. Alpha channels in the image are used as masks so that the covered part of the image will be treated as if it would not exist - icon on the toolbar, right click > Step and repeat, Tools > Color & Special Features > Step and Repeat or second tab in Color Combine.
Halftone Screening Tab
Screening allows specifying the raster that is used for the rasterization when the layers are combined. Please note that Bitmap TIFF files (black & white pixels only) are always rasterized; grayscale TIFF files may be rasterized but can also be combined without rasterization.
Options Tab
The tab Options allows to do some configuration and to save and load configurations as presets.
Cutting Job This command allows doing some contour cutting of the job on a cutting plotter. It requires that the cutting option is included in your software package. You can cut the whole job at once, activate the paneling or cut multiple paths per image. Note: Please note that cutting the medium after printing is not part of the cutting option but enabled in the print environment and the printing dialog when the used printer supports this function.
Access to Cutting Option
(cut environment), (cut settings), (contour cutting activation) icons in the toolbar, or Tools > Cut Environments…
HP Artist The HP Artist feature allows to take a photo from some art picture and to print a perfect reproduction with an HP DesignJet Z3200. To obtain the best result several conditions concerning the light, the background etc must be performed. Refer to the concerning application note to get compete information about how to proceed.
Access to HP Artist
Tools > Color & Special Features > HP Artist.

48
Linearization and Profile Tools Even before we print out an image, we have a distinct idea of what the image should look like in print. To achieve this goal, we need to be able to tell the printer exactly how the image is supposed to look using RIP software. Before we can make these guidelines, we have to analyze how the printer reacts without external influence. Therefore you need to do a density linearization to know the behavior of your printer. After that, limit the ink amount and finally create an ICC profile. For more detailed information please refer to the concerning application note.
Density Linearization Inkjet printers often have a problem caused by mechanical limitations: the optical impression of the printout is not linear from 0% to 100%. The density linearization has to compensate the non-linear behavior of the printer. This can only be done when the characteristic of the printer is exactly known. To get this information, the density linearization process is printing and measuring customized calibration charts.
Creating New Density Linearization
Tools > Linearization & Profile Tools > Density Linearization. Note: To assure a stable density linearization, the curve must be limited.
Density Relinearization The density linearization should be repeated from time to time to make sure that the printer is still in a linearizised state. The density relinearization offers the density linearization with fix settings extracted from the current density linearization so that the conditions for the relinearization cannot be changed.
Realizing a Density Relinearization
Tools > Linearization & Profile Tools > Density Relinearization.
49
ColorGPS ColorGPS creates a color profile conform to the ICC standards, which characterizes the maximum color space of the printer. The technical term for a printer’s color space is gamut. By using an output profile created with ColorGPS you can make sure that all input files, regardless of input color space are rendered color-accurately. ColorGPS is an IN-RIP solution, which can only be used as part of an ErgoSoft RIP. Such an IN-RIP solution has the advantage that the profiler has a direct access to data such as e.g. the density linearization. Furthermore, data such as the calibration grid do not need to be exported and imported, but can be processed directly within the program. To create an output profile for a printer, the print environment must already contain a density linearization. The density linearization is the basis for the output profile. ColorGPS even offers the possibility to create output profiles using only the density linearization.
Access to Color GPS
Tools > Linearization & Profile Tools > ColorGPS.
Color Boost
The Color Boost option allows you to intensify colors. After the measurement of the ICC profile you can increase the color intensity to get an over-saturated profile. Recalculate the profile after changing the intensity – Options > ICC Color Intensity.
Test Images The ErgoSoft RIP comes with some test images, for example an ink limit chart for determining the maximum amount of ink that the media can absorb and a CMYK chart. Use these images to get the best printing result - Tools > Linearization & Profile Tools > Test Images.

50
Other Tools
Variable Data Some jobs require printing the same design (image, background, object, etc.) with personalized text or (consecutive) numbering. Instead of creating a separate image for each combination it is possible to use the Variable Data option to create a template with just the fix part of the object and let the variable text or numbers be automatically added when the template is used.
Creating a Variable Data Template
Tools > Variable Data Template > New.
Using a Variable Data Template
right click > Variable Data or Tools > Variable Data Template > Add Variable Data Images.
Picture Package Often, photographers offer sets of portraits with the same photo in different sizes printed on one big sheet. The picture package does exactly the same; it allows importing the image just once and positions it automatically in the picture package template to create a custom set of this image.
Creating a Picture Package Template
Tools > Picture Package Template > New.
Using a Picture Package Template
right click > Picture Package or Tools > Picture Package Template > Add Picture Package.
Position Template This function allows you to preset positions for various images. This is very useful if you need to print on a certain place on your medium (for example for T-shirt printing).
Creating a Position Template
Tools > Position Template > New.
Using a Position Template right click > Position Template or Tools > Position Template > Select Position Template.
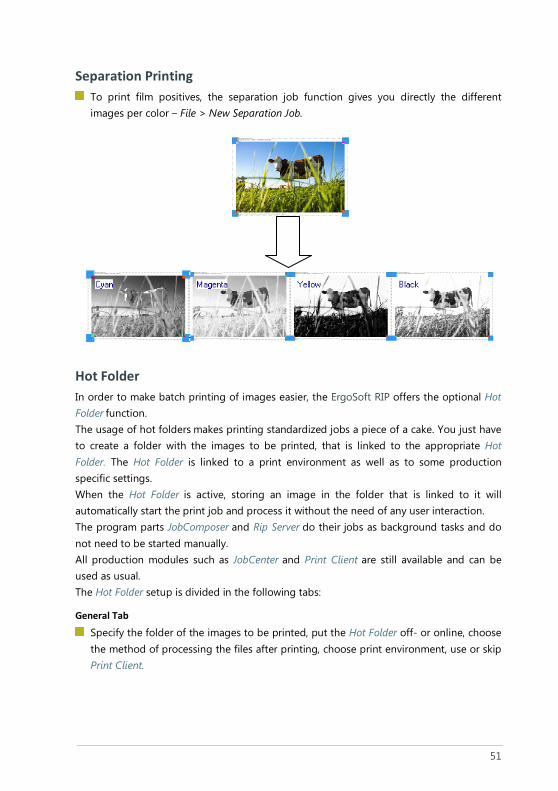
51
Separation Printing To print film positives, the separation job function gives you directly the different
images per color – File > New Separation Job.
Hot Folder In order to make batch printing of images easier, the ErgoSoft RIP offers the optional Hot Folder function. The usage of hot folders makes printing standardized jobs a piece of a cake. You just have to create a folder with the images to be printed, that is linked to the appropriate Hot Folder. The Hot Folder is linked to a print environment as well as to some production specific settings. When the Hot Folder is active, storing an image in the folder that is linked to it will automatically start the print job and process it without the need of any user interaction. The program parts JobComposer and Rip Server do their jobs as background tasks and do not need to be started manually. All production modules such as JobCenter and Print Client are still available and can be used as usual. The Hot Folder setup is divided in the following tabs:
General Tab
Specify the folder of the images to be printed, put the Hot Folder off- or online, choose the method of processing the files after printing, choose print environment, use or skip Print Client.

52
Job Tab
Define media size, use position template, define job length before starting printing, use Fotoba print marks, suspend RIP, suspend printing, keep Rip data after printing, generate job preview.
Image Import Tab
Number of copies per image, image preset, description of image preset, picture package.
Contour Cut Tab
Activate contour cutting, choose cut environment, path settings, passes.
Preflight The preflight function should principally help you to avoid printing error rates for important productions. You have the possibility to have a preview on your monitor or on another medium printed on a smaller printer used as proof.
Manual Preflight
Job Properties window > Job Production > Preflight.
Automatic Preflight
Tools > Options > Preferences > Job > Job Default settings > Processing Policy > Preflight.
Soft Proofing
Soft proofing means that the preview is visible on your screen. You can generate a RGB Jpeg or a RGB Tiff preview. For printers with more colors choose the Device Tiff. Choose a profile and a resolution. For Device Tiff you can also decide to raster PostScript/PDF for target printer resolution.
Print Proofing
Print proofing means that you print your image on a proofing printer simulating the target printer. The preflight mode Print allows you this simulation. Choose a print environment of your target printer and the width and height of the printout.
To proof another printer you can set the profile for target printer simulation in the Extras tab in the print environment.
53
RGB Profiling and Printing The ErgoSoft RIP offers for some printer drivers the possibility of RGB output with help of Windows printer drivers with very limited output calibration possibilities: Just the RGB printer profile can be used; density linearization and ink limitation are not available. Color replacement is available in a very limited way. To create a RGB profile, choose a RGB driver and create a new print environment. Note: It is very important to select the right media! The ink amount is pre-limited for each media.
Calibrating for RGB Output
The calibration for RGB output consists only of printer profile creation in ColorGPS. You simply need to print the calibration chart, measure it and calculate the profile. All other components are set by the printer.
User Level To protect you from unwanted modifications to the configuration and print environments, which can easily happen in the heat of the production process, the ErgoSoft RIP offers 2 user levels. When having activated this functionality, the user level “Production” allows to work with all print environments, but not to change them. The user level “Administrator” can change everything after having entered a password.
Change User Level
Tools > User Level
Scan and Twain Source Import an image from an external device.
Access to Scan and Twain Source
File > Scan, select an external device for importing images – File > Twain Source.

54
Maintenance Tool
Configuration Some basic configurations concerning the RIP software itself can be set here.
Select UI Language
You can choose one of the supported languages for the user interface.
Set User Data Path
You can change the folder in which the user data such as print environments and configurations are saved to switch from basic installation to another one.
Automatically Start Program
If you activate the Startup Manager you can run several RIP Servers at the same time (what helps you enormously to reduce waiting time) as well as choosing the threads per server. You can activate the checkbox to start the JobComposer at Windows start and initiate various Print Clients from the beginning. Note: To stop the Startup Manager please activate the corresponding checkbox.
Shutdown ErgoSoft RIP
Run only if program is blocked. Be careful! Not saved files might be deleted!
Distributed Setup You have the possibility to edit and arrange your job on one computer and to print on another. Therefore you need access to the JobQueueServer which manages all printing jobs from connected computers.
Configure Remote Server
Configure the current JobQueueServer as server for the remote Print Client.
Configure Remote Client
Configure the current Print Client to be controlled from a remote JobQueueServer.
Troubleshooting Some problems that may occur can be solved with the following functions.
Register COM Interfaces
Run if you come upon an installation or registration problem.
Reset Current Print Environment
Run if you have a problem with a specific print environment (e.g. after a system crash).
55
Empty Snapshot Folder List
Clear the list of monitored image folders.
Create Support Data ZIP File
Create a data file with information needed for support purposes that you can send to your support partner on request.
Help Functions
License Info Here you can find all information about your license.
License Code and Dongle Number
The license dialog shows your System ID with your dongle number (PPXXX.XXXX.001) and the license code (128 digit code) you get with your dongle.
The License Details
Shows all functions included in your licensed package of the ErgoSoft RIP.
Enter License This dialog normally appears after the installation. Enter your license code from a file or from your voucher.
Documentation You can download supplementary documentation about the ErgoSoft RIP. Application notes for different chapters are regularly upgraded on our website.
About This dialog gives some information about your version of the ErgoSoft RIP: Version information, dongle number, and folder in which the user data are saved.
ErgoSoft on the Web Lists the most important links to the ErgoSoft homepage sections.

56
ErgoSoft AG - © All rights reserved
All other brand names and trademarks are registered trademarks of their respective holders and are hereby acknowledged. All speci�cations are
subject to change without notice.
Application Notes. For more information how to handle speci�c functions please refer to the according application note. You can �nd these application notes on the product CD, upload them on the help tab in the program, or download on our website.
Introduction. The purpose of this document is to give you a complete overview of the functions and features of the ErgoSoft RIP. Depending on the software package you acquired, not all features are included in your license.
The ErgoSoft RIP is available in different editions. Therefore the description of available features in this document does not necessarily re�ect the license details of your edition of the ErgoSoft RIP. For information on the features included in your edition of the ErgoSoft RIPs refer to the ErgoSoft homepage or contact your dealer.
Related Documents