Integration Solutions Centre Document Ref: 1.2 Software Manual Author: CHIO Date: 15 May 2018 Hilton OnQ Integration SmartConnector Page 1 of 16 Hilton OnQ Integration SmartConnector Installation & User Guide Rev No Date Revised Description 1.0 21 Sep 2017 CI Draft 1.1 25 Sep 2017 CI Release 1.2 15 May 2018 CI Release

Welcome message from author
This document is posted to help you gain knowledge. Please leave a comment to let me know what you think about it! Share it to your friends and learn new things together.
Transcript

Integration Solutions Centre Document Ref: 1.2
Software Manual
Author: CHIO
Date: 15 May 2018
Hilton OnQ Integration SmartConnector
Page 1 of 16
Hilton OnQ Integration SmartConnector
Installation & User Guide
Rev No Date Revised Description
1.0 21 Sep 2017 CI Draft 1.1 25 Sep 2017 CI Release
1.2 15 May 2018 CI Release

Integration Solutions Centre Document Ref: 1.2
Software Manual
Author: CHIO
Date: 15 May 2018
Hilton OnQ Integration SmartConnector
Page 2 of 16
Contents:
Contents: .......................................................................................................................... 2
1. Functional Overview .......................................................................................................... 3
2. Restrictions and Limitations............................................................................................... 4
SmartConnector Service Version ....................................................................................... 4 Supported Systems ........................................................................................................... 4
3. Installation ........................................................................................................................ 5
4. Configuration & Settings .................................................................................................... 6
Processor Configuration.................................................................................................... 6 Adding the custom assembly to the service. ....................................................................... 6
5. Revision History .............................................................................................................. 15

Integration Solutions Centre Document Ref: 1.2
Software Manual
Author: CHIO
Date: 15 May 2018
Hilton OnQ Integration SmartConnector
Page 3 of 16
1. Functional Overview
The Hilton OnQ PMS system interface is a middleware application that enables communication between Hilton OnQ applications with EcoStruxure Building Operation via EcoStruxure Web Services (EWS). Each room in the PMS is represented in the EcoStruxure Building Operation model of the PMS. PMS attributes configured in the interface may be used to implement custom sequences. A multi-state value indicates the number of persons checked into a room as well as information for the guest name, language and expected departure date. The interface can fully represent items in the PMS system with data synchronisation between the two systems. This ensures the SmartConnector database is maintained and kept up to date without any user intervention. The processor leverages the SmartConnector Service framework and details of the application (release history, installation notes etc.) are available separately and are not covered in this manual. The SmartConnector application is licensed on a single server basis but may also be configured to connect to both Automation Server (AS-P) devices as well as Enterprise Servers (ES).

Integration Solutions Centre Document Ref: 1.2
Software Manual
Author: CHIO
Date: 15 May 2018
Hilton OnQ Integration SmartConnector
Page 4 of 16
2. Restrictions and Limitations
SmartConnector Service Version
The processors have been configured to operate with the SmartConnector version 2.3, use with any other version of the SmartConnector framework is not supported.
Supported Systems
The processors can support EcoStruxure systems operating with the EcoStruxure Web Services (EWS) protocol v1.1 and v1.2.

Integration Solutions Centre Document Ref: 1.2
Software Manual
Author: CHIO
Date: 15 May 2018
Hilton OnQ Integration SmartConnector
Page 5 of 16
3. Installation
Please refer to the SmartConnector Installation and Configuration Guide.pdf for guidance on SmartConnector installation. To deploy the OnQ assembly copy the files “ISC.FiasProtocol.dll”, “ISC.OnQ.dll” and “ISC.PmsSql.dll” into the service installation directory. Normally “C:\Program Files (x86)\Schneider Electric\SmartConnector”

Integration Solutions Centre Document Ref: 1.2
Software Manual
Author: CHIO
Date: 15 May 2018
Hilton OnQ Integration SmartConnector
Page 6 of 16
4. Configuration & Settings Processor Configuration
With a default installation of SmartConnector, the configuration pages for the server can be reached at the following address on the server the service has been installed on. http://localhost:8082/
Adding the custom assembly to the service.
Switch to the Configurations tab and select Add New +
At the Add Configuration window, Step 1 – Pick an assembly, select the reference to ISC.OnQ (this will be highlighted green when selected)

Integration Solutions Centre Document Ref: 1.2
Software Manual
Author: CHIO
Date: 15 May 2018
Hilton OnQ Integration SmartConnector
Page 7 of 16
Select Next and proceed to Step 2 Choose a Class Ensure the class ISC.OnQInterfaceProcessor is selected first
Select Next and proceed to Step 3 Name Configuration Enter a meaningful name and description for the Processor which will enable you to identify this process in the configuration window later. Select Finish and proceed to the Configuration screen.

Integration Solutions Centre Document Ref: 1.2
Software Manual
Author: CHIO
Date: 15 May 2018
Hilton OnQ Integration SmartConnector
Page 8 of 16
In the configuration window select the Details Tab, you will then be presented with the screen to enter the configuration information. Much of the configuration has default options however they should be checked and validated for the installation. Edit the applicable fields as follows. IP Address and Port Number These properties should be set to Server’s IP Address and Port Number respectively to establish connection with OnQ server. Read Write Time Out This property is to set amount of time (in milliseconds) that Read and Write operations block waiting for Data. Heartbeat Mins This property is to set the interval (in minutes) between Heartbeat messages. Cache Message Expiry Duration Minutes This property is to set the duration of a message held in Cache before it expires.

Integration Solutions Centre Document Ref: 1.2
Software Manual
Author: CHIO
Date: 15 May 2018
Hilton OnQ Integration SmartConnector
Page 9 of 16
Cache Write Sleep Time This property is to set the time interval (in milliseconds) that Cache waits before processing the next message. Pms Connection Retry Interval This property is to set the time interval (in seconds) between connection retries to PMS. In the configuration window select the Control Tab, you will then be presented with several options to define the Processor’s default behavior. It is recommended to set the following; Runs On Start – Yes (To enable the Processor to automatically start with the machine) Runs On Schedule – Yes (Although this processor should never terminate, attaching a short cycling schedule will ensure that if it stops unexpectedly, it will attempt to auto restart on the schedule.) Manually Startable – Yes (To allow a user to start through the configuration window Manually Stoppable - Yes The Save Button allows the process configuration to be saved to the database.
A complete configuration will appear as follows:

Integration Solutions Centre Document Ref: 1.2
Software Manual
Author: CHIO
Date: 15 May 2018
Hilton OnQ Integration SmartConnector
Page 10 of 16
Follow the same procedure to configure the second Processor. Ensure the class ISC.OnQServerManagerProcessor is selected
Select Next and proceed to Step 3 Name Configuration Enter a meaningful name and description for the Processor which will enable you to identify this process in the configuration window later. Select Finish and proceed to the Configuration screen.

Integration Solutions Centre Document Ref: 1.2
Software Manual
Author: CHIO
Date: 15 May 2018
Hilton OnQ Integration SmartConnector
Page 11 of 16
In the configuration window select the Details Tab, you will then be presented with the screen to enter the configuration information. Much of the configuration has default options however they should be checked and validated for the installation. Edit the applicable fields as follows. User Name This property is required to allow the EWS server connection to be authenticated. Password As above, this is the password related to the user credentials. Server Address This property is should be set to the full address required to access the EWS Server being hosted. This is normally in the case of a StruxureWare ES or AS device as follows: http://<IPADDRESS>:<PORT(8093)>/EcoStruxure/DataExchange *Note that the address is case sensitive! Server Name This property is just a friendly text name field to allow you to easily identify the specific Endpoint you are configuring. Checkout Time This property is just a default Date Time field to allow you to specify a checkout Time of your preference. Room Text This property is just a friendly text name field to allow you to identify the specific property you are configuring. Occupied This property is just a friendly text name field to allow you to identify the specific property you are configuring. Departure Date This property is just a friendly text name field to allow you to identify the specific property you are configuring. Guest Name This property is just a friendly text name field to allow you to identify the specific property you are configuring. Guest Language This property is just a friendly text name field to allow you to identify the specific property you are configuring. Folder Text This property is just a friendly text name field to allow you to identify the specific property you are configuring.

Integration Solutions Centre Document Ref: 1.2
Software Manual
Author: CHIO
Date: 15 May 2018
Hilton OnQ Integration SmartConnector
Page 12 of 16
In the configuration window select the Control Tab, you will then be presented with several options to define the Processor’s default behavior. It is recommended to set the following; Runs On Start – Yes (To enable the Processor to automatically start with the machine) Runs On Schedule – Yes (Define a schedule that determines how often the server is updated with messages received from the PMS – Suggested value would be 15 seconds) Manually Startable – Yes (To allow a user to start through the configuration window Manually Stoppable - Yes The Save Button allows the process configuration to be saved to the database.
A complete configuration will appear as follows:

Integration Solutions Centre Document Ref: 1.2
Software Manual
Author: CHIO
Date: 15 May 2018
Hilton OnQ Integration SmartConnector
Page 13 of 16
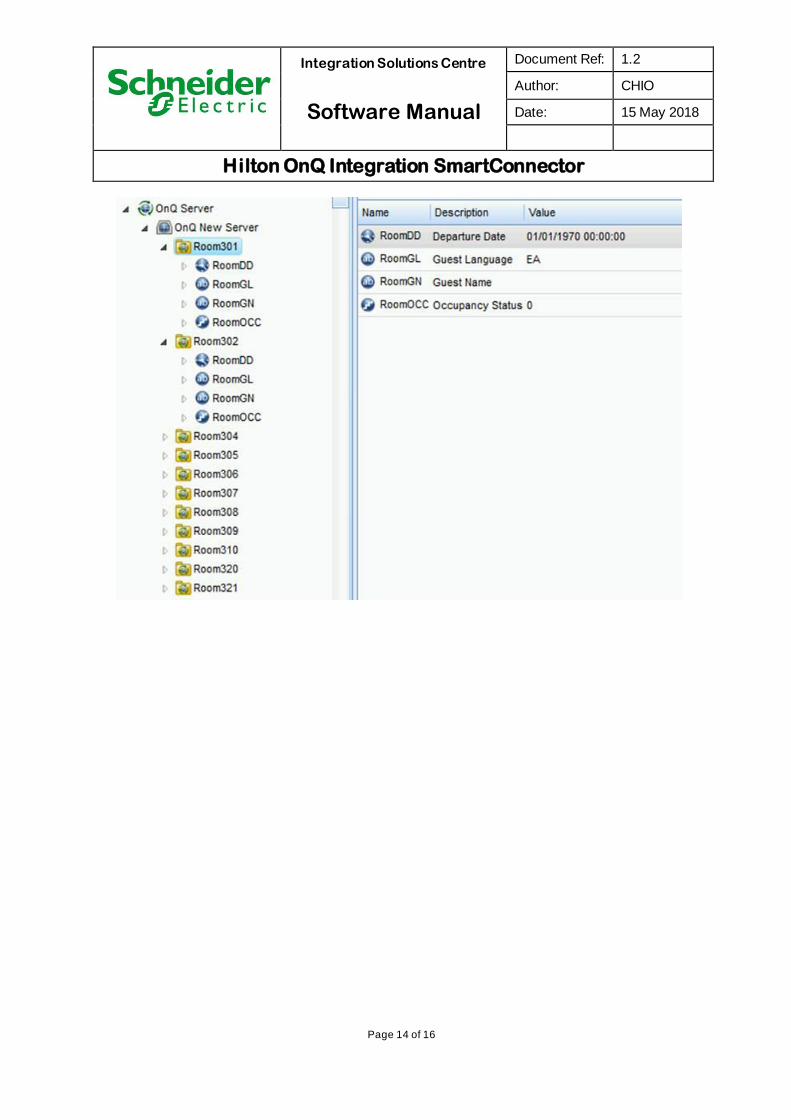
Once the SmartConnector EWS Server Interface has been hosted in EcoStruxure Building Operation, rooms will be displayed as follows:
Integration Solutions Centre Document Ref: 1.2
Software Manual
Author: CHIO
Date: 15 May 2018
Hilton OnQ Integration SmartConnector
Page 14 of 16

Integration Solutions Centre Document Ref: 1.2
Software Manual
Author: CHIO
Date: 15 May 2018
Hilton OnQ Integration SmartConnector
Page 15 of 16
5. Revision History
Version Assembly File Details Date
1.0.0.0 ISC.FiasProtocol.dll 15th May 2018
1.0.0.0 ISC.OnQ.dll 15th May 2018
1.0.0.0 ISC.PmsSql.dll 15th May 2018
Assembly files required: ISC.FiasProtocol.dll ISC.OnQ.dll ISC.PmsSql.dll

Integration Solutions Centre Document Ref: 1.2
Software Manual
Author: CHIO
Date: 15 May 2018
Hilton OnQ Integration SmartConnector
Page 16 of 16
6. References SmartConnector Installation and Configuration Guide.pdf (TDS-M-INSTALLCONFIG-US.BU.N.EN.12.2017.2.30.CC) SmartConnector Version 2.2 Release Notes.pdf (TDS-M-RELEASENOTES-US.BU.N.EN.12.2017.2.30.CC)
Related Documents