Center for Online Learning & Teaching Technology SoftChalk Training Handout 1 1 Softchalk Create 11 TABLE OF CONTENTS TABLE OF CONTENTS............................................................................................................... 1 PURPOSE OF THIS HANDBOOK ............................................................................................ 2 CREATING SOFTCHALK CLOUD ACCOUNT........................................................................ 2 CREATING A FOLDER IN SOFTCHALK CLOUD.................................................................. 2 Adding Users to Folder in Softchalk Cloud ................................................................................ 3 How To Create A Lesson? ....................................................................................................... 4 In SoftChalk Cloud .............................................................................................................................. 4 FORMATTING THE LOOK OF SOFTCHALK CONTENT ................................................... 4 How To Create Navigation Point For Our Lessons? ................................................................ 4 Applying A Style: ................................................................................................................................. 5 ADD LESSON PAGE BREAKS............................................................................................................. 5 PREVIEW THE CHANGES: ....................................................................................................... 6 INSERT AN IMAGE and MEDIA .............................................................................................. 6 Insert a local Image:........................................................................................................................... 6 Insert an image from Media Search Tool ................................................................................... 7 How to Add Activities to Lesson .......................................................................................... 9 ToolTip ................................................................................................................................................... 9 Multiple Choice, QuizPopper .......................................................................................................... 9 HOW TO SAVE LESSON TO THE SOFTCHALK CLOUD ................................................. 10 HOW TO EDIT A LESSON ONLINE IN SOFTCHALK CLOUD ........................................ 10 HOW TO SAVE LESSON TO BLACKBOARD? ................................................................... 11 Step 1: Grab the HTML or LTI Link in Blackboard ............................................................... 11 Step 2: Go to Blackboard ............................................................................................................... 11 ADDITIONAL RESOURCES ................................................................................................... 12 CONTACT COLTT .................................................................................................................... 12 Brownsville Campus ....................................................................................................................... 12 Edinburg Campus............................................................................................................................. 12 Video Tutorials: http://softchalk.com/learn-more/training/video-tutorials

Welcome message from author
This document is posted to help you gain knowledge. Please leave a comment to let me know what you think about it! Share it to your friends and learn new things together.
Transcript

Center for Online Learning & Teaching Technology SoftChalk Training Handout
1
1
Softchalk Create 11
TABLE OF CONTENTS
TABLE OF CONTENTS............................................................................................................... 1
PURPOSE OF THIS HANDBOOK ............................................................................................ 2
CREATING SOFTCHALK CLOUD ACCOUNT ........................................................................ 2
CREATING A FOLDER IN SOFTCHALK CLOUD .................................................................. 2 Adding Users to Folder in Softchalk Cloud ................................................................................ 3
How To Create A Lesson? ....................................................................................................... 4 In SoftChalk Cloud .............................................................................................................................. 4
FORMATTING THE LOOK OF SOFTCHALK CONTENT ................................................... 4 How To Create Navigation Point For Our Lessons? ................................................................ 4 Applying A Style: ................................................................................................................................. 5 ADD LESSON PAGE BREAKS ............................................................................................................. 5
PREVIEW THE CHANGES: ....................................................................................................... 6
INSERT AN IMAGE and MEDIA .............................................................................................. 6 Insert a local Image: ........................................................................................................................... 6 Insert an image from Media Search Tool ................................................................................... 7
How to Add Activities to Lesson .......................................................................................... 9 ToolTip ................................................................................................................................................... 9 Multiple Choice, QuizPopper .......................................................................................................... 9
HOW TO SAVE LESSON TO THE SOFTCHALK CLOUD ................................................. 10
HOW TO EDIT A LESSON ONLINE IN SOFTCHALK CLOUD ........................................ 10
HOW TO SAVE LESSON TO BLACKBOARD? ................................................................... 11 Step 1: Grab the HTML or LTI Link in Blackboard ............................................................... 11 Step 2: Go to Blackboard ............................................................................................................... 11
ADDITIONAL RESOURCES ................................................................................................... 12
CONTACT COLTT .................................................................................................................... 12 Brownsville Campus ....................................................................................................................... 12 Edinburg Campus............................................................................................................................. 12
Video Tutorials: http://softchalk.com/learn-more/training/video-tutorials

2
PURPOSE OF THIS HANDBOOK This handbook serves as a guide for the COLTT SoftChalk Cloud & Create basics training. You can find a more detailed handout in our Blackboard Faculty Support tab.
CREATING SOFTCHALK CLOUD ACCOUNT
The first step is to set up a SoftChalk Cloud account:
1. Go to http://www.softchalkcloud.com/join 2. Under Select Account Type choose: SOFTCHALK CLOUD I have an Activation Key 3. Fill in the fields requested 4. Activation key: kVqUvNHlutTiQy83ca9b
CREATING A FOLDER IN SOFTCHALK CLOUD It is a good idea to create folders for each course that you will teach. As we know, you are assigned different courses each semester and you may decide to work on specific courses with other faculty. This will allow you to give specific faculty access to only certain folders and not all your Softchalk lessons you have developed.
1. Login to the Cloud 2. Select My Content 3. Then Select Lessons
4. The Page updates 5. On the right hand Actions menu select “+ Create Folder” 6. A new window opens asking you to give the folder a name: 7. Once you enter the name select Create Folder

Center for Online Learning & Teaching Technology SoftChalk Training Handout
3
3
Adding Users to Folder in Softchalk Cloud
1. Login to the Cloud 2. Select My Content 3. Then Select Lessons 4. Locate your desired Folder
5. Select the Share folder icon,
6. There are two options to add users:
a. Copy users from another shared folder i. Select folder from drop down
ii. Then Select Copy Users button b. Or Search by Username, Email, Name (The other faculty will need to have
created a Softchalk account to add them to your folder. 7. Once you locate the person, select them 8. Then from the Add Trial or Subscription User(s) move them to the Shared Trial or
Subscription Users by pressing the + sign. 9. Then press Share Folder
4
How To Create A Lesson?
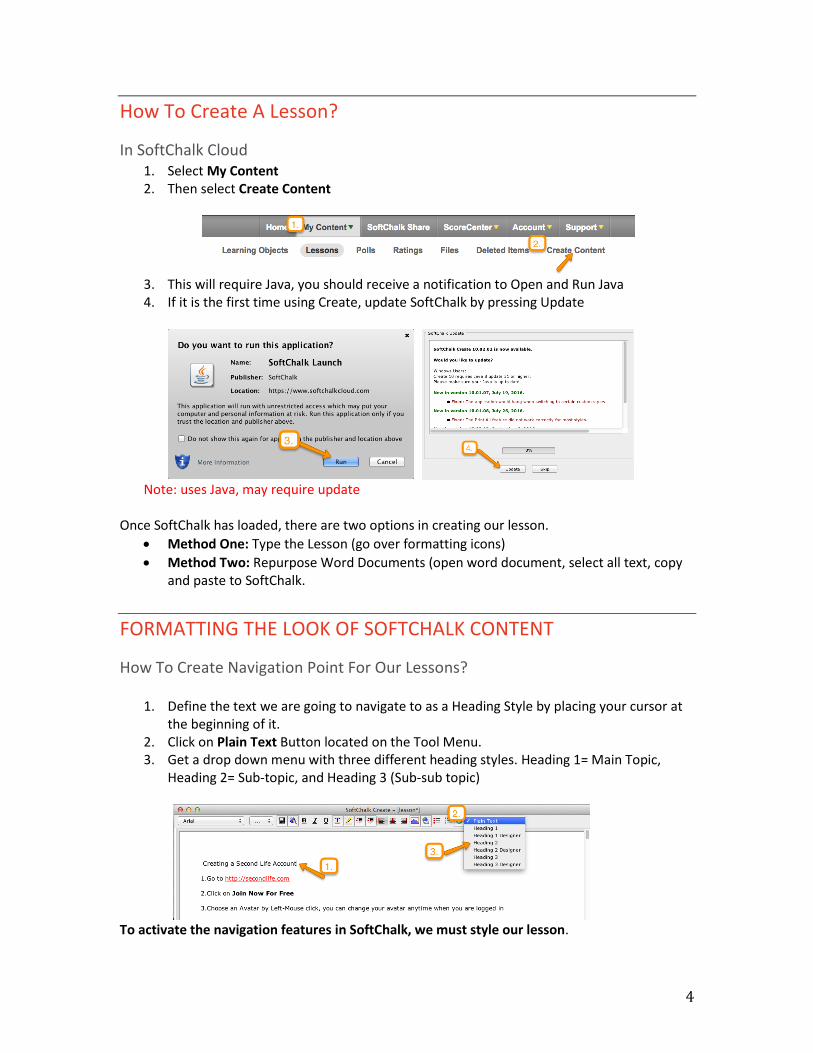
In SoftChalk Cloud 1. Select My Content 2. Then select Create Content
3. This will require Java, you should receive a notification to Open and Run Java 4. If it is the first time using Create, update SoftChalk by pressing Update
Note: uses Java, may require update
Once SoftChalk has loaded, there are two options in creating our lesson.
• Method One: Type the Lesson (go over formatting icons)
• Method Two: Repurpose Word Documents (open word document, select all text, copy and paste to SoftChalk.
FORMATTING THE LOOK OF SOFTCHALK CONTENT
How To Create Navigation Point For Our Lessons?
1. Define the text we are going to navigate to as a Heading Style by placing your cursor at the beginning of it.
2. Click on Plain Text Button located on the Tool Menu. 3. Get a drop down menu with three different heading styles. Heading 1= Main Topic,
Heading 2= Sub-topic, and Heading 3 (Sub-sub topic)
To activate the navigation features in SoftChalk, we must style our lesson.
Center for Online Learning & Teaching Technology SoftChalk Training Handout
5
5
Applying A Style:
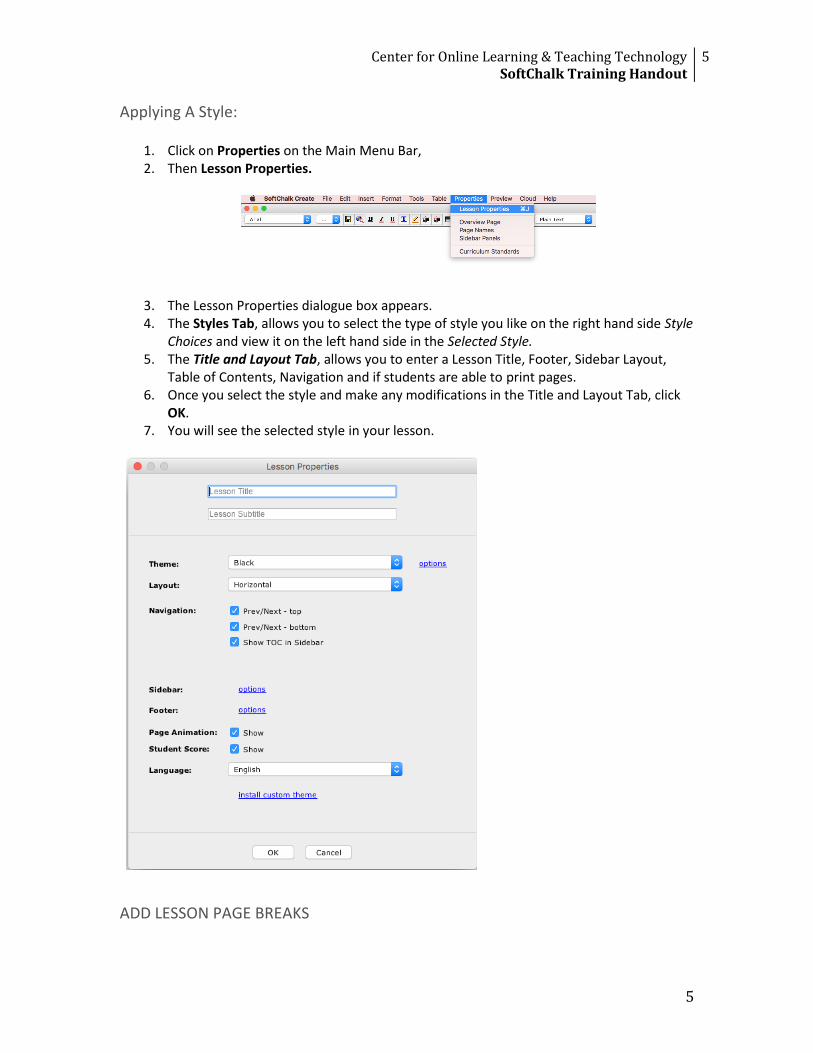
1. Click on Properties on the Main Menu Bar, 2. Then Lesson Properties.
3. The Lesson Properties dialogue box appears. 4. The Styles Tab, allows you to select the type of style you like on the right hand side Style
Choices and view it on the left hand side in the Selected Style. 5. The Title and Layout Tab, allows you to enter a Lesson Title, Footer, Sidebar Layout,
Table of Contents, Navigation and if students are able to print pages. 6. Once you select the style and make any modifications in the Title and Layout Tab, click
OK. 7. You will see the selected style in your lesson.
ADD LESSON PAGE BREAKS
6
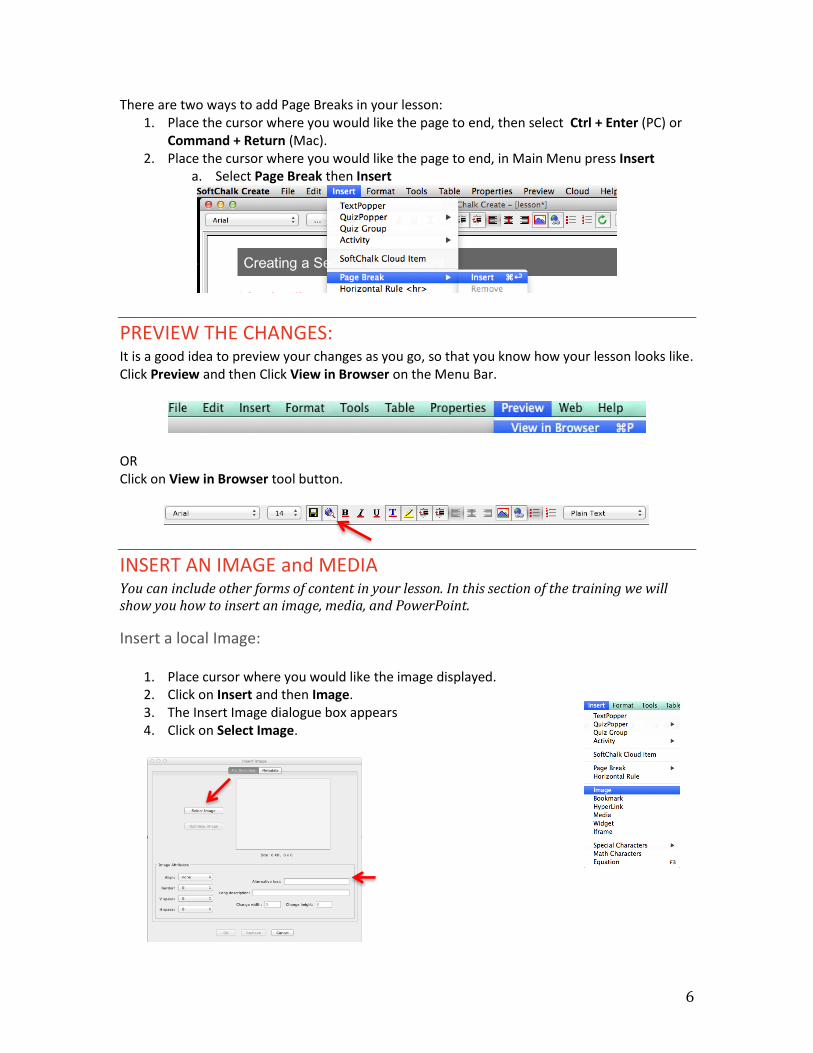
There are two ways to add Page Breaks in your lesson: 1. Place the cursor where you would like the page to end, then select Ctrl + Enter (PC) or
Command + Return (Mac). 2. Place the cursor where you would like the page to end, in Main Menu press Insert
a. Select Page Break then Insert
PREVIEW THE CHANGES: It is a good idea to preview your changes as you go, so that you know how your lesson looks like. Click Preview and then Click View in Browser on the Menu Bar.
OR Click on View in Browser tool button.
INSERT AN IMAGE and MEDIA You can include other forms of content in your lesson. In this section of the training we will show you how to insert an image, media, and PowerPoint.
Insert a local Image:
1. Place cursor where you would like the image displayed. 2. Click on Insert and then Image. 3. The Insert Image dialogue box appears 4. Click on Select Image.

Center for Online Learning & Teaching Technology SoftChalk Training Handout
7
7
5. Browse for your image and select the image. 6. Once image is selected you will be able to modify Image Attributes, add Alternative
Text, Long Description, and change the width and height of the image. 7. Make sure that the size of the image you selected is stated as good, so the image will
not go outside of the margins when published.
8. Once you have selected and modified the image, click OK. 9. You will see the image displayed in your lesson.
Insert an image from Media Search Tool Use preexisting content to provide a different perspective of the topic being taught. SoftChalk
allows you to search from a variety of resources, even other instructors public SoftChalk content.
1. Place cursor where you would like the image displayed. 2. Click on Tools and then Media Search.
3. Get the Media Search dialogue box. (shown below) 4. Type the Topic in the Keyword(s): box 5. Select the Repository you would like to search in for your Topic (able to select more than one
Repository).
8
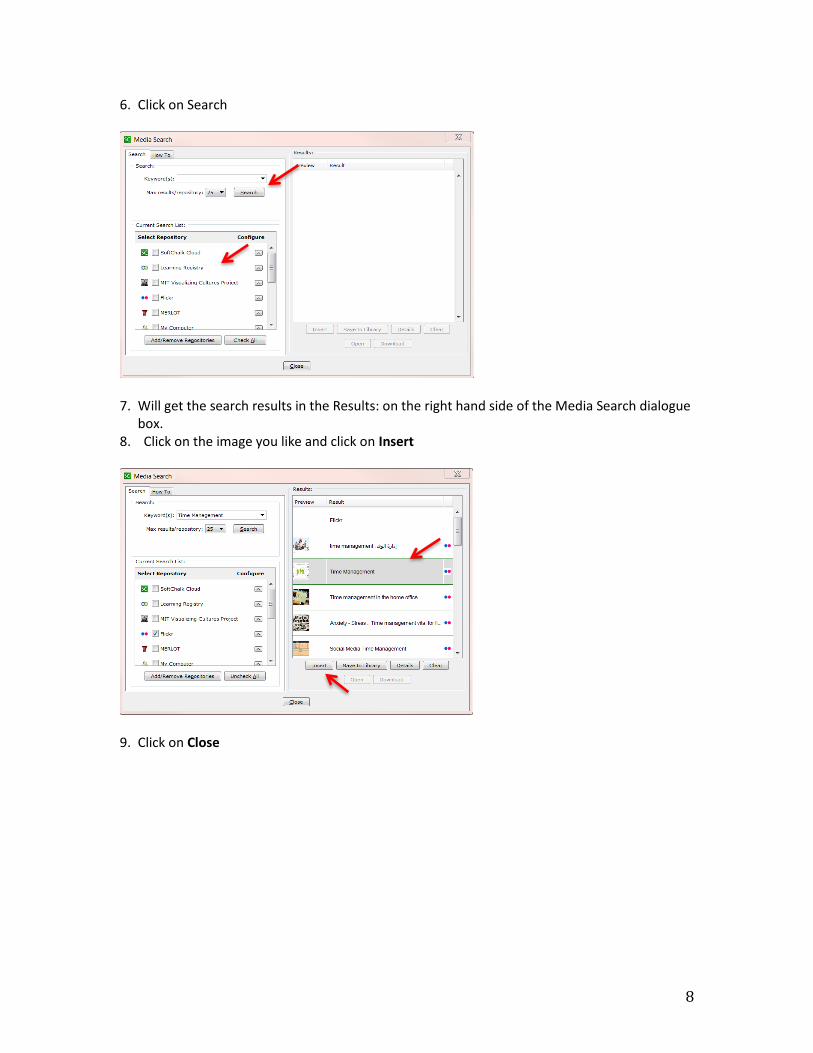
6. Click on Search
7. Will get the search results in the Results: on the right hand side of the Media Search dialogue
box. 8. Click on the image you like and click on Insert
9. Click on Close

Center for Online Learning & Teaching Technology SoftChalk Training Handout
9
9
How to Add Activities to Lesson
ToolTip With the TextPopper, students can select a word within the page to see a definition or additional
information about the word chosen.
1. Highlight the word that you would like to add a
textpopper 2. On main menu, select Insert 3. Then select TextPopper, a new window appears 4. For Bottom Area, enter a definition or desired
text 5. You can change how the TextPopper looks under
Background Style 6. When done click OK
Multiple Choice, QuizPopper
With the Multiple Choice, students are given a list of answers to a question, only one of which is correct.
You can include feedback, with images, for the correct answer as well as feedback if they select one of the
wrong answers.
1. On main menu, select Insert 2. Then select QuizPopper 3. Under the options select Multiple Choice 4. Under the Question tab type your question and
provide points (if any) for activity, as well as Allow retry (optional)
5. Select Answers tab answer on the top of panel 6. Answers display letter a and type Individual
feedback optional. 7. Enter your answer choices 8. If you need to add more answer choices, click on the
Add Answer button, on the bottom right. 9. Place the radial button on the correct answer 10. Provide individual feedback for each answer choice in
the given textbox provided. 11. Under the Feedback tab, you can provide feedback for
correct answer, wrong answer and hint; as well as showing correct answer(s) with feedback.
12. Under Display tab, select how you would like your QuizPopper to display within the lesson
1. Icon 2. Clickable Link 3. Display question within page.
13. When done click OK.

10
HOW TO SAVE LESSON TO THE SOFTCHALK CLOUD Now that you have finished working on your lesson, it is time to save it to the Cloud.
1. In SoftChalk Create, select File from the Main Menu 2. Then select Save to SoftChalk Cloud 3. The Save To Cloud Dialog box
appears 4. Provide Lesson a Name 5. Select Personal, to make it viewable
only to you and your students 6. Select the desired folder to save
lesson to under Repository 7. Click Save 8. Then click Close
HOW TO EDIT A LESSON
ONLINE IN SOFTCHALK CLOUD
Now that you have created your lesson and saved it to the cloud, you may choose to edit your lesson within the cloud. Which is often easier to do then going back and editing the lesson in SoftChalk Create.
1. Login to Softchalk Cloud, 2. Select My Content 3. Then select Lessons 4. Locate the Lesson you want to edit and click on it’s title
5. Under Lesson Actions (scroll down preview options found to the right side of screen), select Edit Lesson
6. Then select Edit in Create Online 7. The Create Online Editor looks somewhat similar
to SoftChalk Create.

Center for Online Learning & Teaching Technology SoftChalk Training Handout
11
11
HOW TO SAVE LESSON TO BLACKBOARD?
Step 1: Grab the HTML or LTI Link in Blackboard
1. Login to SoftChalk Cloud 2. Select My Content 3. Then select Lessons 4. Click the title of the Lesson you would like to place in Blackboard 5. Scroll down to the bottom of the page
6. Locate the options found on the right hand side of the screen 7. Grab the LTI Link or HTML Link from Softchalk Cloud
Step 2: Go to Blackboard 1. Login to Blackboard and go to the desired location you want the link displayed in 2. Select Build Content 3. Then select Web Link

12
4. If it is a gradable item: a. Check This link is a Tool Provider
b. Then Select Enable Evaluation Yes c. Enter the Points possible d. Optional You can enter a due date e. Then Press Submit
ADDITIONAL RESOURCES Video tutorials can be found here http://softchalk.com/learn-more/training
CONTACT COLTT For more information, contact our office:
Brownsville Campus Office: Casa Bella 613 Phone: (956) 882-6792 Fax: (956) 882-6751
Edinburg Campus Office: Education Complex (EEDUC) 2.202 Phone: (956) 665-2979 Fax: (956) 665-5276
Related Documents