Soft Ice Cream Machine - 1 - INDEX GENERAL INFORMATION ___ P.2 1. Announcement 2. Information to the user 3. General data 4. Machine Assembly Identification 5. Control Panel Demonstration 6. Operation Condition 7. Noise INSTALLATION ___ P.10 1. Room Conditions 2. Electricity Connection 3. Accessories Installation OPERATION INSTRUCTION ___ P.14 1. Processes before the First Operation 2. Trial Running 3. Ice Cream Production CLEANING & SANITIZING ___ P.18 1. Cleaning 2. Daily cleaning 3. Sanitize and clean the beater assembly 4. Clean the machine shell 5. Clean the drip tray and drip pan OPTIONAL FUNCTIONS ___ P.21 1. Keep-fresh System (Pre-cooling System) 2. Air Pump System 3. Counter 4. Mixture alert instruction 5. Rainbow 6. Temperature display TROUBLESHOOTING ___ P.27 1. Analysis table (1) 2. Analysis table (2) CIRCUIT DIAGRAM ___ P.31

Welcome message from author
This document is posted to help you gain knowledge. Please leave a comment to let me know what you think about it! Share it to your friends and learn new things together.
Transcript

Soft Ice Cream Machine
- 1 -
INDEX GENERAL INFORMATION ___ P.2
1. Announcement
2. Information to the user 3. General data
4. Machine Assembly Identification
5. Control Panel Demonstration
6. Operation Condition 7. Noise
INSTALLATION ___ P.10
1. Room Conditions 2. Electricity Connection
3. Accessories Installation
OPERATION INSTRUCTION ___ P.14
1. Processes before the First Operation
2. Trial Running 3. Ice Cream Production
CLEANING & SANITIZING ___ P.18
1. Cleaning 2. Daily cleaning
3. Sanitize and clean the beater assembly
4. Clean the machine shell
5. Clean the drip tray and drip pan
OPTIONAL FUNCTIONS ___ P.21
1. Keep-fresh System (Pre-cooling System)
2. Air Pump System 3. Counter
4. Mixture alert instruction 5. Rainbow
6. Temperature display
TROUBLESHOOTING ___ P.27
1. Analysis table (1) 2. Analysis table (2)
CIRCUIT DIAGRAM ___ P.31

Soft Ice Cream Machine
- 2 -
GENERAL INFORMATION
1. Announcement Our company carries out a continuing research, toward
further development and improvement. Therefore, the
information found in the manual is subject to change
without further notice.
All technical data, pictures and drawings contained in this
manual are not binding on the manufacturer, nor can the
manufacturer be held liable for any modifications to the
machine in whole or in part.
2. Information to the user For any explanation and information regarding the machine,
its spare-parts or how to operate it, the manufacturer of the
machine will be available if any questions should arise.
If any problem should occur, please contact our
local distributor or the manufacturer if no
distributor is available.
3. General data
All series of soft ice cream machines can be used for
production and distribution for two or a mixed flavored
soft ice cream.
The equipment applies the technology from several
patents that gained, such as the unique evaporation
cooling technique and the digital control system of the
machine. The machine is fitted with an electronic control
temperature and consistency adjustment system by
which the hardness level of the ice cream can directly be
chosen as per person favor. The operative condition can
also be seen in a real-time display for a clear indication
from the indication lights that the machine is working
properly.

Soft Ice Cream Machine
- 3 -
It is recommended that high quality ice cream mixes
should always be used. Always make sure that the mixes
is made by high quality raw materials or ingredients from
reliable or trustworthy suppliers, so that the over-run rate
and taste taken on from this machine can be farthest
approved.
Note:
• Always follow the instruction given by the supplier.
• When using the ready-to-use ice cream mixes which
goes with stipulated proportion mixing water, do not try to
add more water or sugar, since this may lower the quality
of the product or disturb the operating condition of the
machine.
• Always remember to sanitize the machine after it has
been used, and always keep a strict hygiene.
• For best customer satisfaction, always taste the product
before serving so you are always sure that you will
provide the customer with a first class product
4. Machine Assembly Identification Caption A A1. Strap Wheel A2.φ45X30X10 Seal
A3. Seal Cover A4 . #106 Bearing
A5. Gearbox Cover A6 . #105 Bearing
A7. Big Gear A8 . Square Shaft
A9. Main Shaft A10 . Small Gear
A11. #303 Bearing A12 . #205 Bearing
A13. φ35X20X10 Seal A14. Main Gearbox
A15. Y- Ring A16. Seal Nut
A17. O- Ring

Soft Ice Cream Machine
- 4 -
Drawing A: Gearbox Interior View
Drawing B: Floor-standing Models Interior View

Soft Ice Cream Machine
- 5 -
Caption B B1. Top Cover B2 .Hopper Small Cover B3. Expanded Outer Tube B4 .Expanded Inner Tube B5. φ16 O-Ring B6. Hopper Panel B7. Right Side Panel B8. Handle B9. Middle Plunger B10. Side Plunger B11. φ26 O-Ring B12. Bridge Seal B13. Decorative Plate B14.Throat Block B15. Cover Nut B16. Manual Screw (Long) B17. Manual Screw (Short) B18. Horizontal Bar B19. Star Outlet B20. Front Panel B21. Cylinder B 22. Beater Shaft B23. Circuit Box B 24. Compressor Starter B25. Dryer B26. Expansive Valve B27. Condenser B28. Fan B29. Compressor B30. Frame B31. Casters B32. Motor B33. Filter (Air/Liquid Segregator) B34. Left Side Panel B35. Motor Strap Wheel B36. Strap B37. Gearbox Strap Wheel B38.Gearbox B39. Gearbox O-ring B40. Gearbox Y-ring B41. Seal Nut B42. Rear Panel
Drawing C: Table Top Models Interior View

Soft Ice Cream Machine
- 6 -
Caption C C1. Top Cover
C2.Hopper Small Cover
C3. Expanded Outer Tube
C4. Expanded Inner Tube
C5. φ16 O-Ring C6. Hopper Panel
C7. Cylinder C8.Beater Shaft
C9. Decorative Plate C10. φ88 O-Ring
C11. Throat Block C12.Plunger
C13. Handle C14. φ26 O-Ring
C15. Bridge Seal C16.Cover Nut
C17. Horizontal Bar C18. Manual Screw
C19. Star Outlet C20.Drip Tray
Caption D D1. Top Cover D2.Hopper Small Cover
D3. Expanded Outer Tube D4.Expanded Inner Tube
D5. φ16 O-Ring D6. Hopper Panel
D7. Right Side Panel D8.Handle
D9. Middle Plunger D10.Side Plunger
D11. φ26 O-Ring D12.Bridge Seal
D13. Decorative Plate D14.Throat Block
D15. Cover Nut D16.Manual Screw (Long)
D17. Manual Screw (Short) D18.Horizontal Bar
D19. Star Outlet D20.Front Panel
D21. Cylinder D 22.Beater Shaft
D23. Circuit Box D24.Small Condenser
D25. Small Fan D26.Small Compressor
D27. Compressor Starter D28.Dryer
D29. Expansive Valve D30.Condenser
D31. Fan D32.Compressor
D33.Frame D34.Foot
D35.Motor D36.Filter (Air/Liquid Segregator)
D37. Left Side Panel D38.Motor Strap Wheel
D39.Strap D40.Gearbox Strap Wheel
D41. Gearbox D42.Gearbox O-ring
D43. Gearbox Y-ring D44.Seal Nut
D45. Rear Panel

Soft Ice Cream Machine
- 7 -
Drawing D: Pre-cooling (keep-fresh) System Interior View
5. Control Panel Demonstration
(1) Electronic Easy IT pad Controller
Soft Ice Cream Machine
- 8 -
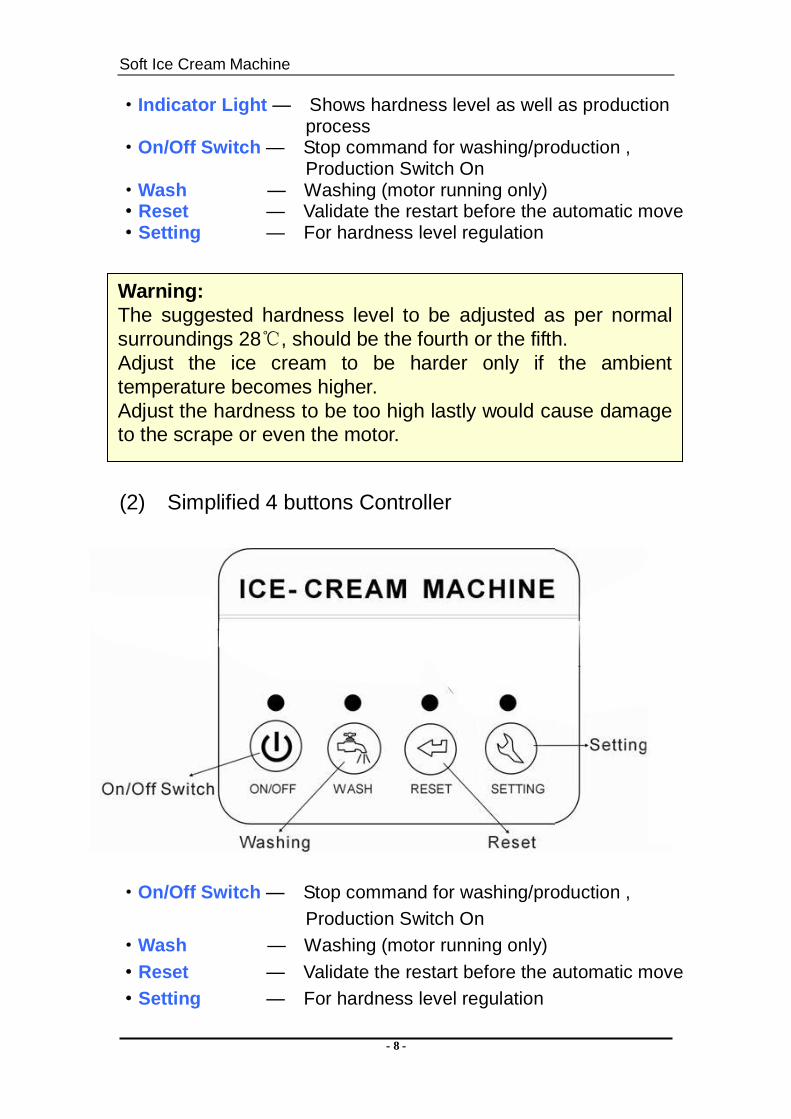
·Indicator Light — Shows hardness level as well as production process
·On/Off Switch — Stop command for washing/production , Production Switch On
·Wash — Washing (motor running only) ·Reset — Validate the restart before the automatic move ·Setting — For hardness level regulation
(2) Simplified 4 buttons Controller
(3) Electronic Easy IT pad Control
·On/Off Switch — Stop command for washing/production ,
Production Switch On
·Wash — Washing (motor running only)
·Reset — Validate the restart before the automatic move
·Setting — For hardness level regulation
Warning:
The suggested hardness level to be adjusted as per normal
surroundings 28℃, should be the fourth or the fifth.
Adjust the ice cream to be harder only if the ambient
temperature becomes higher.
Adjust the hardness to be too high lastly would cause damage
to the scrape or even the motor.

Soft Ice Cream Machine
- 9 -
Note:
·The Simplified 4 button electronic controller comes without
the hardness digital regulator and production process
indicator, comparing to this above controller.
(3) Consistency/Hardness Regulation for the simplified 4
button electronic controller.
(4) Number Display Electronic Controller
Harden
Soften
Number display
·On/Off Switch — Stop command for washing/production ,
Production Switch On
·Wash — Washing (motor running only)
·Reset — Validate the restart before the automatic move
·Setting — For hardness level regulation
· Number Display — Shows hardness level as well as
production process
The consistency Controller
(refer to the image on the right)
is Installed on the
Side Panel

Soft Ice Cream Machine
- 10 -
6. Operation Condition
The operation requirement for the equipment is as
bellows:
• Voltage 220 V (190V~245V)
• Operating air temperature 5 ºC – 48 ºC
• Max relative air humidity 90 %
• Max height above sea level 2000 m
• Normal atmospheric condition
7. Noise The noise level is normally bellow 55 dB which varies from
model to model.
INSTALLATION
1. Room Conditions
The room used for the operation of the soft ice cream
machine must be able to provide air that can circulate
freely, to prevent over-heating. Therefore the distance
from the machine to the wall must be at least 200 mm to
the closest wall. It is better to leave no less than 500mm
for the ventilation side.
The space where the machine is located should be kept
clean, in order to prevent dust or other particles to be
sucked into the machine by its fan.
The place where the machine stands should be firm and
dry and there should not be any heat sources within 500
mm to the machine.
NOTE: If the minimum room condition is not followed, it
may affect the operation of the machine and its output
capacity.

Soft Ice Cream Machine
- 11 -
Picture For Instruction Of Machines Placement
2. Electricity Connection
It is of great importance that the power supply to the
machine is within the permitted range 190V~245V, with a
current capacity above 16 A, also that the machine can be
properly grounded. If the voltage should be outside the
permitted range, then the machine safety protection will
prevent the machine to start and the machine need to be
restarted. The cross-section area of the cable that is
connecting the machine with its power source should be
over 2.5mm2 and the length shorter than 6m.
Warning: if the power cable should of any reason be
damaged, a skilled technician with sufficient knowledge
and skill should immediately replace it.
Warning: Always ensure that socket of the power
source is properly grounded before connecting the
machine.
3. Accessories Installation

Soft Ice Cream Machine
- 12 -
IMPORTANT:
Remember to clean the soft ice cream machine and its
parts before using the first time you start to use the
machine
(1) Beater shaft and throat block Installation
(a) Manually loosen off the plastic/stainless steel screws to
take down the throat block. Disassembly all the parts including
horizontal bar, bolts, and the gaskets.
Prepare a container (pan) of sanitary water. Put the assembly
into the water and clean it one by one to get rid of any dust or
dirt as well as the lubricating oil. (b) Take out the stell beater shaft from the cylinder by pulling &
slight rotating. After washing the shafts, insert the beater shaft
assembly back into the chilling cylinder.
Make sure there is clear without any dirt or stuff.
(c) Assemble the throat block:
·Insert the plunger and make sure it is
properly Installed because the middle
plunger is different from the other two.
·Make sure the plunger with square
sealing always in the middle.
·Insert the horizontal bar to make the plunger place and finally
After installing the beater shaft, turn
on the machine without the throat
block, inspect to make sure that the
rotating direction is always
clock-wise.
Soft Ice Cream Machine
- 13 -
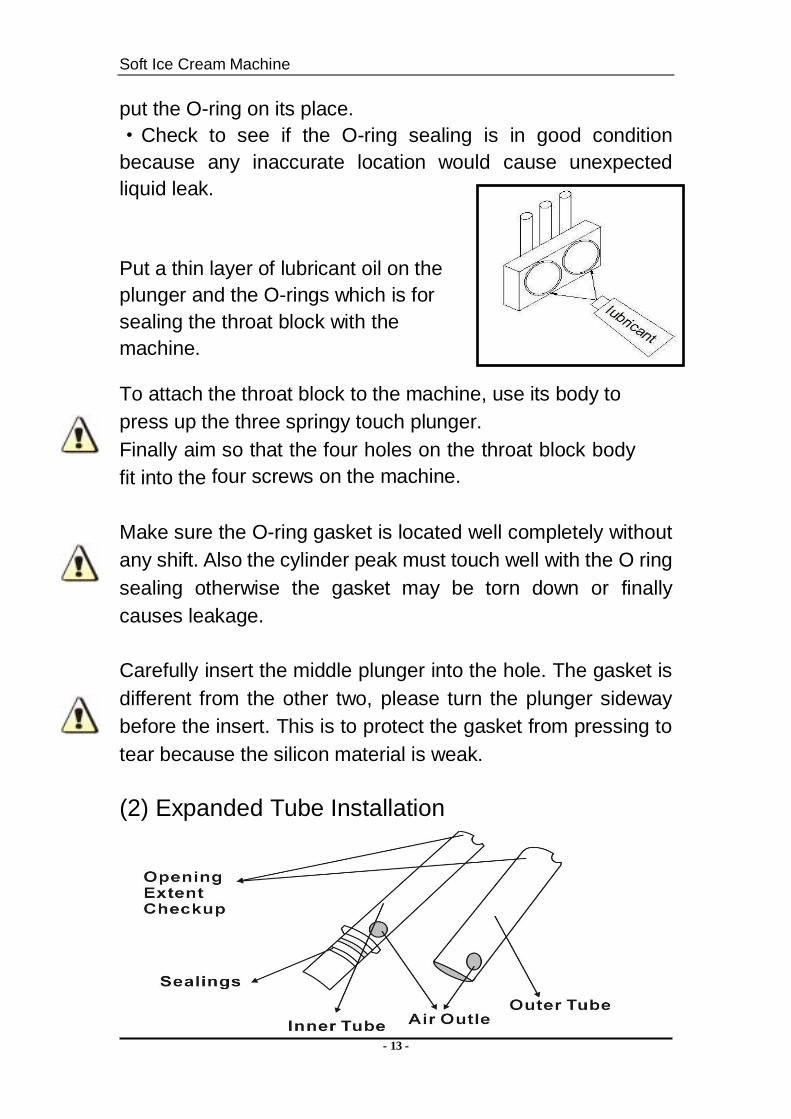
put the O-ring on its place.
·Check to see if the O-ring sealing is in good condition
because any inaccurate location would cause unexpected
liquid leak.
Put a thin layer of lubricant oil on the
plunger and the O-rings which is for
sealing the throat block with the
machine.
To attach the throat block to the machine, use its body to
press up the three springy touch plunger.
Finally aim so that the four holes on the throat block body
fit into the four screws on the machine.
Make sure the O-ring gasket is located well completely without
any shift. Also the cylinder peak must touch well with the O ring
sealing otherwise the gasket may be torn down or finally
causes leakage.
Carefully insert the middle plunger into the hole. The gasket is
different from the other two, please turn the plunger sideway
before the insert. This is to protect the gasket from pressing to
tear because the silicon material is weak.
(2) Expanded Tube Installation

Soft Ice Cream Machine
- 14 -
Instructions of using the expanded tube:
·Sleeve upper tube into the lower tube to make the holes
connective with each other.
·Press it to make it inserting into the hole of hopper.
· Control the feeding by adjusting the air outlet. It is
recommended that it is good for high over-run to feed only 1/3
of the chilling cylinder and leave the outlet 1/3 open so that not
only enough space for expansion can be guaranteed, but also
the cylinder can be well re-supplied.
After pouring enough the ice cream material and adjusting well the
air outlet, cover the hopper so as to keep the material clean from
dust as well as preserving the cold temperature.
OPERATION INSTRUCTION
1. Processes Before The First Operation (1) Clean the throat block
(2) Clean up the hopper
(3) Clean up the cylinder and beater shaft
2. Trial Running
After properly installing all the accessories, a trial running

Soft Ice Cream Machine
- 15 -
before ice cream production must be carries out to ensure
everything is in good condition.
(1) Press CLEAN button, the motor starts and the beater
rotates via transmission. Press STOP button, the motor
stops and the beater halt accordingly.
(2) Press PRODUCTION button, the machine enters into
refrigeration mode. The beater motor starting running first
while within 10 seconds, the fan, compressor, condenser
starts respectively. Hot air is discharged from the
ventilation holes on the side panel. The temperature of the
chilling cylinder drops down shortly and gradually which
turns out to be frosty in no more than one minutes. Please
STOP button,. The whole unit stops.
3. Ice Cream Production
(1) Pour the ready ice cream mix into the two hoppers.
Turn the air outlet open to make the feeding into action till
the chilling cylinder is filled.
(2) Let the ice cream mix free to flow deeply for 2 minutes
and then press the ON/OFF button. The motor starts first
and within 10 seconds other electrical components follows
up and the whole machine will go into production mode.
The ice cream can be finished in 3 to 8 minutes which
Caution:
Remove the beater shaft from the chilling cylinder without
any ice cream material and the trial running is not allowed
for more than 3 minutes because in that case the
refrigeration takes too long and the chilling cylinder would
be too frosty that might cause damage to the shaft.
Soft Ice Cream Machine
- 16 -
varies from models. (For the first batch, the production time
is normally around 6 to 12 minutes)
(3) Draw down the handles on the throat block to
make dispense. Every time when drawing the handle, the
motor and beater will start to pull the ice cream out by the
forces of helicity. The left and right discharge outlets at the
bottom of the spigot are related respectively to the left and
right chilling cylinder from where you can dispense your
optional flavor of ice cream. The middle outlet is applicable
to both of the chilling cylinder and thus it dispenses a
mixed flavor of ice cream.
(4) As soon as the ice cream reaches to the stipulated
hardness, the OVERLOAD indicator will be switching on
and the production will stop automatically. The production
restart in 7 minutes. During this period, if it is required to
continue producing ice cream without waiting, press the
RESET button to for immediate restart.
Caution:
Keep close attention to the material capacity in the
hopper. Make sure the material will never be empty
otherwise consecutive production would cause noise
and even damage to the beater. Check the material
capacity through the visual inner cover from time to time
and re-supply accordingly if necessary.
Caution:
If it is not necessary for dispensing ice cream even if the
hardness is achieved, do not push the RESET button
frequently otherwise the ice cream inside may possible
becomes too hard to serve, and also it is a waste of
electricity consumption.

Soft Ice Cream Machine
- 17 -
(5) Consistency (Hardness) Adjustment
The general principle of hardness control is based on the
fact that the motor current increase as the loading grows.
When the current reaches up to the stipulated rate, the
control circuit reacts and stops the production.
Normally a proper rate of hardness is pre-set up in factory
before delivery. If an optional rate of hardness is required,
please adjust the rate on the control panel or the knob.
For electronic controller which includes IT pad for hardness
adjustment, press - to soften the ice cream and
respectively press + for hardening.
The Specific process is as below:
(a) Press SETTING button for three seconds, the
HARDNESS indicator flashes to show its current hardness
rate.
(b) If the ice cream is too hard from the preferable taste,
press - consecutively till it reaches to the favorite softer
rate and then press SETTING again to save.
(c) If the ice cream is too soft from the preferable taste,
press +consecutively till it reaches to the favorite harder
rate.
(6). After confirming that the proper hardness rate, press
SETTING button to save the rate.
Wait for approximately one minute for each step mentioned above before implementing the next step, otherwise it may not completely go through the expected effect.

Soft Ice Cream Machine
- 18 -
For the simplified electronic controller
or the traditional controller,
please rotates the knobs as the
right image to select
your preferable hardness.
CLEANING & SANITIZING
1. Cleaning Notice
In order to ensure that the machine is clean, before it is
used the first time its parts needs to be sanitized and
washed. The cleaning process is also necessary as a daily
routine after soft ice cream production has been done or if
the machine has not been used for a long time.
If the ice cream reaches up to the required hardness but
the production is still working, please adjust the hardness
to SOFT tag to stop the production. If the production stops without reaching up to the required
hardness, it is caused by OVERLOAD. Please adjust the
hardness to HARD tag to restart the production. The
production automatically stops again when ice cream being
harder so that the machine will not happens to be
―FROZEN CYLINDER‖ which harms the beater and
compressor.
WARNING: Before disassembling any parts, always remember to stop and unplug the machine.

Soft Ice Cream Machine
- 19 -
IMPORTANT:
Because this is a food-producing machine, always
remember to keep good hygiene and to wash and
sanitize all parts that have been in contact with the
product after the machine has been used.
After the cleaning process is done then the parts should
be rinsed with bacteria- free drinking water and
thereafter dried.
The temperature of the water used during cleaning, should
never exceed 40 ºC since it may cause damage to the
plastic parts and seal in the machine.
INFORMATION
To prepare sanitizing solution you need to:
1. Fill a 5 L container with water.
2. Pour one bag of sanitizer into the water.
3. Mix the solution for 2 minutes or until all the sanitizer is
dissolved.
4.The sanitizing solution is ready to be used.
2. Daily cleaning
Mildew and bacteria can thrive and multiply rapidly in fat
mixture contents, therefore cleaning and sterilizing must be
Always remember to be careful while handling the sanitizing powder or solution, since it may cause personal injury or irritation if inhaled or if it get in contact with sensitive parts of the body (like the eyes).
Soft Ice Cream Machine
- 20 -
carried out as above mentioned with utmost care.
All stainless steel materials used for parts in contacts with
mixture and ice cream are easy to clean but do not prevent
the proliferation of mildew if not cleaned sufficiently.
(1) Sanitize and clean the hoppers and the cooling
cylinders
(2) Sanitize and clean the throat block
a. Disassembly the throat block with the metal key
accompanying with the machine package.
b. Put the block into detergent liquid or water. Rise and
drop several times and especially to clean up the
gaskets, plunger and sealing.
3. Sanitize and clean the beater assembly
(1) Pour water into the hopper while the throat block is fixed
on, be sure the water is enough for cleaning.
(2) Press the WASH button, the beater runs strongly for
self-cleaning. After a few minutes, press the WASH button
to turn off the beater and then take out the throat block
slowly to pour out the miry water.
4. Clean the machine shell with a cloth drenched
in a sanitizer.
5. Clean the drip tray with water and sanitizer.
Caution: Too hot water could damage the special materials of the machine suck as the silicon gasket.

Soft Ice Cream Machine
- 21 -
OPTIONAL FUNCTIONS
The below functions are selective. They are available only
in unit models with key letters ―H‖ / ―P‖ / ―C‖ / ‖M‖ / ‖R‖ / ‖T‖.
1. Keep-fresh System (Pre-cooling System)
For regular machine, the ice cream has to be cleaned up
when the machines stop dispensing ice cream in night-time,
otherwise the ice cream remainder inside the hopper and
cylinder will melt or even get rot by the next morning.
This device is designed for convenience and feasibility of
keeping ice cream over-night inside the machine without
any cleaning.
About How To Use This Function:
(1)Use this function during the daytime when the machine
is running for business, it can be capable of promoting the
output capacity as the material mix becomes cooler and
then it shortens the production time.
(2)Use this function during the nighttime when the machine
is not running for business, it can be capable of
refrigerating the hopper & cylinder intermittently.
(3) If lower temperature is required, please take down the
side panel and find the pre-cooling device box. Rotate the
knob to regulate the preferable temperature.
NOTE: This function always use key letter “H”.

Soft Ice Cream Machine
- 22 -
Location Of The Function Switch
Location Of The Function Switch
This function is not running always. Therefore it is not necessary to worry about high power consumption. This function runs only when the hopper temperature is detected to be higher than the expected rate. As soon as the hopper is cold enough, the function automatically runs down.

Soft Ice Cream Machine
- 23 -
2. Air Pump
This device is designed to pump air intermittently into the cylinder
when the production is effected. It makes the taste of ice cream
much better, saves the cost because of less mixture consumption.
It works automatically when the unit is in PRODUCTION
mode.
NOTE: This function always use key letter “P”.
3. Counter
This device is designed to count ice cream quantity for
daily sale. It displays the numbers of ice cream serving and
counts the number up while each time the handle is being
pulled down. With a lock, this device is convenient for shop
management & accounting
About How To Use This Function:
This device works when the unite is in PRODUCTION
mode. It automatically counts the number up when the s/s
handle is pulled down.
To reset the number, take off the lock and press the button.
To lock the counter, simply hang the lock up from the small
hole of the RESET button.
This function is not running always. To prevent the air injection from stopping the ice cream feed, the air pump generator runs intermittently (always 20 seconds running and 20 seconds halt).

Soft Ice Cream Machine
- 24 -
Ice Cream Number Display
Small Hole For Lock RESET
NOTE: This function always use key letter “C”.
4. Mixture Alert
Left hopper indicator
Right hopper indicator
This device reminds user of the time to re-support ice
cream mixture so as to avoid ‗empty cylinder‘ and to
guarantee consecutive feeding for consecutive ice cream
serving. Once the ice cream mixture inside the hopper falls
to the low limited level the stipulated indicator shines on.
NOTE: This function always use key letter “M”.

Soft Ice Cream Machine
- 25 -
5. Rainbow
·Clean before production
Before production please wash and disinfect the
components, pipes, containers which contact with food
components, pipes, containers.
·How to production
Connect to the power supply, press the rocker switch up (–),
left light turns on, lift up the front up-down board of the ice
cream machine, listen to the left rainbow pump whether it is
working properly.
Then press rocker switch down (﹦), the right light turns on,
listen to the right rainbow pump whether it is working
correctly.
Then put down the front up-down board, press the rocker
switch on middle position (O) to pending next step.
·Filter the jam
Filter the jam into smooth in order to avoid the jam block to
plug into the hole. Also insure the jam with enough sugar
percentage to prevent the ice jam blocks the ring groove
and hole.
·Pump the jam
Put the filtered jam into two containers, placed in cabinets,
and put the two suction tubes into the containers.
Press the rocker switch up (–), lift up the up-down board of
the ice cream machine.
When the left rainbow pump pumps the jam into the
discharge block, then press the rocker switch down (﹦).
When the right rainbow pump pumps the jam into the

Soft Ice Cream Machine
- 26 -
discharge block, then put down the up-down board to stop
pumps working.
When ice cream come out it would be with rainbow.
· Clean after production
Unplug the input tube which connects with discharge block,
and lift up the suction tubes at the same time.
Put the suction tube into the container with clean water of
about 40 ℃.
Open the appropriate switch, lift up the front up-down board
so that the pump works, until the pipeline can be out of all
clean water.
Remarks:
NOTE:This function always use key letter “R”.
6. Temperature Display
Shows the temperature of the cylinder
NOTE: This function always use key letter “T”.
UP-DOWN BOARD
ROCKER SWITCH

Soft Ice Cream Machine
- 27 -
TROUBLESHOOTING
1. Analysis table (1)
PPrroobblleemmss RReeaassoonnss PPoossssiibbllee CCaauusseess SSoolluuttiioonnss SSuuggggeesstteedd
Refrigeration
Is
Disable
1.The compressor does not run
A. The starter or capacitor breaks down. B. The overload protection is defective C. Power voltage is too low or the section area of the electric cable is too narrow that it causes low voltage.
A.B. Change the new ones C. Contact the local power supply station for more details or match a unit of regulator. Change a new cable for a large section if it is caused by the cable.
2.The chilling system is blocked by ice
Moisture exists Clean up the moisture
3. Leakage of refrigerant gas
The chilling system is not completely/properly sealed.
Check up the leakage and repair accordingly by vacuumizing and refilling refrigerant gas.
Ice cream is not hard enough even though it is already regulated to be the hardest rate.
Refrigeration is too weak
A. Refrigerant gas is lacking (not enough) or not re-filling enough. B. The machine has been used for a long time. The leakage is over normal annual volume.
Refill the refrigeration system with the corresponding gas type. The volume to be refilled must comply with the amount indicated on the compressor plate sheet. Repair the leakage before refilling
Improper evaporating temperature of the refrigerating
The thermal expansion valve is not properly adjusted
Adjust the valve so that the evaporating temperature to make it in best state.

Soft Ice Cream Machine
- 28 -
2. Analysis table (2)
PPrroobblleemmss RReeaassoonnss PPoossssiibbllee CCaauusseess SSoolluuttiioonnss SSuuggggeesstteedd
Leakage of the ice cream stuff or water
1.Leakage from the throat block
A. The gaskets on the plunger or the sealing O-ring is not properly installed, or not well in location, or has been already defective.
Change some new gaskets or sealing.
B. The fixing screws on throat block are not tight enough or not properly mounted
Mount the screw in proper position and tighten it up.
2. Leakage from the gear box
The Y-ring or O-ring sealing is defective or broken down
Change some new gaskets or sealing.
The ice cream is not able to discharged.
The ice cream is too hard
A. The ice cream material involves too much proportion of sugar B. Improper overload proof adjustment
A. Use the ready-to-use material from good supplier or adjust the proportion of recipe B. Turn to the professional repair man for the adjustment of the overload proof
The beater shaft does not rotate
A. Motor is broken down B, The control circuit is defective C. The transmission belts are too loose. D. The gear box is defective.
Repair or change the damaged parts
Improper Operation
The front section of ice cream in the chilling cylinder is hard while the left part being too soft.
Make sure that material inside the cylinder is feed equably before starting the run the machine.

Soft Ice Cream Machine
- 29 -
CIRCUIT DIAGRAM
DZ —— Electronic Circuit Plate HK —— Command Switch K1 —— Travel Switch (Limit Switch) K2 —— Reset Switch B1 —— Current Sensor B2 —— Main Transformer XD1 —— Overload Indicator XD2 —— Production Indicator D1 —— Beater Motor D2 —— Compressor D3 —— Fan Motor J1,J2 —— Alternating Contactor
Diagram of the 220V simplified controller machines

Soft Ice Cream Machine
- 30 -
Diagram for the 380V machines
Diagram of the 220V electronic controller machines

Soft Ice Cream Machine
- 31 -
BH —— Electronic Controller D3 —— Fan Motor K —— Travel Switch (Limit Switch) J1,J2 —— Direct Current Relay B1 —— Main Transformer B2 —— Main Sensor D1 —— Beater Motor D2 —— Compressor D3 —— Fan Motor
ACCESSORIES PACKAGE
1. 4 PCSφ26 O-ring for side plungers 2. 1 PCSφ26 O-ring and 1 PCS bridge gasket for
middle plunger 3. 2 PCSφ88 O-ring for throat block 4. 4 PCSφ16 O-ring for expanded tube 5. 2 SETS of expanded tube (The above list is for reference only. The actual breakdown
may vary as per different customer‘s request)
Caution:Keep the children away from the machine to avoid any
danger to the children.
Caution:
The above drawing and information are for reference
only. They are subject to change as per production
renovation necessity.
For the accurate diagram for any fixing or maintenance,
please refer to the sticker on the circuit box cover.
Related Documents