Micro Focus Security ArcSight SmartConnectors Software Version: 8.3.0 SmartConnector for Tripwire IP360 File Document Release Date: February 2022 Software Release Date: February 2022

Welcome message from author
This document is posted to help you gain knowledge. Please leave a comment to let me know what you think about it! Share it to your friends and learn new things together.
Transcript
Micro Focus SecurityArcSight SmartConnectorsSoftware Version: 8.3.0
SmartConnector for Tripwire IP360 File
Document Release Date: February 2022Software Release Date: February 2022

Legal NoticesMicro FocusThe Lawn22-30 Old Bath RoadNewbury, Berkshire RG14 1QNUK
https://www.microfocus.com
Copyright Notice© Copyright 2022 Micro Focus or one of its affiliates
Confidential computer software. Valid license from Micro Focus required for possession, use or copying. Theinformation contained herein is subject to change without notice.
The only warranties for Micro Focus products and services are set forth in the express warranty statementsaccompanying such products and services. Nothing herein should be construed as constituting an additional warranty.Micro Focus shall not be liable for technical or editorial errors or omissions contained herein.
No portion of this product's documentation may be reproduced or transmitted in any form or by any means, electronicor mechanical, including photocopying, recording, or information storage and retrieval systems, for any purpose otherthan the purchaser's internal use, without the express written permission of Micro Focus.
Notwithstanding anything to the contrary in your license agreement for Micro Focus ArcSight software, you mayreverse engineer and modify certain open source components of the software in accordance with the license terms forthose particular components. See below for the applicable terms.
U.S. Governmental Rights. For purposes of your license to Micro Focus ArcSight software, “commercial computersoftware” is defined at FAR 2.101. If acquired by or on behalf of a civilian agency, the U.S. Government acquires thiscommercial computer software and/or commercial computer software documentation and other technical data subjectto the terms of the Agreement as specified in 48 C.F.R. 12.212 (Computer Software) and 12.211 (Technical Data) of theFederal Acquisition Regulation (“FAR”) and its successors. If acquired by or on behalf of any agency within theDepartment of Defense (“DOD”), the U.S. Government acquires this commercial computer software and/orcommercial computer software documentation subject to the terms of the Agreement as specified in 48 C.F.R.227.7202-3 of the DOD FAR Supplement (“DFARS”) and its successors. This U.S. Government Rights Section 18.11 is inlieu of, and supersedes, any other FAR, DFARS, or other clause or provision that addresses government rights incomputer software or technical data.
Trademark NoticesAdobe™ is a trademark of Adobe Systems Incorporated.
Microsoft® and Windows® are U.S. registered trademarks of Microsoft Corporation.
UNIX® is a registered trademark of The Open Group.
Documentation UpdatesThe title page of this document contains the following identifying information:
l Software Version number
l Document Release Date, which changes each time the document is updated
l Software Release Date, which indicates the release date of this version of the software
To check for recent updates or to verify that you are using the most recent edition of a document, go to:
https://www.microfocus.com/support-and-services/documentation
SmartConnector for Tripwire IP360 File
Micro Focus SmartConnectors (8.3.0) Page 2 of 24

Support
Phone A list of phonenumbers is available on the Technical SupportPage: https://softwaresupport.softwaregrp.com/support-contact-information
Support Web Site https://softwaresupport.softwaregrp.com/
ArcSight Product Documentation https://community.softwaregrp.com/t5/ArcSight-Product-Documentation/ct-p/productdocs
Contact Information
About this PDF Version of Online HelpThis document is a PDF version of the online help. This PDF file is provided so you can easily print multiple topics fromthe help information or read the online help in PDF format. Because this content was originally created to be viewed asonline help in a web browser, some topics may not be formatted properly. Some interactive topics may not be presentin this PDF version. Those topics can be successfully printed from within the online help.
SmartConnector for Tripwire IP360 File
Micro Focus SmartConnectors (8.3.0) Page 3 of 24

Document Revision HistoryThe title page of this document contains the following identifying information:l Software Version number, which indicates the software version.
l Document Release Date, which changes each time the document is updated.
To check for recent updates or to verify that you are using the most recent edition of a document, go to ArcSight ProductDocumentation Community on the Micro Focus Security Community.
Date Product Version Description
MM/DD/YYYY X.X.X.X Description of change
Document Changes
Page 4 of 24
Contents
Configuration Guide for Tripwire IP360 File SmartConnector 6
Product Overview 7
The ASPL XML Folder 7
Configure the Device for Event Collection 8
Modes of Operation 9
Increase Memory Size for XML Reports 9
Install the SmartConnector 11
Prepare to Install Connector 11
Install Core Software 11
Set Global Parameters (optional) 12
Select Connector and Add Parameter Information 14
Select a Destination 15
Complete Installation and Configuration 16
Run the SmartConnector 17
Device Event Mapping to ArcSight Fields 18Open Ports Event Mappings to ArcSight ESM Fields 18Scanner Mappings to ArcSight ESM Fields 19URIs Event Mappings to ArcSight ESM Fields 19Vulnerabilities Event Mappings to ArcSight ESM Fields 20
SmartConnector Verification 22
Troubleshooting 23
Send Documentation Feedback 24
SmartConnector for Tripwire IP360 File
Page 5 of 24
Configuration Guide for Tripwire IP360 FileSmartConnectorThis guide provides information for installing the SmartConnector for Tripwire IP 360 File andconfiguring the device for event collection. For supported devices and versions, see TechnicalRequirements.
Intended Audience
This guide provides information for IT administrators who are responsible for managing theArcSight SmartConnectors.
Additional Documentation
The ArcSight SmartConnectors documentation library includes the following resources:
l Installation Guide for ArcSight SmartConnectors, which provides detailed information aboutinstalling SmartConnectors.
l Configuration Guides for ArcSight SmartConnectors, which provides information aboutconfiguring SmartConnectors to collect events from different sources.
l Release Notes for ArcSight SmartConnectors, which provides information about the latestrelease
For the most recent version of this guide and other ArcSight SmartConnector documentationresources, visit the documentation site for ArcSight SmartConnectors.
Contact Information
We want to hear your comments and suggestions about this book and the other documentationincluded with this product. You can use the comment on this topic link at the bottom of eachpage of the online documentation, or send an email to [email protected].
For specific product issues, contact Micro Focus Customer Care.
SmartConnector for Tripwire IP360 FileConfiguration Guide for Tripwire IP360 File SmartConnector
Configuration Guide for Tripwire IP360 File SmartConnector Page 6 of 24
Product OverviewTripwire IP360 is an enterprise-class vulnerability and risk management system that enablesorganizations to measure, manage, and reduce their network security risk. IP360 gathersdetailed intelligence about the endpoint devices on the network, and uses reporting andanalytics to prioritize vulnerabilities and provide a comprehensive view of network risk.
The ASPL XML FolderThe ASPL XML folder contains static information about all the possible vulnerabilities,operating systems, and applications of which Tripwire is aware. This changes approximatelytwice a week, and the connector downloads the file from the appliance and saves it in the localASPL XML folder.
If, in the future, Tripwire is not reachable for some reason, the connector can get the ASPLXML file from the local folder. That occurs only when the appliance cannot be reached;otherwise, the connector looks for new versions in the appliance. It only downloads the ASPLXML file when the file has changed in the appliance.
Prior to Tripwire version 6.8, the connector picked up ASPL XML files from the local folder onlyif they were named ASPL-*.<lang>.xml (where <lang> is en for English or jp for Japanese).With the Tripwire Device Profiler version 6.8 support, the connector picks up compressed filesas well as files starting with ontology. The following types of files will be picked up:
ASPL-*.<lang>.xmlASPL-*.<lang>.xml.gzASPL-*.<lang>.xml.zipontology-*.<lang>.xmlontology-*.<lang>.xml.gzontology-*.<lang>.xml.zip
SmartConnector for Tripwire IP360 FileProduct Overview
Product Overview Page 7 of 24

Configure the Device for Event CollectionThe VnE Manager is the central management tool for IP360. It automatically and manuallyexports scan data (both .xml and .md5 files) to user-specified destinations. In Version 6.3.0,IP360 uses XML as a format for automatically exported Device Profiler scan results. ThisSmartConnector reads XML3 exported data.
Under Administer: System -> VnE Manager -> Automated Export, clickModify to view (andchange, if needed) the following fields, which are required during SmartConnector installation:
l User - The user account on the machine to which the data is exported (the user passwordalso will be required during SmartConnector installation).
l Host - Host name or IP address of the machine (the port to which VnE Manager is listening isalso required during SmartConnector installation).
l Directory (Scan Report Folder) - The path to the directory in which the data is stored.
l Format - The format for the exported data (ensure XML3 is selected).
l Status - Ensure that Active is selected. This turns automated export on. If Inactive isselected, automated export is off.
Click Submit to save any changes you made.
SmartConnector for Tripwire IP360 FileConfigure the Device for Event Collection
Configure the Device for Event Collection Page 8 of 24

Modes of OperationThe SmartConnector for Tripwire IP360 File SmartConnector, as with other vulnerabilityscanners, supports two operation modes:
l Interactive – This mode is designed to be used by an operator who requires only certainreports to be sent to the connector. In this mode, the SmartConnector reads the contents ofthe configured folder and presents it in a UI window. You can select which scan reports areto be sent to the ESM Manager. After completing the selections, click on Send to send all theselected scanner reports to ESM. Close (exit) the window when all the desired scans havebeen sent to ESM and the connector will terminate. In this mode, the SmartConnector shouldnot be run as a service, only as a stand-alone application.
l Automatic – This mode is designed to be used in conjunction with an automated procedureto periodically run scans with the Tripwire scanner. At the end of the scan, Tripwire createsanother file with the same name but with the 'md5' extension. When the VnE Manager isconfigured to export the XML report, it also exports the .md5 file into the same folder. Theappearance of this file triggers the SmartConnector to import the report. The reportsprocessed are renamed to {original report file} + "xml_processed".
In both modes, the SmartConnector records the file names of the reports that have been sentto the ESM Manager; therefore, if you use the interactive mode, the list of files availabledisplays only the files that have not yet been sent to the ESM Manager. The same applies forthe automatic mode; only files that are present in the configured folder that have not beensent already are processed.
To run a scanner connector in interactive mode, the connector must be run in standalone modeand not as a service. Automatic mode, however, can be run either standalone or as a service,
Increase Memory Size for XML ReportsThe connector cannot process reports that are too lengthy. With the default 256M memorysetting, the connector can safely process reports up to 250K in length. If memory is increasedto the maximum limit of 1024M, the connector can process reports up to a million lines inlength. Longer reports cannot be processed. ArcSight's recommendation for long reports is tosplit the scan into multiple smaller reports and import them individually.
To increase the memory size for stand-alone connectors from the command line, change thefollowing line in $ARCSIGHT_HOME\current\bin\scripts\connectors.bat (Windows) or$ARCSIGHT_HOME/current/bin/scripts/connectors.sh (Unix)
ARCSIGHT_MEMORY_OPTIONS=" -Xms256m -Xmx256m "
SmartConnector for Tripwire IP360 FileModes of Operation
Modes of Operation Page 9 of 24

to
ARCSIGHT_MEMORY_OPTIONS=" -Xms1024m -Xmx1024m "
To increase the memory size for connectors being run as a service, change the following linesin user/agent/agent.wrapper.conf from:
wrapper.java.initmemory=256 wrapper.java.maxmemory=256
to:
wrapper.java.initmemory=1024 wrapper.java.maxmemory=1024
To increase the memory size for connectors managed by the Connector Appliance/ArcSightManagement Center, the heap size can be set using a container level command.
SmartConnector for Tripwire IP360 FileModes of Operation
Increase Memory Size for XML Reports Page 10 of 24
Install the SmartConnectorThe following sections provide instructions for installing and configuring your selectedSmartConnector.
Connector Appliance/ArcSight Management Center supports mounting for Network File System(NFS) and CIFS (Windows) shares. When you install this connector on one of these devices,establish a CIFS mount on the device before adding the connector. Provide this share nameduring connector configuration. For more information, see Remote File Systems in theConnector Appliance or ArcSight Management Center Administrator's Guide.
Prepare to Install ConnectorBefore you install any SmartConnectors, make sure that the ArcSight products with which theconnectors will communicate have already been installed correctly (such as ArcSight ESM orArcSight Logger).
For complete product information, read the Administrator's Guide as well as the Installationand Configuration guide for your ArcSight product before installing a new SmartConnector. Ifyou are adding a connector to the ArcSight Management Center, see the ArcSightManagement Center Administrator's Guide for instructions, and start the installation procedureat "Set Global Parameters (optional)" or "Select Connector and Add Parameter Information."
Before installing the SmartConnector, be sure the following are available:
l Local access to the machine where the SmartConnector is to be installed
l Administrator passwords
Install Core SoftwareUnless specified otherwise at the beginning of this guide, this SmartConnector can be installedon all ArcSight supported platforms; for the complete list, see the SmartConnector Product andPlatform Support document, available from the Micro Focus SSO and Protect 724 sites.
1 Download the SmartConnector executable for your operating system from the Micro FocusSSO site.
2 Start the SmartConnector installation and configuration wizard by running the executable.
Follow the wizard through the following folder selection tasks and installation of the coreconnector software:
SmartConnector for Tripwire IP360 FileInstall the SmartConnector
Install the SmartConnector Page 11 of 24
Introduction Choose Install Folder Choose Shortcut Folder Pre-Installation Summary Installing...
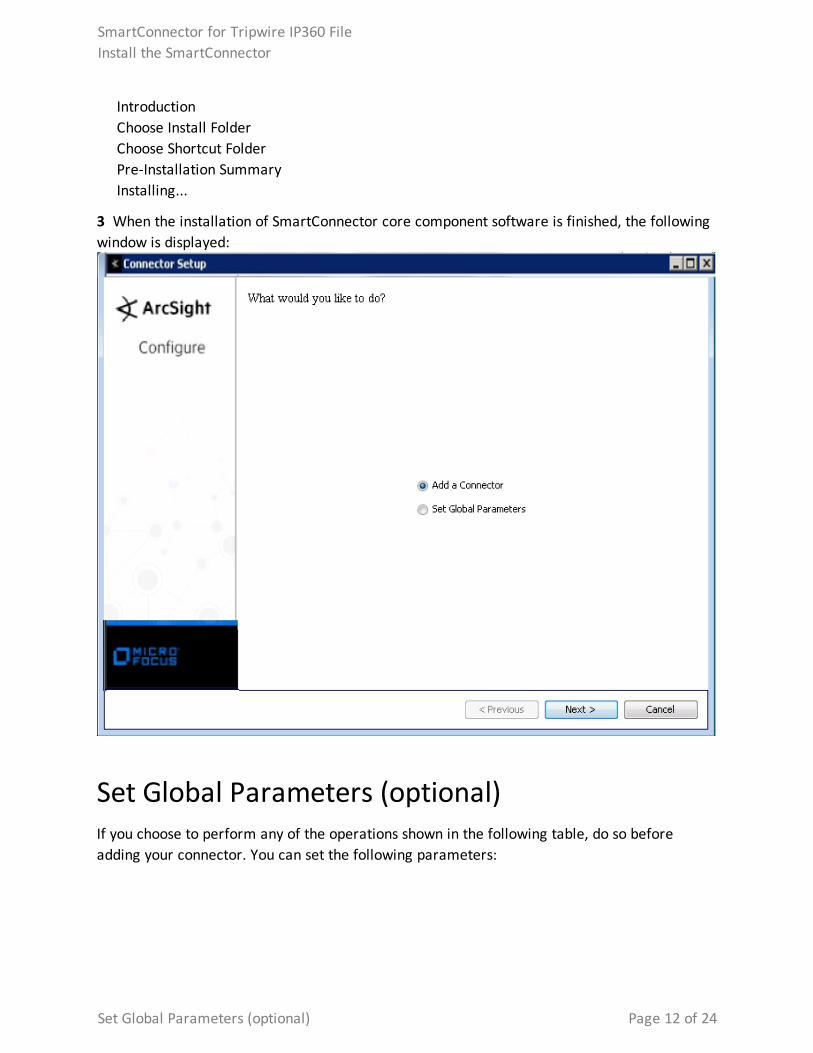
3 When the installation of SmartConnector core component software is finished, the followingwindow is displayed:
Set Global Parameters (optional)If you choose to perform any of the operations shown in the following table, do so beforeadding your connector. You can set the following parameters:
SmartConnector for Tripwire IP360 FileInstall the SmartConnector
Set Global Parameters (optional) Page 12 of 24
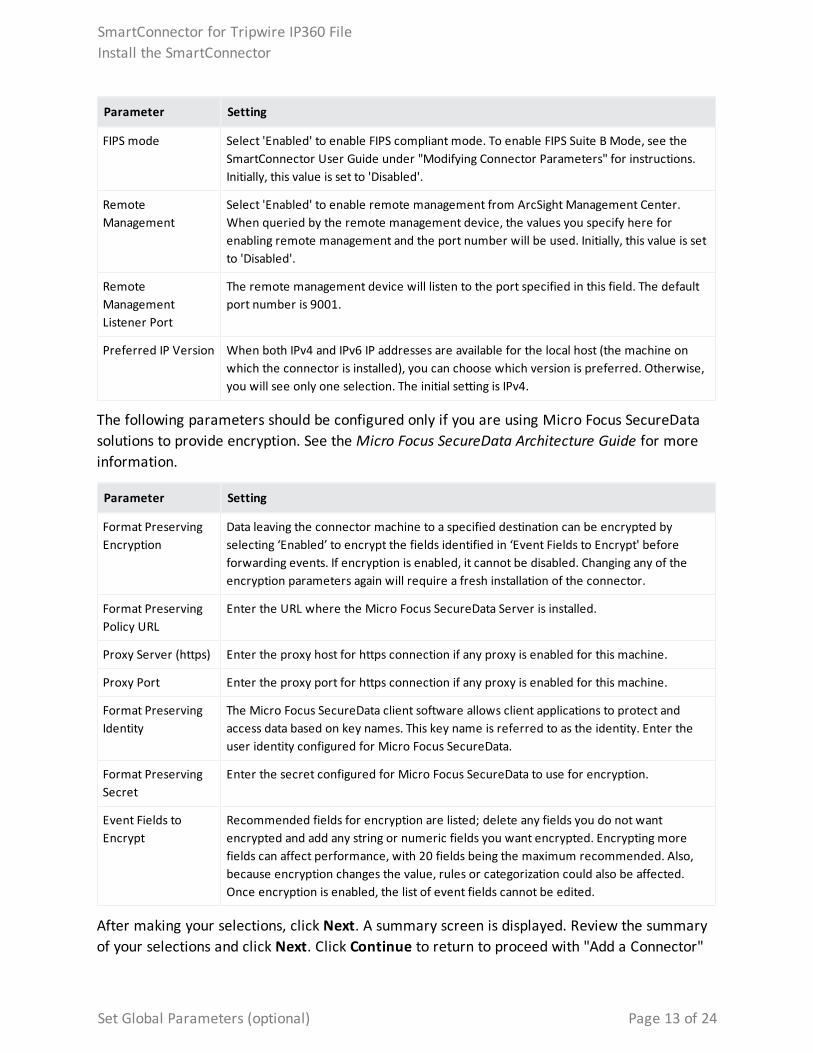
Parameter Setting
FIPS mode Select 'Enabled' to enable FIPS compliant mode. To enable FIPS Suite B Mode, see theSmartConnector User Guide under "Modifying Connector Parameters" for instructions.Initially, this value is set to 'Disabled'.
RemoteManagement
Select 'Enabled' to enable remote management from ArcSight Management Center.When queried by the remote management device, the values you specify here forenabling remote management and the port number will be used. Initially, this value is setto 'Disabled'.
RemoteManagementListener Port
The remote management device will listen to the port specified in this field. The defaultport number is 9001.
Preferred IP Version When both IPv4 and IPv6 IP addresses are available for the local host (the machine onwhich the connector is installed), you can choose which version is preferred. Otherwise,you will see only one selection. The initial setting is IPv4.
The following parameters should be configured only if you are using Micro Focus SecureDatasolutions to provide encryption. See the Micro Focus SecureData Architecture Guide for moreinformation.
Parameter Setting
Format PreservingEncryption
Data leaving the connector machine to a specified destination can be encrypted byselecting ‘Enabled’ to encrypt the fields identified in ‘Event Fields to Encrypt' beforeforwarding events. If encryption is enabled, it cannot be disabled. Changing any of theencryption parameters again will require a fresh installation of the connector.
Format PreservingPolicy URL
Enter the URL where the Micro Focus SecureData Server is installed.
Proxy Server (https) Enter the proxy host for https connection if any proxy is enabled for this machine.
Proxy Port Enter the proxy port for https connection if any proxy is enabled for this machine.
Format PreservingIdentity
The Micro Focus SecureData client software allows client applications to protect andaccess data based on key names. This key name is referred to as the identity. Enter theuser identity configured for Micro Focus SecureData.
Format PreservingSecret
Enter the secret configured for Micro Focus SecureData to use for encryption.
Event Fields toEncrypt
Recommended fields for encryption are listed; delete any fields you do not wantencrypted and add any string or numeric fields you want encrypted. Encrypting morefields can affect performance, with 20 fields being the maximum recommended. Also,because encryption changes the value, rules or categorization could also be affected.Once encryption is enabled, the list of event fields cannot be edited.
After making your selections, click Next. A summary screen is displayed. Review the summaryof your selections and click Next. Click Continue to return to proceed with "Add a Connector"
SmartConnector for Tripwire IP360 FileInstall the SmartConnector
Set Global Parameters (optional) Page 13 of 24

window. Continue the installation procedure with "Select Connector and Add ParameterInformation."
Select Connector and Add Parameter Information1 Select Add a Connector and click Next. If applicable, you can enable FIPS mode and enableremote management later in the wizard after SmartConnector configuration.
2 Select Tripwire IP360 File and click Next.
3 Enter the required SmartConnector parameters to configure the SmartConnector, then clickNext.
Parameter Description
Mode Select whether to send event logs to the connector using Interactive (manual) orAutomatic mode.
Scan Report Folder Enter the name of the folder in which scan reports are stored.
SmartConnector for Tripwire IP360 FileInstall the SmartConnector
Select Connector and Add Parameter Information Page 14 of 24
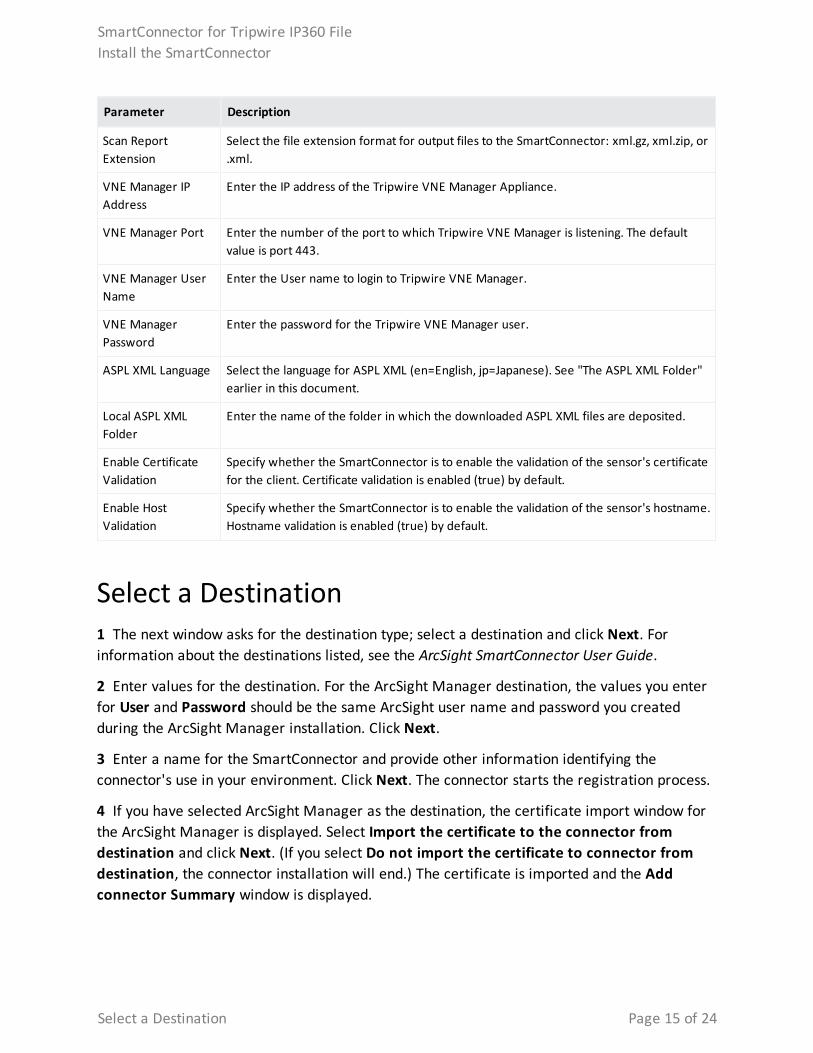
Parameter Description
Scan ReportExtension
Select the file extension format for output files to the SmartConnector: xml.gz, xml.zip, or.xml.
VNE Manager IPAddress
Enter the IP address of the Tripwire VNE Manager Appliance.
VNE Manager Port Enter the number of the port to which Tripwire VNE Manager is listening. The defaultvalue is port 443.
VNE Manager UserName
Enter the User name to login to Tripwire VNE Manager.
VNE ManagerPassword
Enter the password for the Tripwire VNE Manager user.
ASPL XML Language Select the language for ASPL XML (en=English, jp=Japanese). See "The ASPL XML Folder"earlier in this document.
Local ASPL XMLFolder
Enter the name of the folder in which the downloaded ASPL XML files are deposited.
Enable CertificateValidation
Specify whether the SmartConnector is to enable the validation of the sensor's certificatefor the client. Certificate validation is enabled (true) by default.
Enable HostValidation
Specify whether the SmartConnector is to enable the validation of the sensor's hostname.Hostname validation is enabled (true) by default.
Select a Destination1 The next window asks for the destination type; select a destination and click Next. Forinformation about the destinations listed, see the ArcSight SmartConnector User Guide.
2 Enter values for the destination. For the ArcSight Manager destination, the values you enterfor User and Password should be the same ArcSight user name and password you createdduring the ArcSight Manager installation. Click Next.
3 Enter a name for the SmartConnector and provide other information identifying theconnector's use in your environment. Click Next. The connector starts the registration process.
4 If you have selected ArcSight Manager as the destination, the certificate import window forthe ArcSight Manager is displayed. Select Import the certificate to the connector fromdestination and click Next. (If you select Do not import the certificate to connector fromdestination, the connector installation will end.) The certificate is imported and the Addconnector Summary window is displayed.
SmartConnector for Tripwire IP360 FileInstall the SmartConnector
Select a Destination Page 15 of 24
Complete Installation and Configuration1 Review the Add Connector Summary and click Next. If the summary is incorrect, clickPrevious to make changes.
2 The wizard now prompts you to choose whether you want to run the SmartConnector as astand-alone process or as a service. If you choose to run the connector as a stand-aloneprocess, select Leave as a standalone application, click Next, and continue with step 5.
3 If you chose to run the connector as a service, with Install as a service selected, click Next.The wizard prompts you to define service parameters. Enter values for Service Internal Nameand Service Display Name and select Yes or No for Start the service automatically. TheInstall Service Summary window is displayed when you click Next.
4 Click Next on the summary window.
5 To complete the installation, choose Exit and Click Next.
For instructions about upgrading the connector or modifying parameters, see theSmartConnector User Guide.
SmartConnector for Tripwire IP360 FileInstall the SmartConnector
Complete Installation and Configuration Page 16 of 24

Run the SmartConnectorSmartConnectors can be installed and run in stand-alone mode, on Windows platforms as aWindows service, or on UNIX platforms as a UNIX daemon, depending upon the platformsupported. On Windows platforms, SmartConnectors also can be run using shortcuts andoptional Start menu entries.
If the connector is installed in stand-alone mode, it must be started manually and is notautomatically active when a host is restarted. If installed as a service or daemon, the connectorruns automatically when the host is restarted. For information about connectors running asservices or daemons, see the ArcSight SmartConnector User Guide.
To run all SmartConnectors installed in stand-alone mode on a particular host, open acommand window, go to $ARCSIGHT_HOME\current\bin and run: arcsight connectors
To view the SmartConnector log, read the file $ARCSIGHT_HOME\current\logs\agent.log; tostop all SmartConnectors, enter Ctrl+C in the command window.
SmartConnector for Tripwire IP360 FileRun the SmartConnector
Run the SmartConnector Page 17 of 24

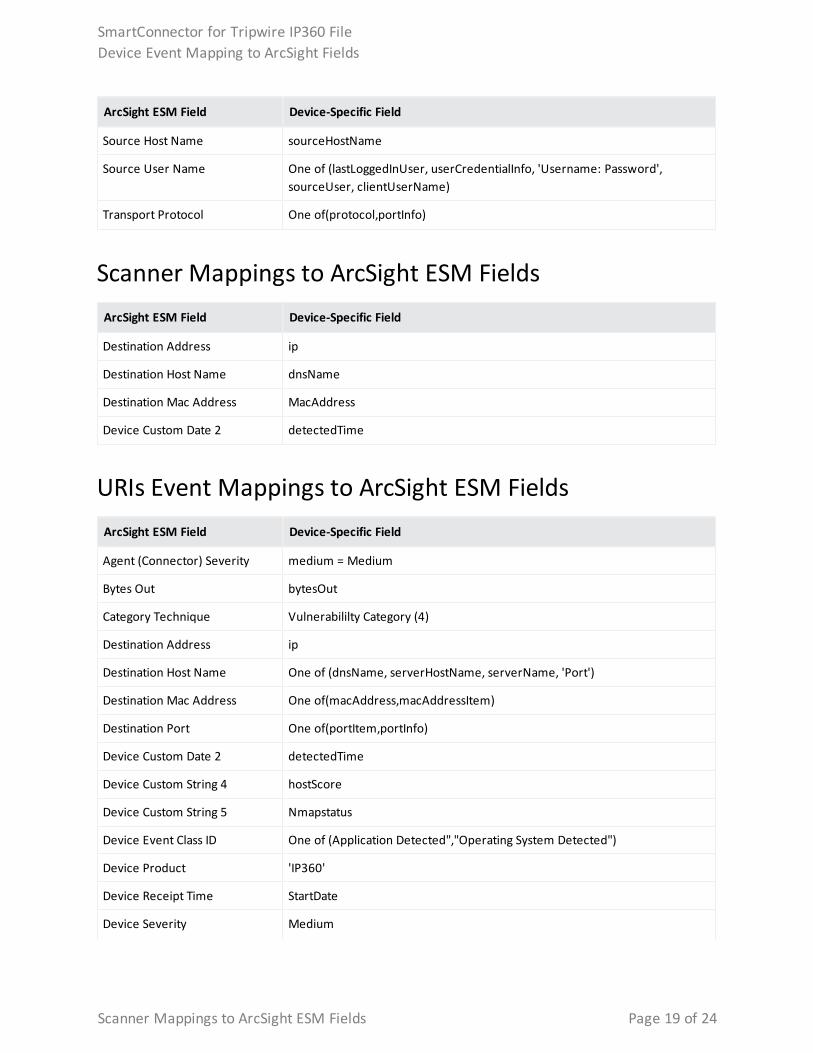
Device Event Mapping to ArcSight FieldsThe following section lists the mappings of ArcSight data fields to the device's specific eventdefinitions. See the ArcSight Console User's Guide for more information about the ArcSight datafields.
Open Ports Event Mappings to ArcSight ESM FieldsArcSight ESM Field Device-Specific Field
Agent (Connector) Severity medium = Medium
Bytes Out bytesOut
Category Technique Vulnerability Category (1)
Destination Address ip
Destination Host Name One of (dnsName, serverHostName, serverName, 'Port')
Destination Mac Address One of(macAddress,macAddressItem)
Destination Port One of(port,portItem)
Device Custom Date 2 detectedTime
Device Custom String 4 hostScore
Device Custom String 5 Nmapstatus
Device Event Class ID Open Port
Device Product 'IP360'
Device Receipt Time StartDate
Device Severity Medium
Device Vendor 'Tripwire'
End Time EndDate
File Path path
File Permission permissionInfo
Message One of (certificateError, serverStatus)
Name 'Open Port'
Request Client Application One of (clientApplication, clientApplicationItem, clientApplicationVersion)
SmartConnector for Tripwire IP360 FileDevice Event Mapping to ArcSight Fields
Device Event Mapping to ArcSight Fields Page 18 of 24
ArcSight ESM Field Device-Specific Field
Source Host Name sourceHostName
Source User Name One of (lastLoggedInUser, userCredentialInfo, 'Username: Password',sourceUser, clientUserName)
Transport Protocol One of(protocol,portInfo)
Scanner Mappings to ArcSight ESM FieldsArcSight ESM Field Device-Specific Field
Destination Address ip
Destination Host Name dnsName
Destination Mac Address MacAddress
Device Custom Date 2 detectedTime
URIs Event Mappings to ArcSight ESM FieldsArcSight ESM Field Device-Specific Field
Agent (Connector) Severity medium = Medium
Bytes Out bytesOut
Category Technique Vulnerabililty Category (4)
Destination Address ip
Destination Host Name One of (dnsName, serverHostName, serverName, 'Port')
Destination Mac Address One of(macAddress,macAddressItem)
Destination Port One of(portItem,portInfo)
Device Custom Date 2 detectedTime
Device Custom String 4 hostScore
Device Custom String 5 Nmapstatus
Device Event Class ID One of (Application Detected","Operating System Detected")
Device Product 'IP360'
Device Receipt Time StartDate
Device Severity Medium
SmartConnector for Tripwire IP360 FileDevice Event Mapping to ArcSight Fields
Scanner Mappings to ArcSight ESM Fields Page 19 of 24

ArcSight ESM Field Device-Specific Field
Device Vendor 'Tripwire'
End Time EndDate
File Path One of(Both("/Site Asset Categories/Application/",appname),path)
File Permission permissionInfo
Message One of (certificateError, serverStatus)
Name Application Detected or Operating System Detected
Request Client Application One of (clientApplication, clientApplicationItem, clientApplicationVersion)
Source Host Name sourceHostName
Source User Name One of (lastLoggedInUser, userCredentialInfo, 'Username: Password',sourceUser, clientUserName)
Transport Protocol portInfo
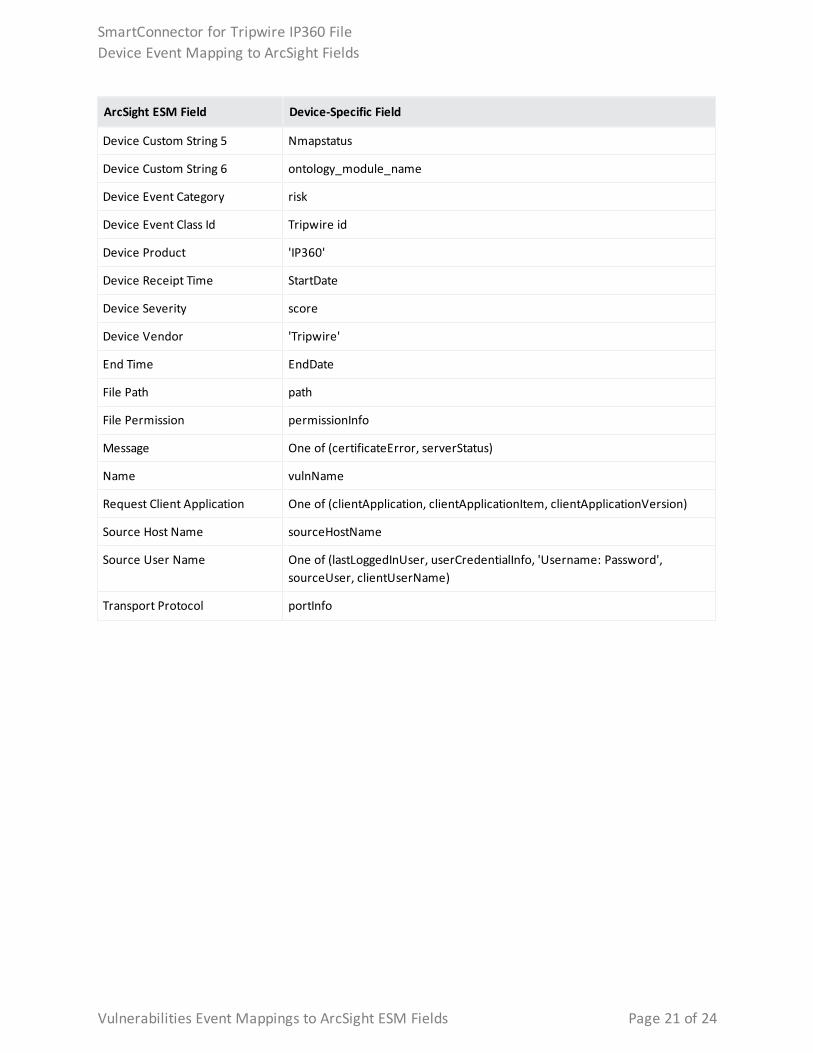
Vulnerabilities Event Mappings to ArcSight ESM FieldsArcSight ESM Field Device-Specific Field
Bytes Out bytesOut
Category Technique Vulnerability Category (0)
Connector (Agent) Severity Very High = 60000..89999; High = 40000..59999; Medium = 20000..39999;Low = 0..19999
Destination Address ip
Destination Host Name One of (dnsName, serverHostName, serverName, 'Port')
Destination Mac Address One of(macAddress,macAddressItem)
Destination Port One of(portItem,portInfo)
Device Custom Date 1 date
Device Custom Date 2 detectedTime
Device Custom Number 1 ruleId
Device Custom String 1 solution
Device Custom String 2 category
Device Custom String 3 netbiosName
Device Custom String 4 hostScore
SmartConnector for Tripwire IP360 FileDevice Event Mapping to ArcSight Fields
Vulnerabilities Event Mappings to ArcSight ESM Fields Page 20 of 24
ArcSight ESM Field Device-Specific Field
Device Custom String 5 Nmapstatus
Device Custom String 6 ontology_module_name
Device Event Category risk
Device Event Class Id Tripwire id
Device Product 'IP360'
Device Receipt Time StartDate
Device Severity score
Device Vendor 'Tripwire'
End Time EndDate
File Path path
File Permission permissionInfo
Message One of (certificateError, serverStatus)
Name vulnName
Request Client Application One of (clientApplication, clientApplicationItem, clientApplicationVersion)
Source Host Name sourceHostName
Source User Name One of (lastLoggedInUser, userCredentialInfo, 'Username: Password',sourceUser, clientUserName)
Transport Protocol portInfo
SmartConnector for Tripwire IP360 FileDevice Event Mapping to ArcSight Fields
Vulnerabilities Event Mappings to ArcSight ESM Fields Page 21 of 24

SmartConnector VerificationThe SmartConnector, when run in interactive mode, displays all the available scan jobs that areyet to be sent to the ESM Manager. You can select one or more jobs and click Send. In lessthan a minute, the ESM Console displays several events coming from this connector reportingthe assets discovered, open ports and vulnerabilities, vulnerability details, and operatingsystem information. In addition, you should see the created or updated asset resources under/All Assets/Site AssetCategories/Zone where Zone is the ESM default or configured zone for theaddress range where asset's ip address falls. Also displayed are open ports, applications, andoperating system information represented as asset categories added to this asset.Vulnerabilities for the asset are found under the Vulnerabilities tab.
SmartConnector for Tripwire IP360 FileSmartConnector Verification
SmartConnector Verification Page 22 of 24

TroubleshootingThe Connector GUI in interactive mode does not display some reports.
Click on Options and select Refresh Job List. This should display any new scan jobs that mayhave completed while the connector is running.please confirm that when customer used MySQL JDBC driver 5.1.38, they had issue to receiveeevents. And the workaround is to apply older driver 5.0.8, after that connector is able toreceived events.
SmartConnector for Tripwire IP360 FileTroubleshooting
Troubleshooting Page 23 of 24

Send Documentation FeedbackIf you have comments about this document, you can contact the documentation team by email.If an email client is configured on this computer, click the link above and an email windowopens with the following information in the subject line:
Feedback on SmartConnector for Tripwire IP360 File (SmartConnectors 8.3.0)
Just add your feedback to the email and click send.
If no email client is available, copy the information above to a new message in a web mailclient, and send your feedback to [email protected].
We appreciate your feedback!
Send Documentation Feedback Page 24 of 24
Related Documents