Was this document helpful? smarttech.com/docfeedback/171152 SMART Learning Suite 17.1 SYSTEM ADMINISTRATOR’S GUIDE FOR WINDOWS OPERATING SYSTEMS

Welcome message from author
This document is posted to help you gain knowledge. Please leave a comment to let me know what you think about it! Share it to your friends and learn new things together.
Transcript

Was this document helpful?smarttech.com/docfeedback/171152
SMART Learning Suite 17.1
SYSTEM ADMINISTRATOR’S GUIDEFOR WINDOWS OPERATING SYSTEMS

smarttech.com/kb/171152
Trademark notice
SMART Notebook, SMART Ink, SMART Document Camera, smarttech, the SMART logo and all SMART taglines are trademarks or registered trademarks ofSMART Technologies ULC in the U.S. and/or other countries. Microsoft, Windows, Internet Explorer, ActiveX, DirectX and Visual Studio are either registeredtrademarks or trademarks of Microsoft Corporation in the U.S. and/or other countries. Adobe Reader is either registered a trademark or trademark of AdobeSystems Incorporated in the U.S. and/or other countries. Firefox is a registered trademark of the Mozilla Foundation. InstallShield is a registered trademark ortrademark of Flexera Software, Inc. and/or InstallShield Co. Inc. in the United States of America and/or other countries. All other third-party product and companynames may be trademarks of their respective owners.
Copyright notice
© 2017 SMART Technologies ULC. All rights reserved. No part of this publication may be reproduced, transmitted, transcribed, stored in a retrieval system ortranslated into any language in any form by any means without the prior written consent of SMART Technologies ULC. Information in this manual is subject to changewithout notice and does not represent a commitment on the part of SMART.
This product and/or use thereof covered by one or more of the following U.S. patents.
www.smarttech.com/patents
09/2017
i smarttech.com/kb/171152
Contents
Chapter 1: Getting started 1
Computer requirements 2Locating installation and supporting files 3Activation connectivity 6
Chapter 2: Customizing the software 9
Using SMART Install Manager 9Using third-party tools 15
Chapter 3: Deploying the software 23
Using the command-line interface 24Using third-party imaging or remote management software 27
Chapter 4: Activating and renewing the software 29
Activating the software during installation 29Activating the software after installation 30Renewing keys 32Using SMART Product Update (SPU) to retrieve activation status 36Returning a product key activation with a command-line script 37
Chapter 5: Updating the software 39
Using a Windows Installer update installation package (MSI file) 40Using a Windows Installer patch (MSP file) 41
Chapter 6: Uninstalling the software 43
Using the SMART Uninstaller user interface 43Using the SMART Uninstaller command line interface 44
Appendix A: Language files and codes 51
Installation language files and codes 51Handwriting recognition resources 52
Installing and maintaining Gallery content 55
Configuring Gallery content using SMART Install Manager 55Working with Gallery content locations 56


Chapter 1
1 smarttech.com/kb/171152
Chapter 1: Getting started
Computer requirements 2Locating installation and supporting files 3
Locating the complete installer 3Locating installation packages 4Required third-party packages 5Language files 5
Activation connectivity 6Using SMART Install Manager 6Using Activation Wizard 6
This guide explains how to customize and deploy the following software:
l SMART Notebook 17.1 collaborative learning software
l SMART Notebook Math Tools software
l SMART Product Drivers 12.9
l SMART Ink® 5.2
NOTE
For information on customizing and deploying previous versions of this software, see the
appropriate system administrator’s guides, available from smarttech.com/support.
This guide is intended for IT administrators and others experienced with customizing, deploying
and administering Windows® software in a networked environment. To use this guide, you must
l Know IT terminology such as “registry” and “domain controller”
l Know how to complete basic administrative tasks in Windows operating systems such as
modifying the registry
l Have administrative privileges and access to servers
l Have access to the Internet

CHAPTER 1GETTING STARTED
2 smarttech.com/kb/171152
IMPORTANT
You must run the commands documented in this guide in an Administrator Command Prompt
window. To open an Administrator Command Prompt window, right-click the Command Prompt
icon, and then select Run as Administrator.
Computer requirements
NOTE
Operating systems and other third-party software released after this SMART software might not
be supported.
Before you install the software, ensure your teachers’ computers meet the minimum requirements:
Supportedoperating systems
Windows 10
Windows 8.1
Windows 7 SP1 (with Platform Update KB2670838 and one of thefollowing security update KB3033929, or any future update thatsupersedes these.
Minimum processor Intel® Core™ 2 Duo
Minimum RAM 2 GB (4 GB for UHD displays)
Minimum hard diskspace
4.7 GB
Other requirements Microsoft® .NET Framework 4.5.1 for SMART Notebook software andSMART Ink
Microsoft Visual Studio® Tools 2010 for Office for SMART Ink
Adobe Reader® 8.0 or later
DirectX® technology 10 or later for SMART Notebook software
DirectX 10 compatible graphics hardware for SMART Notebooksoftware
Internet Explorer® Internet browser 8 or later
Internet access to download SMART software
IMPORTANT
l Some features require access to specific web sites. You might need to white list those web
sites if your network restricts outbound Internet access.
CHAPTER 1GETTING STARTED
3 smarttech.com/kb/171152
l For a complete list of websites to white list see SMART knowledge base article SMART
Notebook add-ons behave unexpectedly behind a firewall or proxy.
l All prerequisite third-party software is built into the EXE file and is automatically installed in
the correct order if you deploy the EXE file.
l The required Microsoft .NET Framework and Microsoft Visual Studio Tools 2010 for Office
prerequisites will be installed automatically when you run the EXE file.
Locating installation and supporting filesBefore you can customize or deploy SMART software, you must decide which type of file to use
for the installation, and then locate the installation and supporting files. Select one of the following
available installation file types.
l Complete installer, also known as an executable (EXE) file
l Installation package, also known as an MSI file
Locating the complete installerYou can download a version of the complete installer (EXE Installer - smart17-1admin.exe) from
https://education.smarttech.com/en/products/notebook/download#admin.
To download the third-party installation package
1. Go to https://education.smarttech.com/en/products/notebook/download#admin.
2. Select SMART Notebook 17.1 from Select your version.
3. Select Admin Msi installer package from Select install package.4. Enter your information in the following fields:
a. First Name
b. Last Name
c. Job Title
d. Email
e. Country
5. Select the service agreement check box.
6. Select Windows from Change operating system.
7. Click DOWNLOAD - WINDOWS.

CHAPTER 1GETTING STARTED
4 smarttech.com/kb/171152
8. Browse to and double click the file you downloaded.
9. Unzip the .zip file.
When the third-party installation packages are unzipped, they can be found in the root of the
Support folder.
NOTE
If you do not have a license key select Download a trial version today the trial version is only
available for EXE.
Locating installation packagesThe SMART Learning Suite installation package (SMARTLearningSuite.msi), supporting third-party
installers, and supporting handwriting language packages can be found within the .zip file and you
can download the installation packages from
https://education.smarttech.com/en/products/notebook/download#admin.
Extract and save the installation packages in a location on your network that’s accessible to all
computers on which you plan to install the software.
IMPORTANT
SMART recommends that you use the SMARTLearningSuite.msi installation package to deploy
the SMART software. If you deploy the software using individual installation packages, you need
to do the following:
l Ensure you use one path for the INSTALLDIR property for SMART Product Drivers and
SMART Ink, and use a second path for the INSTALLDIR property for SMART Notebook
software.
l If you deploy any handwriting recognition resource with the administrator installer, ensure
the Support\Language folder exists in the root of the admin.zip and the folder structure is
intact if you install handwriting languages. This allows the administrator installer to find the
resources to install.

CHAPTER 1GETTING STARTED
5 smarttech.com/kb/171152
Required third-party packagesBefore deploying the SMART Learning Suite installation package, you must deploy the following
third-party installation packages:
If you want to install this software: Deploy these installation packages:
SMART Notebook software l Microsoft .NET Framework 4.5.1 files(dotNetFx451_Full_setup.exe)
SMART Ink l Microsoft .NET Framework 4.5.1 files(dotNetFx451_Full_setup.exe)
l Microsoft Visual Studio Tools for Office(vstor_redist.exe for both 32-bit and 64-bitcomputers)
IMPORTANT
l Install all the prerequisite third-party installation packages before you deploy the
SMARTLearningSuite.msi package. Some SMART Notebook software features will not
function as expected if the prerequisite third-party software is not installed first. For more
information, see Installing prerequisite third-party software on page 24.
l You can run the dotNetFx451_Full_setup.exe file to install all required Microsoft .NET
Framework prerequisites and the Microsoft .NET Framework 4 Client Profile files. However,
SMART recommends that you download the latest version of the Microsoft .NET Framework
files from the Microsoft website. For information on deploying the Microsoft .NET
Framework, refer to the .NET Framework deployment guide for administrators on the MSDN
website (msdn.microsoft.com/en-us/library/ee390831.aspx).
Internet connection is required to download and install the full .NET package.
Language filesIf you plan to deploy the installation packages in a language other than English (U.S.), ensure the
corresponding MST file for the language is in the same folder as the MSI file (see Installation
language files and codes on page 51).
Similarly, if you want users to be able to view and use the handwriting recognition feature in a
language other than English, you must download and install the appropriate handwriting
recognition resources (see Handwriting recognition resources on page 52).

CHAPTER 1GETTING STARTED
6 smarttech.com/kb/171152
NOTE
For users running from the EXE file, the handwriting recognition feature will automatically
download and install the selected languages.
Activation connectivityWhen you deploy SMART Notebook software, make sure the computers can access SMART’s web
activation services. Otherwise, the computers will not be able to activate product keys, during or
after installation.
The activation web services are accessible at the following URLs:
l https://activationservice.smarttech.com/IntegrationCore?WSDL
l https://activationservice.smarttech.com/flexnet/services/ActivationService?WSDL
l https://webservices.smarttech.com/products/Activation_advanced.asmx?WSDL
l https://entitlement.smarttech-prod.com/reachability
When viewed in a web browser, each of the above URLs should display a WSDL document. The
last URL should display a XML document: <?xml version="1.0"?><reachable/>.
NOTE
If these sites are blocked by a proxy in your organization, add the URLs to the proxies.
SMART Install Manager and Activation Wizard will test these URLs and indicate success or failure.
When you use the SMART Install Manager tool, consider that you, as an administrator, may have
less restricted access to the Internet than standard users. It is important to install SMART Notebook
software on a standard user’s computer and use the Activation Wizard connectivity tester to
confirm connectivity.
Using SMART Install ManagerStart the connectivity tester by pressing the Check Activation Server button. The tester will appear
and show green check marks to indicate success. SMART Install Manager will also prompt you to
use the connectivity tester at the time of publishing customizations.
Using Activation WizardIn the Activation Wizard you can access the connectivity tester from the Advanced drop-down
menu in the lower left of the Activation Wizard. The tester will appear and show green check marks

CHAPTER 1GETTING STARTED
7 smarttech.com/kb/171152
to indicate success.
See the Activation FAQ for more details and for information about other issues related (Installing
and Maintaining SMART Notebook 17).

Chapter 2
9 smarttech.com/kb/171152
Chapter 2: Customizing the software
Using SMART Install Manager 9Selecting an installation file 10Using SMART Install Manager with the complete installer 11Using SMART Install Manager with the installation packages 11SMART Install Manager controls 12
Using third-party tools 15Windows Installer properties 15
Using SMART Install ManagerYou can use SMART Install Manager to customize the software. SMART Install Manager works with
the complete installer (EXE file) or the installation package (MSI file).
You can customize SMART software complete installers by publishing XML files. You can also
customize SMART software installation packages by publishing MST files. You can then deploy the
SMART software to computers.
To download and install SMART Install Manager
1. Go to smarttech.com/administratordownloads.
2. Select SMART Notebook 17.1 from Select your version.
3. Select SMART Install Manager from Select install package.
4. Enter your information in the following fields:
a. First Name
b. Last Name
c. Job Title
d. Email
e. Country

CHAPTER2CUSTOMIZING THE SOFTWARE
10 smarttech.com/kb/171152
5. Select the service agreement check box.6. Select Windows from Change operating system.
7. Click DOWNLOAD - WINDOWS
8. Save the EXE file to your computer.
9. Double-click the EXE file.
The SMART Install Manager installation wizard appears.
10. Follow the on-screen instructions.
To customize SMART Learning Suite 17.1 using SMART Install Manager
1. Start SMART Install Manager.
2. Drag the complete installer or the installation package to the SMART Install Manager window.
3. Set the controls on each page (see SMART Install Manager controls on page 12).
4. Select File > Publish.
The Save file dialog box appears.
5. Browse to the location where you extracted the complete installer or the installation package.
6. Type a name for the XML file (for the complete installer) or MST file (for the installation
package) in the File name box, and then press Save.
7. Close SMART Install Manager.
Selecting an installation fileAfter you install SMART Install Manager, shortcuts to the software appear on the desktop and in the
Start menu (Windows 7 or 10 operating systems) or the Apps screen (Windows 8 operating
system).
You can use SMART Install Manager with either the complete installer or with the installation
packages. Depending on which file type you select, you can do the following:
Installation file Tasks
Complete installer(.exe file)
l Open and customize the complete installer (.exe file).
l Save your changes to the installation package as an XML file.
l Publish your changes to the installation packages as an XML file.
Installation package(.msi file)
l Open and customize an installation package (.msi file).
l Save your changes to the installation package as an XML file.
l Publish your changes to the installation packages as an MST file.

CHAPTER2CUSTOMIZING THE SOFTWARE
11 smarttech.com/kb/171152
Using SMART Install Manager with the complete installerUse the following instructions if you selected the complete installer.
Opening a completeinstaller file
To customize the complete installer, drag the file into the SMART InstallManager window.
After you open the complete installer, a set of pages for that installerappears in SMART Install Manager. Customize the complete installerusing the controls on these pages.
Saving your changes After you customize the complete installer, save your changes as anXML file by selecting File > Save As. When you next start SMART InstallManager, load the XML file by selecting File > Open, or by opening theEXE file and then selecting File > Import.
Publishing yourchanges as an XMLfile
The final step in using SMART Install Manager to customize thecomplete installer is to publish your changes as an XML file. To do this,select File > Publish, and then use the dialog box to define a location forand create the XML file.
Using SMART Install Manager with the installation packagesUse the following instructions if you selected the installation packages.
Opening a completeinstaller file
To customize an installation package, drag the file into the SMART InstallManager window.
NOTE
All installation packages you’ve previously opened in SMART InstallManager appear in the Unmodified Packages tab.
After you open an installation package, a set of pages for thatinstallation package appears in SMART Install Manager. Customize theinstallation package using the controls on these pages.
Saving your changes After you customize an installation package, save your changes as anXML file by selecting File > Save As. When you next start SMART InstallManager, load the XML file by selecting File > Open, or by opening theMSI file and then selecting File > Import.
Publishing yourchanges as an XMLfile
The final step in using SMART Install Manager to customize aninstallation package is to publish your changes as an MST file. To do this,select File > Publish, and then use the dialog box to define a location forand create the MST file.
TIP
If you use an older MST file created with an earlier version of the MSIfile, it might not work properly. Use the current MSI file to create yourMST file. Publish the MST file in the same location as the MSI file.

CHAPTER2CUSTOMIZING THE SOFTWARE
12 smarttech.com/kb/171152
SMART Install Manager controls
Control Procedure Notes
General Options: Product Selection
SMART Product Drivers Select to install SMART Product Drivers. [N/A]
SMART Ink Select to install SMART Ink. If you install SMART Ink, you must install SMARTProduct Drivers.When you select this checkbox,SMART InstallManager selects SMART ProductDrivers automatically.
SMART Notebooksoftware
Select to install SMART Notebooksoftware. [N/A]
Product key Type your 25-character product key forSMART Notebooksoftware.
You can type the product keywith or withouthyphens.
When you type a volume product key, the softwareactivates when you deploy it to your networkcomputers.
SMART response 2 SMART response 2 software is nowincluded in the installation and replacesSMARTResponse.
IMPORTANT
Please review the details of the SMART response2update to ensure it will not disrupt current teachwork flows. Existing data may need to be backedup. Learn more (https://education.smarttech.com/en/products/smart-learning-suite/smart-response-2/smart-response-2-faqs).
SMARTNotebookMath Tools
Select to install SMARTNotebookMath Toolsoftware.
If you choose to install SMARTNotebookMath Toolssoftware, you must also install SMARTNotebooksoftware.
Product key Type you 22- or 25-character product keyfor SMARTNotebookMath Tools software.
You can type the product keywith or withouthyphens.When you type a volume product key, thesoftware activates when you deploy it to yournetworkcomputers.
Remove SMARTproducts that aren’tselected above if theyexist on the system
Select to remove SMART software productsavailable in the current SMART LearningSuite package found on anymachine onyour system (except the SMART productsyou selected above). If you don’t select thissetting, all SMART Learning Suite softwarefound is upgraded,even if the SMARTsoftware isn’t selected above.
This affects the behavior of the installer when youperform an upgrade. It enables you to remove anysoftware in the current SMART Learning Suitepackage that isn’t selected in the SMART InstallManager.
Delay activation Select to register the product keys on asystem without activating them.Registeredkeys can be activatedwhen users startSMART Notebooksoftware.
If you don’t select this setting, the softwareautomatically activates during installationrather than manually after installation.
Delaying activation is useful for uniform deploymentsthat include users who don’t use SMART Notebooksoftware.Only users who start SMART Notebooksoftware activate registered keys and consume alicense.
Disable the LicenseStatus dialog box
Select to prevent the software activationreminder from appearing afterSMART Notebooksoftware starts.
When this checkbox is selected, the softwareactivation reminder appears onlywhen theSMART Notebooksoftware trial period expires.

CHAPTER2CUSTOMIZING THE SOFTWARE
13 smarttech.com/kb/171152
Control Procedure Notes
General Options: Installation Options
Installation directory Type the path to your preferred folderwhere program installation files are stored.
Once you specify the path, selectedprograms are installed in sub-directories ofthis location.
If you specify a folder, include a backslash (\) at theend of the path.
If you don’t specify a folder,Windows Installer installsthe software in sub-directories of the default folderC:\Program Files\SMART Technologies (32-bitsystems) or C:\Program Files (x86) SMARTTechnologies (64-bit systems).
IMPORTANT
Ensure the folder path valid.
SMART Installer Manager doesn’t verify the folderpath.
Start SMART SystemMenu at logon
Select to start the SMART System Menuwhen the user logs on.
[N/A]
SMART TechnologiesError Report
SMART Technologies Error Report installsby default as part of the installation.
This application installs by default as part of theinstallation, but can be turned off through InstallManager.
Install desktopshortcuts
Select to create shortcuts on the desktop. In theWindows 7operating system, this optioncreates shortcuts on the desktop.
In theWindows 8.1 operating system, shortcuts arecreated in theWindows 8.1 Appsmenu.
General Options: Network/Firewall Settings
SMART lab featuresoperates as expected
Add the URLs to your teacher and studentnetwork’s whitelist.
This setting confirms that the SMART lab featuresoperate correctly in SMARTNotebook.
Handwriting recognition: Language selection
General Options: Language Selection
Select the handwritingrecognition resourcesyou want to install
Select the handwriting recognitionresources you want to install.
Don’t selectmore than 18 handwriting recognitionresources if you’re running an administratorinstallation with the SMARTLearningSuite.msi file(see smarttech.com/kb/170081).
General Options: SMART Product Update
Install SMART ProductUpdate in Fullmode
Select to install SMART Product Update(SPU) in Fullmode.
[N/A]
Install SMART ProductUpdate in Dashboardmode
Select to install SPU in Dashboardmode. [N/A]
Do not install SMARTProduct Update
Select to not install SPU. [N/A]
Check for updates Type the number of days (1 to 60) betweenSPUchecks.
This option is available only if you install SPU in Fullmode.
By default, SPUchecks for product updates every 30days.

CHAPTER2CUSTOMIZING THE SOFTWARE
14 smarttech.com/kb/171152
Control Procedure Notes
Notify users aboutSMART productupdates
Select to notify users of available SMARTproduct updates.
This option is available only if you install SPU in Fullmode.
Reset per-userchanges to theprevious two settings
Select to remove existingCheck forupdates andNotify users about SMARTproduct updates values the next time theuser runs SPU.
This enables administrators to push new values forthese settings to computers and ensures the newvalues are accepted. Individual users can stillmodifythese settings.
General Options: Customer Experience
Enable the CustomerExperience Programon all devices
Select to automatically enable theCustomer Experience Program for allusers.
[N/A]
Disable the CustomerExperience Programon all devices
Select to automatically disable theCustomer Experience Program for allusers.
[N/A]
SMART Notebook: Gallery Content
GalleryContent
Team Content
MyContent
Team Content path:Type the path to the Team Content folder,which is a location on your school’s networkwhere users can store shared content
MyContent path:Type the path to theMy Content folder,which is a location on the user’s computerwhere he or she can store individualcontent.
See Installing andmaintainingGallery content onpage 55
Install print capturedriver
Select to include the Print Capture Driver inthe installation.
The Print Capture Driver is a printer driver thatenables users to export content from otherprograms to SMARTNotebooksoftware by usingthe SMARTNotebookDocumentWriter.
RegisterSMARTDocumentCamera drivers
Select to enable the registration of SMARTDocument Camera™ drivers.
Disable the registration of SMARTDocumentCamera drivers if they conflict with the third-partydrivers on the computer.
Update theWindowsFirewall exception list
Select to allow SMARTNotebooksoftwareto communicate through theWindowsFirewall for advanced SMARTNotebooksoftware developer kit (NBSDK)functionality.
This property updates theWindows Firewallexception list for Domain and Private networks.
SMART Product Drivers: Optional Settings
Enable Tablet PCSupport
Select to use Tablet PC functionalitywithyour SMART interactive displaywithouthaving to connect a Tablet PC.
This property is applicable for theWindows 7operating systems. It has no effect on otheroperating systems.
Start SNMPAgentservices at logon
Select to enable SNMPAgent services. [N/A]
SMART Ink: Optional Settings
Start SMART Inkatlogon
Select to start SMART Inkwhen the userlogs on.
[N/A]

CHAPTER2CUSTOMIZING THE SOFTWARE
15 smarttech.com/kb/171152
Using third-party toolsYou can customize SMART software installation packages by creating MST files using a third-party
tool, such as Orca database editor, and the Windows Installer properties (see Windows Installer
properties below).
Windows Installer properties
Property Allowed values Notes
General properties
TRANSFORMS [String]: A language MST file for theinstallation (see Installation languagefiles and codes on page 51).
Ensure the specified MST file is in thesame folder as the MSI file.
This property defines the language ofthe installer’s user interface and theinstalled software’s icons andshortcuts. It doesn’t define theinstalled software’s user interfacelanguage. The installed software usesthe computer’s operating systemlanguage if it’s supported, or English(U.S.) if not.
You can also use the TRANSFORMSproperty to apply an MST file createdby SMART Install Manager or a third-party tool.
MSIFASTINSTALL 1: Disable creating a system restorepoint.
0 (default): Ask Windows to create asystem restore point.
This property applies to the completeinstaller (EXE) only. The MSI installerfollows Windows Installerconventions and doesn’t create asystem restore point in quiet (/qn)mode, but asks Windows to create asystem restore point in full, reducedor basic UI modes.
By default, Windows 8.1 operatingsystem and later creates a maximumof one system restore point in a 24-hour period.

CHAPTER2CUSTOMIZING THE SOFTWARE
16 smarttech.com/kb/171152
Property Allowed values Notes
ACTIVATE_LICENSE
1 (default): Register the product keysand automatically activate thesoftware.
0: Register the product keys anddon’t automatically activate thesoftware (delay activation).Registered keys can be activatedwhen users start SMART Notebooksoftware.
Delaying activation (0) is useful foruniform deployments that includeusers who don’t useSMART Notebook software. Onlyusers who start SMART Notebooksoftware activate registered keys andconsume a license.
DISABLE_NAG 1: Prevent the software activationreminder from appearing afterSMART Notebook software starts.
0 (default): Allow the softwareactivation reminder to appear afterSMART Notebook software starts.
When 1 is selected, the softwareactivation reminder appears onlywhen the SMART Notebook softwaretrial period expires.
INSTALL_BOARD 1: Install SMART Product Drivers.
[Empty string]: The product is turnedoff.
[N/A]
LAUNCH_SYSTEM_MENU
1 (default): Automatically start SMARTSystem Menu after installation andeach time the system is started.
[Empty string]: Don’t automaticallystart SMART System Menu afterinstallation and each time the systemis started.
[N/A]
INSTALL_INK 1: Install SMART Ink
[Empty string]: The product is turnedoff.
[N/A]
INSTALL_NOTEBOOK
1: Install SMART Notebook software.
[Empty string]: The product is turnedoff.
[N/A]
NB_PROD_KEY [String]: The 25-character productkey for SMART Notebook softwareyou received from SMART.
[N/A]
MATH_PROD_KEY
[String]: The 22- or 25-characterproduct key for SMART NotebookMath Tools software you receivedfrom SMART.
[N/A]
CHAPTER2CUSTOMIZING THE SOFTWARE
17 smarttech.com/kb/171152
Property Allowed values Notes
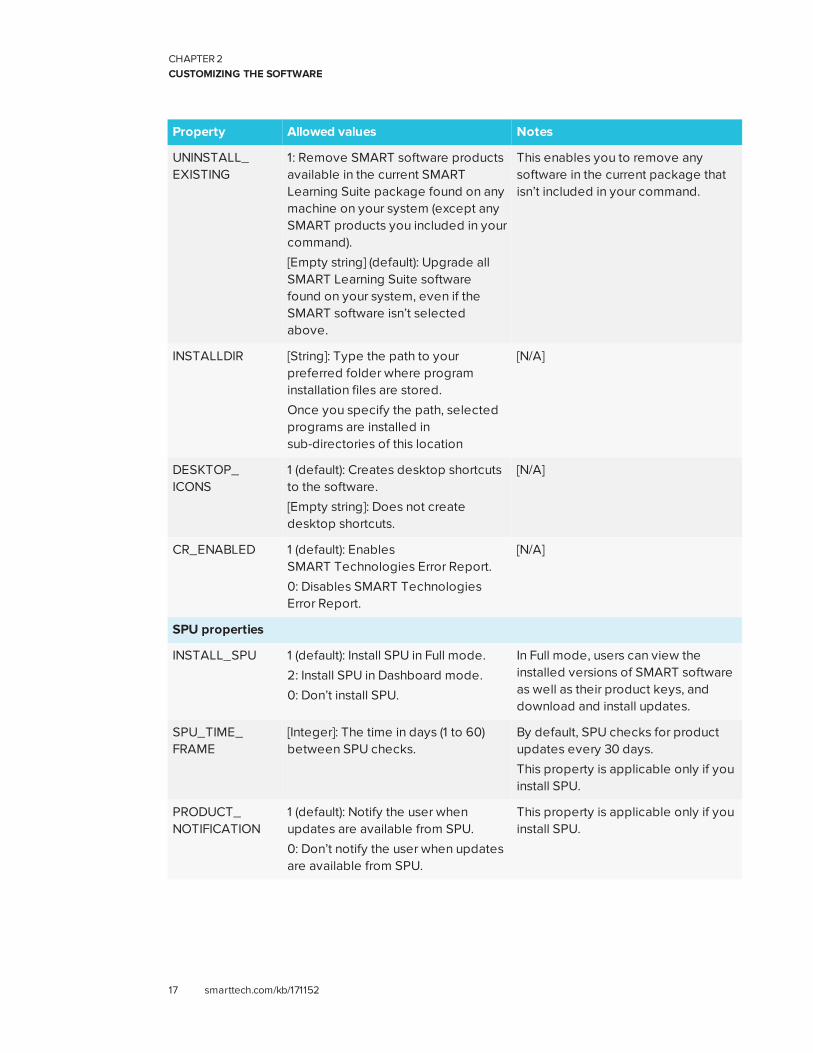
UNINSTALL_EXISTING
1: Remove SMART software productsavailable in the current SMARTLearning Suite package found on anymachine on your system (except anySMART products you included in yourcommand).
[Empty string] (default): Upgrade allSMART Learning Suite softwarefound on your system, even if theSMART software isn’t selectedabove.
This enables you to remove anysoftware in the current package thatisn’t included in your command.
INSTALLDIR [String]: Type the path to yourpreferred folder where programinstallation files are stored.
Once you specify the path, selectedprograms are installed insub-directories of this location
[N/A]
DESKTOP_ICONS
1 (default): Creates desktop shortcutsto the software.
[Empty string]: Does not createdesktop shortcuts.
[N/A]
CR_ENABLED 1 (default): EnablesSMART Technologies Error Report.
0: Disables SMART TechnologiesError Report.
[N/A]
SPU properties
INSTALL_SPU 1 (default): Install SPU in Full mode.
2: Install SPU in Dashboard mode.
0: Don’t install SPU.
In Full mode, users can view theinstalled versions of SMART softwareas well as their product keys, anddownload and install updates.
SPU_TIME_FRAME
[Integer]: The time in days (1 to 60)between SPU checks.
By default, SPU checks for productupdates every 30 days.
This property is applicable only if youinstall SPU.
PRODUCT_NOTIFICATION
1 (default): Notify the user whenupdates are available from SPU.
0: Don’t notify the user when updatesare available from SPU.
This property is applicable only if youinstall SPU.

CHAPTER2CUSTOMIZING THE SOFTWARE
18 smarttech.com/kb/171152
Property Allowed values Notes
INVALIDATE_HKCU_INTERVAL
1: Remove existing Check forupdates and Notify users aboutSMART product updates values thenext time the user runs SPU.
0 (default): Don’t remove existingCheck for updates and Notify usersabout SMART product updatesvalues the next time the user runsSPU.
This enables administrators to pushnew values for these settings tocomputers and ensures the newvalues are accepted. Individual userscan still modify these settings
Customer Experience Program properties
CUSTOMER_LOGGING
1 (default): Enable the CustomerExperience Program.
0: Disable the Customer ExperienceProgram.
[N/A]
SMART Notebook software properties
FULL_GALLERY 1: Install the full product.
[Empty string]: The product is turnedoff.
[N/A]
LAT_CONTENT 1: Install the Lesson Activity Toolkitcollection.
[Empty string]: The product is turnedoff.
[N/A]
TEAM_CONTENT_PATH
[String]: Specify the path to theTeam Content folder, which is alocation on your school’s networkwhere users can store sharedcontent.
You must specify a path to an existingfolder in this property.
MY_CONTENT [String]: Specify the path to theMy Content folder, which is alocation on the user’s computerwhere he or she can store individualcontent.
You can include environmentvariables in the path.
This property is useful if you want tostore content in a shared networkfolder so users can access theirMy Content folder from anycomputer on the network.
PRINT_CAPTURE 1 (default): Install the Print CaptureDriver.
[Empty string]: Don’t install the PrintCapture Driver.
The Print Capture Driver is a printerdriver that enables users to exportcontent from other programs toSMART Notebook software by usingthe SMART Notebook DocumentWriter.

CHAPTER2CUSTOMIZING THE SOFTWARE
19 smarttech.com/kb/171152
Property Allowed values Notes
INSTALL_DOCCAM_DRIVERS
1 (default): Enable the registration ofSMART Document Camera drivers.
[Empty string]: Disable the registrationof SMART Document Camera drivers.
Disable the registration of SMARTDocument Camera drivers if theyconflict with existing third-partydrivers on the computer.
ENABLE_NB_FIREWALL
1 (default): Allow SMART Notebooksoftware to communicate through theWindows Firewall for advancedNBSDK functionality.
0: Don’t allow SMART Notebooksoftware to communicate through theWindows Firewall. SMART Notebooksoftware can listen locally but isunable to communicate through theWindows Firewall.
This property updates the WindowsFirewall exception list for Domain andPrivate networks.
SMART Product Drivers properties
ENABLE_STPCS
1 (default): Use Tablet PC functionalitywith the SMART Board interactivewhiteboard without connecting aTablet PC.
0: Don’t use Tablet PC functionalitywith the SMART Board interactivewhiteboard without connecting aTablet PC.
This property is applicable for theWindows 7 operating systems. It hasno effect on other operating systems.
If you specify 0, users don’t havetouch support at the Windows logonscreen.
START_SNMP_
SERVICE
1: Start Simple Network ManagementProtocol (SNMP) when the user logson.
0 (default): Don’t start SNMP when theuser logs on.
[N/A]
INSTALL_UNSIGNED_DRIVERS
1: Enable the registration of unsignedthird-party drivers.
0 (default): Disable the registration ofunsigned third-party drivers.
If you enable the registration ofunsigned third-party drivers, theinstallation process could ask users ifthey trust the makers of the driversduring installation. This can causeissues if you deploy the installation inSilent mode. Therefore, it’s best todisable the registration of third-partydrivers if you deploy the installation inSilent mode.

CHAPTER2CUSTOMIZING THE SOFTWARE
20 smarttech.com/kb/171152
Property Allowed values Notes
SMART Ink properties
LOSU_INK 1 (default): Start SMART Ink when theuser logs on.
0: Don’t start SMART Ink when theuser logs on.
[N/A]
Handwriting recognition resources properties
Don’t select more than 18 handwriting recognition resources if you’re running anadministrator installation with the SMARTLearningSuite.msi file (seesmarttech.com/kb/170081).
AR 1: Install the Arabic handwritingrecognition resource.
[N/A]
ZH_CN 1: Install the Chinese (Simplified)handwriting recognition resource.
[N/A]
ZH_TW 1: Install the Chinese (Traditional)handwriting recognition resource.
[N/A]
CS 1: Install the Czech handwritingrecognition resource.
[N/A]
DA 1: Install the Danish handwritingrecognition resource.
[N/A]
NL 1: Install the Dutch handwritingrecognition resource.
[N/A]
EN_GB 1: Install the English (UK) handwritingrecognition resource.
[N/A]
ET 1: Install the Estonian handwriting
recognition resource.
[N/A]
FI 1: Install the Finnish handwritingrecognition resource.
[N/A]
FR 1: Install the French handwritingrecognition resource.
[N/A]
DE 1: Install the German handwritingrecognition resource.
[N/A]
EL 1: Install the Greek handwritingrecognition resource.
[N/A]
HE 1: Install the Hebrew handwritingrecognition resource.
[N/A]

CHAPTER2CUSTOMIZING THE SOFTWARE
21 smarttech.com/kb/171152
Property Allowed values Notes
HU 1: Install the Hungarian handwritingrecognition resource.
[N/A]
IT 1: Install the Italian handwritingrecognition resource.
[N/A]
JA 1: Install the Japanese handwritingrecognition resource.
[N/A]
KO 1: Install the Korean handwritingrecognition resource.
[N/A]
LT 1: Install the Lithuanian handwriting
recognition resource.
[N/A]
LV 1: Install the Latvian handwriting
recognition resource.
[N/A]
MS 1: Install the Malay handwriting
recognition resource.
[N/A]
NB 1: Install the Norwegian handwritingrecognition resource.
[N/A]
PL 1: Install the Polish handwritingrecognition resource.
[N/A]
PT_BR 1: Install the Portuguese (Brazil)handwriting recognition resource.
[N/A]
RO 1: Install the Romanian handwritingrecognition resource.
[N/A]
RU 1: Install the Russian handwritingrecognition resource.
[N/A]
SK 1: Install the Slovak handwritingrecognition resource.
[N/A]
ES 1: Install the Spanish (Spain)handwriting recognition resource.
[N/A]
SV 1: Install the Swedish handwritingrecognition resource.
[N/A]
TR 1: Install the Turkish handwritingrecognition resource.
[N/A]
UK 1: Install the Ukrainian handwritingrecognition resource.
[N/A]

CHAPTER2CUSTOMIZING THE SOFTWARE
22 smarttech.com/kb/171152
Property Allowed values Notes
Internet access properties
ACC [Integer]: Enable Internet access forspecified components.
l 0: No components
l 2: Language Setup
l 4: SMART Product Update
l 8: Customer Experience
Program
l 13: All components exceptLanguage Setup
l 15 (default): All components
[N/A]

Chapter 3
23 smarttech.com/kb/171152
Chapter 3: Deploying the software
Using the command-line interface 24Installing prerequisite third-party software 24Installing SMART software with the complete installer 25Installing SMART software with the installation package 25Examples 26Windows Installer parameters 26
Using third-party imaging or remote management software 27
You can deploy the software using one of the following methods:
l Deploy the complete installer using the command line interface.
l Deploy the installation packages using the command line interface.
l Deploying the installation packages using third-party imaging or remote management
software.
IMPORTANT
l Install all the prerequisite third-party installation packages before you deploy the
SMARTLearningSuite.msi package. Some SMART Notebook software features will not
function as expected if the prerequisite third-party software is not installed first. For more
information, see Installing prerequisite third-party software on the next page.
l If you are deploying SMART Product Drivers, the user must log off and log back on after you
deploy the software to start the SMART Board Service. In addition, an error message might
appear after you deploy the software stating that the SMARTBoardService.exe file could
not be found, the user can close this error message. This message will appear only when
the system is not connected to a SMART Board interactive flat panel.
l If you want to install handwriting recognition resources, do so when you first deploy the
software. If you install a handwriting recognition resource after the first deployment use the
resource’s individual MSI file.

CHAPTER3DEPLOYING THE SOFTWARE
24 smarttech.com/kb/171152
NOTES
l You might need to manually activate the software after you deploy it.
l Once the software products are installed, users can use SMART Language Setup to
download and install handwriting recognition languages that were not installed by the
admin.
Using the command-line interfaceUsing the command-line interface, you can deploy installation packages in many ways, such as by
running commands from the command prompt or by including commands in batch script files.
Installing prerequisite third-party software
To install theMicrosoft .NET Framework 4.5.1 files
NOTE
Follow the instructions on the MSDNwebsite
(msdn.microsoft.com/en-us/library/ee390831.aspx) when deploying the Microsoft .NET
Framework in the .NET Framework Deployment Guide for Administrators.
Run the following command to install the files in UI mode:
[Path]\dotNetFx451_Full_setup.exe /passive /showfinalerror
OR
Run the following command to install the files in silent mode:
[Path]\dotNetFx451_Full_setup.exe /q
Where [Path] is the path to the dotNetFx451_Full_setup.exe file.
To install Microsoft Visual Studio Tools for Office for 32-bit and 64-bit computers
Run the following command:
[Path]\vstor_redist.exe /q

CHAPTER3DEPLOYING THE SOFTWARE
25 smarttech.com/kb/171152
Where [Path] is the path to the vstor_redist.exe file.
Installing SMART software with the complete installer
Run the following command if you created an XML file to customize the complete installer:
"[Path]\SMART Learning Suite.exe" --adminfile [XML file][Parameter]
OR
Run the following command if you didn’t create an XML file to customize the installation
package:
"[Path]\SMART Learning Suite.exe" [Properties][Parameter]
Where
o [Path] is the path to the SMART Learning Suite.exe file and XML file.
o [XML file] is the name of the XML file.
o [Properties] is a set of properties you can include to customize the installation (see
Windows Installer properties on page 15).
o [Parameter] is the installation parameter (see Windows Installer parameters on the next
page).
Installing SMART software with the installation package
To install SMART software
Run the following command if you created an MST file to customize the installation package:
msiexec /i "[Path]\SMARTLearningSuite.msi" TRANSFORMS="[MST file]"[Parameter]
OR
Run the following command if you didn’t create an MST file to customize the installation
package:
msiexec /i "[Path]\SMARTLearningSuite.msi" [Properties][Parameter]

CHAPTER3DEPLOYING THE SOFTWARE
26 smarttech.com/kb/171152
Where
o [Path] is the path to the SMARTLearningSuite.msi file and MST file.
o [MST file] is the name of the MST file.
o [Properties] is a set of properties you can include to customize the installation (see
Windows Installer properties on page 15).
o [Parameter] is the installation parameter (see Windows Installer parameters below).
ExamplesThe following example installs SMART Notebook software and SMART Product Drivers in Silent
mode:
msiexec /i "[Path]\SMARTLearningSuite.msi" INSTALL_NOTEBOOK=1 INSTALL_BOARD=1INSTALL_INK="" LAT_CONTENT="" FULL_GALLERY=""
The following example installs the default software products, SMART Notebook software, SMART
Product Drivers, SMART Ink, Gallery Essentials, and Lesson Activity Toolkit:
msiexec /i "[path]\SMARTLearningSuite.msi /q
Windows Installer parametersThe following are the standard Windows Installer parameters for the msiexec command.
Parameter Use
/q Hide the installation wizard.
NOTE
This is Silent mode.
/qb Show a basic installation wizard.
/qb! Show a basic installation wizard without a Cancel button.
/qb+! Show a basic installation wizard without a Cancel button but with a dialog boxsignaling the end of the installation.
/qr Show a reduced installation wizard.
/qf Show the full installation wizard, including a dialog box signaling the end ofthe installation or the Fatal Error, User Exit or Exit dialog box.
/qn Hide the installation wizard and the dialog box signaling the end of theinstallation.

CHAPTER3DEPLOYING THE SOFTWARE
27 smarttech.com/kb/171152
Using third-party imaging or remote managementsoftwareThe following procedure shows how to deploy SMART software using Group Policy-based
deployment software. For information on deploying SMART software using your organization’s
third-party imaging or remote management software, see the software’s documentation.
NOTES
l This procedure may vary depending on your version of Windows operating system and
your system preferences.
l Ensure your domain controller has Windows Installer 4.5.
To deploy an installation package
1. Copy all contents of the admin .zip file (including subfolders) to \\[Domain
Controller]\NETLOGON, where [Domain Controller] is your domain controller.
IMPORTANT
If you want users to be able to view and use the handwriting recognition feature in a
language other than English, you must also copy the Support folder to \\[Domain
Controller]\NETLOGON.
The installer looks for handwriting recognition resources in the Support folder only. The
Support folder is located in the downloaded .zip file.
Also, for both Gallery and Lesson Activity Toolkit to install and operate successfully, verify
that all folders and subfolders of the Support folder is copied over.
It is important you follow these guidelines to ensure a successful installation:
o You must maintain the Support folder structure.
o The Support folder must reside in the root of the folder where the MSI file is stored.
2. Open Control Panel, double-click Administrative Tools, and then double-click Active
Directory Users and Computers.
The Active Directory Users and Computers window appears.
3. Right-click your domain, and then select Properties.
The Properties dialog box appears.

CHAPTER3DEPLOYING THE SOFTWARE
28 smarttech.com/kb/171152
4. Click the Group Policy tab, and then click Edit.
The Group Policy Object Editor dialog box appears.
5. Browse to Computer Configuration\Software Settings.
6. Right-click Software Installation, select New > Package, and then browse to and select the
MSI file from step 1.
7. In the Deploy Software section, click Advanced, and then click OK.
8. Click the Modifications tab, click Add, and then browse to and select the MST file from step 1.
9. Click OK to apply the MST file to the MSI file.
10. Close all open windows and dialog boxes.
The next time each computer on the domain starts, the computer automatically installs the
software in Silent mode with the customizations defined in the MST file.

Chapter 4
29 smarttech.com/kb/171152
Chapter 4: Activating and renewing thesoftware
Activating the software during installation 29Activating the software after installation 30Renewing keys 32
Renewing keys in unattended mode 33Renewing keys in user interface mode 34Enabling and disabling automatic renewal of keys 35
Using SMART Product Update (SPU) to retrieve activation status 36Returning a product key activation with a command-line script 37
Activating the software during installationIf you want to activate SMART Notebook software during deployment, you can use either of the
following practices, depending on your deployment method:
l System imaging: If you use system imaging, do not activate the software before you freeze
the image. You can use the Delayed Activation feature to register your product key on the
system before freezing it. After the image is deployed, SMART Notebook software will
prompt you to activate the registered product key. (see Delay Activation procedure in the
table under SMART Install Manager controls on page 12).
l Network deployment: If you use a network deployment tool, such as Group Policy software
installation, start up scripts, or Microsoft SCCM, you can specify your product key normally in
Install Manager or by using command-line parameters. Activation will occur during installation
on each individual computer.

CHAPTER4ACTIVATING AND RENEWING THE SOFTWARE
30 smarttech.com/kb/171152
Activating the software after installationThere are two situations in which the software doesn’t activate completely:
l Imaging a computer: Activation is linked to the hardware identifier of the computer on which
the software is installed and activated. If you clone a hard drive image with installed and
activated software, you must activate the software on each cloned computer.
l Reverting a computer to an earlier state: If you use system recovery or protection software
that periodically restores the computer to an earlier state, you might need to activate the
software before locking the computer so that the activation record is not cleared each time
the computer is restored.
Run the activation wizard while the computer is connected to the network, or complete the
following procedure to activate the software on each computer.
NOTE
SMART Product Drivers and SMART Ink don't require activation.
Flag Purpose
--a Activate the product key automatically.Specify if it’s an auto renew or not:
--no-auto-renew
or
--auto-renew
--pks="[Product keys]" Specify the product keys. When there are one or moreproduct keys use commas to separate.
--pk Specify the product key.
--v=4 Activation version for this release.
--puid <Product ID> Specify the Product ID.
--monitor=[Number] Specify the monitor to display the activation wizard.
--proxy=[Host:Port] Specify the proxy host and port number to use foractivation.
--proxyuser=[User] Specify the proxy user name to use for activation.
--proxypassword=[Password] Specify the proxy password to use for activation.
--locale=[Code] Display the activation wizard user interface in a specificlanguage, where [Code] is your language code (seeInstallation language files and codes on page 51).

CHAPTER4ACTIVATING AND RENEWING THE SOFTWARE
31 smarttech.com/kb/171152
To activate SMART software after installation
Run the following command:
"C:\Program Files\Common Files\SMART Technologies\SMART Product Update\activationwizard.exe"--puid notebook_14 --m=[Value] --v=4 --a [Optional flags] --pks="[Productkeys]"
Where
o [Value] is 4 to run the activation wizard in unattended mode.
OR
[Value] is 6 to run the activation wizard in user interface mode.
o [Optional flags] are options you can include to configure the activation wizard.
o Where [Product keys] are one or more software product keys, separated by commas.
To activate only SMART Notebook Math Tools software after installation
Run the following command:
"C:\Program Files\Common Files\SMART Technologies\SMART Product Update\activationwizard.exe"--puid notebook_14 --m=[Value] --v=4 --a [Optional flags]--pks="[Product keys]"
Where
o [Value] is 4 to run the activation wizard in unattended mode.
OR
[Value] is 6 to run the activation wizard in user interface mode.

CHAPTER4ACTIVATING AND RENEWING THE SOFTWARE
32 smarttech.com/kb/171152
o [Optional flags] are optional flags you can include to configure the activation wizard.
Flag Purpose
--monitor=[Number] Specify the monitor to display the activation wizard.
--proxy=[Host:Port] Specify the proxy host and port number to use foractivation.
--proxyuser=[User] Specify the proxy user name to use for activation.
--proxypassword=[Password] Specify the proxy password to use for activation.
--locale=[Code] Display the activation wizard user interface in aspecific language, where [Code] is your languagecode (see Installation language files and codes onpage 51).
o Where [Product keys] are one or more software product keys separated by commas.
Renewing keysIf your school has purchased maintenance or subscription licenses, SMART software attempts to
renew the keys automatically on a scheduled basis before and after the keys’ expiry dates.
However, you can choose to explicitly renew the keys at a specified time. You can also choose to
disable automatic renewal in situations where you don’t want the keys on a computer to be
renewed (because, for example, you’re planning to retire the computer).
TIP
The activation wizard user interface distinguishes between maintenance and subscription
licenses:
l Maintenance licenses are labeled with “Premium features will expire on [Date] without an
active subscription”.
l Subscription licenses are labeled with “Expires on [Date]”.

CHAPTER4ACTIVATING AND RENEWING THE SOFTWARE
33 smarttech.com/kb/171152
Renewing keys in unattended mode
To renew all keys
Run the following command:
"C:\Program Files\Common Files\SMART Technologies\SMART Product Update\activationwizard.exe" --m=15 --v=4--renewal-mode all
To renew all keys associated with a single product
Run the following command:
"C:\Program Files\Common Files\SMART Technologies\SMART Product Update\activationwizard.exe" --m=15 --v=4--renewal-mode product --puid=[Product]
Where [Product] is notenook_14.
NOTE
This command renews all keys associated with the specified product.
To renew specific keys
Run the following command:
"C:\Program Files\Common Files\SMART Technologies\SMART Product Update\activationwizard.exe" --m=15 --v=4--renewal-mode product --puid=[Product] --pks="[Product keys]"
Where
o [Product] is notebook_14.
o Where [Product keys] are one or more software product keys separated by commas.

CHAPTER4ACTIVATING AND RENEWING THE SOFTWARE
34 smarttech.com/kb/171152
Renewing keys in user interface mode
To renew all keys associated with a single product
Run the following command:
"C:\Program Files\Common Files\SMART Technologies\SMART Product Update\activationwizard.exe" --m=16 --v=4--renewal-mode product --puid=[Product] --uipack=[UI pack]
Where
o [Product] is notebook_14.
o [UI pack] is the corresponding UI pack for the selected product (notebook_10).
NOTE
This command renews all keys associated with the specified product.
To renew specific keys
Run the following command:
"C:\Program Files\Common Files\SMART Technologies\SMART Product Update\activationwizard.exe" --m=16 --v=4--renewal-mode product --puid=[Product] --uipack=[UI pack]--pks="[Product keys]"
Where
o [Product] is notebook_14.
o [UI pack] is the corresponding UI pack for the selected product (notebook_10).
o Where [Product keys] are one or more software product keys separated by commas.
CHAPTER4ACTIVATING AND RENEWING THE SOFTWARE
35 smarttech.com/kb/171152
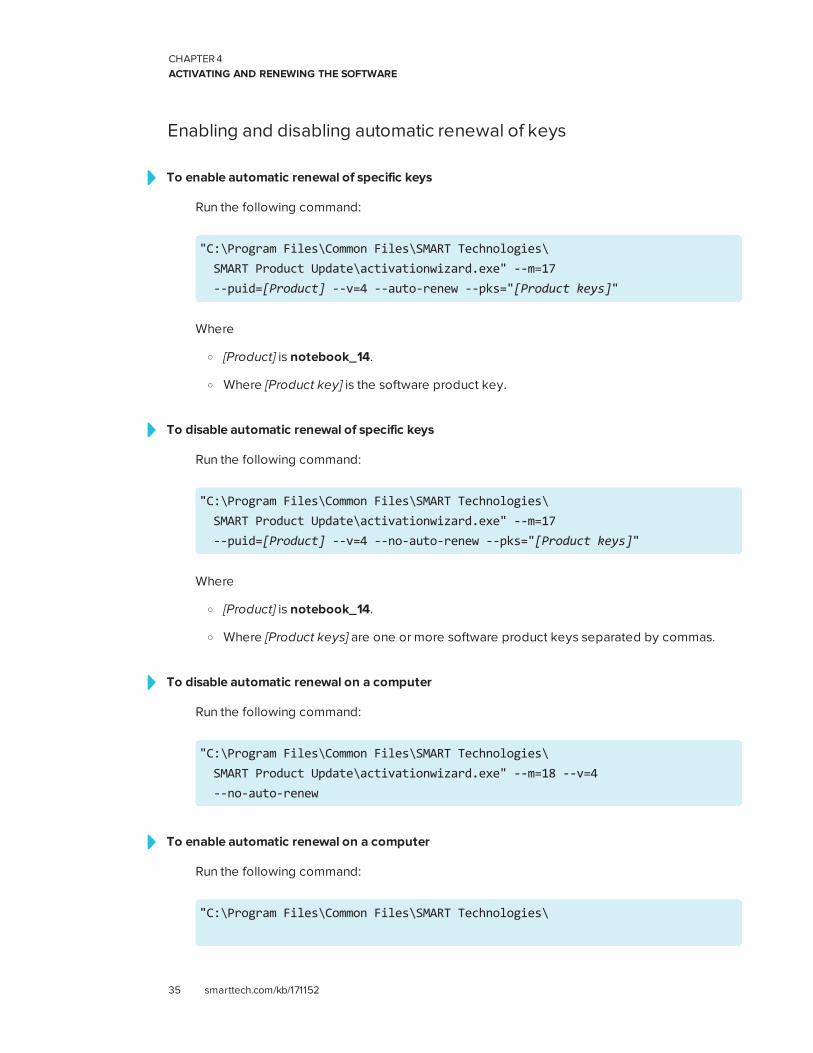
Enabling and disabling automatic renewal of keys
To enable automatic renewal of specific keys
Run the following command:
"C:\Program Files\Common Files\SMART Technologies\SMART Product Update\activationwizard.exe" --m=17--puid=[Product] --v=4 --auto-renew --pks="[Product keys]"
Where
o [Product] is notebook_14.
o Where [Product key] is the software product key.
To disable automatic renewal of specific keys
Run the following command:
"C:\Program Files\Common Files\SMART Technologies\SMART Product Update\activationwizard.exe" --m=17--puid=[Product] --v=4 --no-auto-renew --pks="[Product keys]"
Where
o [Product] is notebook_14.
o Where [Product keys] are one or more software product keys separated by commas.
To disable automatic renewal on a computer
Run the following command:
"C:\Program Files\Common Files\SMART Technologies\SMART Product Update\activationwizard.exe" --m=18 --v=4--no-auto-renew
To enable automatic renewal on a computer
Run the following command:
"C:\Program Files\Common Files\SMART Technologies\

CHAPTER4ACTIVATING AND RENEWING THE SOFTWARE
36 smarttech.com/kb/171152
SMART Product Update\activationwizard.exe" --m=18 --v=4--auto-renew
Using SMART Product Update (SPU) to retrieveactivation statusYou can use SMART Product Update (SPU) from the command line to retrieve information on SPU
settings and activation status. You could use this in scripts with industry standard execution tools to
retrieve information on your network’s computers.
To use SPU on 32-bit Windows
Run the following command:
"C:\Program Files\Common Files\SMART Technologies\SMART Product Update\activationwizard.exe" --query [Options] >OutputFile.txt 2>nul
NOTES
o OutputFile.txt is the file in which you record the results. The path to this file can be
absolute or relative. When specifying a path to a folder, make sure you have write
permissions to that folder.
o The 2>nul command suppresses any messages that appear on the Standard Error
output stream.
o [Options] is used for the following optional parameters:
o --format [Format]
Valid values for [Format] are csv, json or xml. The json and xml format provides full
details, and csv formats provide basic information.
o --key [Key]
This parameter is used to narrow down the returned results. The appropriate
format for this parameter is json or xml.
o The 64-bit version of this command uses the same options and parameters as the 32-
bit version.
CHAPTER4ACTIVATING AND RENEWING THE SOFTWARE
37 smarttech.com/kb/171152
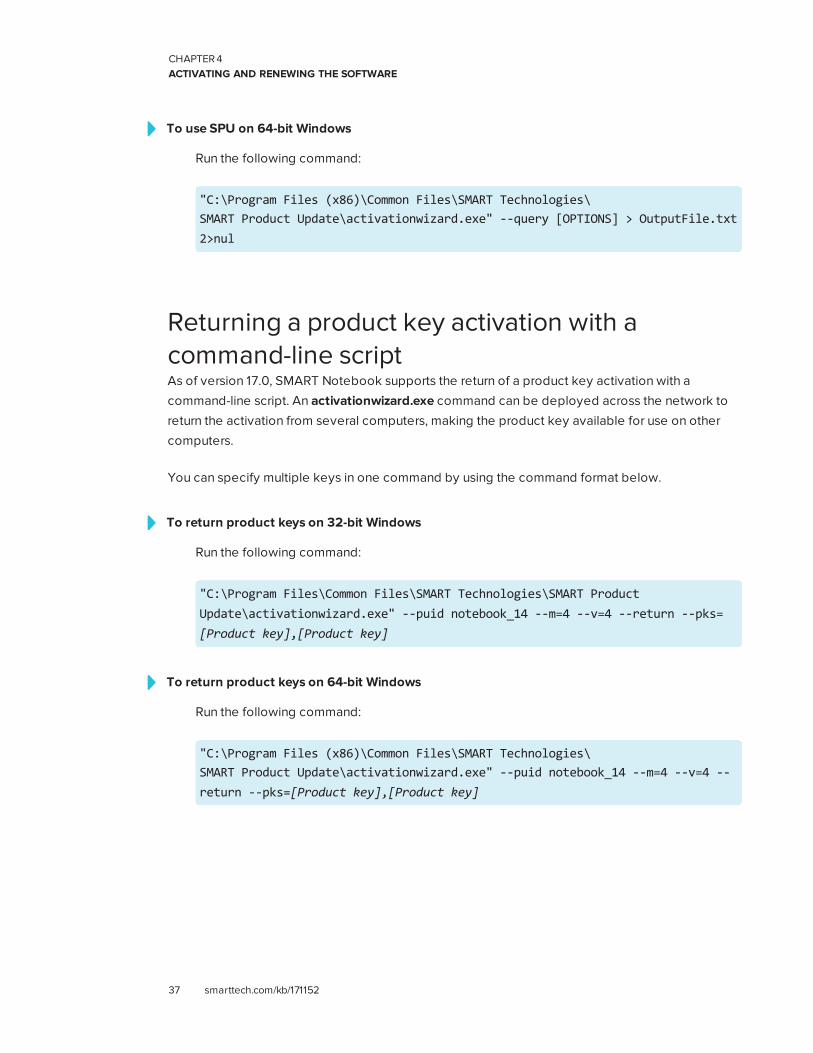
To use SPU on 64-bit Windows
Run the following command:
"C:\Program Files (x86)\Common Files\SMART Technologies\SMART Product Update\activationwizard.exe" --query [OPTIONS] > OutputFile.txt2>nul
Returning a product key activation with acommand-line scriptAs of version 17.0, SMART Notebook supports the return of a product key activation with a
command-line script. An activationwizard.exe command can be deployed across the network to
return the activation from several computers, making the product key available for use on other
computers.
You can specify multiple keys in one command by using the command format below.
To return product keys on 32-bit Windows
Run the following command:
"C:\Program Files\Common Files\SMART Technologies\SMART ProductUpdate\activationwizard.exe" --puid notebook_14 --m=4 --v=4 --return --pks=[Product key],[Product key]
To return product keys on 64-bit Windows
Run the following command:
"C:\Program Files (x86)\Common Files\SMART Technologies\SMART Product Update\activationwizard.exe" --puid notebook_14 --m=4 --v=4 --return --pks=[Product key],[Product key]

Chapter 5
39 smarttech.com/kb/171152
Chapter 5: Updating the software
Using a Windows Installer update installation package (MSI file) 40Using a Windows Installer patch (MSP file) 41
SMART periodically releases updates to its software. These updates add new features and resolve
issues.
Go to smarttech.com/software to download the latest installation package. SMART provides
updates in two file formats in the installation package:
l Windows Installer update installation packages (MSI files)
l Windows Installer patches (MSP files)
NOTE
MSP files are available only for select updates as identified on the SMART website.
Which file format you use depends on the version of the software installed on your computers and
the version of the update. If these versions are the same, you can use the MSP file, if available, to
install the update. If these versions are different (because, for example, a previous version of the
software is installed on your computers), you must first upgrade the software on your computers to
the same version as the update using the MSI file and then install the update using the MSP file, if
available.
After you download an installation package and extract the update files, place the update files in a
location on your network that’s accessible to all the computers you plan to update.
IMPORTANT
You cannot roll back an update after installing it on your computers. You must uninstall the full
version of the software using Control Panel or the command line interface (see Chapter 6:
Uninstalling the software on page 43), and then install the previous version of the software.

CHAPTER5UPDATING THE SOFTWARE
40 smarttech.com/kb/171152
Using a Windows Installer update installationpackage (MSI file)The command line for running an update using a Windows Installer update installation package
varies depending on whether the update is major or minor.
NOTE
The SMART website indicates whether an update is major or minor.
To run a major software update using a Windows Installer update installation package
Run the following command:
msiexec /i "[Path]\[File].msi" [Parameter]
Where
o [Path] is the path to the MSI file.
o [File] is the name of the MSI file.
o [Parameter] is the installation parameter (see Windows Installer parameters on page 26).
IMPORTANT
Do not include the REINSTALLMODE and REINSTALL properties.
To run a minor software update using a Windows Installer update installation package
Run the following command:
msiexec /i "[Path]\[File].msi" REINSTALLMODE=vomus REINSTALL=ALL [Parameter]
Where
o [Path] is the path to the MSI file.
o [File] is the name of the MSI file.
o [Parameter] is the installation parameter (see Windows Installer parameters on page 26).
IMPORTANT
CHAPTER5UPDATING THE SOFTWARE
41 smarttech.com/kb/171152
You must include the REINSTALLMODE=vomus and REINSTALL=ALL properties for a minor
update to succeed.
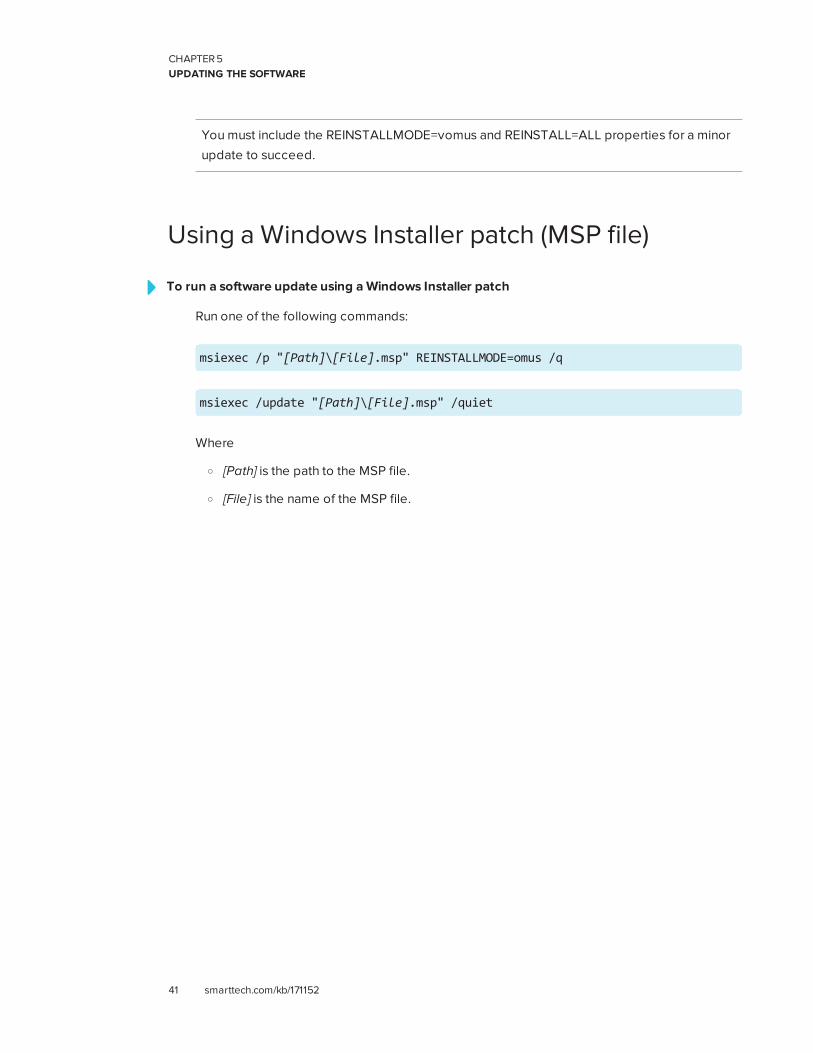
Using a Windows Installer patch (MSP file)
To run a software update using a Windows Installer patch
Run one of the following commands:
msiexec /p "[Path]\[File].msp" REINSTALLMODE=omus /q
msiexec /update "[Path]\[File].msp" /quiet
Where
o [Path] is the path to the MSP file.
o [File] is the name of the MSP file.


Chapter 6
43 smarttech.com/kb/171152
Chapter 6: Uninstalling the software
Using the SMART Uninstaller user interface 43Using the SMART Uninstaller command line interface 44
Other commands 47Product codes 47
After installing SMART Learning Suite 17.1, you can use SMART Uninstaller to uninstall the software.
Using the SMART Uninstaller user interfaceYou can uninstall SMART Learning Suite 17.1 from individual computers using the SMART Uninstaller
user interface.
To uninstall SMART Learning Suite 17.1 using the SMART Uninstaller user interface
1. In Windows 7 operating system, select Start > All Programs > SMART Technologies > SMART
Tools > SMART Uninstaller.
OR
In Windows 8.1 operating system, go to the Apps screen and then scroll to and select
SMART Technologies > SMART Uninstaller.
OR
In Windows 10 operating system, select Start > All apps, and then scroll to and select
SMART Technologies > SMART Uninstaller.
2. Press Next.

CHAPTER6UNINSTALLING THE SOFTWARE
44 smarttech.com/kb/171152
3. Select the check boxes of the SMART software and supporting packages that you want to
uninstall, and then press Next.
NOTES
o Some SMART software is dependent on other SMART software. If you select this
software, SMART Uninstaller automatically selects the software on which it depends.
o SMART Uninstaller automatically uninstalls any supporting packages that are no longer
being used.
o If you choose to uninstall all SMART software, SMART Uninstaller automatically
uninstalls all supporting packages, including itself.
TIPS
o To select all software and supporting packages, press Select All.
o To clear the selection of all software and supporting packages, press Clear All.
4. Press Uninstall.
SMART Uninstaller uninstalls the selected software and supporting packages.
5. Press Finish.
Using the SMART Uninstaller command lineinterfaceIn addition to the user interface, SMART Uninstaller provides a command-line interface. You can
use this interface to automate the removal of SMART Learning Suite 17.1 and uninstall SMART
Learning Suite 17.1 remotely.
NOTE
SMART recommends that you copy SMART Uninstaller to a temporary location before running
command lines and prefix command lines with start /wait.

CHAPTER6UNINSTALLING THE SOFTWARE
45 smarttech.com/kb/171152
To uninstall all SMART software
1. Copy SMART Uninstaller to a temporary location by running one of the following commands:
o For 32-bit operating systems:
copy "%CommonProgramFiles%\SMART Technologies\SMART Uninstaller.exe""%TEMP%"
o For 64-bit operating systems:
copy "%CommonProgramFiles(x86)%\SMART Technologies\SMART Uninstaller.exe""%TEMP%"
2. Uninstall all software by running the following command:
start /wait "SMART Uninstaller" "%TEMP%\SMART Uninstaller.exe" --noui--uninstall-all --uilevel none
3. Delete the copy of SMART Uninstaller in the temporary location by running the following
command:
del "%TEMP%\SMART Uninstaller.exe"
To uninstall SMART software by product name
1. Copy SMART Uninstaller to a temporary location by running one of the following commands:
o For 32-bit operating systems:
copy "%CommonProgramFiles%\SMART Technologies\SMART Uninstaller.exe""%TEMP%"
o For 64-bit operating systems:
copy "%CommonProgramFiles(x86)%\SMART Technologies\SMART Uninstaller.exe""%TEMP%"

CHAPTER6UNINSTALLING THE SOFTWARE
46 smarttech.com/kb/171152
2. Uninstall select software by running the following command:
start /wait "SMART Uninstaller" "%TEMP%\SMART Uninstaller.exe" --noui--uninstall "[Product names]" --uilevel none
Where [Product names] is a comma delimited list of product names.
3. Delete the copy of SMART Uninstaller in the temporary location by running the following
command:
del "%TEMP%\SMART Uninstaller.exe"
To uninstall SMART software by product code
1. Copy SMART Uninstaller to a temporary location by running one of the following commands:
o For 32-bit operating systems:
copy "%CommonProgramFiles%\SMART Technologies\SMART Uninstaller.exe""%TEMP%"
o For 64-bit operating systems:
copy "%CommonProgramFiles(x86)%\SMART Technologies\SMART Uninstaller.exe""%TEMP%"
2. Uninstall select software by running the following command:
start /wait "SMART Uninstaller" "%TEMP%\SMART Uninstaller.exe" --noui--uninstall-pc [Product codes] --uilevel none
Where [Product codes] is a comma delimited list of product codes.
3. Delete the copy of SMART Uninstaller in the temporary location by running the following
command:
del "%TEMP%\SMART Uninstaller.exe"

CHAPTER6UNINSTALLING THE SOFTWARE
47 smarttech.com/kb/171152
Other commandsThe following is a list of all the commands you can use with SMART Uninstaller.
Command Description Notes
--dry-run Runs the command line butdoesn’t uninstall thesoftware.
This is useful for testingcommand lines beforerunning them.
--locale [Language code]Where [Language code] is alanguage code (for example,fr for French)
Displays SMART Uninstallerin a language other than theoperating system’slanguage.
The appropriate languagepack must be installed todisplay SMART Uninstallerin the language.
--uilevel [Level]Where [Level] is none, basic (default),reduced or full
Specifies the user interfacethat displays when SMARTUninstaller uninstalls thesoftware.
Normally, --uilevel none isused only in combinationwith --noui.
--no-auto-remove Disables the automaticremoval of supportingpackages (for example,SMART Common Files) thatare no longer required afterthe selected packages areuninstalled.
This is used only if --noui isalso included.
--noui Doesn’t display the SMARTUninstaller user interface.
Normally, --noui is usedonly in combination with--uilevel none.
--uninstall-all Uninstalls all detectedSMART packages.
[N/A]
--uninstall [Product names]Where [Product names] is a commadelimited list of product names
Uninstalls the specifiedproducts.
[N/A]
--uninstall-pc [Product codes]Where [Product codes] is a commadelimited list of product codes
Uninstalls the specifiedproducts.
[N/A]
Product codes
Version Product code
SMART Notebook software
11.4 {79660EE7-9C0B-4962-B566-2693FE34719D}

CHAPTER6UNINSTALLING THE SOFTWARE
48 smarttech.com/kb/171152
Version Product code
14.0 {4DF72C85-33C5-4297-A0DE-FC6DB766695D}
14.1 {84579080-E961-4DE7-93AB-5E2B81A96387}
14.2 {D4C0DEF0-8D83-4884-91D9-83A07D0F2CB5}
14.3 {18E53BBD-971F-4A77-9620-EB2C1539E308}
15.0 {955F23AC-CABC-4F34-A3E4-3DF2305B64BE}
15.1 {5E112563-E291-4C20-849F-49CE3BAD73D1}
15.2 {E6EE86DD-5B8B-483D-83EB-18B9E1FD9BB8}
16.0 {47F91537-12BD-4B30-8726-5A033FE61CDA}
16.1 {AA217CD3-F8C1-4AEA-A145-5850078BFB17}
16.2 {87948734-3F7C-4E9D-8702-3B05AF3CDA23}
17.0 {6C0FDF5B-142D-4F0D-8DED-3B563A20B033}
17.0.1 {5EBEDBC2-0986-4311-8C52-52C5C69E8182}
17.1 {ACB84BD5-8E84-4103-B611-9836534DED54}
SMART Product Drivers
11.4 {53330A17-78DE-458E-9997-292A2D6D3ADD}
11.5 {B1209081-5D82-4F8A-8318-BE7583B6E265}
11.6 {890680EC-2F88-47F0-970C-593081E62593}
12 {111A1715-267A-4387-B63D-D7E6E7D97677}
12.1 {67F35E75-A186-4F80-B291-8283331D5550}
12.2 {C3C9E674-3FD2-4535-B733-C7C62074DC4A}
12.3 {A418B556-1E81-4D42-B54E-979720B3DEBF}
12.4 {BFF16FAE-1B84-40EA-B60E-385F5A392512}
12.5 {696243E7-E4BB-4696-ACF0-C6D2FC012136}
12.6 {1E280E41-ED8E-424C-9EA9-FD52963B21BE}(shipped with SMART Notebook 16.1)
{3298B999-38D0-4650-8FB7-3C9E71325465}(shipped with SMART Notebook 16.2)
12.7 {1E280E41-ED8E-424C-9EA9-FD52963B21BE}
12.8 {A292B5F2-F55A-4960-A58F-07569554D321}

CHAPTER6UNINSTALLING THE SOFTWARE
49 smarttech.com/kb/171152
Version Product code
12.9 {663AF146-1736-49B3-B96D-A1006692BB0E}
SMART Ink
2.0 {5ABC49B5-D0DC-428D-A082-4AEFF6490F04}
2.1 {B4F5D378-9784-442B-97D5-24CAAF3299AA}
2.2 {FC69B741-DC56-4591-97A2-A6BA211B7E76}
2.3 {FAF3CC40-F647-4AA7-84D6-7BD67C4F2362}
2.3.1 {232C8EC0-4856-4EEA-B99F-5FCC4E103A09}
3.1 {52ECF84B-09E9-4C98-B4FD-17EE1BC09921}
3.2 {57E67FAF-87D9-4573-BC7F-C95B1A71287A}
4.0 {A5AEF478-1170-4335-86B8-561328B193EC}
4.1 {7AB1FDF1-6998-43AD-B705-EA8AF7439407}
4.2 {11ECCC34-FC75-4DA0-B13D-E89D1E6661BF}
5.0 {89E25BCE-F949-405E-ADA9-8537B4F4E2B8}
5.1 {A292B5F2-F55A-4960-A58F-07569554D321}
5.2 {A60BAFDD-6BFF-4F65-8364-499ED8EB91DB}
SMART Common Files
2013 (11.3) {BBA07B40-F7C6-44F7-BF08-767F8835685F}
2013 (11.4) {26A95DBF-A866-4838-A8C9-FA219FCBD22E}


Appendix A
51 smarttech.com/kb/171152
Appendix A: Language files and codes
Installation language files and codes 51Handwriting recognition resources 52
Installation language files and codesLanguage Code File
English (U.S.) 1033 1033.mst
English (UK) 2057 2057.mst
Arabic 1025 1025.mst
Chinese (Simplified) 2052 2052.mst
Chinese (Traditional) 1028 1028.mst
Czech 1029 1029.mst
Danish 1030 1030.mst
Dutch 1043 1043.mst
Estonian 1061 1061.mst
Finnish 1035 1035.mst
French (France) 1036 1036.mst
German 1031 1031.mst
Greek 1032 1032.mst
Hebrew 1037 1037.mst
Hungarian 1038 1038.mst
Italian 1040 1040.mst
Japanese 1041 1041.mst
Latvian 1062 1062.mst
APPENDIX ALANGUAGE FILES AND CODES
52 smarttech.com/kb/171152
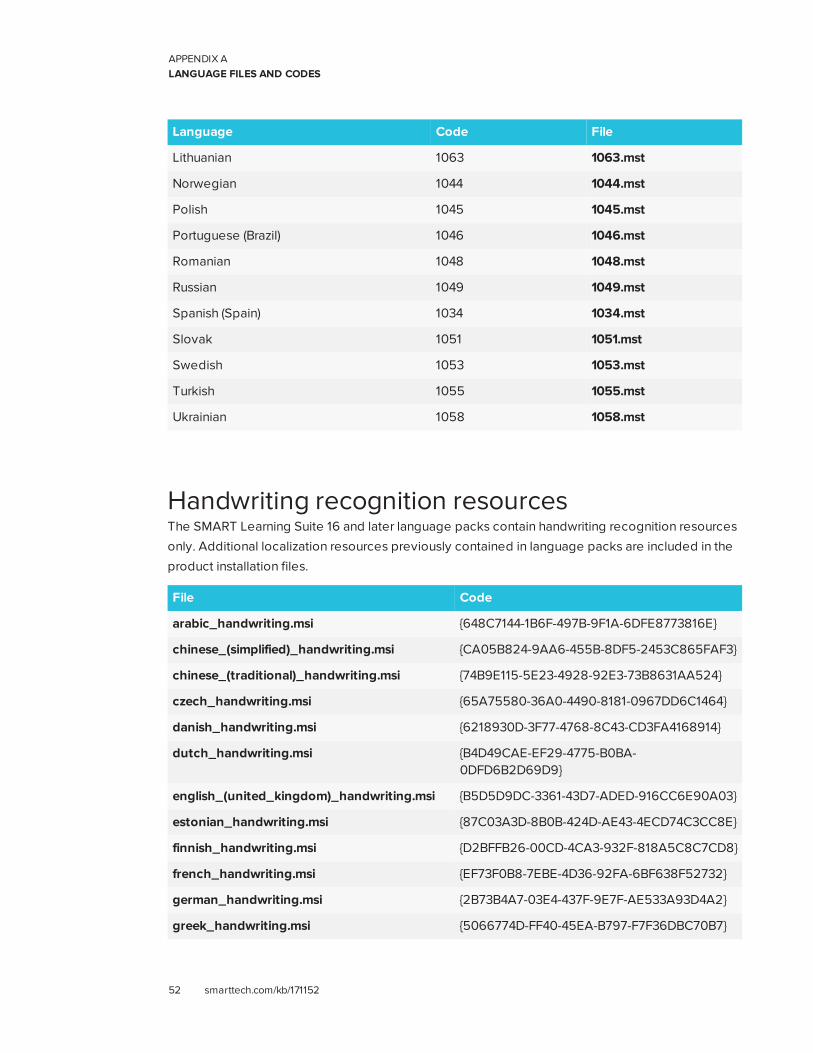
Language Code File
Lithuanian 1063 1063.mst
Norwegian 1044 1044.mst
Polish 1045 1045.mst
Portuguese (Brazil) 1046 1046.mst
Romanian 1048 1048.mst
Russian 1049 1049.mst
Spanish (Spain) 1034 1034.mst
Slovak 1051 1051.mst
Swedish 1053 1053.mst
Turkish 1055 1055.mst
Ukrainian 1058 1058.mst
Handwriting recognition resourcesThe SMART Learning Suite 16 and later language packs contain handwriting recognition resources
only. Additional localization resources previously contained in language packs are included in the
product installation files.
File Code
arabic_handwriting.msi {648C7144-1B6F-497B-9F1A-6DFE8773816E}
chinese_(simplified)_handwriting.msi {CA05B824-9AA6-455B-8DF5-2453C865FAF3}
chinese_(traditional)_handwriting.msi {74B9E115-5E23-4928-92E3-73B8631AA524}
czech_handwriting.msi {65A75580-36A0-4490-8181-0967DD6C1464}
danish_handwriting.msi {6218930D-3F77-4768-8C43-CD3FA4168914}
dutch_handwriting.msi {B4D49CAE-EF29-4775-B0BA-0DFD6B2D69D9}
english_(united_kingdom)_handwriting.msi {B5D5D9DC-3361-43D7-ADED-916CC6E90A03}
estonian_handwriting.msi {87C03A3D-8B0B-424D-AE43-4ECD74C3CC8E}
finnish_handwriting.msi {D2BFFB26-00CD-4CA3-932F-818A5C8C7CD8}
french_handwriting.msi {EF73F0B8-7EBE-4D36-92FA-6BF638F52732}
german_handwriting.msi {2B73B4A7-03E4-437F-9E7F-AE533A93D4A2}
greek_handwriting.msi {5066774D-FF40-45EA-B797-F7F36DBC70B7}

APPENDIX ALANGUAGE FILES AND CODES
53 smarttech.com/kb/171152
File Code
hebrew_handwriting.msi {3623E3DE-104A-4651-B8E3-9D2851636A2F}
hungarian_handwriting.msi {3AE061AF-B255-4052-9918-849AD4FE0C56}
italian_handwriting.msi {AF09A64A-245A-458A-8290-421D611A21F5}
japanese_handwriting.msi {3FB8FA79-CAF4-47CD-A599-D68F72D1CAD1}
korean_handwriting.msi {C106402C-BC3E-4EA4-A3AE-6BDBCB785DC3}
latvian_handwriting.msi {0EB8A795-CCF7-46CD-9E8A-1739A539A382}
lithuanian_handwriting.msi {EE96CAF4-2439-4CD9-BFF7-DC3DFBC7781B}
malay_handwriting.msi {33A07CFE-B356-45A7-B2E5-99F536CC84B9}
norwegian_handwriting.msi {AE4A8476-F602-4FC0-A40D-336DC76DD7EE}
polish_handwriting.msi {11725848-ECA6-4E79-874C-E59D1DA6A122}
portuguese_(brazil)_handwriting.msi {3C2062D0-82F6-4CE3-ADAD-F993CBE2F4F5}
romanian_handwriting.msi {84BCEABF-4624-447D-89D8-5D0B5F4DFFBC}
russian_handwriting.msi {4CF5A60A-8E02-4376-A9F5-8C343D473FCD}
slovak_handwriting.msi {5E6F10F3-9006-4F78-B231-18866B792E06}
spanish_handwriting.msi {62F6F0A3-FB04-4FDF-ABB4-11F3A042EB8A}
swedish_handwriting.msi {9B9B50A8-84A4-4547-A9E5-FA3868CDF78B}
turkish_handwriting.msi {9D3E3459-395A-4514-8C67-064C123C77C4}
ukrainian_handwriting.msi {CEAEC5BE-99AA-4D82-A06D-4D5B5895DB3F}


Appendix B
55 smarttech.com/kb/171152
Installing and maintaining Gallerycontent
Gallery content includes the following:
l Gallery Essentials, which is a collection of educational photos, images, and audio files
compatible files.
l Lesson Activity Toolkit, which contains objects teachers can use to create their own lesson
activities.
You can access Gallery content from the Gallery tab in SMART Notebook software.
Configuring Gallery content using SMART InstallManagerIf you’re customizing the software using SMART Install Manager, complete the procedure in this
section to configure Gallery content.
To configure Gallery content using SMART Install Manager
1. Open the software installation package in SMART Install Manager.
2. Click Product Selection.
The Product Selection page appears.
3. Select SMART Notebook (and any other products you want to install).
4. Click Gallery Content.
The Gallery Content page appears.
5. Select the Gallery content to be installed on each computer.
Gallery Essentials
Lesson Activity Toolkit

APPENDIX BINSTALLING AND MAINTAINING GALLERY CONTENT
56 smarttech.com/kb/171152
6. Publish your changes, and then deploy the files.
If you loaded the ESI .EXE with Install Manager, publish will produce a .xml file.
If you loaded the ESI .MSI with Install Manager, publish will produce a .mst file.
7. Make sure the .xml or .mst file is saved into the same folder as the ESI installation package to
be deployed.
Working with Gallery content locationsAfter installing the software, you can do the following:
l Starting the software in Administration mode.
l Change the location of the My Content folder.
l Create or connect to a Team Content folder.
l Connect to an RSS feed.
Starting the software in Administration modeBefore you can maintain content folders, you must start the software in Administration mode.
To start SMART Notebook software in Administration mode
1. Open a Command Prompt window.
2. Type the following command:
"[Path]\Notebook.exe" /admin
Where [Path] is the path to the SMART Notebook software program folder.
3. Press ENTER.
SMART Notebook software starts in Administration mode.
Changing the location of the My Content folderThe My Content folder is a location where teachers and students can store content for their
individual use.
You can specify the location of the My Content folder during installation or afterward.

APPENDIX BINSTALLING AND MAINTAINING GALLERY CONTENT
57 smarttech.com/kb/171152
To create a new Team Content folder
1. Start the software in Administration mode.
2. Click the Gallery tab.
3. Click the Click here for more Gallery options icon , and then select Administration: Content
Locations.
The Administration: Content Locations dialog box appears.
4. Click Browse.
The Browse For Folder dialog box appears.
5. Browse to and select the new My Content folder, and then click OK.
6. Click Close.
7. Close the software.
Creating or connecting to Team Content foldersAll users can create new content and save it in theirMy Content folders. To allow users to share
content, you must create or connect to a Team Content folder.
TIP
If you create a Team Content folder on a computer’s hard disk, the folder is available only to
users of that computer. However, if you create a Team Content folder on a server, the folder is
available to all users on the school’s network with read and write access to the folder.
To create a new Team Content folder
1. Start the software in Administration mode.
2. Click the Gallery tab.
3. Click the Click here for more Gallery options icon, and then select Administration: Content
Locations.
The Administration: Content Locations dialog box appears.
4. Click Connect to Team Content.

APPENDIX BINSTALLING AND MAINTAINING GALLERY CONTENT
58 smarttech.com/kb/171152
5. Browse to and select the folder you want to designate as a Team Content folder, and the click
OK.
NOTE
The software adds an imsmanifest.xml file to the Team Content folder after you click OK.
This file identifies the folder as a Team Content folder.
6. Click Close.
7. Close the software.
To connect to an existing Team Content folder
1. Start the software in Administration mode.2. Click the Gallery tab.
3. Click the Click here for more Gallery options icon, and select Administration: Content
Location.
The Administration: Content Location dialog box appears.
4. Click Add Existing.
NOTE
The Team Content folder should appear in the list of content folders under the Gallery tab.
5. The Browse to and select the Team Content folder, and then click OK.
6. Click Close.
7. Close the software.
To disconnect a Team Content folder
1. Start the software in Administration mode.2. Click the Gallery tab.
3. Click the Click here for more Gallery option icon, and then select Administration: Content
Locations.
The Administration: Content Locations dialog box appears.

APPENDIX BINSTALLING AND MAINTAINING GALLERY CONTENT
59 smarttech.com/kb/171152
4. Select the folder in the Team Content list, and then click Remove.
IMPORTANT
If you installed the Gallery Essentials and Lesson Activity Toolkit collections, folders for
those collections appear in the Team Content list. Do not remove these folders from the list,
or users will not be able to access these collections.
5. Click Close.
6. Close the software.
Connecting to and RSS feedYou can connect to a public or private RSS feed to send information to your school’s SMART
Notebook software and SMART Notebook SE users through the Gallery tab.
RSS is a format for delivering regularly changing web content. Many news-related websites, blogs
and other publishers broadcast their content as RSS feeds.
To connect to an RSS feed
1. Start the software in Administration mode.
2. Click the Gallery tab.
3. Click the Click here for more Gallery options icon, and then select Administration: Content
Locations.
The Administration: Content Locations dialog box appears.
4. Type the URL of the RSS feed in the Online Resources box.
5. Click Close.
6. Close the software.


SMART TECHNOLOGIES
smarttech.com/support
smarttech.com/contactsupport
smarttech.com/kb/171152
Related Documents