Software License Manager (SLM) Installation and Reference Guide

Welcome message from author
This document is posted to help you gain knowledge. Please leave a comment to let me know what you think about it! Share it to your friends and learn new things together.
Transcript
Software LicenseManager (SLM)
Installation andReference Guide
CopyrightVersion Number: V7.2Month: July 2010
Copyright (c) 2008 – 2010 by Aspen Technology, Inc. All rights reserved.
Aspen HYSYS Dynamics™, Aspen HYSYS Upstream™, Aspen HYSYS®, Aspen Orion XT™, Aspen PIMS™, Aspen Plus®, aspenONE,SLM™, SLM Commute™, SLM Config Wizard™, and the Aspen leaf logo are trademarks or registered trademarks of AspenTechnology, Inc., Burlington, MA.
All other brand and product names are trademarks or registered trademarks of their respective companies.
This document is intended as a guide to using AspenTech's software. This documentation contains AspenTechproprietary and confidential information and may not be disclosed, used, or copied without the prior consent ofAspenTech or as set forth in the applicable license agreement. Users are solely responsible for the proper use ofthe software and the application of the results obtained.
Although AspenTech has tested the software and reviewed the documentation, the sole warranty for the softwaremay be found in the applicable license agreement between AspenTech and the user. ASPENTECH MAKES NOWARRANTY OR REPRESENTATION, EITHER EXPRESSED OR IMPLIED, WITH RESPECT TO THIS DOCUMENTATION,ITS QUALITY, PERFORMANCE, MERCHANTABILITY, OR FITNESS FOR A PARTICULAR PURPOSE.
Aspen Technology, Inc.200 Wheeler RoadBurlington, MA 01803-5501USAPhone: (1) (781) 221-6400Toll Free: (1) (888) 996-7100URL: http://www.aspentech.com

Contents iii
Contents
About This Document ..............................................................................................1
Who Should Read This Guide .............................................................................1Technical Support ............................................................................................1
1 Quick Guide to Installing and Configuring the SLM...............................................3
Prerequisites....................................................................................................4Step 1: Obtaining License Files from AspenTech...................................................4Step 2: Installing AspenTech SLM Network License Server ....................................5
Installing the Sentinel System Drivers (hardware-key drivers) .....................6Step 3: Installing aspenONE products .................................................................7
Installing a new Stand-alone License file ...................................................7Installing a Network License file ...............................................................8
Step 4: Test the SLM Installation .......................................................................9Run-time Licensing.................................................................................9Monitoring the Network License Server ................................................... 10
Step 5: Configuring the SLM and Advanced Features .......................................... 11
2 SLM Overview.....................................................................................................13
Benefits of SLM.............................................................................................. 13SLM Primer.................................................................................................... 14License Terminology ....................................................................................... 15
SLM Components ................................................................................. 15SLM System Requirements .................................................................... 16License Locking Criteria ........................................................................ 16License Files ........................................................................................ 17License Modes ..................................................................................... 18Installation Modes ................................................................................ 18Obtaining License Files.......................................................................... 20SLM Dongles (Hardware-Keys)............................................................... 21Sentinel System Driver ......................................................................... 22Network Requirements.......................................................................... 23
Features and Limitations of SLM....................................................................... 24License Manager Program and Files .................................................................. 25
SLM Configuration Wizard ..................................................................... 25SLM Commute ..................................................................................... 25Environment Variables .......................................................................... 25User Options........................................................................................ 25
3 Installing Stand-Alone License Files...................................................................27
Your License Package ..................................................................................... 27New AspenTech products ...................................................................... 27

iv Contents
Upgraded AspenTech products ............................................................... 27Installing the License File ................................................................................ 28
Installing Stand-alone Mode License Files................................................ 28Installing the SLM Dongle...................................................................... 29
4 Installing and Configuring the License Server....................................................31
Installing and Configuring a Network License Server........................................... 31Step 1: Installing the Network License Server.......................................... 32Step 2: Installing the License Administration Tools ................................... 36Step 3: Installing the License File........................................................... 37Checking SLM Dongle ........................................................................... 37Checking that the License Server has been properly initialized ................... 39Network Problems ................................................................................ 47Log Files ............................................................................................. 49Checking the Client to Server Connection ................................................ 49
5 Configuring SLM .................................................................................................51
Configuring SLM using the SLM Configuration Wizard.......................................... 51Accessing the SLM Configuration Wizard and Online Help .......................... 51
Configuring SLM using Environment Variables.................................................... 52Configuring the Environment Variables ................................................... 52LSDefaultDir Environment Variable......................................................... 54LServOpts Environment Variable ............................................................ 54LServrcCNF Environment Variable .......................................................... 57LSHost Environment Variable................................................................. 57LSHost Environment Variable................................................................. 58LSForceHost Environment Variable ......................................................... 59LSProtocol Environment Variable............................................................ 59
6 Advanced Licensing Functions............................................................................61
Using Alternate License Configurations.............................................................. 61Pooling SLM Dongles............................................................................. 61Mixing Stand-alone and Network Modes .................................................. 62Configuring the SLM using Registry Variables........................................... 62
Commuting Licenses....................................................................................... 62Checking Out Commuter Licenses .......................................................... 63Using Commuter Licenses from Non-Default Bucket.................................. 67Viewing Commuter Licenses .................................................................. 68Accessing Aspen SLM Commute Version Information ................................ 70Returning Commuter Licenses ............................................................... 71Recommended Practices........................................................................ 72License and Product Names ................................................................... 73Commuting the Licenses from a Remote Location..................................... 73
Stopping or Changing the License Server .......................................................... 73Setting User Options....................................................................................... 73
User Alerts .......................................................................................... 73Group Reservations .............................................................................. 76
7 Troubleshooting SLM Problems ..........................................................................83
Introduction .................................................................................................. 83Dongle Problems ............................................................................................ 84
Contents v
Check Dongle Attachment ..................................................................... 84Check that there is no problem with your network.................................... 85Check if license server is outside of your sub network............................... 85Check the host name or IP address ........................................................ 86Check if the license server has been reloaded after installing the licenses onthe server ........................................................................................... 86Check your network connection system................................................... 86
Common Error Messages................................................................................. 87
8 Frequently Asked Questions...............................................................................89
General SLM.................................................................................................. 89How do I fix my SLM installation?........................................................... 89Why are the SLM dongle (Sentinel Hardlock) and its lock code missing when Irun the Configuration Wizard?................................................................ 90I am trying to install an SLM application using network security. Why am Igetting errors?..................................................................................... 90When I install my license file by double-clicking on it from my email, extradigits are added to its name and it will not work. Why?............................. 91Where is the Sentinel System Driver installed? ........................................ 91The computer was a server, but now I want to delete its licenses and stop itfrom being a server. How do I do this? ................................................... 91I have many stand-alone dongles. How do I manage the license files? ........ 92Can I switch a stand-alone SLM dongle between multiple computers? ......... 92What is the Commuter Option? .............................................................. 93Why do I get the error message "Required Component Missing" when tryingto run an AspenTech product? ............................................................... 93Why is the AspenTech product telling me that I do not have the appropriatelicenses to run my product?................................................................... 94How can I run an AspenTech product locally on the same computer that hasthe network license and the dongle?....................................................... 94Can I use SLM-enabled products with a Windows/Citrix Terminal Server?.... 95
Product Specific ............................................................................................. 95HTFS Products don't display the standard SLM error handles. How do Itroubleshoot licensing problems?............................................................ 95
Guidelines for SLM Features ............................................................................ 95How do I get logging to work properly on my server? ............................... 95How do I set up Group Reservations? ..................................................... 96
SLM Administrator Tools.................................................................................. 96My WLMAdmin preferences aren't saving. Why is that? ............................. 96I have shut down the AspenTech product and the WLMadmin tool still states Ihave licenses checked out. Why? ........................................................... 96
About Tokens ................................................................................................ 97What are SLM tokens? .......................................................................... 97
Time Tamper Check........................................................................................ 97Why am I getting the time tamper error? ................................................ 97How can I fix the problem?.................................................................... 97How can I avoid getting this error in the future? ...................................... 98I ran timefix.exe. Why did I get the error message "Error getting time fromlicense file."? ....................................................................................... 99I ran the timefix.exe successfully, but when I run the AspenTech product, Istill get the error message 26. Why? ...................................................... 99

vi Contents

About This Document 1
About This Document
This chapter includes the following information:
Who Should Read This Guide
Technical Support
Who Should Read This GuideThis guide describes the Aspen Software License Manager (SLM) installationand configuration. It also describes how to administer and manage the SLM.
Read this guide if you are involved with the planning, implementation,installation, or maintenance of the license management system for AspenTechproducts for your company.
Technical SupportAspenTech customers with a valid license and software maintenanceagreement can register to access the online AspenTech Support Center at:
http://support.aspentech.com
This Web support site allows you to:
Access current product documentation
Search for tech tips, solutions, and frequently asked questions (FAQs)
Search for and download service packs and product updates
Submit and track technical issues
Send suggestions
Report product defects
Review lists of known deficiencies and defects
Registered users can also subscribe to our Technical Support e-Bulletins.These are used to alert users to important technical support information suchas:
Technical advisories
Product updates and releases

2 About This Document
Customer support is also available by phone, fax, and email. The most up-to-date contact information is available at the AspenTech Support Center athttp://support.aspentech.com.

1 Quick Guide to Installing and Configuring the SLM 3
1 Quick Guide to Installingand Configuring the SLM
This chapter provides abbreviated instructions on how to install and configurethe SLM. It is intended for users that have a general understanding of licensemanagers and who do not intend to use the advanced features of the SLM asdescribed in this installation guide. For more detailed information aboutinstalling and configuring the SLM, see chapters 3 through 6.
All aspenONE V7.2 products use the SLM licensing system. The SLM allowstwo types of licensing: stand-alone and network.
Stand-alone licensing obtains licenses from the same computer on which theAspenTech products are installed. Network licensing is similar to stand-alonelicensing, but the application licenses are obtained across a networkconnection from a network-license-server computer.
In instances where the AspenTech products are installed with a stand-alonelicense, only the SLM Client component is required. When using networklicensing, the SLM Network license server should be installed and configuredon a network server computer prior to installing any AspenTech products onthe client computers. To install any AspenTech V7.2 products, you willrequire either a stand-alone license file or access to a network license serverprior to proceeding with the installation.
Every SLM license file is locked to some locking criteria. This can be asspecific as a piece of hardware (such as a dongle hardware-key or a Hard-diskid), or it can be as liberal as the TCP/IP domain. To obtain a license file,complete the steps described below in “Obtaining New License Files.”
Note: You must have a stand-alone SLM license file or access to an SLMnetwork license server prior to installing aspenONE V7.2 products.

4 1 Quick Guide to Installing and Configuring the SLM
PrerequisitesBefore you install any aspenONE V7.2 products, ensure that you are runninga supported operating system and have the aspenONE V7.2 installation discsavailable.
The SLM supports the following operating systems:
Windows XP Professional SP3 (32-bit)
Windows Vista Business SP2 (32-bit)
Windows Vista Ultimate SP2 (32-bit)
Windows 7 Professional (32-bit)
Windows 7 Ultimate (32-bit)
Windows Server 2003 R2 Standard SP2 (32-bit)
Windows Server 2003 R2 Enterprise SP2 (32-bit)
Windows Server 2008 R2 (64-bit)
AspenTech Product Installation Process:
1 Obtain license file(s) from AspenTech.
2 If you are using a network license file, install and configure SLM NetworkLicense Server.
3 Install the AspenTech products from the aspenONE V7.2 installation disks.You will be prompted to specify either a stand-alone license file or anetwork license server during the installation process.
4 Test the products to ensure license system functionality.
5 Optionally configure the SLM advanced features.
Step 1: Obtaining License Filesfrom AspenTechYou can obtain license files from the AspenTech Customer Support website.For instructions about obtaining license files, go to the AspenTech CustomerSupport website at http://support.aspentech.com, then click UpgradeRequests.
For network licensing, you will obtain a single license file to be installed onthe network license server computer.
For stand-alone licensing, you may receive either a single license file, ormany files (one for each stand-alone client computer).
If you are upgrading from a previous SLM server version to 8.2, there is noneed to request a new license file. Your existing license file is compatible withSLM server version 8.2.

1 Quick Guide to Installing and Configuring the SLM 5
Step 2: Installing AspenTechSLM Network License ServerIf you will be using network licensing, you will need to install and configure anetwork license server. The AspenTech V7.2 SLM licensing system usesSentinel RMS License Manager version 8.2.
Note: AspenTech recommends that you leave your legacy network licensingsystem, such as ALM 2.2, running until all AspenTech products have beensuccessfully upgraded to version 2006 or later.
In some cases, you may already have a Sentinel RMS License Managerversion 8.2 server installed on your network license server machine. If this isthe case, you can skip the installation of the network license server andproceed to installing the network license file and configuring the networklicense server options.
To install the network license server
1 Back up the license file lservrc at <root>\Program Files\RainbowTechnologies\SentinelLM 7.2.0.1 Server\English.
2 Before installing the 8.2 version of the Sentinal RMS License Managerlicense server, shut down and uninstall any existing SentinelLM (orRainbow Technologies-SentinelLM) network license server. To do this, goto “Control Panel/Add or Remove Programs” and remove anyprogram named “SentinelLM X.X.X.X Server”. Also ensure that no usersare logged on to the server.
3 Restart the computer.
4 Ensure that no Windows programs are running on the computer beforestarting the network license server installation process.
5 Insert any aspenONE product disc into the DVD drive of the computer.
Note: For computers that have the DVD Autorun feature enabled, steps#5 and #6 are automatically performed.
6 From the Start menu, select Run.
7 In the Run view, type: d:\\setup.exe and click OK (where d:corresponds to the drive letter of the DVD drive).
The AspenTech Installation Browser appears.
8 On the AspenTech Installation Browser, select the Administrationtab and click Aspen SLM 8.2 Server.
9 Click Install. The Welcome to the InstallShield Wizard for SentinelRMS License Manager 8.2 appears.
10 Complete the screens in the wizard and click Finish.
Note: When you reach the Setup Type dialog box, be sure to selectComplete. When you reach the Firewall Settings Need to be Modifieddialog box, be sure the check box is selected.
The SLM Server is now installed.
6 1 Quick Guide to Installing and Configuring the SLM
Notes:
When you install SLM server on a 64-bit OS, be sure to de-select the"Parallel driver" in the feature selection box; otherwise, you will get anerror message.
If your network license file is locked to a dongle (hardware-key) you willneed to install the SafeNet-SentinelLM Dongle drivers. See “Installing theSentinel System Drivers” below.
If you intend to use Advanced Network Server Features such as Usagelogging or Group License Reservation, details on these features can befound in Chapter 6: Advanced Licensing Functions.
Installing the Sentinel System Drivers(hardware-key drivers)If you are using an SLM license file (stand-alone or network) which is lockedto a dongle (hardware-key), you will need to install Sentinel System Driversto support communications with the device.
If you are installing aspenONE V7.2 products with a stand-alone donglelocked license file, the aspenONE installer will warn you to install the SentinelSystem Drivers before proceeding if they are not found on the computer.
For a network license server, the Sentinel System Drivers must be installed aspart of the server installation process.
Prerequisite: Disconnect any USB or parallel dongle connected to thecomputer.
1 Insert any aspenONE product disc into the DVD drive of the computer.
Note: For computers that have the DVD Autorun feature enabled, steps#2 and #3 are automatically performed.
2 From the Start menu, select Run.
3 In the Run view, type: d:\\setup.exe and click OK (where d:corresponds to the drive letter of the DVD drive).
The AspenTech Installation Browser appears.
4 On the AspenTech Installation Browser, select the Administrationtab and select one of the following:
o Select Aspen SLM Tools 8.2 if you are running Windows Vista or ifyou are using SLM Server version 8.2.
o Select Aspen SLM Tools 7.3 if you are running on any platform otherthan Windows Vista.
Aspen SLM Tools 8.2 only works with version 8.1 or newer of the SLMlicense server. Aspen SLM Tools 7.3 can work with either version 8.1 (ornewer) or version 7.3 of the SLM license server.
5 Click Install. The Welcome to the Aspen SLM Setup Program dialogbox appears.
6 Click Next. The License Agreement dialog box appears. Review the licenseagreement and click Yes, I accept the terms in the licenseagreement.
7 Click Next. The Computer Configuration Type dialog box appears.

1 Quick Guide to Installing and Configuring the SLM 7
8 Click Standard Install if you are using stand-alone licensing or ServerInstall if you are using network licensing. The Destination Locationdialog box appears.
Note: If you already have aspenONE products installed, you will not seethe Destination Location dialog box. Continue to Feature Selection.
9 Accept the default destination location or click Browse to install toanother location. When ready click Next. The Feature Selection dialogbox appears.
10 Expand the Aspen SLM option and make sure that the Sentinel SystemDrivers option is selected (it will not have a red “X” on the icon).
Click Next, and then click Install. When the installation is complete, clickFinish.
11 Verify that the Sentinel System driver was installed. In Windows Explorer,browse to the Sentinel system driver and verify that theSetupSysDriver.exe file exists. The SetupSysDriver.exe file is installedto:
<root>\Program Files\Common Files\SafeNet Sentinel\SentinelSystem Driver\
Note: It is not necessary to run the SetupSysDriver.exe.
12 Install the SLM dongle into the parallel port (printer port) or the USB portof your computer. SLM parallel port dongles have an arrow that indicateswhich end is plugged into the computer.
Caution: Do not plug this dongle into the serial port because it willdamage your computer.
13 Go to Step 3: Installing aspenONE products.
Step 3: Installing aspenONEproductsThe aspenONE V7.2 products require licenses to complete their installations.During the installation process, the user will be prompted to provide a stand-alone license file or the IP or Name of a network license server computer. Theinstaller will automatically install the license file and/or configure the SLMserver connections while performing the product installation. Normally thisshould be all that is required to start using the AspenTech product(s). In theevent that the license-file needs to be changed the following proceduresshould be followed.
Installing a new Stand-alone License file
Note: A stand-alone license file must be installed on the same computer asthe AspenTech product(s).
1 Copy the new license file from the disk (or e-mail) to a temporary localfolder. If your license files are locked to the client computer disk id, therewill be a unique license file for each client computer. If your license files

8 1 Quick Guide to Installing and Configuring the SLM
lock to a network domain, there will be a single, shared, license file thatmust be copied to each client computer on that domain.
2 Double-click on the license file. If SLM Client component is alreadyinstalled on the computer, the file will automatically rename and installitself to the appropriate directory.
If SLM has not been previously installed, copy the license file to:
<root>\Program Files\Common Files\Hyprotech\Shared
Where <root> is the installation path for Microsoft Windows on yourcomputer.
3 Rename the license file extension from .slf or .aealic to .lic. For example,if the license file sent to you is named lservrc_XXX_XXXXX.slf, renameit to lservrc_XXX_XXXXX.lic.
Notes:
Ensure that your system settings are set to display file extensions. Ifthe file icon changes from the Aspen logo to an unknown file type,then the installation or renaming of the license file has beensuccessful.
If this license file replaces an existing license file with the same name,you must manually delete the lservrc_XXX_XXXXX file from thedirectory specified in step 2 above. (It is a good idea to remove alllservrc files from your computer before installing the new license file toensure that only the new license exists on your computer.)
4 Go to Step 4: Test the SLM Installation.
Installing a Network License fileFor network licensing, the Sentinel RMS License Manager 8.2, the networklicense file, and, if you use one, the SLM dongle must all be installed on theSLM license server computer. The AspenTech products are installed onindividual client computers or other application servers.
To install the license file for the Network license server
1 Locate the loadls.exe executable file in the license server directory:
<root>\Program Files\Common Files\SafeNet Sentinel\SentinelRMS License Manager\WinNT
Run loadls.exe and select Remove to stop the license server service.
2 Copy the license file to the Sentinel RMS License Manager license serverdirectory. The default SLM license server directory is:
<root>\Program Files\Common Files\SafeNet Sentinel\SentinelRMS License Manager\WinNT
3 Rename or delete any pre-existing license file(s).
4 Rename the new license file to LSERVRC (no file extension).
5 Run loadls.exe again and select Add to start the license server.
6 Go to Step 4: Test the SLM Installation.
1 Quick Guide to Installing and Configuring the SLM 9
Note: Ensure that you reload the license server whenever you change yourlicense file. All users should exit any software using the network licenseserver and return any commuted licenses before the reload is performed. Ifyou are loading a license file that contains a large number of licenses, it maytake 30-60 minutes for the server to complete the process.
Step 4: Test the SLMInstallationIf you were able to successfully install aspenONE product(s), the SLMlicensing system should have been functioning properly during the installationprocess. To verify that the SLM continues to function properly, the followingtests can be performed:
Run-time LicensingSome products use SLM licensing only at installation time. These “install-timelicensed” AspenTech products do not require the SLM for further use. MostAspenTech products require that the SLM provide licensing when they areused. These products are called “run-time licensed.”
To test run-time licensing with stand-alone licenses
1 Install the AspenTech product following the installation instructions forthat product.
2 Run the SLM Configuration Wizard. Click:
Start | Programs | AspenTech | Common Utilities | SLMConfiguration Wizard
3 On the Introduction dialog box, select No to the prompt, Will you beconnecting to an SLM server over the network? This ensures you areusing only the local stand-alone license file. If the product is unable toaccept a license, there may be a problem with the license file.
Note: If you will be using a combination of network and stand-alonelicenses, you can switch this setting back to Yes after testing the stand-alone licensing.
4 On the Configure Advanced Settings dialog box, select Yes to theprompt, Would you like to configure the Advanced Settings?
5 On the Locking dialog box, select the Lock Mechanism to which yourlicense locks. Click Next through the wizard to exit the wizard.
Note: For more information about the SLM Configuration Wizard, see theSLM Configuration Wizard Help.
6 Launch the AspenTech product. If the AspenTech product launched, SLMwas installed correctly.
If the AspenTech product is unable to obtain a license when you start it, theremay be a problem with the license file. If the product fails to run, verify thateach step for installing SLM and each step for installing the AspenTech
10 1 Quick Guide to Installing and Configuring the SLM
product was properly followed. If you suspect a problem with the license file,contact Technical Support (http://support.aspentech.com).
To test run-time licensing with a network license server
If the aspenONE V7.2 product was installed using a network license server,the installation process should have configured the SLM to contact thespecified server(s) for run-time licensing. To confirm that the servers havebeen configured in the SLM, run the SLM Configuration Wizard as describedabove and select Yes when asked if you will be connecting to a license serverof the network. Verify that the network license server(s) that were specifiedduring installation appear in the Configured Servers list. The SLMConfiguration Wizard can be used to modify and control the client connectionsto multiple license servers. For more information about the SLM ConfigurationWizard, see the SLM Configuration Wizard Help.
Monitoring the Network License Server
The WLMAdmin.exe is the primary tool for monitoring and administering theSentinel RMS Network License Server. The following procedure describes howto install and launch this administration tool. For more information on usingWLMAdmin.exe, see the section “Checking that the License Server has beenproperly initialized” below.
1 Insert any aspenONE product disc into the DVD drive of the computer.
Note: For computers that have the DVD Autorun feature enabled, steps#2 and #3 are automatically performed.
2 From the Start menu, select Run.
3 In the Run view, type: d:\\setup.exe and click OK (where d:corresponds to the drive letter of the DVD drive).
4 On the AspenTech Installation Browser, select the Administration taband select one of the following:
o Select Aspen SLM Tools 8.2 if you are running Windows Vista or ifyou are using SLM Server version 8.1 or newer.
o Select Aspen SLM Tools 7.3 if you are running on any platform otherthan Windows Vista.
Aspen SLM Tools 8.2 only works with version 8.1 or newer of the licenseserver. Aspen SLM Tools 7.3 can work with either version 8.1 (or newer)or version 7.3 of the license server.
5 Click Install. The Welcome to the Aspen SLM Setup Program dialogbox appears.
6 Click Next. The License Agreement dialog box appears. Review thelicense agreement and click Yes, I accept the terms in the licenseagreement.
7 Click Next. The Computer Configuration Type dialog box appears.
8 Click Server Install. The Destination Location dialog box appears.
Note: If you already have aspenONE products installed, you will not seethe Destination Location dialog box. Continue to Feature Selection.

1 Quick Guide to Installing and Configuring the SLM 11
9 Accept the default destination location or click Browse to install toanother location. When ready click Next. The Feature Selection dialogbox appears.
10 Expand the Aspen SLM option. Click the down arrow next to Aspen SLMand select This feature, and all sub features, will be installed onlocal hard drive.
11 Click Next then click Install to begin the installation.
12 When the installation is complete, open the WLMAdmin utility:
Start | Programs | AspenTech | Common Utilities | WLMAdmin
13 Configure the WLMAdmin utility to communicate with a network licenseserver. From the Edit menu, select Defined Server List and add yourserver name. Depending on how many licenses are in your file, it maytake a while for the licenses to appear.
Important: When installing AspenTech products, you will be prompted toenter the name of this license server during the install. AspenTechrecommends that you enter the fully qualified domain name, such aslicenseservername.networkdomain.com.
Step 5: Configuring the SLMand Advanced FeaturesThe SLM may be configured to fit your particular needs and has severaladvanced features you may choose to exercise.
For information about configuring the SLM, such as, accessing the networkserver, what to display in log files, how long to wait between broadcasts forlicenses, and job tracking options, see Chapter 5: Configuring SLM.
For information about advanced licensing functions, such as, alternatelicensing configurations, commuting licenses, and stopping or changing thelicense server, see Chapter 6: Advanced Licensing Functions.

12 1 Quick Guide to Installing and Configuring the SLM
2 SLM Overview 13
2 SLM Overview
AspenTech controls the use of AspenTech products through the SLM. SLM is asoftware-based security system that controls and tracks the usage ofAspenTech software, components, and features as well as certain third-partysoftware.
Note: SLM is required to install or run aspenONE V7.2 products or to upgradeto an aspenONE V7.2 product. aspenONE V7.2 products are not compatiblewith previous license managers, such as Aspen License Manager (ALM) 2.2 or3.0.
Benefits of SLMAll aspenONE V7.2 products use the SLM licensing system. SLM providesequivalent functionality to previous AspenTech license managers, whileadding many of the features requested by clients. Some of the majorcapabilities and benefits offered by SLM are listed below:
Greater return on software investment through improved productivity
o Maximizes corporate-wide access to software
o Leverages investment over multiple time zones
Improved performance through access to a larger technology toolkit
o Ability to access and evaluate new software technologies outside ofcore departments
o Supports adoption of the model-centric, lifecycle approach
o Support of a standardized toolkit for better quality control
Reduced administration and total cost of ownership (TCO)
o Reduce or eliminate stand-alone user key tracking and administration
o Maintain software on central servers, significantly reducing IT time /costs
o Improved monitoring of software usage
o Track current and historical individual, departmental andorganizational use
o Budget / allocate, manage deployment and assess training needs
o Enhanced performance and reliability
14 2 SLM Overview
o Spread licenses across license servers to ensure access to criticalsoftware
Optimized for client Networks
o SLM technology requires less network bandwidth and computingpower.
o The network speed for SLM has been rigorously tested and optimized.
o Tools are provided to enable clients to test and optimize theirnetworks.
License Splitting – Splits license pool over multiple Network LicenseServers
Splits licenses over two (2) or more Network License Servers
o Transparent to standard users
o Improves license access speed by reducing network latency
o Users access servers based on network proximity
o Ensures access to critical software if a server goes down; any Productsin use will shut down gracefully
o When user starts product it will automatically switch to an availableNetwork License Server (if licenses are still available)
Commuting Option – Enables off-network product usage, for example,remote plant site, home, client site.
SLM PrimerThis section describes the general concepts of SLM, including:
License Terminology
SLM Components
SLM System Requirements
License Locking Criteria
License Files
License Modes
Installation Modes
Obtaining License Files
SLM Dongles
Sentinel System Driver
Network Requirements
2 SLM Overview 15
License TerminologyThe following table describes the license terminology used within this manual:
Term Description
License Permission granted to the AspenTechproduct/program/application/component touse a specific feature.
License string An encrypted alphanumeric text string usedto define a single licensed feature.
License File File containing license strings for the specificfeatures licensed to the user.
SLM Dongle Physical hardware device used to securelicenses.
Stand-alone License License granted is local to the usercomputer.
Network License License granted/obtained is from a networklicense server.
Network LicenseServer
Program or service running on a computerthat is attached to the Network (LAN orWAN). This grants licenses to the AspenTechproduct that is running on network usercomputers.
SLM Software License Manager, the AspenTechsoftware security system.
Commuted License Commuting or borrowing is the process oftemporarily moving a license from a licenseserver to a stand-alone computer, such as alaptop.
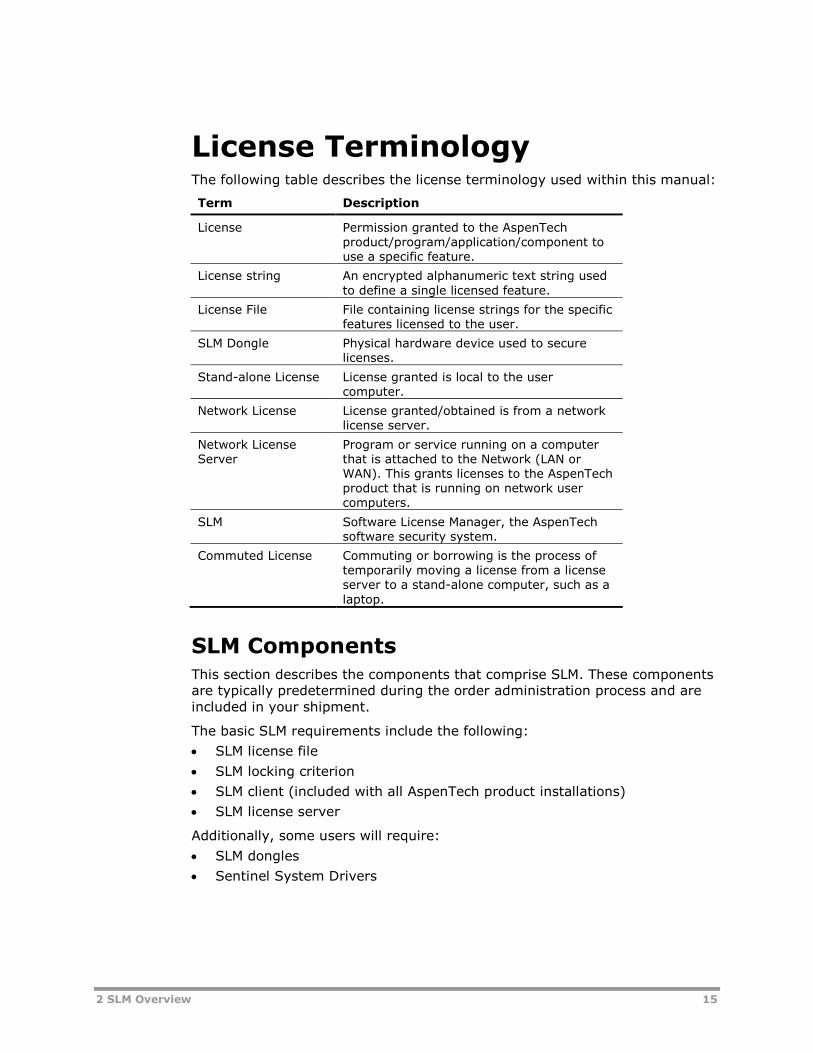
SLM ComponentsThis section describes the components that comprise SLM. These componentsare typically predetermined during the order administration process and areincluded in your shipment.
The basic SLM requirements include the following:
SLM license file
SLM locking criterion
SLM client (included with all AspenTech product installations)
SLM license server
Additionally, some users will require:
SLM dongles
Sentinel System Drivers

16 2 SLM Overview
SLM System Requirements
Supported Operating Systems
For supported operating systems, see the Prerequisites section in chapter 1,Quick Install Guide to Installing and Configuring the SLM.
If you are using an SLM dongle, Sentinel drivers are required.
Minimum System Requirements
A network computer with a Pentium or faster processor and 64+ MB of RAM isrecommended to avoid conflicts with other applications.
License Locking CriteriaSLM uses license files that must be locked to some locking criterion. Thelocking criterion can be as specific as a piece of hardware (such as a dongleor a disk id), or the TCP/IP domain. The locking criteria can be divided intotwo general options: dongle-free and dongle-locked.
Dongle-free. The license file contains a locking code that is locked to somecomponent of the target computer (for example, disk id) or a company’snetwork (for example, TCP/IP domain). The license will only work if thelocking criterion and license file are both available to the user PC (stand-alone) or license server (network).
Dongle-locked. The license file contains a locking code that is locked to adongle and will only work if the dongle is attached to the computer on whichthe license manager is run. This may be a network license server or a stand-alone product installation. Dongles are available to all customers uponrequest.
If a dongle is requested, it will be delivered to your system administrator withthe software package. If you elected the dongle-less licensing option duringorder administration, the license file you receive will have a locking codeassociated with some locking criterion that was provided during the orderadministration process. If you are unsure of whether you need a dongle touse the AspenTech software, contact your system administrator.

2 SLM Overview 17
AspenTech uses the following delivery mechanisms:
Site-based license User-based license
Dongle-freedelivery
Delivered as a stand-alonelicense locked to:
NT Domain and TCP/IP Domainin general
Logon Domain and TCP/IPDomain for Novell networksonly
Delivered as stand-alone ornetwork as per the customer’ssoftware license agreement:
Network licenses are locked tothe network card of the licenseserver.
Stand-alone licenses are locked toPCI Hardware, Network Card, andPhysical Disk Layout.
Dongle-locked
Delivered as a network licenselocked to a dongle, which mustbe attached to the licenseserver.
Delivered as stand-alone or networkas per the customer’s softwarelicense agreement and locked to adongle.
License FilesSLM uses license files to control access to AspenTech products. License filesare obtained during the order administration process and are delivered withyour shipment. For more information about obtaining licenses, see “ObtainingLicense Files” in this chapter. The license files must be installed on each clientcomputer or on the server where the SLM License Server component isinstalled. Each license file contains the following components:
A lock code
A start date
An end date
Product license strings
Note: In order for the license to be valid, the System clock time must fallbetween the start and end dates of the license file.
For hardware locked stand-alone license files (those license files locked to adisk id or network card), there is a separate stand-alone license file requiredfor each user computer or network license file required for each server.Ensure that the license file copied to the target computer is the license filespecifically intended for that computer.
For dongle locked license files, there is a separate license file required foreach dongle. If you are using a dongle, connect the dongle to the appropriateUSB or parallel port. Only one network license file may be installed on anetwork server at one time, but any number of stand-alone, dongle-lockedlicense files may be installed on a single user PC, and SLM will automaticallylocate the appropriate one, based on the dongle it detects.
Caution: Do not plug this dongle into the serial port because it will damageyour computer.
For a network locked license files (those license files locked to a networkdomain), there is a single, shared, license file for each network domain that

18 2 SLM Overview
must be copied to each computer on the domain. Ensure that the license filecopied to the domain computers is the correct license file for that domain.
License ModesThere are two modes for AspenTech licensing, site-based and user-based. Thetype of mode used for your location is determined during the sales andcontracting process. To determine the type of licensing mode specific to yourorganization, see your System Administrator. Site-based and user-basedlicensing modes may be installed as a stand-alone installation (directly oneach user’s computer) or as a network installation using a network licenseserver.
Site-based
Site-based software can be used by any individual within a licensed “site” withno restrictions on the number of users or time in use. A site may contractuallybe defined as an actual customer site, a business department, or some otherorganizational component. It may even be defined as worldwide. SLM doesnot count users with site-based licenses. Site-based licenses may also bereferred to as unlimited.
User-based
Any individual can use user-based software licensing as long as the number ofpurchased license units is not exceeded. SLM counts the software in use andlimits the number of units that can be accessed at one time to the number ofunits purchased. Most often, software is sold in “seats” or simultaneous users,but it may also be sold in bundles, tokens, or other units of measure.
Installation ModesSLM may be installed in a “Stand-alone” mode or “Network” mode.
Stand-alone Mode
In the Stand-alone license mode, the AspenTech products and license fileare installed on a single computer that includes the locking criterion. Thisconfiguration is most often used when the AspenTech product uses a site-based, dongle-free license, or when the user-based AspenTech product is onlyused by one individual or is only installed on a particular computer.
The installation routines of all AspenTech products include the SLM client. Ifyou are using a dongle, you also must have a parallel port or USB portavailable on your computer.
If you are using your AspenTech product on an application server, the SLMclient must be installed on the local, end-user computer.
Notes:
SLM checks for a stand-alone license first. If the license is not found or thelocal security SLM dongle is not installed, SLM searches for an availablenetwork license.
2 SLM Overview 19
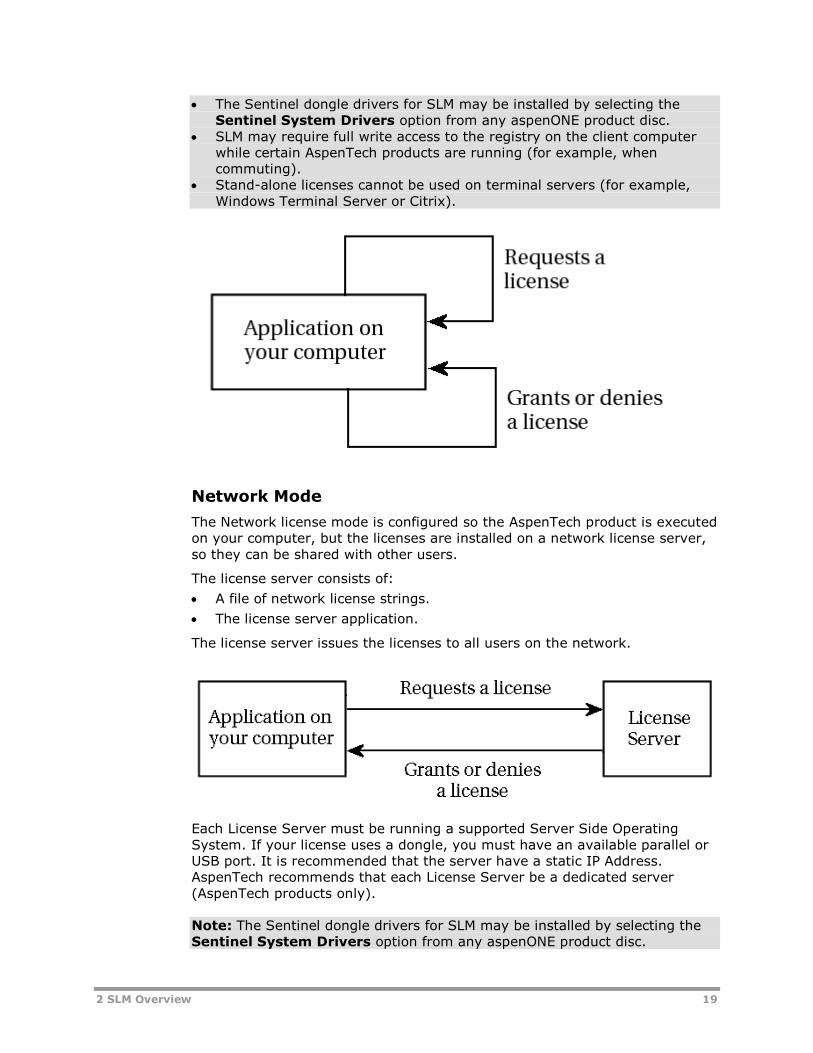
The Sentinel dongle drivers for SLM may be installed by selecting theSentinel System Drivers option from any aspenONE product disc.
SLM may require full write access to the registry on the client computerwhile certain AspenTech products are running (for example, whencommuting).
Stand-alone licenses cannot be used on terminal servers (for example,Windows Terminal Server or Citrix).
Network Mode
The Network license mode is configured so the AspenTech product is executedon your computer, but the licenses are installed on a network license server,so they can be shared with other users.
The license server consists of:
A file of network license strings.
The license server application.
The license server issues the licenses to all users on the network.
Each License Server must be running a supported Server Side OperatingSystem. If your license uses a dongle, you must have an available parallel orUSB port. It is recommended that the server have a static IP Address.AspenTech recommends that each License Server be a dedicated server(AspenTech products only).
Note: The Sentinel dongle drivers for SLM may be installed by selecting theSentinel System Drivers option from any aspenONE product disc.
20 2 SLM Overview
Obtaining License FilesThere a two times when new license files may be required: when a contractchanges or is created, or when there are changes to the software. In anycase, the licenses you need should be delivered with your software package.
Software Updates
If new license files are required, you will be asked to provide lockinginformation during the shipping confirmation or request process.
For Aspen Engineering products: No action required. Shipping willoccur automatically as new license files are not required.
For PIMS and Orion products: Your system administrator will receive acommunication from AspenTech several weeks before the softwarebecomes available for delivery. This communication will explain howAspenTech intends to deliver your software. You will have the opportunityto either confirm the proposed configuration or make changes for yourdelivery. As part of this process, you will be asked to provide the lockinginformation that AspenTech needs to deliver your software.
For all other products: This update will only be delivered upon request.Requests are submitted through AspenTech’s Support site(http://support.aspentech.com). As part of the request form, you will beasked to provide configuration and locking information about yourcomputer(s) or network(s).
Contract Changes, Including new Contracts
If you are receiving new software or additional licenses for existing software,the configuration of the licenses will be specified in the contract. You will becontacted by AspenTech’s Distribution department to provide the lockinginformation they require to ship your licenses. In some cases, you mayreceive your software with a dongle and dongle-locked license. In othercases, you may receive your software with a dongle-less license and nodongle is necessary.
To obtain license files from AspenTech
License files are obtained from the AspenTech Customer Support website. Forinstructions about obtaining license files, go to the AspenTech CustomerSupport website at http://support.aspentech.com, then click UpgradeRequests.
2 SLM Overview 21
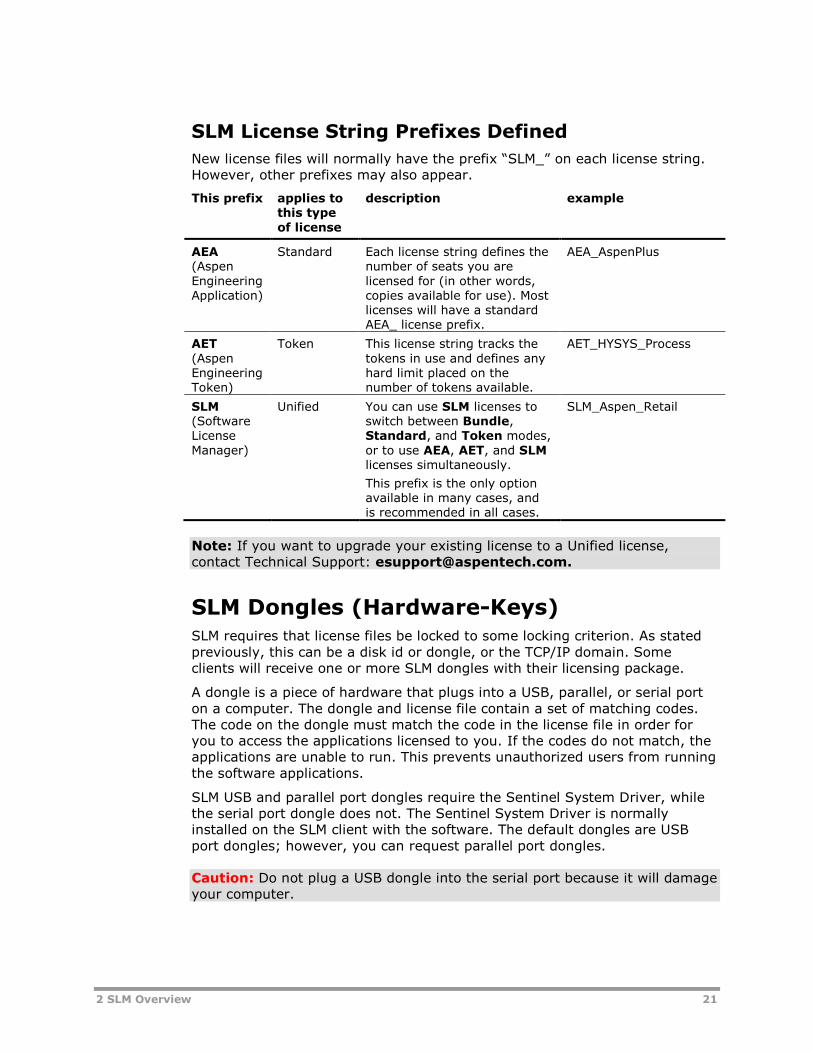
SLM License String Prefixes Defined
New license files will normally have the prefix “SLM_” on each license string.However, other prefixes may also appear.
This prefix applies tothis typeof license
description example
AEA(AspenEngineeringApplication)
Standard Each license string defines thenumber of seats you arelicensed for (in other words,copies available for use). Mostlicenses will have a standardAEA_ license prefix.
AEA_AspenPlus
AET(AspenEngineeringToken)
Token This license string tracks thetokens in use and defines anyhard limit placed on thenumber of tokens available.
AET_HYSYS_Process
SLM(SoftwareLicenseManager)
Unified You can use SLM licenses toswitch between Bundle,Standard, and Token modes,or to use AEA, AET, and SLMlicenses simultaneously.
This prefix is the only optionavailable in many cases, andis recommended in all cases.
SLM_Aspen_Retail
Note: If you want to upgrade your existing license to a Unified license,contact Technical Support: [email protected].
SLM Dongles (Hardware-Keys)SLM requires that license files be locked to some locking criterion. As statedpreviously, this can be a disk id or dongle, or the TCP/IP domain. Someclients will receive one or more SLM dongles with their licensing package.
A dongle is a piece of hardware that plugs into a USB, parallel, or serial porton a computer. The dongle and license file contain a set of matching codes.The code on the dongle must match the code in the license file in order foryou to access the applications licensed to you. If the codes do not match, theapplications are unable to run. This prevents unauthorized users from runningthe software applications.
SLM USB and parallel port dongles require the Sentinel System Driver, whilethe serial port dongle does not. The Sentinel System Driver is normallyinstalled on the SLM client with the software. The default dongles are USBport dongles; however, you can request parallel port dongles.
Caution: Do not plug a USB dongle into the serial port because it will damageyour computer.
22 2 SLM Overview
Notes:
In most cases, dongles are not required for aspenONE V7.2 products. Ifyou have not used dongles for previous versions of AspenTech products,you will not receive dongles with your aspenONE V7.2 license. If youpreviously used dongles with your AspenTech products, you will continueto receive dongles with your product shipment.
If you did not receive a dongle with your shipment, you may ignore thesections of this manual describing dongles.
Serial port dongles are legacy hardware and are no longer available. Formore information about serial port dongles, see the section “HyprotechGreen Dongles” in the chapter “Installing Stand-alone License Files.”
Parallel port dongles cannot be stacked in parallel or in series. Security dongles previously used by AspenTech and Hyprotech prior to
SLM, except for the Hyprotech green dongles, are incompatible with SLM.AspenTech requests that you return your old dongles when you no longerneed them.
Sentinel System DriverIf you are using dongles as your locking device, the Sentinel System Driver isrequired to communicate with the dongle. The Sentinel System Driver can beinstalled from any aspenONE product disc.
To install the Sentinel System Driver on your LicenseServer
Prerequisite: Disconnect any USB or parallel dongle connected to the targetcomputer.
1 Insert any aspenONE product disc into the DVD drive of the computer.
Note: For computers that have the DVD Autorun feature enabled, steps#2 and #3 are automatically performed.
2 From the Start menu, select Run.
3 In the Run view, type: d:\\setup.exe and click OK (where d:corresponds to the drive letter of the DVD drive).
The AspenTech Installation Browser appears.
4 On the AspenTech Installation Browser, select the Administrationtab and select one of the following:
o Select Aspen SLM Tools 8.2 if you are running Windows Vista or ifyou are using SLM Server version 8.1 or newer.
o Select Aspen SLM Tools 7.3 if you are running on any platform otherthan Windows Vista.
Aspen SLM Tools 8.2 only works with version 8.1 or newer of the licenseserver. Aspen SLM Tools 7.3 can work with either version 8.1 (or newer)or version 7.3 of the license server.
5 Click Install. The Welcome to the Aspen SLM Setup Program dialogbox appears.
6 Click Next. The License Agreement dialog box appears. Review thelicense agreement and click Yes, I accept the terms in the licenseagreement.

2 SLM Overview 23
7 Click Next. The Computer Configuration Type dialog box appears.
8 Click Standard Install if you are using stand-alone licensing or ServerInstall if you are using network licensing. The Destination Locationdialog box appears.
Note: If you already have aspenONE products installed, you will not seethe Destination Location dialog box. Continue to Feature Selection.
9 Accept the default destination location or click Browse to install toanother location. When ready click Next. The Feature Selection dialogbox appears.
10 Expand the Aspen SLM option and make sure that the Sentinel SystemDrivers option is selected (it will not have a red “X” on the icon).
11 Click Next, and then click Install. When the installation is complete, clickFinish.
To check that the Sentinel System Driver is installed
Verify that the Sentinel System driver was installed.
In Windows Explorer, browse to the Sentinel system driver and verify thatthe SetupSysDriver.exe file exists. The SetupSysDriver.exe file isinstalled to,
<root>\Program Files\Common Files\SafeNet Sentinel\SentinelSystem Driver\
Note: It is not necessary to run the SetupSysDriver.exe.
Network Requirements
Network Connectivity Requirements
SLM is designed for use on private networks (LAN or WAN), but not on publicnetworks (Internet). In cases where the Internet is the only connectivityavailable, you can establish a VPN (Virtual Private Network) between twoendpoints on the network. This both enables the SLM to function properly andprovides you with network security.
The minimum connection speed is 128 kbps, and the connection must bereliable. Dial-up connections (remote access services) are not recommendeddue to poor reliability. This is especially true if you attempt to commutelicenses over these connections, as reliability is crucial for commutinglicenses.
By default, the Sentinel RMS License Manager service runs at port number5093.
24 2 SLM Overview
Support for Previous Licensing Systems
Caution: SLM network license server and Hyprotech security systems areNOT compatible. Do not install the SLM security system on the samecomputer as a Hyprotech network security system.
If you are running an AspenTech product version that uses the Aspen LicenseManager (ALM), the ALM and SLM license servers may be installed andrunning at the same time. However, you are responsible for ensuring that youdo not exceed the terms of your license agreement when the two servers arerunning simultaneously. If you want to reduce the number of users on eitherof your network servers to help ensure that you remain within yourcontractual limits, contact your sales representative or Technical Support athttp://support.aspentech.com.
Features and Limitations ofSLMThe following lists some of the basic features and limitations of the SLM:
Once the SLM dongle and licenses are installed on the license server, anyuser who has the Aspen products on his computer can run the AspenTechproduct as long as he has a network connection to that license server. Ifthe client computer resides on a different sub-network, or a particularserver is desired (if there are multiple servers), the client can direct itslicense requests to a particular server through the use of:
o SLM Configuration Wizard. AspenTech recommends using this methodto set up the server license request.
o The LSHost environment variable. The environment variable (or itstext file equivalent) lists the license server names and the order inwhich they are called when a license request is made.
If all license servers are unavailable or cannot grant a license request onstart-up of the AspenTech product, access to the AspenTech product isdenied.
Once the AspenTech product has started, the client-side softwareintermittently checks to ensure that the SLM server is available. If theserver is not available (in other words, loss of access to the server whilethe product is open), the user will experience different behaviorsdepending on the product in use. In most cases, the user is prompted tosave his work, the license is checked back in, and the AspenTech productis shut down. The user can then attempt to start the product again. Theamount of time allowed for shut-down of the software varies from a fewseconds for design tools to several days for critical production software.During start-up, license servers are checked for availability again,according to the configuration of the client computer. If one of the serversis able to grant the requested license, the user is allowed to continue.
Licenses that are in use cannot be terminated remotely (in other words,the administrator cannot bump users).

2 SLM Overview 25
Note: The commuter option can only be used with software from oneserver at a time. Software from two or more servers cannot be commutedsimultaneously.
SLM can be loaded on multiple license servers. In this case, the licenses ortokens would need to be divided between servers.
License Manager Program andFilesSLM contains many options that can be set to control the behavior of theLicensing System. You can set or configure these options:
By using the SLM Configuration Wizard.
By setting the environment variables of the operating system.
AspenTech recommends using the SLM Configuration Wizard to set theoptions.
SLM Configuration WizardThe SLM Configuration Wizard is a user-friendly client-side tool used to setthe relevant keys in the registry to the user-specified values.
For information about the SLM Configuration Wizard, see Chapter 5:Configuring SLM.
SLM CommuteUse SLM Commute to manage commuted licenses. Commuting is allowed onlyif permission to commute has been activated in the feature's license string(contact your AspenTech Sales representative for more details).
For detailed information about SLM Commute, see “Commuting Licenses” inChapter 6.
Environment VariablesYou can use environment variables of the operating system to configure theoptions available in SLM. AspenTech recommends using the SLMConfiguration Wizard to set SLM operation variables. For more information,see “Configuring SLM using Environment Variables” in Chapter 6.
User OptionsSLM also contains other options that are set by using specific configurationfiles:
User Alerts
Group Reservations
26 2 SLM Overview
User Alerts
Alerts let you know about certain license events. For detailed informationabout user alerts, see “User Alerts” in Chapter 6.
Setting the Group Reservations
Group reservations let you associate user groups with each feature. Each ofthese user groups is then reserved in a pool containing a certain number oflicenses for that feature. Any licenses not specifically reserved fall in thegeneral pool.
For detailed information about group reservations, see “Group Reservations”in Chapter 6.
3 Installing Stand-Alone License Files 27
3 Installing Stand-AloneLicense Files
This chapter describes how to install SLM in Stand-alone mode and Networkmode. Specifically, this chapter covers the following topics:
Prerequisites
Installing the License files
Installing dongles
Your License Package
New AspenTech productsIf you have newly leased or purchased your AspenTech product, you mayreceive an SLM dongle in addition to the AspenTech product DVD and thefloppy disk containing your license file.
Upgraded AspenTech productsIf you are upgrading your AspenTech product, you will find included in yourpackage the AspenTech product DVD and a disk containing an upgradedlicense file locked to either your existing SLM dongle or locking informationprovided by you during the shipping confirmation or update requestprocesses. The license file may also be sent by email.

28 3 Installing Stand-Alone License Files
Installing the License FileThere are two types of license modes, Stand-alone and Network. Themethod for installation of the License File depends on the type of licensemode you have. Follow the instructions for the type of license mode you areinstalling.
Installing Stand-alone Mode License FilesIn Stand-alone mode, the license file must be installed on the samecomputer as the AspenTech product(s) and, if you have one, the SLM dongle.
To install license files for stand-alone mode automatically
1 Insert the floppy disk containing the license files into a drive on yourcomputer.
2 If you already have an SLM version of an AspenTech product installed onthe computer, navigate to the drive where you inserted the floppy disk;
then double-click the license file icon . The file will install itselfautomatically.
-or-
If you do not have an SLM version installed, save the license file to a localdisk/hard drive. You will be asked for the location of the file when you installthe product. When given the option, click Yes to install the file locally.
To install license files for stand-alone mode manually
1 Insert the floppy disk containing the license files into a drive on yourcomputer.
2 Copy the license file to <ROOT>\program files\commonfiles\hyprotech\shared\
3 Rename the license file’s extension as follows:
The file sent to you is named lservrc_XXX_XXXXX.aealic orlservrc_XXX_XXXXX.SLF.
4 Rename it lservrc_XXX_XXXXX.lic.
Notes:
Only the file extension is changed. Ensure that on the Windows ExplorerTools | Folder Option | View page, the Hide file extensions forknown file types check box is cleared.
If this license file replaces an existing license file with the same name, youmust manually delete the lservrc_XXX_XXXXX file from the sharedfolder. It is a good idea to remove all lservrc files from your computerbefore installing the new license file to ensure that only the new licenseexists on your computer.
3 Installing Stand-Alone License Files 29
Installing the SLM DongleTo run the AspenTech product, you need the license files and you may alsorequire an SLM dongle. SLM reads a unique locking identity from an SLMdongle or other hardware device. This identity locks the licenses to thehardware. When the AspenTech product runs, the locking codes must thenmatch the hardware identifier for the licenses to be valid.
SLM Dongle Types
There are two types of SLM dongles:
SLM parallel port dongles
SLM USB port dongles
SLM Dongles
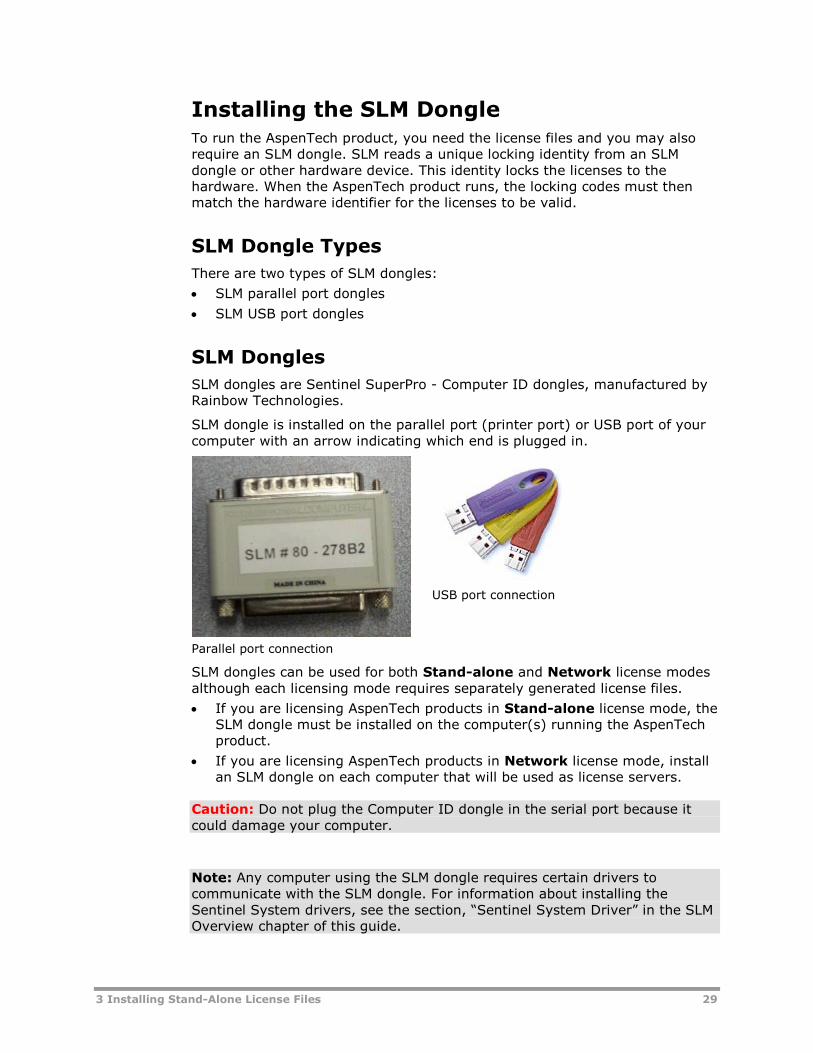
SLM dongles are Sentinel SuperPro - Computer ID dongles, manufactured byRainbow Technologies.
SLM dongle is installed on the parallel port (printer port) or USB port of yourcomputer with an arrow indicating which end is plugged in.
Parallel port connection
USB port connection
SLM dongles can be used for both Stand-alone and Network license modesalthough each licensing mode requires separately generated license files.
If you are licensing AspenTech products in Stand-alone license mode, theSLM dongle must be installed on the computer(s) running the AspenTechproduct.
If you are licensing AspenTech products in Network license mode, installan SLM dongle on each computer that will be used as license servers.
Caution: Do not plug the Computer ID dongle in the serial port because itcould damage your computer.
Note: Any computer using the SLM dongle requires certain drivers tocommunicate with the SLM dongle. For information about installing theSentinel System drivers, see the section, “Sentinel System Driver” in the SLMOverview chapter of this guide.
30 3 Installing Stand-Alone License Files
Alternate Configurations of Stand-alone LicenseMode
Pooled Dongle Configuration
You can configure the computers so that a pool of stand-alone SLM donglescan be shared. For example, if you will be using SLM dongles A and B to runproduct A or B, respectively, ensure that license files for both product A and Bare installed on your computer. Then, to run product A, connect SLM dongle Ato your computer. To run product B, connect SLM dongle B to your computer.SLM automatically determines which license file to use.
Stand-alone and Network Combined Configuration
You can also configure user computers to use both stand-alone and networkmodes. For example, if you must run both products A and B, you can installthe required SLM dongle and license for product A on your computer. Thenyou can install the required SLM dongle and license for product B on thenetwork. When you run product B, SLM will first check your computer forstand-alone licenses. If the required SLM dongle and licenses are not found,SLM will look for an available SLM dongle and license on the network.
Hyprotech Green Dongles
Hyprotech green dongles are legacy hardware. These dongles are no longersupported. If you have one of those dongles, you should contact theAspenTech Customer Care Team to request an updated license file anddongle.
4 Installing and Configuring the License Server 31
4 Installing and Configuringthe License Server
A Network license server computer is made up of the following components:
License Server software
Network license file (containing network license strings)
License Server Tools
SLM dongle (if you are using dongles)
Tip: Multiple license server computers can be configured to spread thelicensing load. This can also be used as a simple and effective form ofredundancy.
The best choice for the license server computer is one that is always running,because the network license server computer must be operational for thenetwork users to run the AspenTech products. The most trouble-freeinstallation will result from a license server computer used only for the licenseserver function. This avoids conflicts with other software.
Installing and Configuring aNetwork License ServerThe following summarizes the steps required to install and configure aNetwork license server:
1 Install the license server software, and install the SLM dongle (ifrequired).
2 Install the license tools.
3 Install the license file.

32 4 Installing and Configuring the License Server
Step 1: Installing the Network LicenseServer
To install the license server and your SLM dongle
1 Before installing the SLM License Server, shut down and uninstall the oldnetwork security server. Ensure that no users are logged on the server.
2 Restart the computer.
3 Ensure that no Windows programs are running on the computer beforestarting the network license server installation process.
4 Insert any aspenONE product disc into the DVD drive of the computer.
Note: For the computers that have the DVD Autorun feature enabled,steps #5 and #6 are automatically performed. Some Aspen products havevariants on the way the installation of Network License Server software isinitiated.
5 From the Start menu, select Run.
6 In the Run view, type: d:\\setup.exe and click OK (where d:corresponds to the drive letter of the DVD drive).
The AspenTech Installation Browser appears.
7 On the AspenTech Installation Browser, select the Administrationtab and click Aspen SLM.
8 Click Install.
The InstallShield Wizard for Sentinel RMS License Manager 8.2appears.
4 Installing and Configuring the License Server 33
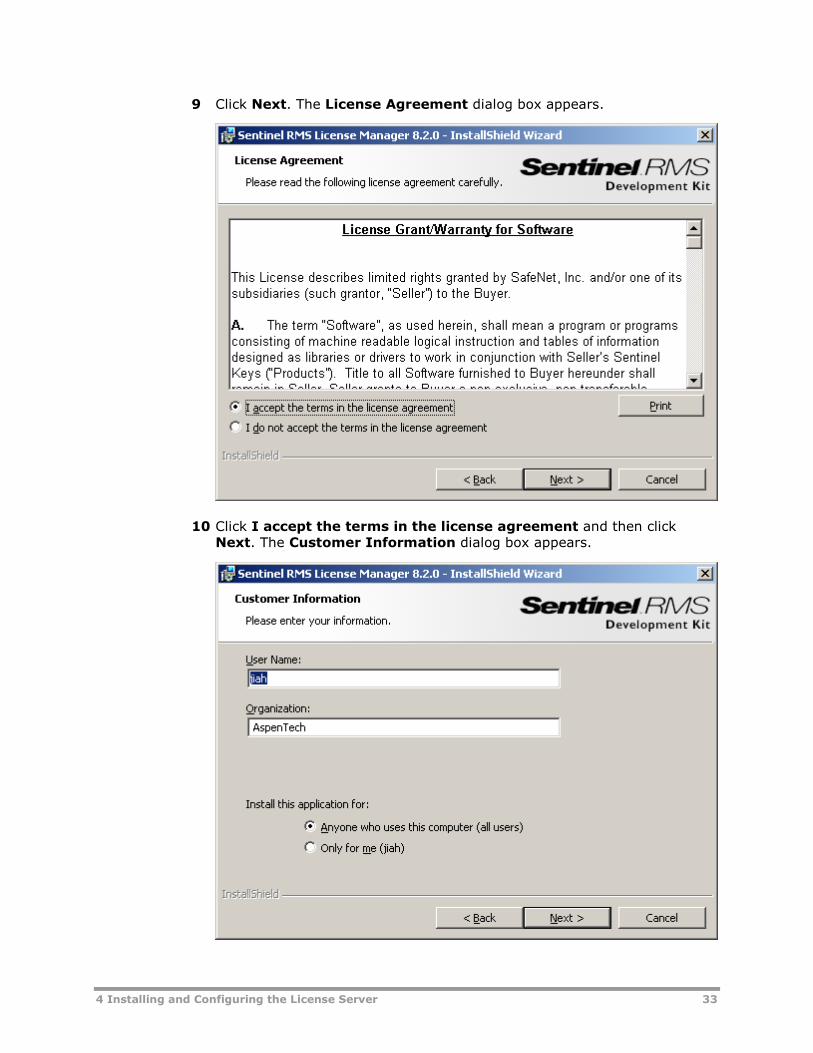
9 Click Next. The License Agreement dialog box appears.
10 Click I accept the terms in the license agreement and then clickNext. The Customer Information dialog box appears.

34 4 Installing and Configuring the License Server
11 Complete the information and then click Next. The Destination Folderdialog box appears.
12 Click Next. The Setup Type dialog box appears.
4 Installing and Configuring the License Server 35
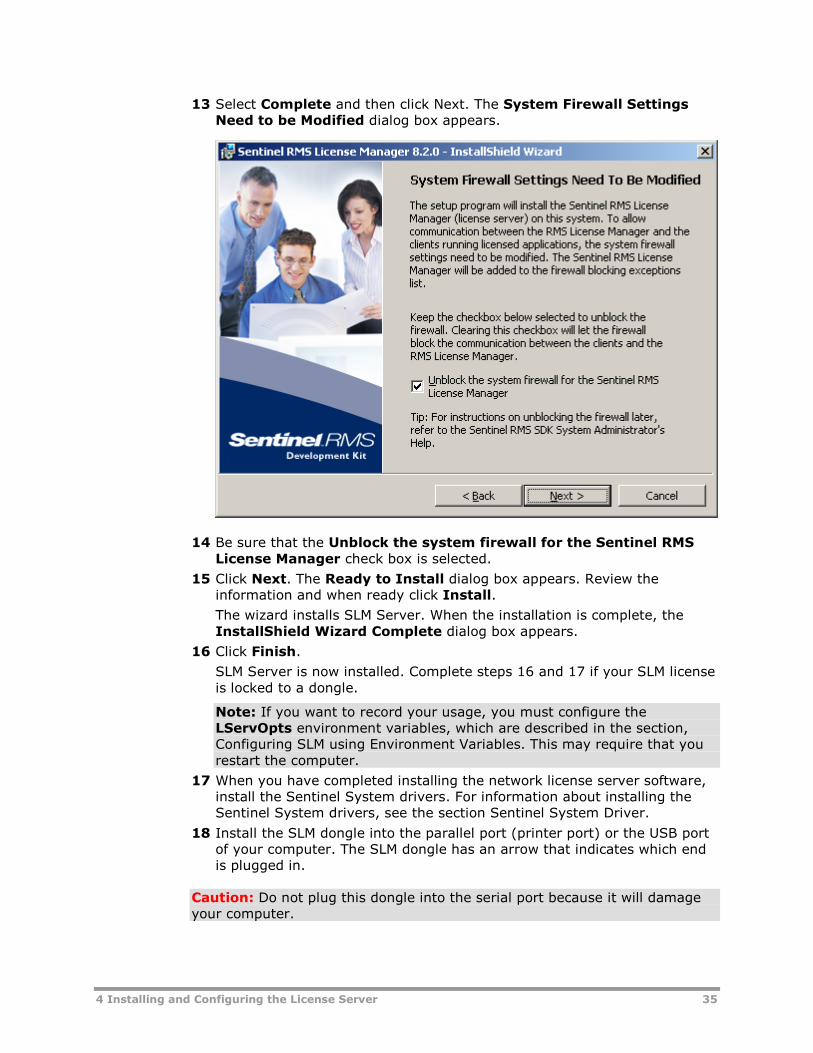
13 Select Complete and then click Next. The System Firewall SettingsNeed to be Modified dialog box appears.
14 Be sure that the Unblock the system firewall for the Sentinel RMSLicense Manager check box is selected.
15 Click Next. The Ready to Install dialog box appears. Review theinformation and when ready click Install.
The wizard installs SLM Server. When the installation is complete, theInstallShield Wizard Complete dialog box appears.
16 Click Finish.
SLM Server is now installed. Complete steps 16 and 17 if your SLM licenseis locked to a dongle.
Note: If you want to record your usage, you must configure theLServOpts environment variables, which are described in the section,Configuring SLM using Environment Variables. This may require that yourestart the computer.
17 When you have completed installing the network license server software,install the Sentinel System drivers. For information about installing theSentinel System drivers, see the section Sentinel System Driver.
18 Install the SLM dongle into the parallel port (printer port) or the USB portof your computer. The SLM dongle has an arrow that indicates which endis plugged in.
Caution: Do not plug this dongle into the serial port because it will damageyour computer.

36 4 Installing and Configuring the License Server
Step 2: Installing the LicenseAdministration Tools
To install the license administration tools
1 Insert any aspenONE product disc into the DVD drive of the computer.
Note: For computers that have the DVD Autorun feature enabled, steps#2 and #3 are automatically performed.
2 From the Start menu, select Run.
3 In the Run view, type: d:\\setup.exe and click OK (where d:corresponds to the drive letter of the DVD drive).
4 On the AspenTech Installation Browser, select the Administrationtab and and select one of the following:
o Select Aspen SLM Tools 8.2 if you are running Windows Vista; Vistais required for Aspen SLM Tools 8.1 or newer.
o Select Aspen SLM Tools 7.3 if you are running on any platform otherthan Windows Vista.
Aspen SLM Tools 8.2 only works with version 8.1 or newer of the licenseserver. Aspen SLM Tools 7.3 can work with either version 8.1 (or newer)or version 7.3 of the license server.
5 Click Install. The Welcome to the Aspen SLM Setup Program dialogbox appears.
6 Click Next. The License Agreement dialog box appears. Review the licenseagreement and click Yes, I accept the terms in the licenseagreement.
7 Click Next. The Computer Configuration Type dialog box appears.
8 Click Server Install. The Destination Location dialog box appears.
Note: If you already have aspenONE products installed, you will not seethe Destination Location dialog box. Continue to Feature Selection.
9 Accept the default destination location or click Browse to install toanother location. When ready, click Next. The Feature Selection dialogbox appears.
10 Expand the Aspen SLM option. Click the down arrow next to Aspen SLMAdmin Tools and select This feature and all subfeatures will beinstalled on local hard drive. (Aspen SLM Admin Tools should nothave a red “X” on the icon.)
11 Click Next then click Install to begin the installation.
4 Installing and Configuring the License Server 37
Step 3: Installing the License File
To install the license file for the Network license server
1 Copy the license file to the SLM license server directory. The default SLMlicense server directory is:
<root>\Program Files\Common Files\SafeNet Sentinel\SentinelRMS License Manager\WinNT
2 Rename or delete any pre-existing license file(s).
3 Rename the new license file to LSERVRC (no file extension).
4 Locate the loadls.exe executable file in the license server directory:
<root>\Program Files\Common Files\SafeNet Sentinel\SentinelRMS License Manager\WinNT
5 Run loadls.exe and select Remove to stop the license server.
6 Run loadls.exe again and select Add to start the license server.
Note: Ensure that you reload the license server whenever you change yourlicense file. All users must exit any software using SLM before the reload isperformed.
Checking SLM DongleThe first test you can perform is to check if SLM dongle is communicating withthe SLM system. Use the SLM Configuration Wizard to perform this test.
To start the SLM Configuration Wizard
1 On the Windows desktop, click Start | Programs | AspenTech | SLMConfiguration Wizard. The Introduction dialog box appears.
When the SLM Configuration Wizard starts, it reads the current settingsthat already exist in the registry. If these settings do not exist, they areset to the default, or, in some cases, left blank.
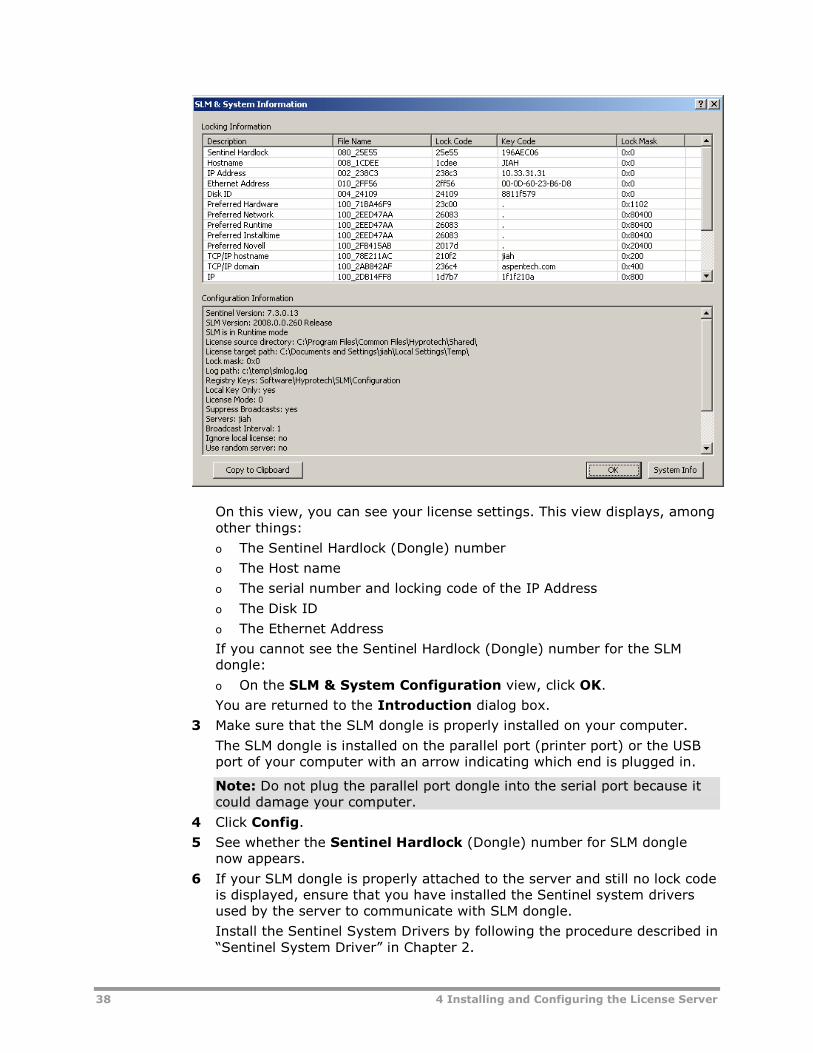
2 Click Config. The SLM & System Configuration view appears.
38 4 Installing and Configuring the License Server
On this view, you can see your license settings. This view displays, amongother things:
o The Sentinel Hardlock (Dongle) number
o The Host name
o The serial number and locking code of the IP Address
o The Disk ID
o The Ethernet Address
If you cannot see the Sentinel Hardlock (Dongle) number for the SLMdongle:
o On the SLM & System Configuration view, click OK.
You are returned to the Introduction dialog box.
3 Make sure that the SLM dongle is properly installed on your computer.
The SLM dongle is installed on the parallel port (printer port) or the USBport of your computer with an arrow indicating which end is plugged in.
Note: Do not plug the parallel port dongle into the serial port because itcould damage your computer.
4 Click Config.
5 See whether the Sentinel Hardlock (Dongle) number for SLM donglenow appears.
6 If your SLM dongle is properly attached to the server and still no lock codeis displayed, ensure that you have installed the Sentinel system driversused by the server to communicate with SLM dongle.
Install the Sentinel System Drivers by following the procedure described in“Sentinel System Driver” in Chapter 2.

4 Installing and Configuring the License Server 39
To check that the Sentinel system Driver is installed
Using Windows Explorer, browse to the Sentinel System Driver folderand verify that the SetupSysDriver.exe file exists. The SetupSysDriver.exeis located at,
<root>\Program Files\Common Files\SafeNet Sentinel\SentinelSystem Driver\
Checking that the License Server has beenproperly initializedAfter confirming that SLM dongle is communicating with the system, checkthat the license server has been properly initialized by using theWLMAdmin.exe program to confirm that the licenses are available. TheWLMAdmin.exe program is not installed with the product, but is accessiblefrom the DVD and added to the folder if you install the Admin tools from theDVD.
WLMAdmin
WLMAdmin is the primary network license administration tool. It is designedto provide access to most of the SLM licensing features and full informationon licensing activities at three levels.
This level displays
Server basic details on the active license servers detected on thenetwork.
Feature/License greater detail on the licenses available on each server.
User further information on the users currently using the licenses.
Caution: Due to the capabilities of the WLMAdmin, it is recommended thatonly administrators have access to this tool. It must not be installed withAspenTech products.
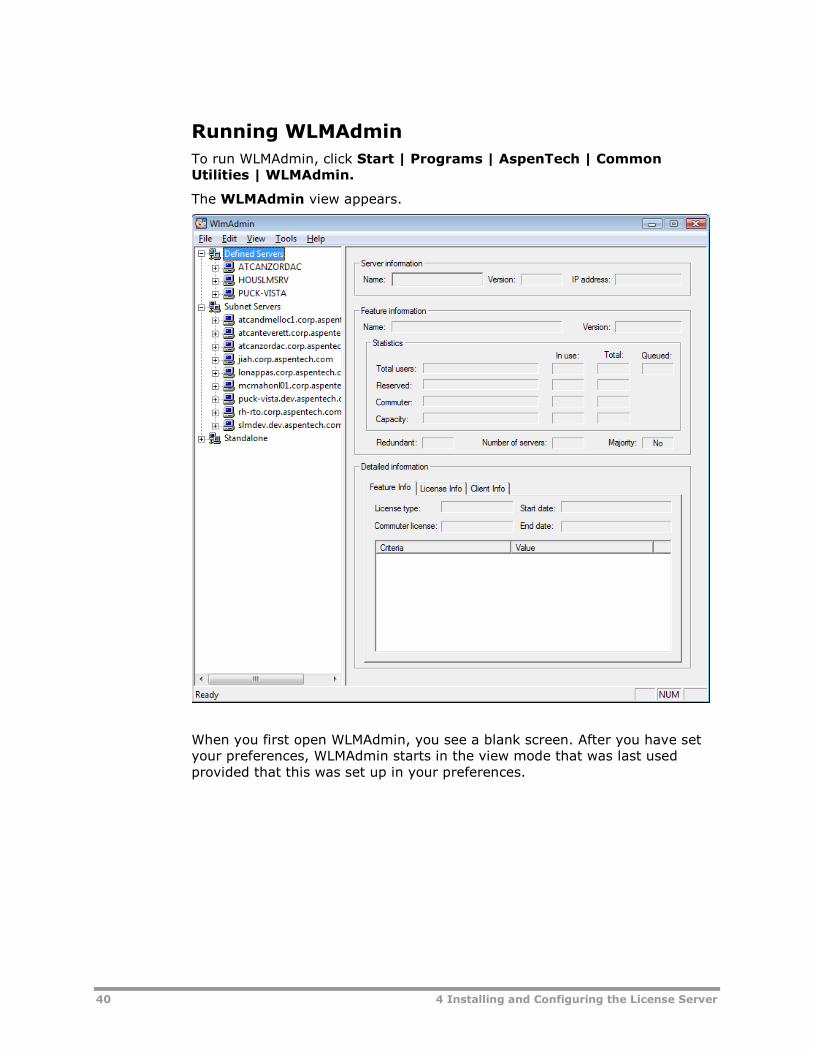
40 4 Installing and Configuring the License Server
Running WLMAdmin
To run WLMAdmin, click Start | Programs | AspenTech | CommonUtilities | WLMAdmin.
The WLMAdmin view appears.
When you first open WLMAdmin, you see a blank screen. After you have setyour preferences, WLMAdmin starts in the view mode that was last usedprovided that this was set up in your preferences.
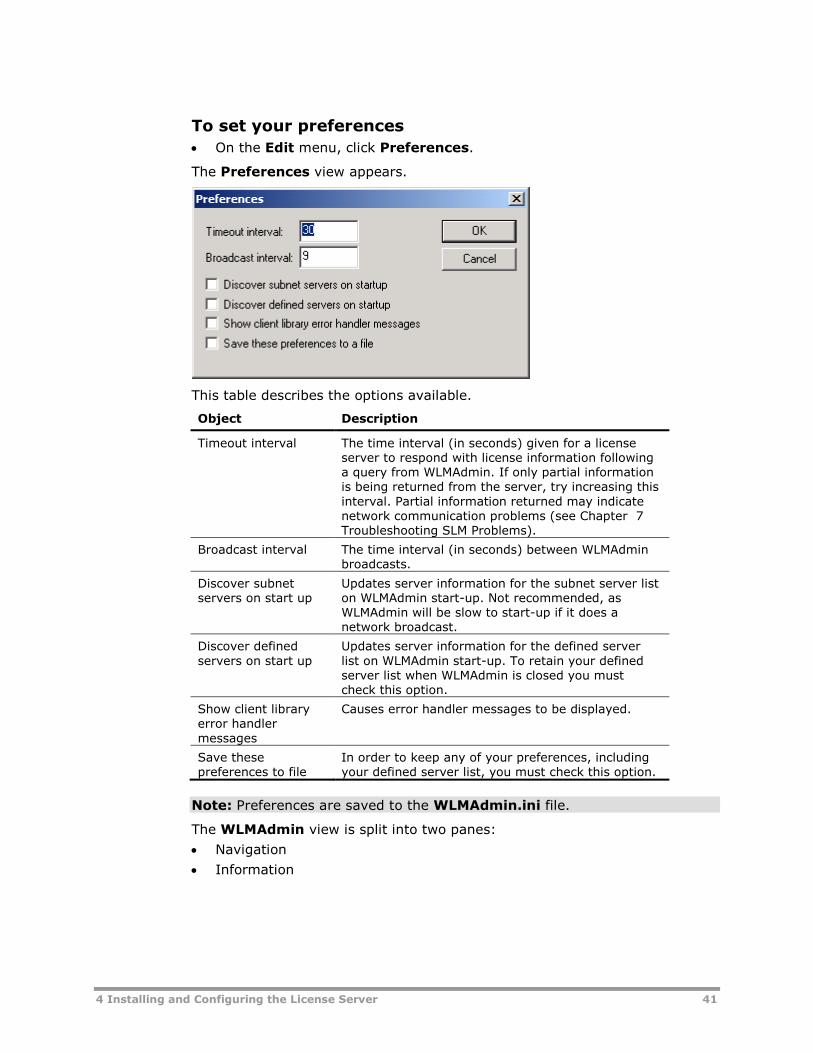
4 Installing and Configuring the License Server 41
To set your preferences
On the Edit menu, click Preferences.
The Preferences view appears.
This table describes the options available.
Object Description
Timeout interval The time interval (in seconds) given for a licenseserver to respond with license information followinga query from WLMAdmin. If only partial informationis being returned from the server, try increasing thisinterval. Partial information returned may indicatenetwork communication problems (see Chapter 7Troubleshooting SLM Problems).
Broadcast interval The time interval (in seconds) between WLMAdminbroadcasts.
Discover subnetservers on start up
Updates server information for the subnet server liston WLMAdmin start-up. Not recommended, asWLMAdmin will be slow to start-up if it does anetwork broadcast.
Discover definedservers on start up
Updates server information for the defined serverlist on WLMAdmin start-up. To retain your definedserver list when WLMAdmin is closed you mustcheck this option.
Show client libraryerror handlermessages
Causes error handler messages to be displayed.
Save thesepreferences to file
In order to keep any of your preferences, includingyour defined server list, you must check this option.
Note: Preferences are saved to the WLMAdmin.ini file.
The WLMAdmin view is split into two panes:
Navigation
Information
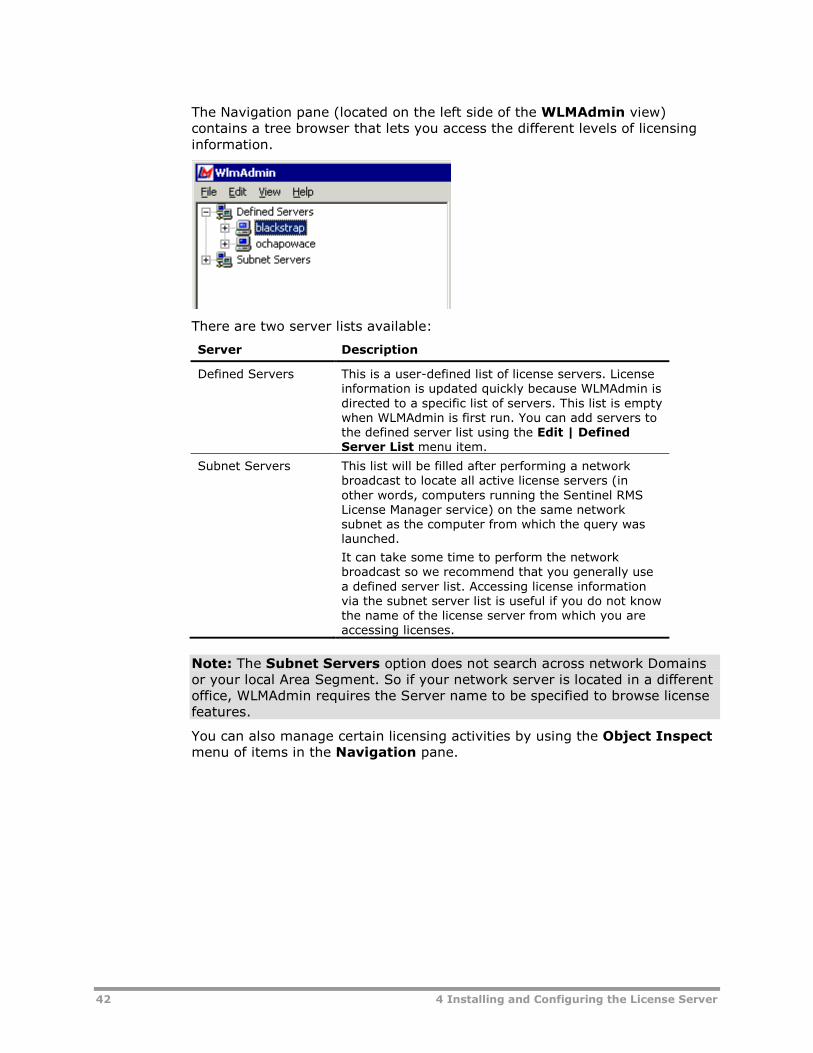
42 4 Installing and Configuring the License Server
The Navigation pane (located on the left side of the WLMAdmin view)contains a tree browser that lets you access the different levels of licensinginformation.
There are two server lists available:
Server Description
Defined Servers This is a user-defined list of license servers. Licenseinformation is updated quickly because WLMAdmin isdirected to a specific list of servers. This list is emptywhen WLMAdmin is first run. You can add servers tothe defined server list using the Edit | DefinedServer List menu item.
Subnet Servers This list will be filled after performing a networkbroadcast to locate all active license servers (inother words, computers running the Sentinel RMSLicense Manager service) on the same networksubnet as the computer from which the query waslaunched.
It can take some time to perform the networkbroadcast so we recommend that you generally usea defined server list. Accessing license informationvia the subnet server list is useful if you do not knowthe name of the license server from which you areaccessing licenses.
Note: The Subnet Servers option does not search across network Domainsor your local Area Segment. So if your network server is located in a differentoffice, WLMAdmin requires the Server name to be specified to browse licensefeatures.
You can also manage certain licensing activities by using the Object Inspectmenu of items in the Navigation pane.

4 Installing and Configuring the License Server 43
The Object Inspect menus in the Navigation pane are accessed by selectingan item (Server, Feature, or User) in the Navigation pane and right-clicking.
Note: AspenTech recommends that the options in the Object Inspect menube used only under the direction of your AspenTech agent.
The following table describes the options available at all three different level:
Object InspectMenu
Server
Sever Level
Add Feature Attempts to add licenses to the license file in use bythe server. You cannot add features without licensestrings from AspenTech. Because AspenTech willsupply you with complete license files, there is noreason to use this option.
Remove all Features Attempts to remove licenses from the license server.
Add to Defined List The server will be added to the defined server list.
Remove fromDefined List
The server will be removed from the defined serverlist.
Change Log Filename Used to change the log filename; overrides thename set in the LServOpts environment variable.Stopping and reloading the Sentinel RMS LicenseManager service will cause the log filename to revertto that listed in the environment variable.
Shutdown Server Used to stop the Sentinel RMS License Managerservice on that server.
Refresh Updates licensing information for this server only.
Feature Level
Remove Feature Attempts to remove a license from the license file inuse by the server.
Refresh Updates licensing information for this feature only.
User Level
Refresh Updates licensing information for this user only.

44 4 Installing and Configuring the License Server
The Information pane (located on the right side of the WLMAdmin view)displays varying amounts of information depending on the level highlighted inthe Navigation pane. The next three views show the information available atthe server level, the feature/license level, and the user level, respectively.
Server Level
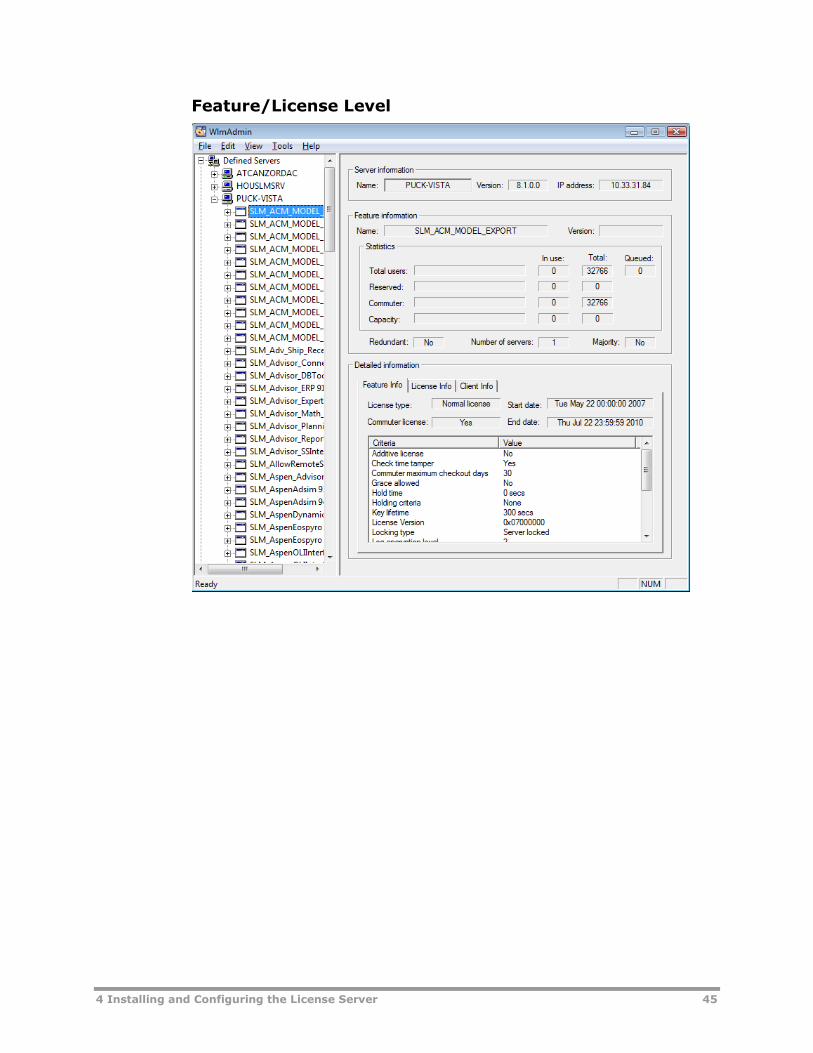
4 Installing and Configuring the License Server 45
Feature/License Level

46 4 Installing and Configuring the License Server
User Level
WLMAdmin Menu Bar Options
The following table describes the commands available on the WLMAdminmenu bar.
Menu-Command Description
File-Exit Exits the WLMAdmin application and closes theWLMAdmin view.
Edit-Defined ServerList
Adds/removes/changes server information in thedefined server list.
Edit-Reservation File This option will start the Group Reservation Editor (ifavailable); reservation files can also be edited usinga standard text editor. See Group Reservations formore details on making reservations.
Edit-RedundantLicense File
This option will start the WRLFTool (if available).
Edit-Preferences Provides access to the Preferences dialog box, onwhich you can specify preferences for how SLM
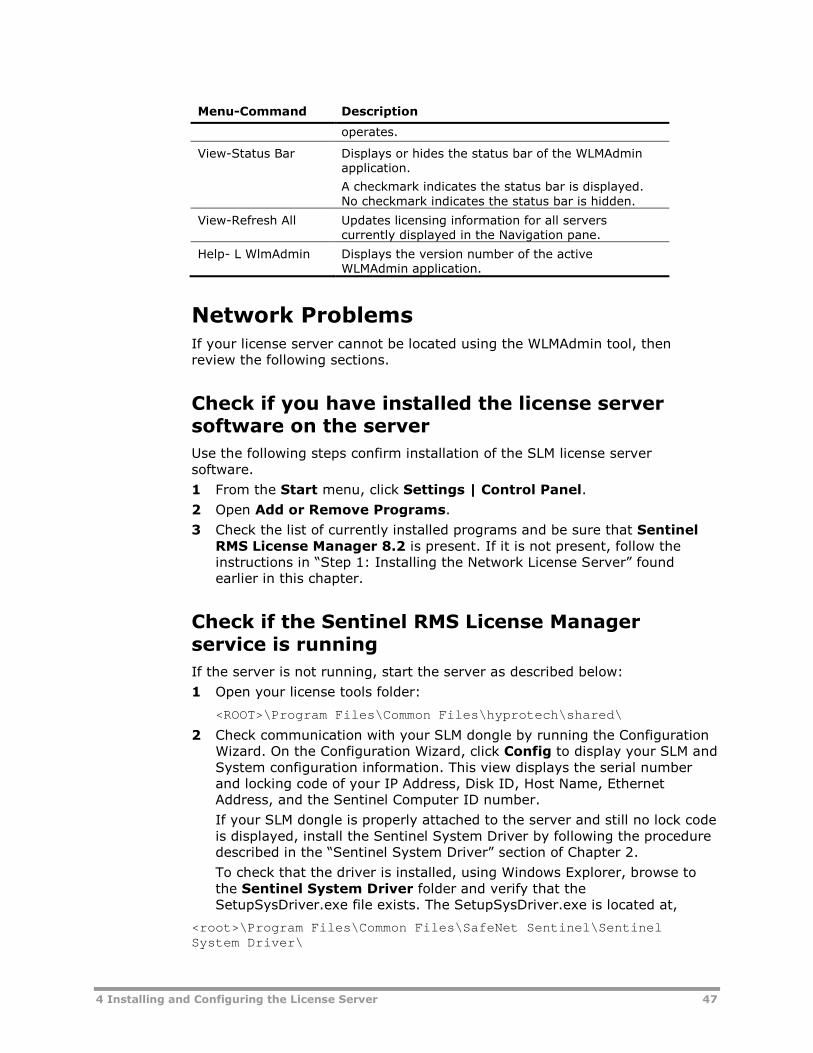
4 Installing and Configuring the License Server 47
Menu-Command Description
operates.
View-Status Bar Displays or hides the status bar of the WLMAdminapplication.
A checkmark indicates the status bar is displayed.No checkmark indicates the status bar is hidden.
View-Refresh All Updates licensing information for all serverscurrently displayed in the Navigation pane.
Help- L WlmAdmin Displays the version number of the activeWLMAdmin application.
Network ProblemsIf your license server cannot be located using the WLMAdmin tool, thenreview the following sections.
Check if you have installed the license serversoftware on the server
Use the following steps confirm installation of the SLM license serversoftware.
1 From the Start menu, click Settings | Control Panel.
2 Open Add or Remove Programs.
3 Check the list of currently installed programs and be sure that SentinelRMS License Manager 8.2 is present. If it is not present, follow theinstructions in “Step 1: Installing the Network License Server” foundearlier in this chapter.
Check if the Sentinel RMS License Managerservice is running
If the server is not running, start the server as described below:
1 Open your license tools folder:
<ROOT>\Program Files\Common Files\hyprotech\shared\
2 Check communication with your SLM dongle by running the ConfigurationWizard. On the Configuration Wizard, click Config to display your SLM andSystem configuration information. This view displays the serial numberand locking code of your IP Address, Disk ID, Host Name, EthernetAddress, and the Sentinel Computer ID number.
If your SLM dongle is properly attached to the server and still no lock codeis displayed, install the Sentinel System Driver by following the proceduredescribed in the “Sentinel System Driver” section of Chapter 2.
To check that the driver is installed, using Windows Explorer, browse tothe Sentinel System Driver folder and verify that theSetupSysDriver.exe file exists. The SetupSysDriver.exe is located at,
<root>\Program Files\Common Files\SafeNet Sentinel\SentinelSystem Driver\
48 4 Installing and Configuring the License Server
3 Check that the license server has been properly initialized by running theWLMAdmin program and checking that the licenses are available.
Start | Programs | AspenTech | Common Utilities | WLMAdmin
The WLMAdmin view is split into two panes:
The Navigation pane is located on the left side of the view. It contains atree structure that allows you to access the different levels of licensinginformation. There are two server lists available:
o Defined Servers. This is a user defined list of license servers. Licenseinformation is updated quickly because WLMAdmin is directed to aspecific list of servers. This list will be empty when WLMAdmin is firstrun. You can add servers to the defined server list using theEdit\Defined Server List menu item.
o Subnet Servers. This list will be filled after performing a networkbroadcast to locate all active license servers (in other words,computers running the Sentinel RMS License Manager service) on thenetwork.
It can take some time to perform the network broadcast so werecommend that you generally use a defined server list. Accessing licenseinformation via the subnet server list is useful if you do not know thename of the license server from which you are accessing licenses.
Note: The Subnet Server option does not search across networkDomains or your Local Area Segment. So if your network server is locatedin a different office, WLMAdmin requires the Server name to be specifiedto browse license features.
The Information pane is located on the right side of the view. It displaysvarying amounts of information depending what level is highlighted in theNavigation pane.
Now that you have the proper license files in place, the next step is toconfigure your network user computer to point to your license server. Forconfiguration information, see Chapter 5 Configuring SLM.
Check the LSHost or LServOpts environmentvariables or files
Are the LSHost or LServOpts values set to No_Net?
1 On your computer, click Start | Settings | Control Panel.
2 Double-click the System icon to open the System Propertiesview.
3 Click the Advanced tab. On the Advanced tab, click EnvironmentVariables.
The Environment Variables view appears.
4 The variable values for lshost or lservopts are located in the Valuecolumns.
5 Make any necessary changes/modification by selecting the variable andclicking the appropriate Edit button.

4 Installing and Configuring the License Server 49
6 Close the Environment Variables and System Properties views byclicking the OK buttons.
7 Reboot the computer to make sure these environment variables takeeffect.
Note the following limitations/requirements Maximum of 256 groups.
Maximum of 256 members in each group.
Maximum of 64 characters in member name.
You can add a “\” to signify the line continuation and the usage is to givea space before the first character of the second line.
Log FilesThe Software License Manager can be configured (via administrator options)to capture the usage for all of the Aspen products in a log file.
The information stored includes the User ID, computer name, date and timeof each license taken and returned. The log file can be used to displayhistorical information of the license usage for individual or all users. The logfile has a maximum file size that is set by the administrator. The file is savedwhen it is full and a new file is automatically created.
The license server log file is set up using the LServOpts environmentvariable.
Checking the Client to Server ConnectionOnce you have confirmed that the proper license strings are in place, the nextstep is to check that your network computers points to your license server.
1 Click Start | Programs | AspenTech |Common Utilities | SLMConfiguration Wizard.
The SLM Configuration Wizard Introduction dialog box appears.
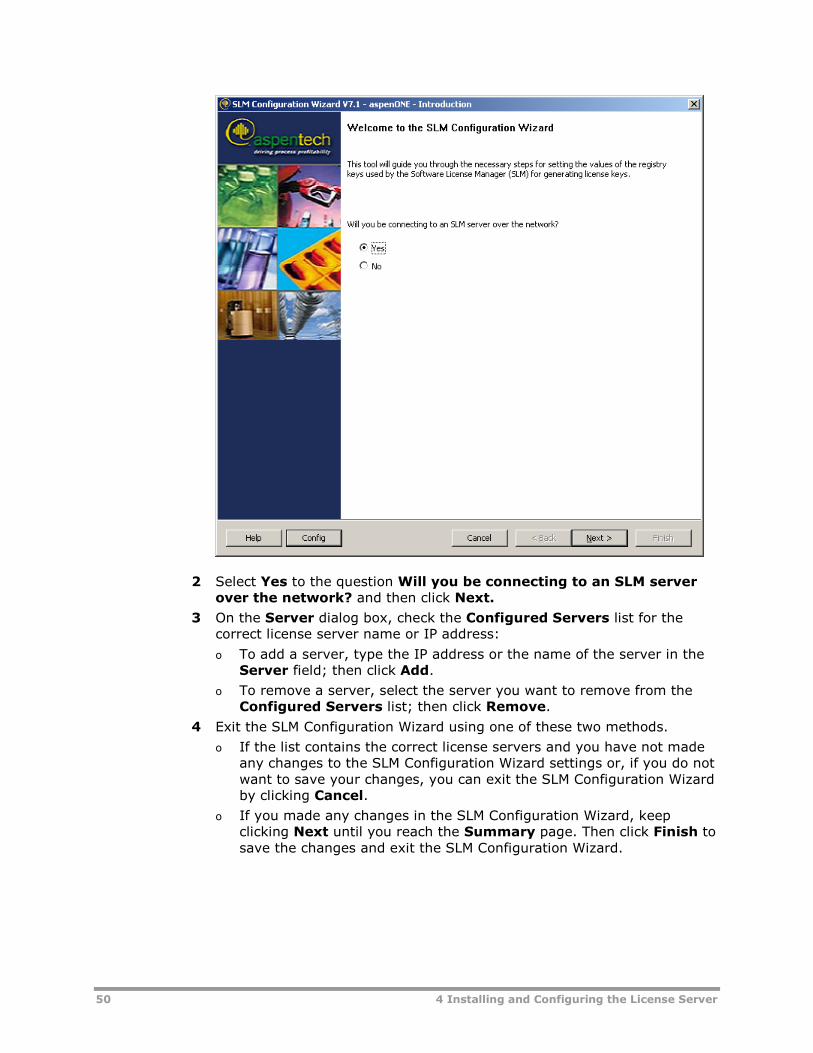
50 4 Installing and Configuring the License Server
2 Select Yes to the question Will you be connecting to an SLM serverover the network? and then click Next.
3 On the Server dialog box, check the Configured Servers list for thecorrect license server name or IP address:
o To add a server, type the IP address or the name of the server in theServer field; then click Add.
o To remove a server, select the server you want to remove from theConfigured Servers list; then click Remove.
4 Exit the SLM Configuration Wizard using one of these two methods.
o If the list contains the correct license servers and you have not madeany changes to the SLM Configuration Wizard settings or, if you do notwant to save your changes, you can exit the SLM Configuration Wizardby clicking Cancel.
o If you made any changes in the SLM Configuration Wizard, keepclicking Next until you reach the Summary page. Then click Finish tosave the changes and exit the SLM Configuration Wizard.

5 Configuring SLM 51
5 Configuring SLM
Configuring SLM using the SLMConfiguration WizardThe SLM Configuration Wizard guides you through a series of steps thatconfigures the SLM to generate license keys. The SLM Configuration Wizard isused to configure the SLM on all computers connecting to an SLM server on anetwork or running SLM locally.
Instructions for using the SLM Configuration Wizard are provided in the SLMConfiguration Wizard Help.
Notes:
The SLM Configuration Wizard makes changes to the registry. Therefore,to use the SLM Configuration Wizard, you must have permission to writeto the registry. If you do not have permission to write to the registry,contact your system administrator.
If you are using SLM tools version 8.2 on Windows 7 or Windows 2008,the first time you use the SLM Configuration Wizard to initialize networklicense keys or a local license file, the initialization may take a fewminutes, especially if there are a large number of licenses in the licensefile.
Accessing the SLM Configuration Wizardand Online Help
To start the SLM Configuration Wizard
On the Windows desktop, click the Start menu; then click Programs |AspenTech | Common Files |SLM Configuration Wizard.
To access the SLM Configuration Wizard Help
From the SLM Configuration Wizard, click Help in the lower left-handcorner of the window.

52 5 Configuring SLM
Configuring SLM usingEnvironment VariablesThe environment variables can be used to control some of the operations ofSLM. The primary environment variables are:
LSHost is used to direct the search for a network license to a list ofpreferred servers.
LServOpts is used to set License Server Options including configurationinformation, usage logging, and error logging. Alternatively some of theseoptions can be set through their own environment variable (in otherwords, LSReserv and LServrcCnf. Where available it is generallyrecommended to use these specific environment variables).
Note: If the user’s computer contains both the registry and the LSHostenvironment variables configurations, SLM always looks to the values in theregistry first. If SLM finds a valid license server in the registry, theLSFORCEHOST and LSHost environment variables are ignored.
Configuring the Environment Variables
To configure the environment variables in the SystemProperties view
1 On your computer, click the Start | Settings | Control Panel.
2 Double-click the System icon to open the System Propertiesview.
3 Click the Advanced tab; then click Environment Variables.
The Environment Variables view appears.
4 In the User or System Variables group, click New.
The New User or System Variable view appears.
5 In the Variable Name field, type the name of the environment variableas lshost.
6 In the Variable Value field, type the IP address or hostname of theserver(s).
7 Click OK.
The New User or System Variable view closes, and the newenvironment variable and value is added in the Environment Variablesview.
8 If you do not need to set any more variables, click the OK buttons to closeboth Environment Variables and System Properties views.
9 Reboot the computer to make sure these environment variables takeeffect.
5 Configuring SLM 53
Configuring the LSHost File or EnvironmentVariable
For an SLM Token system, all environment variables must be configured assystem variables. The environment variable or LSHost file is used to instructthe application where to search for the Token server(s):
The LSHost file contains a list of the IP address or computer names foreach of the Token servers. When the application searches for the licenseinformation it proceeds using the following steps:
1 The application starts with the first address on the list of the LSHostfile.
2 If the IP address is not available, the server does not provide thelicense requested. The application’s search engine then moves to thenext server on the list.
3 The application’s search engine repeats the previous step until it findsa server that provides the license requested.
The LSHost file must be placed in the application root directory foreach SLM-protected application. If the application is installed on anapplication server, the LSHost file resides on that server.
The LSHost environment variable contains an IP address or computername for a Token server. The environment variable is set on the user’scomputer. For more information, see Configuring SLM using EnvironmentVariables.
Note: The LSHost environment variable overrides any LSHost files on thecomputer. Normally, it is recommended to use LSHost files to avoidinterference with any other vendor security that may also be using LSHost.Caution: If you have other vendor securities already using the LSHostenvironment variable, then consider using an LSHost file for each AspenTechproduct or a master LSHost environment variable, which lists the licenseservers for both your Aspen and other vendor products.
Stand-alone and Mixed Licensing Schemes forToken
For an SLM Token system, the use of stand-alone license mode is morerestricted, since Standard license requests must be made when a stand-aloneSLM dongle is in use and Token license requests when the Token LicenseServer is in use.
You cannot use both Token licenses and stand-alone licenses simultaneously.However, it is possible to toggle between the Standard and Token licensingmodes by changing the LicenseMode environment variable in the user’soperating system:
When using the stand-alone license mode, LicenseMode must be set toFalse or 0 on the local computer.
When using the Token network, LicenseMode must be set to True or 1on the local computer.
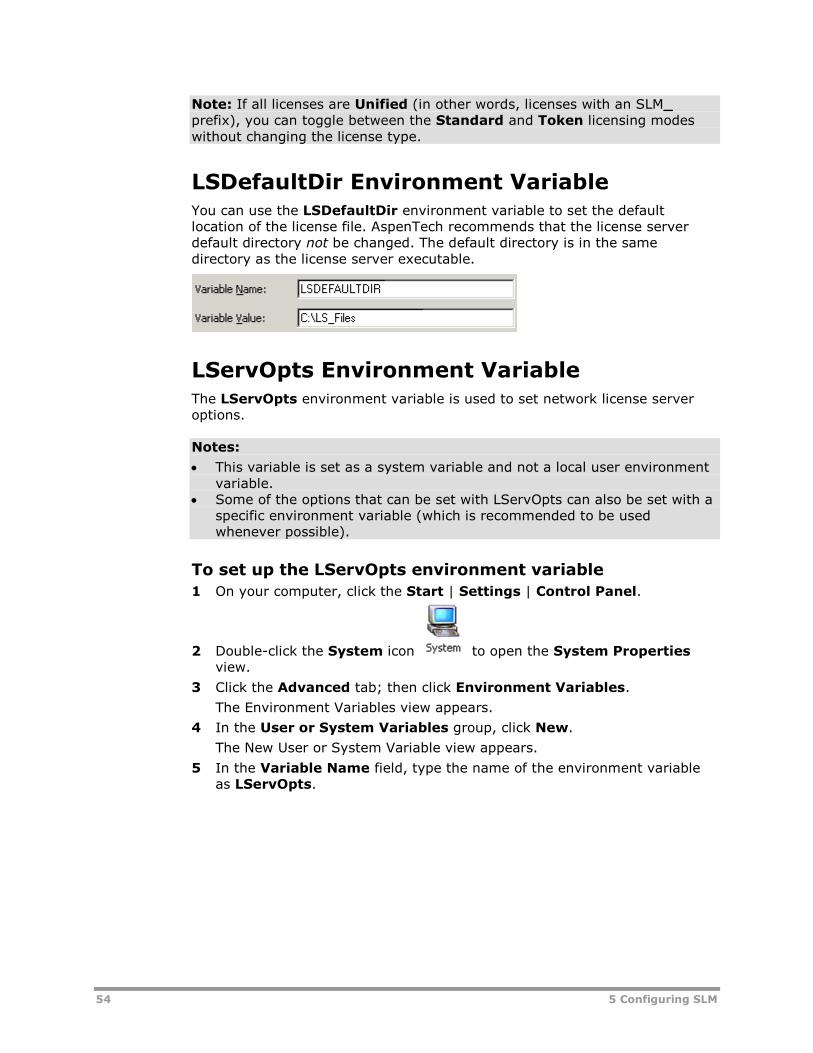
54 5 Configuring SLM
Note: If all licenses are Unified (in other words, licenses with an SLM_prefix), you can toggle between the Standard and Token licensing modeswithout changing the license type.
LSDefaultDir Environment VariableYou can use the LSDefaultDir environment variable to set the defaultlocation of the license file. AspenTech recommends that the license serverdefault directory not be changed. The default directory is in the samedirectory as the license server executable.
LServOpts Environment VariableThe LServOpts environment variable is used to set network license serveroptions.
Notes:
This variable is set as a system variable and not a local user environmentvariable.
Some of the options that can be set with LServOpts can also be set with aspecific environment variable (which is recommended to be usedwhenever possible).
To set up the LServOpts environment variable
1 On your computer, click the Start | Settings | Control Panel.
2 Double-click the System icon to open the System Propertiesview.
3 Click the Advanced tab; then click Environment Variables.
The Environment Variables view appears.
4 In the User or System Variables group, click New.
The New User or System Variable view appears.
5 In the Variable Name field, type the name of the environment variableas LServOpts.
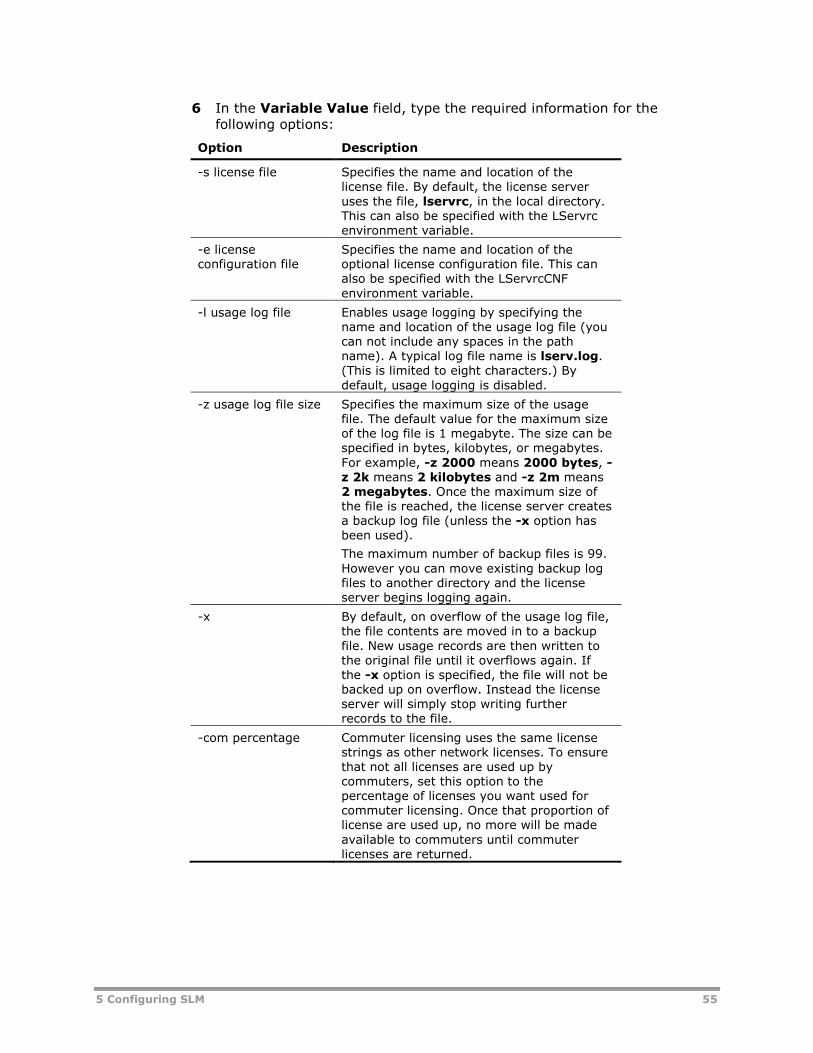
5 Configuring SLM 55
6 In the Variable Value field, type the required information for thefollowing options:
Option Description
-s license file Specifies the name and location of thelicense file. By default, the license serveruses the file, lservrc, in the local directory.This can also be specified with the LServrcenvironment variable.
-e licenseconfiguration file
Specifies the name and location of theoptional license configuration file. This canalso be specified with the LServrcCNFenvironment variable.
-l usage log file Enables usage logging by specifying thename and location of the usage log file (youcan not include any spaces in the pathname). A typical log file name is lserv.log.(This is limited to eight characters.) Bydefault, usage logging is disabled.
-z usage log file size Specifies the maximum size of the usagefile. The default value for the maximum sizeof the log file is 1 megabyte. The size can bespecified in bytes, kilobytes, or megabytes.For example, -z 2000 means 2000 bytes, -z 2k means 2 kilobytes and -z 2m means2 megabytes. Once the maximum size ofthe file is reached, the license server createsa backup log file (unless the -x option hasbeen used).
The maximum number of backup files is 99.However you can move existing backup logfiles to another directory and the licenseserver begins logging again.
-x By default, on overflow of the usage log file,the file contents are moved in to a backupfile. New usage records are then written tothe original file until it overflows again. Ifthe -x option is specified, the file will not bebacked up on overflow. Instead the licenseserver will simply stop writing furtherrecords to the file.
-com percentage Commuter licensing uses the same licensestrings as other network licenses. To ensurethat not all licenses are used up bycommuters, set this option to thepercentage of licenses you want used forcommuter licensing. Once that proportion oflicense are used up, no more will be madeavailable to commuters until commuterlicenses are returned.
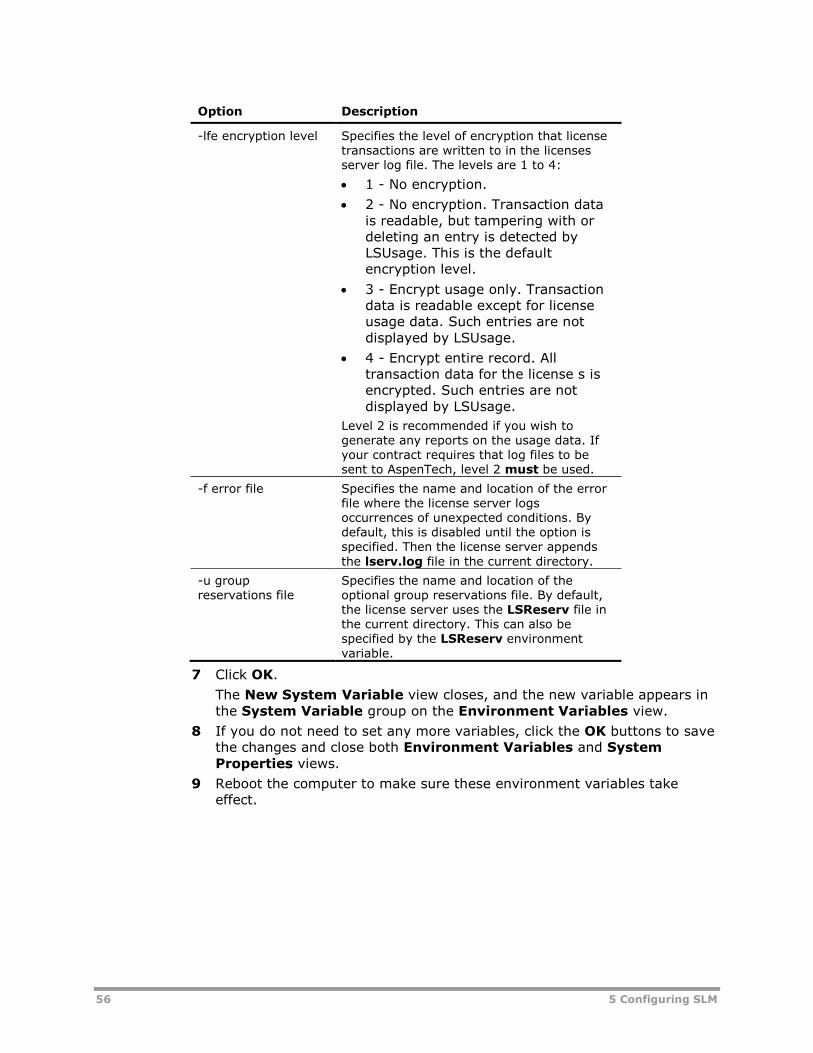
56 5 Configuring SLM
Option Description
-lfe encryption level Specifies the level of encryption that licensetransactions are written to in the licensesserver log file. The levels are 1 to 4:
1 - No encryption.
2 - No encryption. Transaction datais readable, but tampering with ordeleting an entry is detected byLSUsage. This is the defaultencryption level.
3 - Encrypt usage only. Transactiondata is readable except for licenseusage data. Such entries are notdisplayed by LSUsage.
4 - Encrypt entire record. Alltransaction data for the license s isencrypted. Such entries are notdisplayed by LSUsage.
Level 2 is recommended if you wish togenerate any reports on the usage data. Ifyour contract requires that log files to besent to AspenTech, level 2 must be used.
-f error file Specifies the name and location of the errorfile where the license server logsoccurrences of unexpected conditions. Bydefault, this is disabled until the option isspecified. Then the license server appendsthe lserv.log file in the current directory.
-u groupreservations file
Specifies the name and location of theoptional group reservations file. By default,the license server uses the LSReserv file inthe current directory. This can also bespecified by the LSReserv environmentvariable.
7 Click OK.
The New System Variable view closes, and the new variable appears inthe System Variable group on the Environment Variables view.
8 If you do not need to set any more variables, click the OK buttons to savethe changes and close both Environment Variables and SystemProperties views.
9 Reboot the computer to make sure these environment variables takeeffect.

5 Configuring SLM 57
Setting the Usage Logging
The following figure displays the New System Variable view containing theinformation for a usage log file with a maximum size of 2 megabytes andlevel 2 encryption. When typing the path and name of the log file, there canbe NO spaces and quotes are not required.
If you activate the usage logging option, the network license server recordsall license requests and returns in this file. Usage reports can be viewed byusing the LSUsage tool.
LSUsage tool is a command line utility that displays a summary of AspenTechproduct usage, providing information on license transactions contained in thelicense server usage file. At the command line, type the name and path of theLSUsage log file. Where log file is the name you have given to the log file.
Note: If you have a large user base, it is advisable to configure the maximumlog file size to a higher value. For example, set it to 4m or 6m instead of 2m.
LServrcCNF Environment VariableThe LServrcCNF environment variable can be used to set the name andlocation of the network license server configuration file. This file is used insetting up user alerts and other options. If LServrcCNF is not used to specifythe configuration file, then the configuration file resides in the same directoryas the license file and has the same base name as the license code file butwith the extension *.cnf.
It is recommended that the default name and location be used for this file. Inmost installations, this file is called lservc.cnf. It resides in the license serverdefault directory.
LSHost Environment VariableThis variable is set on the user’s computer. When the application is activated,it first tries to identify a stand-alone license. If there is no stand-alonelicense, it will then attempt to obtain a license by searching for license serversover the network. This broadcast search is limited to the user’s local networksubnet. If the License Server is located outside the user’s local subnet, then

58 5 Configuring SLM
the IP address/hostname of the server must be specified to the remotenetwork license server for the Aspen (AspenTech) application(s) to establish aconnection.
For environment variables, there are three ways you can specify theconnection to the proper license server. The following lists the stepsAspenTech applications take to look for a license server:
If the LSForceHost environment variable is set, the application looks forthe specific license server host listed in that variable. If it cannot find thatcomputer, an error message is displayed, and the application closes.
Note: AspenTech does not recommend using the LSForceHostenvironment variable, as it has been proven unreliable during testing.
If no LSForceHost environment variable, then the application looks for. Ifthe LSForceHost environment variable has been set, then the applicationlooks for any of the license server hosts listed.
If the LSForceHost and LSHost environment variables are not set, thena check is made for a file with the name lshost in the application rootdirectory. If this file is found, then the application looks for any of thelicense server hosts listed in the file.
The LSHost environment variable naming conventions are:
Any valid hostname recognized by your network.
Numeric names (IP address).
Note: If you are using a network system where the DNS is variable, thenyou cannot use the IP address for this purpose.
NO_NET to disable the default network broadcast mechanism fromsearching the network for a network license server. With this setting theapplication will only look for a stand-alone license file.
LSHost Environment VariableThe LSHost environment variable is used to tell the application to search forone or more license servers.
Note: When using multiple server names on the same line you need toseparate the names, in both the environment variable string and “lshost” file,with a colon (:).
When this variable is set, the application attempts to contact each server inthe list beginning with the first license server in the list. If none of thespecified license servers is found, the application stops searching and returnsan error. LSHost disables the network broadcast search for servers.
The lshost file works the same way as the LSHost environment variable.
Tip: The lshost file does not have a file name extension attached to it.
The lshost file must be placed in the application root directory. The followingis an example of an lshost file.
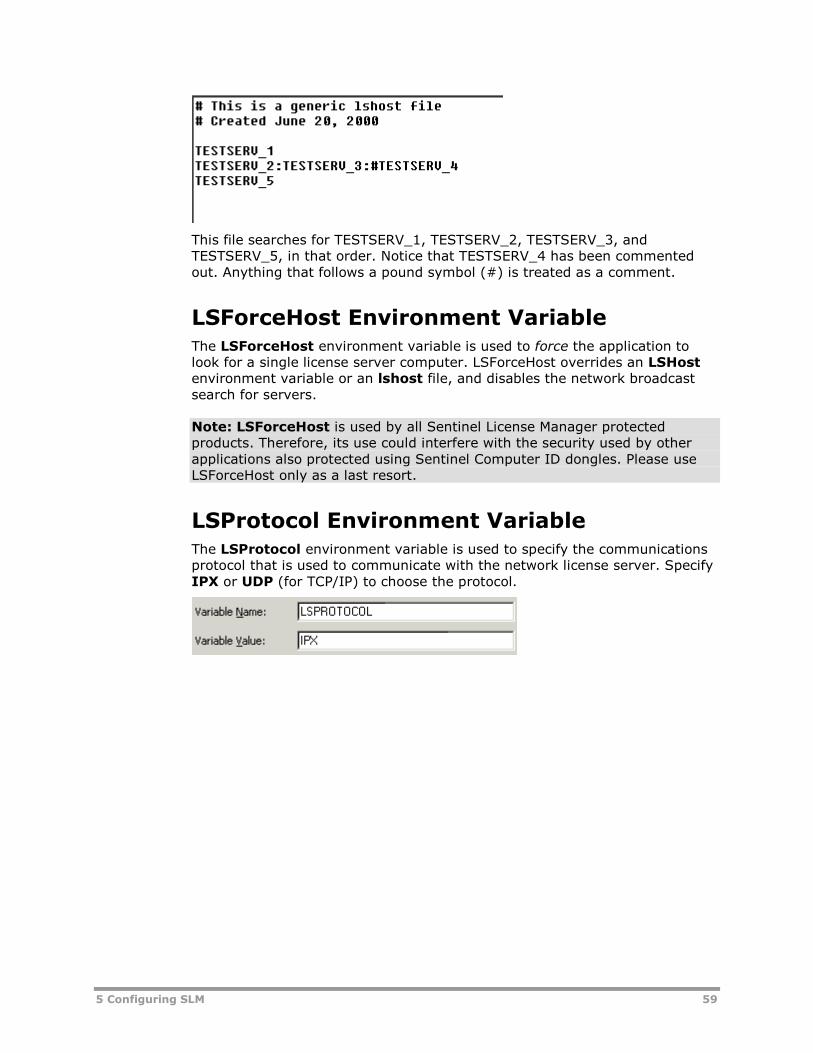
5 Configuring SLM 59
This file searches for TESTSERV_1, TESTSERV_2, TESTSERV_3, andTESTSERV_5, in that order. Notice that TESTSERV_4 has been commentedout. Anything that follows a pound symbol (#) is treated as a comment.
LSForceHost Environment VariableThe LSForceHost environment variable is used to force the application tolook for a single license server computer. LSForceHost overrides an LSHostenvironment variable or an lshost file, and disables the network broadcastsearch for servers.
Note: LSForceHost is used by all Sentinel License Manager protectedproducts. Therefore, its use could interfere with the security used by otherapplications also protected using Sentinel Computer ID dongles. Please useLSForceHost only as a last resort.
LSProtocol Environment VariableThe LSProtocol environment variable is used to specify the communicationsprotocol that is used to communicate with the network license server. SpecifyIPX or UDP (for TCP/IP) to choose the protocol.

60 5 Configuring SLM

6 Advanced Licensing Functions 61
6 Advanced LicensingFunctions
Network licenses provide the administrator with access to many advancedlicensing functions. These are primarily:
Using Alternate Licensing Configurations.
Commuting licenses for use when no network connection to a licenseserver is available. This is an optional feature at additional cost. Forspecific details on the usage of this feature, see Commuting Licenses.
For more information contact your AspenTech sales representative.
Stopping or Changing the License Server. For specific details, seeStopping or Changing the License Server.
Setting user options. The two types of user options you can set are:
o User Alerts. User Alerts let you know about certain license events.There are seven alert types that can be generated using two differentreporting types. For specific information, see User Alerts.
o Group Reservations. Group Reservations reserve licenses forparticular users. Group Reservations can also exclude particular usersfrom license access. For specific information, see Group Reservations.
Using Alternate LicenseConfigurations
Pooling SLM DonglesIt is possible to configure the user computers so that a pool of stand-aloneSLM dongles can be shared. For example, if you want to use 10 differentAspenTech products, and each product has its own license file and SLMdongle, you must install all 10 different license files on your computer. Whenyou run the various AspenTech products, you can just switch between the 10SLM dongles, without the need to reconfigure your computer each time adifferent license file is required.
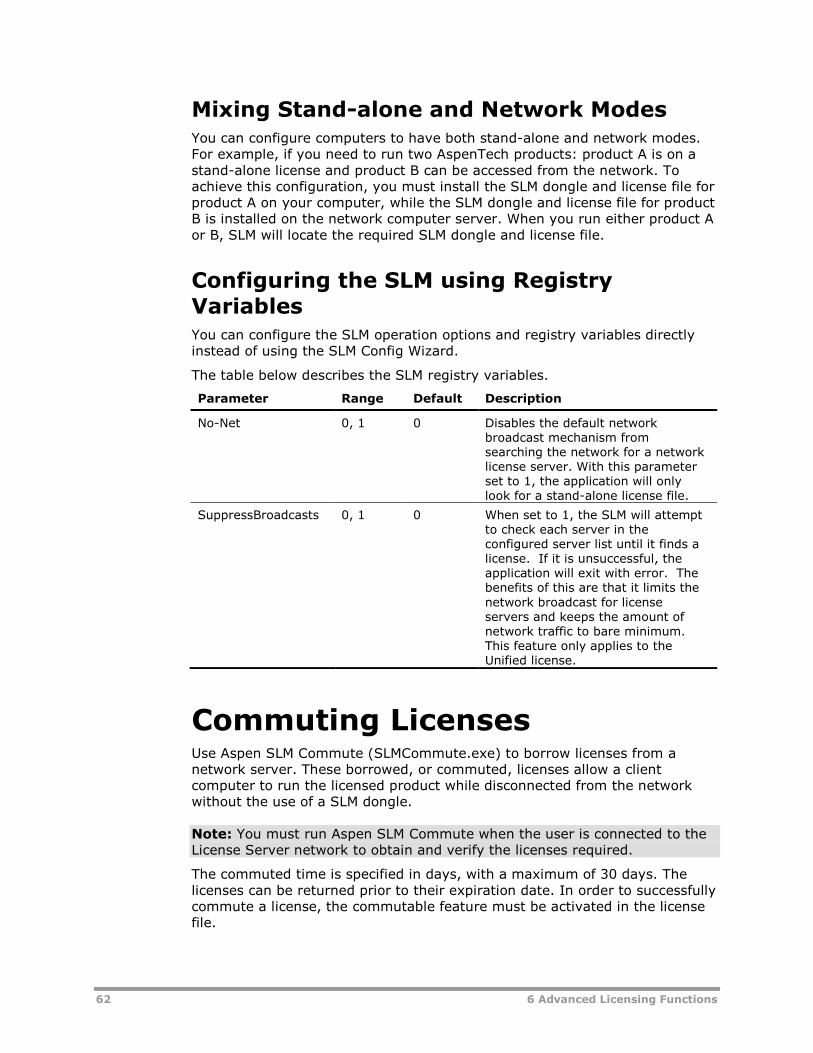
62 6 Advanced Licensing Functions
Mixing Stand-alone and Network ModesYou can configure computers to have both stand-alone and network modes.For example, if you need to run two AspenTech products: product A is on astand-alone license and product B can be accessed from the network. Toachieve this configuration, you must install the SLM dongle and license file forproduct A on your computer, while the SLM dongle and license file for productB is installed on the network computer server. When you run either product Aor B, SLM will locate the required SLM dongle and license file.
Configuring the SLM using RegistryVariablesYou can configure the SLM operation options and registry variables directlyinstead of using the SLM Config Wizard.
The table below describes the SLM registry variables.
Parameter Range Default Description
No-Net 0, 1 0 Disables the default networkbroadcast mechanism fromsearching the network for a networklicense server. With this parameterset to 1, the application will onlylook for a stand-alone license file.
SuppressBroadcasts 0, 1 0 When set to 1, the SLM will attemptto check each server in theconfigured server list until it finds alicense. If it is unsuccessful, theapplication will exit with error. Thebenefits of this are that it limits thenetwork broadcast for licenseservers and keeps the amount ofnetwork traffic to bare minimum.This feature only applies to theUnified license.
Commuting LicensesUse Aspen SLM Commute (SLMCommute.exe) to borrow licenses from anetwork server. These borrowed, or commuted, licenses allow a clientcomputer to run the licensed product while disconnected from the networkwithout the use of a SLM dongle.
Note: You must run Aspen SLM Commute when the user is connected to theLicense Server network to obtain and verify the licenses required.
The commuted time is specified in days, with a maximum of 30 days. Thelicenses can be returned prior to their expiration date. In order to successfullycommute a license, the commutable feature must be activated in the licensefile.

6 Advanced Licensing Functions 63
Checking Out Commuter Licenses1 Ensure you have an AspenTech product open before you commute.
Otherwise the commuting facility can take a long time to start up.
2 Run the commute program by selecting Start | Programs | AspenTech| Common Utilities | SLMCommute command from the desktop menu.
The Aspen SLM Commute dialog box appears.
Aspen SLM Commute displays the servers you have configured using theSLM Configuration Wizard and enables the user to check out licenses fromthose servers.
Commuter Option Description
Single Server searches for and displays a specifiedlicense server. Requires you to specify thelicense server's computer hostname, IPaddress, or IPX address in the field provided.
Sub-Net Searches for and displays all of the licenseservers on your subnet.
Take License(s) Checks out the licenses selected.
Return License(s) Returns the specified licenses.
Return AllLicenses Returns all licenses.

64 6 Advanced Licensing Functions
3 When the program loads, if you know the server from which you want tocommute licenses:
Enter in the Single field either:
o The Server name.
o The IP Address.
Then click Single.
This causes SLM Commute to display the licenses on the server youspecified.
Important: Make a note of the server you are using, because you willneed to return the commuted licenses to the same server.
Note: To find a server from which to commute licenses, click Sub-Net.
Once the server has been located, all the available commuter licenses arelisted. The license list may take some time to display.
Note: If you want to see more licenses, resize the window by pulling onits bottom edge.
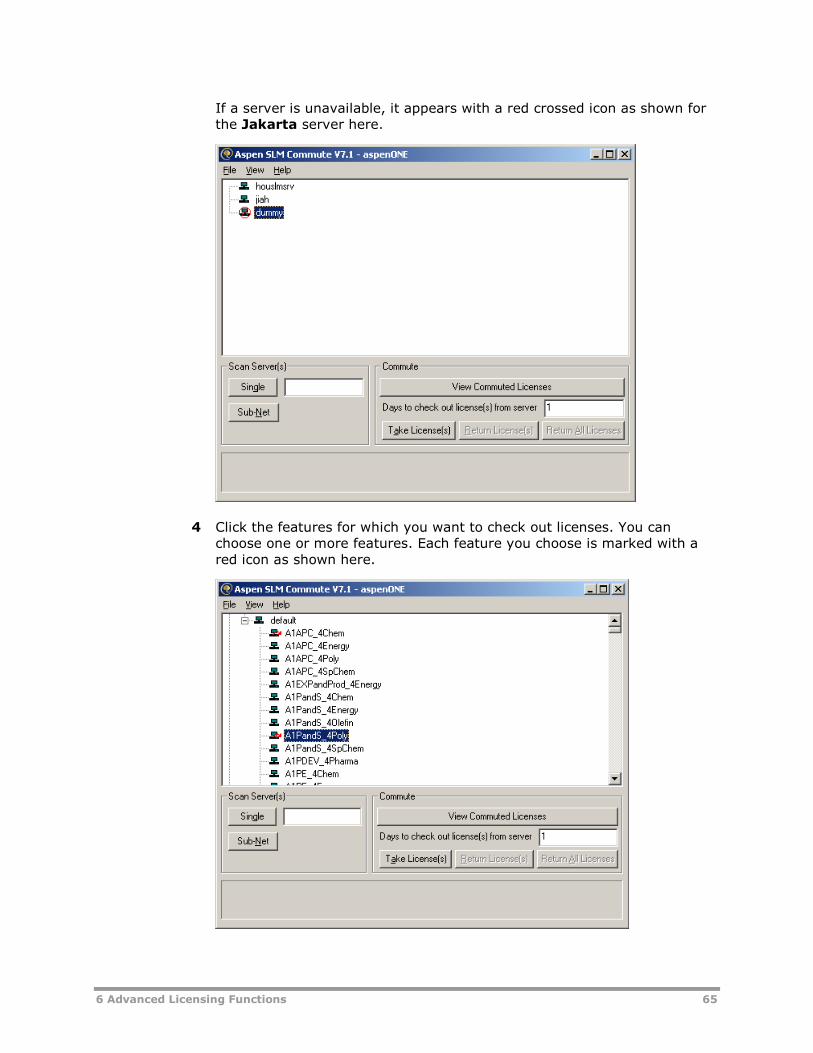
6 Advanced Licensing Functions 65
If a server is unavailable, it appears with a red crossed icon as shown forthe Jakarta server here.
4 Click the features for which you want to check out licenses. You canchoose one or more features. Each feature you choose is marked with ared icon as shown here.
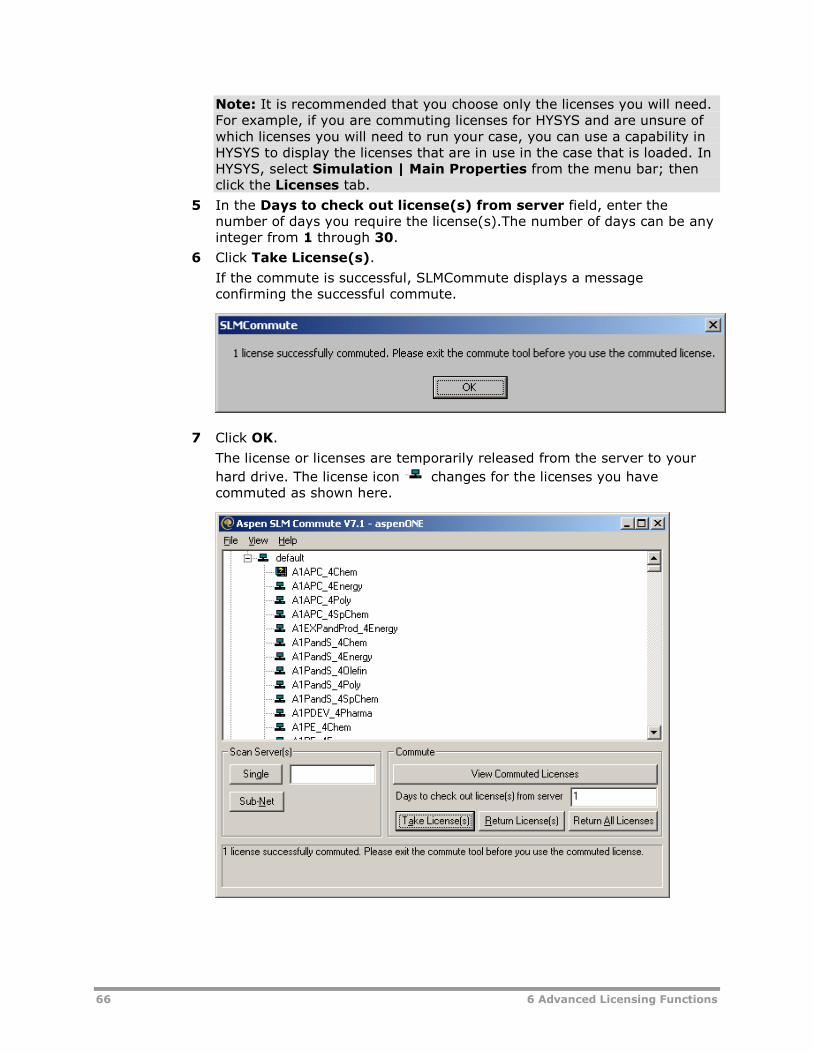
66 6 Advanced Licensing Functions
Note: It is recommended that you choose only the licenses you will need.For example, if you are commuting licenses for HYSYS and are unsure ofwhich licenses you will need to run your case, you can use a capability inHYSYS to display the licenses that are in use in the case that is loaded. InHYSYS, select Simulation | Main Properties from the menu bar; thenclick the Licenses tab.
5 In the Days to check out license(s) from server field, enter thenumber of days you require the license(s).The number of days can be anyinteger from 1 through 30.
6 Click Take License(s).
If the commute is successful, SLMCommute displays a messageconfirming the successful commute.
7 Click OK.
The license or licenses are temporarily released from the server to your
hard drive. The license icon changes for the licenses you havecommuted as shown here.
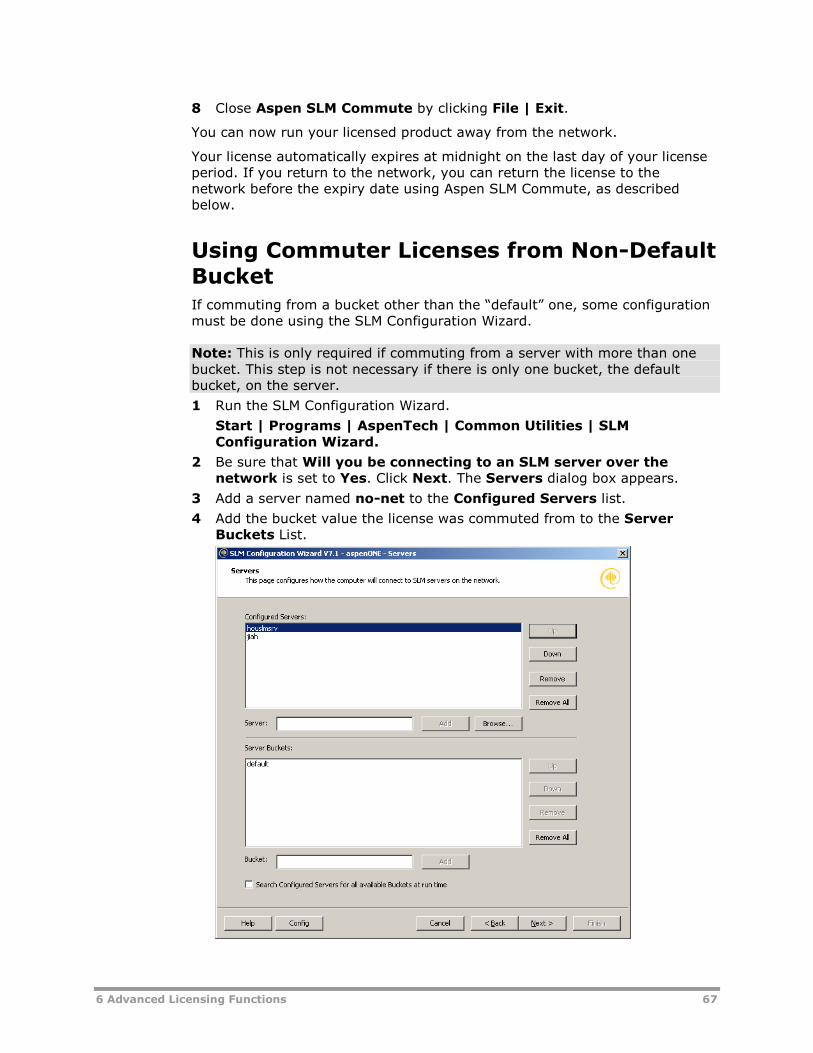
6 Advanced Licensing Functions 67
8 Close Aspen SLM Commute by clicking File | Exit.
You can now run your licensed product away from the network.
Your license automatically expires at midnight on the last day of your licenseperiod. If you return to the network, you can return the license to thenetwork before the expiry date using Aspen SLM Commute, as describedbelow.
Using Commuter Licenses from Non-DefaultBucketIf commuting from a bucket other than the “default” one, some configurationmust be done using the SLM Configuration Wizard.
Note: This is only required if commuting from a server with more than onebucket. This step is not necessary if there is only one bucket, the defaultbucket, on the server.
1 Run the SLM Configuration Wizard.
Start | Programs | AspenTech | Common Utilities | SLMConfiguration Wizard.
2 Be sure that Will you be connecting to an SLM server over thenetwork is set to Yes. Click Next. The Servers dialog box appears.
3 Add a server named no-net to the Configured Servers list.
4 Add the bucket value the license was commuted from to the ServerBuckets List.

68 6 Advanced Licensing Functions
5 Click Next until you reach the Summary dialog box. Then click Finish.
Viewing Commuter LicensesYou can view what licenses are currently commuted.
To view commuter licenses
1 Run the commute program by clicking Start | Programs | AspenTech |Common Utilities | SLMCommute command from the desktop menu.
The Aspen SLM Commute dialog box appears.
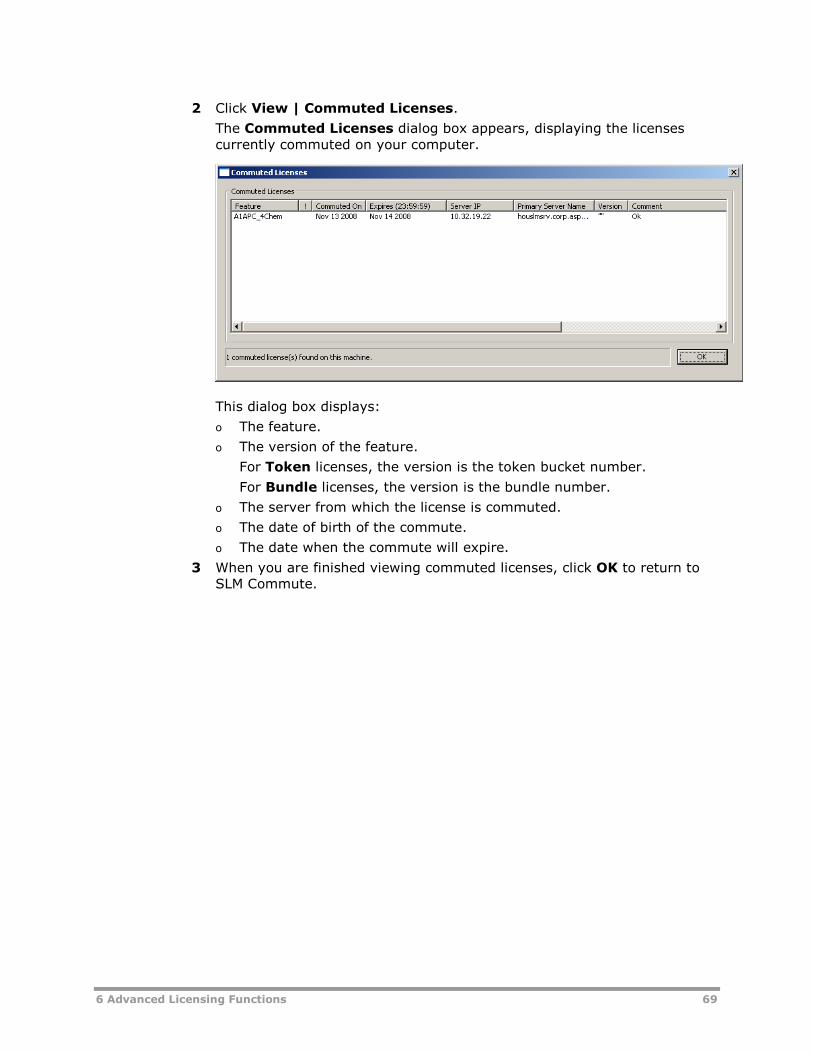
6 Advanced Licensing Functions 69
2 Click View | Commuted Licenses.
The Commuted Licenses dialog box appears, displaying the licensescurrently commuted on your computer.
This dialog box displays:
o The feature.
o The version of the feature.
For Token licenses, the version is the token bucket number.
For Bundle licenses, the version is the bundle number.
o The server from which the license is commuted.
o The date of birth of the commute.
o The date when the commute will expire.
3 When you are finished viewing commuted licenses, click OK to return toSLM Commute.

70 6 Advanced Licensing Functions
Accessing Aspen SLM Commute VersionInformationYou can access the version of SLM Commute. This could be useful whensupplying information to AspenTech support to diagnose problems.
To Access SLM Commute version information
1 Run the commute program by selecting Start | Programs | AspenTech| Common Utilities | SLMCommute command from the desktop menu.
The Aspen SLM Commute dialog box appears.
2 On the toolbar of Aspen SLM Commute dialog box, click Help |About.
The About Aspen SLM Commute dialog box appears, showing theversion of Aspen SLM Commute.
3 Click OK to return to Aspen SLM Commute.
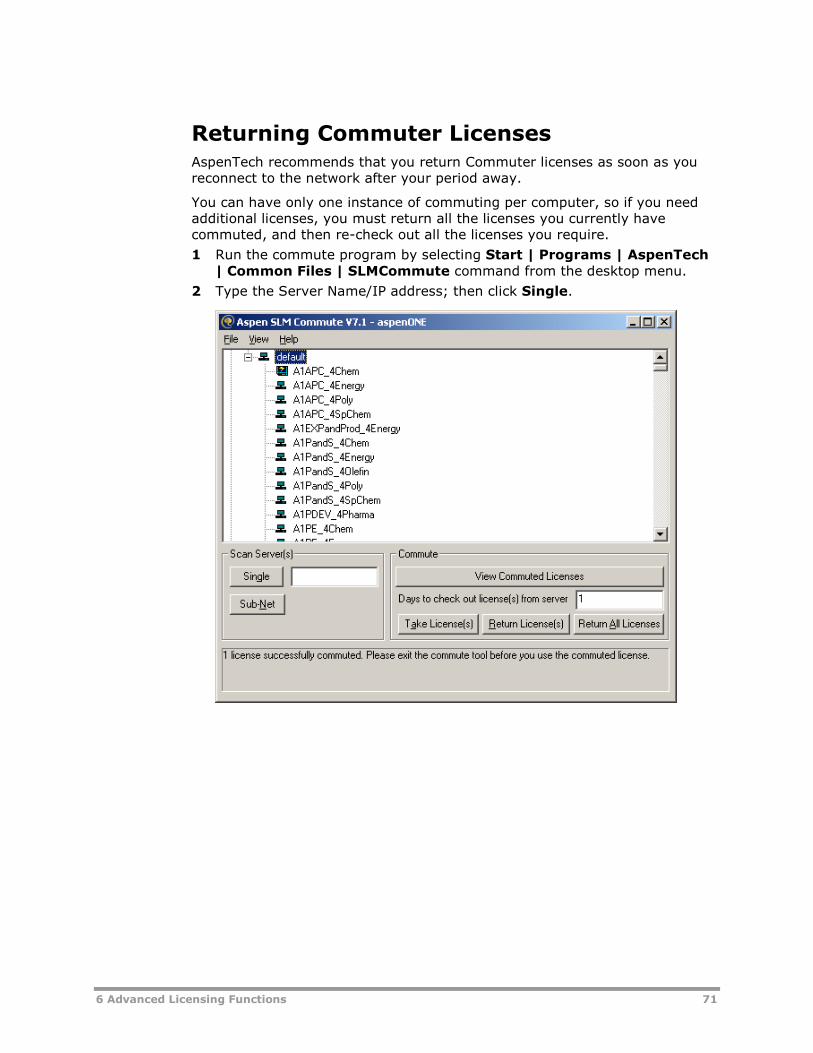
6 Advanced Licensing Functions 71
Returning Commuter LicensesAspenTech recommends that you return Commuter licenses as soon as youreconnect to the network after your period away.
You can have only one instance of commuting per computer, so if you needadditional licenses, you must return all the licenses you currently havecommuted, and then re-check out all the licenses you require.
1 Run the commute program by selecting Start | Programs | AspenTech| Common Files | SLMCommute command from the desktop menu.
2 Type the Server Name/IP address; then click Single.
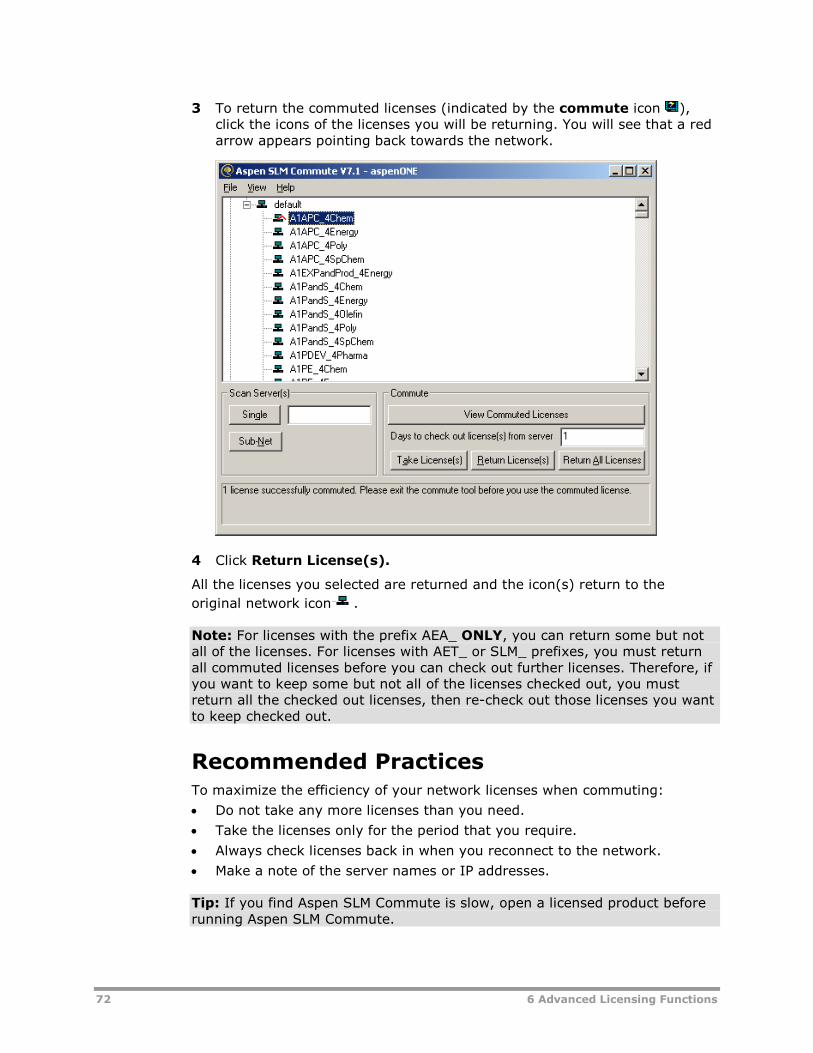
72 6 Advanced Licensing Functions
3 To return the commuted licenses (indicated by the commute icon ),click the icons of the licenses you will be returning. You will see that a redarrow appears pointing back towards the network.
4 Click Return License(s).
All the licenses you selected are returned and the icon(s) return to the
original network icon .
Note: For licenses with the prefix AEA_ ONLY, you can return some but notall of the licenses. For licenses with AET_ or SLM_ prefixes, you must returnall commuted licenses before you can check out further licenses. Therefore, ifyou want to keep some but not all of the licenses checked out, you mustreturn all the checked out licenses, then re-check out those licenses you wantto keep checked out.
Recommended PracticesTo maximize the efficiency of your network licenses when commuting:
Do not take any more licenses than you need.
Take the licenses only for the period that you require.
Always check licenses back in when you reconnect to the network.
Make a note of the server names or IP addresses.
Tip: If you find Aspen SLM Commute is slow, open a licensed product beforerunning Aspen SLM Commute.
6 Advanced Licensing Functions 73
License and Product NamesIn order to commute the correct licenses when the AspenTech product is usedoffline, the user needs to be familiar with the list of licenses that theirAspenTech product uses.
Commuting the Licenses from a RemoteLocationAs long as you can communicate with the License Server, you can commutelicenses from that server. Any program that allows remote access to yournetwork can be used.
Note: Commuting from a remote location requires a very stable connection.If the connection is lost at any time during a commuter transaction whentaking or returning licenses, the commuted license may become corrupted oneither your workstation or the license server.
Stopping or Changing theLicense ServerIf there is no substantial change to the license server, stopping and restartingthe Sentinel RMS License Manager service, including powering down andrestarting the computer, has no effect on actively commuted licenses.Examples of changes requiring a reboot include an unrecoverable hardwarefailure, a reformat of hard drive, or the installation of a new operatingsystem.
Any addition or upgrade to a license file (for example, changing the expirydate) has no effect on commuted licenses. However, if there are activelycommuted licenses and a fundamental characteristic (for example, thenumber of tokens it requires) of a license is changed on the server, it ispossible that the commuted license will not return itself properly. In this caseit must be left to expire.
Note: AspenTech recommends that you return all commuted licenses beforeupgrading the license server program.
Setting User OptionsSLM also contains other options that are set by using specific configurationfiles: User Alerts and Group Reservations.
User AlertsUser Alerts let you know about certain license events. There are seven alerttypes that can be generated using two different reporting types.

74 6 Advanced Licensing Functions
Configuring User Alerts
To enable alerts, you need a configuration file with information on the licensestrings in the license file. The configuration file, lservrc.cnf, is a generalpurpose configuration file associated with a particular license file.
The LServrcCNF environment variable can be used to set the name andlocation of the network license server configuration file. This file is used insetting up user alerts and other options. If LServrcCNF is not used to specifythe configuration file, then the configuration file resides in the same directoryas the license file and has the same base name as the license file but with theextension *.cnf.
It is recommended that the default name and location are used for this file.
Configuring the LServrcCNF Environment Variable
To configure the LServrcCNF environment variable
1 On your computer, click Start | Settings | Control Panel.
2 Double-click the System icon to open the System Propertiesview.
3 Click the Advanced tab. On the Advanced tab, click EnvironmentVariables.
The Environment Variables view appears.
Note: Windows Administrator privileges are needed to change thesesettings.
4 On the Environment Variables view in the System Variables group,click New.
The New System Variable view appears.
5 In the Variable Name field, type the name of the environment variableas LServrcCNF.
6 In the Variable Value field, type the file directory/location for the *.cnffile.
7 Click OK.
The New System Variable view closes and the new variable and value isadded in the Environment Variables view.
8 If you do not need to set any more variables, click OK to close theEnvironment Variables view and exit the System Properties view.
9 Reboot the computer to ensure the new environment variable takes effect.
6 Advanced Licensing Functions 75
Defining the Alert Types
Each alert action has the following format:
<alert-type> = <reporting-type1> ON/OFF <reporting-type2> ON/OFF
where alert-type can be:
hardlimit. Hardlimit exceeded.
appstart. License issued.
appstop. License returned.
denied. License denied.
apptimeout. License time-out.
expired. License expiration date.
and reporting-type can be:
email. E-mail will be sent to recipients given after EMAIL=.
Note: Line continuation is not supported, so all e-mail addresses must fiton one line. The maximum line length is 512 characters.
script. The script given after SCRIPT= will be invoked.
Note: In order to use e-mail alert, you must configure the license serverusing lsmail.exe.
You must configure the Sentinel RMS License Manager 8.2 to automaticallyinstall lsmail.exe. The default location for lsmail.exe is:
<ROOT>:\Program Files\Common Files\SafeNet Sentinel\Sentinel RMSLicense Manager\WinNT
Run the lsmail.exe application. At the prompt, type the host name or IPaddress of an MS Exchange server.
This is an sample configuration file of 'lservrc.cnf', normally placed in thedirectory where the license server is installed:
[AEA_HYSYS_Process *]softlimit = SCRIPT OFF EMAIL OFFhardlimit = SCRIPT OFF EMAIL OFFappstart = SCRIPT OFF EMAIL OFFappstop = SCRIPT OFF EMAIL OFFdenied = SCRIPT OFF EMAIL ONapptimeout = SCRIPT OFF EMAIL OFFexpired = SCRIPT OFF EMAIL OFFEMAIL= [email protected][AEA_HYSYS_Dynamic *]softlimit = SCRIPT OFF EMAIL OFFhardlimit = SCRIPT OFF EMAIL OFFappstart = SCRIPT OFF EMAIL OFFappstop = SCRIPT OFF EMAIL OFFdenied = SCRIPT OFF EMAIL ONapptimeout = SCRIPT OFF EMAIL ONexpired = SCRIPT OFF EMAIL OFFEMAIL= [email protected][* *]softlimit = SCRIPT OFF EMAIL ON
76 6 Advanced Licensing Functions
hardlimit = SCRIPT OFF EMAIL OFFappstart = SCRIPT OFF EMAIL OFFappstop = SCRIPT OFF EMAIL OFFdenied = SCRIPT OFF EMAIL OFFapptimeout = SCRIPT OFF EMAIL OFFexpired = SCRIPT OFF EMAIL [email protected]
This configuration file requests the license server to send an e-mail throughlsmail.exe if:
A license is denied for HYSYS or HYSYS Dynamics.
A license times out for HYSYS Dynamics.
The softlimit is exceeded for all the features available in the license file ([**]).
Group ReservationsGroup reservations let you associate user groups with each feature. A certainnumber of licenses for that feature are then reserved in a pool for these usergroups. Any licenses not specifically reserved remain in the general pool.
A group specification consists of the following:
Name of the feature for which the reservation applies.
Name of the group.
Number of licenses reserved for that group.
Login names of users/host IDs of computers belonging to that group.
The following restrictions apply:
The groups must be mutually exclusive.
Different groups using the same feature cannot have common users orcomputers.
The number of licenses reserved for a feature cannot exceed the numberof concurrent copies specified in the license string for that feature.
When the license server receives a request, it checks whether the usermaking the request belongs to a group.
If this is the case then
the user making the requestbelongs to a group
-and-
licenses are available for thatgroup
the license server issues the license(s)and removes it from that group’s pool
the user making the request does notbelong to a group
the license server issues the license(s)from the general pool until no licenses areavailable
the user making the requestbelongs to a group
-but-
licenses are NOT available for thatgroup
the license server issues the license(s)from the general pool until no licenses areavailable
6 Advanced Licensing Functions 77
Configuring a Group Reservation File
Group reservation information is normally held in a text file called lsreserv(no extension). By default, this file is placed in the Sentinel server directory:
<ROOT>:\Program Files\Common Files\SafeNet Sentinel\Sentinel RMSLicense Manager\WinNT
This is the same location as the server program (usually lservnt.exe) andthe license file (lservrc).
Tip: If you want, the LSReserv environment variable can be used to set adifferent file name or path to the reservation file. For more information aboutenvironment variables, see Configuring SLM using Environment Variables.Group reservations are entered according to the following format, with onegroup per line:
feature_name[ ,ver ]:group_name:num_of_licenses:{user_name |computer}
One or more user names and/or computer names can be specified, but atleast one value must be specified in the last field. User and computer namesmust be separated by a space. The version number is optional.
Note: Sentinel RMS License Manager is not case sensitive. Therefore, thereservation specifications (for example, License Feature Name, UserName, and Computer Name) are not case sensitive.
Sample Group Reservation File:
## This is a sample Group Reservation file## File name: lsreserv## In this sample there are 3 Dynamics licenses being reservedfor## the user group Dynamics_Experts which contains 4 individuals;## if there are more than 3 Dynamics licenses available## on the server the remainder will be available for general use.## Additionally anyone logging in to the computer named “Control”## may access Dynamics. Michael is not allowed to access Dynamics## at all (even via “Control”).AEA_HYSYS_Dynamics:Dynamics_Experts:3:Bob John Mary Doug $Control!Michael
Note: The characters $ and ! have special meaning. $ indicates the name is acomputer name, and ! indicates a logical NOT.
Excluding Users or Computers from Using a Feature
Specifying a user/computer in a group using the logical NOT (!) excludes thatuser/computer from any use of that feature. This means that theuser/computer is prevented from using that feature even if there are licensesavailable in the general pool.

78 6 Advanced Licensing Functions
Guidelines for writing a reservation file
Once the reservation file has been created, stop and start the SLM serviceusing loadls.exe. There is no need to re-start the computer.
Make sure you press Enter after the last line in the reservation file;otherwise, the last line in the reservation file is not taken into account.
There is no comment in the SLM log file showing that the server is using areservation file.
WlmAdmin will show the current number of users for each license, themaximum number of users, and the number of reserved licenses.
Comment lines start with ##.
There is no entry in the SLM log file showing that a reservation is used.
Use the noone keyword in order to prevent anyone from using certainlicenses, for example,
SLM_AspenProperties: Grp2:2: noone
Use $<computer name> to allow any user logged on a specific computerto use the license. The line below will reserve 2 Aspen Properties licensesto user1 and any user logged on to the computer machine1:
SLM_AspenProperties: Grp2:2: user1 $machine1
Use !<username> to prevent a user from using a specific license, even ifa license is available and not reserved. The line will prevent user2 fromusing Aspen Properties:
SLM_AspenProperties: Grp2:2: user1 $machine1 !user2
When a license key is refused to the user, the following error message isdisplayed on the client computer. This is a standard message that is alsodisplayed when there are no more licenses available on the computer.

6 Advanced Licensing Functions 79
License version
The license version should only be used if several buckets are used in thelicense key file. A bucket is a set of licenses, using one or several licensingtechniques (standard, token or bundle). The license version can be found bylooking at WlmAdmin. For more information about licenses and versions, seethe section, “Determining the number of licenses available in a file and theirversions” at the end of this chapter.
If several buckets are available, the following syntax can be used:
SLM_AspenCustomModeler: Grp1:5: user1 user2SLM_AspenCustomModeler,1: Grp2:4: user3 user 4SLM_AspenCustomModeler,2: Grp3:3: user5 user6 user7
The first line is for the default bucket, the second for the Aspen CustomModeler license in bucket 1, the third line for the Aspen Custom ModelerLicense in bucket 2.
Reservation file for standard licenses
In a standard license file, a maximum number of simultaneous users is set foreach product. A reservation allows reserving a certain number of licenses ofeach product to different groups of users. For example,
SLM_AspenPlus: Grp1:10: user1 user2 user3SLM_AspenCustomModeler: Grp2:5: user1 user2 user4SLM_AspenProperties: Grp3:2: user1 $machine1 !user2
The first line will reserve 10 Aspen Plus licenses to user1, user2, and user3.The second line will reserve 5 Aspen Custom Modeler licenses to user1, user2,and user4. The last line will reserve 2 Aspen Properties licenses for user1 andany user logging onto the computer machine1. The last line also preventsuser2 from using Aspen Properties.
Reservation file for token licenses
With a token license key, the reservation can be made on the total number oftokens but also on each individual product.
In a version 4 license file, the total number of tokens is set in featureSLM_Pool. In addition, a maximum number of users is set for each product(for example, SLM_AspenCustomModeler). Both the SLM_Pool feature and theindividual product feature can be used in the reservation file.
For example:
SLM_Token:Grp1:100: user1 user2 user3
Will reserve 100 tokens to the three users listed, regardless of the productthey use.
Simultaneously, a reservation can be made on each product:
SLM_AspenPlus:Grp2:10: user1 user2 user3
This will reserve 10 Aspen Plus licenses to the group of three users. Typically,the maximum number of users is set to 32766 users for each product, exceptspecial license agreements.
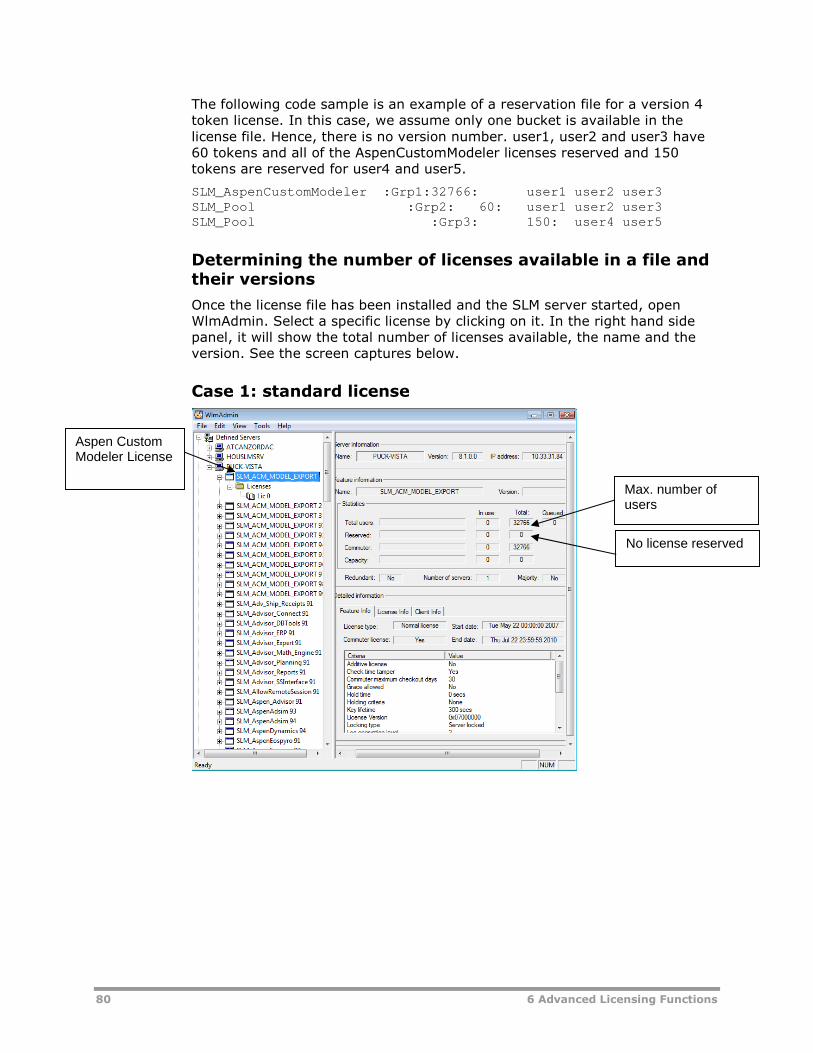
80 6 Advanced Licensing Functions
The following code sample is an example of a reservation file for a version 4token license. In this case, we assume only one bucket is available in thelicense file. Hence, there is no version number. user1, user2 and user3 have60 tokens and all of the AspenCustomModeler licenses reserved and 150tokens are reserved for user4 and user5.
SLM_AspenCustomModeler :Grp1:32766: user1 user2 user3SLM_Pool :Grp2: 60: user1 user2 user3SLM_Pool :Grp3: 150: user4 user5
Determining the number of licenses available in a file andtheir versions
Once the license file has been installed and the SLM server started, openWlmAdmin. Select a specific license by clicking on it. In the right hand sidepanel, it will show the total number of licenses available, the name and theversion. See the screen captures below.
Case 1: standard license
Max. number ofusers
No license reserved
Aspen CustomModeler License
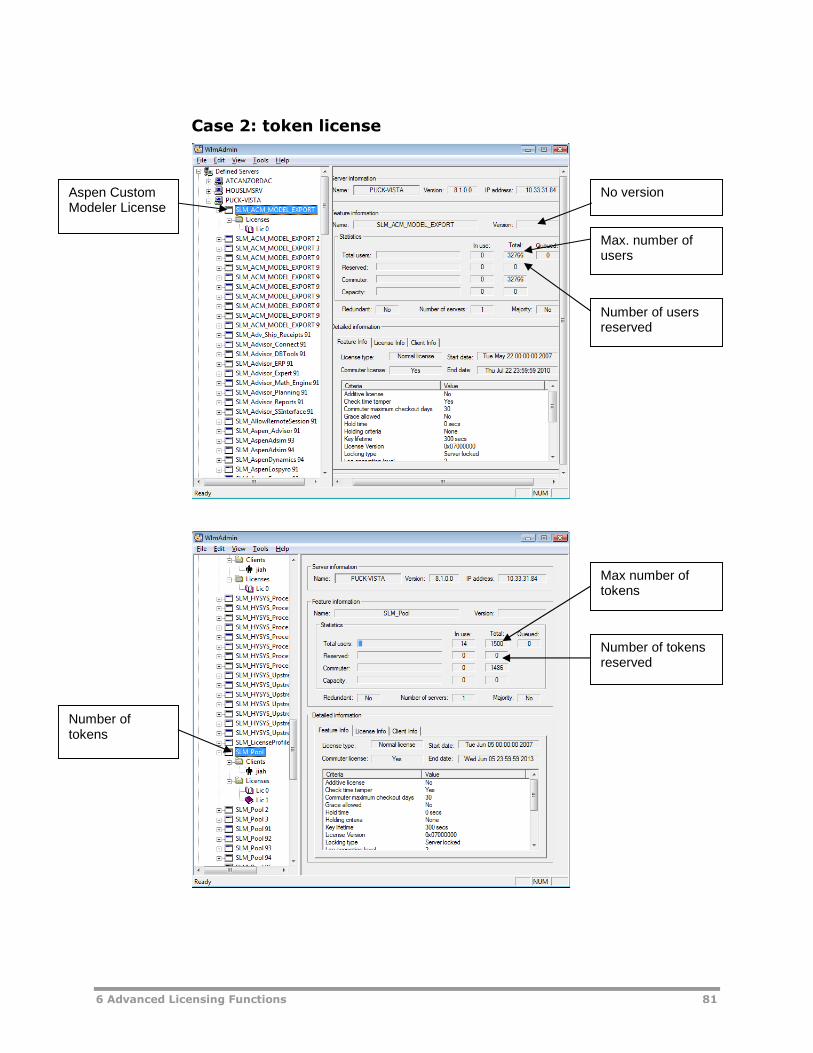
6 Advanced Licensing Functions 81
Case 2: token license
Number oftokens
Max number oftokens
Max. number ofusers
Number of usersreserved
No versionAspen CustomModeler License
Number of tokensreserved

82 6 Advanced Licensing Functions
7 Troubleshooting SLM Problems 83
7 Troubleshooting SLMProblems
IntroductionThis chapter is designed to give you answers to some of the commonproblems encountered when setting up your licensing software. The commonproblems are grouped into the following sections:
Dongle Problems
Network Problems
Environment Variables
Common Error Messages
Please work through the following checklists if you encounter any problems.
Note: Additional troubleshooting information is available athttp://support.aspentech.com.
If you have gone through the checklist and you still have problems, contactyour local Technical Support center.
Before contacting Technical Support, please ensure that you have checkedthat your:
System clock is correct. Your licenses have a start date and end date.Your clock must be correct for the licenses to function.
SLM is properly installed.
Licenses are properly installed.
When contacting Technical Support, you will be asked to supply five pieces ofinformation:
1 Product name(s) with which you are having problems (for example,HYSYS).
2 System Configuration:
o Licensing mode. Stand-alone, Standard network, Token network, orbundle network.

84 7 Troubleshooting SLM Problems
o For Network licensing, whether the application is installed locally or onan application server.
3 An exact description of the error encountered, in other words:
o What happened.
o When did the error happen (during installation, startup, when openinga case, and so forth).
o Most importantly, the specific text or screen shots (preferred) of theerror message(s).
Note: The error message is the most important piece of informationrequired to troubleshoot your problem.
4 A copy of your license file.
5 A copy of your configuration information. To get this, start theConfiguration Wizard, click Config, which causes the SLM & SystemConfiguration page to display, showing your configuration information.Click Copy to Clipboard; then paste that information from the clipboardto a Notepad or other blank document.
Dongle Problems
Check Dongle Attachment
To check dongle attachment
1 Check that the dongle is properly attached to the computer.
o Software License Manager (SLM) dongles are Sentinel SuperPro -Computer ID keys, manufactured by Rainbow Technologies. The SLMdongle is installed on the parallel port (printer port) or USB port ofyour computer with an arrow indicating which end is plugged in.
Note: Do not plug the parallel port dongle in the serial port, because itmay damage your computer.
To test if the port is working properly
1 Try connecting a printer or other device to the port.
If you do not have a device to attach to the port, you can also tryinstalling the Hyprotech green dongle on another computer.
2 Run the SLM Configuration Wizard. On the Introduction dialog box, clickConfig to display your SLM and System configuration information.
If your dongle is properly attached to the server and still no lock code isdisplayed, the next step is to ensure that you have installed the Sentinelsystem drivers used by the server to communicate with the SLM dongle.
To install the Sentinel System Driver
To install the Sentinel System Driver, follow the procedure described in thesection, “Sentinel System Driver” in the “SLM Overview” chapter.

7 Troubleshooting SLM Problems 85
To check that the Sentinel System Driver is Installed
Using Windows Explorer, browse to the Sentinel System Driver folderand verify that the SetupSysDriver.exe file exists. The SetupSysDriver.exeis located at,
<root>\Program Files\Common Files\SafeNet Sentinel\SentinelSystem Driver\
Check that there is no problem with yournetworkEnsure that your workstation and server computers can communicateproperly. For example, use the ping command to test communicationbetween client and server.
If you can see the licenses on the server using WLMAdmin, but you cannotconnect to the server with the application, then review the following checklist:
Check if license server is outside of yoursub networkIf the server is outside your subnetwork, you need to set the LSHostenvironment variable or file on the client’s computer to point to that server.
For the client’s computer, set LSHost using the SLM Configuration Wizard.For configuration information, see Chapter 5 Configuring SLM.
For the SLM server, set LSHost using the operating system’s environmentvariable.
To set LSHost using the operating system’s environmentvariable
1 On your computer, click Start | Settings | Control Panel.
2 Double-click the System icon to open the System Propertiesview.
3 Click the Advanced tab. On the Advanced tab, click EnvironmentVariables.
The Environment Variables view appears.
4 In the System Variables group, click New.
The New System Variable view appears.
5 In the Variable Name field, type the name of the environment variableas LSHost.
6 In the Variable Value field, type the IP address or hostname of theserver(s).
The LSHost variable naming conventions are:
o Any valid hostname recognized by your network.
o Numeric names (IP address).
86 7 Troubleshooting SLM Problems
Note: If you are using a network system where the DNS is variable, thenyou cannot use the IP address for this purpose.
7 Click OK.
The New System Variable view closes, and the new variable and valueis added in the System Variables group of the Environment Variablesview.
8 Reboot the computer to make sure these environment variables takeeffect.
Check the host name or IP addressIs the host name or IP address you specified for the LSHost or LServOptsenvironment variable correct?
1 On your computer, click Start | Settings | Control Panel.
2 Double-click the System icon to open the System Propertiesview.
3 Click the Advanced tab. On the Advanced tab, click EnvironmentVariables.
The Environment Variables view appears.
4 The variable values for lshost or lservopts are located in the Valuecolumn.
5 Make any necessary changes/modification by selecting the variable andclicking the Edit button.
6 Close the Environment Variables and System Properties views byclicking the OK buttons.
Tip: Reboot the computer to make sure these environment variables takeeffect.
If the license server can be located using WLMAdmin and the license file is inthe correct place but you do not see any licenses, or you see the wronglicenses, then review the following checklist:
Check if the license server has beenreloaded after installing the licenses on theserverUse WLMAdmin to verify that the license server has been reloaded. Follow theinstructions in the “Checking that the License Server has been properlyinitialized” section in Chapter 4 of this manual.
Check your network connection systemYou may be experiencing network problems.
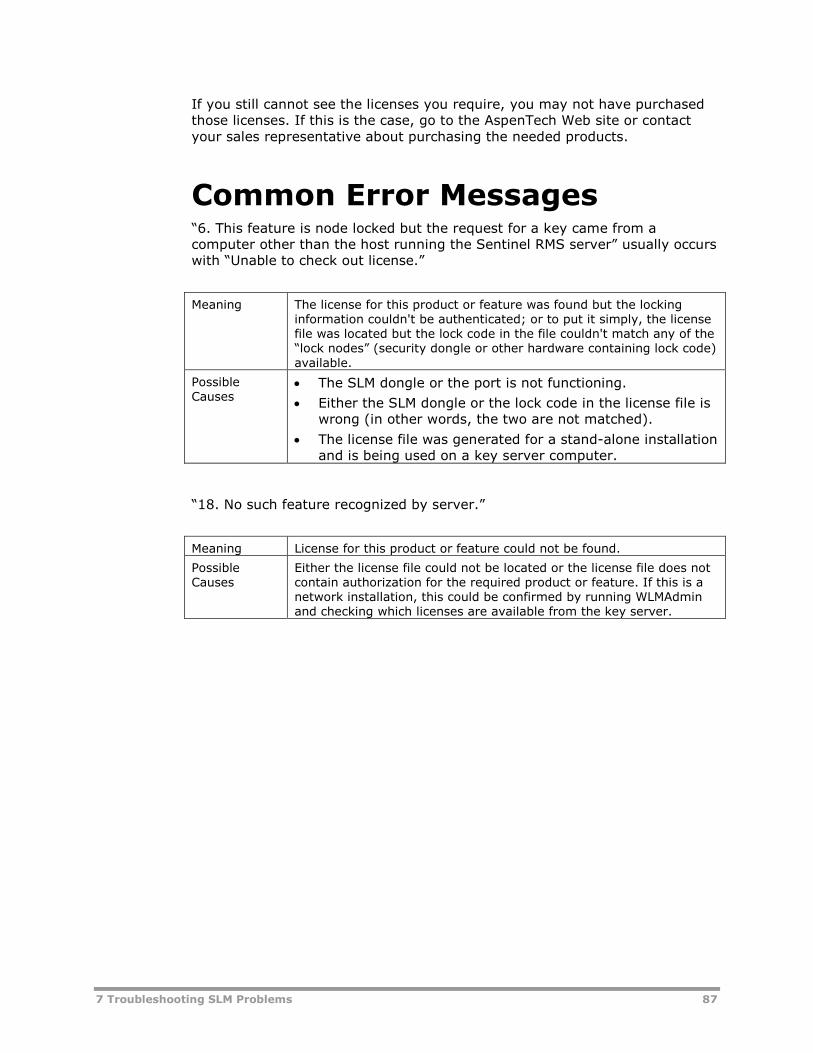
7 Troubleshooting SLM Problems 87
If you still cannot see the licenses you require, you may not have purchasedthose licenses. If this is the case, go to the AspenTech Web site or contactyour sales representative about purchasing the needed products.
Common Error Messages“6. This feature is node locked but the request for a key came from acomputer other than the host running the Sentinel RMS server” usually occurswith “Unable to check out license.”
Meaning The license for this product or feature was found but the lockinginformation couldn't be authenticated; or to put it simply, the licensefile was located but the lock code in the file couldn't match any of the“lock nodes” (security dongle or other hardware containing lock code)available.
PossibleCauses
The SLM dongle or the port is not functioning.
Either the SLM dongle or the lock code in the license file iswrong (in other words, the two are not matched).
The license file was generated for a stand-alone installationand is being used on a key server computer.
“18. No such feature recognized by server.”
Meaning License for this product or feature could not be found.
PossibleCauses
Either the license file could not be located or the license file does notcontain authorization for the required product or feature. If this is anetwork installation, this could be confirmed by running WLMAdminand checking which licenses are available from the key server.

88 7 Troubleshooting SLM Problems
8 Frequently Asked Questions 89
8 Frequently AskedQuestions
General SLM
How do I fix my SLM installation?Occasionally AspenTech products fail to start because they can't get a license.This can be because
SLM is not configured properly.
Licenses on the license server have changed.
The Network or license server is very busy.
The license server has crashed.
Here are some simple steps to follow:
1 Ensure that you are running the latest version of the SLM. Aspen SLM *.dllfile is located in:
<ROOT>:\Program Files\Common Files\hyprotech\shared\strgxi2.dll
Note: The above path may be different for different language versions ofthe operating system.
2 Make sure the correct SLM is installed. Open a DOS prompt and type:
regsvr32 <ROOT>:\Program Files\CommonFiles\hyprotech\shared\strgxi2.dll
3 Clean up your SLM configuration:
o Remove your lshost environment variable.
o Remove your AEATokenmode environment variable.
o Remove your LicenseMode variable.
o If you are using an lshost file, remove it.
o Remove all registry entries under:
HKEY_LOCAL_MACHINE/Software/Aspentech/SLM/

90 8 Frequently Asked Questions
4 Install the latest SLM configuration using the SLM Configuration Wizard.
For more information, see Chapter 5: Configuring SLM.
Why are the SLM dongle (SentinelHardlock) and its lock code missing when Irun the Configuration Wizard?There are two possible solutions to this problem:
Check if the Sentinel System Driver exists.
1 On the operating system desktop, open the Add/Remove Programsview by selecting Start | Settings | Control Panel | Add orRemove Programs.
2 If the Sentinel System Driver exists, remove it.
3 Reinstall the Sentinel System Driver, following the procedure describedin the section, “Sentinel System Driver” in the “SLM Overview”chapter.
4 Return to the Add or Remove Programs view to check that driver isinstalled.
If you now run the Configuration Wizard, the SLM dongle is reported asSentinel Hardlock.
Problem with either the port or the dongle.
Try installing the dongle and drivers on another computer. If theConfiguration Wizard also fails to report the dongle on this computer, youlikely need a dongle replacement. In this case please contact your localAspenTech office to arrange for a dongle replacement.
I am trying to install an SLM applicationusing network security. Why am I gettingerrors?The License Server install for SLM applications does not install the SentinelSystem Driver needed to communicate with the parallel or USB port SLMdongle. Check for the driver as your first troubleshooting step.
Symptoms:
Running the Configuration Wizard does not show an entry for the SLMdongle. Normally there is a Sentinel Hardlock entry.
Sentinel System Driver is absent in the Add/Remove Programs view(select Start | Settings | Control Panel | Add or Remove Programs).
Remedy:
Install the driver manually from the AspenTech product installation DVD:
1 Install the Sentinel System Driver following the procedure described in thesection, “Sentinel System Driver” in the “SLM Overview” chapter.

8 Frequently Asked Questions 91
2 Check that driver is installed. You will see Sentinel System Driver inAdd or Remove Programs view.
Open the Add/Remove Programs view by clicking Start | Settings |Control Panel | Add or Remove Programs on the main desktop.
3 If you now run the Configuration Wizard, the SLM parallel dongle isreported as Sentinel Computer ID.
Continue with regular troubleshooting if this is not the problem.
When I install my license file by double-clicking on it from my email, extra digitsare added to its name and it will not work.Why?When you start an application data file from an email, very often a temporarycopy of the file is made in a temp directory used by Windows or the emailsoftware.
If there is already a copy of the file in this temp directory, it does notoverwrite the old one. Instead it creates a new temp file with a numberappended to it.
For example, double-clicking file name lservrcA.AEALIC causes a copy oflservrcA.AEALIC to be created in the temp directory and then activates it. Ifyou receive another email with the same license file name in it, when youdouble-click it, the license file will save to the temp directory aslservrcA1.AEALIC, and the next time lservrcA2.AEALIC, and so forth.
Use the Save As option to save the file to your hard drive before starting thelicense file installer.
Where is the Sentinel System Driverinstalled?The driver is installed in:
C:\WINNT\System32\snti386.dll
If you open the Add/Remove Programs view (select Start | Settings |Control Panel | Add/Remove Programs), you will see an entry forSentinel System Driver.
The computer was a server, but now I wantto delete its licenses and stop it from beinga server. How do I do this?
To remove the server feature on a computer
1 Remove the dongle connected to the computer.
2 Run the program loadls.exe, and click Remove.
92 8 Frequently Asked Questions
3 Run Add/Remove Programs. Click Start | Settings | Control Panel |Add/Remove Programs.
4 Click SentinelLM Server; then click Remove.
5 Run WLMAdmin. In WLMAdmin, try to view the server to verify you areno longer functioning as a server.
I have many stand-alone dongles. How do Imanage the license files?The easiest way to manage many stand-alone dongles is to install all of thestand-alone license files on each user’s computer.
Each license file works with only one dongle; however, the SLM can detectwhich dongle is on the back of the user's computer and select the correctlicense file from the Shared folder for use. The default location of the Sharedfolder is:
<ROOT>:\Program Files\Common Files\hyprotech\shared\
By installing all of the license files on each computer you don’t need to keeptrack of which user needs which license file. You also create the ability toswap dongles from computer to computer by doing this.
1 Rename the extension of all of your stand-alone license files from*.AEALIC or *.SLF to *.LIC.
2 Then, on each user's computer:
o Install the product (for example, HYSYS).
o Copy all of the *.LIC files to the Shared directory
<ROOT>:\Program Files\Common Files\hyprotech\shared\
If you upgrade an existing stand-alone license file or add a new one (in otherwords, add a new key) you can simply email all users the new license file(leave the extension as .AEALIC or .SLF, as it was delivered). Double-clicking the license file will add it to their *.LIC license file list in the Sharedfolder.
Note: You will also need write access to the application directory on yourcomputer because when you run the application the SLM will copy theappropriate *.LIC file, depending on the key, to the application directory andthen rename it to lservrc.
Can I switch a stand-alone SLM donglebetween multiple computers?Yes. AspenTech continues to support the ability to move your stand-alonedongle from one computer to another and run your licensed software fromany computer, so long as the SLM dongle attached. This is stand-alone dongleinterchangeability.
To do this under SLM simply install the license file locked to the SLM dongleon every computer that will be using the SLM dongle.
8 Frequently Asked Questions 93
If you will be using a pool of stand-alone dongles, then to ensureinterchangeability, the license file for each and every stand-alone dongle youhave will need to be stored on the computer.
When an application starts, SLM will identify the stand-alone dongle beingused and will attempt to find the license file for that SLM dongle. If it does,the application will run. If not, an error will be generated.
License file installation can be done during the AspenTech product installation,but a new or updated license file can also be added at any time.
Note: It is recommended that the computer be shut down before adding orremoving a dongle, particularly with parallel port and serial port dongles. Thecomputer can be safely restarted after the dongle is added or removed.
What is the Commuter Option?The commuter option enables laptop users to check-out the licenses requiredto run an AspenTech product to a specific computer from a network licenseserver. The licenses expire a set period of time following check-out. Themaximum check-out period is 30 calendar days (one month). The licenses canbe checked-in to the network license server when the computer isreconnected to the network.
Why do I get the error message "RequiredComponent Missing" when trying to run anAspenTech product?The Required Component Missing message indicates that some file did notregister itself properly during the installation. A likely candidate is thestrgxi2.dll which must be installed and registered on each client computer.The default location for the strgxi2.dll file is in:
<ROOT>:\Program Files\Common Files\hyprotech\shared\
Use a program like regsvr32.exe (found in your AspenTech product programfolder) to register the strgxi2.dll on the client computer.
1 Copy Regsvr32 into the same folder as the strgxi2.dll.
2 Go to a DOS prompt.
3 Change the active directory to the Shared folder:
CD <ROOT>:\Program Files\Common Files\hyprotech\shared\
4 Run the regsvr32 program:
regsvr32 strgxi2.dll
94 8 Frequently Asked Questions
Why is the AspenTech product telling methat I do not have the appropriate licensesto run my product?Locate your license file and open it in Notepad. Check to see that you arelicensed for the options that the case requires on open.
How can I run an AspenTech productlocally on the same computer that has thenetwork license and the dongle?Follow these steps to use the network license in "local" mode on the user'scomputer:
1 Attach your SLM dongle to the parallel port or USB port of the computer.
2 Run the Product Installer.
Insert the AspenTech product DVD into the DVD drive of the chosen user'scomputer.
From the Start menu, select Run; then, in the dialog box, type D:\setup.exe (where D: is the DVD drive). Click OK. Or the setup programwill run automatically as soon as you insert the DVD into the drive.
3 Install the License Server and license file on the user's computer.
Ensure that the license file is installed in the correct Rainbow TechnologiesSentinel server directory (NOT in the Hyprotech/Shared orAspenTech/Shared folders).
As outlined in the instructions, use the License Tools to check theinstallation.
o Use WLMAdmin.exe to check for proper server set up.
o Use the Configuration Wizard to check that the SLM dongle and driversare properly installed.
Note: Install the Sentinel System Driver following the proceduredescribed in the section, “Sentinel System Driver” in the “SLM Overview”chapter.
4 Install the AspenTech product on the user's computer as per the installinstructions.
Ensure that you choose to use network licensing. During the AspenTechproduct install you will be asked whether you would like to install locallicense files; choose NO to installing local files.
5 Use the SLM Configuration Wizard to set the registry.Or set lshost = the computer name (or fixed IP address) of the user'scomputer.
You can either set this as an LSHost registry entry (preferred) or in theenvironment variable LSHOST. If you choose to create an lshost file, itmust reside in the directory containing the AspenTech product executablefile (for example, HYSYS.exe).
For details on creating an lshost file or environment variable, seeConfiguring SLM using Environment Variables.

8 Frequently Asked Questions 95
Note: Do not set lshost = NO_NET because this will force theAspenTech application to look for a stand-alone license; the license serverwill not be detected.
6 Open the AspenTech product.
Can I use SLM-enabled products with aWindows/Citrix Terminal Server?Limited testing has shown that SLM-enabled applications can be run from aterminal server using network licensing (with the SLM Network License Serveron another non-terminal server computer). AspenTech products will not runwith stand-alone licensing on Citrix or Windows Terminal Server.
Product Specific
HTFS Products don't display the standardSLM error handles. How do I troubleshootlicensing problems?Unfortunately, with HTFS products released prior to March 2002, softwareproducts did not display the descriptive SLM error messages. This makes itvery difficult to troubleshoot installation problems. The following are a fewcommon procedures used to troubleshoot licensing problems:
Run the SLM Configuration Wizard to check for the SLM dongle and lockcode.
Make sure the license file content and installation are correct.
Make sure that your system clock is up to date and that your networkadministrator has not triggered a time tamper error by changing dates onyour system clock.
Check the license file to ensure that it has not expired.
Most licensing problems are related to problems with either the license filecontents, license file installation, or problems communicating with the SLMdongle. Treat these as you would error codes 6. or 18. For more information,see “Common Error Messages.”
Guidelines for SLM Features
How do I get logging to work properly onmy server?There are two major procedures:

96 8 Frequently Asked Questions
1 Set the lservopts environment variable with the -l switch as outlined inthe V2.4 Update / Get Started guide.
2 Perform a hard reboot of the server. The logging may not set properlywithout this second step.
The logging file must always be checked after the reboot to ensure that it islogging correctly.
How do I set up Group Reservations?For instructions, see “Group Reservations.”
If the Reservation file is not working properly, here are some troubleshootingsteps:
1 Ensure that SLM can locate group reservation file:
o Use the default path and file name:
C:\Program Files\Common Files\SafeNet Sentinel\Sentinel RMSLicense Manager\WinNT
o Ensure that both the file path AND name are properly set in theLSRESERV environment variable.
2 Ensure you hard reboot the computer after changing your environmentvariables to ensure that they take effect.
3 Ensure that the correct case is being used for all of the names in use inthe file (set up a log file, the correct case as read by SLM will show for allnames in the log file).
SLM Administrator Tools
My WLMAdmin preferences aren't saving.Why is that?The WLMAdmin preferences usually write to a file named WLMAdmin.ini. Ifthe preferences are not saving, the problem may be that you do not havewrite privileges to your hard disk drive.
Note: This particular problem occurs if you don't have Administrator rights.
I have shut down the AspenTech productand the WLMadmin tool still states I havelicenses checked out. Why?The WLMadmin tool needs to be refreshed. In WLMadmin, in the Navigationpane (left side of the view), click the server name; then right-click and chooseRefresh on the Object Inspect menu.
8 Frequently Asked Questions 97
It might take a few moments as the tool has to interrogate the network. Thelicenses will not show you as a user of the AspenTech product if you haveshut it down and then WLMadmin is refreshed.
About Tokens
What are SLM tokens?A token is a licensing model where users pay for aggregated usage ratherthan product by product. A token can be thought of as a basic unit ofcurrency, like one dollar. Each AspenTech product and its options have a set anumber of tokens they require to run. When a user starts an AspenTechproduct (and one or more of its options), the number of tokens required ischecked out from the SLM network license server, which logs the usage.Additionally, if the client has a fixed maximum number of tokens, a check ismade to ensure that the total number of tokens currently checked-out doesnot exceed that limit. If the limit is exceeded an error is generated and theapplication or option does not start. The tokens are released when the usercloses the application or option.
If you are interested in licensing a token system for your company, pleasecontact your account manager.
Time Tamper CheckTime tamper error message "26. The server has found evidence of tamperingof the system clock, and it cannot service the request since the license forthis feature has been set to be time tamper proof."
Why am I getting the time tamper error?Your AspenTech product is disabled when your licenses expire or areotherwise invalidated. To prevent users from circumventing the expiry dateby changing their system clock, SLM establishes time stamps on yourcomputer system and uses them to detect time tampering. In the eyes of thesecurity system, it has determined that there has been some sort of timetampering on your system.
This can be for valid reasons, which can be avoided.
How can I fix the problem?Depending on what has changed in your system, sometimes simplyreinstalling either the application (stand-alone systems) or the license server(network systems) will remedy this error.
Often, however, it is necessary for AspenTech to send you a timefix programto clean your computer of remnants of the time stamping.

98 8 Frequently Asked Questions
Instructions for running the Time Fix program onyour computer
You will receive the Time Fix program file (timefix.exe) and a "time fixlicense.” For example, fixdec7 is a license to do a time fix on December 7.
To clean your computer with this program
1 Uninstall the AspenTech product or license server.
2 Copy both of the attached files to the C:\ drive of the computer, and thenfrom a DOS prompt, run them as follows:
time fix
Important: Include a space between the two words.
3 Reinstall the AspenTech product or license server.
Important: This "time fix license file" will only function for one day, on thedate for which it is set by AspenTech. This date will be in the name. Forexample, fixdec7 will only function on December 7.Note: This "time fix file" is NOT a license to use products. Do not confuse thisfile with your product licenses.
If running this Time Fix does not solve your problem, contact AspenTech andTechnical Support will continue troubleshooting.
How can I avoid getting this error in thefuture?SLM security incorporates software from Rainbow Technologies, this includesthe time checking. Rainbow Technologies considers their time checkingtechnology to be proprietary and as such we are not privy to its workings;however, what AspenTech does know about it at this time is as follows:
Do not perform any manual registry editing, unless you know exactlywhat the impact will be. It can create a cross-link error which can triggertime-tampering.
Avoid moving, renaming, or deleting *.dll files; some of the "persistence"information (for example, expiry dates) tracked by the security iscontained in such files, and any of these operations could create a timetamper in eyes of the security.
Do not change the system clock (changing the time-zone setting is fine,just not the date or time independently of time zone changes).
Note: If this problem becomes a repeated event, please communicate thisfact with AspenTech so we can offer alternate solutions.

8 Frequently Asked Questions 99
I ran timefix.exe. Why did I get the errormessage "Error getting time from licensefile."?The timefix.exe program cannot read the time fix license needed to cleanyour computer of remnants of the time stamping.
To solve this problem
Ensure that:
The system clock (both time and date) on your computer is correct beforerunning the timefix program.
The "time fix license file" does not have an extension to its name (in otherwords, *.dat), as email programs sometimes will add an extension to thefile. Make sure to save the file to disk without an extension and run theprogram from that disk.
I ran the timefix.exe successfully, but whenI run the AspenTech product, I still get theerror message 26. Why?Delete all license files on your computer (search for all files namedlservrc*.*) and then reinstall them.
If you are still getting error 26, please contact AspenTech Support athttp://support.aspentech.com for further assistance.

100 8 Frequently Asked Questions
Related Documents