Copyright © 2017, Oracle and/or its affiliates. All rights reserved. Page 1. Set Up a Local Development Environment for Windows OS Follow these instructions to set up a Java development environment on your computer. Software Download List Name and Version Download Link JDK 8 or higher http://www.oracle.com/technetwork/java/javase/overview/index.html NetBeans 8.1 or higher https://netbeans.org/downloads/ Git 2.11.0.3 or higher https://git-scm.com/downloads Maven 3.3.9 or higher http://maven.apache.org/download.cgi Note: It is assumed that you will be working on a 64bit setup and provided instructions accordingly to download and install software. If you are not working on 64bit setup then download the software compatible to with your setup. Contents I. Installing JDK ......................................................................................................................................... 2 II. Setting JAVA_HOME, PATH, and CLASSPATH Environment Variables .................................................. 3 III. Verifying the JDK Installation ................................................................................................................ 5 IV. Installing NetBeans ............................................................................................................................... 6 V. Verifying the NetBeans Installation ...................................................................................................... 6 VI. Installing Git .......................................................................................................................................... 7 VII. Verifying the Git Installation ................................................................................................................. 8 VIII. Installing Maven .................................................................................................................................... 8 IX. Setting the M2_HOME, M2, and PATH Environment Variables ......................................................... 10 X. Verifying Maven Installation ............................................................................................................... 12 XI. Creating a Git Repository .................................................................................................................... 13 XII. Creating a Git Repository .................................................................................................................... 14 XIII. Configuring a Git Repository ............................................................................................................... 14

Welcome message from author
This document is posted to help you gain knowledge. Please leave a comment to let me know what you think about it! Share it to your friends and learn new things together.
Transcript
Copyright © 2017, Oracle and/or its affiliates. All rights reserved.
Page 1.
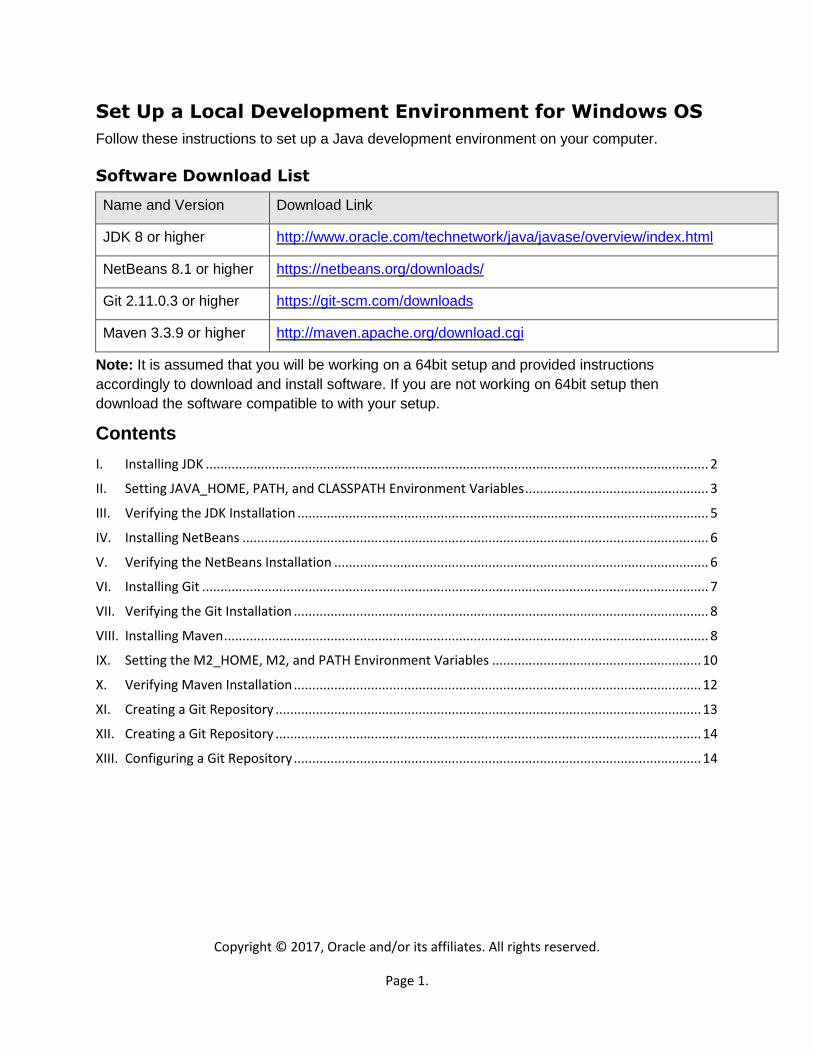
Set Up a Local Development Environment for Windows OS
Follow these instructions to set up a Java development environment on your computer.
Software Download List
Name and Version Download Link
JDK 8 or higher http://www.oracle.com/technetwork/java/javase/overview/index.html
NetBeans 8.1 or higher https://netbeans.org/downloads/
Git 2.11.0.3 or higher https://git-scm.com/downloads
Maven 3.3.9 or higher http://maven.apache.org/download.cgi
Note: It is assumed that you will be working on a 64bit setup and provided instructions
accordingly to download and install software. If you are not working on 64bit setup then
download the software compatible to with your setup.
Contents
I. Installing JDK ......................................................................................................................................... 2
II. Setting JAVA_HOME, PATH, and CLASSPATH Environment Variables.................................................. 3
III. Verifying the JDK Installation ................................................................................................................ 5
IV. Installing NetBeans ............................................................................................................................... 6
V. Verifying the NetBeans Installation ...................................................................................................... 6
VI. Installing Git .......................................................................................................................................... 7
VII. Verifying the Git Installation ................................................................................................................. 8
VIII. Installing Maven.................................................................................................................................... 8
IX. Setting the M2_HOME, M2, and PATH Environment Variables .........................................................10
X. Verifying Maven Installation...............................................................................................................12
XI. Creating a Git Repository ....................................................................................................................13
XII. Creating a Git Repository ....................................................................................................................14
XIII. Configuring a Git Repository ...............................................................................................................14
Copyright © 2017, Oracle and/or its affiliates. All rights reserved.
Page 2.
I. Installing JDK
Use these following instructions to download, install, and configure Java Development Kit on
your computer.
Note: JDK-8U121 is the latest version of JDK available when this document was written. It is
highly recommended that you download the newest version of JDK (if available) and perform
these lab activities.
If you already have JDK 8 or higher version installed on your computer, then skip “Installing
JDK” and proceed to “Setting JAVA_HOME, PATH, and CLASSPATH Environment Variables”
to set up and verify environment variables.
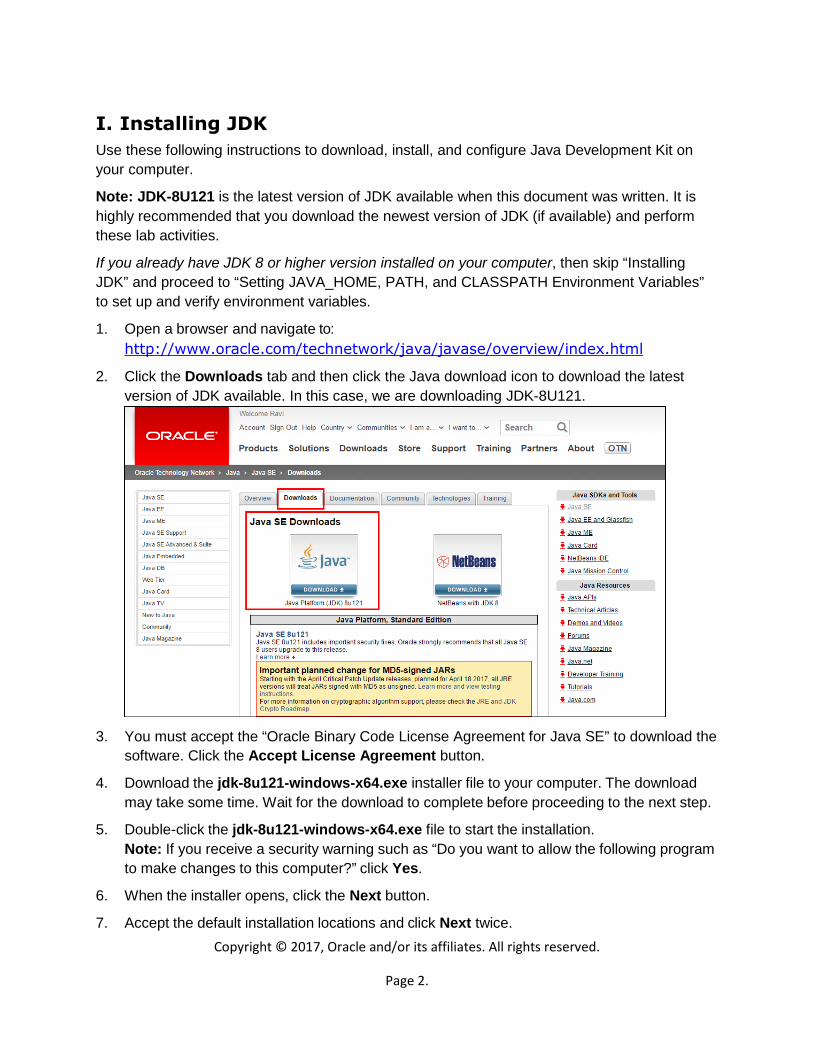
1. Open a browser and navigate to:
http://www.oracle.com/technetwork/java/javase/overview/index.html
2. Click the Downloads tab and then click the Java download icon to download the latest
version of JDK available. In this case, we are downloading JDK-8U121.
3. You must accept the “Oracle Binary Code License Agreement for Java SE” to download the
software. Click the Accept License Agreement button.
4. Download the jdk-8u121-windows-x64.exe installer file to your computer. The download
may take some time. Wait for the download to complete before proceeding to the next step.
5. Double-click the jdk-8u121-windows-x64.exe file to start the installation.
Note: If you receive a security warning such as “Do you want to allow the following program
to make changes to this computer?” click Yes.
6. When the installer opens, click the Next button.
7. Accept the default installation locations and click Next twice.

Copyright © 2017, Oracle and/or its affiliates. All rights reserved.
Page 3.
8. Wait until the installer installs the JDK successfully and displays a “Java SE Development
Kit 8 Update 121 (64-bit)” message. Click the Close button.
II. Setting JAVA_HOME, PATH, and CLASSPATH
Environment Variables
Windows 7: Setting JAVA_HOME, PATH, and CLASSPATH Environment Variables
Note: You must be logged onto your computer as the Admin user.
1. Click the Windows Start button, right-click Computer and select Properties. Click
Advanced system settings.
2. Click Environment Variables.
3. In the Environment Variables window, under System Variables, click the New button.
4. In the New System Variable window, enter the following:
- Variable name: JAVA_HOME
- Variable value: C:\Program Files\Java\jdk1.8.0_121
Then click the OK button.
5. Select the PATH system variable and click the Edit button.
(If PATH system variable is not available, click the New button to create a PATH variable,
enter, name it PATH, and enter
C:\Program Files\Java\jdk1.8.0_121
for the Variable value, and then click the OK button.)
6. In the Edit System Variable window, in the Variable value field, place the cursor at the starting
position and enter the following:C:\Program Files\Java\jdk1.8.0_121\bin;
Then click the OK button.

Copyright © 2017, Oracle and/or its affiliates. All rights reserved.
Page 4.
7. Click the New button to create another System Variable.
8. In the New System Variable window, enter the following:
- Variable name: CLASSPATH
- Variable value: C:\Program Files\Java\jdk1.8.0_121\lib\tools.jar;.;
(Note: The variable value has a semicolon, a period, and a semicolon at the end.)
Then click the OK button.
.
You have created/updated three system variables. Click the OK button to close the Environment
Variables and System Properties windows. Close the Control Panel window
Windows 10: Setting JAVA_HOME, PATH, and CLASSPATH Environment Variables
Note: You must be logged onto your computer as the Admin user.
1. In Windows Desktop, right-click This PC and select Properties. Click Advanced system
settings.
2. Click Environment Variables.
3. In the Environment Variables window, under System Variables, click the New button.
4. In the New System Variable window, enter the following:
- Variable name: JAVA_HOME
- Variable value: C:\Program Files\Java\jdk1.8.0_121
Then click the OK button.
5. Select the PATH system variable and click the Edit button.
(If PATH system variable is not available, click the New button to create a PATH variable,
enter, name it Path, and enter
C:\Program Files\Java\jdk1.8.0_121;
for the Variable value, and then click the OK button.)

Copyright © 2017, Oracle and/or its affiliates. All rights reserved.
Page 5.
6. In the Edit Environment Variable window, click the New button and enter C:\Program
Files\Java\jdk1.8.0_121\bin and then click the OK button.
7. Click the New button to create another System Variable.
8. In the New System Variable window, enter the following:
- Variable name: CLASSPATH
- Variable value: C:\Program Files\Java\jdk1.8.0_121\lib\tools.jar;.;
(Note: The variable value has a semicolon, a period, and a semicolon at the end.)
Then click the OK button.
.
9. You have created/updated three system variables. Click the OK button to close the
Environment Variables and System Properties windows.
III. Verifying the JDK Installation
1. Verify the Java version: Open a Command Prompt window and run the java -version
command. This verifies that a JRE is installed but does not verify that the JDK is installed.
Verify that the output of the java –version command shows “1.8.0_121” or higher.

Copyright © 2017, Oracle and/or its affiliates. All rights reserved.
Page 6.
IV. Installing NetBeans
Use the following instructions to download, install, and configure NetBeans IDE on your
computer.
Note: NetBeans 8.1 is the latest version available at the time of creating this document. It is
highly recommended that you download the newest version of the IDE (if available) to perform
these lab activities.
If you already have NetBeans 8.1 or higher installed on your computer, then skip “Installing
NetBeans” and proceed to “Verifying the NetBeans Installation.”
1. In the Firefox browser, navigate to https://netbeans.org/downloads/.
2. Download the NetBeans 8.1 version that supports All technologies from the last column.
3. Download the netbeans-8.1-windows.exe installer file onto your computer. The download
may take some time. Wait for the download to complete before proceeding to the next step.
4. Double-click the netbeans-8.1-windows.exe file to start the installation.
Note: If you receive a security warning such as “Do you want to allow the following program
to make changes to this computer?” click Yes.
5. When the installer opens, click the Customize… button, click the check box to select
Apache Tomcat 8.0.27 under the Runtimes section, and click the OK button.
6. Click the Next button on the Welcome screen to proceed with the installation.
7. Accept the terms in the license agreement and click the Next button.
8. Accept the default Install the NetBeans IDE to: path for NetBeans, make sure the correct
installation path of JDK (jdk1.8.0_121) is selected in the JDK for the NetBeans IDE: field,
and click the Next button.
9. Accept the default installation path for Glassfish and Apache Tomcat and click the Next
button. Click the Install button on the Summary window.
10. Wait until the installer installs the NetBeans and displays a “Setup Complete” message.
Click the Finish button.
V. Verifying the NetBeans Installation
1. Verify NetBeans: To start the NetBeans IDE and verify the version number of the JDK used
by the IDE, double-click the NetBeans 8.1 shortcut on the desktop. NetBeans opens to a
“Start Page.” Open the Help menu and select About. The NetBeans and Java versions
should be NetBeans IDE 8.1 and Java 1.8.0_121. When done, close the About window.

Copyright © 2017, Oracle and/or its affiliates. All rights reserved.
Page 7.
VI. Installing Git
Use the following instructions to download, install, and configure Git on your computer.
Note: Git 2.11.0.3 is the latest version of the tool available when this document was written. It is
highly recommended that you download the newest version (if available) to perform these lab
activities.
If you already have Git 2.11.0.3 or higher installed on your computer, then skip “Installing Git”
and proceed to “Verifying the Git Installation.”
1. In the Firefox browser, navigate to https://git-scm.com/downloads and click the
Downloads for Windows button.
2. Download the Git-2.11.0.3-64-bit.exe installer file to your computer. The download may
take some time. Wait for the download to complete before proceeding to the next step.
3. Double-click the Git-2.11.0.3-64-bit.exe file to start the installation.
Note: If you receive a security warning such as “Do you want to allow the following program
to make changes to this computer?” click Yes.
4. When the installer opens, click the Next button.
5. Accept the default installation path for Git and click the Next button.
6. Accept the default selection on the Select Components screen and click the Next button.
7. Accept the default value on the Select Start Menu Folder screen and click the Next button.
8. Select the Use Git from Git Bash only option on the Adjusting your PATH environment
screen, and click the Next button.
9. Accept the default selection on the “Configuring the line ending conversions” screen and
click the Next button.
10. Accept the default selection on the “Configuring the terminal emulator to use with Git Bash”
screen and click the Next button.

Copyright © 2017, Oracle and/or its affiliates. All rights reserved.
Page 8.
11. Accept the default selection on the “Configuring extra options” screen and click the Next
button.
12. Accept the default selection on the “Configuring experimental options” screen and click the
Install button. Wait until the installer installs Git 2.11.0.3 and displays a “Setup has finished
installing Git on your computer” message. Click the Finish button.
VII. Verifying the Git Installation
1. Verify Git: Open Git Bash from the Windows Start menu and run the git --version
command. Verify that the output of the git --version command shows “git version
2.11.0.windows.3”.
VIII. Installing Maven
Use the following instructions to download, install, and configure Maven on your computer.
Note: Maven 3.3.9 is the latest version of the tool available at the time of creating this
document. It is highly recommended that you download the newest version of this tool
(if available) and perform these lab activities.
If you already have Maven 3.3.9 or higher installed on your computer, then skip “Installing
Maven” and proceed to “Setting JAVA_HOME, PATH, and CLASSPATH Environment
Variables” to set up/verify the required environment variables.
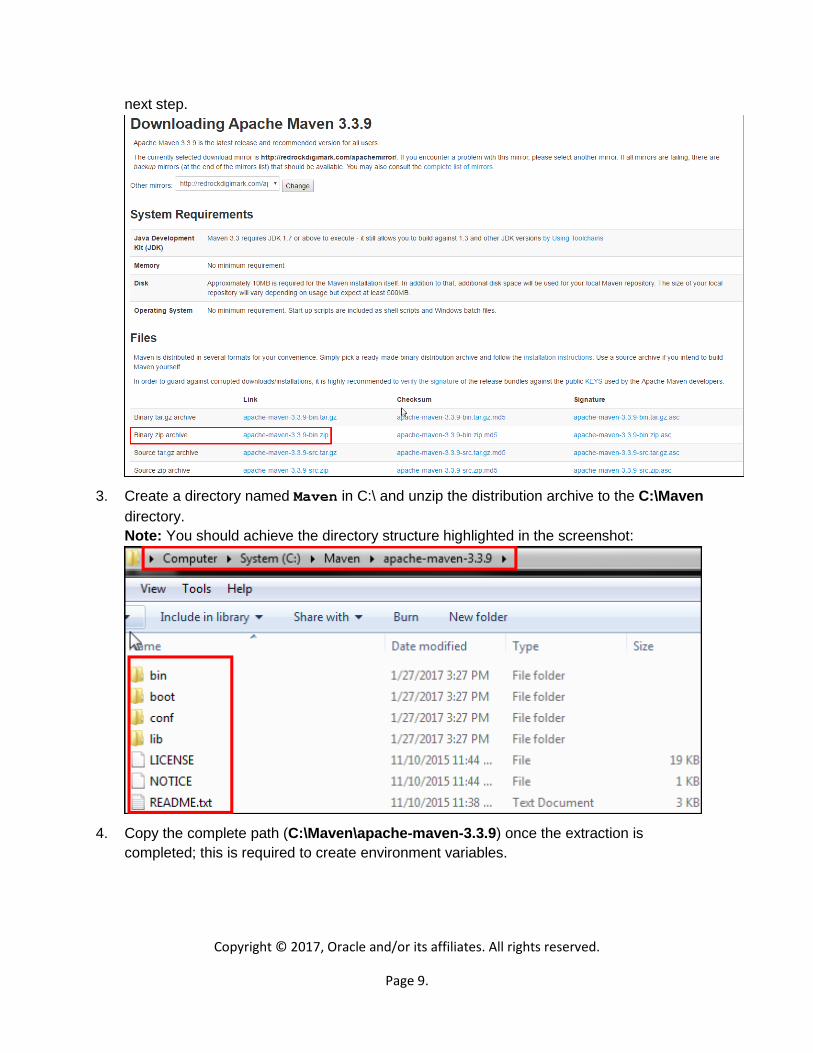
1. In the Firefox browser, navigate to http://maven.apache.org/download.cgi.
2. Download the Binary ZIP archive, apache-maven-3.3.9-bin.zip file to your computer. The
download may take some time. Wait for the download to complete before proceeding to the
Copyright © 2017, Oracle and/or its affiliates. All rights reserved.
Page 9.
next step.
3. Create a directory named Maven in C:\ and unzip the distribution archive to the C:\Maven
directory.
Note: You should achieve the directory structure highlighted in the screenshot:
4. Copy the complete path (C:\Maven\apache-maven-3.3.9) once the extraction is
completed; this is required to create environment variables.

Copyright © 2017, Oracle and/or its affiliates. All rights reserved.
Page 10.
IX. Setting the M2_HOME, M2, and PATH Environment
Variables
Windows 7: Setting M2_HOME, M2, and PATH Environment Variables
Note: You must be logged onto your computer as the Admin user.
1. Click the Windows Start button. Right-click Computer and select Properties. Click
Advanced system settings.
2. Click Environment Variables.
3. In the Environment Variables window, under System Variables, click the New button.
4. In the New System Variable window, enter the following:
- Variable name: M2_HOME
- Variable value: C:\Maven\apache-maven-3.3.9
Then click the OK button.
5. In the Environment Variables window, under System Variables, click the New button.
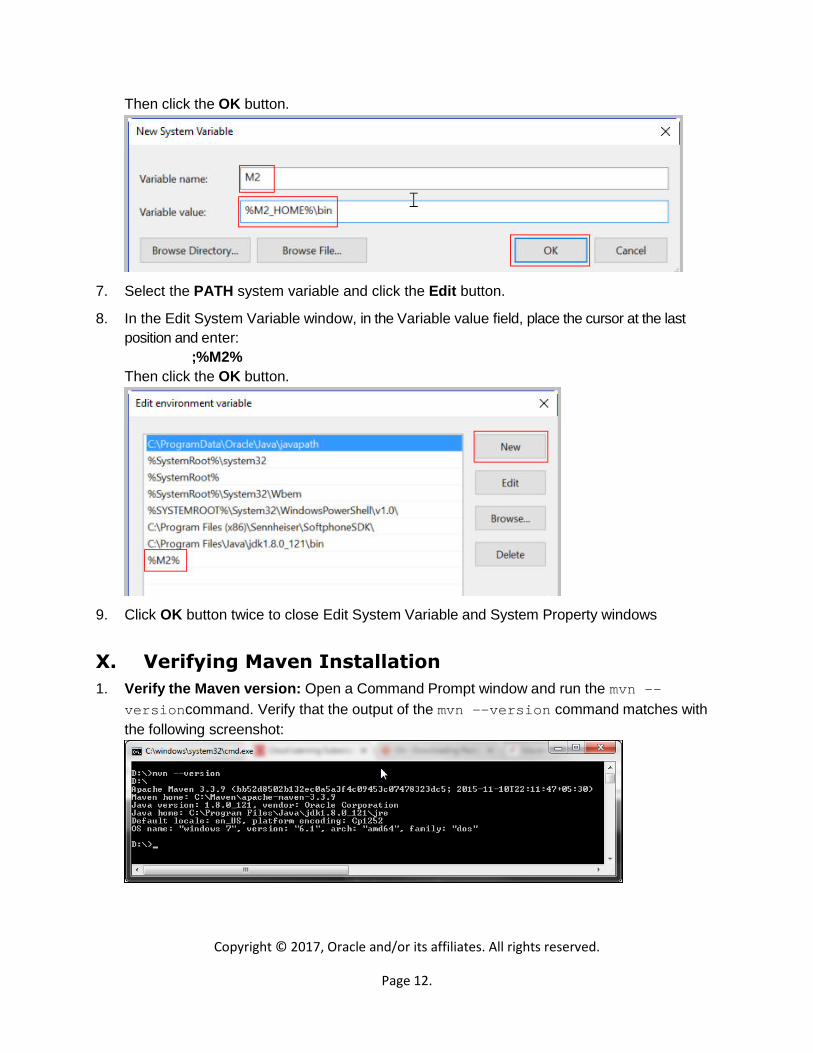
6. In the New System Variable window, enter the following:
- Variable name: M2
- Variable value: %M2_HOME%\bin
Then click the OK button.
7. Select the PATH system variable and click the Edit button.
8. In the Edit System Variable window, in the Variable value field, place the cursor at the last
position and enter:;%M2%

Copyright © 2017, Oracle and/or its affiliates. All rights reserved.
Page 11.
Then click the OK button.
9. Click the OK button twice to close the Edit System Variable and System Property windows
Windows 10: Setting M2_HOME, M2, and PATH Environment Variables
Note: You must be logged onto your computer as the Admin user.
1. In Windows Desktop, right-click This PC and select Properties. Click Advanced system
settings.
2. Click Environment Variables.
3. In the Environment Variables window, under System Variables, click the New button.
4. In the New System Variable window, enter the following:
- Variable name: M2_HOME
- Variable value: C:\Maven\apache-maven-3.3.9
Then click the OK button.
5. In the Environment Variables window, under System Variables, click the New button.
6. In the New System Variable window, enter the following:
- Variable name: M2
- Variable value: %M2_HOME%\bin
Copyright © 2017, Oracle and/or its affiliates. All rights reserved.
Page 12.
Then click the OK button.
7. Select the PATH system variable and click the Edit button.
8. In the Edit System Variable window, in the Variable value field, place the cursor at the last
position and enter:
;%M2%
Then click the OK button.
9. Click OK button twice to close Edit System Variable and System Property windows
X. Verifying Maven Installation
1. Verify the Maven version: Open a Command Prompt window and run the mvn --
versioncommand. Verify that the output of the mvn -–version command matches with
the following screenshot:
Copyright © 2017, Oracle and/or its affiliates. All rights reserved.
Page 13.
XI. Creating a Git Repository
Important Note: Use the following instructions to change the proxy settings for Maven if you
are on a secured network and behind a firewall ONLY; otherwise, skip this activity and continue
with the next activity, “Creating a Git Repository.”
Proxy Settings for Maven in NetBeans
1. Open the C:\Program Files\NetBeans 8.1\java\maven\conf\settings.xml file with a text editor
like Notepad++.
2. Add the following lines under the <proxies> tag:
<proxy><id>Oracle</id><active>true</active><protocol>http</protocol><host>ENTER YOUR PROXY ADDRESS</host><port>80</port>
<nonProxyHosts>localhost|oracle.com</nonProxyHosts></proxy>
3. Replace ENTER YOUR PROXY ADDRESS within the <host> tags with your proxy and save
the file.
Note: If you are facing problems in editing the settings.xml file, save a copy of the settings.xml
file to some other location, modify it, and then put it back into C:\Program Files\NetBeans
8.1\java\maven\conf\ directory.
Proxy Settings for Maven
1. Open the C:\Maven\apache-maven-3.3.9\conf\settings.xml file with a text editor like
Notepad++.
2. Add the following lines under the <proxies> tag:
<proxy><id>Oracle</id>
<active>true</active><protocol>http</protocol><host>ENTER YOUR PROXY ADDRESS</host><port>80</port><nonProxyHosts>localhost|oracle.com</nonProxyHosts>
</proxy>
3. Replace ENTER YOUR PROXY ADDRESS within the <host> tags with your proxy and save
the file.

Copyright © 2017, Oracle and/or its affiliates. All rights reserved.
Page 14.
XII. Creating a Git Repository
As part of this activity, you will learn to create and initialize a local Git repository under user’s
home directory.
1. Open Git Bash from the Windows Start menu.
2. In your home directory, create a cloud directory:
mkdir cloud
3. Change the directory to cloud directory:
cd cloud
4. Create a Git repository type:
git init
5. The cloud directory is now a Git repository. Execute the ls –a command to confirm the
same. The output of the ls –a command must match the output in the following
screenshot:
Note: Now you should see that a .git directory has been created inside the
cloud directory and your repository is ready.
XIII. Configuring a Git Repository
Before you commit changes to Git repository, you must configure your name and email address
to identify your commits in the repository.
1. Execute the following commands to configure your name:
git config --global user.name “Your Name”
Example: git config –global user.name “John Doe”
2. Execute the following commands to configure your email address:
git config --global user.email your-email@address
Copyright © 2017, Oracle and/or its affiliates. All rights reserved.
Page 15.
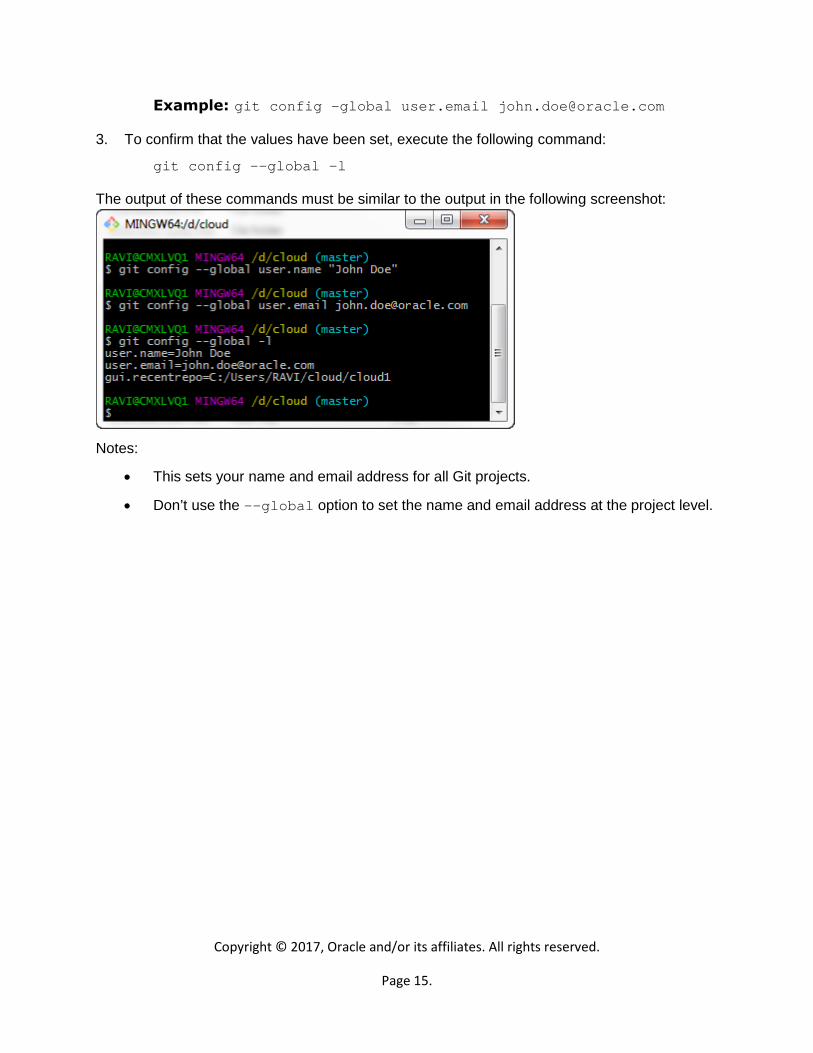
Example: git config –global user.email [email protected]
3. To confirm that the values have been set, execute the following command:
git config --global –l
The output of these commands must be similar to the output in the following screenshot:
Notes:
• This sets your name and email address for all Git projects.
• Don’t use the --global option to set the name and email address at the project level.
Related Documents