Milo Series Slim Mini-ITX case for gaming HTPC ML07

Welcome message from author
This document is posted to help you gain knowledge. Please leave a comment to let me know what you think about it! Share it to your friends and learn new things together.
Transcript

Milo SeriesSlim Mini-ITX case for gaming HTPC
ML07


The following manual and guides were carefully prepared by the SilverStone engineering team to help you maximize the potential of your SilverStone product. Please keep this manual for futurereference when upgrading or performing maintenance on your system. A copy of this manual can also be downloaded from our website at:
Installation and system optimization guide:
Product Overview
Specifications
Disassemble Chart
Installation Guide
Connector Definition
Component Size Limitations
Optimal Thermal Performance Layout
Maintenance and upgrade
Protect Your Computer
Q&A
Warranty Information
P.1
P.1
P.2
P.3
P.12
P.15
P.21
P.31
P.32
P.33
P.35

Product Overview
Specifications
Milo Series
Based on the revolutionary RAVEN RVZ01 chassis, the Milo ML07 is a Mini-ITX HTPC case with compact form factor and powerful
potentials. Utilizing an advanced layout designed for maximum performance and a PCI-E riser, the slim, 14 liter ML07 is capable of
housing the biggest consumer graphics card on the market and the ability to support liquid cooling*. Designed for use in either vertical
or horizontal orientation, it can be placed comfortably in any space-constrained home theater environment that requires a powerful PC.
For those looking to build a cleanly-styled HTPC with gaming or more powerful components in small form factor, the ML07 is the
perfect solution.
Material
Model
Motherboard
Drive Bay
Cooling System
Expansion Slot
Front I/O Port
Power Supply
Expansion Card
Limitation of CPU cooler
Net Weight
Dimension
Extra
*Liquid cooling support limited to component that fit within ML07’s predefined dimensions. For detailed information, please refer to manual.
Reinforced plastic outer shell, steel body
SST-ML07B (black)
Mini-DTX, Mini-ITX
External
Internal
Top
Bottom
2
USB 3.0 x 2 / audio x 1 / MIC x 1
SFX
Support graphics card up to 13”, width restriction - 5.88”
83mm
33.54kg
382mm (W) x 105mm (H) x 350mm (D), 14 liters
Support Kensington lock
Slim slot-loading optical x 1
3.5” x 1, 2.5” x 3
1 x 120mm fan slot
2 x 120mm fan slot
ML07
Introduction
1
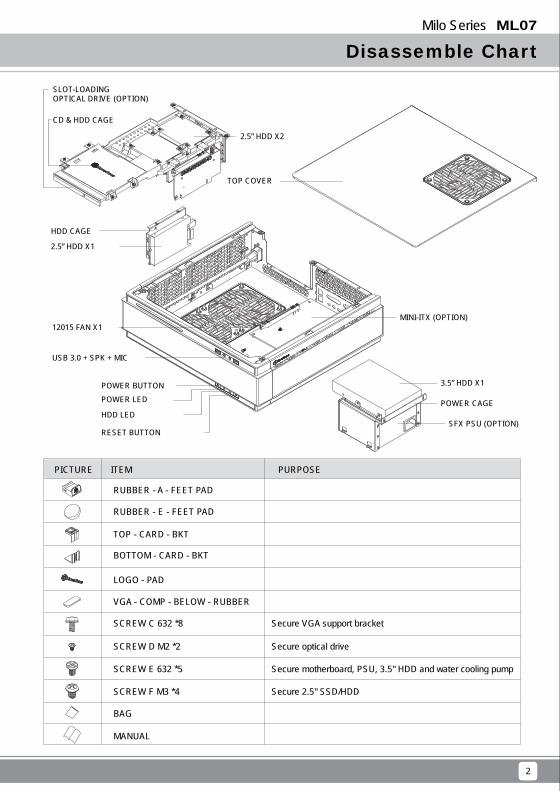
Disassemble Chart Milo Series ML07
2
RUBBER - A - FEET PAD
RUBBER - E - FEET PAD
TOP - CARD - BKT
BOTTOM - CARD - BKT
LOGO - PAD
SCREW C 632 *8
SCREW D M2 *2
SCREW E 632 *5
SCREW F M3 *4
Secure VGA support bracket
Secure optical drive
Secure motherboard, PSU, 3.5" HDD and water cooling pump
Secure 2.5" SSD/HDD
BAG
MANUAL
VGA - COMP - BELOW - RUBBER
PICTURE ITEM PURPOSE
12015 FAN X1MINI-ITX (OPTION)
3.5” HDD X1
POWER CAGE
SFX PSU (OPTION)
USB 3.0 + SPK + MIC
POWER BUTTONPOWER LED
HDD LED
RESET BUTTON
TOP COVER
CD & HDD CAGE
2.5” HDD X2
SLOT-LOADINGOPTICAL DRIVE (OPTION)
HDD CAGE
2.5” HDD X1
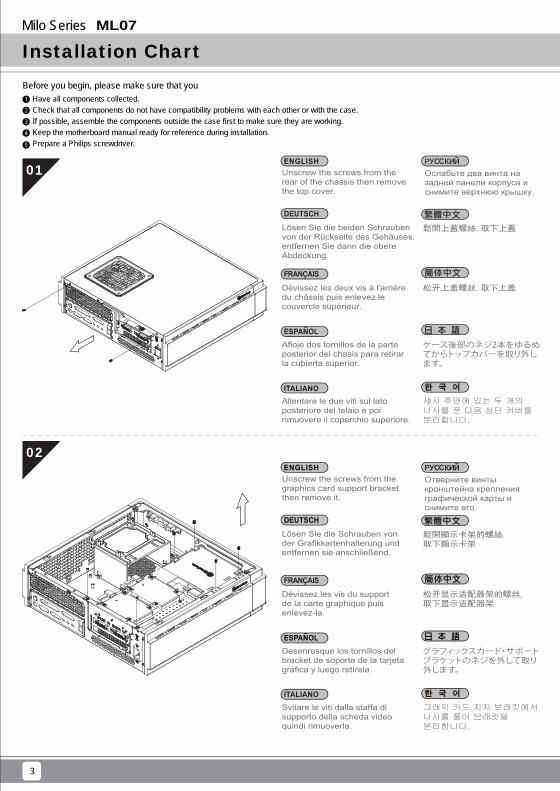
Have all components collected.Check that all components do not have compatibility problems with each other or with the case.If possible, assemble the components outside the case first to make sure they are working.Keep the motherboard manual ready for reference during installation.Prepare a Philips screwdriver.
Installation ChartMilo Series ML07
3
1
2
3
4
5
Before you begin, please make sure that you
01
02
Lösen Sie die beiden Schrauben von der Rückseite des Gehäuses, entfernen Sie dann die obere Abdeckung.
Dévissez les deux vis à l'arrière du châssis puis enlevez le couvercle supérieur.
Afloje dos tornillos de la parte posterior del chasis para retirar la cubierta superior.
Allentare le due viti sul lato posteriore del telaio e poi rimuovere il coperchio superiore.
Unscrew the screws from the rear of the chassis then remove the top cover.
Ослабьте два винта на задней панели корпуса и снимите верхнюю крышку.
섀시 후면에 있는 두 개의 나사를 푼 다음 상단 커버를 분리합니다.
鬆開上蓋螺絲,取下上蓋
松开上盖螺丝,取下上盖
ケース後部のネジ2本をゆるめてからトップカバーを取り外します。
Lösen Sie die Schrauben von der Grafikkartenhalterung und entfernen sie anschließend.
Dévissez les vis du support de la carte graphique puis enlevez-la.
Desenrosque los tornillos del bracket de soporte de la tarjeta gráfica y luego retírela.
Svitare le viti dalla staffa di supporto della scheda video quindi rimuoverla.
Unscrew the screws from the graphics card support bracket then remove it.
Отверните винты кронштейна крепления графической карты и снимите его.
그래픽 카드 지지 브래킷에서 나사를 풀어 브래킷을 분리합니다.
鬆開顯示卡架的螺絲,取下顯示卡架
松开显示适配器架的螺丝,取下显示适配器架
グラフィックスカード・サポートブラケットのネジを外して取り外します。

Installation Chart Milo Series ML07
4
03
04
Lösen Sie zum Abnehmen die Schraube an der Netzteilhalterung.
Dévissez les vis du support du bloc d'alimentation pour le retirer.
Afloje el tornillo de la carcasa de la FA para retirarla.
Allentare la vite sulla staffa PSU per rimuoverlo.
Unscrew the screws from PSU bracket then remove it.
Отвинтите винт кронштейна блока питания и извлеките его.
PSU 케이스의 나사를 풀어 케이스를 분리합니다.
鬆開電源架的螺絲,取下電源架
松开电源架的螺丝,取下电源架
PSUケージのネジを緩めて取り外します。
Falls Sie eine 2,5-Zoll-Festplatte/SSD in der mittleren Klammer montieren möchten, empfehlen wir, sie in diesem Schritt zu entfernen.
Si vous voulez installer un DD/SSD de 2,5" sur la partie centrale, nous vous recommandons de l'enlever lors de cette étape.
Si quiere montar un HDD/SSD de 2,5” en la abrazadera central, le recomendamos que la retire en este paso.
Se si vuole montare un HDD/SSD 2,5” sul supporto centrale, si consiglia di rimuoverlo a questo punto.
If you want to mount a 2.5”HDD/SSD on the center brace, we recommend you to remove it in this step.
Если вы собираетесь установить 2,5-дюймовый жесткий или твердотельный диск на центральном кронштейнe, мы рекомендуем извлечь его на этом шаге.
중앙 죔쇠에 2.5”HDD/SSD를 장착하려는 경우 이 단계에서 이를 분리할 것을 권장합니다.
如果有需要在中央的支架上安裝2.5”硬碟,建議你這時取下來安裝
如果有需要在中央的支架上安装2.5”硬盘,建议你这时取下来安装
2.5”HDD/SSDをセンターブレ-スに取り付ける場合には、この段階で取り外すようお勧めいたします。
2
2
1
Installation ChartMilo Series ML07
5
05
06
Setzen Sie das mit Ihrem Motherboard gelieferte I/O-Blech in die Aussparungen an der Rückseite des Gehäuses ein, installieren Sie anschließend das.
Insérez la plaque d'E/S inclus avec votre carte mère, puis installez la carte mère dans le boîtier.
Inserte el protector de E/S incluido en su placa base, luego instale la placa base en la carcasa.
Installare la mascherina I/O inclusa con la scheda madre, quindi installare la mainboard nel case.
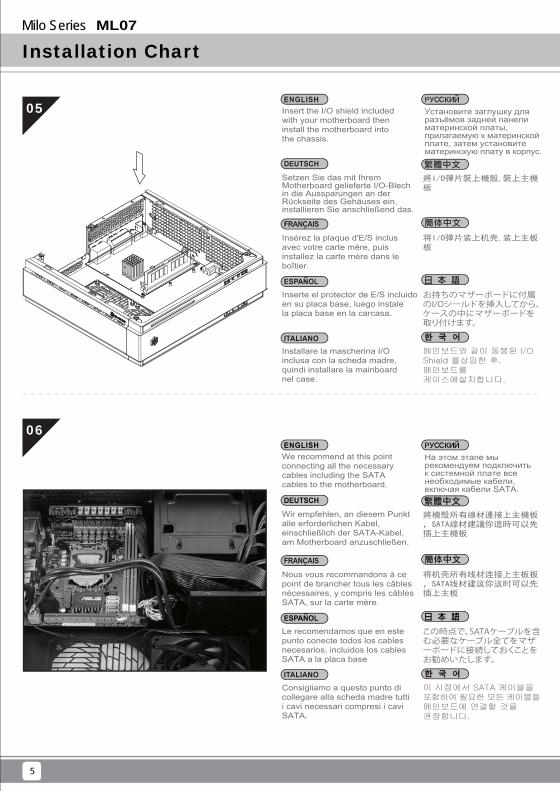
Insert the I/O shield included with your motherboard then install the motherboard into the chassis.
Установите заглушку для разъёмов задней панели материнской платы, прилагаемую к материнской плате, затем установите материнскую плату в корпус.
메인보드와 같이 동봉된 I/O Shield 를삽입한 후, 메인보드를 케이스에설치합니다.
將I/O彈片裝上機殼,裝上主機板
将I/O弹片装上机壳,装上主板板
お持ちのマザーボードに付属のI/Oシールドを挿入してから、ケースの中にマザーボードを取り付けます。
Wir empfehlen, an diesem Punkt alle erforderlichen Kabel, einschließlich der SATA-Kabel, am Motherboard anzuschließen.
Nous vous recommandons à ce point de brancher tous les câbles nécessaires, y compris les câbles SATA, sur la carte mère.
Le recomendamos que en este punto conecte todos los cables necesarios, incluidos los cables SATA a la placa base
Consigliamo a questo punto di collegare alla scheda madre tutti i cavi necessari compresi i cavi SATA.
We recommend at this point connecting all the necessary cables including the SATA cables to the motherboard.
На этом этапе мы рекомендуем подключить к системной плате все необходимые кабели, включая кабели SATA.
이 시점에서 SATA 케이블을 포함하여 필요한 모든 케이블을 메인보드에 연결할 것을 권장합니다.
將機殼所有線材連接上主機板,SATA線材建議你這時可以先插上主機板
将机壳所有线材连接上主板板,SATA线材建议你这时可以先插上主板
この時点で、SATAケーブルを含む必要なケーブル全てをマザーボードに接続しておくことをお勧めいたします。
Installation Chart Milo Series ML07
6
07
08
Befestigen Sie Netzteil und 3,5-Zoll-Festplatte in der Netzteilhalterung.
Attachez le bloc d'alimentation et le DD de 3,5" sur le support du bloc d'alimentation.
Fije la FA y el disco duro de 3,5” en el bracket de la FA
Fissare PSU e HDD 3,5” sulla staffa PSU.
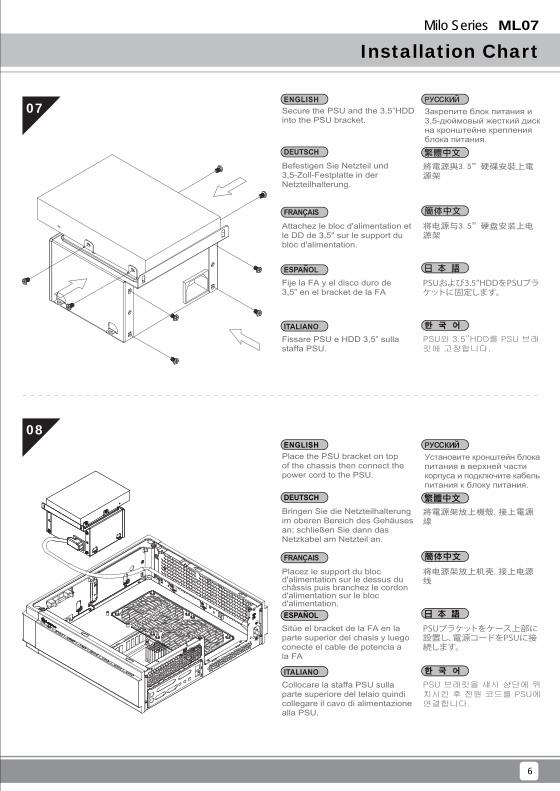
Secure the PSU and the 3.5”HDD into the PSU bracket.
Закрепите блок питания и 3,5-дюймовый жесткий диск на кронштейне крепления блока питания.
PSU와 3.5”HDD를 PSU 브래킷에 고정합니다.
將電源與3.5”硬碟安裝上電源架
将电源与3.5”硬盘安装上电源架
PSUおよび3.5”HDDをPSUブラケットに固定します。
Bringen Sie die Netzteilhalterung im oberen Bereich des Gehäuses an; schließen Sie dann das Netzkabel am Netzteil an.
Placez le support du bloc d'alimentation sur le dessus du châssis puis branchez le cordon d'alimentation sur le bloc d'alimentation.
Sitúe el bracket de la FA en la parte superior del chasis y luego conecte el cable de potencia a la FA
Collocare la staffa PSU sulla parte superiore del telaio quindi collegare il cavo di alimentazionealla PSU.
Place the PSU bracket on top of the chassis then connect the power cord to the PSU.
Установите кронштейн блока питания в верхней части корпуса и подключите кабель питания к блоку питания.
PSU 브래킷을 섀시 상단에 위치시킨 후 전원 코드를 PSU에연결합니다.
將電源架放上機殼,接上電源線
将电源架放上机壳,接上电源线
PSUブラケットをケース上部に設置し、電源コードをPSUに接続します。
Installation ChartMilo Series ML07
7
09
10
Stecken Sie die Netzteilhalterung in ihre ursprüngliche Position und befestigen sie mit Schrauben.
Insérez le support du bloc d'alimentation dans sa position d'origine et attachez-le avec des vis.
Inserte el bracket de la FA en su posición original y fíjelo con tornillos
Inserire la staffa della PSU nella sua posizione originaria e fissarla con le viti.
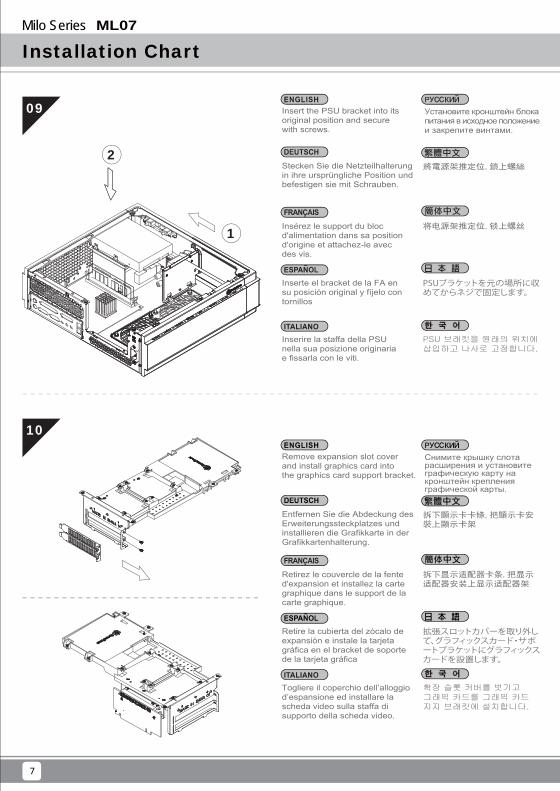
Insert the PSU bracket into its original position and secure with screws.
Установите кронштейн блока питания в исходное положение и закрепите винтами.
PSU 브래킷을 원래의 위치에 삽입하고 나사로 고정합니다.
將電源架推定位,鎖上螺絲
将电源架推定位,锁上螺丝
PSUブラケットを元の場所に収めてからネジで固定します。
Entfernen Sie die Abdeckung des Erweiterungssteckplatzes und installieren die Grafikkarte in der Grafikkartenhalterung.
Retirez le couvercle de la fente d'expansion et installez la carte graphique dans le support de la carte graphique.
Retire la cubierta del zócalo de expansión e instale la tarjeta gráfica en el bracket de soporte de la tarjeta gráfica
Togliere il coperchio dell’alloggio d’espansione ed installare la scheda video sulla staffa di supporto della scheda video.
Remove expansion slot cover and install graphics card into the graphics card support bracket.
Снимите крышку слота расширения и установите графическую карту на кронштейн крепления графической карты.
확장 슬롯 커버를 벗기고 그래픽 카드를 그래픽 카드 지지 브래킷에 설치합니다.
拆下顯示卡卡條,把顯示卡安裝上顯示卡架
拆下显示适配器卡条,把显示适配器安装上显示适配器架
拡張スロットカバーを取り外して、グラフィックスカード・サポートブラケットにグラフィックスカードを設置します。
2
1
Installation Chart Milo Series
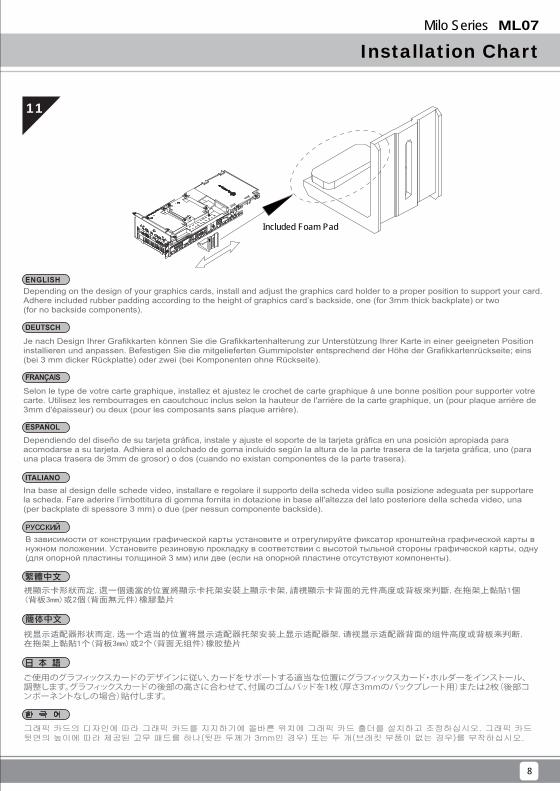
Included Foam Pad
ML07
8
11
Je nach Design Ihrer Grafikkarten können Sie die Grafikkartenhalterung zur Unterstützung Ihrer Karte in einer geeigneten Position installieren und anpassen. Befestigen Sie die mitgelieferten Gummipolster entsprechend der Höhe der Grafikkartenrückseite; eins (bei 3 mm dicker Rückplatte) oder zwei (bei Komponenten ohne Rückseite).
Selon le type de votre carte graphique, installez et ajustez le crochet de carte graphique à une bonne position pour supporter votre carte. Utilisez les rembourrages en caoutchouc inclus selon la hauteur de l'arrière de la carte graphique, un (pour plaque arrière de 3mm d'épaisseur) ou deux (pour les composants sans plaque arrière).
Dependiendo del diseño de su tarjeta gráfica, instale y ajuste el soporte de la tarjeta gráfica en una posición apropiada para acomodarse a su tarjeta. Adhiera el acolchado de goma incluido según la altura de la parte trasera de la tarjeta gráfica, uno (para una placa trasera de 3mm de grosor) o dos (cuando no existan componentes de la parte trasera).
Ina base al design delle schede video, installare e regolare il supporto della scheda video sulla posizione adeguata per supportare la scheda. Fare aderire l’imbottitura di gomma fornita in dotazione in base all'altezza del lato posteriore della scheda video, una (per backplate di spessore 3 mm) o due (per nessun componente backside).
Depending on the design of your graphics cards, install and adjust the graphics card holder to a proper position to support your card. Adhere included rubber padding according to the height of graphics card’s backside, one (for 3mm thick backplate) or two (for no backside components).
В зависимости от конструкции графической карты установите и отрегулируйте фиксатор кронштейна графической карты в нужном положении. Установите резиновую прокладку в соответствии с высотой тыльной стороны графической карты, одну (для опорной пластины толщиной 3 мм) или две (если на опорной пластине отсутствуют компоненты).
그래픽 카드의 디자인에 따라 그래픽 카드를 지지하기에 올바른 위치에 그래픽 카드 홀더를 설치하고 조정하십시오. 그래픽 카드 뒷면의 높이에 따라 제공된 고무 패드를 하나(뒷판 두께가 3mm인 경우) 또는 두 개(브래킷 부품이 없는 경우)를 부착하십시오.
視顯示卡形狀而定,選一個適當的位置將顯示卡托架安裝上顯示卡架,請視顯示卡背面的元件高度或背板來判斷,在拖架上黏貼1個(背板3mm)或2個(背面無元件)橡膠墊片
视显示适配器形状而定,选一个适当的位置将显示适配器托架安装上显示适配器架,请视显示适配器背面的组件高度或背板来判断,在拖架上黏贴1个(背板3mm)或2个(背面无组件)橡胶垫片
ご使用のグラフィックスカードのデザインに従い、カードをサポートする適当な位置にグラフィックスカード・ホルダーをインストール、調整します。グラフィックスカードの後部の高さに合わせて、付属のゴムパッドを1枚(厚さ3mmのバックプレート用)または2枚(後部コンポーネントなしの場合)貼付します。

Installation ChartMilo Series ML07
9
12
13
Installieren Sie eine 2,5-Zoll-Festplatte/SSD und ein optisches Slot-in-Laufwerk an der Grafikkartenhalterung.
Installez le lecteur de DD/SSD de 2,5" et le lecteur optique à chargement mince sur le support de la carte graphique.
Instalar un HDD/SSD de 2,5” y un dispositivo óptico delgado de carga mediante ranura en el bracket de soporte de la tarjeta gráfica.
Installare l’unità HDD/SSD 2,5" l’unità ottica slim con caricamento a fessura sulla staffa di supporto della scheda video.
Install 2.5”HDD/SSD and slim slot-loading optical drive onto the graphics card support bracket.
Установите 2,5-дюймовый жесткий или твердотельный диск и тонкий оптический привод с загрузкой через слот на крепежный кронштейн графической карты.
2.5”HDD/SSD와 슬림형 슬롯 로딩 방식 광드라이브를 그래픽 카드 지지 브래킷에 설치합니다.
將2.5”硬碟與薄型光碟機安裝上顯示卡架
将2.5”硬盘与薄型光驱安装上显示适配器架
2.5"HDD/SSDおよびスリム型スロットローディング光学ドライブをグラフィックスカード・サポートブラケット上にインストールします。
Installieren Sie die Grafikkartenhalterung im Gehäuse und schließen das Netzkabel wie erforderlich an die Grafikkarte an.
Installez le support de la carte graphique dans le châssis et branchez le cordon d'alimentation sur la carte graphique si nécessaire.
Instale el bracket de soporte de la tarjeta gráfica en el chasis y conecte el cable de potencia a la tarjeta gráfica si es necesario.
Installare la staffa di supporto della scheda video nel telaio e collegare il cavo di alimentazione alla scheda video, se necessario.
Install graphics card support bracket into the chassis and connect the power cord to the graphics card if needed.
Установите крепежный кронштейн графической карты в корпус и при необходимости подключите кабель питания к графической карты.
그래픽 카드 지지 브래킷을 섀시에 설치하고 필요한 경우 전원 코드를 그래픽 카드에 연결합니다.
將顯示卡架裝上機殼,如果顯示卡有電源線要接請先接好
将显示适配器架装上机壳,如果显示适配器有电源线要接请先接好
ケースにグラフィックスカード・サポートブラケットを取り付け、必要ならば電源コードをグラフィックスカードに接続します。

Installation Chart Milo Series ML07
10
14
15
Achten Sie darauf, dass sämtliche Kabel richtig angeschlossen sind.
Vérifier que tous les câbles sont correctement branchés.
Asegúrese de que todos los cables están conectados apropiadamente
Assicurarsi che tutti i cavi siano collegati correttamente.
Make sure all the cables are properly connected.
Проверьте правильность подключения всех кабелей.
모든 케이블이 제대로 연결되었는지 확인하십시오.
確定所有線材都已正確的安裝
确定所有线材都已正确的安装
全てのケーブルが確実に接続されていることを確認します。
Setzen Sie die obere Abdeckung wieder auf das Gehäuse auf, fixieren Sie die Abdeckung mit zwei Schrauben.
Remettez le panneau supérieur sur le boîtier et fixez-le avec deux vis.
Vuelva a poner la cubierta superior en la carcasa y asegúrela con dos tornillos.
Riposizionare il cover superiore e serrarlo per mezzo delle due viti.
Place the top cover back onto the chassis and secure with screws.
Установите на место верхнюю крышку корпуса и закрепите ее два шурупами.
상부 커버를 케이스에 재 설치한 후 2개의 나사로 고정시킵니다.
裝回上蓋
装回上盖
ケースに上部カバーを戻し、ネジで固定します。
Installation ChartMilo Series ML07
11
16
Bringen Sie je nach Anforderungen oder Präferenzen vier Gummifüße zur horizontalen Nutzung auf oder installieren die Gummipolster zur vertikalen Nutzung.
Selon les exigences ou les préférences, mettez quatre pieds en caoutchouc pour une utilisation horizontale ou installez les patins en caoutchouc pour une utilisation verticale.
Dependiendo de los requisitos o preferencias, adhiera cuatro patas de goma para un uso horizontal o instale el acolchamiento de goma para un uso vertical.
In base ai requisiti o alle preferenze, fare aderire quattro supporti di gomma per l’uso orizzontale, oppure installare i cuscinetti di gomma per l’uso verticale.
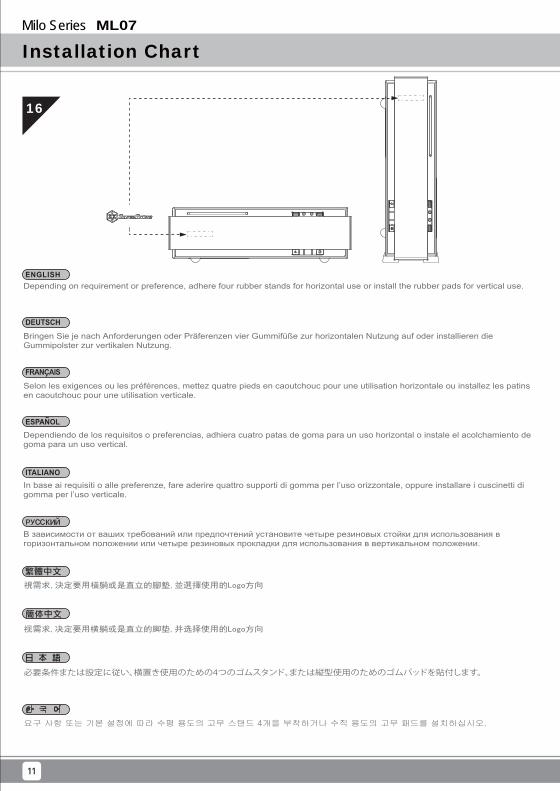
Depending on requirement or preference, adhere four rubber stands for horizontal use or install the rubber pads for vertical use.
В зависимости от ваших требований или предпочтений установите четыре резиновых стойки для использования в горизонтальном положении или четыре резиновых прокладки для использования в вертикальном положении.
요구 사항 또는 기본 설정에 따라 수평 용도의 고무 스탠드 4개을 부착하거나 수직 용도의 고무 패드를 설치하십시오.
視需求,決定要用橫躺或是直立的腳墊,並選擇使用的Logo方向
视需求,决定要用横躺或是直立的脚垫,并选择使用的Logo方向
必要条件または設定に従い、横置き使用のための4つのゴムスタンド、または縦型使用のためのゴムパッドを貼付します。
Connector definition Milo Series ML07
12
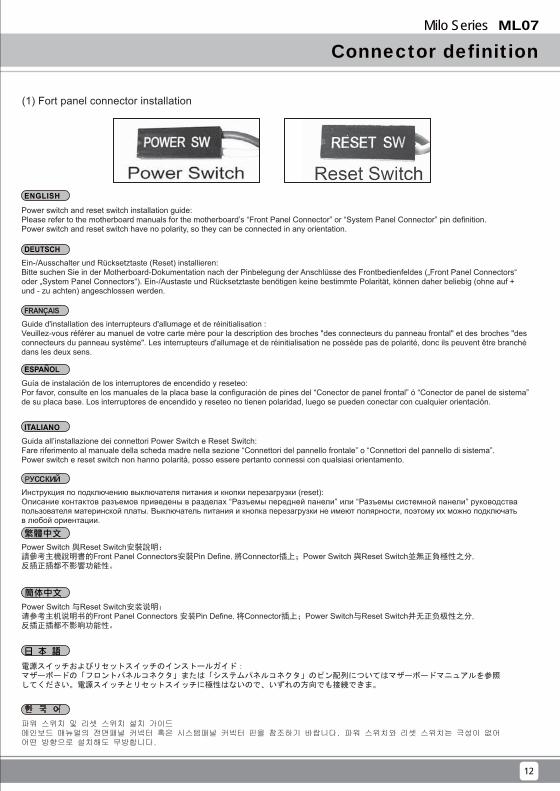
(1) Fort panel connector installation
Power switch and reset switch installation guide:Please refer to the motherboard manuals for the motherboard’s “Front Panel Connector” or “System Panel Connector” pin definition. Power switch and reset switch have no polarity, so they can be connected in any orientation.
Ein-/Ausschalter und Rücksetztaste (Reset) installieren:Bitte suchen Sie in der Motherboard-Dokumentation nach der Pinbelegung der Anschlüsse des Frontbedienfeldes („Front Panel Connectors“ oder „System Panel Connectors“). Ein-/Austaste und Rücksetztaste benötigen keine bestimmte Polarität, können daher beliebig (ohne auf + und - zu achten) angeschlossen werden.
Guide d'installation des interrupteurs d'allumage et de réinitialisation : Veuillez-vous référer au manuel de votre carte mère pour la description des broches "des connecteurs du panneau frontal" et des broches "des connecteurs du panneau système". Les interrupteurs d'allumage et de réinitialisation ne possède pas de polarité, donc ils peuvent être branché dans les deux sens.
Guía de instalación de los interruptores de encendido y reseteo:Por favor, consulte en los manuales de la placa base la configuración de pines del “Conector de panel frontal” ó “Conector de panel de sistema” de su placa base. Los interruptores de encendido y reseteo no tienen polaridad, luego se pueden conectar con cualquier orientación.
Guida all’installazione dei connettori Power Switch e Reset Switch:Fare riferimento al manuale della scheda madre nella sezione “Connettori del pannello frontale” o “Connettori del pannello di sistema”. Power switch e reset switch non hanno polarità, posso essere pertanto connessi con qualsiasi orientamento.
Инструкция по подключению выключателя питания и кнопки перезагрузки (reset):Описание контактов разъемов приведены в разделах “Разъемы передней панели” или “Разъемы системной панели” руководства пользователя материнской платы. Выключатель питания и кнопка перезагрузки не имеют полярности, поэтому их можно подключать в любой ориентации.
파워 스위치 및 리셋 스위치 설치 가이드메인보드 매뉴얼의 전면패널 커넥터 혹은 시스템패널 커넥터 핀을 참조하기 바랍니다. 파워 스위치와 리셋 스위치는 극성이 없어 어떤 방향으로 설치해도 무방합니다.
電源スイッチおよびリセットスイッチのインストールガイド:マザーボードの「フロントパネルコネクタ」または「システムパネルコネクタ」のピン配列についてはマザーボードマニュアルを参照してください。電源スイッチとリセットスイッチに極性はないので、いずれの方向でも接続できま。
Power Switch 與Reset Switch安裝說明:請參考主機說明書的Front Panel Connectors安裝Pin Define,將Connector插上;Power Switch 與Reset Switch並無正負極性之分,反插正插都不影響功能性。
Power Switch 与Reset Switch安装说明:请参考主机说明书的Front Panel Connectors 安装Pin Define,将Connector插上;Power Switch与Reset Switch并无正负极性之分,反插正插都不影响功能性。
Connector definitionMilo Series ML07
13
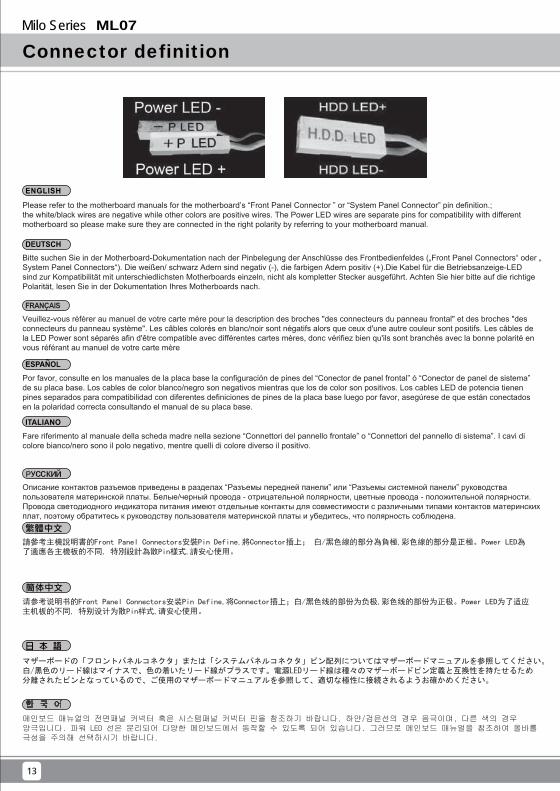
Please refer to the motherboard manuals for the motherboard’s “Front Panel Connector ” or “System Panel Connector” pin definition.; the white/black wires are negative while other colors are positive wires. The Power LED wires are separate pins for compatibility with different motherboard so please make sure they are connected in the right polarity by referring to your motherboard manual.
:
Bitte suchen Sie in der Motherboard-Dokumentation nach der Pinbelegung der Anschlüsse des Frontbedienfeldes („Front Panel Connectors“ oder „ System Panel Connectors“). Die weißen/ schwarz Adern sind negativ (-), die farbigen Adern positiv (+).Die Kabel für die Betriebsanzeige-LED sind zur Kompatibilität mit unterschiedlichsten Motherboards einzeln, nicht als kompletter Stecker ausgeführt. Achten Sie hier bitte auf die richtige Polarität, lesen Sie in der Dokumentation Ihres Motherboards nach.
Veuillez-vous référer au manuel de votre carte mère pour la description des broches "des connecteurs du panneau frontal" et des broches "des connecteurs du panneau système". Les câbles colorés en blanc/noir sont négatifs alors que ceux d'une autre couleur sont positifs. Les câbles de la LED Power sont séparés afin d'être compatible avec différentes cartes mères, donc vérifiez bien qu'ils sont branchés avec la bonne polarité en vous référant au manuel de votre carte mère
Por favor, consulte en los manuales de la placa base la configuración de pines del “Conector de panel frontal” ó “Conector de panel de sistema” de su placa base. Los cables de color blanco/negro son negativos mientras que los de color son positivos. Los cables LED de potencia tienen pines separados para compatibilidad con diferentes definiciones de pines de la placa base luego por favor, asegúrese de que están conectados en la polaridad correcta consultando el manual de su placa base.
Fare riferimento al manuale della scheda madre nella sezione “Connettori del pannello frontale” o “Connettori del pannello di sistema”. I cavi di colore bianco/nero sono il polo negativo, mentre quelli di colore diverso il positivo.
Описание контактов разъемов приведены в разделах “Разъемы передней панели” или “Разъемы системной панели” руководства пользователя материнской платы. Белые/черный провода - отрицательной полярности, цветные провода - положительной полярности. Провода светодиодного индикатора питания имеют отдельные контакты для совместимости с различными типами контактов материнских плат, поэтому обратитесь к руководству пользователя материнской платы и убедитесь, что полярность соблюдена.
請參考主機說明書的Front Panel Connectors安裝Pin Define,將Connector插上; 白/黑色線的部分為負極,彩色線的部分是正極。Power LED為了適應各主機板的不同, 特別設計為散Pin樣式,請安心使用。
请参考说明书的Front Panel Connectors安装Pin Define,将Connector插上;白/黑色线的部份为负极,彩色线的部份为正极。Power LED为了适应主机板的不同, 特别设计为散Pin样式,请安心使用。
マザーボードの「フロントパネルコネクタ」または「システムパネルコネクタ」ピン配列についてはマザーボードマニュアルを参照してください。白/黑色のリード線はマイナスで、色の着いたリード線がプラスです。電源LEDリード線は種々のマザーボードピン定義と互換性を持たせるため分離されたピンとなっているので、ご使用のマザーボードマニュアルを参照して、適切な極性に接続されるようお確かめください。
메인보드 매뉴얼의 전면패널 커넥터 혹은 시스템패널 커넥터 핀을 참조하기 바랍니다. 하얀/검은선의 경우 음극이며, 다른 색의 경우 양극입니다. 파워 LED 선은 분리되어 다양한 메인보드에서 동작할 수 있도록 되어 있습니다. 그러므로 메인보드 매뉴얼을 참조하여 올바를 극성을 주의해 선택하시기 바랍니다.
Connector definition Milo Series ML07
14
(2) Front I/O connector guide
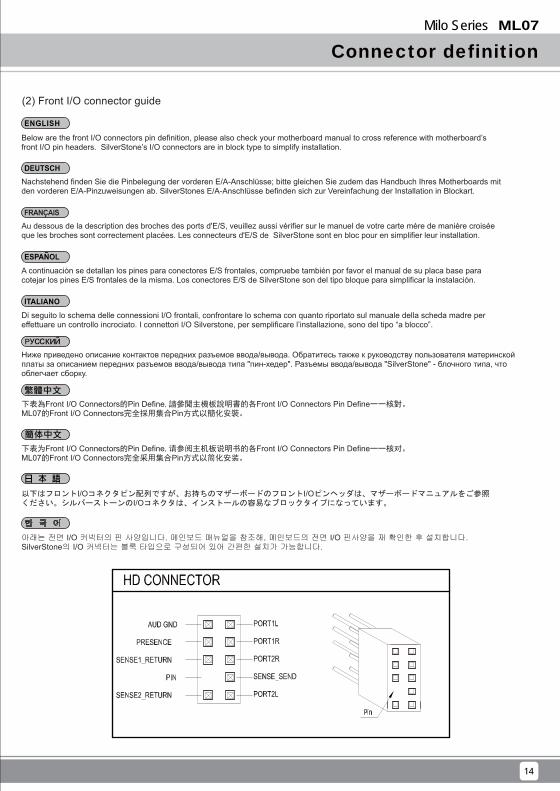
Below are the front I/O connectors pin definition, please also check your motherboard manual to cross reference with motherboard’s front I/O pin headers. SilverStone’s I/O connectors are in block type to simplify installation.
Nachstehend finden Sie die Pinbelegung der vorderen E/A-Anschlüsse; bitte gleichen Sie zudem das Handbuch Ihres Motherboards mit den vorderen E/A-Pinzuweisungen ab. SilverStones E/A-Anschlüsse befinden sich zur Vereinfachung der Installation in Blockart.
Au dessous de la description des broches des ports d'E/S, veuillez aussi vérifier sur le manuel de votre carte mère de manière croisée que les broches sont correctement placées. Les connecteurs d'E/S de SilverStone sont en bloc pour en simplifier leur installation.
A continuación se detallan los pines para conectores E/S frontales, compruebe también por favor el manual de su placa base para cotejar los pines E/S frontales de la misma. Los conectores E/S de SilverStone son del tipo bloque para simplificar la instalación.
Ниже приведено описание контактов передних разъемов ввода/вывода. Обратитесь также к руководству пользователя материнской платы за описанием передних разъемов ввода/вывода типа "пин-хедер". Разъемы ввода/вывода "SilverStone" - блочного типа, что облегчает сборку.
Di seguito lo schema delle connessioni I/O frontali, confrontare lo schema con quanto riportato sul manuale della scheda madre per effettuare un controllo incrociato. I connettori I/O Silverstone, per semplificare l’installazione, sono del tipo “a blocco”.
下表為Front I/O Connectors的Pin Define,請參閱主機板說明書的各Front I/O Connectors Pin Define一一核對。ML07的Front I/O Connectors完全採用集合Pin方式以簡化安裝。
下表为Front I/O Connectors的Pin Define,请参阅主机板说明书的各Front I/O Connectors Pin Define一一核对。ML07的Front I/O Connectors完全采用集合Pin方式以简化安装。
以下はフロントI/Oコネクタピン配列ですが、お持ちのマザーボードのフロントI/Oピンヘッダは、マザーボードマニュアルをご参照ください。シルバーストーンのI/Oコネクタは、インストールの容易なブロックタイプになっています。
아래는 전면 I/O 커넥터의 핀 사양입니다. 메인보드 매뉴얼을 참조해, 메인보드의 전면 I/O 핀사양을 재 확인한 후 설치합니다. SilverStone의 I/O 커넥터는 블록 타입으로 구성되어 있어 간편한 설치가 가능합니다.

Component size limitationsMilo Series ML07
15
The ML07 was designed to be as small as possible while maximizing interior space usage, please refer to the following guidelines for component selection and future upgrade considerations.
A. Height limitation: The ML07 has 83mm height limitation for CPU coolerB. Upper boundary: the cooler can protrude 11mm over the motherboard’s top edge.C. Front boundary: The clearance toward the front of the chassis is 7mm.
A. Höhenbeschränkung: Das ML07 unterstützt beim CPU-Kühler eine Maximalhöhe von 83 mm.B. Obere Grenze: Der Kühler kann 11 mm über die Motherboard-Oberkante hinausstehen.C. Vordere Grenze: Der Abstand Richtung Vorderseite des Gehäuses beträgt 7 mm.
A. Limitation de la hauteur : Le ML07 a une limitation de hauteur de 83mm pour le refroidisseur de CPU.B. Limite supérieure : Le refroidisseur peut dépasser de 11mm sur le bord supérieur de la carte mère.C. Limite avant : Le dégagement vers l'avant du châssis est 7 mm.
A. Limitación de altura: el ML07 tiene una limitación de altura de 83mm para un disipador de CPUB. Límite superior: el disipador puede sobresalir 11mm sobre el límite superior de la placa baseC. Límite frontal: el espacio libre hacia la parte frontal del chasis debe ser de 7mm.
A. Limitazioni dell’altezza: ML07 ha una limitazione di 83 mm in altezza per il dispersore di calore CPUB. Limite superiore: il dispersore di calore può sporgere di 11 mm dal bordo superiore della scheda madre.C. Limite anteriore: Lo spazio libero verso la parte anteriore del telaio è di 7 mm.
A. Ограничение по высоте: Корпус ML07 для установки вентилятора охлаждения процессора имеет ограничение по высоте 83 ммB. Верхний край: вентилятор может выступать на 11 мм над верхним краем системной платы.C. Передний край: Зазор до передней стороны корпуса должен составлять 7 мм.
A.高度限制:CPU Cooler限高是83mm;B.上邊界:Cooler外緣允許超過主機板上邊緣11mm。C.前邊界:Cooler外緣允許超過前邊界7mm。
A.高度限制:CPU Cooler限高是83mm;B.上边界:Cooler外缘允许超过主板上边缘11mm。C.前边界:Cooler外缘允许超过前边界7mm。
A.高さ制限:ML07には、CPUクーラーに対して83mmの高さ制限がありますB.上限:クーラーは、マザーボードの上端の上方11mmまで突出できます。C.正面の制限:ケースの正面の方の許容範囲は7mmです。
A.높이 제한: CPU 쿨러에 대한 ML07의 높이 제한은 83mm입니다.B.상한: 쿨러는 메인보드 상단 가장자리 위로 11mm까지 돌출할 수 있습니다.C.전방 한계: 섀시 전면 쪽 간극은 7mm입니다.
:
(1) CPU cooler height limitation 11mmB
83mmA7mmC

Component size limitations Milo Series ML07
16
(2) Power supply limitations
130 0.5+-
10 0.5+-
51.5 0.1+-
125 0.5+-
63.5 0.5+-
25.8 0.1
5 - NO.6 *32 UNC
+-
25.7 0.1+-
113 0.1+-
6
6
6
The ML07 supports only standard SFX power supply with a 130 mm depth.In the illustration, the PSU is situated in the front part of the chassis with the 90 degrees connector extension cable installed. The extension cable shall not exceed the upper or the lower boundary.
Der ML07 unterstützt SFX-Standardnetzteile mit einer Tiefe von 130 mm.In der Abbildung befindet sich das Netzteil im vorderen Bereich des Gehäuses; mit installiertem Verlängerungskabel mit 90-Grad-Anschluss. Das Verlängerungskabel darf die obere und untere Grenze nicht überschreiten.
Le ML07 supporte une source d'alimentation SFX standard avec une profondeur de 130 mm.Dans l'illustration, l'unité d'alimentation est située dans la partie avant du châssis avec le câble d'extension et un connecteur de 90 degrés. Le câble d'extension ne doit pas dépasser la limite supérieure ou inférieure.
La ML07 acepta fuentes de alimentación SFX estándar con una profundidad de 130 mm.En la ilustración, la FA está situada en la parte frontal del chasis con el cable de extensión con el conector de 90 grados instalado. El cable de extensión no deberá exceder el límite superior o inferior.
Корпус ML07 совместим со стандартными блоками питания SFX глубиной 130 мм.На рисунке блок питания размещен в передней части корпуса с помощью кабеля с уголковым (90 градусов) разъемом. Кабель не должен выходить за пределы верхнего или нижнего края.
ML07 supporta l’alimentatore standard SFX con una profondità di 130 mm.Nell'illustrazione, la PSU si trova sulla parte anteriore del telaio ed è dotata di prolunga con connettore a 90 gradi. La prolunga non deve superare il limite superiore o inferiore.
ML07限定使用長度為130mm的標準SFX電源如圖,ML07電源前置,在內部使用90度的延長線,延長線安裝上後不允許往上或往下超出邊界
ML07限定使用长度为130mm的标准SFX电源如图,ML07电源前置,在内部使用90度的延长线,延长线安装上后不允许往上或往下超出边界
ML07は標準SFX電源(130㎜深)に対応しています。図中では、PSUは90度コネクタ拡張ケーブルを使用して、ケース前方に設置されています。拡張ケーブルは、上限や下限を超えないようにします。
ML07는 130mm 깊이의 표준 SFX 전원 공급장치를 지원합니다.그림에서 PSU는 90도 커넥터 확장 케이블이 설치된 상태에서 섀시의 앞 부분에 위치합니다. 확장 케이블은 상한 또는 하한을 초과해서는 안 됩니다.
Component size limitationsMilo Series ML07
17
(3) Graphics card/expansion card length limitationA. Length limitation
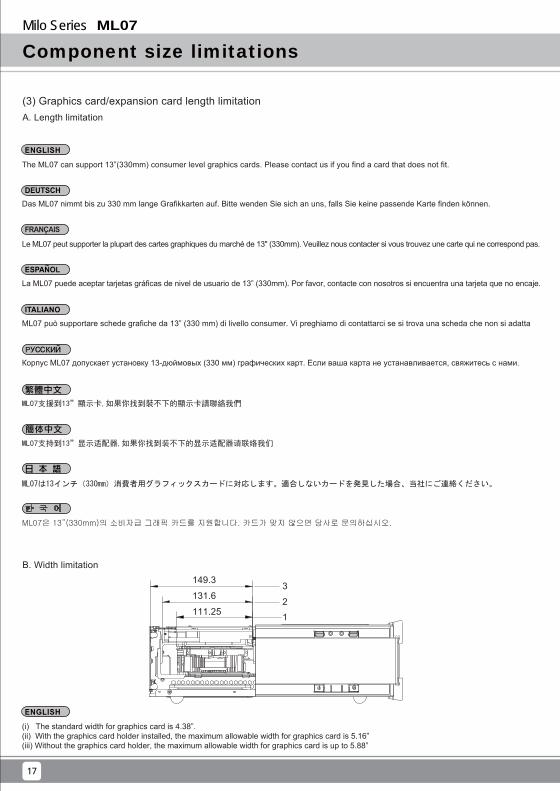
B. Width limitation149.3
131.6
111.25
3
21
The ML07 can support 13”(330mm) consumer level graphics cards. Please contact us if you find a card that does not fit.
(i) The standard width for graphics card is 4.38”.(ii) With the graphics card holder installed, the maximum allowable width for graphics card is 5.16”(iii) Without the graphics card holder, the maximum allowable width for graphics card is up to 5.88”
Das ML07 nimmt bis zu 330 mm lange Grafikkarten auf. Bitte wenden Sie sich an uns, falls Sie keine passende Karte finden können.
Le ML07 peut supporter la plupart des cartes graphiques du marché de 13" (330mm). Veuillez nous contacter si vous trouvez une carte qui ne correspond pas.
La ML07 puede aceptar tarjetas gráficas de nivel de usuario de 13” (330mm). Por favor, contacte con nosotros si encuentra una tarjeta que no encaje.
Корпус ML07 допускает установку 13-дюймовых (330 мм) графических карт. Если ваша карта не устанавливается, свяжитесь с нами.
ML07 può supportare schede grafiche da 13” (330 mm) di livello consumer. Vi preghiamo di contattarci se si trova una scheda che non si adatta
ML07支援到13”顯示卡,如果你找到裝不下的顯示卡請聯絡我們
ML07支持到13”显示适配器,如果你找到装不下的显示适配器请联络我们
ML07は13インチ(330mm)消費者用グラフィックスカードに対応します。適合しないカードを発見した場合、当社にご連絡ください。
ML07은 13”(330mm)의 소비자급 그래픽 카드를 지원합니다. 카드가 맞지 않으면 당사로 문의하십시오.

Component size limitations Milo Series ML07
18
(i) La largeur standard pour les cartes graphiques est 4,38". (11,13cm)(ii) Avec le support de carte graphique, la largeur maximale permise pour les cartes graphiques est 5,16". (13,16cm)(iii) Sans le support de carte graphique, la largeur maximale permise pour les cartes graphiques est 5,88". (14,93cm)
(i) Стандартная ширина графической карты составляет 4,38 дюйма (11,13см).(ii) При установленном кронштейне графической карты максимально допустимая ширина графической карты составляет 5,16 дюйма (13,16 см).(iii) Без установленного кронштейна графической карты максимально допустимая ширина графической карты составляет 5,88 дюйма (14.93 см).
(i) La larghezza standard delle schede video è di 4,38”. (11,13cm)(ii) Quando è installato il supporto della scheda video, la larghezza massima consentita per la scheda video è di 5,16” (13,16 cm)(iii) Quando non è installato il supporto della scheda video, la larghezza massima consentita per la scheda video è di 5,88” (14,93 cm)
(i) 標準顯示卡寬度是4.38”(ii) 如果有要使用輔助托架,支援最大寬度到5.16”(超過標準20mm)(iii) 如果不使用輔助托架,顯示卡寬度最多為5.88” (超過標準38mm)
(i) 标准显示适配器宽度是4.38”(ii) 如果有要使用辅助托架,支持最大宽度到5.16”(超过标准20mm)(iii) 如果不使用辅助托架,显示适配器宽度最多为5.88” (超过标准38mm)
(i) グラフィックスカードの標準的な幅は、4.38インチです。 (11.12cm)(ii) グラフィックスカード・ホルダーを設置した場合、グラフィックスカードの最大許容幅は、5.16インチです。 (13.16cm)(iii) グラフィックスカード・ホルダーなしでは、グラフィックスカードの最大許容幅は、5.88インチです。 (14.93cm)
(i) 그래픽 카드의 표준 폭은 4.38”입니다. (11.12cm)(ii) 그래픽 카드 홀더가 설치된 상태에서 그래픽 카드의 최대 허용 폭은 5.16”입니다. (13.16cm)(iii) 그래픽 카드 홀더가 없는 상태에서 그래픽 카드의 최대 허용 폭은 5.88”입니다. (14.93cm)
(i) Die Standardbreite bei Grafikkarten beträgt 11,13cm.(ii) Bei installierter Grafikkartenhalterung beträgt die maximal erlaubte Grafikkartenbreite 13,11 cm.(iii) Ohne installierte Grafikkartenhalterung beträgt die maximal erlaubte Grafikkartenbreite 14,93 cm.
(i) La anchura estándar para las tarjetas gráficas es de 4,38”. (11,13cm)(ii) Con el soporte para tarjetas gráficas instalado, la anchura máxima permitida para las tarjetas gráficas es de 5,16” (13,16cm)(iii) Sin el soporte para tarjetas gráficas, la anchura máxima permitida para tarjetas gráficas es de hasta 5,88” (14,93cm)

Component size limitationsMilo Series ML07
19
(i) Vom Boden des Gehäuses bis zur Oberkante der Grafikkartenplatine beläuft sich die gesamte Stärkenlimitierung auf 68 mm.(ii) Bei installierter standardmäßiger 34,8 mm dicker Dual-Steckplatz-Grafikkarte beträgt die maximale Lüfterdicke 32 mm.(iii) Bei installierter standardmäßiger 14,5 mm dicker Einzel-Steckplatz-Grafikkarte und schlankem 15 mm hohem Lüfter beträgt die maximale Dicke des Wasserkühlkörpers 38 mm.(iv) Die Dicke der Komponenten an der Rückseite der Grafikkarte ist in der vom Grafikkartenhalterung unterstützten Bereich auf 3 mm beschränkt; die Dickenbeschränkung für die restlichen Komponenten beträgt 10 mm.
(i) Calculé à partir de la partie inférieure de la carte graphique PCB jusqu'à la partie supérieure, la limitation d'épaisseur totale est 68 mm.(ii) Avec une carte graphique double fente standard de 34,8mm d'épaisseur, l'épaisseur maximale des ventilateurs est 32 mm.(iii) Avec une carte graphique à une fente standard de 14,5mm d'épaisseur standard et un ventilateur mince de 15mm d'épaisseur installé, l'épaisseur maximale du radiateur de refroidissement à l'eau est 38mm.(iv) L'épaisseur des composants à l'arrière de la carte graphique est limitée à 3 mm dans la zone prise en charge par le support de carte graphique, la limitation de l'épaisseur pour le reste des composants est 10 mm.
(i) Calculado desde la parte inferior de la carcasa hasta la parte superior del PCB de la tarjeta gráfica, la limitación total de grosor es 68mm.(ii) Con el grosor estándar de 34,8mm de una tarjeta gráfica dual instalada, el grosor máximo de los ventiladores es de 32mm.(iii) Con la tarjeta gráfica estándar de un solo zócalo de 14,5mm de grosor y un ventilador delgado de 15mm de grosor instalados, el grosor máximo del radiador de refrigeración líquida es 38mm.(iv) El grosor de los componentes de la parte posterior de las tarjetas gráficas está limitado a 3mm en la zona del soporte de la tarjeta gráfica, la limitación de grosor para el resto de los componentes es de 10mm
(i) Calcolato dalla parte inferiore a quella superiore del PCB della scheda video, la limitazione totale dello spessore è di 68 mm.(ii) Quando è installato il doppio alloggio scheda video di spessore standard di 34,8 mm, lo spessore massimo delle ventole è di 32 mm.(iii) Quando è installato l’alloggio singolo scheda video di spessore standard di 14,5 mm e le ventole slim da 15 mm, lo spessore massimo del raffreddamento ad acqua è di 38 mm.(iv) Lo spessore dei componenti sul retro della scheda video è limitato a 3 mm nella zona supportata dal supporto scheda video; la limitazione dello spessore per il resto dei componenti è di 10 mm.
(i) Ограничение по толщине от нижнего до верхнего края печатной платы графической карты составляет 68 мм.(ii) При установке стандартной двусторонней графической карты толщиной 34,8 мм максимальная толщина вентиляторов составляет 32 мм.(iii) При установке стандартной графической карты толщиной 14,5 мм с одним разъемом и тонкого вентилятора толщиной 15 мм максимальная толщина радиатора с водяным охлаждением составляет 38 мм.(iv) Толщина компонентов на задней части графической карты имеет ограничение 3 мм в месте установки на кронштейн крепления, ограничение по толщине для остальных компонентов составляет 10 мм.
(i) 從顯示卡電路板表面算起,顯示卡正面到底部厚度總限制為68mm(ii) 以標準雙槽卡正面元件厚度34.8mm限制而言,風扇最大厚度為32mm(iii) 以標準單槽卡正面元件厚度14.5mm限制而言, 如果選購15mm風扇,水冷排最大厚度38mm(iv) 有被顯示卡托架接觸到的部分,顯示卡背面元件厚度限制3mm,未接觸到的部分厚度限制10mm
(i) 从显示适配器电路板表面算起,显示适配器正面到底部厚度总限制为68mm(ii) 以标准双槽卡正面组件厚度34.8mm限制而言,风扇最大厚度为32mm(iii) 以标准单槽卡正面组件厚度14.5mm限制而言, 如果选购15mm风扇,水冷排最大厚度38mm(iv) 有被显示适配器托架接触到的部分,显示适配器背面组件厚度限制3mm,未接触到的部分厚度限制10mm
C. Thickness limitation1
68 34.8
14.5
3.23
(32)
2 3 4
(i) Calculated from the bottom of the case to top of graphics card PCB, the total thickness limitation is 68mm.(ii) With the standard 34.8mm-thick dual slot graphics card installed, the maximum thickness of the fans is 32mm.(iii) With the standard 14.5mm-thick single slot graphics card and the included 15mm-thick fans installed, the maximum thickness of the water cooling radiator is 38mm.(iv) The thickness of the components on the back of the graphics card is limited to 3mm in the area supported by the graphics card holder; the thickness limitation for the rest of the components is 10mm.

Component size limitations Milo Series ML07
20
(4) Optical drive limitation
The ML07 supports only slim slot-loading optical drive.
Das ML07 unterstützt nur schmale optische Laufwerke („Slot-In“).
Le ML07 est compatible seulement avec le les lecteur optique slim sans tiroir (mange-disque aka “slot-loading”).
La ML07 sólo acepta dispositivos ópticos delgados de carga mediante ranura.
ML07 supporta soltanto drive ottici slim “slot-loading”.
Корпус ML07 допускает только установку тонких оптических приводов со «щелевой загрузкой».
ML07只能使用吸入式薄型光碟機
ML07只能使用吸入式薄型光驱
ML07はスリムタイプ「スロットローディング」光学ドライブのみをサポートします。
ML07은 슬립 슬롯 방식의 광드라이브만 지원합니다.
(i) ケース底部からグラフィックスカードPCBの上面までの厚さ限界は68mmです。(ii) 標準的な厚さ34.8mmのデュアルスロット・グラフィックスカードを設置した際のファン最大厚さは32mmです。(iii) 標準の14.5mm厚シングルスロットのグラフィックスカードおよび15mm厚スリムファンをインストールした際、水冷ラジエターの最大厚さ は38mmです。(iv) グラフィックスカード後方のコンポーネントの厚さは、グラフィックスカード・ホルダーが対応可能なエリアで、3mmに限られます。 コンポーネントの残りの厚さ制限は10mmです。
(i) 케이스의 하단부터 그래픽 카드 PCB의 상단까지 계산할 경우 총 두께 제한은 68mm입니다.(ii) 표준 34.8mm 두께의 듀얼 슬롯 그래픽 카드가 설치된 경우 팬의 최대 두께는 32mm입니다.(iii) 표준 14.5mm 두께의 싱글 슬롯 그래픽 카드와 15mm 두께의 슬림형 팬이 설치된 경우 수냉식 냉각 라디에이터의 최대 두께는 38mm입니다.(iv) 그래픽 카드 뒷면에 있는 구성부품의 두께는 그래픽 카드 홀더로 지지되는 영역에서 3mm로 제한됩니다. 나머지 구성부품의 두께 제한은 10mm입니다.

Optimal Thermal Performance Layout Milo Series ML07
21
(1) To improve thermal performance, we recommend using SilverStone NT06-PRO CPU cooler.A. The NT06-PRO must be installed rearward on motherboard such as ASUS P8Z77-I DELUXE. Please install cooler with caution for this type of configuration.B. The CPU socket on Z87 motherboard is closer to the edge. We recommend installing NT06-PRO toward left side.C. Intel reference Mini-ITX motherboard layout has CPU socket next to PCI Express slot, NT06-PRO should have no installation problems with this layout.D. For additional information on NT06-PRO dimensions, please visit our website.E. Theoretically, NT06-PRO’s heat pipes may not work optimally when installed facing downward. However, during ML07’s thermal testing phase, we did not detect any performance difference among different orientation when using a 95W LGA115X based CPU. If you are concerned about heat pipe orientation, ML07 can be placed vertically or horizontally to eliminate this potential problem.
A B C
(1) Zur Steigerung der Wärmeleistung empfehlen wir den Einsatz eines SilverStone NT06-PRO-CPU-Kühlers.A. Der NT06-PRO muss rückwärts gerichtet am Motherboard, wie dem ASUS P8Z77-I DELUXE, installiert werden. Bitte installieren Sie den Kühler bei diesem Konfigurationstyp entsprechend vorsichtig.B. Der CPU-Sockel am Z87-Motherboard befindet sich näher am Rand. Wir empfehlen, den NT06-PRO nach links ausgerichtet zu installieren.C. Das Intel Mini-ITX-Motherboard-Layout hat den CPU-Sockel neben dem PCI-Express-Steckplatz; der NT06-PRO sollte keine Installationsprobleme mit diesem Layout haben.D. Zusätzliche Informationen zu NT06-PRO-Abmessungen finden Sie auf unserer Website.E. Theoretisch arbeiten NT06-PRO-Wärmerohre möglicherweise nicht optimal, wenn sie nach unten gerichtet installiert werden. Wir haben während der ML07-Wärmetestphase jedoch keine Leistungsunterschiede bei unterschiedlichen Ausrichtungen festgestellt, wenn eine LGA115X-basierte 95-W-CPU verwendet wurde. Wenn Sie sich Sorgen um die Ausrichtung der Wärmerohre machen, können Sie das ML07 zur Eliminierung dieses möglichen Problems vertikal oder horizontal aufstellen.
(1) Pour améliorer les performances thermiques, nous recommandons d'utiliser le refroidisseur de CPU SilverStone NT06-PRO.A. Le NT06-PRO doit être installé à l'arrière de la carte mère, par exemple ASUS P8Z77-I DELUXE. Veuillez installer le refroidisseur avec prudence sur ce type de configuration.B. La prise de CPU sur la carte mère Z87 est plus près du bord. Nous vous recommandons d'installer la NT06-PRO vers le côté gauche.C. La disposition de carte mère Intel Mini-ITX de référence a la prise de CPU à côté de la fente PCI Express, le NT06-PRO devrait n'avoir aucun problème d'installation.D. Pour plus d'informations sur les dimensions du NT06-PRO, veuillez visiter notre site Web.E. En théorie, les conduits de chaleur du NT06-PRO peuvent ne pas fonctionner de façon optimale lorsqu'il est installé vers le bas. Cependant, lors de la phase de test thermique du ML07, nous n'avons pas détecté de différence de performance avec une orientation différente lorsque vous utilisez un CPU 95W LGA115X. Si vous vous inquiétez du sens des conduits de chaleur, le ML07 peut être placé verticalement ou horizontalement pour éliminer ce problème potentiel.
(1) Para mejorar el rendimiento térmico, le recomendamos usar el disipador NT06-PRO de SilverStone.A. El NT06-PRO debe instalarse hacia atrás en la placa base como con la ASUS P8Z77-I DELUXE. Por favor, instale el disipador con cuidado para este tipo de configuración.B. El zócalo para CPU en la placa base Z87 está más cerca del borde. Le recomendamos instalar el NT06-PRO hacia el lado izquierdo.C. La disposición de referencia de Intel para las Mini-ITX tiene el zócalo para la CPU junto al zócalo PCI Express, el NT06-PRO no debería tener problemas de instalación con esta disposición.D. Para información adicional sobre las dimensiones del NT06-PRO, por favor visite nuestro sitio web.E. En teoría, los tubos isotérmicos del NT06-PRO podrían no funcionar de forma óptima cuando se instalen hacia abajo. Sin embargo, durante la fase de pruebas térmicas del ML07, no detectamos ninguna diferencia de rendimiento entre las diferentes orientaciones cuando se usó un CPU basado en LGA 115X 95W. Si está preocupado por la orientación de los tubos isotérmicos, la ML07 se puede colocar de forma vertical u horizontal para eliminar este problema potencial.
Optimal Thermal Performance Layout Milo Series ML07
22
A. NT06-PRO deve essere installato all'indietro sulla schede madre come ASUS P8Z77-I DELUXE. Installare con cautela il dispersore di calore per questo tipo di configurazioneB. Il socket CPU sulla scheda madre Z87 è più vicino al bordo. Si consiglia di installare NT06-PRO verso il lato sinistro.C. Il layout di riferimento della scheda madre Mini-ITX Intel ha il socket CPU accanto all’alloggio PCI Express; NT06 -PRO non dovrebbe avere problemi di installazione con questo layout.D. Per altre informazioni sulle dimensioni di NT06-PRO, visitare il sito.E. In teoria, i tubi per lo scambio del calore di NT06-PRO potrebbero non funzionare in modo ottimale quando sono installati rivolti verso il basso. Tuttavia, durante la fase di test termico di ML07, non è stata rilevata alcuna differenza di prestazioni tra i vari orientamenti quando si utilizza una CPU 95W LGA115X. Se si hanno dei dubbi sull’orientamento dei tubi per lo scambio del calore, ML07 può essere posizionato verticalmente o orizzontalmente per eliminare questo potenziale problema.
A. NT06-PRO следует устанавливать с тыльной стороны системной платы, такой как ASUS P8Z77-I DELUXE. Систему охлаждения устанавливайте с учетом данного типа конфигурации.B. Гнездо процессора на системной плате Z87 расположено ближе к краю. Мы рекомендуем устанавливать NT06-PRO с левой стороны.C. На системной плате Mini-ITX компании Intel гнездо процессора расположено рядом с гнездом PCI Express, благодаря чему проблем при установке NT06-PRO возникнуть не должно.D. Дополнительная информация о размерах NT06-PRO размещена на нашем веб-сайте.E. Теоретически характеристики теплоотводных трубок NT06-PRO могут оказаться не оптимальными при установке лицевой стороной вниз. Однако, при тепловых испытаниях корпуса ML07 с использованием процессора на базе 95W LGA115X мы не обнаружили каких-либо различий при различном расположении. Если вы озабочены ориентацией теплоотводных трубок, во избежание потенциальной опасности корпус ML07 можно установить вертикально или горизонтально.
A. 如果使用ASUS P8Z77-I DELUXE主機板,NT06-PRO必須朝後安裝,這種的安裝會比較困難,請小心安裝B. Z87的CPU更靠邊一些,建議NT06-PRO朝左安裝C. 大部分的Intel規格ITX主機板CPU會與PCIE插槽緊靠,NT06-PRO都能順利安裝D. 如果有需要NT06-PRO的詳細尺寸可以參考我們網頁的圖面資料E. 理論上,NT06-PRO在導熱管朝下的狀況下,可能會有導熱管失效的現象。但是我們測試結果在95W的115X平台還測不出有任何效能差異。 如果您在意這一點,ML07直立擺設時,可以選擇避開這個不
A. 如果使用ASUS P8Z77-I DELUXE主板,NT06-PRO必须朝后安装,这种的安装会比较困难,请小心安装B. Z87的CPU更靠边一些,建议NT06-PRO朝左安装C. 大部分的Intel规格ITX主板CPU会与PCIE插槽紧靠,NT06-PRO都能顺利安装D. 如果有需要NT06-PRO的详细尺寸可以参考我们网页的图面数据E. 理论上,NT06-PRO在导热管朝下的状况下,可能会有导热管失效的现象。但是我们测试结果在95W的115X平台还测不出有任何效能差异。 如果您在意这一点,ML07直立摆设时,可以选择避开这个不佳的方向摆设。
A. NT06-PROは、ASUS P8Z77-I DELUXEといったマザーボードの後方に設置する必要があります。このタイプの構成ではクーラーを注意深く設置します。B. Z87マザーボードのCPUソケットはエッジに近くなっています。NT06-PROは左側に設置するようお勧めいたします。C. IntelリファレンスMini-ITXマザーボードのレイアウトでは、CPUソケットはPCI Expressスロットの隣にあります。このレイアウトではNT06-PRO の設置は問題ありません。D. NT06-PROの寸法に関するさらなる情報は、当社ウェブサイトをご参照ください。E. 理論的には、NT06-PROのヒートパイプが下向きに設置されると、最適な効果は得られない可能性があります。しかし、ML07の放熱テストの段階 では、95WのLGA115XベースCPUを使った状態で、当社は異なる方向の間で少しのパフォーマンスの差異も見られませんでした。ヒートパイプの向 きが心配であれば、この潜在的問題を除くために、ML07は垂直または水平に設置可能です。
A. NT06-PRO는 ASUS P8Z77-I DELUXE와 같은 메인보드에서 뒤쪽을 향해 설치해야 합니다. 이러한 유형의 구성에서는 쿨러를 주의해서 설치하십시오.B. Z87 메인보드에서 CPU 소켓은 가장자리 가까이에 있습니다. NT06-PRO는 왼쪽을 향해 설치할 것을 권장합니다.C. Intel 기준 Mini-ITX 메인보드 레이아웃의 경우 CPU 소켓이 PCI Express 슬롯 옆에 있습니다. 이 레이아웃에서 NT06-PRO는 설치상 문제가 없습니다.D. NT06-PRO 치수에 대한 자세한 내용은 당사 웹사이트를 참조하십시오.E. 이론적으로 NT06-PRO의 열 파이프는 아래를 향해 설치될 경우 최적으로 작동하지 않을 수 있습니다. 그러나 ML07의 열 테스트 단계에서 95W LGA115X 기반 CPU를 사용했을 때 방향에 따른 성능상 차이를 발견하지 못했습니다. 열 파이프 방향에 문제가 있으면 ML07을 수직 또는 수평으로 배치하여 이러한 문제의 소지를 없앨 수 있습니다.
(1) Per migliorare le prestazioni termiche, si consiglia di utilizzare il dispersore di calore CPU SilverStone NT06-PRO.
(1) Для улучшения тепловых характеристик мы рекомендуем использовать систему охлаждения процессора SilverStone NT06-PRO.
(1)如果有需要提升散熱效能,我們建議您使用NT06-PRO
(1)如果有需要提升散热效能,我们建议您使用NT06-PRO
(1)放熱性能を向上させるには、当社はSilverStone NT06-PRO CPUクーラーの使用をお勧めいたします。
(1) 열 성능을 높이기 위해 SilverStone NT06-PRO CPU 쿨러를 사용할 것을 권장합니다.

Optimal Thermal Performance Layout Milo Series ML07
23
(2) If you use a high-end graphics card, installing case fans on the bottom vent below graphics card should provide plenty of cooling for them.If you use graphics card with omni-direction or open air cooler, we recommend having two case fans on the bottom vents.
(2) Wenn Sie Highend-Grafikkarten einsetzen, sollten Sie durch Installation von Gehäuselüftern an der unteren Belüftungsöffnung unterhalb der Grafikkarte für reichlich Kühlung sorgen können.Wenn Sie eine Grafikkarte mit omnidirektionalem und Open-Air-Kühler verwenden, empfehlen wir zwei Gehäuselüfter an den unteren Belüftungsöffnungen.
(2) Si vous utilisez une carte graphique haut de gamme, installer des ventilateurs de boîtier sur la sortie du fond de la carte graphique devrait fournir un r efroidissement suffisant.Si vous utilisez une carte graphique multi-directionnelle ou un refroidisseur à l'air ouvert, nous recommandons d'utiliser deux ventilateurs de boîtier sur les sorties inférieures.
(2) Si usa una tarjeta gráfica de alto rendimiento, instalar ventiladores de carcasa en la abertura inferior bajo la tarjeta gráfica debería proporcionar refrigeración de sobra para la misma.Si usa una tarjeta gráfica con un disipador omni-direccional o abierto, le recomendamos tener dos ventiladores de carcasa en las aberturas inferiores.
(2) Se si utilizza una scheda video di fascia alta, installando le ventole sulla presa d’aria inferiore sotto la scheda video, dovrebbero fornire il raffreddamento sufficiente alla scheda.Se si utilizza la scheda video con dispersore di calore omnidirezionale o aperto, si consiglia di installare due ventole sulle prese d'aria inferiori.
(2) Если вы используете профессиональную графическую карту, корпусные вентиляторы, установленные на нижней панели с вентиляционными отверстиями под графической картой обеспечат ее отличное охлаждение.Если вы используете графическую карту с ненаправленным или открытым воздушным охлаждением, мы рекомендуем устанавливать два корпусных вентилятора на нижней панели с вентиляционными отверстиями.
(2)如果您安裝高階顯示卡,顯示卡區有系統風扇頂著吹應該沒問題如果您使用種開放型顯示卡,我們建議您可以把顯示卡區域的兩顆系統風扇都裝上
(2)如果您安装高阶显示适配器,显示适配器区有系统风扇顶着吹应该没问题如果您使用种开放型显示适配器,我们建议您可以把显示适配器区域的两颗系统风扇都装上
(2)ハイエンドのグラフィックスカードを使用される場合、, グラフィックスカード下の底部給気口にケースファンを取り付けることで、十分の冷却 効果が得られます。複数またはオープンクーラー付きのグラフィックスカードを使う場合、底部換気口部分に2つのケースファンを設置するようお勧めいたします。
(2) 고급 그래픽 카드를 사용하는 경우 그래픽 아래의 하단 통풍구에 케이스 팬을 설치하여 그래픽 카드를 충분히 냉각시켜야 합니다.전방향 또는 개방된 기냉식 쿨러를 사용하는 그래픽 카드의 경우 하단 통풍구에 2개의 케이스 팬을 사용할 것을 권장합니다.

Optimal Thermal Performance Layout Milo Series ML07
24
A. The ML07 is designed as a high performance gaming platform, we recommend using SSD as the primary storage device as they are more heat-resistant.B. By the design, ML07 has no active cooling designed for 3.5” hard drives. We recommend using low RPM hard drives or models with better heat resistance. C. If you’re not still satisfied with the thermal performance, we recommend placing the ML07 in the vertical position.
A. Das ML07 ist als hochleistungsstarke Gaming-Plattform konzipiert; wir empfehlen die Verwendung von SSDs als primären Speichergeräten, da diese wärmeresistenter sind.B. Bauartbedingt ermöglicht das ML07 keine aktive Kühlung von 3,5-Zoll-Festplatten. Wir empfehlen den Einsatz von Festplatten mit geringer Drehzahl oder wärmebe ständigere Modelle.C. Falls Sie mit der thermischen Leistung nach wie vor nicht zufrieden sein sollten, empfehlen wir, das ML07 einfach vertikal aufzustellen.
A. La ML07 está diseñada como una plataforma para juegos de alto rendimiento, le recomendamos usar un SSD como dispositivo de almacenamiento primario ya que son más resistentes al calor.B. Según el diseño, la ML07 no tiene refrigeración activa diseñada para discos duros de 3,5”. Le recomendamos usar discos duros con bajas RPM o modelos con mejor resistencia al calor.C. Si todavía no está satisfecho con el rendimiento térmico, le recomendamos situar la ML07 en posición vertical.
A. ML07 è concepito come una piattaforma di gioco ad alte prestazioni, si consiglia di utilizzare SSD come dispositivo d’archiviazione principale in quanto sono più resistenti al calore.B. L'ML07 non prevede un raffreddamento attivo per i dischi rigidi 3,5”. Si consiglia di utilizzare dischi rigidi con RMP bassi, oppure modelli con una migliore resistenza al calore.C. Se non si è ancora soddisfatti delle prestazioni termiche, si consiglia di collocare ML07 in posizione verticale.
A. Корпус ML07 создан для профессиональных игровых платформ, поэтому мы рекомендуем использовать в качестве главного устройства хранения данных твердотельные диски, так как они более устойчивы к нагреву.B. Конструкция ML07 не предусматривает активное охлаждение 3,5-дюймовых жестких дисков. Мы рекомендуем использовать жесткие диски с низкой скоростью вращения или модели с повышенной устойчивостью к нагреву.C. Если вас все же не устраивают тепловые характеристики, мы рекомендуем устанавливать корпус ML07 в вертикальном положении.
(3) Storage device temperature
A. Le ML07 est conçu comme une plate-forme de jeu haute performance, nous vous recommandons d'utiliser le SSD comme périphérique de stockage principal car ils sont plus résistants à la chaleur.B. Par son design, le ML07 ne dispose d'aucun refroidissement actif conçu pour les disques durs de 3,5”. Nous vous recommandons d'utiliser des disques durs à faible RPM ou des modèles avec une meilleure résistance à la chaleur.C. Si vous n'êtes pas satisfait des performances thermiques, nous vous recommandons de placer le ML07 en position verticale.

Optimal Thermal Performance Layout Milo Series ML07
25
A. ML07は高性能ゲーミングプラットホームとして設計されているので、主要なストレージ装置として、より耐熱性のあるSSDを使用されるようお勧 めいたします。B. 設計上、ML07には3.5”ハードディスクドライブに対する能動的冷却方法を備えていません。低回転数ハードディスクドライブまたは耐熱性の高 いモデルの使用をお勧めいたします。C. 放熱性能でご満足いただけない場合、ML07を縦置きで使用されるようお勧めいたします。
A. ML07는 고성능 게임 플랫폼이므로 내열성이 비교적 높은 SSD를 일차 저장 장치로 사용할 것을 권장합니다.B. 설계상 ML07에는 3.5" 하드 드라이브용으로 설계된 효과적인 냉각 시스템이 없습니다. RPM이 낮은 하드 드라이브 또는 모델을 사용할 것을 권장하는데, 이는 내열성이 높기 때문입니다.C. 그래도 열 성능에 만족하지 못할 경우 ML07을 수직으로 배치할 것을 권장합니다.
A. 这是一台游戏机,我们建议使用高效能耐高温的固态硬盘为主B. 3.5”硬盘没有任何系统风扇辅助,如果你有需要大容量的硬盘,我们建议使用低转速的硬盘或是更耐高温的硬盘C. 如果您对温度还是不满意,请试着把系统风扇都装满,或是把主机直立
A. 這是一台遊戲機,我們建議使用高效能耐高溫的固態硬碟為主B. 3.5”硬碟沒有任何系統風扇輔助,如果你有需要大容量的硬碟,我們建議使用低轉速的硬碟或是更耐高溫的硬碟C. 如果您對溫度還是不滿意,請試著把系統風扇都裝滿,或是把主機直立
Optimal Thermal Performance Layout Milo Series ML07
26
A. 由于底层通风性的限制,直立的温度总是会比横躺低B. 横躺使用时请记得贴上脚垫
A. 大部分の換気口が底に位置しているので、ML07を垂直設置した方が水平位置設置より理想的な温度になります。B. 水平設置の場合、ゴムスタンドを底部に貼付したことをご確認ください。
A. 대부분의 통풍구는 바닥에 위치하기 때문에 ML07을 수직으로 배치할 경우 수평 위치보다 온도를 낮출 수 있습니다.B. 케이스를 수평으로 사용할 경우 바닥에 고무 스탠드를 부착하십시오.
A. Because most vents are situated on the bottom, placing the ML07 vertically will result in better temperature than in horizontal position.B. When using the case horizontally, please be sure of adhering rubber stands to the bottom.
A. Da sich die meisten Belüftungsöffnungen an der Unterseite befinden, führt die vertikale Aufstellung des ML07 zu einem besseren Temperaturergebnis als die horizontale Aufstellung.B. Wenn Sie das Gehäuse horizontal verwenden, denken Sie bitte daran, die Gummifüße an der Unterseite anzubringen.
A. Ya que la mayoría de las aberturas están situadas en la parte inferior, situar la ML07 verticalmente provocará que la temperatura sea mejor que en posición horizontal.B. Cuando use la carcasa horizontalmente, por favor asegúrese de adherir las patas de goma a la parte inferior.
A. Poiché la maggior parte delle prese d’aria è situata sulla parte inferiore, collocando ML07 in verticale la temperatura sarà migliore che in posizione orizzontale.B. Quando si utilizza il case in orizzontale, assicurarsi di fare aderire i supporti di gomma sulla parte inferiore.
A. Так как большинство вентиляционных отверстий находятся на нижней панели корпуса, установка ML07 в вертикальном положении приводит к лучшим результатам по сравнению с горизонтальной установкой.B. При горизонтальном размещении закрепите на дне самоклеящиеся резиновые стойки.
A. 由於底層通風性的限制,直立的溫度總是會比橫躺低B. 橫躺使用時請記得貼上腳墊
A. Parce que la plupart des sorties sont situées en bas, le fait de placer le ML07 verticalement permettra d'obtenir une meilleure température que dans la position horizontale.B. Lorsque vous utilisez le boîtier horizontalement, veuillez vous assurer d'installer les pieds de caoutchouc en bas.
(4)Vertical/horizontal placement

Optimal Thermal Performance Layout Milo Series ML07
27
A. When sufficient budget is allowed, we recommended using DIY water cooling.B. A Laing DDC pump can be mounted onto the center 2.5” brace. The mounting holes are shown in the illustration above. C. If you plan to use water cooling radiator in the graphics card area, we recommend using waterblock with full-cover for their overall lowered thickness.D. A dual, stacked power connector housing shown circled on the top of the example photo may interfere with the water cooling radiator; the dual-slot display output connectors shown in the lower circle on the other hand, will not have any interference issues.E. As illustrated above, the indicated numbers are the clearance when two 120mm fans are installed.F. The clearance above the CPU area is illustrated above. The additional clearance toward the rear is reserved for the space required by top cover installation. The height limit for the CPU cooler is 83mm, a figure that is also sufficient for liquid cooler’s waterblock and radiator.
A. Wenn das Budget ausreicht, empfehlen wir den Einsatz einer DIY-Wasserkühlung.B. Sie können eine Laing-DDC-Pumpe an der mittleren 2,5-Zoll-Klammer montieren. Die Montagelöcher werden in der obigen Abbildung gezeigt. C. Wenn Sie einen Wasserkühlungsradiator im Bereich der Grafikkarte einsetzen möchten, empfehlen wir aufgrund der geringeren Höhe einen vollständig geschlossenen Wasserblock.D. Ein im oberen Bereich des Beispielfotos eingekreistes duales gestapeltes Netzanschlussgehäuse kann sich mit dem Wasserkühlkörper ins Gehege kommen; bei den darunter eingekreisten Dual-Steckplatz-Anzeigeausgängen hingegen treten keine derartigen Probleme auf.E. Wie oben abgebildet sind die angezeigten Werte der Abstand, wenn zwei 120-mm-Lüfter installiert sind.F. Der Abstand über dem CPU-Bereich ist oben abgebildet. Der zusätzliche Freiraum Richtung Rückseite ist für den Platz reserviert, der bei Installation der oberen Abdeckung benötigt wird. Die Höhe des CPU-Kühlers ist auf 83 mm beschränkt; dies gilt auch für Wasserblöcke und Kühlkörper.
(5) Recommendation for water cooling
B
31.8
72
29.35
12.4
5
21.8
8
2817
15
83
18.2
45
2.45
D
E F

Optimal Thermal Performance Layout Milo Series ML07
28
A. Cuando disponga de presupuesto suficiente, le recomendamos usar disipación por agua DIY.B. Se puede montar una bomba DDC Laing en la abrazadera central de 2,5”. Los agujeros de montaje se muestran en la ilustración anterior.C. Si planea usar un sistema refrigerado por agua en la zona de la tarjeta gráfica, le recomendamos usar un bloque de agua con cobertura total por su grosor global reducido.D. Un conector de potencia dual y agrupado que se muestra señalado en la parte superior de la foto de ejemplo podría interferir con el radiador refrigerado por agua, los conectores duales que se muestran en el círculo inferior, por otro lado, no tendrán problemas de interferencias.E. Como se ilustra más arriba, los números indicados son el espacio libre necesario cuando se instalan dos ventiladores de 120mm.F. El espacio libre sobre la zona de la CPU se ilustra más arriba. El espacio libre adicional hacia la parte trasera se reserva para el espacio requerido para la instalación de la cubierta superior. El límite de altura para el disipador de la CPU es de 83mm, un número que también es suficiente para el bloque de agua del disipador líquido y el radiador.
A. Se il budget lo permette, si consiglia di utilizzare il raffreddamento ad acqua fai da te.B. Al centro del supporto 2,5” può essere montata una pompa Laing DDC. I fori di fissaggio sono mostrati nella figura di cui sopra. C. Se si prevede di utilizzare il raffreddamento ad acqua nella zona della scheda video, si consiglia di utilizzare waterblock totalmente rivestiti perché nel complesso hanno uno spessore inferiore.D. L’alloggio di un doppio connettore d’alimentazione, mostrato nel cerchio in alto nella foto d’esempio, può interferire con raffreddamento acqua; invece i connettori del doppio alloggio uscita display, mostrati nel cerchio in basso, non creeranno problemi di interferenza.E. Come illustrato sopra, i numeri indicati sono lo spazio libero quando sono installate due ventole da 120 mm.F. Lo spazio libero sopra l'area della CPU è illustrato sopra. Lo spaio libero aggiuntivo verso la parte posteriore è riservato per lo spazio richiesto per l'installazione della copertura superiore. Il limite di altezza per il dispersore di calore CPU è di 83 mm, una misura che è anche sufficiente per il waterblock e radiatore del raffreddamento ad acqua.
A. Если ваш бюджет позволяет, мы рекомендуем использовать устройство водяного охлаждения, изготовленное самостоятельно.B. На центральном 2,5-дюймовом кронштейне можно установить помпу Laing для систем водяного охлаждения. Установочные отверстия показаны на рисунке выше. C. Если вы собираетесь использовать радиатор с водяным охлаждением в зоне установки графической карты, мы рекомендуем использовать закрытый ватерблок малой толщины.D. Двойной разъем питания, обведенный кружком вверху на фотографии, может мешать радиатору водяного охлаждения, с другой стороны, выходные разъемы дисплея, обведенные кружком в нижней части фотографии, не создают никаких помех.E. На приведенном рисунке выше числами обозначен зазор при установке двух 120-мм вентиляторов.F. Зазор над зоной размещения процессора проиллюстрирован выше. Дополнительный зазор к задней части зарезервирован для установки верхней крышки. Ограничение по высоте для системы охлаждения процессора составляет 83 мм, этого расстояния достаточно также для установки ватерблока и радиатора водяного охлаждения.
A. 對於預算充裕的玩家我們建議使用DIY的水冷B. 中央的2.5”支架可以安裝一顆Laing DDC幫浦,鎖固孔如上圖標示C. 如果顯示卡區域有需要使用水冷排散熱,我們建議您使用全覆蓋式的水冷頭以降低厚度D. 如上圖這種雙層疊的電源接頭可能會干涉水冷排,而下面的雙層疊的影像輸出接頭則沒影響E. 如上圖,雙顆120風扇為緊靠,周邊保留空間如圖數字標示F. 而CPU上方的風扇周邊距離,如上圖。與後方摺邊的距離,有另外保留上蓋本身要導入的行程。CPU Cooler的高度限制是83mm,這個值在這邊通常是將 水冷頭風扇厚度與水冷排厚度相加。
A. Lorsque le budget le permet, nous vous recommandons d'utiliser de l'eau pour le refroidissement.B. Une pompe Laing DDC peut être montée sur l'axe central 2,5". Les trous de fixation sont indiqués dans l'illustration ci-dessus. C. Si vous pensez utiliser le radiateur de refroidissement à eau dans la zone de la carte graphique, nous vous recommandons d'utiliser des waterblocks avec une couverture totale pour leur épaisseurgénérale réduite.D. Un boîtier de connecteur d'alimentation double, empilé montré encerclé sur le haut de la photo d'exemple peut interférer avec le radiateur de refroidissement à l'eau, par contre les connecteurs de sortie d'affichage double fente indiqués dans le cercle inférieur n'auront pas de problèmes d'interférence.E. Comme indiqué ci-dessus, les chiffres indiqués sont l'espace libre lorsque deux ventilateurs de 120mm sont installés.F. La hauteur libre au-dessus de la zone du CPU est illustrée ci-dessus. L'espace libre supplémentaire vers l'arrière est réservé pour l'espace requis par l'installation du couvercle supérieur. La limite de hauteur pour le refroidisseur de CPU est 83mm, un chiffre qui est également suffisant pour le radiateur de refroidissement par liquide et le waterblock.

Optimal Thermal Performance Layout Milo Series ML07
29
A. 对于预算充裕的玩家我们建议使用DIY的水冷B. 中央的2.5”支架可以安装一颗Laing DDC帮浦,锁固孔如上图标示C. 如果显示适配器区域有需要使用水冷排散热,我们建议您使用全覆盖式的水冷头以降低厚度D. 如上图这种双层迭的电源接头可能会干涉水冷排,而下面的双层迭的影像输出接头则没影响E. 如上图,双颗120风扇为紧靠,周边保留空间如图数字标示F. 而CPU上方的风扇周边距离,如上图。与后方折边的距离,有另外保留上盖本身要导入的行程。CPU Cooler的高度限制是83mm,这个值在这边通常是将 水冷头风扇厚度与水冷排厚度相加。
A. 十分な予算がある場合、当社はDIYの水冷を使うようお勧めいたします。B. レインDDCポンプは中央の2.5”ブレースに設置可能です。取り付け穴は上図に示されています。 C. グラフィックスカード領域で液冷ラジエターを使用される場合、全体的な厚みの減少に対応してフルカバー付きのウォーターブロックの使用をお 勧めいたします。D. 写真例上部の丸で囲まれたようなデュアル・スタック電源コネクタハウジングは、水冷ラジエターの設置の妨げになる恐れがあります。一方、下 の丸で囲まれたようなデュアルスロットディスプレイ出力コネクタでは、妨げの問題はありません。E. 上図に示された数字は、2台の120mmファンが設置された場合の許容範囲を示しています。F. CPUエリア上方の許容範囲が上図に示されています。後方の許容範囲には上部カバー取り付けに必要なスペースが考慮されています。CPUクーラー の高さ限界は83mmで、液冷式のウォーターブロックおよびラジエータにも十分な数値です。
A.예산이 충분히 허용될 경우 DIY 수냉식 사용을 권장합니다.B.Laing DDC 펌프를 중앙의 2.5” 죔쇠에 장착할 수 있습니다. 장착 구멍은 위의 그림과 같습니다. C.그래픽 카드 영역에 수냉식 라디에이터를 사용하려는 경우 전반적으로 두께보다 낮게 전체를 덮는 워터 블록을 사용할 것을 권장합니다.D.예제 사진의 상단에 원으로 표시한 스택형 듀얼 전원 스위치는 수냉식 라디에이터가 접근상 방해가 될 수 있으나, 하단에 원으로 표시된 듀얼 슬롯 디스플레이 출력 커넥터는 접근상 이러한 방해 문제가 없습니다.E.위의 그림에서와 같이 2개의 120mm 팬이 설치된 경우 표시된 숫자가 간극을 의미합니다.F.CPU 영역 위의 간극은 위의 그림과 같습니다. 뒤쪽의 추가 간극은 상단 커버를 설치할 경우 필요한 공간을 위해 남겨둔 간극입니다. CPU 쿨러의 높이 제한은 83mm인데 이 수치는 액체 쿨러의 워터 블록과 라디에이터에도 충분한 수치입니다.

Optimal Thermal Performance Layout Milo Series ML07
30
Existe algo de espacio entre el panel frontal y la parte lateral de la tarjeta gráfica reservado para el enrutado de cables.
C’è dello spazio tra il pannello frontale ed il lato della scheda video riservato al passaggio dei cavi.
Между передней панелью и местом установки графической карты зарезервировано пространство для прокладки кабелей.
機殼前面與顯示卡側邊應該還有保留一些空間可以塞線
There is some space between the front panel and the side of the graphics card reserved for the cable routing.
Es befindet sich zur Kabelführung etwas Platz zwischen der Frontblende und der Seite der Grafikkarte.
Il y a un certain espace entre le panneau avant et le côté de la carte graphique réservé pour le cheminement des câbles.
机壳前面与显示适配器侧边应该还有保留一些空间可以塞线
フロントパネルとグラフィックスカード側面の間には、若干のスペースがあり、ケーブル取回しに利用できます。
전면 패널과 케이블 경로를 위해 남겨둔 그래픽 카드의 측면 사이에 약간의 공간이 있습니다.
(6) Cable routing
Maintenance and upgradeMilo Series ML07
31
(1) Fan removal guide
Se puede montar un ventilador tras retirar la cubierta superior.El soporte de la tarjeta gráfica necesita retirarse antes de poder instalar ventiladores en las aberturas inferiores.
Le ventole possono essere installate dopo avere rimosso la copertura superiore.Prima di poter installare le ventole sulle prese d’aria inferiori, è necessario rimuovere il supporto della scheda video.
Вентилятор охлаждения можно установить, сняв верхнюю крышку.Перед установкой вентиляторов охлаждения на нижнюю панель с вентиляционными отверстиями фиксатор графической карты следует снять.
上蓋的風扇在拆除上蓋後即可安裝底座的風扇安裝前需要移除顯示卡架
A fan can be mounted after removing the top cover.The graphics card holder needs to be removed before fans can be installed on the bottom vents.
Ein Lüfter kann nach Abnehmen der oberen Abdeckung installiert werden.Vor der Installation von Lüftern an den unteren Belüftungsöffnungen muss der Grafikkartenhalter entnommen werden.
上盖的风扇在拆除上盖后即可安装底座的风扇安装前需要移除显示适配器架
上面カバーを外してからファンが取り付けられます。グラフィックスカードホルダーを取り外してから、底部換気口に ファンが取り付け可能 となります。
상단 커버를 제거한 후 팬을 장착할 수 있습니다.하단 통풍구에 팬을 설치하려면 그래픽 카드 홀더를 분리해야 합니다.
Un ventilateur peut être installé après avoir retiré le couvercle supérieur.Le support de carte graphique doit être enlevé avant d'installer les ventilateurs sur les sorties inférieures.

Protect Your Computer Milo Series ML07
32
Se puede comprar una cerradura y un cable en el mercado para usarlos en los zócalos para seguridad Kensington situados en la parte trasera de la ML07 para evitar abrir todo elordenador o los paneles laterales.Advertencia: Compruebe por favor la compatibilidad antes de comprar la cerradura y el cable para usarlos con los zócalos de seguridad Kensington de la ML07.
Cavo e dispositivo di blocco possono essere acquistati separatamente per l’utilizzo con la fessura Kensington security posta dietro al ML07 per prevenire la rimozione del computer o dei pannelli laterali.Attenzione: Controllare che cavo e dispositivo di blocco siano compatibili con la fessura Kensington security presente sul ML07.
В продаже имеются замки и тросы, используемые с разъемами для защитных замков защитного замка Kensington, расположенными на задней панели корпуса ML07, в целях предотвращения кражи всего компьютера и снятия боковых панелей.Внимание! Перед приобретением замков и тросов под разъемы для защитных замков Kensington корпуса ML07 убедитесь в их совместимости.
註:您的電腦並未隨附安全纜線鎖。安全纜線鎖是從市面上可以買到的防盜裝置。若要使用該鎖,請將其連接至您的ML07上的安兩個全纜線孔。可以避免整台電腦被搬走,同時保護左右側板避免被開啟注意事項:購買防盜裝置之前,請確定它適用於您電腦上的安全纜線孔。
A lock and cable can be purchased on the market for use with the Kensington security slot located on rear of ML07 to prevent removal of the entire computer or top cover.Caution: Please check for compatibility before purchasing the lock and cable for use with ML07’s Kensington security slot.
Im Fachhandel erhalten Sie passende Schlösser und Kabel zum Anschluss an den Kensington-Sicherheitsschlitz; auf diese Weise können Sie verhindern, dass der gesamte Computer gestohlen wird oder die Seitenwände abgenommen werden.Achtung: Bitte erkundigen Sie sich zuvor, ob Schlösser und Kabel zu den Kensington-Sicherheitsschlitzen des ML07 passen.
注:您的计算机并未随附安全缆线锁。安全缆线锁是从市面上可以买到的防盗装置。若要使用该锁,请将其连接至您的ML07上的安两个全缆线孔。可以避免整台计算机被搬走,同时保护左右侧板避免被开启注意事项:购买防盗装置之前,请确定它适用于您计算机上的安全缆线孔。
ML07後部に配置されたケンジントンセキュリティスロットに合ったロックとケーブルは市場で購入でき、コンピュータ全体またはパネルの盗難を防止するのに使用できます。注意:ML07のケンジントンセキュリティスロットに使用するロックとケーブルを購入する前に、互換性をチェックしてください。
켄싱턴 보안 슬롯에 사용할 수 있는 자물쇠와 케이블은 별도로 구입 하실 수 있으며, ML07의 뒤쪽을 잠그므로, 컴퓨터 전체의 사이드 패널을 제거 할 수 없게 해 줍니다.주의: ML07용 켄싱터 보안 잠금 장치를 구입하기전에 호환성을 확인하시기 바랍니다.
Un câble de verrouillage peut être acheté pour utilisé l'emplacement de sécurité Kensington situé à l'arrière du ML07 pour empêcher le boîtier d'être déplacé ou ouvert.Attention : Veuillez vérifier la compatibilité avant d'acheter le verrou et le câble pour l'utiliser avec l'emplacement de sécurité Kensington du ML07.
Kensington Security SlotNote: Cable security lock is not included with ML07
Q&AMilo Series ML07
33
P: ¿Encaja la ML07 en el Pack Sugo?R: ¡Pues sí, con espacio de sobra!
P: ¿Se puede usar el NT06-PRO sin ventilador en la ML07?R: No se lo recomendamos.
P: Todo está instalado correctamente, ¿por qué no arranca el sistema?R: Si su FA tiene un interruptor de potencia, compruebe que el interruptor está en la posición “ON”.
D: ML07 entra nel Sugo Pack?R: Sì. E rimane altro spazio!
D: NT06-PRO può essere utilizzato senza ventilatore in ML07?R: Noi non lo consigliamo.
D: Tutto è installato correttamente, perché non si avvia?R: Se il PSU dispone di un interruttore CA, assicurarsi che l'interruttore sia in posizione "ON".
Вопрос: Корпус ML07 вмещается в сумку Sugo?Ответ: Да, и еще остается свободное место!
Вопрос: Можно ли NT06-PRO использовать без вентилятора в корпусе ML07?Ответ: Мы не рекомендуем это делать.
Вопрос: Все установлено правильно, но системный блок не включается. Что делать?Ответ: Если блок питания имеет выключатель питания, убедитесь, что он установлен в положение ON (Вкл.).
Q: Does ML07 fit in the Sugo Pack?A: Yes it does, with room to spare!
Q: Can the NT06-PRO be used without fan in ML07?A: We do not recommend it.
Q: Everything is properly installed, why does it not start up?A: If your PSU has an AC switch, make sure the switch is at the “ON” position.
F: Passt das ML07 in das Sugo Pack?A: Ja, es passt, es bleibt sogar noch Platz übrig!
F: Kann das NT06-PRO ohne Lüfter im ML07 genutzt werden?A: Wir raten davon ab.
F: Alles ist richtig installiert; warum läuft mein System nicht an?A: Wenn Ihr Netzteil mit einem Schalter ausgestattet ist, vergewissern Sie sich, dass sich dieser in der ON-Position befindet.
Q: Le ML07 convient-il au Sugo Pack?R: Oui, avec en plus de la place!
Q: Est-ce que le NT06-PRO peut être utilisé sans ventilateur dans le ML07 ?R: Cela n'est pas recommandé.
Q: Tout est installé correctement, pourquoi est-ce que rien ne démarre ?R: Si votre PSU dispose d’un commutateur de CA, assurez-vous que le commutateur est en position “ON”.

Q&A Milo Series ML07
34
Q:ML07相容於Sugo pack嗎?A:相容
Q:使用NT06-PRO能不能不裝風扇A:千萬別這麼做
Q:所有東西都安裝妥當了,為何無法順利開機?A:如果您的電源供應器帶有交流電開關,請確認開關的位置是在開啟的狀態。
Q:ML07相容于Sugo pack吗?A:相容
Q:使用NT06-PRO能不能不装风扇A:千万别这么做
Q:所有东西都安装妥当了,为何无法顺利开机?A:如果您的电源供应器带有交流电开关,请确认开关的位置是在开启的状态。
Q: ML07は、Sugoパックに入りますか?A:はい、余裕で入ります!
Q: NT06-PROは、ML07内でファンを設置せずに使用可能ですか?A: 当社はお勧めいたしません。
Q: 全て正しくインストールされたのに、なぜ起動しませんか?A: PSUにACスイッチがある場合、スイッチが「オン」の位置にあることを確認してください。
Q: ML07가 Sugo Pack에 맞습니까?A: 예, 맞습니다. 그리고 여분의 공간이 있습니다!
Q: ML07에서 팬 없이 NT06-PRO를 사용할 수 있습니까?A: 사용하지 않는 것이 좋습니다.
Q:모든 것을 제대로 설치했는데 작동되지 않는 이유가 무엇입니까?A:PSU에 AC 스위치가 있는 경우, 스위치가 “ON” 위치에 있는지 확인하십시오.

This product has a limited 1 year warranty in North America and Australia. For information on warranty periods in other regions, please contact your reseller or SilverStone authorized distributor.
1. Product component defects or damages resulted from defective production is covered under warranty. Defects or damages with the following conditions will be fixed or replaced under SilverStone Technology’s jurisdiction.a) Usage in accordance with instructions provided in this manual, with no misuse, overuse, or other inappropriate actions.b) Damage not caused by natural disaster (thunder, fire, earthquake, flood, salt, wind, insect, animals, etc…)c) Product is not disassembled, modified, or fixed. Components not disassembled or replaced.d) Warranty mark/stickers are not removed or broken. Loss or damages resulted from conditions other than ones listed above are not covered under warranty.
2. Under warranty, SilverStone Technology’s maximum liability is limited to the current market value for the product (depreciated value, excluding shipping, handling, and other fees). SilverStone Technology is not responsible for other damages or loss associated with the use of product.
3. Under warranty, SilverStone Technology is obligated to repair or replace its defective products. Under no circumstances will SilverStone Technology be liable for damages in connection with the sale, purchase, or use including but not limited to loss of data, loss of business, loss of profits, loss of use of the product or incidental or consequential damage whether or not foreseeable and whether or not based on breach of warranty, contract or negligence, even if SilverStone Technology has been advised of the possibility of such damages.
4. Warranty covers only the original purchaser through authorized SilverStone distributors and resellers and is not transferable to a second hand purchaser.
5. You must provide sales receipt or invoice with clear indication of purchase date to determine warranty eligibility.
6. If a problem develops during the warranty period, please contact your retailer/reseller/SilverStone authorized distributors or SilverStone http://www.silverstonetek.com. Please note that: (i) You must provide proof of original purchase of the product by a dated itemized receipt; (ii) You shall bear the cost of shipping (or otherwise transporting) the product to SilverStone authorized distributors. SilverStone authorized distributors will bear the cost of shipping (or otherwise transporting) the product back to you after completing the warranty service; (iii) Before you send the product, you must be issued a Return Merchandise Authorization (“RMA”) number from SilverStone. Updated warranty information will be posted on SilverStone’s official website. Please visit http://www.silverstonetek.com for the latest updates.
Warranty terms & conditions
Additional info & contacts
For North America ([email protected])SilverStone Technology in North America may repair or replace defective product with refurbished product that is not new but has been functionally tested. Replacement product will be warranted for remainder of the warranty period or thirty days, whichever is longer. All products should be sent back to the place of purchase if it is within 30 days of purchase, after 30 days, customers need to initiate RMA procedure with SilverStone Technology in USA by first downloading the “USA RMA form for end-users” form from the below link and follow its instructions.http://silverstonetek.com/contactus.php
For Australia only ([email protected])Our goods come with guarantees that cannot be excluded under the Australian Consumer Law. You are entitled to a replacement or refund for a major failure and for compensation for any other reasonably foreseeable loss or damage. You are also entitled to have the goods repaired or replaced if the goods fail to be of acceptable quality and the failure does not amount to a major failure. Please refer to above “Warranty terms & conditions” for further warranty details.
SilverStone Technology Co., Ltd. 12F No. 168 Jiankang Rd., Zhonghe Dist., New Taipei City 235 Taiwan R.O.C. + 886-2-8228-1238 (standard international call charges apply)
For Europe ([email protected])For all other regions ([email protected])
Warranty InformationMilo Series ML07
35

G11221320
Related Documents


![iTX Manual[1]](https://static.cupdf.com/doc/110x72/5477c1cf5906b57d318b463b/itx-manual1.jpg)