Slicing Jig For Pen Inlays By Randall Smith (randyrls) May 2008 This article has been downloaded from the library of the International Association of Penturners. www.penturners.org You are welcome to reproduce this article and distribute it for the purpose of encouraging the craft of turning pens.

Welcome message from author
This document is posted to help you gain knowledge. Please leave a comment to let me know what you think about it! Share it to your friends and learn new things together.
Transcript

Slicing Jig For Pen Inlays
By Randall Smith (randyrls) May 2008
This article has been downloaded from the library of the
International Association of Penturners.
www.penturners.org
You are welcome to reproduce this article and distribute it for the purpose of encouraging the craft of turning pens.
2
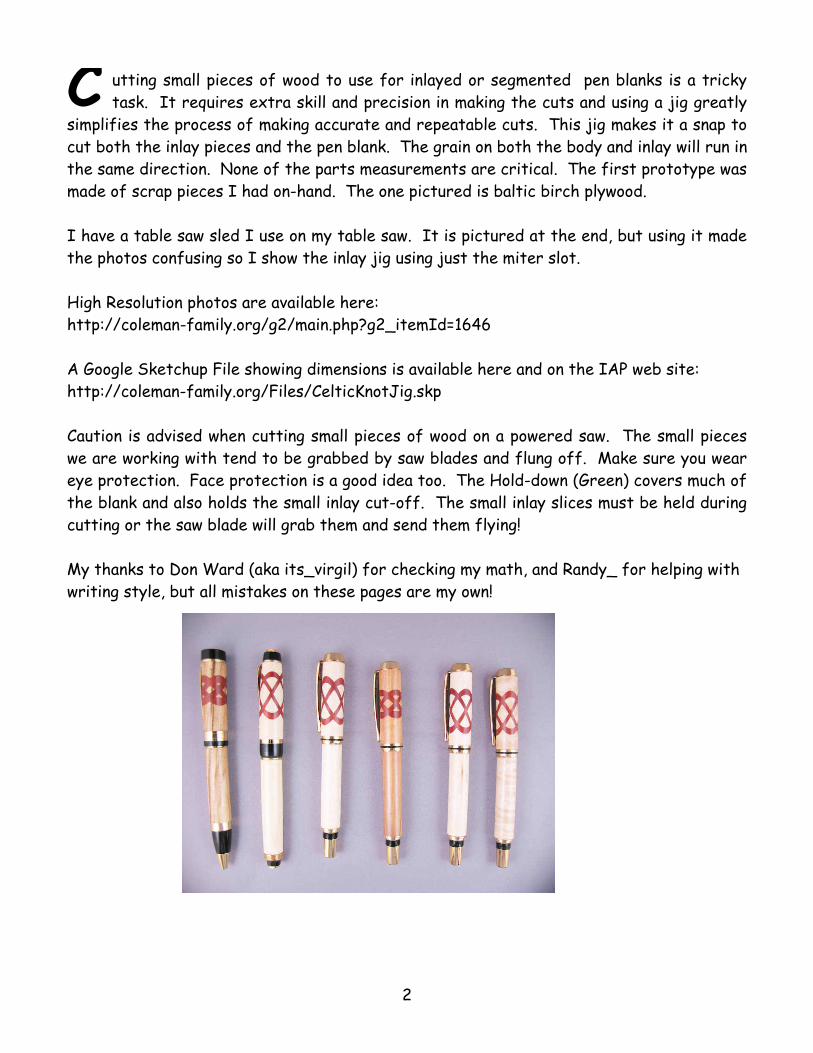
utting small pieces of wood to use for inlayed or segmented pen blanks is a tricky task. It requires extra skill and precision in making the cuts and using a jig greatly
simplifies the process of making accurate and repeatable cuts. This jig makes it a snap to cut both the inlay pieces and the pen blank. The grain on both the body and inlay will run in the same direction. None of the parts measurements are critical. The first prototype was made of scrap pieces I had on-hand. The one pictured is baltic birch plywood. I have a table saw sled I use on my table saw. It is pictured at the end, but using it made the photos confusing so I show the inlay jig using just the miter slot. High Resolution photos are available here: http://coleman-family.org/g2/main.php?g2_itemId=1646 A Google Sketchup File showing dimensions is available here and on the IAP web site: http://coleman-family.org/Files/CelticKnotJig.skp Caution is advised when cutting small pieces of wood on a powered saw. The small pieces we are working with tend to be grabbed by saw blades and flung off. Make sure you wear eye protection. Face protection is a good idea too. The Hold-down (Green) covers much of the blank and also holds the small inlay cut-off. The small inlay slices must be held during cutting or the saw blade will grab them and send them flying! My thanks to Don Ward (aka its_virgil) for checking my math, and Randy_ for helping with writing style, but all mistakes on these pages are my own!
C
3
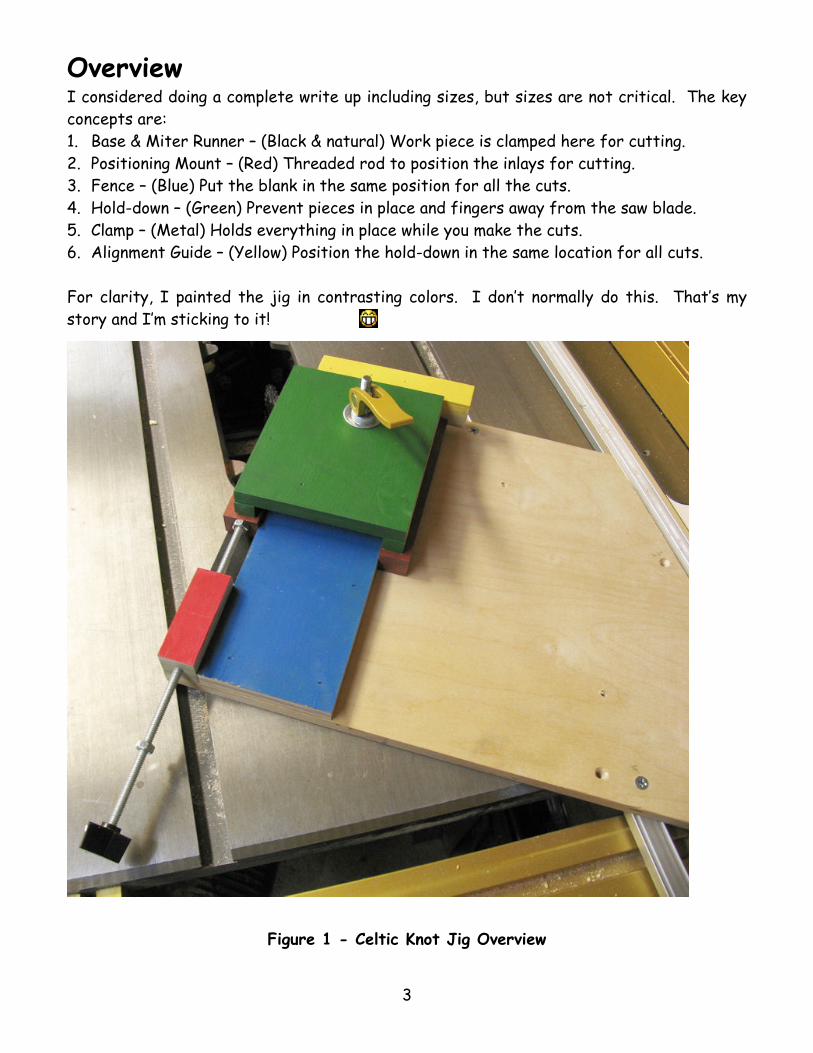
Overview I considered doing a complete write up including sizes, but sizes are not critical. The key concepts are: 1. Base & Miter Runner – (Black & natural) Work piece is clamped here for cutting. 2. Positioning Mount – (Red) Threaded rod to position the inlays for cutting. 3. Fence – (Blue) Put the blank in the same position for all the cuts. 4. Hold-down – (Green) Prevent pieces in place and fingers away from the saw blade. 5. Clamp – (Metal) Holds everything in place while you make the cuts. 6. Alignment Guide – (Yellow) Position the hold-down in the same location for all cuts. For clarity, I painted the jig in contrasting colors. I don’t normally do this. That’s my story and I’m sticking to it!
Figure 1 - Celtic Knot Jig Overview
4
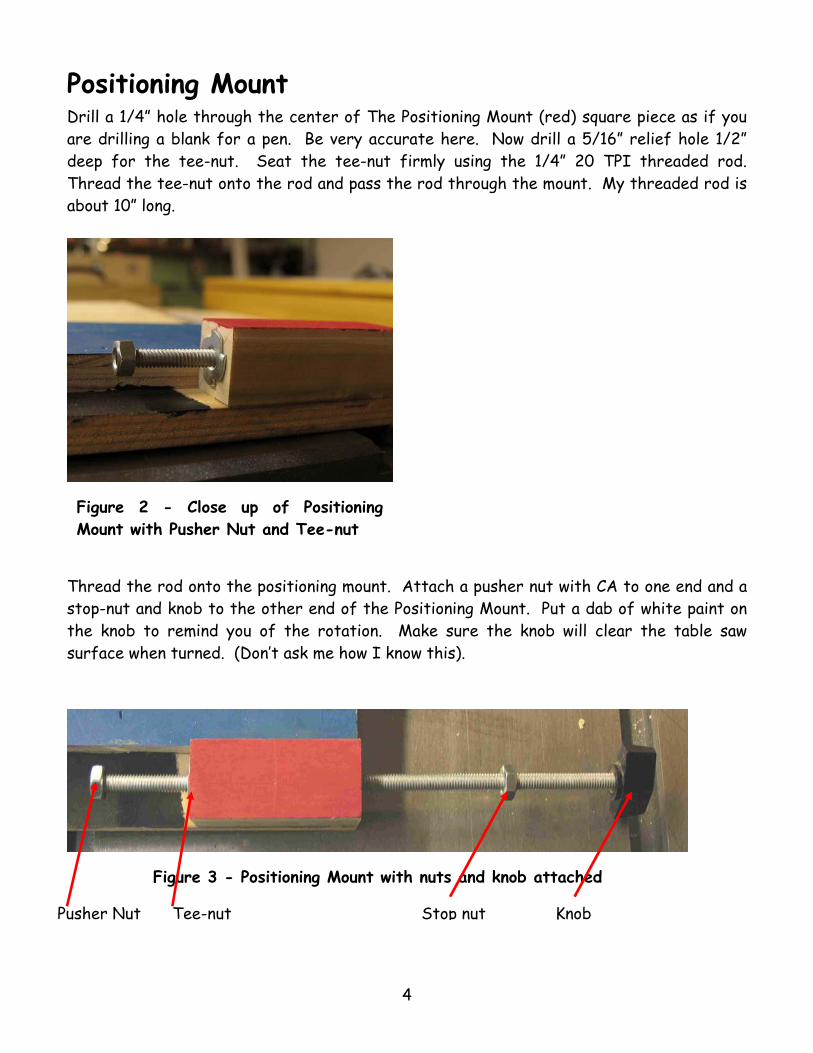
Positioning Mount Drill a 1/4” hole through the center of The Positioning Mount (red) square piece as if you are drilling a blank for a pen. Be very accurate here. Now drill a 5/16” relief hole 1/2” deep for the tee-nut. Seat the tee-nut firmly using the 1/4” 20 TPI threaded rod. Thread the tee-nut onto the rod and pass the rod through the mount. My threaded rod is about 10” long.
Thread the rod onto the positioning mount. Attach a pusher nut with CA to one end and a stop-nut and knob to the other end of the Positioning Mount. Put a dab of white paint on the knob to remind you of the rotation. Make sure the knob will clear the table saw surface when turned. (Don’t ask me how I know this).
Figure 2 - Close up of Positioning Mount with Pusher Nut and Tee-nut
Figure 3 - Positioning Mount with nuts and knob attached
Pusher Nut Stop nut Knob Tee-nut
5
Fence The fence (Blue) is a piece of 1/2” plywood. It must be wide enough for the Hold-down (Green) to clamp down on the blank and the fence piece. The front face must be cut accurately and the fence must be mounted exactly parallel to the front edge of the jig.
Hold-Down
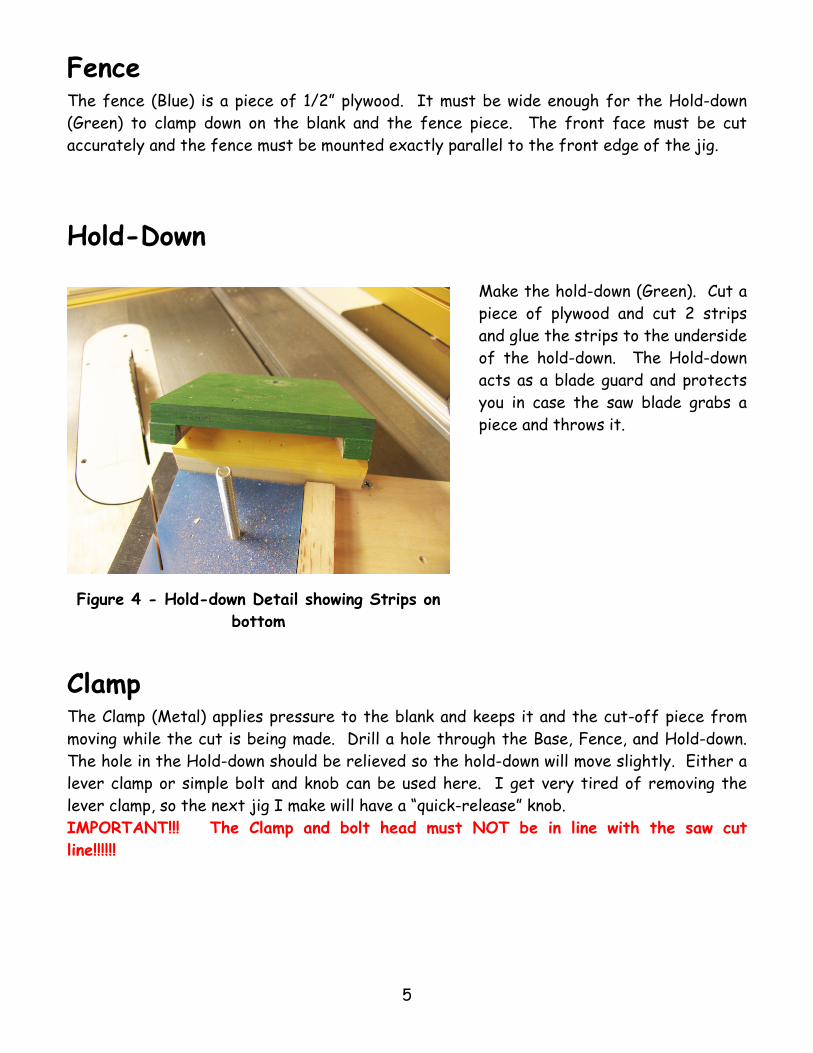
Make the hold-down (Green). Cut a piece of plywood and cut 2 strips and glue the strips to the underside of the hold-down. The Hold-down acts as a blade guard and protects you in case the saw blade grabs a piece and throws it.
Clamp The Clamp (Metal) applies pressure to the blank and keeps it and the cut-off piece from moving while the cut is being made. Drill a hole through the Base, Fence, and Hold-down. The hole in the Hold-down should be relieved so the hold-down will move slightly. Either a lever clamp or simple bolt and knob can be used here. I get very tired of removing the lever clamp, so the next jig I make will have a “quick-release” knob. IMPORTANT!!! The Clamp and bolt head must NOT be in line with the saw cut line!!!!!!
Figure 4 - Hold-down Detail showing Strips on bottom
6
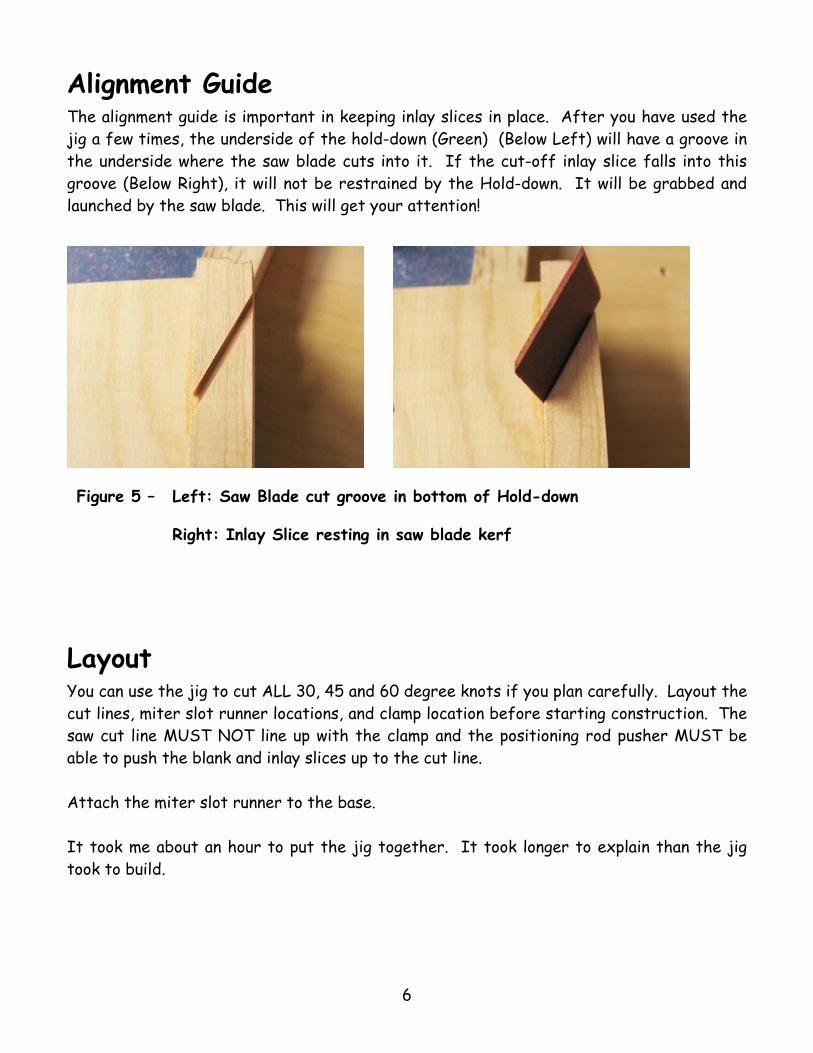
Alignment Guide The alignment guide is important in keeping inlay slices in place. After you have used the jig a few times, the underside of the hold-down (Green) (Below Left) will have a groove in the underside where the saw blade cuts into it. If the cut-off inlay slice falls into this groove (Below Right), it will not be restrained by the Hold-down. It will be grabbed and launched by the saw blade. This will get your attention!
Layout You can use the jig to cut ALL 30, 45 and 60 degree knots if you plan carefully. Layout the cut lines, miter slot runner locations, and clamp location before starting construction. The saw cut line MUST NOT line up with the clamp and the positioning rod pusher MUST be able to push the blank and inlay slices up to the cut line. Attach the miter slot runner to the base. It took me about an hour to put the jig together. It took longer to explain than the jig took to build.
Figure 5 – Left: Saw Blade cut groove in bottom of Hold-down
Right: Inlay Slice resting in saw blade kerf
7
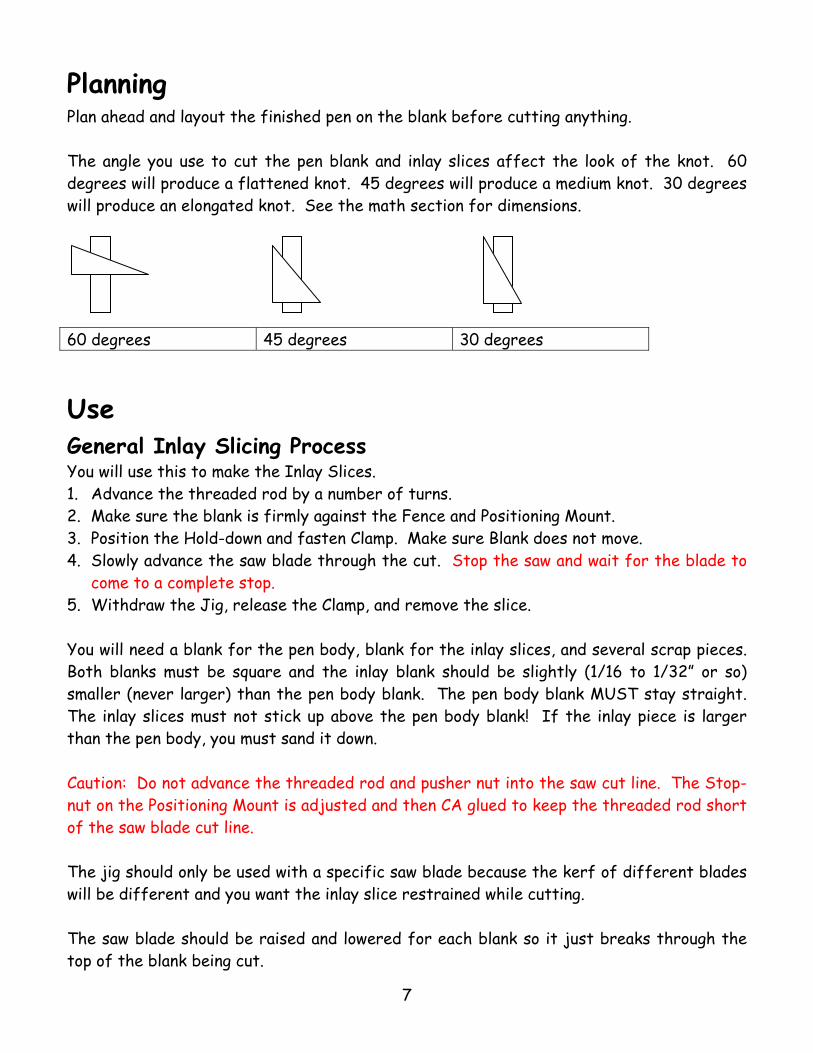
Planning Plan ahead and layout the finished pen on the blank before cutting anything. The angle you use to cut the pen blank and inlay slices affect the look of the knot. 60 degrees will produce a flattened knot. 45 degrees will produce a medium knot. 30 degrees will produce an elongated knot. See the math section for dimensions. 60 degrees 45 degrees 30 degrees
Use General Inlay Slicing Process You will use this to make the Inlay Slices. 1. Advance the threaded rod by a number of turns. 2. Make sure the blank is firmly against the Fence and Positioning Mount. 3. Position the Hold-down and fasten Clamp. Make sure Blank does not move. 4. Slowly advance the saw blade through the cut. Stop the saw and wait for the blade to
come to a complete stop. 5. Withdraw the Jig, release the Clamp, and remove the slice. You will need a blank for the pen body, blank for the inlay slices, and several scrap pieces. Both blanks must be square and the inlay blank should be slightly (1/16 to 1/32” or so) smaller (never larger) than the pen body blank. The pen body blank MUST stay straight. The inlay slices must not stick up above the pen body blank! If the inlay piece is larger than the pen body, you must sand it down. Caution: Do not advance the threaded rod and pusher nut into the saw cut line. The Stop-nut on the Positioning Mount is adjusted and then CA glued to keep the threaded rod short of the saw blade cut line. The jig should only be used with a specific saw blade because the kerf of different blades will be different and you want the inlay slice restrained while cutting. The saw blade should be raised and lowered for each blank so it just breaks through the top of the blank being cut.
8
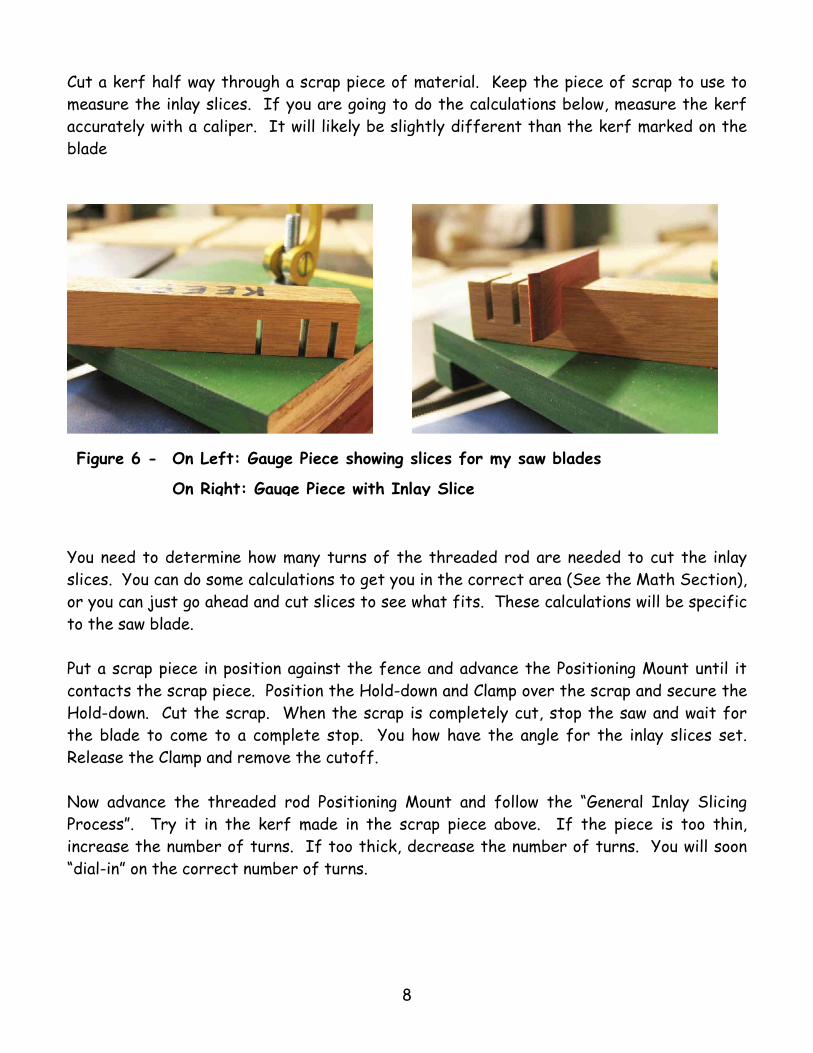
Cut a kerf half way through a scrap piece of material. Keep the piece of scrap to use to measure the inlay slices. If you are going to do the calculations below, measure the kerf accurately with a caliper. It will likely be slightly different than the kerf marked on the blade
You need to determine how many turns of the threaded rod are needed to cut the inlay slices. You can do some calculations to get you in the correct area (See the Math Section), or you can just go ahead and cut slices to see what fits. These calculations will be specific to the saw blade. Put a scrap piece in position against the fence and advance the Positioning Mount until it contacts the scrap piece. Position the Hold-down and Clamp over the scrap and secure the Hold-down. Cut the scrap. When the scrap is completely cut, stop the saw and wait for the blade to come to a complete stop. You how have the angle for the inlay slices set. Release the Clamp and remove the cutoff. Now advance the threaded rod Positioning Mount and follow the “General Inlay Slicing Process”. Try it in the kerf made in the scrap piece above. If the piece is too thin, increase the number of turns. If too thick, decrease the number of turns. You will soon “dial-in” on the correct number of turns.
Figure 6 - On Left: Gauge Piece showing slices for my saw blades
On Right: Gauge Piece with Inlay Slice
9
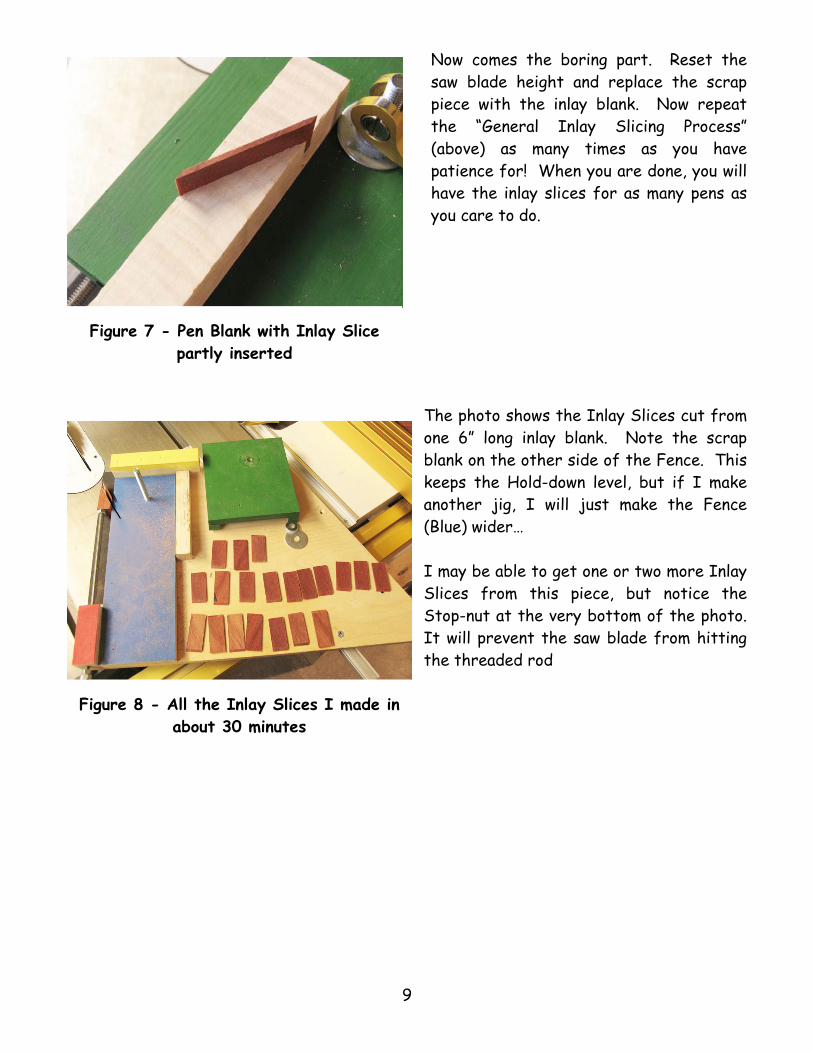
Now comes the boring part. Reset the saw blade height and replace the scrap piece with the inlay blank. Now repeat the “General Inlay Slicing Process” (above) as many times as you have patience for! When you are done, you will have the inlay slices for as many pens as you care to do.
The photo shows the Inlay Slices cut from one 6” long inlay blank. Note the scrap blank on the other side of the Fence. This keeps the Hold-down level, but if I make another jig, I will just make the Fence (Blue) wider… I may be able to get one or two more Inlay Slices from this piece, but notice the Stop-nut at the very bottom of the photo. It will prevent the saw blade from hitting the threaded rod
Figure 7 - Pen Blank with Inlay Slice partly inserted
Figure 8 - All the Inlay Slices I made in about 30 minutes
10
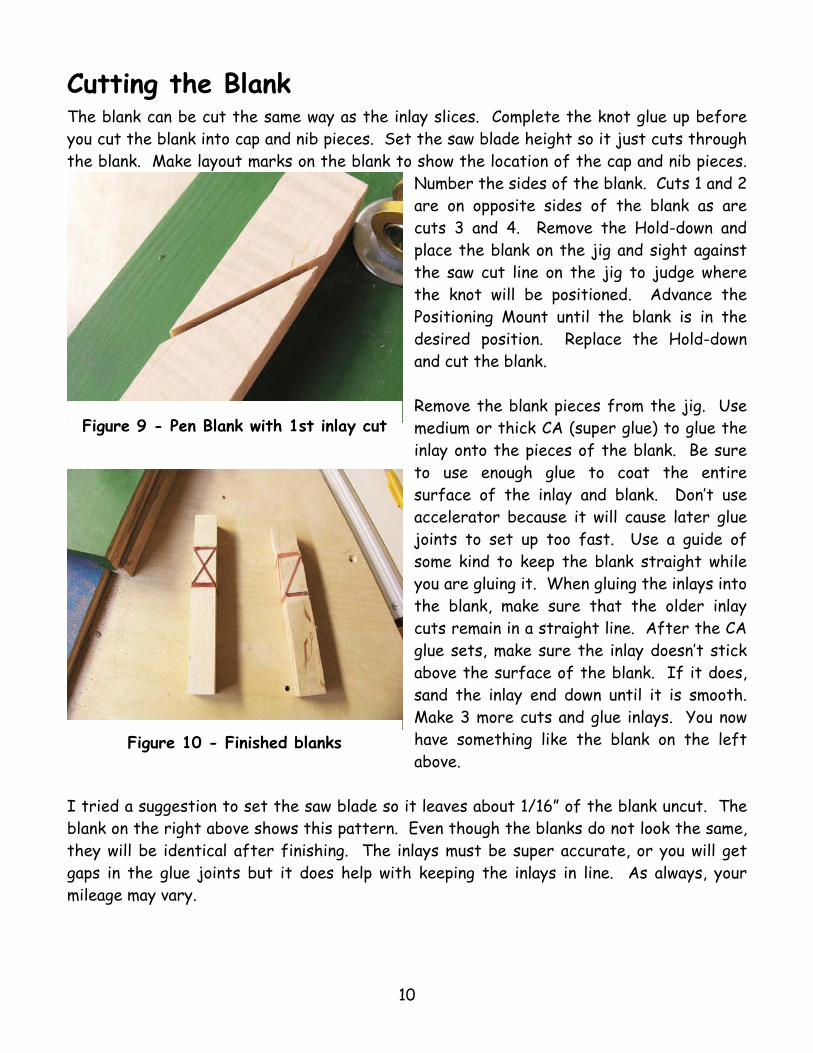
Cutting the Blank The blank can be cut the same way as the inlay slices. Complete the knot glue up before you cut the blank into cap and nib pieces. Set the saw blade height so it just cuts through the blank. Make layout marks on the blank to show the location of the cap and nib pieces.
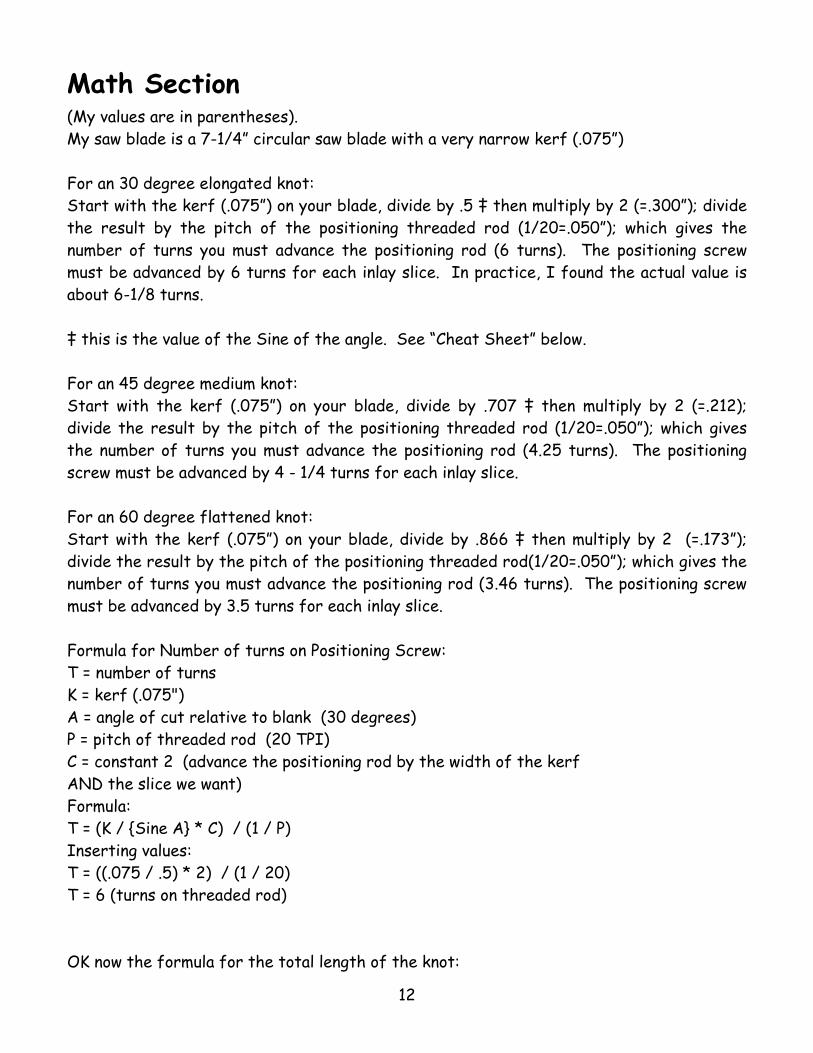
Number the sides of the blank. Cuts 1 and 2 are on opposite sides of the blank as are cuts 3 and 4. Remove the Hold-down and place the blank on the jig and sight against the saw cut line on the jig to judge where the knot will be positioned. Advance the Positioning Mount until the blank is in the desired position. Replace the Hold-down and cut the blank. Remove the blank pieces from the jig. Use medium or thick CA (super glue) to glue the inlay onto the pieces of the blank. Be sure to use enough glue to coat the entire surface of the inlay and blank. Don’t use accelerator because it will cause later glue joints to set up too fast. Use a guide of some kind to keep the blank straight while you are gluing it. When gluing the inlays into the blank, make sure that the older inlay cuts remain in a straight line. After the CA glue sets, make sure the inlay doesn’t stick above the surface of the blank. If it does, sand the inlay end down until it is smooth. Make 3 more cuts and glue inlays. You now have something like the blank on the left above.
I tried a suggestion to set the saw blade so it leaves about 1/16” of the blank uncut. The blank on the right above shows this pattern. Even though the blanks do not look the same, they will be identical after finishing. The inlays must be super accurate, or you will get gaps in the glue joints but it does help with keeping the inlays in line. As always, your mileage may vary.
Figure 9 - Pen Blank with 1st inlay cut
Figure 10 - Finished blanks

11
Prep and Drilling Cut the blanks apart along the layout lines you marked earlier. Drill the tube holes. Put a scrap block under the blank to drill against. If you don’t, you WILL break the glue joint(s). Do this even if you don’t plan on drilling all the way through. Clamp the blank into the vise GENTLY! The hole MUST be accurately centered and drilled. A sharp drill bit and gentle pressure are a must! Glue in the brass tube and trim to length. I prefer a sanding jig rather than a pen mill as the sanding jig puts less stress on the blank. Mount the blank on your mandrel, and round off the corners with a disc or drum sander. Flood the inlay area with thin CA to ensure that the inlays don’t separate from the blank.
General Tips and Creativity The thinner the saw blade the narrower the slices in the knot will be. I use a 7-1/4” circular saw blade in my table saw for cutting the inlay slices. It is unsuitable for general use because it flexes too much to cut accurate straight lines. Although this jig is intended to make celtic knots easy, there is a lot of flexibility in the jig. You don’t “HAVE” to cut all the way through the pen body blank. (Things that make you go Hmmmmmmm!) I am also thinking about a knot that isn’t symmetrical or is cut at different angles. The grain of the inlay slices and body of the pen run in the same direction and I prefer this. Although four sides are a slam-dunk, blanks and inlays with any number of sides can be clamped in the jig. Even round blanks can be clamped.
OOPS! In the group of pens on the opening page, the second pen on the left has a mis-aligned inlay slice because the blank was mis-aligned. The BOW pens have inside angles that are different sizes.
12
Math Section (My values are in parentheses). My saw blade is a 7-1/4” circular saw blade with a very narrow kerf (.075”) For an 30 degree elongated knot: Start with the kerf (.075”) on your blade, divide by .5 ‡ then multiply by 2 (=.300”); divide the result by the pitch of the positioning threaded rod (1/20=.050”); which gives the number of turns you must advance the positioning rod (6 turns). The positioning screw must be advanced by 6 turns for each inlay slice. In practice, I found the actual value is about 6-1/8 turns. ‡ this is the value of the Sine of the angle. See “Cheat Sheet” below. For an 45 degree medium knot: Start with the kerf (.075”) on your blade, divide by .707 ‡ then multiply by 2 (=.212); divide the result by the pitch of the positioning threaded rod (1/20=.050”); which gives the number of turns you must advance the positioning rod (4.25 turns). The positioning screw must be advanced by 4 - 1/4 turns for each inlay slice. For an 60 degree flattened knot: Start with the kerf (.075”) on your blade, divide by .866 ‡ then multiply by 2 (=.173”); divide the result by the pitch of the positioning threaded rod(1/20=.050”); which gives the number of turns you must advance the positioning rod (3.46 turns). The positioning screw must be advanced by 3.5 turns for each inlay slice. Formula for Number of turns on Positioning Screw: T = number of turns K = kerf (.075") A = angle of cut relative to blank (30 degrees) P = pitch of threaded rod (20 TPI) C = constant 2 (advance the positioning rod by the width of the kerf AND the slice we want) Formula: T = (K / {Sine A} * C) / (1 / P) Inserting values: T = ((.075 / .5) * 2) / (1 / 20) T = 6 (turns on threaded rod) OK now the formula for the total length of the knot:
13
L = Total length of knot D = finished diameter of the pen tube K = kerf of saw blade A = angle of cut relative to blank Values: D = .536 (diameter of finished pen – Baron Cap) K = .075 ( kerf of saw blade) A = 30 (angle of cut relative to blank) Example: L = (K / Sine A) + ( Tangent A / D) L = (.075 / .5) + (.577 / .536) L = 1.226” (This is the total length of the knot on the finished pen. Cheat Sheet: Angle in Degrees
Sine Tangent
60° .866 1.73 45° .707 1.0 30° .5 .577
14
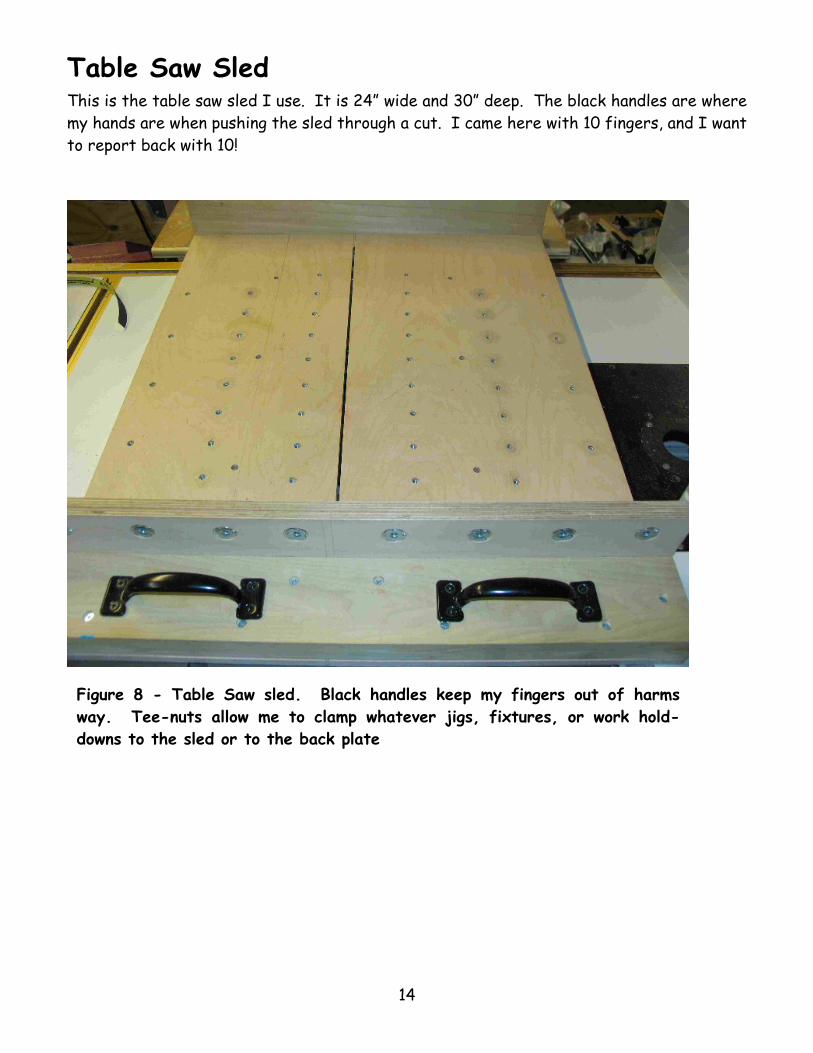
Table Saw Sled This is the table saw sled I use. It is 24” wide and 30” deep. The black handles are where my hands are when pushing the sled through a cut. I came here with 10 fingers, and I want to report back with 10!
Figure 8 - Table Saw sled. Black handles keep my fingers out of harms way. Tee-nuts allow me to clamp whatever jigs, fixtures, or work hold-downs to the sled or to the back plate
Related Documents