SuSE Linux Enterprise Server 10 Mail Scanning Gateway Build Guide Written By: Stephen Carter [email protected] Last Modified 9. May. 2007 Page 1 of 96

SLES10 MaiaMailGuard Gateway 102
Oct 12, 2014
Welcome message from author
This document is posted to help you gain knowledge. Please leave a comment to let me know what you think about it! Share it to your friends and learn new things together.
Transcript
SuSE Linux Enterprise Server 10
Mail Scanning
Gateway Build
Guide
Written By: Stephen [email protected]
Last Modified 9. May. 2007
Page 1 of 96
Table of ContentsDue credit.......................................................................................................................................................4Overview........................................................................................................................................................5System Requirements.....................................................................................................................................6
SLES10 DVD............................................................................................................................................6An existing e-mail server..........................................................................................................................6A Pentium class PC...................................................................................................................................6Internet Access..........................................................................................................................................6Internet Firewall Modifications.................................................................................................................7
Installation Summary.....................................................................................................................................8How it all works.............................................................................................................................................9The base SLES10 installation.....................................................................................................................10
Installing additional Software.................................................................................................................19Perl modules.......................................................................................................................................19Pear modules.......................................................................................................................................22Re2c....................................................................................................................................................23
SuSE firewall configuration ........................................................................................................................24Setting up postfix.........................................................................................................................................26Setting up ClamAV......................................................................................................................................29About amavisd-maia....................................................................................................................................31Setting up MySQL.......................................................................................................................................32Configure PHP5 / Apache2..........................................................................................................................36Maia Mailguard installation.........................................................................................................................37
Download Maia Mailguard.....................................................................................................................37Create the Maia database tables in MySQL............................................................................................37Install the maintenance scripts and templates.........................................................................................37Test dependencies for amavisd-maia and SA.........................................................................................40Install the PHP scripts.............................................................................................................................40Configure the PHP website.....................................................................................................................40Test your PHP configuration...................................................................................................................41Replace amavisd-new with a maia patched version................................................................................42Generate your encryption key.................................................................................................................44Load SpamAssassin rules into Maia Mailguard......................................................................................44First time login........................................................................................................................................46
Internal authentication setup...............................................................................................................46Super administrator registration.........................................................................................................47
Scheduling the maintenance scripts........................................................................................................53Configure SpamAssassin and SARE ruleset updates..............................................................................54
Extending SpamAssassin with extra tests and MySQL support..................................................................56Setting up razor2 agents..........................................................................................................................56Install and setting up DCC......................................................................................................................59
Additional configuration of SpamAssassin..................................................................................................61File locations...........................................................................................................................................61Change settings in the standard local.cf configuration file.....................................................................61Enabling an extra plugin - Country IP....................................................................................................63Quick test to see if SA is working...........................................................................................................63FuzzyOCR image spam plug-in..............................................................................................................64
Giflib-progs........................................................................................................................................64Gifsicle................................................................................................................................................64GNU Ocrad.........................................................................................................................................65GOCR.................................................................................................................................................65
Page 2 of 96

Perl Modules.......................................................................................................................................65First time Testing.........................................................................................................................................69
Check all processes start correctly..........................................................................................................69Using the Mozilla Thunderbird e-mail client for testing.........................................................................70First test e-mail........................................................................................................................................72Testing virus and spam filtering..............................................................................................................74Testing attachment filtering....................................................................................................................76Testing bad header filtering.....................................................................................................................77Testing oversized e-mails........................................................................................................................77Testing Whitelists/Blacklists...................................................................................................................81Testing maintenance scripts....................................................................................................................82System clean up.......................................................................................................................................83
Backing it up................................................................................................................................................84Upgrading to a newer version of Maia Mailguard.......................................................................................84Tweaks and Tightening................................................................................................................................86
System Updates.......................................................................................................................................86Supporting multiple e-mail domains.......................................................................................................86Stopping spam and viruses before they even get in................................................................................87
Reject if the sender doesn't identify itself...........................................................................................87Permit e-mail from trusted networks..................................................................................................87Reject non fully qualified sender's address........................................................................................88Reject from unknown sender domains...............................................................................................89Permit e-mail from trusted networks to any local recipient...............................................................90Reject non fully qualified recipients addresses..................................................................................90Reject unauthorised destination domains...........................................................................................90Reject unverified recipients................................................................................................................91
Tighter control over attachment filtering................................................................................................92Blocking e-mail delivery to local users of the gateway..........................................................................92Setting a lower spam threshold...............................................................................................................92BCC copies of e-mail to another address................................................................................................93Reducing resource requirements on low end computers.........................................................................94Increasing scanning throughput..............................................................................................................94Administering Maia Mailguard with maiadbtool.pl................................................................................94
Basic Troubleshooting.................................................................................................................................95Debugging...............................................................................................................................................95Mailq and qshape tools............................................................................................................................95SpamAssassin and the ALL_TRUSTED score being incorrectly added................................................96Websites for more help...........................................................................................................................96
Page 3 of 96

Due credit
Thank you to everyone who has e-mailed corrections and ideas to help make this revision happen.
Special thanks to:
Dave Roberts, [email protected]
Andy Rosulek, [email protected]
Arthur Bezuidenhout, [email protected]
Koltogyan Sergey, [email protected]
John Chapman, [email protected]
Your efforts and patience are greatly appreciated.
Page 4 of 96
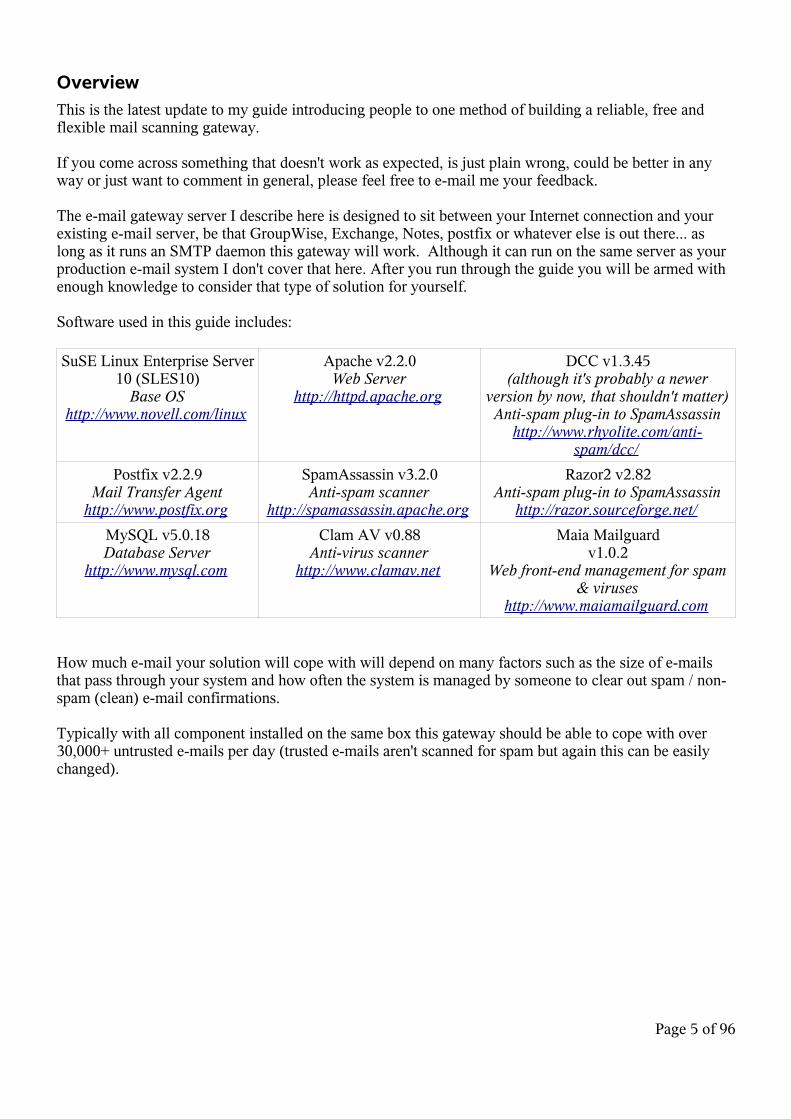
Overview
This is the latest update to my guide introducing people to one method of building a reliable, free and flexible mail scanning gateway.
If you come across something that doesn't work as expected, is just plain wrong, could be better in any way or just want to comment in general, please feel free to e-mail me your feedback.
The e-mail gateway server I describe here is designed to sit between your Internet connection and your existing e-mail server, be that GroupWise, Exchange, Notes, postfix or whatever else is out there... as long as it runs an SMTP daemon this gateway will work. Although it can run on the same server as your production e-mail system I don't cover that here. After you run through the guide you will be armed with enough knowledge to consider that type of solution for yourself.
Software used in this guide includes:
SuSE Linux Enterprise Server 10 (SLES10)
Base OShttp://www.novell.com/linux
Apache v2.2.0Web Server
http://httpd.apache.org
DCC v1.3.45(although it's probably a newer
version by now, that shouldn't matter)Anti-spam plug-in to SpamAssassin
http://www.rhyolite.com/anti-spam/dcc/
Postfix v2.2.9Mail Transfer Agent
http://www.postfix.org
SpamAssassin v3.2.0Anti-spam scanner
http://spamassassin.apache.org
Razor2 v2.82Anti-spam plug-in to SpamAssassin
http://razor.sourceforge.net/
MySQL v5.0.18Database Server
http://www.mysql.com
Clam AV v0.88Anti-virus scanner
http://www.clamav.net
Maia Mailguardv1.0.2
Web front-end management for spam & viruses
http://www.maiamailguard.com
How much e-mail your solution will cope with will depend on many factors such as the size of e-mails that pass through your system and how often the system is managed by someone to clear out spam / non-spam (clean) e-mail confirmations.
Typically with all component installed on the same box this gateway should be able to cope with over 30,000+ untrusted e-mails per day (trusted e-mails aren't scanned for spam but again this can be easily changed).
Page 5 of 96
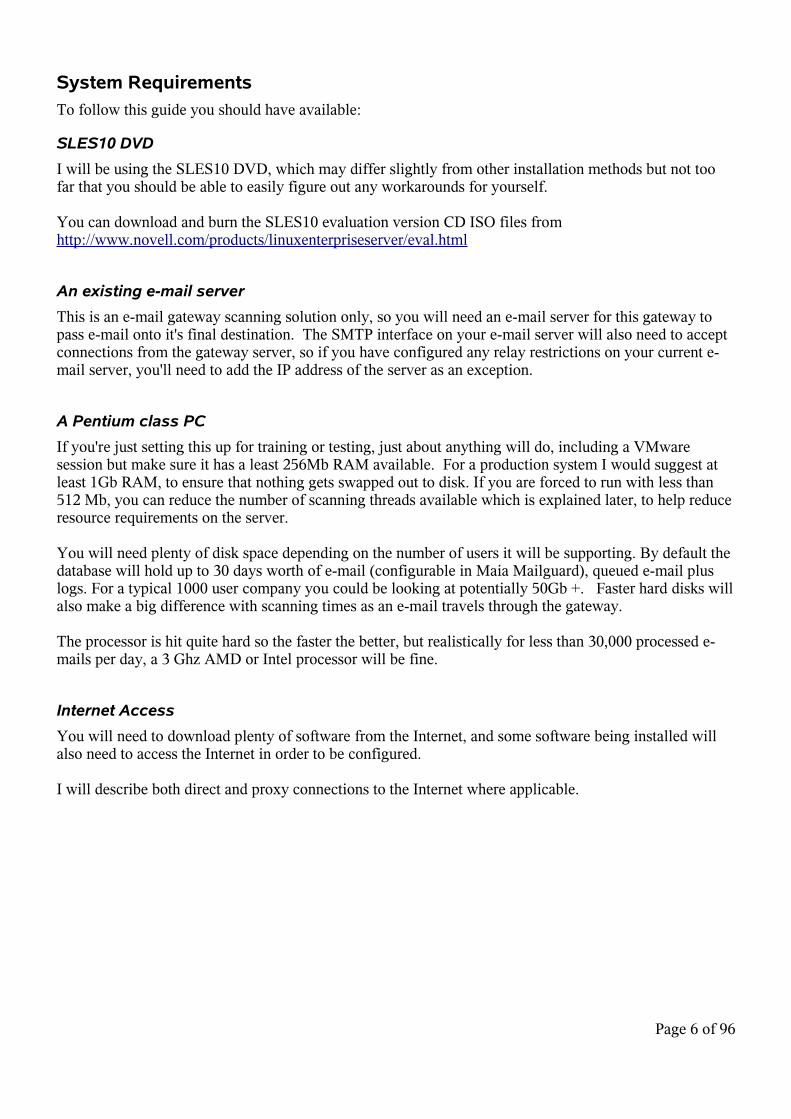
System Requirements
To follow this guide you should have available:
SLES10 DVD
I will be using the SLES10 DVD, which may differ slightly from other installation methods but not too far that you should be able to easily figure out any workarounds for yourself.
You can download and burn the SLES10 evaluation version CD ISO files fromhttp://www.novell.com/products/linuxenterpriseserver/eval.html
An existing e-mail server
This is an e-mail gateway scanning solution only, so you will need an e-mail server for this gateway to pass e-mail onto it's final destination. The SMTP interface on your e-mail server will also need to accept connections from the gateway server, so if you have configured any relay restrictions on your current e-mail server, you'll need to add the IP address of the server as an exception.
A Pentium class PC
If you're just setting this up for training or testing, just about anything will do, including a VMware session but make sure it has a least 256Mb RAM available. For a production system I would suggest at least 1Gb RAM, to ensure that nothing gets swapped out to disk. If you are forced to run with less than 512 Mb, you can reduce the number of scanning threads available which is explained later, to help reduce resource requirements on the server.
You will need plenty of disk space depending on the number of users it will be supporting. By default the database will hold up to 30 days worth of e-mail (configurable in Maia Mailguard), queued e-mail plus logs. For a typical 1000 user company you could be looking at potentially 50Gb +. Faster hard disks will also make a big difference with scanning times as an e-mail travels through the gateway.
The processor is hit quite hard so the faster the better, but realistically for less than 30,000 processed e-mails per day, a 3 Ghz AMD or Intel processor will be fine.
Internet Access
You will need to download plenty of software from the Internet, and some software being installed will also need to access the Internet in order to be configured.
I will describe both direct and proxy connections to the Internet where applicable.
Page 6 of 96

Internet Firewall Modifications
Some software described here needs access through your Internet firewall. If you cannot open some ports, just don't install those services.
Service Port TCP/UDP Direction Description
SMTP 25 tcp in & out Send & receive e-mail
http 80 tcp out Download gateway components and SuSE updates when required.
razor2 2703 tcp out Confirmed spam e-mail razor2 network check
dcc 6277 udp out Mass e-mail DCC network check
Page 7 of 96

Installation Summary
All steps will be thoroughly described and there are plenty of screen shots so novices shouldn't worry about how to enable services, edit configuration files or compile software.
As a rough guide, in order you will● Install a base SLES10 server with all applicable updates● Configure the server● Install and configure additional software not available via YaST● Test basic mail scanning● Install additional network tests● Configure SpamAssassin to use MySQL ● Tweak settings from default values● Profit!
Well maybe not profit, but at least relax a little better knowing you're safer then yesterday.If you're new to SuSE Linux it will take about a work day to install this solution but subsequently it should only take a couple of hours.
If you think you can handle it, keep reading and good luck.
Page 8 of 96
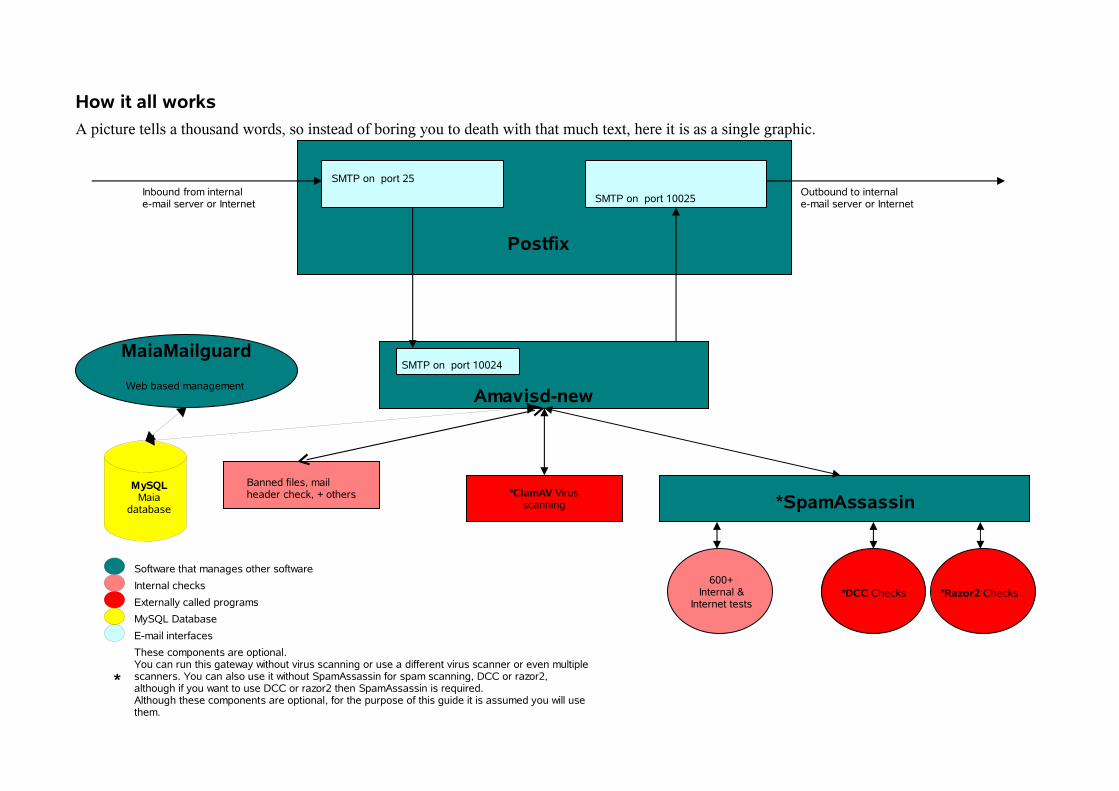
How it all works
A picture tells a thousand words, so instead of boring you to death with that much text, here it is as a single graphic.
600+Internal &
Internet tests*DCC Checks *Razor2 Checks
*SpamAssassin*ClamAV Virus
scanning
Banned files, mailheader check, + others
Amavisd-new
Postfix
SMTP on port 25
SMTP on port 10025
SMTP on port 10024
Outbound to internale-mail server or Internet
Inbound from internale-mail server or Internet
MaiaMailguard
Web based management
MySQLMaia
database
Software that manages other software
Internal checks
Externally called programs
MySQL Database
E-mail interfaces
These components are optional.You can run this gateway without virus scanning or use a different virus scanner or even multiple scanners. You can also use it without SpamAssassin for spam scanning, DCC or razor2, although if you want to use DCC or razor2 then SpamAssassin is required.Although these components are optional, for the purpose of this guide it is assumed you will use them.
*
The base SLES10 installation
This install assumes a clean hard disk. You can of course ask the installer to overwrite whatever else you have on the disk, but that isn't covered here.
This setup is based on a base SLES10 build with no updates. This is to ensure you end up with exactly the same setup as described in this guide. Once you've proven it works here, then consider updating your gateway – with due care which means back it up first.To obtain updates to SLES 10 you will need to register with Novell. They provide a temporary license valid for 15 days after which you must purchase a support license to continue receiving updates.
If you haven't already done so, download and burn the evaluation CD ISO files fromhttp://www.novell.com/products/linuxenterpriseserver/eval.html
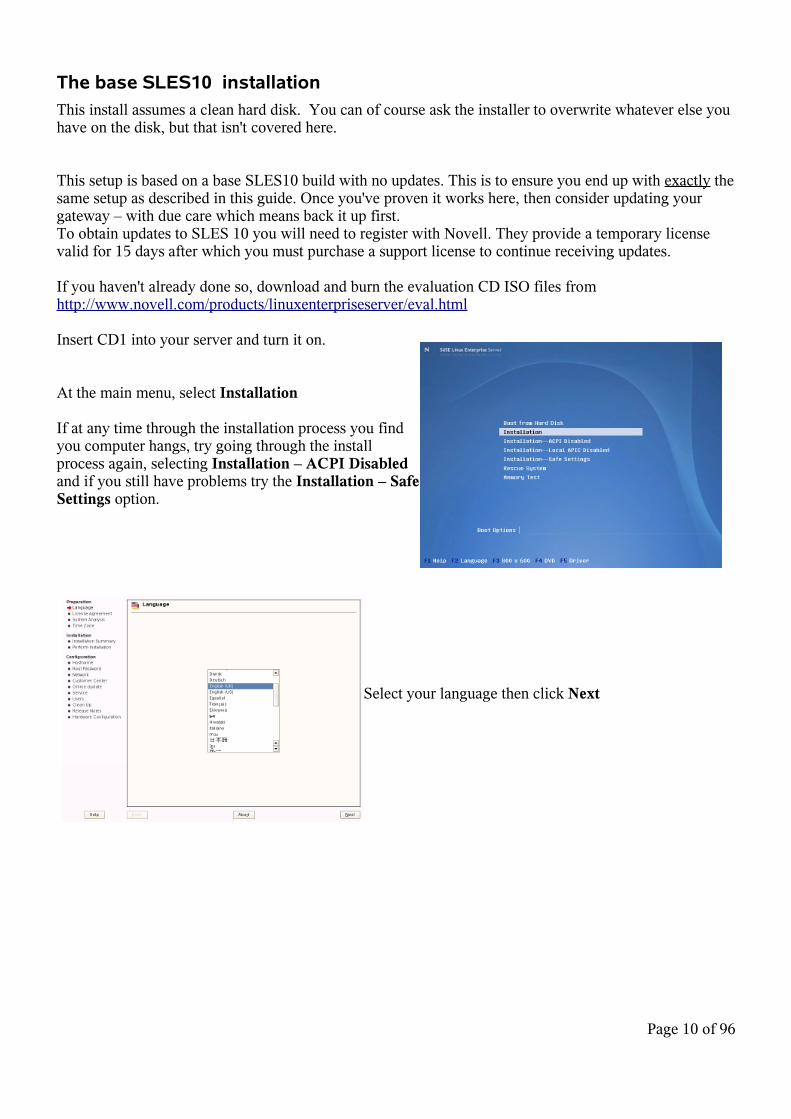
Insert CD1 into your server and turn it on.
At the main menu, select Installation
If at any time through the installation process you find you computer hangs, try going through the install process again, selecting Installation – ACPI Disabled and if you still have problems try the Installation – Safe Settings option.
Select your language then click Next
Page 10 of 96
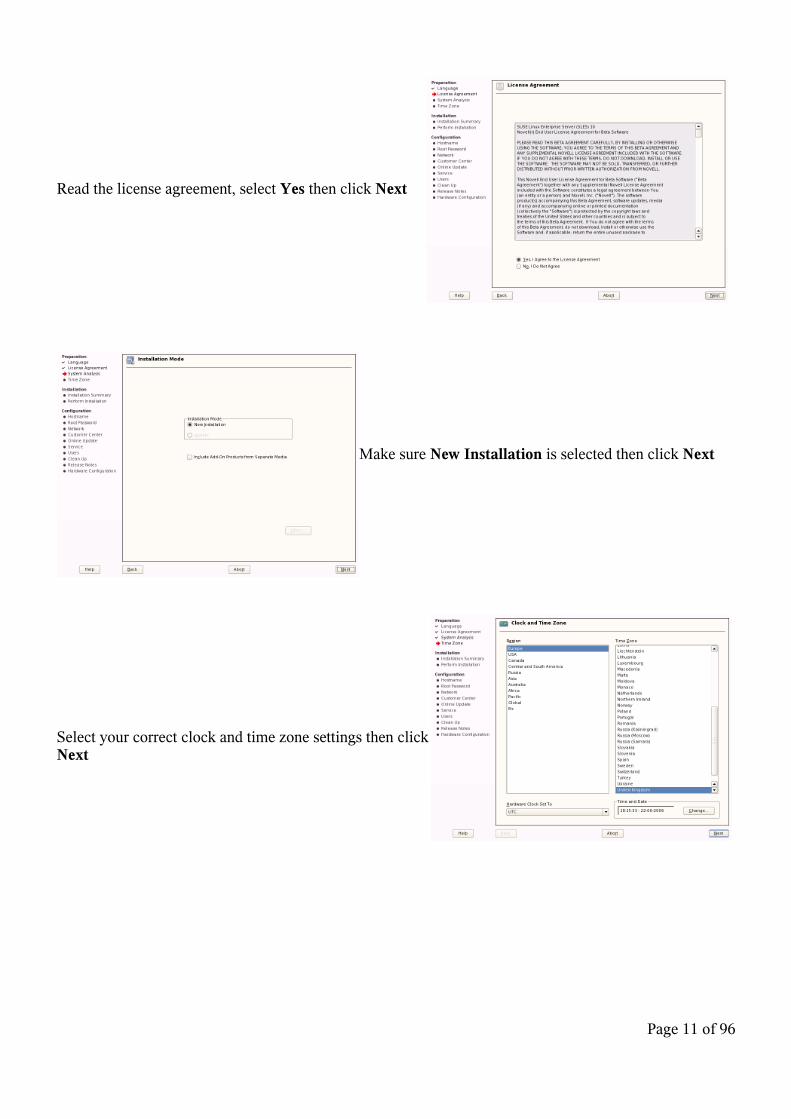
Read the license agreement, select Yes then click Next
Make sure New Installation is selected then click Next
Select your correct clock and time zone settings then click Next
Page 11 of 96
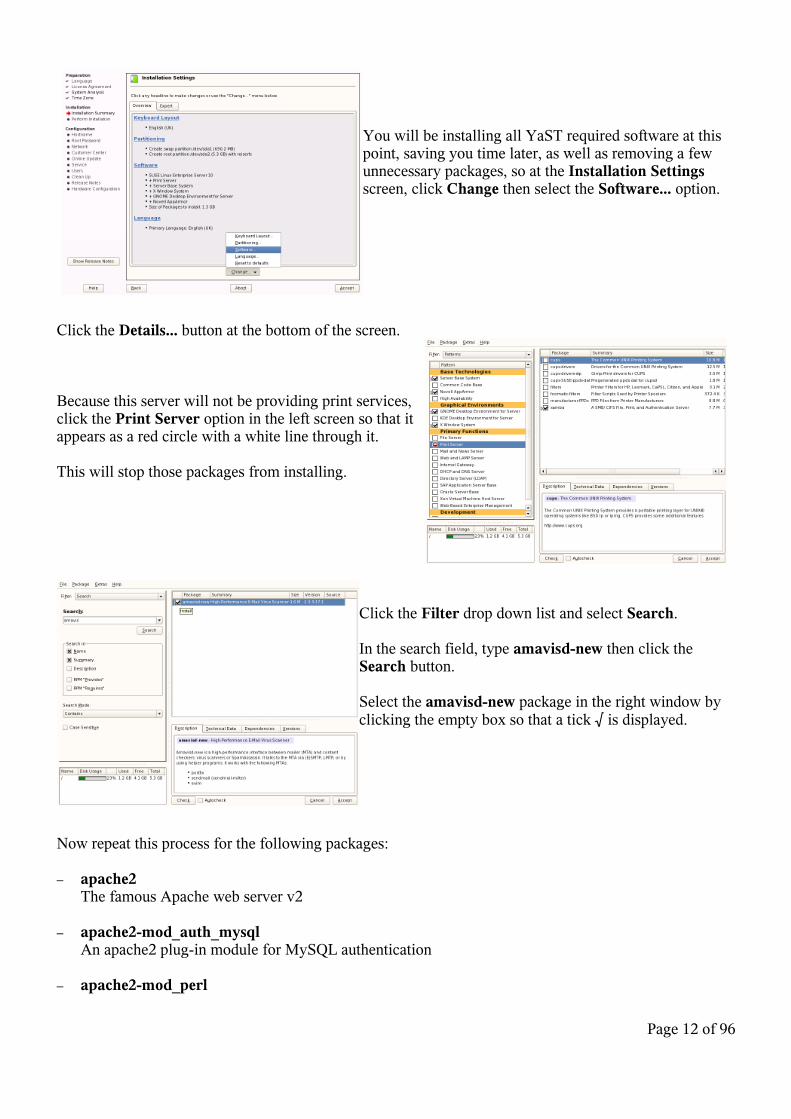
You will be installing all YaST required software at this point, saving you time later, as well as removing a few unnecessary packages, so at the Installation Settings screen, click Change then select the Software... option.
Click the Details... button at the bottom of the screen.
Because this server will not be providing print services, click the Print Server option in the left screen so that it appears as a red circle with a white line through it.
This will stop those packages from installing.
Click the Filter drop down list and select Search.
In the search field, type amavisd-new then click the Search button.
Select the amavisd-new package in the right window by clicking the empty box so that a tick √ is displayed.
Now repeat this process for the following packages:
– apache2 The famous Apache web server v2
– apache2-mod_auth_mysqlAn apache2 plug-in module for MySQL authentication
– apache2-mod_perl
Page 12 of 96
An apache2 plug-in module for the perl language
– apache2-mod_php5An apache2 plug-in module for the php language
– clamavAn anti-virus scanner
– db-develIs a dependency that's used to install BerkeleyDB which can be used by Subversion (which is needed to grab the latest SpamAssassin software
– gcc A GNU C compiler, used to compile software from source code
– gcc-c++A GNU C++ compiler, used to compile software from source code
– gd A drawing library for programs that use PNG or JPEG output (Needed for graphs in MM)
– kernel-sourceSource code for the Linux kernel
– mysqlA True Multiuser, Multithreaded SQL Database Server
– OpenSSL-develRequired for SpamAssassin's Yahoo DomainKey's plugin
– php5-bcmathA library of binary calculator functions for PHP
– php5-gdPHP functions to manipulate graphics using the gd library
– php5-imap PHP interface use to authenticate against an IMAP e-mail service
– php5-ldap PHP interface to LDAP services
– php5-mcrypt PHP interface to the mcrypt library
– php5-mysql PHP functions to access a MySQL database
– php5-pear PHP interface to another scripting language called pear, which Maia Mailguard uses
– php5-wddx
Page 13 of 96

PHP functions for Web Distributed Data Exchange
Click the Accept button, then accept the automatic changes presented by clicking Continue.
Back at the Installation Settings screen, click the Accept button, then click Install to start the installation.
Grab a coffee at this point and relax.....
After about a minute it will tell you approximately how long each CD will take as well as the total time to finish installing the packages.
After this stage it will reboot.
Page 14 of 96

At the Hostname screen enter a hostname and domain name then click Next.
For this guide I will use mailscan and retnet.co.uk respectively – change to suit your own setup.
At the System Administrator password screen, enter a password then click Next.
At the Network Configuration screen, you need to change the network card settings. Start by clicking the Change... button then selecting Network Interfaces.
SuSE should have already detected and configured the network card for DHCP and should be listed in the main window section.
If not, then click the Add button to try and add it manually. You will need to know what type of chip set your network card is using to install it.
If you run into trouble, skip out of this guide and pop over to an on-line SuSE forum such as http://support.novell.com/forums/ for some help..
This computer is going to need a static IP address and dns settings so to change those settings click the Edit button at the bottom of the screen.
Page 15 of 96
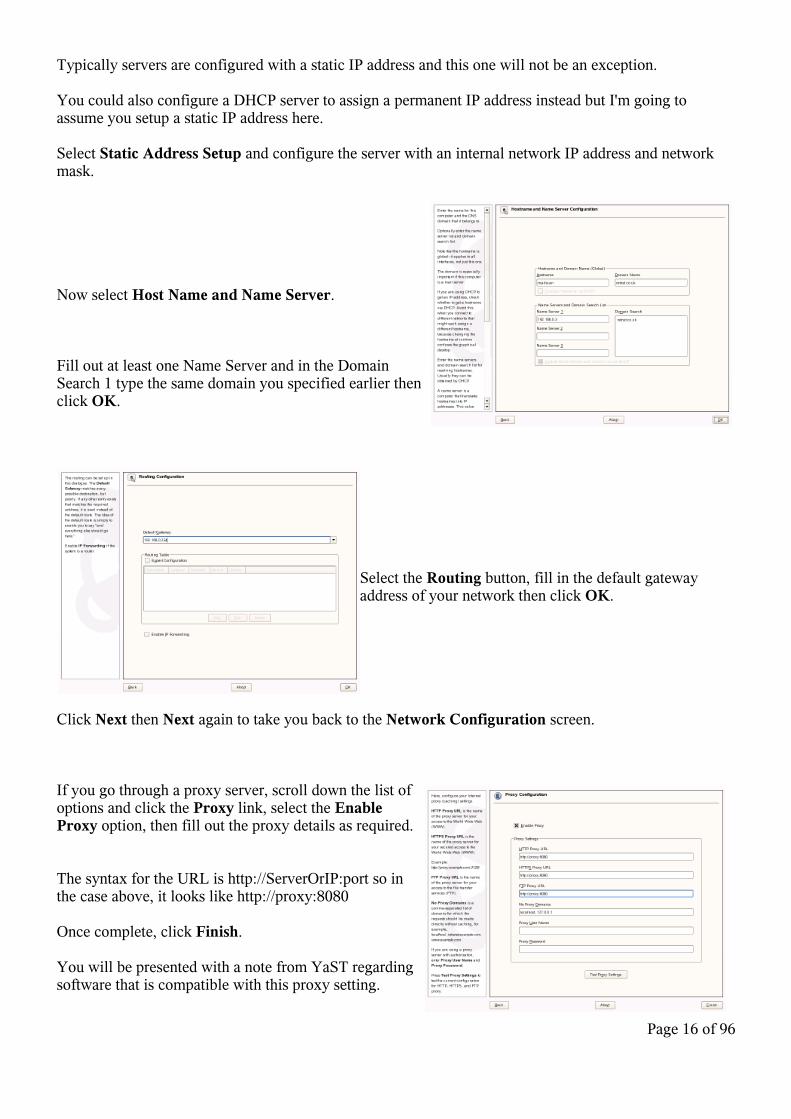
Typically servers are configured with a static IP address and this one will not be an exception.
You could also configure a DHCP server to assign a permanent IP address instead but I'm going to assume you setup a static IP address here.
Select Static Address Setup and configure the server with an internal network IP address and network mask.
Now select Host Name and Name Server.
Fill out at least one Name Server and in the Domain Search 1 type the same domain you specified earlier then click OK.
Select the Routing button, fill in the default gateway address of your network then click OK.
Click Next then Next again to take you back to the Network Configuration screen.
If you go through a proxy server, scroll down the list of options and click the Proxy link, select the Enable Proxy option, then fill out the proxy details as required.
The syntax for the URL is http://ServerOrIP:port so in the case above, it looks like http://proxy:8080
Once complete, click Finish.
You will be presented with a note from YaST regarding software that is compatible with this proxy setting.
Page 16 of 96
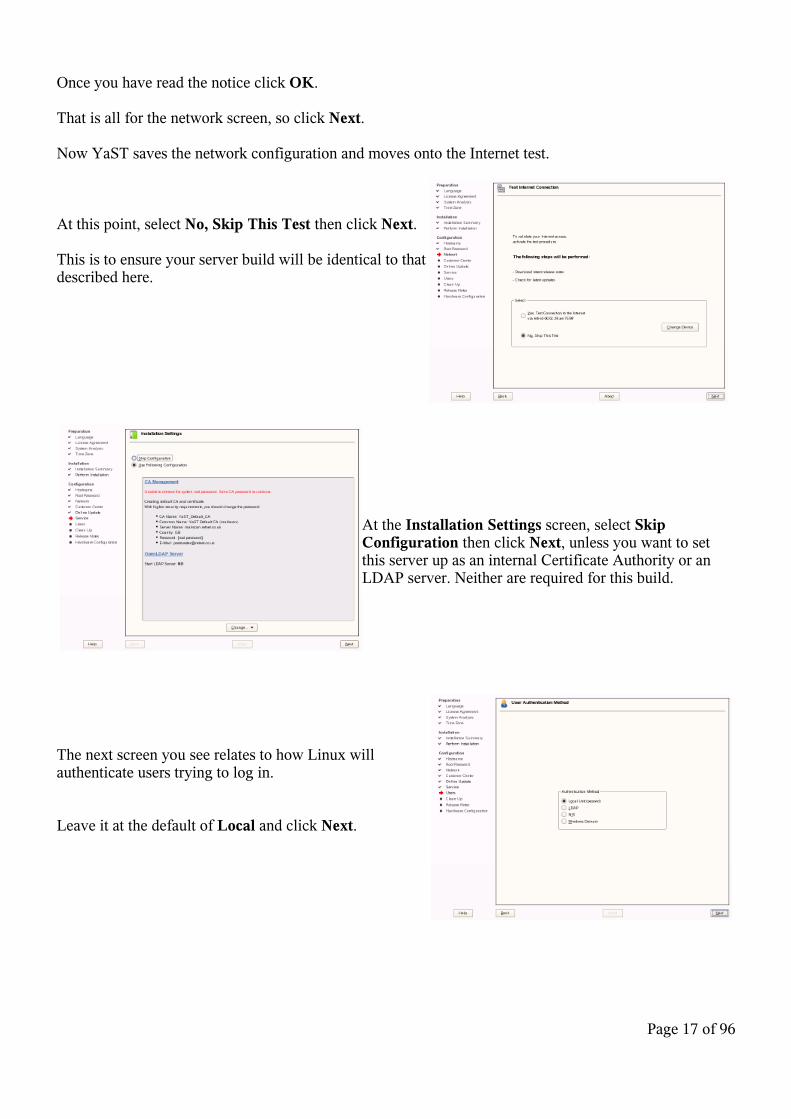
Once you have read the notice click OK.
That is all for the network screen, so click Next.
Now YaST saves the network configuration and moves onto the Internet test.
At this point, select No, Skip This Test then click Next.
This is to ensure your server build will be identical to that described here.
At the Installation Settings screen, select Skip Configuration then click Next, unless you want to set this server up as an internal Certificate Authority or an LDAP server. Neither are required for this build.
The next screen you see relates to how Linux will authenticate users trying to log in.
Leave it at the default of Local and click Next.
Page 17 of 96

At the New Local User screen, leave it blank as you don't need to create any additional local users so just click Next and accept the Empty User dialog that pops up.
SLES will now write out the system configuration and after around a minute it will display the release notes.
After reading them click Next.
At the Hardware Detection screen YaST almost always gets it right, so in most cases you can just click Next.
Finally, at the last installation screen, click Finish.
Page 18 of 96
Installing additional Software
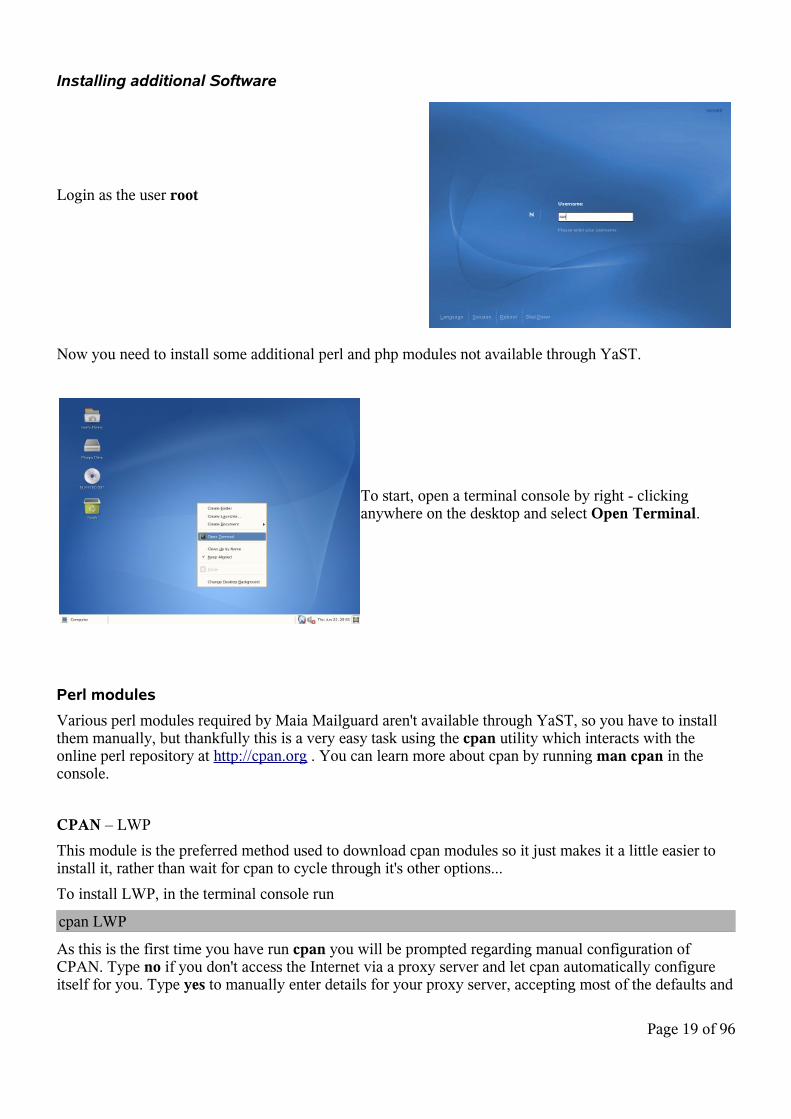
Login as the user root
Now you need to install some additional perl and php modules not available through YaST.
To start, open a terminal console by right - clicking anywhere on the desktop and select Open Terminal.
Perl modules
Various perl modules required by Maia Mailguard aren't available through YaST, so you have to install them manually, but thankfully this is a very easy task using the cpan utility which interacts with the online perl repository at http://cpan.org . You can learn more about cpan by running man cpan in the console.
CPAN – LWP
This module is the preferred method used to download cpan modules so it just makes it a little easier to install it, rather than wait for cpan to cycle through it's other options...
To install LWP, in the terminal console run
cpan LWP
As this is the first time you have run cpan you will be prompted regarding manual configuration of CPAN. Type no if you don't access the Internet via a proxy server and let cpan automatically configure itself for you. Type yes to manually enter details for your proxy server, accepting most of the defaults and
Page 19 of 96
change only the proxy settings when required.
When prompted during the installation, accept the default
If the last line in the console is
/usr/bin/make install --OK
then the installation was successful. If not, scroll up through the text to find the first error listed and try to troubleshoot from there.
Crypt::Blowfish - An encryption module
To install, in the terminal console run
cpan Crypt::Blowfish
If you are prompted about re-running the configuration dialog for CPAM.pm, just press Enter to accept the defaults, then run the command again.
Crypt::CBC – Another encryption module
To install, in the terminal console run
cpan Crypt::CBC
Data::UUID - Perl extension for generating Globally/Universally Unique Identifiers (GUIDs/UUIDs)
To install, in the terminal console run
cpan Data::UUID
When prompted, press Enter to accept the defaults.
IO::Zlib - Interface to Compress::Zlib – Required by SpamAssassin's rule update script sa-update
To install, in the terminal console run
cpan http://backpan.perl.org/authors/id/T/TO/TOMHUGHES/IO-Zlib-1.04.tar.gz
If you try to install the latest version (at time of writing v1.05) will fail during build on SLES 10 base install.
IP::Country - Used by SpamAssassin: Fast lookup of country codes from IP addresses
To install, in the terminal console run
cpan IP::Country
Mail::SpamAssassin - Spam detector and markup engine
To install, in the terminal console run
cpan
Page 20 of 96
force install Mail::SpamAssassinquit
A forced install is necessary else one of the tests will fail.When prompted, just accept the default by pressing Enter
Mail::SPF::Query – Used by SpamAssassin: Query Sender Policy Framework for an IP,email,helo
To install, in the terminal console run
cpan Mail::SPF::Query
When prompted, just accept the defaults by pressing Enter
Template-Toolkit – A template processing system
To install, in the terminal console run
cpan Template
Accept any prompts with Enter.
Crypt::OpenSSL::RSA - RSA encoding and decoding, using the openSSL libraries (Used by SpamAssassin's Yahoo DomainKey's plugin)
To install, in the terminal console run
cpan Crypt::OpenSSL::RSA
When prompted, just accept the default by pressing Enter
The Crypt::OpenSSL::RSA module is installed now instead of earlier due to dependencies which have now been installed.
Email::Address – A dependency of Mail::DomainKeys which is installed next
To install, in the terminal console run
cpan Email::Address
Mail::DKIM - Used by SpamAssassin: Signs/verifies Internet mail with DKIM/DomainKey signatures
To install, in the terminal console run
cpan Mail::DKIM
When prompted, just accept the default by pressing Enter
Convert::UUlib – Recommended update only – Not required. Perl interface to the uulib library (a.k.a. uudeview/uuenview)
To install, in the terminal console run
cpan Convert::UUlib
Page 21 of 96
Mime::Parser – Recommended update only – Not required. Class for parsing MIME streams
To install, in the terminal console run
cpan MIME::Parser
Net::Server – Recommended update only – Not required. Extensible, general Perl server engine
To install, in the terminal console run
cpan Net::Server
Pear modules
To install the necessary pear modules (you can read more about pear at http://peap.php.net ) for Maia Mailguard, open a terminal console as the root user.
If you need to go through a proxy server, pear is one of the programs that do not honor the SuSE proxy settings, so you will need to configure this separately.
To set the proxy server, in the terminal run:pear5 config-set http_proxy http://username:password@ServerOrIP:port
where username is an authorised proxy user (only required if proxy authentication is needed)where password is an authorised proxy user password (only required if proxy authentication is needed)where ServerOrIP is the DNS name or IP address of the proxy serverwhere port is the tcp port the proxy server is listening on.
If you cannot configure pear for Internet access, you will have to manually download the required pear modules from http://pear.php.net and run the same installation commands as below, but substitute the package name with the filenames you downloaded.
In the terminal, run:pear5 install -a Net_SMTP If you receive a warning about an update to channel pear.php.net, you should run the following command to update it: pear5 channel-update pear.php.netpear5 install DBpear5 install Pagerpear5 install Logpear5 install Mail_Mimepear5 install Net_IMAPpear5 install Net_POP3pear5 install Image_Colorpear5 install -f Image_Canvaspear5 install -f Numbers_Wordspear5 install Numbers_Romanpear5 install -f Image_Graph-0.7.2If installing to OpenSuSE 10.1 and Image_Graph fails to install, manually download the v0.7.2 .tar.gz file and run pear5 install /pathtofile/Image_Graph-0.7.2
The -a switch tells pear to install any required and optional dependencies
Page 22 of 96

The -f switch is to force install of 'non-stable' releases. These packages are either in Beta or Alpha. Without them chart graphing in Maia Mailguard won't work.
Pear will attempt to go off to the Internet, fetch the packages and install them for you.
Lastly there is a small change you need to make to Image_Graph 0.7.2. If any later version is available (goto http://pear.php.net and search for Image_Graph to check if one is available) to make the legend text appear.
Open /usr/share/php5/PEAR/Image/Graph/Plot/Pie.php and change on line 502 (may not have to do this with Image_Graph versions greater than 0.7.2. If legend text does not appear with later versions then perform the following change anyway).$this->_clip(true);to$this->_clip(false);
Save the change and quit your text editor.
You're now done with the basic foundation needed for an excellent mail scanning gateway. There are a couple of extra programs you'll need to download, but that can all happen in good time. Next you start configuring the mail components you've already installed.
Re2c
From the website (http://re2c.org/): Re2c is a tool for writing very fast and very flexible scanners. Unlike any other such tool, re2c focuses on generating high efficient code for regular expression matching. As a result this allows a much broader range of use than any traditional lexer.
This is used by SpamAssassin v3.2.0 and higher to compile the rulesets into code that allows it to run a lot more efficiently. For more information about this, check out the SpamAssassin site http://spamassassin.apache.org/full/3.2.x/doc/sa-compile.html
To install this, head over to the website http://sourceforge.net/projects/re2c and download the latest version. I will be using the .tar.gz version of their source code so it's probably best to download that if you want to easily follow these instructions.
Now extract and install the software by running in a terminal console as root
cd ~/Desktoptar -xzvf re2c-0.12.0.tar.gzcd re2c-1.12.0./configuremakemake install
Page 23 of 96
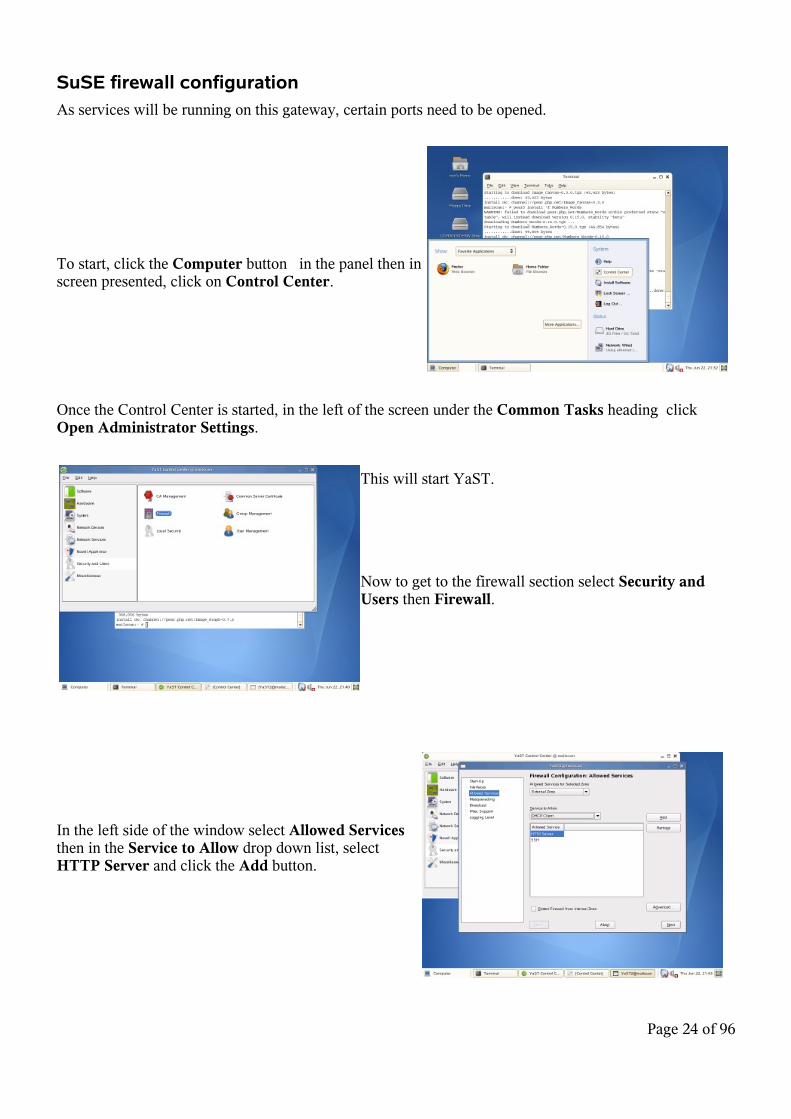
SuSE firewall configuration
As services will be running on this gateway, certain ports need to be opened.
To start, click the Computer button in the panel then in screen presented, click on Control Center.
Once the Control Center is started, in the left of the screen under the Common Tasks heading click Open Administrator Settings.
This will start YaST.
Now to get to the firewall section select Security and Users then Firewall.
In the left side of the window select Allowed Services then in the Service to Allow drop down list, select HTTP Server and click the Add button.
Page 24 of 96

Repeat this process for SSH if you want to be able to remotely administer the server.
(Don't worry about the smtp service.. it will be sorted out automatically)
Now click the Next button.
At the summary screen, click Accept.
Page 25 of 96
Setting up postfix
To start you need to configure the postfix MTA to use amavisd, as well as setting up mail relay.
Start Control Center from the main menu then Open Administrator Settings to start YaST.
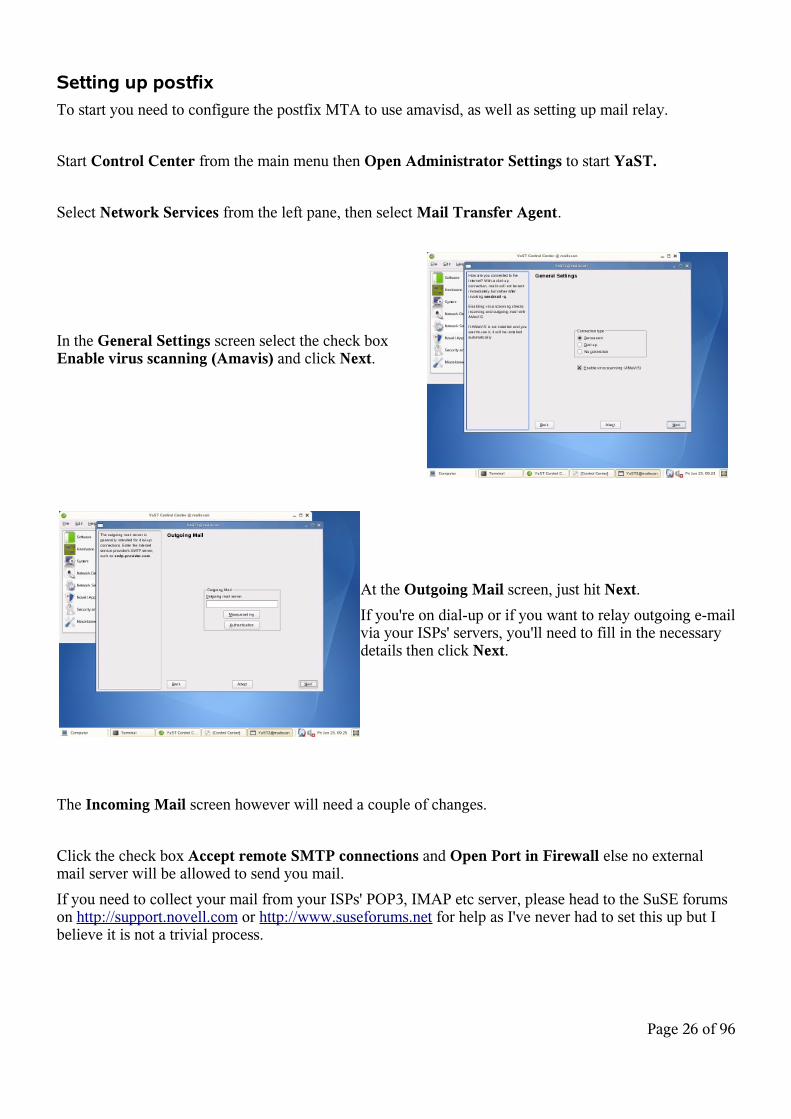
Select Network Services from the left pane, then select Mail Transfer Agent.
In the General Settings screen select the check box Enable virus scanning (Amavis) and click Next.
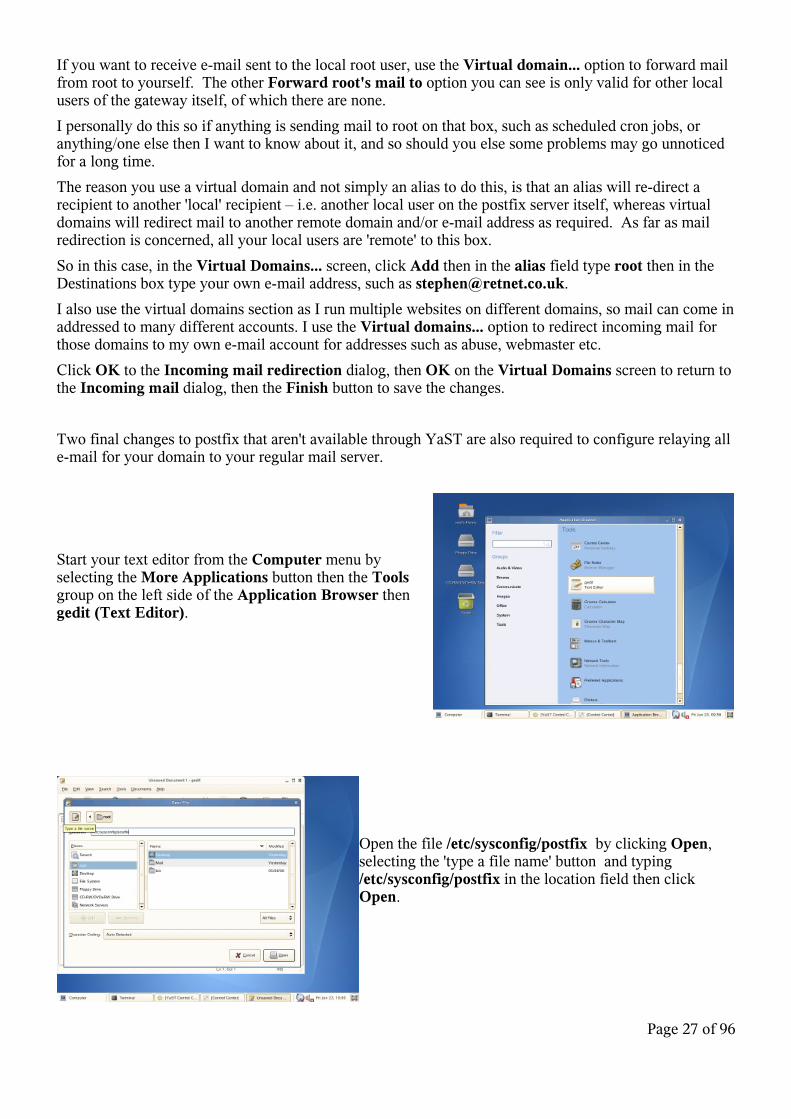
At the Outgoing Mail screen, just hit Next.
If you're on dial-up or if you want to relay outgoing e-mail via your ISPs' servers, you'll need to fill in the necessary details then click Next.
The Incoming Mail screen however will need a couple of changes.
Click the check box Accept remote SMTP connections and Open Port in Firewall else no external mail server will be allowed to send you mail.
If you need to collect your mail from your ISPs' POP3, IMAP etc server, please head to the SuSE forums on http://support.novell.com or http://www.suseforums.net for help as I've never had to set this up but I believe it is not a trivial process.
Page 26 of 96
If you want to receive e-mail sent to the local root user, use the Virtual domain... option to forward mail from root to yourself. The other Forward root's mail to option you can see is only valid for other local users of the gateway itself, of which there are none.
I personally do this so if anything is sending mail to root on that box, such as scheduled cron jobs, or anything/one else then I want to know about it, and so should you else some problems may go unnoticed for a long time.
The reason you use a virtual domain and not simply an alias to do this, is that an alias will re-direct a recipient to another 'local' recipient – i.e. another local user on the postfix server itself, whereas virtual domains will redirect mail to another remote domain and/or e-mail address as required. As far as mail redirection is concerned, all your local users are 'remote' to this box.
So in this case, in the Virtual Domains... screen, click Add then in the alias field type root then in the Destinations box type your own e-mail address, such as [email protected].
I also use the virtual domains section as I run multiple websites on different domains, so mail can come in addressed to many different accounts. I use the Virtual domains... option to redirect incoming mail for those domains to my own e-mail account for addresses such as abuse, webmaster etc.
Click OK to the Incoming mail redirection dialog, then OK on the Virtual Domains screen to return to the Incoming mail dialog, then the Finish button to save the changes.
Two final changes to postfix that aren't available through YaST are also required to configure relaying all e-mail for your domain to your regular mail server.
Start your text editor from the Computer menu by selecting the More Applications button then the Tools group on the left side of the Application Browser then gedit (Text Editor).
Open the file /etc/sysconfig/postfix by clicking Open, selecting the 'type a file name' button and typing /etc/sysconfig/postfix in the location field then click Open.
Page 27 of 96

Scroll to the end of the file and add the following line:
POSTFIX_ADD_RELAY_DOMAINS=”retnet.co.uk”
where retnet.co.uk is your own e-mail domain.
This tells postfix what destination domains it needs to relay. If this change wasn't done, postfix would think all mail to retnet.co.uk was local and try to deliver to a user local on the gateway, which obviously won't work.
Save the file then close it by clicking the small X in the tab displaying the file name.
Now that you have told postfix what domain to relay, you need to tell it where to relay mail bound for that domain.
Open the file /etc/postfix/transport the same way as before.
Scroll to the end of the file and add the following:
retnet.co.uk smtp:[192.168.0.3]
where retnet.co.uk is your e-mail domain name, and
smtp:[192.168.0.3] tells postfix to relay mail bound for retnet.co.uk to 192.168.0.3 which is my real existing mail server (as opposed to a gateway as this is), using the SMTP protocol.
You could also use a host name instead of the IP address. Oh, and the square brackets are important. By default postfix will perform a DNS lookup on the mail exchange (MX) record associated with whatever you type in after the SMTP: . Using the square brackets stops postfix from performing an MX lookup on the transport you specify.
Save and close the transport file.
For these change to take affect, open a terminal console and run:
SuSEconfig
This will update the postfix configuration files. /etc/postfix/main.cf is updated with the setting you made to /etc/sysconfig/postfix and the transport file will be converted into a binary format (/etc/postfix/transport.db) which is more efficient for postfix to use. The option to use amavis is updated in /etc/postfix/master.cf. If you ever manually change a setting in any of the postfix .cf files, SuSEconfig will no longer update them if you make changes through YaST, so be sure to always update the /sysconfig/postfix file when possible.
The SuSEconfig utility will also reload the new postfix settings for you.
Page 28 of 96
Setting up ClamAV“Clam Anti Virus is a GPL anti-virus toolkit for UNIX. The main purpose of this software is the
integration with mail servers (attachment scanning). The package provides a flexible and scalable multi-threaded daemon, a command line scanner, and a tool for automatic updating via
Internet. The programs are based on a shared library distributed with the Clam AntiVirus package, which you can use with your own software. Most importantly, the virus database is kept up to date .”
Quoted from the Clam Antivirus website athttp://www.clamav.net
By default amavisd-maia (the modified version of amavisd-new we will be using, specific for Maia Mailguard) calls ClamAV to scan e-mails that come in. ClamAV can be contacted either via a TCP port or a local socket (a special file), and by default it uses TCP port 3310 to listen on so that's what we'll use.
ClamAV at this point isn't configured to start automatically a service, so fire up YaST (from Open Administrator Settings in the Control Center), select System on the left side then System Services (Runlevel) in the right side window.
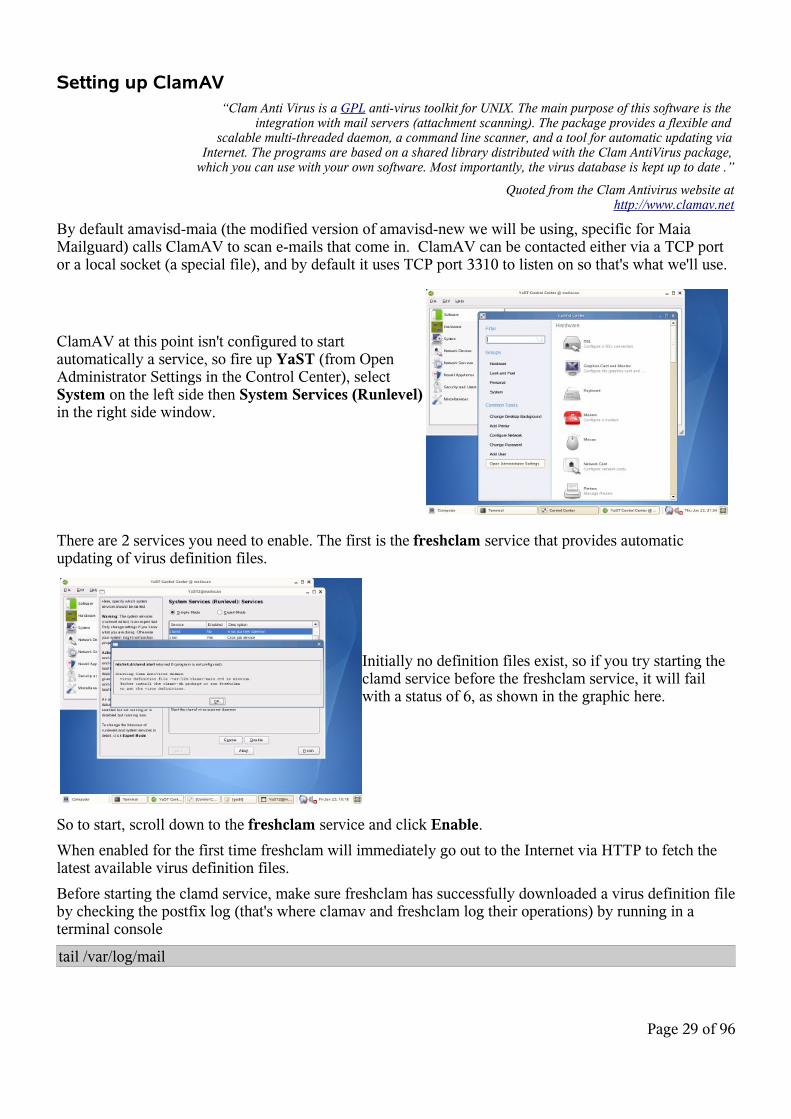
There are 2 services you need to enable. The first is the freshclam service that provides automatic updating of virus definition files.
Initially no definition files exist, so if you try starting the clamd service before the freshclam service, it will fail with a status of 6, as shown in the graphic here.
So to start, scroll down to the freshclam service and click Enable.
When enabled for the first time freshclam will immediately go out to the Internet via HTTP to fetch the latest available virus definition files.
Before starting the clamd service, make sure freshclam has successfully downloaded a virus definition file by checking the postfix log (that's where clamav and freshclam log their operations) by running in a terminal console
tail /var/log/mail
Page 29 of 96

You should see something like the following:
Jun 23 10:21:43 mailscan freshclam[9143]: Daemon started.Jun 23 10:21:43 mailscan freshclam[9144]: freshclam daemon 0.88.2 (OS: linux-gnu, ARCH: i386, CPU: i686)Jun 23 10:21:43 mailscan freshclam[9144]: ClamAV update process started at Fri Jun 23 10:21:43 2006Jun 23 10:21:53 mailscan freshclam[9144]: main.cvd updated (version: 39, sigs: 58116, f-level: 8, builder: tkojm)Jun 23 10:21:54 mailscan freshclam[9144]: daily.cvd updated (version: 1561, sigs: 1964, f-level: 8, builder: sven)Jun 23 10:21:54 mailscan freshclam[9144]: Database updated (60080 signatures) from database.clamav.net (IP: 193.1.193.64)Jun 23 10:21:54 mailscan freshclam[9144]: ERROR: Clamd was NOT notified: Can't connect to clamd on 127.0.0.1:3310Jun 23 10:21:54 mailscan freshclam[9144]: --------------------------------------
The error about not notifying clamd is correct as it's not running yet so that message can be ignored.
By default freshclam will check for updates every 2 hours via HTTP, which can be changed by editing the file /etc/freshclam.conf accordingly and re-starting the service by running /etc/init.d/freshclam restart
If you need to go via a proxy, edit /etc/freshclam.conf, scroll down to the # Proxy Settings section and edit the settings as required. An example might look like:
# Proxy settings# Default: disabledHTTPProxyServer proxy.comHTTPProxyPort 8080HTTPProxyUsername myusernameHTTPProxyPassword mypass
Once you have confirmed that freshclam has downloaded an initial set of virus definitions, enable the clamd service which should now return a status of 0 (success).
Now save these changes by clicking Finish then Yes to the save prompt.
Page 30 of 96

About amavisd-maiaAmavisd-maia is based on amavisd-new. A short blurb about what amavisd-new offers:
“amavisd-new is a high-performance interface between mailer (MTA) and content checkers: virus scanners, and/or SpamAssassin. It is written in Perl for maintainability, without paying
a significant price for speed. It talks to MTA via (E)SMTP or LMTP, or by using helper programs. Best with Postfix, fine with dual-sendmail setup and Exim v4, works with sendmail/milter,
or with any MTA as a SMTP relay.”
Quoted from the amavisd-new website at http://www.ijs.si/software/amavisd
This program is the 'glue' between postfix and the anti-spam/virus scanners but it also does a few other things such as attachment blocking and spam and virus detection notifications via e-mail.
You will be using a modified version of amavisd-new and it's associated configuration file which will come from the Maia Mailguard website that are designed to specifically work with the Maia Mailguard system.
In the Maia Mailguard installation section you will be downloading the modified version and configuring it, so at this stage all you need to do is prepare SLES10 for the modified version to be used.
You may be thinking at this point why you needed to install amavisd-new if that's not actually what you are going to be using?
The answer to that question is to reduce the number of changes you have to make. Installing the default amavisd-new package didn't just install the executable and configuration file, but it also helped to configure the correct postfix configuration files (when you selected the Use Amavis check box while setting up postfix previously. That option wouldn't be available otherwise), it also created the correct SuSE style startup script in /etc/init.d for the System Services (Runlevel) editor. I figured that one check box to install the original package, then simply replacing the required files was an easier option.
Page 31 of 96
Setting up MySQL
The next task is to setup MySQL to store settings, statistics and e-mail for Maia Mailguard.
Just as ClamAV was installed but not enabled as a service, you also need to enable the mysql service.
Start YaST (from Open Administrator Settings in the Control Center), select System on the left side then System Services (Runlevel) in the right side window.
Scroll down to mysql and click the Enable button.
You will be prompted for other service dependencies, so at this dialog click Continue.
The result is that all services should start correctly and you are presented with quite an informative message screen regarding the initial startup of mysql.
Click OK to the message box then Finish in the System Service (Runlevel) editor then finally Yes to save your changes.
Being the first time you've started MySQL, you will now need to set the mysql root password (else it will be open to anyone as the root password is blank by default).
In your terminal console as root and run the command:
mysqladmin -u root password newpassword
where you type in everything in bold exactly as it is above, and your own password in place of newpassword.
You should also change the MySQL max_allowed_packet setting in /etc/my.cnf to allow Maia Mailguard to quarantine e-mails larger than 1 Mb (the default).
Open /etc/my.cnf , search for and change the max_allowed_packet line under the [mysqld] section to read
max_allowed_packet = 16M
Save and close the file.
You can set this value to anything you like, but the setting of 16 Mb will be suitable to run through the various tests I take you through during testing of the gateway functionality. If you know you'll be accepting e-mail larger than this, set the value to e-mail size + 40%. The reason for the 40% is to compensate for conversion of binary attachments into plain text (e.g. MIME format) which all e-mail is transported as. If you're unsure of what I'm on about, I've tried to explain it in greater detail in the testing section.
For mysql to pick up this change, in a terminal console run
/etc/init.d/mysql restart
Page 32 of 96
(Yes you could have made this change earlier and just enabled the service once, but I felt this process made more sense.)
An additional suite of programs that may make your life easier to manage MySQL with is the MySQL GUI Bundle which is a suite of graphical administration tools as opposed to the standard command prompt. It also easily let you monitor MySQL server resource usage and load, helping you easily troubleshoot potential bottlenecks with the system.
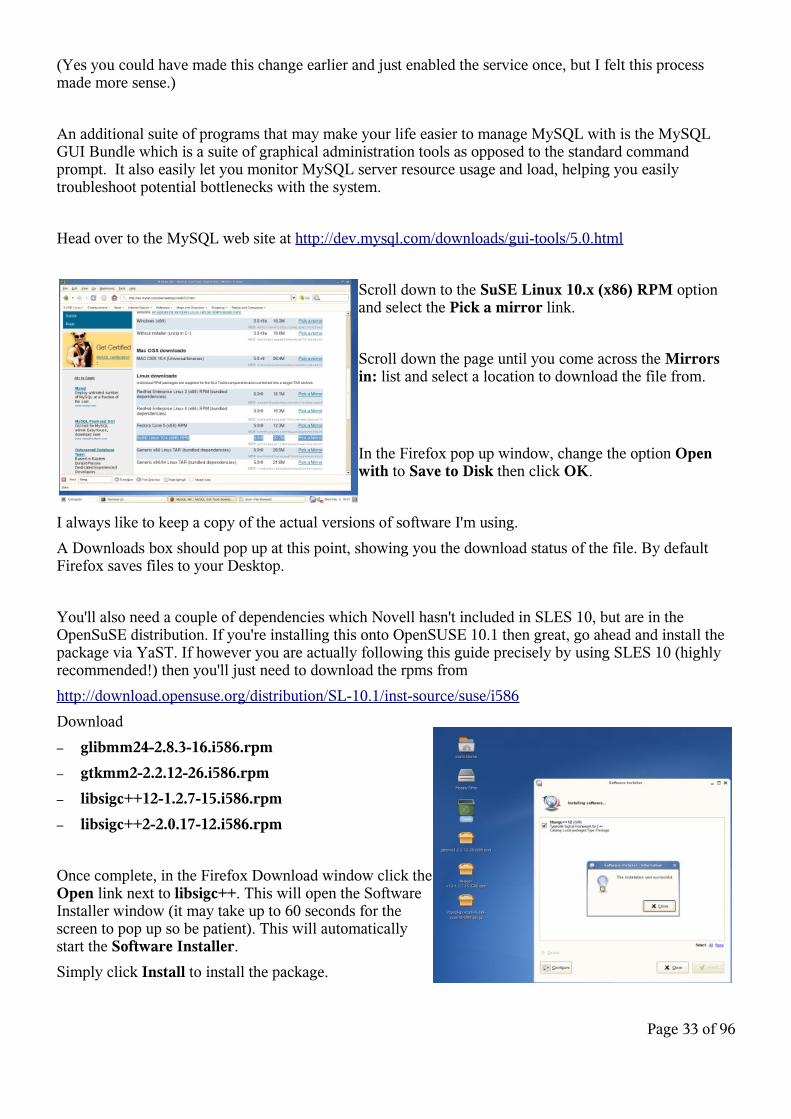
Head over to the MySQL web site at http://dev.mysql.com/downloads/gui-tools/5.0.html
Scroll down to the SuSE Linux 10.x (x86) RPM option and select the Pick a mirror link.
Scroll down the page until you come across the Mirrors in: list and select a location to download the file from.
In the Firefox pop up window, change the option Open with to Save to Disk then click OK.
I always like to keep a copy of the actual versions of software I'm using.
A Downloads box should pop up at this point, showing you the download status of the file. By default Firefox saves files to your Desktop.
You'll also need a couple of dependencies which Novell hasn't included in SLES 10, but are in the OpenSuSE distribution. If you're installing this onto OpenSUSE 10.1 then great, go ahead and install the package via YaST. If however you are actually following this guide precisely by using SLES 10 (highly recommended!) then you'll just need to download the rpms from
http://download.opensuse.org/distribution/SL-10.1/inst-source/suse/i586
Download
– glibmm24-2.8.3-16.i586.rpm
– gtkmm2-2.2.12-26.i586.rpm
– libsigc++12-1.2.7-15.i586.rpm
– libsigc++2-2.0.17-12.i586.rpm
Once complete, in the Firefox Download window click the Open link next to libsigc++. This will open the Software Installer window (it may take up to 60 seconds for the screen to pop up so be patient). This will automatically start the Software Installer.
Simply click Install to install the package.
Page 33 of 96
Click the Close button once the installation is complete.
Now repeat that process for the other 2 packages.
Lastly to install the MySQL GUI Tools, extract the downloaded archive but right-clicking the file and select the menu option Extract Here
It should look something like the graphic on the left.
In order, install the extracted rpm files:
– mysql-gui-tools (Contains common files needed by all MySQL GUI Tools)
– mysql-administrator, mysql-query-browser, mysql-workbench
You only need to install the migration toolkit if you are thinking of migrating databases from other engines such as MSSQL or DB2.
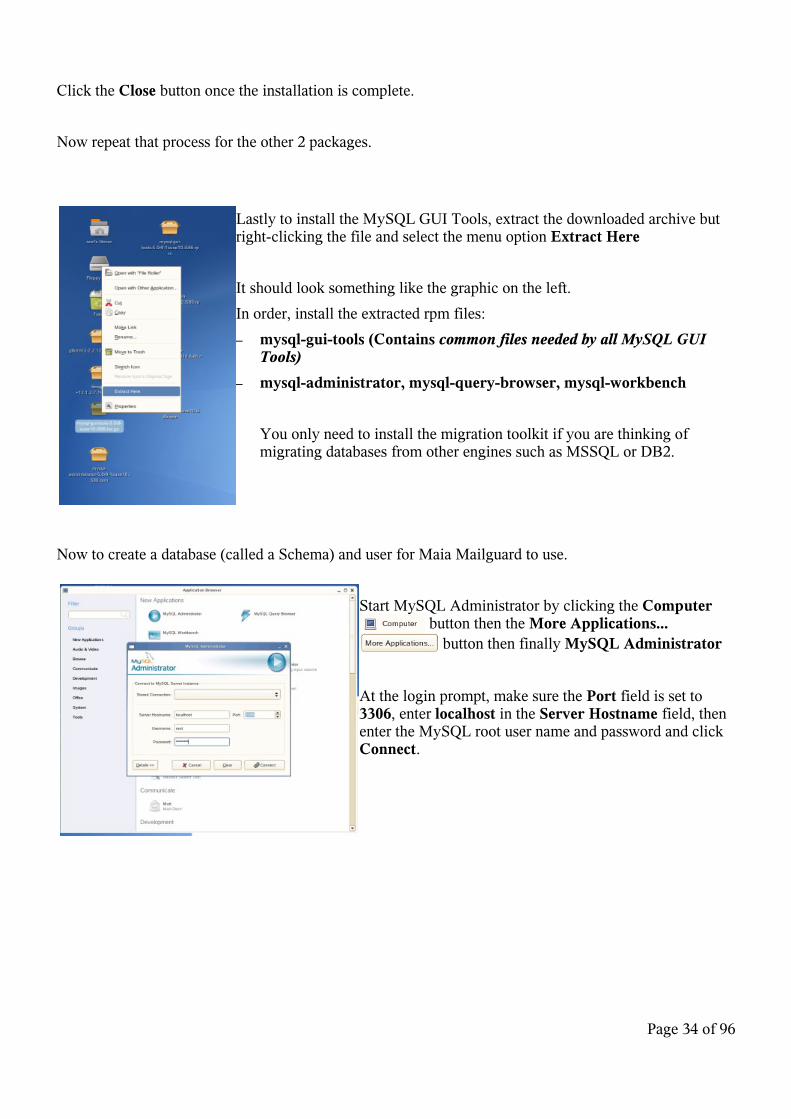
Now to create a database (called a Schema) and user for Maia Mailguard to use.
Start MySQL Administrator by clicking the Computer button then the More Applications...
button then finally MySQL Administrator
At the login prompt, make sure the Port field is set to 3306, enter localhost in the Server Hostname field, then enter the MySQL root user name and password and click Connect.
Page 34 of 96

To create a new database, click on the Catalogs link then right-click under the existing schema's, and choose Create Schema from the pop up menu provided.
Type in a schema name then click OK. I'll be calling mine maia for this guide.
Create a new user by selecting User Administration, right-click in an empty area underneath the other users and select New User.
Type in a username and password – these will be used by Maia Mailguard to connect to the database (Schema).
I will use maiauser for this guide.
You now need to explicitly tell MySQL that maiauser connecting from the host localhost (this box) is allowed to connect and give it permissions to the maia database.
Right click the new_user label for the maiauser and select the +Add Host option, then select Local Host and click OK.
To set the permissions for your user from this host, select the @locahost host so it's highlighted blue then select the Schema Privileges tab.
You can define different permissions for the same user depending on where they are connecting from. If you want to lock the user down to this box only, create a localhost user and set permissions on him instead.
Highlight the maia database then in the Available Privileges list, select the following privileges which you add by clicking the Left arrow button: Select, Insert, Update, Delete, Create, Drop, Alter.
Click the Apply Changes button to save and close MySQL Administrator.
Page 35 of 96
Configure PHP5 / Apache2
There's a problem that appears to be specific to the SuSE 10 code base where even though all PEAR modules are installed, they aren't picked up. The solution is to create a couple of symbolic links.
To fix this problem, in a console run
ln -s /usr/share/php5 /usr/lib/phpln -s /usr/share/php5/PEAR /usr/lib/php/pear
Maia Mailguard uses the Smarty template system for PHP, allowing easier development of themes, so now you need to download and install Smarty – and by install I mean just copy a couple of files.
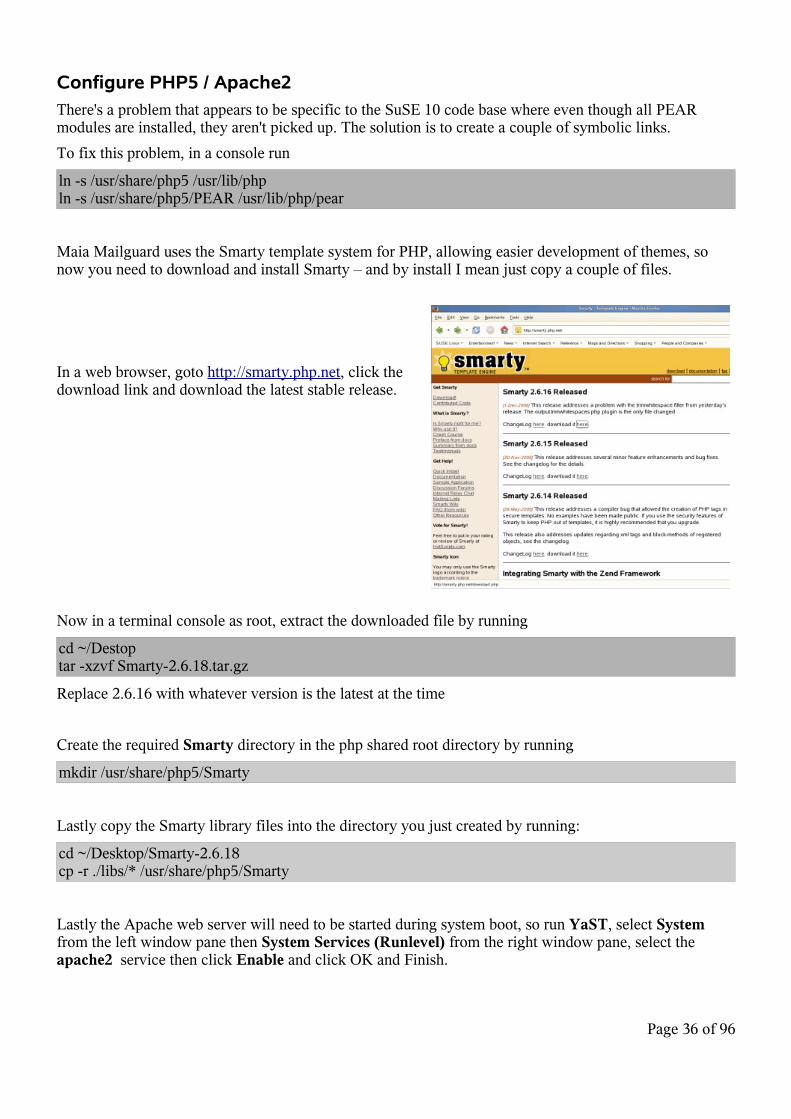
In a web browser, goto http://smarty.php.net, click the download link and download the latest stable release.
Now in a terminal console as root, extract the downloaded file by running
cd ~/Destoptar -xzvf Smarty-2.6.18.tar.gz
Replace 2.6.16 with whatever version is the latest at the time
Create the required Smarty directory in the php shared root directory by running
mkdir /usr/share/php5/Smarty
Lastly copy the Smarty library files into the directory you just created by running:
cd ~/Desktop/Smarty-2.6.18cp -r ./libs/* /usr/share/php5/Smarty
Lastly the Apache web server will need to be started during system boot, so run YaST, select System from the left window pane then System Services (Runlevel) from the right window pane, select the apache2 service then click Enable and click OK and Finish.
Page 36 of 96
Maia Mailguard installation“Maia Mailguard is a web-based interface and management system for the popular amavisd-new e-mail scanner and
SpamAssassin. Written in Perl and PHP, Maia Mailguard gives end-users control over how their mail is processed by virus scanners and spam filters, while giving mail administrators the power to configure site-wide defaults and limits.”
Quoted from the Maia Mailguard web site athttp://www.maiamailguard.com
This is the last stretch so hang in there! The web front end management to your e-mail scanning gateway.I'm only covering the basic functionality of Maia Mailguard here. To read up in detail, check the Maia Mailguard web site.
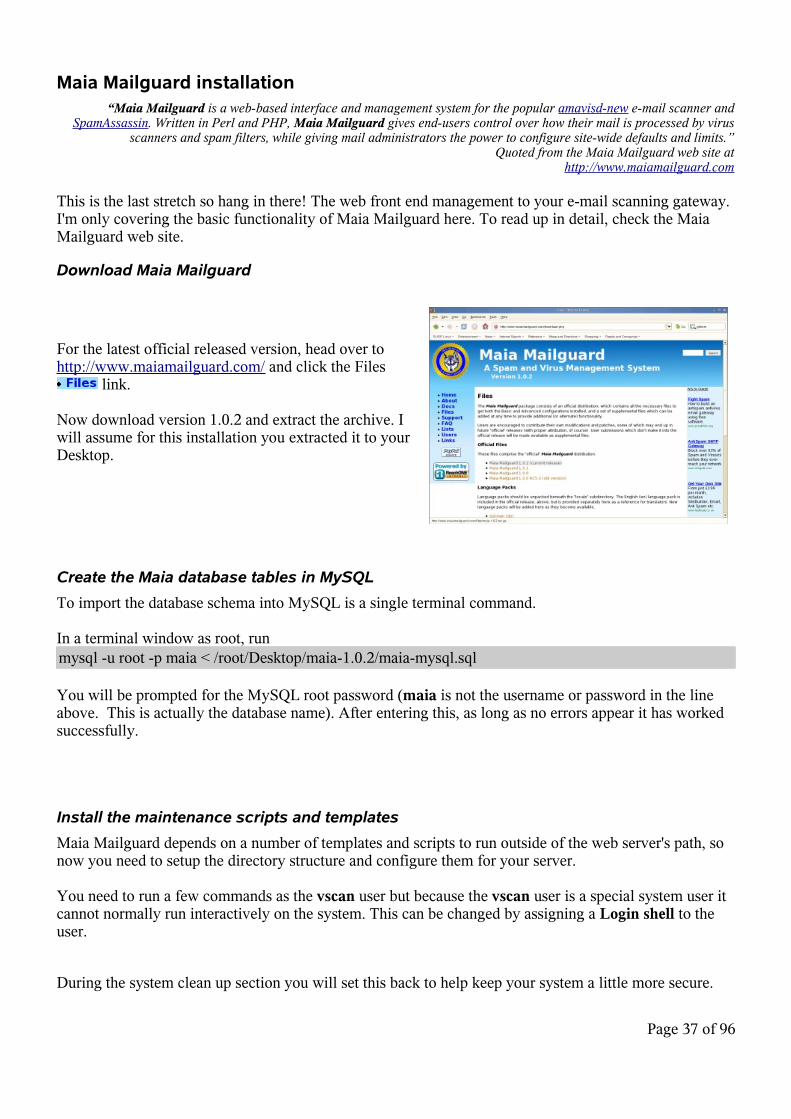
Download Maia Mailguard
For the latest official released version, head over to http://www.maiamailguard.com/ and click the Files
link.
Now download version 1.0.2 and extract the archive. I will assume for this installation you extracted it to your Desktop.
Create the Maia database tables in MySQL
To import the database schema into MySQL is a single terminal command.
In a terminal window as root, runmysql -u root -p maia < /root/Desktop/maia-1.0.2/maia-mysql.sql
You will be prompted for the MySQL root password (maia is not the username or password in the line above. This is actually the database name). After entering this, as long as no errors appear it has worked successfully.
Install the maintenance scripts and templates
Maia Mailguard depends on a number of templates and scripts to run outside of the web server's path, so now you need to setup the directory structure and configure them for your server.
You need to run a few commands as the vscan user but because the vscan user is a special system user it cannot normally run interactively on the system. This can be changed by assigning a Login shell to the user.
During the system clean up section you will set this back to help keep your system a little more secure.
Page 37 of 96
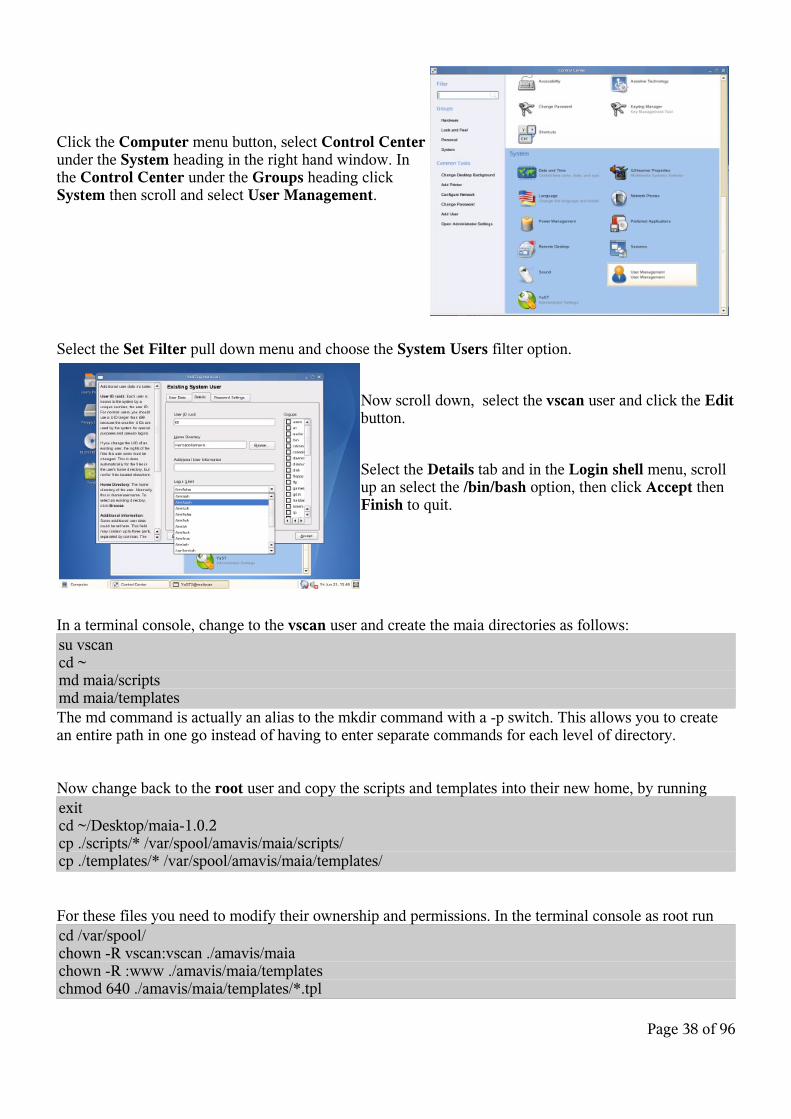
Click the Computer menu button, select Control Center under the System heading in the right hand window. In the Control Center under the Groups heading click System then scroll and select User Management.
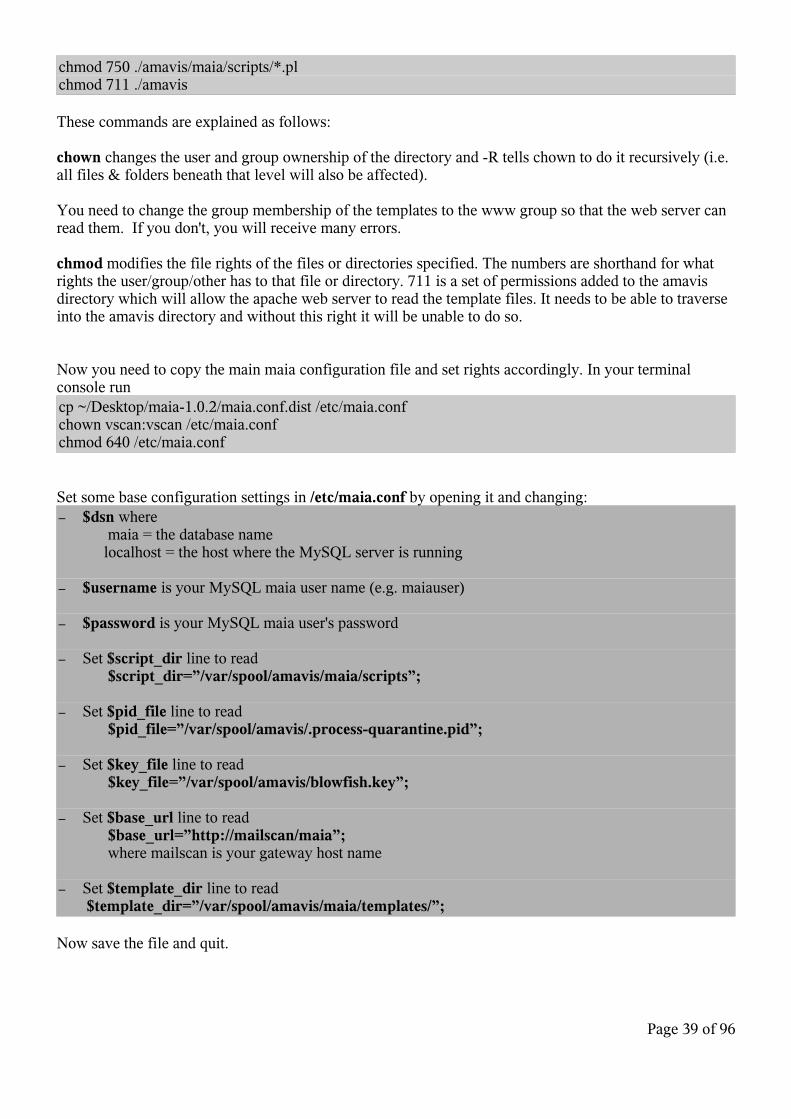
Select the Set Filter pull down menu and choose the System Users filter option.
Now scroll down, select the vscan user and click the Edit button.
Select the Details tab and in the Login shell menu, scroll up an select the /bin/bash option, then click Accept then Finish to quit.
In a terminal console, change to the vscan user and create the maia directories as follows:su vscancd ~md maia/scriptsmd maia/templatesThe md command is actually an alias to the mkdir command with a -p switch. This allows you to create an entire path in one go instead of having to enter separate commands for each level of directory.
Now change back to the root user and copy the scripts and templates into their new home, by runningexitcd ~/Desktop/maia-1.0.2cp ./scripts/* /var/spool/amavis/maia/scripts/cp ./templates/* /var/spool/amavis/maia/templates/
For these files you need to modify their ownership and permissions. In the terminal console as root runcd /var/spool/chown -R vscan:vscan ./amavis/maiachown -R :www ./amavis/maia/templateschmod 640 ./amavis/maia/templates/*.tpl
Page 38 of 96
chmod 750 ./amavis/maia/scripts/*.plchmod 711 ./amavis
These commands are explained as follows:
chown changes the user and group ownership of the directory and -R tells chown to do it recursively (i.e. all files & folders beneath that level will also be affected).
You need to change the group membership of the templates to the www group so that the web server can read them. If you don't, you will receive many errors.
chmod modifies the file rights of the files or directories specified. The numbers are shorthand for what rights the user/group/other has to that file or directory. 711 is a set of permissions added to the amavis directory which will allow the apache web server to read the template files. It needs to be able to traverse into the amavis directory and without this right it will be unable to do so.
Now you need to copy the main maia configuration file and set rights accordingly. In your terminal console runcp ~/Desktop/maia-1.0.2/maia.conf.dist /etc/maia.confchown vscan:vscan /etc/maia.confchmod 640 /etc/maia.conf
Set some base configuration settings in /etc/maia.conf by opening it and changing:– $dsn where
maia = the database name localhost = the host where the MySQL server is running
– $username is your MySQL maia user name (e.g. maiauser)
– $password is your MySQL maia user's password
– Set $script_dir line to read $script_dir=”/var/spool/amavis/maia/scripts”;
– Set $pid_file line to read $pid_file=”/var/spool/amavis/.process-quarantine.pid”;
– Set $key_file line to read $key_file=”/var/spool/amavis/blowfish.key”;
– Set $base_url line to read $base_url=”http://mailscan/maia”; where mailscan is your gateway host name
– Set $template_dir line to read $template_dir=”/var/spool/amavis/maia/templates/”;
Now save the file and quit.
Page 39 of 96
Test dependencies for amavisd-maia and SA
As the root user, in a terminal console run
/var/spool/amavis/maia/scripts/configtest.pl
If you're lucky (and followed these instructions exactly) everything except DBD::Pg and Mail::DomainKeys will return a result of passed or OK.
The DBD::Pg test is only applicable if you are using a PostgreSQL database server, which you aren't if you've followed my instructions, and Mail::DomainKeys is simply the older version of Mail::DKIM which configtest.pl hasn't been updated for yet.
If any modules are listed as UPGRADE RECOMMENDED, it's your choice to upgrade them, but remember that SLES online updates may overwrite those updates in the future, as the SLES versions of those packages have been installed via YaST.
Install the PHP scripts
Copy the website php files to a location on your web server document root and set appropriate permissions.
For this guide we will copy them to /srv/www/hthocs/maia so the full URL address for internal users to access this website will be http://mailscan/maia You could alternatively just place them in the /htdocs/ directory to reduce the path by a few more letters.
In your terminal console as the root user, run
mkdir /srv/www/htdocs/maiacp -r /root/Desktop/maia-1.0.2/php/* /srv/www/htdocs/maiachgrp vscan /srv/www/htdocs/maia/themes/*/compiledchmod 775 /srv/www/htdocs/maia/themes/*/compiledusermod -G vscan wwwrun
Lastly re-start apache to pick up the group changes by running
/etc/init.d/apache2 restart
Configure the PHP website
You now need to make a couple of modifications to the website configuration file, to tell it where the database is and the type of authentication into Maia Mailguard you want to use.
First rename the template configuration file by running
cd /srv/www/htdocs/maiamv ./config.php.dist ./config.php
Open the file /srv/www/htdocs/maia/config.php
Scroll down to the $maia_sql_dsn line and change amavis to your database username and change passwd to your database user's password, so that it looks something like:
$maia_sql_dsn = "mysql://maiauser:password@tcp(localhost:3306)/maia";
Page 40 of 96
Also if you choose to enable pie graph charts on the statistics pages (more on that later), the default graphing font is a less than ideal, so to improve it you can specify your own by scrolling down a little more to the $chart_font=''; section and change it to look like:
$chart_font='VeraBd';
The font specified can be any truetype font on your system. With no path specified PHP will look in /usr/X11R6/lib/X11/fonts/truetype/ and will also assume a .ttf extension. If the truetype font you want to use is installed elsewhere on your system, you will need to explicitly specify it here. For example to explicitly specify the VeraBd font it would look like:
$chart_font=”/usr/X11R6/lib/X11/fonts/truetype/VeraBd.ttf';
One last note on fonts is that if you already have a valid Windows license, you are allowed to use any truetype font on that windows system as well, by copying them from the C:\Windows\Fonts directory.
Save the file and exit.
In this example we are going to be using Internal authentication, meaning users will be setup for authentication against the Maia database, although you can configure it for LDAP v2/3, Exchange 5.5 (experimental), POP3, IMAP or SQL (another SQL database) authentication. Read the Maia Mailguard installation notes on their website for more information on extending this functionality.
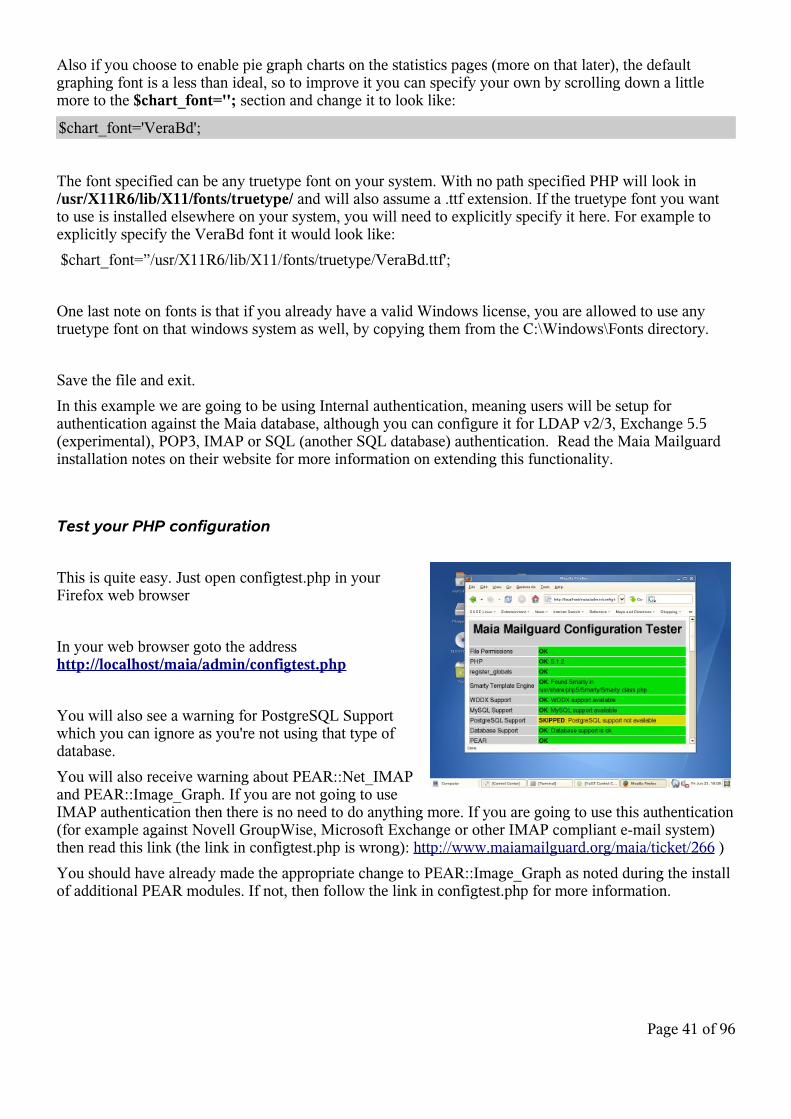
Test your PHP configuration
This is quite easy. Just open configtest.php in your Firefox web browser
In your web browser goto the address http://localhost/maia/admin/configtest.php
You will also see a warning for PostgreSQL Support which you can ignore as you're not using that type of database.
You will also receive warning about PEAR::Net_IMAP and PEAR::Image_Graph. If you are not going to use IMAP authentication then there is no need to do anything more. If you are going to use this authentication (for example against Novell GroupWise, Microsoft Exchange or other IMAP compliant e-mail system) then read this link (the link in configtest.php is wrong): http://www.maiamailguard.org/maia/ticket/266 )
You should have already made the appropriate change to PEAR::Image_Graph as noted during the install of additional PEAR modules. If not, then follow the link in configtest.php for more information.
Page 41 of 96

Replace amavisd-new with a maia patched version
You need to replace both the executable and configuration file.
To start the change, shutdown amavisd from the console..
/etc/init.d/amavis stop
Rename the original executable version of amavis by running
mv /usr/sbin/amavisd /usr/sbin/amavisd-orig
Now copy the new version over using the same name as the original by running
cp ~/Desktop/maia-1.0.2/amavisd-maia /usr/sbin/amavisd
To replace the SuSE default amavisd configuration file, copy the maia version over:
mv /etc/amavisd.conf /etc/amavisd.conf.origcp ~/Desktop/maia-1.0.2/amavisd.conf.dist /etc/amavisd.conf
The following configuration changes to the amavisd.conf file are only a starting point. Re-visit this file to see what else may be of use in the future.
In a text editor open /etc/amavisd.conf
Scroll down the file and check/change the following:
Change the $daemon_user and $daemon_group to the user/group that will run amavisd, so that it looks like:
$daemon_user = 'vscan';$daemon_group = 'vscan';
Change $mydomain to your e-mail domain name, so that it looks similar to:
$mydomain = 'retnet.co.uk';
To support multiple domains, read the Supporting Multiple E-mail Domains section in the Tweaks and Tightening section towards the end of the guide.
Set the $MYHOME variable to the vscan home directory, so that it looks like:
$MYHOME = '/var/spool/amavis';
Change the $keyfile line to read
$key_file=$MYHOME/blowfish.key
Page 42 of 96
Scroll down to the $log_level line. You will want to increase the log verbosity for testing purposes, so change the default setting of 0 up to 2. Once you're done testing, decrease it down to 2. The level of 2 will show all scores for each test that matched each e-mail which will be very handy in troubleshooting scores of e-mails that either pass through or get caught.. and you will get these requests.
$log_level = 2;
Change amavisd-maia logging to use SYSLOG instead of a static log file (using SYSLOG will add entries to the /var/log/mail log which will also automatically rotate the logs for you so you never (or at least a lot less regularly) have to maintain them.)
$DO_SYSLOG = 1;
Scroll down a little further and make sure SpamAssassin network tests are enabled, by checking that $sa_local_tests is set to zero (it should be by default)
$sa_local_tests_only = 0;
Scroll down a couple of lines further and change amavis and password to whatever you are going to setup in MySQL for the username/password combination in MySQL which is setup in the next section:
@lookup_sql_dsn = (['DBI:mysql:maia:localhost, 'user', 'password'] );
Scroll down to the $virus_admin option. I choose not to send e-mail notification of spam or viruses to an admin, as there's too much spam to contemplate sending notifications for those, and most viruses are sent from computers infected with mass mailing worms or viruses of their own.
I suggest you put a comment, (#) hash symbol, in front of the $virus_admin option so that it looks like
#$virus_admin= “virusadmin\@mydomain”;
However if you do want these notifications, change virusadmin to your own name, and enjoy the extra mail!
Just below these lines, comment out all the @addr_extension lines. These lines are used for what's called 'plus addressing'. When these options are enabled, if spam and/or viruses are configured to be passed through the system (and usually tagged to identify them as spam/virus), amavisd-maia will add the suffix as defined by the options to the user's name e.g. [email protected].
E-mail servers that recognise this form of addressing will automatically place the e-mail in a sub folder of the same name in the users mailbox (wouldn't it be nice if most well known commercial systems handled this!), but most don't and simply bounce the message as they see the address extension as a literal part of the user's name.
Make the lines look like:
#@addr_extension_virus_maps#@addr_extension_spam_maps#@addr_extension_banned_maps#@addr_extension_bad_header_maps
Set your gateway hostname by changing $myhosname to look like
Page 43 of 96

$myhostname = 'mailscan.retnet.co.uk'; # must be a fully-qualified domain name!
Find the anti-virus section starting with:
['ClamAV-clamd',
and change the \&ask_daemon line, so that the lot looks like:
['ClamAV-clamd', \&ask_daemon, ["CONTSCAN {}\n", "127.0.0.1:3310"], qr/\bOK$/, qr/\bFOUND$/, qr/^.*?: (?!Infected Archive)(.*) FOUND$/ ],
Save and close the file.
Now to make a directory for amavisd-maia run as root
su vscancd ~mkdir var exit
Generate your encryption key
Maia can store e-mail in MySQL in encrypted form to protect sensitive e-mail from prying eyes. Although optional I think this should be mandatory considering the potential for abuse.
It uses 56-bit blowfish encryption so it's quite reasonably secure.
To create your key file, in a terminal window and as root (so run exit first) run
/var/spool/amavis/maia/scripts/generate-key.pl > /var/spool/amavis/blowfish.key
It's also good practice to keep a separate backup copy of this file in a safe place just in case something should happen to the original, as you'll need it to recover any e-mail in the database.
Now re-start the modified amavisd-maia service by running
/etc/init.d/amavis start
If all goes well you will see a green done notification.If you get a @decoders error, make sure you have downgraded the amavisd configuration file as I pointed in earlier in 'Setting up amavisd-new'.
Load SpamAssassin rules into Maia Mailguard
amavisd-maia will use SpamAssassin to perform spam checks on incoming e-mails and Maia Mailguard will read the e-mail headers that are added as a result.
Page 44 of 96

In Maia Mailguard you can see what rules were triggered and the score for each rule for an e-mail by opening that e-mail in the quarantined e-mail view (will only show basic text or html, and won't run anything so you can even view virus e-mails safely this way), or by checking the system wide SpamAssassin statistics page.
For Maia Mailguard to tally up what rules are being used and their associated scores, you will need to run a script to load those details into the MySQL database.
Open a terminal window and as root run the following command
/var/spool/amavis/maia/scripts/load-sa-rules.pl
It will display each rule as it find it.
IMPORTANT NOTE: Every time you add new SpamAssassin rules or change their associated scores you will need to re-run this script in order to update the Maia Mailguard database. If you don't, no harm will come of it, although you will not be able to see associated statistics of SpamAssassin rules and scores. You can alleviate some pain here by adding this script to a cron job for the root user to run say once per day, so even if you forget to run it yourself, the system will be automatically updated.
Page 45 of 96
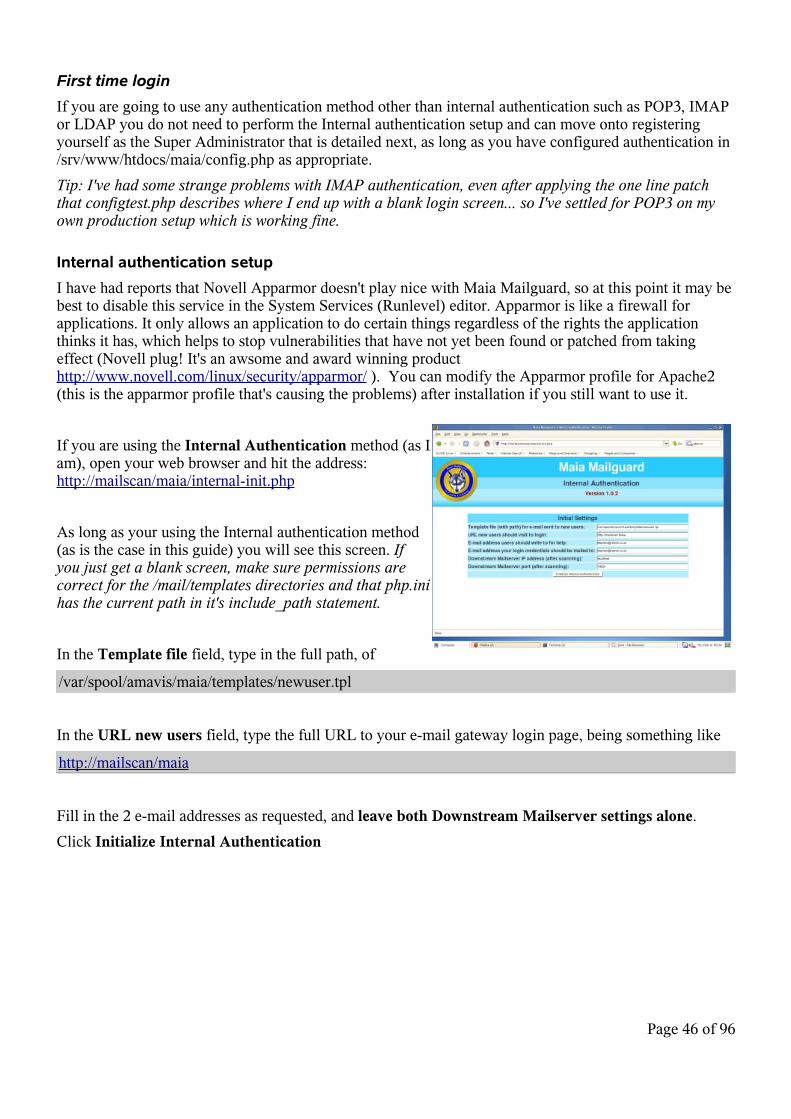
First time login
If you are going to use any authentication method other than internal authentication such as POP3, IMAP or LDAP you do not need to perform the Internal authentication setup and can move onto registering yourself as the Super Administrator that is detailed next, as long as you have configured authentication in /srv/www/htdocs/maia/config.php as appropriate.
Tip: I've had some strange problems with IMAP authentication, even after applying the one line patch that configtest.php describes where I end up with a blank login screen... so I've settled for POP3 on my own production setup which is working fine.
Internal authentication setup
I have had reports that Novell Apparmor doesn't play nice with Maia Mailguard, so at this point it may be best to disable this service in the System Services (Runlevel) editor. Apparmor is like a firewall for applications. It only allows an application to do certain things regardless of the rights the application thinks it has, which helps to stop vulnerabilities that have not yet been found or patched from taking effect (Novell plug! It's an awsome and award winning product http://www.novell.com/linux/security/apparmor/ ). You can modify the Apparmor profile for Apache2 (this is the apparmor profile that's causing the problems) after installation if you still want to use it.
If you are using the Internal Authentication method (as I am), open your web browser and hit the address: http://mailscan/maia/internal-init.php
As long as your using the Internal authentication method (as is the case in this guide) you will see this screen. If you just get a blank screen, make sure permissions are correct for the /mail/templates directories and that php.ini has the current path in it's include_path statement.
In the Template file field, type in the full path, of
/var/spool/amavis/maia/templates/newuser.tpl
In the URL new users field, type the full URL to your e-mail gateway login page, being something like
http://mailscan/maia
Fill in the 2 e-mail addresses as requested, and leave both Downstream Mailserver settings alone.
Click Initialize Internal Authentication
Page 46 of 96

You should at this point see an e-mail in your regular inbox. If not, there are 3 common reasons:
1) You typed in the wrong path to newuser.tpl in the internal-init.php file. This will be seen as “fopen” errors in a php error popup box in your web browser (or the apache2 error log file at /var/log/apache2/error_log)
2) Permissions are not correctly set on the template directory so that the wwwrun user that Apache2 runs as cannot read the newuser.tpl file (will be seen as “fopen” errors in the Apache2 error log file)
3) Postfix is not set correctly to relay for your domain in /etc/postfix/main.cf. The most common
error I've seen is there should not be an @ symbol in the relay_domains option.
Note down the user name and password from the e-mail.
Super administrator registration
Now that you have created an account with Maia Mailguard you need to register yourself as the super administrator, so log in via the web page:
http://mailscan/mail/login.php?super=register
Once logged in, you'll be at your personal Welcome page.
You can also unregister yourself at any time by using login.php?super=unregister
If someone else tries to use the super=register command after a super administrator has already been assigned they will simply be redirected to the normal login page.
A new super administrator can only be set if there are no current super administrators defined (i.e. The last super admin ran the super=unregister command).
The settings you see on this screen are for your own personal account, as denoted by the User tag under the Welcome title at the top. When changing domain defaults, system defaults or another users settings, the User: tag will display the appropriate object name so you know who you are changing settings for.
The Current protection level setting is a predefined set of options for what checks take place and at what score e-mail is considered spam. These are configured in /srv/www/htdocs/mail/config.php under the //Default Protection Level section and the default settings are:
Off – No scanning at all occurs (default)
Low – Virus protection only
Medium – spam is marked at a score of 5 but not quarantined, all attachment types and e-mails with bad
Page 47 of 96

SMTP headers are allowed
High – E-mails are tagged with spam scoring information at a score of 1 and quarantined at a score of 5, all attachments types, bad headers and viruses are quarantined.
For testing purposes you will be creating custom protection settings, so for the moment the Current Protection Level area won't apply. After testing, set the protection levels how you see fit, then use the predefined protection level for all users for easier day-to-day use. For a full explanation of how to configure these settings, refer to the Maia Mailguard installation documentation at http://www.maiamailguard.com
The Cache Contents area is a quick view of how many e-mails are currently quarantined in your cache and at the bottom of the screen are some quick overall stats on how many spam and viruses have been caught for yourself and the entire system.
It generally makes sense to setup the overall site configuration settings first, so click the key icon to enter the administrator section of the site then the System Configuration link.
Of course you can change anything you like in here, but to start with it's best to leave most at their default until after you've read the associated help – click on the ? symbol next to each item for an explanation.
The first option, Enable auto-creation of user accounts? can be either a major headache or an administrative life saver.
Leaving it set to No means an administrator will need to create each user account on the system manually.
Changing to Yes will enable Maia Mailguard to automatically create a user account the first time an e-mail is sent to a user of any configured domains. If your postfix installation does not verify the recipient names are valid e-mail addresses, this can create potentially thousands of dummy accounts, usually caused by spam dictionary attacks. Information on configuring postfix to perform recipient verification is available in the Tweaks and Tightening section.
The Mail size limit is of particular note as mail size settings can be configured in postfix, SpamAssassin, Maia Mailguard and MySQL, all of which have different affects on the system.
The size description here in the System Configuration page relates to the mail size in raw (encoded) format which is 1 MB by default, so if the e-mail has binary attachments, then the 'human readable' limit is somewhere around 700 - 750kB in binary form, due to the way binary attachments are encoded for SMTP delivery.
The setting relates to the upper size limit of e-mails that Maia Mailguard will perform content-filter checking on. Note that the MySQL max_allowed_packet setting in /etc/my.cnf must be set to AT LEAST the same value as the Maia Mailguard Mail size limit. If the MySQL size setting is smaller than set here in Maia Mailguard, Maia will fail to quarantine e-mail between the MySQL size and the Mail size limit resulting in banned file types just going straight through, which you will never want.
Page 48 of 96

If you want to automatically trust any e-mails that are larger than this, change the Oversized items should be option to accept.
To keep things simple, it's generally a good idea to set the Oversized items should be setting to reject, and keep the Mail size limit (note the postfix default is 10Mb, while in Maia it's 1Mb) the same in Maia Mailguard and MySQL as it is in postfix.
Leave it as is for the moment, as we will do an e-mail size test later where this will be changed.
A quick jump from the current setup of Maia Mailguard if you want to increase the mail size limit from the postfix default of 10Mb:
If you do this, you need to edit the postfix configuration file /etc/sysconfig/postfix and change the setting POSTFIX_ADD_MESSAGE_SIZE_LIMIT=”10240000” to the number of bytes for your upper mail size limit. After this, you'll need to open a terminal console and run SuSEconfig to update the postfix configuration. Then in Maia Mailguard, change the Mail size limit setting to be the same. And lastly change the MySQL setting if you want the option of quarantining these.
Lastly on e-mail sizes is a note on SpamAssassin. It will by default only scan for spam in e-mails up to 250Kb in size. The thinking by the Apache group who develop SA is that no spammer in their right mind would send e-mails larger than this, else it would end up costing the spammer too much money to send the e-mails out. To date I've never seen a spam e-mail over 20Kb in size, including those with embedded graphics, so you're fairly safe with this default setting.
Moving on, scroll down and add the full path to the Encryption key file (optional): field to read
/var/spool/amavis/blowfish.key
In the following section Cache Expiry & Quarantine Reminders change the E-mail reminder template file: setting to be the full path of the file, like
/var/spool/amavis/maia/templates/reminder.tpl
You need to do this else Maia Mailguard won't find the template when it tries to e-mail end users to remind them to confirm their spam and non-spam (clean mail). You can also customise the reminder template, which is covered in the Maia Mailguard installation guide at http://www.maiamailguard.com/maia/wiki/Install under section 18. Customise the e-mail templates.
For this guide you won't be setting up per-user settings, thus negating the need for sending reminders but at least this setting is now correct if you ever decide to use it.
The Display and Virus Information sections are pretty self explanatory, although it's worth noting there are license restrictions on how much you can change the display without having to pay the author which allows you to remove all traces of the Maia Mailguard logo from the site. Read the license note at http://www.maiamailguard.com/rebranding-license.php
Bandwidth Accounting lets you see how much your e-mail is really costing you on average per day. Enter your currency symbol and the cost per gigabyte that your bandwidth costs. If you have a leased line and pay for truly unlimited bandwidth, see if you can get some accounting info on cost and bandwidth
Page 49 of 96
utilisation statistics from your ISP to help you calculate a value.
Site Statistics Reporting is a nice way of letting the people who develop Maia Mailguard know how well it's working in real life at other sites. No actual e-mail content is sent, protecting your privacy. If you're interested in joining in, you'll need a Maia ReporterID which you can read about by clicking the ? against the Your site's Maia Reporter ID: field.
The Charts section will allow the display of graphs representing the statistics it accumulates.
Change this to Yes if you want users to have the ability to see these charts.
Users, including yourself will also need to set the miscellaneous personal setting 'Display Graphical Charts?' to Yes – This is explained in the next section.
To access site wide statistics (normally you only see your own), at the Statistics page click the View Systemwide Statistics link at the bottom of the page.
To finish scroll to the bottom and click Update Settings.
With the base configuration out of the way you need to understand the different levels of settings in Maia Mailguard, which are:
– Domain: System Default (@.)
– System Default User (@.)
– Domain defaults (e.g. retnet.co.uk), and
– User defaults (e.g. [email protected]).
Any domain defaults will override the system default settings and any user defaults will override the system default user and both the domain and system defaults.
E-mail for domains that are relayed by the gateway but not specified in Maia Mailguard will be scanned based on the Domain: System Default (@.) settings.
This means as an administrator although you set up the defaults, a user with a Maia account can override settings for their own e-mail needs, for example by decreasing the score threshold for spam or disabling virus checking altogether (although these options can be disabled by the admin as well so end users cannot change them).
To make administration easier, when you create a new domain, it will automatically take it's settings from the System Default @ settings, so makes it easier to setup additional domains ('that's not how I feel right now!' I hear you say...) you should configure the Domain: System Default @ settings.
Click the key icon then select the Domains link then the System Default @. link to open the default domain properties page.
By default no virus or spam scanning takes place, so you should probably change these.
In the Virus Scanning field, change it to Enabled and in the Detected viruses should be field select
Page 50 of 96

Quarantined. This will let you rescue an e-mail caught with a virus if you need to.
In the spam Filtering field, change it to Enabled and in the Detected spam should be field select Quarantine. By quarantining spam you can recover false positives and can also confirm the e-mails as spam which makes the Maia statistics page more accurate.
There's no real need to prefix the subject of spam if you're quarantining it, so leave this set to No.
At the Add X-spam: Headers when Score is >= field, change it to -999 This will mean all incoming e-mail will have headers added to them which will help you identify why certain e-mail was or was not identified as spam.
At the Consider mail 'spam' when Score is >= field, change it to 5 This is the SpamAssassin default value and is a reliable setting for me. After some time you may find that some spam e-mails are sneaking in just under the 5.0 score limit, at which point you may decide to reduce this value, but for the time being, I'd suggest 5 is a good start.
The Quarantine spam when Score is >= value is only used when spam is labeled and passed through instead of quarantined. The idea here is that if a spam e-mail registers a high enough score, then don't send it through to the end user and automatically consider it spam. If you choose to quarantine spam anyway, this setting is irrelevant and you can leave it.
Change the Attachment Type Filtering to Enabled and set it's action to Quarantined.
Leave Bad Header Filtering disabled to start with. There are enough 'legitimate' e-mail servers and mailing list systems that don't format their message headers correctly which trigger against this option that users will complain and it will only be a pain for you to manage.
To properly train SpamAssassin and produce accurate statistics in Maia, you should change the Should non-spam items be cached? to Yes. This allows Maia Mailguard to train SpamAssassin on what is clean e-mail which will over time help your system become more accurate. If you don't, the SpamAssassin database will become biased towards spam and you will get more falsely caught spam than you would otherwise.
It also is a good way of identifying spam that passes through. By telling Maia Mailguard an e-mail it thinks is non-spam is actually spam, it helps it to report this to SpamAssassin which will learn to identify that and similar e-mails in future as spam.
Click the Update This Domain's Defaults button.
To create your own domain in Maia Mailguard, click the key icon then the domains link again.
In the Add Domain section, in the New domain: field enter in your own domain name such as:
@example.com
Page 51 of 96

then click the Add Domain button.
Because you've already configured the System Default (@). domain, your new domain will automatically be created with those defaults. Note if you change the system defaults, this will not change your domain settings, as it will only take affect on newly created domains.
If you want to let e-mail pass through for all domains without scanning apart from those you configure in Maia Mailguard, change the System Default(@) domain to turn off all scanning.
Now that you've configured the domain settings you should set the default user settings.
To change the default user settings, you edit the configuration for the System Default User (@.) by clicking the key icon, selecting the Users link, clicking the Find Users button then selecting the @. user.
You will now see under the Welcome sign the user you are impersonating, being System Default User (@.). As an administrator, impersonating users is how you can change their settings and manage their e-mail cache (confirm spam, clean e-mail etc). You set set a setting in the System Configuration page to also deny administrators from reading user's e-mail thereby protecting peoples privacy.
Click the Cog menu button and change any miscellaneous settings as you wish. The settings you enter here will be used as defaults for all new users that are created within Maia.
The Email Digest interval? setting is a particularly nice option.
Instead of users having to log into the Maia Mailguard page to confirm their e-mail, they can be sent a digest of all unconfirmed items by e-mail, with single click links to help ease end-user management. The setting here is in minutes but for your users sanity I would suggest you set it to 1440 which equates to once per day. A scheduled cron job will run and check if a user is due a new digest and send one when the necessary time has elapsed. The e-mail that is sent can be configured to your liking. Refer to the Maia Mailguard installation notes for more information.
Click the Update Miscellaneous Settings button to save your changes.
Now although you've created the System Default (@.) and @retnet.co.uk settings, you should check and change your own personal user before testing.
This is because although you have setup all the necessary defaults, your own account was created before you changed anything so your current settings are based on the Maia Mailguard defaults so no scanning or graphs of any sort will be done. This is deliberate on the authors part, to make the initial setup transparent as possible to your e-mail system.
To change your own settings you need to revert back to your own user so just click on the Key icon again. This will change your current user back to yourself, which you can see from the user that's identified above the menu icons. Now click the Cog icon, then your Primary Address link, which takes you to your user specific scan settings.
To keep it all uniform I suggest you start with the same settings as in the domain defaults. Set them up then click the Update This Addresses' Settings button at the bottom of the page.
Now scroll down your Mail Filter Settings page and set the same Miscellaneous Settings that you did
Page 52 of 96

previously and click the Update Miscellaneous Settings button.
Scheduling the maintenance scripts
Scripts need to be run by both the vscan and root users so to schedule these, open a terminal console, and as root open the crontab editor by running:
crontab -u vscan -e
The crontab utility uses a basic text editor called vi, which although very powerful, is also quite difficult to get a handle on, so I'm only going to point out how to do the bare minimum.
When vi starts up, you will see a blank page. To start typing text into it you need to press the letter i which is the command for INSERT. When you press i, you will see --- INSERT --- displayed at the bottom of the screen.
If you make a mistake, the backspace key may not work. Move to the start of the mistake and use the Delete key instead.
The command syntax for cron is:
[minute] [hour] [day of month] [month] [day of week] [command]
You can use star * which means 'any', so a * in the minute column would mean that particular task will run every minute.
You can also divide time using /x where x is the divider, so for example if you wanted something to run every 15 minutes, you could type */15 in the minute column.
In the day of week column you can represent days using their first 3 letters.
Enough of that detour for now. If you are interested, you can find out a lot more about cron at http://www.unixgeeks.org/security/newbie/unix/cron-1.html
A quick overview as to the scripts you will configure for scheduling and why:
expire-quarantine-cache.pl is used to help you automatically manage your maia database. If left all on it's own the database would very quickly fill up your entire hard disk. This script deletes e-mail that has been around for too long (5 days for non-spam, 30 days for spam by default) which is configurable in the Maia Admin settings.
process-quarantine.pl is used on e-mail that you have confirmed in Maia Mailguard as non-spam or spam. This script can tell SpamAssassin to learn from the e-mail you've confirmed so it will become more accurate the longer you use it. If an identical e-mail has previously been learned as spam or non-spam it will not learn it again, so you may find that although there were 1000 spam e-mails processed, only 400 were learned... this is nothing to worry about. You can also configure if the scripts reports identified spam to external entities such as spamcop, DCC, razor etc. By default it won't.
send-quarantine-digests.pl sends a digest of all quarantined e-mails to your users. You can configure the sorting of the lists by changing the necessary values within this script. To actually send digests, the user needs to have their personal setting option E-mail digest Interval? set to at least 1. A value of 0 or less disables it. This script needs to run every minute as the configurable digest interval is also in minutes.
Page 53 of 96

There could be confusion if for example a user is configured to receive digests twice a day but you only run the script once per day...
You could also just tell your users they will get it once/twice per day if they set it to 1, then you can control the frequency using cron.
send-quarantine-reminders.pl is used when you have delegated spam/non-spam management to the end users themselves. This can potentially save you as an administrator a lot of time. If users become careless and don't confirm their e-mail, this script will send them a gentle reminder.
stats-snapshot.pl updates the maia database with e-mail statistics which you can use by pulling the data from the maia database directly, as trend graphing functions are not currently available within Maia Mailguard (although current statistical graphs are).
Now moving on, back in your terminal console you should be in insert mode, so type in the following:
#[min] [hr] [dom] [mon] [dow] [command]
# Train SpamAssassin with confirmed spam/non-spam and report known spam0 * * * * /var/spool/amavis/maia/scripts/process-quarantine.pl --learn --report
# Take a snapshot of the stats table at the start of every hour0 * * * * /var/spool/amavis/maia/scripts/stats-snapshot.pl
# Purge quarantined mail that has not been confirmed0 23 * * * /var/spool/amavis/maia/scripts/expire-quarantine-cache.pl
# Send quarantine reminders to neglectful users30 1 * * sun /var/spool/amavis/maia/scripts/send-quarantine-reminders.pl
# Send quarantine digests* * * * * /var/spool/amavis/maia/scripts/send-quarantine-digests.pl
To save the file and exit, press the [ESC] key then type
:wq
then press [Enter]
Pressing the ESC key puts you in 'command' mode. You will see the ---INSERT--- tag disappear when you do this. The :wq command tells vi to write the file and quit. You don't need to specify a filename because the crontab program did that for you.
Be aware the cron scheduler will e-mail the user of any output that these scripts create, in this case being the vscan user. These can be handy for some troubleshooting and ensuring the maintenance scripts are running correctly.
If you would like to receive these e-mails, you need to add an e-mail Alias in postfix via YaST for the root user, on the Incoming Mail screen, which is explained in the Configure Postfix section.
Configure SpamAssassin and SARE ruleset updates
The SARE rulesets are additional rules that I consider a must and not an optional add-on for SA to effectively fight spam.
Now edit the crontab for root by running
Page 54 of 96
crontab -e
In root's crontab create the following job to update SpamAssassin rules daily.
#[min] [hr] [dom] [mon] [dow] [command]
# Check for updates to the core SA rulesets at 3am daily# If new rules are found we also have to update MM and re-start amavisd0 3 * * * sa-update && sa-update --gpgkey D1C035168C1EBC08464946DA258CDB3ABDE9DC10 --channel saupdates.openprotect.com && sa-compile && /var/spool/amavis/maia/scripts/load-sa-rules.pl && /etc/init.d/amavis restart
The above command under the comments is all on a single line.
Exit and save the file.
This job performs ffive different tasks:
1) Updates SpamAssassin's default rulesets
2) Update SA with additional SARE rulesets. Read http://saupdates.openprotect.com/ for more information.
3) Compiles the rulesets into more efficient code for SpamAssassin to use
4) Updates the Maia Mailguard database with any changed rule scores or new rules. For Maia this is only used for reporting purposes and does not affect the actual SA scanning if the Maia database and the SA rulesets are out of sync, although running this command in-line with sa-update ensures they do stay in sync.
5) Restart amavis, which loads SpamAssassin. This causes SA to be reloaded, at which time it will read in any changed or new rules.
To be able to download updated rules from the Apache SpamAssassin website we now need to import their gpg key by creating the sa-update keys directory and set appropriate permissions from a console with:
mkdir /etc/mail/spamassassin/sa-update-keyschmod 0700 /etc/mail/spamassassin/sa-update-keyscd ~wget http://spamassassin.apache.org/updates/GPG.KEYsa-update --import GPG.KEY
To be able to download and use the SARE rulesets, you must also perform the following instructions that have been taken from the http://saupdates.openprotect.com/ website, but first:
Follow the steps below to have our channel working on your mail server or any computer with SA > 3.0 installed on it.
• Have gnupg installed, if you wish to check the channel files against our signature. **Comment: If you are using SLES 10 or OpenSuSE 10.1 you already have this installed**
• Run the command gpg --keyserver pgp.mit.edu --recv-keys BDE9DC10 to import our public key from the mit keyserver. The output should look like:
gpg: requesting key BDE9DC10 from hkp server pgp.mit.edu gpg: key BDE9DC10: public key "Opencomputing Technologies (Key to sign all files from openprotect.com)
• Now, export our key alone from root's public key ring by running the command gpg --armor -o pub.gpg --export BDE9DC10
Page 55 of 96
The public key has been saved to the file pub.gpg now. • Import the public key into sa-update's trusted public keys by running
sa-update --import pub.gpg • Another way to import our public key is get the gpg file and import it manually using sa-update and gpg. The
commands are wget http://saupdates.openprotect.com/pub.gpg. Now, import by running the command sa-update --import pub.gpg which should return without any error or output messages. This isn't the preferred way, as the gpg file could be corrupted or tampered with, if our server is hacked.
• Now schedule daily downloads of rules from this channel using cron using the command sa-update --gpgkey D1C035168C1EBC08464946DA258CDB3ABDE9DC10 --channel saupdates.openprotect.com, where the 40 digit hex is our public key fingerprint and the channel is the URL from which to download the rules. The rules should be installed at /var/lib/spamassassin/ directory and SA will use all these rules by default.
To ensure it works, run the same command starting at the sa-update text in a terminal window.
Once that's done, remove the Maia Mailguard admin web directory for security reasons by running in your console
rm -rf /srv/www/htdocs/maia/admin
Extending SpamAssassin with extra tests and MySQL support
These section is absolutely required, but it's highly recommended. These additions will make you solution more efficient, faster and more reliable.
Setting up razor2 agents
“Vipul's Razor is a distributed, collaborative, spam detection and filtering network.Through user contribution, Razor establishes a distributed and constantly updating catalogue
of spam in propagation that is consulted by email clients to filter out known spam. Detection is done with statistical and randomized signatures that efficiently spot mutating spam content.
User input is validated through reputation assignments based on consensus on report and revoke assertions which in turn is used for computing confidence values associated with individual signatures.”
Quoted from Vipul's Razor web site athttp://razor.sourceforge.net
The razor client sends requests to public Razor servers on the Internet asking if an e-mail is known spam, by sending a special checksum of the e-mail it creates which guarantees it is unique to that e-mail (no e-mails are actually sent so your data is safe).
It sends these requests on outbound TCP port 2703, so your Internet firewall will need to let this out, and associated replies from your mail gateway.
Download the latest version of razor-agents-<version> by opening a web browser and going to http://razor.sourceforge.net . Select a mirror site to download from, then click Save to disk when prompted.
In a terminal window, extract the archive Note: Different options to the last time you ran tar
cd ~/Desktoptar -xjvf razor-agents-2.82.tar.bz2
Page 56 of 96
At the time of writing v2.82 is the latest, but if you see a different version just substitute 2.82 for whatever version you download.
Now compile and install the agents by running
cd razor-agents-2.82perl Makefile.PLmakemake testmake install
If installing on OpenSuSE 10.1, you may have to also install the cpan modules Time::HiRes and Digest::SHA1. Only do this if you receive errors while compiling or making the razor agents.
To configure razor2, you need to create some defaults and register it with the razor network using the razor-admin utility.
In the terminal console, switch to the vscan user and change into it's home directory by running
su vscancd ~
Create a default configuration for the vscan user by running
razor-admin -create
There is a space between admin and -create
You can see the directory and configuration files it created by listing files in the .razor directory. The period at the start of the directory makes it hidden so you won't see it by default.
Now register razor2 with the razor network.
You should first let razor discover publicly available servers, then register it. You can either let razor choose a user name and password for you, choose the user name but let razor generate a password or you can specify the lot.
As the vscan user, run
razor-admin -discoverrazor-admin -register
If you receive a 202 error while trying to register, try it a few more times and it should work. It's just a sign of busy servers.
You can specify a username and password if you like. Just add
-user=foo -pass=foopass
after the -register switch.
razor-admin will tell you if it was successful and where the identity information is stored.
Exit the vscan shell by running
Page 57 of 96

exit
Page 58 of 96
Install and setting up DCC
“The DCC or Distributed Checksum Clearinghouse is an anti-spam content filter. As of mid-2004, it involves millions of users, tens of thousands of clients and more than 250 servers collecting and
counting checksums related to more than 150 million mail messages on week days. The counts can be used by SMTP servers and mail user agents to detect and reject or filter spam or unsolicited
bulk mail. DCC servers exchange or "flood" common checksums. The checksums include values that are constant across common variations in bulk messages, including "personalizations."
The idea of the DCC is that if mail recipients could compare the mail they receive, they could recognize unsolicited bulk mail. A DCC server totals reports of checksums of messages from
clients and answers queries about the total counts for checksums of mail messages. A DCC client reports the checksums for a mail message to a server and is told the total number of recipients of
mail with each checksum.”
Quoted from the Distributed Checksum Clearinghouse websitehttp://www.rhyolite.com/anti-spam/dcc/
First a blurb... it's worth it.
The DCC software is actually a collection of both server and client based programs. You will be installing only one of the client programs as this installation isn't intended on reaching the sort of throughput that dictates you install your own DCC server (around 100,000 internet e-mails per day).
The DCC client works on a different method to razor in that it doesn't actually detect spam, but does a great job in detecting mass e-mails. The idea here is that spam needs to reach a massive audience to gain any tangible returns. The DCC client creates and sends a checksum of incoming e-mail to public DCC servers and checks how many identical e-mails have been seen by other DCC servers. Based on this information it can trigger DCC to mark it as a mass e-mail.
Unfortunately this also means some heavy mailing lists, such as SuSE and others may trigger DCC rules and add a score that will lean their total score towards spam. On the up side, the scores that are added are small enough that almost all of these will still pass through as long as they are properly addressed, have come from correctly configured e-mail servers and conform to correct Internet e-mail standards.
To overcome some clean e-mail that may be triggered, DCC also comes with a good out-of-the-box list of addresses that are known to send out legitimate mass e-mails and can be configured.
Before you start, you will need to allow outgoing packets on UDP port 6277 and inbound replies from UDP port 6277 on your firewall.
You will need to read your router/firewall manual for help if you don't know how to do this. The built in SuSE firewall will work with DCC without modification.
You will need to download the software from the Distributed Checksum Clearinghouse homepage at http://www.rhyolite.com/anti-spam/dcc/
click the hyperlink on the main page with the version (currently 1.3.55), select the Save to Disk option then click OK.
Now to extract the archive. In a terminal run
cd ~gunzip dcc.tar.Ztar -xvf dcc.tar
Page 59 of 96
You can now see a directory called dcc-1.3.55 by running ls (at the time of writing this. The version may differ slightly).
Change to the dcc-1.3.55 directory then run the configure script, by running
cd dcc-1.3.55./configure --disable-sys-inst --disable-dccm
As long as you don't see any error messages, all went well.
Now install dcc by running
make install
Again as long as no errors appear, it worked just fine.
DCC is now installed in /var/dcc. It's configuration file dcc_conf is in this directory, and all executables are in /var/dcc/libexec.
Now you need to tell DCC which components to run when it starts up.
Edit the DCC configuration file /var/dcc/dcc_conf
Scroll down the file and change the option
DCCIFD_ENABLE=off
to read
DCCIFD_ENABLE=on
Save and close the file.
Lastly you need to setup DCC to start automatically during system startup. To do this you will create a link in /etc/init.d to the startup file for the dccifd service so that you can control it using the YaST Runlevel Editor, then Enable the service.
In your terminal window run, exit the vscan user shell (if you have su'd to another user the console prompt will display user@host, so you know who you are running as) and create the link by running
cd /etc/init.dln -s /var/dcc/libexec/rcDCC
The ln command will create a link of the same name to the startup file rcDCC, in the current directory being /etc/init.d/
Now set the service to start automatically by starting YaST, going to System, System Services (Runlevel), scroll down to rcDCC and click Enable, then the OK button.
Page 60 of 96

You can see that although the status returned was success, in the Enabled column it still lists rcDCC as No. This is because the rcDCC startup script doesn't have information to tell YaST at what point during the system boot up it should start the service, which you will now do manually.
Click the Expert Mode radio button at the top of the screen, scroll down and highlight the rcDCC service, then select the 3 and 5 Runlevel check boxes.
Click Finish and Yes to save the changes. If you re-run the RunLevel Editor again you will now see a Yes in the Enabled column.
Lastly you should add a small scheduled job to clean up old dcc log files.
There is already a script to do this, so all that needs doing is to add a symbolic link to this file in cron's daily run directory.
In a console as root, run:
cd /etc/cron.dailyln -s /var/dcc/libexec/cron-dccd
Additional configuration of SpamAssassin
As SpamAssassin (SA) controls all spam scanning, running hundreds of tests, special attention needs to be taken in configuring this component and it's plugins.
File locations
All configuration files that will be relevant to the gateway are stored in /etc/mail/spamassassin
Although user specific options can also be set in each user's home directory (e.g. /var/spool/amavis/.spamassassin for the vscan user) you will be making all changes to the system-wide configuration files located in the /etc/mail/spamassassin directory.
SA uses a Bayesian database to 'learn' the difference between spam and clean e-mail for your company. By default this is a BerkeleyDB database file and is located in the user's ~/.spamassassin directory. You will move this into MySQL in this section, for improved performance and greater reliability.
Change settings in the standard local.cf configuration file
The default configuration file provided by SA is a little thin, so the guys at Renaissoft.com have put up on their website a sample configuration file pack full of goodies so you don't have to go through the hard slog they did in setting it up.
Open /etc/mail/spamassassin/local.cf then fire up a web browser and go to http://www.maiamailguard.com/maia/wiki/SAConfigFile
Copy & paste the sample file over the contents of the existing local.cf file you just opened.
Now change settings for the following lines:
Page 61 of 96

– Set bayes_store_module to Mail::SpamAssassin:BayesStore:MySQL
– Set bayes_sql_dsn the third part (maia) to whatever you have called your database name
– Set bayes_sql_username to your MySQL maia user name
– Set bayes_sql_password to your MySQL maia user's password
– Set bayes_sql_override_username to your MySQL maia user name (yes, again)
– Delete the line bayes_use_chi2_combining (Not necessary in SA v3.1.x)
– Set user_awl_dsn, sql_username and sql_password to same as equivalent bayes_* settings
– Comment out the trusted_networks aaa.bbb.ccc.ddd/ee line by adding a hash # to the start of the line
– Delete the use_razor2 line (This is also started as a plugin so no need for this line)
– Delete the use_dcc line. (This is also started as a plugin so no need for this line)
– Change the dcc_path variable to /usr/local/bin/dccproc
– Comment out all pyzor associated lines (We won't be using it, but you may want to install it later)
– Delete the ok_languages line and associated comments above it (This is a plugin now and started a different way)
Save the file (as /etc/mail/spamassassin/local.cf, overwriting the one already there)
Open /etc/mail/spamassassin/v310.pre
Enable the DCC plugin by removing the hash # comment from the start of the line
loadplugin Mail::SpamAssassin::Plugin::DCC
Add a comment hash (#) to the start of the pyzor line so it looks like
#loadplugin Mail::SpamAssassin::Plugin::Pyzor
Enable the Razor2 plugin by removing the hash # comment from the start of the line
loadplugin Mail::SpamAssassin::Plugin::Razor2
Under the experimental plugins section, add the line
loadplugin Mail::SpamAssassin::Plugin::DKIM
Save the file.
If you're curious, check out the other plugins that are disabled by default, but only uncomment them after at least running through this guide once as they may affect scoring and skew your results with ones performed here.
Page 62 of 96

Enabling an extra plugin - Country IP
SA comes out of the box with this plugin disabled by default as it cannot be sure that your system has the required dependencies installed. As you've already installed it during the initial perl module exercise you will now enable it to be used.
The blurb from the SA website regarding this plug-in reads
“The RelayCountry plugin exposes the countries that a mail was relayed from -- turn it on by reading that documentation page, installing the required
CPAN module IP::Country::Fast, and uncommenting the 'loadplugin' line in the
/etc/mail/spamassassin/init.pre file for Mail::SpamAssassin::Plugin::RelayCountry.
The RelayCountry plugin will add metadata to the Bayesian filtering process, allowing the Bayesian filters to learn information based on countries. “
Open /etc/mail/spamassassin/init.pre
Scroll down and remove the hash (#) symbol from the
loadplugin Mail::SpamAssassin::Plugin::RelayCountry
line.
Save and close all files.
So you've now told SpamAssassin to use a database for it's bayesian and automatic white list data, you need to configure the tables for it to use.
To download and install the database catalog schema files (templates used to create the databases, tables etc), in a terminal console as root, run
cd ~/Desktopwget http://spamassassin.apache.org/full/3.1.x/dist/sql/awl_mysql.sqlwget http://spamassassin.apache.org/full/3.1.x/dist/sql/bayes_mysql.sql
mysql -u root -p maia < awl_mysql.sqlmysql -u root -p maia < bayes_mysql.sql
Don't worry about errors regarding tables already existing. This is because the Maia Mailguard MySQL table setup already created them.
Quick test to see if SA is working
To check if SA's local.cf configuration file is formatted correctly, in a terminal console as root, run
spamassassin --lint
As long as you see no errors it worked fine. A warning about no user pref file being found is fine, as is a warning about the trusted network of 127.0.0.1/32 already being included (on the later, I search my whole PC and couldn't find any other mention of 127.0.0.1/32.. maybe it's included by default now? If someone knows please drop me a line).
Page 63 of 96

To test SpamAssassin against a sample spam message (contains a special string called the GTUBE test. Read more about this test at http://spamassassin.apache.org/gtube ), in the same console run
spamassassin --test < /usr/share/doc/packages/amavisd-new/test-messages/sample-spam-GTUBE-junk.txt
The command above should be typed all on a single line.
The e-mail message is displayed last in the test. Scroll up the console window too see the rules that were triggered and the score it got (against the Content analysis details:). In the case above it scored 1001.4 points.... well I think we can assume this test message as spam then!
FuzzyOCR image spam plug-in
Installing this plug-in will feel like quite a lot of pain, but due to the amount of image spam today I don't think you really have a choice but to do it, so now I've got that out of the way...
Some people believe image spam now accounts for about 30-50% of all spam. Although the system you've setup so far will reliably catch a lot of spam, it cannot read the text in embedded graphics so unless you ban embedded graphics altogether, quite a few image spam will still get through.
This is where the FuzzyOcr SpamAssassin plug-in steps in.
It reads the text from embedded graphics in e-mails then performs a spam test on that text, thereby closing a big hole in the spammers arsenal.
By now you won't be surprised with what I say next. To install this plugin you need to install a few more dependencies, and unfortunately SuSE don't provide most of them as rpm's but enough about that for now. Let's install it.
Giflib-progs
The only rpm that is available via YaST, this provides a collection of GIF manipulation programs that are used by the FuzzyOcr plug-in.
Start YaST, and in Software Management search for and install the giflib-progs package.
Once installed, click No to install any other packages.
Gifsicle
Quote from their website: Gifsicle is a UNIX command-line tool for creating, editing, and getting information about GIF images and animations.
Download and install by running:
cd ~/Desktopwget http://www.lcdf.org/gifsicle/gifsicle-1.46-1.i386.rpmrpm -i ./gifsicle-1.46-1.i386.rpm
Page 64 of 96
GNU Ocrad
Quote from their website: GNU Ocrad is an OCR (Optical Character Recognition) program based on a feature extraction method. It reads images in pbm (bitmap), pgm (greyscale) or ppm (color) formats and produces text in byte (8-bit) or UTF-8 formats.
To get and install the latest version at time of writing, run in a terminal:
cd ~/Desktopwget http://ftp.gnu.org/gnu/ocrad/ocrad-0.16.tar.bz2tar -xjvf ./ocrad-0.16.tar.bz2cd ocr-0.16.tar.bz2./configuremakemake install
GOCR
Using multiple OCR engines increases scanning reliability, so for a good 2nd scanner read on.
From the website: GOCR is an OCR (Optical Character Recognition) program, developed under the GNU Public License. It converts scanned images of text back to text files.
To download and install, run in a terminal:
cd ~/Desktopwget http://prdownloads.sourceforge.net/jocr/gocr-0.43.tar.gztar -xzvf ./gocr-0.43.tar.gzcd gocr-0.43./configuremakemake install
Perl Modules
A few perl module dependencies are now needed:
String::Approx module
From the website: Perl extension for approximate matching (fuzzy matching)
To download and install, run in a terminal:
cpan String::Approx
Perl Time::HiRes module
From the website: High resolution alarm, sleep, gettimeofday, interval timers
To download and install, run in a terminal:
cpan Time::HiRes
Page 65 of 96
Perl MLDBM modules
From the website: store multi-level hash structure in single level tied hash
To download and install, run in a terminal:
cpan MLDBMcpan MLDBM::Synccpan Log::Agent
Now finally for the FuzzyOCR install....
Download and install by running in a terminal window:
cd ~/Desktopwget http://users.own-hero.net/~decoder/fuzzyocr/fuzzyocr-3.5.1-devel.tar.gztar -zxvf ./fuzzyocr-3.5.1-devel.tar.gzcd FuzzyOcr-3.5.1mv ./FuzzyOcr /etc/mail/spamassassin/mv ./FuzzyOcr.cf /etc/mail/spamassassin/mv ./FuzzyOcr.scansets /etc/mail/spamassassin/mv ./FuzzyOcr.preps /etc/mail/spamassassin/mv ./FuzzyOcr.pm /etc/mail/spamassassin/mv ./FuzzyOcr.words /etc/mail/spamassassin/
To save it's findings for future use so that it doesn't have to scan the same image if it comes through again, I'm going to use their experimental MySQL support - it's been quite reliable for me. The biggest problem at the moment is there's no management tools available for their MySQL support yet, but I still prefer this method to reduce contention issues, similar to the problems using SpamAssassin with the db file method vs MySQL support. If you don't feel comfortable with using MySQL for FuzzyOcr that's fine. Just follow the installation instructions on their website on how to use their more mature db file method.
For the MySQL option, edit the configuration file /etc/mail/spamassassin/FuzzyOcr.cf and change the following:
Find focr_enable_image_hashing and remove the hash at the front of the line so it looks like:
focr_enable_image_hashing 3
Scroll down to the bunch of focr_mysql_ lines and change them to look as follows:
focr_mysql_db FuzzyOcrfocr_mysql_hash Hashfocr_mysql_safe safefocr_mysql_user maiauserfocr_mysql_pass maiapassfocr_mysql_host localhostfocr_mysql_port 3306#focr_mysql_socket /tmp/mysql.sock
For username and password use whatever you have already set for your Maia MySQL user. Be sure to leave the last line with a hash.
Save and close the file.
Page 66 of 96
Change a line in the mysql database creation script to give your MySQL maia user rights to the fuzzyocr database, by editing /root/Desktop/FuzzyOcr-3.5.1/FuzzyOcr.mysql then change the user name in the very last line of the file so that the line
ON FuzzyOcr.* TO fuzzyocr@localhost INDETIFIED BY 'fuzzyocr';
looks like
ON FuzzyOcr.* TO 'maiauser'@'localhost' INDETIFIED BY 'maiauser';
If you're MySQL database user exists on a different host to your Maia installation, substitute @'localhost' for whatever host (in IP or dns format) it exists on. And you must use the single quotes around both the username and the localhost host name like I have done else permissions will not be set correctly.
Now create the fuzzyocr database by running in a terminal:
mysql -u root -p < /root/Desktop/FuzzyOcr-3.5.1/FuzzyOcr.mysql
Enter your MySQL root user password then press Enter.
If you see no errors then it's worked fine.
Now to quickly test it. This isn't meant as a thorough test, but because FuzzyOcr is a little finicky to setup you should run this just make sure everything is as it should be.
You will run these tests as the vscan user so that user will need access to the test files. An easy way of doing this is to copy the files to the vscan home directory and change permissions on the files so the vscan user can use them.
Run each of the tests separately so you can verify the results, so to save time you can copy and paste the first 3 commands in one go...
In a terminal run
cp /root/FuzzyOcr-3.5.1/samples/*.eml /var/spool/amavis/chmod 777 /var/spool/amavis/*.emlsu -c "spamassassin --debug FuzzyOcr < /var/spool/amavis/ocr-gif.eml > /dev/null" vscan
su -c "spamassassin --debug FuzzyOcr < /var/spool/amavis/ocr-jpg.eml > /dev/null" vscan
su -c "spamassassin --debug FuzzyOcr < /var/spool/amavis/ocr-multi.eml > /dev/null" vscan
su -c "spamassassin --debug FuzzyOcr < /var/spool/amavis/ocr-obfuscated.eml > /dev/null" vscan
su -c "spamassassin --debug FuzzyOcr < /var/spool/amavis/ocr-png.eml > /dev/null" vscan
su -c "spamassassin --debug FuzzyOcr < /var/spool/amavis/ocr-wrongext.eml > /dev/null" vscan
su -c "spamassassin --debug FuzzyOcr < /var/spool/amavis/ocr-animated.eml > /dev/null" vscan
You will probably notice an [info] line like:
[12869] info: FuzzyOcr: Importing for MLDBM databases not available (dependencies missing)
Page 67 of 96
From my research I can't see that this is a problem so you can fairly safely ignore this (although I'm happy to be corrected).
In the output you are looking for primarily any database connection errors, or errors regarding paths etc.
On mine, I get 2 warnings for a couple of utilities that are only available in netpbm v10.34 and higher (not available as a SuSE rpm at this time), which are
warn: FuzzyOcr: Cannot find executable for pamthresholdwarn: FuzzyOcr: Cannot find executable for tesseract
I haven't had a problem with these warnings so I'm inclined to ignore them as I've seen people 'fix' the problem by patching FuzzyOcr to simply remove the functionality that uses those programs. If anyone knows why they shouldn't be ignored or how to easily fix it on SLES 10, please let me know and I'll amend these instructions.
If you want to check the information is being stored in your FuzzyOcr database, start the MySQL Query Browser program from Computer – More Applications – MySQL Query Browser. Use username of root, root's MySQL password and default schema of FuzzyOcr. In the query box type
select * from Hash
then press the green execute button. You should see one row returned. With that success, close the query browser.
You can now delete the .eml files in /var/spool/amavis, or leave them there (better yet move them to a /amavis/FuzzyOcr/samples directory for more clarity.
Lastly to make sure Maia Mailguard is up to date with the FuzzyOcr rules, as root run
/var/spool/amavis/maia/scripts/load-sa-rule.pl
Page 68 of 96
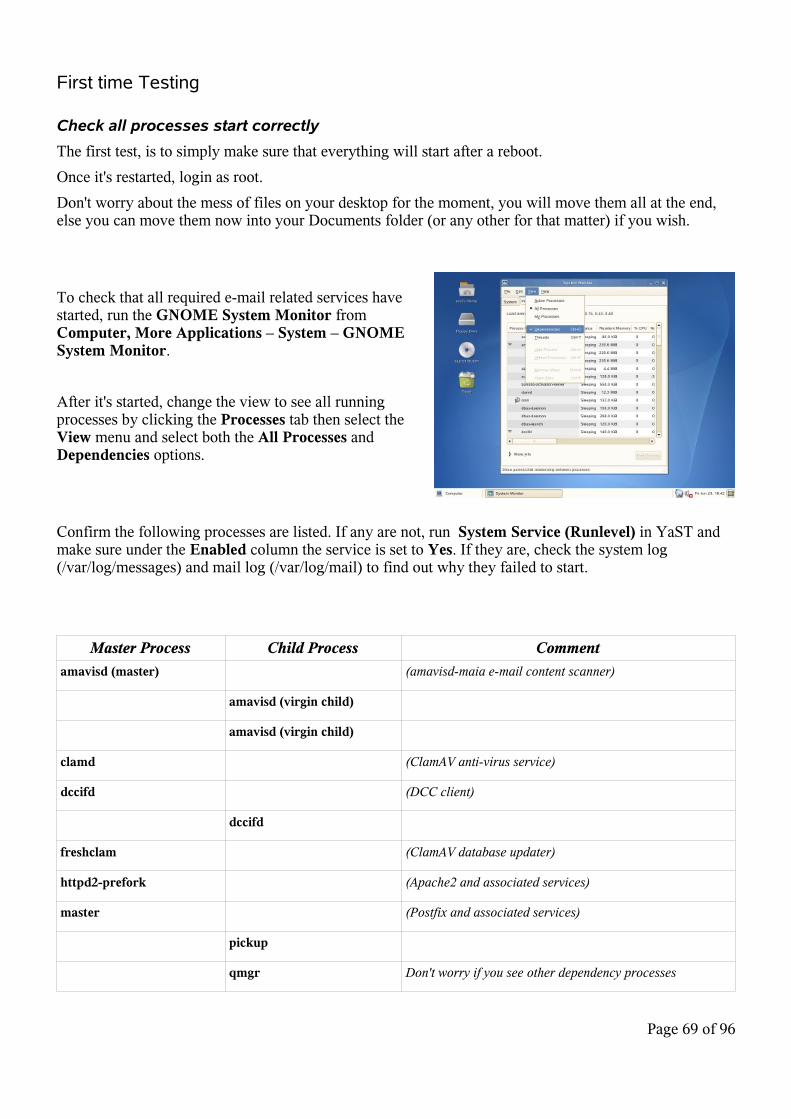
First time Testing
Check all processes start correctly
The first test, is to simply make sure that everything will start after a reboot.
Once it's restarted, login as root.
Don't worry about the mess of files on your desktop for the moment, you will move them all at the end, else you can move them now into your Documents folder (or any other for that matter) if you wish.
To check that all required e-mail related services have started, run the GNOME System Monitor from Computer, More Applications – System – GNOME System Monitor.
After it's started, change the view to see all running processes by clicking the Processes tab then select the View menu and select both the All Processes and Dependencies options.
Confirm the following processes are listed. If any are not, run System Service (Runlevel) in YaST and make sure under the Enabled column the service is set to Yes. If they are, check the system log (/var/log/messages) and mail log (/var/log/mail) to find out why they failed to start.
Master Process Child Process Comment
amavisd (master) (amavisd-maia e-mail content scanner)
amavisd (virgin child)
amavisd (virgin child)
clamd (ClamAV anti-virus service)
dccifd (DCC client)
dccifd
freshclam (ClamAV database updater)
httpd2-prefork (Apache2 and associated services)
master (Postfix and associated services)
pickup
qmgr Don't worry if you see other dependency processes
Page 69 of 96
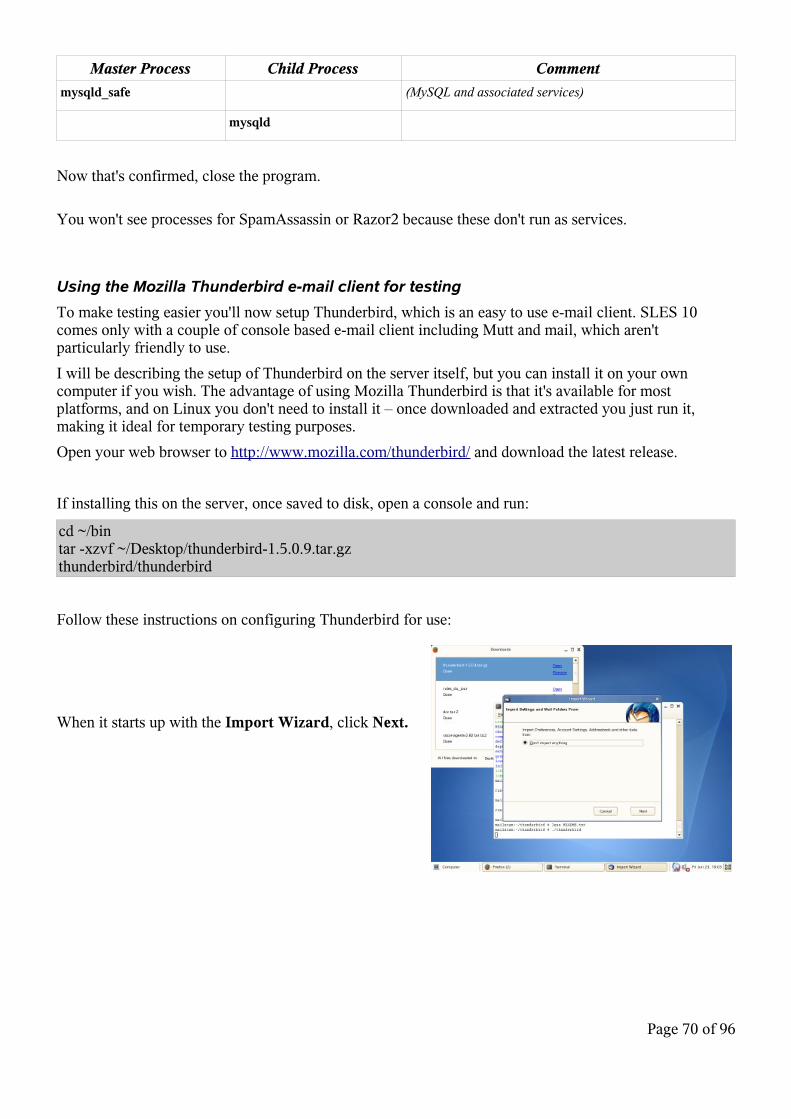
Master Process Child Process Comment
mysqld_safe (MySQL and associated services)
mysqld
Now that's confirmed, close the program.
You won't see processes for SpamAssassin or Razor2 because these don't run as services.
Using the Mozilla Thunderbird e-mail client for testing
To make testing easier you'll now setup Thunderbird, which is an easy to use e-mail client. SLES 10 comes only with a couple of console based e-mail client including Mutt and mail, which aren't particularly friendly to use.
I will be describing the setup of Thunderbird on the server itself, but you can install it on your own computer if you wish. The advantage of using Mozilla Thunderbird is that it's available for most platforms, and on Linux you don't need to install it – once downloaded and extracted you just run it, making it ideal for temporary testing purposes.
Open your web browser to http://www.mozilla.com/thunderbird/ and download the latest release.
If installing this on the server, once saved to disk, open a console and run:
cd ~/bintar -xzvf ~/Desktop/thunderbird-1.5.0.9.tar.gzthunderbird/thunderbird
Follow these instructions on configuring Thunderbird for use:
When it starts up with the Import Wizard, click Next.
Page 70 of 96
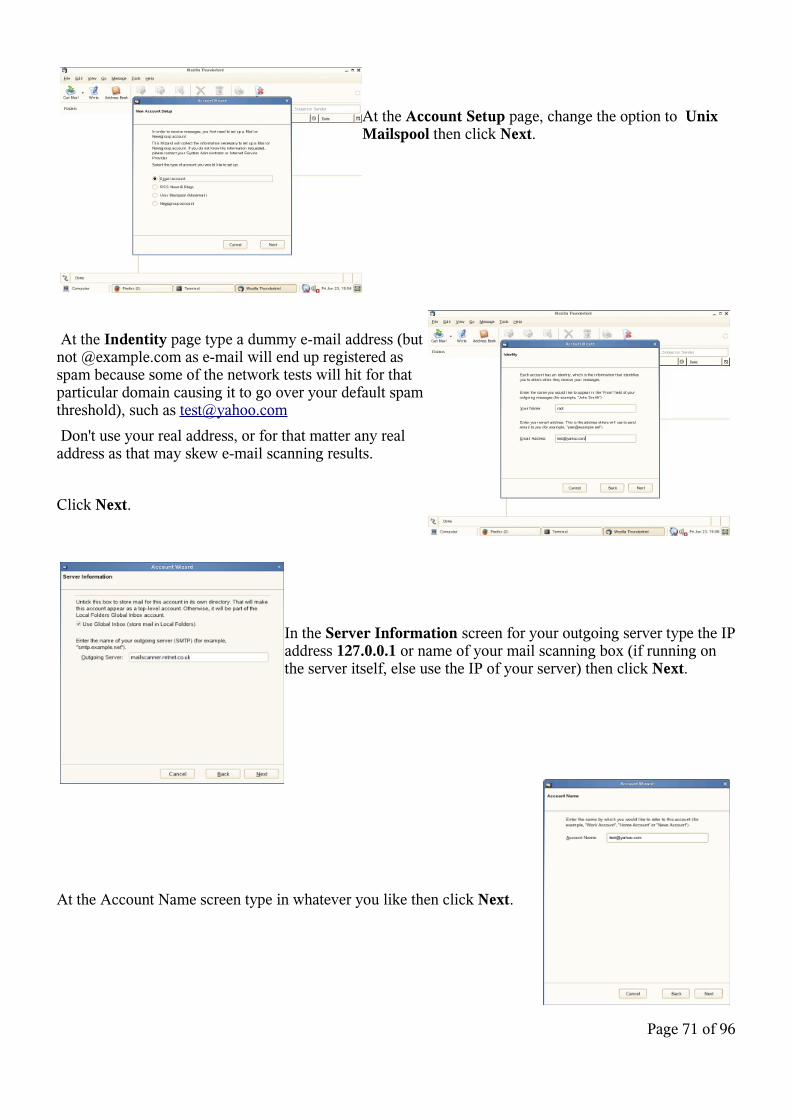
At the Account Setup page, change the option to Unix Mailspool then click Next.
At the Indentity page type a dummy e-mail address (but not @example.com as e-mail will end up registered as spam because some of the network tests will hit for that particular domain causing it to go over your default spam threshold), such as [email protected]
Don't use your real address, or for that matter any real address as that may skew e-mail scanning results.
Click Next.
In the Server Information screen for your outgoing server type the IP address 127.0.0.1 or name of your mail scanning box (if running on the server itself, else use the IP of your server) then click Next.
At the Account Name screen type in whatever you like then click Next.
Page 71 of 96
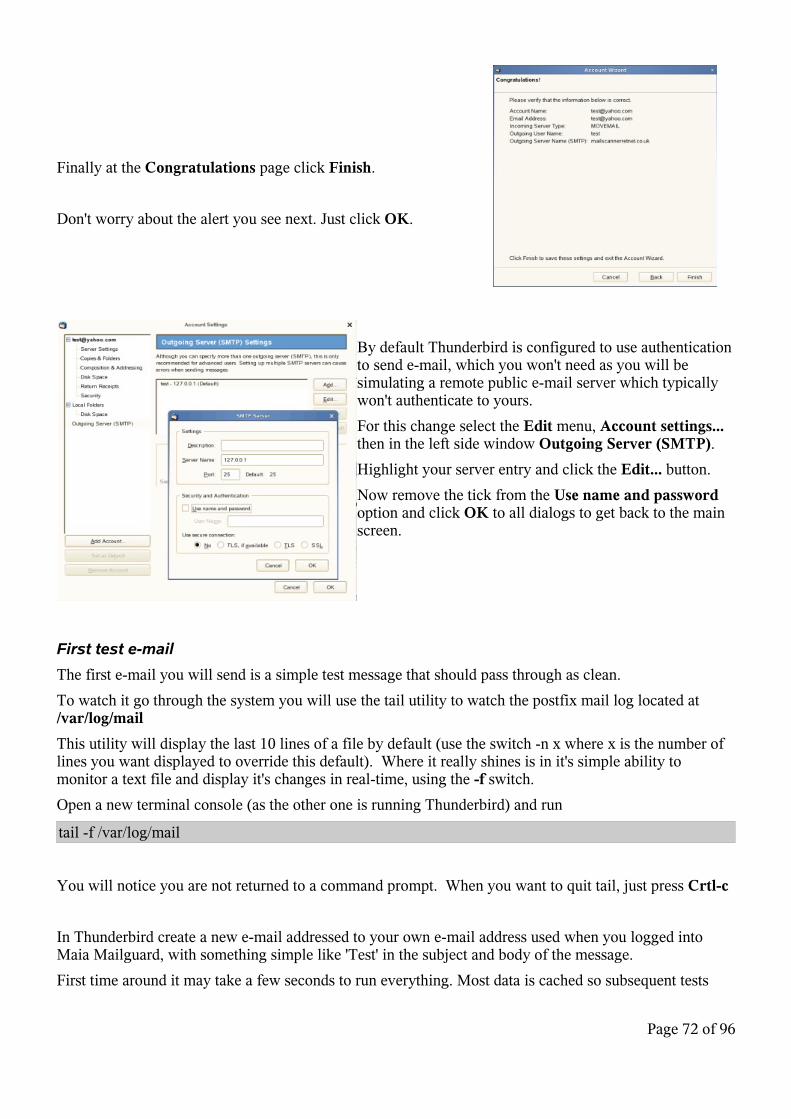
Finally at the Congratulations page click Finish.
Don't worry about the alert you see next. Just click OK.
By default Thunderbird is configured to use authentication to send e-mail, which you won't need as you will be simulating a remote public e-mail server which typically won't authenticate to yours.
For this change select the Edit menu, Account settings... then in the left side window Outgoing Server (SMTP).
Highlight your server entry and click the Edit... button.
Now remove the tick from the Use name and password option and click OK to all dialogs to get back to the main screen.
First test e-mail
The first e-mail you will send is a simple test message that should pass through as clean.
To watch it go through the system you will use the tail utility to watch the postfix mail log located at /var/log/mail
This utility will display the last 10 lines of a file by default (use the switch -n x where x is the number of lines you want displayed to override this default). Where it really shines is in it's simple ability to monitor a text file and display it's changes in real-time, using the -f switch.
Open a new terminal console (as the other one is running Thunderbird) and run
tail -f /var/log/mail
You will notice you are not returned to a command prompt. When you want to quit tail, just press Crtl-c
In Thunderbird create a new e-mail addressed to your own e-mail address used when you logged into Maia Mailguard, with something simple like 'Test' in the subject and body of the message.
First time around it may take a few seconds to run everything. Most data is cached so subsequent tests
Page 72 of 96

will be a lot quicker.
Some typical SMTP error codes for failed e-mails include:
421 Service not available, closing transmission channel (This may be a reply to any command if the service knows it must shut down) 450 Requested mail action not taken: mailbox unavailable (E.g., mailbox busy) 451 Requested action aborted: local error in processing 452 Requested action not taken: insufficient system storage 500 Syntax error, command unrecognized (This may include errors such as command line too long) 501 Syntax error in parameters or arguments 502 Command not implemented 503 Bad sequence of commands 504 Command parameter not implemented 550 Requested action not taken: mailbox unavailable (E.g., mailbox not found, no access) 551 User not local; please try 552 Requested mail action aborted: exceeded storage allocation 553 Requested action not taken: mailbox name not allowed (E.g., mailbox syntax incorrect) 554 Transaction failed
Check your regular e-mail account and you should have now received your test e-mail.
To make sure Maia Mailguard ran both virus and spam scanning, you need to view the header of the e-mail, which in almost all e-mail clients is hidden by default.
If you use Evolution, highlight the e-mail, select the View menu then All Message Headers
If you use KMail, highlight the e-mail, select the View menu then Headers – All headers
If you use Microsoft Outlook, with the e-mail open, select the View menu then Options...
In GroupWise 6.5/7 (not the cross platform client though... in this case open the e-mail in WebAccess and view the mime822 attachment), highlight the e-mail, select the Action menu then View.
Other clients will vary. In any case you should see some X- header lines regrading virus and spam scanning.
These lines tell you the e-mail was scanned for viruses as well as spam, and the corresponding spam tests that the e-mail 'matched' against, triggering a score. Scoring is an extremely complex subject, suffice to say it's always right, and if it's wrong that's because of your config.
If you want to read up on how scores are deduced, you should read the information available at the websites of Maia Mailguard, amavisd-new and SpamAssassin as they all play a part. Be sure to read them in that order though, as some settings in amavisd are controlled by Maia Mailguard, and some settings in SA are controlled by amavisd and Maia Mailguard, so it can get confusing if you read about different scoring systems the other way around, as they don't mention the next layered application that may have an effect.
An alternative to viewing the results in your e-mail client is to use Maia Mailguards built-in message viewer.
Page 73 of 96

Note the superuser always has read rights to all e-mail, but other per-domain administrators can be denied this access, and if you configure individual users, they won't have access to anyone else's e-mail cache.
Log into your Maia Mailguard account and you will see in the Cache Contents box You have 1 items in your non-spam cache. Click the Report/Confirm link to take you into the non-spam cache.
You should see the test e-mail, with it's associated score.
By default you would normally just click the Confirm the Status of these Items button, but this time around you will want to check the e-mail headers, so click on the Hyperlink for the subject of your e-mail.
Here you can see what tests were triggered against this e-mail and the scores assigned to them.
The list of tests should match the list in the header of the e-mail. If not this means that your rules have been updated and sa-load-rules.pl has not been run since. You can either leave it, as it will be run automatically via cron, or run sa-load-rules.pl manually from the console as root.
For this test it scored negative on ALL_TRUSTED because I sent the e-mail from the gateway itself, which is trusted, but as you can see it's not completely trusted. Although there is a heavy weighting of trust, if enough of the e-mail looked suspect it would still be caught.
Click the Confirm this Non-spam link to confirm that e-mail as clean.
Now to perform some other basic virus and spam tests.
Testing virus and spam filtering
There's a great simple test for spam catching called the GTUBE (Generic Test for Unsolicited Bulk Email) test, which we ran manually against spamassassin earlier.
This test is simply a special text string that you insert into the body of an e-mail, and if the spam software is designed to catch it, which SpamAssassin is, Maia Mailguard will correctly quarantine it.
There is also a similar test for the virus checker called the Eicar Test Virus, which again is a special text string inserted into the body of an e-mail.
For the spam test string open /usr/share/doc/packages/amavisd-new/test-messages/sample-spam-GTUBE-junk.txt and copy the text string from there.
Page 74 of 96
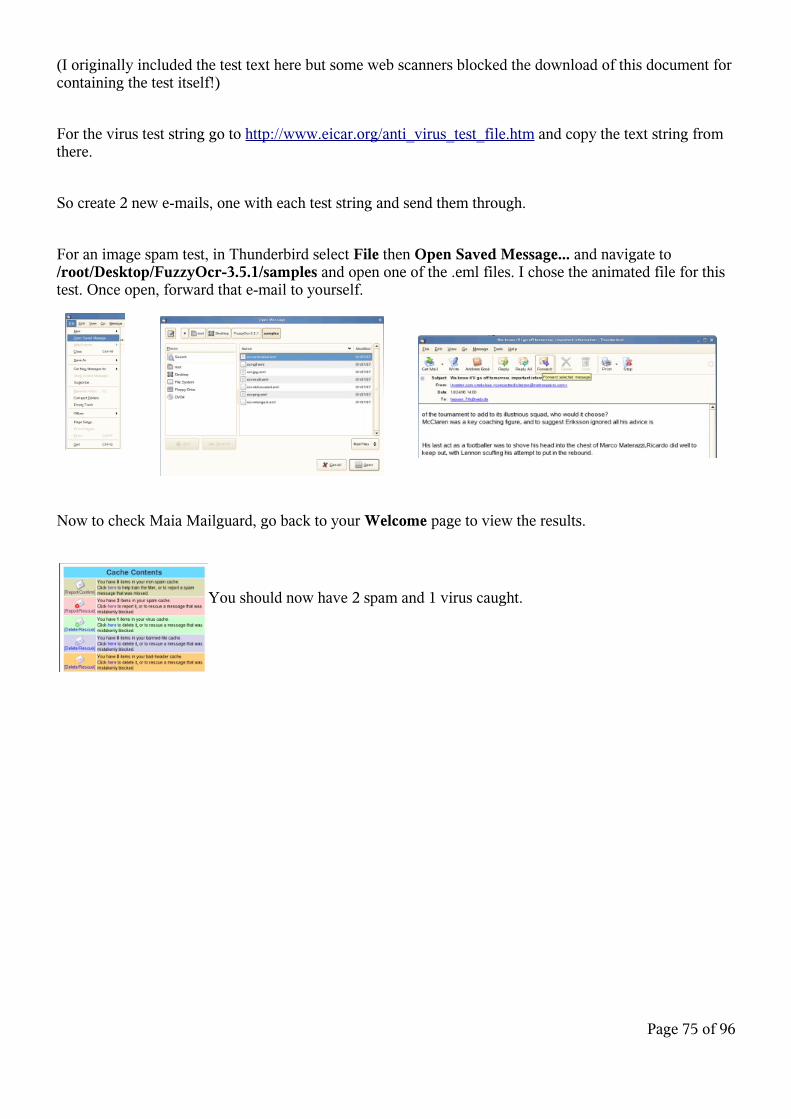
(I originally included the test text here but some web scanners blocked the download of this document for containing the test itself!)
For the virus test string go to http://www.eicar.org/anti_virus_test_file.htm and copy the text string from there.
So create 2 new e-mails, one with each test string and send them through.
For an image spam test, in Thunderbird select File then Open Saved Message... and navigate to /root/Desktop/FuzzyOcr-3.5.1/samples and open one of the .eml files. I chose the animated file for this test. Once open, forward that e-mail to yourself.
Now to check Maia Mailguard, go back to your Welcome page to view the results.
You should now have 2 spam and 1 virus caught.
Page 75 of 96
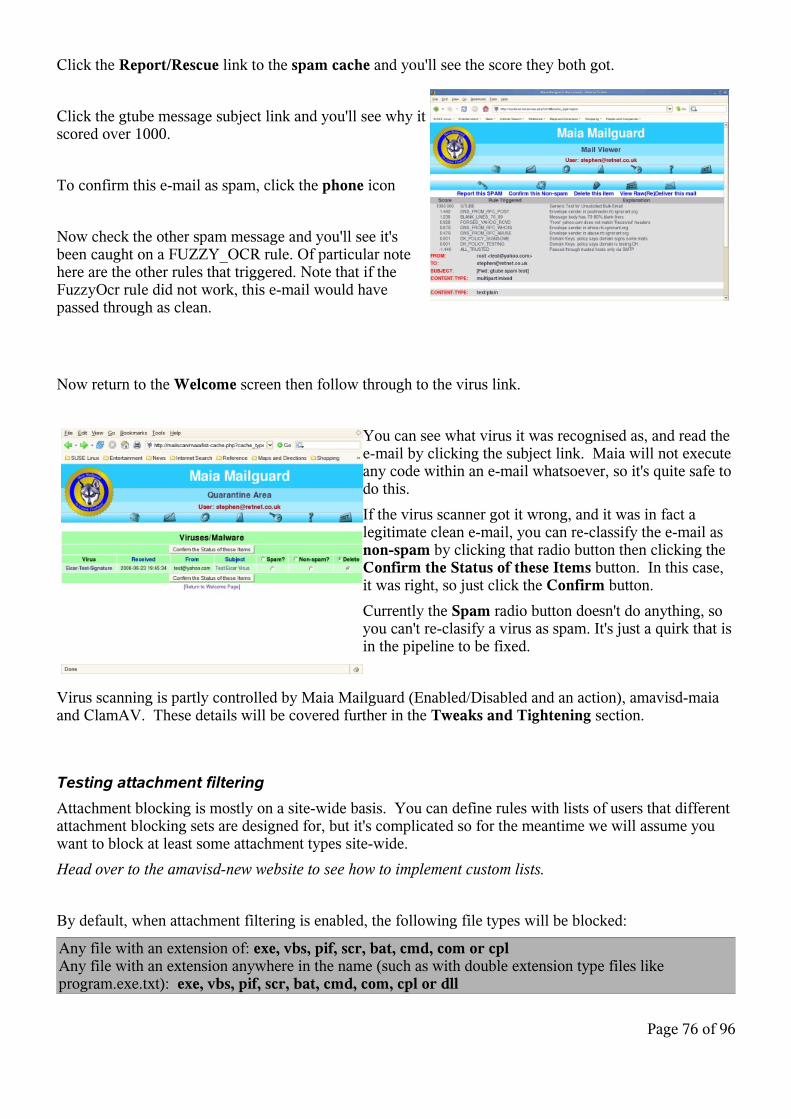
Click the Report/Rescue link to the spam cache and you'll see the score they both got.
Click the gtube message subject link and you'll see why it scored over 1000.
To confirm this e-mail as spam, click the phone icon
Now check the other spam message and you'll see it's been caught on a FUZZY_OCR rule. Of particular note here are the other rules that triggered. Note that if the FuzzyOcr rule did not work, this e-mail would have passed through as clean.
Now return to the Welcome screen then follow through to the virus link.
You can see what virus it was recognised as, and read the e-mail by clicking the subject link. Maia will not execute any code within an e-mail whatsoever, so it's quite safe to do this.
If the virus scanner got it wrong, and it was in fact a legitimate clean e-mail, you can re-classify the e-mail as non-spam by clicking that radio button then clicking the Confirm the Status of these Items button. In this case, it was right, so just click the Confirm button.
Currently the Spam radio button doesn't do anything, so you can't re-clasify a virus as spam. It's just a quirk that is in the pipeline to be fixed.
Virus scanning is partly controlled by Maia Mailguard (Enabled/Disabled and an action), amavisd-maia and ClamAV. These details will be covered further in the Tweaks and Tightening section.
Testing attachment filtering
Attachment blocking is mostly on a site-wide basis. You can define rules with lists of users that different attachment blocking sets are designed for, but it's complicated so for the meantime we will assume you want to block at least some attachment types site-wide.
Head over to the amavisd-new website to see how to implement custom lists.
By default, when attachment filtering is enabled, the following file types will be blocked:
Any file with an extension of: exe, vbs, pif, scr, bat, cmd, com or cplAny file with an extension anywhere in the name (such as with double extension type files like program.exe.txt): exe, vbs, pif, scr, bat, cmd, com, cpl or dll
Page 76 of 96
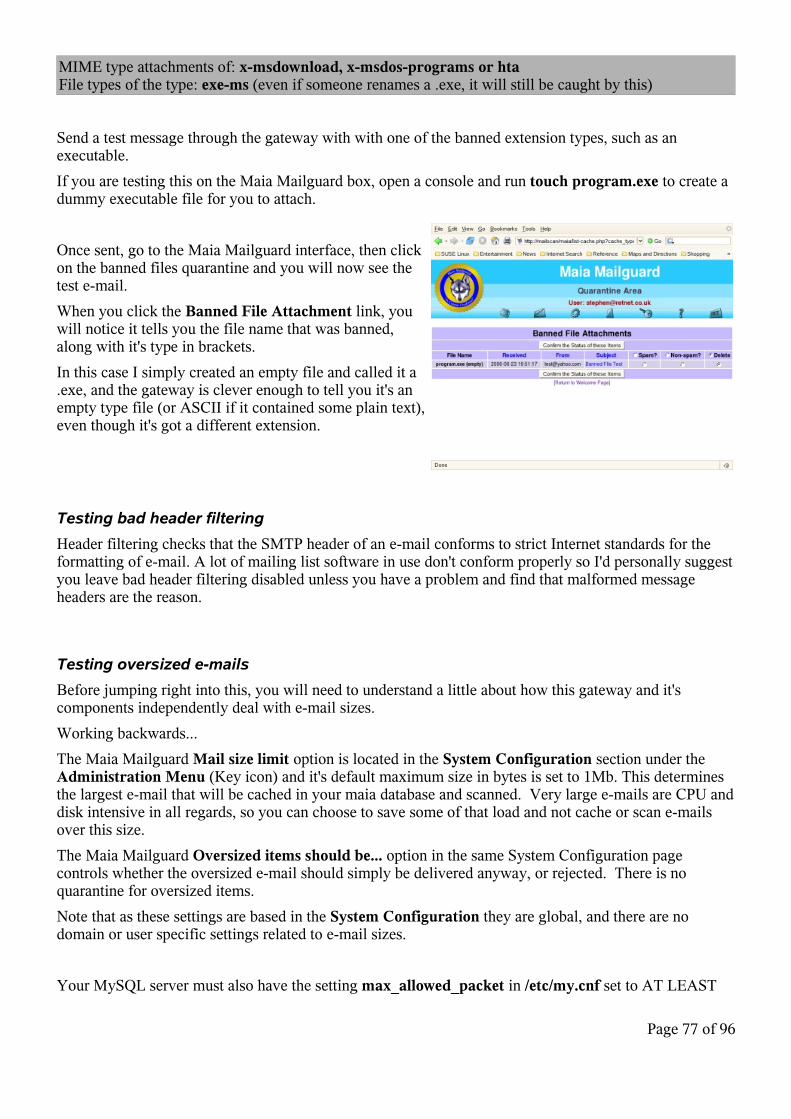
MIME type attachments of: x-msdownload, x-msdos-programs or htaFile types of the type: exe-ms (even if someone renames a .exe, it will still be caught by this)
Send a test message through the gateway with with one of the banned extension types, such as an executable.
If you are testing this on the Maia Mailguard box, open a console and run touch program.exe to create a dummy executable file for you to attach.
Once sent, go to the Maia Mailguard interface, then click on the banned files quarantine and you will now see the test e-mail.
When you click the Banned File Attachment link, you will notice it tells you the file name that was banned, along with it's type in brackets.
In this case I simply created an empty file and called it a .exe, and the gateway is clever enough to tell you it's an empty type file (or ASCII if it contained some plain text), even though it's got a different extension.
Testing bad header filtering
Header filtering checks that the SMTP header of an e-mail conforms to strict Internet standards for the formatting of e-mail. A lot of mailing list software in use don't conform properly so I'd personally suggest you leave bad header filtering disabled unless you have a problem and find that malformed message headers are the reason.
Testing oversized e-mails
Before jumping right into this, you will need to understand a little about how this gateway and it's components independently deal with e-mail sizes.
Working backwards...
The Maia Mailguard Mail size limit option is located in the System Configuration section under the Administration Menu (Key icon) and it's default maximum size in bytes is set to 1Mb. This determines the largest e-mail that will be cached in your maia database and scanned. Very large e-mails are CPU and disk intensive in all regards, so you can choose to save some of that load and not cache or scan e-mails over this size.
The Maia Mailguard Oversized items should be... option in the same System Configuration page controls whether the oversized e-mail should simply be delivered anyway, or rejected. There is no quarantine for oversized items.
Note that as these settings are based in the System Configuration they are global, and there are no domain or user specific settings related to e-mail sizes.
Your MySQL server must also have the setting max_allowed_packet in /etc/my.cnf set to AT LEAST
Page 77 of 96
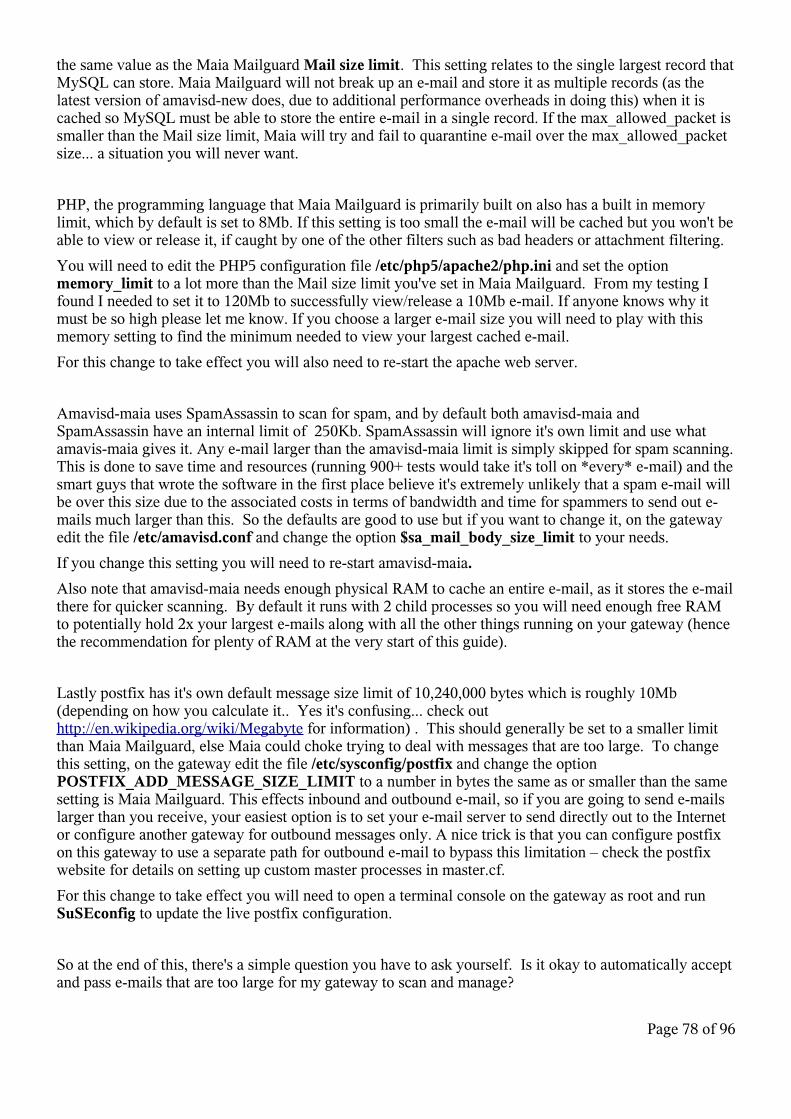
the same value as the Maia Mailguard Mail size limit. This setting relates to the single largest record that MySQL can store. Maia Mailguard will not break up an e-mail and store it as multiple records (as the latest version of amavisd-new does, due to additional performance overheads in doing this) when it is cached so MySQL must be able to store the entire e-mail in a single record. If the max_allowed_packet is smaller than the Mail size limit, Maia will try and fail to quarantine e-mail over the max_allowed_packet size... a situation you will never want.
PHP, the programming language that Maia Mailguard is primarily built on also has a built in memory limit, which by default is set to 8Mb. If this setting is too small the e-mail will be cached but you won't be able to view or release it, if caught by one of the other filters such as bad headers or attachment filtering.
You will need to edit the PHP5 configuration file /etc/php5/apache2/php.ini and set the option memory_limit to a lot more than the Mail size limit you've set in Maia Mailguard. From my testing I found I needed to set it to 120Mb to successfully view/release a 10Mb e-mail. If anyone knows why it must be so high please let me know. If you choose a larger e-mail size you will need to play with this memory setting to find the minimum needed to view your largest cached e-mail.
For this change to take effect you will also need to re-start the apache web server.
Amavisd-maia uses SpamAssassin to scan for spam, and by default both amavisd-maia and SpamAssassin have an internal limit of 250Kb. SpamAssassin will ignore it's own limit and use what amavis-maia gives it. Any e-mail larger than the amavisd-maia limit is simply skipped for spam scanning. This is done to save time and resources (running 900+ tests would take it's toll on *every* e-mail) and the smart guys that wrote the software in the first place believe it's extremely unlikely that a spam e-mail will be over this size due to the associated costs in terms of bandwidth and time for spammers to send out e-mails much larger than this. So the defaults are good to use but if you want to change it, on the gateway edit the file /etc/amavisd.conf and change the option $sa_mail_body_size_limit to your needs.
If you change this setting you will need to re-start amavisd-maia.
Also note that amavisd-maia needs enough physical RAM to cache an entire e-mail, as it stores the e-mail there for quicker scanning. By default it runs with 2 child processes so you will need enough free RAM to potentially hold 2x your largest e-mails along with all the other things running on your gateway (hence the recommendation for plenty of RAM at the very start of this guide).
Lastly postfix has it's own default message size limit of 10,240,000 bytes which is roughly 10Mb (depending on how you calculate it.. Yes it's confusing... check out http://en.wikipedia.org/wiki/Megabyte for information) . This should generally be set to a smaller limit than Maia Mailguard, else Maia could choke trying to deal with messages that are too large. To change this setting, on the gateway edit the file /etc/sysconfig/postfix and change the option POSTFIX_ADD_MESSAGE_SIZE_LIMIT to a number in bytes the same as or smaller than the same setting is Maia Mailguard. This effects inbound and outbound e-mail, so if you are going to send e-mails larger than you receive, your easiest option is to set your e-mail server to send directly out to the Internet or configure another gateway for outbound messages only. A nice trick is that you can configure postfix on this gateway to use a separate path for outbound e-mail to bypass this limitation – check the postfix website for details on setting up custom master processes in master.cf.
For this change to take effect you will need to open a terminal console on the gateway as root and run SuSEconfig to update the live postfix configuration.
So at the end of this, there's a simple question you have to ask yourself. Is it okay to automatically accept and pass e-mails that are too large for my gateway to scan and manage?
Page 78 of 96
Lets move onto an example.
Lets say you want the gateway to handle e-mails up to 10Mb in size, and anything else should be rejected.
Your actual e-mail server will of course also need to accept e-mails of this size for it to work. All the gateway components you've installed base their sizes on the converted MIME format of an e-mail which can be up to around 30% larger, so you need to take that into account.
For a small bit of mail format info, all e-mail sent via SMTP is sent in plain text. This means any binary attachments must be converted to a format in plain text before they can be sent. MIME is a popular format that all SMTP gateways understand, and using it's algorithm on a binary file will produce an ASCII file of around 30% larger than it's original size.
Because different encoding formats are in use by different clients, as a simple rule of thumb allow for a 50% increase in size – at least this way you're sure it will accept all e-mail within your business directive limit which will save yourself and boss the grief of arguments with users over how large an e-mail really is... applying a small buffer by accepting slightly larger e-mail allows you to easily be sure that any e-mail that's rejected due to size was well beyond your company policy.
Taking a 10Mb e-mail as an example, you will need to account for the conversion of this e-mail, based on the fact it is most likely a binary file, into MIME format which will cause the size of the actual e-mail to increase to around 13.5MB in size, or 14,155,776 bytes (13.5 * 1024 * 1024). Using my rule of thumb (because I can) for this example we'll set the limits at 15,000,000 bytes for good measure.
On the gateway server, open the postfix configuration file /etc/sysconfig/postfix
Scroll down to the option (near the bottom of the file) POSTFIX_ADD_MESSGE_SIZE_LIMIT and change the value to read 15 000 000
(I've only put spaces in to make it more readable. Don't include the spaces in the setting itself)
Save and close the file.
Open the PHP configuration file /etc/php5/apache2/php.ini
Scroll down to (or search for) the option memory_limit and change it to read 120M
If this setting is too low the Maia Mailguard e-mail viewer and PHP will generate errors on the server with a 'allowed memory size of xxxx bytes exhausted'.
Save and close the file.
Open the mysql configuration file /etc/my.cnf
Scroll down to the option max_allowed_packet and change the setting to read 16M being just a little larger than required, for breathing space... you really don't want this to go wrong.
Save the file.
Now to enable these changes, on the gateway open a terminal console and run the following commands:
SuSEconfig
SuSEconfig will update the /etc/postfix/main.cf file with your changes andreload the new postfix configuration without restarting it
Page 79 of 96
now run
/etc/init.d/apache2 restart
This tells the apache2 web server to re-start which will re-read the php settings.
and
/etc/init.d/mysql restart
This re-starts mysql which will cause it to pick up the change you made.
Lastly change the Maia Mailguard setting
Go to the System Configuration page via the Administration menu and change the Mail size limit to read 16 000 000
(I've only put spaces in to make it more readable. Don't include the spaces in the setting itself)
Click the Update Settings button.
Now to test it.
To do this accurately you need to create files of exact size, then attach these to your test e-mails.
Running Windows you can use a freeware utility called File Generator which you can download from http://www.soft32.com/download_76964.html
Running Linux ( e.g. SLES!), you can use a utility that's already installed on your computer, called dd.
To use dd to make a 10MB test file, open a terminal console and run
cd ~dd if=/dev/zero of=./test10 bs=1024000 count=10
To explain the above, the option if is the input file, in this case a special device called zero which is actually an area of memory containing all zeros, of is the output file name, bs is the byte size which in this case is 1,024000 bytes (1 MB), and lastly count is the number of times to repeat bs which in this case is 10, which gives us our 10MB attachment.
Create a test e-mail and attach the 10MB file you made, then send it.
You can watch the processing of the e-mail on the gateway by running
tail -f /var/log/mail
If you are running this in a test VMware session it may take a very long time to process. Just keep an eye on the hard disk activity, memory and CPU (by running top) mail log file, and the postfix mail queue (by running mailq). As long as you don't see errors in the mail log file, it is still being processed so you'll just have to wait it out. If the e-mail gets stuck, check out the troubleshooting section towards the end of this guide – most problems are resolved by increasing the amount of RAM available.
Page 80 of 96
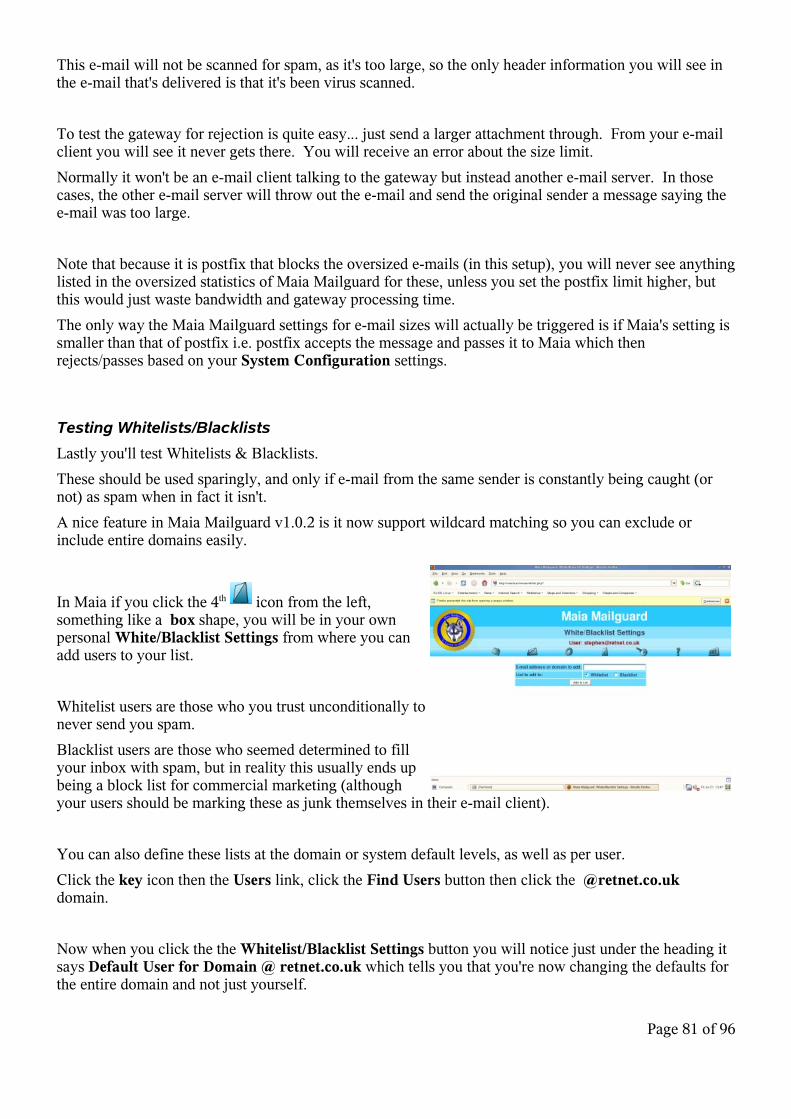
This e-mail will not be scanned for spam, as it's too large, so the only header information you will see in the e-mail that's delivered is that it's been virus scanned.
To test the gateway for rejection is quite easy... just send a larger attachment through. From your e-mail client you will see it never gets there. You will receive an error about the size limit.
Normally it won't be an e-mail client talking to the gateway but instead another e-mail server. In those cases, the other e-mail server will throw out the e-mail and send the original sender a message saying the e-mail was too large.
Note that because it is postfix that blocks the oversized e-mails (in this setup), you will never see anything listed in the oversized statistics of Maia Mailguard for these, unless you set the postfix limit higher, but this would just waste bandwidth and gateway processing time.
The only way the Maia Mailguard settings for e-mail sizes will actually be triggered is if Maia's setting is smaller than that of postfix i.e. postfix accepts the message and passes it to Maia which then rejects/passes based on your System Configuration settings.
Testing Whitelists/Blacklists
Lastly you'll test Whitelists & Blacklists.
These should be used sparingly, and only if e-mail from the same sender is constantly being caught (or not) as spam when in fact it isn't.
A nice feature in Maia Mailguard v1.0.2 is it now support wildcard matching so you can exclude or include entire domains easily.
In Maia if you click the 4th icon from the left, something like a box shape, you will be in your own personal White/Blacklist Settings from where you can add users to your list.
Whitelist users are those who you trust unconditionally to never send you spam.
Blacklist users are those who seemed determined to fill your inbox with spam, but in reality this usually ends up being a block list for commercial marketing (although your users should be marking these as junk themselves in their e-mail client).
You can also define these lists at the domain or system default levels, as well as per user.
Click the key icon then the Users link, click the Find Users button then click the @retnet.co.uk domain.
Now when you click the the Whitelist/Blacklist Settings button you will notice just under the heading it says Default User for Domain @ retnet.co.uk which tells you that you're now changing the defaults for the entire domain and not just yourself.
Page 81 of 96
So let's test it.
While still in the domain White/Blacklist Settings page, add your test user [email protected] to your Whitelist.
Send an e-mail to your account, with the message body being the spam GTUBE code.
To see what's now happened in Maia, go back to the Admin menu by clicking the key icon, select the Users link, then click the Find Users button and select your own named account. Doing this will switch you back to your Welcome page.
Click the stats icon now will now show 1 Whitelisted Item. Note this e-mail, although it passed, is not cached in the non-spam cache like regular e-mails. The reason is you've already told Maia to ignore all checks and to assume it is clean.
Conversely, e-mail from blacklisted senders are never cached either and are always silently discarded, apart from the counter in the statistics page.
If you as an administrator, set up e-mail senders as White or Black listed and give end users the right to change their personal lists, be aware they can override your defaults by adding that sender to their own white or black list.
One last note on White/Black lists is something called the Automatic White List (AWL for short) that's a feature of SpamAssassin. This isn't a white/black list as in Maia Mailguard, but a single list with scores against sender e-mail addresses that's automatically managed by SA.
The purpose of this list is to bias e-mails as they come from known senders, so if for example someone has sent you 50 clean e-mails and they then send something that appears to SA as spam, due to their history of sending clean e-mail, SA will reduce the spam score of the e-mail based on their score in the AWL. SA will then add a few points to the users' score in the AWL towards 'spaminess'.
On the flip side it also means that repeat offenders of spam quickly get caught out regardless of how they've changed the e-mail message contents, due to their history of sending rubbish e-mails.
Because the score is different for every sender that Maia Mailguard has seen, it can't correctly display this score in it's statistics, so always shows a score of 1.000 regardless of the actual score. In this way if you add up the scores they may not match the total spam score.
To read a more details description of the AWL, point your web browser to this SpamAssassin info page:
http://wiki.apache.org/SpamAssassin/AutoWhitelist
Testing maintenance scripts
Well that's just about done. You should also run the maintenance scripts manually as the same user in which the crontab entries were edited to ensure they work without a problem. Output from these scripts will mostly appear in the terminal so any problems should be easily noticed. Be sure to check the digests that are sent include the correct url link (try the link out to make sure!).
Page 82 of 96
System clean up
You should remove the login shell setting for the vscan user that you created near the start of this guide to remove the possibility of anyone gaining access as this user.
You will probably also need to make 1 more change from the following section, labeled Permit e-mail from trusted networks which specifies what internal hosts (or subnets), other than the gateway itself are allowed to send e-mails to foreign domains... I'm going to take a wild guess here and suggest you probably do send out external e-mail, so you'll at least want to read that bit to see if it applies to you.
There's also quite a few really handy tips in tightening up your gateway in the following section, many of which work right at the front gate – the postfix SMTP connector, which will reduce the amount of spam before it even enters your network. It's more intense with no screen shots (you're probably glad of that by now) and if you've followed me this far from the start, I know you'll be able to cope quite easily with it.
Page 83 of 96
Backing it up
The best way to avoid a hard drive failure is to have a RAID system in place, such as a RAID 1 (mirrored) or RAID 5 array. There is simply no substitute. I have a step-by-step guide on my website on how to create a bootable software RAID 1 array, which includes monitoring your RAID and using S.M.A.R.T. based monitoring to pick up disks that are on their way out.
I'm not going to spell out exactly how to back up the relevant configuration as there are simply too many ways to do this and most people have their own preference so instead I will point you to what needs to be backed up and how that can be achieved.
For most of the system configuration files, simply backup the /etc directory and all subdirectories.
For the website, backup the /srv/www directory and all subdirectories.
For the vscan user, backup the /var/spool/amavis directory and all subdirectories.
For MySQL, use the mysqldump tool to export all databases into a backup.sql file and backup that file.
Optional: Backup the root home directory at /root which includes all software you downloaded during the build.
To backup all of these files I personally use rsync, which is a package available through YaST – Software Management. You can read more about rsync at http://rsync.samba.org/
You could alternatively use tar to create a simple backup file of all the above then copy that single file using cron via ftp, rsync, scp YaST System Backup or any other method you can think of (all the the mentioned utilities are available via YaST).
Deciding the method that best suits your infrastructure then finding a solution to match is the best way of approaching this, and once you know what you want to do it will just take a little Internet searching to find all the answers you need.
Upgrading to a newer version of Maia Mailguard
I've had many pains in upgrading due to the number of custom changes you have to make to get all possible functionality, as well as just plain server creep, where 'other' things creep onto the server over time.
If you're upgrading from v1.0.1 then you're in luck as it's a minor point upgrade and the database schema hasn't changed at all. It's quite easy and you should follow the instructions on the Maia Mailguard website. You can of course also this guide to compliment your upgrade with for example the FuzzyOcr plug-in instructions, or the MySQL GUI Tools suite installation.
I've personally found the most reliable method is to not upgrade at all. Treat this box as an appliance. When you do want to upgrade, you've already got the backup as described in the previous section (haven't you?) so set up a test box, install the new version from scratch, import the maia database and read the Maia Mailguard upgrade instructions for the database itself. Run a few tests, then do it again in live.
Now with SLES 10 you have no excuse, as you can create virtual machines using XEN, so you don't need any additional hardware to support this gateway. It also means you can run a test setup on the same physical hardware and cut it over without the pain of dealing with setting up a new physical box.
Page 84 of 96

If you don't want to use that, consider using the free VMware Server software, which runs on any Linux and Windows host (although performance will not be as good as using XEN under SLES 10).
In this way I always have a relatively clean server that has stayed stable on every major update.
Page 85 of 96
Tweaks and Tightening
The system already described in this article will drastically reduce the amount of spam and viruses getting to your e-mail server, and this section show you how to tighten down the hatches even further.
System Updates
If your system is running well and is used only internally, unless there are security updates for the specific components used you could do worse than leave it alone.
If you do want to keep it up to date, configure online updates from the Software Updater applet in the desktop panel next to the date & time.
Whatever you do don't update the amavisd-new package! You will break the Maia Mailguard modified version if you do.
There are several ways you can get around this annoyance. You could copy the amavisd-new rpm from installation source onto your SuSE computer and use rpm to change the signature in the package then install that. Packages without SuSE signatures are automatically set to protected, so they will never be updated automatically.
Another option is to not install amavisd-new, but you will need to copy the init.d script for it from another box or create your own custom script and place it in /etc/init.d. You will also need to manually hook amavis-maia into postfix by modifying the necessary smtpd line in /etc/mail/master.cf. I think you may also need to create the vscan system user and it's associated home directory.
To upgrade any additional software such as DCC, Razor2 or Maia Mailguard, you will need to carefully read the upgrade notes and test the update before going live, but from experience both DCC and razor2 are both separate enough from the rest of the system that upgrades to these haven't caused me any problems.
Supporting multiple e-mail domains
This is quite an easy task but unfortunately it's a manual process.
Add the extra domain to /etc/sysconfig/postfix by adding it to the POSTFIX_ADD_RELAY_DOMAINS line, separating each domain each by white space (space, tab or new line)
E.g.
POSTFIX_ADD_RELAY_DOMAINS=”retnet.co.uk domain.com”
Tell postfix where to relay e-mail destined for that domain by adding an extra line to the /etc/postfix/transport file.
E.g.
retnet.co.uk smtp:[192.168.0.3]domain.com smtp:[192.168.1.4]
Page 86 of 96

Run SuSEconfig to update both configuration files.
In Maia Mailguard, go to the Admin screen, click the Domains link and add your additional domain.
Your new domain will automatically inherit it's defaults from the @. domain you configured earlier.
All done! - Except you may also need to update the postfix trusted network settings, explained further down in the Permit e-mail from trusted networks section.
Stopping spam and viruses before they even get in
These settings are additional checks performed by the postfix SMTP connector, that are performed at different stages throughout the e-mail conversation it has with the outside world.
The file you will edit for this set of restrictions is /etc/sysconfig/postfix, which is the YaST template that creates the postfix configuration file /etc/postfix/main.cf
The set of restrictions listed here will follow a typical SMTP conversation, the first of which is the sender identifying itself.
Reject if the sender doesn't identify itself
The sender should identify itself using an EHLO or HELO command and if it doesn't then there's a good chance it's a poorly written virus or script. All commercial and well known free e-mail servers and clients will tell you who they are before sending you e-mail.
To deny any sender that doesn't identify itself, add the following line to the very end of the /etc/sysconfig/postfix file:
POSTFIX_ADD_SMTPD_HELO_REQUIRED=”yes”
To test this change, save the file, in a terminal run SuSEconfig then postfix reload and try to start an SMTP conversation by running
telnet mailscan 25 mail from: <[email protected]>
Right there you will see a 503 error, and the sender will get no further until the connection times out or it stops trying to send the e-mail.
All of the sender restrictions are also applied to internal senders, i.e. Your e-mail server, but don't worry, the next 'restriction' allows all internal e-mail out, even if it's not properly formatted.
Permit e-mail from trusted networks
This is implied if no sender restrictions are in place, but as you are about to put some in, you will need to implicitly make this statement.
Page 87 of 96
It references a self-calculated list called mynetworks that contains "trusted" SMTP clients that have more privileges than strangers. Restrictions are tested in order and the first to match will be applied. If none match, 'allow' is implied.
It is required in order to allow relaying from hosts other than the gateway itself onto external domains, which if you point your current e-mail server to this gateway, it will need doing.
To make this change, which you must do else you won't be able to relay e-mail out of your network via this gateway, add the following line to the very end of the /etc/sysconfig/postfix file:
POSTFIX_ADD_SMTPD_SENDER_RESTRICTIONS=”permit_mynetworks”
By default postfix will use the subnet of your gateway as a trusted subnet, so any other host on the same subnet will be “trusted”. If your e-mail server is actually on another subnet, you will need to specify this explicitly.
If you do need to do this, add the following line to the very end of the /etc/sysconfig/postfix file:
POSTFIX_ADD_MYNETWORKS=”192.168.0.0/24”
where 192.168.0.0 is the subnet you want to trust, and /24 is the number of bits in the subnet mask (in this case that will be 255.255.255.0). To trust only a single host such as your internal e-mail server, change it to something like 192.168.0.100/32. If you want to trust multiple hosts and/or subnets, separate them with commas.
To test this change, save the file, in a terminal run SuSEconfig.
On a computer in an 'untrusted' network, start an SMTP conversation by running
telnet mailscan 25 mail from: <[email protected]>rcpt to: <[email protected]>
Substitute [email protected] for your own external e-mail address.
Right there you will see a 554 error, with postfix not willing to relay that e-mail. Now repeat the test from a computer on a 'trusted' network and it will work (as long as your MYNETWORKS statement is correct).
Reject non fully qualified sender's address
Have you ever received an e-mail from [email protected] when you know that Joe doesn't exist in your company? This is a simple trick some malicious programs play to try to gain your confidence in opening the e-mail or running an infected attachment. They send the e-mail as simply <joe> instead of <[email protected]>. Your e-mail server will usually by default fill in the @company.com with your own company domain, thus appearing as a legitimate local e-mail.
To deny any sender that doesn't specify a full e-mail address in the MAIL FROM command, add the following line to the very end of the /etc/sysconfig/postfix file:
POSTFIX_ADD_SMTPD_SENDER_RESTRICTIONS=”reject_non_fqdn_sender”
Page 88 of 96

If you already have an option listed, separate them with whitepace meaning any space, tab or new line (enter) so it could look something like:
POSTFIX_ADD_SMTPD_SENDER_RESTRICTIONS=”permit_mynetworksreject_non_fqdn_sender”
To test this change, save the file, in a terminal run SuSEconfig then postfix reload and try to start an SMTP conversation by running
telnet mailscan 25 mail from: <test>rcpt to: <[email protected]>
Substitute [email protected] for your own e-mail address.
Right there you will see a 504 error, with postfix not accepting that user.
Reject from unknown sender domains
The assumption here is all incoming Internet e-mail should have originated from a real, existing Internet domain, so if postfix can't verify that the domain of the sender as specified in the MAIL FROM address exists, then reject the e-mail.
For this restriction, add the following line to the very end of the /etc/sysconfig/postfix file:
POSTFIX_ADD_SMTPD_SENDER_RESTRICTIONS=”reject_unknown_sender_domain”
If you already have the sender_restrictions line in your postfix file, just add additional parameters to it separated by commas and blank lines so that it looks like:
POSTFIX_ADD_SMTPD_SENDER_RESTRICTIONS=”permit_mynetworksreject_non_fqdn_senderreject_unknown_sender_domain”
To test this change, save the file, in a terminal run SuSEconfig then postfix reload and try to start an SMTP conversation by running
telnet mailscan 25 mail from: <[email protected]>rcpt to: <[email protected]>
Substitute [email protected] for your own e-mail address.
Right there you will see a 450 error, with postfix not accepting the sender's domain.
The next set of restrictions relates to the recipients.
Page 89 of 96
Permit e-mail from trusted networks to any local recipient
For the same reasons as the sender restrictions, allow anything from trusted hosts or networks to go through.
POSTFIX_ADD_SMTPD_RECIPIENT_RESTRICTIONS=”permit_mynetworks”
Reject non fully qualified recipients addresses
All e-mail coming into your company should be destined to [email protected] and never to just user. Spammers can use this method to get around you trying to hide your domain name from the Internet. They simply connect to your e-mail server and start firing off e-mails to recipients without specifying your domain so they don't even have to know it!
To enforce that senders send e-mail to fully qualified e-mail addresses, add the following line to the very end of the /etc/sysconfig/postfix
POSTFIX_ADD_SMTPD_RECIPIENT_RESTRICTIONS=”reject_non_fqdn_recipient”
Again if you already the first setting in place, separate the options with whitepace.
To test this change, save the file, in a terminal run SuSEconfig then postfix reload and try to start an SMTP conversation by running
telnet mailscan 25 mail from: <[email protected]>rcpt to: <stephen>
Substitute stephen for your own e-mail name (don't include the domain though).
Right there you will see a 504 error, with postfix not accepting that recipient.
Reject unauthorised destination domains
This check confirms that the domain in the RCPT TO command matches one of your relay domain names.
For this restriction, add the following line to the very end of the /etc/sysconfig/postfix
POSTFIX_ADD_SMTPD_RECIPIENT_RESTRICTIONS=”reject_unauth_destination”
To test this change, save the file, in a terminal run SuSEconfig then postfix reload and try to start an SMTP conversation by running
telnet mailscan 25 mail from: <[email protected]>rcpt to: <[email protected]>
Page 90 of 96

Substitute the stephen part for your own e-mail name (don't include the domain though).
Right there you will see a 554 error, with postfix not accepting the recipient domain.
Reject unverified recipients
This is a pearl of a setting, where postfix will probe your e-mail server to see if the recipient actually exists on your internal e-mail server, before accepting the e-mail from the sender.
This setting therefore prevents undeliverable junk mail from ever entering your e-mail system and wasting resources on processing the e-mail or generating bounce replies that end up sitting on the gateway for days.
Postfix does this by starting a normal SMTP conversation with your e-mail server, and assumes if it receives from your server a 250 OK response to the RCPT TO address, that the user exists. Some e-mail server will respond with a 250 OK even if the user doesn't exist, but most do. This probe is only performed once then the result is cached. If the recipient exists it will stay cached for 7 days before requiring a refresh. If the recipient does not exist that result will stay cached for 3 hours, so if someone was just trying to send a new starter some e-mail who didn't have an account yet, it wouldn't be long before the address was re-checked and any subsequent e-mails to that recipient would be allowed through.
For this restriction, add the following line to the very end of the /etc/sysconfig/postfix
POSTFIX_ADD_SMTPD_RECIPIENT_RESTRICTIONS=”reject_unverified_recipient”
If you already have the recipient_restrictions line in your postfix file, just add additional parameters to it separated by commas and blank lines so that it looks like:
POSTFIX_ADD_SMTPD_RECIPIENT_RESTRICTIONS=”permit_mynetworksreject_non_fqdn_recipientreject_unauth_destinationreject_unverified_recipient”
Also note that Postfix say this is only a good option for low traffic sites... but I believe their idea of low traffic is something like under several hundred thousand of messages per day, which I believe should be fine for most of you out there. Another thing to take heart at is if you did not do this check the gateway would attempt to send the e-mail onto your e-mail server anyway.
To test this change, save the file, in a terminal run SuSEconfig then postfix reload and try to start an SMTP conversation by running
telnet mailscan 25 mail from: <[email protected]>rcpt to: <[email protected]>
Substitute @retnet.co.uk for your own domain name (leave the username as it is, unless you actually have a user called that.... in which case change it to a user that doesn't exist).
Right there you should see a 450 error, with postfix not accepting the recipient's name. If the e-mail is
Page 91 of 96
accepted, try telneting into your company e-mail server directly and doing the same thing. If it replies with a 250 OK repsponse, the e-mail server vendor should be ashamed... There are other ways around it, including pulling down a list of users from an LDAP source but this is way outside the scope of this guide. If you want to use LDAP or any other type of database lookup for valid e-mail addresses, checkout the postfix website at http://www.postfix.org
Tighter control over attachment filtering
File attachment filtering is performed by Amavisd, and this is one area that Maia Mailguard only supports being enabled or not and what to do when they are caught.
If you want to change the types of files caught from the default set, then you will need to modify /etc/amavisd.conf
Scroll down to the $banned_filename section then edit to your heart's desire.
Be sure to re-start Amavisd by running /etc/init.d/amavis restart in a terminal console.
Blocking e-mail delivery to local users of the gateway
Because this is a gateway, no one should ever be trying to send e-mail to locally setup users on the box itself. By getting rid of local e-mail delivery to the gateway makes it harder to break.
In /etc/sysconfig/postfix add to the end of the file
POSTFIX_ADD_MYDESTINATION = ””POSTFIX_ADD_LOCAL_RECIPIENT_MAPS = ””POSTFIX_ADD_LOCAL_TRANSPORT = error: local mail delivery is disabled
Save that file, now open /etc/postfix/master.cf and comment out the local delivery agent line, to look like
#local unix - n n - - local
Save and close the file and in a terminal console run
SuSEconfig
Setting a lower spam threshold
SpamAssassin has very good default settings, but still errs on the side of caution. Some specially crafted spam messages are designed to come in just under the default score of 5.000.
Because Maia doesn't automatically reject spam, but instead quarantines it, you can be safe in tweaking the spam catch score setting in Maia.
To do this, in Maia Mailguard edit the options Consider mail 'spam' when Score is >= and Quarantine spam when Score is >= in your System Default domain (.@), local domain and your own personal e-mail account settings.
Note in the current release of Maia Mailguard that the quarantine level will always be matched to the spam level when quarantining is enabled. These settings can only be different if the labeling option is set.
Page 92 of 96
BCC copies of e-mail to another address
Useful for security or HR/IT investigations, these options will add another address to the e-mail as a BCC so the original sender and recipient has no idea it's being done.
** Note that if any error is generated when trying to send the e-mail to the BCC recipient, the original sender will get a bounce message.
Edit /etc/sysconfig/postfix and add them like this:
# Send a copy of every e-mail generated to another addressPOSTFIX_ADD_ALWAYS_BCC = [email protected]
# Send a copy of every e-mail matching the senderPOSTFIX_ADD_SENDER_BCC_MAPS = 'hash:/etc/postfix/sender_bcc_maps'
# Send a copy of every e-mail matching the recipientPOSTFIX_ADD_RECIPIENT_BCC_MAPS = 'hash:/etc/postfix/recipient_bcc_maps'
The sender_bcc_maps and recipient bcc_maps use a lookup file to match an address then send to it's corresponding bcc'd address. Note that neither address needs to be on your local domain, so you can match an external sender or recipient address.
You will need to create the files yourself as they do not exist by default, and don't include the .db extension.
An example would be if you wanted to receive a copy of all e-mail sent from [email protected] .
Create the file /etc/postfix/sender_bcc_maps and in it put something like:
# This lookup table is used to match sender addresses then send a bcc'd copy# to a matching address.
[email protected] [email protected]
Once you've created the file, save it then run
postmap /etc/postfix/sender_bcc_maps
which will create a hashed index table version of the same file and give it a /db extension.
Now edit /etc/postfix/master.cf and add the sender_bcc_maps option as described above
To finish off, reload postfix with the new changes by runningpostfix reload
To read more about these or any other setting, visit http://www.postfix.org and search for those terms on the front page to find the relevant documentation.
Page 93 of 96
Reducing resource requirements on low end computers
If your server has less than 384 Mb RAM, you may want to also reduce the number of amavisd-maia processes that run concurrently to save on system resources. To do this, reduce the $max_servers setting from it's default of 2 down to 1 in the amavisd.conf file. If you do this it is assumed you're not processing anywhere near 30,000 e-mails per day, given you're setting this system up on such a low end box.
Increasing scanning throughput
One way is to increase the number of scanning threads in amavisd-maia.
To do this, increase the $max_servers setting in /etc/amavisd.conf and restart amavisd.
Also you will need to change the postfix maxproc setting in /etc/postfix/master.cf on the smtpd line that uses amavisd.
# ==========================================================================# service type private unpriv chroot wakeup maxproc command + args# (yes) (yes) (yes) (never) (100)# ==========================================================================smtp inet n - n - 2 smtpd -o content_filter=smtp:[127.0.0.1]:10024
In the above example, maxproc is set to 2. This setting tells postfix how many SMTP connections to use. If the maxproc setting is smaller than the $max_servers setting in amavisd.conf you're just wasting resources as postfix will never send more than 2 e-mails at a time to amavisd and amavisd will always have many unused threads.
On a busy system you can ramp this up to say 50 so at worst imcoming e-mail will simply queue up waiting to be dealt with by amavisd-maia. If you need to support 100 simultaneous incoming connections, then your system is large scale enough to warrant buying a book on postfix for enterprise installations and read it cover to cover to understand the consequences of what you're about to do.
After the change to master.cf, restart postfix with
postfix reload
Another but slightly more risky option is to setup a RAM drive and mount it as the temporary storage area used by amavisd-maia (/var/spool/amavis/tmp). Because there can be a lot of disk spooling going on, especially with 15 or more amavisd-maia processes running, doing this on higher loaded sites can show a huge performance increase, but requires plenty of extra memory.
I've never set one of these up, so if you're interested hop on over to the SuSE support forums at http://support.novell.com/forums/ for some helpful advice.
Administering Maia Mailguard with maiadbtool.pl
Designed as a multi-purpose tools for administrating Maia Mailguard without using the web interface, it can be used to script mass changes along with performing some database maintenance if you need to work with Bayes or AWL tables.
Check the Maia Mailguard website for more details.
Page 94 of 96
Basic Troubleshooting
It's all in the log files....
Every problem from e-mail delivery due to incorrect settings or network problems to troubleshooting a particular spam score can always be found in the logs.
The single most used part of all troubleshooting is the postfix mail log, located at /var/log/mail.
You can search the file easily using a basic command like:
cat /var/log/mail | grep [email protected]
to find all matching lines with [email protected] in them.
This log file also has information on scores applied by ClamAV, Freshclam (database updater) messages and amavisd.
Debugging
You can also turn up debugging in the following:
Amavisd-maia:– Increase the $log_level= setting in /etc/amavisd.conf to 5, re-start the amavis service by
running /etc/init.d/amavis restart then check your /var/log/mail log file.
– Stop the amavisd-maia service by running /etc/init.d/amavis stop
– Run amavisd manually using su – vscan -c amavisd debug
This puts amavisd into full debugging mode and you'll see lots of info on stdout (your terminal screen)
– To debug exactly what SpamAssassin is doing, and the associated scores it assigns to an e-mail, run amavis using su – vscan -c amavisd debug-sa
Postfix:– First backup your /etc/postfix/main.cf file by running
cp /etc/postfix/main.cf /etc/postfix/maincf.orig
– Now edit main.cf and add the line debug_peer_list = some.domainwhere some.domain is the domain you want to debug.This can also be an IP address or some other pattern.
Mailq and qshape tools
Postfix has 2 great tools, one called mailq and another called qshape.
The mailq utility will display details of e-mails in the active or deferred queues, including which directory it's in, it's size and the sender's e-mail address. Just run mailq in a terminal and check the results that are displayed.
Page 95 of 96
The qshape utility displays a table sorted by the destination domain with the largest number of e-mails and shows how long and how many e-mails are sitting in your mail queues (by default the active and deferred queues).
Finding this great utility in SuSE actually takes a little more digging as it's not in any of the 'standard' directories so I suggest you create a link to it in one of the more normal directories in Linux, by running:ln /usr/share/doc/packages/postfix/auxiliary/qshape/qshape.pl /usr/sbin/qshapechmod +x /usr/sbin/qshape
Just run qshape in a terminal and check out the results.
To read more about mailq and qshape, visit http://www.postfix.org and search for those terms on the front page to find the relevant documentation.
SpamAssassin and the ALL_TRUSTED score being incorrectly added
SpamAssassin will automatically try to work out if the Received headers in an e-mail were added by a mail server on your network or not. Sometimes it gets this wrong, so you may see some spam e-mails that have an ALL_TRUSTED negative score against them, or worse, spam that has made it through because the negative score reduced the total e-mail score below your thresholds.
To overcome this issue, you can manually tell SpamAssassin what hosts and/or networks can be trusted.
To do this, edit your /etc/mail/spamassassin/local.cf file and edit the following option:
trusted_networks 192.168.0.1 192.168.1.0/24
The above example will trust the host 192.168.0.1 and all hosts on the C-class network of 192.168.1.0.
Defining this setting ensures that no other hosts will be trusted and you will not get all all_trusted score for any e-mail coming in from any other hosts or networks.
You can visit this URL for more reading regarding this setting:
http://wiki.apache.org/SpamAssassin/TrustPath
Websites for more help
Also check out the websites for the software you're having a problem with, most of which have searchable archives of their mailing list as well as FAQ's and their own full documentation.
Links are back at the start of this document.
Well I hope even if you didn't follow it to the letter, that you have a slightly better understanding of this setup which is fairly common or at least you've been able to glean something of use from this.
Oh, and don't forget you can always e-mail me!
Page 96 of 96
Related Documents


![Administration(SLES10) 2[www informatica-practica es mw]](https://static.cupdf.com/doc/110x72/5571f17d49795947648b4e1c/administrationsles10-2www-informatica-practica-es-mw.jpg)


