SigmaSystemCenter 2.1 Configuration Guide - Fourth Edition -

Welcome message from author
This document is posted to help you gain knowledge. Please leave a comment to let me know what you think about it! Share it to your friends and learn new things together.
Transcript
SigmaSystemCenter 2.1
Configuration Guide
- Fourth Edition -
Copyright (C) NEC Corporation 2003-2009. All rights reserved.
Disclaimer of Warranty All the information, text, graphics, links or other items contained within this document is provided by copyright law. All Rights Reserved. No part of this document may be reproduced or transmitted without permission of NEC. NEC may make changes to this document, at any time without notice. NEC assumes no responsibility for errors or omissions in this document. THIS DOCUMENT IS PROVIDED "AS IS" WITHOUT WARRANTY OF ANY KIND, EITHER EXPRESS OR IMPLIED, INCLUDING WITHOUT LIMITATION THE IMPLIED WARRANTIES OF MERCHANTABILITY, FITNESS FOR A PARTICULAR PURPOSE AND NON-INFRINGEMENT. NEC does not warrant the accuracy or completeness of this document.
Trademark Information Microsoft, Windows, Windows Server, Microsoft Internet Explorer, SQL Server, and Hyper-V are either registered trademarks or trademarks of Microsoft Corporation in the United States and/or other countries. Linux is a registered trademark or trademark of Linus Torvalds in the United States and/or other countries. SUSE is a registered trademark or trademark of Novell, Inc., in the United States and/or other countries. Red Hat is a registered trademark or trademark of Red Hat, Inc. in the United States and/or other countries. Intel, Pentium, Itanium, and Xeon are trademarks of Intel Corporation in the U.S. and other countries. AMD is a trademark of Advanced Micro Devices, Inc. EMC, Symmetrix, CLARiiON, and Navisphere are registered trademarks of EMC Corporation in the United States and other countries. VMware, ESX, ESXi, and VMotion are registered trademarks or trademarks of VMware, Inc. in the United States and other countries. Xen, Citrix, XenServer, and XenCenter are registered trademarks or trademarks of Citrix Systems, Inc. PXE Software Copyright (C) 1997 - 2000 Intel Corporation. Copyright (C) 2005, 2007, ALAXALA Networks Corporation. All rights reserved. (C) 1992-2007 Cisco Systems Inc. All rights reserved. Foundry Networks, FastIron, ServerIron and the 'Iron' family of marks are trademarks or registered trademarks of Foundry Networks, Inc. in the United Status and other countries. BIG-IP is a registered trademark of F5 Networks, Inc. in the United States and/or other countries. InstallShield is a registered trademark and service mark of Macrovision Corporation and/or Macrovision Europe Ltd. in the United States and/or other countries. Java and all Java related trademarks are registered trademarks of Sun Microsystems, Inc. in the United States and other countries. This product includes software developed by the Apache Software Foundation. This product contains JRE (Java Runtime Environment), which is distributed by Sun Microsystems, Inc. without charge, and Tomcat, which is distributed by Apache Software Foundation without charge. Use these products after accepting their license agreements. For details of copyright and ownership rights, refer to the following license files: Tomcat: folder where Tomcat is installed\LICENSE JRE: folder where JRE is installed\LICENSE

Some icons used in this program are based on Silk Icons released by Mark James under a Creative Commons Attribution 2.5 License. Visit http://www.famfamfam.com/lab/icons/silk/ for more details. All other brands and products used in this document are the trademarks or registered trademarks of their respective trademark holders. The (R) and TM marks are not explicitly in this document.

iii
Contents Preface.................................................................................................................................... ix
How to Use This Manual....................................................................................................................... ix Manual Organization............................................................................................................................. ix SigmaSystemCenter Manuals .............................................................................................................. x Document Conventions......................................................................................................................... xii
1. Preparing Before Setting up the System...................................................................... 3 1.1. Starting, Restarting, and Stopping SystemProvisioning .......................................................... 4
1.1.1.Starting SystemProvisioning..................................................................................................................... 4 1.1.2.Restarting SystemProvisioning................................................................................................................. 4 1.1.3.Stopping SystemProvisioning................................................................................................................... 4
1.2. Starting the Web Console and Logging In to SigmaSystemCenter......................................... 5 1.2.1.Starting the Web Console......................................................................................................................... 5 1.2.2.Logging in to SigmaSystemCenter ........................................................................................................... 7 1.2.3.If You Log in to SigmaSystemCenter for the First Time............................................................................ 8
1.3. Understanding Basic Operations on the Web Console ........................................................... 9 1.3.1.Operations by the Web Console............................................................................................................... 9 1.3.2.Maintenance Operations .......................................................................................................................... 11 1.3.3. Views....................................................................................................................................................... 12 1.3.4.Dashboard................................................................................................................................................ 13 1.3.5.Enable Popup Message ........................................................................................................................... 14
1.4. Registering License Keys ........................................................................................................ 15 1.5. Adding a SystemProvisioning User.......................................................................................... 16 1.6. Configuring the Environment ................................................................................................... 17
1.6.1.Configuring the Setting of Collecting the Configuration Information ......................................................... 17 1.6.2.Configuring the Mail Reporting ................................................................................................................. 18 1.6.3.Recording Notifications to Event Log........................................................................................................ 19 1.6.4.Configuring the Log Output ...................................................................................................................... 20 1.6.5.Configuring the Information of a Virtual Resource.................................................................................... 21 1.6.6.Configuring the Root Password of a Virtual Machine Server.................................................................... 22 1.6.7.Changing the Setting for Dashboard ........................................................................................................ 23 1.6.8.Configuring the Information of Compatible NEC ESMPRO Manager ....................................................... 24 1.6.9.Changing the NEC ESMPRO Manager Retry Count and Interval ............................................................ 25
2. Advanced Setting of Compatible Products.................................................................. 27 2.1. About Advanced Setting of Compatible Products.................................................................... 28 2.2. Configuring Settings for a Switch............................................................................................. 29
2.2.1.Registering a Switch to MasterScope Network Manager.......................................................................... 30 2.2.2.Configuring the Login Management for a Switch in MasterScope Network Manager ............................... 32 2.2.3.Configuring the Initial Setting for a Switch Blade...................................................................................... 35
2.3. Configuring Setting for a Load Balancer.................................................................................. 36 2.3.1.Registering a Load Balancer to MasterScope Network Manager ............................................................. 36 2.3.2.Configuring the Login Management for a Load Balancer in MasterScope Network Manager .................. 36
2.4. Configuring the Setting for Storage.......................................................................................... 37 2.4.1.Preparing Storage .................................................................................................................................... 37 2.4.2.Considering the Drive Letter Setting of Partition and Volume................................................................... 39
2.5. Configuring the Setting for Monitoring Performance by System Monitor - Performance Monitoring Services ................................................................................................................. 41
2.5.1.Configuring the User Account on a Monitored Machine ........................................................................... 41 2.5.2.Configuring a Management Server in System Monitor - Performance Monitoring Services (For
the First Time Only) ....................................................................................................................... 42 2.5.3.Configuring Connection Settings in System Monitor - Performance Monitoring Services......................... 44 2.5.4.Adding a Group in System Monitor - Performance Monitoring Services................................................... 45 2.5.5.Adding a Monitored Machine in System Monitor - Performance Monitoring Services .............................. 46 2.5.6.Configuring Threshold Monitoring and Alert Settings in System Monitor - Performance
Monitoring Services ....................................................................................................................... 48

iv
2.6. Configuring the Setting for Sending Failure Events From the Managed Machine...................53 2.6.1.Configuring the Setting on a Machine Running Windows..........................................................................53 2.6.2.Configuring the Setting on a Machine Running Linux ...............................................................................57
2.7. Configuring DPM......................................................................................................................60 2.7.1.Starting DPM Web Console ......................................................................................................................61 2.7.2.Registering Management Server for DPM.................................................................................................62 2.7.3.Registering a Managed Machine to DPM..................................................................................................63 2.7.4.Registering a Virtual Machine Server or Virtual Machine to DPM .............................................................67
2.8. Creating a Scenario Using a Master Machine in DPM ............................................................69 2.8.1.Creating a Master Machine Installing Windows OS ..................................................................................70 2.8.2.Creating a Master Machine Using an Existing Machine (Windows OS) ....................................................71 2.8.3.Creating a Master Machine Installing Linux OS ........................................................................................73 2.8.4.Creating a Master Machine Using an Existing Machine (Linux OS) ..........................................................74 2.8.5.Preparing for Backing up the Master Machine ..........................................................................................76 2.8.6.Creating a Backup Scenario File...............................................................................................................78 2.8.7.Creating a Restoration Scenario File.........................................................................................................81
2.9. Preparing for the Use of VMware.............................................................................................84 2.9.1.Setting Up the VMware Environment ........................................................................................................84
2.10. Creating a Template Using a Master VM in VirtualCenter.......................................................85 2.10.1.Creating a Master VM in VirtualCenter....................................................................................................85 2.10.2.Creating a Template in VirtualCenter ......................................................................................................86
2.11. Preparing for the Use of Xen....................................................................................................87 2.11.1.Setting Up the Xen Environment .............................................................................................................87
2.12. Creating a Template Using a Master VM in XenCenter...........................................................88 2.12.1.Creating a Master VM in XenCenter .......................................................................................................88 2.12.2.Creating a Template in XenCenter ..........................................................................................................89
2.13. Preparing for the Use of ESXi ..................................................................................................90 2.13.1.Creating a Master VM on ESXi ...............................................................................................................90
2.14. Preparing for the Use of Hyper-V.............................................................................................92 2.14.1.Creating a Master VM on Hyper-V ..........................................................................................................92
2.15. Preparing for the Use of Out-of-Band (OOB) Management.....................................................94 2.15.1.Configuring IP Address of BMC ..............................................................................................................94 2.15.2.Creating Administrator Account in BMC..................................................................................................94 2.15.3.Checking the Setting of Firewall ..............................................................................................................94
3. Registering Resources to SigmaSystemCenter...........................................................97 3.1. Registration of Resources to SigmaSystemCenter..................................................................98 3.2. Adding a Subsystem ................................................................................................................99
3.2.1.Adding VMware VirtualCenter as a Subsystem.........................................................................................100 3.2.2.Adding XenServer Pool Master as a Subsystem.......................................................................................101 3.2.3.Adding DPM as a Subsystem....................................................................................................................102 3.2.4.Adding MasterScope Network Manager as a Subsystem .........................................................................103 3.2.5.Adding a Switch Blade as a Subsystem....................................................................................................104 3.2.6.Adding a Storage Management Server as a Subsystem...........................................................................105
3.3. Registering a Switch ................................................................................................................106 3.3.1.Registering a Switch..................................................................................................................................106 3.3.2.Registering a Switch Blade .......................................................................................................................107 3.3.3.Adding a VLAN..........................................................................................................................................108
3.4. Registering a Load Balancer....................................................................................................109 3.4.1.Registering a Load Balancer .....................................................................................................................109 3.4.2.Adding a Load Balancer Group .................................................................................................................110
3.5. Registering Storage .................................................................................................................112 3.5.1.Registering a Disk Array (For NEC Storage and Symmetrix) ....................................................................113 3.5.2.Registering a Disk Array (For CLARiiON) .................................................................................................114 3.5.3.Registering a Disk Volume ........................................................................................................................116 3.5.4.Configuring a Shared Disk ........................................................................................................................117
3.6. Registering a Machine .............................................................................................................118 3.6.1.About Registering a Machine ....................................................................................................................118 3.6.2.Adding a Resource Group.........................................................................................................................119 3.6.3.Registering a Machine...............................................................................................................................120
3.7. Managing ESXi and Hyper-V ...................................................................................................121 3.7.1.Creating a Virtual Manager .......................................................................................................................121 3.7.2.Adding a Virtual Machine Server...............................................................................................................122
v
3.8. Enabling Power Control Function by Out-of-Band (OOB) Management ................................. 124 3.8.1.Enabling Power Control Function by Out-of-Band (OOB) Management................................................... 124
3.9. Creating a Policy ...................................................................................................................... 125 3.9.1.Standard Policy ........................................................................................................................................ 125 3.9.2.Creating a Policy ...................................................................................................................................... 126 3.9.3.Adding a Policy......................................................................................................................................... 127 3.9.4.Copying an Existing Policy ....................................................................................................................... 128 3.9.5.Configuring Policy Property Settings ........................................................................................................ 130 3.9.6.Configuring Event Handler Settings of a Policy Monitoring Event ............................................................ 131 3.9.7.Importing and Exporting a Policy.............................................................................................................. 134
3.10. Preparing Distribution Software ............................................................................................... 135 3.10.1.Checking a Scenario That Can Be Used From SystemProvisioning ...................................................... 135 3.10.2.Checking a Template That Can Be Used From SystemProvisioning...................................................... 136 3.10.3.Adding a Local Script.............................................................................................................................. 137
3.11. Configuring Machine Properties............................................................................................... 138 3.11.1.Configuring Settings on the General Tab ............................................................................................... 139 3.11.2.Configuring Settings on the Network Tab ............................................................................................... 140 3.11.3.Configuring Settings on the Storage Tab................................................................................................ 142 3.11.4.Configuring Settings on the Software Tab .............................................................................................. 143 3.11.5.Checking the Installed Software Tab...................................................................................................... 144
4. Creating an Operation Group ........................................................................................ 145 4.1. Adding a Category ................................................................................................................... 146 4.2. Configuring the Access Authority............................................................................................. 147
4.2.1.Adding a Role........................................................................................................................................... 147 4.2.2.Configuring the Authority Target to a Role ............................................................................................... 148 4.2.3.Allocating a Role to a User ....................................................................................................................... 149
4.3. Adding an Operation Group ..................................................................................................... 150 4.4. Configuring Group Properties .................................................................................................. 151
4.4.1.Configuring Settings on the General Tab ................................................................................................. 152 4.4.2.Configuring Settings on the Model Tab .................................................................................................... 153 4.4.3.Configuring Settings on the Host Tab....................................................................................................... 154 4.4.4.Configuring Settings on the Software Tab ................................................................................................ 156 4.4.5.Configuring Settings on the VLAN Setting Tab......................................................................................... 158 4.4.6.Configuring Settings on the LB Setting Tab.............................................................................................. 159 4.4.7.Configuring Settings on the OS Setting Tab (Windows) ........................................................................... 160 4.4.8.Configuring Settings on the OS Setting Tab (Linux) ................................................................................. 161 4.4.9.Configuring Settings on the ESMPRO/SM Tab ........................................................................................ 162
4.5. Configuring Model Properties (For a Physical Machine) ......................................................... 163 4.5.1.Configuring Settings on the General Tab ................................................................................................. 164 4.5.2.Configuring Settings on the Software Tab ................................................................................................ 165
4.6. Configuring Model Properties (For a Virtual Machine)............................................................. 166 4.6.1.Configuring Settings on the General Tab ................................................................................................. 167 4.6.2.Configuring Settings on the Software Tab ................................................................................................ 169 4.6.3.Configuring Settings on the Network Tab ................................................................................................. 169
4.7. Configuring Model Properties (For a Virtual Machine Server)................................................. 170 4.7.1.Configuring Settings on the General Tab ................................................................................................. 171 4.7.2.Configuring Settings on the Software Tab ................................................................................................ 172 4.7.3.Configuring Settings on the VM Optimized Placement Tab (With a Virtual Machine Server) ................... 172
4.8. Configuring the Host Setting .................................................................................................... 173 4.8.1.Configuring Settings on the General Tab ................................................................................................. 174 4.8.2.Configuring Settings on the Network Tab ................................................................................................. 175 4.8.3.Configuring Settings on the Storage Tab.................................................................................................. 176 4.8.4.Configuring Settings on the Software Tab ................................................................................................ 178
5. Settings to Manage and Operate Virtual Environment................................................ 179 5.1. Creating a Virtual Machine....................................................................................................... 180
5.1.1.About How to Create a Virtual Machine.................................................................................................... 180 5.1.2.Creating a Virtual Machine Using the Full Clone Method ......................................................................... 182 5.1.3.Creating a Virtual Machine Using the HW Profile Clone Method.............................................................. 183 5.1.4.Creating a Virtual Machine Using the Linked Clone Method .................................................................... 185 5.1.5.Creating a Virtual Machine Using the Disk Clone Method ........................................................................ 186
5.2. Creating a Template ................................................................................................................ 188

vi
5.2.1.Creating a Full Clone Template.................................................................................................................189 5.2.2.Creating a HW Profile Clone Template .....................................................................................................191 5.2.3.Creating a Linked Clone Template............................................................................................................192 5.2.4.Creating a Disk Clone Template ...............................................................................................................194
5.3. Configuring to Use the VM Optimized Placement Function.....................................................195 5.3.1.Managing a Virtual Machine Server in a Group.........................................................................................195 5.3.2.Configuring the VM Server Model .............................................................................................................196 5.3.3.Configuring System Monitor - Performance Monitoring Services ..............................................................197 5.3.4.To Use the Power Save Function..............................................................................................................198
6. Operations for Managing a Machine in the Operations View......................................199 6.1. Adding a Machine to a Pool .....................................................................................................200 6.2. Activating a Machine in a Group ..............................................................................................201
6.2.1.Registering a Master Machine...................................................................................................................201 6.2.2.Allocating a Resource to a Host ................................................................................................................203 6.2.3.Creating a Virtual Machine and Activating the Machine in a Group ..........................................................206
6.3. Scale Out..................................................................................................................................209 6.4. Scale In ....................................................................................................................................210 6.5. Changing the Usage of a Machine...........................................................................................211 6.6. Replacing a Machine................................................................................................................213 6.7. Distributing Specified Software to a Machine ..........................................................................214 6.8. Redistributing Software ............................................................................................................216
7. Operations for Managing a Machine in the Virtual View .............................................219 7.1. Moving a Virtual Machine Server .............................................................................................220 7.2. Creating a Virtual Machine in the Virtual View.........................................................................221 7.3. Moving Virtual Machine............................................................................................................222 7.4. Connecting to a Virtual Machine Console................................................................................227 7.5. Shifting the Operation of ESXi .................................................................................................230
7.5.1.Shifting the Environment From Standalone to VirtualCenter .....................................................................230 7.5.2.Shifting the Environment From VirtualCenter to Standalone .....................................................................231 7.5.3.Recovering Configuration Inconsistence of a Virtual Machine Server Recovered From Failure
and a Destination Virtual Machine Server After Failing Over in the Standalone ESXi Environment ...................................................................................................................................232
8. Maintenance ....................................................................................................................237 8.1. Operations for Maintenance.....................................................................................................238
8.1.1.Starting, Restarting, and Stopping SystemProvisioning ............................................................................238 8.1.2.Starting, Restarting, Shutting Down, or Suspending a Machine................................................................239 8.1.3.Setting in the Maintenance Mode and Releasing the Maintenance Mode.................................................240 8.1.4.Clearing the Hardware Status of a Machine From Faulted to Ready ........................................................241 8.1.5.Resetting Job Result .................................................................................................................................242 8.1.6.Executing Power ON, Power OFF, Reset to a Machine............................................................................243 8.1.7.Changing a Group of a Host (for Virtual Groups Only) ..............................................................................245
8.2. Adding a Managed Machine After Starting Operation in SigmaSystemCenter .......................247 8.2.1.Adding a Physical Machine .......................................................................................................................247 8.2.2.Adding a Virtual Machine Server...............................................................................................................248 8.2.3.Registering a Created Virtual Machine......................................................................................................249
8.3. Distributing an Additional Application and Applying a Patch to a Machine..............................251 8.3.1.Distributing an Additional Application to a Machine...................................................................................251 8.3.2.Applying a Patch to a Machine..................................................................................................................253
8.4. Checking Failed Status ............................................................................................................255 8.4.1.Dashboard.................................................................................................................................................255 8.4.2.Event Viewer .............................................................................................................................................256 8.4.3.Checking Failed Status of a Managed Machine ........................................................................................256 8.4.4.Checking Job Execution Status.................................................................................................................258
8.5. Exchanging Hardware..............................................................................................................260 8.5.1.Exchanging a NIC Other Than a Primary NIC...........................................................................................260 8.5.2.Exchanging a Primary NIC ........................................................................................................................261 8.5.3.Exchanging a Machine..............................................................................................................................263 8.5.4.Exchanging a Disk ....................................................................................................................................264 8.5.5.Exchanging an HBA ..................................................................................................................................264

vii
8.5.6.Adding a Switch Blade.............................................................................................................................. 267 8.5.7.Exchanging a Switch Blade ...................................................................................................................... 268 8.5.8.Deleting a Switch Blade............................................................................................................................ 268 8.5.9.Adding a MasterScope Network Manager Switch .................................................................................... 269 8.5.10.Exchanging a MasterScope Network Manager Switch ........................................................................... 270 8.5.11.Deleting a MasterScope Network Manager switch ................................................................................. 270 8.5.12.Exchanging a Disk on an ESX................................................................................................................ 271 8.5.13.Exchanging a Device on an ESX Other Than a Hard Disk ..................................................................... 273 8.5.14.Exchanging a Disk on a XenServer ........................................................................................................ 274 8.5.15.Exchanging a Device on a Xen Server Other Than a Hard Disk ............................................................ 275 8.5.16.Changing the Connection Between a NIC and a Switch......................................................................... 276
8.6. Extracting Logs ........................................................................................................................ 277 8.6.1.Extracting SystemProvisioning Log .......................................................................................................... 277 8.6.2.Extracting System Monitor - Performance Monitoring Services Log......................................................... 278 8.6.3.Extracting DPM Log.................................................................................................................................. 278 8.6.4.Extracting NEC ESMPRO Manager Log .................................................................................................. 282
9. Backup and Restoration ................................................................................................ 283 9.1. Backup Plan ............................................................................................................................. 284
9.1.1.Management Server ................................................................................................................................. 284 9.1.2.Managed Machine .................................................................................................................................... 284
9.2. Backing up and Restoring SystemProvisioning ....................................................................... 285 9.2.1.Backing up SystemProvisioning ............................................................................................................... 286 9.2.2.Restoring SystemProvisioning.................................................................................................................. 287
9.3. Backing up and Restoring System Monitor - Performance Monitoring Services..................... 288 9.3.1.Backing up System Monitor - Performance Monitoring Services.............................................................. 288 9.3.2.Restoring System Monitor - Performance Monitoring Services ................................................................ 289
9.4. Backing up and Restoring DPM............................................................................................... 291 9.4.1.Backing up Data of DPM When Configuring the Initial Setup or Changing the Configuration .................. 291 9.4.2.Backing up Data Updated When Operating DPM..................................................................................... 292 9.4.3.Restoring DPM ......................................................................................................................................... 295
9.5. Backing up and Restoring NEC ESMPRO Manager ............................................................... 298 9.5.1.Backing up NEC ESMPRO Manager........................................................................................................ 298 9.5.2.Restoring NEC ESMPRO Manager .......................................................................................................... 300
Appendix A Revision History .......................................................................................... 303

ix
Preface
How to Use This Manual The SigmaSystemCenter Configuration Guide is intended for system administrators who configure the whole system after installation and who operate and maintain the system after the configuration. Actual operational flow is used to explain the process from the configuration after installation to the operating procedures. This manual also explains the maintenance process.
Manual Organization Part I Environment Setup and Configuration 1 "Preparing Before Setting up the System": Explains the initial setting, standard operations, and environment setting of SigmaSystemCenter. 2 "Advanced Setting of Compatible Products": Explains the advanced configuration of linked products used by SigmaSystemCenter. Part II Start Operation in SigmaSystemCenter 3 "Registering Resources to SigmaSystemCenter": Explains the procedure to register compatible products to SigmaSystemCenter. 4 "Creating an Operation Group": Explains the operations to create an operation group in SigmaSystemCenter. 5 "Settings to Manage and Operate Virtual Environment": Explains how to manage and operate a virtual environment in SigmaSystemCenter. 6 "Operations for Managing a Machine in the Operations View": Explains the operations to manage a machine in the Operations view in SigmaSystemCenter. 7 "Operations for Managing a Machine in the Virtual View": Explains the operations to manage a machine in the Virtual view. Part III Maintenance 8 "Maintenance": Explains the necessary information for the maintenance of SigmaSystemCenter. 9 "Backup and Restoration": Explains the methods of backup and restore during operation of SigmaSystemCenter. Appendix Appendix A "Revision History"

x
SigmaSystemCenter Manuals The manuals of SigmaSystemCenter are configured for the various products and components as follows. In this manual, each of the following manuals is described as "How Manuals Are Called in This Manual."
Products or Components
Manuals How Manuals Are Called in This Manual
SigmaSystemCenter 2.1 First Step Guide SigmaSystemCenter First Step Guide
SigmaSystemCenter 2.1 Installation Guide SigmaSystemCenter Installation Guide
SigmaSystemCenter 2.1 Configuration Guide
SigmaSystemCenter Configuration Guide
SigmaSystemCenter 2.1
SigmaSystemCenter 2.1 Reference Guide SigmaSystemCenter Reference Guide
NEC ESMPRO Manager 4.42
NEC ESMPRO Manager User’s Guide NEC ESMPRO Manager User’s Guide
DeploymentManager System Introduction Ver.5.2
DeploymentManager System Introduction
DeploymentManager (Basic) User’s Guide Ver.5.2
DeploymentManager Basic User’s Guide
DeploymentManager (Advanced) User’s Guide Ver.5.2
DeploymentManager Advanced User’s Guide
DeploymentManager 5.21
DeploymentManager (PackageDescriber) User’s Guide Ver.5.2
DeploymentManager PackageDescriber User’s Guide
System Monitor - Performance Monitoring Services 4.1.1
System Monitor - Performance Monitoring Services User’s Guide
System Monitor - Performance Monitoring Services User’s Guide
Reference: All the latest SigmaSystemCenter manuals are available in the following URL. http://www.nec.co.jp/sigmasystemcenter/download_eng.html

xi
The information regarding product summery, installation, configuration, operation and maintenance of SigmaSystemCenter are included in the following four manuals. The purposes of the manuals are as follows. SigmaSystemCenter First Step Guide This manual is intended for users who use SigmaSystemCenter for the first time and explains the product summery, system design methods and operating environment. SigmaSystemCenter Installation Guide This manual is intended for system administrators who install, upgrade, or uninstall SigmaSystemCenter and explains how to. SigmaSystemCenter Configuration Guide This manual is intended for system administrators who configure the whole system after installation and who operate and maintain the system after the configuration. Actual operational flow is used to explain the process from the configuration after installation to the operating procedures. This manual also explains the maintenance process. SigmaSystemCenter Reference Guide This manual is intended for administrators of SigmaSystemCenter and explains its functions, the operational methods, information of maintenance and trouble shooting, and lists all the operating screens. This manual is a supplement to SigmaSystemCenter Installation Guide and SigmaSystemCenter Configuration Guide.

xii
Document Conventions In this manual, information that needs attention and references are described as follows:
Note: indicates caution notes, and supplementary explanation for functions, operations, and settings.
Reference: indicates why and where you should refer to. In addition, this manual uses the following document conventions.
Convention Used Item Example
Bold font Items that a user selects on a screen, short text input, screen names, short command-line commands, and command-line options
Type Exit and click Enter. User License Confirmation screen Use the –prt command. Use the /a option.
Italic font Book or manual titles, and variable names
Configuration Guide add GroupName
Quotation marks Chapter titles and default values See Chapter 9, "Add a Computer."
Monospace font (courier new)
Long text inputs, messages and command-line commands
Type the following text: Confidential–Class B

1
PPaarrtt II EEnnvviirroonnmmeenntt SSeettuupp aanndd CCoonnffiigguurraattiioonn
This section describes the advanced preparation procedures of the environment, configuration procedures, operation, and maintenance after the installation of SigmaSystemCenter. • 1 Preparing Before Setting up the System • 2 Advanced Setting of Compatible Products


3
1. Preparing Before Setting up the System
This chapter explains the initial setting, standard operations, and environment setting of SigmaSystemCenter. This chapter contains the following sections: • 1.1 Starting, Restarting, and Stopping SystemProvisioning..............................................4 • 1.2 Starting the Web Console and Logging In to SigmaSystemCenter.............................5 • 1.3 Understanding Basic Operations on the Web Console ...............................................9 • 1.4 Registering License Keys ......................................................................................... 15 • 1.5 Adding a SystemProvisioning User .......................................................................... 16 • 1.6 Configuring the Environment .................................................................................... 17

1 Preparing Before Setting up the System
SigmaSystemCenter 2.1 Configuration Guide 4
1.1. Starting, Restarting, and Stopping SystemProvisioning
This section provides starting, restarting and stopping methods of SystemProvisioning.
1.1.1. Starting SystemProvisioning
SystemProvisioning starts automatically when you start a management server. If you want to start SystemProvisioning manually, perform the following procedure.
1. Click the Start menu, and click Control Panel. From Control Panel, double-click Administrative Tools. From Administrative Tools, double-click Services to start the Services Snap-in.
2. From Services, right-click PVMService, and click Start. Starting SystemProvisioning completes.
1.1.2. Restarting SystemProvisioning
To restart SystemProvisioning, perform the following procedure.
1. Click the Start menu, and click Control Panel. From Control Panel, double-click Administrative Tools. From Administrative Tools, double-click Services to start the Services Snap-in.
2. From Services, right-click PVMService, and click Restart. Restarting SystemProvisioning completes.
1.1.3. Stopping SystemProvisioning
To stop SystemProvisioning, perform the following procedure.
1. Click the Start menu, and click Control Panel. From Control Panel, double-click Administrative Tools. From Administrative Tools, double-click Services to start the Services Snap-in.
2. From Services, right-click PVMService, and click Stop. Stopping SystemProvisioning completes.
Starting the Web Console and Logging In to SigmaSystemCenter
Part I Environment Setup and Configuration 5
1.2. Starting the Web Console and Logging In to SigmaSystemCenter
To operate the Web Console, you need to start and log in to the Web Console.
1.2.1. Starting the Web Console
To start the Web Console, perform the following procedure.
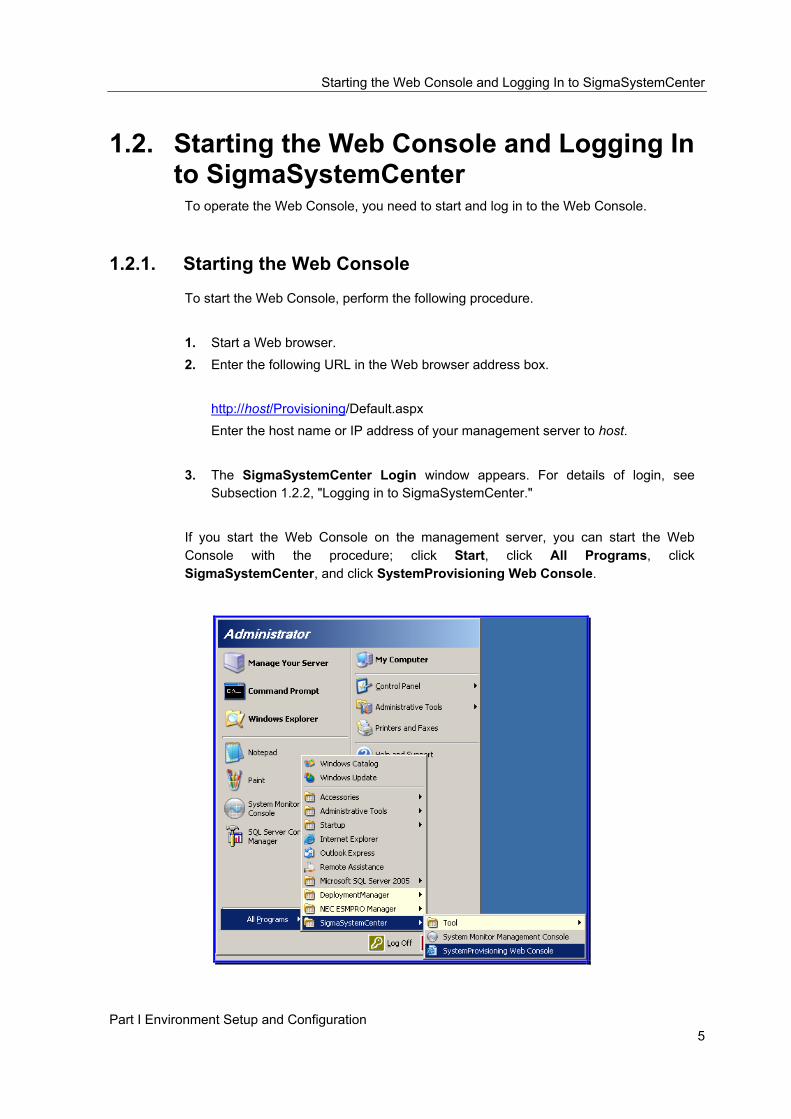
1. Start a Web browser. 2. Enter the following URL in the Web browser address box.
http://host/Provisioning/Default.aspx Enter the host name or IP address of your management server to host.
3. The SigmaSystemCenter Login window appears. For details of login, see Subsection 1.2.2, "Logging in to SigmaSystemCenter."
If you start the Web Console on the management server, you can start the Web Console with the procedure; click Start, click All Programs, click SigmaSystemCenter, and click SystemProvisioning Web Console.

1 Preparing Before Setting up the System
SigmaSystemCenter 2.1 Configuration Guide 6
Note: If you start the Web Console from the Start menu, the Web Console can be opened on an open browser. In that case, open another browser and open the page you need.
If the SigmaSystemCenter Login window is not displayed properly on Windows Server 2003, you need to recover ASP.NET, Perform the following procedure.
1. Open the Command Prompt window, From the Start menu, click All Programs, click Accessory, and then click Command Prompt to open the Command Prompt window.
2. Enter the following command: "%windir%\Microsoft.NET\Framework\v2.0.50727\aspnet_regiis.exe" –i
3. Press Enter. 4. Start the Web Console.
Starting the Web Console completes.
Starting the Web Console and Logging In to SigmaSystemCenter
Part I Environment Setup and Configuration 7
1.2.2. Logging in to SigmaSystemCenter
To log in to SigmaSystemCenter, perform the following procedure. SigmaSystemCenter manages users individually besides OS authentication to control users who can use SigmaSystemCenter. If you log in to SigmaSystemCenter for the first time, log in as an initial user explained in Subsection 1.2.3, "If You Log in to SigmaSystemCenter for the First Time."
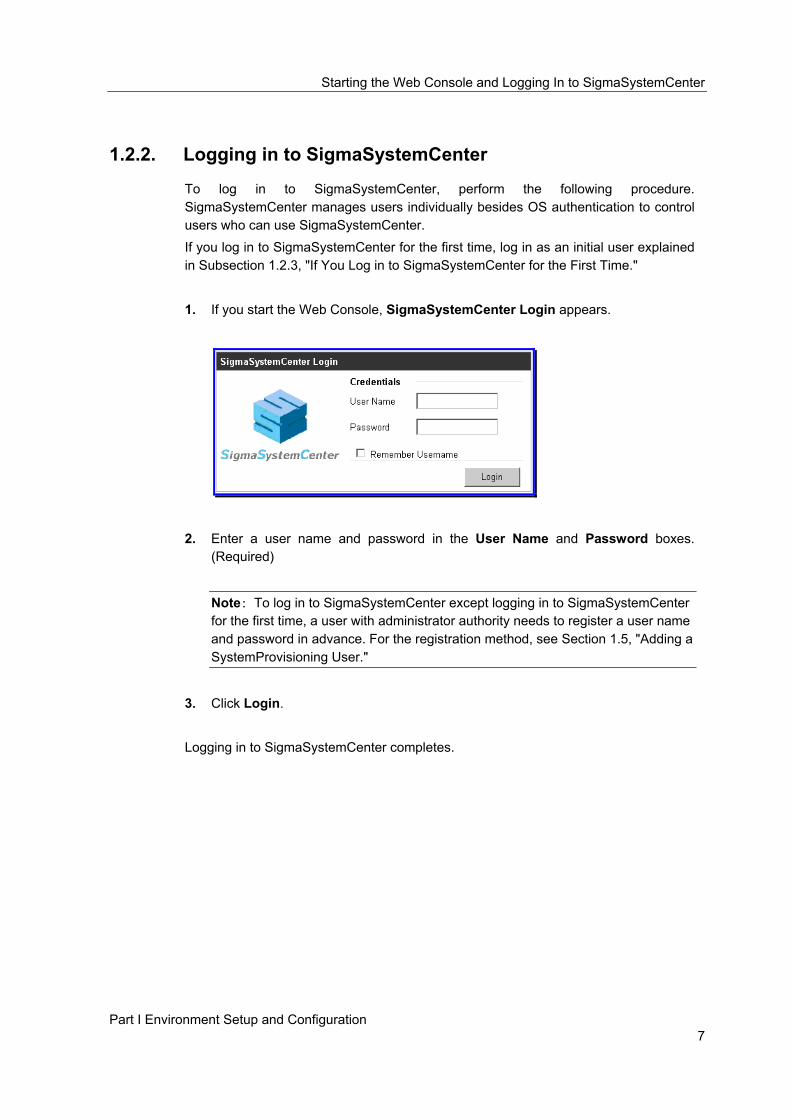
1. If you start the Web Console, SigmaSystemCenter Login appears.
2. Enter a user name and password in the User Name and Password boxes. (Required)
Note: To log in to SigmaSystemCenter except logging in to SigmaSystemCenter for the first time, a user with administrator authority needs to register a user name and password in advance. For the registration method, see Section 1.5, "Adding a SystemProvisioning User."
3. Click Login. Logging in to SigmaSystemCenter completes.
1 Preparing Before Setting up the System
SigmaSystemCenter 2.1 Configuration Guide 8
1.2.3. If You Log in to SigmaSystemCenter for the First Time
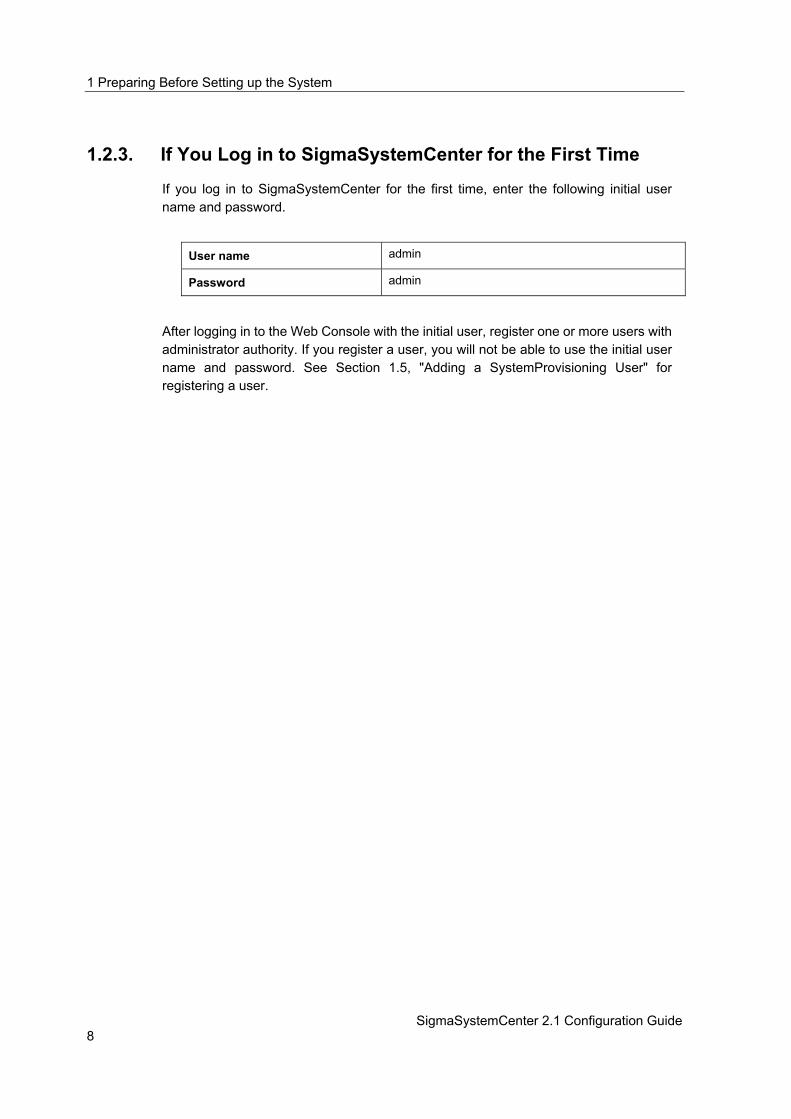
If you log in to SigmaSystemCenter for the first time, enter the following initial user name and password.
User name admin
Password admin
After logging in to the Web Console with the initial user, register one or more users with administrator authority. If you register a user, you will not be able to use the initial user name and password. See Section 1.5, "Adding a SystemProvisioning User" for registering a user.

Understanding Basic Operations on the Web Console
Part I Environment Setup and Configuration 9
1.3. Understanding Basic Operations on the Web Console
This section provides basic knowledge of the SystemProvisioning Web Console.
1.3.1. Operations by the Web Console
Using the Web Console, you can perform various operations, such as operating managed machines and managing groups The Web Console is composed of the following five elements.
(1) Title bar On the Web Console, the title bar is displayed all the time. The title bar is composed of the Search function, Main menu, and Account management function.
(1)
(2)
(3)
(4)
(5)

1 Preparing Before Setting up the System
SigmaSystemCenter 2.1 Configuration Guide 10
• Search function
You can search machines from here. For details, see Section 1.1, "Overview of the Web Console" in SigmaSystemCenter Web Console Reference Guide.
• Main menu By clicking these menus, you can change the view.
• Account management function You can change the password and log out.
(2) Tree view By clicking the main menu, you can change the Tree view. By clicking icons in the Tree view, detailed information, the Configuration menu, and Operation menu are displayed in the Main Window and you can precede operations from there.
(3) Main window This is the main window of SystemProvisioning. • Group box
Group box refers to the box to display details in the list format on the Main Window.
(4) Configuration menu and Operation menu These menus are for managing the settings of target resources. The menus differ according to the state of operations. Operations from the Configuration menu and Operation menu are performed for all the resources in the selected view in the tree view.
(5) Action menu The Action menu refers to the to the menu(s) or drop-down combo box under a group box, and the menu is for operating specified target resources. You can run the command by selecting the check box(es) of the resource(s) from the list in the group box displayed on the Main Window.

Understanding Basic Operations on the Web Console
Part I Environment Setup and Configuration 11
1.3.2. Maintenance Operations
For maintenance operations, such as Power ON and Power OFF to a management machine, SigmaSystemCenter provides a maintenance menu. The maintenance operations are displayed by clicking Show Maintenance Command on the Operation menu in the Operations view or Resource view. Since these operations need special attention, the back screen of the window turns yellow when you select one of these operations. To go back to the normal operation, click Hide Maintenance Command on the Configuration menu or at the lower right of the window.
Reference: For more details of the maintenance operations, see Subsection 8.1.6, "Executing Power ON, Power OFF, Reset to a Machine" or 8.1.7, "Changing a Group of a Host (for Virtual Groups Only)."

1 Preparing Before Setting up the System
SigmaSystemCenter 2.1 Configuration Guide 12
1.3.3. Views
SigmaSystemCenter provides five types of views. You can switch views by clicking menus on the Title bar. Purposes of each view are as follows:
Operations view This view is a main view for operations in SigmaSystemCenter.
Resource view In this view, you can register and manage resources, such as machines, storage, network devices, and software.
Virtual view This view shows you configuration of your virtual environment that SigmaSystemCenter manages. Also, you can execute operations that are only for a virtual environment, such as creating and moving a virtual machine.
Monitor view In this view, you can monitor state of your managed resources or executions state of Jobs on Dashboard. In addition, you can refer to operation logs or job histories. This view shows you summery information of managed machines on multiple SystemProvisioning management servers.
Management view In this view, you can configure settings required to use SigmaSystemCenter, such as registering license keys, adding users, and configuring environmental settings. In addition, you can register operation policies or subsystems.

Understanding Basic Operations on the Web Console
Part I Environment Setup and Configuration 13
1.3.4. Dashboard
You can monitor state of your managed resources or current executions state of Jobs. Click the Dashboard icon in the Monitor tree to display the Dashboard on the Main Window. The Dashboard is updated periodically, by five seconds by default. Job result is displayed for specified period, for 60 minutes by default after the Job is completed, succeeded or failed. For setting the update interval and Job result display period, see Subsection 1.6.7, "Changing the Setting for Dashboard."
Note: To check detailed information of an error of a failed resource or job that ends with an error, check the Operation Logs window or Job window. For more detailed information of the Dashboard or how to check an error, see Subsection 8.4.1, "Dashboard."

1 Preparing Before Setting up the System
SigmaSystemCenter 2.1 Configuration Guide 14
1.3.5. Enable Popup Message
SigmaSystemCenter notices you a completed job by popup message displayed at the lower right of the Main Window. To enable or disable the popup function, change the setting on the Display tab of Environment Setting. For more details, see Subsection 1.6.7, "Changing the Setting for Dashboard."
Registering License Keys
Part I Environment Setup and Configuration 15
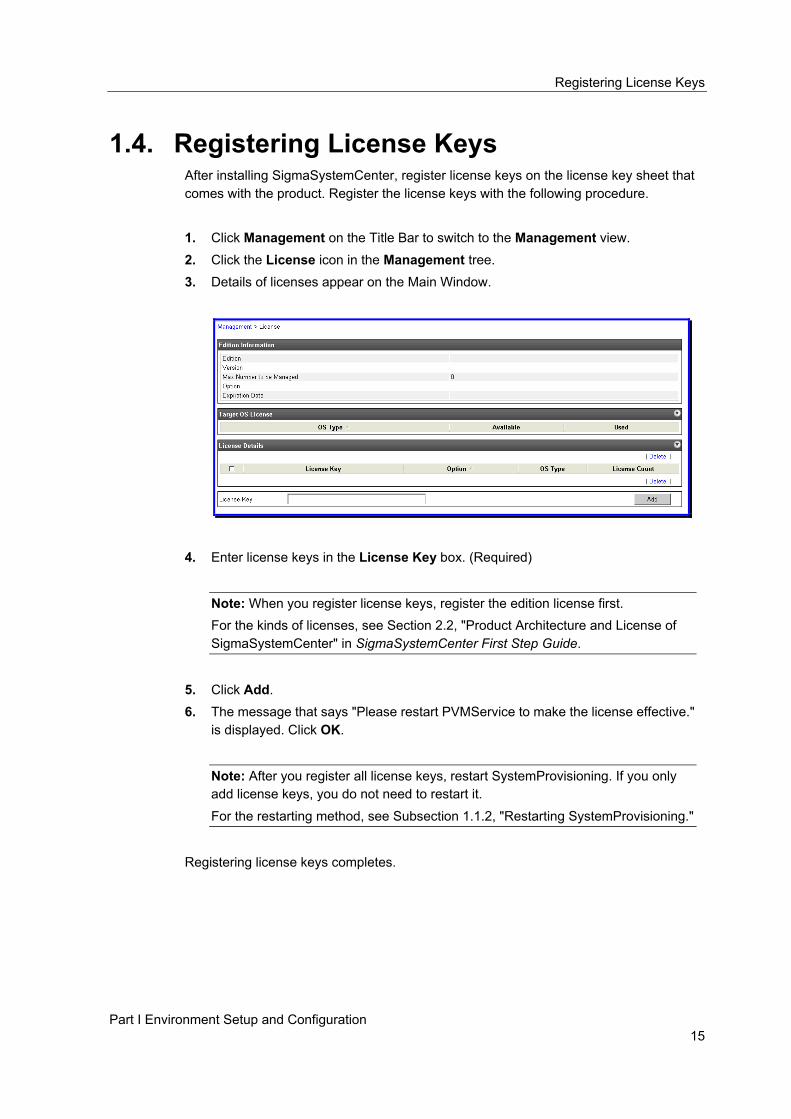
1.4. Registering License Keys After installing SigmaSystemCenter, register license keys on the license key sheet that comes with the product. Register the license keys with the following procedure.
1. Click Management on the Title Bar to switch to the Management view. 2. Click the License icon in the Management tree. 3. Details of licenses appear on the Main Window.
4. Enter license keys in the License Key box. (Required)
Note: When you register license keys, register the edition license first. For the kinds of licenses, see Section 2.2, "Product Architecture and License of SigmaSystemCenter" in SigmaSystemCenter First Step Guide.
5. Click Add. 6. The message that says "Please restart PVMService to make the license effective."
is displayed. Click OK.
Note: After you register all license keys, restart SystemProvisioning. If you only add license keys, you do not need to restart it.
For the restarting method, see Subsection 1.1.2, "Restarting SystemProvisioning."
Registering license keys completes.
1 Preparing Before Setting up the System
SigmaSystemCenter 2.1 Configuration Guide 16
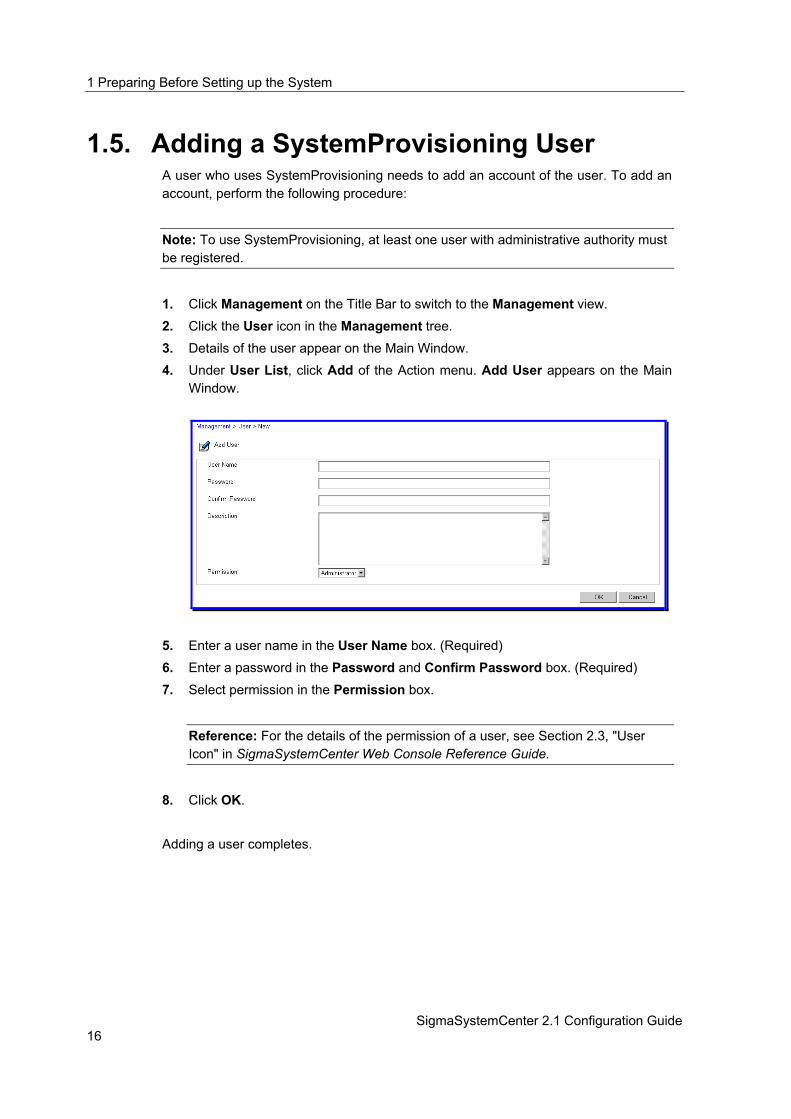
1.5. Adding a SystemProvisioning User A user who uses SystemProvisioning needs to add an account of the user. To add an account, perform the following procedure:
Note: To use SystemProvisioning, at least one user with administrative authority must be registered.
1. Click Management on the Title Bar to switch to the Management view. 2. Click the User icon in the Management tree. 3. Details of the user appear on the Main Window. 4. Under User List, click Add of the Action menu. Add User appears on the Main
Window.
5. Enter a user name in the User Name box. (Required) 6. Enter a password in the Password and Confirm Password box. (Required) 7. Select permission in the Permission box.
Reference: For the details of the permission of a user, see Section 2.3, "User Icon" in SigmaSystemCenter Web Console Reference Guide.
8. Click OK. Adding a user completes.

Configuring the Environment
Part I Environment Setup and Configuration 17
1.6. Configuring the Environment Before starting the operation with SigmaSystemCenter, you need to configure the environment. This section provides the procedure.
1. Click Management on the Title Bar to switch to the Management view. 2. Click the Environment icon in the Management tree. 3. Environment Setting appears on the Main Window. Configure settings on each tab with the procedure in the following subsections. For details on each item, see Subsection 2.13, "Environment Icon" in SigmaSystemCenter Web Console Reference Guide.
1.6.1. Configuring the Setting of Collecting the Configuration
Information
To change the setting from the default setting of collecting the configuration information, which is not collecting the configuration information periodically, perform the following procedure:
1. Display the Environment Setting window, and click the General tab.
2. Select the Gather Information check box. 3. Enter an interval for collecting the configuration information in The interval for
gathering information box. (Required) 4. Click Apply. Configuring the setting of collecting the configuration information completes.

1 Preparing Before Setting up the System
SigmaSystemCenter 2.1 Configuration Guide 18
1.6.2. Configuring the Mail Reporting
To configure to report by mail when a failure is detected, perform the following procedure: Mail reports are sent at the timing of event detection, such as failure detection, and starting and ending actions if Report / E-mail, Event Log action of policy is set. For the details of policy actions, see Subsection 3.9.6, "Configuring Event Handler Settings of a Policy Monitoring Event."
1. Display the Environment Setting window, and click the Notification tab.
2. Select the Mail Reporting check box. 3. Enter a name of a mail server for communication in the SMTP Server box. 4. Enter a mail address of a sender in the E-mail Address (From - Sender) box. 5. Enter a mail address of a recipient in the E-mail Address (From - Recipient) box.
If you specify multiple addresses, separate each address with ",".
6. Click Send Test Mail to check if the test mail is sent successfully. 7. Click Apply. Configuring the mail reporting completes.

Configuring the Environment
Part I Environment Setup and Configuration 19
1.6.3. Recording Notifications to Event Log
To record notifications that SystemProvisioning received and results of policy execution by notifications in the event log, perform the following procedure:
1. Display the Environment Setting window, and click the Notification tab.
2. Select the Write Notification to Windows Event Log check box.
Note: If you clear the Write Notification to Windows Event Log check box, the following notifications will not be recorded in the event log.
Information of a received notification
A notification of action launches by a policy and its result notification
3. Click Apply. Configuring to record notifications to the event log completes. If you install NEC ESMPRO Agent on the SystemProvisioning management server, NEC ESMPRO Agent can notify the information recorded in the event log to NEC ESMPRO Manager.

1 Preparing Before Setting up the System
SigmaSystemCenter 2.1 Configuration Guide 20
1.6.4. Configuring the Log Output
If you change the setting of outputting Operation log and Debug log from the default setting, perform the following procedure:
Note: For a list of debug logs that SystemProvisioning outputs, see Chapter 7, "Logs" in SigmaSystemCenter Reference Guide.
1. Display the Environment Setting window, and click the Log tab.
2. Enter a maximum output number of the Operation log in The maximum output number box under Operation Log Setting.
Note: In the environment of this system, the maximum output number of operation logs is 100,000. Set the number to 100,000 or less when setting the value. For the system requirements, see Chapter 3, "Operational Environment" in SigmaSystemCenter First Step Guide.
3. Enter the maximum output size of the Debug log in The Maximum Output Size box under Debug Log Setting.
4. Select the level of acquisition of the Debug log in the Acquired debug log level setting box.
5. Click Apply. Configuring the log output completes.

Configuring the Environment
Part I Environment Setup and Configuration 21
1.6.5. Configuring the Information of a Virtual Resource
To change the default number (20) of virtual machines that are operational on one virtual machine server, perform the following procedure:
1. Display the Environment Setting window, and click the Virtual Resource tab.
2. Enter the capacity value and cost value in the Capacity Value and Cost Value boxes.
Reference: For more detail of how to specify the Capacity Value and Cost Value, see Subsection 1.1.5, "Capacity Value and Cost Value" in SigmaSystemCenter Web Console Reference Guide. For the detail of controlling capacity of virtual resources, see Subsection 1.3.5, "Capacity Control of the Virtual Machine Server" in SigmaSystemCenter Reference Guide.
3. Click Apply. Configuring the information of a virtual resource completes.

1 Preparing Before Setting up the System
SigmaSystemCenter 2.1 Configuration Guide 22
1.6.6. Configuring the Root Password of a Virtual Machine
Server
The following is the procedure of configuring a root password of ESXs that is used when restoring the failure, in other words, Failover, of ESXs. A specified password is used as a default password for all ESXs:
Note: If a root password or account and password is not configured to each ESX, the process of restoring failure of an ESX (Failover) will fail.
If you configure an account or password for each ESX, configure it on the Edit Subsystem window of the ESXs.
1. Display the Environment Setting window, and click the Virtual Resource tab.
2. Select the Root Password Update check box. 3. Enter a default root password in the Root Password and Root Password
Confirmation boxes. 4. Click Apply. Configuring the root password of a virtual machine server completes.
Configuring the Environment
Part I Environment Setup and Configuration 23
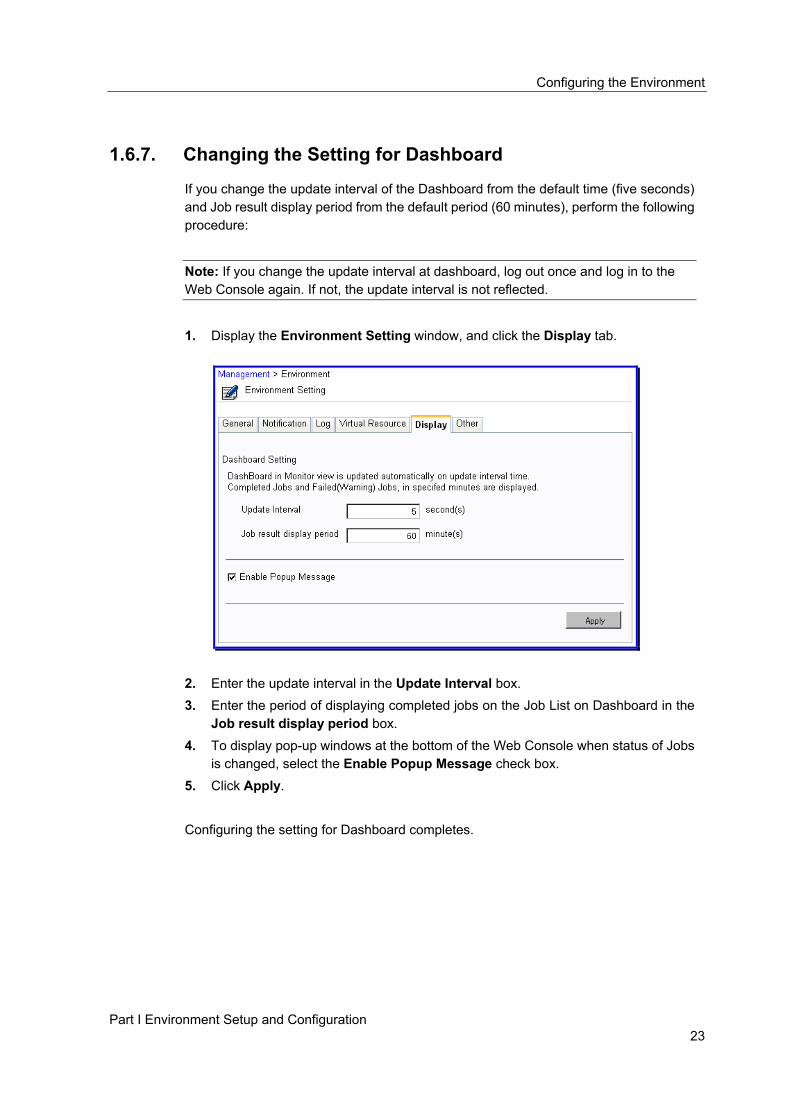
1.6.7. Changing the Setting for Dashboard
If you change the update interval of the Dashboard from the default time (five seconds) and Job result display period from the default period (60 minutes), perform the following procedure:
Note: If you change the update interval at dashboard, log out once and log in to the Web Console again. If not, the update interval is not reflected.
1. Display the Environment Setting window, and click the Display tab.
2. Enter the update interval in the Update Interval box. 3. Enter the period of displaying completed jobs on the Job List on Dashboard in the
Job result display period box. 4. To display pop-up windows at the bottom of the Web Console when status of Jobs
is changed, select the Enable Popup Message check box. 5. Click Apply. Configuring the setting for Dashboard completes.
1 Preparing Before Setting up the System
SigmaSystemCenter 2.1 Configuration Guide 24
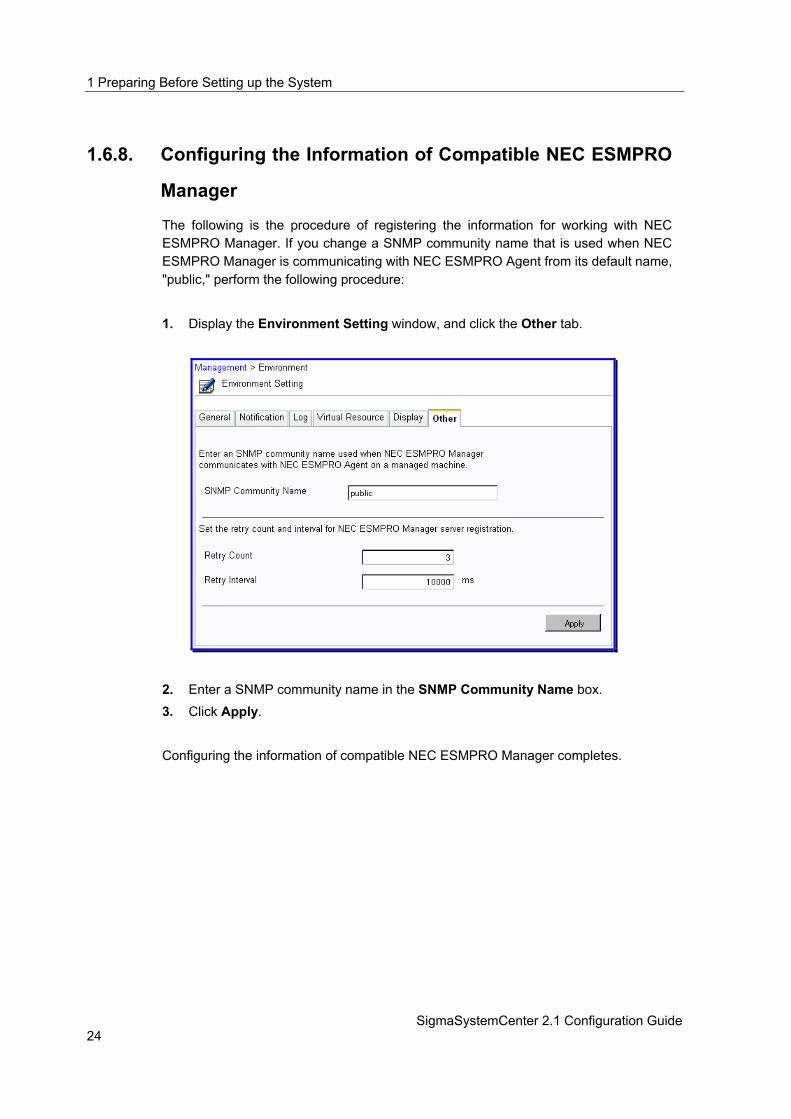
1.6.8. Configuring the Information of Compatible NEC ESMPRO
Manager
The following is the procedure of registering the information for working with NEC ESMPRO Manager. If you change a SNMP community name that is used when NEC ESMPRO Manager is communicating with NEC ESMPRO Agent from its default name, "public," perform the following procedure:
1. Display the Environment Setting window, and click the Other tab.
2. Enter a SNMP community name in the SNMP Community Name box. 3. Click Apply. Configuring the information of compatible NEC ESMPRO Manager completes.

Configuring the Environment
Part I Environment Setup and Configuration 25
1.6.9. Changing the NEC ESMPRO Manager Retry Count and
Interval
SigmaSystemCenter registers a machine to NEC ESMPRO Manager as a monitoring target when activating the machine in a group. A failure event of a managed machine is notified through NEC ESMPRO Manager to SystemProvisioning. To change a retry count (the default count are three times) and interval (the default interval is 10000 milliseconds) of registering a machine to NEC ESMPRO Manager, perform the following procedure:
Note: If you want to reset a changed setting, clear the fields of the items, and click Apply.
1. Display the Environment Setting window, and click the Other tab.
2. To change the retry count, enter the number of times in the Retry Count box. 3. To change the retry interval, enter the time in the Retry Interval box. 4. Click Apply. Changing the NEC ESMPRO Manager retry count and interval completes.


27
2. Advanced Setting of Compatible Products
This chapter explains the advanced configuration of linked products used by SigmaSystemCenter. This chapter contains the following sections: • 2.1 About Advanced Setting of Compatible Products .....................................................28 • 2.2 Configuring Settings for a Switch ..............................................................................29 • 2.3 Configuring Setting for a Load Balancer....................................................................36 • 2.4 Configuring the Setting for Storage ...........................................................................37 • 2.5 Configuring the Setting for Monitoring Performance by System Monitor -
Performance Monitoring Services ...............................................................................................41 • 2.6 Configuring the Setting for Sending Failure Events From the Managed Machine ....53 • 2.7 Configuring DPM .......................................................................................................60 • 2.8 Creating a Scenario Using a Master Machine in DPM ..............................................69 • 2.9 Preparing for the Use of VMware ..............................................................................84 • 2.10 Creating a Template Using a Master VM in VirtualCenter ........................................85 • 2.11 Preparing for the Use of Xen .....................................................................................87 • 2.12 Creating a Template Using a Master VM in XenCenter ............................................88 • 2.13 Preparing for the Use of ESXi....................................................................................90 • 2.14 Preparing for the Use of Hyper-V ..............................................................................92 • 2.15 Preparing for the Use of Out-of-Band (OOB) Management ......................................94

2 Advanced Setting of Compatible Products
SigmaSystemCenter 2.1 Configuration Guide 28
2.1. About Advanced Setting of Compatible Products
This chapter provides advanced preparation of products that are compatible with SigmaSystemCenter; these operations must be completed before beginning operation with SigmaSystemCenter. If you have an environment that these settings have been configured already, you do not need to do over. See Chapter 3, "Registering Resources to SigmaSystemCenter" to register compatible products to SigmaSystemCenter. The flow of advanced settings of compatible products is as follows:

Configuring Settings for a Switch
Part I Environment Setup and Configuration 29
2.2. Configuring Settings for a Switch Switches that can be managed in SigmaSystemCenter include a switch or switch blade managed in MasterScope Network Manager and a switch blade managed only by SystemProvisioning. If you use a switch or switch blade managed in MasterScope Network Manager, you need to configure settings for the switch or switch blade and register it in MasterScope Network Manager in advance. See from Subsection 2.2.1, "Registering a Switch to MasterScope Network Manager" to 2.2.2, "Configuring the Login Management for a Switch in MasterScope Network Manager" to configure MasterScope Network Manager. Similarly, you need to configure settings for a switch blade that can be managed only by SystemProvisioning in advance. Perform the procedure in Subsection 2.2.3, "Configuring the Initial Setting for a Switch Blade" to configure a switch blade.
Note: In SigmaSystemCenter, tag base VLAN control of a switch blade is not supported.

2 Advanced Setting of Compatible Products
SigmaSystemCenter 2.1 Configuration Guide 30
2.2.1. Registering a Switch to MasterScope Network Manager
After configuring a network for switches or switch blades managed in MasterScope Network Manager, register the switch to MasterScope Network Manager with the following procedure:
Reference: For details of the setting, see manuals of MasterScope Network Manager.
1. Select Start, select All Programs, click MasterScope Network Manager and click MasterScope Network Manager Console to start the console of MasterScope Network Manager.
2. From the Setting menu, select Configuration Mode to operate in the configuration mode.
3. On the System tab, click the NetworkView icon, click the NetworkManagement icon, and right-click the map icon. On the context menu, click Configuration Management, click Autodiscover, and click TCP/IP Hosts.
4. The AutoDiscover(TCP/IP Hosts) dialog box appears. Click Address.

Configuring Settings for a Switch
Part I Environment Setup and Configuration 31
5. The Address dialog box appears. Specify the range for IP address and click OK.
And then, click Start on the AutoDiscover(TCP/IP Hosts) dialog box.
6. An icon of the detected switch is displayed on the operation window displayed by clicking the NetworkView icon, the NetworkManagement icon, and the map icon.
Registering a switch to MasterScope Network Manager completes.

2 Advanced Setting of Compatible Products
SigmaSystemCenter 2.1 Configuration Guide 32
2.2.2. Configuring the Login Management for a Switch in
MasterScope Network Manager
To configure the login management for a switch, which is registered with the procedure in Subsection 2.2.1, "Registering a Switch to MasterScope Network Manager" in MasterScope Network Manager, perform the following procedure.
Reference: For details of authentication settings, you can also see manuals of MasterScope Network Manager.
1. Select Start, select All Programs, click MasterScope Network Manager, and click MasterScope Network Manager Console to start the console of MasterScope Network Manager.
2. From the Setting menu, select Configuration Mode to operate in the configuration mode.
3. On the System tab, click the NetworkView icon, click the NetworkManagement icon, and right-click the map icon. On the context menu, click the Login Information Setting.

Configuring Settings for a Switch
Part I Environment Setup and Configuration 33
4. The Login Information Setting screen appears. Right-click the target device,
click Login Setting, and click Password Setting.
5. The Password Setting dialog box appears. Enter a password in the Login Password box and Enable Password box.
6. Click OK. 7. The Login Information Setting screen appears. The icon of the device under
Login Setting changes.

2 Advanced Setting of Compatible Products
SigmaSystemCenter 2.1 Configuration Guide 34
8. Right-click the device to which you want to test log in, and then click Login Test. 9. The test result is displayed under Status on the Login Information Setting
screen.
If the test fails, check the information displayed under Status, clear the cause of the failure, and try the test again.
Configuring the login management for a switch completes.

Configuring Settings for a Switch
Part I Environment Setup and Configuration 35
2.2.3. Configuring the Initial Setting for a Switch Blade
To configure the initial setting for a switch blade, perform the following procedure:
Reference: For more details of the setting, see manuals of Intelligent Switch. Ensure to set a name to a switch blade. If you set two switch blades in one blade enclosure unit, set each switch blade a different name.
1. Create a management VLAN for a switch blade. 2. Configure a network address to be used for managing a machine to the
management VLAN.
3. Configure an IP address for connecting the switch blade. 4. Enable the PXE boot assist function. 5. Register all CPU ports to the management VLAN. 6. Enable the spanning tree function. 7. Enable the SNMP Agent, and configure a community name and SNMP Manager
that permits accesses.
8. After confirming the configuration, save the information on the flash memory.

2 Advanced Setting of Compatible Products
SigmaSystemCenter 2.1 Configuration Guide 36
2.3. Configuring Setting for a Load Balancer If you want to use a load balancer managed in MasterScope Network Manager, you need to configure the load balancer to MasterScope Network Manager. Perform the following procedure to configure a load balancer.
2.3.1. Registering a Load Balancer to MasterScope Network
Manager
After configuring a load balancer, you need to register the load balancer to MasterScope Network Manager. The load balancer registration procedure is the same as that of a switch; see Subsection 2.2.1, "Registering a Switch to MasterScope Network Manager."
2.3.2. Configuring the Login Management for a Load Balancer in
MasterScope Network Manager
You need to configure the login management for a load balancer in MasterScope Network Manager. The procedure of configuring the login management for a load balancer is the same as that of a switch; see Subsection 2.2.2, "Configuring the Login Management for a Switch in MasterScope Network Manager."

Configuring the Setting for Storage
Part I Environment Setup and Configuration 37
2.4. Configuring the Setting for Storage If you use storage, you need to configure storage compatible products in advance. You can use three types of storage with SigmaSystemCenter; NEC Storage, CLARiiON, and Symmetrix. Configure your storage with the following procedural flow.
2.4.1. Preparing Storage
The only setting that you can configure to storage devices from SigmaSystemCenter is access control for disk volumes. You cannot configure setting for a storage device or for software that controls storage form SigmaSystemCenter. You need to configure these settings using the software before you start using the storage. Configure the following setting according to your storage type.
If you use NEC Storage To manage NEC Storage by SystemProvisioning, you need to set up NEC Storage Manager in the NEC Storage environment. The following is the procedural flow of the setup. For more details, see manuals of NEC Storage Manager.
1. Setup on NEC Storage Manager Register a user account of NEC Storage Manager.
2. Configuring a SG file of NEC Storage Manager Integration Base Configure the setting for using NEC Storage Manager Server from NEC Storage Manager Integration Base.
3. Registration of disk arrays on NEC Storage Manager Register disk arrays to be managed by SystemProvisioning.
4. Creating LDs on NEC Storage Create LDs on the disk arrays.
5. Creating LD sets on NEC Storage and configuring access control Create LD sets on the disk arrays, and set access control in WWN mode.
Note: If you use NEC Storage D8, you can only control each logical partition from SigmaSystemCenter. You cannot change the configuration of multiple logical partitions.

2 Advanced Setting of Compatible Products
SigmaSystemCenter 2.1 Configuration Guide 38
If you use CLARiiON
To use a disk array device of CLARiiON from SystemProvisioning, you need to install Navisphere Agent and Navisphere CLI on the management server. For more details, see manuals of Navisphere. • Naviseccli and Navicli
With addition of support for FLARE26 and 28, SigmaSystemCenter supports the Naviseccli command. Therefore, you need to select which command to use, Naviseccli or Navicli.
Note: FLARE is firmware of CLARiiON service processors.
• Selecting Naviseccli or Navicli
When registering CLARiiON, if you want to use Naviseccli, specify all a user name, password, and scope. If you want to use Navicli, skip specifying these items.
1. Installing management software Install the management software of CLARiiON on the storage management server.
2. Creating a logical disk Create a logical disk using the management software.
3. Creating a storage group. Create a storage group on CLARiiON using the management software. And then, assign the logical disk and a host to the storage group.
4. Installing Navisphere Agent and Navisphere CLI Install Navisphere Agent and Navisphere CLI on the management server. When installing Navisphere CLI, check that the Install Classic CLI check box is selected.
5. Configuring Navisphere CLI Confirm that the path of Navisphere CLI is registered to PATH of an environment variable. If not, register the path.
6. Configuring Navisphere Agent Configure the IP address and user name (System) of the Service Processor (SP) of CLARiiON to managed in SigmaSystemCenter to the agent config file of Navisphere Agent.
Note: If the access control is configured to the machine which you are to change the configuration of in the Service Processor of CLARiiON, check the System user with the IP address of the machine on which SystemProvisioning is installed is registered.

Configuring the Setting for Storage
Part I Environment Setup and Configuration 39
You need to assign all the machines to connect to CLARiiON to each storage group in advance.
After registering CLARiiON as subsystem, release the host information assigned to the storage group.
If you use Symmetrix
To use a disk array device of Symmetrix from SystemProvisioning, you need to install SYMCLI on the management server. For more details, see manuals of SYMCLI.
1. Installing management software Install the management software of Symmetrix on the storage management server.
2. Installing Solutions Enabler Install Solutions Enabler on the management server.
3. Configuring Solutions Enabler Configure Solutions Enabler according to the environment where the system issues command to Symmetrix. If you are to configure a management server for Symmetrix storage or have already configured the server, check that SYMAPI is installed on the server and change the setting of SYMCLI on the management server to use SYMAPI.
4. Creating a logical device and assigning the devices Create a logical device using the management software of Symmetrix. And then, assign the logical device to the machine to connect to the storage in advance to register the HBA of the machine to Symmetrix, and release the assignment.
Note: If you do not assign a logical device in advance, you cannot acquire the HBA information of a machine.
You cannot manage Symmetrix connected remotely with SigmaSystemCenter.
2.4.2. Considering the Drive Letter Setting of Partition and
Volume
When a machine is connected to a logical disk on storage triggered by the machine configuration, a drive letter of partition and volume on the logical disk are allocated according to the status of connection to the logical disk or a type of OS. Create a distribution image according to your operational plan.

2 Advanced Setting of Compatible Products
SigmaSystemCenter 2.1 Configuration Guide 40
OS Type of
distribution image
Status of connection of a logical disk before creating a distribution image
Windows Server 2000
Windows Server 2003
Windows Server 2008
Linux
Never connected to a logical disk
The OS allocates a drive letter. The drive letter is allocated in order, usually from the C drive, including built-in disk of the managed machine.
The OS allocates a device file. The device file is allocated in order from the built-in disk.
The same logical disk after distribution
The same drive letter as the one that has allocated to the partition and volume on the logical disk.
The same device
Full backup
Have connected to…
A LD that is not the same logical disk after distribution
The OS allocates a drive letter. The drive letter is allocated in order, usually from the C drive, including built-in disk of the managed machine.
The OS allocates a device file. The device file is allocated in order from the built-in disk.
Never connected to a logical disk
The OS allocate a drive letter. The drive letter is allocated in order, usually from the C drive, including built-in disk of the managed machine.
The OS allocates a device file. The device file is allocated in order from the built-in disk.
The same logical disk after distribution
The same drive letter as the one that has allocated to the partition and volume on the logical disk. *1
The OS allocate a drive letter. The drive letter is allocated in order, usually from the C drive, including built-in disk of the managed machine.
-
Deployment
Have connected to…
A logical disk that is not the same logical disk after distribution
The OS allocate a drive letter. The drive letter is allocated in order, usually from the C drive, including built-in disk of the managed machine.
The OS allocates a device file. The device file is allocated in order from the built-in disk.
*1 To keep the information of the disk, including the signature of the disk and drive letter information, during distributing an image, the same drive letter is allocated after the distribution.

Configuring the Setting for Monitoring Performance by System Monitor - Performance Monitoring Services
Part I Environment Setup and Configuration 41
2.5. Configuring the Setting for Monitoring Performance by System Monitor - Performance Monitoring Services
System Monitor - Performance Monitoring Services runs at all times in the background as a Window service. System Monitor - Performance Monitoring Services has functions to display the performance status and send alert to SystemProvisioning for the performance failure. The following settings are necessary for machines to be monitored by System Monitor - Performance Monitoring Services. Configure the settings below.
2.5.1. Configuring the User Account on a Monitored Machine
First, you need to configure an account on a machine to be monitored by System Monitor - Performance Monitoring Services. Depending on a condition of the machine, the settings differ. Configure the account referring to the following rules.
If the machine is running Windows: You need to prepare a user account for System Monitor - Performance Monitoring Services to access to the machine. The account must belong to an Administrators group or Performance Monitor Users group of the machine.
If the machine is running Linux: • You need to prepare a user account for System Monitor - Performance
Monitoring Services to access to the machine. • To connect the machine to telnet, install Telnet Server and enable the service.
If firewalls are configured, exempt telnet communications from firewall blocking.
• To connect the machine with SSH, enable SSH. If the machine is VMware ESX3.x or 4.0
• You need to prepare a user account for System Monitor - Performance Monitoring Services to access to the machine.
• Configure a role that has Read Only permissions or greater with Virtual Infrastructure Client or vSphere Client.
• If firewalls are configured, exempt SSL communications from firewall blocking. If the machine is Xen Server
• You need to prepare a user account for System Monitor - Performance Monitoring Services to access to the machine.
• If firewalls are configured, exempt SSL communications from firewall blocking.

2 Advanced Setting of Compatible Products
SigmaSystemCenter 2.1 Configuration Guide 42
2.5.2. Configuring a Management Server in System Monitor -
Performance Monitoring Services (For the First Time
Only)
To configure the management server in System Monitor - Performance Monitoring Services, perform the following procedure.
Reference: For more details, see Subsection 2.2, "Registering the Management Server" in System Monitor - Performance Monitoring Services User’s Guide.
1. Click the Start menu, click All Programs, click SigmaSystemCenter, and click System Monitor Management Console to start the management console.

Configuring the Setting for Monitoring Performance by System Monitor - Performance Monitoring Services
Part I Environment Setup and Configuration 43
2. The Management Server dialog box appears only when you start the console for
the first time. Enter each item.
3. Click OK. 4. The Configuration dialog box appears. For the following procedures, see the
Procedure 3 in the following subsection. Configuring the management server completes.

2 Advanced Setting of Compatible Products
SigmaSystemCenter 2.1 Configuration Guide 44
2.5.3. Configuring Connection Settings in System Monitor -
Performance Monitoring Services
To configure an account for System Monitor - Performance Monitoring Services to access the monitored machine and a password, perform the following procedure.
Reference: For more details, see Subsection 2.3, "Connection Settings to Monitored Machines" in System Monitor - Performance Monitoring Services User’s Guide.
1. Start the management console. 2. In the tree on the management console, right-click the management server, and
then click Set Configuration. 3. The Configuration dialog box appears. Click the Connection tab and enter each
item.
4. Click OK. Configuring the connection settings on System Monitor - Performance Monitoring Services completes.
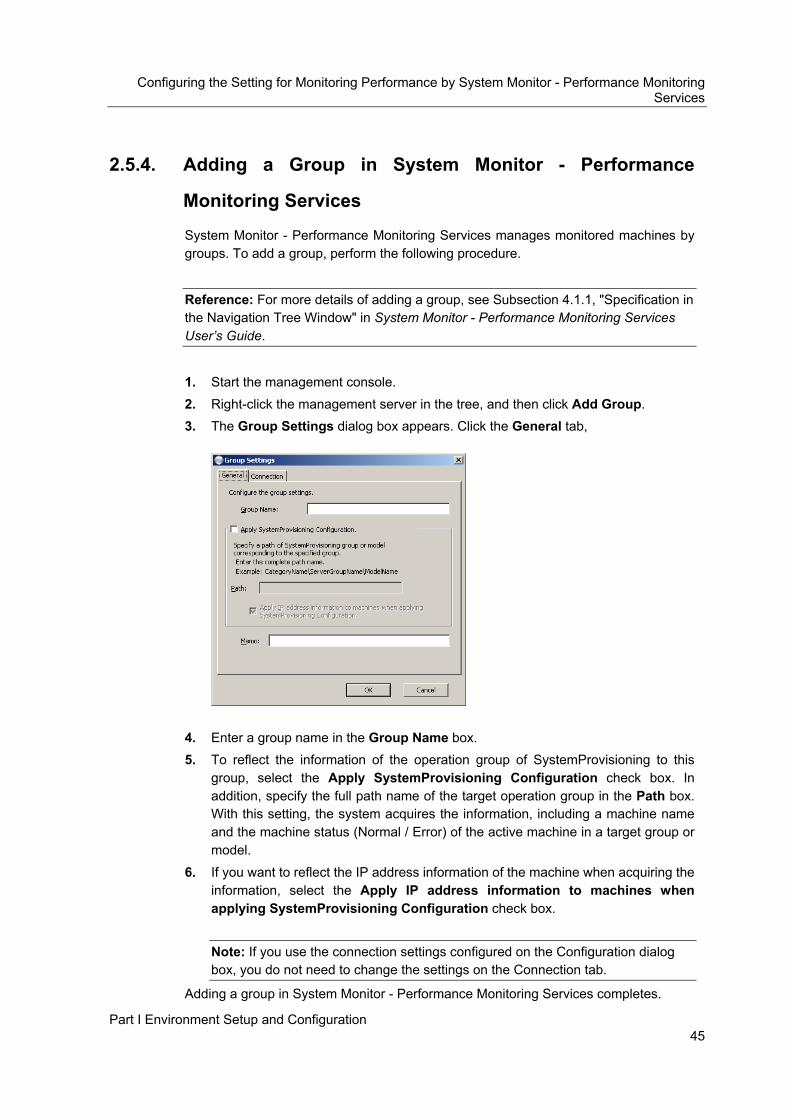
Configuring the Setting for Monitoring Performance by System Monitor - Performance Monitoring Services
Part I Environment Setup and Configuration 45
2.5.4. Adding a Group in System Monitor - Performance
Monitoring Services
System Monitor - Performance Monitoring Services manages monitored machines by groups. To add a group, perform the following procedure.
Reference: For more details of adding a group, see Subsection 4.1.1, "Specification in the Navigation Tree Window" in System Monitor - Performance Monitoring Services User’s Guide.
1. Start the management console. 2. Right-click the management server in the tree, and then click Add Group. 3. The Group Settings dialog box appears. Click the General tab,
4. Enter a group name in the Group Name box. 5. To reflect the information of the operation group of SystemProvisioning to this
group, select the Apply SystemProvisioning Configuration check box. In addition, specify the full path name of the target operation group in the Path box. With this setting, the system acquires the information, including a machine name and the machine status (Normal / Error) of the active machine in a target group or model.
6. If you want to reflect the IP address information of the machine when acquiring the information, select the Apply IP address information to machines when applying SystemProvisioning Configuration check box.
Note: If you use the connection settings configured on the Configuration dialog box, you do not need to change the settings on the Connection tab.
Adding a group in System Monitor - Performance Monitoring Services completes.

2 Advanced Setting of Compatible Products
SigmaSystemCenter 2.1 Configuration Guide 46
2.5.5. Adding a Monitored Machine in System Monitor -
Performance Monitoring Services
To add a machine to be monitored by System Monitor - Performance Monitoring Services, perform the following procedure.
Adding a machine by reflecting the information of an operation group of SystemProvisioning
Reference: For more details of adding a monitored machine by the information of an operation group of SystemProvisioning, see Subsection 1.10, "The SystemProvisioning Linkage Function" in System Monitor - Performance Monitoring Services User’s Guide.
1. Start the management console. 2. Right-click the management server in the tree, and then click Apply
SystemProvisioning Configuration. 3. A confirmation dialog box is displayed. Click Yes.
Adding a machine manually
Reference: For more details, see Subsection 4.1, "Specifications for Monitored Machines" in System Monitor - Performance Monitoring Services User’s Guide.
1. Start the main management console. 2. Right-click the group where the monitored machine is going to be added in the
tree, and then click Add Machine. 3. The Machine Settings dialog box appears.

Configuring the Setting for Monitoring Performance by System Monitor - Performance Monitoring Services
Part I Environment Setup and Configuration 47
4. Click the General tab, enter and select each item.
5. Click the Connection tab. Select and enter the information in the boxes. The dialog box consists of the following elements if the machine is running Windows.

2 Advanced Setting of Compatible Products
SigmaSystemCenter 2.1 Configuration Guide 48
The dialog box consists of the following elements if the machine is running Linux, or the machine is an ESX or Xen Server.
6. Click OK. Adding a monitored machine on System Monitor - Performance Monitoring Services completes.
2.5.6. Configuring Threshold Monitoring and Alert Settings in
System Monitor - Performance Monitoring Services
System Monitor - Performance Monitoring Services can detects failure on a monitored machine using the threshold monitoring of collected performance information and alert to SystemProvisioning. System Monitor - Performance Monitoring Services configures the threshold monitoring settings based on the performance information. In advance, you need to configure to collect the performance information that you want to monitor. To configure a threshold monitoring, follow the procedure shown below.
Reference: For more details, see Subsection 6.1.1, "How to Set up Threshold Monitoring" in System Monitor - Performance Monitoring Services User’s Guide.
1. Start the main management console. 2. Right-click the management server in the tree, and then click Set Threshold
Monitor.

Configuring the Setting for Monitoring Performance by System Monitor - Performance Monitoring Services
Part I Environment Setup and Configuration 49
3. The Set Threshold Monitor dialog box appears.
4. The nodes that can be specified as monitoring objects are displayed, depending on the monitoring unit. Select the node from the tree.
5. Select one of the following three monitoring units: Monitor machine, Monitor group, or Monitor all machines in group.
Reference: For more details of the monitoring units, see Section 1.9, "Threshold Monitoring and the Notification Function" in System Monitor - Performance Monitoring Services User’s Guide.
6. Specify the threshold method. To create a new threshold method, click New under Threshold method.
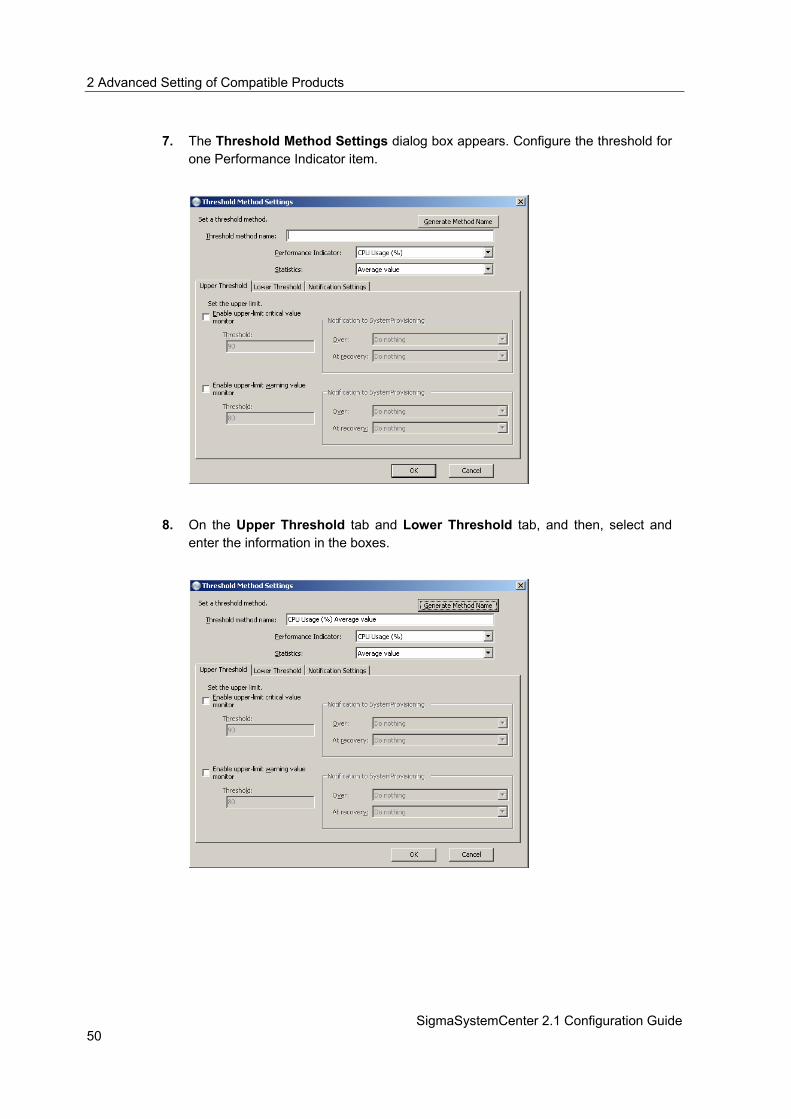
2 Advanced Setting of Compatible Products
SigmaSystemCenter 2.1 Configuration Guide 50
7. The Threshold Method Settings dialog box appears. Configure the threshold for
one Performance Indicator item.
8. On the Upper Threshold tab and Lower Threshold tab, and then, select and enter the information in the boxes.
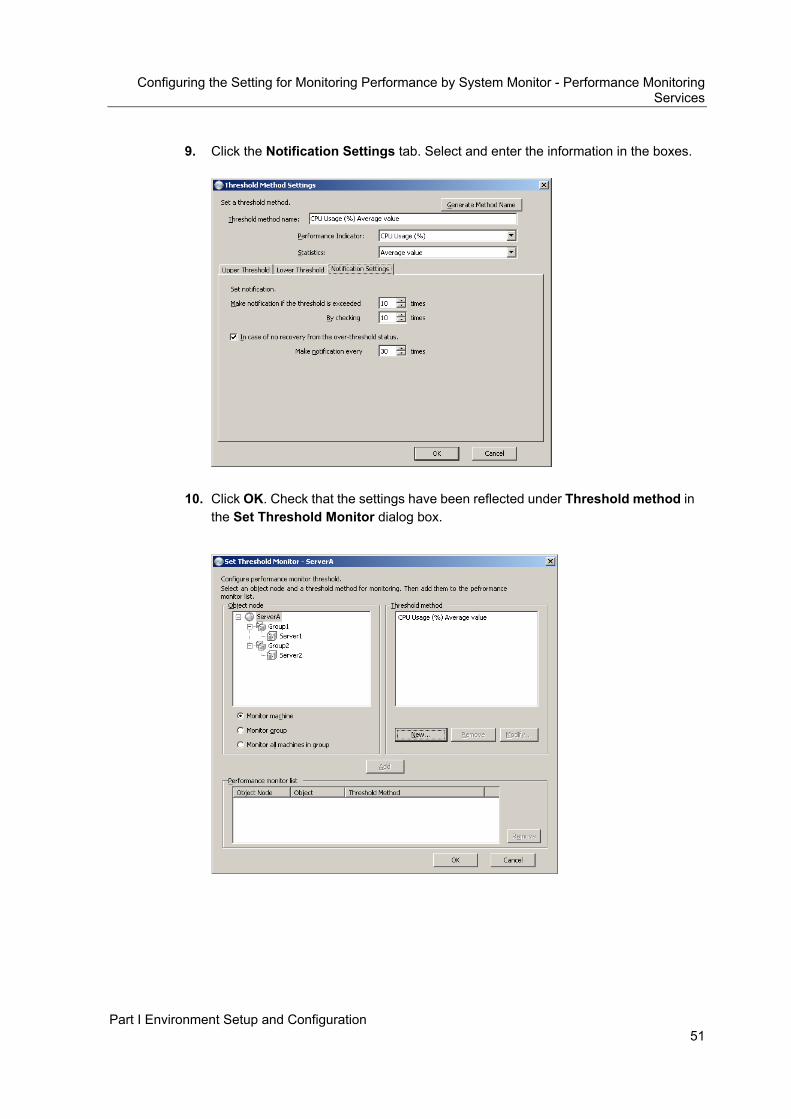
Configuring the Setting for Monitoring Performance by System Monitor - Performance Monitoring Services
Part I Environment Setup and Configuration 51
9. Click the Notification Settings tab. Select and enter the information in the boxes.
10. Click OK. Check that the settings have been reflected under Threshold method in the Set Threshold Monitor dialog box.

2 Advanced Setting of Compatible Products
SigmaSystemCenter 2.1 Configuration Guide 52
11. Select the item that you want to configure as a threshold monitoring item from the
Object node or Threshold method, and then click Add to add the threshold monitoring item to the Performance monitor list.
12. Click OK. Configuring threshold monitoring and alert settings on System Monitor - Performance Monitoring Services completes.

Configuring the Setting for Sending Failure Events From the Managed Machine
Part I Environment Setup and Configuration 53
2.6. Configuring the Setting for Sending Failure Events From the Managed Machine
There are two methods to make a managed machine send alert to a management server, SNMP Trap and Manager Report (TCP/IP In-Band) of NEC ESMPRO Agent. You must configure either setting. If you configure the same alert destination in both methods, you will receive two same events. We recommend configuring the Manager Report (TCP/IP In-Band) of NEC ESMPRO Agent. Determine which to configure and perform the following procedure:
2.6.1. Configuring the Setting on a Machine Running Windows
To configure for a Windows machine to send a failure event alert, configure the setting following the procedure:
Note: The alert destination of Manager Report is not configured by installing NEC ESMPRO Agent. You need to configure the alert manager manually.
SNMP Trap
1. Click the Start menu, and click Control Panel. From Control Panel, double-click Administrative Tools. From Administrative Tools, double-click Services to start the Services Snap-in.
2. Right-click SNMP Service, and then click Properties. 3. The SNMP Service Properties dialog box appears. Click the Trap tab.
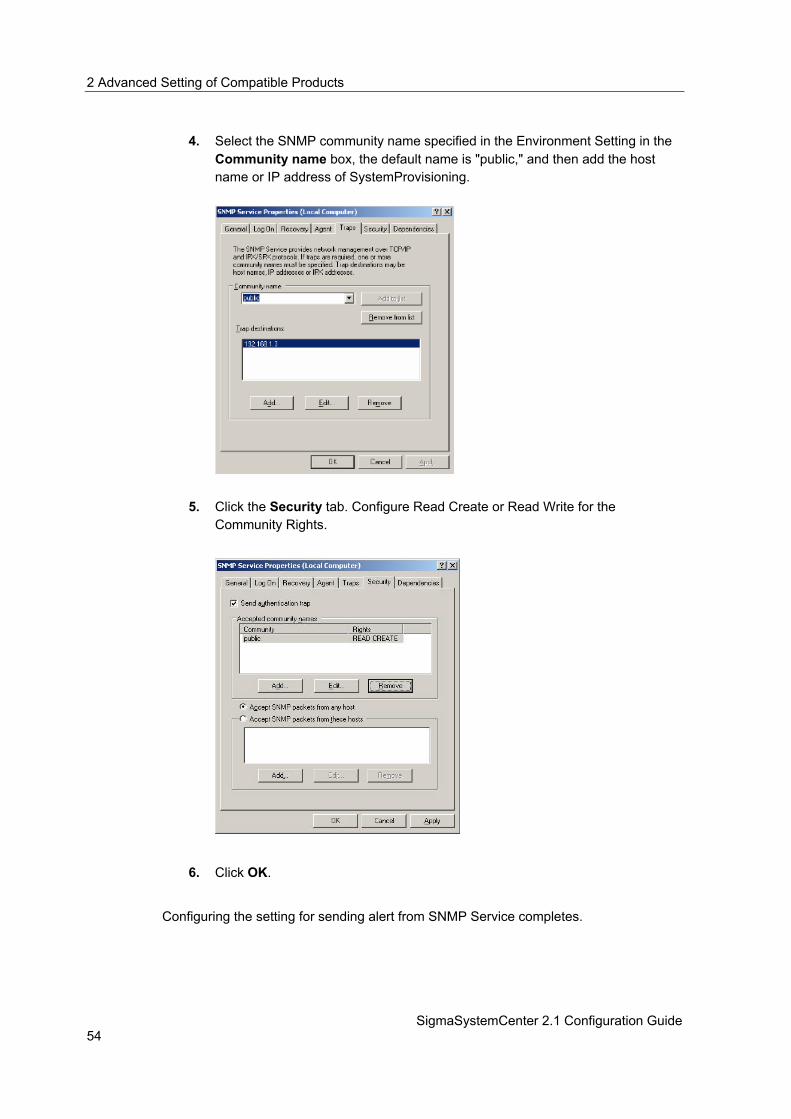
2 Advanced Setting of Compatible Products
SigmaSystemCenter 2.1 Configuration Guide 54
4. Select the SNMP community name specified in the Environment Setting in the
Community name box, the default name is "public," and then add the host name or IP address of SystemProvisioning.
5. Click the Security tab. Configure Read Create or Read Write for the Community Rights.
6. Click OK.
Configuring the setting for sending alert from SNMP Service completes.

Configuring the Setting for Sending Failure Events From the Managed Machine
Part I Environment Setup and Configuration 55
Manager Report (TCP/IP In-Band)
1. Click the Start menu, and click Control Panel. From Control Panel, double-click NEC ESMPRO Agent.
2. The NEC ESMPRO Agent Properties dialog box appears. 3. Click the General tab. Click Report Setting.
4. The Alert Manager dialog box appears. 5. From the Setting menu, select Destination Setting.

2 Advanced Setting of Compatible Products
SigmaSystemCenter 2.1 Configuration Guide 56
6. The Destination Setting dialog box appears. For the configuration method of
alert destination, click the Help menu, from the Online Help, click Outline of setting, click Alert Manager Setting tool, click Destination Setting, click Manager (TCP/IP In-Band) Setting, and see the help.
7. Close the Alert Manager and click OK on the NEC ESMPRO Agent Properties dialog box.
Configuring the setting for sending alert from NEC ESMPRO Agent (Manager Report (TCP/IP In-Band)) of completes.
Configuring the Setting for Sending Failure Events From the Managed Machine
Part I Environment Setup and Configuration 57
2.6.2. Configuring the Setting on a Machine Running Linux
To configure for a Linux machine to send a failure event, configure the setting following the procedure.
Note: The alert destination of Manager Report is not configured by installing NEC ESMPRO Agent. You need to configure the alert manager manually.
SNMP Trap
1. Log in as a root user. 2. Start the service under the following path.
/opt/nec/esmpro_sa/bin/ESMamsadm
3. Select Base Setting and press Enter. 4. Select Manager (SNMP) and press Enter. 5. Select Enable the function. When selected, it is marked with an asterisk "*." 6. If needed, configure an IP address in Trap Destination IP.
Manager Report (TCP/IP In-Band)
1. Log in as a root user. 2. Start the service under the following path.
/opt/nec/esmpro_sa/bin/ESMamsadm
3. Select Base Setting and press Enter. 4. Select Manager (TCP_IP In-Band) and press Enter. 5. Select Enable the function. When selected, it is marked with an asterisk "*." 6. On the ESMamsadm initial screen, select Destination ID Setting and press
Enter. 7. Select TCP_IP IN-BAND, and click Modify. 8. Select Address, and click Enter. 9. If needed, specify an IP address and port number of the destination.

2 Advanced Setting of Compatible Products
SigmaSystemCenter 2.1 Configuration Guide 58
Setting for receiving alerts of CLUSTERPRO events
If you want the managed machine to send events of CLUSTERPRO, you need to monitor events that CLUSTERPRO registers to Syslog. Configure the monitored events of CLUSTERPRO in the Control Panel.
1. Log in as a root user. 2. Start the service under the following path.
/opt/nec/esmpro_sa/bin/ESMamsadm
3. Select Syslog Events Setting and press Enter. 4. Select ON on the Operation on Source:. When selected, it is marked with an
asterisk "*." Select Add… and press Enter. 5. Configure the following event sources on the displayed Add Syslog Item.
Note: Monitoring events is executed with the strings entered in the Keyword. Therefore, enter the exact strings including upper or lower case and spaces. Note that the configuration will not work if you enter long strings.
• With CLUSTERPRO 3.x or earlier
Item Setting
Source CLUSTERPRO
Event ID c00008a4
Keyword <type:#nm><event:#2>#Server
Trap Name Server down
Item Setting
Source CLUSTERPRO
Event ID c0005217
Keyword <type:#rm><event:#9>#Monitor#rr..rr#failed
Trap Name Public LAN error
A sharp sign in the keyword setting represents a single-byte space.

Configuring the Setting for Sending Failure Events From the Managed Machine
Part I Environment Setup and Configuration 59
• With CLUSTERPRO X 1.0 or greater
Item Setting
Source CLUSTERPRO#X
Event ID 40000002
Keyword1 <type: #nm><event: #2>#Server
Keyword2 has#been#stopped.
Trap Name Server down
A sharp sign in the keyword setting represents a single-byte space.

2 Advanced Setting of Compatible Products
SigmaSystemCenter 2.1 Configuration Guide 60
2.7. Configuring DPM SystemProvisioning installs OSs, applications, and patches to managed machines using DPM; you need to register the physical machines to be managed in SystemProvisioning to DPM in advance. This section provides the procedure of the initial settings and registering managed machines.
Note: In DPM, machines are represented as general computers.
You use a Web Console (browser) to operate DPM. For how to start DPM Web Console and for the initial settings, see Subsection 2.7.1, "Starting DPM Web Console" and Subsection 2.7.2, "Registering Management Server for DPM." Registering machines to DPM has two methods: registering a machine automatically and manually, however, this manual explains the automatic method. See Subsection 2.7.3, "Registering a Managed Machine to DPM."
Reference: If you are using DPM for the first time, see Chapter 3, "Using DPM for the First Time (Initial Introduction)" and Chapter 4, "Registering Computers in Management Server for DPM" in DeploymentManager System Introduction.

Configuring DPM
Part I Environment Setup and Configuration 61
2.7.1. Starting DPM Web Console
To start DPM Web Console, perform the following procedure.
Note: If other application uses Embedded Tomcat, because the ports of the Embedded Tomcat uses the same ports of Tomcat used by the Web Server for DPM, the DPM Web Console is not displayed. You need to configure not to use the same ports. Perform the following procedure to change the ports.
1. Click the Start menu, and click Control Panel. From Control Panel, double-click Administrative Tools. From Administrative Tools, double-click Services to start the Services Snap-in.
2. Check that the Apache Tomcat in the Services is stopped. 3. Open the file a folder where Tomcat is installed\conf\Server.xml from the text
editor. The default path of a folder where Tomcat is installed is "C:\Program Files\Apache Software Foundation\Tomcat 6.0." Also we recommend that you back up the file in advance.
4. Change the number "8005", "8080", and "8009" in the file to unused port numbers. Do not configure to the same port numbers.
5. Save the file and close the text editor. 6. Click the Start menu, and click Control Panel. From Control Panel,
double-click Administrative Tools. From Administrative Tools, double-click Services to start the Services Snap-in.
7. Click Apache Tomcat in the Services and click Start the service.
1. Start a Web browser. 2. Enter the URL in the Web browser address column.
http://Host Name: Port Number/DeploymentManager/Start.jsp E.g.)
http://localhost:8080/DeploymentManager/Start.jsp
Note: The part "DeploymentManager/Start.jsp" of the URL distinguishes upper case and lower case. Enter the exact letters. In addition, if your host name includes Internet-standard characters, specify the IP address in the address. If you specify the host name, you may fail to start the DPM Web Console.
3. The DPM Web Console appears. Starting the DPM Web Console completes.

2 Advanced Setting of Compatible Products
SigmaSystemCenter 2.1 Configuration Guide 62
2.7.2. Registering Management Server for DPM
To register Management Server for DPM, perform the following procedure. If you start the DPM Web Console for the first time, the Add Management Server window appears.
Note: After the first time, you can add Management Server for DPM from the main window of DPM. For the procedure, see Section 4.1, "Registering Management Servers" in DeploymentManager System Introduction for details.
1. Start the DPM Web Console. 2. The Add Management Server window appears.
3. Enter a name of the machine on which Management Server for DPM is installed in the Server Name box.
4. Enter the IP address of the machine on which Management Server for DPM is installed in the IP Address boxes.
Note: Do not change the port number because it must match the number that Management Server for DPM is using. The default port number is "56050."
5. Click OK. Registering Management Server for DPM completes.
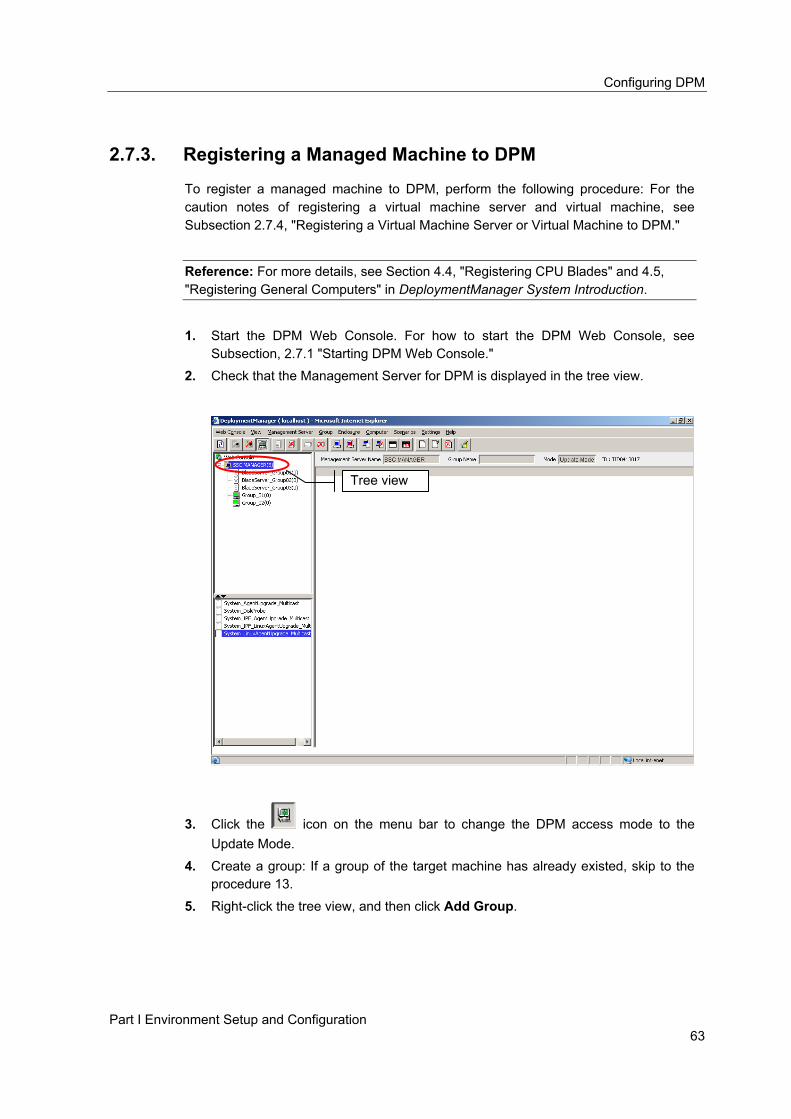
Configuring DPM
Part I Environment Setup and Configuration 63
2.7.3. Registering a Managed Machine to DPM
To register a managed machine to DPM, perform the following procedure: For the caution notes of registering a virtual machine server and virtual machine, see Subsection 2.7.4, "Registering a Virtual Machine Server or Virtual Machine to DPM."
Reference: For more details, see Section 4.4, "Registering CPU Blades" and 4.5, "Registering General Computers" in DeploymentManager System Introduction.
1. Start the DPM Web Console. For how to start the DPM Web Console, see Subsection, 2.7.1 "Starting DPM Web Console."
2. Check that the Management Server for DPM is displayed in the tree view.
3. Click the icon on the menu bar to change the DPM access mode to the Update Mode.
4. Create a group: If a group of the target machine has already existed, skip to the procedure 13.
5. Right-click the tree view, and then click Add Group.
Tree view

2 Advanced Setting of Compatible Products
SigmaSystemCenter 2.1 Configuration Guide 64
6. The Add Group window appears. Select BladeServer to create a group to which
you are going to register a CPU blade or General Computer to create a group to which you are going to register a machine under Group Type.
7. Enter a group name in the Group Name box.
Note: The displayed setting values can be different from the actual window.
8. Click OK 9. If you are creating a BladeServer group, skip to the procedure 13 to register an
enclosure with the CPU blade inserted.
10. In the tree view, right-click the group to which you want to add the enclosure, and click Add Enclosure.
11. The Add Enclosure window appears. Enter the enclosure ID.
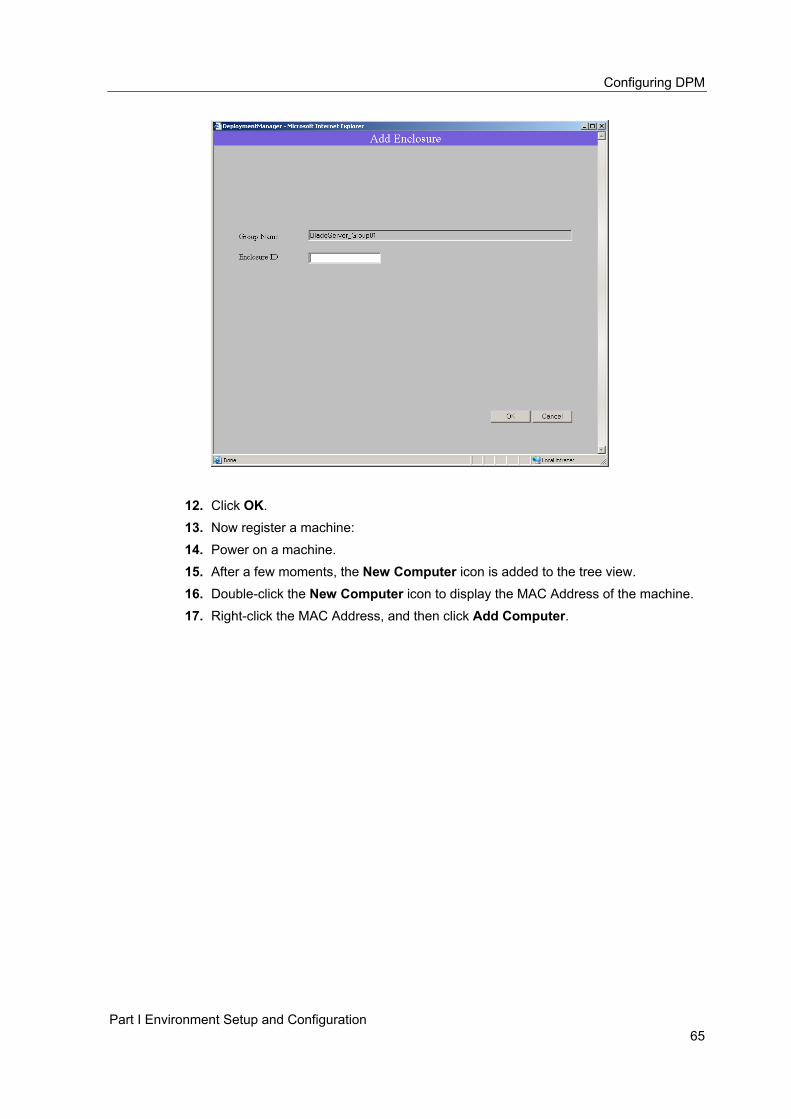
Configuring DPM
Part I Environment Setup and Configuration 65
12. Click OK. 13. Now register a machine: 14. Power on a machine. 15. After a few moments, the New Computer icon is added to the tree view. 16. Double-click the New Computer icon to display the MAC Address of the machine. 17. Right-click the MAC Address, and then click Add Computer.
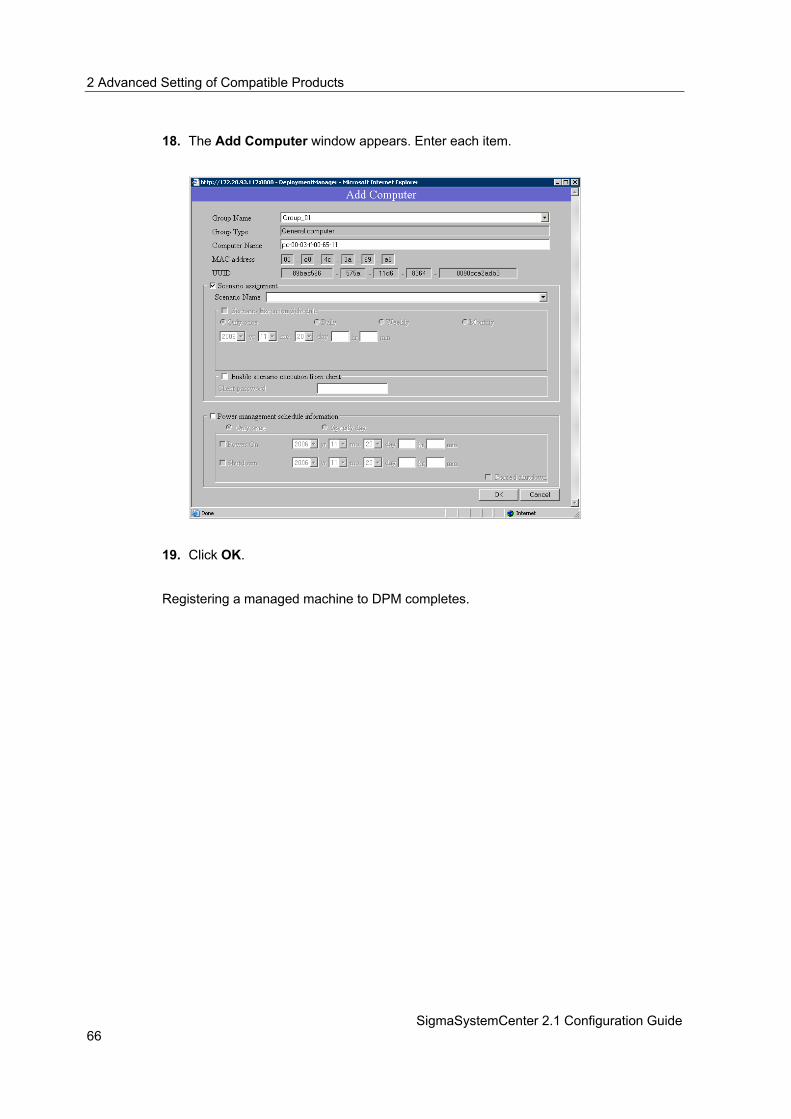
2 Advanced Setting of Compatible Products
SigmaSystemCenter 2.1 Configuration Guide 66
18. The Add Computer window appears. Enter each item.
19. Click OK. Registering a managed machine to DPM completes.

Configuring DPM
Part I Environment Setup and Configuration 67
2.7.4. Registering a Virtual Machine Server or Virtual Machine to
DPM
Note the following points when registering a virtual machine server or virtual machine to DPM. You need to register a virtual machine server or virtual machine in the following cases:
With a virtual machine server: If you execute operation with starting operation of a virtual machine server
With a virtual machine: • To install applications and patches to a virtual machine • To execute Create and Assign Machine or Allocate Machine to a virtual
machine on ESXi, Hyper-V, or XenServer If you select the Register VM with DPM when VM is created check box on the VM model setting, the virtual machine is registered to DPM automatically when the virtual machine is activated in an operation group.
If you register a virtual machine server or virtual machine to DPM, the machine is managed by both its virtual environment management software and DPM. SigmaSystemCenter collects the information of the machine from both.
Note: When you register a virtual machine server to DPM, register its MAC address and UUID. If these are not registered with correct values, the settings do not match machine information collected from virtual environment management software, and SystemProvisioning may consider that they are different machines.
The following is our recommending procedure:
1. Setting of the network boot of a machine Set the order of NIC to boot with PXE upper than a hard disk on the boot order setting of BIOS, and save the setting.
2. Restart the machine By the first network boot after restart, the machine is registered to DPM, and powered off automatically. The machine (its MAC address) is added under the New Computer icon in the tree view on the DPM Web Console.
3. Register the machine to an arbitrary group of DPM Select the machine registered on the New Computer on the DPM Web Console, and execute Add Computer. Confirm that its MAC address and UUID are set to the displayed window when registering the machine.
2 Advanced Setting of Compatible Products
SigmaSystemCenter 2.1 Configuration Guide 68
4. Start the virtual machine server 5. Install Client Service for DPM to a virtual machine server.
Note: If you are using ESXi, you cannot install Client Service for DPM, and the computer name must be resolved. For more details, see Section 4.4, "Registering CPU Blades" and 4.5, "Registering General Computers" in DeploymentManager System Introduction.
You need to open ports that Client Service for DPM uses on the virtual machine server. For the details of the ports, see Section 1.10, "Setting Up the Network Environment" in DeploymentManager System Introduction.
If Client Service for DPM is not installed on a virtual machine server, you need to install Client Service for DPM. Before installing Client Service for DPM, configure the Firewall to the virtual machine, and then, install Client Service for DPM.
6. Confirm the installation of Client Service for DPM Confirm that Client Service for DPM is installed properly. If it is installed properly, the OS name is displayed on properties of the registered machine on the DPM Console.

Creating a Scenario Using a Master Machine in DPM
Part I Environment Setup and Configuration 69
2.8. Creating a Scenario Using a Master Machine in DPM
You need to create a restore scenario, which will be the source for distribution software distributed by SystemProvisioning to managed machines and groups. This procedure is how to create a scenario for a physical machine. Create a restore scenario using a master machine in DPM according to the following flow.
1. Set up a master machine
You need to create an image source machine. The machine is called a master machine. Create a master machine installing OS, various drivers, service packs, and applications. There are two methods to create a master machine: installing a new OS and creating a machine that has already existed as a master machine. Also, creating methods differ according to the OS.
If you want to create a master machine, installing Windows OS, see Subsection 2.8.1, "Creating a Master Machine Installing Windows OS." If you want to create a master machine from an existing machine running Windows, see Subsection 2.8.2, "Creating a Master Machine Using an Existing Machine (Windows OS)." If you want to create a master machine, installing Linux OS, see Subsection 2.8.3, "Creating a Master Machine Installing Linux OS." If you want to create a master machine from an existing machine running Linux, see Subsection 2.8.4, "Creating a Master Machine Using an Existing Machine (Linux OS)."
2. Backing up the master machine
After creating the master machine, you need to save the backup image of the master machine. There are three methods to create the backup image: simple full backup, using Sysprep, which is a tool for duplicating the OS image disk, for a Windows machine, and using individual setting information for a Linux machine. Determine which to use according to your system design. For the method using Sysprep on the Windows machine, see Subsection 2.8.5, "Preparing for Backing up the Master Machine."
3. Creating a scenario for backup
Create a backup scenario. If you execute this scenario, a backup image is created in DPM. See Subsection 2.8.6, "Creating a Backup Scenario File."
4. Creating a restore scenario
Create a scenario for restoring the backup image saved on the management server. See Subsection 2.8.7, "Creating a Restoration Scenario File."
2 Advanced Setting of Compatible Products
SigmaSystemCenter 2.1 Configuration Guide 70
You can register the restore scenario as distribution software in SystemProvisioning. The procedure is the same as when creating distribution software in actual operation.
2.8.1. Creating a Master Machine Installing Windows OS
To create a master machine, installing Windows OS, perform the following procedure.
1. Setting up the machine Install an OS, various drivers, service packs, HotFixes, and application programs.
2. Configuring System Monitor - Performance Monitoring Services
If you want to use System Monitor - Performance Monitoring Services, configure the following settings.
1. Create a user account for connection with System Monitor - Performance
Monitoring Services on all the machines to be monitored by System Monitor - Performance Monitoring Services. Also, create a user account on the master machine. See Subsection 2.5.1, "Configuring the User Account on a Monitored Machine" for details.
2. Changing the setting for the master machine. The procedures differ according to the OS.
• If the OS is Windows 2000: With the default settings, you may not collect data on the Logical Disk that is a performance information category. Run the following command on the master machine to change the settings. DISKPERF -Y
-Y Configures the system to start all the disk performance counters when the system is rebooted.
• If the OS is Windows XP: With the default settings, you may not collect performance information data. Change the local security setting. See Section 1.7, "Connecting to Monitored Machines" in System Monitor - Performance Monitoring Services User’s Guide for how to change the setting.
• If the OS is Windows Vista With the default settings, you cannot collect performance information data. Change the setting to make the service of a master machine, "Remote Registry," start up when the machine starts up. For the method, see Section 1.7, "Connecting to Monitored Machine" in System Monitor - Performance Monitoring Services User’s Guide.
Creating a master machine, installing Windows OS completes.

Creating a Scenario Using a Master Machine in DPM
Part I Environment Setup and Configuration 71
2.8.2. Creating a Master Machine Using an Existing Machine
(Windows OS)
To create a master machine using an existing machine, perform the following procedure.
1. Checking that Client Service for DPM is installed Check the Client Service for DPM is installed on your managed machine with the following procedure.
1. Click the Start menu, and click Control Panel. From Control Panel, double-click Administrative Tools. From Administrative Tools, double-click Services to start the Services Snap-in.
2. Check that DeploymentManager Agent Service and DeploymentManager Remote Update Service Client are registered. If they are registered, the Client Service for DPM is installed.
If the Client Service for DPM is not installed, install it from the SigmaSystemCenter CD-R. See SigmaSystemCenter Installation Guide for details.
2 Advanced Setting of Compatible Products
SigmaSystemCenter 2.1 Configuration Guide 72
2. Configuring System Monitor - Performance Monitoring Services
If you want to use System Monitor - Performance Monitoring Services, configure the following settings.
1. Create a user account for connection with System Monitor - Performance Monitoring Services on all the machines to be monitored by System Monitor - Performance Monitoring Services. Also, create a user account on the master machine. See Subsection 2.5.1, "Configuring the User Account on a Monitored Machine" for details.
2. Changing the setting for the master machine. The procedures differ according to the OS.
• If the OS is Windows 2000: With the default settings, you may not collect data on the Logical Disk that is a performance information category. Run the following command on the master machine to change the settings. DISKPERF -Y
-Y Configures the system to start all the disk performance counters when the system is rebooted.
• If the OS is Windows XP: With the default settings, you may not collect performance information data. Change the local security setting. See Section 1.7, "Connecting to Monitored Machines" in System Monitor - Performance Monitoring Services User’s Guide for how to change the setting.
• If the OS is Windows Vista With the default settings, you cannot collect performance information data. Change the setting to make the service of a master machine, "Remote Registry," start up when the machine starts up. For the method, see Section 1.7, "Connecting to Monitored Machine" in System Monitor - Performance Monitoring Services User’s Guide.
Creating a master machine using an existing machine with Windows OS completes.
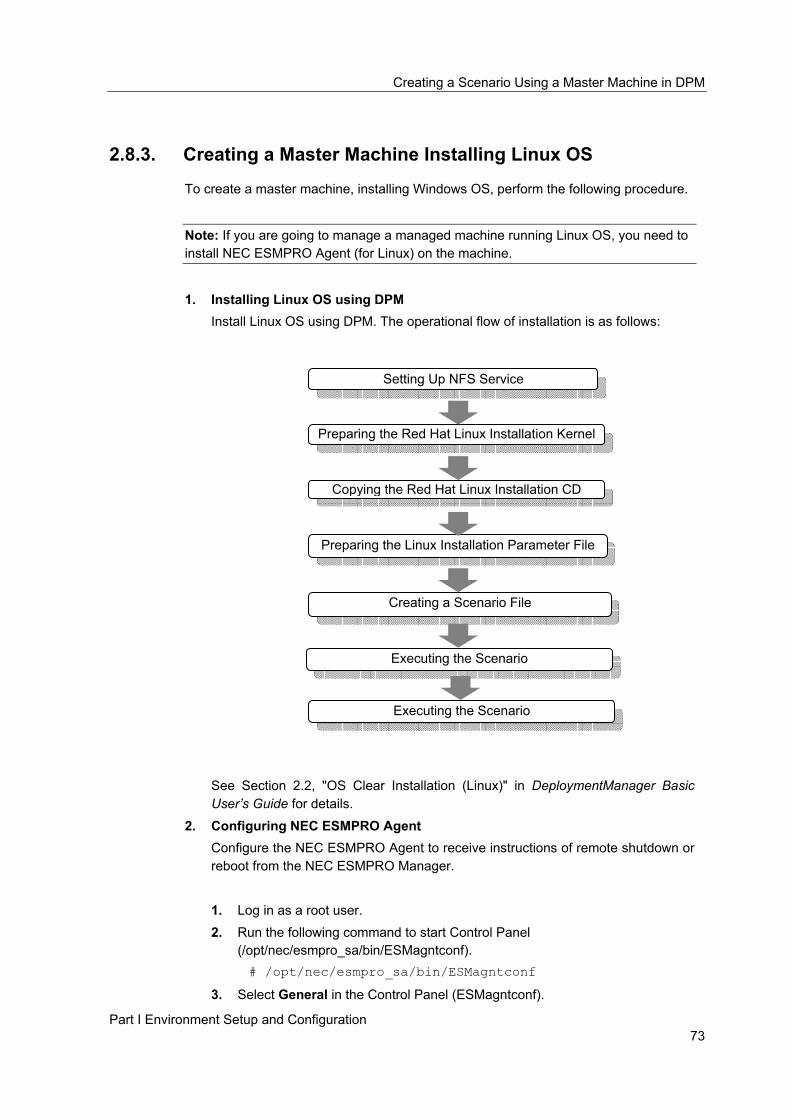
Creating a Scenario Using a Master Machine in DPM
Part I Environment Setup and Configuration 73
2.8.3. Creating a Master Machine Installing Linux OS
To create a master machine, installing Windows OS, perform the following procedure.
Note: If you are going to manage a managed machine running Linux OS, you need to install NEC ESMPRO Agent (for Linux) on the machine.
1. Installing Linux OS using DPM Install Linux OS using DPM. The operational flow of installation is as follows:
See Section 2.2, "OS Clear Installation (Linux)" in DeploymentManager Basic User’s Guide for details.
2. Configuring NEC ESMPRO Agent Configure the NEC ESMPRO Agent to receive instructions of remote shutdown or reboot from the NEC ESMPRO Manager.
1. Log in as a root user. 2. Run the following command to start Control Panel
(/opt/nec/esmpro_sa/bin/ESMagntconf). # /opt/nec/esmpro_sa/bin/ESMagntconf
3. Select General in the Control Panel (ESMagntconf).
Setting Up NFS Service
Preparing the Red Hat Linux Installation Kernel
Copying the Red Hat Linux Installation CD
Preparing the Linux Installation Parameter File
Creating a Scenario File
Executing the Scenario
Executing the Scenario

2 Advanced Setting of Compatible Products
SigmaSystemCenter 2.1 Configuration Guide 74
4. The General Properties screen appears. Check that the check box of Enable the Manager to modify SNMP Setting and Enable Remote Shutdowns / Reboot is filled with "*." If not, press Space to fill with "*."
3. Configuring network
Configure the following items using the command (/opt/nec/setup/necnetsetup).
• Host name • Domain name • IP address • Subnet mask • IP address of Gateway • DNS name server
4. Configuring System Monitor - Performance Monitoring Services
If you want to use System Monitor - Performance Monitoring Services, configure the following settings.
1. Create a user account for connection with System Monitor - Performance Monitoring Services on all the machines to be monitored by System Monitor - Performance Monitoring Services. Also, create a user account on the master machine. See Subsection 2.5.1, "Configuring the User Account on a Monitored Machine" for details.
2. To connect the machine to telnet, install Telnet Server and enable the service. If firewalls are configured, exempt telnet communications from fire wall blocking.
3. To connect the machine with SSH, enable SSH. Creating a master machine, installing Linux OS completes.
2.8.4. Creating a Master Machine Using an Existing Machine
(Linux OS)
To create a master machine using an existing machine, perform the following procedure.
Note: If you are going to manage a managed machine running Linux OS, you need to install NEC ESMPRO Agent (for Linux) on the machine.

Creating a Scenario Using a Master Machine in DPM
Part I Environment Setup and Configuration 75
1. Configuring NEC ESMPRO Agent
Configure the NEC ESMPRO Agent to receive instructions of remote shutdown or reboot from the NEC ESMPRO Manager.
1. Log in as a root user. 2. Run the following command to start Control Panel
(/opt/nec/esmpro_sa/bin/ESMagntconf). # /opt/nec/esmpro_sa/bin/ESMagntconf
3. Select General in the Control Panel (ESMagntconf). 4. The General Properties screen appears. Check that the check box of Enable
the Manager to modify SNMP Setting and Enable Remote Shutdowns / Reboot is filled with "*." If not, press Space to fill with "*."
2. Configuring network Configure the following items using the command (/opt/nec/setup/necnetsetup). • Host name • Domain name • IP address • Subnet mask • IP address of Gateway • DNS name server
3. Configuring System Monitor - Performance Monitoring Services If you want to use System Monitor - Performance Monitoring Services, configure the following settings.
1. Create a user account for connection with System Monitor - Performance Monitoring Services on all the machines to be monitored by System Monitor - Performance Monitoring Services. Also, create a user account on the master machine. See Subsection 2.5.1, "Configuring the User Account on a Monitored Machine" for details.
2. To connect the machine to telnet, install Telnet Server and enable the service. If firewalls are configured, exempt telnet communications from fire wall blocking.
3. To connect the machine with SSH, enable SSH. Creating a master machine using an existing machine with Linux OS completes.

2 Advanced Setting of Compatible Products
SigmaSystemCenter 2.1 Configuration Guide 76
2.8.5. Preparing for Backing up the Master Machine
This subsection explains the backup method using Sysprep on the Windows machine. Full Backup
After creating a parameter file for the master machine, proceed to Subsection 2.8.6, "Creating a Backup Scenario File."
Deployment Backup See Chapter 1, "OS Installation by Disk Duplication" in DeploymentManager Basic User’s Guide for details.
1. Join a work group. 2. Do not configure a password with the Administrator user authority.
Note: If you are using Windows Server 2008 or Windows Vista, operate the following procedure after enabling the Administrator account and logging in to the account. After duplicating the disk, the log in screen of the Administrator account appears.
3. Acquire the IP address of the DHCP server. 4. Creating a Sysprep folder
1. Run the following file in the SigmaSystemCenter CD-R from Explorer. SigmaSystemCenter CD-R:\DPM\TOOLS\SYSPREP\ Windows\COPYSYSPREP.VBS
Note: If an OS boot drive:\Sysprep folder exists, it is overwritten.
2. The Copy of DeploymentManager Sysprep modules dialog box appears. Click OK. The Sysprep file is created on the drive where the OS of the master machine is running.
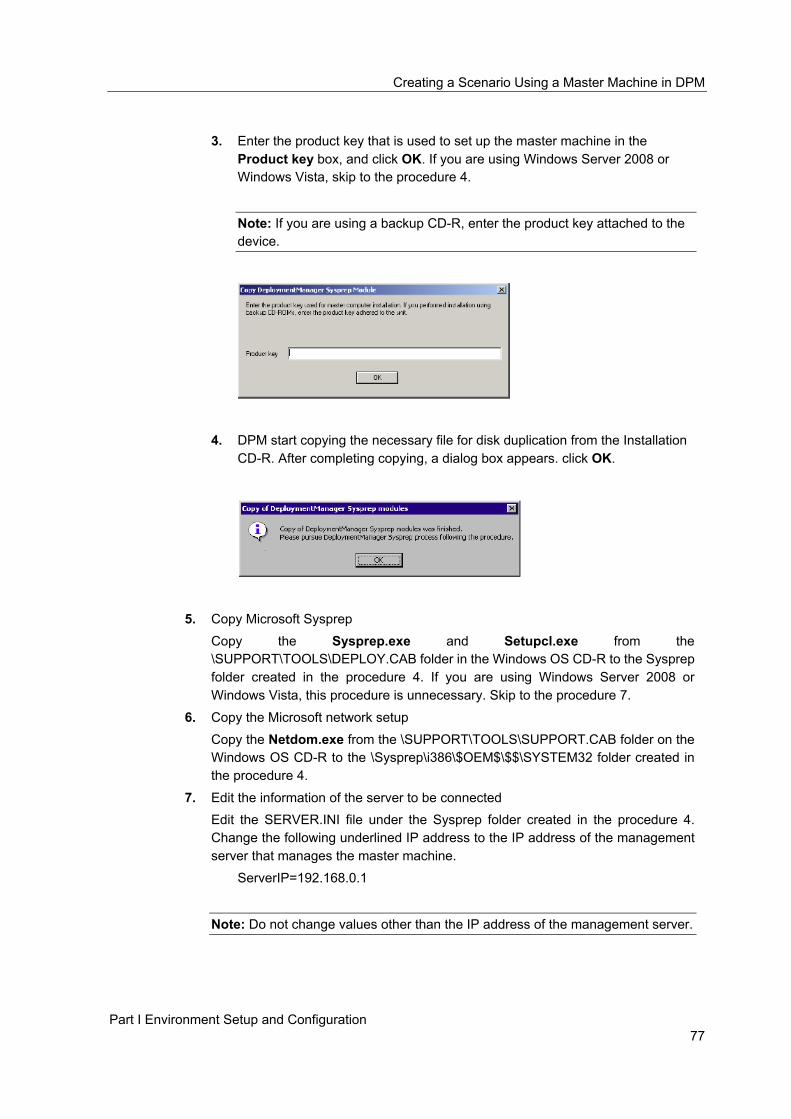
Creating a Scenario Using a Master Machine in DPM
Part I Environment Setup and Configuration 77
3. Enter the product key that is used to set up the master machine in the
Product key box, and click OK. If you are using Windows Server 2008 or Windows Vista, skip to the procedure 4.
Note: If you are using a backup CD-R, enter the product key attached to the device.
4. DPM start copying the necessary file for disk duplication from the Installation CD-R. After completing copying, a dialog box appears. click OK.
5. Copy Microsoft Sysprep Copy the Sysprep.exe and Setupcl.exe from the \SUPPORT\TOOLS\DEPLOY.CAB folder in the Windows OS CD-R to the Sysprep folder created in the procedure 4. If you are using Windows Server 2008 or Windows Vista, this procedure is unnecessary. Skip to the procedure 7.
6. Copy the Microsoft network setup Copy the Netdom.exe from the \SUPPORT\TOOLS\SUPPORT.CAB folder on the Windows OS CD-R to the \Sysprep\i386\$OEM$\$$\SYSTEM32 folder created in the procedure 4.
7. Edit the information of the server to be connected Edit the SERVER.INI file under the Sysprep folder created in the procedure 4. Change the following underlined IP address to the IP address of the management server that manages the master machine.
ServerIP=192.168.0.1
Note: Do not change values other than the IP address of the management server.

2 Advanced Setting of Compatible Products
SigmaSystemCenter 2.1 Configuration Guide 78
8. Create a setup parameter file on the management server.
Create a setup parameter file from the Image Builder. You can use the file created in Subsection 2.8.1, "Creating a Master Machine Installing Windows OS." See Subsection 2.1.2, "Creating Setup Parameters" in DeploymentManager Basic User’s Guide for the method for creating a setup parameter file.
9. Run Sysprep.bat.
1. Run the Sysprep.bat under the Sysprep folder created in the procedure 4. After running the command, follow the instructions displayed on the Command Prompt.
Note: Do not run Sysprep.exe in the same folder.
End all the started applications or explorers,
2. The machine is automatically powered off. If you restart the machine and the POST screen is displayed, power off right before acquiring the IP address by DHCP by pressing the POWER Switch.
10. Create a parameter file for disk duplication on the management server. Create a parameter file for disk duplication based on the parameter file created in the procedure 8 from the Image Builder. Select Acquire the IP address automatically on the setting for IP address of the parameter file for the master machine. See Subsection 1.1.3, "Preparing a Master Computer Disk Duplication Data File" in DeploymentManager Basic User’s Guide or the method for creating a parameter file for disk duplication.
Preparing a backup scenario file completes.
2.8.6. Creating a Backup Scenario File
To create a backup scenario file for Windows OS or Linux OS, perform the following procedure:
Note: Before back up or restore a machine from DPM, check the disk number using Disk Viewer. For the details of disk viewer, see Chapter 4, "Disk Configuration Check" in DeploymentManager Advanced User’s Guide.
1. Start the DPM Web Console.
2. Click the icon on the menu bar to acquire the DPM access mode.
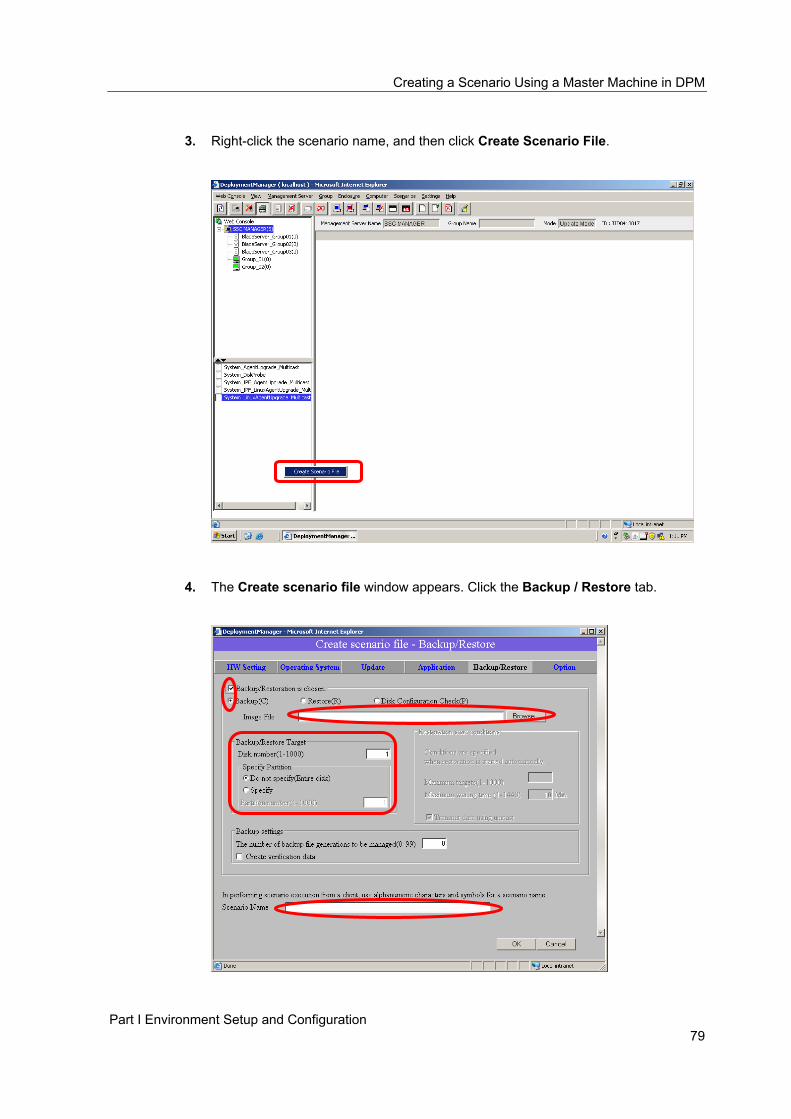
Creating a Scenario Using a Master Machine in DPM
Part I Environment Setup and Configuration 79
3. Right-click the scenario name, and then click Create Scenario File.
4. The Create scenario file window appears. Click the Backup / Restore tab.
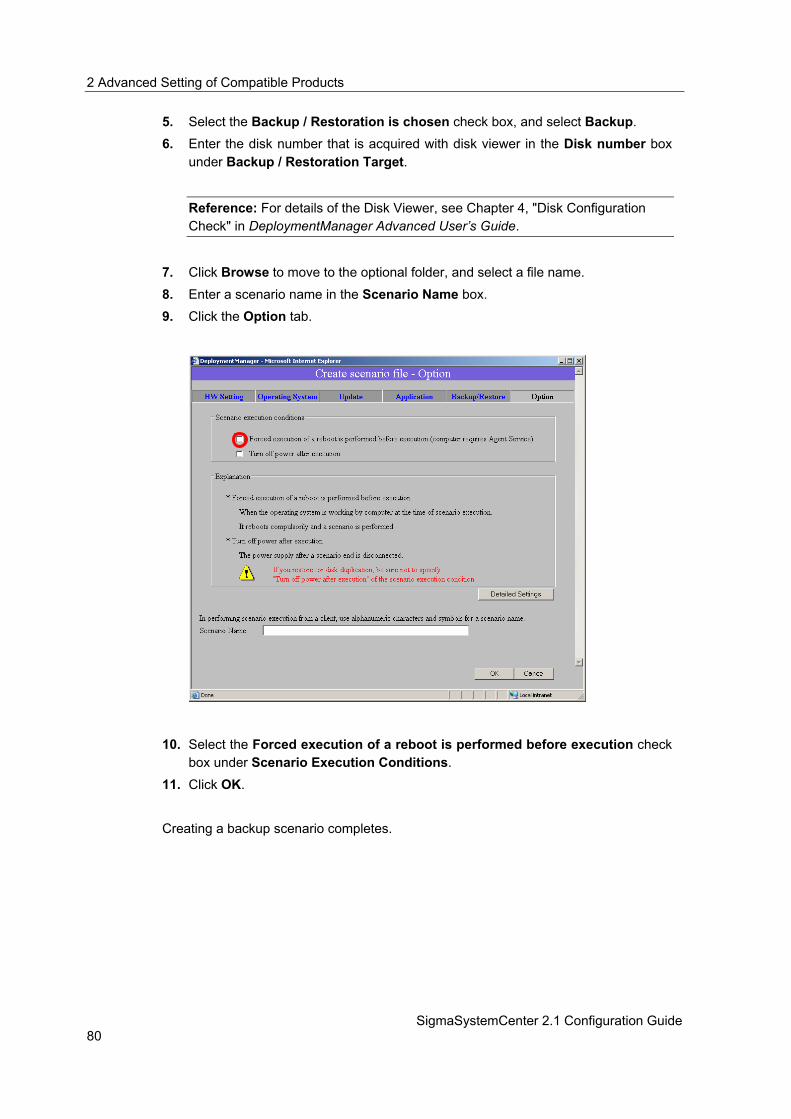
2 Advanced Setting of Compatible Products
SigmaSystemCenter 2.1 Configuration Guide 80
5. Select the Backup / Restoration is chosen check box, and select Backup. 6. Enter the disk number that is acquired with disk viewer in the Disk number box
under Backup / Restoration Target.
Reference: For details of the Disk Viewer, see Chapter 4, "Disk Configuration Check" in DeploymentManager Advanced User’s Guide.
7. Click Browse to move to the optional folder, and select a file name. 8. Enter a scenario name in the Scenario Name box. 9. Click the Option tab.
10. Select the Forced execution of a reboot is performed before execution check box under Scenario Execution Conditions.
11. Click OK. Creating a backup scenario completes.

Creating a Scenario Using a Master Machine in DPM
Part I Environment Setup and Configuration 81
2.8.7. Creating a Restoration Scenario File
To create a restoration scenario file of a Windows OS or a Linux OS, perform the following procedure.
Note: Before you back up or restore in DPM, make sure to check the Disk number using the Disk Viewer, For details of the Disk Viewer, see Chapter 4, "Disk Configuration Check" in DeploymentManager Advanced User’s Guide.
1. Start the DPM Web Console.
2. Click the icon on the menu bar to acquire the DPM access mode.
3. Right-click the scenario name, and then click Create Scenario File.

2 Advanced Setting of Compatible Products
SigmaSystemCenter 2.1 Configuration Guide 82
4. The Create scenario file window appears. Click the Backup/Restore tab.
5. Select the Backup/Restoration is chosen check box, and select Restore. 6. Enter the Disk number and Partition number that is acquired with Disk Viewer in
the Disk number box and Partition number box under Backup / Restoration Target.
Reference: For details of the Disk Viewer, see Chapter 4, "Disk Configuration Check" in DeploymentManager Advanced User’s Guide.
7. Click Browse to move to the optional folder, and select the file name which you specified with the backup scenario.
8. Select the Transit data using unicast check box under Restoration start conditions.
9. Enter a scenario name in the Scenario Name box. 10. Click the Option tab.

Creating a Scenario Using a Master Machine in DPM
Part I Environment Setup and Configuration 83
11. Select the Forced execution of a reboot is performed before execution check
box under Scenario execution conditions.
12. Click OK. Creating a restoration scenario file completes.
2 Advanced Setting of Compatible Products
SigmaSystemCenter 2.1 Configuration Guide 84
2.9. Preparing for the Use of VMware If you use VMware, you need to prepare the environment to use VMware. Configure each setting with the following flow.
2.9.1. Setting Up the VMware Environment
To set up the VMware environment, set up with the following flow:
Reference: For the details of the settings, see a product manual of VMware, Inc.
1. Installing and configuring the following components of VirtualCenter A server component (VirtualCenter Management Server) A client component (Virtual Infrastructure Client)
Note: If VirtualCenter and DPM are installed on one machine, the port of VirtualCenter and that of Tomcat may be conflicting, so you need to change the port of Web Server for DPM. For how to change the port, see in ""Apache Tomcat" does not start" in Section 17, "Web Console" in DeploymentManager Advanced User’s Guide.
2. Installing and configuring VMware ESX 3. Starting Virtual Infrastructure Client and logging in 4. Configuring a datacenter or cluster.
Note: You need to note the following when managing an environment where Enhanced VMotion Compatibility is enabled in SigmaSystemCenter.
A datacenter or cluster name must be unique in VirtualCenter. Do not share a datacenter between datacenters or clusters. SigmaSystemCenter manages clusters with datacenters. A cluster is displayed as a datacenter on the Web Console.
You can create a datacenter in VirtualCenter from the Web Console, however, SigmaSystemCenter does not support creating a cluster in VirtualCenter.
5. Registering an ESX The above are the procedural flow of setting up the VMware environment.

Creating a Template Using a Master VM in VirtualCenter
Part I Environment Setup and Configuration 85
2.10. Creating a Template Using a Master VM in VirtualCenter
This section describes the flow of creating a template which is the same configuration as the existing virtual machine, and its base, a master VM. Create a template with the following flow. Also, a template can be created from SystemProvisioning. See Section 5.2, "Creating a Template" for the method.
2.10.1. Creating a Master VM in VirtualCenter
To create a master VM that will be the source of a virtual machine to manage in SystemProvisioning on the management screen of Virtual Infrastructure Client, follow the flow below:
Reference: For how to create a virtual machine in VirtualCenter using Virtual Infrastructure Client, see a product manual of VMware, Inc.
1. Start and log in to Virtual Infrastructure Client. 2. Create a virtual machine, specifying the number of CPUs corresponding to a
virtual machine to use, memory capacity, disk capacity, the number of disks, and the number of NICs.
3. Install OS that is supported by the virtual machine to use. 4. If you installed Windows on the master VM, clear the administrator password
configured to the OS.
Note: If you do not clear the administrator password, the password for the created virtual machine is different from the specified one. In that case, the password is the one that is configured to the master VM.
5. Install VMwareTools on the master VM. 6. To create a HW Profile Clone template or Disk Clone template to execute Create
and Assign Machine from the master VM, perform the following procedure:
1. Install Client Service for DPM. For the procedure, see Section from 2.7, "Installing to a Managed Machine Running Windows (x86 / x64) From the Installer Dialog Box" to 2.11, "Installing to a Managed Machine Running Linux" according to your environment in SigmaSystemCenter Installation Guide.
2. If you configure the Firewall, open the ports that Client Service for DPM uses. 3. Start the master VM, and change the boot order of NIC of the master VM to
the top on the BIOS screen.
7. Install applications that are supported by the virtual machine to use.

2 Advanced Setting of Compatible Products
SigmaSystemCenter 2.1 Configuration Guide 86
8. To create a virtual machine in SystemProvisioning, you need a template which is created based on the master VM, so you need to create a master VM adjusting to the configuration of the virtual machine to use.
Creating a master VM in VirtualCenter completes.
Note: When you create a Linked Clone template on a master VM, do not take a snapshot on this master VM. If you do, you will not be able to create a virtual machine with the same configuration as the master VM.
2.10.2. Creating a Template in VirtualCenter
To create a template that will be managed by SystemProvisioning on the management screen of Virtual Infrastructure Client, follow the flow below:
Reference: For how to create a template in VirtualCenter using Virtual Infrastructure Client, see a product manual of VMware, Inc.
1. Start and log in to Virtual Infrastructure Client. 2. Display the inventory panel. 3. Select a virtual machine. 4. Shut down the virtual machine. 5. Convert the virtual machine to a template. Creating a template in VirtualCenter completes.
Preparing for the Use of Xen
Part I Environment Setup and Configuration 87
2.11. Preparing for the Use of Xen If you use Xen, you need to prepare the environment to use Xen. Configure each setting with the following flow.
2.11.1. Setting Up the Xen Environment
To set up the Xen environment, set up with the following flow:
Reference: For the details of the settings, see a product manual of Citrix Systems, Inc.
1. Install and configure Xen Server 2. Install and configure XenCenter 3. Start XenCenter and log in 4. Configure Pool 5. Register Xen Server The above are the procedural flow of setting up the Xen environment.

2 Advanced Setting of Compatible Products
SigmaSystemCenter 2.1 Configuration Guide 88
2.12. Creating a Template Using a Master VM in XenCenter
This section describes the flow of creating a template which is the same configuration as the existing virtual machine, and its base, a master VM. Create a template with the following flow. Also, a template can be created from SystemProvisioning. See Section 5.2, "Creating a Template" for the method.
2.12.1. Creating a Master VM in XenCenter
To create a master VM that will be the source of a virtual machine to manage in SystemProvisioning on the management screen of XenCenter, follow the flow below:
Reference: For how to create a virtual machine in XenCenter, see a product manual of Citrix Systems, Inc.
1. Start and log in to XenCenter. 2. Create a virtual machine, specifying the number of CPUs corresponding to a
virtual machine to use, memory capacity, disk capacity, the number of disks, and the number of NICs.
3. Install OS that is supported by the virtual machine to use. If you create a Windows VM, install Windows OS for users.
4. Install Xen Server Tools. 5. To create a Disk Clone template to execute Create and Assign Machine from the
master VM, perform the following procedure:
1. Install Client Service for DPM. For the installation procedure, see from Section 2.7, "Installing to a Managed Machine Running Windows (x86 / x64) From the Installer Dialog Box" to 2.11, "Installing to a Managed Machine Running Linux" in SigmaSystemCenter Installation Guide. Reference differs depending on your environment.
2. If you configure the Firewall, open the ports that Client Service for DPM uses. 3. Set a disk upper than a NIC on the boot order of the master VM.
6. Install applications that are supported by the virtual machine to use. 7. To create a virtual machine in SystemProvisioning, you need a template which is
created based on the master VM, so you need to create a master VM adjusting to the configuration of the virtual machine to use.
Note: Set empty in the DVD Drive to which the created master VM connects. If not, creating a virtual machine from a master VM in SystemProvisioning might fail.

Creating a Template Using a Master VM in XenCenter
Part I Environment Setup and Configuration 89
Creating a master VM in XenCenter completes.
2.12.2. Creating a Template in XenCenter
To create a template that will be managed by SystemProvisioning on the management screen of XenCenter, follow the flow below:
Reference: For how to create a template in XenCenter, see a product manual of Citrix Systems, Inc.
1. Start and log in to XenCenter. 2. Select a virtual machine. 3. Shut down the virtual machine. 4. Convert the virtual machine to a template.
Note: Set empty in the DVD Drive to which the created master VM connects. If not, creating a virtual machine from a master VM in SystemProvisioning might fail.
Creating a template in XenCenter completes.

2 Advanced Setting of Compatible Products
SigmaSystemCenter 2.1 Configuration Guide 90
2.13. Preparing for the Use of ESXi To create a virtual machine on ESXi to manage the virtual machine directory from SystemProvisioning, you need to create a master VM to be the source. Create the master VM with the following flow.
2.13.1. Creating a Master VM on ESXi
To create a master VM that will be the source of a virtual machine to manage in SystemProvisioning on the management screen of Virtual Infrastructure Client, follow the flow below:
Reference: For how to create a virtual machine on ESXi using Virtual Infrastructure Client, see a product manual of VMware, Inc.
1. Start the Virtual Infrastructure Client and log in to ESXi. 2. Create a virtual machine, specifying the number of CPUs corresponding to a
virtual machine to use, memory capacity, disk capacity, the number of disks, and the number of NICs.
Note: If you are going to create a Linked Clone template from a master VM, do not select the independent mode to the mode of a virtual disk of a master VM.
3. Install OS that is supported by the virtual machine to use. 4. Install VMwareTools. 5. If you installed Windows on the master VM, clear the administrator password
configured to the OS.
Note: If you do not clear the administrator password, the password for the created virtual machine is different from the specified one. In that case, the password is the one that is configured to the master VM.
6. To create a HW Profile Clone, Linked Clone, or Disk Clone template, to execute
Create and Assign Machine, from the master VM, perform the following procedure.
1. Install Client Service for DPM. For the installation procedure, see from Section 2.7, "Installing to a Managed Machine Running Windows (x86 / x64) From the Installer Dialog Box" to 2.10, "Installing to a Managed Machine Running Windows (IPF)" in SigmaSystemCenter Installation Guide. Reference differs depending on your environment.
2. If you configure the Firewall, open the ports that Client Service for DPM uses. 3. If you are creating a HW Profile Clone template, start the master VM, and
change the boot order of NIC of the master VM to the top on the BIOS screen.
7. Install applications that are supported by the virtual machine to use.
Preparing for the Use of ESXi
Part I Environment Setup and Configuration 91
8. To create a virtual machine from SystemProvisioning, you need a template (HW Profile Clone, Linked Clone, or Disk Clone) which is created based on the master VM, so you need to create a master VM with the configuration of the virtual machine to use.
Creating a master VM on ESXi completes.

2 Advanced Setting of Compatible Products
SigmaSystemCenter 2.1 Configuration Guide 92
2.14. Preparing for the Use of Hyper-V To create a virtual machine on Hyper-V from SystemProvisioning, you need to create a master VM to be the source. Create the master VM with the following flow.
2.14.1. Creating a Master VM on Hyper-V
To create a master VM that will be the source of a virtual machine to manage in SystemProvisioning on the management screen of Hyper-V Manager, follow the flow below:
Reference: For how to create a virtual machine on Hyper-V using Hyper-V Manager, see the help in Windows Server 2008 or a product manual.
1. Start the Hyper-V Manager. 2. Create a virtual machine to be used as a master VM on the New Virtual Machine
Wizard. Specify the name, memory capacity, virtual disks, and ISO image of the OS of the master VM.
3. Install the OS from the specified ISO image. 4. Clear the administrator password configured to the OS.
Note: If you do not clear the administrator password, the password for the created virtual machine is different from the specified one. In that case, the password is the one that is configured to the master VM.
5. Install Integration Services. 6. Install Client Service for DPM. For the installation procedure, see from Section 2.7,
"Installing to a Managed Machine Running Windows (x86 / x64) From the Installer Dialog Box" to 2.10, "Installing to a Managed Machine Running Windows (IPF)" in SigmaSystemCenter Installation Guide. Reference differs depending on your environment.
7. If you configure the Firewall, open the ports that Client Service for DPM uses. 8. Install applications to be included in the master image. 9. Configure the setting for network adapters. If you are going to use a HW Profile
Clone template, turn off the virtual machine and add a legacy network adapter. Connect this adapter to the network to communicate with DPM because this adapter is used for DPM distribution.
10. Add or delete other network adopters or configure network setting, according to your operation plan. From the Procedure 11, you need to perform only if you are going to distribute OS by DPM distribution using a HW Profile Clone template.
11. Configure the BIOS setting. Select BIOS on the virtual machine setting dialog box. 12. Change the boot order. Set the legacy network adapter at the top in Startup order
on the virtual machine setting dialog box.
Preparing for the Use of Hyper-V
Part I Environment Setup and Configuration 93
Creating a master VM on Hyper-V completes.
Note: The items used to create a new virtual machine based on a master VM are: - Processor (The number of logical processors and relative weight) - Memory amount - Network adapter (Only kinds. MAC address is newly created. To the setting for the destination network, the setting of a model is reflected.) - Virtual disk (Kinds of the virtual disk and capacity.)
Hyper-V has two kinds of NIC: - Network Adapter (High speed / No PXE function) - Legacy Network Adapter (Low speed / With PXE function) Because DPM distribution uses the PXE function, configure to use the legacy network adapter for HW Profile Clone. However, after distribution, the use of higher-speed network adapter suits operations. We recommend that you configure the network adapter to the master VM.
Do not duplicate a virtual machine by the export and import function from Hyper-V Manager. If you do, the UUID to identify a virtual machine is duplicated, and SigmaSystemCenter cannot manage the virtual machine properly.
2 Advanced Setting of Compatible Products
SigmaSystemCenter 2.1 Configuration Guide 94
2.15. Preparing for the Use of Out-of-Band (OOB) Management
This section explains how to configure the BMC that is an abbreviated form of Baseboard Management Controller, (EXPRESSSCOPE engine in case of an Express5800 series server) on a managed machine to manage and control power supply.
Note: A physical machine to be managed by the power control function, Out-of-Band Management must be a model that supports RMCP and RMCP+ and has BMC.
2.15.1. Configuring IP Address of BMC
To activate OOB Management, you need to set IP address of BMC. SigmaSystemCenter connects to this IP address.
2.15.2. Creating Administrator Account in BMC
You need to create an administrator account to connect to BMC from SigmaSystemCenter.
2.15.3. Checking the Setting of Firewall
A SigmaSystemCenter management server communicates to 623 / UDP with which BMC is listening. If firewall exists on the channel, the communication is blocked and the OOB Management may fail. To prevent this situation, confirm that the firewall setting meets the following conditions:
A SigmaSystemCenter management server can communicate to 623 / UDP port of BMC.
All UDP packets from BMC to any port of a SigmaSystemCenter management server can be reached.
95
PPaarrtt IIII SSttaarrtt OOppeerraattiioonn iinn SSiiggmmaaSSyysstteemmCCeenntteerr
This section explains the operations to register compatible products to SigmaSystemCenter and to operate machines in SigmaSystemCenter. • 3 Registering Resources to SigmaSystemCenter • 4 Creating an Operation Group • 5 Settings to Manage and Operate Virtual Environment • 6 Operations for Managing a Machine in the Operations View • 7 Operations for Managing a Machine in the Virtual View


97
3. Registering Resources to SigmaSystemCenter
This chapter explains the procedure to add compatible products to SystemProvisioning. This chapter contains the following sections: • 3.1 Registration of Resources to SigmaSystemCenter ...................................................98 • 3.2 Adding a Subsystem..................................................................................................99 • 3.3 Registering a Switch ............................................................................................... 106 • 3.4 Registering a Load Balancer .................................................................................. 109 • 3.5 Registering Storage ................................................................................................ 112 • 3.6 Registering a Machine ............................................................................................ 118 • 3.7 Managing ESXi and Hyper-V.................................................................................. 121 • 3.8 Enabling Power Control Function by Out-of-Band (OOB) Management................ 124 • 3.9 Creating a Policy..................................................................................................... 125 • 3.10 Preparing Distribution Software.............................................................................. 135 • 3.11 Configuring Machine Properties ............................................................................. 138

3 Registering Resources to SigmaSystemCenter
SigmaSystemCenter 2.1 Configuration Guide 98
3.1. Registration of Resources to SigmaSystemCenter
To start operation with SigmaSystemCenter, you need to register resources you want to use to SystemProvisioning. In order to register the resources to SystemProvisioning, you need to add a compatible product, such as DPM and MasterScope Network Manager, as a subsystem, and then the resources, such as a machine or switch managed by the subsystem, to SystemProvisioning as a managed target. The flow of registering resources to SigmaSystemCenter is as follows:

Adding a Subsystem
Part II Start Operation in SigmaSystemCenter 99
3.2. Adding a Subsystem This section provides the procedure of adding a subsystem. Add compatible products you want to use as a subsystem. SigmaSystemCenter collects the information of managed machines from multiple subsystems: the virtual environment management software, such as VirtualCenter or XenServer Pool Master, and DPM, and uses the information. If a machine is managed by multiple subsystems, the information is collected from each subsystem. Therefore, pay attention for one machine not to be registered as two different machines to SystemProvisioning.
Register subsystems in the order written in this document. If you select a subsystem on the Add Subsystem window and click OK,
SystemProvisioning collects the information in the added subsystem. To register other subsystem, wait until you confirm that the information has collected.
You can check the information of the machine collected from the subsystem in the Resource view.
Note: Register licenses before adding compatible products to use as a subsystem. For how to register a license, see Section 1.4, "Registering License Keys."
Do not add an already added subsystem doubly with other host name, IP address, or URL.
Adds a compatible product as a subsystem:
1. Click Management on the Title Bar to switch to the Management view. 2. Click the Subsystem icon in the Management tree. 3. Click Add Subsystem on the Configuration menu. Add Subsystem is displayed
on the Main Window. Configure settings on each item with the procedure in the following subsections. For the details of each item, see Section 2.10, "Add Subsystem" in SigmaSystemCenter Web Console Reference Guide.
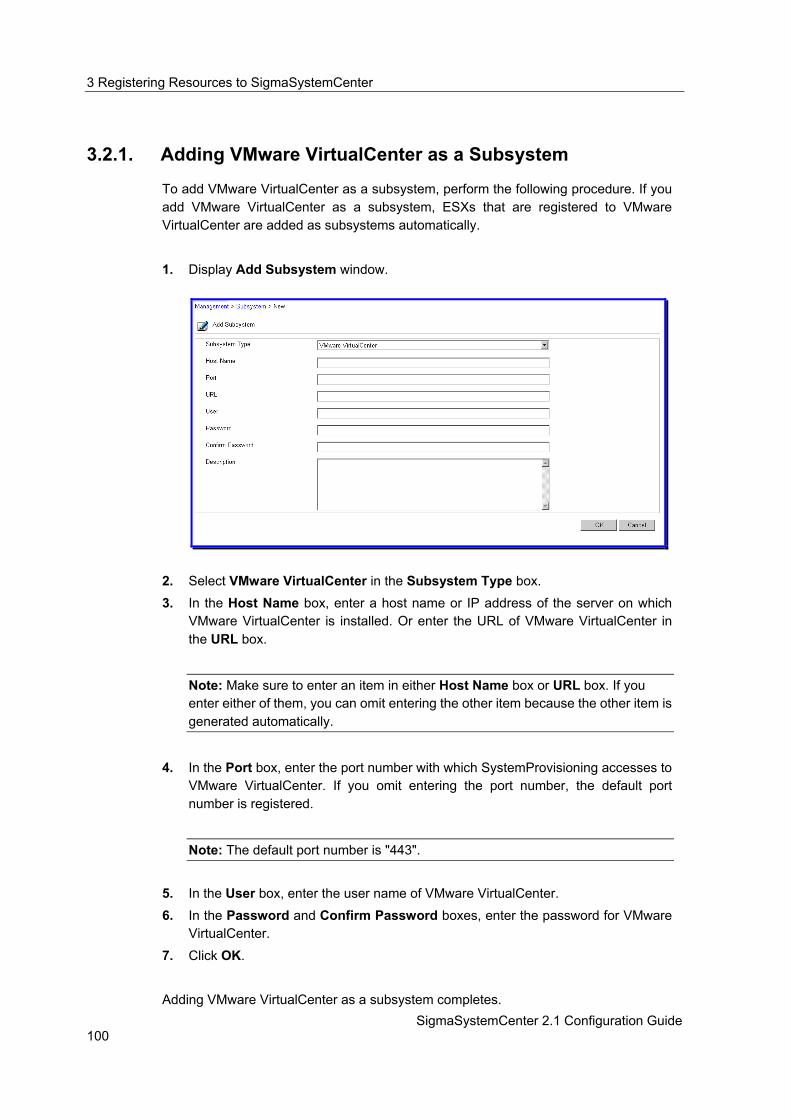
3 Registering Resources to SigmaSystemCenter
SigmaSystemCenter 2.1 Configuration Guide 100
3.2.1. Adding VMware VirtualCenter as a Subsystem
To add VMware VirtualCenter as a subsystem, perform the following procedure. If you add VMware VirtualCenter as a subsystem, ESXs that are registered to VMware VirtualCenter are added as subsystems automatically.
1. Display Add Subsystem window.
2. Select VMware VirtualCenter in the Subsystem Type box. 3. In the Host Name box, enter a host name or IP address of the server on which
VMware VirtualCenter is installed. Or enter the URL of VMware VirtualCenter in the URL box.
Note: Make sure to enter an item in either Host Name box or URL box. If you enter either of them, you can omit entering the other item because the other item is generated automatically.
4. In the Port box, enter the port number with which SystemProvisioning accesses to VMware VirtualCenter. If you omit entering the port number, the default port number is registered.
Note: The default port number is "443".
5. In the User box, enter the user name of VMware VirtualCenter. 6. In the Password and Confirm Password boxes, enter the password for VMware
VirtualCenter.
7. Click OK. Adding VMware VirtualCenter as a subsystem completes.

Adding a Subsystem
Part II Start Operation in SigmaSystemCenter 101
3.2.2. Adding XenServer Pool Master as a Subsystem
To add XenServer Pool Master as a subsystem, perform the following procedure. If you add XenServer Pool Master as a subsystem, Xen Servers that are registered to XenServer Pool Master are added as subsystems automatically.
1. Display Add Subsystem window.
2. Select Citrix XenServer Pool Master in the Subsystem Type box. 3. In the Host Name box, enter a host name or IP address of the server which is
configured as XenServer Pool Master. Or enter the URL of XenServer Pool Master in the URL box.
Note: Make sure to enter an item in either Host Name box or URL box.
Do not add a Xen Server other than XenServer Pool Master.
4. In the Port box, enter the port number with which SystemProvisioning accesses to XenServer Pool Master. If you omit entering the port number, the default port number is registered.
Note: The default port number is "443".
5. In the User box, enter the user name of XenServer Pool Master. 6. In the Password and Confirm Password boxes, enter the password for
XenServer Pool Master.
7. Click OK. Adding XenServer Pool Master as a subsystem completes.

3 Registering Resources to SigmaSystemCenter
SigmaSystemCenter 2.1 Configuration Guide 102
3.2.3. Adding DPM as a Subsystem
To add DPM as a subsystem, add Web Server for DPM as a subsystem. If you add Web Server for DPM as a subsystem, Management Server for DPM that is registered to the Web Server for DPM is added as a subsystem automatically. To add Web Server for DPM as a subsystem, perform the following procedure:
1. Display Add Subsystem window.
2. Select Web Server for DPM in the Subsystem Type box. 3. In the Host Name box, enter a host name or IP address of the server on which
Web Server for DPM is installed.
4. In the Port box, enter the port number with which SystemProvisioning accesses to Web Server for DPM.
Note: The default port number is "8080".
5. In the Password and Confirm Password boxes, enter the Administrator password for Management Server for DPM that is registered to Web Server for DPM.
Note: If multiple instances of Management Server for DPM are registered to Web Server for DPM, the password for all the Management Server for DPM has to be the same.
6. Click OK. Adding DPM as a subsystem completes.

Adding a Subsystem
Part II Start Operation in SigmaSystemCenter 103
3.2.4. Adding MasterScope Network Manager as a Subsystem
To add MasterScope Network Manager as a subsystem, perform the following procedure:
1. Display Add Subsystem window.
2. Select MasterScope Network Manager in the Subsystem Type box. 3. In the Host Name box, enter a host name or IP address of the server on which
MasterScope Network Manager is installed.
4. In the Port box, enter the port number with which SystemProvisioning accesses to MasterScope Network Manager.
Note: The default port number is "52727".
5. Click OK. Adding MasterScope Network Manager as a subsystem completes.

3 Registering Resources to SigmaSystemCenter
SigmaSystemCenter 2.1 Configuration Guide 104
3.2.5. Adding a Switch Blade as a Subsystem
To add a switch blade as a subsystem, perform the following procedure:
1. Display Add Subsystem window.
2. Select Switchblade in the Subsystem Type box. 3. In the Host Name box, enter an IP address of the switch blade. 4. In the User box, enter the user name of the switch blade. 5. In the Password and Confirm Password boxes, enter the password for the
switch blade.
6. Click OK. Adding a switch blade as a subsystem completes.

Adding a Subsystem
Part II Start Operation in SigmaSystemCenter 105
3.2.6. Adding a Storage Management Server as a Subsystem
To add a storage management server as a subsystem, perform the following procedure:
Note: If you manage NEC Storage E1, the storage management software is controlled in SystemProvisioning by executing a local script; therefore, you do not need to add storage management software as a subsystem.
1. Display Add Subsystem window.
2. Select NEC Storage, EMC CLARiiON, or EMC Symmetrix in the Subsystem Type box.
3. Click OK. Adding a storage management server completes.

3 Registering Resources to SigmaSystemCenter
SigmaSystemCenter 2.1 Configuration Guide 106
3.3. Registering a Switch This section provides the procedure of registering a switch or switch blade to be managed by SystemProvisioning and adding a VLAN.
Note: If you have changed the settings of a switch or switch blade in MasterScope Network Manager, be sure to execute Collect Switch on the Operation menu.
3.3.1. Registering a Switch
To register a switch as a managed target of SystemProvisioning, perform the following procedure:
1. Click Resource on the Title bar to switch to the Resource view. 2. Click the Network Device icon in the Resource tree. 3. Click Register Switch on the Configuration menu. 4. Register Switch appears on the Main Window.
5. The list of switches which are managed in MasterScope Network Manager which is registered as a subsystem is displayed under Network Device List. Select the check box of the switch to manage in SystemProvisioning.
6. Click OK. Registering a switch completes.

Registering a Switch
Part II Start Operation in SigmaSystemCenter 107
3.3.2. Registering a Switch Blade
To register a switch blade as a managed target of SystemProvisioning, perform the following procedure:
1. Click Resource on the Title bar to switch to the Resource view. 2. Click the Network Device icon in the Resource tree. 3. Click Register Switch Blade on the Configuration menu. 4. Register Switchblade appears on the Main Window.
5. The list of switch blades which are managed in the Switch Blade which is registered as a subsystem is displayed under Network Device List. Select the check box of the switch blade to manage in SystemProvisioning.
6. Click OK. Registering a switch blade completes.

3 Registering Resources to SigmaSystemCenter
SigmaSystemCenter 2.1 Configuration Guide 108
3.3.3. Adding a VLAN
The following procedure adds a VLAN to a switch or switch blade; at the same time, a port which connects the VLAN and switches and a port to the external network are correlated. Perform the following procedure to add a VLAN:
1. Click Resource on the Title bar to switch to the Resource view. 2. Click the icon of a switch or switch blade to add a VLAN in the Resource tree. 3. Click Add VLAN on the Configuration menu. 4. Add VLAN appears on the Main Window.
5. Enter the VLAN name in the Name box. 6. Enter the VLAN ID in the VLAN ID box. 7. Select the check box of a port to correlate under the Port List. 8. To add tag information, select Tag check boxes. The Tag check boxes can be
used only if a check box of its port is selected.
Note: A check box of Tag is selectable only for a switch or switchblade managed and registered in MasterScope Network Manager.
9. Click OK. Adding a VLAN completes.

Registering a Load Balancer
Part II Start Operation in SigmaSystemCenter 109
3.4. Registering a Load Balancer This section provides the procedure of registering a load balancer to be managed by SystemProvisioning and adding a load balancer group.
Note: If you have changed the settings of a load balancer in MasterScope Network Manager, be sure to execute Collect Load Balancer on the Operation menu.
3.4.1. Registering a Load Balancer
To register a load balancer as a managed target of SystemProvisioning, perform the following procedure:
1. Click Resource on the Title bar to switch to the Resource view. 2. Click the Network Device icon in the Resource tree. 3. Click Register Load Balancer on the Configuration menu. 4. Register Load Balancer appears on the Main Window.
5. The list of load balancers which are managed in MasterScope Network Manager which is registered as a subsystem is displayed under Network Device List. Select the check box of the load balancer to manage in SystemProvisioning.
6. Click OK. Registering a load balancer completes.
3 Registering Resources to SigmaSystemCenter
SigmaSystemCenter 2.1 Configuration Guide 110
3.4.2. Adding a Load Balancer Group
The following procedure adds a load balancer group, and configures a load balancer virtual server and load balancer real server to be the target of load distribution. Registering a load balancer group to an operation group enables you to add or delete a machine to or from a load balancer group automatically with configuration changes. Perform the following procedure to a load balancer group:
Reference: For details of controlling a load balancer from SigmaSystemCenter, see Subsection 1.8.5, "What is a Load Balancer?" in SigmaSystemCenter Reference Guide.
For registering a load balancer group to an operation group, see Subsection 4.4.6, "Configuring Settings on the LB Setting Tab."
1. Click Resource on the Title bar to switch to the Resource view. 2. Click the icon of the load balancer to add a load balancer group in the Resource
tree.
3. Click Add LB Group on the Configuration menu.

Registering a Load Balancer
Part II Start Operation in SigmaSystemCenter 111
4. Add Load Balancer Group appears on the Main Window.
5. Enter the load balancer group name in the Name box. (Required) 6. Select and enter the information in the boxes under Virtual Server. 7. Enter the information in the boxes under Real Server.
Note: To control a load balancer, you need to set the IP address of the machine to control to belong to the range of network addresses of the real server. You cannot manage the machine with an IP address that is not in the range of network addresses of the real server from SystemProvisioning. Configure the IP address of the machine on the Host tab (Network tab) of the Group Property Setting. For the settings of the Host tab of the Group Property Setting, see Subsection 4.8, "Configuring the Host Setting."
8. Click OK.
Adding a load balancer group completes.

3 Registering Resources to SigmaSystemCenter
SigmaSystemCenter 2.1 Configuration Guide 112
3.5. Registering Storage This section provides the procedure of registering storage to be managed in SystemProvisioning.
Note: If you change settings, such as disk arrays, LDs, LD sets, and WWN (HBA), in storage management software, be sure to execute Collect Storage on the Operation menu from SystemProvisioning. However, if you change a disk array name, or change a LD name that has already assigned to a LD set, the storage information cannot be updated properly. If you change a LD name that has already assigned to a LD, disconnect the disk volume, release the LD from the LD set, and then, change the LD set name. After changing the LD name, connect to the disk volume again.
If you upgraded from 1.3 or a former version of SigmaSystemCenter, the information of CLARiiON and Symmetrix set up in the version is not succeeded. You need to add CLARiiON and Symmetrix as a subsystem.
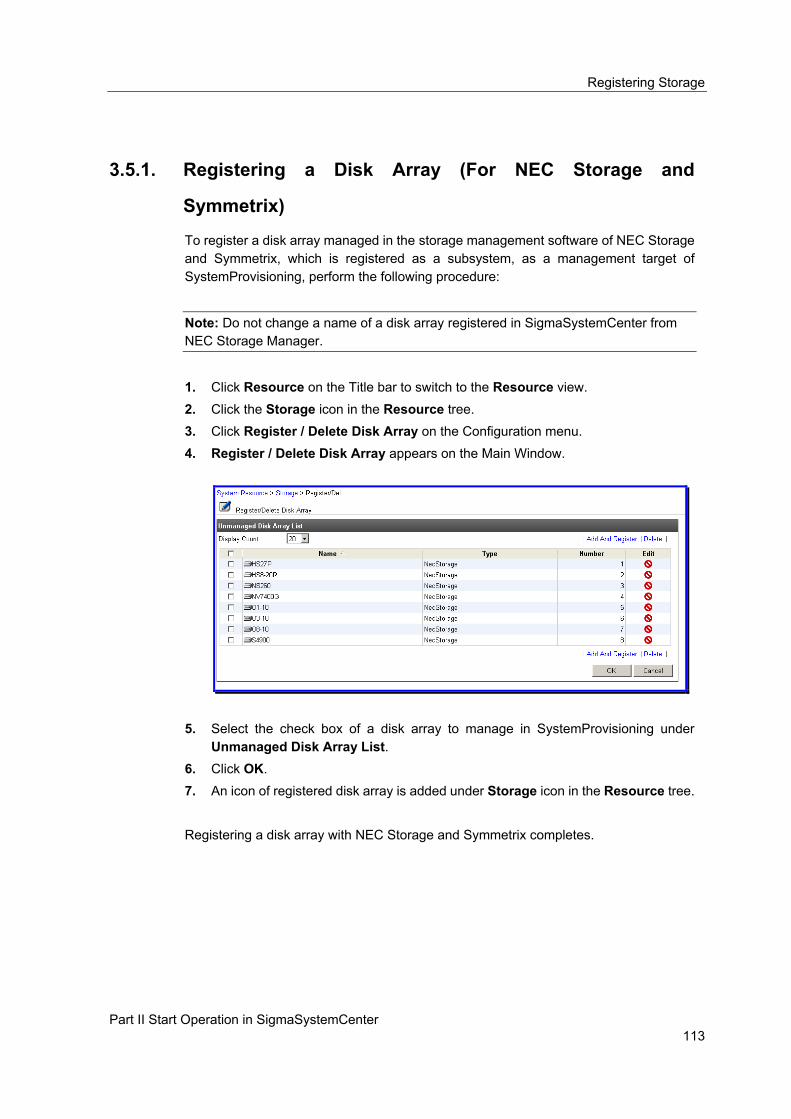
Registering Storage
Part II Start Operation in SigmaSystemCenter 113
3.5.1. Registering a Disk Array (For NEC Storage and
Symmetrix)
To register a disk array managed in the storage management software of NEC Storage and Symmetrix, which is registered as a subsystem, as a management target of SystemProvisioning, perform the following procedure:
Note: Do not change a name of a disk array registered in SigmaSystemCenter from NEC Storage Manager.
1. Click Resource on the Title bar to switch to the Resource view. 2. Click the Storage icon in the Resource tree. 3. Click Register / Delete Disk Array on the Configuration menu. 4. Register / Delete Disk Array appears on the Main Window.
5. Select the check box of a disk array to manage in SystemProvisioning under Unmanaged Disk Array List.
6. Click OK. 7. An icon of registered disk array is added under Storage icon in the Resource tree. Registering a disk array with NEC Storage and Symmetrix completes.

3 Registering Resources to SigmaSystemCenter
SigmaSystemCenter 2.1 Configuration Guide 114
3.5.2. Registering a Disk Array (For CLARiiON)
To register a disk array managed in the storage management software of CLARiiON, which is registered as a subsystem, as a management target of SystemProvisioning, perform the following procedure:
Note: If you want to use Naviseccli, you need to configure all values of IP Address, User Name, Password, and Scope. If you want to use Navicli, you need to configure only a value of IP Address. If you do not configure User Name, Password, and Scope, CLARiiON works with Navicli.
1. Click Resource on the Title bar to switch to the Resource view. 2. Click the Storage icon in the Resource tree. 3. Click Register / Delete Disk Array on the Configuration menu. 4. Register / Delete Disk Array appears on the Main Window.
5. Click Add and Register of the Action menu, 6. Add And Register Disk Array appears on the Main Window.
7. Enter IP address in IP Address box. (Required) To use Navicli, execute the procedure 12 next.
8. Enter a user name in the User Name box. (Required) 9. Enter a password in the Password box. (Required)

Registering Storage
Part II Start Operation in SigmaSystemCenter 115
10. Enter the same password again in the Password Confirmation box for the confirmation. (Required)
11. Enter a value of scope (zero to two) in the Scope box, (Required) 12. Click OK. 13. An icon of registered disk array is added under Storage icon in the Resource tree. Registering a disk array with CLARiiON completes.

3 Registering Resources to SigmaSystemCenter
SigmaSystemCenter 2.1 Configuration Guide 116
3.5.3. Registering a Disk Volume
To register a disk volume as a management target of SystemProvisioning, perform the following procedure:
Note: Disk volume is represented as: a LD in NEC Storage, a storage group in CLARiiON, and a logical device in Symmetrix. Do not change a name of a disk volume to which you executed Allocate Machine in SigmaSystemCenter from NEC Storage Manager. If you need to change the name, release the resource of the disk volume once, change the name in NEC Storage Manager, collect the storage information in SigmaSystemCenter, and then execute Allocate Machine again.
1. Click Resource on the Title bar to switch to the Resource view. 2. Click the icon of disk array to register in the Resource tree. 3. Click Register Disk Volume on the Configuration menu. 4. Register Disk Volume appears on the Main Window.
5. Select the check box of a disk volume to manage in SystemProvisioning under Unmanaged Disk Volume List.
6. Click OK. Registering a disk volume completes.
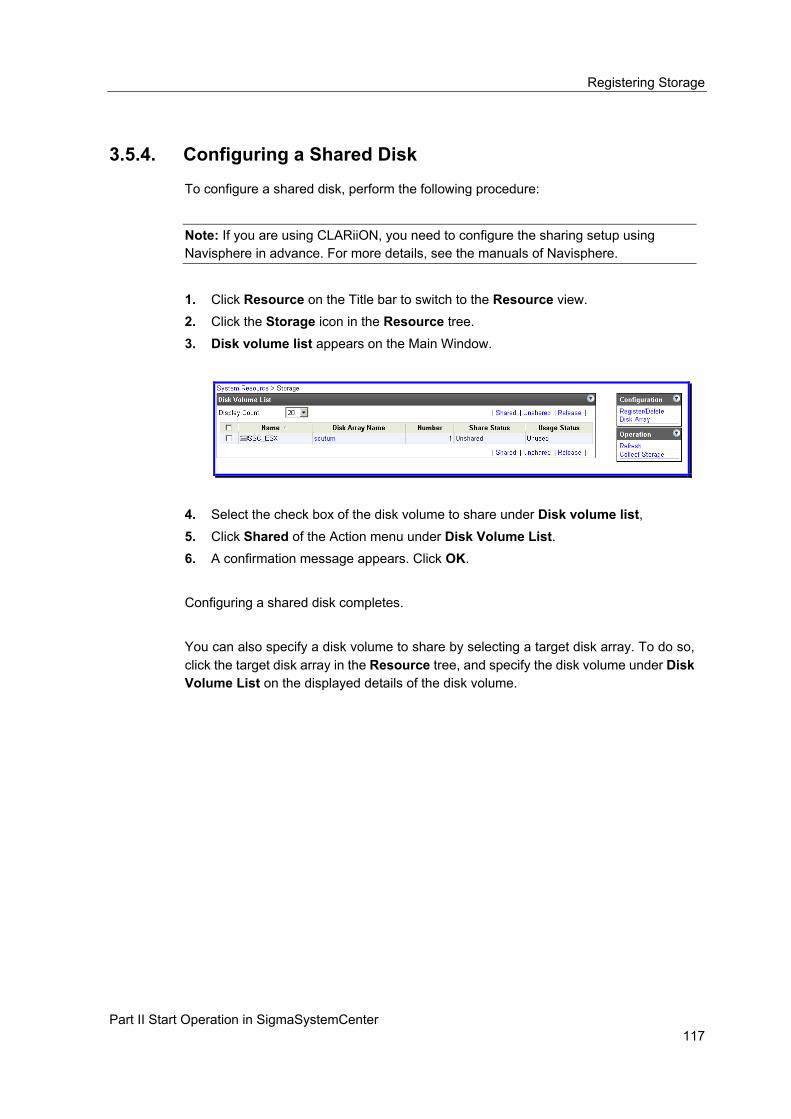
Registering Storage
Part II Start Operation in SigmaSystemCenter 117
3.5.4. Configuring a Shared Disk
To configure a shared disk, perform the following procedure:
Note: If you are using CLARiiON, you need to configure the sharing setup using Navisphere in advance. For more details, see the manuals of Navisphere.
1. Click Resource on the Title bar to switch to the Resource view. 2. Click the Storage icon in the Resource tree. 3. Disk volume list appears on the Main Window.
4. Select the check box of the disk volume to share under Disk volume list, 5. Click Shared of the Action menu under Disk Volume List. 6. A confirmation message appears. Click OK. Configuring a shared disk completes. You can also specify a disk volume to share by selecting a target disk array. To do so, click the target disk array in the Resource tree, and specify the disk volume under Disk Volume List on the displayed details of the disk volume.
3 Registering Resources to SigmaSystemCenter
SigmaSystemCenter 2.1 Configuration Guide 118
3.6. Registering a Machine This section provides the procedure of registering a machine to be managed by SystemProvisioning.
3.6.1. About Registering a Machine
Registering a machine to manage in SystemProvisioning by selecting a physical machine or virtual machine registered in DPM, VMware VirtualCenter, or XenServer Pool Master enables you to execute the following operations:
Start and Shutdown in the Resource view Use the machine as a machine resource in the Operations view
A virtual machine on ESXi or Hyper-V becomes the management target automatically by registering ESXi or Hyper-V in the Virtual view. You do not need to register the virtual machine in the Resource view. For how to register the ESXi or Hyper-V, see Section 3.7, "Managing ESXi and Hyper-V."

Registering a Machine
Part II Start Operation in SigmaSystemCenter 119
3.6.2. Adding a Resource Group
You can add a resource group to which managed machines before registration belong to. To add a resource group, perform the following procedure:
1. Click Resource on the Title bar to switch to the Resource view. 2. Click the Machine icon or the icon of the group to which you want to add a
resource group in the Resource tree. 3. Click Add Resource Group on the Configuration menu. 4. Add Resource Group appears on the Main Window.
5. Enter a resource group name in the Name box. (Required) 6. Click OK. Adding a resource group completes. You can also manage managed machines in a rack unit with the same procedure.

3 Registering Resources to SigmaSystemCenter
SigmaSystemCenter 2.1 Configuration Guide 120
3.6.3. Registering a Machine
To register a machine as a managed target of SystemProvisioning and specify a resource group or rack when registering a machine, perform the following procedure:
1. Click Resource on the Title bar to switch to the Resource view. 2. Click the Machine icon, icon of the resource group or rack to register a machine to
in the Resource tree. 3. Click Register machines on the Configuration menu. 4. Resister machines appears on the Main Window.
7. The list of machines registered to DPM, VMware VirtualCenter, or XenServer Pool Master which is added as a subsystem is displayed under Unmanaged Machine List. Select the check box of the machine to register as a management target of SystemProvisioning in the Unmanaged Machine List.
8. If you do not specify a resource group or rack in the procedure 2, the Parent Resource tree is displayed. Select the resource group or rack in the tree.
9. Click OK. Registering a machine completes.
Managing ESXi and Hyper-V
Part II Start Operation in SigmaSystemCenter 121
3.7. Managing ESXi and Hyper-V This section explains the settings to manage ESXi directory or to manage Hyper-V from SystemProvisioning. By registering ESXi in the Virtual view, ESXi and virtual machines on ESXi are managed in SystemProvisioning. You can execute the power operations to ESXi, create a virtual machine on ESXi, or execute power operations to a virtual machine on ESXi. This can also be applied to Hyper-V.
3.7.1. Creating a Virtual Manager
You can create a virtual manager and datacenter in the Virtual tree. A virtual manager can gather multiple datacenters, and you can create only one virtual manager. Perform the following procedure to create a virtual manager:
1. Click Virtual on the Title bar to switch to the Virtual view. 2. Click the Virtual icon in the Virtual tree. 3. To manage ESXi, click Set ESXi to Be Managed on the Configuration menu. To
manage Hyper-V, click Set Hyper-V to Be Managed on the Configuration menu. 4. A confirmation message appears. Click OK. 5. A virtual manager of ESXi or Hyper-V and a datacenter with the name
DefaultDataCenter are created in the Virtual tree. Creating a virtual manager and datacenter completes.
The added virtual manager is displayed as a subsystem under Subsystem List on the details of a subsystem. The virtual manager names, ESXi and Hyper-V, are the fixed names. You cannot edit the name. You can add a datacenter by clicking the icon of the virtual manager, and click Add DataCenter on the Configuration menu. If you manage the VirtualCenter environment or Xen environment, VMware VirtualCenter or XenServer Pool Master is the virtual manager. If you register VMware VirtualCenter or XenServer Pool Master as a subsystem in the Management view, it is displayed as a virtual manager in the Virtual view. You do not need to create a virtual manager.

3 Registering Resources to SigmaSystemCenter
SigmaSystemCenter 2.1 Configuration Guide 122
3.7.2. Adding a Virtual Machine Server
To add a virtual machine server to a datacenter, perform the following procedure:
Note: Do not add one virtual machine server to both VirtualCenter and ESXi. Operations for virtual machines or the virtual machine server can fail.
1. Click Virtual on the Title bar to switch to the Virtual view. 2. Click the icon of the datacenter to add a virtual machine server to in the Virtual
tree to display the details of the datacenter.
3. Click Add VM Server on the Operation menu. 4. Add VM Server is displayed on the Main Window.
5. Enter a host name or IP address in the Host Name box. (Required)
Note: Even if you enter the IP address of ESXi, the host name is displayed in the Virtual view.

Managing ESXi and Hyper-V
Part II Start Operation in SigmaSystemCenter 123
6. Enter a port number in the Port box. If you omit entering the port number, the
default port number is registered.
Note: If you are using ESXi, the default port number is "443." If you are using Hyper-V, you do not need to register its port number. Even if you entered the port number, the setting is ignored.
7. Enter a name of an account for management of the virtual machine server in the User box. (Required)
8. Enter a password entered in the earlier procedure in the Password and Confirm Password boxes. (Required)
9. Click OK. 10. Check that adding the virtual machine server completes on the Job window in the
Monitor view. 11. Switch the window to Virtual view. 12. Check that the virtual machine server is registered in the datacenter. Adding a virtual machine server completes.
Note: When adding a Xen Server, do not add a XenServer Pool Master. Clusters of VirtualCenter are managed as datacenters in SigmaSystemCenter. If a destination datacenter is clustered, a virtual machine is added to the cluster. If you add an ESX to VMware vSphere 4.0, clear the vCenter requires verified host SSL certificates check box of the SSL setting.

3 Registering Resources to SigmaSystemCenter
SigmaSystemCenter 2.1 Configuration Guide 124
3.8. Enabling Power Control Function by Out-of-Band (OOB) Management
This section explains how to enable the power control function by OOB Management on a managed machine. To enable the function, register account information of OOB Management of a managed machine to SigmaSystemCenter.
3.8.1. Enabling Power Control Function by Out-of-Band (OOB)
Management
To enable the power control function by OOB Management, register an account of OOB Management to a managed machine.
1. Register an account of OOB Management to a managed machine. Register an account of OOB Management to a managed machine using machine-account create command of the ssc command. > ssc machine-account create -machine machine1 -type oob -ip IP Address -u User Name -p Password
Reference: For more details of registering an account, see SSC Command Reference.
Note: To enable the power control function, you need to register an account of OOB Management using the ssc command. You cannot enable this function from the Web Console.
Set the same user name and password as a user account registered to BMC in Subsection 2.15.2, "Creating Administrator Account in BMC."
To register an account of OOB Management, you need to register a virtual machine server or physical machine in advance. For the method, see Section 3.6, "Registering a Machine" or 3.7.2, "Adding a Virtual Machine Server."
If account information of OOB Management registered to SigmaSystemCenter is changed on a target managed machine, connection to the machine fails and you will not be able to use the power control function by OOB Management. In this case, update the account of OOB Management registered to SigmaSystemCenter.
Reference: For the method to change, check or delete account information of OOB Management registered to SigmaSystemCenter, see SSC Command Reference

Creating a Policy
Part II Start Operation in SigmaSystemCenter 125
3.9. Creating a Policy You can configure what kind of process the system performs automatically to restore the failed status for a failure event that software, such as NEC ESMPRO Manager, VirtualCenter, and System Monitor - Performance Monitoring Services, detected. This setting is called a policy. SigmaSystemCenter has multiple policy templates, which we call Standard Policy, to which settings to cope with general errors are configured in advance. You can use the Standard Policy without any customization or create a new policy out of it and use it. In addition, you can export settings set to a policy to a file in the xml format, import the settings when setting up the environment on other management server.
3.9.1. Standard Policy
There are following five types in the Standard Policy:
Standard Policy This is a default policy.
Standard Policy (VM Server) This is a default policy for a virtual machine server.
Standard Policy (VM Server Power Save) This is a default policy for a virtual machine server to operate, saving its power.
Standard Policy (Virtual Machine) This is a default policy for a virtual machine.
Standard Policy (Virtual Machine Server ESXi) This is a default policy for ESXi.
These policies are registered in advance.
Note: Standard Policy (Virtual Machine Server ESXi) is not registered at the initial registration. To use the policy, crate it on the Add Policy window.
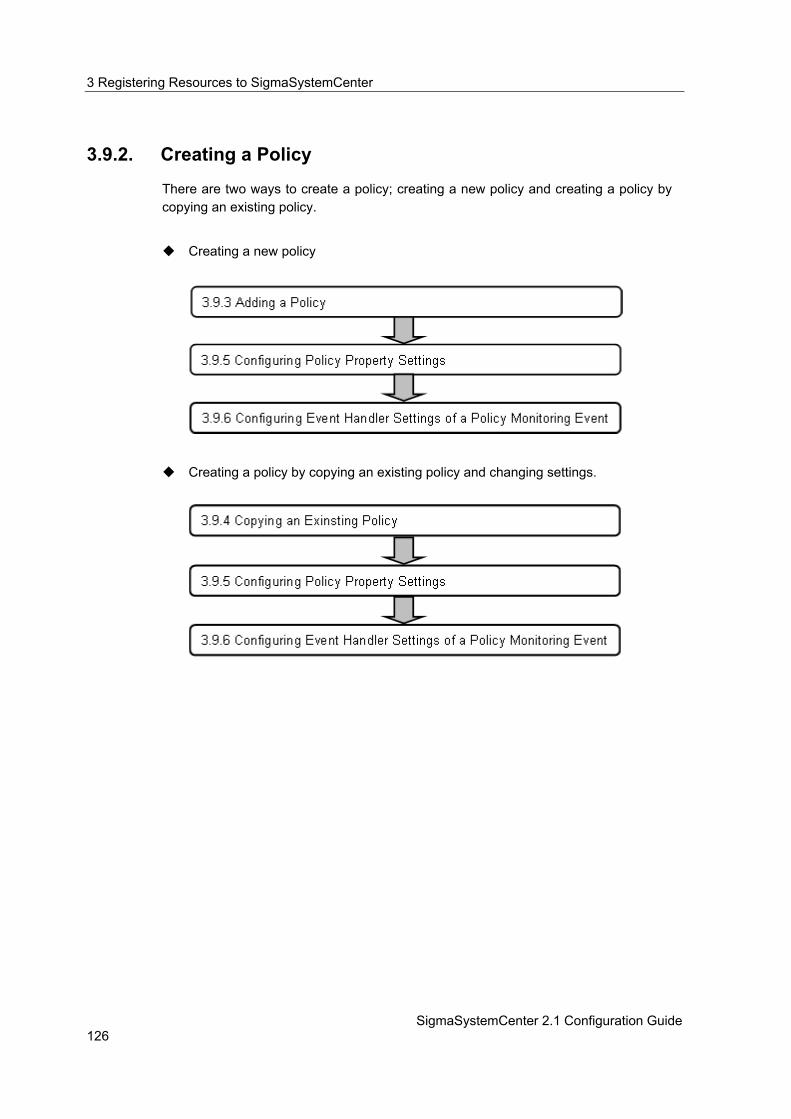
3 Registering Resources to SigmaSystemCenter
SigmaSystemCenter 2.1 Configuration Guide 126
3.9.2. Creating a Policy
There are two ways to create a policy; creating a new policy and creating a policy by copying an existing policy.
Creating a new policy
Creating a policy by copying an existing policy and changing settings.

Creating a Policy
Part II Start Operation in SigmaSystemCenter 127
3.9.3. Adding a Policy
To add a policy, perform the following procedure: With this procedure, you can create a new policy or create a policy using Standard Policy.
1. Click Management on the Title bar to switch to the Management view. 2. Click the Policy icon in the Management tree. 3. Click Add Policy on the Configuration menu. 4. Add Policy appears on the Main Window.
5. Enter a policy name in the Name box. (Required) 6. Select New or one of the Standard Policies in the Template box. If you select a
template name of a Standard Policy, you can create a new policy with the Standard Policy information.
7. Click OK. Creating a policy completes.
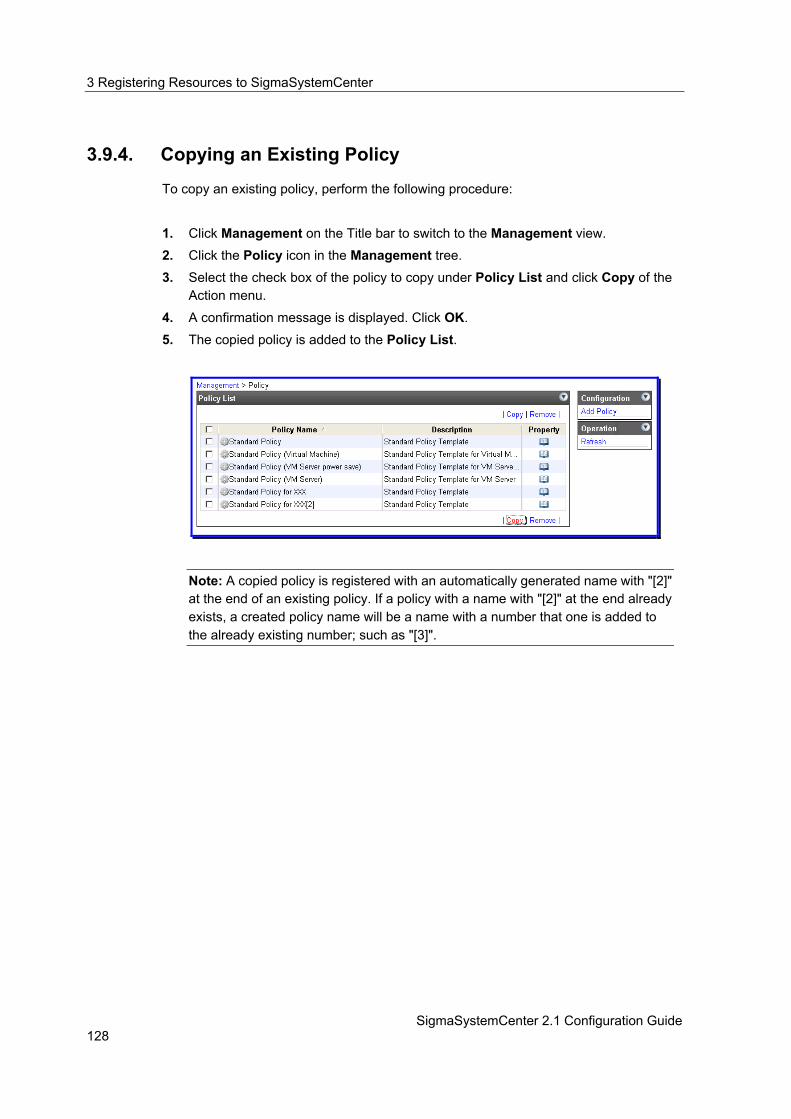
3 Registering Resources to SigmaSystemCenter
SigmaSystemCenter 2.1 Configuration Guide 128
3.9.4. Copying an Existing Policy
To copy an existing policy, perform the following procedure:
1. Click Management on the Title bar to switch to the Management view. 2. Click the Policy icon in the Management tree. 3. Select the check box of the policy to copy under Policy List and click Copy of the
Action menu.
4. A confirmation message is displayed. Click OK. 5. The copied policy is added to the Policy List.
Note: A copied policy is registered with an automatically generated name with "[2]" at the end of an existing policy. If a policy with a name with "[2]" at the end already exists, a created policy name will be a name with a number that one is added to the already existing number; such as "[3]".

Creating a Policy
Part II Start Operation in SigmaSystemCenter 129
6. Click the Property icon of the policy. Policy Property Settings appears on the
Main Window.
7. To change a name of the policy, enter the name in the Name box. 8. Click Apply. Copying an existing policy completes.
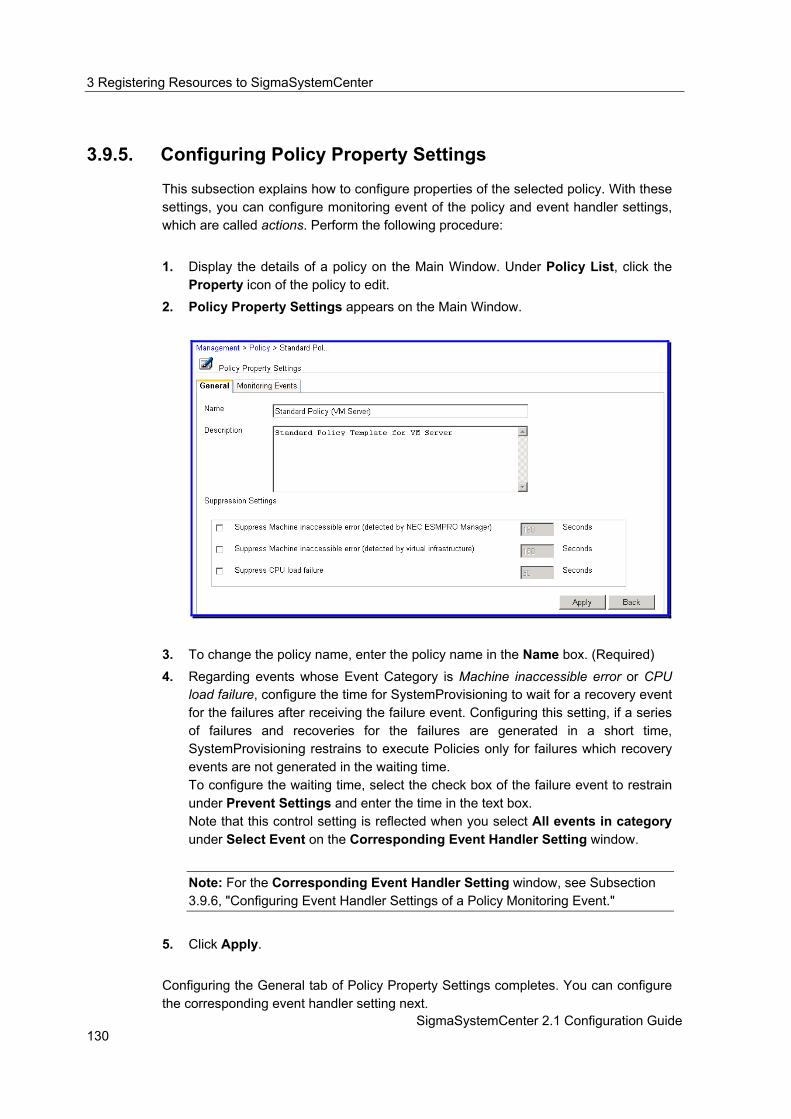
3 Registering Resources to SigmaSystemCenter
SigmaSystemCenter 2.1 Configuration Guide 130
3.9.5. Configuring Policy Property Settings
This subsection explains how to configure properties of the selected policy. With these settings, you can configure monitoring event of the policy and event handler settings, which are called actions. Perform the following procedure:
1. Display the details of a policy on the Main Window. Under Policy List, click the
Property icon of the policy to edit. 2. Policy Property Settings appears on the Main Window.
3. To change the policy name, enter the policy name in the Name box. (Required) 4. Regarding events whose Event Category is Machine inaccessible error or CPU
load failure, configure the time for SystemProvisioning to wait for a recovery event for the failures after receiving the failure event. Configuring this setting, if a series of failures and recoveries for the failures are generated in a short time, SystemProvisioning restrains to execute Policies only for failures which recovery events are not generated in the waiting time. To configure the waiting time, select the check box of the failure event to restrain under Prevent Settings and enter the time in the text box. Note that this control setting is reflected when you select All events in category under Select Event on the Corresponding Event Handler Setting window.
Note: For the Corresponding Event Handler Setting window, see Subsection 3.9.6, "Configuring Event Handler Settings of a Policy Monitoring Event."
5. Click Apply.
Configuring the General tab of Policy Property Settings completes. You can configure the corresponding event handler setting next.

Creating a Policy
Part II Start Operation in SigmaSystemCenter 131
Note: For the Monitoring Events tab of Policy Property Settings, see Subsection 3.9.6, "Configuring Event Handler Settings of a Policy Monitoring Event."
3.9.6. Configuring Event Handler Settings of a Policy Monitoring
Event
This subsection explains the event handler settings of a monitoring event. You can configure recovery processes which are called actions, for monitoring events. Perform the following procedure:
1. Click the Monitoring Events tab on the Policy Property Settings. For the procedure, see the preceding Subsection 3.9.5, "Configuring Policy Property Settings."
2. Click Add of the Action menu or the Edit icon of an event to edit under Event Handler List.
3. Corresponding Event Handler Settings (New) or Corresponding Event Handler Settings (Edit) appears on the Main Window.
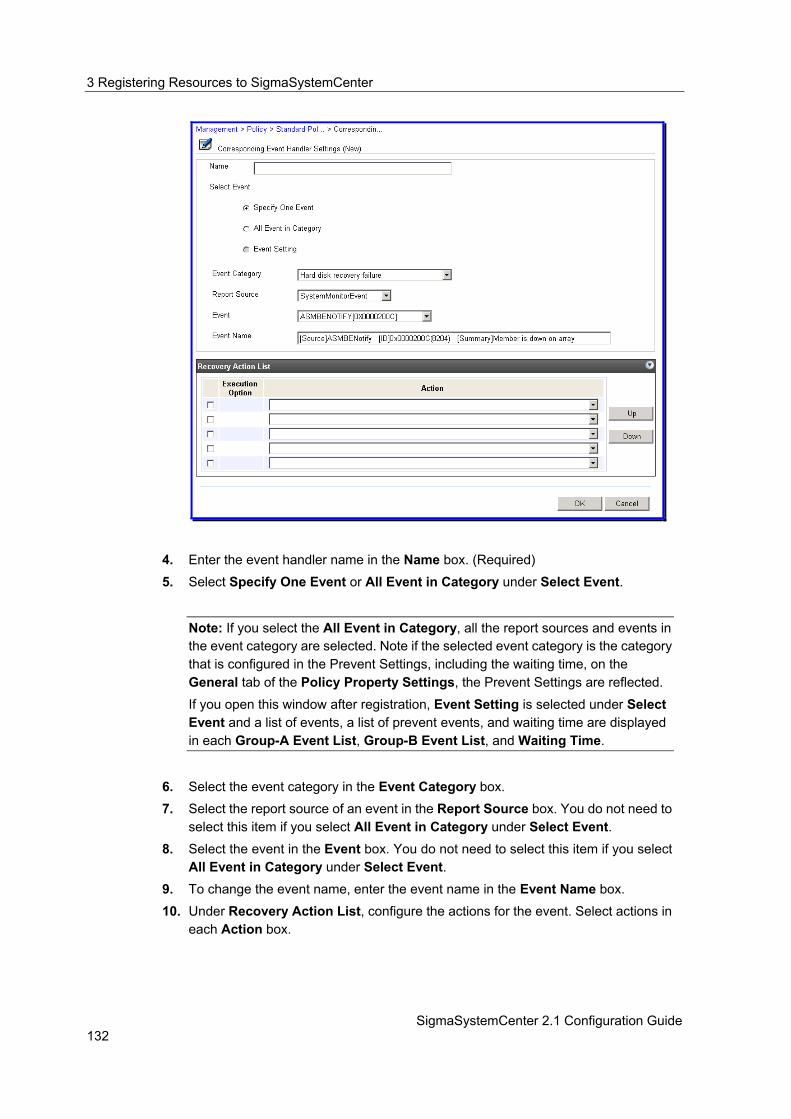
3 Registering Resources to SigmaSystemCenter
SigmaSystemCenter 2.1 Configuration Guide 132
4. Enter the event handler name in the Name box. (Required) 5. Select Specify One Event or All Event in Category under Select Event.
Note: If you select the All Event in Category, all the report sources and events in the event category are selected. Note if the selected event category is the category that is configured in the Prevent Settings, including the waiting time, on the General tab of the Policy Property Settings, the Prevent Settings are reflected. If you open this window after registration, Event Setting is selected under Select Event and a list of events, a list of prevent events, and waiting time are displayed in each Group-A Event List, Group-B Event List, and Waiting Time.
6. Select the event category in the Event Category box. 7. Select the report source of an event in the Report Source box. You do not need to
select this item if you select All Event in Category under Select Event. 8. Select the event in the Event box. You do not need to select this item if you select
All Event in Category under Select Event. 9. To change the event name, enter the event name in the Event Name box. 10. Under Recovery Action List, configure the actions for the event. Select actions in
each Action box.

Creating a Policy
Part II Start Operation in SigmaSystemCenter 133
11. To change the order of the actions, select the check box of the action to move and
click Up or Down. If you are configuring the Corresponding Event Handler Settings for the first time, skip to the procedure 15.
Note: Actions are run in the order registered to the Action boxes. Place the actions with the running order.
You can delete an action by clearing the Action box.
12. Click the Property icon of a recovery action to display Action Parameter Settings on the Main Window.
13. Select Execution Options.
Note: Because an action that is executed first, which is an action displayed at the top of Recovery Action List, is always executed, Absolute: The action must be executed is selected. You cannot change the execution condition of this action. The execution condition of actions of Update 1 or earlier was set to the same level as Success: When the registered action above was executed and completed successfully. By selecting Completed: The action must be executed after the registered action above was executed completely, you can set the action to be executed for sure even if a previous action is aborted.

3 Registering Resources to SigmaSystemCenter
SigmaSystemCenter 2.1 Configuration Guide 134
14. If you execute a local script, enter the local script name under Action Parameter
Information. The name of the local script must be the name of Software Name displayed on the Base Information of software. For how to check a script name, see Section 3.15, "Base Information of Software" in SigmaSystemCenter Web Console Reference Guide. If not, skip to the procedure 15.
Note: "ScriptName" is set as an initial setting. Actions other than Execute Local Script are not displayed under Action Parameter Information.
15. Click OK. Configuring the event handler settings completes.
3.9.7. Importing and Exporting a Policy
You can export settings configured to a policy to a file in the xml format and import the settings to use when setting up an environment on other management server. You can execute this operation with the ssc command. See SSC Command Reference.

Preparing Distribution Software
Part II Start Operation in SigmaSystemCenter 135
3.10. Preparing Distribution Software This section provides the procedure of registering or checking distribution software that is used by SystemProvisioning. Distribution software includes the following three kinds:
Scenario (OS image or patch and application) Template Local script
Reference: For details of distribution software, see Section 1.4, "Distribution Software Management" in SigmaSystemCenter Reference Guide.
3.10.1. Checking a Scenario That Can Be Used From
SystemProvisioning
If you install OSs and applications, or distribute patches to a managed machine using DPM, you can use a scenario that you create in DPM. The information of the scenarios that are managed in DPM which is registered as a subsystem is reflected to SystemProvisioning. To check the information is reflected, perform the following procedure:
1. Click Resource on the Title bar to switch to the Resource view. 2. Click the Software icon in the Resource tree. 3. Summery Information appears on the Main Window. Click DPM Collect on the
Operation menu.
4. After the Job of collecting DPM completes, click Resource on the Title bar again to update the view to the latest status.
5. If you click the Software icon in the Resource tree, software is added in the OSImage, Backup Task, or Application and Update folder.
6. Click a scenario name to display the base information of the scenario on the Main Window.
Checking a scenario that can be used from SystemProvisioning completes.
3 Registering Resources to SigmaSystemCenter
SigmaSystemCenter 2.1 Configuration Guide 136
3.10.2. Checking a Template That Can Be Used From
SystemProvisioning
To create a virtual machine from SystemProvisioning, you use a template. If you manage a virtual machine on VMware ESX or Xen Server, the information of the templates that are managed in VirtualCenter or XenServer Pool Master which is registered as a subsystem is reflected to SystemProvisioning. If you manage a standalone ESXi or Hyper-V, a template exists in SystemProvisioning. To check the information is reflected, perform the following procedure:
1. Click Resource on the Title bar to switch to the Resource view. 2. Click the Software icon in the Resource tree. 3. Summary Information appears on the Main Window.
Note: The information of templates managed in VirtualCenter or XenServer Pool Master is reflected automatically. If not, select VirtualCenter or XenServer Pool Master in the Virtual view and click Refresh on the Operation menu.
4. If you click Template in the Summary Information, Template List appears on the Main Window.
5. Click the name of the template to display Base Information of the template on the Main Window.
Checking a template that can be used from SystemProvisioning completes.

Preparing Distribution Software
Part II Start Operation in SigmaSystemCenter 137
3.10.3. Adding a Local Script
You can use a local script if you want to a specific process that depends on system configuration or environment on a management server when activating, changing the usage of, or replacing a managed machine. When you use a local script, perform the following procedure to add the script:
1. Store a local script, a .bat file, in the following folder. A folder where SystemProvisioning is installed\Script
Note: The default folder is "C:\Program Files\NEC\PVM\Script".
2. Click Resource on the Title bar to switch to the Resource view. 3. Click the Software icon in the Resource tree. 4. Summery Information is displayed on the Main Window. Click Script Collect on
the Operation menu.
5. After the Job of collecting scripts completes, click Resource on the Title bar again to update the view to the latest status.
6. If you click the Software icon in the Resource tree, and then, click the icon of a target local script, scripts are added in a folder.
7. Click a local script name to display the base information of the local script on the Main Window.
Adding a local script completes.

3 Registering Resources to SigmaSystemCenter
SigmaSystemCenter 2.1 Configuration Guide 138
3.11. Configuring Machine Properties This section explains how to configure properties of a registered machine, which you can configure machine unique information. Follow the procedure in this section.
1. Click Resource on the Title bar to switch to the Resource view. 2. Click the icon of the machine to configure in the Resource tree. 3. Click Property on the Configuration menu. 4. Machine Property Setting appears on the Main Window. Configure settings on each tab with the procedure in the following subsections. For more details of the items, see Section 3.8, "Machine Property Setting" in SigmaSystemCenter Web Console Reference Guide.

Configuring Machine Properties
Part II Start Operation in SigmaSystemCenter 139
3.11.1. Configuring Settings on the General Tab
To configure settings on the General tab of the Machine Property Setting, perform the following procedure:
1. Display the Machine Property Setting window, and click the General tab.
2. The item entered in the Model Name box is used as the hardware recognition information when using a shared pool. When the machine is activated, a value collected from a subsystem, such as NEC ESMPRO Manager, is configured automatically. If you want to configure the name before starting operation in SigmaSystemCenter, enter the machine model name in the Model Name box.
Reference: For details of a shared pool, see Subsection 1.1.6, "What is a Pool Machine?" in SigmaSystemCenter Reference Guide.
3. If you want to prohibit SystemProvisioning overwriting (automatic update) the model name for a specific reason, such as you want to use a model name configured manually, clear the Auto update model name check box.
4. Click Apply. Configuring settings on the General tab of the Machine Property Setting completes.

3 Registering Resources to SigmaSystemCenter
SigmaSystemCenter 2.1 Configuration Guide 140
3.11.2. Configuring Settings on the Network Tab
To configure settings on the Network tab of the Machine Property Setting, perform the following procedure:
1. Display the Machine Property Setting window, and click the Network tab. 2. To add a NIC to the NIC List, click Add of the Action menu. 3. NIC Setting is displayed below the NIC List.
4. Select the NIC number in the NIC Number box.
Note: To use a blank for the NIC Number box, add NIC information with arbitrary numbers, and then, clear it from Edit.
5. Enter the MAC address in the MAC Address box.
Note: Enter a MAC Address in the format of "00:00:00:00:00:00".
6. Select the switch in the Switch box. 7. Select the port to connect in the Port box. 8. Click OK. The NIC is added to the NIC List.

Configuring Machine Properties
Part II Start Operation in SigmaSystemCenter 141
9. Click Back to display the details of the group on the Main Window.
Note: To control a VLAN of the switch managed in MasterScope Network Manager, you also need to configure the VLAN tab of the Group Property Setting. If either setting is not configured, SystemProvisioning does not control a VLAN. If you control a VLAN of the switch blade, because the Network tab is automatically configured by the collecting function, only the setting on the VLAN Setting tab needs to be configured. For the settings of the VLAN Setting tab of the Group Property Setting, see Subsection 4.4.5, "Configuring Settings on the VLAN Setting Tab."
Configuring settings on the Network tab of the Machine Property Setting completes.

3 Registering Resources to SigmaSystemCenter
SigmaSystemCenter 2.1 Configuration Guide 142
3.11.3. Configuring Settings on the Storage Tab
To configure settings on the Storage tab of the Machine Property Setting, perform the following procedure:
1. Display the Machine Property Setting window, and click the Storage tab. 2. To add storage information to Storage Information, click Add of the Action menu. 3. HBA Setting is displayed below the Storage Information.
4. Enter the HBA number in the HBA Number box. (Required) If you configure the setting for disk volume on the Storage tab of Host Setting of the resource, specify the value you enter in this box.
5. Select the WWN of the HBA that is connected to the machine in the Address box. (Required)
6. Click OK. The storage information is added to the Storage Information. 7. Click Back to display the details of the group on the Main Window.
Note: To control storage, you also need to configure the Storage tab of the Host Setting. If either setting is not configured, SystemProvisioning does not control storage. For the settings of the Storage tab of the Host Setting, see Subsection 4.8.3, "Configuring Settings on the Storage Tab."
Configuring settings on the Storage tab of the Machine Property Setting completes.

Configuring Machine Properties
Part II Start Operation in SigmaSystemCenter 143
3.11.4. Configuring Settings on the Software Tab
To configure settings on the Software tab of the Machine Property Setting, perform the following procedure:
1. Display the Machine Property Setting window, and click the Software tab. 2. Select the timing that software is distributed in the Software Type box under
Software List. If the box is selected, the list of registered software is displayed. 3. To change the order of the software to distribute, select the check box of the
software to move and click Up or Down. 4. To add new software information to Software List, click Add of the Action menu. 5. Add Software is displayed below the Software List.
6. Select the check box of the software to distribute under Add Software. 7. Click OK. The software information is added to the Software List. 8. To change the order of the software to distribute, select the check box of the
software to move and click Up or Down. 9. Click Apply. Configuring settings on the Software tab of the Machine Property Setting completes.

3 Registering Resources to SigmaSystemCenter
SigmaSystemCenter 2.1 Configuration Guide 144
3.11.5. Checking the Installed Software Tab
On the Installed Software tab of the Machine Property Setting, the list of already distributed software is displayed. To check the software, perform the following procedure:
1. Display the Machine Property Setting window, and click the Installed Software tab.
2. Check the distributed software. 3. Click Back to display the details of the group on the Main Window. Checking the Installed Software tab of the Machine Property Setting completes.
145
4. Creating an Operation Group This chapter explains the operations to create an operation group in SigmaSystemCenter. This chapter contains the following sections: • 4.1 Adding a Category .................................................................................................. 146 • 4.2 Configuring the Access Authority ........................................................................... 147 • 4.3 Adding an Operation Group.................................................................................... 150 • 4.4 Configuring Group Properties................................................................................. 151 • 4.5 Configuring Model Properties (For a Physical Machine) ........................................ 163 • 4.6 Configuring Model Properties (For a Virtual Machine) ........................................... 166 • 4.7 Configuring Model Properties (For a Virtual Machine Server)................................ 170 • 4.8 Configuring the Host Setting................................................................................... 173

4 Creating an Operation Group
SigmaSystemCenter 2.1 Configuration Guide 146
4.1. Adding a Category To add a category, perform the following procedure.
1. Click Operations on the Title bar to switch to the Operations view. 2. Click the Operations icon or the icon of the category to which you want to add a
category in the Operations tree. 3. Click Add Category on the Configuration menu. 4. Add Category appears on the Main Window.
5. Enter a category name in the Name box. (Required) 6. Click OK. Creating a category completes.

Configuring the Access Authority
Part II Start Operation in SigmaSystemCenter 147
4.2. Configuring the Access Authority You can configure the access authority to categories by configuring a role to a category and allocating the role to a user account.
4.2.1. Adding a Role
To add a role, perform the following procedure.
1. Click Management on the Title Bar to switch to the Management view. 2. Click the User icon in the Management tree. 3. Details of the user appear on the Main Window. 4. Under Role List, click Add. 5. Add Role appears on the Main Window.
6. Enter the role name in the Role Name box. 7. Select the access authority in the Permission box. 8. Click OK. Adding a role completes.

4 Creating an Operation Group
SigmaSystemCenter 2.1 Configuration Guide 148
4.2.2. Configuring the Authority Target to a Role
To specify a target of authority; administrator, operator, or observer, perform the following procedure.
1. Click Management on the Title Bar to switch to the Management view. 2. Click the User icon in the Management tree. 3. Details of the user appear on the Main Window. 4. Click Edit Role Scope on the Configuration menu. 5. Distribute the category to the role appears on the Main Window. 6. Select the category to add the role in the Operations tree. 7. Click Add of the Action menu under Assigned Roles. 8. Available Roles is displayed below the Assigned Roles.
9. Select the check box of the role to specify as a target of the category that is selected in the Available Roles.
10. Click OK. The role to specify as a target of the category is added to the Assigned Roles.
11. Click Apply. Configuring the authority target of a role completes.

Configuring the Access Authority
Part II Start Operation in SigmaSystemCenter 149
4.2.3. Allocating a Role to a User
To allocate a role to a user, perform the following procedure:
1. Click Management on the Title Bar to switch to the Management view. 2. Click the User icon in the Management tree. 3. Details of the user appear on the Main Window. 4. Click the Edit icon of the user that you allocate a role under User List. 5. Edit User appears on the Main Window. 6. Click Add of the Action menu under Assigned Roles. 7. Available Roles is displayed below the Assigned Roles.
8. Select the check box of the role to allocate to the user in the Available Roles.
Note: Select a role with the same level as the permission of the user.
9. Click OK. The role to allocate to the user is added to Assigned Roles. 10. Click OK. Allocating a role to a user complete.

4 Creating an Operation Group
SigmaSystemCenter 2.1 Configuration Guide 150
4.3. Adding an Operation Group In SigmaSystemCenter, you can operate a machine with the same procedure regardless of the machine types, a physical machine or virtual machine; however, you need to prepare different operation groups by the machine type and OS type. An operation group can manage only one type of machine. The machine types that can be managed in SigmaSystemCenter are:
Physical machine except a virtual machine server Virtual machines Virtual machine servers
To add an operation group, perform the following procedure.
1. Click Operations on the Title bar to switch to the Operations view. 2. Click the Operation icon or the icon of the category or group to which you want to
create a group in the Operations tree. 3. Click Add Group on the Configuration menu. 4. Add Group appears on the Main Window.
5. Enter an operation group name in the Name box. (Required) 6. Select the type of active OS of the machine to be registered to the group in the OS
Type.
Note: Select Linux as an OS type if the managed machine is a virtual machine server.
7. Click OK. Adding an operation group completes.

Configuring Group Properties
Part II Start Operation in SigmaSystemCenter 151
4.4. Configuring Group Properties This section explains how to configure properties of an operation group. Follow the procedure in this section.
1. Click Operations on the Title bar to switch to the Operations view. 2. Click the icon of the group to configure in the Operations tree. 3. Click Property on the Configuration menu. 4. Group Property Setting appears on the Main Window. Configure settings on each tab with the procedure in the following subsections. For the details of each item, see Section 4.6, "Group Property Setting" in SigmaSystemCenter Web Console Reference Guide.

4 Creating an Operation Group
SigmaSystemCenter 2.1 Configuration Guide 152
4.4.1. Configuring Settings on the General Tab
To configure settings on the General tab of the Group Property Setting, perform the following procedure:
1. Display the Group Property Setting window, and click the General tab.
2. To change the operation group name, enter the operation group name in the Group Name box. (Required)
3. To change the priority of the operation group, select the priority in the Priority box.
Note: The smaller the priority, the faster it is selected.
4. To configure a policy to the operation group, select the policy name in the Policy Name box.
5. Select the use of the pool machine under Machine Pool Setting. 6. Click Apply. Configuring settings on the General tab of the Group Property Setting completes.
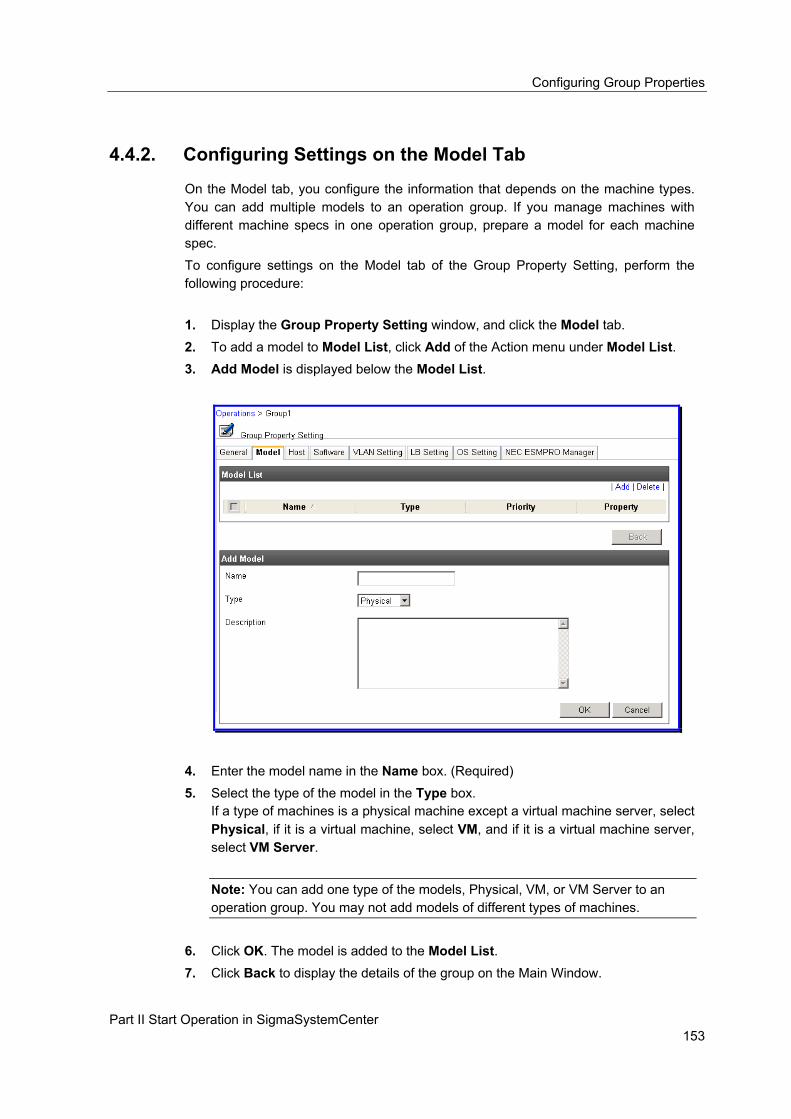
Configuring Group Properties
Part II Start Operation in SigmaSystemCenter 153
4.4.2. Configuring Settings on the Model Tab
On the Model tab, you configure the information that depends on the machine types. You can add multiple models to an operation group. If you manage machines with different machine specs in one operation group, prepare a model for each machine spec. To configure settings on the Model tab of the Group Property Setting, perform the following procedure:
1. Display the Group Property Setting window, and click the Model tab. 2. To add a model to Model List, click Add of the Action menu under Model List. 3. Add Model is displayed below the Model List.
4. Enter the model name in the Name box. (Required) 5. Select the type of the model in the Type box.
If a type of machines is a physical machine except a virtual machine server, select Physical, if it is a virtual machine, select VM, and if it is a virtual machine server, select VM Server.
Note: You can add one type of the models, Physical, VM, or VM Server to an operation group. You may not add models of different types of machines.
6. Click OK. The model is added to the Model List. 7. Click Back to display the details of the group on the Main Window.

4 Creating an Operation Group
SigmaSystemCenter 2.1 Configuration Guide 154
A model is added. Configure Model Property Setting next.
Reference: To configure the Model Property Setting, see Section 4.5, "Configuring Model Properties (For a Physical Machine)," Section 4.6, "Configuring Model Properties (For a Virtual Machine)," or Section 4.7, "Configuring Model Properties (For a Virtual Machine Server)."
4.4.3. Configuring Settings on the Host Tab
On the Host tab, you can configure the information that does not depend on the machine types, such as a host name and IP address, as a Host Setting. To configure settings on the Host tab of the Group Property Setting, perform the following procedure:
1. Display the Group Property Setting window, and click the Host tab. 2. To add a host in Host List, click Add of the Action menu under Host List. 3. Add Host is displayed below the Host List.

Configuring Group Properties
Part II Start Operation in SigmaSystemCenter 155
4. To create multiple hosts simultaneously, select the Create Multiple Hosts check box.
Note: Names of hosts created simultaneously is created with the following rules. Sequential numbers are added to the ending of specified host name. If a host name with a number at the ending, sequential numbers to the number of the host name is added.
When sequential numbers are added, of a specific host name with a number at the ending already exists, numbers that are not registered are added in sequence to the host name. For example, if "Host1", "Host3",and "Host6" already exists and if you enter "5" in the Host Count box, "Host2", "Host4", "Host5", "Host7", and "Host8" are created.
5. Enter the host name in the Host Name box. (Required)
Note: To control a load balancer, you also need to configure the IP address to make the load balancer belong to the network address of the real server in the load balancer group. If either setting is not configured, SystemProvisioning does not control a load balancer. In addition, the IP address of the host is configured to Obtain an IP address automatically, a load balancer is not controlled.
6. Enter a tag (key word) in the Tag box. 7. If the Create Multiple Hosts check box is selected, enter the number of units in
the Host Count box. (Required)
Note: If the Network Settings check box is not selected, the upper limit of the number of hosts is "1000."
If this check box is selected, the upper that can be specified in the Host Count box is the number of assignable IP addresses over the IP address specified in the Start IP box within IP addresses assignable to hosts calculated from IP address specified in the Subnet Mask box. For example, if you specify "192.168.1.250" in the Start IP box and "255.255.255.248" in the Subnet Mask box, the upper limit that you can specify in the Host Count box is "5."
8. To configure network settings, select the Network Settings check box. The following procedures show the procedure to configure network settings to NIC#1. If this check box is cleared, IP address is acquired automatically. In this case, skip to the procedure 13.
9. Enter IP address in the Start IP box. When creating multiple hosts, enter a starting IP address.
10. Enter subnet mask in the Subnet Mask box. When creating multiple hosts, the subnet mask is used commonly.

4 Creating an Operation Group
SigmaSystemCenter 2.1 Configuration Guide 156
11. If you want to monitor physical machines with NEC ESMPRO Manager or monitor
performance of managed machines using their IP addresses with System Monitor - Performance Monitoring Services, select the Management IP Address in the As Management IP Address box.
12. Click OK. The host is added to the Host List. 13. Click Back to display the details of the group on the Main Window.
Host(s) are created. Configure Host Setting next.
Note: To configure the Host Setting, see Section 4.8, "Configuring the Host Setting."
4.4.4. Configuring Settings on the Software Tab
To configure settings on the Software tab of the Group Property Setting, perform the following procedure:
Note: You may not register an automated installation scenario of an ESX to multiple operation groups. If you want to register the scenario to multiple operation groups, create other scenarios with the same procedure.
1. Display the Group Property Setting window, and click the Software tab. 2. Select the timing that software is distributed in the Software Type box under
Software List. If the box is selected, the list of registered software is displayed. 3. To change the distribution order of the software, select the check box of the
software to move and click Up or Down. 4. To add software to distribute to Software List, click Add of the Action menu under
Software List. 5. Add Software is displayed below the Software List.

Configuring Group Properties
Part II Start Operation in SigmaSystemCenter 157
6. Select the check box of the software to distribute under Add Software. 7. Click OK. The software is added to the Software List. 8. To change the distribution order of the software, select the check box of the
software to move and click Up or Down. 9. Click Apply. Configuring settings on the Software tab of the Group Property Setting completes.

4 Creating an Operation Group
SigmaSystemCenter 2.1 Configuration Guide 158
4.4.5. Configuring Settings on the VLAN Setting Tab
To configure settings on the VLAN Setting tab of the Group Property Setting, perform the following procedure:
1. Display the Group Property Setting window, and click the VLAN Setting tab. 2. To add a VLAN to VLAN List, click Add of the Action menu under VLAN List. 3. Add VLAN is displayed below the VLAN List.
4. Select the NIC number in the NIC Number box. 5. Select the switch in the Switch box. 6. Select the VLAN in the VLAN box. 7. Select the Tag check box to configure information of a tag. 8. Click OK. The VLAN is added to the VLAN List. 9. Click Back to display the details of the group on the Main Window.
Note: To control a VLAN, you also need to configure the Network tab of the Machine Property Setting. If either setting is not configured, SystemProvisioning does not control a VLAN. For the settings of the Network tab of the Machine Property Setting, see Subsection 3.11.2, "Configuring Settings on the Network Tab."
A check box of Tag is selectable only for a switch or switchblade managed and registered in MasterScope Network Manager.
Configuring settings on the VLAN Setting tab of the Group Property Setting completes.

Configuring Group Properties
Part II Start Operation in SigmaSystemCenter 159
4.4.6. Configuring Settings on the LB Setting Tab
To configure settings on the LB Setting tab of the Group Property Setting, perform the following procedure:
1. Display the Group Property Setting window, and click the LB Setting tab. 2. To add a load balancer to LB List, click Add of the Action menu under LB List. 3. Add Load Balancer is displayed below LB List.
4. Select the load balancer to add. 5. Click OK. The load balancer is added to the LB List. 6. Click Back to display the details of the group on the Main Window. Configuring settings on the LB Setting tab of the Group Property Setting completes.

4 Creating an Operation Group
SigmaSystemCenter 2.1 Configuration Guide 160
4.4.7. Configuring Settings on the OS Setting Tab (Windows)
To configure settings on the OS Setting tab of the Group Property Setting when the OS of the managed machine is Windows, perform the following procedure:
1. Display the Group Property Setting window, and click the OS Setting tab.
2. To change the Administrator password, select the Update Password check box, and enter the password in the Administrator Password box.
3. If your OS is in the work group, select Participation in the following work group, and enter the work group name in the text box.
4. If your OS is in the work group, select Participation in the following domains, and enter the account name in the Account box. To change the password of the domain, select the Update Password check box, and enter the password in the Password box.
5. Select the tab of the NIC to use. 6. Enter the IP address of the preferred DNS in the Preferred DNS box. 7. Enter the IP address of the alternate DNS in the Alternate DNS box. 8. Enter the IP address of the preferred WINS in the Preferred WINS box. 9. Enter the IP address of the alternate WINS in the Alternate WINS box. 10. Click Apply.

Configuring Group Properties
Part II Start Operation in SigmaSystemCenter 161
Configuring settings on the OS Setting tab of the Group Property Setting (Windows) completes.
4.4.8. Configuring Settings on the OS Setting Tab (Linux)
To configure settings on the OS Setting tab of the Group Property Setting when the OS of the managed machine is Linux, perform the following procedure:
1. Display the Group Property Setting window, and click the OS Setting tab.
2. To change the root password, select the Update Password check box, and enter the new password in the Root Password box. (Required)
3. Enter the domain suffix in the Domain Suffix box. 4. Enter the IP address of the primary DNS in the Primary DNS box. 5. Enter the IP address of the secondary DNS in the Secondary DNS box. 6. Enter the IP address of the tertiary DNS in the Tertiary DNS box. 7. Click Apply. Configuring settings on the OS Setting tab of the Group Property Setting (Linux) completes.

4 Creating an Operation Group
SigmaSystemCenter 2.1 Configuration Guide 162
4.4.9. Configuring Settings on the ESMPRO/SM Tab
To change the default Server Down Detection Retry Count and Server Status Polling Interval of a machine to be registered in NEC ESMPRO Manager from SystemProvisioning, perform the following procedure:
Note: To reset the settings to their default value, clear the Server Down Detection Retry Count box and Server Status Polling Interval box, and Set the values check box, and then click Apply.
1. Display the Group Property Setting window, and click the ESMPRO/SM tab.
2. To configure Server Down Detection Retry Count and Server Status Polling Interval of a machine to be registered in NEC ESMPRO Manager, select the Set the values check box.
3. Enter a retry count when server down is detected in the Server Down Detection Retry Count box.
4. Enter the interval of server performance monitoring in the Server Status Polling Interval box.
5. Click Apply. Configuring settings on the ESMPRO/SM tab of the Group Property Setting completes.

Configuring Model Properties (For a Physical Machine)
Part II Start Operation in SigmaSystemCenter 163
4.5. Configuring Model Properties (For a Physical Machine)
This section provides how to configure detail of a model added with the procedure in Subsection 4.4.2, "Configuring Settings on the Model Tab." On the Model Property Setting, you configure the information that depends on the machine type. In this section, the settings if the Model Type is Physical are explained. Follow the procedure in this section.
1. Click Operations on the Title bar to switch to the Operations view. 2. Click the icon of the group to configure in the Operations tree. 3. Click Property on the Configuration menu. 4. Group Property Setting appears on the Main Window. Click the Model tab. 5. Click the Property icon of the model to configure detailed settings under Model
List. 6. Model Property Setting appears on the Main Window. Configure settings on each tab with the procedure in the following subsections. For the details of each item, see Section 4.7, "Model Property Setting" in SigmaSystemCenter Web Console Reference Guide.

4 Creating an Operation Group
SigmaSystemCenter 2.1 Configuration Guide 164
4.5.1. Configuring Settings on the General Tab
To configure settings on the General tab of the Model Property Setting, perform the following procedure:
1. Display the Group Property Setting window, and click the Model tab. 2. Click the Property icon of the model to configure detailed settings under Model
List. 3. Model Property Setting appears on the Main Window. Click the General tab.
4. To change the model name, enter the model name in the Model Name box. (Required)
5. To change the priority of the model, select the priority in the Priority box. Configure the priority of when SystemProvisioning selects a model automatically.
Note: The less the value is, the stronger it gets for the model to be selected.
6. To configure a policy to the model, select the policy name in the Policy Name box.
Note: If any policy is not configured on the model, the policy configured on the property of the parent model is used.
7. Click Apply. Configuring settings on the General tab of the Model Property Setting completes.
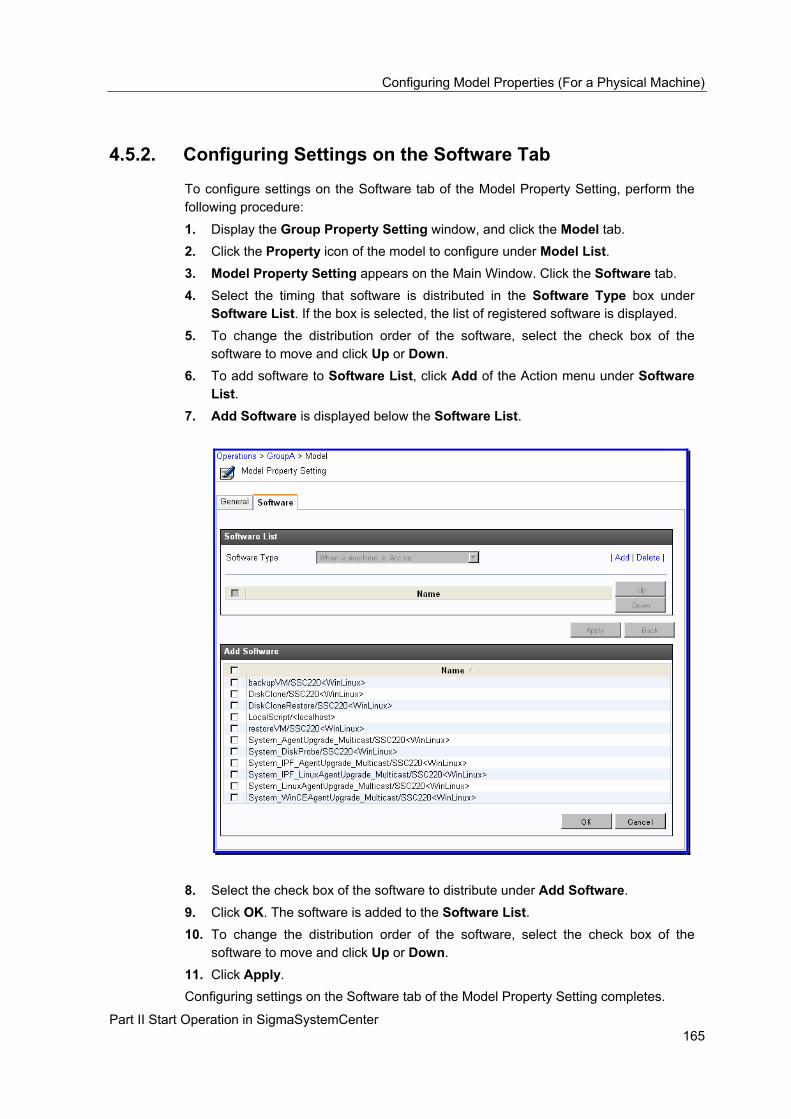
Configuring Model Properties (For a Physical Machine)
Part II Start Operation in SigmaSystemCenter 165
4.5.2. Configuring Settings on the Software Tab
To configure settings on the Software tab of the Model Property Setting, perform the following procedure:
1. Display the Group Property Setting window, and click the Model tab. 2. Click the Property icon of the model to configure under Model List. 3. Model Property Setting appears on the Main Window. Click the Software tab. 4. Select the timing that software is distributed in the Software Type box under
Software List. If the box is selected, the list of registered software is displayed. 5. To change the distribution order of the software, select the check box of the
software to move and click Up or Down. 6. To add software to Software List, click Add of the Action menu under Software
List. 7. Add Software is displayed below the Software List.
8. Select the check box of the software to distribute under Add Software. 9. Click OK. The software is added to the Software List. 10. To change the distribution order of the software, select the check box of the
software to move and click Up or Down. 11. Click Apply. Configuring settings on the Software tab of the Model Property Setting completes.

4 Creating an Operation Group
SigmaSystemCenter 2.1 Configuration Guide 166
4.6. Configuring Model Properties (For a Virtual Machine)
This section provides how to configure detail of a model added with the procedure in Subsection 4.4.2, "Configuring Settings on the Model Tab." On the Model Property Setting, you configure the information that depends on the machine type. In this section, the settings if the Model Type is VM are explained. Follow the procedure in this section.
1. Click Operations on the Title bar to switch to the Operations view. 2. Click the icon of the group to configure in the Operations tree. 3. Click Property on the Configuration menu. 4. Group Property Setting appears on the Main Window. Click the Model tab. 5. Click the Property icon of the model to configure detailed settings under Model
List. 6. Model Property Setting appears on the Main Window. Configure settings on each tab with the procedure in the following subsections. For the details of each item, see Section 4.7, "Model Property Setting" in SigmaSystemCenter Web Console Reference Guide.
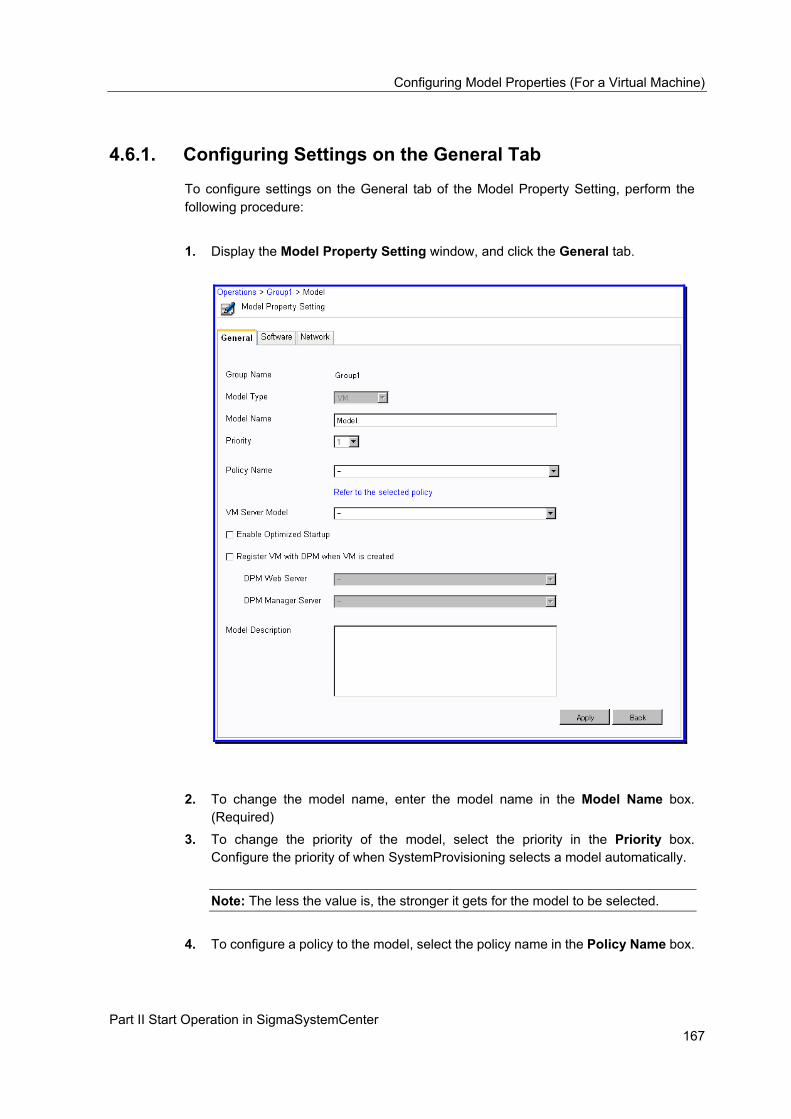
Configuring Model Properties (For a Virtual Machine)
Part II Start Operation in SigmaSystemCenter 167
4.6.1. Configuring Settings on the General Tab
To configure settings on the General tab of the Model Property Setting, perform the following procedure:
1. Display the Model Property Setting window, and click the General tab.
2. To change the model name, enter the model name in the Model Name box.
(Required)
3. To change the priority of the model, select the priority in the Priority box. Configure the priority of when SystemProvisioning selects a model automatically.
Note: The less the value is, the stronger it gets for the model to be selected.
4. To configure a policy to the model, select the policy name in the Policy Name box.

4 Creating an Operation Group
SigmaSystemCenter 2.1 Configuration Guide 168
Note: If any policy is not configured on the model, the policy configured on the property of the parent model is used.
5. To correlate a VM model and a VM Server model, select the VM Server model in
the VM Server Model box. If the VM Server model is specified, SystemProvisioning selects a virtual machine server on which SystemProvisioning creates a virtual machine from virtual machine servers in the VM Server model.
Note: If the VM Server model is not specified, SystemProvisioning selects the virtual machine server from the datacenter to which the virtual machine belongs.
6. To enable the Optimized Startup Function, select the Enable Optimized Startup
check box. If you enable the Optimized Startup function, SystemProvisioning selects the virtual machine server to be the host automatically if the virtual machine cannot be started on the virtual machine server with the current host. If the VM Server model is specified in the VM Server Model box, SystemProvisioning selects the virtual machine server on which SystemProvisioning starts a virtual machine from the virtual machine servers in the VM Server model.
Note: If the VM Server model is not specified, SystemProvisioning selects the virtual machine server from the datacenter to which the virtual machine belongs.
7. To register a virtual machine to activate, select the Register VM with DPM when VM is created check box, and select Web Server for DPM on the DPM Web Server box or Management Server for DPM in the DPM Manager Server box.
Note: To execute Create and Assign Resource or Allocate Machine to a virtual machine on a Xen Server, standalone ESXi, or Hyper-V, you need to configure this setting. If not, you cannot execute the operation.
8. Click Apply. Configuring settings on the General tab of the Model Property Setting completes.

Configuring Model Properties (For a Virtual Machine)
Part II Start Operation in SigmaSystemCenter 169
4.6.2. Configuring Settings on the Software Tab
To configure settings on the Software tab of the Model Property Setting, perform the procedure in Subsection 4.5.2, "Configuring Settings on the Software Tab."
4.6.3. Configuring Settings on the Network Tab
To configure settings on the Network tab of the Model Property Setting, perform the following procedure:
Note: If you configure the VM Server model on the General tab or template on the Software tab, a list of virtual port is displayed on the Virtual NIC boxes. Do not create multiple virtual networks with the same name on one virtual machine server of Hyper-V. Hyper-V cannot identify the networks with the same name.
1. Display the Model Property Setting window, and click the Network tab.
2. Select the virtual ports to which the virtual machine connects in the Virtual NIC boxes. Also, if you select "…", you can enter a specific virtual port.
3. Click Apply.
Configuring settings on the Network tab of the Model Property Setting completes.

4 Creating an Operation Group
SigmaSystemCenter 2.1 Configuration Guide 170
4.7. Configuring Model Properties (For a Virtual Machine Server)
This section provides how to configure detail of a model added with the procedure in Subsection 4.4.2, "Configuring Settings on the Model Tab." On the Model Property Setting, you configure the information that depends on the machine type. In this section, the settings if the Model Type is VM Server are explained. Follow the procedure in this section.
1. Click Operations on the Title bar to switch to the Operations view. 2. Click the icon of the group to configure in the Operations tree. 3. Click Property on the Configuration menu. 4. Group Property Setting appears on the Main Window. Click the Model tab. 5. Click the Property icon of the model to configure detailed settings under Model
List. 6. Model Property Setting appears on the Main Window. Configure settings on each tab with the procedure in the following subsections. For the details of each item, see Section 4.7, "Model Property Setting" in SigmaSystemCenter Web Console Reference Guide.

Configuring Model Properties (For a Virtual Machine Server)
Part II Start Operation in SigmaSystemCenter 171
4.7.1. Configuring Settings on the General Tab
To configure settings on the General tab of the Model Property Setting, perform the following procedure:
Note: If the datacenter to be configured to the model is not configured properly, you cannot add the virtual machine server to the group.
1. Display the Model Property Setting window, and click the General tab.
2. To change the model name, enter the model name in the Model Name box. (Required)
3. To change the priority of the model, select the priority in the Priority box.
Note: The less the value is, the stronger it gets for the model to be selected.
4. To configure a policy to the model, select the policy name in the Policy Name box.
Note: If any policy is not configured on the model, the policy configured on the property of the parent model is used.
5. Select the datacenter to be used by model in the Datacenter box.
4 Creating an Operation Group
SigmaSystemCenter 2.1 Configuration Guide 172
6. Click Apply. Configuring settings on the General tab of the Model Property Setting completes.
4.7.2. Configuring Settings on the Software Tab
To configure settings on the Software tab of the Model Property Setting, perform the procedure in Subsection 4.5.2, "Configuring Settings on the Software Tab."
Note: You cannot register the automatic installation scenario of the same ESX to multiple operation groups. To register the scenario to multiple operation groups, create other scenarios with the same procedure.
4.7.3. Configuring Settings on the VM Optimized Placement Tab
(With a Virtual Machine Server)
Configure the VM Optimized Placement tab of the Model Property Setting. If you do not use the VM Optimized Placement function, clear the Enable Optimized Startup check box. To use the function, configure the setting, referring to the Section 5.3, "Configuring to Use the VM Optimized Placement Function." For the details of the VM Optimized Placement tab, see Subsection 5.3.2, "Configuring the VM Server Model."

Configuring the Host Setting
Part II Start Operation in SigmaSystemCenter 173
4.8. Configuring the Host Setting This section explains how to configure detail of a model added with the procedure in Subsection 4.4.3, "Configuring Settings on the Host Tab." Follow the procedure in this section.
1. Click Operations on the Title bar to switch to the Operations view. 2. Click the icon of the group to configure in the Operations tree. 3. Click Property on the Configuration menu. 4. Group Property Setting appears on the Main Window. Click the Host tab. 5. Click the Property icon of the host to configure under Host List. 6. Host Setting appears on the Main Window. Configure settings on each tab with the procedure in the following subsections. For the details of each item, see Section 4.9, "Host Setting" in SigmaSystemCenter Web Console Reference Guide.

4 Creating an Operation Group
SigmaSystemCenter 2.1 Configuration Guide 174
4.8.1. Configuring Settings on the General Tab
To configure settings on the General tab of the Host Setting, perform the following procedure:
1. Display the Host Setting window, and click the General tab.
2. To change the host name, enter the host name in the Host Name box. (Required) 3. Enter the tag (key word) in the Tag box. 4. Select which administrator password to use, the administrator password
configured to the group or the host. To configure a password to the host, select Use the administrator password that is set for this host, select the Update Password check box, and enter the password in the Administrator Password box.
5. Enter product key in the Product Key for Full Packaged Product box. 6. Click Apply. Configuring settings on the General tab of the Host Setting completes.
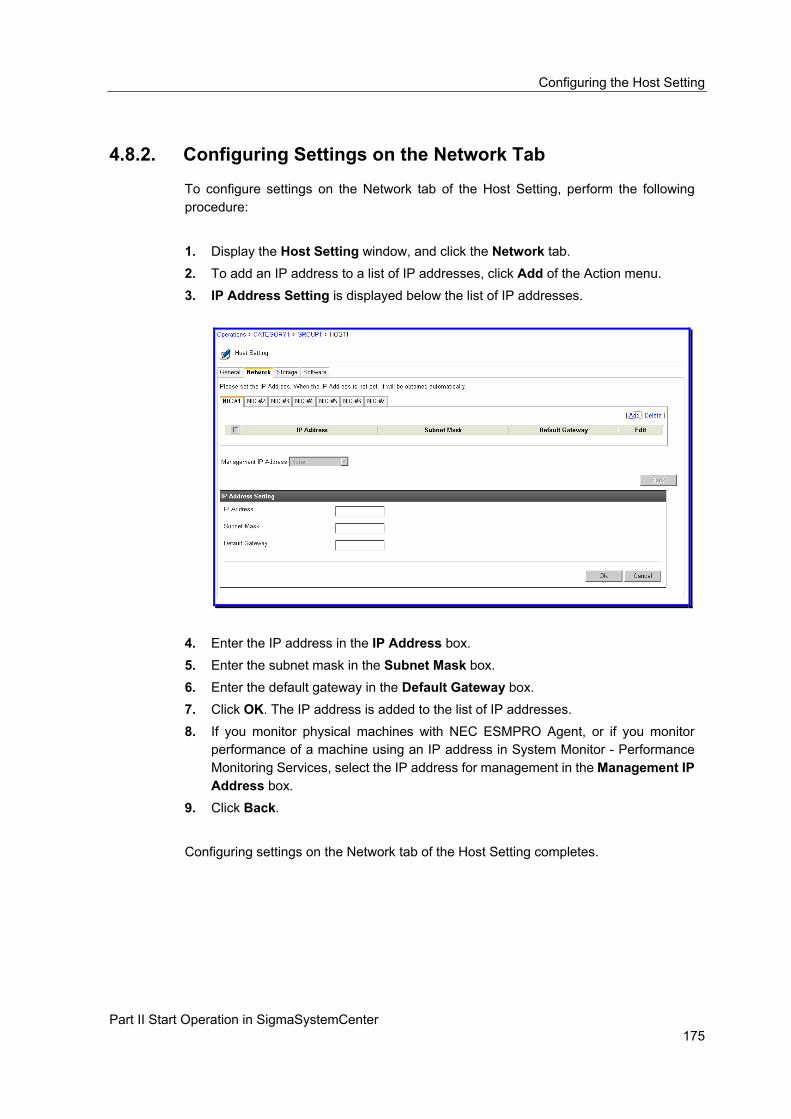
Configuring the Host Setting
Part II Start Operation in SigmaSystemCenter 175
4.8.2. Configuring Settings on the Network Tab
To configure settings on the Network tab of the Host Setting, perform the following procedure:
1. Display the Host Setting window, and click the Network tab. 2. To add an IP address to a list of IP addresses, click Add of the Action menu. 3. IP Address Setting is displayed below the list of IP addresses.
4. Enter the IP address in the IP Address box. 5. Enter the subnet mask in the Subnet Mask box. 6. Enter the default gateway in the Default Gateway box. 7. Click OK. The IP address is added to the list of IP addresses. 8. If you monitor physical machines with NEC ESMPRO Agent, or if you monitor
performance of a machine using an IP address in System Monitor - Performance Monitoring Services, select the IP address for management in the Management IP Address box.
9. Click Back. Configuring settings on the Network tab of the Host Setting completes.
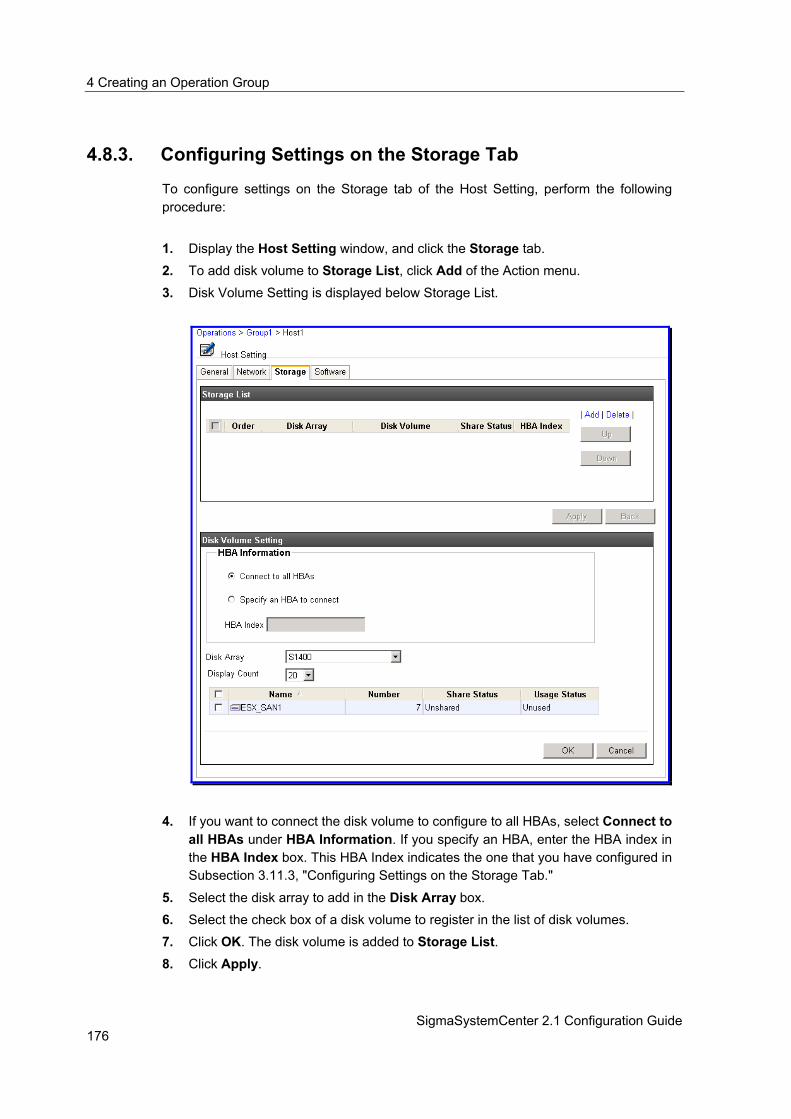
4 Creating an Operation Group
SigmaSystemCenter 2.1 Configuration Guide 176
4.8.3. Configuring Settings on the Storage Tab
To configure settings on the Storage tab of the Host Setting, perform the following procedure:
1. Display the Host Setting window, and click the Storage tab. 2. To add disk volume to Storage List, click Add of the Action menu. 3. Disk Volume Setting is displayed below Storage List.
4. If you want to connect the disk volume to configure to all HBAs, select Connect to all HBAs under HBA Information. If you specify an HBA, enter the HBA index in the HBA Index box. This HBA Index indicates the one that you have configured in Subsection 3.11.3, "Configuring Settings on the Storage Tab."
5. Select the disk array to add in the Disk Array box. 6. Select the check box of a disk volume to register in the list of disk volumes. 7. Click OK. The disk volume is added to Storage List. 8. Click Apply.

Configuring the Host Setting
Part II Start Operation in SigmaSystemCenter 177
Note: To control storage, you also need to configure the Storage tab of the Machine Property Setting. If either setting is not configured, SystemProvisioning does not control storage. For the settings of the Storage tab of the Machine Property Setting, see Subsection 3.11.3, "Configuring Settings on the Storage Tab." Note the following points of the number for disk volume settings: If you are using NEC Storage, you can configure the number of LDs which can be assigned to a LD set as the number of disk volumes. The number depends on each model; for the number, see the manual of your NEC Storage. If you are using Symmetrix, you can configure the maximum spec of the OS for each disk array. If you are using CLARiiON, the number of storage group you can configure for each HBA is one because an HBA corresponds to a storage group with CLARiiON. If you are using CLARiiON, select a disk volume based on the displayed information regarding disk volumes that are actually assigned, for example to Service Processor (SP).
Configuring settings on the Storage tab of the Host Setting completes.
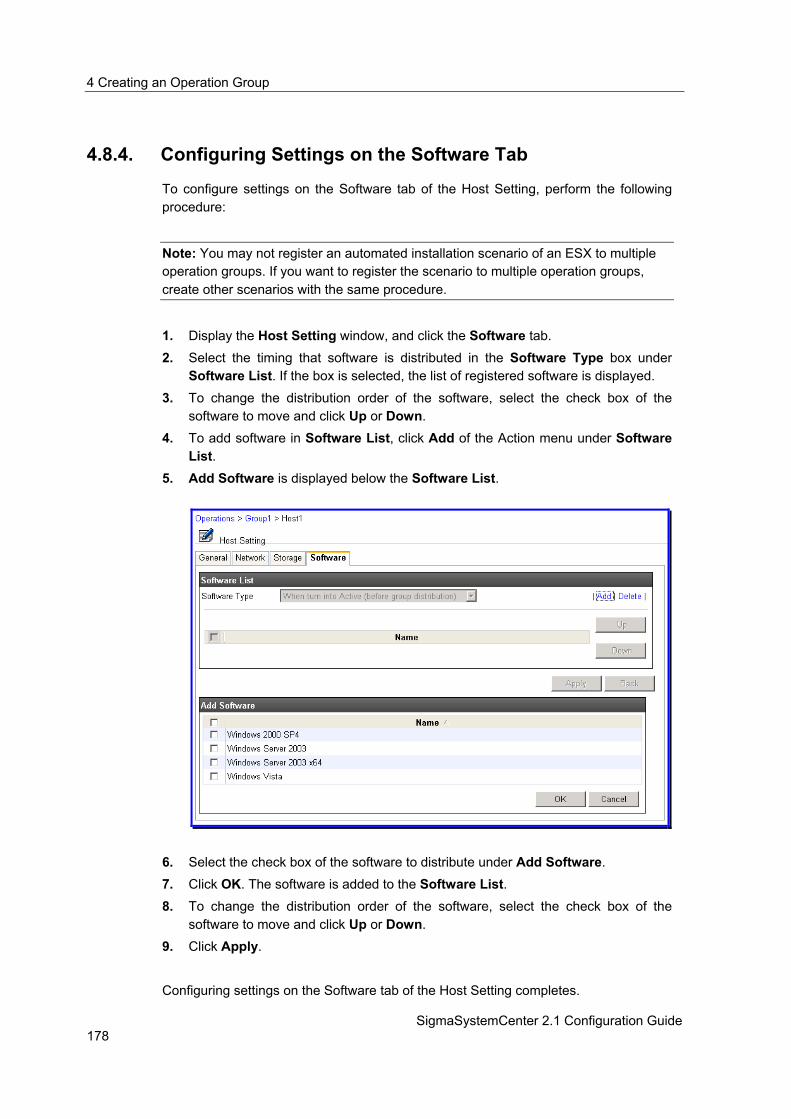
4 Creating an Operation Group
SigmaSystemCenter 2.1 Configuration Guide 178
4.8.4. Configuring Settings on the Software Tab
To configure settings on the Software tab of the Host Setting, perform the following procedure:
Note: You may not register an automated installation scenario of an ESX to multiple operation groups. If you want to register the scenario to multiple operation groups, create other scenarios with the same procedure.
1. Display the Host Setting window, and click the Software tab. 2. Select the timing that software is distributed in the Software Type box under
Software List. If the box is selected, the list of registered software is displayed. 3. To change the distribution order of the software, select the check box of the
software to move and click Up or Down. 4. To add software in Software List, click Add of the Action menu under Software
List. 5. Add Software is displayed below the Software List.
6. Select the check box of the software to distribute under Add Software. 7. Click OK. The software is added to the Software List. 8. To change the distribution order of the software, select the check box of the
software to move and click Up or Down. 9. Click Apply. Configuring settings on the Software tab of the Host Setting completes.

179
5. Settings to Manage and Operate Virtual Environment
This chapter explains how to manage and operate a virtual environment in SigmaSystemCenter. This chapter contains the following sections: • 5.1 Creating a Virtual Machine ..................................................................................... 180 • 5.2 Creating a Template ............................................................................................... 188 • 5.3 Configuring to Use the VM Optimized Placement Function ................................... 195
5 Settings to Manage and Operate Virtual Environment
SigmaSystemCenter 2.1 Configuration Guide 180
5.1. Creating a Virtual Machine With SystemProvisioning, you can create a virtual machine on a virtual machine server managed in SystemProvisioning. To create a virtual machine from SystemProvisioning, there are the following four methods:
Full Clone method HW Profile Clone method Linked Clone method Disk Clone method
This section explains the settings that are necessary for creating a virtual machine by Create and Assign Machine in the Operations view for each method.
Reference: For the flow of creating a master VM to creating a virtual machine and operating the machine in an operation group, see Section 1.6, "Using a Template" in SigmaSystemCenter Reference Guide.
5.1.1. About How to Create a Virtual Machine
To create a virtual machine in SystemProvisioning, there are two methods; creating in the Virtual view, and creating in the Operations view. This subsection provides the difference between these methods and how to.
Creating in the Virtual view If you create a virtual machine in the Virtual view, the created virtual machine will be a complete clone of a master VM, and you cannot configure information, such as a host name or IP address to the virtual machine individually. Also, you can only create a virtual machine with a Full Clone template. You can create a virtual machine on; • ESX and ESXi managed in VMware VirtualCenter • Xen Server The following is the procedure to create a virtual machine in the Virtual view and activate the machine in a group:

Creating a Virtual Machine
Part II Start Operation in SigmaSystemCenter 181
1. Create a virtual machine by executing Create VM (Template) on the Configuration menu in the Virtual view.
2. You cannot customize the virtual machine. Configure the virtual machine manually after creating the machine.
3. Activate the virtual machine in a group by executing Register Master Machine of the Action menu in the Operations view.
Reference: For more details of how to create a virtual machine, see Subsection 7.2, "Creating a Virtual Machine in the Virtual View."
Creating in the Operations view
If you create a virtual machine by Create and Assign Machine in the Operations view, you can configure information, such as a host name or IP address to the virtual machine individually. The following procedure is to create a virtual machine in the Operations view and activate the machine in a group.
1. Create a virtual machine and activate the machine in a group by executing Create and Assign Machine of the Action menu in the Operations view.
Reference: For more details of how to create a virtual machine and activate the machine in a group, see Subsection 6.2.3, "Creating a Virtual Machine and Activating the Machine in a Group."
5 Settings to Manage and Operate Virtual Environment
SigmaSystemCenter 2.1 Configuration Guide 182
5.1.2. Creating a Virtual Machine Using the Full Clone Method
To create a virtual machine using the Full Clone method, you use a Full Clone template. To create a virtual machine executing Create and Assign Machine, you can create a virtual machine in VirtualCenter or on a Xen Server using the Full Clone template from SystemProvisioning. Register a Full Clone template in an operation group as distribution software.
Note: You can also create a virtual machine using the Full Clone template in the Virtual view. For the overview and procedure, see Section 5.1, "Creating a Virtual Machine." If your environment is a Xen environment, you can create a virtual machine using a Full Clone template only in the Virtual view.
1. Setting up a master VM Set up a master VM to be an original virtual machine of a template, referring to Subsection 2.10.1, "Creating a Master VM in VirtualCenter" or 2.12.1, "Creating a Master VM in XenCenter,"
2. Creating a template Create a Full Clone template from the master VM. See Subsection 5.2.1, "Creating a Full Clone Template."
3. Registering the template to an operation group (Only for the VMware environment) Register the template as distribution software to an operation group, referring to Subsection 4.8.4, "Configuring Settings on the Software Tab."
Note: This procedure is unnecessary for the Xen environment.
4. Configuring detailed information of a model Configure detailed information of a model, referring to Subsection 4.6, "Configuring Model Properties (For a Virtual Machine)."
5. Creating a virtual machine and activate the machine in a group • In the VMware environment
Execute Create and Assign Machine to create a virtual machine and activate the machine in a group. For the method, see Subsection 6.2.2, "Allocating a Resource to a Host."

Creating a Virtual Machine
Part II Start Operation in SigmaSystemCenter 183
• In the Xen environment
1. Create a virtual machine based on the template registered in SystemProvisioning. You can create a virtual machine in XenCenter or in the Virtual view.
2. Change the machine-specific information, including a host name, IP address, and administrator password, from XenCenter.
3. Create Host Setting that is adjusted to the changed machine-specific information. With the Host Setting, execute Register Master Machine to the created virtual machine and register the machine in a group.
5.1.3. Creating a Virtual Machine Using the HW Profile Clone
Method
To create a virtual machine using the HW Profile Clone method, you use a HW Profile Clone template and a scenario. You can create a virtual machine in VirtualCenter or on a Standalone ESXi or Hyper-V using the HW Profile Clone template from SystemProvisioning. SystemProvisioning creates an empty VM, which is a virtual machine with no OS, based on a HW Profile Clone template, and then, install an OS and applications using a HW Profile Clone scenario. Register a HW Profile Clone template and a scenario in an operation group as distribution software.
1. Setting up a master VM Set up a master VM to be an original virtual machine of a template, referring to Subsection 2.10.1, "Creating a Master VM in VirtualCenter," 2.12.1, "Creating a Master VM in XenCenter," or 2.14.1, "Creating a Master VM on Hyper-V."
2. Creating a scenario 1. Registering the master VM in DPM
Register the master VM in DPM, referring to Subsection 2.7.4, "Registering a Virtual Machine Server or Virtual Machine to DPM."
2. Collecting a backup of the master VM from DPM Collect a backup of the master VM from DPM, referring to Subsection 2.8.5, "Preparing for Backing up the Master Machine" and 2.8.6, "Creating a Backup Scenario File."
3. Creating a restore scenario from the backup collected from DPM Create a restore scenario from the backup collected from DPM, referring to Subsection 2.8.7, "Creating a Restoration Scenario File."

5 Settings to Manage and Operate Virtual Environment
SigmaSystemCenter 2.1 Configuration Guide 184
Note: SystemProvisioning does not support WOL (Wake On LAN) by DPM for a virtual machine. When you back up a virtual machine of a master VM, execute the operation from SystemProvisioning. If you execute the operation from DPM, you need to power on the virtual machine manually from SystemProvisioning or a manager of a compatible product. DPM does not support multicast distribution from DPM for a virtual machine on Hyper-V. When you create a restoration scenario, specify data distribution by unicast.
3. Creating a template Create a template, referring to Subsection 5.2.2, "Creating a HW Profile Clone Template."
4. Registering the template and scenario to an operation group Register the template and scenario as distribution software to an operation group, referring to Subsection 4.8.4, "Configuring Settings on the Software Tab." If you create a virtual machine on Hyper-V, you can use one HW Profile Clone template on multiple Hyper-Vs. On ESXi, you can use one HW Profile Clone template on ESXi to which its master VM belongs. However, if a datacenter is shared by multiple ESXi, you can use one template on multiple ESXi.
5. Configuring detailed information of a model Configure detailed information of a model, referring to Subsection 4.6, "Configuring Model Properties (For a Virtual Machine)."
6. Creating a virtual machine and activate the machine in a group Execute Allocate Resource to create a virtual machine and activate the machine in a group, referring to Subsection 6.2.2, "Allocating a Resource to a Host."
Creating a Virtual Machine
Part II Start Operation in SigmaSystemCenter 185
5.1.4. Creating a Virtual Machine Using the Linked Clone
Method
To create a virtual machine using the Linked Clone method, you use a Linked Clone template. You can create a virtual machine in VirtualCenter or on a Standalone ESXi or Hyper-V using the Linked Clone template from SystemProvisioning. SystemProvisioning creates a difference disk of a master VM based on a Linked Clone template and create a new virtual machine. Register a Linked Clone template in an operation group as distribution software.
1. Setting up a master VM Set up a master VM to be an original virtual machine of a template, referring to Subsection 2.10.1, "Creating a Master VM in VirtualCenter," 2.12.1, "Creating a Master VM in XenCenter," or 2.14.1, "Creating a Master VM on Hyper-V."
2. Registering the master VM in DPM
Note: If you manage a master VM in VirtualCenter, you do not need this procedure.
Register a master VM in DPM. For the details, see Subsection 2.7.4, "Registering a Virtual Machine Server or Virtual Machine to DPM."
3. Creating a disk duplication parameter file and execute Sysprep in DPM
Note: If you manage a master VM in VirtualCenter, you do not need this procedure.
Create a disk duplication parameter file and execute Sysprep in DPM. For the details, see Subsection 2.8.5, "Preparing for Backing up the Master Machine."
4. Creating a template Create a template after executing Sysprep to DPM, referring to Subsection 5.2.3, "Creating a Linked Clone Template."

5 Settings to Manage and Operate Virtual Environment
SigmaSystemCenter 2.1 Configuration Guide 186
5. Registering the template to an operation group
Register the template as distribution software, referring to Subsection 4.8.4, "Configuring Settings on the Software Tab." If you create a virtual machine on Hyper-V, you can use one Linked Clone template on Hyper-V to which a created master VM belongs. On ESXi, you can use one Linked template on ESXi to which its master VM belongs. However, if a datacenter is shared by multiple ESXi, you can use one template on multiple ESXi.
6. Configuring detailed information of a model Configure detailed information of a model, referring to Subsection 4.6, "Configuring Model Properties (For a Virtual Machine)."
7. Creating a virtual machine and activate the machine in a group Execute Allocate Resource to create a virtual machine and activate the machine in a group, referring to Subsection 6.2.2, "Allocating a Resource to a Host."
5.1.5. Creating a Virtual Machine Using the Disk Clone Method
To create a virtual machine using the Disk Clone method, you use a Disk Clone template. You can create a virtual machine on a Xen Server, Standalone ESXi or Hyper-V using the Disk Clone template from SystemProvisioning. SystemProvisioning copies a virtual disk of a master VM based on a Disk Clone template and create a new virtual machine. Register a Disk Clone template in an operation group as distribution software.
1. Setting up a master VM Set up a master VM to be an original virtual machine of a template, referring to Subsection 2.10.1, "Creating a Master VM in VirtualCenter," 2.12.1, "Creating a Master VM in XenCenter," or 2.14.1, "Creating a Master VM on Hyper-V."
2. Registering the master VM in DPM Register a master VM in DPM. For the details, see Subsection 2.7.4, "Registering a Virtual Machine Server or Virtual Machine to DPM."
3. Creating a disk duplication parameter file and execute Sysprep in DPM to the master VM
Note: If you are using a Xen environment, ensure to set a disk upper than a NIC on the boot order of the master VM before executing Sysprep to the master VM. If not, creating a virtual machine fails.
Create a disk duplication parameter file that installs an OS and applications to virtual machine on the master VM and execute Sysprep in DPM. For the details, see Subsection 2.8.5, "Preparing for Backing up the Master Machine."

Creating a Virtual Machine
Part II Start Operation in SigmaSystemCenter 187
4. Creating a template Create a template after executing Sysprep to DPM, referring to Subsection 5.2.4, "Creating a Disk Clone Template."
5. Registering the template to an operation group Register the template as distribution software, referring to Subsection 4.8.4, "Configuring Settings on the Software Tab." If you create a virtual machine on a Xen Server, you can use one Disk Clone template on multiple Xen Servers. On Hyper-V, you can use one Disk Clone template on Hyper-V to which a created master VM belongs. On ESXi, you can use one Disk Clone template on ESXi to which its master VM belongs. However, if a datacenter is shared by multiple ESXi, you can use one template on multiple ESXi.
6. Configuring detailed information of a model Configure detailed information of a model, referring to Subsection 4.6, "Configuring Model Properties (For a Virtual Machine)."
7. Creating a virtual machine and activate the machine in a group Execute Allocate Resource to create a virtual machine and activate the machine in a group, referring to Subsection 6.2.2, "Allocating a Resource to a Host."

5 Settings to Manage and Operate Virtual Environment
SigmaSystemCenter 2.1 Configuration Guide 188
5.2. Creating a Template Templates that you can use from SystemProvisioning are:
Full Clone template HW Profile Clone template Linked Clone template Disk Clone template
Reference: For the details of the templates, see Subsection 1.4.2, "What Is a Template?" in SigmaSystemCenter Reference Guide.
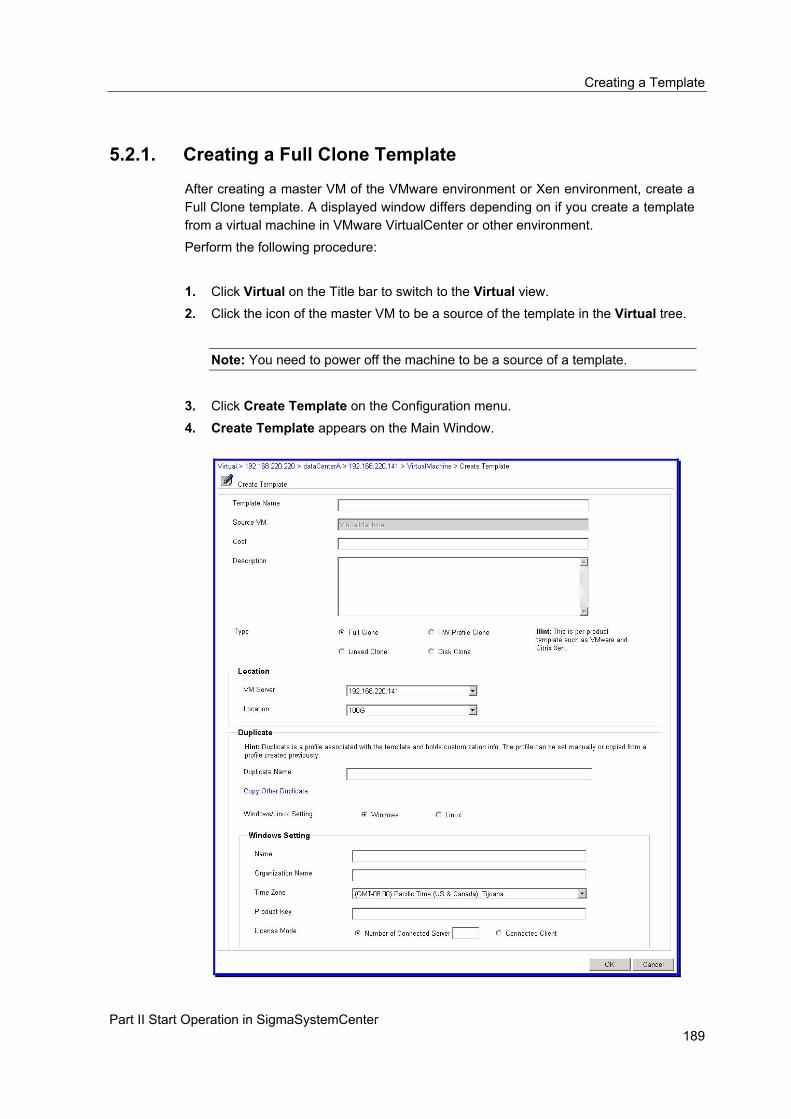
Creating a Template
Part II Start Operation in SigmaSystemCenter 189
5.2.1. Creating a Full Clone Template
After creating a master VM of the VMware environment or Xen environment, create a Full Clone template. A displayed window differs depending on if you create a template from a virtual machine in VMware VirtualCenter or other environment. Perform the following procedure:
1. Click Virtual on the Title bar to switch to the Virtual view. 2. Click the icon of the master VM to be a source of the template in the Virtual tree.
Note: You need to power off the machine to be a source of a template.
3. Click Create Template on the Configuration menu. 4. Create Template appears on the Main Window.

5 Settings to Manage and Operate Virtual Environment
SigmaSystemCenter 2.1 Configuration Guide 190
5. Enter a template name for the Full Clone template in the Template Name box. (Required)
6. Enter a Cost Value that is used when creating a virtual machine from a Full Clone template in the Cost box.
7. Select Full Clone as Type. 8. Select a destination virtual machine server in the VM Server list. 9. Select a destination Datastore in the Location list. If you are creating a virtual
machine in other than the VMware VirtualCenter environment, skip to the procedure 17.
10. Enter a duplicate name in the Duplicate Name box.
Note: Specify a unique Duplicate name.
11. Select the OS of the Full Clone template as Windows/Linux Setting. 12. Enter a name of the OS license owner in the Name box. 13. Enter an organization name of the OS license in the Organization Name box. 14. Select the time zone in the Time Zone list. 15. Enter a product key of the OS in the Product Key box. 16. Select the license mode as License Mode. If you select Number of Connected
Server, enter the number of servers to connect at same time in the text box. 17. Click OK. 18. Confirm that the created template is added under Template List. Preparing a Full Clone template completes.
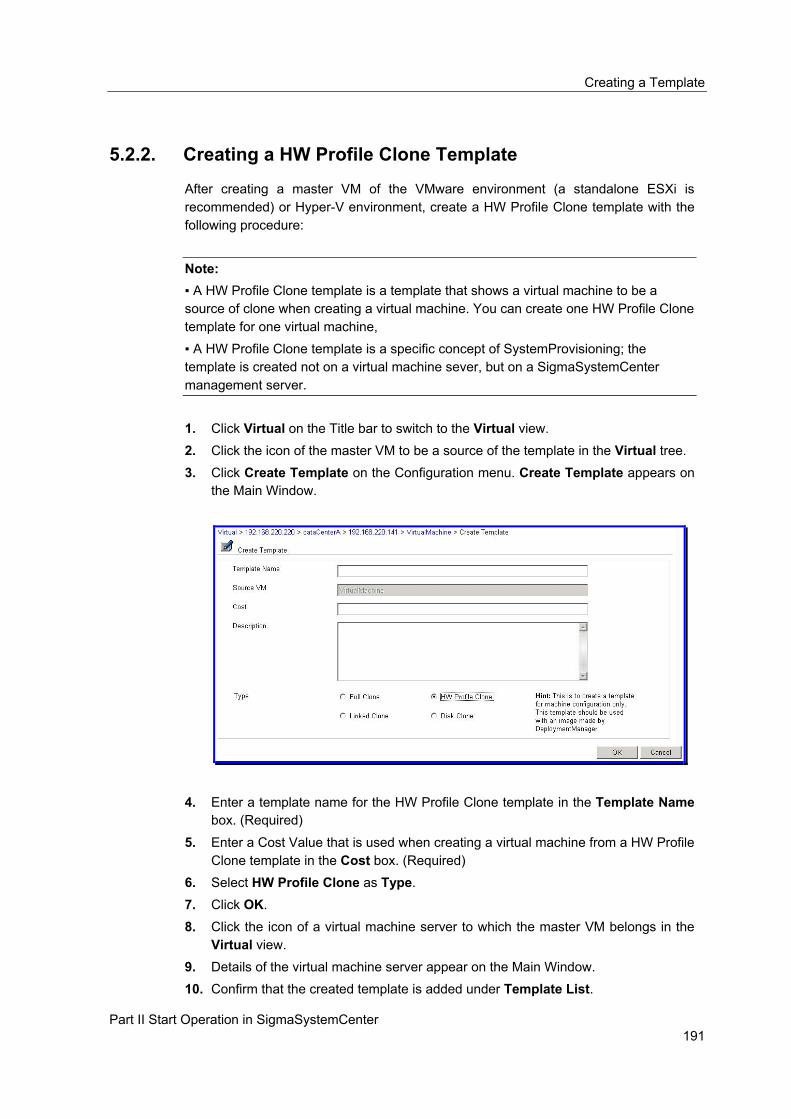
Creating a Template
Part II Start Operation in SigmaSystemCenter 191
5.2.2. Creating a HW Profile Clone Template
After creating a master VM of the VMware environment (a standalone ESXi is recommended) or Hyper-V environment, create a HW Profile Clone template with the following procedure:
Note: A HW Profile Clone template is a template that shows a virtual machine to be a source of clone when creating a virtual machine. You can create one HW Profile Clone template for one virtual machine, A HW Profile Clone template is a specific concept of SystemProvisioning; the template is created not on a virtual machine sever, but on a SigmaSystemCenter management server.
1. Click Virtual on the Title bar to switch to the Virtual view. 2. Click the icon of the master VM to be a source of the template in the Virtual tree. 3. Click Create Template on the Configuration menu. Create Template appears on
the Main Window.
4. Enter a template name for the HW Profile Clone template in the Template Name box. (Required)
5. Enter a Cost Value that is used when creating a virtual machine from a HW Profile Clone template in the Cost box. (Required)
6. Select HW Profile Clone as Type. 7. Click OK. 8. Click the icon of a virtual machine server to which the master VM belongs in the
Virtual view. 9. Details of the virtual machine server appear on the Main Window. 10. Confirm that the created template is added under Template List.

5 Settings to Manage and Operate Virtual Environment
SigmaSystemCenter 2.1 Configuration Guide 192
Creating a HW Profile Clone template completes.
5.2.3. Creating a Linked Clone Template
After creating a master VM of the VMware environment or Hyper-V environment, create a Linked Clone template. A displayed window differs if you create a template from a virtual machine in VMware VirtualCenter or other environment. Perform the following procedure:
Note: A Linked Clone template is a template that shows a virtual machine to be reference of a creating virtual machine. You can create one template for one virtual machine. A Linked Clone template is a specific concept of SystemProvisioning; the template is created not on a virtual machine sever, but on a SigmaSystemCenter management server. When you create a Linked Clone template to be used on Hyper-V, clear all snapshots on a master VM. If you create a Linked Clone template to be used on Hyper-V, do not delete a virtual disk. If you do, you will not be able to use all virtual machines created from the Linked Clone template. Note the following when you are using the VMware VirtualCenter environment. Do not delete a master VM, If you do, you will not be able to use all virtual machines created with a Linked Clone template. Do not delete a virtual machine created with a Linked Clone template from other products than SigmaSystemCenter. If you do, you will not be able to use all virtual machines created with the template. Do not delete snapshots on a virtual machine created with a Linked Clone template. If you do, you will not be able to use all virtual machines and a master VM created with the template. Do not change configuration of hardware of a master VM after creating a Linked Clone template. If you do, you will not be able to use all virtual machines and a master VM created with the template. Files configured on a master VM needs to exist in a single directory. If the files are divided into multiple directories, creating a virtual machine may fail. When creating a Linked Clone template, clear all snapshots on a master VM. Do not delete snapshots on a master VM after created a Linked Clone template. If you do, you will not be able to use all virtual machines created with the template.
1. Click Virtual on the Title bar to switch to the Virtual view. 2. Click the icon of the master VM to be a source of the template in the Virtual tree. 3. Click Create Template on the Configuration menu. Create Template appears on
the Main Window.

Creating a Template
Part II Start Operation in SigmaSystemCenter 193
4. Enter a template name for the Linked Clone template in the Template Name box. (Required)
5. Enter a Cost Value that is used when creating a virtual machine from a Linked Clone template in the Cost box. (Required)
6. Select Linked Clone as Type. If you are creating a virtual machine in other than the VMware VirtualCenter environment, skip to the procedure 14.
7. Enter a duplicate name in the Duplicate Name box. 8. Select the OS of the Linked Clone template as Windows/Linux Setting. 9. Enter a name of the OS license owner in the Name box. 10. Enter an organization name of the OS license in the Organization Name box. 11. Select the time zone in the Time Zone list. 12. Enter a product key of the OS in the Product Key box. 13. Select the license mode as License Mode. If you select Number of Connected
Server, enter the number of servers to connect at same time in the text box. 14. Click OK. 15. Confirm that the created template is added under Template List. Creating a Linked Clone template completes.

5 Settings to Manage and Operate Virtual Environment
SigmaSystemCenter 2.1 Configuration Guide 194
5.2.4. Creating a Disk Clone Template
After creating a master VM of the VMware environment (a standalone ESXi is recommended), Xen environment, or Hyper-V environment, create a Disk Clone template with the following procedure:
Note: A Disk Clone template is a template that shows a virtual machine to be reference of a creating virtual machine. You can create one template for one virtual machine. A Disk Clone template is a specific concept of SystemProvisioning; the template is created not on a virtual machine sever, but on a SigmaSystemCenter management server. When you create a Linked Clone template to be used on Hyper-V, clear all snapshots on a master VM. Do not execute operations, such as starting, to a master VM to be an original virtual machine of a Disk Clone template because Sysprep is executed to the master VM.
1. Click Virtual on the Title bar to switch to the Virtual view. 2. Click the icon of the master VM to be a source of the template in the Virtual tree. 3. Click Create Template on the Configuration menu. Create Template appears on
the Main Window.
4. Enter a template name for the HW Profile Clone template in the Template Name box. (Required)
5. Enter a Cost Value that is used when creating a virtual machine from a Disk Clone template in the Cost box. (Required)
6. Select Disk Clone as Type. 7. Click OK. 8. Confirm that the created template is added under Template List. Creating a Disk Clone template completes.

Configuring to Use the VM Optimized Placement Function
Part II Start Operation in SigmaSystemCenter 195
5.3. Configuring to Use the VM Optimized Placement Function
This section provides the explanation of how to configure the VM Optimized Placement function. For more details of the function, see Subsection 1.3.6, "VM Optimized Replacement" in SigmaSystemCenter Reference Guide.
5.3.1. Managing a Virtual Machine Server in a Group
You can perform Hot Migrate and Cold Migrate, which are the functions of SystemProvisioning, between active virtual machine servers in the same group. To use a function which Hot Migrate or Cold Migrate of a virtual machine follows, such as the load distribution function or power save function for a virtual machine, or restoring the failure by Failover when a failure occurred on a virtual machine server, register the target virtual machine servers in one group. The following figure is an example of load distribution of a virtual machine.
SystemProvisioning can keep loads in a group moderate by monitoring the load condition of virtual machine servers and performing Hot Migrate from a virtual machine server which has heavy loads to a virtual machine server which does not have many loads automatically. Register virtual machine servers that you want to set as a target of load distribution in one group and activate them. An active virtual machine server in other group cannot be the target of Migrate.

5 Settings to Manage and Operate Virtual Environment
SigmaSystemCenter 2.1 Configuration Guide 196
5.3.2. Configuring the VM Server Model
Configure a VM Server model for a group of virtual machine servers. For how to configure a model, see Section 4.5, "Configuring Model Properties (For a Physical Machine)." This subsection explains the VM Optimized Placement tab of the Model Property Setting which you need to configure to use the VM Optimized Placement function.
1. Click Operations on the Title bar to switch to the Operations view. 2. Click the icon of the group to configure in the Operations tree. 3. Click Property on the Configuration menu. 4. Group Property Setting appears on the Main Window. Click the Model tab. 5. Click the Property icon of the model to configure under Model List. 6. Model Property Setting appears on the Main Window. Click the VM Optimized
Placement tab.
7. To enable the VM Optimized Placement function, select the Enable VM Optimization check box.
8. To change the high load bound, configure the new ratio in integer in the High Load Bound box.
9. To change the range of activation target, configure the new range in integer in the Target Region box.
10. To change the low load bound, configure the new ratio in integer in the Low Load Bound box.
11. Select the number of spare machines that wait without stopping their services even when the number of virtual machines gets 0 to manage the load fluctuation in the # of Machines box. You can configure this parameter when you use the power save function. We recommend configuring a value that is 1 or bigger.
12. Click Apply.

Configuring to Use the VM Optimized Placement Function
Part II Start Operation in SigmaSystemCenter 197
Configuring the VM Server Model completes.
5.3.3. Configuring System Monitor - Performance Monitoring
Services
System Monitor - Performance Monitoring Services monitors the performance status of virtual machine servers and send alert to SystemProvisioning when the high load or low load condition of CPU occurs. For the settings of System Monitor - Performance Monitoring Services, see Section 2.5, "Configuring the Setting for Monitoring Performance by System Monitor - Performance Monitoring Services." This subsection explains the necessary settings to use the VM Optimized Placement function.
1. Start the System Monitor - Performance Monitoring Services management console.
2. Add a group in System Monitor - Performance Monitoring Services, and configure the group settings to reflect the configuration of the VM Server model in SystemProvisioning.
3. To reflect the information of the VM Server model, right-click the management server, and click the Apply SystemProvisioning Configuration.
4. Check that the virtual machine server is displayed in the tree. 5. Right-click the group in the tree, and click Set Threshold Monitor. 6. The Set Threshold Monitor dialog box appears. 7. Check that the settings configured to the VM Server model of SystemProvisioning
are reflected to the Threshold method and Performance monitor list. The items that are reflected automatically are displayed in blue.
Reference: For more details of setting Threshold Monitor, see Chapter 6, "Threshold Monitoring and Notification" in System Monitor - Performance Monitoring Services User’s Guide.
Configuring System Monitor - Performance Monitoring Services completes.

5 Settings to Manage and Operate Virtual Environment
SigmaSystemCenter 2.1 Configuration Guide 198
5.3.4. To Use the Power Save Function
To use the power save function of the VM Optimized Placement, configure the Standard Policy (VM Server power save) for the target group of virtual machine servers. If you want SigmaSystemCenter to manage virtual machine servers in a certain mode, such as operating the virtual machine servers saving their power at night that the used number of virtual machines decreases, switch the policies configured to the group for day and night using the commands that SigmaSystemCenter provides.

199
6. Operations for Managing a Machine in the Operations View
This chapter explains the operations to manage a machine in the Operations view in SigmaSystemCenter. This chapter contains the following sections: • 6.1 Adding a Machine to a Pool.................................................................................... 200 • 6.2 Activating a Machine in a Group............................................................................. 201 • 6.3 Scale Out ................................................................................................................ 209 • 6.4 Scale In ................................................................................................................... 210 • 6.5 Changing the Usage of a Machine ......................................................................... 211 • 6.6 Replacing a Machine .............................................................................................. 213 • 6.7 Distributing Specified Software to a Machine ......................................................... 214 • 6.8 Redistributing Software........................................................................................... 216
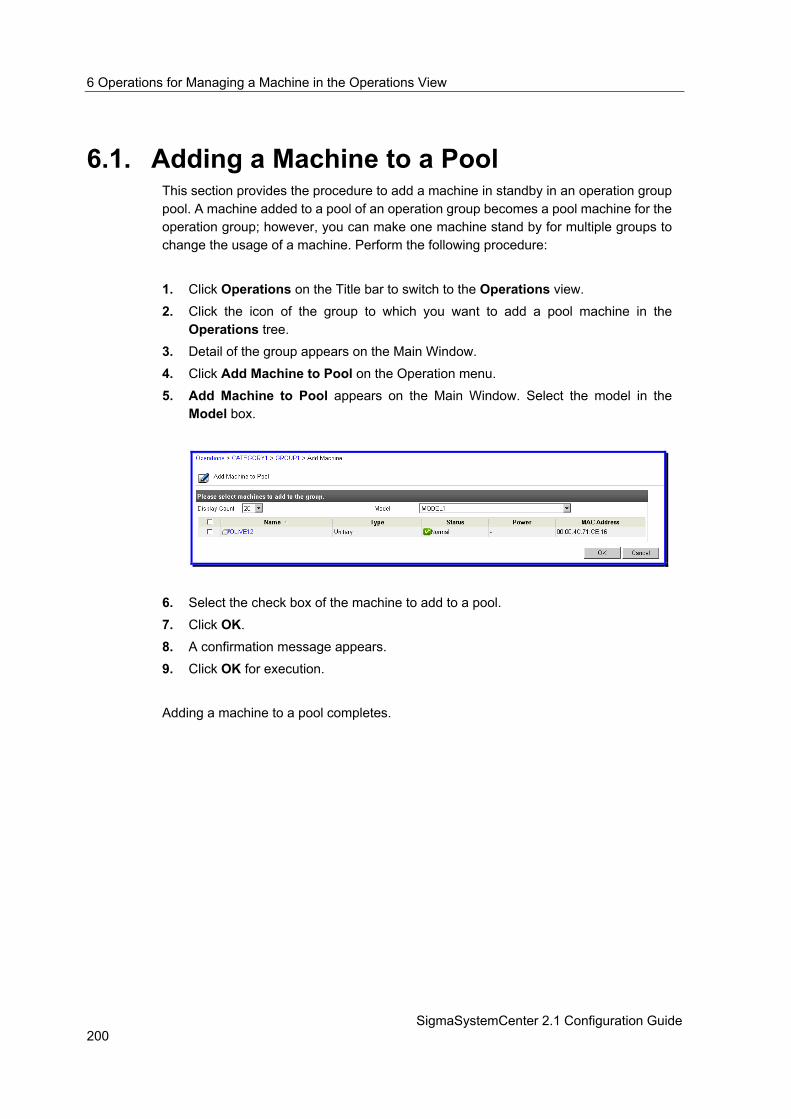
6 Operations for Managing a Machine in the Operations View
SigmaSystemCenter 2.1 Configuration Guide 200
6.1. Adding a Machine to a Pool This section provides the procedure to add a machine in standby in an operation group pool. A machine added to a pool of an operation group becomes a pool machine for the operation group; however, you can make one machine stand by for multiple groups to change the usage of a machine. Perform the following procedure:
1. Click Operations on the Title bar to switch to the Operations view. 2. Click the icon of the group to which you want to add a pool machine in the
Operations tree. 3. Detail of the group appears on the Main Window. 4. Click Add Machine to Pool on the Operation menu. 5. Add Machine to Pool appears on the Main Window. Select the model in the
Model box.
6. Select the check box of the machine to add to a pool. 7. Click OK. 8. A confirmation message appears. 9. Click OK for execution. Adding a machine to a pool completes.

Activating a Machine in a Group
Part II Start Operation in SigmaSystemCenter 201
6.2. Activating a Machine in a Group In SigmaSystemCenter, to allocate a machine to host in the Operations view is called to activate. This section provides how to activate a machine in a group.
6.2.1. Registering a Master Machine
In SigmaSystemCenter, a machine which configuration of network settings or installation of software has completed and which can be operated instantly is called a master machine. In addition, to activate a master machine in a group without distributing software or configuring the network settings is called Register Master Machine. For Register Master Machine, prepare a host to which a host name of the master machine or network settings have configured in advance. To register a master machine, perform the following procedure:
1. Click Operations on the Title bar to switch to the Operations view. 2. Click the icon of the group to which you want to register a master machine in the
Operations tree. 3. Details of the group appear on the Main Window. 4. Select the check box of the host to which you want to register a master machine
under Host List. 5. Select Register Master Machine in the Action menu.

6 Operations for Managing a Machine in the Operations View
SigmaSystemCenter 2.1 Configuration Guide 202
6. Register a master machine to run in the group appears on the Main Window.
Select a model in the Model box.
7. Select the master machine to add to the group. 8. Click Next. 9. The confirmation of the machine to register appears on the Main Window. Confirm
the information, and click Finish.
10. Click Finish. Registering a master machine completes.
Activating a Machine in a Group
Part II Start Operation in SigmaSystemCenter 203
6.2.2. Allocating a Resource to a Host
To activate a machine in a group with distributing software or configuration of the network settings is called Allocate Machine. To perform Allocate Machine, perform the following procedure.
Note: You cannot execute this operation to Xen virtual machines. To activate a Xen virtual machine, execute Register Master Machine or Create and Assign Machine. If you are allocating a virtual machine on standalone ESXi or Hyper-V, you need to configure the Register VM with DPM when VM is created check box, DPM Web Server box, and DPM Manager Server box on the General tab of Model Property Setting. For the details, see Subsection 4.6.1, "Configuring Settings on the General Tab." You also need to register a HW Profile Clone template and a scenario for OS distribution of DPM on the Software tab of one of the property setting in a model, group, or host. If a type of template registered in a Software setting of a model or group is Disk Clone or Linked Clone, you cannot execute this operation.
If you execute Allocate Machine and Script Installation of ESX, the ESX is registered with a name composed of Host Name + Domain Suffix in VirtualCenter. If you use this function, the ESX name must be resolved.
1. Click Operations on the Title bar to switch to the Operations view. 2. Click the icon of the group to which a host to allocate a resource to belongs in the
Operations tree. 3. Details of the group appear on the Main Window. 4. Select the check box of the host to allocate a resource under Host List.
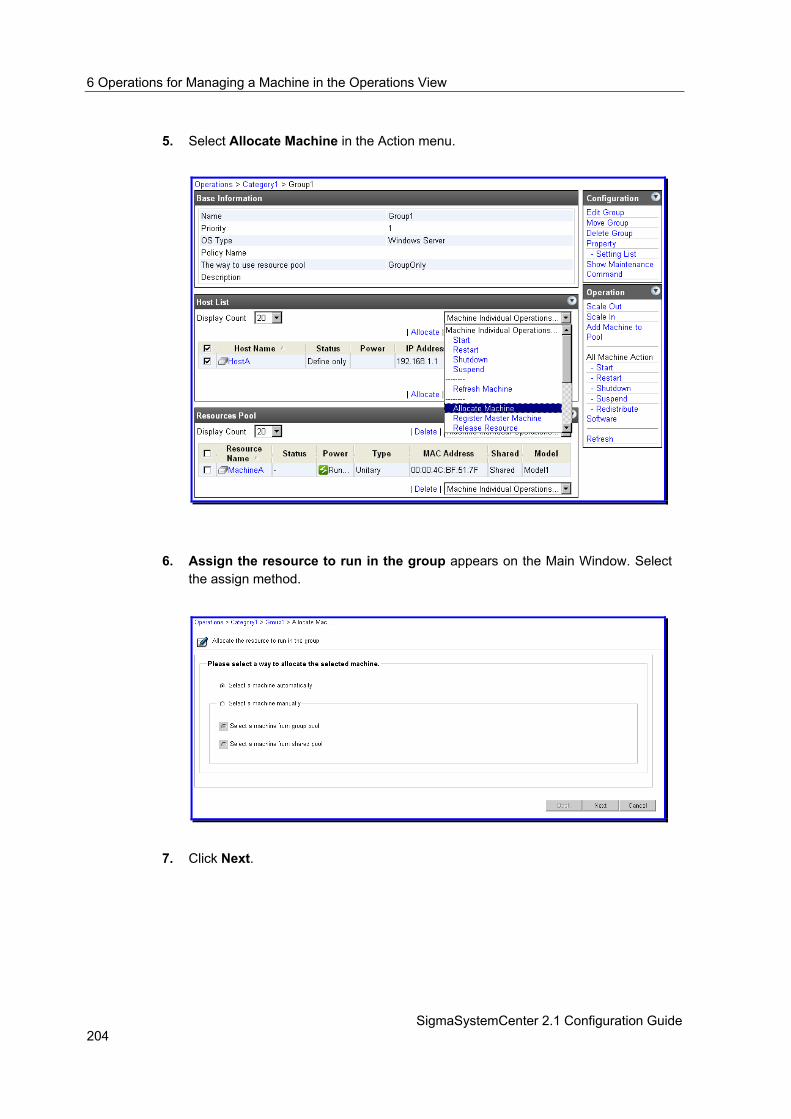
6 Operations for Managing a Machine in the Operations View
SigmaSystemCenter 2.1 Configuration Guide 204
5. Select Allocate Machine in the Action menu.
6. Assign the resource to run in the group appears on the Main Window. Select the assign method.
7. Click Next.
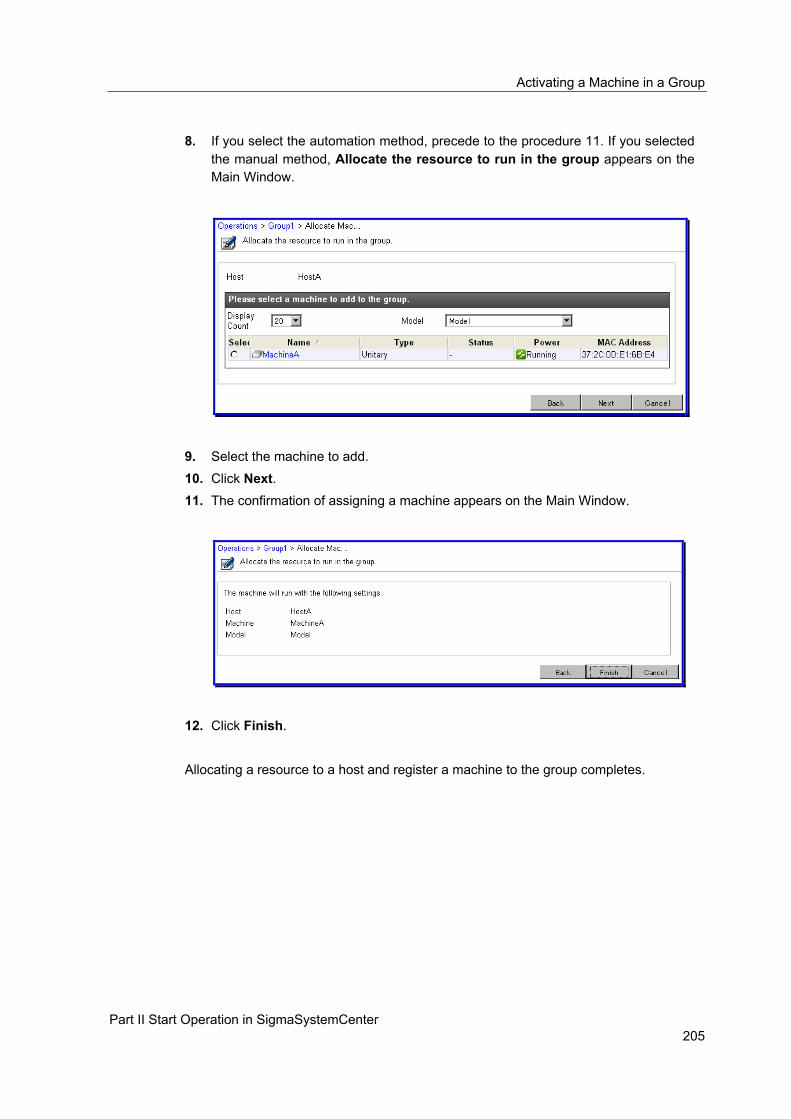
Activating a Machine in a Group
Part II Start Operation in SigmaSystemCenter 205
8. If you select the automation method, precede to the procedure 11. If you selected
the manual method, Allocate the resource to run in the group appears on the Main Window.
9. Select the machine to add. 10. Click Next. 11. The confirmation of assigning a machine appears on the Main Window.
12. Click Finish. Allocating a resource to a host and register a machine to the group completes.
6 Operations for Managing a Machine in the Operations View
SigmaSystemCenter 2.1 Configuration Guide 206
6.2.3. Creating a Virtual Machine and Activating the Machine in
a Group
To create a virtual machine and activate the machine in a group, perform Create and Assign Machine. To perform Create and Assign Machine, perform the following procedure.
Note: If you are creating and activating a virtual machine on standalone ESXi or Hyper-V, you need to configure the Register VM with DPM when VM is created check box, DPM Web Server box, and DPM Manager Server box on the General tab of Model Property Setting. For the details, see Subsection 4.6.1, "Configuring Settings on the General Tab." You also need to register a HW Profile Clone template and a scenario for OS distribution of DPM on the Software tab of one of the property setting in a model, group, or host if you are creating a virtual machine using the HW Profile Clone method.
1. Click Operations on the Title bar to switch to the Operations view. 2. Click the icon of the group to which you are going to register the machine in the
Operations tree. 3. Details of the group appear on the Main Window. 4. Select the check box(es) of the host(s) to which the virtual machine information is
configured under Host List. You can select multiple hosts.
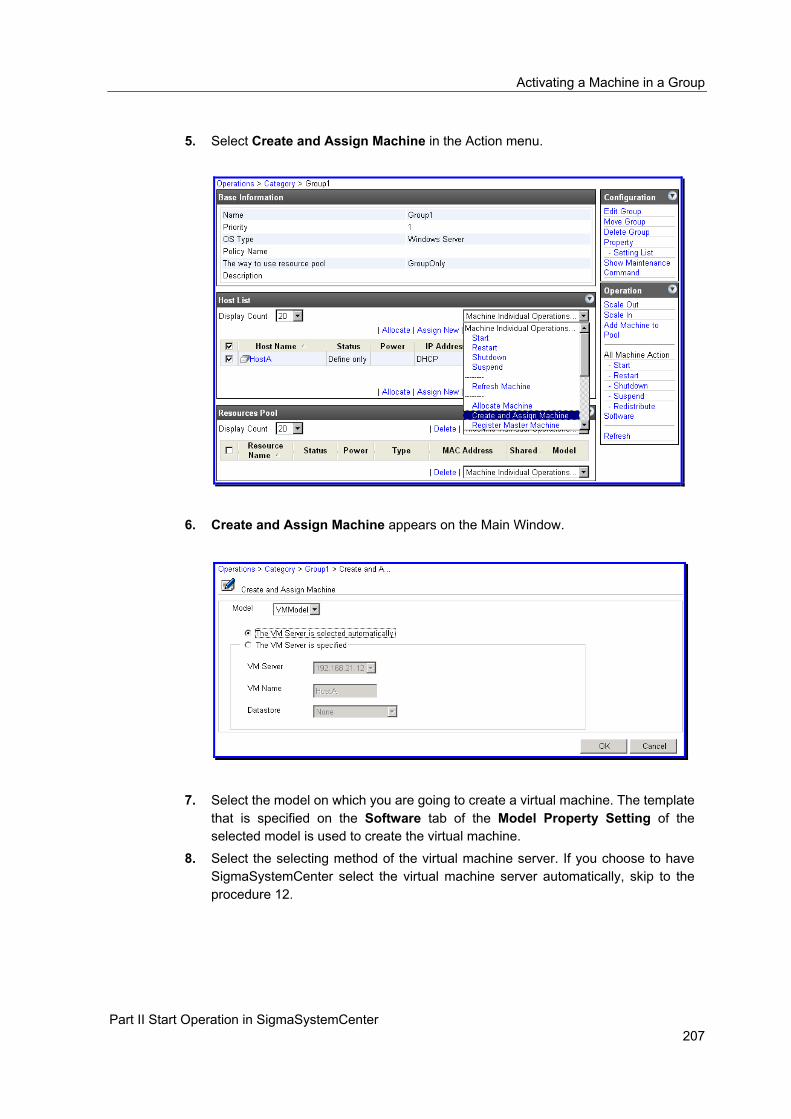
Activating a Machine in a Group
Part II Start Operation in SigmaSystemCenter 207
5. Select Create and Assign Machine in the Action menu.
6. Create and Assign Machine appears on the Main Window.
7. Select the model on which you are going to create a virtual machine. The template that is specified on the Software tab of the Model Property Setting of the selected model is used to create the virtual machine.
8. Select the selecting method of the virtual machine server. If you choose to have SigmaSystemCenter select the virtual machine server automatically, skip to the procedure 12.

6 Operations for Managing a Machine in the Operations View
SigmaSystemCenter 2.1 Configuration Guide 208
9. If you specify the virtual machine server, select the virtual machine server in the
VM Server box. 10. Enter the virtual machine name in the VM Name box. 11. If you specify the virtual machine server, select the new Datastore in the
Datastore box. If you do not specify this item, the new Datastore is selected automatically.
Note: The automatic Datastore selection function selects the following Datastore preferentially.
If a destination virtual machine server is on a shared disk: (1) A Datastore to which a template belongs is selected if the template exists on the shared disk. (2) A Datastore with greatest capacity on the shared disk is selected.
If a destination virtual machine server is not on a shared disk: (1) A Datastore to which a template belongs is selected.
(2) A Datastore with greatest capacity is selected.
12. Click OK. 13. The Create and Assign Machine confirmation dialog box appears.
14. Click OK. Creating a virtual machine and activating the machine in a group completes.

Scale Out
Part II Start Operation in SigmaSystemCenter 209
6.3. Scale Out To activate a machine in standby in an operation group pool; in other words, scale out, perform the following procedure:
Note: If a machine to scale out is a virtual machine server, and if the virtual machine server has a virtual machine or template, you cannot execute Scale Out.
1. Click Operations on the Title bar to switch to the Operations view. 2. Click the icon of the group to Scale Out in the Operations tree. 3. Details of the group appear on the Main Window. 4. Select Scale Out on the Operation menu.
5. A confirmation message appears. Click OK. 6. When scaling out completes, the machine added to the group is displayed under
Host List. Scaling out completes.

6 Operations for Managing a Machine in the Operations View
SigmaSystemCenter 2.1 Configuration Guide 210
6.4. Scale In To make an active machine in an operation group stand by in the pool, perform the following procedure:
1. Click Operations on the Title bar to switch to the Operations view. 2. Click the icon of the group to Scale In in the Operations tree. 3. Details of the group appear on the Main Window. 4. Select Scale In on the Operation menu.
5. A confirmation message appears. Click OK. 6. When scaling in completes, the machine made to stand by is displayed under
Resource Pool. Scaling in completes.

Changing the Usage of a Machine
Part II Start Operation in SigmaSystemCenter 211
6.5. Changing the Usage of a Machine To change the usage of a machine by moving a running machine to other group in an operation group, perform the following procedure:
Note: You cannot change the usage of an active virtual machine server in an operation group of a VM Server model to an operation group of a Physical model.
You cannot change the usage of a virtual machine server if there is a virtual machine on the virtual machine server or a template.
You cannot change the usage of a virtual machine.
1. Click Operations on the Title bar to switch to the Operations view. 2. Click the icon of the group to which the machine to change the usage belongs in
the Operations tree. 3. Details of the machine appear on the Main Window. 4. Select the check box of the machine under Host List. 5. Select Change Machine Usage in the Action menu.
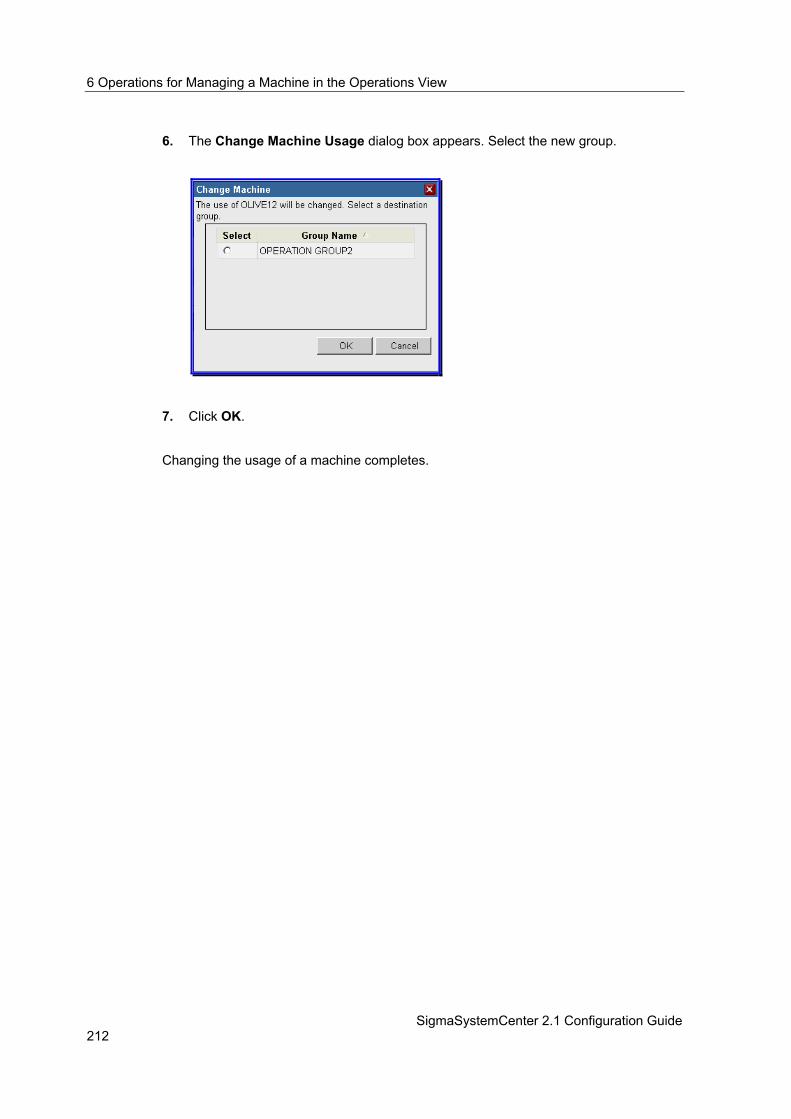
6 Operations for Managing a Machine in the Operations View
SigmaSystemCenter 2.1 Configuration Guide 212
6. The Change Machine Usage dialog box appears. Select the new group.
7. Click OK. Changing the usage of a machine completes.

Replacing a Machine
Part II Start Operation in SigmaSystemCenter 213
6.6. Replacing a Machine To replace a running machine in an operation group with a pool machine, perform the following procedure.
Note: You cannot replace a virtual machine server or virtual machine.
1. Click Operations on the Title bar to switch to the Operations view. 2. Click the icon of the group to which the machine to replace belongs in the
Operations tree. 3. Details of the machine appear on the Main Window. 4. Select the check box of the machine to replace under Host List. 5. Select Replace Machine in the Action menu.
6. A confirmation message appears. Click OK. Replacing a machine completes.

6 Operations for Managing a Machine in the Operations View
SigmaSystemCenter 2.1 Configuration Guide 214
6.7. Distributing Specified Software to a Machine
To distribute specified software to a machine when you want to; in other words, specified distribution of software, perform the following procedure.
1. Click Operations on the Title bar to switch to the Operations view. 2. Click the icon of the group to which you want to distribute software in the
Operations tree. 3. Details of the group appear on the Main Window. 4. Select the check box of the machine to distribute software under Host List. 5. Select Distribute Software in the Action menu.
6. The Distribute Software dialog box appears. Select Distribute Software, and click OK.

Distributing Specified Software to a Machine
Part II Start Operation in SigmaSystemCenter 215
7. Distribute Software appears on the Main Window.
8. Select the check box of the software under Software List. 9. If you distribute multiple pieces of software, you can change the distribution order.
To change the distribution order of the software, select the check box of the software to move and click Up or Down.
10. Click OK. Distributing specified software completes.
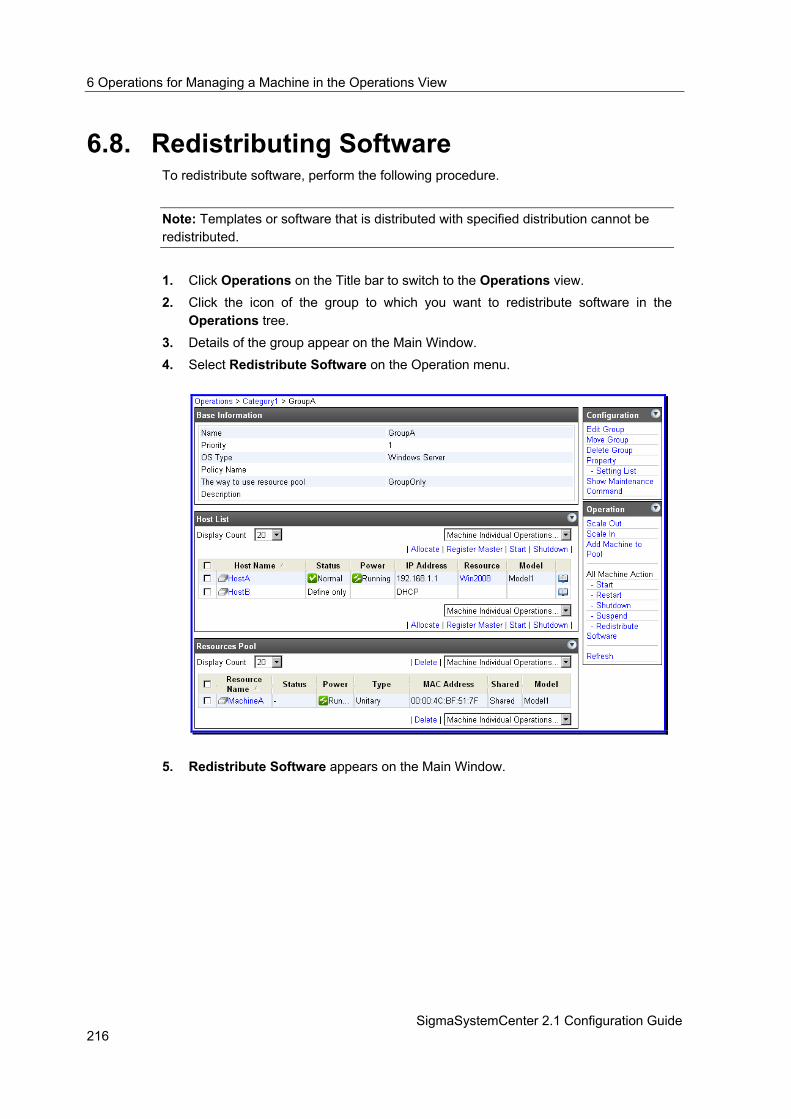
6 Operations for Managing a Machine in the Operations View
SigmaSystemCenter 2.1 Configuration Guide 216
6.8. Redistributing Software To redistribute software, perform the following procedure.
Note: Templates or software that is distributed with specified distribution cannot be redistributed.
1. Click Operations on the Title bar to switch to the Operations view. 2. Click the icon of the group to which you want to redistribute software in the
Operations tree. 3. Details of the group appear on the Main Window. 4. Select Redistribute Software on the Operation menu.
5. Redistribute Software appears on the Main Window.
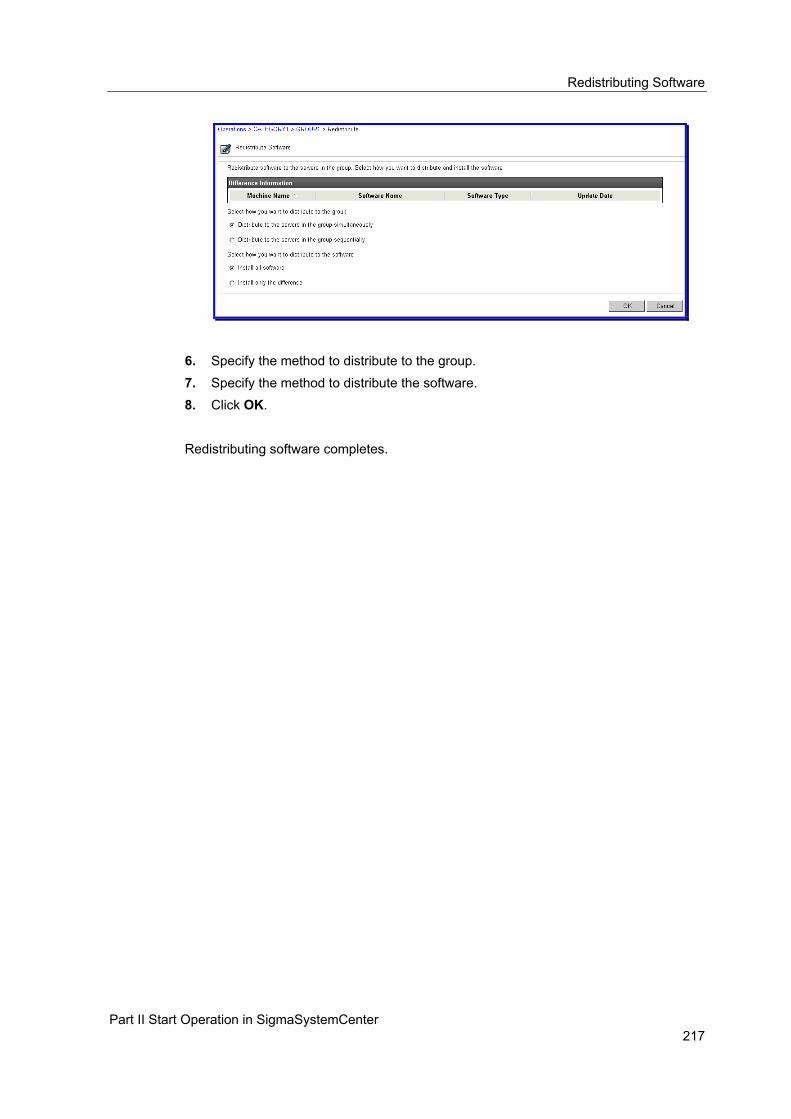
Redistributing Software
Part II Start Operation in SigmaSystemCenter 217
6. Specify the method to distribute to the group. 7. Specify the method to distribute the software. 8. Click OK. Redistributing software completes.


219
7. Operations for Managing a Machine in the Virtual View
This chapter explains the operations to manage a machine in the Virtual view in SigmaSystemCenter. This chapter contains the following sections: • 7.1 Moving a Virtual Machine Server............................................................................ 220 • 7.2 Creating a Virtual Machine in the Virtual View ....................................................... 221 • 7.3 Moving Virtual Machine .......................................................................................... 222 • 7.4 Connecting to a Virtual Machine Console .............................................................. 227 • 7.5 Shifting the Operation of ESXi ................................................................................ 230

7 Operations for Managing a Machine in the Virtual View
SigmaSystemCenter 2.1 Configuration Guide 220
7.1. Moving a Virtual Machine Server With SystemProvisioning, you can move a virtual machine server between datacenters. Perform the following procedure to move a virtual machine server:
Note: This operation is only for a virtual manager of ESXi and Hyper-V.
1. Click Virtual on the Title bar to switch to the Virtual view. 2. Click the icon of the datacenter which you are adding a virtual machine server to in
the Virtual tree to display details of the datacenter. 3. Select the check box of the virtual machine server to move under VM Server List,
and then, click Move of the Action menu. 4. Move VM Server is displayed on the Main Window. Click the icon of the new
datacenter.
5. Click OK. Moving a virtual machine server completes.

Creating a Virtual Machine in the Virtual View
Part II Start Operation in SigmaSystemCenter 221
7.2. Creating a Virtual Machine in the Virtual View
To create a virtual machine in the Virtual view, perform the following procedure.
Note: You cannot execute this operation to standalone ESXi or Hyper-V. This function supports only a Full Clone template.
1. Click Virtual on the Title bar to switch to the Virtual view. 2. Click the icon of the virtual machine server to create in the Virtual tree. 3. Click Create VM (Template) on the Configuration menu. 4. Create VM (Template) appears on the Main Window,
5. Enter the virtual machine name in the VM Name box. Select the Datastore in which you are going to create the virtual machine in the Destination Datastore box.
6. Select the template with which you are going to create the virtual machine in the Template box.
7. Click OK.
Reference: For how to activate a virtual machine in a group, see Subsection 6.2.1, "Registering a Master Machine."
Creating a virtual machine in the Virtual view completes.
7 Operations for Managing a Machine in the Virtual View
SigmaSystemCenter 2.1 Configuration Guide 222
7.3. Moving Virtual Machine You can move a virtual machine to other virtual machine server. There are two methods to move a virtual machine; specifying a virtual machine and specifying a virtual machine server. To move multiple virtual machines on one virtual machine server, move the machines, specifying the virtual machine server. First, the following is the procedure to move a virtual machine to other virtual machine server specifying a virtual machine.
Note: You cannot execute this operation to a virtual machine on or Hyper-V. A standalone ESXi supports Move and Failover to only a virtual machine in the shared storage. However, note that the failover operation cannot be executed from the Web Console. This operation can be executed only when a policy leads the failover operation or when you specified a virtual machine server to a target machine using the evacuate machine command of the ssc command.
1. Click Virtual on the Title bar to switch to the Virtual view. 2. Click the icon of the group where the virtual machine belongs to in the Virtual tree. 3. Detail of the virtual machine appears on the Main Window.

Moving Virtual Machine
Part II Start Operation in SigmaSystemCenter 223
4. Click Move Virtual Machine on the Operation menu. 5. Move Virtual Machine appears on the Main Window,

7 Operations for Managing a Machine in the Virtual View
SigmaSystemCenter 2.1 Configuration Guide 224
Note: Virtual machine servers in the same datacenter as the specified virtual machine are displayed under Destination VM Server List.
6. Select the new virtual machine server under Destination VM Server List. (Required)
7. Select the move method under Please select the way to move VM. If you select the Hot Migration/Cold Migration check box, you can move the virtual machine that is ON with Hot Migration, and the virtual machine that is OFF with the Cold Migration. If you select the Move check box, you can move a virtual machine including its disk after shutting down the virtual machine. If you select the Failover check box, SystemProvisioning moves the virtual machine when the virtual machine server is down by some factor, such as failure. Hot Migration, Cold Migration, and Failover are available when the virtual machine is on a shared disk.
8. If you want to set the virtual machine to turn on automatically after moving a powered off virtual machine, select the Auto On check box.
9. Click OK. Moving a virtual machine completes.

Moving Virtual Machine
Part II Start Operation in SigmaSystemCenter 225
Secondly, the following procedure is the procedure to move a virtual machine to other virtual machine server specifying a virtual machine server.
1. Click Virtual on the Title bar to switch to the Virtual view. 2. Click the icon of a virtual machine server which manages the virtual machine in the
Virtual tree. 3. Detail of the virtual machine server appears on the Main Window.
4. Select the virtual machine in Running VM List or Unused VM List. 5. Click Move VM of the Action menu. From the next procedure, the procedure is the
same as that of specifying a virtual machine.
6. Move Virtual Machine appears on the Main Window,

7 Operations for Managing a Machine in the Virtual View
SigmaSystemCenter 2.1 Configuration Guide 226
Note: Virtual machine servers in the same datacenter as the specified virtual machine are displayed under Destination VM Server List.
7. Select the new virtual machine server under Destination VM Server List. (Required)
8. Select the move method under Please select the way to move VM. If you select the Hot Migration/Cold Migration check box, you can move the virtual machine that is ON with Hot Migration, and the virtual machine that is OFF with the Cold Migration. If you select the Move check box, you can move a virtual machine including its disk after shutting down the virtual machine. If you select the Failover check box, SystemProvisioning moves the virtual machine when the virtual machine server is down by some factor, such as failure. Hot Migration, Cold Migration, and Failover are available when the virtual machine is on a shared disk.
9. If you want to set the virtual machine to turn on automatically after moving a powered off virtual machine, select the Auto On check box.
10. Click OK. Moving a virtual machine completes.

Connecting to a Virtual Machine Console
Part II Start Operation in SigmaSystemCenter 227
7.4. Connecting to a Virtual Machine Console With SystemProvisioning, you can connect to a console of a virtual machine, and operate the virtual machine. Perform the following procedure to connect to the console:
Operating environment You can connect to a console of a virtual machine on: • VMware ESX 3.5 • VMware ESXi 3.5
The following browsers are supported: • Internet Explorer 6 • Internet Explorer 7 • Firefox 2
Your environment must be able to connect directly to ESX or ESXi from a browser. (Port: 902)
Prerequisite
To connect to a console of a virtual machine, you need to install MouseKeyboardScreen plugin (2.1.0.0). The plugin files are installed automatically, however, if you cannot display a console, connect to the Web console of ESX itself and check if the plugin or virtual machine console is displayed with the following procedure:
1. Connect to the Web console of ESX from a browser. https://your esx-ip-address/ui/
Note: If you register a virtual machine server with a name other than its IP address, make the same resolved by a managed machine name.
2. Log into VI Web Access using a user name (root) and password of the ESX. 3. Select a virtual machine and click the Console tab.
Connecting to a console
Perform the following procedure to connect to the virtual machine console:
Note: Turn on the virtual machine before connecting to the virtual machine console. To connect to the virtual machine console, you need to have an Administrator right.

7 Operations for Managing a Machine in the Virtual View
SigmaSystemCenter 2.1 Configuration Guide 228
1. Click Virtual on the Title bar to switch to the Virtual view. 2. Click the icon of the virtual machine to connect to in the Virtual tree. 3. Click Console on the Operation menu. 4. The console of the selected virtual machine is displayed on the Main Window.
Note: The size of the console is the same as the resolution of the virtual machine.
To display the console in the full screen mode, click Full Screen. To exit from the full screen mode of the VM Console, press Ctrl+Alt. If you click Send Ctrl+Alt+Del, the system sends Ctrl+Alt+Del to the virtual machine.
Connecting to a virtual machine console completes.

Connecting to a Virtual Machine Console
Part II Start Operation in SigmaSystemCenter 229
Enabling and disabling the console
You can enable and disable the console by specifying a value in the following file. After changing the setting, execute recycling or stopping and restarting the application pool (ProvisioningPool) on the Internet Information Service (IIS). SystemProvisioning installation folder\ Provisioning\App_Data\Config\CustomizationConfig.xml
Note: The default installation path is "%ProgramFiles%\NEC\PVM".
true: To enable the virtual machine console function false: To disable the virtual machine console function <Configuration>
<Common> <Console > <EnableConsole>true</EnableConsole> </Console> </Common>
</Configuration>
The default value is "true."
Caution notes • If you shut down the virtual machine from its console, the power status is not
reflected to SystemProvisioning. Execute Collect on the Web Console to collect the information of the virtual machine.
• If you execute Move VM, Shutdown, or Restart to a virtual machine, the console connection is disconnected. After the process completes, connect to the virtual machine again.
• SystemProvisioning does not support the exclusion control of console connection.
• There is a case that a console is not displayed. In that case, try again,

7 Operations for Managing a Machine in the Virtual View
SigmaSystemCenter 2.1 Configuration Guide 230
7.5. Shifting the Operation of ESXi You can operate ESXi in the standalone environment or VirtualCenter environment. This section explains how to shift the environment from standalone to VirtualCenter and the other way as well. Shift the environment with the following flow.
Note: You cannot operate one ESXi in both standalone environment and VirtualCenter environment.
7.5.1. Shifting the Environment From Standalone to
VirtualCenter
To shift the environment of ESXi from standalone to VirtualCenter, perform the following procedure:
1. If the ESXi to shift is managed by SystemProvisioning, set the target ESXi in the Maintenance mode from the Web Console. For how to set in the Maintenance mode, see Subsection 8.1.3, "Setting in the Maintenance Mode and Releasing the Maintenance Mode."
2. Click Virtual on the Title bar to switch to the Virtual view. 3. Select the datacenter of the target VirtualCenter in the Virtual tree, and add the
ESXi to shift. For how to add ESXi, see Subsection 3.7.2, "Adding a Virtual Machine Server."
4. Check that the addition of the ESXi is completed on the Job window in the Monitor view.
5. After adding the ESXi, click Update on the Operation menu. 6. Check that the ESXi to shift is registered in the datacenter of the target
VirtualCenter.
7. Click the icon of the datacenter which the ESXi to transmit belongs to in the virtual manager of ESXi in the Virtual tree.
Note: Do not click the icon of ESXi in the tree of the datacenter or a virtual machine on ESXi. If you do, a machine under the VirtualCenter is selected.
8. The details of the datacenter are displayed on the Main Window. 9. Select the check box of the ESXi to shift under VM Server List, and click Delete of
the Action menu.
10. Check that the deletion of the ESXi is completed on the Job window in the Monitor view.
11. Click the Virtual icon in the Virtual tree. 12. After deleting the ESXi, click Update on the Operation menu, and confirm that the
ESXi is deleted from the standalone environment.

Shifting the Operation of ESXi
Part II Start Operation in SigmaSystemCenter 231
13. If you have set the ESXi in the Maintenance Mode, release the Maintenance Mode. For how to release the Maintenance Mode, see Subsection 8.1.3, "Setting in the Maintenance Mode and Releasing the Maintenance Mode."
Note: If you operate the target ESXi in the group with VM Server model, you need to check the settings in the Datacenter list of Model Property Setting of the virtual machine server after shifting the environment. If you have configured the settings, change the settings according to the shifted datacenter. After shifting to the VirtualCenter, you can execute create a virtual machine using a Full Clone template. See Section 5.2, "Creating a Template" to create a full clone template.
Shifting the environment of ESXi from standalone to VirtualCenter completes.
7.5.2. Shifting the Environment From VirtualCenter to
Standalone
To shift the environment of ESXi from VirtualCenter to standalone, perform the following procedure:
1. Click Virtual on the Title bar to switch to the Virtual view. 2. Select the datacenter in the target standalone environment in the Virtual tree, and
add the ESXi to shift. For how to add ESXi, see Subsection 3.7.2, "Adding a Virtual Machine Server."
3. Check that the addition of the ESXi is completed on the Job window in the Monitor view.
4. Delete the virtual machine server from VirtualCenter on the Virtual Infrastructure Client.
Note: For how to delete a virtual machine server from VirtualCenter, see the product manuals of VMware, Inc.
5. Click the icon of VirtualCenter in the Virtual tree on the Web Console. 6. Click Collect on the Operation menu. 7. Click Update on the Operation menu, and confirm that the ESXi is deleted from
VirtualCenter.
8. Prepare a HW Profile Clone template. For how to create a HW Profile Clone template, see Subsection 5.2.2, "Creating a HW Profile Clone Template."
9. Register the template in the operation group where you execute Create and Assign Resource.

7 Operations for Managing a Machine in the Virtual View
SigmaSystemCenter 2.1 Configuration Guide 232
Note: If you operate the target ESXi in the group with VM Server model, you need to check the settings in the Datacenter list of Model Property Setting of the virtual machine server after shifting the environment. If you have configured the settings, change the settings according to the shifted datacenter. After shifting to the VirtualCenter, you cannot use a Full Clone template. To create a virtual machine, prepare a HW Profile Clone template. See Subsection 5.2.2, "Creating a HW Profile Clone Template" to create a HW Profile Clone template.
Shifting the environment of ESXi from VirtualCenter to standalone completes.
7.5.3. Recovering Configuration Inconsistence of a Virtual
Machine Server Recovered From Failure and a
Destination Virtual Machine Server After Failing Over in
the Standalone ESXi Environment
In the virtual environment, when a failure occurred on a virtual machine server, SigmaSystemCenter executes the recovery processing of moving virtual machines to other virtual machine server with Failover and starting the virtual machines on the destination virtual machine server. In the Standalone ESXi environment, if you start a virtual machine server where failure occurred after resolving the issue, you might see virtual machines that are already moved still on the virtual machine server. This phenomenon occurs because the failed virtual machine server does not recognize that the virtual machines that were running on the virtual machine server were moved to other virtual machine server. To recover this issue, perform the following procedure:
1. Click Operations on the Title bar to switch to the Operations view. 2. Click the icon of the target ESX in the Resource tree and click Maintenance On
on the Operation menu.
3. Click Start on the Operation menu to start the virtual machine server. 4. Start the command prompt.
Click the Start menu, click All Programs, click Accessories, and click Command Prompt.
5. Run the ssc recover machine command with the following command line to recover the information of virtual machines managed in the virtual machine server. ssc recover machine SourceName

Shifting the Operation of ESXi
Part II Start Operation in SigmaSystemCenter 233
6. Click Clear Failure Status in the Operation menu. 7. Click Maintenance Off in the Operation menu. 8. Click Collect on the Operation menu to collect information of resources, such as
machines.
Note: If an ESXi that is in the same datacenter as an ESXi to recover cannot be connected due to a specific reason, such as network failure and its connection status is Disconnected, the ESXi cannot be the target destination. This kind of virtual machine server is recorded on the Operations Log as a warning message. If an ESXi to recover cannot be connected due to a specific reason, such as network failure or its connection status is other than Disconnected, the process might fail. In addition, when you execute power operations to a virtual machine that was moved from an original ESXi when recovering, the recovery process might fail. If the recovery process fails, execute the recovery process again or delete a virtual machine that is registered duplicatedly from Virtual Infrastructure Client.


235
PPaarrtt IIIIII MMaaiinntteennaannccee This part explains the operations for maintenance of SigmaSystemCenter and backup and restore. • 8 Maintenance • 9 Backup and Restoration


237
8. Maintenance This chapter explains the necessary information for the maintenance of SigmaSystemCenter. The items explained in this chapter are as follows. • 8.1 Operations for Maintenance ................................................................................... 238 • 8.2 Adding a Managed Machine After Starting Operation in SigmaSystemCenter...... 247 • 8.3 Distributing an Additional Application and Applying a Patch to a Machine ............ 251 • 8.4 Checking Failed Status........................................................................................... 255 • 8.5 Exchanging Hardware ............................................................................................ 260 • 8.6 Extracting Logs ....................................................................................................... 277
8 Maintenance
SigmaSystemCenter 2.1 Configuration Guide 238
8.1. Operations for Maintenance
8.1.1. Starting, Restarting, and Stopping SystemProvisioning
When you execute operations, such as applying a patch of OSs and maintaining a management server, you need to start, restart, and stop SystemProvisioning. Perform the following procedure:
1. Click Monitor on the Title Bar to switch to the Monitor view on the Web Console. 2. Check that there is no Job in operation on the Dashboard window or Job window. 3. Click the Start menu, and click Control Panel. From Control Panel, double-click
Administrative Tools. From Administrative Tools, double-click Services to start Services Snap-In.
4. From Services, right-click PVMService, and click Start, Restart, or Stop. Starting, restarting, and stopping SystemProvisioning completes.

Operations for Maintenance
Part III Maintenance 239
8.1.2. Starting, Restarting, Shutting Down, or Suspending a
Machine
If you execute the power operations to a managed machine directory, you need to start, restart, shut down, or suspend the machine because event notifications generates. Perform the following procedure:
1. Click Operations on the Title bar to switch to the Operations view. 2. Click the icon of the group to which the machine to start, restart, shut down, or
suspend belongs in the Operations tree. 3. Details of the group appear on the Main Window. 4. Select the check box of the host under Host List or Resources Pool.
5. Click Start, Restart, Shutdown, or Suspend in the Action menu.
Note: If you start, restart, shut down, or suspend a machine from the Operation menu, the command is run to all the machines which hosts are allocated to resources.
If you start, restart, shut down, or suspend a machine from the Action menu, the command is run only to the machine selected from the Host List or Resource Pool.
6. A confirmation message appears. Click OK
Starting, restarting, shutting down, or suspending a machine completes.

8 Maintenance
SigmaSystemCenter 2.1 Configuration Guide 240
8.1.3. Setting in the Maintenance Mode and Releasing the
Maintenance Mode
To set in and release Maintenance Mode, perform the following procedure: The Maintenance Mode can be used when you want to ignore failure notifications during maintenance of a machine. If a failure notification is generated on a machine set in the Maintenance Mode, recovery processes according to policies are not executed. In addition, if you set an inactive machine in a resource pool in the Maintenance Mode, the machine is not selected as a replacement target due to a recovery process according to a policy.
1. Click Operations on the Title bar to switch to the Operations view. 2. Click the icon of the group to which the machine to set in or release the
Maintenance Mode belongs in the Operations tree. 3. Details of the group appear on the Main Window. 4. Select the check box of the machine to set in or release the Maintenance Mode
under Host List.
5. To set in Maintenance Mode, click Maintenance On in the Action menu. To release the Maintenance Mode, click Maintenance Off in the Action menu.
6. A confirmation message appears. Click OK. Setting in and release the Maintenance Mode completes.

Operations for Maintenance
Part III Maintenance 241
8.1.4. Clearing the Hardware Status of a Machine From Faulted
to Ready
When a failure on hardware of a machine is detected, SystemProvisioning display Error (Faulted) or Error (Degraded) in the Status column. After you clear the cause of the failure and restore the machine, perform the following procedure to clear the hardware status of a machine:
1. Click Operations on the Title bar to switch to the Operations view. 2. Click the icon of the group of the machine to reset the failed status in the
Operations tree. 3. Details of the group appear on the Main Window. 4. Select the check box of the machine under Host List or Resource Pool.
5. Click Clear Failure Status in the Action menu. 6. A confirmation message appears. Click OK. Resetting the hardware status of a machine completes.

8 Maintenance
SigmaSystemCenter 2.1 Configuration Guide 242
8.1.5. Resetting Job Result
SystemProvisioning sets the status of the resource Error (Abort) if SystemProvisioning failed the execution of Actions for some reason, for instance, starting or stopping a machine from the operation on the Web Console. To reset the management status of the target machine, after collecting logs about the machine and clearing the cause of the failure, perform the following procedure:
1. Click Operations on the Title bar to switch to the Operations view. 2. Click the icon of the group to reset the Job in the Operation tree. 3. Details of the group appear on the Main Window. 4. Select the check box of the machine to reset the Job result in the Host List or
Resource Pool. 5. Click Reset Job Result in the Action menu.
6. A confirmation message appears. Click OK. Resetting a Job result completes.

Operations for Maintenance
Part III Maintenance 243
8.1.6. Executing Power ON, Power OFF, Reset to a Machine
To execute Power ON, Power OFF, and Reset to a machine, perform the following procedure: To execute these maintenance operations, you need to enable the power control function by Out-of-Band Management in advance.
Reference: For how to enable the power control function by Out-of-Band Management, see Subsection 3.8, "Enabling Power Control Function by Out-of-Band (OOB) Management."
Note: If you do not have the Administrator authority, Show Maintenance Command is not displayed on the Configuration menu.
The Power OFF and Reset terminate a machine forcibly. Use these functions with recognition for possibility to harm your system, damaging data for example.
The Power ON executes the power operation to a machine and checks that the machine is powered ON; however, it does not ensure the startup of software, such as OS, on the machine.
The Reset executes commands to reset to a machine; however, it does not check if the machine is reset properly.
1. Click Resource on the Title bar to switch to the Resource view. 2. Click the icon of a target machine to execute Power ON, Power OFF, or Reset in
the Resource tree. 3. Details of the machine appear on the Main Window. 4. If the target machine belongs to an operation group, click Maintenance On in the
Action menu to set the machine in the Maintenance Mode.
5. Click Show Maintenance Command on the Configuration menu. Power ON, Power OFF, and Reset are displayed on the Operation menu.

8 Maintenance
SigmaSystemCenter 2.1 Configuration Guide 244
6. Click Power ON, Power OFF, or Reset on the Operation menu. 7. If you set in the Maintenance Mode in the procedure 4, click Maintenance Off on
the Configuration menu to release the Maintenance Mode.
8. Click Collect on the Operation menu to collect information of resources, such as a machine.
Reference: For more details of Collect, see Subsection 3.16.7, "Collect" in SigmaSystemCenter Web Console Reference Guide.
Execute Power ON, Power OFF, or Reset to a machine completes.

Operations for Maintenance
Part III Maintenance 245
8.1.7. Changing a Group of a Host (for Virtual Groups Only)
To move a host to other group, perform the following procedure: Information set to the host, including IP address information, and information of a resource on which the host is running can be succeeded.
Note: Without administrator authority, The Show Maintenance Command is not displayed on the Configuration menu. In addition, this is displayed only if the model type of a target group is VM.
You cannot change a group if your setting applies to one of the following conditions: • If the OS types of a source operation group and destination operation group
differ • If the network connection information of a source model and destination model
differs • If a host with the same host name as of a selected host is registered to a
destination. • If a running resource on a selected hot is shared in a pool of a destination
operation group, • If some process, such as Job execution and configuration change, is being
executed to a selected host.
1. Click Operations on the Title bar to switch to the Operations view. 2. Click the icon of the group to change in the Operations tree. 3. Details of the group appear on the Main Window. 4. Click Show Maintenance Command on the Configuration menu. Change Group
is displayed on the Action menu under Host List.

8 Maintenance
SigmaSystemCenter 2.1 Configuration Guide 246
5. Select the check box of a host to change a group under Host List. 6. Click Change Group on the Action menu. Change Group is displayed on the
Main Window.
7. Select a destination model and click OK. Changing a group of a host (for virtual groups only) completes.

Adding a Managed Machine After Starting Operation in SigmaSystemCenter
Part III Maintenance 247
8.2. Adding a Managed Machine After Starting Operation in SigmaSystemCenter
This section provides the procedure to add managed machine after starting operation in SigmaSystemCenter. You need to pay attention for one machine not to be registered as two different machines to SigmaSystemCenter.
8.2.1. Adding a Physical Machine
To add a physical machine as a managed machine, perform the following procedure. If you want to use a physical machine as a virtual machine server, see Subsection 8.2.2, "Adding a Virtual Machine Server."
1. Register the managed machine to DPM that is registered as a subsystem of SystemProvisioning.
2. Collect the information of the machines in DPM to which you have registered the machine from SystemProvisioning. Click Management on the Title bar to switch to the Management view.
3. Click the Subsystem icon in the Management tree. 4. Details of the subsystem appear on the Main Window. Select the check box of the
target DPM, and then, click Collect of the Action menu. 5. Check the collected machine. Click Resource on the Title bar to switch the
Resource view, and then, click the Machine icon. 6. Click Register Machine on the Configuration menu, and check the Unmanaged
Machine List to check that the information of the machine registered to DPM is reflected properly.
Note: Because the added machine is not configured as managed target of SystemProvisioning, the machine is displayed on the Unmanaged Machine List.
Select a machine to add as a management target and add the machine.

8 Maintenance
SigmaSystemCenter 2.1 Configuration Guide 248
8.2.2. Adding a Virtual Machine Server
To add a virtual machine server as a managed machine, perform the following procedure: Note that the VMware environment other than the standalone ESXi and Xen environment are the target virtual machine servers that can be registered to SigmaSystemCenter.
1. If you want to execute an operation with starting up a virtual machine server, register the virtual machine server to DPM that is registered as a subsystem of SystemProvisioning. Or you can execute the power operation by enabling the power control function by OOB Management. We recommend that you configure both of the settings.
Reference: Check that the UUID is registered on the Add Computer window on the DPM Web Console. For the registration procedure, see Subsection 2.7.3, "Registering a Managed Machine to DPM."
For the details of the setting to enable the power control function by OOB Management, see Section 3.8, "Enabling Power Control Function by Out-of-Band (OOB) Management."
2. Collect the information of the machines in DPM to which you have registered the machine from SystemProvisioning. Click Management on the Title bar to switch to the Management view.
3. Click the Subsystem icon in the Management tree. 4. Details of the subsystem appear on the Main Window. Select the check box of the
target DPM, and then, click Collect of the Action menu. 5. Check the collected machine. Click Resource on the Title bar to switch the
Resource view, and then, click the Machine icon. 6. Click Register Machine on the Configuration menu, and check the Unmanaged
Machine List to check that the information of the machine registered to DPM is reflected properly.
Note: Because the added machine is not configured as managed target of SystemProvisioning, the machine is displayed on the Unmanaged Machine List.
7. Add the virtual machine server to the virtual environment management software that is registered as a subsystem of SystemProvisioning. Click Virtual on the Title bar to switch to the Virtual view.
8. Click the icon of a datacenter to which you are going to add the virtual machine server in the Virtual tree.

Adding a Managed Machine After Starting Operation in SigmaSystemCenter
Part III Maintenance 249
9. Click Add VM Server on the Configuration menu to add the virtual machine server. 10. The virtual machine server is added as a management target of
SystemProvisioning. Click Resource on the Title bar to switch to the Resource view. Click the Machine icon.
11. Confirm that the registered virtual machine server name is not registered doubly and its MAC address and UUID are registered correctly.
Adding a virtual machine server completes.
8.2.3. Registering a Created Virtual Machine
If you register a virtual machine from SystemProvisioning, the created virtual machine is added as a management target of SystemProvisioning automatically. In addition, if you select the check box on the Edit Datacenter window in the Virtual view, a virtual machine which belongs to the target datacenter becomes a target. To register a created virtual machine individually as a management target, perform the following procedure:
1. Collect the information of the virtual machine server on which virtual machines exist. Click Management on the Title bar to switch to the Management view.
2. Click the Subsystem icon in the Management tree. 3. Details of the subsystem appear on the Main Window. Select the check box of the
target DPM, and then, click Collect of the Action menu. 4. Check the collected machine. Click Resource on the Title bar to switch the
Resource view, and then, click the Machine icon. 5. Click Register Machine on the Configuration menu, click the Unmanaged
Machine List, and check that a registered virtual machine server name is not registered duplicatedly and the MAC address and UUID are registered to check that the information of the machine registered to the virtual environment management software is reflected properly.
Note: Because the added machine is not configured as managed target of SystemProvisioning at this point, the machine is displayed on the Unmanaged Machine List.
6. If you want to install applications and patches to the virtual machine, register the virtual machine to DPM that is registered as a subsystem of SystemProvisioning.
Note: Check that the UUID is registered on the Add Computer window on the DPM Web Console. If the UUID is not registered, enter the UUID manually.
8 Maintenance
SigmaSystemCenter 2.1 Configuration Guide 250
7. Collect the information of the machines in DPM to which you have registered the
machine from SystemProvisioning. Click Management on the Title bar to switch to the Management view.
8. Click the Subsystem icon in the Management tree. 9. Details of the subsystem appear on the Main Window. Select the check box of the
target DPM, and then, click Collect of the Action menu. 10. Check the collected machine. Click Resource on the Title bar to switch the
Resource view, and then, click the Machine icon. 11. Click Register Machine on the Configuration menu, click the Unmanaged
Machine List, and check that a registered virtual machine name is not registered duplicatedly and the MAC address and UUID are registered.
Note: Because the added machine is not configured as managed target of SystemProvisioning at this point, the machine is displayed on the Unmanaged Machine List.
Select the virtual machine to add as a management target and register the virtual machine.

Distributing an Additional Application and Applying a Patch to a Machine
Part III Maintenance 251
8.3. Distributing an Additional Application and Applying a Patch to a Machine
To distribute additional applications and apply patches to a machine, register the application packages with DPM Image Builder and create a scenario file with the procedures in this section.
8.3.1. Distributing an Additional Application to a Machine
To distribute an additional application to a machine, register the application package with DPM Image Builder and create a scenario file for distributing the application.
Reference: For details of registering applications, see Section 3.2, "Registering Service Packs, HotFixes, Linux Patch Files, and Applications" in DeploymentManager Basic User’s Guide.
For details of creating a scenario, see Subsection 3.3.2, "Creating a Scenario File for Installing Applications" in DeploymentManager Basic User’s Guide.
1. Click Start, click All Programs, click DeploymentManager and click Image Builder to start Image Builder.
2. From Image Builder, click Package registration/modification.

8 Maintenance
SigmaSystemCenter 2.1 Configuration Guide 252
3. The Package registration/modification screen appears. From the File menu,
click Create OS package to register a package.
4. Start DPM Web Console. 5. On the DPM Web Console, from the Scenarios menu, click Create Scenario File. 6. Click the Application tab, and under Application Names, select registered
application in the boxes, and select and enter each item.
7. If you want to configure scenario execution conditions, click the Option tab. If you want to power off a machine after distributing scenario to the machine, select the Turn power off check box.
8. Enter a scenario name in the Scenario Name box, and click OK. Distributing an additional application completes.
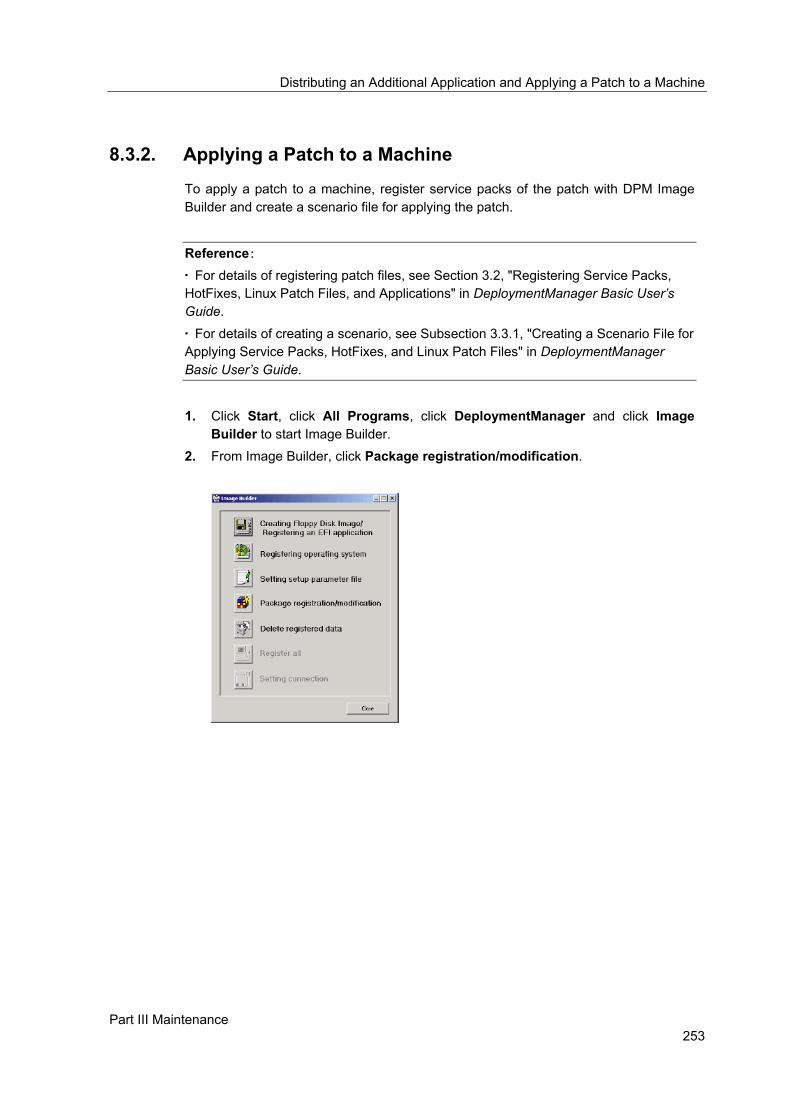
Distributing an Additional Application and Applying a Patch to a Machine
Part III Maintenance 253
8.3.2. Applying a Patch to a Machine
To apply a patch to a machine, register service packs of the patch with DPM Image Builder and create a scenario file for applying the patch.
Reference: For details of registering patch files, see Section 3.2, "Registering Service Packs, HotFixes, Linux Patch Files, and Applications" in DeploymentManager Basic User’s Guide.
For details of creating a scenario, see Subsection 3.3.1, "Creating a Scenario File for Applying Service Packs, HotFixes, and Linux Patch Files" in DeploymentManager Basic User’s Guide.
1. Click Start, click All Programs, click DeploymentManager and click Image Builder to start Image Builder.
2. From Image Builder, click Package registration/modification.

8 Maintenance
SigmaSystemCenter 2.1 Configuration Guide 254
3. The Package registration/modification screen appears. From the File menu,
click Create OS package to register a package.
4. Start DPM Web Console. 5. On the DPM Web Console, from the Scenarios menu, click Create Scenario File. 6. Click the Update tab, and under Service pack/Hotfix, select registered patch files
in the boxes and enter each item.
7. If you want to configure scenario execution conditions, click the Option tab. If you want to power off a machine after distributing scenario to the machine, select the Turn power off check box.
8. Enter a scenario name in the Scenario Name box, and click OK. Applying a patch completes.

Checking Failed Status
Part III Maintenance 255
8.4. Checking Failed Status This section explains how to check failed status of a managed machine or information of Job execution.
8.4.1. Dashboard
The dashboard shows you current status, such as status of a managed resource and Job execution status.
Failure Resource
A list of failed managed machines is displayed. Not only running machines in an operation group, but also unmanaged machines are displayed. If you click a Machine Name, the view switches to the Resource view, which you can check detailed information of the target machine. If you click a group or host, the view
8 Maintenance
SigmaSystemCenter 2.1 Configuration Guide 256
switches to the Operation view, which you can check status of the operation group or host.
Fault Manager A list of subsystems in unconnectable status is displayed.
Job Resource Jobs running and completed in the period specified in the Job result display period box on the Display tab of Environment Setting. You can cancel a running Job from here. An abnormal ended Job is displayed in pink and warned job is displayed in yellow.
You can refer to the action status by clicking the icon. To refer to a Job that is
completed and that the Job result display period specified on the Display tab of Environment Setting has passed, check the Job window.
8.4.2. Event Viewer
You can check Event Logs on Event Viewer. SystemProvisioning records logs with the source names, "PVM" and "SystemMonitorEvent." For a list of event logs, see Section 7.2, "Event Logs" in SigmaSystemCenter Reference Guide. System Monitor - Performance Monitoring Services records errors and event information during operation on the event log on a management server with the source name, "System Monitor - Performance Monitoring Services" and records error information on Application Log or System Log. For event logs of System Monitor - Performance Monitoring Services, see Section 8.1, "The Event Log" in System Monitor - Performance Monitoring Services User’s Guide.
8.4.3. Checking Failed Status of a Managed Machine
You can check failed status of a management machine on the Dashboard window and in the views of SigmaSystemCenter: Operations view, Resource view, and Virtual view. If a managed machine is in failed status, a failed mark appears on an icon of a machine displayed in the tree view. This mark appears also on a group or a category that the failed machine belongs so you can check the existence of a failed machine from the upper group level.

Checking Failed Status
Part III Maintenance 257
You can check the sum of failed machines that belong to an operation group, category, and virtual machine server if a failed machine is a virtual machine from the tool tip of icons of an operation group, category, and virtual machine server.
If you click an icon of a category in the tree view, a list of categories or groups is displayed and from there, you can check its summery information.
Note: Summery information of a failed machine displayed under Category / Group List in the Operation view does not include failure information of machines that belong to the group pool.
If you click an icon of a group in the tree view, details of the group is displayed and from there, you can check information of machines that belong to the group. If you click Status to sort information, a failed machine is displayed at the top of the list. Check a cause of failure with the following procedure according to the status of a failed machine.

8 Maintenance
SigmaSystemCenter 2.1 Configuration Guide 258
Abort
An action by a policy or operation from the Web Console, such as starting, stopping, changing configuration of a machine, is aborted. Check a failed Job on the Job window. You can change the status of the target machine from Abort to Normal by executing Reset Job Result.
Faulted and Degraded SystemProvisioning change status of a machine to Faulted or Degraded if a failure event of a machine monitored by NEC ESMPRO Manager or VMware VirtualCenter is alerted. Check a failed event that caused Faulted or Degraded status on the Operations Log window.
8.4.4. Checking Job Execution Status
You can check Job execution status on the Dashboard window or Job window. The Job window shows completed Jobs. An aborted Job is displayed in pink and warned Job is displayed in yellow. To check
more detailed information, click the icon,

Checking Failed Status
Part III Maintenance 259
You can check a failed Job on the Operations log with the following procedure:
1. Check Job ID of a failed Job on the Job window. 2. Switch to the Operations Log window. 3. Click Option.
4. The Option group box is displayed. 5. Enter a Job ID that you checked in the procedure 1 in the Search Key box and
click Update to display an operation log of the target Job.
See the operation log and confirm a cause of failure. To display more detailed operation log, select Detail or Trace in the Level box and click Update.

8 Maintenance
SigmaSystemCenter 2.1 Configuration Guide 260
8.5. Exchanging Hardware As SystemProvisioning manages machines with the MAC address on the NIC of the machine, it is necessary to make SystemProvisioning recognize the new MAC address as a new machine after exchanging a machine or a NIC. Be sure to set the machine in Maintenance mode when starting or suspending a machine. If you start or suspend a machine without setting in Maintenance mode, the system recognizes the situation as a failure and may try to restore according to policies.
8.5.1. Exchanging a NIC Other Than a Primary NIC
If you exchange a NIC other than a primary NIC, procedures differ according to the status of machines. Exchange the NIC according to the type of machines.
With a machine that has never been activated: SystemProvisioning does not manage NICs other than a Primary NIC. Information of the NICs is not displayed on the Machine Property Setting in the Resource view; therefore, you do not need to perform any operation in SigmaSystemCenter. You can exchange NICs freely.
With a machine that is activated in a group or has been activated in a group, but is not activated now: SystemProvisioning manages information of NICs other than a Primary NIC. You can check information of the NICs on the Machine Property Setting in the Resource view. Therefore, you need to change information of a NIC with the following procedure:
1. Maintenance Mode ON Select the icon of a machine whose NIC you are going to exchange, click Maintenance ON in the Action menu on the Web Console. If the machine is not activated, skip to the following procedure.
2. Shutting down the machine Shut down the machine from the Web Console.
3. Exchanging the NIC. 4. Starting the machine
Start the machine from the Web Console. Select the machine in the tree view on the Main Window of the DPM Web Console. Click Properties in the Computer menu to confirm that the exchanged MAC address is reflected in MAC address box.
5. Updating the NIC information

Exchanging Hardware
Part III Maintenance 261
Select the System Resource icon in the Resource tree, and click Collect on the Configuration menu on the Web Console
6. Deleting the information of NIC before the exchange Select the icon of the machine whose NIC you exchanged in the Resource tree, and click Property on the Configuration menu. Select the Network tab of the Machine Property Setting to display the NIC information. Select the check box of the NIC before the exchange, and click Delete of the Action menu.
7. Adding the information of NIC after the exchange Select the icon of the machine whose NIC you exchanged in the Resource tree, and click Property on the Configuration menu. Select the Network tab of the Machine Property Setting to display the NIC information. Click Add of the Action menu. For configuring NIC information, see Subsection 3.11.2, "Configuring Settings on the Network Tab."
8. Maintenance Mode OFF Select the icon of a machine whose NIC you exchanged, and click Maintenance OFF in the Action menu on the Web Console.
Exchanging a NIC other than a primary NIC completes.
8.5.2. Exchanging a Primary NIC
To exchange a primary NIC, perform the following procedure.
1. Disabling the periodical collection If the periodical configuration information collection is enabled, disable the function.
Click the Environment icon in the Management tree. Select the General tab of the Environment Setting window, and cleat the Gather Information check box.
Note: Do not collect the information manually either until you complete all the procedures of exchanging a NIC.
2. Setting a target machine to be managed in SystemProvisioning If a target machine is unmanaged in SystemProvisioning, change the setting to Managed.
Click the Machine icon in the Resource tree on the Web Console. Click Register Machine on the Operation menu. Select the check box of the machine whose NIC you are going to exchange under Managed Machine List. Select a resource to register in the Parent Resource tree and click OK.
3. Maintenance Mode ON Select the icon of a machine whose NIC you are going to exchange, click Maintenance ON in the Action menu on the Web Console.

8 Maintenance
SigmaSystemCenter 2.1 Configuration Guide 262
4. Shutting down the machine Shut down the machine from the Web Console.
5. Exchanging the NIC. 6. Starting the machine.
Start the machine by pushing the power button.
Select the machine in the tree view on the DPM Web Console. Click Properties in the Computer menu to confirm that the exchanged MAC address is reflected in MAC address box.
7. Displaying the NIC information Select the icon of the machine whose you exchanged the NIC in the Resource tree, and click Property on the Configuration menu. Select the Network tab of the Machine Property Setting to display the NIC information.
8. Deleting the information of NIC before the exchange Confirm that the number of the NIC before the exchange is 1, and click the Edit icon. Change the NIC number from 1 to blank under NIC Setting, and click OK. Select the check box of the NIC before the exchange, and click Delete of the Action menu.
9. Adding the information of NIC after the exchange Click Add of the Action menu. Set 1 to the NIC Number under NIC Setting, and set a MAC address, switch and port. For configuring NIC information, see Subsection 3.11.2, "Configuring Settings on the Network Tab."
10. Maintenance Mode OFF Select the icon of a machine whose NIC you exchanged, and click Maintenance OFF in the Action menu on the Web Console.
11. If you changed to be managed in the Procedure 2, change the setting to Unmanaged.
Click the Machine icon in the Resource tree on the Web Console. Select the check box of the target machine under Machine List. Click Unmanaged of the Action menu.
12. If you disabled the periodical collection in the Procedure 1, enable the setting. If you disabled the periodical collection in the Procedure 1, enable the setting.
Click the Environment icon in the Management tree. Select the General tab of the Environment Setting window, and select the Gather Information check box.
Exchanging a primary NIC completes.

Exchanging Hardware
Part III Maintenance 263
8.5.3. Exchanging a Machine
To exchange a machine, follow the procedure below.
Note: To operate Management Server for DPM, you need to acquire the "update" authority. If you operate Management Server for DPM from SystemProvisioning, you can acquire the authority from the following consoles; however, only one console can acquire the authority at a time. If one console has the authority, you cannot update from the other consoles.
SystemProvisioning Web Console DPM Web Console Command Line for DPM If you have finished an operation from DPM, be sure to release the authority for later operations or actions from SigmaSystemCenter.
1. Deleting the machine from its operation group
Select the failed machine from its group and click Release Resource of the Action menu on the Web Console. The machine is moved to a resource pool of the operation group or system pool in the powered Off state. After releasing the host, when the machine is moved to a resource pool of the operation group, select the machine from the resource pool and click Delete of the Action menu to delete the machine from its pool.
2. Making the machine unmanaged Select the icon of the machine in the Resource tree and click Unmanaged of the Action menu.
3. Exchanging the machine. 4. Registering the machine to DPM
Register a new machine on the DPM Web Console. For registering a managed machine, see Subsection 2.7.3, "Registering a Managed Machine to DPM."
5. Deleting the failed machine. Select the replaced machine in the tree view on the main window of the DPM Web Console. Select Delete Computer from the Computer menu, and click OK on the confirmation window,
6. Collecting information in DPM Click the System Resource icon in the Resource tree on the Web Console. Click Collect on the Operation menu. After the Collect is completed, the failed machine disappears from the Unmanaged Machine List, and the new machine appears.
7. Activating the new machine Activate the new machine from its operation group on the Web Console.
Exchanging a machine completes. To enable the power control function by OOB Management on the machine, enable the setting, referring to Section 3.8, "Enabling Power Control Function by Out-of-Band (OOB) Management."
8 Maintenance
SigmaSystemCenter 2.1 Configuration Guide 264
8.5.4. Exchanging a Disk
If you are to exchange a disk, a machine is managed as the same machine. You need to perform the following procedure.
1. Maintenance Mode ON Select the icon of a machine whose disk you are going to exchange and click Maintenance ON in the Action menu on the Web Console.
2. Shutting down the machine to exchange Shut down the machine to exchange from the Web Console.
3. Exchange the disk. 4. Starting the machine
Start the machine from the Web Console.
5. Maintenance Mode OFF Select the icon of a machine whose disk you exchanged, and click Maintenance OFF in the Action menu on the Web Console.
6. Redistributing software Redistribute software from Operation resource on the Web Console.
7. Resetting the Hardware status After redistributing the software, check that the machine is in the Normal status.
Exchanging a disk completes.
8.5.5. Exchanging an HBA
To exchange an HBA connected to your storage, follow the procedure below. Exchanging an HBA connected to NEC Storage
Note: Remember the WWN before the exchange and WWN after the exchange.
1. Maintenance Mode ON Select the icon of a machine whose HBA you are going to exchange and click Maintenance ON in the Action menu on the Web Console.
2. Shutting down the machine to exchange Shut down the machine to exchange from the Web Console.
3. Exchanging the HBA

Exchanging Hardware
Part III Maintenance 265
4. Configuring the NEC Storage Manager
Change the WWN setting in the NEC Storage Manager. The following is the overview of the procedures of changing the setting using the NEC Storage Manager Client (Web GUI). For more details, see NEC Storage Software Configuration Setting Tool User’s Manual (GUI).
1. Start the NEC Storage Manager Client. 2. Select a disk array that is a target of exchange of the HBA. 3. Click the File menu, click Configuration Settings/References, and
click Configuration Setting to display the Configuration Setting window.
4. Click Setting Access Control on the Configuration Setting window.
5. Select the LD set that has the WWN before exchange, and click Link Path. The Link Path Mode Selection window appears.
6. Click WWPN to display the Link Path window, and replace the WWN before exchange with WWN after exchange.
Note: The button names and items of Setting Access Control on the Configuration Setting window varies according to product purchase circumstances. For the details, see NEC Storage Software Configuration Setting Tool User’s Manual (GUI).
5. Updating storage information Click the System Resource icon in the Resource tree, and click Collect on the Operation menu on the Web Console.
6. Updating the HBA information Delete the HBA before the exchange and add the HBA after the exchange on the Storage tab of the Machine Property Setting in the Resource view on the Web Console.
7. Starting the machine Start the machine from the Web Console.
8. Maintenance Mode OFF Select the icon of a machine whose HBA you exchanged, and click Maintenance OFF in the Action menu on the Web Console.

8 Maintenance
SigmaSystemCenter 2.1 Configuration Guide 266
Exchanging an HBA connected to Symmetrix or CLARiiON
Note: Remember the WWPN / WWN before the exchange and WWPN / WWN after the exchange.
1. Maintenance Mode ON Select the icon of a machine whose HBA you are going to exchange and click Maintenance ON in the Action menu on the Web Console.
2. Shutting down the machine to exchange Shut down the machine to exchange from the Web Console.
3. Releasing the connection to disk volume Release the connection to the disk volume connected to the original HBA.
4. Exchange the HBA of the original machine. 5. Connecting to disk volume
Connect the disk volume connected to the original HBA again. Configure the same status as that in the procedure 3.
6. Updating the storage information Click the System Resource icon in the Resource tree, and click Collect on the Operation menu on the Web Console.
7. Updating the HBA information Delete the HBA before the exchange and add the HBA after the exchange on the Storage tab of the Machine Property Setting in the Resource view on the Web Console.
8. Starting the machine Start the machine from the Web Console.
9. Maintenance Mode OFF Select the icon of a machine whose HBA you exchanged, and click Maintenance OFF in the Action menu on the Web Console.
Exchanging an HBA completes.

Exchanging Hardware
Part III Maintenance 267
8.5.6. Adding a Switch Blade
To add a switch blade, follow the procedure below.
1. Insert a switch blade. 2. Registering the switch blade to SystemProvisioning
Click Subsystem in the Management tree on the Web Console. Click Add Subsystem on the Configuration menu. Register a switch blade as a subsystem. Click the Network Device icon in the Resource tree and click Register Switchblade on the Configuration menu.
3. Adding a VLAN Add a VLAN if needed.
Click the Network Device icon in the Resource tree and click the registered switch blade. Click Add VLAN on the Configuration menu to add a VLAN.
4. Correlating the switch blade Correlate a machine to the switch blade. To set the machine to a machine running in an operation group, click the target operation group in the Operations tree, select the check box of a running machine under Host List, and then, click Maintenance On on the Operation menu. Click a machine to correlate in the Resource tree on the Web Console, click Properties on the Configuration menu, and then set the VLAN added to the switch blade on the VLAN Setting tab on the Group Property Setting.
5. Registering the switch blade to an operation group To control VLAN, configure the VLAN on the switch blade to its operation group.
Click the target group in the Operation tree on the Web Console, click Properties on the Configuration menu, and then set the VLAN added to the switch blade on the VLAN Setting tab on the Group Property Setting. An active machine in the operation group cannot be controlled by VLAN when registering the VLAN on the new switch blade. To control VLAN on the new switch blade in a group that is already active, after deleting all the active machines in the operation group, click an icon of the operation group, select the check box of a host to register as a master machine, and then, click Register Master Machine to add the machine in a group.
Adding a switch blade completes.
8 Maintenance
SigmaSystemCenter 2.1 Configuration Guide 268
8.5.7. Exchanging a Switch Blade
To exchange a switch blade, follow the procedure below.
1. Maintenance Mode ON If there is a running machine in a group in the chassis, select the check box of the machine to correlate in the Operations tree, and then, click Maintenance On on the Operation menu. If there are no running machines, skip to the next procedure.
2. Exchanging the switch blade Pull the switch blade off. Insert the CF card of the switch blade before the exchange to the switch blade after the exchange. Insert the new switch blade. If the CF card cannot be exchanged, set the settings to the condition of the switch blade before the exchange.
3. Updating switch blade information Click the System Resource icon in the Resource tree, and click Collect on the Operation menu on the Web Console.
4. Maintenance Mode OFF If there is a machine set in the Maintenance mode in the procedure 1, click the icon of the machine of which NIC in the Operations tree, and then, click Maintenance On on the Operation menu.
Exchanging a switch blade completes.
8.5.8. Deleting a Switch Blade
To remove a switch blade, follow the procedure below.
Note: With this procedure, a connection to a CPU blade is deleted; the operation cannot delete it completely. In addition, do not delete a switch blade connected to a Primary NIC that is connecting to a network managed by SystemProvisioning.
1. Deleting a subsystem Click Subsystem in the Management tree to display details of subsystems on the Web Console. Select the check box of the subsystem to delete and click Delete of the Action menu.
2. Pull the switch blade off. Deleting a switch blade completes.

Exchanging Hardware
Part III Maintenance 269
8.5.9. Adding a MasterScope Network Manager Switch
To add a MasterScope Network Manager switch, you need to configure the VLAN settings in MasterScope Network Manager. Follow the procedure below.
1. Registering MasterScope Network Manager to SystemProvisioning Click Subsystem in the Management tree on the Web Console. Click Add Subsystem on the Configuration menu. Register MasterScope Network Manager as a subsystem. Click the Network Device icon in the Resource tree and click Register Machine on the Configuration menu.
2. Adding a VLAN Add a VLAN if needed.
Click the Network Device icon in the Resource tree and click the registered switch blade. Click Add VLAN on the Configuration menu to add a VLAN.
3. Correlating the switch Correlate a machine to the switch. If you set the machine to a machine running in an operation group, click the icon of the target operation group in the Operations tree, select the check box of the running machine in the Operations tree, and then, click Maintenance On on the Operation menu. Select the machine to correlate in the Resource tree on the Web console and correlate the switch on the Network tab.
4. Registering the switch to an operation group To control VLAN, configure the VLAN on the switch blade to its operation group. In addition, if needed, click the target group in the Operation tree on the Web Console, click Properties on the Configuration menu, and then set the VLAN added to the switch blade on the VLAN Setting tab on the Group Property Setting. An active machine in the operation group cannot be controlled by VLAN when registering the VLAN on the new switch blade. To control VLAN on the new switch blade in a group that is already active, after deleting all the active machines in the operation group, click an icon of the operation group, select the check box of a host to register as a master machine, and then, click Register Master Machine to add the machine in a group.
Adding a MasterScope Network Manager switch completes.

8 Maintenance
SigmaSystemCenter 2.1 Configuration Guide 270
8.5.10. Exchanging a MasterScope Network Manager Switch
There are conditions to exchange a switch. The conditions differ according to the situation.
Exchanging when there is an active machine on the connected machine On the MasterScope Network Manager management screen, set the switch to the same state before the exchange. There is no operation in SigmaSystemCenter. • You can exchange only the same model of switches. • If you are exchanging a slot, you can exchange only the same model of slots. • We recommend that you set the machine in the Maintenance mode if there is
an active machine.
Exchanging when there is no active machine on the connected machine There is no operation in SigmaSystemCenter also with this situation. What you need to do is to set the switch to the same state before the exchange. If you register the switch as other switch, set the switch as Managed and correlate the switch to NIC on the Network tab of the Machine Property Setting in the Resource view on the Web Console.
Exchanging a MasterScope Network Manager switch completes.
8.5.11. Deleting a MasterScope Network Manager switch
To delete a switch, follow the procedure below.
1. Maintenance Mode ON If a machine connected to the switch is running in an operation group, click the icon of the target operation group in the Operations tree, select the check box of the running machine in the Operations tree, and then, click Maintenance On on the Operation menu.
2. Deleting the switch Click the icon of the machine of which switch you are going to release the correlation in the Resource tree on the Web Console to display the Machine Property Setting on the Main Window. Select the check box of NIC to release under NIC List on the Network tab and click Delete on the Action menu.
3. Setting the switch to Unmanaged Click the icon of the switch to make out of management in the Resource tree on the Web Console to display details of the switch on the Main Window. Click Unmanaged on the Configuration menu to unmanage the switch.

Exchanging Hardware
Part III Maintenance 271
4. Maintenance Mode OFF.
If there is a machine set in the Maintenance mode in the procedure 1, click the icon of the exchanged machine in the Operations tree on the Web Console and click Maintenance Off on the Configuration menu.
Deleting a MasterScope Network Manager switch completes.
8.5.12. Exchanging a Disk on an ESX
To exchanging a disk on an ESX, there are two methods: Backing up the ESX Moving a virtual machine to other ESX
Follow the procedure for each method.
Note: If you stop operation of an ESX, make sure that there is no active virtual machine on the ESX before stopping the operation. If there is any, the virtual machine is stopped, and you cannot operate the virtual machine afterwards.
Backing up the ESX
To exchanging a disk, backing up the ESX, follow the procedure below.
Reference: For details of operation with VirtualCenter, see a product manual of VMware, Inc.
1. Maintenance Mode ON Select the icon of a virtual machine which is on a target ESX in the Resource tree and click Maintenance ON in the Action menu on the Web Console.
2. Shut down the virtual machines on the ESX. Shut down the virtual machines on the ESX from the Web Console.
3. Delete the connection of the ESX from VirtualCenter For the method to delete the connection of the ESX from VirtualCenter, see a product manual of VMware, Inc.
4. Back up the ESX. For the backup method of an ESX, see a product manual of VMware, Inc.
5. Shut down the ESX. Shut down the ESX from the Web Console.
6. Exchange the disk on the ESX. Exchange the disk on the ESX after shutting done the ESX.

8 Maintenance
SigmaSystemCenter 2.1 Configuration Guide 272
7. Install ESX.
For the installation of ESX, see a product manual of VMware, Inc. Configure the same network settings and password on the ESX as before.
8. Restore the ESX. For the restoration of ESX, see a product manual of VMware, Inc.
9. Connect VirtualCenter to the ESX. 10. Maintenance Mode OFF.
Select the icon of a virtual machine which is on a target ESX, and click Maintenance OFF in the Action menu on the Web Console.
11. Updating the information Click the System Resource icon in the Resource tree, and click Collect on the Operation menu on the Web Console to update the registered information.
Moving a virtual machine to other ESX
To exchanging a disk, moving a virtual machine to other ESX, follow the procedure below.
Note: Before exchanging the disk, the ESX in the source and the new ESX are registered to the same datacenter.
Reference: For details of operation with VirtualCenter, see a product manual of VMware, Inc.
1. Maintenance Mode ON Select the icon of a virtual machine which is on a target ESX in the Resource tree and click Maintenance ON in the Action menu on the Web Console.
2. Move the virtual machines to other ESX Move the virtual machines registered to one datacenter to other ESX.
3. Shutting down the ESX Shut down the ESX from the Web Console.
4. Exchanging the disk on the ESX Exchange the disk on the ESX after shutting done the ESX.
5. Install ESX. For the installation of ESX, see a product manual of VMware, Inc. Configure the same network settings and password on the ESX as before.
6. Connecting VirtualCenter to the ESX Check that the VirtualCenter is connected to the ESX.
7. Moving the virtual machines to the ESX after the move Move the virtual machines to the ESX which disk is exchanged after the move on the Web Console.

Exchanging Hardware
Part III Maintenance 273
8. Maintenance Mode OFF.
Select the icon of a virtual machine which is on a target ESX, and click Maintenance OFF in the Action menu on the Web Console.
9. Updating the information Click the System Resource icon in the Resource tree, and click Collect on the Operation menu on the Web Console to update the registered information.
Exchanging a disk on an ESX completes.
8.5.13. Exchanging a Device on an ESX Other Than a Hard Disk
To exchange a device on an ESX other than a hard disk, follow the procedure below.
Reference: For details of operation with VirtualCenter, see a product manual of VMware, Inc.
1. Maintenance Mode ON. Select the icon of a virtual machine which is on a target ESX in the Resource tree and click Maintenance ON in the Action menu on the Web Console.
2. Shutting down the ESX Shut down the ESX from the Web Console.
3. Exchanging the device on the ESX Exchange the device on the ESX after shutting done the ESX. For the exchange of devices on an ESX, see a product manual of VMware, Inc.
4. Connecting VirtualCenter to the ESX Check that the VirtualCenter is connected to the ESX.
5. Maintenance Mode OFF. Select the icon of a virtual machine which is on a target ESX, and click Maintenance OFF in the Action menu on the Web Console.
6. Updating the information Click the System Resource icon in the Resource tree, and click Collect on the Operation menu on the Web Console to update the registered information.
Exchanging a device on an ESX other than a hard disk completes.

8 Maintenance
SigmaSystemCenter 2.1 Configuration Guide 274
8.5.14. Exchanging a Disk on a XenServer
To exchanging a disk on a Xen Server, follow the procedure below.
Reference: For details of operation with XenCenter, see a product manual of Citrix Systems, Inc.
1. Maintenance Mode ON Select the icon of a virtual machine which is on a target Xen Server in the Resource tree and click Maintenance ON in the Action menu on the Web Console.
2. Shutting down the virtual machines on the Xen Server Shut down the virtual machines on the Xen Server from XenCenter.
3. Deleting the XenServer from the pool If the XenServer is registered to a pool. Delete the Xen Server from the pool.
4. Deleting the connection of the Xen Server in XenCenter Delete the connection of the Xen Server in XenCenter.
5. Back up the Xen Server. For the backup method of a Xen Server, see a product manual of Citrix Systems, Inc.
6. Exchanging the disk on the Xen Server Exchange the disk on the Xen Server after shutting done the XenServer.
7. Install XenServer. For the installation of Xen Server, see a product manual of Citrix Systems, Inc. Configure the same network settings and password on the Xen Server as before.
8. Restore the XenServer. For the restoration of Xen Server, see a product manual of Citrix Systems, Inc.
9. Connecting to the Xen Server from XenCenter Connect to the Xen Server from XenCenter.
10. Maintenance Mode OFF. Select the icon of a virtual machine which is on a target Xen Server, and click Maintenance OFF in the Action menu on the Web Console.
11. Updating the information Click the System Resource icon in the Resource tree, and click Collect on the Operation menu on the Web Console to update the registered information.
Exchanging a disk on a XenServer completes.
Exchanging Hardware
Part III Maintenance 275
8.5.15. Exchanging a Device on a Xen Server Other Than a Hard
Disk
To exchange a device on a Xen Server other than a hard disk, follow the procedure below.
Reference: For details of operation with XenCenter, see a product manual of Citrix Systems, Inc.
1. Maintenance Mode ON Select the icon of a virtual machine which is on a target Xen Server in the Resource tree and click Maintenance ON in the Action menu on the Web Console.
2. Shutting down the Xen Server Shut down the Xen Server from XenCenter.
3. Exchanging the device on the XenServer Exchange the device on the Xen Server after shutting done the Xen Server. For the restoration of Xen Server, see a product manual of Citrix Systems, Inc.
4. Connecting to the Xen Server from XenCenter Connect to the Xen Server from XenCenter.
5. Maintenance Mode OFF Select the icon of a virtual machine which is on a target Xen Server, and click Maintenance OFF in the Action menu on the Web Console.
6. Updating the information Click the System Resource icon in the Resource tree, and click Collect on the Operation menu on the Web Console to update the registered information.
Exchanging a device on a Xen Server other than a hard disk completes.
8 Maintenance
SigmaSystemCenter 2.1 Configuration Guide 276
8.5.16. Changing the Connection Between a NIC and a Switch
You cannot change the connection to an active machine because even if the machine is set to the Maintenance mode, its VLAN is not reflected to the configuration information. However, you can exchange the NIC (changing its MAC address) in the Maintenance mode. For the exchanging method, see Subsection 8.5.1, "Exchanging a NIC Other Than a Primary NIC" or Subsection 8.5.2, "Exchanging a Primary NIC." In addition, even if there are active machines in one chassis, you can add or delete the connection setting of inactive machines or setting for connecting a switch to an active machine. To do so, follow the procedure below.
1. Change the cross line of the NIC and the switch physically. 2. Correlate the switch to SystemProvisioning.
1. Click Resource on the Title bar to switch to the Resource view. 2. Click the icon of the machine to correlate in the Resource tree. 3. Click the Property on the Configuration menu. 4. Machine Property Setting appears on the Main Window. 5. Click the Network tab. Click the Edit icon of the NIC to correlate under NIC
List. 6. NIC Setting appears. Change the correlation between the NIC and the switch
port. Changing the connection between a NIC and a switch completes.

Extracting Logs
Part III Maintenance 277
8.6. Extracting Logs When you ask investigation to our PP Support Service, extract logs with the procedure in this section, In addition, other than the logs, we ask you for providing the following information to the best of your knowledge.
Outline of the failure (details of the failure and information, such as what kind of phenomenon occurred)
Date and time the failure occurred Procedure that the failure occurred (information of what kind of operations you
executed when the failure occurred) Error message displayed on the window Network configuration Machine name, IP address, MAC address, and device model of a managed
resource (If the issue is concerning a managed machine.)
Note: If you cannot investigate a cause of failure from SigmaSystemCenter logs, you need to investigate the configuration information database. For how to collect the configuration information database, see Subsection 9.2.1, "Backing up SystemProvisioning."
8.6.1. Extracting SystemProvisioning Log
To acquire log files of SystemProvisioning, perform the following procedure:
1. Extract the log files recorded on the following folder. A folder where SystemProvisioning is installed\log A folder where SystemProvisioning is installed \Provisioning\Logs
Note: The default path is "C:\Program Files\NEC\PVM\log" and "C:\Program Files\NEC\PVM\Provisioning\Logs."
Extracting the SystemProvisioning log completes.

8 Maintenance
SigmaSystemCenter 2.1 Configuration Guide 278
8.6.2. Extracting System Monitor - Performance Monitoring
Services Log
System Monitor - Performance Monitoring Services records errors and operation event information on an event log on a management server with a name of "System Monitor - Performance Monitoring Services." Error information, such as failure in starting System Monitor - Performance Monitoring Services, may be recorded on the application event logs or system event logs. If a problem occurs in System Monitor - Performance Monitoring Services, save the application log, system log, and System Monitor - Performance Monitoring Services log on the Event Viewer in a text format.
1. Click the Start menu, and click Control Panel. From Control Panel, double-click Administrative Tools. From Administrative Tools, double-click Event Viewer to start Event Viewer.
2. The Event Viewer screen appears. Click System Monitor - Performance Monitoring Services and extract event logs, application logs, and system logs.
3. Extract files of detail logs recorded on the directory (A folder where System Monitor - Performance Monitoring Services is installed\log).
Note: The default path is "C:\Program Files\NEC\SystemMonitorPerformance\log".
Extracting the System Monitor - Performance Monitoring Services log completes.
8.6.3. Extracting DPM Log
To extract a DPM log, perform the following procedure. You can collect the log from a management server and a managed machine.
Extracting Logs
Part III Maintenance 279
If you are using a machine running Windows (IA32 or EM64T)
1. End all processes related to DPM
Note: Check that: Any scenario is not being executed. If there is any scenario being executed, wait until the scenario is completed.
The DPM Web Console, including other tools of DPM is not started.
2. Log in to the machine where an error occurred with an Administrator authority, and copy the following folder in the SigmaSystemCenter product CD-R to any place. The following example is a case when the folder is stored in C:\Dpmlog. SigmaSystemCenter installation CD-R:\DPM\TOOLS\DpmLog
3. Start the command prompt. Click the Start menu, click All Programs, click Accessories, and click Command Prompt.
4. Enter the following command to specify the save destination of the log file. cd /d C:\Dpmlog
5. Run DpmLog.exe with the option -A. DpmLog.exe -A
If you are using a machine running Windows (IPF)
Windows (IPF) does not support DpmLog.exe. Collect the following information manually.
• Event logs (Extract the logs in the Event Log form (.evt))
Application System
• Files (Unnecessary if the files do not exist.) SystemRoot%\Inst_Dpm_Client.log %SystemRoot%\system32 %SystemRoot%\system32\DepAgent.log %SystemRoot%\system32\DepAgent.log.bak %SystemRoot%\system32\rupdsvc.log %SystemRoot%\system32\rupdsvc.log.bak %SystemRoot%\system32\DPMTray.log %SystemRoot%\DeploymentManager %SystemDrive%\Sysprep (%SystemRoot% and %SystemDrive% are environment variables.)

8 Maintenance
SigmaSystemCenter 2.1 Configuration Guide 280
• Registries (Extract by exporting from the Registry Editor. Unnecessary if the
files do not exist.) - Under HKEY_LOCAL_MACHINE\ SOFTWARE\Microsoft
Updates Windows NT\CurrentVersion\Hotfix Windows\CurrentVersion\Uninstall Windows\CurrentVersion\Component Based Servicing\Packages (Only for Windows Server 2008)
- Under HKEY_LOCAL_MACHINE\SYSTEM\CurrentControlSet Services Control
• Result of the execution of the following commands
From the Start menu, click All Programs, click Accessory, and then click Command Prompt to open the Command Prompt window. ipconfig /all route -p print net use net share net config WORKSTATION net config server netstat -a -o –n
• System Information
From the Start menu, click All Programs, click Accessory, and then click Command Prompt to open the Command Prompt window. Run the following commands and extract created msdrpt.txt. - If you are using Windows Server 2003 %CommonProgramFiles%\Microsoft Shared\MSInfo\msinfo32.exe /report msdrpt.txt
(%CommonProgramFiles% is an environment variable.) - If you are using Windows Server 2008 %windir%\system32\msinfo32.exe /report msdrpt.txt
(%windir% is an environment variable.)
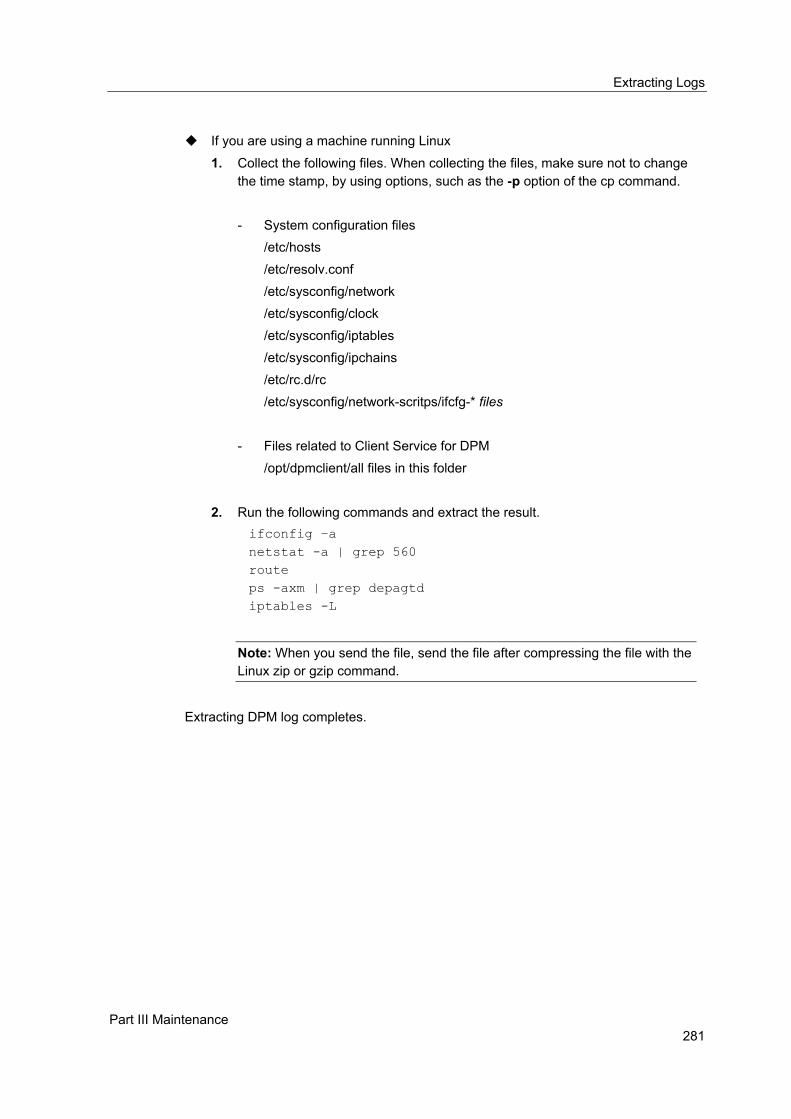
Extracting Logs
Part III Maintenance 281
If you are using a machine running Linux
1. Collect the following files. When collecting the files, make sure not to change the time stamp, by using options, such as the -p option of the cp command.
- System configuration files
/etc/hosts /etc/resolv.conf /etc/sysconfig/network /etc/sysconfig/clock /etc/sysconfig/iptables /etc/sysconfig/ipchains /etc/rc.d/rc /etc/sysconfig/network-scritps/ifcfg-* files
- Files related to Client Service for DPM
/opt/dpmclient/all files in this folder
2. Run the following commands and extract the result. ifconfig –a netstat -a | grep 560 route ps -axm | grep depagtd iptables -L
Note: When you send the file, send the file after compressing the file with the Linux zip or gzip command.
Extracting DPM log completes.

8 Maintenance
SigmaSystemCenter 2.1 Configuration Guide 282
8.6.4. Extracting NEC ESMPRO Manager Log
To extract operation logs, detailed logs, application logs, and system logs of NEC ESMPRO Manager, perform the following procedure.
Note: The default installation path of NEC ESMPRO Manager is "C:\Program Files\NEC\SMM."
1. Run the following command at Command Prompt. NEC ESMPRO Manager Installation Folder\ESMSM\collectm\collectm.exe
2. Extract the information in the following folder. NEC ESMPRO Manager Installation Folder\ESMSM\collectm\smlog
Extracting NEC ESMPRO Manager completes.

283
9. Backup and Restoration This chapter explains the methods of backup and restore during operation of SigmaSystemCenter. This chapter contains the following sections: • 9.1 Backup Plan............................................................................................................ 284 • 9.2 Backing up and Restoring SystemProvisioning...................................................... 285 • 9.3 Backing up and Restoring System Monitor - Performance Monitoring Services.... 288 • 9.4 Backing up and Restoring DPM ............................................................................. 291 • 9.5 Backing up and Restoring NEC ESMPRO Manager.............................................. 298

9 Backup and Restoration
SigmaSystemCenter 2.1 Configuration Guide 284
9.1. Backup Plan Back up setting information of management server components as needed. If you back up the information, even if the management server is faulted, for some reason, such as a failure of the hardware, you can restore the condition. You can keep the distribution image (restoration image) latest by backing up your management server and managed machine after every update, so that you can restore when a failure happened. This section provides the outline and method for backing up various machines.
9.1.1. Management Server
Configuration information of SystemProvisioning We recommend that you back up the configuration information of SystemProvisioning periodically. For backing up and restoring the configuration information, see Section 9.2, "Backing up and Restoring SystemProvisioning."
Configuration information of System Monitor - Performance Monitoring Services We recommend that you back up the configuration information of System Monitor - Performance Monitoring Services and the performance information periodically. For backing up and restoring the configuration information, see Section 9.3, "Backing up and Restoring System Monitor - Performance Monitoring Services."
Configuration information of DPM We recommend that you back up the configuration information of DPM periodically. For backing up and restoring the configuration information, see Section 9.4, "Backing up and Restoring DPM."
Configuration information of NEC ESMPRO Manager We recommend that you back up the configuration information of NEC ESMPRO Manager periodically. For backing up and restoring the configuration information, see Section 9.5, "Backing up and Restoring NEC ESMPRO Manager."
9.1.2. Managed Machine
To keep distribution of SigmaSystemCenter the latest, you need to back up the managed machine using DPM to make the distribution image (restoration image) the latest. If you back up the machine using DPM, suspend the machine and back up the machine. The time taken for backing up differs according to the disk capacity or network state. If update runs on the machine frequently, back up the machine with the following method.
Back up when the operation load is low Back up manually on line

Backing up and Restoring SystemProvisioning
Part III Maintenance 285
9.2. Backing up and Restoring SystemProvisioning
Back up the configuration database, configuration files, and registries as the occasion demands. You can restore the configuration database even if a management server breaks down due to such reasons as hardware failure.
You can back up and restore the configuration database using the sqlcmd command provided by SQL Server 2005.
Reference: For the details of the sqlcmd command, see the following URL of Microsoft Corporation.
http://msdn2.microsoft.com/en-us/library/ms170207.aspx
Note: The initial sa password of SQL Server 2005 that is installed with SystemProvisioning is "rc76duvg." If you are a system administrator, change the password using the sqlcmd command.
If you change the instance name from its default name, SSCCMDB, the name needs to be in the " (local)\the instance name" form. In addition, if you have transferred the configuration database to SQL Server 2005 on other server in the network after installing SigmaSystemCenter, the instance name needs to be in the "the server name\the instance name" form.

9 Backup and Restoration
SigmaSystemCenter 2.1 Configuration Guide 286
9.2.1. Backing up SystemProvisioning
To back up SystemProvisioning, perform the following procedure:
1. Stopping the Web Console Close the Web Console if it is open.
2. Stopping SystemProvisioning. To stop SystemProvisioning, see Subsection 8.1.1, "Starting, Restarting, and Stopping SystemProvisioning."
3. Backing up files Back up the files in the SystemProvisioning installation directory. Back up the files without changing their saved permission.
Note: The default installation directory is %ProgramFiles%\NEC\PVM.
4. Backing up registries Back up the registries in HKEY_LOCAL_MACHINE\SOFTWARE\NEC\PVM. You can back up them exporting the data from Registry Editor.
5. Running the backup command Run the following command at the command prompt. This is the example of creating a backup file backup.dat in \temp of the C drive. > sqlcmd -E -S (local)\SSCCMDB 1> backup database pvminf to disk = 'c:\temp\backup.dat' with init 2> go
Note: If you have changed the instance name from the default instance name "SSCCMDB", specify (local)\the instance name.
6. Starting SystemProvisioning Start SystemProvisioning after the backup has completed. For the procedure, see Subsection 8.1.1, "Starting, Restarting, and Stopping SystemProvisioning."
Backing up SystemProvisioning completes.
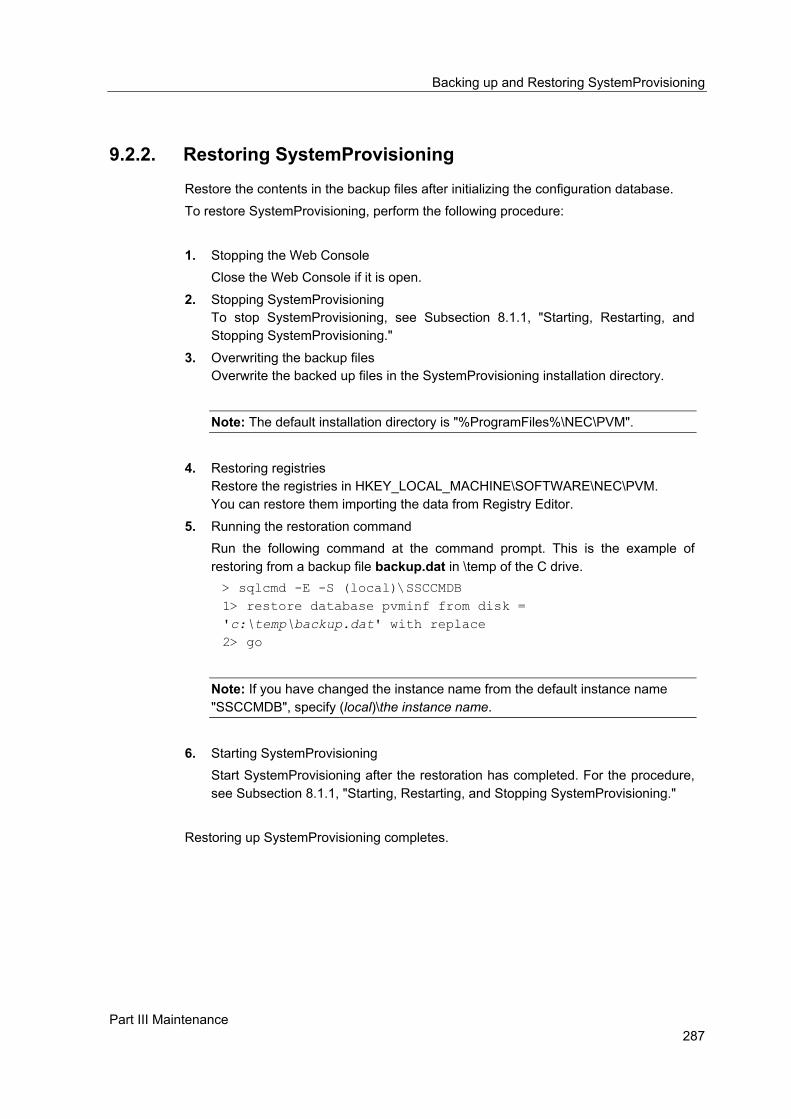
Backing up and Restoring SystemProvisioning
Part III Maintenance 287
9.2.2. Restoring SystemProvisioning
Restore the contents in the backup files after initializing the configuration database. To restore SystemProvisioning, perform the following procedure:
1. Stopping the Web Console Close the Web Console if it is open.
2. Stopping SystemProvisioning To stop SystemProvisioning, see Subsection 8.1.1, "Starting, Restarting, and Stopping SystemProvisioning."
3. Overwriting the backup files Overwrite the backed up files in the SystemProvisioning installation directory.
Note: The default installation directory is "%ProgramFiles%\NEC\PVM".
4. Restoring registries Restore the registries in HKEY_LOCAL_MACHINE\SOFTWARE\NEC\PVM. You can restore them importing the data from Registry Editor.
5. Running the restoration command Run the following command at the command prompt. This is the example of restoring from a backup file backup.dat in \temp of the C drive. > sqlcmd -E -S (local)\SSCCMDB 1> restore database pvminf from disk = 'c:\temp\backup.dat' with replace 2> go
Note: If you have changed the instance name from the default instance name "SSCCMDB", specify (local)\the instance name.
6. Starting SystemProvisioning Start SystemProvisioning after the restoration has completed. For the procedure, see Subsection 8.1.1, "Starting, Restarting, and Stopping SystemProvisioning."
Restoring up SystemProvisioning completes.

9 Backup and Restoration
SigmaSystemCenter 2.1 Configuration Guide 288
9.3. Backing up and Restoring System Monitor - Performance Monitoring Services
You can back up and restore the database of System Monitor - Performance Monitoring Services using the sqlcmd command provided by SQL Server 2005.
9.3.1. Backing up System Monitor - Performance Monitoring
Services
To back up System Monitor - Performance Monitoring Services, perform the following procedure:
1. Stopping the System Monitor Management Console Select Exit from the File menu of the management console main window of System Monitor - Performance Monitoring Services to close the console.
2. Stopping the Performance Monitor Service Click the Start menu, and click Control Panel. From Control Panel, double-click Administrative Tools. From Administrative Tools, and double-click Services to start the Services Snap-in.
Right-click System Monitor Performance Monitoring Service, and click Stop. 3. Backing up files
Back up the following two files in the directory where System Monitor - Performance Monitoring Services is installed.
Note: The default directory is "%ProgramFiles%\NEC\SystemMonitorPerformance."
bin\rm_client.xml bin\rm_service_init.xml
4. Backing up database Run the following command at the command prompt. This is the example of creating a backup file sysmonbk.dat in \temp of the C drive. > sqlcmd -E -S (local)\SSCCMDB -Q "backup database RM_PerformanceDataBase2 to disk = 'c:\temp\sysmonbk.dat' with init"
Note: If you changed the default instance "SSCCMDB," enter "(local)\instance name."

Backing up and Restoring System Monitor - Performance Monitoring Services
Part III Maintenance 289
5. Starting the Performance Monitor Service Start the Performance Monitor Service.
Click the Start menu, and click Control Panel. From Control Panel, double-click Administrative Tools. From Administrative Tools, double-click Services to start the Services Snap-in.
Right-click System Monitor Performance Monitor Service, and click Start. Backing up System Monitor - Performance Monitoring Services completes.
9.3.2. Restoring System Monitor - Performance Monitoring
Services
To restore System Monitor - Performance Monitoring Services, perform the following procedure:
1. Stopping the System Monitor Management Console Select Exit from the File menu of the management console main window of System Monitor - Performance Monitoring Services to close the console.
2. Stopping the Performance Monitor Service Click the Start menu, and click Control Panel. From Control Panel, double-click Administrative Tools. From Administrative Tools, double-click Services to start the Services Snap-in.
Right-click System Monitor Performance Monitoring Service, and click Stop. 3. Overwriting backup files
Overwrite the two backup files in the directory where System Monitor - Performance Monitoring Services is installed which backup are collected.
Note: The default directory is "%ProgramFiles%\NEC\SystemMonitorPerformance."
bin\rm_client.xml bin\rm_service_init.xml

9 Backup and Restoration
SigmaSystemCenter 2.1 Configuration Guide 290
4. Running the restoration command
Run the following command at the command prompt. This is the example of restoring the backup file sysmonbk.dat in \temp of the C drive. > sqlcmd -E -S (local)\SSCCMDB -Q "restore database RM_PerformanceDataBase2 from disk = 'c:\temp\sysmonbk.dat' with replace"
Note: If you changed the default instance "SSCCMDB," enter "(local)\instance name."
5. Starting the Performance Monitor Service Start the Performance Monitor Service.
Click the Start menu, and click Control Panel. From Control Panel, double-click Administrative Tools. From Administrative Tools, double-click Services to start the Services Snap-in.
Right-click System Monitor Performance Monitor Service, and click Start. Restoring System Monitor - Performance Monitoring Services completes.

Backing up and Restoring DPM
Part III Maintenance 291
9.4. Backing up and Restoring DPM
9.4.1. Backing up Data of DPM When Configuring the Initial
Setup or Changing the Configuration
Save the following data when registering Management Server for DPM or a database to Web Server for DPM, or when changing the configuration from the menu on the DPM Web Console.
Settings for the Web Console Settings on the Web Console Settings window that can be open by clicking Environment Setting in the Web Console menu on the DPM Web Console.
Shared folder path
Select the General tab on the Detailed Settings window that can be open by clicking Detailed Setting in the Settings menu on the DPM Web Console. Settings specified to Shared Folder under Server Information.
Settings for the management server Settings specified to Server Name, IP address, and Port Number on the Management Server Property window that can be open by clicking the icon of the management server displayed on the DPM Web Console and clicking Property.
DPM Administrator Password
IP address of the database server The following registry data (IP address of the database server) HKEY_LOCAL_MACHINE\SOFTWARE\NEC\DeploymentManager\DBSrvIPAddress(REG_SZ)
Others If you change files and registries manually, save the settings.

9 Backup and Restoration
SigmaSystemCenter 2.1 Configuration Guide 292
9.4.2. Backing up Data Updated When Operating DPM
You can back up the data that are updated when operating DPM with the processes, such as registering or deleting a computer, creating a package from the Image Builder or PackageDescriber, and creating, changing, or executing a scenario. If you execute these operations, back up the data with the following procedure on the machine where Management Server for DPM or database is installed.
Note: Log in to the system with a user with the administrator authority and execute this operation.
1. End all processes related to DPM.
Note: Check that: Any scenario is not being executed. If there is any scenario being executed, wait until the scenario is completed.
The DPM Web Console, including other tools of DPM is not started.
2. Stopping the DPM services Click the Start menu, and click Control Panel. From Control Panel, double-click Administrative Tools. From Administrative Tools, double-click Services to start the Services Snap-in. Stop all the services starting with DeploymentManager. Right-click the service name, and click Stop.
3. Backing up data Back up the following data in the directory where DPM is installed. • All files in the Datafile folder • All files in the PXE\Images folder • All files in the linux folder • All files in the Log folder
Note: The default directory is "C:\Program Files\NEC\DeploymentManager." Save the DPM installation folder path because you will need the path when restoring DPM.

Backing up and Restoring DPM
Part III Maintenance 293
• All data in the shared folder
Note: Check the Shared Folder under Server Information by clicking Detailed Setting from the Settings menu on the DPM Web Console, and selecting the General tab on the displayed Detailed Setting window. The default value of the shared folder is "C:\Deploy."
The folder size can be heavy because there are registered package data and OS image files for installation stored to the shared folder; so back up the folder when adding, changing, or deleting the data.
• Backup image files (with extension ".lbr" and ".nvr")
Note: Back up the files only if there is a change from when you backed up the files the last time.
Back up the .nvr file if there is one.
4. Backing up database Run the following command at the command prompt to collect the backup file, DPM.bak.
Note: If the database is installed on other server on which Management Server for DPM is installed, execute this process after restoring Management Server for DPM.
osql.exe -E -S localhost\DPMDBI BACKUP DATABASE DPM TO DISK='DPM.bak' WITH INIT GO
Note: The database uses the following fixed parameters. The instance name: DPMDBI The database name: DPM
The backup files are created in the following folder. Microsoft SQL Server installation folder\Backup The default installation path is "C:\Program Files\Microsoft SQL Server\MSSQL.n\MSSQL." A number of the SQL Server instances are entered in n in MSSQL.n. Substitute the number according to your environment.

9 Backup and Restoration
SigmaSystemCenter 2.1 Configuration Guide 294
5. Backing up data recorded in registry Run the following command at the command prompt to collect the backup file, RegExportDPM.reg, on the machine where Management Server for DPM is installed. regedit /e RegExportDPM.reg "HKEY_LOCAL_MACHINE\SOFTWARE\NEC\DeploymentManager"
Note: The backup files are created in the current directory where you ran the command.
6. Starting the DPM Services Click the Start menu, and click Control Panel. From Control Panel, double-click Administrative Tools. From Administrative Tools, double-click Services to start the Services Snap-in. Stop all the services starting with DeploymentManager. Right-click the service name, and click Start.
Backing up data that is updated when operating DPM completes.
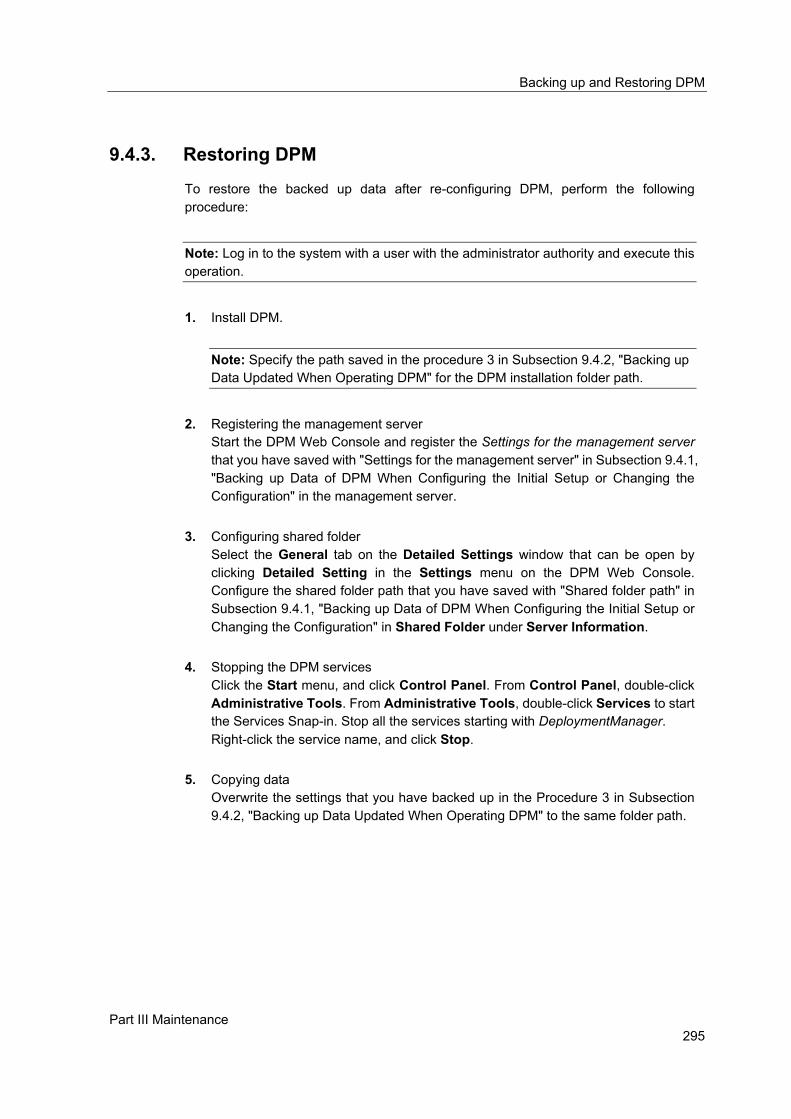
Backing up and Restoring DPM
Part III Maintenance 295
9.4.3. Restoring DPM
To restore the backed up data after re-configuring DPM, perform the following procedure:
Note: Log in to the system with a user with the administrator authority and execute this operation.
1. Install DPM.
Note: Specify the path saved in the procedure 3 in Subsection 9.4.2, "Backing up Data Updated When Operating DPM" for the DPM installation folder path.
2. Registering the management server Start the DPM Web Console and register the Settings for the management server that you have saved with "Settings for the management server" in Subsection 9.4.1, "Backing up Data of DPM When Configuring the Initial Setup or Changing the Configuration" in the management server.
3. Configuring shared folder Select the General tab on the Detailed Settings window that can be open by clicking Detailed Setting in the Settings menu on the DPM Web Console. Configure the shared folder path that you have saved with "Shared folder path" in Subsection 9.4.1, "Backing up Data of DPM When Configuring the Initial Setup or Changing the Configuration" in Shared Folder under Server Information.
4. Stopping the DPM services Click the Start menu, and click Control Panel. From Control Panel, double-click Administrative Tools. From Administrative Tools, double-click Services to start the Services Snap-in. Stop all the services starting with DeploymentManager. Right-click the service name, and click Stop.
5. Copying data Overwrite the settings that you have backed up in the Procedure 3 in Subsection 9.4.2, "Backing up Data Updated When Operating DPM" to the same folder path.

9 Backup and Restoration
SigmaSystemCenter 2.1 Configuration Guide 296
6. Copying database
Overwrite the settings that you have backed up in the Procedure 4 in Subsection 9.4.2, "Backing up Data Updated When Operating DPM" to the same folder path.
Note: The backup files are created in the following folder. Microsoft SQL Server installation folder\Backup The default installation path is "C:\Program Files\Microsoft SQL Server\MSSQL.n\MSSQL." A number of the SQL Server instances are entered in n in MSSQL.n. Substitute the number according to your environment.
7. Checking the settings of the back up files that are copied to the folder
1. Check the properties of the backup files. Right-click the backup file name and click Properties.
2. Check if there is a user that starts with SQL Server 2005 MSSQL in the User List on the Security tab.
3. Click Detailed Settings. If there is the user in the Procedure 2, check that the Allow inheritable permissions from the parent to propagate to this object and all child objects. Include these with entries explicitly defined here check box is selected. If there is not the user, select the check box. If there is no user, select the Allow inheritable permissions from the parent to propagate to this object and all child objects. Include these with entries explicitly defined here check box.
8. Running the restore command Run the following restore command at the command prompt.
Note: If the database is installed on other server on which Management Server for DPM is installed, execute this process after restoring Management Server for DPM.
osql -E -S localhost\DPMDBI RESTORE DATABASE DPM FROM DISK = 'DPM.bak' WITH REPLACE GO
Note: The database uses the following fixed parameters. The instance name: DPMDBI
The database name: DPM

Backing up and Restoring DPM
Part III Maintenance 297
9. Applying backup files
Apply RegExportDPM.reg that you have backed up in the Procedure 5 in Subsection 9.4.2, "Backing up Data Updated When Operating DPM" by the method, such as double-clicking the file from the Explorer.
10. Restoring files and registries If you have changed files and registries manually, apply the saved settings.
11. Starting the DPM Services Click the Start menu, and click Control Panel. From Control Panel, double-click Administrative Tools. From Administrative Tools, double-click Services to start the Services Snap-in. Stop all the services starting with DeploymentManager. Right-click the service name, and click Start.
12. Configuring the DPM Administrator password Start the DPM Web Console, select Set Administrator Password in the Settings menu, and configure the DPM Administrator password.
Restoring DPM completes.

9 Backup and Restoration
SigmaSystemCenter 2.1 Configuration Guide 298
9.5. Backing up and Restoring NEC ESMPRO Manager
9.5.1. Backing up NEC ESMPRO Manager
To back up NEC ESMPRO Manager, follow the procedure below:
1. Logging into NEC ESMPRO Manager Log into NEC ESMPRO Manager with a user that has the Administrator authority.
2. Starting the My Manager screen Click Options on the operation window, click Customize, and click My Manager to open the My Manager screen.
3. Changing the SNMP trap reception setting If you set the SNMP trap reception setting to Use SNMP Trap Service, change the setting to Use own method.
4. Ending applications End all applications related to NEC ESMPRO Manager.
5. Stopping NEC ESMPRO Manager Services If the following compatible products are installed, stop their services. • NEC ESMPRO Agent
And then, click the Start menu, and click Control Panel. From Control Panel, double-click Administrative Tools. From Administrative Tools, double-click Services to start the Services Snap-in. From Services, right-click the following services, and click Stop. • NVBase System Service and related services • Alert Manager Main Service • Alert Manager Socket(S) Service • Alert Manager Socket(R) Service • Alert Manager ALIVE(S) Service • Alert Manager ALIVE(R) Service
Note: The above services may not exist according to circumstances of compatible product installation.
6. Backing up database (files) Back up the following database (files).

Backing up and Restoring NEC ESMPRO Manager
Part III Maintenance 299
• Files in the ESMWORK directory NEC ESMPRO Manager installation folder\ESMWORK directory
Note: Eliminate backing up the \ESMWORK\DATA\Alert folder.
The default installation folder is "C:\Program Files\NEC\SMM."
• Files in the AlertMan directory
- NEC ESMPRO Manager installation folder\AlertMan\Security - NEC ESMPRO Manager installation folder\AlertMan\WORK\SCK - NEC ESMPRO Manager installation folder\AlertMan\WORK\ALV - NEC ESMPRO Manager installation folder\AlertMan\WORK\DATA - NEC ESMPRO Manager installation folder\
AlertMan\Program\AMRLIGHT.INI
Note: The above folders and files may not exist according to circumstances of compatible product installation. The AlertMan folder is created in a directory of a product installed the first in the products with the notification function. For example, if NEC ESMPRO Agent is installed with its default value before installing NEC ESMPRO Manager, the installing folder will be C:\ESM\AlertMan.
7. Backing up registries Back up the following registries.
HKEY_LOCAL_MACHINE\SOFTWARE\NEC\ESMAlertMan keys HKEY_LOCAL_MACHINE\SOFTWARE\NEC\ESMSM keys HKEY_LOCAL_MACHINE\SOFTWARE\NEC\NVBASE keys
8. Saving the data of access authority to the database file and the registry Save the data of the database file and access authority of the registry. If you specify the default user group (Administrator) as an NEC ESMPRO User Group, the settings are as follows:
Administrators Full Control Everyone Read SYSTEM Full Control
9. Restarting the machine

9 Backup and Restoration
SigmaSystemCenter 2.1 Configuration Guide 300
If you changed the SNMP trap reception setting from Use SNMP Trap Service to Use own method in the Procedure 3, restart the machine once, change the setting back, and restart the machine again.
Backing up NEC ESMPRO Manager completes.
9.5.2. Restoring NEC ESMPRO Manager
To restore NEC ESMPRO Manager, perform the following procedure:
1. Logging into NEC ESMPRO Manager Log into NEC ESMPRO Manager with a user that has the Administrator authority.
2. Ending applications End all operating applications regarding NEC ESMPRO Manager, if there are some.
3. Stopping the services of NEC ESMPRO Manager Stop the services of NEC ESMPRO Manager with the procedures 5 in Subsection 9.5.1, "Backing up NEC ESMPRO Manager."
4. Restoring the database (files) Restore the database (files) backed up in the Procedure 6 in Subsection 9.5.1, "Backing up NEC ESMPRO Manager."
5. Restoring the registries Restore the registries backed up in the Procedure 7 in Subsection 9.5.1, "Backing up NEC ESMPRO Manager."
6. Configuring the access authority Configure the access authority that you saved in Procedure 8 in Subsection 9.5.1, "Backing up NEC ESMPRO Manager."
7. Restarting the machine If you changed the SNMP trap reception setting from Use SNMP Trap Service to Use own method in the Procedure 3 in Subsection 9.5.1, "Backing up NEC ESMPRO Manager," restart the machine once, change the setting back, and restart the machine again.
Note: If you restored NEC ESMPRO Manager, start operations after confirming that the system behaves properly.
Restoring NEC ESMPRO Manager completes.

301
AAppppeennddiixx • Appendix A Revision History


303
Appendix A Revision History
Fourth Edition (July 2009): Revised to include the functional enhancements in Update 2.
Added description regarding addition of the mail report policy action
Chapter 1 1.6.2, "Configuring the Mail Reporting"
Added description regarding addition of the retry count and interval for NEC ESMPRO Manager
Chapter 1 1.6.9, "Changing the NEC ESMPRO Manager Retry Count and Interval"
Added description regarding functional enhancement of storage
Chapter 2 2.4.1, "Preparing Storage"
Chapter 3 3.5.1, "Registering a Disk Array (For NEC Storage and Symmetrix)" 3.5.2, "Registering a Disk Array (For CLARiiON)" 3.11.3, "Configuring Settings on the Storage Tab"
Chapter 4 4.8.3, "Configuring Settings on the Storage Tab"
Modified the description of error occurrence depending on existence of a snap shot
Chapter 2 2.10.1, "Creating a Master VM in VirtualCenter"
Chapter 5 5.2.3, "Creating a Linked Clone Template" 5.2.4, "Creating a Disk Clone Template"
Added description of addition of a tag information setting when setting VLAN
Chapter 3 3.3.3, "Adding a VLAN"
Chapter 4 4.4.5, "Configuring Settings on the VLAN Setting Tab"
Added and modified description regarding functional enhancement of policy
Chapter 3 3.9.3, "Adding a Policy" 3.9.5, "Configuring Policy Property Settings" 3.9.6, "Configuring Event Handler Settings of a Policy Monitoring Event" 3.9.7, "Importing and Exporting a Policy"
Added description regarding functional enhancement of collect
Chapter 3 3.10.1, "Checking a Scenario That Can Be Used From SystemProvisioning"3.10.3, "Adding a Local Script"
Added description regarding addition of the load balancer information
Chapter 4 4.4.6, "Configuring Settings on the LB Setting Tab"
Added description of addition of the function to configure NEC ESMPRO Manager and NEC ESMPRO Agent from SigmaSystemCenter
Chapter 4 4.4.9, "Configuring Settings on the ESMPRO/SM Tab"
Added description regarding the power control function by OOB Management
Chapter 2 2.15, "Preparing for the Use of Out-of-Band (OOB) Management"
Chapter 3 3.8, "Enabling Power Control Function by Out-of-Band (OOB) Management"

Appendix A Revision History
SigmaSystemCenter 2.1 Configuration Guide 304
Chapter 8 8.5.3, "Exchanging a Machine"
Third Edition (February 2009): Revised to include the functional enhancements in Update 1.
Added description regarding Cluster and EVC support
Chapter 2 2.9.1, "Setting Up the VMware Environment"
Chapter 6 6.1, "Adding a Virtual Machine Server" 6.2, "Moving a Virtual Machine Server"
Added description regarding supporting Create and Assign Machine by Xen Server
Chapter 2 2.7.5, "Registering a Virtual Machine Server or Virtual Machine to DPM"
Chapter 5 5.6.1, "Configuring Settings on the General Tab" 5.12.2, "Allocating a Resource to a Host" 5.12.3, "Creating a Virtual Machine and Activating the Machine in a Group"
Chapter 6 6.3.1, "About How to Create a Virtual Machine"
Added description regarding addition of the Linked Clone and Disk Clone functions
Chapter 2 2.10.1, "Creating a Master VM in VirtualCenter" 2.12.1, "Creating a Master VM in XenCenter" 2.13.1, "Creating a Master VM on ESXi"
Chapter 5 5.9, "Configuring to Create a Virtual Machine" 5.12.2, "Allocating a Resource to a Host"
Chapter 6 6.4.3, "Creating a Linked Clone Template" 6.4.4, "Creating a Disk Clone Template"
Added sections and description regarding addition of the policy copy function
Chapter 3 3.6, "Creating a Policy" 3.6.2, "Copying a Standard Policy" 3.6.3, "Copying an Existing Policy"
Added description regarding addition of the VM Standard Policy
Chapter 3 3.6, "Creating a Policy"
Changed section configuration regarding improvement of storage setting
Chapter 3 3.5.1 "Registering a Disk Array and Disk Volume" 3.5.2, "Registering a Disk Array" 3.5.3, "Registering a Disk Volume"
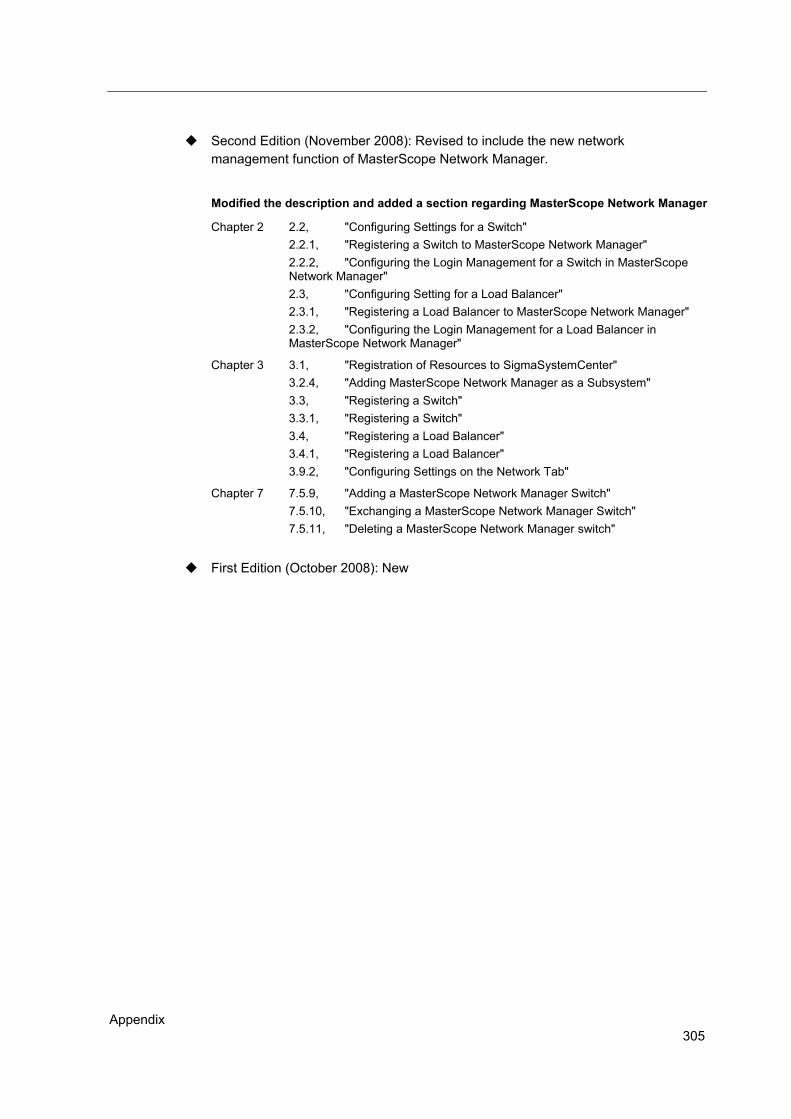
Appendix 305
Second Edition (November 2008): Revised to include the new network
management function of MasterScope Network Manager.
Modified the description and added a section regarding MasterScope Network Manager
Chapter 2 2.2, "Configuring Settings for a Switch" 2.2.1, "Registering a Switch to MasterScope Network Manager" 2.2.2, "Configuring the Login Management for a Switch in MasterScope Network Manager" 2.3, "Configuring Setting for a Load Balancer" 2.3.1, "Registering a Load Balancer to MasterScope Network Manager" 2.3.2, "Configuring the Login Management for a Load Balancer in MasterScope Network Manager"
Chapter 3 3.1, "Registration of Resources to SigmaSystemCenter" 3.2.4, "Adding MasterScope Network Manager as a Subsystem" 3.3, "Registering a Switch" 3.3.1, "Registering a Switch" 3.4, "Registering a Load Balancer" 3.4.1, "Registering a Load Balancer" 3.9.2, "Configuring Settings on the Network Tab"
Chapter 7 7.5.9, "Adding a MasterScope Network Manager Switch" 7.5.10, "Exchanging a MasterScope Network Manager Switch" 7.5.11, "Deleting a MasterScope Network Manager switch"
First Edition (October 2008): New


307
Related Documents