fåëí~ää~íáçå ~åÇ léÉê~íçêDë j~åì~ä MNKOMNQ pfaf`lj mp kÉï ~ë çÑW båÖäáëÜ SIDICOM PS Installation and Operator's Manual

Welcome message from author
This document is posted to help you gain knowledge. Please leave a comment to let me know what you think about it! Share it to your friends and learn new things together.
Transcript
fåëí~ää~íáçå=~åÇ=léÉê~íçêDë=j~åì~ä
MNKOMNQ
pfaf`lj=mp
kÉï=~ë=çÑW==
båÖäáëÜ
=
SIDICOM PS Installation and Operator's Manual
62 59 241 D34072 D3407.201.04.02.02 01.2014
Table of contents Sirona Dental Systems GmbHInstallation and Operator's Manual SIDICOM PS
Table of contents
1 General..................................................................................................................... 3
2 Installing and uninstalling the software..................................................................... 4
2.1 Installing the software ................................................................................... 42.2 Update of DICOM Print Interface 1.5 ............................................................ 42.3 Uninstalling SIDICOM PS ............................................................................. 5
3 Configuring printers .................................................................................................. 6
3.1 Changing the printer settings ........................................................................ 73.2 Changing the film settings............................................................................. 83.3 Adapting the printer matrix ............................................................................ 93.4 Manual printer configuration.......................................................................... 103.5 Setting up a new printer ................................................................................ 10
4 Printing via SIDEXIS ................................................................................................ 12
4.1 Printing an image .......................................................................................... 124.1.1 Print preview ...................................................................................... 134.1.2 Printing a region of interest (ROI) ...................................................... 15
4.2 Printing an exam ........................................................................................... 154.2.1 Print preview ...................................................................................... 17
4.3 Printer queue................................................................................................. 184.4 Printing errors................................................................................................ 184.5 Printout with DICOM Accession No. ............................................................. 18
5 Additional information............................................................................................... 20
5.1 Printer information (informative character only) ............................................ 20

62 59 241 D3407D3407.201.04.02.02 01.2014 3
Sirona Dental Systems GmbH 1 GeneralInstallation and Operator's Manual SIDICOM PS
båÖäáëÜ
1 GeneralSIDICOM PS is a plug-in for SIDEXIS XG.
SIDICOM PS enables X-ray exposures to be printed as single and multi-image printouts as well as printing entire odontograms.
In addition to single images, complete examinations and report pages can be printed.
NOTICE Multi-image print
SIDICOM PS does not support multi-image prints. Examinations can be used as an alternative.

2 Installing and uninstalling the software Sirona Dental Systems GmbH2.1 Installing the software Installation and Operator's Manual SIDICOM PS
2 Installing and uninstalling the software
2.1 Installing the software
1. Insert the CD-ROM included in delivery in the drive. The installation program starts.
2. Then simply proceed as prompted by the installation program. SIDICOM PS was installed.
2.2 Update of DICOM Print Interface 1.5If you have already configured printers in a predecessor version, you can continue using them in SIDICOM PS.
Stopping print servers
1. Right-click the Print Server icon. You can find this icon in the notification area of the Windows taskbar. The context menu opens.
2. Click on "Shutdown". Print Server is stopped.
Preparing an update
1. Copy the configuration files (with the cfg extension) from the "config" program folder to your local file system.
2. Select the menu command "[U]tilities/Configure [s]ystem..." in SIDEXIS XG.
3. Click on the "Service" button.4. In the database area, click on the "Partners" button.5. Delete the entry PRNSRV (SLIDA partner).6. Close the service area.7. Remove the program from the Windows Autostart folder.8. Delete the installation path (standard: C:\Sirona\prnsrv).
Installing the software
1. Install SIDICOM PS 2.0 as described in the Chapter "Installing the software" [ → 4].
2. Copy the backed-up configuration files to the new program folder "config".
NOTICE Licensing
You will be prompted to license the program by entering your registration number during the installation. If you do not license the program, it starts in demo mode.
You can start the program in the demo mode only 200 times.
62 59 241 D34074 D3407.201.04.02.02 01.2014
Sirona Dental Systems GmbH 2 Installing and uninstalling the softwareInstallation and Operator's Manual SIDICOM PS 2.3 Uninstalling SIDICOM PS
båÖäáëÜ
3. Configure the new functionalities as described in the section "Configuring printers" [ → 6].
2.3 Uninstalling SIDICOM PS1. Delete the folder "SIDICOM PS" at the Windows file level.2. Remove the plug-in in the Plug-in manager. Refer to the SIDEXIS XG
Operator's Manual.
NOTICE New functionalities
The old configurations apply only to a film format or an image type.
62 59 241 D3407D3407.201.04.02.02 01.2014 5

3 Configuring printers Sirona Dental Systems GmbHInstallation and Operator's Manual SIDICOM PS
3 Configuring printers
You can set the following parameters via the configuration:
● IP-Adress
– IP address of the printer
● Port
– Printer port
● SIDICOM PS AE Title
– Name of printer server for identification
– The title is freely selectable
● Printer AE Title
– Name of the selected communication partner (printer)
– Obtain the AE title from the respective printer configuration or ask your DICOM administrator.
● Priority
– Priority of print job
– Selection possibilities: High, Medium, Low
● Medium
– Printing medium for the print job
– Selection possibilities: Paper, Clear Film, Blue Film, Current
● Distination
– Magazines for stored films
– Processor for printed films
● Printer resolution
– Resolution of printer
● Supports 12-bit
The maximum resolution SIDEXIS can offer is 12 bits.Likewise, in SIDICOM PS, a maximum of 12 bits can be processed.When using this option, the bit depth is set and transferred from the SIDICOM PS spooler to the printer.
– Activated: Printer supports 12 bits
– Deactivated: Printer does not support 12 bits
● SIDEXIS Header / Footer
NOTICE
The title can generally be freely selected unless your DICOM administrator has assigned other directives in the network.
➢ Contact your DICOM administrator.
62 59 241 D34076 D3407.201.04.02.02 01.2014
Sirona Dental Systems GmbH 3 Configuring printersInstallation and Operator's Manual SIDICOM PS 3.1 Changing the printer settings
båÖäáëÜ
– Activated: The area for the header and page footer is used by SIDEXIS.
– Deactivated: The area for the header and page footer may also be used by the printer.
● Ensure ruler while printing
– Activated: When printing, this ensures that a ruler is visible.
– Deactivated: When printing, a ruler is only also printed if it has been previously activated.
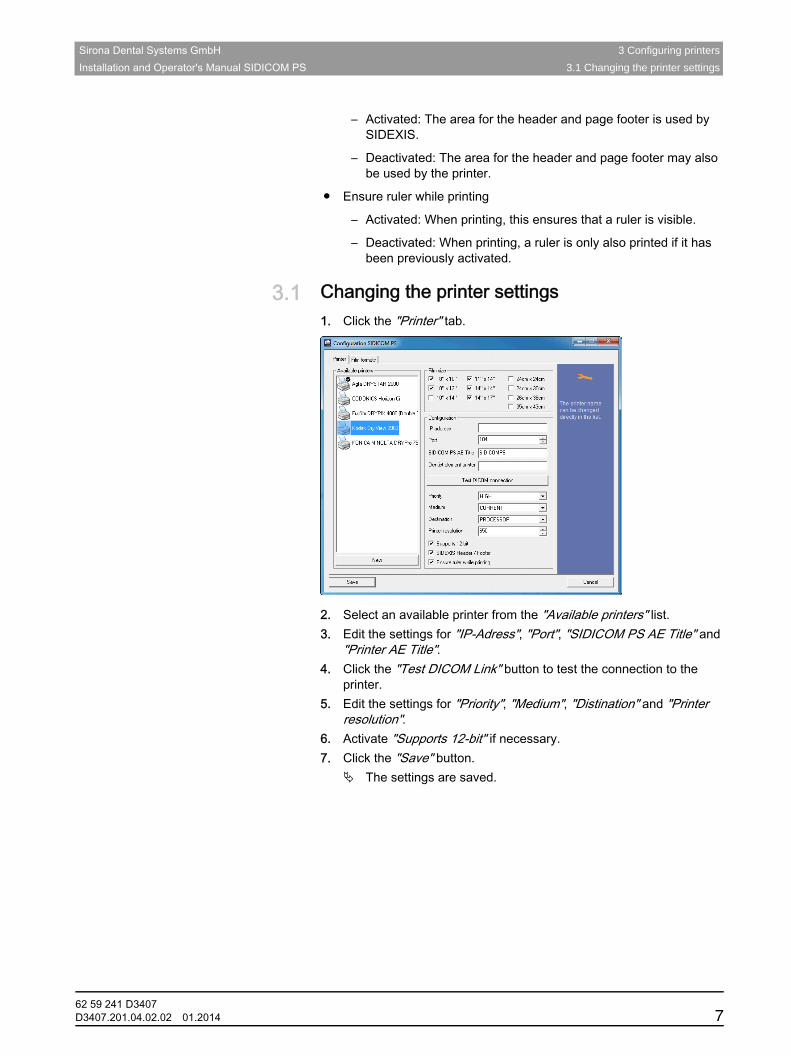
3.1 Changing the printer settings1. Click the "Printer" tab.
2. Select an available printer from the "Available printers" list.3. Edit the settings for "IP-Adress", "Port", "SIDICOM PS AE Title" and
"Printer AE Title".4. Click the "Test DICOM Link" button to test the connection to the
printer.5. Edit the settings for "Priority", "Medium", "Distination" and "Printer
resolution".6. Activate "Supports 12-bit" if necessary.7. Click the "Save" button.
The settings are saved.
62 59 241 D3407D3407.201.04.02.02 01.2014 7
3 Configuring printers Sirona Dental Systems GmbH3.2 Changing the film settings Installation and Operator's Manual SIDICOM PS
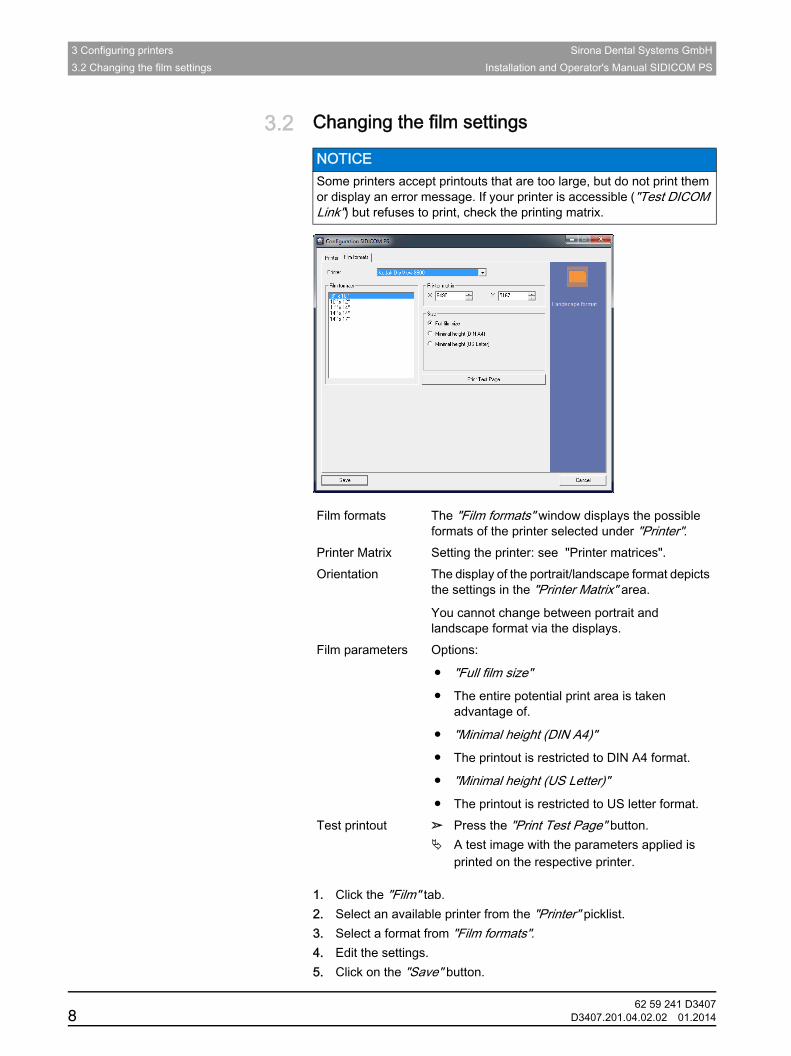
3.2 Changing the film settings
1. Click the "Film" tab.2. Select an available printer from the "Printer" picklist.3. Select a format from "Film formats".4. Edit the settings.5. Click on the "Save" button.
NOTICE Some printers accept printouts that are too large, but do not print them or display an error message. If your printer is accessible ("Test DICOM Link") but refuses to print, check the printing matrix.
Film formats The "Film formats" window displays the possible formats of the printer selected under "Printer".
Printer Matrix Setting the printer: see "Printer matrices".Orientation The display of the portrait/landscape format depicts
the settings in the "Printer Matrix" area.
You cannot change between portrait and landscape format via the displays.
Film parameters Options:
● "Full film size"● The entire potential print area is taken
advantage of.
● "Minimal height (DIN A4)"● The printout is restricted to DIN A4 format.
● "Minimal height (US Letter)"● The printout is restricted to US letter format.
Test printout ➢ Press the "Print Test Page" button. A test image with the parameters applied is
printed on the respective printer.
62 59 241 D34078 D3407.201.04.02.02 01.2014
Sirona Dental Systems GmbH 3 Configuring printersInstallation and Operator's Manual SIDICOM PS 3.3 Adapting the printer matrix
båÖäáëÜ
The settings are saved.
3.3 Adapting the printer matrixObtain the values for the printer matrix from the respective printer configuration or ask your DICOM administrator.
If these values are not available, first check the values of a comparable printer and a comparable film format.
The values set for the printing matrix must be exactly correct in order to ensure high-quality printouts. A deviation of only a few pixels can lead to artifacts and distortions in the printouts.Some printers scale the image if the printing matrix has been set too small or too large. A 1:1 printout can then no longer be ensured. Be sure to check the adjusted values.
Checking the printer matrix
1. Start the SIDICOM PS configuration.2. Click on the "Print Test Page" button.
The image is printed.
3. Measure the ruler imaged on the film manually. Check whether 1cm of the imaged ruler equals exactly 1cm of the actual ruler.
Calculating the printer matrix
Sample calculation
● Old value of printer matrix: 2000
● Length measured on film: 0.9cm for 1cm of the ruler
NOTICE X and Y printer matrices
Check the settings for the X and Y values consecutively according to the principle explained here.
NOTICE Calculating the printer matrix
If the value measured agrees with the imaged ruler, the printer is properly calibrated.
If the measured length deviates from the actual length, the printing matrix must be adjusted accordingly.
➢ Calculate the new value of the printer matrix.➢ Correct the value in the film settings.➢ Check the printer matrix again.
Old matrix valueNew value =Measured length
Actual length*
62 59 241 D3407D3407.201.04.02.02 01.2014 9
3 Configuring printers Sirona Dental Systems GmbH3.4 Manual printer configuration Installation and Operator's Manual SIDICOM PS
3.4 Manual printer configurationOpening the configuration file
➢ Open the centrally stored cfg file for the printer affected (in the <PDATA> folder, subdirectory \Plugins\SIDICOM PS\config\).
Editing the configuration file
1. Create a new section in the cfg file [FILM_...]. (Example: [[FILM_36CMX48CM]])
2. Enter the following values, in accordance with the DICOM Conformance Statement of the printer:
● ID of film size ("FilmSizeID")● Printer resolution in DPI ("ResPrinter")● Printer resolution in pixels ("MatrixX" and "MatrixY")● Orientation (Orientation): If a value of "MatrixX" > value of "MatrixY",
then set to "Landscape", otherwise set to "Portrait".
Example:
Example section for new film size 36cm x 48cm:
[FILM_36CMX48CM]
FilmSizeID=36CMX48CM
ResPrinter=500
MatrixX=8000
MatrixY=6000
Orientation=Landscape
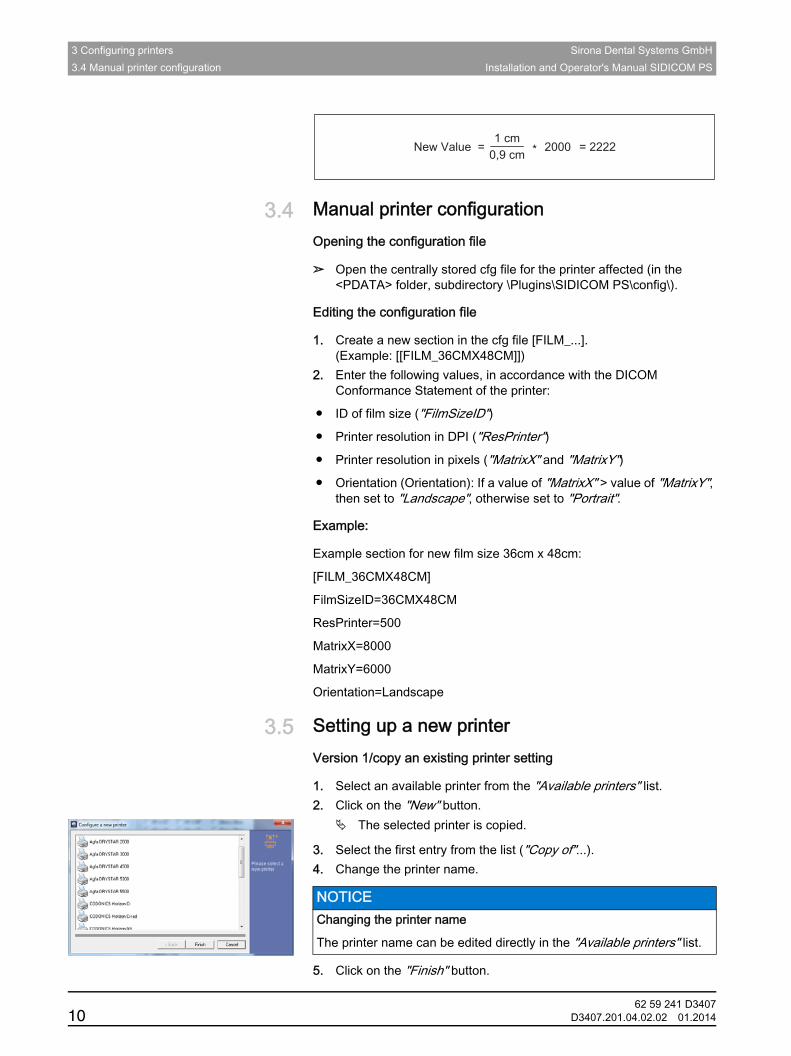
3.5 Setting up a new printerVersion 1/copy an existing printer setting
1. Select an available printer from the "Available printers" list.2. Click on the "New" button.
The selected printer is copied.
3. Select the first entry from the list ("Copy of"...).4. Change the printer name.
5. Click on the "Finish" button.
2000New Value =0,9 cm
1 cm* = 2222
NOTICE Changing the printer name
The printer name can be edited directly in the "Available printers" list.
62 59 241 D340710 D3407.201.04.02.02 01.2014
Sirona Dental Systems GmbH 3 Configuring printersInstallation and Operator's Manual SIDICOM PS 3.5 Setting up a new printer
båÖäáëÜ
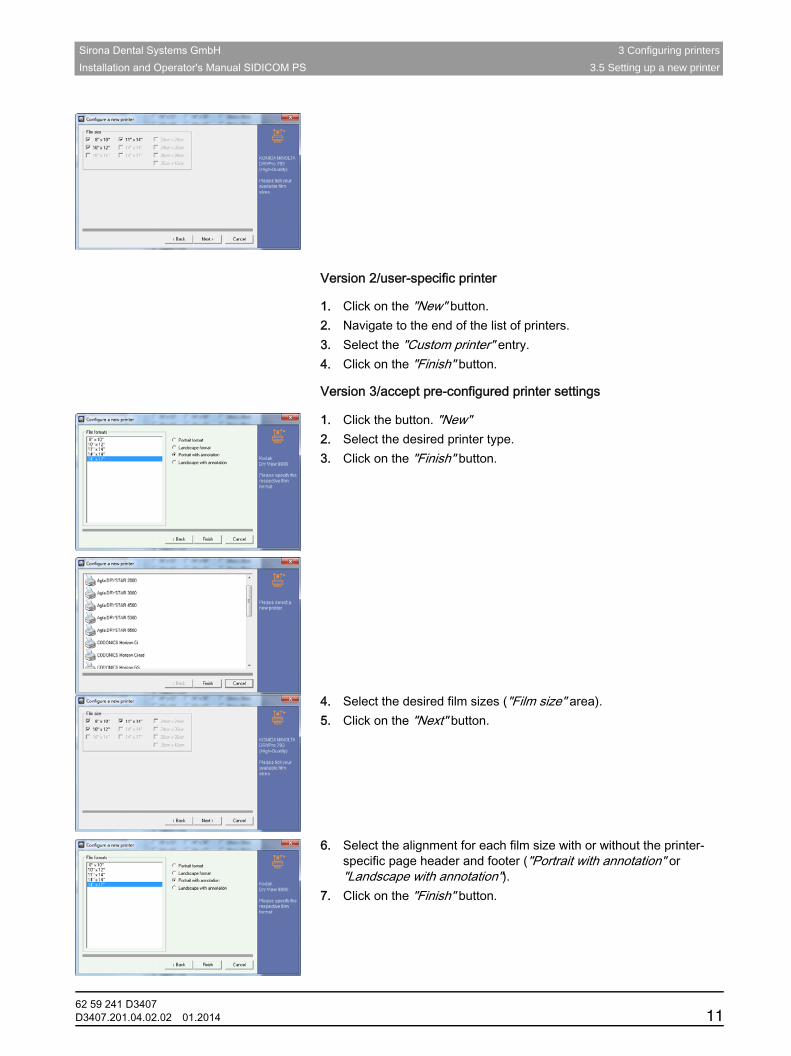
Version 2/user-specific printer
1. Click on the "New" button.2. Navigate to the end of the list of printers.3. Select the "Custom printer" entry.4. Click on the "Finish" button.
Version 3/accept pre-configured printer settings
1. Click the button. "New"2. Select the desired printer type.3. Click on the "Finish" button.
4. Select the desired film sizes ("Film size" area).5. Click on the "Next" button.
6. Select the alignment for each film size with or without the printer-specific page header and footer ("Portrait with annotation" or "Landscape with annotation").
7. Click on the "Finish" button.
62 59 241 D3407D3407.201.04.02.02 01.2014 11

4 Printing via SIDEXIS Sirona Dental Systems GmbH4.1 Printing an image Installation and Operator's Manual SIDICOM PS
4 Printing via SIDEXISYou can open the DICOM print dialog box in SIDEXIS. There are several ways to do this:
● Menu command Exam/Print
– Print to DICOM printer
– DICOM print preview exam
● Menu command Image/Print
– Print to DICOM printer
– DICOM print preview image
4.1 Printing an imageYou have the option of printing a 1:1 or a page-filling image:
Printing SIDEXIS overlays
SIDEXIS overlays must be printed in grayscale. This option can be switched on or off for each printout.
Activation:
➢ Activate the "Print Overlays" check box.
Operation
1. Start printing with the command "Image/Print/Print to DICOM printer". The print dialog box opens.
Print 1:1 The original format is retained. The printout is not adapted to the output format and part of it may be cut off.
Page-filling The printout is adapted to the output format so that the entire page is filled.
62 59 241 D340712 D3407.201.04.02.02 01.2014
Sirona Dental Systems GmbH 4 Printing via SIDEXISInstallation and Operator's Manual SIDICOM PS 4.1 Printing an image
båÖäáëÜ
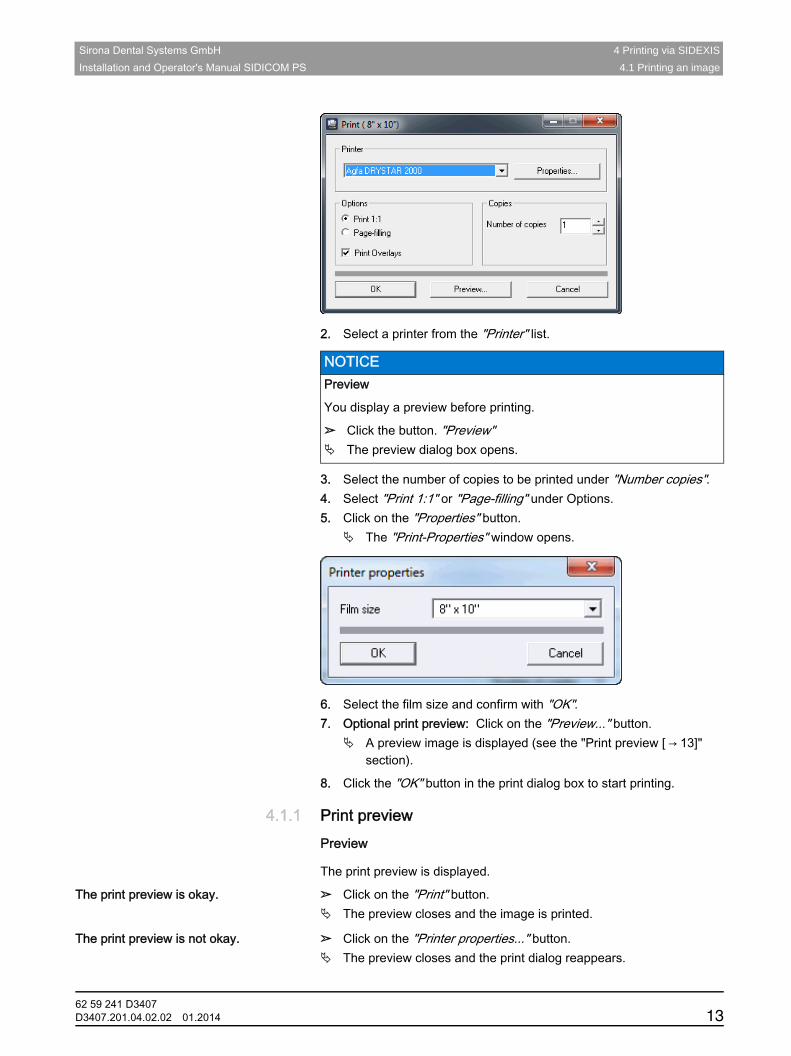
2. Select a printer from the "Printer" list.
3. Select the number of copies to be printed under "Number copies".4. Select "Print 1:1" or "Page-filling" under Options.5. Click on the "Properties" button.
The "Print-Properties" window opens.
6. Select the film size and confirm with "OK".7. Optional print preview: Click on the "Preview..." button.
A preview image is displayed (see the "Print preview [ → 13]" section).
8. Click the "OK" button in the print dialog box to start printing.
4.1.1 Print previewPreview
The print preview is displayed.
The print preview is okay. ➢ Click on the "Print" button. The preview closes and the image is printed.
The print preview is not okay. ➢ Click on the "Printer properties..." button. The preview closes and the print dialog reappears.
NOTICE Preview
You display a preview before printing.
➢ Click the button. "Preview" The preview dialog box opens.
62 59 241 D3407D3407.201.04.02.02 01.2014 13

4 Printing via SIDEXIS Sirona Dental Systems GmbH4.1 Printing an image Installation and Operator's Manual SIDICOM PS
Example screens
Standard image
Region of interest (ROI)
62 59 241 D340714 D3407.201.04.02.02 01.2014
Sirona Dental Systems GmbH 4 Printing via SIDEXISInstallation and Operator's Manual SIDICOM PS 4.2 Printing an exam
båÖäáëÜ
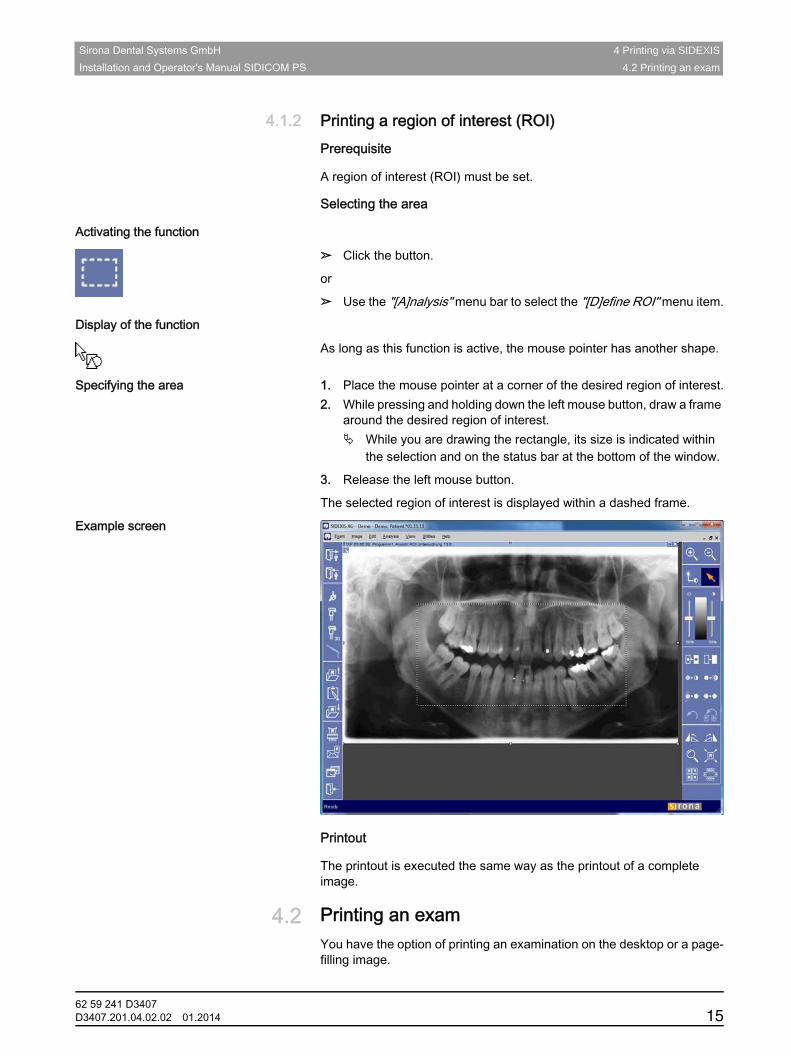
4.1.2 Printing a region of interest (ROI)Prerequisite
A region of interest (ROI) must be set.
Selecting the area
Activating the function
➢ Click the button.
or
➢ Use the "[A]nalysis" menu bar to select the "[D]efine ROI" menu item.
Display of the function
As long as this function is active, the mouse pointer has another shape.
Specifying the area 1. Place the mouse pointer at a corner of the desired region of interest.2. While pressing and holding down the left mouse button, draw a frame
around the desired region of interest. While you are drawing the rectangle, its size is indicated within
the selection and on the status bar at the bottom of the window.
3. Release the left mouse button.
The selected region of interest is displayed within a dashed frame.
Example screen
Printout
The printout is executed the same way as the printout of a complete image.
4.2 Printing an examYou have the option of printing an examination on the desktop or a page-filling image.
62 59 241 D3407D3407.201.04.02.02 01.2014 15
4 Printing via SIDEXIS Sirona Dental Systems GmbH4.2 Printing an exam Installation and Operator's Manual SIDICOM PS
Operation
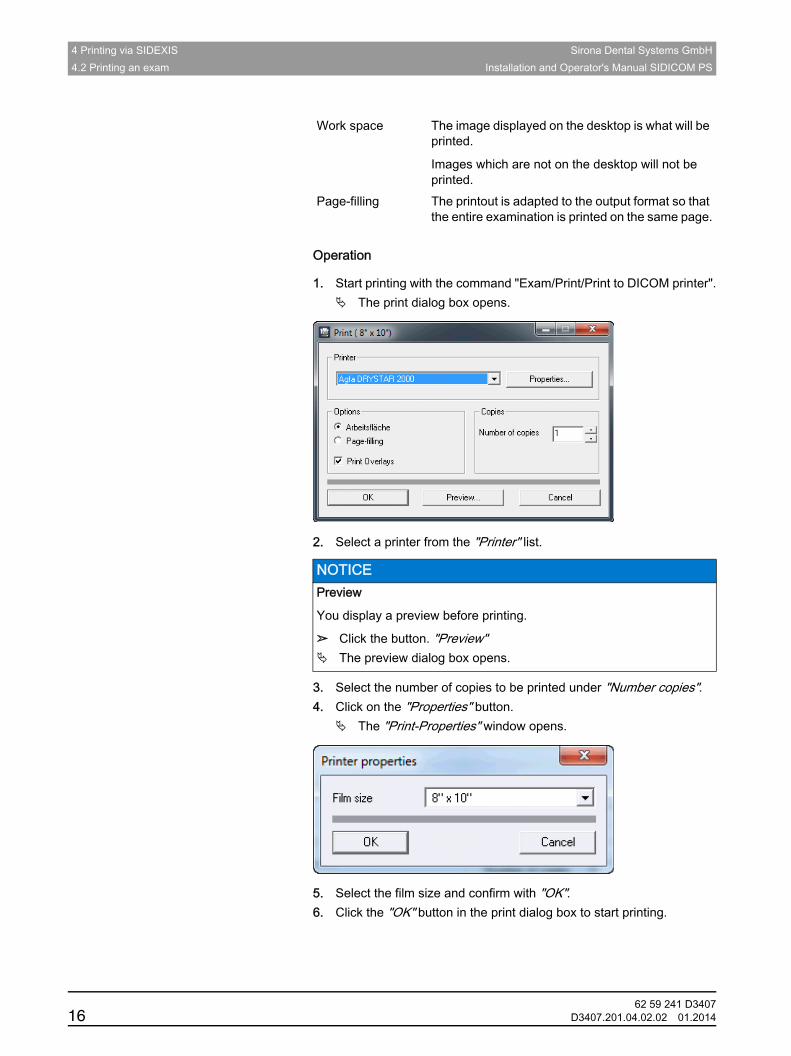
1. Start printing with the command "Exam/Print/Print to DICOM printer". The print dialog box opens.
2. Select a printer from the "Printer" list.
3. Select the number of copies to be printed under "Number copies".4. Click on the "Properties" button.
The "Print-Properties" window opens.
5. Select the film size and confirm with "OK".6. Click the "OK" button in the print dialog box to start printing.
Work space The image displayed on the desktop is what will be printed.
Images which are not on the desktop will not be printed.
Page-filling The printout is adapted to the output format so that the entire examination is printed on the same page.
NOTICE Preview
You display a preview before printing.
➢ Click the button. "Preview" The preview dialog box opens.
62 59 241 D340716 D3407.201.04.02.02 01.2014

Sirona Dental Systems GmbH 4 Printing via SIDEXISInstallation and Operator's Manual SIDICOM PS 4.2 Printing an exam
båÖäáëÜ
4.2.1 Print previewPreview
The print preview is displayed.
The print preview is okay. ➢ Click on the "Print" button. The preview closes and the image is printed.
The print preview is not okay. ➢ Click on the "Printer properties..." button. The preview closes and the print dialog reappears.
Example screen
62 59 241 D3407D3407.201.04.02.02 01.2014 17
4 Printing via SIDEXIS Sirona Dental Systems GmbH4.3 Printer queue Installation and Operator's Manual SIDICOM PS
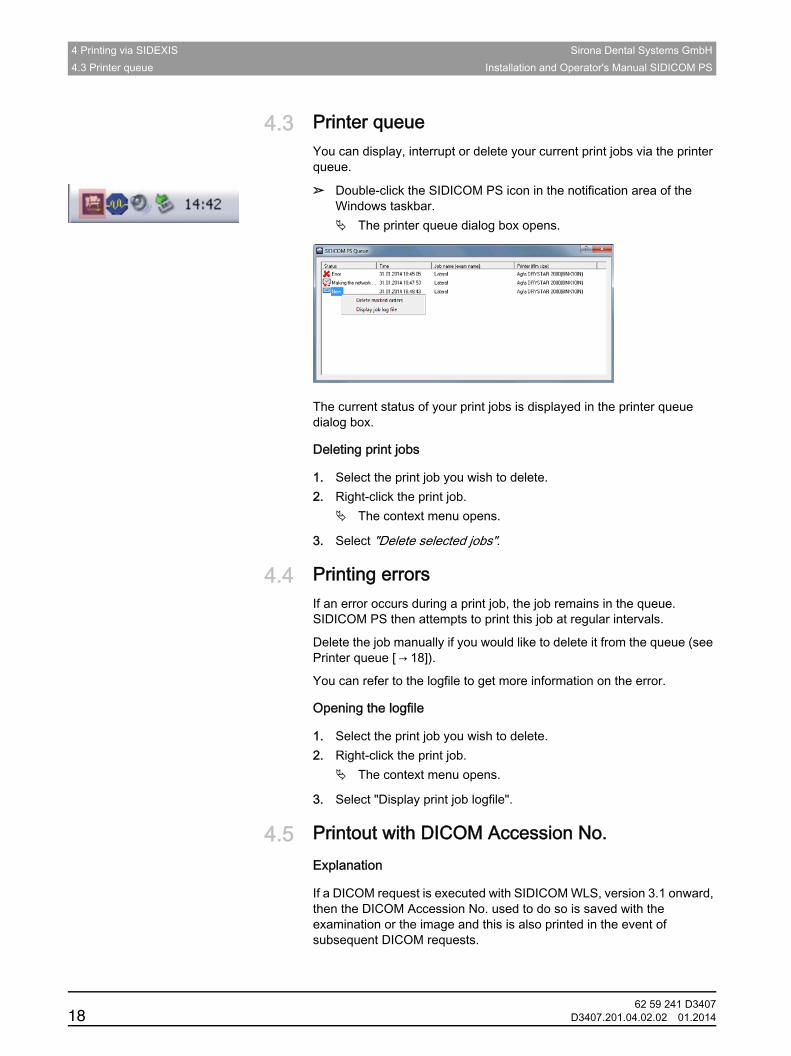
4.3 Printer queueYou can display, interrupt or delete your current print jobs via the printer queue.
➢ Double-click the SIDICOM PS icon in the notification area of the Windows taskbar. The printer queue dialog box opens.
The current status of your print jobs is displayed in the printer queue dialog box.
Deleting print jobs
1. Select the print job you wish to delete.2. Right-click the print job.
The context menu opens.
3. Select "Delete selected jobs".
4.4 Printing errorsIf an error occurs during a print job, the job remains in the queue. SIDICOM PS then attempts to print this job at regular intervals.
Delete the job manually if you would like to delete it from the queue (see Printer queue [ → 18]).
You can refer to the logfile to get more information on the error.
Opening the logfile
1. Select the print job you wish to delete.2. Right-click the print job.
The context menu opens.
3. Select "Display print job logfile".
4.5 Printout with DICOM Accession No.Explanation
If a DICOM request is executed with SIDICOM WLS, version 3.1 onward, then the DICOM Accession No. used to do so is saved with the examination or the image and this is also printed in the event of subsequent DICOM requests.
62 59 241 D340718 D3407.201.04.02.02 01.2014

Sirona Dental Systems GmbH 4 Printing via SIDEXISInstallation and Operator's Manual SIDICOM PS 4.5 Printout with DICOM Accession No.
båÖäáëÜ
Printout
The Accession No. can be found in the respective image title in the following format:
"<Image type> <Date> <Time> Acc.No. <Saved Accession No.>"
62 59 241 D3407D3407.201.04.02.02 01.2014 19

62 59 241 D340720 D3407.201.04.02.02 01.2014
5 Additional information Sirona Dental Systems GmbH5.1 Printer information (informative character only) Installation and Operator's Manual SIDICOM PS
5 Additional information
5.1 Printer information (informative character only)The compatibility with printers is regulated by the corresponding DICOM conformance statements.Informative character
Sirona is aware that the following printers function successfully with SIDICOM PS:
● Fujifilm Drypix 7000 (successfully tested at the Sirona laboratory)
● Kodak 8900
● Kodak 8300 (successfully tested at the Sirona laboratory)
● Agfa Drystar 5302
● Agfa Drystar 5300
● Agfa Drystar 4500
NOTICE Informative character
Since not all printers were tested at the Sirona laboratory, no liability whatsoever can be assumed for their successful start-up. The following information is therefore of a purely informative character.

tÉ=êÉëÉêîÉ=íÜÉ=êáÖÜí=íç=ã~âÉ=~åó=~äíÉê~íáçåë=ïÜáÅÜ=ã~ó=ÄÉ=êÉèìáêÉÇ=ÇìÉ=íç=íÉÅÜåáÅ~ä=áãéêçîÉãÉåíëK
«=páêçå~=aÉåí~ä=póëíÉãë=dãÄe=OMNQ péê~ÅÜÉW ÉåÖäáëÅÜ mêáåíÉÇ=áå=dÉêã~åóaPQMTKOMNKMQKMOKMO MNKOMNQ ûKJkêKW= NNU=RPP
páêçå~=aÉåí~ä=póëíÉãë=dãÄeáå=íÜÉ=rp^W
c~Äêáâëíê~≈É=PNaJSQSOR=_ÉåëÜÉáãdÉêã~åóïïïKëáêçå~KÅçã
páêçå~=aÉåí~ä=póëíÉãë=ii`QUPR=páêçå~=aêáîÉI=pìáíÉ=NMM`Ü~êäçííÉI=k`=OUOTPrp^
lêÇÉê=kç SO=RV=OQN=aPQMT
Related Documents