Shower & Spa Systems Waterproofing System Solutions for tiled wet rooms www.wedi.com.au NZ AU

Welcome message from author
This document is posted to help you gain knowledge. Please leave a comment to let me know what you think about it! Share it to your friends and learn new things together.
Transcript

Shower & Spa SystemsWaterproofing System Solutions for tiled wet rooms
www.wedi.com.auNZAU
01
03
04
2
02
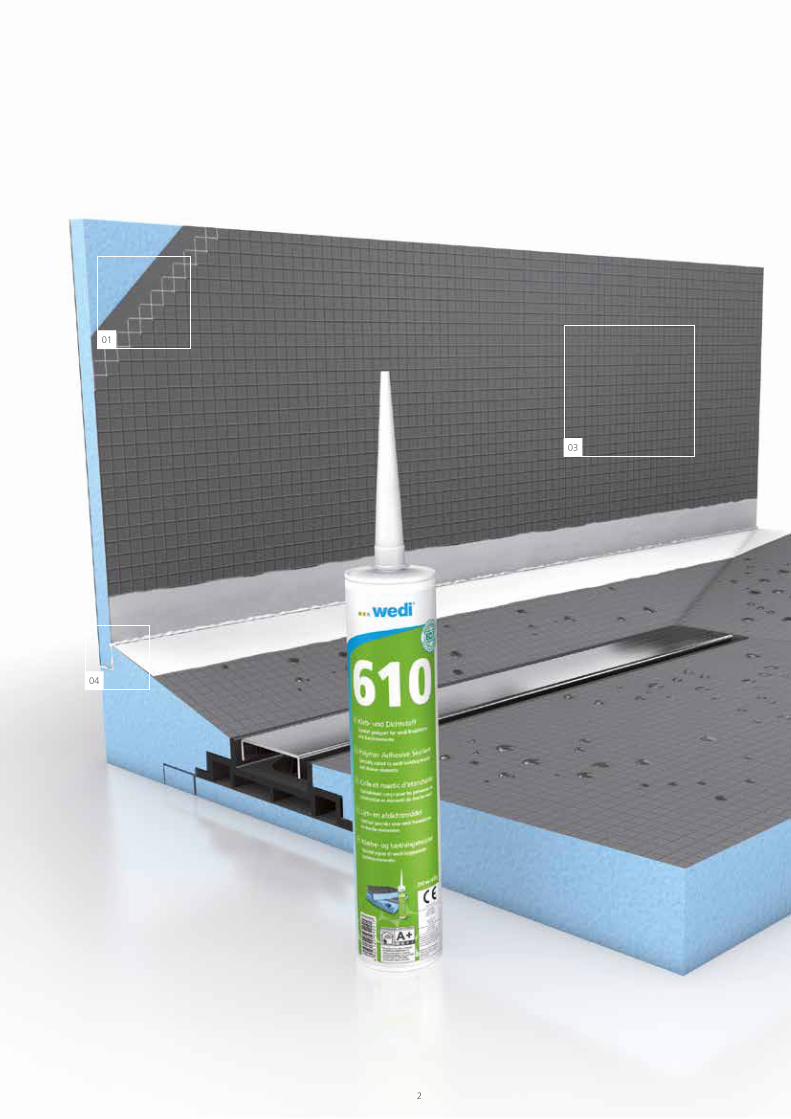
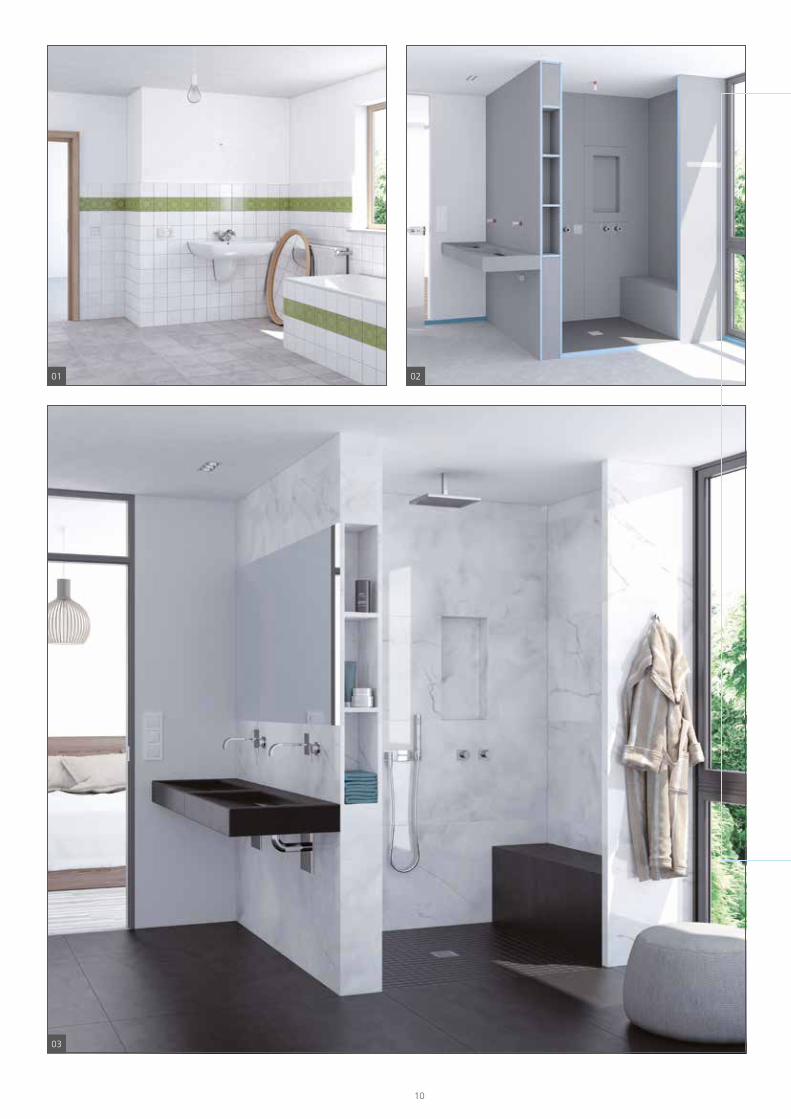
03 All building board systems
have great heat insulation
properties, save energy costs
and provide long-term protec-
tion against mould due to its
inorganic nature and ability to
safely waterproof.
04 wedi Building Boards can be
safely adhered and sealed in
assemblies using wedi 610
Adhesive Sealant: strong
reinforcement, bond and wa-
terproofing with virtually no
build up as with conventional
taping. As no other seal is
necessary, craftsmen benefit
from increased protection ac-
companied by a shorter surface
preparation time before tiling
starts.
01 wedi Building Boards‘ rein-
forced cement resin surface of-
fers a superior bond surface to
virtually any tile and stone or
tile adhesive. No delamination,
no surprises.
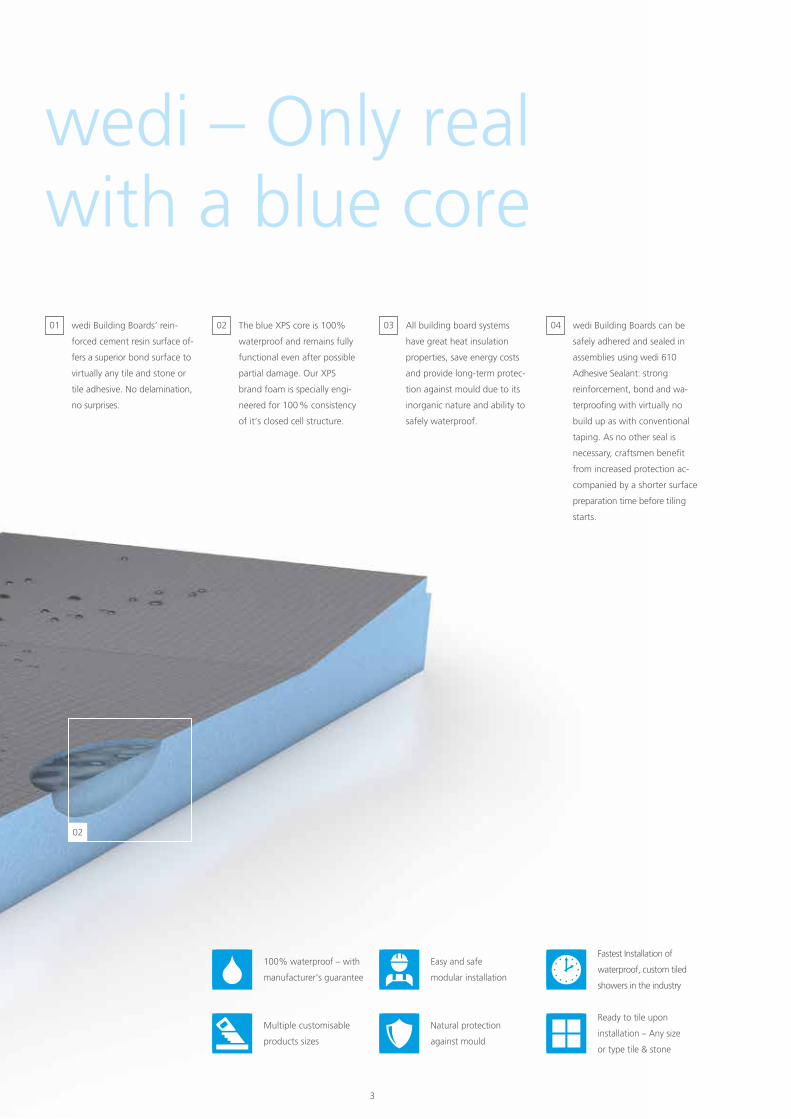
02 The blue XPS core is 100%
waterproof and remains fully
functional even after possible
partial damage. Our XPS
brand foam is specially engi-
neered for 100 % consistency
of it‘s closed cell structure.
wedi – Only real with a blue core
32
100% waterproof – with
manufacturer‘s guarantee
Multiple customisable
products sizes
Easy and safe
modular installation
Natural protection
against mould
Fastest Installation of
waterproof, custom tiled
showers in the industry
Ready to tile upon
installation – Any size
or type tile & stone
4
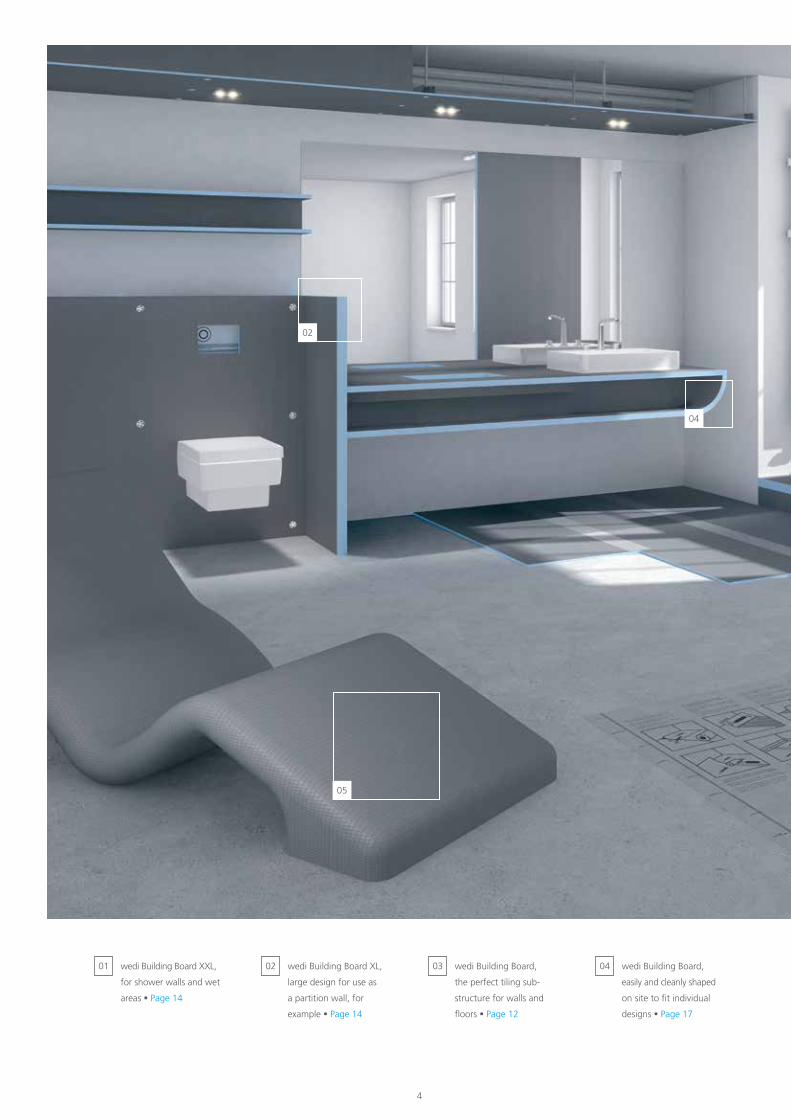
01 wedi Building Board XXL,
for shower walls and wet
areas Page 14
02 wedi Building Board XL,
large design for use as
a partition wall, for
example Page 14
03 wedi Building Board,
the perfect tiling sub-
structure for walls and
floors Page 12
04 wedi Building Board,
easily and cleanly shaped
on site to fit individual
designs Page 17
05
04
02
4 5
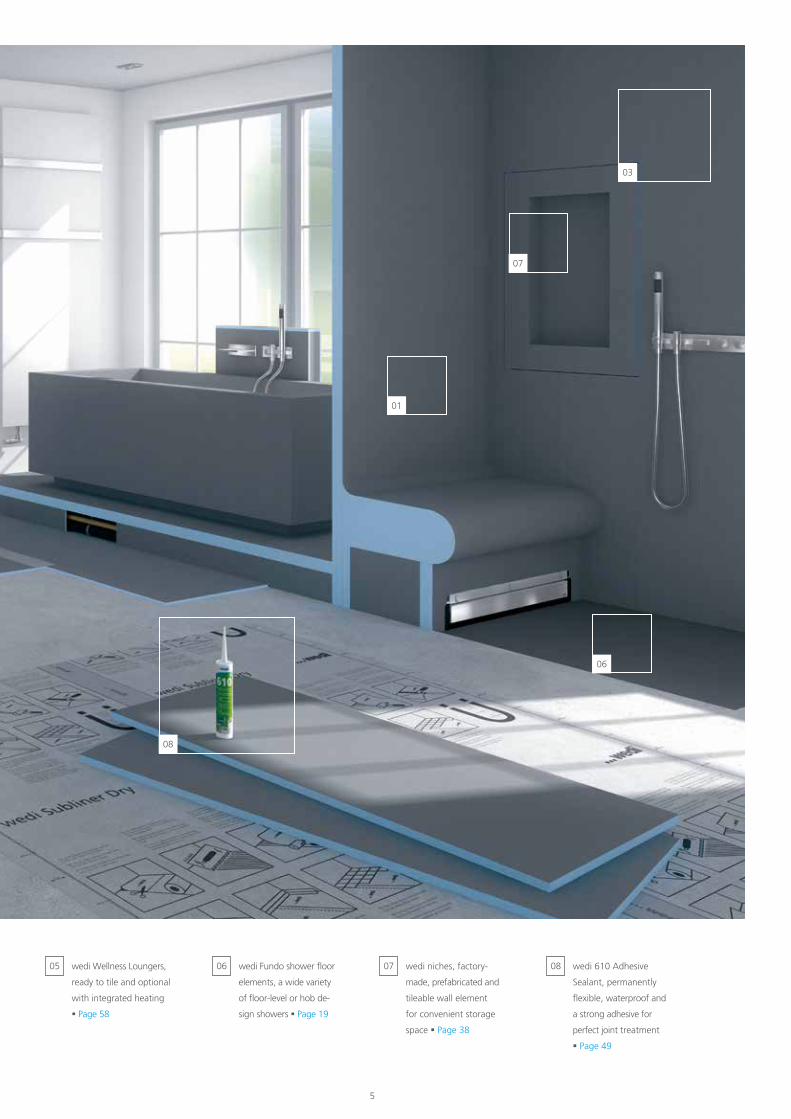
05 wedi Wellness Loungers,
ready to tile and optional
with integrated heating
Page 58
06 wedi Fundo shower floor
elements, a wide variety
of floor-level or hob de-
sign showers Page 19
07 wedi niches, factory-
made, prefabricated and
tileable wall element
for convenient storage
space Page 38
08 wedi 610 Adhesive
Sealant, permanently
flexible, waterproof and
a strong adhesive for
perfect joint treatment
Page 49
03
01
06
08
07
6
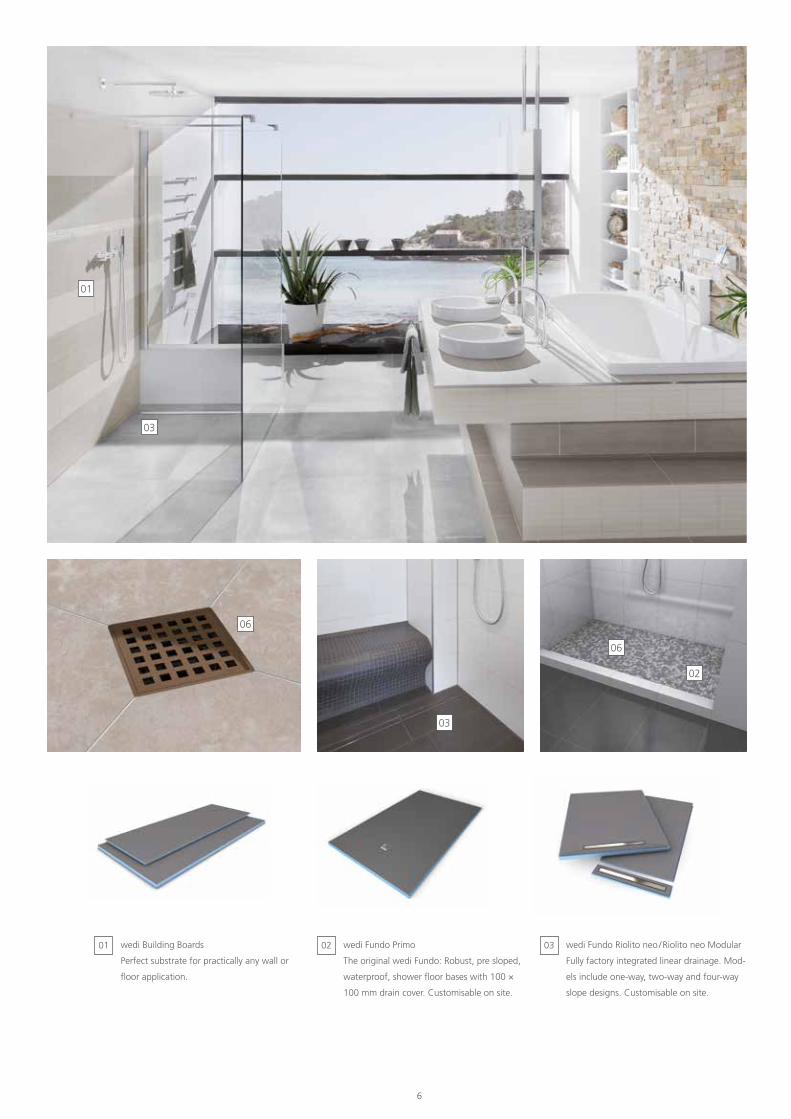
02 wedi Fundo Primo
The original wedi Fundo: Robust, pre sloped,
waterproof, shower floor bases with 100 ×
100 mm drain cover. Customisable on site.
0301 wedi Fundo Riolito neo / Riolito neo Modular
Fully factory integrated linear drainage. Mod-
els include one-way, two-way and four-way
slope designs. Customisable on site.
wedi Building Boards
Perfect substrate for practically any wall or
floor application.
03
06
03
06
02
01
6 7
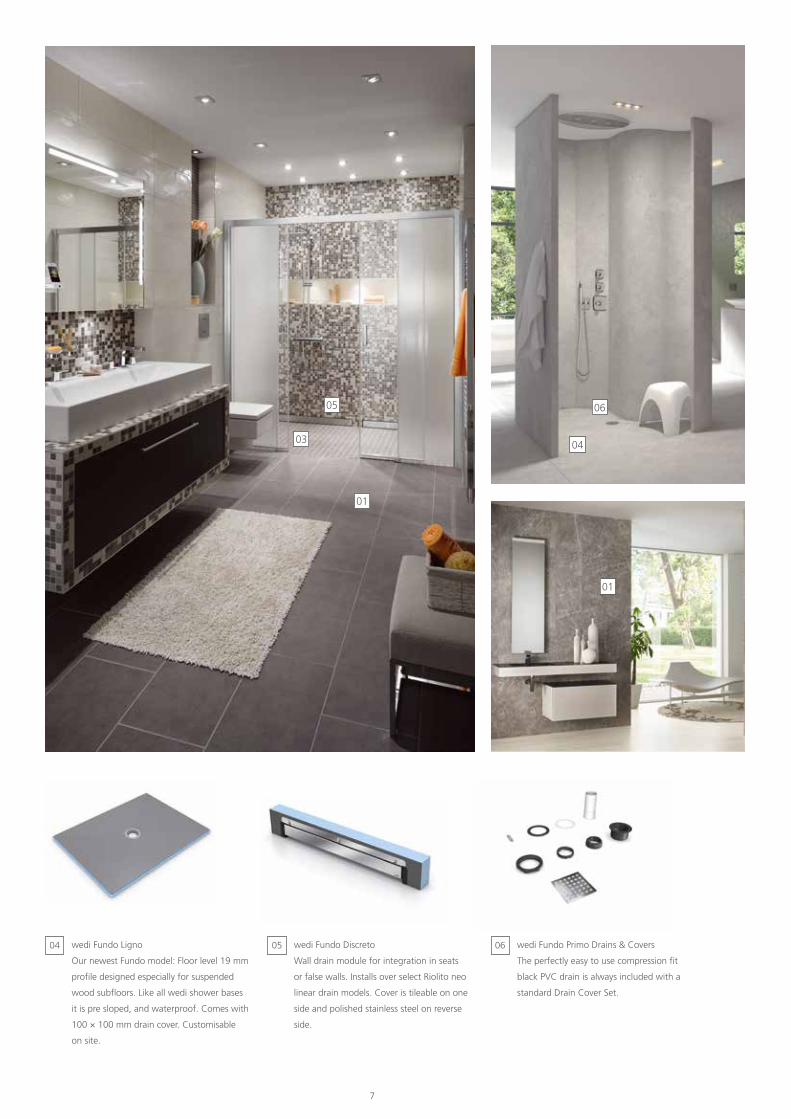
05 wedi Fundo Discreto
Wall drain module for integration in seats
or false walls. Installs over select Riolito neo
linear drain models. Cover is tileable on one
side and polished stainless steel on reverse
side.
04 06wedi Fundo Ligno
Our newest Fundo model: Floor level 19 mm
profile designed especially for suspended
wood subfloors. Like all wedi shower bases
it is pre sloped, and waterproof. Comes with
100 × 100 mm drain cover. Customisable
on site.
wedi Fundo Primo Drains & Covers
The perfectly easy to use compression fit
black PVC drain is always included with a
standard Drain Cover Set.
03 04
01
0605
01
8
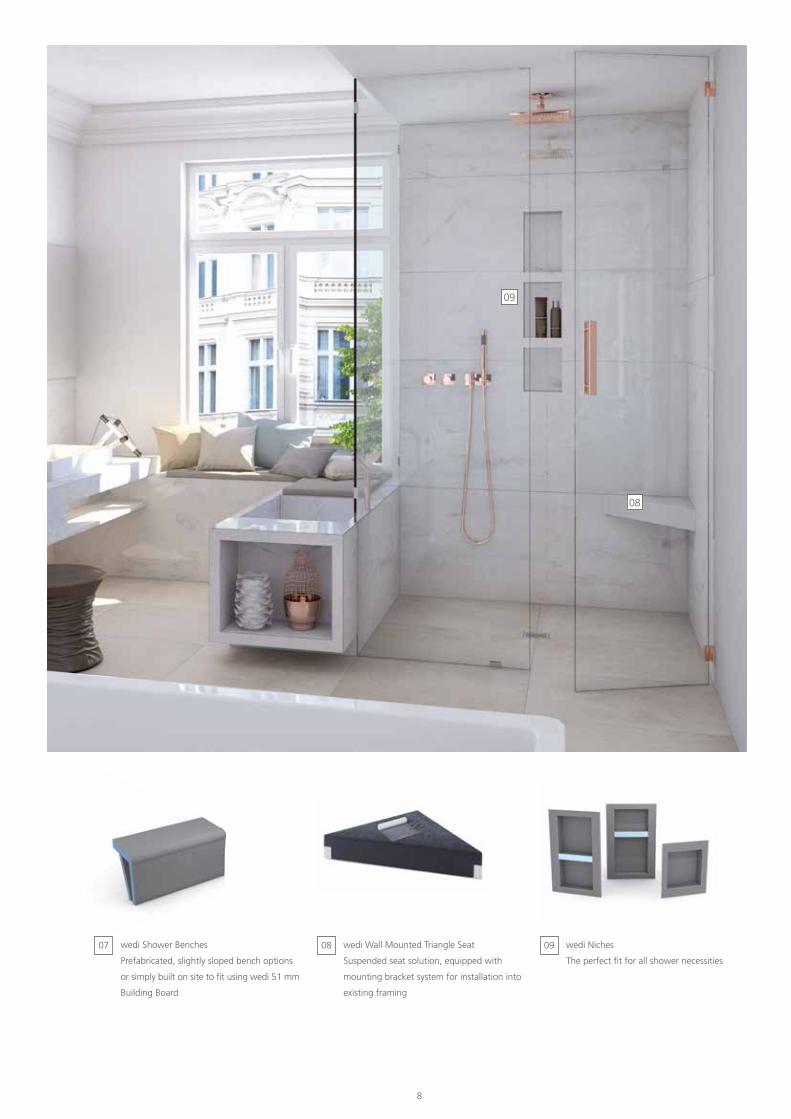
07 wedi Shower Benches
Prefabricated, slightly sloped bench options
or simply built on site to fit using wedi 51 mm
Building Board
08 wedi Wall Mounted Triangle Seat
Suspended seat solution, equipped with
mounting bracket system for installation into
existing framing
09 wedi Niches
The perfect fit for all shower necessities
09
08
8 9
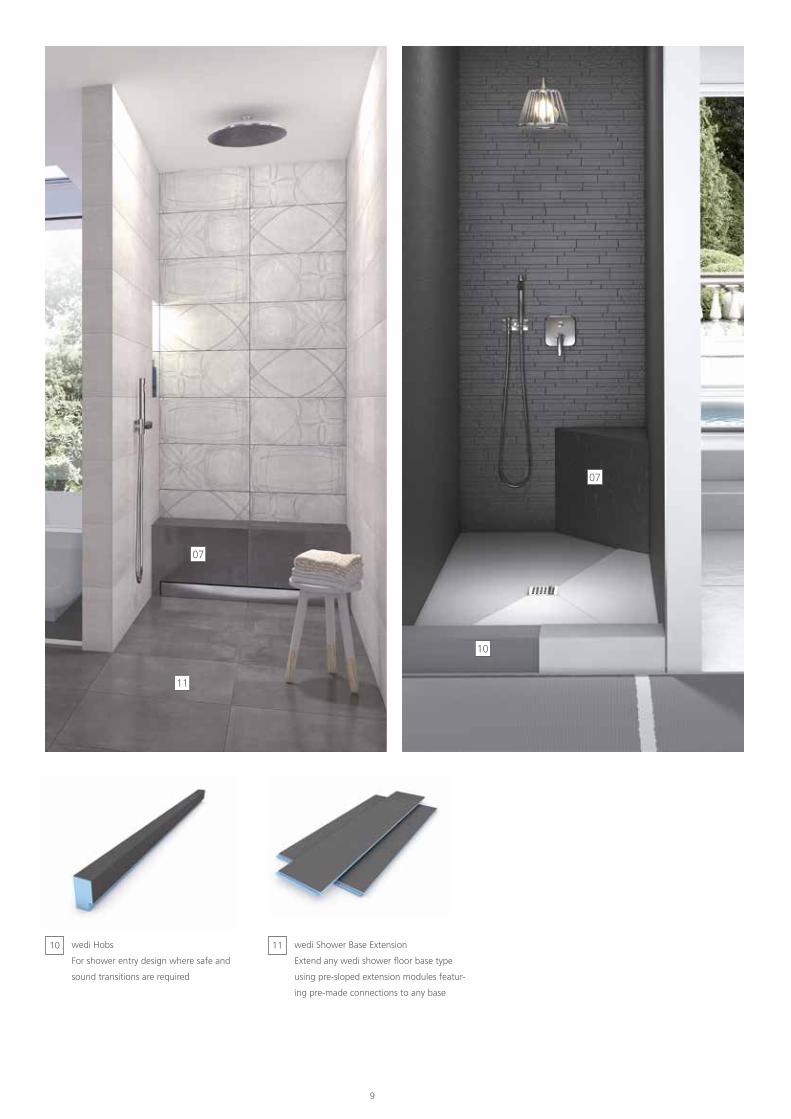
10 wedi Hobs
For shower entry design where safe and
sound transitions are required
11 wedi Shower Base Extension
Extend any wedi shower floor base type
using pre-sloped extension modules featur-
ing pre-made connections to any base
07
07
10
11
10
01 02
03
10 11
The Ultimate Tile Backerboard
wedi Building Boards are so much more than a simple tile backer board and offer endless installation
opportunities. Available in a wide variety of thicknesses and sizes, they are compatible with virtually
any substructure. wedi Building Boards are lightweight, internally waterproof and dimensionally stable,
making them fast, clean and simple to work with. The blue waterproof core is CFC- and HBCD free,
made from waterproof extruded polystyrene foam, reinforced with fiberglass mesh on both sides and
coated with synthetic polymer resin mortar which fully embeds the mesh layer resulting in the board‘s
strength and the ability to develop highest adhesion strength to virtually any type of Tile Adhesive. The
embedded mesh eliminates the risk of delamination of installation layers.
The wedi Building Board combines the benefits of the latest manufacturing technology and material
quality with sound and traditional benefits our trades enjoy. wedi Building Boards are waterproof,
lightweight, easy and clean to cut and still incredibly strong and bond friendly for use with any type
of Tile Adhesive application. The wedi Building Board can be tiled with all types of ceramic, glass or
stone tile whether they are mosaic or large format tiles. Especially large and thin tile benefits of the
durability of the wedi Building Board and the even surface it provides.
Building Board Applications
12
100 % waterproof blue core, made from CFC-free,
HBCD-free extruded polystyrene closed cell foam
Available in multiple thicknesses and sizes
Compatible with virtually any stable substructure
Versatile, limitless installation capabilities
Strong, due to cement resin with embedded
mesh reinforcement – no chance for delamination
Superior bond to any tile using any Tile Adhesive
on cement or epoxy basis
Extremely light weight, easy and clean to cut
Includes thermal insulating properties
Protects against mould and mildew naturally
Perfect, even surface for mosaics, as well
as large size or thin body tile
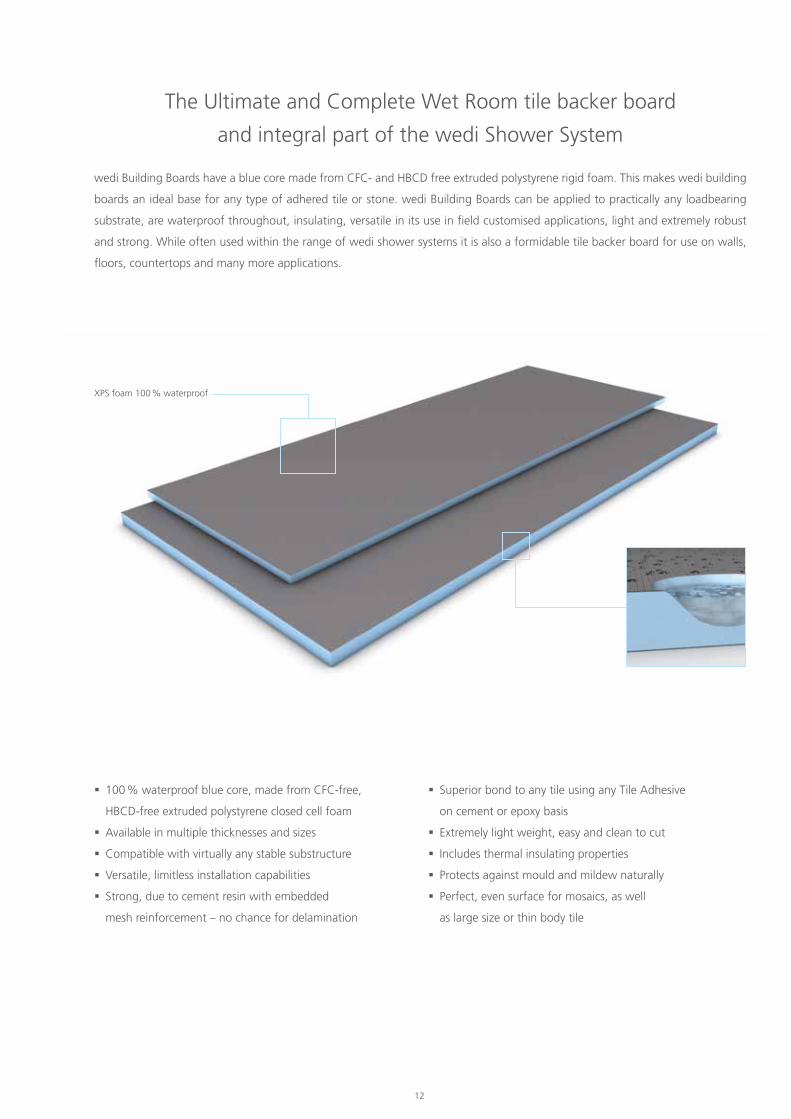
XPS foam 100 % waterproof
The Ultimate and Complete Wet Room tile backer board
and integral part of the wedi Shower System
wedi Building Boards have a blue core made from CFC- and HBCD free extruded polystyrene rigid foam. This makes wedi building
boards an ideal base for any type of adhered tile or stone. wedi Building Boards can be applied to practically any loadbearing
substrate, are waterproof throughout, insulating, versatile in its use in field customised applications, light and extremely robust
and strong. While often used within the range of wedi shower systems it is also a formidable tile backer board for use on walls,
floors, countertops and many more applications.
12 13
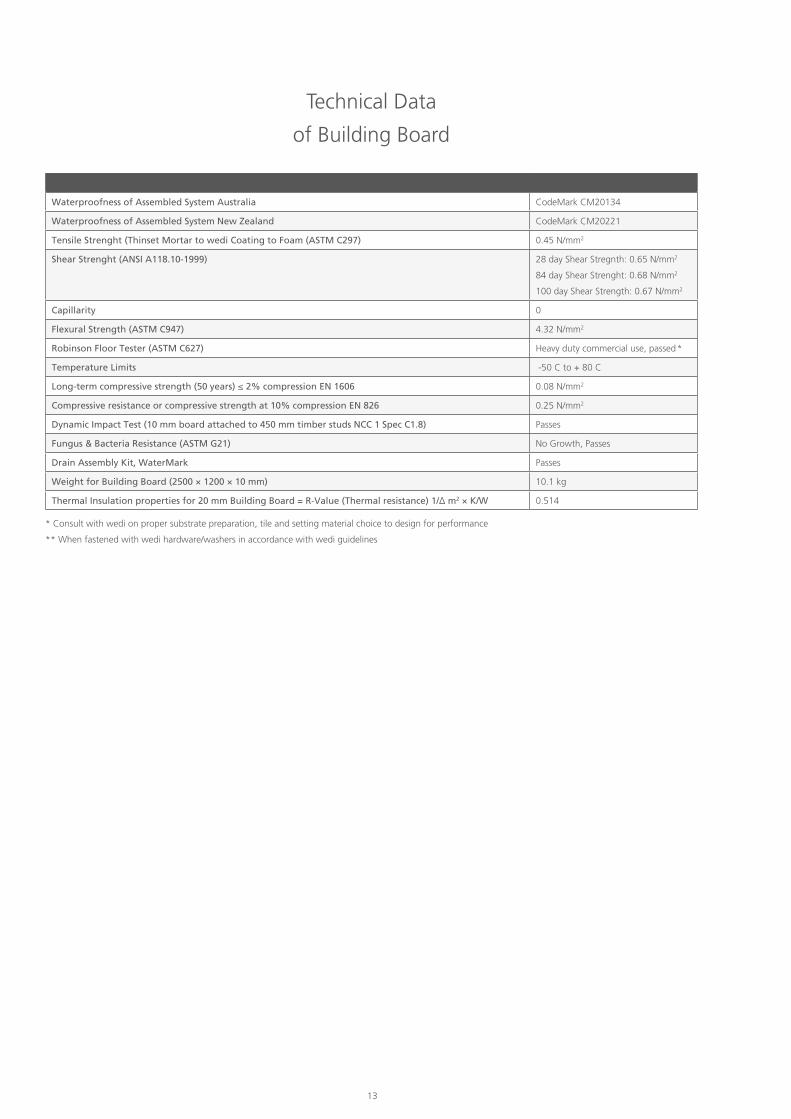
Technical Data
of Building Board
Waterproofness of Assembled System Australia CodeMark CM20134
Waterproofness of Assembled System New Zealand CodeMark CM20221
Tensile Strenght (Thinset Mortar to wedi Coating to Foam (ASTM C297) 0.45 N/mm2
Shear Strenght (ANSI A118.10-1999) 28 day Shear Stregnth: 0.65 N/mm2
84 day Shear Strenght: 0.68 N/mm2
100 day Shear Strength: 0.67 N/mm2
Capillarity 0
Flexural Strength (ASTM C947) 4.32 N/mm2
Robinson Floor Tester (ASTM C627) Heavy duty commercial use, passed *
Temperature Limits -50 C to + 80 C
Long-term compressive strength (50 years) ≤ 2% compression EN 1606 0.08 N/mm2
Compressive resistance or compressive strength at 10% compression EN 826 0.25 N/mm2
Dynamic Impact Test (10 mm board attached to 450 mm timber studs NCC 1 Spec C1.8) Passes
Fungus & Bacteria Resistance (ASTM G21) No Growth, Passes
Drain Assembly Kit, WaterMark Passes
Weight for Building Board (2500 × 1200 × 10 mm) 10.1 kg
Thermal Insulation properties for 20 mm Building Board = R-Value (Thermal resistance) 1/Δ m2 × K/W 0.514
* Consult with wedi on proper substrate preparation, tile and setting material choice to design for performance
** When fastened with wedi hardware/washers in accordance with wedi guidelines
14
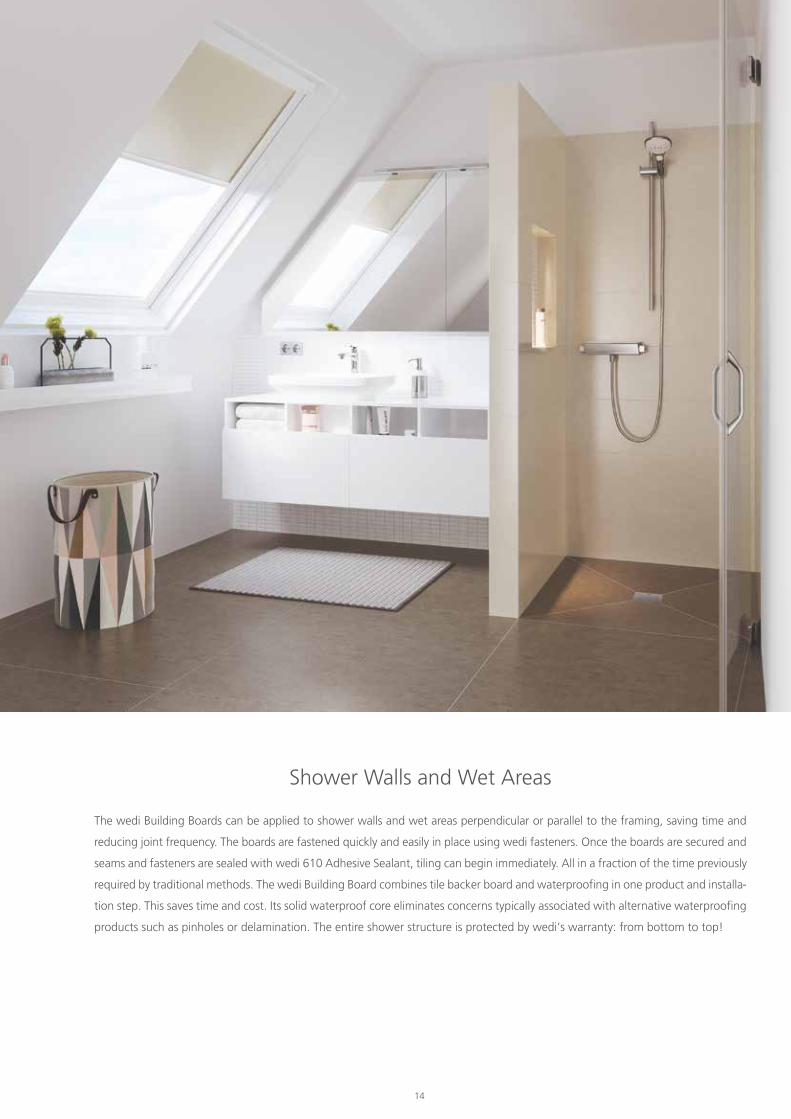
Shower Walls and Wet Areas
The wedi Building Boards can be applied to shower walls and wet areas perpendicular or parallel to the framing, saving time and
reducing joint frequency. The boards are fastened quickly and easily in place using wedi fasteners. Once the boards are secured and
seams and fasteners are sealed with wedi 610 Adhesive Sealant, tiling can begin immediately. All in a fraction of the time previously
required by traditional methods. The wedi Building Board combines tile backer board and waterproofing in one product and installa-
tion step. This saves time and cost. Its solid waterproof core eliminates concerns typically associated with alternative waterproofing
products such as pinholes or delamination. The entire shower structure is protected by wedi‘s warranty: from bottom to top!
14 15
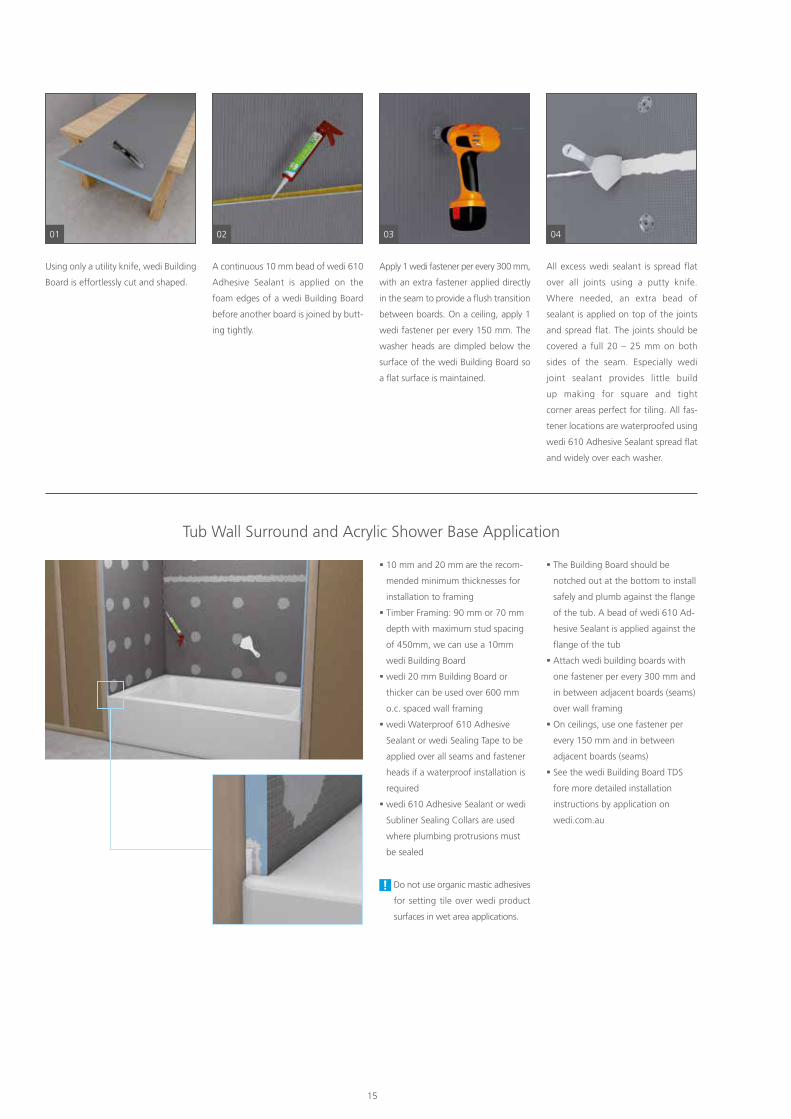
Tub Wall Surround and Acrylic Shower Base Application
10 mm and 20 mm are the recom-
mended minimum thicknesses for
installation to framing
Timber Framing: 90 mm or 70 mm
depth with maximum stud spacing
of 450mm, we can use a 10mm
wedi Building Board
wedi 20 mm Building Board or
thicker can be used over 600 mm
o.c. spaced wall framing
wedi Waterproof 610 Adhesive
Sealant or wedi Sealing Tape to be
applied over all seams and fastener
heads if a waterproof installation is
required
wedi 610 Adhesive Sealant or wedi
Subliner Sealing Collars are used
where plumbing protrusions must
be sealed
The Building Board should be
notched out at the bottom to install
safely and plumb against the flange
of the tub. A bead of wedi 610 Ad-
hesive Sealant is applied against the
flange of the tub
Attach wedi building boards with
one fastener per every 300 mm and
in between adjacent boards (seams)
over wall framing
On ceilings, use one fastener per
every 150 mm and in between
adjacent boards (seams)
See the wedi Building Board TDS
fore more detailed installation
instructions by application on
wedi.com.au
Do not use organic mastic adhesives
for setting tile over wedi product
surfaces in wet area applications.
01 02
Using only a utility knife, wedi Building
Board is effortlessly cut and shaped.
A continuous 10 mm bead of wedi 610
Adhesive Sealant is applied on the
foam edges of a wedi Building Board
before another board is joined by butt-
ing tightly.
03 04
Apply 1 wedi fastener per every 300 mm,
with an extra fastener applied directly
in the seam to provide a flush transition
between boards. On a ceiling, apply 1
wedi fastener per every 150 mm. The
washer heads are dimpled below the
surface of the wedi Building Board so
a flat surface is maintained.
All excess wedi sealant is spread flat
over all joints using a putty knife.
Where needed, an extra bead of
sealant is applied on top of the joints
and spread flat. The joints should be
covered a full 20 – 25 mm on both
sides of the seam. Especially wedi
joint sealant provides little build
up making for square and tight
corner areas perfect for tiling. All fas-
tener locations are waterproofed using
wedi 610 Adhesive Sealant spread flat
and widely over each washer.

16
01 02 03
0504
Fit the support in the wall area. Apply wedi 610 Adhesive Sealant ad-
hesive sealant along the top edges of
the building boards.
Sit the elements under the edges of the bathtub and make the necessary ad-
justments.
Assembly is also possible without an inspection window. If required, an inspection
opening can be created at any time.
Adjust the height of the feet using an open-jawed spanner (size 17) or pipe
wrench so that the wedi bathboard sits securely under the edge of the bathtub.
wedi Bathboard
Bathtub cladding
The wedi Bathboard cladding – made of the 20 mm wedi building board – has
sparked something of a revolution in the cladding of bathtubs and showering
trays. Height variations of up to 10 cm in rough concrete or screeding can be
compensated for during installation using height-adjustable feet. Installing a control
framework is not mandatory.
16 17
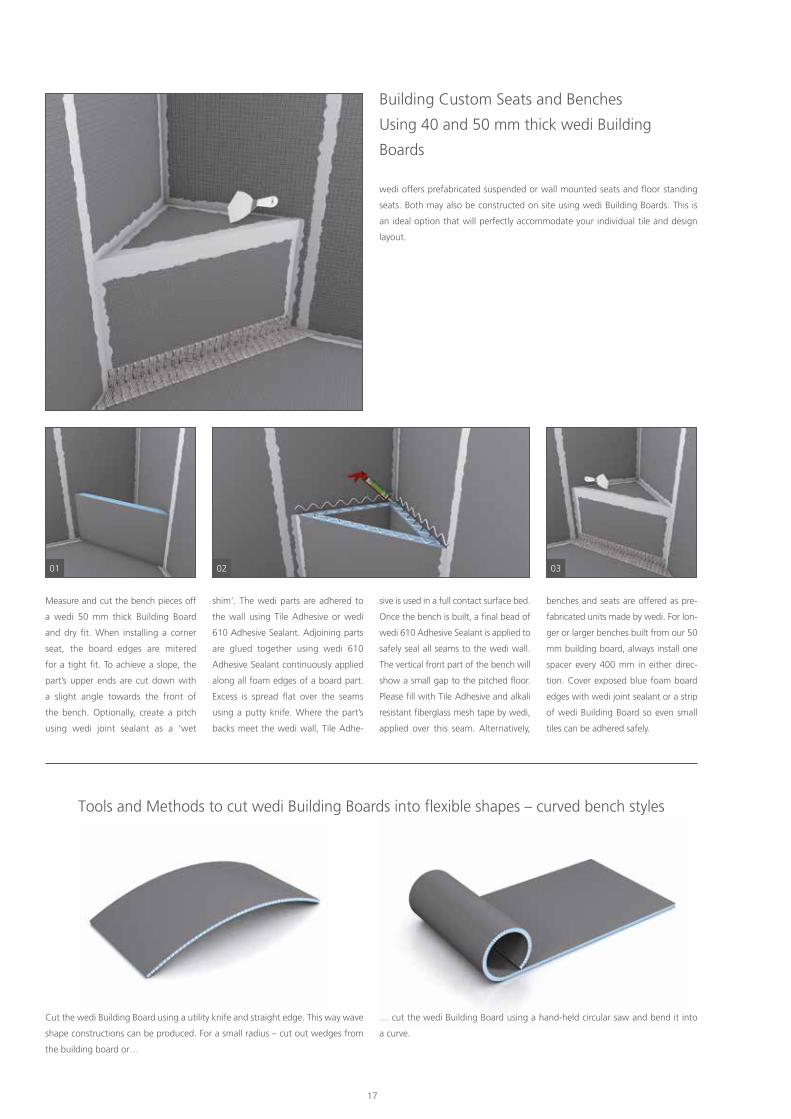
01 02
Measure and cut the bench pieces off
a wedi 50 mm thick Building Board
and dry fit. When installing a corner
seat, the board edges are mitered
for a tight fit. To achieve a slope, the
part’s upper ends are cut down with
a slight angle towards the front of
the bench. Optionally, create a pitch
using wedi joint sealant as a ‘wet
shim‘. The wedi parts are adhered to
the wall using Tile Adhesive or wedi
610 Adhesive Sealant. Adjoining parts
are glued together using wedi 610
Adhesive Sealant continuously applied
along all foam edges of a board part.
Excess is spread flat over the seams
using a putty knife. Where the part’s
backs meet the wedi wall, Tile Adhe-
sive is used in a full contact surface bed.
Once the bench is built, a final bead of
wedi 610 Adhesive Sealant is applied to
safely seal all seams to the wedi wall.
The vertical front part of the bench will
show a small gap to the pitched floor.
Please fill with Tile Adhesive and alkali
resistant fiberglass mesh tape by wedi,
applied over this seam. Alternatively,
03
benches and seats are offered as pre-
fabricated units made by wedi. For lon-
ger or larger benches built from our 50
mm building board, always install one
spacer every 400 mm in either direc-
tion. Cover exposed blue foam board
edges with wedi joint sealant or a strip
of wedi Building Board so even small
tiles can be adhered safely.
Building Custom Seats and Benches
Using 40 and 50 mm thick wedi Building
Boards
wedi offers prefabricated suspended or wall mounted seats and floor standing
seats. Both may also be constructed on site using wedi Building Boards. This is
an ideal option that will perfectly accommodate your individual tile and design
layout.
Cut the wedi Building Board using a utility knife and straight edge. This way wave
shape constructions can be produced. For a small radius – cut out wedges from
the building board or…
… cut the wedi Building Board using a hand-held circular saw and bend it into
a curve.
Tools and Methods to cut wedi Building Boards into flexible shapes – curved bench styles
18
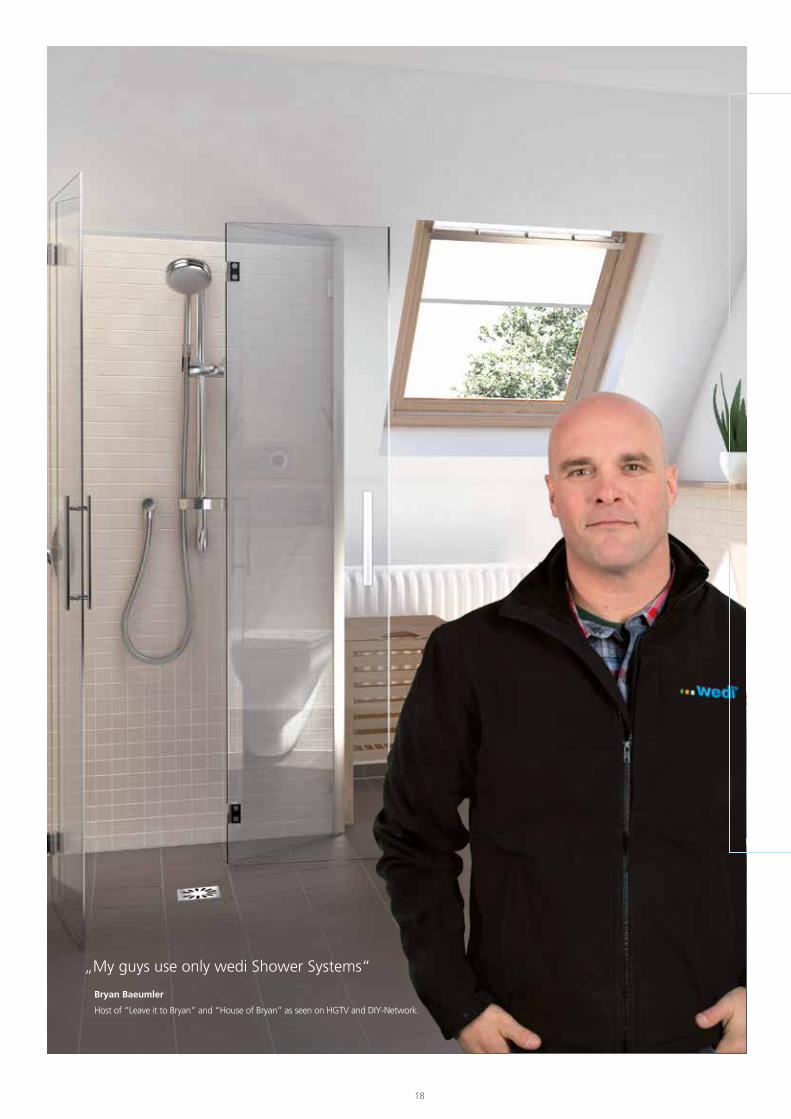
Bryan Baeumler
Host of “Leave it to Bryan” and “House of Bryan” as seen on HGTV and DIY-Network.
„My guys use only wedi Shower Systems“
18 19
The modular wedi Shower System
wedi Shower floors and building boards are extremely lightweight yet they perform with extreme
strength – thanks to the composition of their reinforced mortar resin surface coatings.
wedi shower floors can be covered with mosaic tiles or large format tiles. Mosaic tiles smaller than 50 mm
square must be grouted using epoxy grout. Tiles larger than 100 mm square are cut along the slope
lines of the wedi base to form grout lines where slope fields meet. There is no limitation to the type or
size of tile or stone used. All cement or epoxy based Tile Adhesives and grouts work with wedi products.
Please do not use premixed, organic adhesives (Mastic) to set tile over wedi systems in wet areas.
WaterproofShower SystemSolutions
20
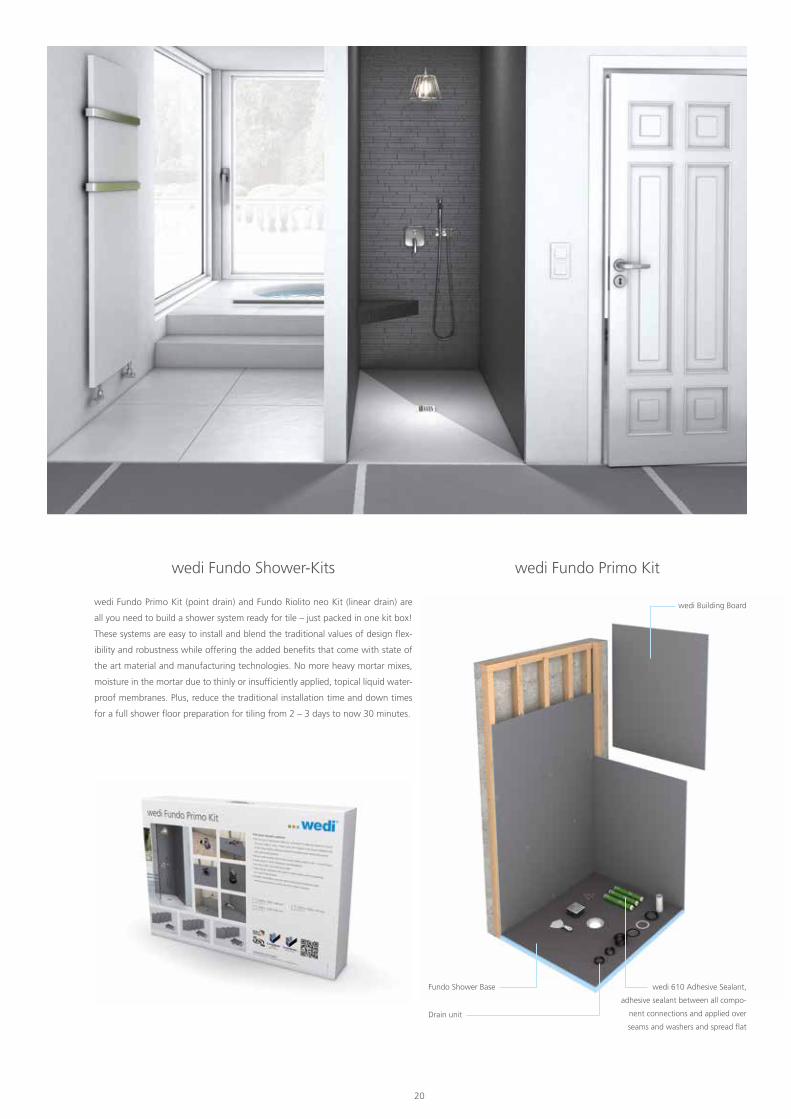
wedi Fundo Shower-Kits
wedi Fundo Primo Kit (point drain) and Fundo Riolito neo Kit (linear drain) are
all you need to build a shower system ready for tile – just packed in one kit box!
These systems are easy to install and blend the traditional values of design flex-
ibility and robustness while offering the added benefits that come with state of
the art material and manufacturing technologies. No more heavy mortar mixes,
moisture in the mortar due to thinly or insufficiently applied, topical liquid water-
proof membranes. Plus, reduce the traditional installation time and down times
for a full shower floor preparation for tiling from 2 – 3 days to now 30 minutes.
wedi Fundo Primo Kit
Drain unit
Fundo Shower Base
wedi Building Board
wedi 610 Adhesive Sealant,
adhesive sealant between all compo-
nent connections and applied over
seams and washers and spread flat
20 21
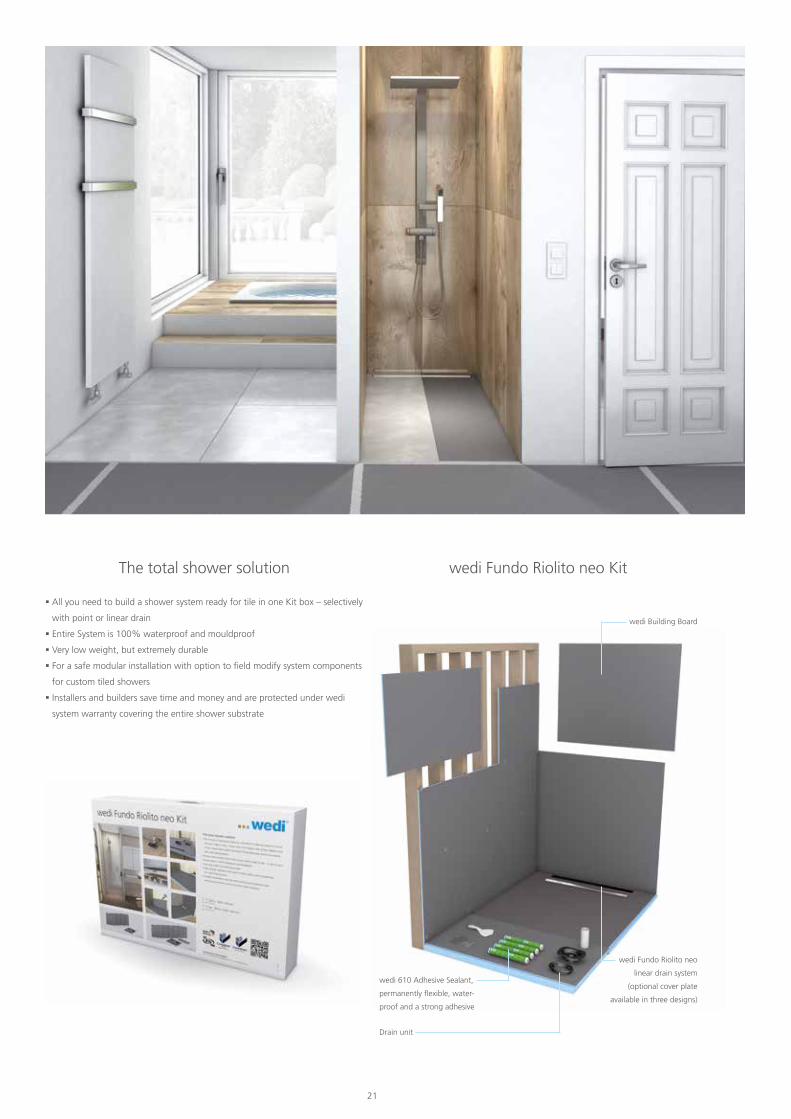
wedi Fundo Riolito neo KitThe total shower solution
All you need to build a shower system ready for tile in one Kit box – selectively
with point or linear drain
Entire System is 100% waterproof and mouldproof
Very low weight, but extremely durable
For a safe modular installation with option to field modify system components
for custom tiled showers
Installers and builders save time and money and are protected under wedi
system warranty covering the entire shower substrate
Drain unit
wedi 610 Adhesive Sealant,
permanently flexible, water-
proof and a strong adhesive
wedi Building Board
wedi Fundo Riolito neo
linear drain system
(optional cover plate
available in three designs)
22
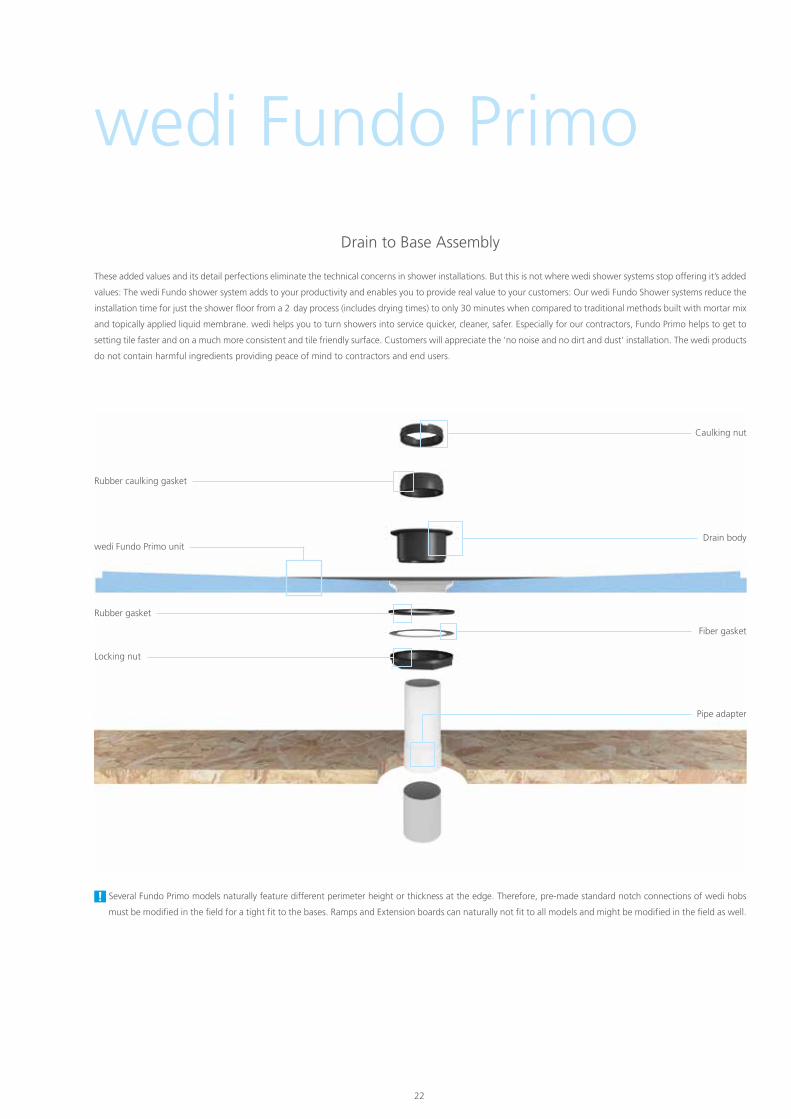
Drain to Base Assembly
These added values and its detail perfections eliminate the technical concerns in shower installations. But this is not where wedi shower systems stop offering it’s added
values: The wedi Fundo shower system adds to your productivity and enables you to provide real value to your customers: Our wedi Fundo Shower systems reduce the
installation time for just the shower floor from a 2 day process (includes drying times) to only 30 minutes when compared to traditional methods built with mortar mix
and topically applied liquid membrane. wedi helps you to turn showers into service quicker, cleaner, safer. Especially for our contractors, Fundo Primo helps to get to
setting tile faster and on a much more consistent and tile friendly surface. Customers will appreciate the ‘no noise and no dirt and dust‘ installation. The wedi products
do not contain harmful ingredients providing peace of mind to contractors and end users.
Several Fundo Primo models naturally feature different perimeter height or thickness at the edge. Therefore, pre-made standard notch connections of wedi hobs
must be modified in the field for a tight fit to the bases. Ramps and Extension boards can naturally not fit to all models and might be modified in the field as well.
wedi Fundo Primo unit
wedi Fundo Primo
Rubber caulking gasket
Locking nut
Rubber gasket
Drain body
Caulking nut
Pipe adapter
Fiber gasket
22 23
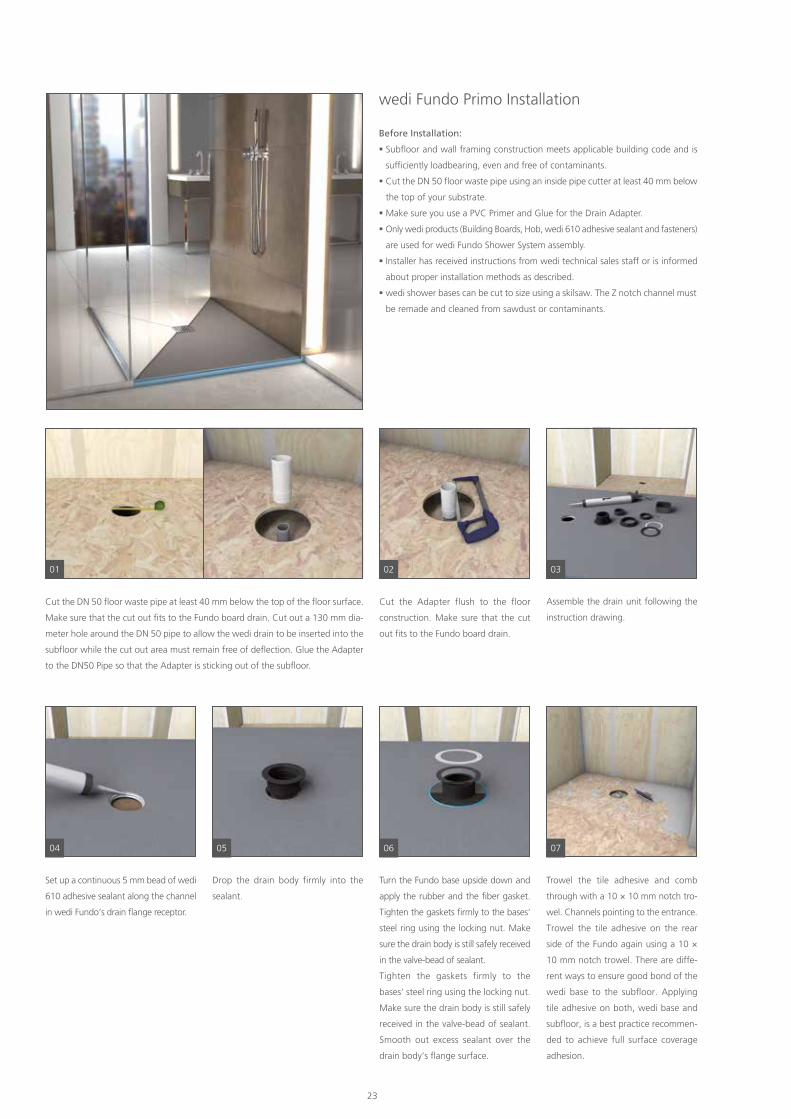
01 02
05 06
Cut the DN 50 floor waste pipe at least 40 mm below the top of the floor surface.
Make sure that the cut out fits to the Fundo board drain. Cut out a 130 mm dia-
meter hole around the DN 50 pipe to allow the wedi drain to be inserted into the
subfloor while the cut out area must remain free of deflection. Glue the Adapter
to the DN50 Pipe so that the Adapter is sticking out of the subfloor.
Cut the Adapter flush to the floor
construction. Make sure that the cut
out fits to the Fundo board drain.
04
Set up a continuous 5 mm bead of wedi
610 adhesive sealant along the channel
in wedi Fundo‘s drain flange receptor.
Drop the drain body firmly into the
sealant.
Turn the Fundo base upside down and
apply the rubber and the fiber gasket.
Tighten the gaskets firmly to the bases‘
steel ring using the locking nut. Make
sure the drain body is still safely received
in the valve-bead of sealant.
Tighten the gaskets firmly to the
bases‘ steel ring using the locking nut.
Make sure the drain body is still safely
received in the valve-bead of sealant.
Smooth out excess sealant over the
drain body‘s flange surface.
07
Trowel the tile adhesive and comb
through with a 10 × 10 mm notch tro-
wel. Channels pointing to the en trance.
Trowel the tile adhesive on the rear
side of the Fundo again using a 10 ×
10 mm notch trowel. There are diffe-
rent ways to ensure good bond of the
wedi base to the subfloor. Applying
tile adhesive on both, wedi base and
subfloor, is a best practice recommen-
ded to achieve full surface coverage
adhesion.
wedi Fundo Primo Installation
Before Installation:
Subfloor and wall framing construction meets applicable building code and is
sufficiently loadbearing, even and free of contaminants.
Cut the DN 50 floor waste pipe using an inside pipe cutter at least 40 mm below
the top of your substrate.
Make sure you use a PVC Primer and Glue for the Drain Adapter.
Only wedi products (Building Boards, Hob, wedi 610 adhesive sealant and fasteners)
are used for wedi Fundo Shower System assembly.
Installer has received instructions from wedi technical sales staff or is informed
about proper installation methods as described.
wedi shower bases can be cut to size using a skilsaw. The Z notch channel must
be remade and cleaned from sawdust or contaminants.
03
Assemble the drain unit follow ing the
instruction drawing.

24
09 10
Tighten (squeeze) the rubber caulking
gasket firmly with the caulking nut (use
a flat headed screwdriver) and finally
insert the plastic frame and strainer on
top (without adhesive). The frame and
strainer will be held in a grout joint only
once tiling commences.
11
Set up a continuous 10 mm bead of
wedi 610 adhesive sealant along the
pans channel on the outer perimeter
and only in areas where you can im-
mediately install a building board into
the fresh sealant.
12 13
14
Push the wedi board all the way into the channel of the shower base channel
and its bead of sealant. Smooth out any pushed out sealant on inside seam using
a putty knife. Fasten the boards directly to the studs starting 300 mm above the
base and at a rate of 1 fastener per 300 mm. One extra fastener is set into the
seam to the next board to create a flush transition.
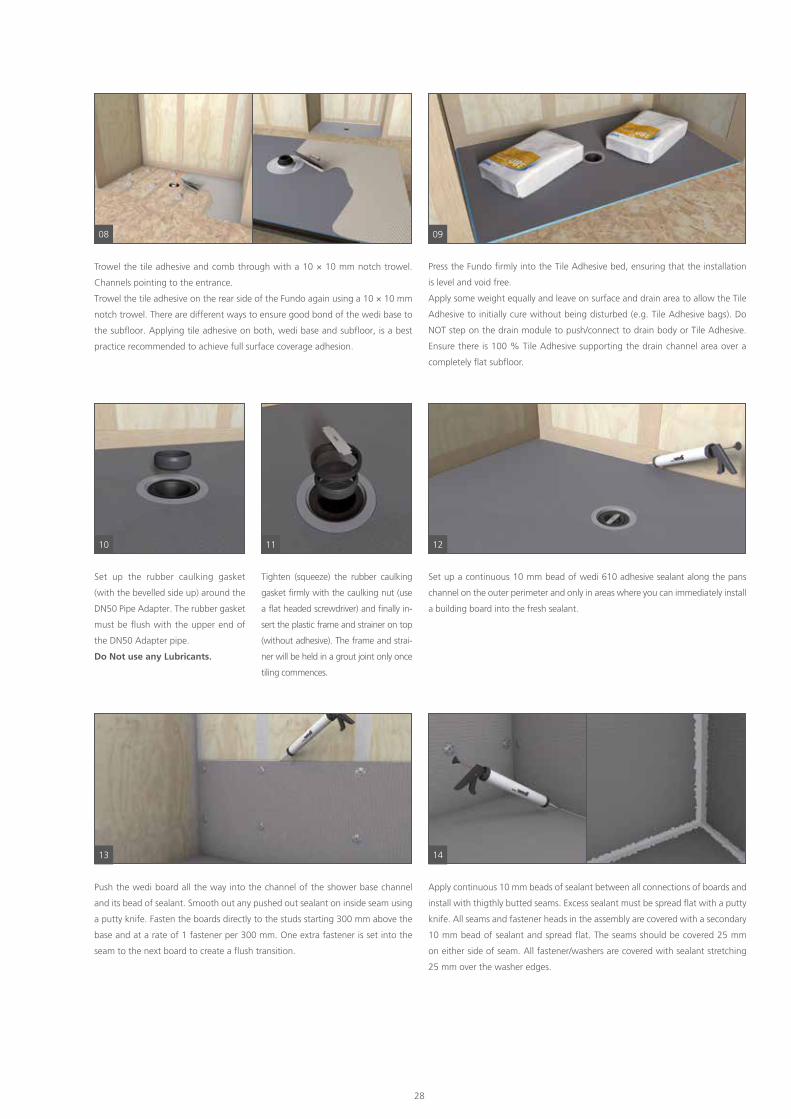
Apply continuous 10 mm beads of sealant between all connections of boards and install
with thigthly butted seams. Excess sealant must be spread flat with a putty knife. All
seams and fastener heads in the assembly are covered with a secondary 10 mm bead
of sealant and spread flat. The seams should be covered 25 mm on either side of seam.
All fastener/washers are covered with sealant stretching 25 mm over the washer edges.
16 17
A continuous 10 mm bead of sealant
is set into the channel and along the
vertical hob notch part. A circle of 10
mm sealant bead is set against the wall
boards where the hob attaches. A 10 ×
10 mm notch trowel bed of cementiti-
ous tile adhesive is applied to the sub-
floor and a skim coat on the bottom
surface of the hob as a best practice.
The tightly fitting hob is pressed into
the connection area.
15
2 Fasteners each side of the niche are
set to create a flush transition to the
wall boards. Another 10 mm bead of
wedi 610 adhesive sealant is spread
over fasteners and seams.
Weight is applied on and against the
hob (from outside) and another 10 mm
bead of sealant is applied over all hob
seams and spread flat. The seams must
be covered 25 mm either side of a seam.
wedi Niches are installed in a cut out
in the wedi wall and attached with it‘s
flange right into the center of 450 mm
studs. wedi 610 adhesive sealant is set
along the connection of wall to niche.
Hob connection notches must be
cut to fit select Primo bases with
perimeter thickness higher than
38 mm. For a fully waterproofed
installation please install wedi sea-
ling gaskets for mixing valve and
shower head cut outs.
08
Press the Fundo firmly into the tile adhesive bed, ensuring that the installation is
level and void free. Apply some weight equally and leave on surface and drain area
to allow the tile adhesive to initially cure without being disturbed (e.g. tile adhesive
bags). Do NOT step on the drain module to push/connect to drain body or tile ad-
hesive. Ensure there is 100 % tile adhesive supporting the drain channel area over
a completely flat subfloor.
Set up the rubber caulking gasket (with the bevelled side up) around the 50 mm
pipe in the subfloor. The rubber gasket must be flush with the upper end of the
50 mm ABS or PVC pipe. Do Not use any Lubricants.
24 25
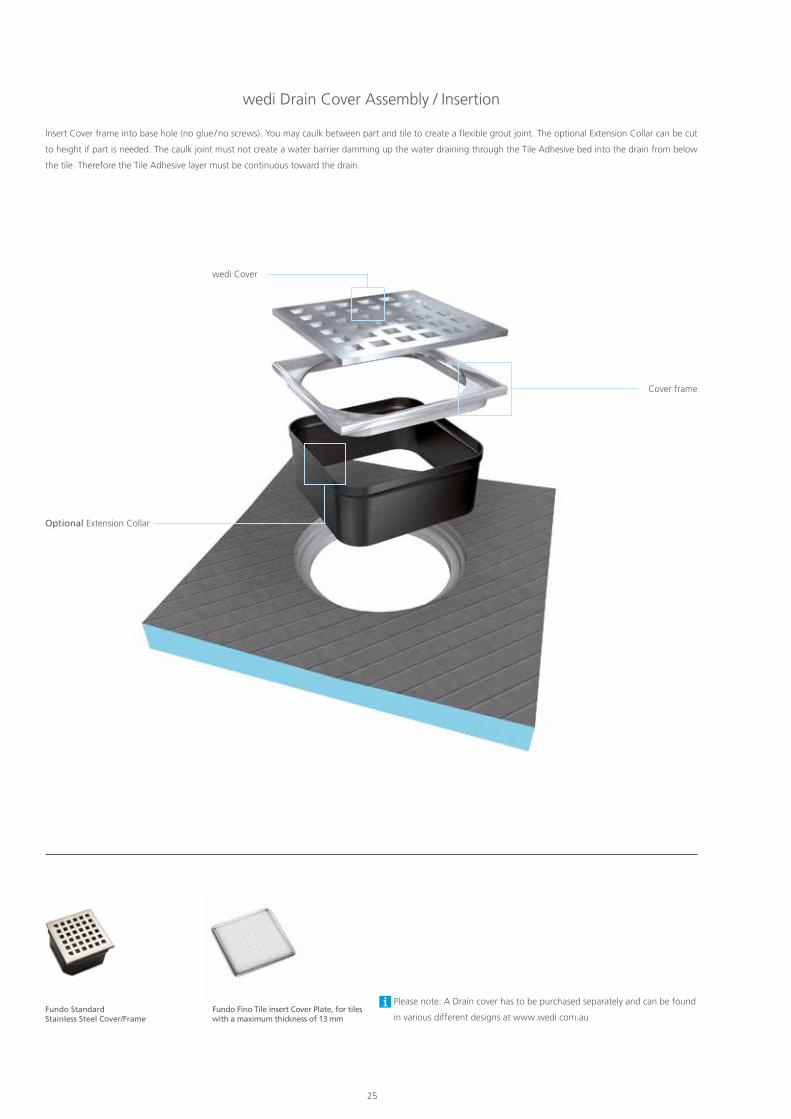
wedi Drain Cover Assembly / Insertion
Insert Cover frame into base hole (no glue / no screws). You may caulk between part and tile to create a flexible grout joint. The optional Extension Collar can be cut
to height if part is needed. The caulk joint must not create a water barrier damming up the water draining through the Tile Adhesive bed into the drain from below
the tile. Therefore the Tile Adhesive layer must be continuous toward the drain.
Cover frame
Optional Extension Collar
wedi Cover
Please note: A Drain cover has to be purchased separately and can be found
in various different designs at www.wedi.com.auFundo Standard Stainless Steel Cover/Frame
Fundo Fino Tile insert Cover Plate, for tiles with a maximum thickness of 13 mm
2626
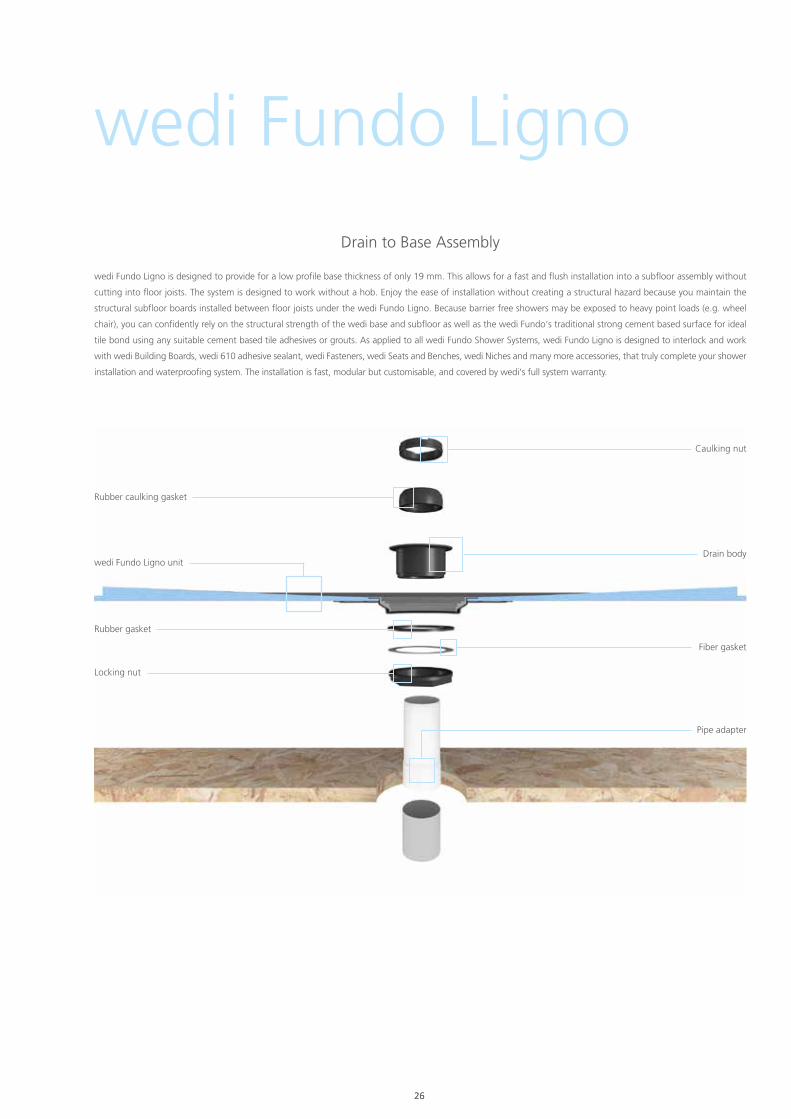
Drain to Base Assembly
wedi Fundo Ligno is designed to provide for a low profile base thickness of only 19 mm. This allows for a fast and flush installation into a subfloor assembly without
cutting into floor joists. The system is designed to work without a hob. Enjoy the ease of installation without creating a structural hazard because you maintain the
structural subfloor boards installed between floor joists under the wedi Fundo Ligno. Because barrier free showers may be exposed to heavy point loads (e.g. wheel
chair), you can confidently rely on the structural strength of the wedi base and subfloor as well as the wedi Fundo‘s traditional strong cement based surface for ideal
tile bond using any suitable cement based tile adhesives or grouts. As applied to all wedi Fundo Shower Systems, wedi Fundo Ligno is designed to interlock and work
with wedi Building Boards, wedi 610 adhesive sealant, wedi Fasteners, wedi Seats and Benches, wedi Niches and many more accessories, that truly complete your shower
installation and waterproofing system. The installation is fast, modular but customisable, and covered by wedi‘s full system warranty.
Rubber caulking gasket
Locking nut
Rubber gasket
Drain body
Caulking nut
Pipe adapter
Fiber gasket
wedi Fundo Ligno
wedi Fundo Ligno unit
26 2726
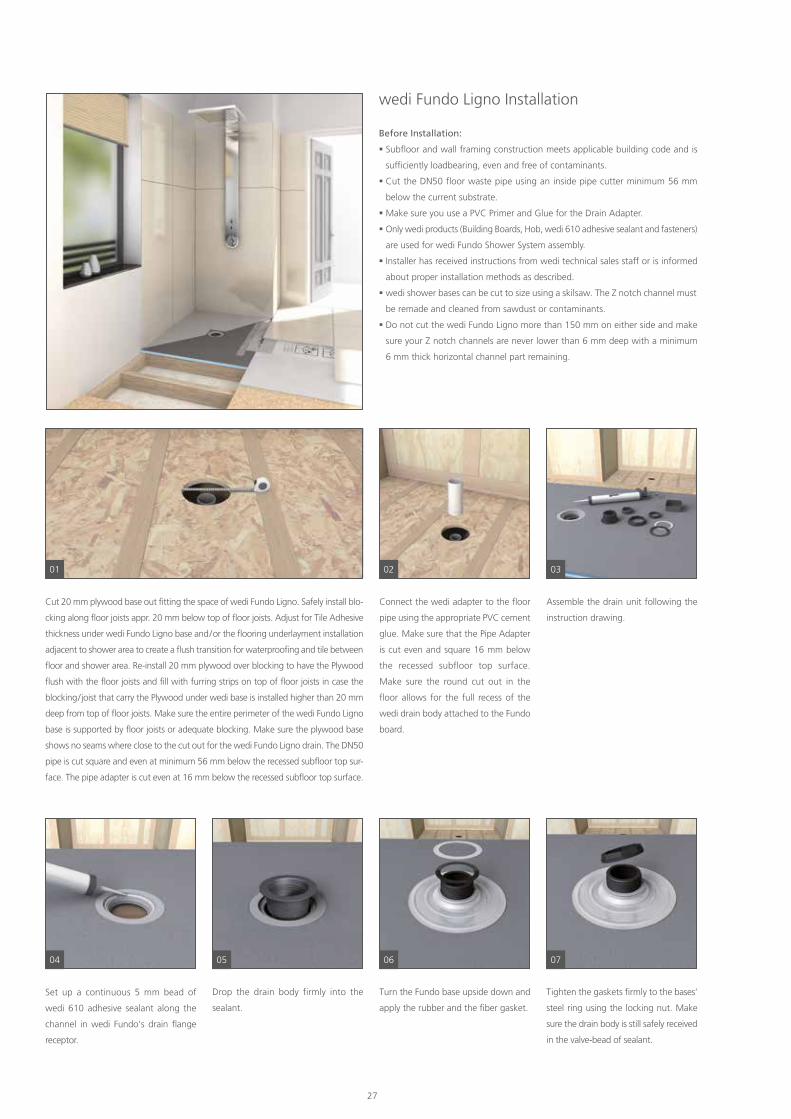
01 02
Cut 20 mm plywood base out fitting the space of wedi Fundo Ligno. Safely install blo-
cking along floor joists appr. 20 mm below top of floor joists. Adjust for Tile Adhesive
thickness under wedi Fundo Ligno base and / or the flooring underlayment installation
adjacent to shower area to create a flush transition for waterproofing and tile between
floor and shower area. Re-install 20 mm plywood over blocking to have the Plywood
flush with the floor joists and fill with furring strips on top of floor joists in case the
blocking / joist that carry the Plywood under wedi base is installed higher than 20 mm
deep from top of floor joists. Make sure the entire perimeter of the wedi Fundo Ligno
base is supported by floor joists or adequate blocking. Make sure the plywood base
shows no seams where close to the cut out for the wedi Fundo Ligno drain. The DN50
pipe is cut square and even at minimum 56 mm below the recessed subfloor top sur-
face. The pipe adapter is cut even at 16 mm below the recessed subfloor top surface.
Connect the wedi adapter to the floor
pipe using the appropriate PVC cement
glue. Make sure that the Pipe Adapter
is cut even and square 16 mm below
the recessed subfloor top surface.
Make sure the round cut out in the
floor allows for the full recess of the
wedi drain body attached to the Fundo
board.
wedi Fundo Ligno Installation
Before Installation:
Subfloor and wall framing construction meets applicable building code and is
sufficiently loadbearing, even and free of contaminants.
Cut the DN50 floor waste pipe using an inside pipe cutter minimum 56 mm
below the current substrate.
Make sure you use a PVC Primer and Glue for the Drain Adapter.
Only wedi products (Building Boards, Hob, wedi 610 adhesive sealant and fasteners)
are used for wedi Fundo Shower System assembly.
Installer has received instructions from wedi technical sales staff or is informed
about proper installation methods as described.
wedi shower bases can be cut to size using a skilsaw. The Z notch channel must
be remade and cleaned from sawdust or contaminants.
Do not cut the wedi Fundo Ligno more than 150 mm on either side and make
sure your Z notch channels are never lower than 6 mm deep with a minimum
6 mm thick horizontal channel part remaining.
03
Assemble the drain unit follow ing the
instruction drawing.
0605 07
Turn the Fundo base upside down and
apply the rubber and the fiber gasket.
Drop the drain body firmly into the
sealant.
Tighten the gaskets firmly to the bases‘
steel ring using the locking nut. Make
sure the drain body is still safely received
in the valve-bead of sealant.
04
Set up a continuous 5 mm bead of
wedi 610 adhesive sealant along the
channel in wedi Fundo‘s drain flange
receptor.
28
09
Press the Fundo firmly into the Tile Adhesive bed, ensuring that the installation
is level and void free.
Apply some weight equally and leave on surface and drain area to allow the Tile
Adhesive to initially cure without being disturbed (e.g. Tile Adhesive bags). Do
NOT step on the drain module to push/connect to drain body or Tile Adhesive.
Ensure there is 100 % Tile Adhesive supporting the drain channel area over a
completely flat subfloor.
10 11
Set up the rubber caulking gasket
(with the bevelled side up) around the
DN50 Pipe Adapter. The rubber gasket
must be flush with the upper end of
the DN50 Adapter pipe.
Do Not use any Lubricants.
Tighten (squeeze) the rubber caulking
gasket firmly with the caulking nut (use
a flat headed screwdriver) and finally in-
sert the plastic frame and strainer on top
(without adhesive). The frame and strai-
ner will be held in a grout joint only once
tiling commences.
08
Trowel the tile adhesive and comb through with a 10 × 10 mm notch trowel.
Channels pointing to the en trance.
Trowel the tile adhesive on the rear side of the Fundo again using a 10 × 10 mm
notch trowel. There are different ways to ensure good bond of the wedi base to
the subfloor. Applying tile adhesive on both, wedi base and subfloor, is a best
practice recommended to achieve full surface coverage adhesion.
12
1413
Set up a continuous 10 mm bead of wedi 610 adhesive sealant along the pans
channel on the outer perimeter and only in areas where you can immediately install
a building board into the fresh sealant.
Apply continuous 10 mm beads of sealant between all connections of boards and
install with thigthly butted seams. Excess sealant must be spread flat with a putty
knife. All seams and fastener heads in the assembly are covered with a secondary
10 mm bead of sealant and spread flat. The seams should be covered 25 mm
on either side of seam. All fastener/washers are covered with sealant stretching
25 mm over the washer edges.
Push the wedi board all the way into the channel of the shower base channel
and its bead of sealant. Smooth out any pushed out sealant on inside seam using
a putty knife. Fasten the boards directly to the studs starting 300 mm above the
base and at a rate of 1 fastener per 300 mm. One extra fastener is set into the
seam to the next board to create a flush transition.
28 29
15 16
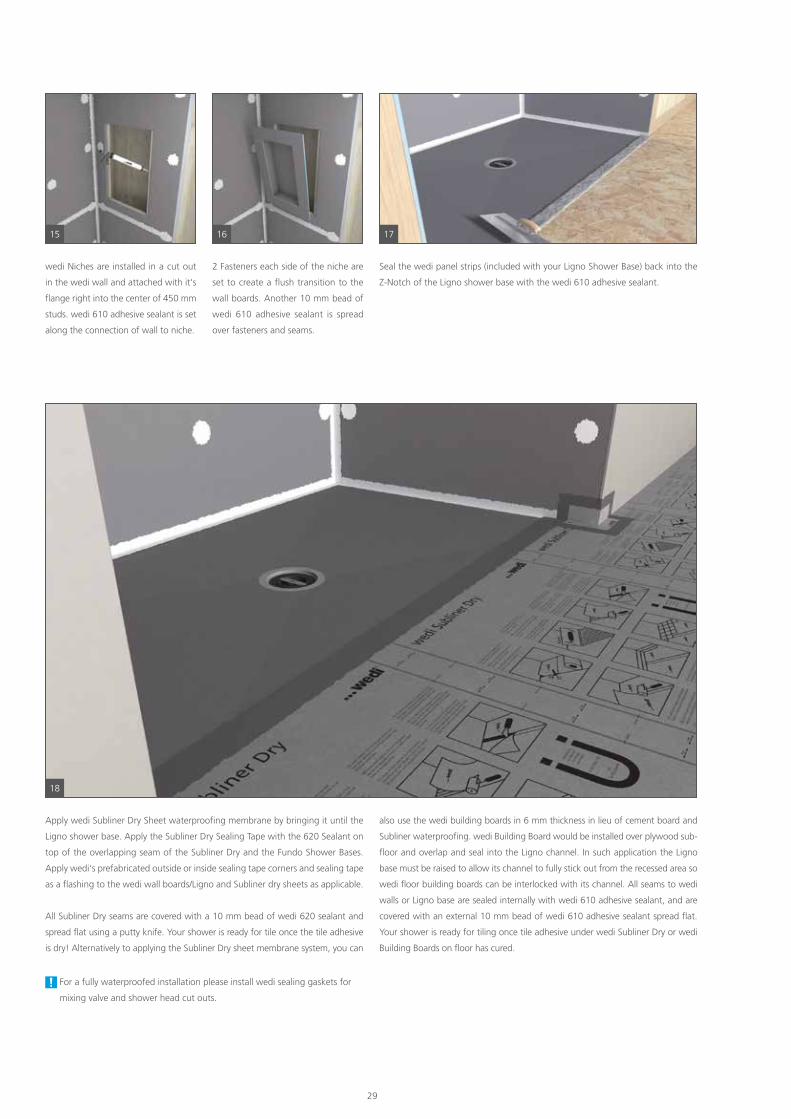
wedi Niches are installed in a cut out
in the wedi wall and attached with it‘s
flange right into the center of 450 mm
studs. wedi 610 adhesive sealant is set
along the connection of wall to niche.
2 Fasteners each side of the niche are
set to create a flush transition to the
wall boards. Another 10 mm bead of
wedi 610 adhesive sealant is spread
over fasteners and seams.
17
18
Seal the wedi panel strips (included with your Ligno Shower Base) back into the
Z-Notch of the Ligno shower base with the wedi 610 adhesive sealant.
Apply wedi Subliner Dry Sheet waterproofing membrane by bringing it until the
Ligno shower base. Apply the Subliner Dry Sealing Tape with the 620 Sealant on
top of the overlapping seam of the Subliner Dry and the Fundo Shower Bases.
Apply wedi‘s prefabricated outside or inside sealing tape corners and sealing tape
as a flashing to the wedi wall boards/Ligno and Subliner dry sheets as applicable.
All Subliner Dry seams are covered with a 10 mm bead of wedi 620 sealant and
spread flat using a putty knife. Your shower is ready for tile once the tile adhesive
is dry! Alternatively to applying the Subliner Dry sheet membrane system, you can
also use the wedi building boards in 6 mm thickness in lieu of cement board and
Subliner waterproofing. wedi Building Board would be installed over plywood sub-
floor and overlap and seal into the Ligno channel. In such application the Ligno
base must be raised to allow its channel to fully stick out from the recessed area so
wedi floor building boards can be interlocked with its channel. All seams to wedi
walls or Ligno base are sealed internally with wedi 610 adhesive sealant, and are
covered with an external 10 mm bead of wedi 610 adhesive sealant spread flat.
Your shower is ready for tiling once tile adhesive under wedi Subliner Dry or wedi
Building Boards on floor has cured.
For a fully waterproofed installation please install wedi sealing gaskets for
mixing valve and shower head cut outs.
30
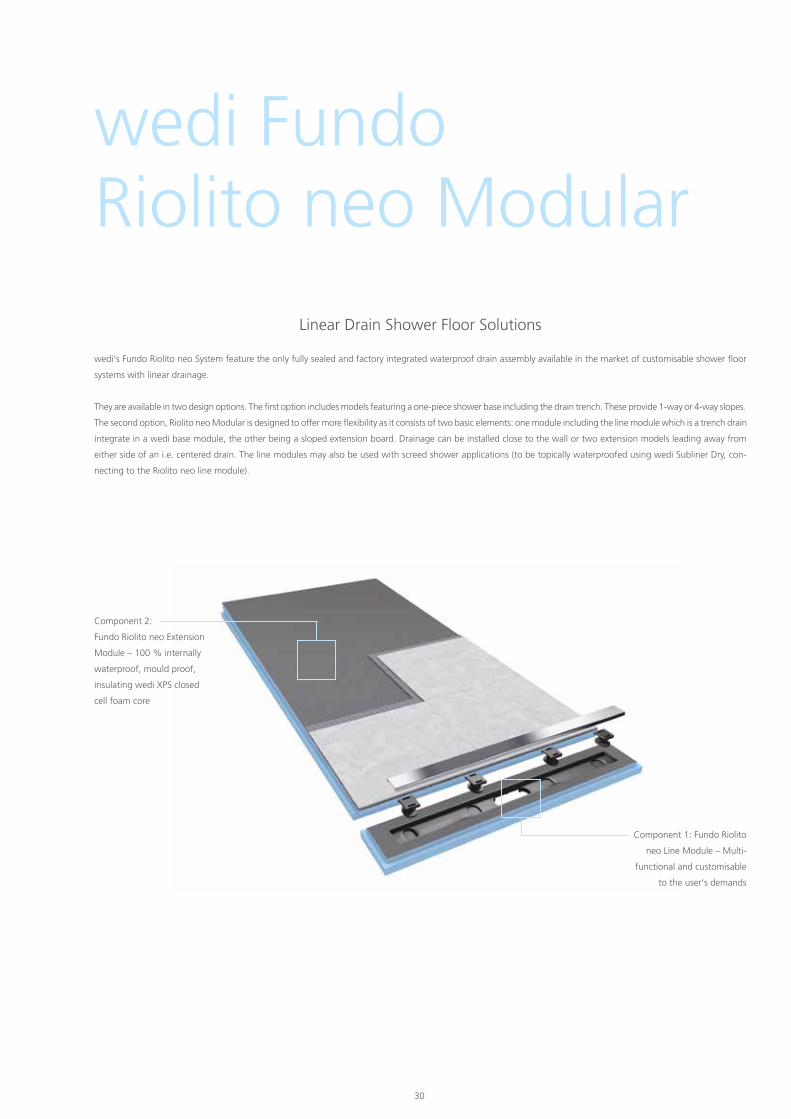
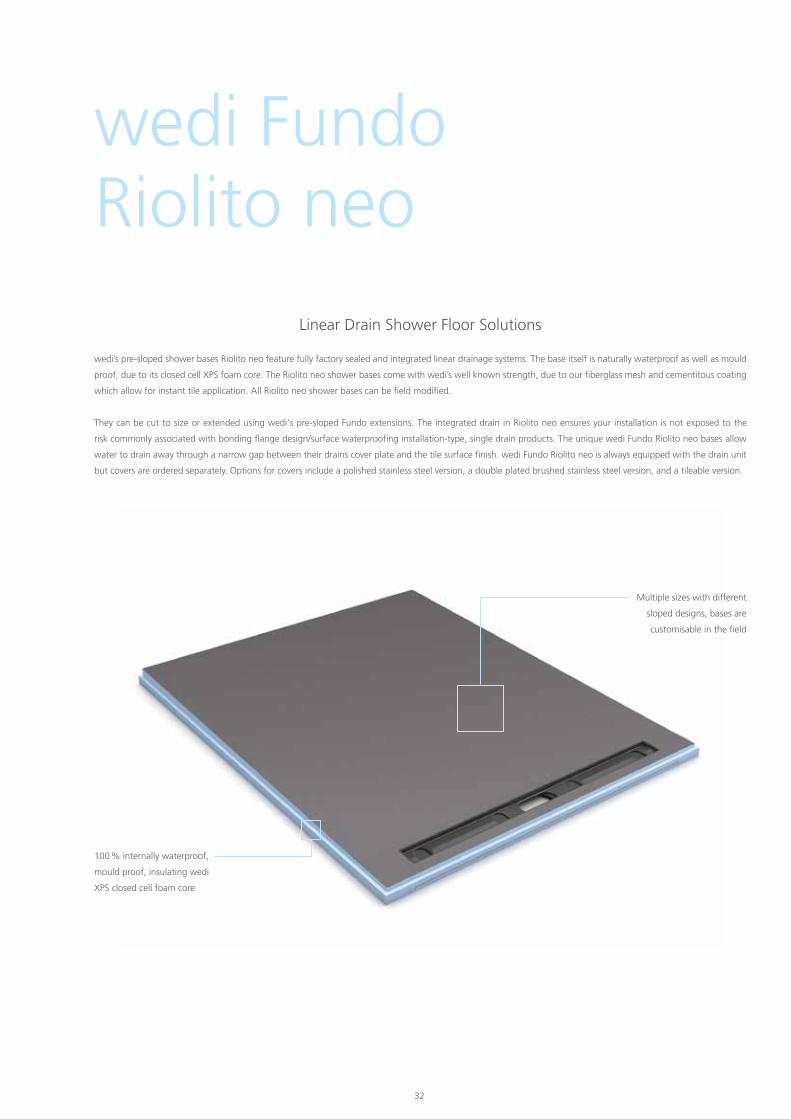
Linear Drain Shower Floor Solutions
wedi‘s Fundo Riolito neo System feature the only fully sealed and factory integrated waterproof drain assembly available in the market of customisable shower floor
systems with linear drainage.
They are available in two design options. The first option includes models featuring a one-piece shower base including the drain trench. These provide 1-way or 4-way slopes.
The second option, Riolito neo Modular is designed to offer more flexibility as it consists of two basic elements: one module including the line module which is a trench drain
integrate in a wedi base module, the other being a sloped extension board. Drainage can be installed close to the wall or two extension models leading away from
either side of an i.e. centered drain. The line modules may also be used with screed shower applications (to be topically waterproofed using wedi Subliner Dry, con-
necting to the Riolito neo line module).
wedi Fundo Riolito neo Modular
Component 1: Fundo Riolito
neo Line Module – Multi-
functional and customisable
to the user‘s demands
Component 2:
Fundo Riolito neo Extension
Module – 100 % internally
waterproof, mould proof,
insulating wedi XPS closed
cell foam core
30 31
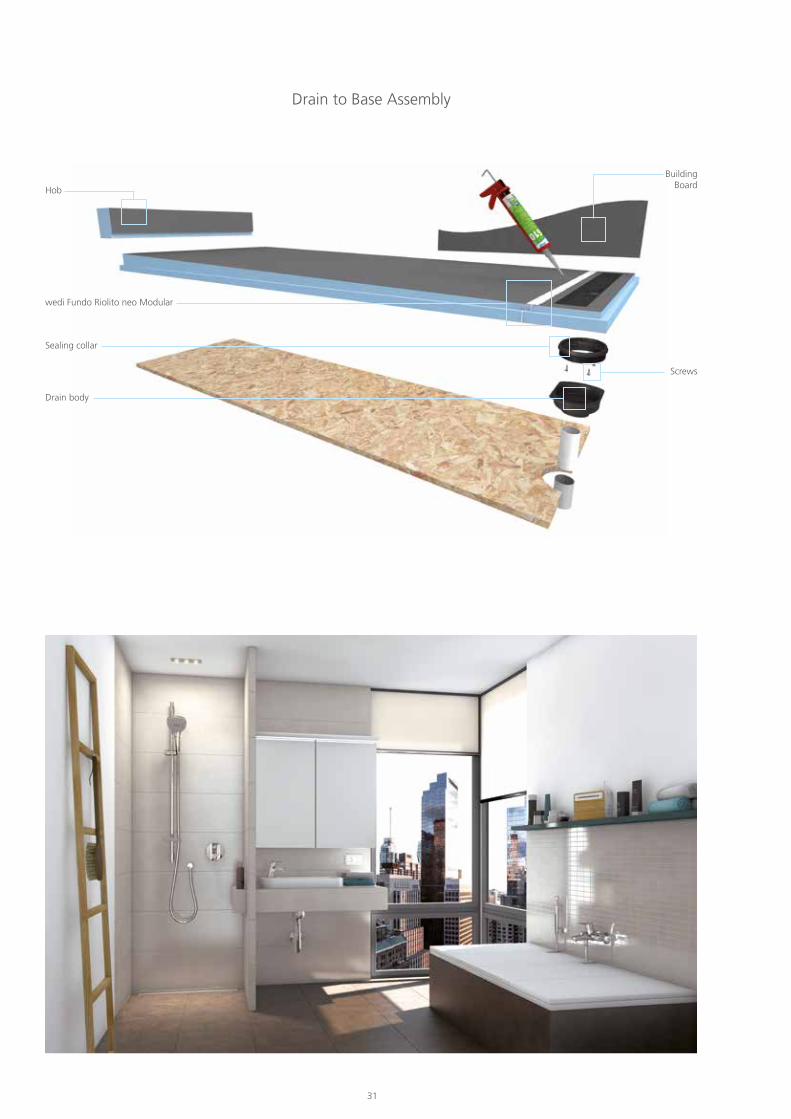
Drain to Base Assembly
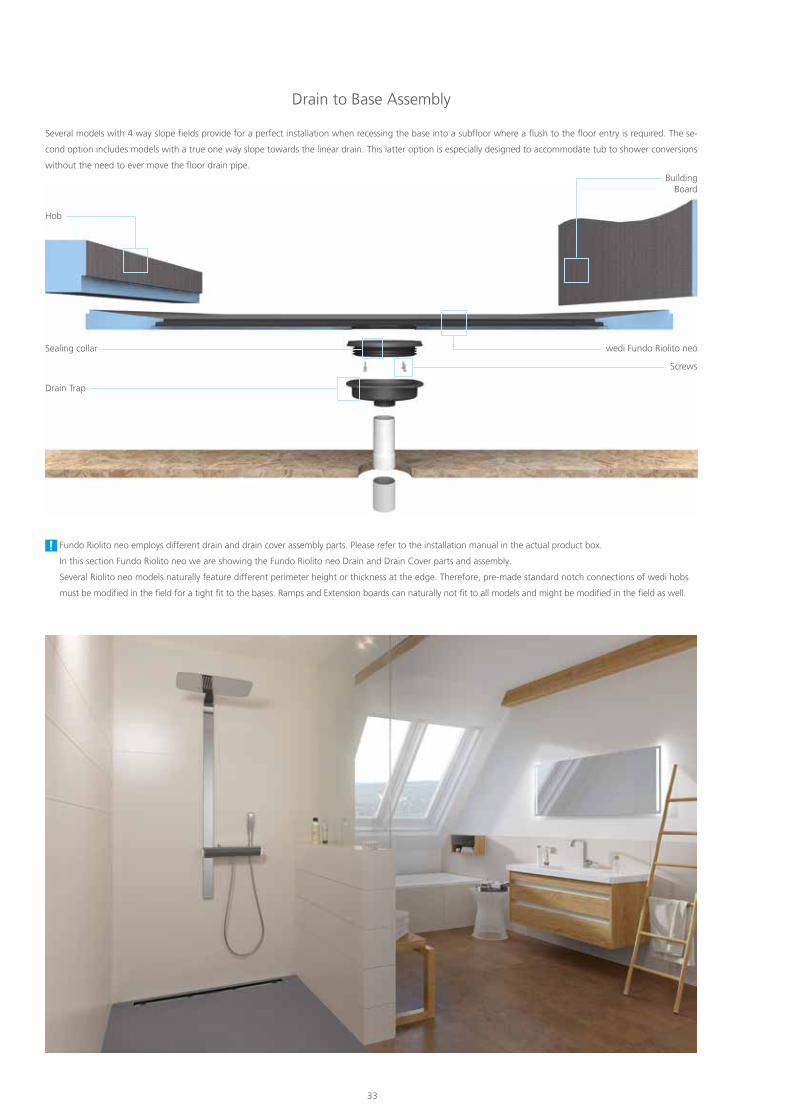
Sealing collar
wedi Fundo Riolito neo Modular
Drain body
Hob
Building Board
Screws
32
Linear Drain Shower Floor Solutions
wedi’s pre-sloped shower bases Riolito neo feature fully factory sealed and integrated linear drainage systems. The base itself is naturally waterproof as well as mould
proof, due to its closed cell XPS foam core. The Riolito neo shower bases come with wedi’s well known strength, due to our fiberglass mesh and cementitous coating
which allow for instant tile application. All Riolito neo shower bases can be field modified.
They can be cut to size or extended using wedi‘s pre-sloped Fundo extensions. The integrated drain in Riolito neo ensures your installation is not exposed to the
risk commonly associated with bonding flange design/surface waterproofing installation-type, single drain products. The unique wedi Fundo Riolito neo bases allow
water to drain away through a narrow gap between their drains cover plate and the tile surface finish. wedi Fundo Riolito neo is always equipped with the drain unit
but covers are ordered separately. Options for covers include a polished stainless steel version, a double plated brushed stainless steel version, and a tileable version.
wedi Fundo Riolito neo
100 % internally waterproof,
mould proof, insulating wedi
XPS closed cell foam core
Multiple sizes with different
sloped designs, bases are
customisable in the field
32 33
Sealing collar
Drain Trap
Hob
Building Board
wedi Fundo Riolito neo
Screws
Drain to Base Assembly
Several models with 4 way slope fields provide for a perfect installation when recessing the base into a subfloor where a flush to the floor entry is required. The se-
cond option includes models with a true one way slope towards the linear drain. This latter option is especially designed to accommodate tub to shower conversions
without the need to ever move the floor drain pipe.
Fundo Riolito neo employs different drain and drain cover assembly parts. Please refer to the installation manual in the actual product box.
In this section Fundo Riolito neo we are showing the Fundo Riolito neo Drain and Drain Cover parts and assembly.
Several Riolito neo models naturally feature different perimeter height or thickness at the edge. Therefore, pre-made standard notch connections of wedi hobs
must be modified in the field for a tight fit to the bases. Ramps and Extension boards can naturally not fit to all models and might be modified in the field as well.
34
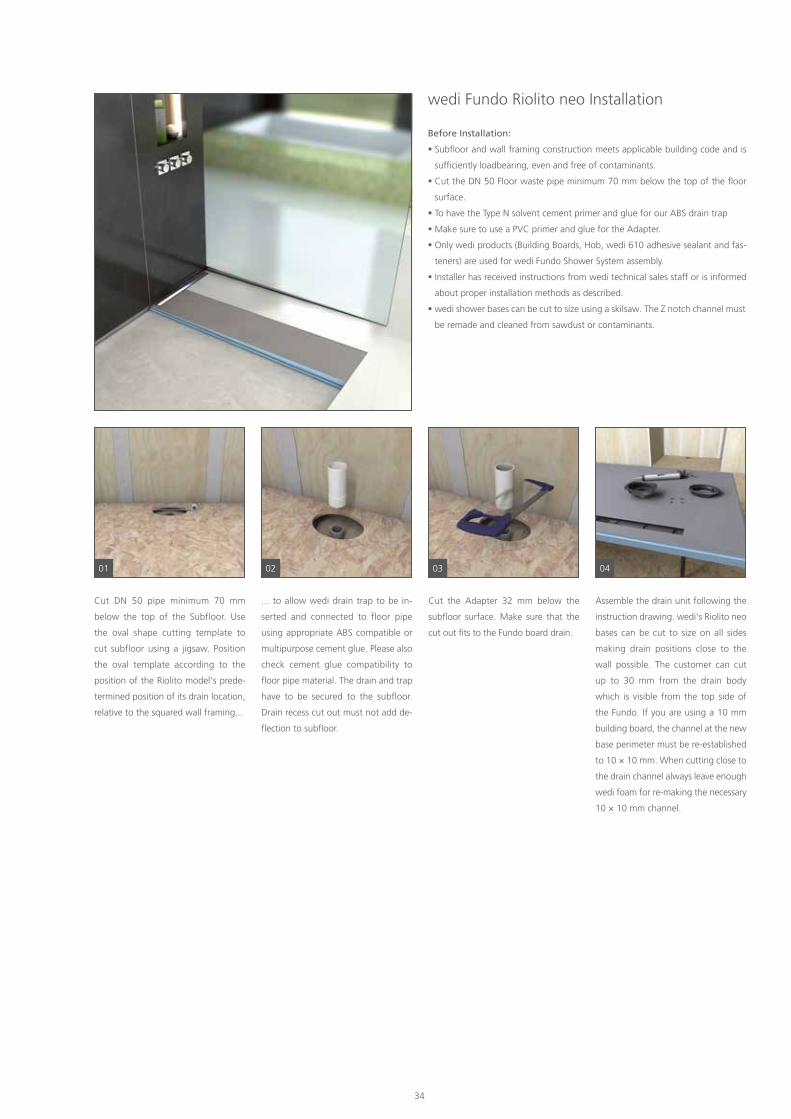
0401 02
Assemble the drain unit following the
instruction drawing. wedi‘s Riolito neo
bases can be cut to size on all sides
making drain positions close to the
wall possible. The customer can cut
up to 30 mm from the drain body
which is visible from the top side of
the Fundo. If you are using a 10 mm
building board, the channel at the new
base perimeter must be re-established
to 10 × 10 mm. When cutting close to
the drain channel always leave enough
wedi foam for re-making the necessary
10 × 10 mm channel.
Cut DN 50 pipe minimum 70 mm
below the top of the Subfloor. Use
the oval shape cutting template to
cut subfloor using a jigsaw. Position
the oval template according to the
position of the Riolito model‘s prede-
termined position of its drain location,
relative to the squared wall framing...
... to allow wedi drain trap to be in-
serted and connected to floor pipe
using appropriate ABS compatible or
multipurpose cement glue. Please also
check cement glue compatibility to
floor pipe material. The drain and trap
have to be secured to the subfloor.
Drain recess cut out must not add de-
flection to subfloor.
wedi Fundo Riolito neo Installation
Before Installation:
Subfloor and wall framing construction meets applicable building code and is
sufficiently loadbearing, even and free of contaminants.
Cut the DN 50 Floor waste pipe minimum 70 mm below the top of the floor
surface.
To have the Type N solvent cement primer and glue for our ABS drain trap
Make sure to use a PVC primer and glue for the Adapter.
Only wedi products (Building Boards, Hob, wedi 610 adhesive sealant and fas-
teners) are used for wedi Fundo Shower System assembly.
Installer has received instructions from wedi technical sales staff or is informed
about proper installation methods as described.
wedi shower bases can be cut to size using a skilsaw. The Z notch channel must
be remade and cleaned from sawdust or contaminants.
03
Cut the Adapter 32 mm below the
subfloor surface. Make sure that the
cut out fits to the Fundo board drain.
34 35
09
11
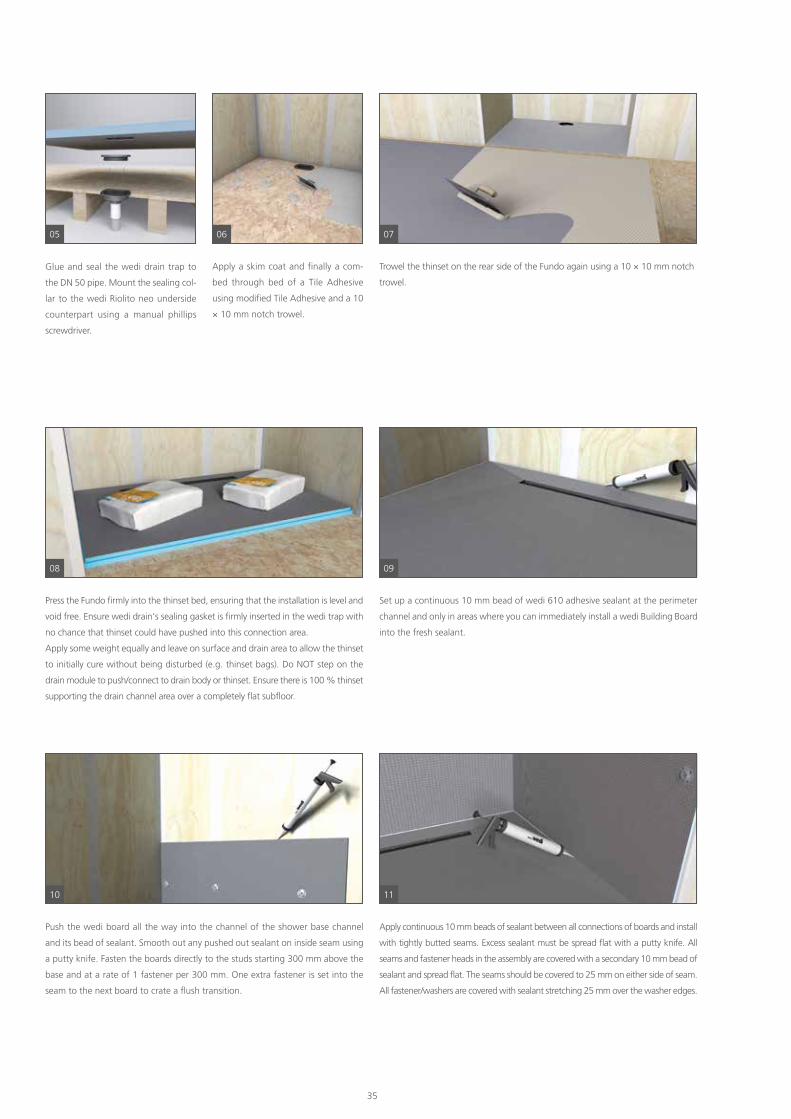
Set up a continuous 10 mm bead of wedi 610 adhesive sealant at the perimeter
channel and only in areas where you can immediately install a wedi Building Board
into the fresh sealant.
Apply continuous 10 mm beads of sealant between all connections of boards and install
with tightly butted seams. Excess sealant must be spread flat with a putty knife. All
seams and fastener heads in the assembly are covered with a secondary 10 mm bead of
sealant and spread flat. The seams should be covered to 25 mm on either side of seam.
All fastener/washers are covered with sealant stretching 25 mm over the washer edges.
05
Glue and seal the wedi drain trap to
the DN 50 pipe. Mount the sealing col-
lar to the wedi Riolito neo underside
counterpart using a manual phillips
screwdriver.
06
Apply a skim coat and finally a com-
bed through bed of a Tile Adhesive
using modified Tile Adhesive and a 10
× 10 mm notch trowel.
07
Trowel the thinset on the rear side of the Fundo again using a 10 × 10 mm notch
trowel.
08
10
Press the Fundo firmly into the thinset bed, ensuring that the installation is level and
void free. Ensure wedi drain‘s sealing gasket is firmly inserted in the wedi trap with
no chance that thinset could have pushed into this connection area.
Apply some weight equally and leave on surface and drain area to allow the thinset
to initially cure without being disturbed (e.g. thinset bags). Do NOT step on the
drain module to push/connect to drain body or thinset. Ensure there is 100 % thinset
supporting the drain channel area over a completely flat subfloor.
Push the wedi board all the way into the channel of the shower base channel
and its bead of sealant. Smooth out any pushed out sealant on inside seam using
a putty knife. Fasten the boards directly to the studs starting 300 mm above the
base and at a rate of 1 fastener per 300 mm. One extra fastener is set into the
seam to the next board to crate a flush transition.
3636
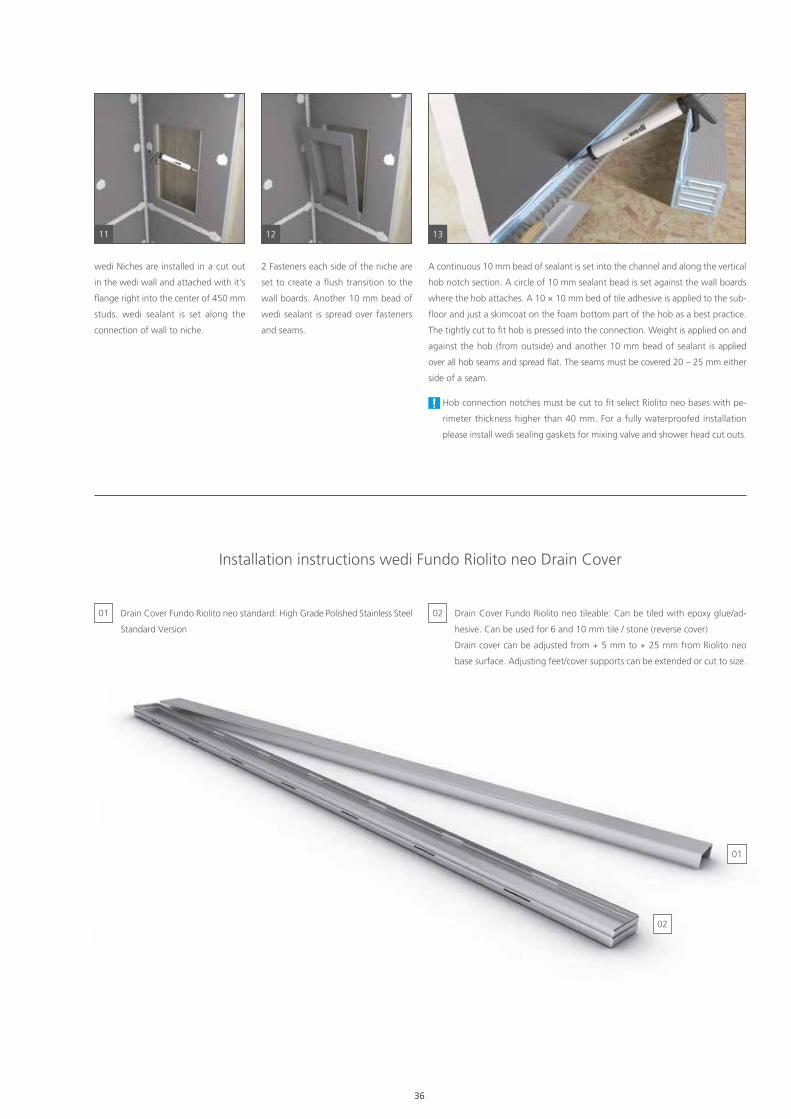
Installation instructions wedi Fundo Riolito neo Drain Cover
Hob connection notches must be cut to fit select Riolito neo bases with pe-
rimeter thickness higher than 40 mm. For a fully waterproofed installation
please install wedi sealing gaskets for mixing valve and shower head cut outs.
1311
A continuous 10 mm bead of sealant is set into the channel and along the vertical
hob notch section. A circle of 10 mm sealant bead is set against the wall boards
where the hob attaches. A 10 × 10 mm bed of tile adhesive is applied to the sub-
floor and just a skimcoat on the foam bottom part of the hob as a best practice.
The tightly cut to fit hob is pressed into the connection. Weight is applied on and
against the hob (from outside) and another 10 mm bead of sealant is applied
over all hob seams and spread flat. The seams must be covered 20 – 25 mm either
side of a seam.
12
2 Fasteners each side of the niche are
set to create a flush transition to the
wall boards. Another 10 mm bead of
wedi seal ant is spread over fasteners
and seams.
wedi Niches are installed in a cut out
in the wedi wall and attached with it‘s
flange right into the center of 450 mm
studs. wedi sealant is set along the
connection of wall to niche.
01
01 Drain Cover Fundo Riolito neo standard: High Grade Polished Stainless Steel
Standard Version
02
02 Drain Cover Fundo Riolito neo tileable: Can be tiled with epoxy glue/ad-
hesive. Can be used for 6 and 10 mm tile / stone (reverse cover)
Drain cover can be adjusted from + 5 mm to + 25 mm from Riolito neo
base surface. Adjusting feet/cover supports can be extended or cut to size.
36 3736
38
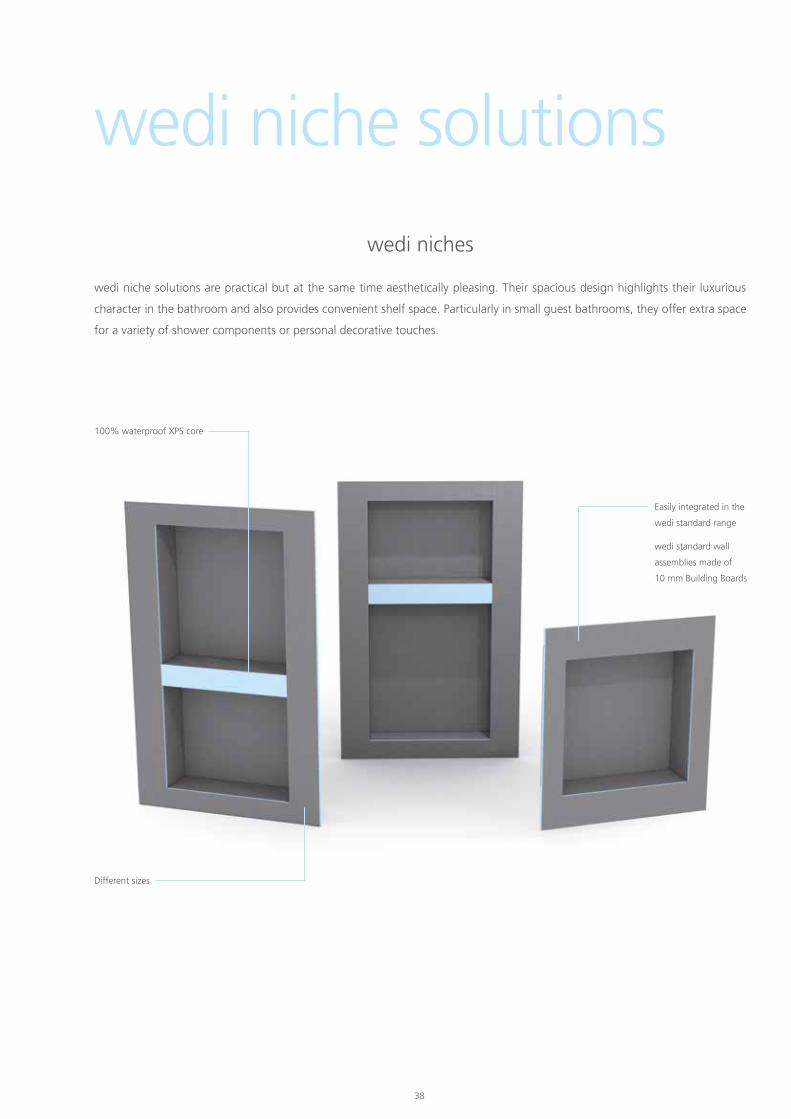
wedi niches
wedi niche solutions are practical but at the same time aesthetically pleasing. Their spacious design highlights their luxurious
character in the bathroom and also provides convenient shelf space. Particularly in small guest bathrooms, they offer extra space
for a variety of shower components or personal decorative touches.
wedi niche solutions
Easily integrated in the
wedi standard range
wedi standard wall
assemblies made of
10 mm Building Boards
Different sizes
100% waterproof XPS core
38 39
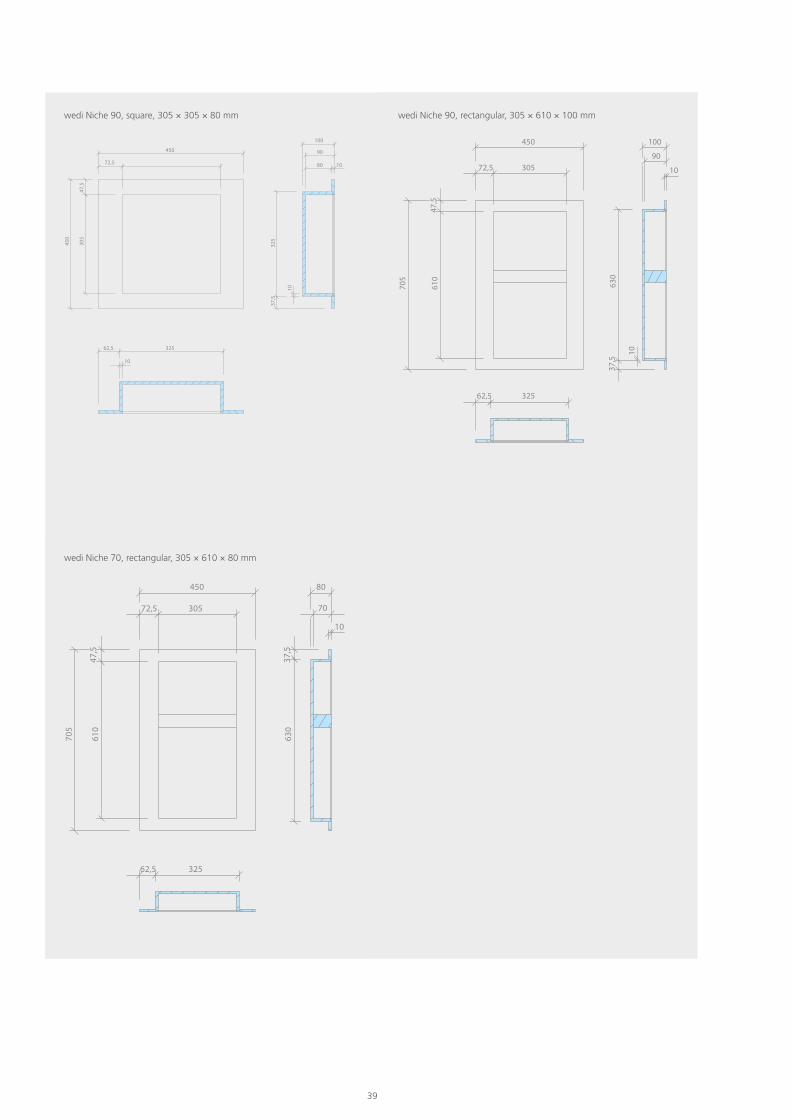
wedi niche solutions wedi Niche 90, square, 305 × 305 × 80 mm wedi Niche 90, rectangular, 305 × 610 × 100 mm
wedi Niche 70, rectangular, 305 × 610 × 80 mm
80 10
90
100
325
37,5
10
72,5
450
305
47,5
450
32562,5
10
305
32562,5
72,5
610
705
47,5
630
37,5
450 80
70
10
450 100
90
10305
610
630
37,5
10
47,5
705
32562,5
72,5
4040
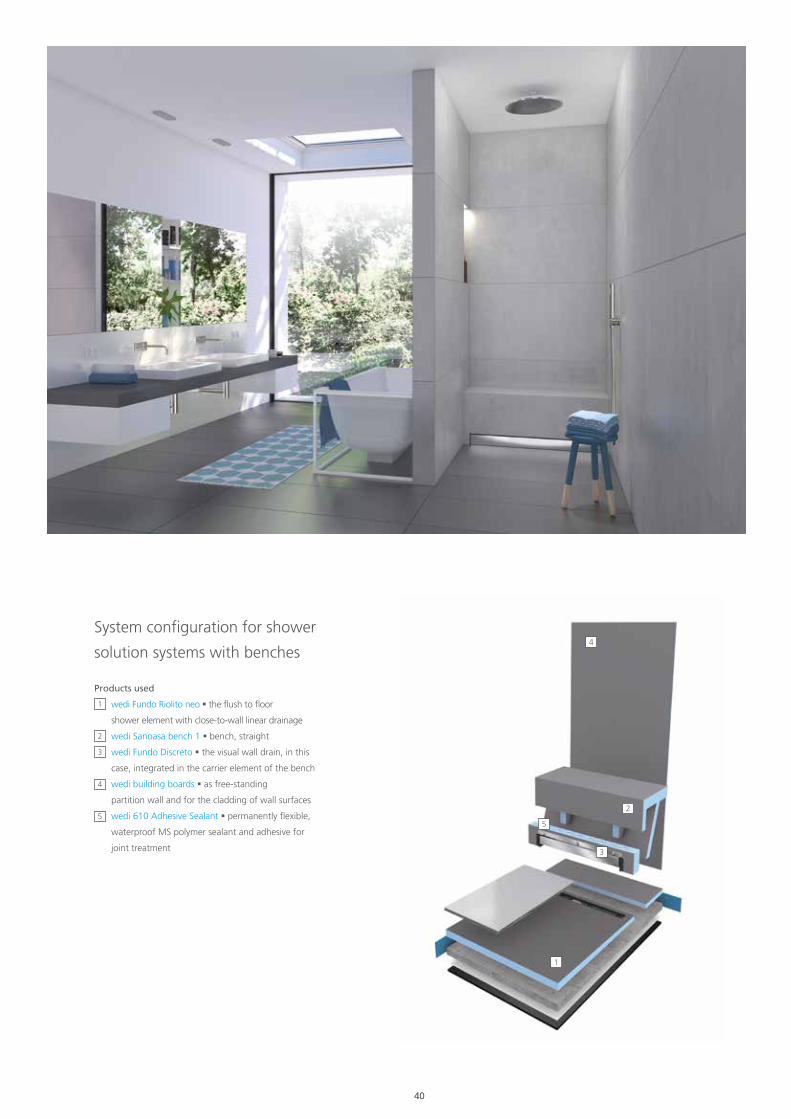
Products used
wedi Fundo Riolito neo the flush to floor
shower element with close-to-wall linear drainage
wedi Sanoasa bench 1 bench, straight
wedi Fundo Discreto the visual wall drain, in this
case, integrated in the carrier element of the bench
wedi building boards as free-standing
partition wall and for the cladding of wall surfaces
wedi 610 Adhesive Sealant permanently flexible,
waterproof MS polymer sealant and adhesive for
joint treatment
1
2
3
4
5
System configuration for shower
solution systems with benches
1
2
4
5
3
40 4140
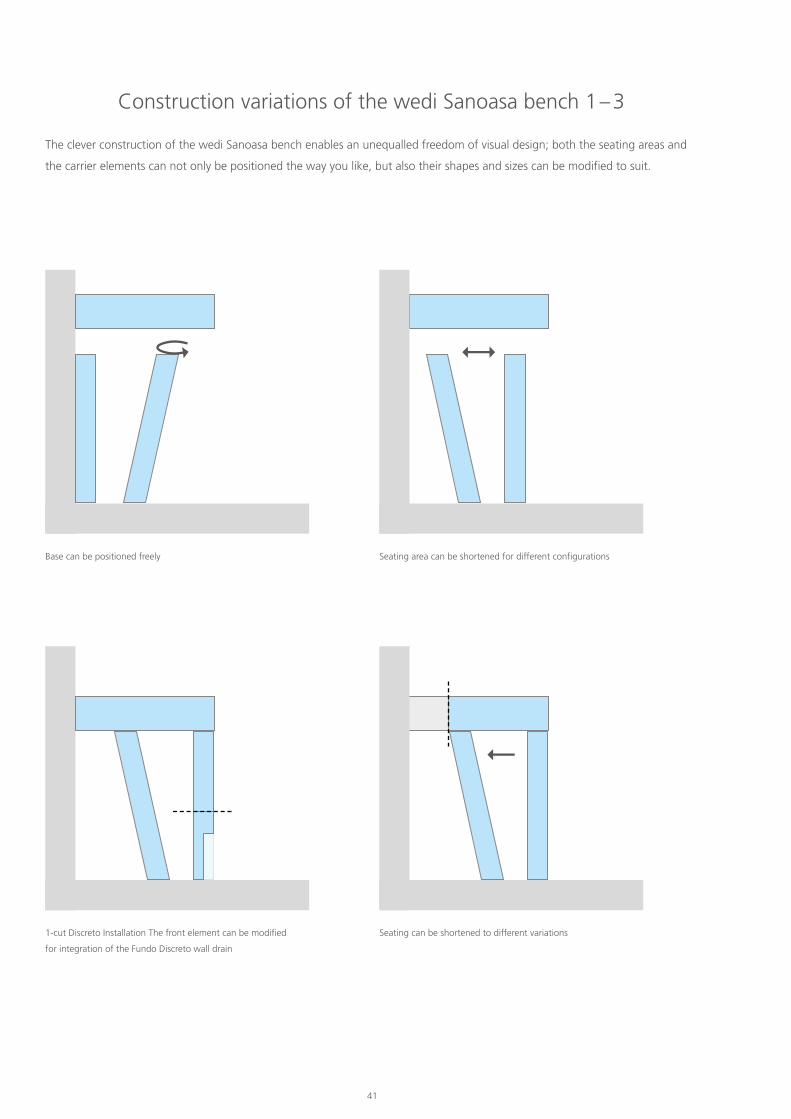
Construction variations of the wedi Sanoasa bench 1 – 3
The clever construction of the wedi Sanoasa bench enables an unequalled freedom of visual design; both the seating areas and
the carrier elements can not only be positioned the way you like, but also their shapes and sizes can be modified to suit.
Base can be positioned freely Seating area can be shortened for different configurations
Seating can be shortened to different variations1-cut Discreto Installation The front element can be modified
for integration of the Fundo Discreto wall drain
42
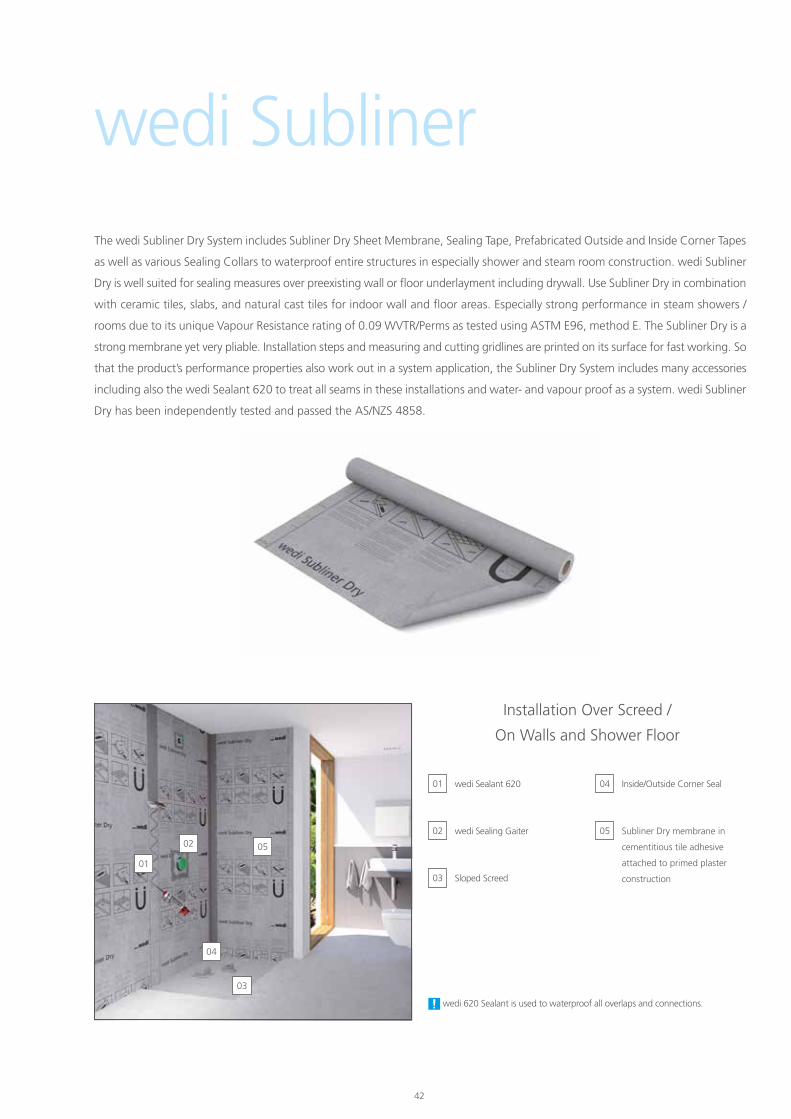
The wedi Subliner Dry System includes Subliner Dry Sheet Membrane, Sealing Tape, Prefabricated Outside and Inside Corner Tapes
as well as various Sealing Collars to waterproof entire structures in especially shower and steam room construction. wedi Subliner
Dry is well suited for sealing measures over preexisting wall or floor underlayment including drywall. Use Subliner Dry in combination
with ceramic tiles, slabs, and natural cast tiles for indoor wall and floor areas. Especially strong performance in steam showers /
rooms due to its unique Vapour Resistance rating of 0.09 WVTR/Perms as tested using ASTM E96, method E. The Subliner Dry is a
strong membrane yet very pliable. Installation steps and measuring and cutting gridlines are printed on its surface for fast working. So
that the product’s performance properties also work out in a system application, the Subliner Dry System includes many accessories
including also the wedi Sealant 620 to treat all seams in these installations and water- and vapour proof as a system. wedi Subliner
Dry has been independently tested and passed the AS/NZS 4858.
05
04
01
02
03
01 wedi Sealant 620
02 wedi Sealing Gaiter
03
04
Sloped Screed
Inside/Outside Corner Seal
05 Subliner Dry membrane in
cementitious tile adhesive
attached to primed plaster
construction
Installation Over Screed /
On Walls and Shower Floor
wedi Subliner
wedi 620 Sealant is used to waterproof all overlaps and connections.
42 43
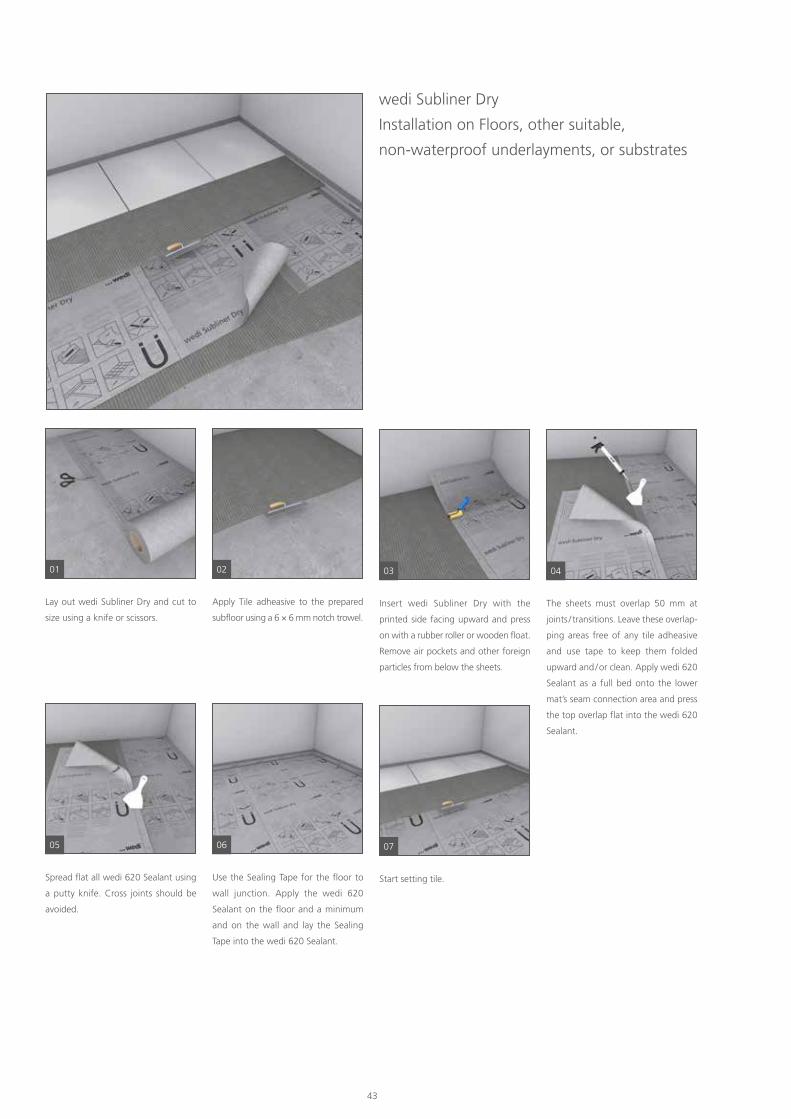
wedi Subliner
01
05
02
06
Lay out wedi Subliner Dry and cut to
size using a knife or scissors.
Spread flat all wedi 620 Sealant using
a putty knife. Cross joints should be
avoided.
Apply Tile adheasive to the prepared
subfloor using a 6 × 6 mm notch trowel.
Use the Sealing Tape for the floor to
wall junction. Apply the wedi 620
Sealant on the floor and a minimum
and on the wall and lay the Sealing
Tape into the wedi 620 Sealant.
wedi Subliner Dry
Installation on Floors, other suitable,
non-waterproof underlayments, or substrates
03
07
04
Insert wedi Subliner Dry with the
printed side facing upward and press
on with a rubber roller or wooden float.
Remove air pockets and other foreign
particles from below the sheets.
Start setting tile.
The sheets must overlap 50 mm at
joints / transitions. Leave these overlap-
ping areas free of any tile adheasive
and use tape to keep them folded
upward and / or clean. Apply wedi 620
Sealant as a full bed onto the lower
mat’s seam connection area and press
the top overlap flat into the wedi 620
Sealant.
44
Description Length × Width × Thickness Unit/Palette Item #
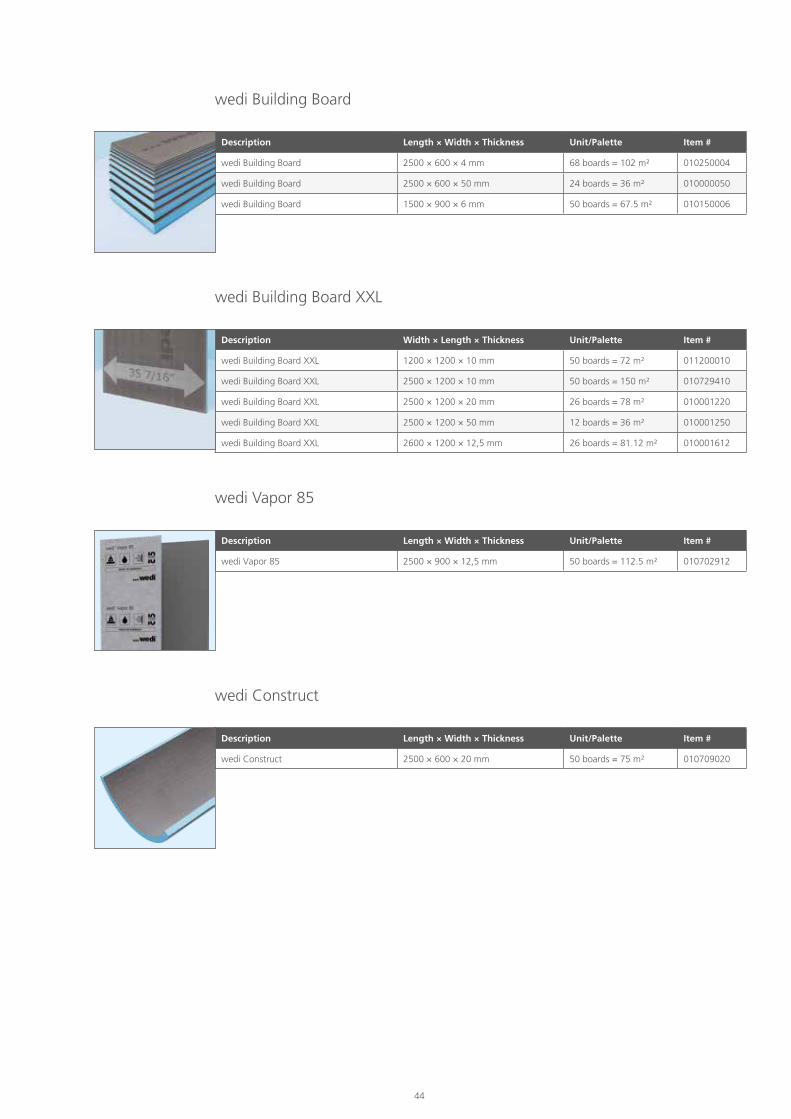
wedi Building Board 2500 × 600 × 4 mm 68 boards = 102 m² 010250004
wedi Building Board 2500 × 600 × 50 mm 24 boards = 36 m² 010000050
wedi Building Board 1500 × 900 × 6 mm 50 boards = 67.5 m² 010150006
Description Length × Width × Thickness Unit/Palette Item #
wedi Vapor 85 2500 × 900 × 12,5 mm 50 boards = 112.5 m² 010702912
Description Length × Width × Thickness Unit/Palette Item #
wedi Construct 2500 × 600 × 20 mm 50 boards = 75 m² 010709020
wedi Building Board
wedi Vapor 85
wedi Construct
Description Width × Length × Thickness Unit/Palette Item #
wedi Building Board XXL 1200 × 1200 × 10 mm 50 boards = 72 m² 011200010
wedi Building Board XXL 2500 × 1200 × 10 mm 50 boards = 150 m² 010729410
wedi Building Board XXL 2500 × 1200 × 20 mm 26 boards = 78 m² 010001220
wedi Building Board XXL 2500 × 1200 × 50 mm 12 boards = 36 m² 010001250
wedi Building Board XXL 2600 × 1200 × 12,5 mm 26 boards = 81.12 m² 010001612
wedi Building Board XXL
44 45
Description Dimensions Unit Item #
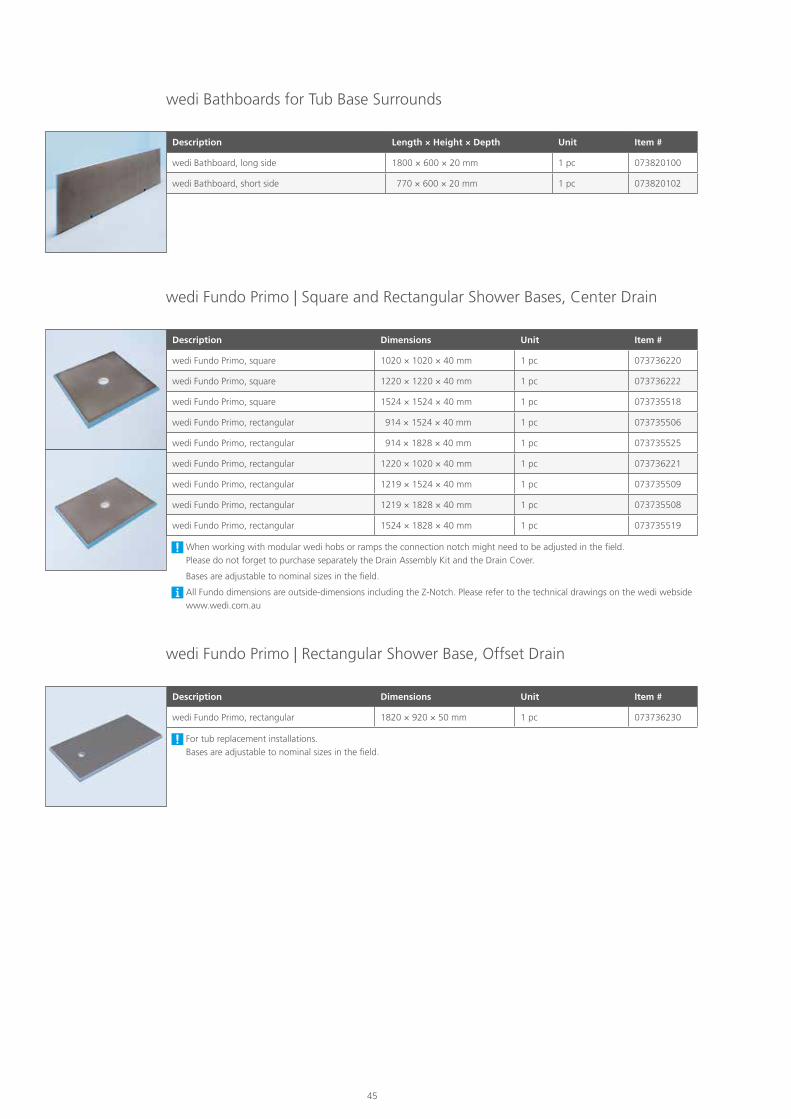
wedi Fundo Primo, square 1020 × 1020 × 40 mm 1 pc 073736220
wedi Fundo Primo, square 1220 × 1220 × 40 mm 1 pc 073736222
wedi Fundo Primo, square 1524 × 1524 × 40 mm 1 pc 073735518
wedi Fundo Primo, rectangular 914 × 1524 × 40 mm 1 pc 073735506
wedi Fundo Primo, rectangular 914 × 1828 × 40 mm 1 pc 073735525
wedi Fundo Primo, rectangular 1220 × 1020 × 40 mm 1 pc 073736221
wedi Fundo Primo, rectangular 1219 × 1524 × 40 mm 1 pc 073735509
wedi Fundo Primo, rectangular 1219 × 1828 × 40 mm 1 pc 073735508
wedi Fundo Primo, rectangular 1524 × 1828 × 40 mm 1 pc 073735519
wedi Fundo Primo | Square and Rectangular Shower Bases, Center Drain
When working with modular wedi hobs or ramps the connection notch might need to be adjusted in the field. Please do not forget to purchase separately the Drain Assembly Kit and the Drain Cover.
Bases are adjustable to nominal sizes in the field.
All Fundo dimensions are outside-dimensions including the Z-Notch. Please refer to the technical drawings on the wedi webside www.wedi.com.au
Description Dimensions Unit Item #
wedi Fundo Primo, rectangular 1820 × 920 × 50 mm 1 pc 073736230
wedi Fundo Primo | Rectangular Shower Base, Offset Drain
For tub replacement installations. Bases are adjustable to nominal sizes in the field.
Description Length × Height × Depth Unit Item #
wedi Bathboard, long side 1800 × 600 × 20 mm 1 pc 073820100
wedi Bathboard, short side 770 × 600 × 20 mm 1 pc 073820102
wedi Bathboards for Tub Base Surrounds
46
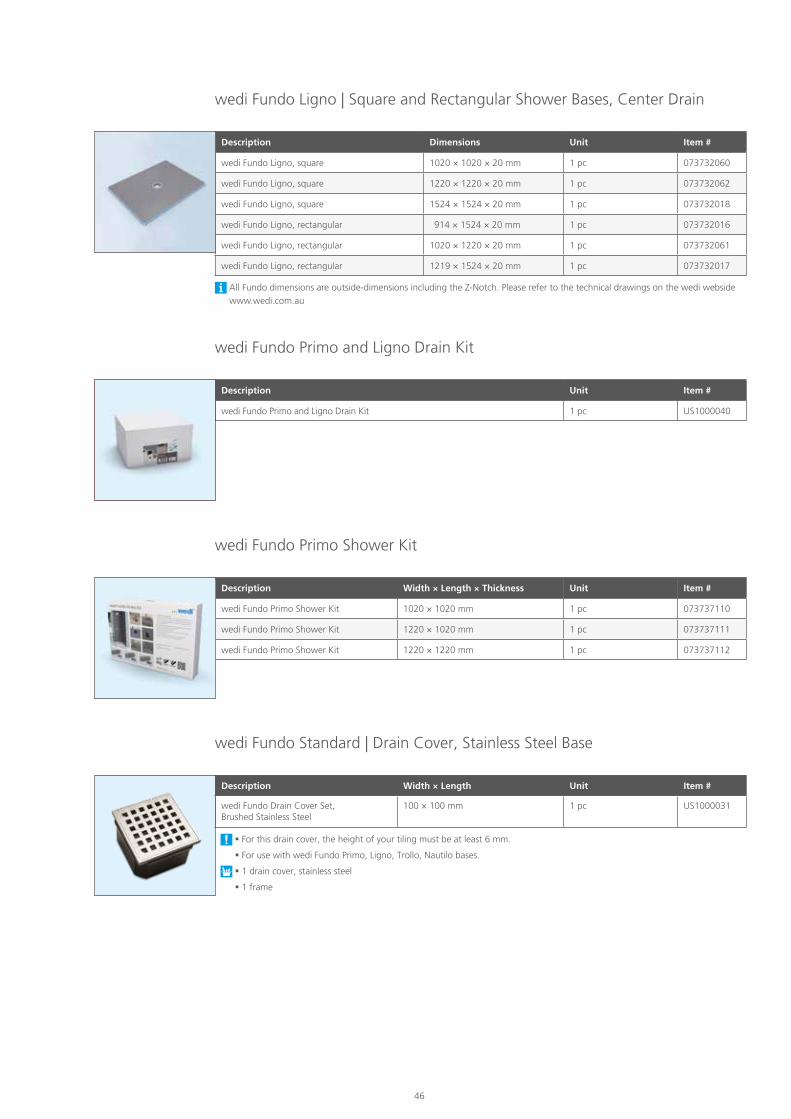
For this drain cover, the height of your tiling must be at least 6 mm.
For use with wedi Fundo Primo, Ligno, Trollo, Nautilo bases.
1 drain cover, stainless steel
1 frame
wedi Fundo Standard | Drain Cover, Stainless Steel Base
Description Width × Length Unit Item #
wedi Fundo Drain Cover Set, Brushed Stainless Steel
100 × 100 mm 1 pc US1000031
Description Unit Item #
wedi Fundo Primo and Ligno Drain Kit 1 pc US1000040
wedi Fundo Primo and Ligno Drain Kit
Description Width × Length × Thickness Unit Item #
wedi Fundo Primo Shower Kit 1020 × 1020 mm 1 pc 073737110
wedi Fundo Primo Shower Kit 1220 × 1020 mm 1 pc 073737111
wedi Fundo Primo Shower Kit 1220 × 1220 mm 1 pc 073737112
wedi Fundo Primo Shower Kit
Description Dimensions Unit Item #
wedi Fundo Ligno, square 1020 × 1020 × 20 mm 1 pc 073732060
wedi Fundo Ligno, square 1220 × 1220 × 20 mm 1 pc 073732062
wedi Fundo Ligno, square 1524 × 1524 × 20 mm 1 pc 073732018
wedi Fundo Ligno, rectangular 914 × 1524 × 20 mm 1 pc 073732016
wedi Fundo Ligno, rectangular 1020 × 1220 × 20 mm 1 pc 073732061
wedi Fundo Ligno, rectangular 1219 × 1524 × 20 mm 1 pc 073732017
wedi Fundo Ligno | Square and Rectangular Shower Bases, Center Drain
All Fundo dimensions are outside-dimensions including the Z-Notch. Please refer to the technical drawings on the wedi webside www.wedi.com.au
46 47
Description External Dimensions Length × Width × Height
Channel Length Item #
wedi Fundo Riolito neo Modular, line module
1220 × 146 mm 1100 mm 075100053
wedi Fundo Riolito neo Modular, extension module
1220 × 1700 mm – 075100051
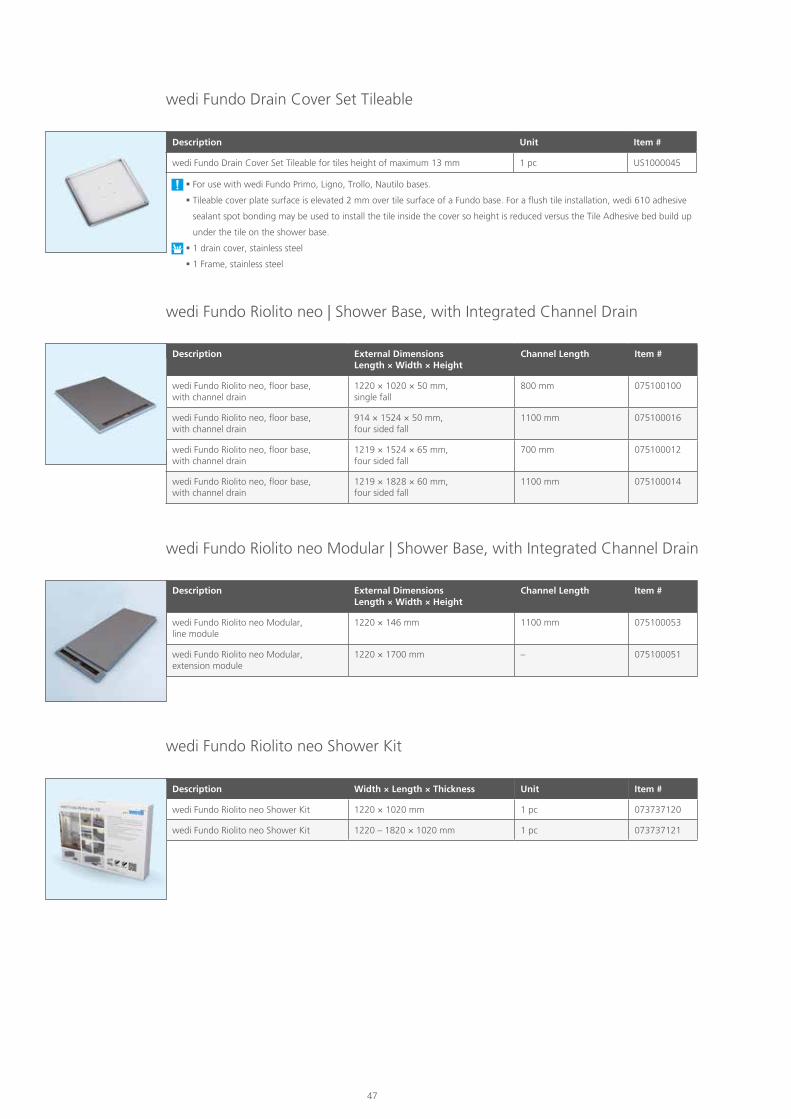
wedi Fundo Riolito neo Modular | Shower Base, with Integrated Channel Drain
Description Unit Item #
wedi Fundo Drain Cover Set Tileable for tiles height of maximum 13 mm 1 pc US1000045
wedi Fundo Drain Cover Set Tileable
For use with wedi Fundo Primo, Ligno, Trollo, Nautilo bases.
Tileable cover plate surface is elevated 2 mm over tile surface of a Fundo base. For a flush tile installation, wedi 610 adhesive
sealant spot bonding may be used to install the tile inside the cover so height is reduced versus the Tile Adhesive bed build up
under the tile on the shower base.
1 drain cover, stainless steel
1 Frame, stainless steel
Description External Dimensions Length × Width × Height
Channel Length Item #
wedi Fundo Riolito neo, floor base, with channel drain
1220 × 1020 × 50 mm, single fall
800 mm 075100100
wedi Fundo Riolito neo, floor base, with channel drain
914 × 1524 × 50 mm, four sided fall
1100 mm 075100016
wedi Fundo Riolito neo, floor base, with channel drain
1219 × 1524 × 65 mm, four sided fall
700 mm 075100012
wedi Fundo Riolito neo, floor base, with channel drain
1219 × 1828 × 60 mm, four sided fall
1100 mm 075100014
wedi Fundo Riolito neo | Shower Base, with Integrated Channel Drain
Description Width × Length × Thickness Unit Item #
wedi Fundo Riolito neo Shower Kit 1220 × 1020 mm 1 pc 073737120
wedi Fundo Riolito neo Shower Kit 1220 – 1820 × 1020 mm 1 pc 073737121
wedi Fundo Riolito neo Shower Kit
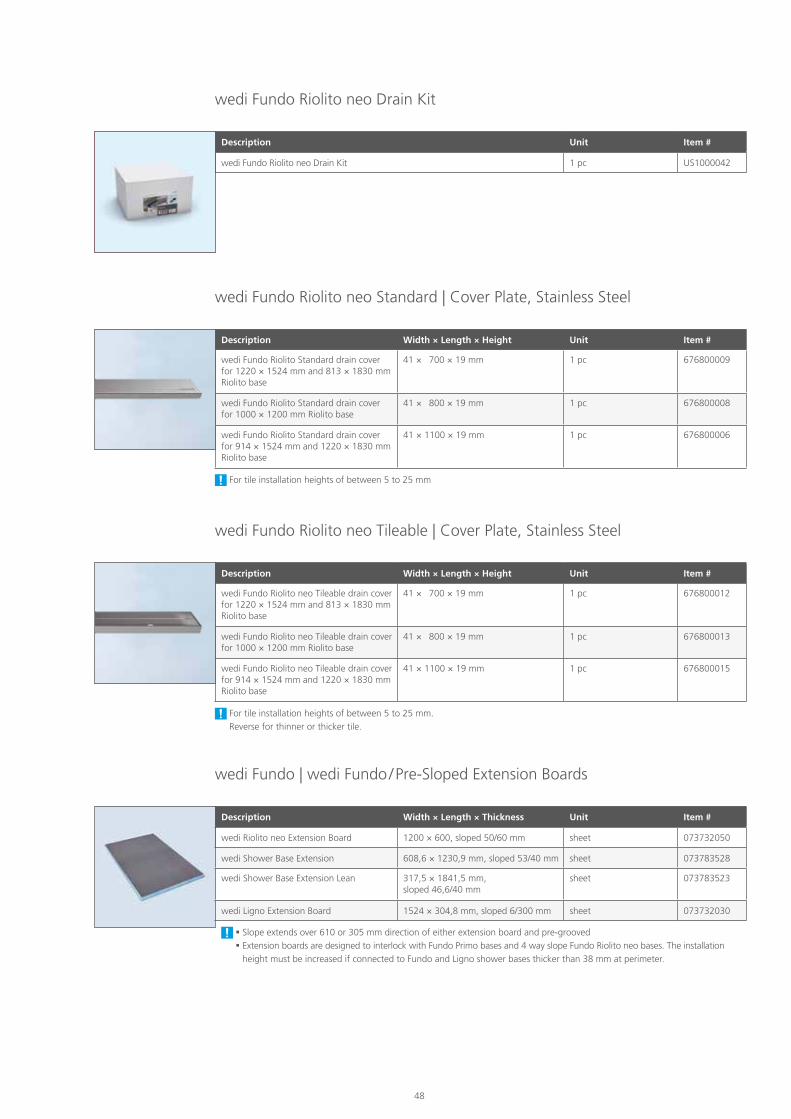
48
Description Width × Length × Height Unit Item #
wedi Fundo Riolito neo Tileable drain cover for 1220 × 1524 mm and 813 × 1830 mm Riolito base
41 × 700 × 19 mm 1 pc 676800012
wedi Fundo Riolito neo Tileable drain cover for 1000 × 1200 mm Riolito base
41 × 800 × 19 mm 1 pc 676800013
wedi Fundo Riolito neo Tileable drain cover for 914 × 1524 mm and 1220 × 1830 mm Riolito base
41 × 1100 × 19 mm 1 pc 676800015
wedi Fundo Riolito neo Tileable | Cover Plate, Stainless Steel
For tile installation heights of between 5 to 25 mm. Reverse for thinner or thicker tile.
Description Width × Length × Height Unit Item #
wedi Fundo Riolito Standard drain cover for 1220 × 1524 mm and 813 × 1830 mm Riolito base
41 × 700 × 19 mm 1 pc 676800009
wedi Fundo Riolito Standard drain cover for 1000 × 1200 mm Riolito base
41 × 800 × 19 mm 1 pc 676800008
wedi Fundo Riolito Standard drain cover for 914 × 1524 mm and 1220 × 1830 mm Riolito base
41 × 1100 × 19 mm 1 pc 676800006
wedi Fundo Riolito neo Standard | Cover Plate, Stainless Steel
For tile installation heights of between 5 to 25 mm
Description Unit Item #
wedi Fundo Riolito neo Drain Kit 1 pc US1000042
wedi Fundo Riolito neo Drain Kit
Slope extends over 610 or 305 mm direction of either extension board and pre-grooved Extension boards are designed to interlock with Fundo Primo bases and 4 way slope Fundo Riolito neo bases. The installation
height must be increased if connected to Fundo and Ligno shower bases thicker than 38 mm at perimeter.
wedi Fundo | wedi Fundo / Pre-Sloped Extension Boards
Description Width × Length × Thickness Unit Item #
wedi Riolito neo Extension Board 1200 × 600, sloped 50/60 mm sheet 073732050
wedi Shower Base Extension 608,6 × 1230,9 mm, sloped 53/40 mm sheet 073783528
wedi Shower Base Extension Lean 317,5 × 1841,5 mm, sloped 46,6/40 mm
sheet 073783523
wedi Ligno Extension Board 1524 × 304,8 mm, sloped 6/300 mm sheet 073732030
48 49
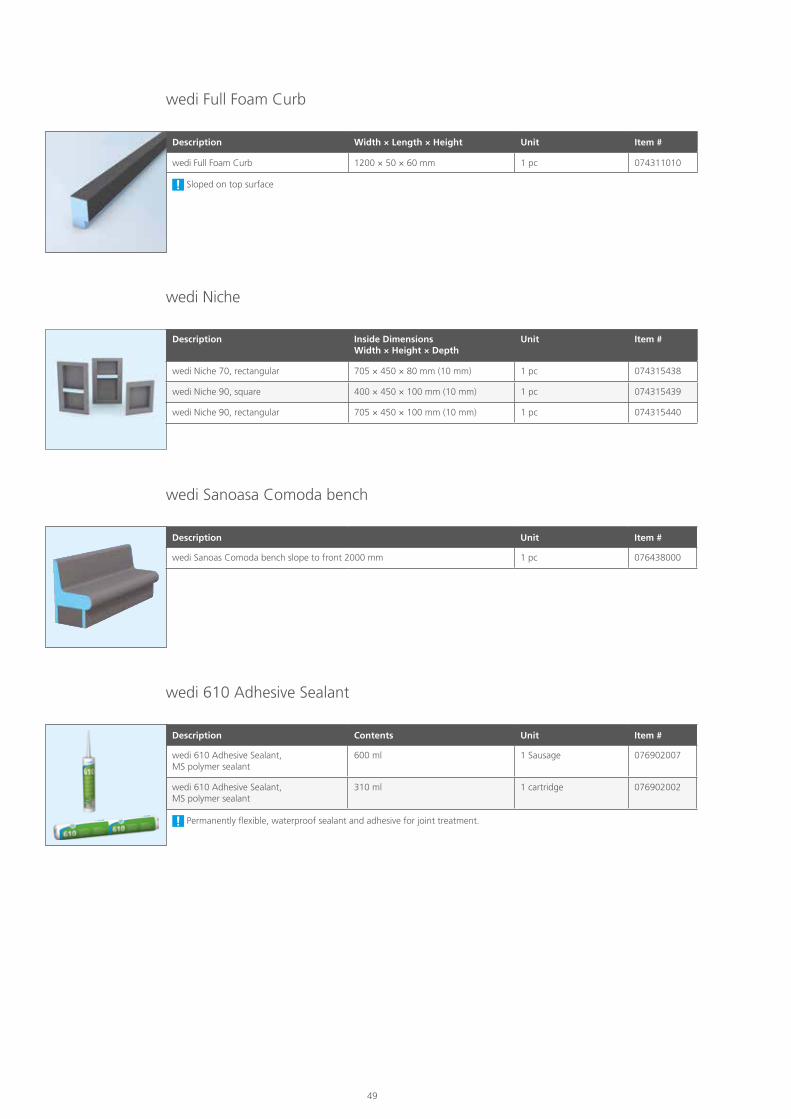
Sloped on top surface
Description Width × Length × Height Unit Item #
wedi Full Foam Curb 1200 × 50 × 60 mm 1 pc 074311010
wedi Full Foam Curb
wedi Niche
Description Inside DimensionsWidth × Height × Depth
Unit Item #
wedi Niche 70, rectangular 705 × 450 × 80 mm (10 mm) 1 pc 074315438
wedi Niche 90, square 400 × 450 × 100 mm (10 mm) 1 pc 074315439
wedi Niche 90, rectangular 705 × 450 × 100 mm (10 mm) 1 pc 074315440
Description Contents Unit Item #
wedi 610 Adhesive Sealant,MS polymer sealant
600 ml 1 Sausage 076902007
wedi 610 Adhesive Sealant,MS polymer sealant
310 ml 1 cartridge 076902002
wedi 610 Adhesive Sealant
Permanently flexible, waterproof sealant and adhesive for joint treatment.
wedi Sanoasa Comoda bench
Description Unit Item #
wedi Sanoas Comoda bench slope to front 2000 mm 1 pc 076438000
50
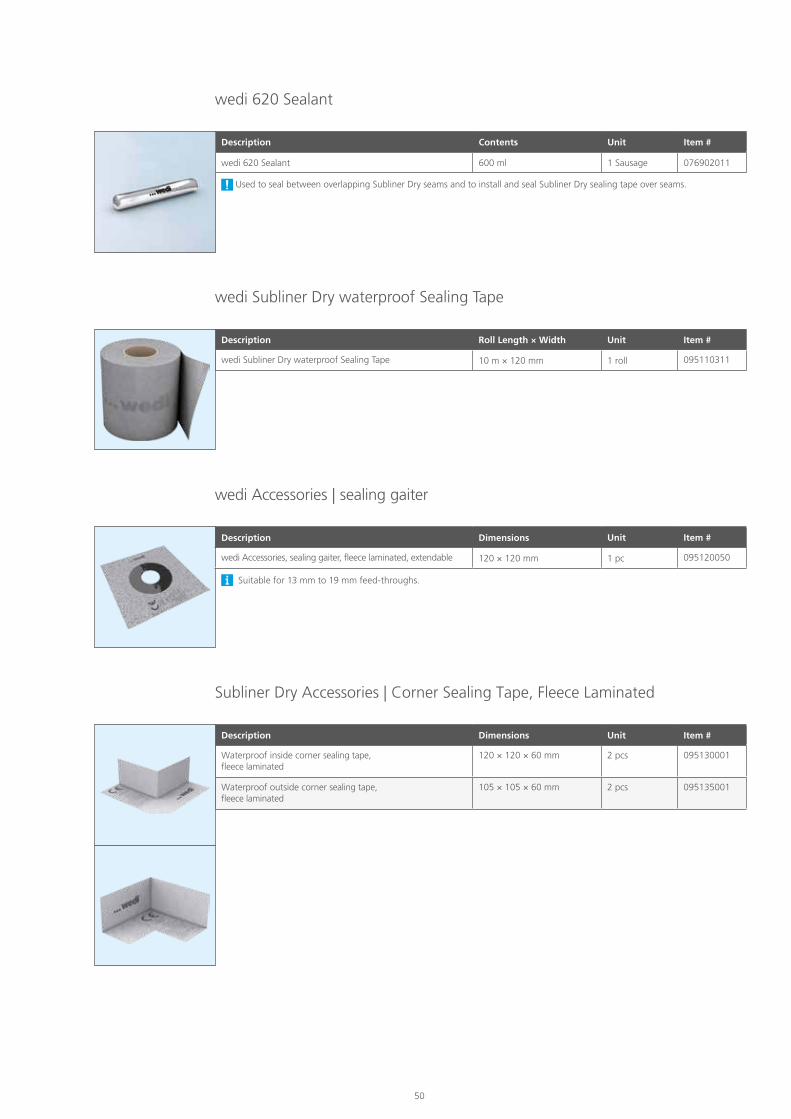
Description Roll Length × Width Unit Item #
wedi Subliner Dry waterproof Sealing Tape 10 m × 120 mm 1 roll 095110311
wedi Subliner Dry waterproof Sealing Tape
Description Dimensions Unit Item #
Waterproof inside corner sealing tape, fleece laminated
120 × 120 × 60 mm 2 pcs 095130001
Waterproof outside corner sealing tape, fleece laminated
105 × 105 × 60 mm 2 pcs 095135001
Subliner Dry Accessories | Corner Sealing Tape, Fleece Laminated
Description Dimensions Unit Item #
wedi Accessories, sealing gaiter, fleece laminated, extendable 120 × 120 mm 1 pc 095120050
wedi Accessories | sealing gaiter
Suitable for 13 mm to 19 mm feed-throughs.
Description Contents Unit Item #
wedi 620 Sealant 600 ml 1 Sausage 076902011
wedi 620 Sealant
Used to seal between overlapping Subliner Dry seams and to install and seal Subliner Dry sealing tape over seams.

50 51
Description Length Unit Item #
wedi Fastener Kit 100 wedi Stainless Steel screws 100 wedi Zinc-coated Steel Washers
1 pc 607023513
wedi Fastener Kit
Description Length Unit/Box Item #
Stainless steel screws, countersunk head 45 mm 1000 pcs 607023514
Zinc-coated Steel Washers 35 mm 1000 pcs 094862107
wedi Tools | Screws & Washers
For installation to wooden and metal framework.
Description Width × Roll Length Unit Item #
wedi Subliner Dry, waterproofing sheet membrane 5 × 1 m 1 roll 095110305
wedi Subliner Dry, waterproofing sheet membrane 30 × 1 m 1 roll 095110332
wedi Subliner Dry | Waterproofing and Crack-bridging Sheet Membrane
Flexible waterproofing membrane for medium and high exposure wet areas – for interior walls / showers and steam showers.
Description Unit/Bag Item #
wedi Tools, corner putty knife for wedi shower system installations 1 pc US5000044
wedi Tools | Corner Putty Knife
Use to smooth out wedi 610 Adhesive Sealant applications.
Description Width × Length × Thickness Unit Item #
wedi Tools sloped lip-end sealing tape left 160 × 100 × 65 mm 1 pc 095135005
wedi Tools sloped lip-end sealing tape right 160 × 100 × 65 mm 1 pc 095135004
wedi Tools | sloped lip-end sealing tape
52
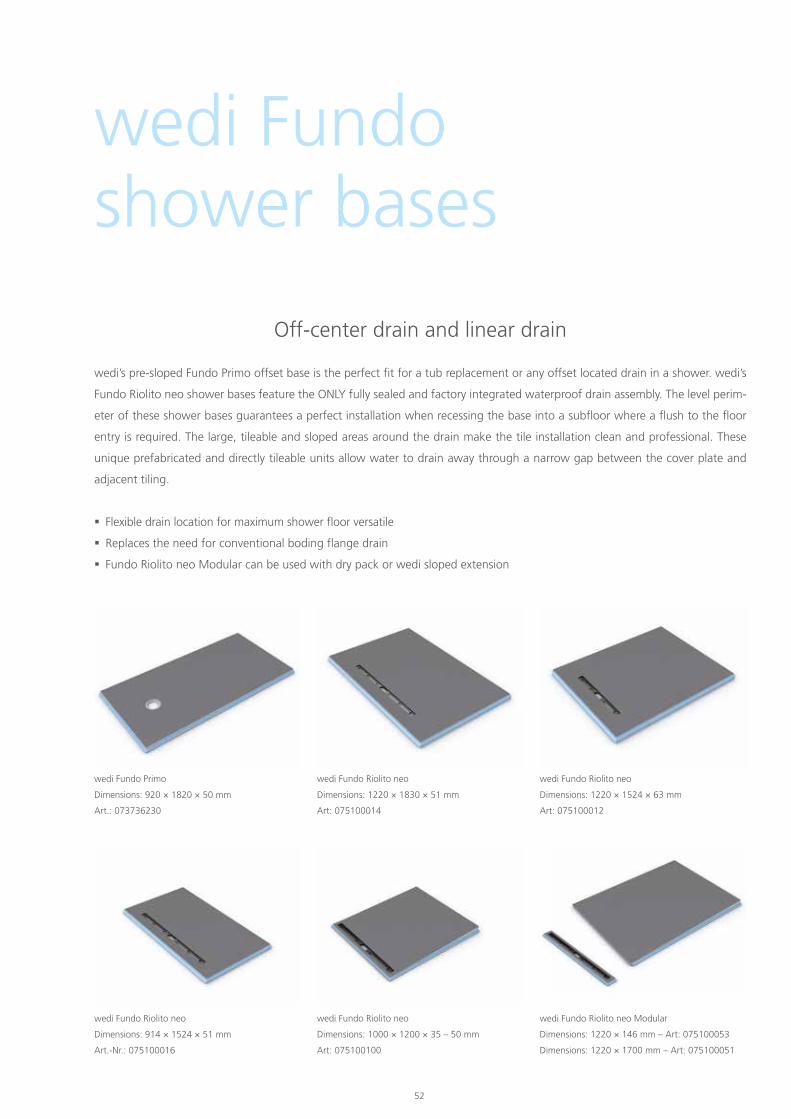
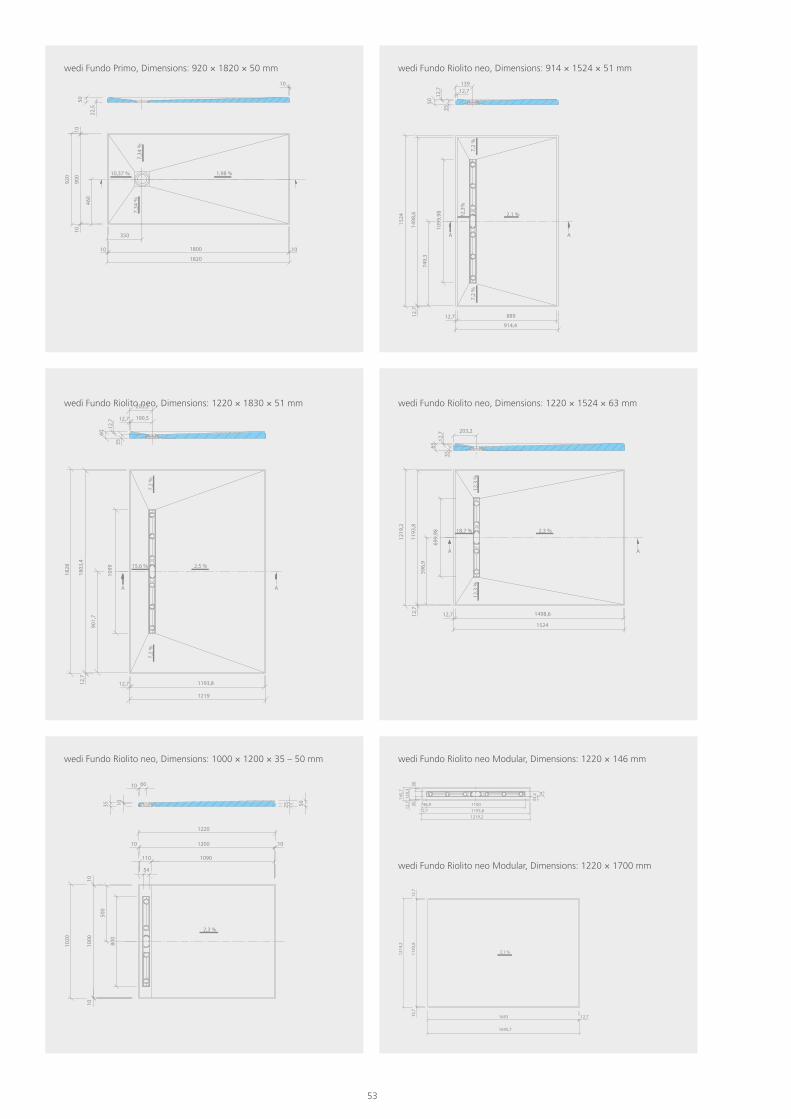
wedi Fundo shower bases
wedi Fundo Riolito neo
Dimensions: 914 × 1524 × 51 mm
Art.-Nr.: 075100016
wedi Fundo Riolito neo
Dimensions: 1220 × 1830 × 51 mm
Art: 075100014
wedi Fundo Riolito neo Modular
Dimensions: 1220 × 146 mm – Art: 075100053
Dimensions: 1220 × 1700 mm – Art: 075100051
wedi Fundo Riolito neo
Dimensions: 1220 × 1524 × 63 mm
Art: 075100012
wedi Fundo Riolito neo
Dimensions: 1000 × 1200 × 35 – 50 mm
Art: 075100100
Off-center drain and linear drain
wedi’s pre-sloped Fundo Primo offset base is the perfect fit for a tub replacement or any offset located drain in a shower. wedi’s
Fundo Riolito neo shower bases feature the ONLY fully sealed and factory integrated waterproof drain assembly. The level perim-
eter of these shower bases guarantees a perfect installation when recessing the base into a subfloor where a flush to the floor
entry is required. The large, tileable and sloped areas around the drain make the tile installation clean and professional. These
unique prefabricated and directly tileable units allow water to drain away through a narrow gap between the cover plate and
adjacent tiling.
Flexible drain location for maximum shower floor versatile
Replaces the need for conventional boding flange drain
Fundo Riolito neo Modular can be used with dry pack or wedi sloped extension
wedi Fundo Primo
Dimensions: 920 × 1820 × 50 mm
Art.: 073736230
52 53
wedi Fundo Riolito neo Modular, Dimensions: 1220 × 146 mm
wedi Fundo Riolito neo Modular, Dimensions: 1220 × 1700 mm
wedi Fundo Riolito neo, Dimensions: 1220 × 1830 × 51 mm wedi Fundo Riolito neo, Dimensions: 1220 × 1524 × 63 mm
wedi Fundo Riolito neo, Dimensions: 1000 × 1200 × 35 – 50 mm
wedi Fundo Riolito neo, Dimensions: 914 × 1524 × 51 mm
50
1524
1498
,6
749,
3
12,7
12,7 889
AA
914,4
1099
,98
3512
,7 12,7139
2,1 %
7,2
%7,
2 %
12,3
%
1219
,2
1193
,8
699,
98
596,
9
12,7
12,7 1498,6
1524
2,3 %18,7 %
A A
203,265
12,7
35
12,3
%12
,3 %
800
500
1000
1010
35 10 5025
120010 10
1220
6010
1090110
54
1020
2,3 %
2,5 %
7,2
%7,
2 %
15,6 %
1828
1803
,4
1099
60
3512
,7 12,7 190,5
203,2
901,
7
12,7
12,7 1193,8
1219
A A
1695,7
1683
1219
,2
1193
,812
,712
,714
5,7
120,
312
,7 3030
5433
,2
1219,21193,812,7110046,9
12,7
2,1 %
1695,7
1683
1219
,2
1193
,812
,712
,714
5,7
120,
312
,7 3030
5433
,2
1219,21193,812,7110046,9
12,7
2,1 %
50
1524
1498
,6
749,
3
12,7
12,7 889
AA
914,4
1099
,98
3512
,7 12,7139
2,1 %
7,2
%7,
2 %
12,3
%
1219
,2
1193
,8
699,
98
596,
9
12,7
12,7 1498,6
1524
2,3 %18,7 %
A A
203,2
6512
,735
12,3
%12
,3 %
800
500
1000
1010
35 10 5025
120010 10
1220
6010
1090110
54
1020
2,3 %
wedi Fundo Primo, Dimensions: 920 × 1820 × 50 mm
1,98 %10,37 %
7,34
%7,
34 %
5010
22,5
1820
180010 10
350
1010
900
920
460

54
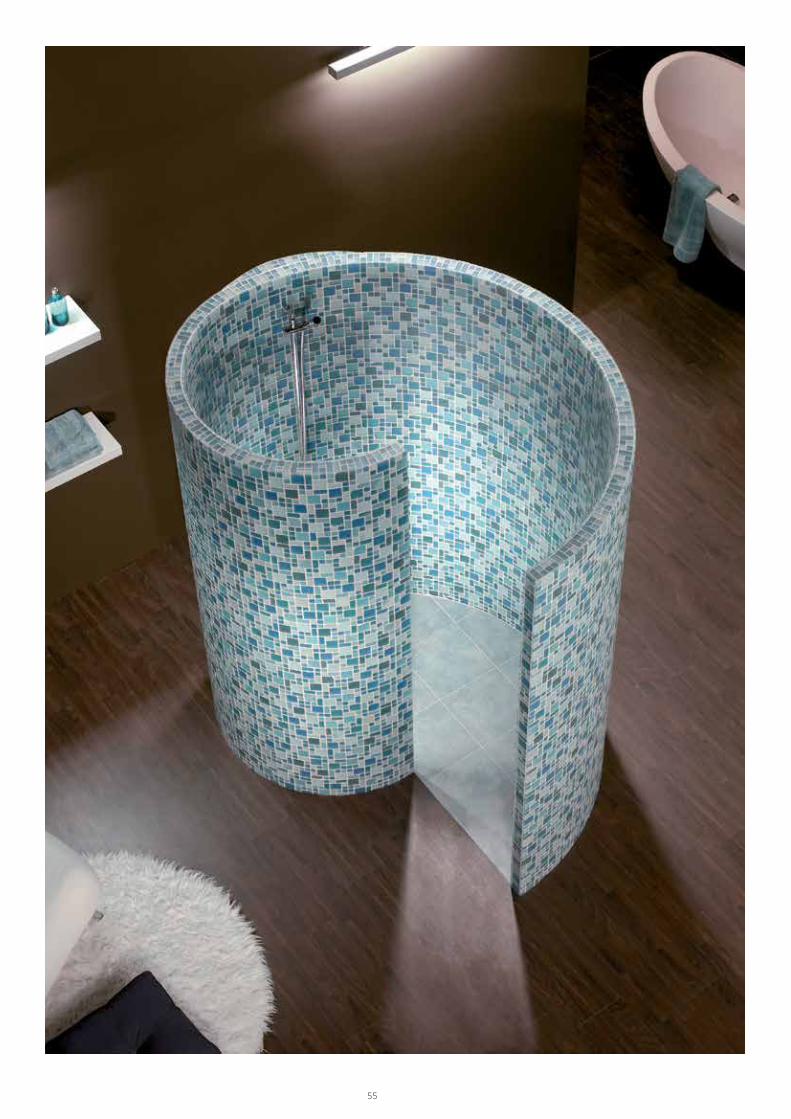
The inspiration to let your creative ideas take shape
Today, floor-level showers are practically a must-have in all public wellness facilities as they combine aesthetic requirements with a high
level of functionality. The Fundo design concept unites creative lines with natural shapes and offers wall and floor elements to match
the design series Trollo and Nautilo – either with or without supply channels. Contact us for order information and customised designs.
wedi Fundo design showers
wedi Fundo Trollo libero wedi Fundo Nautilo libero | Right hand entry wedi Fundo Nautilo libero | Left hand entry
wedi Fundo Trollo wedi Fundo Nautilo | Right hand entry wedi Fundo Nautilo | Left hand entry
54 55
5656
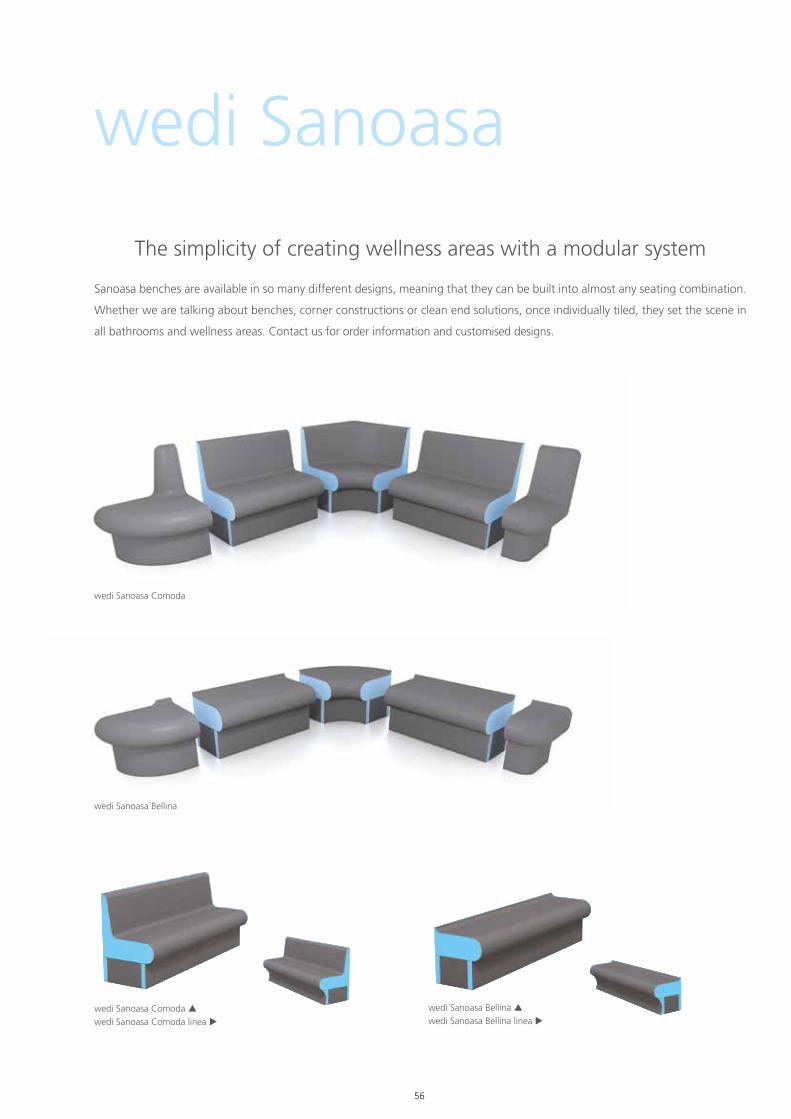
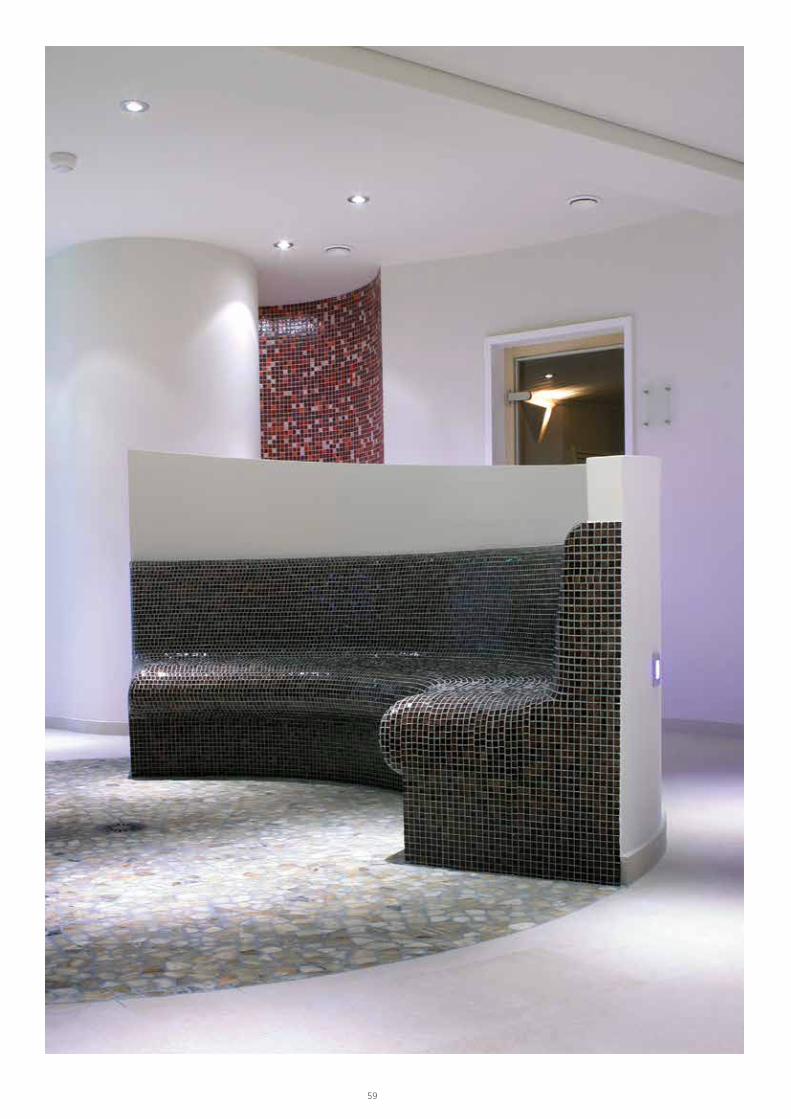
The simplicity of creating wellness areas with a modular system
Sanoasa benches are available in so many different designs, meaning that they can be built into almost any seating combination.
Whether we are talking about benches, corner constructions or clean end solutions, once individually tiled, they set the scene in
all bathrooms and wellness areas. Contact us for order information and customised designs.
wedi Sanoasa
wedi Sanoasa Comoda
wedi Sanoasa Bellina
wedi Sanoasa Comoda wedi Sanoasa Comoda linea
wedi Sanoasa Bellina wedi Sanoasa Bellina linea
56 5756
wedi Sanoasa
58
wedi Sanoasa
01
01
02
02
03
03
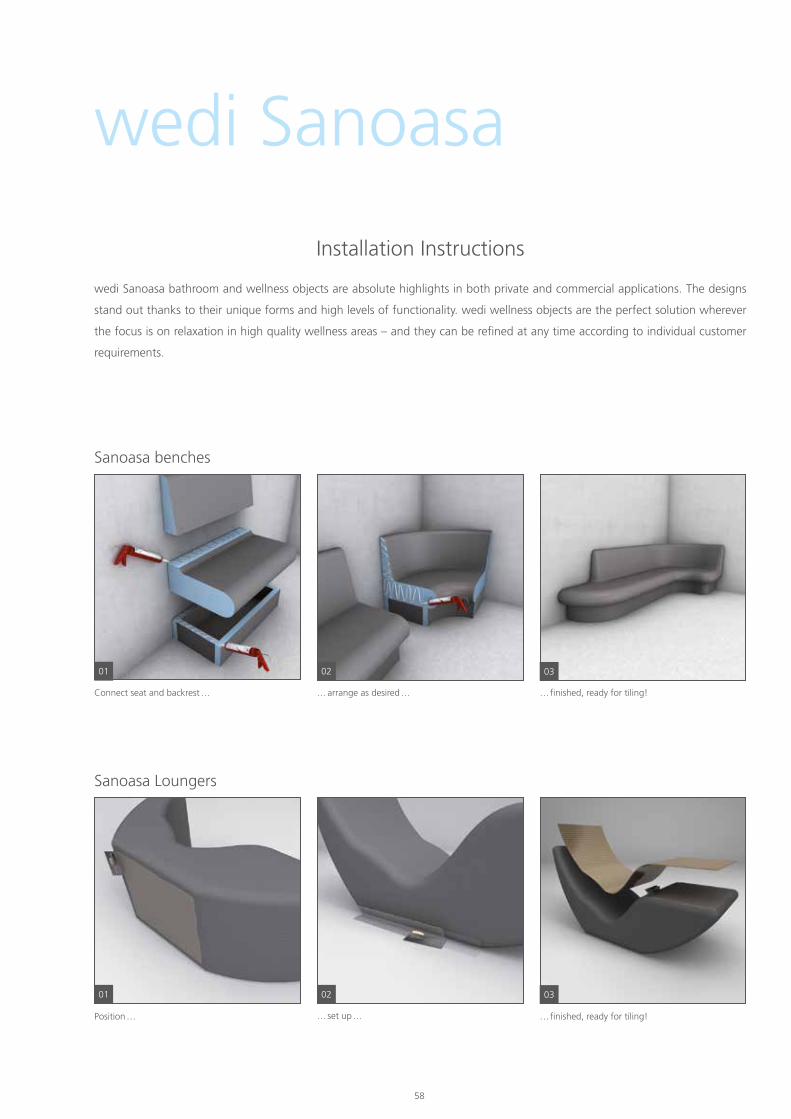
Sanoasa benches
Sanoasa Loungers
Connect seat and backrest …
Position …
… arrange as desired …
… set up …
… finished, ready for tiling!
… finished, ready for tiling!
Installation Instructions
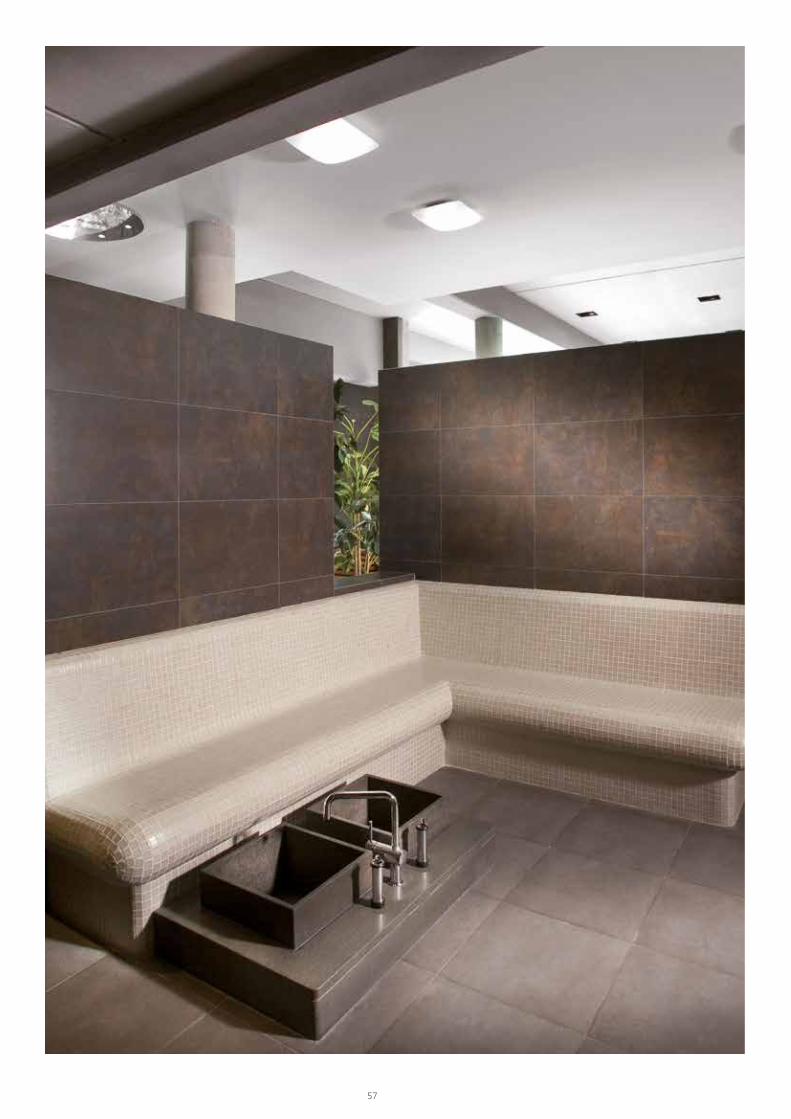
wedi Sanoasa bathroom and wellness objects are absolute highlights in both private and commercial applications. The designs
stand out thanks to their unique forms and high levels of functionality. wedi wellness objects are the perfect solution wherever
the focus is on relaxation in high quality wellness areas – and they can be refined at any time according to individual customer
requirements.
58 59

6060
• Hospitality
• Fitness Centers
• Universities
• Dormitories
wedi Custom Wellness & Spa Design SolutionEndless Possibilities for Residential and Commercial Spa‘s

6060
1
2
3
4
We are here to help you from the beginning to finish
Starting an new custom project, residential or commercial steam room? Do you need custom loungers? From idea to installation,
you have our promise wedi will support your right from the start. The moment you contact us, our team springs into action. We
generate custom CAD drawings based upon your ideas and plans. We test all the assemblies to ensure everything works flawless
before we supply you with all the components, ready to install. We understand products are just part of the project. That‘s why
we create and work in tandem with your lighting concepts, heating systems and preferred shower technology.
wedi – Preferred Supplier for
Your ideaAs you envision your wellness concept, contact
wedi and we can help bring your idea to life.
On time deliveryWe deliver all prefabricated components on time
and in their entirety, with complete step-by-step
assembly instructions so you can take your idea and
bring it to life!
Made-to-measure productsWith your approval, we produce solutions that fit
your specifications and requirements perfectly. Then
we assure the system measures up in terms of per-
formance through to trial assemblies at our factory
all prior to shipping.
We plan togetherwedi provides integrated project planning to ensure
all components, shower technologies, drains and
supply pipes are incorporated into your vision and
unified for proper performance.
61
62
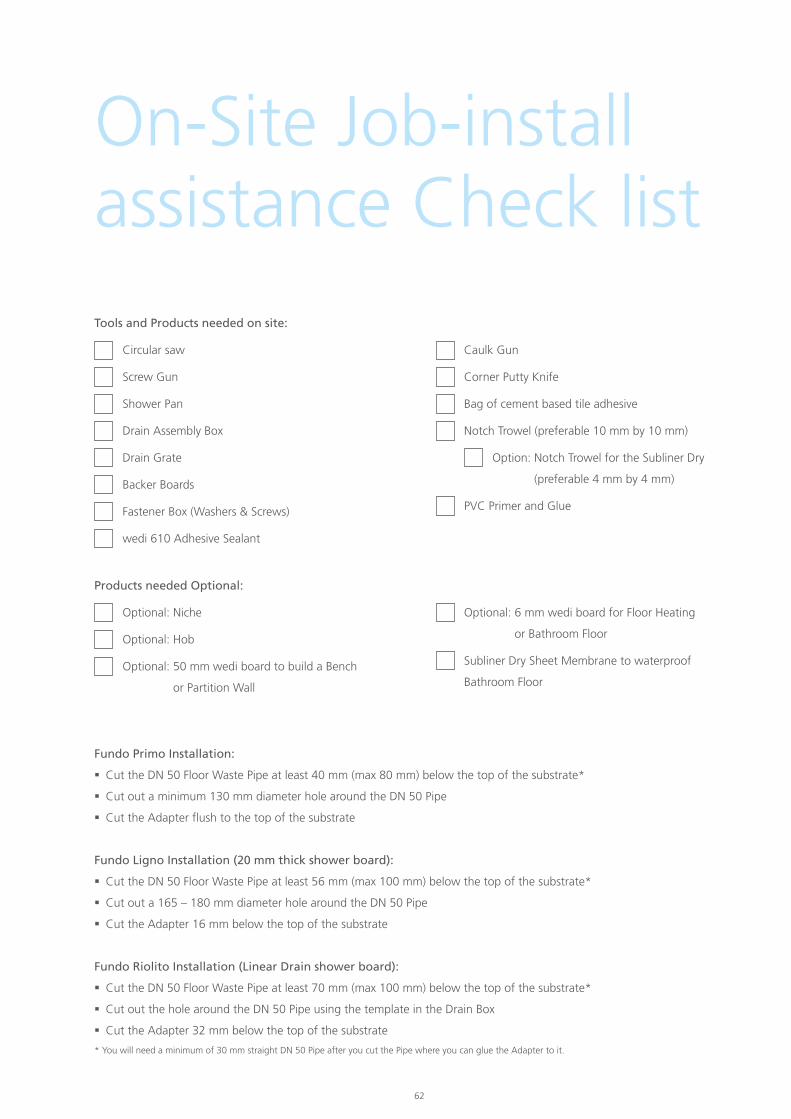
On-Site Job-install assistance Check list
Fundo Primo Installation:
Cut the DN 50 Floor Waste Pipe at least 40 mm (max 80 mm) below the top of the substrate*
Cut out a minimum 130 mm diameter hole around the DN 50 Pipe
Cut the Adapter flush to the top of the substrate
Fundo Ligno Installation (20 mm thick shower board):
Cut the DN 50 Floor Waste Pipe at least 56 mm (max 100 mm) below the top of the substrate*
Cut out a 165 – 180 mm diameter hole around the DN 50 Pipe
Cut the Adapter 16 mm below the top of the substrate
Fundo Riolito Installation (Linear Drain shower board):
Cut the DN 50 Floor Waste Pipe at least 70 mm (max 100 mm) below the top of the substrate*
Cut out the hole around the DN 50 Pipe using the template in the Drain Box
Cut the Adapter 32 mm below the top of the substrate
* You will need a minimum of 30 mm straight DN 50 Pipe after you cut the Pipe where you can glue the Adapter to it.
Tools and Products needed on site:
Circular saw
Screw Gun
Shower Pan
Drain Assembly Box
Drain Grate
Backer Boards
Fastener Box (Washers & Screws)
wedi 610 Adhesive Sealant
Caulk Gun
Corner Putty Knife
Bag of cement based tile adhesive
Notch Trowel (preferable 10 mm by 10 mm)
Option: Notch Trowel for the Subliner Dry
(preferable 4 mm by 4 mm)
PVC Primer and Glue
Products needed Optional:
Optional: Niche
Optional: Hob
Optional: 50 mm wedi board to build a Bench
or Partition Wall
Optional: 6 mm wedi board for Floor Heating
or Bathroom Floor
Subliner Dry Sheet Membrane to waterproof
Bathroom Floor
62 63
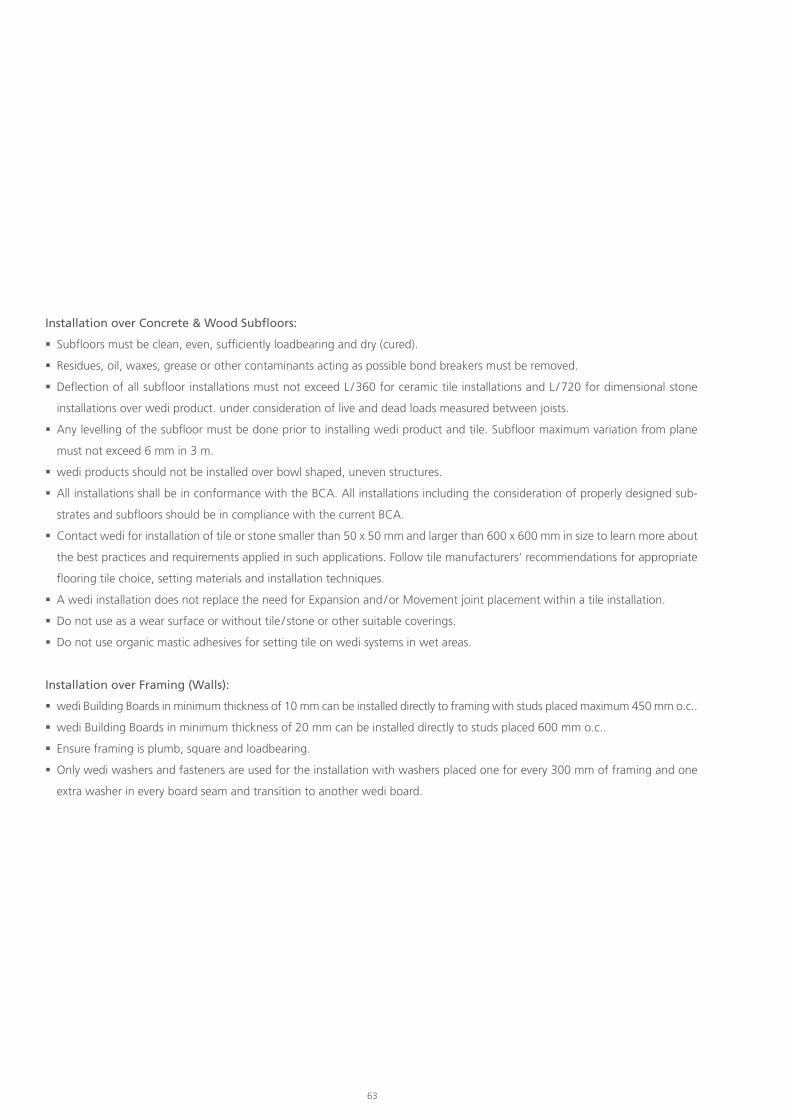
Installation over Concrete & Wood Subfloors:
Subfloors must be clean, even, sufficiently loadbearing and dry (cured).
Residues, oil, waxes, grease or other contaminants acting as possible bond breakers must be removed.
Deflection of all subfloor installations must not exceed L / 360 for ceramic tile installations and L / 720 for dimensional stone
installations over wedi product. under consideration of live and dead loads measured between joists.
Any levelling of the subfloor must be done prior to installing wedi product and tile. Subfloor maximum variation from plane
must not exceed 6 mm in 3 m.
wedi products should not be installed over bowl shaped, uneven structures.
All installations shall be in conformance with the BCA. All installations including the consideration of properly designed sub-
strates and subfloors should be in compliance with the current BCA.
Contact wedi for installation of tile or stone smaller than 50 x 50 mm and larger than 600 x 600 mm in size to learn more about
the best practices and requirements applied in such applications. Follow tile manufacturers‘ recommendations for appropriate
flooring tile choice, setting materials and installation techniques.
A wedi installation does not replace the need for Expansion and / or Movement joint placement within a tile installation.
Do not use as a wear surface or without tile / stone or other suitable coverings.
Do not use organic mastic adhesives for setting tile on wedi systems in wet areas.
Installation over Framing (Walls):
wedi Building Boards in minimum thickness of 10 mm can be installed directly to framing with studs placed maximum 450 mm o.c..
wedi Building Boards in minimum thickness of 20 mm can be installed directly to studs placed 600 mm o.c..
Ensure framing is plumb, square and loadbearing.
Only wedi washers and fasteners are used for the installation with washers placed one for every 300 mm of framing and one
extra washer in every board seam and transition to another wedi board.
Sept
embe
r 20
20; V
ersi
on 3
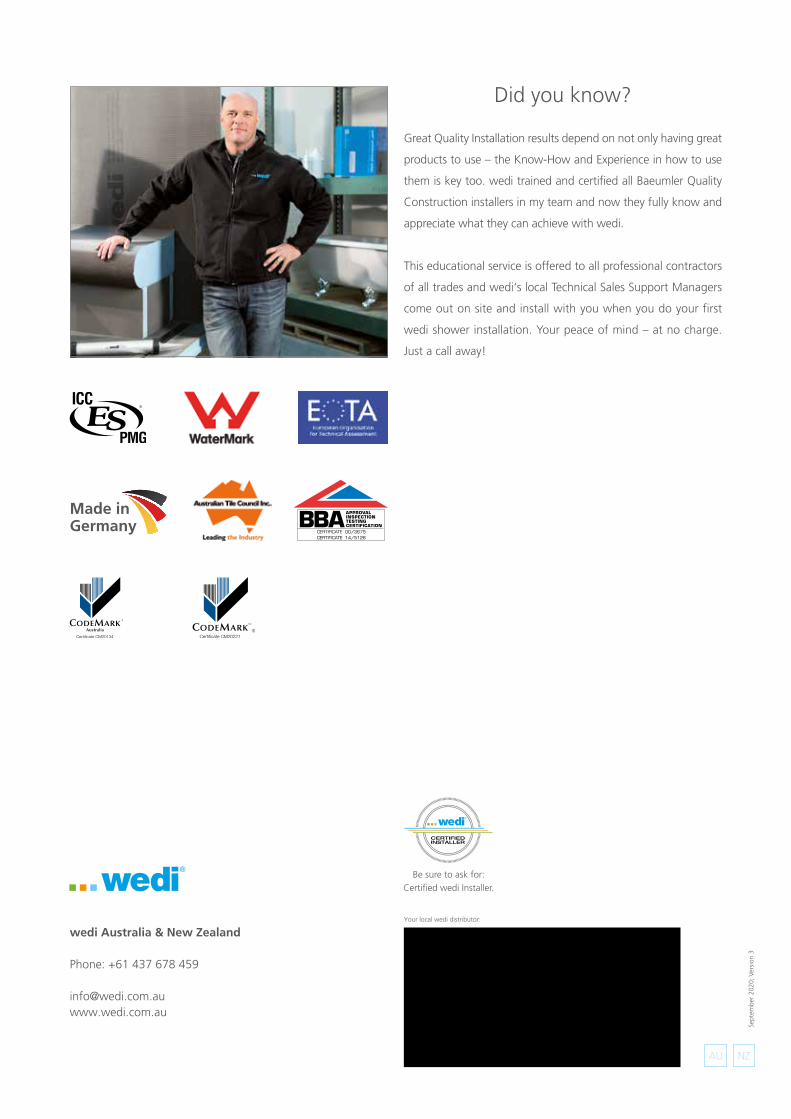
Did you know?
Great Quality Installation results depend on not only having great
products to use – the Know-How and Experience in how to use
them is key too. wedi trained and certified all Baeumler Quality
Construction installers in my team and now they fully know and
appreciate what they can achieve with wedi.
This educational service is offered to all professional contractors
of all trades and wedi‘s local Technical Sales Support Managers
come out on site and install with you when you do your first
wedi shower installation. Your peace of mind – at no charge.
Just a call away!
wedi Australia & New Zealand Phone: +61 437 678 459 [email protected] www.wedi.com.au
Made in Germany
14/5126 00/3675
Your local wedi distributor:
Be sure to ask for: Certified wedi Installer.
NZAU
Related Documents