Customer service Monday to Friday: 9 AM - 5 PM E.S.T. Service à la clientèle Lundi au vendredi : 9 h à 17 h H.N.E. Tel./Tél. : 1-866-661-9606 [email protected] rev. 18-Mar-2015 Artika for Living Inc. Dorval, Canada, H9P 2R2 www.artika.com Made in China Fabriqué en Chine SHOWER CADDY TOUR DE RANGEMENT Assembly Instructions IMPORTANT, RETAIN FOR FUTURE REFERENCE: READ CAREFULLY Instructions d’assemblage IMPORTANT, CONSERVER POUR CONSULTATION FUTURE : LIRE ATTENTIVEMENT For domestic use only Pour usage domestique seulement

Welcome message from author
This document is posted to help you gain knowledge. Please leave a comment to let me know what you think about it! Share it to your friends and learn new things together.
Transcript

Customer service Monday to Friday: 9 AM - 5 PM E.S.T.
Service à la clientèle Lundi au vendredi : 9 h à 17 h H.N.E.
Tel./Tél. : 1-866-661-9606 [email protected]
rev. 18-Mar-2015
Artika for Living Inc.Dorval, Canada, H9P 2R2www.artika.com
Made in China Fabriqué en Chine
SHOWER CADDYTOUR DE RANGEMENT
Assembly InstructionsIMPORTANT, RETAIN FOR FUTURE REFERENCE: READ CAREFULLY
Instructions d’assemblageIMPORTANT, CONSERVER POUR CONSULTATION FUTURE : LIRE ATTENTIVEMENT
For domestic use onlyPour usage domestique seulement

Instru
ction
Man
ual / M
anu
el d’in
structio
n
2
1
2 4
5
3
Aluminium pole parts:
1. Main body 2. Upper part 3. Short bottom extension 4. Upper extension 5. Long bottom extension
4 × Shelf sliders 4 × Supports amovibles
3 × Wire shelves 3 × Paniers métalliques
Washcloth hanger Support à débarbouillette
2 × Q-CupsTM
2 × Q-CupsMC
Soap tray Tablettes à savon
Bottom foot Pied inférieur
Ceiling foot Pied du plafond
2 × Bottom connectors 2 × Connecteur inférieur
Top connector Connecteur supérieur
Pièces du support d’aluminium :
1. Support principal 2. Partie supérieure 3. Extension courte inférieure 4. Extension supérieure 5. Extension longue inférieure
Parts / Pièce :
a c
d e f
b
g h

Instru
ction
Man
ual / M
anu
el d’in
structio
n
3
1. Measure the height of your ceiling. 1. Mesurer la hauteur de votre plafond.
2. Choose which pole parts to assemble:
3. Identify the aluminium pole parts with the labels at their top end.
Before Assembly / Avant l’assemblage
Bathtub Bain
Shower Douche
Parts requiredCeiling height
1.68m - 1.83m (5ft. 6in. - 6ft.) 1, 2
2.01m - 2.21m (6ft. 7in. - 7ft. 3in.) 1, 2, 4
2.36m - 2.57m (7ft 9in. - 8ft. 5in.)
2.74m - 2.97m (9ft. - 9ft. 9in.)2.57m - 2.74m (8ft. 5in. - 9ft.)
1, 2, 3, 5
1, 2, 3, 4, 51, 2, 4, 5
1.83m - 2.01m (6ft. - 6ft. 7in.) 1, 2, 3
2.21m - 2.36m (7ft. 3in. - 7ft. 9in.) 1, 2, 3, 4
3
2. Choisir quelle partie du support assembler:
3. Identifier les parties du support avec les indications dans le haut.
Pièces requisesHauteur du plafond1,68 m - 1,83 m (5 pi 6 po - 6 pi) 1, 2
2,01 m - 2,21 m (6 pi 7 po - 7 pi 3 po) 1, 2, 4
2,36 m - 2,57 m (7 pi 9 po - 8 pi 5 po)
2,74 m - 2,97 m (9 pi - 9 pi 9 po)2,57 m - 2,74 m (8 pi 5 po - 9 pi)
1, 2, 3, 5
1, 2, 3, 4, 51, 2, 4, 5
1,83 m - 2,01 m (6 pi - 6 pi 7 po) 1, 2, 3
2,21 m - 2,36 m (7 pi 3 po - 7 pi 9 po) 1, 2, 3, 4

Instru
ction
Man
ual / M
anu
el d’in
structio
n
4
1. Insérer le bas de la pièce 2 dans le haut de la pièce 1.
1. Insert the bottom end of part 2 into the upper end of part 1.
2. Si des extensions sont nécessaires, utiliser les connecteurs appropriés.
2. If extension parts are required, fit them using the appropriate connectors.
3. Insérer le pied de plafond dans le haut du support principal, et le pied inférieur dans la partie du bas.
3. Insert the ceiling foot in the top end of the pole, and the bottom foot in the bottom end.
1
Pole assembly / Ensemble de support
1
2
4
5
3e
f
g
h
Instru
ction
Man
ual / M
anu
el d’in
structio
n
5
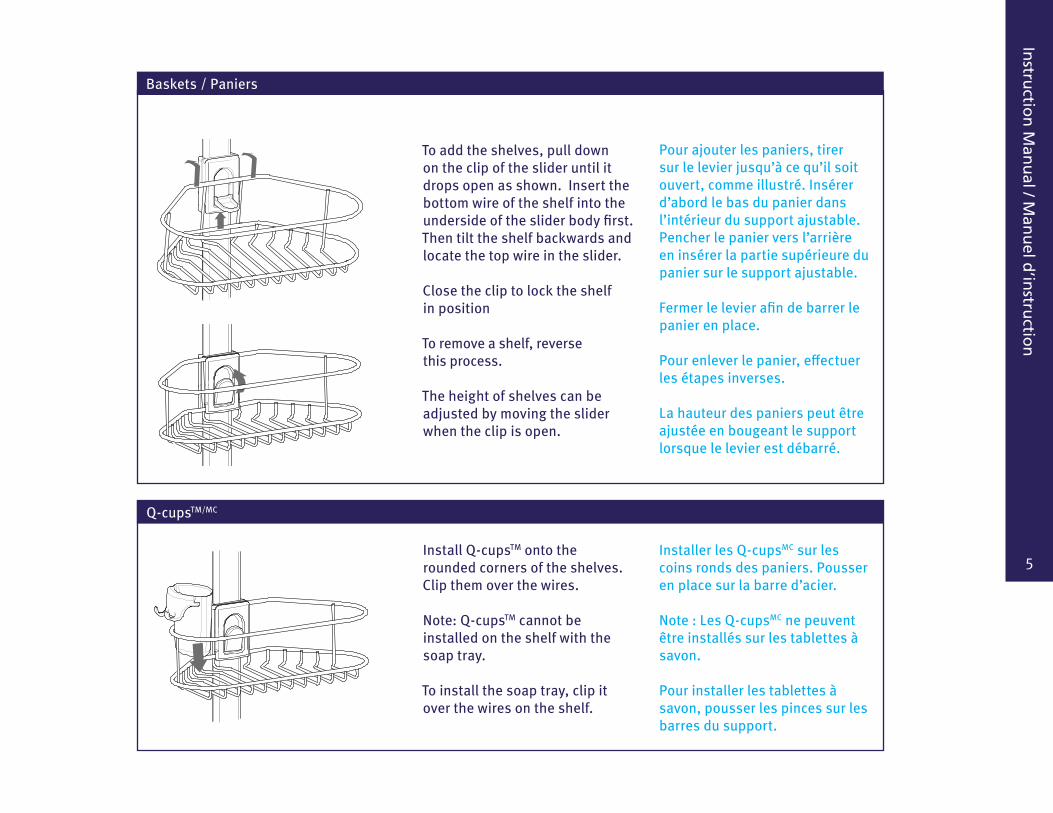
Baskets / Paniers
To add the shelves, pull down on the clip of the slider until it drops open as shown. Insert the bottom wire of the shelf into the underside of the slider body first. Then tilt the shelf backwards and locate the top wire in the slider.
Close the clip to lock the shelf in position
To remove a shelf, reverse this process.
The height of shelves can be adjusted by moving the slider when the clip is open.
Pour ajouter les paniers, tirer sur le levier jusqu’à ce qu’il soit ouvert, comme illustré. Insérer d’abord le bas du panier dans l’intérieur du support ajustable. Pencher le panier vers l’arrière en insérer la partie supérieure du panier sur le support ajustable.
Fermer le levier afin de barrer le panier en place.
Pour enlever le panier, effectuer les étapes inverses.
La hauteur des paniers peut être ajustée en bougeant le support lorsque le levier est débarré.
Install Q-cupsTM onto the rounded corners of the shelves. Clip them over the wires.
Note: Q-cupsTM cannot be installed on the shelf with the soap tray.
To install the soap tray, clip it over the wires on the shelf.
Installer les Q-cupsMC sur les coins ronds des paniers. Pousser en place sur la barre d’acier.
Note : Les Q-cupsMC ne peuvent être installés sur les tablettes à savon.
Pour installer les tablettes à savon, pousser les pinces sur les barres du support.
Q-cupsTM/MC

Instru
ction
Man
ual / M
anu
el d’in
structio
n
6
Artika for Living inc. est fier de vous offrir une garantie de 1 an. Nous garantissons que notre produit n’a aucun défaut de fabrication dans les matériaux et la production, et ce pour une période de 1 an suivant la date d’achat. Si vous découvrez un défaut de fabrication au cours de la période de garantie, Artika remplacera votre produit sans frais.
Veuillez appeler au 1-866-661-9606 pour plus de détails.
Notre garantie ne couvre pas les portes-ac-cessoires de douche qui ont été incorrecte-ment installés, ou qui ont fait l’objet d’une utilisation anormale. Notre portes-accessoires de douche est destiné a un usage résidentiel seulement, et non commercial. La garantie ne couvre ni les couts de main d’œuvre, ni tout autre cout associé à l’installation ou au rem-placement du portes-accessoires de douche et ne s’applique que pour le consommateur initial.
La valeur maximale de la garantie ne peut dépasser le prix de détail du produit.
Artika for Living inc. N’es pas responsable des dommages indirects ou conséquents découlant d’une utilisation ou installation inadéquate.
Artika for Living inc. is proud to offer you a 1 year warranty. We warrant it to be free of manufacturing defects in material and work-manship for a period of 1 year from the date of purchase. Should a defect arise within a warrant period, Artika will provide a replace-ment free of charge.
Please call 1-866-661-9606 for more details.
Our warranty does not cover a shower caddy that has been installed incorrectly, or sub-jected to abnormal use. Our shower caddy is intended for residential use only, and not commercial. The warranty does not cover shipping costs, labor costs or any other cost associated with the installation or replacement of the shower caddy, and is extended to the original consumer.
The maximal value of the warranty cannot exceed the retail price of the product.
Artika for Living inc. is not liable for indirect or consequential damages arising from improper use or installation of this shower caddy.
Warranty / Garantie


Related Documents