Shoviv EDB to PST Copyright © 2018 Shoviv Software Private Limited Shoviv EDB to PST Shoviv EDB to PST - Recovers emails from corrupted or offline EDB file and export EDB Mailboxes into PST, Live Exchange and Office365 Mailboxes Also save EDB Files Items in various format like: MSG, EML, HTML, RTF ect.

Welcome message from author
This document is posted to help you gain knowledge. Please leave a comment to let me know what you think about it! Share it to your friends and learn new things together.
Transcript

Shoviv EDB to PST
Copyright © 2018 Shoviv Software Private Limited
Shoviv EDB to PST
Shoviv EDB to PST - Recovers emails from corrupted or offline EDB file and
export EDB Mailboxes into PST, Live Exchange and Office365 Mailboxes
Also save EDB Files Items in various format like: MSG, EML, HTML, RTF ect.

Shoviv EDB to PST
Copyright © 2018 Shoviv Software Private Limited
Table of Contents
1. About Shoviv Exchange EDB to PST
1.1 Introduction 1.2 Key Features 1.3 System Requirements
2. Installation and Uninstallation 3. User Interface
3.1 Introduction 3.2 Ribbon Bar 3.3 Folder View 3.4 Item View 3.5 Item Preview
4. Add and Close EDB
4.1 Add EDB 4.2 Close EDB
5. Save Attachments 6. Export EDB Single Mailbox
7. 7.1 In Exchange Server 7.2 In Office 365
8. Export EDB Multiple Mailbox
8.1 In Outlook PST 8.2 In Live Exchange Mailbox 8.3 In Office 365 Mailbox
9. Help 11. Buy Now
11.1 Buy Now 12. Legal Notice
12.1 Copyright
12.2 Trademarks
12.3 Disclaimer
12.4 License Agreement

Shoviv EDB to PST
Copyright © 2018 Shoviv Software Private Limited
Introduction to Shoviv EDB to PST
Shoviv EDB to PST is a complete solution to recover corrupted and non-corrupted Exchange Server EDB files. It exports recovered EDB files Mailboxes Items to Outlook PST file format. It also allows you to export EDB files Mailboxes to Live Exchange and Office 365 Mailboxes with features of mapping EDB mailbox. The software comes with excellent features which support to save EDB files Mailbox Items into various format like: MSG, EML, HTML, RTF etc.
Add corrupted and non-corrupted Exchange Server EDB file and scans them to preview Mailboxes, folders, items and attachment.
It maintain proper Mailboxes Folder Hierarchy, and Items Metadata.
It’s also support Unicode Data of Item property.
It also preview Mailbox Folders, items, body, Subject, Date/Time, Message Class, From, Recipient and more Item Properties.
Quickly recover large EDB file with no file size limitation.
Export EDB Mailboxes to PST files, Live Exchange Mailboxes and Office 365 Mailboxes.
Export item in multiple format like MSG Unicode, MSG, EML, HTML, RTF, cal, VCAL, vCARD File Format etc.
Shoviv EDB to PST
Copyright © 2018 Shoviv Software Private Limited
Key Features
1. Add multiple EDB file pub and priv EDB no file limit. 2. Recovers large EDB files no size limitation. 3. Recovers EDB files Mailboxes, folders, email, calendar events, contacts, tasks, notes,
drafts etc.
4. Recovers attachments, images, text files etc. 5. Close multiple and single EDB file. 6. Open item in outlook view from item view. 7. Save and open attachment in preview panel. 8. Save Selected items in various format like: MSG Unicode, MSG, EML, HTML, RTF,
cal, VCAL, vCARD etc.
9. Save selected items attachments in disk. 10. Save selected Mailboxes and Folders Items in various format in one go like: MSG
Unicode, MSG, EML, HTML, RTF, cal, VCAL, vCARD etc.
11. Save Mailboxes and Folders Items attachments to disk in one go. 12. Export EDB Mailboxes in multiple PST Files.
Export in existing PST.
Export in new PST with password protected.
Export in new PST with split feature between 100 MB to 51200 MB and 1 GB to 50 GB.
Filter option also available message class and date range.
13. Export EDB Mailboxes in live exchange Mailboxes with Mailbox mapping. 14. Export EDB Mailbox in live exchange Public Folder and Archive Mailbox. 15. Export EDB Mailboxes in hosted exchange and office 365 Mailboxes with Mailbox
mapping.
16. Export EDB Mailboxes in office 365 in Public Folder and Archive Mailbox. 17. Export EDB Mailboxes Items with filter (Date range and Message type). 18. Supports all Outlook version both 32 bit and 64 bit. 19. Supports Exchange Server 2003/2007/2010/2013/2016 both 32 bit and 64 bit.

Shoviv EDB to PST
Copyright © 2018 Shoviv Software Private Limited
System Requirements
System Specifications
Hard Disk: 100 MB of free hard disk space
Processor: 1 GHz Processor (2.4 GHz is recommended)
RAM: 512 MB of RAM (1 GB is recommended)
Supported Versions
Support EDB: Public and private EDB of Exchange Server 2016/2013/2010/2007/2003/2000/5.5/5.0
MS Outlook (both 32 and 64 editions): Outlook 2000, 2003, 2007, 2010, 2013, 2016 versions.
Support Operating System (both 32 and 64 editions): Microsoft Windows 10/8.1/8/7 & all below version, Microsoft Windows Server 2003/2008/2008 R2/2012/2012 R2
Virtual environment: Hyper-V Server 2008/2008 R2/2012/2012 R2, VMware and Microsoft Virtual PC
Support Exchange Server (both 32 and 64 editions):
2002/2003/2007/2010/2013/2016 and Office365
Application Pre-Requisites
Microsoft Outlook should be installed and configure properly.
Export to Exchange Server 2000 - Microsoft Outlook 2000 or later
Export to Exchange Server 2003 - Microsoft Outlook 2003 or later
Export to Exchange Server 2007 - Microsoft Outlook 2003/2007/2010
Export to Exchange Server 2010 - Microsoft Outlook 2007/2010/2013
Export to Exchange Server 2013 - Microsoft Outlook 2013, Outlook 2010 Service Pack 1 (Version 14.0.6126.5000), Outlook 2007 Service Pack 3(Version 12.0.6665.5000)
Export to Exchange Server 2016 - Microsoft Outlook 2016, Outlook 2013, Outlook 2010 with KB2965295
Export to Office 365 - Microsoft Outlook 2016, Outlook 2013, Outlook 2010 SP1(64-bit), Outlook 2010(Version 14.0.7106.5003-32-bit)

Shoviv EDB to PST
Copyright © 2018 Shoviv Software Private Limited
Install The Software
To install the software first make sure that the software installer file is available on your computer. If the file is not available then you can download the file from our website - https://www.shoviv.com/convert-edb-to-pst.html
Following are the steps to install the software.
Double-click the Shoviv EDB to PST installer file.
Follow the instructions. When the installation process is completed then the setup install completion screen will be appears on the software installation screen.
Click the Finish button to launch the software.

Shoviv EDB to PST
Copyright © 2018 Shoviv Software Private Limited
Uninstall The Software
There are two methods to Uninstall Shoviv EDB to PST Software:
Uninstall from Windows Start Menu
Uninstall from Control Panel
Uninstall from Windows Start Menu
Click Start -> All Programs - > Shoviv for EDB to PST Software -> Uninstall Shoviv EDB to PST Software. A warning message will be displayed.
Click the Yes button to continue uninstalling the Shoviv EDB to PST Software. When the
“Shoviv EDB to PST Software successfully removed from your computer” message will be displayed.
Click the OK button to complete the Shoviv EDB to PST Software un-installation process.
Uninstall from Control Panel
Click Start -> Control Panel. The Control Panel window appears.
Double-click the Add or Remove Programs icon. A list of the programs installed on your computer appears.
Select Shoviv EDB to PST Software and click the Remove button. A warning message will be displayed.
Click the Yes button to continue uninstalling the Shoviv EDB to PST Software. The Shoviv EDB to PST Software was successfully removed from your computer” message will be displayed.
Click the OK button to complete the Shoviv EDB to PST Software un-installation process.

Shoviv EDB to PST
Copyright © 2018 Shoviv Software Private Limited
Introduction
Ribbon Bar is top level bar in user interface.
User Interface of Shoviv EDB to PST contain three
sections 1. Folder View
Display the folders of added EDB file(s).
Folder contains option Add EDB, Close EDB, Save Item, Save Attachment, Export Item, Export Item in Live Exchange.
2. Item View
Display the items of EDB folder(s).
Item view contains three option Open Item, Save Item, Save Attachment and Select All item(s).
3. Item Preview
Display the message of the item, Item Property, Recipient, Attachment

Shoviv EDB to PST
Copyright © 2018 Shoviv Software Private Limited
Ribbon Bar
1. Actions
Add EDB File: Add corrupted and non corrupted EDB file for further processing.
Close EDB File: Close added multiple EDB file. Refresh: Refresh the Item view.
2. Export EDB Multiple Mailboxes
Outlook PST: Export EDB Mailboxes in PST files using filter options.
Live Exchange Mailbox: Export EDB Mailboxes in live exchange mailboxes with Mailbox Mapping and filter options.
Office 365 Mailbox: Export EDB Mailboxes in Office365 mailboxes with Mailbox Mapping and filter options.
3. Export EDB Single Mailbox

Shoviv EDB to PST
Copyright © 2018 Shoviv Software Private Limited
Live Exchange Mailbox: Export EDB Mailbox in Live Exchange mailbox.
Office 365 Mailbox: Export EDB Mailbox in Live Exchange archive mailbox using filter.
Live Exchange Public Folder: Export EDB Mailbox in Live Exchange Public Folder using filter.
Office 365 Public Folder: Export EDB Mailbox in Office365 Public Folder using filter.
Live Exchange Archive: Export EDB Mailbox in Live Exchange Archive Mailbox using filter.
Office 365 Archive: Export EDB Mailbox in Office365 Archive Mailbox using filter.
4. Save EDB Mailboxes
Save Item: Save EDB Mailbox(s) item in disk using filter and folder hierarchy.
Save Attachment: Save EDB Mailbox(s) item(s) attachment in disk using filter and Folder Hierarchy.
5. List Actions

Shoviv EDB to PST
Copyright © 2018 Shoviv Software Private Limited
Save Item: Save Selected items in various format like: MSG Unicode, MSG, EML, HTML, RTF, cal, VCAL, vCARD etc.
Open: Open Selected Item in Outlook.
Save Attachment: Save selected item(s) attachment in disk using filter and Folder Hierarchy.
Select All: Select all Item in Item View.
6. Exit
Exit: Exit from Software click the Exit Button.
7. Activate
Activate License: Software activate using the received activation file or Order Number and Activation Key.
8. Buy Now
Buy Now: Buy the Software click here.

Shoviv EDB to PST
Copyright © 2018 Shoviv Software Private Limited
Folder View
1. There are two ways to Add EDB File, Close EDB File, Refresh, Save Item, Save Attachment, Export Single Mailbox in PST, Export Single Mailbox in Live Exchange, Export Multiple Mailboxes in PST, Export Multiple Mailboxes in Live Exchange.
First Option : Go to the Ribbon Bar folder Menu and select any one option as you want to use.
Second Option : Right click on folder list and select any one option as you want to use.

Shoviv EDB to PST
Copyright © 2018 Shoviv Software Private Limited

Shoviv EDB to PST
Copyright © 2018 Shoviv Software Private Limited
Item View
1. There are two ways to Open, Refresh, Save Item, Save Attachment and Select All.
First option : Go to the Ribbon Bar item Menu and select any one option as you want to use.
Second option : Right click on item list and select any one option as you want to use.

Shoviv EDB to PST
Copyright © 2018 Shoviv Software Private Limited
Item Preview
To display the body of the EDB Items then select Item Body tab.
To display property of the EDB Items then select Item Property tab.
To display recipient of the EDB Items then select Item Recipient tab.

Shoviv EDB to PST
Copyright © 2018 Shoviv Software Private Limited
There are two ways to Open, Save and Select All attachment.
First Option-Go to the Ribbon Bar attachment Menu and select any one option as you want to use.
Second Option click on the attachment tab from item preview then right click on attachment and select any one option as you want to use.

Shoviv EDB to PST
Copyright © 2018 Shoviv Software Private Limited
Add EDB
There are two ways to add corrupted and non corrupted EDB file.
First Option : Go to the Ribbon Bar menu and click on the Add EDB file option under "actions".
Second Option : Right click on the folder list and select "Add EDB" file option.
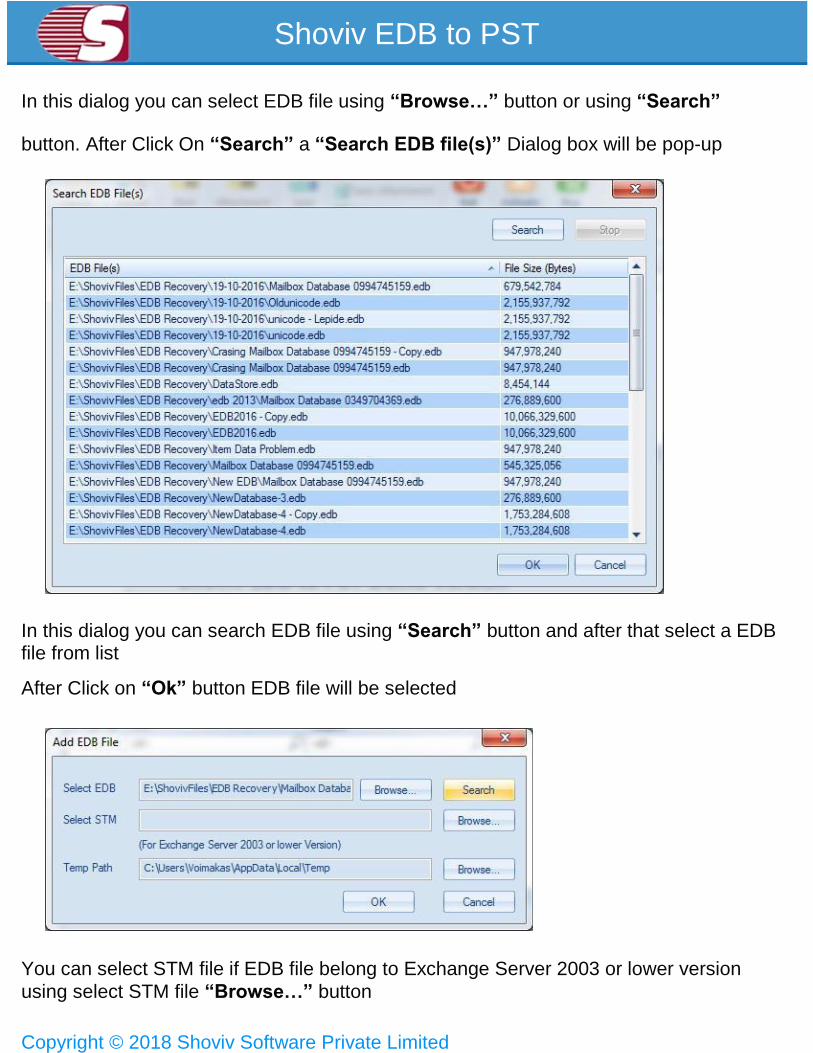
After Click On “Add EDB” a “Add EDB File” Dialog box is pop-up
Shoviv EDB to PST
Copyright © 2018 Shoviv Software Private Limited
In this dialog you can select EDB file using “Browse…” button or using “Search”
button. After Click On “Search” a “Search EDB file(s)” Dialog box will be pop-up
In this dialog you can search EDB file using “Search” button and after that select a EDB file from list
After Click on “Ok” button EDB file will be selected
You can select STM file if EDB file belong to Exchange Server 2003 or lower version
using select STM file “Browse…” button
Shoviv EDB to PST
Copyright © 2018 Shoviv Software Private Limited
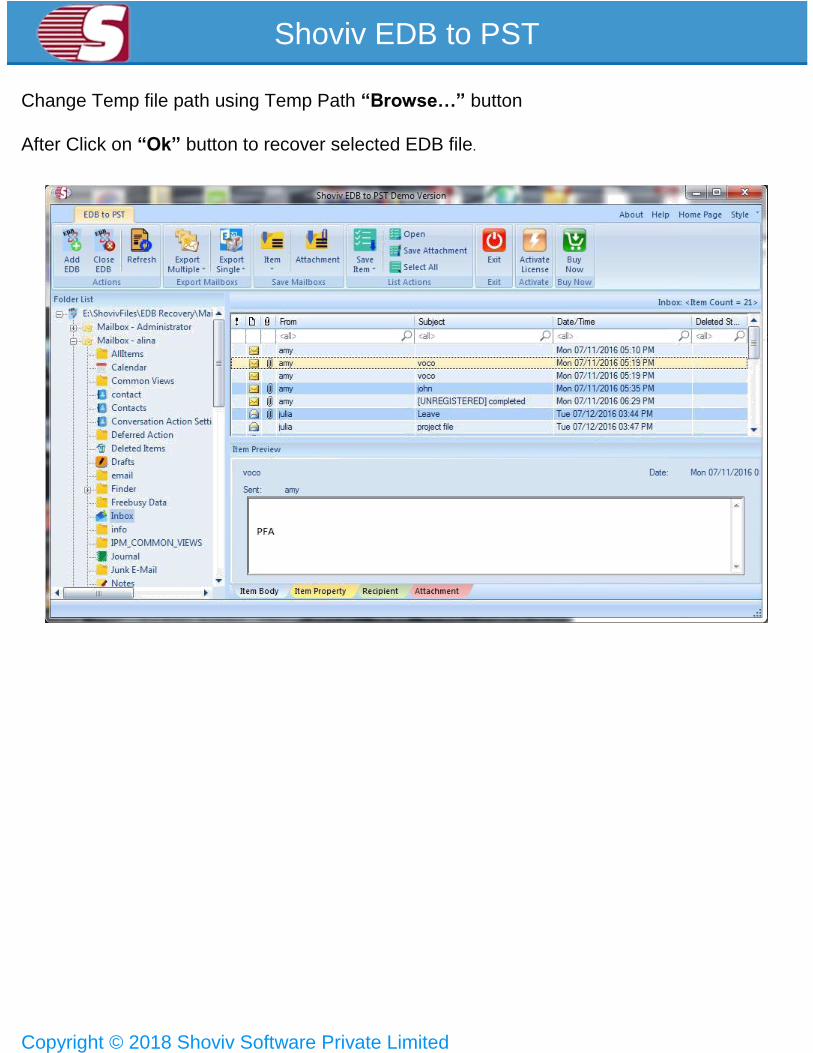
Change Temp file path using Temp Path “Browse…” button
After Click on “Ok” button to recover selected EDB file.

Shoviv EDB to PST
Copyright © 2018 Shoviv Software Private Limited
Close EDB
There are two ways to close EDB file from software.
First Option : Go to the Ribbon Bar menu and click on the "Close EDB file" option.
Second Option : Right click on the folder list and select Close EDB file option.
After Click On “Close EDB” a “Close EDB” Dialog box is pop-up

Shoviv EDB to PST
Copyright © 2018 Shoviv Software Private Limited
In this dialog you can check EDB file which you want to close. And then Click on “Ok” button
After Click on “Ok” button a confirmation message box will be pop-up
After Click on “Yes” button All Checked EDB files will be closed from the software

Shoviv EDB to PST
Copyright © 2018 Shoviv Software Private Limited
Item Preview
Save Attachment In Disk
There are two ways to save all attachment in the disk.
First Option : Go to the Ribbon Bar attachment Menu and click on the save option. Second Option : Right click on item preview and select the save option from the sub-menu.
Shoviv EDB to PST
Copyright © 2018 Shoviv Software Private Limited
Item View
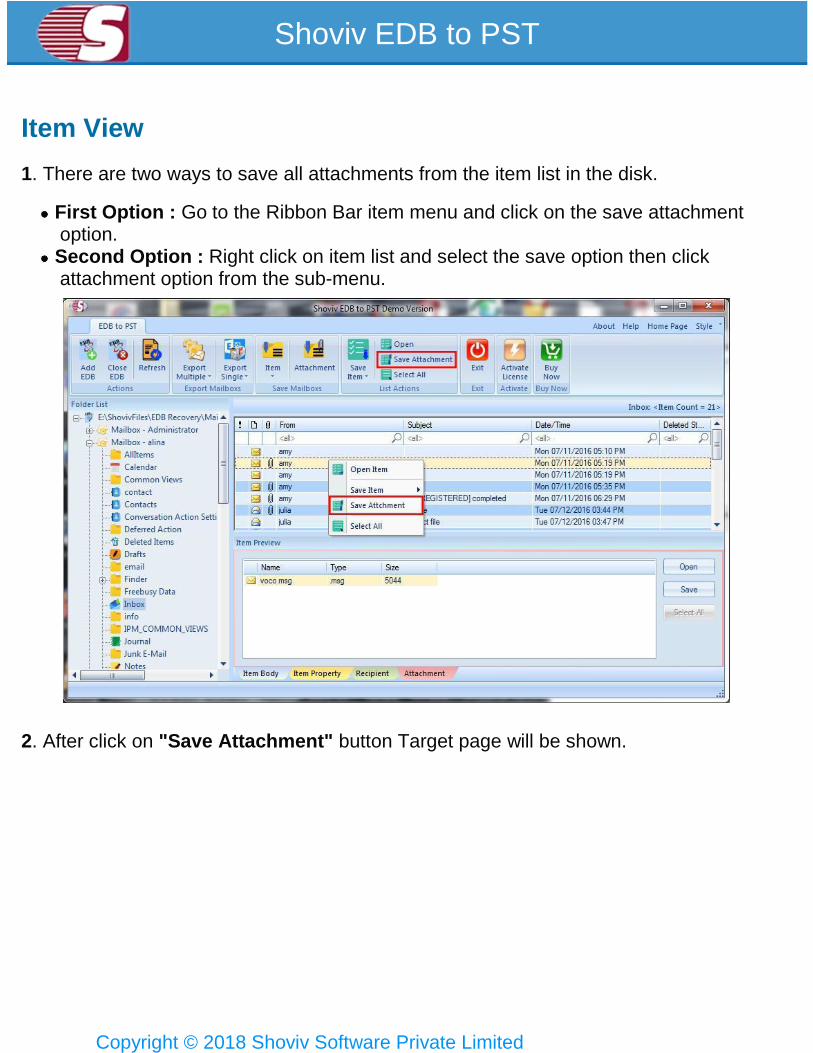
1. There are two ways to save all attachments from the item list in the disk.
First Option : Go to the Ribbon Bar item menu and click on the save attachment option.
Second Option : Right click on item list and select the save option then click attachment option from the sub-menu.
2. After click on "Save Attachment" button Target page will be shown.
Shoviv EDB to PST
Copyright © 2018 Shoviv Software Private Limited
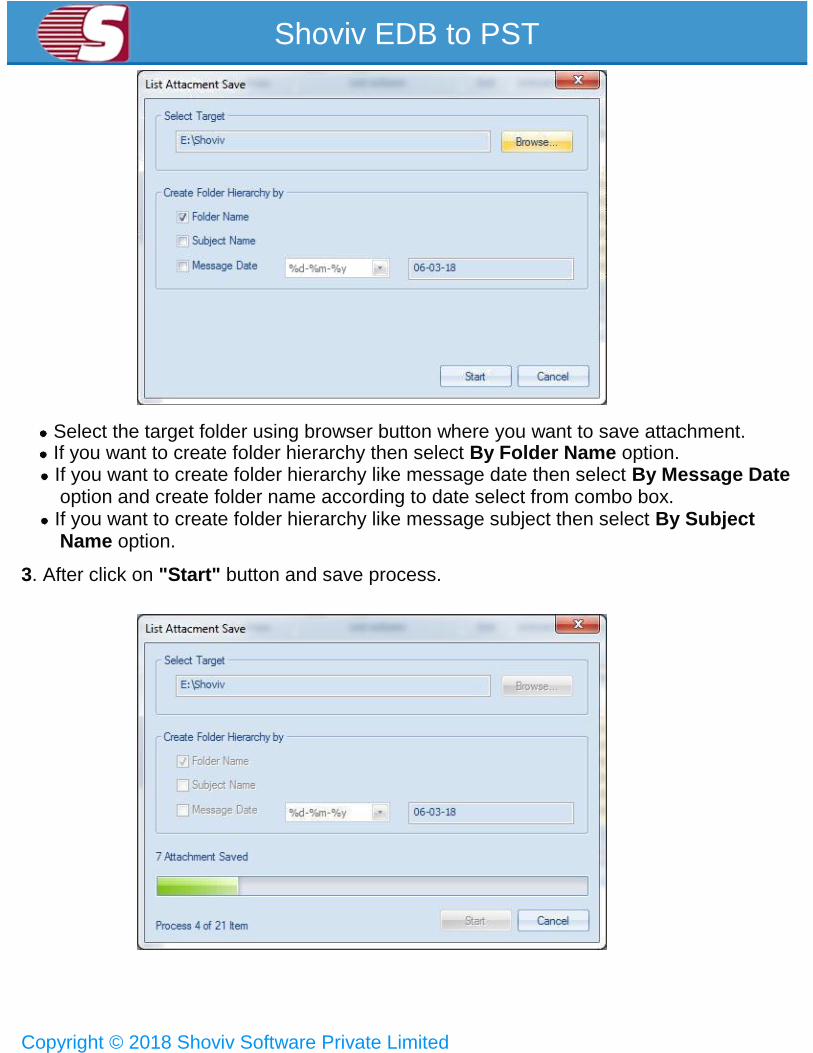
Select the target folder using browser button where you want to save attachment.
If you want to create folder hierarchy then select By Folder Name option. If you want to create folder hierarchy like message date then select By Message Date option and create folder name according to date select from combo box.
If you want to create folder hierarchy like message subject then select By Subject Name option.
3. After click on "Start" button and save process.
Shoviv EDB to PST
Copyright © 2018 Shoviv Software Private Limited
Folder View
Save Attachment In Disk
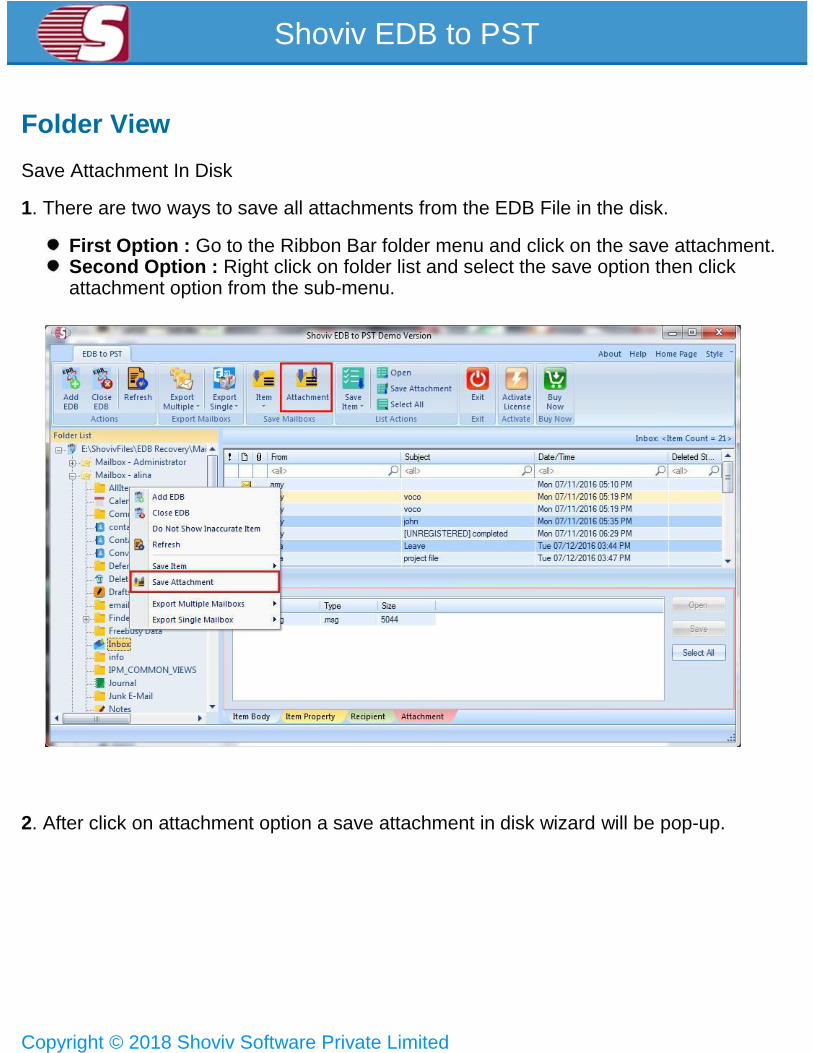
1. There are two ways to save all attachments from the EDB File in the disk.
First Option : Go to the Ribbon Bar folder menu and click on the save attachment. Second Option : Right click on folder list and select the save option then click attachment option from the sub-menu.
2. After click on attachment option a save attachment in disk wizard will be pop-up.

Shoviv EDB to PST
Copyright © 2018 Shoviv Software Private Limited
Is Select Sub Folder - When you check this option click on any check box in folder list then all child folder automatically will be selected or un-selected.
If this option unselected then you can click on any folder in folder list then particular folder will be selected or un-selected.
3. After click on next button the Filter page will be shown. There are two options in Filter item
Shoviv EDB to PST
Copyright © 2018 Shoviv Software Private Limited
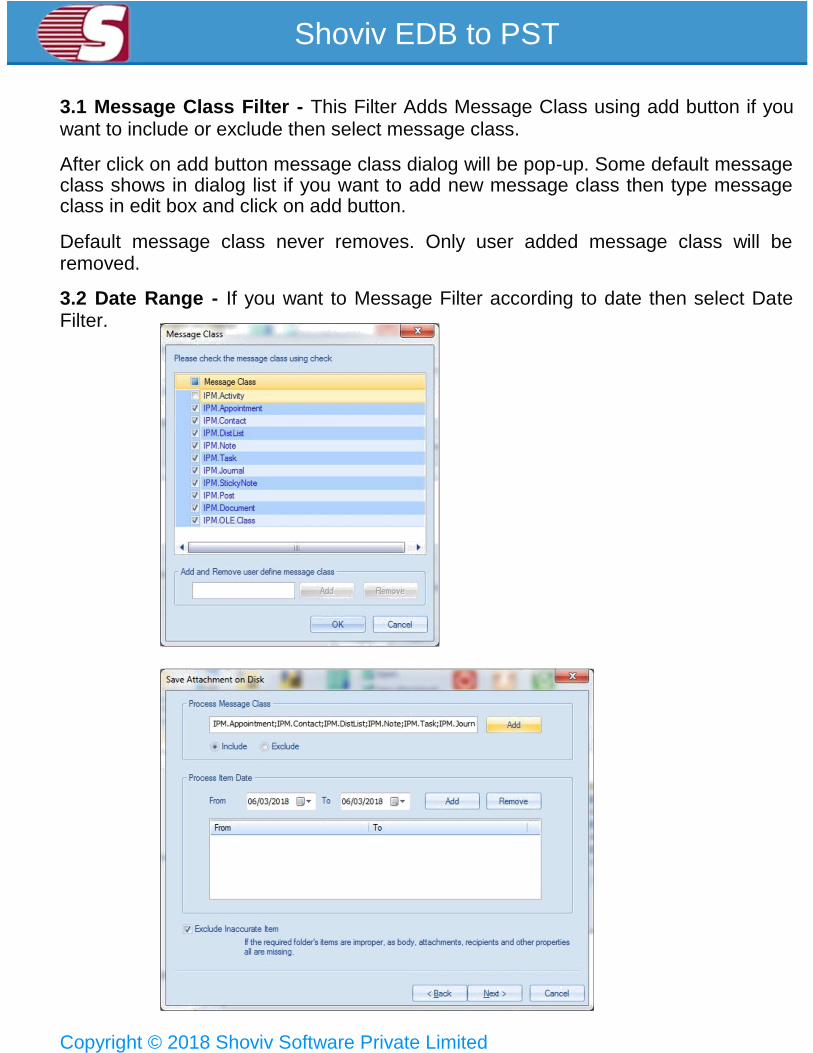
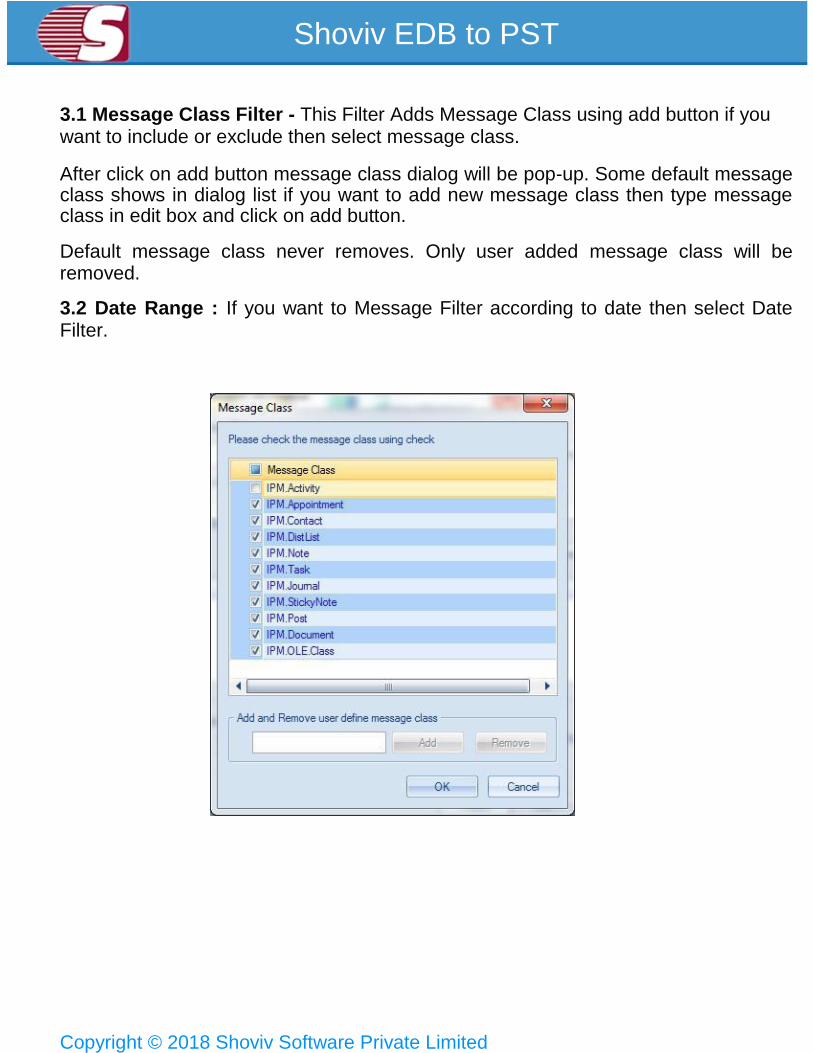
3.1 Message Class Filter - This Filter Adds Message Class using add button if you want to include or exclude then select message class.
After click on add button message class dialog will be pop-up. Some default message class shows in dialog list if you want to add new message class then type message class in edit box and click on add button.
Default message class never removes. Only user added message class will be removed.
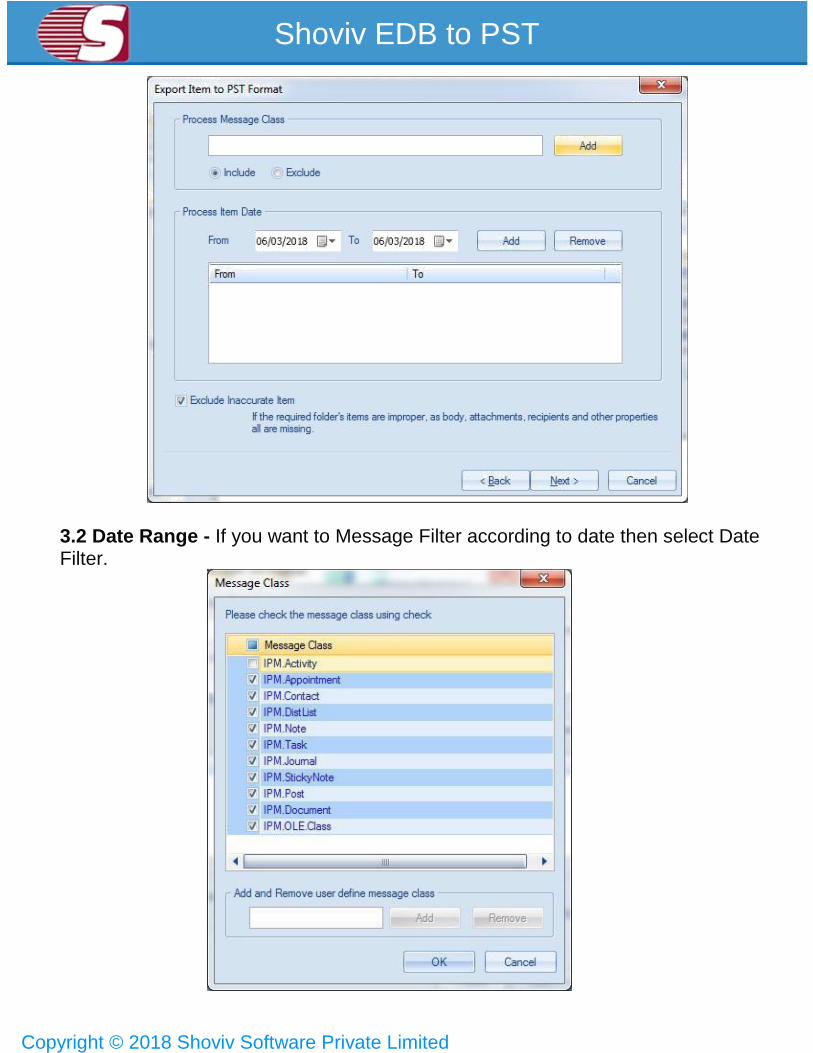
3.2 Date Range - If you want to Message Filter according to date then select Date Filter.

Shoviv EDB to PST
Copyright © 2018 Shoviv Software Private Limited
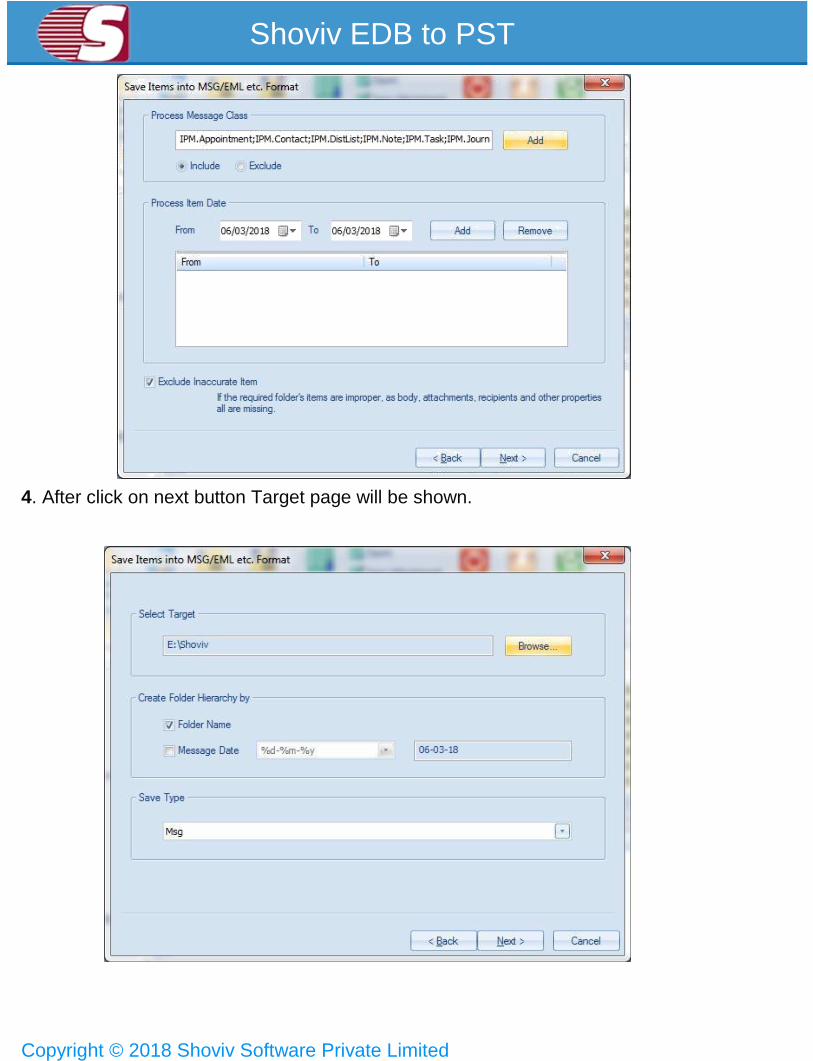
4. After click on next button Target page will be shown.
Select the target folder using browser button where you want to save attachment.
If you want to create folder hierarchy then select By Folder Name option. If you want to create folder hierarchy like message date then select By Message
Date option and create folder name according to date select from combo box.
If you want to create folder hierarchy like message subject then select By Subject Name option.
Shoviv EDB to PST
Copyright © 2018 Shoviv Software Private Limited
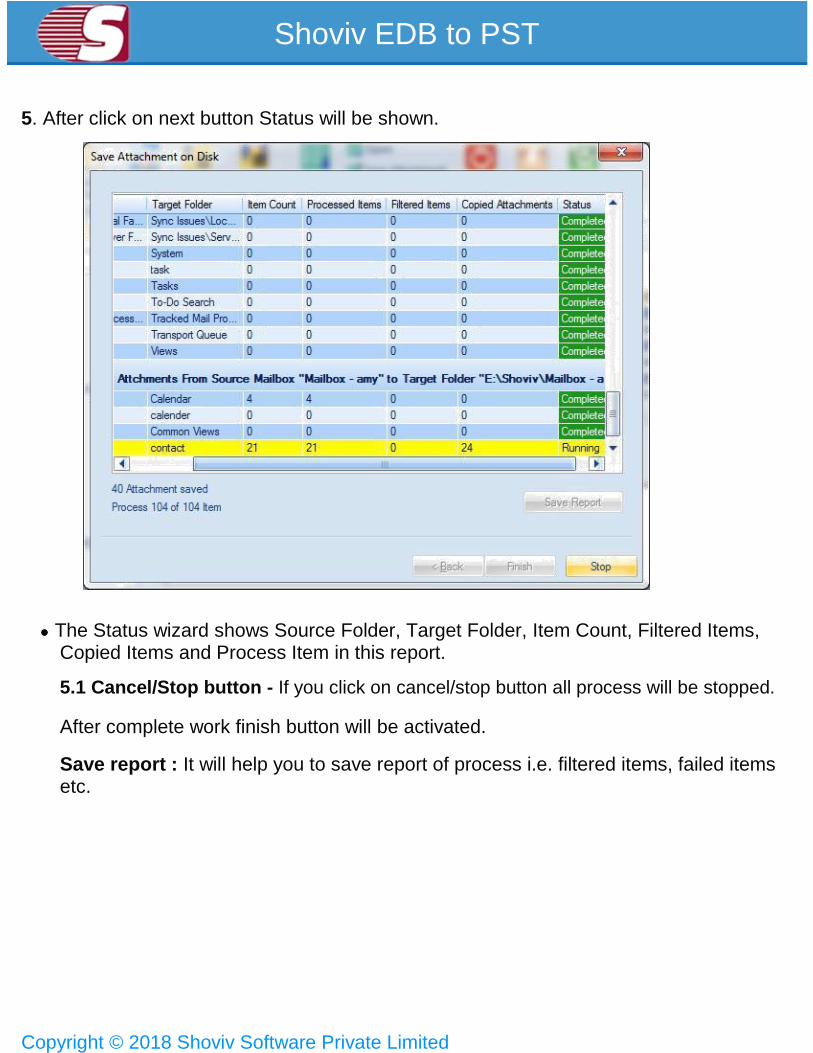
5. After click on next button Status will be shown.
The Status wizard shows Source Folder, Target Folder, Item Count, Filtered Items, Copied Items and Process Item in this report.
5.1 Cancel/Stop button - If you click on cancel/stop button all process will be stopped.
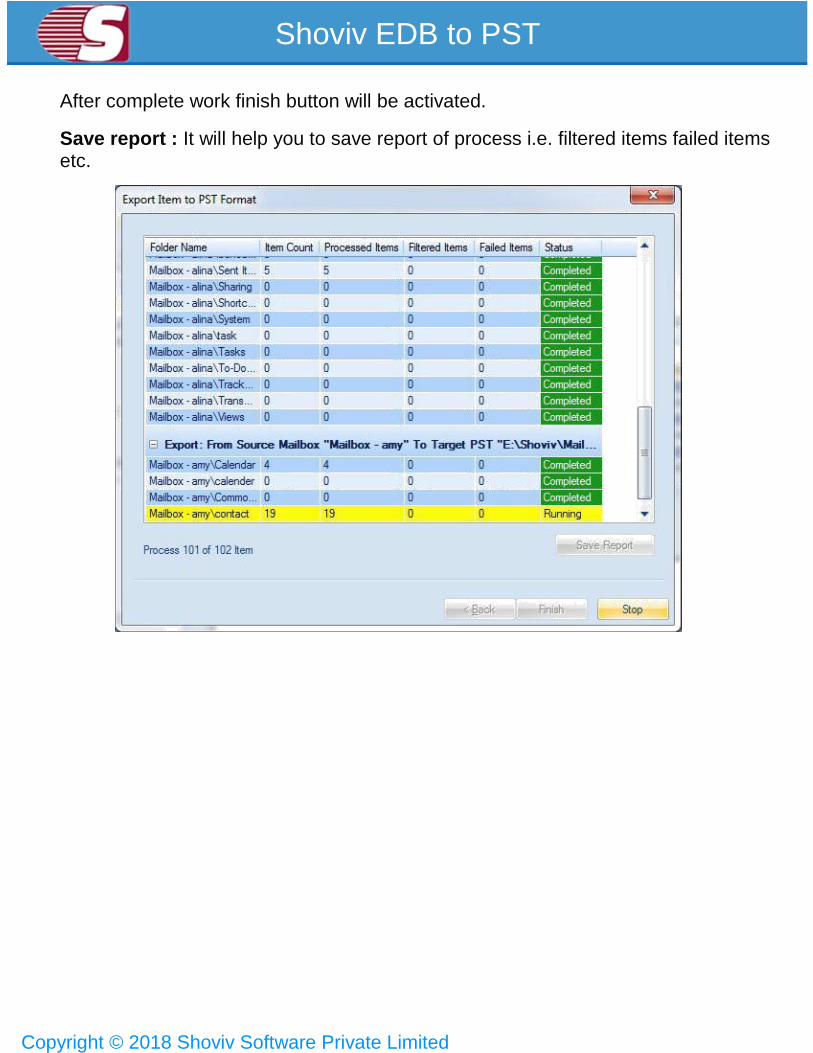
After complete work finish button will be activated.
Save report : It will help you to save report of process i.e. filtered items, failed items etc.

Shoviv EDB to PST
Copyright © 2018 Shoviv Software Private Limited
Folder View
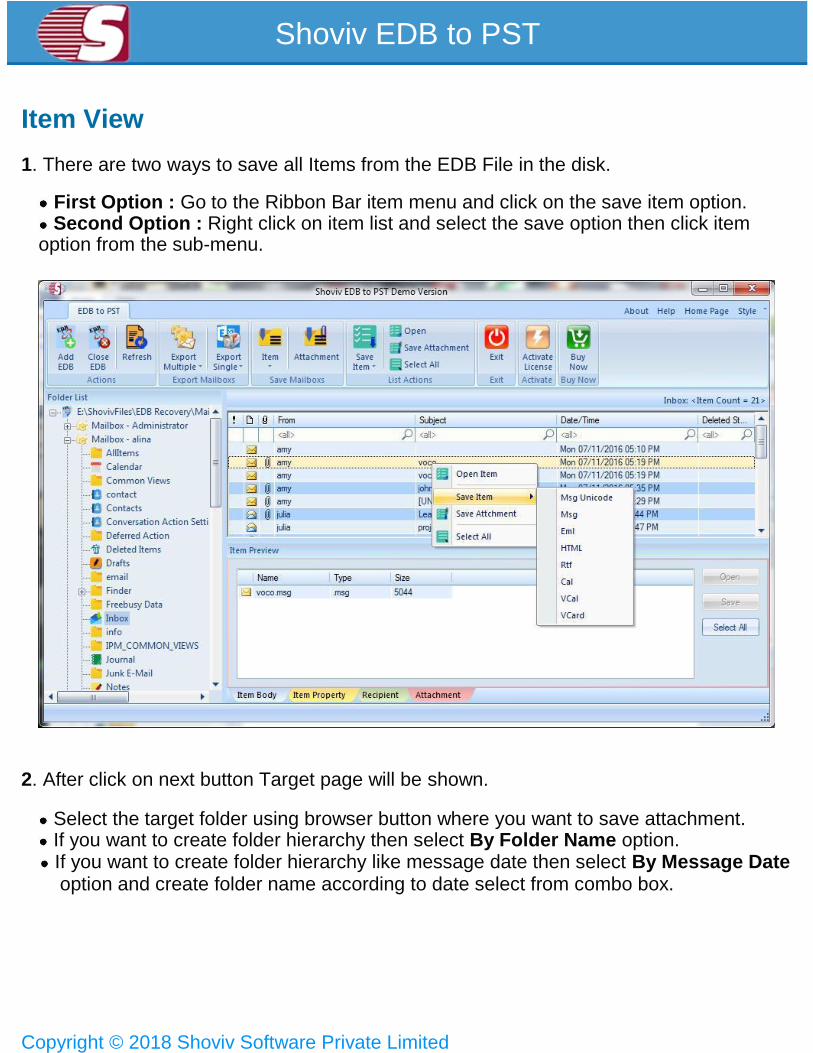
1. There are two ways to save all Items from the EDB File in the disk.
First Option : Go to the Ribbon Bar item menu and click on the save item option. Second Option : Right click on itme list and select the save option then click item option from the sub-menu.
2. After click on attachment option a save attachment in disk wizard will be pop-up.
Check/Uncheck Sub folders : When you check this option click on any check box in folder list then all child folder automatically will be selected or un-selected.
If this option unselected then you can click on any folder in folder list then particular folder will be selected or un-selected.

Shoviv EDB to PST
Copyright © 2018 Shoviv Software Private Limited
3. After click on next button the Filter page will be shown. There are two options in Filter item
Shoviv EDB to PST
Copyright © 2018 Shoviv Software Private Limited
3.1 Message Class Filter - This Filter Adds Message Class using add button if you want to include or exclude then select message class.
After click on add button message class dialog will be pop-up. Some default message class shows in dialog list if you want to add new message class then type message class in edit box and click on add button.
Default message class never removes. Only user added message class will be removed.
3.2 Date Range : If you want to Message Filter according to date then select Date Filter.
Shoviv EDB to PST
Copyright © 2018 Shoviv Software Private Limited
4. After click on next button Target page will be shown.

Shoviv EDB to PST
Copyright © 2018 Shoviv Software Private Limited
Select the target folder using browser button where you want to save attachment.
If you want to create folder hierarchy then select By Folder Name option. If you want to create folder hierarchy like message date then select By Message Date option and create folder name according to date select from combo box.
5. After click on next button Status will be shown.
The Status wizard shows Source Folder, Target Folder, Item Count, Filtered Items, Copied Items and Process Item in this report.
5.1 Cancel/Stop button - If you click on cancel/stop button all process will be stopped.
After complete work finish button will be activated.
Save report it will help you to save report of process i.e. filtered items, failed items etc.
Shoviv EDB to PST
Copyright © 2018 Shoviv Software Private Limited
Item View
1. There are two ways to save all Items from the EDB File in the disk.
First Option : Go to the Ribbon Bar item menu and click on the save item option.
Second Option : Right click on item list and select the save option then click item option from the sub-menu.
2. After click on next button Target page will be shown.
Select the target folder using browser button where you want to save attachment.
If you want to create folder hierarchy then select By Folder Name option. If you want to create folder hierarchy like message date then select By Message Date option and create folder name according to date select from combo box.

Shoviv EDB to PST
Copyright © 2018 Shoviv Software Private Limited
3. After click on "Start" button and save process.
Shoviv EDB to PST
Copyright © 2018 Shoviv Software Private Limited
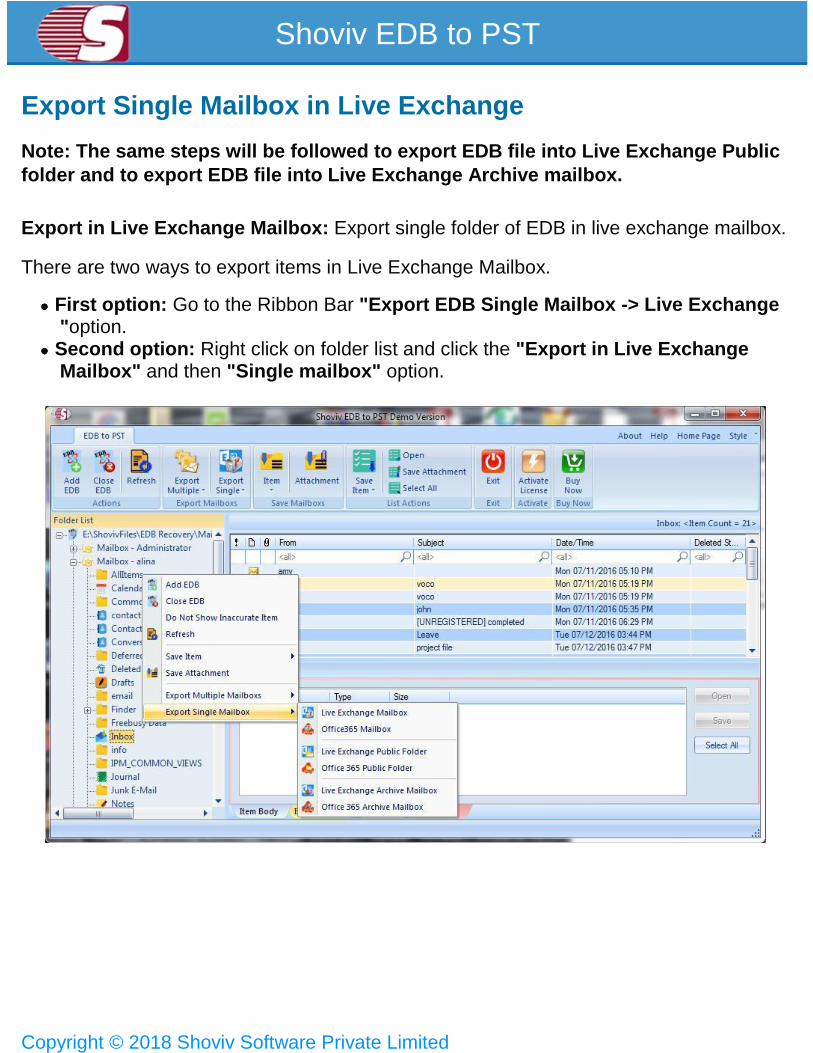
Export Single Mailbox in Live Exchange
Note: The same steps will be followed to export EDB file into Live Exchange Public
folder and to export EDB file into Live Exchange Archive mailbox.
Export in Live Exchange Mailbox: Export single folder of EDB in live exchange mailbox.
There are two ways to export items in Live Exchange Mailbox.
First option: Go to the Ribbon Bar "Export EDB Single Mailbox -> Live Exchange "option.
Second option: Right click on folder list and click the "Export in Live Exchange Mailbox" and then "Single mailbox" option.
Shoviv EDB to PST
Copyright © 2018 Shoviv Software Private Limited
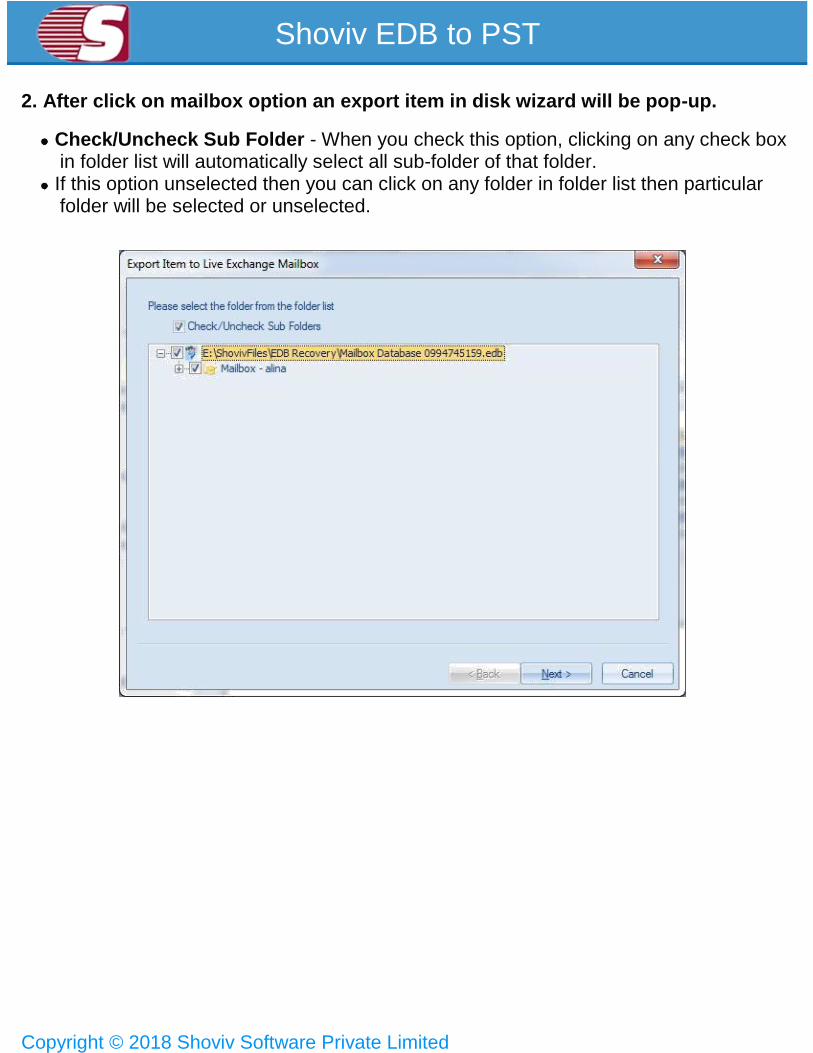
2. After click on mailbox option an export item in disk wizard will be pop-up.
Check/Uncheck Sub Folder - When you check this option, clicking on any check box in folder list will automatically select all sub-folder of that folder.
If this option unselected then you can click on any folder in folder list then particular folder will be selected or unselected.
Shoviv EDB to PST
Copyright © 2018 Shoviv Software Private Limited
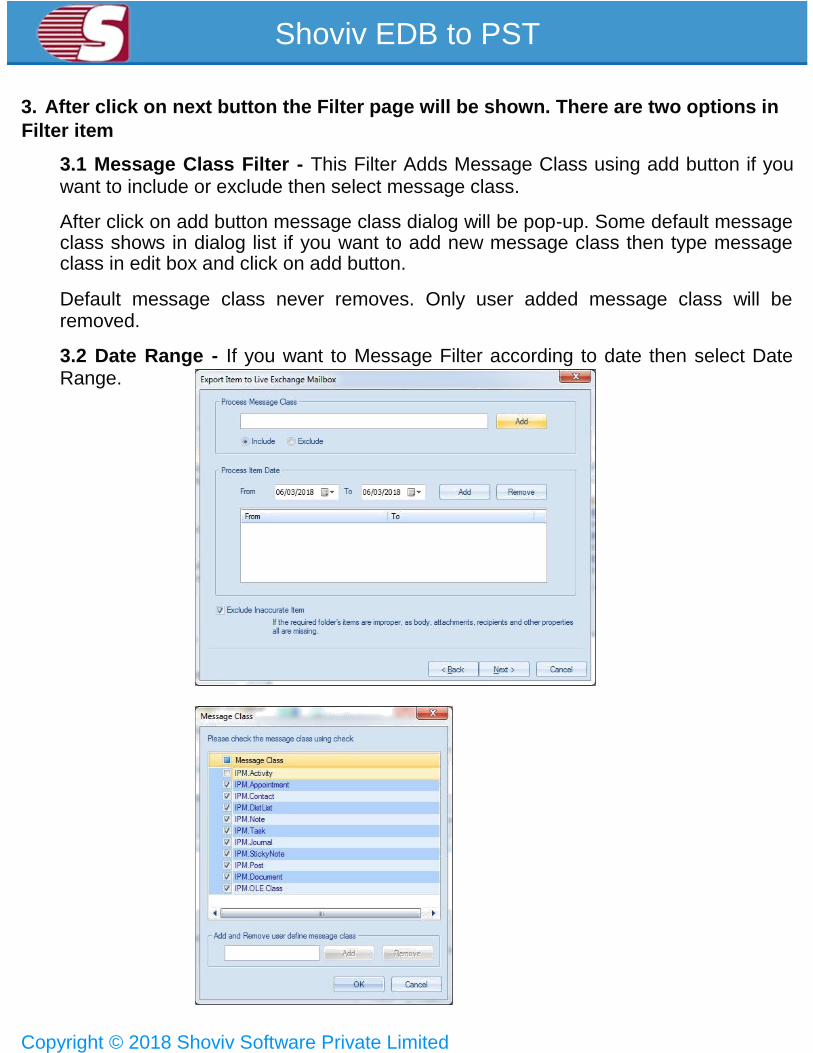
3. After click on next button the Filter page will be shown. There are two options in
Filter item
3.1 Message Class Filter - This Filter Adds Message Class using add button if you want to include or exclude then select message class.
After click on add button message class dialog will be pop-up. Some default message class shows in dialog list if you want to add new message class then type message class in edit box and click on add button.
Default message class never removes. Only user added message class will be removed.
3.2 Date Range - If you want to Message Filter according to date then select Date Range.
Shoviv EDB to PST
Copyright © 2018 Shoviv Software Private Limited
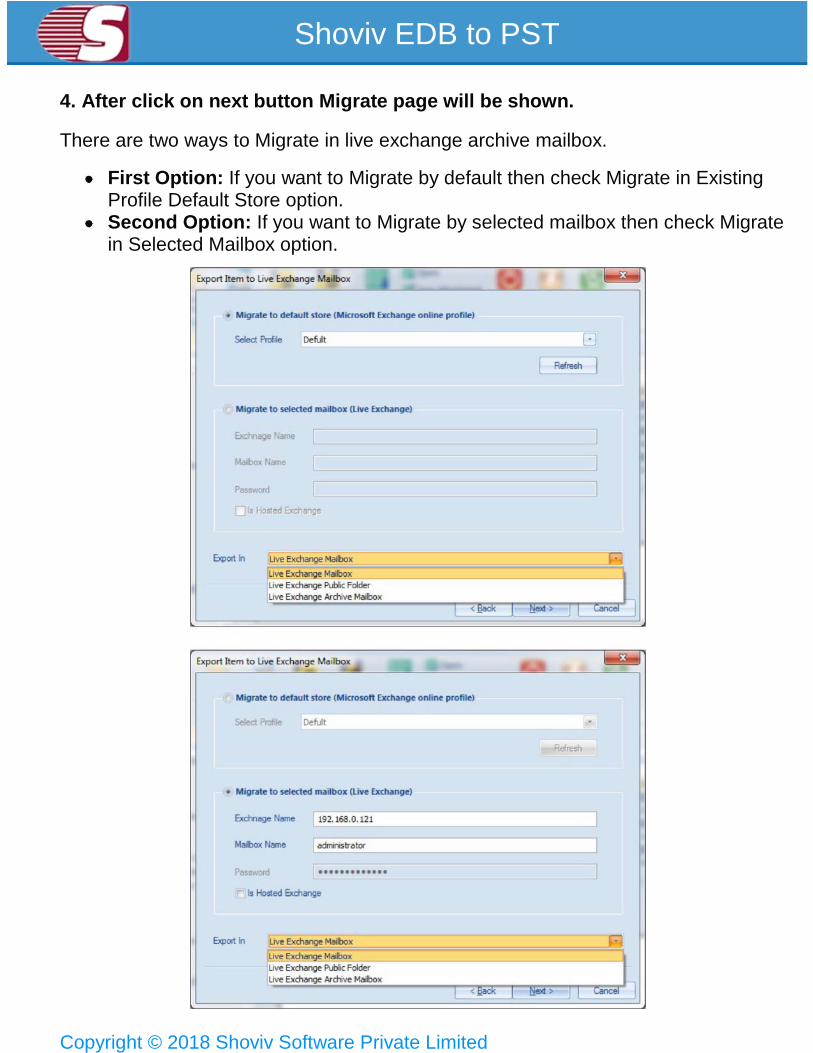
4. After click on next button Migrate page will be shown.
There are two ways to Migrate in live exchange archive mailbox.
First Option: If you want to Migrate by default then check Migrate in Existing Profile Default Store option.
Second Option: If you want to Migrate by selected mailbox then check Migrate in Selected Mailbox option.

Shoviv EDB to PST
Copyright © 2018 Shoviv Software Private Limited
5. After click on next button Status will be shown.
The Status wizard shows Source Folder, Target Folder, Item Count, Filtered Items, Copied Items and Process Item in this report.
1. Skip Process button - If you want to skip any folder processing then click on the skip process button. Skip process stops current running folder process and then renaming folder will be processed.
2. Cancel/Stop button - If you click on cancel/stop button all process will be
stopped. After complete work finish button will be activated.
Save report: It will help you to save report of process i.e. filtered items failed items etc.
Shoviv EDB to PST
Copyright © 2018 Shoviv Software Private Limited
Export in Office365 Mailbox
Note : The same steps will be followed to export EDB file into Office365 Public folder and to export EDB file into Office365 Archive mailbox.
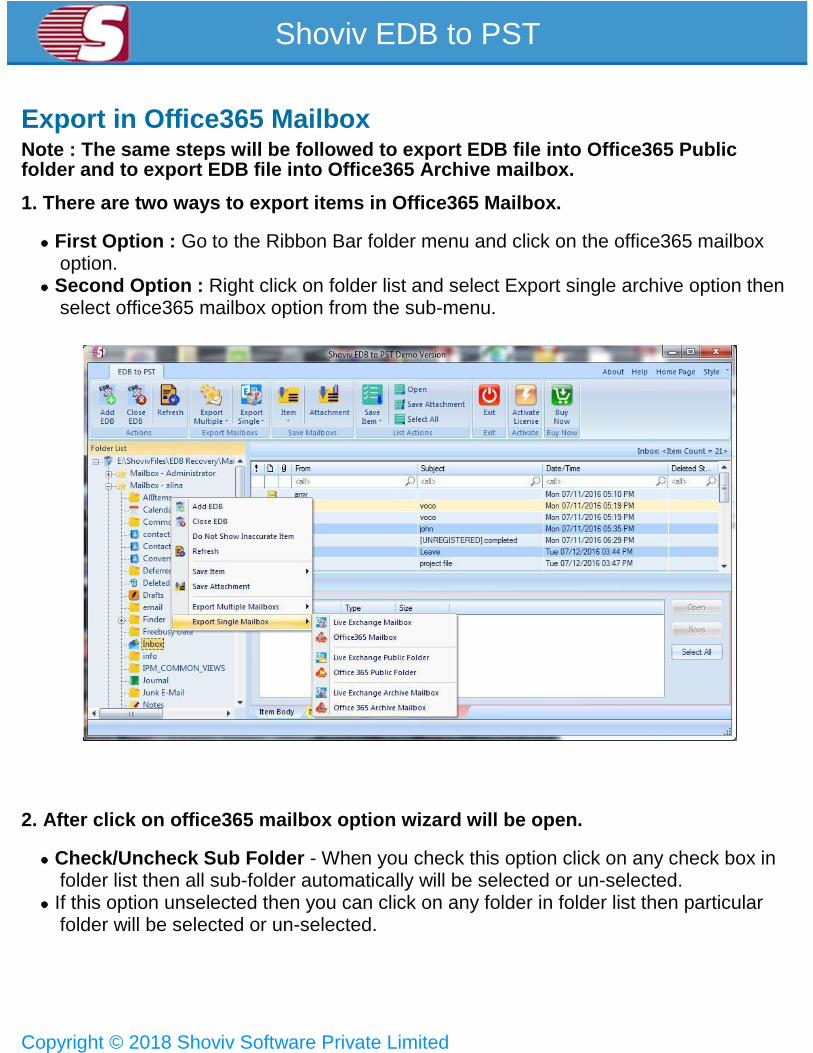
1. There are two ways to export items in Office365 Mailbox.
First Option : Go to the Ribbon Bar folder menu and click on the office365 mailbox option.
Second Option : Right click on folder list and select Export single archive option then select office365 mailbox option from the sub-menu.
2. After click on office365 mailbox option wizard will be open.
Check/Uncheck Sub Folder - When you check this option click on any check box in folder list then all sub-folder automatically will be selected or un-selected.
If this option unselected then you can click on any folder in folder list then particular folder will be selected or un-selected.

Shoviv EDB to PST
Copyright © 2018 Shoviv Software Private Limited
3. After click on next button the Filter page will be shown. There are two options in
Filter item.
3.1 Message Class Filter - This Filter Adds Message Class using add button if you want to include or exclude then select message class.
After click on add button message class dialog will be pop-up. Some default message class shows in dialog list if you want to add new message class then type message class in edit box and click on add button.
Default message class never removes. Only user added message class will be removed.

Shoviv EDB to PST
Copyright © 2018 Shoviv Software Private Limited
3.2 Date Range - If you want to Message Filter according to date then select Date Range.
Shoviv EDB to PST
Copyright © 2018 Shoviv Software Private Limited
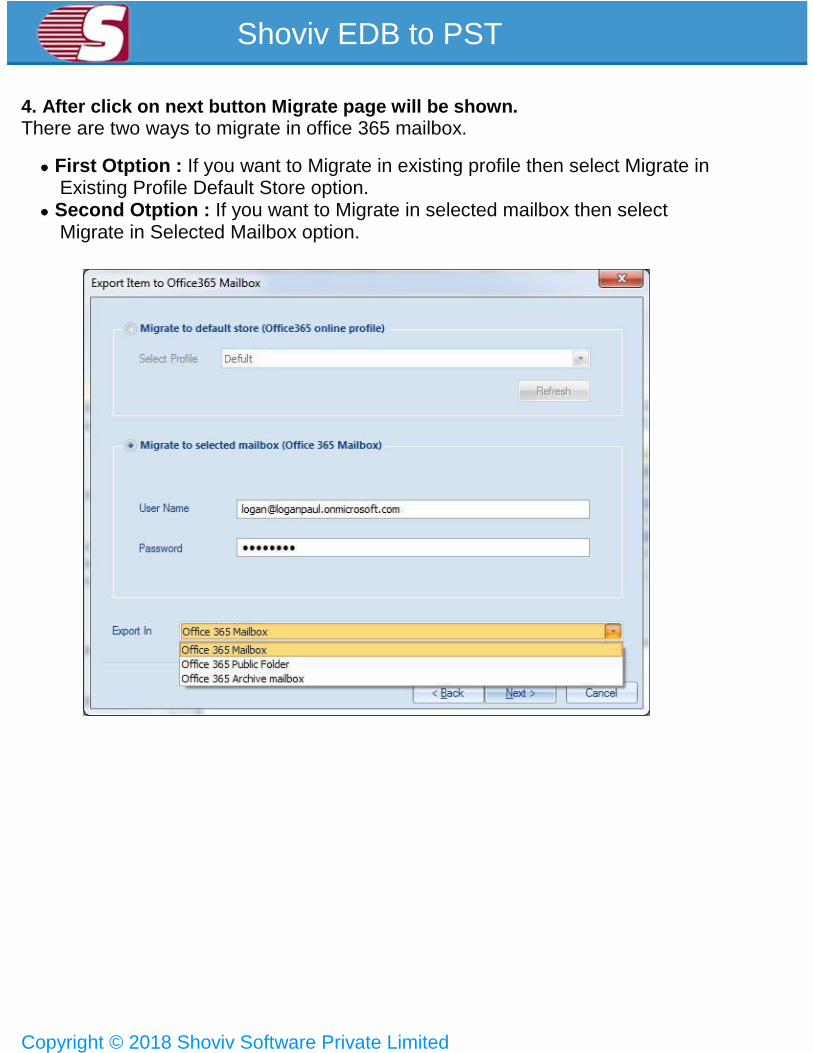
4. After click on next button Migrate page will be shown. There are two ways to migrate in office 365 mailbox.
First Otption : If you want to Migrate in existing profile then select Migrate in Existing Profile Default Store option.
Second Otption : If you want to Migrate in selected mailbox then select Migrate in Selected Mailbox option.

Shoviv EDB to PST
Copyright © 2018 Shoviv Software Private Limited
5. After click on next button Status will be shown.
In Status page shown Target Folder, Item Count, Filtered Items, Process Items, failed items and status. 5.1 Cancel/Stop button - If you click on cancel/stop button all process will be stopped. After processes completed finish button will be activated.
Save report : It will help you to save report of process i.e. filtered items failed items etc.

Shoviv EDB to PST
Copyright © 2018 Shoviv Software Private Limited
Export Multiple Mailboxes in Outlook PST
1.There are two ways to export items in PST.
First Option : Go to the Ribbon Bar "Export EDB Multiple Mailboxes -> Outlook PST"option.
Second Option : Right click on folder list and select "Export in Outlook PST -> Mltiple Mailboxes" option.

Shoviv EDB to PST
Copyright © 2018 Shoviv Software Private Limited
2. After click on Outlook PST option wizard will open. There are two option.
Check/Uncheck Sub Folder When you check this option click on any check box in folder list then all sub-folder automatically will be selected or un-selected.
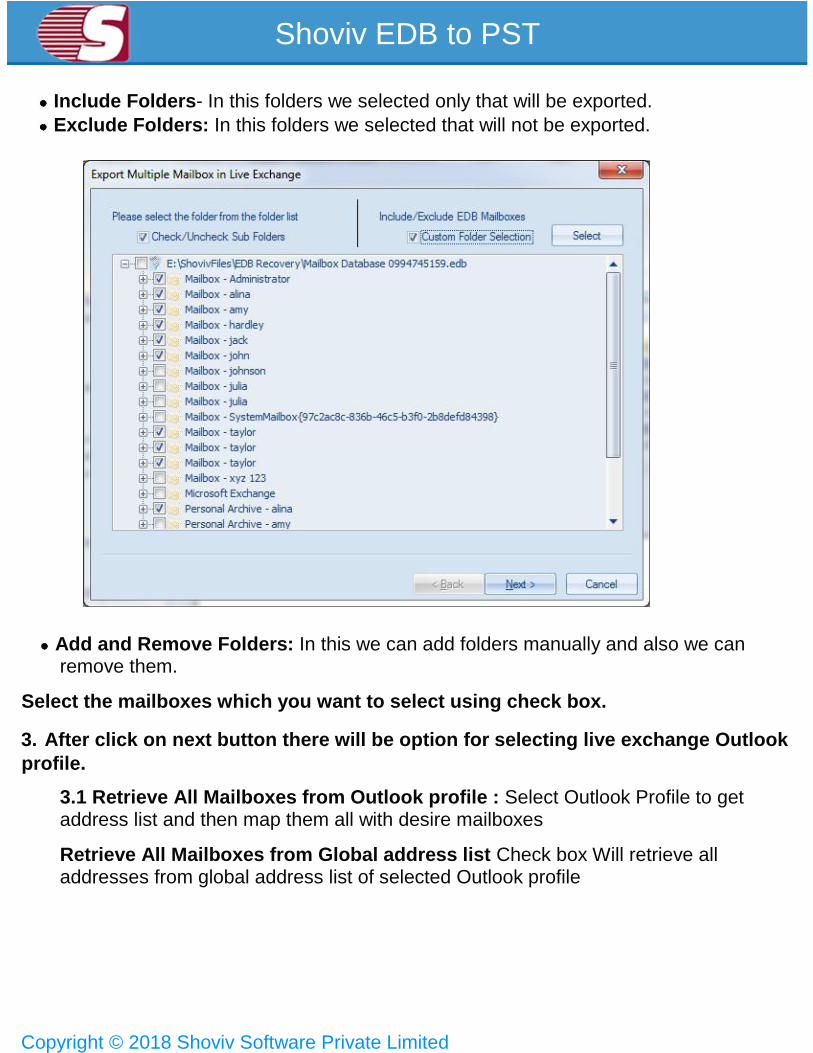
Include Folders/Exclude Folders
Include Folders : In this folders we selected only that will be exported.
Exclude Folders : In this folders we selected that will not be exported.
Add and Remove Folders : In this we can add folders manually and also we can remove them.

Shoviv EDB to PST
Copyright © 2018 Shoviv Software Private Limited
3. After click on next button the Filter page will be shown. There are two options in Filter item.
3.1 Message Class Filter - This Filter Adds Message Class using add button if you want to include or exclude then select message class.
After click on add button message class dialog will be pop-up. Some default message class shows in dialog list if you want to add new message class then type message class in edit box and click on add button.
Default message class never removes. Only user added message class will be removed.
Shoviv EDB to PST
Copyright © 2018 Shoviv Software Private Limited
3.2 Date Range - If you want to Message Filter according to date then select Date Filter.
Shoviv EDB to PST
Copyright © 2018 Shoviv Software Private Limited
4. After click on next button Status will be shown.
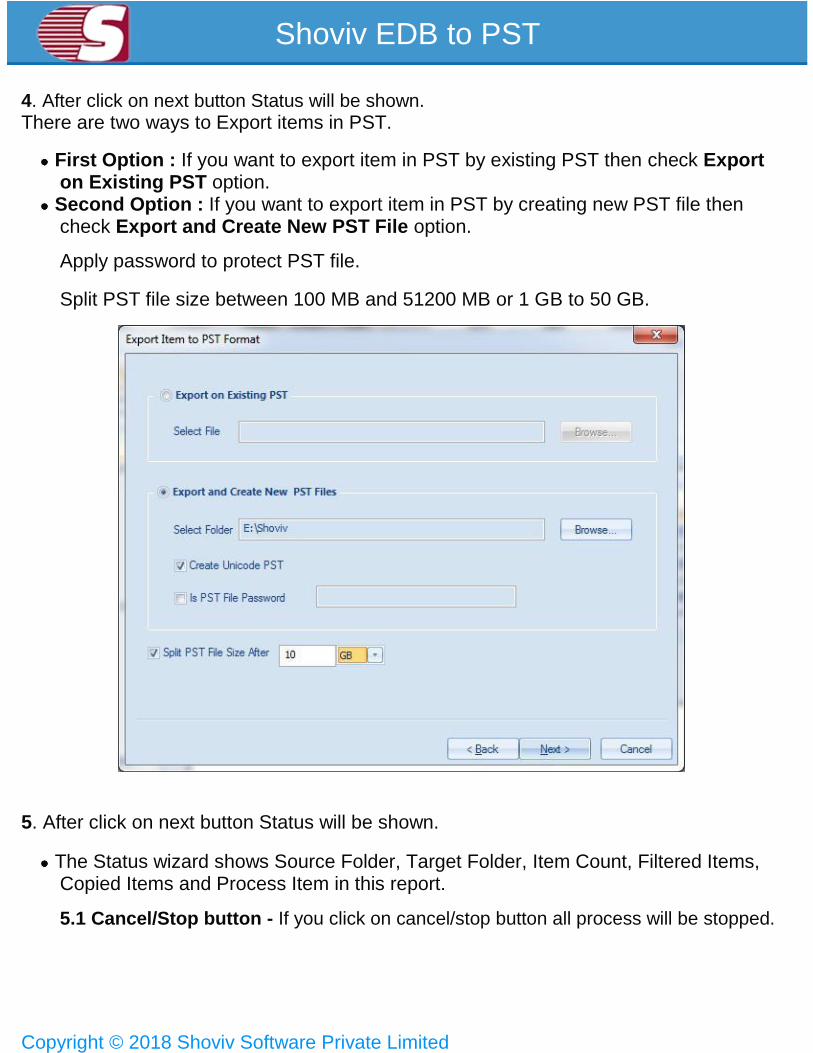
There are two ways to Export items in PST.
First Option : If you want to export item in PST by existing PST then check Export on Existing PST option.
Second Option : If you want to export item in PST by creating new PST file then check Export and Create New PST File option.
Apply password to protect PST file.
Split PST file size between 100 MB and 51200 MB or 1 GB to 50 GB.
5. After click on next button Status will be shown.
The Status wizard shows Source Folder, Target Folder, Item Count, Filtered Items, Copied Items and Process Item in this report.
5.1 Cancel/Stop button - If you click on cancel/stop button all process will be stopped.
Shoviv EDB to PST
Copyright © 2018 Shoviv Software Private Limited
After complete work finish button will be activated.
Save report : It will help you to save report of process i.e. filtered items failed items etc.

Shoviv EDB to PST
Copyright © 2018 Shoviv Software Private Limited
Export Multiple Mailboxes in Exchange Server
1. There are two ways to export Multiple Mailboxes in Exchange Server.
First Option : Go to the Ribbon Bar "Export EDB Multiple Mailboxes -> Live Exchange"option.
Second Option : Right click on folder list and select Export In Live Exchange Mailbox -> Multiple Mailboxes"option.
2. After click on live exchange mailbox option wizard will be open. There are two
option.
2. 1 Check/Uncheck Sub Folder : When you check this option click on any check box in folder list then all sub-folder automatically will be selected or un-selected.

Shoviv EDB to PST
Copyright © 2018 Shoviv Software Private Limited
If this option unselected then you can click on any folder in folder list then particular folder will be selected or un-selected.
2.2 Include Folders/Exclude Folders:
Shoviv EDB to PST
Copyright © 2018 Shoviv Software Private Limited
Include Folders- In this folders we selected only that will be exported.
Exclude Folders: In this folders we selected that will not be exported.
Add and Remove Folders: In this we can add folders manually and also we can remove them.
Select the mailboxes which you want to select using check box.
3. After click on next button there will be option for selecting live exchange Outlook
profile.
3.1 Retrieve All Mailboxes from Outlook profile : Select Outlook Profile to get address list and then map them all with desire mailboxes
Retrieve All Mailboxes from Global address list Check box Will retrieve all addresses from global address list of selected Outlook profile

Shoviv EDB to PST
Copyright © 2018 Shoviv Software Private Limited
3.2 Retrieve All Mailboxes from Outlook profile : Get list of mailbox using MAPI message table method.

Shoviv EDB to PST
Copyright © 2018 Shoviv Software Private Limited
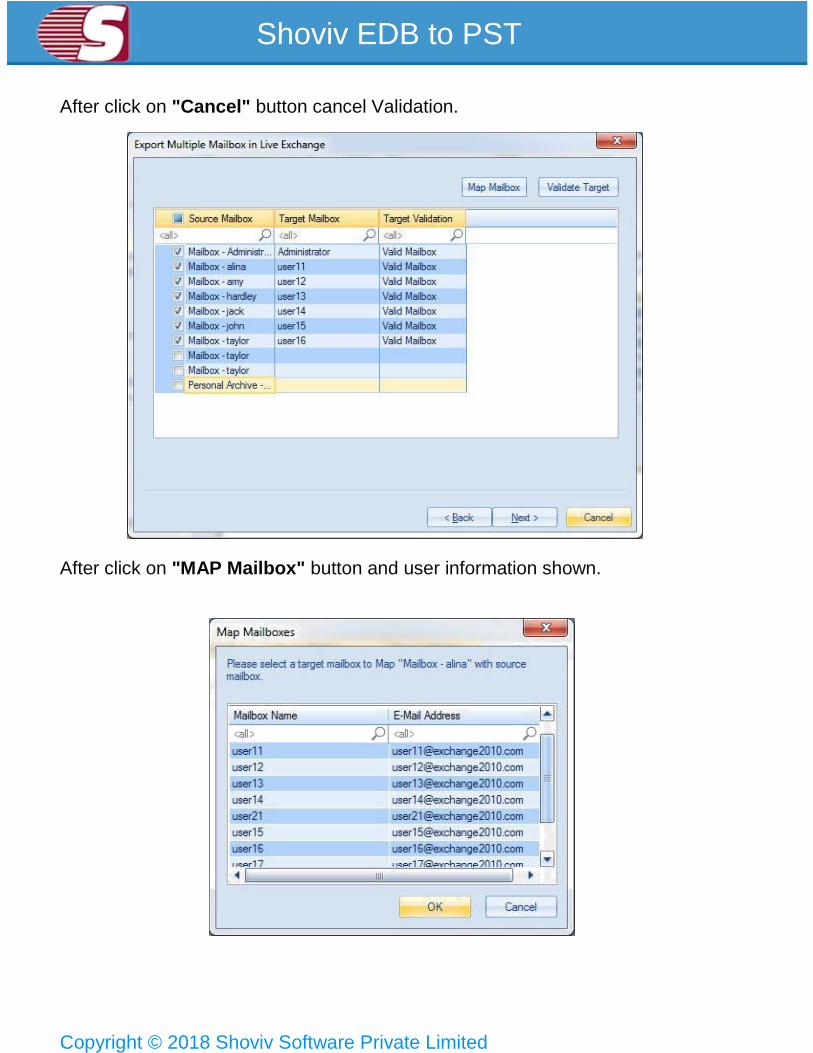
4. After click on next button there will be report view in which the list of EDB Files will shows.
You have to choose each individual EDB Files and map it with respective live exchange mailbox profile by clicking on map mailbox button, you can also validate Live Exchange profile to find out whether it exist or not.
After click on "Next" button and create New Profile for Migration.
After click on "Validate Target" button and validation .
Shoviv EDB to PST
Copyright © 2018 Shoviv Software Private Limited
After click on "Cancel" button cancel Validation.
After click on "MAP Mailbox" button and user information shown.

Shoviv EDB to PST
Copyright © 2018 Shoviv Software Private Limited
5. After click on next button the Filter page will be shown. There are two options in
Filter item
Process Message Class : This Filter Adds Message Class using add button if you want to include or exclude then select message class.
After click on add button message class dialog will be pop-up. Some default message class shows in dialog list if you want to add new message class then type message class in edit box and click on add button.
Default message class never removes. Only user added message class will be removed.
Process Item Date : If you want to Message Filter according to date then select Date Filter.

Shoviv EDB to PST
Copyright © 2018 Shoviv Software Private Limited
Select Message Class using check

Shoviv EDB to PST
Copyright © 2018 Shoviv Software Private Limited
6. After click on next button Status will be shown.
The Status wizard shows Folder Name, Item Count, Filtered Items, Process Item,Failed Items and status in this report.
Cancel/Stop button : If you click on cancel/stop button all process will be stopped. After complete processing finish button will be activated.
Save report : It will help you to save report of process into HTML file i.e. filtered items failed items etc.

Shoviv EDB to PST
Copyright © 2018 Shoviv Software Private Limited
Export multiple Mailboxes in Office365
1. There are two ways to export items in office 365.
First Option : Go to the Ribbon Bar "Export EDB Multiple mailboxes -> Office365" Second Option : Right click on folder list and select "Export in Office365 -> Multiple
mailboxes"
2. After click on "Export in Office365 -> Multiple mailboxes" option wizard will be open. There are two option.
Check/Uncheck Sub Folder : When you check this option click on any check box in folder list then all sub-folder automatically will be selected or un-selected.
If this option unselected then you can click on any folder in folder list then particular folder will be selected or un-selected.

Shoviv EDB to PST
Copyright © 2018 Shoviv Software Private Limited
Include Folders- In this folders we selected only that will be exported.
Exclude Folders: In this folders we selected that will not be exported.

Shoviv EDB to PST
Copyright © 2018 Shoviv Software Private Limited
Add and Remove Folders: In this we can add folders manually and also we can
remove them.
3. After click on next button there will be option for selecting Outlook profile.
3.1 Retrieve All Mailboxes from Outlook profile : Select Outlook Profile to get address list and then map them all with desire mailboxes

Shoviv EDB to PST
Copyright © 2018 Shoviv Software Private Limited
Retrieve All Mailboxes from Global address list Check box Will retrieve all addresses from global address list of selected Outlook profile
3.2 Retrive All Mailbxes from Outlook profile : Get list of mailbox using MAPI massage table method.
4. After click on next button then create profile for migration page will be appear. This page only appear when "Get all mailbox from active directory(AD)". Option will be selected from above page otherwise click on next button direct maping page will be appear. In this page two option for selecting migration profile. First option is existing profile and another is create new profile.
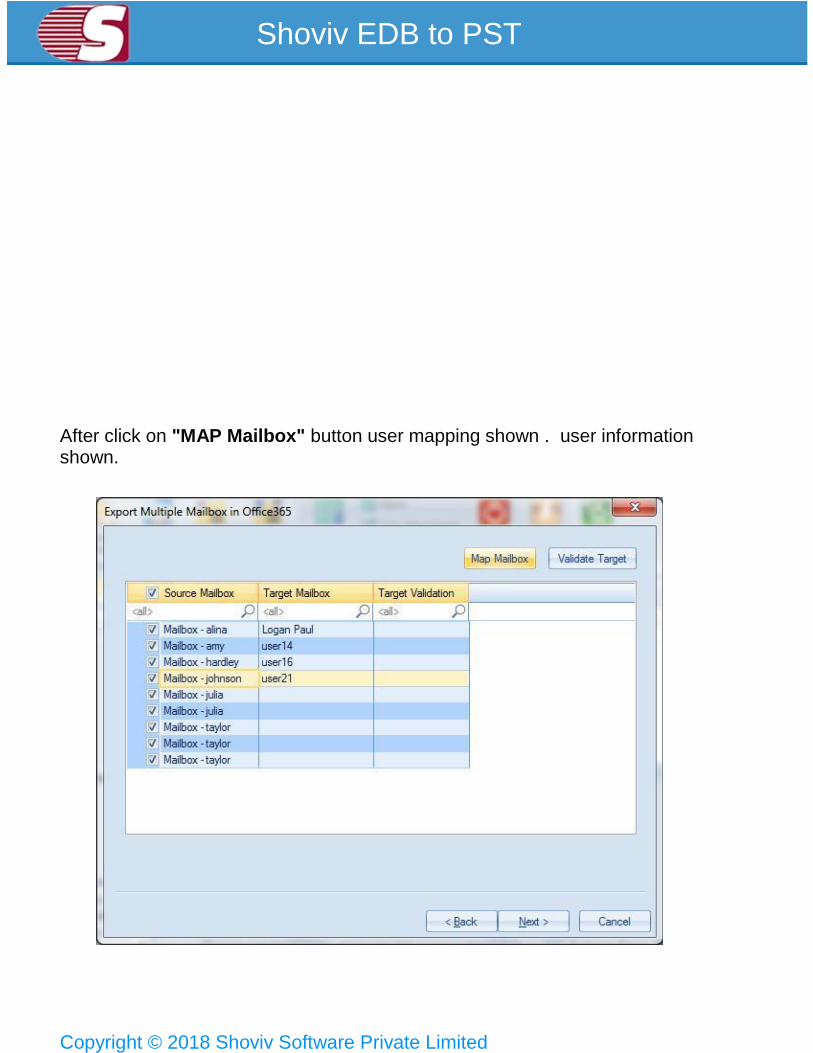
You have to choose each individual EDB Files and map it with respective live exchange mailbox profile by clicking on map mailbox button, you can also validate office365 profiles to find out whether it exist or not.
After click on "Next" button and create New Profile for Migration.
Shoviv EDB to PST
Copyright © 2018 Shoviv Software Private Limited
After click on "MAP Mailbox" button user mapping shown . user information shown.

Shoviv EDB to PST
Copyright © 2018 Shoviv Software Private Limited
5. After click on next button the Filter page will be shown. There are two options in
Filter item
Process Message Class : This Filter Adds Message Class using add button if you want to include or exclude then select message class.
After click on add button message class dialog will be pop-up. Some default message class shows in dialog list if you want to add new message class then type message class in edit box and click on add button.
Default message class never removes. Only user added message class will be removed.

Shoviv EDB to PST
Copyright © 2018 Shoviv Software Private Limited
Process Item Date : If you want to Message Filter according to date then select Date Filter.
Shoviv EDB to PST
Copyright © 2018 Shoviv Software Private Limited
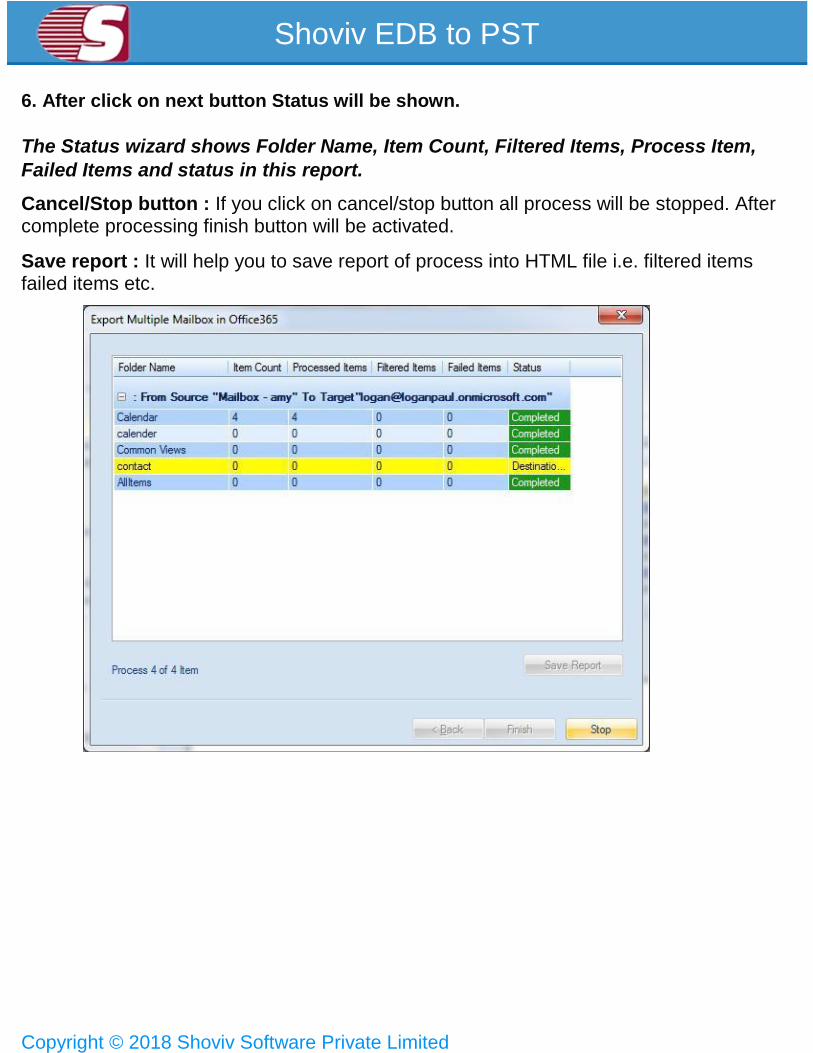
6. After click on next button Status will be shown.
The Status wizard shows Folder Name, Item Count, Filtered Items, Process Item,
Failed Items and status in this report.
Cancel/Stop button : If you click on cancel/stop button all process will be stopped. After complete processing finish button will be activated.
Save report : It will help you to save report of process into HTML file i.e. filtered items failed items etc.
Shoviv EDB to PST
Copyright © 2018 Shoviv Software Private Limited
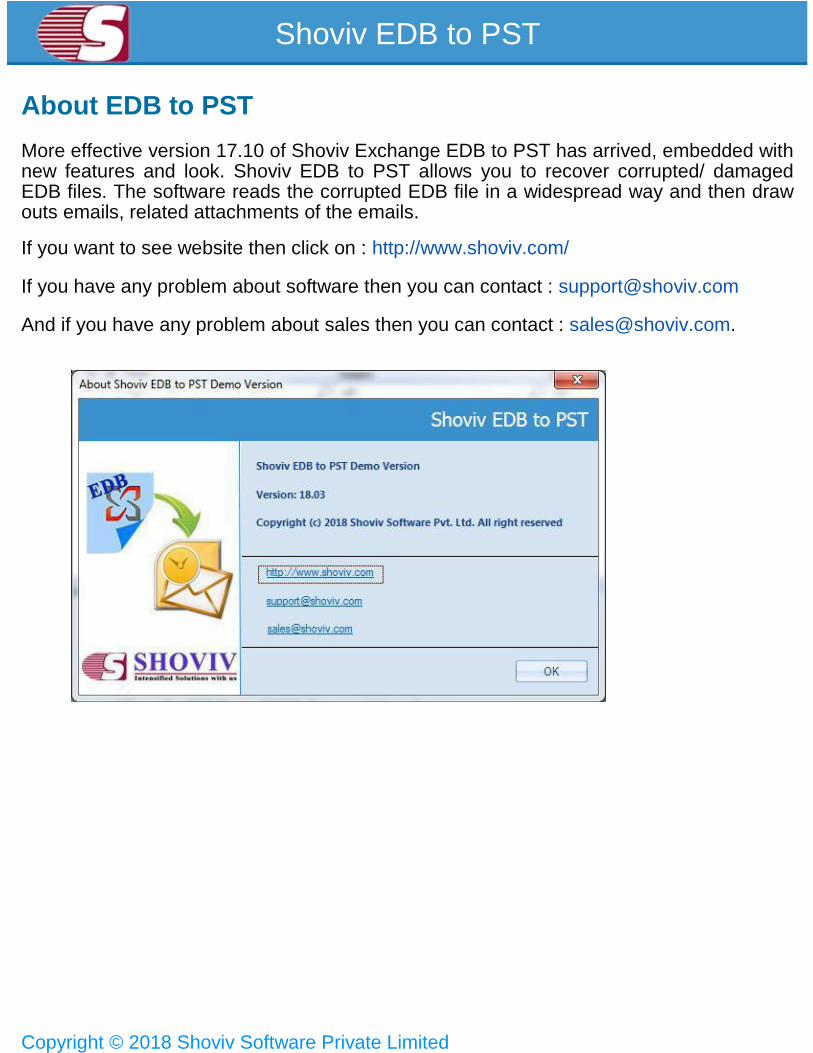
About EDB to PST
More effective version 17.10 of Shoviv Exchange EDB to PST has arrived, embedded with new features and look. Shoviv EDB to PST allows you to recover corrupted/ damaged EDB files. The software reads the corrupted EDB file in a widespread way and then draw outs emails, related attachments of the emails.
If you want to see website then click on : http://www.shoviv.com/
If you have any problem about software then you can contact : [email protected]
And if you have any problem about sales then you can contact : [email protected].
Shoviv EDB to PST
Copyright © 2018 Shoviv Software Private Limited
Visit Homepage
The Shoviv EDB to PST is fully functional and helps about the capability and accuracy of the software. You can download the trial version of Shoviv EDB to PST to visit the website click on http://www.shoviv.com
Supports
We have an efficient support system to assist our customers with all issues related to using Shoviv EDB to PST . The software comes with an embedded help manual that can be accessed by clicking Help > Software Help in the menu-bar.
You can access the online help for Shoviv EDB to PST Software at [email protected]
We also have live support wherein you can chat with our software experts at [email protected]

Shoviv EDB to PST
Copyright © 2018 Shoviv Software Private Limited
Activate License
Activation - You can activate Shoviv product by two methods.
1. Online Activation
2. Offline Activation
1. Online Activation
When purchase or buy to Shoviv product/software then you will receive
an email. Which will have an order number and activation key. By using
this option you can activate this product online.
Shoviv EDB to PST
Copyright © 2018 Shoviv Software Private Limited
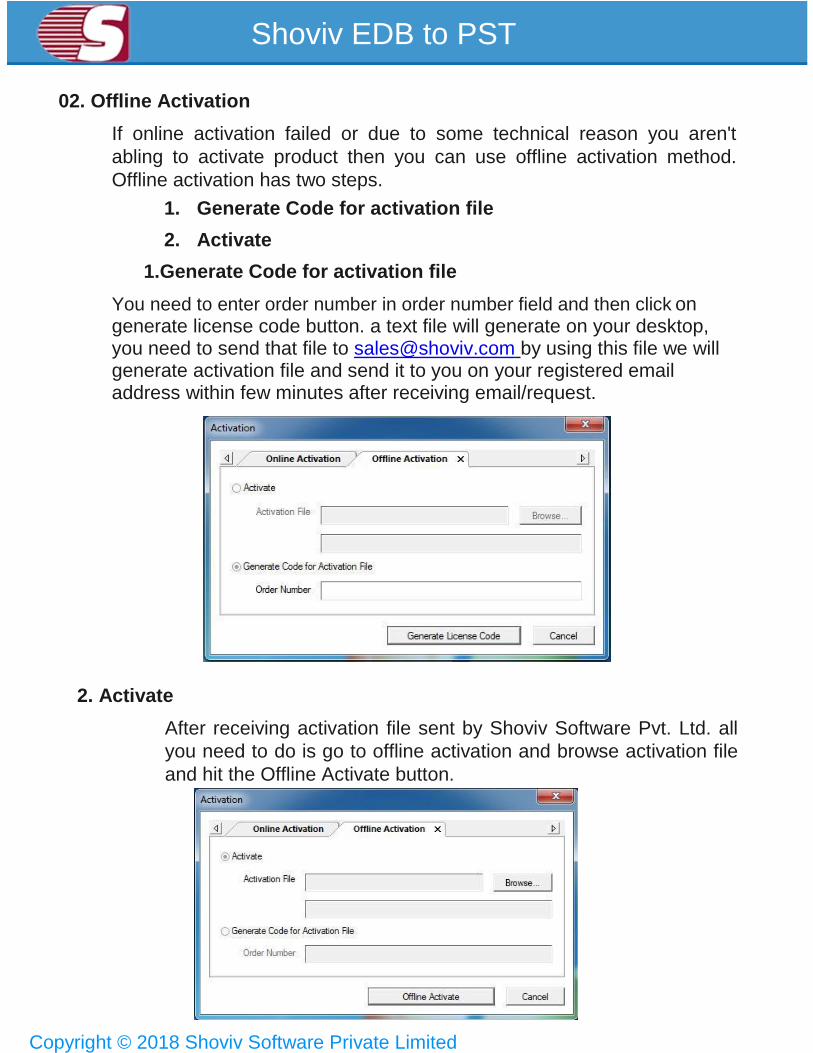
02. Offline Activation
If online activation failed or due to some technical reason you aren't
abling to activate product then you can use offline activation method.
Offline activation has two steps.
1. Generate Code for activation file
2. Activate 1.Generate Code for activation file
You need to enter order number in order number field and then click on generate license code button. a text file will generate on your desktop, you need to send that file to [email protected] by using this file we will generate activation file and send it to you on your registered email address within few minutes after receiving email/request.
2. Activate
After receiving activation file sent by Shoviv Software Pvt. Ltd. all
you need to do is go to offline activation and browse activation file
and hit the Offline Activate button.
Shoviv EDB to PST
Copyright © 2018 Shoviv Software Private Limited
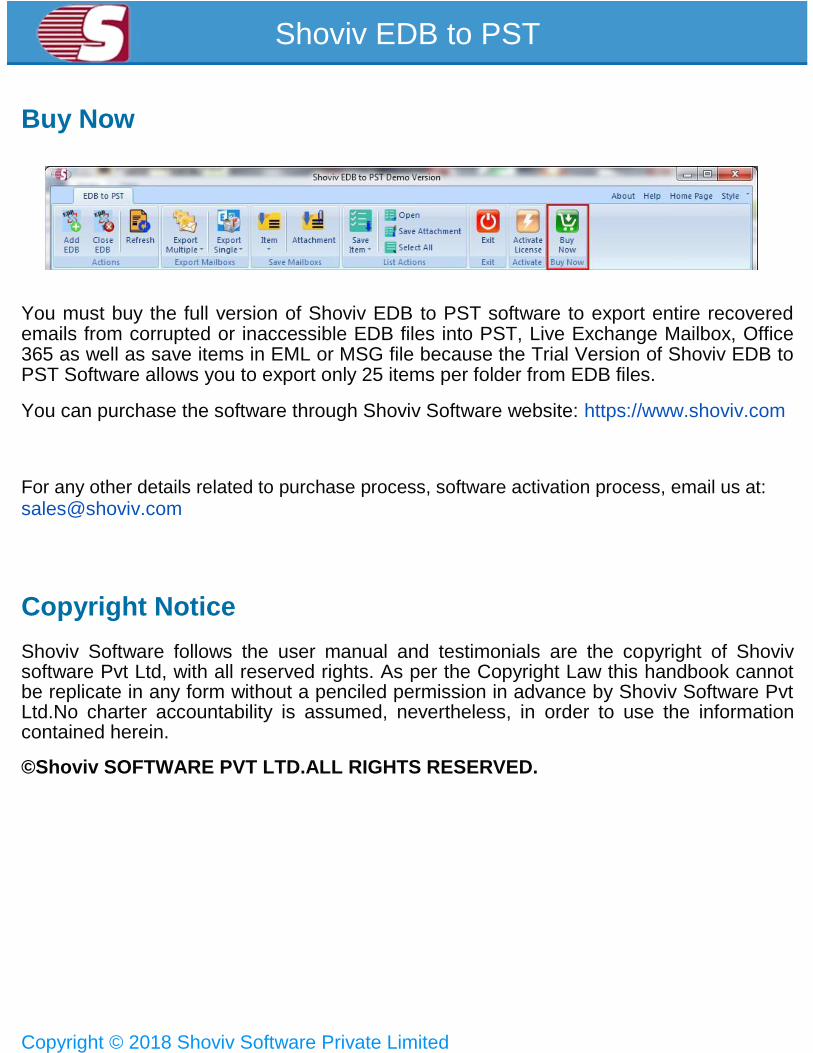
Buy Now
You must buy the full version of Shoviv EDB to PST software to export entire recovered emails from corrupted or inaccessible EDB files into PST, Live Exchange Mailbox, Office 365 as well as save items in EML or MSG file because the Trial Version of Shoviv EDB to PST Software allows you to export only 25 items per folder from EDB files.
You can purchase the software through Shoviv Software website: https://www.shoviv.com
For any other details related to purchase process, software activation process, email us at:
Copyright Notice
Shoviv Software follows the user manual and testimonials are the copyright of Shoviv software Pvt Ltd, with all reserved rights. As per the Copyright Law this handbook cannot be replicate in any form without a penciled permission in advance by Shoviv Software Pvt Ltd.No charter accountability is assumed, nevertheless, in order to use the information contained herein.
©Shoviv SOFTWARE PVT LTD.ALL RIGHTS RESERVED.
Shoviv EDB to PST
Copyright © 2018 Shoviv Software Private Limited
Trademarks
Shoviv ® is a copyright work of Shoviv Software Pvt Ltd.
Registered trademark of Microsoft Corporation are
Window 95®, Window 98®, Window ME®, Window NT®, Window 2000 server®, Window 2000 advanced server®, Window 2003 server®, MS word and window XP ®.
All product names are registered trademark of their respective companies.
Disclaimer
The information described in this manual is not restricted to any product stipulations and can be changed without any prior intimation. Shoviv Software Pvt Ltd do not provide any warranty in regards to this documentation or any other information contained in it and abandon any implied warranties of merchantability or robustness for any specific rationale consideration to any of the aforesaid. Issues such as damage by mishandling, technical error, omission contained or variance between product and manual are not be secured under the tagline called ‘warranty’. Shoviv Software Pvt Ltd will be liable for any incidental, consequential or exemplary damage, whether based on trespass, contract or otherwise, arising out of or in connection with this manual or any other information contained herein or the use there of.
Shoviv EDB to PST
Copyright © 2018 Shoviv Software Private Limited
License Agreement
Shoviv EDB to PST Copyright © Shoviv Software Pvt. Ltd. All rights reserved.
Your agreement to this license
It is a legal agreement between you and Shoviv software Pvt. Ltd. Term and conditions of the License will brief you the authorized use and users of each licensed copy of the Shoviv EDB to PST.
Term and conditions are mandatory to accept for become an authorized user, if you do not agree with the Term and conditions then do not copy, install, distribute or use any copy of Shoviv EDB to PST.
Term and conditions:
You should read the term and conditions carefully before use, install, and copy or distribute the software.
Scope of License
You can use only permitted copy of the software
Single workstation program
This term refers to a program installed and used only by a single user on a single computer at a time. The Program must not be installed, distributed, shared or used on multiple computers.
Multiple workstation programs
This term refers to a program installed, used, specified no. of computer at a time. Program must not be installed, shared, distribute or used by no. of computers exceed to the authorized limit.
Multimedia File Authorization
The Publisher and licensor reserve all cerebral asset’s rights associated to multimedia files that may be given with the program images, audio, video files. License holder can use this file only for personal purpose excluding commercial or any other intended purpose.
Authorization
Shoviv EDB to PST includes an advance feature to protect it against an unauthorized reproduction. You can make only one copy for backup and contained purpose; you cannot make more than the authorized copies of the Shoviv EDB to PST.
Shoviv EDB to PST
Copyright © 2018 Shoviv Software Private Limited
Activation
To activate the Shoviv EDB to PST we provide you an Online Activation key and Order number in purchase package, if you face any problem in online activation than we will provide you an offline activation key on request. The Online and offline Activation key is the Publisher’s exclusive asset that it is strictly confidential information and must not be shareable with third party. The user commit for the protection of confidentiality of activation key.
Restrictions
All rights are reserved and are not granted in this license. You cannot lease, modify, translate, reverse engineer, decompile, disassemble or get the source code of software.
Legality statement
The program which is licensed to you is absolutely legal and you are the legal owner of the entire file or data you are going to recover through using this software .You have the permission from legitimate owner to perform these acts.
Any illegal use of Shoviv EDB to PST will be solely your responsibility.
You further attest that recovered data, password or files will not be used for any illegal purpose.
Be aware that password recovery, unauthorized data encryption, illegally obtained file may constitute theft or other wrongful action may result in your civil and criminal prosecution.
About
The license is the complete statement of concurrence between the parties on the subject matter and joins and replaces all other prior understandings, purchase orders, agreement and arrangements. Shoviv software Pvt. Ltd. does not give any benefit to third party and is not responsible for any obligations created by the party. Shoviv Software Pvt. Ltd. will not give you any waiver on violation of this License and you shall neither constitute nor contribute to a waiver.
Copyright © Shoviv Software Pvt. Ltd. All Rights of any kind are reserved by the
Shoviv Software Pvt. Ltd. and are not expressly granted in License.
Shoviv EDB to PST
Copyright © 2018 Shoviv Software Private Limited
Related Documents