SPIF 2.1 for Sitecore XP 8.0 or later SharePoint Integration Framework Developer's Cookbook Rev: 2015-01-28 Sitecore® is a registered trademark. All other brand and product names are the property of their respective holders. The contents of this document are the property of Sitecore. Copyright © 2001-2015 Sitecore. All rights reserved. SPIF 2.1 for Sitecore XP 8.0 or later SharePoint Integration Framework Developer's Cookbook A Guide to Integrating Sitecore and SharePoint

Welcome message from author
This document is posted to help you gain knowledge. Please leave a comment to let me know what you think about it! Share it to your friends and learn new things together.
Transcript
SPIF 2.1 for Sitecore XP 8.0 or later SharePoint Integration Framework Developer's Cookbook Rev: 2015-01-28
Sitecore® is a registered trademark. All other brand and product names are the property of their respective holders. The contents of this document are the property of Sitecore. Copyright © 2001-2015 Sitecore. All rights reserved.
SPIF 2.1 for Sitecore XP 8.0 or later
SharePoint Integration Framework Developer's Cookbook A Guide to Integrating Sitecore and SharePoint
SPIF 2.1 for Sitecore XP 8.0 or later
Sitecore® is a registered trademark. All other brand and product names are the property of their respective holders. The contents of this document are the property of Sitecore. Copyright © 2001-2015 Sitecore. All rights reserved.
Page 2 of 74
Table of Contents
Chapter 1 Introduction .......................................................................................................................... 4 Chapter 2 The SharePoint Integration Framework .............................................................................. 5
2.1 System Requirements ............................................................................................................. 6 2.2 Overview ................................................................................................................................. 7 2.3 Architecture ............................................................................................................................. 9
Chapter 3 Configuration ..................................................................................................................... 10 3.1 Configuration ......................................................................................................................... 11
3.1.1 Handling Configuration ...................................................................................................... 11 Default Configuration ................................................................................................................. 11
3.1.2 SharePoint Configuration File ........................................................................................... 12 Settings ...................................................................................................................................... 12 Predefined List-type and Item-type Definitions .......................................................................... 12 Predefined Configurations for SharePoint Sites ........................................................................ 13 Connection Configuration ........................................................................................................... 14 Claims-based Authentication Connection Configuration ........................................................... 15
3.2 SharePoint On-Premises Solutions Authentication............................................................... 19 3.2.1 Windows Authentication .................................................................................................... 19
Active Directory and Single Sign-on .......................................................................................... 19 3.2.2 Claims-Based Authentication ............................................................................................ 19
3.3 SharePoint On-Premises Solutions Configuration ................................................................ 21 SharePoint Security and Permissions ........................................................................................ 21 Enabling Sitecore Access to SharePoint Webs ......................................................................... 21 List View Threshold .................................................................................................................... 22 Alternate Access Mappings ........................................................................................................ 22
3.4 SharePoint Online Authentication ......................................................................................... 23 Chapter 4 Page-level Integration ....................................................................................................... 24
4.1 Components .......................................................................................................................... 25 4.1.1 SharePoint Web Template ................................................................................................ 25 4.1.2 SharePoint Sample Controls ............................................................................................. 25
4.2 Using Sample Controls to Display SharePoint Lists ............................................................. 27 4.2.1 Displaying SharePoint Lists on an Existing Item ............................................................... 27 4.2.2 Displaying SharePoint Lists on a New Item ...................................................................... 30
4.3 Using SharePoint Search ...................................................................................................... 32 4.3.1 Standard Search ............................................................................................................... 32 4.3.2 Advanced Search .............................................................................................................. 32 4.3.3 SharePoint Search API Classes ....................................................................................... 32 4.3.4 Understanding the Search Control .................................................................................... 33
4.4 Configuring Sample Control Properties ................................................................................ 34 4.4.1 Creating a List Value ......................................................................................................... 34
Chapter 5 Item-level Integration ......................................................................................................... 36 5.1 Overview ............................................................................................................................... 37 5.2 Components .......................................................................................................................... 38
5.2.1 SharePoint Integration Definition Item .............................................................................. 38 5.2.2 The SharePoint Integration Wizard ................................................................................... 38 5.2.3 Synchronization Process ................................................................................................... 39 5.2.4 Synchronization in Distributed Environments (On-Premise and Cloud Deployments) ..... 39 5.2.5 How SPIF Maps SharePoint Items and Integration Items................................................. 39
5.3 Options and Settings ............................................................................................................. 40 5.3.1 Creating SharePoint Integration Mappings ....................................................................... 40 5.3.2 Performance Tuning .......................................................................................................... 40
Scheduled BLOB Transfer ......................................................................................................... 40 Expiration Interval ...................................................................................................................... 40 Uploading Modified BLOBs Only ............................................................................................... 41
5.3.3 Updating SharePoint Lists from Sitecore .......................................................................... 41 5.3.4 Presentation Options ......................................................................................................... 42
SharePoint Integration Framework Developer's Cookbook
Sitecore® is a registered trademark. All other brand and product names are the property of their respective holders. The contents of this document are the property of Sitecore. Copyright © 2001-2015 Sitecore. All rights reserved.
Page 3 of 74
5.4 Using the SharePoint Integration Wizard .............................................................................. 43 5.5 Editing the XML in a SharePoint Integration Definition Item ................................................. 49
Chapter 6 Integration Scenarios ........................................................................................................ 52 6.1 Page-level Integration ........................................................................................................... 53
6.1.1 Implementing an Announcements List Control ................................................................. 53 6.1.2 Implementing a SharePoint List Control ........................................................................... 57
Creating a SharePoint View ....................................................................................................... 58 6.2 Item-level Integration on a Sitecore Extranet ........................................................................ 64
6.2.1 Integrating SharePoint Announcements with the Sitecore Content Tree ......................... 65 Creating a SharePoint Integration Definition Item in Sitecore ................................................... 65
6.2.2 Integrating SharePoint Document Libraries with the Sitecore Media Library ................... 67 Chapter 7 Appendix ........................................................................................................................... 69
7.1 Configuring Impersonation and Delegation in Windows ....................................................... 70 7.1.1 Configuring Internet Explorer ............................................................................................ 70 7.1.2 Configuring Active Directory .............................................................................................. 70 7.1.3 Configuring IIS ................................................................................................................... 71
Additional SharePoint Server Configuration .............................................................................. 72 Kerberos Authentication ............................................................................................................. 73
SPIF 2.1 for Sitecore XP 8.0 or later
Sitecore® is a registered trademark. All other brand and product names are the property of their respective holders. The contents of this document are the property of Sitecore. Copyright © 2001-2015 Sitecore. All rights reserved.
Page 4 of 74
Chapter 1
Introduction
The SharePoint Integration Framework (SPIF) enables you to display SharePoint lists in a Sitecore website. The framework includes default, customizable sample controls for page-level integration and the SharePoint Integration wizard for item-level integration.
Developers can use the SPIF API to customize the framework. For more information on how to use the API, see the manual SPIF API Reference.
This cookbook is for Sitecore partners and developers, and includes useful tips as well as examples.
This document contains the following chapters:
Chapter 1 — Introduction The description of the content, aims, and the intended audience of this cookbook.
Chapter 2 — The SharePoint Integration Framework An overview of the SPIF architecture and main component parts.
Chapter 3 — Configuration The information on how to configure SPIF for both on-premises and online SharePoint solutions.
Chapter 4 — Page-level Integration The information on how to use the sample controls included in the SharePoint Integration Framework to integrate SharePoint and Sitecore content in real time.
Chapter 5 — Item-level Integration The information explaining how to use the SharePoint Integration wizard to integrate SharePoint items with Sitecore content items.
Chapter 6 — Integration Scenarios Several fictional scenarios to demonstrate how to implement page or item-level integration in a typical business context. Each walkthrough includes instructions to guide you through the integration process.
Chapter 7 — Appendix Description of impersonation and delegation in Windows for on-premises installations.
SharePoint Integration Framework Developer's Cookbook
Sitecore® is a registered trademark. All other brand and product names are the property of their respective holders. The contents of this document are the property of Sitecore. Copyright © 2001-2015 Sitecore. All rights reserved.
Page 5 of 74
Chapter 2
The SharePoint Integration Framework
This section is an introduction to the basic concepts and components used in the SharePoint Integration Framework (SPIF).
This chapter contains the following sections:
System Requirements
Overview
Architecture
SPIF 2.1 for Sitecore XP 8.0 or later
Sitecore® is a registered trademark. All other brand and product names are the property of their respective holders. The contents of this document are the property of Sitecore. Copyright © 2001-2015 Sitecore. All rights reserved.
Page 6 of 74
2.1 System Requirements
SPIF has the following system requirements:
.NET Framework 4.5
SharePoint 2013 client-side object model (CSOM) DLLs on the server where SPIF is deployed. For more information about client-side object model (CSOM) DLLs, see http://www.microsoft.com/en-us/download/details.aspx?id=35585.
Sitecore XP 8.0 or later.
SPIF works with the following SharePoint versions:
SharePoint Server 2010, 2013
SharePoint Foundation 2010, 2013
SharePoint Online
Note From SPIF version 1.2, we no longer support SharePoint 2007 (Microsoft no longer provides Mainstream support for SharePoint 2007, see http://support.microsoft.com/lifecycle/search/default.aspx?sort=PN&alpha=sharepoint+server+2007&Filter=FilterNO).
Important Starting from SPIF 2.1, the module works only on Sitecore XP 8.0 or later versions. The module is not backwards compatible with the Sitecore CMS 6 or 7 series.
SharePoint Integration Framework Developer's Cookbook
Sitecore® is a registered trademark. All other brand and product names are the property of their respective holders. The contents of this document are the property of Sitecore. Copyright © 2001-2015 Sitecore. All rights reserved.
Page 7 of 74
2.2 Overview
SPIF provides Sitecore developers with a flexible and customizable development framework to integrate SharePoint with Sitecore content.
SPIF supports integration with the following SharePoint solutions:
On-premises – installed on your hardware. For user authentication, both these SharePoint on-premises authentication types are supported:
o Windows classic-mode authentication
o Claims-based authentication
Online (hosted using Office 365 with the SharePoint Online service).
Note You need an Office 365 subscription to use SPIF with SharePoint Online. For more information on Office 365 subscriptions, see http://office.microsoft.com/en-us/business/.
The framework offers you three possible approaches to integration:
Page-level integration
Item-level integration
API integration
Page-level Integration
With page-level integration, you work directly with SharePoint lists. You must have access to both the SharePoint server and the Sitecore server.
You can use renderings and sub-layouts to integrate SharePoint content. The sample controls in SPIF are just examples that you can customize:
SharePoint List
SharePoint Announcements
SharePoint Tasks
SharePoint Search
For more information about each control, see section Page-level Integration.
Item-level Integration
With item-level integration, access to SharePoint is required to create or update integration items. After integration, you work directly with the Sitecore items.
Use the SharePoint Integration wizard to:
Create Sitecore content items bound to SharePoint list items.
Create field mappings, configure options such as bidirectional integration, and schedule BLOB transfers.
Integrate items in real time or set an interval between updates.
For more information about item-level integration, see the section Item-level Integration.
API Integration
The API contains the following class groupings:
Object Model
SPIF 2.1 for Sitecore XP 8.0 or later
Sitecore® is a registered trademark. All other brand and product names are the property of their respective holders. The contents of this document are the property of Sitecore. Copyright © 2001-2015 Sitecore. All rights reserved.
Page 8 of 74
o SharePoint objects
o The Connector (SharePoint web service wrappers)
Integration Providers
o The SharePoint Provider
Integration Pipelines
itemProvider pipeline processors
For more information about the API, see the SPIF API Reference document.
The following list contains a number of potential development options that are available when you use SPIF:
Use or customize sample controls to display your own SharePoint lists.
Create your own controls to display standard or custom SharePoint list items.
Use the itemProvider pipeline processors to represent SharePoint lists as Sitecore content items.
Use pipelines to customize item-level integration.
Integrate with custom SharePoint list types.
Extend the framework using SharePoint web services.
Note In this document, the term connector refers to the
Sitecore.Sharepoint.ObjectModel.Connectors class used by the integration module to
connect to SharePoint Web services. This should not be confused with the Sitecore SharePoint Connector module, which was an earlier way of integrating with SharePoint.
SharePoint Integration Framework Developer's Cookbook
Sitecore® is a registered trademark. All other brand and product names are the property of their respective holders. The contents of this document are the property of Sitecore. Copyright © 2001-2015 Sitecore. All rights reserved.
Page 9 of 74
2.3 Architecture
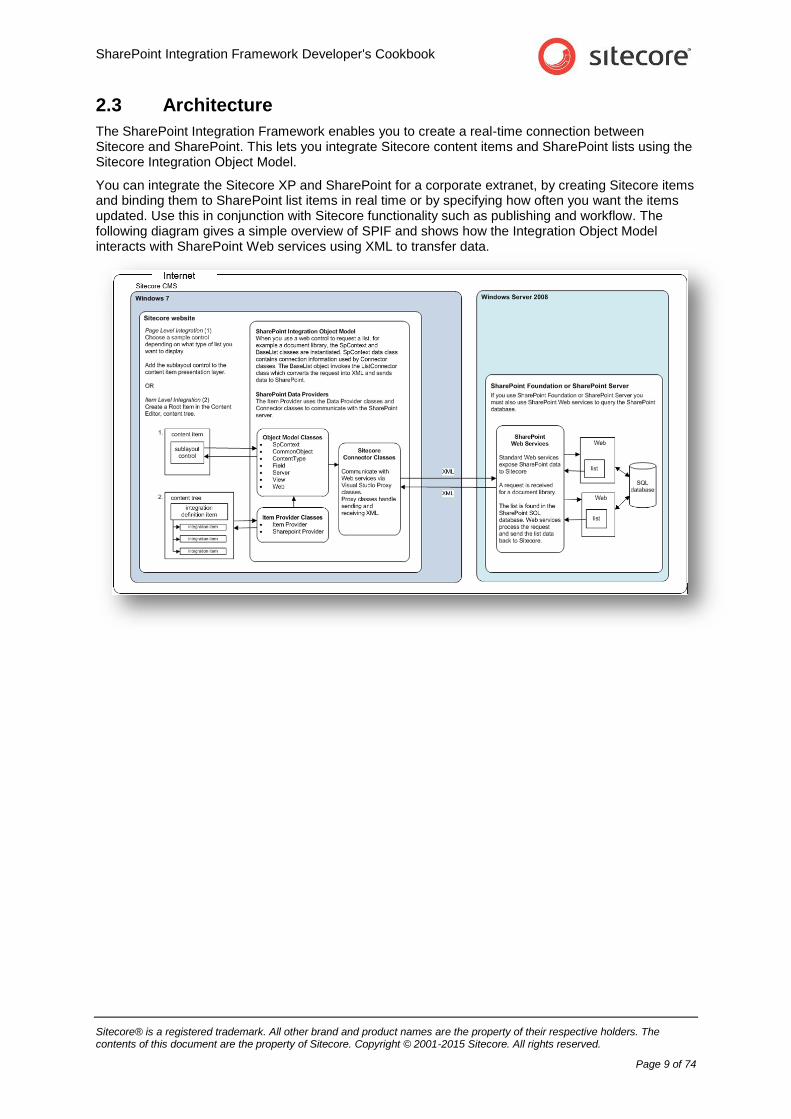
The SharePoint Integration Framework enables you to create a real-time connection between Sitecore and SharePoint. This lets you integrate Sitecore content items and SharePoint lists using the Sitecore Integration Object Model.
You can integrate the Sitecore XP and SharePoint for a corporate extranet, by creating Sitecore items and binding them to SharePoint list items in real time or by specifying how often you want the items updated. Use this in conjunction with Sitecore functionality such as publishing and workflow. The following diagram gives a simple overview of SPIF and shows how the Integration Object Model interacts with SharePoint Web services using XML to transfer data.
SPIF 2.1 for Sitecore XP 8.0 or later
Sitecore® is a registered trademark. All other brand and product names are the property of their respective holders. The contents of this document are the property of Sitecore. Copyright © 2001-2015 Sitecore. All rights reserved.
Page 10 of 74
Chapter 3
Configuration
This chapter describes how to configure SPIF for both on-premises and online SharePoint solutions.
Before you install the SharePoint Integration Framework for the first time, it is important to understand some basic security and authentication concepts. You must also perform some additional configuration steps in SharePoint and Sitecore.
This chapter contains the following sections:
Configuration
SharePoint On-Premises Solutions Authentication
SharePoint On-Premises Solutions Configuration
SharePoint Online Authentication
SharePoint Integration Framework Developer's Cookbook
Sitecore® is a registered trademark. All other brand and product names are the property of their respective holders. The contents of this document are the property of Sitecore. Copyright © 2001-2015 Sitecore. All rights reserved.
Page 11 of 74
3.1 Configuration
To enable a Sitecore website to communicate with a SharePoint server, you must first understand how Sitecore and SPIF handle authentication, and configure the appropriate permissions in IIS and
the sharepoint.config file.
Use the Sitecore security system to control security and permissions in Sitecore.
For more information on configuring Sitecore security, see the manual Security Administrators Cookbook on the Sitecore SDN.
3.1.1 Handling Configuration
The following configuration is necessary to establish connection to a SharePoint site:
Login credentials
Connection configuration
There are three ways to configure SPIF:
Using the configuration that is manually entered by the user:
o In the wizard, users can enter alternative configuration details for item-level integration. For more information about alternative configuration details, see section Using the SharePoint Integration Wizard.
o The sample controls of the page-level integration might prompt a user to enter login credentials.
Using the predefined configuration stored in the sharepoint.config file.
Using the default configuration.
SPIF determines which configuration to use using the following prioritization:
1. It checks whether there is an alternative configuration. For item-level integration, the configuration is in the Integration Configuration Data field of the Integration Definition item. For more information about configuration for item-level integration, see section Editing the XML in a SharePoint Integration Definition Item.
2. If there are no alternative configuration details, SPIF checks for predefined configuration
details in the sharepoint.config file.
3. If there are no predefined configuration details, it uses the default configuration details.
The framework handles each configuration detail separately. For example, if a user enters only alternative credentials and there is no predefined connection configuration for the SharePoint site, then alternative credentials and the default connection configuration is used to connect to the SharePoint site.
Default Configuration
By default, SPIF uses network credentials of the current security. They are handled in the API by the
CredentialCache.DefaultNetworkCredentials class.
Important
Because of the way that the CredentialCache.DefaultNetworkCredentials class provides
credentials, default credentials cannot be used for SharePoint on-premise and SharePoint Online environments that use claims-based authentication.
The default connection configuration is specified in the
sitecore/sharepoint/connectionConfigurations/Default node of sharepoint.config. Windows
authentication is used by default.
SPIF 2.1 for Sitecore XP 8.0 or later
Sitecore® is a registered trademark. All other brand and product names are the property of their respective holders. The contents of this document are the property of Sitecore. Copyright © 2001-2015 Sitecore. All rights reserved.
Page 12 of 74
3.1.2 SharePoint Configuration File
Use the sharepoint.config file to:
Set up predefined configurations for SharePoint sites.
Manage available connection configurations.
The path to the sharepoint.config file is: website\app_config\include\.
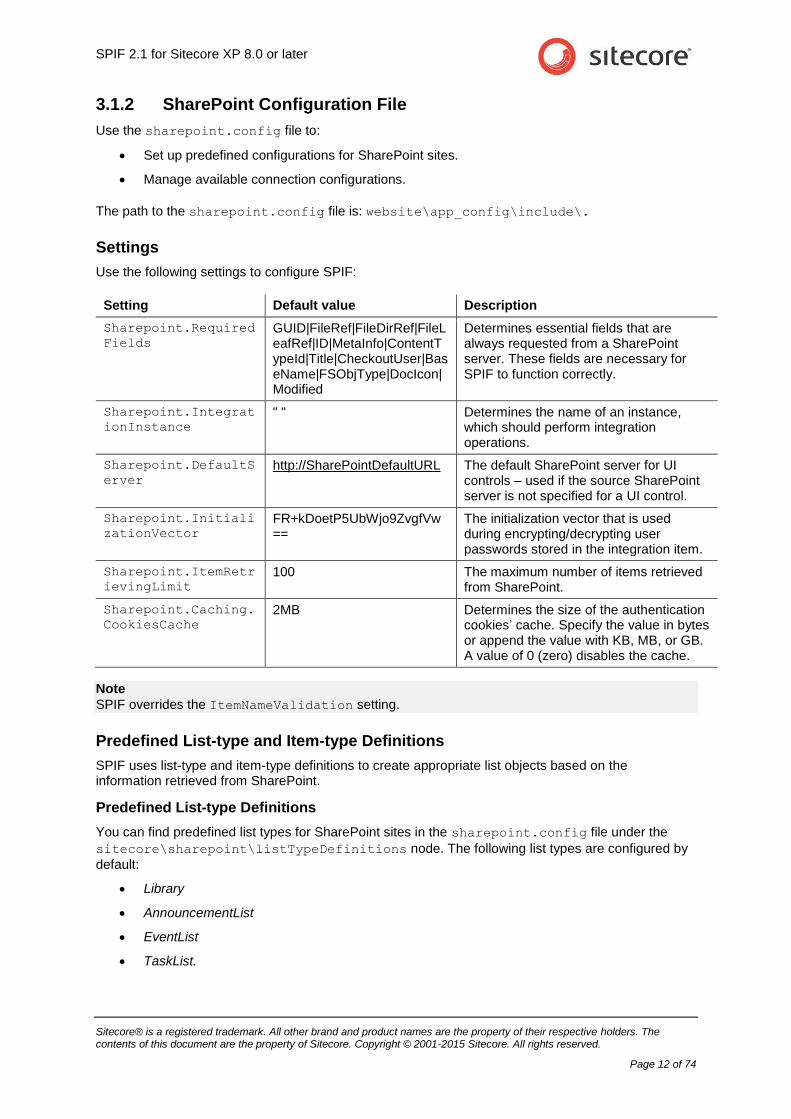
Settings
Use the following settings to configure SPIF:
Setting Default value Description
Sharepoint.Required
Fields
GUID|FileRef|FileDirRef|FileLeafRef|ID|MetaInfo|ContentTypeId|Title|CheckoutUser|BaseName|FSObjType|DocIcon|Modified
Determines essential fields that are always requested from a SharePoint server. These fields are necessary for SPIF to function correctly.
Sharepoint.Integrat
ionInstance
" " Determines the name of an instance, which should perform integration operations.
Sharepoint.DefaultS
erver
http://SharePointDefaultURL The default SharePoint server for UI controls – used if the source SharePoint server is not specified for a UI control.
Sharepoint.Initiali
zationVector
FR+kDoetP5UbWjo9ZvgfVw==
The initialization vector that is used during encrypting/decrypting user passwords stored in the integration item.
Sharepoint.ItemRetr
ievingLimit
100 The maximum number of items retrieved from SharePoint.
Sharepoint.Caching.
CookiesCache
2MB Determines the size of the authentication cookies’ cache. Specify the value in bytes or append the value with KB, MB, or GB. A value of 0 (zero) disables the cache.
Note
SPIF overrides the ItemNameValidation setting.
Predefined List-type and Item-type Definitions
SPIF uses list-type and item-type definitions to create appropriate list objects based on the information retrieved from SharePoint.
Predefined List-type Definitions
You can find predefined list types for SharePoint sites in the sharepoint.config file under the
sitecore\sharepoint\listTypeDefinitions node. The following list types are configured by
default:
Library
AnnouncementList
EventList
TaskList.
SharePoint Integration Framework Developer's Cookbook
Sitecore® is a registered trademark. All other brand and product names are the property of their respective holders. The contents of this document are the property of Sitecore. Copyright © 2001-2015 Sitecore. All rights reserved.
Page 13 of 74
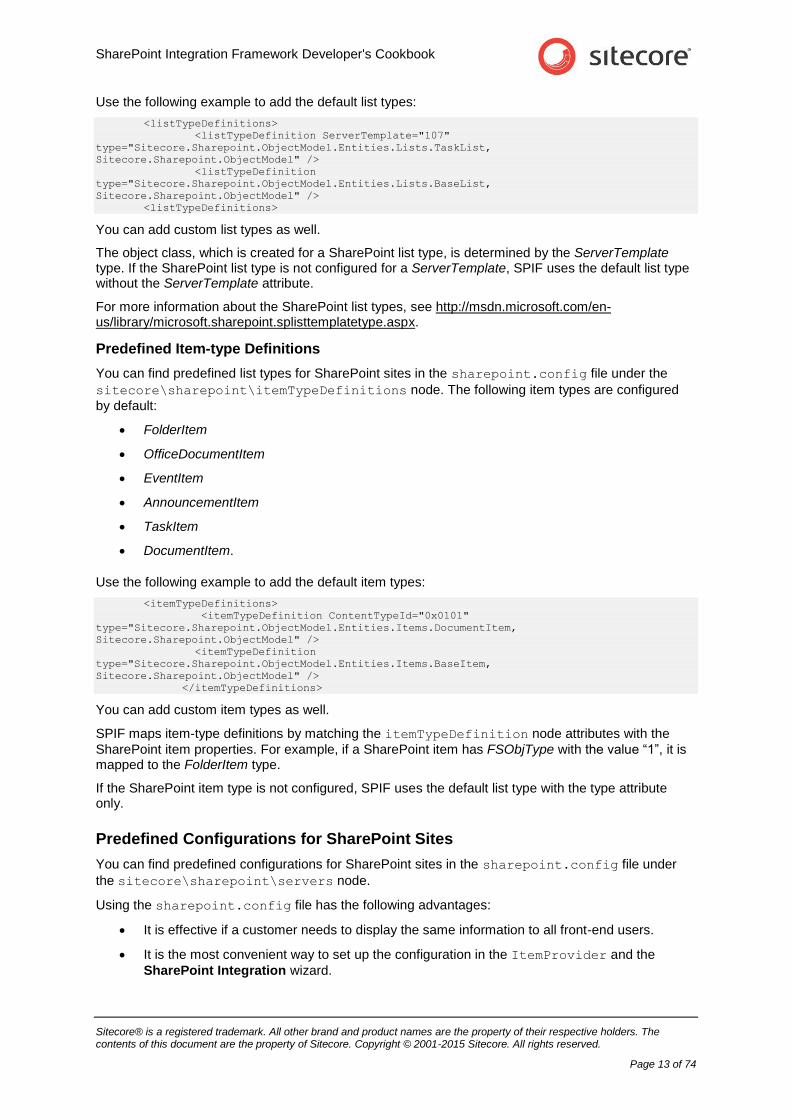
Use the following example to add the default list types:
<listTypeDefinitions>
<listTypeDefinition ServerTemplate="107"
type="Sitecore.Sharepoint.ObjectModel.Entities.Lists.TaskList,
Sitecore.Sharepoint.ObjectModel" />
<listTypeDefinition
type="Sitecore.Sharepoint.ObjectModel.Entities.Lists.BaseList,
Sitecore.Sharepoint.ObjectModel" />
<listTypeDefinitions>
You can add custom list types as well.
The object class, which is created for a SharePoint list type, is determined by the ServerTemplate type. If the SharePoint list type is not configured for a ServerTemplate, SPIF uses the default list type without the ServerTemplate attribute.
For more information about the SharePoint list types, see http://msdn.microsoft.com/en-us/library/microsoft.sharepoint.splisttemplatetype.aspx.
Predefined Item-type Definitions
You can find predefined list types for SharePoint sites in the sharepoint.config file under the
sitecore\sharepoint\itemTypeDefinitions node. The following item types are configured
by default:
FolderItem
OfficeDocumentItem
EventItem
AnnouncementItem
TaskItem
DocumentItem.
Use the following example to add the default item types:
<itemTypeDefinitions>
<itemTypeDefinition ContentTypeId="0x0101"
type="Sitecore.Sharepoint.ObjectModel.Entities.Items.DocumentItem,
Sitecore.Sharepoint.ObjectModel" />
<itemTypeDefinition
type="Sitecore.Sharepoint.ObjectModel.Entities.Items.BaseItem,
Sitecore.Sharepoint.ObjectModel" />
</itemTypeDefinitions>
You can add custom item types as well.
SPIF maps item-type definitions by matching the itemTypeDefinition node attributes with the
SharePoint item properties. For example, if a SharePoint item has FSObjType with the value “1”, it is mapped to the FolderItem type.
If the SharePoint item type is not configured, SPIF uses the default list type with the type attribute only.
Predefined Configurations for SharePoint Sites
You can find predefined configurations for SharePoint sites in the sharepoint.config file under
the sitecore\sharepoint\servers node.
Using the sharepoint.config file has the following advantages:
It is effective if a customer needs to display the same information to all front-end users.
It is the most convenient way to set up the configuration in the ItemProvider and the
SharePoint Integration wizard.
SPIF 2.1 for Sitecore XP 8.0 or later
Sitecore® is a registered trademark. All other brand and product names are the property of their respective holders. The contents of this document are the property of Sitecore. Copyright © 2001-2015 Sitecore. All rights reserved.
Page 14 of 74
It lets you store different configurations for different SharePoint sites.
Each server entity provides configuration for a single SharePoint site. For example:
<server url="https://<sitename><web>" username="*****" password="*****"
connectionConfiguration=”SharePointOnline” context="Provider" />
<server url="http://<sitename><web>" username="*****" password="*****" context="Any"
/>
<server url="http://<sitename><web>" connectionConfiguration=”Default”
context="Webcontrol" />
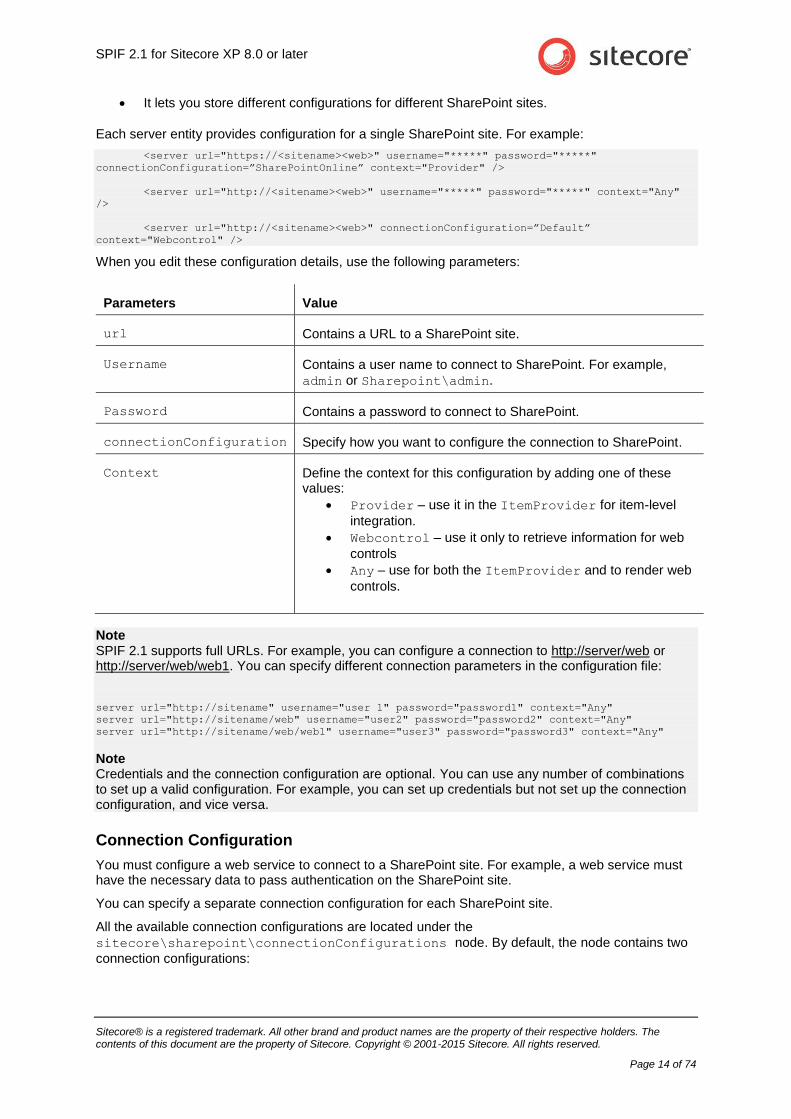
When you edit these configuration details, use the following parameters:
Parameters Value
url Contains a URL to a SharePoint site.
Username Contains a user name to connect to SharePoint. For example,
admin or Sharepoint\admin.
Password Contains a password to connect to SharePoint.
connectionConfiguration Specify how you want to configure the connection to SharePoint.
Context Define the context for this configuration by adding one of these values:
Provider – use it in the ItemProvider for item-level
integration.
Webcontrol – use it only to retrieve information for web
controls
Any – use for both the ItemProvider and to render web
controls.
Note SPIF 2.1 supports full URLs. For example, you can configure a connection to http://server/web or http://server/web/web1. You can specify different connection parameters in the configuration file:
server url="http://sitename" username="user 1" password="password1" context="Any"
server url="http://sitename/web" username="user2" password="password2" context="Any"
server url="http://sitename/web/web1" username="user3" password="password3" context="Any"
Note Credentials and the connection configuration are optional. You can use any number of combinations to set up a valid configuration. For example, you can set up credentials but not set up the connection configuration, and vice versa.
Connection Configuration
You must configure a web service to connect to a SharePoint site. For example, a web service must have the necessary data to pass authentication on the SharePoint site.
You can specify a separate connection configuration for each SharePoint site.
All the available connection configurations are located under the
sitecore\sharepoint\connectionConfigurations node. By default, the node contains two
connection configurations:
SharePoint Integration Framework Developer's Cookbook
Sitecore® is a registered trademark. All other brand and product names are the property of their respective holders. The contents of this document are the property of Sitecore. Copyright © 2001-2015 Sitecore. All rights reserved.
Page 15 of 74
Default for connection to SharePoint on-premises solutions that utilize Windows
authentication methods.
SharePointOnline for connection to SharePoint Online solutions.
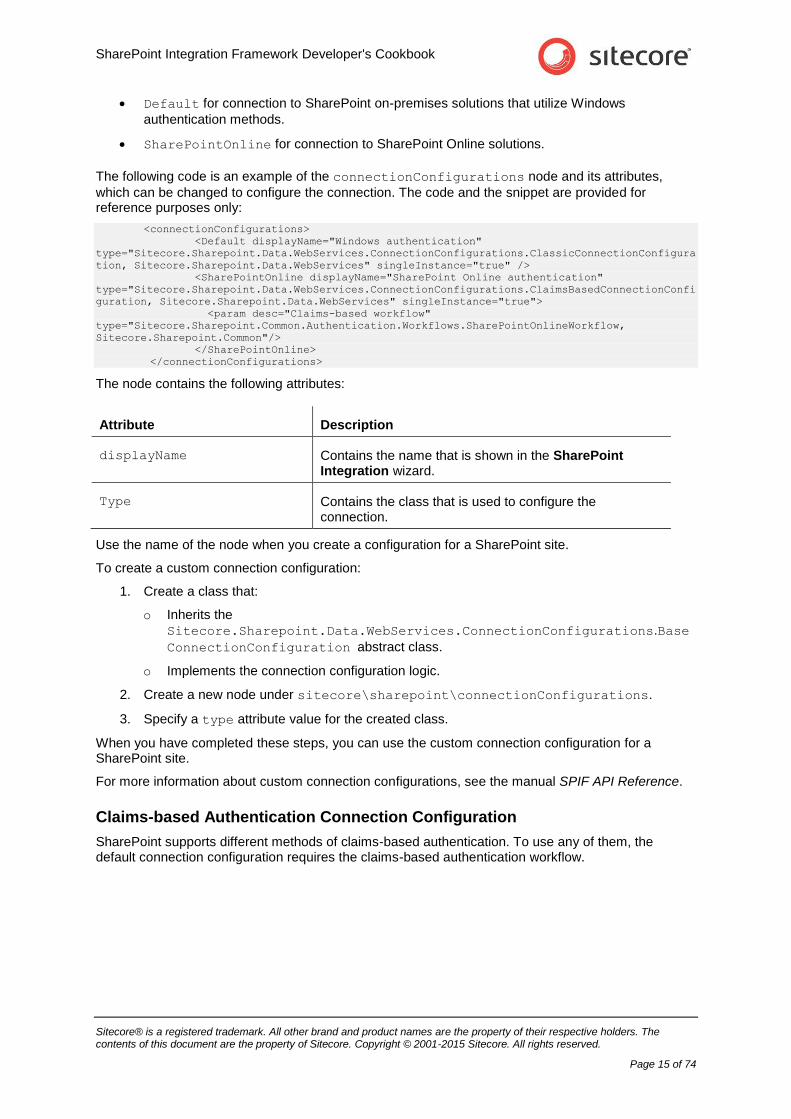
The following code is an example of the connectionConfigurations node and its attributes,
which can be changed to configure the connection. The code and the snippet are provided for reference purposes only:
<connectionConfigurations>
<Default displayName="Windows authentication"
type="Sitecore.Sharepoint.Data.WebServices.ConnectionConfigurations.ClassicConnectionConfigura
tion, Sitecore.Sharepoint.Data.WebServices" singleInstance="true" />
<SharePointOnline displayName="SharePoint Online authentication"
type="Sitecore.Sharepoint.Data.WebServices.ConnectionConfigurations.ClaimsBasedConnectionConfi
guration, Sitecore.Sharepoint.Data.WebServices" singleInstance="true">
<param desc="Claims-based workflow"
type="Sitecore.Sharepoint.Common.Authentication.Workflows.SharePointOnlineWorkflow,
Sitecore.Sharepoint.Common"/>
</SharePointOnline>
</connectionConfigurations>
The node contains the following attributes:
Attribute Description
displayName Contains the name that is shown in the SharePoint Integration wizard.
Type Contains the class that is used to configure the connection.
Use the name of the node when you create a configuration for a SharePoint site.
To create a custom connection configuration:
1. Create a class that:
o Inherits the
Sitecore.Sharepoint.Data.WebServices.ConnectionConfigurations.Base
ConnectionConfiguration abstract class.
o Implements the connection configuration logic.
2. Create a new node under sitecore\sharepoint\connectionConfigurations.
3. Specify a type attribute value for the created class.
When you have completed these steps, you can use the custom connection configuration for a SharePoint site.
For more information about custom connection configurations, see the manual SPIF API Reference.
Claims-based Authentication Connection Configuration
SharePoint supports different methods of claims-based authentication. To use any of them, the default connection configuration requires the claims-based authentication workflow.

SPIF 2.1 for Sitecore XP 8.0 or later
Sitecore® is a registered trademark. All other brand and product names are the property of their respective holders. The contents of this document are the property of Sitecore. Copyright © 2001-2015 Sitecore. All rights reserved.
Page 16 of 74
Claims-based authentication uses the following workflow:
1. SPIF reads the configuration for the provided server URL.
Note The target SharePoint Server configuration is read as the first step, as the configuration dictates all of the subsequent workflow steps.
2. SPIF instantiates an authentication layer based on the server configuration.
3. SPIF requests a security token from the Security Token Service (STS).
4. The Identity Provider authenticates a user.
5. The Identity Provider receives the information about the user.
6. The Identity Provider creates and returns the security token.
7. SPIF parses the security token in the authentication layer.
Note It is possible that the STS returns a token that must be parsed before submitting it to the relying party application.
8. SPIF submits the security token to the relying party application (SharePoint Online or SharePoint on-premises 2010/2013).
9. The relying party application verifies the token’s signature and checks whether the STS is trusted.
10. The relying party application creates and returns cookies.
11. The authentication layer provides cookies to the Web Services Initialization layer.
12. The Web Services Initialization layer saves and uses the obtained cookies.
SharePoint Integration Framework Developer's Cookbook
Sitecore® is a registered trademark. All other brand and product names are the property of their respective holders. The contents of this document are the property of Sitecore. Copyright © 2001-2015 Sitecore. All rights reserved.
Page 17 of 74
Note It is not necessary to request a token for each request to the relying party application. Once all the steps are performed, it is possible to communicate with the SharePoint server using the web services. The appropriate credentials are applied to the requests.
The workflow implements the steps needed for the claims-based authentication method. In general, it exchanges credentials for a security token and then exchanges the security tokens with authentication cookies. The connection configuration attaches the cookies to the web service, which then uses them for authentication on SharePoint.
SPIF contains two claims-based authentication workflows in the
Sitecore.Sharepoint.Common.Authentication.Workflows namespace:
SharePointOnlineWorkflow to authenticate SharePoint Online solutions
ADFSWorkflow to authenticate SharePoint on-premises solutions that utilize Active Directory
Federation Services (AD FS) 2.0 for claims-based authentication
Note Active Directory Federation Services (AD FS) 2.0 helps simplify access to applications and other systems with an open and interoperable claims-based model. The AD FS 2.0 platform provides a fully redesigned Windows-based Federation Service that supports the WS-Trust, WS-Federation, and Security Assertion Markup Language (SAML) protocols.
For more information about AD FS, see http://technet.microsoft.com/en-us/windowsserver/dd448613.aspx.
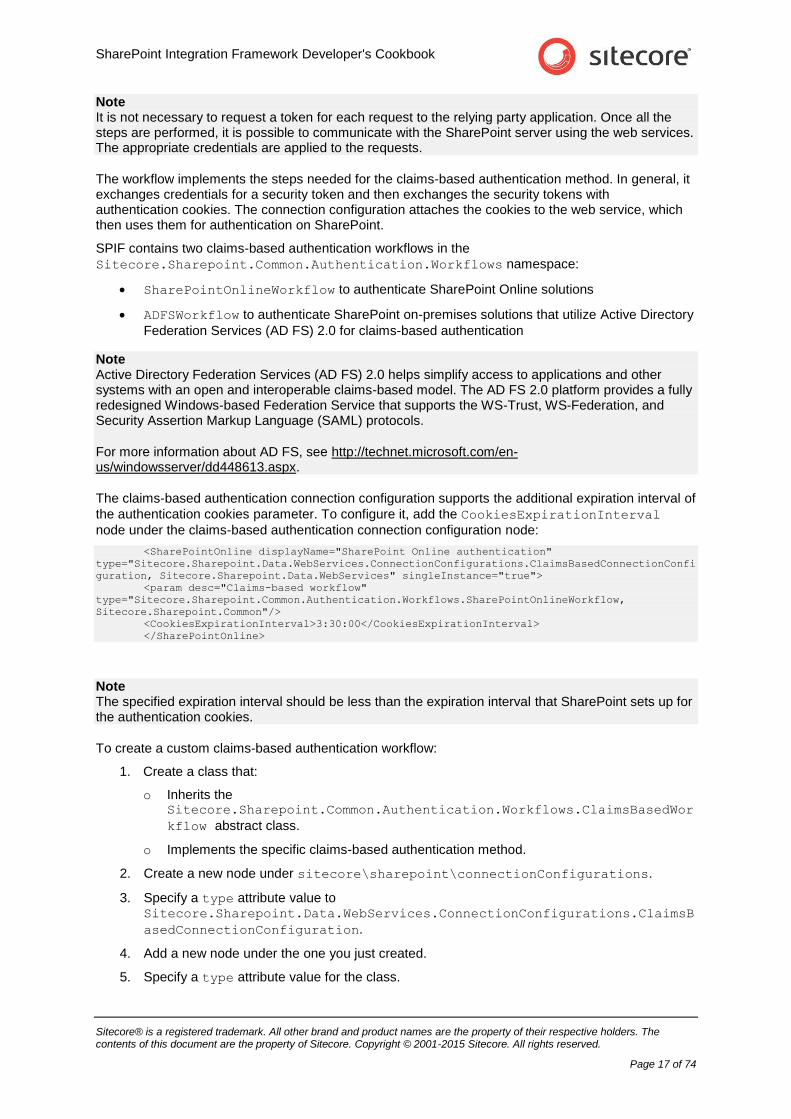
The claims-based authentication connection configuration supports the additional expiration interval of
the authentication cookies parameter. To configure it, add the CookiesExpirationInterval
node under the claims-based authentication connection configuration node:
<SharePointOnline displayName="SharePoint Online authentication"
type="Sitecore.Sharepoint.Data.WebServices.ConnectionConfigurations.ClaimsBasedConnectionConfi
guration, Sitecore.Sharepoint.Data.WebServices" singleInstance="true">
<param desc="Claims-based workflow"
type="Sitecore.Sharepoint.Common.Authentication.Workflows.SharePointOnlineWorkflow,
Sitecore.Sharepoint.Common"/>
<CookiesExpirationInterval>3:30:00</CookiesExpirationInterval>
</SharePointOnline>
Note The specified expiration interval should be less than the expiration interval that SharePoint sets up for the authentication cookies.
To create a custom claims-based authentication workflow:
1. Create a class that:
o Inherits the Sitecore.Sharepoint.Common.Authentication.Workflows.ClaimsBasedWor
kflow abstract class.
o Implements the specific claims-based authentication method.
2. Create a new node under sitecore\sharepoint\connectionConfigurations.
3. Specify a type attribute value to Sitecore.Sharepoint.Data.WebServices.ConnectionConfigurations.ClaimsB
asedConnectionConfiguration.
4. Add a new node under the one you just created.
5. Specify a type attribute value for the class.
SPIF 2.1 for Sitecore XP 8.0 or later
Sitecore® is a registered trademark. All other brand and product names are the property of their respective holders. The contents of this document are the property of Sitecore. Copyright © 2001-2015 Sitecore. All rights reserved.
Page 18 of 74
When these steps are complete, you can start using the workflow for a SharePoint site configuration.
For more information about claims-based authentication connection configuration, see the manual SPIF API Reference.

SharePoint Integration Framework Developer's Cookbook
Sitecore® is a registered trademark. All other brand and product names are the property of their respective holders. The contents of this document are the property of Sitecore. Copyright © 2001-2015 Sitecore. All rights reserved.
Page 19 of 74
3.2 SharePoint On-Premises Solutions Authentication
SharePoint on-premises solutions can be configured to use claims-based or classic-mode authentication. They support different methods of both user authentications types.
For more information about user authentication in SharePoint on-premises solutions, see http://technet.microsoft.com/EN-US/library/cc262350.aspx.
The SharePoint Integration Framework (SPIF) module implements the following default user authentication methods:
Type Classic-mode authentication Claims-based authentication
Windows authentication methods
NTLM
Kerberos
NTLM
Kerberos
SAML token-based authentication methods
N/A AD FS 2.0
3.2.1 Windows Authentication
If your SharePoint on-premises solution is configured to use Windows authentication, Use the default connection configuration. The configuration is similar for both classic and claims-based types.
Active Directory and Single Sign-on
Single sign-on means that you only need to enter your credentials once to access Sitecore and SharePoint lists. To enable single sign-on in your Sitecore installation, use the Active Directory common authentication layer and the Active Directory Integration module.
Install the Sitecore Active Directory Module that can be downloaded from the Sitecore Developer Network.
For more information about the Active Directory Module, see the manual Active Directory Module Administrators Guide.
Note To enable single sign-on, you must add the appropriate settings in the IIS Manager. For more information about single sign-on, see the section Configuring Impersonation and Delegation in Windows.
3.2.2 Claims-Based Authentication
You can configure SPIF to integrate with a SharePoint on-premises solution, configured to utilize Windows claims-based authentication. To do this, use the default connection configuration.
If the SharePoint on-premises solution uses SAML token-based authentication:
1. Set up the SAML token-based authentication connection configuration. For more information on how to set up a new connection configuration, see the section Claims-based Authentication Connection Configuration.
2. Set up the claims-based authentication connection configuration that you want to use the Sitecore.Sharepoint.Common.Authentication.Workflows.ADFSWorkflow
workflow.
This implements SAML token-based authentication (if your implementation uses AD FS 2.0 by SharePoint on-premises for claims-based authentication) and utilizes WS-Trust 1.3 protocol to communicate with the STS.
SPIF 2.1 for Sitecore XP 8.0 or later
Sitecore® is a registered trademark. All other brand and product names are the property of their respective holders. The contents of this document are the property of Sitecore. Copyright © 2001-2015 Sitecore. All rights reserved.
Page 20 of 74
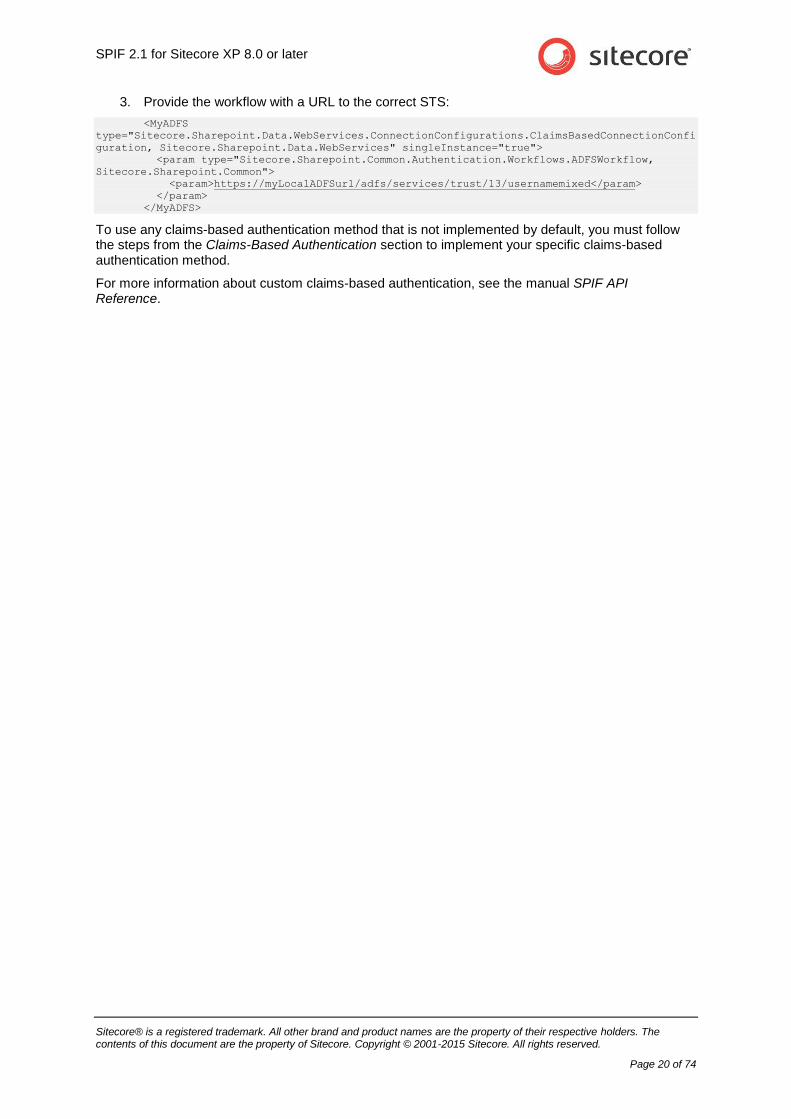
3. Provide the workflow with a URL to the correct STS:
<MyADFS
type="Sitecore.Sharepoint.Data.WebServices.ConnectionConfigurations.ClaimsBasedConnectionConfi
guration, Sitecore.Sharepoint.Data.WebServices" singleInstance="true">
<param type="Sitecore.Sharepoint.Common.Authentication.Workflows.ADFSWorkflow,
Sitecore.Sharepoint.Common">
<param>https://myLocalADFSurl/adfs/services/trust/13/usernamemixed</param>
</param>
</MyADFS>
To use any claims-based authentication method that is not implemented by default, you must follow the steps from the Claims-Based Authentication section to implement your specific claims-based authentication method.
For more information about custom claims-based authentication, see the manual SPIF API Reference.
SharePoint Integration Framework Developer's Cookbook
Sitecore® is a registered trademark. All other brand and product names are the property of their respective holders. The contents of this document are the property of Sitecore. Copyright © 2001-2015 Sitecore. All rights reserved.
Page 21 of 74
3.3 SharePoint On-Premises Solutions Configuration
SharePoint Security and Permissions
The SharePoint Integration Framework uses web services to connect to SharePoint lists. To integrate Sitecore and SharePoint content, enable the settings in SharePoint described in the following section.
Enabling Sitecore Access to SharePoint Webs
On your SharePoint site, enable read rights so that Sitecore can access the appropriate webs and sub-webs. If you do not have an appropriate SharePoint site to use, create a new website or subsite and add a new permission level.
To add permissions to a website in SharePoint:
1. At the top level of your SharePoint site, click Site Actions, Site Permissions, and then click Permission Levels.
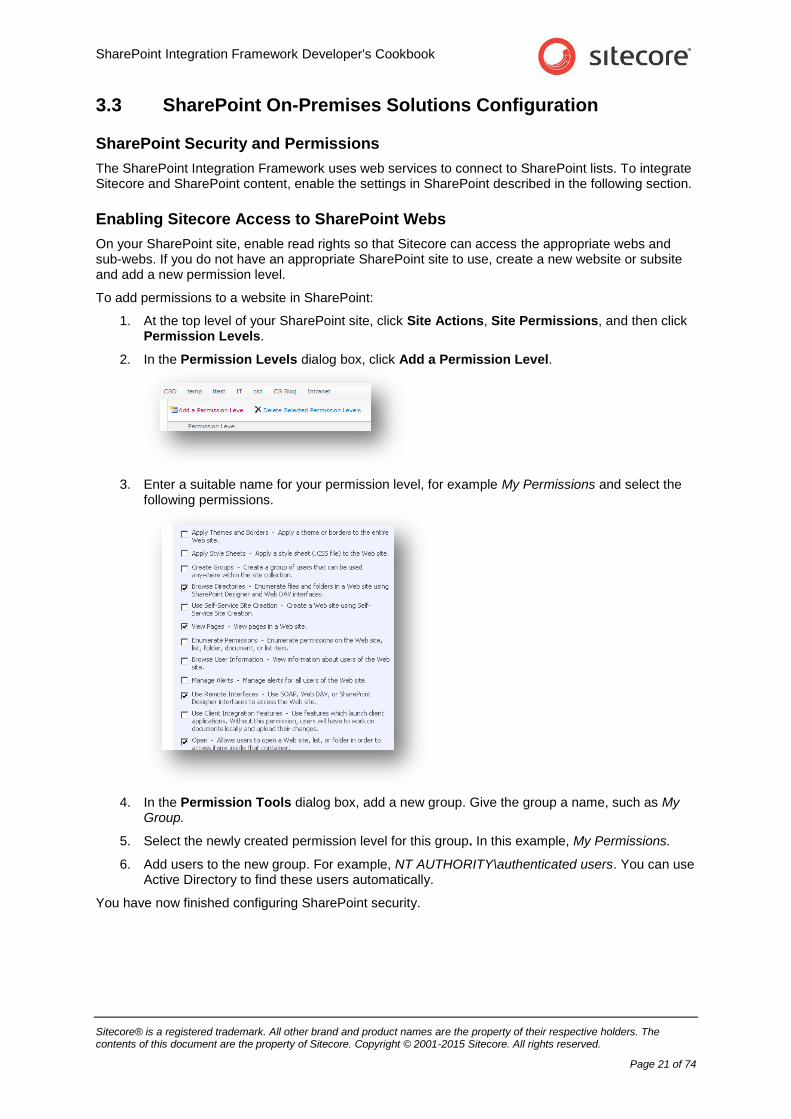
2. In the Permission Levels dialog box, click Add a Permission Level.
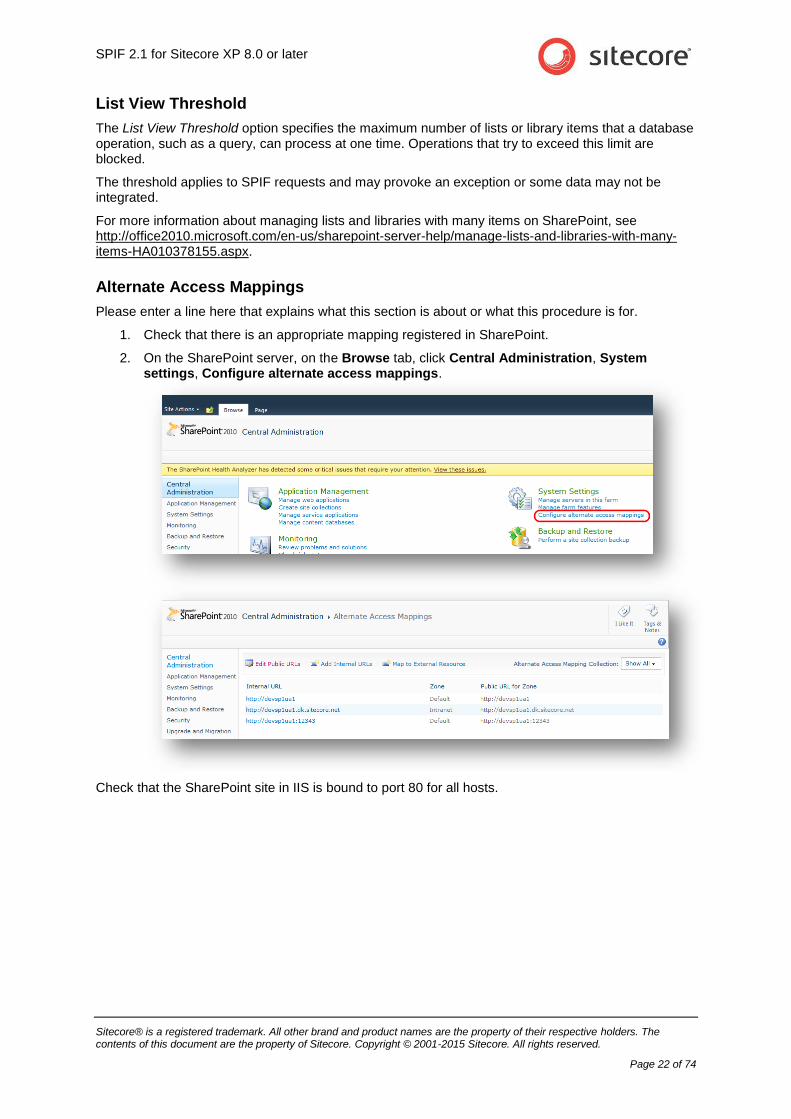
3. Enter a suitable name for your permission level, for example My Permissions and select the following permissions.
4. In the Permission Tools dialog box, add a new group. Give the group a name, such as My Group.
5. Select the newly created permission level for this group. In this example, My Permissions.
6. Add users to the new group. For example, NT AUTHORITY\authenticated users. You can use Active Directory to find these users automatically.
You have now finished configuring SharePoint security.
SPIF 2.1 for Sitecore XP 8.0 or later
Sitecore® is a registered trademark. All other brand and product names are the property of their respective holders. The contents of this document are the property of Sitecore. Copyright © 2001-2015 Sitecore. All rights reserved.
Page 22 of 74
List View Threshold
The List View Threshold option specifies the maximum number of lists or library items that a database operation, such as a query, can process at one time. Operations that try to exceed this limit are blocked.
The threshold applies to SPIF requests and may provoke an exception or some data may not be integrated.
For more information about managing lists and libraries with many items on SharePoint, see http://office2010.microsoft.com/en-us/sharepoint-server-help/manage-lists-and-libraries-with-many-items-HA010378155.aspx.
Alternate Access Mappings
Please enter a line here that explains what this section is about or what this procedure is for.
1. Check that there is an appropriate mapping registered in SharePoint.
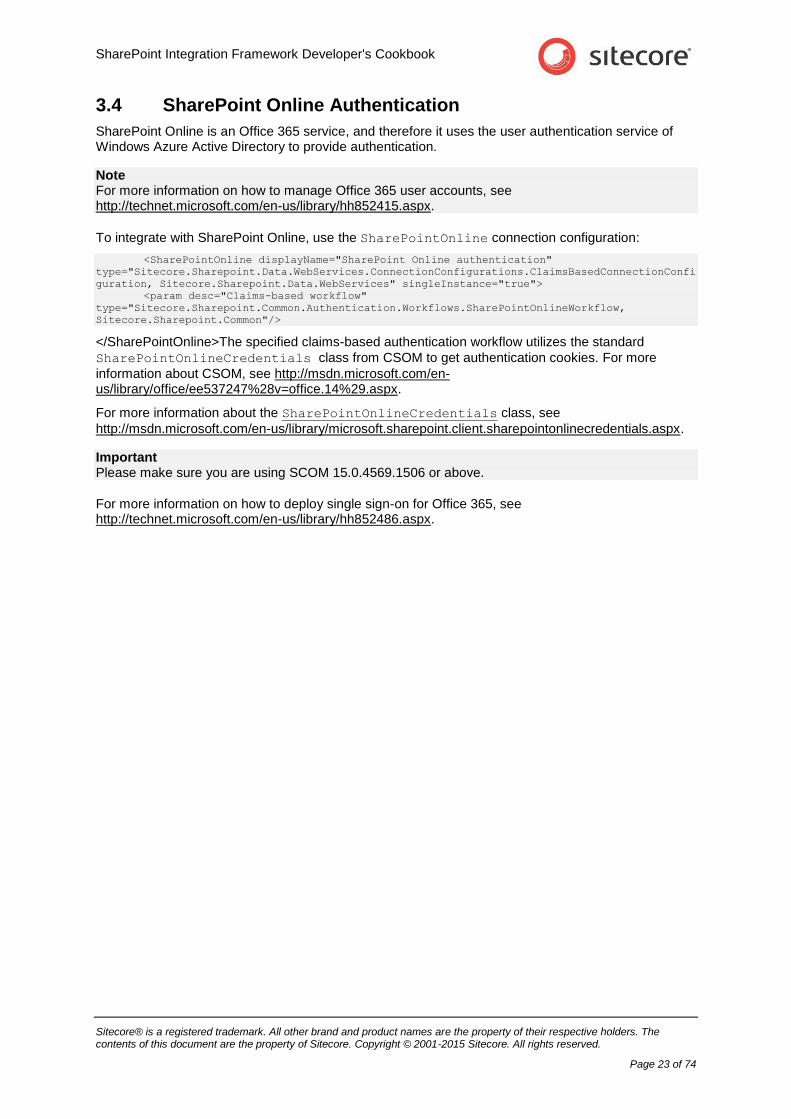
2. On the SharePoint server, on the Browse tab, click Central Administration, System settings, Configure alternate access mappings.
Check that the SharePoint site in IIS is bound to port 80 for all hosts.
SharePoint Integration Framework Developer's Cookbook
Sitecore® is a registered trademark. All other brand and product names are the property of their respective holders. The contents of this document are the property of Sitecore. Copyright © 2001-2015 Sitecore. All rights reserved.
Page 23 of 74
3.4 SharePoint Online Authentication
SharePoint Online is an Office 365 service, and therefore it uses the user authentication service of Windows Azure Active Directory to provide authentication.
Note For more information on how to manage Office 365 user accounts, see http://technet.microsoft.com/en-us/library/hh852415.aspx.
To integrate with SharePoint Online, use the SharePointOnline connection configuration:
<SharePointOnline displayName="SharePoint Online authentication"
type="Sitecore.Sharepoint.Data.WebServices.ConnectionConfigurations.ClaimsBasedConnectionConfi
guration, Sitecore.Sharepoint.Data.WebServices" singleInstance="true">
<param desc="Claims-based workflow"
type="Sitecore.Sharepoint.Common.Authentication.Workflows.SharePointOnlineWorkflow,
Sitecore.Sharepoint.Common"/>
</SharePointOnline>The specified claims-based authentication workflow utilizes the standard
SharePointOnlineCredentials class from CSOM to get authentication cookies. For more
information about CSOM, see http://msdn.microsoft.com/en-us/library/office/ee537247%28v=office.14%29.aspx.
For more information about the SharePointOnlineCredentials class, see
http://msdn.microsoft.com/en-us/library/microsoft.sharepoint.client.sharepointonlinecredentials.aspx.
Important Please make sure you are using SCOM 15.0.4569.1506 or above.
For more information on how to deploy single sign-on for Office 365, see http://technet.microsoft.com/en-us/library/hh852486.aspx.
SPIF 2.1 for Sitecore XP 8.0 or later
Sitecore® is a registered trademark. All other brand and product names are the property of their respective holders. The contents of this document are the property of Sitecore. Copyright © 2001-2015 Sitecore. All rights reserved.
Page 24 of 74
Chapter 4
Page-level Integration
Page-level integration lets you use the SPIF sample controls to embed SharePoint lists in a Sitecore website. Sitecore provides several sample controls with the SharePoint Integration Framework. This section describes how to configure and use these controls.
This chapter contains the following sections:
Components
Using Sample Controls to Display SharePoint Lists
Using SharePoint Search
Configuring Sample Control Properties
SharePoint Integration Framework Developer's Cookbook
Sitecore® is a registered trademark. All other brand and product names are the property of their respective holders. The contents of this document are the property of Sitecore. Copyright © 2001-2015 Sitecore. All rights reserved.
Page 25 of 74
4.1 Components
When you install the SharePoint Integration Framework, it adds these additional presentation components to your site:
SharePoint Templates
SharePoint Web controls
4.1.1 SharePoint Web Template
In the Sitecore content tree, navigate to the Sharepoint Web template:
/sitecore/templates/Sharepoint/Page Level Integration/Sharepoint Web.
The SharePoint web template is a standard template that you can use with SharePoint Integration
sample controls. This template allows you to enter information about your source SharePoint site.
Note You can use other templates when you create Sitecore items to integrate with SharePoint. The advantage of using the Sharepoint Web template is that you can enter information about the SharePoint source site such as the server and web without having to enter it on the properties of each sample control.
4.1.2 SharePoint Sample Controls
Use the sample controls to display SharePoint lists, such as document libraries, announcements, and tasks in real time on a Sitecore website. All the sample controls are .ascx files. Some of the controls also contain C# code behind files.
To add controls to the presentation layer and to configure the properties for each control, in the Content Editor, on the Presentation tab, click Layout Details.
Sample control categories:
Multi List — Generic grid control
Use the SharepointList.ascx control to display any SharePoint list. This control is very versatile but quite complex and requires more advanced developer skills to customize.
Single List — Basic sample control
Use this type of control to point to a specific SharePoint list. This category is easy to
implement and customize but more limited. For example, AnnouncementsList.ascx.
To locate these controls in the Sitecore content tree, navigate to
/sitecore/layout/Sublayouts/Sharepoint.
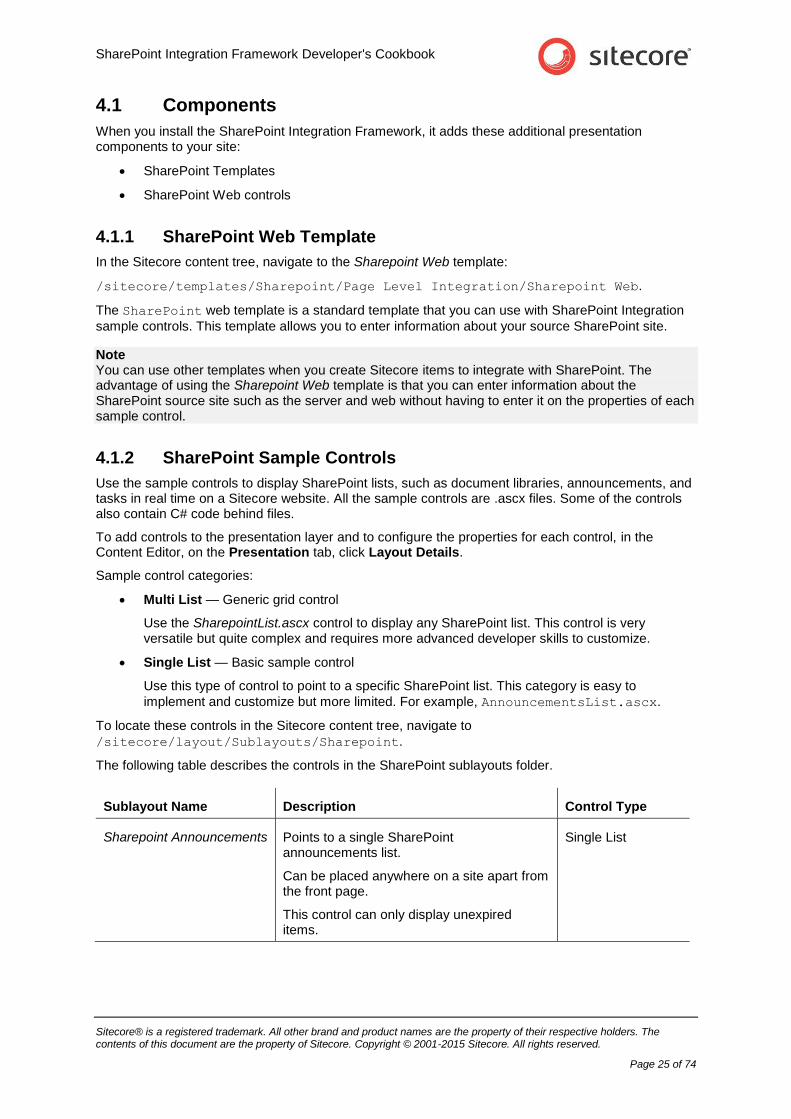
The following table describes the controls in the SharePoint sublayouts folder.
Sublayout Name Description Control Type
Sharepoint Announcements Points to a single SharePoint announcements list.
Can be placed anywhere on a site apart from the front page.
This control can only display unexpired items.
Single List
SPIF 2.1 for Sitecore XP 8.0 or later
Sitecore® is a registered trademark. All other brand and product names are the property of their respective holders. The contents of this document are the property of Sitecore. Copyright © 2001-2015 Sitecore. All rights reserved.
Page 26 of 74
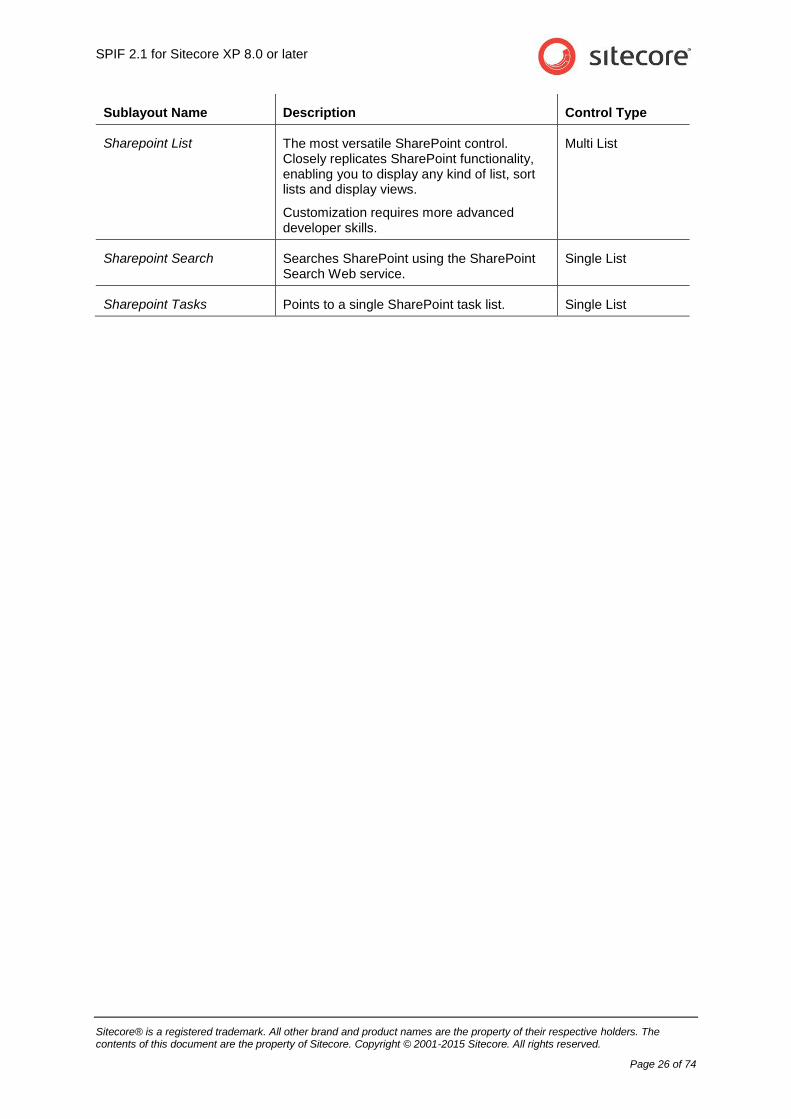
Sublayout Name Description Control Type
Sharepoint List The most versatile SharePoint control. Closely replicates SharePoint functionality, enabling you to display any kind of list, sort lists and display views.
Customization requires more advanced developer skills.
Multi List
Sharepoint Search Searches SharePoint using the SharePoint Search Web service.
Single List
Sharepoint Tasks Points to a single SharePoint task list. Single List
SharePoint Integration Framework Developer's Cookbook
Sitecore® is a registered trademark. All other brand and product names are the property of their respective holders. The contents of this document are the property of Sitecore. Copyright © 2001-2015 Sitecore. All rights reserved.
Page 27 of 74
4.2 Using Sample Controls to Display SharePoint Lists
Use the sample controls provided with this module to quickly and easily connect to SharePoint and display any list on your Sitecore website.
Choose a suitable control depending on your business objectives and then in the Content Editor or Page Editor add the control to the presentation layer of an item.
You can integrate three types of Sitecore controls with SharePoint:
SharePoint Tasks
SharePoint Lists
SharePoint Announcements
You can use one of the following ways to place these controls on a page:
Existing items — this is the quickest and easiest approach. You can add a SharePoint control to any existing Sitecore item regardless of template or layout. You must specify a SharePoint server and web on the control.
New items — create a new content item based on the Sharepoint Web template. Then add any SharePoint control to the item using Layout Details. Some sample controls also allow you to specify a SharePoint server and web.
The following sections outline each of these methods in more detail.
Note The SharePoint Integration wizard offers flexible ways of displaying SharePoint data in Sitecore. For more information, see the section Item-level Integration.
4.2.1 Displaying SharePoint Lists on an Existing Item
Choose a SharePoint Integration Framework sample control to add to an existing Sitecore content
item. The SharePoint List control is the most flexible of the sample controls and most closely
replicates SharePoint functionality.
To add a SharePoint List control to a content item in Sitecore:
1. Open the Content Editor.
2. In the content tree, select a suitable item.
3. On the ribbon, click Presentation, and in the Layout group, click Details.
4. In the Layout Details dialog box, select the Default layout and click Edit.

SPIF 2.1 for Sitecore XP 8.0 or later
Sitecore® is a registered trademark. All other brand and product names are the property of their respective holders. The contents of this document are the property of Sitecore. Copyright © 2001-2015 Sitecore. All rights reserved.
Page 28 of 74
5. In the Device Editor, select Layout, and then click Sample Layout.
6. In the Device Editor, select Controls and then add a SharePoint List sublayout:
/sitecore/layout/Sublayouts/Sharepoint/Sharepoint List.
SharePoint Integration Framework Developer's Cookbook
Sitecore® is a registered trademark. All other brand and product names are the property of their respective holders. The contents of this document are the property of Sitecore. Copyright © 2001-2015 Sitecore. All rights reserved.
Page 29 of 74
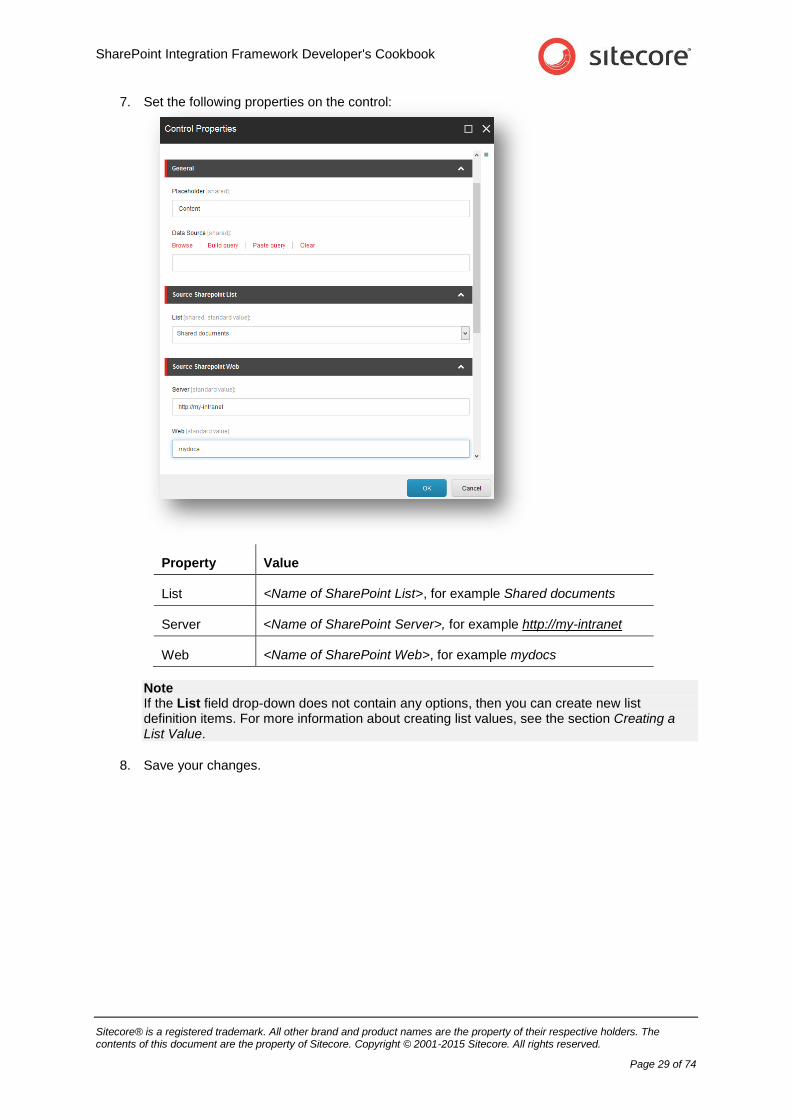
7. Set the following properties on the control:
Property Value
List <Name of SharePoint List>, for example Shared documents
Server <Name of SharePoint Server>, for example http://my-intranet
Web <Name of SharePoint Web>, for example mydocs
Note If the List field drop-down does not contain any options, then you can create new list definition items. For more information about creating list values, see the section Creating a List Value.
8. Save your changes.
SPIF 2.1 for Sitecore XP 8.0 or later
Sitecore® is a registered trademark. All other brand and product names are the property of their respective holders. The contents of this document are the property of Sitecore. Copyright © 2001-2015 Sitecore. All rights reserved.
Page 30 of 74
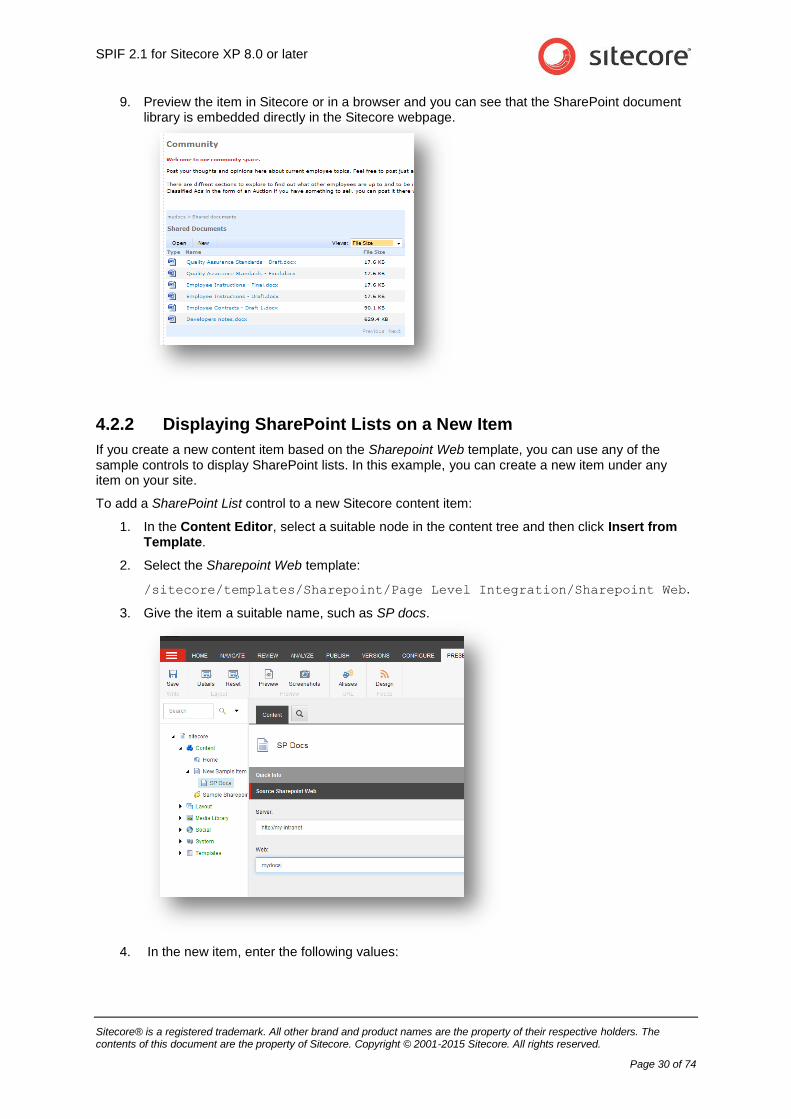
9. Preview the item in Sitecore or in a browser and you can see that the SharePoint document library is embedded directly in the Sitecore webpage.
4.2.2 Displaying SharePoint Lists on a New Item
If you create a new content item based on the Sharepoint Web template, you can use any of the sample controls to display SharePoint lists. In this example, you can create a new item under any item on your site.
To add a SharePoint List control to a new Sitecore content item:
1. In the Content Editor, select a suitable node in the content tree and then click Insert from Template.
2. Select the Sharepoint Web template:
/sitecore/templates/Sharepoint/Page Level Integration/Sharepoint Web.
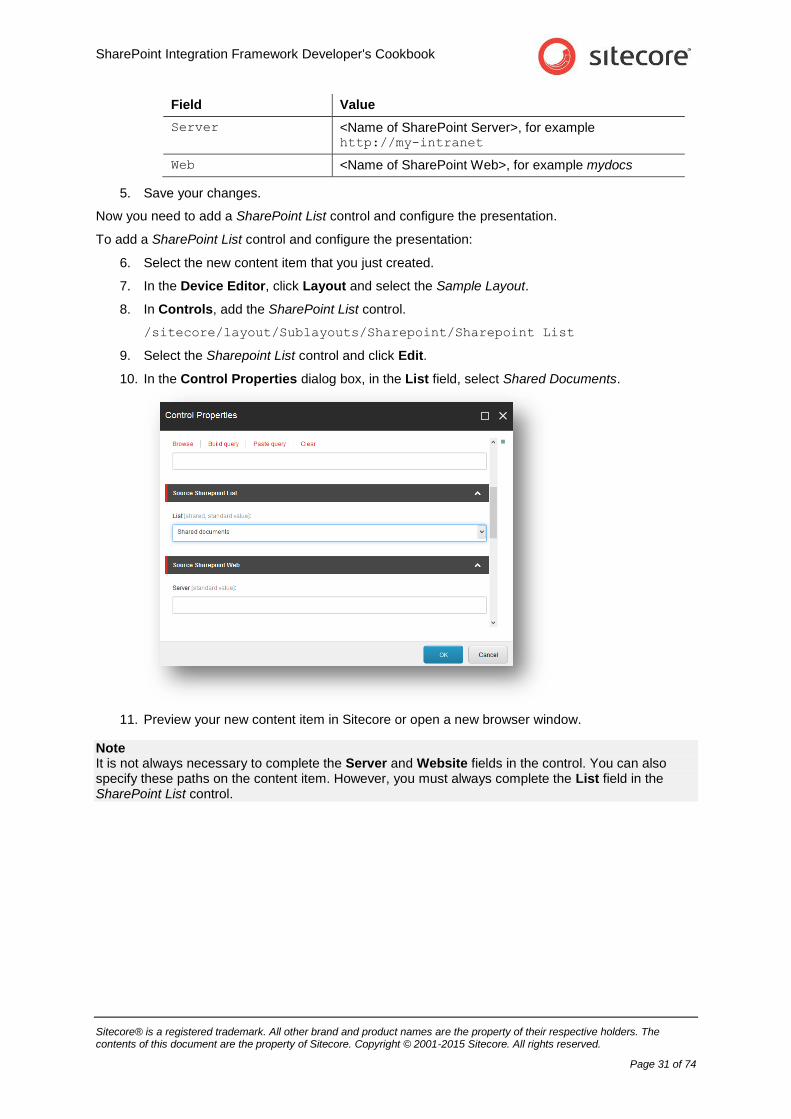
3. Give the item a suitable name, such as SP docs.
4. In the new item, enter the following values:
SharePoint Integration Framework Developer's Cookbook
Sitecore® is a registered trademark. All other brand and product names are the property of their respective holders. The contents of this document are the property of Sitecore. Copyright © 2001-2015 Sitecore. All rights reserved.
Page 31 of 74
Field Value
Server <Name of SharePoint Server>, for example http://my-intranet
Web <Name of SharePoint Web>, for example mydocs
5. Save your changes.
Now you need to add a SharePoint List control and configure the presentation.
To add a SharePoint List control and configure the presentation:
6. Select the new content item that you just created.
7. In the Device Editor, click Layout and select the Sample Layout.
8. In Controls, add the SharePoint List control.
/sitecore/layout/Sublayouts/Sharepoint/Sharepoint List
9. Select the Sharepoint List control and click Edit.
10. In the Control Properties dialog box, in the List field, select Shared Documents.
11. Preview your new content item in Sitecore or open a new browser window.
Note It is not always necessary to complete the Server and Website fields in the control. You can also specify these paths on the content item. However, you must always complete the List field in the SharePoint List control.
SPIF 2.1 for Sitecore XP 8.0 or later
Sitecore® is a registered trademark. All other brand and product names are the property of their respective holders. The contents of this document are the property of Sitecore. Copyright © 2001-2015 Sitecore. All rights reserved.
Page 32 of 74
4.3 Using SharePoint Search
The SharePoint Integration Search control enables you to search SharePoint lists for items in lists from a Sitecore website. The SharePoint Integration Framework sample search control is an example of how you can implement SharePoint search. Use this control as a quick and easy way to implement the SharePoint search functionality on your Sitecore website.
You can add the sample search control to the presentation layer of any content item created with the Sharepoint Web template. Add this control to the presentation layer in the same way as any of the other sample controls.
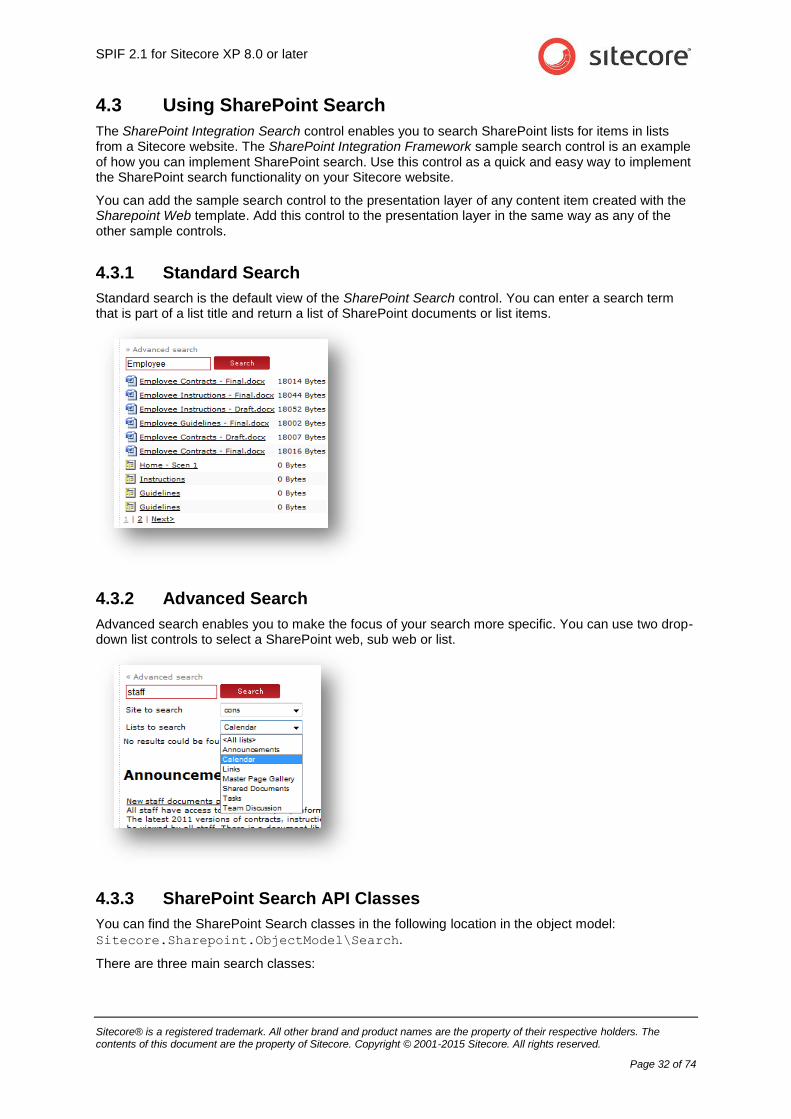
4.3.1 Standard Search
Standard search is the default view of the SharePoint Search control. You can enter a search term that is part of a list title and return a list of SharePoint documents or list items.
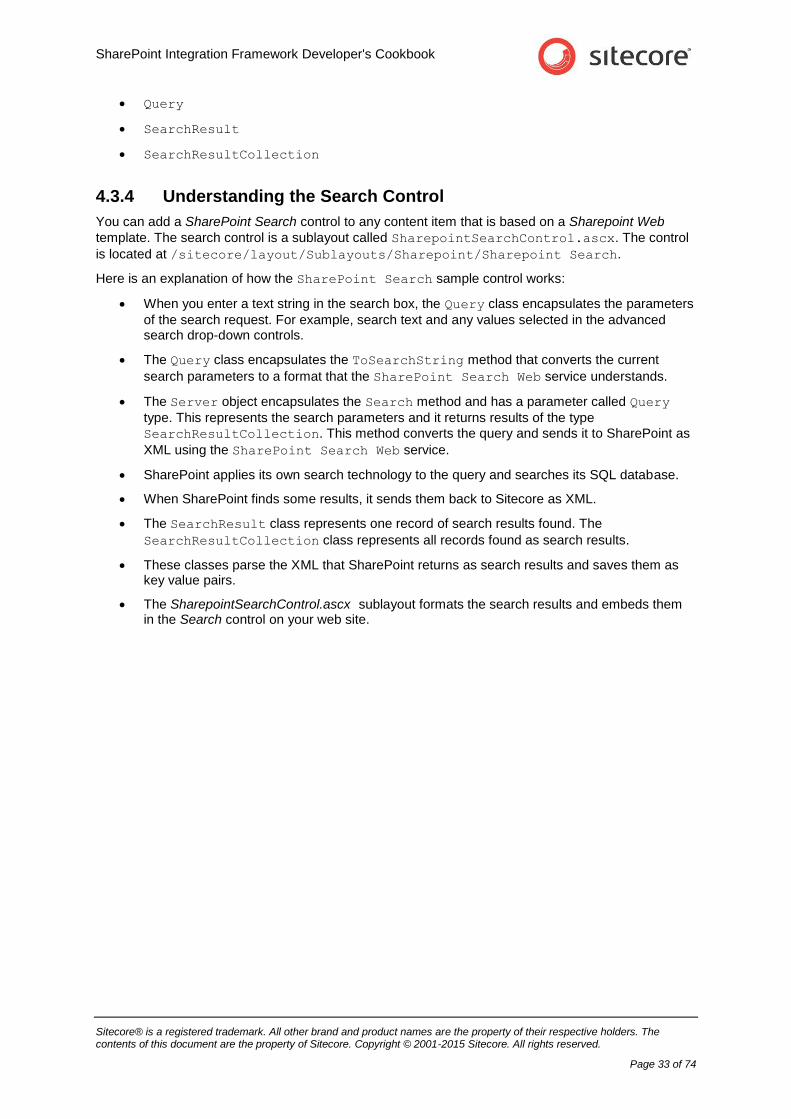
4.3.2 Advanced Search
Advanced search enables you to make the focus of your search more specific. You can use two drop-down list controls to select a SharePoint web, sub web or list.
4.3.3 SharePoint Search API Classes
You can find the SharePoint Search classes in the following location in the object model:
Sitecore.Sharepoint.ObjectModel\Search.
There are three main search classes:
SharePoint Integration Framework Developer's Cookbook
Sitecore® is a registered trademark. All other brand and product names are the property of their respective holders. The contents of this document are the property of Sitecore. Copyright © 2001-2015 Sitecore. All rights reserved.
Page 33 of 74
Query
SearchResult
SearchResultCollection
4.3.4 Understanding the Search Control
You can add a SharePoint Search control to any content item that is based on a Sharepoint Web
template. The search control is a sublayout called SharepointSearchControl.ascx. The control
is located at /sitecore/layout/Sublayouts/Sharepoint/Sharepoint Search.
Here is an explanation of how the SharePoint Search sample control works:
When you enter a text string in the search box, the Query class encapsulates the parameters
of the search request. For example, search text and any values selected in the advanced search drop-down controls.
The Query class encapsulates the ToSearchString method that converts the current
search parameters to a format that the SharePoint Search Web service understands.
The Server object encapsulates the Search method and has a parameter called Query
type. This represents the search parameters and it returns results of the type
SearchResultCollection. This method converts the query and sends it to SharePoint as
XML using the SharePoint Search Web service.
SharePoint applies its own search technology to the query and searches its SQL database.
When SharePoint finds some results, it sends them back to Sitecore as XML.
The SearchResult class represents one record of search results found. The
SearchResultCollection class represents all records found as search results.
These classes parse the XML that SharePoint returns as search results and saves them as key value pairs.
The SharepointSearchControl.ascx sublayout formats the search results and embeds them in the Search control on your web site.
SPIF 2.1 for Sitecore XP 8.0 or later
Sitecore® is a registered trademark. All other brand and product names are the property of their respective holders. The contents of this document are the property of Sitecore. Copyright © 2001-2015 Sitecore. All rights reserved.
Page 34 of 74
4.4 Configuring Sample Control Properties
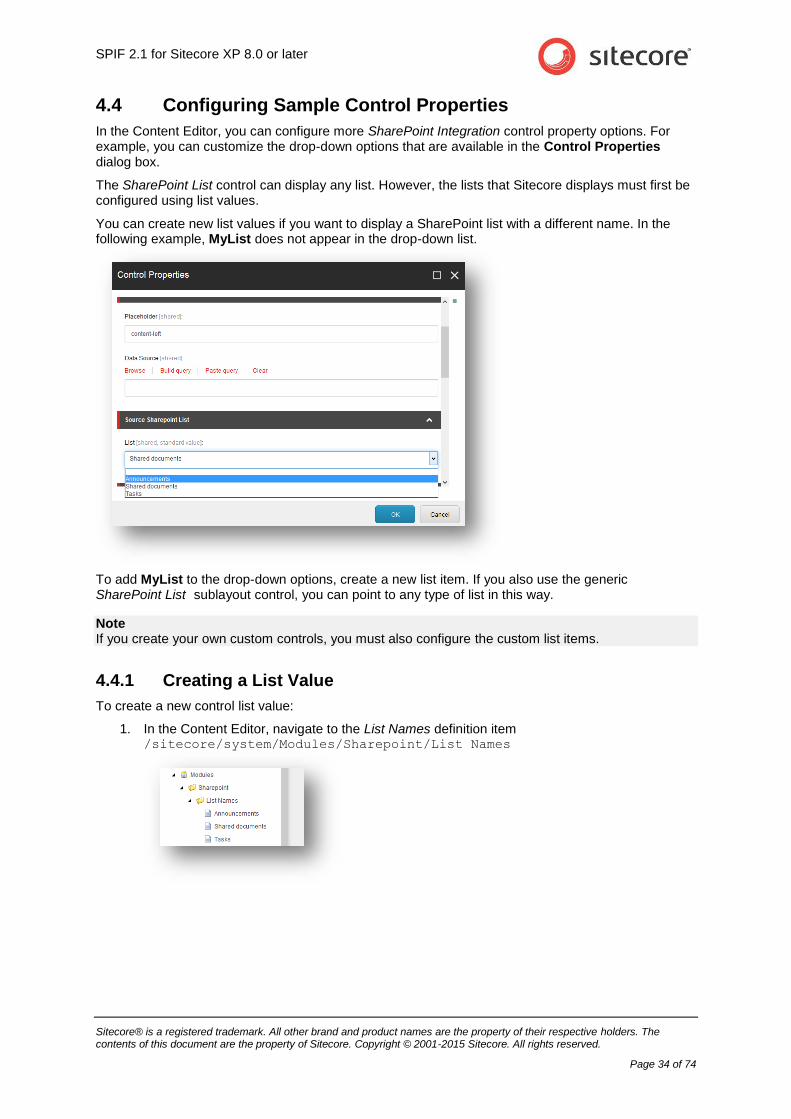
In the Content Editor, you can configure more SharePoint Integration control property options. For example, you can customize the drop-down options that are available in the Control Properties dialog box.
The SharePoint List control can display any list. However, the lists that Sitecore displays must first be configured using list values.
You can create new list values if you want to display a SharePoint list with a different name. In the following example, MyList does not appear in the drop-down list.
To add MyList to the drop-down options, create a new list item. If you also use the generic SharePoint List sublayout control, you can point to any type of list in this way.
Note If you create your own custom controls, you must also configure the custom list items.
4.4.1 Creating a List Value
To create a new control list value:
1. In the Content Editor, navigate to the List Names definition item /sitecore/system/Modules/Sharepoint/List Names
SharePoint Integration Framework Developer's Cookbook
Sitecore® is a registered trademark. All other brand and product names are the property of their respective holders. The contents of this document are the property of Sitecore. Copyright © 2001-2015 Sitecore. All rights reserved.
Page 35 of 74
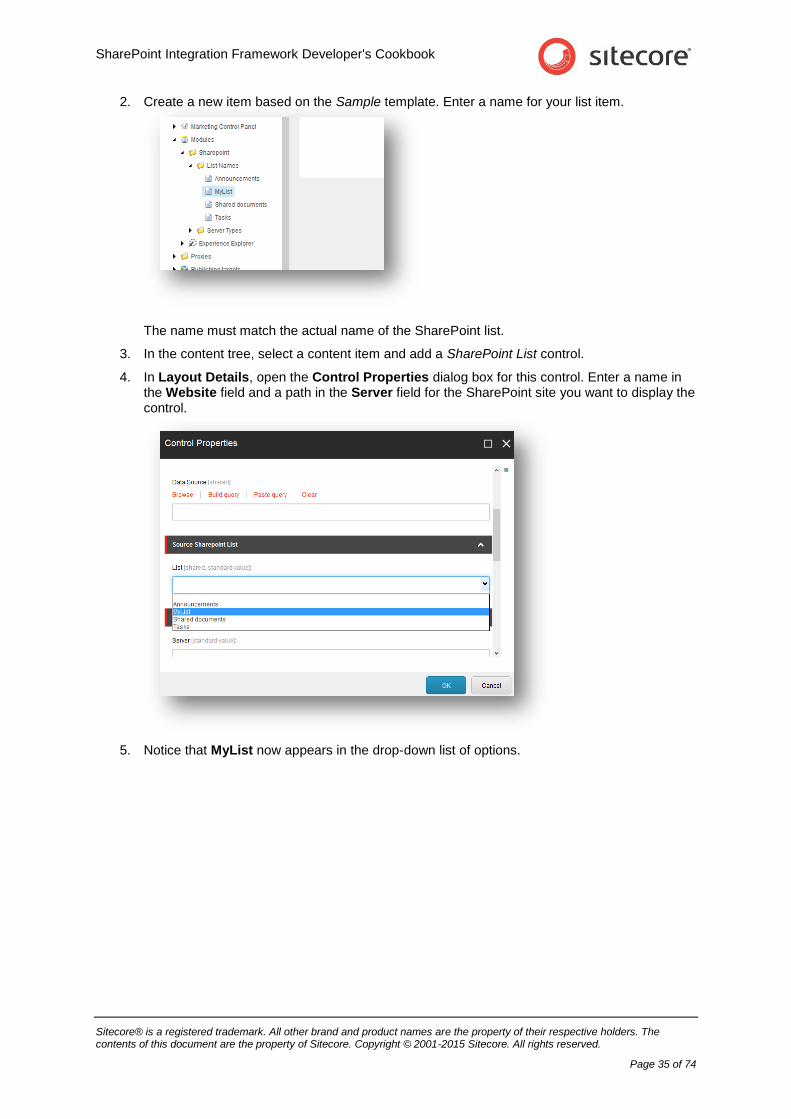
2. Create a new item based on the Sample template. Enter a name for your list item.
The name must match the actual name of the SharePoint list.
3. In the content tree, select a content item and add a SharePoint List control.
4. In Layout Details, open the Control Properties dialog box for this control. Enter a name in the Website field and a path in the Server field for the SharePoint site you want to display the control.
5. Notice that MyList now appears in the drop-down list of options.
SPIF 2.1 for Sitecore XP 8.0 or later
Sitecore® is a registered trademark. All other brand and product names are the property of their respective holders. The contents of this document are the property of Sitecore. Copyright © 2001-2015 Sitecore. All rights reserved.
Page 36 of 74
Chapter 5
Item-level Integration
Item-level integration offers you more fully featured SharePoint integration options. This section describes how to configure and map integration items using the SharePoint Integration wizard or by directly editing the XML in the SharePoint integration definition item.
The integration item is an item, created by SPIF and containing some data from a SharePoint item.
This chapter includes:
Overview
Components
Options and Settings
Using the SharePoint Integration Wizard
Editing the XML in a SharePoint Integration
SharePoint Integration Framework Developer's Cookbook
Sitecore® is a registered trademark. All other brand and product names are the property of their respective holders. The contents of this document are the property of Sitecore. Copyright © 2001-2015 Sitecore. All rights reserved.
Page 37 of 74
5.1 Overview
Item-level integration uses a wizard and the itemProvider pipeline processors to integrate SharePoint lists with Sitecore in real time as common content items or as Media Library items. The SharePoint Integration wizard creates a bidirectional relationship between SharePoint and Sitecore. This means changes to SharePoint lists appear in Sitecore and changes to Sitecore integration items appear straight away in SharePoint. You can configure settings in the wizard to enable or disable this functionality.
The SharePoint Integration wizard enables you to create mappings between SharePoint lists and Sitecore items and then saves all configuration settings as XML to a field in the SharePoint integration definition item. The itemProvider pipeline processors use the XML configuration information to integrate SharePoint list data with Sitecore.
Item-level integration enables you to work with SharePoint lists completely in Sitecore, a method suitable for publishing SharePoint content to a corporate extranet. In the Content Editor, you can view SharePoint lists in real-time and specify how often integrated content is updated.
Note SPIF also supports a non-bidirectional relationship.
Benefits of Item-level Integration:
Integrate SharePoint and Sitecore content in real time.
Store SharePoint lists in the content tree or the Media Library.
The SharePoint Integration wizard simplifies configuration and field mappings.
Set an expiration interval to update lists and optimize performance.
Apply Sitecore functionality to SharePoint lists, such as publishing and workflow.
Use scheduled BLOB transfer to import BLOBs data from SharePoint.
SPIF 2.1 for Sitecore XP 8.0 or later
Sitecore® is a registered trademark. All other brand and product names are the property of their respective holders. The contents of this document are the property of Sitecore. Copyright © 2001-2015 Sitecore. All rights reserved.
Page 38 of 74
5.2 Components
This section includes an explanation of each of the components, options and settings available in item-level integration.
5.2.1 SharePoint Integration Definition Item
To integrate SharePoint lists with the Sitecore content tree or the Media Library use the SharePoint Integration wizard to create a SharePoint integration definition item based on the SharePoint Integration Configuration template. You can find the SharePoint Integration Configuration template at the following location:
/sitecore/templates/Sharepoint/Item Level Integration/Sharepoint
Integration Configuration
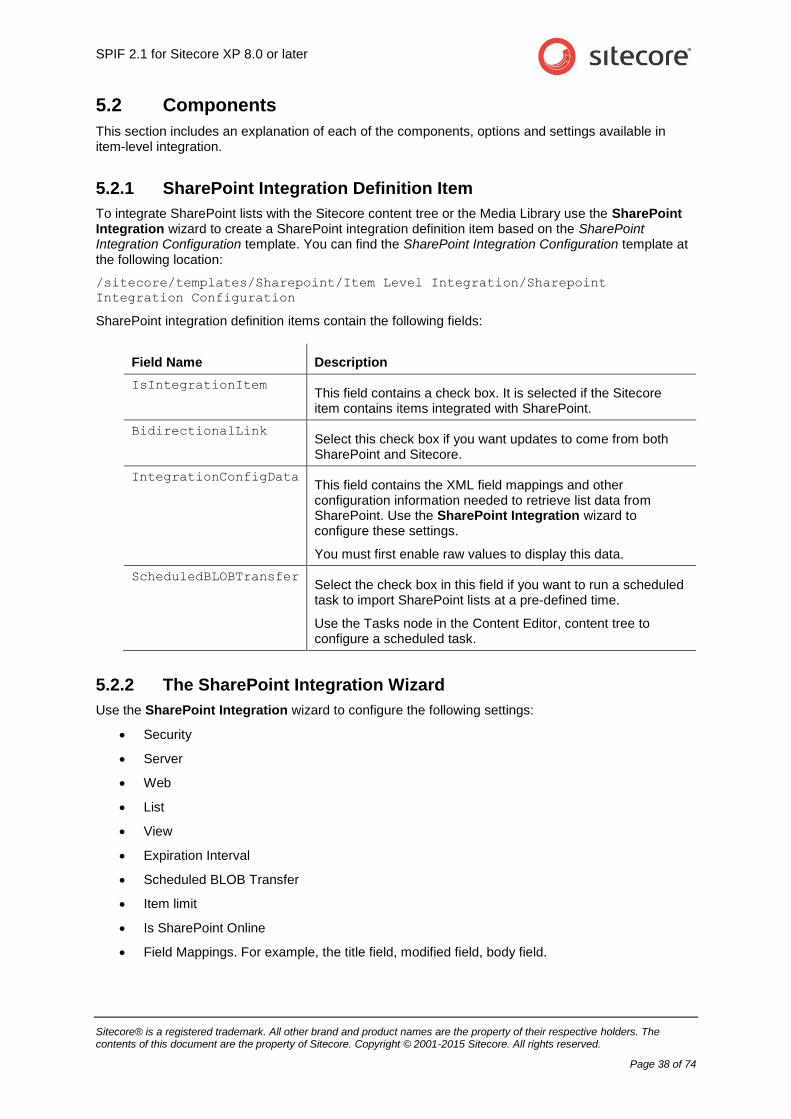
SharePoint integration definition items contain the following fields:
Field Name Description
IsIntegrationItem This field contains a check box. It is selected if the Sitecore item contains items integrated with SharePoint.
BidirectionalLink Select this check box if you want updates to come from both SharePoint and Sitecore.
IntegrationConfigData This field contains the XML field mappings and other configuration information needed to retrieve list data from SharePoint. Use the SharePoint Integration wizard to configure these settings.
You must first enable raw values to display this data.
ScheduledBLOBTransfer Select the check box in this field if you want to run a scheduled task to import SharePoint lists at a pre-defined time.
Use the Tasks node in the Content Editor, content tree to configure a scheduled task.
5.2.2 The SharePoint Integration Wizard
Use the SharePoint Integration wizard to configure the following settings:
Security
Server
Web
List
View
Expiration Interval
Scheduled BLOB Transfer
Item limit
Is SharePoint Online
Field Mappings. For example, the title field, modified field, body field.
SharePoint Integration Framework Developer's Cookbook
Sitecore® is a registered trademark. All other brand and product names are the property of their respective holders. The contents of this document are the property of Sitecore. Copyright © 2001-2015 Sitecore. All rights reserved.
Page 39 of 74
Once you have completed the wizard, the SharePoint integration definition item contains your settings. In the wizard, you also have the option to save your settings to a new template.
5.2.3 Synchronization Process
You can customize the synchronization process using the synchronizeTree pipeline.
SPIF supports two types of synchronization:
Non-bidirectional
SPIF only receives items and changes for existing items from SharePoint. Any changes made in the Sitecore website are overwritten after synchronization. For example, Sitecore receives content from SharePoint (such as a Word document), if a user changes the Word document on Sitecore and the synchronization occurs, the changes would be lost.
Bidirectional
SPIF can receive changes from SharePoint and push changes to SharePoint as well. All actions that a user performs with an integration item in Sitecore (save\create\delete), appear in SharePoint only after the synchronization process. SPIF does nothing when a user saves items. It just “remembers” that an item was changed. All changes are pushed to the SharePoint Server when the integration configuration item or integration configuration folder is expired. SPIF behaves in the same way when an item is created or deleted.
5.2.4 Synchronization in Distributed Environments (On-Premise and Cloud Deployments)
In SPIF only one instance (the integration instance) within a distributed environment (such as a server cluster or virtual “cloud” deployment) can perform synchronization between Sitecore and SharePoint.
All other instances (slave instances) within the distributed environment cannot perform the synchronization. The slave instances only notify the integration instance that it should update the integration configuration item via the event queue. SPIF uses the Sharepoint.IntegrationInstance setting to determine, which instance is an integration instance in a distributed environment (for example, a Content Management server). The integration instance performs synchronization only if expiration interval passed since last synchronization. Slave instances also use expiration interval to not send events frequently.
5.2.5 How SPIF Maps SharePoint Items and Integration Items
Sitecore items and SharePoint items are mapped via the __SharePointItemGUID field. The
__SharePointItemGUID field contains GUID of a SharePoint item. If the __SharePointItemGUID
value is empty, the item has not been synchronized yet.
SPIF 2.1 for Sitecore XP 8.0 or later
Sitecore® is a registered trademark. All other brand and product names are the property of their respective holders. The contents of this document are the property of Sitecore. Copyright © 2001-2015 Sitecore. All rights reserved.
Page 40 of 74
5.3 Options and Settings
This section contains more the detailed information on how to configure item-level integration using the SharePoint Integration wizard.
5.3.1 Creating SharePoint Integration Mappings
Use the wizard to create field mappings between SharePoint list items and Sitecore content items. The wizard saves mappings and other configuration settings as XML in the
IntegrationConfigData field.
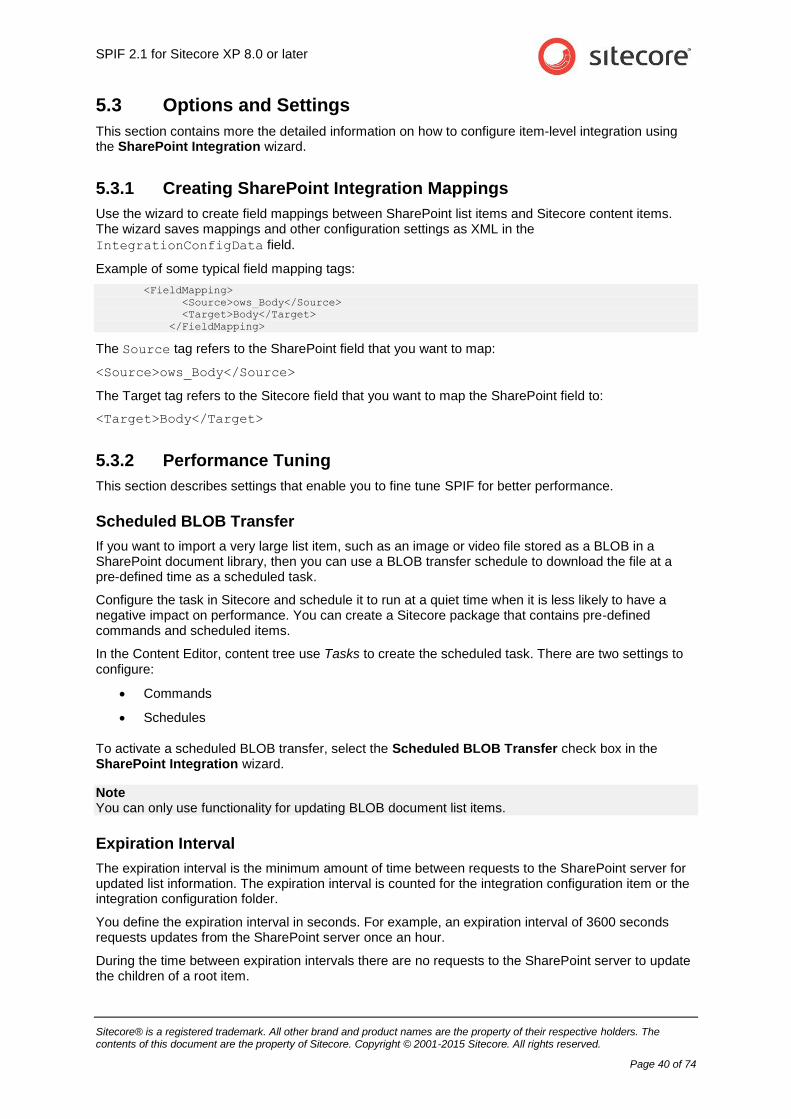
Example of some typical field mapping tags:
<FieldMapping>
<Source>ows_Body</Source>
<Target>Body</Target>
</FieldMapping>
The Source tag refers to the SharePoint field that you want to map:
<Source>ows_Body</Source>
The Target tag refers to the Sitecore field that you want to map the SharePoint field to:
<Target>Body</Target>
5.3.2 Performance Tuning
This section describes settings that enable you to fine tune SPIF for better performance.
Scheduled BLOB Transfer
If you want to import a very large list item, such as an image or video file stored as a BLOB in a SharePoint document library, then you can use a BLOB transfer schedule to download the file at a pre-defined time as a scheduled task.
Configure the task in Sitecore and schedule it to run at a quiet time when it is less likely to have a negative impact on performance. You can create a Sitecore package that contains pre-defined commands and scheduled items.
In the Content Editor, content tree use Tasks to create the scheduled task. There are two settings to configure:
Commands
Schedules
To activate a scheduled BLOB transfer, select the Scheduled BLOB Transfer check box in the SharePoint Integration wizard.
Note You can only use functionality for updating BLOB document list items.
Expiration Interval
The expiration interval is the minimum amount of time between requests to the SharePoint server for updated list information. The expiration interval is counted for the integration configuration item or the integration configuration folder.
You define the expiration interval in seconds. For example, an expiration interval of 3600 seconds requests updates from the SharePoint server once an hour.
During the time between expiration intervals there are no requests to the SharePoint server to update the children of a root item.

SharePoint Integration Framework Developer's Cookbook
Sitecore® is a registered trademark. All other brand and product names are the property of their respective holders. The contents of this document are the property of Sitecore. Copyright © 2001-2015 Sitecore. All rights reserved.
Page 41 of 74
Set the expiration interval using the SharePoint Integration wizard or by editing the XML in the
IntegrationConfigData field.
Uploading Modified BLOBs Only
This feature helps to avoid uploading BLOBs that have not been modified on the SharePoint since the most recent synchronization. It improves performance, especially when integrating large BLOBs that are seldom modified.
The feature is enabled for integration media items based on the
/sitecore/templates/System/Media/Unversioned/File template. To enable it for any
integration item that contains a BLOB, you must ensure that the template of your item is based on
from the /sitecore/templates/Sharepoint/Item Level Integration/Sharepoint
Integration File template.
Important
In order to use this feature, Field Mappings must not contain the mapping between the __Modified
Sitecore field and any field of the SharePoint item.
A SharePoint view that is used for synchronization, must allow to get the ows_Modified field.
5.3.3 Updating SharePoint Lists from Sitecore
After you have used the SharePoint Integration wizard to import SharePoint lists, you can update, edit and delete list items from Sitecore or SharePoint. SPIF creates a real time, bidirectional relationship.
For example, if you integrate an announcements list, you can edit the title and body text of the announcement in Sitecore and see the changes immediately in SharePoint. This is because when
there is a GetItem call for a specific Sitecore item the update is immediate.
Note If you set the expiration interval too low, you may create a condition where SharePoint updates the item before you can save your changes. This makes it impossible to see recent changes reflected in the Sitecore item.
Important All items contain some fields that it is not possible to update, such as AssignedTo, Created and LinkTitle.
In your integration item, if you want to create a new SharePoint item or list from Sitecore without recreating the integration item, you can take two approaches:
Item-level Integration - If you have used the SharePoint Integration wizard to create integration items you can create new items from Sitecore if the items are documents or items in a document library. In the Content Editor go to the SharePoint integration definition item you created using the wizard (this item must already map to a SharePoint document library). Insert an item from a template, which contains a BLOB field. You can also add items to a SharePoint document library using the Sitecore Upload Files (Advanced) button.
Page-level Integration – The SharePoint List and Document List sample controls have built in actions, such as Open and New that you can use to create a new item from Sitecore. If you click New this opens a SharePoint page where you can create the item. When you click OK, the item appears in both SharePoint and Sitecore.
Note Although you can create any type of list item from SharePoint, it is not always possible to do the same from Sitecore. However, it may be possible to use the SharePoint Integration Framework API to extend this standard functionality.

SPIF 2.1 for Sitecore XP 8.0 or later
Sitecore® is a registered trademark. All other brand and product names are the property of their respective holders. The contents of this document are the property of Sitecore. Copyright © 2001-2015 Sitecore. All rights reserved.
Page 42 of 74
5.3.4 Presentation Options
SPIF represents SharePoint list items of a specified list as content items or media items in the Sitecore content tree.
A SharePoint announcement list item represented in the Sitecore content tree:
This gives you more flexibility and a wide variety of presentation options. You can use any existing rendering or sub layout, if it is suitable or you can create your own custom controls.
You can also use other Sitecore functionality, such as publishing, workflow and versioning to manage your integrated content.
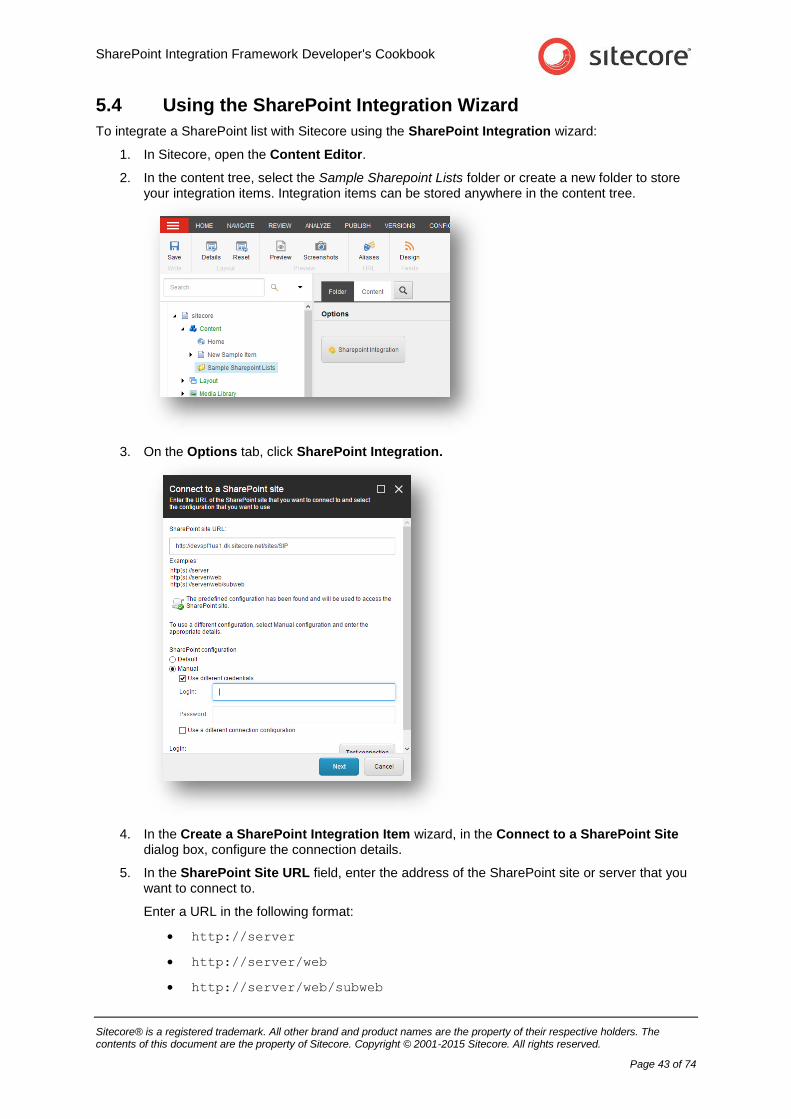
SharePoint Integration Framework Developer's Cookbook
Sitecore® is a registered trademark. All other brand and product names are the property of their respective holders. The contents of this document are the property of Sitecore. Copyright © 2001-2015 Sitecore. All rights reserved.
Page 43 of 74
5.4 Using the SharePoint Integration Wizard
To integrate a SharePoint list with Sitecore using the SharePoint Integration wizard:
1. In Sitecore, open the Content Editor.
2. In the content tree, select the Sample Sharepoint Lists folder or create a new folder to store your integration items. Integration items can be stored anywhere in the content tree.
3. On the Options tab, click SharePoint Integration.
4. In the Create a SharePoint Integration Item wizard, in the Connect to a SharePoint Site dialog box, configure the connection details.
5. In the SharePoint Site URL field, enter the address of the SharePoint site or server that you want to connect to.
Enter a URL in the following format:
http://server
http://server/web
http://server/web/subweb
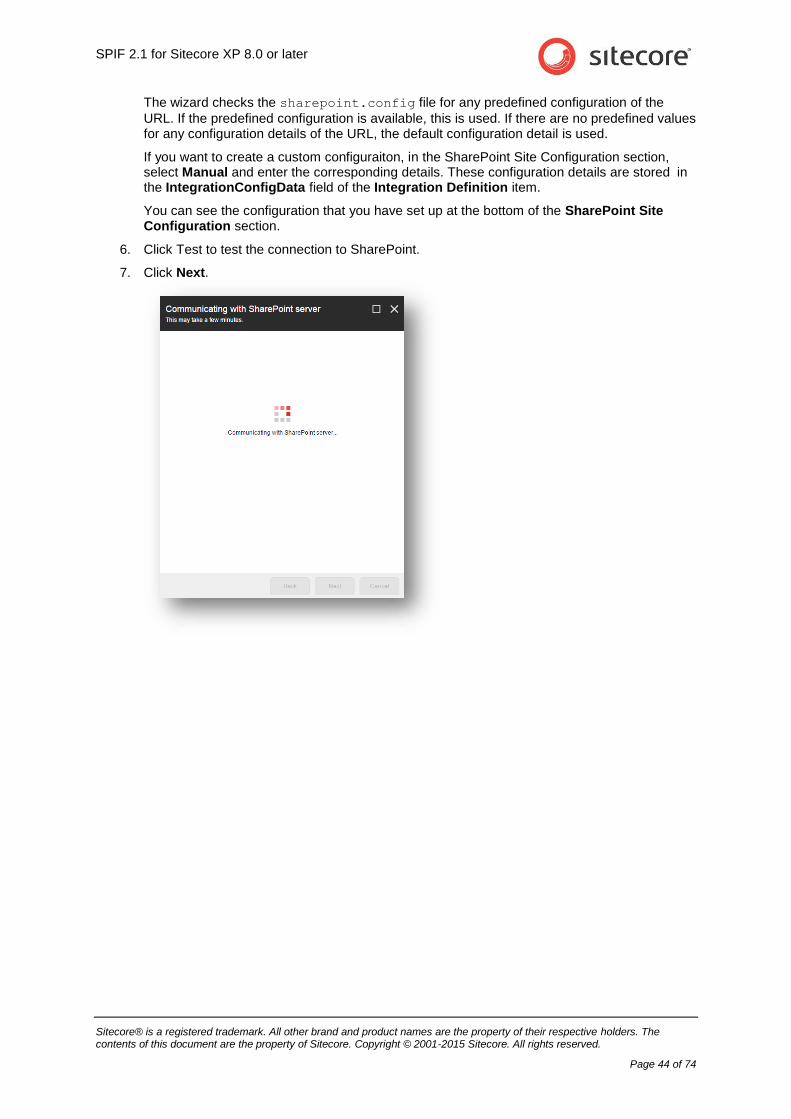
SPIF 2.1 for Sitecore XP 8.0 or later
Sitecore® is a registered trademark. All other brand and product names are the property of their respective holders. The contents of this document are the property of Sitecore. Copyright © 2001-2015 Sitecore. All rights reserved.
Page 44 of 74
The wizard checks the sharepoint.config file for any predefined configuration of the
URL. If the predefined configuration is available, this is used. If there are no predefined values for any configuration details of the URL, the default configuration detail is used.
If you want to create a custom configuraiton, in the SharePoint Site Configuration section, select Manual and enter the corresponding details. These configuration details are stored in the IntegrationConfigData field of the Integration Definition item.
You can see the configuration that you have set up at the bottom of the SharePoint Site Configuration section.
6. Click Test to test the connection to SharePoint.
7. Click Next.
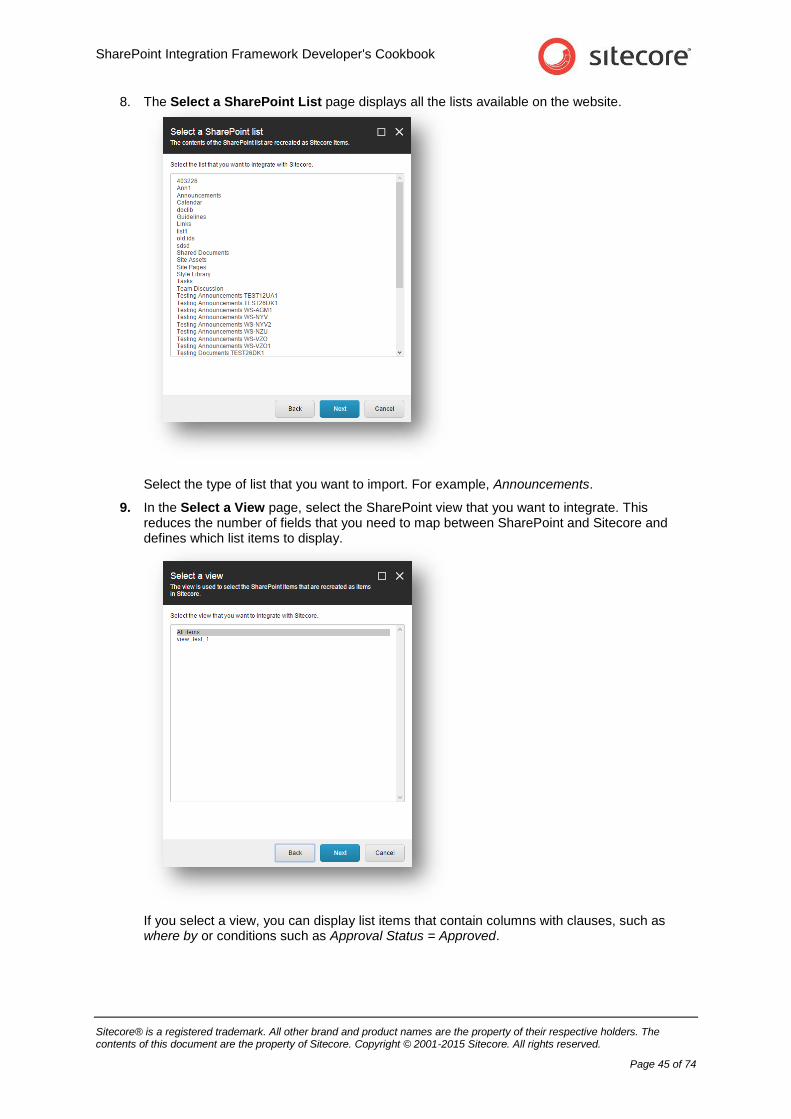
SharePoint Integration Framework Developer's Cookbook
Sitecore® is a registered trademark. All other brand and product names are the property of their respective holders. The contents of this document are the property of Sitecore. Copyright © 2001-2015 Sitecore. All rights reserved.
Page 45 of 74
8. The Select a SharePoint List page displays all the lists available on the website.
Select the type of list that you want to import. For example, Announcements.
9. In the Select a View page, select the SharePoint view that you want to integrate. This reduces the number of fields that you need to map between SharePoint and Sitecore and defines which list items to display.
If you select a view, you can display list items that contain columns with clauses, such as where by or conditions such as Approval Status = Approved.
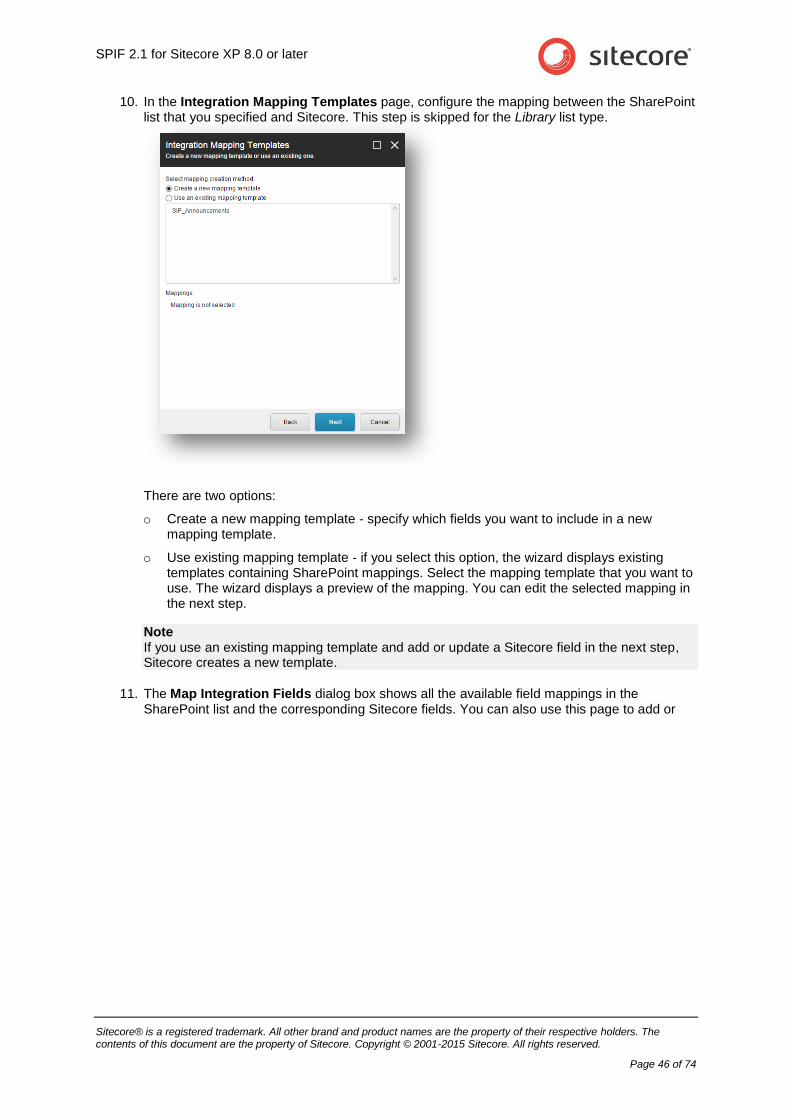
SPIF 2.1 for Sitecore XP 8.0 or later
Sitecore® is a registered trademark. All other brand and product names are the property of their respective holders. The contents of this document are the property of Sitecore. Copyright © 2001-2015 Sitecore. All rights reserved.
Page 46 of 74
10. In the Integration Mapping Templates page, configure the mapping between the SharePoint list that you specified and Sitecore. This step is skipped for the Library list type.
There are two options:
o Create a new mapping template - specify which fields you want to include in a new mapping template.
o Use existing mapping template - if you select this option, the wizard displays existing templates containing SharePoint mappings. Select the mapping template that you want to use. The wizard displays a preview of the mapping. You can edit the selected mapping in the next step.
Note If you use an existing mapping template and add or update a Sitecore field in the next step, Sitecore creates a new template.
11. The Map Integration Fields dialog box shows all the available field mappings in the SharePoint list and the corresponding Sitecore fields. You can also use this page to add or
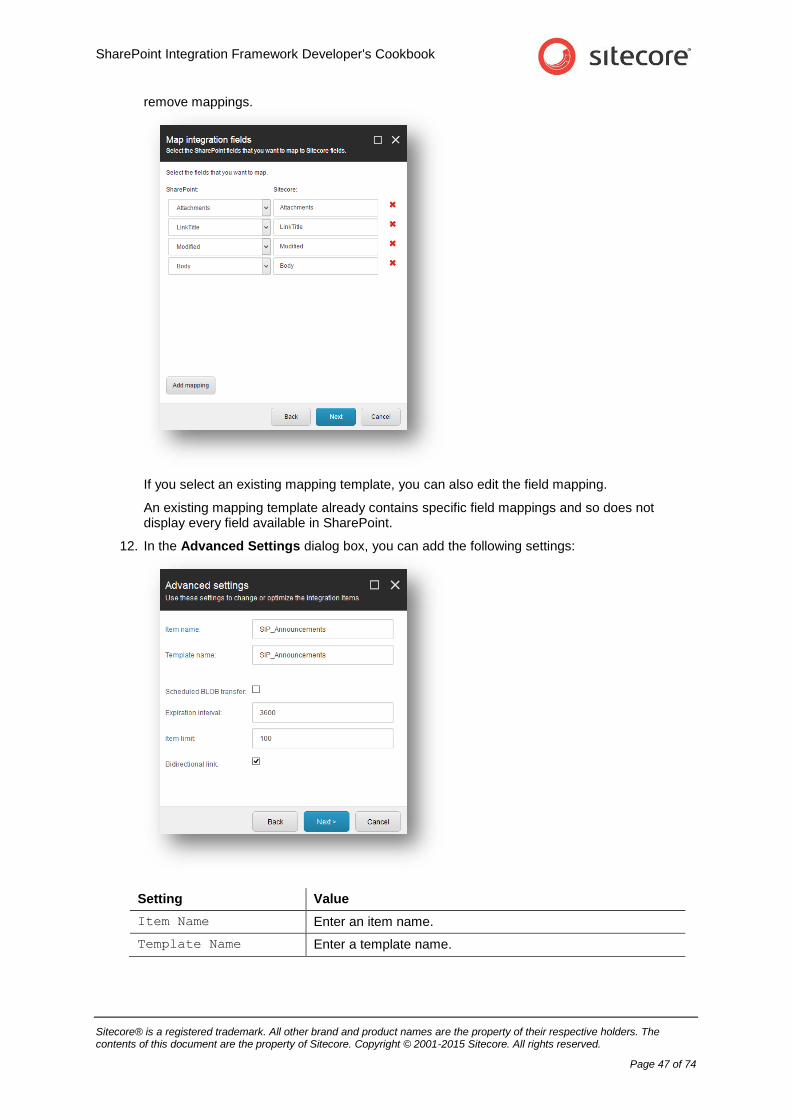
SharePoint Integration Framework Developer's Cookbook
Sitecore® is a registered trademark. All other brand and product names are the property of their respective holders. The contents of this document are the property of Sitecore. Copyright © 2001-2015 Sitecore. All rights reserved.
Page 47 of 74
remove mappings.
If you select an existing mapping template, you can also edit the field mapping.
An existing mapping template already contains specific field mappings and so does not display every field available in SharePoint.
12. In the Advanced Settings dialog box, you can add the following settings:
Setting Value
Item Name Enter an item name.
Template Name Enter a template name.
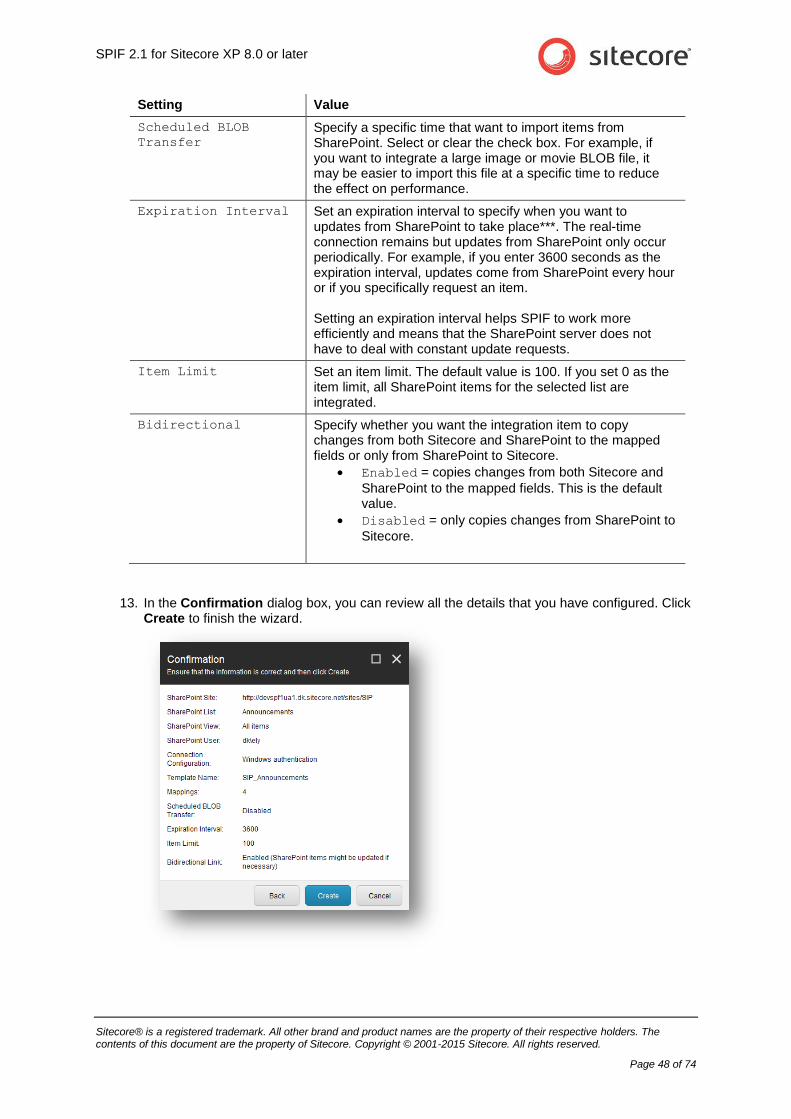
SPIF 2.1 for Sitecore XP 8.0 or later
Sitecore® is a registered trademark. All other brand and product names are the property of their respective holders. The contents of this document are the property of Sitecore. Copyright © 2001-2015 Sitecore. All rights reserved.
Page 48 of 74
Setting Value
Scheduled BLOB
Transfer
Specify a specific time that want to import items from SharePoint. Select or clear the check box. For example, if you want to integrate a large image or movie BLOB file, it may be easier to import this file at a specific time to reduce the effect on performance.
Expiration Interval Set an expiration interval to specify when you want to updates from SharePoint to take place***. The real-time connection remains but updates from SharePoint only occur periodically. For example, if you enter 3600 seconds as the expiration interval, updates come from SharePoint every hour or if you specifically request an item. Setting an expiration interval helps SPIF to work more efficiently and means that the SharePoint server does not have to deal with constant update requests.
Item Limit Set an item limit. The default value is 100. If you set 0 as the item limit, all SharePoint items for the selected list are integrated.
Bidirectional Specify whether you want the integration item to copy changes from both Sitecore and SharePoint to the mapped fields or only from SharePoint to Sitecore.
Enabled = copies changes from both Sitecore and
SharePoint to the mapped fields. This is the default value.
Disabled = only copies changes from SharePoint to
Sitecore.
13. In the Confirmation dialog box, you can review all the details that you have configured. Click Create to finish the wizard.
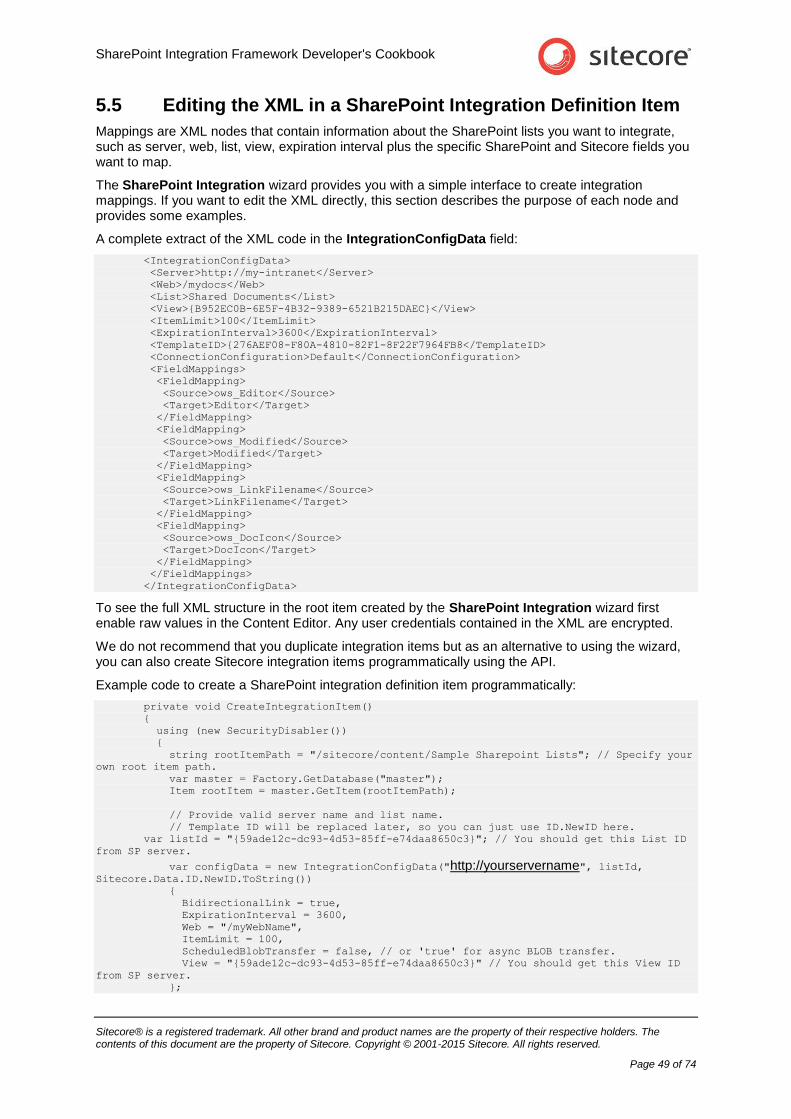
SharePoint Integration Framework Developer's Cookbook
Sitecore® is a registered trademark. All other brand and product names are the property of their respective holders. The contents of this document are the property of Sitecore. Copyright © 2001-2015 Sitecore. All rights reserved.
Page 49 of 74
5.5 Editing the XML in a SharePoint Integration Definition Item
Mappings are XML nodes that contain information about the SharePoint lists you want to integrate, such as server, web, list, view, expiration interval plus the specific SharePoint and Sitecore fields you want to map.
The SharePoint Integration wizard provides you with a simple interface to create integration mappings. If you want to edit the XML directly, this section describes the purpose of each node and provides some examples.
A complete extract of the XML code in the IntegrationConfigData field:
<IntegrationConfigData>
<Server>http://my-intranet</Server>
<Web>/mydocs</Web>
<List>Shared Documents</List>
<View>{B952EC0B-6E5F-4B32-9389-6521B215DAEC}</View>
<ItemLimit>100</ItemLimit>
<ExpirationInterval>3600</ExpirationInterval>
<TemplateID>{276AEF08-F80A-4810-82F1-8F22F7964FB8</TemplateID>
<ConnectionConfiguration>Default</ConnectionConfiguration>
<FieldMappings>
<FieldMapping>
<Source>ows_Editor</Source>
<Target>Editor</Target>
</FieldMapping>
<FieldMapping>
<Source>ows_Modified</Source>
<Target>Modified</Target>
</FieldMapping>
<FieldMapping>
<Source>ows_LinkFilename</Source>
<Target>LinkFilename</Target>
</FieldMapping>
<FieldMapping>
<Source>ows_DocIcon</Source>
<Target>DocIcon</Target>
</FieldMapping>
</FieldMappings>
</IntegrationConfigData>
To see the full XML structure in the root item created by the SharePoint Integration wizard first enable raw values in the Content Editor. Any user credentials contained in the XML are encrypted.
We do not recommend that you duplicate integration items but as an alternative to using the wizard, you can also create Sitecore integration items programmatically using the API.
Example code to create a SharePoint integration definition item programmatically:
private void CreateIntegrationItem()
{
using (new SecurityDisabler())
{
string rootItemPath = "/sitecore/content/Sample Sharepoint Lists"; // Specify your
own root item path.
var master = Factory.GetDatabase("master");
Item rootItem = master.GetItem(rootItemPath);
// Provide valid server name and list name.
// Template ID will be replaced later, so you can just use ID.NewID here.
var listId = "{59ade12c-dc93-4d53-85ff-e74daa8650c3}"; // You should get this List ID
from SP server.
var configData = new IntegrationConfigData("http://yourservername", listId, Sitecore.Data.ID.NewID.ToString())
{
BidirectionalLink = true,
ExpirationInterval = 3600,
Web = "/myWebName",
ItemLimit = 100,
ScheduledBlobTransfer = false, // or 'true' for async BLOB transfer.
View = "{59ade12c-dc93-4d53-85ff-e74daa8650c3}" // You should get this View ID
from SP server.
};
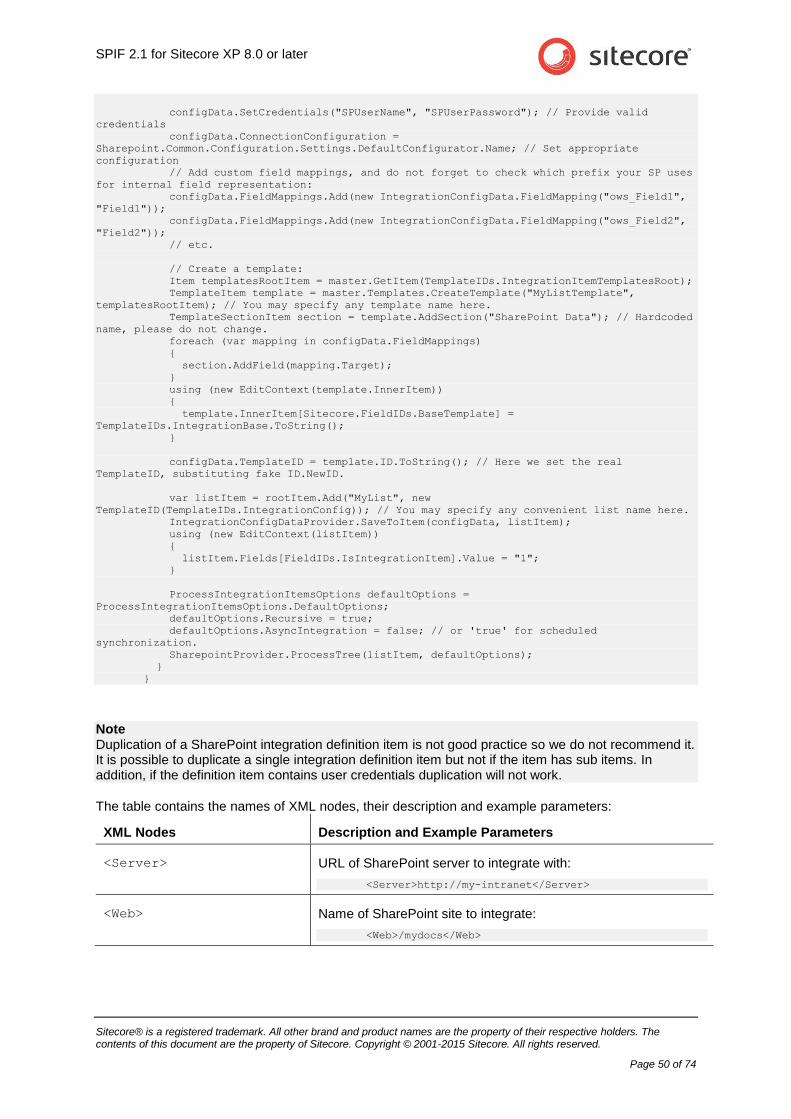
SPIF 2.1 for Sitecore XP 8.0 or later
Sitecore® is a registered trademark. All other brand and product names are the property of their respective holders. The contents of this document are the property of Sitecore. Copyright © 2001-2015 Sitecore. All rights reserved.
Page 50 of 74
configData.SetCredentials("SPUserName", "SPUserPassword"); // Provide valid
credentials
configData.ConnectionConfiguration =
Sharepoint.Common.Configuration.Settings.DefaultConfigurator.Name; // Set appropriate
configuration
// Add custom field mappings, and do not forget to check which prefix your SP uses
for internal field representation:
configData.FieldMappings.Add(new IntegrationConfigData.FieldMapping("ows_Field1",
"Field1"));
configData.FieldMappings.Add(new IntegrationConfigData.FieldMapping("ows_Field2",
"Field2"));
// etc.
// Create a template:
Item templatesRootItem = master.GetItem(TemplateIDs.IntegrationItemTemplatesRoot);
TemplateItem template = master.Templates.CreateTemplate("MyListTemplate",
templatesRootItem); // You may specify any template name here.
TemplateSectionItem section = template.AddSection("SharePoint Data"); // Hardcoded
name, please do not change.
foreach (var mapping in configData.FieldMappings)
{
section.AddField(mapping.Target);
}
using (new EditContext(template.InnerItem))
{
template.InnerItem[Sitecore.FieldIDs.BaseTemplate] =
TemplateIDs.IntegrationBase.ToString();
}
configData.TemplateID = template.ID.ToString(); // Here we set the real
TemplateID, substituting fake ID.NewID.
var listItem = rootItem.Add("MyList", new
TemplateID(TemplateIDs.IntegrationConfig)); // You may specify any convenient list name here.
IntegrationConfigDataProvider.SaveToItem(configData, listItem);
using (new EditContext(listItem))
{
listItem.Fields[FieldIDs.IsIntegrationItem].Value = "1";
}
ProcessIntegrationItemsOptions defaultOptions =
ProcessIntegrationItemsOptions.DefaultOptions;
defaultOptions.Recursive = true;
defaultOptions.AsyncIntegration = false; // or 'true' for scheduled
synchronization.
SharepointProvider.ProcessTree(listItem, defaultOptions);
}
}
Note Duplication of a SharePoint integration definition item is not good practice so we do not recommend it. It is possible to duplicate a single integration definition item but not if the item has sub items. In addition, if the definition item contains user credentials duplication will not work.
The table contains the names of XML nodes, their description and example parameters:
XML Nodes Description and Example Parameters
<Server> URL of SharePoint server to integrate with:
<Server>http://my-intranet</Server>
<Web> Name of SharePoint site to integrate:
<Web>/mydocs</Web>
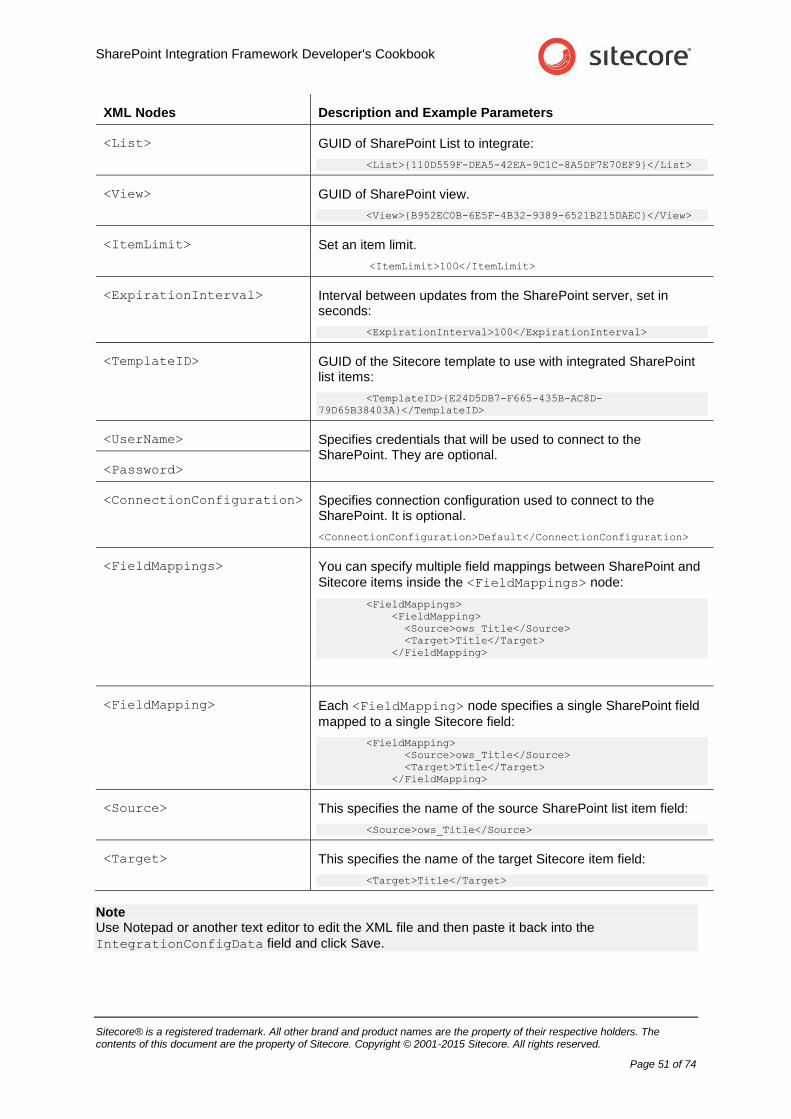
SharePoint Integration Framework Developer's Cookbook
Sitecore® is a registered trademark. All other brand and product names are the property of their respective holders. The contents of this document are the property of Sitecore. Copyright © 2001-2015 Sitecore. All rights reserved.
Page 51 of 74
XML Nodes Description and Example Parameters
<List> GUID of SharePoint List to integrate:
<List>{110D559F-DEA5-42EA-9C1C-8A5DF7E70EF9}</List>
<View> GUID of SharePoint view.
<View>{B952EC0B-6E5F-4B32-9389-6521B215DAEC}</View>
<ItemLimit> Set an item limit.
<ItemLimit>100</ItemLimit>
<ExpirationInterval> Interval between updates from the SharePoint server, set in seconds:
<ExpirationInterval>100</ExpirationInterval>
<TemplateID> GUID of the Sitecore template to use with integrated SharePoint list items:
<TemplateID>{E24D5DB7-F665-435B-AC8D-
79D65B38403A}</TemplateID>
<UserName> Specifies credentials that will be used to connect to the SharePoint. They are optional.
<Password>
<ConnectionConfiguration> Specifies connection configuration used to connect to the SharePoint. It is optional.
<ConnectionConfiguration>Default</ConnectionConfiguration>
<FieldMappings> You can specify multiple field mappings between SharePoint and
Sitecore items inside the <FieldMappings> node:
<FieldMappings>
<FieldMapping>
<Source>ows_Title</Source>
<Target>Title</Target>
</FieldMapping>
<FieldMapping> Each <FieldMapping> node specifies a single SharePoint field
mapped to a single Sitecore field:
<FieldMapping>
<Source>ows_Title</Source>
<Target>Title</Target>
</FieldMapping>
<Source> This specifies the name of the source SharePoint list item field:
<Source>ows_Title</Source>
<Target> This specifies the name of the target Sitecore item field:
<Target>Title</Target>
Note Use Notepad or another text editor to edit the XML file and then paste it back into the
IntegrationConfigData field and click Save.
SPIF 2.1 for Sitecore XP 8.0 or later
Sitecore® is a registered trademark. All other brand and product names are the property of their respective holders. The contents of this document are the property of Sitecore. Copyright © 2001-2015 Sitecore. All rights reserved.
Page 52 of 74
Chapter 6
Integration Scenarios
This section contains scenarios that demonstrate different approaches to implementing the SharePoint Integration Framework with the Sitecore in a typical business context.
This chapter contains the following scenarios:
Page-level Integration
Item-level Integration on a Sitecore Extranet
SharePoint Integration Framework Developer's Cookbook
Sitecore® is a registered trademark. All other brand and product names are the property of their respective holders. The contents of this document are the property of Sitecore. Copyright © 2001-2015 Sitecore. All rights reserved.
Page 53 of 74
6.1 Page-level Integration
Use the SharePoint Integration Framework to add sample controls to a website.
About these Walkthroughs
The walkthroughs in this section demonstrate how to:
Implement an Announcements List control
Implement a SharePoint List control
Story
A facilities management organization has a small group of staff who use SharePoint to maintain a large number of documents. The documents are typically guidelines and instructions. Draft and final versions of the documents are stored in a SharePoint document library. When a document becomes final, they would like it to publish it to the company Intranet.
The same organization also has several SharePoint document libraries containing other documents such as contracts. They would like to use SharePoint to store these documents and make them available to staff on the company Intranet. They would also like to be able to post announcements on the Intranet informing staff of any news related to the publication of company documents.
Personas
Jane - SharePoint Editor/Contributor
Jane is responsible for creating and editing multiple Word documents stored in several SharePoint document libraries. Documents can be in two possible states: draft or final. If a document is in its final state, Jane uses SharePoint workflow to review and publish the document to the company Intranet. Once she has approved a document for publication, it automatically appears in the Published view of the SharePoint document library.
Peter – Sitecore/SharePoint Developer
Peter is the company .NET developer. He is an experienced Sitecore C# developer and knows the fundamentals of MOSS. He must implement an integration solution that allows Jane to achieve all her objectives.
Prerequisites
You need the following items to complete this walkthrough:
A SharePoint Server
Webs – One or more SharePoint websites
An Announcements list with sample announcements.
One or more document libraries – For example, Guidelines, Instructions and Contracts
Sample draft and final Word documents
6.1.1 Implementing an Announcements List Control
Introduction
Jane wants to be able to post announcements related to newly published staff documents. She asks Peter (SharePoint developer) to make it possible to display announcements for guidelines and instructions on the staff Intranet.
In the SharePoint Integration Framework, the Announcement List and Task List controls are the simplest category of sample controls to implement. In this task, Peter uses the Announcements List control to display staff announcements related to published documents on the company Intranet site.
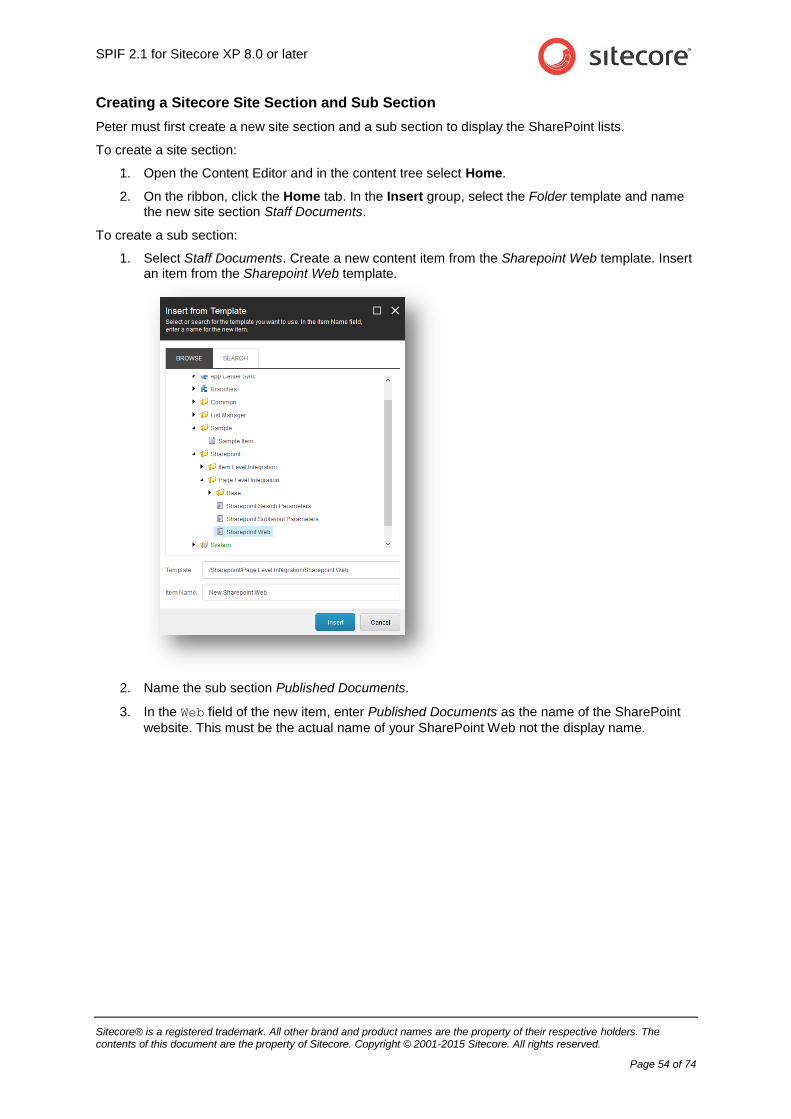
SPIF 2.1 for Sitecore XP 8.0 or later
Sitecore® is a registered trademark. All other brand and product names are the property of their respective holders. The contents of this document are the property of Sitecore. Copyright © 2001-2015 Sitecore. All rights reserved.
Page 54 of 74
Creating a Sitecore Site Section and Sub Section
Peter must first create a new site section and a sub section to display the SharePoint lists.
To create a site section:
1. Open the Content Editor and in the content tree select Home.
2. On the ribbon, click the Home tab. In the Insert group, select the Folder template and name the new site section Staff Documents.
To create a sub section:
1. Select Staff Documents. Create a new content item from the Sharepoint Web template. Insert an item from the Sharepoint Web template.
2. Name the sub section Published Documents.
3. In the Web field of the new item, enter Published Documents as the name of the SharePoint
website. This must be the actual name of your SharePoint Web not the display name.
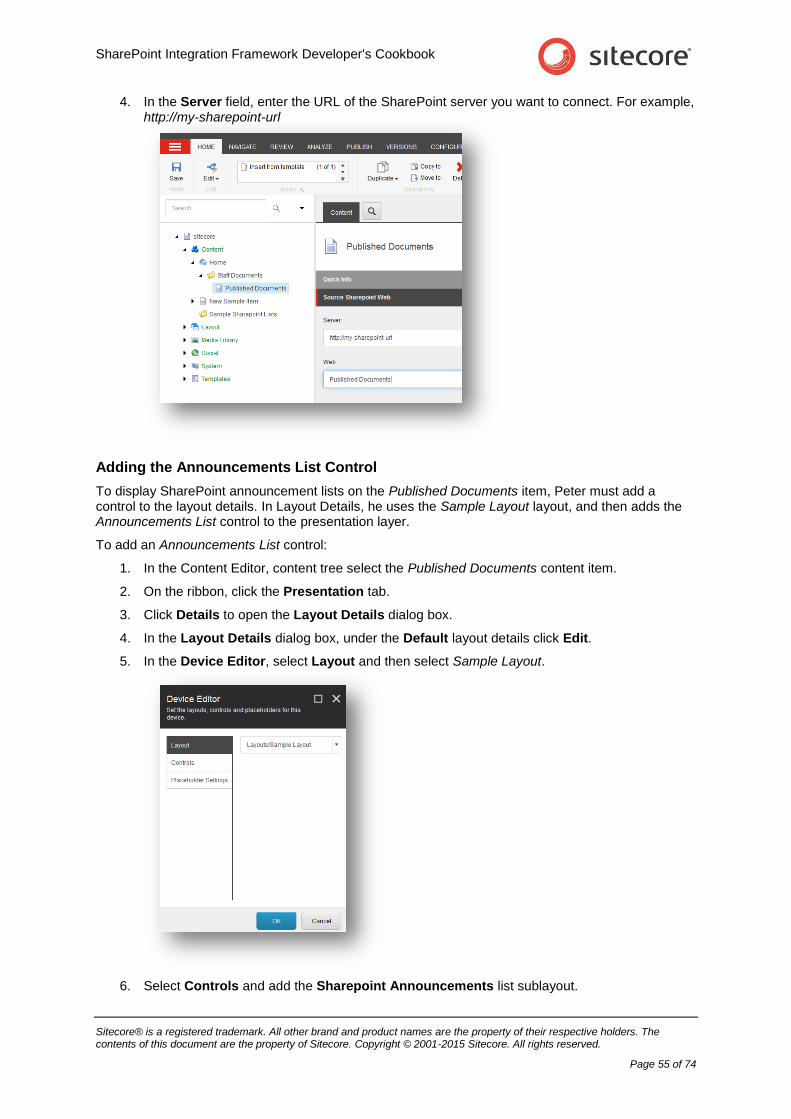
SharePoint Integration Framework Developer's Cookbook
Sitecore® is a registered trademark. All other brand and product names are the property of their respective holders. The contents of this document are the property of Sitecore. Copyright © 2001-2015 Sitecore. All rights reserved.
Page 55 of 74
4. In the Server field, enter the URL of the SharePoint server you want to connect. For example, http://my-sharepoint-url
Adding the Announcements List Control
To display SharePoint announcement lists on the Published Documents item, Peter must add a control to the layout details. In Layout Details, he uses the Sample Layout layout, and then adds the Announcements List control to the presentation layer.
To add an Announcements List control:
1. In the Content Editor, content tree select the Published Documents content item.
2. On the ribbon, click the Presentation tab.
3. Click Details to open the Layout Details dialog box.
4. In the Layout Details dialog box, under the Default layout details click Edit.
5. In the Device Editor, select Layout and then select Sample Layout.
6. Select Controls and add the Sharepoint Announcements list sublayout.
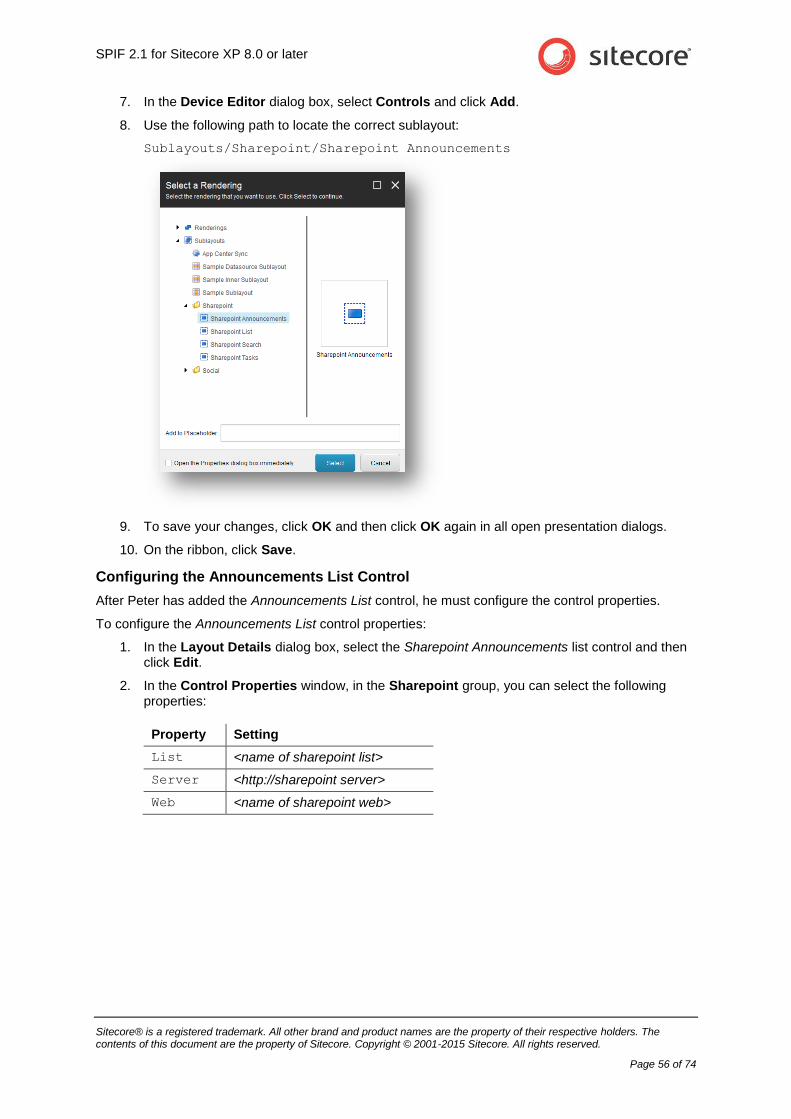
SPIF 2.1 for Sitecore XP 8.0 or later
Sitecore® is a registered trademark. All other brand and product names are the property of their respective holders. The contents of this document are the property of Sitecore. Copyright © 2001-2015 Sitecore. All rights reserved.
Page 56 of 74
7. In the Device Editor dialog box, select Controls and click Add.
8. Use the following path to locate the correct sublayout:
Sublayouts/Sharepoint/Sharepoint Announcements
9. To save your changes, click OK and then click OK again in all open presentation dialogs.
10. On the ribbon, click Save.
Configuring the Announcements List Control
After Peter has added the Announcements List control, he must configure the control properties.
To configure the Announcements List control properties:
1. In the Layout Details dialog box, select the Sharepoint Announcements list control and then click Edit.
2. In the Control Properties window, in the Sharepoint group, you can select the following properties:
Property Setting
List <name of sharepoint list>
Server <http://sharepoint server>
Web <name of sharepoint web>
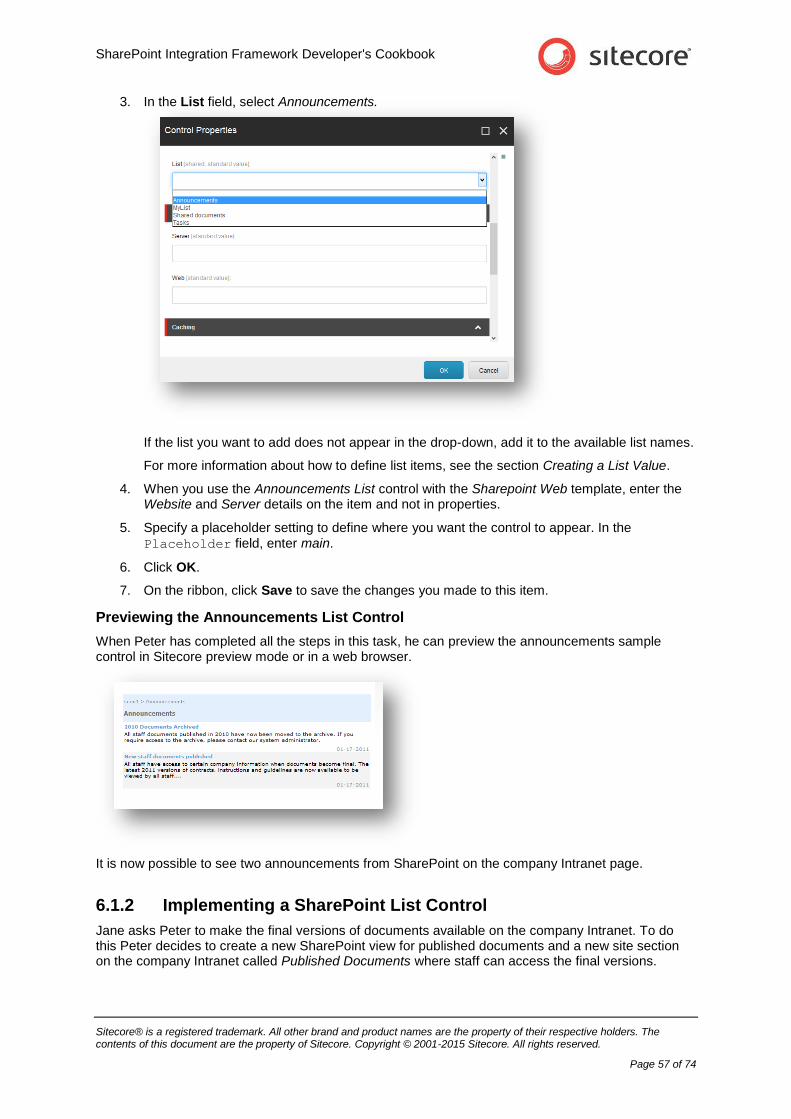
SharePoint Integration Framework Developer's Cookbook
Sitecore® is a registered trademark. All other brand and product names are the property of their respective holders. The contents of this document are the property of Sitecore. Copyright © 2001-2015 Sitecore. All rights reserved.
Page 57 of 74
3. In the List field, select Announcements.
If the list you want to add does not appear in the drop-down, add it to the available list names.
For more information about how to define list items, see the section Creating a List Value.
4. When you use the Announcements List control with the Sharepoint Web template, enter the Website and Server details on the item and not in properties.
5. Specify a placeholder setting to define where you want the control to appear. In the
Placeholder field, enter main.
6. Click OK.
7. On the ribbon, click Save to save the changes you made to this item.
Previewing the Announcements List Control
When Peter has completed all the steps in this task, he can preview the announcements sample control in Sitecore preview mode or in a web browser.
It is now possible to see two announcements from SharePoint on the company Intranet page.
6.1.2 Implementing a SharePoint List Control
Jane asks Peter to make the final versions of documents available on the company Intranet. To do this Peter decides to create a new SharePoint view for published documents and a new site section on the company Intranet called Published Documents where staff can access the final versions.
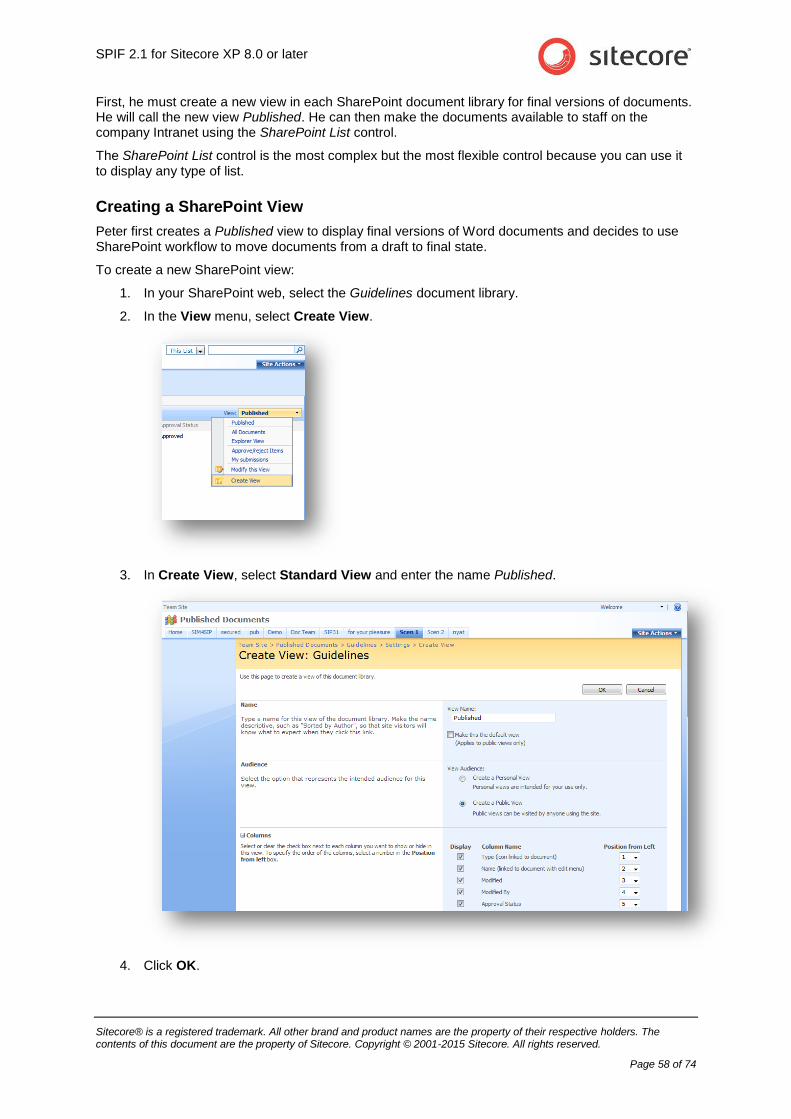
SPIF 2.1 for Sitecore XP 8.0 or later
Sitecore® is a registered trademark. All other brand and product names are the property of their respective holders. The contents of this document are the property of Sitecore. Copyright © 2001-2015 Sitecore. All rights reserved.
Page 58 of 74
First, he must create a new view in each SharePoint document library for final versions of documents. He will call the new view Published. He can then make the documents available to staff on the company Intranet using the SharePoint List control.
The SharePoint List control is the most complex but the most flexible control because you can use it to display any type of list.
Creating a SharePoint View
Peter first creates a Published view to display final versions of Word documents and decides to use SharePoint workflow to move documents from a draft to final state.
To create a new SharePoint view:
1. In your SharePoint web, select the Guidelines document library.
2. In the View menu, select Create View.
3. In Create View, select Standard View and enter the name Published.
4. Click OK.
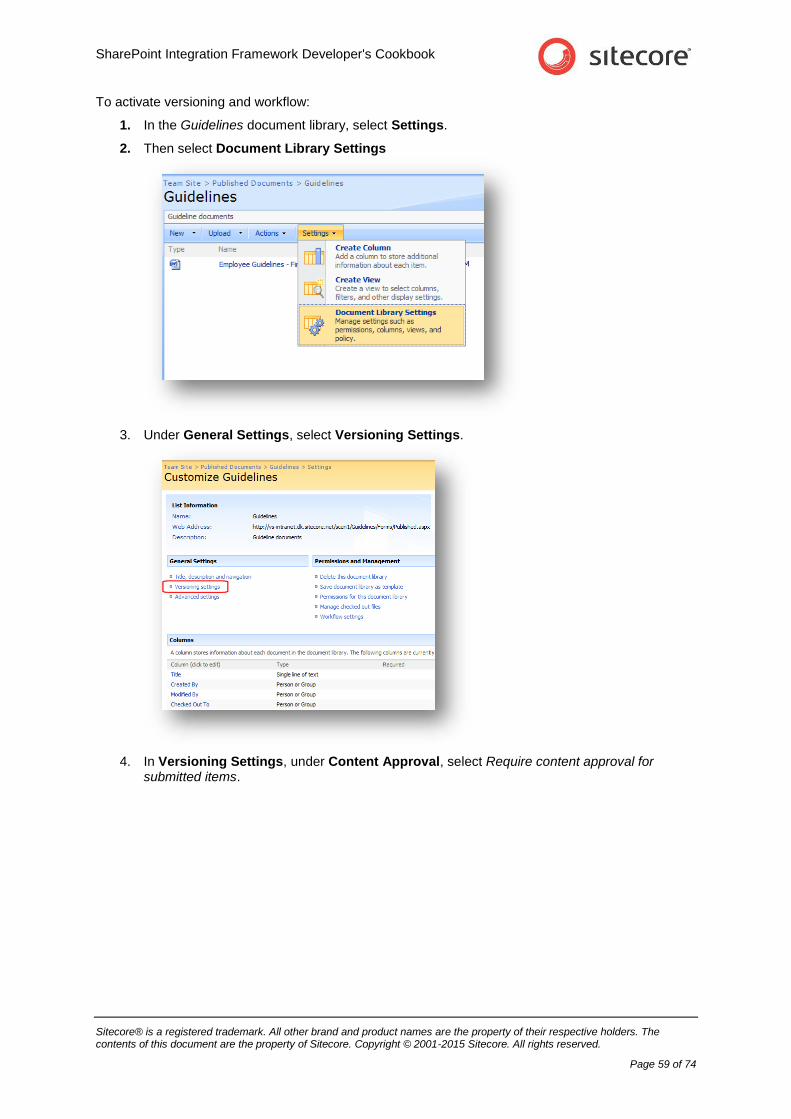
SharePoint Integration Framework Developer's Cookbook
Sitecore® is a registered trademark. All other brand and product names are the property of their respective holders. The contents of this document are the property of Sitecore. Copyright © 2001-2015 Sitecore. All rights reserved.
Page 59 of 74
To activate versioning and workflow:
1. In the Guidelines document library, select Settings.
2. Then select Document Library Settings
3. Under General Settings, select Versioning Settings.
4. In Versioning Settings, under Content Approval, select Require content approval for submitted items.
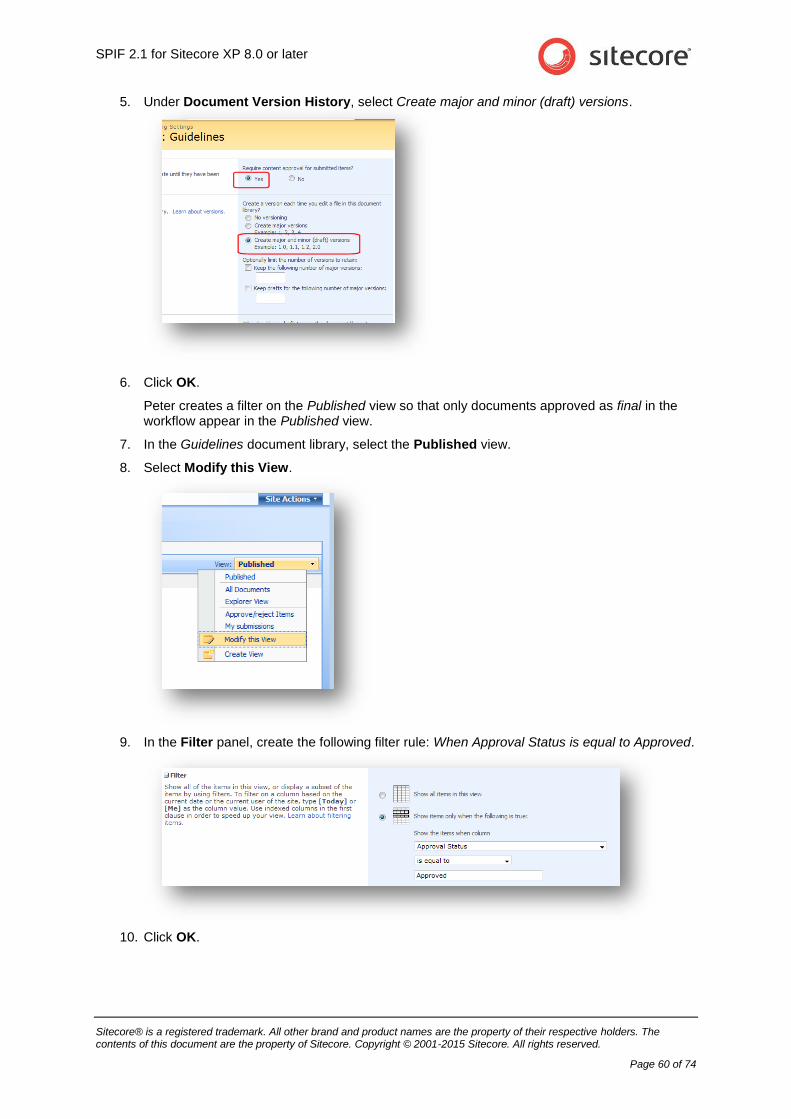
SPIF 2.1 for Sitecore XP 8.0 or later
Sitecore® is a registered trademark. All other brand and product names are the property of their respective holders. The contents of this document are the property of Sitecore. Copyright © 2001-2015 Sitecore. All rights reserved.
Page 60 of 74
5. Under Document Version History, select Create major and minor (draft) versions.
6. Click OK.
Peter creates a filter on the Published view so that only documents approved as final in the workflow appear in the Published view.
7. In the Guidelines document library, select the Published view.
8. Select Modify this View.
9. In the Filter panel, create the following filter rule: When Approval Status is equal to Approved.
10. Click OK.
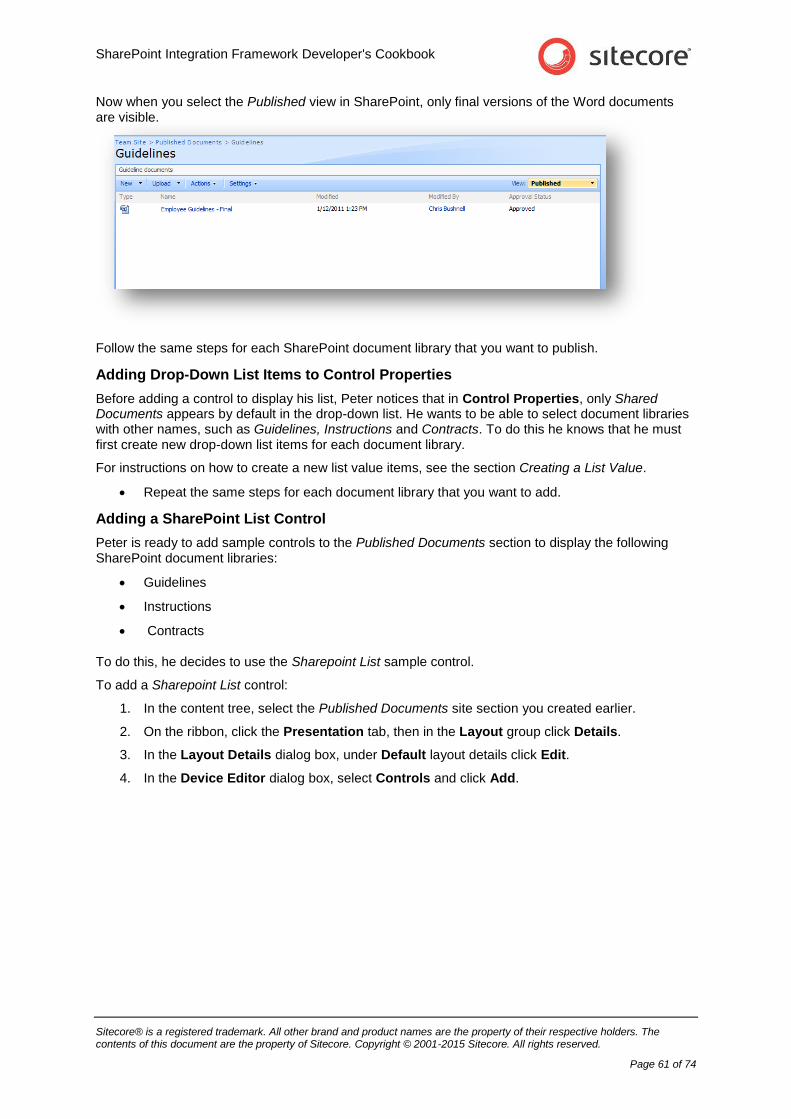
SharePoint Integration Framework Developer's Cookbook
Sitecore® is a registered trademark. All other brand and product names are the property of their respective holders. The contents of this document are the property of Sitecore. Copyright © 2001-2015 Sitecore. All rights reserved.
Page 61 of 74
Now when you select the Published view in SharePoint, only final versions of the Word documents are visible.
Follow the same steps for each SharePoint document library that you want to publish.
Adding Drop-Down List Items to Control Properties
Before adding a control to display his list, Peter notices that in Control Properties, only Shared Documents appears by default in the drop-down list. He wants to be able to select document libraries with other names, such as Guidelines, Instructions and Contracts. To do this he knows that he must first create new drop-down list items for each document library.
For instructions on how to create a new list value items, see the section Creating a List Value.
Repeat the same steps for each document library that you want to add.
Adding a SharePoint List Control
Peter is ready to add sample controls to the Published Documents section to display the following SharePoint document libraries:
Guidelines
Instructions
Contracts
To do this, he decides to use the Sharepoint List sample control.
To add a Sharepoint List control:
1. In the content tree, select the Published Documents site section you created earlier.
2. On the ribbon, click the Presentation tab, then in the Layout group click Details.
3. In the Layout Details dialog box, under Default layout details click Edit.
4. In the Device Editor dialog box, select Controls and click Add.
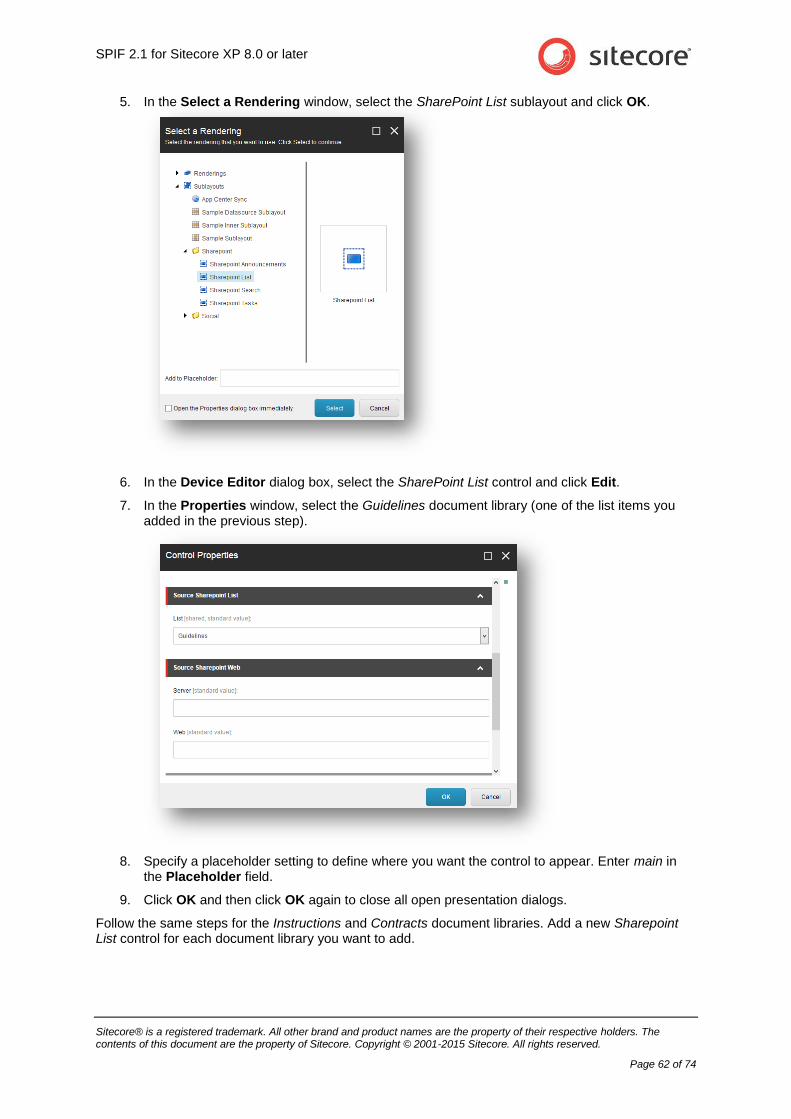
SPIF 2.1 for Sitecore XP 8.0 or later
Sitecore® is a registered trademark. All other brand and product names are the property of their respective holders. The contents of this document are the property of Sitecore. Copyright © 2001-2015 Sitecore. All rights reserved.
Page 62 of 74
5. In the Select a Rendering window, select the SharePoint List sublayout and click OK.
6. In the Device Editor dialog box, select the SharePoint List control and click Edit.
7. In the Properties window, select the Guidelines document library (one of the list items you added in the previous step).
8. Specify a placeholder setting to define where you want the control to appear. Enter main in the Placeholder field.
9. Click OK and then click OK again to close all open presentation dialogs.
Follow the same steps for the Instructions and Contracts document libraries. Add a new Sharepoint List control for each document library you want to add.
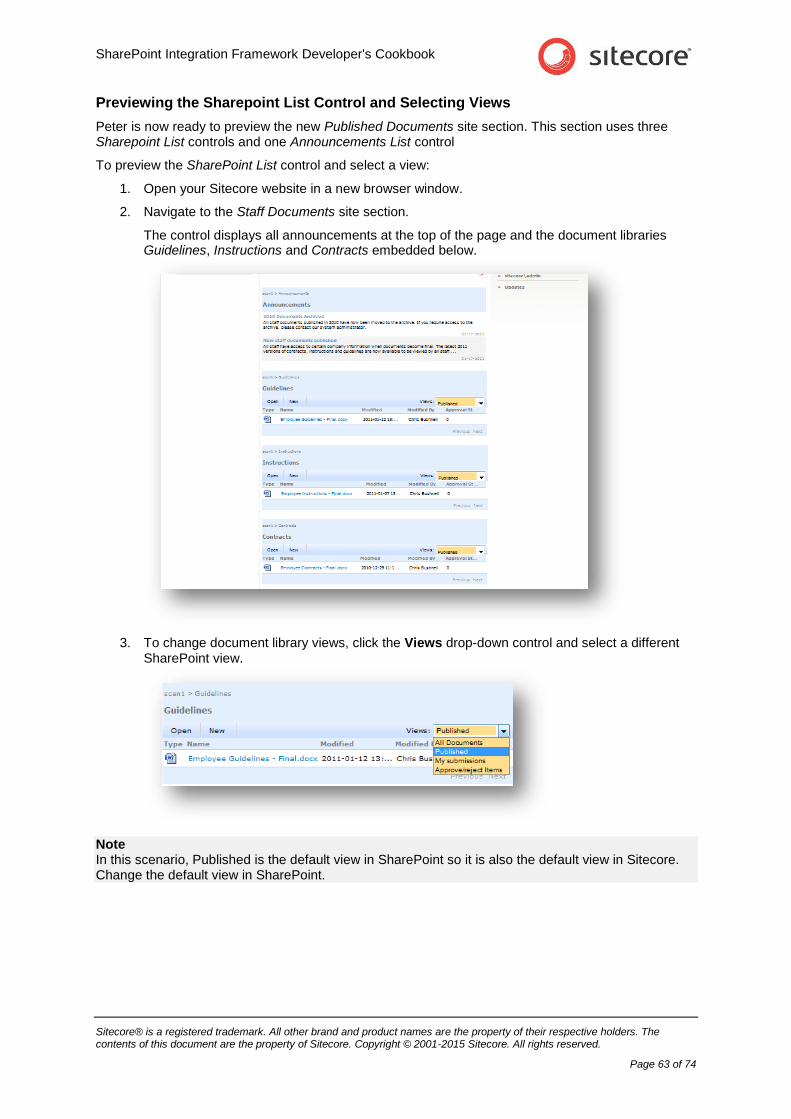
SharePoint Integration Framework Developer's Cookbook
Sitecore® is a registered trademark. All other brand and product names are the property of their respective holders. The contents of this document are the property of Sitecore. Copyright © 2001-2015 Sitecore. All rights reserved.
Page 63 of 74
Previewing the Sharepoint List Control and Selecting Views
Peter is now ready to preview the new Published Documents site section. This section uses three Sharepoint List controls and one Announcements List control
To preview the SharePoint List control and select a view:
1. Open your Sitecore website in a new browser window.
2. Navigate to the Staff Documents site section.
The control displays all announcements at the top of the page and the document libraries Guidelines, Instructions and Contracts embedded below.
3. To change document library views, click the Views drop-down control and select a different SharePoint view.
Note In this scenario, Published is the default view in SharePoint so it is also the default view in Sitecore. Change the default view in SharePoint.
SPIF 2.1 for Sitecore XP 8.0 or later
Sitecore® is a registered trademark. All other brand and product names are the property of their respective holders. The contents of this document are the property of Sitecore. Copyright © 2001-2015 Sitecore. All rights reserved.
Page 64 of 74
6.2 Item-level Integration on a Sitecore Extranet
The following scenario demonstrates how to implement the SharePoint Integration Framework using the SharePoint Integration wizard and a Sitecore extranet website.
About these Walkthroughs
The walkthroughs in this section demonstrate how to:
Map SharePoint announcements to the Sitecore content tree.
Map SharePoint document libraries to the Sitecore Media Library.
Story
A quality assurance company serves among other clients the European financial services industry and automotive industry. Standards and rules are changing at a high rate and changes must appear in the documentation immediately. They want to make changes available to customers right away.
The company authors its own documents internally and stores them in several SharePoint document libraries. They also have a company extranet powered by Sitecore. When the documents are final, they want to publish them on the customer portal extranet web site.
Personas
Miriam – SharePoint Editor/Contributor
Miriam creates and updates Word documents and stores them in several SharePoint document libraries. She has created document libraries for product testing, improvement plans, and review processes. She wants to make some of these documents available to customers on the company extranet.
Johan – Sitecore developer
Johan has many years of experience working with Sitecore but is not so familiar with SharePoint. The company extranet uses Sitecore, so he wants to utilize the power of Sitecore to manage integration items natively.
Aims
Use the SharePoint Integration wizard to import documents and lists from SharePoint to Sitecore. Once the required lists are in the Sitecore content tree use functionality such as publishing, versioning and workflow to manage the items. Publish content to the customer portal using appropriate presentation options.
This task makes SharePoint documents available as Sitecore items as soon as they are ready and means that any changes made to a document appears on the website straight away.
Prerequisites
You need the following to complete this walkthrough:
A SharePoint server
Webs – One or more SharePoint websites
One or more announcements lists
One or more document libraries
Sample draft and final Word documents
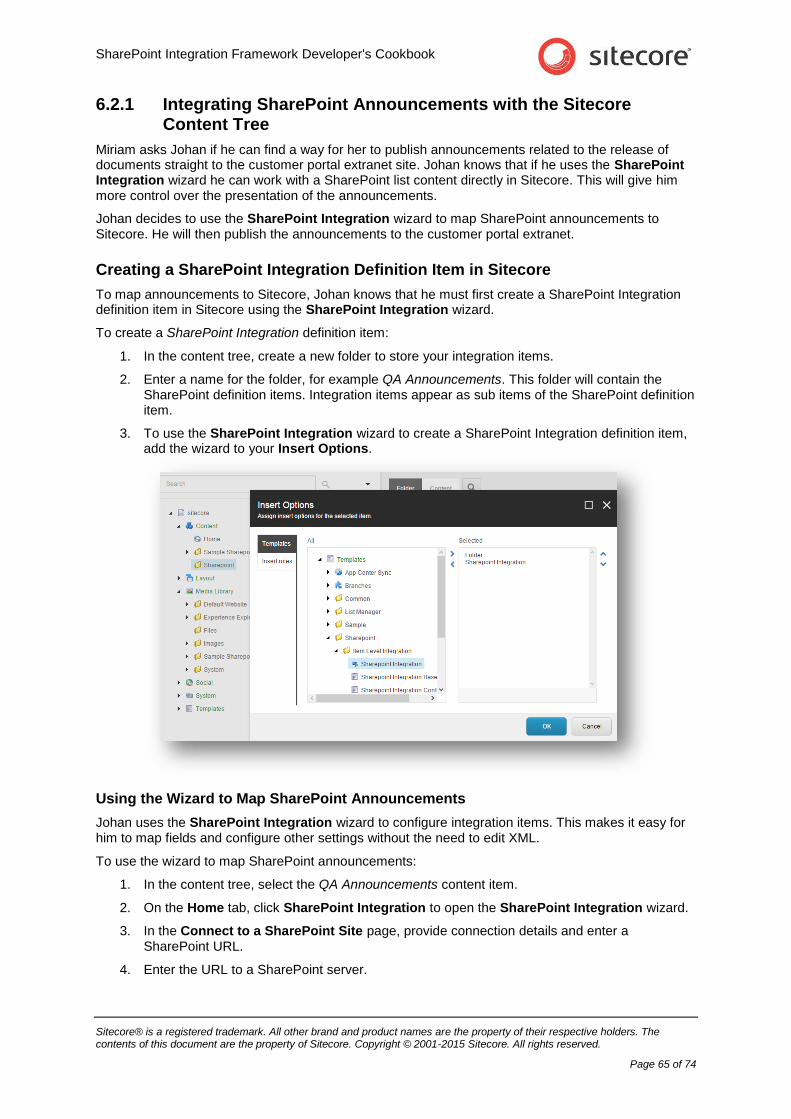
SharePoint Integration Framework Developer's Cookbook
Sitecore® is a registered trademark. All other brand and product names are the property of their respective holders. The contents of this document are the property of Sitecore. Copyright © 2001-2015 Sitecore. All rights reserved.
Page 65 of 74
6.2.1 Integrating SharePoint Announcements with the Sitecore Content Tree
Miriam asks Johan if he can find a way for her to publish announcements related to the release of documents straight to the customer portal extranet site. Johan knows that if he uses the SharePoint Integration wizard he can work with a SharePoint list content directly in Sitecore. This will give him more control over the presentation of the announcements.
Johan decides to use the SharePoint Integration wizard to map SharePoint announcements to Sitecore. He will then publish the announcements to the customer portal extranet.
Creating a SharePoint Integration Definition Item in Sitecore
To map announcements to Sitecore, Johan knows that he must first create a SharePoint Integration definition item in Sitecore using the SharePoint Integration wizard.
To create a SharePoint Integration definition item:
1. In the content tree, create a new folder to store your integration items.
2. Enter a name for the folder, for example QA Announcements. This folder will contain the SharePoint definition items. Integration items appear as sub items of the SharePoint definition item.
3. To use the SharePoint Integration wizard to create a SharePoint Integration definition item, add the wizard to your Insert Options.
Using the Wizard to Map SharePoint Announcements
Johan uses the SharePoint Integration wizard to configure integration items. This makes it easy for him to map fields and configure other settings without the need to edit XML.
To use the wizard to map SharePoint announcements:
1. In the content tree, select the QA Announcements content item.
2. On the Home tab, click SharePoint Integration to open the SharePoint Integration wizard.
3. In the Connect to a SharePoint Site page, provide connection details and enter a SharePoint URL.
4. Enter the URL to a SharePoint server.
SPIF 2.1 for Sitecore XP 8.0 or later
Sitecore® is a registered trademark. All other brand and product names are the property of their respective holders. The contents of this document are the property of Sitecore. Copyright © 2001-2015 Sitecore. All rights reserved.
Page 66 of 74
5. Enter your SharePoint server credentials in the sharepoint.config file or in the
Credentials for Sharepoint server fields in the wizard. If you have added default credentials
to the sharepoint.config file the wizard will find these automatically.
6. In the Select a SharePoint List page of the wizard, select the Announcements list.
7. In the Select a SharePoint View page, select a view. For example, All Items.
8. In the Integration Mapping Template, either use an existing mapping template or create a new template to save your own mappings.
9. Map SharePoint fields with similar or equivalent Sitecore fields. An example XML field mapping that maps the SharePoint body field with the Sitecore body field.
<Source>ows_Body</Source>
<Target>Body</Target>
10. In the Map Integration Fields page, check that you have the correct SharePoint fields mapped to the correct Sitecore fields. You can also add and remove mappings.
11. Configure Advanced Settings, for example set an expiration interval and select scheduled BLOB transfer, if appropriate.
12. Set the expiration interval to 100 seconds.
13. In the Confirmation page, check your settings and click Create.
When you have completed all the pages in the wizard, the SharePoint list items that you integrated appear straight away as content items in the content tree under the node you specified. In this example, they appear under the scen2_Announcements SharePoint integration definition item.
Configuring Presentation
Item-level integration allows you to integrate SharePoint list items with Sitecore without the need to use special SharePoint controls to display content on your website. Each list item that you integrate appears as a separate content item in Sitecore.
Some presentation options include:
Use standard Sitecore renderings and sublayouts - for example, you can display announcement text using the Sample rendering control.
Create custom renderings or sublayouts - you can create your own custom control to display documents that come from a SharePoint document library.
Configuring Other Sitecore Options
Configure Sitecore workflow, publishing or versioning on your integration items. For example, you could integrate all document library content with Sitecore and then use Sitecore workflow rather than SharePoint workflow to handle the publication of documents to the extranet.
Previewing Integration Items on an Extranet
To preview integration Items on an extranet:
In the Content Editor, on the ribbon, click Publish and then click Preview to view the content that you have integrated with Sitecore.
OR
Open a new browser window and navigate to your extranet site.
SharePoint Integration Framework Developer's Cookbook
Sitecore® is a registered trademark. All other brand and product names are the property of their respective holders. The contents of this document are the property of Sitecore. Copyright © 2001-2015 Sitecore. All rights reserved.
Page 67 of 74
6.2.2 Integrating SharePoint Document Libraries with the Sitecore Media Library
Introduction
Miriam asks Johan if he can find a way for her to publish final versions of QA Word documents to the customer portal extranet site. Johan wants to use item-level integration again but this time decides to integrate the SharePoint document libraries with a Media Library folder. He thinks that the functionality available in the Media Library is more suitable for SharePoint document libraries than the Sitecore content tree.
Johan uses the SharePoint Integration wizard to map a SharePoint document library to Sitecore. He then uses Sitecore to publish the Word documents on the customer portal extranet.
SharePoint Prerequisites
In SharePoint, create the following quality assurance document libraries:
Standards
Testing
Improvement
Review
Upload sample Word documents to each document library.
Using the Wizard to Integrate a SharePoint Document Library
Johan uses the SharePoint Integration wizard to map the Word documents for each of Miriam’s document libraries to the Sitecore Media Library.
To use the SharePoint Integration wizard to integrate a SharePoint Document Library:
1. Select a suitable node in the Media Library content tree and create a new folder for your integration items. Name the folder QA documents.
2. In the Media Library, select the QA Documents media content item.
3. Open the SharePoint Integration wizard.
4. In the Connect to a SharePoint Site page, provide user credentials and enter a SharePoint URL.
5. In the Select a SharePoint List page, select the document library that you want to integrate.
6. In the Select a SharePoint View page, select a view. For example, All Documents.
7. In the Integration Mapping Template, either use an existing mapping template or create your own mappings.
8. In the Map Integration Fields page, check the default mappings. Accept the default mappings or you can add or remove more fields.
9. Configure Advanced Settings, for example set an expiration interval and select scheduled BLOB transfer, if appropriate.
10. Click Create.
The list items that you mapped now appear in the Media Library content tree under the SharePoint integration definition item you created.
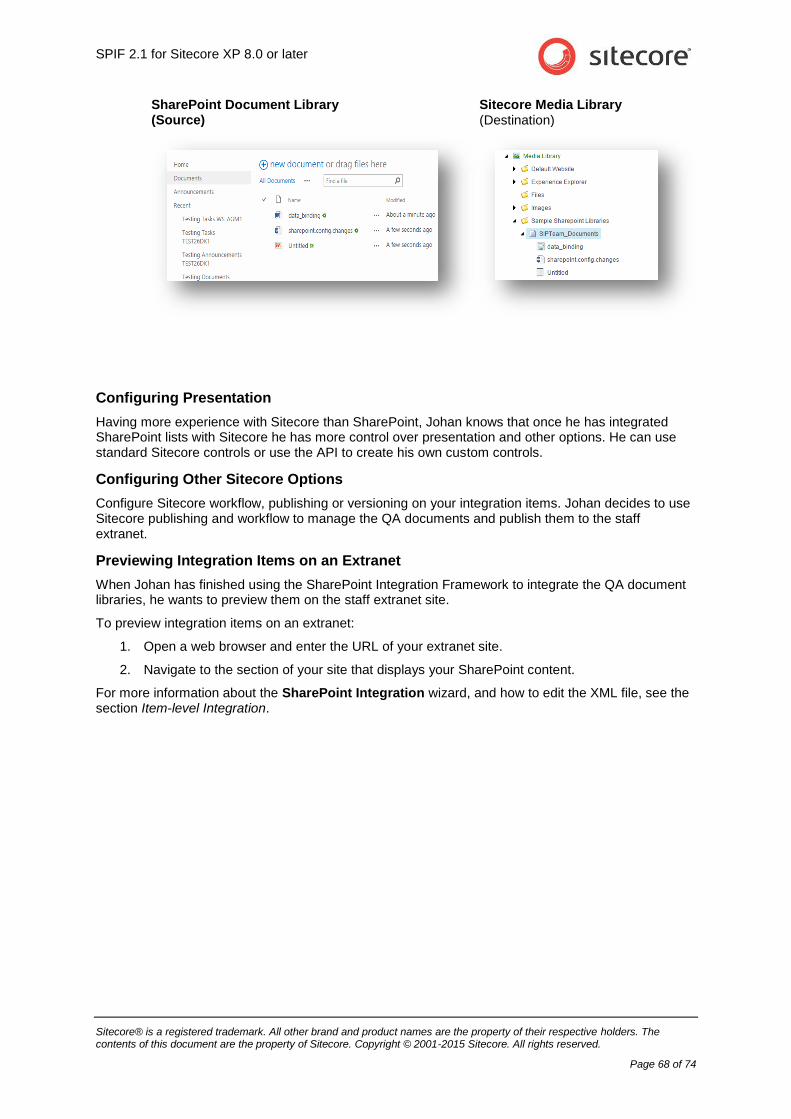
SPIF 2.1 for Sitecore XP 8.0 or later
Sitecore® is a registered trademark. All other brand and product names are the property of their respective holders. The contents of this document are the property of Sitecore. Copyright © 2001-2015 Sitecore. All rights reserved.
Page 68 of 74
SharePoint Document Library (Source)
Sitecore Media Library (Destination)
Configuring Presentation
Having more experience with Sitecore than SharePoint, Johan knows that once he has integrated SharePoint lists with Sitecore he has more control over presentation and other options. He can use standard Sitecore controls or use the API to create his own custom controls.
Configuring Other Sitecore Options
Configure Sitecore workflow, publishing or versioning on your integration items. Johan decides to use Sitecore publishing and workflow to manage the QA documents and publish them to the staff extranet.
Previewing Integration Items on an Extranet
When Johan has finished using the SharePoint Integration Framework to integrate the QA document libraries, he wants to preview them on the staff extranet site.
To preview integration items on an extranet:
1. Open a web browser and enter the URL of your extranet site.
2. Navigate to the section of your site that displays your SharePoint content.
For more information about the SharePoint Integration wizard, and how to edit the XML file, see the section Item-level Integration.
SharePoint Integration Framework Developer's Cookbook
Sitecore® is a registered trademark. All other brand and product names are the property of their respective holders. The contents of this document are the property of Sitecore. Copyright © 2001-2015 Sitecore. All rights reserved.
Page 69 of 74
Chapter 7
Appendix
This section describes impersonation and delegation in Windows for on-premises installations.
This chapter includes:
Configuring Impersonation and Delegation in Windows
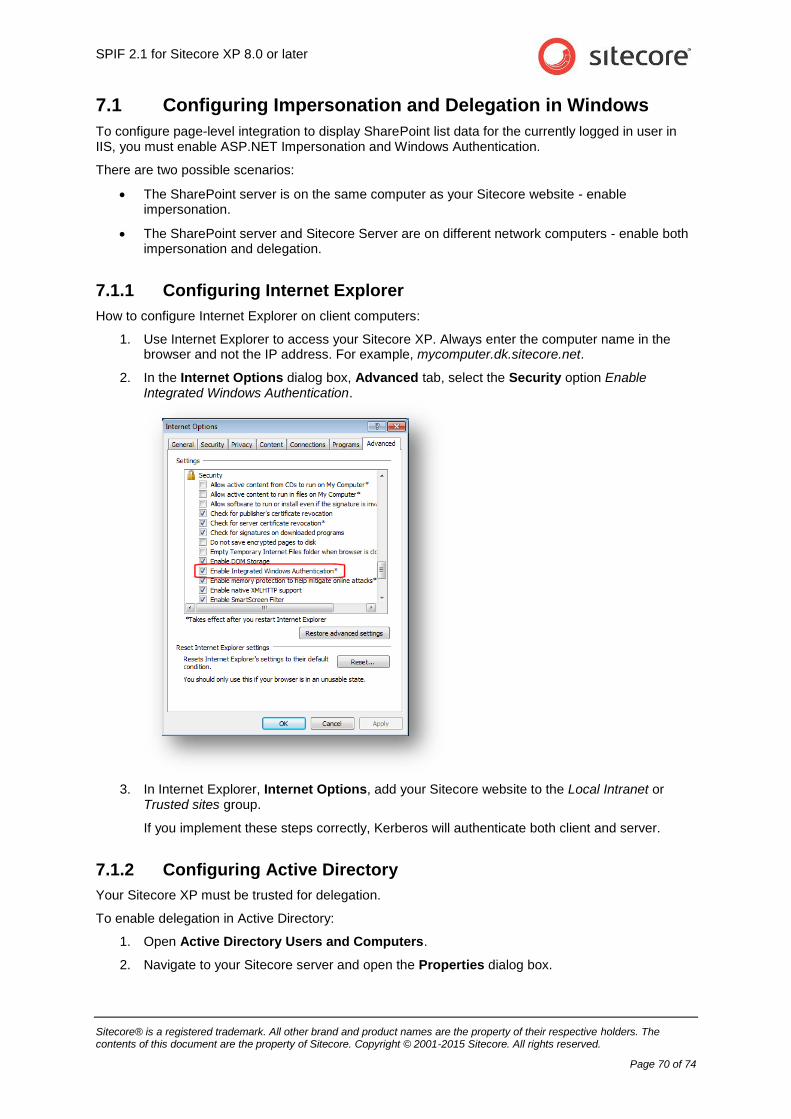
SPIF 2.1 for Sitecore XP 8.0 or later
Sitecore® is a registered trademark. All other brand and product names are the property of their respective holders. The contents of this document are the property of Sitecore. Copyright © 2001-2015 Sitecore. All rights reserved.
Page 70 of 74
7.1 Configuring Impersonation and Delegation in Windows
To configure page-level integration to display SharePoint list data for the currently logged in user in IIS, you must enable ASP.NET Impersonation and Windows Authentication.
There are two possible scenarios:
The SharePoint server is on the same computer as your Sitecore website - enable impersonation.
The SharePoint server and Sitecore Server are on different network computers - enable both impersonation and delegation.
7.1.1 Configuring Internet Explorer
How to configure Internet Explorer on client computers:
1. Use Internet Explorer to access your Sitecore XP. Always enter the computer name in the browser and not the IP address. For example, mycomputer.dk.sitecore.net.
2. In the Internet Options dialog box, Advanced tab, select the Security option Enable Integrated Windows Authentication.
3. In Internet Explorer, Internet Options, add your Sitecore website to the Local Intranet or Trusted sites group.
If you implement these steps correctly, Kerberos will authenticate both client and server.
7.1.2 Configuring Active Directory
Your Sitecore XP must be trusted for delegation.
To enable delegation in Active Directory:
1. Open Active Directory Users and Computers.
2. Navigate to your Sitecore server and open the Properties dialog box.
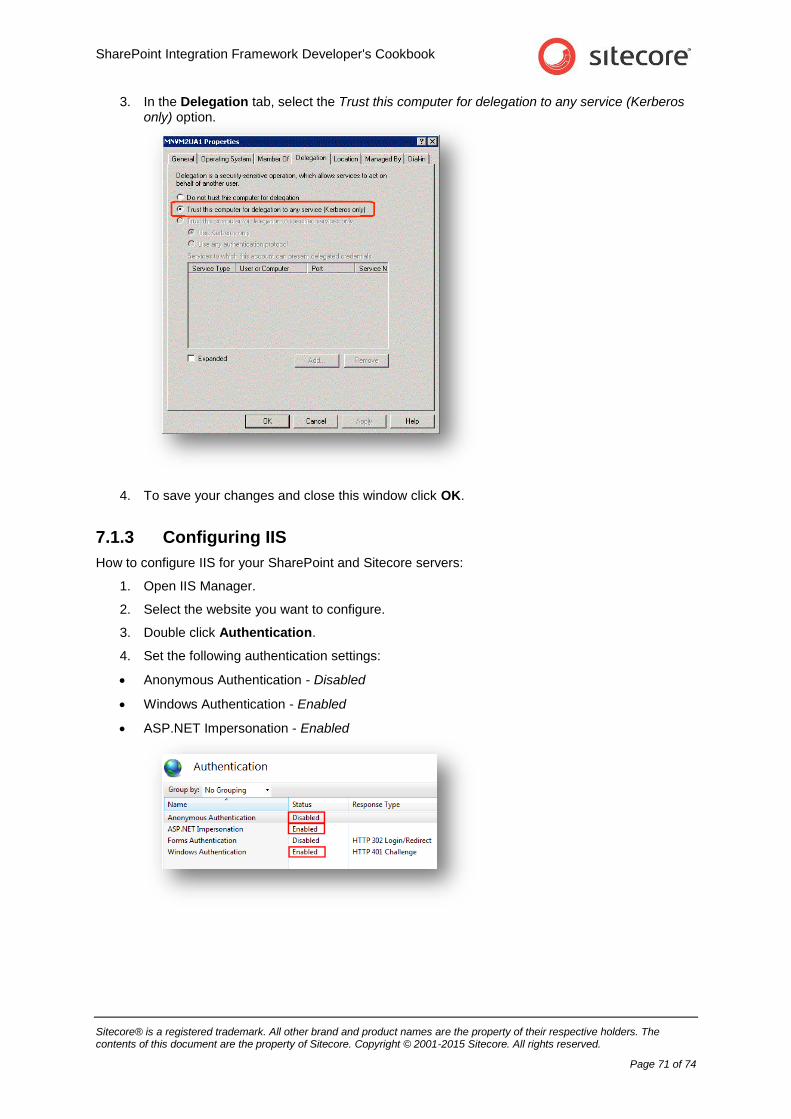
SharePoint Integration Framework Developer's Cookbook
Sitecore® is a registered trademark. All other brand and product names are the property of their respective holders. The contents of this document are the property of Sitecore. Copyright © 2001-2015 Sitecore. All rights reserved.
Page 71 of 74
3. In the Delegation tab, select the Trust this computer for delegation to any service (Kerberos only) option.
4. To save your changes and close this window click OK.
7.1.3 Configuring IIS
How to configure IIS for your SharePoint and Sitecore servers:
1. Open IIS Manager.
2. Select the website you want to configure.
3. Double click Authentication.
4. Set the following authentication settings:
Anonymous Authentication - Disabled
Windows Authentication - Enabled
ASP.NET Impersonation - Enabled
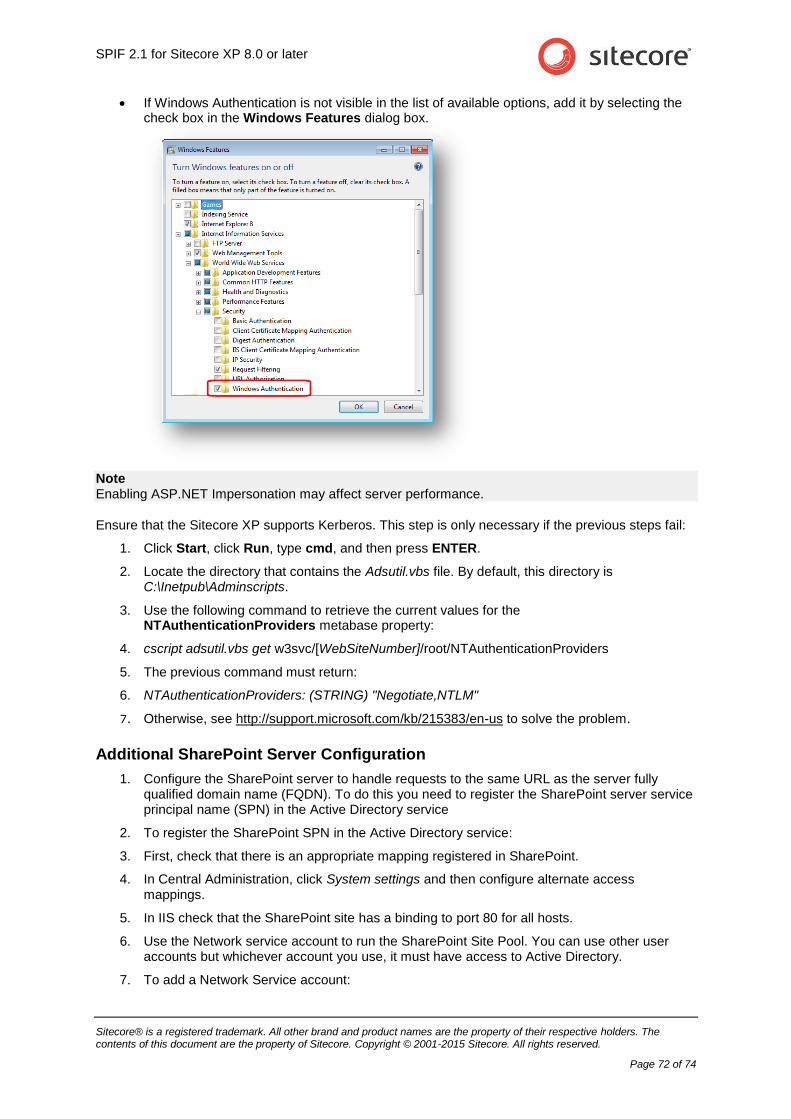
SPIF 2.1 for Sitecore XP 8.0 or later
Sitecore® is a registered trademark. All other brand and product names are the property of their respective holders. The contents of this document are the property of Sitecore. Copyright © 2001-2015 Sitecore. All rights reserved.
Page 72 of 74
If Windows Authentication is not visible in the list of available options, add it by selecting the check box in the Windows Features dialog box.
Note Enabling ASP.NET Impersonation may affect server performance.
Ensure that the Sitecore XP supports Kerberos. This step is only necessary if the previous steps fail:
1. Click Start, click Run, type cmd, and then press ENTER.
2. Locate the directory that contains the Adsutil.vbs file. By default, this directory is C:\Inetpub\Adminscripts.
3. Use the following command to retrieve the current values for the NTAuthenticationProviders metabase property:
4. cscript adsutil.vbs get w3svc/[WebSiteNumber]/root/NTAuthenticationProviders
5. The previous command must return:
6. NTAuthenticationProviders: (STRING) "Negotiate,NTLM"
7. Otherwise, see http://support.microsoft.com/kb/215383/en-us to solve the problem.
Additional SharePoint Server Configuration
1. Configure the SharePoint server to handle requests to the same URL as the server fully qualified domain name (FQDN). To do this you need to register the SharePoint server service principal name (SPN) in the Active Directory service
2. To register the SharePoint SPN in the Active Directory service:
3. First, check that there is an appropriate mapping registered in SharePoint.
4. In Central Administration, click System settings and then configure alternate access mappings.
5. In IIS check that the SharePoint site has a binding to port 80 for all hosts.
6. Use the Network service account to run the SharePoint Site Pool. You can use other user accounts but whichever account you use, it must have access to Active Directory.
7. To add a Network Service account:

SharePoint Integration Framework Developer's Cookbook
Sitecore® is a registered trademark. All other brand and product names are the property of their respective holders. The contents of this document are the property of Sitecore. Copyright © 2001-2015 Sitecore. All rights reserved.
Page 73 of 74
8. In Central Administration, click Security, then click Configure Service Accounts
9. Select Web Application Pool for your site.
10. Select Network Service as an account for this component.
11. Make sure that you have configured the default authentication provider correctly.
12. To configure default authentication:
13. In Central Administration, Security, click Authentication Providers and then click Default.
14. Configure the following settings:
o Authentication type = Windows
o Anonymous access = disabled
o IIS Authentication settings = Integrated Windows Authentication (Negotiate Kerberos)
When you have correctly configured the SharePoint server, you can see the following entries in the Windows Security Log:
If you have configured the SharePoint server correctly the Logon Process = Kerberos.
Kerberos Authentication
For the Kerberos authentication to work, you must implement one of the two following options:
1. Configure the SharePoint server so that other applications access it using exactly the same URL as the server fully qualified domain name (FQDN).
2. If the previous option is not suitable for you, you must register the server service principal name (SPN) in the Active Directory service.
To use the first option:
1. Register appropriate Alternate Access Mappings.
The NETWORK SERVICE account should be used to run the SharePoint Site Pool.
2. Click Central Administration, Security, Configure Service Accounts.
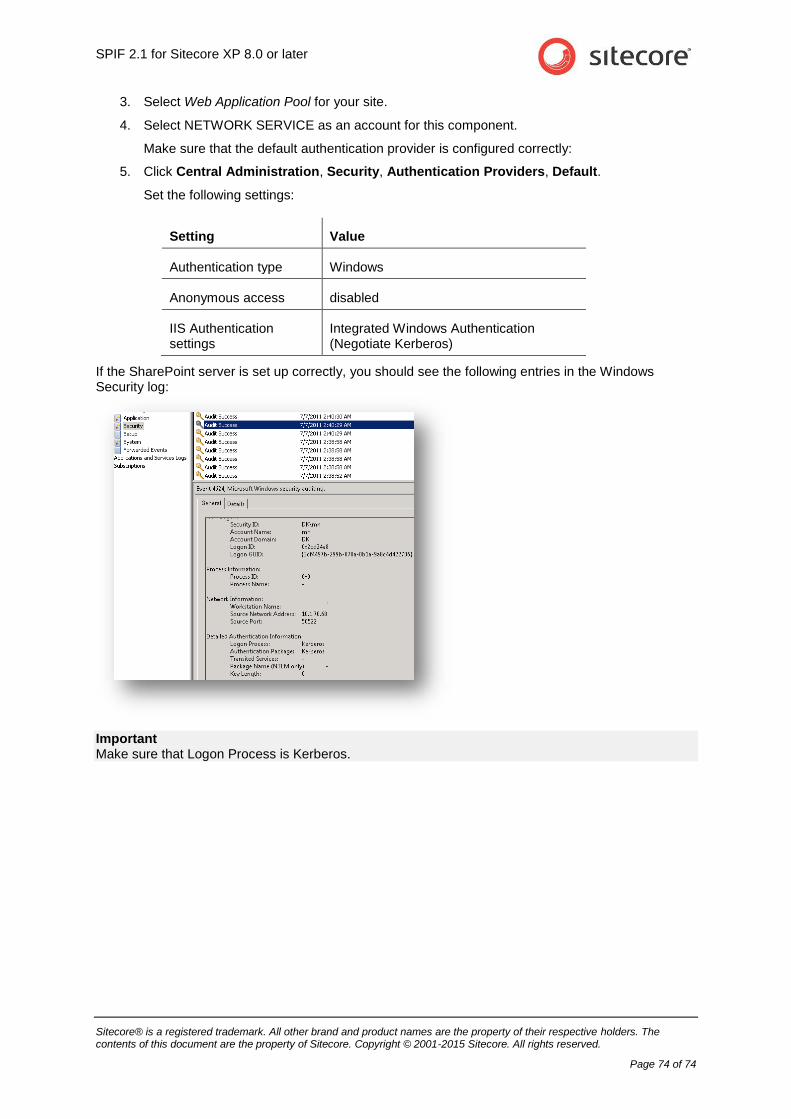
SPIF 2.1 for Sitecore XP 8.0 or later
Sitecore® is a registered trademark. All other brand and product names are the property of their respective holders. The contents of this document are the property of Sitecore. Copyright © 2001-2015 Sitecore. All rights reserved.
Page 74 of 74
3. Select Web Application Pool for your site.
4. Select NETWORK SERVICE as an account for this component.
Make sure that the default authentication provider is configured correctly:
5. Click Central Administration, Security, Authentication Providers, Default.
Set the following settings:
Setting Value
Authentication type Windows
Anonymous access disabled
IIS Authentication settings
Integrated Windows Authentication (Negotiate Kerberos)
If the SharePoint server is set up correctly, you should see the following entries in the Windows Security log:
Important Make sure that Logon Process is Kerberos.
Related Documents