ShadowSense Troubleshooting Guide

Welcome message from author
This document is posted to help you gain knowledge. Please leave a comment to let me know what you think about it! Share it to your friends and learn new things together.
Transcript

ShadowSense Troubleshooting Guide
1
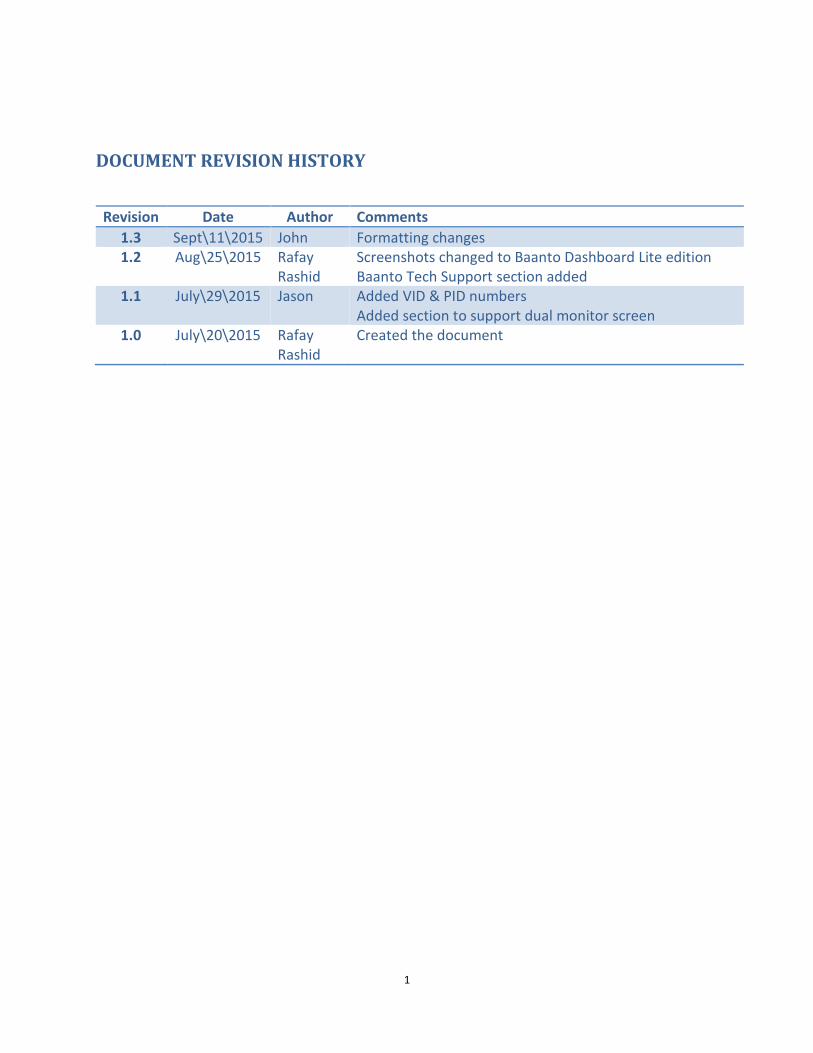
DOCUMENT REVISION HISTORY
Revision Date Author Comments
1.3 Sept\11\2015 John Formatting changes 1.2 Aug\25\2015 Rafay
Rashid Screenshots changed to Baanto Dashboard Lite edition Baanto Tech Support section added
1.1 July\29\2015 Jason Added VID & PID numbers Added section to support dual monitor screen
1.0 July\20\2015 Rafay Rashid
Created the document

2
TABLE OF CONTENTS
DOCUMENT REVISION HISTORY .................................................................................................................... 1
DESCRIPTION ................................................................................................................................................. 3
1.0 Touch Does Not Work ....................................................................................................................... 3
1.1 Device Manager Touch Frame Recognition .................................................................................. 5
1.2 Resetting Configuration Parameters ............................................................................................. 7
1.3 Exporting LED View ....................................................................................................................... 8
2.0 Resetting the Calibration .................................................................................................................. 9
3.0 Dual Monitor Setup with a Single PC .............................................................................................. 11
4.0 Turning off Flicks ............................................................................................................................. 14
5.0 Configuring for Use with a Mac ...................................................................................................... 15
6.0 Unable to Run Dashboard ............................................................................................................... 16
7.0 Baanto Tech Support....................................................................................................................... 17

3
DESCRIPTION
This document lists the common issues experienced by users of ShadowSense™ touch frames and step-by-step procedures for fault finding and debugging the touch frame. The document is divided up based on the most common problems users will experience and contact tech support about.
1.0 Touch Does Not Work
If the touch frame is not working, refer to the flow chart on the next page for step-by-step instructions
on how to resolve issues or determine if the unit needs to be repaired.
Do not use this flow chart if the end user has been upgrading or downgrading firmware. The end user
should not be upgrading or downgrading firmware without the help of an experienced support person.
The touch screen is tested prior to shipping and should work right out of the box without the use of
Dashboard.

4
Start
Check device manager for touch frame recognition (pg.4)
Actions to try Ensure power to the monitor is on Check device manager for touch frame recognition (pg.4) Swap USB cable Swap the USB port being used on the PC Use a different PC to drive monitor If another ShadowSense frame Is available that works try plugging
the PC into that unit
Power off frame then power back on after 10 seconds Open dashboard, in device options select rescan ShadowSense USB Devices Reset calibration in dashboard (pg. 8) Ensure all tranform configurations are set correctly (pg. 6)
Is this the first time the touch frame was plugged in on this PC?
YES
NO
Is the Frame seen?
NO
YES
Is the touch frame fixed?
YES
Finish
NO
Is the touch frame
working now?
YES
NO
If Dashboard is installed on PC, Export the LED view (pg.7) Send the resulting
.xml file to NEC Techsupport.
Defective unit, send back for
repairs
My touch frame is not working.
Does Techsupport
consider faulty frame?
Yes
NO Provide corrective action to customer
(pg.5)
(pg.5)
(pg.9) (pg.7)
(pg.8)
5
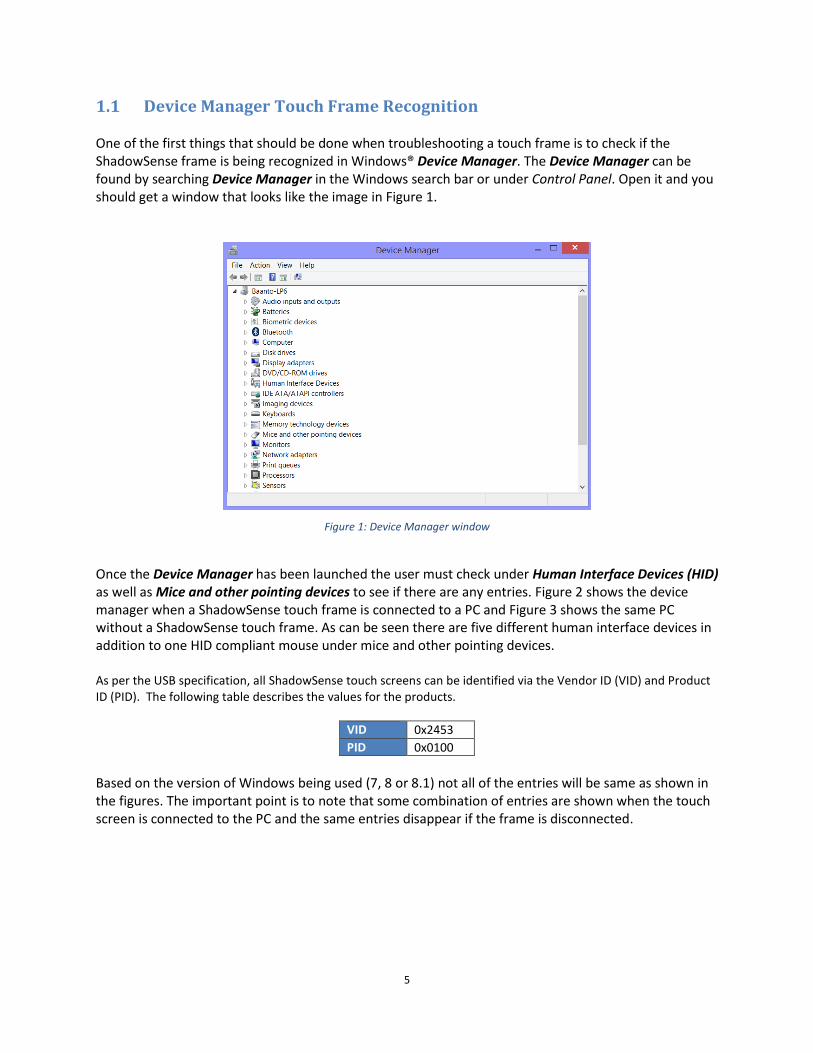
1.1 Device Manager Touch Frame Recognition
One of the first things that should be done when troubleshooting a touch frame is to check if the ShadowSense frame is being recognized in Windows® Device Manager. The Device Manager can be found by searching Device Manager in the Windows search bar or under Control Panel. Open it and you should get a window that looks like the image in Figure 1.
Figure 1: Device Manager window
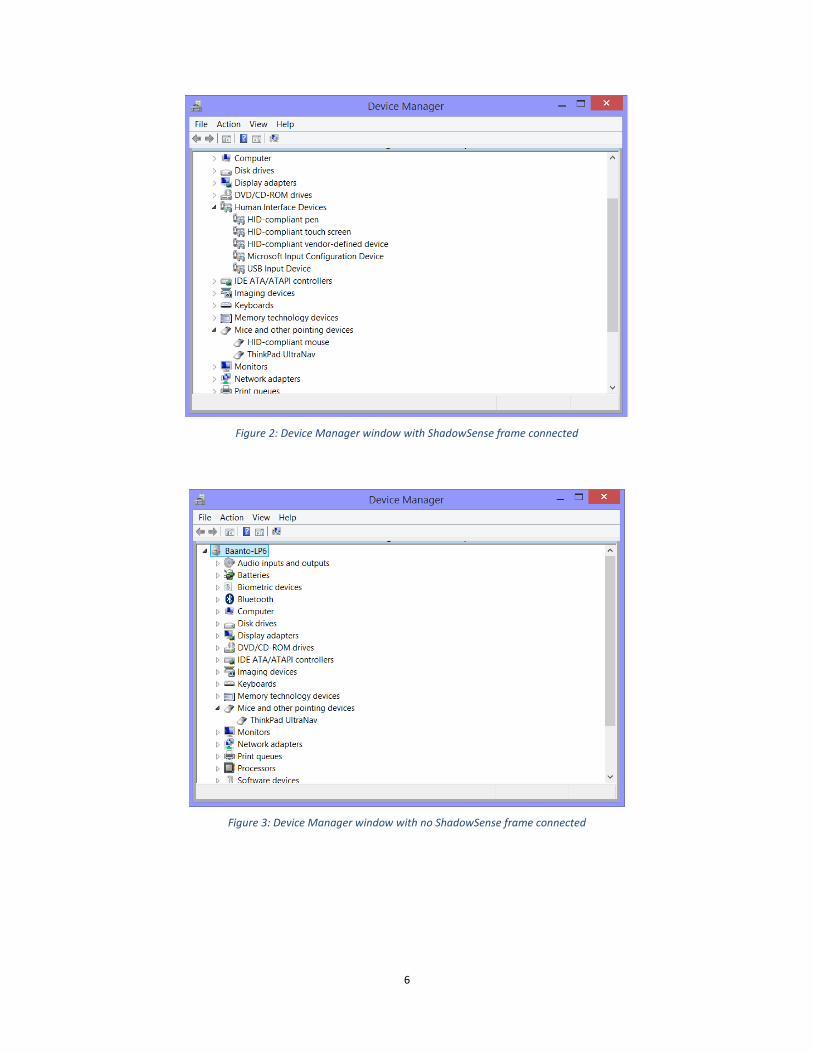
Once the Device Manager has been launched the user must check under Human Interface Devices (HID) as well as Mice and other pointing devices to see if there are any entries. Figure 2 shows the device manager when a ShadowSense touch frame is connected to a PC and Figure 3 shows the same PC without a ShadowSense touch frame. As can be seen there are five different human interface devices in addition to one HID compliant mouse under mice and other pointing devices. As per the USB specification, all ShadowSense touch screens can be identified via the Vendor ID (VID) and Product ID (PID). The following table describes the values for the products.
VID 0x2453
PID 0x0100
Based on the version of Windows being used (7, 8 or 8.1) not all of the entries will be same as shown in the figures. The important point is to note that some combination of entries are shown when the touch screen is connected to the PC and the same entries disappear if the frame is disconnected.
6
Figure 2: Device Manager window with ShadowSense frame connected
Figure 3: Device Manager window with no ShadowSense frame connected

7
1.2 Resetting Configuration Parameters In order to reset the configuration parameters for the ShadowSense touch frame the Dashboard application must be launched. Once Dashboard is open, the user must go into the configuration view in the top left of the window. When you open the configuration view you will then get the following screen shown in Figure 4. Click the reset button in the bottom right of the window. This resets most of the parameters back to the default for the ShadowSense frame.
Figure 4: Dashboard configuration tab
There are a few of the parameters that are not automatically reset when the reset button is clicked. In Operating System make sure Apple Settings is disabled and the Screen Rotation is set to landscape. The last parameter to check is in Setup Hardware and is called Touch Regions Mask. Make sure that all four regions are disabled.
8
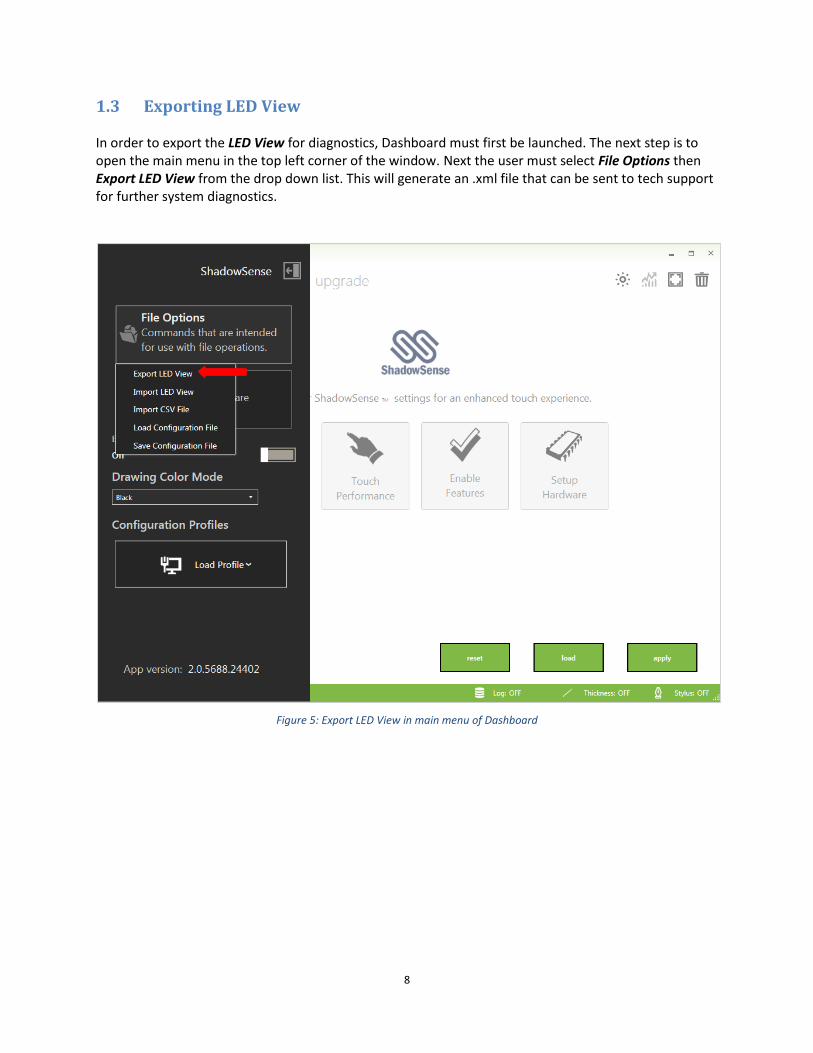
1.3 Exporting LED View In order to export the LED View for diagnostics, Dashboard must first be launched. The next step is to open the main menu in the top left corner of the window. Next the user must select File Options then Export LED View from the drop down list. This will generate an .xml file that can be sent to tech support for further system diagnostics.
Figure 5: Export LED View in main menu of Dashboard

9
2.0 Resetting the Calibration
Regardless of the OS the touch screen is used with, it is important to do the calibration on a Windows PC as that is the only OS that supports the Dashboard application.
1) Before doing any calibration, connect the touch frame to a Windows PC and open up Tablet PC Settings located inside the Control Panel.
2) Notice the Tablet PC Settings icon will not show up in the control panel if the touch frame is not powered up or USB is disconnected. If you are using a laptop with a touch screen this icon will always appear since the PC is always connected to a touch screen.
3) From the Display drop down menu select the touch monitor. Ensure the Reset button is greyed out. If the Reset button is not disabled, click the Reset Button and then click Apply. This will reset the Microsoft touch calibration on the PC for the corresponding touch monitor.
Figure 6: Tablet PC Settings
4) Open up Dashboard. Select the Setup Hardware button from the configuration view. Browse to the Calibrate section.
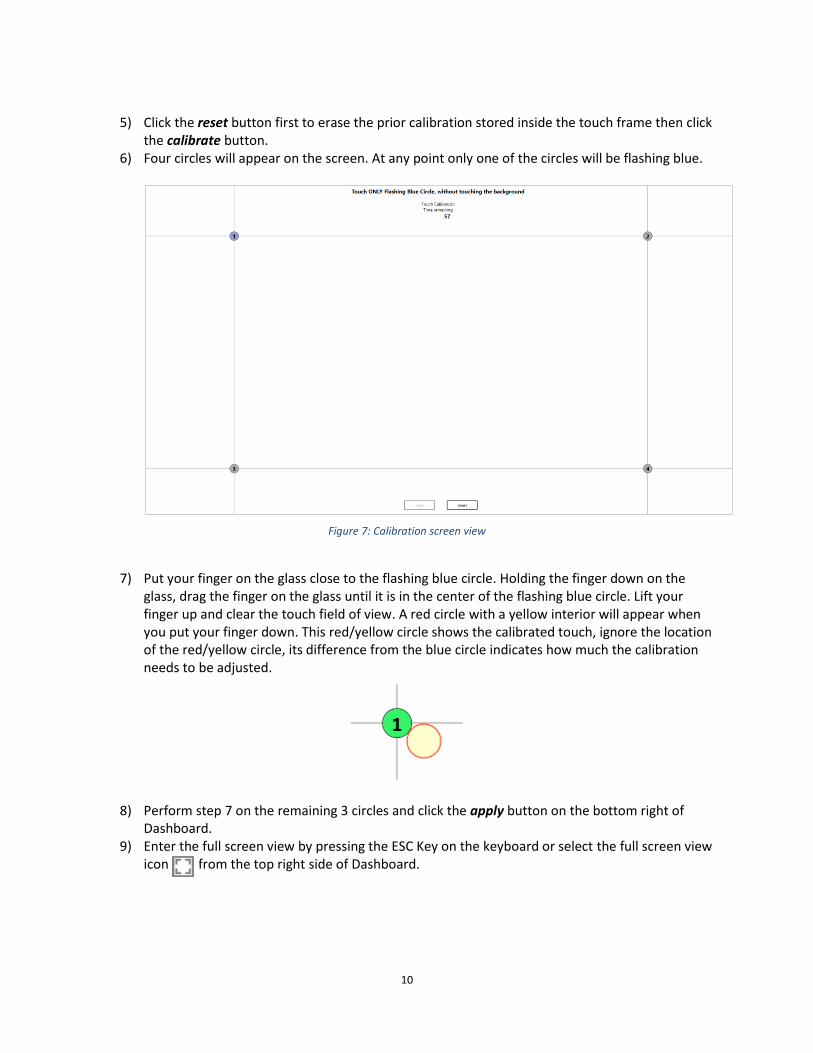
10
5) Click the reset button first to erase the prior calibration stored inside the touch frame then click
the calibrate button. 6) Four circles will appear on the screen. At any point only one of the circles will be flashing blue.
Figure 7: Calibration screen view
7) Put your finger on the glass close to the flashing blue circle. Holding the finger down on the
glass, drag the finger on the glass until it is in the center of the flashing blue circle. Lift your finger up and clear the touch field of view. A red circle with a yellow interior will appear when you put your finger down. This red/yellow circle shows the calibrated touch, ignore the location of the red/yellow circle, its difference from the blue circle indicates how much the calibration needs to be adjusted.
8) Perform step 7 on the remaining 3 circles and click the apply button on the bottom right of Dashboard.
9) Enter the full screen view by pressing the ESC Key on the keyboard or select the full screen view icon from the top right side of Dashboard.

11
3.0 Dual Monitor Setup with a Single PC
In Windows® 7, 8 and 10, it is easy to add a second monitor to the same PC. This section will show how the user can add a secondary touch monitor to the same PC.
1) Connect the second touch monitor to the PC via a VGA, DVI or HDMI port. Connect the USB cable corresponding to the touch monitor to the PC. Right click on the desktop and select screen resolution.
2) Notice the second screen will be shown as number 2 on the PC. For Multiple displays select
Extend these displays from the drop down menu.
12
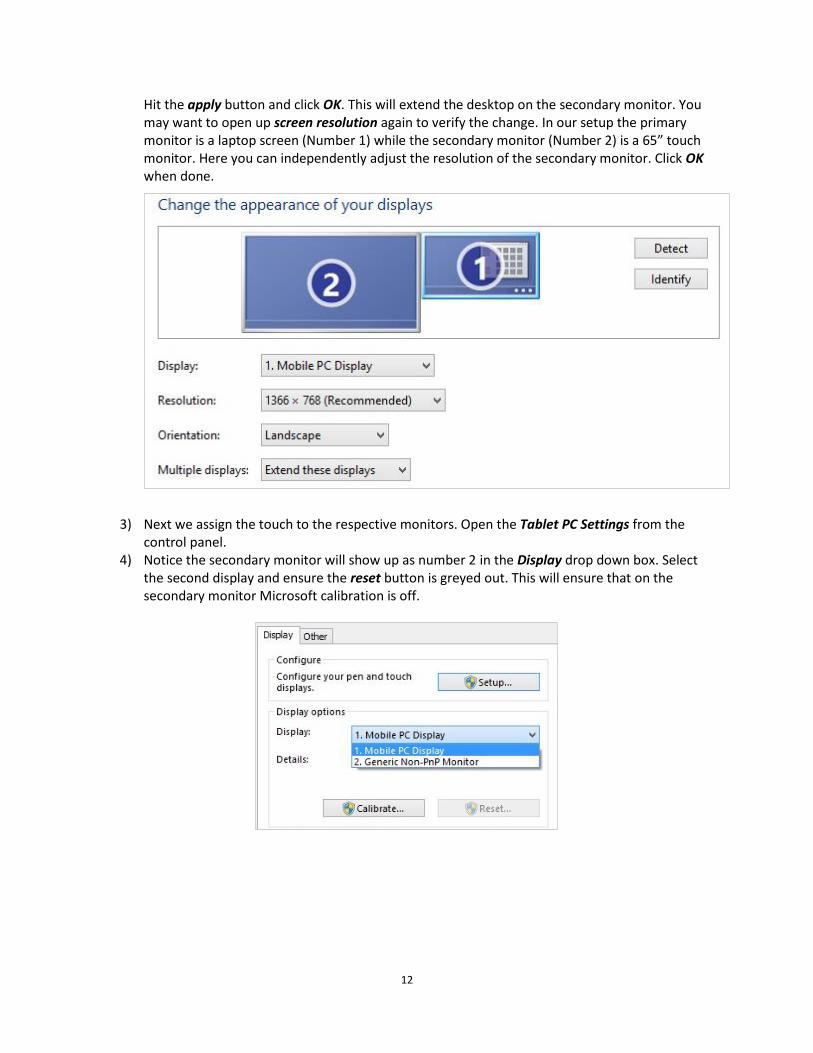
Hit the apply button and click OK. This will extend the desktop on the secondary monitor. You may want to open up screen resolution again to verify the change. In our setup the primary monitor is a laptop screen (Number 1) while the secondary monitor (Number 2) is a 65” touch monitor. Here you can independently adjust the resolution of the secondary monitor. Click OK when done.
3) Next we assign the touch to the respective monitors. Open the Tablet PC Settings from the
control panel. 4) Notice the secondary monitor will show up as number 2 in the Display drop down box. Select
the second display and ensure the reset button is greyed out. This will ensure that on the secondary monitor Microsoft calibration is off.
13
5) Assign touch to the right monitor by selecting the Setup button under configure.
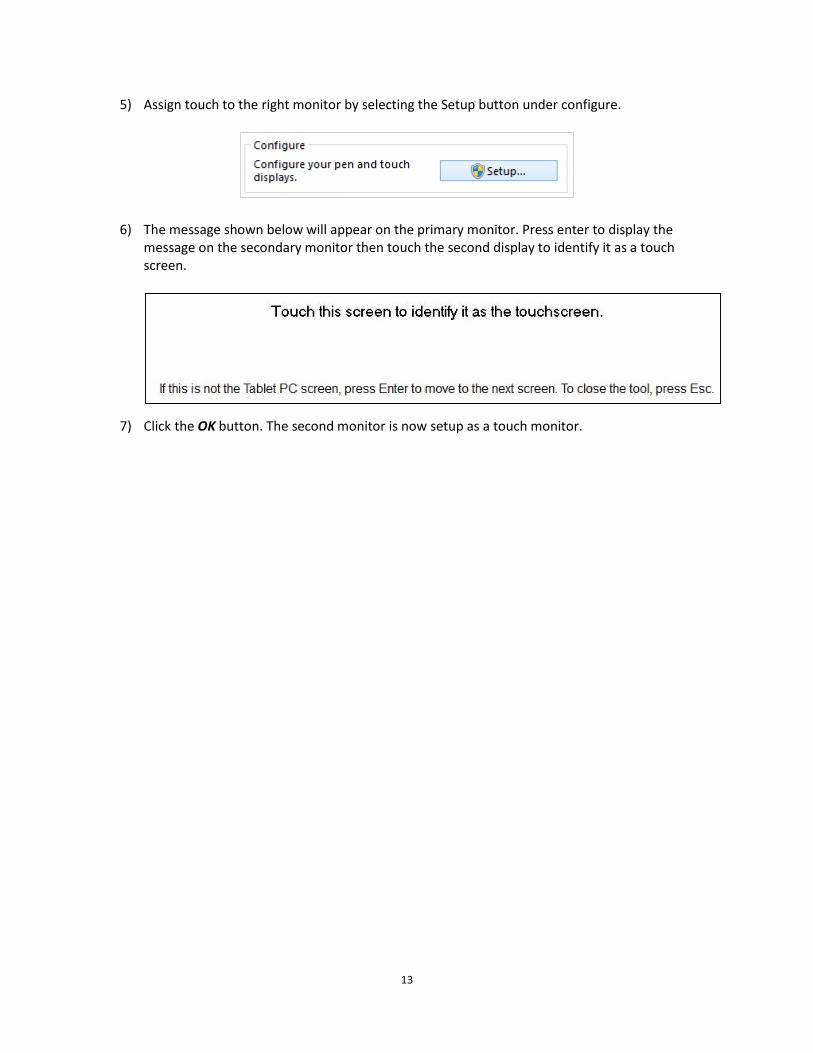
6) The message shown below will appear on the primary monitor. Press enter to display the message on the secondary monitor then touch the second display to identify it as a touch screen.
7) Click the OK button. The second monitor is now setup as a touch monitor.

14
4.0 Turning off Flicks
Windows® 7, 8 and 10 offer gestures called flicks with tablet touch screens. These allow the user to quickly navigate and perform shortcuts on smaller touch screens. On larger touch screens these gestures are more of a nuisance and not really desired. This section will talk about how to disable flicks.
1) Open up Pen and Touch settings located inside the Control Panel. 2) Select the Flicks tab.
Figure 8: Pen and Touch window
3) Un-check the box ‘Use flicks to perform common actions’ 4) Click the Apply button and then the OK button.

15
5.0 Configuring for Use with a Mac
When the ShadowSense screens are used with certain versions of the Mac OS® system there can be an offset between the touch location and where the mouse cursor is reported. This offset is due to a difference in the co-ordinate system between Mac and Windows PC’s. This offset can be eliminated and corrected by enabling the Apple Setting control. Enable this control whenever the touchscreen is to be used with a Mac OS prior to Yosemite 10.10. This section will discuss the steps required to enable Mac mode.
1) Open up Dashboard and select the Enable Features button from the configuration view. In this tab you will want to switch the Multi Touch parameter from “Enabled” to “Disabled”. This is done by clicking the slider. This step must be done regardless of what Mac OS version is being run as Mac’s natively don’t support Multitouch function and only recognize mouse mode.
2) Select the Operating System button from the configuration view. Here you will find the Apple Settings. Enable this control if you are using Mac OS prior to Yosemite 10.10. For Yosemite it should remain disabled.

16
6.0 Unable to Run Dashboard
Dashboard requires .NET Framework 4.5 in order to run. If you are unable to run the Dashboard after installing it you must ensure the framework is installed on your PC. This can be done by first locating the Dashboard directory that was created during the initial installation. In this directory you will find a folder called “Redist”. This folder should contain 3 files as shown in the following image.
Once the Redist folder is open and the 3 files can be seen, they must all be installed. These installers are smart and will let you know if they are needed on your machine.

17
7.0 Baanto Tech Support
If you have bought the item directly from Baanto please contact [email protected] for issues not listed in this document. You may also contact your local sales representative for immediate help.
Related Documents


