J2X1-7610-06ENZ0(04) June 2014 Windows/Linux FUJITSU Software ServerView Resource Orchestrator Cloud Edition V3.1.2 Setup Guide

Welcome message from author
This document is posted to help you gain knowledge. Please leave a comment to let me know what you think about it! Share it to your friends and learn new things together.
Transcript
J2X1-7610-06ENZ0(04)June 2014
Windows/Linux
FUJITSU SoftwareServerView Resource Orchestrator Cloud Edition V3.1.2
Setup Guide
Preface
Purpose of This Document
This manual provides information on the operations and settings required for setup of FUJITSU Software ServerView ResourceOrchestrator Cloud Edition (hereinafter Resource Orchestrator).
Intended Readers
This manual is written for system administrators who will use Resource Orchestrator to operate the infrastructure in private cloud or datacenter environments.When setting up systems, it is assumed that readers have the basic knowledge required to configure the servers, storage, network devices,and server virtualization software to be installed. Additionally, a basic understanding of directory services such as Active Directory andLDAP is necessary.
Structure of This Document
This manual is composed as follows:
Chapter 1 Flow of Setup for Resource Orchestrator
Explains the overall flow of setup operations when using Resource Orchestrator.
Chapter 2 Installation
Explains how to install Resource Orchestrator.
Chapter 3 SSL Communication Environment Settings for the ROR Console
Explains the environment settings necessary for SSL communications.
Chapter 4 Login to the ROR Console
Explains how to open and close the ROR console.
Chapter 5 License Setup and Confirmation
Explains how to set up and confirm the licenses necessary to use Resource Orchestrator.
Chapter 6 Importing a Certificate to a Browser
Explains how to import the site certificate necessary when using a test site, to a browser.
Chapter 7 Registering Infrastructure Administrators
Explains how to set up Resource Orchestrator after installation.
Chapter 8 Creating Definition Files
This section explains how to use Resource Orchestrator to create the definition files required to manage (monitor and automaticallyconfigure, etc.) network devices.
Chapter 9 Registering Resources with Resource Orchestrator
Explains how to register, change, and delete resources used by Resource Orchestrator.
Chapter 10 Settings for the HBA address rename Setup Service
Explains how to configure the HBA address rename setup service.
Chapter 11 Installing Software and Registering Agents on VM Hosts
Explains the installation of software and registration of agents on VM hosts.
Chapter 12 Registering Resources to the Global Pool
Explains how to register resources to resource pools.
- i -
Chapter 13 Creating L-Server Templates
Explains how to create L-Server templates.
Chapter 14 Creating an L-Server for an Infrastructure Administrator
Explains how to create L-Servers for infrastructure administrators.
Chapter 15 Collecting and Registering Cloning Images
Explains how to collect and register cloning images used for the entire system.
Chapter 16 Creating L-Platform Templates
Explains how to create L-Server templates.
Chapter 17 Creating Tenants, Tenant Administrators, or Tenant Users
Explains the creation of tenants, tenant administrators, and tenant users.
Chapter 18 Post-Installation Procedures
Explains how to post-installation procedures.
Chapter 19 Saving Environment Settings
Explains how to save environment settings.
Chapter 20 Uninstallation
Explains how to uninstall Resource Orchestrator.
Appendix A Advisory Notes for Environments with Systemwalker Centric Manager or ETERNUS SF Storage Cruiser
Explains advisory notes regarding use of Resource Orchestrator with Systemwalker Centric Manager or ETERNUS SF Storage Cruiser.
Appendix B Configuration when Creating Physical L-Servers
Explains how to perform configuration when creating a physical L-Server.
Appendix C Configuration when Creating Virtual L-Servers
Explains how to perform configuration when creating a virtual L-Server.
Appendix D Installing VM Hosts on Physical L-Servers
Explains how to install VM hosts on physical L-Servers.
Appendix E To Customize Dashboard
Explains how to customize the dashboard.
Appendix F Upgrading from Earlier Versions
Explains how to upgrade from earlier versions of Resource Coordinator.
Appendix G Compatibility with Earlier Versions
Explains compatibility with earlier versions of Resource Orchestrator.
Appendix H Configuration when Using Ethernet Fabrics
Explains how to configure the settings when using an Ethernet Fabric as a network device.
Appendix I Coordination with Other Products
Explains how to coordinate use of Resource Orchestrator and other products.
Appendix J Co-Existence with ServerView Deployment Manager
Explains how to use both Resource Orchestrator and ServerView Deployment Manager on the same network.
Appendix K Co-Existence with Management Software
Explains the procedure and advisory notes regarding use of Resource Orchestrator with management software (Systemwalker OperationManager and Systemwalker Service Quality Coordinator).
- ii -

Appendix L Migration Procedure when Using Active Directory with a Redundant Configuration
Explains the migration procedure for changing operation of the Active Directory used for the Single Sign-On function of ServerViewOperations Manager from one server to two servers.
Appendix M Settings for Using VDI Coordination
Explains how to perform configuration for using VDI coordination.
Document Conventions
The notation in this manual conforms to the following conventions.
- When there is different information for the different versions of Resource Orchestrator, it is indicated as follows:
[All Editions] Sections relevant for all editions
[Cloud Edition] Sections related to Cloud Edition
[Virtual Edition] Sections related to Virtual Edition
- When using Resource Orchestrator and the functions necessary differ due to the necessary basic software (OS), it is indicated asfollows:
[Windows Manager] Sections related to Windows manager
[Linux Manager] Sections related to Linux manager
[Windows] Sections related to Windows
[Linux] Sections related to Linux
[Solaris] Sections related to Solaris
[VMware] Sections related to VMware
[Hyper-V] Sections related to Hyper-V
[Xen] Sections related to RHEL5-Xen
[KVM] Sections related to RHEL-KVM
[Solaris Zones] Sections related to Solaris zones
[OVM for x86 2.2] Sections related to Oracle VM Server for x86 2.2
[OVM for x86 3.2] Sections related to Oracle VM Server for x86 3.2
[OVM for SPARC] Sections related to Oracle VM Server for SPARC
[Citrix Xen] Sections related to Citrix XenServer
[Physical Servers] Sections related to physical servers
- Unless specified otherwise, the blade servers mentioned in this manual refer to PRIMERGY BX servers.
- Oracle Solaris may also be indicated as Solaris, Solaris Operating System, or Solaris OS.
- Oracle Solaris Zones may also be indicated as Solaris Containers or Solaris Container.
- Oracle VM Server for x86 may also be indicated as Oracle VM.
- In Resource Orchestrator, the following servers are referred to as SPARC Enterprise.
- SPARC Enterprise M3000/M4000/M5000/M8000/M9000
- SPARC Enterprise T5120/T5140/T5220/T5240/T5440
- In Resource Orchestrator, the following servers are referred to as SPARC M10.
- SPARC M10-1/M10-4/M10-4S
- Fujitsu M10 is the product name used for SPARC M10 when they are sold outside Japan.
- iii -
- References and character strings or values requiring emphasis are indicated using double quotes ( " ).
- Window names, dialog names, menu names, and tab names are shown enclosed by brackets ( [ ] ).
- Button names are shown enclosed by angle brackets (< >) or square brackets ([ ]).
- The order of selecting menus is indicated using [ ]-[ ].
- Text to be entered by the user is indicated using bold text.
- Variables are indicated using italic text and underscores.
- The ellipses ("...") in menu names, indicating settings and operation window startup, are not shown.
- The ">" used in Windows is included in usage examples. When using Linux, read ">" as meaning "#".
- If using Windows 8 or Windows Server 2012, please note the following:Operations descriptions in this manual use examples assuming operating systems up to Windows 7 and Windows Server 2008 - ifusing this product with Windows 8 or Windows Server 2012, read instructions regarding the [Start] menu as if they were instructionsfor the [Apps] page.Display the [Apps] page by right-clicking in the [Start] screen, and then clicking on [All apps].
- When using Resource Orchestrator on Windows 8.1 and Windows Server 2012 R2, please note the following.When OS operations are explained in this manual, the examples assume OSs up to Windows 7 and Windows Server 2008. When usingResource Orchestrator on Windows 8.1 or Windows Server 2012 R2, take explanations regarding the [Start] menu as indicating the[Apps] screen.The [Apps] screen can be displayed by swiping the [Start] screen from bottom to top, or clicking the downward facing arrow on thelower-left of the [Start] screen.
Menus in the ROR console
Operations on the ROR console can be performed using either the menu bar or pop-up menus.
By convention, procedures described in this manual only refer to pop-up menus.
Regarding Installation Folder Paths
The installation folder path may be given as C:\Fujitsu\ROR in this manual.
Replace it as shown below.
- When using Windows 64-bit (x64)
C:\Program Files (x86)\Resource Orchestrator
- When using Windows 32-bit (x86)
C:\Program Files\Resource Orchestrator
Command Examples
The paths used in command examples may be abbreviated. When using commands, execute them using the paths in the "Name" columnin the "Reference Guide (Command) VE" and the "Reference Guide (Command/XML) CE".
Web Site URLs
URLs provided as reference sources within the main text are correct as of June 2014.
Please understand that they are subject to change without notice.
- iv -

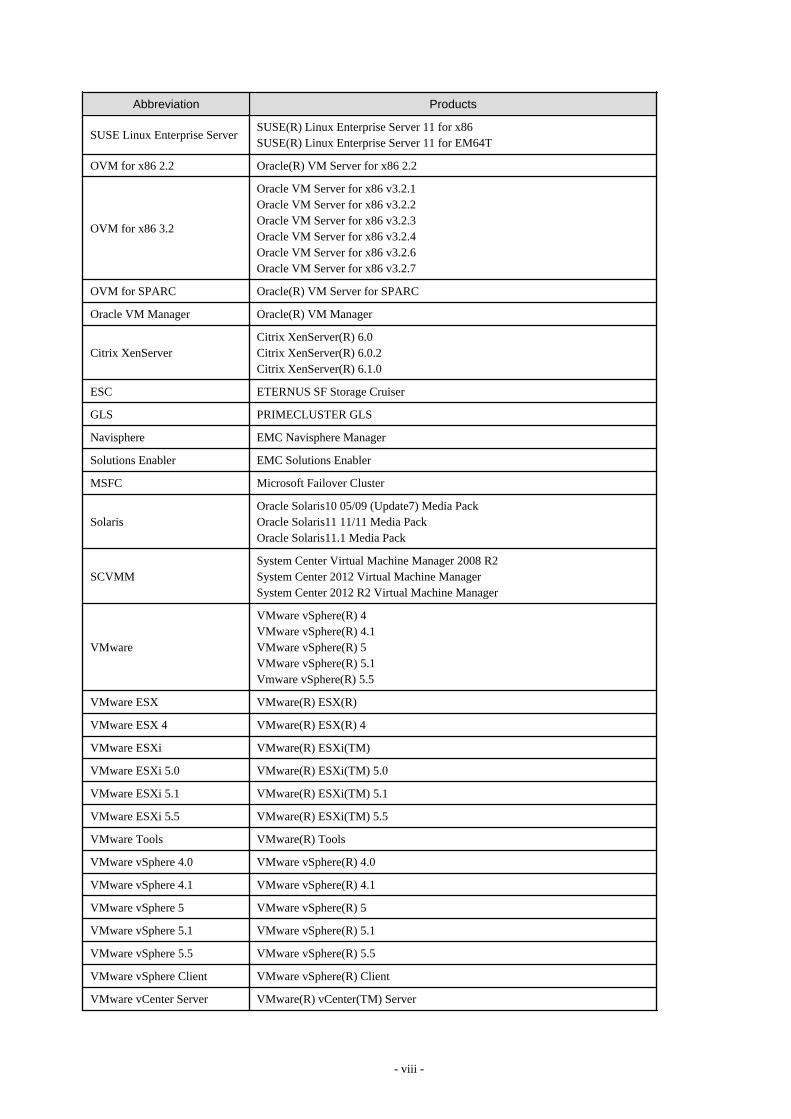
Abbreviations
The following abbreviations are used in this manual:
Abbreviation Products
Windows
Microsoft(R) Windows Server(R) 2003 R2, Standard EditionMicrosoft(R) Windows Server(R) 2003 R2, Enterprise EditionMicrosoft(R) Windows Server(R) 2003 R2, Standard x64 EditionMicrosoft(R) Windows Server(R) 2003 R2, Enterprise x64 EditionMicrosoft(R) Windows Server(R) 2008 StandardMicrosoft(R) Windows Server(R) 2008 EnterpriseMicrosoft(R) Windows Server(R) 2008 R2 StandardMicrosoft(R) Windows Server(R) 2008 R2 EnterpriseMicrosoft(R) Windows Server(R) 2008 R2 DatacenterMicrosoft(R) Windows Server(R) 2012 StandardMicrosoft(R) Windows Server(R) 2012 DatacenterMicrosoft(R) Windows Server(R) 2012 R2 StandardMicrosoft(R) Windows Server(R) 2012 R2 DatacenterMicrosoft(R) Windows(R) XP Professional operating systemWindows Vista(R) BusinessWindows Vista(R) EnterpriseWindows Vista(R) UltimateWindows(R) 7 ProfessionalWindows(R) 7 UltimateWindows(R) 8 ProWindows(R) 8 EnterpriseWindows(R) 8.1 ProWindows(R) 8.1 Enterprise
Windows Server 2003
Microsoft(R) Windows Server(R) 2003 R2, Standard EditionMicrosoft(R) Windows Server(R) 2003 R2, Enterprise EditionMicrosoft(R) Windows Server(R) 2003 R2, Standard x64 EditionMicrosoft(R) Windows Server(R) 2003 R2, Enterprise x64 Edition
Windows 2003 x64 EditionMicrosoft(R) Windows Server(R) 2003 R2, Standard x64 EditionMicrosoft(R) Windows Server(R) 2003 R2, Enterprise x64 Edition
Windows Server 2008
Microsoft(R) Windows Server(R) 2008 StandardMicrosoft(R) Windows Server(R) 2008 EnterpriseMicrosoft(R) Windows Server(R) 2008 R2 StandardMicrosoft(R) Windows Server(R) 2008 R2 EnterpriseMicrosoft(R) Windows Server(R) 2008 R2 Datacenter
Windows 2008 x86 EditionMicrosoft(R) Windows Server(R) 2008 Standard (x86)Microsoft(R) Windows Server(R) 2008 Enterprise (x86)
Windows 2008 x64 EditionMicrosoft(R) Windows Server(R) 2008 Standard (x64)Microsoft(R) Windows Server(R) 2008 Enterprise (x64)
Windows Server 2012
Microsoft(R) Windows Server(R) 2012 StandardMicrosoft(R) Windows Server(R) 2012 DatacenterMicrosoft(R) Windows Server(R) 2012 R2 StandardMicrosoft(R) Windows Server(R) 2012 R2 Datacenter
Windows PE Microsoft(R) Windows(R) Preinstallation Environment
Windows XP Microsoft(R) Windows(R) XP Professional operating system
Windows VistaWindows Vista(R) BusinessWindows Vista(R) EnterpriseWindows Vista(R) Ultimate
- v -

Abbreviation Products
Windows 7Windows(R) 7 ProfessionalWindows(R) 7 Ultimate
Windows 8
Windows(R) 8 ProWindows(R) 8 EnterpriseWindows(R) 8.1 ProWindows(R) 8.1 Enterprise
Linux
Red Hat(R) Enterprise Linux(R) 5 (for x86)Red Hat(R) Enterprise Linux(R) 5 (for Intel64)Red Hat(R) Enterprise Linux(R) 5.1 (for x86)Red Hat(R) Enterprise Linux(R) 5.1 (for Intel64)Red Hat(R) Enterprise Linux(R) 5.2 (for x86)Red Hat(R) Enterprise Linux(R) 5.2 (for Intel64)Red Hat(R) Enterprise Linux(R) 5.3 (for x86)Red Hat(R) Enterprise Linux(R) 5.3 (for Intel64)Red Hat(R) Enterprise Linux(R) 5.4 (for x86)Red Hat(R) Enterprise Linux(R) 5.4 (for Intel64)Red Hat(R) Enterprise Linux(R) 5.5 (for x86)Red Hat(R) Enterprise Linux(R) 5.5 (for Intel64)Red Hat(R) Enterprise Linux(R) 5.6 (for x86)Red Hat(R) Enterprise Linux(R) 5.6 (for Intel64)Red Hat(R) Enterprise Linux(R) 5.7 (for x86)Red Hat(R) Enterprise Linux(R) 5.7 (for Intel64)Red Hat(R) Enterprise Linux(R) 5.8 (for x86)Red Hat(R) Enterprise Linux(R) 5.8 (for Intel64)Red Hat(R) Enterprise Linux(R) 5.9 (for x86)Red Hat(R) Enterprise Linux(R) 5.9 (for Intel64)Red Hat(R) Enterprise Linux(R) 5.10 (for x86)Red Hat(R) Enterprise Linux(R) 5.10 (for Intel64)Red Hat(R) Enterprise Linux(R) 6.2 (for x86)Red Hat(R) Enterprise Linux(R) 6.2 (for Intel64)Red Hat(R) Enterprise Linux(R) 6.3 (for x86)Red Hat(R) Enterprise Linux(R) 6.3 (for Intel64)Red Hat(R) Enterprise Linux(R) 6.4 (for x86)Red Hat(R) Enterprise Linux(R) 6.4 (for Intel64)Red Hat(R) Enterprise Linux(R) 6.5 (for x86)Red Hat(R) Enterprise Linux(R) 6.5 (for Intel64)SUSE(R) Linux Enterprise Server 11 for x86SUSE(R) Linux Enterprise Server 11 for EM64T
Red Hat Enterprise Linux
Red Hat(R) Enterprise Linux(R) 5 (for x86)Red Hat(R) Enterprise Linux(R) 5 (for Intel64)Red Hat(R) Enterprise Linux(R) 5.1 (for x86)Red Hat(R) Enterprise Linux(R) 5.1 (for Intel64)Red Hat(R) Enterprise Linux(R) 5.2 (for x86)Red Hat(R) Enterprise Linux(R) 5.2 (for Intel64)Red Hat(R) Enterprise Linux(R) 5.3 (for x86)Red Hat(R) Enterprise Linux(R) 5.3 (for Intel64)Red Hat(R) Enterprise Linux(R) 5.4 (for x86)Red Hat(R) Enterprise Linux(R) 5.4 (for Intel64)Red Hat(R) Enterprise Linux(R) 5.5 (for x86)Red Hat(R) Enterprise Linux(R) 5.5 (for Intel64)Red Hat(R) Enterprise Linux(R) 5.6 (for x86)Red Hat(R) Enterprise Linux(R) 5.6 (for Intel64)Red Hat(R) Enterprise Linux(R) 5.7 (for x86)Red Hat(R) Enterprise Linux(R) 5.7 (for Intel64)Red Hat(R) Enterprise Linux(R) 5.8 (for x86)
- vi -

Abbreviation Products
Red Hat(R) Enterprise Linux(R) 5.8 (for Intel64)Red Hat(R) Enterprise Linux(R) 5.9 (for x86)Red Hat(R) Enterprise Linux(R) 5.9 (for Intel64)Red Hat(R) Enterprise Linux(R) 5.10 (for x86)Red Hat(R) Enterprise Linux(R) 5.10 (for Intel64)Red Hat(R) Enterprise Linux(R) 6.2 (for x86)Red Hat(R) Enterprise Linux(R) 6.2 (for Intel64)Red Hat(R) Enterprise Linux(R) 6.3 (for x86)Red Hat(R) Enterprise Linux(R) 6.3 (for Intel64)Red Hat(R) Enterprise Linux(R) 6.4 (for x86)Red Hat(R) Enterprise Linux(R) 6.4 (for Intel64)Red Hat(R) Enterprise Linux(R) 6.5 (for x86)Red Hat(R) Enterprise Linux(R) 6.5 (for Intel64)
Red Hat Enterprise Linux 5
Red Hat(R) Enterprise Linux(R) 5 (for x86)Red Hat(R) Enterprise Linux(R) 5 (for Intel64)Red Hat(R) Enterprise Linux(R) 5.1 (for x86)Red Hat(R) Enterprise Linux(R) 5.1 (for Intel64)Red Hat(R) Enterprise Linux(R) 5.2 (for x86)Red Hat(R) Enterprise Linux(R) 5.2 (for Intel64)Red Hat(R) Enterprise Linux(R) 5.3 (for x86)Red Hat(R) Enterprise Linux(R) 5.3 (for Intel64)Red Hat(R) Enterprise Linux(R) 5.4 (for x86)Red Hat(R) Enterprise Linux(R) 5.4 (for Intel64)Red Hat(R) Enterprise Linux(R) 5.5 (for x86)Red Hat(R) Enterprise Linux(R) 5.5 (for Intel64)Red Hat(R) Enterprise Linux(R) 5.6 (for x86)Red Hat(R) Enterprise Linux(R) 5.6 (for Intel64)Red Hat(R) Enterprise Linux(R) 5.7 (for x86)Red Hat(R) Enterprise Linux(R) 5.7 (for Intel64)Red Hat(R) Enterprise Linux(R) 5.8 (for x86)Red Hat(R) Enterprise Linux(R) 5.8 (for Intel64)Red Hat(R) Enterprise Linux(R) 5.9 (for x86)Red Hat(R) Enterprise Linux(R) 5.9 (for Intel64)Red Hat(R) Enterprise Linux(R) 5.10 (for x86)Red Hat(R) Enterprise Linux(R) 5.10 (for Intel64)
Red Hat Enterprise Linux 6
Red Hat(R) Enterprise Linux(R) 6.2 (for x86)Red Hat(R) Enterprise Linux(R) 6.2 (for Intel64)Red Hat(R) Enterprise Linux(R) 6.3 (for x86)Red Hat(R) Enterprise Linux(R) 6.3 (for Intel64)Red Hat(R) Enterprise Linux(R) 6.4 (for x86)Red Hat(R) Enterprise Linux(R) 6.4 (for Intel64)Red Hat(R) Enterprise Linux(R) 6.5 (for x86)Red Hat(R) Enterprise Linux(R) 6.5 (for Intel64)
RHEL5-XenRed Hat(R) Enterprise Linux(R) 5.4 (for x86) Linux Virtual Machine FunctionRed Hat(R) Enterprise Linux(R) 5.4 (for Intel64) Linux Virtual Machine Function
RHEL-KVM
Red Hat(R) Enterprise Linux(R) 6.2 (for x86) Virtual Machine FunctionRed Hat(R) Enterprise Linux(R) 6.2 (for Intel64) Virtual Machine FunctionRed Hat(R) Enterprise Linux(R) 6.3 (for x86) Virtual Machine FunctionRed Hat(R) Enterprise Linux(R) 6.3 (for Intel64) Virtual Machine FunctionRed Hat(R) Enterprise Linux(R) 6.4 (for x86) Virtual Machine FunctionRed Hat(R) Enterprise Linux(R) 6.4 (for Intel64) Virtual Machine FunctionRed Hat(R) Enterprise Linux(R) 6.5 (for x86) Virtual Machine FunctionRed Hat(R) Enterprise Linux(R) 6.5 (for Intel64) Virtual Machine Function
DOS Microsoft(R) MS-DOS(R) operating system, DR DOS(R)
- vii -
Abbreviation Products
SUSE Linux Enterprise ServerSUSE(R) Linux Enterprise Server 11 for x86SUSE(R) Linux Enterprise Server 11 for EM64T
OVM for x86 2.2 Oracle(R) VM Server for x86 2.2
OVM for x86 3.2
Oracle VM Server for x86 v3.2.1Oracle VM Server for x86 v3.2.2Oracle VM Server for x86 v3.2.3Oracle VM Server for x86 v3.2.4Oracle VM Server for x86 v3.2.6Oracle VM Server for x86 v3.2.7
OVM for SPARC Oracle(R) VM Server for SPARC
Oracle VM Manager Oracle(R) VM Manager
Citrix XenServerCitrix XenServer(R) 6.0Citrix XenServer(R) 6.0.2Citrix XenServer(R) 6.1.0
ESC ETERNUS SF Storage Cruiser
GLS PRIMECLUSTER GLS
Navisphere EMC Navisphere Manager
Solutions Enabler EMC Solutions Enabler
MSFC Microsoft Failover Cluster
SolarisOracle Solaris10 05/09 (Update7) Media PackOracle Solaris11 11/11 Media PackOracle Solaris11.1 Media Pack
SCVMMSystem Center Virtual Machine Manager 2008 R2System Center 2012 Virtual Machine ManagerSystem Center 2012 R2 Virtual Machine Manager
VMware
VMware vSphere(R) 4VMware vSphere(R) 4.1VMware vSphere(R) 5VMware vSphere(R) 5.1Vmware vSphere(R) 5.5
VMware ESX VMware(R) ESX(R)
VMware ESX 4 VMware(R) ESX(R) 4
VMware ESXi VMware(R) ESXi(TM)
VMware ESXi 5.0 VMware(R) ESXi(TM) 5.0
VMware ESXi 5.1 VMware(R) ESXi(TM) 5.1
VMware ESXi 5.5 VMware(R) ESXi(TM) 5.5
VMware Tools VMware(R) Tools
VMware vSphere 4.0 VMware vSphere(R) 4.0
VMware vSphere 4.1 VMware vSphere(R) 4.1
VMware vSphere 5 VMware vSphere(R) 5
VMware vSphere 5.1 VMware vSphere(R) 5.1
VMware vSphere 5.5 VMware vSphere(R) 5.5
VMware vSphere Client VMware vSphere(R) Client
VMware vCenter Server VMware(R) vCenter(TM) Server
- viii -
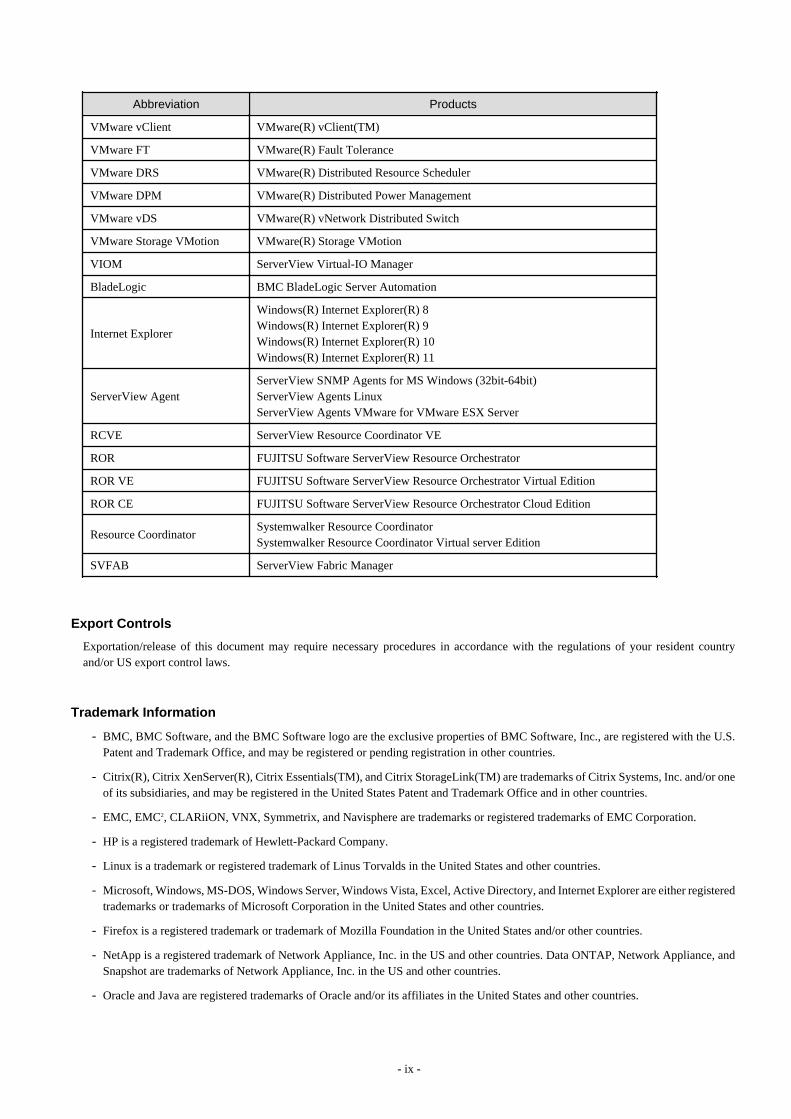
Abbreviation Products
VMware vClient VMware(R) vClient(TM)
VMware FT VMware(R) Fault Tolerance
VMware DRS VMware(R) Distributed Resource Scheduler
VMware DPM VMware(R) Distributed Power Management
VMware vDS VMware(R) vNetwork Distributed Switch
VMware Storage VMotion VMware(R) Storage VMotion
VIOM ServerView Virtual-IO Manager
BladeLogic BMC BladeLogic Server Automation
Internet Explorer
Windows(R) Internet Explorer(R) 8Windows(R) Internet Explorer(R) 9Windows(R) Internet Explorer(R) 10Windows(R) Internet Explorer(R) 11
ServerView AgentServerView SNMP Agents for MS Windows (32bit-64bit)ServerView Agents LinuxServerView Agents VMware for VMware ESX Server
RCVE ServerView Resource Coordinator VE
ROR FUJITSU Software ServerView Resource Orchestrator
ROR VE FUJITSU Software ServerView Resource Orchestrator Virtual Edition
ROR CE FUJITSU Software ServerView Resource Orchestrator Cloud Edition
Resource CoordinatorSystemwalker Resource CoordinatorSystemwalker Resource Coordinator Virtual server Edition
SVFAB ServerView Fabric Manager
Export Controls
Exportation/release of this document may require necessary procedures in accordance with the regulations of your resident countryand/or US export control laws.
Trademark Information
- BMC, BMC Software, and the BMC Software logo are the exclusive properties of BMC Software, Inc., are registered with the U.S.Patent and Trademark Office, and may be registered or pending registration in other countries.
- Citrix(R), Citrix XenServer(R), Citrix Essentials(TM), and Citrix StorageLink(TM) are trademarks of Citrix Systems, Inc. and/or oneof its subsidiaries, and may be registered in the United States Patent and Trademark Office and in other countries.
- EMC, EMC2, CLARiiON, VNX, Symmetrix, and Navisphere are trademarks or registered trademarks of EMC Corporation.
- HP is a registered trademark of Hewlett-Packard Company.
- Linux is a trademark or registered trademark of Linus Torvalds in the United States and other countries.
- Microsoft, Windows, MS-DOS, Windows Server, Windows Vista, Excel, Active Directory, and Internet Explorer are either registeredtrademarks or trademarks of Microsoft Corporation in the United States and other countries.
- Firefox is a registered trademark or trademark of Mozilla Foundation in the United States and/or other countries.
- NetApp is a registered trademark of Network Appliance, Inc. in the US and other countries. Data ONTAP, Network Appliance, andSnapshot are trademarks of Network Appliance, Inc. in the US and other countries.
- Oracle and Java are registered trademarks of Oracle and/or its affiliates in the United States and other countries.
- ix -
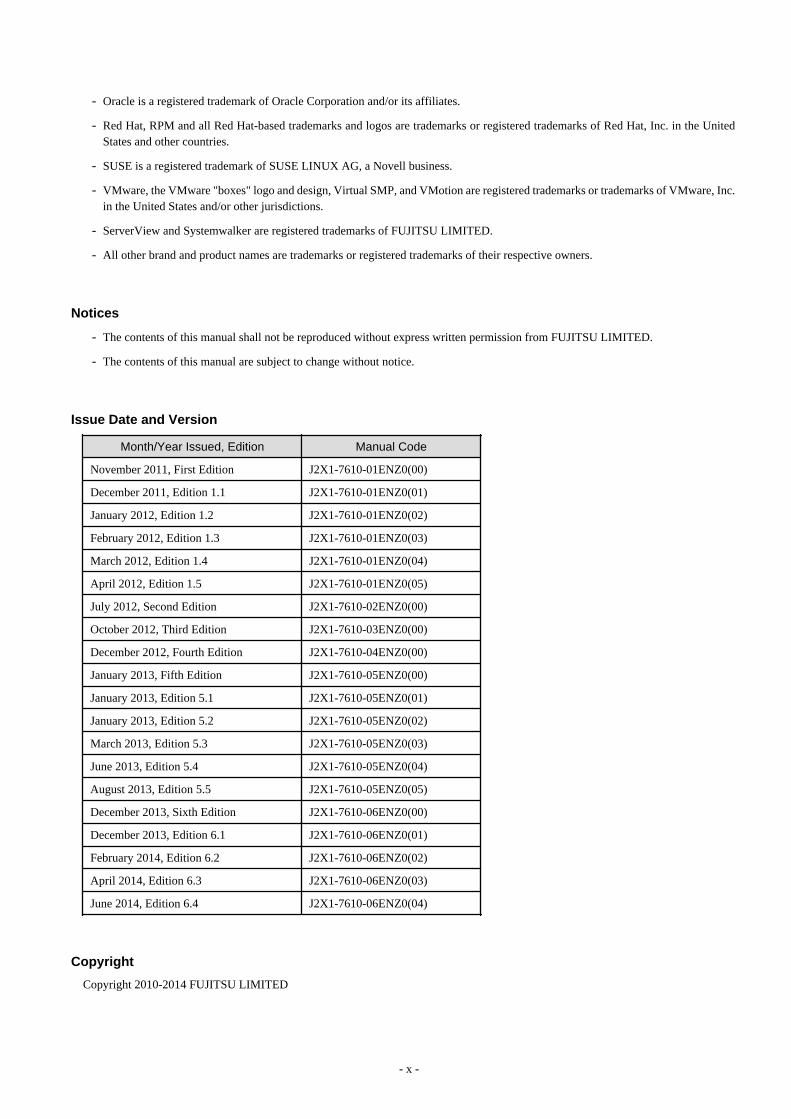
- Oracle is a registered trademark of Oracle Corporation and/or its affiliates.
- Red Hat, RPM and all Red Hat-based trademarks and logos are trademarks or registered trademarks of Red Hat, Inc. in the UnitedStates and other countries.
- SUSE is a registered trademark of SUSE LINUX AG, a Novell business.
- VMware, the VMware "boxes" logo and design, Virtual SMP, and VMotion are registered trademarks or trademarks of VMware, Inc.in the United States and/or other jurisdictions.
- ServerView and Systemwalker are registered trademarks of FUJITSU LIMITED.
- All other brand and product names are trademarks or registered trademarks of their respective owners.
Notices
- The contents of this manual shall not be reproduced without express written permission from FUJITSU LIMITED.
- The contents of this manual are subject to change without notice.
Issue Date and Version
Month/Year Issued, Edition Manual Code
November 2011, First Edition J2X1-7610-01ENZ0(00)
December 2011, Edition 1.1 J2X1-7610-01ENZ0(01)
January 2012, Edition 1.2 J2X1-7610-01ENZ0(02)
February 2012, Edition 1.3 J2X1-7610-01ENZ0(03)
March 2012, Edition 1.4 J2X1-7610-01ENZ0(04)
April 2012, Edition 1.5 J2X1-7610-01ENZ0(05)
July 2012, Second Edition J2X1-7610-02ENZ0(00)
October 2012, Third Edition J2X1-7610-03ENZ0(00)
December 2012, Fourth Edition J2X1-7610-04ENZ0(00)
January 2013, Fifth Edition J2X1-7610-05ENZ0(00)
January 2013, Edition 5.1 J2X1-7610-05ENZ0(01)
January 2013, Edition 5.2 J2X1-7610-05ENZ0(02)
March 2013, Edition 5.3 J2X1-7610-05ENZ0(03)
June 2013, Edition 5.4 J2X1-7610-05ENZ0(04)
August 2013, Edition 5.5 J2X1-7610-05ENZ0(05)
December 2013, Sixth Edition J2X1-7610-06ENZ0(00)
December 2013, Edition 6.1 J2X1-7610-06ENZ0(01)
February 2014, Edition 6.2 J2X1-7610-06ENZ0(02)
April 2014, Edition 6.3 J2X1-7610-06ENZ0(03)
June 2014, Edition 6.4 J2X1-7610-06ENZ0(04)
Copyright
Copyright 2010-2014 FUJITSU LIMITED
- x -
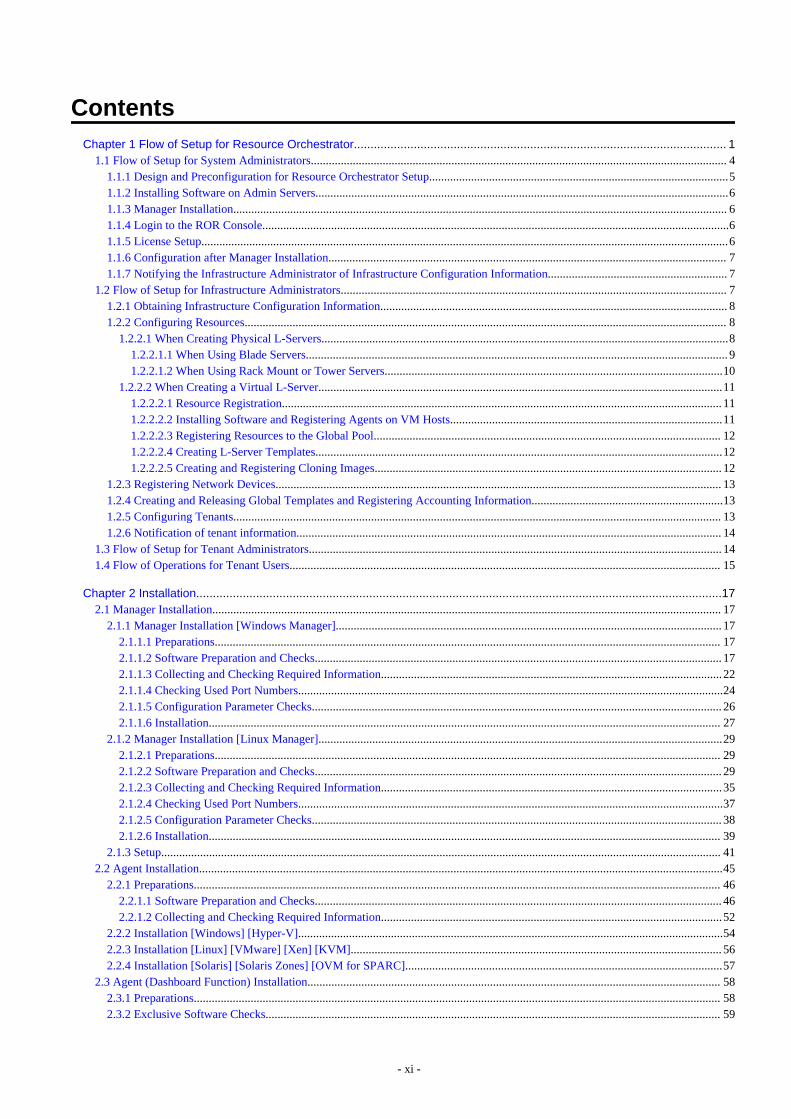
ContentsChapter 1 Flow of Setup for Resource Orchestrator................................................................................................................ 1
1.1 Flow of Setup for System Administrators........................................................................................................................................... 41.1.1 Design and Preconfiguration for Resource Orchestrator Setup....................................................................................................51.1.2 Installing Software on Admin Servers..........................................................................................................................................61.1.3 Manager Installation..................................................................................................................................................................... 61.1.4 Login to the ROR Console............................................................................................................................................................61.1.5 License Setup................................................................................................................................................................................61.1.6 Configuration after Manager Installation..................................................................................................................................... 71.1.7 Notifying the Infrastructure Administrator of Infrastructure Configuration Information............................................................ 7
1.2 Flow of Setup for Infrastructure Administrators................................................................................................................................. 71.2.1 Obtaining Infrastructure Configuration Information.................................................................................................................... 81.2.2 Configuring Resources................................................................................................................................................................. 8
1.2.2.1 When Creating Physical L-Servers........................................................................................................................................81.2.2.1.1 When Using Blade Servers............................................................................................................................................. 91.2.2.1.2 When Using Rack Mount or Tower Servers.................................................................................................................10
1.2.2.2 When Creating a Virtual L-Server.......................................................................................................................................111.2.2.2.1 Resource Registration................................................................................................................................................... 111.2.2.2.2 Installing Software and Registering Agents on VM Hosts...........................................................................................111.2.2.2.3 Registering Resources to the Global Pool.................................................................................................................... 121.2.2.2.4 Creating L-Server Templates........................................................................................................................................121.2.2.2.5 Creating and Registering Cloning Images.................................................................................................................... 12
1.2.3 Registering Network Devices..................................................................................................................................................... 131.2.4 Creating and Releasing Global Templates and Registering Accounting Information................................................................131.2.5 Configuring Tenants................................................................................................................................................................... 131.2.6 Notification of tenant information.............................................................................................................................................. 14
1.3 Flow of Setup for Tenant Administrators.......................................................................................................................................... 141.4 Flow of Operations for Tenant Users................................................................................................................................................ 15
Chapter 2 Installation..............................................................................................................................................................172.1 Manager Installation.......................................................................................................................................................................... 17
2.1.1 Manager Installation [Windows Manager]................................................................................................................................. 172.1.1.1 Preparations......................................................................................................................................................................... 172.1.1.2 Software Preparation and Checks........................................................................................................................................ 172.1.1.3 Collecting and Checking Required Information..................................................................................................................222.1.1.4 Checking Used Port Numbers..............................................................................................................................................242.1.1.5 Configuration Parameter Checks......................................................................................................................................... 262.1.1.6 Installation........................................................................................................................................................................... 27
2.1.2 Manager Installation [Linux Manager].......................................................................................................................................292.1.2.1 Preparations......................................................................................................................................................................... 292.1.2.2 Software Preparation and Checks........................................................................................................................................ 292.1.2.3 Collecting and Checking Required Information..................................................................................................................352.1.2.4 Checking Used Port Numbers..............................................................................................................................................372.1.2.5 Configuration Parameter Checks......................................................................................................................................... 382.1.2.6 Installation........................................................................................................................................................................... 39
2.1.3 Setup........................................................................................................................................................................................... 412.2 Agent Installation...............................................................................................................................................................................45
2.2.1 Preparations................................................................................................................................................................................ 462.2.1.1 Software Preparation and Checks........................................................................................................................................ 462.2.1.2 Collecting and Checking Required Information..................................................................................................................52
2.2.2 Installation [Windows] [Hyper-V]..............................................................................................................................................542.2.3 Installation [Linux] [VMware] [Xen] [KVM]............................................................................................................................ 562.2.4 Installation [Solaris] [Solaris Zones] [OVM for SPARC]..........................................................................................................57
2.3 Agent (Dashboard Function) Installation.......................................................................................................................................... 582.3.1 Preparations................................................................................................................................................................................ 582.3.2 Exclusive Software Checks........................................................................................................................................................ 59
- xi -
2.3.3 Installation [Windows] [Hyper-V]..............................................................................................................................................592.3.4 Installation [Linux]..................................................................................................................................................................... 602.3.5 Installation [Solaris] [Solaris Zones].......................................................................................................................................... 60
2.4 HBA address rename Setup Service Installation............................................................................................................................... 612.4.1 Preparations................................................................................................................................................................................ 61
2.4.1.1 Software Preparation and Checks........................................................................................................................................ 612.4.1.2 Collecting and Checking Required Information..................................................................................................................62
2.4.2 Installation [Windows]............................................................................................................................................................... 622.4.3 Installation [Linux]..................................................................................................................................................................... 63
Chapter 3 SSL Communication Environment Settings for the ROR Console........................................................................ 653.1 Obtaining Certificates and Registering them with Certificate Authorities........................................................................................65
3.1.1 Creating the Interstage Certificate Environment and the Application to Obtain the Certificate that is used for SSL Communication............................................................................................................................................................................................ 65
3.1.2 Registering Certificates used in SSL Communication............................................................................................................... 683.2 Changing SSL Definitions................................................................................................................................................................. 693.3 Importing a Certificate to ServerView SSO Authentication Server.................................................................................................. 70
Chapter 4 Login to the ROR Console.....................................................................................................................................72
Chapter 5 License Setup and Confirmation............................................................................................................................74
Chapter 6 Importing a Certificate to a Browser...................................................................................................................... 75
Chapter 7 Registering Infrastructure Administrators.............................................................................................................. 77
Chapter 8 Creating Definition Files.........................................................................................................................................788.1 Definition Files (For Both Physical L-Servers and Virtual L-Servers)............................................................................................. 788.2 Definition Files (For Physical L-Servers)..........................................................................................................................................798.3 Definition Files (For Virtual L-Servers)............................................................................................................................................81
8.3.1 Definition Files (VMware)......................................................................................................................................................... 828.3.2 Definition Files (Hyper-V)......................................................................................................................................................... 828.3.3 Definition Files (RHEL5-Xen)................................................................................................................................................... 848.3.4 Definition Files (OVM for x86 2.2)............................................................................................................................................848.3.5 Definition Files (RHEL-KVM).................................................................................................................................................. 848.3.6 Definition Files (Solaris Zones)..................................................................................................................................................848.3.7 Definition Files (OVM for SPARC)...........................................................................................................................................858.3.8 Definition Files (OVM for x86 3.2)............................................................................................................................................858.3.9 Definition Files (Citrix XenServer)............................................................................................................................................ 85
8.4 Definition Files (Network).................................................................................................................................................................86
Chapter 9 Registering Resources with Resource Orchestrator..............................................................................................879.1 Necessity of Resource Registration................................................................................................................................................... 879.2 Registration Order and Registration Method for Resources..............................................................................................................88
Chapter 10 Settings for the HBA address rename Setup Service..........................................................................................90
Chapter 11 Installing Software and Registering Agents on VM Hosts................................................................................... 92
Chapter 12 Registering Resources to the Global Pool...........................................................................................................9612.1 Physical L-Servers........................................................................................................................................................................... 9612.2 Virtual L-Servers............................................................................................................................................................................. 97
Chapter 13 Creating L-Server Templates...............................................................................................................................98
Chapter 14 Creating an L-Server for an Infrastructure Administrator.....................................................................................99
Chapter 15 Collecting and Registering Cloning Images.......................................................................................................10015.1 Physical L-Servers......................................................................................................................................................................... 10115.2 Virtual L-Servers........................................................................................................................................................................... 101
- xii -

Chapter 16 Creating L-Platform Templates..........................................................................................................................103
Chapter 17 Creating Tenants, Tenant Administrators, or Tenant Users.............................................................................. 104
Chapter 18 Post-Installation Procedures..............................................................................................................................10518.1 Settings for Sending Email............................................................................................................................................................ 105
18.1.1 Stopping the Manager.............................................................................................................................................................10518.1.2 Settings for Email Sent from Tenant Management................................................................................................................ 10518.1.3 Settings for Email Sent from the L-Platform Management Window..................................................................................... 10618.1.4 Email Sent from the Usage Charge Calculator.......................................................................................................................10718.1.5 Starting the Manager...............................................................................................................................................................10818.1.6 Settings for Email Sent via the Application Process.............................................................................................................. 10818.1.7 Settings for Email Sent from the Dashboard.......................................................................................................................... 110
18.2 Application Process Settings......................................................................................................................................................... 11018.2.1 Registering an Application Process Assessor.........................................................................................................................110
18.2.1.1 Creating an Infrastructure Administrator/Dual-role Administrator.................................................................................11118.2.1.2 Adding an Infrastructure Administrator/Dual-role Administrator to IflowUsers Group................................................ 112
18.2.2 Stopping the Manager.............................................................................................................................................................11318.2.3 Setting Application Process Settings...................................................................................................................................... 11318.2.4 Setting Application Process to be Used..................................................................................................................................11418.2.5 Starting the Manager...............................................................................................................................................................11518.2.6 Role Settings for the Display of the Application List Tab..................................................................................................... 115
18.3 Customizing the Dashboard...........................................................................................................................................................11518.4 Setting the Host Names for Virtual Servers...................................................................................................................................115
18.4.1 Setting Method........................................................................................................................................................................11618.4.2 Setting Form........................................................................................................................................................................... 117
18.5 Setting the Method for Setting Resource Names...........................................................................................................................11918.5.1 Setting Method .......................................................................................................................................................................12018.5.2 Setting Form........................................................................................................................................................................... 121
18.6 Settings for the Overcommit Function...........................................................................................................................................12318.7 Editing the Environment Setup File for the L-Platform API.........................................................................................................12518.8 Settings when RHEL5-Xen is Used...............................................................................................................................................12618.9 System Disk Settings for Physical L-Servers................................................................................................................................ 12618.10 Setting for the Restarting Managers............................................................................................................................................ 12718.11 Changing Multiple Operations of Managers............................................................................................................................... 12718.12 Editing the License Agreement....................................................................................................................................................12718.13 Editing the User Agreement when Registering a User................................................................................................................ 12818.14 Setting the Database for the Dashboard (Pool Conditions) ........................................................................................................ 130
Chapter 19 Saving Environment Settings.............................................................................................................................132
Chapter 20 Uninstallation..................................................................................................................................................... 13320.1 Manager Uninstallation..................................................................................................................................................................133
20.1.1 Preparations............................................................................................................................................................................ 13320.1.2 Unsetup................................................................................................................................................................................... 13420.1.3 Uninstallation [Windows Manager]........................................................................................................................................13520.1.4 Uninstallation [Linux Manager]............................................................................................................................................. 13820.1.5 Post-uninstallation Procedure................................................................................................................................................. 141
20.1.5.1 Fujitsu XML Processor Uninstallation [Windows Manager].......................................................................................... 14120.1.5.2 SMEE Uninstallation [Linux]..........................................................................................................................................14120.1.5.3 Securecrypto Library RunTime Uninstallation [Linux].................................................................................................. 14220.1.5.4 Groups Remaining after Uninstallation........................................................................................................................... 14220.1.5.5 Cautions about SMEE and Securecrypto Library RunTime Uninstallation [Linux].......................................................14220.1.5.6 Deleting the Registered Certificate of ServerView Operations Manager........................................................................142
20.2 Agent Uninstallation...................................................................................................................................................................... 14320.2.1 Uninstallation [Windows] [Hyper-V].....................................................................................................................................14320.2.2 Uninstallation [Linux] [VMware] [Xen] [KVM]................................................................................................................... 14420.2.3 Uninstallation [Solaris] [Solaris Zones] [OVM for SPARC]................................................................................................. 146
- xiii -
20.3 Agent (Dashboard Function) Uninstallation..................................................................................................................................14620.3.1 Uninstallation [Windows] [Hyper-V].....................................................................................................................................14720.3.2 Uninstallation [Linux].............................................................................................................................................................14720.3.3 Uninstallation [Solaris] [Solaris Zones]................................................................................................................................. 147
20.4 HBA address rename Setup Service Uninstallation...................................................................................................................... 14820.4.1 Uninstallation [Windows].......................................................................................................................................................14820.4.2 Uninstallation [Linux].............................................................................................................................................................149
20.5 Uninstallation of "Uninstall (Middleware)"...................................................................................................................................150
Appendix A Advisory Notes for Environments with Systemwalker Centric Manager or ETERNUS SF Storage Cruiser..... 152
Appendix B Configuration when Creating Physical L-Servers..............................................................................................154B.1 Creating Definition Files.................................................................................................................................................................154
B.1.1 Creating Definition Files Combining Ports of SAN Storage................................................................................................... 155B.1.2 Format Selection for the Names of Virtual Storage Resources and Disk Resources Managed by ESC................................. 157B.1.3 Configuration of Priority for Resource Selection on Thin Provisioning and Automatic Storage Layering............................ 159B.1.4 Creating Mirroring Definition Files for Dynamic LUN Mirroring..........................................................................................159B.1.5 Definition File for EMC Storage..............................................................................................................................................160B.1.6 Configuration when Creating a Physical L-Server without Specifying a Model Name in the L-Server Template.................161B.1.7 Setting the Number of FCs Fitted and their Position for Each Physical Server...................................................................... 164B.1.8 Definition File for Alive Monitoring....................................................................................................................................... 166B.1.9 Definition File for Admin LAN Uplink Set.............................................................................................................................167B.1.10 Definition File for iSCSI Network.........................................................................................................................................168B.1.11 Definition File for FalconStor NSS........................................................................................................................................169
B.2 Registering Resources with Resource Orchestrator........................................................................................................................170B.2.1 When using Blade Servers....................................................................................................................................................... 170B.2.2 When Registering Something other than a Blade Server.........................................................................................................171
B.3 Registering Resources in Resource Pools....................................................................................................................................... 172B.3.1 Automatic Network Configuration.......................................................................................................................................... 173B.3.2 Manual Network Configuration............................................................................................................................................... 175
B.4 Creating L-Server Templates.......................................................................................................................................................... 176B.5 Creating an L-Server....................................................................................................................................................................... 177
B.5.1 Creating an L-Server Using an L-Server Template................................................................................................................. 177B.5.2 Creating an L-Server Specifying Individual Specifications.....................................................................................................178B.5.3 Manual OS Installation............................................................................................................................................................ 178B.5.4 Installation of an Operating System Using PXE Boot............................................................................................................. 181
B.6 Collecting and Registering Cloning Images................................................................................................................................... 183B.6.1 When Collecting a Cloning Image from an L-Server after OS Installation.............................................................................183
B.7 [OS] Tab Configuration.................................................................................................................................................................. 185B.8 Network Redundancy and VLAN Settings of L-Servers................................................................................................................185B.9 Methods for Selecting Physical Servers Automatically..................................................................................................................188B.10 Advisory Notes for Physical L-Server Usage............................................................................................................................... 190
Appendix C Configuration when Creating Virtual L-Servers.................................................................................................191C.1 Definition Files Commonly Shared when Creating Virtual L-Servers...........................................................................................191
C.1.1 Overcommit Definition Files................................................................................................................................................... 191C.1.2 VM Specific Information Definition File................................................................................................................................ 192C.1.3 Configuration of Priority for Resource Selection on Thin Provisioning................................................................................. 196C.1.4 Configuration when Creating a Virtual L-Server Using a Server which cannot Use ServerView Agents..............................197C.1.5 Configuration when Creating a Virtual L-Server Using VMware ESXi on Other Vendor's Servers......................................199C.1.6 Definition File for Alive Monitoring....................................................................................................................................... 201C.1.7 OS Property Definition File..................................................................................................................................................... 203
C.2 VMware...........................................................................................................................................................................................207C.2.1 Creating Definition Files..........................................................................................................................................................207C.2.2 Registering Resources with Resource Orchestrator.................................................................................................................211C.2.3 Registering Resources in Resource Pools................................................................................................................................ 212C.2.4 Automatic Network Configuration.......................................................................................................................................... 213C.2.5 Manual Network Configuration............................................................................................................................................... 219
- xiv -
C.2.6 Creating L-Server Templates................................................................................................................................................... 220C.2.7 Creating an L-Server................................................................................................................................................................ 221C.2.8 Collecting a Cloning Image..................................................................................................................................................... 222C.2.9 [OS] Tab Configuration........................................................................................................................................................... 224C.2.10 Advisory Notes for VMware Usage.......................................................................................................................................226C.2.11 Overcommit............................................................................................................................................................................228C.2.12 participating in an Active Directory domain..........................................................................................................................231C.2.13 Using a GUIRunOnce............................................................................................................................................................ 232
C.3 Hyper-V...........................................................................................................................................................................................233C.3.1 Creating Definition Files..........................................................................................................................................................233C.3.2 Registering Resources with Resource Orchestrator.................................................................................................................233C.3.3 Registering Resources in Resource Pools................................................................................................................................ 235C.3.4 Automatic Network Configuration.......................................................................................................................................... 235C.3.5 Manual Network Configuration............................................................................................................................................... 242C.3.6 Creating L-Server Templates................................................................................................................................................... 250C.3.7 L-Server Creation.....................................................................................................................................................................250C.3.8 Collecting and Deleting Cloning Images................................................................................................................................. 252C.3.9 [OS] Tab Configuration........................................................................................................................................................... 255C.3.10 Advisory Notes for Hyper-V Usage.......................................................................................................................................258C.3.11 Overcommit............................................................................................................................................................................261
C.4 RHEL5-Xen.................................................................................................................................................................................... 266C.4.1 Creating Definition Files..........................................................................................................................................................266C.4.2 Registering Resources with Resource Orchestrator.................................................................................................................266C.4.3 Registering Resources in Resource Pools................................................................................................................................ 267C.4.4 Manual Network Configuration............................................................................................................................................... 267C.4.5 Creating L-Server Templates................................................................................................................................................... 269C.4.6 L-Server Creation.....................................................................................................................................................................270C.4.7 Advisory Notes for RHEL5-Xen Usage.................................................................................................................................. 271
C.5 OVM for x86 2.2.............................................................................................................................................................................272C.5.1 Creating Definition Files..........................................................................................................................................................272C.5.2 Registering Resources with Resource Orchestrator.................................................................................................................272C.5.3 Registering Resources in Resource Pools................................................................................................................................ 274C.5.4 Manual Network Configuration............................................................................................................................................... 274C.5.5 Creating L-Server Templates................................................................................................................................................... 276C.5.6 L-Server Creation.....................................................................................................................................................................276C.5.7 Collecting a Cloning Image..................................................................................................................................................... 277C.5.8 [OS] Tab Configuration........................................................................................................................................................... 277C.5.9 Advisory Notes for OVM for x86 2.2 Usage...........................................................................................................................278
C.6 RHEL-KVM....................................................................................................................................................................................281C.6.1 Creating Definition Files..........................................................................................................................................................281C.6.2 Registering Resources with Resource Orchestrator.................................................................................................................285C.6.3 Registering Resources in Resource Pools................................................................................................................................ 286C.6.4 Manual Network Configuration............................................................................................................................................... 292C.6.5 Creating L-Server Templates................................................................................................................................................... 294C.6.6 L-Server Creation.....................................................................................................................................................................294C.6.7 Collecting a Cloning Image..................................................................................................................................................... 297C.6.8 [OS] Tab Configuration........................................................................................................................................................... 302C.6.9 Advisory Notes for RHEL-KVM Usage..................................................................................................................................305C.6.10 Overcommit............................................................................................................................................................................307
C.7 Solaris Zones...................................................................................................................................................................................308C.7.1 Creating Definition Files..........................................................................................................................................................309C.7.2 Registering Resources with Resource Orchestrator.................................................................................................................312C.7.3 Registering Resources in Resource Pools................................................................................................................................ 312C.7.4 Manual Network Configuration............................................................................................................................................... 317C.7.5 Creating L-Server Templates................................................................................................................................................... 318C.7.6 Creating an L-Server................................................................................................................................................................ 319C.7.7 [OS] Tab Configuration........................................................................................................................................................... 319
- xv -

C.7.8 Advisory Notes for Solaris Zone Usage...................................................................................................................................320C.7.9 Overcommit..............................................................................................................................................................................322C.7.10 Managing Solaris Zones Configured on a Guest Domain of OVM for SPARC................................................................... 323
C.8 OVM for SPARC............................................................................................................................................................................ 324C.8.1 Creating Definition Files..........................................................................................................................................................324C.8.2 Registering Resources with Resource Orchestrator.................................................................................................................332C.8.3 Registering Resources in Resource Pools................................................................................................................................ 332C.8.4 Manual Network Configuration............................................................................................................................................... 337C.8.5 Creating L-Server Templates................................................................................................................................................... 338C.8.6 Creating an L-Server................................................................................................................................................................ 339C.8.7 [OS] Tab Configuration........................................................................................................................................................... 341C.8.8 Advisory Notes for OVM for SPARC Usage.......................................................................................................................... 343C.8.9 Overcommit..............................................................................................................................................................................349
C.9 Citrix XenServer............................................................................................................................................................................. 350C.9.1 Creating Definition Files..........................................................................................................................................................350C.9.2 Registering Resources with Resource Orchestrator.................................................................................................................353C.9.3 Registering Resources in Resource Pools................................................................................................................................ 354C.9.4 Manual Network Configuration............................................................................................................................................... 356C.9.5 Creating L-Server Templates................................................................................................................................................... 357C.9.6 Creating an L-Server................................................................................................................................................................ 357C.9.7 Collecting and Registering Cloning Images............................................................................................................................ 358C.9.8 [OS] Tab Configuration........................................................................................................................................................... 358C.9.9 Relating to an L-Server............................................................................................................................................................ 361C.9.10 Advisory Notes for Citrix XenServer Usage......................................................................................................................... 361C.9.11 Overcommit............................................................................................................................................................................362C.9.12 Customization Function of Guest OS.................................................................................................................................... 363
C.10 OVM for x86 3.2...........................................................................................................................................................................366C.10.1 Creating Definition Files........................................................................................................................................................366C.10.2 Registering Resources with Resource Orchestrator...............................................................................................................367C.10.3 Registering Resources in Resource Pools.............................................................................................................................. 368C.10.4 Manual Network Configuration............................................................................................................................................. 369C.10.5 Creating L-Server Templates................................................................................................................................................. 370C.10.6 Creating an L-Server.............................................................................................................................................................. 371C.10.7 Collecting and Registering Cloning Images.......................................................................................................................... 371C.10.8 [OS] Tab Configuration......................................................................................................................................................... 372C.10.9 Relating to an L-Server.......................................................................................................................................................... 372C.10.10 Advisory Notes for OVM for x86 3.2 Usage.......................................................................................................................372C.10.11 Overcommit..........................................................................................................................................................................373
C.11 Advisory Notes for Virtual L-Servers...........................................................................................................................................373
Appendix D Installing VM Hosts on Physical L-Servers....................................................................................................... 375D.1 Installation.......................................................................................................................................................................................375D.2 Changing Configuration..................................................................................................................................................................376D.3 Deletion...........................................................................................................................................................................................377D.4 Advisory Notes for Installation of VM Hosts on Physical L-Servers............................................................................................ 377
Appendix E To Customize Dashboard................................................................................................................................. 378E.1 Building the Dashboard Development Environment...................................................................................................................... 378
E.1.1 Installing the Dashboard Development Environment.............................................................................................................. 378E.1.2 Setting Up the Dashboard Development Environment............................................................................................................ 380
E.2 To Customize Dashboard................................................................................................................................................................ 382E.2.1 Customizing Email Send Settings............................................................................................................................................ 383E.2.2 Customizing Threshold Values................................................................................................................................................ 385E.2.3 Customizing Monitored Pools..................................................................................................................................................386
E.3 Backup and Restore the Dashboard Development Environment.................................................................................................... 388E.3.1 Backing Up the Definition Information................................................................................................................................... 388E.3.2 Restoring the Definition Information....................................................................................................................................... 388
E.4 Uninstalling the Dashboard Development Environment.................................................................................................................389
- xvi -
E.4.1 Uninstalling the Interstage Business Process Manager Analytics Client.................................................................................389E.4.2 Uninstalling Interstage Business Process Manager Studio...................................................................................................... 390E.4.3 Uninstalling JRE 5.0.................................................................................................................................................................390
E.5 Changing the Schedule for Deleting Event Data.............................................................................................................................390E.5.1 Settings..................................................................................................................................................................................... 390
E.6 The Interstage Business Process Manager Analytics Management Console.................................................................................. 391E.6.1 Access.......................................................................................................................................................................................391E.6.2 Changing the Password of the Administrator...........................................................................................................................391E.6.3 Creating and Changing Analytics Studio Users....................................................................................................................... 391E.6.4 Restarting the Analytics Server................................................................................................................................................391E.6.5 Changing the Schedule for Data Deletion................................................................................................................................392
Appendix F Upgrading from Earlier Versions....................................................................................................................... 393F.1 Overview......................................................................................................................................................................................... 393F.2 Manager........................................................................................................................................................................................... 395F.3 Agent............................................................................................................................................................................................... 409F.4 Client............................................................................................................................................................................................... 414F.5 HBA address rename Setup Service................................................................................................................................................415F.6 Configuring a Single Sign-On Environment................................................................................................................................... 416
F.6.1 Registering Directory Service Connection Information in Resource Orchestrator..................................................................418F.6.2 Changing Already Registered Directory Service Connection Information..............................................................................418F.6.3 Registering CA Certificates of ServerView Operations Manager............................................................................................419F.6.4 Moving Information in the Directory Service Used in Earlier Versions..................................................................................420F.6.5 Registering Users in the Directory Service.............................................................................................................................. 420F.6.6 Transferring Tenants and Tenant Administrators.....................................................................................................................422
Appendix G Compatibility with Earlier Versions................................................................................................................... 426
Appendix H Configuration when Using Ethernet Fabrics..................................................................................................... 427H.1 Performing Preconfiguration.......................................................................................................................................................... 427H.2 Creating the Network Configuration Information.......................................................................................................................... 427H.3 Registering Network Devices......................................................................................................................................................... 427H.4 Automatic Network Configuration................................................................................................................................................. 427H.5 Creating Definition Files for the Port Profile Configuration Function...........................................................................................427H.6 Registering Network Resources......................................................................................................................................................428
Appendix I Coordination with Other Products.......................................................................................................................429I.1 Coordination with BMC BladeLogic Server Automation................................................................................................................429
I.1.1 Coordination for Creation and Operation of Virtual L-Servers................................................................................................ 429I.1.2 Coordination of Registration and Deletion of Managed Servers, Cloning, and Software Deployment................................... 431
I.2 Sending SNMP Traps....................................................................................................................................................................... 434I.2.1 SNMP Trap Settings Using CA Spectrum................................................................................................................................ 436
Appendix J Co-Existence with ServerView Deployment Manager....................................................................................... 439J.1 Overview.......................................................................................................................................................................................... 439J.2 Restricted Functions.........................................................................................................................................................................440
Appendix K Co-Existence with Management Software........................................................................................................ 441K.1 Systemwalker Service Quality Coordinator....................................................................................................................................441
K.1.1 Setup........................................................................................................................................................................................ 441K.1.2 Uninstallation...........................................................................................................................................................................441
Appendix L Migration Procedure when Using Active Directory with a Redundant Configuration.........................................443
Appendix M Settings for Using VDI Coordination.................................................................................................................447M.1 VMware Horizon View..................................................................................................................................................................447
M.1.1 Installation...............................................................................................................................................................................447M.1.2 Subscription.............................................................................................................................................................................453M.1.3 Cancellation.............................................................................................................................................................................454
- xvii -

M.1.4 Customizing the Completion Waiting Time for Guest OSs....................................................................................................455M.1.5 Advisory Notes for VMware Horizon View Usage................................................................................................................ 456
- xviii -

Chapter 1 Flow of Setup for Resource OrchestratorThis chapter explains the overall flow of setup when using Resource Orchestrator.
Setup operations when using Resource Orchestrator are performed by the users below.
System Administrators
System administrators manage the entire system. They install Resource Orchestrator and configure the necessary settings.
OS administrator privileges are required for these operations. Usually, the roles of infrastructure administrator and system administratorare performed by the same person.
Infrastructure Administrators
Infrastructure administrators manage ICT resources such as servers, storage, networks, and images.
They collectively manage ICT resources in resource pools, and perform addition, configuration modification, and maintenance of ICTresources when necessary.
In Resource Orchestrator, the following roles can be assigned to infrastructure administrators:
- infra_admin (infrastructure administrator)
Tenant Administrators
Provide tenant users with L-Platform templates based on their needs.
In Resource Orchestrator, the following roles can be assigned to tenant administrators:
- tenant_admin (tenant administrator)
Tenant Users
Tenant users create L-Platforms and use them.
In Resource Orchestrator, the following roles can be assigned to tenant users:
- tenant_user (tenant user)
- lplatform_user (L-Platform user)
Dual-role Administrators
The following role combines the roles of infrastructure administrators and tenant administrators.
In Resource Orchestrator, the following roles can be assigned to dual-role administrators:
- administrator (administrator)
For details on roles, refer to "5.1 Restricting Access Using Roles" in the "Design Guide CE".
An overview of setup operations when using Resource Orchestrator is given below.
Flow of Setup and Service Provision Using Business Applications
In Resource Orchestrator, the flow of setup and services provision using business applications is as shown below.
- 1 -
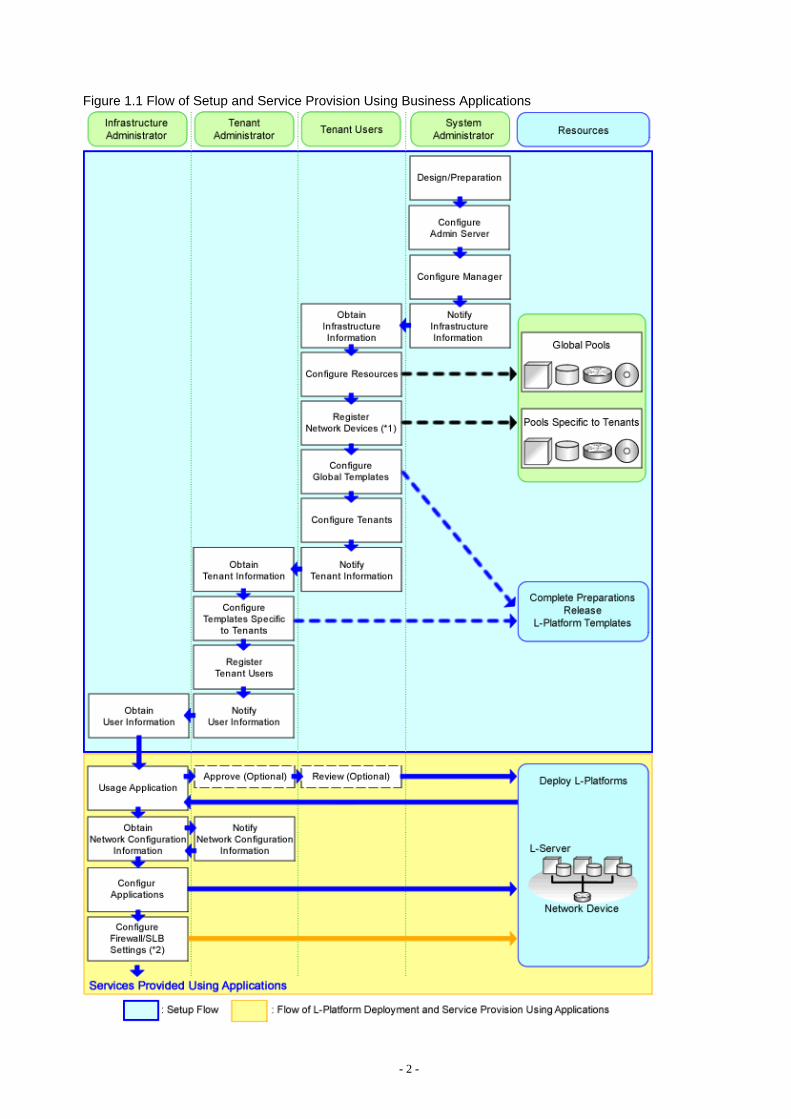
Figure 1.1 Flow of Setup and Service Provision Using Business Applications
- 2 -
*1: Necessary when using firewalls, server load balancers (SLB), or L2 switches.*2: Necessary when using firewalls or server load balancers (SLB).
The flow of setup is as follows:
Table 1.1 Flow of Setup
Operator Operation Overview Details Reference
SystemAdministrators
Design
- Designing the system configuration- Defining user accounts- Defining tenants and resource pools- Defining high availability and Disaster Recovery- Defining the server environment- Defining the network- Defining the storage environment- Deciding server virtualization software
Refer to "1.1 Flow ofSetup for SystemAdministrators".
Preconfiguration
- Configuring the server environment- Configuring the network environment- Configuring the storage environment- Settings for server virtualization software- Installing and defining Single Sign-On- Deciding and configuring the power monitoring environment
Software installation onadmin servers
- Installing an OS- Installing required software
Manager installation andconfiguration
- Installing the manager- Configuring SSL communications on the ROR console (*1)- Logging in to the ROR Console- License setup- Importing a certificate to a browser (*2)- Registering infrastructure administrators- Creating definition files
Notification ofinfrastructureinformation
- Notifying the infrastructure information
InfrastructureAdministrators
Obtaining infrastructureinformation
- Obtaining the infrastructure information Refer to "1.2 Flow ofSetup for InfrastructureAdministrators".
Resource configuration
- Registering resources with Resource Orchestrator- Settings for the HBA address rename setup service (*4)- Installing software and registering agents on VM hosts (*5)- Registering Resources to the Global Pool- Creating L-Server templates- Collecting and registering cloning images
Registration of networkdevices
- Creating the network configuration information (XMLdefinition)- Creating scripts for network device auto-configuration settings- Registering network device resources- Registering network pools for network devices (*3)
Global templateconfiguration
- Creating and releasing global templates and registeringaccounting information (*6)
Tenant configuration- Creating tenants- Creating tenant administrators- Registering resources to a dedicated pool for the tenant
- 3 -
Operator Operation Overview Details Reference
Notification of TenantInformation
- User IDs and passwords for the tenant administrator- Information of tenants which can be used by the tenantadministrator and resources allocated to tenants- Global template information- Notifying the information to configure on a firewall or a serverload balancer (*3)
TenantAdministrators
Obtaining tenantinformation
- Obtaining available tenant and resource information- Obtaining the global template information- Obtaining the information to configure on a firewall or a serverload balancer (*3)
Refer to "1.3 Flow ofSetup for TenantAdministrators".
Configuration of atemplate specific to thetenant
- Copying and editing a template specific to the tenant- Releasing and retracting a template specific to the tenant
User registration - Registering tenant users
Notification of the userinformation
- Notifying the user information
Notify the Tenant User ofNetwork ConfigurationInformation
- Notifying the segment settings- Notifying the information to configure on a firewall or a serverload balancer (*3)
*1: Necessary when replacing the test certificate set up by default with another certificate. For details, refer to "Chapter 3 SSLCommunication Environment Settings for the ROR Console".*2: Necessary when using the site certificate for tests.*3: Necessary when using a firewall or a server load balancer.*4: Necessary when using HBA address rename.*5: Necessary when using server virtualization software*6: It is necessary to register accounting information when using accounting.
The flow of service provision using business applications is as shown below.
Table 1.2 Flow of Service Provision Using Business Applications
Operator Operation Overview Details Reference
TenantUsers
Obtaining the user information - Obtaining the user information Refer to "1.4 Flow ofOperations for TenantUsers".
L-Platform deployment - Applying for L-Platform usage- Checking L-Platform usage application status
Configuration of businessapplications
- Configuring business applications
Configuration of firewalls or serverload balancers
- Configuring a firewall- Configuring a server load balancer
Service provision using businessapplications
- Providing services using business applications
* Note: Necessary when using firewalls or server load balancers.
1.1 Flow of Setup for System AdministratorsThis section explains flow of setup for system administrators.
- 4 -

Table 1.3 Overview of Setup for System AdministratorsOperation Overview Tabs Used on the
ROR ConsoleReference
Design - Refer to "Design for Resource Orchestrator Setup".
Preconfiguration - Refer to "Preconfiguration for Resource OrchestratorSetup".
Software installation on admin servers - Refer to "1.1.2 Installing Software on Admin Servers".
Managerinstallation andconfiguration
Manager installation - Refer to "1.1.3 Manager Installation".
Login to the ROR Console - Refer to "1.1.4 Login to the ROR Console".
License Setup [Resource] Refer to "1.1.5 License Setup".
Configuration after managerinstallation
- Refer to "1.1.6 Configuration after Manager Installation".
Notification of infrastructure configuration information - Refer to "1.1.7 Notifying the Infrastructure Administratorof Infrastructure Configuration Information".
-: There are no tabs that can be used on the ROR console.
1.1.1 Design and Preconfiguration for Resource Orchestrator SetupThis section explains the design and preconfiguration necessary when installing this product.
Design for Resource Orchestrator Setup
The following operations have to be performed to install this product.
- Defining the System Configuration
Refer to "Chapter 4 System Configuration Design" in the "Design Guide CE".
- Defining and Configuring User Accounts
Refer to "Chapter 5 Defining User Accounts" in the "Design Guide CE".
- Defining Tenants and Resource Pools
Refer to "Chapter 6 Defining Tenants and Resource Pools" in the "Design Guide CE".
- Defining High Availability and Disaster Recovery
Refer to "Chapter 7 Defining High Availability and Disaster Recovery" in the "Design Guide CE", and the "DR Option Instruction".
- Defining the Server Environment
Refer to "8.1 Defining the Server Environment" in the "Design Guide CE".
- Defining the Network Environment
Refer to "Chapter 9 Defining and Configuring the Network Environment" in the "Design Guide CE".
- Defining the Storage Environment
Refer to "10.1 Deciding the Storage Environment" in the "Design Guide CE".
- Deciding Server Virtualization Software
Refer to "11.1 Deciding Server Virtualization Software" in the "Design Guide CE".
- Deciding the Power Monitoring Environment
Refer to "13.1 Deciding the Power Monitoring Environment" in the "Design Guide CE".
- 5 -
Preconfiguration for Resource Orchestrator Setup
Perform preconfiguration for setup of Resource Orchestrator.
- Configuring the Server Environment
Refer to "8.2 Configuring the Server Environment" in the "Design Guide CE".
- Configuring the Network Environment
Refer to "Chapter 9 Defining and Configuring the Network Environment" in the "Design Guide CE".
- Configuring the Storage Environment
Refer to "10.2 Configuring the Storage Environment" in the "Design Guide CE".
- Settings for Server Virtualization Software
Refer to "11.2 Settings for Server Virtualization Software" in the "Design Guide CE".
- Installing and Defining Single Sign-On
Refer to "Chapter 12 Installing and Defining Single Sign-On" in the "Design Guide CE".
- Configuring the Power Monitoring Environment
Refer to "13.2 Configuring the Power Monitoring Environment" in the "Design Guide CE".
1.1.2 Installing Software on Admin ServersConfigure an admin server.
Perform installation of software on the admin server.
1. Install an OS
2. Install required software
1.1.3 Manager InstallationInstall the manager. Configure the SSL communication environment settings for log in to the ROR console.
1. Install the manager
Install the manager of Resource Orchestrator.
For details, refer to "2.1 Manager Installation".
2. Configure SSL Communications on the ROR Console
Use SSL communications when accessing the ROR console from a browser.
When changing the certificate used for SSL communication from the test certificate set up by default to another certificate, refer to"Chapter 3 SSL Communication Environment Settings for the ROR Console".
When using the test certificate, it is not necessary to change the certificates.
1.1.4 Login to the ROR ConsoleLog in to Resource Orchestrator.
Refer to "Chapter 4 Login to the ROR Console" and "Chapter 2 Login and Logout" in the "User's Guide for Infrastructure AdministratorsCE".
1.1.5 License SetupConfigure licenses.
For details, refer to "Chapter 5 License Setup and Confirmation".
- 6 -
1.1.6 Configuration after Manager InstallationConfigure the license for the manager, after installing the manager.
1. Import a Certificate to a Browser
In order to use a test site certificate, the certificate must be installed to the Web browser.
For details, refer to "Chapter 6 Importing a Certificate to a Browser".
2. Register Infrastructure Administrators
The administrator role, which is the role that combines infrastructure administrator and tenant administrator roles, is assigned to theuser created when installing Resource Orchestrator.
Resource Orchestrator can be configured and operated by this user or another user registered with the infrastructure administratorrole, in order to prevent the operation of an L-Platform from being stopped by erroneous operations.
For details on how to register network resources, refer to "3.1 Registering User Accounts" in the "User's Guide for InfrastructureAdministrators (Resource Management) CE".
3. Create Definition Files
Create the Definition Files
For details, refer to "Chapter 8 Creating Definition Files".
1.1.7 Notifying the Infrastructure Administrator of InfrastructureConfiguration Information
The system administrator notifies the infrastructure administrator of the details designed for Resource Orchestrator setup or the followinginfrastructure configuration information that has been configured in advance.
- Physical system configuration of hardware managed by the infrastructure administrator (servers, storage, and networks)
- Connection information between devices (connection ports, connection types, etc.)
- Hardware information managed by the infrastructure administrator
- Vendor name
- Model name
- Resource information managed in Resource Orchestrator
To manage resources in Resource Orchestrator, it is necessary to register them.
For details, refer to "Chapter 9 Registering Resources with Resource Orchestrator".
- Information such as segments or IP addresses used in an L-Platform
For details on the segments or IP addresses allocated to an L-Platform, refer to "9.1.3 Physical Network Design for the Public LANand iSCSI LAN" in the "Design Guide CE".
- Configuration information when using a firewall or a server load balancer on an L-Platform
- When using the firewall address conversion functions, the virtual IP address used in the function
- When using the server load balancer, the virtual IP addresses used in the server load balancing functions
1.2 Flow of Setup for Infrastructure AdministratorsThis section explains flow of setup for infrastructure administrators.
Procedures differ depending on the type of L-Server which comprises an L-Platform or the server hardware being used, and the networkconfiguration which is connected to an L-Server.
- 7 -
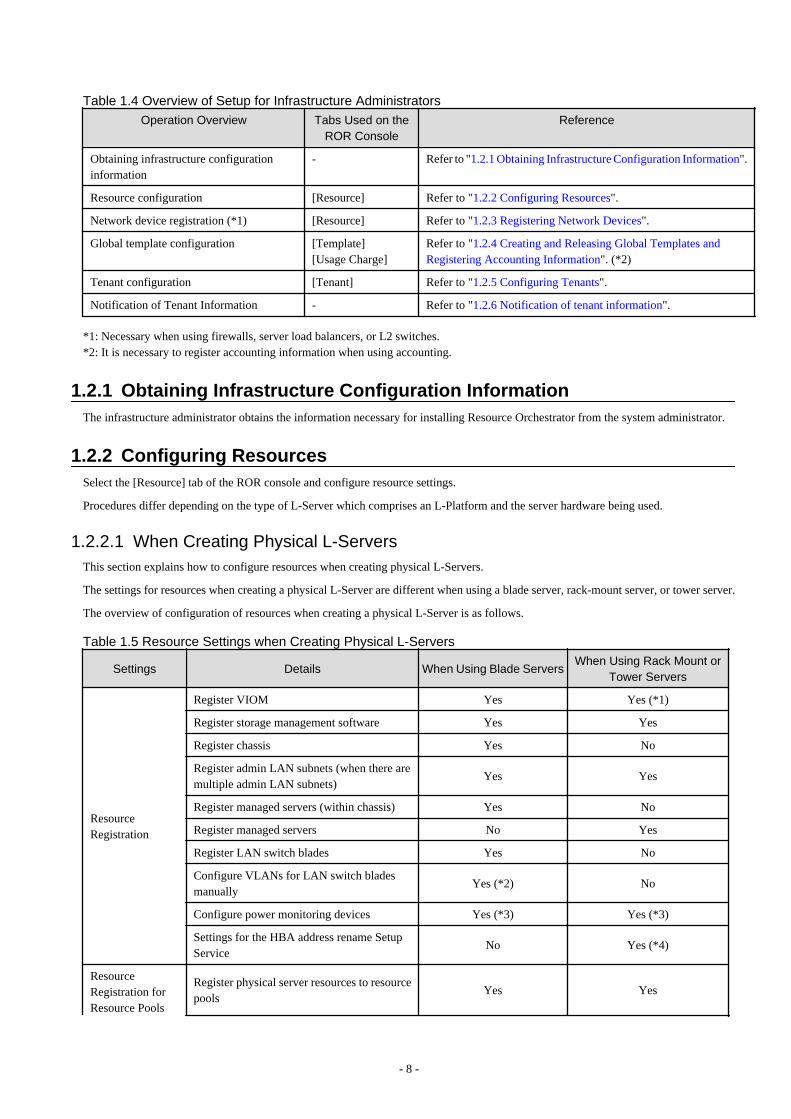
Table 1.4 Overview of Setup for Infrastructure AdministratorsOperation Overview Tabs Used on the
ROR ConsoleReference
Obtaining infrastructure configurationinformation
- Refer to "1.2.1 Obtaining Infrastructure Configuration Information".
Resource configuration [Resource] Refer to "1.2.2 Configuring Resources".
Network device registration (*1) [Resource] Refer to "1.2.3 Registering Network Devices".
Global template configuration [Template][Usage Charge]
Refer to "1.2.4 Creating and Releasing Global Templates andRegistering Accounting Information". (*2)
Tenant configuration [Tenant] Refer to "1.2.5 Configuring Tenants".
Notification of Tenant Information - Refer to "1.2.6 Notification of tenant information".
*1: Necessary when using firewalls, server load balancers, or L2 switches.*2: It is necessary to register accounting information when using accounting.
1.2.1 Obtaining Infrastructure Configuration InformationThe infrastructure administrator obtains the information necessary for installing Resource Orchestrator from the system administrator.
1.2.2 Configuring ResourcesSelect the [Resource] tab of the ROR console and configure resource settings.
Procedures differ depending on the type of L-Server which comprises an L-Platform and the server hardware being used.
1.2.2.1 When Creating Physical L-ServersThis section explains how to configure resources when creating physical L-Servers.
The settings for resources when creating a physical L-Server are different when using a blade server, rack-mount server, or tower server.
The overview of configuration of resources when creating a physical L-Server is as follows.
Table 1.5 Resource Settings when Creating Physical L-Servers
Settings Details When Using Blade ServersWhen Using Rack Mount or
Tower Servers
ResourceRegistration
Register VIOM Yes Yes (*1)
Register storage management software Yes Yes
Register chassis Yes No
Register admin LAN subnets (when there aremultiple admin LAN subnets)
Yes Yes
Register managed servers (within chassis) Yes No
Register managed servers No Yes
Register LAN switch blades Yes No
Configure VLANs for LAN switch bladesmanually
Yes (*2) No
Configure power monitoring devices Yes (*3) Yes (*3)
Settings for the HBA address rename SetupService
No Yes (*4)
ResourceRegistration forResource Pools
Register physical server resources to resourcepools
Yes Yes
- 8 -
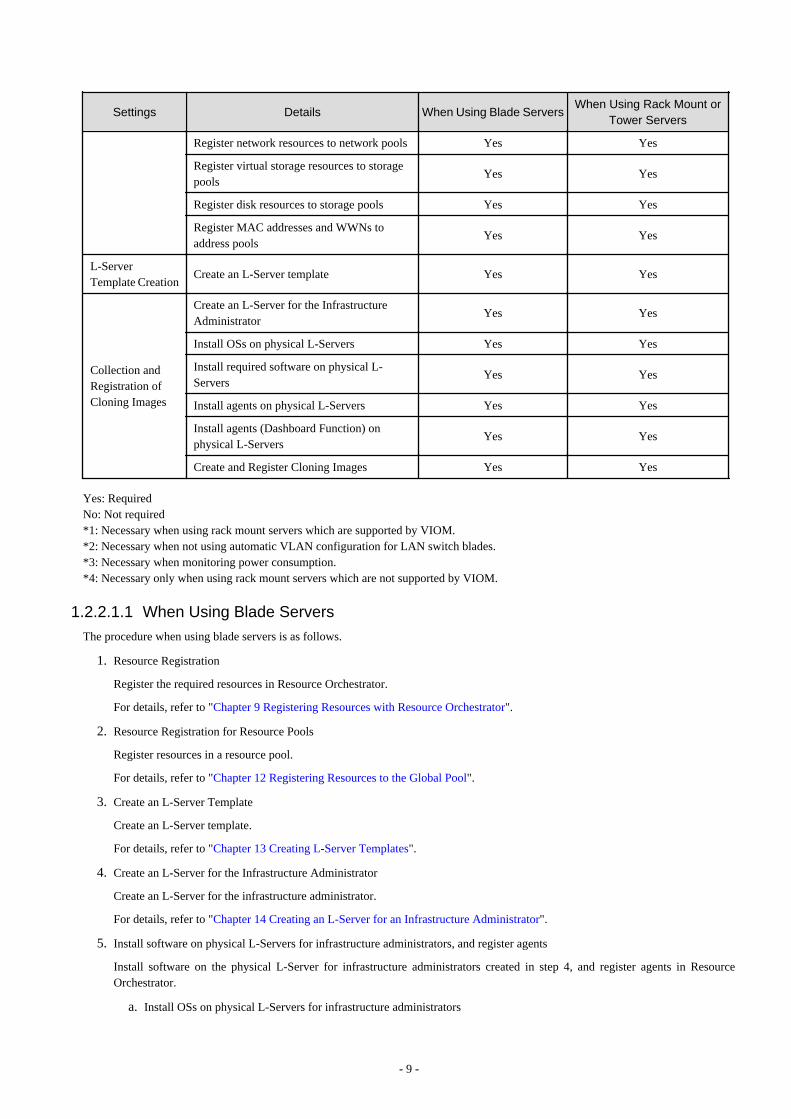
Settings Details When Using Blade ServersWhen Using Rack Mount or
Tower Servers
Register network resources to network pools Yes Yes
Register virtual storage resources to storagepools
Yes Yes
Register disk resources to storage pools Yes Yes
Register MAC addresses and WWNs toaddress pools
Yes Yes
L-ServerTemplate Creation
Create an L-Server template Yes Yes
Collection andRegistration ofCloning Images
Create an L-Server for the InfrastructureAdministrator
Yes Yes
Install OSs on physical L-Servers Yes Yes
Install required software on physical L-Servers
Yes Yes
Install agents on physical L-Servers Yes Yes
Install agents (Dashboard Function) onphysical L-Servers
Yes Yes
Create and Register Cloning Images Yes Yes
Yes: RequiredNo: Not required*1: Necessary when using rack mount servers which are supported by VIOM.*2: Necessary when not using automatic VLAN configuration for LAN switch blades.*3: Necessary when monitoring power consumption.*4: Necessary only when using rack mount servers which are not supported by VIOM.
1.2.2.1.1 When Using Blade Servers
The procedure when using blade servers is as follows.
1. Resource Registration
Register the required resources in Resource Orchestrator.
For details, refer to "Chapter 9 Registering Resources with Resource Orchestrator".
2. Resource Registration for Resource Pools
Register resources in a resource pool.
For details, refer to "Chapter 12 Registering Resources to the Global Pool".
3. Create an L-Server Template
Create an L-Server template.
For details, refer to "Chapter 13 Creating L-Server Templates".
4. Create an L-Server for the Infrastructure Administrator
Create an L-Server for the infrastructure administrator.
For details, refer to "Chapter 14 Creating an L-Server for an Infrastructure Administrator".
5. Install software on physical L-Servers for infrastructure administrators, and register agents
Install software on the physical L-Server for infrastructure administrators created in step 4, and register agents in ResourceOrchestrator.
a. Install OSs on physical L-Servers for infrastructure administrators
- 9 -
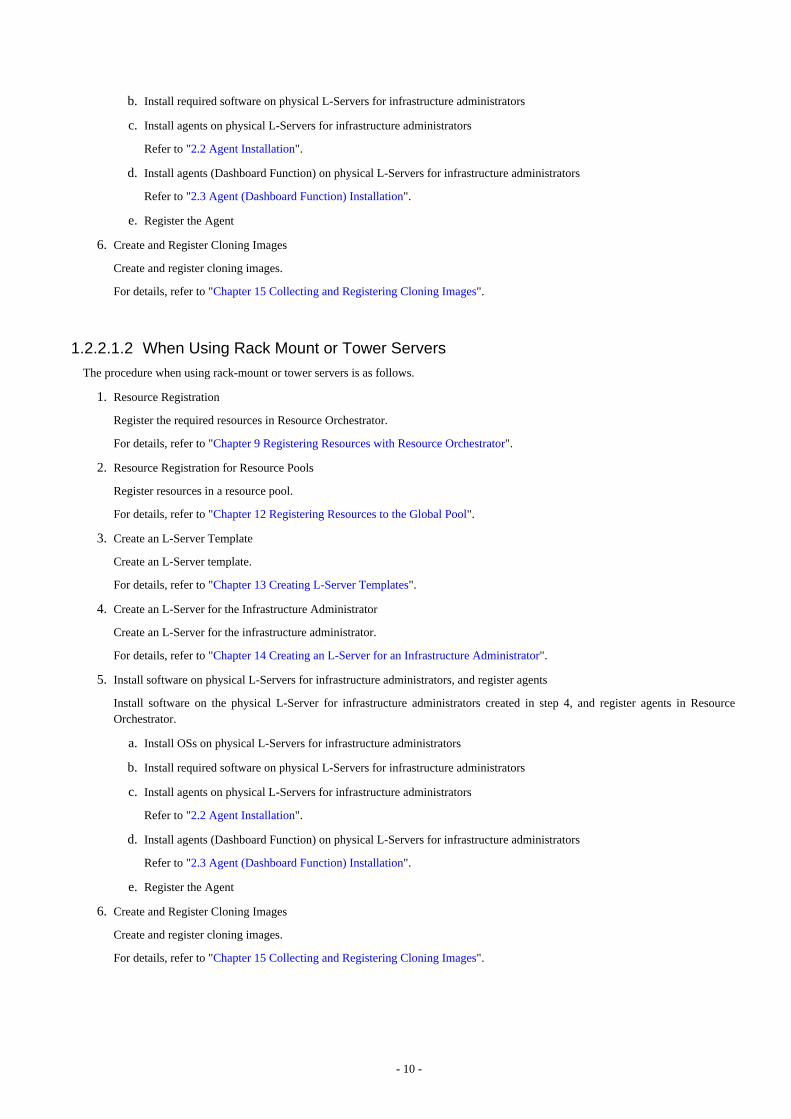
b. Install required software on physical L-Servers for infrastructure administrators
c. Install agents on physical L-Servers for infrastructure administrators
Refer to "2.2 Agent Installation".
d. Install agents (Dashboard Function) on physical L-Servers for infrastructure administrators
Refer to "2.3 Agent (Dashboard Function) Installation".
e. Register the Agent
6. Create and Register Cloning Images
Create and register cloning images.
For details, refer to "Chapter 15 Collecting and Registering Cloning Images".
1.2.2.1.2 When Using Rack Mount or Tower Servers
The procedure when using rack-mount or tower servers is as follows.
1. Resource Registration
Register the required resources in Resource Orchestrator.
For details, refer to "Chapter 9 Registering Resources with Resource Orchestrator".
2. Resource Registration for Resource Pools
Register resources in a resource pool.
For details, refer to "Chapter 12 Registering Resources to the Global Pool".
3. Create an L-Server Template
Create an L-Server template.
For details, refer to "Chapter 13 Creating L-Server Templates".
4. Create an L-Server for the Infrastructure Administrator
Create an L-Server for the infrastructure administrator.
For details, refer to "Chapter 14 Creating an L-Server for an Infrastructure Administrator".
5. Install software on physical L-Servers for infrastructure administrators, and register agents
Install software on the physical L-Server for infrastructure administrators created in step 4, and register agents in ResourceOrchestrator.
a. Install OSs on physical L-Servers for infrastructure administrators
b. Install required software on physical L-Servers for infrastructure administrators
c. Install agents on physical L-Servers for infrastructure administrators
Refer to "2.2 Agent Installation".
d. Install agents (Dashboard Function) on physical L-Servers for infrastructure administrators
Refer to "2.3 Agent (Dashboard Function) Installation".
e. Register the Agent
6. Create and Register Cloning Images
Create and register cloning images.
For details, refer to "Chapter 15 Collecting and Registering Cloning Images".
- 10 -

1.2.2.2 When Creating a Virtual L-ServerThis section explains how to configure resources when creating virtual L-Servers.
The settings for resources when creating a virtual L-Server differ depending on the server virtualization software that is used.
1.2.2.2.1 Resource Registration
Register the required resources in Resource Orchestrator.
Resource registration when creating a virtual L-Server is as follows.
For details, refer to "Chapter 9 Registering Resources with Resource Orchestrator".
Table 1.6 Resource Registration when Creating Virtual L-Servers
Settings DetailsWhen Using Blade
Servers
When Using RackMount or Tower
Servers
When UsingPRIMEQUEST
Servers
When UsingFujitsu M10/
SPARC Enterprise
ResourceRegistration
Register VM ManagementSoftware
Yes (*1) Yes (*1) Yes (*1) No
Register Server ManagementSoftware
No Yes (*2) No Yes (*2)
Register storage managementsoftware
Yes (*3) Yes (*3) Yes (*3) No
Register chassis Yes No Yes Yes (*4)
Register admin LAN subnets(when there are multiple adminLAN subnets)
Yes Yes Yes Yes
Register managed servers (withinchassis)
Yes No Yes Yes
Register managed servers No Yes No No
Register LAN switch blades Yes No No No
Configure VLANs for LANswitch blades manually
Yes (*5) No No No
Configure power monitoringdevices
Yes (*6) Yes (*6) Yes (*6) Yes (*6)
Register Disk Resources Yes (*7) Yes (*2, *7) Yes (*2, *7) Yes (*2)
Yes: RequiredNo: Not required*1: Register when using VMware, Hyper-V, OVM for x86 2.2, or OVM for x86 3.2.*2: Necessary when using Solaris Zones or OVM for SPARC.*3: It is necessary to register storage management software when using RHEL5-Xen.*4: Register when using SPARC Enterprise M4000/M5000/M8000/M9000 or FUJITSU M10-4S.*5: Necessary when not using automatic VLAN configuration for LAN switch blades.*6: Necessary when using.*7: Necessary when using RHEL-KVM.
1.2.2.2.2 Installing Software and Registering Agents on VM Hosts
Install software on VM hosts and register agents in Resource Orchestrator.
1. Install OSs on VM Hosts
2. Install Required Software on VM Hosts
- 11 -
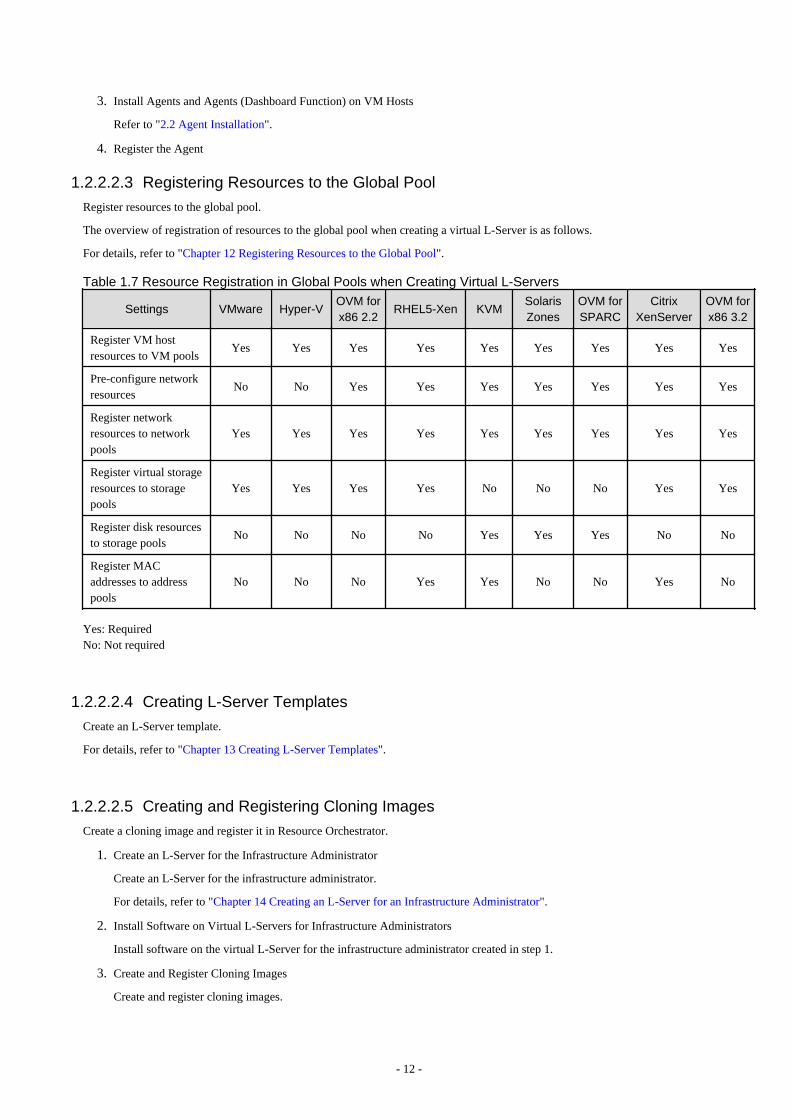
3. Install Agents and Agents (Dashboard Function) on VM Hosts
Refer to "2.2 Agent Installation".
4. Register the Agent
1.2.2.2.3 Registering Resources to the Global Pool
Register resources to the global pool.
The overview of registration of resources to the global pool when creating a virtual L-Server is as follows.
For details, refer to "Chapter 12 Registering Resources to the Global Pool".
Table 1.7 Resource Registration in Global Pools when Creating Virtual L-Servers
Settings VMware Hyper-VOVM forx86 2.2
RHEL5-Xen KVMSolarisZones
OVM forSPARC
CitrixXenServer
OVM forx86 3.2
Register VM hostresources to VM pools
Yes Yes Yes Yes Yes Yes Yes Yes Yes
Pre-configure networkresources
No No Yes Yes Yes Yes Yes Yes Yes
Register networkresources to networkpools
Yes Yes Yes Yes Yes Yes Yes Yes Yes
Register virtual storageresources to storagepools
Yes Yes Yes Yes No No No Yes Yes
Register disk resourcesto storage pools
No No No No Yes Yes Yes No No
Register MACaddresses to addresspools
No No No Yes Yes No No Yes No
Yes: RequiredNo: Not required
1.2.2.2.4 Creating L-Server Templates
Create an L-Server template.
For details, refer to "Chapter 13 Creating L-Server Templates".
1.2.2.2.5 Creating and Registering Cloning Images
Create a cloning image and register it in Resource Orchestrator.
1. Create an L-Server for the Infrastructure Administrator
Create an L-Server for the infrastructure administrator.
For details, refer to "Chapter 14 Creating an L-Server for an Infrastructure Administrator".
2. Install Software on Virtual L-Servers for Infrastructure Administrators
Install software on the virtual L-Server for the infrastructure administrator created in step 1.
3. Create and Register Cloning Images
Create and register cloning images.
- 12 -
For details, refer to "Chapter 15 Collecting and Registering Cloning Images".
Point
When using Solaris Zones, create cloning images using BladeLogic.
For details, refer to the BladeLogic manual.
1.2.3 Registering Network DevicesRegister network devices when necessary.
1. Create the network configuration information (XML definition) necessary for registering network device as resources.
For details, refer to "9.4.8 When Managing Network Devices as Resources" in the "Design Guide CE".
2. When automatically configuring or operating the network device, prepare a script.
For details, refer to "Appendix F Preparing for Automatic Configuration and Operation of Network Devices" in the "Design GuideCE".
3. Register network devices as network device resources.
For details, refer to "5.7 Registering Network Devices" in the "User's Guide for Infrastructure Administrators (ResourceManagement) CE".
4. Register the network device resources in the network pool.
Among the network devices registered as resources, the network devices with "Firewall" or "SLB" set for their resource type mustbe registered in the network pool.
For details, refer to "14.4 Network Devices" in the "User's Guide for Infrastructure Administrators (Resource Management) CE".
1.2.4 Creating and Releasing Global Templates and Registering AccountingInformation
Create and release a global template and register the accounting information.
A global template is an L-Platform template which can be used for all tenants.
1. Create L-Platform templates using the [Template] tab of the ROR console.
For details, refer to "8.3.1 Creating New L-Platform Template" and "8.3.2 Copying L-Platform Template" in the "User's Guide forInfrastructure Administrators CE".
2. When using accounting, register the accounting information using the registration function of the product master maintenancecommand.
For details, refer to "15.3.1 Register Accounting Information" in the "Operation Guide CE".
3. Release L-Platform templates using the [Template] tab of the ROR console.
For details, refer to "8.3.5 Publishing and Hiding L-Platform Template" in the "User's Guide for Infrastructure Administrators CE".
1.2.5 Configuring TenantsCreate tenants and tenant administrators, and register resources in a dedicated pool for the tenant.
1. Create Tenants
Create tenants.
For details, refer to "11.3 Creating a Tenant" in the "User's Guide for Infrastructure Administrators CE".
- 13 -
2. Create Tenant Administrators
Create tenant administrators.
For details, refer to "11.7 Registering a User" in the "User's Guide for Infrastructure Administrators CE".
3. Register resources in a dedicated pool for the tenant
Register resources in a dedicated pool for the tenant (local pool).
For details, refer to "Chapter 14 Registering Resources in Resource Pools" in the "User's Guide for Infrastructure Administrators(Resource Management) CE".
1.2.6 Notification of tenant informationThe infrastructure administrator notifies the tenant administrator of the following tenant information.
- User IDs and Passwords for the tenant administrator
- Information of tenants which can be used by the tenant administrator and resources allocated to tenants
- Global template information
When Using Firewalls or Server Load Balancers
When using a firewall or a server load balancer, the infrastructure administrator notifies the tenant administrator of the informationnecessary to configure a firewall or a server load balancer.
Note the following, when a firewall or a server load balancer is included in the L-Platform template to create.
- It is necessary to configure a firewall or a server load balancer after deploying an L-Platform.
Inform the tenant administrator of this fact.
- Configure Firewalls
Inform the tenant user of the values of virtual IP addresses used for the firewall address conversion functions, and the parametersand values for other firewall settings.
- Configure Server Load Balancers
Inform the tenant user of the values of virtual IP addresses used for server load balancing functions of the server load balancerand the parameters or values for other server load balancer settings.
- Use the ruleset for server load balancer operations
Inform the tenant administrator of the ruleset and the usage used during operations. Inform the tenant administrator of the parametersand the configured values for each ruleset used, and the operation logs to check the results of operations in.
When using the ruleset, it is necessary to prepare the ruleset in advance.
For details on how to prepare the ruleset, refer to "9.4.9.1 When Automatically Configuring and Operating Network Devices UsingUser Customization Mode" in the "Design Guide CE".
1.3 Flow of Setup for Tenant AdministratorsOperation by the tenant administrator is shown as below.
1. Obtaining tenant information
The tenant administrator obtains the information necessary for installing Resource Orchestrator from the infrastructure administrator.
2. Edit a Template Specific to the Tenant
Edit a template specific to the tenant.
A template specific to the tenant is an L-Platform template used only for that specific tenant.
- 14 -

When a template specific to the tenant is required, edit the template specific to the tenant.
For details, refer to "7.3.2 Copying L-Platform Template" or "7.3.3 Editing L-Platform Template" in the "User's Guide for TenantAdministrators CE".
3. Release a Template Specific to the Tenant
Release a template specific to the tenant to the tenant user.
For details, refer to "7.3.5 Publishing and Hiding L-Platform Template" in the "User's Guide for Tenant Administrators CE".
4. Register the Tenant User
Register the tenant user.
For details, refer to "10.3 Registering a User" in the "User's Guide for Tenant Administrators CE".
5. Notify the Tenant User of Network Configuration Information
- Notify the tenant user of the segment information
The tenant administrator notifies the tenant user of the segment information specified in an L-Platform.
- Notify the tenant user of the information to configure in a firewall or a server load balancer
When using a firewall or a server load balancer, the tenant administrator notifies the tenant user of the information necessaryto configure a firewall or a server load balancer.
Note the following, when a firewall or a server load balancer is included in the L-Platform template edited in step 1.
- It is necessary to configure a firewall or a server load balancer after deploying an L-Platform.
Inform the tenant user of this fact.
- Configure Firewalls
Inform the tenant user of the values of virtual IP addresses used for the firewall address conversion functions, and theparameters and values for other firewall settings.
- Configure Server Load Balancers
Inform the tenant user of the values of virtual IP addresses used for server load balancing functions of the server loadbalancer and the parameters or values for other server load balancer settings.
- Use the ruleset for server load balancer operations
Inform the tenant user of the ruleset and the usage used during operations. Inform the tenant user of the parameters and theconfigured values for each ruleset used, and the operation logs to check the results of operations in.
1.4 Flow of Operations for Tenant UsersThe details of operations by the tenant user until starting to provide services using business applications are as shown below.
1. Apply for L-Platform Usage
Apply for L-Platform usage.
For details, refer to "5.2 Subscribe to an L-Platform" in the "User's Guide for Tenant Users CE".
2. Check L-Platform Usage Application Status
Check L-Platform usage application status.
For details, refer to "5.3 L-Platform Management" in the "User's Guide for Tenant Users CE".
3. Obtain Network Configuration Information
The tenant user obtains the information necessary for configuring business applications from the tenant administrator.
4. Configure Business Applications
Configure business applications.
- 15 -

5. Configure Firewalls
Configure a firewall when necessary.
For details, refer to "5.3.8 Setup Firewall" in the "User's Guide for Tenant Users CE".
6. Configure Server Load Balancers
Configure a server load balancer when necessary.
For details, refer to "5.3.10 Server Load Balancer (SLB) Settings" in the "User's Guide for Tenant Users CE".
7. Service provision using business applications
Provide services using business applications.
- 16 -

Chapter 2 InstallationThis chapter explains the installation of FUJITSU Software ServerView Resource Orchestrator.
2.1 Manager InstallationThis section explains installation of managers.
2.1.1 Manager Installation [Windows Manager]This section explains installation of Windows managers.
2.1.1.1 PreparationsThis section explains the preparations and checks required before commencing installation.
- Host Name Checks
- System Time Checks
- Exclusive Software Checks
- Required Software Preparation and Checks
- Required Patch Checks
- Collecting and Checking Required Information
- Checking Used Port Numbers
- Configuration Parameter Checks
- Post-uninstallation Procedure
Before installing Resource Orchestrator in an environment from which Resource Orchestrator has been deleted, perform the post-uninstallation procedure.Refer to "20.1.5 Post-uninstallation Procedure".
2.1.1.2 Software Preparation and ChecksSoftware preparation and checks are explained in the following sections.
This section explains the preparations and checks required before commencing the installation of Resource Orchestrator.
Host Name Checks
It is necessary to set the host name (FQDN) for the admin server to operate normally. Describe the host name in the hosts file, using256 characters or less. In the hosts file, for the IP address of the admin server, configure the host name (FQDN) and then the computername.
hosts File
System_drive\Windows\System32\drivers\etc\hosts
Note
When configuring the hosts file, note the following.
- Do not set the host name (FQDN) and the computer name to "127.0.0.1".
- Confirm that "127.0.0.1" (IPv4 format) is set to "localhost".Note that IPv6 format must not be set.
- 17 -
Example
When configuring the admin server with the IP address "10.10.10.10", the host name (FQDN) "remote1.example.com", andthe computer name "remote1"
10.10.10.10 remote1.example.com remote1127.0.0.1 localhost.localdomain localhost
For the admin client, either configure the hosts file so access to the admin server is possible using the host name (FQDN), or nameresolution using a DNS server.
System Time Checks
Set the same system time for the admin server and managed servers.
If the system time differs, correct values will not be displayed in the [System Condition] tab on the ROR console.
Exclusive Software Checks
Before installing Resource Orchestrator, check that the software listed in "2.4.2.5 Exclusive Software" in the "Design Guide CE" and themanager of Resource Orchestrator have not been installed on the system.Use the following procedure to check that exclusive software has not been installed.
1. Open [Add or Remove Programs] on the Windows Control Panel.
The [Add or Remove Programs] window will be displayed.
2. Check that none of the software listed in "2.4.2.5 Exclusive Software" in the "Design Guide CE" or the following software aredisplayed.
- "ServerView Resource Orchestrator Manager"
3. If the names of exclusive software have been displayed, uninstall them according to the procedure described in the relevant manualbefore proceeding.
If managers of an earlier version of Resource Orchestrator have been installed, they can be upgraded. Refer to "F.2 Manager".When reinstalling a manager on a system on which the same version of Resource Orchestrator has been installed, performuninstallation referring to "20.1 Manager Uninstallation", and then perform the reinstallation.
Information
For Windows Server 2008 or later, select [Programs and Features] from the Windows Control Panel.
Note
- When uninstalling exclusive software, there are cases where other system operation administrators might have installed the software,so check that deleting the software causes no problems before actually doing so.
Required Software Preparation and Checks
Before installing Resource Orchestrator, perform the following operations.In addition, check that the required software, such as ServerView Operations Manager, given in "2.4.2.4 Required Software" in the "DesignGuide CE" has been installed. If it has not been installed, install it before continuing.
- 18 -
- Microsoft LAN Manager Module
Before installing Resource Orchestrator, obtain the Microsoft LAN Manager module from the following FTP site.The Microsoft LAN Manager module can be used regardless of the CPU architecture type (x86, x64).
URL: ftp://ftp.microsoft.com/bussys/clients/msclient/dsk3-1.exe
Prepare for the following depending on the architecture of the installation target.
- When installing a manager on Windows 32-bit (x86)
The Microsoft LAN Manager module can be installed without extracting it in advance.Deploy the obtained module to the folder that has been set for environment_variable%SystemRoot%.
- When installing a manager on Windows 64-bit (x64)
The obtained module must be extracted using the Expand command on a computer with x86 CPU architecture.The obtained module is for x86 CPU architecture, and cannot be extracted on computers with x64 CPU architecture.
For details on how to extract the module, refer to the following examples:
Example
When dsk3-1.exe was deployed on c:\temp
>cd /d c:\temp <RETURN>>dsk3-1.exe <RETURN>>Expand c:\temp\protman.do_ /r <RETURN>>Expand c:\temp\protman.ex_ /r <RETURN>
Use the Windows 8.3 format (*) for the folder name or the file name.After manager installation is complete, the extracted Microsoft LAN Manager module is no longer necessary.
* Note: File names are limited to 8 characters and extensions limited to 3 characters.
After extracting the following modules, deploy them to the folder that has been set for environment_variable%SystemRoot%.
- PROTMAN.DOS
- PROTMAN.EXE
- NETBIND.COM
When installing Resource Orchestrator to an environment that already has ServerView Deployment Manager installed, it is notnecessary to obtain the Microsoft LAN Manager module.
- Settings for ServerView Operations Manager
In order to open the console screen of managed server, register the account of Remote Management Controller in ServerViewOperations Manager.For the settings, refer to the ServerView Operations Manager manual.
- Settings for ServerView Operations Manager 5.50 or an earlier version
When installing ServerView Operations Manager 5.50 or an earlier version on the admin server, the ServerView Virtual-IOManager service may not be able to be started. This can be handled by changing the settings of ServerView Operations Manager.
If ServerView Operations Manager 5.50 or later is used, this procedure is not necessary.
Before Installing Resource Orchestrator, please edit the following file of ServerView Operation Manager (hereinafter SVOM).
Files
SVOM installation folder\ServerView Suite\jboss\bin\run.conf.bat
- 19 -
Example
C:\Program Files (x86)\Fujitsu\ServerView Suite\jboss\bin\run.conf.bat
Change Location
rem set "JAVA_HOME=C:\opt\jdk1.6.0_13"
Uncomment this line, and set the proper path for the JRE 1.6.
Example
- Before changing
rem set "JAVA_HOME=C:\opt\jdk1.6.0_13"
- After changing
set "JAVA_HOME=C:\Program Files (x86)\Java\jre6"
If the editing procedure above is performed after installing the Resource Orchestrator manager, after that restart the SVOM servicesin the following order.
1. Stop the services:
a. ServerView Download Services
b. ServerView Services
c. ServerView JBoss Application Server 5.1
2. Start the services:
a. ServerView JBoss Application Server 5.1
b. ServerView Services
c. ServerView Download Services
- SNMP Trap Service Settings
In order for Resource Orchestrator to operate correctly, the following settings for the standard Windows SNMP trap service arerequired.
- Open [Services] from [Administrative Tools] on the Windows Control Panel, and then configure the startup type of SNMP Trapservice as [Manual] or [Automatic] on the [Services] window.
Set the service status to "Started".
- Settings for ServerView Virtual-IO Manager
When using VIOM, in order for Resource Orchestrator to operate correctly, ensure that the following settings are made when installingServerView Virtual-IO Manager for Windows.
- When using the I/O Virtualization Option
Clear the [Select address ranges for IO Virtualization] checkbox on the virtual I/O address range selection window.
- When not using the I/O Virtualization Option
Check the [Select address ranges for IO Virtualization] checkbox on the virtual I/O address range selection window, and thenselect address ranges for the MAC address and the WWN address.When there is another manager, select address ranges which do not conflict those of the other manager.
For details, refer to the ServerView Virtual-IO Manager for Windows manual.
- 20 -
- DHCP server installation
Installation of the Windows standard DHCP Server is necessary when managed servers belonging to different subnets from the adminserver are to be managed.
Depending on the functions used, it may necessary to configure the router settings. For details, refer to "9.2.4.2 Admin LAN Settings"in the "Design Guide CE".
When registering managed servers that belong to a different subnet from the admin server, they must be registered on the admin LANsubnet in advance.For details, refer to "5.11 Registering Admin LAN Subnets" in the "User's Guide for Infrastructure Administrators (ResourceManagement) CE".
Install the DHCP Server following the procedure below:
1. Add DHCP Server to the server roles.Perform binding of the network connections for the NIC to use as the admin LAN.For the details on adding and binding, refer to the manual for Windows.
2. Open [Services] from [Administrative Tools] on the Windows Control Panel, and then configure the startup type of DHCPServer service as [Manual] on the [Services] window.
3. From the [Services] window, stop the DHCP Server service.
When an admin server is a member of a domain, perform step 4.
4. Authorize DHCP servers.
a. Open [DHCP] from [Administrative Tools] on the Windows Control Panel, and select [Action]-[Managed authorizedservers] on the [DHCP] window.
The [Manage Authorized Servers] window will be displayed.
b. Click <Authorize>.
The [Authorize DHCP Server] window will be displayed.
c. Enter the admin IP address of the admin server in [Name or IP address].
d. Click <OK>.
The [Confirm Authorization] window will be displayed.
e. Check the [Name] and [IP Address].
f. Click <OK>.
The server will be displayed in the [Authorized DHCP servers] of the [Manage Authorized Servers] window.
- ETERNUS SF Storage Cruiser
When using ESC, configure the Fibre Channel switch settings in advance.
- Stopping the BMC BladeLogic Server Automation service [Solaris Zones] [OVM for SPARC]
Stop the BladeLogic Application Server service in the Services window in Administrative Tools.
Required Patch Checks
Before installing Resource Orchestrator, check that the required patches for the manager listed in "2.4.2.2 Required Patches" in the "DesignGuide CE" have been applied.
If they have not been applied, apply them before continuing.
User Account Checks
This product automatically creates the user accounts listed below - if an application is using these OS user accounts, ensure there is noimpact on the application before deleting them:
- 21 -
- rcxdb (for connecting to the database)
- swrbadbuser (for starting up database services for process management)
- swrbajobuser (for starting up services for job execution control)
- rcxctdbchg (for starting up database services for metering)
- rcxctdbdsb (for starting up database services for the dashboard (pool status))
Single Sign-On Preparation and Checks
Before installing Resource Orchestrator, install ServerView Operations Manager.Configure the directory service at that time.It is also necessary to prepare certificates and perform registration of an administrator (privileged user) with the directory service.For details, refer to "Chapter 12 Installing and Defining Single Sign-On" in the "Design Guide CE".
For setting up Resource Orchestrator, it is necessary to establish communication beforehand, since communication between the managerand the directory service requires LDAP (Lightweight Directory Access Protocol) of the TCP/IP protocol protected by SSL.Use tools or commands to check communications.
- When the directory server is Microsoft Active Directory
Right-click the certificate issued by Certification Authority, and install it using the Certificate Import Wizard.For details, refer to the Microsoft web site below.
How to enable LDAP over SSL with a third-party certification authority
URL: http://support.microsoft.com/kb/321051/en/
Language Settings
As Resource Orchestrator installs programs that correspond to the supported language, language settings (locale) cannot be changed afterinstallation.
Therefore, set the language (locale) to Japanese or English according to your operational requirements.
The example of language settings (locale) confirmation methods is given below:
Example
From the Control Panel, open [Date, Time, Language, and Regional Options] and select [Regional and Language Options].
2.1.1.3 Collecting and Checking Required InformationBefore installing Resource Orchestrator, collect required information and check the system status, then determine the information to bespecified on the installation window. The information that needs to be prepared is given below.
- Installation Folder
Decide the installation folder for Resource Orchestrator.Note that folders on removable disks cannot be specified.Check that there are no files or folders in the installation folder.Check that the necessary disk space can be secured on the drive for installation.For the amount of disk space necessary for Resource Orchestrator, refer to "2.4.2.6 Static Disk Space" and "2.4.2.7 Dynamic DiskSpace" in the "Design Guide CE".
- 22 -

- Image File Storage Folder
The image file storage folder is located in the installation folder.Check that sufficient disk space can be secured on the drive where the storage folder will be created.For the necessary disk space, refer to "2.4.2.7 Dynamic Disk Space" in the "Design Guide CE".
For details of how to change the image file storage folder, refer to "5.9 rcxadm imagemgr" in the "Reference Guide (Command/XML)CE".
- Port Number
For details on port numbers, refer to "2.1.1.4 Checking Used Port Numbers".
- Directory Service Connection Information for Single Sign-On of ServerView Operations Manager
Confirm that the directory service used for Single Sign-On of ServerView Operations Manager is correctly configured.
This can be performed using either of the following procedures:
- Log in to ServerView Operations Manager.
Refer to the following manuals:
- Manual for ServerView Operations Manager:
"ServerView user management via an LDAP directory service" in "FUJITSU Software ServerView Suite User Managementin ServerView"
- Manual for ServerView Operations Manager:
"Starting ServerView Operations Manager" in "FUJITSU Software ServerView Suite ServerView Operations Manager"
- Perform modification install of ServerView Operations Manager.
When performing modification installation, the settings of directory service can be checked.
Refer to the following manuals:
- Manual for ServerView Operations Manager:
"ServerView user management via an LDAP directory service" in "FUJITSU Software ServerView Suite User Managementin ServerView"
- Manual for ServerView Operations Manager:
"Modify installation of Operations Manager software" in "FUJITSU Software ServerView Suite ServerView OperationsManager Installing ServerView Operations Manager Software under Windows"
If the settings of the directory service for ServerView Operations Manager are correct, exit the modification installation withoutmaking any changes.If there are errors in the settings of the directory service for ServerView Operations, perform modification installation ofServerView Operations Manager to correct the errors.
ServerView Operations Manager V6.1 and later include OpenDJ as a directory service.In the following descriptions, when "OpenDS" is used, replace it with "OpenDJ".
Parameters Used for Installation
The following table contains the parameters used for installation.
No. Window Entry Description
1Installation FolderSelection
Installation Folder
This is the folder where Resource Orchestrator is installed.
- When using a 64-bit (x64) OS
Default value: C:\Program Files (x86)\Resource Orchestrator
- When using a 32-bit (x86) OS
Default value: C:\Program Files\Resource Orchestrator
- 23 -

No. Window Entry Description
The installation folder can contain 45 characters or less including the driveletter and "\".A path starting with "\\" or a relative path cannot be specified.Alphanumeric characters and blank spaces (" ") can be used. However, the"C:\Program Files (x86)" part of the default value of 64-bit OSs is theexception.Specify an NTFS disk.
Note
- When using 64-bit Windows Server OSs, the following folder namescannot be specified for the installation folders.
- "Program Files" Folder
- When using 64-bit Windows Server OSs, if the drive letter is changedfrom the default value, the following folder name cannot be specifiedfor the installation folder.
- "Program Files (x86)" Folder
2AdministrativeUser Creation
User Account
This is the user account name to be used for logging into ResourceOrchestrator as an administrative user.
Specify the user registered in the directory service in "Single Sign-OnPreparation and Checks" in "2.1.1.2 Software Preparation and Checks".
Specifying the administrator account, "Administrator", of ServerViewOperations Manager enables Single Sign-On coordination with ServerViewOperations Manager when the OpenDS that is included with ServerViewOperations Manager is used.
The name must start with an alphabetic character and can be up to 16alphanumeric characters long, including underscores ("_"), hyphens ("-"),and periods, ("."). Input is case-sensitive.
3Admin LANSelection
Network to use forthe admin LAN
This is the network to be used as the admin LAN. Select it from the list.The maximum value for the subnet mask is 255.255.255.255 (32-bit mask).The minimum value is 255.255.0.0 (16-bit mask). However,255.255.255.254 cannot be specified.
4Port NumberSettings
InterstageManagementConsole
This is the port number of the Interstage management console.
Default value: 12000
Web Server(Interstage HTTPServer)
This is the port number of the Web server.
Default value: 80
CORBA ServiceThe port number of the CORBA service used by Resource Orchestrator.
Default value: 8002
5Admin ServerSettings
FQDN for the AdminServer
The FQDN of the authentication server used by Resource Orchestrator. TheFQDN of the authentication server must be the FQDN of the admin server.The FQDN can be up to 255 characters long and must be supported for nameresolution.
2.1.1.4 Checking Used Port Numbers
- 24 -
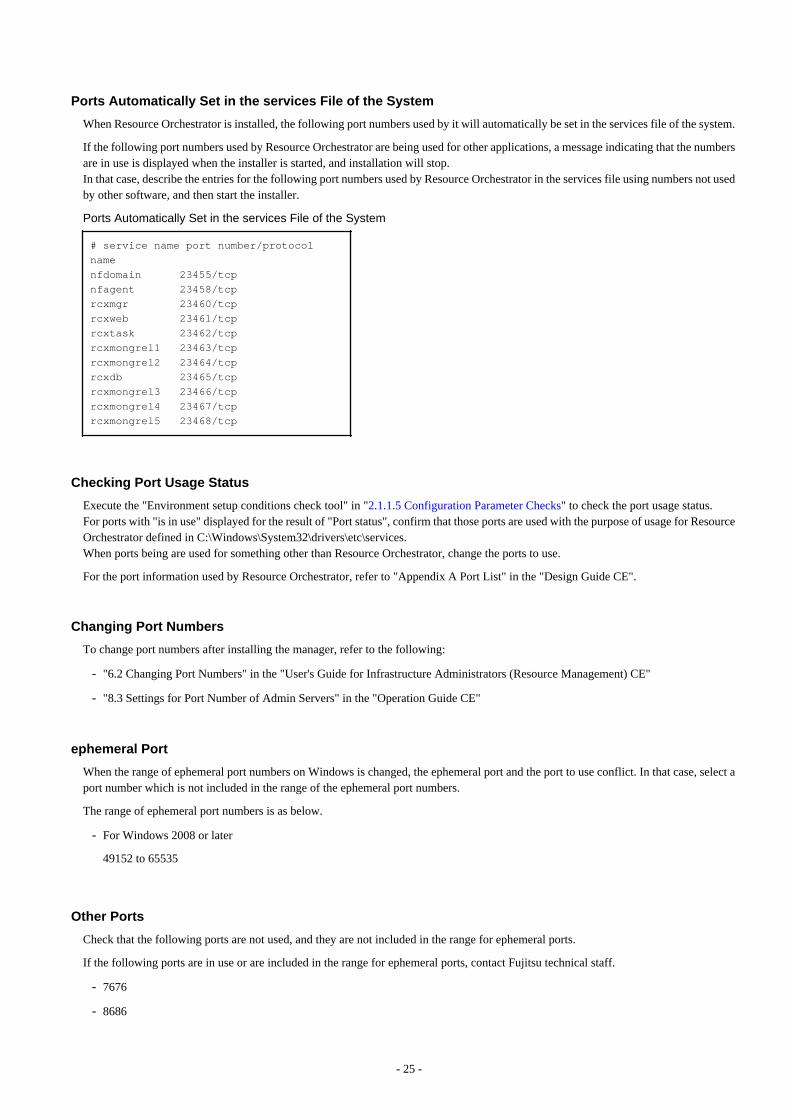
Ports Automatically Set in the services File of the System
When Resource Orchestrator is installed, the following port numbers used by it will automatically be set in the services file of the system.
If the following port numbers used by Resource Orchestrator are being used for other applications, a message indicating that the numbersare in use is displayed when the installer is started, and installation will stop.In that case, describe the entries for the following port numbers used by Resource Orchestrator in the services file using numbers not usedby other software, and then start the installer.
Ports Automatically Set in the services File of the System # service name port number/protocol namenfdomain 23455/tcpnfagent 23458/tcprcxmgr 23460/tcprcxweb 23461/tcprcxtask 23462/tcprcxmongrel1 23463/tcprcxmongrel2 23464/tcprcxdb 23465/tcprcxmongrel3 23466/tcprcxmongrel4 23467/tcprcxmongrel5 23468/tcp
Checking Port Usage Status
Execute the "Environment setup conditions check tool" in "2.1.1.5 Configuration Parameter Checks" to check the port usage status.For ports with "is in use" displayed for the result of "Port status", confirm that those ports are used with the purpose of usage for ResourceOrchestrator defined in C:\Windows\System32\drivers\etc\services.When ports being are used for something other than Resource Orchestrator, change the ports to use.
For the port information used by Resource Orchestrator, refer to "Appendix A Port List" in the "Design Guide CE".
Changing Port Numbers
To change port numbers after installing the manager, refer to the following:
- "6.2 Changing Port Numbers" in the "User's Guide for Infrastructure Administrators (Resource Management) CE"
- "8.3 Settings for Port Number of Admin Servers" in the "Operation Guide CE"
ephemeral Port
When the range of ephemeral port numbers on Windows is changed, the ephemeral port and the port to use conflict. In that case, select aport number which is not included in the range of the ephemeral port numbers.
The range of ephemeral port numbers is as below.
- For Windows 2008 or later
49152 to 65535
Other Ports
Check that the following ports are not used, and they are not included in the range for ephemeral ports.
If the following ports are in use or are included in the range for ephemeral ports, contact Fujitsu technical staff.
- 7676
- 8686
- 25 -
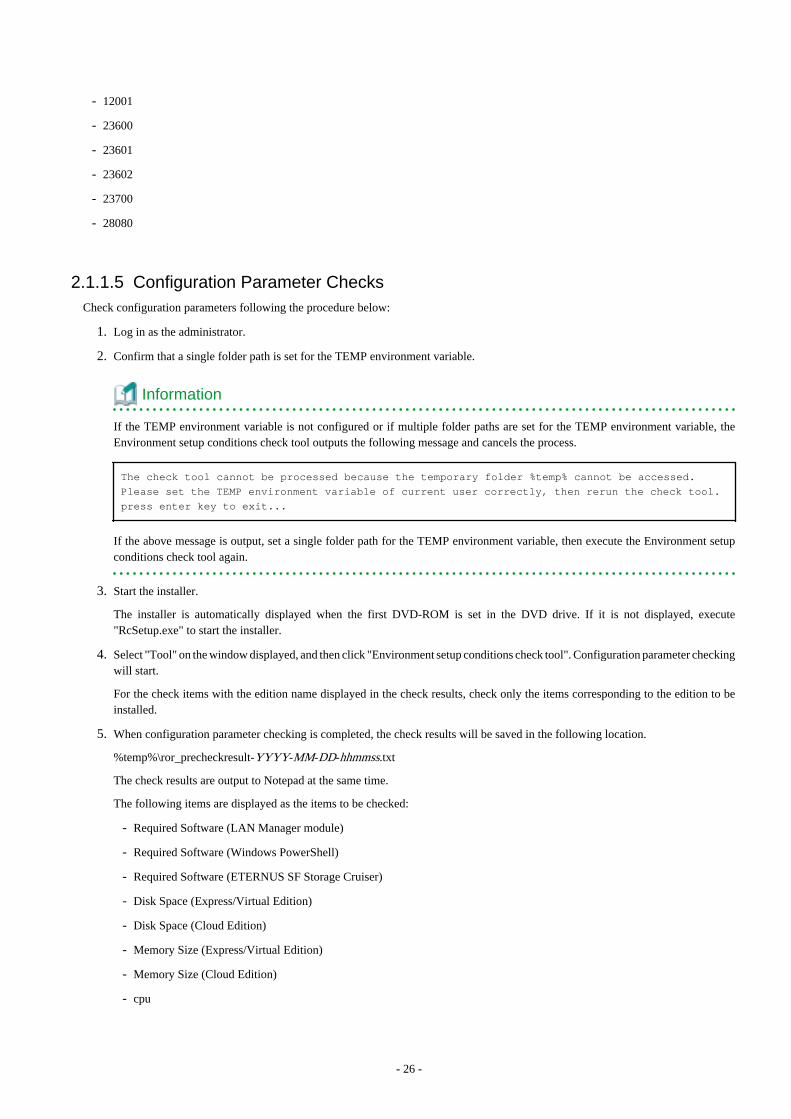
- 12001
- 23600
- 23601
- 23602
- 23700
- 28080
2.1.1.5 Configuration Parameter ChecksCheck configuration parameters following the procedure below:
1. Log in as the administrator.
2. Confirm that a single folder path is set for the TEMP environment variable.
Information
If the TEMP environment variable is not configured or if multiple folder paths are set for the TEMP environment variable, theEnvironment setup conditions check tool outputs the following message and cancels the process.
The check tool cannot be processed because the temporary folder %temp% cannot be accessed. Please set the TEMP environment variable of current user correctly, then rerun the check tool.press enter key to exit...
If the above message is output, set a single folder path for the TEMP environment variable, then execute the Environment setupconditions check tool again.
3. Start the installer.
The installer is automatically displayed when the first DVD-ROM is set in the DVD drive. If it is not displayed, execute"RcSetup.exe" to start the installer.
4. Select "Tool" on the window displayed, and then click "Environment setup conditions check tool". Configuration parameter checkingwill start.
For the check items with the edition name displayed in the check results, check only the items corresponding to the edition to beinstalled.
5. When configuration parameter checking is completed, the check results will be saved in the following location.
%temp%\ror_precheckresult-YYYY-MM-DD-hhmmss.txt
The check results are output to Notepad at the same time.
The following items are displayed as the items to be checked:
- Required Software (LAN Manager module)
- Required Software (Windows PowerShell)
- Required Software (ETERNUS SF Storage Cruiser)
- Disk Space (Express/Virtual Edition)
- Disk Space (Cloud Edition)
- Memory Size (Express/Virtual Edition)
- Memory Size (Cloud Edition)
- cpu
- 26 -
- SNMP Service
- Port Status (Express/Virtual Edition)
- Port Status (Cloud Edition)
6. Confirm that "Warning" or "NG" is not included in the check results. If there are check items that were determined as "Warning"or "NG", resolve the cause of the problem based on the output message. For details of the corrective actions, refer to "2.1.1.1Preparations" and "2.4 Software Environment" and "2.5 Hardware Environment" in the "Design Guide CE".
2.1.1.6 InstallationThe procedure for manager installation is given below.
Before installation, check if "2.1.1.1 Preparations" have been performed.
Precautions for Installation
When a terminal server has been installed, execute the following command using the command prompt to change the terminal service toinstallation mode.
CHANGE USER /INSTALLUser session is ready to install applications.
Enabling Generation of 8.3 Format File Names
It is necessary to generate file names (*) in the Windows 8.3 format on the file system to be used during the installation.
Execute the following command to check if 8.3 format file names can be generated.
fsutil behavior query disable8dot3
- If "disable8dot3 = 0" is displayed, 8.3 format file names can be generated.
- If "disable8dot3 = 1" is displayed, 8.3 format file name cannot be generated. Execute the following command to change the setting.
fsutil behavior set disable8dot3 0
* Note: File names are limited to 8 characters and extensions are limited to 3 characters.
Nullifying Firewall Settings for Ports to be used by Resource Orchestrator
When installing Resource Orchestrator on systems with active firewalls, in order to enable correct communication between the manager,agents, and clients, disable the firewall settings for the port numbers to be used for communication.
For the port numbers used by Resource Orchestrator and required software, refer to "Appendix A Port List" in the "Design Guide CE".
However, when port numbers have been changed by editing the services file during installation of Resource Orchestrator, replace thedefault port numbers listed in "Appendix A Port List" in the "Design Guide CE" with the port numbers changed to during installation.
Installation
The procedure for manager installation is given below.
1. Log on as the administrator.
Log on to the system on which the manager is to be installed.Log on using the Administrator account of the local computer.
- 27 -
2. Start the installer.
The installer is automatically displayed when the first DVD-ROM is set in the DVD drive. If it is not displayed, execute"RcSetup.exe" to start the installer.
3. Click "Manager(Cloud Edition) installation".
4. Following the installation wizard, enter the parameters prepared and confirmed in "Parameters Used for Installation" properly.
5. Upon request of the wizard for DVD-ROM switching, set the second DVD-ROM and the third DVD-ROM to continue theinstallation.
Point
[Solaris Zones] [OVM for SPARC]When BMC BladeLogic Server Automation is installed on the admin server and BMC BladeLogic Server Automation is installed afterthis product was installed, perform the following procedure:
1. Stop the Interstage data store service in the Services window in Administrative Tools.
2. Change the startup type from Automatic to Disabled.
It is necessary to set up the manager after installation. For details, refer to "2.1.3 Setup".
Note
- In the event of installation failure, restart and then log in as the user that performed the installation, and perform uninstallation followingthe uninstallation procedure.After that, remove the cause of the failure referring to the meaning of the output message and the suggested corrective actions, andthen perform installation again.
- If there are internal inconsistencies detected during installation, the messages "The problem occurred while installing it" or "NativeInstaller Failure" will be displayed and installation will fail. In this case, uninstall the manager and reinstall it. If the problem persists,please contact Fujitsu technical staff.
- For uninstallation of managers, refer to "20.1.3 Uninstallation [Windows Manager]".
- If rolling back to the previous status before an installation failure has not finished, the message "System has some on incomplete installinformation. Please delete before this installation" will be displayed and installation will fail. Uninstall the manager and reinstall it.For uninstallation of managers, refer to "20.1.3 Uninstallation [Windows Manager]". If the problem persists even if reinstallation isperformed, please collect troubleshooting information and contact Fujitsu technical staff.
- If used ports exist when performing installation, the message "The specified port number Port Number selected for ServerViewResource Orchestrator is already used." will be displayed, and installation will fail. If this happens, please contact Fujitsu technicalstaff.
- The following files are created under the system drive after installation.
- F4ANsetup.log
- swinst.err
- swrba_inst.log
These files are the material for investigation of installation failure.
Post-installation Cautions
- When a terminal server has been installed, execute the following command using the command prompt to change the terminal serviceto the execution mode.
When continuously setting up after installation, this step is not necessary.
- 28 -
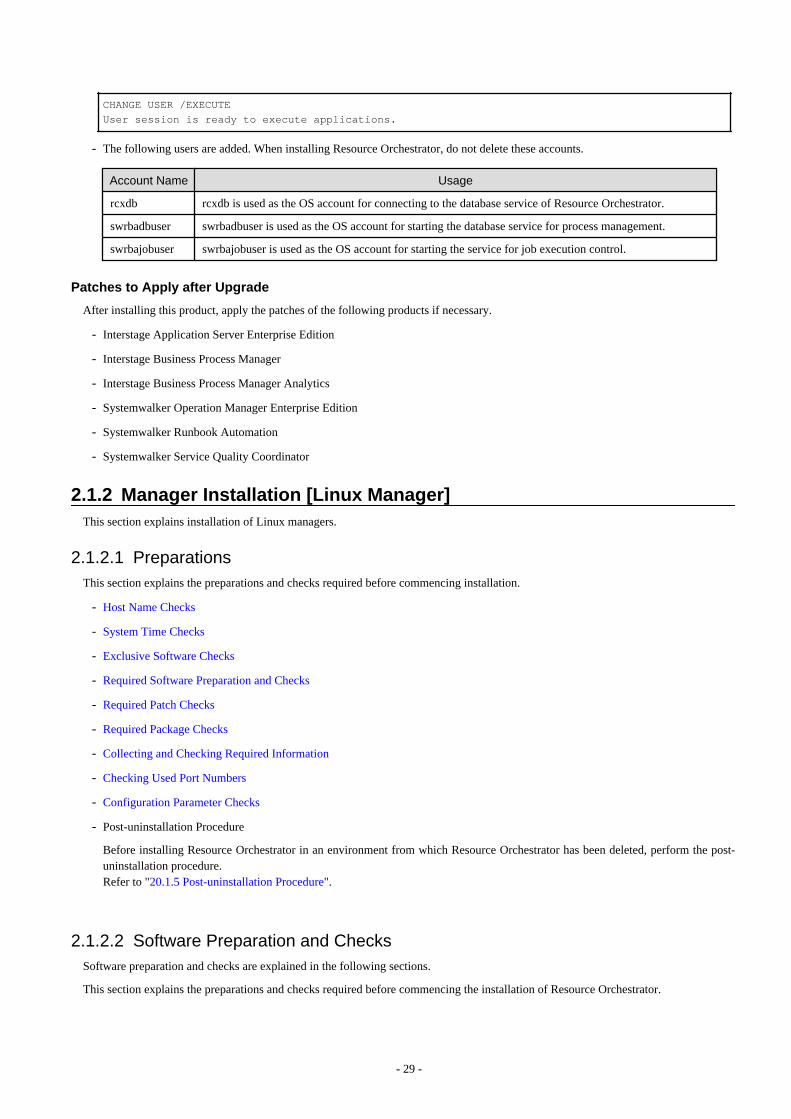
CHANGE USER /EXECUTEUser session is ready to execute applications.
- The following users are added. When installing Resource Orchestrator, do not delete these accounts.
Account Name Usage
rcxdb rcxdb is used as the OS account for connecting to the database service of Resource Orchestrator.
swrbadbuser swrbadbuser is used as the OS account for starting the database service for process management.
swrbajobuser swrbajobuser is used as the OS account for starting the service for job execution control.
Patches to Apply after Upgrade
After installing this product, apply the patches of the following products if necessary.
- Interstage Application Server Enterprise Edition
- Interstage Business Process Manager
- Interstage Business Process Manager Analytics
- Systemwalker Operation Manager Enterprise Edition
- Systemwalker Runbook Automation
- Systemwalker Service Quality Coordinator
2.1.2 Manager Installation [Linux Manager]This section explains installation of Linux managers.
2.1.2.1 PreparationsThis section explains the preparations and checks required before commencing installation.
- Host Name Checks
- System Time Checks
- Exclusive Software Checks
- Required Software Preparation and Checks
- Required Patch Checks
- Required Package Checks
- Collecting and Checking Required Information
- Checking Used Port Numbers
- Configuration Parameter Checks
- Post-uninstallation Procedure
Before installing Resource Orchestrator in an environment from which Resource Orchestrator has been deleted, perform the post-uninstallation procedure.Refer to "20.1.5 Post-uninstallation Procedure".
2.1.2.2 Software Preparation and ChecksSoftware preparation and checks are explained in the following sections.
This section explains the preparations and checks required before commencing the installation of Resource Orchestrator.
- 29 -

Host Name Checks
It is necessary to set the host name (FQDN) for the admin server to operate normally. Describe the host name in the hosts file, using256 characters or less. In the hosts file, for the IP address of the admin server, configure the host name (FQDN) and then the computername.
hosts File
/etc/hosts
Note
When configuring the hosts file, note the following.
- Do not set the host name (FQDN) and the computer name to "127.0.0.1".
- Confirm that "127.0.0.1" (IPv4 format) is set to "localhost".Note that IPv6 format must not be set.
Example
When configuring the admin server with the IP address "10.10.10.10", the host name (FQDN) "remote1.example.com", andthe computer name "remote1"
10.10.10.10 remote1.example.com remote1127.0.0.1 localhost.localdomain localhost
For the admin client, either configure the hosts file so access to the admin server is possible using the host name (FQDN), or nameresolution using a DNS server.
System Time Checks
Set the same system time for the admin server and managed servers.
If the system time differs, correct values will not be displayed in the [System Condition] tab on the ROR console.
Exclusive Software Checks
Before installing Resource Orchestrator, check that the software listed in "2.4.2.5 Exclusive Software" in the "Design Guide CE" and themanager of Resource Orchestrator have not been installed on the system.Use the following procedure to check that exclusive software has not been installed.
1. Check that none of the software listed in "2.4.2.5 Exclusive Software" in the "Design Guide CE" or the following software aredisplayed.
Execute the following command and check if Resource Orchestrator Manager has been installed.
# rpm -q FJSVrcvmr <RETURN>
2. If the names of exclusive software have been displayed, uninstall them according to the procedure described in the relevant manualbefore proceeding.
If managers of an earlier version of Resource Orchestrator have been installed, they can be upgraded. Refer to "F.2 Manager".When reinstalling a manager on a system on which the same version of Resource Orchestrator has been installed, performuninstallation referring to "20.1 Manager Uninstallation", and then perform the reinstallation.
- 30 -
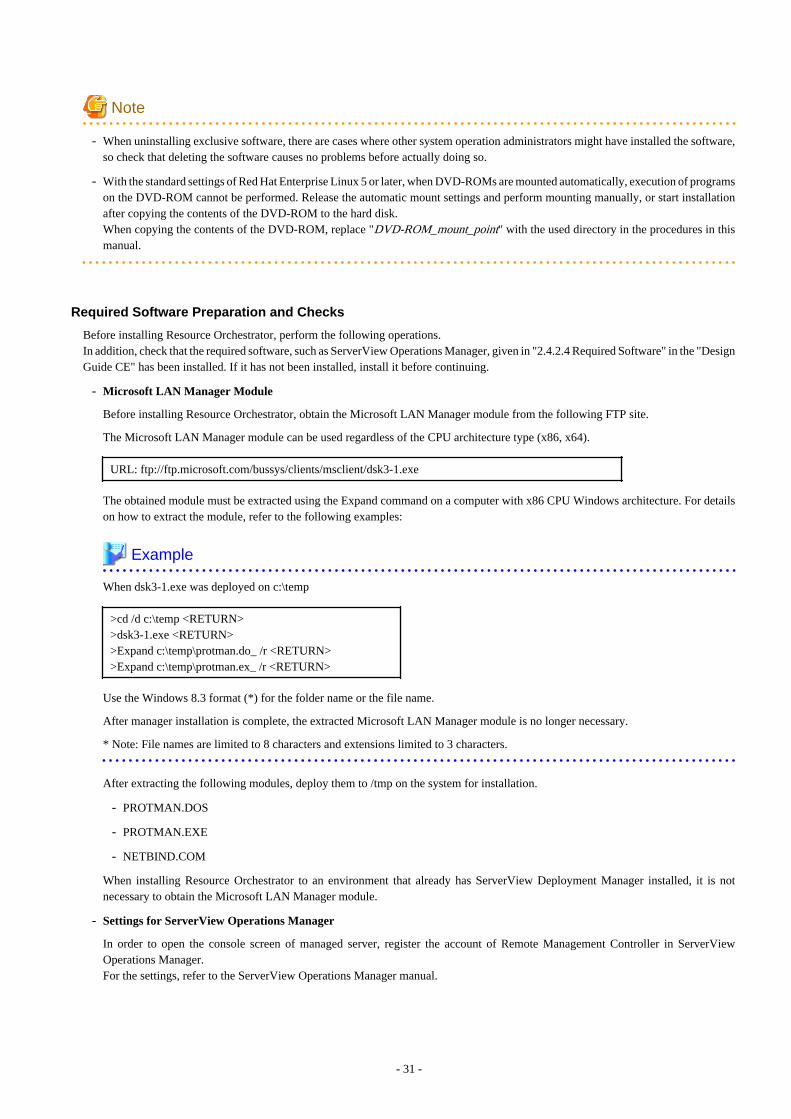
Note
- When uninstalling exclusive software, there are cases where other system operation administrators might have installed the software,so check that deleting the software causes no problems before actually doing so.
- With the standard settings of Red Hat Enterprise Linux 5 or later, when DVD-ROMs are mounted automatically, execution of programson the DVD-ROM cannot be performed. Release the automatic mount settings and perform mounting manually, or start installationafter copying the contents of the DVD-ROM to the hard disk.When copying the contents of the DVD-ROM, replace "DVD-ROM_mount_point" with the used directory in the procedures in thismanual.
Required Software Preparation and Checks
Before installing Resource Orchestrator, perform the following operations.In addition, check that the required software, such as ServerView Operations Manager, given in "2.4.2.4 Required Software" in the "DesignGuide CE" has been installed. If it has not been installed, install it before continuing.
- Microsoft LAN Manager Module
Before installing Resource Orchestrator, obtain the Microsoft LAN Manager module from the following FTP site.
The Microsoft LAN Manager module can be used regardless of the CPU architecture type (x86, x64).
URL: ftp://ftp.microsoft.com/bussys/clients/msclient/dsk3-1.exe
The obtained module must be extracted using the Expand command on a computer with x86 CPU Windows architecture. For detailson how to extract the module, refer to the following examples:
Example
When dsk3-1.exe was deployed on c:\temp
>cd /d c:\temp <RETURN>>dsk3-1.exe <RETURN>>Expand c:\temp\protman.do_ /r <RETURN>>Expand c:\temp\protman.ex_ /r <RETURN>
Use the Windows 8.3 format (*) for the folder name or the file name.
After manager installation is complete, the extracted Microsoft LAN Manager module is no longer necessary.
* Note: File names are limited to 8 characters and extensions limited to 3 characters.
After extracting the following modules, deploy them to /tmp on the system for installation.
- PROTMAN.DOS
- PROTMAN.EXE
- NETBIND.COM
When installing Resource Orchestrator to an environment that already has ServerView Deployment Manager installed, it is notnecessary to obtain the Microsoft LAN Manager module.
- Settings for ServerView Operations Manager
In order to open the console screen of managed server, register the account of Remote Management Controller in ServerViewOperations Manager.For the settings, refer to the ServerView Operations Manager manual.
- 31 -

- SNMP Trap Daemon
In order for Resource Orchestrator to operate correctly to operate correctly, ensure that the following settings are made for the "/etc/snmp/snmptrapd.conf" file, when installing the net-snmp package. When there is no file, add the following setting after creating thefile.
disableAuthorization yes
It is also necessary to enable the automatic startup setting for the snmptrapd daemon.
- DHCP server installation
Installation of the Linux standard DHCP server is necessary when managed servers belonging to different subnets from the adminserver are to be managed.
Depending on the functions used, it may necessary to configure the router settings. For details, refer to "9.2.4.2 Admin LAN Settings"in the "Design Guide CE".
When registering managed servers that belong to a different subnet from the admin server, they must be registered on the admin LANsubnet in advance.For details, refer to "5.11 Registering Admin LAN Subnets" in the "User's Guidefor Infrastructure Administrators (ResourceManagement) CE".
Install the DHCP server following the procedure below:
1. Install the dhcp package.
2. Execute the following command to modify the setting for automatic startup of the DHCP server service (dhcpd):
# chkconfig dhcpd off <RETURN>
3. Execute the following command to stop the DHCP server service (dhcpd):
# /etc/init.d/dhcpd stop <RETURN>
- ETERNUS SF Storage Cruiser
When using ESC, configure the Fibre Channel switch settings in advance.
- Stopping the BMC BladeLogic Server Automation service [Solaris Zones] [OVM for SPARC]
Stop the BladeLogic Application Server service by executing the following command:
# /etc/init.d/blappserv stop <RETURN>
Required Patch Checks
Before installing Resource Orchestrator, check that the required patches for the manager listed in "2.4.2.2 Required Patches" in the "DesignGuide CE" have been applied.
If they have not been applied, apply them before continuing.
Required Package Checks
Before installing Resource Orchestrator, check that the required packages for the manager [Linux Manager] listed in "2.4.2.3 RequiredPackages" in the "Design Guide CE" have been applied.
If they have not been installed, install them before continuing.
User Account Checks
This product automatically creates the user accounts listed below - if an application is using these OS user accounts, ensure there is noimpact on the application before deleting them:
- 32 -

- rcxdb (for connecting to the database)
- swrbadbuser (for starting up database services for process management)
- swrbajobuser (for starting up services for job execution control)
- rcxctdbchg (for starting up database services for metering)
- rcxctdbdsb (for starting up database services for the dashboard (pool status))
Single Sign-On Preparation and Checks
Before installing Resource Orchestrator, install ServerView Operations Manager.Configure the directory service at that time.It is also necessary to prepare certificates and perform registration of an administrator (privileged user) with the directory service.For details, refer to "Chapter 12 Installing and Defining Single Sign-On" in the "Design Guide CE".
Language Settings
As Resource Orchestrator installs programs that correspond to the supported language, language settings (locale) cannot be changed afterinstallation.
Therefore, set the language (locale) to Japanese or English according to your operational requirements.
The example of language settings (locale) confirmation methods is given below:
Example
From the desktop screen, select [System]-[Administration]-[Language].
Tuning System Parameters (Admin Server) [Linux Manager]
Before installation, it is necessary to tune up system parameters for the admin server. See the table below for the system parameters thatneed to be tuned and their values.
Point
Set the values according to the "type" of each parameter as follows:
- When the type is "setup value"
Modification is not necessary if already set value (default or previous value) is equal to or larger than the value in the table. If it issmaller than the value in the table, change the value to the one in the table.
- When the type is "additional value"
Add the value in the table to already set value. Before adding the value, check the upper limit for the system, and set either the resultingvalue or the upper limit for the system, whichever is smaller.
For details, refer to the Linux manual.
- Shared Memory
Parameter Description Value Type
shmmaxMaximum Segment Size of SharedMemory
2684354560 Setup value
shmallTotal amount of shared memory availablefor use
655360 Setup value
- 33 -

Parameter Description Value Type
shmmniMaximum number of shared memorysegments
113Additionalvalue
- Semaphores
To configure semaphores, specify the value for each parameter in the following format:
kernel.sem = para1 para2 para3 para4
Parameter Description Value Type
para1Maximum number of semaphores foreach semaphore identifier
512 Setup value
para2Total number of semaphores in thesystem
14862Additionalvalue
para3Maximum number of operators for eachsemaphore call
50 Setup value
para4Total number of semaphore operators inthe system
2208Additionalvalue
- Message Queue
Parameter Description Value Type
msgmax Maximum size of a message 16384 Setup value
msgmnbMaximum size of the messages that canbe retained in a single message queue
114432 Setup value
msgmni Maximum number of message queue IDs 1578Additionalvalue
[Tuning Procedure]
Use the following procedure to perform tuning:
1. Use the following command to check the values of the corresponding parameters currently configured for the system.
# /sbin/sysctl -a
Example
# /sbin/sysctl -a... (omitted)...
kernel.sem = 250 32000 32 128kernel.msgmnb = 65536kernel.msgmni = 16kernel.msgmax = 65536kernel.shmmni = 4096kernel.shmall = 4294967296kernel.shmmax = 68719476736
... (omitted)...
- 34 -

2. For each parameter, compare the current value to that in the above table, and then calculate the appropriate value, based on its valuetype (setup or additional value).
3. Edit /etc/sysctl.conf. Edit the content as in the following example:
Example
kernel.sem = 512 13325 50 1358kernel.msgmnb = 114432kernel.msgmni = 1041kernel.shmmni = 4154
4. Confirm that edited content is reflected in /etc/sysctl.conf, using the following command:
# /bin/cat /etc/sysctl.conf
5. Enable the configuration on 4. using one of the following methods:
- Reboot the system to reflect the settings
# /sbin/shutdown -r now
- Use /sbin/sysctl -p to reflect the settings
# /sbin/sysctl -p /etc/sysctl.conf (*)
* Note: When using this command, reboot is not necessary.
6. Confirm that configured parameters are reflected, using the following command:
# /sbin/sysctl -a
Example
# /sbin/sysctl -a ... (omitted)...
kernel.sem = 512 13325 50 1358kernel.msgmnb = 114432kernel.msgmni = 1041kernel.msgmax = 65536kernel.shmmni = 4154kernel.shmall = 4294967296kernel.shmmax = 68719476736
... (omitted)...
2.1.2.3 Collecting and Checking Required InformationBefore installing Resource Orchestrator, collect required information and check the system status, then determine the information to bespecified on the installation window. The information that needs to be prepared is given below.
- Installation Folder
The installation directory of Resource Orchestrator is as below. It cannot be changed.
- 35 -
- /opt
- /etc/opt
- /var/opt
- /root/InstallShield
Check that the necessary disk space can be secured on the drive for installation.For the amount of disk space necessary for Resource Orchestrator, refer to "2.4.2.6 Static Disk Space" and "2.4.2.7 Dynamic DiskSpace" in the "Design Guide CE".
- Image File Storage Folder
The image file storage folder is located in the installation folder.Check that sufficient disk space can be secured on the drive where the storage folder will be created.For the necessary disk space, refer to "2.4.2.7 Dynamic Disk Space" in the "Design Guide CE".
For details of how to change the image file storage folder, refer to "5.9 rcxadm imagemgr" in the "Reference Guide (Command/XML)CE".
- Port Number
For details on port numbers, refer to "2.1.2.4 Checking Used Port Numbers".
- Directory Service Connection Information for Single Sign-On of ServerView Operations Manager
Confirm that the directory service used for Single Sign-On of ServerView Operations Manager is correctly configured.
This can be performed using either of the following procedures:
- Log in to ServerView Operations Manager.
Refer to the following manuals:
- Manual for ServerView Operations Manager:
"ServerView user management via an LDAP directory service" in "FUJITSU Software ServerView Suite User Managementin ServerView"
- Manual for ServerView Operations Manager:
"Starting ServerView Operations Manager" in "FUJITSU Software ServerView Suite ServerView Operations Manager"
- Perform modification install of ServerView Operations Manager.
When performing modification installation, the settings of directory service can be checked.
Refer to the following manuals:
- Manual for ServerView Operations Manager:
"ServerView user management via an LDAP directory service" in "FUJITSU Software ServerView Suite User Managementin ServerView"
- Manual for ServerView Operations Manager:
"Installing the Operations Manager software" in "FUJITSU Software ServerView Suite ServerView Operations ManagerV6.30 Installing ServerView Operations Manager Software under Linux"
If the settings of the directory service for ServerView Operations Manager are correct, exit the modification installation withoutmaking any changes.If there are errors in the settings of the directory service for ServerView Operations, perform modification installation ofServerView Operations Manager to correct the errors.
ServerView Operations Manager V6.1 and later include OpenDJ as a directory service.In the following descriptions, when "OpenDS" is used, replace it with "OpenDJ".
Parameters Used for Installation
The following table contains the parameters used for installation.
- 36 -
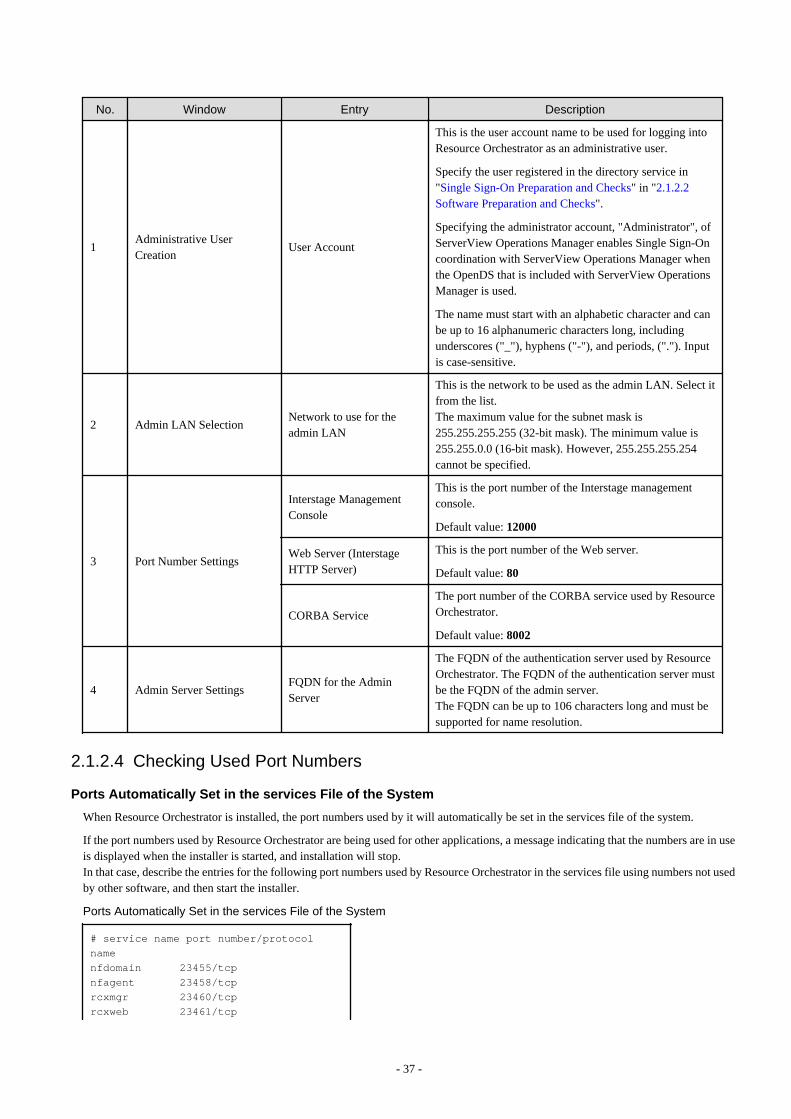
No. Window Entry Description
1Administrative UserCreation
User Account
This is the user account name to be used for logging intoResource Orchestrator as an administrative user.
Specify the user registered in the directory service in"Single Sign-On Preparation and Checks" in "2.1.2.2Software Preparation and Checks".
Specifying the administrator account, "Administrator", ofServerView Operations Manager enables Single Sign-Oncoordination with ServerView Operations Manager whenthe OpenDS that is included with ServerView OperationsManager is used.
The name must start with an alphabetic character and canbe up to 16 alphanumeric characters long, includingunderscores ("_"), hyphens ("-"), and periods, ("."). Inputis case-sensitive.
2 Admin LAN SelectionNetwork to use for theadmin LAN
This is the network to be used as the admin LAN. Select itfrom the list.The maximum value for the subnet mask is255.255.255.255 (32-bit mask). The minimum value is255.255.0.0 (16-bit mask). However, 255.255.255.254cannot be specified.
3 Port Number Settings
Interstage ManagementConsole
This is the port number of the Interstage managementconsole.
Default value: 12000
Web Server (InterstageHTTP Server)
This is the port number of the Web server.
Default value: 80
CORBA Service
The port number of the CORBA service used by ResourceOrchestrator.
Default value: 8002
4 Admin Server SettingsFQDN for the AdminServer
The FQDN of the authentication server used by ResourceOrchestrator. The FQDN of the authentication server mustbe the FQDN of the admin server.The FQDN can be up to 106 characters long and must besupported for name resolution.
2.1.2.4 Checking Used Port Numbers
Ports Automatically Set in the services File of the System
When Resource Orchestrator is installed, the port numbers used by it will automatically be set in the services file of the system.
If the port numbers used by Resource Orchestrator are being used for other applications, a message indicating that the numbers are in useis displayed when the installer is started, and installation will stop.In that case, describe the entries for the following port numbers used by Resource Orchestrator in the services file using numbers not usedby other software, and then start the installer.
Ports Automatically Set in the services File of the System # service name port number/protocol namenfdomain 23455/tcpnfagent 23458/tcprcxmgr 23460/tcprcxweb 23461/tcp
- 37 -

rcxtask 23462/tcprcxmongrel1 23463/tcprcxmongrel2 23464/tcprcxdb 23465/tcprcxmongrel3 23466/tcprcxmongrel4 23467/tcprcxmongrel5 23468/tcp
Checking Port Usage Status
Execute the "Environment setup conditions check tool" in "2.1.2.5 Configuration Parameter Checks" to check the port usage status.For ports with "is in use" displayed for the result of "Port status", confirm that those ports are used with the purpose of usage for ResourceOrchestrator defined in /etc/services.When ports being are used for something other than Resource Orchestrator, change the ports to use.
For the port information used by Resource Orchestrator, refer to "Appendix A Port List" in the "Design Guide CE".
Changing Port Numbers
To change port numbers after installing the manager, refer to the following:
- "6.2 Changing Port Numbers" in the "User's Guide for Infrastructure Administrators (Resource Management) CE"
- "8.3 Settings for Port Number of Admin Servers" in the "Operation Guide CE"
Other Ports
Check that the following ports are not used:
If they are being used, please contact Fujitsu technical staff.
- 7676
- 8686
- 12001
- 23600
- 23601
- 23602
- 23700
- 28080
2.1.2.5 Configuration Parameter ChecksCheck configuration parameters following the procedure below:
1. Log in to the system as the OS administrator (root).
Boot the admin server in multi-user mode to check that the server meets requirements for installation, and then log in to the systemusing root.
2. Set the first Resource Orchestrator DVD-ROM.
3. Execute the following command to mount the DVD-ROM. If the auto-mounting daemon (autofs) is used for starting the mountedDVD-ROM, the installer will fail to start due to its "noexec" mount option.
# mount -t iso9660 -r /dev/hdc DVD-ROM_mount_point <RETURN>
- 38 -
4. Execute the agent installation command (the RcSetup.sh command).
# cd DVD-ROM_mount_point <RETURN># ./RcSetup.sh <RETURN>
5. Select "Environment setup conditions check tool" from the menu to execute the tool.
For the check items with the edition name displayed in the check results, check only the items corresponding to the edition to beinstalled.
6. When the check is completed, the result will be sent to standard output.
The following items are displayed as the items to be checked:
- Required Software (LAN Manager module)
- Required Software (ETERNUS SF Storage Cruiser)
- Disk Space (Express/Virtual Edition)
- Disk Space (Cloud Edition)
- Memory Size (Express/Virtual Edition)
- Memory Size (Cloud Edition)
- cpu
- SNMP Service
- Port Status (Express/Virtual Edition)
- Port Status (Cloud Edition)
7. Confirm that "Warning" or "NG" is not included in the check results. If there are check items that were determined as "Warning"or "NG", resolve the cause of the problem based on the output message. For details of the corrective actions, refer to "2.1.2.1Preparations" and "2.4 Software Environment" and "2.5 Hardware Environment" in the "Design Guide CE".
2.1.2.6 InstallationThe procedure for manager installation is given below.
Before installation, check if "2.1.2.1 Preparations" have been performed.
Current Directory Setting
Do not set the current directory to the DVD-ROM to allow disk switching.
Settings in Single User Mode
In single user mode, X Window Sytem does not start, and one of the following operations is required.
- Switching virtual consoles (using the [Ctrl] + [Alt] + [Fn] keys)
- Making commands run in the background
Nullifying Firewall Settings for Ports to be used by Resource Orchestrator
When installing Resource Orchestrator on systems with active firewalls, in order to enable correct communication between the manager,agents, and clients, disable the firewall settings for the port numbers to be used for communication.
For the port numbers used by Resource Orchestrator and required software, refer to "Appendix A Port List" in the "Design Guide CE".
However, when port numbers have been changed by editing the services file during installation of Resource Orchestrator, replace thedefault port numbers listed in "Appendix A Port List" in the "Design Guide CE" with the port numbers changed to during installation.
- 39 -
Installation
The procedure for manager installation is given below.
1. Log in to the system as the OS administrator (root).
Boot the admin server that Resource Orchestrator is to be installed on in multi-user mode, and then log in to the system using root.
2. Set the first Resource Orchestrator DVD-ROM and execute the following command to mount the DVD-ROM. If the auto-mountingdaemon (autofs) is used for DVD-ROM auto-mounting, the installer fails to start due to its "noexec" mount option.
Set the same value for the first, second, and third DVD-ROMs in the DVD mount point.
# mount -t iso9660 -r /dev/hdc DVD-ROM_mount_point <RETURN>
3. Execute the manager installation command (the RcSetup.sh command).
# DVD-ROM_mount_point/ RcSetup.sh <RETURN>
4. Select "2. Manager(Cloud Edition) installation".
5. Perform installation according to the installer's interactive instructions.
Enter the parameters prepared and confirmed in "Parameters Used for Installation" in "2.1.2.3 Collecting and Checking RequiredInformation".
6. A message for disk switching will be output.
7. Start a different terminal (such as a GNOME terminal), and then eject the DVD-ROM using the following command.
# eject DVD-ROM_mount_point <RETURN>
8. Set the second DVD-ROM and wait for the completion of auto-mounting.
9. Mount the DVD-ROM again.
# umount DVD-ROM_mount_point <RETURN># mount -t iso9660 -r /dev/hdc DVD-ROM_mount_point <RETURN>
10. Press the [Enter] key to continue the installation.
11. Repeat steps 8 to 10 with the third DVD-ROM as well to continue the installation.
Point
[Solaris Zones] [OVM for SPARC]When BMC BladeLogic Server Automation is installed on the admin server and BMC BladeLogic Server Automation is installed afterthis product was installed, perform the following procedure:
1. Execute the following command as the OS administrator (root) and stop the Interstage data store service:
# /opt/FJSVena/Enabler/server/bin/enablerstop <RETURN>
2. Execute the following command as the OS administrator (root) and disable the Interstage data store service:
# /sbin/chkconfig --del Enabler <RETURN>
It is necessary to set up the manager after installation. For details, refer to "2.1.3 Setup".
- 40 -
Note
- Corrective Action for Installation Failure
In the event of installation failure, restart the OS and then log in as the user that performed the installation, and perform uninstallationfollowing the uninstallation procedure.
After that, remove the cause of the failure referring to the meaning of the output message and the suggested corrective actions, andthen perform installation again.
- If there are internal inconsistencies detected during installation, the messages "The problem occurred while installing it" or "It failedin the installation" will be displayed and installation will fail. In this case, uninstall the manager and reinstall it. If the problem persists,please contact Fujitsu technical staff.
- If used ports exist when performing installation, the message "The specified port number Port Number selected for ServerViewResource Orchestrator is already used." will be displayed, and installation will fail. If this happens, please contact Fujitsu technicalstaff.
- If installation stopped before the process was complete, perform the following corrective actions.
1. Forcibly stop the installation.
2. Perform uninstallation.
Refer to "20.1 Manager Uninstallation".
Execute the post-uninstallation procedure.
3. Perform installation again.
Post-installation Cautions
- The following users are added. When installing Resource Orchestrator, do not delete these accounts.
Account Name Usage
rcxdb rcxdb is used as the OS account for connecting to the database service of Resource Orchestrator.
swrbadbuser swrbadbuser is used as the OS account for starting the database service for process management.
rcxctdbchg rcxctdbchg is used as the OS account for starting the database service for metering.
Patches to Apply after Upgrade
After installing this product, apply the patches of the following products if necessary.
- Interstage Application Server Enterprise Edition
- Interstage Business Process Manager
- Interstage Business Process Manager Analytics
- Systemwalker Operation Manager Enterprise Edition
- Systemwalker Runbook Automation
- Systemwalker Service Quality Coordinator
2.1.3 SetupThis section explains the procedure for manager setup.
- 41 -
Advisory Notes for Pre-setup
When Using Microsoft Active Directory on a Different Server from the Manager [Windows Manager]
To use the ldifde command for automatic user registration in Active Directory, add "Active Directory Lightweight Directory Services"to the servers on which managers are operating.
Use the following procedure to add "Active Directory Lightweight Directory Services".
1. Select [Start]-[Administrative Tools]-[Server Manager] on the Windows menu.
The [Server Manager] dialog is displayed.
2. Select [Roles]-[Add Roles]-[Active Directory Lightweight Directory Services].
3. Following the wizard to add roles, click <Install> on a confirmation window.
Setup
For manager setup, execute the setup command.Setup is executable from either the media or the extracted module.
[Windows Manager]
1. Log on as the administrator.
Log on to the system on which the manager is to be set up.Log on using the Administrator account of the local computer.
2. Execute the setup command.
- When executing from the media
>Installation_medium\RcSetup.exe <RETURN>
- When executing from the extracted module
>Installation_folder\SVROR\Manager\sys\setup\RcSetup.exe <RETURN>
3. Select setup from the menu to execute the setup command.
4. Check the execution results of the setup command.
- When setup is successful
The following message is displayed.
INFO : Resource Orchestrator Cloud Edition setup successfully.
- When setup fails
The following message is displayed.
ERROR : Resource Orchestrator Cloud Edition setup failed.
Refer to the Note, and perform setup again after resolving the problem.
If the problem persists, please contact Fujitsu technical staff.
5. Change the directory service connection information.
When using OpenDS provided with ServerView Operations Manager V5.3, it is necessary to change the information of the directoryserver administrator that has registered with the Resource Orchestrator.Change directory service connection information in the following procedures.
- 42 -
a. Stop the manager.
Execute the rcxadm mgrctl stop command and stop the manager.For details on the rcxadm mgrctl stop command, refer to "5.14 rcxadm mgrctl" of the "Reference Guide (Command/XML)CE".
b. Change the directory service connection information.
Execute the rcxadm authctl modify command and change the directory service connection information.
Example
>Installation_folder\SVROR\Manager\bin\rcxadm authctl modify -bind "cn=Directory Manager" -passwdadmin <RETURN>
Specify the password for directory server administrator as a passwd option. The OpenDS Directory Manager's predefinedpassword is "admin".For details on the rcxadm authctl modify command, refer to "5.4 rcxadm authctl" of the "Reference Guide (Command/XML)CE".
c. Start the manager.
Execute the rcxadm mgrctl start command and start the manager.For details on the rcxadm mgrctl start command, refer to "5.14 rcxadm mgrctl" of the "Reference Guide (Command/XML)CE".
[Linux Manager]
1. Log in to the system as the OS administrator (root).
2. Execute the setup command.
- When executing from the media
# Installation_medium/RcSetup.sh <RETURN>
- When executing from the extracted module
# /opt/FJSVrcvmr/sys/setup/RcSetup.sh <RETURN>
3. Select setup from the menu to execute the setup command.
4. Check the execution results of the setup command.
- When setup is successful
The following message is displayed.
INFO : Resource Orchestrator Cloud Edition setup successfully.
- When setup fails
The following message is displayed.
ERROR : Resource Orchestrator Cloud Edition setup failed.
Refer to the Note, and perform setup again after resolving the problem.
If the problem cannot be resolved, collect troubleshooting information and contact Fujitsu technical staff.
5. Change the directory service connection information.
When using OpenDS provided with ServerView Operations Manager V5.3, it is necessary to change the information of the directoryserver administrator that has registered with the Resource Orchestrator.Change directory service connection information in the following procedures.
- 43 -
a. Stop the manager.
Execute the rcxadm mgrctl stop command and stop the manager.For details on the rcxadm mgrctl stop command, refer to "5.14 rcxadm mgrctl" of the "Reference Guide (Command/XML)CE".
b. Change the directory service connection information.
Execute the rcxadm authctl modify command and change the directory service connection information.
Example
# /opt/FJSVrcvmr/bin/rcxadm authctl modify -bind "cn=Directory Manager" -passwd admin <RETURN>
Specify the password for directory server administrator as a passwd option. The OpenDS Directory Manager's predefinedpassword is "admin".For details on the rcxadm authctl modify command, refer to "5.4 rcxadm authctl" of the "Reference Guide (Command/XML)CE".
c. Start the manager.
Execute the rcxadm mgrctl start command and start the manager.For details on the rcxadm mgrctl start command, refer to "5.14 rcxadm mgrctl" of the "Reference Guide (Command/XML)CE".
Note
When setup failed, check if there are no problems for the following cases:
- Unsetup has not been completed
Delete the following entries from the directory service to use:
- swrbaadmin
- swrbasch
- Group
- The OpenDS LDAP port number has been changed
Reset the port number to the default, and perform the operation again.
- LDAPS communications between managers and directory servers have not been established
When using Microsoft Active Directory as a directory service, check the following:
- If the appropriate certificates have been issued by the Certification Authority
- If the issued certificates have been correctly installed
Use tools or ldp commands to check communications.
Advisory Notes for Post-setup
- The following users are added.
[Windows Manager]
- rcxctdbchg
rcxctdbchg is used as an OS account to start the database service for metering. Do not delete this account when ResourceOrchestrator has been installed.
- 44 -
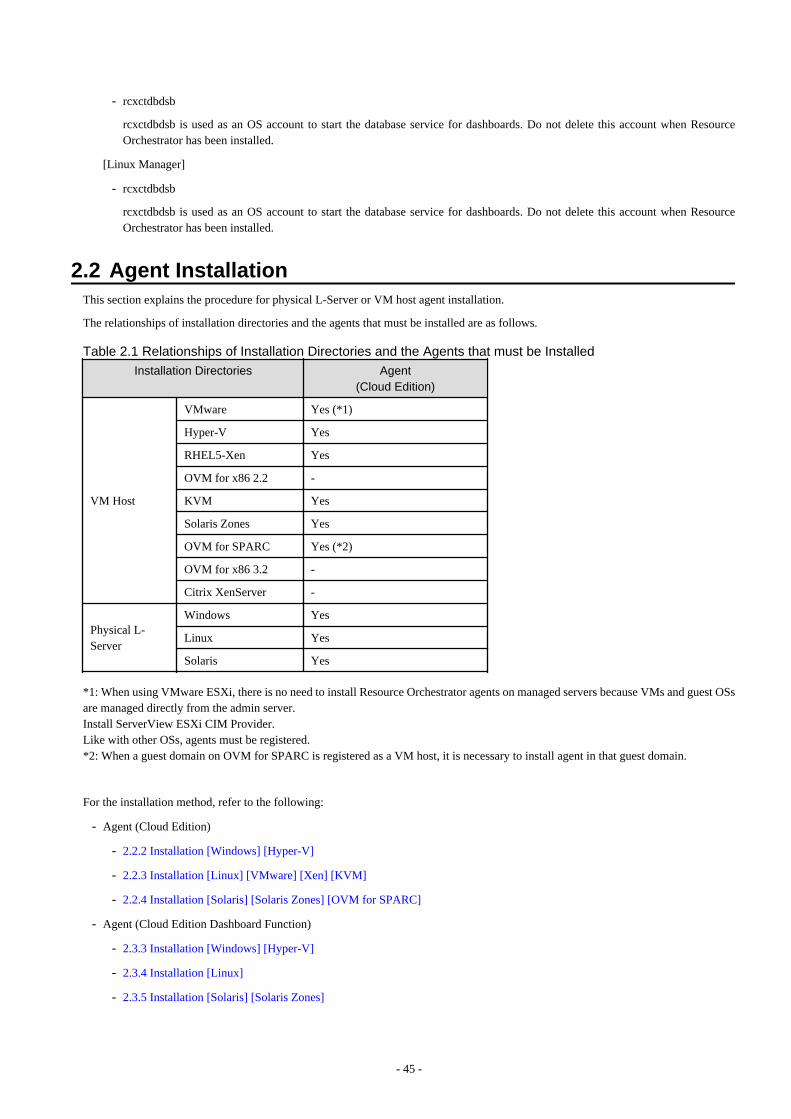
- rcxctdbdsb
rcxctdbdsb is used as an OS account to start the database service for dashboards. Do not delete this account when ResourceOrchestrator has been installed.
[Linux Manager]
- rcxctdbdsb
rcxctdbdsb is used as an OS account to start the database service for dashboards. Do not delete this account when ResourceOrchestrator has been installed.
2.2 Agent InstallationThis section explains the procedure for physical L-Server or VM host agent installation.
The relationships of installation directories and the agents that must be installed are as follows.
Table 2.1 Relationships of Installation Directories and the Agents that must be Installed
Installation Directories Agent(Cloud Edition)
VM Host
VMware Yes (*1)
Hyper-V Yes
RHEL5-Xen Yes
OVM for x86 2.2 -
KVM Yes
Solaris Zones Yes
OVM for SPARC Yes (*2)
OVM for x86 3.2 -
Citrix XenServer -
Physical L-Server
Windows Yes
Linux Yes
Solaris Yes
*1: When using VMware ESXi, there is no need to install Resource Orchestrator agents on managed servers because VMs and guest OSsare managed directly from the admin server.Install ServerView ESXi CIM Provider.Like with other OSs, agents must be registered.*2: When a guest domain on OVM for SPARC is registered as a VM host, it is necessary to install agent in that guest domain.
For the installation method, refer to the following:
- Agent (Cloud Edition)
- 2.2.2 Installation [Windows] [Hyper-V]
- 2.2.3 Installation [Linux] [VMware] [Xen] [KVM]
- 2.2.4 Installation [Solaris] [Solaris Zones] [OVM for SPARC]
- Agent (Cloud Edition Dashboard Function)
- 2.3.3 Installation [Windows] [Hyper-V]
- 2.3.4 Installation [Linux]
- 2.3.5 Installation [Solaris] [Solaris Zones]
- 45 -
2.2.1 PreparationsThis section explains the preparations and checks required before commencing installation.
- Exclusive Software Checks
Refer to "Exclusive Software Checks".
- Required Software Checks
Refer to "Required Software Preparation and Checks".
- Required Patch Checks
Refer to "Required Patch Checks".
- Required Package Checks
Refer to "Required Package Checks [Linux]".
2.2.1.1 Software Preparation and ChecksSoftware preparation and checks are explained in the following sections.
Exclusive Software Checks
Before installing Resource Orchestrator, check that the software listed in "2.4.2.5 Exclusive Software" in the "Design Guide CE" and theagent of Resource Orchestrator have not been installed on the system.Use the following procedure to check that exclusive software has not been installed.
[Windows] [Hyper-V]
1. Open [Add or Remove Programs] on the Windows Control Panel.
The [Add or Remove Programs] window will be displayed.
2. Check that none of the software listed in "2.4.2.5 Exclusive Software" in the "Design Guide CE" has been installed on the system,and there is no information which shows a Resource Orchestrator agent has been installed.
- "ServerView Resource Orchestrator Agent"
3. When any of the exclusive software is displayed on the [Add or Remove Programs] window, uninstall it according to the proceduredescribed in the relevant manual before installing Resource Orchestrator.
If agents of an earlier version of Resource Orchestrator have been installed, they can be upgraded. Refer to "F.3 Agent".When reinstalling an agent on a system on which an agent of the same version of Resource Orchestrator has been installed, performuninstallation referring to "20.2.1 Uninstallation [Windows] [Hyper-V]", and then perform installation.
Information
For Windows Server 2008 or later, select [Programs and Features] from the Windows Control Panel.
[Linux]
1. Check that none of the software listed in "2.4.2.5 Exclusive Software" in the "Design Guide CE" are displayed. Execute the followingcommand and check if Resource Orchestrator Agent has been installed.
# rpm -q FJSVssagt <RETURN>
- 46 -
2. If the names of exclusive software have been displayed, uninstall them according to the procedure described in the relevant manualbefore proceeding.
If agents of an earlier version of Resource Orchestrator have been installed, they can be upgraded. Refer to "F.3 Agent".When reinstalling an agent on a system on which an agent of the same version of Resource Orchestrator has been installed, performuninstallation referring to "20.2.2 Uninstallation [Linux] [VMware] [Xen] [KVM]" and then perform installation.
Note
- When uninstalling exclusive software, there are cases where other system operation administrators might have installed thesoftware, so check that deleting the software causes no problems before actually doing so.
- With the standard settings of Red Hat Enterprise Linux 5 or later, when DVD-ROMs are mounted automatically, execution ofprograms on the DVD-ROM cannot be performed. Release the automatic mount settings and perform mounting manually, orstart installation after copying the contents of the DVD-ROM to the hard disk.When copying the contents of the DVD-ROM, replace "DVD-ROM_mount_point" with the used directory in the proceduresin this manual.
[Solaris] [Solaris Zones]
1. Check that none of the software listed in "2.4.2.5 Exclusive Software" in the "Design Guide CE" are displayed. Execute the followingcommand and check if Resource Orchestrator Agent has been installed.
# pkginfo FJSVrcvat <RETURN>
2. If the names of exclusive software have been displayed, uninstall them according to the procedure described in the relevant manualbefore proceeding.
If agents of an earlier version of Resource Orchestrator have been installed, they can be upgraded. Refer to "F.3 Agent".When reinstalling an agent on a system on which an agent of the same version of Resource Orchestrator has been installed, performuninstallation referring to "20.2.3 Uninstallation [Solaris] [Solaris Zones] [OVM for SPARC]" and then perform installation.
Note
When uninstalling exclusive software, there are cases where other system operation administrators might have installed the software,so check that deleting the software causes no problems before actually doing so.
Required Software Preparation and Checks
Before installing Resource Orchestrator, check that the required software given in "2.4.2.4 Required Software" in the "Design Guide CE"has been installed. If it has not been installed, install it before continuing.
Note
- ServerView Agents Settings
To operate Resource Orchestrator correctly on PRIMERGY series servers, perform the necessary settings for SNMP services duringinstallation of ServerView Agents.For how to perform SNMP service settings, refer to the ServerView Agents manual.
- For the SNMP community name, specify the same value as the SNMP community name set for the management blade.
- For the SNMP community name, set Read (reference) or Write (reference and updating) authority.
- For the host that receives SNMP packets, select [Accept SNMP packets from any host] or [Accept SNMP packets from thesehosts] and set the admin LAN IP address of the admin server.
- 47 -
- For the SNMP trap target, set the IP address of the admin server.When an admin server with multiple NICs is set as the SNMP trap target, specify the IP address of the admin LAN used forcommunication with the managed server.
- The "setupcl.exe" and "sysprep.exe" Modules
For Windows OSs other than Windows Server 2008 and Windows Server 2012, it is necessary to specify storage locations for the"setupcl.exe" and "sysprep.exe" modules during installation. Obtain the newest modules before starting installation of ResourceOrchestrator.
For the method of obtaining the modules, refer to "2.4.2.4 Required Software" in the "Design Guide CE".
Extract the obtained module using the following method:
Example
When WindowsServer2003-KB926028-v2-x86-JPN.exe has been placed in c:\temp
>cd /d c:\temp <RETURN>>WindowsServer2003-KB926028-v2-x86-JPN.exe /x <RETURN>
During installation, specify the cabinet file "deploy.cab" in the extracted folder, or the "setupcl.exe" and "sysprep.exe" modulescontained in "deploy.cab".After agent installation is complete, the extracted module is no longer necessary.
Required Patch Checks
Before installing Resource Orchestrator, check that the required patches for the agent listed in "2.4.2.2 Required Patches" in the "DesignGuide CE" have been applied.
If they have not been applied, apply them before continuing.
Required Package Checks [Linux]
Before installing Resource Orchestrator, check that the required packages [Linux] for the agent listed in "2.4.2.3 Required Packages" inthe "Design Guide CE" have been applied.
If they have not been installed, install them before continuing.
Language Settings
As Resource Orchestrator installs programs that correspond to the supported language, language settings (locale) cannot be changed afterinstallation.
Therefore, set the language (locale) to Japanese or English according to your operational requirements.
The example of language settings (locale) confirmation methods is given below:
Example
- For Windows
From the Control Panel, open [Date, Time, Language, and Regional Options] and select [Regional and Language Options].
- For Red Hat Enterprise Linux 5
From the desktop screen, select [System]-[Administration]-[Language].
- 48 -
Red Hat Enterprise Linux 6 Preconfiguration
Only perform this when using Red Hat Enterprise Linux 6 as the basic software of a server.
- When using cloning and server switchover, perform the following procedure to modify the configuration file.
1. Execute the following command.
# systool -c net <RETURN>
Example # systool -c net <RETURN>Class = "net"Class Device = "eth0"Device ="0000:01:00.0"Class Device = "eth1"Device ="0000:01:00.1"Class Device = "eth2"Device ="0000:2:00 AM.0"Class Device = "eth3"Device ="0000:2:00 AM.1"Class Device = "lo"Class Device = "sit0"
2. Confirm the device name which is displayed after "Class Device =" and the PCI bus number which is displayed after "Device=" in the command output results.
3. Correct the configuration file.
After confirming support for device name and MAC address in the following configuration file, changeATTR{address}=="MAC_address" to KERNELS=="PCI_bus_number".
All corresponding lines should be corrected.
Configuration File Storage Location
/etc/udev/rules.d/70-persistent-net.rules
Example
- Before changing
SUBSYSTEM=="net", ACTION=="add", DRIVERS=="?*",ATTR{address}=="MAC_address", ATTR{type}=="1", KERNEL=="eth*",NAME="Device_name"
- After changing
SUBSYSTEM=="net", ACTION=="add", DRIVERS=="?*",KERNELS=="PCI_bus_number", ATTR{type}=="1", KERNEL=="eth*",NAME="Device_name"
4. After restarting the managed servers, check if communication with the entire network is possible.
- 49 -
- Disable NetworkManager service
1. Execute the following commands to disable the NetworkManager service.
# service NetworkManager stop <RETURN># chkconfig NetworkManager off <RETURN>
2. Edit the "/etc/sysconfig/network-scripts/ifcfg-ethX" files(ethX is the interface name of eth0, eth1, etc.) to change the value forNM_CONTROLLED to "no".
Example
- Before changing
DEVICE="eth0"HWADDR="xx:xx:xx:xx:xx:xx"NM_CONTROLLED="yes"ONBOOT="yes"TYPE=Ethernet
- After changing
DEVICE="eth0"HWADDR="xx:xx:xx:xx:xx:xx"NM_CONTROLLED="no"ONBOOT="yes"TYPE=Ethernet
3. Execute the following command to restart the network service.
# service network restart <RETURN>
Configuration File Check
- When using Red Hat Enterprise Linux
When using the following functions, check the configuration files of network interfaces before installing Resource Orchestrator, andrelease any settings made to bind MAC addresses.
- Server switchover
- Cloning
Only perform this when using Red Hat Enterprise Linux 4 AS/ES as the basic software of a server.
Refer to the /etc/sysconfig/network-scripts/ifcfg-ethX file (ethX is an interface name such as eth0 or eth1), and check that there is noline starting with "HWADDR=" in the file.If there is a line starting with "HWADDR=", this is because the network interface is bound to a MAC address. In that case, commentout the line.
Example
When the admin LAN interface is eth0
DEVICE=eth0#HWADDR=xx:xx:xx:xx:xx:xx <- If this line exists, comment it out.
- 50 -
ONBOOT=yesTYPE=Ethernet
- When using SUSE Linux Enterprise Server
- When using cloning and server switchover, perform the following procedure to modify the configuration file.
1. Execute the following command.
# systool -c net <RETURN>
Example # systool -c net <RETURN>Class = "net"
Class Device = "eth0" Device = "0000:01:00.0"
Class Device = "eth1" Device = "0000:01:00.1"
Class Device = "eth2" Device = "0000:2:00 AM.0"
Class Device = "eth3" Device = "0000:2:00 AM.1"
Class Device = "lo"
Class Device = "sit0"
2. Confirm the device name which is given after "Class Device =" and PCI bus number which is given after "Device =" in thecommand output results.
3. Modify the configuration file.
When using SUSE Linux Enterprise Server 10
a. After confirming support for device name and MAC address in the following configuration file, changeSYSFS{address}=="MAC_address" to ID=="PCI_bus_number".All corresponding lines should be corrected.Support of the device name and MAC address will be used after step b.
/etc/udev/rules.d/30-net_persistent_names.rules
Before changing
SUBSYSTEM=="net", ACTION=="add", SYSFS{address}=="MAC_address",IMPORT="/lib/udev/rename_netiface %k device_name"
After changing
SUBSYSTEM=="net", ACTION=="add", ID=="PCI_bus_number", IMPORT="/lib/udev/rename_netiface %k device_name"
b. Based on the results of step 1 and a in step 3, change the name of the following file will be to a name that includes thePCI bus number.
Before changing
- 51 -
/etc/sysconfig/network/ifcfg-eth-id-MAC address
After changing
/etc/sysconfig/network/ifcfg-eth-bus-pci-PCI bus number
When using SUSE Linux Enterprise Server 11
Change ATTR{address}=="MAC address" to KERNELS=="PCI_bus_number" in the following configuration file.All corresponding lines should be corrected.
/etc/udev/rules.d/70-persistent-net.rules
Before changing
SUBSYSTEM=="net", ACTION=="add", DRIVERS=="?*",ATTR{address}=="MAC_address", ATTR{type}=="1", KERNEL=="eth*",NAME="device_name"
After changing
SUBSYSTEM=="net", ACTION=="add", DRIVERS=="?*",KERNELS=="PCI_bus_number", ATTR{type}=="1", KERNEL=="eth*",NAME="device_name"
4. After restarting the managed servers, check if communication with the entire network is possible.
- When using cloning or the backup and restore method for server switchover, during installation perform partition settings so thatnames of device paths are defined using the "Device Name" format (for example: /dev/sda1) in the /etc/fstab file.
When installation is already complete, change the names of device paths defined in the boot configuration files /boot/efi/SuSE/elilo.conf and /boot/grub/menu.lst, and the /etc/fstab file so they use the "Device Name" format (for example: /dev/sda1).Forspecific details about the mount definition, please refer to the following URL and search for the Document ID:3580082.
http://www.suse.com/documentation/
2.2.1.2 Collecting and Checking Required InformationBefore installing Resource Orchestrator, collect required information and check the system status, then determine the information to bespecified on the installation window. The information that needs to be prepared is given below.
- Installation folder and available disk space
Decide the installation folder for Resource Orchestrator. Check that the necessary disk space can be secured on the drive for installation.For the amount of disk space necessary for Resource Orchestrator, refer to "2.4.2.6 Static Disk Space" and "2.4.2.7 Dynamic DiskSpace" in the "Design Guide CE".
- Port Number
When Resource Orchestrator is installed, the port numbers used by it will automatically be set in the services file of the system. Sousually, there is no need to pay attention to port numbers.If the port numbers used by Resource Orchestrator are being used for other applications, a message indicating that the numbers are inuse is displayed when the installer is started, and installation will stop.In that case, describe the entries for the port numbers used by Resource Orchestrator in the services file using numbers not used byother software, and then start the installer.For details, refer to "7.1.6 Changing Port Numbers" in the "User's Guide for Infrastructure Administrators (Resource Management)CE".
- Check the status of the admin LAN and NIC
Decide the network (IP addresses) to be used for the admin LAN.Check that the NIC used for communication with the admin LAN is enabled.For details on admin LANs, refer to "9.1.1 Admin LAN Network Design" in the "Design Guide CE".
- 52 -
[Linux] [Xen] [KVM]Make the numeral of the managed server's network interface name (ethX) one of a consecutive sequence starting from 0. For thesettings, refer to the manual for the OS.
- Check the target disk of image operations
For backup and restoration of system images to disks, refer to "16.1 Overview" in the "User's Guide VE".For details on disks for cloning, refer to "12.1 Overview" in the "User's Guide for Infrastructure Administrators (ResourceManagement) CE".
- Windows Volume License Information [Windows]
When using the following functions, you must have a volume license for the version of Windows to be installed on managed serversby Resource Orchestrator.Check whether the Windows license you have purchased is a volume license.
- Server switchover (HBA address rename method/ VIOM server profile switchover method)
- Cloning
- Restoration after server replacement
- Server replacement using HBA address rename
When using cloning, you must enter volume license information when installing Resource Orchestrator.Depending on the version of Windows being used, check the following information prior to installation.
- For Windows Server 2003
Check the product key.Generally, the product key is provided with the DVD-ROM of the Windows OS purchased.
- For Windows Server 2008 or Later
Check the information necessary for license authentication (activation).The two activation methods are Key Management Service (KMS) and Multiple Activation Key (MAK). Check which methodyou will use.
Check the following information required for activation depending on the method you will use.
- Activation Information
Table 2.2 Activation Information Methods and Information to Check
Method Information to Check
KMS (*1)- The KMS host name (FQDN) or the computer name or IP address
- Port number (Default 1688) (*2)
MAK The MAK key
*1: When using Domain Name Service (DNS) to automatically find the KMS host, checking is not necessary.*2: When changing the port number from the default (1688), correct the definition file after installing agents. Refer to "12.2Collecting" in the "User's Guide for Infrastructure Administrators (Resource Management) CE".
- Proxy Server Information
When using a proxy server to connect to the KMS host (KMS method) or the Volume Activation Management Tool (VAMT)to authenticate a proxy license (MAK method), check the host name or IP address, and the port number of the proxy server.
- Administrator's Password
Check the password as it is necessary for performing activation.
- Windows Administrator accounts
When using Windows Server 2008 or later, check whether Administrator accounts have been changed (renamed).Environments which have been changed (renamed) are not supported.
- 53 -

2.2.2 Installation [Windows] [Hyper-V]This section explains the procedure for agent installation.
Before installation, check if "2.2.1 Preparations" have been performed.
1. Log on to Windows as the administrator.
Log on to the system on which the agent is to be installed. Log on using the Administrator account.
2. Start the installer from the window displayed when the first Resource Orchestrator DVD-ROM is set.
Click [Agent(Cloud Edition) installation] which is displayed on the window.
3. The Resource Orchestrator setup window will be displayed.
Check the contents of the license agreement window etc. and then click <Yes>.
4. The [Choose Install Location] window is displayed.
Click <Next>> to use the default Installation Folder. To change folders, click <Browse>, change folders, and click <Next>>.
Note
When changing the folders, be careful about the following points.
- Do not specify the installation folder of the system (such as C:\).
- Enter the location using 100 characters or less. Do not use double-byte characters or the following symbols in the folder name.
""", "|", ":", "*", "?", "/", ".", "<", ">", ",", "%", "&", "^", "=", "!", ";", "#", "'", "+", "[", "]", "{", "}"
- When using 64 bit Windows Server OSs, the following folder names cannot be specified for the installation folders.
- "%SystemRoot%\System32\"
- When using cloning, installation on the OS system drive is advised, because Sysprep initializes the drive letter during deploymentof cloning images.
5. The [Admin Server Registration] window will be displayed.
Specify the admin LAN IP address of the admin server, the folder containing the "setupcl.exe" and "sysprep.exe" modules, thenclick <Next>>.
Admin Server IP Address
Specify the IP address of the admin server. When the admin server has multiple IP addresses, specify the IP address used forcommunication with managed servers.
Folder Containing the setupcl.exe and sysprep.exe Modules
Click <Refer> and specify "deploy.cab" or "setupcl.exe" and "sysprep.exe" as prepared in "2.2.1.1 Software Preparation andChecks".
Information
With Windows Server 2008 or later, "setupcl.exe" and "sysprep.exe" are installed along with the OS so specification is notnecessary (<Refer> will be disabled).
6. The [License Authentication] window will be displayed.
Enter the license authentication information for the Windows volume license.As license authentication information is not necessary if cloning will not be used, click <Next>> without selecting [Using the cloningfeature of this product].
If cloning will be used, depending on the version of Windows being used, specify the following information collected in "WindowsVolume License Information [Windows]" of "2.2.1.2 Collecting and Checking Required Information", and click <Next>>.
For Windows Server 2003
- 54 -

Product Key
Enter the Windows product key for the computer the agent is to be installed on.
Confirm Product Key
Enter the Windows product key again to confirm it.
For Windows Server 2008 or Later
License Authentication Method
Select the license authentication method from Key Management Service (KMS) and Multiple Activation Key (MAK).
- When Key Management Service (KMS) is selected
KMS host
Enter the host name of the KMS host name, and the computer name or IP address.When using Domain Name Service (DNS) to automatically find the KMS host, this is not necessary.
- When Multiple Activation Key (MAK) is selected
The MAK key
Enter the MAK key for the computer the agent is to be installed on.
Confirm Multiple Activation Key
Enter the MAK key again to confirm it.
Proxy server used for activation
Enter the host name or IP address of the proxy server.When the proxy server has a port number, enter the port number.
Administrator's Password
Enter the administrator password for the computer the agent is to be installed on.
Note
If an incorrect value is entered for [Product Key], [Key Management Service host], [The MAK Key], or [Proxy server used foractivation] on the [License Authentication Information Entry] window, cloning will be unable to be used.Check that the correct values have been entered.
7. The [Start Copying Files] window will be displayed.
Check that there are no mistakes in the contents displayed on the window, and then click <Install>>.Copying of files will start.To change the contents, click <<Back>.
8. The Resource Orchestrator setup completion window will be displayed.
When setup is completed, the [Installshield Wizard Complete] window will be displayed.Click <Finish> and close the window.
Note
- Corrective Action for Installation Failure
When installation is stopped due to errors (system errors, processing errors such as system failure, or errors due to execution conditions)or cancellation by users, remove the causes of any problems, and then take corrective action as follows.
- Open [Add or Remove Programs] from the Windows Control Panel, and when [ServerView Resource Orchestrator Agent] isdisplayed, uninstall it and then install the agent again.For uninstallation, refer to "20.2 Agent Uninstallation".
- 55 -

Information
For Windows Server 2008 or later, select "Programs and Features" from the Windows Control Panel.
- If [ServerView Resource Orchestrator Agent] is not displayed, install it again.
- Nullifying Firewall Settings for Ports to be used by Resource Orchestrator
When installing Resource Orchestrator on systems with active firewalls, in order to enable the manager to communicate with agentscorrectly, disable the firewall settings for the port numbers to be used for communication.For the port numbers used by Resource Orchestrator and required software, refer to "Appendix A Port List" in the "Design Guide CE".However, when port numbers have been changed by editing the services file during installation of Resource Orchestrator, replace thedefault port numbers listed in "Appendix A Port List" in the "Design Guide CE" with the port numbers changed to during installation.
- Uninstall the Related Services
When installing ServerView Deployment Manager after Resource Orchestrator has been installed, or using ServerView DeploymentManager in the same subnet, it is necessary to uninstall the related services.
For the method for uninstalling the related services, please refer to "5.1 deployment_service_uninstall" in the "Reference Guide(Command/XML) CE".
2.2.3 Installation [Linux] [VMware] [Xen] [KVM]This section explains the procedure for agent installation.
Before installation, check if "2.2.1 Preparations" have been performed.
1. Log in to the system as the OS administrator (root).
Boot the managed server that this product is to be installed on in multi-user mode, and then log in to the system using root.
[Xen] [KVM]Log in from the console.
2. Set the first Resource Orchestrator DVD-ROM.
3. Execute the following command to mount the DVD-ROM. If the auto-mounting daemon (autofs) is used for starting the mountedDVD-ROM, the installer will fail to start due to its "noexec" mount option.
# mount -t iso9660 -r /dev/hdc DVD-ROM_mount_point <RETURN>
4. Execute the agent installation command (RcSetup.sh).
# cd DVD-ROM_mount_point <RETURN># ./RcSetup.sh <RETURN>
5. Select "4. Agent(Cloud Edition) installation".
6. Perform installation according to the installer's interactive instructions.
7. Enter the host name or IP address of a connected admin server.
Note
- Corrective Action for Installation Failure
In the event of installation failure, restart and then log in as the user that performed the installation, and perform uninstallation followingthe uninstallation procedure.After that, remove the cause of the failure referring to the meaning of the output message and the suggested corrective actions, andthen perform installation again.
- 56 -
- Nullifying Firewall Settings for Ports to be used by Resource Orchestrator
When installing Resource Orchestrator on systems with active firewalls, in order to enable the manager to communicate with agentscorrectly, disable the firewall settings for the port numbers to be used for communication.
Example
[VMware]
# /usr/sbin/esxcfg-firewall -openPort 23458,tcp,in,"nfagent" <RETURN>
For the port numbers used by Resource Orchestrator and required software, refer to "Appendix A Port List" in the "Design Guide CE".However, when port numbers have been changed by editing the services file during installation of Resource Orchestrator, replace thedefault port numbers listed in "Appendix A Port List" in the "Design Guide CE" with the port numbers changed to during installation.
- When Installation was Performed without using the Console [Xen] [KVM]
When installation is performed by logging in from somewhere other than the console, the network connection will be severed beforeinstallation is complete, and it is not possible to confirm if the installation was successful. Log in from the console and restart themanaged server. After restarting the server, follow the procedure in "Corrective Action for Installation Failure" and perform installationagain.
- Uninstall the Related Services
When installing ServerView Deployment Manager after Resource Orchestrator has been installed, or using ServerView DeploymentManager in the same subnet, it is necessary to uninstall the related services.
For the method for uninstalling the related services, please refer to "5.1 deployment_service_uninstall" in the "Reference Guide(Command/XML) CE".
2.2.4 Installation [Solaris] [Solaris Zones] [OVM for SPARC]This section explains the procedure for agent installation.
Before installation, check if "2.2.1 Preparations" have been performed.
1. Log in to the system as the OS administrator (root).
Boot the managed server that this product is to be installed on in multi-user mode, and then log in to the system using root.
2. Set the first Resource Orchestrator DVD-ROM.
3. Execute the agent install command (RcSetup.sh).
# cd DVD-ROM_mount_point <RETURN>
# ./RcSetup.sh <RETURN>
4. Select "2. Agent(Cloud Edition) installation".
5. Perform installation according to the installer's interactive instructions.
Information
When a guest domain on OVM for SPARC is registered as a VM host, it is necessary to install agent in that guest domain.
Note
- Corrective Action for Installation Failure
Execute the following command, delete the packages from the environment in which installation failed, and then perform installationagain.
- 57 -
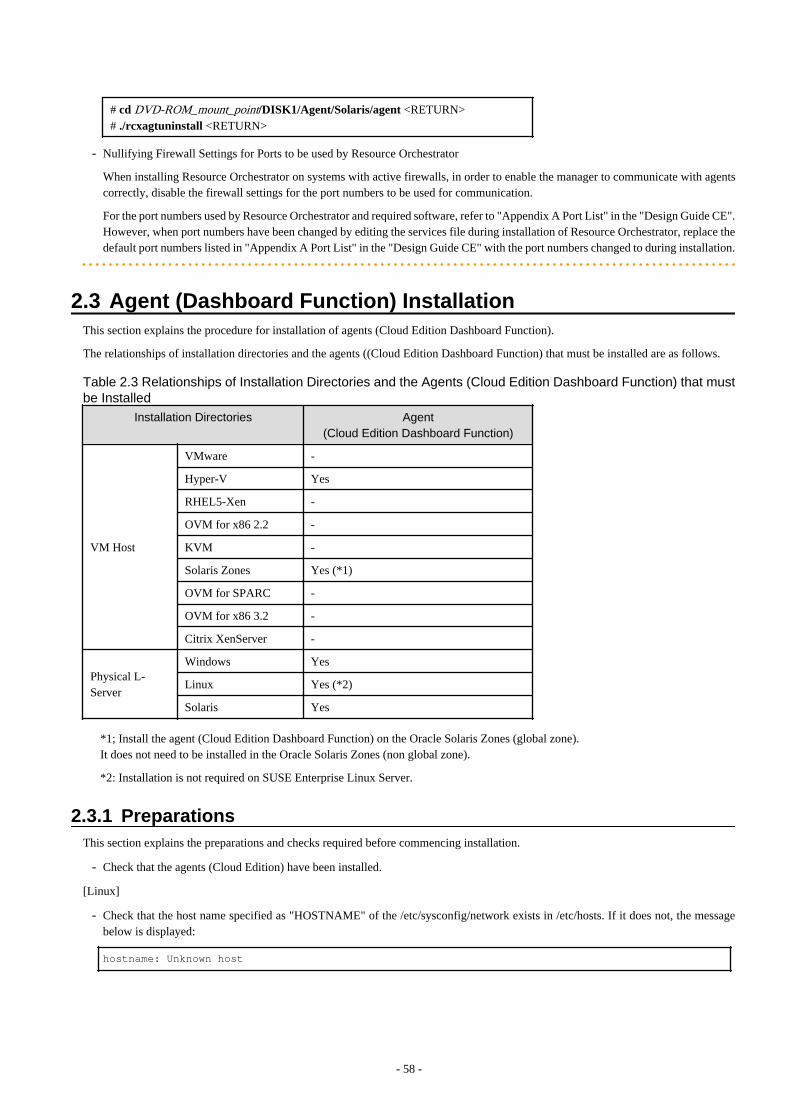
# cd DVD-ROM_mount_point/DISK1/Agent/Solaris/agent <RETURN># ./rcxagtuninstall <RETURN>
- Nullifying Firewall Settings for Ports to be used by Resource Orchestrator
When installing Resource Orchestrator on systems with active firewalls, in order to enable the manager to communicate with agentscorrectly, disable the firewall settings for the port numbers to be used for communication.
For the port numbers used by Resource Orchestrator and required software, refer to "Appendix A Port List" in the "Design Guide CE".However, when port numbers have been changed by editing the services file during installation of Resource Orchestrator, replace thedefault port numbers listed in "Appendix A Port List" in the "Design Guide CE" with the port numbers changed to during installation.
2.3 Agent (Dashboard Function) InstallationThis section explains the procedure for installation of agents (Cloud Edition Dashboard Function).
The relationships of installation directories and the agents ((Cloud Edition Dashboard Function) that must be installed are as follows.
Table 2.3 Relationships of Installation Directories and the Agents (Cloud Edition Dashboard Function) that mustbe Installed
Installation Directories Agent(Cloud Edition Dashboard Function)
VM Host
VMware -
Hyper-V Yes
RHEL5-Xen -
OVM for x86 2.2 -
KVM -
Solaris Zones Yes (*1)
OVM for SPARC -
OVM for x86 3.2 -
Citrix XenServer -
Physical L-Server
Windows Yes
Linux Yes (*2)
Solaris Yes
*1; Install the agent (Cloud Edition Dashboard Function) on the Oracle Solaris Zones (global zone).It does not need to be installed in the Oracle Solaris Zones (non global zone).
*2: Installation is not required on SUSE Enterprise Linux Server.
2.3.1 PreparationsThis section explains the preparations and checks required before commencing installation.
- Check that the agents (Cloud Edition) have been installed.
[Linux]
- Check that the host name specified as "HOSTNAME" of the /etc/sysconfig/network exists in /etc/hosts. If it does not, the messagebelow is displayed:
hostname: Unknown host
- 58 -
2.3.2 Exclusive Software ChecksBefore installing agent (Cloud Edition Dashboard Function), check that the software listed in "2.4.2.5 Exclusive Software" in the "DesignGuide CE" and the agent (Cloud Edition Dashboard Function) of Resource Orchestrator have not been installed on the system.
Use the following procedure to check that exclusive software has not been installed.
[Windows] [Hyper-V]
1. Open "Add or Remove Programs" on the Windows Control Panel.
The [Add or Remove Programs] window will be displayed.
2. Check that none of the software listed in "2.4.2.5 Exclusive Software" in the "Design Guide CE" or the agent (Cloud EditionDashboard Function) of Resource Orchestrator have not been installed on the system.
3. When any of the exclusive software is displayed on the [Add or Remove Programs] window, uninstall it according to the proceduredescribed in the relevant manual before installing Resource Orchestrator.
Information
For Windows Server 2008 or later, select "Programs and Features" from the Windows Control Panel.
[Linux]
1. Execute the following command and check if the package has been installed.
# rpm -q FJSVsqcag <RETURN>
2. If it has been installed, uninstall it before continuing.
[Solaris]
1. Execute the following command and check if the package has been installed.
# pkginfo FJSVsqcag <RETURN>
2. If it has been installed, uninstall it before continuing.
2.3.3 Installation [Windows] [Hyper-V]Install agents (Cloud Edition Dashboard Function) using the following procedure.
Before installation, check if "2.3.1 Preparations" have been performed.
1. Log on to Windows as the administrator.
Log on to the system on which the agent (Cloud Edition Dashboard Function) is to be installed. Log on using the Administratoraccount.
2. Start the installer from the window displayed when the Resource Orchestrator DVD-ROM is set.
Click "Agent(Cloud Edition for Dashboard) installation" which is displayed on the window.
3. When installation is completed successfully, the following message will be displayed:
INFO : ServerView Resource Orchestrator Agent (Cloud Edition for Dashboard) was installed successfully.
4. Execute the following command.
>Installation_folder\RCXCTMGA\setup\dsbsetup.bat IP_address <RETURN>
Specify the admin LAN IP address of the managed server for IP address. It takes a few minutes to complete the command.
Confirm that the message below is displayed after the command is completed.
- 59 -

Info: Setup completed successfully.
2.3.4 Installation [Linux]Install agents (Cloud Edition Dashboard Function) using the following procedure.
Before installation, check if "2.3.1 Preparations" have been performed.
1. Log in to the system as the OS administrator (root).
Boot the managed server that this product is to be installed on in multi-user mode, and then log in to the system using root.
2. Set the Resource Orchestrator DVD-ROM.
Execute the following command to mount the DVD-ROM. If the auto-mounting daemon (autofs) is used for DVD-ROM auto-mounting, the installer fails to start due to its "noexec" mount option.
# mount -t iso9660 -r /dev/hdc DVD-ROM_mount_point <RETURN>
3. Launch the installation command (RcSetup.sh).
# cd DVD-ROM_mount_point <RETURN># ./RcSetup.sh <RETURN>
4. Perform installation according to the installer's interactive instructions.
Click "Agent(Cloud Edition for Dashboard) installation" which is displayed on the window.
5. When installation is completed successfully, the following message will be displayed:
INFO: ServerView Resource Orchestrator Agent (Cloud Edition for Dashboard) was installed successfully.
2.3.5 Installation [Solaris] [Solaris Zones]Install agents (Cloud Edition Dashboard Function) using the following procedure.
Before installation, check if "2.3.1 Preparations" have been performed.
1. Log in to the system as the OS administrator (root).
Boot the managed server that agent (Cloud Edition Dashboard Function) is to be installed on in multi-user mode, and then log into the system using root.
2. Set the Resource Orchestrator DVD-ROM.
3. Launch the installation command (RcSetup.sh).
# cd DVD-ROM_mount_point <RETURN>
# ./RcSetup.sh <RETURN>
4. Perform installation according to the installer's interactive instructions.
Click "Agent(Cloud Edition for Dashboard) installation" which is displayed on the window.
5. Specify the IP address of a connected admin server for Admin Server IP Address.
6. Specify the admin LAN IP address of the managed server for Managed Server IP Address.
7. When installation is completed successfully, the following message will be displayed:
INFO: ServerView Resource Orchestrator Agent (Cloud Edition for Dashboard) was installed successfully.
- 60 -
2.4 HBA address rename Setup Service InstallationThis section explains installation of the HBA address rename setup service.
The HBA address rename setup service is only necessary when using HBA address rename.For details, refer to "2.6 System Configuration" in the "Design Guide CE".
2.4.1 PreparationsThis section explains the preparations and checks required before commencing installation.
- Exclusive Software Checks
Refer to "Exclusive Software Checks".
- Required Software Checks
Refer to "Required Software Checks".
- Required Patch Checks
Refer to "Required Patch Checks".
- Required Package Checks
Refer to "Required Package Checks [Linux]".
2.4.1.1 Software Preparation and ChecksSoftware preparation and checks are explained in the following sections.
Exclusive Software Checks
Before installing Resource Orchestrator, check that the software listed in "2.4.2.5 Exclusive Software" in the "Design Guide CE" and theHBA address rename setup service of Resource Orchestrator have not been installed on the system.Use the following procedure to check that exclusive software has not been installed.
1. Check if the HBA address rename setup service has been installed using the following procedure:
[Windows]Open [Add or Remove Programs] from the Windows Control Panel, and check that none of the software listed in "2.4.2.5 ExclusiveSoftware" in the "Design Guide CE" or the HBA address rename setup service have been installed.
Information
For Windows Server 2008 or later, or Windows Vista, select [Programs and Features] from the Windows Control Panel.
[Linux]Execute the following command and check if the package has been installed.
# rpm -q FJSVrcvhb FJSVscw-common FJSVscw-tftpsv <RETURN>
2. If exclusive software has been installed, uninstall it according to the procedure described in the relevant manual before proceeding.
Required Software Checks
Before installing Resource Orchestrator, check that the required software given in "2.4.2.4 Required Software" in the "Design Guide CE"has been installed. If it has not been installed, install it before continuing.
- 61 -
Required Patch Checks
Before installing Resource Orchestrator, check that the required patches for the HBA address rename setup service listed in "2.4.2.2Required Patches" in the "Design Guide CE" have been applied.
If they have not been applied, apply them before continuing.
Required Package Checks [Linux]
Before installing Resource Orchestrator, check that the required packages [Linux] for the HBA address rename setup service listed in"2.4.2.3 Required Packages" in the "Design Guide CE" have been applied.
If they have not been installed, install them before continuing.
2.4.1.2 Collecting and Checking Required InformationBefore installing Resource Orchestrator, collect required information and check the system status, then determine the information to bespecified on the installation window. The information that needs to be prepared is given below.
- Installation folder and available disk space
Decide the installation folder for Resource Orchestrator. Check that the necessary disk space can be secured on the drive for installation.For the amount of disk space necessary for Resource Orchestrator, refer to "2.4.2.6 Static Disk Space" and "2.4.2.7 Dynamic DiskSpace" in the "Design Guide CE".
2.4.2 Installation [Windows]Install the HBA address rename setup service using the following procedure.
Before installation, check if "2.4.1 Preparations" have been performed.
1. Log on to Windows as the administrator.
Log on to the system on which the HBA address rename setup service is to be installed. Log on using the Administrator account.
2. Start the installer from the window displayed when the first Resource Orchestrator DVD-ROM is set.
Click "HBA address rename setup service installation" on the window.
Information
If the above window does not open, execute "RcSetup.exe" from the DVD-ROM drive.
3. The Resource Orchestrator setup window will be displayed.
Check the contents of the license agreement window etc. and then click <Yes>.
4. The [Choose Install Location] window is displayed.
Click <Next>> to use the default Installation Folder. To change folders, click <Browse>, change folders, and click <Next>>.
Note
When changing the folders, be careful about the following points.
- Do not specify the installation folder of the system (such as C:\).
- Enter the location using 100 characters or less. Do not use double-byte characters or the following symbols in the folder name.
""", "|", ":", "*", "?", "/", ".", "<", ">", ",", "%", "&", "^", "=", "!", ";", "#", "'", "+", "[", "]", "{", "}"
- When using 64 bit Windows Server OSs, the following folder names cannot be specified for the installation folders.
- "%SystemRoot%\System32\"
- 62 -
- Folder names including "Program Files" (except the default "C:\Program Files (x86)")
5. The [Start Copying Files] window will be displayed.
Check that there are no mistakes in the contents displayed on the window, and then click <Install>>.
Copying of files will start.
To change the contents, click <<Back>.
6. The Resource Orchestrator setup completion window will be displayed.
When using the HBA address rename setup service immediately after configuration, check the [Yes, launch it now.] checkbox.
Click <Finish> and close the window.
- If the check box is checked
The HBA address rename setup service will start after the window is closed.
- If the check box is not checked
Refer to "Chapter 10 Settings for the HBA address rename Setup Service", and start the HBA address rename setup service.
Note
- Corrective Action for Installation Failure
When installation is stopped due to errors (system errors, processing errors such as system failure, or errors due to execution conditions)or cancellation by users, remove the causes of any problems, and then take corrective action as follows.
- Open [Add or Remove Programs] from the Windows Control Panel, and if [ServerView Resource Orchestrator HBA addressrename Setup Service] is displayed, uninstall it and then install the service again.For uninstallation, refer to "20.4 HBA address rename Setup Service Uninstallation".
Information
For Windows Server 2008 or later, or Windows Vista, select "Programs and Features" from the Windows Control Panel.
- If [ServerView Resource Orchestrator HBA address rename setup service] is not displayed, install it again.
2.4.3 Installation [Linux]Install the HBA address rename setup service using the following procedure.
Before installation, check if "2.4.1 Preparations" have been performed.
1. Log in to the system as the OS administrator (root).
Boot the managed server that this product is to be installed on in multi-user mode, and then log in to the system using root.
2. Set the first Resource Orchestrator DVD-ROM.
3. Execute the following command to mount the DVD-ROM. If the auto-mounting daemon (autofs) is used for starting the mountedDVD-ROM, the installer will fail to start due to its "noexec" mount option.
# mount -t iso9660 -r /dev/hdc DVD-ROM_mount_point <RETURN>
4. Execute the installation command (RcSetup.sh).
# cd DVD-ROM_mount_point <RETURN># ./RcSetup.sh <RETURN>
5. Perform installation according to the installer's instructions.
- 63 -

Note
- Corrective Action for Installation Failure
Execute the following command, delete the packages from the environment in which installation failed, and then perform installationagain.
# cd DVD-ROM_mount_point/DISK1/HBA/Linux/hbaar <RETURN># ./rcxhbauninstall <RETURN>
- 64 -
Chapter 3 SSL Communication Environment Settings forthe ROR Console
SSL communication is used to access the ROR console from a browser.During setup, a self-signed certificate (referred to as "test certificate") will be automatically created by default. This chapter describes theprocedure to replace this test certificate with another certificate.The procedures described in this chapter are not necessary if the test certificate is used.
Note
[VMware] [Hyper-V]When using Java(TM) Platform, Standard Edition Runtime Environment Version 7 (hereinafter JRE7) on a client, as JRE7 has improvedsecurity functions, the console connection function of L-Servers and the VM management console starting function cannot be used.
To use these functions in a JRE7 environment, as well as the procedures in this chapter, follow the procedure for "Adding the AdminServer's Certificate to Client Browsers" in "Appendix B HTTPS Communications" in the "Design Guide CE". Create a certificatecorresponding to the host name (FQDN) of the admin server and install it in the web browser.
After that, export the certificate installed in the web browser and import it to JRE7.
3.1 Obtaining Certificates and Registering them with CertificateAuthorities
The following procedures are required for getting a certificate from the Certificate Authority:
- 3.1.1 Creating the Interstage Certificate Environment and the Application to Obtain the Certificate that is used for SSL Communication
- 3.1.2 Registering Certificates used in SSL Communication
3.1.1 Creating the Interstage Certificate Environment and the Application toObtain the Certificate that is used for SSL Communication
The CSR creation command (from now on, this is referred to as the "scsmakeenv command") is used to create the CSR that will createthe Interstage certificate environment and apply for the certificate that is used for SSL communication.The creation procedure and execution example are shown below:
Creation procedure
1. Set the JDK or JRE installation path in the JAVA_HOME environment variable. This procedure is only required for Linux. Settingof the environment variable JAVA_HOME is unnecessary for Windows.
2. Execute the scsmakeenv command.
[Windows Manager]
scsmakeenv -n <private key nickname> -f <output destination file name for the CSR>
[Linux Manager]
scsmakeenv -n <private key nickname> -f <output destination file name for the CSR> -g <Group that has permissions to access the Interstage certificate environment>
Change the CSR output destination file name if necessary.
- 65 -

Point
The private key nickname specified in the scsmakeenv command will be required when the site certificate obtained from the CA isregistered.
Information
Refer to "SSL Environment Setting Commands" in the "Interstage Application Server Reference Manual (Command Edition)" forinformation on the scsmakeenv command.
3. Enter a password to access the Interstage certificate environment.
The default password is "changeit".
4. Enter an identifier.
When the "What is your first and last name?" enquiry is made, specify the FQDN of the server used to apply for the certificate asthe Web server host name.
5. As with step 4, enter the following items:
- Name of organizational unit
- Name of organization
- Name of City or Locality
- Name of State or Province
- Two-letter country code
6. Check the values that were entered.
To create the CSR using the values that were entered, enter yes. To change the values that were entered, enter no.
7. Send the CSR to the CA to request that a certificate be issued.
If the scsmakeenv command has terminated normally, the CSR will be output to the certificate output destination file name that wasspecified in the -f option of the scsmakeenv command. Send that file to the CA and request that a certificate be issued. Follow therequest method used by the CA.
Execution example [Windows Manager]
The command execution examples shown below use the following values:
- Site certificate nickname: SERVERCERT- Applicant output destination file name: C:\temp\ssocert.txt- First and last name: rormanager.example.com- Name of organizational unit: FUJITSU TOKYO- Name of organization: FUJITSU- Name of City or Locality: Shinjuku- Name of State or Province: Tokyo- Two-letter country code for this unit:jp
C:\>scsmakeenv -n SERVERCERT -f C:\temp\ssocert.txtPassword:
Input X.500 distinguished names.What is your first and last name?
[Unknown]: rormanager.example.comWhat is the name of your organizational unit?
[Unknown]: FUJITSU TOKYOWhat is the name of your organization?
- 66 -
[Unknown]: FUJITSUWhat is the name of your City or Locality?
[Unknown]: ShinjukuWhat is the name of your State or Province?
[Unknown]: TokyoWhat is the two-letter country code for this unit?
[Un]: jp
Is <CN=rormanager.example.com, OU=FUJITSU TOKYO, O=FUJITSU, L=Shinjuku, ST=Tokyo,C=jp> correct?
[no]: yesC:\>
Execution example [Linux Manager]
The command execution examples shown below use the following values:
- Site certificate nickname: SERVERCERT- Applicant output destination file name: /tmp/ssocert.txt- Group that has permissions to access the Interstage certificate environmentiscertg- First and last name: rormanager.example.com- Name of organizational unit: FUJITSU TOKYO- Name of organization: FUJITSU- Name of City or Locality: Shinjuku- Name of State or Province: Tokyo- Two-letter country code for this unit:jp
In the execution example, a new Interstage certificate environment is created for which "iscertg" access permissions are set, and the CSRis also created. Then set access permissions to it if necessary.
The Bourne shell has been used in the execution example.
# JAVA_HOME=/opt/FJSVawjbk/jdk5;export JAVA_HOME# scsmakeenv -n SERVERCERT -f /tmp/ssocert.txt -g iscertgPassword:
Input X.500 distinguished names.What is your first and last name?
[Unknown]: rormanager.example.comWhat is the name of your organizational unit?
[Unknown]: FUJITSU TOKYOWhat is the name of your organization?
[Unknown]: FUJITSUWhat is the name of your City or Locality?
[Unknown]: ShinjukuWhat is the name of your State or Province?
[Unknown]: TokyoWhat is the two-letter country code for this unit?
[Un]: jp
Is <CN=rormanager.example.com, OU=FUJITSU TOKYO, O=FUJITSU, L=Shinjuku, ST=Tokyo,C=jp> correct?
[no]: yesUX:SCS: INFO: scs0180: The owners group of Interstage certificate environment was set.#
Point
You will be asked for the password for the Interstage certificate environment. Enter the password for the Interstage certificate environment.
The default password is "changeit".
- 67 -
3.1.2 Registering Certificates used in SSL CommunicationObtain the site certificate that was issued by the CA, and the CA certificate of the issuer of that certificate, and register them using thecertificate/CRL registration command (from now on, this is referred to as the "scsenter command").
Information
Depending on the CA, it might be necessary to register an intermediate CA certificate. Refer to "Registering Certificates and CRL" in"Setting and Use of the Interstage Certificate Environment" in the "Interstage Application Server Security System Guide" for details.This work is unnecessary if you created a test site certificate.
Creation procedure
1. Set the JDK or JRE installation path in the JAVA_HOME environment variable.
2. Register the CA certificate using the scsenter command.
scsenter -n <CA certificate nickname> -f <CA certificate>
Information
Refer to "SSL Environment Setting Commands" in the "Interstage Application Server Reference Manual (Command Edition)" forinformation on the scsenter command.
3. Enter a password to access the Interstage certificate environment.
Enter the password that was specified in the scsmakeenv command to access the Interstage certificate environment.
4. Register the site certificate using the scsenter command.
scsenter -n <Site certificate nickname> -f <Site certificate> -o
To register the site certificate that was obtained from the CA, specify the nickname that was specified in the private key in thescsmakeenv command. Note that the -o option must be specified to register the site certificate.
5. Enter a password to access the Interstage certificate environment.
Enter the password that was specified in the scsmakeenv command to access the Interstage certificate environment.
Execution example [Windows Manager]
The command execution examples shown below use the following values:
- CA certificate: C:\temp\ca-cert.cer- CA certificate nickname: CACERT- Site certificate: C:\temp\server-cert.cer- Site certificate nickname: SERVERCERT
Change the file names of the CA and site certificates that were obtained if necessary.
C:\>scsenter -n CACERT -f C:\temp\ca-cert.cerPassword:SCS: INFO: scs0104: Certificate was imported.C:\>scsenter -n SERVERCERT -f C:\temp\server-cert.cer -oPassword:SCS: INFO: scs0104: Certificate was imported.C:\>
Execution example [Linux Manager]
The command execution examples shown below use the following values:
- 68 -
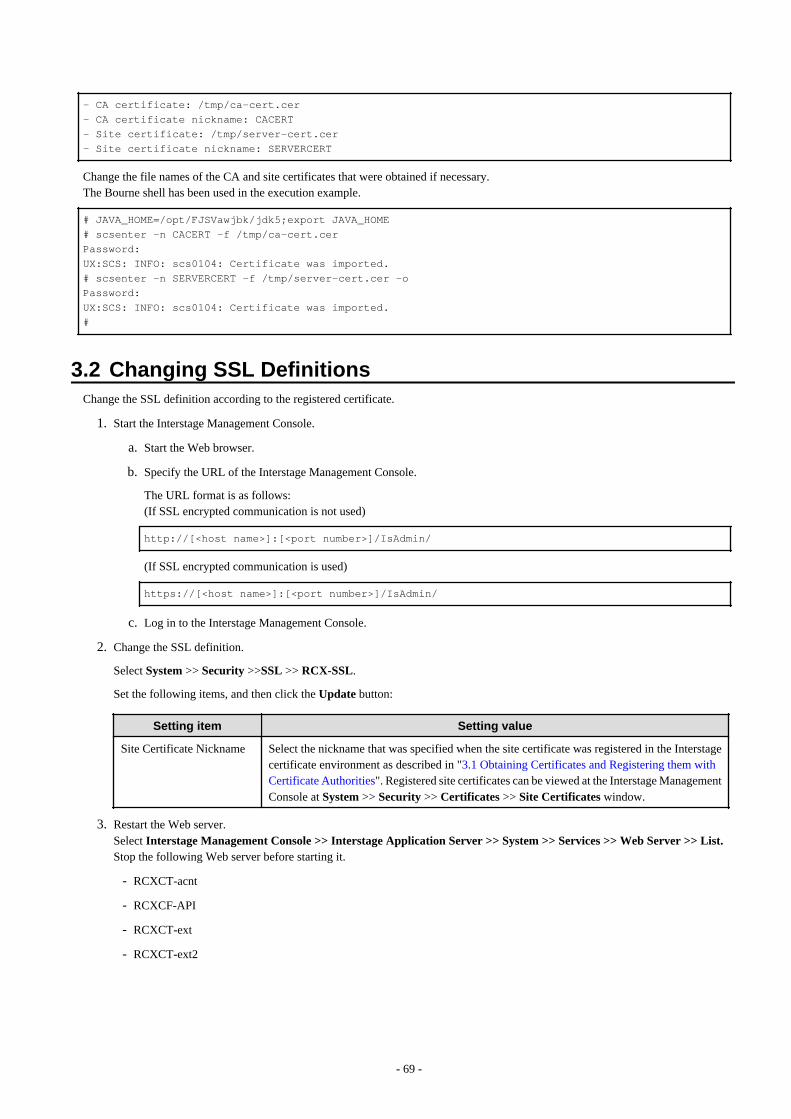
- CA certificate: /tmp/ca-cert.cer- CA certificate nickname: CACERT- Site certificate: /tmp/server-cert.cer- Site certificate nickname: SERVERCERT
Change the file names of the CA and site certificates that were obtained if necessary.The Bourne shell has been used in the execution example.
# JAVA_HOME=/opt/FJSVawjbk/jdk5;export JAVA_HOME# scsenter -n CACERT -f /tmp/ca-cert.cerPassword:UX:SCS: INFO: scs0104: Certificate was imported.# scsenter -n SERVERCERT -f /tmp/server-cert.cer -oPassword:UX:SCS: INFO: scs0104: Certificate was imported.#
3.2 Changing SSL DefinitionsChange the SSL definition according to the registered certificate.
1. Start the Interstage Management Console.
a. Start the Web browser.
b. Specify the URL of the Interstage Management Console.
The URL format is as follows:(If SSL encrypted communication is not used)
http://[<host name>]:[<port number>]/IsAdmin/
(If SSL encrypted communication is used)
https://[<host name>]:[<port number>]/IsAdmin/
c. Log in to the Interstage Management Console.
2. Change the SSL definition.
Select System >> Security >>SSL >> RCX-SSL.
Set the following items, and then click the Update button:
Setting item Setting value
Site Certificate Nickname Select the nickname that was specified when the site certificate was registered in the Interstagecertificate environment as described in "3.1 Obtaining Certificates and Registering them withCertificate Authorities". Registered site certificates can be viewed at the Interstage ManagementConsole at System >> Security >> Certificates >> Site Certificates window.
3. Restart the Web server.Select Interstage Management Console >> Interstage Application Server >> System >> Services >> Web Server >> List.Stop the following Web server before starting it.
- RCXCT-acnt
- RCXCF-API
- RCXCT-ext
- RCXCT-ext2
- 69 -
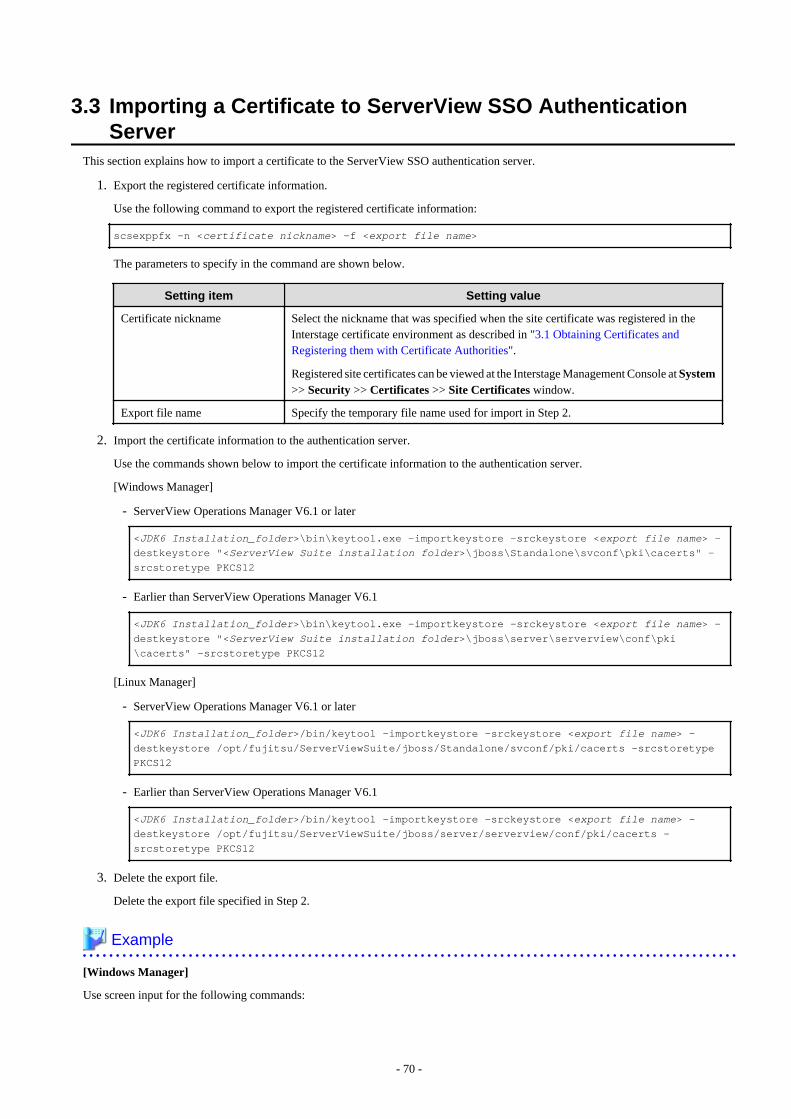
3.3 Importing a Certificate to ServerView SSO AuthenticationServer
This section explains how to import a certificate to the ServerView SSO authentication server.
1. Export the registered certificate information.
Use the following command to export the registered certificate information:
scsexppfx -n <certificate nickname> -f <export file name>
The parameters to specify in the command are shown below.
Setting item Setting value
Certificate nickname Select the nickname that was specified when the site certificate was registered in theInterstage certificate environment as described in "3.1 Obtaining Certificates andRegistering them with Certificate Authorities".
Registered site certificates can be viewed at the Interstage Management Console at System>> Security >> Certificates >> Site Certificates window.
Export file name Specify the temporary file name used for import in Step 2.
2. Import the certificate information to the authentication server.
Use the commands shown below to import the certificate information to the authentication server.
[Windows Manager]
- ServerView Operations Manager V6.1 or later
<JDK6 Installation_folder>\bin\keytool.exe -importkeystore -srckeystore <export file name> -destkeystore "<ServerView Suite installation folder>\jboss\Standalone\svconf\pki\cacerts" -srcstoretype PKCS12
- Earlier than ServerView Operations Manager V6.1
<JDK6 Installation_folder>\bin\keytool.exe -importkeystore -srckeystore <export file name> -destkeystore "<ServerView Suite installation folder>\jboss\server\serverview\conf\pki\cacerts" -srcstoretype PKCS12
[Linux Manager]
- ServerView Operations Manager V6.1 or later
<JDK6 Installation_folder>/bin/keytool -importkeystore -srckeystore <export file name> -destkeystore /opt/fujitsu/ServerViewSuite/jboss/Standalone/svconf/pki/cacerts -srcstoretype PKCS12
- Earlier than ServerView Operations Manager V6.1
<JDK6 Installation_folder>/bin/keytool -importkeystore -srckeystore <export file name> -destkeystore /opt/fujitsu/ServerViewSuite/jboss/server/serverview/conf/pki/cacerts -srcstoretype PKCS12
3. Delete the export file.
Delete the export file specified in Step 2.
Example
[Windows Manager]
Use screen input for the following commands:
- 70 -

- Certificate nickname: testCert- Export file name: c:\work\isas.p12
C:\>scsexppfx -n testCert -f c:\work\isas.p12Password:<Interstage certificate environment password>PKCS#12 Password:<Password of the certificate being exported> <- Used by the command parameters shown below.Retype:<Password of the certificate being exported>
C:\>cd C:\Program Files (x86)\Java\jre6\binC:\Program Files (x86)\Java\jre6\bin>keytool.exe -importkeystore -srckeystore c:\work\isas.p12 -destkeystore "C:\Program Files (x86)\Fujitsu\ServerView Suite\jboss\server\serverview\conf\pki\cacerts" -srcstoretype PKCS12
Enter destination keystore password:<jboss certificate creation environment password: The default is changeit.>Enter source keystore password:<Password at time of export> <- Specify the password that was specified for the above command.
del c:\work\isas.p12
[Linux Manager]
Use screen input for the following commands:
- Certificate nickname:testCert- Export file name: /tmp/isas.p12
# scsexppfx -n testCert -f /tmp/isas.p12Password:<Interstage certificate environment password>PKCS#12 Password:<Password of the certificate being exported><- Used by the command parameters shown below.Retype:<Password of the certificate being exported># cd /usr/java/jre1.6.0_02/bin# ./keytool -importkeystore -srckeystore /tmp/isas.p12 -destkeystore /opt/fujitsu/ServerViewSuite/jboss/server/serverview/conf/pki/cacerts -srcstoretype PKCS12
Enter destination keystore password:<jboss certificate creation environment password: The default is changeit.>Enter source keystore password:<Password at time of export> <- Specify the password that was specified for the above command.
# rm /tmp/isas.p12#
- 71 -
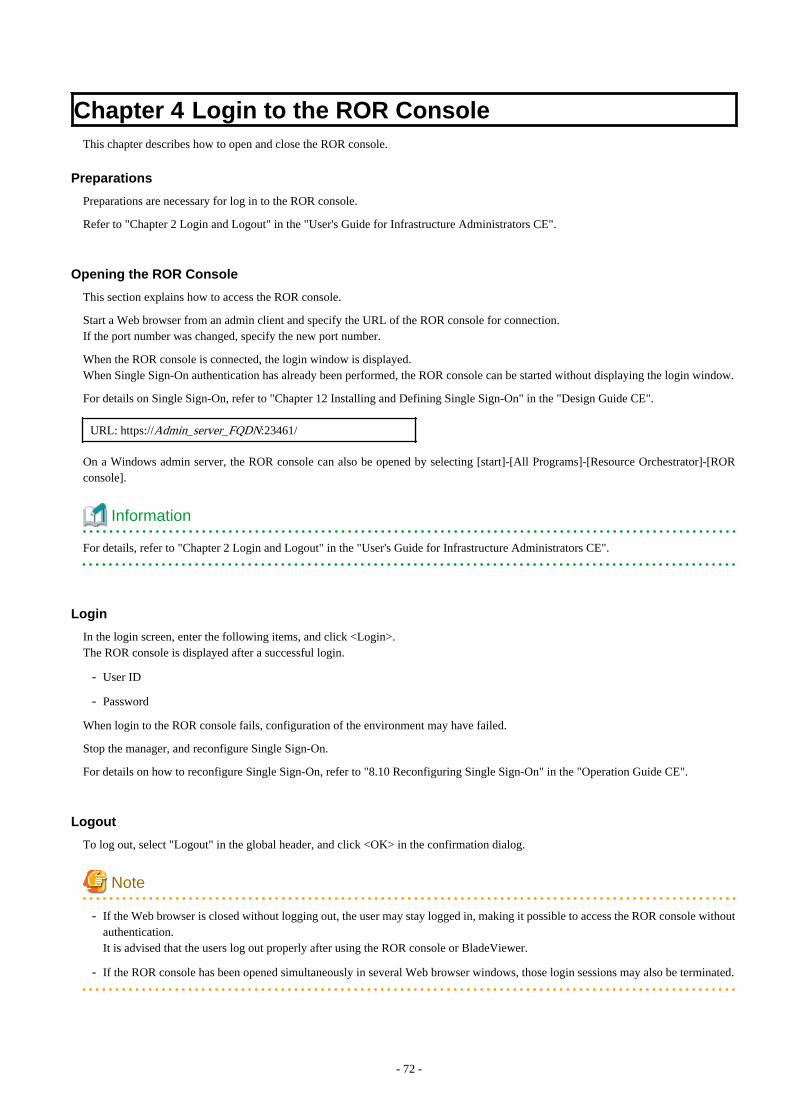
Chapter 4 Login to the ROR ConsoleThis chapter describes how to open and close the ROR console.
Preparations
Preparations are necessary for log in to the ROR console.
Refer to "Chapter 2 Login and Logout" in the "User's Guide for Infrastructure Administrators CE".
Opening the ROR Console
This section explains how to access the ROR console.
Start a Web browser from an admin client and specify the URL of the ROR console for connection.If the port number was changed, specify the new port number.
When the ROR console is connected, the login window is displayed.When Single Sign-On authentication has already been performed, the ROR console can be started without displaying the login window.
For details on Single Sign-On, refer to "Chapter 12 Installing and Defining Single Sign-On" in the "Design Guide CE".
URL: https://Admin_server_FQDN:23461/
On a Windows admin server, the ROR console can also be opened by selecting [start]-[All Programs]-[Resource Orchestrator]-[RORconsole].
Information
For details, refer to "Chapter 2 Login and Logout" in the "User's Guide for Infrastructure Administrators CE".
Login
In the login screen, enter the following items, and click <Login>.The ROR console is displayed after a successful login.
- User ID
- Password
When login to the ROR console fails, configuration of the environment may have failed.
Stop the manager, and reconfigure Single Sign-On.
For details on how to reconfigure Single Sign-On, refer to "8.10 Reconfiguring Single Sign-On" in the "Operation Guide CE".
Logout
To log out, select "Logout" in the global header, and click <OK> in the confirmation dialog.
Note
- If the Web browser is closed without logging out, the user may stay logged in, making it possible to access the ROR console withoutauthentication.It is advised that the users log out properly after using the ROR console or BladeViewer.
- If the ROR console has been opened simultaneously in several Web browser windows, those login sessions may also be terminated.
- 72 -

Exit
To exit the ROR console, simply close the Web browser window.
- 73 -

Chapter 5 License Setup and Confirmation
License Setup
When using Resource Orchestrator, it is necessary to configure the license first.
Use the following procedure to configure the license:
1. After logging into Resource Orchestrator, select the [Resource] tab, then select [Tools]-[Licenses] from the menu, and click <Add>in the displayed dialog.
The [Register License] dialog is displayed.
2. In the [Register License] dialog, enter the license key to register.
3. Click <OK>.
The license will be registered.
Note
After applying the Cloud Edition license, restart the manager.
Confirming the License
Use the following procedure to confirm the registered license:
1. After logging into Resource Orchestrator, select the [Resource] tab, then select [Tools]-[Licenses] from the menu, and click thelicense name in the displayed dialog.
The [Licenses] dialog is displayed.
Note
- When "-" is displayed for "Number of Licenses", the same number of agents as the number of purchased licenses can be used.
- 74 -
Chapter 6 Importing a Certificate to a BrowserIn order to use a test site certificate, the certificate must be installed to the Web browser.Log in to the ROR Console, and perform the operations below while the [Account] dialog is open.If these operations are not performed, the [Forward screen] dialog used by the ROR Console L-Platform application process cannot bedisplayed."Certificates" stated in this section refer to "server certificates".
Point
- The license settings must be completed, before starting operations in Resource Orchestrator. Refer to "License Setup" in "Chapter 5License Setup and Confirmation" for information on how to configure licenses.
- If multiple admin clients are used, perform this operation on each admin client.
Internet Explorer
1. Open the [Certificate] dialog.
Open the "Certificate is invalid dialog" by clicking the "Certificate Error" displayed in the address bar. This will open an "UntrustedCertificate" or "Certificate Expired" message.Click the "View certificates" link displayed at the bottom of this dialog.
2. Confirm that the "Issued to" and "Issued by" displayed in the [Certificate] dialog are both set to the IP address or host name (FQDN)used to generate the certificate.
3. In the [Certificate] dialog, click <Install Certificate>.
4. The [Certificate Import Wizard] dialog is displayed.
Click <Next>>.
5. Select "Place all certificates in the following store" and click <Browse>.
6. The [Select Certificate Store] dialog is displayed.
Select the "Trusted Root Certification Authorities" and click <OK>.
7. Click <Next>>.
8. Check that "Trusted Root Certification Authorities" is selected and click <Finish>.
9. Restart the Web browser.
Firefox
1. Select I [Understand the Risks] while the [This Connection is Untrusted] window is displayed and click the <Add Exception...>button.The [Add Security Exception] window is displayed.
2. In the [Add Security Exception] window, click the <View> button to display the Certificate Viewer.
3. In the [Certificate Viewer], ensure that the certificate and the issuer have the IP address or hostname (FQDN) specified when thecertificate was created.
4. In the [Add Security Exception] window, click the <Confirm Security Exception> button.
- 75 -

Note
- Enter the IP address or host name (FQDN) used to generate the certificate in the Web browser's URL bar. If the entered URL differsfrom that of the certificate, a certificate warning is displayed.An example of how to display a warning is given below.
- The entered URL uses an IP address while the certificate was created using a host name (FQDN)
- The admin server is set with multiple IP addresses, and the entered URL uses an IP address different from that used to generatethe certificate
- When using Firefox in a Windows environment, the certificate needs to be registered with the OS, so also register the certificate inInternet Explorer.
- 76 -

Chapter 7 Registering Infrastructure AdministratorsThe administrator role, which is the role that combines infrastructure administrator and tenant administrator roles, is assigned to the usercreated when installing Resource Orchestrator.
Resource Orchestrator can be configured and operated by this user or another user registered with the infrastructure administrator role, inorder to prevent the operation of an L-Platform from being stopped by erroneous operations.
For details on how to register network resources, refer to "3.1 Registering User Accounts" in the "User's Guide for InfrastructureAdministrators (Resource Management) CE".
- 77 -

Chapter 8 Creating Definition FilesThis chapter explains how to create the definition files necessary to use Resource Orchestrator.
Configuration of Definition Files
To use the functions of Resource Orchestrator, it is necessary to create definition files in advance.
Note
If you edit and save a UTF-8 text file using Windows Notepad, the Byte Order Mark (BOM) is stored in the first three bytes of the file,and the information specified on the first line of the file will not be analyzed correctly. When using Notepad, specify the information fromthe second line.
When the user group name is included in the name of the definition file, delete the definition file after deleting the tenant.If the definition file is not deleted, the remaining definition file is used, when a tenant with the same name as that of the deleted tenant iscreated.
Location of the Definition File
Definition files are created in the following location.
[Windows Manager]Installation_folder\SVROR\Manager\etc\customize_data
[Linux Manager]/etc/opt/FJSVrcvmr/customize_data
Definition File Required for Creating a Physical L-Server
When creating a physical L-Server, it is necessary to create a definition file combining ports of SAN storage first.For details, refer to "B.1.1 Creating Definition Files Combining Ports of SAN Storage".For a list of the other definition files that are necessary when creating a physical L-Server, refer to "Table 8.1 List of Functions Requiringa Definition File (For Both Physical L-Servers and Virtual L-Servers)" and "Table 8.2 List of Functions Requiring a Definition File (ForPhysical L-Servers)".
Definition File Required for Creating a Virtual L-Server
For the definition files necessary when creating a virtual L-Server, refer to "Table 8.1 List of Functions Requiring a Definition File (ForBoth Physical L-Servers and Virtual L-Servers)" and "Table 8.3 List of Functions Requiring a Definition File (For Virtual L-Servers)".
Definition File Required for Network Auto-Configuration
For a list of the definition files necessary for network auto-configuration, refer to "Table 8.13 List of Functions Requiring a DefinitionFile (Network)".The network devices that are the target of auto-configuration are the network devices registered in Resource Orchestrator.For details on how to register resources for network devices, refer to "5.7 Registering Network Devices" in the "User's Guide forInfrastructure Administrators (Resource Management) CE".
8.1 Definition Files (For Both Physical L-Servers and Virtual L-Servers)
The definition file for physical L-Servers and virtual L-Servers is as follows:
- 78 -

Table 8.1 List of Functions Requiring a Definition File (For Both Physical L-Servers and Virtual L-Servers)Function Definition File Name Reference
When changing the location to back upconfiguration definition information
manager_backup.rcxpropRefer to "9.2 Backup" in the "Operation GuideVE".
When configuring priority for resourceselection on Thin Provisioning (*)
storage.rcxprop
Refer to "B.1 Creating Definition Files" and"C.1 Definition Files Commonly Shared whenCreating Virtual L-Servers".
Refer to "B.1.3 Configuration of Priority forResource Selection on Thin Provisioning andAutomatic Storage Layering" and "C.1.3Configuration of Priority for ResourceSelection on Thin Provisioning".
When changing the default values in the[General] tab and the [Server] tab during L-Server creation, and the operations relatedto L-Servers.
l_server.rcxpropRefer to "17.8.1 Installation" in the "User'sGuide for Infrastructure Administrators(Resource Management) CE".
When not executing reconfiguration ofhardware properties automatically
auto_replace.rcxpropRefer to "9.2.2 Reconfiguration of HardwareProperties" in the "Operation Guide CE".
When performing Disaster Recovery fa_dr.rcxpropRefer to "3.3 Manager Installation andConfiguration" in the "DR Option Instruction".
Folder operation definition file folder.rcxpropRefer to "3.5 rcxadm folder" in the "ReferenceGuide (Command/XML) CE".
Directory service operation definition file ldap_attr.rcxpropRefer to "8.6.1 Settings for TenantManagement and Account Management" inthe "Operation Guide CE".
Changing the multiplicity of manageroperations
rcx_base.rcxpropRefer to "Appendix A Notes on OperatingServerView Resource Orchestrator" in the"Operation Guide CE".
Tenant creation default definition file tenant_config.xmlRefer to "15.11 Tenants" in the "ReferenceGuide (Command/XML) CE".
When sorting the resource list in the tree onthe [Resource] tab (compatible with V3.0.0)
gui_config.rcxpropRefer to "2.3.1.3 Sorting the Resource List inthe Tree" in the "Release Notes".
* Note: When there is both a storage pool with thin provisioning attributes set and a storage pool without thin provisioning attributes set.
8.2 Definition Files (For Physical L-Servers)The definition file for physical L-Servers is as follows:
Table 8.2 List of Functions Requiring a Definition File (For Physical L-Servers)
Function Definition File Name Reference
WhenusingSANstorage
Settings required for all storageunits
storage_portset.rcxpropRefer to "B.1.1 Creating Definition FilesCombining Ports of SAN Storage".
Settings when using ETERNUSstorage
storage.rcxpropRefer to "B.1.2 Format Selection for the Namesof Virtual Storage Resources and Disk ResourcesManaged by ESC".
Settings when using dynamicLUN mirroring
storage_mirroring.rcxpropRefer to "B.1.4 Creating Mirroring DefinitionFiles for Dynamic LUN Mirroring".
- 79 -
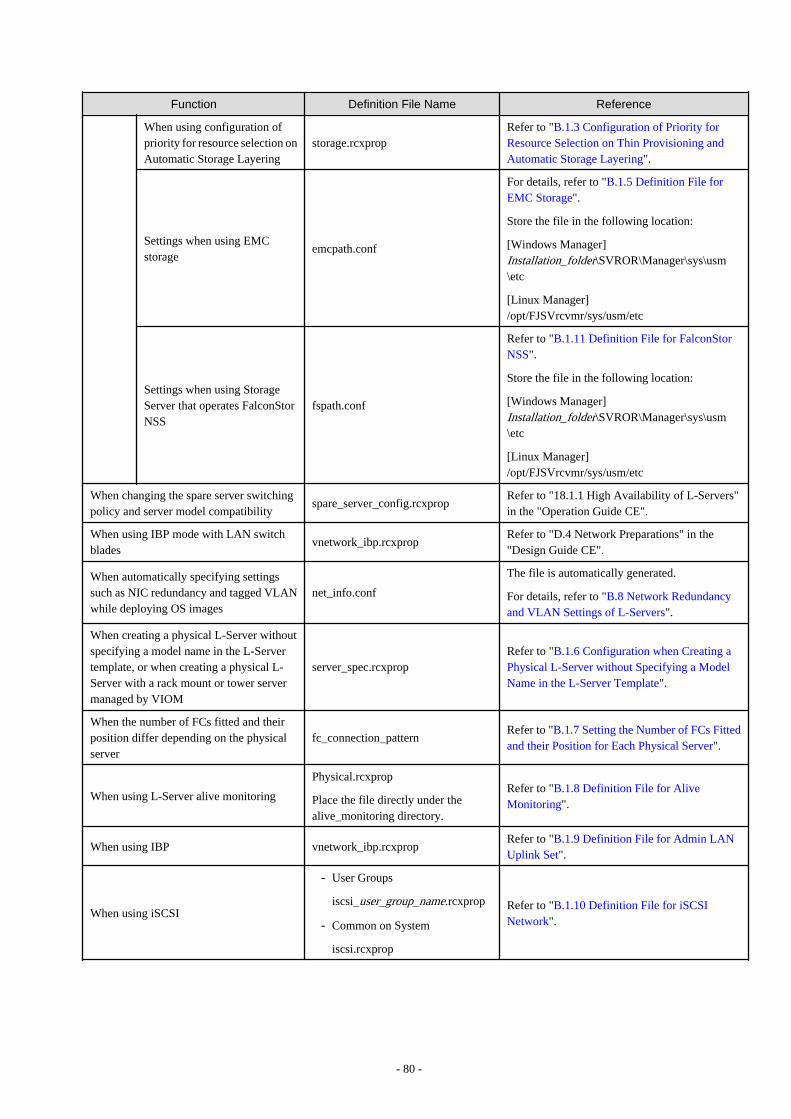
Function Definition File Name Reference
When using configuration ofpriority for resource selection onAutomatic Storage Layering
storage.rcxpropRefer to "B.1.3 Configuration of Priority forResource Selection on Thin Provisioning andAutomatic Storage Layering".
Settings when using EMCstorage
emcpath.conf
For details, refer to "B.1.5 Definition File forEMC Storage".
Store the file in the following location:
[Windows Manager]Installation_folder\SVROR\Manager\sys\usm\etc
[Linux Manager]/opt/FJSVrcvmr/sys/usm/etc
Settings when using StorageServer that operates FalconStorNSS
fspath.conf
Refer to "B.1.11 Definition File for FalconStorNSS".
Store the file in the following location:
[Windows Manager]Installation_folder\SVROR\Manager\sys\usm\etc
[Linux Manager]/opt/FJSVrcvmr/sys/usm/etc
When changing the spare server switchingpolicy and server model compatibility
spare_server_config.rcxpropRefer to "18.1.1 High Availability of L-Servers"in the "Operation Guide CE".
When using IBP mode with LAN switchblades
vnetwork_ibp.rcxpropRefer to "D.4 Network Preparations" in the"Design Guide CE".
When automatically specifying settingssuch as NIC redundancy and tagged VLANwhile deploying OS images
net_info.conf
The file is automatically generated.
For details, refer to "B.8 Network Redundancyand VLAN Settings of L-Servers".
When creating a physical L-Server withoutspecifying a model name in the L-Servertemplate, or when creating a physical L-Server with a rack mount or tower servermanaged by VIOM
server_spec.rcxpropRefer to "B.1.6 Configuration when Creating aPhysical L-Server without Specifying a ModelName in the L-Server Template".
When the number of FCs fitted and theirposition differ depending on the physicalserver
fc_connection_patternRefer to "B.1.7 Setting the Number of FCs Fittedand their Position for Each Physical Server".
When using L-Server alive monitoring
Physical.rcxprop
Place the file directly under thealive_monitoring directory.
Refer to "B.1.8 Definition File for AliveMonitoring".
When using IBP vnetwork_ibp.rcxpropRefer to "B.1.9 Definition File for Admin LANUplink Set".
When using iSCSI
- User Groups
iscsi_user_group_name.rcxprop
- Common on System
iscsi.rcxprop
Refer to "B.1.10 Definition File for iSCSINetwork".
- 80 -
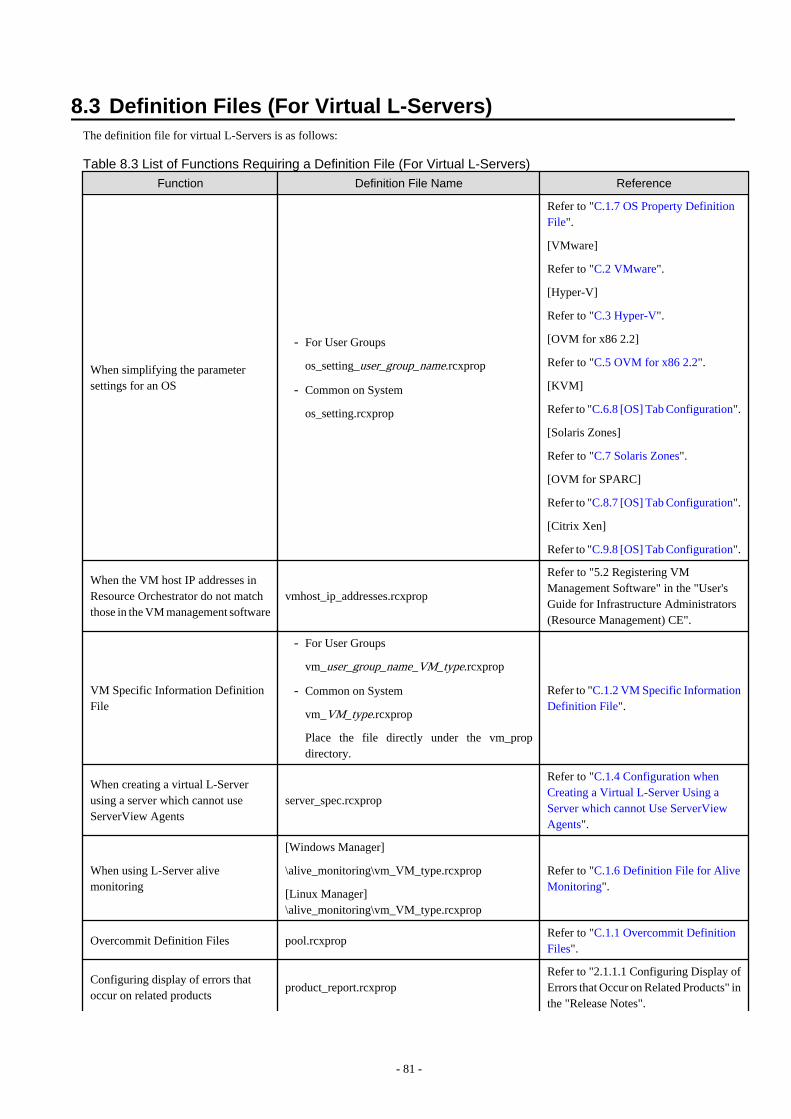
8.3 Definition Files (For Virtual L-Servers)The definition file for virtual L-Servers is as follows:
Table 8.3 List of Functions Requiring a Definition File (For Virtual L-Servers)
Function Definition File Name Reference
When simplifying the parametersettings for an OS
- For User Groups
os_setting_user_group_name.rcxprop
- Common on System
os_setting.rcxprop
Refer to "C.1.7 OS Property DefinitionFile".
[VMware]
Refer to "C.2 VMware".
[Hyper-V]
Refer to "C.3 Hyper-V".
[OVM for x86 2.2]
Refer to "C.5 OVM for x86 2.2".
[KVM]
Refer to "C.6.8 [OS] Tab Configuration".
[Solaris Zones]
Refer to "C.7 Solaris Zones".
[OVM for SPARC]
Refer to "C.8.7 [OS] Tab Configuration".
[Citrix Xen]
Refer to "C.9.8 [OS] Tab Configuration".
When the VM host IP addresses inResource Orchestrator do not matchthose in the VM management software
vmhost_ip_addresses.rcxprop
Refer to "5.2 Registering VMManagement Software" in the "User'sGuide for Infrastructure Administrators(Resource Management) CE".
VM Specific Information DefinitionFile
- For User Groups
vm_user_group_name_VM_type.rcxprop
- Common on System
vm_VM_type.rcxprop
Place the file directly under the vm_propdirectory.
Refer to "C.1.2 VM Specific InformationDefinition File".
When creating a virtual L-Serverusing a server which cannot useServerView Agents
server_spec.rcxprop
Refer to "C.1.4 Configuration whenCreating a Virtual L-Server Using aServer which cannot Use ServerViewAgents".
When using L-Server alivemonitoring
[Windows Manager]
\alive_monitoring\vm_VM_type.rcxprop
[Linux Manager]\alive_monitoring\vm_VM_type.rcxprop
Refer to "C.1.6 Definition File for AliveMonitoring".
Overcommit Definition Files pool.rcxpropRefer to "C.1.1 Overcommit DefinitionFiles".
Configuring display of errors thatoccur on related products
product_report.rcxpropRefer to "2.1.1.1 Configuring Display ofErrors that Occur on Related Products" inthe "Release Notes".
- 81 -
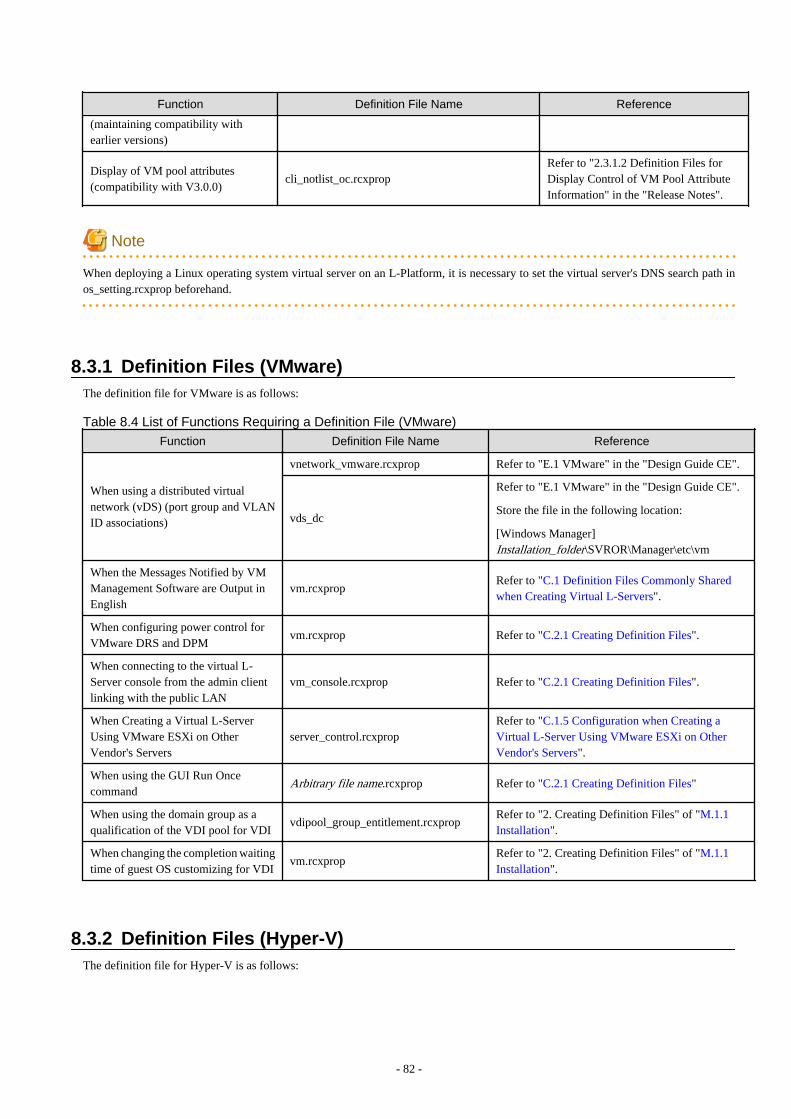
Function Definition File Name Reference
(maintaining compatibility withearlier versions)
Display of VM pool attributes(compatibility with V3.0.0)
cli_notlist_oc.rcxpropRefer to "2.3.1.2 Definition Files forDisplay Control of VM Pool AttributeInformation" in the "Release Notes".
Note
When deploying a Linux operating system virtual server on an L-Platform, it is necessary to set the virtual server's DNS search path inos_setting.rcxprop beforehand.
8.3.1 Definition Files (VMware)The definition file for VMware is as follows:
Table 8.4 List of Functions Requiring a Definition File (VMware)
Function Definition File Name Reference
When using a distributed virtualnetwork (vDS) (port group and VLANID associations)
vnetwork_vmware.rcxprop Refer to "E.1 VMware" in the "Design Guide CE".
vds_dc
Refer to "E.1 VMware" in the "Design Guide CE".
Store the file in the following location:
[Windows Manager]Installation_folder\SVROR\Manager\etc\vm
When the Messages Notified by VMManagement Software are Output inEnglish
vm.rcxpropRefer to "C.1 Definition Files Commonly Sharedwhen Creating Virtual L-Servers".
When configuring power control forVMware DRS and DPM
vm.rcxprop Refer to "C.2.1 Creating Definition Files".
When connecting to the virtual L-Server console from the admin clientlinking with the public LAN
vm_console.rcxprop Refer to "C.2.1 Creating Definition Files".
When Creating a Virtual L-ServerUsing VMware ESXi on OtherVendor's Servers
server_control.rcxpropRefer to "C.1.5 Configuration when Creating aVirtual L-Server Using VMware ESXi on OtherVendor's Servers".
When using the GUI Run Oncecommand
Arbitrary file name.rcxprop Refer to "C.2.1 Creating Definition Files"
When using the domain group as aqualification of the VDI pool for VDI
vdipool_group_entitlement.rcxpropRefer to "2. Creating Definition Files" of "M.1.1Installation".
When changing the completion waitingtime of guest OS customizing for VDI
vm.rcxpropRefer to "2. Creating Definition Files" of "M.1.1Installation".
8.3.2 Definition Files (Hyper-V)The definition file for Hyper-V is as follows:
- 82 -
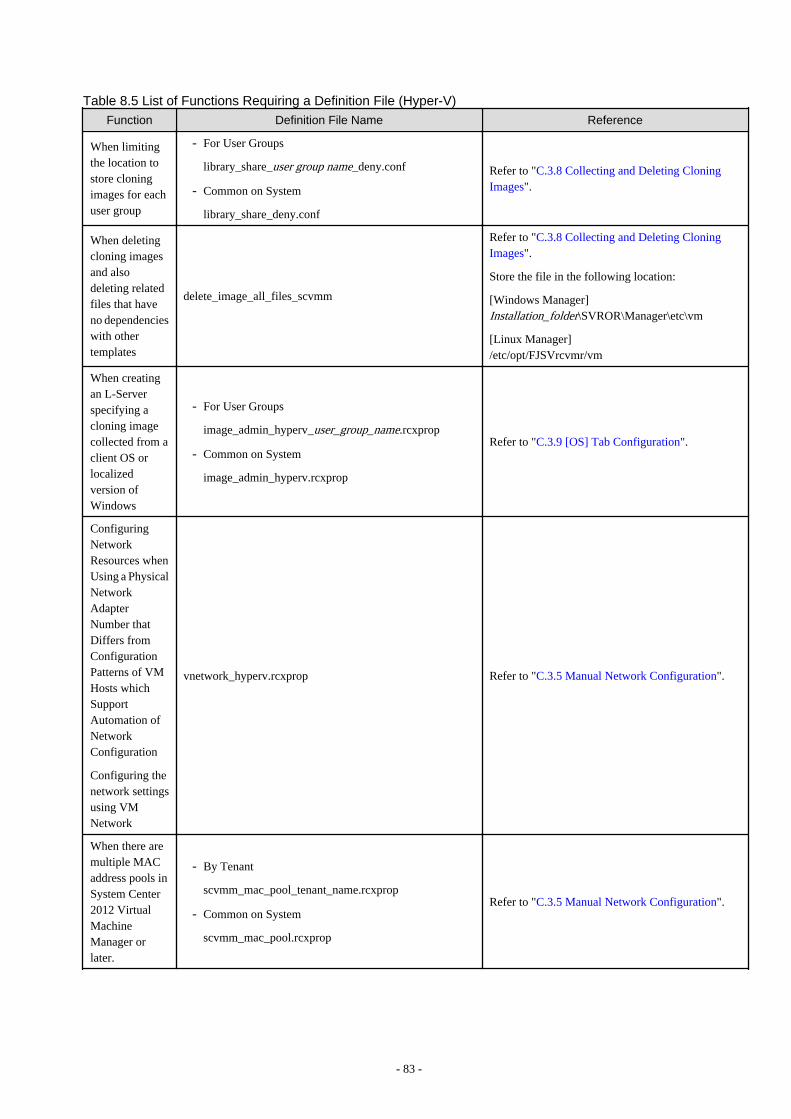
Table 8.5 List of Functions Requiring a Definition File (Hyper-V)Function Definition File Name Reference
When limitingthe location tostore cloningimages for eachuser group
- For User Groups
library_share_user group name_deny.conf
- Common on System
library_share_deny.conf
Refer to "C.3.8 Collecting and Deleting CloningImages".
When deletingcloning imagesand alsodeleting relatedfiles that haveno dependencieswith othertemplates
delete_image_all_files_scvmm
Refer to "C.3.8 Collecting and Deleting CloningImages".
Store the file in the following location:
[Windows Manager]Installation_folder\SVROR\Manager\etc\vm
[Linux Manager]/etc/opt/FJSVrcvmr/vm
When creatingan L-Serverspecifying acloning imagecollected from aclient OS orlocalizedversion ofWindows
- For User Groups
image_admin_hyperv_user_group_name.rcxprop
- Common on System
image_admin_hyperv.rcxprop
Refer to "C.3.9 [OS] Tab Configuration".
ConfiguringNetworkResources whenUsing a PhysicalNetworkAdapterNumber thatDiffers fromConfigurationPatterns of VMHosts whichSupportAutomation ofNetworkConfiguration
Configuring thenetwork settingsusing VMNetwork
vnetwork_hyperv.rcxprop Refer to "C.3.5 Manual Network Configuration".
When there aremultiple MACaddress pools inSystem Center2012 VirtualMachineManager orlater.
- By Tenant
scvmm_mac_pool_tenant_name.rcxprop
- Common on System
scvmm_mac_pool.rcxprop
Refer to "C.3.5 Manual Network Configuration".
- 83 -

8.3.3 Definition Files (RHEL5-Xen)The definition file for RHEL5-Xen is as follows:
Table 8.6 List of Functions Requiring a Definition File (RHEL5-Xen)
Function Definition File Name Reference
When changing the shared classconfiguration of PRIMECLUSTER GDS
storage_vmhost.rcxprop Refer to "C.4.1 Creating Definition Files".
Relating the virtual bridge and VLAN ID vnetwork_rhelxen.rcxpropRefer to "C.4.4 Manual NetworkConfiguration".
8.3.4 Definition Files (OVM for x86 2.2)The definition files for OVM for x86 2.2 are as follows:
Table 8.7 List of Functions Requiring a Definition File (For OVM for x86 2.2)
Function Definition File Name Reference
Relating the virtual bridge and VLAN ID vnetwork_oraclevm.rcxpropRefer to "C.5.4 Manual NetworkConfiguration".
Specifying SSL access for VM managementsoftware
ovmm.rcxpropRefer to "C.5.9 Advisory Notes for OVM forx86 2.2 Usage".
8.3.5 Definition Files (RHEL-KVM)The definition file for RHEL-KVM is as follows:
Table 8.8 List of Functions Requiring a Definition File (RHEL-KVM)
Function Definition File Name Reference
Relating the virtual bridge and VLAN ID vnetwork_rhelkvm.rcxprop Refer to "C.6.4 Manual NetworkConfiguration".
When performing the following operationsfor a virtual L-Server, the data type to bedeleted can be selected
- Deleting Virtual L-Servers
- Detaching Virtual L-Server Disks
- Deleting Cloning Images
storage.rcxprop Refer to "C.6.1 Creating Definition Files".
When configuring the following resourcesizes to secure for the VM hosts:
- CPU Capacity
- Memory Size
host_config_RHEL-KVM.rcxprop Refer to "C.6.1 Creating Definition Files".
8.3.6 Definition Files (Solaris Zones)The definition file for Solaris Zones is as follows:
- 84 -
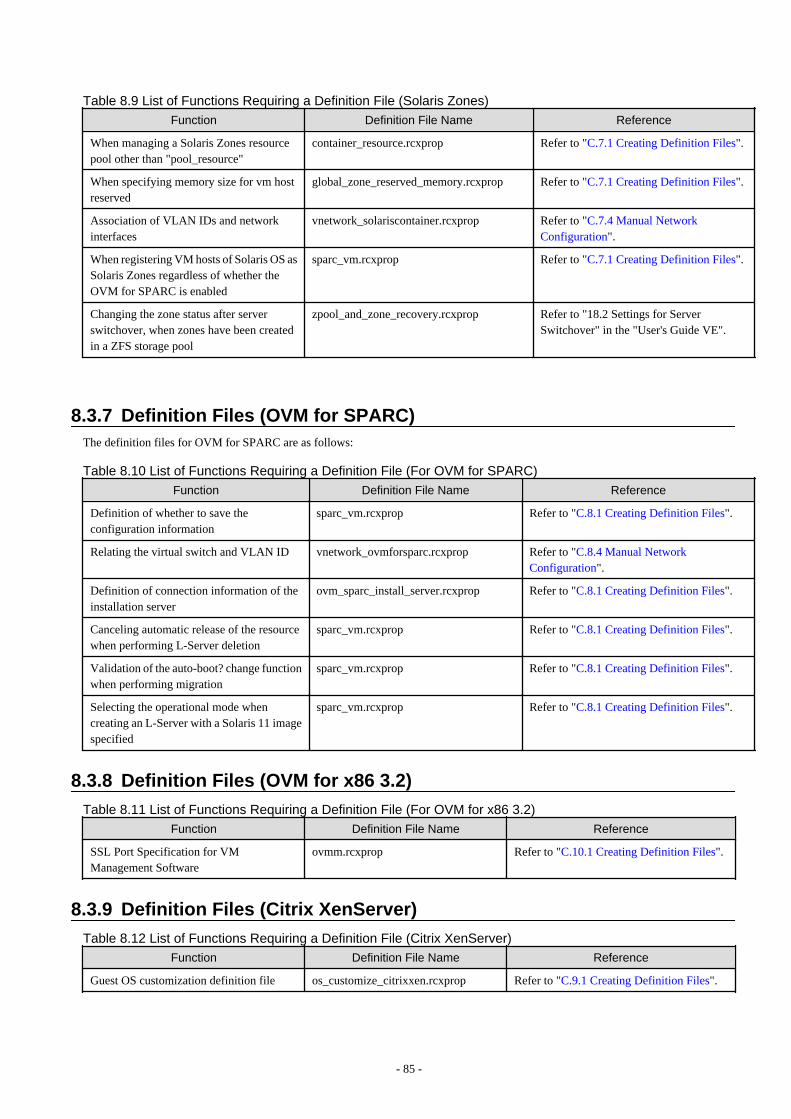
Table 8.9 List of Functions Requiring a Definition File (Solaris Zones)Function Definition File Name Reference
When managing a Solaris Zones resourcepool other than "pool_resource"
container_resource.rcxprop Refer to "C.7.1 Creating Definition Files".
When specifying memory size for vm hostreserved
global_zone_reserved_memory.rcxprop Refer to "C.7.1 Creating Definition Files".
Association of VLAN IDs and networkinterfaces
vnetwork_solariscontainer.rcxprop Refer to "C.7.4 Manual NetworkConfiguration".
When registering VM hosts of Solaris OS asSolaris Zones regardless of whether theOVM for SPARC is enabled
sparc_vm.rcxprop Refer to "C.7.1 Creating Definition Files".
Changing the zone status after serverswitchover, when zones have been createdin a ZFS storage pool
zpool_and_zone_recovery.rcxprop Refer to "18.2 Settings for ServerSwitchover" in the "User's Guide VE".
8.3.7 Definition Files (OVM for SPARC)The definition files for OVM for SPARC are as follows:
Table 8.10 List of Functions Requiring a Definition File (For OVM for SPARC)
Function Definition File Name Reference
Definition of whether to save theconfiguration information
sparc_vm.rcxprop Refer to "C.8.1 Creating Definition Files".
Relating the virtual switch and VLAN ID vnetwork_ovmforsparc.rcxprop Refer to "C.8.4 Manual NetworkConfiguration".
Definition of connection information of theinstallation server
ovm_sparc_install_server.rcxprop Refer to "C.8.1 Creating Definition Files".
Canceling automatic release of the resourcewhen performing L-Server deletion
sparc_vm.rcxprop Refer to "C.8.1 Creating Definition Files".
Validation of the auto-boot? change functionwhen performing migration
sparc_vm.rcxprop Refer to "C.8.1 Creating Definition Files".
Selecting the operational mode whencreating an L-Server with a Solaris 11 imagespecified
sparc_vm.rcxprop Refer to "C.8.1 Creating Definition Files".
8.3.8 Definition Files (OVM for x86 3.2) Table 8.11 List of Functions Requiring a Definition File (For OVM for x86 3.2)
Function Definition File Name Reference
SSL Port Specification for VMManagement Software
ovmm.rcxprop Refer to "C.10.1 Creating Definition Files".
8.3.9 Definition Files (Citrix XenServer) Table 8.12 List of Functions Requiring a Definition File (Citrix XenServer)
Function Definition File Name Reference
Guest OS customization definition file os_customize_citrixxen.rcxprop Refer to "C.9.1 Creating Definition Files".
- 85 -
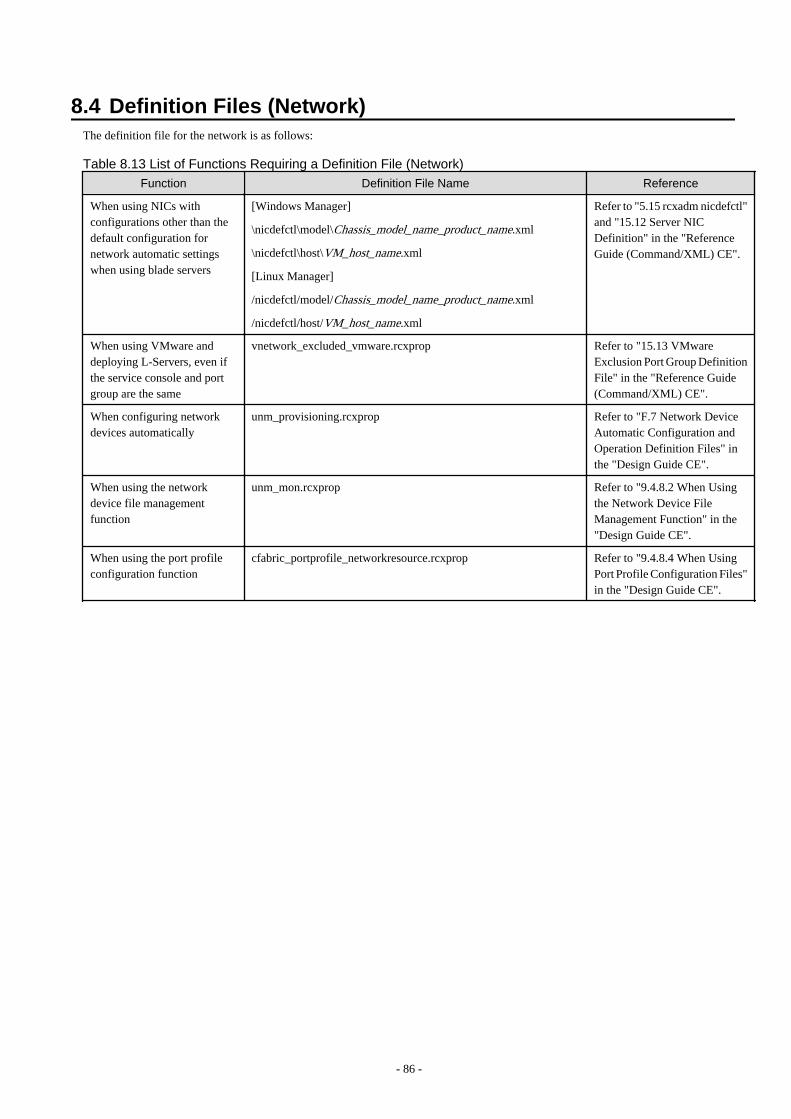
8.4 Definition Files (Network)The definition file for the network is as follows:
Table 8.13 List of Functions Requiring a Definition File (Network)
Function Definition File Name Reference
When using NICs withconfigurations other than thedefault configuration fornetwork automatic settingswhen using blade servers
[Windows Manager]
\nicdefctl\model\Chassis_model_name_product_name.xml
\nicdefctl\host\VM_host_name.xml
[Linux Manager]
/nicdefctl/model/Chassis_model_name_product_name.xml
/nicdefctl/host/VM_host_name.xml
Refer to "5.15 rcxadm nicdefctl"and "15.12 Server NICDefinition" in the "ReferenceGuide (Command/XML) CE".
When using VMware anddeploying L-Servers, even ifthe service console and portgroup are the same
vnetwork_excluded_vmware.rcxprop Refer to "15.13 VMwareExclusion Port Group DefinitionFile" in the "Reference Guide(Command/XML) CE".
When configuring networkdevices automatically
unm_provisioning.rcxprop Refer to "F.7 Network DeviceAutomatic Configuration andOperation Definition Files" inthe "Design Guide CE".
When using the networkdevice file managementfunction
unm_mon.rcxprop Refer to "9.4.8.2 When Usingthe Network Device FileManagement Function" in the"Design Guide CE".
When using the port profileconfiguration function
cfabric_portprofile_networkresource.rcxprop Refer to "9.4.8.4 When UsingPort Profile Configuration Files"in the "Design Guide CE".
- 86 -
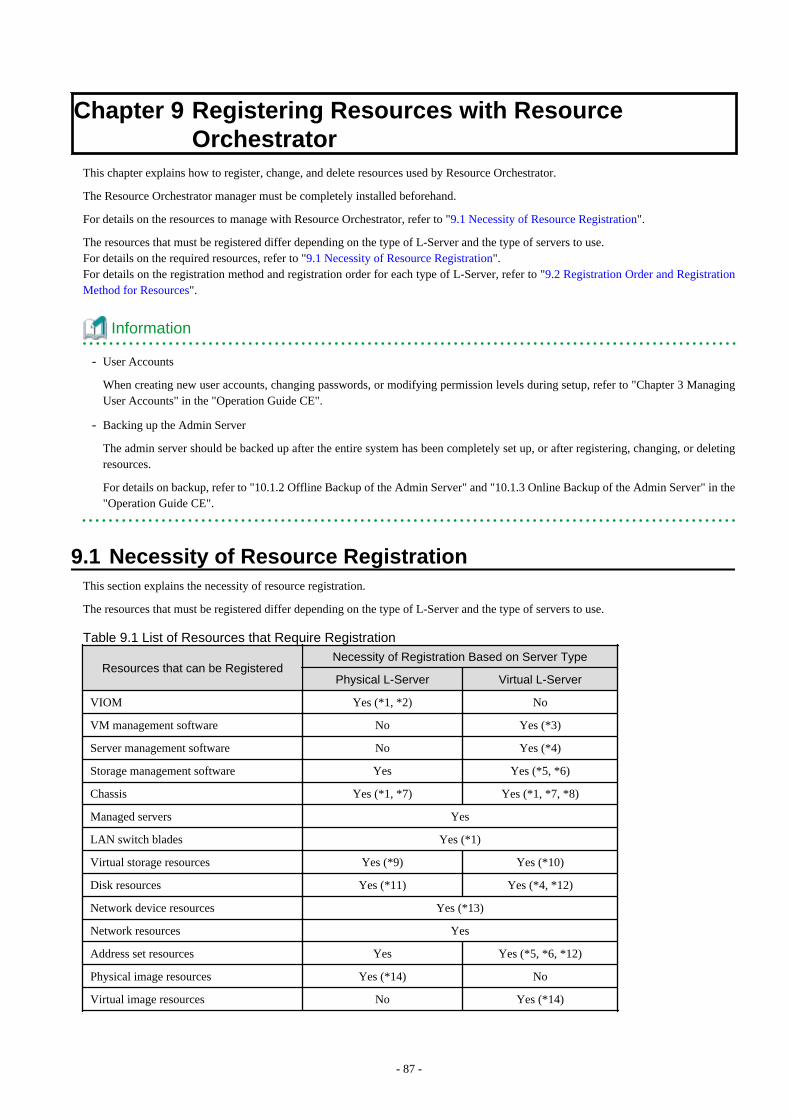
Chapter 9 Registering Resources with ResourceOrchestrator
This chapter explains how to register, change, and delete resources used by Resource Orchestrator.
The Resource Orchestrator manager must be completely installed beforehand.
For details on the resources to manage with Resource Orchestrator, refer to "9.1 Necessity of Resource Registration".
The resources that must be registered differ depending on the type of L-Server and the type of servers to use.For details on the required resources, refer to "9.1 Necessity of Resource Registration".For details on the registration method and registration order for each type of L-Server, refer to "9.2 Registration Order and RegistrationMethod for Resources".
Information
- User Accounts
When creating new user accounts, changing passwords, or modifying permission levels during setup, refer to "Chapter 3 ManagingUser Accounts" in the "Operation Guide CE".
- Backing up the Admin Server
The admin server should be backed up after the entire system has been completely set up, or after registering, changing, or deletingresources.
For details on backup, refer to "10.1.2 Offline Backup of the Admin Server" and "10.1.3 Online Backup of the Admin Server" in the"Operation Guide CE".
9.1 Necessity of Resource RegistrationThis section explains the necessity of resource registration.
The resources that must be registered differ depending on the type of L-Server and the type of servers to use.
Table 9.1 List of Resources that Require Registration
Resources that can be RegisteredNecessity of Registration Based on Server Type
Physical L-Server Virtual L-Server
VIOM Yes (*1, *2) No
VM management software No Yes (*3)
Server management software No Yes (*4)
Storage management software Yes Yes (*5, *6)
Chassis Yes (*1, *7) Yes (*1, *7, *8)
Managed servers Yes
LAN switch blades Yes (*1)
Virtual storage resources Yes (*9) Yes (*10)
Disk resources Yes (*11) Yes (*4, *12)
Network device resources Yes (*13)
Network resources Yes
Address set resources Yes Yes (*5, *6, *12)
Physical image resources Yes (*14) No
Virtual image resources No Yes (*14)
- 87 -
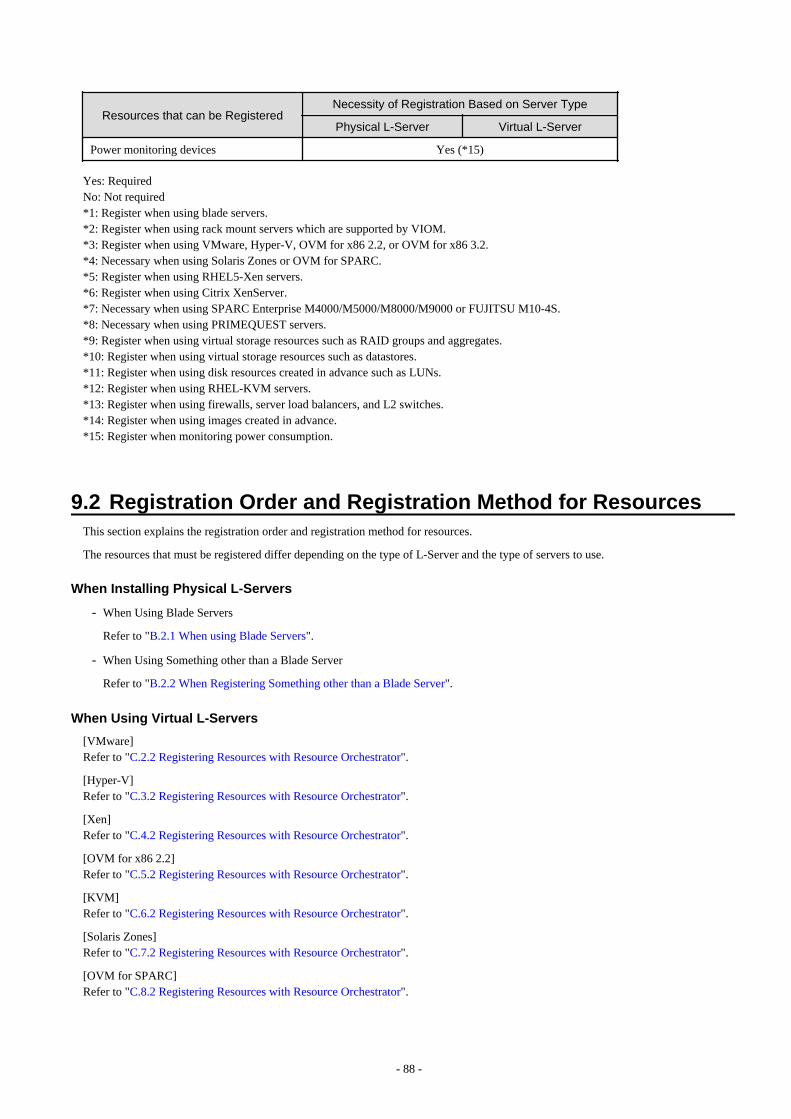
Resources that can be RegisteredNecessity of Registration Based on Server Type
Physical L-Server Virtual L-Server
Power monitoring devices Yes (*15)
Yes: RequiredNo: Not required*1: Register when using blade servers.*2: Register when using rack mount servers which are supported by VIOM.*3: Register when using VMware, Hyper-V, OVM for x86 2.2, or OVM for x86 3.2.*4: Necessary when using Solaris Zones or OVM for SPARC.*5: Register when using RHEL5-Xen servers.*6: Register when using Citrix XenServer.*7: Necessary when using SPARC Enterprise M4000/M5000/M8000/M9000 or FUJITSU M10-4S.*8: Necessary when using PRIMEQUEST servers.*9: Register when using virtual storage resources such as RAID groups and aggregates.*10: Register when using virtual storage resources such as datastores.*11: Register when using disk resources created in advance such as LUNs.*12: Register when using RHEL-KVM servers.*13: Register when using firewalls, server load balancers, and L2 switches.*14: Register when using images created in advance.*15: Register when monitoring power consumption.
9.2 Registration Order and Registration Method for ResourcesThis section explains the registration order and registration method for resources.
The resources that must be registered differ depending on the type of L-Server and the type of servers to use.
When Installing Physical L-Servers
- When Using Blade Servers
Refer to "B.2.1 When using Blade Servers".
- When Using Something other than a Blade Server
Refer to "B.2.2 When Registering Something other than a Blade Server".
When Using Virtual L-Servers
[VMware]Refer to "C.2.2 Registering Resources with Resource Orchestrator".
[Hyper-V]Refer to "C.3.2 Registering Resources with Resource Orchestrator".
[Xen]Refer to "C.4.2 Registering Resources with Resource Orchestrator".
[OVM for x86 2.2]Refer to "C.5.2 Registering Resources with Resource Orchestrator".
[KVM]Refer to "C.6.2 Registering Resources with Resource Orchestrator".
[Solaris Zones]Refer to "C.7.2 Registering Resources with Resource Orchestrator".
[OVM for SPARC]Refer to "C.8.2 Registering Resources with Resource Orchestrator".
- 88 -

[Citrix Xen]Refer to "C.9.2 Registering Resources with Resource Orchestrator".
[OVM for x86 3.2]Refer to "C.10.2 Registering Resources with Resource Orchestrator".
- 89 -

Chapter 10 Settings for the HBA address rename SetupService
This chapter explains settings for the HBA address rename setup service.
Point
The following procedure is used only when creating a physical L-Server using a rack mount or tower server.When using rack mount servers that are supported by VIOM, target servers can be managed using VIOM.
In Resource Orchestrator, configure the WWN on the servers according to the server operations, and adopt I/O virtualization (HBA addressrename) that enables I/O control on the server side.
HBA address rename is enabled by setting the WWN of the managed server HBA from the admin server when a managed server is poweredon. This WWN is kept by managed servers until powered off.
However, a managed server will not be able to receive its assigned WWN unless it can communicate with the admin server. Ifcommunication with the admin server fails, because of problems on the admin server or a failure of the managed server's NIC, the managedserver will not start up properly as its HBA will not be set up with the correct WWN.This can be avoided by using the HBA address rename setup service, which acts as a backup service in case of communication issuesbetween the admin server and managed servers. This service, which must run on a server other than the admin server, can set up managedservers HBAs WWNs in the same way the admin server does.
For details on HBA address rename settings, refer to "5.5.2 HBA address rename Settings" in the "User's Guide for InfrastructureAdministrators (Resource Management) CE".
This service must be running in order to use HBA address rename.
Use the following procedure to configure the HBA address rename setup service.
1. Open the [HBA address rename setup service] dialog.
[Windows]Select [start]-[All Programs]-[Resource Orchestrator]-[HBA address rename setup service].
[Linux]Execute the following command while in a desktop environment.
# nohup /opt/FJSVrcvhb/bin/rcxhbactl start& <RETURN>
The [HBA address rename setup service] dialog is displayed.
2. Define the following settings:
Status
The status of the service is displayed. [Stopping] is displayed if the service is not running, and [Running] is displayed if theservice is running.
IP address of admin server
Enter the IP address of the admin server.
Port number
Enter the port number that is used to communicate with the admin server. The port number at installation is 23461.If the "rcxweb" port number of the admin server is changed, specify the number that has been changed.
The latest synchronous time
Displays the latest synchronization time.This is the last time this service synchronized its data (managed server settings) with that of the admin server.
- 90 -
3. Click one of the following buttons:
- To Start This Service:
Click <Run>.
- To Stop This Service:
Click <Stop>.
- To Cancel the Operation:
Click <Cancel>.
To verify that this service is running properly, power off the admin server and confirm that managed servers can still start up normally.
Point
When the graphical mode cannot be used in a Linux environment, use the service rcvhb {stop | start | status} command to stop, start, orcheck the status of services after starting the HBA address rename setup service once.
When operating correctly, the descriptions are displayed as below.
# service rcvhb statusrservice is running...pxeservice is running...SystemcastWizard TFTP service is running...
Note
The following remarks apply to this service.
- Keep it [Running] at all times.
- Start it on only one server for each admin server.
- OS administrator privileges are required to start and stop this service.
- Do not operate it on the server where the manager is installed.
- The admin server and the servers configured with the HBA address rename setup service must be placed in the same segment of anadmin LAN.
- 91 -
Chapter 11 Installing Software and Registering Agents onVM Hosts
This chapter explains how to install software and register an agent on VM host.
Point
As OSs, required software, and agents are installed on physical L-Servers after their creation, the procedures in this chapter are not necessaryfor physical L-Servers. Simply skip the steps that were already performed.
Use the following procedure to install required software and register an agent on a VM host.
After agent registration, the VM host on which the agent was installed will be displayed in the server resource tree. Usually, a server agentis automatically registered during server registration. In that case, this procedure can be skipped.
It is not necessary to re-install an already-setup operating system, required software, or agent. Simply skip the steps that were alreadyperformed.
1. Install an OS
a. Install the operating system on the managed server.
b. Set up the admin LAN.
Set up the admin IP address, the related network mask, and the default gateway for the managed servers defined in "9.2.5Settings for Managed Servers" in the "Design Guide CE".
Using storage devices in multi-path configurations
- Install a multi-path driver on a and VM hosts. For VM hosts, use the one provided by default by either the operating system orvirtualization software, when one is available.
- When using SAN boot and HBA address rename, refer to "2. Settings for the HBA address rename Function" in "5.5.2 HBAaddress rename Settings" in the "User's Guide for Infrastructure Administrators (Resource Management) CE" to set the numberof HBA paths used with HBA address rename for the number of HBA ports.The server is automatically restarted using a multi-path configuration.
- When using SAN boot together with VIOM, follow the procedure described in "5.1.1 Registering VIOM Server Profiles" inthe "User's Guide for Infrastructure Administrators (Resource Management) CE" to configure server profiles on the Webinterface of ServerView Virtual-IO Manager.After configuration, the server will be started using a multi-path configuration.
- When using SAN boot together with ESC, follow the procedure described in "8.1 Configuring WWN Settings for ETERNUSSF Storage Cruiser Integration" in the "User's Guide for Infrastructure Administrators (Resource Management) CE", and setthe path name for HBA, WWNs of each HBA and the target CA, and Affinity Group. Also, correct the settings of the OS andOBP for multi-path use.After configuration, the server will be started using a multi-path configuration.
Note
After configuration of agents, the server name (computer name for [Hyper-V] or a system node name for [Solaris] [Solaris Zones][VMware] [Xen] [KVM] [Citrix Xen] [OVM for x86 2.2] [OVM for x86 3.2] [OVM for SPARC]) defined during OS installationshould be set according to the following guidelines.
[Hyper-V]Specify up to 63 characters, including alphanumeric characters, underscores ("_"), and hyphens ("-").The string cannot be composed solely of numbers.
- 92 -

[VMware] [Xen] [KVM] [Citrix Xen]Specify up to 64 characters, including alphanumeric characters as well as the following symbols.
"%", "+", ",", "-", ".", "/", ":", "=", "@", "_", "~"
[Solaris] [Solaris Zones] [OVM for SPARC]Specify up to 24 characters, including alphanumeric characters, underscores ("_"), and hyphens ("-"). This name should start withan alphabetical character.
However, it is recommended that the name is comprised of the following characters defined in RFC (Request For Comment) 952,to take into consideration communication with other servers.
- Alphanumeric Characters
- Hyphens, ("-")
It is recommended not to use duplicate names for , VM hosts, and VM guests. If duplicated names are used, those resources cannotbe managed from the command-line.
[Solaris] [Solaris Zones] [OVM for SPARC]When using Solaris 11, if creating user accounts during installation, roots are registered as roles. Therefore, the root account cannotbe used for login. Log in using the user account, and use the su command to become a root user.
When using Solaris 10 or earlier versions, execute the following as root in order to change to enable direct login using the rootaccount. In this case, the root role is recognized as a root user.
rolemod -K type=normal root <RETURN>
Use SSH connection with the root account, and check if communication with the VM host is possible.If communication fails, modify the configuration. For details, refer to the manual of the basic software.
2. Install Required Software
Install the software packages that are required for a managed server.For details of the required software, refer to "2.4.2.4 Required Software" in the "Design Guide CE".
Note
When installing BMC BladeLogic RSCD Agent, add managed servers to BladeLogic.Specify the admin IP addresses of managed servers to add.
3. Install the Agent
Refer to "2.2 Agent Installation".
4. Register the Agent
Register the agent from the ROR console while the target server is running.
[Solaris Zones] [OVM for SPARC]When the Logical Domains Manager daemon is enabled, VM hosts can be registered as Solaris Zones by configuring the definitionfiles.
For details, refer to "Chapter 8 Creating Definition Files".
a. In the ROR console server resource tree, right-click the target server, and select [Register]-[Agent] from the popup menu.
The [Register Agent] dialog is displayed.
- 93 -
b. Select the Server OS category (physical OS or VM host).
- For Servers than Fujitsu M10/SPARC Enterprise
For a Physical OS
Select [Windows/Linux].
For a VM Host
Select [VM Host], and enter the VM host login account information.This login account information will be used by Resource Orchestrator to control and communicate with the registeredVM host.
- For Fujitsu M10/SPARC Enterprise
For a Physical OSSelect "Solaris".
For a VM HostSelect "VM Host", and enter the VM host login account information.This login account information will be used by Resource Orchestrator to control and communicate with the registeredVM host.
User ID
Enter the user ID to log in to the VM host.
Specify the user name "root" which has VM host administrator authority.
Note
[Solaris] [Solaris Zones] [OVM for SPARC]When using Solaris 11, if creating user accounts during installation, roots are registered as roles. Therefore, the rootaccount cannot be used for login. Log in using the user account, and use the su command to become a root user.
When using Solaris 10 or earlier versions, execute the following as root in order to change to enable direct login usingthe root account. In this case, the root role is recognized as a root user.
rolemod -K type=normal root <RETURN>
Use SSH connection with the root account, and check if communication with the VM host is possible.If communication fails, modify the configuration. For details, refer to the manual of the basic software.
Password
Enter the password of the user to log in to the VM host.
c. Click <OK>.
The admin server starts to monitor and display server information obtained from the agent.
Note
- If "unknown" is displayed in the server resource tree for the status of a server in which the agent is installed, refer to "2.2 "unknown"Server Status" in "Troubleshooting" to solve the problem.
- When an agent is registered on a VM host, all VM guests running on that VM host are also registered automatically. Whenever a VMguest is created, modified, deleted, or moved on a registered VM host, the changes are automatically updated in the server resourcetree.
The VM guest name displayed in the ROR console is either the VM name defined in its server virtualization software or the hostnamedefined in the guest OS.
The timing at which the hostname of a guest OS is detected and displayed varies according its server virtualization software. Fordetails, refer to "D.3 Functional Differences between Products" in the "Design Guide VE".
- 94 -

- When performing system image backup or cloning image collection, it is necessary to either reboot the managed server or restart its"Related services" (explained in "2.2 Starting and Stopping Agents" in the "Operation Guide CE") after server registration.For details on how to restart the agent, refer to "2.2 Starting and Stopping Agents" in the "Operation Guide CE".
- A server running a VM host can still be registered as a physical OS if "Windows/Linux" is selected in the [Server OS category]selection list. (Windows Server 2008 etc.)A VM host server that was mistakenly registered as a physical OS should be deleted and re-registered as a VM host.
- 95 -
Chapter 12 Registering Resources to the Global PoolThis chapter explains the registration of resources to resource pools.
When creating a cloning image common to tenants, an L-Server for the infrastructure administrator must be created.
To create an L-Server for the infrastructure administrator, resources must be registered to the global pool.
The resources that are required to be registered to the resource pool differ depending on the type of L-Server.
Table 12.1 Registering Resources to Resource Pools Based on Resource Type
Resource PoolTypes
Type of Resources Storedin the Resource Pool
Method of Registration to theResource Pool
Necessity of Registration Based onServer Type
Physical L-Server Virtual L-Server
VM pool VM host resources
Refer to "14.1 VM HostResources" in the "User's Guidefor Infrastructure Administrators(Resource Management) CE".
No Yes
Server pool Physical server resources
Refer to "14.2 Physical ServerResources" in the "User's Guidefor Infrastructure Administrators(Resource Management) CE".
Yes No
Storage poolVirtual storage resources ordisk resources
Refer to "14.5 Storage Resources"in the "User's Guide forInfrastructure Administrators(Resource Management) CE".
Yes Yes
Network poolNetwork resources ornetwork devices (firewallsor server load balancers)
For details on how to registernetwork device resources, refer to"14.3 Network Resources" or"14.4 Network Devices" in the"User's Guide for InfrastructureAdministrators (ResourceManagement) CE".
Yes Yes
Address pool Address set resources
Refer to "14.6 Address SetResources" in the "User's Guidefor Infrastructure Administrators(Resource Management) CE".
Yes Yes (*1)
Yes: RequiredNo: Not required*1: When using RHEL5-Xen, RHEL-KVM, or Citrix XenServer, it is necessary to register MAC addresses. It is necessary to manageMAC addresses in Resource Orchestrator, since the MAC addresses used for VM guests are not managed by the server virtualizationsoftware.
Information
For details on changing the settings for, canceling registration, and deleting resources registered in a resource pool, refer to "Chapter 19Resource Operations" in the "User's Guide for Infrastructure Administrators (Resource Management) CE".
12.1 Physical L-ServersRefer to "B.3 Registering Resources in Resource Pools".
- 96 -
12.2 Virtual L-Servers[VMware]Refer to "C.2.3 Registering Resources in Resource Pools".
[Hyper-V]Refer to "C.3.3 Registering Resources in Resource Pools".
[Xen]Refer to "C.4.3 Registering Resources in Resource Pools".
[OVM for x86 2.2]Refer to "C.5.3 Registering Resources in Resource Pools".
[KVM]Refer to "C.6.3 Registering Resources in Resource Pools".
[Solaris Zones]Refer to "C.7.3 Registering Resources in Resource Pools".
[OVM for SPARC]Refer to "C.8.3 Registering Resources in Resource Pools".
[Citrix Xen]Refer to "C.9.3 Registering Resources in Resource Pools".
[OVM for x86 3.2]Refer to "C.10.3 Registering Resources in Resource Pools".
- 97 -
Chapter 13 Creating L-Server TemplatesThis chapter explains how to create an L-Server template.
An L-Server template comprises pre-defined specifications (number of CPUs, memory capacity, disk capacity, number of NICs, etc.) foran L-Server.
L-Server templates can be created using the following methods.
Using the Wizard GUI
L-Server templates can be created using the wizard GUI in the wizard format.For details on the GUI in the wizard format, refer to "15.1 Operations Using the Wizard GUI" in the "User's Guide for InfrastructureAdministrators (Resource Management) CE".
Manually
L-Server templates can be created using an editor.For details on how to export L-Server templates, refer to "15.2 Editing a Template Using an Editor" in the "User's Guide for InfrastructureAdministrators (Resource Management) CE".
- 98 -
Chapter 14 Creating an L-Server for an InfrastructureAdministrator
This chapter explains how to create L-Servers for Infrastructure Administrators.
L-Servers for Infrastructure Administrators can only be used only infrastructure administrators. Tenant administrators and tenant usersare not able to use those L-Servers. Normally, L-Servers can only be used by tenant administrators and tenant users.
The purposes of creation are as follow:
- To collect cloning images (collection is performed by infrastructure administrators)
Refer to "Chapter 15 Collecting and Registering Cloning Images".
- To install VM hosts on physical L-Servers
Refer to "Appendix D Installing VM Hosts on Physical L-Servers".
- To install software used for infrastructure (such as VM management software and the like) administration on L-Servers
When Creating a Physical L-Server
Refer to "B.5 Creating an L-Server".
When Creating a Virtual L-Server
[VMware]Refer to "C.2.7 Creating an L-Server".
[Hyper-V]Refer to "C.3.7 L-Server Creation".
[Xen]Refer to "C.4.6 L-Server Creation".
[OVM for x86 2.2]Refer to "C.5.6 L-Server Creation".
[KVM]Refer to "C.6.6 L-Server Creation".
[Solaris Zones]
Refer to "C.7.6 Creating an L-Server".
[OVM for SPARC]Refer to "C.8.6 Creating an L-Server".
[Citrix Xen]Refer to "C.9.6 Creating an L-Server".
[OVM for x86 3.2]Refer to "C.10.6 Creating an L-Server".
- 99 -
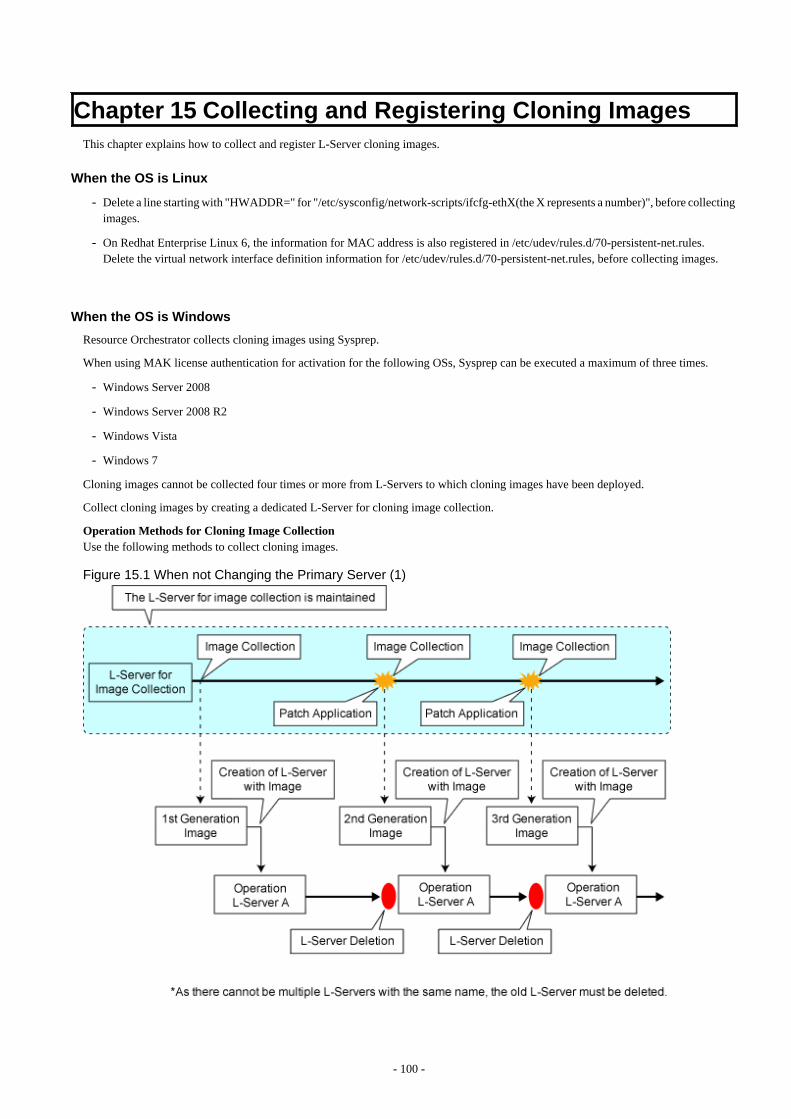
Chapter 15 Collecting and Registering Cloning ImagesThis chapter explains how to collect and register L-Server cloning images.
When the OS is Linux
- Delete a line starting with "HWADDR=" for "/etc/sysconfig/network-scripts/ifcfg-ethX(the X represents a number)", before collectingimages.
- On Redhat Enterprise Linux 6, the information for MAC address is also registered in /etc/udev/rules.d/70-persistent-net.rules.Delete the virtual network interface definition information for /etc/udev/rules.d/70-persistent-net.rules, before collecting images.
When the OS is Windows
Resource Orchestrator collects cloning images using Sysprep.
When using MAK license authentication for activation for the following OSs, Sysprep can be executed a maximum of three times.
- Windows Server 2008
- Windows Server 2008 R2
- Windows Vista
- Windows 7
Cloning images cannot be collected four times or more from L-Servers to which cloning images have been deployed.
Collect cloning images by creating a dedicated L-Server for cloning image collection.
Operation Methods for Cloning Image CollectionUse the following methods to collect cloning images.
Figure 15.1 When not Changing the Primary Server (1)
- 100 -
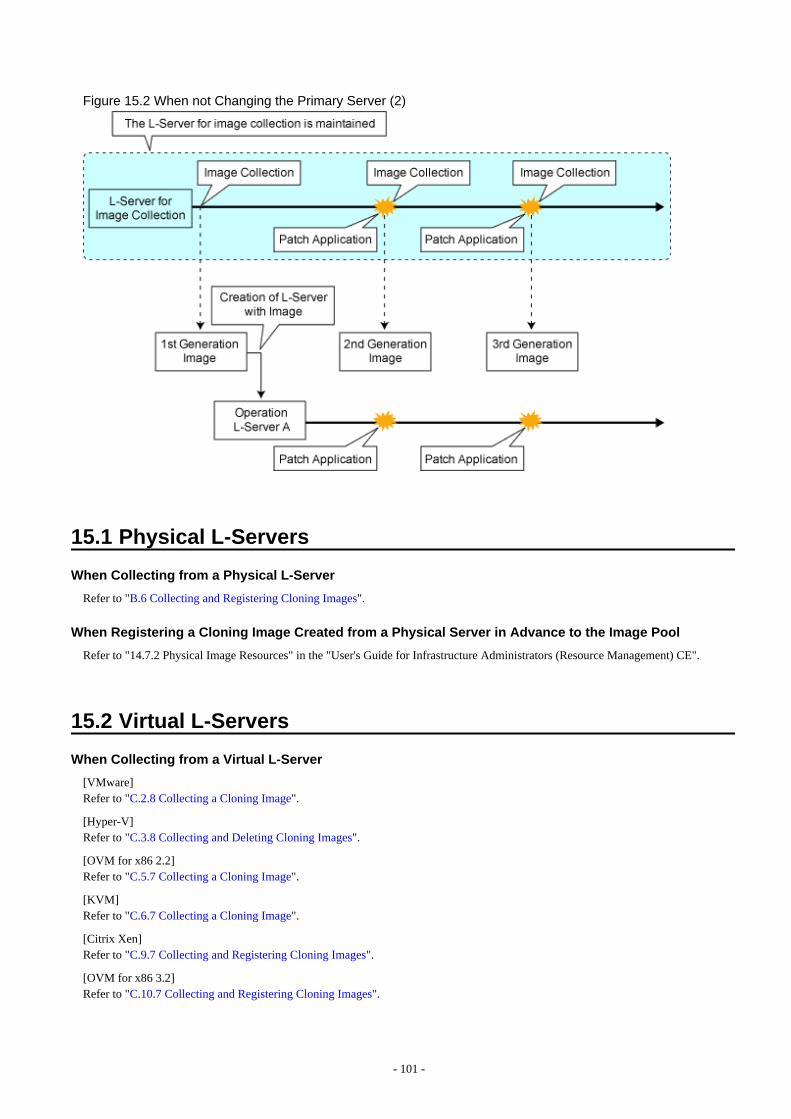
Figure 15.2 When not Changing the Primary Server (2)
15.1 Physical L-Servers
When Collecting from a Physical L-Server
Refer to "B.6 Collecting and Registering Cloning Images".
When Registering a Cloning Image Created from a Physical Server in Advance to the Image Pool
Refer to "14.7.2 Physical Image Resources" in the "User's Guide for Infrastructure Administrators (Resource Management) CE".
15.2 Virtual L-Servers
When Collecting from a Virtual L-Server
[VMware]Refer to "C.2.8 Collecting a Cloning Image".
[Hyper-V]Refer to "C.3.8 Collecting and Deleting Cloning Images".
[OVM for x86 2.2]Refer to "C.5.7 Collecting a Cloning Image".
[KVM]Refer to "C.6.7 Collecting a Cloning Image".
[Citrix Xen]Refer to "C.9.7 Collecting and Registering Cloning Images".
[OVM for x86 3.2]Refer to "C.10.7 Collecting and Registering Cloning Images".
- 101 -

When Registering an Image (Template) Created with VM Management Software in Advance to the ImagePool
Refer to "14.7.1 Virtual Image Resources" in the "User's Guide for Infrastructure Administrators (Resource Management) CE".
Point
In the following cases, Sysprep is executed and included in the count:
- Customizing a guest OS using a template in VMware
- Template creation in SCVMM
Refer to "Chapter 15 Collecting and Registering Cloning Images" for the operation.
- 102 -
Chapter 16 Creating L-Platform TemplatesThis chapter explains how to create an L-Platform template.
An L-Platform template defines systems of various levels and the logical OS structure in advance.
An L-Platform template can be specified to easily create L-Platforms.Create L-Platform templates in the [Template] tab of the ROR console.For details on the [Template] tab, refer to "Chapter 8 Template" in the "User's Guide for Infrastructure Administrators CE".
- 103 -
Chapter 17 Creating Tenants, Tenant Administrators, orTenant Users
Create tenants, tenant administrators, and tenant users.
For details, refer to "1.2.5 Configuring Tenants". Also refer to "Chapter 11 Tenant" in the "User's Guide for Infrastructure AdministratorsCE".
- 104 -
Chapter 18 Post-Installation ProceduresThis section explains how to Post-Installation procedures.
18.1 Settings for Sending EmailThis section explains how to change settings for sending email.
This product sends the following five types of email:
Point
The setting of five kinds of mails can be set by "Setup wizard" on the ROR Console about a host name of the SMTP server, a port number,and a sender's email address. The Mail Sending function enables, and moreover, SMTP server authentication is none if defining it from"Setup wizard".
Refer to "3.1 Setup Wizard" in the "User's Guide for Infrastructure Administrators CE" for information on "Setup Wizard".
- Email sent from the tenant management
When the tenant administrator adds or changes a user, notification to that effect is sent to the tenant administrators, tenant users, andtenant email addresses within that same tenancy.
- Email sent from the L-Platform Management window
Email sent from the L-Platform management window notifies the end or failure of processing to the tenant administrators and thetenant users when the tenant users have used the ROR Console to perform an application to use L-Platform, an L-Platform modification,or an application to cancel L-Platform.
- Email sent from the usage charge calculator
Email will be enabled if the calculator for charges is used.
A usage charge file is sent to the set email address with the monthly usage charges for each tenant.
- Email sent via the application process
An email will be sent via the application process when changes or requests have been made.The following notification will be sent for an application to use L-Platform, an L-Platform modification, or an application to cancelL-Platform from the L-Platform management window:
- Notification of acceptance of application, rejection of application, and dismissal of application to the tenant users
- Notification of request for approval and dismissal of application to the tenant administrators
- Notification of request for assessment to the infrastructure administrators
- Email sent from the dashboard
Email can be sent from the dashboard if the dashboard alert function is being used.A notification is sent to the email address specified in the dashboard email send settings when the resource pool use rate thresholdvalue is exceeded.
18.1.1 Stopping the ManagerStop the manager before making settings for sending email.Refer to "2.1 Starting and Stopping Managers" in the "Operation Guide CE" for information on how to stop the manager.
18.1.2 Settings for Email Sent from Tenant ManagementModify the operating environment file so that notification of the tenant administrator adding or changing users is sent to the email addressesof the tenant administrator, tenant users, and the tenants in the same tenancy.
- 105 -

portal.properties settings
Follow the steps below to modify the email settings:
1. Back up the following operating environment file to a work directory.
[Windows Manager]
<installation_folder>\RCXCTMG\SecurityManagement\conf\portal.properties
[Linux Manager]
/etc/opt/FJSVctsec/conf/portal.properties
2. Open the above operating environment file, and configure the following items:
Setting item Description
sendmail.smtp Host name or IP address of the SMTP server
sendmail.smtp.port Port number of the SMTP server"25" is set during installation.
sendmail.fromAddress Sender's email address
Do not change the setting items other than the ones listed above - if you have changed any of them, restore the file that was backedup.
An example is shown below.
...# sendmailsendmail.smtp = smtp.example.comsendmail.smtp.port = 25sendmail.fromAddress = [email protected] ...
18.1.3 Settings for Email Sent from the L-Platform Management WindowModify the operating environment file so that users are notified of processes completion or failure by email when tenant administratorsand tenant users have used the L-Platform Management window for L-Platform subscription, L-Platform modification, or L-Platformcancellation operations.
mail_config.xml settings
Follow the steps below to modify the email settings:
1. Back up the following operating environment file to a work directory.
[Windows Manager]
<installation_folder>\RCXCFMG\config\mail_config.xml
[Linux Manager]
/etc/opt/FJSVcfmg/config/mail_config.xml
2. Open the above operating environment file, and configure the following items:
Setting item Description
enable-email Set true.Set true in order to enable the email sending function.
smtp-host Host name or IP address of the SMTP server
- 106 -
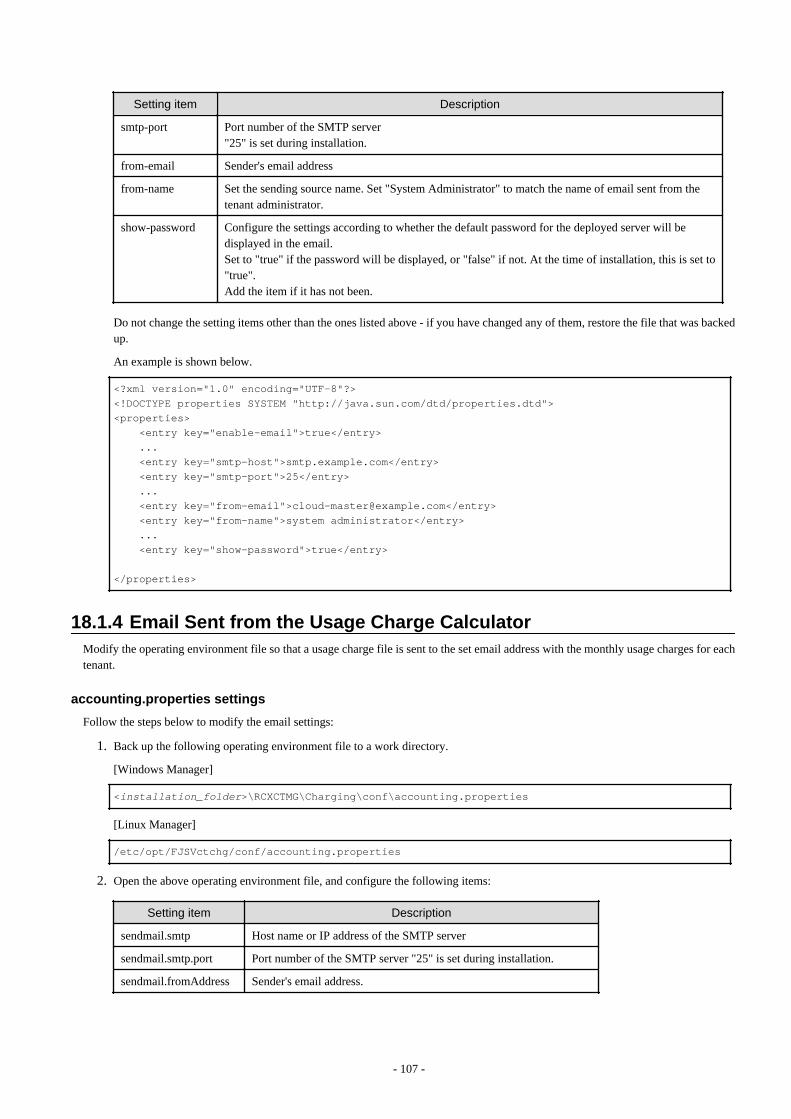
Setting item Description
smtp-port Port number of the SMTP server"25" is set during installation.
from-email Sender's email address
from-name Set the sending source name. Set "System Administrator" to match the name of email sent from thetenant administrator.
show-password Configure the settings according to whether the default password for the deployed server will bedisplayed in the email.Set to "true" if the password will be displayed, or "false" if not. At the time of installation, this is set to"true". Add the item if it has not been.
Do not change the setting items other than the ones listed above - if you have changed any of them, restore the file that was backedup.
An example is shown below.
<?xml version="1.0" encoding="UTF-8"?><!DOCTYPE properties SYSTEM "http://java.sun.com/dtd/properties.dtd"><properties> <entry key="enable-email">true</entry> ... <entry key="smtp-host">smtp.example.com</entry> <entry key="smtp-port">25</entry> ... <entry key="from-email">[email protected]</entry> <entry key="from-name">system administrator</entry> ... <entry key="show-password">true</entry>
</properties>
18.1.4 Email Sent from the Usage Charge CalculatorModify the operating environment file so that a usage charge file is sent to the set email address with the monthly usage charges for eachtenant.
accounting.properties settings
Follow the steps below to modify the email settings:
1. Back up the following operating environment file to a work directory.
[Windows Manager]
<installation_folder>\RCXCTMG\Charging\conf\accounting.properties
[Linux Manager]
/etc/opt/FJSVctchg/conf/accounting.properties
2. Open the above operating environment file, and configure the following items:
Setting item Description
sendmail.smtp Host name or IP address of the SMTP server
sendmail.smtp.port Port number of the SMTP server "25" is set during installation.
sendmail.fromAddress Sender's email address.
- 107 -
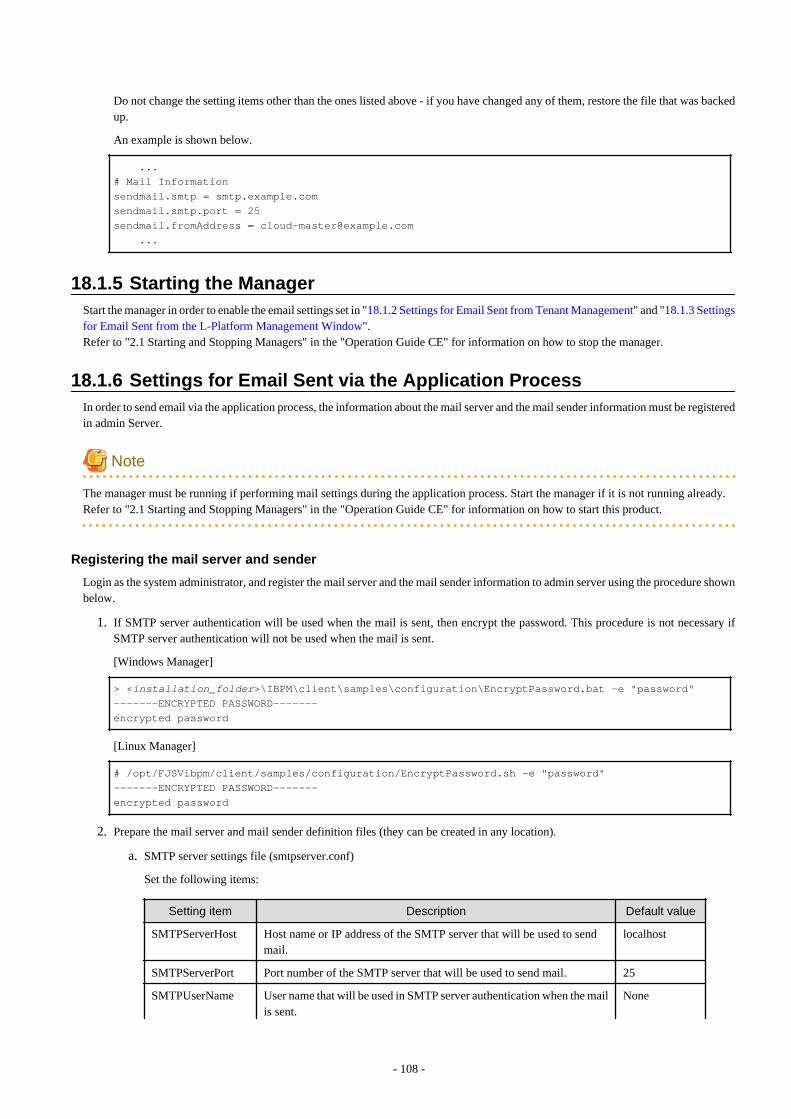
Do not change the setting items other than the ones listed above - if you have changed any of them, restore the file that was backedup.
An example is shown below.
...# Mail Informationsendmail.smtp = smtp.example.comsendmail.smtp.port = 25sendmail.fromAddress = [email protected] ...
18.1.5 Starting the ManagerStart the manager in order to enable the email settings set in "18.1.2 Settings for Email Sent from Tenant Management" and "18.1.3 Settingsfor Email Sent from the L-Platform Management Window".Refer to "2.1 Starting and Stopping Managers" in the "Operation Guide CE" for information on how to stop the manager.
18.1.6 Settings for Email Sent via the Application ProcessIn order to send email via the application process, the information about the mail server and the mail sender information must be registeredin admin Server.
Note
The manager must be running if performing mail settings during the application process. Start the manager if it is not running already.Refer to "2.1 Starting and Stopping Managers" in the "Operation Guide CE" for information on how to start this product.
Registering the mail server and sender
Login as the system administrator, and register the mail server and the mail sender information to admin server using the procedure shownbelow.
1. If SMTP server authentication will be used when the mail is sent, then encrypt the password. This procedure is not necessary ifSMTP server authentication will not be used when the mail is sent.
[Windows Manager]
> <installation_folder>\IBPM\client\samples\configuration\EncryptPassword.bat -e "password"-------ENCRYPTED PASSWORD-------encrypted password
[Linux Manager]
# /opt/FJSVibpm/client/samples/configuration/EncryptPassword.sh -e "password"-------ENCRYPTED PASSWORD-------encrypted password
2. Prepare the mail server and mail sender definition files (they can be created in any location).
a. SMTP server settings file (smtpserver.conf)
Set the following items:
Setting item Description Default value
SMTPServerHost Host name or IP address of the SMTP server that will be used to sendmail.
localhost
SMTPServerPort Port number of the SMTP server that will be used to send mail. 25
SMTPUserName User name that will be used in SMTP server authentication when the mailis sent.
None
- 108 -
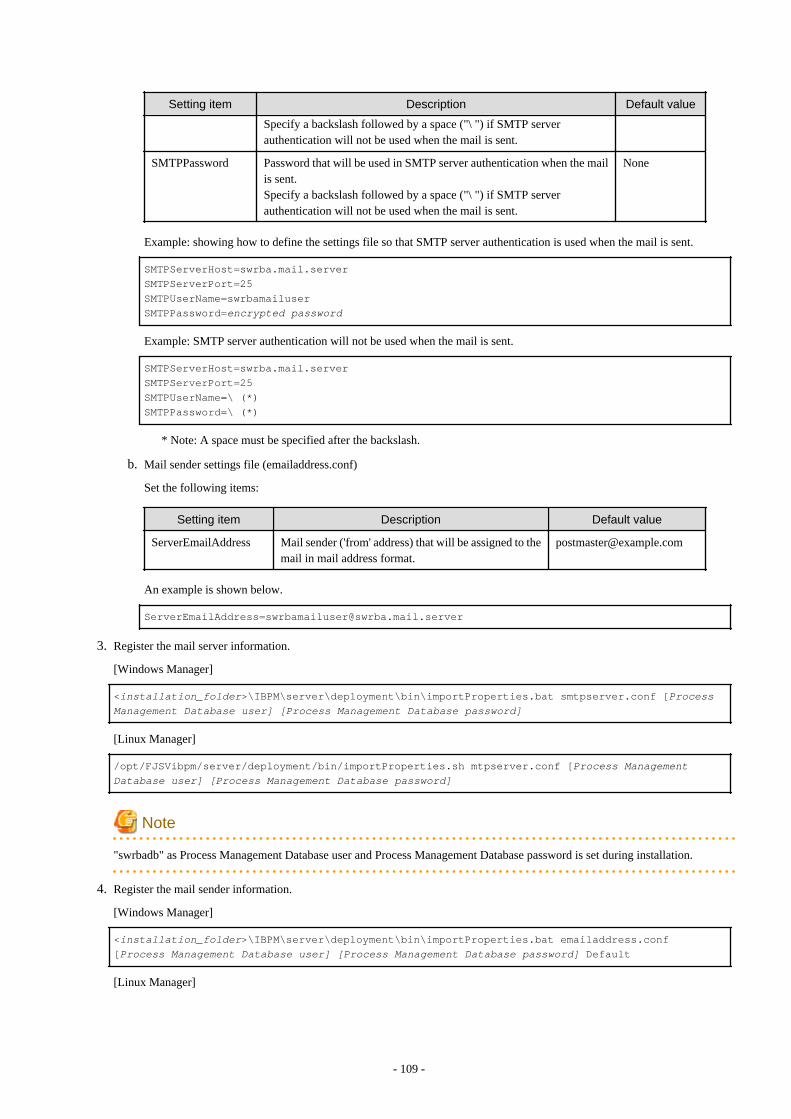
Setting item Description Default value
Specify a backslash followed by a space ("\ ") if SMTP serverauthentication will not be used when the mail is sent.
SMTPPassword Password that will be used in SMTP server authentication when the mailis sent.Specify a backslash followed by a space ("\ ") if SMTP serverauthentication will not be used when the mail is sent.
None
Example: showing how to define the settings file so that SMTP server authentication is used when the mail is sent.
SMTPServerHost=swrba.mail.serverSMTPServerPort=25SMTPUserName=swrbamailuserSMTPPassword=encrypted password
Example: SMTP server authentication will not be used when the mail is sent.
SMTPServerHost=swrba.mail.serverSMTPServerPort=25SMTPUserName=\ (*)SMTPPassword=\ (*)
* Note: A space must be specified after the backslash.
b. Mail sender settings file (emailaddress.conf)
Set the following items:
Setting item Description Default value
ServerEmailAddress Mail sender ('from' address) that will be assigned to themail in mail address format.
An example is shown below.
3. Register the mail server information.
[Windows Manager]
<installation_folder>\IBPM\server\deployment\bin\importProperties.bat smtpserver.conf [Process Management Database user] [Process Management Database password]
[Linux Manager]
/opt/FJSVibpm/server/deployment/bin/importProperties.sh mtpserver.conf [Process Management Database user] [Process Management Database password]
Note
"swrbadb" as Process Management Database user and Process Management Database password is set during installation.
4. Register the mail sender information.
[Windows Manager]
<installation_folder>\IBPM\server\deployment\bin\importProperties.bat emailaddress.conf [Process Management Database user] [Process Management Database password] Default
[Linux Manager]
- 109 -
/opt/FJSVibpm/server/deployment/bin/importProperties.sh emailaddress.conf [Process Management Database user] [Process Management Database password] Default
The "Default" option must be specified at the end.
Note
"swrbadb" as Process Management Database user and Process Management Database password is set during installation.
5. Restart the manager
Restart the manager in order to apply the new settings.Refer to "2.1 Starting and Stopping Managers" in the "Operation Guide CE" for information on how to restart the manager.
18.1.7 Settings for Email Sent from the DashboardIf the dashboard alert function is to be used, use the operation management console of Interstage Business Process Manager Analytics toset the mail settings to be used by the dashboard alert function.
Note that the dashboard email send settings must be set if the dashboard alert function is used. Refer to "E.2.1 Customizing Email SendSettings" for information on setting dashboard email send settings.
SMTP server information settings
Follow the steps below to modify the email settings:
1. Connect to the operation management console and log in. Refer to "E.6.1 Access" for details.
2. In the left pane, click IBPM Analytics >> System >> Mail.
3. Change the displayed SMTP Server settings to suit the environment. After setting the following items click Modify:
Setting item Description
SMTP Server Address Host name or IP address of the SMTP server
SMTP Port Number Port number of the SMTP server"25" is set during installation.
Sender Address Sender's email address
4. Restart the Analytics server. Refer to "E.6.4 Restarting the Analytics Server" for details.
Note
- The initial password must be changed. Use the operation management console of Interstage Business Process Manager Analytics tochange the password. Refer to "E.6.2 Changing the Password of the Administrator" for details.
- Do not perform any operations from the operation management console other than changing password settings, changing SMTP serverinformation, and restarting the Interstage Business Process Manager Analytics server.
18.2 Application Process SettingsThis section explains how to set application process setting.
18.2.1 Registering an Application Process AssessorThis section explains how to register an infrastructure administrator or dual-role administrator as an application process assessor.
- 110 -
Add all infrastructure administrators and dual-role administrators to the directory service IflowUsers group in order to use applicationprocesses. Use the LDIF file to register an application process assessor at the directory server. Follow the procedure below to register asapplication process assessor.
1. Create an infrastructure administrator or dual-role administrator.
2. Add the infrastructure administrator or dual-role administrator as a member of the IflowUsers group.
Note
- Infrastructure administrators and dual-role administrators who have not been registered in the "IflowUsers" group cannotconduct assessment in application processes. Also, if infrastructure administrators and dual-role administrators not registeredin the "IflowUsers" group select the Request tab in the ROR Console, the following error message appears:
Error message : Failed to authenticate the user.
- Administrators (dual-role administrators) created during installation are not registered in the "IflowUsers" group. Add them tothe "IflowUsers" group.
- If an email address is not set, assessment request emails are not sent, and reservation notification emails are not sent when anerror occurs.
- If no infrastructure administrators or dual-role administrators are registered in the IflowUsers group, the following message isdisplayed after the application is forwarded from the Forward screen window when the user subscribes to the service:
PCS1002An error occurred while processing application. Please contact the infrastructure administrator.
18.2.1.1 Creating an Infrastructure Administrator/Dual-role AdministratorUse the following procedure to register infrastructure administrators and dual-role administrators.
1. Check if user information is registered in the directory service. If no user information is registered, register it.
This operation is not necessary when using internal authentication in Basic mode.
2. In the ROR console, select [Settings]-[User Accounts].
The [User Accounts] dialog is displayed.
3. Click <Add>.
The [Add User Account] dialog is displayed.
4. Set the following:
User ID
Specify a user ID registered in the directory service.
E-mail address
Specify the email address of the user.Specify a string using up to 64 alphanumeric characters or symbols.
User Groups
Select the user group to configure for the user account from the already created user group.
Select the "supervisor" user group to register as an application process assessor.
Scopes/Roles (Optional)
Access Scope
Select the scope of access to set for the user account.
- 111 -
Role
Select the role to set for the user account.
Label (Optional)
Enter a label for the user account.Enter a maximum of 32 characters.
Comment (Optional)
Enter any comments for the user group.Enter a maximum of 256 characters.
5. Click <OK>.The user account is created.
When using user operations to register users also in the directory service in Resource Orchestrator, use the rcxadm user create commandafter checking the settings of the definition file for directory service operations (ldap_attr.rcxprop). For details on the definition file fordirectory service operations, refer to "8.6.1 Settings for Tenant Management and Account Management" in the "Operation Guide CE".For details on the rcxadm user create command, refer to "7.1 rcxadm user" in the "Reference Guide (Command/XML) CE".
18.2.1.2 Adding an Infrastructure Administrator/Dual-role Administrator to IflowUsersGroup
Follow the procedure below to add an infrastructure administrator or dual-role administrator as a member of the IflowUsers group.
For OpenDS
1. Create an LDIF file.
Edit a sample LDIF file to create the file. An example of an LDIF file is shown below.
# Add manager to IflowUsersdn: cn=IflowUsers,ou=group,dc=fujitsu,dc=comchangetype: modifyadd: membermember: cn=manager,ou=users,dc=fujitsu,dc=com
2. Execute the ldapmodify command.
Before executing the ldapmodify command of OpenDS, set JAVA_HOME as the path of Java SE 6.
[Windows Manager]
Specify the created LDIF file, and then execute the ldapmodify command.
<OpenDS installation directory>\bat\ldapmodify.bat" -p <port number> -f <ldif file> -D < administrator user DN> -w <password>
An execution example is shown below.
c:\> c:\Program Files (x86)\Fujitsu\ServerView Suite\opends\bat\ldapmodify -p 1473 -f c:\ldif\adduser2group.ldif -D "cn=Directory Manager" -w admin Processing MODIFY request for cn=IflowUsers,ou=group,dc=fujitsu,dc=comMODIFY operation successful for DN cn=IflowUsers,ou=group,dc=fujitsu,dc=com
[Linux Manager]
Specify the created LDIF file, and then execute the ldapmodify command.
# <OpenDS installation directory>/bin/ldapmodify" -p <port number> -f <ldif file> -D <administrator user DN> -w <password>
An execution example is shown below.
# /opt/fujitsu/ServerViewSuite/opends/bin/ldapmodify -p 1473 -D "cn=Directory Manager" -f /tmp/ldif/adduser2group.ldif -w admin
- 112 -
Processing MODIFY request for cn=IflowUsers,ou=group,dc=fujitsu,dc=comMODIFY operation successful for DN cn=IflowUsers,ou=group,dc=fujitsu,dc=com
Note
- In the command input line, enter the command as one line without entering any line feeds.
- For the directory service port number, administrator DN, and administrator DN password, enter the values that were set duringinstallation.
- When working with ServerView Operations Manager V5.5 or later, the message "The directory name is invalid" may bedisplayed - you can still proceed.
For Active Directory
1. From the Start menu, open [Control Panel]-[Administrative Tools]-[Active Directory Users and Computers].
2. Select the name of a domain that is managed by Active Directory.
3. Right-click "IflowUsers" of the organizational unit "Group", and select [Property].
4. Select the [Members] tab, and click the [Add] button.
5. The [Select Users, Contacts, Computers, Or Groups] window will be displayed. Input the member list of the above table in the[Enter the object names to select] field, and click the [OK] button. If there is more than one member, separate them with semicolons.
6. After returning to the property window of the group, confirm that the members have been added correctly, and click the [OK] button.
18.2.2 Stopping the ManagerStop the manager before making settings for sending email.Refer to "2.1 Starting and Stopping Managers" in the "Operation Guide CE" for information on how to stop the manager.
18.2.3 Setting Application Process SettingsThis section explains how to modify the application process settings.
To change Application process settings
The procedure for changing the setting whether to use the application process is as follows.
Point
Setting Application process setting can be set by "Setup Wizard" on the ROR Console.The "Setup Wizard" displays as three items the six items that are explained in this section and in "18.2.4 Setting Application Process tobe Used". When items are not selected in the Setup Wizard, the corresponding items in this section are set to "false". When items areselected in the Setup Wizard, then the corresponding items in this section are set to "true".
Refer to "3.1 Setup Wizard" in the "User's Guide for Infrastructure Administrators CE" for information on "Setup Wizard".
1. Open the following file.
[Windows Manager]
<installation_folder>\RCXCTMG\MyPortal\config\custom_config.xml
[Linux Manager]
/etc/opt/FJSVctmyp/config/custom_config.xml
2. Set the following items:
- 113 -
Setting item Description
enable-create-workflow Specify "true" if you want to use the application process for L-Platform subscriptions.Specify "false" to not use it."false" is set during installation.
enable-reconfigure-workflow Specify "true" if you want to use the application process for L-Platform modifications.Specify "false" to not use it."false" is set during installation.
enable-return-workflow Specify "true" if you want to use the application process for L-Platform cancellations.Specify "false" to not use it."false" is set during installation.
workflow-mode Specify "1" if you want to use the application process feature. Specify "0" to not use it. "0" is set during installation.
Note
The Application List tab of the ROR console is not displayed when display of the Application List is not permitted in the roledefinitions.
An example is shown below.
<?xml version="1.0" encoding="UTF-8"?><properties> ... <entry key="workflow-mode">1</entry> <entry key="enable-create-workflow">true</entry> <entry key="enable-reconfigure-workflow">true</entry> <entry key="enable-return-workflow">true</entry> ...</properties>
18.2.4 Setting Application Process to be UsedThis section explains how to modify the application process to be used.
To change the application process to be used
The modification procedure of the application process to be used is as follows.
Point
Setting Application process to be used can be set by "Setup Wizard" on the ROR Console.The "Setup Wizard" displays as three items the six items that are explained in this section and in "18.2.3 Setting Application ProcessSettings". In this section, settings can be made for the items corresponding to those that were selected in the Setup Wizard. When itemsare not selected in the Setup Wizard, then the corresponding items in "18.2.3 Setting Application Process Settings" are set to false, so thecorresponding settings in this section will be disabled.Refer to "3.1 Setup Wizard" in the "User's Guide for Infrastructure Administrators CE" for information on "Setup Wizard".
1. Open the following file.
[Windows Manager]
<installation_folder>\RCXCTMG\MyPortal\config\application_process.properties
[Linux Manager]
/etc/opt/FJSVctmyp/config/application_process.properties
- 114 -

2. Set the following items:
Setting item Setting value
ServiceCreate_processName When applying to use L-Platform, enter "Default" if approval and assessment are to beperformed, enter "ApproverOnly" if approval only is to be performed, and enter"JudgeOnly" if assessment only is to be performed."Default" is set during installation.
ServiceChange_processName When modifying L-Platform, enter "Default" if approval and assessment are to beperformed, enter "ApproverOnly" if approval only is to be performed, and enter"JudgeOnly" if assessment only is to be performed."Default" is set during installation.
ServiceReturn_processName When canceling L-Platform, enter "Default" if approval and assessment are to beperformed, enter "ApproverOnly" if approval only is to be performed, and enter"JudgeOnly" if assessment only is to be performed."Default" is set during installation.
An example is shown below:
...ServiceCreate_applicationId=ctmgApplicationServiceCreate_processName=DefaultServiceChange_applicationId=ctmgApplicationServiceChange_processName=DefaultServiceReturn_applicationId=ctmgApplicationServiceReturn_processName=Default ...
18.2.5 Starting the ManagerStart the manager in order to enable the email settings set in "18.2.3 Setting Application Process Settings" and "18.2.4 Setting ApplicationProcess to be Used".Refer to "2.1 Starting and Stopping Managers" in the "Operation Guide CE" for information on how to stop the manager.
18.2.6 Role Settings for the Display of the Application List TabThis section explains customizing roles to display the [Application List] of the ROR console.
The [Application List] tab of the ROR console is not displayed when display of the [Application List] is not permitted in the role definitions.The default at installation is not to permit display.
When the procedure in "18.2.3 Setting Application Process Settings" is performed and the value of workflow-mode is changed to "1", addthe permissions to display the [Application List] by customizing the role. Refer to "Chapter 3 Configuring Users and Customizing Roles"in the "User's Guide for Infrastructure Administrators (Resource Management) CE" for information on customizing roles.
Note that when "Enable" is selected for the Application process function in the setup wizard, the permissions to display the [ApplicationList] are simultaneously added to the role definition for the corresponding basic role.
18.3 Customizing the DashboardRefer to "Appendix E To Customize Dashboard" for information on customizing the dashboard.
18.4 Setting the Host Names for Virtual Servers
- 115 -
Note
Set the method for setting the virtual server host name before commencing operations. This attribute cannot be switched once operationshave commenced.
This product sets the host names (computer names) for the virtual servers that are deployed. These names are automatically generated asbelow:
VXXXXXXXXXNNNNXXXXXXXXX: Nine arbitrary alphanumeric characters (part of the L-Platform ID)NNNN: A four-digit serial number starting from 0001
The setting method can be changed to make the correspondence between these host names and actual servers more obvious.
The following setting methods can be selected:
Settingmethodnumber
Setting method Description
1 Automatic generation This is the original function.
2 Server name The host name is set to the string that the user specifies as the "server name" in the RORconsole.
3 Prefix + serial number The Template Manager specifies a prefix, and the host name is set to a string consisting ofthis prefix followed by a serial number.
4 Tenant name + serialnumber
The host name is set to a string consisting of the tenant name for the user followed by a serialnumber.
18.4.1 Setting Method
Point
Setting the Host Names for Virtual Servers can be set by "Setup Wizard" on the ROR Console.
Refer to "3.1 Setup Wizard" in the "User's Guide for Infrastructure Administrators CE" for information on "Setup Wizard".
Use the following procedure to specify the setting method:
1. Open the definition file in a text editor.
The definition file is stored in the following location:
[Windows Manager]
<installation_folder>\RCXCFMG\config\vsys_config.xml
[Linux Manager]
/etc/opt/FJSVcfmg/config/vsys_config.xml
2. Set the following items in the settings file:
Key name Setting range Content
hostname-method 1 to 4 Specify the method for setting host names.If this key is omitted, "1" will be used as the default value.The number specified for this key corresponds to the setting method numberin the table.
- 116 -
Key name Setting range Content
hostname-header An arbitrary stringwith one to eightcharacters (*)
Specify the prefix to be set as the host name.This key is only valid if "3" is specified for the "hostname-method" key.If this key is omitted, "VM-" will be used as the default value.
hostname-digits 1 to 7 Specify the number of digits for the serial number to be set for the host name.This key is only valid if "3" or "4" is specified for the "hostname-method" key.If this key is omitted, "7" will be used as the default value.
hostname-check yes/no This key specifies whether to check for duplicate host names.This key is only valid if "2" is specified for the "hostname-method" key.
yes: Returns a deployment error if the same host name exists on the serverwhere the system has been deployed.no: Does not return an error even if the same host name exists.If this key is omitted, "yes" will be used as the default value.
* Note: The characters that can be specified are alphanumeric characters and hyphens ("-"). However, the string cannot consist ofonly numbers.
A specification example is shown below:
Note
<properties version="1.0"> : <entry key="hostname-method">3</entry> <entry key="hostname-header">HOST-</entry> <entry key="hostname-digits">4</entry>
3. Save the file.
4. Restart the manager.Refer to "2.1 Starting and Stopping Managers" in the "Operation Guide CE" for information on how to Restart the manager.
18.4.2 Setting Form
Automatic generation
The following host name will be automatically generated:
VXXXXXXXXXNNNNXXXXXXXXX: Nine arbitrary alphanumeric characters (part of the system ID)NNNN: A four-digit serial number starting from 0001
This behavior is the original (default) behavior.
Server name
This method directly sets the host name to the string that the user has set as the "server name" in the Manager View.
The characters that can be specified for the server name are subject to the following restrictions:
Maximum string length For Windows OS, 15 characters.
For OSs other than Windows, 63 characters.
Characters that can be specified Alphanumeric characters or hyphens ("-").
However, the string cannot consist of only numbers.
A deployment error will occur if a string that does not match these restrictions is specified.
- 117 -

If "yes" has been specified for the "hostname-check" key, a deployment error will occur if you specify a server name that duplicates thename of a server that has already been deployed. (An error will also occur even if the server name duplicates the name of a server belongingto another organization.)
Note
When the host name is to be used in the L-Server name as the method for setting resource name, do not specify names starting with"SUNW" for the names of Solaris Zones servers.
Prefix + serial number
This method sets the host name to a string consisting of the string that the Template Manager has specified for the "hostname-header" keyin the definition file, followed by a serial number with the number of digits specified by "hostname-digits".
The serial number starts from 1 and is left padded with zeros.
The serial number that will be set for the next server to be deployed can be checked using the command for displaying a list of serialnumbers for host name settings (cfmg_listhostnamecounter).
Refer to "10.6 cfmg_listhostnamecounter (Display List of Serial Numbers for Host Name Settings)" in the "Reference Guide (Command/XML) CE" for information on this command.
Example
When "VM-" is specified for "hostname-header" and "7" is specified for "hostname-digits"
VM-0000001
A deployment error will occur if the serial number overflows.
Serial numbers are unique within the entire Admin Server, but are managed separately for each of the strings specified for "hostname-header".
If the serial number has overflowed, either reset the serial number using the command for resetting the serial number for host name settings(cfmg_resethostnamecounter) or change the value for "hostname-header" to enable systems to be deployed again.
Refer to "10.7 cfmg_resethostnamecounter (Reset Serial Numbers for Host Name Settings)" in the "Reference Guide (Command/XML)CE" for details
Note
- When Solaris Zones are being used and when the host name is to be used in the L-Server name as the method for setting resourcename, do not prefix starting with "SUNW" for the special string.
- Specify the prefix using eight or fewer alphanumeric characters and hyphens. Prefixes consisting solely of numbers are not allowed.
Tenant name + serial number
This method sets the host name to a string consisting of the tenant name for the user that made the deployment request, followed by aserial number with the number of digits specified for "hostname-digits".
The serial number starts from 1 and is left padded with zeros.
The serial number that will be set for the next server to be deployed can be checked using the command for displaying a list of serialnumbers for host name settings (cfmg_listhostnamecounter).
Refer to "10.6 cfmg_listhostnamecounter (Display List of Serial Numbers for Host Name Settings)" in the "Reference Guide (Command/XML) CE" for information on this command.
- 118 -

Example
When "DIV" is specified for the tenant name and "7" is specified for "hostname-digits"
DIV0000001
A deployment error will occur if the serial number overflows.
Serial numbers are managed separately for each organization ID.
If the serial number has overflowed, reset the serial number using the command for resetting the serial number for host name settings(cfmg_resethostnamecounter) to enable systems to be deployed again.
Refer to "10.7 cfmg_resethostnamecounter (Reset Serial Numbers for Host Name Settings)" in the "Reference Guide (Command/XML)CE" for information on this command.
Note
- Specify the prefix using eight or fewer alphanumeric characters and hyphens. Prefixes consisting solely of numbers are not allowed.
- The "tenant name + serial number" item is displayed in the "Setting method for host name" in the "Setup Wizard" only when "tenantname + serial number" is set here. "tenant name + serial number" is not displayed if another setting is set. Use this setting to changefrom another setting to "tenant name + serial number".
18.5 Setting the Method for Setting Resource NamesPoint
Setting the method for setting resource names allows the names of virtual servers created using L-PlatformSubscription (L-Server names)to be made to match any of the following. Performing this setting allows servers to be identified easily:
- Server ID
- Host name
- Server name
Note
Set the method for setting the resource names before commencing operations. This method cannot be switched once operations havecommenced.
In this product, the method for setting resource names for the L-Platform to be deployed can be selected from a number of methods.
The target resources are as follows:
- Folder
- L-Server
The following methods for setting resource names can be selected for these resources:
Folder name
Setting method number String set as the folder name
1 L-Platform ID (the default method)
2 Tenant name + serial number
3 Tenant name + L-Platform name
4 L-Platform name
- 119 -
L-Server name
Setting method number String set as the L-Server name
1 Server ID (the default method)
2 Host name
3 Server name
18.5.1 Setting Method
Point
Setting the Method for Setting Resource Names can be set by "Setup Wizard" on the ROR Console.
For details of "Setup Wizard", refer to "3.1 Setup Wizard" in the "User's Guide for Infrastructure Administrators CE".
Use the following procedure to specify the setting method:
1. Open the definition file in a text editor.
The definition file is stored in the following location:
[Windows Manager]
<installation_folder>\RCXCFMG\config\vsys_config.xml
[Linux Manager]
/etc/opt/FJSVcfmg/config/vsys_config.xml
2. Set the following items in the settings file:
Key name Setting range Content
folder-name-method 1 to 4 Specify the method for setting folder names.If this key is omitted, "1" will be used as the default value. The numbers correspond to the setting method numbers in the table in"Folder name".
lserver-name-method 1 to 3 Specify the method for setting L-Server names.If this key is omitted, "1" will be used as the default value.The numbers correspond to the setting method numbers in the table in "L-Server name".
A specification example is shown below:
Example
<properties version="1.0"> : <entry key="folder-name-method">2</entry> <entry key="lserver-name-method">2</entry>
3. Save the file.
4. Restart the manager.Refer to "2.1 Starting and Stopping Managers" in the "Operation Guide CE" for information on how to Restart the manager.
- 120 -

18.5.2 Setting Form
Folder name
The L-Platform deployed by ROR Console are in a 1:1 correspondence with folders.By changing the method for setting folder names, the L-Platform or tenant deployed by ROR Console can be made to correspond to foldersmore easily.
L-Platform ID
This method sets the L-Platform ID as the name of the folder corresponding to the L-Platform to be deployed.The L-Platform ID will be a string with 9 digits of random alphanumeric characters added to the first 8 characters of the tenant name.
Example
The result will be the following kind of string:
sosiki1-WCJFRUH6L
This setting is the default setting for ROR Console It is recommended that this setting method be used in operational situations wherethere is no need to have the L-Platform deployed by this product correspond to r folders.
Tenant name + serial number
The folder name corresponding to the L-Platform deployed will be the first eight letters of the tenant name and a four-digit serial number.
Example
The result will be the following kind of string:
sosiki1-0001
This string is not displayed in the L-Platform management window for ROR Console, and so in order to maintain correspondence betweenthe L-Platform deployed by this product and folders it is necessary to look up the system name and other information that have been setin the comment field for the folder.
It is recommended that this setting method be used when the correspondence between folders and each organization needs only to bemaintained for operational purposes.
Note
Do not use this setting method in environments where a cumulative total of 10,000 or more systems are expected to be deployed within asingle tenant.If a cumulative total of 10,000 or more systems are deployed, the deployment will be executed normally, but a serial number with five ormore digits will be added to the folder name.
Tenant name + L-Platform name
This method sets the tenant name followed by the L-Platform name specified with the L-Platform management window as the name ofthe folder corresponding to the L-Platform to be deployed.
Example
The result will be the following kind of string:
sosiki1-system1
- 121 -
Because the L-Platform name specified by the user is included within the folder name as shown above, it is easier to find the system withinthe ROR Console than the "L-Platform ID".However, with this setting method, the string specified for the L-Platform name must consist of no more than 23 characters (alphanumericcharacters, underscores and hyphens).
L-Platform name
The L-Platform name specified in the L-Platform applications window will be the name of the folder of the deployed L-Platform.As the folder name will use the L-Platform name specified by the user, it will be easier to find the L-Platform in the resource window ofthe ROR console than the "L-Platform ID".To use this setting, however, ensure that the L-Platform name starts with an alphanumeric, and uses up to 32 characters consisting ofalphanumerics, underscores, and hyphens.It is recommended that this setting method be used if there is no operational requirement to specify Japanese text for system names.
L-Server name
The servers deployed by this product correspond to the L-Servers.By changing the method for setting L-Server names, the servers deployed by ROR Console can be made to correspond to L-Servers moreeasily.
Server ID
This method sets the server ID as the name of the L-Server that corresponds to the server to be deployed.The server ID is a string where a four-digit serial number has been added to the L-Platform ID.
Example
The result will be the following kind of string:
sosiki1-WCJFRUH6L-S-0001
The server ID is not displayed in the L-Platform management window, and so in order to maintain correspondence between L-Serversand the servers deployed by ROR Console it is necessary to check the IP address and so on.
This setting method is the default setting for this product. It is recommended that this setting method be used in operational situations suchas when there is no need to have the servers deployed by ROR Console correspond to L-Servers.
Host name
This method sets the host name (computer name) as the name of the L-Server that corresponds to the server to be deployed.
The host name can be looked up in the operation window for the server virtualization software (such as VMware) and in guest operatingsystems. For this reason, it is recommended that this setting method be used when it is necessary to maintain server correspondence betweenthis product and the server virtualization software.
Note
If this setting has been performed with server virtualization software other than VMware, the host name will not be able to be changedwhen the server is active.Alternatively, if the "server name"(Setting Method:2) has been set in "18.4 Setting the Host Names for Virtual Servers", the server namewill not be able to be changed using L-Platform configuration modification when the server is active.
Server name
This method sets the server name specified with the L-Platform management window as the name of the L-Server that corresponds to theserver to be deployed.
It is recommended that this setting method be used in situations such as when there is a need to have the servers deployed by this productcorrespond to L-Servers.
- 122 -

However, with this setting method, the string specified for the server name must consist of no more than 64 characters (alphanumericcharacters, underscores and hyphens) that start with an alphanumeric character.
Note
- Do not specify names starting with "SUNW" for Solaris Zones server names.
- If this setting has been performed with server virtualization software other than VMware, the server name will not be able to be changedwhen the server is active.
18.6 Settings for the Overcommit FunctionThe overcommit function can virtually allocate more resources to guest operating systems than the total resources (such as CPU or memoryresources) installed on the server.
The overcommit function involves specifying the following kind of settings for CPU and memory:
Item name Content server virtualization software
VMware Hyper-V RHEL-KVM SolarisZones
CPU Performance Specify CPU performance of the virtual server. Y Y Y Y
CPU Reserved Specify the reserved CPU performance for the virtualserver.
Y Y N N
[VMware]CPU Shares
[Hyper-V]CPU Weight
Specify the relative allotment ratio for determining theallotment of memory size when multiple virtualmachines are competing for memory resources.
Y Y N N
Memory size Specify the memory size of the virtual server. Y Y Y Y
[VMware]Memory Reserved
[Hyper-V]Memory RAM
Specify the reserved memory size for the virtual server. N N N N
[VMware]Memory Shares
[Hyper-V]Memory Weight
Specify the relative allotment ratio for determining theallotment of memory size when multiple virtualmachines are competing for memory resources.
N N N N
Y: Can specify.
N: Cannot specify.
Note
- Settings for the overcommit function are required for all L-Server templates except the physical server used by this product.However, if the overcommit function is enabled, even a deployment (by selecting an L-Server template that has not been set up forthe overcommit function) will be executed as if it had been set up for the function.
- For virtual servers where the overcommit function has been enabled, resources will be consumed when the virtual server starts. Forthis reason, if the settings for reserved CPU performance and reserved memory capacity are less than minimum requirements for theoperating system to start, the virtual server may fail to start due to insufficient resources.
- Be sure to specify whether to enable or disable the overcommit function before operations commence. This attribute cannot be switchedonce operations have commenced.
- 123 -
Point
Refer to the following for more information about the overcommit function:
- Refer to "Chapter 15 L-Server Template Operations" in the "User's Guide for Infrastructure Administrators (Resource Management)CE".
- Refer to "20.2 Creating" in the "User's Guide for Infrastructure Administrators (Resource Management) CE".
- Refer to "8.7.1 Display Function Settings for Estimated Price" in the "Operation Guide CE".
- Refer to "8.7.4 Usage Charge Calculator Settings" in the "Operation Guide CE".
- Refer to "8.8 System Condition Server List Settings" in the "Operation Guide CE".
How to Use the Overcommit Function
To use the overcommit function, perform the following procedure:
1. Register an L-Server Template.
Refer to "Chapter 15 L-Server Template Operations" in the "User's Guide for Infrastructure Administrators (Resource Management)CE" for information on how to create and register L-Server Templates.
2. Set a definition file.
Point
Settings for the Overcommit Function can be set by "Setup Wizard" on the ROR Console.Refer to "3.1 Setup Wizard" in the "User's Guide for Infrastructure Administrators CE" for information on "Setup Wizard".
a. Open the definition file for this product in a text editor.
Set the following items in the settings file:
[Windows Manager]
[vsys_config.xml]
<installation_folder>\RCXCFMG\config\vsys_config.xml
[managerview_config.xml]
<installation_folder>\RCXCTMG\MyPortal\config\managerview_config.xml
[Linux Manager]
[vsys_config.xml]
/etc/opt/FJSVcfmg/config/vsys_config.xml
[managerview_config.xml]
/etc/opt/FJSVctmyp/config/managerview_config.xml
b. Add the following key and value:
[vsys_config.xml]
Key name Content
over-commit no : Disables the overcommit function (the default value). yes : Enables the overcommit function.
A specification example is shown below:
- 124 -
Example
<properties version="1.0"> : <entry key="over-commit">yes</entry>
[managerview_config.xml]
Key name Content
enable-overcommit false: Disables the overcommit function (the default value). true: Enables the overcommit function.
c. Save the file.
d. Restart the manager.
Refer to "2.1 Starting and Stopping Managers" in the "Operation Guide CE" for information on how to Restart the manager.
3. Set up VM pools.
If the overcommit function is enabled, set up all the VM pools that will be used to deploy L-Platforms to use the overcommitfunction.
Refer to "Chapter 20 Resource Pool Operations" in the "User's Guide for Infrastructure Administrators (Resource Management)CE" for information on setting up VM pools
18.7 Editing the Environment Setup File for the L-Platform APIUse the following procedure to edit the environment setup file:
1. Edit the environment setup file for the L-Platform APIs:
[command_config.xml]
[Windows Manager]
<installation_folder>\RCXCFMG\config\command_config.xml
[Linux Manager]
/etc/opt/FJSVcfmg/config/command_config.xml
2. Specify the following values:
l_platform-api-protcol:<Protocol for communicating with L-Platform API> (*1)l_platform-api-host:<Host name or IP address of server on which L-Platform API operates>l_platform-api-port:<Port number on which L-Platform API operates>l_platform-api-uri :<Path on which L-Platform API operates>output-char-set :<Command output results character code> (*2)
*1: https is set by default. Set a new value if the default value needs to be changed.*2: When the value is not specified, the default character code of the system will be output.The specifiable character code is "UTF-8".
A specification example is shown below:
Example
<entry key="l_platform-api-protocol">https</entry><entry key="l_platform-api-host">localhost</entry><entry key="l_platform-api-port">8014</entry>
- 125 -

<entry key="l_platform-api-uri">/cfmgapi/endpoint</entry><entry key="output-char-set">UTF-8</entry>
18.8 Settings when RHEL5-Xen is UsedWhen RHEL5-Xen is used as server virtualization software, it is necessary to set the default value of MAC address to allocate to virtualservers.
Follow the procedure below to use RHEL5-Xen.
1. Use the editor to open the settings file.
The settings file is stored in the following location:
[Windows Manager]
<installation_folder>\RCXCFMG\config\vsys_config.xml
[Linux Manager]
/etc/opt/FJSVcfmg/config/vsys_config.xml
2. Set the following items in the settings file:
Key name Content
default-macaddress One of the names of the MAC address set resources that have been registered with the resourcemanagement
3. Save the file.
4. Restart the manager.
Refer to "2.1 Starting and Stopping Managers" in the "Operation Guide CE" for information on how to Restart the manager.
Note
When RHEL5-Xen is used as server virtualization software, this setting is necessary.If it is omitted, L-Platform subscription applications will result in an error and L-Platforms cannot be created.
18.9 System Disk Settings for Physical L-ServersThe following explanation describes how to modify settings when using an existing disk as the system disk for the physical L-Serverdeployed from the L-Platform window.
Point
System Disk Settings for Physical L-Servers can be set by "Setup Wizard" on the ROR Console.Refer to "3.1 Setup Wizard" in the "User's Guide for Infrastructure Administrators CE" for information on "Setup Wizard".
Note
Set whether to use an existing disk before commencing operations. This cannot be changed once operations have commenced.
Usage Method
Implement the following procedures when using an existing disk as the physical L-Server system disk:
- 126 -
1. Use the editor to open the settings file.
The settings file is stored in the following location:
[Windows Manager]
<installation_folder>\RCXCFMG\config\vsys_config.xml
[Linux Manager]
/etc/opt/FJSVcfmg/config/vsys_config.xml
2. Set the following items in the settings file:
Key name Content
existing-disk-mode no: Does not use existing disk (This is the default value)yes: Uses existing disk
A specification example is shown below:
Example
<properties version="1.0"> : <entry key="existing-disk-mode">yes</entry>
3. Save the file.
4. Restart the manager.
Refer to "2.1 Starting and Stopping Managers" in the "Operation Guide CE" for information on how to Restart the manager.
18.10 Setting for the Restarting ManagersBy default, the manager services restart at 3:45 am everyday for stable system operation.The settings for restarting can be changed depending on the authority level.Refer to "Restarting Managers" of the "Appendix A Notes on Operating ServerView Resource Orchestrator" in the "Operation Guide CE"for information on how to restart the manager.
18.11 Changing Multiple Operations of ManagersWhen executing multiple operations simultaneously, the upper limit is set for the number of simultaneous operations.The upper limit of the number of simultaneous operations can be changed depending on the usage environment.Refer to "Changing Multiple Operations of Managers" of the "Appendix A Notes on Operating ServerView Resource Orchestrator" in the"Operation Guide CE" for information on how to change multiple operations of managers.
18.12 Editing the License AgreementThis section explains how to edit the license agreement that is displayed in the L-Platform management window.
There are three license agreements as follows:
- License agreement when subscribing to the L-Platform
- License agreement when reconfiguring the L-Platform
- License agreement when canceling the L-Platform
Storage locations
Edit the following files to edit the license agreements:
- 127 -

[Windows Manager]
License agreement when subscribing to the L-Platform <installation_folder>\RCXCTMG\MyPortal\config\license\create\default
License agreement when reconfiguring the L-Platform <installation_folder>\RCXCTMG\MyPortal\config\license\reconfigure\default
License agreement when canceling the L-Platform <installation_folder>\RCXCTMG\MyPortal\config\license\return\default
[Linux Manager]
License agreement when subscribing to the L-Platform /etc/opt/FJSVctmyp/config/license/create/default
L License agreement when reconfiguring the L-Platform
/etc/opt/FJSVctmyp/config/license/reconfigure/default
License agreement when canceling the L-Platform /etc/opt/FJSVctmyp/config/license/return/default
Note
- The agreements window is not displayed if the file does not exist. Do not delete the file.
- After editing the license agreement, back up the file.
Settings
Write the license agreement in the file.
- The character-code of the file is UTF-8.
- The agreements window may be slow in displaying when the there are more than 10,000 characters.
- The initial values for the files shows the storage locations and entry examples. Edit the file as required.The following are the initial values for the license agreement when subscribing to the L-Platform:
To install and operate, edit the following file.[Windows][installation_folder]\RCXCTMG\MyPortal\config\license\create\default
[Linux]/etc/opt/FJSVctmyp/config/license/create/default
[Description example]L-Platform subscription license agreement...
Example of settings
The following is an example of the license agreement when subscribing to the L-Platform:
L-Platform subscription license agreementThe following actions involving the use of the L-Platform are not permitted. To use this L-Platform for personal use To use this L-Platform under false identity
18.13 Editing the User Agreement when Registering a UserThis section explains how to edit the user agreement that is displayed in the Register User window when a new tenant user is to performa registration procedure.To edit the user agreement, edit the following HTML file:
If the user agreement has been edited, collect a backup of the HTML file after the edit.
- 128 -
[Windows Manager]
<installation_folder>\IAPS\F3FMihs\servers\FJapache\htdocs\sopdocs\pub\html\en\cRegApply_agreement.forUse_en.html
[Linux Manager]
/var/opt/FJSVihs/servers/FJapache/htdocs/sopdocs/pub/html/en/cRegApply_agreement.forUse_en.html
Note
If the HTML file does not exist, the Register User window will not be displayed. The HTML file must not be deleted.
Settings
The user agreement must be written in a section defined with the <body> tag in the HTML file.
- Edit according to the HTML syntax.
- Only the section defined with the <div> tag can be edited. Do not edit a section outside the <div> tag. When a section outside the<div> tag is edited, the user agreement may not be displayed properly when a user is added.
- The following is written as the initial value in the section defined with the <div> tab in the HTML file. Edit the section as required tosuit your usage.
<body><div id="iframeHeight" style="font-size:small;">To install and operate, edit the following file.<br>[Windows]<br> <installation_folder>\IAPS\F3FMihs\servers\FJapache\htdocs\sopdocs\pub\html\en\cRegApply_agreement.forUse_en.html<br><br>[Linux] /var/opt/FJSVihs/servers/FJapache/htdocs/sopdocs/pub/html/en/cRegApply_agreement.forUse_en.html<br><br>[Description example]<br><br>Article 1 GENERAL RULES <br><br>Section 1 (Application of User Agreement)This agreement defines the conditions required to grant the user the use of XXXX service (hereafter referred to as "the service") supplied by XXXX. <br> <br> <br> <br><br>Supplementary provision <br>1.This agreement takes effect on 20XX/XX/XX. <br><br></div></body>
Example of settings
<body><div id="iframeHeight" style="font-size:small;">The following actions involving the use of the service are not permitted.<br><br> To collect personal information other than that of one's own through fraudulent means or without agreement of the owner of the information<br> To falsify or delete information that this service may use<br> To use this service under false identity<br>
- 129 -
<br>Supplementary provision<br>1.This agreement takes effect on 1 November 2011.<br><br></div></body>
18.14 Setting the Database for the Dashboard (Pool Conditions)Perform setting of the database to use for dashboard (pool conditions).
Setting Method
Perform the following procedure:
1. Estimate the numbers of pools that will be set in the future and L-Server templates.
Pools and L-Server templates refer to the following.
- VM pools, server pools, storage pools, network pools, and address pools
- Virtual L-Server templates and physical L-Server templates
Note
By default, local pools will be created automatically.When you have estimated the number of pools, include them in your estimate.
2. Using the following files, calculate the required FSM (Free Space Map) value from the numbers of pools and L-Server templatesestimated in the step 1.
[Windows Manager]
Installation_folder\RCXCTMG\Dashboard\setup\files\documents\dsb_fsm.xls
[Linux Manager]
/opt/FJSVctdsb/documents/dsb_fsm.xls
Use the Excel format in Windows environments.
Enter the numbers in the thick black frames on the "FSM Calculation" sheet.
The calculated FSM value will be output at the "FSM Value".
3. Make backups of database (PostgreSQL) configuration files of dashboard (pool conditions).
Back up the postgresql.conf files in the following directories.
[Windows Manager]
Installation_folder\RCXCTMG\Dashboard\var\pgsql\db
[Linux Manager]
/var/opt/FJSVctdsb/pgsql/db
Copy source file name: postgresql.conf
Copy destination file name: postgresql.conf.org
4. Edit the parameter value of the postgresql.conf file and save the file.
Parameter to be edited: max_fsm_pages = xxxxxx
Value to set: the value calculated value in step 2 FSM values ("FSM Calculation" sheet: yellow)
- 130 -
5. Restart dashboard (pool conditions).
Perform the following procedure:
a. Stop dashboard (pool conditions) by executing the following command.
[Windows Manager]
Installation_folder\RCXCTMG\Dashboard\bin\dsb_pool_stop
[Linux Manager]
/opt/FJSVctdsb/bin/dsb_pool_stop.sh
b. Start dashboard (pool conditions) by executing the following command.
[Windows Manager]
Installation_folder\RCXCTMG\Dashboard\bin\dsb_pool_start
[Linux Manager]
/opt/FJSVctdsb/bin/dsb_pool_start.sh
Information
Use the following methods to count numbers of pools and L-Server templates which are currently active with Resource Orchestrator.When the numbers of pools and L-Server templates exceed the estimated numbers during operation, perform this setting again.
- Number of pools
Display a list of pools using the rcxadm pool list command.
Count the number of pools with the "TYPE" VM, Server, Storage, Network, and Address in the displayed list.
TYPE Description
VM VM pools
Server Srver pools
Storage Storage pools
Network Network pools
Address Address pools
- Number of L-Server templates
Display a list of L-Server templates using the rcxadm template list command.
Count the number of L-Server templates displayed in the list with the "TYPE" Virtual or Physical.
TYPE Description
Virtual Virtual L-Server templates
Physical Physical L-Server templates
- 131 -
Chapter 19 Saving Environment SettingsThis chapter explains how to save environment settings.
The configuration of a Resource Orchestrator setup can be saved to guard against unexpected problems. Use the admin server backupfunction and troubleshooting data collection command to save settings.This troubleshooting data can be used in conjunction with the data later collected when a problem occurs for a more effective investigation,and should therefore be stored with caution.
See
- For details on the admin server backup command, refer to "10.1 Backup and Restoration of Admin Servers" in the "Operation GuideCE".
- For collecting troubleshooting data, refer to "1.3 Collecting Troubleshooting Data (Cloud Edition)".
- 132 -
Chapter 20 UninstallationThis chapter explains the uninstallation of FUJITSU Software ServerView Resource Orchestrator.
The uninstallation of managers, agents, and the HBA address rename setup service is performed in the following order:
1. Manager Uninstallation
Refer to "20.1 Manager Uninstallation".
2. Agent (Dashboard Function) Uninstallation
Refer to "20.3 Agent (Dashboard Function) Uninstallation".
3. Agent Uninstallation
Refer to "20.2 Agent Uninstallation".
4. HBA address rename setup service Uninstallation
For uninstallation, refer to "20.4 HBA address rename Setup Service Uninstallation".
When uninstalling a Resource Orchestrator manager, specify Resource Orchestrator using "Uninstall (middleware)" first, and uninstallthe manager."Uninstall (middleware)" is a common tool for Fujitsu middleware products.
The Resource Orchestrator Manager is compatible with "Uninstall (middleware)".
When a Resource Orchestrator Manager is installed, "Uninstall (middleware)" is installed first, and then "Uninstall (middleware)" willcontrol the installation and uninstallation of Fujitsu middleware products. If "Uninstall (middleware)" has already been installed, theinstallation is not performed.
For the uninstallation of Uninstall (middleware), refer to "20.5 Uninstallation of "Uninstall (Middleware)"".
20.1 Manager UninstallationThe uninstallation of managers is explained in the following sections.
The procedure for manager uninstallation is given below.
- Preparations
Refer to "20.1.1 Preparations".
- Unsetup
Refer to "20.1.2 Unsetup".
- Uninstallation
Refer to "20.1.3 Uninstallation [Windows Manager]" or "20.1.4 Uninstallation [Linux Manager]".
20.1.1 PreparationsThis section explains the preparations and checks required before commencing uninstallation.
Pre-uninstallation Advisory Notes
- Executing unsetup
Be sure to execute unsetup before commencing uninstallation.If setup has not been executed, however, unsetup is not necessary.For details, refer to "20.1.2 Unsetup".
- Checking physical L-Server system images and cloning images
The L-Server generated by this product and system and cloning images collected by this product are deleted.
- 133 -
If changed from the default, it remains in the directory storing the image file.
- Checking HBA address rename
When using HBA address rename, the manager sets the WWN for the HBA of each managed server.When uninstalling a manager be sure to do so in the following order:
1. Delete servers (*)
2. Uninstall the manager
* Note: For the server deletion method, refer to "9.2 Deleting Managed Servers" in the "User's Guide for Infrastructure Administrators(Resource Management) CE".
Note
When using HBA address rename, if the manager is uninstalled without servers being deleted, the WWNs of the servers are not resetto the factory default values.Ensure uninstallation of managers is performed only after servers are deleted.
When operating without resetting the WWN, if the same WWN is setup on another server, data may be damaged if the volume isaccessed at the same time.
- Back up (copy) certificates
When operating managers in cluster environments, back up (copy) certificates before performing uninstallation.
Manager certificates are stored in the following folders:
[Windows Manager]Drive_name:\Fujitsu\ROR\SVROR\certificate
[Linux Manager]Shared_disk_mount_point/Fujitsu/ROR/SVROR
- Definition files
All definition files created for using Resource Orchestrator will be deleted.If the definition files are necessary, before uninstalling Resource Orchestrator back up (copy) the folder below to another folder.
[Windows Manager]Installation_folder\SVROR\Manager\etc\customize_data
[Linux Manager]/etc/opt/FJSVrcvmr/customize_data
- Security files used for issuing Navisphere CLI
All security files for Navisphere created for using EMC storage will be deleted.If the security files are necessary, before uninstalling Resource Orchestrator back them up (copy them).
20.1.2 UnsetupThis section explains the procedure for manager unsetup.
Unsetup
For manager unsetup, execute the unsetup command.
Unsetup is executable from either the media or the extracted module.
[Windows Manager]
1. Log in as the administrator.
- 134 -

2. Execute the unsetup command.
- When executing from the media
>Installation_medium\RcSetup.exe <RETURN>
- When executing from the extracted module
>Installation_folder\SVROR\Manager\sys\setup\RcSetup.exe <RETURN>
3. Select unsetup from the menu to execute the unsetup command.
4. Check the execution results of the unsetup command.
- When unsetup is successful
The following message is displayed.
INFO : Resource Orchestrator Cloud Edition unsetup successfully.
- When unsetup fails
The following message is displayed.
ERROR : Resource Orchestrator Cloud Edition unsetup failed.
Collect troubleshooting information and contact Fujitsu technical staff.
[Linux Manager]
1. Log in to the system as the OS administrator (root).
2. Execute the unsetup command.
- When executing from the media
# Installation_medium/RcSetup.sh <RETURN>
- When executing from the extracted module
# /opt/FJSVrcvmr/sys/setup/RcSetup.sh <RETURN>
3. Select unsetup from the menu to execute the unsetup command.
4. Check the execution results of the unsetup command.
- When unsetup is successful
The following message is displayed.
INFO : Resource Orchestrator Cloud Edition unsetup successfully.
- When unsetup fails
The following message is displayed.
ERROR : Resource Orchestrator Cloud Edition unsetup failed.
Collect troubleshooting information and contact Fujitsu technical staff.
20.1.3 Uninstallation [Windows Manager]The procedure for manager uninstallation is given below.
Before uninstalling this product, check that the preparations given in "20.1.1 Preparations" have been performed.
- 135 -

1. Log on to Windows as the administrator.
Log on to the system from which the manager is to be uninstalled. Log on using the Administrator account.
2. Execute the following command.
Installation_folder\SWRBAM\F4ANswnc\bin\swncctrl stop <RETURN>
3. Start the uninstaller. Select [Start]-[All Programs]-[Fujitsu]-[Uninstall (middleware)] from the Windows menu. Click the productname then <Remove>, and the uninstallation window will open.
Information
The services of Resource Orchestrator are automatically stopped and deleted.
The start-up account created during installation is not automatically deleted.When the account is not necessary, delete it. However, do not delete the account if it is also used for other purposes.
Information
Deletion Methods for Windows User AccountsOpen "Computer Management" from "Administrative Tools" on the Windows Control Panel, then select [Local Users and Groups]-[Users]on the [Computer Management] window.Right-click the user account to be deleted, and then select [Delete] from the displayed menu.
Note
- During uninstallation, certificates are backed up to the following folders. When reinstalling a manager and using the same certificates,copy the backed up certificates to the appropriate folders below.
- Installation_folder\SVROR\back\site\certificate
- Installation_folder\SVROR\back\domain\certificate
If the certificates backed up on uninstallation are not necessary, delete them manually.
- Any updates that have been applied to Resource Orchestrator will be deleted during uninstallation.However, if updates have been applied to the products listed in "Patches to Apply after Upgrade" of "2.1.1.6 Installation", delete theseupdates and then perform uninstallation.
- If a manager is uninstalled and then reinstalled without agents being deleted, it will not be able to communicate with agents usedbefore uninstallation.In this case, the certificates to indicate that it is the same manager are necessary.After installation, manager certificates are stored in the following folder:
- Installation_folder\SVROR\Manager\etc\opt\FJSVssmgr\current\certificate
- Installation_folder\SVROR\Manager\etc\opt\FJSVrcxdm\certificate
When uninstalling the manager, the certificates are backed up in the following folder. When reinstalling a manager and using the samecertificates, copy the backed up certificates to the appropriate folders.
- Installation_folder\SVROR\back\site\certificate
- Installation_folder\SVROR\back\domain\certificate
If the certificates backed up on uninstallation are not necessary, delete them manually.
When operating managers in cluster environments, back up the certificates as indicated in the preparations for uninstallation.When reinstalling a manager in a cluster environment and using the same certificates, copy the backed up certificates from the primarynode to the above folders.
- 136 -
- After uninstallation, folders and files may remain. Delete the following folders (along with contained files and sub-folders) and files.
- Installation_folder (by default, C:\Fujitsu\ROR or C:\ProgramFiles(x86)\Resource Orchestrator) and its contents
- IAPS
- IBPM
- IBPMA
- IBPMA_DATA
- J2EE
- SQCM
- SQC_CL
- SQC_DATA
- RCXCFMG
- RCXCFMG-upgradedata (remains when upgrade installation is performed)
- RCXCTMG
- RCXCTMG-upgradedata (remains when upgrade installation is performed)
- ROR_upgradedata (remains when upgrade installation is performed)
- SVROR
- SWOMGR
- SWRBAM
When Systemwalker Runbook Automation has been installed, delete the following folders and files, after uninstalling SystemwalkerRunbook Automation.
- IAPS
- IBPM
- IJEE
- J2EE
- SWOMGR
- SWRBAM
- Deletion may fail due to locked files. Restart the OS and then delete them.
- The "%SystemDrive%\ProgramData" folder is not displayed on Explorer as it is a hidden folder.To look into the folder, specify the folder name directly, or go to [Organize]-[Folder and search options] of Explorer, select the [View]tab, and enable "Show hidden files, folders, and drives" under [Hidden files and folders].
- Setting information of the DHCP server modified using Resource Orchestrator will not be initialized after uninstallation. Performinitialization if necessary.
- After uninstallation of Resource Orchestrator, the automatic startup settings of the DHCP server (dhcpd) become "OFF" and the serviceis stopped.
- After uninstallation, when a password has been saved using the rcxlogin command, the password saved in the following folder remainsfor each OS user account on which the rcxlogin command was executed. When re-installing the manager, delete it.
Folder_set_for_each_user's_APPDATA_environment_variable\Systemwalker Resource Coordinator\
- After uninstallation, the following files may remain under the system drive. If they are not necessary, delete them.
- F4ANsetup.log
- swinst.err
- 137 -
- swrba_inst.log
- swrba_uninst.log
- If the problem persists, please collect troubleshooting information and contact Fujitsu technical staff.
20.1.4 Uninstallation [Linux Manager]The procedure for manager uninstallation is given below.
Before uninstalling this product, check that the preparations given in "20.1.1 Preparations" have been performed.
1. Log in to the system as the OS administrator (root).
2. Execute the following command.
# /opt/FJSVswnc/bin/swncctrl stop <RETURN>
3. Execute the following command.
# isstop -f <RETURN>
4. Execute the following command.
# ismngconsolestop <RETURN>
5. If the Interstage HTTP Server service is already started, stop the service.
Confirm the value of "Status" using the ihsdisp command.Execute the ihsstop command with "-all" option if a Web Server, which "Status" value is "Running", exists.
# /opt/FJSVihs/bin/ihsdisp <RETURN>Web Server Name : FJapacheStatus : RunningConfiguration File: /opt/FJSVihs/servers/FJapache/conf/httpd.confServer Version : FJapache/10.0Current Time : Wednesday, 13-Jun-2012 13:27:53Start Time : Wednesday, 13-Jun-2012 13:25:54Daemon Process ID : 11888Child Process ID : 11894 11895 11896 11897 11898Listening Port : [::]:800 requests currently being processed, 5 idle servers
# /opt/FJSVihs/bin/ihsstop -all <RETURN>
6. If the Interstage Java EE DAS service is already started, stop the service.
Confirm the value of "Status" using the ijdasstat command.Execute the ijdasstop command if the value of "Status" is "started".
# /opt/FJSVisjee/bin/ijdasstat <RETURN>Name Status--------------------------------------Interstage Java EE DAS started
# /opt/FJSVisjee/bin/ijdasstop <RETURN>
7. If the Interstage Java Node Agent service is already started, stop the service.
Confirm the value of "Status" using the ijnastat command.Execute the ijnastop command if the value of "Status" is "started".
- 138 -
# /opt/FJSVisjee/bin/ijnastat <RETURN>Name Status---------------------------------------Interstage Java EE Node Agent started
# /opt/FJSVisjee/bin/ijnastop <RETURN>
8. If Interstage Directory Service is being used, stop all the repositories of the service.
Detect the active repositories using the ireplist command, and then stop all of them using the irepstop command.
# ireplist <RETURN>No Repository Status-- ---------- -------- 1 rep001 Active
# irepstop -R rep001 <RETURN>
9. Launch the uninstallation command (cimanager.sh).
Perform uninstallation according to the uninstaller's interactive instructions.
# /opt/FJSVcir/cimanager.sh -c <RETURN>
Note
- When the PATH variable has been configured to enable execution of UpdateAdvisor (Middleware) commands from a user-definedlocation, performing uninstallation will delete any patches that have been applied to Resource Orchestrator so there is no need to returnit to the state prior to application.However, in the following cases, unapply patches before performing uninstallation.
- The PATH variable has not been configured.
- Updates have been applied to the products listed in "Patches to Apply after Upgrade" of "2.1.2.6 Installation"
- If a manager is uninstalled and then reinstalled without agents being deleted, it will not be able to communicate with agents usedbefore uninstallation.In this case, the certificates to indicate that it is the same manager are necessary.After installation, manager certificates are stored in the following directory:
/etc/opt/FJSVrcvmr/opt/FJSVssmgr/current/certificate
- When uninstalling the manager, the certificates are backed up in the following directory.When reinstalling a manager and using the same certificates, copy the backed up certificates to the above folder.
/var/tmp/back/site/certificate
- If the certificates backed up on uninstallation are not necessary, delete them manually.When operating managers in cluster environments, back up the certificates as indicated in the preparations for uninstallation.When reinstalling a manager in a cluster environment and using the same certificates, copy the backed up certificates from the primarynode to the above folders.
- After uninstallation, the installation directories below may remain. In that case, delete any remaining directories manually.
- /opt/FJSVawjbk
- /opt/FJSVctchg
- /opt/FJSVctdsb
- /opt/FJSVctmg
- /opt/FJSVctmyp
- /opt/FJSVctope
- /opt/FJSVctpw
- 139 -

- /opt/FJSVctsec
- /opt/FJSVena
- /opt/FJSVibpma
- /opt/FJSVisscs
- /opt/FJSVssqc
- /opt/FJSVtd (Confirm whether directories in this directory can be deleted referring to the caution below.)
- /etc/opt/FJSVctchg
- /etc/opt/FJSVctmg
- /etc/opt/FJSVctmyp
- /etc/opt/FJSVctope
- /etc/opt/FJSVctpw
- /etc/opt/FJSVctsec
- /etc/opt/FJSVibpma
- /etc/opt/FJSVirep
- /etc/opt/FJSVisas
- /etc/opt/FJSVisgui
- /etc/opt/FJSVisscs
- /etc/opt/FJSVod
- /etc/opt/FJSVssqc
- /var/opt/FJSVcfmg
- /var/opt/FJSVctchg
- /var/opt/FJSVctdsb
- /var/opt/FJSVctmg
- /var/opt/FJSVctmyp
- /var/opt/FJSVctsec
- /var/opt/FJSVena
- /var/opt/FJSVibpma
- /var/opt/FJSVirep
- /var/opt/FJSVisas
- /var/opt/FJSVisgui
- /var/opt/FJSVisjmx
- /var/opt/FJSVisscs
- /var/opt/FJSVssqc
- /var/opt/FJSVswrbam
- /var/opt/FJSVtd
- root_account_home_directory/InstallShield
- Do not delete /opt/FJSVtd/var/IRDB.
- 140 -
- After uninstallation, when a password is saved using the rcxlogin command, the password saved in the following directory remainsdepending on the user account for an OS on which the rcxlogin commands are executed. When re-installing the manager, delete it.
/Directory_set_for_each_user's_HOME_environment_variable/.rcx/
- Setting information of the DHCP server modified using Resource Orchestrator will not be initialized after uninstallation of ResourceOrchestrator. Perform initialization if necessary.
- After uninstallation of Resource Orchestrator, the DHCP server service (dhcpd) is stopped.
20.1.5 Post-uninstallation ProcedureThis section explains the procedures to be taken after manager uninstallation.
If necessary, delete the users registered in the directory service.If necessary, delete the IflowUsers group registered in the directory service.
20.1.5.1 Fujitsu XML Processor Uninstallation [Windows Manager]This section explains the uninstallation of the Fujitsu XML Processor.
Note
Confirm that other products are not using it before performing uninstallation.
[Add or Remove Programs] ([Programs and Functions] on Windows Server 2008 or later) displays an old version of the Fujitsu XMLProcessor. If it is not necessary, uninstall it as well.
The procedure for uninstallation of the Fujitsu XML Processor is given below:
1. Log in using an account belonging to the Administrators group.
2. Start the uninstaller.
Open [Add or Remove Programs] from the Windows Control Panel.
Select "Fujitsu XML Processor V5.2.4" and then click <Remove>.
Information
For Windows Server 2008 or later, select [Programs and Features] from the Windows Control Panel.
3. A confirmation message for continuing uninstallation will be displayed.
To execute uninstallation, click <OK>.To cancel, click <Cancel>.
4. Execute uninstallation.
The program removal window will open.The program and the relevant registry information will be removed.
20.1.5.2 SMEE Uninstallation [Linux]This section explains the uninstallation of SMEE.
- 141 -
Note
Confirm that other products are not using it before performing uninstallation.
The procedure for uninstallation of SMEE is given below.
1. Log in to the system as the superuser (root).
2. Use the rpm command to uninstall the package.
# rpm -e FJSVsmee <RETURN>
20.1.5.3 Securecrypto Library RunTime Uninstallation [Linux]This section explains the uninstallation of Securecrypto Library RunTime.
Note
Confirm that other products are not using it before performing uninstallation.
The procedure for uninstallation of Securecrypto Library RunTime is given below.
1. Log in to the system as the superuser.
2. Use the rpm command to uninstall the package.
# rpm -e FJSVsclr <RETURN>
20.1.5.4 Groups Remaining after UninstallationThe iscertg and swadmin groups have been created. If it is not necessary, delete this group.
20.1.5.5 Cautions about SMEE and Securecrypto Library RunTime Uninstallation [Linux]After SMEE and Securecrypto Library RunTime uninstallation, the following folders will remain. Confirm that other products are notusing them, and delete them manually if they are not necessary.
Delete any remaining files and folders contained in these folders as well.
- /opt/FJSVsmee
- /etc/opt/FJSVsclr
20.1.5.6 Deleting the Registered Certificate of ServerView Operations ManagerThis section explains the procedure for deleting the registered certificate.Delete the registered certificate if you regularly use ServerView Operations Manager.
[Windows Manager]
The CA certificate(keystore) of ServerView Operations Manager is stored in the following location:
- ServerView Operations Manager V6.1 or later
ServerView Suite Installation_folder\jboss\standalone\svconf\pki\cacerts
- 142 -

- Earlier than ServerView Operations Manager V6.1
ServerView Suite Installation_folder\jboss\server\serverview\conf\pki\cacerts
An example of deleting the registered certificate is as follows:
Example
> RJE Installation_folder\bin\keytool.exe -delete -alias alias -keystore "C:\Program Files (x86)\Fujitsu\ServerView Suite\jboss\server\serverview\conf\pki\cacerts"<RETURN>
Enter destination keystore password:<jboss certificate creation environment password>
Specify "testcert" or "Certificate nickname" registered in "3.3 Importing a Certificate to ServerView SSO Authentication Server" asthe alias.The default password for the jboss certificate creation environment is "changeit".
[Linux Manager]
The CA certificate(keystore) of ServerView Operations Manager is stored in the following location:
- ServerView Operations Manager V6.1 or later
/opt/fujitsu/ServerViewSuite/jboss/standalone/svconf/pki/cacerts
- Earlier than ServerView Operations Manager V6.1
/opt/fujitsu/ServerViewSuite/jboss/server/serverview/conf/pki/cacerts
An example of deleting the registered certificate is as follows:
Example
# RJE Installation_directory/bin/keytool -delete -alias alias -keystore /opt/fujitsu/ServerViewSuite/jboss/server/serverview/conf/pki/cacerts<RETURN>
Enter destination keystore password:<jboss certificate creation environment password>
Specify "testcert" or "Certificate nickname" registered in "3.3 Importing a Certificate to ServerView SSO Authentication Server" asthe alias.The default password for the jboss certificate creation environment is "changeit".
20.2 Agent UninstallationThe uninstallation of agents is explained in the following sections.
If the agent (Dashboard Function) has been installed, when the agent is uninstalled, the agent (Dashboard Function) is also uninstalled.
20.2.1 Uninstallation [Windows] [Hyper-V]This section explains the procedure for uninstallation of agents.
1. Log on to Windows as the administrator.
Log on to the system from which the agent is to be uninstalled. Log on using the Administrator account.
2. Delete agents.
Open "Add or Remove Programs" from the Windows Control Panel, and if "ServerView Resource Orchestrator Agent" is notdisplayed on the [Add or Remove Programs] window, delete any remaining resources manually.
- 143 -
Information
For Windows Server 2008 or later, select "Programs and Features" from the Windows Control Panel.
3. The [Confirm Uninstall] dialog will be displayed.
Click <OK>.
Information
The services of Resource Orchestrator are automatically stopped and deleted.
4. When uninstallation is completed, the confirmation window will be displayed.
Click <Finish>.
Note
- Any updates that have been applied to Resource Orchestrator will be deleted during uninstallation.
However, if the agent (Dashboard Function) is installed, unapply patches before performing uninstallation.
- When uninstallation is stopped due to errors (system errors or processing errors such as system failure) or cancellation by users,resolve the causes of any problems, and then attempt uninstallation again.
If uninstallation fails even when repeated, the executable program used for uninstallation may have become damaged somehow.
In this case, set the first Resource Orchestrator DVD-ROM, open the command prompt, and execute the following command:
>"DVD-ROM_drive\DISK1\Agent\Windows\agent\win\setup.exe" /z"UNINSTALL" <RETURN>
Open "Add or Remove Programs" from the Windows Control Panel, and if "ServerView Resource Orchestrator Agent" is notdisplayed on the [Add or Remove Programs] window, delete any remaining folders manually.
Information
For Windows Server 2008 or later, select "Programs and Features" from the Windows Control Panel.
20.2.2 Uninstallation [Linux] [VMware] [Xen] [KVM]This section explains the procedure for uninstallation of agents.
1. Log in to the system as the OS administrator (root).
Log in to the managed server from which Resource Orchestrator will be uninstalled, using root.
2. Execute the rcxagtuninstall command.
Executing this command performs uninstallation, and automatically deletes the packages of Resource Orchestrator.
# /opt/FJSVrcxat/bin/rcxagtuninstall <RETURN>
When uninstallation is completed successfully, the following message will be displayed.
INFO : ServerView Resource Orchestrator Agent was uninstalled successfully.
If uninstallation fails, the following message will be displayed.
ERROR : Uninstalling package_name was failed.
- 144 -

Information
When the uninstaller of Resource Orchestrator is started, its services are stopped.
3. If uninstallation fails, use the rpm command to remove the packages given in the message, and start the process from step 1 again.
# rpm -e package_name <RETURN>
Note
- When the PATH variable has been configured to enable execution of UpdateAdvisor (Middleware) commands from a user-definedlocation, performing uninstallation will delete any patches that have been applied to Resource Orchestrator, so there is no need toreturn it to the state prior to application.
However, in the following cases, unapply patches before performing uninstallation.
- The PATH variable has not been configured.
- The agent (Dashboard Function) has been installed.
- After uninstallation, the installation directories and files below may remain. In that case, delete any remaining directories and filesmanually.
Directories
- /opt/FJSVnrmp
- /opt/FJSVrcxat
- /opt/FJSVrcximg
- /opt/FJSVrcxkvm
- /opt/FJSVssagt
- /opt/FJSVssqc
- /opt/systemcastwizard
- /etc/opt/FJSVnrmp
- /etc/opt/FJSVrcxat
- /etc/opt/FJSVssagt
- /etc/opt/FJSVssqc
- /var/opt/systemcastwizard
- /var/opt/FJSVnrmp
- /var/opt/FJSVrcxat
- /var/opt/FJSVssagt
- /var/opt/FJSVssqc
Files
- /boot/clcomp2.dat
- /etc/init.d/scwagent
- /etc/scwagent.conf
- 145 -

20.2.3 Uninstallation [Solaris] [Solaris Zones] [OVM for SPARC]This section explains the procedure for uninstallation of agents.
1. Log in to the system as the OS administrator (root).
Log in to the managed server from which Resource Orchestrator will be uninstalled, using root.
2. Execute the rcxagtuninstall command.
Executing this command performs uninstallation, and automatically deletes the packages of Resource Orchestrator.
# /opt/FJSVrcvat/bin/rcxagtuninstall <RETURN>
When uninstallation is completed successfully, the following message will be displayed.
INFO : ServerView Resource Orchestrator Agent was uninstalled successfully.
If uninstallation fails, the following message will be displayed.
ERROR : Uninstalling package_name was failed.
Information
When the uninstaller of Resource Orchestrator is started, its services are stopped.
If uninstallation fails, use the pkgrm command to remove the packages given in the message, and start the process from step 1 again.
# pkgrm package_name <RETURN>
Note
- When the PATH variable has been configured to enable execution of UpdateAdvisor (Middleware) commands from a user-definedlocation, performing uninstallation will delete any patches that have been applied to Resource Orchestrator, so there is no need toreturn it to the state prior to application.However, in the following cases, unapply patches before performing uninstallation.
- The PATH variable has not been configured.
- The agent (Dashboard Function) has been installed.
- After uninstallation, the installation directories below may remain. In that case, delete any remaining directories manually.
- /opt/FJSVrcvat
- /opt/FJSVssqc
- /etc/opt/FJSVrcvat
- /etc/opt/FJSVssqc
- /var/opt/FJSVrcvat
- /var/opt/FJSVssqc
20.3 Agent (Dashboard Function) UninstallationThis section explains the procedure for uninstallation of agents (Dashboard Function).
- 146 -
20.3.1 Uninstallation [Windows] [Hyper-V]When the agent is uninstalled, the agent (Dashboard Function) is uninstalled.
Note
- Unapply patches applied to this product before performing uninstallation.
- When uninstallation is stopped due to errors (system errors or processing errors such as system failure) or cancellation by users, resolvethe causes of any problems, and then attempt uninstallation again.
20.3.2 Uninstallation [Linux]When the agent is uninstalled, the agent (Dashboard Function) is uninstalled.
Note
- Unapply patches applied to this product before performing uninstallation.
- When the agent (Dashboard Function) has been installed, the agent (Cloud Edition for Dashboard) is also uninstalled automatically.
- After uninstallation, the installation directories and files below may remain. In that case, delete any remaining directories and filesmanually.
- Directories
- /opt/systemcastwizard
- /opt/FJSVnrmp
- /opt/FJSVrcvat
- /opt/FJSVssagt
- /opt/FJSVssqc
- /etc/opt/FJSVnrmp
- /etc/opt/FJSVrcvat
- /etc/opt/FJSVssagt
- /etc/opt/FJSVssqc
- /var/opt/systemcastwizard
- /var/opt/FJSVnrmp
- /var/opt/FJSVrcvat
- /var/opt/FJSVssagt
- /var/opt/FJSVssqc
- Files
- /boot/clcomp2.dat
- /etc/init.d/scwagent
- /etc/scwagent.conf
20.3.3 Uninstallation [Solaris] [Solaris Zones]When the agent is uninstalled, the agent (Dashboard Function) is uninstalled.
- 147 -
Note
- Unapply patches applied to this product before performing uninstallation.
- After uninstallation, the installation directories and files below may remain. In that case, delete any remaining directories and filesmanually.
- /opt/FJSVrcvat
- /opt/FJSVssqc
- /etc/opt/FJSVrcvat
- /etc/opt/FJSVssqc
- /var/opt/FJSVrcvat
- /var/opt/FJSVssqc
20.4 HBA address rename Setup Service UninstallationThis section explains uninstallation of the HBA address rename setup service.
20.4.1 Uninstallation [Windows]The procedure for uninstallation of the HBA address rename setup service is given below.
1. Log on to Windows as the administrator.
Log on to the system from which the HBA address rename setup service is to be uninstalled. Log on using the Administrator account.
2. Delete the HBA address rename setup service.
Open "Add or Remove Programs" from the Windows Control Panel, and select "ServerView Resource Orchestrator HBA addressrename setup service" and delete it from the [Add or Remove Programs] window.
Information
For Windows Server 2008 or later, or Windows Vista, select "Programs and Features" from the Windows Control Panel.
3. The [Confirm Uninstall] dialog will be displayed.
Click <OK>.
Information
The services of Resource Orchestrator are automatically stopped and deleted.
4. When uninstallation is completed, the confirmation window will be displayed.
Click <Finish>.
Note
- Any updates that have been applied to Resource Orchestrator will be deleted during uninstallation.
- When uninstallation is stopped due to errors (system errors or processing errors such as system failure) or cancellation by users, resolvethe causes of any problems, and then attempt uninstallation again.
If uninstallation fails even when repeated, the executable program used for uninstallation may have become damaged somehow.
- 148 -
In this case, set the first Resource Orchestrator DVD-ROM, open the command prompt, and execute the following command:
>"DVD-ROM_drive\DISK1\HBA\Windows\hbaar\win\setup.exe" /z"UNINSTALL" <RETURN>
Open "Add or Remove Programs" from the Windows Control Panel, and if "ServerView Resource Orchestrator HBA address renamesetup service" is not displayed on the [Add or Remove Programs] window, delete any remaining folders manually.
Information
For Windows Server 2008 or later, or Windows Vista, select "Programs and Features" from the Windows Control Panel.
20.4.2 Uninstallation [Linux]The procedure for uninstallation of the HBA address rename setup service is given below.
1. Log in to the system as the OS administrator (root).
Log in to the managed server from which Resource Orchestrator will be uninstalled, using root.
2. Execute the rcxhbauninstall command.
# /opt/FJSVrcvhb/bin/rcxhbauninstall <RETURN>
Starting the uninstaller displays the following message which explains that before uninstallation the Resource Orchestrator serviceswill be automatically stopped.
Any Resource Orchestrator service that is still running will be stopped and removed.Do you want to continue ? [y,n,?,q]
To stop the services and uninstall Resource Orchestrator enter "y", to discontinue the uninstallation enter "n".
If "n" or "q" is entered, the uninstallation is discontinued.
If "?" is entered, an explanation of the entry method will be displayed.
3. Enter "y" and the uninstallation will start.
When uninstallation is completed successfully, the following message will be displayed.
INFO : ServerView Resource Orchestrator HBA address rename setup service was uninstalled successfully.
If uninstallation fails, the following message will be displayed.
ERROR : Uninstalling "package_name" was failed
4. If uninstallation fails, use the rpm command to remove the packages given in the message, and start the process from step 1 again.
# rpm -e package_name <RETURN>
Note
- When the PATH variable has been configured to enable execution of UpdateAdvisor (Middleware) commands from a user-definedlocation, performing uninstallation will delete any patches that have been applied to Resource Orchestrator so there is no need to returnit to the state prior to application.When the PATH variable has not been configured, return it to the state prior to application before performing uninstallation.
- After uninstallation, the installation directories below may remain. In that case, delete any remaining directories manually.
- /opt/FJSVrcvhb
- /opt/FJSVscw-common
- 149 -

- /opt/FJSVscw-tftpsv
- /etc/opt/FJSVrcvhb
- /etc/opt/FJSVscw-common
- /etc/opt/FJSVscw-tftpsv
- /var/opt/FJSVrcvhb
- /var/opt/FJSVscw-common
- /var/opt/FJSVscw-tftpsv
20.5 Uninstallation of "Uninstall (Middleware)"The uninstallation of "Uninstall (middleware)" is explained in this section.
Note
"Uninstall (middleware)" also manages product information on Fujitsu middleware other than Resource Orchestrator. Do not uninstall"Uninstall (middleware)" unless it is necessary for some operational reason.
In the event of accidental uninstallation, reinstall it following the procedure below.
[Windows]
1. Log on to Windows as the administrator.
2. Set the first Resource Orchestrator DVD-ROM.
3. Execute the installation command.
>DVD-ROM_drive\DISK1\CIR\cirinst.exe <RETURN>
[Linux]
1. Log in to the system as the superuser (root).
2. Set the first Resource Orchestrator DVD-ROM.
3. Execute the following command to mount the DVD-ROM.
If the auto-mounting daemon (autofs) is used for DVD-ROM auto-mounting, the installer fails to start due to its "noexec" mountoption.
# mount -t iso9660 -r /dev/hdc DVD-ROM_mount_point <RETURN># cd DVD-ROM_mount_point <RETURN>
4. Execute the installation command.
# ./DISK1/CIR/cirinst.sh <RETURN>
[Solaris]
1. Log in to the system as the superuser (root).
2. Set the first Resource Orchestrator DVD-ROM.
3. Execute the installation command.
# ./DISK1/CIR/cirinst.sh <RETURN>
- 150 -
Uninstallation of "Uninstall (Middleware)"
To uninstall "Uninstall (middleware)", follow the procedure below.
1. Start "Uninstall (middleware)" and check that other Fujitsu middleware products do not remain.
The starting method is as follows.
[Windows]Select [Start]-[All Programs]-[Fujitsu]-[Uninstall (middleware)].
[Linux] [Solaris]
# /opt/FJSVcir/cimanager.sh -c <RETURN>
Note
If the command path contains a blank space, it will fail to start. Do not specify a directory with a name containing blank spaces.
2. After checking that no Fujitsu middleware product has been installed, execute the following uninstallation command.
[Windows]
>%SystemDrive%\FujitsuF4CR\bin\cirremove.exe <RETURN>
[Linux] [Solaris]
# /opt/FJSVcir/bin/cirremove.sh <RETURN>
3. When "This software is a common tool of Fujitsu products. Are you sure you want to remove it? [y/n]:" is displayed, enter "y" tocontinue. Uninstallation will be completed in seconds.
4. After uninstallation is complete, delete the following directory and contained files.
[Windows]%SystemDrive%FujitsuF4CR%ProgramData%\Fujitsu\FujitsuF4CR(For Windows Server 2008 or Windows Server 2012)%ALLUSERSPROFILE%\Application Data\Fujitsu\FujitsuF4CR(For Windows Server 2003)
[Linux] [Solaris]/var/opt/FJSVcir
- 151 -

Appendix A Advisory Notes for Environments withSystemwalker Centric Manager or ETERNUSSF Storage Cruiser
This appendix explains advisory notes for use of Resource Orchestrator in combination with Systemwalker Centric Manager or ETERNUSSF Storage Cruiser.
Installation [Linux Manager]
When using the following products on servers that a manager has been installed on, in order to share SNMP Traps between serversServerView Trap Server for Linux (trpsrvd) is necessary.
- Systemwalker Centric Manager (Operation management servers and section admin servers)
- ETERNUS SF Storage Cruiser Manager 14.1 or earlier
ServerView Trap Server for Linux (trpsrvd) is used to transfer snmp traps received at UDP port number 162 to other UDP port numbers.The ServerView Trap Server for Linux is included in some versions of ServerView Operations Manager. In this case, install ServerViewTrap Server for Linux referring to the ServerView Operations Manager manual.
If ServerView Trap Server for Linux is not included with ServerView Operations Manager, download it from the following web site, andinstall it referring to the documents provided with it.
URL: http://download.ts.fujitsu.com/prim_supportcd/SVSSoftware/html/ServerView_e.html
Perform the following settings after installing ServerView Trap Server for Linux.
1. Log in as OS administrator (root).
2. Edit the /etc/services file, and add the following line.
mpwksttr-trap 49162/udp
3. Edit the /usr/share/SMAWtrpsv/conf/trpsrvtargets file, and add port 49162.
Before editing
######################################################################### Copyright (C) Fujitsu Siemens Computers 2007# All rights reserved# Configuration File for trpsrv (SMAWtrpsv)########################################################################
# Syntax# port [(address | -) [comment]]
# examples# 8162# 9162 - test# 162 145.25.124.121
After editing
######################################################################### Copyright (C) Fujitsu Siemens Computers 2007# All rights reserved# Configuration File for trpsrv (SMAWtrpsv)########################################################################
- 152 -
# Syntax# port [(address | -) [comment]]
# examples# 8162# 9162 - test# 162 145.25.124.121
#Transfer to UDP port 49162.49162
4. Restart the system.
Upgrading from Earlier Versions
- When upgrading managers of V2.1.3 or earlier versions
[Windows Manager]The SNMP trap service (SystemWalker MpWksttr service) installed by the manager of V2.1.3 or earlier versions will be deleted byupgrading Resource Orchestrator.As the SystemWalker MpWksttr service is shared in environments where the following software exists, if the SystemWalker MpWksttrservice is deleted when upgrading to Resource Orchestrator, perform installation and setup operation of the SystemWalker MpWksttrservice referring to the manual of the following software.
- Systemwalker Centric Manager (Operation management servers and department admin servers)
- ETERNUS SF Storage Cruiser Manager 14.1 or earlier
[Linux Manager]The SNMP trap service (SystemWalker MpWksttr service) installed by the manager of V2.1.3 or earlier versions will be deleted byupgrading Resource Orchestrator.As the SystemWalker MpWksttr service is shared in environments where the following software exists, if the SystemWalker MpWksttrservice is deleted when upgrading to Resource Orchestrator, perform installation and setup operation of the SystemWalker MpWksttrservice referring to the manual of the following software.
- Systemwalker Centric Manager (Operation management servers and department admin servers)
In environments where the above software has not been installed but the following software has, when upgrading managers of V2.1.3or earlier versions, the SystemWalker MpWksttr service will remain even after upgrading, but the SystemWalker MpWksttr serviceis not required.
- ETERNUS SF Storage Cruiser Manager 14.1 or later
In this case, execute the following command as the OS administrator (root) and delete the SystemWalker MpWksttr service.
# rpm -e FJSVswstt <RETURN>
- 153 -
Appendix B Configuration when Creating Physical L-Servers
This appendix explains configuration regarding the creation of physical L-Servers.
Prerequisites
To create a physical L-Server, Virtual I/O using VIOM or HBA address rename is required.
Usage methods of VIOM and HBA address rename differ depending on the hardware of the managed servers used for a physical L-Server.
- Blade Servers
Use VIOM.
- Rack Mount Servers
Use HBA address rename.However, when using rack mount servers which are supported by VIOM, manage them with VIOM.
When managing servers other than the above, associate the configured physical servers with L-Servers. For details on associatingconfigured physical servers with L-Servers, refer to "Chapter 18 Linking L-Servers with Configured Physical Servers or Virtual Machines"in the "User's Guide for Infrastructure Administrators (Resource Management) CE".
It is also necessary to enter configuration information (CPU core count, CPU clock speed, memory capacity, etc.) of the physical serversin the definition file.For details, refer to "Chapter 8 Creating Definition Files".
B.1 Creating Definition FilesThis section explains how to create definition files.
When using a physical L-Server, the configuration of the definition file may be necessary.
When using SAN storage
- For all storage
Refer to "B.1.1 Creating Definition Files Combining Ports of SAN Storage".
- When using ETERNUS storage
Refer to "B.1.2 Format Selection for the Names of Virtual Storage Resources and Disk Resources Managed by ESC".
- When configuring Thin Provisioning attributes on a storage pool
Refer to "20.2 Creating" in the "User's Guide for Infrastructure Administrators (Resource Management) CE".When migration is not executed using the configuration methods for overcommit functions after performing upgrade of the adminserver from ROR V2.3.0 or V3.0.0, refer to "2.3.1.1 Overcommit Definition Files" in the "Release Notes".
- When using configuration of priority for resource selection on Thin Provisioning and Automatic Storage Layering
Refer to "B.1.3 Configuration of Priority for Resource Selection on Thin Provisioning and Automatic Storage Layering".
- When using dynamic LUN mirroring
Refer to "B.1.4 Creating Mirroring Definition Files for Dynamic LUN Mirroring".
- When using EMC storage
For details, refer to "B.1.5 Definition File for EMC Storage".
- When using Storage Server that operates FalconStor NSS
Refer to "B.1.11 Definition File for FalconStor NSS".
- When the number of FCs fitted and their position differ depending on the physical server
Refer to "B.1.7 Setting the Number of FCs Fitted and their Position for Each Physical Server".
- 154 -

When creating a physical L-Server without specifying a model name in the L-Server template
Refer to "B.1.6 Configuration when Creating a Physical L-Server without Specifying a Model Name in the L-Server Template".
When using alive monitoring
Refer to "B.1.8 Definition File for Alive Monitoring".
B.1.1 Creating Definition Files Combining Ports of SAN StorageCreate the following definition file in advance, then define the combination of the ports of storage units used when accessing the L-Serverdisk.In Resource Orchestrator, LUN masking on the ports of storage units is configured using the definition file combining ports for SAN storage.For ETERNUS storage units, zoning of fibre channel switches is also configured using the port combination definition file of the SANstorage.When adding a storage unit and then adding it to a resource pool as a storage resource, define the following file:
When the storage unit is Storage Server that operates FalconStor NSS or NetApp FAS storage, this definition file need not be made.
When the definition file has been edited, it is not necessary to restart the manager.
Storage Location of the Definition File
[Windows Manager]Installation_folder\SVROR\Manager\etc\customize_data
[Linux Manager]/etc/opt/FJSVrcvmr/customize_data
Definition File Name
storage_portset.rcxprop
Definition File Format
Describe the storage information. Each storage information must be described using a single line, and be in the following format startingfrom the start of the line. Use of line breaks is not allowed.
storage_unit_ipaddr,"portX:portY","portX:portY",...
Definition File Items
- When using ETERNUS storage
storage_unit_ipaddr
Specify IP addresses of operation management LAN ports of ETERNUS storage that are managed by ESC.When the same IP address is specified in multiple lines, the first defined line is valid.
Portset
A pair of FC-CA ports of ETERNUS storage used when accessing an L-Server disk, represented using the WWPN of the FC-CA ports.Specify a pair of FC-CA ports using two WWPNs (16 digit hexadecimal numbers) separated with colons (":"). A maximumof 64 combinations can be specified.If there is trouble with the ETERNUS storage controller, in order to avoid blocking both of the FC-CA ports used for L-Server,do not use combinations of ports on the same controller.
WWPNs of FC-CA ports that are not connected using Fibre Channel cable cannot be specified.WWPNs that are already defined cannot be specified for different portsets.
LUN masking and zoning are configured by the following pairs of HBA and storage unit port. Check that Fibre Channel cablesare connected between the ports of HBAs and storage units.
- HBA Port1 and the first defined storage unit port
- HBA Port2 and the second defined storage unit port
- 155 -
Point
In Resource Orchestrator, access paths are defined in the following order.
- Storage unit port defined in portX and HBA Port1
- Storage unit port defined in portX and HBA Port2
Note
The order of the HBA Ports to which HBA address rename allocates the WWN depends on the server hardware type.
Refer to "C.2 WWN Allocation Order during HBA address rename Configuration" in the "Design Guide CE".
- When using EMC CLARiiON storage or EMC VNX storage
storage_unit_ipaddr
Specify the IP address of SP of EMC CLARiiON storage or EMC VNX storage.
When the same IP address is specified in multiple lines, the first defined line is valid.
Portset
A pair of SP ports of EMC CLARiiON storage or EMC VNX storage used when accessing an L-Server disk, represented usingan SP port name.
Specify a pair of SP ports using two SP port names separated with colons (":"). A maximum of 64 combinations can be specified.
If the number of FCs to be used on one L-Server is 1 or 4, use the definition file described in "B.1.7 Setting the Number ofFCs Fitted and their Position for Each Physical Server" rather than the file described here.
The two ports specified here should be selected from the SP ports of different SPs. When using SP ports on the same SP ofEMC CLARiiON storage or EMC VNX storage, if there is trouble with the SP, the SP ports used by L-Servers may not beavailable.
SP ports that are not connected using Fibre Channel cables cannot be specified.
SP ports that are already defined cannot be specified for different portsets.
- When using EMC Symmetrix DMX storage or EMC Symmetrix VMAX storage
storage_unit_ipaddr
Specify the Symmetrix ID of EMC Symmetrix DMX Storage or EMC Symmetrix VMAX Storage.
When the same Symmetrix ID is specified in multiple lines, the first defined line is valid.
Portset
A pair of ports of EMC Symmetrix DMX storage or EMC Symmetrix VMAX storage used when accessing an L-Server disk,represented using director numbers and port numbers.Specify a pair of ports using two port names separated with colons (":"). A maximum of one combination can be specified.
The two ports specified here should be selected from the ports of different directors. When using ports on the same director ofEMC Symmetrix DMX storage or EMC Symmetrix VMAX storage, if there is trouble with the director, the ports used by L-Servers may not be available.
The ports not connected using Fibre Channel cables cannot be specified.Director numbers and port numbers that are already defined cannot be specified for different portsets.
In the following cases, use the definition file described in "B.1.7 Setting the Number of FCs Fitted and their Position for EachPhysical Server" rather than the file described here.
- When using 2 or more groups of director ports from an L-Server
- If the number of FCs to be used on one L-Server is 1 or 4
- When there are a large number of L-Servers using the storage
- 156 -
Example
An example definition file is indicated below.
- When using ETERNUS storage
192.168.1.24,"500000E0D00C7006:500000E0D00C7086","500000E0D00C7086:500000E0D00C7087"
- SP ports that are not connected using Fibre Channel cables cannot be specified.
192.168.1.24,"SPAPort0:SPBPort0","SPAPort1:SPBPort1"
- When using EMC Symmetrix DMX storage or EMC Symmetrix VMAX storage
000192601264,"07GPort1:08GPort1"
B.1.2 Format Selection for the Names of Virtual Storage Resources and DiskResources Managed by ESC
The format of the names of virtual storage resources and disk resources managed by ESC can be selected. When the definition file hasbeen edited, restart the manager.
Location of the Definition File
[Windows Manager]Installation_folder\SVROR\Manager\etc\customize_data
[Linux Manager]/etc/opt/FJSVrcvmr/customize_data
Definition File Name
storage.rcxprop
Definition File Format
In the definition file, the items to set are entered on individual lines. Each line is entered in the following format.
Item_specified = Value_specified
Definition File Items
ETERNUS_VOLUME_NAME_TO_DISK_NAME
Select the format of the name of disk resources managed by ESC.
- If "true" is specified
The alias name of the ETERNUS LUN will be the disk resource name. If the format of the alias name is not suitable for theformat of the disk resource name, Resource Orchestrator automatically sets a disk resource name that conforms to the alias name.Even if "true" has been specified, when ETERNUS does not support the alias name, the disk resource name will be same aswhen "false" has been specified.
- If "false" is specified
The disk resource name will be as follows, based on the LUN type.
- Open VolumeA name combining the IP address of the ETERNUS, the RAID group number, and the volume number.Example: P192-168-0-201_R0x0000_V0x0004
- 157 -
- TPV(Thin Provisioning Volume)A name combining the IP address of the ETERNUS, the TPP number, and the volume number.Example: P192-168-0-201_T0x0000_V0x0005
- FTV(Flexible Tier Volume)A name combining the IP address of the ETERNUS, the FTRP number, and the volume number.Example: P192-168-0-201_F0x0000_V0x0006
- If nothing is specified
"false" is set.
Note
If the disk has been separated from the virtual storage and saved, then the ETERNUS LUN alias name is not reflected on the diskresource name even if the value is "true".
ETERNUS_RAIDGROUP_NAME_TO_VSTORAGE_NAME
Select the format of the name of virtual storage resources managed by ESC.
- If "true" is specified
The virtual storage resource name will be the RAID group name of the ETERNUS, the TPP name, or the FTRP name.If the format of the RAID group name, the TPP name, or the FTRP name is not suitable for the format of the virtual storageresource name, Resource Orchestrator automatically sets a virtual storage resource name that conforms to the RAID groupname, the TPP name, or the FTRP name.Even if "true" has been specified, when ETERNUS does not support the RAID group name, the TPP name, or the FTRP name,the virtual storage resource name will be the same as when "false" has been specified.
- If "false" is specified
The following names will be used according the type of the RAID group, TPP, and FTRP.
- RAID groupA name combining the IP address of the ETERNUS and the RAID group number.Example: P192-168-0-201_R0x0000
- TPP(Thin Provisioning Pool)A name combining the IP address of the ETERNUS and the TPP number.Example: P192-168-0-201_T0x0000
- FTRP(Flexible Tier Pool)A name combining the IP address of the ETERNUS and the FTRP number.Example: P192-168-0-201_F0x0000
- If nothing is specified
"false" is set.
Example
An example definition file is indicated below.
ETERNUS_VOLUME_NAME_TO_DISK_NAME = trueETERNUS_RAIDGROUP_NAME_TO_VSTORAGE_NAME = true
- 158 -

B.1.3 Configuration of Priority for Resource Selection on Thin Provisioningand Automatic Storage Layering
The following resources can be registered in a storage pool with thin provisioning attributes set:
- FTRP and FTV for Automatic Storage Layering
- TPP and TPV for Thin Provisioning
When setting to automatic selection for resource selection while creating L-Server or attaching a disk under the condition that both storagepools with and without the configuration of thin provisioning attributes remain the same priority, either of their resources can be givenhigher priority.
When the definition file has been edited, restart the manager.
Location of the Definition File
[Windows Manager]Installation_folder\SVROR\Manager\etc\customize_data
[Linux Manager]/etc/opt/FJSVrcvmr/customize_data
Definition File Name
storage.rcxprop
Definition File Format
In the definition file, the items to set are entered on individual lines. Each line is entered in the following format.
Specified item = Specifiedvalue
Definition File Items
SELECT_THIN_PROVISIONING_POOL_FIRST
When both storage pools with and without the configuration of thin provisioning attributes remain the same priority, either of theirresources can be given higher priority for automatic selection of storage resource.
- If "true" is specified
A storage pool with thin provisioning attributes will be given priority.
- If "false" is specified
A storage pool without thin provisioning attributes will be given priority.
- If nothing is specified
"false" is set.
Example
An example definition file is indicated below.
SELECT_THIN_PROVISIONING_POOL_FIRST = true
B.1.4 Creating Mirroring Definition Files for Dynamic LUN MirroringWhen using dynamic LUN mirroring, create a mirroring definition file and configure the ETERNUS storage to create a copied volume.
- 159 -
Location of the Definition File
[Windows Manager]
Installation_folder\SVROR\Manager\etc\customize_data
[Linux Manager]
/etc/opt/FJSVrcvmr/customize_data
Definition File Name
storage_mirroring.rcxprop
Definition File Format
Describe the virtual storage information. Each virtual storage information must be described using a single line, and be in the followingformat starting from the start of the line. Use of line breaks is not allowed.
local_storage_ipaddr,virtual_storage_type,local_storage_number,remote_storege_boxid,remote_storage_number,copy_group
Definition File Items
local_storage_ipaddr
Enter the IP address of the local site ETERNUS storage device that will automatically create the disk resource.
virtual_storage_type
Specify the virtual server type.
Specify "RAID" for RAID group.
Specify "TPP" for TPP.
local_storage_number
Specify the RAID group or TPP number from which the disk resource will be extracted in the ETERNUS storage on the local site.Specify 4-digit hexadecimal numbers starting with 0x.
remote_storage_boxid
Specify the BOX-ID of ETERNUS storage in the remote side to create the copied volume.
Check the BOX-ID in "Advanced Copy Path Status" which is the Web GUI for ETERNUS.
remote_storage_number
Specify the RAID group or TPP number that will be used to create the copied volume in the ETERNUS storage on the remote site.Specify 4-digit hexadecimal numbers starting with 0x.
copy_group
Specify the name for the copy group created when setting inter-chassis copying.
Example
An example definition file is indicated below.
192.168.1.24,RAID,0x0011,00ETERNUSDXLS2ET092DD#####LN4521132A09##,0x0022,group1192.168.1.24,TPP,0x0033,00ETERNUSDXLS2ET092DD#####LN4521132A09##,0x0044,group2
B.1.5 Definition File for EMC StorageWhen registering EMC Navisphere Manager or EMC Solutions Enabler as storage management software, it is necessary to specify theinstallation folder of Navisphere CLI or SYMCLI in the definition file for EMC storage.
- 160 -

Storage Location of the Definition File for EMC Storage
[Windows Manager]Installation_folder\SVROR\Manager\sys\usm\etc
[Linux Manager]/opt/FJSVrcvmr/sys/usm/etc
Definition File Name for EMC Storage
emcpath.conf
Definition File Format for EMC Storage
The format of the definition file for EMC storage is as follows:
When registering EMC Navisphere Manager as storage management software, modify the line beginning with "naviseccli".
naviseccli=Navisphere CLI_installation_folder
When registering EMC Solutions Enabler for storage management software, modify the line beginning with "symcli".
symcli=SYMCLI_installation_folder
[Windows]Use "\\" for the file separator. Do not modify the line beginning with "secfilepath".
Example
[Windows]
naviseccli=C:\\Program Files\\EMC\\Navisphere CLIsecfilepath=..\\..\\..\\etc\\storage\\emcsymcli=C:\\Program Files\\EMC\\SYMCLI\\bin
[Linux]
naviseccli=/opt/Navisphere/binsecfilepath=/etc/opt/FJSVrcvmr/storage/emcsymcli=/opt/symcli/bin
B.1.6 Configuration when Creating a Physical L-Server without Specifyinga Model Name in the L-Server Template
To create a physical L-Server without specifying a model name in the L-Server template, create the definition file, define the configurationinformation (CPU core count, CPU clock speed, memory capacity, etc.), and then register the server as a managed server.Or, it is necessary to define card information mounted on server, when creating a physical L-Server with a rack mount or tower servermanaged by VIOM.
In the following cases, create the definition file first, and then register the hardware information with Resource Orchestrator again.
- If the target server was registered with Resource Orchestrator before creation of the definition file
- When modifying the configuration information (CPU core count, CPU clock speed, memory capacity, etc.) in the definition file of aserver that has been registered with Resource Orchestrator
For details, refer to "Chapter 9 Hardware Maintenance" in the "Operation Guide CE".
- 161 -
Note
If the value entered in the definition file differs from the actual configuration information of the server, creation or starting of physical L-Servers may fail, or physical servers may be deployed with incorrect information about CPU and memory.
Be sure to confirm that the values entered in the definition file and the actual configuration information of the server are the same.
Storage Location of the Definition File
[Windows Manager]Installation_folder\SVROR\Manager\etc\customize_data
[Linux Manager]/etc/opt/FJSVrcvmr/customize_data
Definition File Name
server_spec.rcxprop
Character Code
[Windows Manager] [Linux Manager]UTF-8
Line Break Code
[Windows Manager]CR/LF
[Linux Manager]LF
Definition File Format
- The following line must be entered in the first line of definition files.
ServerSpec,V1.0 or V1.1
- In the definition file, enter the configuration information (CPU core count, CPU clock speed, memory capacity, card information,etc.), separated by commas (",").
When defining two or more servers, use line breaks.Each line is entered in the following format.
model_name, cpu_core_count, cpu_clock, memory_size, cpu_type[, cardinfo]Orphysical_server, cpu_core_count, cpu_clock, memory_size, cpu_type[, cardinfo]
- Blank spaces between data and commas (",") are ignored.
If there is duplicated configuration information (CPU core count, CPU clock speed, memory capacity, etc.) for the same physicalserver, the values that appear first will be used.
- When adding comments, start the line with a number sign ("#").
Definition File Items
model_name
Enter the model name of the managed server.Enter "[" for the first character, and "]" for the last character.The model name displayed in the General information of the Resource Details window.
physical_server
Enter the same physical server name as the one entered when registering a managed server.Enter a character string beginning with an alphabetical character and containing up to 15 alphanumeric characters and hyphens("-").
- 162 -

cpu_core_count
Enter the total number of physical CPU cores.Enter an integer between 0 and 999.When entering "0", hyphens ("-") are displayed in the basic information on the resource details screen, and physical L-Serverscannot be created.
cpu_clock
Enter the CPU clock speed.Enter an integer between 0 and 999,999.Use megahertz for the unit. Enter 1,000 MHz for 1 GHz, for example.When entering "0", hyphens ("-") are displayed in the basic information on the resource details screen, and physical L-Serverscannot be created.
memory_size
Enter the total memory size.Enter an integer between 0 and 999999999.Use megabytes for the unit. Enter 1,024 MB for 1 GB, for example.When entering "0", hyphens ("-") are displayed in the basic information on the resource details screen, and physical L-Serverscannot be created.
cpu_type
Enter the CPU type.The string must be composed of alphanumeric characters and symbols (ASCII characters 0x20 to 0x7e), except for commas (","),and can be up to 64 characters long.When omitted, a hyphen ("-") is displayed.
cardinfo
Enter the information for cards mounted on servers.It is necessary to define card information mounted on server, when creating a physical L-Server with a rack mount or tower servermanaged by VIOM.When this item is defined, it is necessary to make ServerSpec V1.1.
ServerSpec,V1.1
Card information can be omitted. If omitted, the following is described for the hardware configuration (The admin LAN usesOnboardLAN).
RX200S7 or later: Onboard LAN1, OnboardLAN2, PCISlot1 (LAN) 2Port, PCISlot2 (FC) 2Port, PCISlot3 (FC) 2PortRX300S7 or later: Onboard LAN1, OnboardLAN2, PCISlot1 (LAN) 2Port, PCISlot2 (LAN) 2Port, PCISlot3 (FC) 2Port,PCISlot4 (FC) 2Port
Enter the information for each card in the following format. Use colons (":") to separate each piece of card information.
- Card type
Enter one of the following card types:
- "LAN"
- "FC"
- "CNA"
When entering characters other than the above, the card information will be invalid.
- Slot type
Enter the slot type.
Enter an integer between 0 and 9 for the slot type as below.
- "0": Onboard
- "1" to "9": PCI slot numbers
- 163 -
- Port number
Enter the port numbers. Enter an integer between 1 and 9 for the port number, preceded by a hyphen ("-").
- Flags to confirm if the LAN card is used for an admin LAN
When using a LAN card for an admin LAN, enter "**" or "*" to indicate that the LAN card is used for an admin LAN.
When using the card for a LAN other than an admin LAN, do not enter anything.
Enabled when the card type is set to "LAN" or "CNA".
- The card for the primary admin LAN: Enter "*".
- The card for the secondary admin LAN: Enter "**".
- A card not for an admin LAN: Leave blank.
Example
An example definition file is indicated below.
ServerSpec,V1.1
############################################################################ server_spec.rcxprop##All Rights Reserved, Copyright(C) FUJITSU LIMITED 2012############################################################################# [model_name], cpu_core_count, cpu_clock, memory_size, cpu_type, cardinfo# physical_server, cpu_core_count, cpu_clock, memory_size, cpu_type, cardinfo#
server001, 8, 3160, 4096, Intel(R) Xeon(R)server002, 8, 2660, 12288, Intel(R) Xeon(R),LAN0-1*:LAN0-2**:LAN1-1:LAN1-2:FC2-1:FC2-2[PRIMERGY RX300 S7], 2, 2000, 65536, Intel(R) Xeon(R),LAN0-1*:LAN0-2**:LAN1-1:LAN1-2:FC2-1:FC2-2server004, 4, 4000, 4096, Intel(R) Xeon(R) Processor E5501
B.1.7 Setting the Number of FCs Fitted and their Position for Each PhysicalServer
If the number of FCs fitted or their location differs from physical server to physical server, prepare an "FC connection pattern" and definethe number of FCs and their location for each physical server.
This setting can be made when the storage units are the following:
- SP ports that are already defined cannot be specified for different portsets.
- EMC Symmetrix DMX Storage
- EMC Symmetrix VMAX Storage
Location of the Definition File
[Windows Manager]Installation_folder\SVROR\Manager\etc\customize_data\fc_connection_pattern
[Linux Manager]/etc/opt/FJSVrcvmr/customize_data/fc_connection_pattern
- 164 -
Definition File Name
Make the file extension .rcxprop and then allocate a file with an arbitrary file name. Specify the file name using the following string:
The file name must start with an alphanumeric character, and can contain up to 64 alphanumeric characters, underscores ("_"), andhyphens ("-").
Definition File Format
Create a different "FC pattern" file for each system that has a different pattern.
NUM_OF_FC=Number_of_FCs_usedBOOT_FC_PORT =["HBA_number", "HBA_number"]STORAGE_X="Storage_chassis_identifier","HBA_number","target_port_number"
Definition File Items
NUM_OF_FC (mandatory)
Specify the number of FCs to be used. 1, 2, and 4 can be specified for the number.
BOOT_FC_PORT
Specify the number of HBAs that are actually mounted on the server.
Allocate a sequential number to all of the ports, sorted in the expansion slot order.
By specifying the HBA numbers, up to two FC ports can be set as Boot paths.
The priority of HBA numbers is set based on the order in which they are listed.
Only numbers under the value specified in NUM_OF_FC can be specified.
NUM_OF_FC valueValid Range of HBA
Numbers
4 0 - 3
2 0 - 1
1 0
STORAGE_X (mandatory)
Specify as many as there are connected storage chassis. However, the number in X must be a decimal between 0 and 99, startingfrom 0 and counting up.
"Storage chassis identification number"
Specify the storage chassis identification number.
"HBA number"
Define the FCPort pairing on the server side, separating with a colon (:).
"target port number"
Define the FCPort pairing on the storage side, separating with a colon (:).
By specifying separate HBA numbers for each STORAGE_X, logical paths to two storage chassis can be set from each singlephysical server.
However, if the same storage chassis identification number is defined multiple times, only the one defined first will be valid.
Note
- The file names of FC connection patterns cannot be changed after performing the following operations:
- Import of the L-Server template specifying an FC connection pattern
- Turning on of the physical L-Server with a definition specifying an FC connection pattern
- 165 -
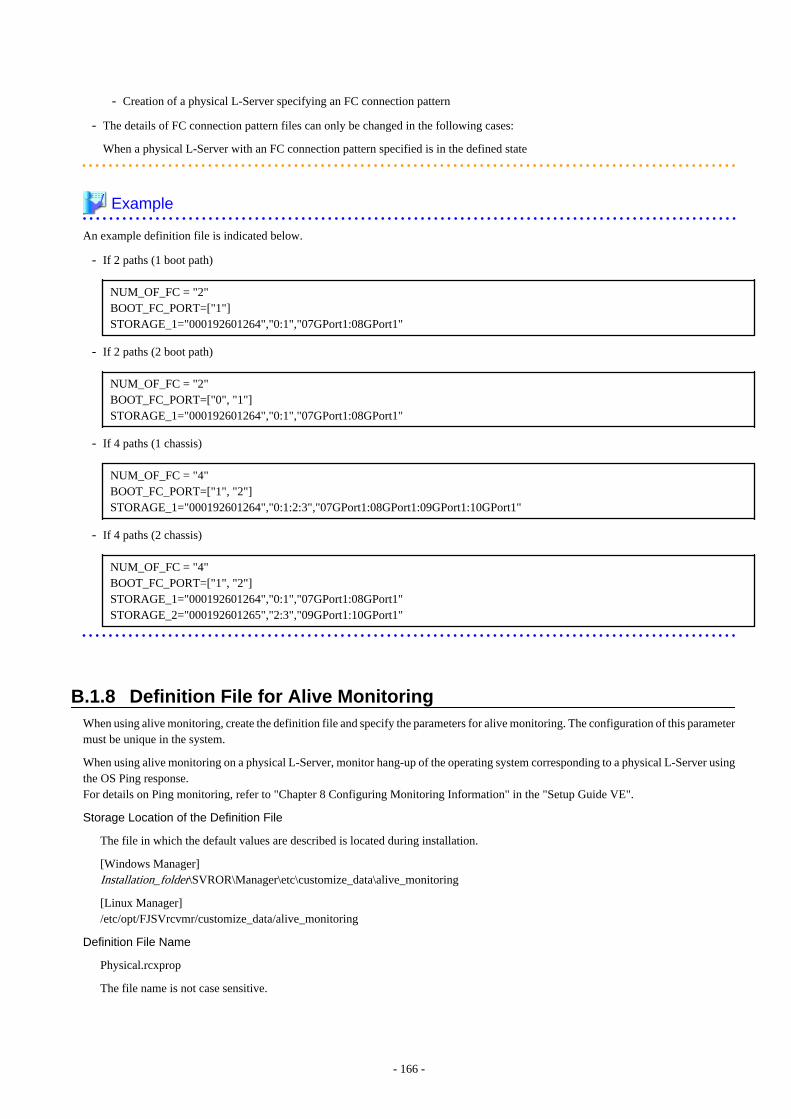
- Creation of a physical L-Server specifying an FC connection pattern
- The details of FC connection pattern files can only be changed in the following cases:
When a physical L-Server with an FC connection pattern specified is in the defined state
Example
An example definition file is indicated below.
- If 2 paths (1 boot path)
NUM_OF_FC = "2"BOOT_FC_PORT=["1"]STORAGE_1="000192601264","0:1","07GPort1:08GPort1"
- If 2 paths (2 boot path)
NUM_OF_FC = "2"BOOT_FC_PORT=["0", "1"]STORAGE_1="000192601264","0:1","07GPort1:08GPort1"
- If 4 paths (1 chassis)
NUM_OF_FC = "4"BOOT_FC_PORT=["1", "2"]STORAGE_1="000192601264","0:1:2:3","07GPort1:08GPort1:09GPort1:10GPort1"
- If 4 paths (2 chassis)
NUM_OF_FC = "4"BOOT_FC_PORT=["1", "2"]STORAGE_1="000192601264","0:1","07GPort1:08GPort1"STORAGE_2="000192601265","2:3","09GPort1:10GPort1"
B.1.8 Definition File for Alive MonitoringWhen using alive monitoring, create the definition file and specify the parameters for alive monitoring. The configuration of this parametermust be unique in the system.
When using alive monitoring on a physical L-Server, monitor hang-up of the operating system corresponding to a physical L-Server usingthe OS Ping response.For details on Ping monitoring, refer to "Chapter 8 Configuring Monitoring Information" in the "Setup Guide VE".
Storage Location of the Definition File
The file in which the default values are described is located during installation.
[Windows Manager]Installation_folder\SVROR\Manager\etc\customize_data\alive_monitoring
[Linux Manager]/etc/opt/FJSVrcvmr/customize_data/alive_monitoring
Definition File Name
Physical.rcxprop
The file name is not case sensitive.
- 166 -
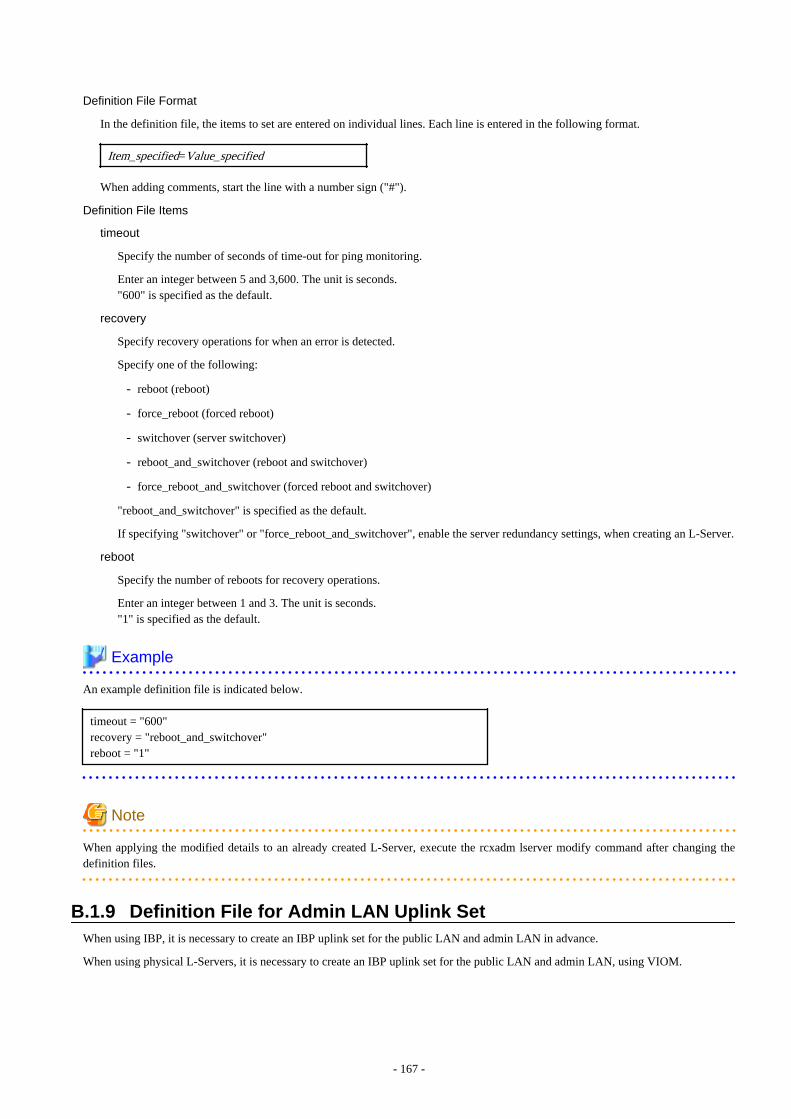
Definition File Format
In the definition file, the items to set are entered on individual lines. Each line is entered in the following format.
Item_specified=Value_specified
When adding comments, start the line with a number sign ("#").
Definition File Items
timeout
Specify the number of seconds of time-out for ping monitoring.
Enter an integer between 5 and 3,600. The unit is seconds."600" is specified as the default.
recovery
Specify recovery operations for when an error is detected.
Specify one of the following:
- reboot (reboot)
- force_reboot (forced reboot)
- switchover (server switchover)
- reboot_and_switchover (reboot and switchover)
- force_reboot_and_switchover (forced reboot and switchover)
"reboot_and_switchover" is specified as the default.
If specifying "switchover" or "force_reboot_and_switchover", enable the server redundancy settings, when creating an L-Server.
reboot
Specify the number of reboots for recovery operations.
Enter an integer between 1 and 3. The unit is seconds."1" is specified as the default.
Example
An example definition file is indicated below.
timeout = "600"recovery = "reboot_and_switchover"reboot = "1"
Note
When applying the modified details to an already created L-Server, execute the rcxadm lserver modify command after changing thedefinition files.
B.1.9 Definition File for Admin LAN Uplink SetWhen using IBP, it is necessary to create an IBP uplink set for the public LAN and admin LAN in advance.
When using physical L-Servers, it is necessary to create an IBP uplink set for the public LAN and admin LAN, using VIOM.
- 167 -
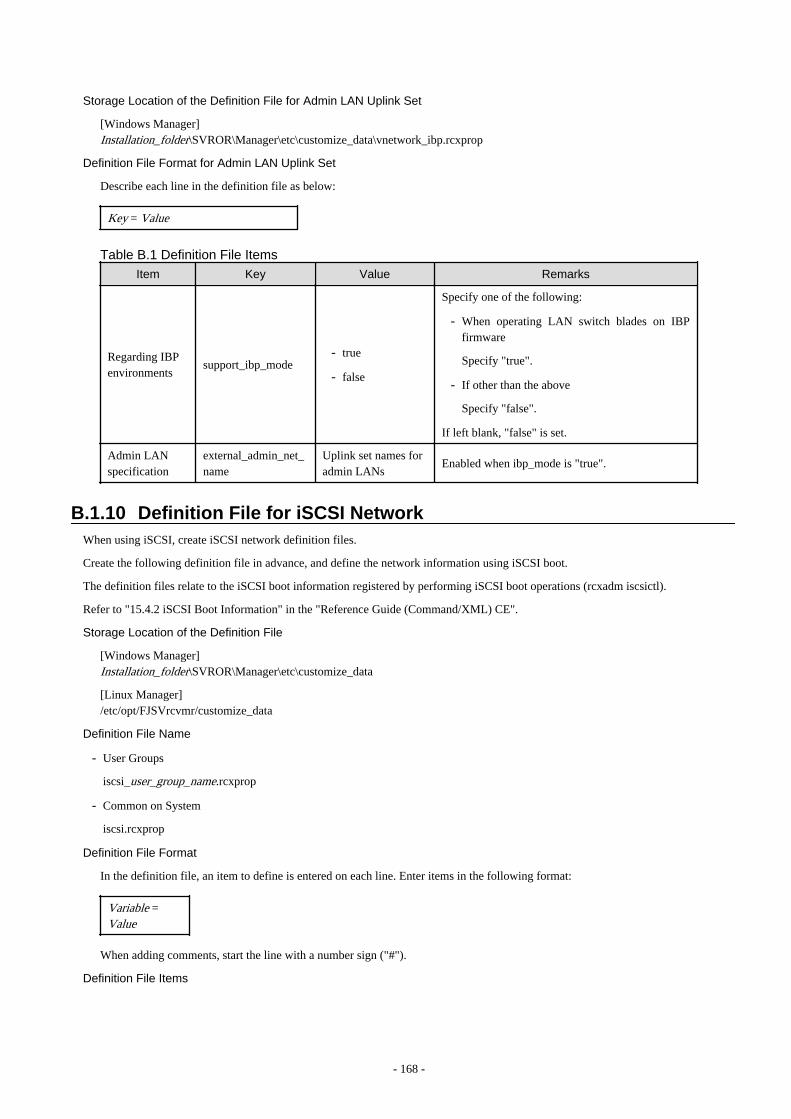
Storage Location of the Definition File for Admin LAN Uplink Set
[Windows Manager]Installation_folder\SVROR\Manager\etc\customize_data\vnetwork_ibp.rcxprop
Definition File Format for Admin LAN Uplink Set
Describe each line in the definition file as below:
Key = Value
Table B.1 Definition File Items
Item Key Value Remarks
Regarding IBPenvironments
support_ibp_mode- true
- false
Specify one of the following:
- When operating LAN switch blades on IBPfirmware
Specify "true".
- If other than the above
Specify "false".
If left blank, "false" is set.
Admin LANspecification
external_admin_net_name
Uplink set names foradmin LANs
Enabled when ibp_mode is "true".
B.1.10 Definition File for iSCSI NetworkWhen using iSCSI, create iSCSI network definition files.
Create the following definition file in advance, and define the network information using iSCSI boot.
The definition files relate to the iSCSI boot information registered by performing iSCSI boot operations (rcxadm iscsictl).
Refer to "15.4.2 iSCSI Boot Information" in the "Reference Guide (Command/XML) CE".
Storage Location of the Definition File
[Windows Manager]Installation_folder\SVROR\Manager\etc\customize_data
[Linux Manager]/etc/opt/FJSVrcvmr/customize_data
Definition File Name
- User Groups
iscsi_user_group_name.rcxprop
- Common on System
iscsi.rcxprop
Definition File Format
In the definition file, an item to define is entered on each line. Enter items in the following format:
Variable =Value
When adding comments, start the line with a number sign ("#").
Definition File Items
- 168 -

Table B.2 Items for the iSCSI Network Definition FileVariable Meaning Value
server_model.model_name.boot_nic
Specify the server model names and NICs to bootusing iSCSI. Multiple NICs can be specified.
- BX620
- BX920
- BX922
- BX924
- BX960
An asterisk ("*") is specified by default.
Specify in the followingformat.
NIC[index]
index is an integer startingfrom "1".
Example #Server Sectionserver_model.BX922.boot_nic = NIC1server_model.BX924.boot_nic = NIC1,NIC2server_model.*.boot_nic = NIC1,NIC2server_model.RX300. boot_nic = NIC1,NIC2
B.1.11 Definition File for FalconStor NSSWhen registering SAN Client CLI as storage management software, it is necessary to specify the installation folder of SAN Client CLI inthe definition file for FalconStor NSS.
Storage Location of the Definition File
[Windows Manager]Installation_folder\SVROR\Manager\sys\usm\etc
[Linux Manager]/opt/FJSVrcvmr/sys/usm/etc
Definition File Name
fspath.conf
Definition File Format
The format of the definition file for FalconStor NSS is as follows:
iscli = SAN Client CLI_installation_folder
[Windows]Use "\\" for the file separator.
Example
[Windows Manager]iscli= C:\\Program Files\\FalconStor\\IPStor\\client
[Linux Manager]iscli=/usr/ipstor/bin
- 169 -
B.2 Registering Resources with Resource OrchestratorThis section explains how to register resources with Resource Orchestrator.
- When Using Blade Servers
Refer to "B.2.1 When using Blade Servers".
- When Using Something other than a Blade Server
Refer to "B.2.2 When Registering Something other than a Blade Server".
B.2.1 When using Blade ServersRegistration of resources when creating a physical L-Server using a blade server is explained.
Register using the following procedure:
1. Registering VIOM Coordination
Refer to "5.1 Registering VIOM Coordination" in the "User's Guide for Infrastructure Administrators (Resource Management) CE".
Note
It is not necessary to register a VIOM server profile.
When creating a physical L-Server, VIOM server profiles are automatically created.
2. Register Storage Management Software
When storage management software is registered, RAID groups or aggregates that were created during pre-setup preparations areautomatically registered in Resource Orchestrator as virtual storage resources.
Execute the rcxadm storagemgr register command to register storage management software with Resource Orchestrator.For details on the rcxadm storagemgr register command, refer to "5.17 rcxadm storagemgr" in the "Reference Guide (Command/XML) CE".
Note
If ETERNUS SF Storage Cruiser is specified as the storage management software, virtual storage resources and disk resourcesregistered with ETERNUS SF Storage Cruiser will be recognized. Recognition targets are as follow.
- Virtual storage resources
- RAID groups
- TPP
- FTRP
- Disk resources
- Open volumes
- TPV
- FTV
LUN concatenated volumes and encrypted volumes will not be recognized.
3. Register Chassis
Refer to "5.4.1 Registering Chassis" in the "User's Guide for Infrastructure Administrators (Resource Management) CE".
4. Register Managed Servers (within Chassis)
Refer to "5.4.2 Registering Blade Servers" or "5.5.1 Registering Rack Mount or Tower Servers" in the "User's Guide forInfrastructure Administrators (Resource Management) CE".
- 170 -
When performing admin LAN NIC redundancy and registering a physical server, check the [Use Admin LAN redundancy] checkboxin the "Register Server" dialog when registering the server.
When directly specifying an IP address during physical L-Server creation, do not configure the same IP address on a managed server.An error will occur during the following operations, if there are managed servers configured with the same IP addresses as thoseallocated to physical L-Servers, in other than physical servers.
- Creation of physical L-Servers
- Starting of a physical L-Server for which only the configuration definition has been created
Note
When not using the default NIC, specify the NIC for admin LAN during the physical server registration.
For details, refer to the "[Apply Admin LAN NIC settings] checkbox" in "5.4.2 Registering Blade Servers" in the "User's Guide forInfrastructure Administrators (Resource Management) CE".
5. Register LAN Switch Blades
Refer to "5.4.3 Registering LAN Switch Blades" and "5.13 Registering LAN Switches" in the "User's Guide for InfrastructureAdministrators (Resource Management) CE".
6. Register Network Device Resources
For details on how to register network device resources, refer to "5.7.2 Registering Network Devices" in the "User's Guide forInfrastructure Administrators (Resource Management) CE".
7. Register Power Monitoring Devices (when Using Devices)
Refer to "5.10 Registering Power Monitoring Devices" in the "User's Guide for Infrastructure Administrators (ResourceManagement) CE".
To register a network resource or an address set resource, specify a resource pool when creating the resource.
Refer to "B.3 Registering Resources in Resource Pools".
B.2.2 When Registering Something other than a Blade ServerRegistration of resources when creating a physical L-Server using a server other than a blade server is explained.
Register using the following procedure:
1. Register VIOM Coordination or Configure HBA address rename
When using rack mount servers which are supported by VIOM, manage them with VIOM.Refer to "5.1 Registering VIOM Coordination" in the "User's Guide for Infrastructure Administrators (Resource Management) CE".
When using servers other than rack mount or tower servers, configure HBA address rename.Refer to "5.5.2 HBA address rename Settings" in the "User's Guide for Infrastructure Administrators (Resource Management) CE".
2. Register Storage Management Software
Execute the rcxadm storagemgr register command.For details on the rcxadm storagemgr register command, refer to "5.17 rcxadm storagemgr" in the "Reference Guide (Command/XML) CE".
When storage management software is registered, virtual storage resources and disk resources created in advance are automaticallyrecognized.
Note
If ETERNUS SF Storage Cruiser is specified as the storage management software, virtual storage resources and disk resourcesregistered with ETERNUS SF Storage Cruiser will be recognized. Recognition targets are as follow.
- 171 -
- Virtual storage resources
- RAID groups
- TPP
- FTRP
- Disk resources
- Open volumes
- TPV
- FTV
LUN concatenated volumes and encrypted volumes will not be recognized.
3. Register Managed Servers
Refer to "5.5.1 Registering Rack Mount or Tower Servers" in the "User's Guide for Infrastructure Administrators (ResourceManagement) CE".
When performing admin LAN NIC redundancy and registering a physical server, check the [Use Admin LAN redundancy] checkboxin the "Register Server" dialog when registering the server.When directly specifying an IP address during physical L-Server creation, do not configure the same IP address on a managed server.An error will occur during the following operations, if there are managed servers configured with the same IP addresses as thoseallocated to physical L-Servers, in other than physical servers.
- Creation of physical L-Servers
- Starting of a physical L-Server for which only the configuration definition has been created
4. Register network device resources
For details on how to register network device resources, refer to "5.7.2 Registering Network Devices" in the "User's Guide forInfrastructure Administrators (Resource Management) CE".
5. Register Power Monitoring Devices (when Using Devices)
Refer to "5.10 Registering Power Monitoring Devices" in the "User's Guide for Infrastructure Administrators (ResourceManagement) CE".
To register a network resource or an address set resource, specify a resource pool when creating the resource.
Refer to "B.3 Registering Resources in Resource Pools".
B.3 Registering Resources in Resource PoolsThis chapter explains the registration of resources to resource pools.
Use the following procedure to register a resource to a resource pool:
1. Register Physical Server Resources
Register physical servers to the server pool.
For details, refer to "14.2 Physical Server Resources" in the "User's Guide for Infrastructure Administrators (Resource Management)CE".
2. Register Network Resources
If network resources are connected when creating an L-Server, LAN switch blades will be registered automatically as the physicalserver that the L-Server will operate on. If an image is specified, the IP address is configured.For details, refer to "B.3.1 Automatic Network Configuration".
a. In the ROR console orchestration tree, right-click the target network pool, and select [Create Network Resource].
When creating a new network resource, select [New].
When creating a resource using an already registered admin LAN subnet, select [Using existing admin subnet].
- 172 -
The [Create a network resource] dialog is displayed.
b. Enter the items necessary for network resources.For details, refer to "14.3 Network Resources" in the "User's Guide for Infrastructure Administrators (Resource Management)CE".
Note
When the destination of a physical L-Server is a PRIMERGY BX920 series or BX922 series server and LAN switch blades PY-SWB104 (PG-SW109) or PY-SWB101 (PG-SW201) are mounted in CB1 and CB2, only NIC1 and NIC2 can be used.
3. Register Network Device Resources
For details on how to register network device resources, refer to "14.4 Network Devices" in the "User's Guide for InfrastructureAdministrators (Resource Management) CE".
4. Register Storage Resources
The procedure differs depending on the storage resources to use.
- When using virtual storage resources or disk resources created in advance
For details, refer to "14.5 Storage Resources" in the "User's Guide for Infrastructure Administrators (Resource Management)CE".
- When using iSCSI boot
Execute the operation command for iSCSI boot (rcxadm iscsictl register) to register the resources.
For details on the rcxadm iscsictl register command, refer to "5.10 rcxadm iscsictl" in the "Reference Guide (Command/XML)CE".
5. Register Address Set Resources
For WWNs and MAC addresses, address set resources must be created and registered to the address pool.Execute the rcxadm addrset create command to register WWNs and MAC addresses to the address pool.For details on the rcxadm addrset create command, refer to "3.1 rcxadm addrset" in the "Reference Guide (Command/XML) CE".
B.3.1 Automatic Network ConfigurationIf network resources are connected when creating an L-Server, LAN switch blades will be registered automatically as the blade serverthat the L-Server will operate on.
If an image is specified, the IP address is configured.Specify an IP address in a different subnet from the admin LAN.
For rack mount and tower servers, only connect network resources.
When creating a physical L-Server, the IP address cannot be automatically configured if specifying a Red Hat Enterprise Linux image.Manually configure the IP address after the image has been deployed to the L-Server.
Physical Server (Blade Server) Configuration to Support Automation of Network Configuration in ResourceOrchestrator
The physical server (blade server) configuration to support automation of network configuration (server blades, specification of uplinkport for network resources, correspondence relations of numbers of LAN switch blades and physical network adapters, etc.) in ResourceOrchestrator are shown in the following list. In this list, show the specifiable scope of physical network adapter numbers according to theserver blade models, uplink port specifications and combination of LAN switch blades to use.
- 173 -
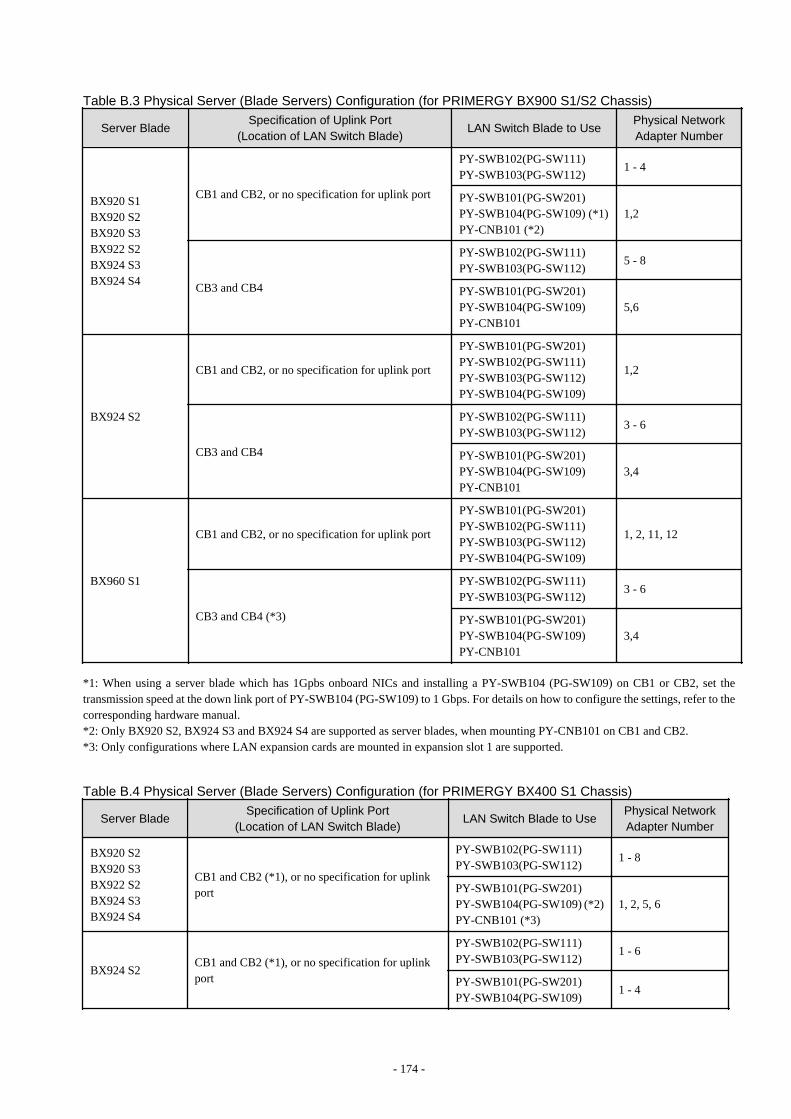
Table B.3 Physical Server (Blade Servers) Configuration (for PRIMERGY BX900 S1/S2 Chassis)
Server BladeSpecification of Uplink Port
(Location of LAN Switch Blade)LAN Switch Blade to Use
Physical NetworkAdapter Number
BX920 S1BX920 S2BX920 S3BX922 S2BX924 S3BX924 S4
CB1 and CB2, or no specification for uplink port
PY-SWB102(PG-SW111)PY-SWB103(PG-SW112)
1 - 4
PY-SWB101(PG-SW201)PY-SWB104(PG-SW109) (*1)PY-CNB101 (*2)
1,2
CB3 and CB4
PY-SWB102(PG-SW111)PY-SWB103(PG-SW112)
5 - 8
PY-SWB101(PG-SW201)PY-SWB104(PG-SW109)PY-CNB101
5,6
BX924 S2
CB1 and CB2, or no specification for uplink port
PY-SWB101(PG-SW201)PY-SWB102(PG-SW111)PY-SWB103(PG-SW112)PY-SWB104(PG-SW109)
1,2
CB3 and CB4
PY-SWB102(PG-SW111)PY-SWB103(PG-SW112)
3 - 6
PY-SWB101(PG-SW201)PY-SWB104(PG-SW109)PY-CNB101
3,4
BX960 S1
CB1 and CB2, or no specification for uplink port
PY-SWB101(PG-SW201)PY-SWB102(PG-SW111)PY-SWB103(PG-SW112)PY-SWB104(PG-SW109)
1, 2, 11, 12
CB3 and CB4 (*3)
PY-SWB102(PG-SW111)PY-SWB103(PG-SW112)
3 - 6
PY-SWB101(PG-SW201)PY-SWB104(PG-SW109)PY-CNB101
3,4
*1: When using a server blade which has 1Gpbs onboard NICs and installing a PY-SWB104 (PG-SW109) on CB1 or CB2, set thetransmission speed at the down link port of PY-SWB104 (PG-SW109) to 1 Gbps. For details on how to configure the settings, refer to thecorresponding hardware manual.*2: Only BX920 S2, BX924 S3 and BX924 S4 are supported as server blades, when mounting PY-CNB101 on CB1 and CB2.*3: Only configurations where LAN expansion cards are mounted in expansion slot 1 are supported.
Table B.4 Physical Server (Blade Servers) Configuration (for PRIMERGY BX400 S1 Chassis)
Server BladeSpecification of Uplink Port
(Location of LAN Switch Blade)LAN Switch Blade to Use
Physical NetworkAdapter Number
BX920 S2BX920 S3BX922 S2BX924 S3BX924 S4
CB1 and CB2 (*1), or no specification for uplinkport
PY-SWB102(PG-SW111)PY-SWB103(PG-SW112)
1 - 8
PY-SWB101(PG-SW201)PY-SWB104(PG-SW109) (*2)PY-CNB101 (*3)
1, 2, 5, 6
BX924 S2CB1 and CB2 (*1), or no specification for uplinkport
PY-SWB102(PG-SW111)PY-SWB103(PG-SW112)
1 - 6
PY-SWB101(PG-SW201)PY-SWB104(PG-SW109)
1 - 4
- 174 -

*1: The same LAN switch blade model should be mounted in CB1 and CB2.*2: When installing a PY-SWB104 (PG-SW109) on CB1 or CB2, set the transmission speed at the down link port of PY-SWB104 (PG-SW109) to 1 Gbps. For details on how to configure the settings, refer to the corresponding hardware manual.*3: Only BX920 S2, BX924 S3 and BX924 S4 are supported as server blades, when mounting PY-CNB101 on CB1 and CB2.
Table B.5 Physical Server (Blade Servers) Configuration (for PRIMERGY BX600 S3 Chassis)
Server BladeSpecification of Uplink Port
(Location of LAN Switch Blade)LAN Switch Blade to
UsePhysical NetworkAdapter Number
BX600 seriesservers
NET1 and NET2, or no specification for uplink port PG-SW107 1 - 6
NET3 and NET4 PG-SW104 7,8
The NIC number of the L-Server the network resource above is allocated to is the number of the physical network adapter of the physicalserver.
When the LAN switch blade is in IBP mode, specify the NIC of the L-Server that network resources are allocated to as in the case whenuplink ports have not been specified (internal network).
The physical server (blade server) configuration as described in the following configuration example when using a PRIMERGY BX900S1 chassis is as shown below.
Table B.6 Configuration Example
Server blades BX920 S2
Specification of uplink port CB1 and CB2
LAN switch blade to use PY-SWB103(PG-SW112)
Figure B.1 Physical Server (Blade Servers) Configuration (for PRIMERGY BX900 S1 Chassis)
B.3.2 Manual Network ConfigurationWhen using a physical network adapter number that is different from the one used in the physical server configuration patterns, createnetwork resources using the following procedure.
- 175 -
- From the GUI:
1. In the ROR console orchestration tree, right-click the target network pool, and select [Create Network Resource].
When creating a new network resource, select [New].
When creating a resource using an already registered admin LAN subnet, select [Using existing admin subnet].
The [Create a network resource] dialog is displayed.
2. Enter the items necessary for network resources.For details, refer to "14.3 Network Resources" in the "User's Guide for Infrastructure Administrators (Resource Management)CE".
Create a network resource by checking the [Use configured virtual switches.] checkbox.
- From the Command-line:
1. Create the XML file that defines network resources.
In this case, specify auto="false" in the Network tag.
For details on the Network element and creation of XML files that define network resources, refer to "15.5 Network Resources"in the "Reference Guide (Command/XML) CE".
2. Execute the rcxadm network create command specifying the XML file created in step 1.
See
- For details on the Network element and creation of XML files that define network resources, refer to "15.5 Network Resources" inthe "Reference Guide (Command/XML) CE".
- For details on the rcxadm network command, refer to "3.9 rcxadm network" in the "Reference Guide (Command/XML) CE".
B.4 Creating L-Server TemplatesThis chapter explains how to create an L-Server template.
L-Server templates can be created using the following methods.
- Using the Wizard GUI
L-Server templates can be created using the wizard GUI in the wizard format.
For details on the GUI in the wizard format, refer to "15.1 Operations Using the Wizard GUI" in the "User's Guide for InfrastructureAdministrators (Resource Management) CE".
- Manually
Use the following procedure to create an L-Server template:
1. Export an L-Server Template
The sample L-Server templates provided with Resource Orchestrator can be exported.For details on how to export L-Server templates, refer to "15.2.1 Export" in the "User's Guide for Infrastructure Administrators(Resource Management) CE".
2. Edit an L-Server Template
The L-Server template output in step 1 can be edited with an editor, etc.For details on the L-Server templates for physical L-Servers, refer to "15.2.1 Physical L-Server Templates" in the "ReferenceGuide (Command/XML) CE".
3. Import an L-Server Template
The L-Server template edited in step 2 can be imported.For details on how to import L-Server templates, refer to "15.2.3 Import" in the "User's Guide for Infrastructure Administrators(Resource Management) CE".
- 176 -
B.5 Creating an L-ServerThis section explains the creation of physical L-Servers.
Physical L-Servers can be created using the following methods:
- Creating an L-Server Using an L-Server Template
Refer to "B.5.1 Creating an L-Server Using an L-Server Template".
- Creating an L-Server Specifying Individual Specifications
Refer to "B.5.2 Creating an L-Server Specifying Individual Specifications".
- Installation of an Operating System Using PXE Boot
Refer to "B.5.4 Installation of an Operating System Using PXE Boot".
Configuration parameters for an OS can be specified by entering the parameters in the [OS] tab when creating an L-Server specifying animage using the [General] tab. For details, refer to "B.7 [OS] Tab Configuration".
For details, refer to the following:
B.5.1 Creating an L-Server Using an L-Server Template- When there are no cloning images, or when not using already registered cloning images
1. Create an L-Server Using an L-Server Template
Create an L-Server, referring to "16.1 Creation Using an L-Server Template" in the "User's Guide for InfrastructureAdministrators (Resource Management) CE".
In this case, perform the following configuration:
- Select [None] for images.
- Check if the [Single path mode] checkbox for FC path is checked.
- When specifying "None" for images, the [Single path mode] checkbox for FC path is automatically checked.
2. Manually Install an OS
Refer to "B.5.3 Manual OS Installation".
3. Install a Multipath Driver (when using a Multipath for the Path to the SAN)
When using multipaths between L-Server and SAN, install the multipath driver for the L-Server.
For details on how to install the multipath driver, refer to the multipath driver manual.
4. Stop the L-Server
For details on stopping L-Servers, refer to "17.1.2 Stopping an L-Server" in the "User's Guide for Infrastructure Administrators(Resource Management) CE".
5. Change the SAN Path Status of the L-Server
Follow the procedure below to change the SAN path status of the L-Server.
a. Right-click the target L-Server in the orchestration tree, and select [Change Settings]-[Modify Specification] from thepopup menu.
The [Modify an L-Server] dialog is displayed.
b. Uncheck the [Single path mode] checkbox for FC path.
c. Click <OK>.
6. Start the L-Server
For details on starting L-Servers, refer to "17.1.1 Starting an L-Server" in the "User's Guide for Infrastructure Administrators(Resource Management) CE".
- 177 -

7. Install the Agent
It is necessary to install an agent after installing the OS, and then register it.
For details on installing agents, refer to "2.2 Agent Installation".
8. Register the Agent
Use the following procedure to register an agent on the server used as an L-Server.
a. Right-click the target L-Server in the orchestration tree, and select [Register]-[Agent] from the popup menu.
b. Click <OK>.
The [Register Agent] dialog is displayed.
c. Click <OK>.
- When using an existing cloning image
Create an L-Server, referring to "16.1 Creation Using an L-Server Template" in the "User's Guide for Infrastructure Administrators(Resource Management) CE". In this case, specify the cloning image that you want to use as an image.
B.5.2 Creating an L-Server Specifying Individual Specifications- When there are no cloning images, or when not using already registered cloning images
Refer to "16.2 Creation of Physical L-Servers Using Parameters" in the "User's Guide for Infrastructure Administrators (ResourceManagement) CE".
In this case, perform the following configuration:
- Select [None] for images.
- Check if the [Single path mode] checkbox for FC path is checked.
When specifying "None" for images, the [Single path mode] checkbox for FC path is automatically checked.
Perform steps 2 to 8 in "B.5.1 Creating an L-Server Using an L-Server Template".
- When using an existing cloning image
Refer to "16.2 Creation of Physical L-Servers Using Parameters" in the "User's Guide for Infrastructure Administrators (ResourceManagement) CE".
In this case, perform the following configuration:
- Specify a cloning image to deploy.
- Check if the [Single path mode] checkbox for FC path is unchecked.
When specifying an image, the [Single path mode] checkbox for FC path is automatically unchecked.
For details on how to configure the [OS] tab, refer to "16.2.5 [OS] Tab" in the "User's Guide for Infrastructure Administrators (ResourceManagement) CE".
B.5.3 Manual OS InstallationInstall the OS and applications required for deployment.
For manual OS installation, installation by remote console is recommended after starting the MB (Management Blade) or iRMC (RemoteManagement Controller) screen.
Additionally, apply any required patches and other necessary settings.
Make sure that the source server operates properly after those steps.
- Check whether the DHCP client is enabled on the managed server to collect the cloning image from.
- 178 -
- Cloning images with the same name can be saved up until the maximum number of image versions.
When collecting a new cloning image when the maximum number of image versions has already been reached, select the cloningimage to delete.
The maximum number of image versions is three by default.
For details of how to change the maximum number of image versions, refer to "6.4 Changing the Maximum Number of Cloning ImageVersions (Physical Servers)" in the "User's Guide for Infrastructure Administrators (Resource Management) CE".
- When the target of operation is a PRIMEQUEST server, confirm that the boot option settings on the target server and the boot optionset in BIOS are configured for Legacy boot.When the settings of one of the servers are UEFI, configure the settings after changing to Legacy boot.
For details on changing the boot options, refer to "7.1.10 Changing Boot Options" in the "User's Guide for Infrastructure Administrators(Resource Management) CE".
[Windows]
- Enable NetBIOS over TCP/IP
- A volume license is required for cloning, and must be entered during the installation of Resource Orchestrator Agent.
For details, refer to "2.2.1.2 Collecting and Checking Required Information" and "2.2.2 Installation [Windows] [Hyper-V]".
If no volume license is entered during the agent installation, or if this information is changed after installation, edit the followinglicense configuration file on the source server. Note that the structure and location of this file depend on the version of Windows thatis being used.
- For Windows Server 2003
Installation_folder\Agent\scw\SeparateSetting\sysprep\sysprep.inf
Edit the following line to enter a valid product ID.
ProductID=Windows product key (*1)
*1: 5-digit values separated by hyphens
Example
ProductID=11111-22222-33333-44444-55555
Note
If there is a mistake in the product ID value or format, an error occurs when the collected cloning image is deployed. Make sureto enter a valid product ID when editing the definition file.
- For Windows Server 2008 or Later
Installation_folder\Agent\scw\SeparateSetting\ipadj\activation.dat
Specify the parameters in the format "parameter=value" in each line of the [ActivationInfo] section of the definition file.
Refer to the following table for details on each parameter.
Table B.7 Structure of the Definition FileForma
tParameter Value
KMS.cmd.remotescript.1.params.kmscheck (Mandatory)
KMS host search type.
Select one of the following:
- AUTO
- 179 -
Format
Parameter Value
Automatically searches KMS hosts.
- MANUAL
Specify the KMS host.
When "MANUAL" is selected, make sure toset .cmd.remotescript.1.params.kmsname.
.cmd.remotescript.1.params.kmsname
Host name (FQDN), computer name or IP address of the KMShost.
.cmd.remotescript.1.params.kmsport
KMS host port number. If omitted, "1688" will be set.
MAK.cmd.remotescript.1.params.makkey (Mandatory)
MAK key.
Common
.cmd.remotescript.1.params.ieproxy
Host name (FQDN) and the port number of the proxy server. Thehost name and port number are separated by a colon (":").
.cmd.remotescript.1.params.password
Administrator password.
An existing password setting will be displayed as an encryptedcharacter string.To edit the password, overwrite it with plain text, delete the"encrypted=yes" line, and perform the encryption procedureindicated in the example.If this parameter is not set, the password will be re-initialized.
encrypted
The encryption status of the Administrator password.Encryption is performed when "yes" is specified.If this line exists, the rcxadm deployctl command does notoperate.
Example
- With KMS (Automatic Search)
[ActivationInfo].cmd.remotescript.1.params.kmscheck=AUTO.cmd.remotescript.1.params.ieproxy=proxy.activation.com:8080.cmd.remotescript.1.params.password=PASSWORD
- With KMS (Manual Settings)
[ActivationInfo].cmd.remotescript.1.params.kmscheck=MANUAL.cmd.remotescript.1.params.kmsname=fujitsu.activation.com.cmd.remotescript.1.params.kmsport=4971.cmd.remotescript.1.params.ieproxy=proxy.activation.com:8080.cmd.remotescript.1.params.password=PASSWORD
- With MAK
[ActivationInfo].cmd.remotescript.1.params.makkey=11111-22222-33333-44444-55555.cmd.remotescript.1.params.ieproxy=proxy.activation.com:8080.cmd.remotescript.1.params.password=PASSWORD
- 180 -
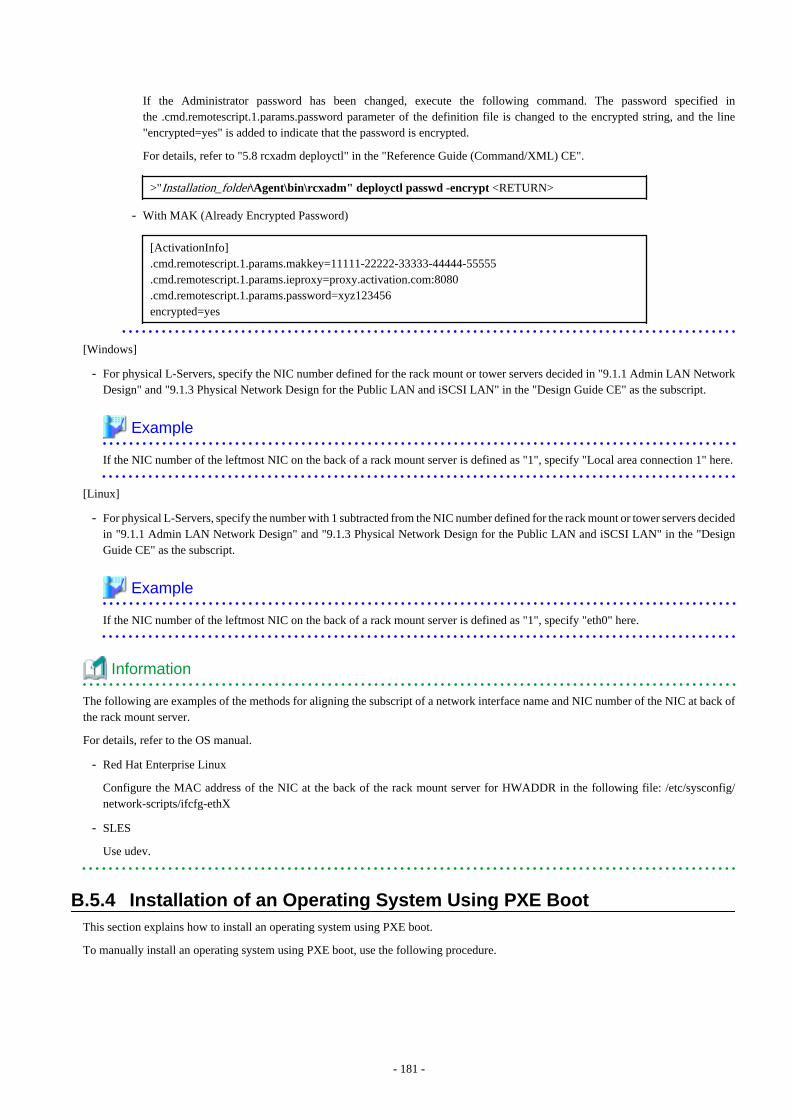
If the Administrator password has been changed, execute the following command. The password specified inthe .cmd.remotescript.1.params.password parameter of the definition file is changed to the encrypted string, and the line"encrypted=yes" is added to indicate that the password is encrypted.
For details, refer to "5.8 rcxadm deployctl" in the "Reference Guide (Command/XML) CE".
>"Installation_folder\Agent\bin\rcxadm" deployctl passwd -encrypt <RETURN>
- With MAK (Already Encrypted Password)
[ActivationInfo].cmd.remotescript.1.params.makkey=11111-22222-33333-44444-55555.cmd.remotescript.1.params.ieproxy=proxy.activation.com:8080.cmd.remotescript.1.params.password=xyz123456encrypted=yes
[Windows]
- For physical L-Servers, specify the NIC number defined for the rack mount or tower servers decided in "9.1.1 Admin LAN NetworkDesign" and "9.1.3 Physical Network Design for the Public LAN and iSCSI LAN" in the "Design Guide CE" as the subscript.
Example
If the NIC number of the leftmost NIC on the back of a rack mount server is defined as "1", specify "Local area connection 1" here.
[Linux]
- For physical L-Servers, specify the number with 1 subtracted from the NIC number defined for the rack mount or tower servers decidedin "9.1.1 Admin LAN Network Design" and "9.1.3 Physical Network Design for the Public LAN and iSCSI LAN" in the "DesignGuide CE" as the subscript.
Example
If the NIC number of the leftmost NIC on the back of a rack mount server is defined as "1", specify "eth0" here.
Information
The following are examples of the methods for aligning the subscript of a network interface name and NIC number of the NIC at back ofthe rack mount server.
For details, refer to the OS manual.
- Red Hat Enterprise Linux
Configure the MAC address of the NIC at the back of the rack mount server for HWADDR in the following file: /etc/sysconfig/network-scripts/ifcfg-ethX
- SLES
Use udev.
B.5.4 Installation of an Operating System Using PXE BootThis section explains how to install an operating system using PXE boot.
To manually install an operating system using PXE boot, use the following procedure.
- 181 -
Note
When using PXE boot, VIOM is required.
1. Create a physical L-Server, selecting [NIC for PXE boot] and [Network for PXE boot] of "Boot device priority" on the [Server]tab.
For details on how to configure the [Server] tab, refer to "16.2 Creation of Physical L-Servers Using Parameters" in the "User'sGuide for Infrastructure Administrators (Resource Management) CE".
In this case, perform the following configuration:
- Specify the network boot (PXE) for the boot mode.
- Select the network resource for PXE boot.
- Select [None] for images.
- Check if the [Single path mode] checkbox for FC path is checked.
- When specifying [None] for images, the [Single path mode] checkbox for FC path is automatically checked.
2. Using the DHCP service settings of the PXE boot server, set the relevant physical L-Server to perform PXE boot.
3. Using PXE boot, install an OS on the physical L-Server.
4. Stop the physical L-Server after installing the OS.
5. In the [Modify an L-Server] dialog, change [Network for PXE boot] to [Default] under [Boot mode].
6. Using the DHCP service settings of the PXE boot server, set the relevant physical L-Server so as not to perform PXE boot.
7. Start the L-Server.
For details on starting L-Servers, refer to "17.1.1 Starting an L-Server" in the "User's Guide for Infrastructure Administrators(Resource Management) CE".
8. Install a multipath driver.
When using multipaths between L-Server and SAN, install the multipath driver for the L-Server.
Refer to the manual of the multipath driver for details on installing multipath drivers.
9. Stop the L-Server.
For details on stopping L-Servers, refer to "17.1.2 Stopping an L-Server" in the "User's Guide for Infrastructure Administrators(Resource Management) CE".
10. Change the status of SAN paths for the L-Server.
Follow the procedure below to change the SAN path status of the L-Server.
a. Right-click the target L-Server in the orchestration tree, and select [Change Settings]-[Modify Specification] from the popupmenu.
The [Modify an L-Server] dialog is displayed.
b. Uncheck the [Single path mode] checkbox for FC path, and click <OK>.
11. Start the L-Server.
For details on starting L-Servers, refer to "17.1.1 Starting an L-Server" in the "User's Guide for Infrastructure Administrators(Resource Management) CE".
12. Install the agent.
It is necessary to install an agent after installing the OS, and then register it.
For details on installing agents, refer to "2.2 Agent Installation".
13. Register the agent.
Use the following procedure to register an agent on the server used as an L-Server.
- 182 -

a. Right-click the target L-Server in the orchestration tree, select [Register]-[Agent] from the popup menu, and click <OK>.
The [Register Agent] dialog is displayed.
b. Click <OK>.
B.6 Collecting and Registering Cloning ImagesCloning images can be collected using the following two methods:
- Collecting a Cloning Image from an L-Server after OS Installation
Refer to "B.6.1 When Collecting a Cloning Image from an L-Server after OS Installation".
- When Registering a Cloning Image Created from a Physical Server in Advance to the Image Pool
Refer to "14.7.2 Physical Image Resources" in the "User's Guide for Infrastructure Administrators (Resource Management) CE".
When the target server of cloning image collection has a redundant NIC configured, release redundancy and then perform collection ofcloning images.
Collect cloning images in the state where a multi driver is installed.
B.6.1 When Collecting a Cloning Image from an L-Server after OSInstallation
Cloning images can be collected from the L-Server after an OS is installed.
1. Collecting a Cloning Image
In the orchestration tree on the [Resource] tab of the ROR console, right-click the L-Server created in "Chapter 14 Creating an L-Server for an Infrastructure Administrator", and select [Cloning] - [Collect] from the popup menu.
The [Collect a Cloning Image] dialog is displayed.
Configure the necessary items.
The cloning image is stored in the specified image pool.
For details on collecting cloning images, refer to "17.5.1 Collecting and Registering" in the "User's Guide for Infrastructure Administrators(Resource Management) CE".
Note
- This function is not available if ServerView Deployment Manager is used on the admin LAN. Use the cloning function of ServerViewDeployment Manager. For details, refer to "Appendix J Co-Existence with ServerView Deployment Manager".
- When cloning, only the content of the first disk recognized in the BIOS (the boot disk) of the managed server is collected.
Data disk content (second disk onwards) cannot be cloned. Use other backup software and the copy functions of storage units to collectand deploy the data.
If multiple storage areas (Windows drivers or Linux partitions) are set in the first disk, all the partitions are cloned.
Table B.8 Cloning Target Examples
Disk Windows Drive Cloning Target
First diskC: Yes
E: Yes
Second diskD: No
F: No
- When collecting a cloning image, work must be stopped because the managed server is restarted.
- The first partition must be a primary partition.
- 183 -
- Cloning images can be collected with the following file systems. Note that LVM (Logical Volume Manager) partitions are notsupported.
- NTFS
- EXT3
- EXT4
- LinuxSwap
- When the managed server is Windows Server 2012, collection of cloning images from system disks that include ReFS data areas isnot possible.
- All of the following conditions must be met for the managed server to collect the cloning image from and the managed server to deploythe cloning image to.
- The model names are the same
- The hardware configurations are the same, such as the optional cards and expansion cards, and their locations
- The BIOS settings are the same for all servers according to the procedure in "8.2.7 Configuring BIOS Settings of Managed Servers"in the "Design Guide CE".
- The LAN and SAN connections have the same redundancy methods and the same number of redundancy paths, and can accessthe same network devices and storage units
Note that LAN or fibre channel switches connected in a cascade configuration are viewed as a single device.
- Some applications may require manual adjustments to function properly after cloning.
If necessary, manually perform such adjustments before or after the cloning process.
- Up to four system image backup, restoration, and cloning image collection processes can be executed at the same time. If five or moreprocesses are requested, the extra processes wait until the processes being executed are complete.
Restore operations executed by the backup/restore method during server switchover and failback also wait. When using auto-recoveryand manual switchover operations with the backup/restore method, execute a maximum of three system image backup/restore orcloning image collection/deployment operations at the same time.
- After collecting or deploying a cloning image, software required for connecting to external servers, etc. when the OS is started maynot start correctly.
In this case, restart the OS after it is collected.
- If the Watchdog (function that automatically resets or turns off the OS when a hang is detected because the OS does not respond fora certain period) function of the managed server is enabled, the OS may be automatically reset or turned off during cloning.
It is therefore highly recommended to disable the Watchdog function before a cloning operation.
For details, refer to the manual of the managed server.
- When using MAK license authentication for activation for the following OSs, Sysprep can be executed a maximum of three times.
- Microsoft(R) Windows Server(R) 2008 R2
- Microsoft(R) Windows Server(R) 2008
Since Sysprep is executed when creating L-Server with images specified or when collecting cloning images, collection of cloningimages and creation of L-Servers with images specified cannot be performed more than four times. Therefore, it is recommended notto collect cloning images from L-Servers that have had cloning images deployed, but to collect them from a dedicated master server.
- As there is a chance that data will be damaged, do not perform collection or deployment of a cloning image while performing an iSCSIconnection using a software initiator.
When using data disks, use the hardware initiator.
- 184 -
B.7 [OS] Tab ConfigurationEnter the parameters to set for the OS when creating the L-Server. This setting is valid only if an image is specified in the [General] tab.The setting process is performed the first time the L-Server is started.
If an image name is not specified, entry is not necessary.
Table B.9 List of Settings
Item Description
Host name/Computer name
Enter the host name or computer name.
[Windows]Specify up to 63 characters, including alphanumeric characters, underscores ("_"), and hyphens("-"). The string cannot be composed solely of numbers.
[Linux]Specify up to 64 characters, including alphanumeric characters, hyphens ("-"), periods ("."), andunderscores ("_").
Underscores ("_") in the L-Server name will be converted to hyphens ("-").
If the basic information is not specified, the L-Server name is converted and set as indicated above.
B.8 Network Redundancy and VLAN Settings of L-ServersIn Resource Orchestrator, when images of Red Hat Enterprise Linux are specified, IP address settings of public LANs are not configured.Server NIC redundancy and the OS settings of tagged VLANs are also not configured.When starting an OS after L-Server creation, set the image to be configured automatically after creating an L-Server. For this setting, usethe image collected in the state where the scripts to configure the network settings have been prepared beforehand.In this case, prepare a script like the following, and perform collection of a cloning image with the script executed once on starting of theOS.
According to the description in the network information file, perform the following settings for using NIC redundancy software (such asWindows Intel PROSet/Linux bonding).
- NIC Redundancy
- Tagged VLAN Configuration
- IP Address Configuration
For details on the specifications of the network information file, refer to "Network Information File".
Network Information File
The settings for NIC redundancy and tagged VLANs for a physical L-Server are described in the file. It is automatically transferred to aphysical L-Server during creation. When the rcxadm lserver command is executed after creation of the physical L-Server, the networkinformation file will be transferred to the L-Server.
Network Information File Storage Destination
[Windows]Installation_folder\Agent\etc\net
[Linux]/etc/opt/FJSVrcxat/net/
File Name of the Network Information File
net_info.conf
Character Code
UTF-8
- 185 -

Line Break Code
[Windows]CR/LF
[Linux]LF
Format for the Network Information File
The formats are shown below.
Table B.10 List of Items Specified in the Network Information File
Variable Meaning Value
NIC[index]_MacAddress NIC MAC address (*)MAC addresses, noted in hexadecimal form,separated by colons (":")
GroupsList of groups of redundantNICs
Group numbers, separated by spaces
Group[index]_NetworkLinksNetworkLink list allocated togroups
NetworkLinkIndex separated by spaces
Group[index]_[NetworkLinkIndex]_Nics List of NICs comprising groups NIC numbers separated by spaces
Group[index]_[NetworkLinkIndex]_IpAddress
Group IP address
IPv4 addresses separated by periods (".")Group[index]_[NetworkLinkIndex]_Netmask
Net masks of groups
Group[index]_[NetworkLinkIndex]_DefaultGateway
Default gateway
Group[index]_[NetworkLinkIndex]_Vlanid
VLANID of NetLink allocatedto the group
2-4094
Group[index]_[NetworkLinkIndex]_VlanMode
Specification of tagged VLANsor untagged VLANs
tagged or untagged
Group[index]_[NetworkLinkIndex]_ExtParams_[ParamName]
Additional group parametersFor [ParamName], theparameter name specifiedduring L-Server creation isused.
Parameter value specified by the user
SingleNicsList of non-redundant NICs insingle configurations
NIC numbers separated by spaces
NIC [index]_NetworkLinksNetworkLink list allocated togroups
NetworkLinkIndex separated by spaces
NIC[index]_[NetworkLinkIndex]_IpAddress
NIC IP addresses
IPv4 addresses separated by periods (".")NIC[index]_[NetworkLinkIndex]_Netmask
NIC Net masks
NIC[index]_[NetworkLinkIndex]_DefaultGateway
Default gateway
NIC [index]_[NetworkLinkIndex]_VlanidVLANID of NetLink allocatedto NICs
2-4094
NIC[index]_[NetworkLinkIndex]_VlanMode
Specification of tagged VLANsor untagged VLANs
tagged or untagged
- 186 -
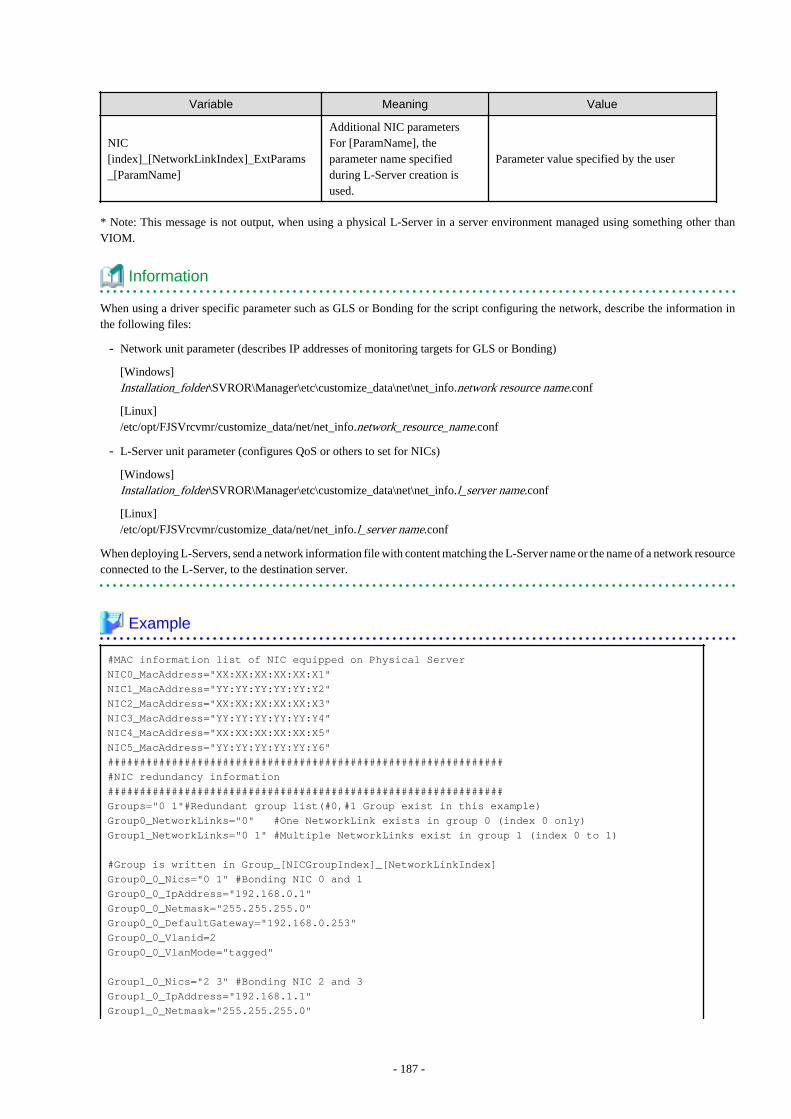
Variable Meaning Value
NIC[index]_[NetworkLinkIndex]_ExtParams_[ParamName]
Additional NIC parametersFor [ParamName], theparameter name specifiedduring L-Server creation isused.
Parameter value specified by the user
* Note: This message is not output, when using a physical L-Server in a server environment managed using something other thanVIOM.
Information
When using a driver specific parameter such as GLS or Bonding for the script configuring the network, describe the information inthe following files:
- Network unit parameter (describes IP addresses of monitoring targets for GLS or Bonding)
[Windows]Installation_folder\SVROR\Manager\etc\customize_data\net\net_info.network resource name.conf
[Linux]/etc/opt/FJSVrcvmr/customize_data/net/net_info.network_resource_name.conf
- L-Server unit parameter (configures QoS or others to set for NICs)
[Windows]Installation_folder\SVROR\Manager\etc\customize_data\net\net_info.l_server name.conf
[Linux]/etc/opt/FJSVrcvmr/customize_data/net/net_info.l_server name.conf
When deploying L-Servers, send a network information file with content matching the L-Server name or the name of a network resourceconnected to the L-Server, to the destination server.
Example #MAC information list of NIC equipped on Physical ServerNIC0_MacAddress="XX:XX:XX:XX:XX:X1"NIC1_MacAddress="YY:YY:YY:YY:YY:Y2"NIC2_MacAddress="XX:XX:XX:XX:XX:X3"NIC3_MacAddress="YY:YY:YY:YY:YY:Y4"NIC4_MacAddress="XX:XX:XX:XX:XX:X5"NIC5_MacAddress="YY:YY:YY:YY:YY:Y6"###############################################################NIC redundancy information##############################################################Groups="0 1"#Redundant group list(#0,#1 Group exist in this example)Group0_NetworkLinks="0" #One NetworkLink exists in group 0 (index 0 only)Group1_NetworkLinks="0 1" #Multiple NetworkLinks exist in group 1 (index 0 to 1)
#Group is written in Group_[NICGroupIndex]_[NetworkLinkIndex]Group0_0_Nics="0 1" #Bonding NIC 0 and 1Group0_0_IpAddress="192.168.0.1"Group0_0_Netmask="255.255.255.0"Group0_0_DefaultGateway="192.168.0.253"Group0_0_Vlanid=2Group0_0_VlanMode="tagged"
Group1_0_Nics="2 3" #Bonding NIC 2 and 3Group1_0_IpAddress="192.168.1.1"Group1_0_Netmask="255.255.255.0"
- 187 -
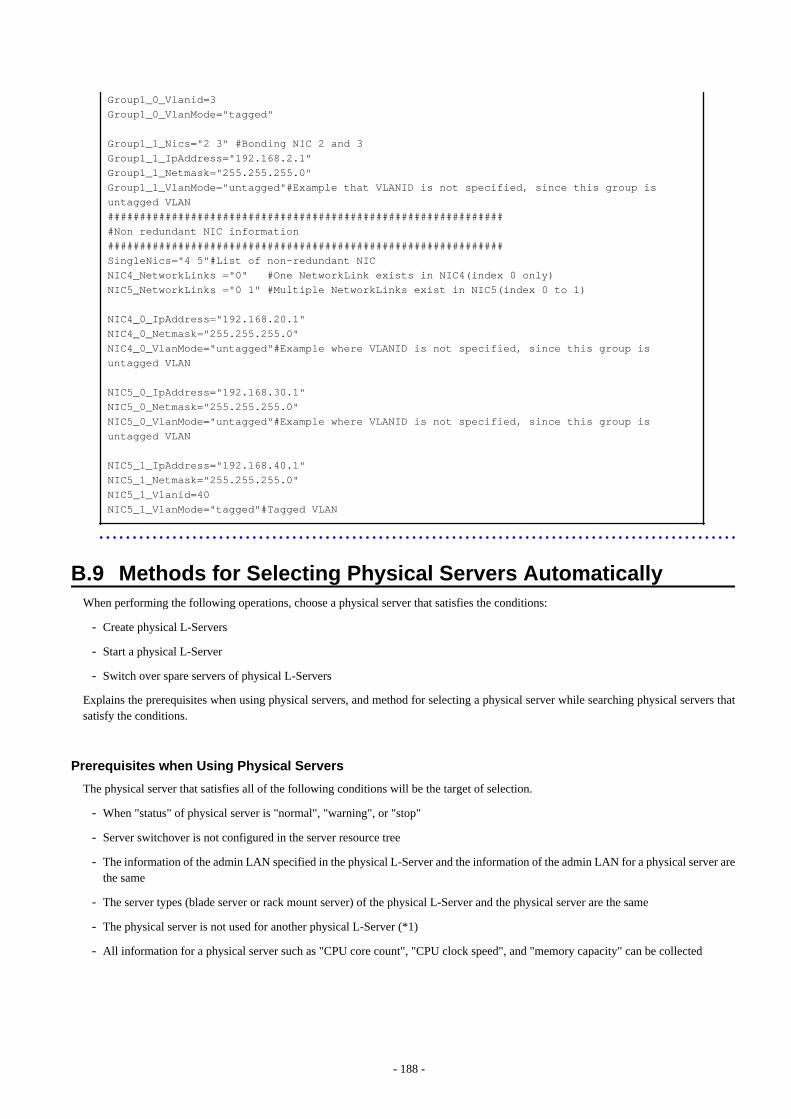
Group1_0_Vlanid=3Group1_0_VlanMode="tagged"
Group1_1_Nics="2 3" #Bonding NIC 2 and 3Group1_1_IpAddress="192.168.2.1"Group1_1_Netmask="255.255.255.0"Group1_1_VlanMode="untagged"#Example that VLANID is not specified, since this group is untagged VLAN###############################################################Non redundant NIC information##############################################################SingleNics="4 5"#List of non-redundant NICNIC4_NetworkLinks ="0" #One NetworkLink exists in NIC4(index 0 only)NIC5_NetworkLinks ="0 1" #Multiple NetworkLinks exist in NIC5(index 0 to 1)
NIC4_0_IpAddress="192.168.20.1"NIC4_0_Netmask="255.255.255.0"NIC4_0_VlanMode="untagged"#Example where VLANID is not specified, since this group is untagged VLAN
NIC5_0_IpAddress="192.168.30.1"NIC5_0_Netmask="255.255.255.0"NIC5_0_VlanMode="untagged"#Example where VLANID is not specified, since this group is untagged VLAN
NIC5_1_IpAddress="192.168.40.1"NIC5_1_Netmask="255.255.255.0"NIC5_1_Vlanid=40NIC5_1_VlanMode="tagged"#Tagged VLAN
B.9 Methods for Selecting Physical Servers AutomaticallyWhen performing the following operations, choose a physical server that satisfies the conditions:
- Create physical L-Servers
- Start a physical L-Server
- Switch over spare servers of physical L-Servers
Explains the prerequisites when using physical servers, and method for selecting a physical server while searching physical servers thatsatisfy the conditions.
Prerequisites when Using Physical Servers
The physical server that satisfies all of the following conditions will be the target of selection.
- When "status" of physical server is "normal", "warning", or "stop"
- Server switchover is not configured in the server resource tree
- The information of the admin LAN specified in the physical L-Server and the information of the admin LAN for a physical server arethe same
- The server types (blade server or rack mount server) of the physical L-Server and the physical server are the same
- The physical server is not used for another physical L-Server (*1)
- All information for a physical server such as "CPU core count", "CPU clock speed", and "memory capacity" can be collected
- 188 -
Selection Method for Physical Servers
Select a physical server from a group of physical servers satisfying prerequisites using the following order of priority:
Describe the items in order of their priority.
- Create physical L-Servers
- The server in the server pool to which a high priority has been given (*2)
- The server with the physical server configuration that is most similar to the L-Server definition
- A server which is not allocated to another physical L-Server that was not running when starting up the previous time
- A physical server that is in the same chassis as the server started at the last startup (when using a blade server)
- A physical server which was started at the last startup
- Start a physical L-Server
- The server in the server pool to which a high priority has been given (*2)
- The server with the physical server configuration that is most similar to the L-Server definition
- A server which is not allocated to another physical L-Server that was not running when starting up the previous time
- A physical server that is in the same chassis as the server started at the last startup (when using a blade server)
- A physical server which was started at the last startup
- When there was no physical server, and "HA" is specified for "Server Recovery", physical servers in the spare server pool aresearched.
- Switch over spare servers of physical L-Servers
- The server in the server pool to which a high priority has been given (*2)
- The server with the physical server configuration that is most similar to the L-Server definition
- A server which is not allocated to another physical L-Server that was not running when starting up the previous time
- A physical server that is in the same chassis as the server started at the last startup (when using a blade server)
- The server that is allowed "Turn off forcibly" as Spare server behavior (*3)
*1: Compare the physical L-Server definition and the physical server using the following conditions. A physical server with the sameconditions or meeting all conditions is selected.
- If model names are specified when specifying a physical L-Server
- The "model names" are the same, or compatible
- Number of NICs
- If CPUs and memories are specified when specifying a physical L-Server
- CPU core count
- CPU clock speed
- Memory capacity
- Number of NICs
*2: When [Resource type] and [Spare server pool] are [Automatic], priority is given to a resource pool. If the priority of resource poolsis the same, the resource pool is selected randomly.
*3: Physical L-Server that is set "Turn off forcibly to use as a spare server" can use the server that is allowed "Turn off forcibly" as Spareserver behavior.
When the [Use a low spec server] checkbox for [Spare server specs] is checked, the servers will be selected as follows:
- 189 -

- If model names are specified when specifying a physical L-Server
A physical server with the same server model as that in the L-Server definition is selected.
- If CPUs and memories are specified when specifying a physical L-Server
Configurations are not checked.
When there are multiple physical servers with the same conditions, the server is selected using the internal logic of Resource Orchestrator.
B.10 Advisory Notes for Physical L-Server UsageThis section explains advisory notes for usage of physical L-Servers.
Deleting an L-Server
When deleting an L-Server, log out from the ETERNUSmgr of ETERNUS storage registered on ESC.
When operating NetApp storage in cluster environments and operating a partial system due to system trouble, perform the operation afterrecovering the NetApp storage and returning the system to cluster operation.
When the disk resource is a LUN created in advance or a LUN for iSCSI boot, it is recommended to delete the data on the disk, as thedata is not deleted when deleting an L-Server to which the disk resource is allocated.
For details on how to delete data on disks, refer to "14.5 Storage Resources" in the "User's Guide for Infrastructure Administrators (ResourceManagement) CE".
L-Server Snapshots
Snapshots of L-Servers cannot be used.
Moving an L-Server between servers (Migration)
Moving between servers (migration) cannot be used.
Network Settings for L-Servers OSs
In Resource Orchestrator, settings for an operating system, such as NIC redundancy on servers or tagged VLANs, are not performed.When specifying an image of Red Hat Enterprise Linux, the IP address cannot be automatically configured.When starting an OS after L-Server creation, set the image to be configured automatically after creating an L-Server. For this setting, usethe image collected in the state where the scripts to configure the network settings have been prepared beforehand.For details, refer to "B.8 Network Redundancy and VLAN Settings of L-Servers".
- 190 -
Appendix C Configuration when Creating Virtual L-Servers
This appendix explains configuration regarding the creation of virtual L-Servers.
C.1 Definition Files Commonly Shared when Creating Virtual L-Servers
This section explains the definition files used when creating a virtual L-Server.
When using an L-Server, configuration of a definition file may be necessary.
- When using overcommit [VMware] [Hyper-V] [KVM] [Solaris Zones] [OVM for SPARC] [Citrix-Xen] [OVM for x86 3.2]
Refer to "2.3.1.1 Overcommit Definition Files" in the "Release Notes".
- When defining VM specific information [VMware] [Hyper-V] [KVM] [Citrix Xen]
Refer to "C.1.2 VM Specific Information Definition File".
- When using thin provisioning [VMware]
Refer to "C.1.3 Configuration of Priority for Resource Selection on Thin Provisioning".
- When creating a virtual L-Server using a server which cannot use ServerView Agents
Refer to "C.1.4 Configuration when Creating a Virtual L-Server Using a Server which cannot Use ServerView Agents".
- Configuration when creating a virtual L-Server using VMware ESXi on other vendor's servers [VMware]
Refer to "C.1.5 Configuration when Creating a Virtual L-Server Using VMware ESXi on Other Vendor's Servers".
- When using alive monitoring [VMware] [Hyper-V]
Refer to "C.1.6 Definition File for Alive Monitoring".
- When generating the default value for the information such as the [OS] Tab when creating an L-Server [VMware] [Hyper-V] [KVM][Solaris Zones] [OVM for SPARC] [Citrix-Xen]
Refer to "C.1.7 OS Property Definition File".
C.1.1 Overcommit Definition FilesThis section explains overcommit definition files.
Only edit the overcommit definition files when changing the default value of the calculation method for available space for a VM poolused for overcommit.For details on how to create a VM pool to use for overcommit, refer to "20.2 Creating" in the "User's Guide for Infrastructure Administrators(Resource Management) CE".
Storage Location of the Definition File
[Windows Manager]Installation_folder\SVROR\Manager\etc\customize_data
[Linux Manager]/etc/opt/FJSVrcvmr/customize_data
Information
In the storage location above, the sample definition file (pool.sample.rcxprop) is stored. When using the sample as the definition file, placethe file after deleting the ".sample" included in the file name.
- 191 -
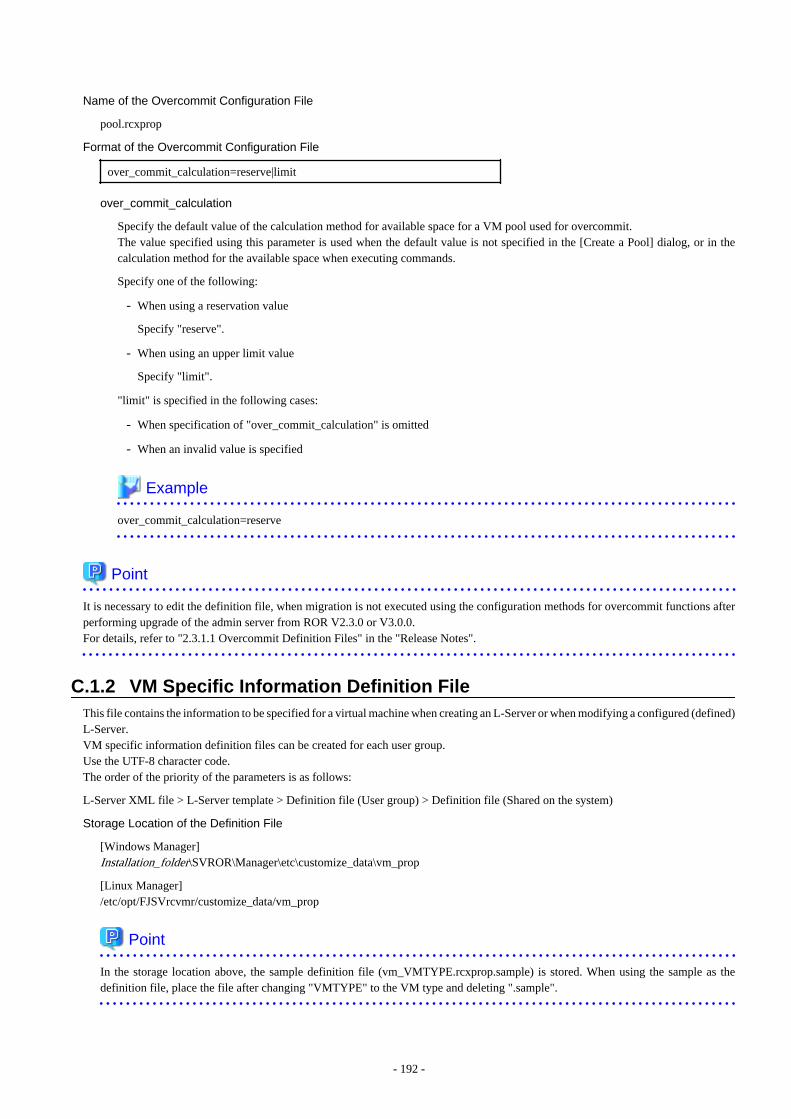
Name of the Overcommit Configuration File
pool.rcxprop
Format of the Overcommit Configuration File
over_commit_calculation=reserve|limit
over_commit_calculation
Specify the default value of the calculation method for available space for a VM pool used for overcommit.The value specified using this parameter is used when the default value is not specified in the [Create a Pool] dialog, or in thecalculation method for the available space when executing commands.
Specify one of the following:
- When using a reservation value
Specify "reserve".
- When using an upper limit value
Specify "limit".
"limit" is specified in the following cases:
- When specification of "over_commit_calculation" is omitted
- When an invalid value is specified
Example
over_commit_calculation=reserve
Point
It is necessary to edit the definition file, when migration is not executed using the configuration methods for overcommit functions afterperforming upgrade of the admin server from ROR V2.3.0 or V3.0.0.For details, refer to "2.3.1.1 Overcommit Definition Files" in the "Release Notes".
C.1.2 VM Specific Information Definition FileThis file contains the information to be specified for a virtual machine when creating an L-Server or when modifying a configured (defined)L-Server.VM specific information definition files can be created for each user group.Use the UTF-8 character code.The order of the priority of the parameters is as follows:
L-Server XML file > L-Server template > Definition file (User group) > Definition file (Shared on the system)
Storage Location of the Definition File
[Windows Manager]Installation_folder\SVROR\Manager\etc\customize_data\vm_prop
[Linux Manager]/etc/opt/FJSVrcvmr/customize_data/vm_prop
Point
In the storage location above, the sample definition file (vm_VMTYPE.rcxprop.sample) is stored. When using the sample as thedefinition file, place the file after changing "VMTYPE" to the VM type and deleting ".sample".
- 192 -
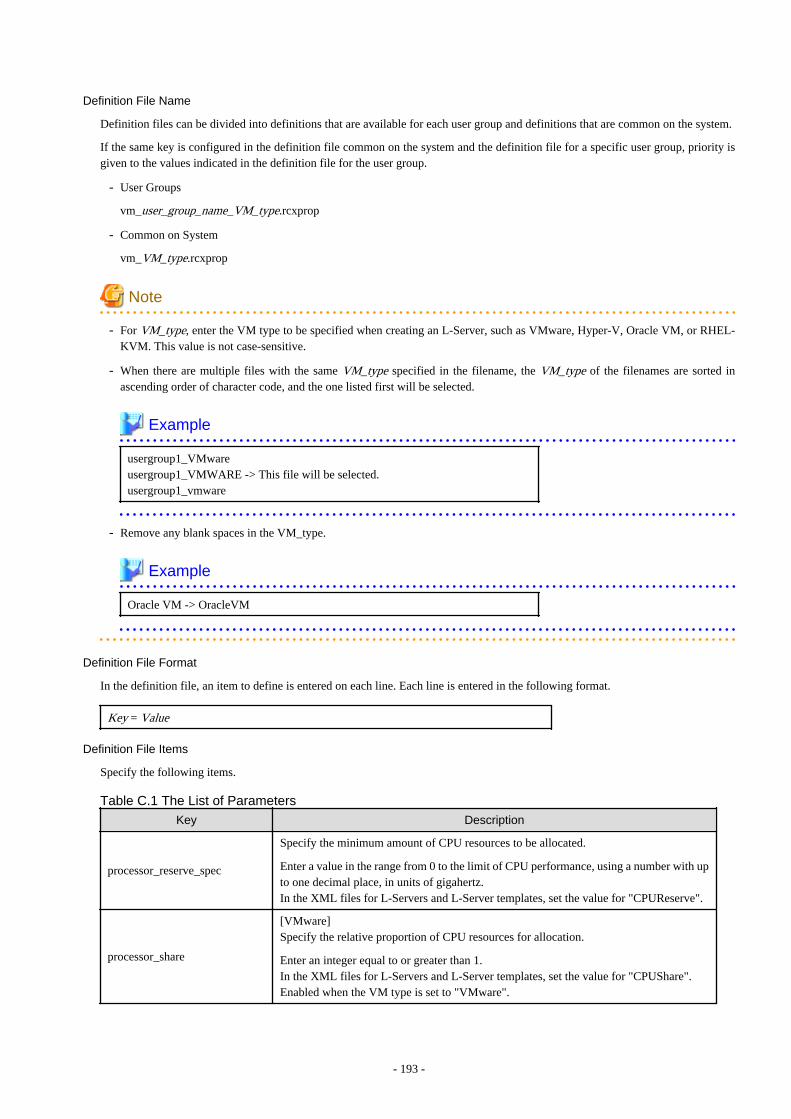
Definition File Name
Definition files can be divided into definitions that are available for each user group and definitions that are common on the system.
If the same key is configured in the definition file common on the system and the definition file for a specific user group, priority isgiven to the values indicated in the definition file for the user group.
- User Groups
vm_user_group_name_VM_type.rcxprop
- Common on System
vm_VM_type.rcxprop
Note
- For VM_type, enter the VM type to be specified when creating an L-Server, such as VMware, Hyper-V, Oracle VM, or RHEL-KVM. This value is not case-sensitive.
- When there are multiple files with the same VM_type specified in the filename, the VM_type of the filenames are sorted inascending order of character code, and the one listed first will be selected.
Example
usergroup1_VMwareusergroup1_VMWARE -> This file will be selected.usergroup1_vmware
- Remove any blank spaces in the VM_type.
Example
Oracle VM -> OracleVM
Definition File Format
In the definition file, an item to define is entered on each line. Each line is entered in the following format.
Key = Value
Definition File Items
Specify the following items.
Table C.1 The List of Parameters
Key Description
processor_reserve_spec
Specify the minimum amount of CPU resources to be allocated.
Enter a value in the range from 0 to the limit of CPU performance, using a number with upto one decimal place, in units of gigahertz.In the XML files for L-Servers and L-Server templates, set the value for "CPUReserve".
processor_share
[VMware]Specify the relative proportion of CPU resources for allocation.
Enter an integer equal to or greater than 1.In the XML files for L-Servers and L-Server templates, set the value for "CPUShare".Enabled when the VM type is set to "VMware".
- 193 -
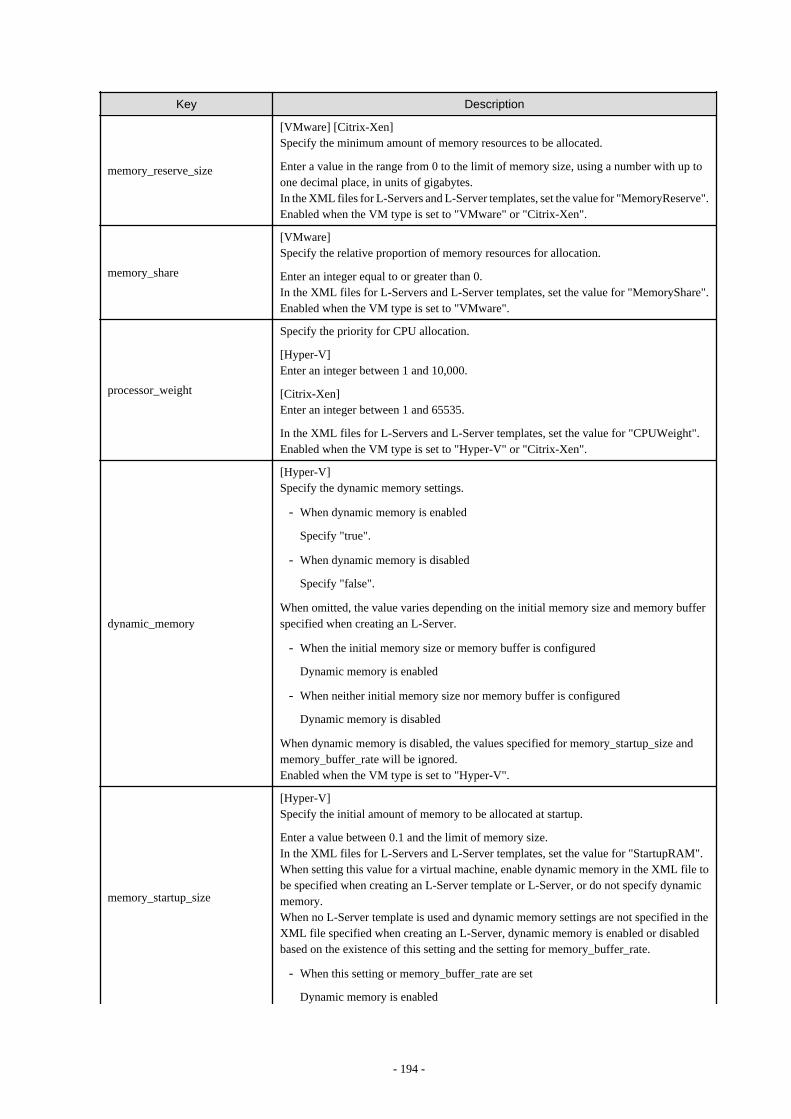
Key Description
memory_reserve_size
[VMware] [Citrix-Xen]Specify the minimum amount of memory resources to be allocated.
Enter a value in the range from 0 to the limit of memory size, using a number with up toone decimal place, in units of gigabytes.In the XML files for L-Servers and L-Server templates, set the value for "MemoryReserve".Enabled when the VM type is set to "VMware" or "Citrix-Xen".
memory_share
[VMware]Specify the relative proportion of memory resources for allocation.
Enter an integer equal to or greater than 0.In the XML files for L-Servers and L-Server templates, set the value for "MemoryShare".Enabled when the VM type is set to "VMware".
processor_weight
Specify the priority for CPU allocation.
[Hyper-V]Enter an integer between 1 and 10,000.
[Citrix-Xen]Enter an integer between 1 and 65535.
In the XML files for L-Servers and L-Server templates, set the value for "CPUWeight".Enabled when the VM type is set to "Hyper-V" or "Citrix-Xen".
dynamic_memory
[Hyper-V]Specify the dynamic memory settings.
- When dynamic memory is enabled
Specify "true".
- When dynamic memory is disabled
Specify "false".
When omitted, the value varies depending on the initial memory size and memory bufferspecified when creating an L-Server.
- When the initial memory size or memory buffer is configured
Dynamic memory is enabled
- When neither initial memory size nor memory buffer is configured
Dynamic memory is disabled
When dynamic memory is disabled, the values specified for memory_startup_size andmemory_buffer_rate will be ignored.Enabled when the VM type is set to "Hyper-V".
memory_startup_size
[Hyper-V]Specify the initial amount of memory to be allocated at startup.
Enter a value between 0.1 and the limit of memory size.In the XML files for L-Servers and L-Server templates, set the value for "StartupRAM".When setting this value for a virtual machine, enable dynamic memory in the XML file tobe specified when creating an L-Server template or L-Server, or do not specify dynamicmemory.When no L-Server template is used and dynamic memory settings are not specified in theXML file specified when creating an L-Server, dynamic memory is enabled or disabledbased on the existence of this setting and the setting for memory_buffer_rate.
- When this setting or memory_buffer_rate are set
Dynamic memory is enabled
- 194 -

Key Description
- When this setting and memory_buffer_rate are not set
Dynamic memory is disabled
When dynamic memory is disabled, this setting is ignored.Enabled when the VM type is set to "Hyper-V".
memory_buffer_rate
[Hyper-V]Specify the percentage of memory to be reserved as a buffer.
Enter an integer between 5 and 2000 in units of percent.In the XML files for L-Servers and L-Server templates, set this value for "MemoryBuffer".When setting this value for a virtual machine, either enable dynamic memory in the XMLfile to be specified when creating an L-Server template or L-Server, or do not specifydynamic memory.When no L-Server template is used and dynamic memory is not specified in the XML filespecified during L-Server creation, dynamic memory setting is enabled or disabled basedon whether this setting and the setting for memory_startup_size exist.
- When this setting or memory_startup_size exists
Dynamic memory is enabled
- When this setting and memory_startup_size are not set
Dynamic memory is disabled
When dynamic memory is disabled, this setting is ignored.Enabled when the VM type is set to "Hyper-V".
memory_weight
[Hyper-V]Specify the priority for allocation of memory.
Enter an integer between 0 and 10,000.In the XML files for L-Servers and L-Server templates, set this value for "MemoryWeight".Enabled when the VM type is set to "Hyper-V".
max_definable_memory_size
[KVM]Specify the maximum amount of memory that can be configured for the VM guest on KVM.
Enter a value in the range from the limit of memory size to the memory size of a physicalserver, using a number with up to one decimal place, in units of gigabytes.The memory amount for the VM guest can be changed, using this value as the upper limit.When omitted, this memory size is the same as the amount of physical memory for the VMhost.When specifying this item, if the amounts of memory mounted on the VM hosts registeredin a VM pool are not the same, specify the memory capacity using a lower value than thatof the VM host with the lowest memory capacity.When specifying values exceeding the physical memory capacity, starting of an L-Serverwill fail.
Enabled when the VM type is set to "RHEL-KVM".
memory_hotplug
[KVM]Specify enabling/disabling of the memory hotplug function for VM guests.
- When enabling the memory hotplug function
Specify "true".
- When disabling the memory hotplug function
Specify "false".
If left blank, "true" is set. The default is "true".
- 195 -
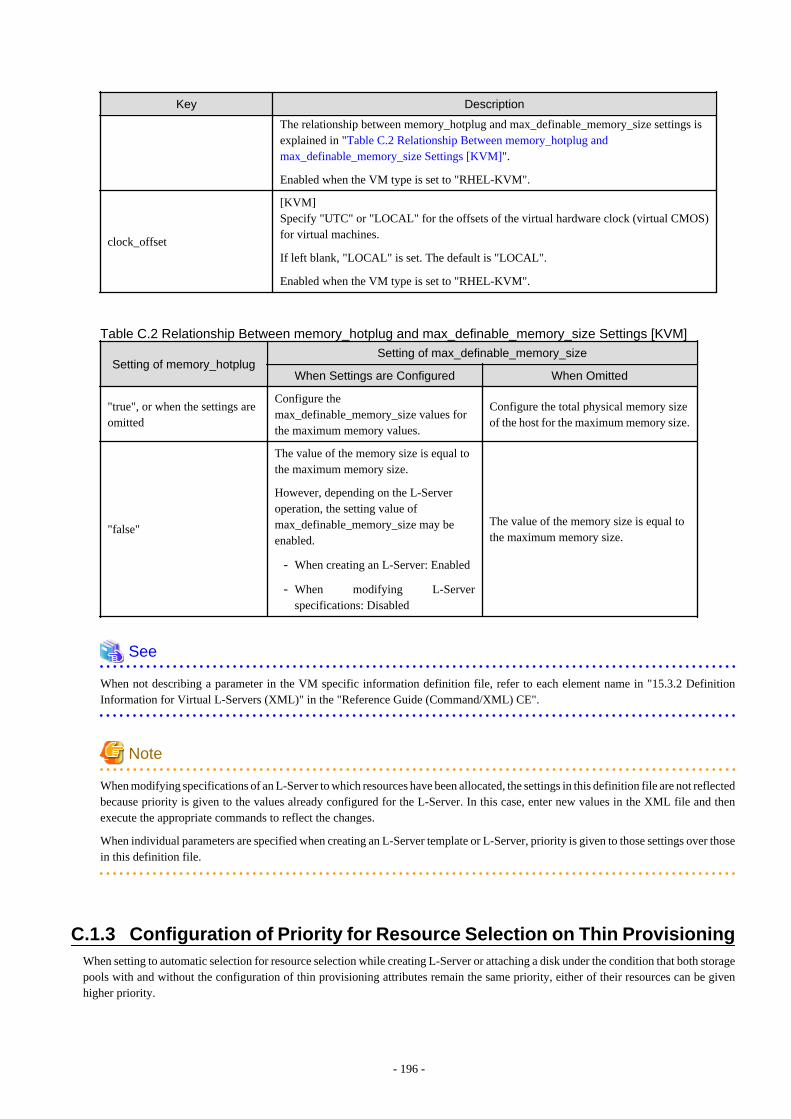
Key Description
The relationship between memory_hotplug and max_definable_memory_size settings isexplained in "Table C.2 Relationship Between memory_hotplug andmax_definable_memory_size Settings [KVM]".
Enabled when the VM type is set to "RHEL-KVM".
clock_offset
[KVM]Specify "UTC" or "LOCAL" for the offsets of the virtual hardware clock (virtual CMOS)for virtual machines.
If left blank, "LOCAL" is set. The default is "LOCAL".
Enabled when the VM type is set to "RHEL-KVM".
Table C.2 Relationship Between memory_hotplug and max_definable_memory_size Settings [KVM]
Setting of memory_hotplugSetting of max_definable_memory_size
When Settings are Configured When Omitted
"true", or when the settings areomitted
Configure themax_definable_memory_size values forthe maximum memory values.
Configure the total physical memory sizeof the host for the maximum memory size.
"false"
The value of the memory size is equal tothe maximum memory size.
However, depending on the L-Serveroperation, the setting value ofmax_definable_memory_size may beenabled.
- When creating an L-Server: Enabled
- When modifying L-Serverspecifications: Disabled
The value of the memory size is equal tothe maximum memory size.
See
When not describing a parameter in the VM specific information definition file, refer to each element name in "15.3.2 DefinitionInformation for Virtual L-Servers (XML)" in the "Reference Guide (Command/XML) CE".
Note
When modifying specifications of an L-Server to which resources have been allocated, the settings in this definition file are not reflectedbecause priority is given to the values already configured for the L-Server. In this case, enter new values in the XML file and thenexecute the appropriate commands to reflect the changes.
When individual parameters are specified when creating an L-Server template or L-Server, priority is given to those settings over thosein this definition file.
C.1.3 Configuration of Priority for Resource Selection on Thin ProvisioningWhen setting to automatic selection for resource selection while creating L-Server or attaching a disk under the condition that both storagepools with and without the configuration of thin provisioning attributes remain the same priority, either of their resources can be givenhigher priority.
- 196 -
When the definition file has been edited, restart the manager.
Location of the Definition File
[Windows Manager]Installation_folder\SVROR\Manager\etc\customize_data
[Linux Manager]/etc/opt/FJSVrcvmr/customize_data
Definition File Name
storage.rcxprop
Definition File Format
In the definition file, the items to set are entered on individual lines. Each line is entered in the following format.
Item_specified =Value_specified
Definition File Items
- SELECT_THIN_PROVISIONING_POOL_FIRST
When both storage pools with and without the configuration of thin provisioning attributes remain the same priority, either of theirresources can be given higher priority for automatic selection of storage resource.
- If "true" is specified
A storage pool with thin provisioning attributes will be given priority.
- If "false" is specified
A storage pool without thin provisioning attributes will be given priority.
- If nothing is specified
"false" is set.
Example
An example definition file is indicated below.
SELECT_THIN_PROVISIONING_POOL_FIRST = true
C.1.4 Configuration when Creating a Virtual L-Server Using a Server whichcannot Use ServerView Agents
As ServerView Agents cannot be used for the following servers, the hardware configuration information (CPU core count, CPU clockspeed, memory capacity, etc.) cannot be acquired.
- PRIMERGY CX1000 series servers
- Other vendor's servers
When creating a virtual L-Server after installing VM management software on the servers above, it is necessary to register a managedserver, after creating a definition file first, and defining the configuration information.
In the following cases, create the definition file first, and then register the hardware information with Resource Orchestrator again.
- If the target server was registered with Resource Orchestrator before creation of the definition file
- When modifying the configuration information (CPU core count, CPU clock speed, memory capacity, etc.) in the definition file of aserver that has been registered with Resource Orchestrator
- 197 -
For details, refer to "Chapter 9 Hardware Maintenance" in the "Operation Guide CE".
Note
When there are differences between the values in the definition file and the actual configuration information of the server, creation orstarting of the virtual L-Server may fail, or the virtual machine may be deployed using incorrect CPU and memory information.
Be sure to confirm that the values entered in the definition file and the actual configuration information of the server are the same.
Storage Location of the Definition File
[Windows Manager]Installation_folder\SVROR\Manager\etc\customize_data
[Linux Manager]/etc/opt/FJSVrcvmr/customize_data
Definition File Name
server_spec.rcxprop
Character Code
[Windows Manager] [Linux Manager]UTF-8
Line Break Code
[Windows Manager]CR/LF
[Linux Manager]LF
Definition File Format
- The following line must be entered in the first line of definition files.
ServerSpec,V1.0
- In the definition file, enter the configuration information (CPU core count, CPU clock speed, memory capacity, etc.), separatedby commas (",").
When defining two or more servers, use line breaks.Each line is entered in the following format.
physical_server, cpu_core_count, cpu_clock, memory_size[, cpu_type]
- Blank spaces between data and commas (",") are ignored.
If there is duplicated configuration information (CPU core count, CPU clock speed, memory capacity, etc.) for the same physicalserver, the values that appear first will be used.
- When adding comments, start the line with a number sign ("#").
Definition File Items
physical_server
Enter the same physical server name as the one entered when registering a managed server.
cpu_core_count
Enter the total number of physical CPU cores.Enter an integer between 0 and 999.If "0" is entered, a hyphen ("-") will be displayed in the General information of the Resource Details window, indicating that novirtual L-Server will be created.
- 198 -
cpu_clock
Enter the CPU clock speed.Enter an integer between 0 and 999,999.Use megahertz for the unit. Enter 1,000 MHz for 1 GHz, for example.If "0" is entered, a hyphen ("-") will be displayed in the General information of the Resource Details window, indicating that novirtual L-Server will be created.
memory_size
Enter the total memory size.Enter an integer between 0 and 999999999.Use megabytes for the unit. Enter 1,024 MB for 1 GB, for example.If "0" is entered, a hyphen ("-") will be displayed in the General information of the Resource Details window, indicating that novirtual L-Server will be created.
cpu_type
Enter the CPU type.The string must be composed of alphanumeric characters and symbols (ASCII characters 0x20 to 0x7e), except for commas (","),and can be up to 64 characters long.When omitted, a hyphen ("-") is displayed.
Example
An example definition file is indicated below.
ServerSpec,V1.0
############################################################################ server_spec.rcxprop##All Rights Reserved, Copyright(C) FUJITSU LIMITED 2011############################################################################# physical_server, cpu_core_count, cpu_clock, memory_size, cpu_type#
server001, 8, 3160, 4096, Intel(R) Xeon(R)server002, 8, 2660, 12288, Intel(R) Xeon(R)server003, 2, 2000, 65536server004, 4, 4000, 4096, Intel(R) Xeon(R) Processor E5501
C.1.5 Configuration when Creating a Virtual L-Server Using VMware ESXion Other Vendor's Servers
It is necessary to define that the server can be used as a VM software agent without using an agent for Resource Orchestrator, by creatingthe definition files before registering a server. When registering the server, select the [Register agent] checkbox, and register the serveras VM host. In VM hosts registered using these definitions, obtain the server status or hardware configuration information (CPU corecount, CPU clock speed, memory capacity, etc.) from VM software.
When the definition file is changed after registration, the modification is not valid.
Note
- The server cannot be used for anything other than a VM host (spare server or Windows/Linux server).
- 199 -
- Even if the following settings are configured, priority is given to the information obtained from VM software.
- Configuration when Creating a Virtual L-Server Using a Server which cannot Use ServerView Agents
- Configurations to specify "Enable" for server management software (ServerView) when creating a server
- On VM hosts registered using this definition, the following functions cannot be used.
- Server switchover
- In the configuration definition file for pre-configuration, do not describe the values in the following section header parameter forsection name [Server]: If the values are described, registration fails.
- snmp_community_name
Storage Location of the Definition File
[Windows Manager]Installation_folder\SVROR\Manager\etc\customize_data
[Linux Manager]/etc/opt/FJSVrcvmr/customize_data
Point
In the storage location above, the sample definition file (server_control.sample.rcxprop) is stored. When using the sample as thedefinition file, place the file after deleting the ".sample" included in the file name.
Definition File Name
server_control.rcxprop
Character Code
[Windows Manager] [Linux Manager]UTF-8
Line Break Code
[Windows Manager]CR/LF
[Linux Manager]LF
Definition File Format
- The following line must be entered in the first line of definition files.
ServerControl,V1.0
- In the definition file, the name of each server is described on an individual line.
When defining two or more servers, use line breaks.Each line is entered in the following format.
physical_server
Even if there are multiple same physical server names in the individual lines, no errors occur.
- When adding comments, start the line with a number sign ("#").
Definition File Items
physical_server
Enter the same physical server name as the one entered when registering a managed server.
- 200 -
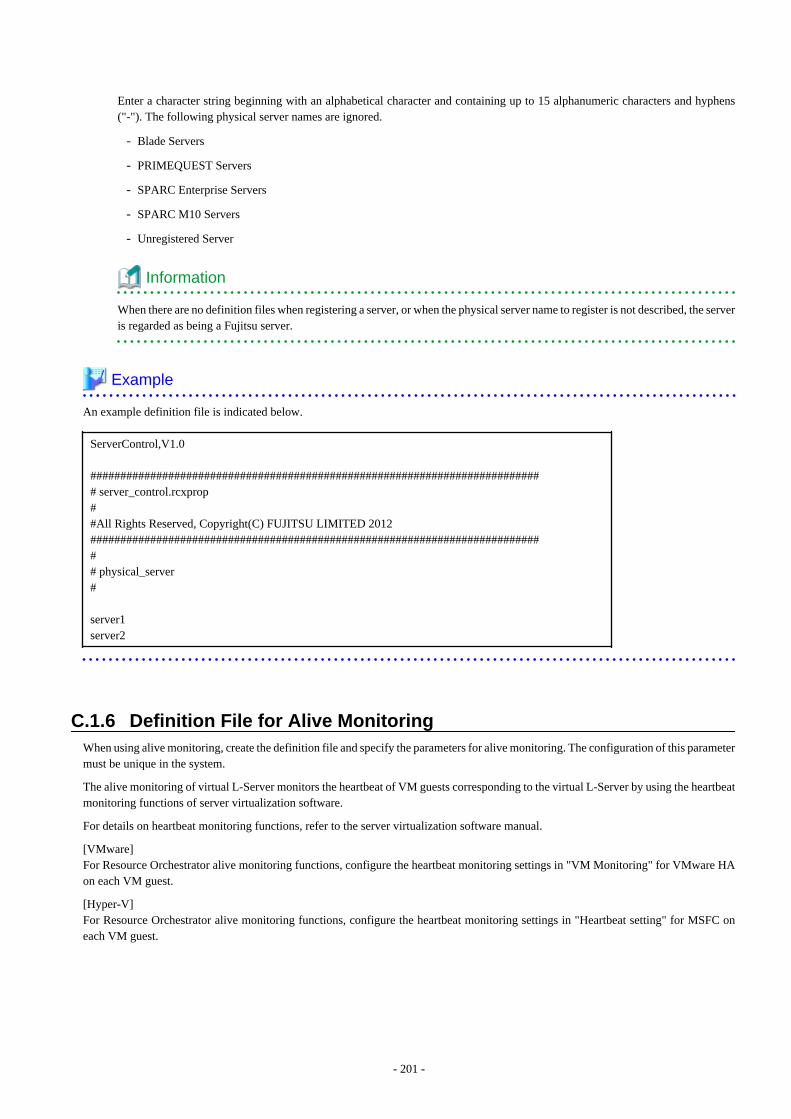
Enter a character string beginning with an alphabetical character and containing up to 15 alphanumeric characters and hyphens("-"). The following physical server names are ignored.
- Blade Servers
- PRIMEQUEST Servers
- SPARC Enterprise Servers
- SPARC M10 Servers
- Unregistered Server
Information
When there are no definition files when registering a server, or when the physical server name to register is not described, the serveris regarded as being a Fujitsu server.
Example
An example definition file is indicated below.
ServerControl,V1.0
############################################################################ server_control.rcxprop##All Rights Reserved, Copyright(C) FUJITSU LIMITED 2012############################################################################# physical_server#
server1server2
C.1.6 Definition File for Alive MonitoringWhen using alive monitoring, create the definition file and specify the parameters for alive monitoring. The configuration of this parametermust be unique in the system.
The alive monitoring of virtual L-Server monitors the heartbeat of VM guests corresponding to the virtual L-Server by using the heartbeatmonitoring functions of server virtualization software.
For details on heartbeat monitoring functions, refer to the server virtualization software manual.
[VMware]For Resource Orchestrator alive monitoring functions, configure the heartbeat monitoring settings in "VM Monitoring" for VMware HAon each VM guest.
[Hyper-V]For Resource Orchestrator alive monitoring functions, configure the heartbeat monitoring settings in "Heartbeat setting" for MSFC oneach VM guest.
- 201 -

Note
When changing configuration of alive monitoring on server virtualization software, the modification is not reflected on ResourceOrchestrator.Therefore, do not change alive monitoring configurations on server virtualization software.
Storage Location of the Definition File
The file in which the default values are described is located during installation.
[Windows Manager]Installation_folder\SVROR\Manager\etc\customize_data\alive_monitoring
[Linux Manager]/etc/opt/FJSVrcvmr/customize_data/alive_monitoring
Definition File Name
- vm_VMware.rcxprop
- vm_Hyper-V.rcxprop
The file name is not case sensitive.
Definition File Format
In the definition file, the items to set are entered on individual lines. Each line is entered in the following format.
Item_specified=Value_specified
When adding comments, start the line with a number sign ("#").
Specified Items for vm_VMware.rcxprop
min_uptime
Specify "Minimum uptime" in the heartbeat monitoring settings for VMware.
Enter an integer between 0 and 100000. The unit is seconds."120" is specified as the default.
failure_interval
Specify "Failure interval" in the heartbeat monitoring settings for VMware.
Enter an integer between 1 and 100000. The unit is seconds."30" is specified as the default.
max_failures
Specify "Maximum per-VM resets" in the heartbeat monitoring settings for VMware.
Enter an integer between 1 and 1000."3" is specified as the default.
max_failure_window
Specify "Maximum resets time window" in the heartbeat monitoring settings for VMware.
Enter -1, and an integer between 1 and 1000. The unit is hours.When -1 is specified, "None" is configured."1" is specified as the default.
off_override_cluster
When configuring to disable alive monitoring in Resource Orchestrator, overwrite the heartbeat monitoring settings for VMwareclusters, and specify if disabling the heartbeat monitoring settings of VM guests.
To disable heartbeat monitoring configuration of VM guests, specify "true".To configure the same settings of VM guest heartbeat monitoring as the settings of VMware cluster, specify "false"."false" is specified as the default.
- 202 -
Note
When applying the modified details to an already created L-Server, execute the rcxadm lserver modify command after changing thedefinition files.
For details on the following parameters, refer to the VMware manual.
- Minimum uptime
- Failure interval
- Maximum per-VM resets
- Maximum resets time window
Specified items for vm_Hyper-V.rcxprop
restart_period
Specify "Period for restarts [mm:ss]" in the heartbeat monitoring settings for MSFC.
Enter an integer between 0 and 3599. The unit is seconds.Specify a smaller value of time than that specified in "retry_period_on_failure"."900" is specified as the default.
restart_threshold
Specify "Maximum restarts in the specified period" in the heartbeat monitoring settings for MSFC.
Enter an integer between 0 and 4294967295."1" is specified as the default.
failover
Specify "If restart is unsuccessful, fail over all resources in this service or application" in the heartbeat monitoring settings forMSFC.
When performing failover, specify "true".When not performing failover, specify "false"."true" is specified as the default.
retry_period_on_failure
Specify "If all the restart attempts fail, begin restarting again after the specified period [hh:mm]" in the heartbeat monitoring settingsfor MSFC.Enter -1, and an integer between 0 and 1439. The unit is minutes.When -1 is specified, it is disabled.When specifying 0 to 1,439, specify a larger value of time than that specified in "restart_period"."60" is specified as the default.
Note
When applying the modified details to an already created L-Server, execute the rcxadm lserver modify command after changing thedefinition files.
Refer to the MSFC manual for details on each parameter.
C.1.7 OS Property Definition FileBy setting the default values in an OS property definition file in advance, the default values of the information on the [OS] tab, etc. aregenerated when creating a virtual L-Server. Use the UTF-8 character code for OS property definition files.
- 203 -
Point
The OS property definition file can be configured using the "Setup Wizard" of the ROR console.
For details on the setup wizard, refer to "3.1 Setup Wizard" in the "User's Guide for Infrastructure Administrators CE".
For details on the [OS] Tab, refer to the following:
[VMware]Refer to "C.2.9 [OS] Tab Configuration".
[Hyper-V]Refer to "C.3.9 [OS] Tab Configuration".
[KVM]Refer to "C.6.8 [OS] Tab Configuration".
[Solaris Zones]Refer to "C.7.7 [OS] Tab Configuration".
[OVM for SPARC]Refer to "C.8.7 [OS] Tab Configuration".
[Citrix-Xen]Refer to "C.9.8 [OS] Tab Configuration".
Location of the Definition File
[Windows Manager]Installation_folder\SVROR\Manager\etc\customize_data
[Linux Manager]/etc/opt/FJSVrcvmr/customize_data
Definition File Name
The definition file name can be used by dividing into definitions that are available for each user group and definitions that are commonto the system. If the key of the definition file common to the system is the same as a definition file for a user group, priority is givento the values indicated in the definition file for the user group.
- For User Groups
os_setting_user_group_name.rcxprop
- Common on System
os_setting.rcxprop
Definition File Format
In the definition file, an item to define is entered on each line. Each line is entered in the following format.
Key = Value
When adding comments, start the line with a number sign ("#").
Definition File Items
Specify the following items in a definition file.
Table C.3 List of Items
Item Key Value Remarks
Domain nameworkgroup_name (*1) For Windows
domain_name (*1) For Linux
DNS searchpath
dns_search_path (*1) -
- 204 -

Item Key Value Remarks
Full name full_name (*1) -
Organizationname
org_name (*1) -
Product key product_key (*1) -
License mode license_mode
Specify one of the following:
- "seat"(number of connectedclients)
- "server"(in the unit ofservers: number of serversused at the same time)
-
Maximumnumber ofconnections
license_users (*1) -
Administratorpassword
admin_password (*1) -
Hardwareclockconfiguration
hwclock
Specify one of the following:
- "UTC"
- "LOCAL"
-
DNS server(Whenconfiguring foreach NIC onWindows) (*2)
nicN_dns_addressX
Specify the IP address usingnumerical values (between 0 and255) and periods. (*2)
When not configuring a DNSserver, specify a hyphen ("-").
For N, specify the NIC number.For X, specify primary ("1") orsecondary ("2").
DNS server(Whenconfiguring allNICs using thesame settingson Windows)
dns_addressXSpecify the IP address usingnumerical values (between 0 and255) and periods.
For X, specify primary ("1") orsecondary ("2").
Priority is given to nicN_dns_addressXspecifications.
DNS server(for Linux)
dns_addressXSpecify the IP address usingnumerical values (between 0 and255) and periods.
For X, specify primary ("1"), secondary("2"), or tertiary ("3").
ActiveDirectorydomain namein which itparticipates
windomain_name
The character string that showsthe Active Directory domainname composed at alphanumericcharacter, hyphen ("-") within 64characters, and period (".") isspecified.
Please refer to following URL for thenaming rule of the domain name. http://support.microsoft.com/kb/909264/en-us
(*3), (*4), (*5), (*6), (*7), (*8)
Domainparticipationaccount usedby attestingdomainparticipation
windomain_user
The name of the user used for thedomain participation is specifiedin the form
of the following. (*9)
Domain_Name\User_Name or
User_Name@Domain_Name
The character string within 256characters (For normal-width) isspecified.
Please refer to following URL for thelimitation of the string length of the nameof the user. http://technet.microsoft.com/en-us/library/active-directory-maximum-limits-scalability
(*3), (*4), (*5), (*6), (*8)
- 205 -

Item Key Value Remarks
Password ofdomainparticipationaccount usedby attestingdomainparticipation
windomain_passwordThe character string includingthe alphanumeric character andthe sign is specified.
(*3), (*4), (*5), (*6), (*8)
*1: For details on the values, refer to the following:[VMware]Refer to "Table C.11 List of Settings".[Hyper-V]Refer to "Table C.18 List of Settings".[KVM]Refer to "Table C.23 List of Settings".[Solaris Zones]Refer to "Table C.25 List of Settings".[OVM for SPARC]Refer to "Table C.27 List of Settings".[Citrix-Xen]Refer to "Table C.28 List of Settings".
*2: When omitting keys or values, use the value "dns_addressX" to configure the same values for the NIC definitions of all NICs onWindows.
*3: It is possible to specify it for "VMware" the VM type.
*4: It is effective when OS type of virtual L-Server is Windows.
*5: It is an item that the setup wizard cannot set.
*6: It is not used as a default value on [OS] tab of creating a virtual L-Server.
*7: Participation in the Active Directory domain is given to priority when both domain name (workgroup_name) and Active Directorydomain name (windomain_name) in which it participates are specified.
*8: The support scope of each servers is following.However, there is OS type of virtual L-Server that becomes outside the support of the virtualization software by the version of thevirtualization software. Please refer to the manual of the virtualization software for details.
Target Support Scope
Virtualization software
VMware vSphere 4.0VMware vSphere 4.1VMware vSphere 5.0VMware vSphere 5.1VMware vSphere 5.5
OS type of virtual L-Server
Microsoft(R) Windows(R) 2008Microsoft(R) Windows(R) 2008 R2Microsoft(R) Windows(R) 2012Microsoft(R) Windows(R) 2012 R2Microsoft(R) Windows(R) VistaMicrosoft(R) Windows(R) 7Microsoft(R) Windows(R) 8Microsoft(R) Windows(R) 8.1
Resource OrchestratorManager
Windows Manager
*9: [VMware] A specified form is different depending on OS type of the virtual L-Server. Please refer to following URL for details.
- 206 -

http://kb.vmware.com/kb/1012314
Example
An example definition file is indicated below.
# Windowsworkgroup_name = WORKGROUPfull_name = WORKNAMEorg_name = WORKORGANIZATIONproduct_key = AAAA-BBBB-CCCC-DDDDlicense_mode = serverlicense_users = 5admin_password = xxxxxxxxnic1_dns_address1 = 192.168.0.60nic1_dns_address2 = 192.168.0.61nic2_dns_address1 =nic2_dns_address2 =windomain_name = Test.TestDom.comwindomain_user = [email protected]_password = test0000
# Linuxdomain_name = localdomaindns_search_path = test.domain.comhwclock = LOCALdns_address1 = 192.168.0.60dns_address2 = 192.168.0.61dns_address3 =
C.2 VMwareThis section explains the settings used when using VMware as server virtualization software.
- When Creating a Virtual L-Server
Configure the settings referring to the information in "C.2.1 Creating Definition Files" or the following sections.
- When Associating L-Servers with Configured Virtual Machines
Refer to "18.4.3 For Virtual Machines" in the "User's Guide for Infrastructure Administrators (Resource Management) CE".
- Importing to L-Platforms
Refer to "7.2.3 Importing to L-Platform" in the "Operation Guide CE".
C.2.1 Creating Definition FilesThis section explains how to create definition files.
For definition files common to virtual L-Servers, refer to "C.1 Definition Files Commonly Shared when Creating Virtual L-Servers".
This section explains the definition files specific to VMware.
Server Virtualization Software Definition File
Operations related to server virtualization software can be changed by configuring values in the following definition files beforehand.
Use the UTF-8 character code for definition files.
- 207 -
Location of the Definition File
[Windows Manager]Installation_folder\SVROR\Manager\etc\customize_data
[Linux Manager]/etc/opt/FJSVrcvmr/customize_data
Definition File Name
vm.rcxprop
Definition File Format
Describe each line of the definition file in the following format:
Key = Value
Definition File Items Table C.4 List of Items
Item Key Value Remarks
Configuration ofpower control forVMware DRS andDPM
drs_power_on_vm true|false
When server virtualization software is VMware, the values arevalid.
- When starting an L-Server (VM guest), if moving an L-Server (VM guest) between VM hosts using VMwareDRS, or turning on a VM host using VMware DPM
Specify "true".
- If other than the above
Specify "false".
If left blank, "false" is set.Restarting of the server is not required after changing thisconfiguration.
When specifying "true", set VMware DRS and VMware DPMas follows:
- VMware DRS
"partly automatic" or "full automatic"
- VMware DPM
"off" or "automatic"
When specifying "Manual", startup of L-Servers and VMguests may fail.
For details on VMware DRS/DPM, refer to "When usingVMware DRS or VMware DPM" in "E.1.2 Preparations forServers" in the "Design Guide CE".
Definition Files to Configure using Console Connections from Public LAN
When using console connections from the public LAN, configure the connection destination for the VM host in the following definitionfiles:
Location of the Definition File
[Windows Manager]Installation_folder\SVROR\Manager\etc\customize_data
- 208 -

[Linux Manager]/etc/opt/FJSVrcvmr/customize_data
Definition File Name
vm_console.rcxprop
Definition File Format
Specify a folder or tenant name, the physical server name of the VM host, and the corresponding connection destination in one line,separated by commas (",").
folder_or_tenant_name, physical_server_name, destination_to_connect
Definition File Items Table C.5 List of Items
Item Description
Folder or tenant name Specify the folder name or tenant name using a full path (the first letter must be "/").
Physical server name Specify the physical server name of the VM host.
Connection destinationSpecify the IP address for a VM host that can be connected to through the adminclient, or the host name for which name resolution is available in the admin clientenvironment.
Example Definition File
/, bx900-1, 192.168.10.100 (*1)/folderA, bx900-1, host1 (*2)/folderA/tenantB, bx900-1, 192.168.30.100 (*3)/folderA/tenantB, bx900-2, 192.168.30.200 (*3)
*1: Definition for root folder (/). The default settings in all tenants.*2: Definition for folder (/folderA). Specify the destination to connect to using host name.*3: Definition of tenants (/folderA/tenantB). Specify multiple hosts.
Note
- When describing more than three commas (",") in one line, any descriptions after the third comma are ignored.
- When the descriptions start with a "#", the string is regarded as a comment line.
- If reading of the definition file fails, set the IP address of the admin LAN for the VM host registered in Resource Orchestrator as theconnection destination.
- When the folder or tenant name, and the physical server name do not match the definition file specifications, perform consoleconnections using the IP address of the admin LAN for the VM host.
- When there are multiple VM hosts used in a folder or a tenant, settings using the same folder or tenant must be described separately,in multiple lines.
- When specifying a folder, apply the relevant settings to the sub folders and tenants under that folder.
- When settings targeting the sub folders or tenants under the specified folder are configured, and definitions with the same physicalserver name also exist, the priority is given to the definitions.
Example
When there are the following definitions of (1) and (2), the folder or tenant name is "/folderA/tenantB" and the physical server nameis virtual L-Server of "bx900-1", console connections are performed by using the IP address (2).
(1)/folderA,bx900-1,192.168.10.100(2)/folderA/tenantB,bx900-1,192.168.20.100
- 209 -
- When describing the same physical server configurations in the same folder or tenant using multiple lines, the configurations in thelatter descriptions are valid.
Example
When there are the following definitions of (1) and (2), the definition (2) is valid.
(1)/folderA,bx900-1,192.168.10.100(2)/folderA,bx900-1,192.168.20.100
- When using console connection of virtual L-Server in the following environments from Public LAN through the proxy server, pleasespecify an IP address that can be communicated to the proxy server.
- VMware vSphere 5.1
- VMware vSphere 5.5
GUIRunOnce definition file
When virtual L-Server OS is Windows, the GUIRunOnce command (*) can be specified by virtual L-Server creating that specifies theimage.
*Note: command executed by guest OS when the user logs in GUI for the first time.Please set the following definition files when you specify command GUIRunOnce.
Support Scope
The support scope of each servers is following.However, there is OS type of virtual L-Server that becomes outside the support of the virtualization software by the version of thevirtualization software. Please refer to the manual of the virtualization software for details.
Target Support Scope
Virtualization software
VMware vSphere 4.0VMware vSphere 4.1VMware vSphere 5.0VMware vSphere 5.1VMware vSphere 5.5
OS type of virtual L-Server
Microsoft(R) Windows(R) 2008Microsoft(R) Windows(R) 2008 R2Microsoft(R) Windows(R) 2012Microsoft(R) Windows(R) 2012 R2Microsoft(R) Windows(R) VistaMicrosoft(R) Windows(R) 7Microsoft(R) Windows(R) 8Microsoft(R) Windows(R) 8.1
Resource OrchestratorManager
Windows Manager
Location of the Definition File
[Windows Manager]Installation_folder\SVROR\Manager\etc\customize_data\sysprep_guirunonce
Definition File Name
The extension, please assume .rcxprop, and an arbitrary file name. However, please define the file name by the following characterstrings.
In the first alphanumeric character, character string definition file format within 64 characters composed of alphanumeric character,underscore ("_"), and hyphen ("-").
- 210 -
Definition File Format
It describes it in the definition file as follows in every one line.
Command statement specified for GUIRunOnce command
Windows must specify signs of a double quotation and a single quotation, etc. to use the specified character string as it is by the formatthat can be recognized as command statement.
The null line is disregarded.
It is possible to specify it up to 500 commands (500 lines) in the maximum. It is disregarded since the 501st line even if specified.
The line where # starts is treated as a comment.
The command is sequentially executed from the first line to the last line on a page. The following command is not executed until theprevious command ends.
Character code
Please give the character code of the file to me as UTF-8.
Line Break code
Please set the line break code of the file as follows.
[Windows Manager]CR+LF
Example
c:\setup\setup_first.bat
netsh advfirewall firewall set rule group="remote desktop" new enable=yes
...
c:\setup\setup_last.bat
C.2.2 Registering Resources with Resource Orchestrator
When Using Blade Servers
1. Register VM Management Software
When registering VM management software, datastores that are created in advance during pre-setup preparations, are automaticallyregistered in Resource Orchestrator as virtual storage resources.
For details on how to register VM management software, refer to "5.2 Registering VM Management Software" in the "User's Guidefor Infrastructure Administrators (Resource Management) CE".
2. Register Chassis
Refer to "5.4.1 Registering Chassis" in the "User's Guide for Infrastructure Administrators (Resource Management) CE".
3. Register Managed Servers (within Chassis)
Refer to "5.4.2 Registering Blade Servers" in the "User's Guide for Infrastructure Administrators (Resource Management) CE".
4. Register LAN Switch Blades
Refer to "5.4.3 Registering LAN Switch Blades" in the "User's Guide for Infrastructure Administrators (Resource Management)CE".
To register a network device resource, specify a network pool when creating the network device resource.
To register a network resource, specify a network pool when creating the network resource.
For details, refer to "Chapter 14 Registering Resources in Resource Pools" in the "User's Guide for Infrastructure Administrators (ResourceManagement) CE".
- 211 -

When Using Rack Mount or Tower Servers
1. Register VM Management Software
When registering VM management software, datastores that are created in advance during pre-setup preparations, are automaticallyregistered in Resource Orchestrator as virtual storage resources.
For details on how to register VM management software, refer to "5.2 Registering VM Management Software" in the "User's Guidefor Infrastructure Administrators (Resource Management) CE".
2. Register Managed Servers
Refer to "5.5.1 Registering Rack Mount or Tower Servers" in the "User's Guide for Infrastructure Administrators (ResourceManagement) CE".
3. Register LAN Switches
Refer to "5.13 Registering LAN Switches" in the "User's Guide for Infrastructure Administrators (Resource Management) CE".
To register a network device resource, specify a network pool when creating the network device resource.
To register a network resource, specify a network pool when creating the network resource.
For details, refer to "Chapter 14 Registering Resources in Resource Pools" in the "User's Guide for Infrastructure Administrators (ResourceManagement) CE".
When Using PRIMEQUEST Servers
1. Register VM Management Software
When registering VM management software, datastores that are created in advance during pre-setup preparations, are automaticallyregistered in Resource Orchestrator as virtual storage resources.
For details on how to register VM management software, refer to "5.2 Registering VM Management Software" in the "User's Guidefor Infrastructure Administrators (Resource Management) CE".
2. Register Chassis
Refer to "5.8.1 Registering Chassis (For PRIMEQUEST Servers)" in the "User's Guide for Infrastructure Administrators (ResourceManagement) CE".
3. Register Managed Servers (within Chassis)
Refer to "5.8.2 Registering PRIMEQUEST Servers" in the "User's Guide for Infrastructure Administrators (Resource Management)CE".
To register a network device resource, specify a network pool when creating the network device resource.
To register a network resource, specify a network pool when creating the network resource.
For details, refer to "Chapter 14 Registering Resources in Resource Pools" in the "User's Guide for Infrastructure Administrators (ResourceManagement) CE".
C.2.3 Registering Resources in Resource Pools1. Register VM Host Resources
Refer to "14.1 VM Host Resources" in the "User's Guide for Infrastructure Administrators (Resource Management) CE".
2. Register Virtual Storage Resources
Refer to "14.5 Storage Resources" in the "User's Guide for Infrastructure Administrators (Resource Management) CE".
3. Register Network Device Resources
Create network devices to be used on the L-Platform and register those with the type Firewall or SLB in the network pool.
Refer to "14.4 Network Devices" in the "User's Guide for Infrastructure Administrators (Resource Management) CE".
- 212 -

4. Register Network Resources
If the NIC and network resources are connected when an L-Server is created, the settings matching the network resource definitionwill be registered automatically for the VM host that the L-Server will operate on.For details, refer to "C.2.4 Automatic Network Configuration".
A redundant NIC configuration will be configured. When configuring a non-redundant NIC, refer to "C.2.5 Manual NetworkConfiguration".
Point
When using VMware vDS, in port group creation for distributed virtual switches, set the same VLAN ID used for the port groupto the network resource.
For details on how to create a network resource, refer to "14.3 Network Resources" in the "User's Guide for InfrastructureAdministrators (Resource Management) CE".
Information
For details on automatic configuration of network resources, refer to "C.2.4 Automatic Network Configuration".
- When using VMware vDS
Refer to "When Using Distributed Virtual Switch (VMware vDS)" in "E.1.4 Network Preparations" in the "Design Guide CE".
- When using the definition for port groups excluded from the selections for automatic network configuration
Refer to "When Using the Definition for Port Groups Excluded from the Selections for Automatic Network Configuration" in"E.1.4 Network Preparations" in the "Design Guide CE".
C.2.4 Automatic Network ConfigurationIf the NIC and network resources are connected when an L-Server is created, the following settings matching the network resourcedefinition will be registered automatically for the VM host that the L-Server will operate on.
- LAN switch blade (when using blade servers)
When using a LAN switch blade in switch mode or end-host mode, a VLAN is configured on the internal connection port.
When creating a network resource, a tagged VLAN is automatically configured on the port of the LAN switch blade specified in theuplink port, using the following procedure.
- From the GUI:
In the [Create a network resource] dialog, check the [Automatically configure VLANs for the uplink ports.] checkbox.
- From the Command-line:
In the XML definition for the network resource, specify "true" for vlanautosetting (Automatic VLAN configuration for uplinkports).
- Virtual switches and port groups
If the required network resources do not exist, they are automatically created. A redundant NIC configuration will be configured.
If it already exists, the virtual switch and port group are used.
When the user configures the network automatically using an arbitrary physical NIC, define the physical NIC to be used in the serverNIC definition file, and then specify the physical LAN segment in the server NIC definition from the network resource.
This enables automatic network configuration even in configurations using an arbitrary physical NIC.
To reflect the physical NIC configuration specified in the server NIC definition file on Resource Orchestrator, use the rcxadm nicdefctlcommit command.
- 213 -
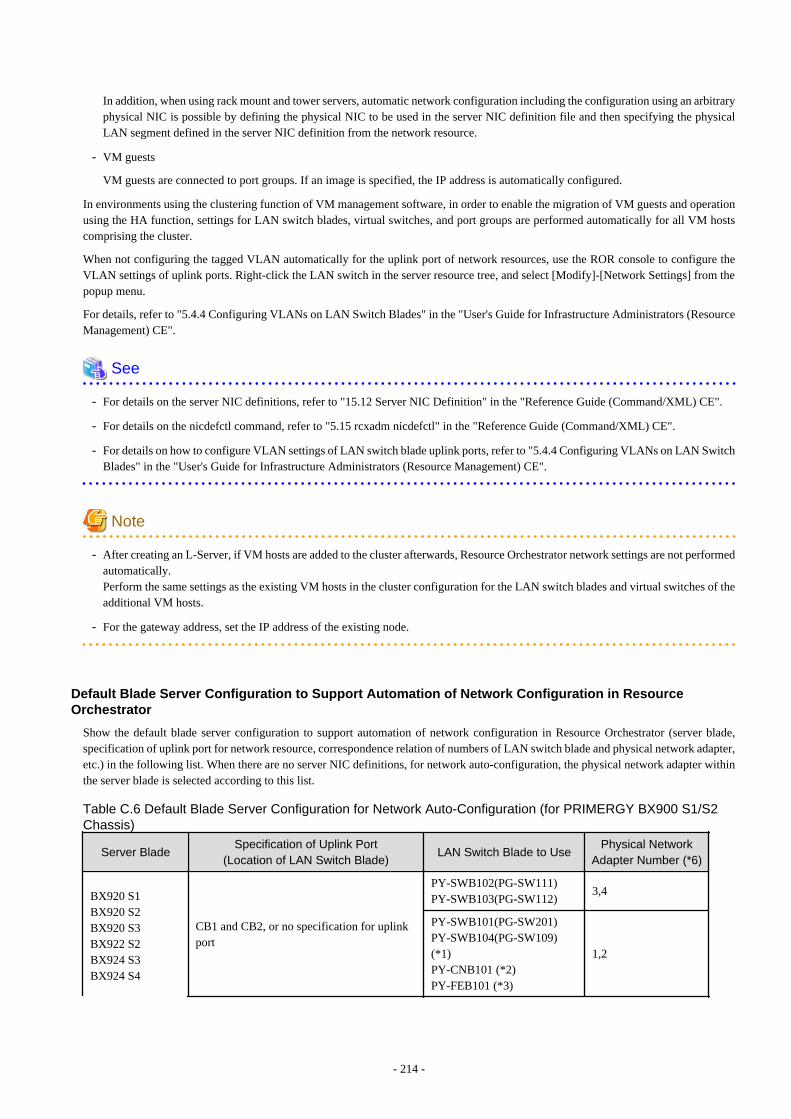
In addition, when using rack mount and tower servers, automatic network configuration including the configuration using an arbitraryphysical NIC is possible by defining the physical NIC to be used in the server NIC definition file and then specifying the physicalLAN segment defined in the server NIC definition from the network resource.
- VM guests
VM guests are connected to port groups. If an image is specified, the IP address is automatically configured.
In environments using the clustering function of VM management software, in order to enable the migration of VM guests and operationusing the HA function, settings for LAN switch blades, virtual switches, and port groups are performed automatically for all VM hostscomprising the cluster.
When not configuring the tagged VLAN automatically for the uplink port of network resources, use the ROR console to configure theVLAN settings of uplink ports. Right-click the LAN switch in the server resource tree, and select [Modify]-[Network Settings] from thepopup menu.
For details, refer to "5.4.4 Configuring VLANs on LAN Switch Blades" in the "User's Guide for Infrastructure Administrators (ResourceManagement) CE".
See
- For details on the server NIC definitions, refer to "15.12 Server NIC Definition" in the "Reference Guide (Command/XML) CE".
- For details on the nicdefctl command, refer to "5.15 rcxadm nicdefctl" in the "Reference Guide (Command/XML) CE".
- For details on how to configure VLAN settings of LAN switch blade uplink ports, refer to "5.4.4 Configuring VLANs on LAN SwitchBlades" in the "User's Guide for Infrastructure Administrators (Resource Management) CE".
Note
- After creating an L-Server, if VM hosts are added to the cluster afterwards, Resource Orchestrator network settings are not performedautomatically.Perform the same settings as the existing VM hosts in the cluster configuration for the LAN switch blades and virtual switches of theadditional VM hosts.
- For the gateway address, set the IP address of the existing node.
Default Blade Server Configuration to Support Automation of Network Configuration in ResourceOrchestrator
Show the default blade server configuration to support automation of network configuration in Resource Orchestrator (server blade,specification of uplink port for network resource, correspondence relation of numbers of LAN switch blade and physical network adapter,etc.) in the following list. When there are no server NIC definitions, for network auto-configuration, the physical network adapter withinthe server blade is selected according to this list.
Table C.6 Default Blade Server Configuration for Network Auto-Configuration (for PRIMERGY BX900 S1/S2Chassis)
Server BladeSpecification of Uplink Port
(Location of LAN Switch Blade)LAN Switch Blade to Use
Physical NetworkAdapter Number (*6)
BX920 S1BX920 S2BX920 S3BX922 S2BX924 S3BX924 S4
CB1 and CB2, or no specification for uplinkport
PY-SWB102(PG-SW111)PY-SWB103(PG-SW112)
3,4
PY-SWB101(PG-SW201)PY-SWB104(PG-SW109)(*1)PY-CNB101 (*2)PY-FEB101 (*3)
1,2
- 214 -
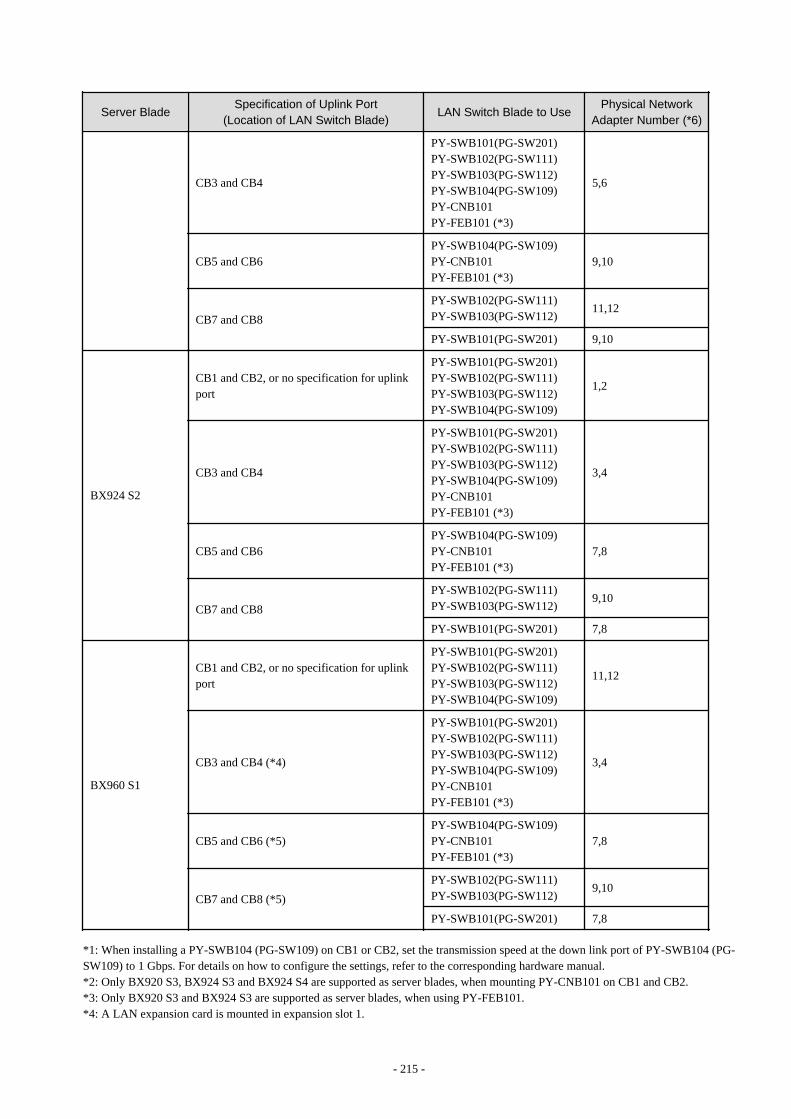
Server BladeSpecification of Uplink Port
(Location of LAN Switch Blade)LAN Switch Blade to Use
Physical NetworkAdapter Number (*6)
CB3 and CB4
PY-SWB101(PG-SW201)PY-SWB102(PG-SW111)PY-SWB103(PG-SW112)PY-SWB104(PG-SW109)PY-CNB101PY-FEB101 (*3)
5,6
CB5 and CB6PY-SWB104(PG-SW109)PY-CNB101PY-FEB101 (*3)
9,10
CB7 and CB8
PY-SWB102(PG-SW111)PY-SWB103(PG-SW112)
11,12
PY-SWB101(PG-SW201) 9,10
BX924 S2
CB1 and CB2, or no specification for uplinkport
PY-SWB101(PG-SW201)PY-SWB102(PG-SW111)PY-SWB103(PG-SW112)PY-SWB104(PG-SW109)
1,2
CB3 and CB4
PY-SWB101(PG-SW201)PY-SWB102(PG-SW111)PY-SWB103(PG-SW112)PY-SWB104(PG-SW109)PY-CNB101PY-FEB101 (*3)
3,4
CB5 and CB6PY-SWB104(PG-SW109)PY-CNB101PY-FEB101 (*3)
7,8
CB7 and CB8
PY-SWB102(PG-SW111)PY-SWB103(PG-SW112)
9,10
PY-SWB101(PG-SW201) 7,8
BX960 S1
CB1 and CB2, or no specification for uplinkport
PY-SWB101(PG-SW201)PY-SWB102(PG-SW111)PY-SWB103(PG-SW112)PY-SWB104(PG-SW109)
11,12
CB3 and CB4 (*4)
PY-SWB101(PG-SW201)PY-SWB102(PG-SW111)PY-SWB103(PG-SW112)PY-SWB104(PG-SW109)PY-CNB101PY-FEB101 (*3)
3,4
CB5 and CB6 (*5)PY-SWB104(PG-SW109)PY-CNB101PY-FEB101 (*3)
7,8
CB7 and CB8 (*5)
PY-SWB102(PG-SW111)PY-SWB103(PG-SW112)
9,10
PY-SWB101(PG-SW201) 7,8
*1: When installing a PY-SWB104 (PG-SW109) on CB1 or CB2, set the transmission speed at the down link port of PY-SWB104 (PG-SW109) to 1 Gbps. For details on how to configure the settings, refer to the corresponding hardware manual.*2: Only BX920 S3, BX924 S3 and BX924 S4 are supported as server blades, when mounting PY-CNB101 on CB1 and CB2.*3: Only BX920 S3 and BX924 S3 are supported as server blades, when using PY-FEB101.*4: A LAN expansion card is mounted in expansion slot 1.
- 215 -
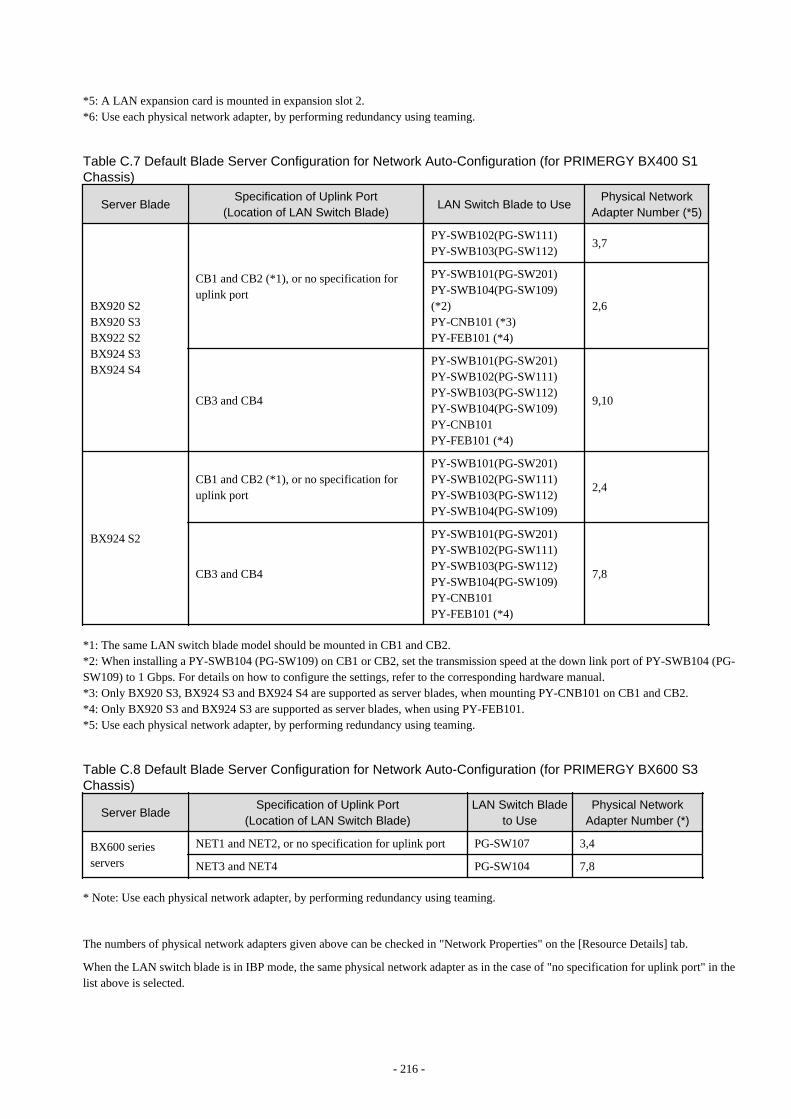
*5: A LAN expansion card is mounted in expansion slot 2.*6: Use each physical network adapter, by performing redundancy using teaming.
Table C.7 Default Blade Server Configuration for Network Auto-Configuration (for PRIMERGY BX400 S1Chassis)
Server BladeSpecification of Uplink Port
(Location of LAN Switch Blade)LAN Switch Blade to Use
Physical NetworkAdapter Number (*5)
BX920 S2BX920 S3BX922 S2BX924 S3BX924 S4
CB1 and CB2 (*1), or no specification foruplink port
PY-SWB102(PG-SW111)PY-SWB103(PG-SW112)
3,7
PY-SWB101(PG-SW201)PY-SWB104(PG-SW109)(*2)PY-CNB101 (*3)PY-FEB101 (*4)
2,6
CB3 and CB4
PY-SWB101(PG-SW201)PY-SWB102(PG-SW111)PY-SWB103(PG-SW112)PY-SWB104(PG-SW109)PY-CNB101PY-FEB101 (*4)
9,10
BX924 S2
CB1 and CB2 (*1), or no specification foruplink port
PY-SWB101(PG-SW201)PY-SWB102(PG-SW111)PY-SWB103(PG-SW112)PY-SWB104(PG-SW109)
2,4
CB3 and CB4
PY-SWB101(PG-SW201)PY-SWB102(PG-SW111)PY-SWB103(PG-SW112)PY-SWB104(PG-SW109)PY-CNB101PY-FEB101 (*4)
7,8
*1: The same LAN switch blade model should be mounted in CB1 and CB2.*2: When installing a PY-SWB104 (PG-SW109) on CB1 or CB2, set the transmission speed at the down link port of PY-SWB104 (PG-SW109) to 1 Gbps. For details on how to configure the settings, refer to the corresponding hardware manual.*3: Only BX920 S3, BX924 S3 and BX924 S4 are supported as server blades, when mounting PY-CNB101 on CB1 and CB2.*4: Only BX920 S3 and BX924 S3 are supported as server blades, when using PY-FEB101.*5: Use each physical network adapter, by performing redundancy using teaming.
Table C.8 Default Blade Server Configuration for Network Auto-Configuration (for PRIMERGY BX600 S3Chassis)
Server BladeSpecification of Uplink Port
(Location of LAN Switch Blade)LAN Switch Blade
to UsePhysical Network
Adapter Number (*)
BX600 seriesservers
NET1 and NET2, or no specification for uplink port PG-SW107 3,4
NET3 and NET4 PG-SW104 7,8
* Note: Use each physical network adapter, by performing redundancy using teaming.
The numbers of physical network adapters given above can be checked in "Network Properties" on the [Resource Details] tab.
When the LAN switch blade is in IBP mode, the same physical network adapter as in the case of "no specification for uplink port" in thelist above is selected.
- 216 -
When the user configures the network automatically using an arbitrary physical NIC, define the physical NIC to be used in the server NICdefinition file, and specify the physical LAN segment in the server NIC definition from the network resource.
To reflect the physical NIC configuration specified in the server NIC definition file on Resource Orchestrator, use the rcxadm nicdefctlcommit command. This enables automatic network configuration even in configurations using an arbitrary physical NIC.However, when using server NIC definitions, the operation must be performed from the command-line.In addition, when using rack mount and tower servers, automatic network configuration including the configuration using an arbitraryphysical NIC is possible by defining the physical NIC to be used in the server NIC definition file and then specifying the physical LANsegment defined in the server NIC definition from the network resource.
See
- For details on the server NIC definitions, refer to "15.12 Server NIC Definition" in the "Reference Guide (Command/XML) CE".
- For details on the nicdefctl command, refer to "5.15 rcxadm nicdefctl" in the "Reference Guide (Command/XML) CE".
In the diagram, the default blade server configurations as described in the following configuration example when using a PRIMERGYBX900 S1 chassis are shown.
Table C.9 Configuration Example 1
Server blades BX920 S2
Specification of uplink port CB1 and CB2
LAN switch blade to use PY-SWB103(PG-SW112)
Table C.10 Configuration Example 2
Server blades BX920 S2
Specification of uplink portBoth "no specification for uplink port" and "CB3 and CB4" arespecified
LAN switch blade to use PY-SWB104(PG-SW109)
- 217 -
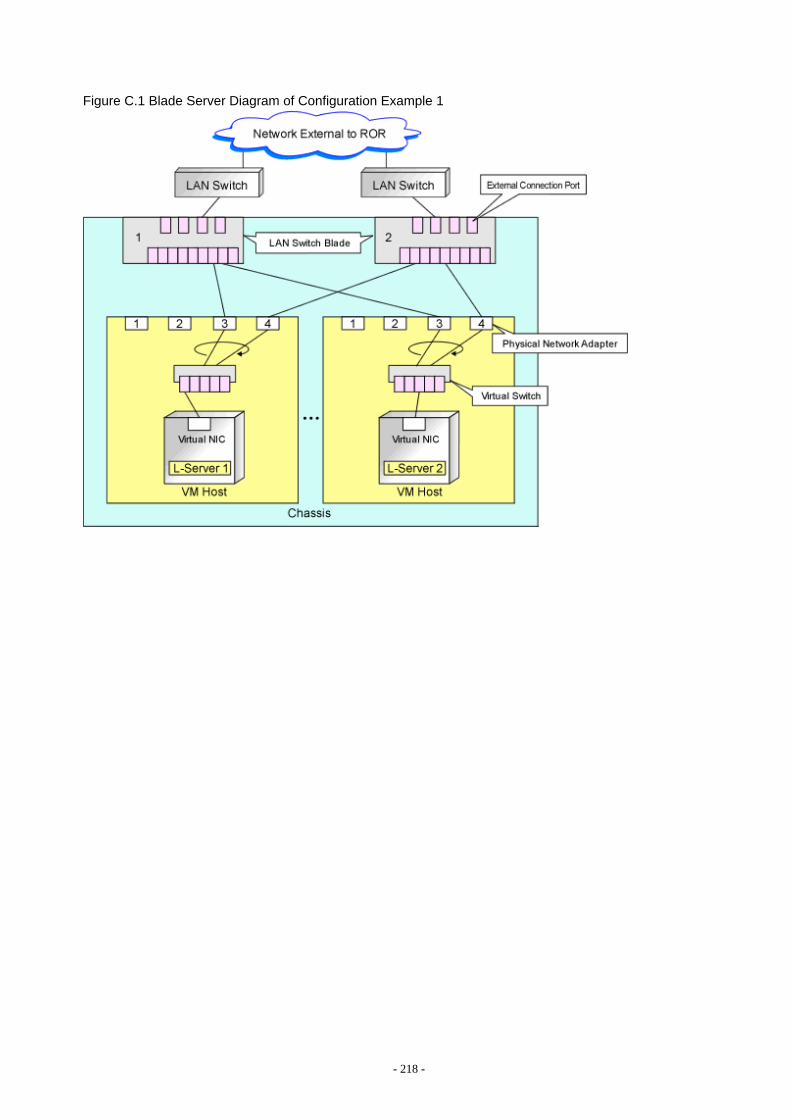
Figure C.1 Blade Server Diagram of Configuration Example 1
- 218 -

Figure C.2 Blade Server Diagram of Configuration Example 2
C.2.5 Manual Network ConfigurationWhen using a configuration which is not supported for the network auto-configuration (such as triplicity or quadruplicity of NICs),configure the network using the following procedure:
Create port groups that use the same VLAN ID and have the same name (which is case sensitive) for all VM hosts that compose a clusterconfiguration.When using server virtualization software other than VMware with the same manager, set a different port group name from the one usedfor the virtual switch, virtual network, and virtual bridge on the other server virtualization software.
1. Manually create a virtual switch connected to a physical NIC.
For details on how to create virtual switches, refer to the VMware manual.
2. On the virtual switch was created in step 1, manually create a port group for which a VLAN ID has been set.
For details on how to create port groups, refer to the VMware manual.
3. For the LAN switch blade connected to the physical NICs, configure a VLAN that includes a downlink port.
a. Right-click the target LAN switch in the server resource tree on the ROR console, and select [Modify]-[Network Settings]from the popup menu.
The [VLAN Settings] dialog is displayed.
b. Configure a VLAN.
- 219 -
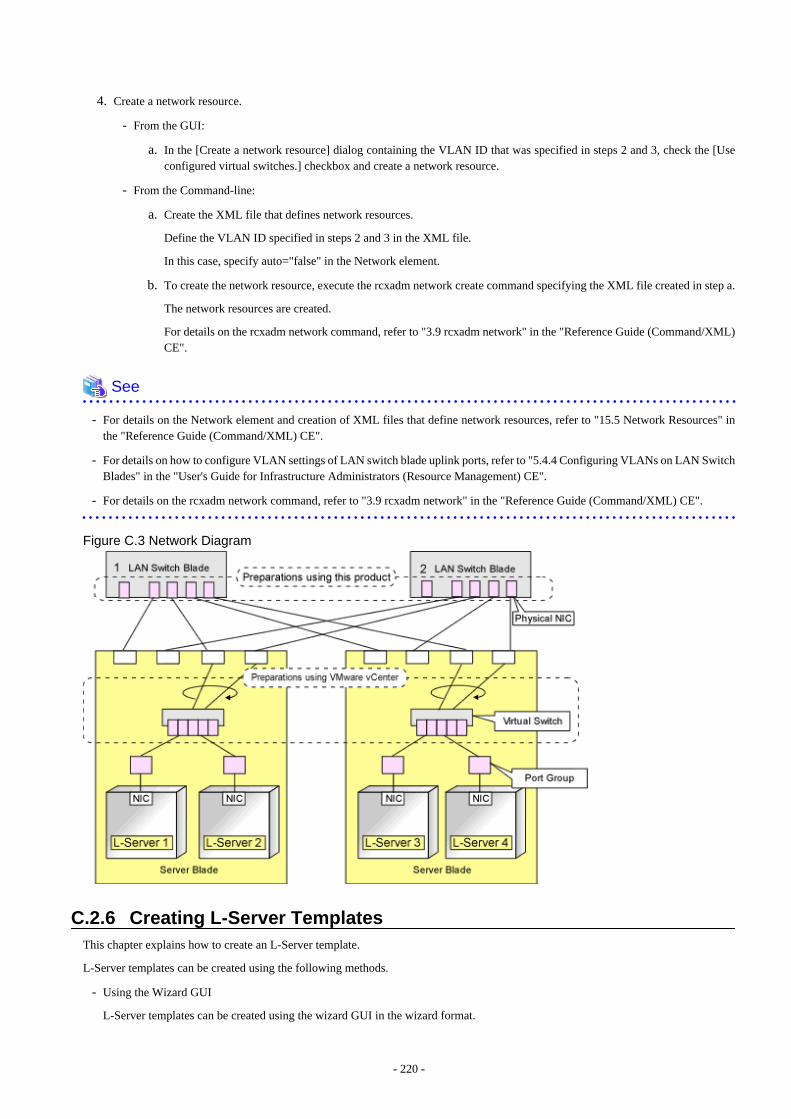
4. Create a network resource.
- From the GUI:
a. In the [Create a network resource] dialog containing the VLAN ID that was specified in steps 2 and 3, check the [Useconfigured virtual switches.] checkbox and create a network resource.
- From the Command-line:
a. Create the XML file that defines network resources.
Define the VLAN ID specified in steps 2 and 3 in the XML file.
In this case, specify auto="false" in the Network element.
b. To create the network resource, execute the rcxadm network create command specifying the XML file created in step a.
The network resources are created.
For details on the rcxadm network command, refer to "3.9 rcxadm network" in the "Reference Guide (Command/XML)CE".
See
- For details on the Network element and creation of XML files that define network resources, refer to "15.5 Network Resources" inthe "Reference Guide (Command/XML) CE".
- For details on how to configure VLAN settings of LAN switch blade uplink ports, refer to "5.4.4 Configuring VLANs on LAN SwitchBlades" in the "User's Guide for Infrastructure Administrators (Resource Management) CE".
- For details on the rcxadm network command, refer to "3.9 rcxadm network" in the "Reference Guide (Command/XML) CE".
Figure C.3 Network Diagram
C.2.6 Creating L-Server TemplatesThis chapter explains how to create an L-Server template.
L-Server templates can be created using the following methods.
- Using the Wizard GUI
L-Server templates can be created using the wizard GUI in the wizard format.
- 220 -
For details on the GUI in the wizard format, refer to "15.1 Operations Using the Wizard GUI" in the "User's Guide for InfrastructureAdministrators (Resource Management) CE".
- Manually
Use the following procedure to create an L-Server template:
1. Export an L-Server Template
The sample L-Server templates provided with Resource Orchestrator can be exported.
Refer to "15.2.1 Export" in the "User's Guide for Infrastructure Administrators (Resource Management) CE".
2. Edit an L-Server Template
The L-Server template output in step 1 can be edited with an editor, etc.
For details on the L-Server templates for virtual L-Servers, refer to "15.2.2 Virtual L-Server Templates" in the "Reference Guide(Command/XML) CE".
3. Import an L-Server Template
Refer to "15.2.3 Import" in the "User's Guide for Infrastructure Administrators (Resource Management) CE".
C.2.7 Creating an L-ServerUse the following procedure to create L-Servers:
1. Create an L-Server Using an L-Server Template
a. When there are no cloning images, or when not using already registered cloning images
1. Create an L-Server, referring to "16.1 Creation Using an L-Server Template" in the "User's Guide for InfrastructureAdministrators (Resource Management) CE". When creating the L-Server, select [None] for images.
2. Install an OS, referring to "Manual OS Installation".
3. When collecting cloning images after creating an L-Server, the cloning images are stored in the image pool. Whencollecting cloning images, refer to "C.2.8 Collecting a Cloning Image".
b. When using an existing cloning image
Create an L-Server, referring to "16.1 Creation Using an L-Server Template" in the "User's Guide for InfrastructureAdministrators (Resource Management) CE". In this case, specify the cloning image that you want to use as an image.
2. Create an L-Server Specifying Individual Specifications
Refer to "16.3 Creation of Virtual L-Servers Using Parameters" in the "User's Guide for Infrastructure Administrators (ResourceManagement) CE".
For details on the [OS] tab settings, refer to "C.2.9 [OS] Tab Configuration".
Manual OS Installation
To manually install an operating system, use the following procedure.
1. Stop the L-Server.
If an L-Server is operating, stop it.For details on how to stop an L-Server, refer to "17.1.2 Stopping an L-Server" in the "User's Guide for Infrastructure Administrators(Resource Management) CE".
2. Connect a console to the L-Server.
Connect a console to the L-Server.For details on how to connect the console, refer to "Console" in "17.3 Using the L-Server Console" in the "User's Guide forInfrastructure Administrators (Resource Management) CE".
- 221 -

3. Connect DVD drives.
Perform connection of DVD drives from the console window.
4. Install an OS manually on the L-Server.
Start an L-Server, and manually install an OS on the L-Server.
When installing an OS manually, refer to the Guest Operating System Installation Guide.
Refer to the relevant version of the document, referring to the following web site:
Guest Operating System Installation Guide
URL: http://www.vmware.com/support/pubs/vs_pubs.html
Configuration after OS Installation
Install VMware Tools after installing an OS.
Use the following procedure to install VMware Tools.
1. Right-click the target L-Server in the orchestration tree, and select [Install VM Tool] from the popup menu.
The confirmation dialog is displayed.
2. Click <OK>.
The ISO images are connected to the L-Server for VM guest.
For details on VMware Tools, refer to the information on VMware Tools in "vSphere Basic System Administration" of VMware.
Refer to the relevant version of the document, referring to the following web site:
vSphere Basic System Administration
URL: http://www.vmware.com/support/pubs/
Note
When a connection with the ISO image of VMware Tools has already been established, subsequent operations for the connection will becompleted normally. In some cases, a task error may be output on VMware vCenter Server. This error is output by ignoring the messagealready received from VMware vCenter Server that informs the user that connection has already been established, and does not affect thesystem operations.
C.2.8 Collecting a Cloning ImageThis section explains how to collect cloning images.
Use the following procedure to collect cloning images:After installing an OS, stop the target L-Server.
1. Right-click the target L-Server in the orchestration tree, and select [Cloning]-[Collect] from the popup menu.
2. Click <OK>.
A cloning image is collected.
A given cloning image (identified by its name attribute) can be managed by image version.
If a cloning image is created using VM management software, it can be used as is.
- 222 -

Point
When "Default" is specified in the [Collect a Cloning Image] dialog, it is assumed that the virtual storage resource containing the L-Serverfor collecting cloning images has been specified.
When performing cloning of a Windows OS on an L-Server, the Microsoft Sysprep tool is necessary.The necessary files vary depending on the CPU architecture (x86, x64) of the target system, and the OS version.It is not necessary to obtain new files, since the following OSs include Microsoft Sysprep:
- Windows Server 2008
- Windows Server 2008 R2
- Windows Server 2012
- Windows Vista
- Windows 7
- Windows 8
For details on obtaining tool and its installation, refer to the information regarding the Microsoft Sysprep tool in the "vSphere Basic SystemAdministration" documentation and the following VMware web site.
Refer to the relevant version of the document, referring to the following web site:
vSphere Basic System Administration
URL: http://www.vmware.com/support/pubs/
VMware web site
URL:http://kb.vmware.com/selfservice/microsites/search.do?language=en_US&cmd=displayKC&externalId=1005593
Note
- If an L-Server is created with a specified Windows image, when deploying the image use Sysprep, provided by Microsoft, toreconfigure the properties unique to the server. By executing Sysprep, the user information and OS setting information are reset.For details on Sysprep, refer to the information provided by Microsoft.
- If stopping or restarting of the manager is performed during execution of Sysprep, the operation being executed will be performedafter the manager is started.Until the process being executed is completed, do not operate the target resource.
- When using MAK license authentication for activation for the following OSs, Sysprep can be executed a maximum of three times.
- Windows Server 2008
- Windows Server 2008 R2
- Windows Vista
- Windows 7
Since Sysprep is executed when creating L-Server with images specified or when collecting cloning images, collection of cloningimages and creation of L-Servers with images specified cannot be performed more than four times. Therefore, it is recommended notto collect cloning images from L-Servers that have had cloning images deployed, but to collect them from a dedicated master server.The number is also included in the count when Sysprep is performed in the following cases:
- When customizing a guest OS using template functions in VMware
- When creating templates in SCVMM
- 223 -
- If an L-Server is created with a Windows image specified, use Sysprep to set the server specific information again, when starting forthe first time after creating the L-Server. After startup and resetting of the server specific information, when the L-Server console isopened from the server virtualization software management window, you will be logged on with Administrator status. Therefore, itis recommended that you log off.
- Note the following points when collecting cloning images from an L-Server that was created using a cloning image.
- As L-Servers which have not been used even once after creation do not have server specific information set, creation of L-Serversusing cloning images collected from an L-Server may fail. When collecting cloning images, set the server specific informationon L-Server, after starting the target L-Server.
C.2.9 [OS] Tab ConfigurationEnter the parameters to set for the OS when creating the L-Server. This setting is valid only if an image is specified in the [General] tab.
The setting process is performed the first time the L-Server is started. If an image name is not specified, it is not necessary to enter allthese items.
Table C.11 List of Settings
Item
Windows Linux
DescriptionNecessity ofEntry
Values When OmittedNecessity of Entry
Values WhenOmitted
Host name/Computer name
Possible
L-Server Name Possible L-Server Name
Enter the host name or computername.
[Windows]Enter a character string beginningwith an alphanumeric characterand containing up to 15alphanumeric characters andhyphens ("-").The string cannot be composedsolely of numbers.
[Linux]Enter a character string beginningwith an alphanumeric characterand containing up to 63alphanumeric characters andhyphens ("-").The string cannot be composedsolely of numbers.
If this parameter is not specified,the L-Server name is convertedand set as indicated above.If underscores ("_") or periods(".") are used in an L-Server name,they will be replaced with hyphens("-"), because these characterscannot be used for host names orcomputer names.
Domain namePossibl
eWORKGROUP (*1) Possible localdomain (*1)
[Windows]Enter the workgroup name.Settings for participation in adomain cannot be made.
- 224 -

Item
Windows Linux
DescriptionNecessity ofEntry
Values When OmittedNecessity of Entry
Values WhenOmitted
The same workgroup name as thecomputer name cannot bespecified.Enter a character string beginningwith an alphabetic character andcontaining up to 15 alphanumericcharacters, hyphens ("-"), andperiods (".").Refer to the Microsoft informationabout the character strings that canbe input for workgroup names.
[Linux]Enter the domain name.Enter a character string beginningwith an alphabetic character andcontaining up to 255 alphanumericcharacters, hyphens ("-"), andperiods (".").
DNS search pathNot
Required
-Essentia
l-
Enter a list of domain names to usefor DNS searching, using between1 and 32,767 characters. You canspecify the same characters as thedomain name.To specify multiple domainnames, use a blank space as theseparator character.
Full namePossibl
eWORKNAME (*1)
NotRequire
d-
Enter the Windows full nameusing between 1 and 50 characters.By default, the value defined in theOS property definition file isentered.
Organization namePossibl
eWORKORGANIZATION (*1)
NotRequire
d-
Enter the organization namedisplayed in the Windows systemproperties using between 1 and 50characters.
Product keyPossibl
e
If omitted, thefollowing will happenwhen the OS isoperated: (*1)
- For WindowsServer 2003, theproduct key entryscreen is displayedthe first time theserver is started.
- For WindowsServer 2008 orlater, the productkey is unregistered.
NotRequire
d- Enter a product key.
- 225 -
Item
Windows Linux
DescriptionNecessity ofEntry
Values When OmittedNecessity of Entry
Values WhenOmitted
License modePossibl
eServer unit (*1)
NotRequire
d-
Specify "Seat Unit" (number ofconnected clients) or "ServerUnit" (number of servers used atthe same time).
Maximum numberof connections
Possible
5 (*1)Not
Required
-
Specify this when "Server Unit" isset (number of servers used at thesame time: server).Specify a number between 5 and9,999.
Administratorpassword
Possible
- (*1)Not
Required
-
Configure the same password asthat specified for the localadministrator account during L-Server creation.Enter the password using between1 and 128 alphanumeric charactersor symbols. (*2)
Hardware clockconfiguration
NotRequir
ed- Possible Local
Specify one of the following:
- UTC
- Local (LOCAL)
Time zonePossibl
eThe same time zone asthe OS of the manager
PossibleThe same time zoneas the OS of themanager
Specify the time zone of the OS.
*1: When the value is specified in the OS property definition file, its values are configured.*2: When a different password from the password of the local administrator account of the images specified during L-Server creation isspecified, enter the values according to VM management software specifications.For details on administrator password settings, refer to the section of customization for virtual machines of the "vSphere Basic SystemAdministration".
vSphere Basic System Administration
URL: http://www.vmware.com/support/pubs/
Information
OS Property Definition File
By setting the default values in an OS property definition file in advance, the default values of the information on the [OS] tab, etc. aregenerated when creating an L-Server.
For details, refer to "C.1.7 OS Property Definition File".
C.2.10 Advisory Notes for VMware UsageThis section explains advisory notes for VMware.
Values for CPU Share and Memory Share
If CPU share and memory share for a virtual L-Server have been set to a value of 1,000,000 or greater using the ROR console, when theVM guest is edited from vSphereClient, these values may be forcibly replaced with 1,000,000.
- 226 -
When setting a value greater than 1,000,000, modify the configuration from the ROR console again.
Operating Systems for which Parameters can be Set and the Prerequisites for Performing the Settings
Depending on the server virtualization software used, some restrictions may apply to the operating systems that parameters can be set forand the prerequisites for performing the settings.
For details, refer to the manual of server virtualization software.
Information
Snapshot
The snapshot function provided by server virtualization software records the disk from the last update. Consequently, when a disk failureoccurs, the snapshot function becomes unavailable at the same time.Snapshot can be used as a corrective measure for problems such as the following:
Example
- For recovery when a problems occurs with the applied patch
- For recovery when a problem occurs when changing operating system parameters
VMware Storage VMotion
The following are advisory notes for when using VMware Storage VMotion.
- When disk resources are moved to a newly created datastore which has not yet been detected by Resource Orchestrator, the informationof moved disk resources is reflected as follows:
1. The newly created datastore is detected as a virtual storage resource during regular update.
2. After being detected as virtual storage resources, the information of moved disk resources is reflected on Resource Orchestrator.
- When using VMware vSphere Client, after completing moving of disk resources, the newest datastore status may not be reflected.
When performing update of the datastore, the newest status is displayed.
VMware FT
When an L-Server is linked with a virtual machine on which VMware FT has been configured, the secondary VM host information canbe checked using the following method:
1. Select the target L-Server on the orchestration tree.
In the [Server recovery] on the [Resource Details] tab, VMware FT (Secondary_VM_host_name) is displayed.
Example
VMware FT(host2)
When migration to the secondary VM host occurs, the secondary VM host information will be updated by periodic update.
- 227 -
VMware DPM, VMware DRS
When starting an L-Server using VMware DPM or VMware DRS, if moving an L-Server (VM guest) between VM hosts using VMwareDRS, or turning on a VM host using VMware DPM, refer to "When using VMware DRS or VMware DPM" in "E.1.2 Preparations forServers" in the "Design Guide CE".
When using VMware DPM, the VM hosts which compose a cluster need to be registered in a single resource pool. When the VM hostswhich compose a cluster are divided into two or more resource pools, the VM host CPU and memory resources of standby mode are notcalculated as active VM host's resources.
C.2.11 OvercommitThis section explains the overcommit function for L-Servers.
Overcommit
The VMware overcommit function for the CPU and memory is available on Resource Orchestrator.
The VMware overcommit function for the CPU and memory virtually allows a guest OS to use more resources than that of the actual CPUand memory of a server.
Resource Orchestrator provides the following functions to utilize the VMware overcommit function for the CPU and memory when creatingL-Servers.
- Creating an L-Server with the overcommit function for the CPU and memory
- CPU PerformanceThe maximum number of CPU resources to be allocated to a virtual machine (Limitation)
- CPU Reservation PerformanceThe minimum number of CPU resources to be reserved for a virtual machine (Reservation)
- CPU SharesThe relative proportion for allocation of CPU resources when there are competing virtual machines (Share)
- Memory Size
- Memory Reserved
The maximum amount of memory resources to be allocated to a virtual machine (Limitation)
- Memory Size
The maximum amount of memory resources to be allocated to a virtual machine by the VM host (Memory Size)
For the virtual L-Server created using Resource Orchestrator, the same value is set for both Memory Reserved and Memory Size.
- Memory Reservation CapacityThe minimum amount of memory resources to be reserved for a virtual machine (Reservation)
- Memory SharesThe relative proportion for allocation of memory resources when there are competing virtual machines (Share)
- Setting an overcommit attribute for a resource pool
Overcommit attributes can be set for resource pools. An L-Server with overcommit attributes can be created using overcommitattributes settings or a resource pool.
- Calculation of available space on VM pools, which uses values set for CPU reservation performance and memory reservation capacity
- Conversion of the free CPU capacity and free memory capacity of VM pools with overcommit attributes
For a VM pool with overcommit attributes, the conversion of free CPU capacity and free memory capacity can be displayed based onthe CPU reservation values and memory allocation capacity of an L-Server created beforehand.
- Display of the number of L-Servers that can be created for a VM pool with overcommit attributes
For a VM pool with overcommit attributes, the number of L-Servers that can be created based on the CPU reservation values andmemory reservation capacity specified in the L-Server template can be displayed.
- 228 -
For details on L-Servers, refer to "2.2.3 L-Server" in the "Design Guide CE", "C.2.7 Creating an L-Server", or "Chapter 16 Creating L-Servers" in the "User's Guide for Infrastructure Administrators (Resource Management) CE".For details on resource pools, refer to "2.2.2 Resource Pools" in the "Design Guide CE", or "Chapter 20 Resource Pool Operations" in the"User's Guide for Infrastructure Administrators (Resource Management) CE".For details on the available capacity view or the L-Server conversion view, refer to "20.6 Viewing" in the "User's Guide for InfrastructureAdministrators (Resource Management) CE".
Installation Procedure
Use the following procedure to install overcommit.
1. Create a VM Pool for Overcommit
For details on how to create a VM pool, refer to "Chapter 20 Resource Pool Operations" in the "User's Guide for InfrastructureAdministrators (Resource Management) CE".
Point
- When creating L-Servers that use overcommit and L-Servers that do not, both a VM pool that uses overcommit and a VM poolthat does not must be created.
- It is necessary to edit the definition file separately, when migration is not executed using the configuration methods forovercommit functions after performing upgrade of the admin server from ROR V2.3.0 or V3.0.0. For details, refer to "2.3.1.1Overcommit Definition Files" in the "Release Notes".
Note
- For the VM pool for overcommit, register only VM hosts that support overcommit (VMware, Hyper-V, RHEL-KVM, SolarisContainers, or OVM for SPARC). If VM hosts that do not support overcommit have been registered, move those VM hosts toanother VM pool.If VM hosts that do not support overcommit have been registered in VM pools for overcommit, the following operations cannotbe performed.
- Creating an L-Server
- Associating L-Servers with configured virtual machines
For RHEL-KVM, associating L-Servers with configured virtual machines is not supported.
- When two or more VM pools using overcommit exist, the VM host the L-Server is deployed to is selected from all VM hostsin the resource pool, regardless of the priority configured.
- When the L-Server is linked to a virtual machine on the VM host in the VM pool used by overcommit, the overcommit attributesof the VM pool which the VM host is registered in are configured on the L-Server.
2. Create a VM Specific Information Definition File
Create a VM specific information definition file. Create a VM specific information definition file when configuring different settingsfor individual user groups without configuring overcommit settings on the L-Server template.For VM specific information definition files, refer to "C.1 Definition Files Commonly Shared when Creating Virtual L-Servers".
3. Export an L-Server Template
For details on how to export L-Server templates, refer to "15.2.1 Export" in the "User's Guide for Infrastructure Administrators(Resource Management) CE".
L-Server template operations (steps 3 to 5) can be performed using the GUI.For details on how to operate L-Server templates using the GUI, refer to "15.1 Operations Using the Wizard GUI" in the "User'sGuide for Infrastructure Administrators (Resource Management) CE".
- 229 -

4. Edit an L-Server Template
Configure the overcommit settings for an L-Server template.Edit the XML definition of L-Server templates, referring to "15.2.2 Virtual L-Server Templates" in the "Reference Guide (Command/XML) CE".
When configuring overcommit settings using the VM specific information definition file, do not configure the following parametersexcept "Enabling/disabling overcommit". When overcommit settings are configured in the L-Server template, priority is given tothose settings.
- CPU Reservation Performance
- CPU Shares
- Memory Reservation Capacity
- Memory Shares
Information
If a template is imported without editing the L-Server template name, the content of the existing L-Server template is overwritten.If an L-Server template is imported after the name is edited from when it was exported, the L-Server template is added.
5. Import an L-Server Template
For details on how to import L-Server templates, refer to "15.2.3 Import" in the "User's Guide for Infrastructure Administrators(Resource Management) CE".
6. Create an L-Server
Create an L-Server using the L-Server template created in step 5.For details, refer to "16.1 Creation Using an L-Server Template" in the "User's Guide for Infrastructure Administrators (ResourceManagement) CE".
When not using an L-Server template, create an L-Server using a command. Edit the L-Server XML referring to "Chapter 16 CreatingL-Servers" in the "User's Guide for Infrastructure Administrators (Resource Management) CE", and then execute the rcxadm lservercreate command.For details on the rcxadm lserver command, refer to "3.6 rcxadm lserver" in the "Reference Guide (Command/XML) CE".
Point
When you create an L-Server which uses overcommit from the [Resource] Tab of the ROR console, specify a L-Server template.
7. Confirm the Overcommit Function Settings for an L-Server
To confirm overcommit settings configured for an L-Server, execute the rcxadm lserver show command.
Confirm that the command output result includes the line starting with "OverCommit: true".
For details on the rcxadm lserver command, refer to "3.6 rcxadm lserver" in the "Reference Guide (Command/XML) CE".
Note
When starting of an L-Server fails, the retrieval method varies depending on the L-Server settings.Perform the following:
- When "Boot Location" of the L-Server is set to "Relocate at startup"
Start the L-Server again. When there is a VM host with an available resource, the L-Server will start on that VM host afterseveral attempts at startup.
- When [Boot Location] of the L-Server is set to [Fixed]
As no VM host is automatically selected, start the L-Server after changing its boot location, or moving or stopping other L-Servers on the same VM host.
- 230 -
For details on how to change the boot location, refer to "16.3 Creation of Virtual L-Servers Using Parameters" in the "User'sGuide for Infrastructure Administrators (Resource Management) CE".For details on how to move the boot location, refer to "17.7 Migration between VM Hosts" in the "User's Guide for InfrastructureAdministrators (Resource Management) CE".
Changing L-Server Specifications
This section explains how to modify L-Server specifications.
To change L-Server specifications, execute the rcxadm lserver modify command.For details on the rcxadm lserver command, refer to "3.6 rcxadm lserver" in the "Reference Guide (Command/XML) CE".
Note
Changing of L-Server specifications will fail if the resources (the number of CPUs, CPU frequency, and memory capacity) of a physicalserver where a VM host operates are less than the CPU reservation performance and memory reservation capacity.
When CPU performance and memory capacity are smaller than the CPU reservation performance and memory reservation capacity,modification of L-Server specifications fails.
When modifying specifications of an L-Server to which resources have been allocated, the information in the VM specific informationdefinition file is not reflected because priority is given to the values already configured to the L-Server. In that case, enter the new valuesin the XML file and then use the appropriate commands to reflect the changes.
C.2.12 participating in an Active Directory domainThis section explains how to participate in an Active Directory domain.
When virtual L-Server OS is Windows, the Active Directory domain participation can be specified by virtual L-Server creating thatspecifies the image
Use the following procedure to participate in an Actice Directory domain:
1. Edit an OS Property Definition File
Describe the Active Directory domain name, the user name, and the password in the OS property definition file.
For details, refer to "C.1.7 OS Property Definition File".
2. Export an L-Server Template
For details on how to export L-Server templates, refer to "15.2.1 Export" in the "User's Guide for Infrastructure Administrators(Resource Management) CE".
L-Server template operations (steps 2 to 4) can be performed using the GUI.
For details on how to operate L-Server templates using the GUI, refer to "15.1 Operations Using the Wizard GUI" in the "User'sGuide for Infrastructure Administrators (Resource Management) CE".
3. Edit an L-Server Template
Configure the Active Directory domain participation setting for an L-Server template.
Edit the XML definition of L-Server templates, referring to "15.2.2 Virtual L-Server Templates" in the "Reference Guide (Command/XML) CE".
4. Import an L-Server Template
For details on how to import L-Server templates, refer to "15.2.3 Import" in the "User's Guide for Infrastructure Administrators(Resource Management) CE".
- 231 -

5. Create an L-Server
Create an L-Server using the L-Server template created in step 4.
For details, refer to "16.1 Creation Using an L-Server Template" in the "User's Guide for Infrastructure Administrators (ResourceManagement) CE".
When not using an L-Server template, create an L-Server using a command. Edit the L-Server XML referring to "Chapter 16 CreatingL-Servers" in the "User's Guide for Infrastructure Administrators (Resource Management) CE", and then execute the rcxadm lservercreate command.
For details on the rcxadm lserver command, refer to "3.6 rcxadm lserver" in the "Reference Guide (Command/XML) CE".
Note
Either of the following results when participation in the domain fails by the Active Directory domain inaccessible and authority error ofthe account for participation and reason for the mistake of the password etc.
- L-Server that participates in default workgroup (WORKGROUP) of Windows is created.
- The creating process of L-Server fails by the timeout.
Use it after checking it is possible to participate in the Active Directory domain correctly by a prior verification by actual operation.
C.2.13 Using a GUIRunOnceThis section explains how to use a GUIRunOnce.
When virtual L-Server OS is Windows, the GUIRunOnce command (Command executed by guest OS when the user logs in GUI for thefirst time.) can be specified by virtual L-Server creating that specifies the image.
Use the following procedure to use a GUIRunOnce:
1. Create a GUIRunOnce definition file.
Create the GUIRunOnce definition file and describe the command statement.
For details, refer to "C.2.1 Creating Definition Files".
2. Export an L-Server Template
For details on how to export L-Server templates, refer to "15.2.1 Export" in the "User's Guide for Infrastructure Administrators(Resource Management) CE".
L-Server template operations (steps 2 to 4) can be performed using the GUI.
For details on how to operate L-Server templates using the GUI, refer to "15.1 Operations Using the Wizard GUI" in the "User'sGuide for Infrastructure Administrators (Resource Management) CE".
3. Edit an L-Server Template
Configure the GUIRunOnce setting for an L-Server template.
Edit the XML definition of L-Server templates, referring to "15.2.2 Virtual L-Server Templates" in the "Reference Guide (Command/XML) CE".
4. Import an L-Server Template
For details on how to import L-Server templates, refer to "15.2.3 Import" in the "User's Guide for Infrastructure Administrators(Resource Management) CE".
5. Create an L-Server
Create an L-Server using the L-Server template created in step 4.
For details, refer to "16.1 Creation Using an L-Server Template" in the "User's Guide for Infrastructure Administrators (ResourceManagement) CE".
- 232 -
When not using an L-Server template, create an L-Server using a command. Edit the L-Server XML referring to "Chapter 16 CreatingL-Servers" in the "User's Guide for Infrastructure Administrators (Resource Management) CE", and then execute the rcxadm lservercreate command.
For details on the rcxadm lserver command, refer to "3.6 rcxadm lserver" in the "Reference Guide (Command/XML) CE".
C.3 Hyper-VThis section explains how to configure Hyper-V as server virtualization software.
- When Creating a Virtual L-Server
Configure the settings referring to the information in "C.3.1 Creating Definition Files" or the following sections.
- When Associating L-Servers with Configured Virtual Machines
Refer to "18.4.3 For Virtual Machines" in the "User's Guide for Infrastructure Administrators (Resource Management) CE".
- Importing to L-Platforms
Refer to "7.2.3 Importing to L-Platform" in the "Operation Guide CE".
C.3.1 Creating Definition FilesThis section explains how to create definition files.
For definition files common to virtual L-Servers, refer to "C.1 Definition Files Commonly Shared when Creating Virtual L-Servers".
C.3.2 Registering Resources with Resource Orchestrator
When Using Blade Servers
1. Register VM Management Software
When registering VM management software, CSV files that are created in advance during pre-setup preparations, are automaticallyregistered in Resource Orchestrator as virtual storage resources.
When configuring L-Server alive monitoring, domain users which belong to the Administrators group for all VM hosts must bespecified for the login account for VM management software registered in Resource Orchestrator.
For details on how to register VM management software, refer to "5.2 Registering VM Management Software" in the "User's Guidefor Infrastructure Administrators (Resource Management) CE".
2. Register Chassis
Refer to "5.4.1 Registering Chassis" in the "User's Guide for Infrastructure Administrators (Resource Management) CE".
3. Register Managed Servers (within Chassis)
Refer to "5.4.2 Registering Blade Servers" in the "User's Guide for Infrastructure Administrators (Resource Management) CE".
4. Register LAN Switch Blades
Refer to "5.4.3 Registering LAN Switch Blades" in the "User's Guide for Infrastructure Administrators (Resource Management)CE".
5. Preparations for Networks (for Manual Network Configuration)
Preparation is necessary in the following cases.For details, refer to "Preparations" of "Connections with Virtual Networks Created in Advance".
- When not performing network redundancy for L-Servers with blade servers
- When using servers other than blade servers
6. Network resources
To register a network resource, specify a network pool when creating the network resource.
- 233 -
By creating network resources in advance, if the NIC and network resources are connected when an L-Server is created, the followingsettings matching the network resource definition will be registered automatically.
For details on automatic configuration of network resources, refer to "C.3.4 Automatic Network Configuration".
When Using Rack Mount or Tower Servers
1. Register VM Management Software
When registering VM management software, CSV files that are created in advance during pre-setup preparations, are automaticallyregistered in Resource Orchestrator as virtual storage resources.
When configuring L-Server alive monitoring, domain users which belong to the Administrators group for all VM hosts must bespecified for the login account for VM management software registered in Resource Orchestrator.
For details on how to register VM management software, refer to "5.2 Registering VM Management Software" in the "User's Guidefor Infrastructure Administrators (Resource Management) CE".
2. Register Managed Servers
Refer to "5.5.1 Registering Rack Mount or Tower Servers" in the "User's Guide for Infrastructure Administrators (ResourceManagement) CE".
3. Register LAN Switches
Refer to "5.13 Registering LAN Switches" in the "User's Guide for Infrastructure Administrators (Resource Management) CE".
4. Preparations for Networks (for Manual Network Configuration)
Preparation is necessary in the following cases.For details, refer to "Preparations" of "Connections with Virtual Networks Created in Advance".
- When not performing network redundancy for L-Servers with blade servers
- When using servers other than blade servers
5. Network resources
To register a network resource, specify a network pool when creating the network resource.
By creating network resources in advance, if the NIC and network resources are connected when an L-Server is created, the followingsettings matching the network resource definition will be registered automatically.
For details on automatic configuration of network resources, refer to "C.3.4 Automatic Network Configuration".
When Using PRIMEQUEST Servers
1. Register VM Management Software
When registering VM management software, CSV files that are created in advance during pre-setup preparations, are automaticallyregistered in Resource Orchestrator as virtual storage resources.
When configuring L-Server alive monitoring, domain users which belong to the Administrators group for all VM hosts must bespecified for the login account for VM management software registered in Resource Orchestrator.
For details on how to register VM management software, refer to "5.2 Registering VM Management Software" in the "User's Guidefor Infrastructure Administrators (Resource Management) CE".
2. Register Chassis
Refer to "5.8.1 Registering Chassis (For PRIMEQUEST Servers)" in the "User's Guide for Infrastructure Administrators (ResourceManagement) CE".
3. Register Managed Servers (within Chassis)
Refer to "5.8.2 Registering PRIMEQUEST Servers" in the "User's Guide for Infrastructure Administrators (Resource Management)CE".
4. Preparations for Networks (for Manual Network Configuration)
Preparation is necessary in the following cases.
- 234 -
For details, refer to "Preparations" of "Connections with Virtual Networks Created in Advance".
- When not performing network redundancy for L-Servers with blade servers
- When using servers other than blade servers
5. Network resources
To register a network resource, specify a network pool when creating the network resource.
By creating network resources in advance, if the NIC and network resources are connected when an L-Server is created, the followingsettings matching the network resource definition will be registered automatically.
For details on the automatic configuration of network resources, refer to "C.3.4 Automatic Network Configuration".
C.3.3 Registering Resources in Resource Pools1. Register VM Host Resources
Refer to "14.1 VM Host Resources" in the "User's Guide for Infrastructure Administrators (Resource Management) CE".
2. Register Virtual Storage Resources
Refer to "14.5 Storage Resources" in the "User's Guide for Infrastructure Administrators (Resource Management) CE".
3. Register Network Resources
If the NIC and network resources are connected when an L-Server is created, a VLAN ID is automatically configured for the NICof the VM guest, and connected to the virtual network.For details, refer to "C.3.4 Automatic Network Configuration".
a. In the ROR console orchestration tree, right-click the target network pool, and select [Create Network Resource].
When creating a new network resource, select [New].
When creating a resource using an already registered admin LAN subnet, select [Using existing admin subnet].
The [Create a network resource] dialog is displayed.
b. Enter the items necessary for network resources.For details, refer to "14.3 Network Resources" in the "User's Guide for Infrastructure Administrators (Resource Management)CE".
4. Register network device resources
Create network devices to be used on the L-Platform and register those with the type Firewall or SLB in the network pool.
Refer to "14.4 Network Devices" in the "User's Guide for Infrastructure Administrators (Resource Management) CE".
C.3.4 Automatic Network ConfigurationNetwork settings on Hyper-V differ depending on hardware (such as blade servers and rack mount servers), and whether networkredundancy will be performed for L-Servers.
- Automatic network configuration for blade servers
Refer to "Automatic Network Configuration for Blade Servers".
- When not performing network redundancy for L-Servers with blade servers
Refer to "C.3.5 Manual Network Configuration".
Automatic network configuration using an arbitrary physical NIC is also possible by defining the physical NIC to be used in the serverNIC definition file and then specifying the physical LAN segment defined in the server NIC definition from the network resource.
This enables automatic network configuration even in configurations using an arbitrary physical NIC.
To reflect the physical NIC configuration specified in the server NIC definition file on Resource Orchestrator, use the rcxadm nicdefctlcommit command.
- 235 -

See
- For details on the server NIC definitions, refer to "15.12 Server NIC Definition" in the "Reference Guide (Command/XML) CE".
- For details on the nicdefctl command, refer to "5.15 rcxadm nicdefctl" in the "Reference Guide (Command/XML) CE".
- Network configuration for servers other than blade servers
Refer to "C.3.5 Manual Network Configuration".
Automatic Network Configuration for Blade Servers
If the NIC and network resources are connected when an L-Server is created, the following settings will be registered automatically forthe VM host that the L-Server will operate on.
- LAN Switch Blades
When using a LAN switch blade in switch mode or end-host mode, a VLAN is configured on the internal connection port.
When creating a network resource, a VLAN can be configured on the port of LAN switch blade specified as the uplink port, by usingthe following procedure.
- From the GUI:
In the [Create a network resource] dialog, check the [Automatically configure VLANs for the uplink ports.] checkbox.
- From the Command-line:
In the XML definition for the network resource, specify "true" for vlanautosetting (Automatic VLAN configuration for uplinkports).
- Virtual Network
When there is no virtual network on the public LAN, it will be created automatically using the virtual interface (IntelPROSet orPRIMECLUSTER GLS)) manually created in advance.
When a network already exists, the virtual network can be used.
- VM Guests
Configure a VLAN on the virtual NIC of the VM guest, and connect with the virtual network.
If an image is specified, the IP address is automatically configured. For details on how to configure IP addresses automatically, referto "Network (NIC)" of "16.3.1 [General] Tab" in the "User's Guide for Infrastructure Administrators (Resource Management) CE".
In environments using the clustering function of VM management software, in order to enable the migration of VM guests and operationusing the HA function, settings for LAN switch blades and virtual switches are performed automatically for all VM hosts comprising thecluster.
When not configuring the tagged VLAN automatically for the uplink port of network resources, use the ROR console to configure theVLAN settings of uplink ports. Right-click the LAN switch in the server resource tree, and select [Modify]-[Network Settings] from thepopup menu.
For details, refer to "5.4.4 Configuring VLANs on LAN Switch Blades" in the "User's Guide for Infrastructure Administrators (ResourceManagement) CE".
Note
After creating an L-Server, if VM hosts are added to the cluster afterwards, Resource Orchestrator network settings are not performedautomatically.
Perform the same settings as the existing VM hosts in the cluster configuration for the LAN switch blades and virtual networks of theadditional VM hosts.
Virtual network definition files for blade servers
- 236 -
- When configuring the network for blade servers automatically
It is not necessary to create a virtual network definition file.
- When a virtual network definition file exists and no virtual network with a VLAN ID is defined
The virtual network is automatically configured.
- When a virtual network with a VLAN ID is defined, using a virtual network definition file
It is necessary that a virtual network with the VLAN ID be manually configured beforehand.
For details, refer to "C.3.5 Manual Network Configuration".
Default Blade Server Configuration to Support Automation of Network Configuration in ResourceOrchestrator
The default blade server configuration to support automation of network configuration in Resource Orchestrator (server blades,specification of uplink ports for network resource, correspondence relation of numbers of LAN switch blades and physical networkadapters, etc.) is shown in the following list. When there are no server NIC definitions, for network auto-configuration, a virtual networkis created using the physical network adapter selected according to this list.
Table C.12 Default Blade Server Configuration for Network Auto-Configuration (for PRIMERGY BX900 S1/S2Chassis)
Server BladeSpecification of Uplink Port
(Location of LAN Switch Blade)LAN Switch Blade to Use
Physical NetworkAdapter Number (*6)
BX920 S1BX920 S2BX920 S3BX922 S2BX924 S3BX924 S4
CB1 and CB2, or no specification for uplink port
PY-SWB102(PG-SW111)PY-SWB103(PG-SW112)
3,4
PY-SWB101(PG-SW201)PY-SWB104(PG-SW109)(*1)PY-CNB101 (*2)PY-FEB101 (*3)
1,2
CB3 and CB4
PY-SWB101(PG-SW201)PY-SWB102(PG-SW111)PY-SWB103(PG-SW112)PY-SWB104(PG-SW109)PY-CNB101PY-FEB101 (*3)
5,6
CB5 and CB6PY-SWB104(PG-SW109)PY-CNB101PY-FEB101 (*3)
9,10
CB7 and CB8
PY-SWB102(PG-SW111)PY-SWB103(PG-SW112)
11,12
PY-SWB101(PG-SW201) 9,10
BX924 S2
CB1 and CB2, or no specification for uplink port
PY-SWB101(PG-SW201)PY-SWB102(PG-SW111)PY-SWB103(PG-SW112)PY-SWB104(PG-SW109)
1,2
CB3 and CB4
PY-SWB101(PG-SW201)PY-SWB102(PG-SW111)PY-SWB103(PG-SW112)PY-SWB104(PG-SW109)PY-CNB101PY-FEB101 (*3)
3,4
- 237 -
Server BladeSpecification of Uplink Port
(Location of LAN Switch Blade)LAN Switch Blade to Use
Physical NetworkAdapter Number (*6)
CB5 and CB6PY-SWB104(PG-SW109)PY-CNB101PY-FEB101 (*3)
7,8
CB7 and CB8
PY-SWB102(PG-SW111)PY-SWB103(PG-SW112)
9,10
PY-SWB101(PG-SW201) 7,8
BX960 S1
CB1 and CB2, or no specification for uplink port
PY-SWB101(PG-SW201)PY-SWB102(PG-SW111)PY-SWB103(PG-SW112)PY-SWB104(PG-SW109)
11,12
CB3 and CB4 (*4)
PY-SWB101(PG-SW201)PY-SWB102(PG-SW111)PY-SWB103(PG-SW112)PY-SWB104(PG-SW109)PY-CNB101PY-FEB101 (*3)
3,4
CB5 and CB6 (*5)PY-SWB104(PG-SW109)PY-CNB101PY-FEB101 (*3)
7,8
CB7 and CB8 (*5)
PY-SWB102(PG-SW111)PY-SWB103(PG-SW112)
9,10
PY-SWB101(PG-SW201) 7,8
*1: When installing a PY-SWB104 (PG-SW109) on CB1 or CB2, set the transmission speed at the down link port of PY-SWB104 (PG-SW109) to 1 Gbps. For details on how to configure the settings, refer to the corresponding hardware manual.*2: Only BX920 S3, BX924 S3 and BX924 S4 are supported as server blades, when mounting PY-CNB101 on CB1 and CB2.*3: Only BX920 S3 and BX924 S3 are supported as server blades, when using PY-FEB101.*4: A LAN expansion card is mounted in expansion slot 1.*5: A LAN expansion card is mounted in expansion slot 2.*6: Configure a virtual network automatically on a virtual interface configured beforehand in a redundant configuration using individualphysical network adapters. Configure the virtual interface on the managed server using one of following products beforehand.
- Intel PROSet
- PRIMECLUSTER GLS for Windows
Table C.13 Default Blade Server Configuration for Network Auto-Configuration (for PRIMERGY BX400 S1Chassis)
Server BladeSpecification of Uplink Port
(Location of LAN Switch Blade)LAN Switch Blade to Use
Physical NetworkAdapter Number (*5)
BX920 S2BX920 S3BX922 S2BX924 S3BX924 S4
CB1 and CB2 (*1), or no specification for uplinkport
PY-SWB102(PG-SW111)PY-SWB103(PG-SW112)
3,7
PY-SWB101(PG-SW201)PY-SWB104(PG-SW109) (*2)PY-CNB101 (*3)PY-FEB101 (*4)
2,6
CB3 and CB4
PY-SWB101(PG-SW201)PY-SWB102(PG-SW111)PY-SWB103(PG-SW112)PY-SWB104(PG-SW109)PY-CNB101PY-FEB101 (*4)
9,10
- 238 -

Server BladeSpecification of Uplink Port
(Location of LAN Switch Blade)LAN Switch Blade to Use
Physical NetworkAdapter Number (*5)
BX924 S2
CB1 and CB2 (*1), or no specification for uplinkport
PY-SWB101(PG-SW201)PY-SWB102(PG-SW111)PY-SWB103(PG-SW112)PY-SWB104(PG-SW109)
2,4
CB3 and CB4
PY-SWB101(PG-SW201)PY-SWB102(PG-SW111)PY-SWB103(PG-SW112)PY-SWB104(PG-SW109)PY-CNB101PY-FEB101 (*4)
7,8
*1: The same LAN switch blade model should be mounted in CB1 and CB2.*2: When installing a PY-SWB104 (PG-SW109) on CB1 or CB2, set the transmission speed at the down link port of PY-SWB104 (PG-SW109) to 1 Gbps. For details on how to configure the settings, refer to the corresponding hardware manual.*3: Only BX920 S3, BX924 S3 and BX924 S4 are supported as server blades, when mounting PY-CNB101 on CB1 and CB2.*4: Only BX920 S3 and BX924 S3 are supported as server blades, when using PY-FEB101.*5: Configure a virtual network automatically on a virtual interface configured beforehand in a redundant configuration using individualphysical network adapters. Configure the virtual interface on the managed server using one of following products beforehand.
- Intel PROSet
- PRIMECLUSTER GLS for Windows
Table C.14 Default Blade Server Configuration for Network Auto-Configuration (for PRIMERGY BX600 S3Chassis)
Server BladeSpecification of Uplink Port
(Location of LAN Switch Blade)LAN Switch Blade
to UsePhysical Network
Adapter Number (*)
BX600 seriesservers
NET1 and NET2, or no specification for uplink port PG-SW107 3,4
NET3 and NET4 PG-SW104 7,8
* Note: Configure a virtual network automatically on a virtual interface configured beforehand in a redundant configuration using individualphysical network adapters. Configure the virtual interface on the managed server using one of following products beforehand.
- Intel PROSet
- PRIMECLUSTER GLS for Windows
The numbers of physical network adapters given above can be checked on the details window of the LAN switch blade.
The MAC address (IP address) information of managed servers can be confirmed in [Hardware Maintenance] on the [Resource Details]tab.
Configure the Intel PROSet or PRIMECLUSTER GLS settings on the managed server in advance, using this MAC address information.
When the LAN switch blade is in IBP mode, create a virtual network on the virtual interface configured beforehand in the redundantconfiguration using the same physical network adapter as in the case of "no specification for uplink port" in the list above.
Performing the following procedure enables automatic network configuration using an arbitrary physical NIC.
1. Create a server NIC definition and reflect it on Resource Orchestrator.
a. Create a server NIC definition
Edit the template file and create a server NIC definition.
b. Reflect the server NIC definition
Execute the rcxadm nicdefctl commit command to reflect the physical NIC configuration specified in the server NIC definitionfile on Resource Orchestrator.
- 239 -
c. Confirm the reflected server NIC definition
Execute the rcxadm nicdefctl show command and confirm the server NIC definition has been reflected on ResourceOrchestrator.
2. Create a network resource.
- From the GUI:
a. In the ROR console orchestration tree, right-click the network pool to create a network resource in, and select [CreateNetwork Resource].When creating a new network resource, select [New].When creating a resource using an already registered admin LAN subnet, select [Using existing admin subnet].
b. In the [Create a network resource] dialog, clear the [Use configured virtual switches.] checkbox.
c. In the [Create a Network Resource] dialog, select "Settings" in "Physical LAN Segment".
d. In the [Physical LAN segment settings] dialog, select the physical LAN segment specified in PhysicalLANSegment nameof the server NIC definition.
- From the Command-line:
a. Create the XML file that defines network resources.Specify the physical LAN segment name that was specified for "PhysicalLANSegment name" in the server NIC definitionfile for "PhysicalLANSegment" in the XML file that defines network resources.In this case, specify auto="true" in the Network element.
b. Create a network resource.Execute the rcxadm network create command specifying the XML file created in step a.
See
- For details on the server NIC definitions, refer to "15.12 Server NIC Definition" in the "Reference Guide (Command/XML) CE".
- For details on the nicdefctl command, refer to "5.15 rcxadm nicdefctl" in the "Reference Guide (Command/XML) CE".
- For details on how to define network resources, refer to "15.5 Network Resources" in the "Reference Guide (Command/XML) CE".
- For details on the rcxadm network command, refer to "3.9 rcxadm network" in the "Reference Guide (Command/XML) CE".
Note
- If there are VM hosts that meet all of the following conditions, automation of network configuration is not supported in the chassis.
- Network resources with uplink ports specified are used
- There is a virtual network that uses a NIC in a VM host configuration pattern that differs from the ones supporting automation ofnetwork configuration
- If there are VM hosts that meet all of the following conditions, automation of network configuration is not supported.
- Network resources with no uplink port specified are used
- There is a virtual network that uses a NIC in a VM host configuration pattern that differs from the ones supporting automation ofnetwork configuration
In the diagram, the default blade server configurations as described in the following configuration example when using a PRIMERGYBX900 S1 chassis are shown.
Table C.15 Configuration Example 1
Server blades BX920 S2
Specification of uplink port CB1 and CB2
- 240 -
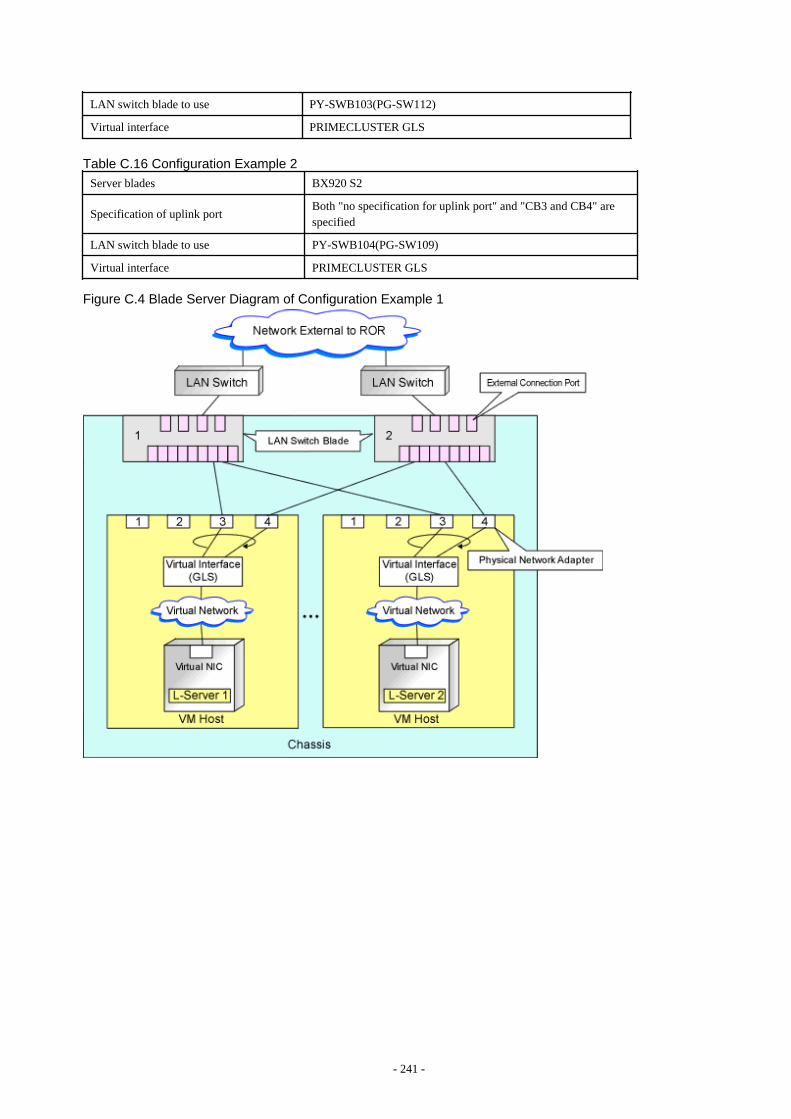
LAN switch blade to use PY-SWB103(PG-SW112)
Virtual interface PRIMECLUSTER GLS
Table C.16 Configuration Example 2
Server blades BX920 S2
Specification of uplink portBoth "no specification for uplink port" and "CB3 and CB4" arespecified
LAN switch blade to use PY-SWB104(PG-SW109)
Virtual interface PRIMECLUSTER GLS
Figure C.4 Blade Server Diagram of Configuration Example 1
- 241 -
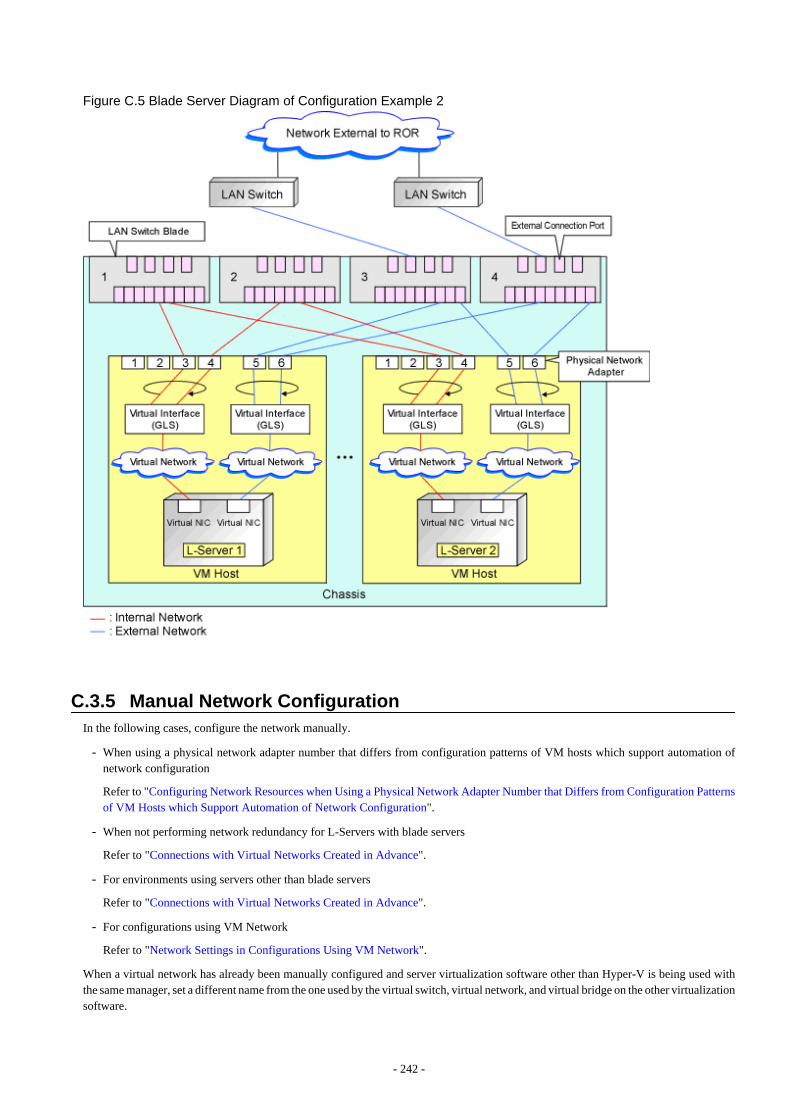
Figure C.5 Blade Server Diagram of Configuration Example 2
C.3.5 Manual Network ConfigurationIn the following cases, configure the network manually.
- When using a physical network adapter number that differs from configuration patterns of VM hosts which support automation ofnetwork configuration
Refer to "Configuring Network Resources when Using a Physical Network Adapter Number that Differs from Configuration Patternsof VM Hosts which Support Automation of Network Configuration".
- When not performing network redundancy for L-Servers with blade servers
Refer to "Connections with Virtual Networks Created in Advance".
- For environments using servers other than blade servers
Refer to "Connections with Virtual Networks Created in Advance".
- For configurations using VM Network
Refer to "Network Settings in Configurations Using VM Network".
When a virtual network has already been manually configured and server virtualization software other than Hyper-V is being used withthe same manager, set a different name from the one used by the virtual switch, virtual network, and virtual bridge on the other virtualizationsoftware.
- 242 -

Configuring Network Resources when Using a Physical Network Adapter Number that Differs fromConfiguration Patterns of VM Hosts which Support Automation of Network Configuration
When using a physical network adapter number that is different from the one used in the configuration patterns mentioned above, createnetworks using the following procedure.
1. Create a virtual network with the same name (including upper and lower case characters) for all VM hosts comprising the cluster.
This enables migration of VM guests between VM hosts. When using System Center 2012 Virtual Machine Manager or later asVM management software, only "External" can be used for the type of virtual network which is the connection destination for theVM guest.For details on how to create networks, refer to the SCVMM help.
2. Configure LAN switches to enable communication using the tagged VLAN between virtual networks using the same name.
Right-click the target LAN switch in the server resource tree on the ROR console, and select [Modify]-[Network Settings] from thepopup menu.
The [VLAN Settings] dialog is displayed.
3. Configure a VLAN.
4. Define supported virtual networks and VLAN IDs in the following definition file:
Installation_folder\SVROR\Manager\etc\customize_data\vnetwork_hyperv.rcxprop
For details on definition file format, refer to "File Format for Virtual Network Definitions".
5. Create Network Resources
- From the GUI:
a. In the [Create a network resource] dialog containing the VLAN ID that was specified in steps 2 and 4, uncheck the [Useconfigured virtual switches.] checkbox and create a network resource.
- From the Command-line:
a. Create the XML file that defines network resources.
Define the VLAN ID specified in steps 2 to 4 in the XML file.
In this case, specify auto="false" in the Network element.
b. To create the network resource, execute the rcxadm network create command specifying the XML file created in step a.
The network resources are created.
See
- For details on how to configure VLAN settings of LAN switch blade uplink ports, refer to "5.4.4 Configuring VLANs on LAN SwitchBlades" in the "User's Guide for Infrastructure Administrators (Resource Management) CE".
- For details on the Network element and creation of XML files that define network resources, refer to "15.5 Network Resources" inthe "Reference Guide (Command/XML) CE".
- For details on the rcxadm network command, refer to "3.9 rcxadm network" in the "Reference Guide (Command/XML) CE".
- 243 -
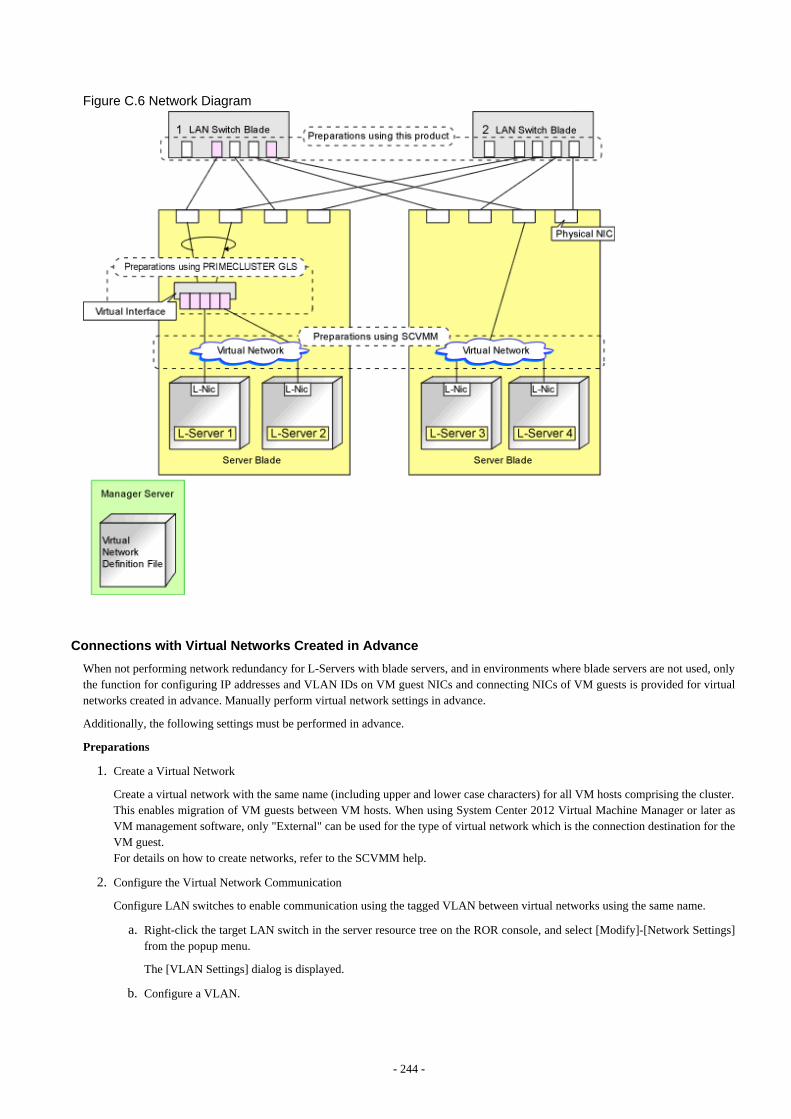
Figure C.6 Network Diagram
Connections with Virtual Networks Created in Advance
When not performing network redundancy for L-Servers with blade servers, and in environments where blade servers are not used, onlythe function for configuring IP addresses and VLAN IDs on VM guest NICs and connecting NICs of VM guests is provided for virtualnetworks created in advance. Manually perform virtual network settings in advance.
Additionally, the following settings must be performed in advance.
Preparations
1. Create a Virtual Network
Create a virtual network with the same name (including upper and lower case characters) for all VM hosts comprising the cluster.This enables migration of VM guests between VM hosts. When using System Center 2012 Virtual Machine Manager or later asVM management software, only "External" can be used for the type of virtual network which is the connection destination for theVM guest.For details on how to create networks, refer to the SCVMM help.
2. Configure the Virtual Network Communication
Configure LAN switches to enable communication using the tagged VLAN between virtual networks using the same name.
a. Right-click the target LAN switch in the server resource tree on the ROR console, and select [Modify]-[Network Settings]from the popup menu.
The [VLAN Settings] dialog is displayed.
b. Configure a VLAN.
- 244 -
3. Define the Supported Virtual Network and VLAN ID
Supported virtual networks and VLAN IDs are defined in the following definition file of Resource Orchestrator:
Installation_folder\SVROR\Manager\etc\customize_data\vnetwork_hyperv.rcxprop
For details on definition file format, refer to "File Format for Virtual Network Definitions".
4. Create Network Resources
- From the GUI:
In the [Create a network resource] dialog containing the VLAN ID that was specified in steps 2 and 3, uncheck the [Useconfigured virtual switches.] checkbox and create a network resource.
- From the Command-line:
a. Create the XML file that defines network resources.
Define the VLAN ID specified in steps 2 to 3 in the XML file.In this case, specify auto="false" in the Network element.
b. To create the network resource, execute the rcxadm network create command specifying the XML file created in step a.
The network resources are created.
See
- For details on how to configure VLAN settings of LAN switch blade uplink ports, refer to "5.4.4 Configuring VLANs on LAN SwitchBlades" in the "User's Guide for Infrastructure Administrators (Resource Management) CE".
- For details on the rcxadm network command, refer to "3.9 rcxadm network" in the "Reference Guide (Command/XML) CE".
Virtual NIC Automatic Configuration for VM Guests
Configure a VLAN on the virtual NIC of the VM guest, and connect with the virtual network.
If an image is specified, the IP address is automatically configured. For details on how to configure IP addresses automatically, refer to"Network (NIC)" of "16.3.1 [General] Tab" in the "User's Guide for Infrastructure Administrators (Resource Management) CE".
For rack mount or tower servers, an example of virtual NIC configuration and connection with virtual networks using network resourcesis given below:
- 245 -
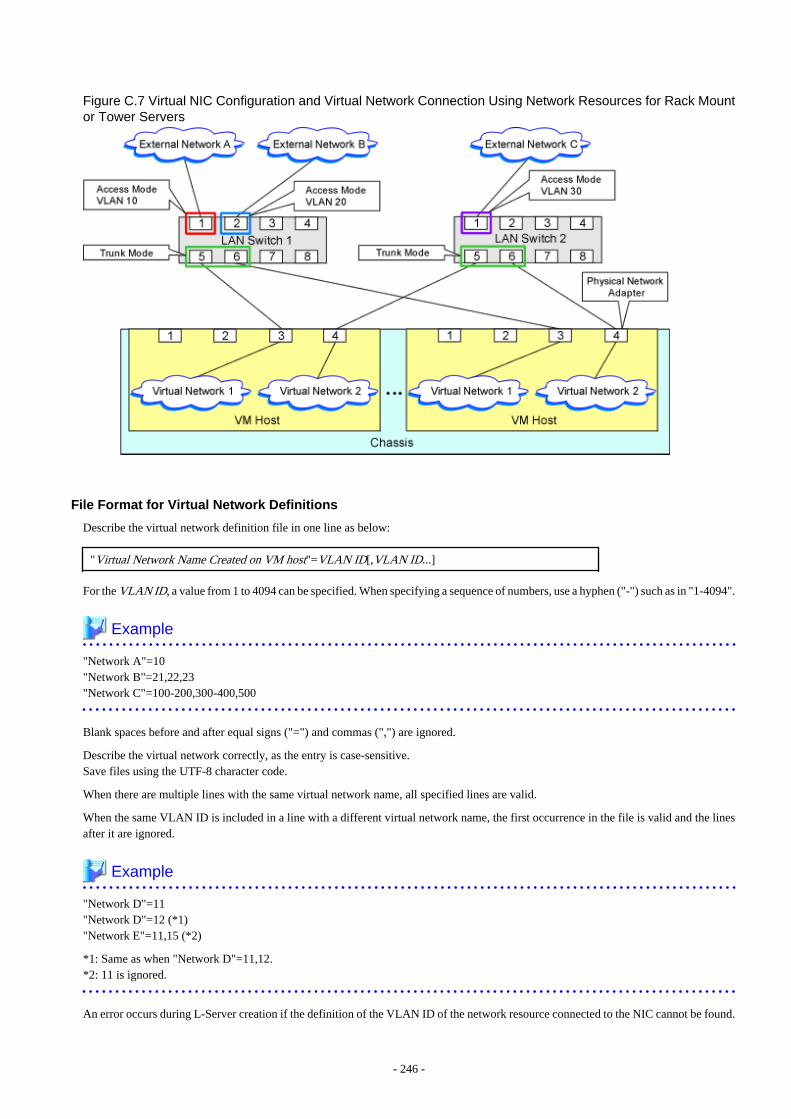
Figure C.7 Virtual NIC Configuration and Virtual Network Connection Using Network Resources for Rack Mountor Tower Servers
File Format for Virtual Network Definitions
Describe the virtual network definition file in one line as below:
"Virtual Network Name Created on VM host"=VLAN ID[,VLAN ID...]
For the VLAN ID, a value from 1 to 4094 can be specified. When specifying a sequence of numbers, use a hyphen ("-") such as in "1-4094".
Example
"Network A"=10"Network B"=21,22,23"Network C"=100-200,300-400,500
Blank spaces before and after equal signs ("=") and commas (",") are ignored.
Describe the virtual network correctly, as the entry is case-sensitive.Save files using the UTF-8 character code.
When there are multiple lines with the same virtual network name, all specified lines are valid.
When the same VLAN ID is included in a line with a different virtual network name, the first occurrence in the file is valid and the linesafter it are ignored.
Example
"Network D"=11"Network D"=12 (*1)"Network E"=11,15 (*2)
*1: Same as when "Network D"=11,12.*2: 11 is ignored.
An error occurs during L-Server creation if the definition of the VLAN ID of the network resource connected to the NIC cannot be found.
- 246 -
Configuration for MAC Address Pools
In the case System Center 2012 Virtual Machine Manager or later, in order to allocate a MAC address to the NIC when creating an L-Server connected to the NIC coordinating with SCVMM, use MAC address pools for SCVMM.
When not changing the default MAC address pool on SCVMM, or only one MAC address pool exists for a Hyper-V environment, usethat MAC address pool.
When there is no MAC address pool for a Hyper-V environment on SCVMM, create a MAC address pool to allocate MAC addressesusing SCVMM.
When there are multiple MAC address pools on SCVMM, use the following procedure to define the MAC address pool to use.
1. Settings When Using Tenants in Resource Orchestrator
When creating multiple host groups on SCVMM, use the following procedure to use the same tenant configurations as that of thehost group.
1. Create the same number of tenants as the number of host groups in Resource Orchestrator.
2. Register the VM host located in each host group in the local pool of the corresponding tenant.
2. Definition of a MAC Address Pool Using an L-Server
Define the MAC address pool to use when creating an L-Server in the MAC address pool definition file in Resource Orchestrator.
When dividing MAC address pools for each tenant created in step 1., define the MAC address pool used in each tenant in the MACaddress definition file.
When creating multiple host groups in SCVMM, create a definition for each tenant, and specify the MAC address pool allocatedto the host group.
For details on the definition file format for MAC address pools, refer to "Definition File Format for MAC Address Pools".
Definition File Format for MAC Address Pools
Location of the Definition File
[Windows Manager]Installation_folder\SVROR\Manager\etc\customize_data
Definition File Name
The definition file name can be used by dividing it into definitions that are available for each tenant and definitions that are commonto the system.
If both a definition file for each tenant and a common definition file exist on the system, priority is given to the definitions indicatedin the definition file for each tenant.
- By Tenant
scvmm_mac_pool_tenant_name.rcxprop
- Common on System
scvmm_mac_pool.rcxprop
Character Code
UTF-8
Line Break Code
CR/LF
Definition Configuration File Format
Key = Value
- 247 -

Table C.17 Definition File ItemsItem Description
Key - When one SCVMM is registered
all
- When multiple SCVMMs are registered
scvmm[SCVMM registered name]
Value Specify the name of a MAC address pool created in SCVMM.
When the MAC address pool name being specified includes blank spaces, enclose the MAC address pool namein double quotes ( " ).
For details on the character types available for MAC address pools, refer to the SCVMM manual.
Example
- When only one SCVMM is registered, or when multiple SCVMMs are registered and the MAC address pool names used in eachSCVMM are the same
all = "MAC pool A"
- When multiple SCVMMs are registered, and different MAC address pool names are used for each SCVMM
scvmm[scvmm1] = "MAC pool A"scvmm[scvmm2] = "MAC pool B"
Note
- When the VM management software to use is System Center Virtual Machine Manager 2008 R2, it is ignored even if the definitionfiles exist.
- If you edit and save a UTF-8 text file using Windows Notepad, the Byte Order Mark (BOM) is stored in the first three bytes of thefile, and the information specified on the first line of the file will not be analyzed correctly. When using Notepad, specify the informationfrom the second line.
- More than one blank spaces or tabs at the beginning and end of the line, and before and after equal signs ("=").
- When a line starts with "#", that line is regarded as a comment.
- The details of lines that are not based on the format above are ignored.
- Only lower case is valid for "all", "scvmm[registration_name_of_SCVMM]", and "scvmm" used for keys. If upper case charactersare included, the string is ignored.
- When the same key exists in the line, the definitions described last in the line are valid.
- When both the "all" key and "scvmm[registration_name_of_SCVMM]" key exist together, priority is given to the definitions for"scvmm[registration_name_of_SCVMM]".
- The definition file configurations are reflected without restarting the manager in Resource Orchestrator.
Network Settings in Configurations Using VM Network
For configurations using VM Network, a function of System Center 2012 Virtual Machine Manager(hereinafter SCVMM) SP1 or later,the function for connecting a VM Network configured in advance with a virtual L-Server is provided.
Perform the following preconfiguration:
- 248 -
1. Create a logical network on SCVMM.
The logical network can be used only for a VLAN-based configuration.In the logical network, create a network site depending on the VLAN ID to be used.For details on how to create networks, refer to the SCVMM help.
2. Configure the virtual switch on the host that is the management target
Configure a logical switch or standard virtual switch for which the logical network created in step 1. can be used.For details on how to configure switches, refer to the SCVMM or Windows help.
3. Create the VM Network using the logical network configured in step 1. on SCVMM.
Ensure the VLAN ID is specified using this VM Network, and do not perform automatic allocation of VLAN IDs.For details on how to create networks, refer to the SCVMM help.
4. Define the relation between the VM Network and the VLAN ID in the following definition file of the ROR manager.
Installation_folder\SVROR\Manager\etc\customize_data\vnetwork_hyperv.rcxprop
For details on definition file format, refer to "File Format for Virtual Network Definitions (Configuration Using VM Network)".
5. Create Network Resources
- From the GUI:
In the [Create a network resource] dialog containing the VLAN ID that was specified in step 4., uncheck the [Use configuredvirtual switches.] checkbox and create a network resource.
- From the Command-line:
a. Create the XML file that defines network resources.
Define the VLAN ID specified in steps 2 to 4 in the XML file.In this case, specify auto="false" in the Network element.
b. To create the network resource, execute the rcxadm network create command specifying the XML file created in step a.
The network resources are created.
See
- For details on how to configure VLAN settings of LAN switch blade uplink ports, refer to "5.4.4 Configuring VLANs on LAN SwitchBlades" in the "User's Guide for Infrastructure Administrators (Resource Management) CE".
- For details on the rcxadm network command, refer to "3.9 rcxadm network" in the "Reference Guide (Command/XML) CE".
File Format for Virtual Network Definitions (Configuration Using VM Network)
Definition File Format
The definition file is entered in the following format.
"VLAN network name (Standard virtual switch name)"=VLAN ID[,VLAN ID]
[VM Networks]"VM Network Name"= VLAN ID
Example
"Network A"=10"Network B"=21,22,23"Network C"=100-200,300-400,500[VM Networks]"vm network" = 100
- 249 -

For the VLAN ID, a value from 1 to 4094 can be specified. When specifying a sequence of numbers, use a hyphen ("-") such as in"1-4094".
Blank spaces before and after equal signs ("=") and commas (",") are ignored.
Describe the virtual network correctly, as the entry is case-sensitive.
Save files using the UTF-8 character code.
When there are multiple lines with the same virtual network name, all specified lines are valid.
When the same VLAN ID is included in a line with a different virtual network name, the first occurrence in the file is valid and thelines after it are ignored.
When the same VLAN ID is included in a line with a different VM Network name, the first occurrence in the file is used and the linesafter it are ignored.
When the same VLAN ID is included in the virtual network name and the VM Network name, the VM Network name is valid.
Even if there is a blank space before [VM Networks], it is ignored.
When the VM management software is an earlier version than SCVMM2012 SP1, the VM Network name is ignored even if it isspecified.
C.3.6 Creating L-Server TemplatesThis chapter explains how to create an L-Server template.
L-Server templates can be created using the following methods.
- Using the Wizard GUI
L-Server templates can be created using the wizard GUI in the wizard format.
For details on the GUI in the wizard format, refer to "15.1 Operations Using the Wizard GUI" in the "User's Guide for InfrastructureAdministrators (Resource Management) CE".
- Manually
Use the following procedure to create an L-Server template:
1. Export an L-Server Template
The sample L-Server templates provided with Resource Orchestrator can be exported.
Refer to "15.2.1 Export" in the "User's Guide for Infrastructure Administrators (Resource Management) CE".
2. Edit an L-Server Template
The L-Server template output in step 1 can be edited with an editor, etc.
For details on the L-Server templates for virtual L-Servers, refer to "15.2.2 Virtual L-Server Templates" in the "Reference Guide(Command/XML) CE".
3. Import an L-Server Template
Refer to "15.2.3 Import" in the "User's Guide for Infrastructure Administrators (Resource Management) CE".
C.3.7 L-Server CreationUse the following procedure to create L-Servers:
- Create an L-Server using an L-Server template
- When there are no cloning images, or when not using cloning images which have been already registered
1. Create an L-Server, referring to "16.1 Creation Using an L-Server Template" in the "User's Guide for InfrastructureAdministrators (Resource Management) CE". When creating the L-Server, select [None] for images.
In this case, the created L-Server may not be displayed in the orchestration tree.For details, refer to "Note- When the created L-Server is not displayed in the orchestration tree".For details on the created VM guests or cloning images, refer to "Information- Information created during L-Server creation".
- 250 -
2. Install an OS, referring to "Manual OS Installation".
3. When collecting cloning images after creating an L-Server, the cloning images are stored in the image pool. When collectingcloning images, refer to "C.3.8 Collecting and Deleting Cloning Images".
- When using an existing cloning image
Create an L-Server, referring to "16.1 Creation Using an L-Server Template" in the "User's Guide for Infrastructure Administrators(Resource Management) CE". In this case, specify the cloning image that you want to use as an image.
- Create an L-Server specifying individual specifications
Refer to "16.3 Creation of Virtual L-Servers Using Parameters" in the "User's Guide for Infrastructure Administrators (ResourceManagement) CE".
For details on the [OS] tab settings, refer to "C.3.9 [OS] Tab Configuration".
Note
When the created L-Server is not displayed in the orchestration tree
When using the following SCVMM functions for the VM of the created L-Server, after this, the L-Server will not be recognized or displayedin the orchestration tree, and operation of the L-Server becomes unavailable.
- Saving in the library, deploying from the library
- New template
- Transfer the template to a cluster node that is not managed by Resource Orchestrator
When "copying" is performed, the copied VM is not recognized as an L-Server.
Information
Information created during L-Server creation
- VM guests created as L-Servers have the following configuration:
Disk and DVD
First disk (system volume)
Connected to the primary channel (0) of IDE device
Second or later disk
Connected to a SCSI adapter as data disk (*)
DVD drive
Connected to the secondary channel (0) of IDE device
* Note: Cannot be used on guest OSs without the integrated service. Only boot disks connected to the IDE adapter can be used.
Virtual network adapter
When a guest OS that Hyper-V supports is specified, a converged network adapter will be used. When a different OS has beenselected, an emulated network adapter will be added.
For details on the guest OSs supported by Hyper-V, refer to the following Microsoft web site.
Microsoft download web site
URL: http://technet.microsoft.com/en-US/library/cc794868(v=ws.10).aspxURL: http://technet.microsoft.com/en-us/library/hh831531.aspx
- 251 -
CPU type
"1.00GHz Pentium III Xeon" or "3.60 GHz Xeon (2 MB L2 cache)" (the SCVMM default value) is specified. The CPU type isused for internal operations of SCVMM, and it does not indicate the CPU performance.
It is also different from the information displayed for the computer information of the guest OS.
- Using cloning images, collection or deployment of data disks other than system volumes can be selected.
When registering a template created using SCVMM in the image pool of Resource Orchestrator, use a template created from a VMguest that has the system volume (a disk connected to primary channel (0) of the IDE device).
In other configurations, deploying using Resource Orchestrator will create VM guests without system volumes.
Manual OS Installation
Manually install an OS, after configuring the DVD connection settings from the SCVMM management window.
To use a guest OS supported by Microsoft on Hyper-V, it is necessary to install a virtual guest service on the guest OS.
For details on virtual guest service installation, refer to the Help of SCVMM.
C.3.8 Collecting and Deleting Cloning ImagesThis section explains how to collect and delete cloning images.
Collecting Cloning Images
Use the following procedure to collect cloning images:After installing an OS, stop the target L-Server.
1. Right-click the target L-Server in the orchestration tree, and select [Cloning]-[Collect] from the popup menu.
2. Click <OK>.
A given cloning image (identified by its name attribute) can be managed by image version.
If a cloning image is created using VM management software, it can be used as is.
Note
- If an L-Server is created with a specified Windows image, when deploying the image use Sysprep, provided by Microsoft, toreconfigure the properties unique to the server. By executing Sysprep, the user information and OS setting information are reset.For details on Sysprep, refer to the information provided by Microsoft.
- If stopping or restarting of the manager is performed during execution of Sysprep, the operation being executed will be performedafter the manager is started.Until the process being executed is completed, do not operate the target resource.
- When using MAK license authentication for activation for the following OSs, Sysprep can be executed a maximum of three times.
- Microsoft(R) Windows Server(R) 2008 R2
- Microsoft(R) Windows Server(R) 2008
- Microsoft(R) Windows(R) 7
- Microsoft(R) Windows Vista(R)
Since Sysprep is executed when creating L-Server with images specified or when collecting cloning images, collection of cloningimages and creation of L-Servers with images specified cannot be performed more than four times. Therefore, it is recommended notto collect cloning images from L-Servers that have had cloning images deployed, but to collect them from a dedicated master server.The number is also included in the count when Sysprep is performed when a template is created using SCVMM.
- 252 -
- Creation of L-Servers by specifying cloning images on which Windows 2000 Server and Windows 2000 Advanced Server are installedis not supported.
- When using System Center 2012 Virtual Machine Manager or later as VM management software, only cloning images with high-availability attributes can be used in Resource Orchestrator.
Point
Images are stored in the SCVMM library.
Specify a library that has sufficient disk space available to store the collected images.
When [Automatic selection] is specified in the [Collect a Cloning Image] dialog, selection is made from libraries registered with SCVMM,but collection of images may fail, as the available disk space of libraries is not managed by SCVMM.
Resource Orchestrator uses SCVMM templates for collection of images.
When collecting images from L-Servers, a template is created using a name with the version number added to the image name. Whenretrieving the template created by the user as an image, the template is treated as an image.
In order to collect images of L-Servers, a work area equal to the size of the disk (the system volume, all data disks, snapshot, andconfiguration definition file) of the target of L-Server creation is necessary. This work area is released, when collection of images iscomplete.
When collecting images, collecting only system volumes, or images including data disks can be selected.
In Resource Orchestrator, the virtual hard disk of the primary channel (0) of the IDE device is managed as the system volume.
DVD drives other than the secondary channel (0) of the IDE device are deleted. A DVD drive is added to the secondary IDE channel (0)even if there is no DVD drive in the image. If DVD drives other than this drive exist, they are deleted.
Collection of images cannot be collected, when there are snapshots. Collect images after deleting snapshots. When creating checkpointsfrom the SCVMM management console or creating snapshots from Hyper-V manager, collection of images will fail.
It fails in the collection of the cloning image until the merge processing of the Snapshot file is completed even if the Snapshot is deleted.Collect the cloning image after it waits for a while until the merge processing is completed.The merge processing works only in the state that the virtual L-Server stopped when the host of Hyper-V is Windows Server 2008 R2.
When retrieving SCVMM templates created by users using SCVMM, manage them as follows:
- The template name is the image name.
- The virtual hard disk of the primary channel (0) of the IDE device is managed as a system volume.
- When creating an L-Server using an image which contains data disks other than system volumes, creation of an L-Server includingdata disks or excluding data disks can be selected.
- When creating an L-Server from an image with no system volume, an L-Server with no system volume will be created.
- On L-Servers created by retrieving an image from a template where DVD drives are connected to somewhere other than the secondaryIDE channel (0), these DVD drives will be deleted.
- When L-Servers are created from an image retrieved from a template not connected to a DVD drive, the DVD drive will be added tothe secondary IDE channel (0).
Image collection of VM guest of Linux
In SCVMM since System Center 2012 SP1, OS cannot gather the image from the VM guest of Linux by the specification of SCVMM.Therefore, make the template on SCVMM referring to the procedure described in following URL. Register the made template in thisproduct as an image after that.
http://technet.microsoft.com/en-us/library/hh427282.aspx
However, it is necessary to meet all the following requirements to use the template made at this time with this product.
- 253 -
- Integration Services (ICs) is installed in the VM guest of Linux that becomes the making origin of the template.
- The Linux guest agent of SCVMM is introduced into the VM guest of Linux that becomes the making origin of the template.
- The high availability is set with the hardware organization of the template.
- [Create new Linux operating system customization settings] is selected from [Guest OS profile] by "Cofigure Operating System" ofthe template, and VM guest's OS is selected from the [Operating system].
Each parameter of L-Server cannot be customized by the L-Server creating that specifies the image of the VM guest of Linux.
Access Control Configuration File of Image Storage Location
By specifying unavailable library shared path names in the access control configuration file of the image storage destination in advance,cloning image storage destinations can be controlled based on user groups.
Storage Location of the Configuration File
[Windows Manager]Installation_folder\SVROR\Manager\etc\customize_data
Configuration File Name
The configuration files can be divided into definitions that are available for each user group and definitions that are common to thesystem. When there are both types of files, the limitations of both are valid.
- For User Groups
library_share_user group name_deny.conf
- Common on System
library_share_deny.conf
Configuration File Format
In the configuration file, library shared path names are entered on each line.
Library_shared_path_name
Example
An example configuration file is indicated below:
\\rcxvmm1.rcxvmmshv.local\MSSCVMMLibrary\\rcxvmm2.rcxvmmshv.local\lib
Deleting Cloning Images
Use the following procedure to delete cloning images:
1. Select the target image pool on the orchestration tree.
The [Resource List] tab is displayed.
2. Right-click the cloning image to be deleted, and select [Delete] from the popup menu.
3. Click <OK>.
The cloning image is deleted.
When SCVMM template creation requirements are not met, or configuration changes are performed outside Resource Orchestrator,collection of images may fail.
When deleting cloning images, the corresponding templates in the SCVMM library are deleted.
- 254 -

When deleting these templates, related files (such as .vhd and .vfd) will remain in the SCVMM library as only template definition filesare deleted.
When these related files are unnecessary, delete them individually from SCVMM.
Information
By creating the following setting file beforehand, when deleting cloning images, the related files that have no dependencies with othertemplates can be deleted at the same time.
Storage Location of the Configuration File
[Windows Manager]Installation_folder\SVROR\Manager\etc\vm
Configuration File Name
delete_image_all_files_scvmm
Configuration File Format
It is not necessary to describe content in the configuration file.
As in the case of deletion of related files from the SCVMM management console, only the related files are deleted from the SCVMMlibrary. The folder where the related files are stored will remain.
C.3.9 [OS] Tab ConfigurationEnter the parameters to set for the OS when creating the L-Server. This setting is valid only if an image is specified in the [General] tab.
The setting process is performed the first time the L-Server is started. If an image name is not specified, it is not necessary to enter allthese items.
Table C.18 List of Settings
Item
Windows
DescriptionNecessity of Entry
Values WhenOmitted
Host name/Computer name
Possible L-Server Name
Enter the host name or computer name.
Enter a character string beginning with an alphanumeric character andcontaining up to 15 alphanumeric characters and hyphens ("-").The string cannot be composed solely of numbers.
If this parameter is not specified, the L-Server name is converted and setas indicated above.If underscores ("_") or periods (".") are used in an L-Server name, theywill be replaced with hyphens ("-"), because these characters cannot beused for host names or computer names.
Domain name Possible WORKGROUP (*)
Enter the workgroup name. Settings for participation in a domain cannotbe made.The same workgroup name as the computer name cannot be specified.Enter a character string beginning with an alphabetical character andcontaining up to 15 alphanumeric characters, hyphens ("-"), and periods(".").Refer to the information provided by Microsoft about the character stringthat can be input to the workgroup name.
DNS search pathNot
Required
-Enter a list of domain names to use for DNS searching, using between 1and 32,767 characters. You can specify the same characters as the domainname.
- 255 -
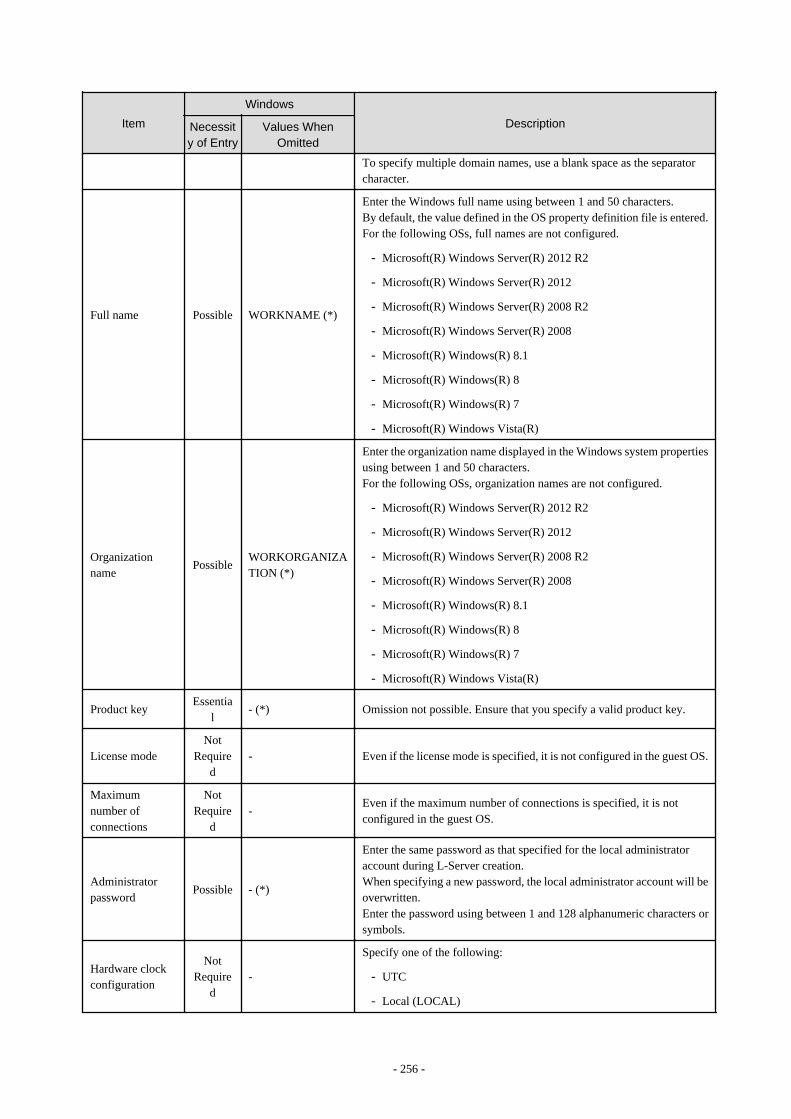
Item
Windows
DescriptionNecessity of Entry
Values WhenOmitted
To specify multiple domain names, use a blank space as the separatorcharacter.
Full name Possible WORKNAME (*)
Enter the Windows full name using between 1 and 50 characters.By default, the value defined in the OS property definition file is entered.For the following OSs, full names are not configured.
- Microsoft(R) Windows Server(R) 2012 R2
- Microsoft(R) Windows Server(R) 2012
- Microsoft(R) Windows Server(R) 2008 R2
- Microsoft(R) Windows Server(R) 2008
- Microsoft(R) Windows(R) 8.1
- Microsoft(R) Windows(R) 8
- Microsoft(R) Windows(R) 7
- Microsoft(R) Windows Vista(R)
Organizationname
PossibleWORKORGANIZATION (*)
Enter the organization name displayed in the Windows system propertiesusing between 1 and 50 characters.For the following OSs, organization names are not configured.
- Microsoft(R) Windows Server(R) 2012 R2
- Microsoft(R) Windows Server(R) 2012
- Microsoft(R) Windows Server(R) 2008 R2
- Microsoft(R) Windows Server(R) 2008
- Microsoft(R) Windows(R) 8.1
- Microsoft(R) Windows(R) 8
- Microsoft(R) Windows(R) 7
- Microsoft(R) Windows Vista(R)
Product keyEssentia
l- (*) Omission not possible. Ensure that you specify a valid product key.
License modeNot
Required
- Even if the license mode is specified, it is not configured in the guest OS.
Maximumnumber ofconnections
NotRequire
d-
Even if the maximum number of connections is specified, it is notconfigured in the guest OS.
Administratorpassword
Possible - (*)
Enter the same password as that specified for the local administratoraccount during L-Server creation.When specifying a new password, the local administrator account will beoverwritten.Enter the password using between 1 and 128 alphanumeric characters orsymbols.
Hardware clockconfiguration
NotRequire
d-
Specify one of the following:
- UTC
- Local (LOCAL)
- 256 -
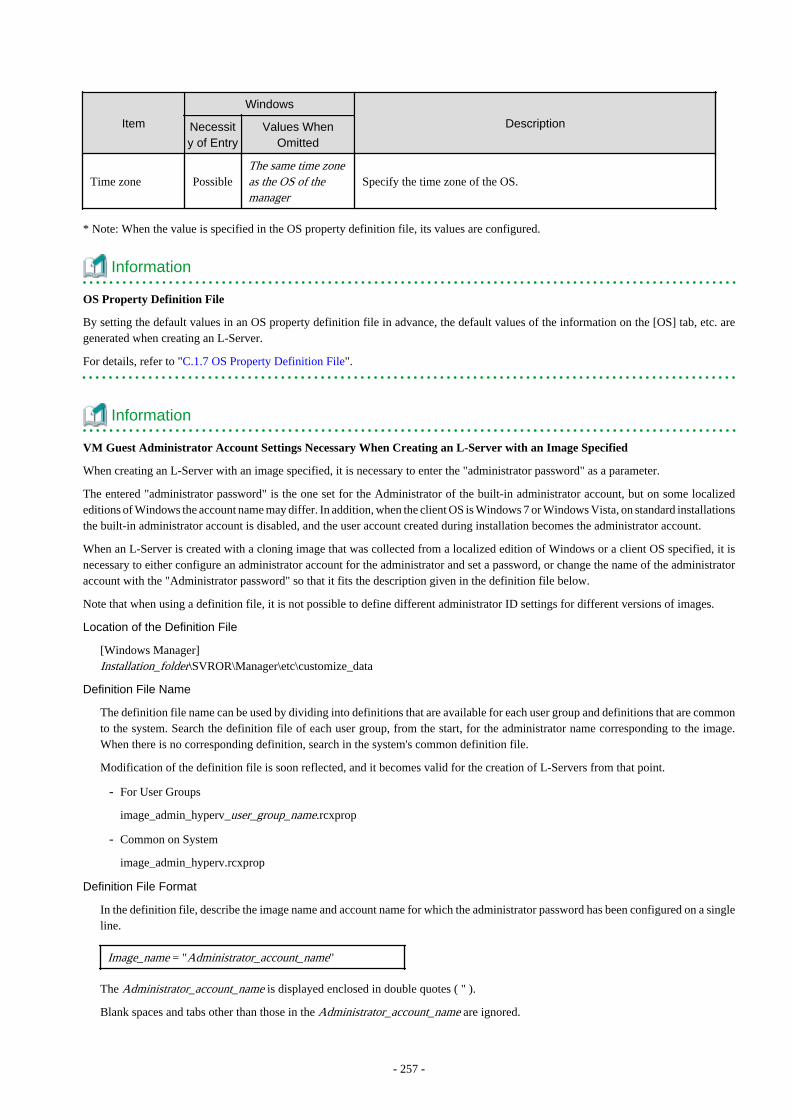
Item
Windows
DescriptionNecessity of Entry
Values WhenOmitted
Time zone PossibleThe same time zoneas the OS of themanager
Specify the time zone of the OS.
* Note: When the value is specified in the OS property definition file, its values are configured.
Information
OS Property Definition File
By setting the default values in an OS property definition file in advance, the default values of the information on the [OS] tab, etc. aregenerated when creating an L-Server.
For details, refer to "C.1.7 OS Property Definition File".
Information
VM Guest Administrator Account Settings Necessary When Creating an L-Server with an Image Specified
When creating an L-Server with an image specified, it is necessary to enter the "administrator password" as a parameter.
The entered "administrator password" is the one set for the Administrator of the built-in administrator account, but on some localizededitions of Windows the account name may differ. In addition, when the client OS is Windows 7 or Windows Vista, on standard installationsthe built-in administrator account is disabled, and the user account created during installation becomes the administrator account.
When an L-Server is created with a cloning image that was collected from a localized edition of Windows or a client OS specified, it isnecessary to either configure an administrator account for the administrator and set a password, or change the name of the administratoraccount with the "Administrator password" so that it fits the description given in the definition file below.
Note that when using a definition file, it is not possible to define different administrator ID settings for different versions of images.
Location of the Definition File
[Windows Manager]Installation_folder\SVROR\Manager\etc\customize_data
Definition File Name
The definition file name can be used by dividing into definitions that are available for each user group and definitions that are commonto the system. Search the definition file of each user group, from the start, for the administrator name corresponding to the image.When there is no corresponding definition, search in the system's common definition file.
Modification of the definition file is soon reflected, and it becomes valid for the creation of L-Servers from that point.
- For User Groups
image_admin_hyperv_user_group_name.rcxprop
- Common on System
image_admin_hyperv.rcxprop
Definition File Format
In the definition file, describe the image name and account name for which the administrator password has been configured on a singleline.
Image_name = "Administrator_account_name"
The Administrator_account_name is displayed enclosed in double quotes ( " ).
Blank spaces and tabs other than those in the Administrator_account_name are ignored.
- 257 -

It is possible to use an asterisk ("*") as a wildcard in image names. By specifying an asterisk ("*") it is possible to create substitutestrings for strings of indefinite length.
When creating an L-Server from an image, the corresponding image name is searched for from the start of the definition file, and thespecified "Administrator password" will be set for the specified administrator account name.
It is necessary to create the definition files using the following line break code and character codes:
- Line Break Code
CR+LF(0x0d0a)
- Character Code
Shift-JIS in a Japanese environment, UTF-8 in other environments
Example
An example definition file is indicated below.
- Image names and administrator account names are set in pairs.
FR_WIN2003_001 = "Administrator"EN_WIN7_001 = "root"EN_WIN7_002 = "admin"
- For image names that start with "FR_WIN", use "Administrator" as the name of the administrator account.
FR_WIN* = "Administrator"
- Use "Administrator" as the name of the administrator account for all images. When an image name is specified using only awildcard, the definition after that line will be ignored.
* = "Administrator"
C.3.10 Advisory Notes for Hyper-V UsageThis section explains advisory notes for Hyper-V usage.
Operating Systems for which Parameters can be Set and the Prerequisites for Performing the Settings
Depending on the server virtualization software used, some restrictions may apply to the operating systems that parameters can be set forand the prerequisites for performing the settings.For details, refer to the manual of server virtualization software.
VMware ESX Management
VMware ESX can be managed by SCVMM, but only VM host for Hyper-V can be managed when using SCVMM in Resource Orchestrator.
Management of Citrix(R) XenServer(R)
Citrix(R) XenServer(R) can be managed by Microsoft(R) System Center 2012 Virtual Machine Manager or later, but only VM hosts forHyper-V can be managed when using SCVMM.
Attaching and detaching of disks
- Data disks are connected to the L-Server as SCSI disks. They cannot be connected as IDE disks.
- 258 -
- 14 data disks are connected to the first SCSI card, and 15 data disks are connected to each of the second to fourth SCSI cards.
- When changing the configuration, a maximum of up to four disks can be specified at one time. To perform addition of five or moredisks, please perform an additional configuration change.
- Adding data disks while the L-Server is operating is possible except when additional SCSI cards become necessary.
Snapshot
The Resource Orchestrator snapshot uses the checkpoint function of SCVMM. To collect snapshots, sufficient free space is necessary tocreate a difference disk on the storage destination of VM guest.
When connecting the VM management software using the path through disk, snapshot creation will fail.
Operation with snapshots collected is not recommended due to the following reasons:
- When snapshots are collected, operation uses disk difference, and performance may deteriorate.
- If a snapshot is created from a VM guest that has been moved between servers (migration), and the snapshot is restored to a differentVM host, the status on SCVMM becomes "Stored" and the VM may not be able to be started. In this situation, it is necessary to returnthe VM guest to the VM host from which the snapshot was collected and then start it.
- For combining of difference disks, it is necessary to delete not only all snapshots collected using Resource Orchestrator, but also allcheckpoints created using VM management software. Combining of the disk is automatically performed by SCVMM, but dependingon the status of the VM guest, the operation may take a long time, because it is only performed while the target VM guest is stopped.
Information
The snapshot function provided by server virtualization software records the disk from the last update. Consequently, when a disk failureoccurs, the snapshot function becomes unavailable at the same time.Snapshot can be used as a corrective measure for problems such as the following:
Example
- For recovery when a problems occurs with the applied patch
- For recovery when a problem occurs when changing operating system parameters
L-Server Parameter Details [General] Tab
When a guest OS that Hyper-V supports is specified for the OS type, a converged network adapter will be added to VM.
When another OS has been selected, an emulated network adapter will be added.
When using a converged network adapter, it is necessary to install a virtual guest service on the guest OS.
For details on virtual guest service installation, refer to the Help of SCVMM.
L-Server Parameter Details [Server] Tab
If an unsupported OS type is specified, there is a chance that installation may fail or the OS of the VM guest may not operate correctly.Additionally, if an incorrect OS type is specified, there is a chance that image collection or L-Server creation for a specified image mayfail, and a guest OS may start but hang while awaiting entry. This occurs because Microsoft's Sysprep cannot be processed correctly duringpersonalization processing.
The OS types displayed in the list are the guest OSs which can be specified on the SCVMM management console.
Resource Orchestrator displays all guest OSs in the list in order not to limit user selection, however this does not mean that all guest OSsare supported by SCVMM.
- 259 -
Hyper-V does not support some server type settings such as number of CPUs depending on the OS type. When an incorrect OS type andserver type are selected, operation is not guaranteed.
Additionally, even when a service pack is not listed in the OS type list, it may be necessary to install the service pack.
When a guest OS that Hyper-V supports is specified for the OS type, a converged network adapter will be added to VM.When a different OS has been selected, an emulated network adapter will be added.
Creation of L-Servers by specifying cloning images on which Windows 2000 Server and Windows 2000 Advanced Server are installedis not supported.
For details on the guest OSs supported by SCVMM, refer to the Help of SCVMM.For details on the guest OSs supported by Hyper-V, refer to the following Microsoft web site.
Microsoft download web site
URL: http://technet.microsoft.com/en-US/library/cc794868(v=ws.10).aspxURL: http://technet.microsoft.com/en-us/library/hh831531.aspx
L-Server Parameter Details [Disk] Tab
When creating an L-Server or changing the configuration, a maximum of four disks can be specified at one time.
To perform addition of five or more disks, please perform an additional configuration change.
L-Server Parameter Details [Network] Tab
IP addresses can be automatically configured, on the following guest OSs on which the integrated services are installed.
- Microsoft(R) Windows Server(R) 2012 R2
- Microsoft(R) Windows Server(R) 2012
- Microsoft(R) Windows Server(R) 2008 R2
- Microsoft(R) Windows Server(R) 2008
- Microsoft(R) Windows Server(R) 2003 R2
- Microsoft(R) Windows Server(R) 2003
- Microsoft(R) Windows(R) 8.1
- Microsoft(R) Windows(R) 8
- Microsoft(R) Windows(R) 7
- Microsoft(R) Windows Vista(R)
- Microsoft(R) Windows(R) XP
DVD Disk Operations
DVD disk operations cannot be performed for L-Servers. When using a DVD, use VM management software functions.
Automatic Network Configuration with Intel PROSet for Blade Servers
- The VLAN functions of Intel PROSet are not supported by Resource Orchestrator. Do not use the VLAN functions of Intel PROSet.
- User Accounts used when logging in to the SCVMM server must belong to the Administrator's group of each managed server.
- 260 -
- With SCVMM, NIC information of a managed server recognized once is not updated even if the NIC information is changed.
When changing the Intel PROSet settings of a managed server, use the following procedure to make SCVMM re-realize the NICinformation:
1. Disable the virtual NIC of Intel PROSet using the Device Manager of the managed server (Hyper-V).
2. In the SCVMM management console of the admin server (SCVMM), right-click the target host, then select [Refresh].
3. Change the settings of Intel PROSet, and enable the virtual NIC using the Device Manager of the managed server (Hyper-V).
4. In the SCVMM management console of the admin server (SCVMM), right-click the target host, then select [Refresh].
If the information recognized by SCVMM is not reflected even after performing the above operations, follow the steps below to releaseand reconfigure Intel PROSet.
1. Cancel teaming settings for Intel PROSet on the managed server (Hyper-V).
2. In the SCVMM management console of the admin server (SCVMM), right-click the target host, then select [Refresh].
3. Reconfigure teaming settings for Intel PROSet on the managed server (Hyper-V).
4. In the SCVMM management console of the admin server (SCVMM), right-click the target host, then select [Refresh].
- When setting "ALB" for the teaming mode of Intel PROSet, disable the RLB (Receive Load Balancing) function. This configurationis not supported by Hyper-V.
- Do not disable NIC devices teamed using Intel PROSet.
Note
If this procedure is not performed correctly, automatic network configuration will fail.
Alive Monitoring Settings
In Resource Orchestrator, alive monitoring functions are enabled by using heartbeat function for Virtual machine resources on MSFC.
The default settings of heartbeat differ depending on the host OS versions. In Resource Orchestrator, if the alive monitoring settings arenot specified during creation of L-Servers, the heartbeat settings are disabled, regardless of the default settings.In order to enable the heartbeat function, enable the alive monitoring function of Resource Orchestrator first.
Information
When using the following OS, the MSFC functions corresponding to these settings are disabled.
- Microsoft(R) Windows Server(R) 2008 R2
When using the following OS, the MSFC functions corresponding to these settings are enabled.
- Microsoft(R) Windows Server(R) 2012 R2
- Microsoft(R) Windows Server(R) 2012
Default Library Server of SCVMM
Do not delete the default library server and library share of SCVMM because it is used as a temporary storage area when creating virtualL-Servers.Creating virtual L-Servers will fail if they are deleted.
C.3.11 OvercommitThis section explains the overcommit function for L-Servers.
- 261 -

Overcommit
Resource Orchestrator supports the Hyper-V overcommit function for the CPU and dynamic memory.
The Hyper-V overcommit function for the CPU allows virtual allocation of more resources than that of the actual CPU installed on a serverto a guest OS.
Hyper-V dynamic memory allows virtual allocation of more memory than that of the actual memory installed on a server to a guest OS.
Note
When using the dynamic memory or the memory weight, the VM host must be one of the following:
- Microsoft(R) Windows Server(R) 2008 R2 SP1 or later
- Microsoft(R) Windows Server(R) 2012 or later
SCVMM must be one of the following in order to be able to manage the target VM hosts:
- System Center Virtual Machine Manager 2008 R2 SP1 or later
- System Center 2012 Virtual Machine Manager or later
If there is no VM host or SCVMM as above, creation and modification of L-Servers with dynamic memory and memory weight enabledwill fail.
The guest OSs able to utilize dynamic memory are limited to particular Windows software versions. Refer to the Microsoft web site below.
URL: http://technet.microsoft.com/en-us/library/ff817651(WS.10).aspx
When the VM host is Windows Server 2012 or later, it is not possible to set it from this product though the minimum memory value existsas a setting of the dynamic memory.The same value as startup memory size is set.
Resource Orchestrator provides the following functions to utilize the Hyper-V overcommit function for the CPU and dynamic memorywhen creating L-Servers.
- Creating an L-Server with CPU overcommit and dynamic memory configured
- CPU Performance
The maximum number of CPU resources to be allocated to a virtual machine (Limitation)
- CPU Weight
The priority of CPU allocated to a virtual machine
- Memory Size
- Maximum Memory
The maximum amount of memory resources to be allocated to a virtual machine (Limitation)
- Virtual Machine Memory
The maximum amount of memory resources to be allocated to a virtual machine by the VM host (Memory Size)
For virtual L-Servers created using Resource Orchestrator, set the memory size as follows, depending on the dynamic memorysetting:
When Dynamic Memory is Disabled
Set only the virtual machine memory.
When Dynamic Memory is Enabled
Set only the maximum memory.
- 262 -
- Dynamic Memory
- Initial Memory Size
Initial memory size to be allocated at startup
- Memory Buffer
Available memory to be reserved for a virtual machine as a buffer
- Memory Weight
The priority of memory resources to be allocated to a virtual machine
- Setting an overcommit attribute for a resource pool
Overcommit attributes can be set for resource pools. An L-Server with overcommit attributes can be created using overcommitattributes settings or a resource pool.
- Deployment of L-Servers with more resources than those of the server
Creation of an L-Server with more resources than that of the actual CPU or memory installed on a server is possible.
Whether the resulting L-Server can be started depends on the resources available on the VM host.
- Calculation of available space on VM pools, which uses values set for CPU reservation performance
- Conversion of the free CPU capacity and free memory capacity of VM pools with overcommit attributes
For a VM pool with overcommit attributes, the conversion of free CPU capacity and free memory capacity can be displayed based onthe CPU reservation values and memory allocation capacity of an L-Server created beforehand.
- L-Server Conversion of a VM Pool with Overcommit Attributes
For the free CPU capacity and free memory capacity of a VM pool with overcommit attributes, L-Server conversion can be displayedbased on the CPU reservation values and memory reservation capacity specified in the L-Server template.
For details on L-Servers, refer to "2.2.3 L-Server" in the "Design Guide CE", "C.3.7 L-Server Creation", or "Chapter 16 Creating L-Servers" in the "User's Guide for Infrastructure Administrators (Resource Management) CE".
For details on resource pools, refer to "2.2.2 Resource Pools" in the "Design Guide CE", or "Chapter 20 Resource Pool Operations"in the "User's Guide for Infrastructure Administrators (Resource Management) CE".
For details on the available capacity view or the L-Server conversion view, refer to "20.6 Viewing" in the "User's Guide forInfrastructure Administrators (Resource Management) CE".
Prerequisites
Admin Server
When using the function for coordination with Resource Orchestrator, Hyper-V, or the overcommit function for the CPU and memory,the only supported admin server OS is Windows.
Installation Procedure
Use the following procedure to install overcommit.
1. Create a VM Pool for Overcommit
For details on how to create a VM pool, refer to "Chapter 20 Resource Pool Operations" in the "User's Guide for InfrastructureAdministrators (Resource Management) CE".
Point
Refer to the "Point" described in "1. Create a VM Pool for Overcommit" in "Installation Procedure" in "C.2.11 Overcommit".
- 263 -
Note
Refer to the "Note" described in "1. Create a VM Pool for Overcommit" in "Installation Procedure" in "C.2.11 Overcommit".
2. Create the Definition Files
Create a definition file (VM specific information definition file) when configuring different settings for individual user groupswithout configuring overcommit settings on the L-Server template.
For VM specific information definition files, refer to "C.1 Definition Files Commonly Shared when Creating Virtual L-Servers".
3. Export an L-Server Template
For details on how to export L-Server templates, refer to "15.2.1 Export" in the "User's Guide for Infrastructure Administrators(Resource Management) CE".
L-Server template operations (steps 3 to 5) can be performed using the GUI.
For details on how to operate L-Server templates using the GUI, refer to "15.1 Operations Using the Wizard GUI" in the "User'sGuide for Infrastructure Administrators (Resource Management) CE".
4. Edit an L-Server Template
Configure the overcommit settings for an L-Server template.
Edit the XML definition of L-Server templates, referring to "15.2.2 Virtual L-Server Templates" in the "Reference Guide (Command/XML) CE".
- When overcommit settings are configured in both the L-Server template and the VM specific information definition file
Priority is given to the settings in the L-Server template.
- When configuring individual values for overcommit using the VM specific information definition file
Configure only the following element on the L-Server template.
- Enabling/Disabling Overcommit
Do not specify the following elements:
- CPU Reservation Performance
- CPU Weight
- Initial Memory Size
- Memory Buffer
- Memory Weight
Information
If a template is imported without editing the L-Server template name, the content of the existing L-Server template is overwritten.If an L-Server template is imported after the name is edited from when it was exported, the L-Server template is added.
When editing an L-Server template, check the combination of enabling/disabling dynamic memory, initial memory size, and memorybuffer.
- When Dynamic Memory is Enabled
Initial memory size and memory buffer will be adopted when creating an L-Server
- When Dynamic Memory is Disabled
Initial memory size and memory buffer will be ignored when creating an L-Server
5. Import an L-Server Template
For details on how to import an L-Server template, refer to "15.2.3 Import" in the "User's Guide for Infrastructure Administrators(Resource Management) CE".
- 264 -
6. Create an L-Server
Create an L-Server using the L-Server template created in step 5.For details, refer to "16.1 Creation Using an L-Server Template" in the "User's Guide for Infrastructure Administrators (ResourceManagement) CE".
When not using an L-Server template, create an L-Server using a command. Edit the L-Server XML referring to "Chapter 16 CreatingL-Servers" in the "User's Guide for Infrastructure Administrators (Resource Management) CE", and then execute the rcxadm lservercreate command.
For details, refer to "3.6 rcxadm lserver" and "15.2.2 Virtual L-Server Templates" in the "Reference Guide (Command/XML) CE".
Point
When you create an L-Server which uses overcommit from the [Resource] Tab of the ROR console, specify a L-Server template.
7. Confirm the Overcommit Function Settings for an L-Server
To confirm overcommit settings configured for an L-Server, execute the rcxadm lserver show command.
Confirm that the command output result includes the line starting with "OverCommit: true".
Additionally, confirm the combination of the dynamic memory setting, initial memory size, and memory buffer.
For details on the rcxadm lserver command, refer to "3.6 rcxadm lserver" in the "Reference Guide (Command/XML) CE".
Note
When starting of an L-Server fails, the procedures vary depending on the L-Server settings. Perform the following procedures:
- When [Boot Location] of the L-Server is set to [Relocate at startup]
Start the L-Server again. When there is a VM host with an available resource, the L-Server will start on that VM host afterseveral attempts at startup.
- When [Boot Location] of the L-Server is set to [Fixed]
As no VM host is automatically selected, start the L-Server after changing its boot location, or moving or stopping other L-Servers on the same VM host.
For details on changing the boot location, refer to "16.3 Creation of Virtual L-Servers Using Parameters" in the "User's Guidefor Infrastructure Administrators (Resource Management) CE".For details on moving the boot location, refer to "17.7 Migration between VM Hosts" in the "User's Guide for InfrastructureAdministrators (Resource Management) CE".
Changing L-Server Specifications
This section explains how to modify L-Server specifications.
To change L-Server specifications, execute the rcxadm lserver modify command.
For details, refer to "3.6 rcxadm lserver" in the "Reference Guide (Command/XML) CE".
Note
Changing of L-Server specifications will fail if the resources (the number of CPUs, CPU frequency, and memory capacity) of a physicalserver where a VM host operates are less than the CPU reservation performance and memory size.
When CPU performance and memory capacity are smaller than the CPU reservation performance and memory reservation capacity,modification of L-Server specifications fails.
- 265 -
When modifying specifications of an L-Server to which resources have been allocated, the information in the VM specific informationdefinition file is not reflected because priority is given to the values already configured to the L-Server. In that case, enter the new valuesin the XML file and then execute the appropriate commands to reflect the changes.
C.4 RHEL5-XenThis section explains how to configure RHEL5-Xen as server virtualization software.
C.4.1 Creating Definition FilesThis section explains how to create definition files.
For definition files common to virtual L-Servers, refer to "C.1 Definition Files Commonly Shared when Creating Virtual L-Servers".
This section explains the definition files specific to RHEL5-Xen.
Storage Connection Definition Files
Give descriptions, separating the admin IP addresses of VM hosts belonging to the scope of PRIMECLUSTER GDS shared classes usingcommas, and giving the scopes of shared clusters on individual lines.
When changing the shared class configuration, modify the definition files.
Location of the Definition File
[Linux Manager]/etc/opt/FJSVrcvmr/customize_data
Definition File Name
storage_vmhost.rcxprop
Definition File Format
vmhost_ipaddr,vmhost_ipaddr,...
C.4.2 Registering Resources with Resource Orchestrator1. Register Storage Management Software
Register PRIMECLUSTER GDS on VM hosts as storage management software.
Register 1 of the VM hosts belonging to the scope of PRIMECLUSTER GDS shared classes. It is not necessary to register all VMhosts which belong to the scope.
When registering PRIMECLUSTER GDS as storage management software, single disks which were created in advance during pre-setup preparations, are automatically registered in Resource Orchestrator as virtual storage resources.
Execute the rcxadm storagemgr command to register storage management software.
For details on the rcxadm storagemgr command, refer to "5.17 rcxadm storagemgr" in the "Reference Guide (Command/XML)CE".
2. Register Managed Servers (Domain 0)
a. Register Managed Servers
Refer to "5.5.1 Registering Rack Mount or Tower Servers" in the "User's Guide for Infrastructure Administrators (ResourceManagement) CE".
b. Register LAN Switches
Refer to "5.13 Registering LAN Switches" in the "User's Guide for Infrastructure Administrators (Resource Management)CE".
- 266 -

C.4.3 Registering Resources in Resource Pools1. Register VM Host Resources (Domain 0)
a. In the ROR console orchestration tree, right-click the target VM pool, and select [Register Resources] from the popup menu.
The [Register Resources] dialog is displayed.
b. Select the VM host to register.
c. Click <OK>.
2. Register Virtual Storage Resources
a. In the ROR console orchestration tree, right-click the target storage pool, and select [Register Resources] from the popupmenu.
The [Register Resources] dialog is displayed.
b. Select the virtual storage resource to register.
c. Click <OK>.
3. Register Network Resources
If the NIC and network resources are connected when an L-Server is created, the settings matching the network resource definitionwill be registered automatically for the VM host that the L-Server will operate on.For details, refer to "C.4.4 Manual Network Configuration".
a. In the ROR console orchestration tree, right-click the target network pool, and select [Create Network Resource].
When creating a new network resource, select [New].
When creating a resource using an already registered admin LAN subnet, select [Using existing admin subnet].
The [Create a network resource] dialog is displayed.
b. Enter the items necessary for network resources.
For details, refer to "14.3 Network Resources" in the "User's Guide for Infrastructure Administrators (Resource Management)CE".
4. Register Network Device Resources
Create network devices to be used on the L-Platform and register those with the type Firewall or SLB in the network pool.
Refer to "14.4 Network Devices" in the "User's Guide for Infrastructure Administrators (Resource Management) CE".
5. Register Address Set Resources (MAC Addresses)
Create and register an address set resource (MAC address) in the address pool.
For details, refer to "14.6 Address Set Resources" in the "User's Guide for Infrastructure Administrators (Resource Management)CE".
C.4.4 Manual Network ConfigurationFor the virtual bridge created in advance, only provide the function for connection with the virtual bridge. Manually perform virtual bridgesettings in advance.
Use a different VLAN ID for each virtual bridge to connect with the virtual bridge.
Additionally, the following settings must be performed in advance.
1. Create a Virtual Bridge
Create a virtual bridge with the same name (including upper and lower case characters) for all VM hosts comprising the cluster.This enables migration of VM guests between VM hosts.
- 267 -
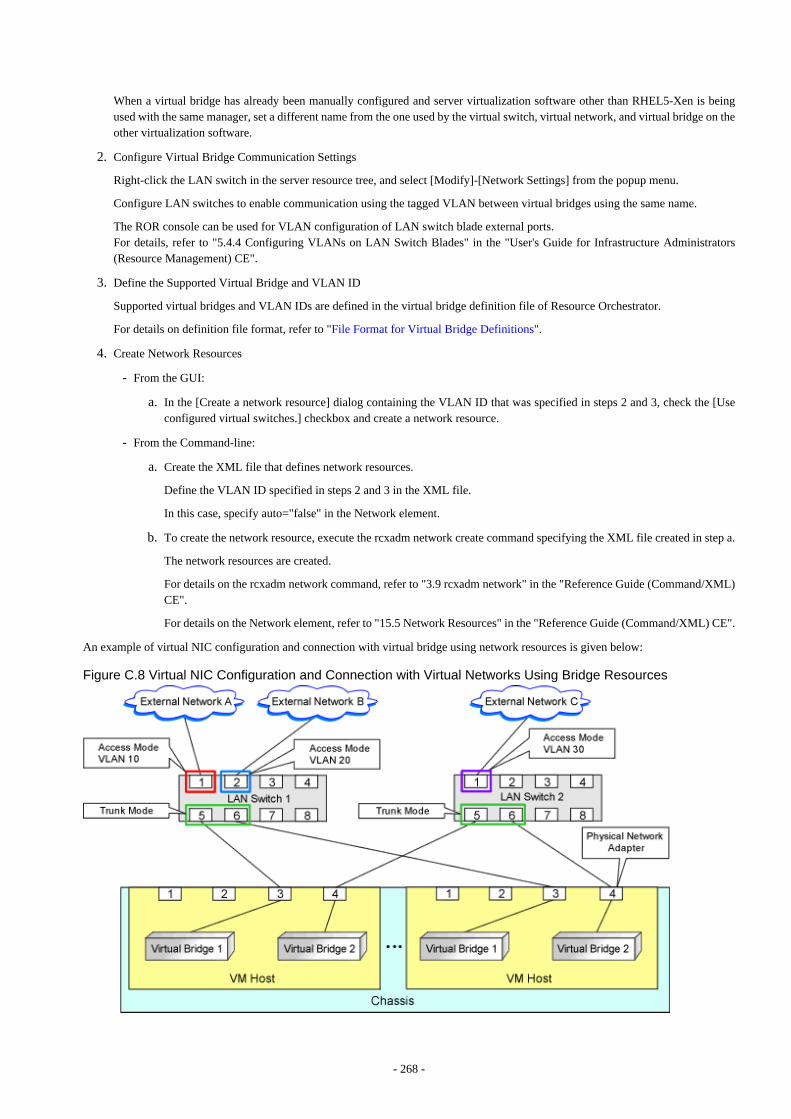
When a virtual bridge has already been manually configured and server virtualization software other than RHEL5-Xen is beingused with the same manager, set a different name from the one used by the virtual switch, virtual network, and virtual bridge on theother virtualization software.
2. Configure Virtual Bridge Communication Settings
Right-click the LAN switch in the server resource tree, and select [Modify]-[Network Settings] from the popup menu.
Configure LAN switches to enable communication using the tagged VLAN between virtual bridges using the same name.
The ROR console can be used for VLAN configuration of LAN switch blade external ports.For details, refer to "5.4.4 Configuring VLANs on LAN Switch Blades" in the "User's Guide for Infrastructure Administrators(Resource Management) CE".
3. Define the Supported Virtual Bridge and VLAN ID
Supported virtual bridges and VLAN IDs are defined in the virtual bridge definition file of Resource Orchestrator.
For details on definition file format, refer to "File Format for Virtual Bridge Definitions".
4. Create Network Resources
- From the GUI:
a. In the [Create a network resource] dialog containing the VLAN ID that was specified in steps 2 and 3, check the [Useconfigured virtual switches.] checkbox and create a network resource.
- From the Command-line:
a. Create the XML file that defines network resources.
Define the VLAN ID specified in steps 2 and 3 in the XML file.
In this case, specify auto="false" in the Network element.
b. To create the network resource, execute the rcxadm network create command specifying the XML file created in step a.
The network resources are created.
For details on the rcxadm network command, refer to "3.9 rcxadm network" in the "Reference Guide (Command/XML)CE".
For details on the Network element, refer to "15.5 Network Resources" in the "Reference Guide (Command/XML) CE".
An example of virtual NIC configuration and connection with virtual bridge using network resources is given below:
Figure C.8 Virtual NIC Configuration and Connection with Virtual Networks Using Bridge Resources
- 268 -

File Format for Virtual Bridge Definitions
Location of the Definition File
[Linux Manager]/etc/opt/FJSVrcvmr/customize_data
Definition File Name
vnetwork_rhelxen.rcxprop
Definition File Format
Describe the virtual bridge definition file in one line as below:
"Virtual_bridge_name Created on VM host"=VLAN ID
For the VLAN ID, a value from 1 to 4094 can be specified.
Example
"xenbr0"=10
Blank spaces before and after equal signs ("=") are ignored.
Describe the virtual bridge correctly, as the entry is case-sensitive.
Save files using the UTF-8 character code.
When there are multiple lines with the same virtual bridge name, all specified lines are valid.
When the same VLAN ID is included in a line with a different virtual bridge name, the first occurrence in the file is valid and the linesafter it are ignored.
An error occurs during L-Server creation if the definition of the VLAN ID of the network resource connected to the NIC cannot befound.
C.4.5 Creating L-Server TemplatesThis chapter explains how to create an L-Server template.
Create an L-Server using an L-Server template.
The L-Server is the L-Server to collect cloning images from.
L-Server templates can be created using the following methods.
- Using the Wizard GUI
L-Server templates can be created using the wizard GUI in the wizard format.
For details on the GUI in the wizard format, refer to "15.1 Operations Using the Wizard GUI" in the "User's Guide for InfrastructureAdministrators (Resource Management) CE".
- Manually
Use the following procedure to create an L-Server template:
1. Export an L-Server Template
Refer to "15.2.1 Export" in the "User's Guide for Infrastructure Administrators (Resource Management) CE".
2. Edit an L-Server Template
The L-Server template output in step 1 can be edited with an editor, etc.
For details on the XML definition of L-Server templates, refer to "15.2.2 Virtual L-Server Templates" in the "Reference Guide(Command/XML) CE".
- 269 -
In this case, perform the following configuration:
- Specify RHEL-Xen for the VM type.
- Specify "None" for the redundancy.
- Specify "Fixed" for the positioning.
3. Import an L-Server Template
Refer to "15.2.3 Import" in the "User's Guide for Infrastructure Administrators (Resource Management) CE".
C.4.6 L-Server CreationUse the following procedure to create L-Servers:
- Create an L-Server using an L-Server template.
1. Create an L-Server using an L-Server Template.
Execute the rcxadm lserver create command, and create an L-Server.For details on the rcxadm lserver create command, refer to "3.6 rcxadm lserver" in the "Reference Guide (Command/XML)CE".
In this case, perform the following configuration:
- For the name of an L-Server template, specify the name of the L-Server template that has been created in advance.
- For VM host, specify the VM host (admin OS) to allocate to the L-Server.
2. Install an OS
For manual OS installation, use the virtual machine manager.
For manual OS installation, refer to the "Red Hat Enterprise Linux 5 Virtualization Guide".
Red Hat Enterprise Linux 5 Virtualization Guide
URL: http://docs.redhat.com/docs/en-US/Red_Hat_Enterprise_Linux/5/html/Virtualization/index.html
3. Collect a Cloning Image
Collect cloning images after creating an L-Server. Execute rcxadm image create to collect cloning images.
When executing rcxadm image create, the cloning images are stored in the storage pool.
For details on the rcxadm image create command, refer to "4.1 rcxadm image" in the "Reference Guide (Command/XML) CE".
Point
When the destination folder for image storage is omitted during the cloning image collection, virtual storage in the same storagepool as the virtual storage used by the L-Server that is the target for collecting cloning images is automatically selected.
- Create an L-Server using Systemwalker Software Configuration Manager.For details, refer to the "Systemwalker Software Configuration Manager Operation Guide".
In this case, specify the cloning images collected during L-Server creation for images.
Note
When sharing disks among L-Servers, create the Nth L-Server, after completing creation of the Nth-1 L-Server.
When copying the data during the L-Server creation, perform the operation after powering off the L-Server that is the source of thedata to be copied. When creating an L-Server while copying data, do not perform power operations on the source of the data to becopied.
- 270 -

L-Server Operations
When using RHEL5-Xen, L-Server operations cannot be performed using the ROR console.Use the rcxadm lserver command, for L-Server operations.For details, refer to "3.6 rcxadm lserver" in the "Reference Guide (Command/XML) CE".
Changing L-Server Specifications
To change L-Server specifications, execute rcxadm lserver modify.For details on the specifications that can be changed, refer to "15.3.2 Definition Information for Virtual L-Servers (XML)" in the "ReferenceGuide (Command/XML) CE".
The value after changing the specifications can be checked in the [Resource List] tab in the orchestration tree.
From the command-line, execute rcxadm lserver list and rcxadm lserver show.For details, refer to "3.6 rcxadm lserver" in the "Reference Guide (Command/XML) CE".
Check the CAP value of a guest domain that is operating, using the virsh schedinfo command.
Check the CAP value of a guest domain that has been stopped, using the domain configuration files.
For details, refer to the "Red Hat Enterprise Linux 5 Virtualization Guide".
Red Hat Enterprise Linux 5 Virtualization Guide
URL: http://docs.redhat.com/docs/en-US/Red_Hat_Enterprise_Linux/5/html/Virtualization/index.html
The CAP value is calculated as follows:
CAP value = ((Specified_CPU_clock_speed GHz * 1000) * CPU_number * 100) / physical_CPU_clock_speed MHz
C.4.7 Advisory Notes for RHEL5-Xen UsageThis section explains advisory notes for RHEL5-Xen.
Required Software
When using RHEL5-Xen, Systemwalker Software Configuration Manager is required.
Admin Server
When using RHEL5-Xen as managed servers, the only supported OS of the admin server is Linux.
Managed Server
When using RHEL5-Xen as managed servers, the only server type available for use as managed servers is RHEL5-Xen.
L-Server OS
When using RHEL5-Xen as managed servers, the only OS supported for the L-Server is Linux.
Snapshot
When using RHEL5-Xen, snapshots cannot be used.
Collect L-Server snapshots using PRIMECLUSTER GDS.
The part of the virtual storage name before "-" is the PRIMECLUSTER GDS class name, and the part after "-" is the single disk name.
The disk resource name corresponds to the volume name.
- 271 -
For details on snapshots, refer to the PRIMECLUSTER GDS manual.
VM Type View
In the ROR console, the VM type of VM host and VM guest for RHEL5-Xen is displayed as "Xen".
Shared Disk View
On the ROR console, when multiple L-Servers have shared disk resources, only the information of one L-Server to which the resourcesare allocated is displayed.
Check the disk shared information, using the rcxadm disk show command.
Max. Number of Possible L-Servers View
The available space on resources and the space displayed for [the number of L-Servers that can be created] are calculated as follows:
Available Amount of CPUs and [Number of L-Servers that can be Created]
Total resource space * 80% - (Total of resources used for L-Server)
Attaching Resources
When attaching VM hosts, virtual storage or networks, perform the same procedure as in "C.4.2 Registering Resources with ResourceOrchestrator" or "C.4.3 Registering Resources in Resource Pools".
Hardware Maintenance
When server failure is detected on Systemwalker Software Configuration Manager, open the ROR console, and identify the failed server.For details on server hardware replacement, refer to "Chapter 9 Hardware Maintenance" in the "Operation Guide CE".
Directory for collecting performance information
When registering resources, create the directories and files on the server where the resources are registered that are necessary forperformance monitoring. Refer to "C.6.9 Advisory Notes for RHEL-KVM Usage" for details.
C.5 OVM for x86 2.2This section explains how to configure OVM for x86 2.2 as server virtualization software.
C.5.1 Creating Definition FilesThis section explains how to create definition files.
For definition files common to virtual L-Servers, refer to "C.1 Definition Files Commonly Shared when Creating Virtual L-Servers".
C.5.2 Registering Resources with Resource Orchestrator1. Register VM Management Software (Oracle VM Manager)
When registering VM management software, the storage repositories that were created in advance during pre-setup preparations,are automatically registered in Resource Orchestrator as virtual storage resources.
Use the following procedure to register VM management software:
- 272 -

a. In the ROR console, select [Settings]-[Register]-[Management Software (OVM Manager)].
The [Management Software (OVM Manager)] dialog is displayed.
b. Define the following settings:
Management software name
Enter the name of the target VM management software.
Enter a character string beginning with an alphabetical character and containing up to 15 alphanumeric characters andhyphens ("-").
Location
Select the location where the VM management software to register is operating.
- For Resource Orchestrator admin servers
Specify [Admin Server].
- For servers other than Resource Orchestrator admin servers
Specify [Other Server].
In the IP address entry field, enter the IP address of the server on which VM management software is operating.
"Admin Server" is selected by default.
IP address
Enter the IP address of VM management software. When specifying "Admin Server" for the location, entry is not possible,as the IP address of admin server remains displayed.Enter the IP address using periods ".".
User ID
Enter the user ID to use to control VM management software.The string must be composed of alphanumeric characters and symbols (ASCII characters 0x20 to 0x7e), and can be upto 128 characters long.Specify a user ID with administrative privileges.
Password
Enter the password for VM management software.The string must be composed of alphanumeric characters and symbols (ASCII characters 0x20 to 0x7e), and can be upto 128 characters long.
c. Click <OK>.
VM management software is registered.
2. Register Managed Servers (Domain 0)
a. Register Chassis (for Blade Servers)
Refer to "5.4.1 Registering Chassis" in the "User's Guide for Infrastructure Administrators (Resource Management) CE".
b. Register Managed Servers
Refer to "5.4.2 Registering Blade Servers" or "5.5.1 Registering Rack Mount or Tower Servers" in the "User's Guide forInfrastructure Administrators (Resource Management) CE".
c. Register LAN Switch Blades (for Blade Servers) or LAN Switches (for Rack Mount Servers)
Refer to "5.4.3 Registering LAN Switch Blades" and "5.13 Registering LAN Switches" in the "User's Guide for InfrastructureAdministrators (Resource Management) CE".
3. Network Resources
To register a network resource, specify a network pool when creating the network resource.
By creating network resources in advance, if the NIC and network resources are connected when an L-Server is created, the followingsettings matching the network resource definition will be registered automatically.
- 273 -
For details on automatic configuration of network resources, refer to "C.5.4 Manual Network Configuration".
C.5.3 Registering Resources in Resource Pools1. Register VM Host Resources (Domain 0)
a. In the ROR console orchestration tree, right-click the target VM pool, and select [Register Resources] from the popup menu.The [Register Resources] dialog is displayed.
b. Select the VM host to register.
c. Click <OK>.
2. Register Virtual Storage Resources
a. In the ROR console orchestration tree, right-click the target storage pool, and select [Register Resources] from the popupmenu.The [Register Resources] dialog is displayed.
b. Select the virtual storage resource to register.
c. Click <OK>.
3. Register Network Resources
If the NIC and network resources are connected when an L-Server is created, the settings matching the network resource definitionwill be registered automatically for the VM host that the L-Server will operate on.For details, refer to "C.5.4 Manual Network Configuration".
a. In the ROR console orchestration tree, right-click the target network pool, and select [Create Network Resource].
When creating a new network resource, select [New].
When creating a resource using an already registered admin LAN subnet, select [Using existing admin subnet].
The [Create a network resource] dialog is displayed.
b. Enter the items necessary for network resources.For details, refer to "14.3 Network Resources" in the "User's Guide for Infrastructure Administrators (Resource Management)CE".
4. Register Network Device Resources
Create network devices to be used on the L-Platform and register those with the type Firewall or SLB in the network pool.
Refer to "14.4 Network Devices" in the "User's Guide for Infrastructure Administrators (Resource Management) CE".
C.5.4 Manual Network ConfigurationFor the virtual bridge created in advance, only provide the function for connection with the virtual bridge. Manually perform virtual bridgesettings in advance.
Use a different VLAN ID for each virtual bridge to connect with the virtual bridge.
Additionally, the following settings must be performed in advance.
1. Create a virtual bridge
When configuring a cluster, create a virtual bridge with the same name (including upper and lower case characters) for all VM hostscomprising the cluster. This enables migration of VM guests between VM hosts.
When a virtual bridge has already been manually configured and server virtualization software other than OVM for x86 2.2 is beingused with the same manager, set a different name from the one used by the virtual switch, virtual network, and virtual bridge on theother virtualization software.
2. Configure Virtual Bridge Communication Settings
Right-click the LAN switch in the server resource tree, and select [Modify]-[Network Settings] from the popup menu.
- 274 -
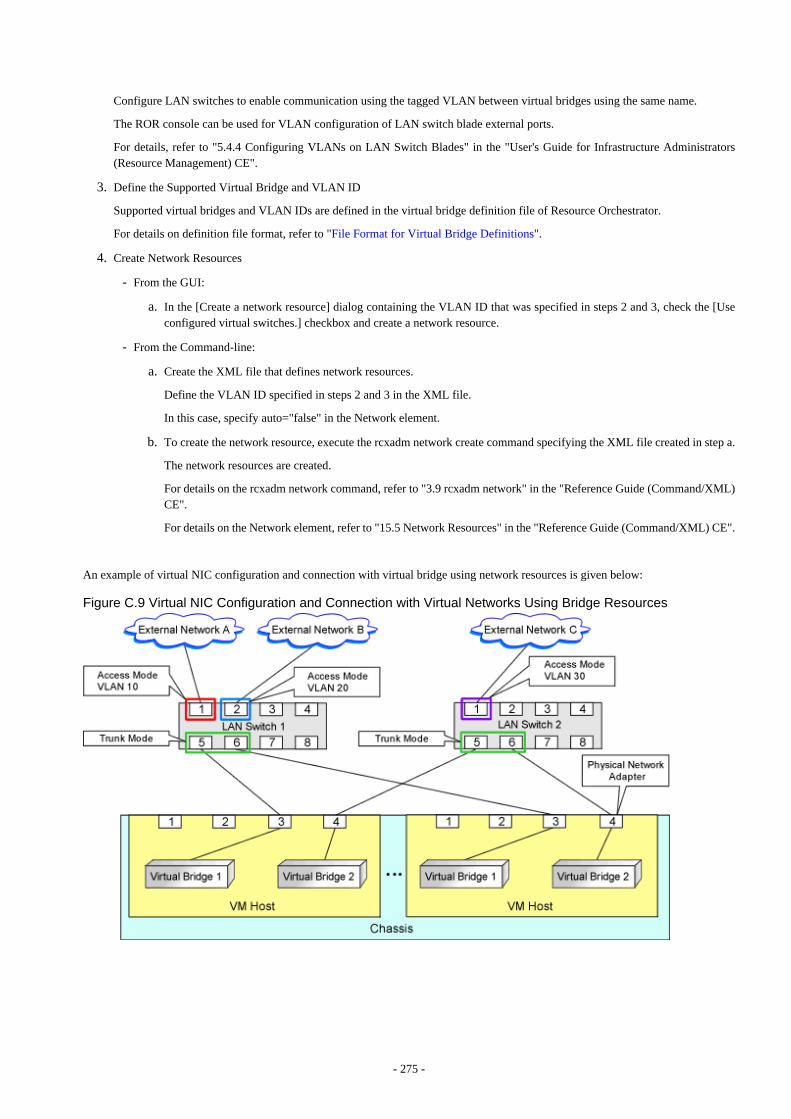
Configure LAN switches to enable communication using the tagged VLAN between virtual bridges using the same name.
The ROR console can be used for VLAN configuration of LAN switch blade external ports.
For details, refer to "5.4.4 Configuring VLANs on LAN Switch Blades" in the "User's Guide for Infrastructure Administrators(Resource Management) CE".
3. Define the Supported Virtual Bridge and VLAN ID
Supported virtual bridges and VLAN IDs are defined in the virtual bridge definition file of Resource Orchestrator.
For details on definition file format, refer to "File Format for Virtual Bridge Definitions".
4. Create Network Resources
- From the GUI:
a. In the [Create a network resource] dialog containing the VLAN ID that was specified in steps 2 and 3, check the [Useconfigured virtual switches.] checkbox and create a network resource.
- From the Command-line:
a. Create the XML file that defines network resources.
Define the VLAN ID specified in steps 2 and 3 in the XML file.
In this case, specify auto="false" in the Network element.
b. To create the network resource, execute the rcxadm network create command specifying the XML file created in step a.
The network resources are created.
For details on the rcxadm network command, refer to "3.9 rcxadm network" in the "Reference Guide (Command/XML)CE".
For details on the Network element, refer to "15.5 Network Resources" in the "Reference Guide (Command/XML) CE".
An example of virtual NIC configuration and connection with virtual bridge using network resources is given below:
Figure C.9 Virtual NIC Configuration and Connection with Virtual Networks Using Bridge Resources
- 275 -
File Format for Virtual Bridge Definitions
Location of the Definition File
[Windows Manager]Installation_folder\SVROR\Manager\etc\customize_data
[Linux Manager]/etc/opt/FJSVrcvmr/customize_data
Definition File Name
vnetwork_oraclevm.rcxprop
Definition File Format
Describe the virtual bridge definition file in one line as below:
"Virtual_bridge_name Created on VM host"=VLAN ID
For the VLAN ID, a value from 1 to 4094 can be specified.
Example
"xenbr0"=10
Blank spaces before and after equal signs ("=") are ignored.
Describe the virtual bridge correctly, as the entry is case-sensitive.
Save files using the UTF-8 character code.
When the same VLAN ID is included in a line with a different virtual bridge name, the first occurrence in the file is valid and the linesafter it are ignored.
Example
"xenbr4"=11"xenbr5"=11 (*)
* Note: This line is ignored.
An error occurs during L-Server creation if the definition of the VLAN ID of the network resource connected to the NIC cannot befound.
C.5.5 Creating L-Server Templates1. Export an L-Server Template
Refer to "15.2.1 Export" in the "User's Guide for Infrastructure Administrators (Resource Management) CE".
2. Edit an L-Server Template
Refer to "15.2.2 Editing" in the "User's Guide for Infrastructure Administrators (Resource Management) CE".
3. Import an L-Server Template
Refer to "15.2.3 Import" in the "User's Guide for Infrastructure Administrators (Resource Management) CE".
C.5.6 L-Server CreationUse the following procedure to create L-Servers:
- 276 -

1. Create an L-Server Using an L-Server Template
Create an L-Server, referring to "16.1 Creation Using an L-Server Template" in the "User's Guide for Infrastructure Administrators(Resource Management) CE".
In this case, specify the cloning image that you want to use as an image.
2. Create an L-Server Specifying Individual Specifications
Refer to "16.3 Creation of Virtual L-Servers Using Parameters" in the "User's Guide for Infrastructure Administrators (ResourceManagement) CE".
For details on the [OS] tab settings, refer to "C.5.8 [OS] Tab Configuration".
Manual OS Installation
To manually install an operating system, use VM management software.
When installing an OS manually, refer to the virtual machine creation section of the "Oracle VM Server User's Guide".
Refer to the relevant version of the document, referring to the following web site:
URL: http://www.oracle.com/technetwork/indexes/documentation/index.html
C.5.7 Collecting a Cloning ImageThis section explains how to collect cloning images.
Use the following procedure to collect cloning images:
After installing an OS, stop the target L-Server.
1. On the ROR console, right-click the target L-Server in the orchestration tree, and select [Cloning]-[Collect] from the popup menu.
2. Click <OK>.
A given cloning image (identified by its name attribute) can be managed by image version.
If a cloning image is created using VM management software, it can be used as is.
DVD Drive Configuration
The same DVD drive as the one in the image to be deployed is configured for the L-Server to be created. If there is no DVD drive in theimage, no DVD drive will be created on the L-Server.
C.5.8 [OS] Tab ConfigurationFor OVM for x86 2.2, the values specified in the [OS] tab are not set.
Instead, it is necessary to specify a console password in the OS property definition file.
OS Property Definition File
When creating a VM guest using Oracle VM Manager, specify a console password for connection from Oracle VM Manager to VM guestconsole. The console password should be specified in the OS definition file in advance. Use the UTF-8 character code for OS propertydefinition files.
Location of the Definition File
[Windows Manager]Installation_folder\SVROR\Manager\etc\customize_data
- 277 -
[Linux Manager]/etc/opt/FJSVrcvmr/customize_data
Definition File Name
The definition file name can be used by dividing into definitions that are available for each user group and definitions that are commonto the system. If the key of the definition file common to the system is the same as a definition file for a user group, priority is givento the values indicated in the definition file for the user group.
- For User Groups
os_setting_user_group_name.rcxprop
- Common on System
os_setting.rcxprop
Definition File Format
In the definition file, an item to define is entered on each line. Each line is entered in the following format.
Key = Value
When adding comments, start the line with a number sign ("#").
Definition File Items
Specify the following items in a definition file. Other key specifications will be ignored.
Table C.19 List of Items
Item Key Value Remarks
Console password console_password
The string must be composed ofalphanumeric characters andunderscores ("_"), and can be up to 24characters long.
Specify the passwordrequired to open the console.
Example Definition File
An example definition file is indicated below.
# group Aconsole_password = xxxxxxxx
C.5.9 Advisory Notes for OVM for x86 2.2 UsageThis section explains advisory notes for when using OVM for x86 2.2.
Operating Systems for which Parameters can be Set and the Prerequisites for Performing the Settings
Depending on the server virtualization software used, some restrictions may apply to the operating systems that parameters can be set forand the prerequisites for performing the settings.
For details, refer to the manual of server virtualization software.
VM Host Functions
VM Hosts that have no ability to provide virtual machine and virtual server functions cannot be registered in VM pools.
If those VM Hosts were registered, when a VM host specification used to create L-Servers is omitted, one of the VM host may be selectedas the operational VM host.
In this case, even if the VM host is registered in the VM pool, when it is selected to create an L-Server, creation will fail.
- 278 -
Snapshot
When using OVM for x86 2.2, snapshots cannot be used.
L-Server Creation
When creating L-Servers, set the destination VM host to the Preferred Server of a created VM guest.
L-Server Disk
Disks cannot be detached while they are powered ON.
L-Server Network (NIC)
One or more networks must be specified.
L-Server CPU Performance
For L-Server CPU performance, do not specify a value of less than 1GHz.
Moving an L-Server between Servers (Migration)
When performing migration with an L-Server powered on, after powering it off, the L-Server may be moved back to the previous server.
In this case, power off the L-Server before migration, and power it on again after moving it.
When the L-Server is an HVM (Hardware Virtualized Machine)
Installation of paravirtual drivers is required to connect data disks as SCSI disks.
If paravirtual drivers are not installed, the OS may fail to recognize the data disks.
SSL Access Method for VM Management Software
When starting VM management software from the management console, SSL-enabled URL or SSL-disabled URL can be specified as thedestination. In Oracle VM Manager configurations, if SSL is enabled for access to Oracle VM Manager, the following definition file isrequired: Use the UTF-8 character code for definition files.
Location of the Definition File
[Windows Manager]Installation_folder\SVROR\Manager\etc\customize_data
[Linux Manager]/etc/opt/FJSVrcvmr/customize_data
Definition File Name
ovmm.rcxprop
Definition File Format
The definition file is entered in the following format.
Key = Value
Definition File Items
Specify the following items in a definition file. Other key specifications will be ignored.
- 279 -

Table C.20 List of ItemsItem Key Value Remarks
Enable/DisableSSL
SSL
"vmm_ip[:port][,vmm_ip[:port]...]"
vmm_ip: IP address of SSL-enabled VMmanagement softwareport: Port number of SSL-enabled VM managementsoftware
If the port number is omitted, thedefault port number (4443) is set.
Example Definition File
An example definition file is indicated below.
# Oracle VM Managerssl = 192.168.2.2:4443,192.168.2.3:4443
Name and Number of Detected Virtual Storage Resources
Even if multiple storage repositories are connected to a VM host, only a single virtual storage resource is detected for each VM host.
The displayed name of virtual storage resources is the string of the VM host root repository, excluding the path name (/var/ovs/mount).
Example
D1567B83A58D41FEB28FB8897801C7ED
Virtual Storage Resource Free Space
When multiple storage repositories have been connected to the VM host, a storage repository that has the largest available space is displayedas the available space of the virtual storage resource.
Therefore, the space may not decrease in proportion to the virtual disk space created during L-Server creation.
Total Virtual Storage Resource Size
Not displayed.
Virtual Storage Resource Used Space
Not displayed.
Cloning Images Collected from L-Servers
Cloning images are stored in Oracle VM Manager, using the following template name:
"cloning_image_name[_index]@version_number"
However, in the template editor window of Oracle VM Manager, "@" cannot be included in the template name. When using Oracle VMManager to edit the template information collected using Resource Orchestrator, modify the template name so that it does not contain"@".
- 280 -
VM Host Status
Even when a VM host is running and the xend daemon is not running, "normal" is displayed as the status of the VM host. If L-Serveroperation fails when the VM host status is "normal", execute the following command from the VM host to check the status of the xenddaemon. If the xend daemon is not running, start it.
- Status Check for the xend Daemon
>service xend status <RETURN>
- Starting the xend Daemon
>service xend start <RETURN>
When Managing Multiple Server Pools Using Oracle VM Manager
When creating an L-Server, specify an image, VM host, or virtual storage that satisfies all of the following conditions:
- Belongs to the same server pool as the image and VM host
Check the server pool to which the image and the VM host belong using Oracle VM Manager
- Image
"Server Pool Name" in the "Virtual Machine Templates" list
- VM Host
"Server Pool Name" in the "Servers" list
When adding L-Server disks, it is necessary to specify a virtual storage which is recognized by the VM host for the disk to create.
The name of a virtual storage recognized by the VM host is the string of the root storage repository, excluding the path name (/var/ovs/mount). To check the root storage repository, log in to the VM host, then execute the following command:
# ls -l /OVS <RETURN>
Example
lrwxrwxrwx 1 root root 47 Apr 11 23:15 /OVS -> /var/ovs/mount/D1567B83A58D41FEB28FB8897801C7ED
C.6 RHEL-KVMThis section explains how to configure RHEL-KVM as server virtualization software.
C.6.1 Creating Definition FilesThis section explains how to create definition files.
For definition files common to virtual L-Servers, refer to "C.1 Definition Files Commonly Shared when Creating Virtual L-Servers".
Selecting Disk Data Type for Virtual L-Servers [KVM]
When performing the following operations for a virtual L-Server on RHEL-KVM, the data type to be deleted can be selected.
When the definition file has been edited, restart the manager.
- Deleting an L-Server
- Detaching L-Server Disks
- 281 -
- Deleting Cloning Images
Location of the Definition File
[Windows Manager]Installation_folder\SVROR\Manager\etc\customize_data
[Linux Manager]/etc/opt/FJSVrcvmr/customize_data
Definition File Name
storage.rcxprop
Definition File Format
In the definition file, the items to set are entered on individual lines. Each line is entered in the following format.
Specified item = Specifiedvalue
Definition File Items
CLEAN_VM_GUEST_DISK_RESOURCE
When performing the following operations for a virtual L-Server on RHEL-KVM, the data type to be deleted can be selected.
- Deleting an L-Server
- Detaching L-Server Disks
- Deleting Cloning Images
- When the following values are used for specified values.
- If "true" is specified
The data of disks is deleted.
- If "false" is specified
The data of disks is not deleted.
- If nothing is specified
"false" is set.
Example
An example definition file is indicated below.
CLEAN_VM_GUEST_DISK_RESOURCE = true
Note
When specifying "true" for the specified value, check the following advisory notes.
- Operations such as deleting virtual L-Servers on RHEL-KVM will take more time. Operation time changes depending on thenumber of disks and the disk size.
- When starting to delete disks, message 22502 is output in the event log.While deleting the disk data, the status of disk resource will be "unknown".When deletion of the data is complete, the message 22503 is output in the event log, and the status of disk resource changesto "normal".If the deletion of data fails, message 42504 is output in the event log. The status of disk resources will not be changed from"unknown".
- 282 -
Definition File that Configures Resource Sizes to Secure for VM Hosts [KVM]
To configure the size of the resources to be secured for VM hosts, set the values in the following definition file:
Location of the Definition File
[Windows Manager]Installation_folder\SVROR\Manager\etc\customize_data
[Linux Manager]/etc/opt/FJSVrcvmr/customize_data
Definition File Name
host_config_RHEL-KVM.rcxprop
Definition File Format
Specify the values separated by commas (",") as follows:
ALL, configuration scope, memory size, CPU capacity
Or
Configuration scope type, configuration scope, memory size, CPU capacity
Definition File Items
The items to specify are shown below.
- When specifying for the entire system
Item Description Remarks
ALL The identifier for specifying the entiresystem
Memory size The value
- Unit: GB
- Up to one decimal place
- 0 or larger
- Specification of the unit is notrequired.
CPU Capacity {Value}{Unit}
- Unit
- Percent: %
- Number of physical cores: core
- The value
- When using "%" as the unit
- Integer only
- 0 - 100
- When using "cores" as the unit
- Integer only
- 0 or larger
- Specification of the unit is required.
- When "%" is specified for the unit, 100% means the entire VM host.
The entire VM host here meansphysical CPU performance value x thenumber of physical CPU cores.
- When specifying the values by tenant, pool, or physical server
- Item Description Remarks
Configuration scopetype
The identifier for specifying the scope of configuration.
The following types can be specified:
- 283 -
- Item Description Remarks
- When specifying a tenant
TENANT
- When specifying a pool
POOL
- When specifying a physical server
PHYSICAL_SERVER
Configuration scope The following can be specified:
- When specifying a tenant
The tenant name including the resource folder name
- When specifying a pool
The pool name including the resource folder name and thetenant name
- When specifying a physical server
Physical server name
Memory size Set the value in the same way for setting the memory size of theentire system.
CPU Capacity Set the value in the same way for setting the CPU capacity of theentire system.
Example
An example definition file is indicated below.
ALL,3,10%
TENANT,/hoge_FLODER/HOGE_TENANT,4,20%
POOL,/hoge/VMPool,3,1core POOL,/TENANT_1/hoge_pool,,20%
PHYSICAL_SERVER,bx600_1,1 PHYSICAL_SERVER,bx900_1,4,3core
Note
- About Comment Lines
Lines starting with "#" are regarded as comment lines.
Lines consisting of only blank spaces (" "), tab symbols, and line breaks are also regarded as comment lines.
Comment lines are skipped.
- If there are duplicated definitions, the last occurrence will be used.
- A KVM host which has not been registered to a VM pool can be specified if the physical server has been specified.
- When not defining the memory size, do not define anything between commas (",").
- 284 -

Example
POOL,/VMPool,,3core
- When not defining the CPU capacity, do not enter anything at the corresponding part.
Example
POOL,/VMPool,1
C.6.2 Registering Resources with Resource Orchestrator
When Using Blade Servers
1. Register chassis
Refer to "5.4.1 Registering Chassis" in the "User's Guide for Infrastructure Administrators (Resource Management) CE".
2. Register Managed Servers (Hosts)
The procedure differs depending on the managed server to be used.
Refer to "5.4 When Using Blade Servers" in the "User's Guide for Infrastructure Administrators (Resource Management) CE".
3. Register LAN Switch Blades
Refer to "5.4.3 Registering LAN Switch Blades" in the "User's Guide for Infrastructure Administrators (Resource Management)CE".
To register a network device resource, specify a network pool when creating the network device resource.
To register a network resource, specify a network pool when creating the network resource.
Refer to "Chapter 5 Registering Resources" in the "User's Guide for Infrastructure Administrators (Resource Management) CE".
When Using Rack Mount or Tower Servers
1. Register Managed Servers (Hosts)
The procedure differs depending on the managed server to be used.
Refer to "5.5 When Using Rack Mount and Tower Servers" in the "User's Guide for Infrastructure Administrators (ResourceManagement) CE".
2. Register LAN Switches
Refer to "5.13 Registering LAN Switches" in the "User's Guide for Infrastructure Administrators (Resource Management) CE".
To register a network device resource, specify a network pool when creating the network device resource.
To register a network resource, specify a network pool when creating the network resource.
Refer to "Chapter 5 Registering Resources" in the "User's Guide for Infrastructure Administrators (Resource Management) CE".
When Using PRIMEQUEST Servers
1. Register Chassis
Refer to "5.8.1 Registering Chassis (For PRIMEQUEST Servers)" in the "User's Guide for Infrastructure Administrators (ResourceManagement) CE".
- 285 -
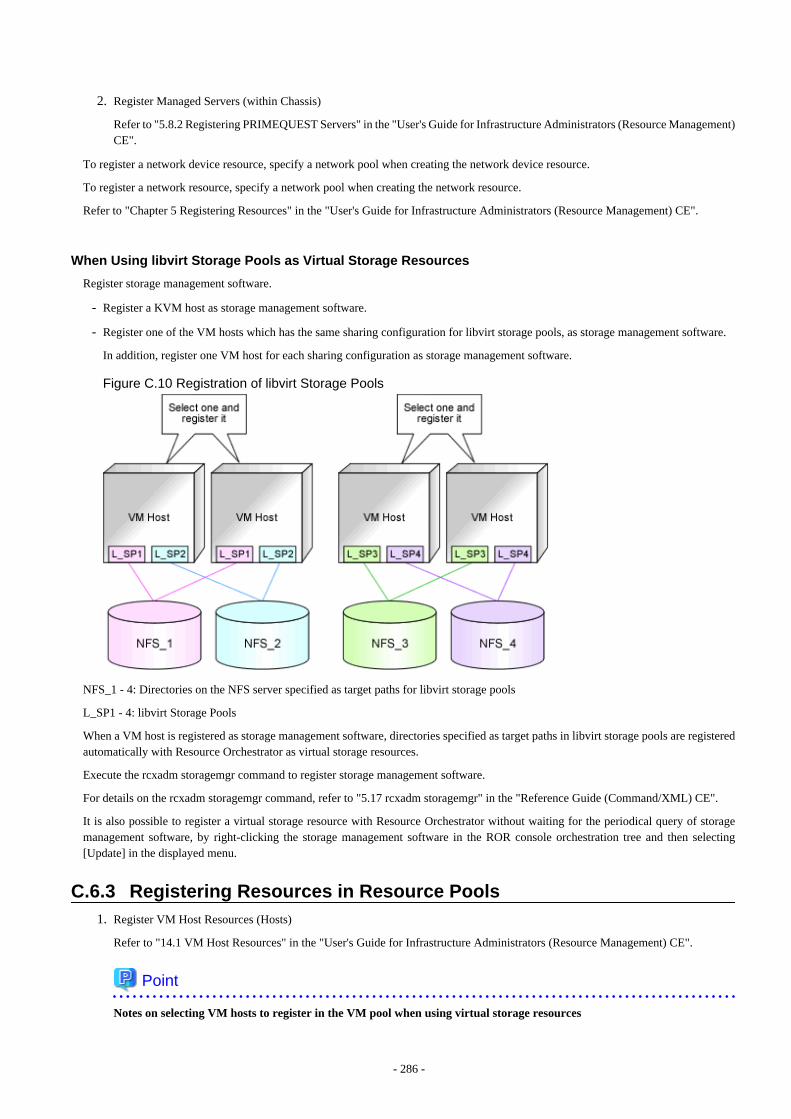
2. Register Managed Servers (within Chassis)
Refer to "5.8.2 Registering PRIMEQUEST Servers" in the "User's Guide for Infrastructure Administrators (Resource Management)CE".
To register a network device resource, specify a network pool when creating the network device resource.
To register a network resource, specify a network pool when creating the network resource.
Refer to "Chapter 5 Registering Resources" in the "User's Guide for Infrastructure Administrators (Resource Management) CE".
When Using libvirt Storage Pools as Virtual Storage Resources
Register storage management software.
- Register a KVM host as storage management software.
- Register one of the VM hosts which has the same sharing configuration for libvirt storage pools, as storage management software.
In addition, register one VM host for each sharing configuration as storage management software.
Figure C.10 Registration of libvirt Storage Pools
NFS_1 - 4: Directories on the NFS server specified as target paths for libvirt storage pools
L_SP1 - 4: libvirt Storage Pools
When a VM host is registered as storage management software, directories specified as target paths in libvirt storage pools are registeredautomatically with Resource Orchestrator as virtual storage resources.
Execute the rcxadm storagemgr command to register storage management software.
For details on the rcxadm storagemgr command, refer to "5.17 rcxadm storagemgr" in the "Reference Guide (Command/XML) CE".
It is also possible to register a virtual storage resource with Resource Orchestrator without waiting for the periodical query of storagemanagement software, by right-clicking the storage management software in the ROR console orchestration tree and then selecting[Update] in the displayed menu.
C.6.3 Registering Resources in Resource Pools1. Register VM Host Resources (Hosts)
Refer to "14.1 VM Host Resources" in the "User's Guide for Infrastructure Administrators (Resource Management) CE".
Point
Notes on selecting VM hosts to register in the VM pool when using virtual storage resources
- 286 -
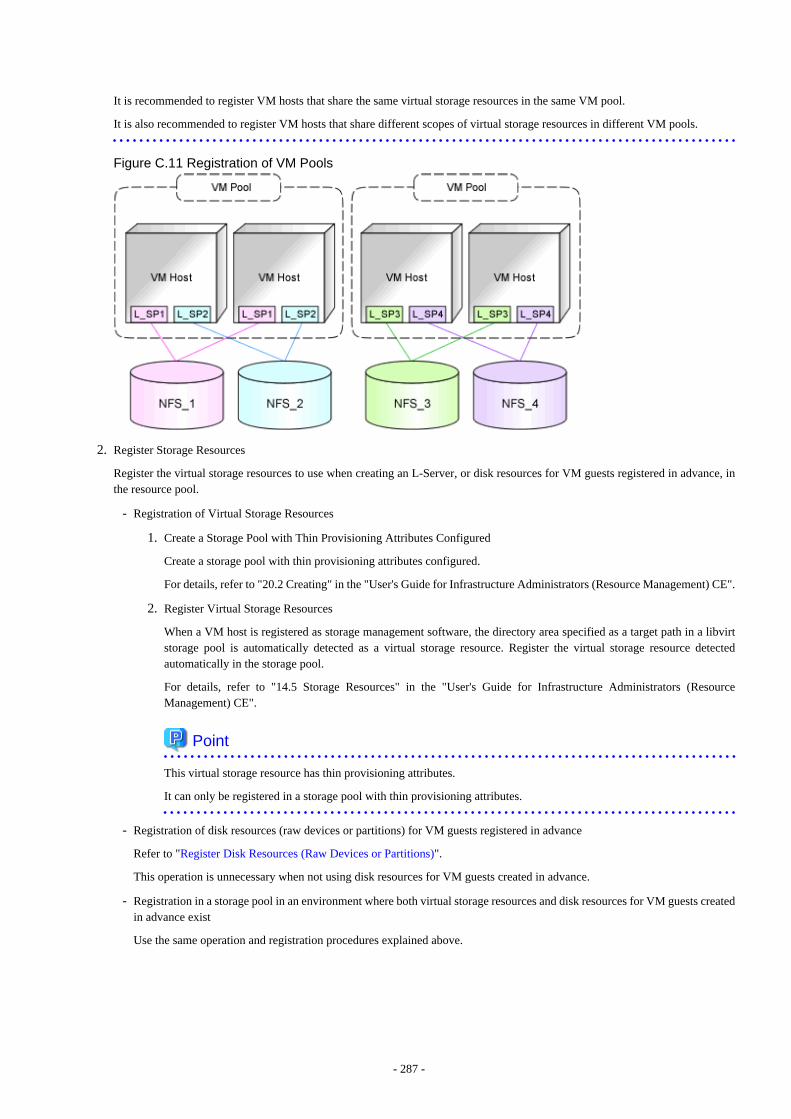
It is recommended to register VM hosts that share the same virtual storage resources in the same VM pool.
It is also recommended to register VM hosts that share different scopes of virtual storage resources in different VM pools.
Figure C.11 Registration of VM Pools
2. Register Storage Resources
Register the virtual storage resources to use when creating an L-Server, or disk resources for VM guests registered in advance, inthe resource pool.
- Registration of Virtual Storage Resources
1. Create a Storage Pool with Thin Provisioning Attributes Configured
Create a storage pool with thin provisioning attributes configured.
For details, refer to "20.2 Creating" in the "User's Guide for Infrastructure Administrators (Resource Management) CE".
2. Register Virtual Storage Resources
When a VM host is registered as storage management software, the directory area specified as a target path in a libvirtstorage pool is automatically detected as a virtual storage resource. Register the virtual storage resource detectedautomatically in the storage pool.
For details, refer to "14.5 Storage Resources" in the "User's Guide for Infrastructure Administrators (ResourceManagement) CE".
Point
This virtual storage resource has thin provisioning attributes.
It can only be registered in a storage pool with thin provisioning attributes.
- Registration of disk resources (raw devices or partitions) for VM guests registered in advance
Refer to "Register Disk Resources (Raw Devices or Partitions)".
This operation is unnecessary when not using disk resources for VM guests created in advance.
- Registration in a storage pool in an environment where both virtual storage resources and disk resources for VM guests createdin advance exist
Use the same operation and registration procedures explained above.
- 287 -
3. Register Network Resources
If the NIC and network resources are connected when an L-Server is created, the settings matching the network resource definitionwill be registered automatically for the VM host that the L-Server will operate on.For details, refer to "C.6.4 Manual Network Configuration".
- In the ROR console orchestration tree, right-click the target network pool, and select [Create Network Resource].
When creating a new network resource, select [New].
When creating a resource using an already registered admin LAN subnet, select [Using existing admin subnet].
- The [Create a network resource] dialog is displayed.
- Enter the items necessary for network resources. For details, refer to "14.3 Network Resources" in the "User's Guide forInfrastructure Administrators (Resource Management) CE".
4. Register network device resources
Create network devices to be used on the L-Platform and register those with the type Firewall or SLB in the network pool.
Refer to "14.4 Network Devices" in the "User's Guide for Infrastructure Administrators (Resource Management) CE".
5. Register Address Set Resources (MAC Addresses)
Create and register an address set resource (MAC address) in the address pool.For details, refer to "14.6 Address Set Resources" in the "User's Guide for Infrastructure Administrators (Resource Management)CE".
Environments with Both Virtual Storage Resources and Disk Resources Created in Advance
Use of RHEL-KVM provides the following benefits:
- There are two types of cloning images
- When allocating storage resources, the following allocations are possible:
- Disk resources automatically created from virtual storage
- Disk resources created in advance
When having both of the above types of resources, it is recommended to register each type of resource in different resource pools, as usageconditions differ depending on the resource type.
It is also recommended to register VM hosts that share the same scope of virtual storage resources and disk resources created in advance,in the same VM pool.
For details on the two types of cloning images, refer to "Image Location Type and Storage Location of Cloning Images" in "C.6.7 Collectinga Cloning Image".
Register Disk Resources (Raw Devices or Partitions)
Register the raw devices or partitions recognized by VM hosts as disk resources.
When migrating VM guests for virtual L-Servers, register the raw devices or the partitions shared between multiple VM hosts as diskresources defined to be shared.
Register the raw devices or the partitions to store cloning images shared between multiple VM hosts as disk resources defined as shared.
Perform the following procedure:
1. Create a storage pool (admin server)
To use a storage pool other than default one, create the storage pool.
For details on how to create a storage pool, refer to "20.2 Creating" in the "User's Guide for Infrastructure Administrators (ResourceManagement) CE".
- 288 -
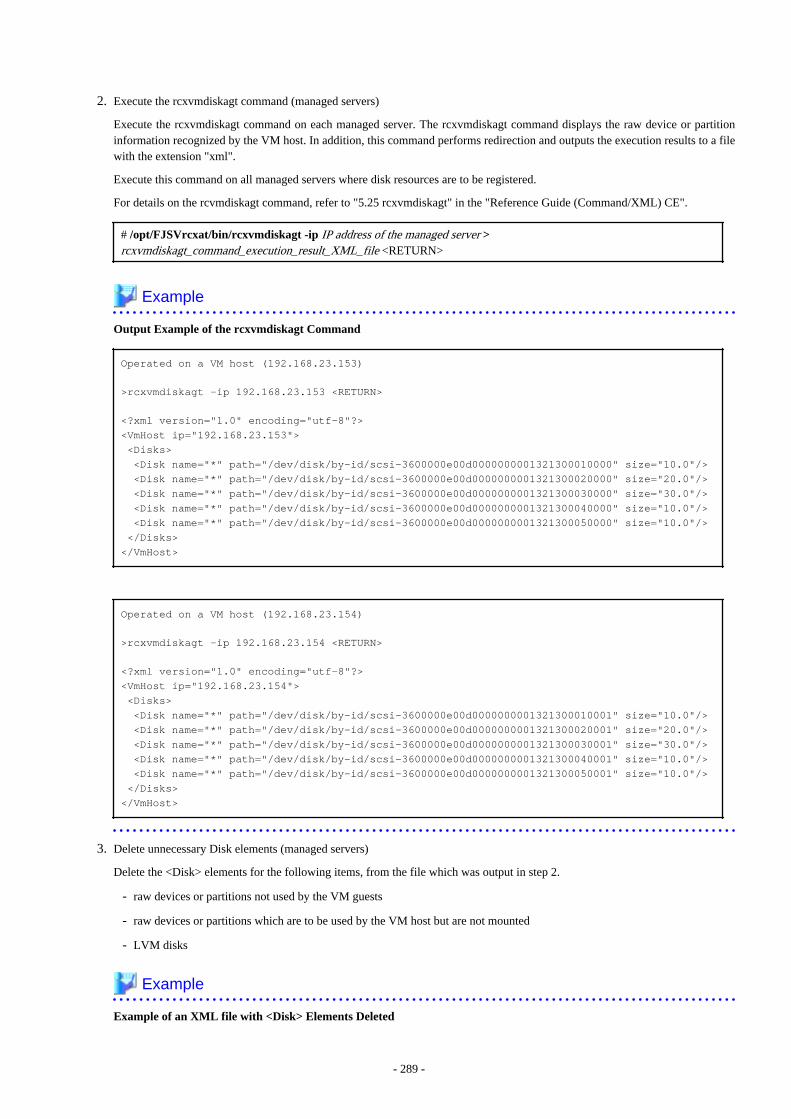
2. Execute the rcxvmdiskagt command (managed servers)
Execute the rcxvmdiskagt command on each managed server. The rcxvmdiskagt command displays the raw device or partitioninformation recognized by the VM host. In addition, this command performs redirection and outputs the execution results to a filewith the extension "xml".
Execute this command on all managed servers where disk resources are to be registered.
For details on the rcvmdiskagt command, refer to "5.25 rcxvmdiskagt" in the "Reference Guide (Command/XML) CE".
# /opt/FJSVrcxat/bin/rcxvmdiskagt -ip IP address of the managed server >rcxvmdiskagt_command_execution_result_XML_file <RETURN>
Example
Output Example of the rcxvmdiskagt Command
Operated on a VM host (192.168.23.153)
>rcxvmdiskagt -ip 192.168.23.153 <RETURN>
<?xml version="1.0" encoding="utf-8"?><VmHost ip="192.168.23.153"> <Disks> <Disk name="*" path="/dev/disk/by-id/scsi-3600000e00d0000000001321300010000" size="10.0"/> <Disk name="*" path="/dev/disk/by-id/scsi-3600000e00d0000000001321300020000" size="20.0"/> <Disk name="*" path="/dev/disk/by-id/scsi-3600000e00d0000000001321300030000" size="30.0"/> <Disk name="*" path="/dev/disk/by-id/scsi-3600000e00d0000000001321300040000" size="10.0"/> <Disk name="*" path="/dev/disk/by-id/scsi-3600000e00d0000000001321300050000" size="10.0"/> </Disks></VmHost>
Operated on a VM host (192.168.23.154)
>rcxvmdiskagt -ip 192.168.23.154 <RETURN>
<?xml version="1.0" encoding="utf-8"?><VmHost ip="192.168.23.154"> <Disks> <Disk name="*" path="/dev/disk/by-id/scsi-3600000e00d0000000001321300010001" size="10.0"/> <Disk name="*" path="/dev/disk/by-id/scsi-3600000e00d0000000001321300020001" size="20.0"/> <Disk name="*" path="/dev/disk/by-id/scsi-3600000e00d0000000001321300030001" size="30.0"/> <Disk name="*" path="/dev/disk/by-id/scsi-3600000e00d0000000001321300040001" size="10.0"/> <Disk name="*" path="/dev/disk/by-id/scsi-3600000e00d0000000001321300050001" size="10.0"/> </Disks></VmHost>
3. Delete unnecessary Disk elements (managed servers)
Delete the <Disk> elements for the following items, from the file which was output in step 2.
- raw devices or partitions not used by the VM guests
- raw devices or partitions which are to be used by the VM host but are not mounted
- LVM disks
Example
Example of an XML file with <Disk> Elements Deleted
- 289 -
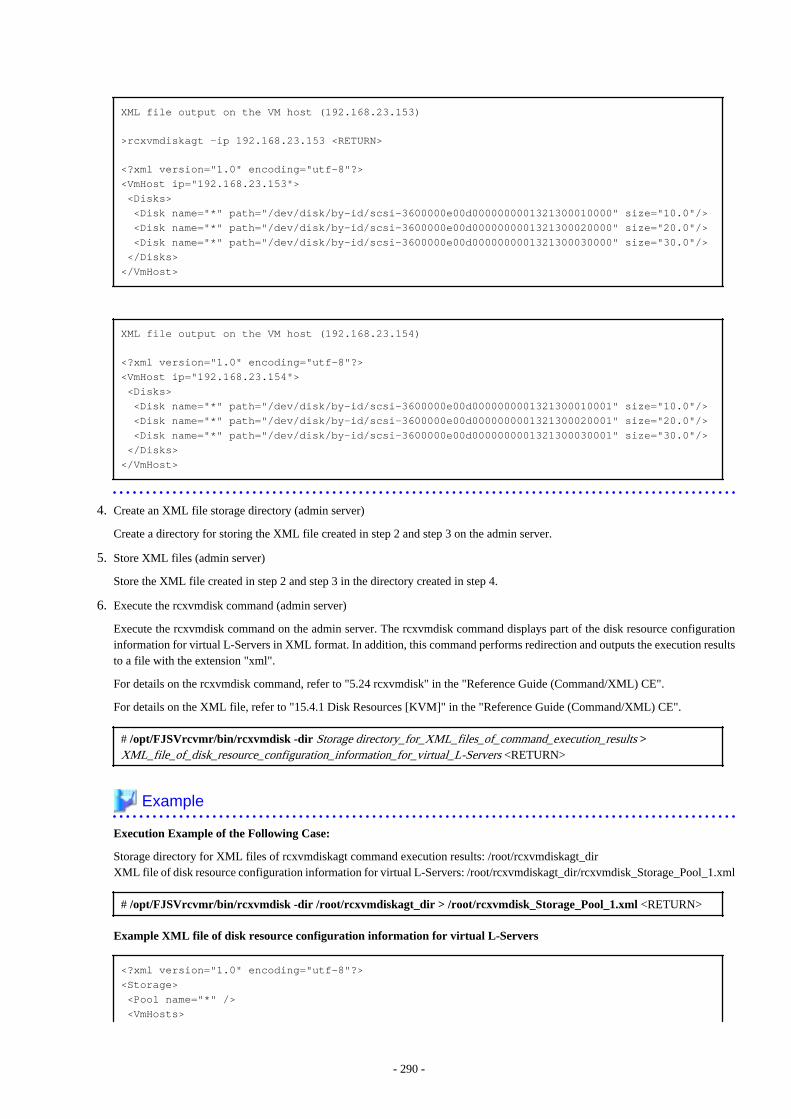
XML file output on the VM host (192.168.23.153)
>rcxvmdiskagt -ip 192.168.23.153 <RETURN>
<?xml version="1.0" encoding="utf-8"?><VmHost ip="192.168.23.153"> <Disks> <Disk name="*" path="/dev/disk/by-id/scsi-3600000e00d0000000001321300010000" size="10.0"/> <Disk name="*" path="/dev/disk/by-id/scsi-3600000e00d0000000001321300020000" size="20.0"/> <Disk name="*" path="/dev/disk/by-id/scsi-3600000e00d0000000001321300030000" size="30.0"/> </Disks></VmHost>
XML file output on the VM host (192.168.23.154)
<?xml version="1.0" encoding="utf-8"?><VmHost ip="192.168.23.154"> <Disks> <Disk name="*" path="/dev/disk/by-id/scsi-3600000e00d0000000001321300010001" size="10.0"/> <Disk name="*" path="/dev/disk/by-id/scsi-3600000e00d0000000001321300020001" size="20.0"/> <Disk name="*" path="/dev/disk/by-id/scsi-3600000e00d0000000001321300030001" size="30.0"/> </Disks></VmHost>
4. Create an XML file storage directory (admin server)
Create a directory for storing the XML file created in step 2 and step 3 on the admin server.
5. Store XML files (admin server)
Store the XML file created in step 2 and step 3 in the directory created in step 4.
6. Execute the rcxvmdisk command (admin server)
Execute the rcxvmdisk command on the admin server. The rcxvmdisk command displays part of the disk resource configurationinformation for virtual L-Servers in XML format. In addition, this command performs redirection and outputs the execution resultsto a file with the extension "xml".
For details on the rcxvmdisk command, refer to "5.24 rcxvmdisk" in the "Reference Guide (Command/XML) CE".
For details on the XML file, refer to "15.4.1 Disk Resources [KVM]" in the "Reference Guide (Command/XML) CE".
# /opt/FJSVrcvmr/bin/rcxvmdisk -dir Storage directory_for_XML_files_of_command_execution_results >XML_file_of_disk_resource_configuration_information_for_virtual_L-Servers <RETURN>
Example
Execution Example of the Following Case:
Storage directory for XML files of rcxvmdiskagt command execution results: /root/rcxvmdiskagt_dirXML file of disk resource configuration information for virtual L-Servers: /root/rcxvmdiskagt_dir/rcxvmdisk_Storage_Pool_1.xml
# /opt/FJSVrcvmr/bin/rcxvmdisk -dir /root/rcxvmdiskagt_dir > /root/rcxvmdisk_Storage_Pool_1.xml <RETURN>
Example XML file of disk resource configuration information for virtual L-Servers
<?xml version="1.0" encoding="utf-8"?><Storage> <Pool name="*" /> <VmHosts>
- 290 -

<VmHost ip="192.168.23.153"> <Disks> <Disk name="*" path="/dev/disk/by-id/scsi-3600000e00d0000000001321300010000" size="10.0"/> <Disk name="*" path="/dev/disk/by-id/scsi-3600000e00d0000000001321300020000" size="20.0"/> <Disk name="*" path="/dev/disk/by-id/scsi-3600000e00d0000000001321300030000" size="30.0"/> </Disks> </VmHost> <VmHost ip="192.168.23.154"> <Disks> <Disk name="*" path="/dev/disk/by-id/scsi-3600000e00d0000000001321300010001" size="10.0"/> <Disk name="*" path="/dev/disk/by-id/scsi-3600000e00d0000000001321300020001" size="20.0"/> <Disk name="*" path="/dev/disk/by-id/scsi-3600000e00d0000000001321300030001" size="30.0"/> </Disks> </VmHost> </VmHosts></Storage>
7. Specify the storage pool name
For the name attribute of the <Pool> element in the XML file of disk resource configuration information for virtual L-Servers whichwas created in step 6, specify the name of the storage pool in which disk resources for virtual L-Servers are to be registered. Forthe name attribute of each <Disk> element, specify the disk resource name.
Example
Example of the XML file of disk resource configuration information for virtual L-Servers when registering disk resourcesbased on the following information:
XML file name of disk resource configuration information for virtual L-Servers: rcxvmdisk_Storage_Pool_1.xmlStorage pool name: Storage_Pool_1
raw Device or Partition Path on the VM host (192.168.23.153)raw Device or Partition Path on the VM host (192.168.23.154)
Disk Resource Name
/dev/disk/by-id/scsi-3600000e00d0000000001321300010000/dev/disk/by-id/scsi-3600000e00d0000000001321300010001
disk_resource_10gb
/dev/disk/by-id/scsi-3600000e00d0000000001321300020000/dev/disk/by-id/scsi-3600000e00d0000000001321300020001
disk_resource_20gb
/dev/disk/by-id/scsi-3600000e00d0000000001321300030000/dev/disk/by-id/scsi-3600000e00d0000000001321300030001
disk_resource_30gb
In order to migrate VM guests for virtual L-Servers, register the raw devices or the partitions shared between multiple VM hosts asdisk resources defined to be shared.
XML file of disk resource configuration information for virtual L-Servers
<?xml version="1.0" encoding="utf-8"?><Storage> <Pool name="Storage_Pool_1" /> <VmHosts> <VmHost ip="192.168.23.153"> <Disks> <Disk name="disk_resource_10gb" path="/dev/disk/by-id/scsi-3600000e00d0000000001321300010000" size="10.0"/>
- 291 -
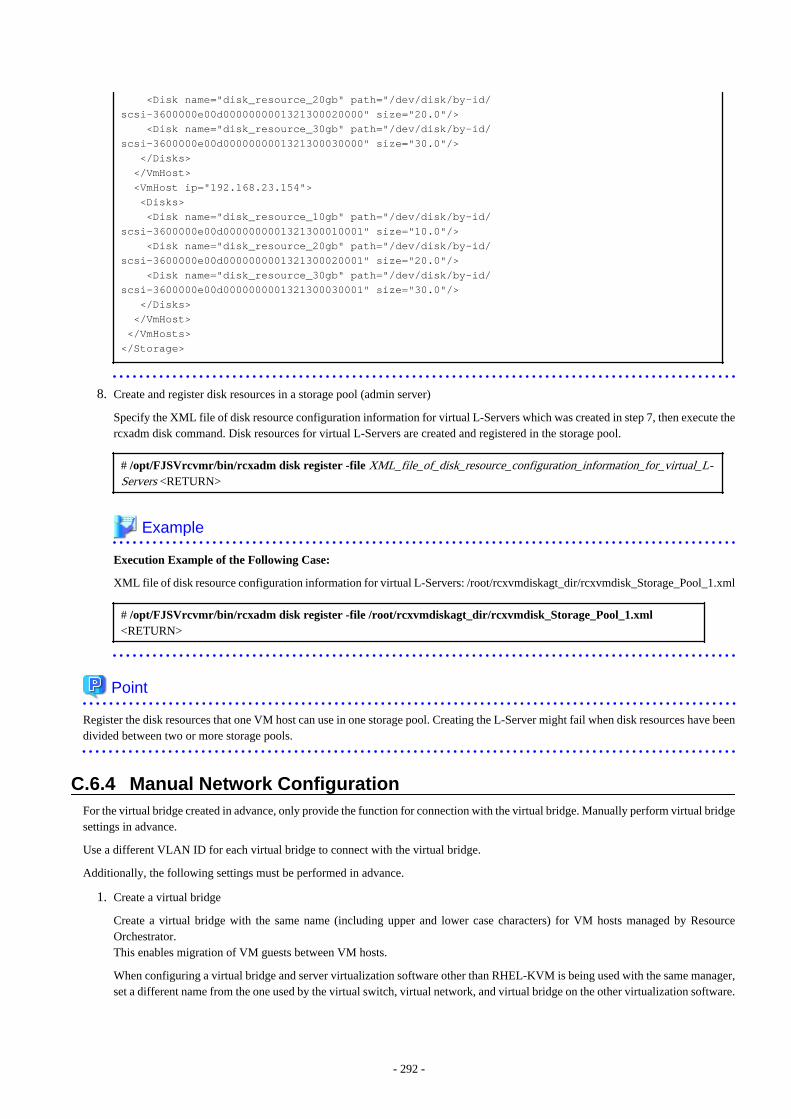
<Disk name="disk_resource_20gb" path="/dev/disk/by-id/scsi-3600000e00d0000000001321300020000" size="20.0"/> <Disk name="disk_resource_30gb" path="/dev/disk/by-id/scsi-3600000e00d0000000001321300030000" size="30.0"/> </Disks> </VmHost> <VmHost ip="192.168.23.154"> <Disks> <Disk name="disk_resource_10gb" path="/dev/disk/by-id/scsi-3600000e00d0000000001321300010001" size="10.0"/> <Disk name="disk_resource_20gb" path="/dev/disk/by-id/scsi-3600000e00d0000000001321300020001" size="20.0"/> <Disk name="disk_resource_30gb" path="/dev/disk/by-id/scsi-3600000e00d0000000001321300030001" size="30.0"/> </Disks> </VmHost> </VmHosts></Storage>
8. Create and register disk resources in a storage pool (admin server)
Specify the XML file of disk resource configuration information for virtual L-Servers which was created in step 7, then execute thercxadm disk command. Disk resources for virtual L-Servers are created and registered in the storage pool.
# /opt/FJSVrcvmr/bin/rcxadm disk register -file XML_file_of_disk_resource_configuration_information_for_virtual_L-Servers <RETURN>
Example
Execution Example of the Following Case:
XML file of disk resource configuration information for virtual L-Servers: /root/rcxvmdiskagt_dir/rcxvmdisk_Storage_Pool_1.xml
# /opt/FJSVrcvmr/bin/rcxadm disk register -file /root/rcxvmdiskagt_dir/rcxvmdisk_Storage_Pool_1.xml<RETURN>
Point
Register the disk resources that one VM host can use in one storage pool. Creating the L-Server might fail when disk resources have beendivided between two or more storage pools.
C.6.4 Manual Network ConfigurationFor the virtual bridge created in advance, only provide the function for connection with the virtual bridge. Manually perform virtual bridgesettings in advance.
Use a different VLAN ID for each virtual bridge to connect with the virtual bridge.
Additionally, the following settings must be performed in advance.
1. Create a virtual bridge
Create a virtual bridge with the same name (including upper and lower case characters) for VM hosts managed by ResourceOrchestrator.This enables migration of VM guests between VM hosts.
When configuring a virtual bridge and server virtualization software other than RHEL-KVM is being used with the same manager,set a different name from the one used by the virtual switch, virtual network, and virtual bridge on the other virtualization software.
- 292 -

2. Configure Virtual Bridge Communication Settings
Right-click the LAN switch in the server resource tree, and select [Modify]-[Network Settings] from the popup menu.
Configure LAN switches to enable communication using the tagged VLAN between virtual bridges using the same name.
The ROR console can be used for VLAN configuration of LAN switch blade external ports.For details, refer to "9.3.6 Pre-configuring LAN Switch Blades on Managed Blade Systems" in the "Design Guide CE".
3. Define the Supported Virtual Bridge and VLAN ID
Supported virtual bridges and VLAN IDs are defined in the virtual bridge definition file of Resource Orchestrator.
For details on definition file format, refer to "File Format for Virtual Bridge Definitions".
4. Create Network Resources
- From the GUI:
a. In the [Create a network resource] dialog containing the VLAN ID that was specified in steps 2 and 3, check the [Useconfigured virtual switches.] checkbox and create a network resource.
- From the Command-line:
a. Create the XML file that defines network resources.
Define the VLAN ID specified in steps 2 and 3 in the XML file.
In this case, specify auto="false" in the Network element.
b. To create the network resource, execute the rcxadm network create command specifying the XML file created in step a.
The network resources are created.
For details on the rcxadm network command, refer to "3.9 rcxadm network" in the "Reference Guide (Command/XML)CE".
For details on the Network element, refer to "15.5 Network Resources" in the "Reference Guide (Command/XML) CE".
An example of virtual NIC configuration and connection with virtual bridge using network resources is given below:
Figure C.12 Virtual NIC Configuration and Connection with Virtual Networks Using Bridge Resources
- 293 -
File Format for Virtual Bridge Definitions
Location of the Definition File
[Windows Manager]Installation_folder\SVROR\Manager\etc\customize_data
[Linux Manager]/etc/opt/FJSVrcvmr/customize_data
Definition File Name
vnetwork_rhelkvm.rcxprop
Definition File Format
Describe the virtual bridge definition file in one line as below:
"Virtual_bridge_name Created on VM host"=VLAN ID
For the VLAN ID, a value from 1 to 4094 can be specified.
Example
"br0"=10
Blank spaces before and after equal signs ("=") are ignored.
Describe the virtual bridge correctly, as the entry is case-sensitive.
Save files using the UTF-8 character code.
When there are multiple lines with the same virtual bridge name, all specified lines are valid.
When the same VLAN ID is included in a line with a different virtual bridge name, the first occurrence in the file is valid and the linesafter it are ignored.
An error occurs during L-Server creation if the definition of the VLAN ID of the network resource connected to the NIC cannot befound.
C.6.5 Creating L-Server TemplatesCreate an L-Server to collect cloning images from using an L-Server template.
1. Export an L-Server Template
Refer to "15.2.1 Export" in the "User's Guide for Infrastructure Administrators (Resource Management) CE".
2. Edit an L-Server Template
For details on the XML definition of L-Server templates, refer to "15.2 L-Server Template" in the "Reference Guide (Command/XML) CE".
In this case, perform the following configuration:
- Specify [RHEL-KVM] for the VM type.
- Specify "None" for the redundancy.
- Specify "Fixed" for the positioning.
3. Import an L-Server Template
Refer to "15.2.3 Import" in the "User's Guide for Infrastructure Administrators (Resource Management) CE".
C.6.6 L-Server CreationCreate an L-Server to collect virtual cloning images to be used by Resource Orchestrator.
- 294 -
If no cloning images exist, create an L-Server.
- Create an L-Server using an L-Server Template
- When there are no cloning images, or when not using already registered cloning images
1. Create an L-Server, referring to "16.1 Creation Using an L-Server Template" in the "User's Guide for InfrastructureAdministrators (Resource Management) CE".
When creating the L-Server, select [None] for images.
When creating an L-Server without specifying a cloning image for deployment, the specification method depends on thetype of disk resource allocated as the system disk.
- When allocating disk resources (qcow2 format image files) created from virtual storage resources
When selecting a disk resource, ensure "Virtual Storage" is selected for Resource Type.
- When allocating disk resources for VM guests created in advance
When selecting disk resources, select one of the following:
"Automatic"
"Storage Pool"
"Disk"
2. Install an OS
For manual OS installation, use the virtual machine manager.
For manual OS installation, refer to the "Red Hat Enterprise Linux 6 Virtualization Administration Guide".
Red Hat Enterprise Linux 6 Virtualization Administration Guide
URL: http://docs.redhat.com/docs/en-US/Red_Hat_Enterprise_Linux/6/html/Virtualization_Administration_Guide/index.html
The manuals for Red Hat Enterprise Linux can be referred to from the following URL.
URL: https://access.redhat.com/site/documentation/en-US/Red_Hat_Enterprise_Linux/index.html
3. Collect a Cloning Image
When collecting cloning images after creating an L-Server, the cloning images are stored in the image pool.
When collecting cloning images, refer to "C.6.7 Collecting a Cloning Image".
- When using an existing cloning image
Create an L-Server, referring to "16.1 Creation Using an L-Server Template" in the "User's Guide for Infrastructure Administrators(Resource Management) CE". In this case, specify the cloning image that you want to use as an image.
Only cloning images whose image location type is the same as the disk type of the L-Server can be deployed.
For details, "Conditions for Collection and Updating of Cloning Images" in "C.6.7 Collecting a Cloning Image".
- Create an L-Server specifying individual specifications
Refer to "16.3 Creation of Virtual L-Servers Using Parameters" in the "User's Guide for Infrastructure Administrators (ResourceManagement) CE".
For details on the [OS] tab settings, refer to "C.6.8 [OS] Tab Configuration".
Note
- When a virtual L-Server on which an OS is not installed is powered on, the same amount of memory as the physical memory on theVM host is secured.
- 295 -
- When using a Linux cloning image, ensure that the system volume for the guest OS is not in an LVM configuration.
Creating an L-Server for Infrastructure Administrators
When all of the following conditions are met, select "Virtual Storage" for the resource type, and then select a virtual storage resource touse.
- When not deploying cloning images
- When using virtual storage resources
When one of the following conditions is met, refer to "Storage Resources to be Selected".
- When selecting a resource using the [Disk] tab
- When selecting a storage pool
Storage Resources to be Selected
Both disk resources created automatically from virtual resources and disk resources for VM guests created in advance can be allocated toan L-Server.
This section explains the relationships between the storage resources selected according to the resource type specified on the [Disk] taband the cloning images selected for Image on the [General] tab in the ROR console.
- When the image location type of cloning images is "Virtual Disk"
When Automatic or Storage Pool is selected, a virtual storage resource is selected.
- When the image location type of cloning images is "Raw Disk" or "Do not deploy" is selected
When Automatic or Storage Pool is selected, a disk resource for VM guests is selected.
Conditions for Creating L-Servers that Use Cloning Images
The types of disk resources that can be used as the system disk of the L-Server differ depending on the image location type of cloningimages.
- Only disk resources of the same disk type as the image location type of cloning images can be used.
- When the image location type of cloning images is "Virtual Disk"
Disk resources created automatically from virtual storage resources can be used.
- When the image location type of cloning images is "Raw Disk"
Disk resources that were created in advance can be used.
For details on image location types of cloning images, "Image Location Type and Storage Location of Cloning Images" in "C.6.7Collecting a Cloning Image".
- Confirm that the following storage conditions are met:
- When the image location type of cloning images is "Virtual Disk"
The following libvirt storage pools are defined on the same VM host:
- The libvirt storage pool corresponding to the virtual storage resource to which the disk resource where cloning images arestored belongs
- The libvirt storage pool corresponding to the virtual storage resource that automatically creates the disk resource used as thesystem disk of the L-Server
Examples are given below.
- L-Servers can be created on the VM host where L_SP1 and L_SP2 are defined.
- 296 -
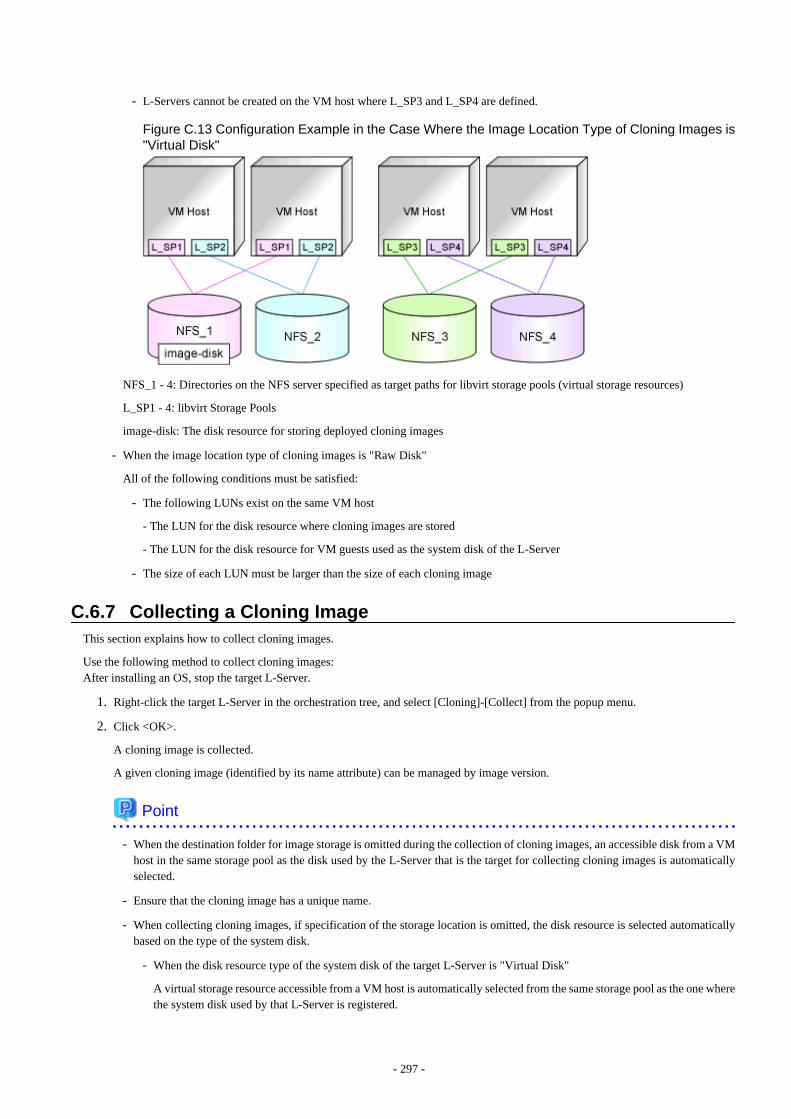
- L-Servers cannot be created on the VM host where L_SP3 and L_SP4 are defined.
Figure C.13 Configuration Example in the Case Where the Image Location Type of Cloning Images is"Virtual Disk"
NFS_1 - 4: Directories on the NFS server specified as target paths for libvirt storage pools (virtual storage resources)
L_SP1 - 4: libvirt Storage Pools
image-disk: The disk resource for storing deployed cloning images
- When the image location type of cloning images is "Raw Disk"
All of the following conditions must be satisfied:
- The following LUNs exist on the same VM host
- The LUN for the disk resource where cloning images are stored
- The LUN for the disk resource for VM guests used as the system disk of the L-Server
- The size of each LUN must be larger than the size of each cloning image
C.6.7 Collecting a Cloning ImageThis section explains how to collect cloning images.
Use the following method to collect cloning images:After installing an OS, stop the target L-Server.
1. Right-click the target L-Server in the orchestration tree, and select [Cloning]-[Collect] from the popup menu.
2. Click <OK>.
A cloning image is collected.
A given cloning image (identified by its name attribute) can be managed by image version.
Point
- When the destination folder for image storage is omitted during the collection of cloning images, an accessible disk from a VMhost in the same storage pool as the disk used by the L-Server that is the target for collecting cloning images is automaticallyselected.
- Ensure that the cloning image has a unique name.
- When collecting cloning images, if specification of the storage location is omitted, the disk resource is selected automaticallybased on the type of the system disk.
- When the disk resource type of the system disk of the target L-Server is "Virtual Disk"
A virtual storage resource accessible from a VM host is automatically selected from the same storage pool as the one wherethe system disk used by that L-Server is registered.
- 297 -
- When the disk resource type of the system disk of the target L-Server is "Raw Disk"
A disk resource accessible from a VM host is automatically selected from the same storage pool as the one where the systemdisk used by that L-Server is registered.
When automatically configuring the IP address or the host name on the OS for the L-Server to create, follow the procedures below, as thepreparations and conditions differ depending on the OS type and storage location type of the cloning image to use.
- When using a Linux cloning image
Ensure all of the following conditions are satisfied:
- The SELinux setting for the guest OS is "disabled"
- The system volume for the guest OS is not in an LVM configuration
- When starting the guest OS, configure the settings not to start the Network Manager of the guest OS.
- Preparations
Perform the following preparations:Install the packages described below on the VM host on which Virtual L-Servers created.
The package that satisfies the following conditions described in "Table 2.42 Required Packages of Agent for Red Hat EnterpriseLinux 6 [Linux] [KVM]" in "2.4.2.3 Required Packages" in the "Design Guide CE"
- The OS architecture is Intel64, the OS type is Linux, and a cloning image with "Virtual Disk" configured for the storagelocation is being used
- When using a Linux (SELinux) cloning image
Ensure all of the following conditions are satisfied:
- The system volume for the guest OS is not in an LVM configuration
- When starting the guest OS, configure the settings not to start the Network Manager of the guest OS.
- Preparations
Perform the following preparations:Install the packages described below on the VM host on which Virtual L-Servers created.
The package that satisfies the following conditions described in "Table 2.42 Required Packages of Agent for Red Hat EnterpriseLinux 6 [Linux] [KVM]" in "2.4.2.3 Required Packages" in the "Design Guide CE"
- The OS architecture is Intel64 and a Linux (SELinux) cloning image is being used
- When using a Windows cloning image
- Combination of the VM host and the virtual L-Server supporting the OS auto-configuration functions
Combinations of the versions of VM hosts supporting the OS auto-configuration functions and the OS versions of virtual L-Serversare as follow:
Table C.21 Combinations of the Versions of VM Hosts Supporting the OS Auto-configuration Functionsand the OS Versions of Virtual L-Servers
OS Versions of Virtual L-Servers
Microsoft(R)WindowsServer(R)2008 R2
Microsoft(R)WindowsServer(R)
2012Standard
Microsoft(R)WindowsServer(R)
2012Datacenter
Microsoft(R)WindowsServer(R)2012 R2Standard
Microsoft(R)WindowsServer(R)2012 R2
Datacenter
Versions ofVM hosts
Red Hat(R)Enterprise Linux(R)6.2
Yes No No No No
- 298 -
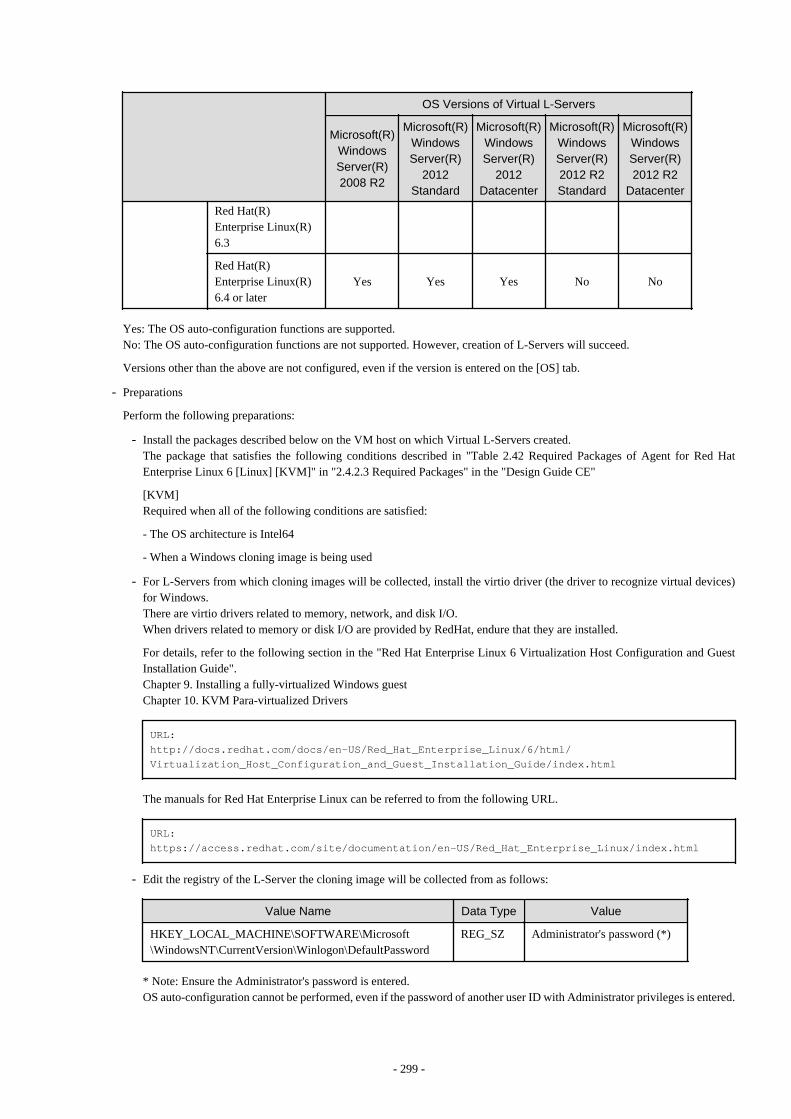
OS Versions of Virtual L-Servers
Microsoft(R)WindowsServer(R)2008 R2
Microsoft(R)WindowsServer(R)
2012Standard
Microsoft(R)WindowsServer(R)
2012Datacenter
Microsoft(R)WindowsServer(R)2012 R2Standard
Microsoft(R)WindowsServer(R)2012 R2
Datacenter
Red Hat(R)Enterprise Linux(R)6.3
Red Hat(R)Enterprise Linux(R)6.4 or later
Yes Yes Yes No No
Yes: The OS auto-configuration functions are supported.No: The OS auto-configuration functions are not supported. However, creation of L-Servers will succeed.
Versions other than the above are not configured, even if the version is entered on the [OS] tab.
- Preparations
Perform the following preparations:
- Install the packages described below on the VM host on which Virtual L-Servers created.The package that satisfies the following conditions described in "Table 2.42 Required Packages of Agent for Red HatEnterprise Linux 6 [Linux] [KVM]" in "2.4.2.3 Required Packages" in the "Design Guide CE"
[KVM]Required when all of the following conditions are satisfied:
- The OS architecture is Intel64
- When a Windows cloning image is being used
- For L-Servers from which cloning images will be collected, install the virtio driver (the driver to recognize virtual devices)for Windows.There are virtio drivers related to memory, network, and disk I/O.When drivers related to memory or disk I/O are provided by RedHat, endure that they are installed.
For details, refer to the following section in the "Red Hat Enterprise Linux 6 Virtualization Host Configuration and GuestInstallation Guide".Chapter 9. Installing a fully-virtualized Windows guestChapter 10. KVM Para-virtualized Drivers
URL: http://docs.redhat.com/docs/en-US/Red_Hat_Enterprise_Linux/6/html/Virtualization_Host_Configuration_and_Guest_Installation_Guide/index.html
The manuals for Red Hat Enterprise Linux can be referred to from the following URL.
URL: https://access.redhat.com/site/documentation/en-US/Red_Hat_Enterprise_Linux/index.html
- Edit the registry of the L-Server the cloning image will be collected from as follows:
Value Name Data Type Value
HKEY_LOCAL_MACHINE\SOFTWARE\Microsoft\WindowsNT\CurrentVersion\Winlogon\DefaultPassword
REG_SZ Administrator's password (*)
* Note: Ensure the Administrator's password is entered.OS auto-configuration cannot be performed, even if the password of another user ID with Administrator privileges is entered.
- 299 -

The tool to edit the registry above is stored in the Resource Orchestrator DVD-ROM (the first one).
Storage Location for Tool/DISK1/Common/kvm_windows_setting
File Name for Toolpasswd_for_cloning.bat
Use the following procedure to execute the tools.
1. Store the tools in the folder for the L-Server to collect cloning images from.
2. Execute the command prompt as an administrator.
3. Execute the tools from the command prompt.The prompt to enter the password is displayed.
4. Enter the password for the Administrator.The password entered in the registry above is configured.
Example
C:\> passwd_for_cloning.bat
When performing OS auto-configuration, the following registries are edited by Resource Orchestrator.
Value Name
- HKEY_LOCAL_MACHINE\SOFTWARE\Microsoft\Windows\CurrentVersion\ RunOnce
- HKEY_LOCAL_MACHINE\SOFTWARE\Microsoft\WindowsNT\CurrentVersion\Winlogon\AutoAdminLogon
- HKEY_LOCAL_MACHINE\SOFTWARE\Microsoft\WindowsNT\CurrentVersion\Winlogon\DefaultUserName
Also, the following registries are read by Resource Orchestrator.
Value Name
- HKEY_LOCAL_MACHINE\SOFTWARE\Microsoft\Windows NT\CurrentVersion\ProductName
- HKEY_LOCAL_MACHINE\SYSTEM\ControlSet001\Control\SessionManager\Environment\PROCESSOR_ARCHITECTURE
Information
The response files that exist in the L-Server OS to collect a cloning image from cannot be used in the OS auto-configurationfunctions of Resource Orchestrator.
Note
- If an L-Server is created with a specified Windows image, when deploying the image use Sysprep, provided by Microsoft, toreconfigure the properties unique to the server. By executing Sysprep, the user information and OS setting information are reset.
For details on Sysprep, refer to the information provided by Microsoft.
- If stopping or restarting of the manager is performed during execution of Sysprep, the operation being executed will be performedafter the manager is started.
Until the process being executed is completed, do not operate the target resource.
- When using MAK license authentication for activation of Windows Server 2008 images OS, Sysprep can be executed a maximum ofthree times. Since Sysprep is executed when creating L-Server with images specified, collection of cloning images and creation of L-Servers with images specified cannot be performed more than four times. Therefore, it is recommended not to collect cloning imagesfrom L-Servers that have had cloning images deployed, but to collect them from a dedicated master server.
- 300 -
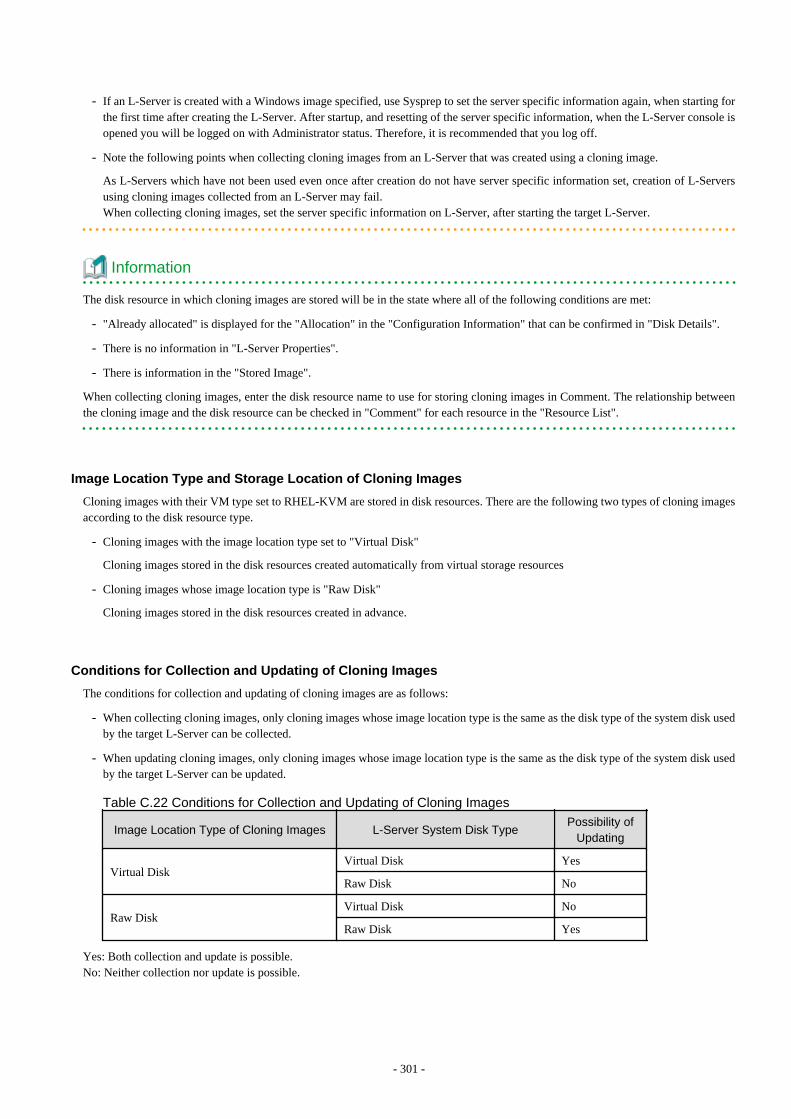
- If an L-Server is created with a Windows image specified, use Sysprep to set the server specific information again, when starting forthe first time after creating the L-Server. After startup, and resetting of the server specific information, when the L-Server console isopened you will be logged on with Administrator status. Therefore, it is recommended that you log off.
- Note the following points when collecting cloning images from an L-Server that was created using a cloning image.
As L-Servers which have not been used even once after creation do not have server specific information set, creation of L-Serversusing cloning images collected from an L-Server may fail.When collecting cloning images, set the server specific information on L-Server, after starting the target L-Server.
Information
The disk resource in which cloning images are stored will be in the state where all of the following conditions are met:
- "Already allocated" is displayed for the "Allocation" in the "Configuration Information" that can be confirmed in "Disk Details".
- There is no information in "L-Server Properties".
- There is information in the "Stored Image".
When collecting cloning images, enter the disk resource name to use for storing cloning images in Comment. The relationship betweenthe cloning image and the disk resource can be checked in "Comment" for each resource in the "Resource List".
Image Location Type and Storage Location of Cloning Images
Cloning images with their VM type set to RHEL-KVM are stored in disk resources. There are the following two types of cloning imagesaccording to the disk resource type.
- Cloning images with the image location type set to "Virtual Disk"
Cloning images stored in the disk resources created automatically from virtual storage resources
- Cloning images whose image location type is "Raw Disk"
Cloning images stored in the disk resources created in advance.
Conditions for Collection and Updating of Cloning Images
The conditions for collection and updating of cloning images are as follows:
- When collecting cloning images, only cloning images whose image location type is the same as the disk type of the system disk usedby the target L-Server can be collected.
- When updating cloning images, only cloning images whose image location type is the same as the disk type of the system disk usedby the target L-Server can be updated.
Table C.22 Conditions for Collection and Updating of Cloning Images
Image Location Type of Cloning Images L-Server System Disk TypePossibility of
Updating
Virtual DiskVirtual Disk Yes
Raw Disk No
Raw DiskVirtual Disk No
Raw Disk Yes
Yes: Both collection and update is possible.No: Neither collection nor update is possible.
- 301 -

- The following storage conditions must be satisfied:
- When the disk resource type of the system disk of the L-Server is "Virtual Disk"
The following libvirt storage pools are defined on the same VM host:
- The libvirt storage pool corresponding to the virtual storage resource to which the disk resource used as the system disk ofthe L-Server belongs
- The libvirt storage pool corresponding to the virtual storage resource which will be used for storing cloning images
Examples are given below.
- Virtual storage resources corresponding to L_SP1 and L_SP2 can be used as cloning image storage locations.
- Virtual storage resources corresponding to L_SP3 and L_SP4 cannot be used as cloning image storage locations.
Figure C.14 Virtual Storage Usable as Cloning Image Locations
NFS_1 - 4: Directories on the NFS server specified as target paths for libvirt storage pools (virtual storage resources)
L_SP1 - 4: libvirt Storage Pools
- When the image location type of cloning images is "Raw Disk"
All of the following conditions must be satisfied:
- The following LUNs are defined on the same VM host
- The LUN for the disk resource created in advance, which will be used as the system disk of the L-Server
- The LUN for the disk resource created in advance, which will be used as the storage location of cloning images
- Each LUN is larger than the system disk of the L-Server
C.6.8 [OS] Tab ConfigurationEnter the parameters to set for the OS when creating the L-Server. This setting is valid only if an image is specified in the [General] tab.The setting process is performed the first time the L-Server is started. If an image name is not specified, it is not necessary to enter allthese items.
When the OS type on the [Server] tab is "Linux", "Windows", or "Linux(SELinux)", the items can be entered. When the OS type is "Other",the items cannot be entered.
The [OS] tab cannot be configured in the following cases:
- When the SELinux setting for the host OS is "Enable"
- When the system volume for the guest OS is LVM
- 302 -
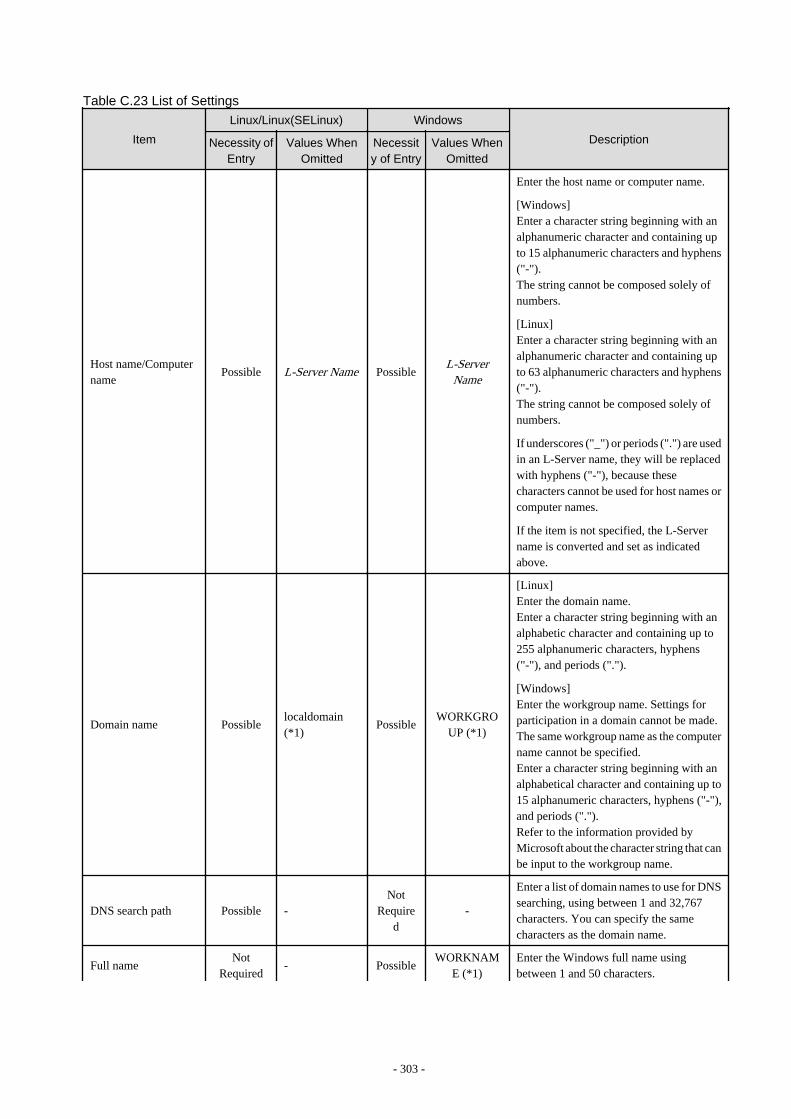
Table C.23 List of Settings
Item
Linux/Linux(SELinux) Windows
DescriptionNecessity ofEntry
Values WhenOmitted
Necessity of Entry
Values WhenOmitted
Host name/Computername
Possible L-Server Name PossibleL-Server
Name
Enter the host name or computer name.
[Windows]Enter a character string beginning with analphanumeric character and containing upto 15 alphanumeric characters and hyphens("-").The string cannot be composed solely ofnumbers.
[Linux]Enter a character string beginning with analphanumeric character and containing upto 63 alphanumeric characters and hyphens("-").The string cannot be composed solely ofnumbers.
If underscores ("_") or periods (".") are usedin an L-Server name, they will be replacedwith hyphens ("-"), because thesecharacters cannot be used for host names orcomputer names.
If the item is not specified, the L-Servername is converted and set as indicatedabove.
Domain name Possiblelocaldomain(*1)
PossibleWORKGRO
UP (*1)
[Linux]Enter the domain name.Enter a character string beginning with analphabetic character and containing up to255 alphanumeric characters, hyphens("-"), and periods (".").
[Windows]Enter the workgroup name. Settings forparticipation in a domain cannot be made.The same workgroup name as the computername cannot be specified.Enter a character string beginning with analphabetical character and containing up to15 alphanumeric characters, hyphens ("-"),and periods (".").Refer to the information provided byMicrosoft about the character string that canbe input to the workgroup name.
DNS search path Possible -Not
Required
-
Enter a list of domain names to use for DNSsearching, using between 1 and 32,767characters. You can specify the samecharacters as the domain name.
Full nameNot
Required- Possible
WORKNAME (*1)
Enter the Windows full name usingbetween 1 and 50 characters.
- 303 -
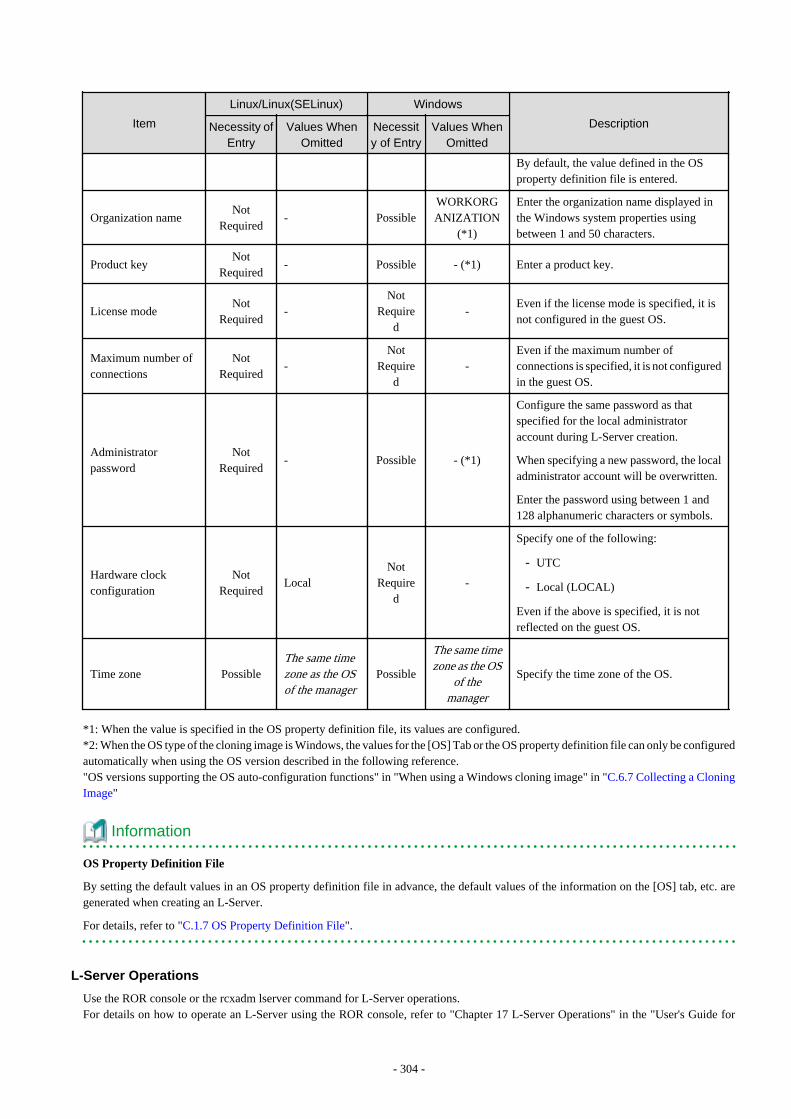
Item
Linux/Linux(SELinux) Windows
DescriptionNecessity ofEntry
Values WhenOmitted
Necessity of Entry
Values WhenOmitted
By default, the value defined in the OSproperty definition file is entered.
Organization nameNot
Required- Possible
WORKORGANIZATION
(*1)
Enter the organization name displayed inthe Windows system properties usingbetween 1 and 50 characters.
Product keyNot
Required- Possible - (*1) Enter a product key.
License modeNot
Required-
NotRequire
d-
Even if the license mode is specified, it isnot configured in the guest OS.
Maximum number ofconnections
NotRequired
-Not
Required
-Even if the maximum number ofconnections is specified, it is not configuredin the guest OS.
Administratorpassword
NotRequired
- Possible - (*1)
Configure the same password as thatspecified for the local administratoraccount during L-Server creation.
When specifying a new password, the localadministrator account will be overwritten.
Enter the password using between 1 and128 alphanumeric characters or symbols.
Hardware clockconfiguration
NotRequired
LocalNot
Required
-
Specify one of the following:
- UTC
- Local (LOCAL)
Even if the above is specified, it is notreflected on the guest OS.
Time zone PossibleThe same timezone as the OSof the manager
Possible
The same timezone as the OS
of themanager
Specify the time zone of the OS.
*1: When the value is specified in the OS property definition file, its values are configured.*2: When the OS type of the cloning image is Windows, the values for the [OS] Tab or the OS property definition file can only be configuredautomatically when using the OS version described in the following reference."OS versions supporting the OS auto-configuration functions" in "When using a Windows cloning image" in "C.6.7 Collecting a CloningImage"
Information
OS Property Definition File
By setting the default values in an OS property definition file in advance, the default values of the information on the [OS] tab, etc. aregenerated when creating an L-Server.
For details, refer to "C.1.7 OS Property Definition File".
L-Server Operations
Use the ROR console or the rcxadm lserver command for L-Server operations.For details on how to operate an L-Server using the ROR console, refer to "Chapter 17 L-Server Operations" in the "User's Guide for
- 304 -
Infrastructure Administrators (Resource Management) CE".For details on the rcxadm lserver command, refer to "3.6 rcxadm lserver" in the "Reference Guide (Command/XML) CE".
Changing L-Server Specifications
Use the ROR console or the rcxadm lserver modify command to change L-Server specifications.For details on the specifications that can be changed, refer to "Chapter 17 L-Server Operations" in the "User's Guide for InfrastructureAdministrators (Resource Management) CE".
The value after changing the specifications can be checked in the [Resource List] tab in the orchestration tree.
From the command-line, execute rcxadm lserver list and rcxadm lserver show.For details, refer to "3.6 rcxadm lserver" in the "Reference Guide (Command/XML) CE".
C.6.9 Advisory Notes for RHEL-KVM UsageThis section explains advisory notes for RHEL-KVM.
VM Type View
In the ROR console, the VM type of RHEL-KVM VM hosts and VM guests is displayed as "RHEL-KVM".
Snapshot
The operations that can be performed differ depending on the disk configuration and power status of the L-Server.
Conditions for collecting, restoring, and deleting of snapshots are as follows:
- The L-Server is powered off
- The operations that can be performed differ depending on the type of the disk resources connected to the L-Server, as shown below.
OperationType of Disk Resources Connected to the L-Server
Raw Disks Only Virtual Disks Only Both Raw Disks and Virtual Disks
Collection No Yes No
Restoration No Yes Yes
Deletion No Yes Yes
Yes: Possible.No: Not possible.
Note
Japanese and double-byte characters cannot be used for comments.
Restoring the collected snapshots resets the following parameters for the L-Server back to the state at the time when collection wasperformed.
- Number of CPUs
- CPU Performance
- Memory Size
- Maximum Memory Size
- Disk Configuration
- Networks
- 305 -
- OS Settings
Guest OS Automatic Configuration
When using RHEL-KVM, guest OS auto-configuration can be used for Linux, Windows, and Linux (SELinux).
Note
When the OS type is Windows, OS auto-configuration can be used for the OS versions described below.
"C.6.7 Collecting a Cloning Image"
- When using a Windows cloning image
- OS versions supporting the OS auto-configuration functions
Detaching Disks and Deleting L-Servers
The data in the disk resources for virtual L-Servers cannot be deleted when detaching disks or deleting L-Servers, except when deletingthe disk details for virtual L-Servers is enabled using the definition files.
Therefore, it is recommended to delete the data from the disk.
For details on how to delete data on disks, refer to "14.5 Storage Resources" in the "User's Guide for Infrastructure Administrators (ResourceManagement) CE".
For details on how to specify definition files, refer to "C.6.1 Creating Definition Files".
Configuration for L-Server Live Migration
In RHEL-KVM environments, use SSH to perform live migration on virtual L-Servers.
It is necessary to configure each involved host to enable live migration of an L-Server from the manager.
For details, refer to "E.5.2 Preparations for Servers" in the "Design Guide CE".
Note
When performing live migration using the virsh migrate command for KVM, specify both the --undefinesource and --persistent options.
If the command is executed without specifying these two options, the same VM guests may exist on both the destination and source VMhosts. In this state, the VM guests cannot be turned on using Resource Orchestrator. This occurs to prevent double VM guest startupoperations in the state that multiple instances of the same VM guest exist on different VM hosts.
When turning on VM guests, the state where there are multiple instances of the same VM guest must be avoided by using the virsh command.For details, refer to the following section in the "Red Hat Enterprise Linux 6 Virtualization Administration Guide".
- Chapter 14. Managing guest virtual machines with virsh
URL: http://docs.redhat.com/docs/en-US/Red_Hat_Enterprise_Linux/6/html/Virtualization_Administration_Guide/index.html
The manuals for Red Hat Enterprise Linux can be referred to from the following URL.
URL: https://access.redhat.com/site/documentation/en-US/Red_Hat_Enterprise_Linux/index.html
Max. Number of Possible L-Servers View
The available space on resources and the space displayed for [the number of L-Servers that can be created] are calculated as follows:
- 306 -
Available Amount of CPUs and [Number of L-Servers that can be Created]
Total resource space - (Total of resources reserved for VM hosts + Total of resources used for L-Server)
Directory for collecting performance information
When resources are registered, the directories and files that are necessary for performance monitoring are created on the server where theresources are registered.The directories and files are created in the following location. (Files with the same name in the same location are overwritten.)
/{Home directory of the user ID specified when registering the resources}/dsa_temp_*
Do not delete the above directory until the resources themselves are deleted. Performance information will not be collected if this directory is deleted. Restart the Manager if the directory is deleted accidentally.The above directory is not automatically deleted when the resources are deleted. Delete it manually.
Live Migration to Copy Disks between Storage that are not Shared
Do not perform live migration to copy disks between storage that are not shared, from within VM software.Such operation is not supported by Resource Orchestrator.
About the migration
The migration might fail when a cold migration is specified in the migration from the state of power supply ON.Power supply ON after the migration is executed after power supply OFF, and it waits for a while.
Corrective Action for Failure of a VM host Registered as Storage Management Software
When a VM host registered as storage management software fails, creation and deletion of virtual L-Servers and addition and deletion ofdisks cannot be performed using the virtual storage (libvirt storage pools) managed by the storage management software.In order to make these operations possible, it is necessary to change storage management software.
Change the IP address of the storage management software to the IP address of a VM host which has the same sharing configuration forlibvirt storage pools as the failed VM host.To change the IP address of the storage management software, execute the modify subcommand of the rcxadm storagemgr command.For details on the rcxadm storagemgr command, refer to "5.17 rcxadm storagemgr" in the "Reference Guide (Command/XML) CE".
C.6.10 OvercommitThis section explains the overcommit function for L-Servers.
Overcommit
The RHEL-KVM overcommit function for the CPU and memory is available on Resource Orchestrator.
The RHEL-KVM overcommit function for the CPU and memory virtually allows a guest OS to use more resources than that of the actualCPU and memory of a server.
Resource Orchestrator provides the following functions to utilize the RHEL-KVM overcommit function when creating L-Servers.
- Setting an overcommit attribute for a resource pool
Overcommit attributes can be set for resource pools. If an L-Server template with the overcommit attribute configured is used, an L-Server with the overcommit attribute configured can be created by selecting the resource from the resource pool with overcommitconfigured.
- 307 -

- Deployment of L-Servers with more resources than those of the server
Creation of an L-Server with more resources than that of the actual CPU or memory installed on a server is possible.Whether the resulting L-Server can be started depends on the resources available on the VM host.
Installation Procedure
1. Create a VM Pool for Overcommit
For details on how to create a VM pool, refer to "Chapter 20 Resource Pool Operations" in the "User's Guide for InfrastructureAdministrators (Resource Management) CE".
Point
Refer to the "Point" described in "1. Create a VM Pool for Overcommit" in "Installation Procedure" in "C.2.11 Overcommit".
Note
Refer to the "Note" described in "1. Create a VM Pool for Overcommit" in "Installation Procedure" in "C.2.11 Overcommit".
2. Create a VM Specific Information Definition File
Create a VM specific information definition file. Create a VM specific information definition file when configuring different settingsfor individual user groups without configuring overcommit settings on the L-Server template.
For VM specific information definition files, refer to "C.1 Definition Files Commonly Shared when Creating Virtual L-Servers".
For details on how to edit the L-Server template, or create and check an L-Server, perform the operations of step 3 and later described in"C.2.11 Overcommit". Since the values that can be configured in the L-Server template or the VM specific information definition files asdescribed in the reference differ depending on the VM types, replace the values with ones for KVM.
Note
Due to limitations of the KVM management application, it may take a few minutes until the amount of memory used by VM is reflectedon the ROR console.
C.7 Solaris ZonesThis section explains the settings used when using Solaris Zones as server virtualization software.
- When Creating a Virtual L-Server
Configure the settings referring to the information in "C.7.1 Creating Definition Files" or the following sections.
- When Associating L-Servers with Configured Virtual Machines
Refer to "18.4.3 For Virtual Machines" in the "User's Guide for Infrastructure Administrators (Resource Management) CE".
- Importing to L-Platforms
Refer to "7.2.3 Importing to L-Platform" in the "Operation Guide CE".
Point
When using Solaris 11 Zones as VM hosts, association of L-Servers with configured virtual machines is supported.
- 308 -
C.7.1 Creating Definition FilesThis section explains how to create definition files.
For definition files common to virtual L-Servers, refer to "C.1 Definition Files Commonly Shared when Creating Virtual L-Servers".
This section explains the definition files specific to Solaris Zones.
Definition Files of Managed Resource Pools
In Resource Orchestrator, the resource pool for Solaris Zones, with the name "pool_resource", is the target of management.When changing the managed resource pools for Solaris Zones, specify either MANAGED_POOL or the admin IP address for the VMhost, or both of them, in the definition file in advance.When MANAGED_POOL and the admin IP address of the VM host are both specified, priority is given to the admin IP address of theVM host.Use the UTF-8 character code for definition files.
Storage Location of the Definition File
[Windows Manager]Installation_folder\SVROR\Manager\etc\customize_data
[Linux Manager]/etc/opt/FJSVrcvmr/customize_data
Point
The sample definition file (container_resource.sample.rcxprop) is stored in the storage location above.
When using the sample as the definition file, place the file after deleting the ".sample" included in the file name.
Definition File Name
container_resource.rcxprop
Definition File Format
In the definition file, an item to define is entered on each line. Each line must be entered in the following format.
Key = Value
If there is duplicated configuration information for the same VM host, the values that appear first will be used.
Table C.24 Definition File Items
Key Description
MANAGED_POOLSpecify this item when using common resource pools in theoverall managed VM host (global zone) in ResourceOrchestrator.
Admin IP address of the VM hostDefine a resource pool for each managed VM host (globalzone) in Resource Orchestrator.
When there are no definitions corresponding to the managed VM host, the resource pool with the name "pool_resource" will be thetarget of management.
Note
- In a Solaris Zone environment, it is necessary to enable the resource pools service corresponding to MANAGED_POOL specified inthe definitions.
- When definitions are changed during operation, or the resource pool name is changed in a Solaris Zone environment, also change thecalculation and display of the resource capacity in Resource Orchestrator. Do not change the definitions during operation.
- 309 -
- When changing the VM host IP address, also modify the definition files.
- When the descriptions start with a "#", the string is regarded as a comment line.
Definition Files of Reserved Memory Size for VM Hosts
Define the reserved memory size for the global zone of a Solaris Zone.
When calculating and displaying available memory resources, the reserved memory size for VM hosts specified in this definition file isused.
Use the UTF-8 character code for definition files.
Storage Location of the Definition File
[Windows Manager]Installation_folder\SVROR\Manager\etc\customize_data
[Linux Manager]/etc/opt/FJSVrcvmr/customize_data
Information
The sample definition file (global_zone_reserved_memory.rcxprop.sample) is stored in the location above.When using the sample as the definition file, place the file after deleting the ".sample" included in the file name.
Definition File Name
global_zone_reserved_memory.rcxprop
Definition File Format
In the definition file, an item to define is entered on each line. Each line must be entered in the following format.
Key = Value
When the same key is stated in multiple lines, the definition in the line described last is valid.
Definition File Items
Specify the following items:
Key Description
ALLSpecify the reserved memory size to be used between VM hosts (global_zone)managed by ROR.Enter an integer. The unit of the value is MB.
Admin IP address of the VM host
Specify the reserved memory size for the VM host (global_zone) to which thespecified IP address has been assigned.Enter an integer. The unit of the value is MB.Priority is given to this setting over the value specified for ALL.
Note
- If this definition is modified during operation, the resource amount calculated and displayed by Resource Orchestrator will be changedas well.
- When changing the IP address of the VM host, modify this definition file.
- 310 -
- If valid values are not specified in this definition file, it will be treated as if the value for capped-memory configured for the globalzone has been specified.If capped-memory has not been configured for the global zone, it will be treated as if 0 has been specified.
Definition Files for Enabling Solaris Zones
Define if registering VM hosts as Solaris Zones regardless of whether the Logical Domains Manager daemon is enabled or disabled.
Storage Location of the Definition File
[Windows Manager]Installation_folder\SVROR\Manager\etc\customize_data
[Linux Manager]
/etc/opt/FJSVrcvmr/customize_data
Information
The sample definition file (sparc_vm.rcxprop.sample) is stored in the location above.When using the sample as the definition file, delete the ".sample" included in the file name after changing the content.
Definition File Name
sparc_vm.rcxprop
Character Code
UTF-8
Line Break Code
[Windows Manager]CR/LF
[Linux Manager]LF
Definition File Format
In the definition file, an item to define is entered on each line. Each line must be entered in the following format.
Key = Value
Definition File Items
Specify the following items:
Key Description
ALWAYS_ZONE
Specify if registering VM hosts as Solaris Zones regardless of whether the Logical Domains Managerdaemon is enabled or disabled.
- If "true" is specified
Registers VM hosts as Solaris Zones regardless of whether the Logical Domains Managerdaemon is enabled or disabled.
- If "false" is specified
Registers VM hosts based on whether the Logical Domains Manager daemon is enabled ordisabled.
- 311 -
Example
When registering VM hosts as Solaris Zones regardless of whether the Logical Domains Manager daemon is enabled or disabled
ALWAYS_ZONE=true
Note
- When more than two lines are written, the configurations described in the last line are valid.
- Blank spaces and tabs directly before and after an equal sign ("=") are ignored.
- Describe the definitions carefully, as entry is case-sensitive.
- If you edit and save a UTF-8 text file using Windows Notepad, the Byte Order Mark (BOM) is stored in the first three bytes ofthe file, and the information specified on the first line of the file will not be analyzed correctly. When using Notepad, specify theinformation from the second line.
- The definition file configurations are reflected without restarting the manager in Resource Orchestrator.
C.7.2 Registering Resources with Resource Orchestrator
Register Server Management Software
Register BMC BladeLogic Server Automation as server management software. Perform the necessary preparations before registration.
For details on preparations, refer to "I.1 Coordination with BMC BladeLogic Server Automation".
For details on how to register server management software, refer to "5.12 Registering BMC BladeLogic Server Automation" in the "User'sGuide for Infrastructure Administrators (Resource Management) CE".
Register Managed Servers (Global Zone)
Refer to "5.9 When Using Fujitsu M10/SPARC Enterprise" in the "User's Guide for Infrastructure Administrators (Resource Management)CE".
C.7.3 Registering Resources in Resource PoolsUse the following procedure to register a resource to a resource pool:
1. Register VM Host Resources (Global Zone)
a. In the ROR console orchestration tree, right-click the target VM pool, and select [Register Resources] from the popup menu.
The [Register Resources] dialog is displayed.
b. Select the VM host to register.
c. Click <OK>.
For details, refer to "14.1 VM Host Resources" in the "User's Guide for Infrastructure Administrators (Resource Management) CE".
Point
- When deploying multiple L-Servers to an L-Platform at the same time, deploy the same number of L-Servers as the number ofVM hosts in the VM pool.
- When using multiple L-Platforms that use the same network, create different VM pools for each L-Platform.
- 312 -

2. Register Disk Resources
Register the disks used in the non-global zone as disk resources.
When migrating a non-global zone for virtual L-Servers, register the disks shared between multiple global zones as disk resourcesdefined to be shared.
Perform the following procedure:
a. Create a storage pool (admin server)
To use a storage pool other than default one, create the storage pool.
For details on how to create a storage pool, refer to "20.2 Creating" in the "User's Guide for Infrastructure Administrators(Resource Management) CE".
b. Execute the rcxvmdiskagt command (managed servers)
Execute the rcxvmdiskagt command on each managed server. The rcxvmdiskagt command displays the disk informationstated in /etc/vfstab of the global zone. In addition, this command performs redirection and outputs the execution results toa file with the extension "xml".
Execute this command on all managed servers where disk resources are to be registered.
For details on the rcvmdiskagt command, refer to "5.25 rcxvmdiskagt" in the "Reference Guide (Command/XML) CE".
# /opt/FJSVrcvat/bin/rcxvmdiskagt -ip IP address of the managed server -vmtype solaris-zone >rcxvmdiskagt_command_execution_result_XML_file <RETURN>
Example
Output Example of the rcxvmdiskagt Command
>rcxvmdiskagt -ip 192.168.23.153 <RETURN>
<?xml version="1.0" encoding="utf-8"?><VmHost ip="192.168.23.153"> <Disks> <Disk name="*" path="/ror/zones/zone1" size="10.0"/> <Disk name="*" path="/ror/zones/zone2" size="20.0"/> <Disk name="*" path="/ror/zones/zone3" size="30.0"/> <Disk name="*" path="/ror/zones/zone4" size="40.0"/> <Disk name="*" path="/ror/zones/zone5" size="50.0"/> </Disks></VmHost>
c. Delete unnecessary Disk elements (managed servers)
Delete the <Disk> elements for the following items, from the file which was output in step b.
- Disks not used in non-global zones
- Disks which are to be used in a global zone but are not mounted
- LVM disks
Example
Example of an XML file with <Disk> Elements Deleted
>rcxvmdiskagt -ip 192.168.23.153 <RETURN>
<?xml version="1.0" encoding="utf-8"?><VmHost ip="192.168.23.153">
- 313 -

<Disks> <Disk name="*" path="/ror/zones/zone1" size="10.0"/> <Disk name="*" path="/ror/zones/zone2" size="20.0"/> <Disk name="*" path="/ror/zones/zone3" size="30.0"/> </Disks></VmHost>
d. Create an XML file storage directory (admin server)
Create a directory for storing the XML file created in step b and step c on the admin server.
e. Store XML files (admin server)
Store the XML file created in step b and step c in the directory created in step d.
f. Execute the rcxvmdisk command (admin server)
Execute the rcxvmdisk command on the admin server. The rcxvmdisk command displays part of the disk resourceconfiguration information for virtual L-Servers in XML format. In addition, this command performs redirection and outputsthe execution results to a file with the extension "xml".
For details on the rcxvmdisk command, refer to "5.24 rcxvmdisk" in the "Reference Guide (Command/XML) CE".
For details on the XML file, refer to "15.4.3 Disk Resources [Solaris Zones]" in the "Reference Guide (Command/XML)CE".
# /opt/FJSVrcvmr/bin/rcxvmdisk -dir Storage directory_for_XML_files_of_command_execution_results >XML_file_of_disk_resource_configuration_information_for_virtual_L-Servers <RETURN>
Example
Execution Example of the Following Case:
Storage directory for XML files of rcxvmdiskagt command execution results: /root/rcxvmdiskagt_dirXML file of disk resource configuration information for virtual L-Servers: /root/rcxvmdiskagt_dir/rcxvmdisk_Storage_Pool_1.xml
# /opt/FJSVrcvmr/bin/rcxvmdisk -dir /root/rcxvmdiskagt_dir > /root/rcxvmdisk_Storage_Pool_1.xml<RETURN>
Example XML file of disk resource configuration information for virtual L-Servers
<?xml version="1.0" encoding="utf-8"?><Storage> <Pool name="*" /> <VmHosts> <VmHost ip="192.168.23.153"> <Disks> <Disk name="*" path="/ror/zones/zone1" size="10.0"/> <Disk name="*" path="/ror/zones/zone2" size="20.0"/> <Disk name="*" path="/ror/zones/zone3" size="30.0"/> </Disks> </VmHost> </VmHosts></Storage>
g. Specify the storage pool name
For the name attribute of the <Pool> element in the XML file of disk resource configuration information for virtual L-Serverswhich was created in step f, specify the name of the storage pool in which disk resources for virtual L-Servers are to beregistered. For the name attribute of each <Disk> element, specify the disk resource name.
- 314 -

Example
Example of the XML file of disk resource configuration information for virtual L-Servers when registering diskresources based on the following information:
XML file name of disk resource configuration information for virtual L-Servers: rcxvmdisk_Storage_Pool_1.xmlStorage pool name: Storage_Pool_1
Mount Point Disk Resource Name
/ror/zones/zone1 disk_resource_10gb
/ror/zones/zone2 disk_resource_20gb
/ror/zones/zone3 disk_resource_30gb
XML file of disk resource configuration information for virtual L-Servers
<?xml version="1.0" encoding="utf-8"?><Storage> <Pool name="Storage_Pool_1" /> <VmHosts> <VmHost ip="192.168.23.153"> <Disks> <Disk name="disk_resource_10gb" path="/ror/zones/zone1" size="10.0"/> <Disk name="disk_resource_20gb" path="/ror/zones/zone2" size="20.0"/> <Disk name="disk_resource_30gb" path="/ror/zones/zone3" size="30.0"/> </Disks> </VmHost> </VmHosts></Storage>
h. Create and register disk resources in a storage pool (admin server)
Specify the XML file of disk resource configuration information for virtual L-Servers which was created in step g, thenexecute the rcxadm disk command. Disk resources for virtual L-Servers are created and registered in the storage pool.
# /opt/FJSVrcvmr/bin/rcxadm disk register -fileXML_file_of_disk_resource_configuration_information_for_virtual_L-Servers <RETURN>
Example
Execution Example of the Following Case:
XML file of disk resource configuration information for virtual L-Servers: /root/rcxvmdiskagt_dir/rcxvmdisk_Storage_Pool_1.xml
# /opt/FJSVrcvmr/bin/rcxadm disk register -file /root/rcxvmdiskagt_dir/rcxvmdisk_Storage_Pool_1.xml<RETURN>
3. Register Network Resources
If the NIC and network resources are connected when an L-Server is created, the settings matching the network resource definitionwill be registered automatically for the VM host that the L-Server will operate on.For details, refer to "C.7.4 Manual Network Configuration".
Check the information of VLANs and subnets to which the NICs for the VM guest to be imported are connected. These settings arenot necessary when there are already network resources corresponding to the combinations of VLANs and subnets. When there areno network resources, use the following procedure to create a new network resource.
- 315 -
a. In the ROR console orchestration tree, right-click the target network pool, and select [Create Network Resource].
When creating a new network resource, select [New].
When creating a resource using an already registered admin LAN subnet, select [Using existing admin subnet].
The [Create a network resource] dialog is displayed.
b. Enter the items necessary for network resources.
- VLAN ID
When using a VLAN, specify the value. When not using a VLAN, specify an arbitrary VLAN ID that is not used foralready created network resource and will not be used in the future.
- Uplink port
Do not specify anything.
- Detail configuration
Do not configure anything.
For details on how to add the NIC information to the L-Server, refer to "3.6 rcxadm lserver" in the "Reference Guide (Command/XML) CE".
4. Register Network Device Resources
Create a network resource to be used on the L-Platform. If the type of the network devices is Firewall or SLB, register them to thenetwork pool.For details, refer to "14.4 Network Devices" in the "User's Guide for Infrastructure Administrators (Resource Management) CE".
5. Register Virtual Image Resources
Register the virtual image resources used when creating virtual L-Servers in the resource pool.It is necessary to create a BladeLogic virtual package in advance and register it with Resource Orchestrator.
a. Create a BladeLogic virtual package
From the BladeLogic console, create a BladeLogic virtual package in the following folder.
Depot/ROR/Solaris/vm/container
The name of the virtual package must start with an alphabetic character (upper or lower case), and can contain up to 32alphanumeric characters or underscores ("_").
For details, contact Fujitsu technical staff.
Point
- There are two methods to create packages. One is to copy the virtual package created when registering the servermanagement software, and the other is to create a new package without using the package created in advance.
Create a package using one of the following methods:
When Creating a New Virtual Package
Configure any necessary additional settings after setting the following items:
[General Settings]- Zone Name: zone- Zone Path: /zone- Resource Pool: pool_resource- Auto boot on host reboot: unchecked- Boot Zone after creation: unchecked- Processor Settings: Default- Memory Settings: Default
[Network Settings]- IP Type: Exclusive
- 316 -
[ZFS Data Sets]- Only UFS can be used as a file system. Do not specify this item.
[Inherited Package-Directories]- Zone Type: Whole Root
[Custom Attributes]- zone.cpu-cap is reconfigured, when creating or modifying an L-Server.
When Copying a Virtual Package
Copy the BladeLogic virtual package stored in the following location.
Depot/ROR/Solaris/vm/container/template/Zones
In the virtual package, only the minimum parameters necessary for operations described in "When Creating a New VirtualPackage" are configured. Modify the parameters depending on your environment.The virtual package is added to Resource Orchestrator, when server management software is registered.
- When deploying the created images to VM hosts in Solaris Zones, the images can also be used for other VM hosts.
b. Register the BladeLogic virtual package with Resource Orchestrator
Refer to "17.5.1 Collecting and Registering" in the "User's Guide for Infrastructure Administrators (Resource Management)CE".
c. Register the virtual image resource in the resource pool
For details, refer to "14.7.1 Virtual Image Resources" in the "User's Guide for Infrastructure Administrators (ResourceManagement) CE".
C.7.4 Manual Network ConfigurationSpecify the network interface to be allocated to an L-Server (non-global zone) based on the network resource. Therefore, it is necessaryto associate the network resource and the network interface in the global zone in advance.
In the global zone, only one network interface can be associated with the network resource. When there are multiple network interfacesin the global zone, create a network resource for each network interface.
When using exclusive IP settings, the network interface in the global zone must be allocated to only one non-global zone. Only specifythe network resources for one L-Server.
Use the VLAN ID as an identifier in order to associate the network resource with the network interface in the global zone. Use differentVLAN IDs for each network interface in the global zone.
The VLAN ID is used as an identifier, but VLAN settings are not performed. When VLAN settings are required, configure them in advance.
It is necessary to configure the following settings beforehand.
1. Check the Network Interface
In VM hosts (global zones) managed with Resource Orchestrator, check that the network interfaces used by VM guests are notbeing used.
When migrating VM guests (non-global zone) between VM hosts (global zones), check if the source and destination networkinterfaces have the same name.
When configuring the network interface, if using a server virtualization software other than a Solaris Zone on the same manager,check that a different name from the one used for a virtual switch, a virtual network, or a virtual bridge on the other servervirtualization software is used.
2. Define the Supported Network Interface and VLAN IDs.
Define the supported network interface and VLAN IDs in the virtual network definition file for Resource Orchestrator.
For details on definition file format, refer to "File Format for Virtual Network Definitions".
- 317 -
3. Create Network Resources
- From the GUI:
Create network resources using the VLAN IDs specified in step 2.
In the [Create a network resource] dialog, check the [Use configured virtual switches.] checkbox.
- From the Command-line:
a. Create the XML file that defines network resources.
Define the VLAN ID specified in step 2. in the XML file.
In this case, specify auto="false" in the Network element.
b. To create the network resource, execute the rcxadm network create command specifying the XML file created in step a.
The network resources are created.
For details on the rcxadm network command, refer to "3.9 rcxadm network" in the "Reference Guide (Command/XML)CE".
For details on the Network element, refer to "15.5 Network Resources" in the "Reference Guide (Command/XML) CE".
File Format for Virtual Network Definitions
Location of the Definition File
[Windows Manager]Installation_folder\SVROR\Manager\etc\customize_data
[Linux Manager]/etc/opt/FJSVrcvmr/customize_data
Definition File Name
vnetwork_solariscontainer.rcxprop
Definition File Format
Describe the network definition file in one line as below:
"Network interface name"=VLAN ID
For the VLAN ID, a value from 1 to 4094 can be specified.
Example
"bge1"=10
Blank spaces before and after equal signs ("=") are ignored.
Describe the network interface name correctly, as the entry is case-sensitive.
Save files using the UTF-8 character code.
When the same VLAN ID is included in a line with a different network interface name, the first occurrence in the file is valid and thelines after it are ignored.
An error occurs during L-Server (non-global zone) creation if the definition of the VLAN ID of the network resource connected to theNIC cannot be found.
C.7.5 Creating L-Server TemplatesThis chapter explains how to create an L-Server template.
L-Server templates can be created using the following methods.
- 318 -
- Using the Wizard GUI
L-Server templates can be created using the wizard GUI in the wizard format.For details on the GUI in the wizard format, refer to "15.1 Operations Using the Wizard GUI" in the "User's Guide for InfrastructureAdministrators (Resource Management) CE".
- Manually
Use the following procedure to create an L-Server template:
1. Export an L-Server Template
The sample L-Server templates provided with Resource Orchestrator can be exported.For details on how to export L-Server templates, refer to "15.2.1 Export" in the "User's Guide for Infrastructure Administrators(Resource Management) CE".
2. Edit an L-Server Template
The L-Server template output in step 1 can be edited with an editor, etc.For details on the L-Server templates for virtual L-Servers, refer to "15.2.2 Virtual L-Server Templates" in the "Reference Guide(Command/XML) CE".
3. Import an L-Server Template
For details on how to import L-Server templates, refer to "15.2.3 Import" in the "User's Guide for Infrastructure Administrators(Resource Management) CE".
C.7.6 Creating an L-ServerUse the following procedure to create L-Servers:In this case, specify the cloning image that you want to use as an image.
1. Create an L-Server Using an L-Server Template
Create an L-Server, referring to "16.1 Creation Using an L-Server Template" in the "User's Guide for Infrastructure Administrators(Resource Management) CE".
2. Create an L-Server Specifying Individual Specifications
Refer to "16.3 Creation of Virtual L-Servers Using Parameters" in the "User's Guide for Infrastructure Administrators (ResourceManagement) CE".For details on the [OS] tab settings, refer to "C.7.7 [OS] Tab Configuration".
The cap values configured in the non-global zone are calculated using the CPU performance and the number of CPUs for L-Servers.The calculation formula is as below.
cap value = CPU performance(GHz) * number of CPUs / physical CPU performance(GHz) * 100
C.7.7 [OS] Tab ConfigurationEnter the parameters to set for the OS when creating the L-Server.
In L-Server creation, perform settings to start the non-global zone.
For Oracle Solaris Zones, only the following parameters are reflected.
If any other parameters are set, they will be ignored.
Table C.25 List of Settings
Item
Solaris
DescriptionNecessityof Entry
Values WhenOmitted
Host name Possible L-Server Name Enter the host name.When creating multiple NICs in the host name of the non-global zone,
- 319 -
Item
Solaris
DescriptionNecessityof Entry
Values WhenOmitted
the second and later NICs will be configured in the following format:Specified host name-sequential number
Enter a character string containing up to 21 alphanumeric charactersand hyphens ("-").Hyphens ("-") cannot be specified for the first or last characters.
If this parameter is not specified, the L-Server name is converted andset as indicated above.If underscores ("_") or periods (".") are used in an L-Server name, theywill be replaced with hyphens ("-"), because these characters cannotbe used for host names or computer names.
Administrator password Possible - (*) Set the administrator password for the L-Server.Enter the password using between 1 and 255 alphanumeric charactersor symbols.
* Note: When the value is specified in the OS property definition file, its values are configured.
Information
OS Property Definition File
By setting the default values in an OS property definition file in advance, the default values of the information on the [OS] tab, etc. aregenerated when creating an L-Server.
For details, refer to "C.1.7 OS Property Definition File".
C.7.8 Advisory Notes for Solaris Zone Usage
Resource Pools for Solaris Zones Managed in Resource Orchestrator
In Resource Orchestrator, resource management is performed with one resource pool for a Solaris Zone being managed in each globalzone.
The target resource pool can be changed.
For details, refer to "C.7.1 Creating Definition Files".
Non-Global Zone Names in Solaris Zones
When specifying the names of non-global zones managed by Resource Orchestrator, ensure that those names are unique.
When there are multiple non-global zones with the same name, those zones may be erroneously recognized as the same non-global zone.
However, when all of non-global zone of the same name are managed as L-Server, it is able to the same name.
Operations when uuids Change in Solaris Zones
In Resource Orchestrator, manage the non-global zone using uuids.
As a Solaris Zone configures a uuid for each OS, when the OS is reinstalled in a non-global zone or when the global zone on which a non-global zone is started is changed, the uuid of the non-global zone changes. When a uuid changes, the operation varies depending on whetherthe zone is managed as an L-Server.
- 320 -

- When the non-global zone is not being managed as an L-Server
If an operation that leads to uuid change is performed, the non-global zone with the changed uuid will be recognized as a new non-global zone. As a result, the label, comment, and home position setting which were configured for the non-global zone will be cleared.Reconfigure those settings.
- When the non-global zone is being managed as an L-Server
If an operation that leads to uuid change is performed, when the non-global zone with the changed uuid is detected, whether the non-global zone is the same or not is determined based on the non-global zone name. If the zone is determined to be the same, settingswhich had been configured for that zone before the uuid changed will be inherited.
If the zone is determined to be different, such as when there are multiple non-global zones with the same name, that zone will berecognized as a new non-global zone. In that case, it is necessary to associate the zone with the L-Server and import it into the L-Platform again.
Release the L-Server from the L-Platform and delete the L-Server, then associate the server with the L-Server and import the L-Serverto the L-Platform.
For details about releasing the L-Server from the L-Platform, refer to "7.2.3.3 Releasing L-Servers" in the "Operation Guide CE".
For details about deleting the L-Server, refer to "17.4 Deleting" in the "User's Guide for Infrastructure Administrators (ResourceManagement) CE".
For details about importing the L-Server to the L-Platform, refer to "7.2.3 Importing to L-Platform" in the "Operation Guide CE".
Migration Operations
Resource Orchestrator provides a function which migrates non-global zones between global zones (cold migration only). This function isrealized by performing the following procedure.
Prerequisites
- The non-global zone to migrate is stopped.
- The servers at the migration source and destination have the same system environment.
Process
1. Detach the non-global zone at the migration source.
Do this using zoneadm detach.
2. In the global zone at the migration source, unmount the disk which is mounted on the zone path of the non-global zone.
3. In the global zone at the migration destination, mount the disk on the zone path to be used by the non-global zone, according tothe definition in vfstab.
The zone path used for the non-global zone is configured according to the definition of the registered disk resource.
4. In the global zone at the migration destination, create a non-global zone.
5. In the global zone at the migration destination, attach the non-global zone.
Here, perform this using zoneadm attach with the -u option specified.
It is not recommended to perform normal operations while carrying out migration, for the following reasons. Consider the risks beforeperforming migration.
- If the disk resources or global zones are incorrectly configured, Resource Orchestrator will try to attach the non-global zone usingan incorrect disk at the destination server. As a result, the data in the non-global zone may be corrupted or the non-global zonemay disappear.
- If a migration operation fails, the zone will not be automatically rolled back to the state before the operation.
In that case, log in to the global zones at the migration source and destination and perform recovery.When doing this, be sure to recover the migration destination first. If you recover the migration source first, the disk will be accessedfrom both global zones, which may corrupt the data.
- 321 -
CPU Performance and the Number of CPUs for L-Servers
Update the CPU performance and the number of CPUS, using the values calculated by the cap values, when the CPU performance andthe number of CPUs for L-Servers are different from the values calculated from the cap values configured in the non-global zone.When the cap values calculated using the CPU performance and the number of CPUs for L-Servers are the same as those configured forthe non-global zone, the CPU performance and the number of CPUs for L-Servers are not updated, and the values are not changed fromthe configured values.
CPU Performance and the Number of CPUs for L-Servers when Changing cap Values in the Non-globalZone
When increasing the cap value in the non-global zone, the CPU performance for L-Servers may be the same as the value before changingof the cap value, not the CPU performance calculated by the cap value.If this occurs, increase the cap value by one. After checking if the CPU performance for L-Servers has changed, change the cap value tothe intended value.
Changing L-Server Specifications
If the CPU performance is increased by 0.1 GHz when modifying L-Server specifications, but the number of CPUs is not changed, thecap values in the non-global zone may not have been changed.To change the cap values for certain, change the value by 0.2 GHz or more.
LUNs Shared between Multiple Global Zones
Do not mount LUNs that are shared between multiple global zones or the LUNs for the zone path used by virtual L-Servers by selectingthem from the other global zone. Data may be damaged when deploying the virtual L-Server using the disk for the corresponding LUN,due to conflicting LUN access.
Non-global Zone Charges
The following settings need to be made when creating the non-global zone if the non-global zone's CPU or memory will be using themetering and usage fee functions.However, these settings are not necessary if metering and usage fee functions are not used, or if the CPU or memory are not made thesubject of charges.
Table C.26 Setting Items when creating a non-global zoneSubject of charges Required settings
CPU Perform CPU sharing settings
Memory Perform memory capping settings
Refer to the documentation that that comes with the Operating System for information on CPU sharing and memory capping.
C.7.9 OvercommitThis section explains the overcommit function for L-Servers.
Overcommit
The Solaris Zone overcommit function for the CPU and memory is available on Resource Orchestrator.
The Solaris Zone overcommit function for the CPU and memory virtually allows a guest OS to use more resources than that of the actualCPU and memory of a server.
Resource Orchestrator provides the following functions to utilize the Solaris Zone overcommit function when creating L-Servers.
- 322 -
- Setting an overcommit attribute for a resource pool
Overcommit attributes can be set for resource pools. If an L-Server template with the overcommit attribute configured is used, an L-Server with the overcommit attribute configured can be created by selecting the resource from the resource pool with overcommitconfigured.
- Deployment of L-Servers with more resources than those of the server
Creation of an L-Server with more resources than that of the actual CPU or memory installed on a server is possible.Whether the resulting L-Server can be started depends on the resources available on the VM host.
Installation Procedure
1. Create a VM Pool for Overcommit
For details on how to create a VM pool, refer to "Chapter 20 Resource Pool Operations" in the "User's Guide for InfrastructureAdministrators (Resource Management) CE".
Point
Refer to the "Point" described in "1. Create a VM Pool for Overcommit" in "Installation Procedure" in "C.2.11 Overcommit".
Note
Refer to the "Note" described in "1. Create a VM Pool for Overcommit" in "Installation Procedure" in "C.2.11 Overcommit".
For details on how to edit the L-Server template, or create and check an L-Server, perform the operations of step 3 and later described in"C.2.11 Overcommit". The values that can be configured in the L-Server template or the VM specific information definition files asdescribed in the reference differ depending on the VM types. In Solaris Zones, the values can only be specified when configuringovercommit in the L-Server template.
C.7.10 Managing Solaris Zones Configured on a Guest Domain of OVM forSPARC
In this product, Solaris zones constructed on the guest domain of OVM for SPARC can be managed.
When managing Solaris zones constructed on the guest domain of OVM for SPARC, it is necessary to register the guest domain thatcomposes the Solaris zones as a VM host.
The procedure for introduction of this product is as follows.
1. Install software on the control domain of OVM for SPARC
Install software and the agent of this product on the control domain of OVM for SPARC.Refer to the following.
- "2.2.1 Preparations"
- "2.2.4 Installation [Solaris] [Solaris Zones] [OVM for SPARC]"
2. Register the server of OVM for SPARC
Register the server of OVM for SPARC.Refer to "5.9 When Using Fujitsu M10/SPARC Enterprise" in the "User's Guide for Infrastructure Administrators (ResourceManagement) CE".
3. Create a global zone on the guest domain of OVM for SPARC
Refer to Oracle manuals.
- 323 -
4. Install software on the guest domain of OVM for SPARC
Install software and the agent of this product on the control domain of OVM for SPARC.Refer to the following.
- "2.2.1 Preparations"
- "2.2.4 Installation [Solaris] [Solaris Zones] [OVM for SPARC]"
- Refer to "E.6.2 Preparations for Servers" in the "Design Guide CE".
5. Register the guest domain as a resource
When the guest domain is registered as VM host, non-global zone made on the guest domain is displayed as VM guest.After it is confirmed that OS of the guest domain starts, it registers as VM host.Refer to "5.9.3 Registering Guest Domains on Oracle VM for SPARC" in the "User's Guide for Infrastructure Administrators(Resource Management) CE".
6. Registering Resources in Resource Pools
Register the guest domain of OVM for SPARC in the VM pool.For details, refer to "14.1 VM Host Resources" in the "User's Guide for Infrastructure Administrators (Resource Management) CE".
7. Register Network Resources
Register network resources in the network pool.For details, refer to "14.3 Network Resources" in the "User's Guide for Infrastructure Administrators (Resource Management) CE".
8. Register Storage Resources
The storage resource is registered in the storage pool.Necessary when performing migration of the non-global zoneFor details, refer to "14.5 Storage Resources" in the "User's Guide for Infrastructure Administrators (Resource Management) CE".
9. Relating to an L-Server
By linking the non-global zone on the guest domain of OVM for SPARC and an L-Server, it is possible to managed the non-globalzone on the guest domain of OVM for SPARC as a virtual L-Server, and import it to an L-Platform.For details, refer to "7.2.3 Importing to L-Platform" in the "Operation Guide CE".
There are cautionary notes regarding operation of this product when the guest domain of OVM for SPARC is registered as a VM host.Refer to "C.8.8 Advisory Notes for OVM for SPARC Usage".
C.8 OVM for SPARCThis section explains the settings used when using OVM for SPARC as server virtualization software.
- When Creating a Virtual L-Server
Configure the settings referring to the information in "C.8.1 Creating Definition Files" or the following sections.
- When Associating L-Servers with Configured Virtual Machines
Refer to "18.4.3 For Virtual Machines" in the "User's Guide for Infrastructure Administrators (Resource Management) CE".
- Importing to L-Platforms
Refer to "7.2.3 Importing to L-Platform" in the "Operation Guide CE".
Point
When Solaris zones are constructed on the guest domain, and the guest domain is registered as a VM host, virtual L-Servers linked withthe guest domain cannot be imported into the L-Platform.
C.8.1 Creating Definition FilesThis section explains how to create definition files.
- 324 -
For definition files common to virtual L-Servers, refer to "C.1 Definition Files Commonly Shared when Creating Virtual L-Servers".
Configure the definition files for enabling Solaris Zones so that VM hosts are registered based on whether the Logical Domains Managerdaemon is enabled or disabled.For details, refer to "C.7.1 Creating Definition Files".
Definition File of Whether to Save the Configuration Information
Defines whether to save the configuration information of VM guests automatically when changes are made to them.The scope of this definition file includes all VM hosts.
Automatic saving of the configuration information is triggered by the following operations:
- When performing the following operations using Resource Orchestrator:
- Power operations of VM guests/virtual L-Servers (power on/power off/forced power off/reboot/reboot (forced))
- Migration between servers on VM guests/virtual L-Servers
- Creating and Deleting Virtual L-Servers
- Modification of virtual L-Server specifications (the number of CPUs, memory size)
- Attachment/detachment of disks to and from a virtual L-Server
- When performing the following operations for a guest domain on the control domain:
- Creation/removal of guest domains
- Binding/unbinding of resources
- Stopping/starting of a guest domain
- Modification of the number of CPUs and memory size
- Addition/deletion of virtual disks
- Migration of a guest domain
Storage Location of the Definition File
[Windows Manager]Installation_folder\SVROR\Manager\etc\customize_data
[Linux Manager]/etc/opt/FJSVrcvmr/customize_data
Information
The sample definition file (sparc_vm.rcxprop.sample) is stored in the location above.When using the sample as the definition file, delete the ".sample" included in the file name after changing the content.
Definition File Name
sparc_vm.rcxprop
Character Code
UTF-8
Line Break Code
[Windows Manager]CR/LF
[Linux Manager]LF
- 325 -

Definition File Format
In the definition file, an item to define is entered on each line. Each line must be entered in the following format.
Key = Value
When adding comments, start the line with a number sign ("#").
Definition File Items
Specify the following items:
Key Description
OVM_AUTO_SAVE_CONFIG
Use this key to specify whether to save the configuration information of VM guestsautomatically.
- If "true" is specified
The configuration information of VM guests will be saved automatically.
- If "false" is specified
The configuration information of VM guests will not be saved automatically.
Example
When saving the configuration information of VM guests automatically
OVM_AUTO_SAVE_CONFIG=true
Note
- When more than two lines are written, the configurations described in the last line are valid.
- Blank spaces and tabs directly before and after an equal sign ("=") are ignored.
- Describe the definitions carefully, as entry is case-sensitive.
- When it corresponds to the following conditions, the operation becomes the same as the case when "true" is specified.
- When the definition is omitted
- When a value other than true/false is specified
- If you edit and save a UTF-8 text file using Windows Notepad, the Byte Order Mark (BOM) is stored in the first three bytes ofthe file, and the information specified on the first line of the file will not be analyzed correctly. When using Notepad, specify theinformation from the second line.
- The definition file configurations are reflected without restarting the manager in Resource Orchestrator.
Definition of connection information of the installation server
Define the following required information in order to connect with the installation server of Solaris 11.Use the UTF-8 character code for definition files.
- URL which shows the location of an installation server
Indicate the URL for the wanboot-cgi program on an installation server in the definition file.The URL for the wanboot-cgi program is defined as a parameter called "root_server" of the following configuration file on theinstallation server.
- 326 -
- File Name
/etc/netboot/wanboot.conf
- The parameter name defined for the URL
root_server
Storage Location of the Definition File
[Windows Manager]Installation_folder\SVROR\Manager\etc\customize_data
[Linux Manager]/etc/opt/FJSVrcvmr/customize_data
Information
The sample definition file (ovm_sparc_install_server.rcxprop.sample) is stored in the location above.When using the sample as the definition file, delete the ".sample" included in the file name after changing the content.
Definition File Name
ovm_sparc_install_server.rcxprop
Character Code
UTF-8
Line Break Code
[Windows Manager]CR/LF
[Linux Manager]LF
Definition File Format
In the definition file, an item to define is entered on each line. Each line must be entered in the following format.
Key = Value
When adding comments, start the line with a number sign ("#").
Definition File Items
Specify the following items:
Key Description
INSTALL_SERVER
Specify the URL which shows the location of the installation server.
Example
http://192.168.11.12:5555/cgi-bin/wanboot-cgi
Note
- When the same key is defined in more than two lines, the configuration in the last line is valid.
- Blank spaces and tabs directly before and after an equal sign ("=") are ignored.
- Describe the definitions carefully, as entry is case-sensitive.
- When a definition is omitted, error message number 67136 is output.
- 327 -
- If you edit and save a UTF-8 text file using Windows Notepad, the Byte Order Mark (BOM) is stored in the first three bytes ofthe file, and the information specified on the first line of the file will not be analyzed correctly. When using Notepad, specify theinformation from the second line.
- The definition file configurations are reflected without restarting the manager in Resource Orchestrator.
Automatic release cancellation of the resource at the time of L-Server deletion
When deletion of L-Server is performed with this product and the guest domain for deletion is in a bound state, this product releasesresources automatically (unbind) and deletes the guest domain in the bound state.When changing a setup so that a guest domain that is in a bound state may not be deleted, indicate the definition in the following definitionfiles.
Storage Location of the Definition File
[Windows Manager]Installation_folder\SVROR\Manager\etc\customize_data
[Linux Manager]/etc/opt/FJSVrcvmr/customize_data
Information
The sample definition file (sparc_vm.rcxprop.sample) is stored in the location above.When using the sample as the definition file, delete the ".sample" included in the file name after changing the content.
Definition File Name
sparc_vm.rcxprop
Character Code
UTF-8
Line Break Code
[Windows Manager]CR/LF
[Linux Manager]LF
Definition File Format
In the definition file, an item to define is entered on each line. Each line must be entered in the following format.
Key = Value
When adding comments, start the line with a number sign ("#").
Definition File Items
Specify the following items:
Key Description
OVM_FORCE_DELETION
Define whether to change the value of auto-boot? into "false" at the time of execution ofmigration.
- If "true" is specified
Change the value of auto-boot? to "false".
- If "false" is specified
- 328 -
Key Description
Do not change the value of auto-boot? to "false".
Note
- When more than two lines are written, the configurations described in the last line are valid.
- Blank spaces and tabs directly before and after an equal sign ("=") are ignored.
- Describe the definitions carefully, as entry is case-sensitive.
- When it corresponds to the following conditions, the operation becomes the same as the case when "true" is specified.
- When the definition is omitted
- When a value other than true/false is specified
- If you edit and save a UTF-8 text file using Windows Notepad, the Byte Order Mark (BOM) is stored in the first three bytes ofthe file, and the information specified on the first line of the file will not be analyzed correctly. When using Notepad, specify theinformation from the second line.
- The definition file configurations are reflected without restarting the manager in Resource Orchestrator.
Validation of the auto-boot? change function on migration
When performing VM guest or migration of L-Server from this product, you are advised to saving configuration information automaticallyby setting the value of auto-boot? to "false" in advance.When the value of auto-boot? is set as "false" and configuration information is saved automatically on migration, include the definitionfor validating the function in the following definition files.By indicating the definition for validating a function, the following processes are automatically performed on migration.
1. Change the value of auto-boot? into "false" before execution of migration, and save the configuration information.
2. Return the value of auto-boot? to the original value (true) after execution of migration.
Storage Location of the Definition File
[Windows Manager]Installation_folder\SVROR\Manager\etc\customize_data
[Linux Manager]/etc/opt/FJSVrcvmr/customize_data
Information
The sample definition file (sparc_vm.rcxprop.sample) is stored in the location above.When using the sample as the definition file, delete the ".sample" included in the file name after changing the content.
Definition File Name
sparc_vm.rcxprop
Character Code
UTF-8
Line Break Code
[Windows Manager]CR/LF
[Linux Manager]LF
- 329 -

Definition File Format
In the definition file, an item to define is entered on each line. Each line must be entered in the following format.
Key = Value
When adding comments, start the line with a number sign ("#").
Definition File Items
Specify the following items:
Key Description
OVM_SAFE_MIGRATION
Define whether to change the value of auto-boot? to "false" on execution of migration.
- If "true" is specified
Change the value of auto-boot? to "false".
- If "false" is specified
Do not change the value of auto-boot? to "false".
Note
- When more than two lines are written, the configurations described in the last line are valid.
- Blank spaces and tabs directly before and after an equal sign ("=") are ignored.
- Describe the definitions carefully, as entry is case-sensitive.
- In the following cases, the same operation as when "false" is specified will be performed:
- When the definition is omitted
- When a value other than true/false is specified
- If you edit and save a UTF-8 text file using Windows Notepad, the Byte Order Mark (BOM) is stored in the first three bytes ofthe file, and the information specified on the first line of the file will not be analyzed correctly. When using Notepad, specify theinformation from the second line.
- The definition file configurations are reflected without restarting the manager in Resource Orchestrator.
Selection of the operational mode when creating multiple L-Servers with a Solaris 11 image specifieddefinition file
When creation of multiple L-Servers with a Solaris 11 image specified is performed by using this product, an error may occur.It is possible to carry out serial execution of the creation process so that an error does not occur, by indicating the operation for each L-Server in this definition file.If necessary, edit the definition to change operation mode of the L-Server.For example, when large numbers of L-Servers need to be created, such as during initial installations, etc., it is recommended to specify"true" for this definition.
Storage Location of the Definition File
[Windows Manager]Installation_folder\SVROR\Manager\etc\customize_data
[Linux Manager]/etc/opt/FJSVrcvmr/customize_data
- 330 -
Information
The sample definition file (sparc_vm.rcxprop.sample) is stored in the location above.When using the sample as the definition file, delete the ".sample" included in the file name after changing the content.
Definition File Name
sparc_vm.rcxprop
Character Code
UTF-8
Line Break Code
[Windows Manager]CR/LF
[Linux Manager]LF
Definition File Format
In the definition file, an item to define is entered on each line. Each line must be entered in the following format.
Key = Value
When adding comments, start the line with a number sign ("#").
Definition File Items
Specify the following items:
Key Description
OVM_SOL11_SERIAL_CREATION
Define the operation to be performed when creating multiple L-Servers with a Solaris11 image specified.
- If "true" is specified
Carry out serial execution of the L-Server creation process.
- If "false" is specified
When an error occurs in L-Server creation, it will end abnormally.
Note
- When more than two lines are written, the configurations described in the last line are valid.
- Blank spaces and tabs directly before and after an equal sign ("=") are ignored.
- Describe the definitions carefully, as entry is case-sensitive.
- In the following cases, the same operation as when "false" is specified will be performed:
- When the definition is omitted
- When a value other than true/false is specified
- If you edit and save a UTF-8 text file using Windows Notepad, the Byte Order Mark (BOM) is stored in the first three bytes ofthe file, and the information specified on the first line of the file will not be analyzed correctly. When using Notepad, specify theinformation from the second line.
- The definition file configurations are reflected without restarting the manager in Resource Orchestrator.
- 331 -
C.8.2 Registering Resources with Resource Orchestrator
Register Managed Servers
Refer to "5.9 When Using Fujitsu M10/SPARC Enterprise" in the "User's Guide for Infrastructure Administrators (Resource Management)CE".
Register Server Management Software
Register BMC BladeLogic Server Automation as server management software. Perform the necessary preparations before registration.
For details on preparations, refer to "I.1 Coordination with BMC BladeLogic Server Automation".
For details on how to register server management software, refer to "5.12 Registering BMC BladeLogic Server Automation" in the "User'sGuide for Infrastructure Administrators (Resource Management) CE".
C.8.3 Registering Resources in Resource Pools1. Register VM Host Resources
a. In the ROR console orchestration tree, right-click the target VM pool, and select [Register Resources] from the popup menu.
The [Register Resources] dialog is displayed.
b. Select the VM host to register.
c. Click <OK>.
For details, refer to "14.1 VM Host Resources" in the "User's Guide for Infrastructure Administrators (Resource Management) CE".
2. Register Disk Resources
Register the raw devices or partitions used by VM guests as disk resources.
When migrating VM guests for virtual L-Servers, register the raw devices or the partitions shared between multiple VM hosts asdisk resources defined to be shared.
Perform the following procedure:
a. Create a storage pool (admin server)
To use a storage pool other than default one, create the storage pool.
For details on how to create a storage pool, refer to "20.2 Creating" in the "User's Guide for Infrastructure Administrators(Resource Management) CE".
b. Execute the rcxvmdiskagt command (managed servers)
Execute the rcxvmdiskagt command on each managed server. The rcxvmdiskagt command displays the raw device or partitioninformation recognized by the VM host. In addition, this command performs redirection and outputs the execution results toa file with the extension "xml".
Execute this command on all managed servers where disk resources are to be registered.
For details on the rcvmdiskagt command, refer to "5.25 rcxvmdiskagt" in the "Reference Guide (Command/XML) CE".
# /opt/FJSVrcvat/bin/rcxvmdiskagt -ip IP address of the managed server -vmtype ovm-sparc >rcxvmdiskagt_command_execution_result_XML_file <RETURN>
Example
Output Example of the rcxvmdiskagt Command
>rcxvmdiskagt -ip 192.168.23.153 <RETURN>
<?xml version="1.0" encoding="utf-8"?><VmHost ip="192.168.23.153">
- 332 -
<Disks> <Disk name="*" path="vol0@primary-vds0" size="10.0"/> <Disk name="*" path="vol1@primary-vds0" size="20.0"/> <Disk name="*" path="vol2@primary-vds0" size="30.0"/> <Disk name="*" path="vol3@primary-vds0" size="40.0"/> <Disk name="*" path="vol4@primary-vds0" size="50.0"/> </Disks></VmHost>
c. Delete unnecessary Disk elements (managed servers)
Delete the <Disk> elements for the following items, from the file which was output in step b.
- raw devices or partitions not used by the VM guests
- raw devices or partitions which are to be used by the VM host but are not mounted
- LVM disks
Example
Example of an XML file with <Disk> Elements Deleted
>rcxvmdiskagt -ip 192.168.23.153 <RETURN>
<?xml version="1.0" encoding="utf-8"?><VmHost ip="192.168.23.153"> <Disks> <Disk name="*" path="vol0@primary-vds0" size="10.0"/> <Disk name="*" path="vol1@primary-vds0" size="20.0"/> <Disk name="*" path="vol2@primary-vds0" size="30.0"/> </Disks></VmHost>
d. Create an XML file storage directory (admin server)
Create a directory for storing the XML file created in step b and step c on the admin server.
e. Store XML files (admin server)
Store the XML file created in step b and step c in the directory created in step d.
f. Execute the rcxvmdisk command (admin server)
Execute the rcxvmdisk command on the admin server. The rcxvmdisk command displays part of the disk resourceconfiguration information for virtual L-Servers in XML format. In addition, this command performs redirection and outputsthe execution results to a file with the extension "xml".
For details on the rcxvmdisk command, refer to "5.24 rcxvmdisk" in the "Reference Guide (Command/XML) CE".
For details on the XML file, refer to "15.4.4 Disk Resources [OVM for SPARC]" in the "Reference Guide (Command/XML)CE".
# /opt/FJSVrcvmr/bin/rcxvmdisk -dir Storage directory_for_XML_files_of_command_execution_results >XML_file_of_disk_resource_configuration_information_for_virtual_L-Servers <RETURN>
Example
Execution Example of the Following Case:
- 333 -
Storage directory for XML files of rcxvmdiskagt command execution results: /root/rcxvmdiskagt_dirXML file of disk resource configuration information for virtual L-Servers: /root/rcxvmdiskagt_dir/rcxvmdisk_Storage_Pool_1.xml
# /opt/FJSVrcvmr/bin/rcxvmdisk -dir /root/rcxvmdiskagt_dir > /root/rcxvmdisk_Storage_Pool_1.xml<RETURN>
Example XML file of disk resource configuration information for virtual L-Servers
<?xml version="1.0" encoding="utf-8"?><Storage> <Pool name="*" /> <VmHosts> <VmHost ip="192.168.23.153"> <Disks> <Disk name="*" path="vol0@primary-vds0" size="10.0"/> <Disk name="*" path="vol1@primary-vds0" size="20.0"/> <Disk name="*" path="vol2@primary-vds0" size="30.0"/> </Disks> </VmHost> </VmHosts></Storage>
g. Specify the storage pool name
For the name attribute of the <Pool> element in the XML file of disk resource configuration information for virtual L-Serverswhich was created in step f, specify the name of the storage pool in which disk resources for virtual L-Servers are to beregistered. For the name attribute of each <Disk> element, specify the disk resource name.
Example
Example of the XML file of disk resource configuration information for virtual L-Servers when registering diskresources based on the following information:
XML file name of disk resource configuration information for virtual L-Servers: rcxvmdisk_Storage_Pool_1.xmlStorage pool name: Storage_Pool_1
Virtual Disk Service Information Disk Resource Name
vol0@primary-vds0 disk_resource_10gb
vol1@primary-vds0 disk_resource_20gb
vol2@primary-vds0 disk_resource_30gb
XML file of disk resource configuration information for virtual L-Servers
<?xml version="1.0" encoding="utf-8"?><Storage> <Pool name="Storage_Pool_1" /> <VmHosts> <VmHost ip="192.168.23.153"> <Disks> <Disk name="disk_resource_10gb" path="vol0@primary-vds0" size="10.0"/> <Disk name="disk_resource_20gb" path="vol1@primary-vds0" size="20.0"/> <Disk name="disk_resource_30gb" path="vol2@primary-vds0" size="30.0"/> </Disks> </VmHost> </VmHosts></Storage>
- 334 -

h. Create and register disk resources in a storage pool (admin server)
Specify the XML file of disk resource configuration information for virtual L-Servers which was created in step g, thenexecute the rcxadm disk command. Disk resources for virtual L-Servers are created and registered in the storage pool.
# /opt/FJSVrcvmr/bin/rcxadm disk register -fileXML_file_of_disk_resource_configuration_information_for_virtual_L-Servers <RETURN>
Example
Execution Example of the Following Case:
XML file of disk resource configuration information for virtual L-Servers: /root/rcxvmdiskagt_dir/rcxvmdisk_Storage_Pool_1.xml
# /opt/FJSVrcvmr/bin/rcxadm disk register -file /root/rcxvmdiskagt_dir/rcxvmdisk_Storage_Pool_1.xml<RETURN>
3. Register Network Resources
a. In the ROR console orchestration tree, right-click the target network pool, and select [Create Resource] from the popup menu.
The [Create a network resource] dialog is displayed.
b. Enter the items necessary for network resources.
For details, refer to "14.3 Network Resources" in the "User's Guide for Infrastructure Administrators (Resource Management) CE".
Point
IP address of management LAN is necessary to connect it with the installation server for making L-Server that specifies the image.Therefore, please make the network resource of management LAN to the VM host's management LAN for the pool within user'srange of the access.
4. Register Virtual Image Resources
Register the virtual image resources used when creating virtual L-Servers in the resource pool.It is necessary to create a BladeLogic system package and register it with Resource Orchestrator.
a. Template configuration
Specify the data store instance name constructed in "E.7.2 Preparations for Servers" in the "Design Guide CE" as"DATA_STORE" of the "Local Properties" of the system package stored in the following location.
Depot/ROR/Solaris/vm/ovm/template
b. Create the BladeLogic system package
From the console of BladeLogic, create the BladeLogic system package in the following folder.
Depot/ROR/Solaris/vm/ovm
The name of the system package must start with an alphabetic character (upper or lower case), and can contain up to 32alphanumeric characters or underscores ("_").For details, contact Fujitsu technical staff.
Point
A default system package is created under the following folder at the time of registration of server management software.Copy the system package and use it.
- 335 -
Depot/ROR/Solaris/vm/ovm/template
The minimum parameters required for operation are set in these system packages. Modify the parameters depending on yourenvironment.Correct the following parameters according to the environment.If correction of other parameters is necessary, contact Fujitsu technical staff.
In the case of Solaris 11
- [Computer Settings]
All the items
- [Network]
- Name service type
- [Finish Script/Agent Install]
- Installing RSCD agents
- Pushing ACL
- Executing batch job after installation
- Forced batch job after installation
- Application server for BMI callback
In the case of Solaris 10
- [Disk partition]
All the items
- [Computer Settings]
All the items
- [Network]
- Name service type
- [Package Specifications]
All the items
- [Rules File Script]
All the items
- [Begin Script]
All the items
- [Finish Script/Agent Install]
- Installing RSCD agents
- Pushing ACL
- Executing batch job after installation
- Forced batch job after installation
- Application server for BMI callback
c. Register the BladeLogic system package with Resource Orchestrator
Refer to "17.5.1 Collecting and Registering" in the "User's Guide for Infrastructure Administrators (Resource Management)CE".
- 336 -

d. Register the virtual image resource in the resource pool
For details, refer to "14.7.1 Virtual Image Resources" in the "User's Guide for Infrastructure Administrators (ResourceManagement) CE".
C.8.4 Manual Network ConfigurationROR provides the function for connection with virtual NICs, for virtual switches created on OVM for SPARC.
Manually perform virtual switch settings on OVM for SPARC in advance.
Use a different VLAN ID for each virtual switch on OVM for SPARC to connect the virtual switches created on OVM for SPARC withvirtual NICs.
It is necessary to configure the following settings beforehand.
1. Create Virtual Switches on OVM for SPARC
The virtual switch must be created on the VM host, in order to connect the L-Server to the network.
Create a virtual switch with the same name (including upper and lower case characters) for all VM hosts comprising the cluster.
This enables migration of VM guests between VM hosts.
When configuring a virtual switch on OVM for SPARC and server virtualization software other than OVM for SPARC is beingused with the same manager, set a different name from the one used by the virtual switch, virtual network, and virtual bridge on theother virtualization software.
For details on how to create virtual switches on OVM for SPARC, refer to the OVM for SPARC manual.
2. Configure Virtual Switch Communication on OVM for SPARC
Right-click the LAN switch in the server resource tree, and select [Modify]-[Network Settings] from the popup menu.
Configure LAN switches to enable communication using the tagged VLAN between virtual switches created on OVM for SPARCusing the same name.
The ROR console can be used for VLAN configuration of LAN switch blade external ports.
For details, refer to "5.4.4 Configuring VLANs on LAN Switch Blades" in the "User's Guide for Infrastructure Administrators(Resource Management) CE".
3. Define the Virtual Switch Created on OVM for SPARC and the VLAN ID
Define the virtual switch created on OVM for SPARC and the VLAN ID in the virtual network definition file for ResourceOrchestrator.
For details on definition file format, refer to "File Format for Virtual Network Definitions".
4. Create Network Resources
- From the GUI:
Create network resources using the VLAN IDs specified in steps 2 and 3. In the [Create a network resource] dialog, check the[Use configured virtual switches.] checkbox.
- From the Command-line:
a. Create the XML file that defines network resources.
Define the VLAN ID specified in steps 2 and 3 in the XML file.In this case, specify auto="false" in the Network element.
b. To create the network resource, execute the rcxadm network create command specifying the XML file created in step a.
The network resources are created.
For details on the rcxadm network command, refer to "3.9 rcxadm network" in the "Reference Guide (Command/XML)CE".
For details on the Network element, refer to "15.5 Network Resources" in the "Reference Guide (Command/XML) CE".
- 337 -
File Format for Virtual Network Definitions
Location of the Definition File
[Windows Manager]Installation_folder\SVROR\Manager\etc\customize_data
[Linux Manager]/etc/opt/FJSVrcvmr/customize_data
Definition File Name
vnetwork_ovmforsparc.rcxprop
Definition File Format
Describe the virtual network definition file in one line as below:
"Name of the virtual switch service created in OVM for SPARC"=VLAN ID
For the VLAN ID, a value from 1 to 4094 can be specified.
Example
"primary-vsw0"=10
Blank spaces before and after equal signs ("=") are ignored.
Describe the virtual switch service name correctly, as the entry is case-sensitive.
Save files using the UTF-8 character code.
When the same VLAN ID is included in a line with a different virtual switch service name, the first occurrence in the file is valid andthe lines after it are ignored.
An error occurs during L-Server creation if the definition of the VLAN ID of the network resource connected to the NIC cannot befound.
C.8.5 Creating L-Server TemplatesThis chapter explains how to create an L-Server template.
L-Server templates can be created using the following methods.
- Using the Wizard GUI
L-Server templates can be created using the wizard GUI in the wizard format.For details on the GUI in the wizard format, refer to "15.1 Operations Using the Wizard GUI" in the "User's Guide for InfrastructureAdministrators (Resource Management) CE".
- Manually
Use the following procedure to create an L-Server template:
1. Export an L-Server Template
The sample L-Server templates provided with Resource Orchestrator can be exported.For details on how to export L-Server templates, refer to "15.2.1 Export" in the "User's Guide for Infrastructure Administrators(Resource Management) CE".
2. Edit an L-Server Template
The L-Server template output in step 1 can be edited with an editor, etc.For details on the L-Server templates for virtual L-Servers, refer to "15.2.2 Virtual L-Server Templates" in the "Reference Guide(Command/XML) CE".
- 338 -

3. Import an L-Server Template
For details on how to import L-Server templates, refer to "15.2.3 Import" in the "User's Guide for Infrastructure Administrators(Resource Management) CE".
C.8.6 Creating an L-ServerUse the following procedure to create L-Servers:
- Create an L-Server using an L-Server template
- When there are no cloning images, or when not using already registered cloning images
1. Create an L-Server, referring to "16.1 Creation Using an L-Server Template" in the "User's Guide for InfrastructureAdministrators (Resource Management) CE".
When creating the L-Server, select [None] for images.
2. Manually install the OS in the guest domain created in step 1.
For manual OS installation, refer to the OVM for SPARC manual.
- When using an existing cloning image
Create an L-Server, referring to "16.1 Creation Using an L-Server Template" in the "User's Guide for Infrastructure Administrators(Resource Management) CE". In this case, specify the cloning image that you want to use as an image.
- Create an L-Server specifying individual specifications
Refer to "16.3 Creation of Virtual L-Servers Using Parameters" in the "User's Guide for Infrastructure Administrators (ResourceManagement) CE".
For details on the [OS] tab settings, refer to "C.8.7 [OS] Tab Configuration".
Point
- When the OS type of the cloning image specified during L-Server creation is "Solaris 11", the number of the IP addresses which canbe set is one, and the IP address of admin LAN is set.
When admin LAN is not specified for the NIC of the L-Server, after creating the L-Server, it is necessary to delete the IP address ofthe admin LAN.Moreover, after creating the L-Server, the user needs to set IP address of public LAN. For details, refer to "Operation after creatingan L-Server".When the OS type of the image is "Solaris 10", the IP address is set to all NICs.
- When using the following functions, perform set up manually after creating the L-Server.
- Setting of the dependency to the guest domain (master/slave)
- CPU Power Management
- CPU Dynamic Resource Management
When using the CPU Dynamic Resource Management function it is necessary to allocate CPU for each thread.
Operation after creating an L-Server
1. Deletion of the IP address of the admin LAN
This operation is required when an L-Server fulfilling the following conditions is created.
- A Solaris 11 cloning image is specified for the image to be deployed to the L-Server
- One or more NICs are set for the L-Server
- The admin LAN is not included in the connection destination of the NIC
- 339 -
To deploy the cloning image to the L-Server that fulfills the above conditions, an IP address from the network resources of theadmin LAN is temporarily allocated to the guest domain. This IP address remains on the OS, after the L-Server is created.Therefore, it is necessary to delete the admin LAN IP address which remains on the OS using the following procedure.
a. Check the subnet address set for the network resource of the admin LAN.
b. Check the IP interface name which was checked in step a. and to which the IP address of admin LAN subnet is set using thefollowing command.
# ipadm show-addr <RETURN>
c. Delete the IP address set for the IP interface checked in step b. using the following command.
# ipadm delete-addr netX/v4 <RETURN>
d. Delete the IP interface checked in step b. using the following command.
# ipadm delete-ip netX <RETURN>
2. Set the IP addresses of the public LAN and admin LAN.
This operation is required, when creating an L-Server with a Solaris 11 cloning image specified.This is necessary when two or more NICs of the L-Server are specified for the admin LAN.
The IP addresses of the public LAN and admin LAN are not reflected on the OSs of L-Servers which have Solaris 11 cloning imagesspecified.Therefore, after checking the IP addresses of the public LAN and admin LAN allocated for each NIC of the L-Server, set them onthe OS.In addition, the number attached to the end of the network interface name on the OS is the same as the index number of the NIC ofthe L-Server.
Example
When the Index is the NIC of 1
The network interface name on the OS is set to net1.
3. Set up the default gateway of the public LAN and the admin LAN.
This operation is required when it corresponds to the following conditions.
- When an L-Server with an image specifed has been created
- When the default gateway has been set as a network resource of the public LAN
This operation is required, when all the following conditions are satisfied.
- When two or more network resources of the admin LAN are specified for NICs of the L-Server
- When configuring a default gateway for the network resource of the admin LAN
However, the admin LAN network resource must be one other than the last one specified.
Connect to the console of a guest domain and set up a default gateway using the following procedure.
a. Check the address of the default gateway set as the network resource specified during L-Server creation.
Check the address of the default gateway set for the applicable network resource.
b. Set up a default gateway.
Set the address of the default gateway checked by a. from the OS.Refer to the manual of Solaris for the setting method.
4. Check the output destination of the system log of the guest domain.
When creating an L-Server with a cloning image specified, check the output destination of the system log using the followingprocedures, and change the destination if necessary.
- 340 -
When the following conditions are met, the admin LAN IP address used temporarily when creating the L-Server is set for the outputdestination of the system log. In that case, ensure the output destination of the system log is changed.
- A Solaris 10 cloning image is specified
- The admin LAN IP address for the NIC is not specified
a. Connect to the console of the guest domain, and check the output destination of the system log.
Refer to the following file and confirm the IP address specified for loghost, which is the output destination of the system log.
/etc/inet/hosts
b. Changing the output place of a system log
When the output location of a system log needs to be changed, edit the file indicated in step a. and specify another IP addressas loghost.Since the definition of the admin LAN IP address used temporarily during L-Server creation remains when the IP address ofadmin LAN is not specified when creating the L-Server creation, delete it if necessary.In that case, since it is necessary to change the host name of the system, refer to the Solaris manual and change the host nameof the system.
Additionally, other than the file indicated in step a., there is a TCP/IP composition file (*) in which the definition for theadmin LAN IP addresses used temporarily will remain. If necessary, delete the definitions in those files.
* Note: The definition remains in the following files. For details, refer to the manual of Solaris.
- /etc/inet/ipnodes
- /etc/inet/netmasks
c. Reboot the OS
Reboot the OS and check that the system log is output to the server set as the output location for system logs.
5. Settings for sharing disks
This setting is required when sharing a disk between L-Servers (guest domains).
a. Register a disk in a virtual disk service.
b. Register the disk registered in step a. to a storage pool.
Disk resources can be registered by executing the rcxadm disk register command.
c. Add a virtual disk to a guest domain.
C.8.7 [OS] Tab ConfigurationEnter the parameters to set for the OS when creating the L-Server.
For OVM for SPARC, only the following parameters are reflected.
If any other parameters are set, they will be ignored.
Table C.27 List of Settings
Item
Solaris
DescriptionNecessityof Entry
Values WhenOmitted
Host name Possible L-Server Name Enter the host name or computer name.
Enter a character string containing up to 21 alphanumeric charactersand hyphens ("-").Hyphens ("-") cannot be specified for the first or last characters.
If this parameter is not specified, the L-Server name is converted andset as indicated above.If underscores ("_") or periods (".") are used in an L-Server name, they
- 341 -
Item
Solaris
DescriptionNecessityof Entry
Values WhenOmitted
will be replaced with hyphens ("-"), because these characters cannotbe used for host names or computer names.
- When a Solaris 10 image is specified
When creating multiple NICs in a guest domain, this product setsthe 2nd and latter NICs in the following format.
Specified host name-suffix (01-)
In addition, the host name set in the system becomes the host nameset in the NIC connected to the admin LAN.
When a NIC connected to the admin LAN is not created during L-Server creation, the host name set for the admin LAN NIC that isused temporarily during L-Server creation is set as the host nameof the system.
Example
When a 3rd NIC linked to the admin LAN is added
Host name-03 specified becomes the host name of the system.
- When a Solaris 11 image is specified
The specified value is set as a host name.
Administrator password Possible - (*1, *2) Set the administrator password for the L-Server.
Enter the password using between 1 and 255 alphanumeric charactersor symbols.
This product uses the DES system for the cipher system of passwords.The maximum number of characters which can be enciphered by a DESsystem is eight.When a character string of nine or more characters is specified as anadministrator password, the first eight characters are set as thepassword, and anything after the ninth character is ignored.Refer to the manual or support information of Solaris for details of theDES system.
*1: When the value is specified in the OS property definition file, its values are configured.*2: When the administrator password is omitted, operation differs based on the OS of the specified image.
- When a Solaris 10 image is specified
The error message of message number 67390 is output and the process ends abnormally.Do not omit the administrator password when you specify a Solaris 10 image.
- When a Solaris 11 image is specified
Although creation of the L-Server ended normally, it will be in the state where log in to the OS in multiuser mode is not possible.In order to make login possible in multiuser mode, change the administrator password using the following procedures.
1. On the control domain, change the value of auto-boot?, which is an environment variable of OBP, to "false".
# ldm set-variable auto-boot?=false guest domain's name <RETURN>
2. Connect to the console of the guest domain and from OBP mode, start the OS in single user mode.
For the method of starting the OS in single user mode, refer to the manual of Solaris.
- 342 -

3. Log in to the OS and change the password of the root account.
For the method of changing the password, refer to the manual of Solaris.
4. On the control domain, change the value of auto-boot?, which is an environment variable of OBP, to "true".
# ldm set-variable auto-boot?=true guest domain's name <RETURN>
Information
OS Property Definition File
By setting the default values in an OS property definition file in advance, the default values of the information on the [OS] tab, etc. aregenerated when creating an L-Server.
For details, refer to "C.1.7 OS Property Definition File".
C.8.8 Advisory Notes for OVM for SPARC Usage
OS Startup Configuration while Starting Domains
When starting an OS while starting up an L-Server, specify "true" for the auto-boot? variable of the guest domain.In addition, when an L-Server is created using this product, the following values are set for the auto-boot? variable.
- When an L-Server with an image specified is created
"true" is set for the auto-boot? variable.
- When an L-Server with no image specified is created
"false" is set for the auto-boot? variable.
Connection with the console of the guest domain during L-Server creation
If it is connected with the console of a guest domain during L-Server creation, L-Server creation may fail.Therefore, do not connect with the console of a guest domain during L-Server creation.
IP address specified during L-Server creation
In order to connect to an installation server, an IP address of the admin LAN is needed for creation of an L-Server an image specified.Therefore, if an IP address of the admin LAN is not specified creating the L-Server creation, a NIC connected to the admin LAN istemporarily added to the L-Server, and an IP address from the network resources of the admin LAN is set for the guest domain.The temporarily added NIC for connection to the admin LAN is automatically deleted after creation of the L-Server.
When the default gateway is configured for the admin LAN network resource and an admin LAN IP address is temporarily configured, adefault gateway is also set.
Therefore, take into consideration that the admin LAN IP address of the default gateway is set, and do not specify multiple default gatewaysduring L-Server creation.
- About operation when a Solaris 11 image is specified
When an L-Server is created with a Solaris 11 specified, the number of the IP addresses set for the guest domain is one.This is because the number of IP addresses which can be set during OS installation is one, due to the specifications of Solaris 11.
Since the IP address of the admin LAN is essential when creating an L-Server with an image specified, the IP address set for the guestdomain becomes the IP address for the admin LAN.Therefore, even if the public LAN IP address is specified during L-Server creation, the public LAN IP address is not set for the guestdomain.
- 343 -
Also, when the admin LAN IP address is not specified during L-Server creation, the IP address of the admin LAN network resourcethat is used temporarily is set for the guest domain. The setting of this IP address remains on the OS after creation of the L-Server.Therefore, it is necessary to perform the following operations on the OS of a guest domain after L-Server creation.
- Delete the setting of the admin LAN IP address used temporarily
- Set the admin LAN IP address specified when creating the L-Server
In addition, please refer to "C.8.6 Creating an L-Server" of "Operation after creating an L-Server" for the above-mentioned operation.
Display of CPU Performance and the Number of CPUs for L-Servers
The number of CPUs for L-Servers are calculated using the number of CPU threads configured for the domain, and is displayed per core.The CPU performance of CPUs for L-Servers is calculated using the CPU performance and the number of CPU threads configured forthe VM host.
The calculation formula is as below.
- Number of CPUs = number of threads / number of threads per core (round-up any decimal values)
- CPU performance = (number of threads * physical CPU performance) / (number of threads per core * number of CPUs)
Example
When creating an L-Server to which 2 cores (16 threads) are allocated on a VM host with a 2.8 GHz CPU, 1 core, and 8 threads
Number of CPUs = 16 / 8 = 2CPU performance = (16 * 2.8) / (8 * 2) = 2.8 (GHz)
When creating an L-Server to which 12 threads are allocated on a VM host with a 2.8 GHz CPU, 1 core, and 8 threads
Number of CPUs = 12 / 8 = 1.5 ≑ 2CPU performance = (12 * 2.8) / (8 * 2) = 2.1 (GHz)
CPU Capacity and Memory Capacity when Settings are Configured for Conversion Using ReservationValues
When the settings are configured to calculate using the reservation values, the same CPU capacity and memory capacity as used by avirtual machine are configured as the values for conversion using a maximum value.
Max. Number of Possible L-Servers View
In OVM for SPARC, CPU performance is the VM host's CPU performance. Therefore, the CPU performance of the L-Server template isdisregarded.
Creating an L-Server
This product only supports creation of guest domains.When creating the I/O domain and the service domain, do so on the control domain.Also, setting of a global zone is not performed for the created guest domain. When using a guest domain as a global zone, perform settingsfor the global zone on the OS of the guest domain after creating the L-Server.
Display of Disk Information
The identifier information (ID number) is displayed for the device path.
- 344 -
L-Server Power Operations
When functions are not supported by OVM for SPARC, stopping and rebooting of L-Servers cannot be performed.Depending on the statuses of virtual machines, either operate virtual machines directly, or perform a forced stop or a forced reboot.
When executing power operations of VM guests in this product, binding and unbinding of resources is also executed.
- When starting a VM guest
Binding of resources is executed.
- When stopping a VM guest
Unbinding of resources is executed.
- When restarting a VM guest
Binding/unbinding of resources is not executed.
When two or more virtual L-Servers are sharing a specific disk on a VM host, when one of the virtual L-Server has been started, the otherL-Server which is sharing the disk cannot be started.
I/O Domain
In Resource Orchestrator, I/O domains are detected as VM guests.An I/O domain may affect other guest domains when performing power operations.
It is recommended to perform management without linking an I/O domain with an L-Server.This is to avoid performing incorrect operations due to confusion of the I/O domain with another guest domain, as a result of the I/Odomain being managed as an L-Server or an L-Platform.
Number of VM Host CPUs
The number of cores that are recognized by the control domain is displayed for the number of CPUs of the VM host.
Adding Disks to L-Servers
When adding disks to L-Servers, the disk name of guest domains are set using the following rule.
vdiskN
N is the disk number(0-63) which was specified when adding the disk.
Migration Operations
When performing migration of virtual L-Servers between servers, disk resources must be linked with all disks detected by the L-servers.The candidates for the migration target are the resources which meet all of the following conditions:
- VM hosts which share the disk resources already allocated to an L-Server
- VM hosts which have the same spare server settings for the VM host
When migrating an L-Server to the VM host using one of the following methods, the L-Server after migration may be unlinked from thedisk resources or the disk information may not be updated.
- Migration between servers from the server tree of the ROR console
- Migration between servers using a command with the destination VM host specified
- 345 -
As a product specification of OVM for SPARC, no check of whether a disk allocated to a guest domain is shared between source VM hostand the target VM host is performed.Therefore, check the following items to confirm sharing settings of disks.
- All disks allocated to the guest domain are shared with the target control domain
- The disk service and volume name are the same in the source control domain and target control domain
When executing migration of a guest domain with unshared disks, migration may be successful, but operation is not guaranteed.
After migration, it is necessary to execute the "ldm add-spconfig" command on the control domain to save VM guest configurationinformation on the service processor. This means the VM host configuration is retained even after a reboot.
In this product, VM guest configuration information is saved when migration of a VM guest is detected. When disabling automatic savingof configuration information of this product, disable the definition in the definition file indicated in "Definition File of Whether to Savethe Configuration Information".
When a VM host fails during migration, VM guests may be started twice.In order to prevent this, when the value of VM guest's auto-boot? variable is set as "true", please change the value of auto-boot? using thefollowing procedures.
1. Before performing migration, change the value of auto-boot? to "false" and save configuration information.
2. After execution of migration, return the value of auto-boot? to the original value (true).
In addition, when all of the following conditions are satisfied, it is possible to perform step 1 and step 2 above automatically by includingthe definition in the file mentioned in "Validation of the auto-boot? change function on migration".
- The auto-save function of configuration information is enabled (*1)
- "true" is configured for the value of auto-boot? of the guest domain (*2)
*1: For details on auto-saving of auto configuration, refer to "Definition File of Whether to Save the Configuration Information".*2: Use the following ldm command to check the auto-boot? value which is configured for the guest domain.
# ldm list-variable auto-boot? Guest domain name <RETURN>
As the result of command execution, true is configured for auto-boot? when "auto-boot?=true" is displayed.
When auto-execution of the process in steps 1. to 2. described above fails, the migration process of servers, the message number 67375or the message number 67385 is output and migration fails. When an error occurs, as the auto-boot? value may not be returned to the original value, check the auto-boot? value referring to thecorrective actions of the error message.
As a product specification of OVM for SPARC, during execution of migration other operations cannot be performed for guest domains.So, if operations for other VM guests or L-Servers are performed during migration, those operations may fail.When [Automatic] is specified, the L-Server does not migrate to the VM host where the L-Server (guest domain) which is sharing thedisk allocated to the L-Server is located.
When the following VM host is specified as the migration point for a powered on L-Server, the operation is dependent on the specificationsof OVM for SPARC.
- A VM host in which another powered on L-Server (guest domain) which is sharing the disk exists
When the following VM host is specified as the migration target and cold migration of a powered on L-Server is performed, the guestdomain will fail to start after being moved to the VM host of the migration target.
- A VM host in which another powered on L-Server (guest domain) which is sharing the disk exists
CPU Performance Values of L-Servers
Resource Orchestrator calculates the CPU performance values of virtual L-Servers based on the CPU performance value of the VM host.Therefore, even when the number of CPUs of a virtual L-Server is the same, virtual L-Server's CPU performance value may change dueto the VM Host's CPU performance value.
- 346 -
Deletion of L-Servers
When a VM guest who assigned to an L-Server is registered with this product as a VM host, the L-Server cannot be deleted.When deleting an L-Server registered as a VM host, delete the L-Server after using the following procedures to cancel the VM host'sregistration.
1. When a Solaris Zone L-Server exists in a VM host, delete or release the relationship with the L-Server.
2. Delete the disk resource relationship with the VM host from the storage pool.
3. Delete unnecessary network resources from the network pool.
4. Release registration of unnecessary cloning images from the image pool.
5. Carry out registration release of the VM host from the VM pool.
6. Cancel the VM host's registration from the server tree.
7. Delete the L-Server from the orchestration tree.
Linking of a Guest Domain with Virtual L-Servers
When Solaris zones are constructed on the guest domain, and the guest domain is registered as a VM host, virtual L-Servers linked withthe guest domain cannot be imported into the L-Platform.In addition, the virtual L-Servers that configured a Solaris Zone on a guest domain must be managed by the administrator in charge of theentire system (a supervisor or a dual-role administrator).
When the following operations are performed for a virtual L-Server created on a Solaris zone in a guest domain, the non global zone willalso be affected, so check the scope of effect before performing the operations.
- Power operations
- Moving an L-Server between Servers (Migration)
- Modifying L-Server specifications
- Detaching a Disk
Users are advised to exclude the virtual L-Servers which configured a Solaris Zone on a guest domain from the targets of batch powercontrol.
When using batch power control in an environment where a Solaris zone is configured on a guest domain, set the startup priority of thevirtual L-Servers which configure the Solaris Zone on the guest domain as higher than that of the virtual L-Servers configured on thatSolaris zone.
As power control uses the function of the VM management software, if power control fails, perform power operations on each L-Server.
When modifying virtual L-Server specifications, assign more resources to the guest domain than the resources of all the non global zonescreated on the Solaris zone.When fewer resources than the resources of all of the non global zones constructed on the Solaris zone are assigned, the followingphenomena may occur.
- It becomes impossible to start the non global zone
- The performance of the non global zone deteriorates
Saving of VM Guest Configuration Information
When the following operations are performed on VM guests or L-Servers using this product, it is necessary to save configurationinformation on a service processor.
- 347 -
- Power Operations (ON/OFF/OFF(Forced)/Reboot/Reboot(Forced))
When using the function for auto-saving of VM guest configuration information, VM guest configuration information is maintainedeven after reboot/force reboot is executed.The reason for this is that auto-save of configuration information is executed when the statuses of VM guests or L-Servers change.
- Migration
- Creating and Deleting Virtual L-Servers
- Modification of virtual L-Server specifications (the number of CPUs, memory size)
- Adding / removing disks of virtual L-Servers
In Resource Orchestrator, configuration information is automatically saved when the operations above are performed.Configuration information is also automatically saved when the following operations for guest domains are performed from the controldomain.
- Creation/removal of guest domains
- Binding/unbinding of resources
- Stopping/starting of a guest domain
- Modification of the number of CPUs and memory size
- Addition/deletion of virtual disks
- Migration of a guest domain
When saving VM guest configurations manually, set the definition value in the definition file indicated in "C.8.1 Creating DefinitionFiles" to false, and execute the "ldm add-spconfig" command in the control domain.
When using the function for auto-saving of VM guest configurations, be careful of the following points.
- Since auto-save of configuration information is performed when change is detected in the periodic update of servers, there is a timelag between completion of the operation and saving of composition information.
Also, when changing of the state or configuration of a guest domain is directly performed on a VM host, auto-save of the configurationinformation is carried out when change is detected in the periodic update of servers.However, there will be a time lag when configuration information is saved. When directly operating the guest domain on a VM host,it is recommended to manually save the configuration information, after canceling auto-save of configuration information.
- When a VM guest/L-Server which has carried out migration is detected, saving of configuration information is performed on thesource and destination VM hosts
In the auto-saving of configuration, this product overwrites the newest configuration information to the configuration with the [current]state. However, overwrite the configuration information with the [next poweron] status, when there is no configuration informationwith the [current] status.
- When factory-default is chosen as configuration information for updating, this product does not save configuration information (whenfactory-default is in [current] or the [next poweron] state).
- With this product, since the newest configuration is saved temporarily, this product creates the composition information using thename config_tmp. Therefore, do not create configuration information named config_tmp.
- In SPARC M10s, a maximum of eight sets of configuration information can be saved, including factory-default.
In Resource Orchestrator, as the configuration information, config_tmp, is temporarily created, only seven sets of configurationinformation, including the factory-default, can be created.
- Single quotes (') cannot be used in configuration names. This product does not save configurations when a single quote (') is containedin the name of the configuration information used as the candidate for updating.
- Due to the specifications of OVM for SPARC, this product cannot save configuration during execution of migration. Therefore, whenmigration is performed continuously, the configuration information is not saved until the final migration is completed.
- 348 -

- If saving of configuration information and operation of a VM host of configuration are performed simultaneously, saving of theconfiguration information may fail.
It such cases Message number 41127 is displayed in the event log, when this occurs, save the configuration information again. Fordetails on how to restore configurations, refer to "3.1.1 411XX Series" in "Messages".
When executing power operations of VM hosts, it is recommended to execute power operations after canceling automatic collectionof configuration information and manually saving configuration information.
CPU Dynamic Resource Management
When the CPU values of virtual L-Servers are modified in Resource Orchestrator, CPUs are allocated per core.
Therefore, the function of CPU Dynamic Resource Management becomes unable to be used (*).
When using CPU Dynamic Resource Management, it is necessary to allocate CPUs per thread for the guest domain in the control domain.
If the calculation of usage charges is enabled, the usage charge for CPUs will be calculated based on the number of CPUs changeddynamically by CPU Dynamic Resource Management.
*Note: The CPU Dynamic Resource Management function dynamically changes the number of CPUs for each thread. When CPUs areallocated per core, it is not possible to change the number of CPUs per thread. This means the CPU Dynamic Resource Managementfunction cannot be used. For details, refer to the manual of OVM for SPARC.
Sharing disks
- During L-Server creation and disk addition, disks used by other L-Servers (guest domains) cannot be specified. When sharing a diskbetween two or more L-Servers (guest domains), set up the disk to share on the VM host after creating the L-Server.
- When deleting disks from L-Servers, disks shared with other L-Servers (guest domains) cannot be deleted. Delete the disk shared bytwo or more L-Servers (guest domains) from the VM host.
- L-Servers with disks shared with other L-Servers (guest domains) cannot be deleted. For guest domains, delete the disk shared withanother L-Server (guest domain) from the VM host. Delete the L-Server after checking that the disk has been deleted in the detailedinformation of the L-Server.
Check the disk information of the L-Server using the GUI.
1. Display the ROR console.
2. Select the L-Server on the orchestration tree.
3. Check that the disk which was being shared is not displayed on the [Disk Information] on the [Resource Details] tab in the mainpanel.
C.8.9 OvercommitThis section explains the overcommit function for L-Servers.
Overcommit
The OVM for SPARC overcommit function for the CPU and memory is available on Resource Orchestrator.
The OVM for SPARC overcommit function for the CPU and memory allows a guest domain to use more virtual resources than that ofthe actual CPU and memory of a server.
Resource Orchestrator provides the following functions to utilize the OVM for SPARC overcommit function when creating L-Servers.
- Setting an overcommit attribute for a resource pool
Overcommit attributes can be set for resource pools. If an L-Server template with the overcommit attribute configured is used, an L-Server with the overcommit attribute configured can be created by selecting the resource from the resource pool with overcommitconfigured.
- 349 -
- Deployment of L-Servers with more resources than those of the server
Creation of an L-Server with more resources than that of the actual CPU or memory installed on a server is possible.Whether the resulting L-Server can be started depends on the resources available on the VM host.
Installation Procedure
1. Create a VM Pool for Overcommit
For details on how to create a VM pool, refer to "Chapter 20 Resource Pool Operations" in the "User's Guide for InfrastructureAdministrators (Resource Management) CE".
Point
Refer to the "Point" described in "1. Create a VM Pool for Overcommit" in "Installation Procedure" in "C.2.11 Overcommit".
Note
Refer to the "Note" described in "1. Create a VM Pool for Overcommit" in "Installation Procedure" in "C.2.11 Overcommit".
For details on how to edit the L-Server template, or create and check an L-Server, perform the operations of step 3 and later described in"C.2.11 Overcommit". The values that can be configured in the L-Server template or the VM specific information definition files asdescribed in the reference differ depending on the VM types. In OVM for SPARC, the values can only be specified when configuringovercommit in the L-Server template.
C.9 Citrix XenServerThis section explains how to configure Citrix XenServer as server virtualization software.
C.9.1 Creating Definition FilesThis section explains how to create definition files.
For definition files common to virtual L-Servers, refer to "C.1 Definition Files Commonly Shared when Creating Virtual L-Servers".
This section explains the definition files specific to Citrix-Xen.
For the managers and guest OSs that support the customization function, refer to "C.9.12 Customization Function of Guest OS".
Guest OS Customization Definition File
When the customization function of a guest OS is used, the following definition files are set.
Location of the Definition File
[Windows Manager]Installation_folder\SVROR\Manager\etc\customize_data
Definition File Name
os_customize_citrixxen.rcxprop
Definition File Format
Describe each line of the definition file in the following format:
Key = Value
When the same key is stated in multiple lines, the definition in the line described last is valid.
- 350 -
Definition File Items
Specify the following items:
Key Value Description
The IP address of the admin LANof the pool master name or theresource pool name of CitrixXenServer
The name of the storagerepository name for storingVCD
Describe the name of the storage repository for storingVCD. Specify when using customization of guest OSs.
Note
- Describe the XenServer pool master on CitrixXen in one line.
- When the key corresponding to the IP address of the resource pool or the pool master of Citrix XenServer of the object does notexist in the definition file, an error occurs.
- The key corresponding to the resource pool of Citrix XenServer
- The key corresponding to the admin LAN IP address of the pool master
- Use the UTF-8 character code for this file.
- When a description starts with a "#", the string is regarded as a comment line.
- When both of the following are defined in a definition file, the line in which the resource pool name is defined is used.
- The Citrix XenServer resource pool name
- The admin LAN IP address of a pool master belonging to the above resource pool
- When there are two or more lines of the following definition, the latter line will be used.
- The same resource pool name
- The IP address of the pool master
- Equal signs ("="), underscores ("_"), and single quotes (') cannot be used for the resource pool name or the storage repositoryname.
Customizable OS Type Definition File
When using the customization function of guest OS, define a customizable OS type in the following definition files.
Location of the Definition File
[Windows Manager]Installation_folder\SVROR\Manager\etc\customize_data
Definition File Name
customizable_os_type_citrixxen.rcxprop
Definition File Format
Describe each line of the definition file in the following format:
OS Type
- Describe the OS type of the VM guest of XenServer for OS Type.
- When a description starts with a "#", the string is regarded as a comment line.
- Empty lines are ignored.
- Use the UTF-8 character code for files.
- 351 -
- Everything from the start of a line to the next line feed code is treated as a single OS type.
- When there are two or more lines of the same OS type, the specifications in all lines are used.
Point
Describe the OS type of the template of XenServer in OS type.OS type can be acquired using the following commands. Refer to the Citrix website for the relevant product manual.
>xe vm-param-get uuid=Template_UUID param-name=os-version param-key=name <RETURN>
Citrix Website
URL: http://support.citrix.com/product/xens/
OS Type Conversion Definition File
In Resource Orchestrator, the OS type (Windows/Linux) of L-Servers is determined based on information obtained from VM products.In some cases, OS information cannot be correctly acquired for some VM products. As a result, processes of this product may not beperformed correctly.
In detailed information of L-Servers that use Windows OS or Linux OS, when the character string of "Windows" or "Linux" is not includedin OS type, edit this definition file to display the correct OS type.By relating part of the OS type displayed in the detailed information of the L-Server and the correct OS type name in this definition file,the L-Server will be processed as an L-Server of the specified OS type.
For Windows, client OS and server OS are judged from OS type information in ROR. Define the correct OS type including the characterstring "Server" when the server OS is Windows and OS information is not displayed correctly.
Location of the Definition File
[Windows Manager]Installation_folder\SVROR\Manager\etc\customize_data
Definition File Name
convert_os_type.rcxprop
Definition File Format
Describe each line of the definition file in the following format:
"OS type of detailed information on L-Server"="Correct OS type"
- OS type describes the OS type of the detailed information of the L-Server.
- When a description starts with a "#", the string is regarded as a comment line.
- Empty lines are ignored.
- Use the UTF-8 character code for files.
- Only the first line defined is used when there are two or more lines of the same "OS type of detailed information on L-Server".
- Specify the correct OS type using alphanumeric characters.
- The "OS type of detailed information on L-Server" is not case-sensitive.
- The character string in "OS type of detailed information on L-Server" is used to determine if the OS is a guest OS or server OS.
Example Definition File
In the following example, the OS type "Microsoft" displayed in detailed information of an L-Server is converted into the correct OStype, "Microsoft Windows Server 2008 Standard Edition".
- 352 -
"Microsoft"="Microsoft Windows Server 2008 Standard Edition"
C.9.2 Registering Resources with Resource OrchestratorThis section explains how to register resources with Resource Orchestrator.
When Using Blade Servers
1. Register VM Hosts as Storage Management Software
Register one of the VM hosts belonging to the pools on Citrix XenServer. It is not necessary to register all VM hosts which belongto the pools.
When registering VM hosts as storage management software, the storage repositories that were created in advance during storagepre-configuration are automatically registered with Resource Orchestrator as virtual storage resources.
Execute the rcxadm storagemgr command to register storage management software.
For details on the rcxadm storagemgr command, refer to "5.17 rcxadm storagemgr" in the "Reference Guide (Command/XML)CE".
2. Register Chassis
Refer to "5.4.1 Registering Chassis" in the "User's Guide for Infrastructure Administrators (Resource Management) CE".
3. Register Managed Servers (within Chassis)
When registering managed servers, the storage repositories that were created in advance during pre-setup preparations areautomatically registered in Resource Orchestrator as virtual storage resources. When the registered managed server is a Pool Master,the templates created in advance are automatically registered as virtual cloning images by Resource Orchestrator.
For details on how to register managed servers, refer to "5.4.2 Registering Blade Servers" in the "User's Guide for InfrastructureAdministrators (Resource Management) CE".
4. Register LAN Switch Blades
Refer to "5.4.3 Registering LAN Switch Blades" in the "User's Guide for Infrastructure Administrators (Resource Management)CE".
To register a network resource, specify a network pool when creating the network resource.
For details, refer to "Chapter 14 Registering Resources in Resource Pools" in the "User's Guide for Infrastructure Administrators(Resource Management) CE".
When Using a Server other than a Blade Server
1. Register VM Hosts as Storage Management Software
Register one of the VM hosts belonging to the pools on Citrix XenServer. It is not necessary to register all VM hosts which belongto the pools.
When registering VM hosts as storage management software, the storage repositories that were created in advance during storagepre-configuration are automatically registered with Resource Orchestrator as virtual storage resources.
Execute the rcxadm storagemgr command to register storage management software.
For details on the rcxadm storagemgr command, refer to "5.17 rcxadm storagemgr" in the "Reference Guide (Command/XML)CE".
2. Register Managed Servers
When registering managed servers, the storage repositories that were created in advance during pre-setup preparations areautomatically registered in Resource Orchestrator as virtual storage resources. When the registered managed server is a Pool Master,the templates created in advance are automatically registered as virtual cloning images by Resource Orchestrator.
- 353 -

For details on how to register managed servers, refer to "5.5.1 Registering Rack Mount or Tower Servers" in the "User's Guide forInfrastructure Administrators (Resource Management) CE".
3. Register LAN Switches
Refer to "5.13 Registering LAN Switches" in the "User's Guide for Infrastructure Administrators (Resource Management) CE".
To register a network resource, specify a network pool when creating the network resource.
For details, refer to "Chapter 14 Registering Resources in Resource Pools" in the "User's Guide for Infrastructure Administrators(Resource Management) CE".
C.9.3 Registering Resources in Resource PoolsThis chapter explains the registration of resources to resource pools.
For details on the resources that require registration, refer to "Chapter 12 Registering Resources to the Global Pool".
Use the following procedure to register a resource to a resource pool:
1. Register VM Host Resources
a. In the ROR console orchestration tree, right-click the target VM pool, and select [Register Resources] from the popup menu.
The [Register Resources] dialog is displayed.
b. Select the VM host to register.
c. Click <OK>.
For details, refer to "14.1 VM Host Resources" in the "User's Guide for Infrastructure Administrators (Resource Management) CE".
Note
Register all VM hosts in the resource pool on Citrix XenServer as managed servers on Resource Orchestrator. Register such VMhosts in all VM pools.
2. Register Storage Resources
Register the virtual storage resources used when creating virtual L-Servers in the resource pool.
For details, refer to "14.5 Storage Resources" in the "User's Guide for Infrastructure Administrators (Resource Management) CE".
When using Thin Provisioning, configure the settings as follows:
When registering an NFS storage repository as a virtual storage resource registered in a storage pool with Thin Provisioning attributesset, the amount of space of virtual storage is calculated as Thin Provisioning.
For how to set Thin Provisioning attributes for a storage pool, refer to "20.2 Creating" in the "User's Guide for InfrastructureAdministrators (Resource Management) CE".
For details on the display of available free space of storage pools and the calculation method for free space, refer to "20.6 Viewing"in the "User's Guide for Infrastructure Administrators (Resource Management) CE". Replace "VMware datastore" with "CitrixXenServer storage repository".
Note
When registering a NFS storage repository as a virtual storage resource in a storage pool without Thin Provisioning attributes set,as calculation is performed assuming that the necessary amount of space has been allocated, the amount of available space is lessthan the actual free space.
When registering a storage repository other than NFS as a virtual storage resource registered in a storage pool with Thin Provisioningattributes set, secure the necessary space, and allocate the disk resources to an L-Server.
3. Register Network Resources
4. Register Network Device Resources
- 354 -
5. Register Address Set Resources
When using Citrix XenServer, it is necessary to register MAC addresses in the address pool. As the management for availability ofVM guest MAC addresses is limited (only the uniqueness in resource pools of Citrix XenServer is managed), it is necessary tomanage MAC addresses using Resource Orchestrator.
6. Create templates as virtual cloning images for use in Resource Orchestrator
Create a template with an OS installed. Perform the following procedure:
a. Create a new VM guest
b. Install an OS on the VM guest created in step a.
c. Install XenServerTools
d. Create a template from the created VM guest
7. Register Virtual Image Resources
Register the virtual image resources used when creating virtual L-Servers in the resource pool.
For details, refer to "14.7.1 Virtual Image Resources" in the "User's Guide for Infrastructure Administrators (Resource Management)CE".
Point
The information for virtual image resources is obtained from Citrix XenServer Pool Masters registered with Resource Orchestrator.If Pool Masters have not been registered, register the Pool Masters as VM hosts. Wait a couple of minutes and then perform theregistration operation again.
When the customization function of the VM guest is used, the following procedures are necessary in addition to the above-mentionedprocedure.
1. Create the Citrix XenServer storage repository
Create the Windows shared folder registered in the storage repository and the storage repository of Citrix XenServer that becomesthe storage location of the VCD medium.
For details, refer to "Storage Repository of XenServer" of "C.9.12 Customization Function of Guest OS" for details.
2. Creating definition files to use customization functions
When using the customization function of the guest OS, define a customizable OS type in the following definition files.
- Guest OS Customization Definition File
- Customizable OS Type Definition File
For details, refer to "C.9.1 Creating Definition Files".
3. Create an L-Server
Create the L-Server using either of the following methods.
- Linking to the L-Server of a configured virtual machine
- Creating an L-Server with an image specified
4. Install the customization tool
Install the customization tool on the guest OS of the created L-Server.
For details of the installation procedure, refer to "C.9.12 Customization Function of Guest OS" of "Installation and Deletion of theCustomization Tool".
5. Collect the cloning image for customization
Collect the cloning image using customization specification.
At this time, confirm the type of the system of the specified guest OS using the following procedure.
- 355 -
a. Log in to the guest OS.
b. Confirm the type of the system.
C.9.4 Manual Network ConfigurationROR provides the function for connection with virtual NICs, for the network created on XenServer.
Manually perform network settings on XenServer. Use a different VLAN ID for each network on XenServer to connect the network createdon XenServer with virtual NICs. Additionally, the following settings must be performed in advance.
1. Create a XenServer Network
The network must be created on the VM host, in order to connect the L-Server to the network.
Create a network with the same name (the name is case-sensitive) for all VM hosts comprising the cluster. This enables migrationof VM guests between VM hosts.
When configuring the XenServer network, if using a server virtualization software other than Citrix XenServer on the same manager,configure a different name from the name used for a virtual switch, a virtual network, or a virtual bridge on the other servervirtualization software.
For details on how to create a network on XenServer, refer to the Citrix XenServer manual.
2. Configure Network Communication on XenServer
Right-click the LAN switch in the server resource tree, and select [Modify]-[Network Settings] from the popup menu.
Configure LAN switches to enable communication using the tagged VLAN between networks created on XenServer using the samename.
The ROR console can be used for VLAN configuration of LAN switch blade external ports.
For details, refer to "5.4.4 Configuring VLANs on LAN Switch Blades" in the "User's Guide for Infrastructure Administrators(Resource Management) CE".
3. Define the Supported Network Created on XenServer and the VLAN ID
Define the supported network created on XenServer and VLAN IDs in the virtual network definition file for Resource Orchestrator.
For details on definition file format, refer to "File Format for Virtual Network Definitions".
4. Create Network Resources
- From the GUI:
Create network resources using the VLAN IDs specified in steps 2 to 3. In the [Create a network resource] dialog, check the[Use configured virtual switches.] checkbox.
- From the Command-line:
a. Create the XML file that defines network resources. Define the VLAN ID specified in steps 2 and 3 in the XML file. Inthis case, specify auto="false" in the Network element.
b. To create the network resource, execute the rcxadm network create command specifying the XML file created in step a.
For details on the rcxadm network command, refer to "3.9 rcxadm network" in the "Reference Guide (Command/XML) CE".
For details on the Network element, refer to "15.5 Network Resources" in the "Reference Guide (Command/XML) CE".
File Format for Virtual Network Definitions
Location of the Definition File
[Windows Manager]Installation_folder\SVROR\Manager\etc\customize_data
[Linux Manager]/etc/opt/FJSVrcvmr/customize_data
- 356 -
Definition File Name
vnetwork_citrixxen.rcxprop
Definition File Format
Describe the virtual network definition file in one line as below:
"Network Name Created on XenServer"=VLAN ID
For the VLAN ID, a value from 1 to 4094 can be specified.
Example
"MyVMNetwork"=10
- Blank spaces before and after equal signs ("=") are ignored.
- Describe the network correctly, as the entry is case-sensitive.
- Save files using the UTF-8 character code.
- When there are multiple lines with the same network name, all specified lines are valid.
- When the same VLAN ID is included in a line with a different network name, the first occurrence in the file is used and the linesafter it are ignored.
- An error occurs during L-Server creation if the definition of the VLAN ID of the specified network resource cannot be found.
C.9.5 Creating L-Server TemplatesThis chapter explains how to create an L-Server template.
L-Server templates can be created using the following methods.
- Using the Wizard GUI
L-Server templates can be created using the wizard GUI in the wizard format.
For details on the GUI in the wizard format, refer to "15.1 Operations Using the Wizard GUI" in the "User's Guide for InfrastructureAdministrators (Resource Management) CE".
- Manually
Use the following procedure to create an L-Server template:
1. Export an L-Server Template
The sample L-Server templates provided with Resource Orchestrator can be exported.
Refer to "15.2.1 Export" in the "User's Guide for Infrastructure Administrators (Resource Management) CE".
2. Edit an L-Server Template
The L-Server template output in step 1 can be edited with an editor, etc.
For details on the L-Server templates for virtual L-Servers, refer to "15.2.2 Virtual L-Server Templates" in the "Reference Guide(Command/XML) CE".
3. Import an L-Server Template
Refer to "15.2.3 Import" in the "User's Guide for Infrastructure Administrators (Resource Management) CE".
C.9.6 Creating an L-ServerThis section explains the creation of L-Servers.
- 357 -
Use the following procedure to create L-Servers:
- Create an L-Server Using an L-Server Template
Create an L-Server, referring to "16.1 Creation Using an L-Server Template" in the "User's Guide for Infrastructure Administrators(Resource Management) CE".
- Create an L-Server Specifying Individual Specifications
Refer to "16.3 Creation of Virtual L-Servers Using Parameters" in the "User's Guide for Infrastructure Administrators (ResourceManagement) CE".
Note
The following operations for L-Server creation are not supported:
- Creation of a virtual L-Server without a cloning image specified
- Creation of a virtual L-Server with cloning images including data disks specified
Manual OS Installation
Install the operating system after creating an L-Server.
C.9.7 Collecting and Registering Cloning ImagesUse the following procedure to collect cloning images:
After installing an OS, stop the target L-Server.
1. On the ROR console, right-click the target L-Server in the orchestration tree, and select [Cloning]-[Collect] from the popup menu.
2. Click <OK>.
A given cloning image (identified by its name attribute) can be managed by image version.
If a cloning image is created using VM management software, it can be used as is.
Refer to "17.5.1 Collecting and Registering" in the "User's Guide for Infrastructure Administrators (Resource Management) CE".
Note
In Resource Orchestrator, use Citrix XenServer templates as virtual image resources. However, templates without disks cannot be usedas virtual image resources, which is the same as the templates provided by default.
Install OSs and XenServerTools on templates.
C.9.8 [OS] Tab ConfigurationEnter the parameters to set for the OS when creating the L-Server. This setting is valid only if an image is specified in the [General] tab.
The setting process is performed the first time the L-Server is started. If an image name is not specified, it is not necessary to enter allthese items.
Table C.28 List of Settings
Item
Windows
DescriptionNecessity ofEntry
Values WhenOmitted
Host name/Computername
Possible L-Server Name Enter the host name or computer name.
- 358 -
Item
Windows
DescriptionNecessity ofEntry
Values WhenOmitted
Enter a character string beginning with an alphanumeric character andcontaining up to 15 alphanumeric characters and hyphens ("-").The string cannot be composed solely of numbers.
If this parameter is not specified, the L-Server name is converted andset as indicated above.If underscores ("_") or periods (".") are used in an L-Server name, theywill be replaced with hyphens ("-"), because these characters cannot beused for host names or computer names.
Domain name PossibleWORKGROUP(*)
Enter the workgroup name. Settings for participation in a domain cannotbe made.
Enter a character string beginning with an alphabetic character andcontaining up to 15 alphanumeric characters, hyphens ("-"), and periods(".").
DNS search pathNotRequired
-Even if the DNS search path is specified, it is not configured in the guestOS.
Full nameNotRequired
- Even if the full name is specified, it is not configured in the guest OS.
Organization nameNotRequired
-Even if the organization name is specified, it is not configured in theguest OS.
Product key Essential - (*) Omission not possible. Ensure that you specify a valid product key.
License modeNotRequired
-Even if the license mode is specified, it is not configured in the guestOS.
Maximum number ofconnections
NotRequired
-Even if the maximum number of connections is specified, it is notconfigured in the guest OS.
Administrator password Possible - (*)
Enter the same password as that specified for the local administratoraccount during L-Server creation.When specifying a new password, the local administrator account willbe overwritten.Enter the password using between 1 and 128 alphanumeric charactersor symbols.
Hardware clockconfiguration
NotRequired
-Even if the hardware clock configuration is specified, it is not configuredin the guest OS.
Time zone PossibleThe same timezone as the OS ofthe manager
Specify the time zone of the OS.
* Note: When the value is specified in the OS property definition file, its values are configured.
Information
OS Property Definition File
By setting the default values in an OS property definition file in advance, the default values of the information on the [OS] tab, etc. aregenerated when creating an L-Server.
For details, refer to "C.1.7 OS Property Definition File".
- 359 -

Information
VM Guest Administrator Account Settings Necessary When Creating an L-Server with an Image Specified
When creating an L-Server with an image specified, it is necessary to enter the "administrator password" as a parameter.
The entered "administrator password" is the one set for the Administrator of the built-in administrator account, but on some localizededitions of Windows the account name may differ. In addition, when the client OS is Windows 7 or Windows Vista, on standard installationsthe built-in administrator account is disabled, and the user account created during installation becomes the administrator account.
When an L-Server is created with a cloning image that was collected from a localized edition of Windows or a client OS specified, it isnecessary to either configure an administrator account for the administrator and set a password, or change the name of the administratoraccount with the "Administrator password" so that it fits the description given in the definition file below.
Note that when using a definition file, it is not possible to define different administrator ID settings for different versions of images.
Location of the Definition File
[Windows Manager]Installation_folder\SVROR\Manager\etc\customize_data
Definition File Name
The definition file name can be used by dividing into definitions that are available for each user group and definitions that are commonto the system. Search the definition file of each user group, from the start, for the administrator name corresponding to the image.When there is no corresponding definition, search in the system's common definition file.
Modification of the definition file is soon reflected, and it becomes valid for the creation of L-Servers from that point.
- For User Groups
image_admin_citrixxen_user_group_name.rcxprop
- Common on System
image_admin_citrixxen.rcxprop
Definition File Format
In the definition file, describe the image name and account name for which the administrator password has been configured on a singleline.
Image_name = "Administrator_account_name"
The Administrator_account_name is displayed enclosed in double quotes ( " ).
Blank spaces and tabs other than those in the Administrator_account_name are ignored.
It is possible to use an asterisk ("*") as a wildcard in image names. By specifying an asterisk ("*") it is possible to create substitutestrings for strings of indefinite length.
When creating an L-Server from an image, the corresponding image name is searched for from the start of the definition file, and thespecified "Administrator password" will be set for the specified administrator account name.
It is necessary to create the definition files using the following line break code and character codes:
- Line Break Code
CR+LF(0x0d0a)
- Character Code
Shift-JIS in a Japanese environment, UTF-8 in other environments
Example
An example definition file is indicated below.
- Image names and administrator account names are set in pairs.
- 360 -
FR_WIN2003_001 = "Administrator"EN_WIN7_001 = "root"EN_WIN7_002 = "admin"
- For image names that start with "FR_WIN", use "Administrator" as the name of the administrator account.
FR_WIN* = "Administrator"
- Use "Administrator" as the name of the administrator account for all images. When an image name is specified using only awildcard, the definition after that line will be ignored.
* = "Administrator"
C.9.9 Relating to an L-ServerFor details on how to link to an L-Server, refer to "Chapter 18 Linking L-Servers with Configured Physical Servers or Virtual Machines"in the "User's Guide for Infrastructure Administrators (Resource Management) CE".
C.9.10 Advisory Notes for Citrix XenServer Usage
Resource Pools on Citrix XenServer
Register all VM hosts in the resource pool on Citrix XenServer as managed servers on Resource Orchestrator. Register such VM hosts inall VM pools.
Templates Used as Virtual Image Resources
In Resource Orchestrator, use Citrix XenServer templates as virtual image resources. However, templates without disks cannot be usedas virtual image resources, which is the same as the templates provided by default.
Install OSs and XenServerTools on templates.
Device 2 and 3 of a VM Guest
Devices 2 and 3 of VM guests are not used for disks as they are used for CD/DVD drives. When operating Citrix XenServer directly andconnecting to device 2 or 3, they will be detected as unmanaged disks.
When importing the VM guest to a virtual L-Server, disk operations (addition or deletion) cannot be performed for the virtual L-Server.
When creating a virtual L-Server using the customization function of a guest OS, do not use device 2 of the specified cloning image.
When Creating the Image (Template) with a VM Management Product
Do not use a single quotation (') for the image name.
Snapshot
When a Virtual L-Server is powered on, snapshots cannot be used.
Corresponding Terms Related to Memory in Resource Orchestrator and Citrix XenServer
The relationship of the terms related to memory in Resource Orchestrator and Citrix XenServer is as follows:
- 361 -

Virtual L-Server Parameters for Resource Orchestrator VM Guest Parameters for Citrix XenServer
Maximum memory size Maximum static memory size (memory-static-max)
Memory size Maximum dynamic memory size (memory-dynamic-max)
Memory Reservation Capacity Minimum dynamic memory size (memory-dynamic-min)
None Minimum static memory size (memory-static-min)
Memory Size when Creating an L-Server
When creating an L-Server in Resource Orchestrator, configure the same value as the Citrix XenServer VM guest for the maximumdynamic memory size. Configure 0 for the minimum static memory size. When changing the maximum dynamic memory size, or theminimum static memory size, operate Citrix XenServer directly, and modify the settings.
Maximum Number of CPUs when Creating an L-Server
In Resource Orchestrator, when creating an L-Server, configure the same values for the maximum number of CPUs as the already specifiednumber of CPUs. When changing the maximum number of CPUs, operate Citrix XenServer directly, and modify the settings.
VM Guest Home Server Configurations
When using Citrix XenServer, while VM guests are powered off, they are not managed by a specific VM host. Therefore, in ResourceOrchestrator the VM host used to manage powered off VM guests is determined based on the Home Server settings. When Home Serversettings are not configured, if a VM guest is powered off, it will not be managed by Resource Orchestrator.
Then, the status of virtual L-Servers related to a VM guest will become unknown, and operations other than deletion cannot be performed.Power on the VM guest using Citrix XenServer, check that the virtual L-Server status returns to normal, and then perform the operationagain.
High Availability Functions of Citrix XenServer
When using a resource pool, high-availability should be enabled for that resource pool.If high-availability is not enabled, and the pool master become unreachable, Resource Orchestrator will not be able to control or getinformation from the VM hosts and VM guests placed in that resource pool. If VM guest statuses become out-of-date, or operations onVM hosts or VM guests fail, check the status of the pool master. If the pool master is not reachable, resolve any communication problemthat may prevent the manager from communicating with it (if necessary, change the pool master to another VM host).For details, refer to the manual of server virtualization software.
VM Maintenance Mode
With Citrix XenServer, a VM host assigned as a pool master cannot be put into maintenance mode.
To put such a VM host into maintenance mode, the pool master role should first be assigned to a different VM host (within the sameresource pool).
Windows Shared Folder Used by the Guest OS Customization Function
Resource Orchestrator operates using the System account. Therefore, when creating a Windows shared folder for servers other than theserver on which Resource Orchestrator is installed, ensure the shared folder can be accessed using the System account.
C.9.11 OvercommitThis section explains the overcommit function for L-Servers.
- 362 -

Overcommit
The Citrix-Xen overcommit function for the CPU and memory is available on Resource Orchestrator.
The Citrix-Xen overcommit function for the CPU and memory virtually allows a guest OS to use more resources than that of the actualCPU and memory of a server.
Resource Orchestrator provides the following functions to utilize the Citrix-Xen overcommit function when creating L-Servers.
- Setting an overcommit attribute for a resource pool
Overcommit attributes can be set for resource pools. If an L-Server template with the overcommit attribute configured is used, an L-Server with the overcommit attribute configured can be created by selecting the resource from the resource pool with overcommitconfigured.
- Deployment of L-Servers with more resources than those of the server
Creation of an L-Server with more resources than that of the actual CPU or memory installed on a server is possible.Whether the resulting L-Server can be started depends on the resources available on the VM host.
Installation Procedure
1. Create a VM Pool for Overcommit
For details on how to create a VM pool, refer to "Chapter 20 Resource Pool Operations" in the "User's Guide for InfrastructureAdministrators (Resource Management) CE".
Point
Refer to the "Point" described in "1. Create a VM Pool for Overcommit" in "Installation Procedure" in "C.2.11 Overcommit".
Note
Refer to the "Note" described in "1. Create a VM Pool for Overcommit" in "Installation Procedure" in "C.2.11 Overcommit".
2. Create a VM Specific Information Definition File
Create a VM specific information definition file. Create a VM specific information definition file when configuring different settingsfor individual user groups without configuring overcommit settings on the L-Server template.
For VM specific information definition files, refer to "C.1 Definition Files Commonly Shared when Creating Virtual L-Servers".
For details on how to edit the L-Server template, or create and check an L-Server, perform the operations of step 3 and later described in"C.2.11 Overcommit". Since the values that can be configured in the L-Server template or the VM specific information definition files asdescribed in the reference differ depending on the VM types, replace the values with ones for Citrix-Xen.
C.9.12 Customization Function of Guest OSThis section explains the customization function of guest OSs of Citrix Xen.
Citrix Xen has no function for customizing guest OSs, so the ROR customization function is used when customizing guest Oss. Thecustomization function of the guest OS is provided by using the customization tool installed on the VM guest OS to control Sysprep.
The following ROR managers and guest OSs can use this function.
When the customization function is executed by an unsupported ROR manager and guest OS, an error occurs.
Target Support Scope
ManagerRefer to "Table 2.12 [Windows Manager] (*)" in"2.4.2.1 Required Basic Software" in the "DesignGuide CE".
- 363 -
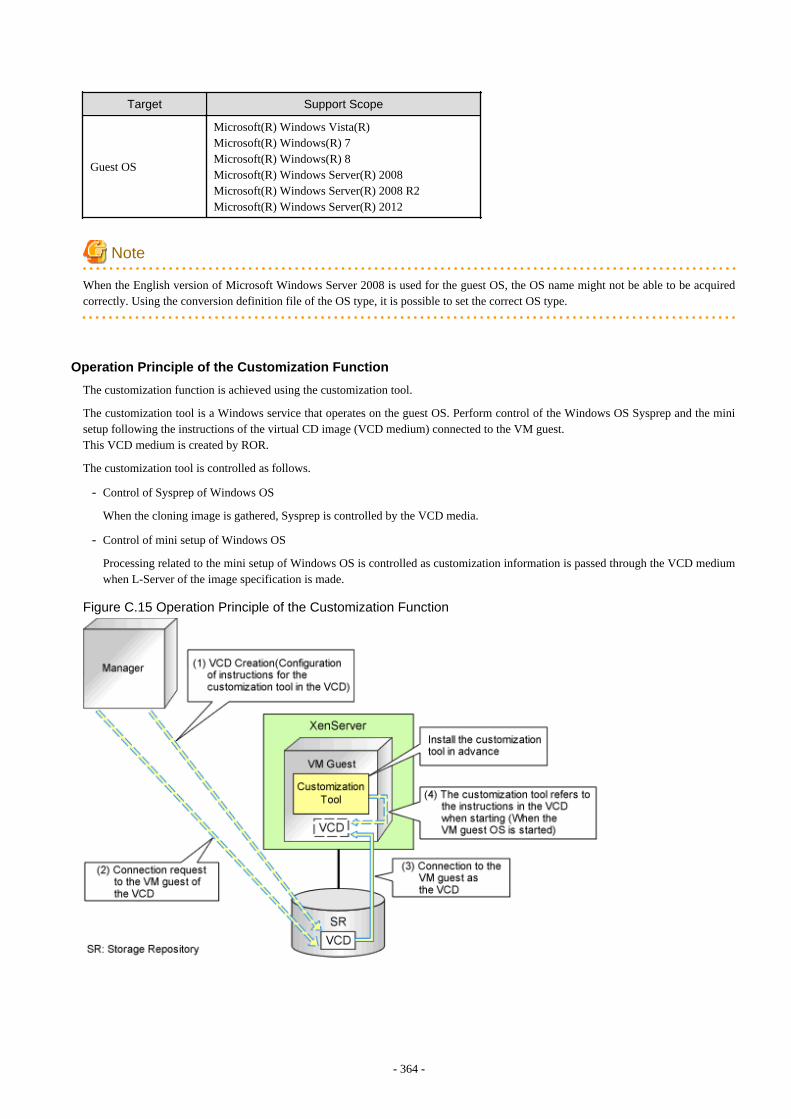
Target Support Scope
Guest OS
Microsoft(R) Windows Vista(R)Microsoft(R) Windows(R) 7Microsoft(R) Windows(R) 8Microsoft(R) Windows Server(R) 2008Microsoft(R) Windows Server(R) 2008 R2Microsoft(R) Windows Server(R) 2012
Note
When the English version of Microsoft Windows Server 2008 is used for the guest OS, the OS name might not be able to be acquiredcorrectly. Using the conversion definition file of the OS type, it is possible to set the correct OS type.
Operation Principle of the Customization Function
The customization function is achieved using the customization tool.
The customization tool is a Windows service that operates on the guest OS. Perform control of the Windows OS Sysprep and the minisetup following the instructions of the virtual CD image (VCD medium) connected to the VM guest.This VCD medium is created by ROR.
The customization tool is controlled as follows.
- Control of Sysprep of Windows OS
When the cloning image is gathered, Sysprep is controlled by the VCD media.
- Control of mini setup of Windows OS
Processing related to the mini setup of Windows OS is controlled as customization information is passed through the VCD mediumwhen L-Server of the image specification is made.
Figure C.15 Operation Principle of the Customization Function
- 364 -

VCD Medium
The VCD medium is automatically created for the storage repository of XenServer by ROR, and connected to the VM guest.Therefore, it is necessary to create the storage repository and the definition file of XenServer beforehand.For details on the definition file, refer to "C.9.1 Creating Definition Files".
Storage Repository of XenServer
This is the storage location of the VCD medium. When the customization function is used, it is necessary to create it beforehand.
Create the storage repository noting the following points.
- Create a storage repository for the resource pool on Citrix XenServer or the pool master.
- Specify the type of storage repository in ISO format, and the storage location as a Windows shared folder
- Create one shared folder for each storage repository.
- Create the shared folder in an environment that the server on which the ROR manager is installed can access.
- Configure the access authority of the shared folder to grant reading/writing (Read/Write) authority to the account of ResourceOrchestrator.
- Refer to the Citrix website for the relevant product manual for the creation method.
Citrix Website
http://support.citrix.com/product/xens/
Service Name of the Customization Tool
When the customization tool is installed, the service is registered in the guest OS with the following name.
Resource Orchestrator windows guest customize tool
Installation and Deletion of the Customization Tool
This section explains the procedures for installing and uninstalling the customization tool.
- Install the customization tool
1. Copy the customization tool onto a suitable folder on the guest.
Copy Tool_Storage_Folder of the ROR manager onto Folder_Name_At_Copy_Destination on the guest of each folder.The Tool_Storage_Folder is the following.
[Windows Manager]Installation_folder\SVROR\Manager\opt\FJSVrcxmr\sys\winguestcustomizetool
The folder name becomes c:\temp\winguestcustomizetool when the copy destination is assumed to be C:\temp.
2. Start the command prompt using local administrator rights.
3. Change Current to the installation folder.
>cd Folder_Name_At_Copy_Destination <RETURN>
4. Install the customization tool
>winguesttool.exe -install <RETURN>
5. After the installation is complete, delete Folder_Name_At_Copy_Destination.
- 365 -

>rmdir /s Folder_Name_At_Copy_Destination<RETURN>
- Uninstallation of the customization tool
1. Start the command prompt using local administrator rights.
2. Change Current to the installation folder.
>cd "%ProgramFiles%\Fujitsu\Resource Orchestrator\WinGuestCustomizeTool" <RETURN>
3. Uninstallation of customization tool
>winguesttool.exe -remove <RETURN>
4. Delete the installation folder of the customization tool
When uninstallation ends normally, delete the following folders.
>rmdir /s "%ProgramFiles%\Fujitsu\Resource Orchestrator\WinGuestCustomizeTool" <RETURN>
If no other services or tools have been installed, delete the following folders.
>rmdir /s "%ProgramFiles%\Fujitsu\Resource Orchestrator" <RETURN>>rmdir /s "%ProgramFiles%\Fujitsu" <RETURN>
C.10 OVM for x86 3.2This section explains how to configure OVM for x86 3.2 as server virtualization software.
C.10.1 Creating Definition FilesThis section explains how to create definition files.
For definition files common to virtual L-Servers, refer to "C.1 Definition Files Commonly Shared when Creating Virtual L-Servers".
The definition files specific to OVM for x86 3.2 are as follow:
SSL Port Specification Methods for VM Management Software
Configure the SSL ports for Oracle VM Manager. Use them when starting VM management software from the management console.This setting is required in Oracle VM Manager V3.2.1.
Use the UTF-8 character code for definition files.
Location of the Definition File
[Windows]Installation_folder\SVROR\Manager\etc\customize_data
[Linux]/etc/opt/FJSVrcvmr/customize_data
Definition File Name
ovmm.rcxprop
Definition File Format
The definition file is entered in the following format.
Key = Value
- 366 -
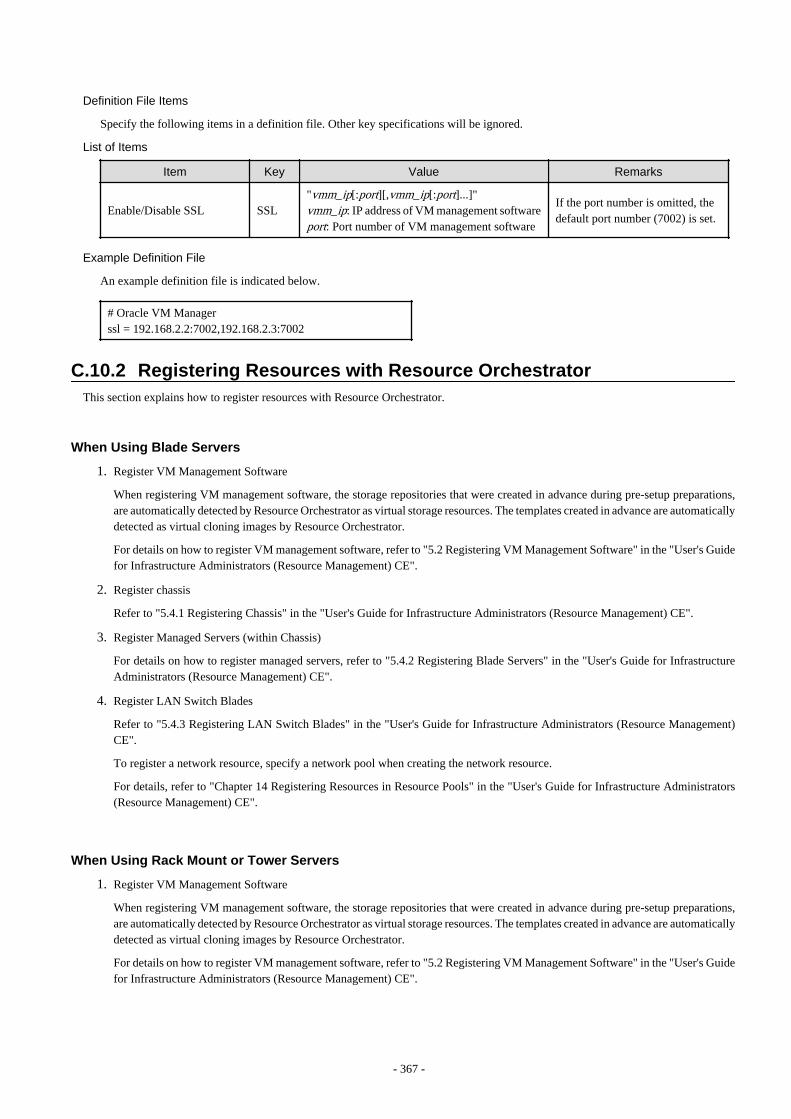
Definition File Items
Specify the following items in a definition file. Other key specifications will be ignored.
List of Items
Item Key Value Remarks
Enable/Disable SSL SSL"vmm_ip[:port][,vmm_ip[:port]...]"vmm_ip: IP address of VM management softwareport: Port number of VM management software
If the port number is omitted, thedefault port number (7002) is set.
Example Definition File
An example definition file is indicated below.
# Oracle VM Managerssl = 192.168.2.2:7002,192.168.2.3:7002
C.10.2 Registering Resources with Resource OrchestratorThis section explains how to register resources with Resource Orchestrator.
When Using Blade Servers
1. Register VM Management Software
When registering VM management software, the storage repositories that were created in advance during pre-setup preparations,are automatically detected by Resource Orchestrator as virtual storage resources. The templates created in advance are automaticallydetected as virtual cloning images by Resource Orchestrator.
For details on how to register VM management software, refer to "5.2 Registering VM Management Software" in the "User's Guidefor Infrastructure Administrators (Resource Management) CE".
2. Register chassis
Refer to "5.4.1 Registering Chassis" in the "User's Guide for Infrastructure Administrators (Resource Management) CE".
3. Register Managed Servers (within Chassis)
For details on how to register managed servers, refer to "5.4.2 Registering Blade Servers" in the "User's Guide for InfrastructureAdministrators (Resource Management) CE".
4. Register LAN Switch Blades
Refer to "5.4.3 Registering LAN Switch Blades" in the "User's Guide for Infrastructure Administrators (Resource Management)CE".
To register a network resource, specify a network pool when creating the network resource.
For details, refer to "Chapter 14 Registering Resources in Resource Pools" in the "User's Guide for Infrastructure Administrators(Resource Management) CE".
When Using Rack Mount or Tower Servers
1. Register VM Management Software
When registering VM management software, the storage repositories that were created in advance during pre-setup preparations,are automatically detected by Resource Orchestrator as virtual storage resources. The templates created in advance are automaticallydetected as virtual cloning images by Resource Orchestrator.
For details on how to register VM management software, refer to "5.2 Registering VM Management Software" in the "User's Guidefor Infrastructure Administrators (Resource Management) CE".
- 367 -
2. Register Managed Servers
For details on how to register managed servers, refer to "5.5.1 Registering Rack Mount or Tower Servers" in the "User's Guide forInfrastructure Administrators (Resource Management) CE".
3. Register LAN Switches
Refer to "5.13 Registering LAN Switches" in the "User's Guide for Infrastructure Administrators (Resource Management) CE".
To register a network resource, specify a network pool when creating the network resource.
For details, refer to "Chapter 14 Registering Resources in Resource Pools" in the "User's Guide for Infrastructure Administrators(Resource Management) CE".
When Using PRIMEQUEST Servers
1. Register VM Management Software
When registering VM management software, datastores that are created in advance during pre-setup preparations, are automaticallyregistered in Resource Orchestrator as virtual storage resources.
For details on how to register VM management software, refer to "5.2 Registering VM Management Software" in the "User's Guidefor Infrastructure Administrators (Resource Management) CE".
2. Register Chassis
Refer to "5.8.1 Registering Chassis (For PRIMEQUEST Servers)" in the "User's Guide for Infrastructure Administrators (ResourceManagement) CE".
3. Register Managed Servers (within Chassis)
Refer to "5.8.2 Registering PRIMEQUEST Servers" in the "User's Guide for Infrastructure Administrators (Resource Management)CE".
C.10.3 Registering Resources in Resource PoolsThis chapter explains the registration of resources to resource pools.
For details on the resources that require registration, refer to "Chapter 12 Registering Resources to the Global Pool".
Use the following procedure to register a resource to a resource pool:
1. Register VM Host Resources
a. In the ROR console orchestration tree, right-click the target VM pool, and select [Register Resources] from the popup menu.
The [Register Resources] dialog is displayed.
b. Select the VM host to register.
c. Click <OK>.
For details, refer to "14.1 VM Host Resources" in the "User's Guide for Infrastructure Administrators (Resource Management) CE".
2. Register Storage Resources
Register the virtual storage resources used when creating virtual L-Servers in the resource pool.
For details, refer to "14.5 Storage Resources" in the "User's Guide for Infrastructure Administrators (Resource Management) CE".
Point
- Register storage repositories in which the image resources used for L-Server creation are stored as virtual storage resources.
- When registering multiple storage repositories accessible from VM hosts in server pools of Oracle VM Manager, it isrecommended to register them in the same storage pool. It is recommended to register storage repositories shared with multipleserver pools in Oracle VM Manager in the global pool.
- 368 -
- Perform configuration so that the virtual storage registered in the storage pool can be accessed from all VM hosts registered inthe tenant.
The provisioning attributes of disk resources which are allocated during L-Server creation are as follows. However, the provisioningattributes are not displayed on the window.
- When automatically creating disk resources from virtual storage resources registered in a storage pool with Thin Provisioningattributes set, set the thin format and allocate the disk resources to a virtual L-Server.
- When automatically creating disk resources from virtual storage resources registered in a storage pool without Thin Provisioningattributes set, set the thick format and allocate the disk resources to a virtual L-Server.
For how to set Thin Provisioning attributes for a storage pool, refer to "20.2 Creating" in the "User's Guide for InfrastructureAdministrators (Resource Management) CE".
3. Register Network Resources
4. Register Network Device Resources
5. Create templates as virtual cloning images for use in Resource Orchestrator
Create a template with an OS installed. Perform the following procedure:
a. Create a new VM guest
b. Install an OS on the VM guest created in step a.
c. When there is a Paravirtual (PV) Driver, install it
d. Create a template from the created VM guest
6. Register Virtual Image Resources
Register the virtual image resources used when creating virtual L-Servers in the resource pool.
For details, refer to "14.7.1 Virtual Image Resources" in the "User's Guide for Infrastructure Administrators (Resource Management)CE".
C.10.4 Manual Network ConfigurationROR provides the function for connection with the virtual NICs, for the virtual machine network created in advance.
Manually perform virtual machine network settings in advance. Use a different VLAN ID for each virtual machine network to connectthe virtual machine network with virtual NICs. Additionally, the following settings must be performed in advance.
1. Create a Virtual Machine Network
The network must be created on the VM host, in order to connect the L-Server to the network.
The only characters which can be used for the virtual machine network name are alphanumeric characters (upper and lower case),numbers, and underscores ("_").
Create a network with the same name (the name is case-sensitive) for all VM hosts comprising the cluster. This enables migrationof VM guests between VM hosts.
When configuring the virtual machine network, if using a server virtualization software other than OVM for x86 3.2 on the samemanager, configure a different name from the name used for a virtual switch, a virtual network, or a virtual bridge on the otherserver virtualization software.
For details on how to create a virtual machine network on XenServer, refer to the OVM for x86 3.2 manual.
2. Configure the Virtual Machine Network Communication
Right-click the LAN switch in the server resource tree, and select [Modify]-[Network Settings] from the popup menu.
Configure LAN switches to enable communication using the tagged VLAN between virtual machine networks using the same name.
The ROR console can be used for VLAN configuration of LAN switch blade external ports.
For details, refer to "5.4.4 Configuring VLANs on LAN Switch Blades" in the "User's Guide for Infrastructure Administrators(Resource Management) CE".
- 369 -
3. Define the Supported Virtual Machine Network and VLAN ID
Define the supported virtual machine network and VLAN IDs in the virtual network definition file for Resource Orchestrator.
For details on definition file format, refer to "File Format for Virtual Network Definitions".
4. Create Network Resources
- From the GUI:
Create network resources using the VLAN IDs specified in steps 2 to 3. In the [Create a network resource] dialog, check the[Use configured virtual switches.] checkbox.
- From the Command-line:
a. Create the XML file that defines network resources. Define the VLAN ID specified in steps 2 and 3 in the XML file. Inthis case, specify auto="false" in the Network element.
b. To create the network resource, execute the rcxadm network create command specifying the XML file created in step a.
For details on the rcxadm network command, refer to "3.9 rcxadm network" in the "Reference Guide (Command/XML) CE".
For details on the Network element, refer to "15.5 Network Resources" in the "Reference Guide (Command/XML) CE".
File Format for Virtual Network Definitions
Location of the Definition File
[Windows Manager]Installation_folder\SVROR\Manager\etc\customize_data
[Linux Manager]/etc/opt/FJSVrcvmr/customize_data
Definition File Name
vnetwork_ovmforx86.rcxprop
Definition File Format
Describe the virtual network definition file in one line as below:
"Virtual Machine Network Name Created on OVM for x86"=VLAN ID
For the VLAN ID, a value from 1 to 4094 can be specified.
Example
"MyVMNetwork"=10
- Blank spaces before and after equal signs ("=") are ignored.
- Describe the virtual machine network name correctly, as the entry is case-sensitive.
- Save files using the UTF-8 character code.
- When there are multiple lines with the same virtual machine network name, all specified lines are valid.
- When the same VLAN ID is included in a line with a different virtual machine network name, the first occurrence in the file isused and the lines after it are ignored.
- An error occurs during L-Server creation if the definition of the VLAN ID of the specified network resource cannot be found.
C.10.5 Creating L-Server TemplatesThis chapter explains how to create an L-Server template.
- 370 -
L-Server templates can be created using the following methods.
- Using the Wizard GUI
L-Server templates can be created using the wizard GUI in the wizard format.
For details on the GUI in the wizard format, refer to "15.1 Operations Using the Wizard GUI" in the "User's Guide for InfrastructureAdministrators (Resource Management) CE".
- Manually
Use the following procedure to create an L-Server template:
1. Export an L-Server Template
The sample L-Server templates provided with Resource Orchestrator can be exported.
Refer to "15.2.1 Export" in the "User's Guide for Infrastructure Administrators (Resource Management) CE".
2. Edit an L-Server Template
The L-Server template output in step 1 can be edited with an editor, etc.
For details on the L-Server templates for virtual L-Servers, refer to "15.2.2 Virtual L-Server Templates" in the "Reference Guide(Command/XML) CE".
3. Import an L-Server Template
Refer to "15.2.3 Import" in the "User's Guide for Infrastructure Administrators (Resource Management) CE".
C.10.6 Creating an L-ServerThis section explains the creation of L-Servers.
Use the following procedure to create L-Servers:
- Create an L-Server Using an L-Server Template
Create an L-Server, referring to "16.1 Creation Using an L-Server Template" in the "User's Guide for Infrastructure Administrators(Resource Management) CE".
- Create an L-Server Specifying Individual Specifications
Refer to "16.3 Creation of Virtual L-Servers Using Parameters" in the "User's Guide for Infrastructure Administrators (ResourceManagement) CE".
Note
The following operations for L-Server creation are not supported:
- Creation of a virtual L-Server without a cloning image specified
- Creation of a virtual L-Server with cloning images including data disks specified
- Creation of a virtual L-Server with personalization specified and cloning images specified
Manual OS Installation
Install the operating system after creating an L-Server.
C.10.7 Collecting and Registering Cloning ImagesUse the following procedure to collect cloning images:
After installing an OS, stop the target L-Server.
- 371 -

1. On the ROR console, right-click the target L-Server in the orchestration tree, and select [Cloning]-[Collect] from the popup menu.
2. Click <OK>.
A given cloning image (identified by its name attribute) can be managed by image version.
If a cloning image is created using VM management software, it can be used as is.
Refer to "17.5.1 Collecting and Registering" in the "User's Guide for Infrastructure Administrators (Resource Management) CE".
C.10.8 [OS] Tab ConfigurationThe [OS] tab cannot be configured in OVM for x86 3.2.
C.10.9 Relating to an L-ServerFor details on how to link to an L-Server, refer to "Chapter 18 Linking L-Servers with Configured Physical Servers or Virtual Machines"in the "User's Guide for Infrastructure Administrators (Resource Management) CE".
C.10.10 Advisory Notes for OVM for x86 3.2 Usage
Allocation of Physical CPU (pin)
Physical CPUs are not allocated (pin) from Resource Orchestrator. When necessary, operate Oracle VM directly, and configure the settings.When a VM host which starts when powering on an L-Server is changed, it is recommended to configure "Fixed" for the L-Server bootlocation, as the physical CPU allocation settings will be cancelled.
Destination Storage Repository when Creating an L-Server
In Resource Orchestrator, when creating an L-Server using a virtual cloning image, the L-Server is created in the storage repository inwhich the virtual cloning image is stored.
Destination Storage Repository when Collecting Virtual Cloning Images
In Resource Orchestrator, when collecting virtual cloning images from an L-Server, the virtual cloning images are stored in the samestorage repository as the L-Server.
Upgrading of Oracle VMs
In Resource Orchestrator, when managing Oracle VM V2.2 environments, if an Oracle VM server is upgraded to version V3.2.1, it cannotbe managed as the same server. After registering the upgraded server as a new server, import and manage the existing VM guest as an L-Server.
Maximum Number of CPUs when Creating an L-Server
In Resource Orchestrator, when creating an L-Server, configure the same values for the maximum number of CPUs as the already specifiednumber of CPUs. When changing the maximum number of CPUs, operate Oracle VM directly, and modify the settings.
Maximum Memory Size when Creating an L-Server
In Resource Orchestrator, when creating an L-Server, configure the same values for the maximum memory size as the already specifiedmemory size. When changing the maximum memory size, operate Oracle VM directly, and modify the settings.
Specification of CPU Performance Values
When a value of less than 10% of the CPU performance of a physical server is specified, it is rounded up to the value of 10%.Therefore, it is recommended to set a value of 1GHz or more.
Device 1 of a VM Guest
In Resource Orchestrator, device 1 of a VM guest is used as a CD-ROM drive. Configure device 2 or devices with later numbers as thedata disks.
- 372 -
Name and Number of Detected Virtual Storage Resources
All virtual storage resources connected to VM hosts are detected.
The names of displayed virtual storage resources are the names of storage repositories displayed on Oracle VM Manager.
C.10.11 OvercommitThis section explains the overcommit function for L-Servers.
Overcommit
The OVM for x86 3.2 overcommit function for the CPU and memory is available on Resource Orchestrator.
The OVM for x86 3.2 overcommit function for the CPU and memory virtually allows a guest OS to use more resources than that of theCPU and memory actually installed on a server.
Resource Orchestrator provides the following functions to utilize the OVM for x86 3.2 overcommit function when creating L-Servers.
- Setting an overcommit attribute for a resource pool
Overcommit attributes can be set for resource pools. If an L-Server template with the overcommit attribute configured is used, an L-Server with the overcommit attribute configured can be created by selecting the resource from the resource pool with overcommitconfigured.
- Deployment of L-Servers with more resources than those of the server
Creation of an L-Server with more resources than that of the actual CPU or memory installed on a server is possible.Whether the resulting L-Server can be started depends on the resources available on the VM host.
Installation Procedure
1. Create a VM Pool for Overcommit
For details on how to create a VM pool, refer to "Chapter 20 Resource Pool Operations" in the "User's Guide for InfrastructureAdministrators (Resource Management) CE".
Point
Refer to the "Point" described in "1. Create a VM Pool for Overcommit" in "Installation Procedure" in "C.2.11 Overcommit".
Note
Refer to the "Note" described in "1. Create a VM Pool for Overcommit" in "Installation Procedure" in "C.2.11 Overcommit".
For details on how to edit the L-Server template, or create and check an L-Server, perform the operations of step 3 and later described in"C.2.11 Overcommit". The values that can be configured in the L-Server template or the VM specific information definition files asdescribed in the reference differ depending on the VM types. In OVM for x86 3.2, the values can only be specified when configuringovercommit in the L-Server template.
C.11 Advisory Notes for Virtual L-Servers
Resource release (Repurpose)
The resource release is a function to prepare more L-Servers than the CPU and memory of the VM host, and to start the L-Server to beswitched to.
Because the resource release can be changed using this function according to the time and situation, the resources of the VM host can beshared effectively.
- 373 -

Moreover, the CPU and memory allocated to L-Servers cannot be calculated as the total usage amount of VM pools. Therefore, the amountof the resource that has been allocated for L-Server of power ON can be understood.
Please prepare for the materials shortages of VM host by whom L-Server is arranged, and set "Relocate at startup" to the "Boot Location".Then, L-Server is started, after searching VM host in whom CPU and a memory resource exist and migrating to the VM host at a L-Serverstart-up.When CPU and memory do not exist in other VM hosts, starting of L-Server is tried by current VM host.
The resources which the "Boot Location" assigns to started L-Server by "Fixed", When it will be in an over commit state on the VM host,in order to share CPU and memory on the VM host among two or more L-Servers, please check the influence of L-Server on others, andstart L-Server.
In addition, when L-Server more than the physical resource on VM host is started, in order for two or more L-Server to share resourcesand to operate, in the following environments, it recommends setting "Resource release" to false.
- The overcommit is not used.
- The virtual products which do not recommend the overcommit are used.
- 374 -
Appendix D Installing VM Hosts on Physical L-ServersThis appendix explains how to install a VM host on a physical L-Server.
Installation of VM Hosts on physical L-Servers offers the following benefits:
- Simplified configuration of servers, storage, and networks
When installing a physical L-Server on a VM host, the following configurations can be simplified further than when installing a VMhost on a physical server.
- Server configuration such as I/O virtualization
- Storage configuration such as LUN masking
- Network configuration such as LAN switch blades
D.1 InstallationThis section explains how to install a VM host on a physical L-Server.
1. Preparations for Physical L-Server Creation
For physical L-Server creation, configure the necessary settings.
For details, refer to the following:
- "D.2 Preparations for Servers" in the "Design Guide CE"
- "D.3 Storage Preparations" in the "Design Guide CE"
- "D.4 Network Preparations" in the "Design Guide CE"
- "Appendix B Configuration when Creating Physical L-Servers"
2. Create Resource Folders
Create a resource folder to locate physical L-Servers to install VM hosts on.
For details on how to create a resource folder, refer to "21.2 Creating" in the "User's Guide for Infrastructure Administrators(Resource Management) CE".
Note
In Basic mode, to prevent accidental deletion, create a resource folder for the physical L-Server on which the VM host will beinstalled, and configure it so that tenant administrators cannot access it.
For details, refer to "5.1 Restricting Access Using Roles" in the "Design Guide CE".
3. Create Physical L-Servers
Create a physical L-Server to install a VM host in the created resource folder.
For details on how to create a physical L-Server, refer to "B.5 Creating an L-Server".
Note
- Cloning images for a physical L-Server on which a VM host has been installed cannot be collected or deployed.
- Use the NIC for the public LAN of an L-Server with the status "not connected" without connecting network resources.
Point
If using Auto Deploy to create a VM host, perform the following procedures:
- 375 -
- Specify "Do not deploy" for "Image deployment".
- Specify "Network boot (PXE)" for "Boot mode".
4. Install a VM Host
Install a VM host on the created physical L-Server.
When using Auto Deploy to create a VM host, reserve the MAC address of the admin NIC and admin IP address for the physicalL-Server on the DHCP server used with Auto Deploy and start the L-Server.
Specify the virtual MAC address configured on VIOM for the MAC address of the admin NIC.
For details, refer to the individual manuals of server virtualization software.
5. Install Agents
Install a Resource Orchestrator agent and ServerView Agents on a VM host.
If using Auto Deploy to create a VM host, this procedure is not necessary.
For details on installing agents, refer to "2.2 Agent Installation".
Point
When using VMware ESX, install Resource Orchestrator agents and ServerView for VMware agents.
When using VMware ESXi, install ServerView ESXi CIM Provider.
6. Configure a Network for VM Hosts
When performing auto-configuration for virtual switches during virtual L-Server creation, confirm that Resource Orchestrator isconfigured to support auto-configuration of networks beforehand.
For details, refer to "C.2.4 Automatic Network Configuration".
7. Register a VM Host
Registers a VM host with VM management software.
For details, refer to the individual manuals of server virtualization software.
8. Register VM Management Software
Register VM management software in Resource Orchestrator.
For details, refer to "5.2 Registering VM Management Software" in the "User's Guide for Infrastructure Administrators (ResourceManagement) CE".
9. Register Agents
Register an agent on the physical L-Servers the VM host will be installed on. Execute the following procedure to register agents.
a. Right-click the target L-Server in the orchestration tree, and select [Register]-[Agent] from the popup menu.
b. In the displayed "Register Agent" dialog, click <OK>.
10. Register Resources to a VM Pool
Register a VM host in a VM pool.
For details, refer to "14.1 VM Host Resources" in the "User's Guide for Infrastructure Administrators (Resource Management) CE".
D.2 Changing ConfigurationConfiguration of VM hosts can be changed the same way as physical L-Servers.
Refer to "17.2 Modifying" in the "User's Guide for Infrastructure Administrators (Resource Management) CE".
- 376 -
D.3 DeletionExecute the following procedure to delete a VM host.
1. Unregister the VM Host
Unregister the VM host from VM pools.
Refer to "19.4 Unregistration" in the "User's Guide for Infrastructure Administrators (Resource Management) CE".
2. Stop the VM Host
Stop the VM host.
Refer to "17.1.2 Stopping an L-Server" in the "User's Guide for Infrastructure Administrators (Resource Management) CE".
3. Delete Physical L-Servers
Delete the physical L-Server used for installation of the VM host.
Refer to "17.4 Deleting" in the "User's Guide for Infrastructure Administrators (Resource Management) CE".
D.4 Advisory Notes for Installation of VM Hosts on Physical L-Servers
This section explains advisory notes when installing a VM host on a physical L-Server.
Collecting and Deploying Cloning Images
Cloning images cannot be collected or deployed.
When Using Auto Deploy to Create a VM Host
Backup and restore functions cannot be used for the created VM host.
When a VM Host is VMware vSphere 4 or Later
When installing a VMware vSphere 4 or later VM host on a physical L-Server, take note of the following points:
- Backup and restore functions cannot be used.
- When using L-Server redundancy, it is not possible to specify the same pool as that of a spare server between L-Servers on whichWindows is operating.
- When performing physical server usage change, the same physical servers cannot be switched over between L-Servers on whichWindows is operating.
- When switching over operating and standby storage as disks used for datastores, mount the VMFS datastores using the currently usedsignature on VMware vCenter Server.
When a VM Host is VMware ESXi
Alive Monitoring is not supported.
- 377 -
Appendix E To Customize DashboardThe dashboard provides an alert function for sending notifications via email if the global pool use rate exceeds the threshold value.
The following settings can be customized by changing the alert information:
- Email send settings
- Threshold value
- Monitored pools
A dashboard development environment is required in order to customize alert information. This appendix explains how to build a dashboarddevelopment environment and how to change the alert information.
Point
Alert information can be changed by copying and editing the sample alert information provided by this product. In the sample information,"90%" is set as the threshold value, and "All global pools" is set as the monitored pools.
E.1 Building the Dashboard Development EnvironmentThe dashboard development environment is required to customize the cloud operation management dashboard. This section explains howto build the dashboard development environment.
The installation flow is shown as follows:
1. Installing the Dashboard Development Environment
2. Setting up the Dashboard Development Environment
Note
The dashboard development environment can be built in the Windows environment only. If a Linux version is used, a separate Windowsmachine must be arranged for to build the dashboard development environment.
E.1.1 Installing the Dashboard Development EnvironmentThis section explains the steps required to install the dashboard development environment.
Note
- Use Interstage Business Process Manager Studio and Interstage Business Process Manager Analytics Studio bundled with this productwhen installing them. Studio bundled with Interstage Business Process Manager or Interstage Business Process Manager Analyticssupplied as a standalone product cannot be used.
- If a Linux version is used, a Windows client machine that has been arranged for the dashboard development environment must beused to perform the tasks.
Firstly, insert the following DVD-ROM (Disk 3) into the DVD-ROM drive of the computer.
Follow the steps below to install.
Install JRE 5.0
Install JRE 5.0 in advance when installing the dashboard development environment to a machine other than the admin Server.
- 378 -

1. Execute the following file:
[Windows Manager]
DVD-ROM drive:\DISK3\Studio\Windows\RCXCTMG\Disc1\en\autorun.exe
[Linux Manager]
DVD-ROM drive:\DISK3\Studio\Windows\RCXCTMG\Disc1\en\autorun.exe
2. Click Install.
3. Select Custom, and click Next.
4. To select an installation folder other than the default folder, select Destination Folder displayed and select the installation folder.Click Next.
5. To select installation functions, select the JRE-JBK Plugin and >> 5.0 checkboxes only. Clear all other checkboxes. Click Next.
6. Check the installation details and click Install.
7. Click Finish when installation is completed.
Install Interstage Business Process Manager Studio
Install BPM Studio.
1. Execute the following file:
[Windows Manager]
DVD-ROM drive:\DISK3\Studio\Windows\RCXCTMG\Disc2\setup.exe
[Linux Manager]
DVD-ROM drive:\DISK3\Studio\Windows\RCXCTMG\Disc2\setup.exe
The following dialog box will be displayed if exclusive software such as Systemwalker Runbook Automation Studio and InterstageBPM Studio for Systemwalker, or a standalone product such as Interstage BPM Studio has been installed.
If exclusive software is installed, build the dashboard development environment after uninstalling the exclusive software or buildthe dashboard development environment on a separate Windows machine.
2. Click Next.
3. To change the installation folder, click Change and select the folder. Click Next.
4. Check if the JDK or JRE folder is set correctly. If it is not set properly, set either one of the following and click Next:
- Installation folder\IAPS\JDK5 (*)
- Installation folder specified when JRE5.0 was installed\JBKDI\jre5
*note: The following will be used if the dashboard development environment is deployed to the same machine as the admin server.Installation folder\IAPS\JDK6
5. Do not enter anything in UDDI Search URL and click Next.
6. Click Next.
7. Click Finish when installation is completed.
- 379 -

Install Interstage BPM Analytics Studio
Install Analytics Studio.
1. Execute the following file:
[Windows Manager]
DVD-ROM drive:\DISK3\Manager_Extended\Windows\Install\RCXCTMG\Disc3\IBPMM\setup.exe
[Linux Manager]
DVD-ROM drive:\unified\Disc5\ibpma\Client\IBPMM\setup.exe
2. [Windows Manager]Specify Client, and install the Interstage Business Process Manager Analytics client.
Select the client when in the same environment as the admin server, then click Next.Do not remove the selection in Server.
3. Confirm that [Install Location of Analytics Studio Plug-in] is <Interstage Business Process Manager Studio Installation_folder>\bin in the Check Installation settings window, and with Do not make any change selected click Next. Installation will start.
When the [Install Location of Analytics Studio Plug-in] is other than BPM Studio installation folder\bin, select Change and thenclick Next, and then select the correct installation folder.
The Check Installation settings window described above will not be displayed when in the same environment as the admin server.The window will be displayed when using the wizard, click Next.Installation will start.
4. Click Finish when installation is completed.
E.1.2 Setting Up the Dashboard Development Environment1. Perform the connection setting to the admin Server.
a. Select Windows start menu >> Interstage Business Process Manager Studio and then Studio.
b. The confirmation window for the work space folder will be displayed. Change the folder as required, and click the OK button.
c. Select Open Perspective on the Window menu, and click Analytics Studio.
d. Enter the IP address and the port number of the admin Server in Analytics Server, and click the OK button. (If the adminServer is installed on the same machine, "localhost" may also be specified.)
- 380 -
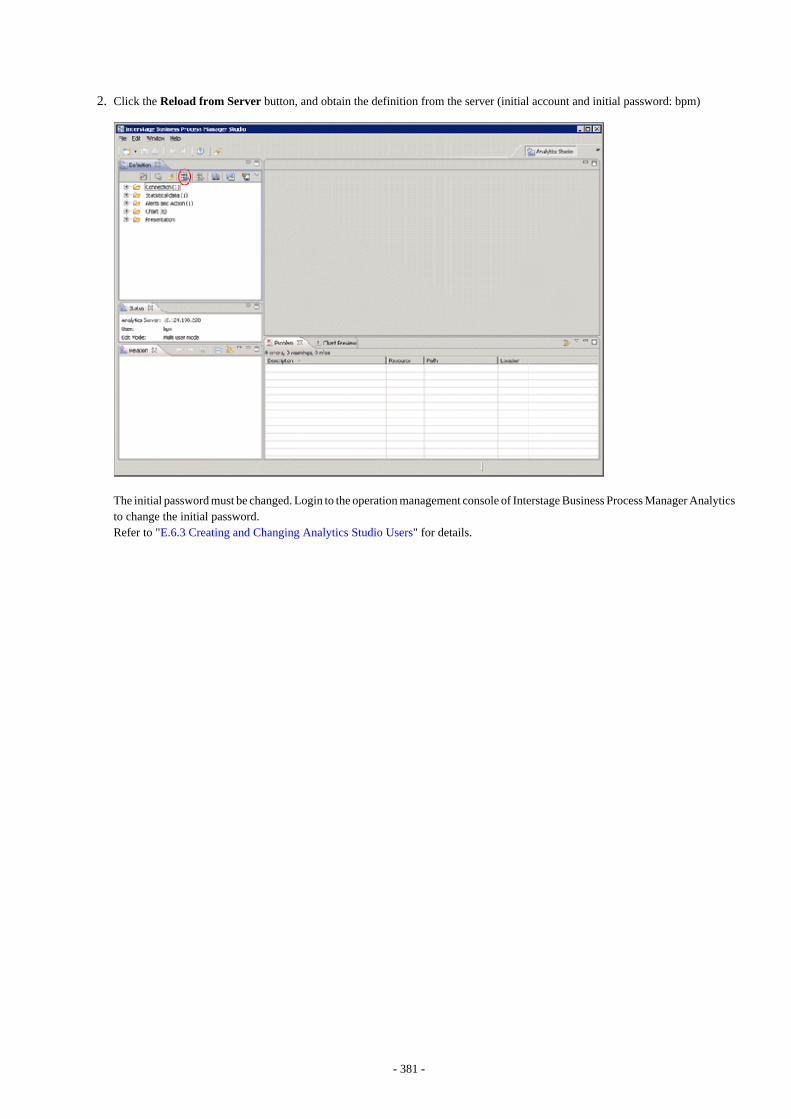
2. Click the Reload from Server button, and obtain the definition from the server (initial account and initial password: bpm)
The initial password must be changed. Login to the operation management console of Interstage Business Process Manager Analyticsto change the initial password.Refer to "E.6.3 Creating and Changing Analytics Studio Users" for details.
- 381 -
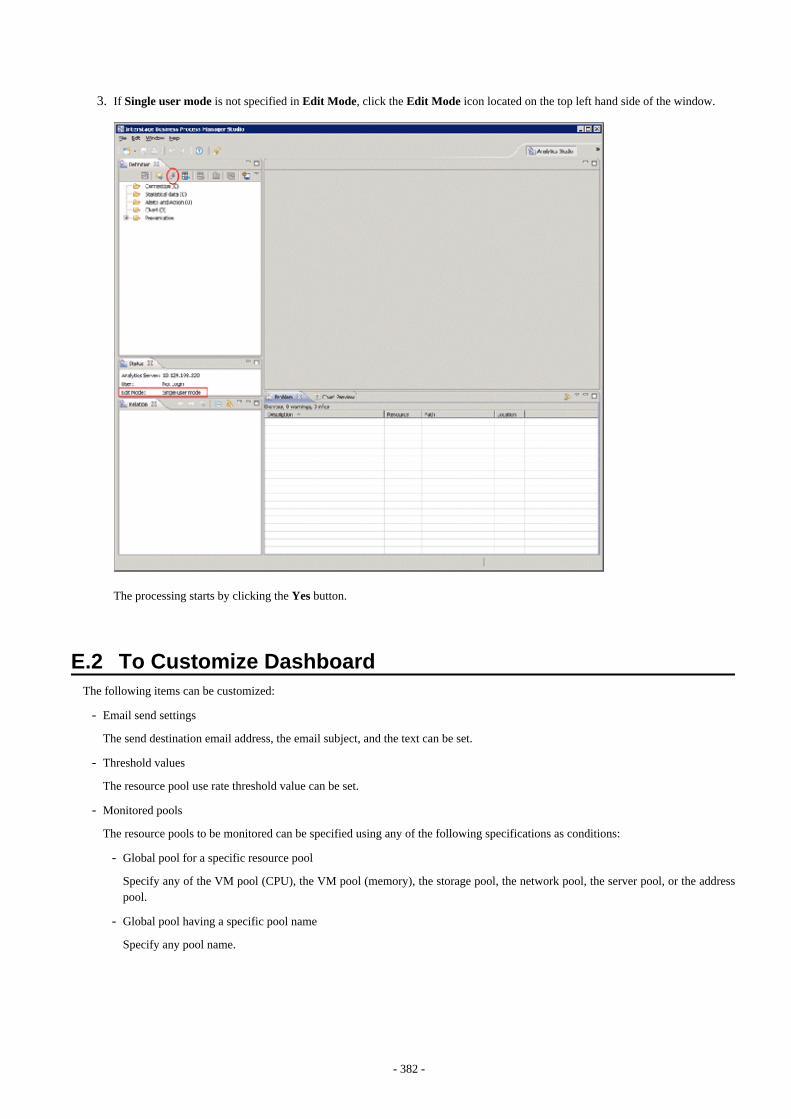
3. If Single user mode is not specified in Edit Mode, click the Edit Mode icon located on the top left hand side of the window.
The processing starts by clicking the Yes button.
E.2 To Customize DashboardThe following items can be customized:
- Email send settings
The send destination email address, the email subject, and the text can be set.
- Threshold values
The resource pool use rate threshold value can be set.
- Monitored pools
The resource pools to be monitored can be specified using any of the following specifications as conditions:
- Global pool for a specific resource pool
Specify any of the VM pool (CPU), the VM pool (memory), the storage pool, the network pool, the server pool, or the addresspool.
- Global pool having a specific pool name
Specify any pool name.
- 382 -
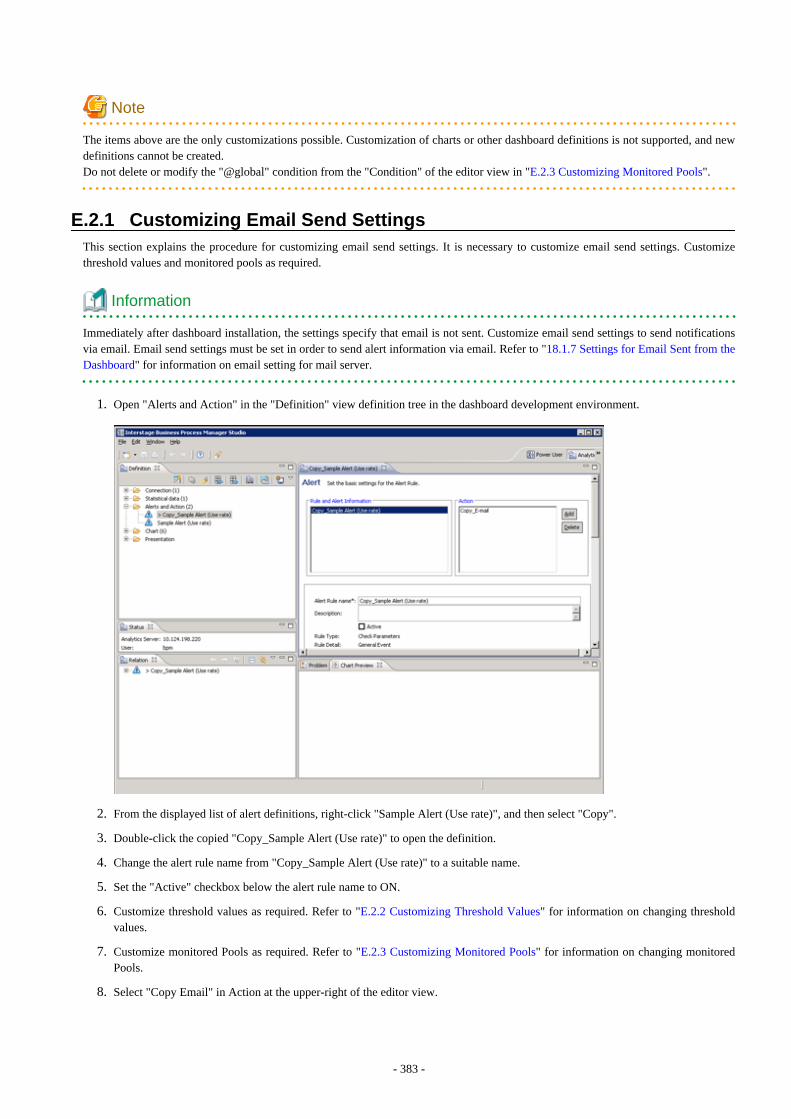
Note
The items above are the only customizations possible. Customization of charts or other dashboard definitions is not supported, and newdefinitions cannot be created.Do not delete or modify the "@global" condition from the "Condition" of the editor view in "E.2.3 Customizing Monitored Pools".
E.2.1 Customizing Email Send SettingsThis section explains the procedure for customizing email send settings. It is necessary to customize email send settings. Customizethreshold values and monitored pools as required.
Information
Immediately after dashboard installation, the settings specify that email is not sent. Customize email send settings to send notificationsvia email. Email send settings must be set in order to send alert information via email. Refer to "18.1.7 Settings for Email Sent from theDashboard" for information on email setting for mail server.
1. Open "Alerts and Action" in the "Definition" view definition tree in the dashboard development environment.
2. From the displayed list of alert definitions, right-click "Sample Alert (Use rate)", and then select "Copy".
3. Double-click the copied "Copy_Sample Alert (Use rate)" to open the definition.
4. Change the alert rule name from "Copy_Sample Alert (Use rate)" to a suitable name.
5. Set the "Active" checkbox below the alert rule name to ON.
6. Customize threshold values as required. Refer to "E.2.2 Customizing Threshold Values" for information on changing thresholdvalues.
7. Customize monitored Pools as required. Refer to "E.2.3 Customizing Monitored Pools" for information on changing monitoredPools.
8. Select "Copy Email" in Action at the upper-right of the editor view.
- 383 -
9. At Email address, specify the email address of the alert email send destination. Delete the email address "admin@localhost"specified as the default.An alert email is sent as Bcc (Blind Carbon Copy), so the addresses of other addressees will not be seen by the recipient. Dependingon the settings of the mail server, the "to address" (the recipient) may also be shown as "undisclosed-recipients:;".Modify the following items, as required:
- Action: Change from "Copy_Email" to a suitable name.
- Subject: "${EVENT.VALUE,Pool} exceeded threshold" as default.
example: /VMHostPool exceeded threshold
- Body: the following items can be as default:
- Alert name: ${ALERT.NAME}
- Alert occurrence time: ${ALERT.OCCURRENCETIME}
- Pool name: ${EVENT.VALUE,Pool}
- Pool resource type: ${EVENT.VALUE,RscTYPE}
- Availability: ${EVENT.VALUE,Availability}%
The alert parameter to be used in Subject and Body is as follows:
Variable Description Example
${ALERT.NAME} Alert Rule name Alert (Use rate) CPU
${ALERT.OCCURRENCETIME} time when alerts occurred October 14, 2011 13:05:45
${EVENT.VALUE,Pool} global pool name /VMHostPool
${EVENT.VALUE,RscTYPE} resource type CPU
${EVENT.VALUE,Availability} global pool use rate 35.5%
- 384 -

10. Click the Save icon.
11. Click the Upload to Server icon from the tool bar on the Definition view.
12. Do not select the After uploading the Analytics Definition, replicate result in the system checkbox but click the OK button.
13. Click OK.
14. Restart the Analytics server. Refer to "E.6.4 Restarting the Analytics Serverr" for details.
- The initial password must be changed. Use the operation management console of Interstage Business Process Manager Analyticsto change the initial password. Refer to "E.6.2 Changing the Password of the Administrator" for details.
- Do not perform any operations from the operation management console other than setting passwords and the procedure describedabove for restarting the Interstage Business Process Manager Analytics server.
E.2.2 Customizing Threshold ValuesThis section explains the procedure for customizing threshold values.
- 385 -
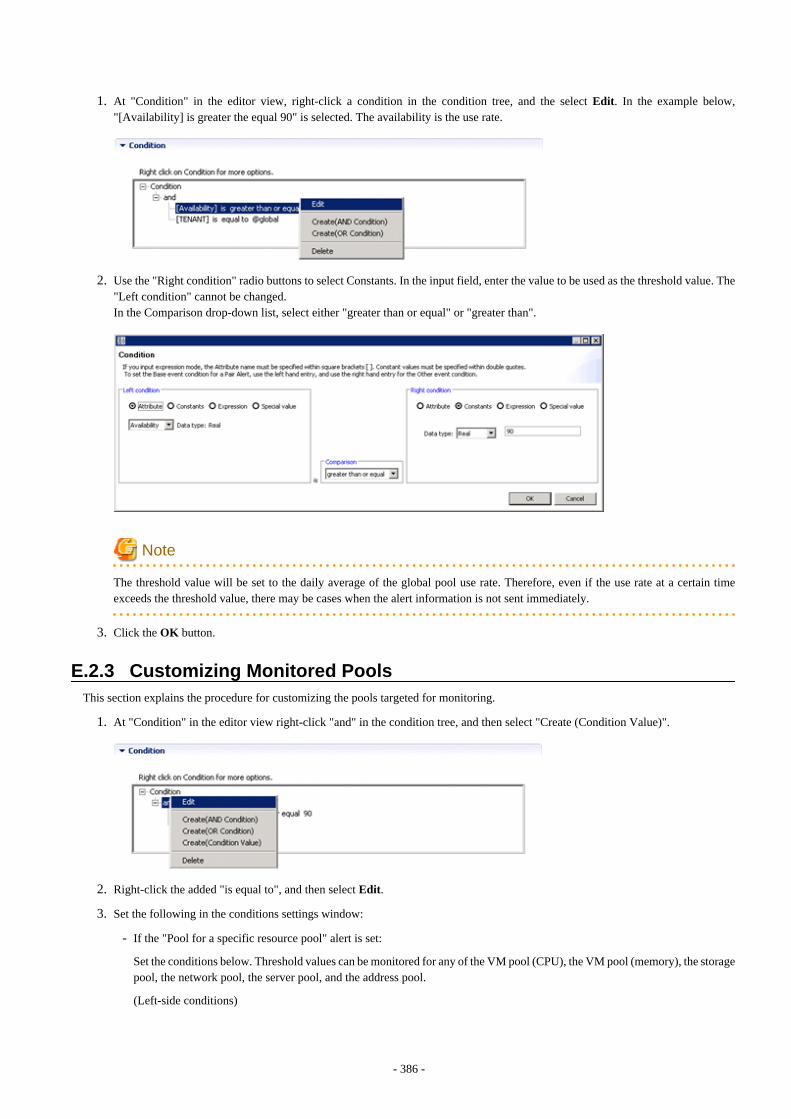
1. At "Condition" in the editor view, right-click a condition in the condition tree, and the select Edit. In the example below,"[Availability] is greater the equal 90" is selected. The availability is the use rate.
2. Use the "Right condition" radio buttons to select Constants. In the input field, enter the value to be used as the threshold value. The"Left condition" cannot be changed.In the Comparison drop-down list, select either "greater than or equal" or "greater than".
Note
The threshold value will be set to the daily average of the global pool use rate. Therefore, even if the use rate at a certain timeexceeds the threshold value, there may be cases when the alert information is not sent immediately.
3. Click the OK button.
E.2.3 Customizing Monitored PoolsThis section explains the procedure for customizing the pools targeted for monitoring.
1. At "Condition" in the editor view right-click "and" in the condition tree, and then select "Create (Condition Value)".
2. Right-click the added "is equal to", and then select Edit.
3. Set the following in the conditions settings window:
- If the "Pool for a specific resource pool" alert is set:
Set the conditions below. Threshold values can be monitored for any of the VM pool (CPU), the VM pool (memory), the storagepool, the network pool, the server pool, and the address pool.
(Left-side conditions)
- 386 -
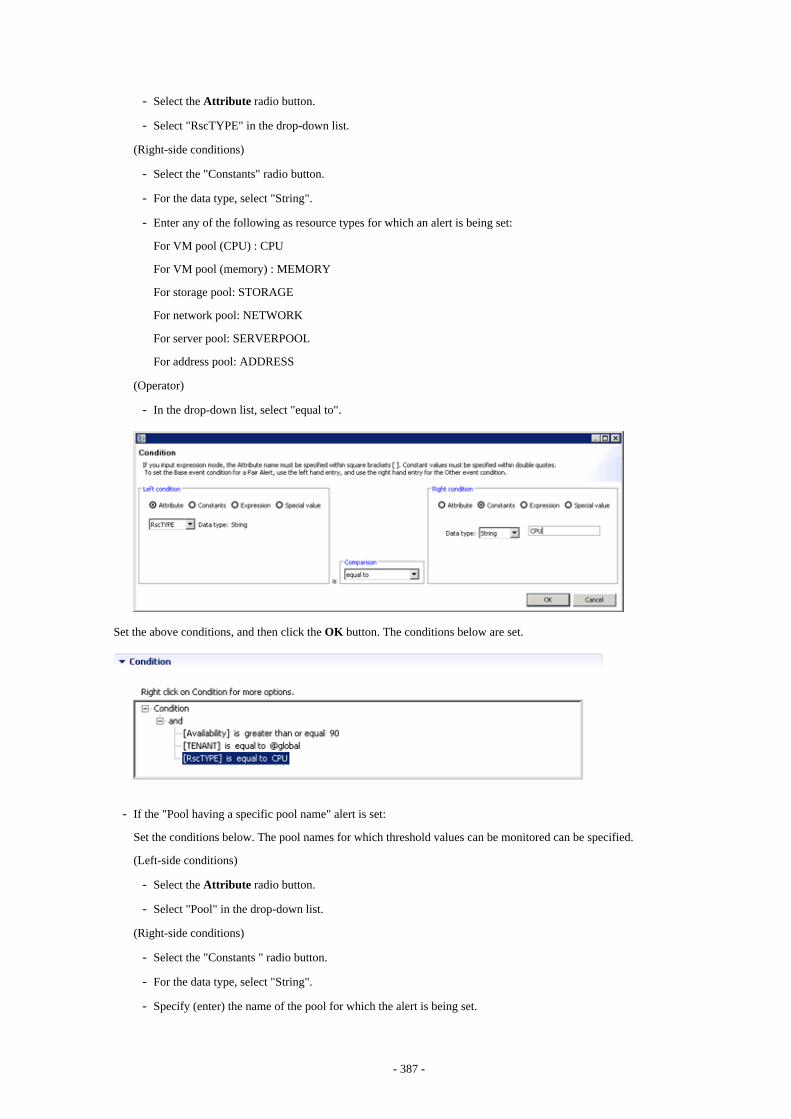
- Select the Attribute radio button.
- Select "RscTYPE" in the drop-down list.
(Right-side conditions)
- Select the "Constants" radio button.
- For the data type, select "String".
- Enter any of the following as resource types for which an alert is being set:
For VM pool (CPU) : CPU
For VM pool (memory) : MEMORY
For storage pool: STORAGE
For network pool: NETWORK
For server pool: SERVERPOOL
For address pool: ADDRESS
(Operator)
- In the drop-down list, select "equal to".
Set the above conditions, and then click the OK button. The conditions below are set.
- If the "Pool having a specific pool name" alert is set:
Set the conditions below. The pool names for which threshold values can be monitored can be specified.
(Left-side conditions)
- Select the Attribute radio button.
- Select "Pool" in the drop-down list.
(Right-side conditions)
- Select the "Constants " radio button.
- For the data type, select "String".
- Specify (enter) the name of the pool for which the alert is being set.
- 387 -
(Operator)
- In the drop-down list, select "equal to".
Set the above conditions, and then click the OK button. The conditions below are set.
4. Click the OK button.
E.3 Backup and Restore the Dashboard DevelopmentEnvironment
Backup and restore of the dashboard development environment refers to the backup and restore of the definition information being editedin the dashboard development environment.
This section explains the procedure required to backup and restore the definition information.
E.3.1 Backing Up the Definition InformationFollow the steps below to backup the definition information:
1. Close the dashboard development environment if it had been started.
2. Copy the workspace folder used in the dashboard development environment to another location without modifying it. The workspacefolder that was copied becomes the backup.
E.3.2 Restoring the Definition InformationFollow the steps below to restore the definition information:
1. Close the dashboard development environment if it had been started.
2. Delete the workspace folder used in the dashboard development environment if it exists.
3. Copy the backed-up workspace folder to the workspace folder used in the dashboard development environment.
4. Start the dashboard development environment.
- 388 -

5. Click the Open the definition icon.
E.4 Uninstalling the Dashboard Development EnvironmentDelete the dashboard development environment by uninstalling it. The uninstallation flow is shown as follows:
1. Uninstall the Interstage Business Process Manager Analytics Client
2. Uninstall Interstage Business Process Manager Studio
3. Uninstall JRE 5.0
E.4.1 Uninstalling the Interstage Business Process Manager AnalyticsClient
[Windows Manager]
If the dashboard development environment and the admin Server are installed on the same machine, follow the steps below to uninstallthe dashboard development environment:
1. Select Interstage Business Process Manager Analytics from the list displayed on Control Panel >> Uninstall or change aprogram, and click the Uninstall button.
2. Deselect the Client checkbox on the Select function dialog box, and click Next.
3. A dialog box confirming the deletion of the Client function will be displayed. Click Yes and execute uninstallation.
4. After uninstallation is completed, delete the work area for the dashboard development environment. Delete the following folder:
<Workspace selected when BPM Studio was started>\Interstage BPM Analytics
When the dashboard development environment is installed on a different machine from where the admin Server is installed, uninstall thedashboard development environment by following the same procedure as that for [Linux].
- 389 -

[Linux]
1. Select Interstage Business Process Manager Analytics from the list displayed on Control Panel >> Add or RemovePrograms, and click the Remove button.
2. Uninstall by following the confirmation dialog boxes.
3. After uninstallation is completed, delete the work area for the dashboard development environment. Delete the following directory:
<Workspace selected when BPM Studio was started>\Interstage BPM Analytics
Note
When both the admin Server and the dashboard development environment are built on the same machine and both of these are to beuninstalled, the clients of Interstage Business Process Manager Analytics are also uninstalled when the admin Server is uninstalled. Tasksdiscussed in this section are therefore not required.
E.4.2 Uninstalling Interstage Business Process Manager Studio1. Select Interstage Business Process Manager Studio from the list displayed on Control Panel >> Uninstall or change a
program, and click the Uninstall button.
2. Uninstall by following the confirmation dialog boxes.
E.4.3 Uninstalling JRE 5.0This operation is not necessary if the dashboard development environment is deployed to the same machine as the admin server.
1. Select Interstage Application Server V9.3.0 Client Package from the list displayed on Control panel >> Uninstall or changea program, and click the Uninstall/Change button.
2. Uninstall by following the confirmation dialog boxes.
E.5 Changing the Schedule for Deleting Event DataData displayed in the dashboard (event data) is collated at specific times. This collated data is then deleted at certain times.If the service is unable to delete the data, because the server is stopped every time it is meant to delete the data, then the data cannot bedeleted and unnecessary data will accumulate.If this situation occurs, perform the following procedure to change the time to a more appropriate one.
E.5.1 Settings1. Connect to the operation management console and log in. Refer to "E.6.1 Access" for details.
2. Select the Archive Rules CTDSB002 to CTDSB004 in the operation management console, display the Execution Schedule, thenselect the time to be changed and click Modify. Refer to "E.6.5 Changing the Schedule for Data Deletion" for details.
Initial frequency and times
Time CTDSB001 : Everyday 03:51 (reservation not used) CTDSB002 : Everyday 02:51 CTDSB003 : Everyday 01:51 CTDSB004 : Everymonth 1st 00:51
3. Select the time to be changed and click Modify.
- 390 -
Note
Do not change this unless there is a particular need.The most appropriate times have been selected for the default settings.
E.6 The Interstage Business Process Manager AnalyticsManagement Console
To log into the Interstage Business Process Manager Analytics management console, connect to the operation management console andlog in (the default password is "bpm").In the operation management console, perform only those operations described in this section and in "18.1.7 Settings for Email Sent fromthe Dashboard".
E.6.1 AccessAccess the following URL in a browser to start the Interstage Business Process Manager Analytics management console:
http://<FQDN of the admin server>/ibpmm/BPMAdminTool.do
E.6.2 Changing the Password of the AdministratorThis is the password for logging into the Interstage Business Process Manager Analytics management console.Manage passwords based on security policy.The password at installation is "bpm".
Change the password of the administrator using the following procedure:
1. After logging into the operation management console, click BPM Analytics in the pane on the left.
2. Click Set Password in the pane on the right, enter the three fields (Current Password, New Password, and Confirm Password),then click Modify
E.6.3 Creating and Changing Analytics Studio Usersf uploading operation settings to the Analytics Server using the Analytics Studio, user authentication is required.The default Analytics Studio user has the user ID "bpm" and the password "bpm".
Create or change the Analytics Studio user with the following procedure:
1. After logging into the operation management console, click BPM Analytics >> System >> Analytics Studio Authentication inthe pane on the left.
2. Click on the User List in the pane on the right, then either edit an existing user or click on the Create a New User tab and createa new user.
E.6.4 Restarting the Analytics ServerRestart the Analytics server using the following procedure:
1. After logging into the operation management console, click BPM Analytics >> Server Management >> BPM AnalyticsServer in the pane on the left.
2. Click Stop in the pane on the right.
3. Confirm that Status has changed to Stopped, and then click Start.
4. Confirm that Status has changed to Running.
- 391 -

E.6.5 Changing the Schedule for Data DeletionChange the time for regularly deleting dashboard data using the following procedure:
1. After logging into the operation management console, click BPM Analytics >> System >> Data Migration in the pane on the left.
2. Click Archive Rules in the pane on the right, then click the name of the definition to be edited in Rule Name.
3. Click Execution Schedule [Open/Close].
4. Change the time and click Change.
- 392 -
Appendix F Upgrading from Earlier VersionsThis appendix explains the following upgrade procedures.
How to upgrade the following environments to this version of ROR CE
- Environments configured using RCVE
- Environments configured using an earlier version of ROR
- Environments configured using an earlier version of ROR VE
- Environments configured using an earlier version of ROR CE
- Environments configured using this version of ROR VE
F.1 OverviewThis section explains an overview of the following upgrades.
Support Scope
The versions of agents and HBA address rename setup service supported by managers of this version are as shown below.
Manager
Agent HBA address rename Setup Service
RCVE V2.1.0 orlater
V3.1.2RCVE V2.1.0 or
laterV3.1.2
V3.1.2 Yes (*) Yes No Yes
Yes: SupportedNo: UnsupportedNote: When using this version of manager and an earlier version of agents in combination, the scope of available functions is limited tothe one provided by the earlier version of agents.
Whether upgrading from an earlier version is possible is shown below:
[Windows Manager]
Earlier Version Upgradability
RCVE V2.2.2 No
ROR V2.2.2 No
ROR V2.3
Refer to "Upgrade using Upgrade Installation".
ROR VE V3.0
ROR CE V3.0
ROR VE V3.1.0
ROR CE V3.1.0
ROR VE V3.1.1
ROR CE V3.1.1
ROR VE V3.1.2 Refer to "Upgrade from this version of ROR VE to ROR CE".
No: Unsupported
[Linux Manager]
- 393 -

Earlier Version Upgradability
RCVE V2.2.2 Refer to "Upgrade using Upgrade Installation".
ROR V2.2.2 No
ROR V2.3 No
ROR VE V3.0 Refer to "Upgrade using Upgrade Installation".
ROR CE V3.0 No
ROR VE V3.1.0 Refer to "Upgrade using Upgrade Installation".
ROR CE V3.1.0 No
ROR VE V3.1.1 Refer to "Upgrade using Upgrade Installation".
ROR CE V3.1.1 No
ROR VE V3.1.2 Refer to "Upgrade from this version of ROR VE to ROR CE".
No: Unsupported
Agent [Windows] [Linux]
Earlier Version Upgradability
RCVE V2.1.0 -RCVE V2.2.2
Refer to "Upgrade using Upgrade Installation".ROR V2.2.0 - RORV3.1.1
ROR VE V3.1.2 No
No: Unsupported
Agent [Solaris]
Earlier Version Upgradability
ROR V3.1.0 - RORV3.1.1
Refer to "Upgrade using Upgrade Installation".
ROR VE V3.1.2 No
No: Unsupported
HBA address rename Setup Service
Earlier Version Upgradability
RCVE V2.1.0 -RCVE V2.2.2
Refer to "Upgrade using Upgrade Installation".ROR V2.2.0 - RORV3.1.1
Note
After upgrading RCVE V2.2.2 to ROR VE V3.1.2, it is not possible to upgrade from ROR VE V3.1.2 to ROR CE V3.1.2.
Upgrade using Upgrade Installation
Using the installer of Resource Orchestrator, it is possible to automatically upgrade from an earlier version to this version.
When performing upgrade installation from an earlier version to this version, perform the upgrade in the order of manager, agents, andthen the HBA address rename setup service.
- 394 -

Upgrade from this version of ROR VE to ROR CE
The upgrade from ROR VE of this version to ROR CE can be automatically done with the installer of this product.
The manager, agent, and HBA address rename setup service must be upgraded for upgrading from ROR VE to ROR CE. In addition,Cloud Edition licenses are required for each agent used.
For license registration, refer to "Chapter 5 License Setup and Confirmation".
F.2 ManagerThis section explains the upgrading of managers.
When operating managers in clusters, transfer using upgrade installation cannot be performed. Perform "Transfer of the Manager UsingRe-installation or the Pre-configuration Function".
Point
- When maintaining compatibility with earlier versions, refer to "2.3.1 Maintaining Compatibility with Earlier Versions" in the "ReleaseNotes", and change each setting.
[Windows Manager]
- When upgrading an environment configured using an earlier version of ServerView Resource Coordinator to this version of FUJITSUSoftware ServerView Resource Orchestrator Cloud Edition, replace the "Installation_folder\SVROR\Manager" used in ResourceOrchestrator manuals with "Installation_folder\Manager".
Transferred Data
The following manager data is transferred:
- Resource Orchestrator setting information (Setting information for the environment of the earlier version)
- Certificates
- System images and cloning images (Files in the image file storage folder)
Also, with transfer using upgrade installation the following data is also transferred:
- Port number settings
- Power consumption data
- Batch files and script files for event-related functions
Data which is transferred during upgrade installation, except for system images and cloning images, is created and stored in the followingfolder.For system images and cloning images, the installation folder of the earlier version is used.Ensure that the folder is not deleted until after the upgrade is complete.
[Windows Manager]32-bit (x86) OSDrive_name\Program Files\RCVE-upgradedata64-bit (x64) OSDrive_name\Program Files (x86)\RCVE-upgradedataSystem_drive\swrbaworkinstallation_ folder\RCXCFMG-upgradedatainstallation_ folder\RCXCTMG-upgradedata
- 395 -

[Linux Manager]/var/opt/RCVE-upgradedata/var/opt/backupscwdir
Note
The total disk space of the following folders plus 100 MB is required under System_drive\swrbawork and /var/tmp/swrbawork.
[Windows Manager]
- System_drive\SWRBADB
- installation_ folder\SWRBAM
- installation_ folder\IAPS
- installation_ folder\SWOMGR
[Linux Manager]
- /var/opt/FJSVJMCMN
- /var/opt/FJSVJOBSC
- /var/opt/FJSVMJS
- /var/opt/FJSVcmdba
- /var/opt/FJSVcmdbi
- /var/opt/FJSVcmdbm
- /var/opt/FJSVejb
- /var/opt/FJSVena
- /var/opt/FJSVes
- /var/opt/FJSVextp
- /var/opt/FJSVftlo
- /var/opt/FJSVfwseo
- /var/opt/FJSVfwtco
- /var/opt/FJSVihs
- /var/opt/FJSVirep
- /var/opt/FJSVirepc
- /var/opt/FJSVisas
- /var/opt/FJSVisgui
- /var/opt/FJSVisjmx
- /var/opt/FJSVisscs
- /var/opt/FJSVj2ee
- /var/opt/FJSVjmcal
- /var/opt/FJSVjms
- /var/opt/FJSVjmweb
- /var/opt/FJSVjs2su
- /var/opt/FJSVjs5
- /var/opt/FJSVlnkbs
- 396 -

- /var/opt/FJSVod
- /var/opt/FJSVots
- /var/opt/FJSVporb
- /var/opt/FJSVshnsk
- /var/opt/FJSVshs
- /var/opt/FJSVssoac
- /var/opt/FJSVssoaz
- /var/opt/FJSVssocm
- /var/opt/FJSVssofs
- /var/opt/FJSVssosv
- /var/opt/FJSVstem
- /var/opt/FJSVsvmon
- /var/opt/FJSVswaic
- /var/opt/FJSVswnc
- /var/opt/FJSVswrbac
- /var/opt/FJSVswrbam
- /var/opt/FJSVtd
- /etc/opt/FJSVMJS
- /etc/opt/FJSVcmdba
- /etc/opt/FJSVcmdbm
- /etc/opt/FJSVejb
- /etc/opt/FJSVes
- /etc/opt/FJSVextp
- /etc/opt/FJSVftlo
- /etc/opt/FJSVihs
- /etc/opt/FJSVirep
- /etc/opt/FJSVisas
- /etc/opt/FJSVisgui
- /etc/opt/FJSVisjmx
- /etc/opt/FJSVisscs
- /etc/opt/FJSVj2ee
- /etc/opt/FJSVjms
- /etc/opt/FJSVjs2su
- /etc/opt/FJSVjs5
- /etc/opt/FJSVlnkbs
- /etc/opt/FJSVod
- /etc/opt/FJSVots
- /etc/opt/FJSVporb
- 397 -
- /etc/opt/FJSVsclr
- /etc/opt/FJSVshnsk
- /etc/opt/FJSVshs
- /etc/opt/FJSVssoac
- /etc/opt/FJSVssoaz
- /etc/opt/FJSVssofs
- /etc/opt/FJSVssosv
- /etc/opt/FJSVsvmon
- /etc/opt/FJSVswaic
- /etc/opt/FJSVswnc
- /etc/opt/FJSVswrbac
- /etc/opt/FJSVswrbam
- /etc/opt/FJSVtd
Preparations
Perform the following preparations and checks before upgrading:
- Check that the environment is one in which managers of this version can be operated.For the operational environment, refer to "2.4 Software Environment" and "2.5 Hardware Environment" in the "Design Guide CE".Take particular care regarding the memory capacity.
- To enable recovery in case there is unexpected trouble during the upgrade process, please back up the system.
- When using GLS to perform redundancy of NICs for the admin LAN of managed servers, activate the admin LAN on the primaryinterface.
- To confirm that the upgrade is complete, if there are registered VM hosts on which there are VM guests, check from the ROR consolethat all of the VM guests are displayed and record their information before upgrading.
- When server switchover settings have been performed, it is not possible to upgrade when spare servers have been switched to. Restoreany such servers before starting the upgrade. For how to restore, refer to the information about Server Switchover in the "OperationGuide VE" of an earlier version.
- If ETERNUS SF Storage Cruiser Manager or ETERNUS SF AdvancedCopy Manager is installed, stop the service or daemon for eachof them (the service starts even if a license has not been registered). Refer to the manuals for information on how to stop the servicesand daemons.
- Check that the following ports are not used: If they are being used, please contact Fujitsu technical staff.
- 7676
- 8015
- 8686
- 12001
- 23600
- 23601
- 23602
- 23700
- 28080
- 398 -
- Stop the BMC BladeLogic Server Automation service if it is in use.
[Windows Manager]Refer to "Required Software Preparation and Checks" in "2.1.1.2 Software Preparation and Checks" for information on how to stopthe service.
[Linux Manager]Refer to "Required Software Preparation and Checks" in "2.1.2.2 Software Preparation and Checks" for information on how to stopthe service.
- Check that Software Configuration Manager (Admin Server) is not installed.If it is installed, please contact Fujitsu technical staff.
Upgrade using Upgrade Installation
When upgrading to this version, upgrade can be performed using upgrade installation. Perform the upgrade using the following procedure:
Note
- Do not change the hardware settings or configurations of managers, agents, or any other devices until upgrading is completed.
- When performing an upgrade installation, please do not access the installation folder of the earlier version or any of the files andfolders inside it using the command prompt, Explorer, or an editor.While it is being accessed, attempts to perform upgrade installation will fail.If upgrade installation fails, stop accessing the files or folders and then perform the upgrade installation again.
- In the event that upgrade installation fails, please restore the system that was backed up during the preparations and then performupgrade installation again.If the problem cannot be resolved and upgrade installation fails again, please contact Fujitsu technical staff.
- To revert to the status before an upgrade was performed, restore the system that was backed up in the preparation stage.
- Upgrade installation will delete patches that were applied to the earlier version.
However, if the patches of the products listed in the following section have been applied to the earlier version, these patches may notbe deleted.
[Windows Manager]
- "Patches to Apply after Upgrade" of "2.1.1.6 Installation"
[Linux Manager]
- "Patches to Apply after Upgrade" of "2.1.2.6 Installation"
[Linux Manager]When the PATH variable has not been configured to enable execution of UpdateAdvisor (Middleware) commands from a user-definedlocation, performing upgrade installation will delete any patches that have been applied to the old version, but it will not delete productinformation or component information. Refer to the UpdateAdvisor (Middleware) manual and delete software and componentinformation from the applied modification checklist.
- When operating managers in clusters, transfer using upgrade installation cannot be performed. Perform transfer using re-installationor the pre-configuration function.
- If used ports exist when performing an upgrade installation, the message "The specified port number Port Number selected forServerView Resource Orchestrator is already used." will be displayed, and installation will fail. If this happens, please contact Fujitsutechnical staff.
[Windows Manager]The specified port number Port Number selected for ServerView Resource Orchestrator is already used.
[Linux Manager]The specified port number Port Number selected for ServerView Resource Orchestrator is already used.
- 399 -
- When the path of the installation folder before the upgrade is 46 characters or longer, transfer using upgrade installation is not possible.Perform transfer using re-installation or the pre-configuration function.
1. Upgrade Installation
[Windows Manager]
Refer to steps 1 to 5 and Point in the installation section in "2.1.1.6 Installation", and execute the Resource Orchestrator installer.
The Resource Orchestrator setup window will be displayed. Check the contents of the license agreement, etc. and then click <Next>.The settings to be inherited from the earlier version will be displayed. Check them and click <Next>. Upgrade installation willbegin.
[Linux Manager]
Refer to steps 1 to 11 and Point in the installation section in "2.1.2.6 Installation", and execute the Resource Orchestrator installer.
Check the contents of the license agreement, etc. and then enter "y".The setting information that will be taken over from the earlier version will be displayed. Please check it and then enter "y". Upgradeinstallation will begin.
2. Restarting after Upgrade Installation is Finished
After upgrade installation is finished, restart the system in order to complete the upgrade.
3. Transfer of Configuration Methods for Overcommit Functions
For ROR V3.1.0 and later, the configuration method for overcommit functions differ from those of earlier versions of ResourceOrchestrator. Therefore, the configuration method must be transferred from the earlier version.When performing upgrade installation of an admin server that is ROR V2.3.0 or V3.0.0, execute the following command to transferthe configuration information.
[Windows Manager]Installation_folder\SVROR\Manager\bin\rcxmigrate_oc
[Linux Manager]/opt/FJSVrcvmr/bin/rcxmigrate_oc
For details on the rcxmigrate_oc command, refer to "5.2 rcxmigrate_oc" in the "Reference Guide (Command/XML) CE".
Note
If this step is omitted, overcommit cannot be set for VM pools in "Chapter 20 Resource Pool Operations" in the "User's Guide forInfrastructure Administrators (Resource Management) CE". In that case, edit overcommit definition files as in the case of the earlierversions.
For details, refer to "2.3.1.1 Overcommit Definition Files" in the "Release Notes".
4. Configure a Single Sign-On Environment
When performing upgrade installation from the following products to Cloud Edition, configuration of a "Single Sign-Onenvironment" is necessary.
- Earlier version of ROR
- Earlier version of ROR VE
- This version of ROR VE
After this step, refer to "F.6 Configuring a Single Sign-On Environment", and configure a Single Sign-On environment.
When upgrading from ROR V3.0.0 to Cloud Edition this procedure is not necessary.
5. Transfer of L-Server templates of ROR V2.3.0
When performing upgrade installation of an admin server that is ROR V2.3.0, execute the following command to transfer the physicalL-Server templates.
- 400 -
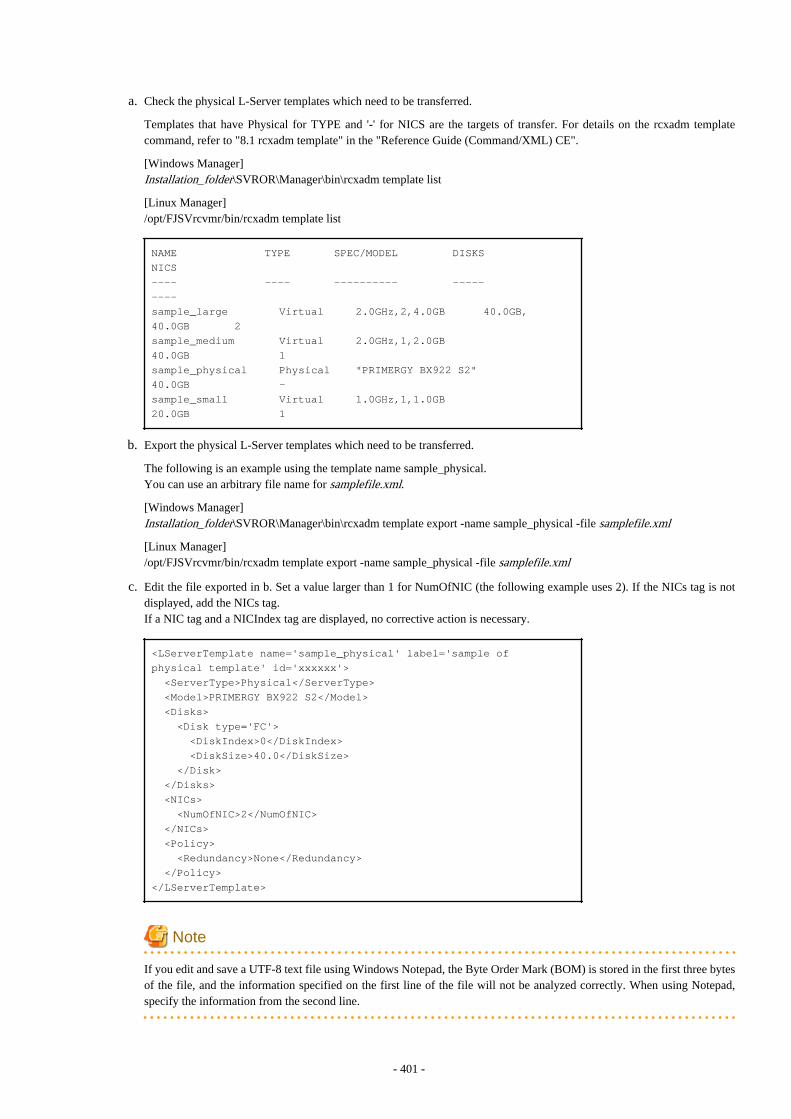
a. Check the physical L-Server templates which need to be transferred.
Templates that have Physical for TYPE and '-' for NICS are the targets of transfer. For details on the rcxadm templatecommand, refer to "8.1 rcxadm template" in the "Reference Guide (Command/XML) CE".
[Windows Manager]Installation_folder\SVROR\Manager\bin\rcxadm template list
[Linux Manager]/opt/FJSVrcvmr/bin/rcxadm template list
NAME TYPE SPEC/MODEL DISKS NICS---- ---- ---------- ----- ----sample_large Virtual 2.0GHz,2,4.0GB 40.0GB,40.0GB 2sample_medium Virtual 2.0GHz,1,2.0GB 40.0GB 1sample_physical Physical "PRIMERGY BX922 S2" 40.0GB -sample_small Virtual 1.0GHz,1,1.0GB 20.0GB 1
b. Export the physical L-Server templates which need to be transferred.
The following is an example using the template name sample_physical.You can use an arbitrary file name for samplefile.xml.
[Windows Manager]Installation_folder\SVROR\Manager\bin\rcxadm template export -name sample_physical -file samplefile.xml
[Linux Manager]/opt/FJSVrcvmr/bin/rcxadm template export -name sample_physical -file samplefile.xml
c. Edit the file exported in b. Set a value larger than 1 for NumOfNIC (the following example uses 2). If the NICs tag is notdisplayed, add the NICs tag.If a NIC tag and a NICIndex tag are displayed, no corrective action is necessary.
<LServerTemplate name='sample_physical' label='sample of physical template' id='xxxxxx'> <ServerType>Physical</ServerType> <Model>PRIMERGY BX922 S2</Model> <Disks> <Disk type='FC'> <DiskIndex>0</DiskIndex> <DiskSize>40.0</DiskSize> </Disk> </Disks> <NICs> <NumOfNIC>2</NumOfNIC> </NICs> <Policy> <Redundancy>None</Redundancy> </Policy></LServerTemplate>
Note
If you edit and save a UTF-8 text file using Windows Notepad, the Byte Order Mark (BOM) is stored in the first three bytesof the file, and the information specified on the first line of the file will not be analyzed correctly. When using Notepad,specify the information from the second line.
- 401 -
d. Overwrite the template by importing the edited file.
[Windows Manager]Installation_folder\SVROR\Manager\bin\rcxadm import -file samplefile.xml -force
[Linux Manager]/opt/FJSVrcvmr/bin/rcxadm import -file samplefile.xml -force
e. Check that a value larger than 1 is displayed for NICS in the transferred physical L-Server template.
[Windows Manager]Installation_folder\SVROR\Manager\bin\rcxadm template list
[Linux Manager]/opt/FJSVrcvmr/bin/rcxadm template list
NAME TYPE SPEC/MODEL DISKS NICS---- ---- ---------- ----- ----sample_large Virtual 2.0GHz,2,4.0GB 40.0GB,40.0GB 2sample_medium Virtual 2.0GHz,1,2.0GB 40.0GB 1sample_physical Physical "PRIMERGY BX922 S2" 40.0GB -sample_small Virtual 1.0GHz,1,1.0GB 20.0GB 1
6. Usage Charge Calculation Feature Settings
This section describes the usage charge calculation feature settings.
If an upgrade installation is performed, pre-upgrade settings are retained. To use the post-upgrade usage charge calculation feature,configure the following, according to the pre-upgrade version.Restart the manager for the definition file settings to take effect. Refer to Section "2.1 Starting and Stopping Managers" in the"Operation Guide CE" for information on starting the manager.
Location of the Definition File
[Windows Manager]Installation_folder\RCXCTMG\Charging\conf
[Linux Manager]/etc/opt/FJSVctchg/conf/
Definition File Name
accounting.properties
Definition File Format
Describe each line of the definition file in the following format:
accounting.calculate.sys.disk=yesaccounting.calculate.snapshot=yesgui.identifier.server=namegui.identifier.disk=name
Definition File Items Table F.1 List of Items
Version beforeupgrade
Item Name Description
V3.1.0 or V3.1.0A accounting.calculate.sys.disk From V3.1.1, it is possible to set billing and tally usage chargesat the system disk level, separately from L-Server images. Whenbilling system disks separately from L-Server images, add thefollowing row:accounting.calculate.sys.disk=yes
Note that in an environment where system disk units are includedin L-Server image products, change the settings carefully forproduct units, paying special attention to the applicable periods
- 402 -

Version beforeupgrade
Item Name Description
for product units and tenant cut-off dates so that there is no doublecharging for system disks.Refer to Section "15.3.2 Modify Accounting Information" in the"Operation Guide CE" for information on reconfiguring productunit prices.
V3.1.0 or V3.1.0A gui.identifier.server From V3.1.1, the server name specified in the L-PlatformManagement, not the internal ID, can be displayed as theidentification information for the virtual or physical server in theUsage Charge Detail window. To display the server name, addthe following row:gui.identifier.server=name
V3.1.0 or V3.1.0A gui.identifier.disk From V3.1.1, the disk name specified in the L-PlatformManagement, not the internal ID, can be displayed as theidentification information for the data disk capacity in the UsageCharge Detail window. To display the disk name, add thefollowing row:gui.identifier.disk=name
V3.1.1 accounting.calculate.snapshot From V3.1.2, it is possible to set and tally usage charges at thesnapshot level for virtual L-Servers.When billing for snapshots, add the following row:accounting.calculate.snapshot=yes
Note that in an environment where snapshot units are included inL-Server image products, change the settings carefully for productunits, paying special attention to the applicable periods forproduct units and tenant cut-off dates so that there is no doublecharging for snapshots. Refer to "15.3.2 Modify AccountingInformation" in the "Operation Guide CE" for information onchanging the product unit settings.
7. Backup
When using the backup and restoration function of the admin server, save the resources after completion of the upgrade installationby performing an offline backup. If you choose to backup online, use a base backup.For details, refer to "10.1 Backup and Restoration of Admin Servers" in the "Operation Guide CE".
Note
- When using backup system images or collecting cloning images without upgrading agents, either reboot managed servers after themanager upgrade is completed, or restart the related services.For restarting the Related Services, refer to "5.2 Agent" in the "ServerView Resource Coordinator VE Setup Guide".
- Before upgrading, installation and configuration of Single Sign-On are required.For details, refer to "Chapter 12 Installing and Defining Single Sign-On" in the "Design Guide CE".
- Perform the following tasks to configure if linking with "Service Quality Coordinator"."1.14 Linking to ServerView Resource Orchestrator" in the "Systemwalker Service Quality Coordinator User's Guide"
Transfer of the Manager Using Re-installation or the Pre-configuration Function
In the following cases, import system configuration files (import) and export system configuration files (export) using pre-configuration.
- Transfer from RCVE manager to this version of ROR CE
- Transfer of a cluster operated using RCVE manager to this version of ROR CE manager
- 403 -
- Transfer of a cluster operated using ROR VE manager to this version of ROR CE manager
- When the path of the installation folder before transfer is 46 characters or longer
Use the following procedure to perform "Transfer of the Manager Using Re-installation or the Pre-configuration Function".
See
For pre-configuration, refer to the following manuals:
[RCVE]
- "Chapter 7 Pre-configuration" in the "ServerView Resource Coordinator VE Setup Guide"
- "Appendix D Format of CSV System Configuration Files" in the "ServerView Resource Coordinator VE Setup Guide"
[ROR VE V3.0.0]
- "Chapter 6 Pre-configuration" in the "ServerView Resource Orchestrator Virtual Edition V3.0.0 User's Guide"
- "Appendix A Format of CSV System Configuration Files" in the "ServerView Resource Orchestrator Virtual Edition V3.0.0 User'sGuide"
Also, when transferring the manager using the pre-configuration function, perform the following preparations and checks.
- To confirm that transfer using the pre-configuration function is complete, if there are registered VM hosts on which there are VMguests, check from the ROR console that all of the VM guests are displayed, and record their information.
- When server switchover settings have been performed, it is not possible to transfer using the pre-configuration function when spareservers have been switched to. Perform restoration before starting transfer using the pre-configuration function.
For the restoration method, refer to the following manuals:
[RCVE]
- "Chapter 10 Server Switchover" in the "ServerView Resource Coordinator VE Operation Guide"
[ROR VE V3.0.0]
- "Chapter 10 Server Switchover" in the "ServerView Resource Orchestrator Virtual Edition V3.0.0 Operation Guide"
- The following information will not be transferred. Reconfiguration is necessary when performing transfer using the pre-configurationfunction.
Record the following configuration information from the RC console or the ROR Console.
- User account information
- Registration status of the agent of each managed server, and maintenance mode settings
- Spare server settings
- Agent registration information of OVM for SPARC guest domains
- Power consumption data
When monitoring of power consumption is being performed, collected power consumption data will not be transferred.
When the power consumption data is necessary, export it in CSV format.
For the export method, refer to the following manuals:
[RCVE]
- "13.2 Exporting Power Consumption Data" in the "ServerView Resource Coordinator VE Operation Guide"
[ROR VE V3.0.0]
- "13.2 Exporting Power Consumption Data" in the "ServerView Resource Orchestrator Virtual Edition V3.0.0 Operation Guide"
- 404 -
Note
Do not change the settings of the manager, agents, or any other hardware devices, or their configuration, until transfer using the pre-configuration function is complete.
1. Set Maintenance Mode
From the RC console of the RCVE manager, or the ROR console of ROR VE, place all managed servers into maintenance mode.
2. System Configuration File Export
Use the pre-configuration function to export a system configuration file in CSV format. During the export, do not perform any otheroperations with Resource Orchestrator.For the export method, refer to the following manuals:
[RCVE]
- "Chapter 7 Pre-configuration" in the "ServerView Resource Coordinator VE Setup Guide"
[ROR VE V3.0.0]
- "Chapter 6 Pre-configuration" in the "ServerView Resource Orchestrator Virtual Edition V3.0.0 User's Guide"
3. Backup (copy) Assets to Transfer
a. Back up (copy) certificates.
Back up (copy) the following folders and directories:
- RCVE Windows Manager
Installation_folder\Manager\etc\opt\FJSVssmgr\current\certificateInstallation_folder\Manager\etc\opt\FJSVrcxdm\certificateInstallation_folder\Manager\sys\apache\conf\ssl.crtInstallation_folder\Manager\sys\apache\conf\ssl.key
- ROR VE Windows Manager
Installation_folder\SVROR\Manager\etc\opt\FJSVssmgr\current\certificateInstallation_folder\SVROR\Manager\etc\opt\FJSVrcxdm\certificateInstallation_folder\SVROR\Manager\sys\apache\conf\ssl.crtInstallation_folder\SVROR\Manager\sys\apache\conf\ssl.key
- RCVE and ROR VE Linux Manager
/etc/opt/FJSVrcvmr/opt/FJSVssmgr/current/certificate/etc/opt/FJSVrcvmr/sys/apache/conf/ssl.crt/etc/opt/FJSVrcvmr/sys/apache/conf/ssl.key
b. Back up (copy) the folder containing the collected system images and cloning images to a location other than the installationfolder and the image file storage folder.When using the default image file storage folder, back up (copy) the following folder or directory:
- RCVE Windows Manager
Installation_folder\ScwPro\depot\Cloneimg
- ROR VE Windows Manager
Installation_folder\SVROR\ScwPro\depot\Cloneimg
- RCVE and ROR VE Linux Manager
/var/opt/FJSVscw-deploysv/depot/CLONEIMG
When using a folder or directory other than the default, back up (copy) the "Cloneimg" folder or "CLONEIMG" directoryused.
- 405 -
c. Back up (copy) the following file.
- Port Number Settings
[Windows Manager]System_drive\WINDOWS\system32\drivers\etc\services
[Linux Manager]/etc/services
- Batch Files and Script Files for Event-related Functions
RCVE Windows ManagerInstallation_folder\Manager\etc\trapop.bat
ROR VE Windows ManagerInstallation_folder\SVROR\Manager\etc\trapop.bat
Linux Manager/etc/opt/FJSVrcvmr/trapop.sh
Note
- When operating managers in clusters, the above folders or directories are stored on the shared disk. Check if files, folders, ordirectories stored in the above locations are correctly backed up (copied).The backup (copy) storage target can be set to be stored in a folder or directory on the shared disk other than "RCoordinator"or "SVROR" which are created during setup of the manager cluster service.
- When operating managers in clusters, the backup (copy) of folders or directories should be executed on the primary node.
- Before making a backup (copy) of system images and cloning images, check the available disk space. For the disk spacenecessary for system images and cloning images, refer to the following manuals:
[RCVE]
- "1.1.2.5 Dynamic Disk Space" in the "ServerView Resource Coordinator VE Installation Guide"
[ROR VE V3.0.0]
- "1.4.2.5 Dynamic Disk Space" in the "ServerView Resource Orchestrator Virtual Edition V3.0.0 Setup Guide"
When there is no storage folder for system images and cloning images, this step is not necessary.
4. Uninstall Earlier Products or Managers of Earlier Versions
Refer to the "ServerView Resource Coordinator VE Installation Guide" or the "ServerView Resource Orchestrator Virtual EditionV3.0.0 Installation Guide", and uninstall the manager.
When operating managers in clusters, refer to the following manuals, delete the cluster service and uninstall the manager.
[RCVE]
- "Appendix B Manager Cluster Operation Settings and Deletion" in the "ServerView Resource Coordinator VE InstallationGuide"
[ROR VE V3.0.0]
- "Appendix B Manager Cluster Operation Settings and Deletion" in the "ServerView Resource Orchestrator Virtual EditionV3.0.0 Installation Guide"
Note
- Do not perform "Delete servers" as given in the Preparations in the "ServerView Resource Coordinator VE Installation Guide"or the "ServerView Resource Orchestrator Virtual Edition V3.0.0 Installation Guide".When managed servers using HBA address rename have been deleted, it is necessary to reboot managed servers after upgradingof the manager is completed.
- 406 -
- User account information is deleted when managers are uninstalled. Refer to step 6 and perform reconfiguration from the RORconsole.
5. Installation of Managers of This Version
Install managers of this version.For installation, refer to "2.1 Manager Installation".
Note
When installing managers, specify the same admin LAN as used for the RCVE manager on the [Admin LAN Selection] window.
After installing managers, use the following procedure to restore the certificates and image file storage folder backed up (copied)in step 3.
a. Stop the manager.
For the method for stopping managers, refer to "2.1 Starting and Stopping Managers" in the "Operation Guide CE".
b. Return the image file storage folder backup (copy) to the folder specified during installation.
When using the default image file storage folder, restore to the following folder or directory:
[Windows Manager]Installation_folder\ScwPro\depot\Cloneimg
[Linux Manager]/var/opt/FJSVscw-deploysv/depot/CLONEIMG
When using a folder other than the default, restore to the new folder.When the image file storage folder was not backed up, this step is not necessary.
c. Restore the backed up (copied) certificates to the manager installation_folder.
Restore to the following folder or directory:
[Windows Manager]Installation_folder\SVROR\Manager\etc\opt\FJSVssmgr\current\certificateInstallation_folder\SVROR\Manager\etc\opt\FJSVrcxdm\certificateInstallation_folder\SVROR\Manager\sys\apache\conf\ssl.crtInstallation_folder\SVROR\Manager\sys\apache\conf\ssl.key
[Linux Manager]/etc/opt/FJSVrcvmr/opt/FJSVssmgr/current/certificate/etc/opt/FJSVrcvmr/sys/apache/conf/ssl.crt/etc/opt/FJSVrcvmr/sys/apache/conf/ssl.key
d. Restore the information that was backed up during preparations.
- Port number settings
Change the port numbers based on the information that was backed up during preparations.For details on how to change port numbers, refer to "6.2 Changing Port Numbers" in the "User's Guide for InfrastructureAdministrators (Resource Management) CE".When the port number has not been changed from the default, this step is not necessary.
- Batch files and script files for event-related functions
Restore them by replacing the following file.
[Windows Manager]Installation_folder\SVROR\Manager\etc\trapop.bat
[Linux]/etc/opt/FJSVrcvmr/trapop.sh
- 407 -
e. Start the manager.
For the methods for starting and stopping managers, refer to "2.1 Starting and Stopping Managers" in the "Operation GuideCE".
6. User Account Settings
Using the information recorded during preparations, perform setting of user accounts using the ROR console.For details on how to configure user accounts, refer to "Chapter 3 Configuring Users and Customizing Roles" in the "User's Guidefor Infrastructure Administrators (Resource Management) CE".
7. Edit System Configuration Files
Based on the environment created for the manager, edit the system configuration file (CSV format) exported in 2.Change the operation column of all resources to "new".
For how to edit system configuration files (CSV format), refer to "Appendix B Format of CSV System Configuration Files" in the"User's Guide for Infrastructure Administrators (Resource Management) CE".
Note
When the spare server information is configured, use the following procedure to delete the spare server information.
- In the "SpareServer" section, set "operation" as a hyphen ("-").
8. Creating an Environment of This Version
Import the system configuration file and create an environment of this version.Use the following procedure to configure an environment of this version.
a. Import of the system configuration file
Import the edited system configuration file.For the import method, refer to "10.2 Importing the System Configuration File" in the "User's Guide for InfrastructureAdministrators (Resource Management) CE".
b. Register the Agent
Using the information recorded during preparations, perform agent registration using the ROR console. Perform agentregistration with the OS of the managed server booted.For details on registering agents, refer to "Chapter 11 Installing Software and Registering Agents on VM Hosts".After completing agent registration, use the ROR console to check that all VM hosts are displayed. When there are VM hosts(with VM guests) registered, check that all VM guests are displayed.
c. Spare Server Information Settings
Using the information recorded during preparations, perform registration of spare server information using the ROR console.For registration of spare server information, refer to "18.2 Settings for Server Switchover" in the "User's Guide VE".
d. Registration of Labels, Comments, and Contact Information
When label, comment, and contact information has been registered, change the contents of the operation column of the systemconfiguration file (CSV format) that were changed to "new" in 7 back to hyphens ("-"), and change the contents of the operationcolumn of resources contained in the [Memo] section to "new".For how to edit system configuration files (CSV format), refer to "Appendix B Format of CSV System Configuration Files"in the "User's Guide for Infrastructure Administrators (Resource Management) CE".Import the edited system configuration file.For the import method, refer to "10.2 Importing the System Configuration File" in the "User's Guide for InfrastructureAdministrators (Resource Management) CE".
9. Set Maintenance Mode
Using the information recorded during preparation, place the managed serves placed into maintenance mode before the transferusing the pre-configuration function into maintenance mode again.For maintenance mode settings, refer to "Appendix C Maintenance Mode" in the "User's Guide for Infrastructure Administrators(Resource Management) CE".
- 408 -

10. Manager Setup
It is necessary to confirm whether Single Sign-On has been configured before performing setup of the manager.
For setting Single Sign-On, refer to "Chapter 12 Installing and Defining Single Sign-On" in the "Design Guide CE".
For the manager's setup, refer to "2.1.3 Setup".
After completing transfer of a manager of this version of ROR CE using the pre-configuration function, setup of the manager isnecessary.
11. Registration of license
Access the ROR console, and register the license of Cloud Edition.
For the registration of the license, refer to the setting of the license of "Chapter 5 License Setup and Confirmation".
Use SSL communications when accessing the ROR console from a browser.When changing the certificate used for SSL communication from the test certificate set up by default to another certificate, refer to"Chapter 3 SSL Communication Environment Settings for the ROR Console".
Note
- When using backup system images or collecting cloning images without upgrading agents, either reboot managed servers afterreinstallation of the manager or transfer using the pre-configuration function is completed, or restart the related services.
For restarting the Related Services, refer to "2.2 Starting and Stopping Agents" in the "Operation Guide CE".
- Set the following manuals when you set cooperation with "Service Quality Coordinator"."1.14 Linking to ServerView Resource Orchestrator" in the "Systemwalker Service Quality Coordinator User's Guide".
F.3 AgentThis section explains the upgrading of agents.Upgrading of agents is not mandatory even when managers have been upgraded to this version. Perform upgrades if necessary.
Transferred Data
Before upgrading, note that the following agent resources are transferred:
- Definition files of the network parameter auto-configuration function (when the network parameter auto-configuration function isbeing used)
[Windows] [Hyper-V]Installation_folder\Agent\etc\event_script folderInstallation_folder\Agent\etc\ipaddr.conf fileInstallation_folder\Agent\etc\ipaddr.conf file
[Linux] [VMware] [Xen] [KVM]/etc/opt/FJSVrcxat/event_script directory/etc/opt/FJSVnrmp/lan/ipaddr.conf file/etc/FJSVrcx.conf file
[Solaris]There is no resource to transfer.
Data and work files which are transferred during upgrade installation are stored in the following folder. Ensure that the folder is not deleteduntil after the upgrade is complete.
[Windows] [Hyper-V]32-bit (x86) OSDrive_name\Program Files\RCVE-upgradedata64-bit (x64) OSDrive_name\Program Files (x86)\RCVE-upgradedata
- 409 -
[Linux] [VMware] [Xen] [KVM]/var/opt/RCVE-upgradedata
[Solaris]/var/opt/RCVE-upgradedata
Preparations
Perform the following preparations and checks before upgrading:
- Check that the environment is one in which agents of this version can be operated.For the operational environment, refer to "2.4 Software Environment" and "2.5 Hardware Environment" in the "Design Guide CE".
- To enable recovery in case there is unexpected trouble during the upgrade process, back up the folders and files listed in "TransferredData" to a folder other than the agent installation folder.
Upgrade using Upgrade Installation
When performing upgrade installation from V2.1.1 of agents in Windows environments, upgrade installation can be performed using theinstaller of this version.
Use the following procedure to upgrade agents of earlier versions to agents of this version on all of the managed servers that are beingupgraded.
On the managed server on which the agent (Dashboard Function) is installed, the agent (Dashboard Function) is also upgraded whenperforming upgrade installation of the agent.
Note
- Do not perform any other operations with Resource Orchestrator until the upgrade is completed.
- Perform upgrading of agents after upgrading of managers is completed.
- In the event that upgrade installation fails, please resolve the cause of the failure and perform upgrade installation again. If the problemcannot be resolved and upgrade installation fails again, please contact Fujitsu technical staff.
- When performing an upgrade installation, please do not access the installation folder of the earlier version or any of the files andfolders inside it using the command prompt, Explorer, or an editor.While it is being accessed, attempts to perform upgrade installation will fail.If upgrade installation fails, stop accessing the files or folders and then perform the upgrade installation again.
- When stopping the upgrade and restoring the earlier version, please re-install the agent of the earlier version and then replace theinformation that was backed up during the preparations.When performing restoration and an agent of this version or an earlier version has been installed, please uninstall it.After restoration, please delete the folder containing the backed up assets.
- Upgrade installation will delete patches that were applied to the earlier version.
[Linux]When the PATH variable has not been configured to enable execution of UpdateAdvisor (Middleware) commands from a user-definedlocation, performing upgrade installation will delete any patches that have been applied to the old version, but it will not delete productinformation or component information. Refer to the UpdateAdvisor (Middleware) manual and delete software and componentinformation from the applied modification checklist.
1. Upgrade Installation
[Windows] [Hyper-V]Refer to "2.2.2 Installation [Windows] [Hyper-V]", and execute the Resource Orchestrator installer.The Resource Orchestrator setup window will be displayed. Check the contents of the license agreement, etc. and then click <Yes>.The setting information that will be taken over from the earlier version will be displayed. Please check it and then click <Install>.Upgrade installation will begin.
- 410 -

[Linux] [VMware] [Xen] [KVM]Refer to "2.2.3 Installation [Linux] [VMware] [Xen] [KVM]", and execute the Resource Orchestrator installer.Check the contents of the license agreement, etc. and then enter "y".The setting information that will be taken over from the earlier version will be displayed. Please check it and then enter "y". Upgradeinstallation will begin.
[Solaris]Refer to "2.2.4 Installation [Solaris] [Solaris Zones] [OVM for SPARC]", and execute the Resource Orchestrator installer.Check the contents of the license agreement, etc. and then enter "y". Upgrade installation will begin.
Note
- When upgrade installation is conducted on SUSE Linux Enterprise Server, upgrade installation will be conducted successfullyeven if the following message is displayed.
insserv: Warning, current runlevel(s) of script 'scwagent' overwrites defaults.
2. Agent (Dashboard Function) Installation
To use an agent (Dashboard Function), install the agent (Dashboard Function).If the agent (Dashboard Function) has already been installed, this step is not necessary.
[Windows] [Hyper-V]Refer to "2.3.3 Installation [Windows] [Hyper-V]".
[Linux]Refer to "2.3.4 Installation [Linux]".
[Solaris] [Solaris Zones]Refer to "2.3.5 Installation [Solaris] [Solaris Zones]".
3. Set Maintenance Mode
When server switchover settings have been performed for managed servers, place them into maintenance mode.When managed servers are set as spare servers, place the managed servers set as spare servers into maintenance mode.
4. Backing up (copying) of Network Parameter Auto-configuration Function Definition Files
When using the network parameter auto-configuration function during deployment of cloning images, back up (copy) the followingfolders and files to a location other than the agent installation folder.
[Windows] [Hyper-V]Installation_folder\Agent\etc\event_script folderInstallation_folder\Agent\etc\ipaddr.conf fileInstallation_folder\Agent\etc\ipaddr.conf file
[Linux] [VMware] [Xen] [KVM]/etc/opt/FJSVrcxat/event_script directory/etc/opt/FJSVnrmp/lan/ipaddr.conf file/etc/FJSVrcx.conf file
5. Restoration of Network Parameter Auto-configuration Function Definition Files
When using the network parameter auto-configuration function during deployment of cloning images, restore the definition filesthat were backed up (copied) in step 4. When step 4 was not performed, this step is not necessary.
a. Stop agents.
For the method for stopping agents, refer to "2.2 Starting and Stopping Agents" in the "Operation Guide CE".
b. Restore the definition file.
Restore the folders and files backed up (copied) in step 4 to the following locations in the installation folder of this version:
[Windows] [Hyper-V]Installation_folder\Agent\etc\event_script folder
- 411 -
Installation_folder\Agent\etc\ipaddr.conf fileInstallation_folder\Agent\etc\ipaddr.conf file
[Linux] [VMware] [Xen] [KVM]/etc/opt/FJSVrcxat/event_script directory/etc/opt/FJSVnrmp/lan/ipaddr.conf file/etc/FJSVrcx.conf file
c. Start agents.
For the method for starting agents, refer to "2.2 Starting and Stopping Agents" in the "Operation Guide CE".
6. Set up the Agent (Dashboard Function)
When the agent (Dashboard Function) has been installed, set it up.
[Windows] [Hyper-V]
> Installation_folder\RCXCTMGA\setup\dsbsetup.bat IP_address <RETURN>
[Linux] [Solaris] [Solaris Zones]
The command does not have to be executed.
7. Release Maintenance Mode
Release the maintenance mode of managed servers placed into maintenance mode in 3.
Note
- After upgrading agents, use the ROR console to check if the upgraded managed servers are being displayed correctly.
- Updating of system images and cloning images is advised after agents have been upgraded.
Transfer of Agents Using Re-installation or the Pre-configuration Function
Use the following procedure to perform transfer from agents of earlier versions to agents on this version on all managed servers for whichtransfer using the pre-configuration function will be performed.
Note
- Do not perform any other operations with Resource Orchestrator until the transfer using the pre-configuration function is completed.
- Perform transfer of agents after transfer of the manager using the pre-configuration function is completed.
- When using the network parameter auto-configuration function during deployment of cloning images, specify the same installationfolder for agents of the earlier version and those of this version.
1. Set Maintenance Mode
- When server switchover settings have been performed for managed servers
Place them into maintenance mode.
- When managed servers are set as spare servers
Place the managed servers set as spare servers into maintenance mode.
2. Backing up (copying) of Network Parameter Auto-configuration Function Definition Files
When using the network parameter auto-configuration function during deployment of cloning images, back up (copy) the followingfolders and files to a location other than the agent installation folder.
[Windows] [Hyper-V]Installation_folder\Agent\etc\event_script folder
- 412 -

Installation_folder\Agent\etc\ipaddr.conf fileInstallation_folder\Agent\etc\ipaddr.conf file
[Linux] [VMware] [Xen] [KVM]/etc/opt/FJSVrcxat/event_script directory/etc/opt/FJSVnrmp/lan/ipaddr.conf file/etc/FJSVrcx.conf file
3. Uninstall Earlier Version ROR Agents
Refer to the "ServerView Resource Orchestrator User's Guide", and uninstall the agents.
4. Install ROR CE Agents
Install ROR CE agents.For installation, refer to "2.2 Agent Installation".
5. Agent (Dashboard Function) Installation
To use an agent (Dashboard Function), install the agent (Dashboard Function).For details of installation, refer to "2.3 Agent (Dashboard Function) Installation".
6. Restoration of Network Parameter Auto-configuration Function Definition Files
When using the network parameter auto-configuration function during deployment of cloning images, restore the definition filesthat were backed up (copied) in step 2. When step 2 was not performed, this step is not necessary.
a. Stop agents.
For the method for stopping agents, refer to "2.2 Starting and Stopping Agents" in the "Operation Guide CE".
b. Restore the definition file.
Restore the folders and files backed up (copied) in 2 to the following locations in the installation folder of this version:
[Windows] [Hyper-V]Installation_folder\Agent\etc\event_script folderInstallation_folder\Agent\etc\ipaddr.conf fileInstallation_folder\Agent\etc\ipaddr.conf file
[Linux] [VMware] [Xen] [KVM]/etc/opt/FJSVrcxat/event_script directory/etc/opt/FJSVnrmp/lan/ipaddr.conf file/etc/FJSVrcx.conf file
c. Start agents.
For the method for starting agents, refer to "2.2 Starting and Stopping Agents" in the "Operation Guide CE".
7. Release Maintenance Mode
Release the maintenance mode of managed servers placed into maintenance mode in 1.
Note
- After transferring agents, use the ROR console to check that the upgraded managed servers are being displayed correctly.
- Updating of system images and cloning images is advised after agents have been transferred.
Upgrading with ServerView Update Manager or ServerView Update Manager Express
Upgrade installation can be performed with ServerView Update Manager or ServerView Update Manager Express when upgrading to thisversion from RCVE V2.2.2 or later.
Refer to the manual of ServerView Update Manager or ServerView Update Manager Express for the procedure.
- 413 -
Note
- To upgrade with ServerView Update Manager, the server to be upgrade must be managed by ServerView Operations Manager.
- OSs and hardware supported by ServerView Update Manager or ServerView Update Manager Express can be updated.
- For Linux or VMware, the installed ServerView Agents must be at least V5.01.08.
- Do not perform any other operations with Resource Orchestrator until the upgrade is completed.
- Perform upgrading of agents after upgrading of managers is completed.
- In the event that upgrade installation fails, please resolve the cause of the failure and perform upgrade installation again. If the problemcannot be resolved and upgrade installation fails again, please contact Fujitsu technical staff.
- When performing an upgrade installation, please do not access the installation folder of the earlier version or any of the files andfolders inside it using the command prompt, Windows Explorer, or an editor. While it is being accessed, attempts to perform upgradeinstallation will fail.
- If upgrade installation fails, stop accessing the files or folders and then perform the upgrade installation again.
- When stopping the upgrade and restoring the earlier version, please re-install the agent of the earlier version and then replace theinformation that was backed up during the preparations.
When performing restoration and an agent of this version or an earlier version has been installed, please uninstall it.
After restoration, please delete the folder containing the backed up assets.
- Upgrade installation will delete patches that were applied to the earlier version.
[Linux]
- When the PATH variable has not been configured to enable execution of UpdateAdvisor (Middleware) commands from a user-definedlocation, performing upgrade installation will delete any patches that have been applied to the old version, but it will not delete productinformation or component information. Refer to the UpdateAdvisor (Middleware) manual and delete software and componentinformation from the applied modification checklist.
- After upgrading agents, use the ROR console to check that the upgraded managed servers are being displayed correctly.
- Updating of system images and cloning images is advised after agents have been upgraded.
F.4 ClientThis section explains the necessary operations for clients after upgrading of managers.
Web browsers are used as clients of this version.
When upgrading managers, it is necessary to clear the Web browser's cache (temporary internet files), before accessing the ROR console.
Use the following procedure to clear the Web browser's cache.
For Internet Explorer
1. Select [Tools]-[Internet Options].
The [Internet Options] dialog is displayed.
2. Select the [General] tab on the [Internet Options] dialog.
3. Select <Delete> in the "Browsing history" area.
The [Delete Browsing History] dialog is displayed.
4. Check the [Temporary Internet files] checkbox in the [Delete Browsing History] dialog and unselect the other checkboxes.
5. Click <Delete>.
The Web browser's cache is cleared.
- 414 -

For Firefox
1. Select [Tools]-[Options].
The [Options] dialog is displayed.
2. Select the [Advanced] tab on the [Options] dialog.
3. Select the [Network] tab.
4. In the "Cached Web Content" area, click <Clear Now>.
The Web browser's cache is cleared.
F.5 HBA address rename Setup ServiceThis section explains upgrading of the HBA address rename setup service.
Transferred Data
There is no HBA address rename setup service data to transfer when upgrading from an earlier version to this version.
Preparations
Perform the following preparations and checks before upgrading:
- Check that the environment is one in which agents of this version can be operated.
For the operational environment, refer to "2.4 Software Environment" and "2.5 Hardware Environment" in the "Design Guide CE".
Upgrade using Upgrade Installation
When upgrading to this version from RCVE V2.2.2, upgrade can be performed using upgrade installation. Perform the upgrade using thefollowing procedure:
Note
- Do not perform any other operations with Resource Orchestrator until the upgrade is completed.
- Perform upgrading of the HBA address rename setup service after upgrading of managers is completed.
- In the event that upgrade installation fails, please resolve the cause of the failure and perform upgrade installation again. If the problemcannot be resolved and upgrade installation fails again, please contact Fujitsu technical staff.
- When performing an upgrade installation, please do not access the installation folder of the earlier version or any of the files andfolders inside it using the command prompt, Explorer, or an editor.While it is being accessed, attempts to perform upgrade installation will fail.If upgrade installation fails, stop accessing the files or folders and then perform the upgrade installation again.
- When stopping the upgrade and restoring the earlier version, please re-install the HBA address rename setup service of the earlierversion.When performing restoration and the HBA address rename setup service of this version or an earlier version has been installed, pleaseuninstall it.
- Upgrade installation will delete patches that were applied to the earlier version.
[Linux]When the PATH variable has not been configured to enable execution of UpdateAdvisor (Middleware) commands from a user-definedlocation, performing upgrade installation will delete any patches that have been applied to the old version, but it will not delete productinformation or component information. Refer to the UpdateAdvisor (Middleware) manual and delete software and componentinformation from the applied modification checklist.
- 415 -
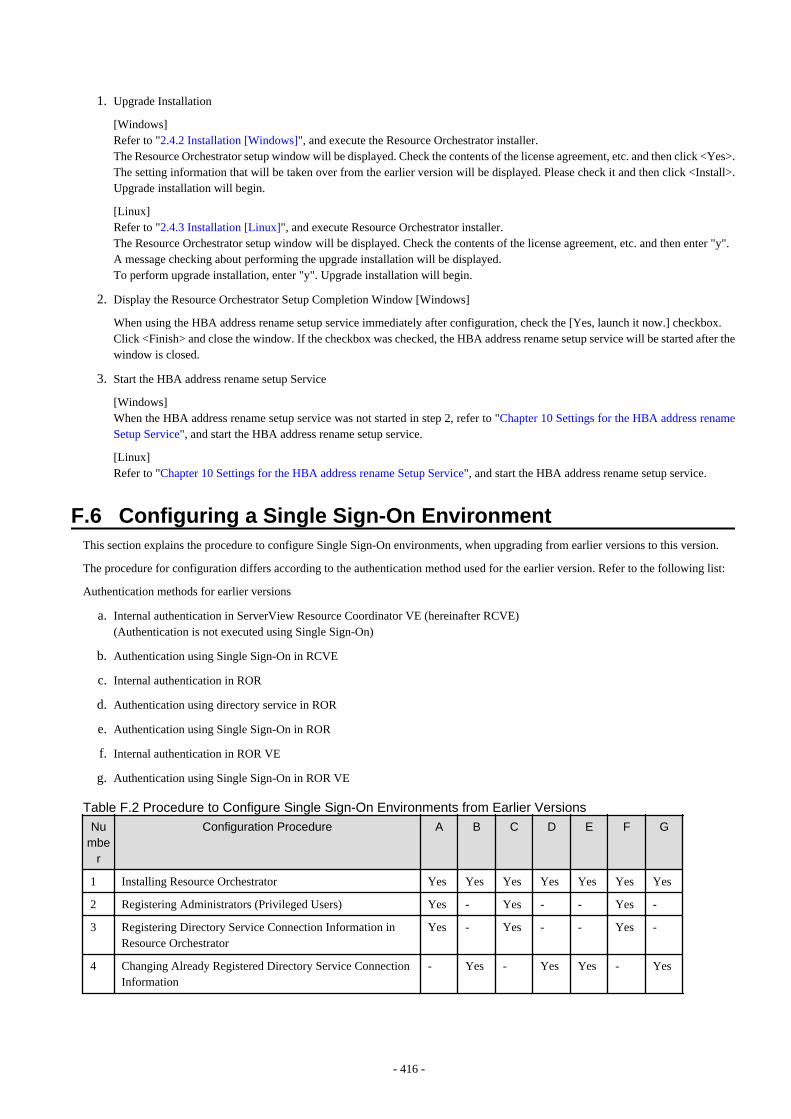
1. Upgrade Installation
[Windows]Refer to "2.4.2 Installation [Windows]", and execute the Resource Orchestrator installer.The Resource Orchestrator setup window will be displayed. Check the contents of the license agreement, etc. and then click <Yes>.The setting information that will be taken over from the earlier version will be displayed. Please check it and then click <Install>.Upgrade installation will begin.
[Linux]Refer to "2.4.3 Installation [Linux]", and execute Resource Orchestrator installer.The Resource Orchestrator setup window will be displayed. Check the contents of the license agreement, etc. and then enter "y".A message checking about performing the upgrade installation will be displayed.To perform upgrade installation, enter "y". Upgrade installation will begin.
2. Display the Resource Orchestrator Setup Completion Window [Windows]
When using the HBA address rename setup service immediately after configuration, check the [Yes, launch it now.] checkbox.Click <Finish> and close the window. If the checkbox was checked, the HBA address rename setup service will be started after thewindow is closed.
3. Start the HBA address rename setup Service
[Windows]When the HBA address rename setup service was not started in step 2, refer to "Chapter 10 Settings for the HBA address renameSetup Service", and start the HBA address rename setup service.
[Linux]Refer to "Chapter 10 Settings for the HBA address rename Setup Service", and start the HBA address rename setup service.
F.6 Configuring a Single Sign-On EnvironmentThis section explains the procedure to configure Single Sign-On environments, when upgrading from earlier versions to this version.
The procedure for configuration differs according to the authentication method used for the earlier version. Refer to the following list:
Authentication methods for earlier versions
a. Internal authentication in ServerView Resource Coordinator VE (hereinafter RCVE)(Authentication is not executed using Single Sign-On)
b. Authentication using Single Sign-On in RCVE
c. Internal authentication in ROR
d. Authentication using directory service in ROR
e. Authentication using Single Sign-On in ROR
f. Internal authentication in ROR VE
g. Authentication using Single Sign-On in ROR VE
Table F.2 Procedure to Configure Single Sign-On Environments from Earlier Versions
Numbe
r
Configuration Procedure A B C D E F G
1 Installing Resource Orchestrator Yes Yes Yes Yes Yes Yes Yes
2 Registering Administrators (Privileged Users) Yes - Yes - - Yes -
3 Registering Directory Service Connection Information inResource Orchestrator
Yes - Yes - - Yes -
4 Changing Already Registered Directory Service ConnectionInformation
- Yes - Yes Yes - Yes
- 416 -
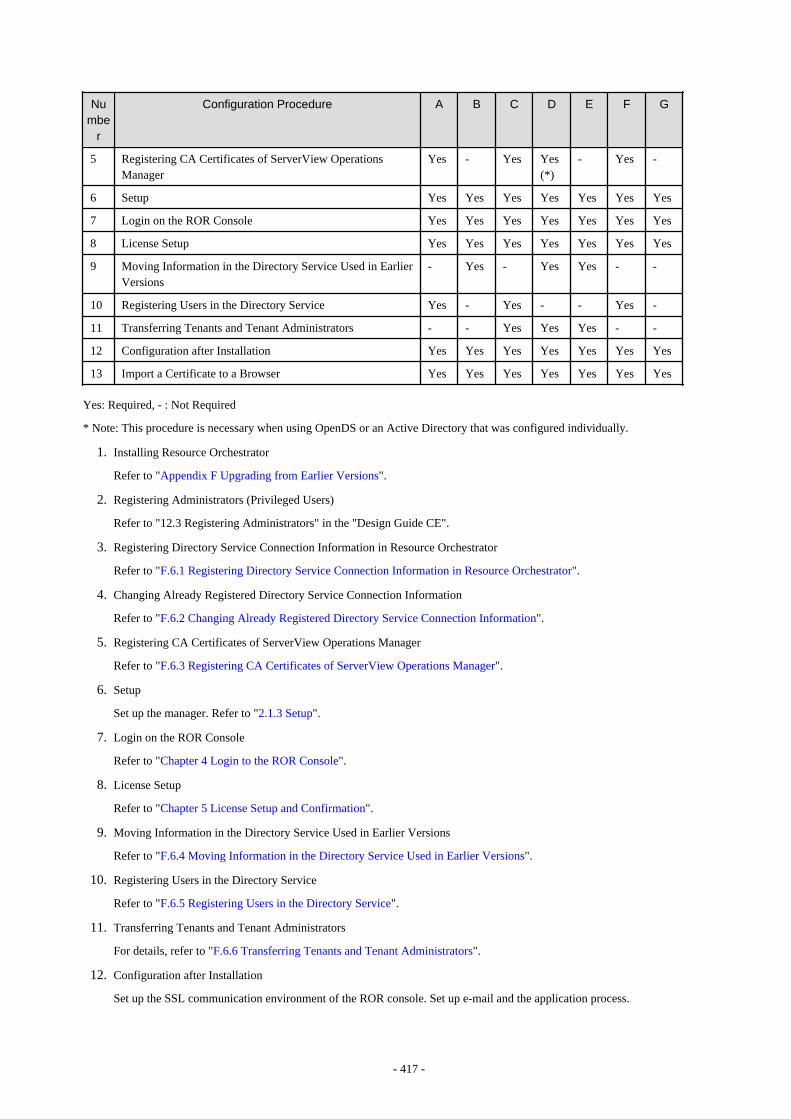
Numbe
r
Configuration Procedure A B C D E F G
5 Registering CA Certificates of ServerView OperationsManager
Yes - Yes Yes(*)
- Yes -
6 Setup Yes Yes Yes Yes Yes Yes Yes
7 Login on the ROR Console Yes Yes Yes Yes Yes Yes Yes
8 License Setup Yes Yes Yes Yes Yes Yes Yes
9 Moving Information in the Directory Service Used in EarlierVersions
- Yes - Yes Yes - -
10 Registering Users in the Directory Service Yes - Yes - - Yes -
11 Transferring Tenants and Tenant Administrators - - Yes Yes Yes - -
12 Configuration after Installation Yes Yes Yes Yes Yes Yes Yes
13 Import a Certificate to a Browser Yes Yes Yes Yes Yes Yes Yes
Yes: Required, - : Not Required
* Note: This procedure is necessary when using OpenDS or an Active Directory that was configured individually.
1. Installing Resource Orchestrator
Refer to "Appendix F Upgrading from Earlier Versions".
2. Registering Administrators (Privileged Users)
Refer to "12.3 Registering Administrators" in the "Design Guide CE".
3. Registering Directory Service Connection Information in Resource Orchestrator
Refer to "F.6.1 Registering Directory Service Connection Information in Resource Orchestrator".
4. Changing Already Registered Directory Service Connection Information
Refer to "F.6.2 Changing Already Registered Directory Service Connection Information".
5. Registering CA Certificates of ServerView Operations Manager
Refer to "F.6.3 Registering CA Certificates of ServerView Operations Manager".
6. Setup
Set up the manager. Refer to "2.1.3 Setup".
7. Login on the ROR Console
Refer to "Chapter 4 Login to the ROR Console".
8. License Setup
Refer to "Chapter 5 License Setup and Confirmation".
9. Moving Information in the Directory Service Used in Earlier Versions
Refer to "F.6.4 Moving Information in the Directory Service Used in Earlier Versions".
10. Registering Users in the Directory Service
Refer to "F.6.5 Registering Users in the Directory Service".
11. Transferring Tenants and Tenant Administrators
For details, refer to "F.6.6 Transferring Tenants and Tenant Administrators".
12. Configuration after Installation
Set up the SSL communication environment of the ROR console. Set up e-mail and the application process.
- 417 -
Refer to "Chapter 3 SSL Communication Environment Settings for the ROR Console" and "Chapter 18 Post-InstallationProcedures".
The [Application List] tab is displayed by default. To hide it, perform the following settings.
"18.2.6 Role Settings for the Display of the Application List Tab"
13. Import a Certificate to a Browser
Refer to "Chapter 6 Importing a Certificate to a Browser".
F.6.1 Registering Directory Service Connection Information in ResourceOrchestrator
Register the directory service connection information for performing Single Sign-On in Resource Orchestrator.
Use the following procedure to register the directory service connection information in Resource Orchestrator.
1. Stop the manager.
Execute the rcxadm mgrctl stop command and stop the manager.
For details on the rcxadm mgrctl stop command, refer to "5.14 rcxadm mgrctl" in the "Reference Guide (Command/XML) CE".
2. Register the directory service connection information for performing Single Sign-On.
Execute the rcxadm authctl sync command and register the directory service connection information.
For details on the rcxadm authctl sync command, refer to "5.4 rcxadm authctl" in the "Reference Guide (Command/XML) CE".
3. Start the manager.
Execute the rcxadm mgrctl start command and start the manager.
For details on the rcxadm mgrctl start command, refer to "5.14 rcxadm mgrctl" in the "Reference Guide (Command/XML) CE".
F.6.2 Changing Already Registered Directory Service ConnectionInformation
Change the already registered directory service connection information from authentication by the directory service to Single Sign-Onoperations.Change the directory service connection information used in earlier versions.
1. Stop the manager.
Execute the rcxadm mgrctl stop command and stop the manager.
For details on the rcxadm mgrctl stop command, refer to "5.14 rcxadm mgrctl" in the "Reference Guide (Command/XML) CE".
2. Change the directory service connection information.
Execute the rcxadm authctl sync command and change the directory service connection information.
For details on the rcxadm authctl sync command, refer to "5.4 rcxadm authctl" in the "Reference Guide (Command/XML) CE".
>rcxadm authctl sync
3. When using OpenDS provided with ServerView Operations Manager V5.3, it is necessary to change the information of the directoryserver administrator that was changed in step 2.
Execute the rcxadm authctl modify command and change the directory service connection information.
Example
- 418 -

>rcxadm authctl modify -bind "cn=Directory Manager" -passwd admin
Specify the password for directory server administrator as a passwd option. The OpenDS Directory Manager's predefined passwordis "admin".
4. Start the manager.
Execute the rcxadm mgrctl start command and start the manager.
For details on the rcxadm mgrctl start command, refer to "5.14 rcxadm mgrctl" in the "Reference Guide (Command/XML) CE".
F.6.3 Registering CA Certificates of ServerView Operations ManagerUse the following procedure to register CA certificates to Resource Orchestrator.
1. Stop the manager.
Execute the rcxadm mgrctl stop command and stop the manager.
For details on the rcxadm mgrctl stop command, refer to "5.14 rcxadm mgrctl" in the "Reference Guide (Command/XML) CE".
2. Check the content of the CA certificate for updating.
rcxadm authctl diffcert<RETURN>
The difference of the CA certificate (keystore) of ServerView Operations Manager and the registered CA certificate (keystore) ofResource Orchestrator is displayed.
Example
[Windows Manager]
>C:\Fujitsu\ROR\SVROR\Manager\bin\rcxadm authctl diffcertsvs_cmsldaphost.fujitsu.com
[Linux Manager]
# /opt/FJSVrcvmr/bin/rcxadm authctl diffcertsvs_cmsldaphost.fujitsu.com
3. Update the CA certificate.
Execute the following command.
rcxadm authctl refreshcert -alias alias <RETURN>
Specify the alias of the certificate displayed by executing "Confirming Certificates" as alias.
When importing two or more certificates to Resource Orchestrator, repeat this procedure for each certificate.
Example
[Windows Manager]
>C:\Fujitsu\ROR\SVROR\Manager\bin\rcxadm authctl refreshcert -alias svs_cms <RETURN>
[Linux Manager]
- 419 -

# /opt/FJSVrcvmr/bin/rcxadm authctl refreshcert -alias svs_cms <RETURN>
4. Check the difference of the CA certificate.
Perform step 2 again, and check that the updated certificate is not displayed.
5. Start the manager.
Execute the rcxadm mgrctl start command and start the manager.
For details on the rcxadm mgrctl start command, refer to "5.14 rcxadm mgrctl" in the "Reference Guide (Command/XML) CE".
F.6.4 Moving Information in the Directory Service Used in Earlier VersionsIf user management has been conducted by the directory service with ServerView Resource Orchestrator V2.3.0, transfer resource dataon the directory server to Resource Orchestrator information.
Transfer the following data:
- User group information and group users
It is necessary that user information be registered both on the directory server and as Resource Orchestrator information with the samename. Single Sign-On is used for authentication to log in to Resource Orchestrator. Manage the user passwords using the directoryservice used for Single Sign-On.
- Role definitions
- Access range and roles
Execute the rcxadm authctl export command to move the information. Move the information as an OS administrator. For details on thercxadm authctl export command, refer to "5.4 rcxadm authctl" in the "Reference Guide (Command/XML) CE".
F.6.5 Registering Users in the Directory ServiceRegister a user to the directory service.
When Using Active Directory
1. Export the user information which is registered in Resource Orchestrator as files in the LDIF format.
Example
>rcxadm user list -format ldif > myusers.ldif <RETURN>
2. Modify the user information exported as the ldif file in step 1 for the actual environment.
Modify the base names of entries based on the base name of the Active Directory.
3. Execute the ldifde command to register the ldif file modified in step 2 with Active Directory.
Example
>ldifde -i -e -k -t 636 -f myusers.ldif <RETURN>
For details on the ldifde command, refer to the Active Directory documentation.
Registered user passwords are reset as follows.
- 420 -

rcxuser@123
4. Change the user passwords registered in step 3 to appropriate values. Use the Active Directory functions, and change the password.
5. When performing Single Sign-On operations with ServerView Operations Manager, user definitions are necessary for ServerViewOperations Manager. For details on how to add user definitions for ServerView Operations Manager, perform settings for SingleSign-On referring to the following manual:
- "Integrating ServerView User Management into Microsoft Active Directory" in the "ServerView Suite User Management inServerView"
When Using OpenDS
1. Export the user and user group information which are registered in Resource Orchestrator as files in the LDIF format.
Example
>rcxadm user list -format ldif > myusers.ldif <RETURN>
The ldif file for the Active Directory is output.
2. Modify the user information exported as the ldif file in step 1 for OpenDS.
a. Modify the base names of entries based on the base name of the directory service.
b. Delete the following attributes.
- samAccountName
- userAccountControl
- unicodePwd
c. Add the following attributes to user entries.
- sn
- uid (same value as the cn attribute)
- userPassword
d. Modify the values of the objectclass attribute.
- Change "user" to "inetOrgPerson".
e. Change "cn=Users" in the "cn=User_name,cn=Users,dc=fujitsu,dc=com" to "ou=Users".
Example
- Before editing (ldif file for Active Directory)
# User
dn: cn=user01,cn=Users,dc=example,dc=local # Change cn=Users to ou=Users.changetype: add
objectclass: user # Change to objectclass: inetOrgPerson.cn: user01
samAccountName: user01 # Delete this line.
userAccountControl: 512 # Delete this line.
unicodePwd:: IgByAGMAeAB1AHMAZQByAEAAMQAyADMAIgA= # Delete this line.
- 421 -
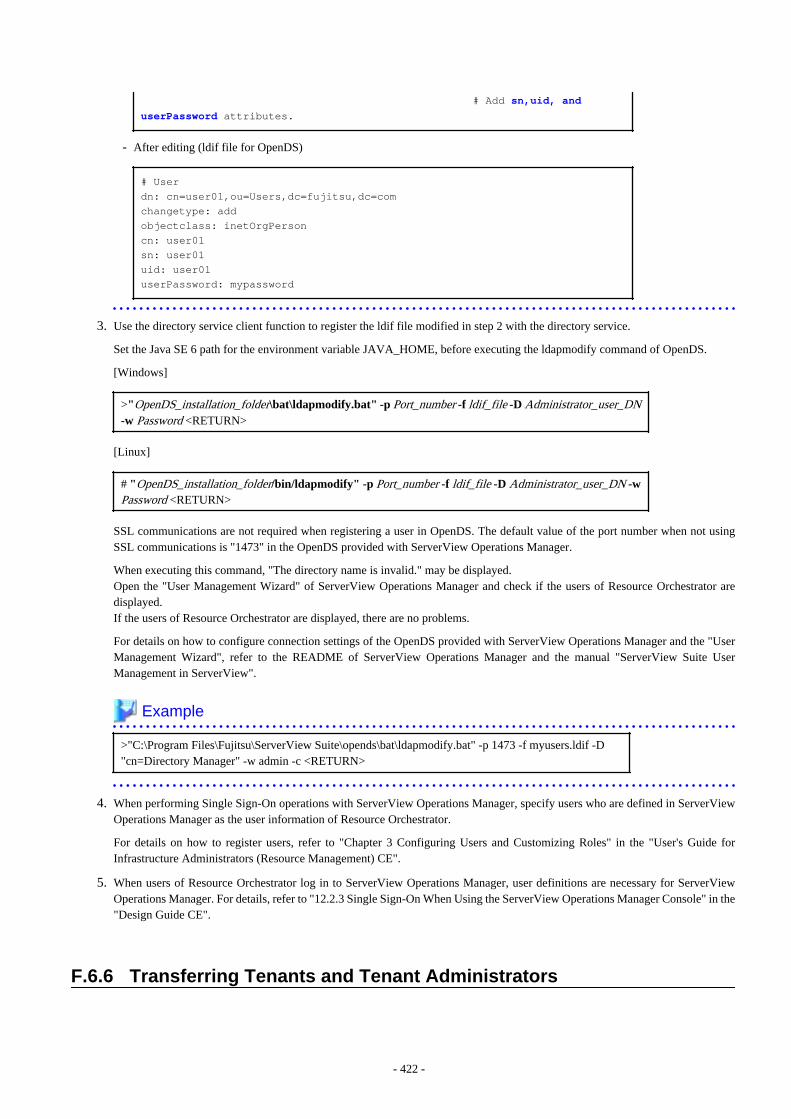
# Add sn,uid, and
userPassword attributes.
- After editing (ldif file for OpenDS)
# Userdn: cn=user01,ou=Users,dc=fujitsu,dc=comchangetype: addobjectclass: inetOrgPersoncn: user01sn: user01uid: user01userPassword: mypassword
3. Use the directory service client function to register the ldif file modified in step 2 with the directory service.
Set the Java SE 6 path for the environment variable JAVA_HOME, before executing the ldapmodify command of OpenDS.
[Windows]
>"OpenDS_installation_folder\bat\ldapmodify.bat" -p Port_number -f ldif_file -D Administrator_user_DN-w Password <RETURN>
[Linux]
# "OpenDS_installation_folder/bin/ldapmodify" -p Port_number -f ldif_file -D Administrator_user_DN -wPassword <RETURN>
SSL communications are not required when registering a user in OpenDS. The default value of the port number when not usingSSL communications is "1473" in the OpenDS provided with ServerView Operations Manager.
When executing this command, "The directory name is invalid." may be displayed.Open the "User Management Wizard" of ServerView Operations Manager and check if the users of Resource Orchestrator aredisplayed.If the users of Resource Orchestrator are displayed, there are no problems.
For details on how to configure connection settings of the OpenDS provided with ServerView Operations Manager and the "UserManagement Wizard", refer to the README of ServerView Operations Manager and the manual "ServerView Suite UserManagement in ServerView".
Example
>"C:\Program Files\Fujitsu\ServerView Suite\opends\bat\ldapmodify.bat" -p 1473 -f myusers.ldif -D"cn=Directory Manager" -w admin -c <RETURN>
4. When performing Single Sign-On operations with ServerView Operations Manager, specify users who are defined in ServerViewOperations Manager as the user information of Resource Orchestrator.
For details on how to register users, refer to "Chapter 3 Configuring Users and Customizing Roles" in the "User's Guide forInfrastructure Administrators (Resource Management) CE".
5. When users of Resource Orchestrator log in to ServerView Operations Manager, user definitions are necessary for ServerViewOperations Manager. For details, refer to "12.2.3 Single Sign-On When Using the ServerView Operations Manager Console" in the"Design Guide CE".
F.6.6 Transferring Tenants and Tenant Administrators
- 422 -

Upgrading from V3.0
Tenants, tenant administrators, and tenant users of the previous version are transferred as is. The transfer operation is unnecessary.
Upgrading from V2.3
The tenant management role cannot operate tenants and L-Servers in tenants that were operated on V2.3.To enable the tenant management role to operate tenants that were operated with V2.3, use either of the following procedures to transferthe tenant according to the position in which the tenant was created.Use the multiple roles and operate tenants when the transfer is unnecessary. When one user operates two or more tenants, it is necessaryto use the multiple roles.
- When the tenant is created directly under the orchestration tree
1. Create user groups.
The user group must have the same name as the tenant name, the tenant name must be in the access scope, and tenant_admin(tenant administrator) must be set for the role.
Create user groups according to the following procedure.
>rcxadm usergroup create -name tenant_name -role tenant_name=tenant_admin <RETURN>
Modify user groups according to the following procedures when user groups of the same name as the tenant name already exist.
>rcxadm usergroup modify -name tenant_name -role tenant_name=tenant_admin <RETURN>
For details on the rcxadm usergroup command, refer to "7.2 rcxadm usergroup" in the "Reference Guide (Command/XML)CE".
2. Modify tenants.
The tenants which were operated with V2.3 are displayed in the [Tenant] tab of the ROR console.Set the following information using the [Modify Tenant] window.
- Tenant display name
- Email address
For details on the [Modify Tenant] window, refer to "11.4 Modifying a Tenant" in the "User's Guide for InfrastructureAdministrators CE".
3. Perform the "Common Procedures".
- When the tenant is not created directly under the orchestration tree
Transfer the tenant data to the newly created tenant.
Transferred Data of Tenants
- Users (users who operate the tenant as tenant administrators, tenant operators, and tenant monitors)
- Resources in local pools of tenants
- L-Server
Use the following procedure to transfer tenants and tenant administrators.
1. Create tenants.
In the [Tenant] tab of the ROR console, create a Tenant.
2. Move resources.
In the [Resource] tab of ROR console, move the following resources in the old tenant to the new tenant. If the L-Server hasbeen started, move the resources after stopping it.
- 423 -
- Resources in the local pool
Move them to a local pool or a global pool of the newly created tenant.
- L-Server
Move it to the newly created tenant.
3. Perform the "Common Procedures".
4. Delete the old tenant.
Delete the old tenant using the rcxadm tenant delete command.
>rcxadm tenant delete -name /OldTenant <RETURN>
Common Procedures
1. Modify tenant users.
Allocate appropriate roles to the users operating as tenant administrators, tenant operators, or tenant monitors among users whooperated the earlier versions.
Use the following procedure to allocate roles to users.
a. Output the user information in files in XML format.
>rcxadm user list -format xml > myusers.xml
For details on the rcxadm user command, refer to "7.1 rcxadm user" in the "Reference Guide (Command/XML) CE".
b. Edit the XML files.
Delete the information of other users from the XML file, so that only the users operating as tenant administrators, tenantoperators, and tenant monitors remain.
Define the tenant administrator roles to allocate.
Add the following information:
- Email address
- First name
- Family name
For details on the XML definition of tenant administrators, refer to "15.9.1 Tenant Management Roles and Tenant User Role"in the "Reference Guide (Command/XML) CE".
Example
Example of the XML definition in which the tenant administrator role of "NewTenant" is allocated to the user "john"
<?xml version="1.0" encoding="utf-8"?><Users> <User name="john"> <Roles> <Role name="tenant_admin"> <Scopes> <Scope>NewTenant</Scope> </Scopes> </Role> </Roles> <MailAddress>[email protected]</MailAddress> <ActualName> <FirstName>john</FirstName>
- 424 -
<LastName>fujitsu</LastName> </ActualName> </User></Users>
c. Allocate the tenant administrator roles to the user by specifying the XML file edited in the rcxadm user command.
>rcxadm user modify -file my_tenantadmins.xml
2. Import L-Servers to the L-Platform.
Import L-Servers to the L-Platform using the cfmg_importlserver command.
>cfmg_importlserver -user john -org NewTenant -lserver /NewTenant/lserverA
For details, refer to "7.2.3.2 Importing L-Servers" in the "Operation Guide CE".
- 425 -

Appendix G Compatibility with Earlier VersionsFor details on compatibility with earlier versions of Resource Orchestrator, refer to "Release Notes".
- 426 -
Appendix H Configuration when Using Ethernet FabricsThis appendix explains how to configure the settings when using an Ethernet Fabric as a network device.
When Converged Fabric is used as an Ethernet fabric, ServerView Fabric Manager can be used. Registering ServerView Fabric Managerin Resource Orchestrator as Converged Fabric management software enables starting of the window of ServerView Fabric Manager fromResource Orchestrator.
For details on registering, refer to "5.14 Registering Converged Fabric Management Software" in the "User's Guide for InfrastructureAdministrators (Resource Management) CE".
Note
ServerView Fabric Manager must nullify and install the function related to the port profile when you use Resource Orchestrator andServerView Fabric Manager at the same time.Please refer to the manual of ServerView Fabric Manager for the nullification method.
H.1 Performing PreconfigurationPerform preconfiguration for Ethernet Fabric switches, referring to "9.2.3 Settings for Managed Network Devices" in the "Design GuideCE".
H.2 Creating the Network Configuration InformationCreate the network configuration information (XML definition), referring to "9.4.8.1 When Creating Network Configuration Information(XML Definition)" in the "Design Guide CE".
H.3 Registering Network DevicesUse the rcxadm netdevice command to execute network device registration.For details on the rcxadm netdevice command, refer to "3.8 rcxadm netdevice" in the "Reference Guide (Command/XML) CE".
After registration, back up environments using the functions provided by the Ethernet fabric.The backup can be used for restoration when replacing Ethernet fabric devices due to failures.For details on how to back up environments, refer to the manual of the Ethernet fabric.
H.4 Automatic Network ConfigurationWhen using Ethernet Fabrics, the port profile migration function (hereinafter AMPP) can be used on virtual L-Servers. ResourceOrchestrator supports VLAN as a parameter of AMPP. AMPP works with virtual L-Server migration and automatically migrates the portsettings of the Ethernet fabric switch to the physical port of the Ethernet fabric switch adjacent to the migration target server.
When creating a network resource, a VLAN port profile is created for the Ethernet fabric with port profile configuration enabled.
The VLAN port profiles are created for the specified virtual fabrics (VFAB), if the VFAB are linked with the tenants when registeringnetwork devices. When linking is not performed, the profile is created for the default VFAB.
When creating a virtual L-Server, the NIC of the virtual L-Server is linked with the VLAN port profile. This configures a VLAN for theserver connection port of the Ethernet fabric when the virtual L-Server on the migration target server performs communications.
H.5 Creating Definition Files for the Port Profile ConfigurationFunction
When using the port profile manually configured on the relevant devices for the port profile configuration function used in ResourceOrchestrator, refer to "9.4.8.4 When Using Port Profile Configuration Files" in the "Design Guide CE".
- 427 -

H.6 Registering Network ResourcesWhen using an Ethernet Fabric, it is necessary to configure an external connection port for network devices. Configure the CIR port ofthe Ethernet Fabric as the external connection port.Create network resources, referring to "14.3 Network Resources" in the "User's Guide for Infrastructure Administrators (ResourceManagement) CE".
When using a virtual fabric (VFAB) other than the default VFAB on Converged Fabric, a pool is necessary for each tenant.Refer to "6.6 Concept for Separating Tenants by Resource Pool" and "H.1.3 Virtual Fabrics" in the "Design Guide CE".
- 428 -
Appendix I Coordination with Other ProductsThis appendix explains how to coordinate Resource Orchestrator with other products.
I.1 Coordination with BMC BladeLogic Server AutomationThis section explains how to coordinate Resource Orchestrator with BMC's server automation software BMC BladeLogic ServerAutomation.
External Software
Resource Orchestrator can coordinate with the software in BMC BladeLogic Server Automation Suite 8.0 or later.
Note
For coordination for the creation and migration of virtual L-Servers, BMC BladeLogic Server Automation Suite 8.2 or later is required.
I.1.1 Coordination for Creation and Operation of Virtual L-Servers
Functional Overview
Through coordination, the following becomes possible:
- Virtual L-Server Creation [Solaris Zones] [OVM for SPARC]
Registering BMC BladeLogic Server Automation with Resource Orchestrator as server management software enables creation ofvirtual L-Servers.
- Virtual L-Server Operation [Solaris Zones] [OVM for SPARC]
Registering BMC BladeLogic Server Automation with Resource Orchestrator as server management software enables operations suchas migration of virtual L-Servers between servers.
Function Details
- Virtual L-Server Creation
For details on how to design a virtual L-Server, refer to following manual.
[Solaris Zones]"E.6 Solaris Zones" in the "Design Guide CE"
[OVM for SPARC]"E.7 OVM for SPARC" in the "Design Guide CE"
For details on how to create a virtual L-Server, refer to following manual.
[Solaris Zones]"C.7 Solaris Zones"
[OVM for SPARC]"C.8 OVM for SPARC"
- Virtual L-Server Operation
For details on how to operate virtual L-Servers, refer to "Chapter 17 L-Server Operations" in the "User's Guide for InfrastructureAdministrators (Resource Management) CE".
- 429 -

Installing BMC BladeLogic Server Automation
Install BMC BladeLogic Server Automation referring to the BMC BladeLogic Server Automation manual. The following are advisorynotices regarding coordination with Resource Orchestrator.
- Installation Order
The order of installation of Resource Orchestrator and BMC BladeLogic Server Automation is not important. Therefore, you caninstall in any order you like.However, when BMC BladeLogic Server Automation is installed after this product, rebooting is necessary to make this productrecognize the environment variables added at the time of installation of BMC BladeLogic Server Automation.
- Manager Installation
It is possible to install the Resource Orchestrator manager and Application Server (the BMC BladeLogic Server Automation manager)on the same server or on separate servers.
Note
When registering BMC BladeLogic Server Automation with Resource Orchestrator as server management software, it is recommendedto install it on the same server. However, when operating Resource Orchestrator managers in clusters, it is recommended to install iton a different server.
- Required Coordination Components
Please install BMC BladeLogic Server Automation Console on the server on which the Resource Orchestrator manager is installed.When creating and operating virtual L-Servers of Solaris zones, introduce a RSCD agent in the global zone.For details, refer to "E.7.2 Preparations for Servers" in the "Design Guide CE".
Setup Procedure
After installing BMC BladeLogic Server Automation, perform the following settings on the admin server. For details, contact Fujitsutechnical staff.
1. Create Users
Create the user for coordination with Resource Orchestrator.Make the user name "ServerAdmin".Configure the "BLAdmins" role for the role of the "ServerAdmin" user.
2. Create Authentication Files
Use the bl_gen_blcli_user_info command and create an authentication file for the user created in 1.The path and name for the file to create are as below.
Path
[Windows]BladeLogic_installation_folder\user
[Linux]/opt/bmc/bladelogic/user
Name
user_info.dat
3. Create Authentication Profiles
Create an authentication profile with the name "server-profile".Specify "SRP" for the authentication method.
4. Confirm the Connection
Login to the admin server as the "Administrator" for Windows, or the "root" for Linux.Start the BladeLogic console, and connect to the Application Server.
- 430 -

I.1.2 Coordination of Registration and Deletion of Managed Servers,Cloning, and Software Deployment
Functional Overview
Through coordination, the following becomes possible:
- Coordination of registration and deletion of managed servers
When registration or deletion of managed servers is performed using Resource Orchestrator, the managed servers are automaticallyregistered or deleted from BMC BladeLogic Server Automation. When Resource Orchestrator and BMC BladeLogic ServerAutomation both manage a server in the same environment, this coordination eases the workload of the staff responsible for serverregistration.
- Coordination of cloning and software deployment
Coordination of Resource Orchestrator's cloning function and BMC BladeLogic Server Automation's software deployment functionenables deployment of software to servers installed through cloning. This coordination eases the workload of installing software thatcannot be deployed using cloning images (software that saves environment specific information such as MAC addresses on installation)on managed servers.
Function Details
- Common notes
- The BMC BladeLogic Server Automation processes and process results resulting from execution of coordination are displayedas Resource Orchestrator processes in the recent operations area of the ROR console.
- Resource Orchestrator processes are given priority in the order of execution. If Resource Orchestrator processes terminateabnormally, BMC BladeLogic Server Automation processes will not be executed.
- If Resource Orchestrator processes are completed normally, but BMC BladeLogic Server Automation processes terminateabnormally, they will be displayed as errors in the recent operations area of the ROR console.
- Check the details of BMC BladeLogic Server Automation processes that terminated abnormally on the Server Automation consoleof BMC BladeLogic Server Automation, and take corrective action referring to the BMC BladeLogic Server Automation manual.
- Coordination of managed server registration
- When managed server registration is performed due to automatic registration of Resource Orchestrator agents, server registrationwith BMC BladeLogic Server Automation is performed automatically.
- When agents are not registered automatically during server registration, coordination is not performed. By registering agents afterregistering servers, server registration with BMC BladeLogic Server Automation is performed automatically.
- The computer name set in the OS (for Windows) or the hostname (for Linux) is used as the server name of servers registered withBMC BladeLogic Server Automation.
- If Resource Orchestrator processes are completed normally, but BMC BladeLogic Server Automation processes terminateabnormally, they will be displayed as errors in the recent operations area of the ROR console. In such cases, as status is one wherethe physical server has been registered with Resource Orchestrator but the agent is still not registered, resolve the cause of theproblem and register the agent again.
- Coordination of managed server deletion
- When performing deletion of managed servers using Resource Orchestrator, the server will automatically be deleted from BMCBladeLogic Server Automation.
- If Resource Orchestrator processes are completed normally, but BMC BladeLogic Server Automation processes terminateabnormally, they will be displayed as errors in the recent operations area of the ROR console. In such cases, as server deletionfrom Resource Orchestrator is complete, perform server deletion for BMC BladeLogic Server Automation using the ServerAutomation console.
- 431 -

- Coordination of cloning and software deployment
- By preparing software application batch jobs with BMC BladeLogic Server Automation in advance, software deployment settingsare performed.
- After deployment of cloning images using Resource Orchestrator, as well as automatic registration with BMC BladeLogic ServerAutomation, the batch job registered with BMC BladeLogic Server Automation will be executed.
- If Resource Orchestrator processes are completed normally, but BMC BladeLogic Server Automation processes terminateabnormally, they will be displayed as errors in the recent operations area of the ROR console. In such cases, as image deploymentfrom Resource Orchestrator is complete, execute the software deployment batch job for BMC BladeLogic Server Automationusing the Server Automation console.
Installing BMC BladeLogic Server Automation
Install BMC BladeLogic Server Automation referring to the BMC BladeLogic Server Automation manual. The following are advisorynotices regarding coordination with Resource Orchestrator.
- Installation Order
The order of installation of Resource Orchestrator and BMC BladeLogic Server Automation is not important. Therefore, you caninstall in any order you like.
- Manager Installation
It is possible to install the Resource Orchestrator manager and Application Server (the BMC BladeLogic Server Automation manager)on the same server or on separate servers.
Note
When registering BMC BladeLogic Server Automation with Resource Orchestrator as server management software, it is recommendedto install it on the same server. However, when operating Resource Orchestrator managers in clusters, it is recommended to install inon a different server.
- Required Coordination Components
When the Resource Orchestrator manager and Application Server are installed on separate servers, please install the BMC BladeLogicServer Automation console on the server on which the Resource Orchestrator manager has been installed.
Setup Procedure
Coordination can be performed after processing of Resource Orchestrator, by executing BMC BladeLogic Server Automation functionsby using the coordination script. Before using the coordination script, use the following procedure to perform settings for BMC BladeLogicServer Automation and the coordination script.
Common Settings
- Settings for BMC BladeLogic Server Automation
1. Perform settings for managed server name resolution.
On BMC BladeLogic Server Automation, servers are registered by specifying the server names. Therefore, it is necessary toconfigure DNS or a hosts file in advance so that registered server names can be resolved from Application Server.
Note
When using the Resource Orchestrator cloning function to install a server, the name of the server can be set in "Server nameafter deployment" of the [Deploy a Cloning Image] dialog.If the server name set in "Server name after deployment" cannot be resolved from Application Server, the coordination process
- 432 -

for BMC BladeLogic Server Automation will fail.In order to avoid the above problem, in "Server name after deployment" set a server name that can be resolved.
2. Connect to Application Server using the Server Automation console and obtain the certificate. When the certificate has alreadybeen obtained, this step is not necessary.
[Windows]While logged in as the Administrator, connect to the Application Server.
Note
Depending on the language version of Windows, the name of the built-in account for the administrator may not be named"Administrator". In such cases, change the user name of the administrator based on the environment being used.
[Linux]While logged in to the OS as root, connect to the Application Server.
3. In the property dictionary, create an integer type property named "CLONING_DEPLOY" as a property of the server, settingthe default value to "0".
4. Create a server smart group named "CLONING_DEPLOY" in the [Servers] workspace. In the conditions area of the windowdisplayed when creating the smart group, configure the following conditions.
- Select "Server" from the list, and enter "CLONING_DEPLOY".
- Select "equals" from the list, and enter "1".
- Settings for Resource Orchestrator
1. Change the extension of the script for coordination.
The script for coordination can be found in the following location:
[Windows Manager]Installation_folder\SVROR\Manager\etc\scripts
[Linux Manager]/etc/opt/FJSVrcvmr/scripts
Based on the functions being used, change the extension of the file named "sample" to "bat".
Table I.1 Coordination Scripts
Function File name (excluding extension)
Server registration post_register_server
Server deletion post_delete_server
Cloning image deployment post_cloning_deploy
2. Settings for connection to Application Server
Edit the file named "blenv.bat" that is in the same folder as the script for coordination, rewriting the values specified for thefollowing variables based on the connection information for Application Server.
Variable Meaning
PROFILE The name of the authentication profile used for connection to Application Server
ID A user name with authority for executing coordination patch jobs
PASSWD The password for the above user
- 433 -

Note
- As "blenv.bat" contains connection information for Application Server, protect the connection information using thefollowing method.
- Secure the admin server.
- Restrict the authority of the BMC BladeLogic Server Automation account used for coordination so that only thecoordination batch job can be executed.
[Windows]
- The following path configured in "blenv.bat" may not exist depending on the language version of Windows being used. Insuch cases, change the user name of the built-in administrator and the application data storage folder based on theenvironment being used.
set BL_SSO_TRUSTED_CERT_KEYSTORE_FILE="C:\Documents and Settings\Administrator\Application Data\BladeLogic\client_keystore.pkcs12.PEM"
Required Settings for Coordination of Cloning and Software Deployment
Perform the following settings for Resource Orchestrator.
Edit the script for coordination "post_cloning_deploy.bat", and specify the batch job created for software deployment using BMCBladeLogic Server Automation.Re-write the values of the following variables as given below.
Variable Meaning
JOB_GROUP Job folder name
JOB_NAME Batch job name
Advisory Notes
When uninstalling the manager, the coordination scripts will not be saved. Therefore, back them up if necessary.
I.2 Sending SNMP TrapsThis section explains the function used to send the details of Resource Orchestrator events to other products as SNMP traps.
Functional Overview
By receiving SNMP traps sent by Resource Orchestrator on other products (operation management products, etc.) it is possible to monitormajor Resource Orchestrator events on other products. With this function, in operating environments where monitoring is mainly performedusing the consoles of other products, as it is not necessary to constantly display the Resource Orchestrator console, centralization of themonitoring console is possible.
Function Details
- SNMPv1 traps are sent to servers registered as destinations. Destination servers are registered, changed, and deleted using the rcxadmeventctl command.For details on this command, refer to "5.7 rcxadm eventctl" in the "Reference Guide (Command) VE".
- The SNMP traps sent by Resource Orchestrator contain information about the operation details of Resource Orchestrator. For eventsrelated to status changes of resources managed by Resource Orchestrator and events internal to resources, the SNMP traps will besent by the resource itself.
- 434 -
- The events that are the target of sending as SNMP traps are as follow:
FJSVrcx:INFO:21143:operation:startedFJSVrcx:INFO:21144:operation:completedFJSVrcx:INFO:21145:operation:cancelledFJSVrcx:ERROR:61143:operation:failedFJSVrcx:ERROR:61144:operation:rollback failed
- For details of the Resource Orchestrator events that are sent as SNMP traps, check the event log of the ROR console.
Setup Procedure
This section explains the procedure for setting other products to receive Resource Orchestrator SNMP traps.Here it is assumed that installation of other products for receiving SNMP traps has been performed, and that basic settings such as thoseof the SNMP trap service necessary to receive traps and the required ports, have been made.
1. Configure a SNMP community name for the product that will receive SNMP traps.Enter a string of up to 32 alphanumeric characters, hyphens ("-"), and underscores ("_") for the SNMP community name.
2. Load the Resource Orchestrator MIB file on the product that is to receive SNMP traps.The MIB file that defines the SNMP traps for Resource Orchestrator is located in the following folder on the admin server.
[Windows Manager]Installation_folder\SVROR\Manager\etc\mibs\RCVE-Event-Trap-MIB.mib
[Linux Manager]/etc/opt/FJSVrcvmr/mibs/RCVE-Event-Trap-MIB.mib
3. Register destination servers using the rcxadm eventctl add command of Resource Orchestrator.
Modification Procedure
Use the following procedure to change SNMP trap destination settings:
1. Delete the target destination server information using the rcxadm eventctl delete command of Resource Orchestrator.
2. Register the new destination servers using the rcxadm eventctl add command of Resource Orchestrator.
Deletion Procedure
Delete the target destination server information using the rcxadm eventctl delete command of Resource Orchestrator.
Operation Checks
Use the following procedure to confirm that SNMP trap destinations have been registered correctly.
1. From the ROR console, place the desired managed server into maintenance mode.
a. In the ROR console server resource tree, right-click the desired server (or its physical OS), and select [Maintenance Mode]-[Set] from the popup menu.
The [Set Maintenance Mode] dialog is displayed.
b. Click <OK>.
2. The managed server is released from maintenance mode.
a. In the ROR console server resource tree, right-click the desired server (or its physical OS) and select [Maintenance Mode]-[Release] from the popup menu.
The [Release Maintenance Mode] dialog is displayed.
- 435 -
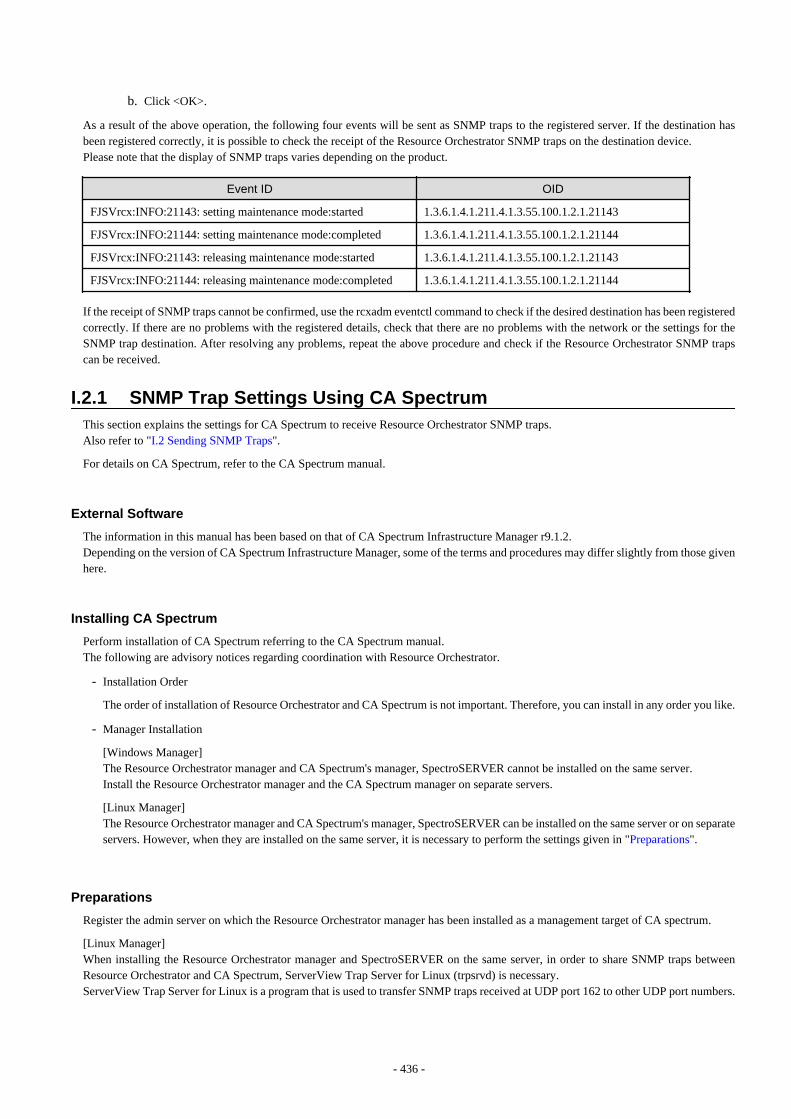
b. Click <OK>.
As a result of the above operation, the following four events will be sent as SNMP traps to the registered server. If the destination hasbeen registered correctly, it is possible to check the receipt of the Resource Orchestrator SNMP traps on the destination device.Please note that the display of SNMP traps varies depending on the product.
Event ID OID
FJSVrcx:INFO:21143: setting maintenance mode:started 1.3.6.1.4.1.211.4.1.3.55.100.1.2.1.21143
FJSVrcx:INFO:21144: setting maintenance mode:completed 1.3.6.1.4.1.211.4.1.3.55.100.1.2.1.21144
FJSVrcx:INFO:21143: releasing maintenance mode:started 1.3.6.1.4.1.211.4.1.3.55.100.1.2.1.21143
FJSVrcx:INFO:21144: releasing maintenance mode:completed 1.3.6.1.4.1.211.4.1.3.55.100.1.2.1.21144
If the receipt of SNMP traps cannot be confirmed, use the rcxadm eventctl command to check if the desired destination has been registeredcorrectly. If there are no problems with the registered details, check that there are no problems with the network or the settings for theSNMP trap destination. After resolving any problems, repeat the above procedure and check if the Resource Orchestrator SNMP trapscan be received.
I.2.1 SNMP Trap Settings Using CA SpectrumThis section explains the settings for CA Spectrum to receive Resource Orchestrator SNMP traps.Also refer to "I.2 Sending SNMP Traps".
For details on CA Spectrum, refer to the CA Spectrum manual.
External Software
The information in this manual has been based on that of CA Spectrum Infrastructure Manager r9.1.2.Depending on the version of CA Spectrum Infrastructure Manager, some of the terms and procedures may differ slightly from those givenhere.
Installing CA Spectrum
Perform installation of CA Spectrum referring to the CA Spectrum manual.The following are advisory notices regarding coordination with Resource Orchestrator.
- Installation Order
The order of installation of Resource Orchestrator and CA Spectrum is not important. Therefore, you can install in any order you like.
- Manager Installation
[Windows Manager]The Resource Orchestrator manager and CA Spectrum's manager, SpectroSERVER cannot be installed on the same server.Install the Resource Orchestrator manager and the CA Spectrum manager on separate servers.
[Linux Manager]The Resource Orchestrator manager and CA Spectrum's manager, SpectroSERVER can be installed on the same server or on separateservers. However, when they are installed on the same server, it is necessary to perform the settings given in "Preparations".
Preparations
Register the admin server on which the Resource Orchestrator manager has been installed as a management target of CA spectrum.
[Linux Manager]When installing the Resource Orchestrator manager and SpectroSERVER on the same server, in order to share SNMP traps betweenResource Orchestrator and CA Spectrum, ServerView Trap Server for Linux (trpsrvd) is necessary.ServerView Trap Server for Linux is a program that is used to transfer SNMP traps received at UDP port 162 to other UDP port numbers.
- 436 -
ServerView Trap Server for Linux is shipped with some versions of ServerView Operations Manager. In such cases, install ServerViewTrap Server for Linux following the instructions given in the ServerView Operations Manager manual.
If ServerView Trap Server for Linux is not shipped with ServerView Operations Manager, download it from the following site, and installit referring to the attached documents.
URL: http://download.ts.fujitsu.com/prim_supportcd/SVSSoftware/html/ServerView_e.html
Perform the following settings after installing ServerView Trap Server for Linux.
1. Log in as OS administrator (root).
2. Change the SpectroSERVER SNMP trap reception port to one other than 162.
The port number can be changed by editing the file shown below.
{SpectroSERVER_installation_folder}/CC/.vnmrc
Example
When changing the port number to 9162:
snmp_trap_port=9162
3. Restart SpectroSERVER.
4. Edit the /usr/share/SMAWtrpsv/conf/trpsrvtargets file and add the SpectroSERVER SNMP trap reception port.
Before editing
######################################################################### Copyright (C) Fujitsu Siemens Computers 2007# All rights reserved# Configuration File for trpsrv (SMAWtrpsv)######################################################################### Syntax# port [(address | -) [comment]]
# examples# 8162# 9162 - test# 162 145.25.124.121
After editing (When making the SpectroSERVER SNMP trap reception port 9162)
######################################################################### Copyright (C) Fujitsu Siemens Computers 2007# All rights reserved# Configuration File for trpsrv (SMAWtrpsv)########################################################################
# Syntax# port [(address | -) [comment]]
# examples# 8162# 9162 - test# 162 145.25.124.121
#Transfer to UDP port 9162.9162
- 437 -
5. Restart the system.
Setup Procedure
In this section, the procedures for checking SNMP traps that CA Spectrum receives from Resource Orchestrator, as event messages onOneClick (CA Spectrum's console) are explained.Refer to the CA Spectrum manual for details on each procedure.
1. Start CA Spectrum's MIB Tools.
2. Click <Add MIB> on the "Navigation" panel.
The [MIB Tools: Add MIB] dialog is displayed.
3. Click <Browse> and select the Resource Orchestrator MIB file.
4. Click <Compile>.
Confirm that compiling of the MIB file was successful in the messages displayed in "Compiler" of the [MIB Tools: Add MIB]dialog.
5. Click <Add & Close>.
The loaded MIB is displayed in the MIB Tools "Navigation" panel.
6. On "Navigation" panel, select the Resource Orchestrator MIB, and click the [Map] tab on the "Contents" panel.
7. Select the trap displayed in "Trap Support", and click <Information> to check the trap details.
8. Select the trap displayed in "Trap Support", and click <Map Traps>.
The [MIB Tools: Assign Trap Alarms] dialog is displayed.
9. Click <set> in "Alarm Severity", and select the severity of alarms for each trap.
10. Click <OK>.
The [MIB Tools: Trap Support Results] dialog will be displayed, and you can check the results of the operation.
11. Click <Close>.
Check that event codes have been allocated for each trap in the MIB Tools "Trap Support".
12. Select a trap from "Trap Support", and click <Edit Traps>.
The Event Configuration application will start.
13. On the "Navigation" panel, select the event code allocated to the trap.
14. In "Event Message" of the "Contents" panel, the event message to be displayed when the trap is received is displayed.
The message can be edited following the format specified by CA Spectrum.For details of the format, refer to the CA Spectrum manual.
15. After changing a message, select [Save All] or [Save Selected] from the Event Configuration application menu and save the settings.
After performing the above settings, perform the operation check described in "I.2 Sending SNMP Traps".
- 438 -
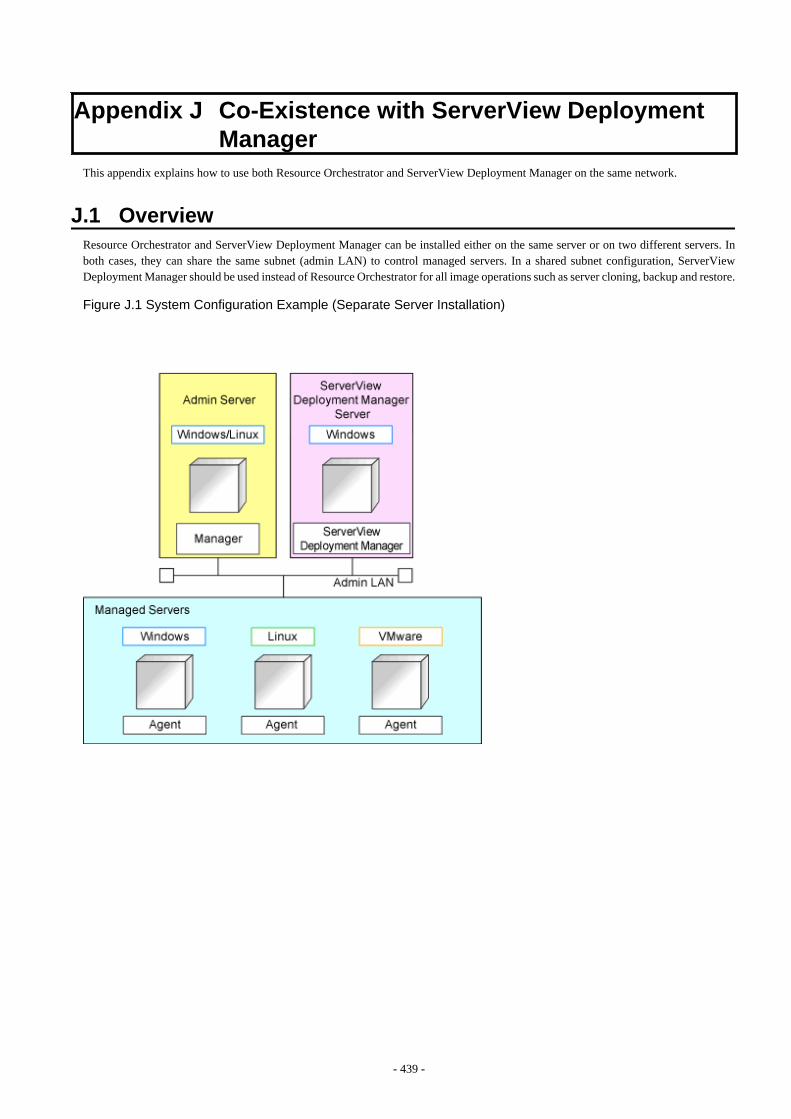
Appendix J Co-Existence with ServerView DeploymentManager
This appendix explains how to use both Resource Orchestrator and ServerView Deployment Manager on the same network.
J.1 OverviewResource Orchestrator and ServerView Deployment Manager can be installed either on the same server or on two different servers. Inboth cases, they can share the same subnet (admin LAN) to control managed servers. In a shared subnet configuration, ServerViewDeployment Manager should be used instead of Resource Orchestrator for all image operations such as server cloning, backup and restore.
Figure J.1 System Configuration Example (Separate Server Installation)
- 439 -
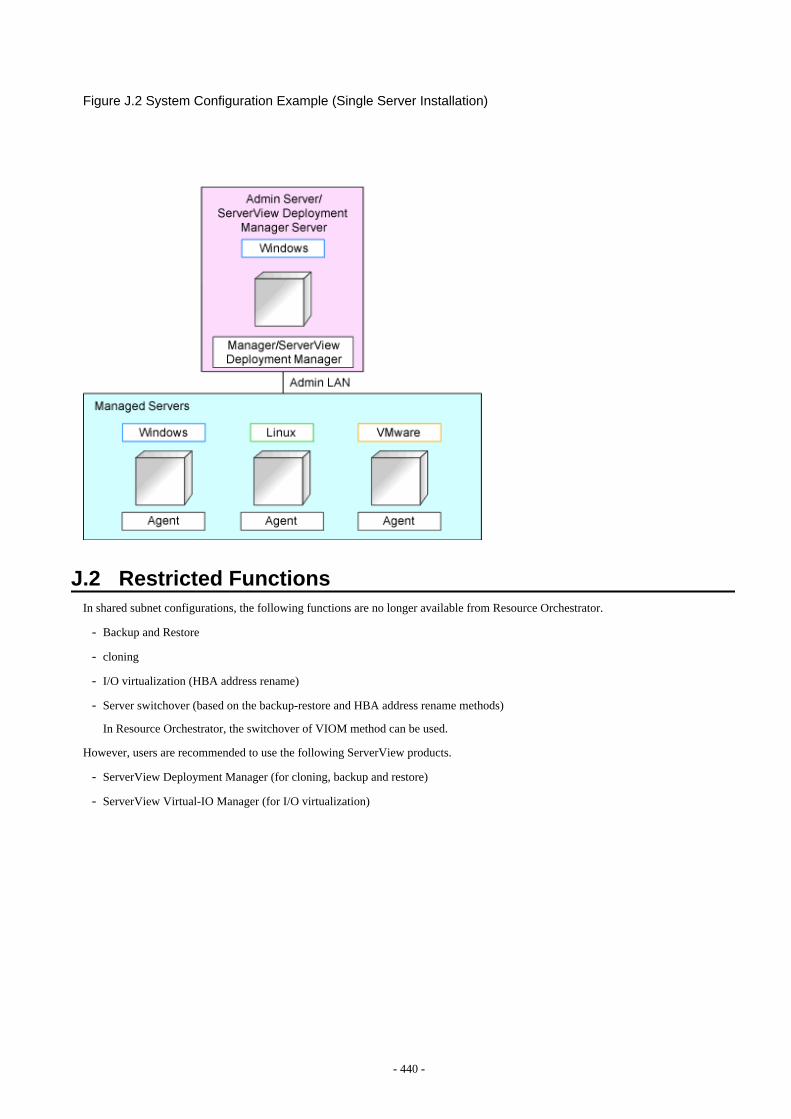
Figure J.2 System Configuration Example (Single Server Installation)
J.2 Restricted FunctionsIn shared subnet configurations, the following functions are no longer available from Resource Orchestrator.
- Backup and Restore
- cloning
- I/O virtualization (HBA address rename)
- Server switchover (based on the backup-restore and HBA address rename methods)
In Resource Orchestrator, the switchover of VIOM method can be used.
However, users are recommended to use the following ServerView products.
- ServerView Deployment Manager (for cloning, backup and restore)
- ServerView Virtual-IO Manager (for I/O virtualization)
- 440 -

Appendix K Co-Existence with Management SoftwareThis section explains co-existence of Resource Orchestrator with operation management software.
- Systemwalker Service Quality Coordinator
K.1 Systemwalker Service Quality CoordinatorThe ROR manager is operated using the functions of Systemwalker Service Quality Coordinator, and there are some points to be noted.This section explains the installation and uninstallation procedures of Systemwalker Service Quality Coordinator.
Note
The supported version of Systemwalker Service Quality Coordinator is as follows.
- [Windows Manager]Systemwalker Service Quality Coordinator V15.0.1 (x86)
- [Linux Manager]Systemwalker Service Quality Coordinator V15.0.1 (x86)
K.1.1 SetupA license and the installation media are necessary to use the functions of Systemwalker Service Quality Coordinator. Purchase theinstallation media and license of Setup of Systemwalker Service Quality Coordinator and refer to "1.14 Linking to ServerView ResourceOrchestrator" in the "Systemwalker Service Quality Coordinator User's Guide" for the installation procedure.
Note
Take care regarding the following points when installing Systemwalker Service Quality Coordinator, and refer to the "SystemwalkerService Quality Coordinator User's Guide".
- There are two types of models for linking to ServerView Resource Orchestrator, installing "together with" and installing "separatelyfrom". Use the "together with" type of installation.
- The work in "1. Install and set up the Manager of the ServerView Resource Orchestrator" in "1.14.1.1.1 Tasks to perform on theManager of the ServerView Resource Orchestrator" in the "Systemwalker Service Quality Coordinator User's Guide" is not necessaryas the ROR manager is already installed.
- [Linux Manager]Because the installer of the ROR manager does not install the Operation Management Client of the Systemwalker Service QualityCoordinator, perform "1.14.1.2.1 Tasks to perform on the Operation Management Client of the Systemwalker Service QualityCoordinator".
K.1.2 UninstallationThis section explains the uninstallation procedure for Systemwalker Service Quality Coordinator when it is operated on the same serveras an ROR manager.
Note
Uninstallation of only Systemwalker Service Quality Coordinator is not possible as the ROR manager is operated using the functions ofSystemwalker Service Quality Coordinator.
- 441 -
Uninstallation of Both the ROR Manager and Systemwalker Service Quality Coordinator
Refer to "20.1 Manager Uninstallation" when uninstalling both the ROR manager and Systemwalker Service Quality Coordinator.Systemwalker Service Quality Coordinator will also be uninstalled if the ROR manager is uninstalled.
Note
Make backups as necessary before starting the uninstallation. Refer to the following manuals for details.
- Backup of ROR manager"10.1 Backup and Restoration of Admin Servers" in the "Operation Guide CE"
- Backup of Systemwalker Service Quality Coordinator"Chapter 12 Backup and Restore" in the "Systemwalker Service Quality Coordinator User's Guide"
- 442 -
Appendix L Migration Procedure when Using ActiveDirectory with a Redundant Configuration
This appendix explains how to change Active Directory used by the single sign-on function of ServerView Operations Manager from oneto two. Here it is assumed that Active Directory be a redundant configuration.
By operating Active Directory in a redundancy configuration it is possible to continue operations by automatically switching to the otherdomain controller when the active domain controller fails.
Preparations
- Active Directory Settings
- Set the domain controller that uses it as a backup host.
- ServerView Operations Manager Settings
- Register the backup host in the directory service setting.
Refer to "ServerView user management via an LDAP directory service" in "FUJITSU Software ServerView Suite User Managementin ServerView".
- Resource Orchestrator Settings
- Create the folder for storing user account information
Create the folder for storing user account information for the place where enough capacity of the disk is secured.
Example
The folder for storing user account information
- When the total of the user managed with Resource Orchestrator is 100 users
210MB + (0.04MB * 100 users)
Satisfy the following conditions about the absolute path of the folder for storing user account information.
Windows Manager Linux Manager
number ofcharacters
192bytes or less 242bytes or less
usable charactertypes
- Alphanumeric characters
- Dollar sign ($)
- Ampersand (&)
- Apostrophe (')
- Plus sign (+)
- Hyphen (-)
- Period (.)
- Equal sign (=)
- At mark (@)
- Underscore (_)
- Backward quote (`)
- Tilde (~)
- Alphanumeric characters
- Slash (/)
- Hyphen (-)
- Underscore (_)
- Tilde (~)
- 443 -

Windows Manager Linux Manager
- Left bracket ([)
- Right bracket (])
- Left brace ({)
- Right brace (})
- Blank space ( )
- Colon (:)
- Back slash (\)
Point
The user information management folder cannot be created in the default installation folder.
[Windows Manager]Set in the right of access of the created folder (low rank folder from the folder of most significant) and set the right of access ofa full control to the "Administrators" group of Windows.
[Linux Manager]Set to the owner of the made folder that "Read", "Write", and "Execution" are permitted. Set the owner to "oms". This productautomatically creates the oms account.Set the right of access to access all high rank folders of the made folder by the oms account authority.
Information
An example is shown below, when create the folder (/data/user):
1. Create the folder
# mkdir -p /data/user <RETURN>
2. Set the authority of "Read", "Write", and "Execution" to the owner
# chmod 700 /data/user <RETURN>
3. Set the owner to "oms"
# chown oms /data/user <RETURN>
4. Set the right of access to access all high rank folders (/data) of the made folder by the oms account authority
When the owner of a high rank folder is not "oms", and the group is things except the group to which "oms" userbelongs
# chmod o+x /data <RETURN>
Note
Please do not operate the deletion etc., and, because, the created folder to use it while operating Resource Orchestrator.
- Tuning System Parameters (Admin Server) [Linux Manager]
Before setup procedure, it is necessary to tune up system parameters for the admin server. See the table below for the systemparameters that need to be tuned and their values.
- 444 -

- Shared Memory
Parameter Description Value Type
shmmni Maximum number of sharedmemory segments
4 Additional value (*)
* Note: For details of how to set, refer to Point in the Tuning System Parameters of "2.1.1.2 Software Preparation andChecks".
- File descriptor
Set for hard limits of the number of maximum file descriptors of "oms" account to become 65,536 from 256.When set hard limits of the number of maximum file descriptors of the entire systems to a value that is bigger than 65,536,set the oms user individually.
Example
When the oms account is individually set, set as follows.
1. Edit /etc/security/limits.conf.
* hard nofile 524288oms hard nofile 65536
2. Reboot the system to enable the configuration on 1.
- Checking Used Port Numbers
The following ports are used with Admin Server. If any of those ports is already used by another service, allocate a different portnumber.
Function
Overview
Source Destination
ProtocolServerService
Service PortModification
ServerService
Service PortModification
InterstageApplicationServer forinternalcontrol
Adminserver
-Variablevalue
-Adminserver
- 9700
Notpossible
tcp
Adminserver
-Variablevalue
-Adminserver
- 389
Notpossible
tcp
Adminserver
-Variablevalue
-Adminserver
- 636
Notpossible
tcp
Adminserver
-Variablevalue
-Adminserver
-6000 -65535(*)
Notpossible
tcp
*Note: Number not used when the Reconfigure Application Process command is executed among 6000-65535
- 445 -

Setup Procedure
1. Stop the manager
Refer to "2.1 Starting and Stopping Managers" in the "Operation Guide CE" for information on how to stop the manager.
2. Execute the Reconfigure Application Process command
Execute the following command.
[Windows Manager]
>Installation_folder\SVROR\Manager\bin\rcxreconfig_appproc.bat setup -dir the folder for storing user account information<RETURN>
[Linux Manager]
# /opt/FJSVrcvmr/bin/rcxreconfig_appproc.sh setup -dir the folder for storing user account information <RETURN>
The folder for storing user account information created during preparations is specified for the folder for storing user accountinformation by the absolute path.
Note
If there are internal inconsistencies detected during the Reconfigure Application Process command, the messages"FJSVrcx:ERROR:67278:internal error" will be displayed and installation will fail. In this case, collect the following log file, pleasecontact Fujitsu technical staff.
[Windows Manager]Installation_folder\SVROR\Manager\var\log\rcxreconfig_appproc.log
[Linux Manager]/var/opt/FJSVrcvmr/log/rcxreconfig_appproc.log
3. Register the directory service connection information for performing Single Sign-On.
Execute the rcxadm authctl sync command to register the connection information for the two Active Directories registered in theServerView Operations Manager in the manager.
For details on the rcxadm authctl sync command, refer to "5.4 rcxadm authctl" in the "Reference Guide (Command/XML) CE".
4. Confirm certificates of the backup host
Execute the rcxadm authctl diffcert command to check the alias of the CA certificate (keystore) of the backup host.
For details on the rcxadm authctl diffcert command, refer to "5.4 rcxadm authctl" in the "Reference Guide (Command/XML) CE".
5. Register certificates of the backup host
Register the alias of the CA certificate (keystore) of the backup host checked in step 4.For details on how to register, refer to "8.10.1.2 Registering Certificates" in the "Operation Guide CE".
6. Start the manager
Refer to "2.1 Starting and Stopping Managers" in the "Operation Guide CE" for information on how to stop the manager.
- 446 -
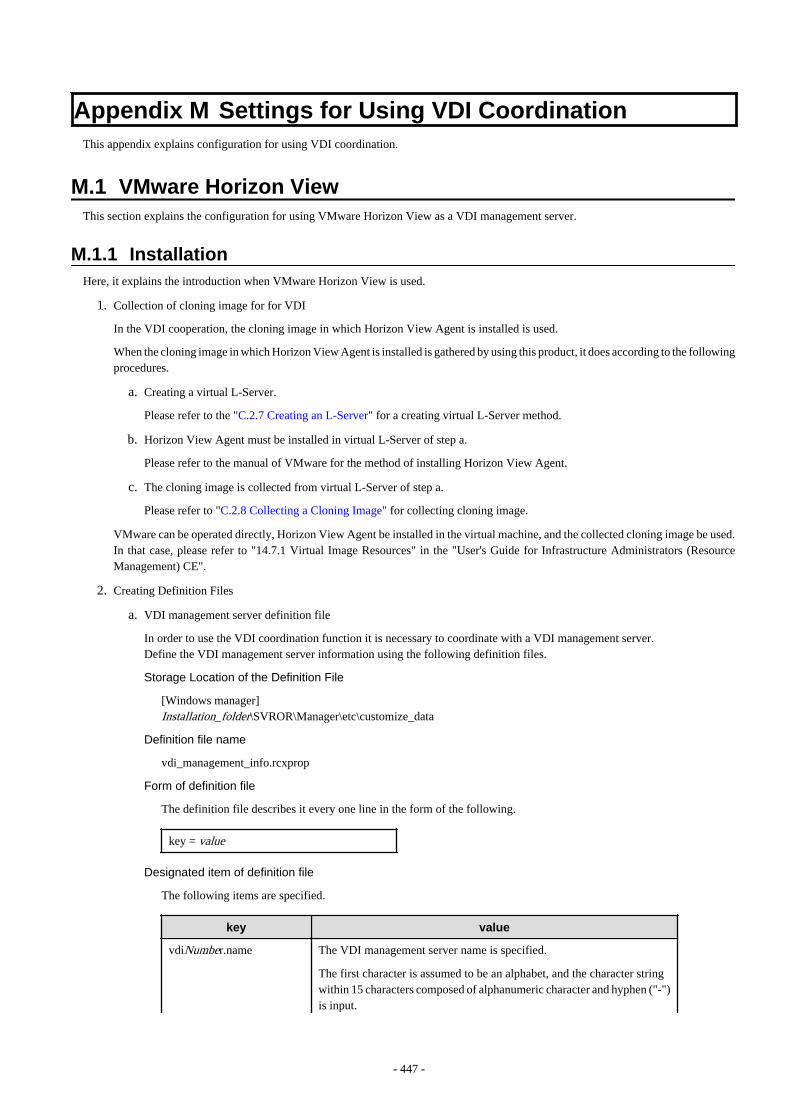
Appendix M Settings for Using VDI CoordinationThis appendix explains configuration for using VDI coordination.
M.1 VMware Horizon ViewThis section explains the configuration for using VMware Horizon View as a VDI management server.
M.1.1 InstallationHere, it explains the introduction when VMware Horizon View is used.
1. Collection of cloning image for for VDI
In the VDI cooperation, the cloning image in which Horizon View Agent is installed is used.
When the cloning image in which Horizon View Agent is installed is gathered by using this product, it does according to the followingprocedures.
a. Creating a virtual L-Server.
Please refer to the "C.2.7 Creating an L-Server" for a creating virtual L-Server method.
b. Horizon View Agent must be installed in virtual L-Server of step a.
Please refer to the manual of VMware for the method of installing Horizon View Agent.
c. The cloning image is collected from virtual L-Server of step a.
Please refer to "C.2.8 Collecting a Cloning Image" for collecting cloning image.
VMware can be operated directly, Horizon View Agent be installed in the virtual machine, and the collected cloning image be used.In that case, please refer to "14.7.1 Virtual Image Resources" in the "User's Guide for Infrastructure Administrators (ResourceManagement) CE".
2. Creating Definition Files
a. VDI management server definition file
In order to use the VDI coordination function it is necessary to coordinate with a VDI management server.Define the VDI management server information using the following definition files.
Storage Location of the Definition File
[Windows manager]Installation_folder\SVROR\Manager\etc\customize_data
Definition file name
vdi_management_info.rcxprop
Form of definition file
The definition file describes it every one line in the form of the following.
key = value
Designated item of definition file
The following items are specified.
key value
vdiNumber.name The VDI management server name is specified.
The first character is assumed to be an alphabet, and the character stringwithin 15 characters composed of alphanumeric character and hyphen ("-")is input.
- 447 -

key value
Please specify each unique value for VDI management server name.
vdiNumber.type The VDI administrative server type is specified.
"vmwareview" is specified for VMware Horizon View.
vdiNumber.ipaddr IP address of the VDI management server used by the control by thisproduct is specified.
vdiNumber.user The name of the administrator of the VDI management server is specified.
The character string within 84 characters composed of the alphanumericcharacter and the sign (ASCII character (0x20-0x7e)) is input.
For details, refer to "K.1.1 Function of VDI Coordination" in the "DesignGuide CE".
vdiNumber.password The administrator password of the VDI management server is specified.
The character string within 128 characters composed of the alphanumericcharacter and the sign (ASCII character (0x20-0x7e)) is input.
vdiNumber.vmmgr The name in ROR of the VM management software registered in the VDImanagement server is specified.
When there are two or more VM management products, please use","(comma) to delimitation.
vdiNumber.connect_info The connection information of the VDI management server specified whenthe VDI user uses the virtual desktop is specified.
When there are two or more connection information, please use ","(comma)to delimitation.
Please specify the character string of one connection information within1024 characters composed of alphanumeric and signs (ASCII character(0x20-0x2b, 0x2d-0x7e)) except "," (comma).
The first connection information is notified with mail when L-Platform isdisposed.
- For VMware Horizon View Client
The hostname or IP of the VDI management server that the user of thevirtual desktop uses as a connection destination is specified.
Note
- It is not necessary to restart the ROR manager after creating the definition files.
- The defined item of each VDI management server is described in one line one by one.
- The comment describes the first character in Sharp ("#").
- Number begins from 1, and add 1 to each VDI management server definition.
- When two or more lines with the same key exist, the line described in behind becomes effective.
- When two or more VDI management servers with the same VDI management server name are defined, the definitiondescribed in behind becomes effective.
- When the item is insufficient because of the definition of the VDI management server or the value is illegal, the definitionis disregarded.
- The blank characters at head of line and end of line, before and behind the equal sign are disregarded.
- 448 -

Example
#VDI1vdi1.name=horizonview1vdi1.type=vmwareviewvdi1.ipaddr=192.168.2.1vdi1.user=viewdomain1\admin1vdi1.password=password1vdi1.vmmgr=vc1,vc2vdi1.connect_info=192.168.123.1, http://192.168.123.1/vmwareview/
#VDI2vdi2.name=horizonview2vdi2.type=vmwareviewvdi2.ipaddr=192.168.2.2vdi2.user= viewdomain2\admin2vdi2.password=password2vdi2.vmmgr=vc3,vc4vdi2.connect_info=192.168.123.2
b. Group qualification for VDI pool definition file
When the domain group is used as a qualification of the VDI pool, use this file.The relation among the VDI management server, the VDI pool, and the domain group is defined in here.
Storage Location of the Definition File
[Windows Manager]Installation_folder\SVROR\Manager\etc\customize_data
Definition File Name
vdipool_group_entitlement.rcxprop
Definition File Format
The definition file is described every one line in the form of the following.
VDI management server name:VDI pool name:domain group name 1[:domain group name 2:...]
It is not necessary to restart the ROR manager after creating the definition files.It is considered the comment line when "#" is set to the head of line and is disregarded.The relation among the VDI management server, the VDI pool, and the domain group is specified by colon (":")delimitation every one line.When two or more VDI pools exist in a VDI management server, specify line by line at each VDI pool.When two or more domain groups are given to the VDI pool, specify them and use colon (":") as delimitation.The name of the VDI management server in this file must be the name of the VDI management software that specifiedwhen registering the VDI management software.When the same combination of the VDI pool name and the VDI management server name is specified by two lines ormore, the setting of the bottom becomes effective.
Definition File Items Table M.1 The List of Items
Item Description
VDI management servername
The VDI management server name is specified.
The first character is assumed to be an alphabet, and the character string within15 characters composed of alphanumeric character and hyphen ("-") is input.
VDI pool name The VDI pool name is specified.
- 449 -
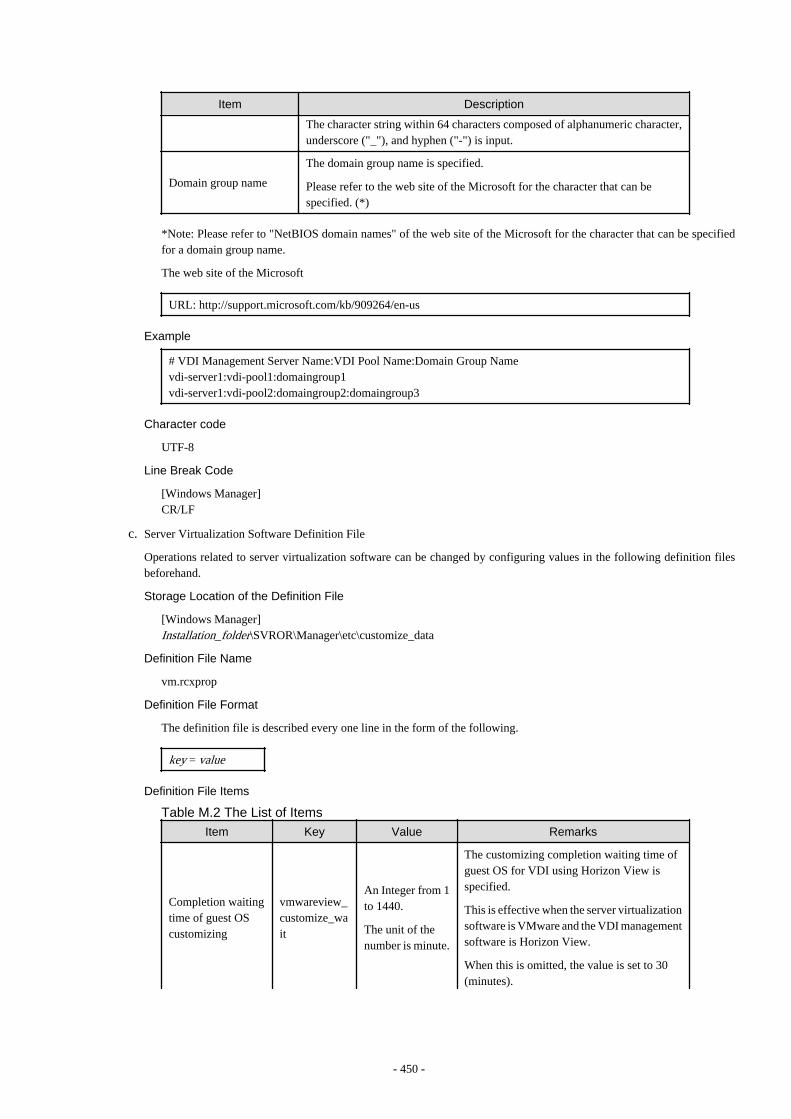
Item Description
The character string within 64 characters composed of alphanumeric character,underscore ("_"), and hyphen ("-") is input.
Domain group name
The domain group name is specified.
Please refer to the web site of the Microsoft for the character that can bespecified. (*)
*Note: Please refer to "NetBIOS domain names" of the web site of the Microsoft for the character that can be specifiedfor a domain group name.
The web site of the Microsoft
URL: http://support.microsoft.com/kb/909264/en-us
Example
# VDI Management Server Name:VDI Pool Name:Domain Group Namevdi-server1:vdi-pool1:domaingroup1vdi-server1:vdi-pool2:domaingroup2:domaingroup3
Character code
UTF-8
Line Break Code
[Windows Manager]CR/LF
c. Server Virtualization Software Definition File
Operations related to server virtualization software can be changed by configuring values in the following definition filesbeforehand.
Storage Location of the Definition File
[Windows Manager]Installation_folder\SVROR\Manager\etc\customize_data
Definition File Name
vm.rcxprop
Definition File Format
The definition file is described every one line in the form of the following.
key = value
Definition File Items Table M.2 The List of Items
Item Key Value Remarks
Completion waitingtime of guest OScustomizing
vmwareview_customize_wait
An Integer from 1to 1440.
The unit of thenumber is minute.
The customizing completion waiting time ofguest OS for VDI using Horizon View isspecified.
This is effective when the server virtualizationsoftware is VMware and the VDI managementsoftware is Horizon View.
When this is omitted, the value is set to 30(minutes).
- 450 -
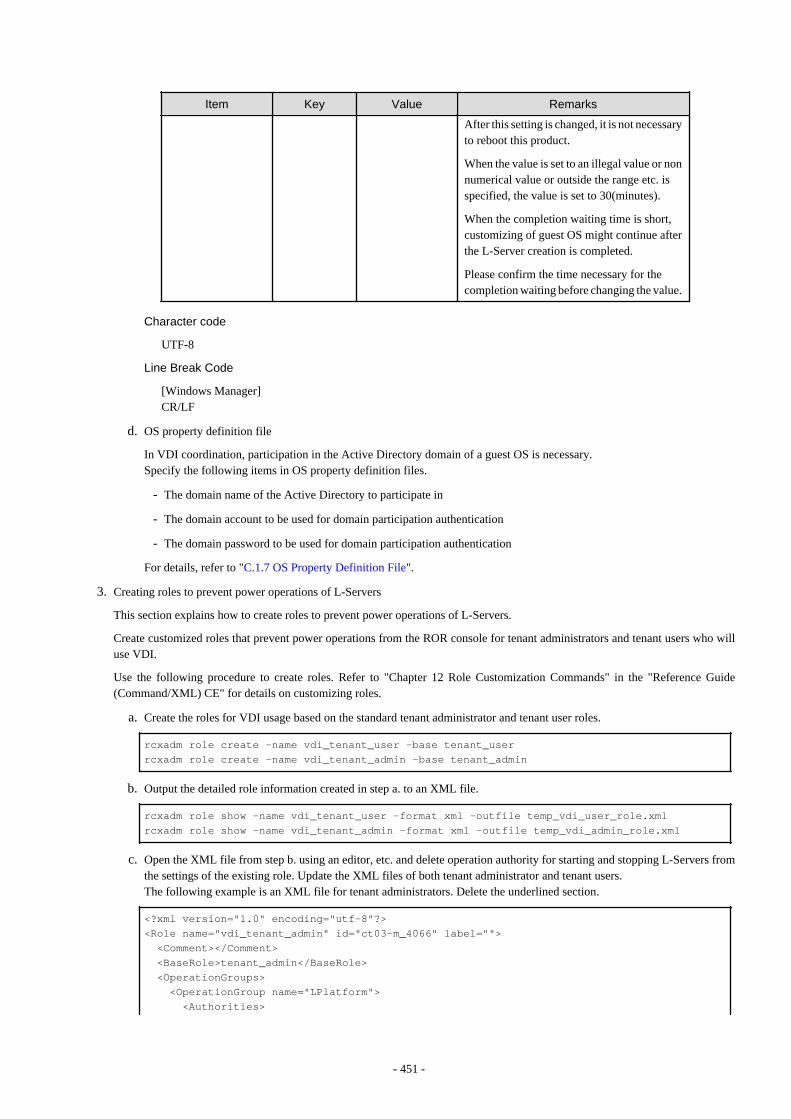
Item Key Value Remarks
After this setting is changed, it is not necessaryto reboot this product.
When the value is set to an illegal value or nonnumerical value or outside the range etc. isspecified, the value is set to 30(minutes).
When the completion waiting time is short,customizing of guest OS might continue afterthe L-Server creation is completed.
Please confirm the time necessary for thecompletion waiting before changing the value.
Character code
UTF-8
Line Break Code
[Windows Manager]CR/LF
d. OS property definition file
In VDI coordination, participation in the Active Directory domain of a guest OS is necessary.Specify the following items in OS property definition files.
- The domain name of the Active Directory to participate in
- The domain account to be used for domain participation authentication
- The domain password to be used for domain participation authentication
For details, refer to "C.1.7 OS Property Definition File".
3. Creating roles to prevent power operations of L-Servers
This section explains how to create roles to prevent power operations of L-Servers.
Create customized roles that prevent power operations from the ROR console for tenant administrators and tenant users who willuse VDI.
Use the following procedure to create roles. Refer to "Chapter 12 Role Customization Commands" in the "Reference Guide(Command/XML) CE" for details on customizing roles.
a. Create the roles for VDI usage based on the standard tenant administrator and tenant user roles.
rcxadm role create -name vdi_tenant_user -base tenant_userrcxadm role create -name vdi_tenant_admin -base tenant_admin
b. Output the detailed role information created in step a. to an XML file.
rcxadm role show -name vdi_tenant_user -format xml -outfile temp_vdi_user_role.xmlrcxadm role show -name vdi_tenant_admin -format xml -outfile temp_vdi_admin_role.xml
c. Open the XML file from step b. using an editor, etc. and delete operation authority for starting and stopping L-Servers fromthe settings of the existing role. Update the XML files of both tenant administrator and tenant users.The following example is an XML file for tenant administrators. Delete the underlined section.
<?xml version="1.0" encoding="utf-8"?><Role name="vdi_tenant_admin" id="ct03-m_4066" label=""> <Comment></Comment> <BaseRole>tenant_admin</BaseRole> <OperationGroups> <OperationGroup name="LPlatform"> <Authorities>
- 451 -

<Authority>create</Authority> <Authority>modify</Authority> <Authority>delete</Authority> <Authority>ruleset</Authority> <Authority>showlog</Authority> </Authorities> </OperationGroup> <OperationGroup name="LServer"> <Authorities> <Authority>create</Authority> <Authority>modify</Authority> <Authority>delete</Authority> <Authority>resource_operation</Authority> <Authority>start</Authority> <Authority>stop</Authority> <Authority>image_collect</Authority> <Authority>backup</Authority> <Authority>restore</Authority> <Authority>delete_backup</Authority> </Authorities> </OperationGroup> <OperationGroup name="Console"> <Authorities> <Authority>home</Authority> <Authority>dashboard</Authority> <Authority>template</Authority> <Authority>lplatform</Authority> <Authority>account</Authority> </Authorities> </OperationGroup> </OperationGroups></Role>
d. Change the role settings of tenant administrators and tenant users who will use VDI, based on the XML file modified in stepc.
rcxadm role modify -name vdi_tenant_user -file temp_vdi_user_role.xmlrcxadm role modify -name vdi_tenant_admin -file temp_vdi_admin_role.xml
When changing or registering user information of tenant administrators and tenant users who will use VDI, use the roles created inthis section.
Refer to "11.7 Registering a User" and "11.8 Modifying a User" in the "User's Guide for Infrastructure Administrators CE" fordetails of the operation method.
The steps from a. to d. can also be performed from the ROR console. When performing the operation from the ROR console, referto "3.6 Creating a Role" in the "User's Guide for Infrastructure Administrators (Resource Management) CE", and perform theoperation to create the same role as in steps a. to d.
4. Settings for L-Platform management
This section explains the settings of definition files to enable VDI coordination when deploying L-Platforms and L-Platformtemplates.
- When enabling VDI coordination
Refer to "8.5.14.1 Enabling VDI" in the "Operation Guide CE".
- When enabling specification of a user name for VDI connection during application for L-Platform usage
Refer to "8.5.14.2 Settings for VDI User Names" in the "Operation Guide CE".
5. Create an L-Server Template
This section explains how to create an L-Server template specified when an L-Platform template is created.
Create an L-Server template that specifies the Active Directory domain participation setting.
- 452 -
For details on the participation setting to Active Directory domain, refer to "C.2.12 participating in an Active Directory domain".
Refer to "Chapter 15 L-Server Template Operations" in the "User's Guide for Infrastructure Administrators (Resource Management)CE" for information on how to create L-Server templates.
6. Create an L-Platform Template
This chapter explains how to create an L-Platform template.Use the following procedure to create an L-Platform template.
a. Open the [Template] tab from the ROR Console and display the [L-Platform template] window.
b. Select the [Image] tab and click [Create new].
c. On the [Select Image] page, select the cloning image imported in step 1 and click [Next].
d. Set basic information of images on the [General] page.Check "Use for desktop virtualization" and click [Next].
e. Set the information of software and patches on [Patch information] and [Select Software], then click [Next].
f. Ensure there are no mistakes in the contents displayed on the [Configuration] page, and click [Next].
g. Select the [Template] tab and click [Create new].
h. Set basic information on the [General] page and click [Next].
i. Drag segment the virtual server will be deployed to from [Additional Options] on the [Changing Configuration] page, anddrop it on the configuration part of the L-Platform template. Specify the segment information in the details of configurationelements.
j. Drag the image information created in steps b. to f. from [Additional Options], and drop it on the segment added in step i.Set server information in the details of configuration elements. Specify the pool name for VDI.
k. Ensure there are no mistakes in the contents displayed on the [Configuration] page, and click [Next].
l. Select the created template in the [Template List] window and click [Release].
Refer to "8.3.1 Creating New L-Platform Template", "8.4.2 Image Information" and "8.4.4 Template Information" in the "User'sGuide for Infrastructure Administrators CE" for details of the operation method.
M.1.2 SubscriptionUse the following procedure to subscribe to an L-Platform.
1. Open the [L-Platforms] tab from the ROR Console and display the L-Platform.
2. Select [Subscribe to L-Platform] from the operation menu on the L-Platform.
3. Click [Create New L-Platform] on the [Subscription] page.
4. On the [Select Template] page, select the L-Platform template created in "6. Create an L-Platform Template" of "M.1.1Installation", and click [Next].
5. Specify the L-Platform name on the [General] page and click [Next]
6. Modify the configuration of the L-Platform template on the [Change Configuration] page if necessary.Change the VDI user if the login user name of the ROR Console is different from the VDI user name (VDI connection user name).When the change is complete, click [Next].
7. Ensure there are no mistakes in the contents displayed on the [Configuration] page, and click [Next].
8. Confirm the license agreement displayed on the [License Agreement] page, check [Agree to the license] , and then click <Create>.As the L-Platform subscription application has been received, the [Complete] window will be displayed.
9. Click [Close] and return to the [Subscription] page.
Refer to "5.2 Subscribe to an L-Platform" in the "User's Guide for Tenant Users CE" or "8.2 Subscribe to an L-Platform" in the "User'sGuide for Tenant Administrators CE" for details of the operation method.
- 453 -

Point
- To display the [Changing Configuration] window, the setting to permit changing of L-Platform settings must be enabled. Refer to"8.5.1 Settings for Permissions to Change L-Platform Templates" in the "Operation Guide CE" for details.
- Permissions of VDI user name settings must be granted to enable specifying of the VDI connected user name. Refer to "8.5.14.2Settings for VDI User Names" in the "Operation Guide CE"for details.
M.1.3 CancellationUse the following procedure to cancel L-Platforms.
1. Open the [L-Platforms] tab from ROR Console and display the L-Platform.
2. Select [Management] from the operation menu on the L-Platform.
3. Select the L-Platform to be canceled on the [Management] and click [Details].
4. If the servers to be deleted are running, click [OFF] to turn off the power.
5. Click [Cancel] on the [L-Platform Details] window.
6. Ensure there are no mistakes in the [Confirming L-Platform] window and click [Next].
7. Check the [Cancel] checkbox on the [Terms of Cancellation] window and click [Cancel].
8. The [Complete] window will be displayed when cancellation of the L-Platform has been completed.
Refer to "5.3.14 Cancel an L-Platform" in the "User's Guide for Tenant Users CE" or "8.3.16 Cancel an L-Platform" in the "User's Guidefor Tenant Administrators CE"for details.
Note
The VDI management software does not assume the power supply operation to the VM guest under management excluding the VDImanagement software usually.
Therefore, even if the guest stopped beforehand of VM, it is likely to be started by the VDI management software.
For details, refer to the manual of the VDI management software.
The Canceling of L-Platform might fail with the following messages when virtual L-Server in L-Platform that is the object of the deletiona power supply is turning on by the VDI management software.
VSYS30001 Failed to delete L-Platform. [L-Platform ID:{0}][L-Platform Name:{1}][Detail:{2}]
Parameter
{0}: L-Platform ID
{1}: L-Platform Name
{2}: ROR(67391 deleting VM guest failed. detail=(message,vmerrno=104,ip=IPaddress))
In this case, neither L-Platform and virtual L-Server are deleted from the orchestration tree in the [Resource] tab though L-Platform isdeleted from the [L-Platforms] tab. Please delete it by the following procedures.
1. Turn off the power supply of virtual L-Server
a. Acquire L-Platform ID of L-Platform that failed from the event log of the [L-Platforms] tab.
b. Specify virtual L-Serverin L-Platform whose "Label" of basic information is concerned L-Platform ID from the orchestrationtree in the [Resource] tab.
- 454 -

c. Acquire the name of the guest of a virtual machine related to virtual L-Server of that from "Allocated Resource Information"in [Resource Details] tab of virtual L-server specified according to procedure b.
d. Specify a virtual machine from the name of the guest confirmed according to procedure c. with the server tree in the [Resource]tab.
e. Turn off the power supply of the virtual machine specified according to procedure d.
Or, the name of the guest of a virtual machine is displayed in the event log of procedure a.
It is also possible to turn off the power supply from VMware vCenter Server or VMware vSphere Client by using this name of theguest.
2. Delete L-Platform
Delete L-Platform and virtual L-Server by using the cfmg_deletelplatform command.
Acquire L-Platform ID from the above-mentioned message.
For details on the cfmg_deletelplatform command, refer to "10.1 cfmg_deletelplatform (Delete L-Platform)" in the "ReferenceGuide (Command/XML) CE"
M.1.4 Customizing the Completion Waiting Time for Guest OSsIt explains the customizing the completion waiting time for guest OSs.
It is necessary to participate in the Active Directory domain in the customizing processing of guest OS done by virtual L-Server makingin the VDI cooperation.
Therefore, to wait for the customizing end of processing to guest OS in this product, it meets 30 minutes as customizing completion waitingtime of guest OS in default.
It is changable in "Completion waiting time of guest OS customizing" in "M.1.1 Installation" - "Server virtualization software definitionfile" at the customizing completion waiting time of guest OS.
The completion waiting time is the time from the starting of virtual machines in step 2 of the following internal process.
The time that hangs to customizing of guest OS depends on the content and the performance etc. of the virtual machine.
Please change this completion waiting time when customizing is not completed, and waiting time is generated more than the necessity.
Please measure the time that hangs to customizing of guest OS according to the following procedures, and set the value in which theenvironmental condition of the performance etc. of VM is considered in addition when you change the completion waiting time.
1. The virtual machine is made on VMware with a template that becomes substance in VMware of the cloning image used by virtualL-Server making. Please assume and set information specified with this product to information for customizing of guest OS.
2. The made virtual machine is started.
3. The console is connected with the virtual machine.
4. Please observe the situation of customizing of guest OS, and measure time until completing.
Internal processing of virtual L-Server making of this product is described as follows.
1. The virtual machine is made on VMware.
2. The virtual machine is started on VMware.
Among guests OS, the customizing processing of guest OS is executed. (*)
Participation in the Active Directory domain necessary for the VDI cooperation is done in this customizing processing.
This product meets to wait for the customizing end of processing at fixed time.
The completion waiting time of default is 30 minutes.
- 455 -
3. The virtual machine is registered in VMware Horizon View.
After virtual L-Server creation processing is completed, customizing of guest OS might be executed when the above-mentioned completionwaiting time is short.
In that case, please wait for a while until customizing can be completed.
*Note: When guest OS is Windows, the generalization processing by Sysprep and initialization by the mini setup are done.
M.1.5 Advisory Notes for VMware Horizon View UsageThis appendix explains the advisory notes when VMware Horizon View is used.
Registration of user and group to Active Directory domain
The user and the group of desktop should be the domain users and be groups of the Active Directory domain. Create the domain user andthe group that uses desktop for the Active Directory domain beforehand.
Regarding the creation/configuration modification/deletion of L-Server which enables the VDI option
Please perform the operation (creation/configuration modification/deletion) in the L-Platform tab.
Power operations of servers during VDI coordination
It is not recommended to use measures other than the VDI management product to operate the power of a server for VDI coordination.
At least one of the servers of a VDI pool keeps running due to the specification of the VDI product. After stopping a server by using thisproduct or the VM management product, it may be started automatically by the VDI management product.
Installation and use the software to user's client PC
It is necessary to install Horizon View Client in desktop user's Windows client.
Refer to "Using VMware Horizon View Client for Windows" that the VMware Corporation offers for the installation method and use.
Failure of a desktop connection
There is a possibility that there is a problem in virtual machine, client PC, and the network setting when the user fails in the connectionto desktop from the client PC.Check the following cases:
- Case that infrastructure administrator confirms
It is necessary to install Horizon View Agent in a virtual machine so that the user may use desktop.Check Horizon View Agent is installed in a virtual machine.
- Case that user confirms
It is necessary to solve the host name of the VDI Management Server to establish the connection to desktop from user's client PC.Check the following settings on the client PC. Check with the infrastructure administrator when unsure of the set values.
- Setting of network and proxy
- Setting of firewall
- Setting of DNS reference
- 456 -

Updating VDI coordination parameters
When the VDI coordination parameters displayed on the ROR console have become incorrect due to modification of the settings withVMware Horizon View or other reasons, update the parameters using the following commands:
- The cfmg_deletevdiparams command
- The cfmg_updatevdiconnectinfo command
- The cfmg_updatevdiparams command
For details of the commands, refer to "10.4 cfmg_deletevdiparams (Delete VDI Coordination Parameters) [Windows Manager]", "10.9cfmg_updatevdiconnectinfo (Update VDI Management Server Connection Information) [Windows Manager]", and "10.10cfmg_updatevdiparams (Update VDI Coordination Parameters) [Windows Manager]" in the "Reference Guide (Command/XML) CE".
- 457 -
Related Documents