1 Setting up Ubuntu with VirtualBox Following is an install guide for setting up VirtualBox with Ubuntu 16.04.3 on your system. If you have problems, more detailed instruction and troubleshooting tips can be found on the Ubuntu site. 1. Download the version of VirtualBox (https://www.virtualbox.org/wiki/Downloads) for your machine (under “VirtualBox platform packages”, choose the host package that corresponds to your operating system (i.e. if you’re installing on Mac, choose the package “VirtualBox 5.2.0 for OS X hosts”, if you’re installing on Windows, choose the package “VirutalBox 5.2.0 for Windows Hosts ). 2. Download the 64 bit version of Ubuntu Linux 16.04.3 LTS (http://releases.ubuntu.com/releases/). 3. If your system has less than 2GB RAM select the 32 bit version 4. Run the VirtualBox-5.2.0-118431-Win.exe file and follow the Installer wizard

Welcome message from author
This document is posted to help you gain knowledge. Please leave a comment to let me know what you think about it! Share it to your friends and learn new things together.
Transcript

1
Setting up Ubuntu with VirtualBox
Following is an install guide for setting up VirtualBox with Ubuntu 16.04.3 on your system. If you have
problems, more detailed instruction and troubleshooting tips can be found on the Ubuntu site.
1. Download the version of VirtualBox (https://www.virtualbox.org/wiki/Downloads) for your
machine (under “VirtualBox platform packages”, choose the host package that corresponds to
your operating system (i.e. if you’re installing on Mac, choose the package “VirtualBox 5.2.0 for
OS X hosts”, if you’re installing on Windows, choose the package “VirutalBox 5.2.0 for
Windows Hosts ).
2. Download the 64 bit version of Ubuntu Linux 16.04.3 LTS
(http://releases.ubuntu.com/releases/).
3. If your system has less than 2GB RAM select the 32 bit version
4. Run the VirtualBox-5.2.0-118431-Win.exe file and follow the Installer wizard

2
5. After the installation, open the VirtualBox application 6. Select “New” from the application ribbon, choose a name for your system, and select Type:
Linux and Version Ubuntu (64bit). Remember to select Version: Ubuntu (64-bit)
7. Select the amount of memory for your virtual machine (If you have 4GB of RAM or more,
generally set this to 2048MB or half your system RAM, whichever is greater).

3
8. Select the “Create a virtual hard drive now” option: Note: your grayed area may say Empty
instead of Ubuntu as shown in the figure.

4
o Select the “VDI (VirtualBox Disk Image)” option for Hard disk File Type
o Select “Dynamically allocated” for Storage on physical hard disk

5
Select the starting drive size (it is recommended to allot at least 128GB). Note: you may be
unable to get exactly 128GB.
9. With your new instance selected, select start from the application ribbon.
6
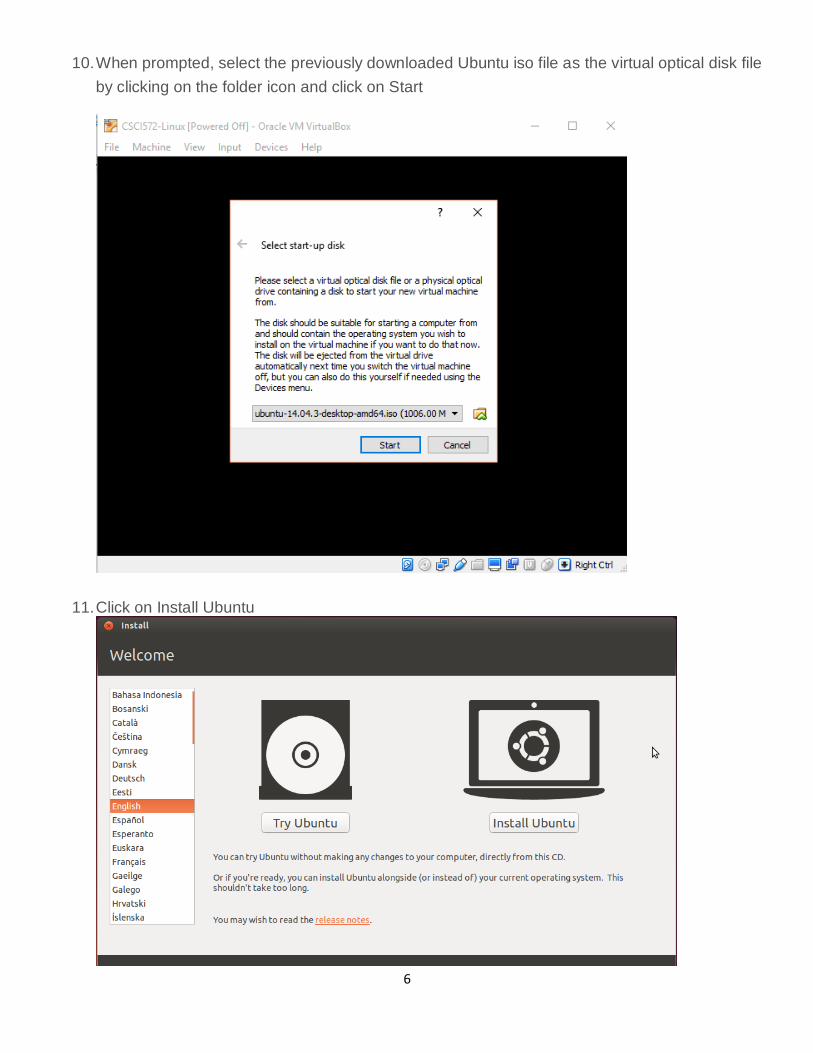
10. When prompted, select the previously downloaded Ubuntu iso file as the virtual optical disk file
by clicking on the folder icon and click on Start
11. Click on Install Ubuntu

7
Click on Continue and select Erase disk and install Ubuntu and click on Install Now. Messages
may appear indicating Auto capture of keyboard and mouse pointer. The messages can be
removed
12. Follow the prompts to install Ubuntu. Select Location and Language. Enter your username and
Password for the Ubuntu system. Select either Log in automatically if you want to log in without
password when the Ubuntu machine is started from VirtualBox

8
Ubuntu Installation will begin after you click on Continue. This will take a while, be patient.

9
13. After the installation, system will prompt you to restart the system.
14. Adding Guest Additions (extensions to help Ubuntu run better when virtualized).
1. After restarting your system, open a terminal and run "sudo apt-get install build-
essential module-assistant linux-headers-generic".
2. From the menu, select Devices > Insert Guest Additions CD Image.
3. Select "Run" when prompted and enter your password. You should see the following
screen if it is running successfully

10
Note: If you get an error “Unable to mount CD .. “, then follow these instructions
1. Install kernel headers and build tools
Virtualbox guest additions are compiled for the target system, so it needs the necessary kernel headers
and related programs. Install the following 2 packages.
$ sudo apt-get install build-essential module-assistant
Now run
$ sudo m-a prepare
Mount manually
If it does not mount by itself, then you can manually mount it. Find out the device using blkid and then use the
mount command to mount it somewhere in your home directory
# find out the device
$ sudo blkid
/dev/sr0: LABEL="VBOXADDITIONS_4.3.10_93012" TYPE="iso9660"

11
# Or use the lsblk command
$ sudo lsblk -o NAME,TYPE,SIZE,LABEL,MOUNTPOINT,MODEL
NAME TYPE SIZE LABEL MOUNTPOINT MODEL
sda disk 8G VBOX HARDDISK
├─sda1 part 6G /
├─sda2 part 1K
└─sda5 part 2G [SWAP]
sr0 rom 61.7M VBOXADDITIONS_4.3.10_93012 CD-ROM
Note down the device name which is "/dev/sr0" here. Next we have to mount this device (cdrom) to access the
contents.
# create directory to mount
$ mkdir cdrom
# mount the cd
$ sudo mount /dev/sr0 ~/cdrom/
[sudo] password for silver:
mount: block device /dev/sr0 is write-protected, mounting read-only
# get inside the mounted directory
$ cd cdrom/
~/cdrom$ ls
32Bit cert VBoxSolarisAdditions.pkg
64Bit OS2 VBoxWindowsAdditions-amd64.exe
AUTORUN.INF runasroot.sh VBoxWindowsAdditions.exe
autorun.sh VBoxLinuxAdditions.run VBoxWindowsAdditions-x86.exe
Start compiling
Navigate to the directory and run the script named VBoxLinuxAdditions.run
/media/silver/VBOXADDITIONS_4.3.10_93012$ ls
32Bit cert VBoxSolarisAdditions.pkg
64Bit OS2 VBoxWindowsAdditions-amd64.exe

12
AUTORUN.INF runasroot.sh VBoxWindowsAdditions.exe
autorun.sh VBoxLinuxAdditions.run VBoxWindowsAdditions-x86.exe
/media/silver/VBOXADDITIONS_4.3.10_93012$ sudo ./VBoxLinuxAdditions.run
[sudo] password for silver:
Verifying archive integrity... All good.
Uncompressing VirtualBox 4.3.10 Guest Additions for Linux............
VirtualBox Guest Additions installer
Copying additional installer modules ...
Installing additional modules ...
Removing existing VirtualBox DKMS kernel modules ...done.
Removing existing VirtualBox non-DKMS kernel modules ...done.
Building the VirtualBox Guest Additions kernel modules ...done.
Doing non-kernel setup of the Guest Additions ...done.
Starting the VirtualBox Guest Additions ...done.
Installing the Window System drivers
Installing X.Org Server 1.15 modules ...done.
Setting up the Window System to use the Guest Additions ...done.
You may need to restart the hal service and the Window System (or just restart
the guest system) to enable the Guest Additions.
Installing graphics libraries and desktop services components ...done.
Note the line
Building the VirtualBox Guest Additions kernel modules ...done.
If it shows done, then virtualbox guest additions are compiled successfully.
Now restart the guest OS.

13
3. Verify that guest additions are working
After rebooting the OS, the screen resolution of the guest OS should adjust with the window size of virtualbox.
Other things like mouse scroller, copy paste from guest to host should also work.
You can verify that the guest additions are loaded with the following command
# check loaded modules
$ lsmod | grep -io vboxguest
vboxguest
# check module
$ modinfo vboxguest
filename: /lib/modules/3.13.0-24-generic/updates/dkms/vboxguest.ko
version: 4.3.10
license: GPL
description: Oracle VM VirtualBox Guest Additions for Linux Module
author: Oracle Corporation
.....
$ lsmod | grep -io vboxguest | xargs modinfo | grep -iw version
version: 4.3.10
15. After installing guest additions, you can share folders across the guest and host OS, allowing
each of them to access each other's files. The folder exists on the host OS and is shared to the
guest OS. The guest may or may not be given the permission to write to the shared folder.
Click Devices > Shared folder settings on the VirtualBox window. Click the plus icon on the right side and select the directory from the host OS that you want to share with the guest OS. If you choose "Make permanent" it becomes a Machine folder, else it is a Transient folder. You also have the option to make it read only, so that the guest OS cannot make modifications to the folder.

14
16. Once you have specified the shared directory, it is time to mount it inside the guest OS. The
list of shared folders would show you the name and path of the shared directory. Note down
the name, and mount it using the following command 17. # create a directory in your home directory
18. $ mkdir shared
19.
20. # mount using the mount command. SHARENAME is the name of the shared directory
21. $ sudo mount -t vboxsf SHARENAME ~/shared
22.
23. # or
24. $ sudo mount.vboxsf SHARENAME ~/shared
Tips:
1. To enable copy-paste between guest and host:

15
2. Apache Solr runs on Java 8 or greater. You may use this document for instructions on how to
install java 8 in Ubuntu:
(Please make sure to download Java 8 jdk before proceeding to the tutorial) https://www.wikihow.com/Install-Oracle-Java-on-Ubuntu-Linux
Related Documents