Service & Support Answers for industry. Operating system update with WinCC flexible WinCC flexible FAQ y July 2009

Welcome message from author
This document is posted to help you gain knowledge. Please leave a comment to let me know what you think about it! Share it to your friends and learn new things together.
Transcript

Service & Support
Answers for industry.
Operating system update with WinCC flexible WinCC flexible
FAQ July 2009
Question
2 OS_Update_WinCC_flexible
V1.2, Entry ID: 19701610
This entry originates from the Service&Support Portal of Siemens AG, Sector Industry, Industry Automation and Drive Technologies. The conditions of use specified there apply (www.siemens.com/nutzungsbedingungen).
Go to the following link to download this document.
http://support.automation.siemens.com/WW/view/de/19701610
Question How do you do an operating system update (OS update) on operator panels with WinCC flexible?
Answer Follow the instructions and notes listed in this document for a detailed answer to the above question.

Contents
OS_Update_WinCC_flexible V1.2, Entry ID: 19701610 3
Contents 1 Operating system update with WinCC flexible ............................................ 4 1.1 Operating system update (OS update) ............................................................. 4 1.2 Resetting the operating system to the factory settings (booting) ...................... 6 1.3 Resetting the operating system to the factory settings via Ethernet connection8
2 Additional information ................................................................................. 12 2.1 Cable connection between PC and operator panel ........................................ 12 2.1.1 Operating system update................................................................................ 12 2.1.2 Resetting the operating system to the factory settings (booting) .................... 12 2.2 Set the image path / file in ProSave ............................................................... 14 2.3 Determining the MAC address........................................................................ 15
3 Problem Analysis.......................................................................................... 16 3.1 Disconnected connection when using the RS232/PPI multimaster cable....... 16 3.2 Check box not available in ProSave ............................................................... 16 3.3 Error message during the transfer of the configuration................................... 16 3.4 MP 377 "Reset to factory settings" (booting) .................................................. 16 3.5 A connection to the operator panel cannot be established............................. 17 3.5.1 Check transmission type and address on the operator panel......................... 17 3.5.2 Check cable connection and connector.......................................................... 18 3.5.3 Check the PG/PC interface on the configuration computer ............................ 19
4 History ........................................................................................................... 20
1 Operating system update with WinCC flexible
4 OS_Update_WinCC_flexible
V1.2, Entry ID: 19701610
1 Operating system update with WinCC flexible
Below is a summary of how to do an operating system update with WinCC flexible.
• The operating system of the operator panel depends on the version of WinCC flexible used. You should do any operating system update whenever the operating system of the operator panel does not match the software version used. Information on this is available in section 1.1.
• If no operable operator panel image exists on the operator panel, you can only update the operating system by means of a reset to factory settings. Information on this is available in section 1.2 and section 1.3.
• If you have questions on establishing the connection or problems with the operating system update, please refer to chapter 2 and chapter 3 respectively.
1.1 Operating system update (OS update)
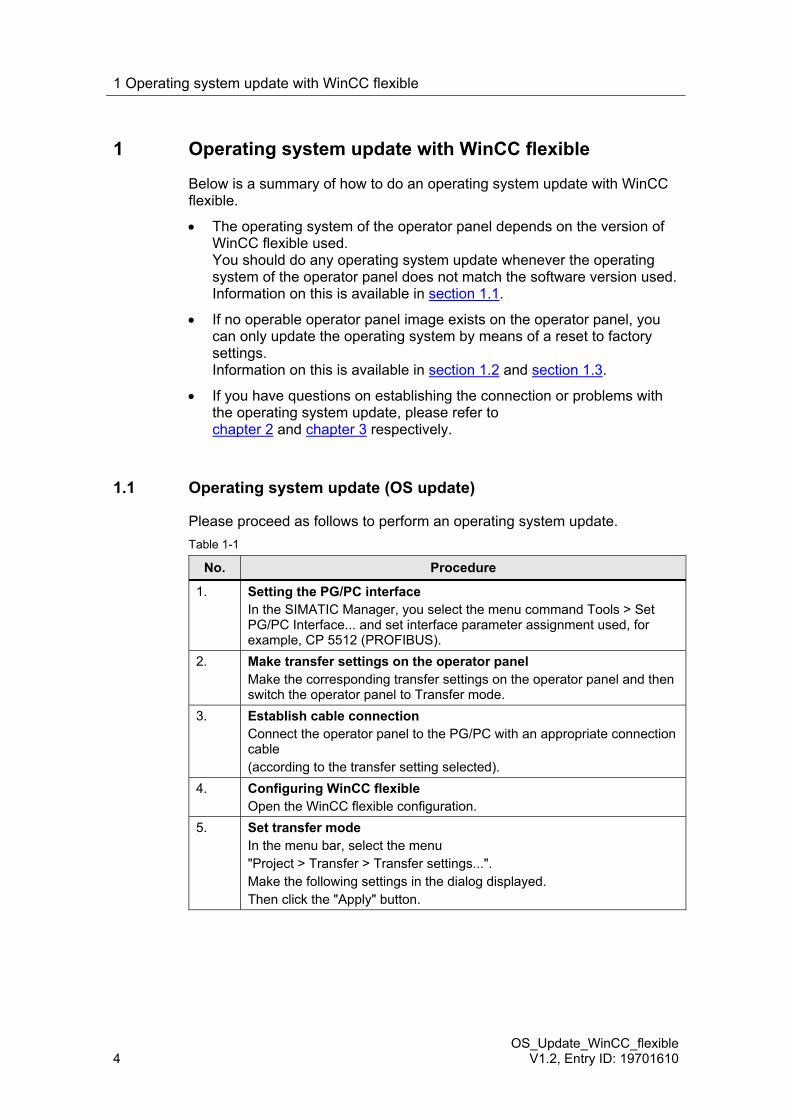
Please proceed as follows to perform an operating system update. Table 1-1
No. Procedure
1. Setting the PG/PC interface In the SIMATIC Manager, you select the menu command Tools > Set PG/PC Interface... and set interface parameter assignment used, for example, CP 5512 (PROFIBUS).
2. Make transfer settings on the operator panel Make the corresponding transfer settings on the operator panel and then switch the operator panel to Transfer mode.
3. Establish cable connection Connect the operator panel to the PG/PC with an appropriate connection cable (according to the transfer setting selected).
4. Configuring WinCC flexible Open the WinCC flexible configuration.
5. Set transfer mode In the menu bar, select the menu "Project > Transfer > Transfer settings...". Make the following settings in the dialog displayed. Then click the "Apply" button.
1 Operating system update with WinCC flexible
OS_Update_WinCC_flexible V1.2, Entry ID: 19701610 5
No. Procedure
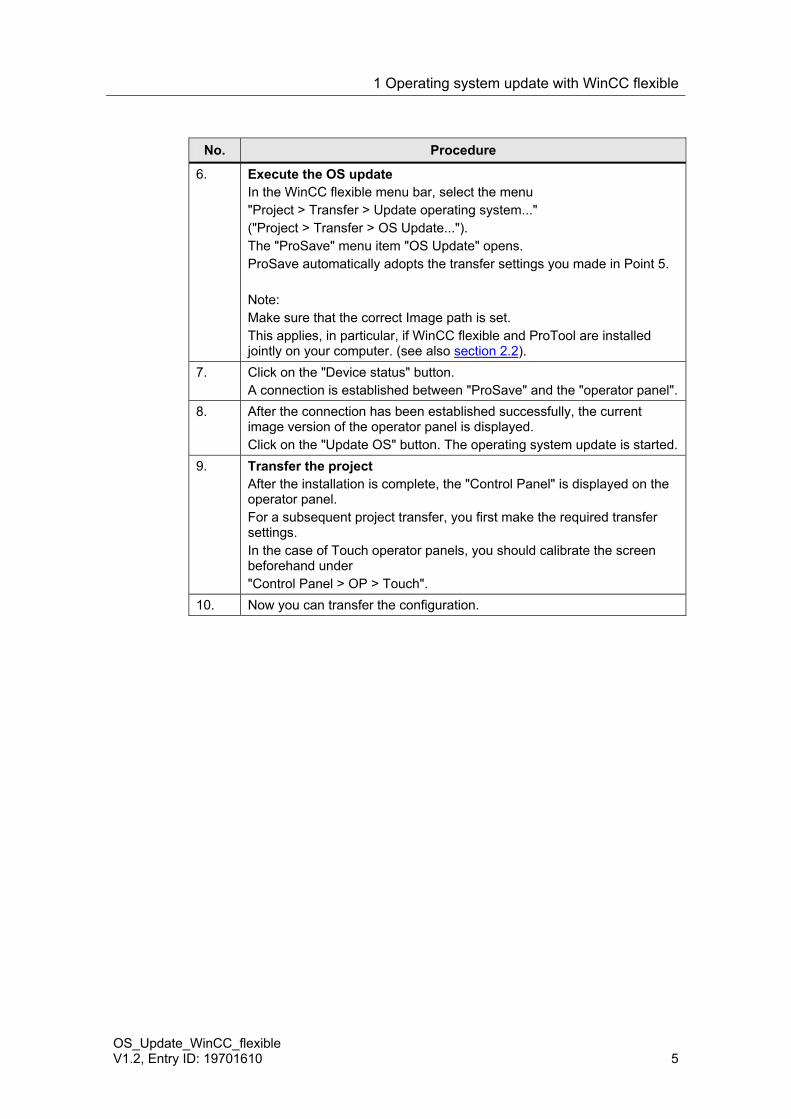
6. Execute the OS update In the WinCC flexible menu bar, select the menu "Project > Transfer > Update operating system..." ("Project > Transfer > OS Update..."). The "ProSave" menu item "OS Update" opens. ProSave automatically adopts the transfer settings you made in Point 5. Note: Make sure that the correct Image path is set. This applies, in particular, if WinCC flexible and ProTool are installed jointly on your computer. (see also section 2.2).
7. Click on the "Device status" button. A connection is established between "ProSave" and the "operator panel".
8. After the connection has been established successfully, the current image version of the operator panel is displayed. Click on the "Update OS" button. The operating system update is started.
9. Transfer the project After the installation is complete, the "Control Panel" is displayed on the operator panel. For a subsequent project transfer, you first make the required transfer settings. In the case of Touch operator panels, you should calibrate the screen beforehand under "Control Panel > OP > Touch".
10. Now you can transfer the configuration.
1 Operating system update with WinCC flexible
6 OS_Update_WinCC_flexible
V1.2, Entry ID: 19701610
1.2 Resetting the operating system to the factory settings (booting)
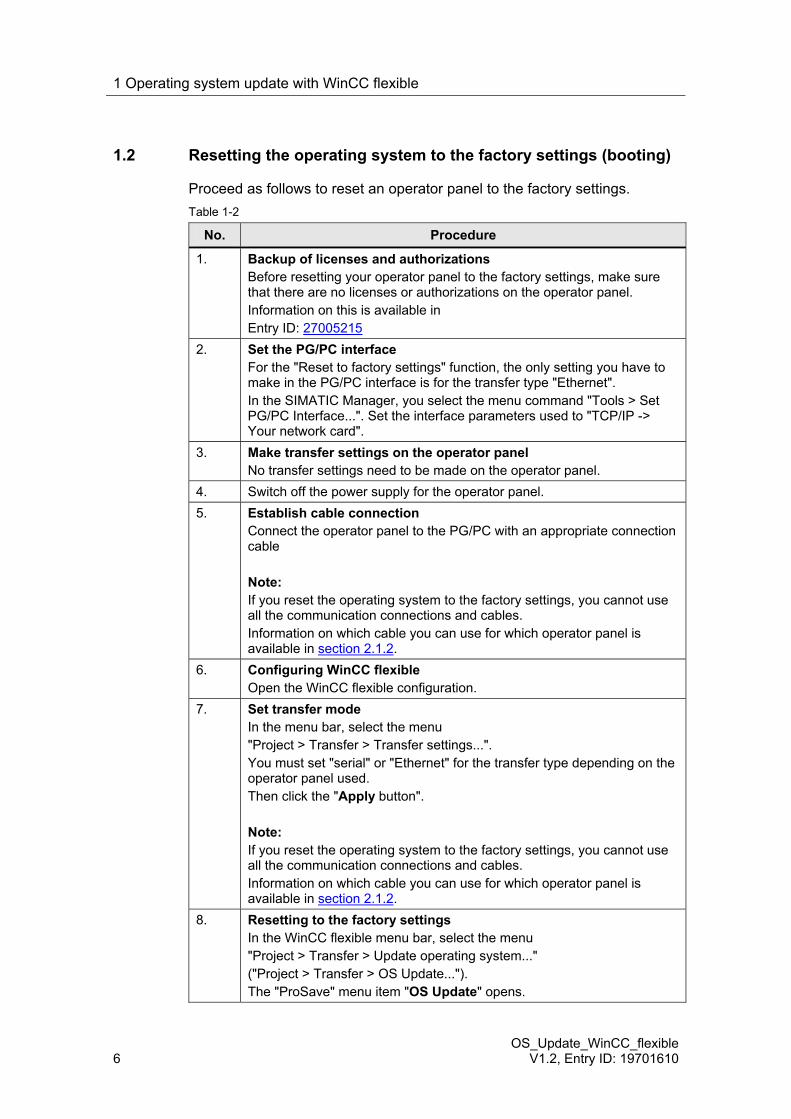
Proceed as follows to reset an operator panel to the factory settings. Table 1-2
No. Procedure
1. Backup of licenses and authorizations Before resetting your operator panel to the factory settings, make sure that there are no licenses or authorizations on the operator panel. Information on this is available in Entry ID: 27005215
2. Set the PG/PC interface For the "Reset to factory settings" function, the only setting you have to make in the PG/PC interface is for the transfer type "Ethernet". In the SIMATIC Manager, you select the menu command "Tools > Set PG/PC Interface...". Set the interface parameters used to "TCP/IP -> Your network card".
3. Make transfer settings on the operator panel No transfer settings need to be made on the operator panel.
4. Switch off the power supply for the operator panel. 5. Establish cable connection
Connect the operator panel to the PG/PC with an appropriate connection cable Note: If you reset the operating system to the factory settings, you cannot use all the communication connections and cables. Information on which cable you can use for which operator panel is available in section 2.1.2.
6. Configuring WinCC flexible Open the WinCC flexible configuration.
7. Set transfer mode In the menu bar, select the menu "Project > Transfer > Transfer settings...". You must set "serial" or "Ethernet" for the transfer type depending on the operator panel used. Then click the "Apply button". Note: If you reset the operating system to the factory settings, you cannot use all the communication connections and cables. Information on which cable you can use for which operator panel is available in section 2.1.2.
8. Resetting to the factory settings In the WinCC flexible menu bar, select the menu "Project > Transfer > Update operating system..." ("Project > Transfer > OS Update..."). The "ProSave" menu item "OS Update" opens.
1 Operating system update with WinCC flexible
OS_Update_WinCC_flexible V1.2, Entry ID: 19701610 7
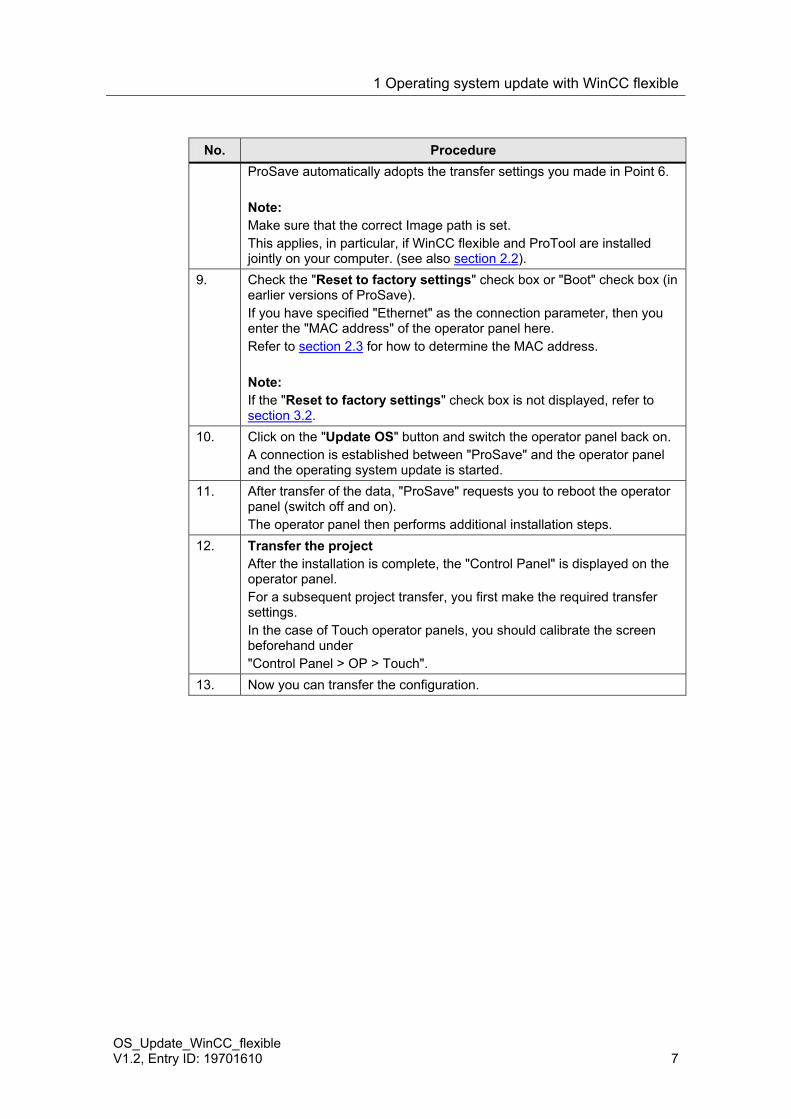
No. Procedure ProSave automatically adopts the transfer settings you made in Point 6. Note: Make sure that the correct Image path is set. This applies, in particular, if WinCC flexible and ProTool are installed jointly on your computer. (see also section 2.2).
9. Check the "Reset to factory settings" check box or "Boot" check box (in earlier versions of ProSave). If you have specified "Ethernet" as the connection parameter, then you enter the "MAC address" of the operator panel here. Refer to section 2.3 for how to determine the MAC address. Note: If the "Reset to factory settings" check box is not displayed, refer to section 3.2.
10. Click on the "Update OS" button and switch the operator panel back on. A connection is established between "ProSave" and the operator panel and the operating system update is started.
11. After transfer of the data, "ProSave" requests you to reboot the operator panel (switch off and on). The operator panel then performs additional installation steps.
12. Transfer the project After the installation is complete, the "Control Panel" is displayed on the operator panel. For a subsequent project transfer, you first make the required transfer settings. In the case of Touch operator panels, you should calibrate the screen beforehand under "Control Panel > OP > Touch".
13. Now you can transfer the configuration.
1 Operating system update with WinCC flexible
8 OS_Update_WinCC_flexible
V1.2, Entry ID: 19701610
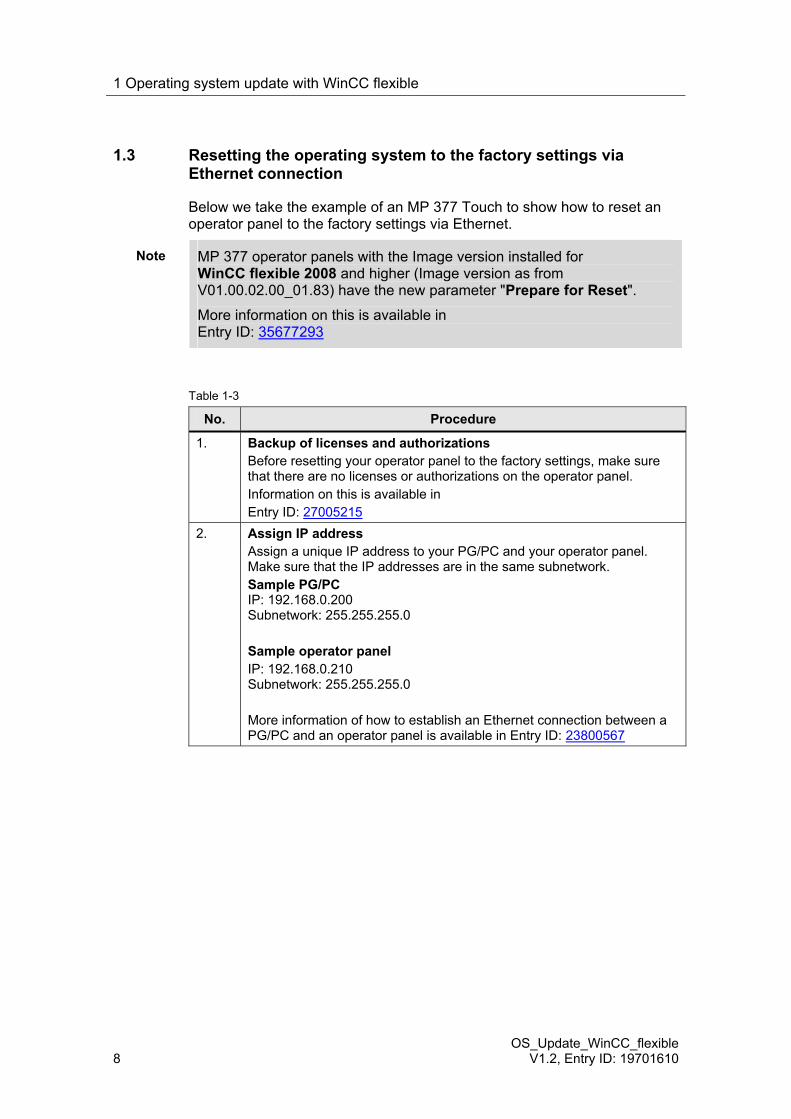
1.3 Resetting the operating system to the factory settings via Ethernet connection
Below we take the example of an MP 377 Touch to show how to reset an operator panel to the factory settings via Ethernet.
Note MP 377 operator panels with the Image version installed for WinCC flexible 2008 and higher (Image version as from V01.00.02.00_01.83) have the new parameter "Prepare for Reset". More information on this is available in Entry ID: 35677293
Table 1-3
No. Procedure
1. Backup of licenses and authorizations Before resetting your operator panel to the factory settings, make sure that there are no licenses or authorizations on the operator panel. Information on this is available in Entry ID: 27005215
2. Assign IP address Assign a unique IP address to your PG/PC and your operator panel. Make sure that the IP addresses are in the same subnetwork. Sample PG/PC IP: 192.168.0.200 Subnetwork: 255.255.255.0 Sample operator panel IP: 192.168.0.210 Subnetwork: 255.255.255.0 More information of how to establish an Ethernet connection between a PG/PC and an operator panel is available in Entry ID: 23800567
1 Operating system update with WinCC flexible
OS_Update_WinCC_flexible V1.2, Entry ID: 19701610 9
No. Procedure
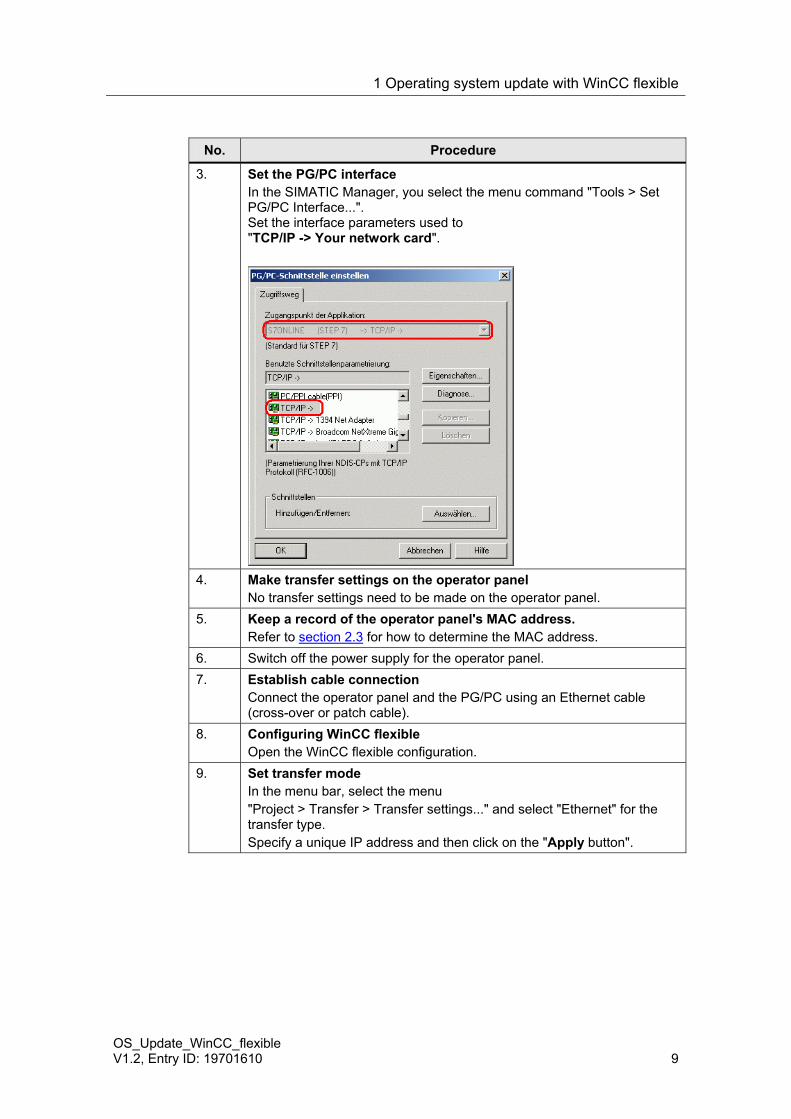
3. Set the PG/PC interface In the SIMATIC Manager, you select the menu command "Tools > Set PG/PC Interface...". Set the interface parameters used to "TCP/IP -> Your network card".
4. Make transfer settings on the operator panel
No transfer settings need to be made on the operator panel. 5. Keep a record of the operator panel's MAC address.
Refer to section 2.3 for how to determine the MAC address. 6. Switch off the power supply for the operator panel. 7. Establish cable connection
Connect the operator panel and the PG/PC using an Ethernet cable (cross-over or patch cable).
8. Configuring WinCC flexible Open the WinCC flexible configuration.
9. Set transfer mode In the menu bar, select the menu "Project > Transfer > Transfer settings..." and select "Ethernet" for the transfer type. Specify a unique IP address and then click on the "Apply button".

1 Operating system update with WinCC flexible
10 OS_Update_WinCC_flexible
V1.2, Entry ID: 19701610
No. Procedure
10. Resetting to the factory settings In the WinCC flexible menu bar, select the menu "Project > Transfer > Update operating system..." ("Project > Transfer > OS Update..."). The "ProSave" menu item "OS Update" opens. ProSave automatically adopts the transfer settings you made in Point 8. Note: Make sure that the correct Image path is set. This applies, in particular, if WinCC flexible and ProTool are installed jointly on your computer (see also section 2.2).
11. Check the "Reset to factory settings" check box or "Boot" check box (in earlier versions of ProSave). The "MAC address" option field is then displayed. Enter the operator panel's "MAC address" here. Note: If the "Reset to factory settings" check box is not displayed, refer to section 3.2.
Click on the "Update OS" button and switch the operator panel back on. A connection is established between "ProSave" and the operator panel.
1 Operating system update with WinCC flexible
OS_Update_WinCC_flexible V1.2, Entry ID: 19701610 11
No. Procedure
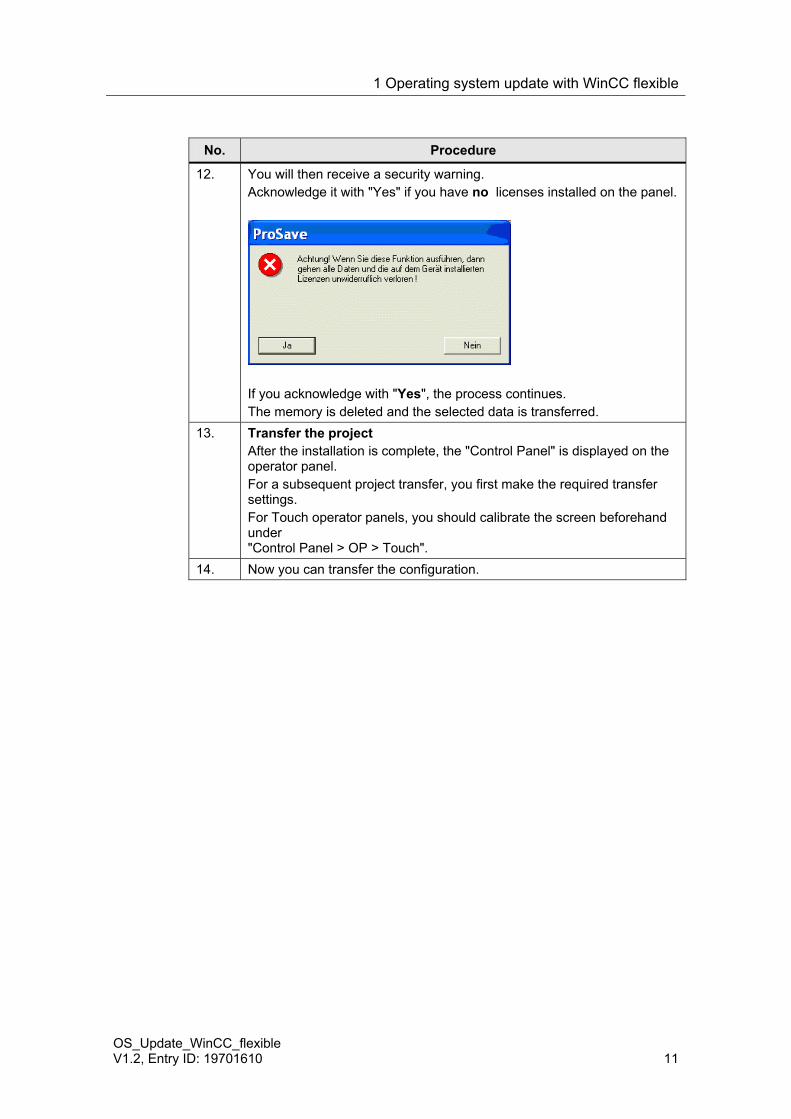
12. You will then receive a security warning. Acknowledge it with "Yes" if you have no licenses installed on the panel.
If you acknowledge with "Yes", the process continues. The memory is deleted and the selected data is transferred.
13. Transfer the project After the installation is complete, the "Control Panel" is displayed on the operator panel. For a subsequent project transfer, you first make the required transfer settings. For Touch operator panels, you should calibrate the screen beforehand under "Control Panel > OP > Touch".
14. Now you can transfer the configuration.
2 Additional information
12 OS_Update_WinCC_flexible
V1.2, Entry ID: 19701610
2 Additional information
2.1 Cable connection between PC and operator panel
2.1.1 Operating system update
When performing an operating system update, you can use all the communication connections supported by your operator panel.
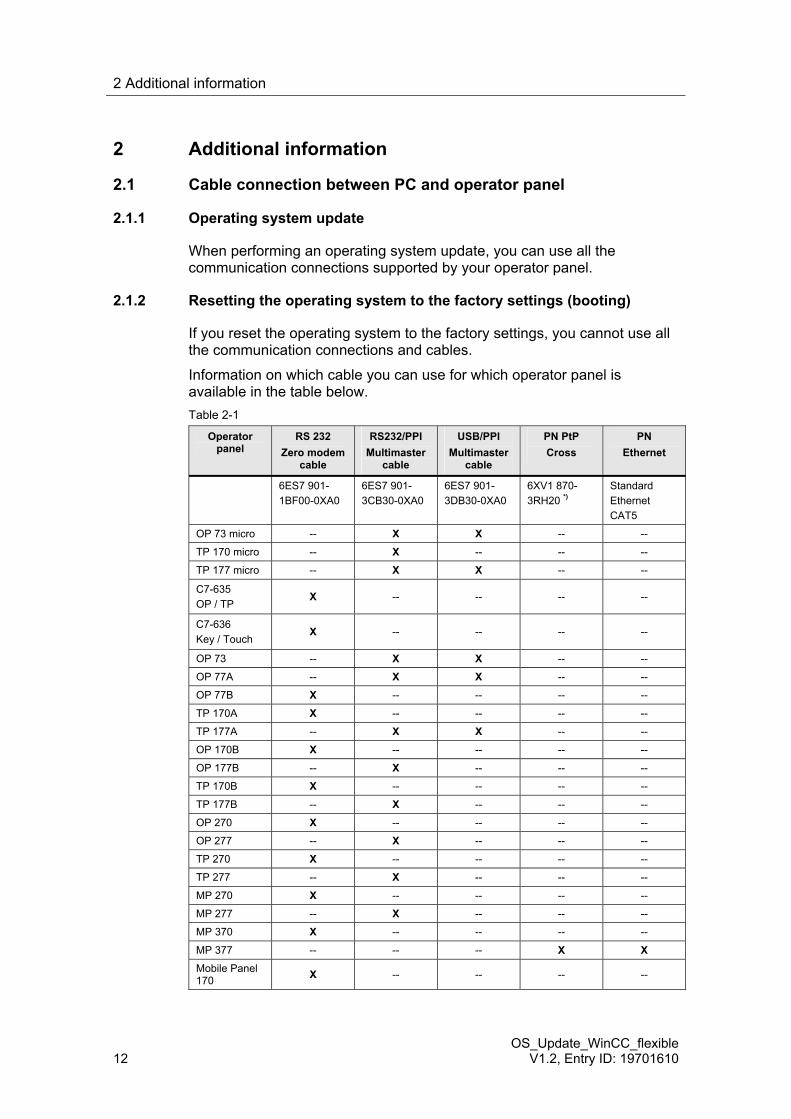
2.1.2 Resetting the operating system to the factory settings (booting)
If you reset the operating system to the factory settings, you cannot use all the communication connections and cables.
Information on which cable you can use for which operator panel is available in the table below. Table 2-1
Operator panel
RS 232 Zero modem
cable
RS232/PPI Multimaster
cable
USB/PPI Multimaster
cable
PN PtP Cross
PN Ethernet
6ES7 901- 1BF00-0XA0
6ES7 901- 3CB30-0XA0
6ES7 901- 3DB30-0XA0
6XV1 870- 3RH20 *)
Standard Ethernet CAT5
OP 73 micro -- X X -- --
TP 170 micro -- X -- -- --
TP 177 micro -- X X -- --
C7-635 OP / TP
X -- -- -- --
C7-636 Key / Touch
X -- -- -- --
OP 73 -- X X -- --
OP 77A -- X X -- --
OP 77B X -- -- -- --
TP 170A X -- -- -- --
TP 177A -- X X -- --
OP 170B X -- -- -- --
OP 177B -- X -- -- --
TP 170B X -- -- -- --
TP 177B -- X -- -- --
OP 270 X -- -- -- --
OP 277 -- X -- -- --
TP 270 X -- -- -- --
TP 277 -- X -- -- --
MP 270 X -- -- -- --
MP 277 -- X -- -- --
MP 370 X -- -- -- --
MP 377 -- -- -- X X
Mobile Panel 170 X -- -- -- --
2 Additional information
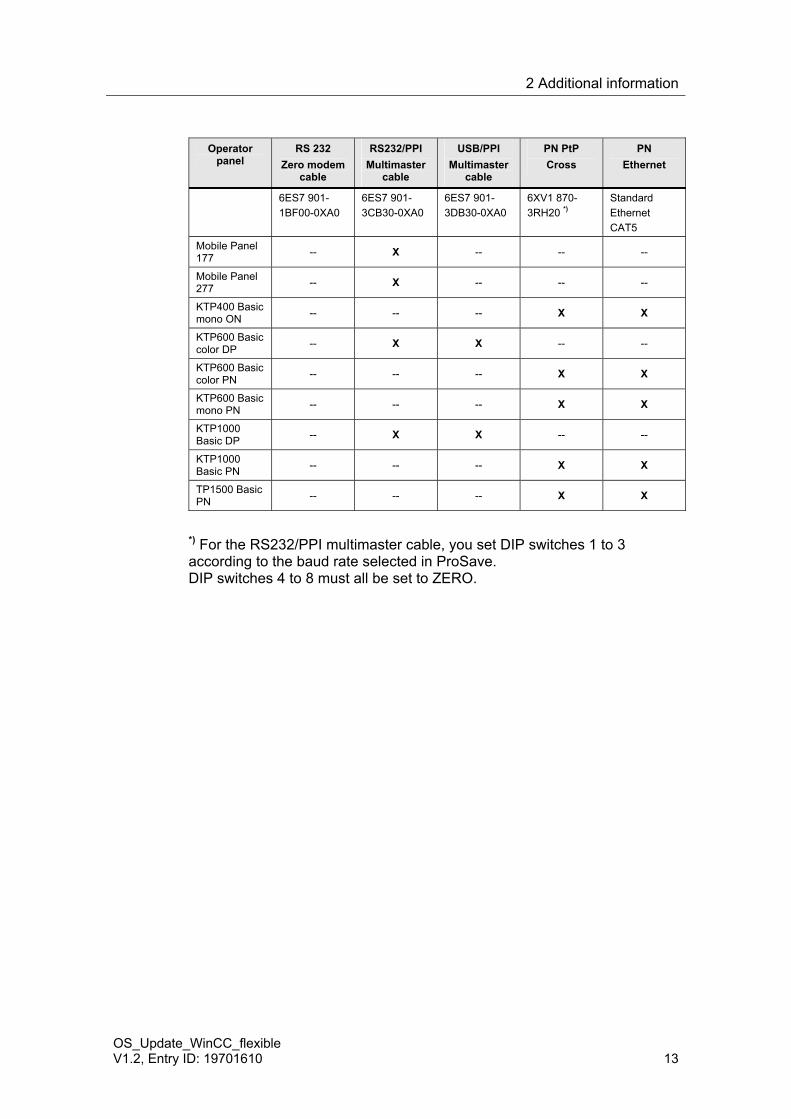
OS_Update_WinCC_flexible V1.2, Entry ID: 19701610 13
Operator panel
RS 232 Zero modem
cable
RS232/PPI Multimaster
cable
USB/PPI Multimaster
cable
PN PtP Cross
PN Ethernet
6ES7 901- 1BF00-0XA0
6ES7 901- 3CB30-0XA0
6ES7 901- 3DB30-0XA0
6XV1 870- 3RH20 *)
Standard Ethernet CAT5
Mobile Panel 177 -- X -- -- --
Mobile Panel 277 -- X -- -- --
KTP400 Basic mono ON -- -- -- X X
KTP600 Basic color DP -- X X -- --
KTP600 Basic color PN -- -- -- X X
KTP600 Basic mono PN -- -- -- X X
KTP1000 Basic DP -- X X -- --
KTP1000 Basic PN -- -- -- X X
TP1500 Basic PN -- -- -- X X
*) For the RS232/PPI multimaster cable, you set DIP switches 1 to 3 according to the baud rate selected in ProSave. DIP switches 4 to 8 must all be set to ZERO.
2 Additional information
14 OS_Update_WinCC_flexible
V1.2, Entry ID: 19701610
2.2 Set the image path / file in ProSave
In the following cases, you must change the image path or the image file accordingly:
1. After you have set the ProTool image path for the operator panel displayed, you must set the image path for WinCC flexible if you now wish to use the same operator panel in WinCC flexible.
2. If you need an earlier version of Image than the one currently displayed.
Notes: • The image path setting is device-related. The setting is retained for the selected panel type after ProSave is closed.
• Beforehand, make sure that the correct Image path is set. This applies, in particular, if WinCC flexible and ProTool are installed jointly on your computer.
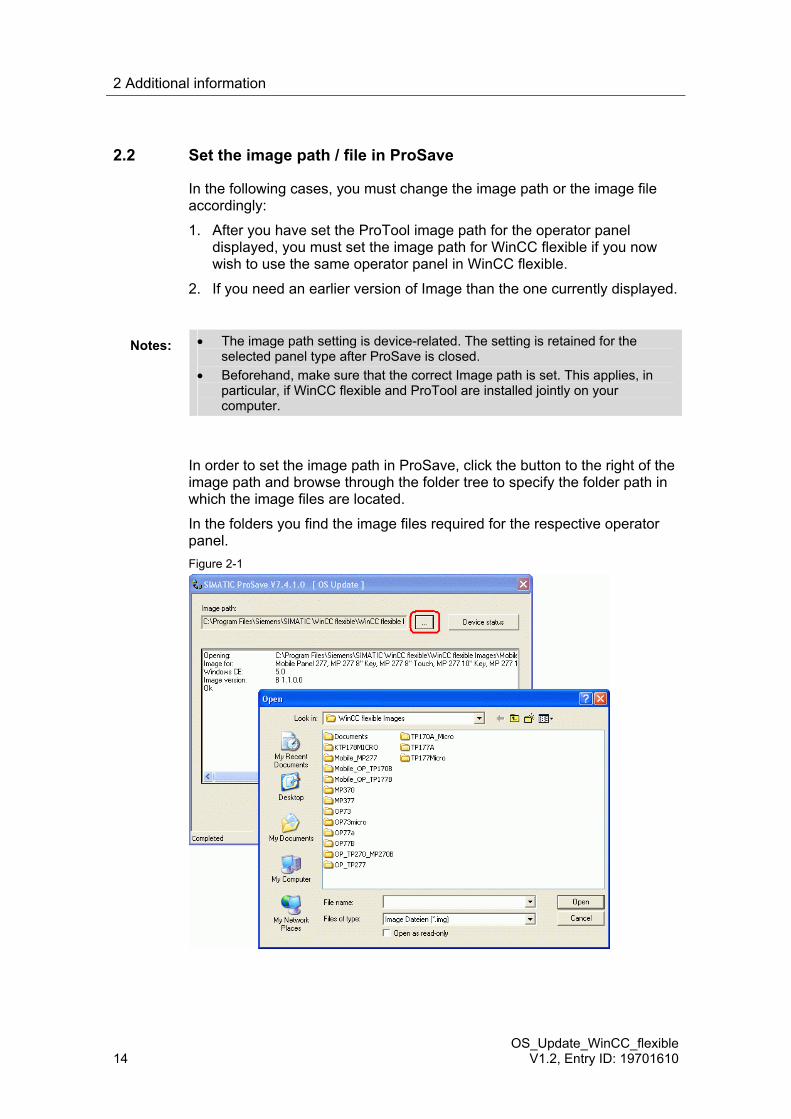
In order to set the image path in ProSave, click the button to the right of the image path and browse through the folder tree to specify the folder path in which the image files are located.
In the folders you find the image files required for the respective operator panel. Figure 2-1
2 Additional information
OS_Update_WinCC_flexible V1.2, Entry ID: 19701610 15
Sample image path in WinCC flexible C:\Program Files\Siemens\SIMATIC WinCC flexible\WinCC flexible Images\Operator panel...
Note The Image version of the operator panels depends on the version of WinCC flexible used.
More information on the interrelation between WinCC flexible and the version designations is available at the following link:
http://support.automation.siemens.com/WW/view/de/21742389
2.3 Determining the MAC address
Operator panels that use "Ethernet" as a connection for executing the "Reset to factory settings" function
need to have the MAC address specified in order to execute the function.
You can determine the operator panel's MAC address as follows.
• The MAC address is printed on the back of the operator panel (e.g. MAC-ADD.: 00-0E-8C-84-1F-87).
• When you switch on the operator panel, the MAC address is displayed during startup.
• Via the "Control Panel" of the operator panel. TP/OP/MP/Mobile Panel: Control Panel > OP > Device KTP/TP1500 Basic Panels: Control Panel > Profinet > Device
3 Problem Analysis
16 OS_Update_WinCC_flexible
V1.2, Entry ID: 19701610
3 Problem Analysis
3.1 Disconnected connection when using the RS232/PPI multimaster cable
If the connection is disconnected when updating the operating system, set a lower bit rate.
If you are using high bit rates, then you must implement the RS232/PPI multimaster cable with "E-Stand 03" (development status 03) or higher.
3.2 Check box not available in ProSave
If the check box "Reset to factory settings" is not displayed, then recheck the connection settings made in ProSave. It is possible that the operator panel does not support the transfer type required for this option.
Refer here to Table 2-1 in section 2.1.2.
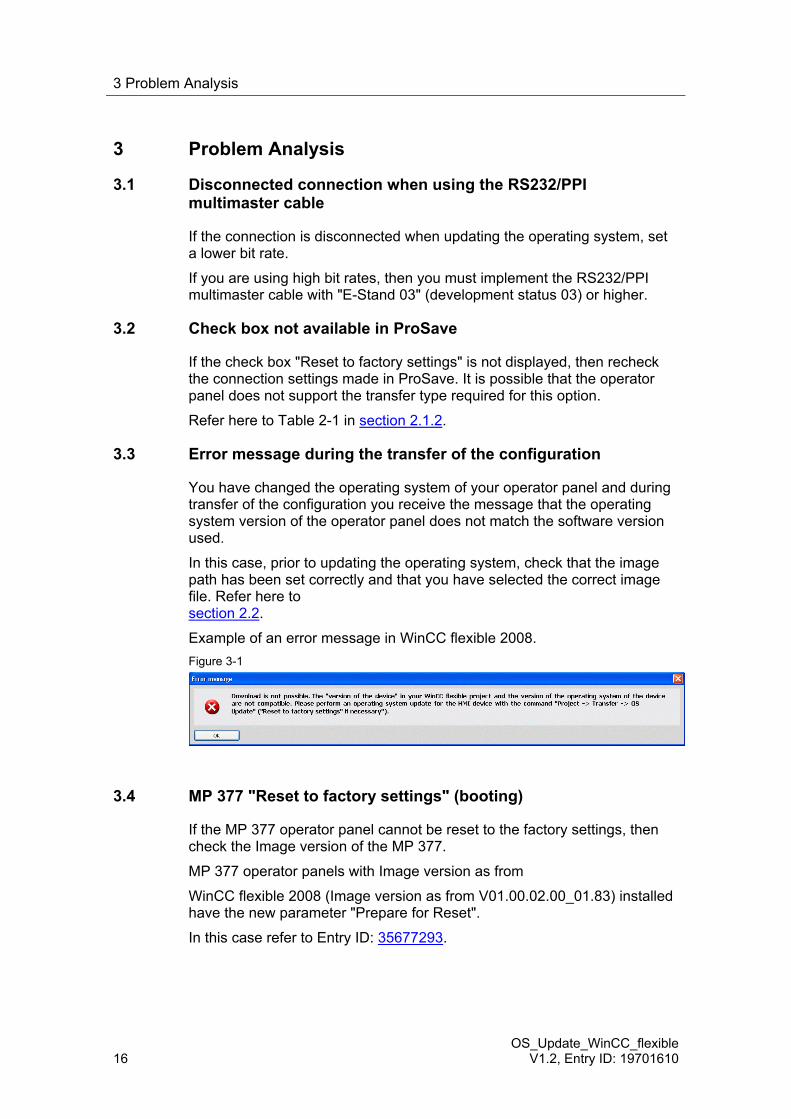
3.3 Error message during the transfer of the configuration
You have changed the operating system of your operator panel and during transfer of the configuration you receive the message that the operating system version of the operator panel does not match the software version used.
In this case, prior to updating the operating system, check that the image path has been set correctly and that you have selected the correct image file. Refer here to section 2.2.
Example of an error message in WinCC flexible 2008. Figure 3-1
3.4 MP 377 "Reset to factory settings" (booting)
If the MP 377 operator panel cannot be reset to the factory settings, then check the Image version of the MP 377.
MP 377 operator panels with Image version as from
WinCC flexible 2008 (Image version as from V01.00.02.00_01.83) installed have the new parameter "Prepare for Reset".
In this case refer to Entry ID: 35677293.
3 Problem Analysis
OS_Update_WinCC_flexible V1.2, Entry ID: 19701610 17
3.5 A connection to the operator panel cannot be established
Some points are given below, which you should check if no connection is established between the operator panel and the configuration computer.
3.5.1 Check transmission type and address on the operator panel
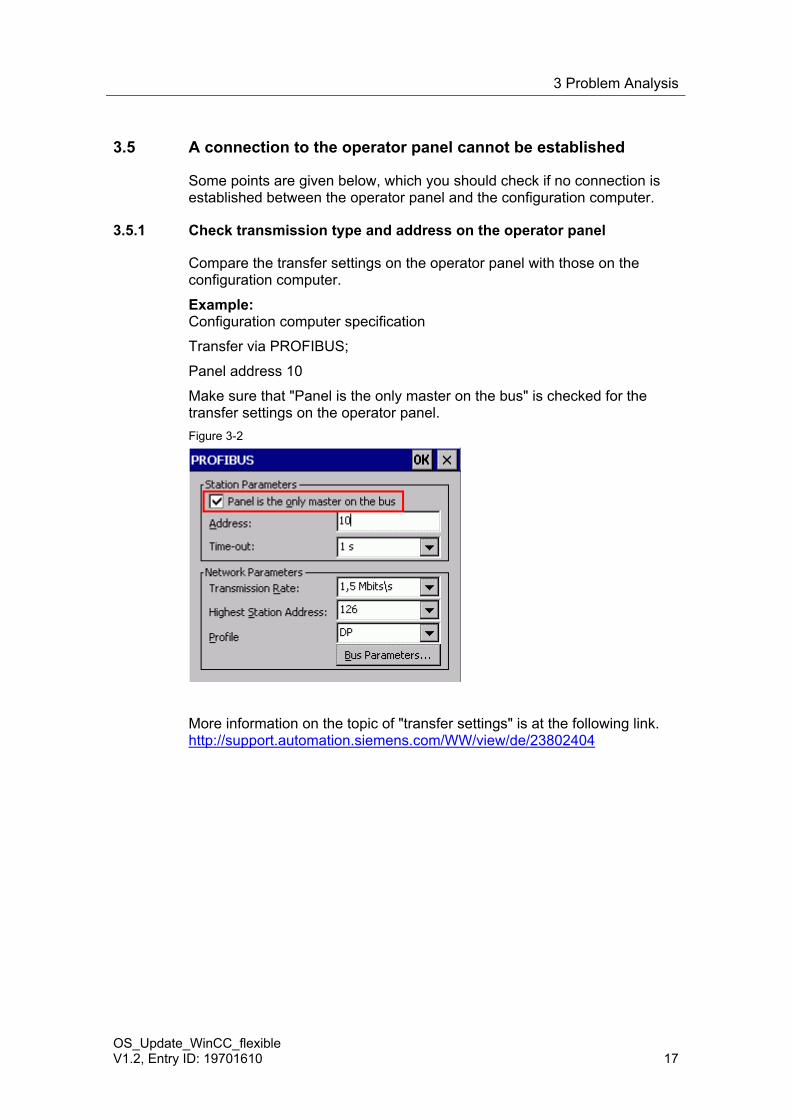
Compare the transfer settings on the operator panel with those on the configuration computer.
Example: Configuration computer specification
Transfer via PROFIBUS;
Panel address 10
Make sure that "Panel is the only master on the bus" is checked for the transfer settings on the operator panel. Figure 3-2
More information on the topic of "transfer settings" is at the following link. http://support.automation.siemens.com/WW/view/de/23802404
3 Problem Analysis
18 OS_Update_WinCC_flexible
V1.2, Entry ID: 19701610
3.5.2 Check cable connection and connector
MPI/PROFIBUS cable Please check the following points:
• Cable connection between the operator panel and the configuration computer.
• Check the cable for damage.
• Bus connector especially the connection of the terminating resistors.
– Terminating resistors ON/OFF.
The following guideline value applies:
• Bus terminating resistor OFF:
– Bus connector with "two" cables connected.
• Bus terminating resistor ON:
– Bus connector with "one" cable connected.
More information on the topic of "bus terminating resistors" is available at the following link. http://support.automation.siemens.com/WW/view/de/187276
RS232/PPI multimaster cable When using an RS232/PPI multimaster cable, please note the switch settings.
Refer here to the entry at the following link: http://support.automation.siemens.com/WW/view/de/16532946
Ethernet cable Use a "crossed" Ethernet cable for the connection between a PG/PC and an operator panel.
If you use a "patch" cable, you need a switch in addition.
3 Problem Analysis
OS_Update_WinCC_flexible V1.2, Entry ID: 19701610 19
3.5.3 Check the PG/PC interface on the configuration computer
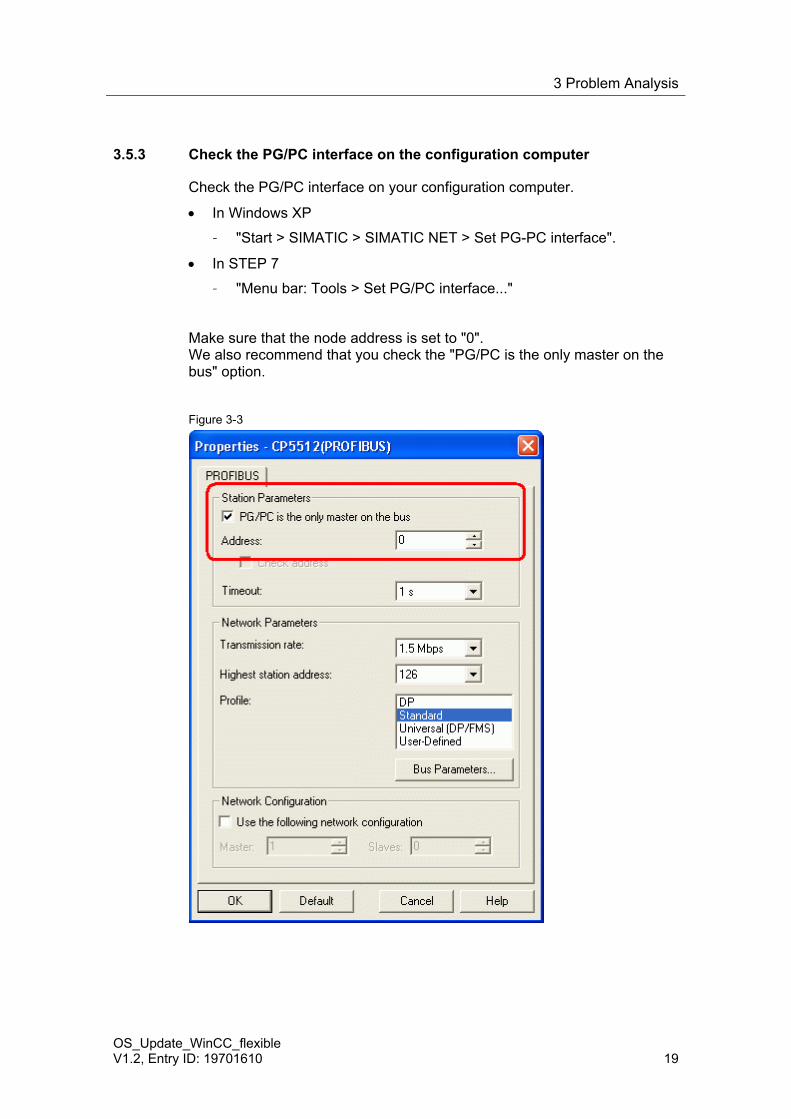
Check the PG/PC interface on your configuration computer.
• In Windows XP
– "Start > SIMATIC > SIMATIC NET > Set PG-PC interface".
• In STEP 7
– "Menu bar: Tools > Set PG/PC interface..."
Make sure that the node address is set to "0". We also recommend that you check the "PG/PC is the only master on the bus" option.
Figure 3-3

4 History
20 OS_Update_WinCC_flexible
V1.2, Entry ID: 19701610
4 History Table 4-1
Version Date Amendments
V1.0 20.09.2008 First edition V1.1 07.01.2009 Addition inserted V1.2 09.07.2009 Additions to MP 377 and KTPs inserted.
Tables changed.
Related Documents