GB Service Manual Aqualtis - 2005 Edition 2005.07.06 Language English DRAFT SERVICE MANUAL Washing Machine 2005 Aqualtis SERVICE MANUAL Washing Machine 2005 Aqualtis All the parts included in this document are the property of Indesit Company S.p.A. All rights reserved. This document and the information it contains are supplied without liability for possi- ble errors or omissions; no part of this document can be reproduced, used or copied without written permission or without being authorised by the terms of a contract clause.

Welcome message from author
This document is posted to help you gain knowledge. Please leave a comment to let me know what you think about it! Share it to your friends and learn new things together.
Transcript

GB
Service ManualAqualtis - 2005
Edition2005.07.06
LanguageEnglish
DRAFT
SERVICE MANUAL
Washing Machine 2005Aqualtis
SERVICE MANUAL
Washing Machine 2005Aqualtis
All the parts included in this document are the property of Indesit Company S.p.A.
All rights reserved. This document and the information it contains are supplied without liability for possi-ble errors or omissions; no part of this document can be reproduced, used or copied without writtenpermission or without being authorised by the terms of a contract clause.

2
Service ManualAqualtis - 2005
Edition2005.07.06
GB
LanguageEnglish
CONTENTS OF THE MANUAL: NOTE FOR THE ENGINEERThis manual is a supporting document for technical personnel. It contains a description of the variousproduct types, the general operating principle, and indications concerning assistance.
Technical personnel should anyway consult the specific model on(servicenet.indesitcompany.com) to access data and updates of electrical diagrams, technical bul-letins, and spare parts.
3
Service ManualAqualtis - 2005
Edition2005.07.06
GB
LanguageEnglish
CONTENTS
1. PRODUCT TYPE 4-7Legend 4Interfaces 5Technical features 6Energy Label 7
2. OPERATING LOGIC 8-14Product features 8-10Explanations on Setting & Functioning 11-12Programs 13-14
3. COMPONENTS 15-17
4. WIRING DIAGRAMS 18-19
5. TECHNICAL ASSISTANCE 20-28Demo Mode 20Auto Test (Testing / Running-in) 20Auto Test sequence 20Fault & Solutions 21-23Doctor 24Trouble Shooting 24-25Assembly/Disassembly 26-28
6. EXPLODED VIEW 29-33
7. APPENDIX 31-41Wash data table 34Programs diagrams 35-47

TY
PE
4
Service ManualAqualtis - 2005
Edition2005.07.06
GB
LanguageEnglish
1. TYPOLOGY OF PRODUCT:
1.1. LEGEND:
A Q L 8 9 H1st letter 2nd letter 3rd letter 4th letter 1st&2nd Number 3rd Number 4th letter 5th letterBrand Product line Type user interface Max Spin Speed Specs height ColourA=Ariston Q=washing machine blank= standard 6kg L= led 4 = 400 8/9=SILENT h: 100cm high S = Silver
QM=washerdryer x= maxi 7,5kg F=lcd/digit 5 = 500 3=2 Function button blank = std blank = WhiteS = Slim D= DISPLAY 16 = 1600 4=3 function button 5=with delay timer
ExampleAQL 89H Ariston led WM; 800rpm;triphase motor; 100CM
TY
PE
5
Service ManualAqualtis - 2005
Edition2005.07.06
GB
LanguageEnglish
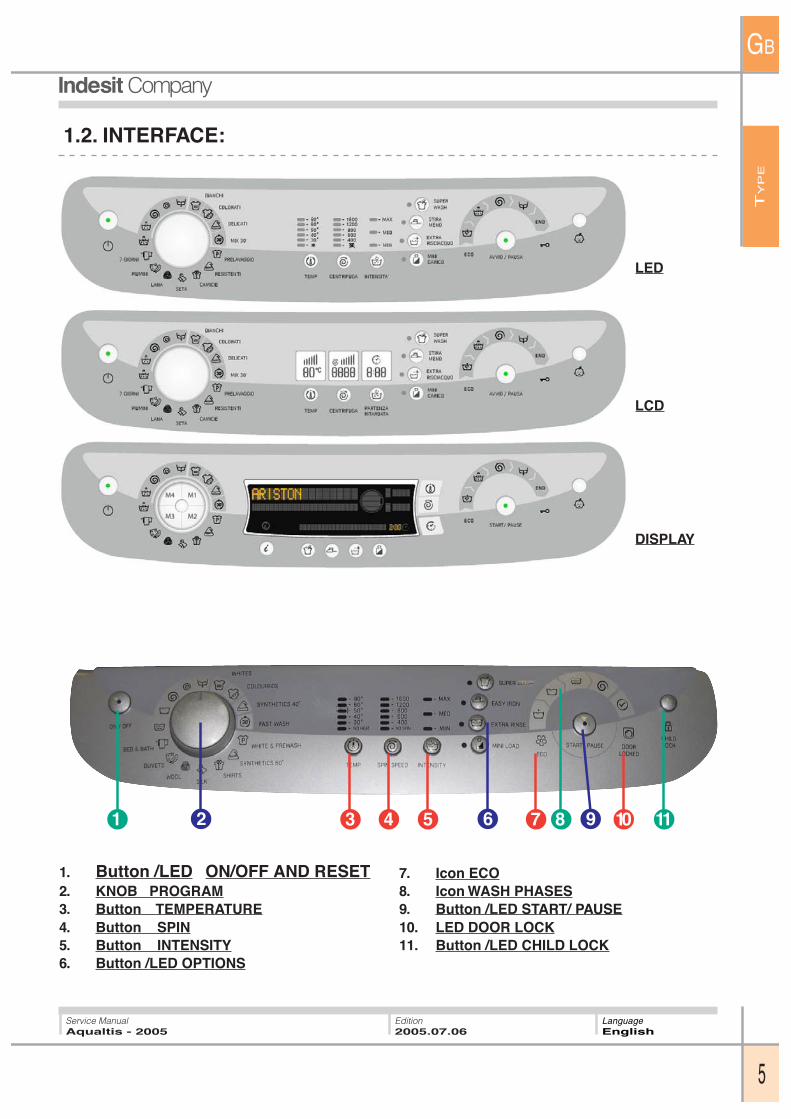
1.2. INTERFACE:
31 4 52 6 87 9 1110
1. Button /LED ON/OFF AND RESET2. KNOB PROGRAM3. Button TEMPERATURE4. Button SPIN5. Button INTENSITY6. Button /LED OPTIONS
7. Icon ECO8. Icon WASH PHASES9. Button /LED START/ PAUSE10. LED DOOR LOCK11. Button /LED CHILD LOCK
LED
LCD
DISPLAY
TY
PE
6
Service ManualAqualtis - 2005
Edition2005.07.06
GB
LanguageEnglish
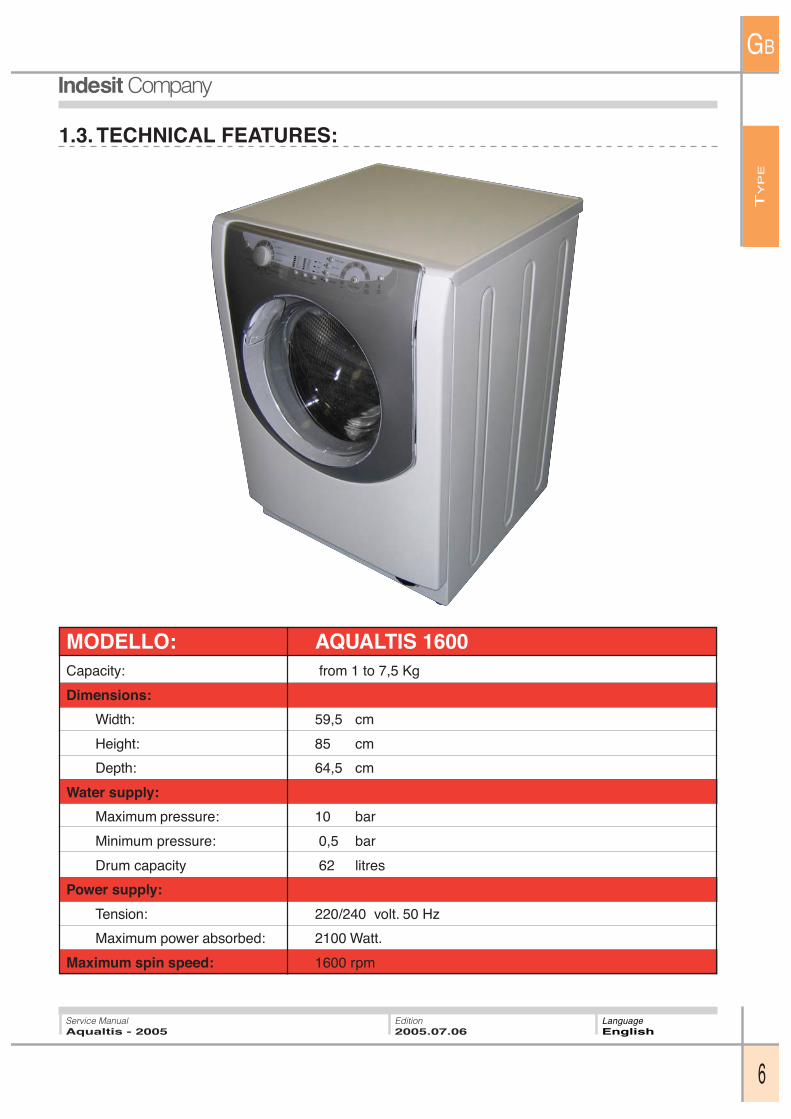
1.3. TECHNICAL FEATURES:
MODELLO: AQUALTIS 1600Capacity: from 1 to 7,5 Kg
Dimensions:
Width: 59,5 cm
Height: 85 cm
Depth: 64,5 cm
Water supply:
Maximum pressure: 10 bar
Minimum pressure: 0,5 bar
Drum capacity 62 litres
Power supply:
Tension: 220/240 volt. 50 Hz
Maximum power absorbed: 2100 Watt.
Maximum spin speed: 1600 rpm
TY
PE
7
Service ManualAqualtis - 2005
Edition2005.07.06
GB
LanguageEnglish
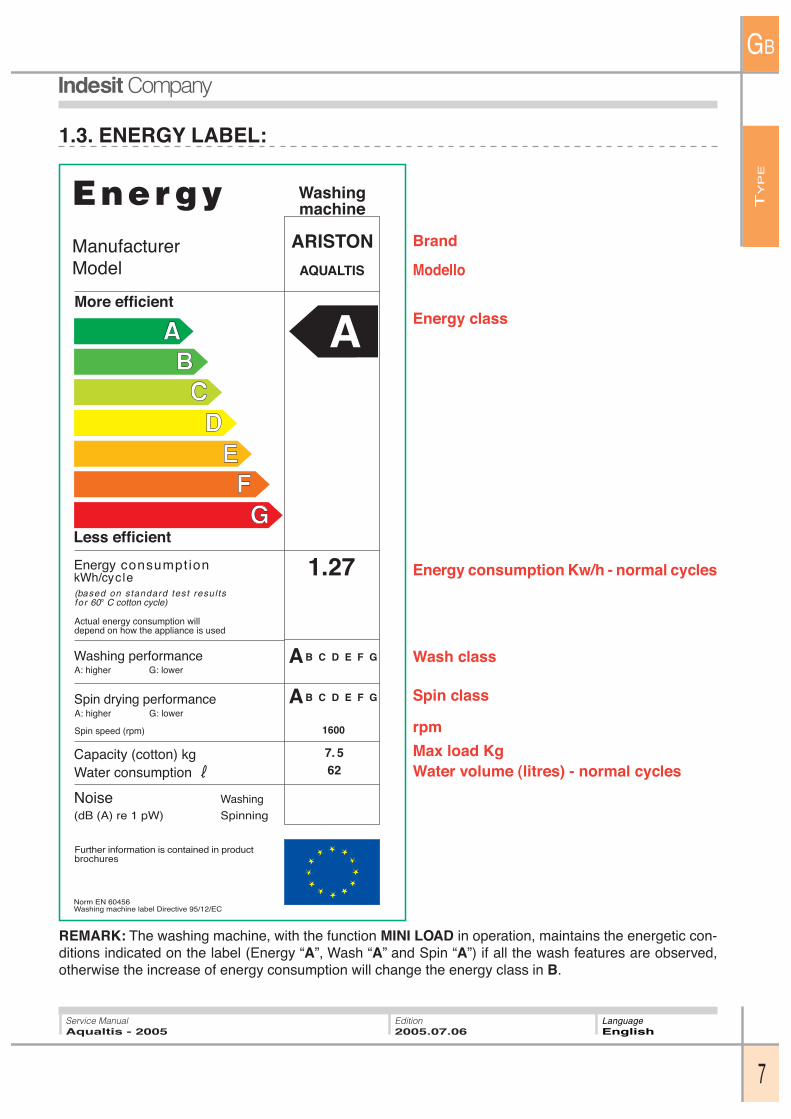
1.3. ENERGY LABEL:
REMARK: The washing machine, with the function MINI LOAD in operation, maintains the energetic con-ditions indicated on the label (Energy “A”, Wash “A” and Spin “A”) if all the wash features are observed,otherwise the increase of energy consumption will change the energy class in B.
EnergyManufacturerModel
Washingmachine
More efficient
Less efficient
Energy consumptionkWh/cycle(based on standard test resul tsfor 60° C cotton cycle)
Actual energy consumption willdepend on how the appliance is used
Washing performanceA: higher G: lower
Spin drying performanceA: higher G: lower
Spin speed (rpm)
Capacity (cotton) kgWater consumption
Noise Washing
(dB (A) re 1 pW) Spinning
Further information is contained in productbrochures
Norm EN 60456Washing machine label Directive 95/12/EC
AQUALTIS
1600
7. 562
B C D E F GA
1.27
A
ARISTON
B C D E F GA
Brand
Modello
Energy class
Energy consumption Kw/h - normal cycles
Wash class
Spin class
rpm
Max load KgWater volume (litres) - normal cycles
OP
ER
AT
ION
8
Service ManualAqualtis - 2005
Edition2005.07.06
GB
LanguageEnglish
2. FUNCTIONING:
2.1. PRODUCT FEATURES AND TECHNOLOGICAL INNOVATIONS:
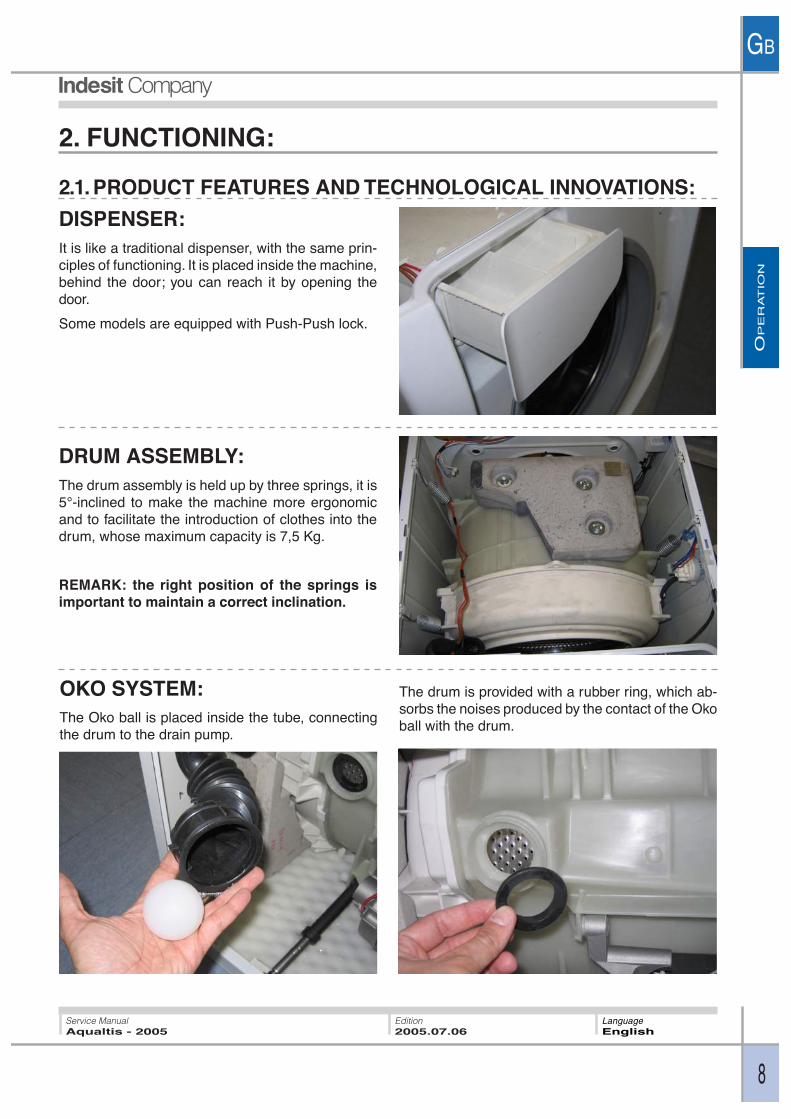
DRUM ASSEMBLY:The drum assembly is held up by three springs, it is5°-inclined to make the machine more ergonomicand to facilitate the introduction of clothes into thedrum, whose maximum capacity is 7,5 Kg.
REMARK: the right position of the springs isimportant to maintain a correct inclination.
DISPENSER:It is like a traditional dispenser, with the same prin-ciples of functioning. It is placed inside the machine,behind the door; you can reach it by opening thedoor.
Some models are equipped with Push-Push lock.
OKO SYSTEM:The Oko ball is placed inside the tube, connectingthe drum to the drain pump.
The drum is provided with a rubber ring, which ab-sorbs the noises produced by the contact of the Okoball with the drum.
OP
ER
AT
ION
9
Service ManualAqualtis - 2005
Edition2005.07.06
GB
LanguageEnglish
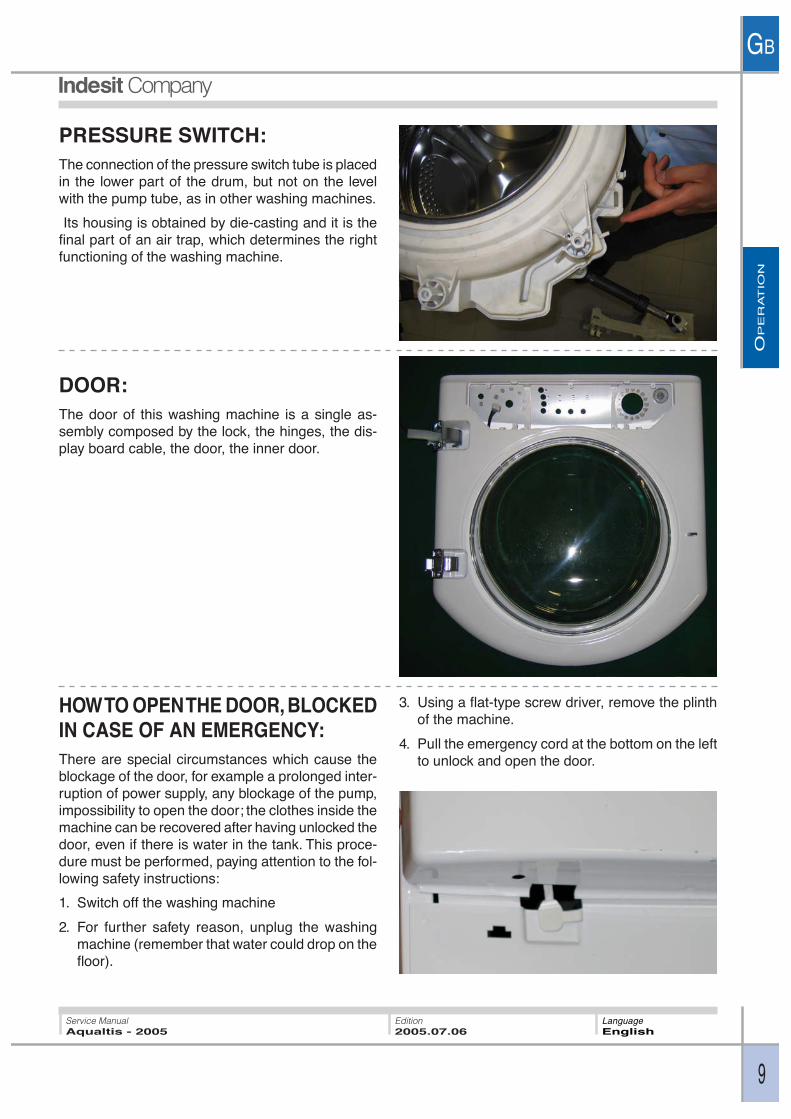
PRESSURE SWITCH:The connection of the pressure switch tube is placedin the lower part of the drum, but not on the levelwith the pump tube, as in other washing machines.
Its housing is obtained by die-casting and it is thefinal part of an air trap, which determines the rightfunctioning of the washing machine.
HOW TO OPEN THE DOOR, BLOCKEDIN CASE OF AN EMERGENCY:There are special circumstances which cause theblockage of the door, for example a prolonged inter-ruption of power supply, any blockage of the pump,impossibility to open the door; the clothes inside themachine can be recovered after having unlocked thedoor, even if there is water in the tank. This proce-dure must be performed, paying attention to the fol-lowing safety instructions:
1. Switch off the washing machine
2. For further safety reason, unplug the washingmachine (remember that water could drop on thefloor).
3. Using a flat-type screw driver, remove the plinthof the machine.
4. Pull the emergency cord at the bottom on the leftto unlock and open the door.
DOOR:The door of this washing machine is a single as-sembly composed by the lock, the hinges, the dis-play board cable, the door, the inner door.
OP
ER
AT
ION
10
Service ManualAqualtis - 2005
Edition2005.07.06
GB
LanguageEnglish
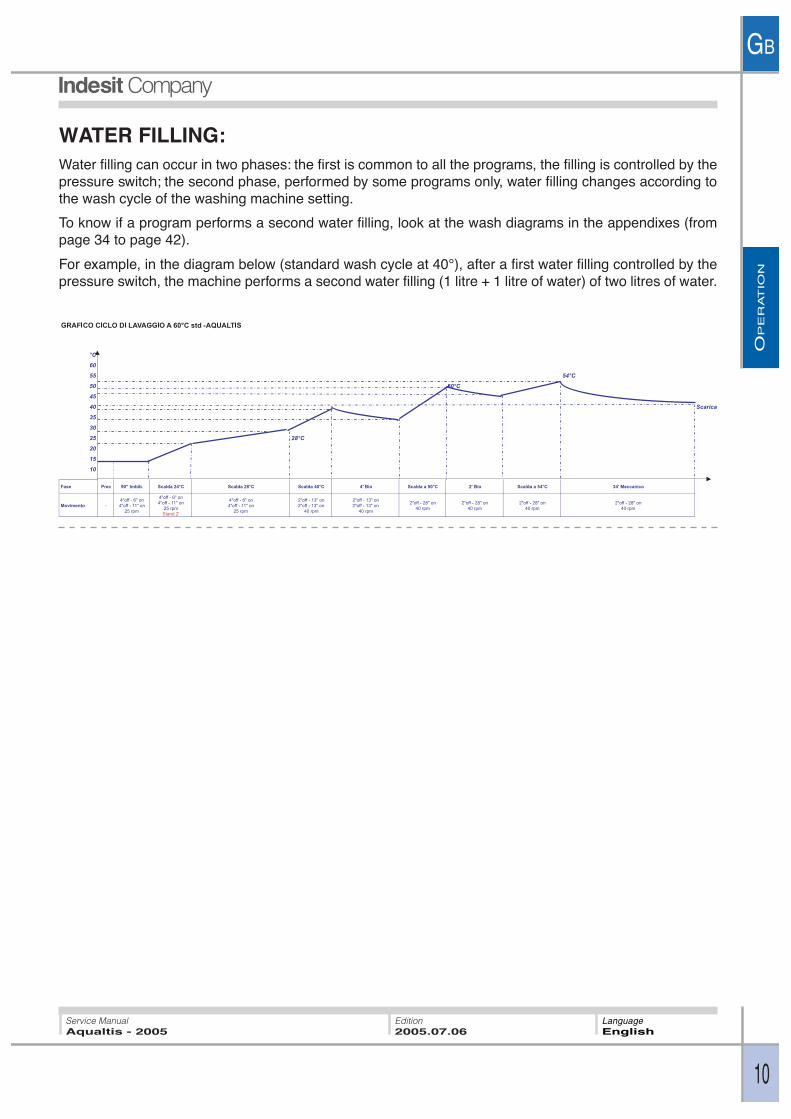
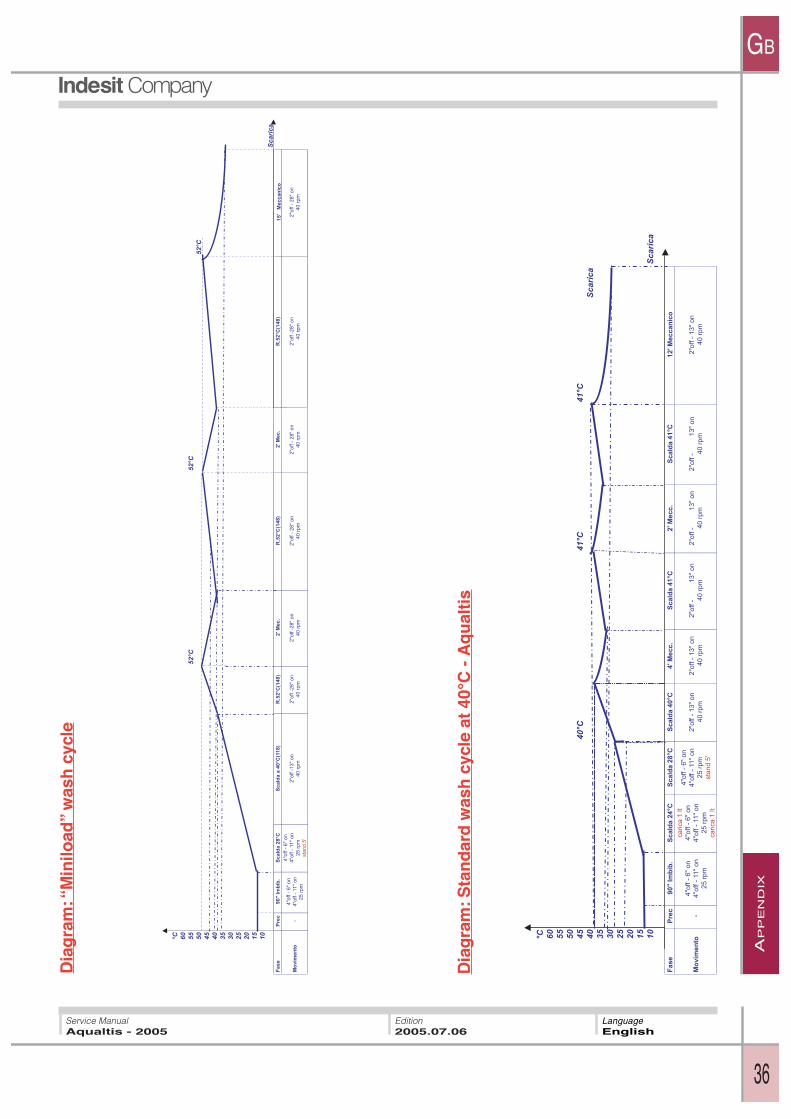
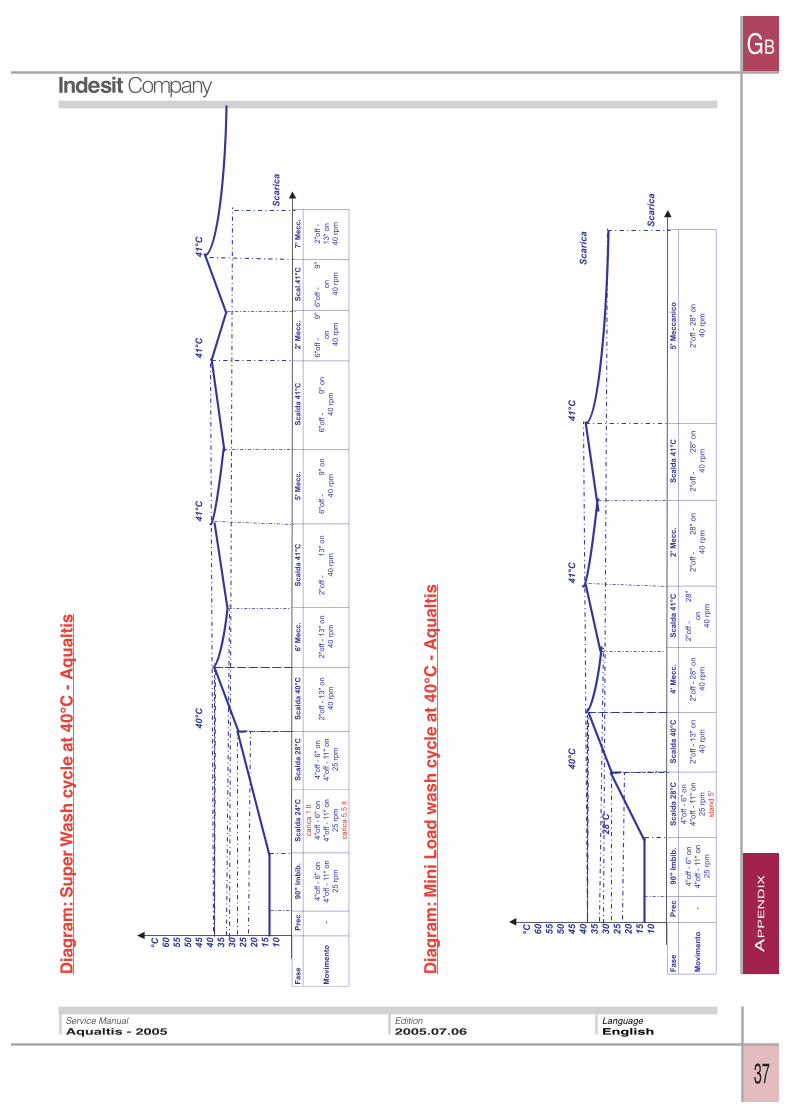
WATER FILLING:Water filling can occur in two phases: the first is common to all the programs, the filling is controlled by thepressure switch; the second phase, performed by some programs only, water filling changes according tothe wash cycle of the washing machine setting.
To know if a program performs a second water filling, look at the wash diagrams in the appendixes (frompage 34 to page 42).
For example, in the diagram below (standard wash cycle at 40°), after a first water filling controlled by thepressure switch, the machine performs a second water filling (1 litre + 1 litre of water) of two litres of water.

OP
ER
AT
ION
11
Service ManualAqualtis - 2005
Edition2005.07.06
GB
LanguageEnglish
2.2. BUTTONS AND WASH FUNCTIONS:ON/OFF & RESET BUTTON:
This button has a double function: it switches on/off the machine and resets a program in progress. Toswitch on the machine, press the button. The indicator lights (led) turn on simultaneously for 1 second. Toswitch off the machine, press the button again, the machine will be on stand-by. To reset the machine, pressand hold the button for three seconds to cancel the program in progress.
START/PAUSE BUTTON:
It is used to start/stop a wash cycle selected.
PROGRAM SELECTOR:
It permits the selection of a program and can be turned clockwise and anticlockwise indifferently. A lit iconcorresponding to the program switches on. The electronic board sets temperature, spin speed and washintensity, according to the program chosen. The user can always change the program through the suitablebuttons.

OP
ER
AT
ION
12
Service ManualAqualtis - 2005
Edition2005.07.06
GB
LanguageEnglish
DOOR LOCK LED:
When this icon is lit, the door is blocked to prevent accidental opening or eventual damages. To unblock thedoor, wait for the light to switch off. This model allows the user to open the door during the program bypressing the Pause button. The door will open, but in presence of safety conditions, for example: no muchwater in the tank, a low temperature of the machine.
BUTTONS SELECTING WASH FEATURES:
It is possible to change the wash features of the cycle selected in order to choose temperature, spin speedor wash intensity for your clothes.
REMARK: The machine automatically escapes the selection of different incompatible functions.
DOOR LOCKED LIGHT:
It has a safety function. The selection of this function avoids anyone using it improperly. All the buttons of thewashing machine are blocked, during the normal functioning or when the machine is on Stand-by. To unlockthe buttons, press and hold the button for about four seconds.
OP
ER
AT
ION
13
Service ManualAqualtis - 2005
Edition2005.07.06
GB
LanguageEnglish
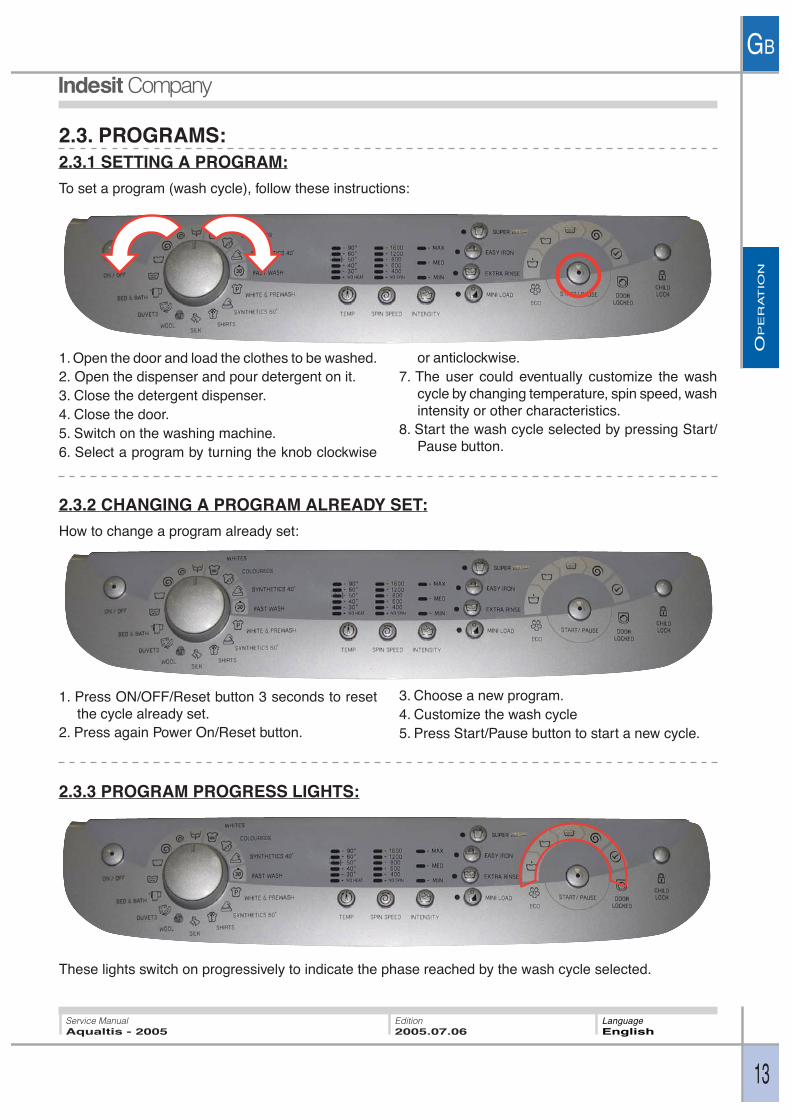
2.3. PROGRAMS:2.3.1 SETTING A PROGRAM:
To set a program (wash cycle), follow these instructions:
1. Open the door and load the clothes to be washed.2. Open the dispenser and pour detergent on it.3. Close the detergent dispenser.4. Close the door.5. Switch on the washing machine.6. Select a program by turning the knob clockwise
or anticlockwise.7. The user could eventually customize the wash
cycle by changing temperature, spin speed, washintensity or other characteristics.
8. Start the wash cycle selected by pressing Start/Pause button.
2.3.2 CHANGING A PROGRAM ALREADY SET:
How to change a program already set:
1. Press ON/OFF/Reset button 3 seconds to resetthe cycle already set.
2. Press again Power On/Reset button.
3. Choose a new program.4. Customize the wash cycle5. Press Start/Pause button to start a new cycle.
2.3.3 PROGRAM PROGRESS LIGHTS:
These lights switch on progressively to indicate the phase reached by the wash cycle selected.
OP
ER
AT
ION
14
Service ManualAqualtis - 2005
Edition2005.07.06
GB
LanguageEnglish
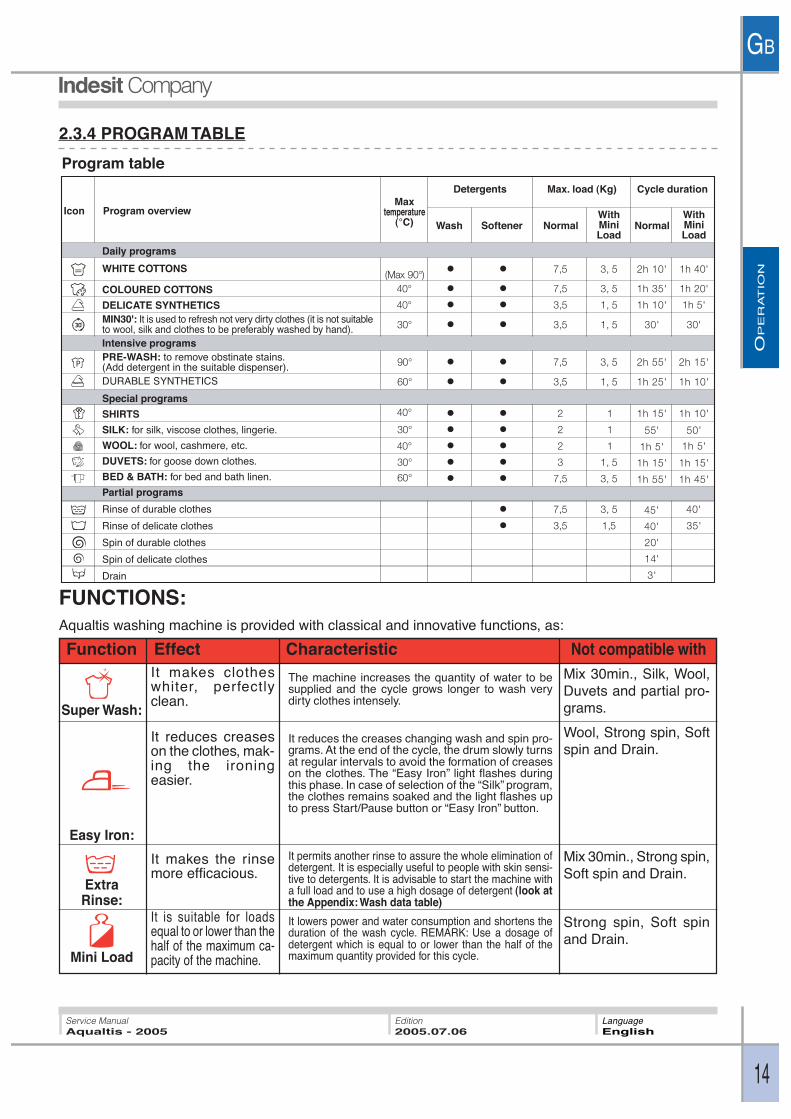
2.3.4 PROGRAM TABLE
Daily programs
WHITE COTTONS
COLOURED COTTONS
DELICATE SYNTHETICSMIN30': It is used to refresh not very dirty clothes (it is not suitableto wool, silk and clothes to be preferably washed by hand).Intensive programsPRE-WASH: to remove obstinate stains.(Add detergent in the suitable dispenser).DURABLE SYNTHETICS
Special programs
SHIRTS
SILK: for silk, viscose clothes, lingerie.
WOOL: for wool, cashmere, etc.
DUVETS: for goose down clothes.
BED & BATH: for bed and bath linen.
Partial programs
Rinse of durable clothes
Rinse of delicate clothes
Spin of durable clothes
Spin of delicate clothes
Drain
Program table
Icon Program overviewMax
temperature(°C) Wash Softener
WithMiniLoad
Detergents Max. load (Kg) Cycle duration
NormalWithMiniLoad
Normal
FUNCTIONS:Aqualtis washing machine is provided with classical and innovative functions, as:
Super Wash:
Easy Iron:
ExtraRinse:
Mini Load
It makes clotheswhiter, perfectlyclean.
It reduces creaseson the clothes, mak-ing the ironingeasier.
It makes the rinsemore efficacious.
It is suitable for loadsequal to or lower than thehalf of the maximum ca-pacity of the machine.
The machine increases the quantity of water to besupplied and the cycle grows longer to wash verydirty clothes intensely.
It reduces the creases changing wash and spin pro-grams. At the end of the cycle, the drum slowly turnsat regular intervals to avoid the formation of creaseson the clothes. The “Easy Iron” light flashes duringthis phase. In case of selection of the “Silk” program,the clothes remains soaked and the light flashes upto press Start/Pause button or “Easy Iron” button.
It permits another rinse to assure the whole elimination ofdetergent. It is especially useful to people with skin sensi-tive to detergents. It is advisable to start the machine witha full load and to use a high dosage of detergent (look atthe Appendix: Wash data table)
It lowers power and water consumption and shortens theduration of the wash cycle. REMARK: Use a dosage ofdetergent which is equal to or lower than the half of themaximum quantity provided for this cycle.
Mix 30min., Silk, Wool,Duvets and partial pro-grams.
Wool, Strong spin, Softspin and Drain.
Mix 30min., Strong spin,Soft spin and Drain.
Strong spin, Soft spinand Drain.
Function Effect Characteristic Not compatible with
CO
MP
ON
EN
TS
15
Service ManualAqualtis - 2005
Edition2005.07.06
GB
LanguageEnglish
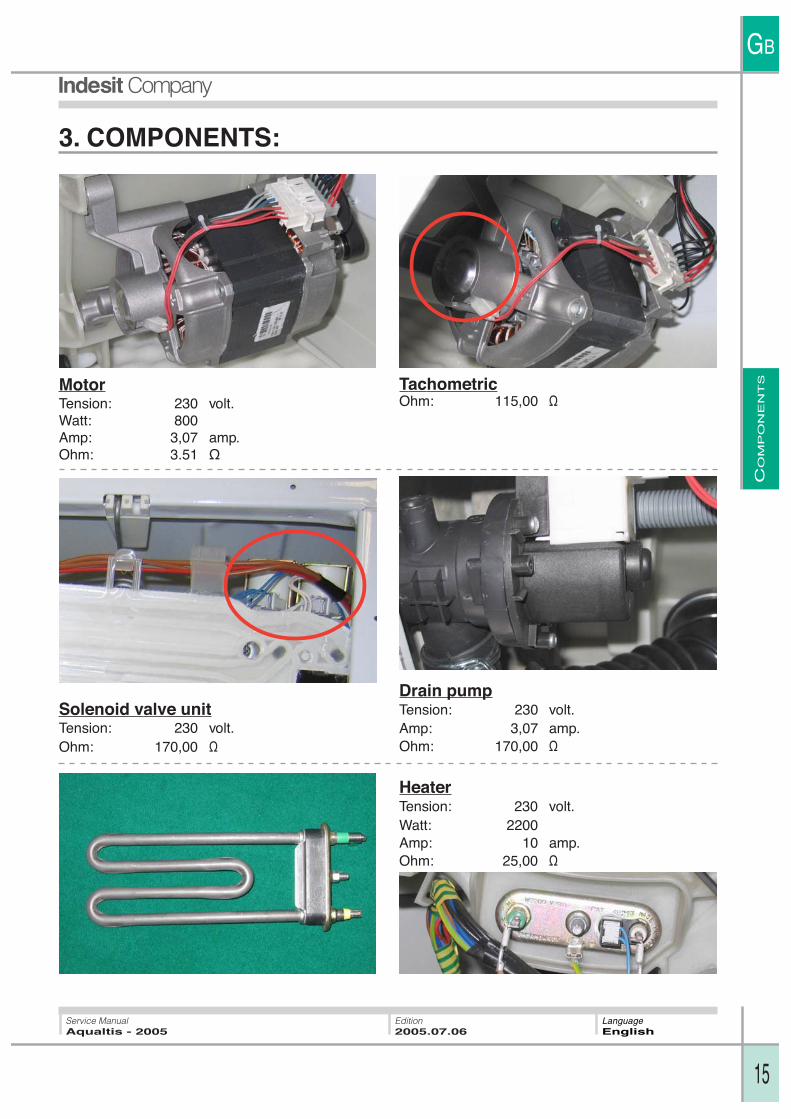
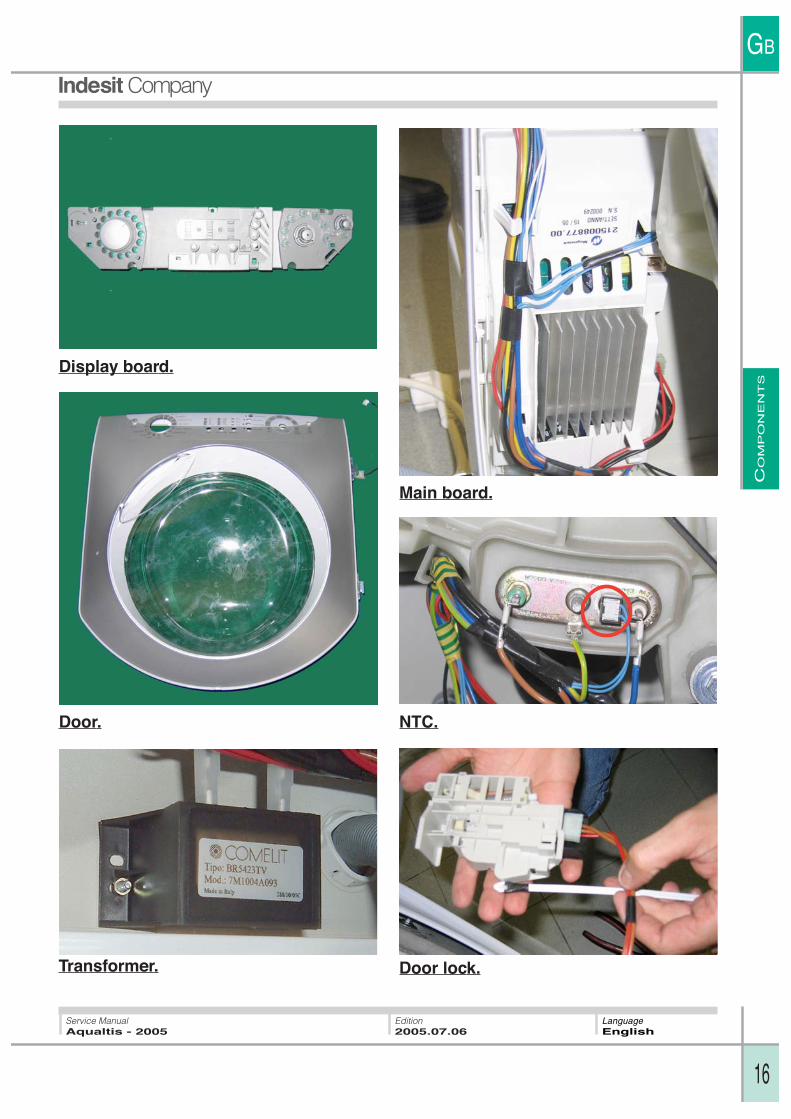
3. COMPONENTS:
MotorTension: 230 volt.Watt: 800Amp: 3,07 amp.Ohm: 3.51
TachometricOhm: 115,00
Solenoid valve unitTension: 230 volt.Ohm: 170,00
Drain pumpTension: 230 volt.Amp: 3,07 amp.Ohm: 170,00
HeaterTension: 230 volt.Watt: 2200Amp: 10 amp.Ohm: 25,00
CO
MP
ON
EN
TS
16
Service ManualAqualtis - 2005
Edition2005.07.06
GB
LanguageEnglish
Display board.
Door.
Main board.
Transformer.
NTC.
Door lock.

CO
MP
ON
EN
TS
17
Service ManualAqualtis - 2005
Edition2005.07.06
GB
LanguageEnglish
Back part.
1 Pulley.
2 Belts
3 Motor
4 Tank
5 Heater
6 Shock absorber
7 Drain pump
2
3
56
4
1
7
4 2
3
8
7 6 1
Upper part.
1 Display cable
2 Door gasket
3 Hopper
4 Counterweight
5 Pressure switch
6 Spring
7 Anti-noises filter
8 Solenoid valve unit
5
WIR
ING D
IAG
RA
MS
18
Service ManualAqualtis - 2005
Edition2005.07.06
GB
LanguageEnglish
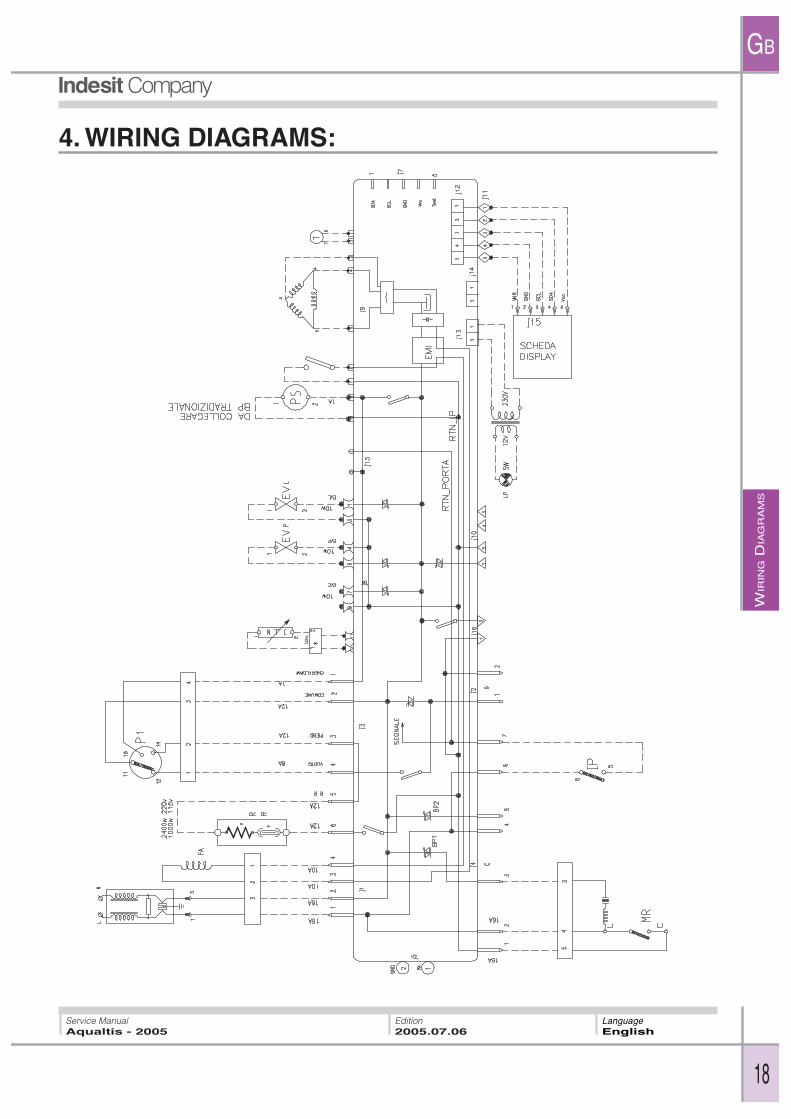
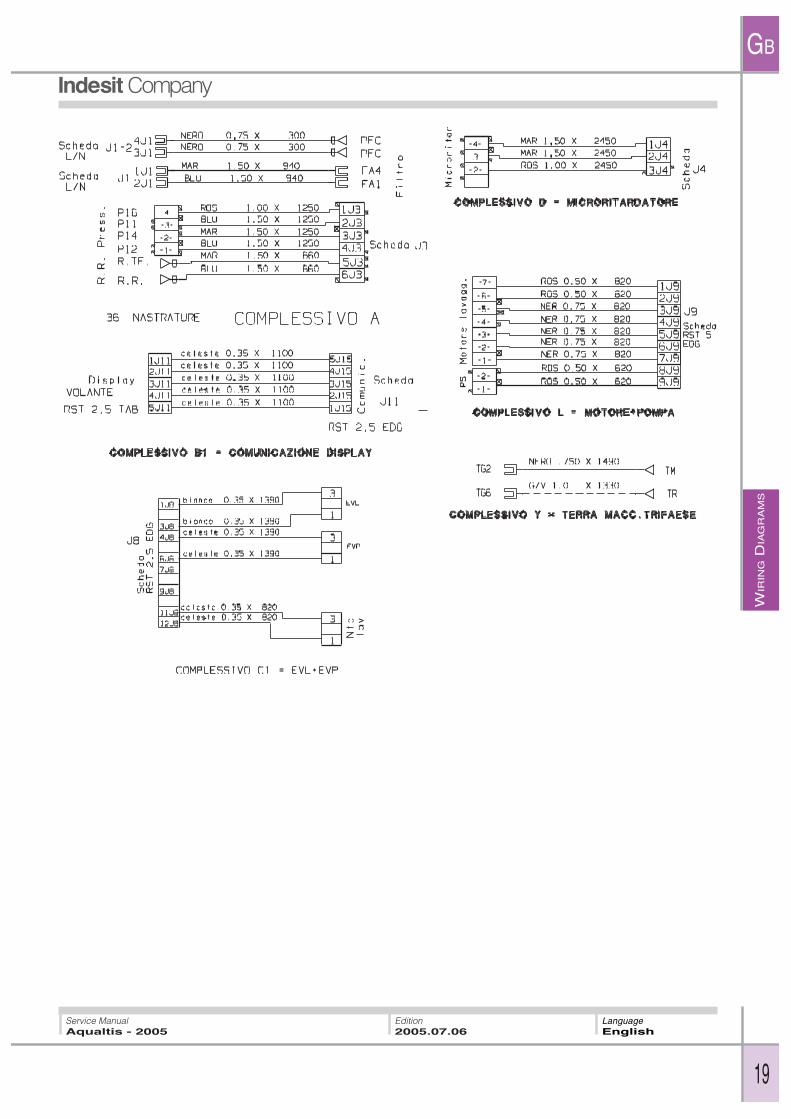
4. WIRING DIAGRAMS:
WIR
ING D
IAG
RA
MS
19
Service ManualAqualtis - 2005
Edition2005.07.06
GB
LanguageEnglish

AS
SIS
TA
NC
E
20
Service ManualAqualtis - 2005
Edition2005.07.06
GB
LanguageEnglish
Activation: Power On + Start/Reset + 4th button at the lower part
for 6 seconds.
Deactivation: Power On + Start/Reset
for 3 seconds.
5.2. AUTO TEST (TESTING / RUNNING_IN):The Hardware Key permits the execution of the platform EVO II Auto Test program.
On the hardware key switches on a BLUE LED, indicating it is an EVO II washing machine. A flashingRED led on the key (when it is connected with the appliance) indicates that the electronic board iscommunicating with the hardware key. If the hardware key does not succeed in connecting with thewashing machine, the message “ERR” will flash on the display
Initial conditions to start Auto Test:1. Washing machine without water in the tank.
2. Door closed.
3. Switch on the washing machine and fit the key on the suitable housing.
Remember that the Auto Test program activates the heater to warm up water and controls the spin;so it is necessary to select a temperature higher than 30°C and not to exclude the spin.
To start the AUTO-TEST program, press and leave the button marked as AUTO-TEST. A sound-signal will be given out and on the display will slide the writing “AUTO-TEST”.
Auto Test sequence for Washing Machines and Washer Dryer- Loading of wash solenoid valve for 10" ca.
- Loading of pre-wash solenoid valve for 10" ca.
- Loading of hot water solenoid valve for 10" ca (in machines equipped with this solenoid valve).
- Motor movement on both directions.
- Activation of the wash heater: warming up to the temperature of 30°C.
- Drain and spin.
- Stop.
NOTICE!! If now the washing machine works correctly, but previously it has had a FAULT, it will not start upthe AUTO-TEST program, but such a FAULT will be surely shown on the display of the hardware key.
In this case, to start up the “Auto-test” program is necessary to remove the hardware key.
5. TECHNICAL ASSISTANCE:
5.1. DEMO MODE:
It is available only on models with LCD and Display interface.

AS
SIS
TA
NC
E
21
Service ManualAqualtis - 2005
Edition2005.07.06
GB
LanguageEnglish
5.3. FAULT ANALYSIS & SOLUTIONS:
LED 5LED 4LED 3LED 2LED 1
LED COMBINATIONFAULT CAUSE TEMPERATURE LED
F01 LED 5 LED 4 LED 3 LED 2 LED 1
F02 LED 5 LED 4 LED 3 LED 2 LED 1
F03 LED 5 LED 4 LED 3 LED 2 LED 1
F04 LED 5 LED 4 LED 3 LED 2 LED 1
F05 LED 5 LED 4 LED 3 LED 2 LED 1
F07 LED 5 LED 4 LED 3 LED 2 LED 1
F08 LED 5 LED 4 LED 3 LED 2 LED 1
F09 LED 5 LED 4 LED 3 LED 2 LED 1
F10 LED 5 LED 4 LED 3 LED 2 LED 1
F11 LED 5 LED 4 LED 3 LED 2 LED 1
F12 LED 5 LED 4 LED 3 LED 2 LED 1
F18 LED 5 LED 4 LED 3 LED 2 LED 1
SIMBOLS:
led ON
led OFF
Motor piloting tr iac shortcircuited
Motor blocked, motor tacho open/ short circuited
Wash NTC probe open / shortcircuited
“Empty” + pressure switch over-flow simultaneously
“Empty” pressure switch notreached, drain pump clogged
No absorption of the washheater
Wash heater relay welded to theNA/NC contact
Fault of setup file (EEPROM notprogrammed or not working)
No signal of simultaneous “full”and “empty”
No supply to the drain pump
No communication between dis-play board and control board
Faulty communication betweenMicroprocessor and DSP (Dig-ital Signal Processor).
AS
SIS
TA
NC
E
22
Service ManualAqualtis - 2005
Edition2005.07.06
GB
LanguageEnglish
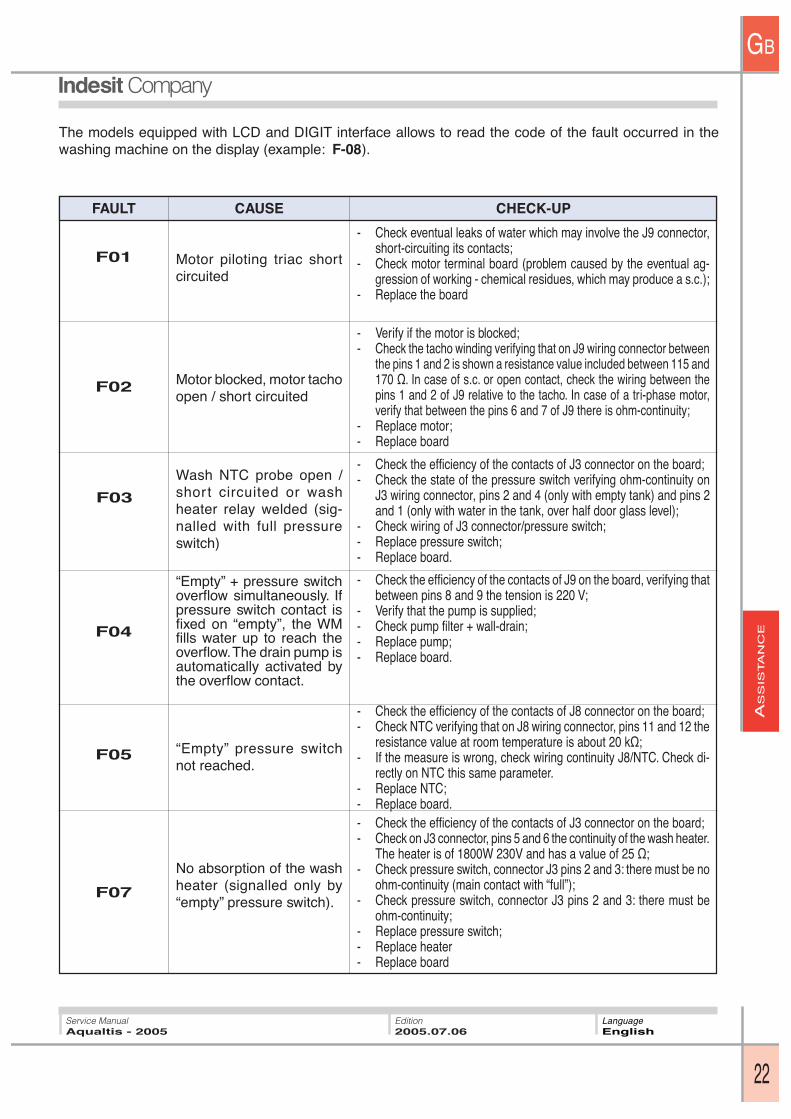
FAULT CHECK-UPCAUSE
- Check eventual leaks of water which may involve the J9 connector,short-circuiting its contacts;
- Check motor terminal board (problem caused by the eventual ag-gression of working - chemical residues, which may produce a s.c.);
- Replace the board
- Verify if the motor is blocked;- Check the tacho winding verifying that on J9 wiring connector between
the pins 1 and 2 is shown a resistance value included between 115 and170 . In case of s.c. or open contact, check the wiring between thepins 1 and 2 of J9 relative to the tacho. In case of a tri-phase motor,verify that between the pins 6 and 7 of J9 there is ohm-continuity;
- Replace motor;- Replace board
- Check the efficiency of the contacts of J3 connector on the board;- Check the state of the pressure switch verifying ohm-continuity on
J3 wiring connector, pins 2 and 4 (only with empty tank) and pins 2and 1 (only with water in the tank, over half door glass level);
- Check wiring of J3 connector/pressure switch;- Replace pressure switch;- Replace board.
- Check the efficiency of the contacts of J9 on the board, verifying thatbetween pins 8 and 9 the tension is 220 V;
- Verify that the pump is supplied;- Check pump filter + wall-drain;- Replace pump;- Replace board.
- Check the efficiency of the contacts of J8 connector on the board;- Check NTC verifying that on J8 wiring connector, pins 11 and 12 the
resistance value at room temperature is about 20 k ;- If the measure is wrong, check wiring continuity J8/NTC. Check di-
rectly on NTC this same parameter.- Replace NTC;- Replace board.- Check the efficiency of the contacts of J3 connector on the board;- Check on J3 connector, pins 5 and 6 the continuity of the wash heater.
The heater is of 1800W 230V and has a value of 25 ;- Check pressure switch, connector J3 pins 2 and 3: there must be no
ohm-continuity (main contact with “full”);- Check pressure switch, connector J3 pins 2 and 3: there must be
ohm-continuity;- Replace pressure switch;- Replace heater- Replace board
F01 Motor piloting triac shortcircuited
Motor blocked, motor tachoopen / short circuited
Wash NTC probe open /short circuited or washheater relay welded (sig-nalled with full pressureswitch)
F03
F02
F04
“Empty” + pressure switchoverflow simultaneously. Ifpressure switch contact isfixed on “empty”, the WMfills water up to reach theoverflow. The drain pump isautomatically activated bythe overflow contact.
“Empty” pressure switchnot reached.
F05
The models equipped with LCD and DIGIT interface allows to read the code of the fault occurred in thewashing machine on the display (example: F-08).
No absorption of the washheater (signalled only by“empty” pressure switch).
F07

AS
SIS
TA
NC
E
23
Service ManualAqualtis - 2005
Edition2005.07.06
GB
LanguageEnglish
FAULT CHECK-UPCAUSE
- Check the efficiency of the contacts of J3 connector on the board;- Check the state of the pressure switch verifying ohm-continuity on
J3 wiring connector, pins 2 and 4 (only with empty tank), pins 2 and3 (only with water in the tank) and pin 2 and 1 (only with water in thetank over half door glass level);
- Ambient with a high rate of humidity;
- In case of board with EEPROM welded on it, replace board andEEPROM;
- In case of spare EEPROM, check the correct fitting of the EEPROMin the socket of the board.
- Check the efficiency of contact on J3connector on the board;- Check the state of the pressure switch, verifying the ohm-continuity
on the wiring connector J3 pins 2 and 4 (it must be present withempty tank only) and pins 2 and 1 (it must be present with water intank over half door glass level);
- Check the wiring of J3-connector/pressure switch;- Replace pressure switch;- Replace board.
- Check the efficiency of the contacts of J9-connector on the board;- Verify on J15 connector, pins 1 and 2 (in case of wm with Easy Door
door lock) or on J9 connector, pins 8 and 9 (in case of general doorlock) the continuity of the pump, checking the resistance value 170
;- Check the wiring of the J15 connector (or J9)/pump;- Replace pump;- Replace board.
- Check efficiency of contacts of the J11 connector on the board;- Check the continuity of J11-connector/5-output connector of the dis-
play board;- Replace main board;
- Replace board display
Wash heater relay welded(signalled in presence of“empty”) or pressure switchfixed on “empty” (empty andfull simultaneously).
F08
F09
F10
F11
Fault of setup file(EEPROM not pro-grammed or not working)
No signal of simultaneous“full” and “empty”
No pump feedback (drainpump disconnected orwinding interrupted).
F12No communication be-tween display board andcontrol board
Faulty communication betweenMicroprocessor and DSP (Dig-ital Signal Processor).
F18

AS
SIS
TA
NC
E
24
Service ManualAqualtis - 2005
Edition2005.07.06
GB
LanguageEnglish
5.4. DOCTOR:The main board is installed on the back part, on theright. The interface, protected by a cover, allows theconnection of the hardware key to the machine:
* Connect the handheld to the hardware key;
* Follows the instruction in the “WM DOCTOR”manual.
PROBLEM ANALISYS
- Check the socket.- Verify if the door closes the safety switch.- Door micro door-lock- Display board- Tap closed or low pressure- Solenoid valve clogged- Solenoid valve not supplied- Solenoid valve broken- Drain tube too low- Check pressure switch- Air trap or pressure switch tube- Check pressure switch- Check motor winding- Motor terminal box or board- The motor is not under tension- Check driving belt- Check the motor- Function excluded- Check drain pump and filter- Check drain pump tension- Verify if the program provides drain block- Check wall-drain
It does not switch on
It continuously fills it-self with water
It does not fill itself withwater
The motor does not run
The drum does not rotate
5.5. TROUBLE SHOOTING:
It does not drain

AS
SIS
TA
NC
E
25
Service ManualAqualtis - 2005
Edition2005.07.06
GB
LanguageEnglish
PROBLEM ANALISYS
- Wrong wash temperature- Lack of a detergent- The program selected is not the right one
- Too much detergent- Faulty drain- The presence of foam is normal, because of the presence of zeolites
- Unbalanced load- Check bearing- Belt worn-out- Loose wash paddles- Loose counterweight
- Check earth-drain- Anti-noise filter
- Load too much unbalanced- False contacts in the terminal box
Noisy spin
It does not wash well
Presence of foam at theend of the wash
Loss of current
The motor performswashes but not spins
AS
SIS
TA
NC
E
26
Service ManualAqualtis - 2005
Edition2005.07.06
GB
LanguageEnglish
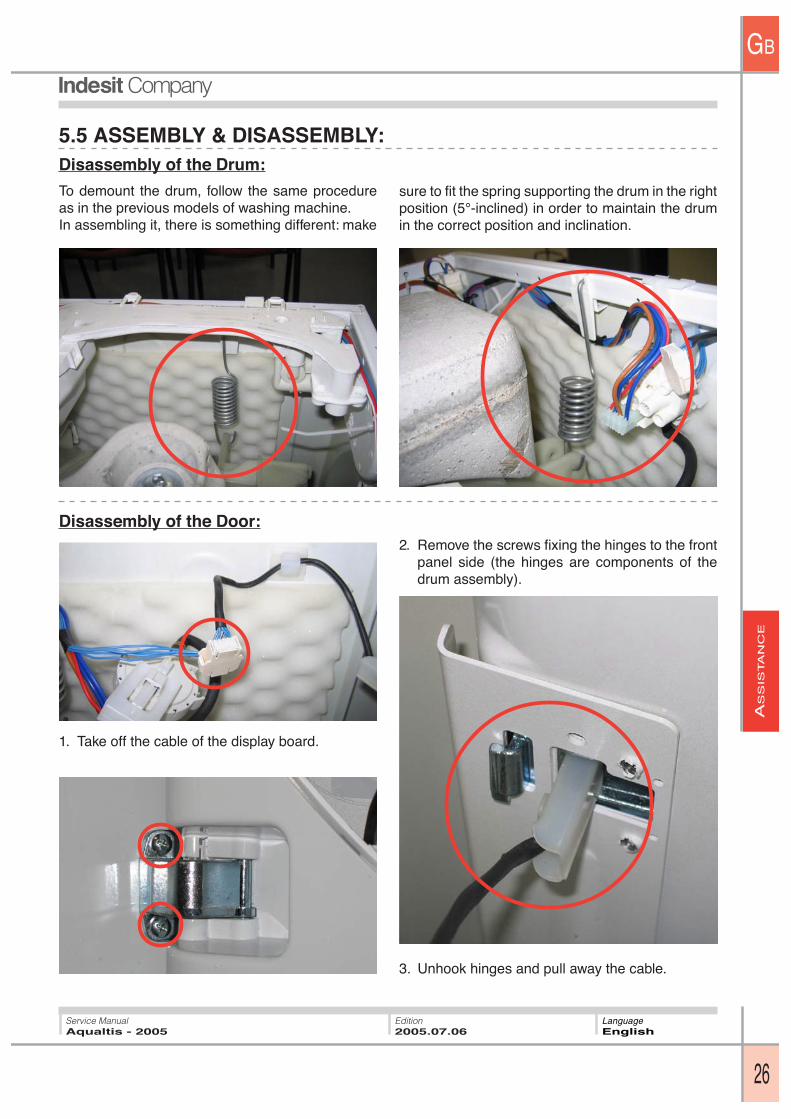
5.5 ASSEMBLY & DISASSEMBLY:Disassembly of the Drum:
To demount the drum, follow the same procedureas in the previous models of washing machine.In assembling it, there is something different: make
sure to fit the spring supporting the drum in the rightposition (5°-inclined) in order to maintain the drumin the correct position and inclination.
Disassembly of the Door:
1. Take off the cable of the display board.
2. Remove the screws fixing the hinges to the frontpanel side (the hinges are components of thedrum assembly).
3. Unhook hinges and pull away the cable.
AS
SIS
TA
NC
E
27
Service ManualAqualtis - 2005
Edition2005.07.06
GB
LanguageEnglish
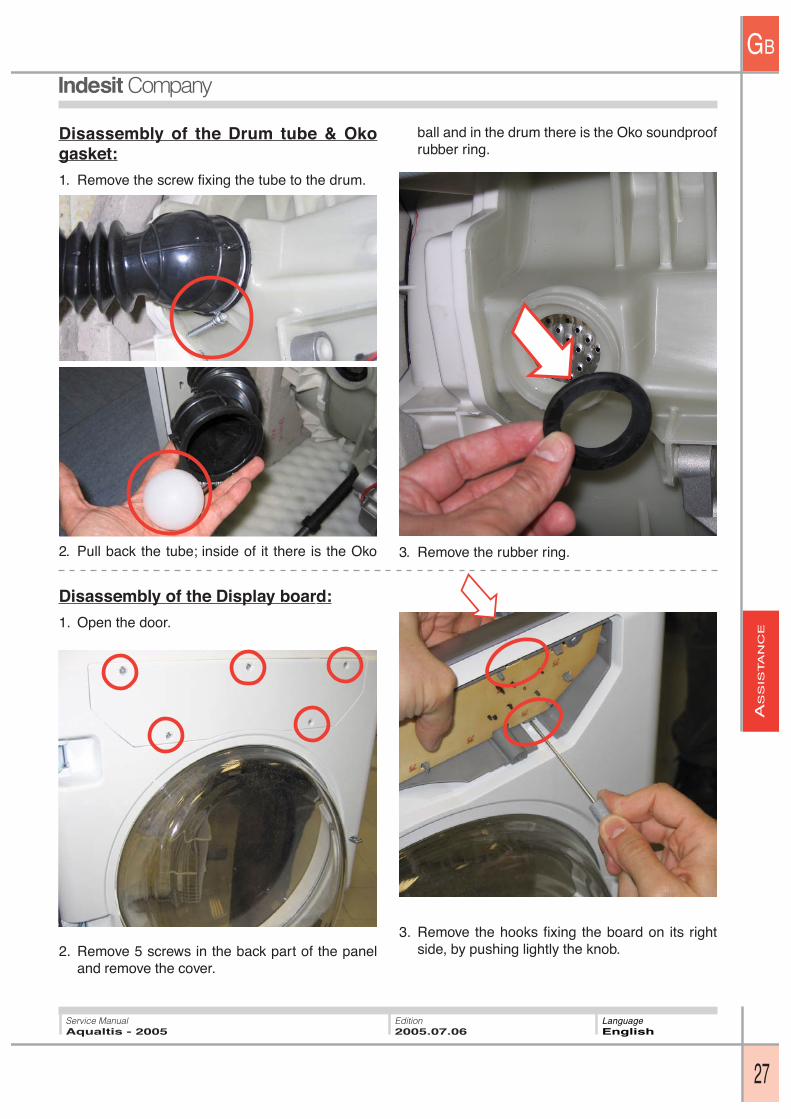
Disassembly of the Drum tube & Okogasket:
1. Remove the screw fixing the tube to the drum.
2. Pull back the tube; inside of it there is the Oko
ball and in the drum there is the Oko soundproofrubber ring.
3. Remove the rubber ring.
Disassembly of the Display board:
1. Open the door.
2. Remove 5 screws in the back part of the paneland remove the cover.
3. Remove the hooks fixing the board on its rightside, by pushing lightly the knob.
AS
SIS
TA
NC
E
28
Service ManualAqualtis - 2005
Edition2005.07.06
GB
LanguageEnglish
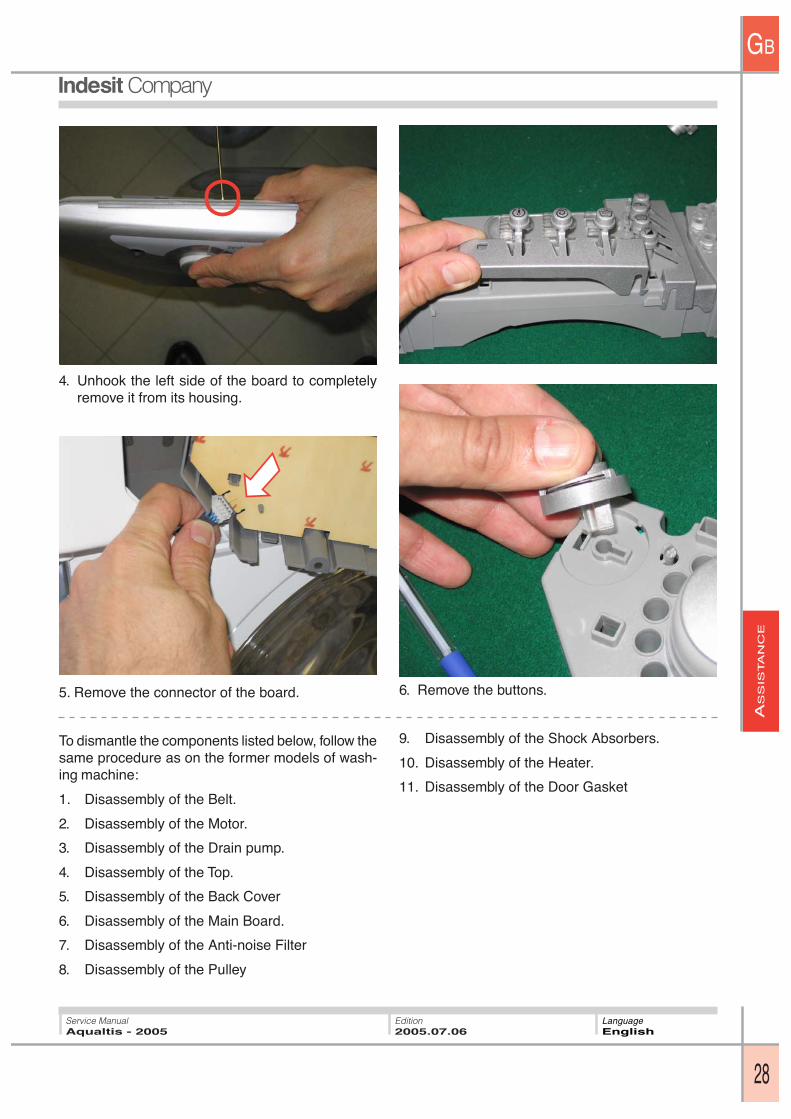
4. Unhook the left side of the board to completelyremove it from its housing.
To dismantle the components listed below, follow thesame procedure as on the former models of wash-ing machine:
1. Disassembly of the Belt.
2. Disassembly of the Motor.
3. Disassembly of the Drain pump.
4. Disassembly of the Top.
5. Disassembly of the Back Cover
6. Disassembly of the Main Board.
7. Disassembly of the Anti-noise Filter
8. Disassembly of the Pulley
9. Disassembly of the Shock Absorbers.
10. Disassembly of the Heater.
11. Disassembly of the Door Gasket
5. Remove the connector of the board. 6. Remove the buttons.
EX
PLO
DE
DV
IEW
S
29
Service ManualAqualtis - 2005
Edition2005.07.06
GB
LanguageEnglish
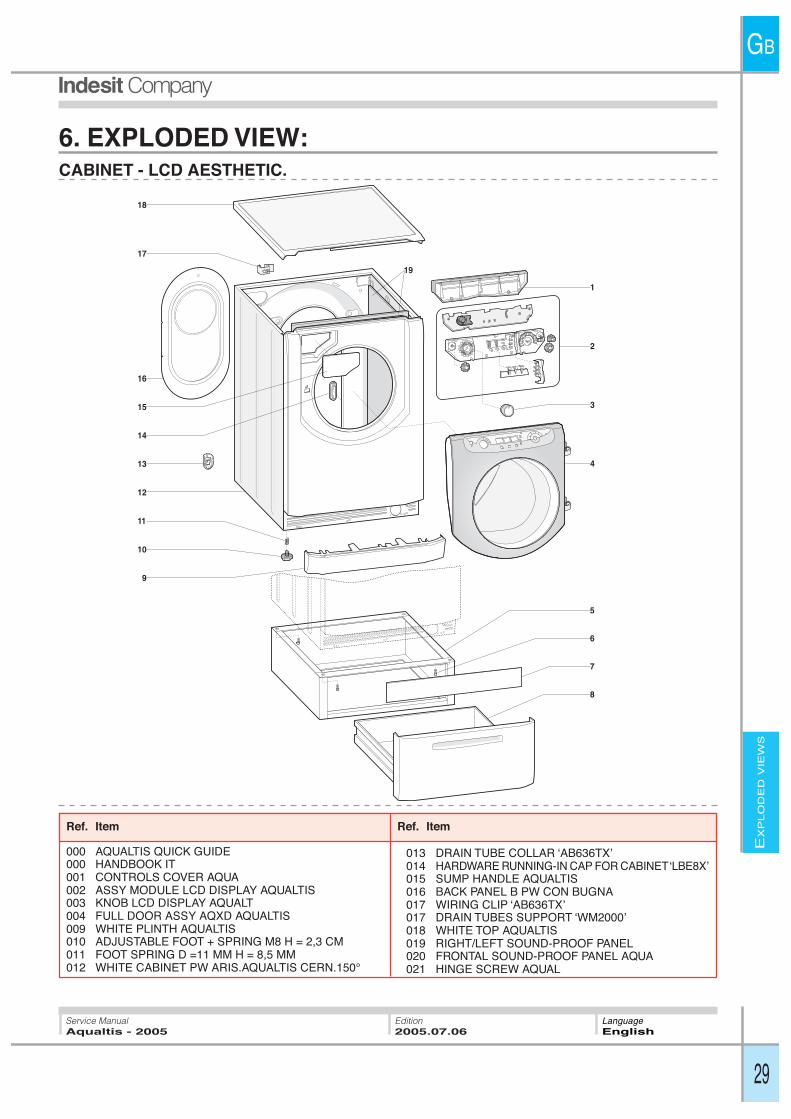
6. EXPLODED VIEW:CABINET - LCD AESTHETIC.
3
4
1
9
10
11
12
13
17
18
8
7
5
6
2
14
15
19
16
000 AQUALTIS QUICK GUIDE000 HANDBOOK IT001 CONTROLS COVER AQUA002 ASSY MODULE LCD DISPLAY AQUALTIS003 KNOB LCD DISPLAY AQUALT004 FULL DOOR ASSY AQXD AQUALTIS009 WHITE PLINTH AQUALTIS010 ADJUSTABLE FOOT + SPRING M8 H = 2,3 CM011 FOOT SPRING D =11 MM H = 8,5 MM012 WHITE CABINET PW ARIS.AQUALTIS CERN.150°
Ref. Item
013 DRAIN TUBE COLLAR ‘AB636TX’014 HARDWARE RUNNING-IN CAP FOR CABINET ‘LBE8X’015 SUMP HANDLE AQUALTIS016 BACK PANEL B PW CON BUGNA017 WIRING CLIP ‘AB636TX’017 DRAIN TUBES SUPPORT ‘WM2000’018 WHITE TOP AQUALTIS019 RIGHT/LEFT SOUND-PROOF PANEL020 FRONTAL SOUND-PROOF PANEL AQUA021 HINGE SCREW AQUAL
Ref. Item

EX
PLO
DE
DV
IEW
S
30
Service ManualAqualtis - 2005
Edition2005.07.06
GB
LanguageEnglish
CABINET - DISPLAY AESTHETIC
3
4
1
9
10
11
12
13
16
17
18
8
7
5
6
2
14
15
19
001 SCREW FOR COUNTERWEIGHT/TANK AQUALT003 UPPER COUNTERWEIGHT VPL 13KG AQUAL004 SPRING RING NUT AQUAL005 TANK WHITE SPRING 8,5 SPIRE AQUAL006 PLASTIC TANK ASSY. 62 L H=20 MM AQUAL007 BACK SPRING TIGHT RING AQUAL008 DOOR GASKET AQUALTIS009 FRONT RING AQUALTIS010 FRON COUNTERWEIGHT VPL 9,4KG011 OKO TUBE BALL EVO II013 DRAIN BELLOWS AQUALTIS014 PIPE-CLIP BAND DRAIN PUMP SIDE015 PIPE-CLIP BAND PRESSURE SWITCH
Ref. Item
016 PIPE-CLIP BAND TANK SIDE019 BELLOWS DRAIN GASKET OKO AQUAL020 EXPANDER021 NUT ROMOB M6X20X1,6022 SHOCK ABSORBER 100 N INCL.023 BELLOWS DETERGENT FILLING AQUALTIS024 DUCT PULLEY D=280 MM H=20 MM025 SCREW M8X23 TEFL’AL68X’026 ELASTIC BELT AQUAL027 VIOLET TANK SPRING 10,5 SPIRE AQUAL028 SCREW TORX M8 X 27 DRI-LOC’ALS748TX’028 EXTRACTABLE WASH PADDLE DRUM. 46L
Ref. Item

EX
PLO
DE
DV
IEW
S
31
Service ManualAqualtis - 2005
Edition2005.07.06
GB
LanguageEnglish
CABINET - LED AESTHETIC
3
4
1
9
10
11
12
13
17
18
8
7
5
6
2
14
15
19
16
000 AQUALTIS QUICK GUIDE000 HANDBOOK IT001 CONTROLS COVER AQUA002 ASSY MODULE LCD DISPLAY AQUALTIS003 KNOB LCD DISPLAY AQUALT004 FULL DOOR ASSY AQXD AQUALTIS009 WHITE PLINTH AQUALTIS010 ADJUSTABLE FOOT + SPRING M8 H = 2,3 CM011 FOOT SPRING D =11 MM H = 8,5 MM012 WHITE CABINET PW ARIS.AQUALTIS CERN.150°
Ref. Item
013 DRAIN TUBE COLLAR ‘AB636TX’014 HARDWARE RUNNING-IN CAP FOR CABINET ‘LBE8X’015 SUMP HANDLE AQUALTIS016 BACK PANEL B PW CON BUGNA017 WIRING CLIP ‘AB636TX’017 DRAIN TUBES SUPPORT ‘WM2000’018 WHITE TOP AQUALTIS019 RIGHT/LEFT SOUND-PROOF PANEL020 FRONTAL SOUND-PROOF PANEL AQUA021 HINGE SCREW AQUAL
Ref. Item
EX
PLO
DE
DV
IEW
S
32
Service ManualAqualtis - 2005
Edition2005.07.06
GB
LanguageEnglish
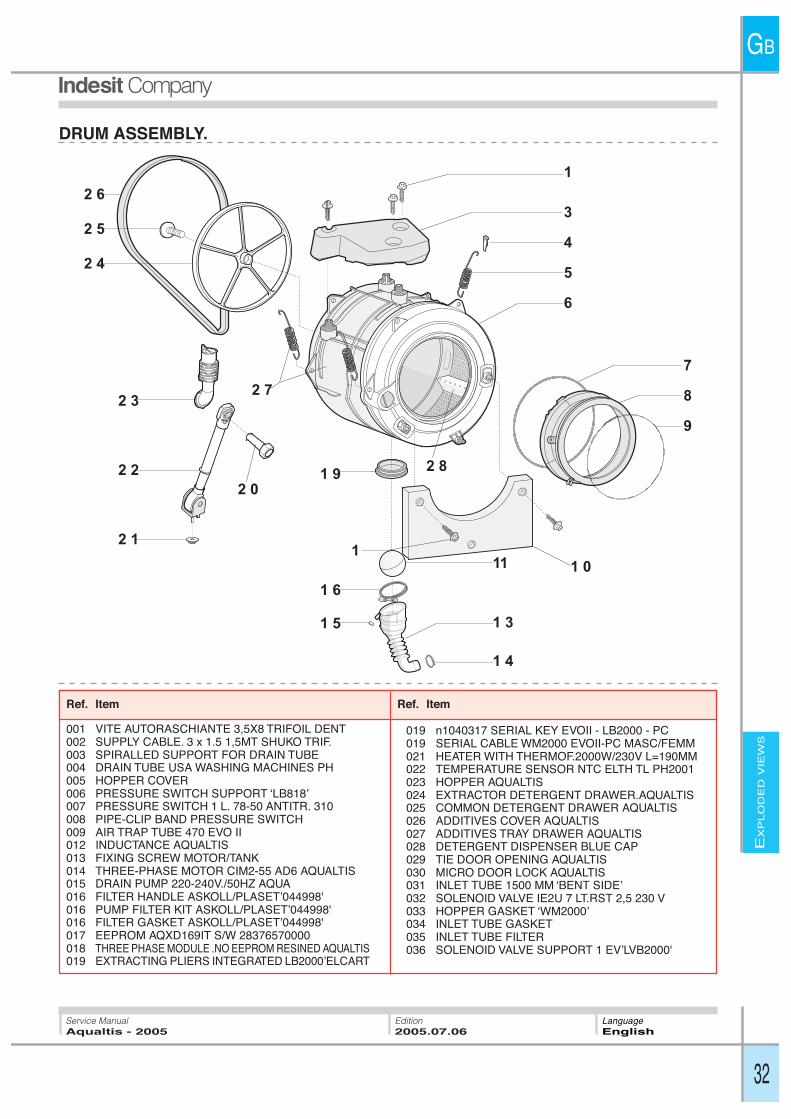
DRUM ASSEMBLY.
1
3
4
5
6
7
8
9
2 0
2 1
2 2
2 3
2 4
2 6
2 5
11
1 3
1 4
1 6
1 5
2 7
1 01
1 92 8
001 VITE AUTORASCHIANTE 3,5X8 TRIFOIL DENT002 SUPPLY CABLE. 3 x 1.5 1,5MT SHUKO TRIF.003 SPIRALLED SUPPORT FOR DRAIN TUBE004 DRAIN TUBE USA WASHING MACHINES PH005 HOPPER COVER006 PRESSURE SWITCH SUPPORT ‘LB818’007 PRESSURE SWITCH 1 L. 78-50 ANTITR. 310008 PIPE-CLIP BAND PRESSURE SWITCH009 AIR TRAP TUBE 470 EVO II012 INDUCTANCE AQUALTIS013 FIXING SCREW MOTOR/TANK014 THREE-PHASE MOTOR CIM2-55 AD6 AQUALTIS015 DRAIN PUMP 220-240V./50HZ AQUA016 FILTER HANDLE ASKOLL/PLASET’044998'016 PUMP FILTER KIT ASKOLL/PLASET’044998'016 FILTER GASKET ASKOLL/PLASET’044998'017 EEPROM AQXD169IT S/W 28376570000018 THREE PHASE MODULE .NO EEPROM RESINED AQUALTIS019 EXTRACTING PLIERS INTEGRATED LB2000’ELCART
Ref. Item
019 n1040317 SERIAL KEY EVOII - LB2000 - PC019 SERIAL CABLE WM2000 EVOII-PC MASC/FEMM021 HEATER WITH THERMOF.2000W/230V L=190MM022 TEMPERATURE SENSOR NTC ELTH TL PH2001023 HOPPER AQUALTIS024 EXTRACTOR DETERGENT DRAWER.AQUALTIS025 COMMON DETERGENT DRAWER AQUALTIS026 ADDITIVES COVER AQUALTIS027 ADDITIVES TRAY DRAWER AQUALTIS028 DETERGENT DISPENSER BLUE CAP029 TIE DOOR OPENING AQUALTIS030 MICRO DOOR LOCK AQUALTIS031 INLET TUBE 1500 MM ‘BENT SIDE’032 SOLENOID VALVE IE2U 7 LT.RST 2,5 230 V033 HOPPER GASKET ‘WM2000’034 INLET TUBE GASKET035 INLET TUBE FILTER036 SOLENOID VALVE SUPPORT 1 EV’LVB2000'
Ref. Item
EX
PLO
DE
DV
IEW
S
33
Service ManualAqualtis - 2005
Edition2005.07.06
GB
LanguageEnglish
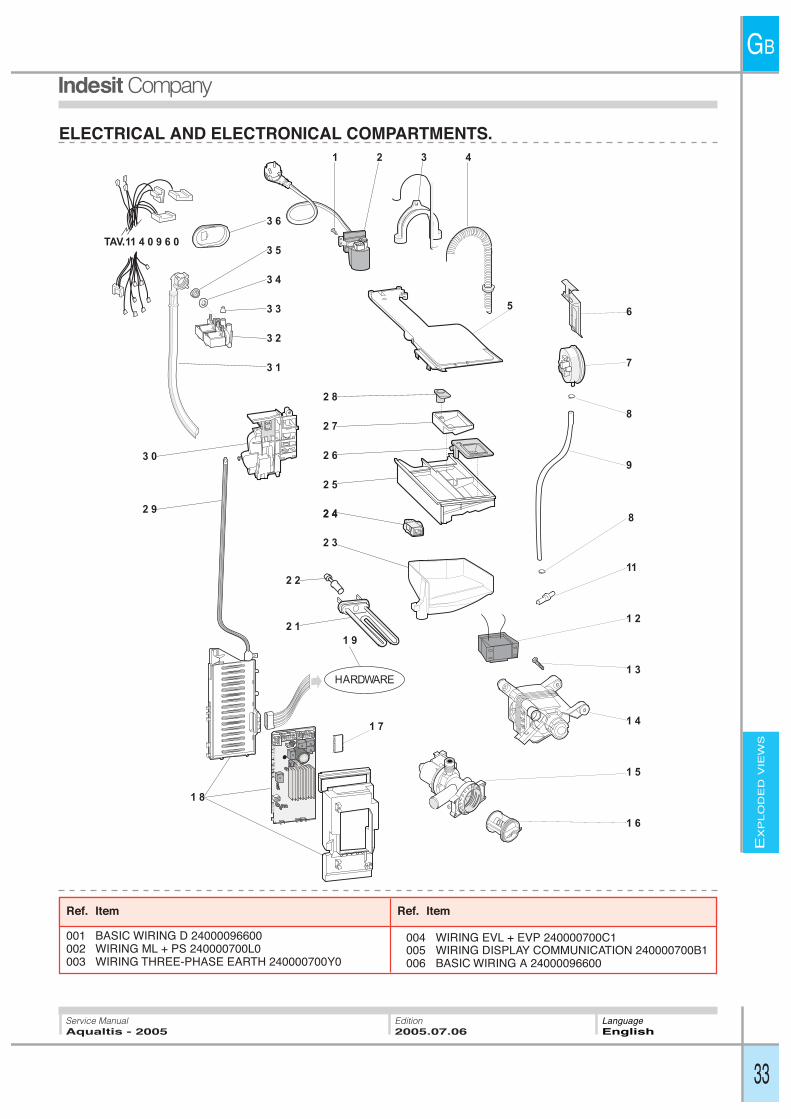
ELECTRICAL AND ELECTRONICAL COMPARTMENTS.
001 BASIC WIRING D 24000096600002 WIRING ML + PS 240000700L0003 WIRING THREE-PHASE EARTH 240000700Y0
Ref. Item
004 WIRING EVL + EVP 240000700C1005 WIRING DISPLAY COMMUNICATION 240000700B1006 BASIC WIRING A 24000096600
Ref. Item
AP
PE
ND
IX
34
Service ManualAqualtis - 2005
Edition2005.07.06
GB
LanguageEnglish
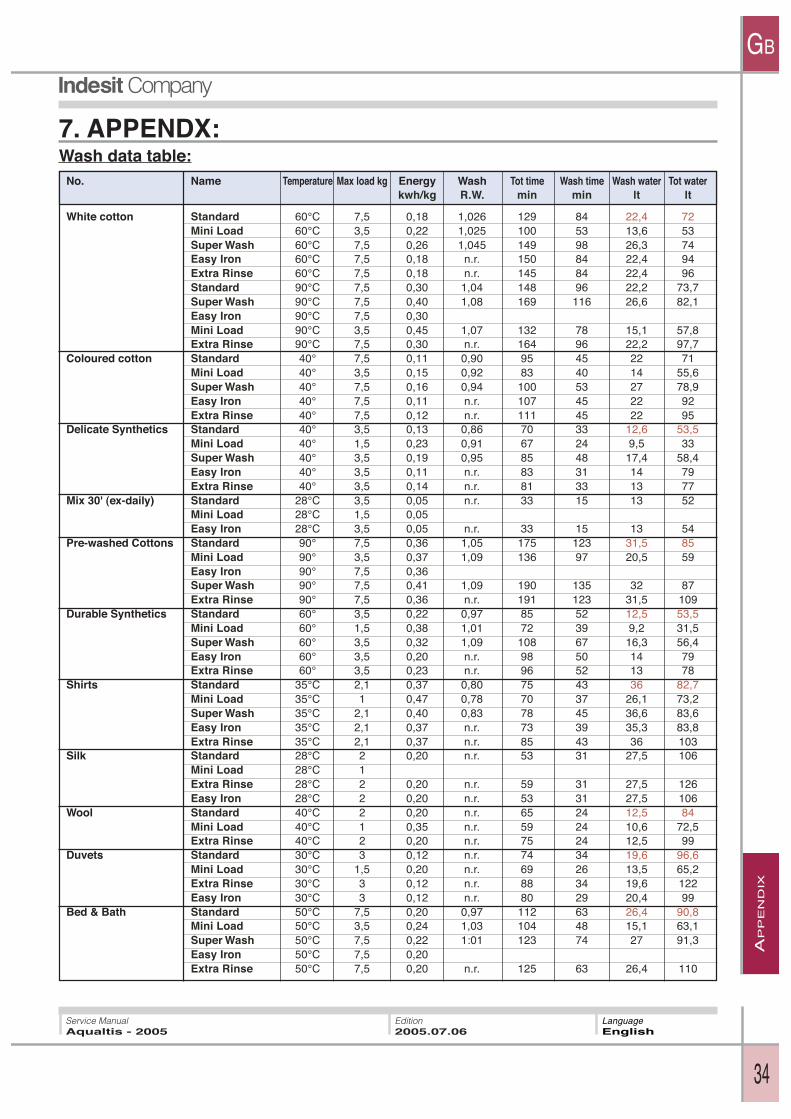
Wash data table:7. APPENDX:
No. Name Temperature Max load kg Energy Wash Tot time Wash time Wash water Tot waterkwh/kg R.W. min min lt lt
White cotton Standard 60°C 7,5 0,18 1,026 129 84 22,4 72Mini Load 60°C 3,5 0,22 1,025 100 53 13,6 53Super Wash 60°C 7,5 0,26 1,045 149 98 26,3 74Easy Iron 60°C 7,5 0,18 n.r. 150 84 22,4 94Extra Rinse 60°C 7,5 0,18 n.r. 145 84 22,4 96Standard 90°C 7,5 0,30 1,04 148 96 22,2 73,7Super Wash 90°C 7,5 0,40 1,08 169 116 26,6 82,1Easy Iron 90°C 7,5 0,30Mini Load 90°C 3,5 0,45 1,07 132 78 15,1 57,8Extra Rinse 90°C 7,5 0,30 n.r. 164 96 22,2 97,7
Coloured cotton Standard 40° 7,5 0,11 0,90 95 45 22 71Mini Load 40° 3,5 0,15 0,92 83 40 14 55,6Super Wash 40° 7,5 0,16 0,94 100 53 27 78,9Easy Iron 40° 7,5 0,11 n.r. 107 45 22 92Extra Rinse 40° 7,5 0,12 n.r. 111 45 22 95
Delicate Synthetics Standard 40° 3,5 0,13 0,86 70 33 12,6 53,5Mini Load 40° 1,5 0,23 0,91 67 24 9,5 33Super Wash 40° 3,5 0,19 0,95 85 48 17,4 58,4Easy Iron 40° 3,5 0,11 n.r. 83 31 14 79Extra Rinse 40° 3,5 0,14 n.r. 81 33 13 77
Mix 30' (ex-daily) Standard 28°C 3,5 0,05 n.r. 33 15 13 52Mini Load 28°C 1,5 0,05Easy Iron 28°C 3,5 0,05 n.r. 33 15 13 54
Pre-washed Cottons Standard 90° 7,5 0,36 1,05 175 123 31,5 85Mini Load 90° 3,5 0,37 1,09 136 97 20,5 59Easy Iron 90° 7,5 0,36Super Wash 90° 7,5 0,41 1,09 190 135 32 87Extra Rinse 90° 7,5 0,36 n.r. 191 123 31,5 109
Durable Synthetics Standard 60° 3,5 0,22 0,97 85 52 12,5 53,5Mini Load 60° 1,5 0,38 1,01 72 39 9,2 31,5Super Wash 60° 3,5 0,32 1,09 108 67 16,3 56,4Easy Iron 60° 3,5 0,20 n.r. 98 50 14 79Extra Rinse 60° 3,5 0,23 n.r. 96 52 13 78
Shirts Standard 35°C 2,1 0,37 0,80 75 43 36 82,7Mini Load 35°C 1 0,47 0,78 70 37 26,1 73,2Super Wash 35°C 2,1 0,40 0,83 78 45 36,6 83,6Easy Iron 35°C 2,1 0,37 n.r. 73 39 35,3 83,8Extra Rinse 35°C 2,1 0,37 n.r. 85 43 36 103
Silk Standard 28°C 2 0,20 n.r. 53 31 27,5 106Mini Load 28°C 1Extra Rinse 28°C 2 0,20 n.r. 59 31 27,5 126Easy Iron 28°C 2 0,20 n.r. 53 31 27,5 106
Wool Standard 40°C 2 0,20 n.r. 65 24 12,5 84Mini Load 40°C 1 0,35 n.r. 59 24 10,6 72,5Extra Rinse 40°C 2 0,20 n.r. 75 24 12,5 99
Duvets Standard 30°C 3 0,12 n.r. 74 34 19,6 96,6Mini Load 30°C 1,5 0,20 n.r. 69 26 13,5 65,2Extra Rinse 30°C 3 0,12 n.r. 88 34 19,6 122Easy Iron 30°C 3 0,12 n.r. 80 29 20,4 99
Bed & Bath Standard 50°C 7,5 0,20 0,97 112 63 26,4 90,8Mini Load 50°C 3,5 0,24 1,03 104 48 15,1 63,1Super Wash 50°C 7,5 0,22 1:01 123 74 27 91,3Easy Iron 50°C 7,5 0,20Extra Rinse 50°C 7,5 0,20 n.r. 125 63 26,4 110

AP
PE
ND
IX
35
Service ManualAqualtis - 2005
Edition2005.07.06
GB
LanguageEnglish
PR
OG
RA
M D
IAG
RA
MS
Dia
gra
m:W
ash
cyc
le a
t 60
°C +
Su
per
Was
h
Dia
gra
m: S
tan
dar
d w
ash
60°
C -
Aq
ual
tis
AP
PE
ND
IX
36
Service ManualAqualtis - 2005
Edition2005.07.06
GB
LanguageEnglish
Dia
gra
m: S
tan
dar
d w
ash
cyc
le a
t 40
°C -
Aq
ual
tis
Dia
gra
m: “
Min
iload
” w
ash
cyc
le
C° 06 55 05C°1 4
C °14C °04
54 04aciracS
53 03 52 02 51 01aciracS
C°1
4a
dla
cS
.c
ce
M'
2C°
14
ad l
ac
S.
cc
eM
'4
C °0
4a
d la
cS
C °8
2a
dla
cS
C°4
2a
dla
cS
.bi
bmI
"0
9c
e rP
es
aF
otn
em i
vo
M-
no
"6
-ff
o"4
no
"1
1-
ffo"
4
mpr
52
tl1
acir
ac
no
"6
-ff
o"4
no
"1
1-
ffo"
4
mpr
52
tl1
aci r
ac
no
"6
-ff
o"4
no
"1
1-
f fo"
4
mpr
52
'5
dn
ats
no
"3
1-
ffo"
2
mpr
04
no
"3
1-
ffo"
2
mp r
04
no
"3
1-
ffo"
2
mpr
04
no
"3
1-
ffo"
2
mpr
04
no
"3
1-
ffo"
2
mpr
04
oci
na
cc
eM
'2
1
no
"3
1-
ffo"
2
mpr
04
AP
PE
ND
IX
37
Service ManualAqualtis - 2005
Edition2005.07.06
GB
LanguageEnglish
Dia
gra
m: M
ini L
oad
was
h c
ycle
at
40°C
- A
qu
alti
s
Dia
gra
m: S
up
er W
ash
cyc
le a
t 40
°C -
Aq
ual
tis
C° 06 55 05C °14
C°1 4C °14
C °0454 04 53 03 52 02 51 01
aciracS
.c
ce
M'
7C°
14 . l
ac
S.
cc
eM
'2
C°1
4a
dla
cS
.c
ce
M'
5C°
14
adl
ac
S.
cc
eM
'6
C°0
4a
dla
cS
C°8
2a
dla
cS
C°4
2a
d la
cS
.bi
bmI
"0
9c
erP
es
aF
otn
em i
vo
M-
no
"6
-ff
o"4
no
"1
1-
ffo "
4
mpr
52
tl1
ac ir
ac
no
"6
-ff
o "4
no
"1
1-
ffo"
4
mpr
52
tl5,
5a
cira
c
no
"6
-ff
o"4
no
"1
1-
ffo"
4
mp r
52
no
"3
1-
ffo"
2
mpr
04
no
"3
1-
ffo"
2
mpr
04
no
"3
1-
ffo"
2
mpr
04
no
"9
-ff
o "6
mpr
04
no
"9
-ff
o"6
mpr
04
"9
-ff
o"6
no
mpr
04
"9
-ff
o"6
no
mpr
04
-f f
o "2
no
"3
1
mpr
04
C° 06 55 05C°14
C°14C°04
5 4 04aci racS
53C°82
03 52 02 51 01aci racS
C°1
4a
dla
cS
.c
ce
M'
2C°
14
ad l
ac
S.
cc
eM
'4
C°0
4a
dla
cS
C °8
2a
dla
cS
.bi
bmI
"0
9c
erP
es
aF
o tn
emi
vo
M-
no
"6
-f f
o"4
no
"1
1-
ffo"
4
mp r
52
no
"6
-ff
o"4
no
"1
1-
f fo "
4
mpr
52
'5
dn
ats
no
"3
1-
ffo"
2
mpr
04
no
"8
2-
ffo"
2
mpr
04
"8
2-
ffo"
2
no
mp r
04
no
"8
2-
ffo"
2
mpr
04
no
"8
2-
ffo"
2
mpr
04
oci
na
cc
eM
'5
no
"8
2-
ffo "
2
mpr
04
AP
PE
ND
IX
38
Service ManualAqualtis - 2005
Edition2005.07.06
GB
LanguageEnglish
Dia
gra
m: S
up
er W
ash
Co
tto
n W
ash
Cyc
le a
t 90
°C -
Aq
ual
tis
Dia
gra
m: S
tan
dar
d C
ott
on
Was
h C
ycle
at
90°C
- A
qu
alti
s
C°C°2 8
09 08C°27
07 06 55C°05
05 54 04C° 04
53C°72
03 52 02 51 01a ciracS
C°2
8C °
27 .
csi
Ro
cin
ac
ce
M'
5C°
05
a.
siR
o iB
'4
C°0
4a
dla
cS
C°0
3a
dla
cS
C°4
2a
dla
cS
.b i
bmI
"0
9c
erP
'0
1.c
eM
°7
2.
siR
es
aF
otn
emi
vo
Mn
o"
6-
ffo "
4
no
"1
1-
ffo"
4
mpr
52
no
"9
-ff
o"6
no
"9
-ff
o"6
mpr
04
-
no
"6
-ff
o "4
no
"1
1-
ffo"
4
mpr
52
no
"6
-ff
o "4
no
"1
1-
ffo"
4
mpr
52
t l1
acir
ac
no
"6
-ff
o"4
no
"1
1-
ffo "
4
mpr
52
'3
dn
a ts
no
"9
-ff
o"6
no
"9
-ff
o "6
mpr
04
no
"9
-f f
o"6
no
"9
-f f
o"6
mpr
04
no
"9
-ff
o"6
no
"9
-ff
o"6
mpr
04
no
"9
-f f
o"6
no
"9
-f f
o"6
mpr
04
no
"9
-f f
o"6
no
"9
-ff
o"6
mpr
04
omr
e fa
oc i
na
cc
eM
'7
1
no
"9
-f f
o"6
no
"9
-f f
o"6
mpr
04
C°C °2 8
09C °2 8
08 07 06 55 05 54 04C°04
53C°7 2
03 52 02ac ira cS
51 01
C °2
8 .c
siR
C°2
8.c
siR
a.
siR
oiB
'4
C°0
4a
dla
cS
C°0
3a
dla
cS
C°4
2a
dla
cS
.b i
bmI
"0
9c
erP
'0
1.c
eM
°7
2.
siR
es
aF
otn
em i
vo
Mn
o"
6-
ffo"
4
no
"1
1-
ffo"
4
mpr
52
no
"9
-ff
o"6
no
"9
-ff
o"6
mpr
04
-
no
"6
-ff
o "4
no
"1
1-
ffo"
4
mpr
52
no
"6
-ff
o "4
no
"1
1-
ffo"
4
mpr
52
tl5,
5a
cira
c
no
"6
-ff
o"4
no
"1
1-
ffo "
4
mpr
52
'3
dn
a ts
no
"9
-f f
o"6
no
"9
-ff
o "6
mpr
04
no
"9
-ff
o"6
no
"9
-ff
o"6
mpr
04
no
"9
-ff
o"6
no
"9
-ff
o"6
mpr
04
no
"9
-ff
o"6
no
"9
-ff
o"6
mpr
04
no
"9
-ff
o "6
no
"9
-ff
o"6
mpr
04
no
"9
-ff
o"6
no
"9
-f f
o"6
mpr
04
no
"9
-f f
o"6
no
"9
-f f
o"6
mpr
04
oci
na
cc
eM
'7
oc i
na
cc
eM
'8

AP
PE
ND
IX
39
Service ManualAqualtis - 2005
Edition2005.07.06
GB
LanguageEnglish
Dia
gra
m: S
tan
dar
d C
ott
on
Was
h C
ycle
at
90°C
- A
qu
alti
s
Dia
gra
m: M
ini L
oad
Co
tto
n W
ash
Cyc
le a
t 90
°C -
Aq
ual
tis
C°C°28
09 08C°27
07 06 55C°05
05 54 04 53C°72
03 52 02 51 01
C°2
8C°
27.
csi
Ro
cin
ac
ce
M'
4C°
05
a.
siR
oiB
'4
C°0
4a
dla
cS
C°0
3a
dla
cS
.b i
bmI
"0
9c
erP
'0
1.c
eM
°7
2.
siR
es
aF
otn
emi
vo
Mn
o"
6-
ffo"
4
no
"1
1-
ffo"
4
mpr
52
no
"9
-ff
o"6
no
"9
-f f
o"6
mp r
04
-
no
"6
-ff
o "4
no
"1
1-
ffo"
4
mpr
52
no
"6
-f f
o "4
no
"1
1-
ffo"
4
mpr
52
'3
dn
ats
no
"9
-ff
o"6
no
"9
-ff
o"6
mpr
04
no
"9
-ff
o"6
no
"9
-ff
o"6
mpr
04
no
"9
-ff
o"6
no
"9
-ff
o"6
mpr
04
no
"9
-f f
o"6
no
"9
-ff
o"6
mpr
04
no
"9
-ff
o"6
no
"9
-ff
o"6
mpr
04
omr
efa
oci
na
cc
eM
'7
1
no
"9
-ff
o "6
no
"9
-ff
o"6
mpr
04
C°C°2 8
09 08 07C °27
06 55 05C°0 5
54 04 53aci ra c
S03 52 02 51 01
C°2
8C°
27.
csi
Ro
cin
ac
ce
M'
5a
.s i
Roi
B'
4C°
04
adl
ac
SC°
03
adl
ac
SC°
42
adl
ac
S.
bib
mI"
09
cer
Pe
sa
F
otn
emi
vo
M-
no
"6
-ff
o"4
no
"1
1-
ffo "
4
mpr
52
no
"6
-ff
o"4
no
"1
1-
ffo"
4
mpr
52
tl1
acir
ac
no
"6
-ff
o"4
no
"1
1-
ffo"
4
mpr
52
'3
dn
ats
no
"9
-ff
o "6
no
"9
-ff
o"6
mpr
04
no
"9
-ff
o"6
no
"9
-ff
o"6
mp r
04
no
"9
-ff
o "6
no
"9
-ff
o"6
mpr
04
no
"9
-f f
o"6
no
"9
-f f
o"6
mpr
04
no
"9
-ff
o "6
no
"9
-f f
o "6
mpr
04
om r
e fa
oci
na
cc
eM
'7
1
no
"9
-f f
o "6
no
"9
-ff
o "6
mpr
04
AP
PE
ND
IX
40
Service ManualAqualtis - 2005
Edition2005.07.06
GB
LanguageEnglish
Dia
gra
m: M
ini L
oad
Co
tto
n W
ash
Cyc
le a
t 90
°C -
Aq
ual
tis
Dia
gra
m: S
up
er W
ash
Co
tto
n W
ash
Cyc
le a
t 90
°C -
Aq
ual
tis
C°C °2 8
09C °2 8
08 07C°27
06 55 05C°05
54 04 53 03 52 02 51 01aci ra c
S
C°2
8.c
siR
C°0
5a
.si
Roi
B'
4C°
04
adl
ac
SC°
03
adl
ac
SC°
42
adl
ac
S.
bib
mI"
09
cer
Pe
sa
F
otn
emi
vo
M-
no
"6
-ff
o "4
no
"1
1-
f fo"
4
mpr
52
no
"6
-ff
o "4
no
"1
1-
ffo"
4
mpr
52
tl5,
5a
c ira
c
no
"6
-ff
o"4
no
"1
1-
ffo"
4
mpr
52
'3
dn
ats
no
"9
-ff
o"6
no
"9
-ff
o "6
mpr
04
no
"9
-ff
o"6
no
"9
-ff
o"6
mpr
04
no
"9
-ff
o"6
no
"9
-ff
o"6
mpr
04
no
"9
-ff
o"6
no
"9
-ff
o"6
mpr
04
oci
na
cc
eM
'8
no
"9
-ff
o "6
no
"9
-ff
o "6
mpr
04
no
"9
-ff
o "6
no
"9
-ff
o"6
mpr
04
no
"9
-ff
o "6
no
"9
-ff
o "6
mpr
04
C°2
8 .c
siR
oci
na
cc
eM
'7
C° 09C°2 8
08C°2 7
07 06 55 05C °05
54 04 53 03 52 02 51 01a ci rac
SC°
28
C°2
7.c
siR
oci
na
cc
eM
'4
C°0
5a
.si
Roi
B'
4C°
04
adl
ac
SC°
03
adl
ac
S.
bib
m I"
09
cer
Pe
sa
F
o tn
emi
vo
M-
no
"6
-ff
o"4
no
"1
1-
ffo"
4
mpr
52
no
"6
-f f
o"4
no
"1
1-
ffo"
4
mpr
52
'3
dn
ats
no
"9
-ff
o"6
no
"9
-f f
o "6
mpr
04
no
"9
-f f
o "6
no
"9
-ff
o"6
mpr
04
no
"9
-ff
o"6
no
"9
-f f
o"6
mpr
04
no
"9
-ff
o"6
no
"9
-ff
o"6
mpr
04
no
"9
-ff
o"6
no
"9
-ff
o"6
mp r
04
omr
efa
no
"9
-ff
o"6
no
"9
-ff
o"6
mpr
04
oci
na
cc
eM
'7
1
AP
PE
ND
IX
41
Service ManualAqualtis - 2005
Edition2005.07.06
GB
LanguageEnglish
C° 06
C° 3555 05 54 04 53 03 52 02 5 1 01
a cir acS.
ce
M'
02
-C°
35
A.
csi
RC°
04.
siR
.bi
bmI
"0
9c
erP
es
aF
otn
emi
vo
M-
no
"6
-ff
o"4
no
"1
1-
ffo"
4
mpr
52
no
"3
1-ff
o "2
mpr
04
no
"3
1-f f
o"2
mpr
04
C°0
3.si
R
tl3
acir
ac
no
"6
-ff
o"4
no
"1
1-
ffo"
4
mpr
52
'5
dn
a ts
C° 06C°7 5
55C °6 5
05 54 04 53 03 52 02 51 01aciracS
.bi
bmI
"0
9c
erP
es
aF
'0
1.c
eM
otn
emi
vo
M-
no
"6
-ff
o "4
no
"1
1-
ffo"
4
mpr
52
no
"3
1-ff
o"2
mpr
04
C°6
5 .si
RC°
03.
siR
'0
2 .c
eM
C°7
5.si
R
t l5 ,
4a
c ira
c
no
"6
-ff
o "4
no
"1
1-
ffo"
4
mpr
52
'5
dn
a ts
no
"3
1-ff
o"2
mpr
04
no
"9 -
ffo "
6
mpr
04
no
"3
1-ff
o"2
mp r
04
Dia
gra
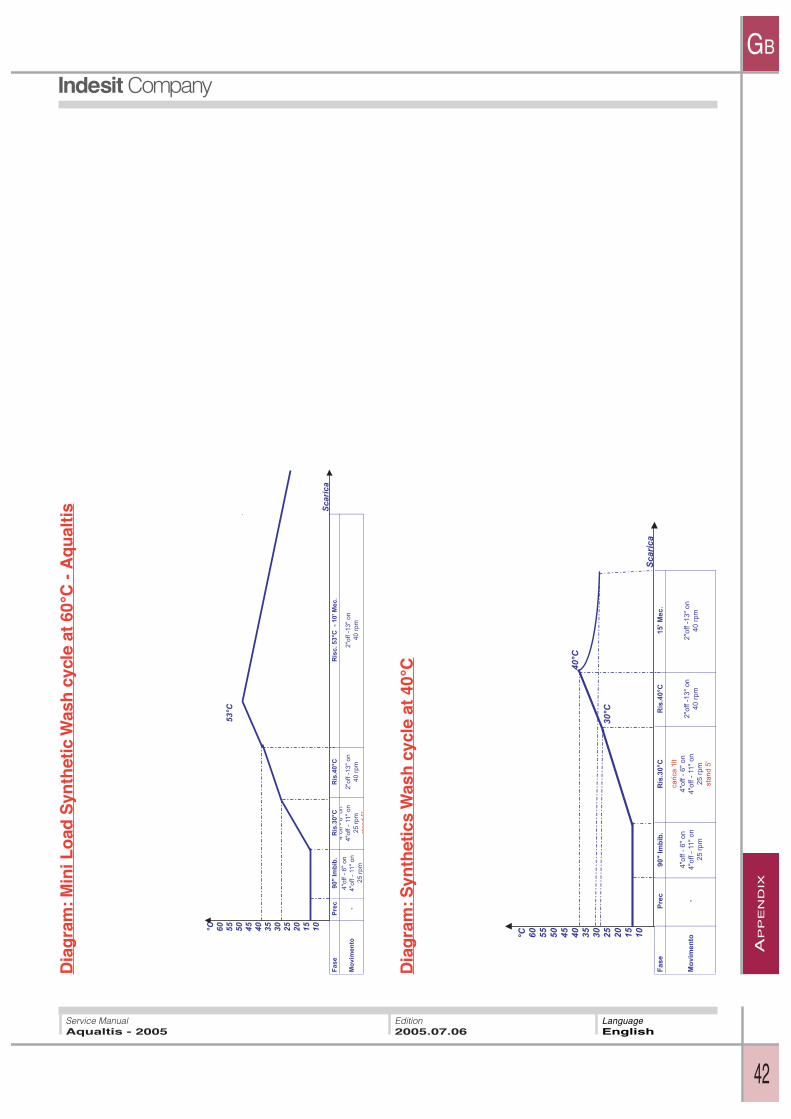
m: S
up
er W
ash
cyc
le a
t 60
°C -
Aq
ual
tis
Dia
gra
m: S
tan
dar
d S
ynth
etic
s W
ash
cyc
le a
t 60
°C -
Aq
ual
tis
AP
PE
ND
IX
42
Service ManualAqualtis - 2005
Edition2005.07.06
GB
LanguageEnglish
C° 06 55 05 54C °04
04 53 03C°03
52 02 51 01a c ir acS
C°0
4.si
R.
bib
mI"
09
cer
Pe
sa
F
otn
emi
vo
M-
no
"6
-ff
o"4
no
"1
1-
ffo"
4
mpr
52
no
"3
1-f f
o "2
mpr
04
C°0
3.si
R
tl1
acir
ac
no
"6
-ff
o"4
no
"1
1-
f fo"
4
mpr
52
'5
dn
ats
.c
eM
'5
1
no
"3
1 -f f
o"2
mpr
04
Dia
gra
m: S
ynth
etic
s W
ash
cyc
le a
t 40
°C
Dia
gra
m: M
ini L
oad
Syn
thet
ic W
ash
cyc
le a
t 60
°C -
Aq
ual
tis
C° 06C° 35
55 05 54 04 53 03 52 02 51 01acira cS
.c
eM
'0
1-
C°3
5.
csi
RC°
04.
siR
.bi
bm I
"0
9c
e rP
es
aF
o tn
emi
vo
M-
no
"6
-ff
o"4
no
"1
1-
ffo"
4
r5
2p
m
no
"3
1-ff
o"2
mp r
04
no
"3
1-ff
o"2
mpr
04
C°0
3.si
Rff
o4
-n
o6
no
"1
1-
ffo"
4
mp r
52
dn
a ts
5'
AP
PE
ND
IX
43
Service ManualAqualtis - 2005
Edition2005.07.06
GB
LanguageEnglish
C° 06 55 0 5C°04
54 04 53 03C°03
52 02 51 01a cirac S
C°0
4.si
R.
b ib
mI"
09
cer
Pe
sa
F
otn
emi
vo
M-
no
"6
-ff
o"4
no
"1
1-
ffo"
4
r5
2pm
no
"3
1 -ff
o"2
mpr
04
C °0
3 .si
R
no
"6
-ff
o"4
no
"1
1-
ffo"
4
r5
2p
m
.c
eM
'7
no
"3
1-ff
o"2
mp r
04
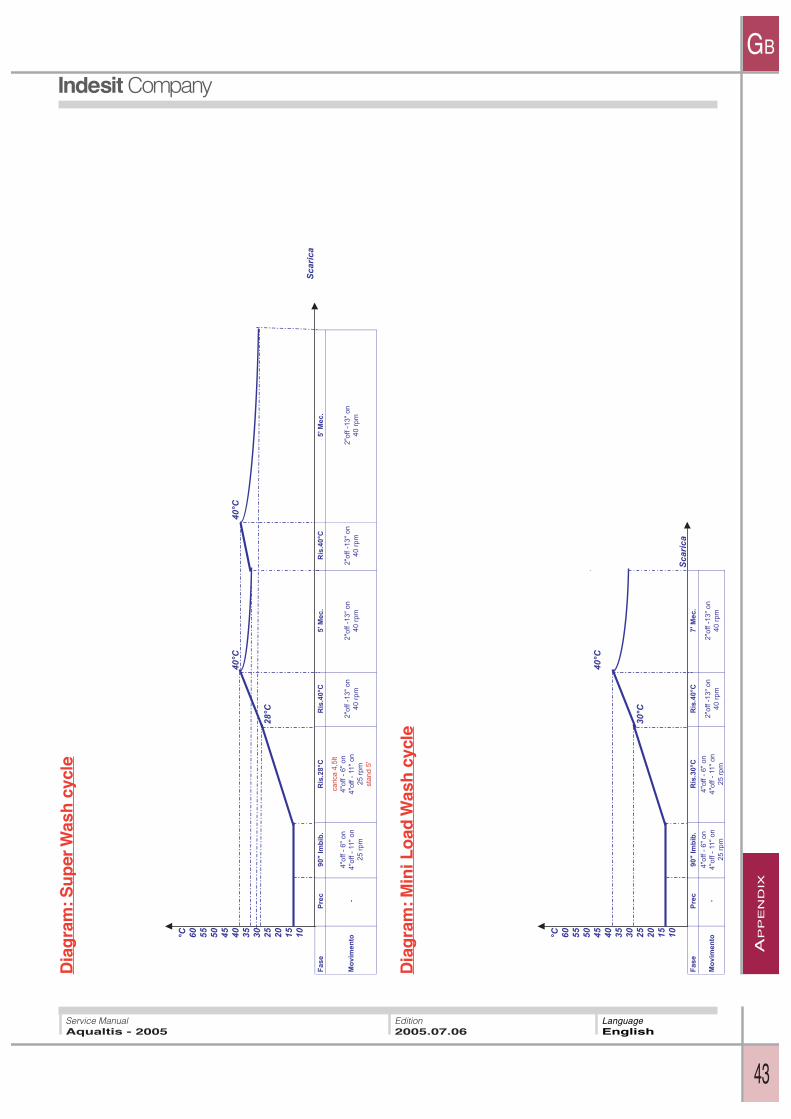
Dia
gra
m: M
ini L
oad
Was
h c
ycle
Dia
gra
m: S
up
er W
ash
cyc
le
C° 06 55 05 54C °0 4
C°0404 53 03
C°8252 02 51 01
a ci rac SC°
04 .
siR
C°0
4.si
R.
b ib
mI"
09
cer
Pe
sa
F
otn
emi
vo
M-
no
"6
-ff
o"4
no
"1
1-
ffo"
4
mp r
52
no
"3
1 -ff
o"2
mp r
04
no
"3
1-ff
o"2
mpr
04
C°8
2.si
R.
ce
M'
5
tl5,
4a
cira
c
no
"6
-ff
o"4
no
"1
1-
ffo"
4
mpr
52
'5
dn
ats
no
"3
1-f f
o "2
mpr
04
.c
eM
'5
no
"3
1-ff
o"2
mpr
04
AP
PE
ND
IX
44
Service ManualAqualtis - 2005
Edition2005.07.06
GB
LanguageEnglish
°C 60 55 50 45 40Scarica
35 3028°C
25 20 15 10Scarica
Fase
Pre
cS
cald
a 2
8°C
- 5
' M
ecc.
Mo
vim
en
to -
4"o
ff -
6"
on
4"o
ff -
11"
on
25 r
pm
3' M
ecc.
2"o
ff -
1
3"
on
40 r
pm
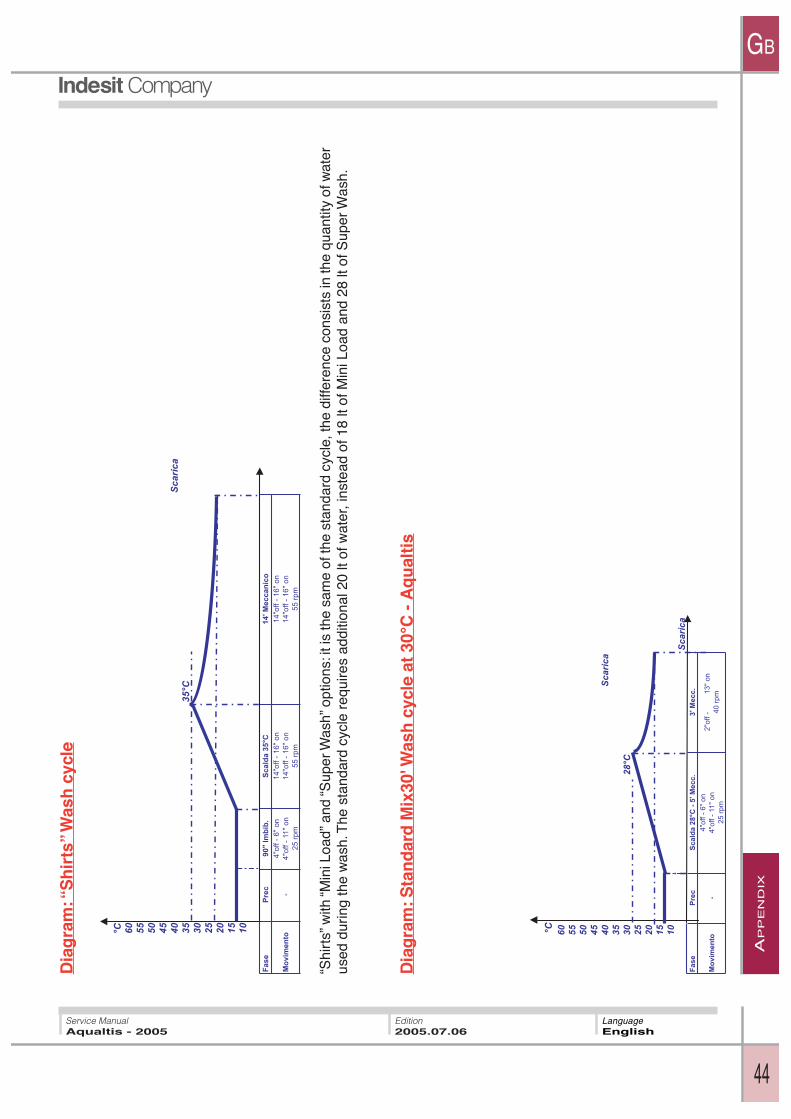
Dia
gra
m: S
tan
dar
d M
ix30
' Was
h c
ycle
at
30°C
- A
qu
alti
s
Dia
gra
m:“
Sh
irts
”W
ash
cyc
le
“Shi
rts”
with
“Min
i Loa
d” a
nd “S
uper
Was
h” o
ptio
ns: i
t is
the
sam
e of
the
stan
dard
cyc
le, t
he d
iffer
ence
con
sist
s in
the
quan
ti ty
of w
ater
used
dur
ing
the
was
h. T
he s
tand
ard
cycl
e re
quire
s ad
ditio
nal 2
0 lt
of w
ater
, ins
tead
of 1
8 lt
of M
ini L
oad
and
28 lt
of S
uper
Was
h.
C° 06 55 05 54 04aci ra cS
C°5353 0 3 52 02 5 1 01
.bi
bm I
"0
9c
e rP
es
aF
otn
emi
vo
M-
no
"6
-ff
o "4
no
"1
1-
ffo"
4
mpr
52
oci
na
cc
eM
'4
1C°
53
adl
ac
S
no
"6
1-
ffo"
41
no
"6
1-
ffo"
41
mpr
55
no
"6
1-
f fo"
41
no
"6
1-
ffo "
41
mpr
55
AP
PE
ND
IX
45
Service ManualAqualtis - 2005
Edition2005.07.06
GB
LanguageEnglish
C° 06 55C° 25
05 54C°0 4
04 53 03 52 02 51 01ac ira cS
C°8
2a
dla
cS
C °4
2a
dla
cS
es
aF
otn
emi
vo
M
no
"6
-ff
o"4
no
"1
1-
ffo"
4
mpr
52
t l1
aci r
ac
no
"6
-ff
o"4
no
"1
1-
ffo"
4
mp r
52
.c
eM
'6
C°2
5 .si
R
no
"6
-ff
o"4
no
"1
1-
ffo"
4
mp r
52
no
"3
1-
ffo"
2
no
"3
1-
ffo "
2
mpr
04
no
"3
1-ff
o "2
mpr
04
no
"8
2-f f
o"2
mp r
04
no
"3
1 -f f
o"2
mp r
04
.c
eM
'4
C°0
4 .si
R.
bib
mI"
09-.
cer
P
C° 06 5 5 0 5 5 4 0 4
C° 8253 03 5 2 0 2 51 01
aci rac S
es
aF
otn
em i
vo
M
.c
eM
'2
1C°
82.
siR
.b i
bmI
no
"4
-f f
o "2
1
no
"4
-ff
o"2
1
mpr
52
no
"4
-ff
o "6
5
mp r
52
no
"4-
f fo "
21
mpr
52
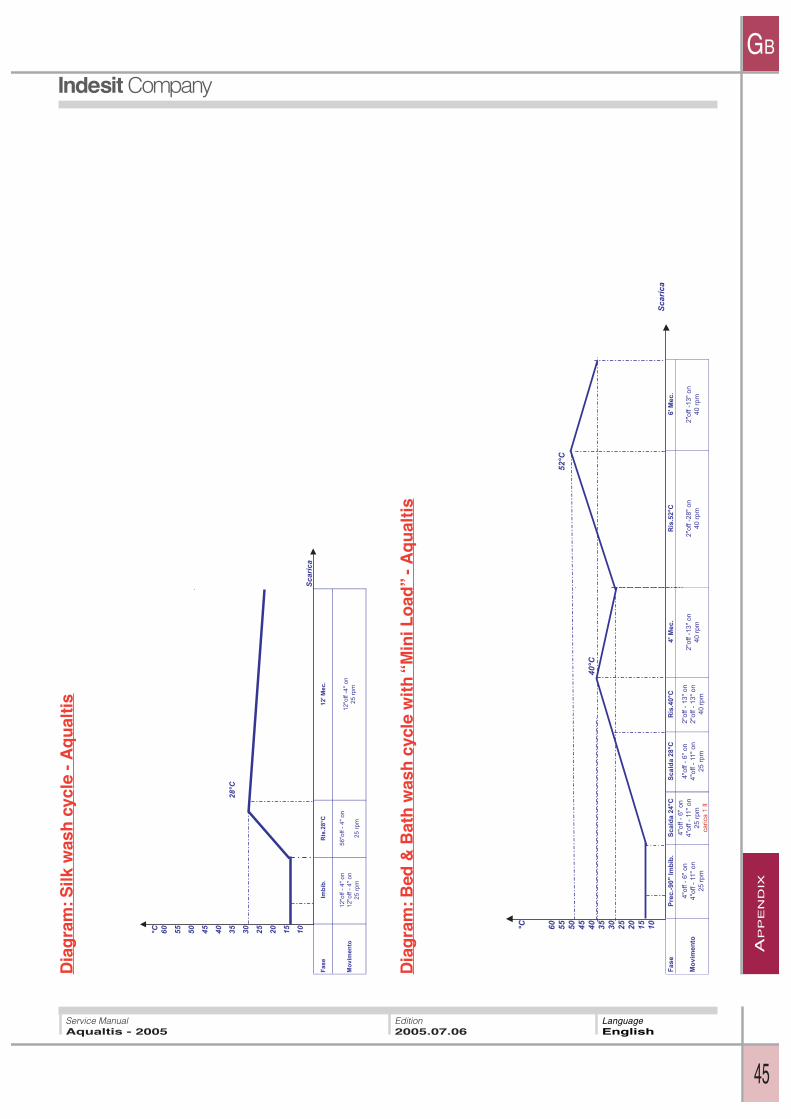
Dia
gra
m: B
ed &
Bat
h w
ash
cyc
le w
ith
“M
ini L
oad
” -
Aq
ual
tis
Dia
gra
m: S
ilk w
ash
cyc
le -
Aq
ual
tis
AP
PE
ND
IX
46
Service ManualAqualtis - 2005
Edition2005.07.06
GB
LanguageEnglish
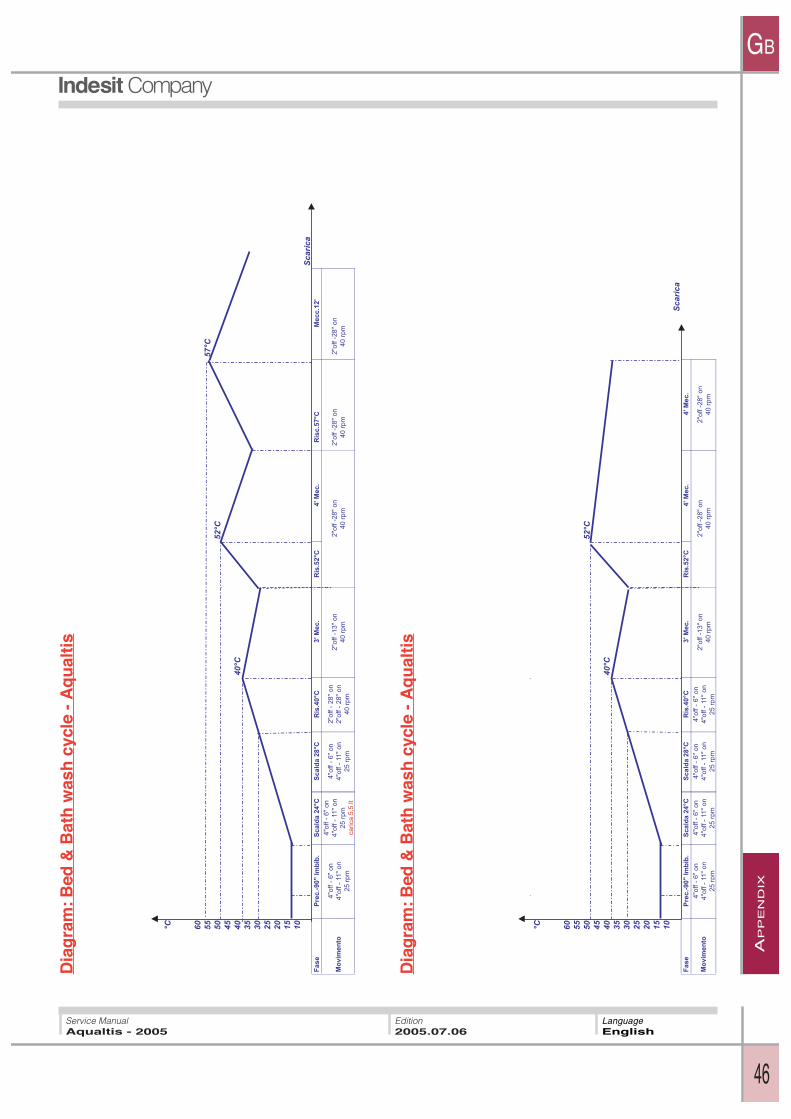
Dia
gra
m: B
ed &
Bat
h w
ash
cyc
le -
Aq
ual
tis
Dia
gra
m: B
ed &
Bat
h w
ash
cyc
le -
Aq
ual
tis
C° 06 55C° 7 5
05C°25
54C°04
04 53 03 52 02 51 01aci racS
C °7
5 .c
siR
C°2
5.si
RC °
82
adl
ac
SC°
42
ad l
ac
Se
sa
F
otn
emi
vo
M
no
"6
-ff
o "4
no
"1
1-
ffo"
4
mpr
52
tl5,
5a
cira
c
no
"6
-ff
o"4
no
"1
1-
ffo"
4
mpr
52
no
"8
2-f f
o"2
mp r
04
no
"8
2 -f f
o"2
mpr
04
'2
1 .c
ce
M
no
"6
-ff
o"4
no
"1
1-
ffo"
4
mpr
52
no
"8
2-
ffo"
2
no
"8
2-
ffo"
2
mpr
04
no
"3
1-ff
o"2
mpr
04
no
"8
2-ff
o"2
mpr
04
.c
eM
'4
.c
eM
'3
C °0
4.si
R.
bib
mI"
09-.
cer
P
C° 06 55 05C°25
54C°0 4
04 53 03 52 02 51 01acir acS
C°2
5.si
RC°
82
adl
ac
SC °
42
adl
ac
Se
sa
F
otn
emi
vo
Mn
o"
6-
ffo "
4
no
"1
1-
ffo"
4
r5
2pm
no
"6
-f f
o "4
no
"1
1-
ffo"
4
r5
2pm
.c
eM
'4
no
"6
-ff
o "4
no
"1
1-
ffo"
4
r5
2p
m
no
"6
-ff
o"4
no
"1
1-
ffo"
4
r5
2pm
no
"3
1 -ff
o"2
mp r
04
no
"8
2-ff
o"2
mpr
04
no
"8
2-ff
o"2
mp r
04
.c
eM
'4
.c
eM
'3
C°0
4.si
R.
bib
mI"
09-.
ce r
P

AP
PE
ND
IX
47
Service ManualAqualtis - 2005
Edition2005.07.06
GB
LanguageEnglish
Dia
gra
m:W
oo
l was
h c
ycle
- A
qu
alti
s
C° 06 55 05 54 04 53C°73
03 52 02 51 01aciracS
es
aF
otn
em i
vo
M
) '5 (.
ce
MC °
73.
siR
ocir
ac
-a
c ira
cer
P
acir
ac
erp
tl4
acir
ac
91
vo
m
'1
dn
ats
omr
efa
'5
dn
ats
mpr
09
"0
21
GB
Indesit Companyviale Aristide Merloni, 4760044 Fabriano - Italytel. +39 0732 66 11 - telex 560196 - fax +39 0732 66 2954 - www.indesitcompany.com
Service ManualAqualtis - 2005
Edition2005.07.06
LanguageEnglish
Related Documents