Electrolux FSE - Dishwashing Platform Electrolux Professional DOC. NO. 5956.446.00 ©Copyright 2002 by Electrolux Professional P .1 /46 SERVICE MANUAL v.3.00 CONTENTS: This document contains the instruction to change parameter settings of electronic board by means of user interface. EDITION: 09.2002 TANK BOILER 3.00 TANK BOILER 3.00 TANK BOILER 3.00

Welcome message from author
This document is posted to help you gain knowledge. Please leave a comment to let me know what you think about it! Share it to your friends and learn new things together.
Transcript
ElectroluxFSE - Dishwashing PlatformElectrolux Professional
DOC. NO. 5956.446.00 ©Copyright 2002 by Electrolux Professional P.1 /46
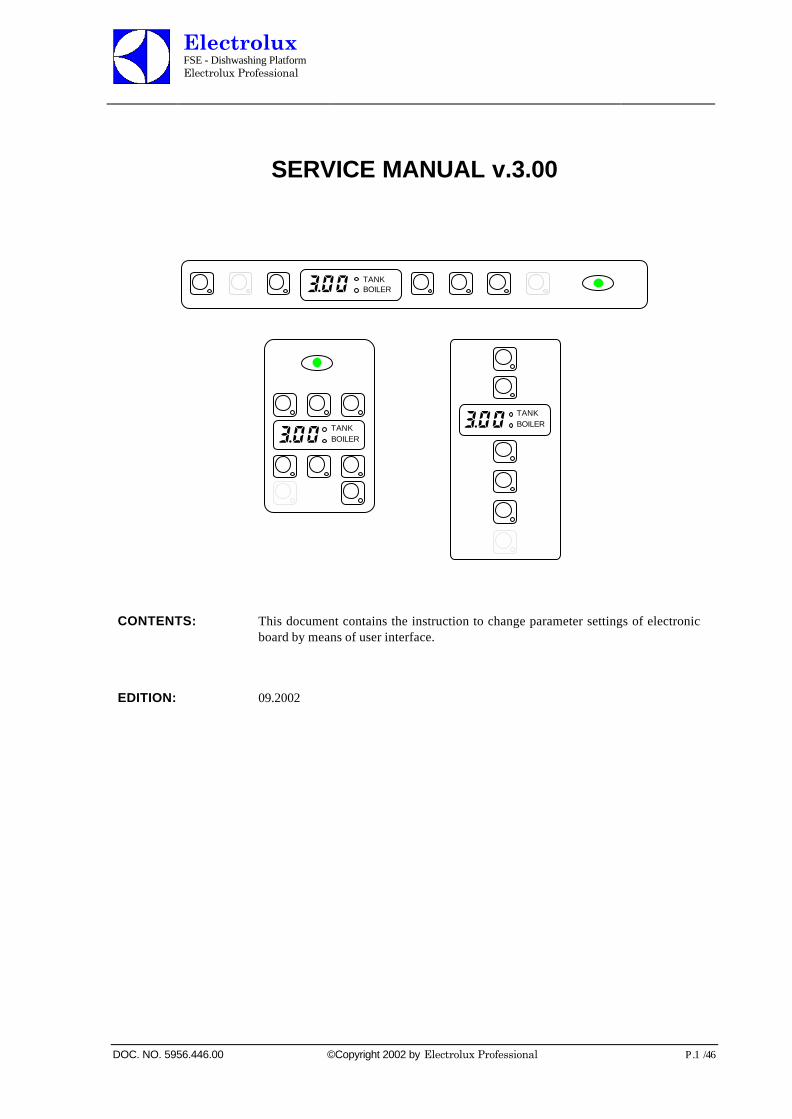
SERVICE MANUAL v.3.00
CONTENTS: This document contains the instruction to change parameter settings of electronicboard by means of user interface.
EDITION: 09.2002
TANKBOILER3.00
TANKBOILER3.00
TANKBOILER3.00
ElectroluxFSE - Dishwashing PlatformElectrolux Professional
Electronic DishwasherSERVICE MANUAL
DOC. NO. 5956.446.00 ©Copyright 2002 by Electrolux Professional P.2/46
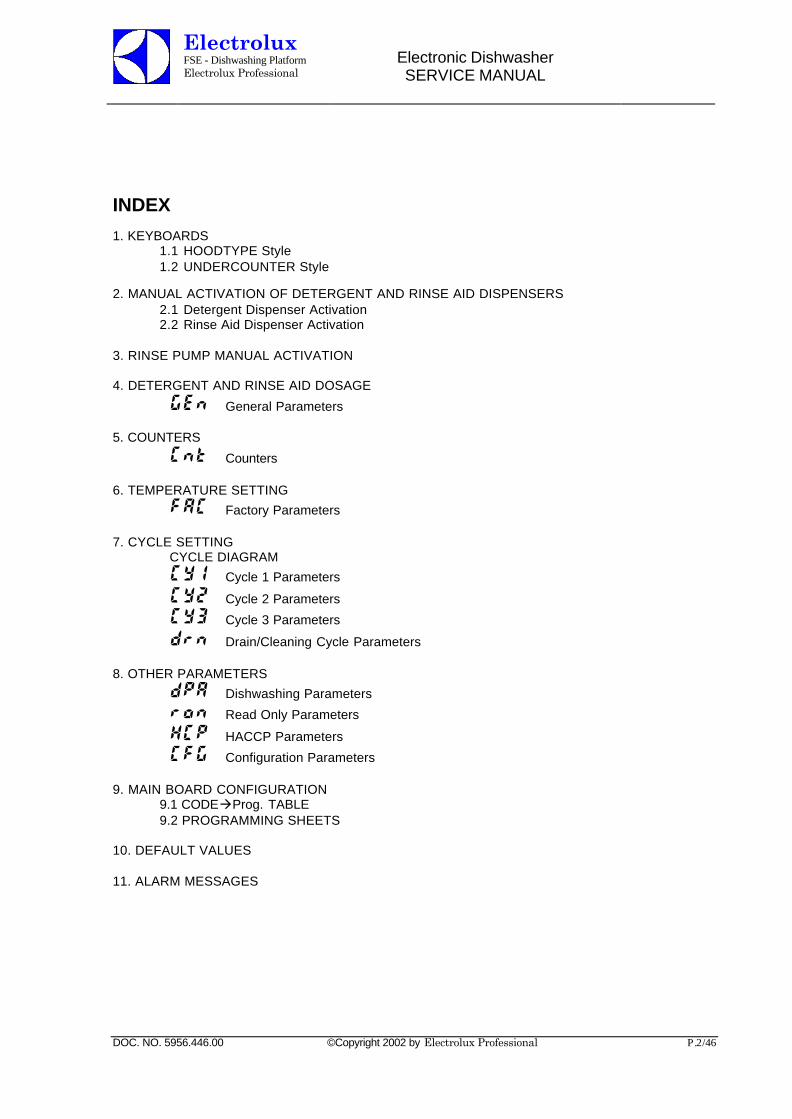
INDEX
1. KEYBOARDS1.1 HOODTYPE Style1.2 UNDERCOUNTER Style
2. MANUAL ACTIVATION OF DETERGENT AND RINSE AID DISPENSERS2.1 Detergent Dispenser Activation2.2 Rinse Aid Dispenser Activation
3. RINSE PUMP MANUAL ACTIVATION
4. DETERGENT AND RINSE AID DOSAGE
GEn General Parameters
5. COUNTERS
Cnt Counters
6. TEMPERATURE SETTING
FAC Factory Parameters
7. CYCLE SETTINGCYCLE DIAGRAM
CY1 Cycle 1 Parameters
CY2 Cycle 2 Parameters
CY3 Cycle 3 Parameters
drn Drain/Cleaning Cycle Parameters
8. OTHER PARAMETERS
dPA Dishwashing Parameters
ron Read Only Parameters
HCP HACCP Parameters
CFG Configuration Parameters
9. MAIN BOARD CONFIGURATION9.1 CODEàProg. TABLE9.2 PROGRAMMING SHEETS
10. DEFAULT VALUES
11. ALARM MESSAGES
ElectroluxFSE - Dishwashing PlatformElectrolux Professional
Electronic DishwasherSERVICE MANUAL
DOC. NO. 5956.446.00 ©Copyright 2002 by Electrolux Professional P.3/46
1. KEYBOARDS
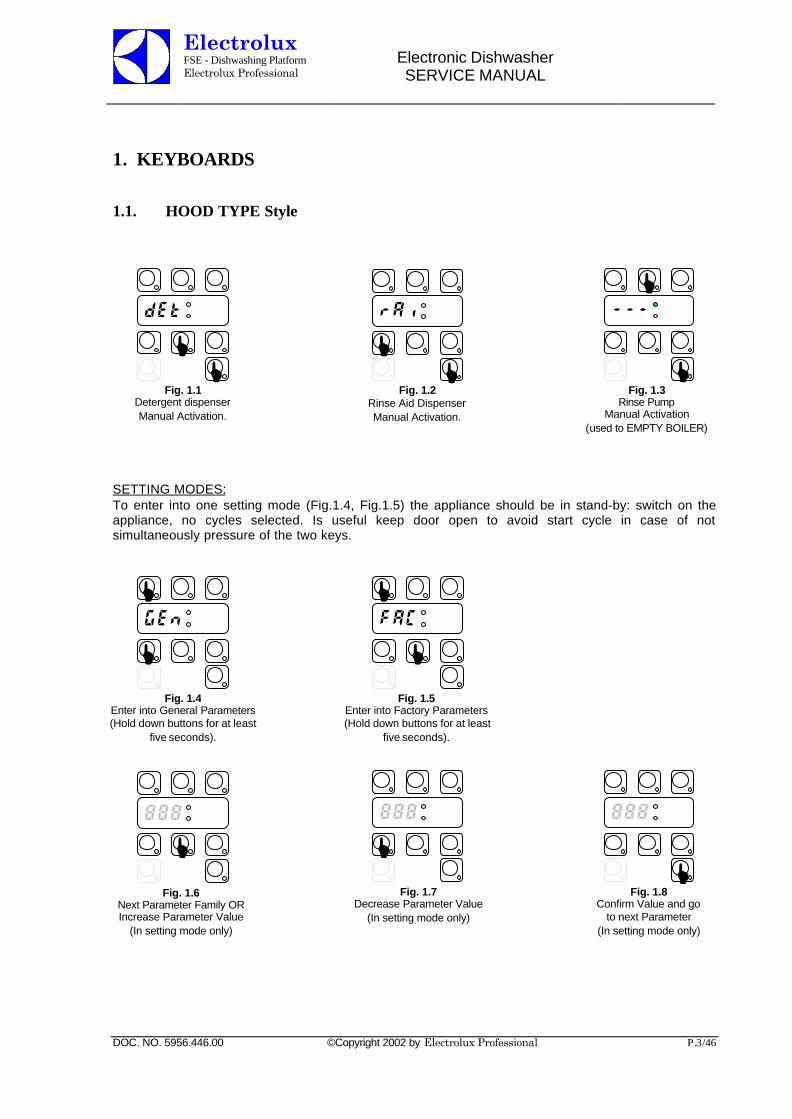
1.1. HOOD TYPE Style
SETTING MODES:To enter into one setting mode (Fig.1.4, Fig.1.5) the appliance should be in stand-by: switch on theappliance, no cycles selected. Is useful keep door open to avoid start cycle in case of notsimultaneously pressure of the two keys.
L
LFig. 1.5
Enter into Factory Parameters(Hold down buttons for at least
five seconds).
FAC
LFig. 1.8
Confirm Value and goto next Parameter
(In setting mode only)
888
LFig. 1.7
Decrease Parameter Value(In setting mode only)
888
LFig. 1.6
Next Parameter Family ORIncrease Parameter Value
(In setting mode only)
888
LL
Fig. 1.2Rinse Aid DispenserManual Activation.
rAiL
LFig. 1.3
Rinse PumpManual Activation
(used to EMPTY BOILER)
---
L
LFig. 1.4
Enter into General Parameters(Hold down buttons for at least
five seconds).
GEn
LL
Fig. 1.1Detergent dispenserManual Activation.
dEt
ElectroluxFSE - Dishwashing PlatformElectrolux Professional
Electronic DishwasherSERVICE MANUAL
DOC. NO. 5956.446.00 ©Copyright 2002 by Electrolux Professional P.4/46
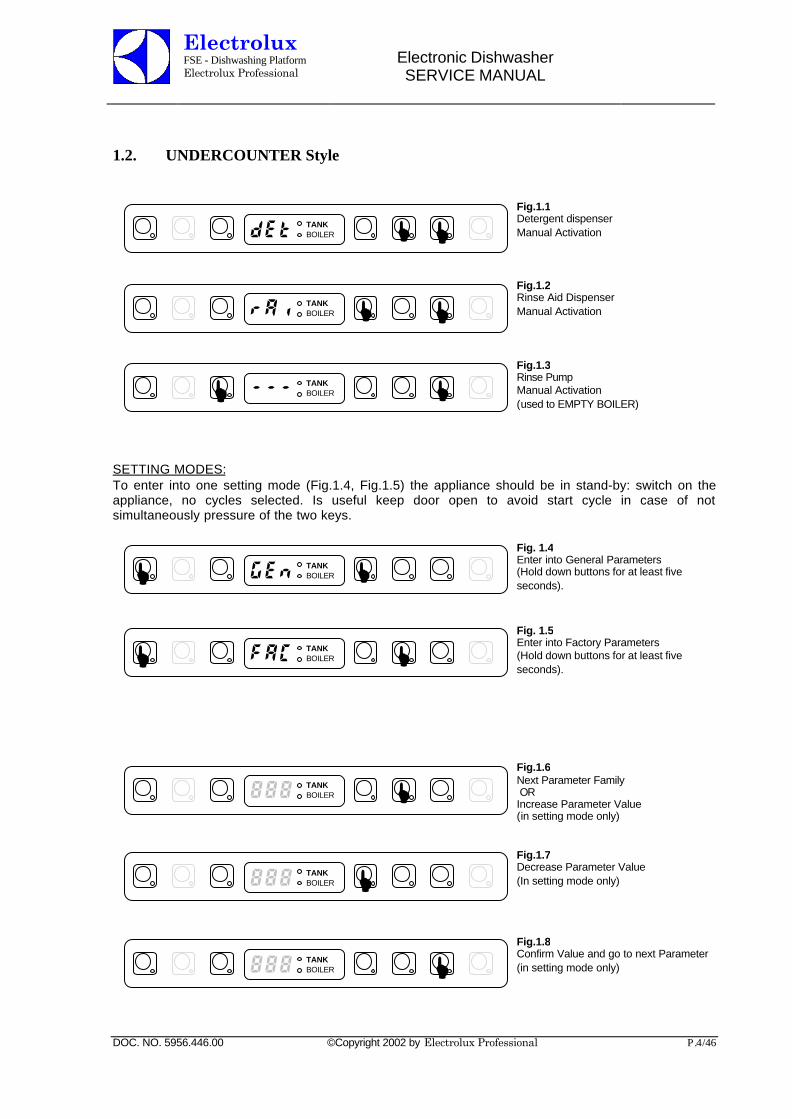
1.2. UNDERCOUNTER Style
SETTING MODES:To enter into one setting mode (Fig.1.4, Fig.1.5) the appliance should be in stand-by: switch on theappliance, no cycles selected. Is useful keep door open to avoid start cycle in case of notsimultaneously pressure of the two keys.
LLTANKBOILERdEt
Fig.1.1Detergent dispenserManual Activation
LLTANKBOILERrAi
Fig.1.2Rinse Aid DispenserManual Activation
LL TANKBOILER---
Fig.1.3Rinse PumpManual Activation(used to EMPTY BOILER)
L LTANKBOILERGEn
Fig. 1.4Enter into General Parameters(Hold down buttons for at least fiveseconds).
L LTANKBOILERFAC
Fig. 1.5Enter into Factory Parameters(Hold down buttons for at least fiveseconds).
LTANKBOILER888
Fig.1.6Next Parameter Family ORIncrease Parameter Value(in setting mode only)
LTANKBOILER888
Fig.1.7Decrease Parameter Value(In setting mode only)
LTANKBOILER888
Fig.1.8Confirm Value and go to next Parameter(in setting mode only)
ElectroluxFSE - Dishwashing PlatformElectrolux Professional
Electronic DishwasherSERVICE MANUAL
DOC. NO. 5956.446.00 ©Copyright 2002 by Electrolux Professional P.5/46
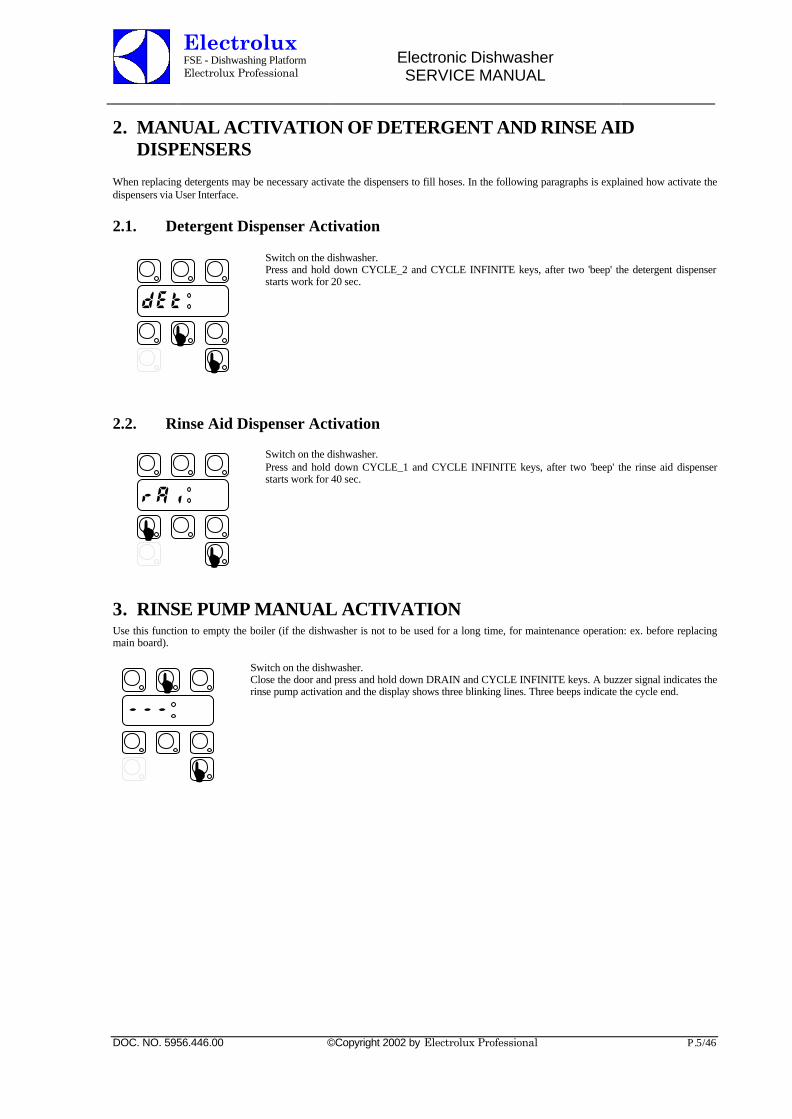
2. MANUAL ACTIVATION OF DETERGENT AND RINSE AIDDISPENSERS
When replacing detergents may be necessary activate the dispensers to fill hoses. In the following paragraphs is explained how activate thedispensers via User Interface.
2.1. Detergent Dispenser Activation
Switch on the dishwasher.Press and hold down CYCLE_2 and CYCLE INFINITE keys, after two 'beep' the detergent dispenserstarts work for 20 sec.
2.2. Rinse Aid Dispenser Activation
Switch on the dishwasher.Press and hold down CYCLE_1 and CYCLE INFINITE keys, after two 'beep' the rinse aid dispenserstarts work for 40 sec.
3. RINSE PUMP MANUAL ACTIVATIONUse this function to empty the boiler (if the dishwasher is not to be used for a long time, for maintenance operation: ex. before replacingmain board).
Switch on the dishwasher.Close the door and press and hold down DRAIN and CYCLE INFINITE keys. A buzzer signal indicates therinse pump activation and the display shows three blinking lines. Three beeps indicate the cycle end.
LL
dEt
LL
rAi
L
L
---
ElectroluxFSE - Dishwashing PlatformElectrolux Professional
Electronic DishwasherSERVICE MANUAL
DOC. NO. 5956.446.00 ©Copyright 2002 by Electrolux Professional P.6/46
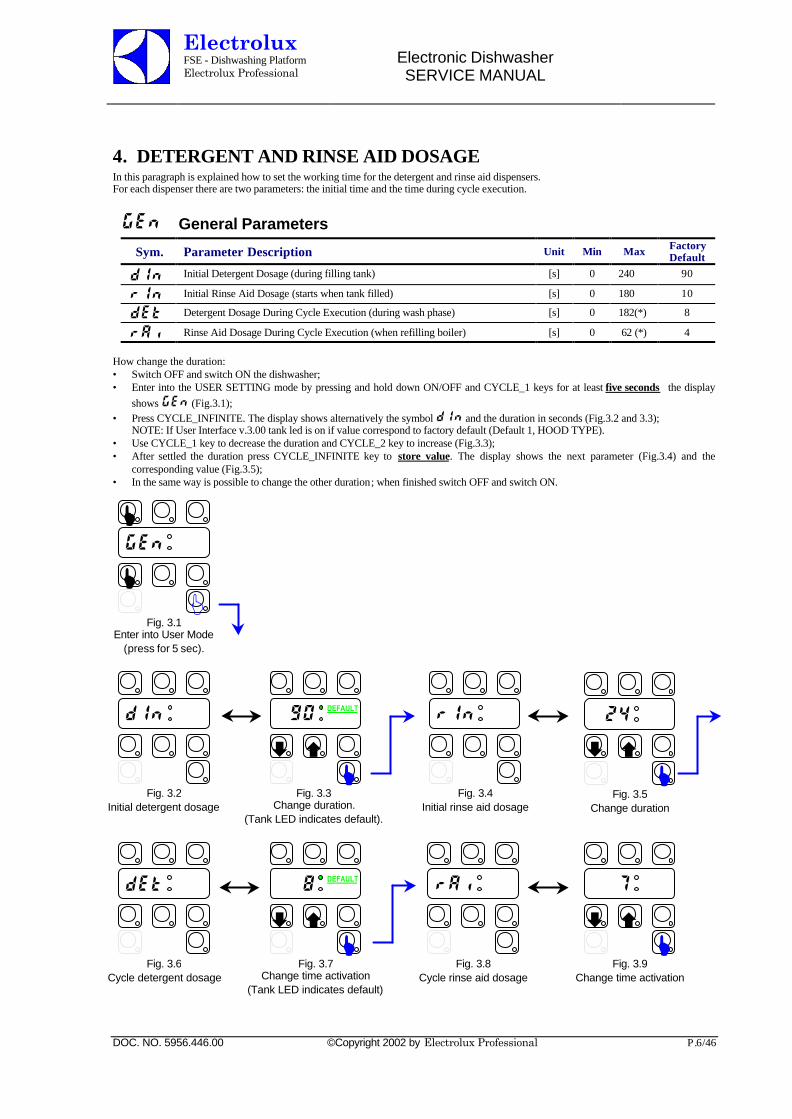
4. DETERGENT AND RINSE AID DOSAGEIn this paragraph is explained how to set the working time for the detergent and rinse aid dispensers.For each dispenser there are two parameters: the initial time and the time during cycle execution.
GEn General Parameters
Sym. Parameter Description Unit Min Max FactoryDefault
dIn Initial Detergent Dosage (during filling tank) [s] 0 240 90
rIn Initial Rinse Aid Dosage (starts when tank filled) [s] 0 180 10
dEt Detergent Dosage During Cycle Execution (during wash phase) [s] 0 182(*) 8
rAi Rinse Aid Dosage During Cycle Execution (when refilling boiler) [s] 0 62 (*) 4
How change the duration:• Switch OFF and switch ON the dishwasher;• Enter into the USER SETTING mode by pressing and hold down ON/OFF and CYCLE_1 keys for at least five seconds the display
shows GEn (Fig.3.1);• Press CYCLE_INFINITE. The display shows alternatively the symbol dIn and the duration in seconds (Fig.3.2 and 3.3);
NOTE: If User Interface v.3.00 tank led is on if value correspond to factory default (Default 1, HOOD TYPE).• Use CYCLE_1 key to decrease the duration and CYCLE_2 key to increase (Fig.3.3);• After settled the duration press CYCLE_INFINITE key to store value. The display shows the next parameter (Fig.3.4) and the
corresponding value (Fig.3.5);• In the same way is possible to change the other duration; when finished switch OFF and switch ON.
Fig. 3.8Cycle rinse aid dosage
rAi
ÇÈL
Fig. 3.9Change time activation
7
ÇÈL
DEFAULT
Fig. 3.7Change time activation
(Tank LED indicates default)
8
Fig. 3.6Cycle detergent dosage
dEt
Fig. 3.2Initial detergent dosage
dIn
ÇÈL
DEFAULT
Fig. 3.3Change duration.
(Tank LED indicates default).
90
Fig. 3.4Initial rinse aid dosage
rIn
ÇÈL
Fig. 3.5Change duration
24
L
LJ
Fig. 3.1Enter into User Mode
(press for 5 sec).
GEn
ElectroluxFSE - Dishwashing PlatformElectrolux Professional
Electronic DishwasherSERVICE MANUAL
DOC. NO. 5956.446.00 ©Copyright 2002 by Electrolux Professional P.7/46
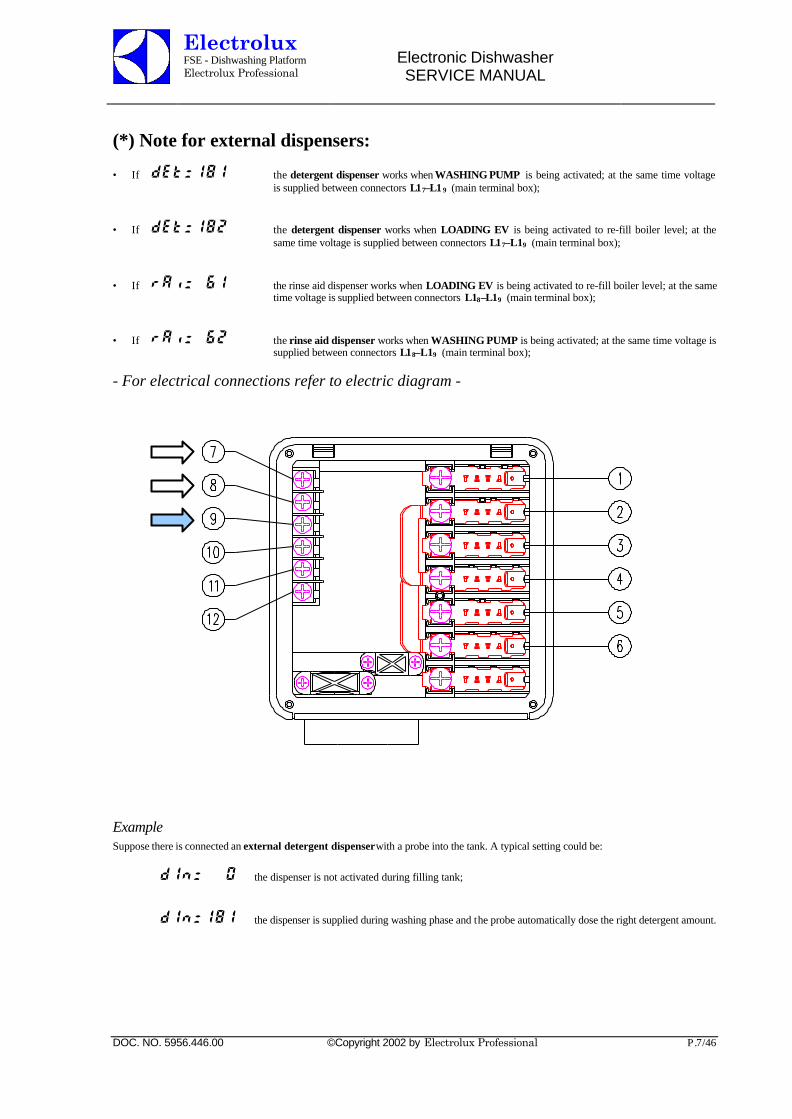
(*) Note for external dispensers:
• If DEt=181 the detergent dispenser works when WASHING PUMP is being activated; at the same time voltageis supplied between connectors L17–L1 9 (main terminal box);
• If dEt=182 the detergent dispenser works when LOADING EV is being activated to re-fill boiler level; at thesame time voltage is supplied between connectors L17–L19 (main terminal box);
• If rAi= 61 the rinse aid dispenser works when LOADING EV is being activated to re-fill boiler level; at the sametime voltage is supplied between connectors L18–L19 (main terminal box);
• If rAi= 62 the rinse aid dispenser works when WASHING PUMP is being activated; at the same time voltage issupplied between connectors L18–L19 (main terminal box);
- For electrical connections refer to electric diagram -
ExampleSuppose there is connected an external detergent dispenser with a probe into the tank. A typical setting could be:
DIn= 0 the dispenser is not activated during filling tank;
DIn=181 the dispenser is supplied during washing phase and the probe automatically dose the right detergent amount.
ElectroluxFSE - Dishwashing PlatformElectrolux Professional
Electronic DishwasherSERVICE MANUAL
DOC. NO. 5956.446.00 ©Copyright 2002 by Electrolux Professional P.8/46
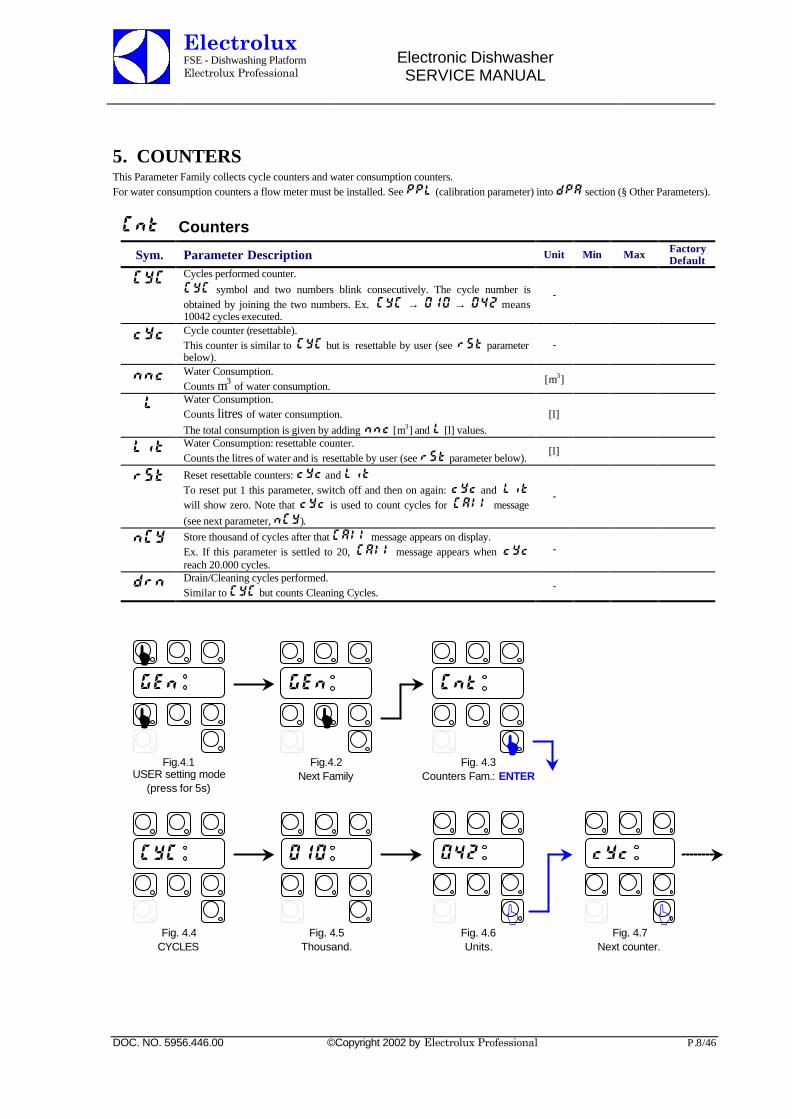
5. COUNTERSThis Parameter Family collects cycle counters and water consumption counters.For water consumption counters a flow meter must be installed. See PPL (calibration parameter) into dPA section (§ Other Parameters).
Cnt Counters
Sym. Parameter Description Unit Min Max FactoryDefault
CYC Cycles performed counter.CYC symbol and two numbers blink consecutively. The cycle number isobtained by joining the two numbers. Ex. CYC → 010 → 042 means10042 cycles executed.
-
cYc Cycle counter (resettable).This counter is similar to CYC but is resettable by user (see rSt parameterbelow).
-
nnc Water Consumption.Counts m3 of water consumption.
[m3]
L Water Consumption.Counts litres of water consumption.The total consumption is given by adding nnc [m3] and L [l] values.
[l]
Lit Water Consumption: resettable counter.Counts the litres of water and is resettable by user (see rSt parameter below).
[l]
rSt Reset resettable counters: cYc and LitTo reset put 1 this parameter, switch off and then on again: cYc and Litwill show zero. Note that cYc is used to count cycles for CAll message(see next parameter, nCY).
-
nCY Store thousand of cycles after that CAll message appears on display.Ex. If this parameter is settled to 20, CAll message appears when cYcreach 20.000 cycles.
-
drn Drain/Cleaning cycles performed.Similar to CYC but counts Cleaning Cycles.
-
LFig.4.2
Next Family
GEn
LFig. 4.3
Counters Fam.: ENTER
Cnt
Fig. 4.4CYCLES
CYC
L
LFig.4.1
USER setting mode(press for 5s)
GEn
Fig. 4.5Thousand.
010
JFig. 4.6Units.
042
JFig. 4.7
Next counter.
cYc

ElectroluxFSE - Dishwashing PlatformElectrolux Professional
Electronic DishwasherSERVICE MANUAL
DOC. NO. 5956.446.00 ©Copyright 2002 by Electrolux Professional P.9/46
6. TEMPERATURE SETTINGIn this paragraph is explained how to change temperature thresholds and all parameters related to boiler and tank.
FAC Factory Parameters
Sym. Parameter Description Unit Min Max FactoryDefault
bt°C Boiler Temperature: THRESHOLD.When boiler temperature reaches this value, heaters switch off. [°C] 45 95 76
btH Boiler Temperature HISTERESIS, (represent dead band).Heater switch on if tank temperature is below: bt°C - btH [°C] 2 10 2
bHi Boiler Temperature: HIGH LIMIT.When boiler temperature reaches this value C 2 alarm appears.Put 0 to disable C 2 alarm.
[°C] 0 98 96
bLo Boiler Temperature: LOW LIMIT.During boiler warm-up, temperature must increase at least bLo °C otherwiseE 3 warning appears.Put 0 to disable E 3 warning.
[°C] 0 10 1
bFL Boiler Filling Timeout.If filling time is longer than bFL, A 1 alarm appears.Put 0 to disable A 1 alarm.
[min] 0 42 5
bAJ Boiler Temperature Adjust. [°C] 0 7 4
bP Boiler Priority (enable boiler wait function) 0=disabled 1=enabled
- 0 1 1
bSt Booster FunctionOverheat gap over Boiler Temperature Threshold
[°C] 0 15 4
btd Boiler temperature negative differential: when the dishwasher is in standby,boiler threshold becomes: bt°C - btd(Used to save energy during machine inactivity by keeping boiler water at alower temperature).
[°C] 0 20 0
tt°C Tub Temperature: THRESHOLDWhen tank temperature reaches this value, heater switch off. [°C] 40 85 63
ttH Tub Temperature: HISTERESIS, (represent dead band).Heater switch on if tank temperature is below: tt°C - ttH
[°C] 2 30 5
tHi Tank Temperature: HIGH LIMIT.When tank temperature reaches this value C 3 alarm appears.Put 0 to disable C 3 alarm.
[°C] 0 95 75
tLo Tank Temperature: LOW LIMIT.During tank warm-up, temperature must increase at least bLo °C otherwiseE 2 warning appears.Put 0 to disable E 2 warning.
[°C] 0 10 1
tFL Tank Filling Timeout.If filling time is longer than tFL, A 1 alarm appears.Put 0 to disable A 1 alarm.
[min] 0 42 20
ElectroluxFSE - Dishwashing PlatformElectrolux Professional
Electronic DishwasherSERVICE MANUAL
DOC. NO. 5956.446.00 ©Copyright 2002 by Electrolux Professional P.10/46
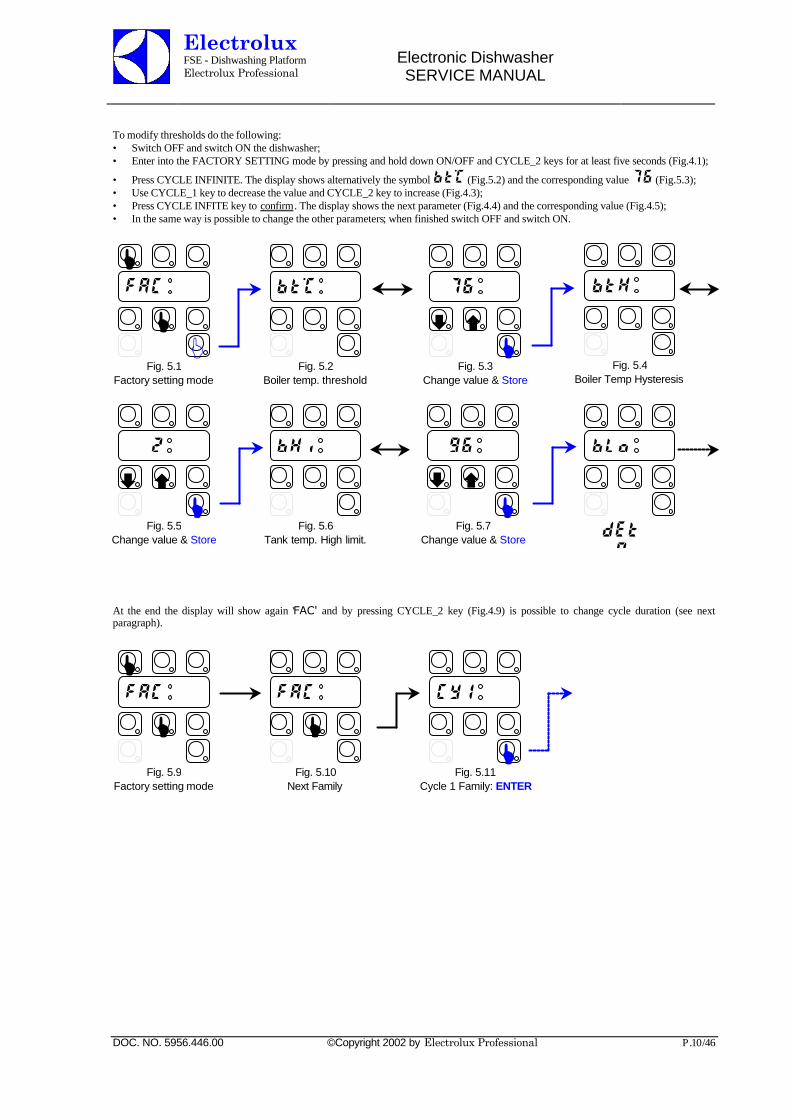
To modify thresholds do the following:• Switch OFF and switch ON the dishwasher;• Enter into the FACTORY SETTING mode by pressing and hold down ON/OFF and CYCLE_2 keys for at least five seconds (Fig.4.1);
• Press CYCLE INFINITE. The display shows alternatively the symbol bt°C (Fig.5.2) and the corresponding value 76 (Fig.5.3);• Use CYCLE_1 key to decrease the value and CYCLE_2 key to increase (Fig.4.3);• Press CYCLE INFITE key to confirm. The display shows the next parameter (Fig.4.4) and the corresponding value (Fig.4.5);• In the same way is possible to change the other parameters; when finished switch OFF and switch ON.
At the end the display will show again 'FAC' and by pressing CYCLE_2 key (Fig.4.9) is possible to change cycle duration (see nextparagraph).
L
LFig. 5.9
Factory setting mode
FAC
LFig. 5.10
Next Family
FAC
LFig. 5.11
Cycle 1 Family: ENTER
CY1
ÇÈL
Fig. 5.7Change value & Store
96
dEtrAi
bLo
Fig. 5.6Tank temp. High limit.
bHi
ÇÈL
Fig. 5.5Change value & Store
2
L
LJ
Fig. 5.1Factory setting mode
FAC
Fig. 5.2Boiler temp. threshold
bt°C
ÇÈL
Fig. 5.3Change value & Store
76
Fig. 5.4Boiler Temp Hysteresis
btH
ElectroluxFSE - Dishwashing PlatformElectrolux Professional
Electronic DishwasherSERVICE MANUAL
DOC. NO. 5956.446.00 ©Copyright 2002 by Electrolux Professional P.11/46
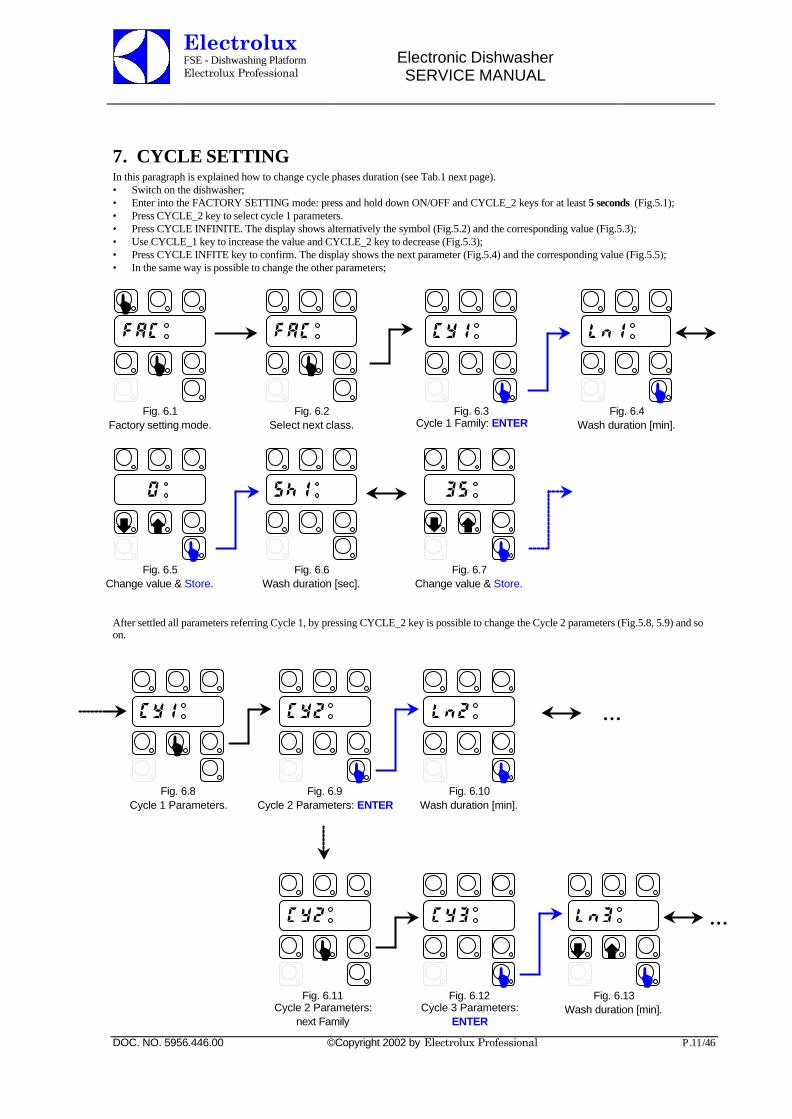
7. CYCLE SETTINGIn this paragraph is explained how to change cycle phases duration (see Tab.1 next page).• Switch on the dishwasher;• Enter into the FACTORY SETTING mode: press and hold down ON/OFF and CYCLE_2 keys for at least 5 seconds (Fig.5.1);• Press CYCLE_2 key to select cycle 1 parameters.• Press CYCLE INFINITE. The display shows alternatively the symbol (Fig.5.2) and the corresponding value (Fig.5.3);• Use CYCLE_1 key to increase the value and CYCLE_2 key to decrease (Fig.5.3);• Press CYCLE INFITE key to confirm. The display shows the next parameter (Fig.5.4) and the corresponding value (Fig.5.5);• In the same way is possible to change the other parameters;
After settled all parameters referring Cycle 1, by pressing CYCLE_2 key is possible to change the Cycle 2 parameters (Fig.5.8, 5.9) and soon.
ÇÈL
Fig. 6.7Change value & Store.
35
Fig. 6.6Wash duration [sec].
Sh1
ÇÈL
Fig. 6.5Change value & Store.
0
L
LFig. 6.1
Factory setting mode.
FAC
LFig. 6.2
Select next class.
FAC
LFig. 6.3
Cycle 1 Family: ENTER
CY1
LFig. 6.4
Wash duration [min].
Ln1
ÇÈL
Fig. 6.13Wash duration [min].
Ln3
LFig. 6.12
Cycle 3 Parameters:ENTER
Cy3
LFig. 6.11
Cycle 2 Parameters:next Family
CY2
LFig. 6.8
Cycle 1 Parameters.
CY1
LFig. 6.9
Cycle 2 Parameters: ENTER
CY2
LFig. 6.10
Wash duration [min].
Ln2 …
…
ElectroluxFSE - Dishwashing PlatformElectrolux Professional
Electronic DishwasherSERVICE MANUAL
DOC. NO. 5956.446.00 ©Copyright 2002 by Electrolux Professional P.12/46
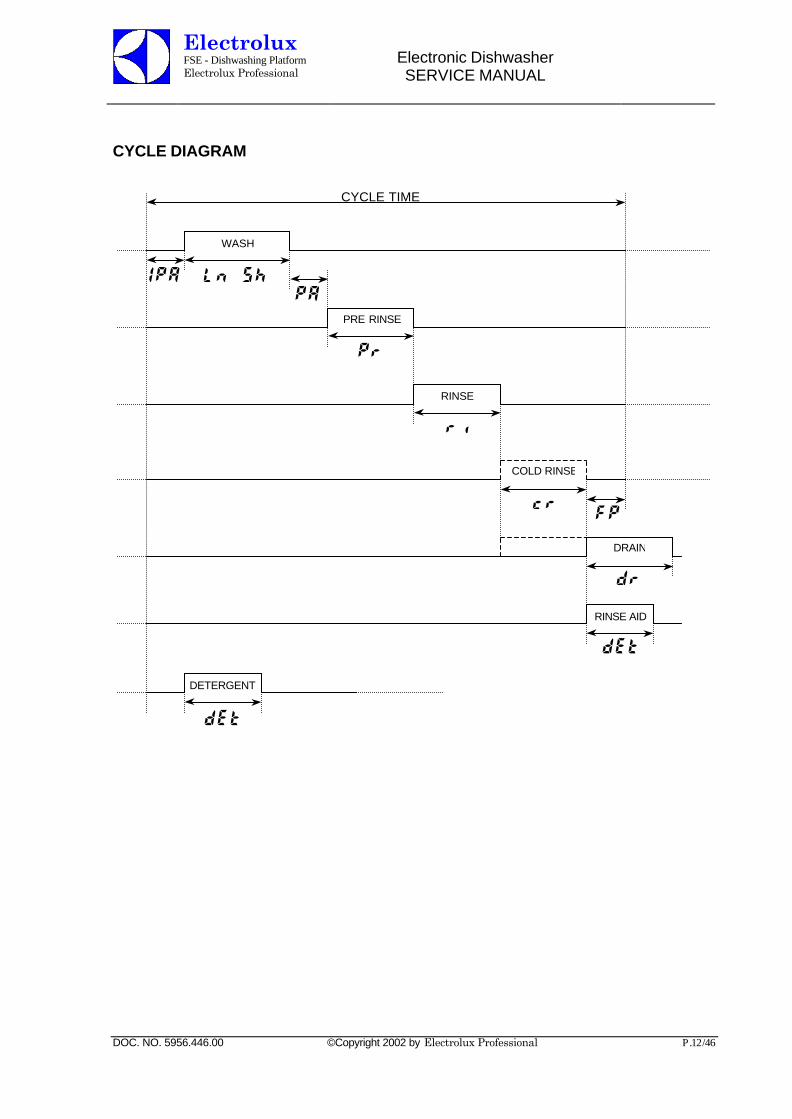
CYCLE DIAGRAM
CYCLE TIME
WASH
PRE RINSE
RINSE
COLD RINSE
DRAIN
RINSE AID
DETERGENT
IPA Ln ShPA
Pr
ri
cr FP
dr
dEt
dEt
ElectroluxFSE - Dishwashing PlatformElectrolux Professional
Electronic DishwasherSERVICE MANUAL
DOC. NO. 5956.446.00 ©Copyright 2002 by Electrolux Professional P.13/46
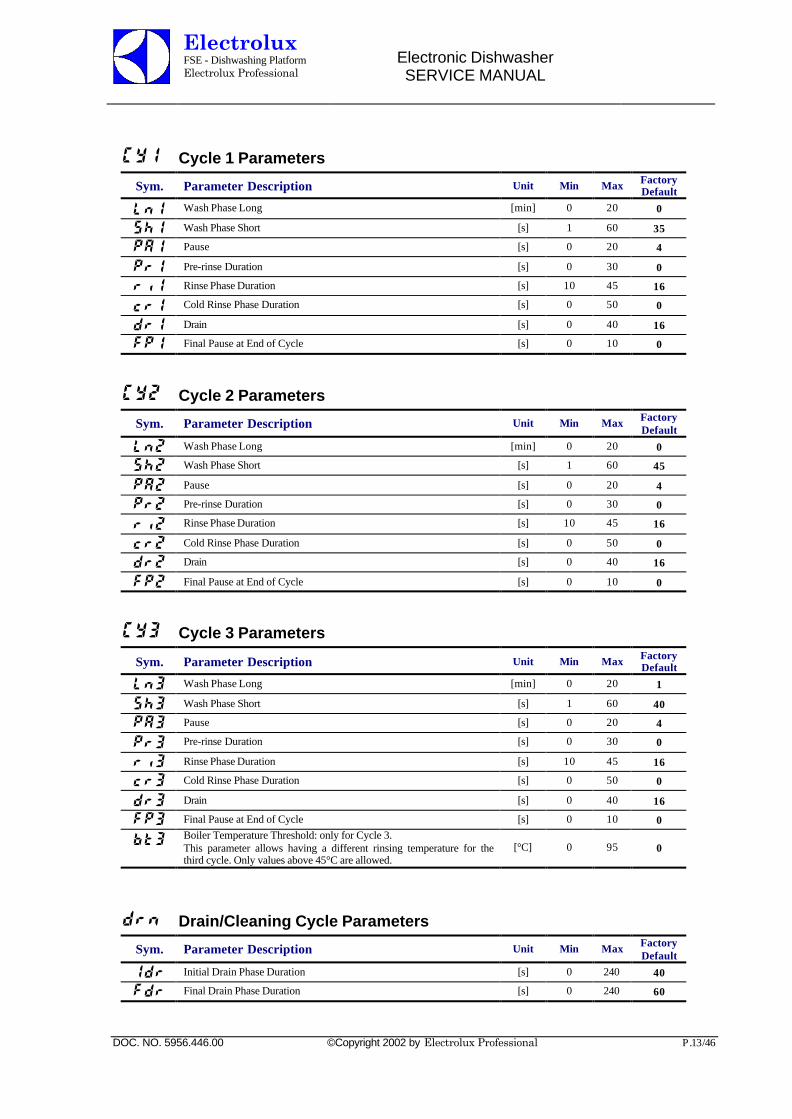
CY1 Cycle 1 Parameters
Sym. Parameter Description Unit Min Max FactoryDefault
Ln1 Wash Phase Long [min] 0 20 0
Sh1 Wash Phase Short [s] 1 60 35
PA1 Pause [s] 0 20 4
Pr1 Pre-rinse Duration [s] 0 30 0
ri1 Rinse Phase Duration [s] 10 45 16
cr1 Cold Rinse Phase Duration [s] 0 50 0
dr1 Drain [s] 0 40 16
FP1 Final Pause at End of Cycle [s] 0 10 0
CY2 Cycle 2 Parameters
Sym. Parameter Description Unit Min Max FactoryDefault
Ln2 Wash Phase Long [min] 0 20 0
Sh2 Wash Phase Short [s] 1 60 45
PA2 Pause [s] 0 20 4
Pr2 Pre-rinse Duration [s] 0 30 0
ri2 Rinse Phase Duration [s] 10 45 16
cr2 Cold Rinse Phase Duration [s] 0 50 0
dr2 Drain [s] 0 40 16
FP2 Final Pause at End of Cycle [s] 0 10 0
CY3 Cycle 3 Parameters
Sym. Parameter Description Unit Min Max FactoryDefault
Ln3 Wash Phase Long [min] 0 20 1
Sh3 Wash Phase Short [s] 1 60 40
PA3 Pause [s] 0 20 4
Pr3 Pre-rinse Duration [s] 0 30 0
ri3 Rinse Phase Duration [s] 10 45 16
cr3 Cold Rinse Phase Duration [s] 0 50 0
dr3 Drain [s] 0 40 16
FP3 Final Pause at End of Cycle [s] 0 10 0
bt3 Boiler Temperature Threshold: only for Cycle 3.This parameter allows having a different rinsing temperature for thethird cycle. Only values above 45°C are allowed.
[°C] 0 95 0
drn Drain/Cleaning Cycle Parameters
Sym. Parameter Description Unit Min Max FactoryDefault
Idr Initial Drain Phase Duration [s] 0 240 40
Fdr Final Drain Phase Duration [s] 0 240 60
ElectroluxFSE - Dishwashing PlatformElectrolux Professional
Electronic DishwasherSERVICE MANUAL
DOC. NO. 5956.446.00 ©Copyright 2002 by Electrolux Professional P.14/46
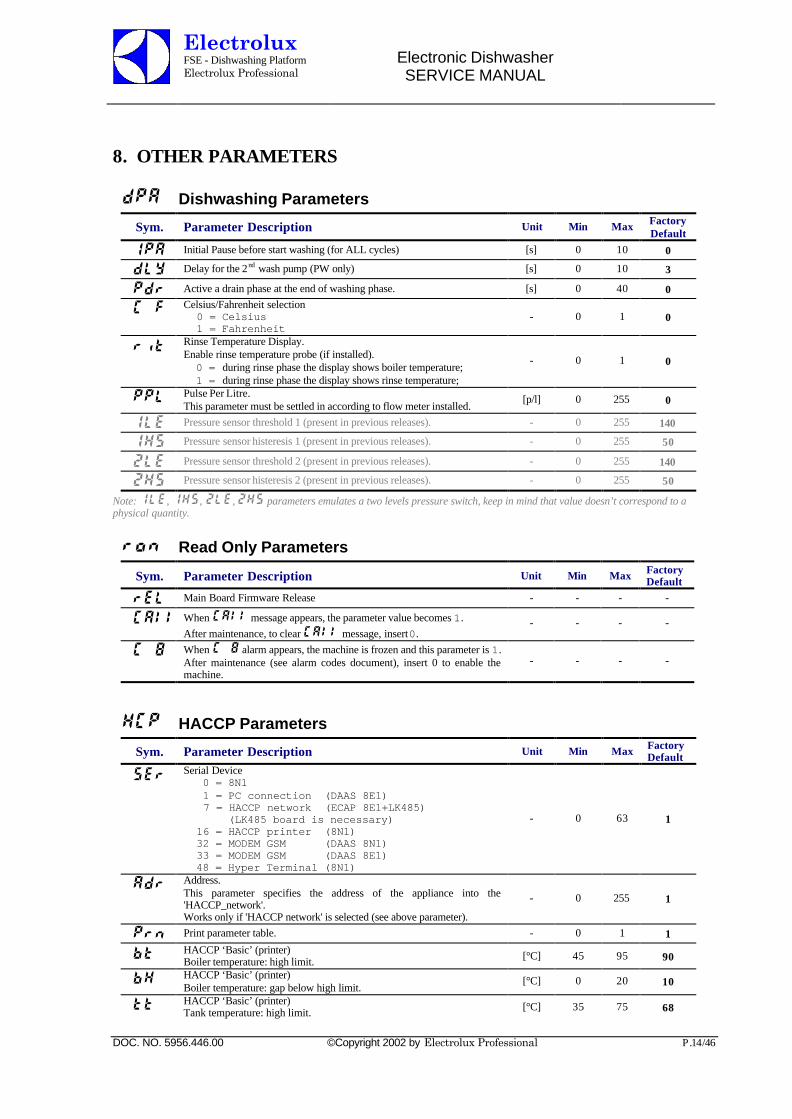
8. OTHER PARAMETERS
dPA Dishwashing Parameters
Sym. Parameter Description Unit Min Max FactoryDefault
IPA Initial Pause before start washing (for ALL cycles) [s] 0 10 0
dLY Delay for the 2nd wash pump (PW only) [s] 0 10 3
Pdr Active a drain phase at the end of washing phase. [s] 0 40 0
C F Celsius/Fahrenheit selection 0 = Celsius 1 = Fahrenheit
- 0 1 0
rit Rinse Temperature Display.Enable rinse temperature probe (if installed). 0 = during rinse phase the display shows boiler temperature; 1 = during rinse phase the display shows rinse temperature;
- 0 1 0
PPL Pulse Per Litre.This parameter must be settled in according to flow meter installed.
[p/l] 0 255 0
1LE Pressure sensor threshold 1 (present in previous releases). - 0 255 140
1HS Pressure sensor histeresis 1 (present in previous releases). - 0 255 50
2LE Pressure sensor threshold 2 (present in previous releases). - 0 255 140
2Hs Pressure sensor histeresis 2 (present in previous releases). - 0 255 50
Note: 1LE, 1HS, 2LE, 2HS parameters emulates a two levels pressure switch, keep in mind that value doesn’t correspond to aphysical quantity.
ron Read Only Parameters
Sym. Parameter Description Unit Min Max FactoryDefault
rEL Main Board Firmware Release - - - -
CAll When CAll message appears, the parameter value becomes 1.After maintenance, to clear CAll message, insert 0.
- - - -
C 8 When C 8 alarm appears, the machine is frozen and this parameter is 1.After maintenance (see alarm codes document), insert 0 to enable themachine.
- - - -
HCP HACCP Parameters
Sym. Parameter Description Unit Min Max FactoryDefault
SEr Serial Device 0 = 8N1 1 = PC connection (DAAS 8E1) 7 = HACCP network (ECAP 8E1+LK485) (LK485 board is necessary) 16 = HACCP printer (8N1) 32 = MODEM GSM (DAAS 8N1) 33 = MODEM GSM (DAAS 8E1) 48 = Hyper Terminal (8N1)
- 0 63 1
Adr Address.This parameter specifies the address of the appliance into the'HACCP_network'.Works only if 'HACCP network' is selected (see above parameter).
- 0 255 1
Prn Print parameter table. - 0 1 1
bt HACCP ‘Basic’ (printer)Boiler temperature: high limit. [°C] 45 95 90
bH HACCP ‘Basic’ (printer)Boiler temperature: gap below high limit.
[°C] 0 20 10
tt HACCP ‘Basic’ (printer)Tank temperature: high limit. [°C] 35 75 68
ElectroluxFSE - Dishwashing PlatformElectrolux Professional
Electronic DishwasherSERVICE MANUAL
DOC. NO. 5956.446.00 ©Copyright 2002 by Electrolux Professional P.15/46
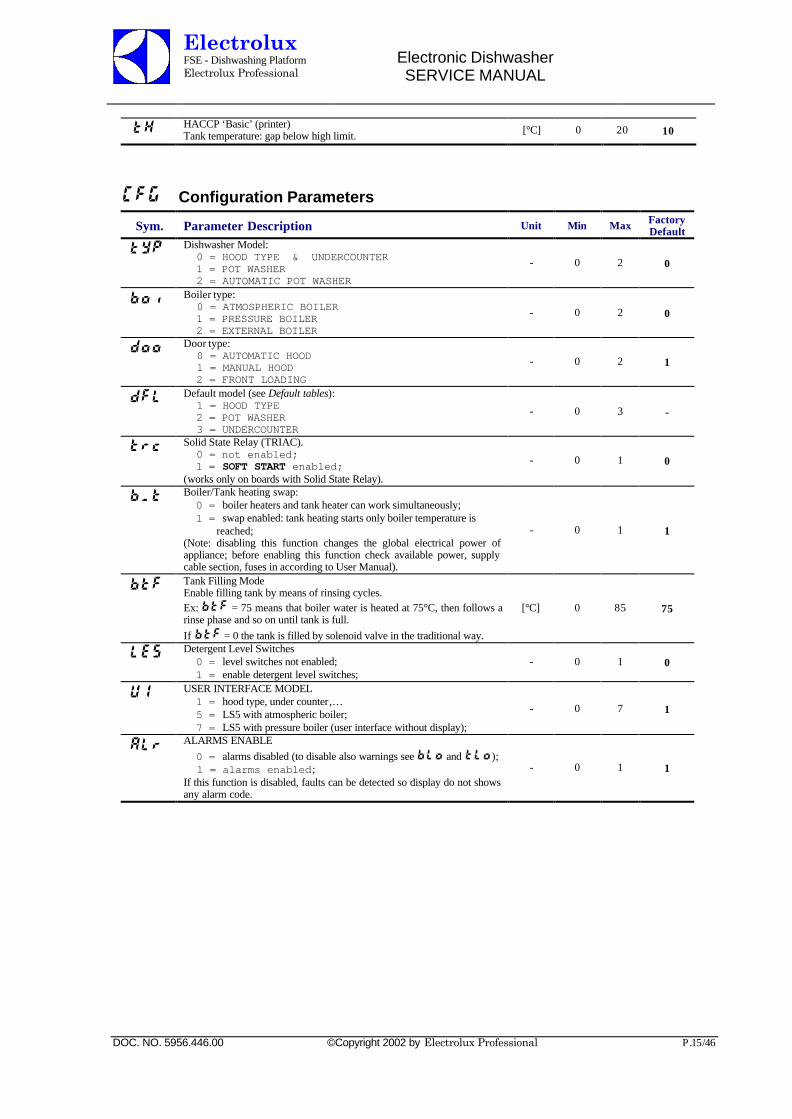
tH HACCP ‘Basic’ (printer)Tank temperature: gap below high limit. [°C] 0 20 10
CFG Configuration Parameters
Sym. Parameter Description Unit Min Max FactoryDefault
tYP Dishwasher Model: 0 = HOOD TYPE & UNDERCOUNTER 1 = POT WASHER 2 = AUTOMATIC POT WASHER
- 0 2 0
boi Boiler type: 0 = ATMOSPHERIC BOILER 1 = PRESSURE BOILER 2 = EXTERNAL BOILER
- 0 2 0
doo Door type: 0 = AUTOMATIC HOOD 1 = MANUAL HOOD 2 = FRONT LOADING
- 0 2 1
dFL Default model (see Default tables): 1 = HOOD TYPE 2 = POT WASHER 3 = UNDERCOUNTER
- 0 3 -
trc Solid State Relay (TRIAC). 0 = not enabled; 1 = SOFT START enabled;(works only on boards with Solid State Relay).
- 0 1 0
b_t Boiler/Tank heating swap: 0 = boiler heaters and tank heater can work simultaneously; 1 = swap enabled: tank heating starts only boiler temperature is
reached;(Note: disabling this function changes the global electrical power ofappliance; before enabling this function check available power, supplycable section, fuses in according to User Manual).
- 0 1 1
btF Tank Filling ModeEnable filling tank by means of rinsing cycles.Ex: btF = 75 means that boiler water is heated at 75°C, then follows arinse phase and so on until tank is full.If btF = 0 the tank is filled by solenoid valve in the traditional way.
[°C] 0 85 75
LES Detergent Level Switches 0 = level switches not enabled; 1 = enable detergent level switches;
- 0 1 0
UI USER INTERFACE MODEL 1 = hood type, under counter,… 5 = LS5 with atmospheric boiler; 7 = LS5 with pressure boiler (user interface without display);
- 0 7 1
ALr ALARMS ENABLE 0 = alarms disabled (to disable also warnings see bLo and tLo); 1 = alarms enabled;If this function is disabled, faults can be detected so display do not showsany alarm code.
- 0 1 1
ElectroluxFSE - Dishwashing PlatformElectrolux Professional
Electronic DishwasherSERVICE MANUAL
DOC. NO. 5956.446.00 ©Copyright 2002 by Electrolux Professional P.16/46
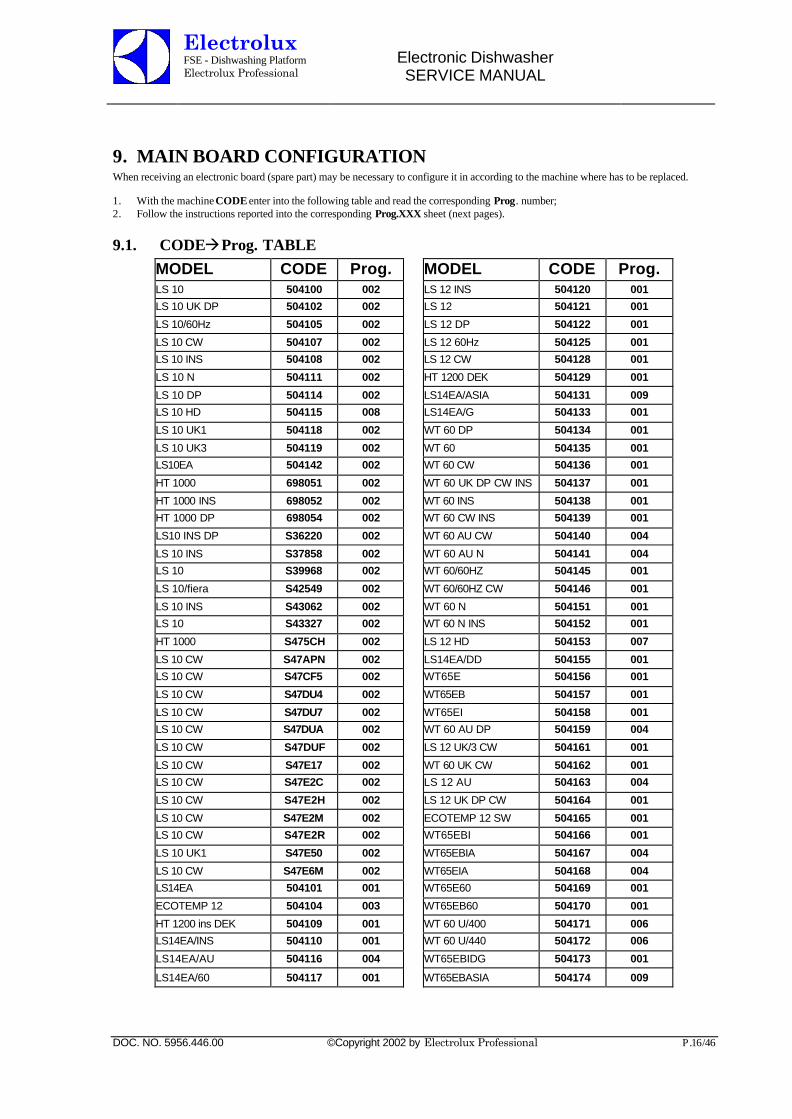
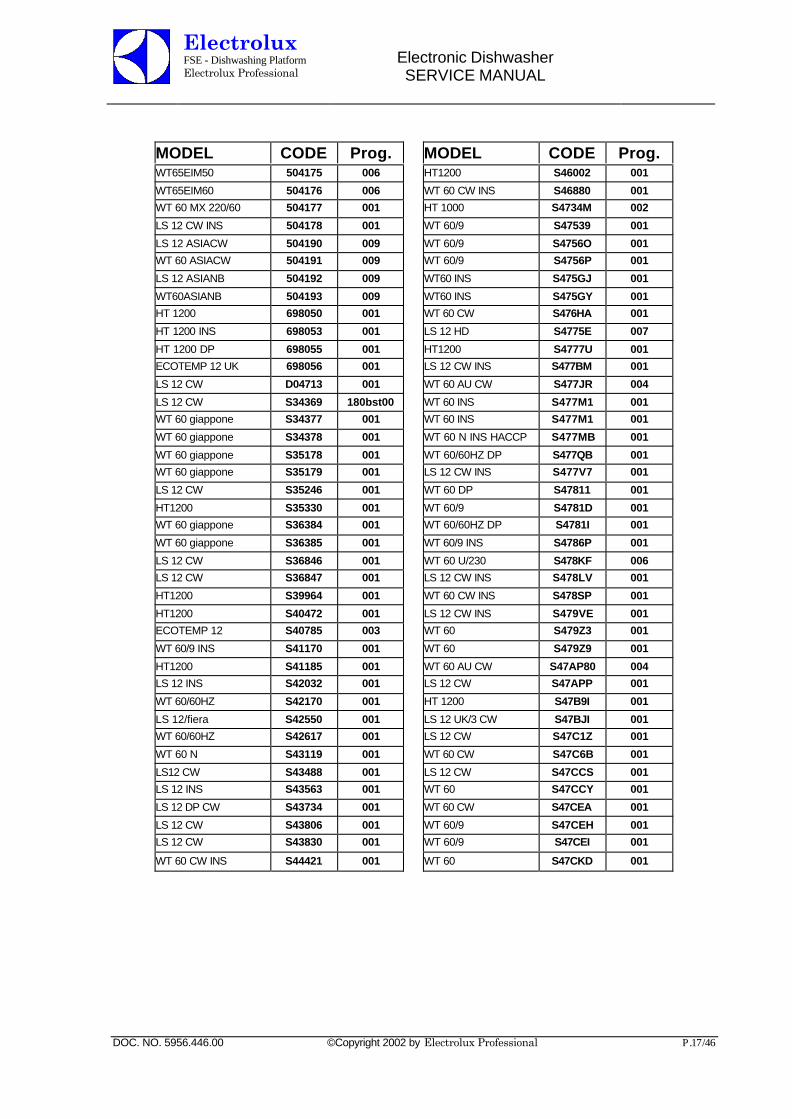
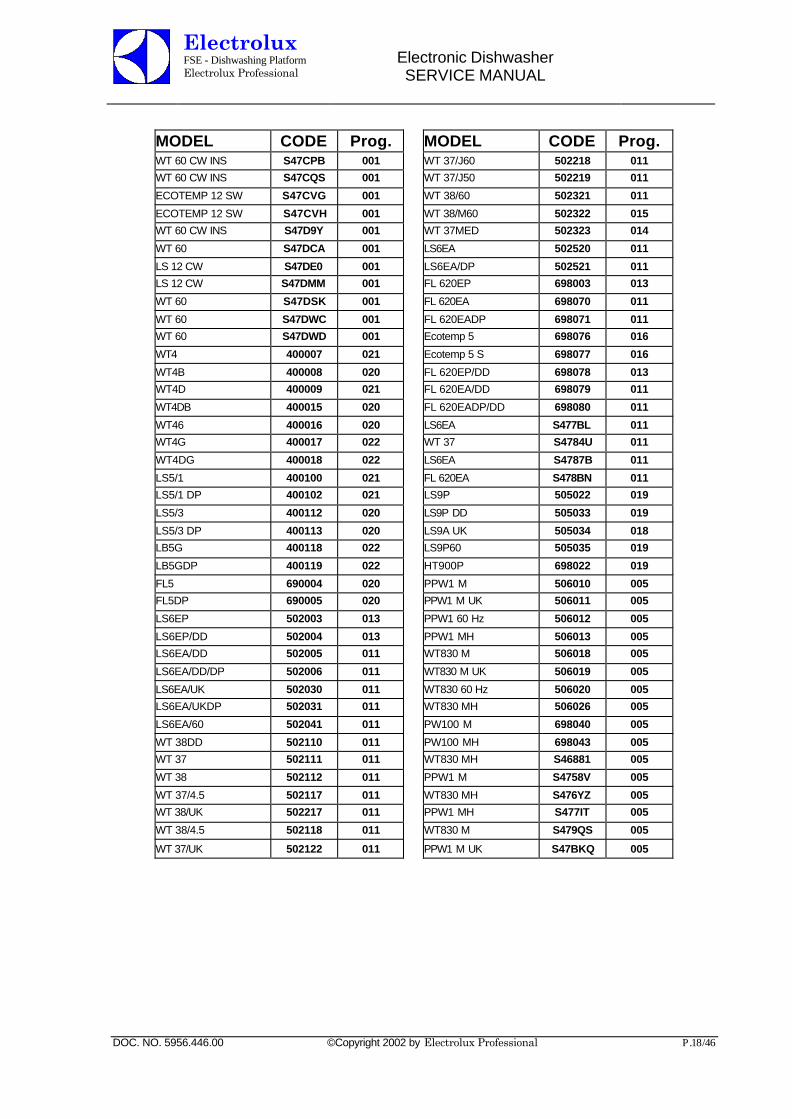
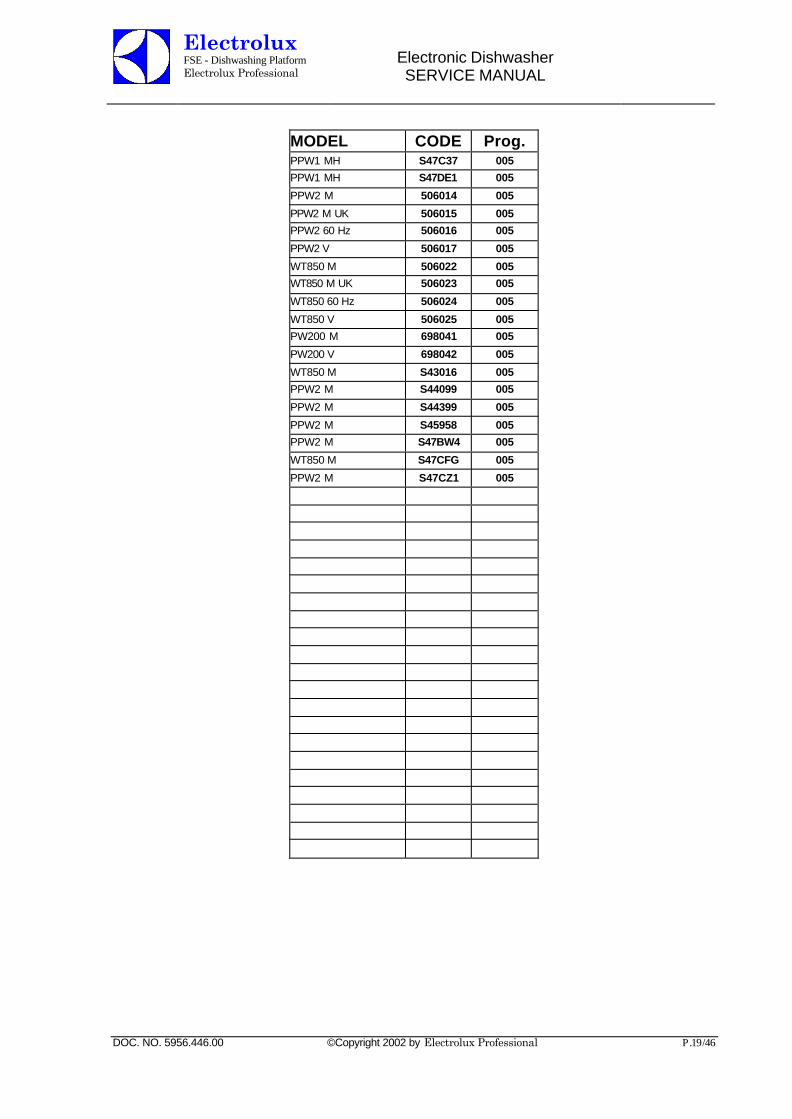
9. MAIN BOARD CONFIGURATIONWhen receiving an electronic board (spare part) may be necessary to configure it in according to the machine where has to be replaced.
1. With the machine CODE enter into the following table and read the corresponding Prog. number;2. Follow the instructions reported into the corresponding Prog.XXX sheet (next pages).
9.1. CODEàProg. TABLEMODEL CODE Prog. MODEL CODE Prog.LS 10 504100 002 LS 12 INS 504120 001
LS 10 UK DP 504102 002 LS 12 504121 001
LS 10/60Hz 504105 002 LS 12 DP 504122 001
LS 10 CW 504107 002 LS 12 60Hz 504125 001
LS 10 INS 504108 002 LS 12 CW 504128 001
LS 10 N 504111 002 HT 1200 DEK 504129 001
LS 10 DP 504114 002 LS14EA/ASIA 504131 009
LS 10 HD 504115 008 LS14EA/G 504133 001
LS 10 UK1 504118 002 WT 60 DP 504134 001
LS 10 UK3 504119 002 WT 60 504135 001
LS10EA 504142 002 WT 60 CW 504136 001
HT 1000 698051 002 WT 60 UK DP CW INS 504137 001
HT 1000 INS 698052 002 WT 60 INS 504138 001
HT 1000 DP 698054 002 WT 60 CW INS 504139 001
LS10 INS DP S36220 002 WT 60 AU CW 504140 004
LS 10 INS S37858 002 WT 60 AU N 504141 004
LS 10 S39968 002 WT 60/60HZ 504145 001
LS 10/fiera S42549 002 WT 60/60HZ CW 504146 001
LS 10 INS S43062 002 WT 60 N 504151 001
LS 10 S43327 002 WT 60 N INS 504152 001
HT 1000 S475CH 002 LS 12 HD 504153 007
LS 10 CW S47APN 002 LS14EA/DD 504155 001
LS 10 CW S47CF5 002 WT65E 504156 001
LS 10 CW S47DU4 002 WT65EB 504157 001
LS 10 CW S47DU7 002 WT65EI 504158 001
LS 10 CW S47DUA 002 WT 60 AU DP 504159 004
LS 10 CW S47DUF 002 LS 12 UK/3 CW 504161 001
LS 10 CW S47E17 002 WT 60 UK CW 504162 001
LS 10 CW S47E2C 002 LS 12 AU 504163 004
LS 10 CW S47E2H 002 LS 12 UK DP CW 504164 001
LS 10 CW S47E2M 002 ECOTEMP 12 SW 504165 001
LS 10 CW S47E2R 002 WT65EBI 504166 001
LS 10 UK1 S47E50 002 WT65EBIA 504167 004
LS 10 CW S47E6M 002 WT65EIA 504168 004
LS14EA 504101 001 WT65E60 504169 001
ECOTEMP 12 504104 003 WT65EB60 504170 001
HT 1200 ins DEK 504109 001 WT 60 U/400 504171 006
LS14EA/INS 504110 001 WT 60 U/440 504172 006
LS14EA/AU 504116 004 WT65EBIDG 504173 001
LS14EA/60 504117 001 WT65EBASIA 504174 009
ElectroluxFSE - Dishwashing PlatformElectrolux Professional
Electronic DishwasherSERVICE MANUAL
DOC. NO. 5956.446.00 ©Copyright 2002 by Electrolux Professional P.17/46
MODEL CODE Prog. MODEL CODE Prog.WT65EIM50 504175 006 HT1200 S46002 001
WT65EIM60 504176 006 WT 60 CW INS S46880 001
WT 60 MX 220/60 504177 001 HT 1000 S4734M 002
LS 12 CW INS 504178 001 WT 60/9 S47539 001
LS 12 ASIACW 504190 009 WT 60/9 S4756O 001
WT 60 ASIACW 504191 009 WT 60/9 S4756P 001
LS 12 ASIANB 504192 009 WT60 INS S475GJ 001
WT60ASIANB 504193 009 WT60 INS S475GY 001
HT 1200 698050 001 WT 60 CW S476HA 001
HT 1200 INS 698053 001 LS 12 HD S4775E 007
HT 1200 DP 698055 001 HT1200 S4777U 001
ECOTEMP 12 UK 698056 001 LS 12 CW INS S477BM 001
LS 12 CW D04713 001 WT 60 AU CW S477JR 004
LS 12 CW S34369 180bst00 WT 60 INS S477M1 001
WT 60 giappone S34377 001 WT 60 INS S477M1 001
WT 60 giappone S34378 001 WT 60 N INS HACCP S477MB 001
WT 60 giappone S35178 001 WT 60/60HZ DP S477QB 001
WT 60 giappone S35179 001 LS 12 CW INS S477V7 001
LS 12 CW S35246 001 WT 60 DP S47811 001
HT1200 S35330 001 WT 60/9 S4781D 001
WT 60 giappone S36384 001 WT 60/60HZ DP S4781I 001
WT 60 giappone S36385 001 WT 60/9 INS S4786P 001
LS 12 CW S36846 001 WT 60 U/230 S478KF 006
LS 12 CW S36847 001 LS 12 CW INS S478LV 001
HT1200 S39964 001 WT 60 CW INS S478SP 001
HT1200 S40472 001 LS 12 CW INS S479VE 001
ECOTEMP 12 S40785 003 WT 60 S479Z3 001
WT 60/9 INS S41170 001 WT 60 S479Z9 001
HT1200 S41185 001 WT 60 AU CW S47AP80 004
LS 12 INS S42032 001 LS 12 CW S47APP 001
WT 60/60HZ S42170 001 HT 1200 S47B9I 001
LS 12/fiera S42550 001 LS 12 UK/3 CW S47BJI 001
WT 60/60HZ S42617 001 LS 12 CW S47C1Z 001
WT 60 N S43119 001 WT 60 CW S47C6B 001
LS12 CW S43488 001 LS 12 CW S47CCS 001
LS 12 INS S43563 001 WT 60 S47CCY 001
LS 12 DP CW S43734 001 WT 60 CW S47CEA 001
LS 12 CW S43806 001 WT 60/9 S47CEH 001
LS 12 CW S43830 001 WT 60/9 S47CEI 001
WT 60 CW INS S44421 001 WT 60 S47CKD 001
ElectroluxFSE - Dishwashing PlatformElectrolux Professional
Electronic DishwasherSERVICE MANUAL
DOC. NO. 5956.446.00 ©Copyright 2002 by Electrolux Professional P.18/46
MODEL CODE Prog. MODEL CODE Prog.WT 60 CW INS S47CPB 001 WT 37/J60 502218 011
WT 60 CW INS S47CQS 001 WT 37/J50 502219 011
ECOTEMP 12 SW S47CVG 001 WT 38/60 502321 011
ECOTEMP 12 SW S47CVH 001 WT 38/M60 502322 015
WT 60 CW INS S47D9Y 001 WT 37MED 502323 014
WT 60 S47DCA 001 LS6EA 502520 011
LS 12 CW S47DE0 001 LS6EA/DP 502521 011
LS 12 CW S47DMM 001 FL 620EP 698003 013
WT 60 S47DSK 001 FL 620EA 698070 011
WT 60 S47DWC 001 FL 620EADP 698071 011
WT 60 S47DWD 001 Ecotemp 5 698076 016
WT4 400007 021 Ecotemp 5 S 698077 016
WT4B 400008 020 FL 620EP/DD 698078 013
WT4D 400009 021 FL 620EA/DD 698079 011
WT4DB 400015 020 FL 620EADP/DD 698080 011
WT46 400016 020 LS6EA S477BL 011
WT4G 400017 022 WT 37 S4784U 011
WT4DG 400018 022 LS6EA S4787B 011
LS5/1 400100 021 FL 620EA S478BN 011
LS5/1 DP 400102 021 LS9P 505022 019
LS5/3 400112 020 LS9P DD 505033 019
LS5/3 DP 400113 020 LS9A UK 505034 018
LB5G 400118 022 LS9P60 505035 019
LB5GDP 400119 022 HT900P 698022 019
FL5 690004 020 PPW1 M 506010 005
FL5DP 690005 020 PPW1 M UK 506011 005
LS6EP 502003 013 PPW1 60 Hz 506012 005
LS6EP/DD 502004 013 PPW1 MH 506013 005
LS6EA/DD 502005 011 WT830 M 506018 005
LS6EA/DD/DP 502006 011 WT830 M UK 506019 005
LS6EA/UK 502030 011 WT830 60 Hz 506020 005
LS6EA/UKDP 502031 011 WT830 MH 506026 005
LS6EA/60 502041 011 PW100 M 698040 005
WT 38DD 502110 011 PW100 MH 698043 005
WT 37 502111 011 WT830 MH S46881 005
WT 38 502112 011 PPW1 M S4758V 005
WT 37/4.5 502117 011 WT830 MH S476YZ 005
WT 38/UK 502217 011 PPW1 MH S477IT 005
WT 38/4.5 502118 011 WT830 M S479QS 005
WT 37/UK 502122 011 PPW1 M UK S47BKQ 005
ElectroluxFSE - Dishwashing PlatformElectrolux Professional
Electronic DishwasherSERVICE MANUAL
DOC. NO. 5956.446.00 ©Copyright 2002 by Electrolux Professional P.19/46
MODEL CODE Prog.PPW1 MH S47C37 005
PPW1 MH S47DE1 005
PPW2 M 506014 005
PPW2 M UK 506015 005
PPW2 60 Hz 506016 005
PPW2 V 506017 005
WT850 M 506022 005
WT850 M UK 506023 005
WT850 60 Hz 506024 005
WT850 V 506025 005
PW200 M 698041 005
PW200 V 698042 005
WT850 M S43016 005
PPW2 M S44099 005
PPW2 M S44399 005
PPW2 M S45958 005
PPW2 M S47BW4 005
WT850 M S47CFG 005
PPW2 M S47CZ1 005
ElectroluxFSE - Dishwashing PlatformElectrolux Professional
Electronic DishwasherSERVICE MANUAL
DOC. NO. 5956.446.00 ©Copyright 2002 by Electrolux Professional P.20/46
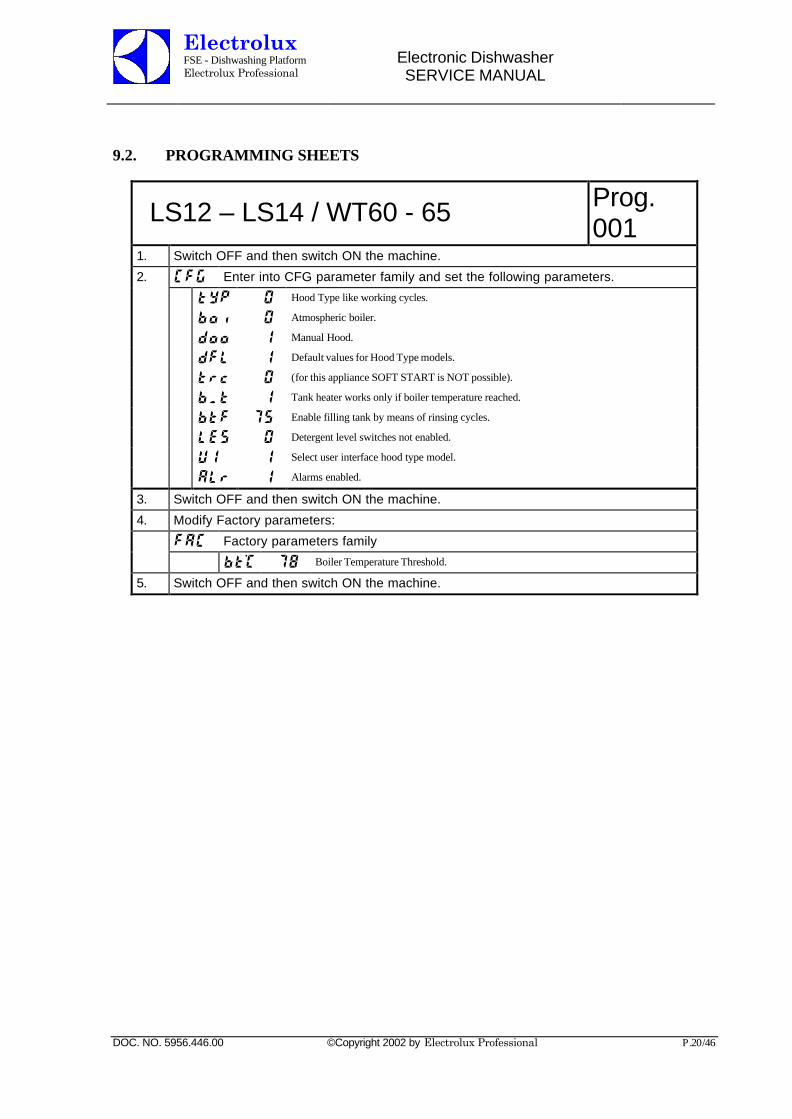
9.2. PROGRAMMING SHEETS
LS12 – LS14 / WT60 - 65 Prog.001
1. Switch OFF and then switch ON the machine.
2. CFG Enter into CFG parameter family and set the following parameters.
tYP 0 Hood Type like working cycles.
boi 0 Atmospheric boiler.
doo 1 Manual Hood.
dFL 1 Default values for Hood Type models.
trc 0 (for this appliance SOFT START is NOT possible).
b_t 1 Tank heater works only if boiler temperature reached.
btF 75 Enable filling tank by means of rinsing cycles.
LES 0 Detergent level switches not enabled.
UI 1 Select user interface hood type model.
ALr 1 Alarms enabled.
3. Switch OFF and then switch ON the machine.
4. Modify Factory parameters:
FAC Factory parameters family
bt°C 78 Boiler Temperature Threshold.
5. Switch OFF and then switch ON the machine.
ElectroluxFSE - Dishwashing PlatformElectrolux Professional
Electronic DishwasherSERVICE MANUAL
DOC. NO. 5956.446.00 ©Copyright 2002 by Electrolux Professional P.21/46
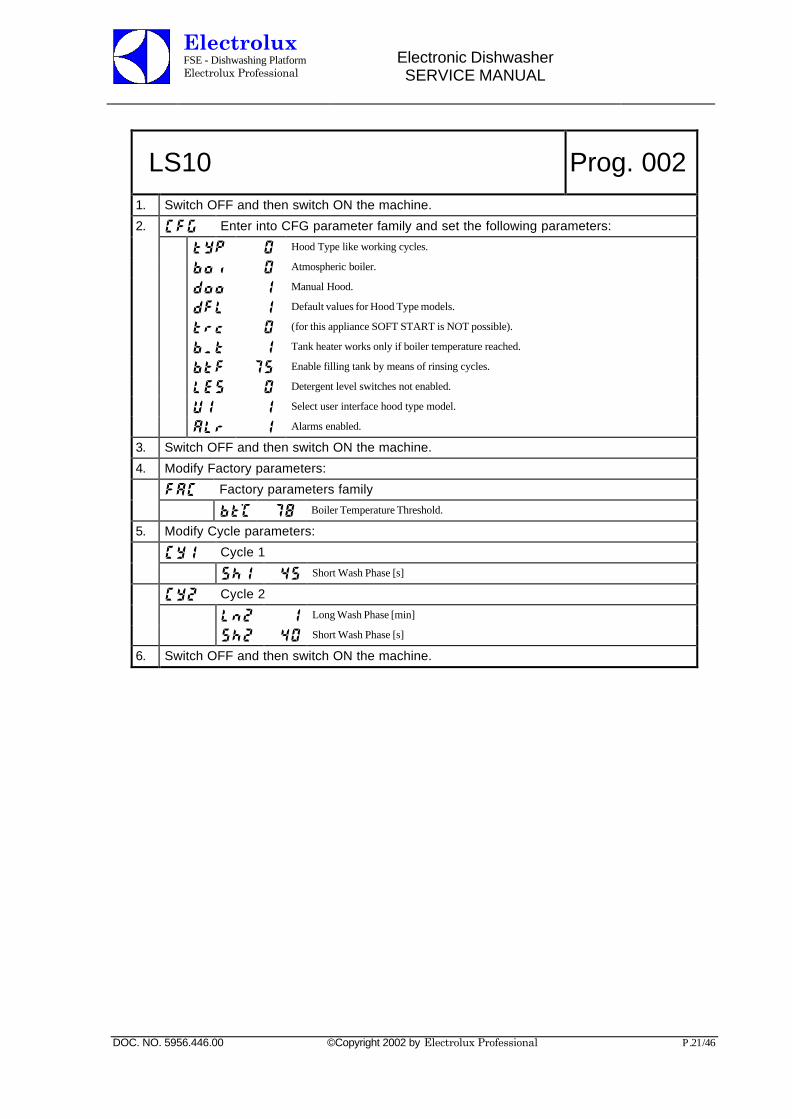
LS10 Prog. 0021. Switch OFF and then switch ON the machine.
2. CFG Enter into CFG parameter family and set the following parameters:
tYP 0 Hood Type like working cycles.
boi 0 Atmospheric boiler.
doo 1 Manual Hood.
dFL 1 Default values for Hood Type models.
trc 0 (for this appliance SOFT START is NOT possible).
b_t 1 Tank heater works only if boiler temperature reached.
btF 75 Enable filling tank by means of rinsing cycles.
LES 0 Detergent level switches not enabled.
UI 1 Select user interface hood type model.
ALr 1 Alarms enabled.
3. Switch OFF and then switch ON the machine.
4. Modify Factory parameters:
FAC Factory parameters family
bt°C 78 Boiler Temperature Threshold.
5. Modify Cycle parameters:
CY1 Cycle 1
Sh1 45 Short Wash Phase [s]
CY2 Cycle 2
Ln2 1 Long Wash Phase [min]
Sh2 40 Short Wash Phase [s]
6. Switch OFF and then switch ON the machine.
ElectroluxFSE - Dishwashing PlatformElectrolux Professional
Electronic DishwasherSERVICE MANUAL
DOC. NO. 5956.446.00 ©Copyright 2002 by Electrolux Professional P.22/46
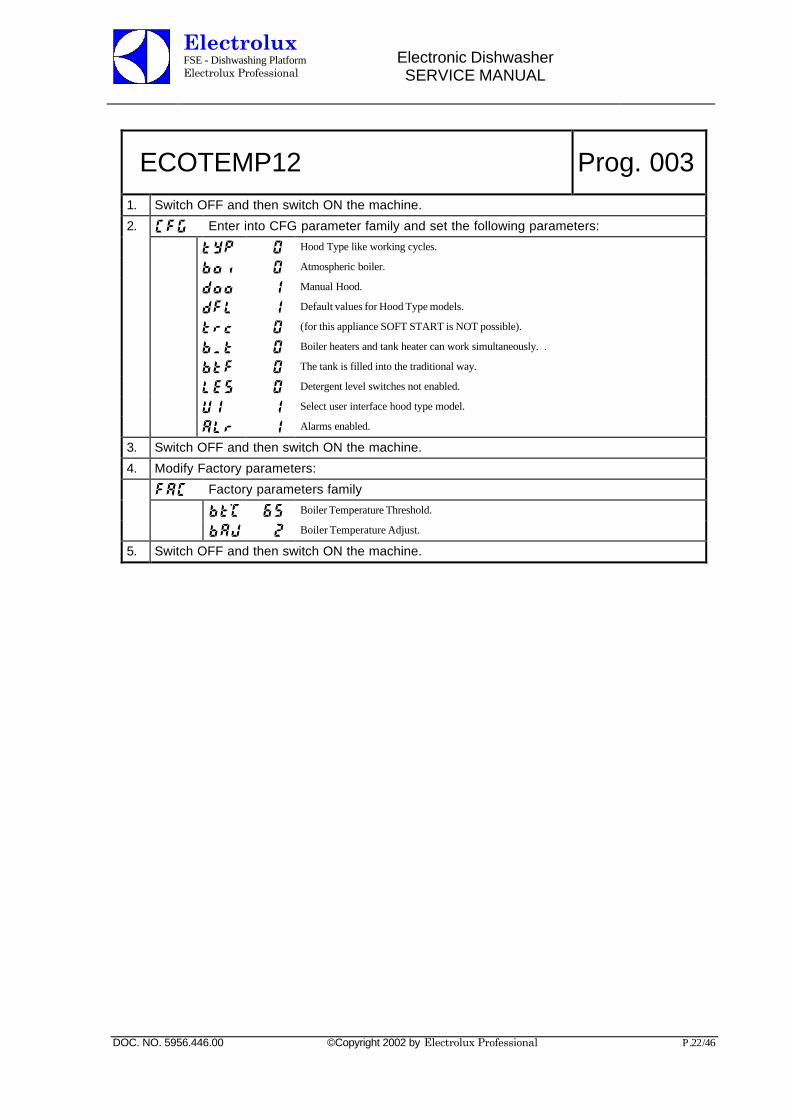
ECOTEMP12 Prog. 0031. Switch OFF and then switch ON the machine.
2. CFG Enter into CFG parameter family and set the following parameters:
tYP 0 Hood Type like working cycles.
boi 0 Atmospheric boiler.
doo 1 Manual Hood.
dFL 1 Default values for Hood Type models.
trc 0 (for this appliance SOFT START is NOT possible).
b_t 0 Boiler heaters and tank heater can work simultaneously. .
btF 0 The tank is filled into the traditional way.
LES 0 Detergent level switches not enabled.
UI 1 Select user interface hood type model.
ALr 1 Alarms enabled.
3. Switch OFF and then switch ON the machine.
4. Modify Factory parameters:
FAC Factory parameters family
bt°C 65 Boiler Temperature Threshold.
bAJ 2 Boiler Temperature Adjust.
5. Switch OFF and then switch ON the machine.
ElectroluxFSE - Dishwashing PlatformElectrolux Professional
Electronic DishwasherSERVICE MANUAL
DOC. NO. 5956.446.00 ©Copyright 2002 by Electrolux Professional P.23/46
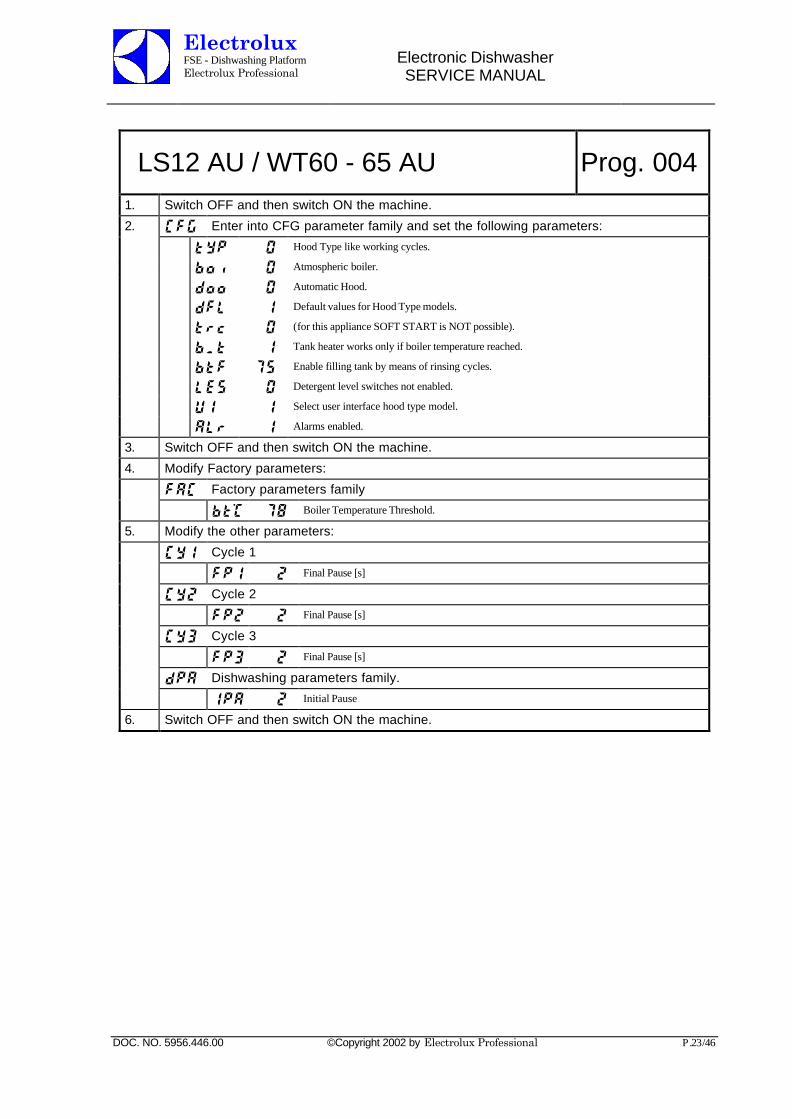
LS12 AU / WT60 - 65 AU Prog. 0041. Switch OFF and then switch ON the machine.
2. CFG Enter into CFG parameter family and set the following parameters:
tYP 0 Hood Type like working cycles.
boi 0 Atmospheric boiler.
doo 0 Automatic Hood.
dFL 1 Default values for Hood Type models.
trc 0 (for this appliance SOFT START is NOT possible).
b_t 1 Tank heater works only if boiler temperature reached.
btF 75 Enable filling tank by means of rinsing cycles.
LES 0 Detergent level switches not enabled.
UI 1 Select user interface hood type model.
ALr 1 Alarms enabled.
3. Switch OFF and then switch ON the machine.
4. Modify Factory parameters:
FAC Factory parameters family
bt°C 78 Boiler Temperature Threshold.
5. Modify the other parameters:
CY1 Cycle 1
FP1 2 Final Pause [s]
CY2 Cycle 2
FP2 2 Final Pause [s]
CY3 Cycle 3
FP3 2 Final Pause [s]
dPA Dishwashing parameters family.
IPA 2 Initial Pause
6. Switch OFF and then switch ON the machine.
ElectroluxFSE - Dishwashing PlatformElectrolux Professional
Electronic DishwasherSERVICE MANUAL
DOC. NO. 5956.446.00 ©Copyright 2002 by Electrolux Professional P.24/46
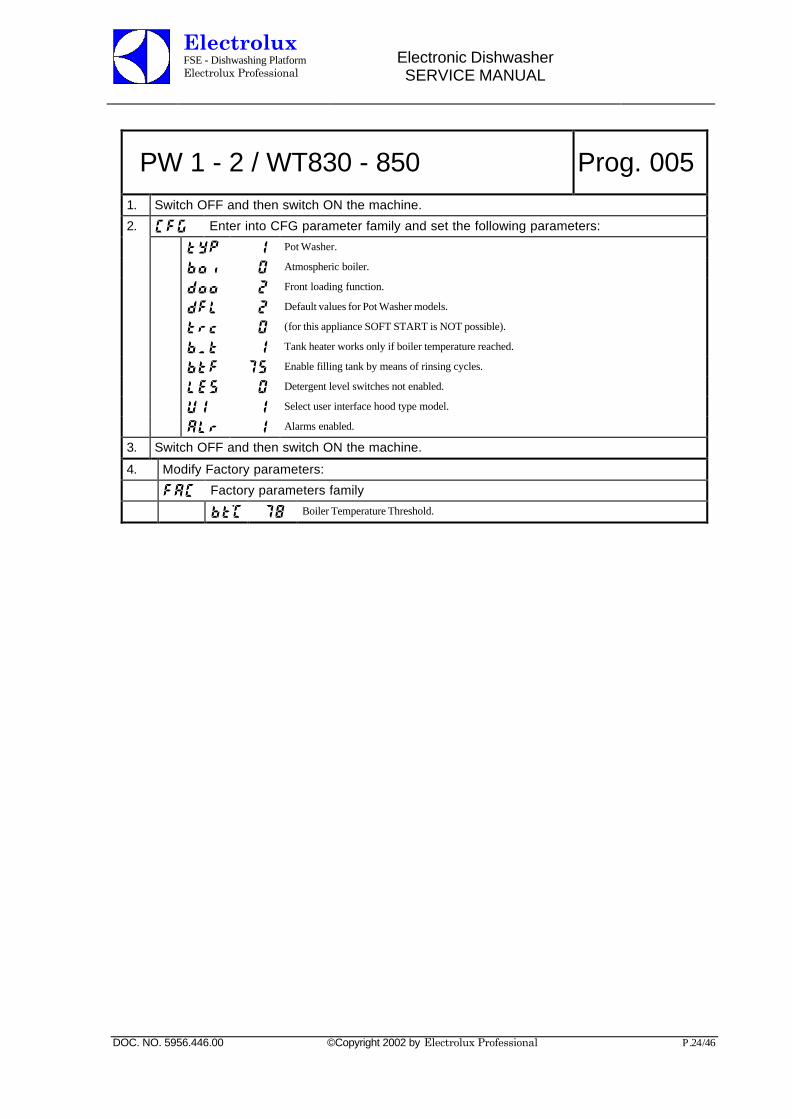
PW 1 - 2 / WT830 - 850 Prog. 0051. Switch OFF and then switch ON the machine.
2. CFG Enter into CFG parameter family and set the following parameters:
tYP 1 Pot Washer.
boi 0 Atmospheric boiler.
doo 2 Front loading function.
dFL 2 Default values for Pot Washer models.
trc 0 (for this appliance SOFT START is NOT possible).
b_t 1 Tank heater works only if boiler temperature reached.
btF 75 Enable filling tank by means of rinsing cycles.
LES 0 Detergent level switches not enabled.
UI 1 Select user interface hood type model.
ALr 1 Alarms enabled.
3. Switch OFF and then switch ON the machine.
4. Modify Factory parameters:
FAC Factory parameters family
bt°C 78 Boiler Temperature Threshold.
ElectroluxFSE - Dishwashing PlatformElectrolux Professional
Electronic DishwasherSERVICE MANUAL
DOC. NO. 5956.446.00 ©Copyright 2002 by Electrolux Professional P.25/46
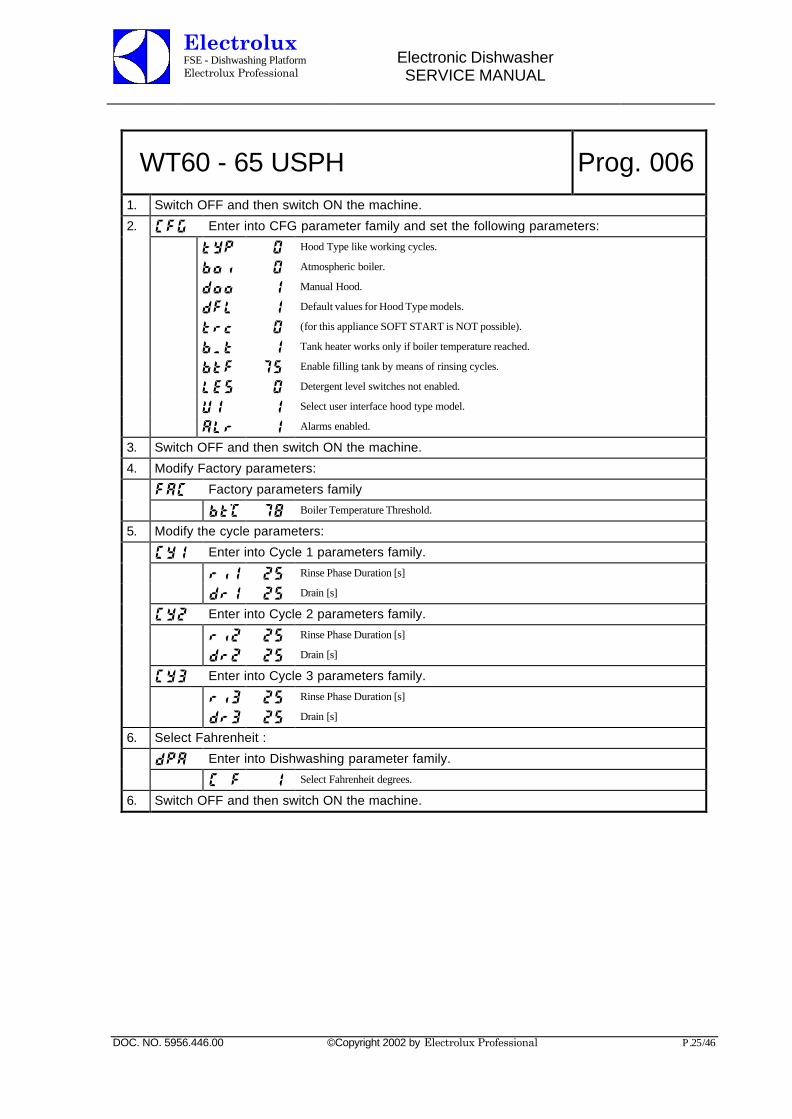
WT60 - 65 USPH Prog. 0061. Switch OFF and then switch ON the machine.
2. CFG Enter into CFG parameter family and set the following parameters:
tYP 0 Hood Type like working cycles.
boi 0 Atmospheric boiler.
doo 1 Manual Hood.
dFL 1 Default values for Hood Type models.
trc 0 (for this appliance SOFT START is NOT possible).
b_t 1 Tank heater works only if boiler temperature reached.
btF 75 Enable filling tank by means of rinsing cycles.
LES 0 Detergent level switches not enabled.
UI 1 Select user interface hood type model.
ALr 1 Alarms enabled.
3. Switch OFF and then switch ON the machine.
4. Modify Factory parameters:
FAC Factory parameters family
bt°C 78 Boiler Temperature Threshold.
5. Modify the cycle parameters:
CY1 Enter into Cycle 1 parameters family.
ri1 25 Rinse Phase Duration [s]
dr1 25 Drain [s]
CY2 Enter into Cycle 2 parameters family.
ri2 25 Rinse Phase Duration [s]
dr2 25 Drain [s]
CY3 Enter into Cycle 3 parameters family.
ri3 25 Rinse Phase Duration [s]
dr3 25 Drain [s]
6. Select Fahrenheit :
dPA Enter into Dishwashing parameter family.
C F 1 Select Fahrenheit degrees.
6. Switch OFF and then switch ON the machine.
ElectroluxFSE - Dishwashing PlatformElectrolux Professional
Electronic DishwasherSERVICE MANUAL
DOC. NO. 5956.446.00 ©Copyright 2002 by Electrolux Professional P.26/46
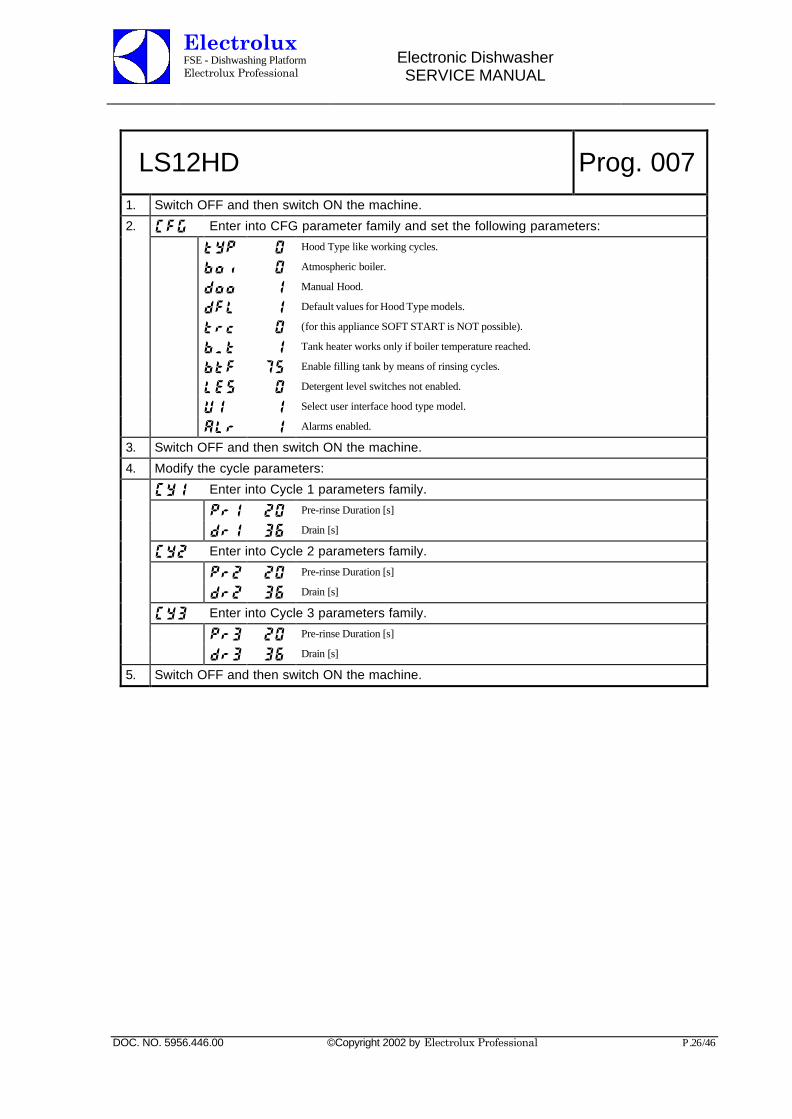
LS12HD Prog. 0071. Switch OFF and then switch ON the machine.
2. CFG Enter into CFG parameter family and set the following parameters:
tYP 0 Hood Type like working cycles.
boi 0 Atmospheric boiler.
doo 1 Manual Hood.
dFL 1 Default values for Hood Type models.
trc 0 (for this appliance SOFT START is NOT possible).
b_t 1 Tank heater works only if boiler temperature reached.
btF 75 Enable filling tank by means of rinsing cycles.
LES 0 Detergent level switches not enabled.
UI 1 Select user interface hood type model.
ALr 1 Alarms enabled.
3. Switch OFF and then switch ON the machine.
4. Modify the cycle parameters:
CY1 Enter into Cycle 1 parameters family.
Pr1 20 Pre-rinse Duration [s]
dr1 36 Drain [s]
CY2 Enter into Cycle 2 parameters family.
Pr2 20 Pre-rinse Duration [s]
dr2 36 Drain [s]
CY3 Enter into Cycle 3 parameters family.
Pr3 20 Pre-rinse Duration [s]
dr3 36 Drain [s]
5. Switch OFF and then switch ON the machine.
ElectroluxFSE - Dishwashing PlatformElectrolux Professional
Electronic DishwasherSERVICE MANUAL
DOC. NO. 5956.446.00 ©Copyright 2002 by Electrolux Professional P.27/46
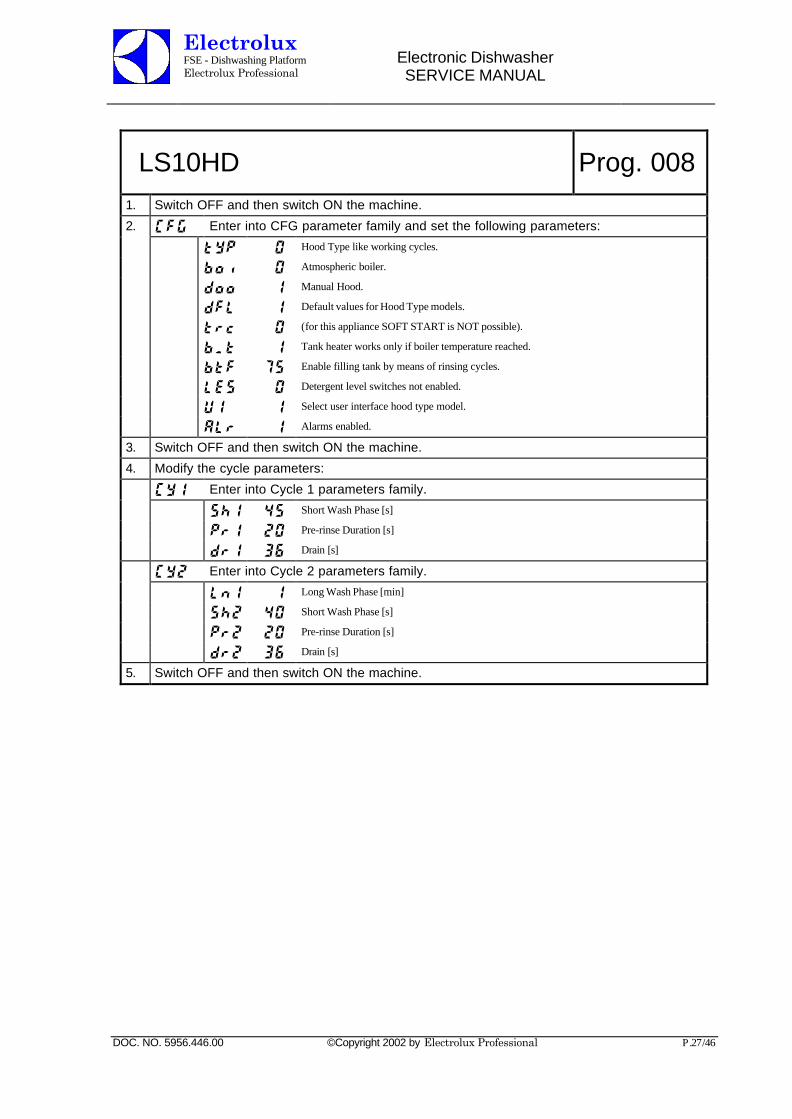
LS10HD Prog. 0081. Switch OFF and then switch ON the machine.
2. CFG Enter into CFG parameter family and set the following parameters:
tYP 0 Hood Type like working cycles.
boi 0 Atmospheric boiler.
doo 1 Manual Hood.
dFL 1 Default values for Hood Type models.
trc 0 (for this appliance SOFT START is NOT possible).
b_t 1 Tank heater works only if boiler temperature reached.
btF 75 Enable filling tank by means of rinsing cycles.
LES 0 Detergent level switches not enabled.
UI 1 Select user interface hood type model.
ALr 1 Alarms enabled.
3. Switch OFF and then switch ON the machine.
4. Modify the cycle parameters:
CY1 Enter into Cycle 1 parameters family.
Sh1 45 Short Wash Phase [s]
Pr1 20 Pre-rinse Duration [s]
dr1 36 Drain [s]
CY2 Enter into Cycle 2 parameters family.
Ln1 1 Long Wash Phase [min]
Sh2 40 Short Wash Phase [s]
Pr2 20 Pre-rinse Duration [s]
dr2 36 Drain [s]
5. Switch OFF and then switch ON the machine.
ElectroluxFSE - Dishwashing PlatformElectrolux Professional
Electronic DishwasherSERVICE MANUAL
DOC. NO. 5956.446.00 ©Copyright 2002 by Electrolux Professional P.28/46
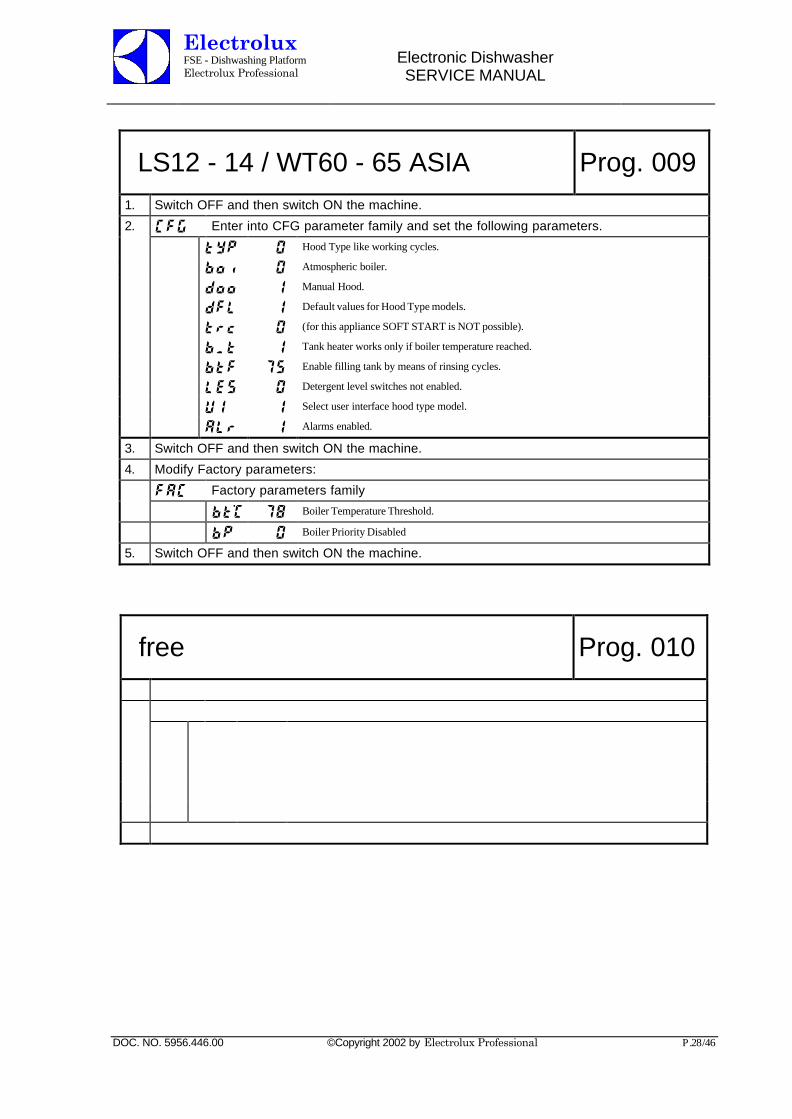
LS12 - 14 / WT60 - 65 ASIA Prog. 0091. Switch OFF and then switch ON the machine.
2. CFG Enter into CFG parameter family and set the following parameters.
tYP 0 Hood Type like working cycles.
boi 0 Atmospheric boiler.
doo 1 Manual Hood.
dFL 1 Default values for Hood Type models.
trc 0 (for this appliance SOFT START is NOT possible).
b_t 1 Tank heater works only if boiler temperature reached.
btF 75 Enable filling tank by means of rinsing cycles.
LES 0 Detergent level switches not enabled.
UI 1 Select user interface hood type model.
ALr 1 Alarms enabled.
3. Switch OFF and then switch ON the machine.
4. Modify Factory parameters:
FAC Factory parameters family
bt°C 78 Boiler Temperature Threshold.
bp 0 Boiler Priority Disabled
5. Switch OFF and then switch ON the machine.
free Prog. 010
ElectroluxFSE - Dishwashing PlatformElectrolux Professional
Electronic DishwasherSERVICE MANUAL
DOC. NO. 5956.446.00 ©Copyright 2002 by Electrolux Professional P.29/46
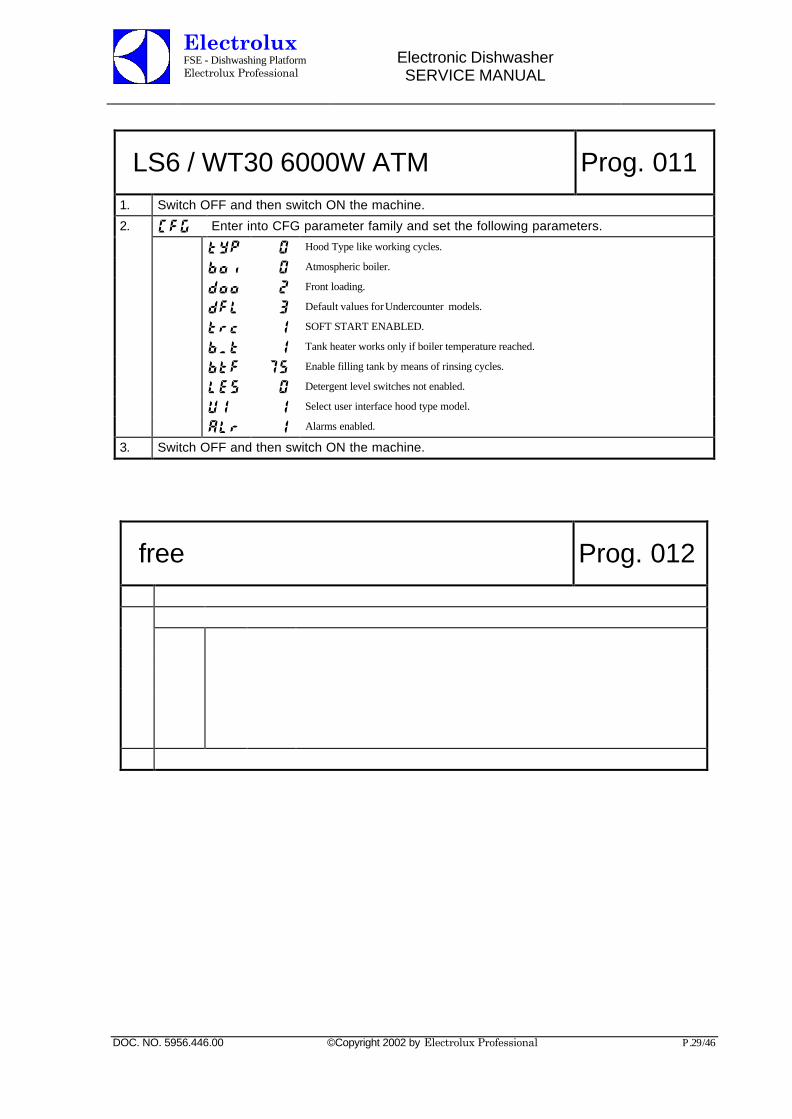
LS6 / WT30 6000W ATM Prog. 0111. Switch OFF and then switch ON the machine.
2. CFG Enter into CFG parameter family and set the following parameters.
tYP 0 Hood Type like working cycles.
boi 0 Atmospheric boiler.
doo 2 Front loading.
dFL 3 Default values for Undercounter models.
trc 1 SOFT START ENABLED.
b_t 1 Tank heater works only if boiler temperature reached.
btF 75 Enable filling tank by means of rinsing cycles.
LES 0 Detergent level switches not enabled.
UI 1 Select user interface hood type model.
ALr 1 Alarms enabled.
3. Switch OFF and then switch ON the machine.
free Prog. 012
ElectroluxFSE - Dishwashing PlatformElectrolux Professional
Electronic DishwasherSERVICE MANUAL
DOC. NO. 5956.446.00 ©Copyright 2002 by Electrolux Professional P.30/46
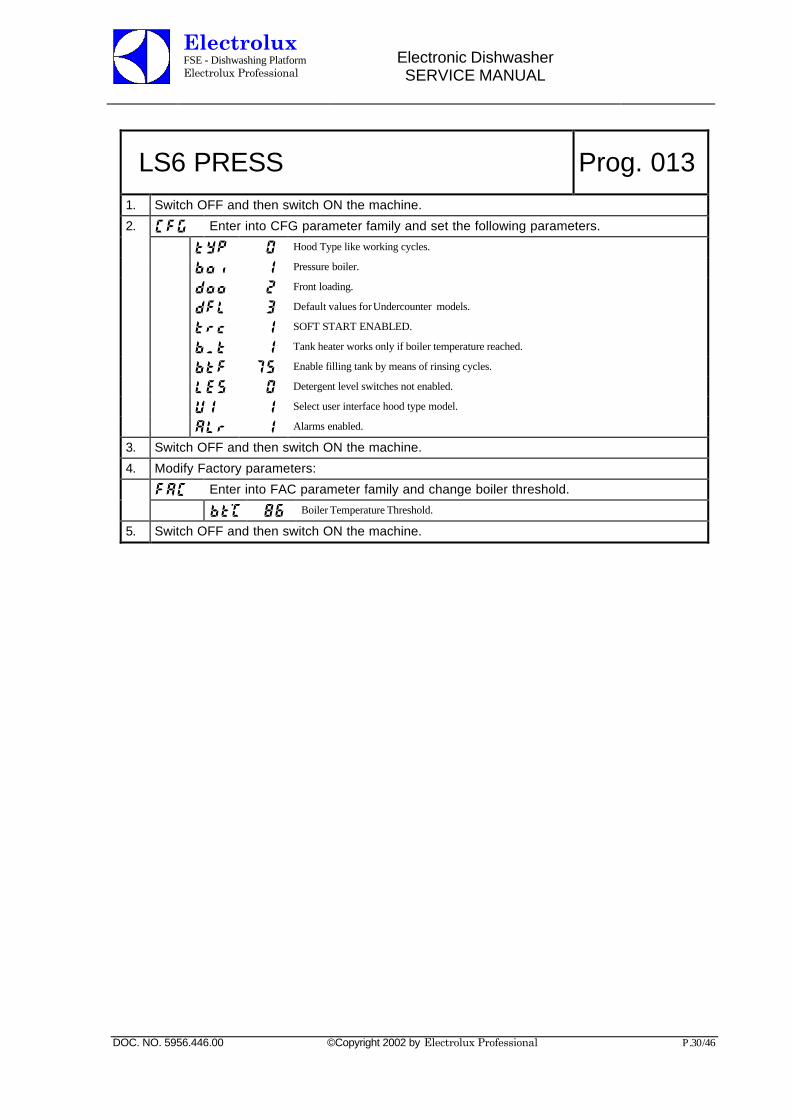
LS6 PRESS Prog. 0131. Switch OFF and then switch ON the machine.
2. CFG Enter into CFG parameter family and set the following parameters.
tYP 0 Hood Type like working cycles.
boi 1 Pressure boiler.
doo 2 Front loading.
dFL 3 Default values for Undercounter models.
trc 1 SOFT START ENABLED.
b_t 1 Tank heater works only if boiler temperature reached.
btF 75 Enable filling tank by means of rinsing cycles.
LES 0 Detergent level switches not enabled.
UI 1 Select user interface hood type model.
ALr 1 Alarms enabled.
3. Switch OFF and then switch ON the machine.
4. Modify Factory parameters:
FAC Enter into FAC parameter family and change boiler threshold.
bt°C 86 Boiler Temperature Threshold.
5. Switch OFF and then switch ON the machine.
ElectroluxFSE - Dishwashing PlatformElectrolux Professional
Electronic DishwasherSERVICE MANUAL
DOC. NO. 5956.446.00 ©Copyright 2002 by Electrolux Professional P.31/46
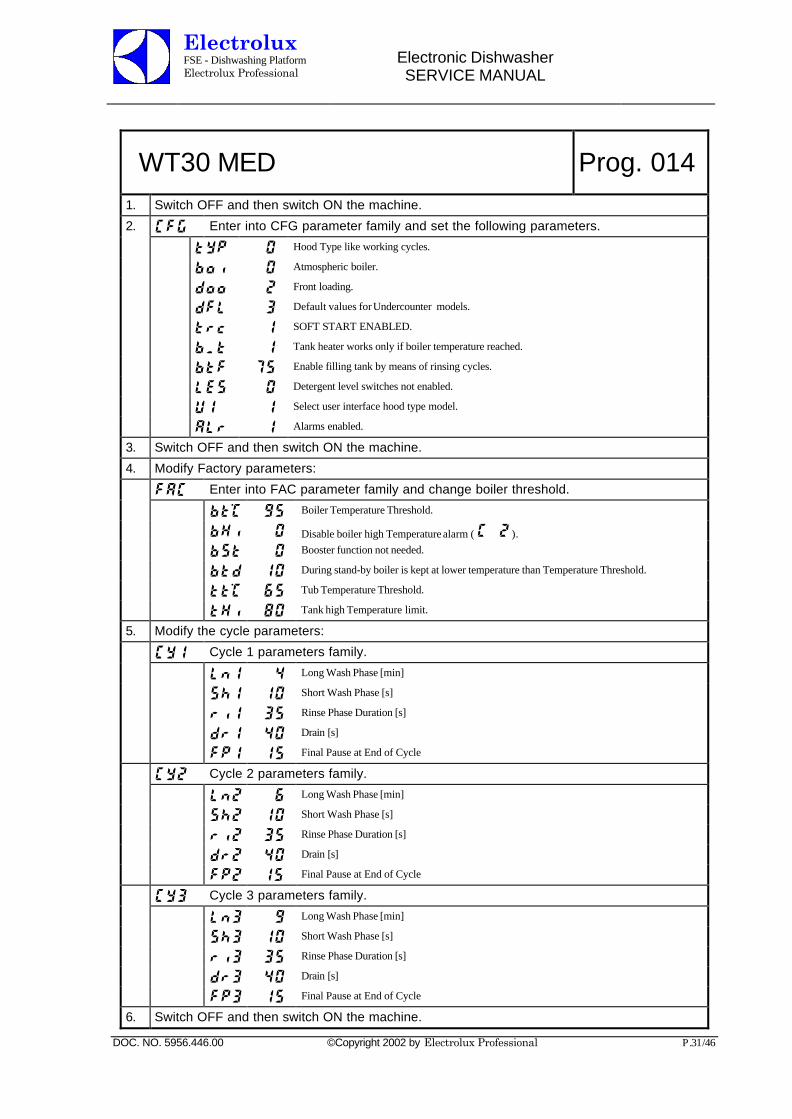
WT30 MED Prog. 0141. Switch OFF and then switch ON the machine.
2. CFG Enter into CFG parameter family and set the following parameters.
tYP 0 Hood Type like working cycles.
boi 0 Atmospheric boiler.
doo 2 Front loading.
dFL 3 Default values for Undercounter models.
trc 1 SOFT START ENABLED.
b_t 1 Tank heater works only if boiler temperature reached.
btF 75 Enable filling tank by means of rinsing cycles.
LES 0 Detergent level switches not enabled.
UI 1 Select user interface hood type model.
ALr 1 Alarms enabled.
3. Switch OFF and then switch ON the machine.
4. Modify Factory parameters:
FAC Enter into FAC parameter family and change boiler threshold.
bt°C 95 Boiler Temperature Threshold.
bHi 0 Disable boiler high Temperature alarm ( C 2 ).
bSt 0 Booster function not needed.
btd 10 During stand-by boiler is kept at lower temperature than Temperature Threshold.
tt°C 65 Tub Temperature Threshold.
tHi 80 Tank high Temperature limit.
5. Modify the cycle parameters:
CY1 Cycle 1 parameters family.
Ln1 4 Long Wash Phase [min]
Sh1 10 Short Wash Phase [s]
ri1 35 Rinse Phase Duration [s]
dr1 40 Drain [s]
FP1 15 Final Pause at End of Cycle
CY2 Cycle 2 parameters family.
Ln2 6 Long Wash Phase [min]
Sh2 10 Short Wash Phase [s]
ri2 35 Rinse Phase Duration [s]
dr2 40 Drain [s]
FP2 15 Final Pause at End of Cycle
CY3 Cycle 3 parameters family.
Ln3 9 Long Wash Phase [min]
Sh3 10 Short Wash Phase [s]
ri3 35 Rinse Phase Duration [s]
dr3 40 Drain [s]
FP3 15 Final Pause at End of Cycle
6. Switch OFF and then switch ON the machine.
ElectroluxFSE - Dishwashing PlatformElectrolux Professional
Electronic DishwasherSERVICE MANUAL
DOC. NO. 5956.446.00 ©Copyright 2002 by Electrolux Professional P.32/46
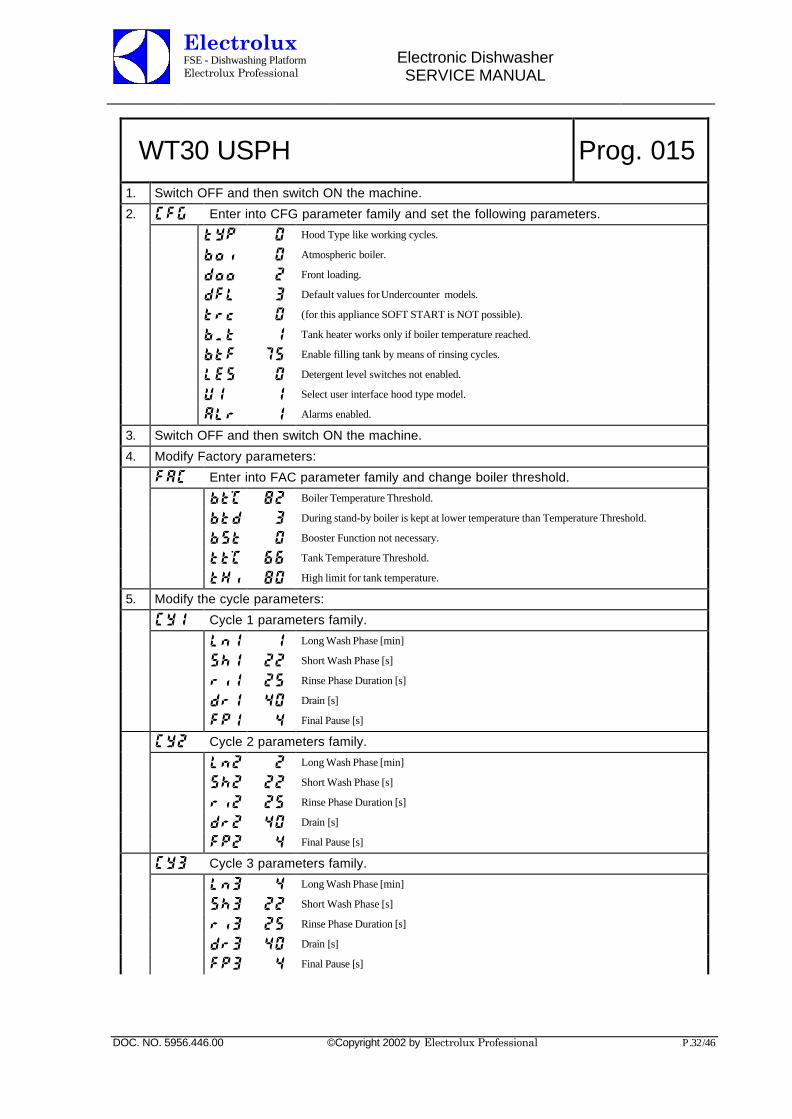
WT30 USPH Prog. 0151. Switch OFF and then switch ON the machine.
2. CFG Enter into CFG parameter family and set the following parameters.
tYP 0 Hood Type like working cycles.
boi 0 Atmospheric boiler.
doo 2 Front loading.
dFL 3 Default values for Undercounter models.
trc 0 (for this appliance SOFT START is NOT possible).
b_t 1 Tank heater works only if boiler temperature reached.
btF 75 Enable filling tank by means of rinsing cycles.
LES 0 Detergent level switches not enabled.
UI 1 Select user interface hood type model.
ALr 1 Alarms enabled.
3. Switch OFF and then switch ON the machine.
4. Modify Factory parameters:
FAC Enter into FAC parameter family and change boiler threshold.
bt°C 82 Boiler Temperature Threshold.
btd 3 During stand-by boiler is kept at lower temperature than Temperature Threshold.
bSt 0 Booster Function not necessary.
tt°C 66 Tank Temperature Threshold.
tHi 80 High limit for tank temperature.
5. Modify the cycle parameters:
CY1 Cycle 1 parameters family.
Ln1 1 Long Wash Phase [min]
Sh1 22 Short Wash Phase [s]
ri1 25 Rinse Phase Duration [s]
dr1 40 Drain [s]
FP1 4 Final Pause [s]
CY2 Cycle 2 parameters family.
Ln2 2 Long Wash Phase [min]
Sh2 22 Short Wash Phase [s]
ri2 25 Rinse Phase Duration [s]
dr2 40 Drain [s]
FP2 4 Final Pause [s]
CY3 Cycle 3 parameters family.
Ln3 4 Long Wash Phase [min]
Sh3 22 Short Wash Phase [s]
ri3 25 Rinse Phase Duration [s]
dr3 40 Drain [s]
FP3 4 Final Pause [s]
ElectroluxFSE - Dishwashing PlatformElectrolux Professional
Electronic DishwasherSERVICE MANUAL
DOC. NO. 5956.446.00 ©Copyright 2002 by Electrolux Professional P.33/46
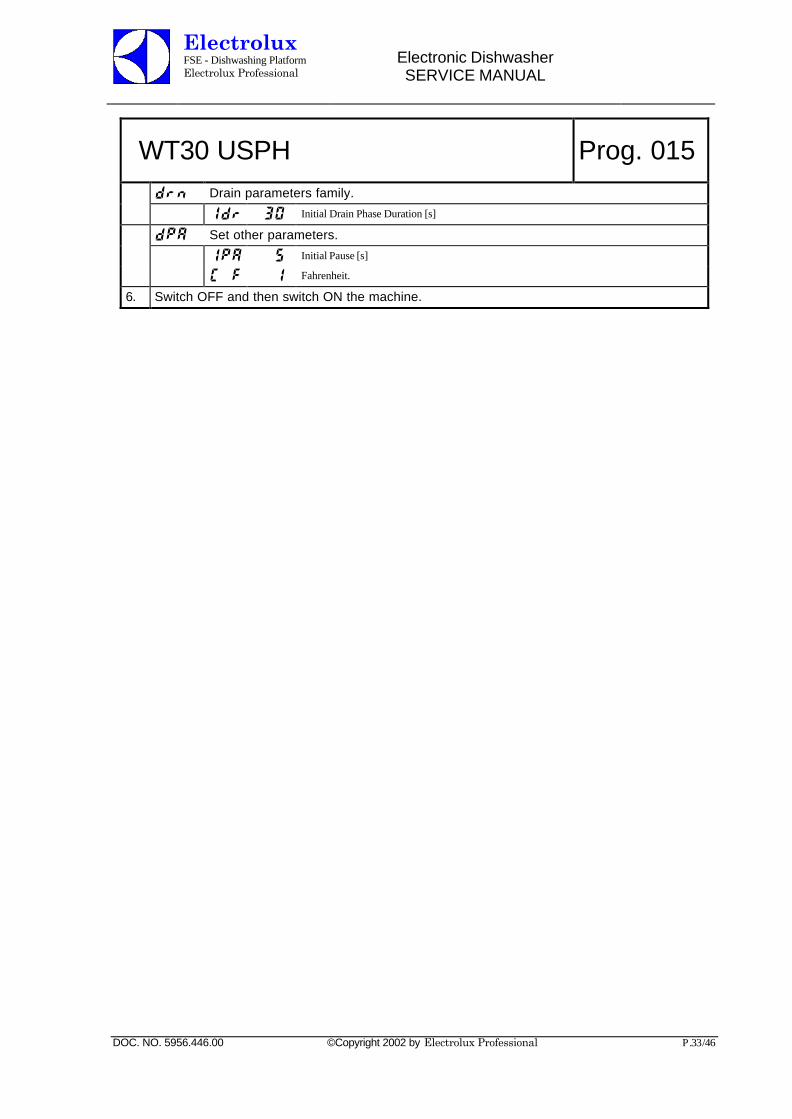
WT30 USPH Prog. 015drn Drain parameters family.
Idr 30 Initial Drain Phase Duration [s]
dPA Set other parameters.
IPA 5 Initial Pause [s]
C F 1 Fahrenheit.
6. Switch OFF and then switch ON the machine.
ElectroluxFSE - Dishwashing PlatformElectrolux Professional
Electronic DishwasherSERVICE MANUAL
DOC. NO. 5956.446.00 ©Copyright 2002 by Electrolux Professional P.34/46
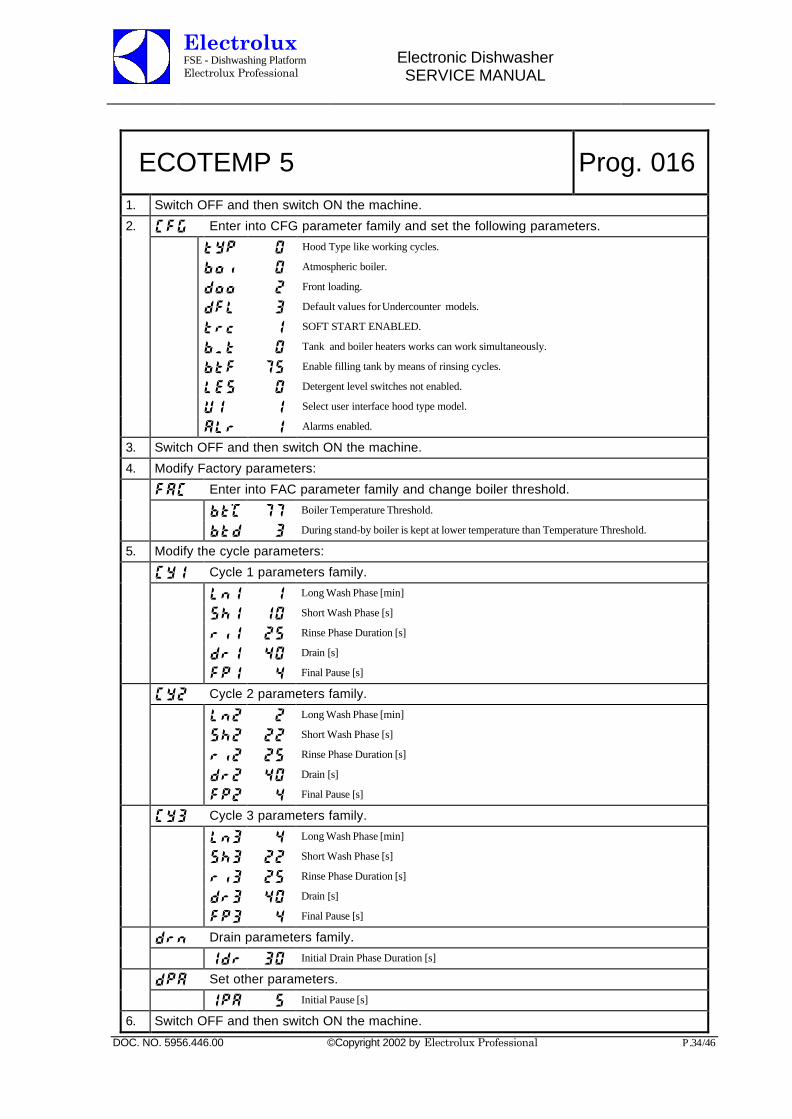
ECOTEMP 5 Prog. 0161. Switch OFF and then switch ON the machine.
2. CFG Enter into CFG parameter family and set the following parameters.
tYP 0 Hood Type like working cycles.
boi 0 Atmospheric boiler.
doo 2 Front loading.
dFL 3 Default values for Undercounter models.
trc 1 SOFT START ENABLED.
b_t 0 Tank and boiler heaters works can work simultaneously.
btF 75 Enable filling tank by means of rinsing cycles.
LES 0 Detergent level switches not enabled.
UI 1 Select user interface hood type model.
ALr 1 Alarms enabled.
3. Switch OFF and then switch ON the machine.
4. Modify Factory parameters:
FAC Enter into FAC parameter family and change boiler threshold.
bt°C 77 Boiler Temperature Threshold.
btd 3 During stand-by boiler is kept at lower temperature than Temperature Threshold.
5. Modify the cycle parameters:
CY1 Cycle 1 parameters family.
Ln1 1 Long Wash Phase [min]
Sh1 10 Short Wash Phase [s]
ri1 25 Rinse Phase Duration [s]
dr1 40 Drain [s]
FP1 4 Final Pause [s]
CY2 Cycle 2 parameters family.
Ln2 2 Long Wash Phase [min]
Sh2 22 Short Wash Phase [s]
ri2 25 Rinse Phase Duration [s]
dr2 40 Drain [s]
FP2 4 Final Pause [s]
CY3 Cycle 3 parameters family.
Ln3 4 Long Wash Phase [min]
Sh3 22 Short Wash Phase [s]
ri3 25 Rinse Phase Duration [s]
dr3 40 Drain [s]
FP3 4 Final Pause [s]
drn Drain parameters family.
Idr 30 Initial Drain Phase Duration [s]
dPA Set other parameters.
IPA 5 Initial Pause [s]
6. Switch OFF and then switch ON the machine.
ElectroluxFSE - Dishwashing PlatformElectrolux Professional
Electronic DishwasherSERVICE MANUAL
DOC. NO. 5956.446.00 ©Copyright 2002 by Electrolux Professional P.35/46
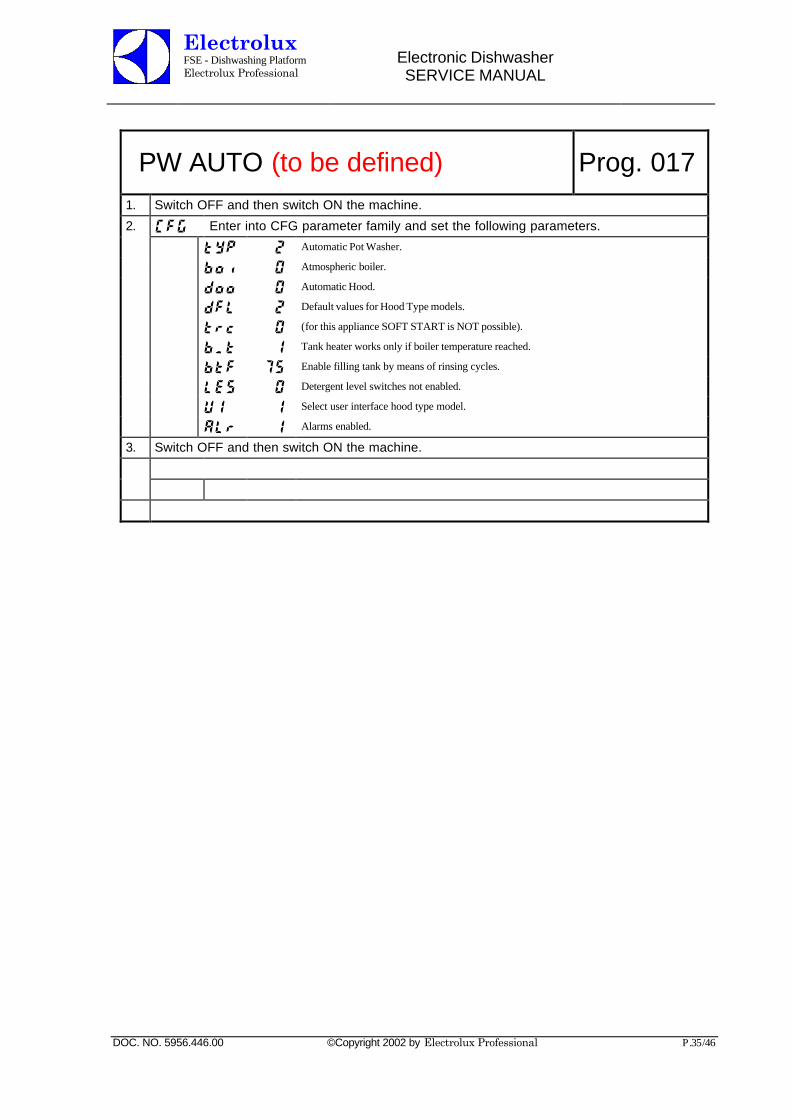
PW AUTO (to be defined) Prog. 0171. Switch OFF and then switch ON the machine.
2. CFG Enter into CFG parameter family and set the following parameters.
tYP 2 Automatic Pot Washer.
boi 0 Atmospheric boiler.
doo 0 Automatic Hood.
dFL 2 Default values for Hood Type models.
trc 0 (for this appliance SOFT START is NOT possible).
b_t 1 Tank heater works only if boiler temperature reached.
btF 75 Enable filling tank by means of rinsing cycles.
LES 0 Detergent level switches not enabled.
UI 1 Select user interface hood type model.
ALr 1 Alarms enabled.
3. Switch OFF and then switch ON the machine.
ElectroluxFSE - Dishwashing PlatformElectrolux Professional
Electronic DishwasherSERVICE MANUAL
DOC. NO. 5956.446.00 ©Copyright 2002 by Electrolux Professional P.36/46
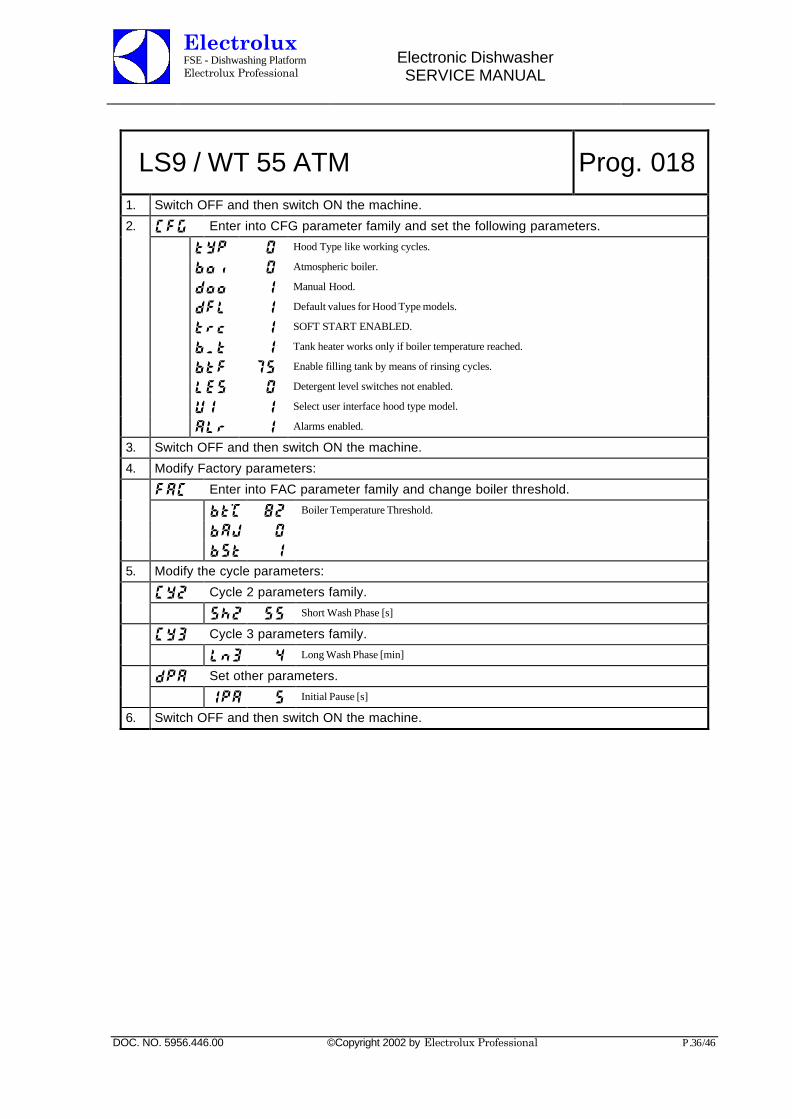
LS9 / WT 55 ATM Prog. 0181. Switch OFF and then switch ON the machine.
2. CFG Enter into CFG parameter family and set the following parameters.
tYP 0 Hood Type like working cycles.
boi 0 Atmospheric boiler.
doo 1 Manual Hood.
dFL 1 Default values for Hood Type models.
trc 1 SOFT START ENABLED.
b_t 1 Tank heater works only if boiler temperature reached.
btF 75 Enable filling tank by means of rinsing cycles.
LES 0 Detergent level switches not enabled.
UI 1 Select user interface hood type model.
ALr 1 Alarms enabled.
3. Switch OFF and then switch ON the machine.
4. Modify Factory parameters:
FAC Enter into FAC parameter family and change boiler threshold.
bt°C 82 Boiler Temperature Threshold.
bAJ 0bSt 1
5. Modify the cycle parameters:
CY2 Cycle 2 parameters family.
Sh2 55 Short Wash Phase [s]
CY3 Cycle 3 parameters family.
Ln3 4 Long Wash Phase [min]
dPA Set other parameters.
IPA 5 Initial Pause [s]
6. Switch OFF and then switch ON the machine.
ElectroluxFSE - Dishwashing PlatformElectrolux Professional
Electronic DishwasherSERVICE MANUAL
DOC. NO. 5956.446.00 ©Copyright 2002 by Electrolux Professional P.37/46
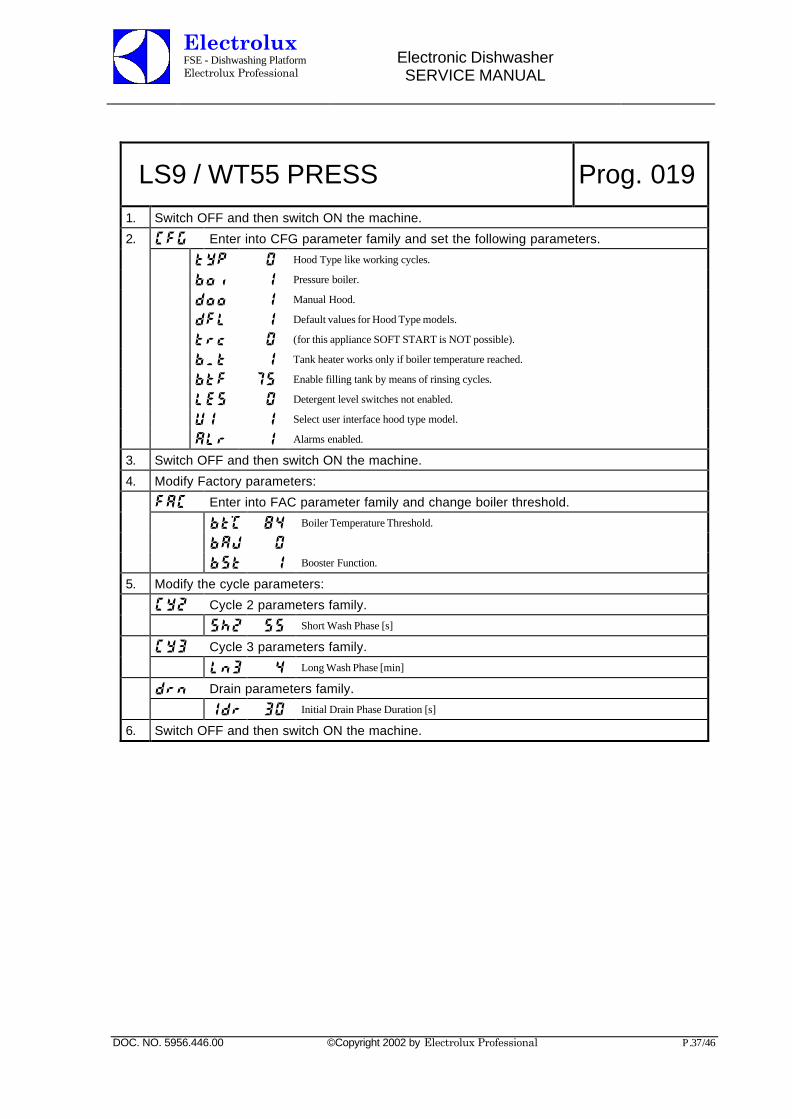
LS9 / WT55 PRESS Prog. 0191. Switch OFF and then switch ON the machine.
2. CFG Enter into CFG parameter family and set the following parameters.
tYP 0 Hood Type like working cycles.
boi 1 Pressure boiler.
doo 1 Manual Hood.
dFL 1 Default values for Hood Type models.
trc 0 (for this appliance SOFT START is NOT possible).
b_t 1 Tank heater works only if boiler temperature reached.
btF 75 Enable filling tank by means of rinsing cycles.
LES 0 Detergent level switches not enabled.
UI 1 Select user interface hood type model.
ALr 1 Alarms enabled.
3. Switch OFF and then switch ON the machine.
4. Modify Factory parameters:
FAC Enter into FAC parameter family and change boiler threshold.
bt°C 84 Boiler Temperature Threshold.
bAJ 0bSt 1 Booster Function.
5. Modify the cycle parameters:
CY2 Cycle 2 parameters family.
Sh2 55 Short Wash Phase [s]
CY3 Cycle 3 parameters family.
Ln3 4 Long Wash Phase [min]
drn Drain parameters family.
Idr 30 Initial Drain Phase Duration [s]
6. Switch OFF and then switch ON the machine.
ElectroluxFSE - Dishwashing PlatformElectrolux Professional
Electronic DishwasherSERVICE MANUAL
DOC. NO. 5956.446.00 ©Copyright 2002 by Electrolux Professional P.38/46
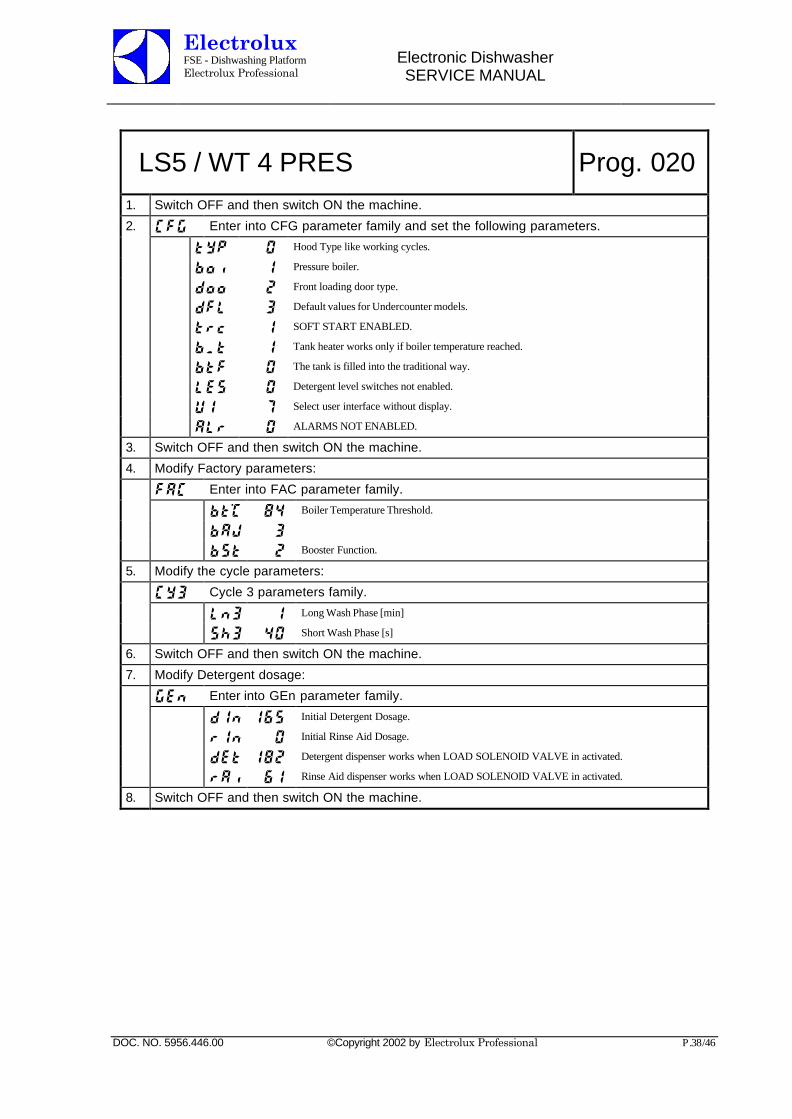
LS5 / WT 4 PRES Prog. 0201. Switch OFF and then switch ON the machine.
2. CFG Enter into CFG parameter family and set the following parameters.
tYP 0 Hood Type like working cycles.
boi 1 Pressure boiler.
doo 2 Front loading door type.
dFL 3 Default values for Undercounter models.
trc 1 SOFT START ENABLED.
b_t 1 Tank heater works only if boiler temperature reached.
btF 0 The tank is filled into the traditional way.
LES 0 Detergent level switches not enabled.
UI 7 Select user interface without display.
ALr 0 ALARMS NOT ENABLED.
3. Switch OFF and then switch ON the machine.
4. Modify Factory parameters:
FAC Enter into FAC parameter family.
bt°C 84 Boiler Temperature Threshold.
bAJ 3bSt 2 Booster Function.
5. Modify the cycle parameters:
CY3 Cycle 3 parameters family.
Ln3 1 Long Wash Phase [min]
Sh3 40 Short Wash Phase [s]
6. Switch OFF and then switch ON the machine.
7. Modify Detergent dosage:
GEn Enter into GEn parameter family.
dIn 165 Initial Detergent Dosage.
rIn 0 Initial Rinse Aid Dosage.
dEt 182 Detergent dispenser works when LOAD SOLENOID VALVE in activated.
rAi 61 Rinse Aid dispenser works when LOAD SOLENOID VALVE in activated.
8. Switch OFF and then switch ON the machine.
ElectroluxFSE - Dishwashing PlatformElectrolux Professional
Electronic DishwasherSERVICE MANUAL
DOC. NO. 5956.446.00 ©Copyright 2002 by Electrolux Professional P.39/46
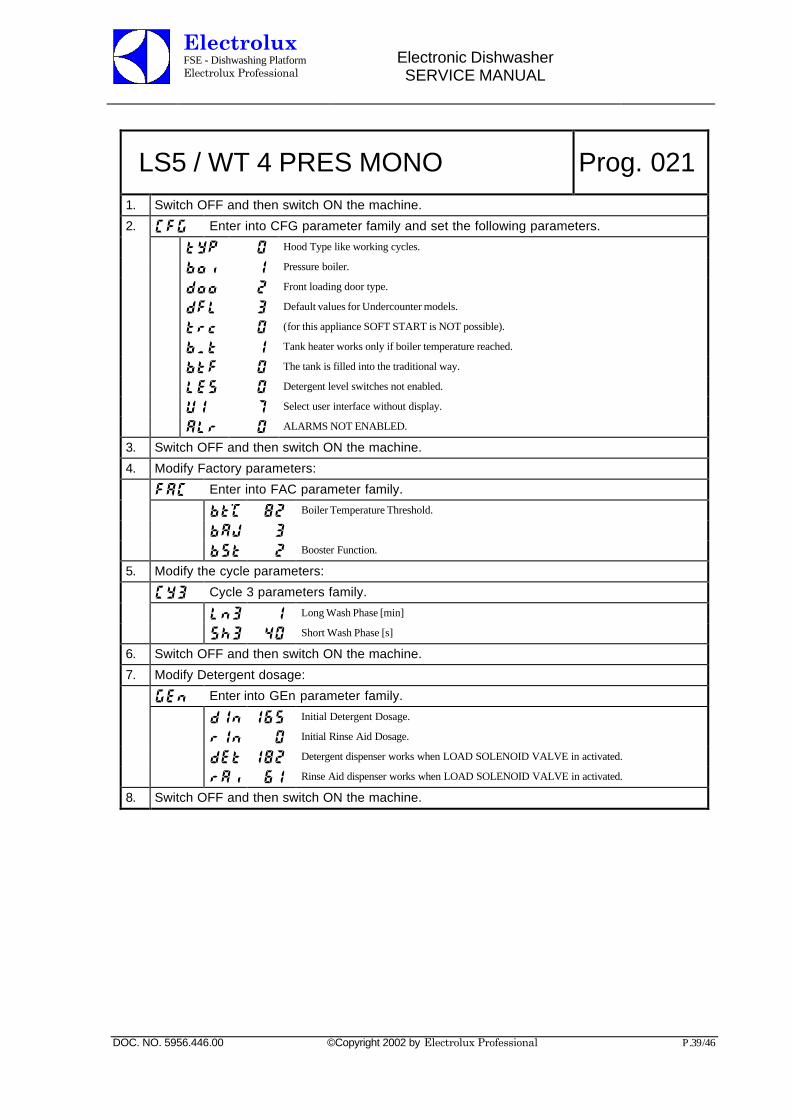
LS5 / WT 4 PRES MONO Prog. 0211. Switch OFF and then switch ON the machine.
2. CFG Enter into CFG parameter family and set the following parameters.
tYP 0 Hood Type like working cycles.
boi 1 Pressure boiler.
doo 2 Front loading door type.
dFL 3 Default values for Undercounter models.
trc 0 (for this appliance SOFT START is NOT possible).
b_t 1 Tank heater works only if boiler temperature reached.
btF 0 The tank is filled into the traditional way.
LES 0 Detergent level switches not enabled.
UI 7 Select user interface without display.
ALr 0 ALARMS NOT ENABLED.
3. Switch OFF and then switch ON the machine.
4. Modify Factory parameters:
FAC Enter into FAC parameter family.
bt°C 82 Boiler Temperature Threshold.
bAJ 3bSt 2 Booster Function.
5. Modify the cycle parameters:
CY3 Cycle 3 parameters family.
Ln3 1 Long Wash Phase [min]
Sh3 40 Short Wash Phase [s]
6. Switch OFF and then switch ON the machine.
7. Modify Detergent dosage:
GEn Enter into GEn parameter family.
dIn 165 Initial Detergent Dosage.
rIn 0 Initial Rinse Aid Dosage.
dEt 182 Detergent dispenser works when LOAD SOLENOID VALVE in activated.
rAi 61 Rinse Aid dispenser works when LOAD SOLENOID VALVE in activated.
8. Switch OFF and then switch ON the machine.
ElectroluxFSE - Dishwashing PlatformElectrolux Professional
Electronic DishwasherSERVICE MANUAL
DOC. NO. 5956.446.00 ©Copyright 2002 by Electrolux Professional P.40/46
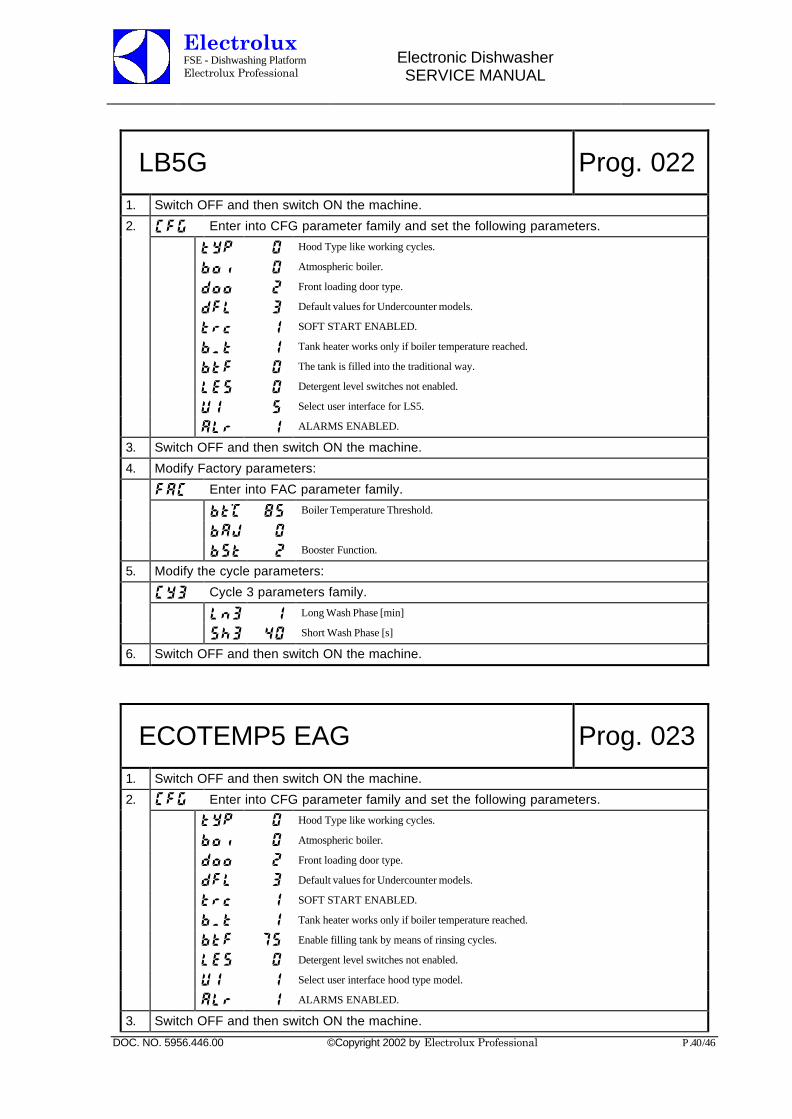
LB5G Prog. 0221. Switch OFF and then switch ON the machine.
2. CFG Enter into CFG parameter family and set the following parameters.
tYP 0 Hood Type like working cycles.
boi 0 Atmospheric boiler.
doo 2 Front loading door type.
dFL 3 Default values for Undercounter models.
trc 1 SOFT START ENABLED.
b_t 1 Tank heater works only if boiler temperature reached.
btF 0 The tank is filled into the traditional way.
LES 0 Detergent level switches not enabled.
UI 5 Select user interface for LS5.
ALr 1 ALARMS ENABLED.
3. Switch OFF and then switch ON the machine.
4. Modify Factory parameters:
FAC Enter into FAC parameter family.
bt°C 85 Boiler Temperature Threshold.
bAJ 0bSt 2 Booster Function.
5. Modify the cycle parameters:
CY3 Cycle 3 parameters family.
Ln3 1 Long Wash Phase [min]
Sh3 40 Short Wash Phase [s]
6. Switch OFF and then switch ON the machine.
ECOTEMP5 EAG Prog. 0231. Switch OFF and then switch ON the machine.
2. CFG Enter into CFG parameter family and set the following parameters.
tYP 0 Hood Type like working cycles.
boi 0 Atmospheric boiler.
doo 2 Front loading door type.
dFL 3 Default values for Undercounter models.
trc 1 SOFT START ENABLED.
b_t 1 Tank heater works only if boiler temperature reached.
btF 75 Enable filling tank by means of rinsing cycles.
LES 0 Detergent level switches not enabled.
UI 1 Select user interface hood type model.
ALr 1 ALARMS ENABLED.
3. Switch OFF and then switch ON the machine.
ElectroluxFSE - Dishwashing PlatformElectrolux Professional
Electronic DishwasherSERVICE MANUAL
DOC. NO. 5956.446.00 ©Copyright 2002 by Electrolux Professional P.41/46
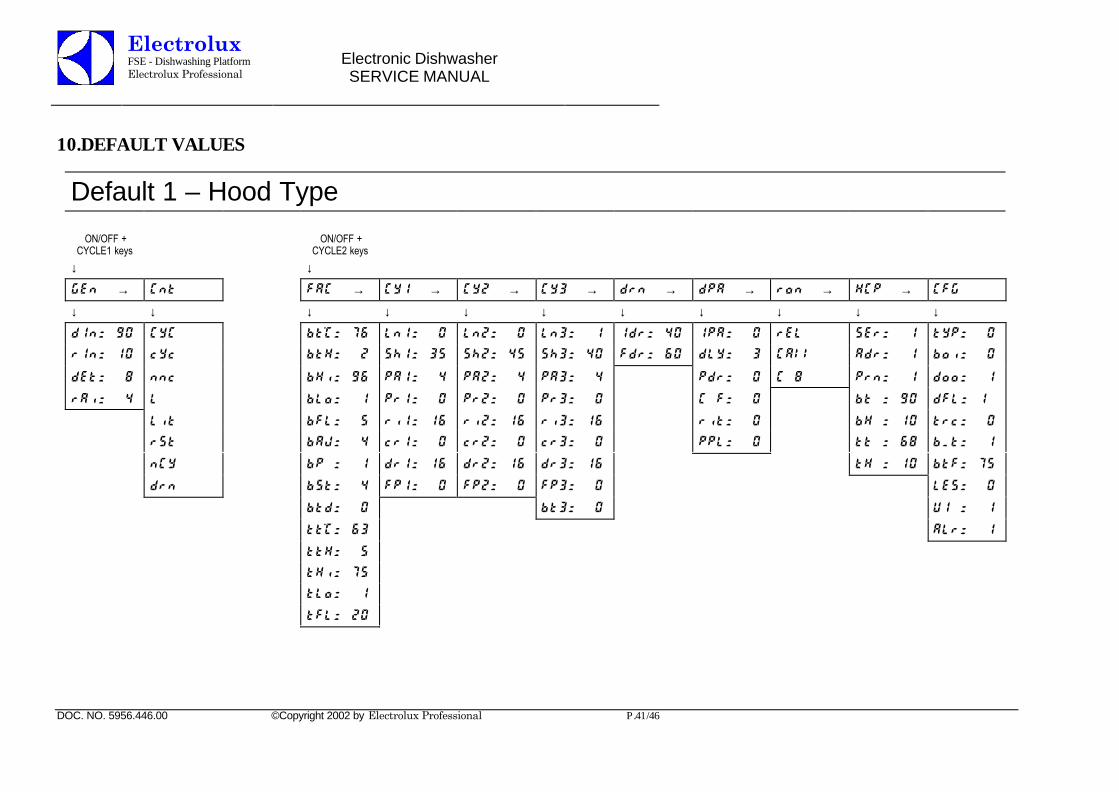
10. DEFAULT VALUES
Default 1 – Hood Type
ON/OFF +CYCLE1 keys
ON/OFF +CYCLE2 keys
↓ ↓
GEn → Cnt FAC → CY1 → CY2 → CY3 → Drn → DPA → Ron → HCP → CFG
↓ ↓ ↓ ↓ ↓ ↓ ↓ ↓ ↓ ↓ ↓
DIn= 90 CYC Bt°C= 76 Ln1= 0 Ln2= 0 Ln3= 1 Idr= 40 IpA= 0 REL SEr= 1 tYP= 0
RIn= 10 cyc BtH= 2 Sh1= 35 Sh2= 45 Sh3= 40 Fdr= 60 DLY= 3 CA\\ Adr= 1 Boi= 0
DEt= 8 Nnc BHi= 96 PA1= 4 PA2= 4 PA3= 4 Pdr= 0 C 8 Prn= 1 Doo= 1
RAi= 4 L BLo= 1 Pr1= 0 Pr2= 0 Pr3= 0 C F= 0 Bt = 90 DFL= 1
Lit BFL= 5 Ri1= 16 Ri2= 16 Ri3= 16 Rit= 0 BH = 10 trc= 0
RSt BAJ= 4 cr1= 0 cr2= 0 cr3= 0 PPL= 0 tt = 68 B_t= 1
NCY BP = 1 Dr1= 16 Dr2= 16 Dr3= 16 tH = 10 BtF= 75
drn BSt= 4 FP1= 0 FP2= 0 FP3= 0 LES= 0
Btd= 0 Bt3= 0 UI = 1
tt°C= 63 ALr= 1
ttH= 5
tHi= 75
tLo= 1
tFL= 20
ElectroluxFSE - Dishwashing PlatformElectrolux Professional
Electronic DishwasherSERVICE MANUAL
DOC. NO. 5956.446.00 ©Copyright 2002 by Electrolux Professional P.42/46
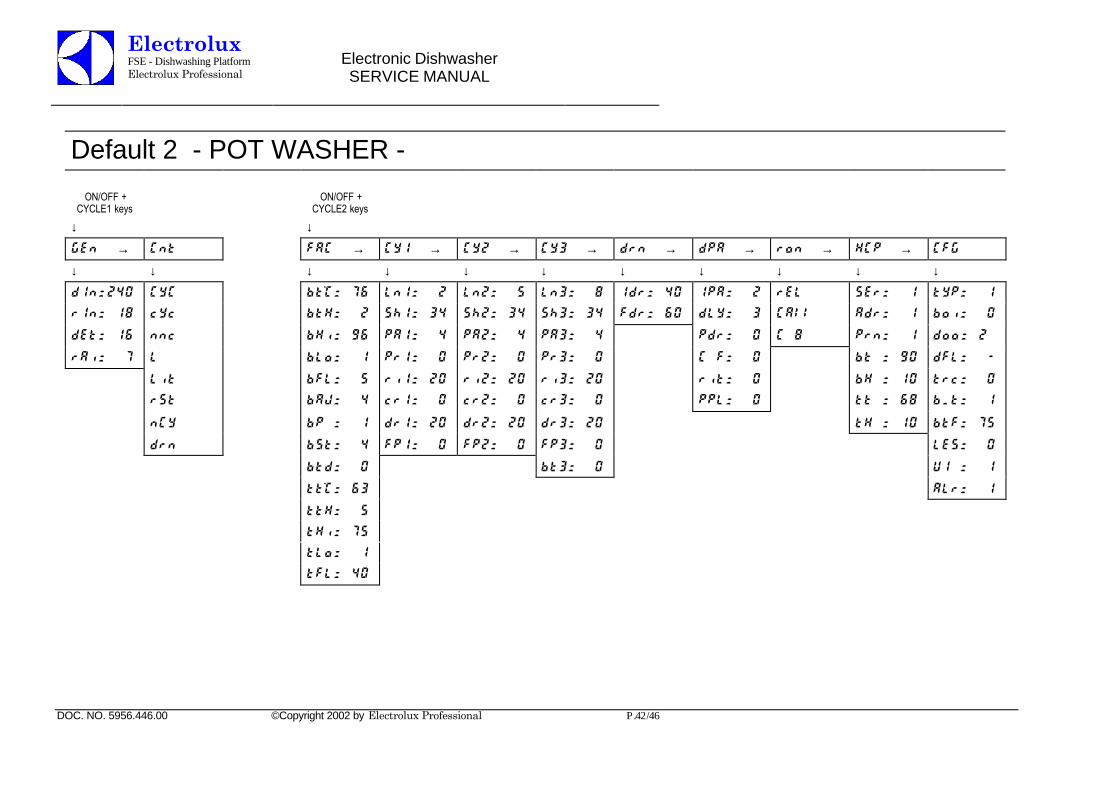
Default 2 - POT WASHER -
ON/OFF +CYCLE1 keys
ON/OFF +CYCLE2 keys
↓ ↓
GEn → Cnt FAC → CY1 → CY2 → CY3 → Drn → DPA → Ron → HCP → CFG
↓ ↓ ↓ ↓ ↓ ↓ ↓ ↓ ↓ ↓ ↓
DIn=240 CYC Bt°C= 76 Ln1= 2 Ln2= 5 Ln3= 8 Idr= 40 IpA= 2 REL SEr= 1 tYP= 1
RIn= 18 cyc BtH= 2 Sh1= 34 Sh2= 34 Sh3= 34 Fdr= 60 DLY= 3 CA\\ Adr= 1 Boi= 0
DEt= 16 Nnc BHi= 96 PA1= 4 PA2= 4 PA3= 4 Pdr= 0 C 8 Prn= 1 Doo= 2
RAi= 7 L BLo= 1 Pr1= 0 Pr2= 0 Pr3= 0 C F= 0 Bt = 90 DFL= -
Lit BFL= 5 Ri1= 20 Ri2= 20 Ri3= 20 Rit= 0 BH = 10 trc= 0
RSt BAJ= 4 cr1= 0 cr2= 0 cr3= 0 PPL= 0 tt = 68 B_t= 1
NCY BP = 1 Dr1= 20 Dr2= 20 Dr3= 20 tH = 10 BtF= 75
drn BSt= 4 FP1= 0 FP2= 0 FP3= 0 LES= 0
Btd= 0 Bt3= 0 UI = 1
tt°C= 63 ALr= 1
ttH= 5
tHi= 75
tLo= 1
tFL= 40

ElectroluxFSE - Dishwashing PlatformElectrolux Professional
Electronic DishwasherSERVICE MANUAL
DOC. NO. 5956.446.00 ©Copyright 2002 by Electrolux Professional P.43/46
Default 3 - UNDERCOUNTER -
ON/OFF +CYCLE1 keys
ON/OFF +CYCLE2 keys
↓ ↓
GEn → Cnt FAC → CY1 → CY2 → CY3 → Drn → DPA → Ron → HCP → CFG
↓ ↓ ↓ ↓ ↓ ↓ ↓ ↓ ↓ ↓ ↓
DIn= 50 CYC Bt°C= 80 Ln1= 1 Ln2= 1 Ln3= 3 Idr= 30 IpA= 0 REL SEr= 1 tYP= 0
RIn= 10 cyc BtH= 2 Sh1= 10 Sh2= 40 Sh3= 40 Fdr= 60 DLY= 3 CA\\ Adr= 1 Boi= 0
DEt= 8 Nnc BHi= 96 PA1= 4 PA2= 4 PA3= 4 Pdr= 0 C 8 Prn= 1 Doo= 2
RAi= 4 L BLo= 1 Pr1= 0 Pr2= 0 Pr3= 0 C F= 0 Bt = 90 DFL= 3
Lit BFL= 5 Ri1= 16 Ri2= 16 Ri3= 16 Rit= 0 BH = 10 trc= 1
RSt BAJ= 0 cr1= 0 cr2= 0 cr3= 0 PPL= 0 tt = 68 B_t= 1
NCY BP = 1 Dr1= 30 Dr2= 30 Dr3= 30 tH = 10 BtF= 75
drn BSt= 4 FP1= 0 FP2= 0 FP3= 0 LES= 0
Btd= 3 Bt3= 0 UI = 1
tt°C= 63 ALr= 1
ttH= 5
tHi= 75
tLo= 1
tFL= 20
ElectroluxFSE - Dishwashing PlatformElectrolux Professional
Electronic DishwasherSERVICE MANUAL
DOC. NO. 5956.446.00 ©Copyright 2002 by Electrolux Professional P.44/46
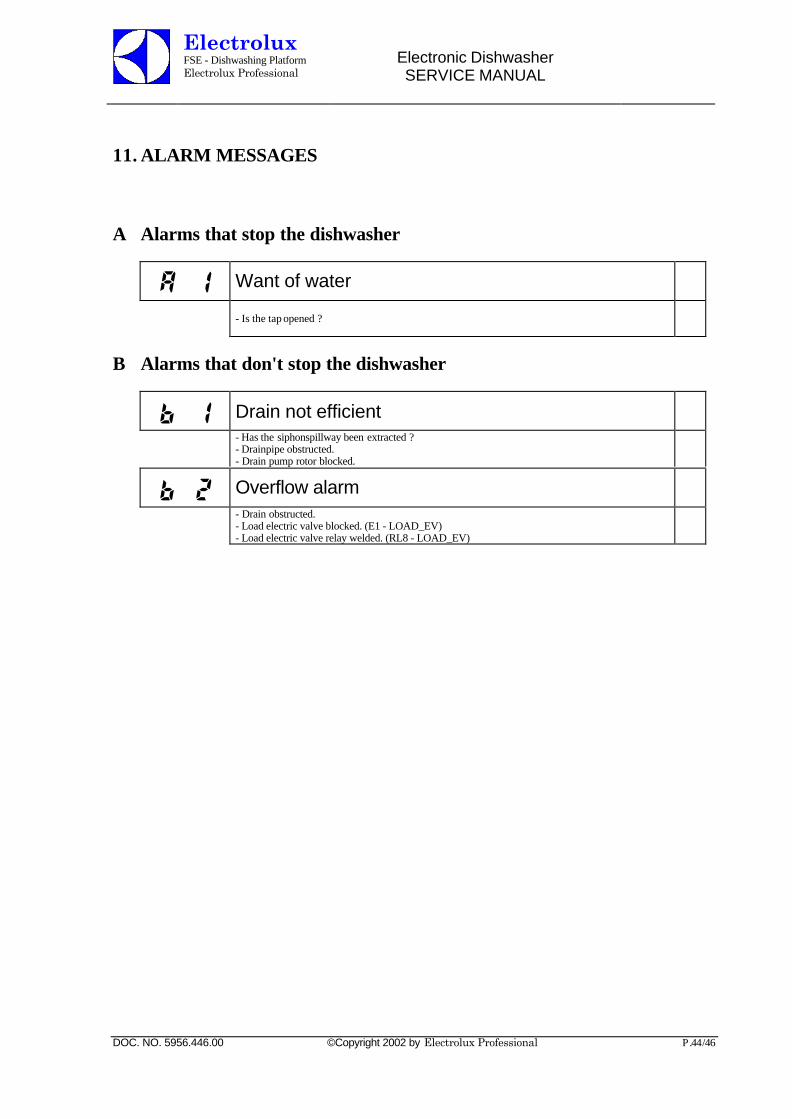
11. ALARM MESSAGES
A Alarms that stop the dishwasher
A 1 Want of water
- Is the tap opened ?
B Alarms that don't stop the dishwasher
B 1 Drain not efficient- Has the siphonspillway been extracted ?- Drainpipe obstructed.- Drain pump rotor blocked.
B 2 Overflow alarm- Drain obstructed.- Load electric valve blocked. (E1 - LOAD_EV)- Load electric valve relay welded. (RL8 - LOAD_EV)

ElectroluxFSE - Dishwashing PlatformElectrolux Professional
Electronic DishwasherSERVICE MANUAL
DOC. NO. 5956.446.00 ©Copyright 2002 by Electrolux Professional P.45/46
C Alarms that stop the functioning and suggest to call the service
C 1 Boiler temperature rise too fast
- The boiler may be empty. Boiler level sensor not efficient.
C 2 Boiler temperature too high- Boiler relay welded/melted (see RL2,RL3,RL4).- Boiler level sensor not efficient.
C 3 Tank temperature too high- Tank relay welded/melted (RL5 - TUB_HEAT).- Rinse water too hot.
C 4 Tank temperature sensor out of order
- Sensor broken or disconnected (NT1).
C 5 Tank temperature sensor out of order
- Sensor short-circuited (NT1).
C 6 Boiler temperature sensor out of order
- Sensor broken or disconnected (NT2).
C 7 Boiler temperature sensor out of order
- Sensor short-circuited (NT2).
C 8 During rinse phase boiler doesn't empty- Rinse pump not efficient.- Rinse arms obstructed.- Boiler level sensor out of order.
C 9 Automatic hood out of order- Hood blocked, motor overload.- End switch out of order.
ElectroluxFSE - Dishwashing PlatformElectrolux Professional
Electronic DishwasherSERVICE MANUAL
DOC. NO. 5956.446.00 ©Copyright 2002 by Electrolux Professional P.46/46
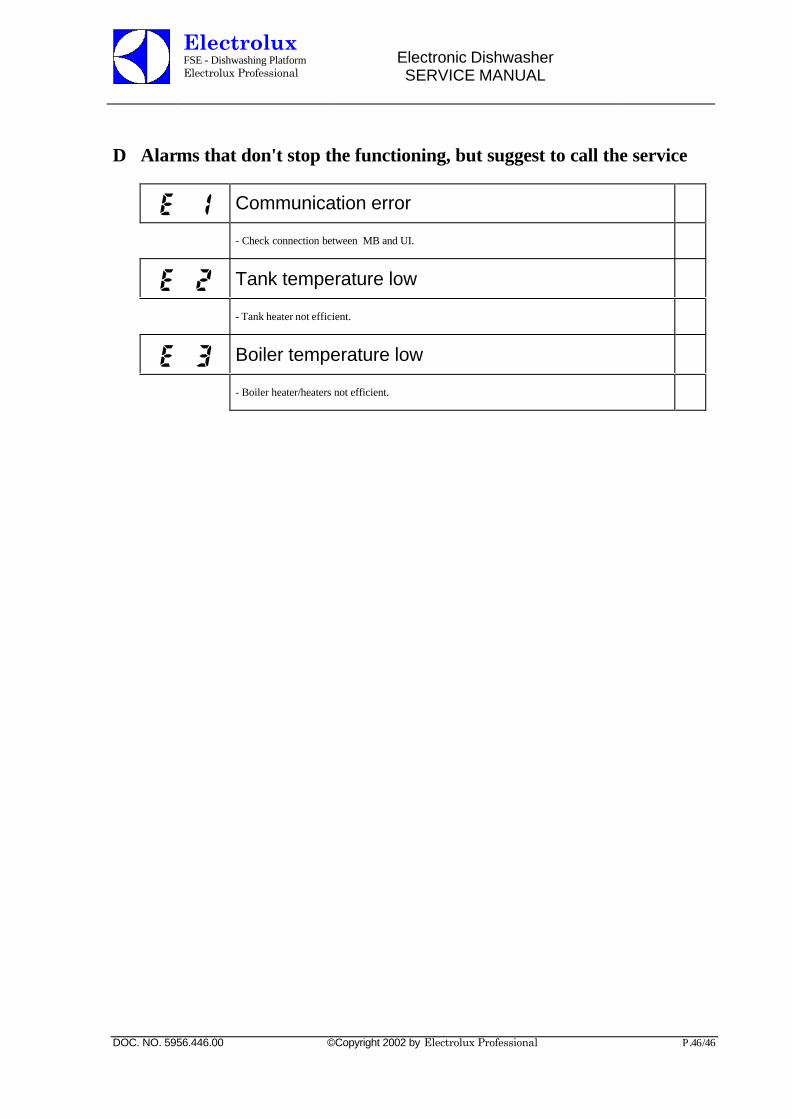
D Alarms that don't stop the functioning, but suggest to call the service
E 1 Communication error
- Check connection between MB and UI.
E 2 Tank temperature low
- Tank heater not efficient.
E 3 Boiler temperature low
- Boiler heater/heaters not efficient.
Related Documents