SERVICE & MAINTENANCE MANUAL REV. 2.2

Welcome message from author
This document is posted to help you gain knowledge. Please leave a comment to let me know what you think about it! Share it to your friends and learn new things together.
Transcript

SERVICE & MAINTENANCE MANUAL
REV. 2.2

The information contained in this manual is intended for QUALIFIED TECHNICIANS who have
completed a specific TECHNOGYM training course and are authorized to perform machine start-up and adjustment procedures as well as extraordinary maintenance or repairs which require a
thorough knowledge of the machine, its operation, its safety devices and working procedures.
CAREFULLY READ THE INFORMATION CONTAINED IN THIS MANUAL BEFORE PERFORMING ANY MAINTENANCE
PROCEDURES ON THE MACHINE
DANGEROUS VOLTAGES PRESENT EVEN WHEN THE MACHINE IS TURNED OFF
NOTE:
The information contained in this document is subject to change without notice. Technogym does not guarantee this documentation in any way. Technogym shall not be held responsible for any errors contained in this manual and declines all liability for accidents or damages resulting from the supply, characteristics or use of this manual. This document contains proprietary information that is protected by copyright. All rights reserved. No part of this document may be photocopied, reproduced or translated into another language without the prior written consent of Technogym. The Technogym® trademark is property of Technogym S.p.A. The Kinesis ONE™ trademark is property of Technogym S.p.A.

KINESIS ONE: Service & Maintenance Manual rev. 2.2
Page i
Contents 1. GENERAL NOTICES ............................................................................................................................................. 1.1
1.1. INTRODUCTION ................................................................................................................................................... 1.1 1.2. RECOMMENDATIONS .......................................................................................................................................... 1.1 1.3. GENERAL RULES FOR REPAIR PROCEDURES ........................................................................................................ 1.2
2. TECHNICAL CHARACTERISTICS .................................................................................................................... 2.1 2.1. PRODUCT CODES................................................................................................................................................. 2.1 2.2. MECHANICAL CARATTERISTICS .......................................................................................................................... 2.2 2.3. AMBIENT SPECIFICATIONS .................................................................................................................................. 2.2 2.4. CONFORMITY TO REGULATIONS ......................................................................................................................... 2.3
3. CABLES ROUTING ................................................................................................................................................ 3.1
4. ACCESSORIES ....................................................................................................................................................... 4.1 4.1. GENERIC ACCESSORIES ....................................................................................................................................... 4.1
5. INSTALLATION AND HANDLING MACHINES .............................................................................................. 5.1 5.1. SPECIFICATIONS AND REQUIREMENTS ................................................................................................................ 5.1 5.2. INSTALLATION .................................................................................................................................................... 5.1
6. DISASSEMBLY PART ........................................................................................................................................... 6.1 6.1. REAR PANEL DISASSEMBLY ................................................................................................................................ 6.2 6.2. FORNT PANEL DISASSEMBLY .............................................................................................................................. 6.3 6.3. REAR CABLE DISASSEMBLY ................................................................................................................................ 6.4
6.3.1. Rear cable disassembly .......................................................................................................................... 6.4 6.3.2. Rear cable reassembly ............................................................................................................................ 6.5
6.4. REMOVING WEIGHT STACK CABLE (HANDLES) ................................................................................................... 6.7 6.4.1. Weight stack cable and handles disassembly ......................................................................................... 6.7 6.4.2. Weight stack cable reassembly ............................................................................................................... 6.8
6.5. ARMS DISASSEMBLY .................................................................................................................................... 6.16 6.5.1. Lower arms ........................................................................................................................................... 6.16 6.5.2. Upper arms ........................................................................................................................................... 6.17
6.6. PULLEY DISASSEMBLY...................................................................................................................................... 6.18 6.7. CAM DISASSEMBLY .......................................................................................................................................... 6.19 6.8. ROTATING PULLEY SYSTEM DISASSEMBLY ....................................................................................................... 6.20 6.9. WEIGHT STACK DISASSEMBLY .......................................................................................................................... 6.22 6.10. FOOT ADJUSTMENT DISASSEMBLY .................................................................................................................... 6.24
7. ADJUSTMENT ........................................................................................................................................................ 7.1 7.1. THE WEIGHT STACK IS NOT FLOWING FLUID ....................................................................................................... 7.1 7.2. THE CABLE OF WEIGHT STACK IS NOT IN TENSION .............................................................................................. 7.2 7.3. ADJUSTING THE FRONT PANEL POSITION............................................................................................................. 7.3 7.4. THE MACHINE IS NOT FLAT ................................................................................................................................. 7.5 7.5. ADJUSTMENT WEIGHT STACK STOP..................................................................................................................... 7.6
8. SCHEDULED MAINTENANCE ........................................................................................................................... 8.1 8.1. ORDINARY MAINTENANCE OPERATIONS ............................................................................................................. 8.2
8.1.1. External cleaning operations ................................................................................................................. 8.2 8.1.2. Cleaning the covering panels ................................................................................................................. 8.2 8.1.3. Check the cross, bars and weight stack plates ....................................................................................... 8.2 8.1.4. Check the cables ..................................................................................................................................... 8.3 8.1.5. Check the cross limit switch ................................................................................................................... 8.3 8.1.6. Checking various rubber parts ............................................................................................................... 8.3
8.2. EXTRA-ORDINARY MAINTENANCE OPERATIONS............................................................................................... 8.4
KINESIS ONE: Service & Maintenance Manual rev. 2.2
Page ii
8.2.1. Check the pulleys .................................................................................................................................... 8.4 8.2.2. Check the weight stack rod stops ............................................................................................................ 8.4 8.2.3. Replacing the cables ............................................................................................................................... 8.4 8.2.4. Screw and bolt check .............................................................................................................................. 8.4 8.2.5. Checking for mechanism play ................................................................................................................ 8.4 8.2.6. Checking cross alignment ...................................................................................................................... 8.4
9. APPENDICE ............................................................................................................................................................ 9.1 9.1. TOOLS TO USE .................................................................................................................................................... 9.1
KINESIS ONE: Service & Maintenance Manual rev. 2.2
Page 1.1
1. GENERAL NOTICES
1.1. INTRODUCTION This document is reserved for Technogym Service technicians, and is intended to provide authorized personnel with the necessary information to correctly carry out repairs and maintenance. A thorough knowledge of the technical information contained in this manual is essential for completing the professional training of the operator. In order to facilitate consultation, the paragraphs are accompanied by schematic drawings which illustrate the procedure being described. This manual contains notices and symbols which have a specific meanings:
WARNING: non observance may result in accident or injury.
CAUTION: non observance may cause damage to the machine.
Information about the operation in progress.
Observation about the operation in progress.
1.2. RECOMMENDATIONS Technogym recommends the following steps for planning repair procedures: • Carefully evaluate the customer’s description of the machine malfunction and ask all the
necessary questions to clarify the symptoms of the problem. • Clearly diagnose the causes of the problem. This manual provides the fundamental theoretical
basis, which must then be integrated by personal experience and attendance at the training courses periodically offered by Technogym.
• Rationally plan the repair procedure so as to minimize the downtime necessary for procuring
spare parts, preparing tools, etc. • Access the component to be repaired, avoiding any unnecessary operations. In this regard it will
be useful to refer to the disassembling sequence described in this manual.
KINESIS ONE: Service & Maintenance Manual rev. 2.2
Page 1.2
1.3. GENERAL RULES FOR REPAIR PROCEDURES 1. Always mark any parts or positions which may be confused with each other at the time of
reassembly. 2. Use original Technogym spare parts and lubricants of the recommended brands. 3. Use special tools where specified. 4. Consult the Technical Newsletters, which may contain more up-to-date information on adjusts
and maintenance than those contained in this manual. 5. Before starting the repair procedure, make sure that the recommended tools are available and in
good condition. 6. For the procedures described in this manual, use only the specified tools.
The tool sizes quoted in this manual are expressed in mm.
KINESIS ONE: Service & Maintenance Manual rev. 2.2
Page 2.1
2. TECHNICAL CHARACTERISTICS
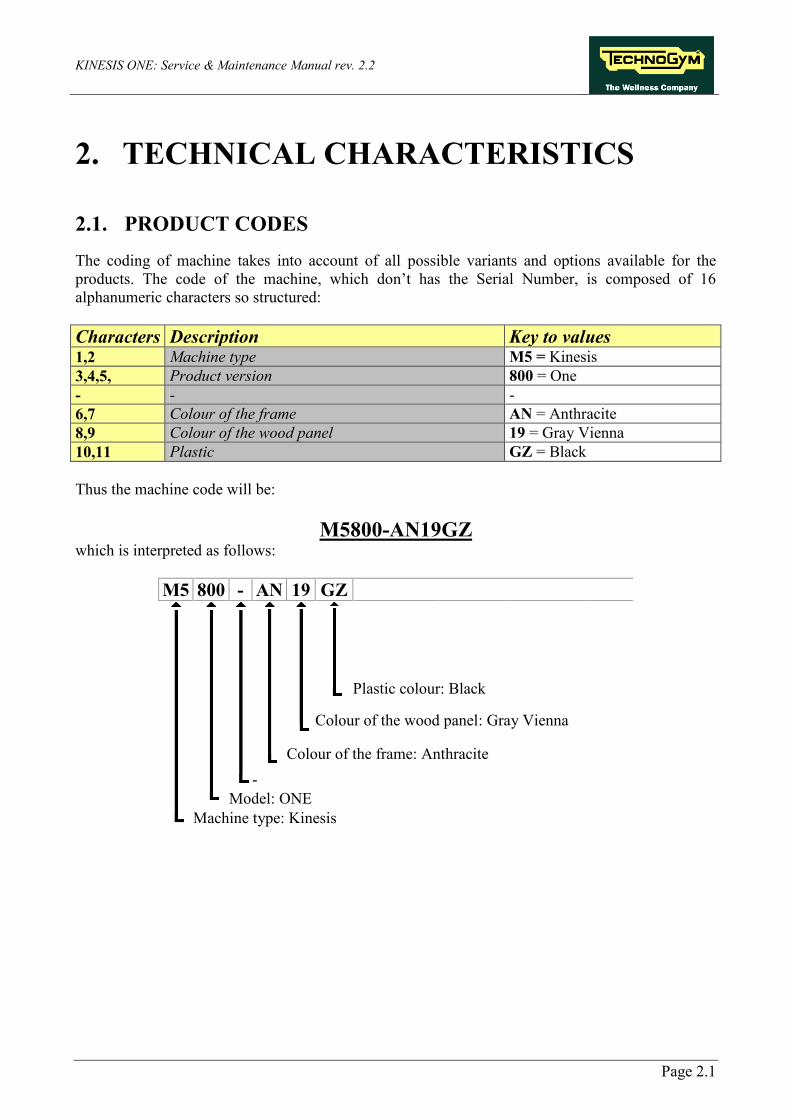
2.1. PRODUCT CODES The coding of machine takes into account of all possible variants and options available for the products. The code of the machine, which don’t has the Serial Number, is composed of 16 alphanumeric characters so structured: Characters Description Key to values 1,2 Machine type M5 = Kinesis 3,4,5, Product version 800 = One - - - 6,7 Colour of the frame AN = Anthracite 8,9 Colour of the wood panel 19 = Gray Vienna 10,11 Plastic GZ = Black Thus the machine code will be:
M5800-AN19GZ which is interpreted as follows:
M5 800 - AN 19 GZ
Plastic colour: Black
Colour of the wood panel: Gray Vienna
Colour of the frame: Anthracite -
Model: ONE Machine type: Kinesis

KINESIS ONE: Service & Maintenance Manual rev. 2.2
Page 2.2
2.2. MECHANICAL CARATTERISTICS
KINESIS ONE
Width A 1405mm – 55” Length B 1650mm – 65” Height C 2120mm – 83”
Machine weight 361 Kg – 797 lb Weight stack weight 2x79 Kg - 2x175 lb
2.3. AMBIENT SPECIFICATIONS
Temperature Operating from 10° to 25° C Storage from 10° to 25° C
Humidity Operating from 20% to 90% non-condensing Storage from 20% to 90% non-condensing
KINESIS ONE: Service & Maintenance Manual rev. 2.2
Page 2.3
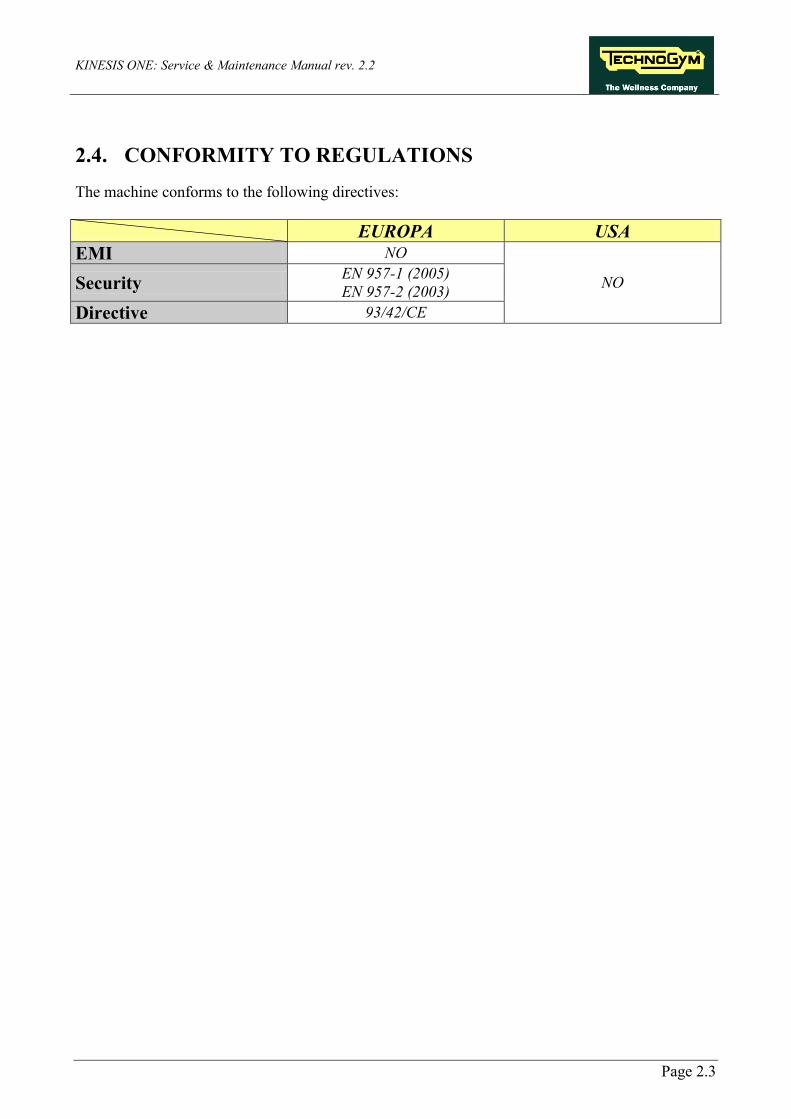
2.4. CONFORMITY TO REGULATIONS The machine conforms to the following directives: EUROPA USA EMI NO
NO Security EN 957-1 (2005) EN 957-2 (2003)
Directive 93/42/CE
KINESIS ONE: Service & Maintenance Manual rev. 2.2
Page 2.4
Page intentionally left blank
KINESIS ONE: Service & Maintenance Manual rev. 2.2
Page 3.1
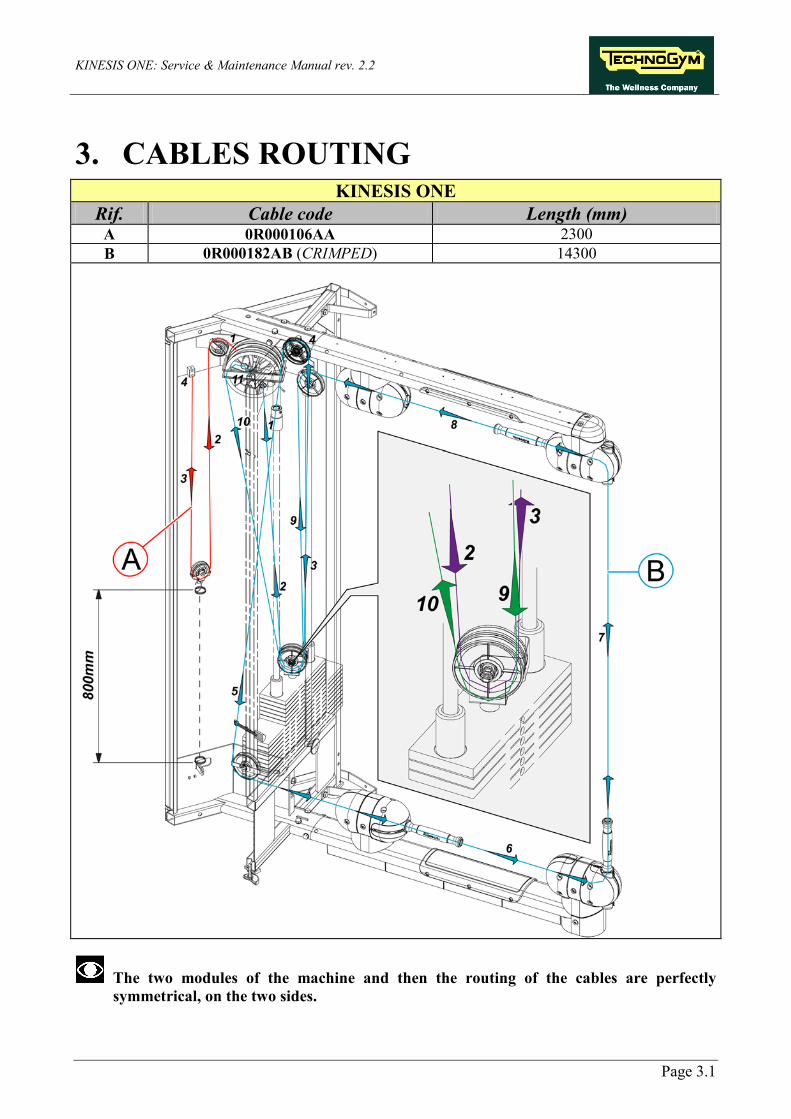
3. CABLES ROUTING KINESIS ONE
Rif. Cable code Length (mm) A 0R000106AA 2300 B 0R000182AB (CRIMPED) 14300
The two modules of the machine and then the routing of the cables are perfectly symmetrical, on the two sides.

KINESIS ONE: Service & Maintenance Manual rev. 2.2
Page 3.2
Page intentionally left blank
KINESIS ONE: Service & Maintenance Manual rev. 2.2
Page 4.1
4. ACCESSORIES
4.1. GENERIC ACCESSORIES
The accessories supplied are detailed in the User Manual of the machine with the relevant particulars of use.

KINESIS ONE: Service & Maintenance Manual rev. 2.2
Page 4.2
Page intentionally left blank
KINESIS ONE: Service & Maintenance Manual rev. 2.2
Page 5.1
5. INSTALLATION AND HANDLING MACHINES
5.1. SPECIFICATIONS AND REQUIREMENTS For correct machine installation, make sure that:
• The machine is installed on a level surface that is free of vibrations and has sufficient carrying capacity for the combined weight of the machine and user.
• The place of installation is free of dust and sand.
• The place of installation meets the operating temperature and humidity conditions specified
in paragraph: 2.3. “ Ambient specifications”.
5.2. INSTALLATION The machine is delivered partially disassembled, wrapped in cellophane, and fixed on top of a wooden pallet. The machine’s arm group are delivered in cardboard boxes, wrapped in pluriball and fixed inside the frame of the machine.
Installation and assembly procedure are provided in the proper manual supplied with the machine.

KINESIS ONE: Service & Maintenance Manual rev. 2.2
Page 5.2
Page intentionally left blank
KINESIS ONE: Service & Maintenance Manual rev. 2.2
Page 6.1
6. DISASSEMBLY PART
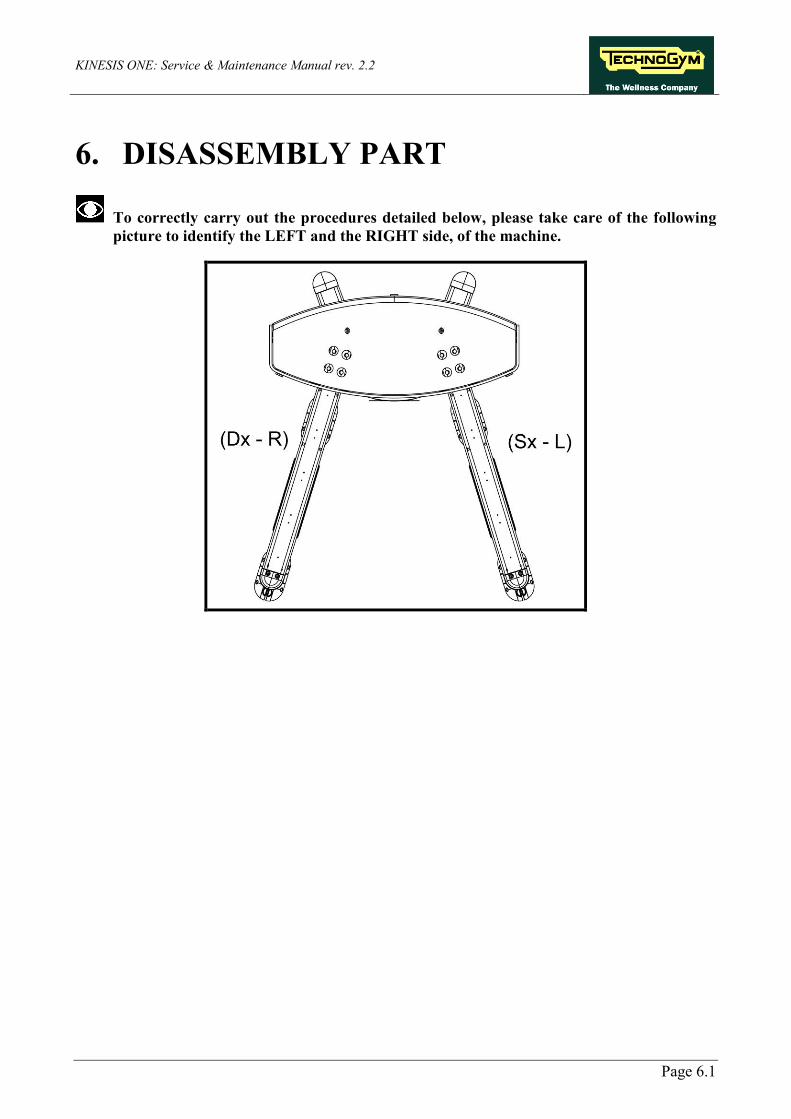
To correctly carry out the procedures detailed below, please take care of the following picture to identify the LEFT and the RIGHT side, of the machine.
KINESIS ONE: Service & Maintenance Manual rev. 2.2
Page 6.2
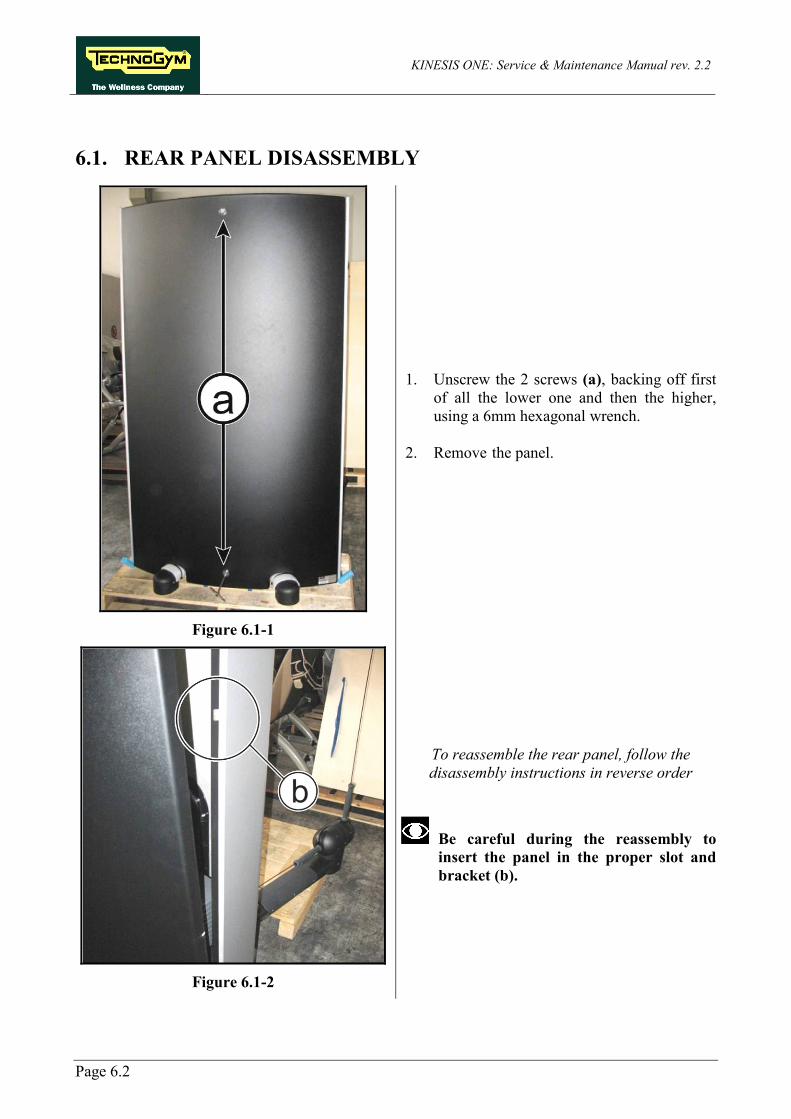
6.1. REAR PANEL DISASSEMBLY
Figure 6.1-1
1. Unscrew the 2 screws (a), backing off first of all the lower one and then the higher, using a 6mm hexagonal wrench.
2. Remove the panel.
Figure 6.1-2
To reassemble the rear panel, follow the disassembly instructions in reverse order
Be careful during the reassembly to insert the panel in the proper slot and bracket (b).
KINESIS ONE: Service & Maintenance Manual rev. 2.2
Page 6.3
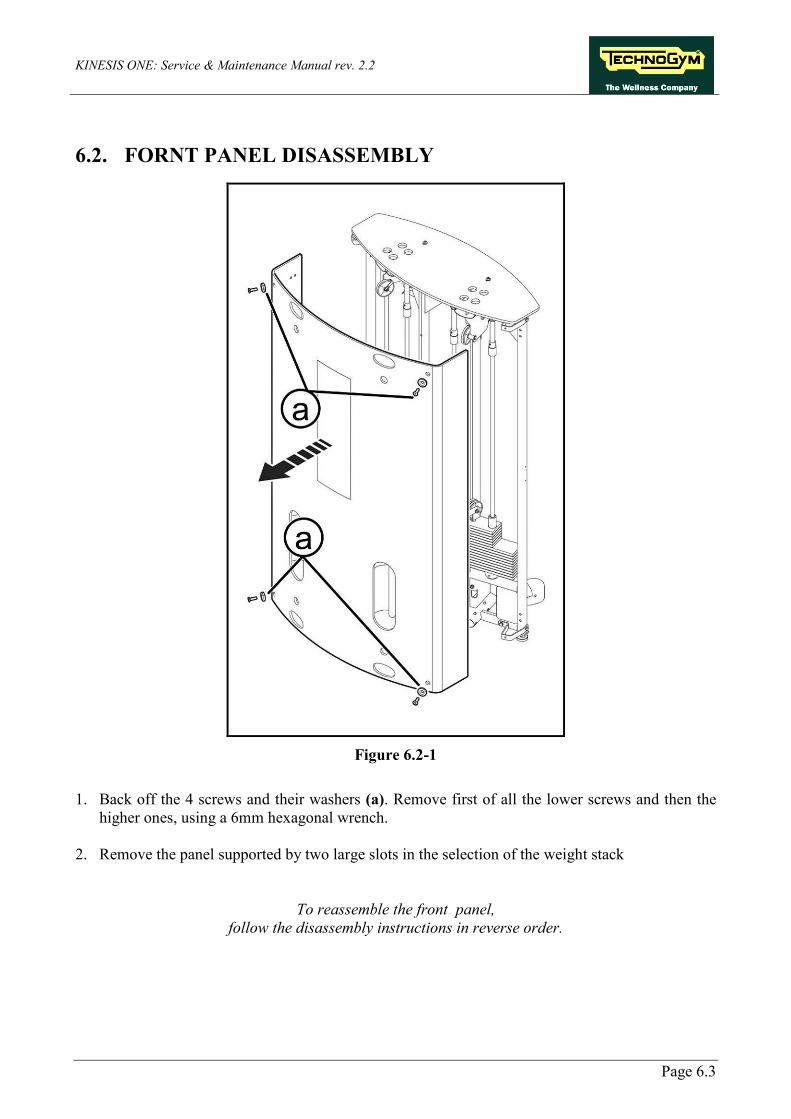
6.2. FORNT PANEL DISASSEMBLY
Figure 6.2-1
1. Back off the 4 screws and their washers (a). Remove first of all the lower screws and then the
higher ones, using a 6mm hexagonal wrench.
2. Remove the panel supported by two large slots in the selection of the weight stack
To reassemble the front panel,
follow the disassembly instructions in reverse order.
KINESIS ONE: Service & Maintenance Manual rev. 2.2
Page 6.4
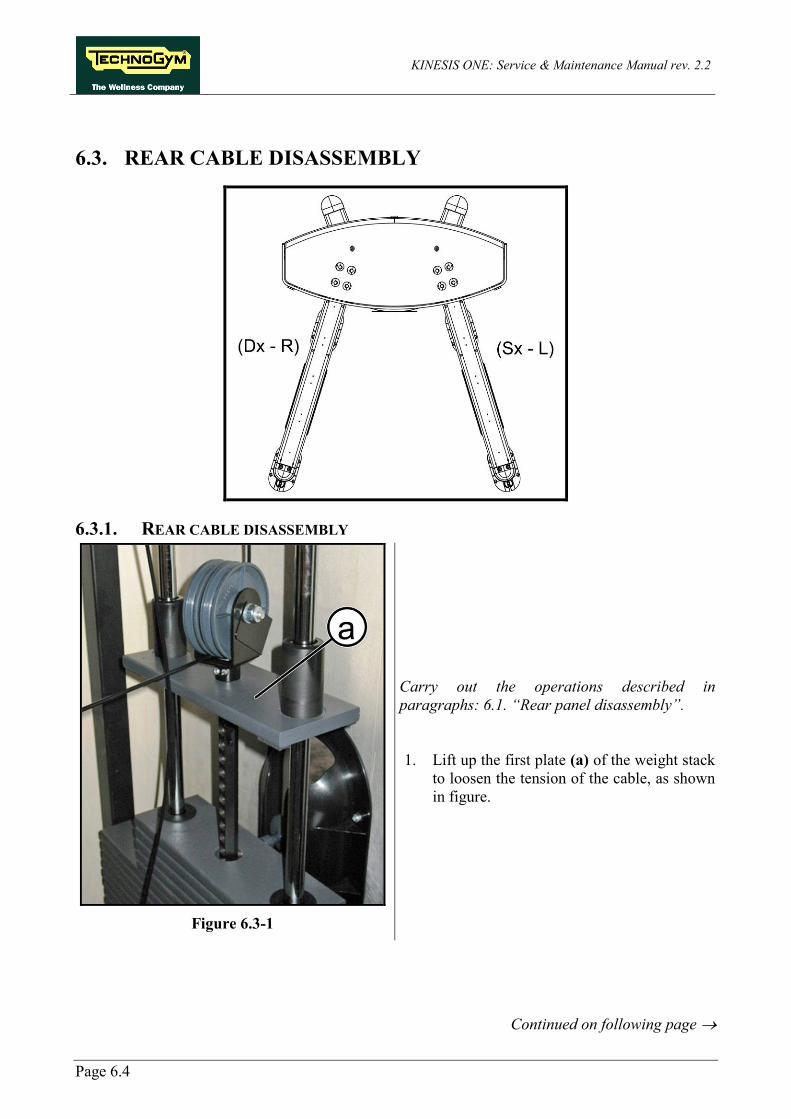
6.3. REAR CABLE DISASSEMBLY
6.3.1. REAR CABLE DISASSEMBLY
Figure 6.3-1
Carry out the operations described in paragraphs: 6.1. “Rear panel disassembly”. 1. Lift up the first plate (a) of the weight stack
to loosen the tension of the cable, as shown in figure.
Continued on following page →
KINESIS ONE: Service & Maintenance Manual rev. 2.2
Page 6.5
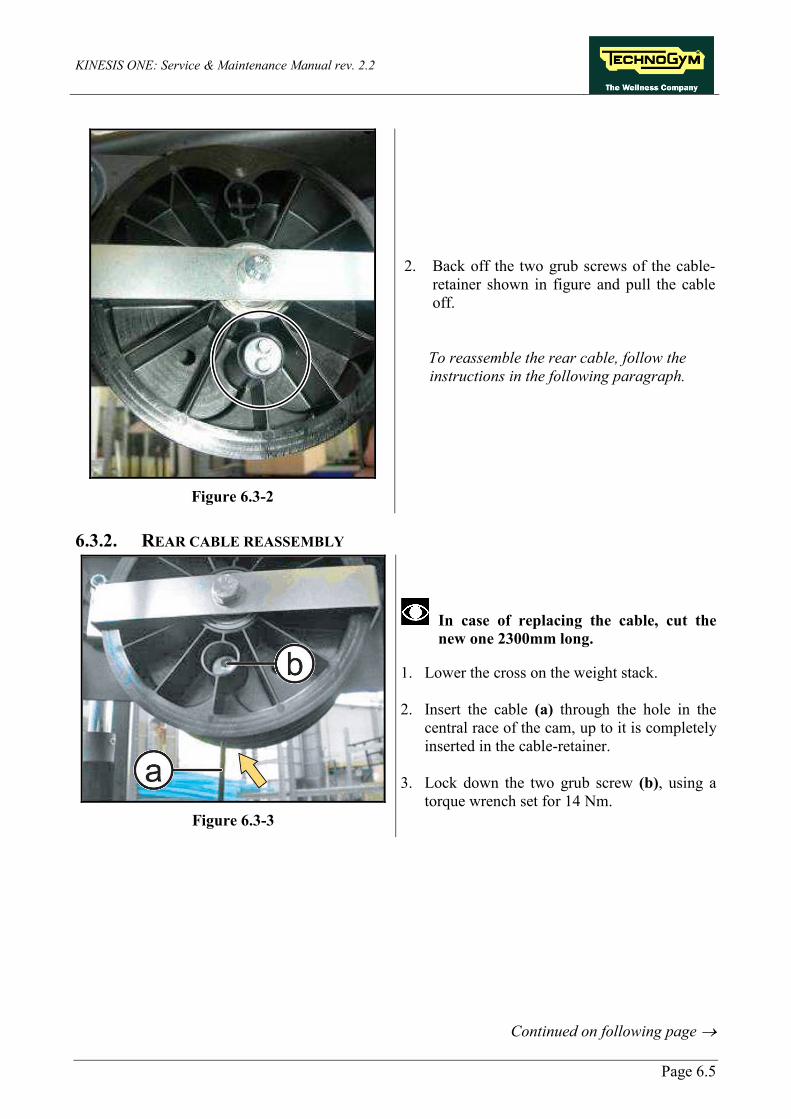
Figure 6.3-2
2. Back off the two grub screws of the cable-retainer shown in figure and pull the cable off.
To reassemble the rear cable, follow the instructions in the following paragraph.
6.3.2. REAR CABLE REASSEMBLY
Figure 6.3-3
In case of replacing the cable, cut the new one 2300mm long.
1. Lower the cross on the weight stack. 2. Insert the cable (a) through the hole in the
central race of the cam, up to it is completely inserted in the cable-retainer.
3. Lock down the two grub screw (b), using a
torque wrench set for 14 Nm.
Continued on following page →
KINESIS ONE: Service & Maintenance Manual rev. 2.2
Page 6.6
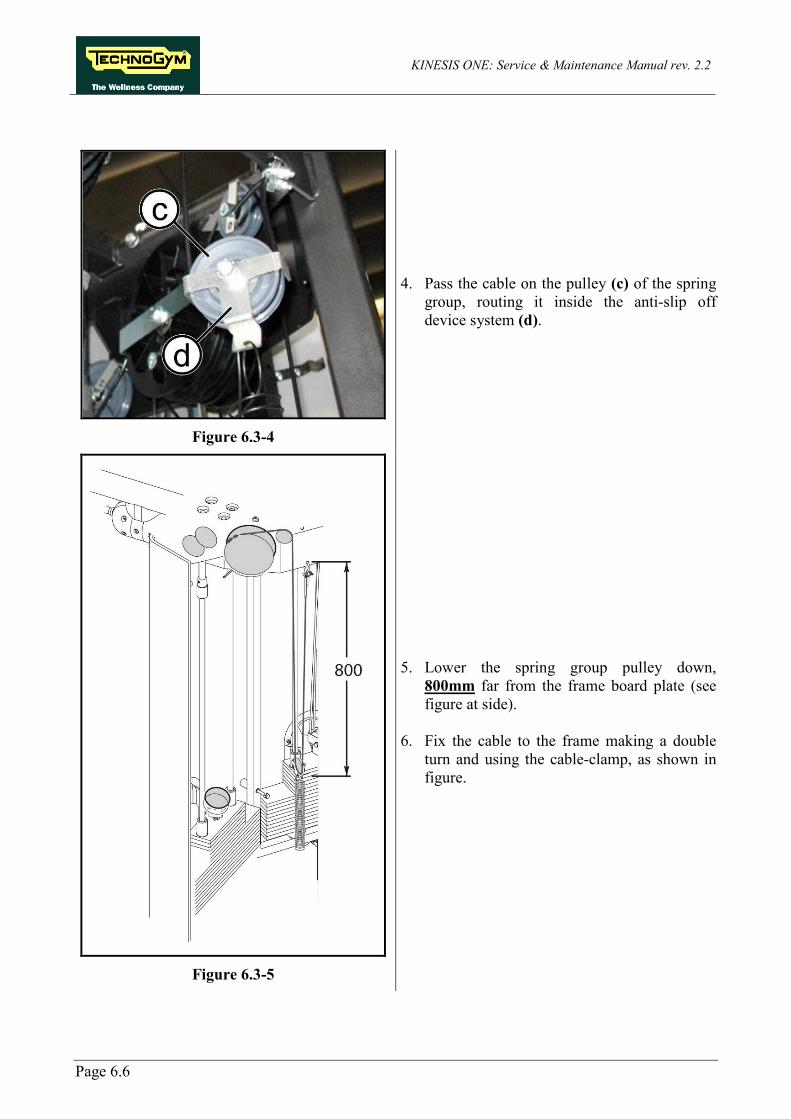
Figure 6.3-4
4. Pass the cable on the pulley (c) of the spring group, routing it inside the anti-slip off device system (d).
Figure 6.3-5
5. Lower the spring group pulley down, 800mm far from the frame board plate (see figure at side).
6. Fix the cable to the frame making a double
turn and using the cable-clamp, as shown in figure.
KINESIS ONE: Service & Maintenance Manual rev. 2.2
Page 6.7
6.4. REMOVING WEIGHT STACK CABLE (HANDLES)
6.4.1. WEIGHT STACK CABLE AND HANDLES DISASSEMBLY
Figure 6.4-1
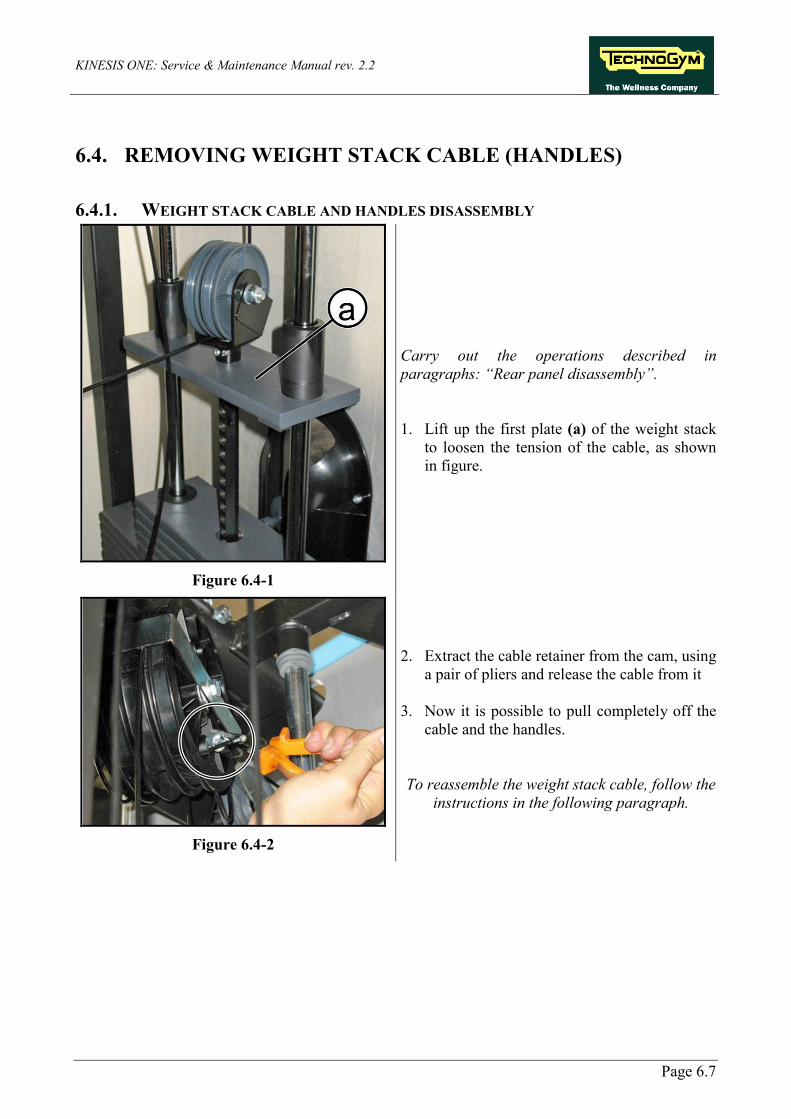
Carry out the operations described in paragraphs: “Rear panel disassembly”. 1. Lift up the first plate (a) of the weight stack
to loosen the tension of the cable, as shown in figure.
Figure 6.4-2
2. Extract the cable retainer from the cam, using a pair of pliers and release the cable from it
3. Now it is possible to pull completely off the
cable and the handles. To reassemble the weight stack cable, follow the
instructions in the following paragraph.
KINESIS ONE: Service & Maintenance Manual rev. 2.2
Page 6.8
6.4.2. WEIGHT STACK CABLE REASSEMBLY
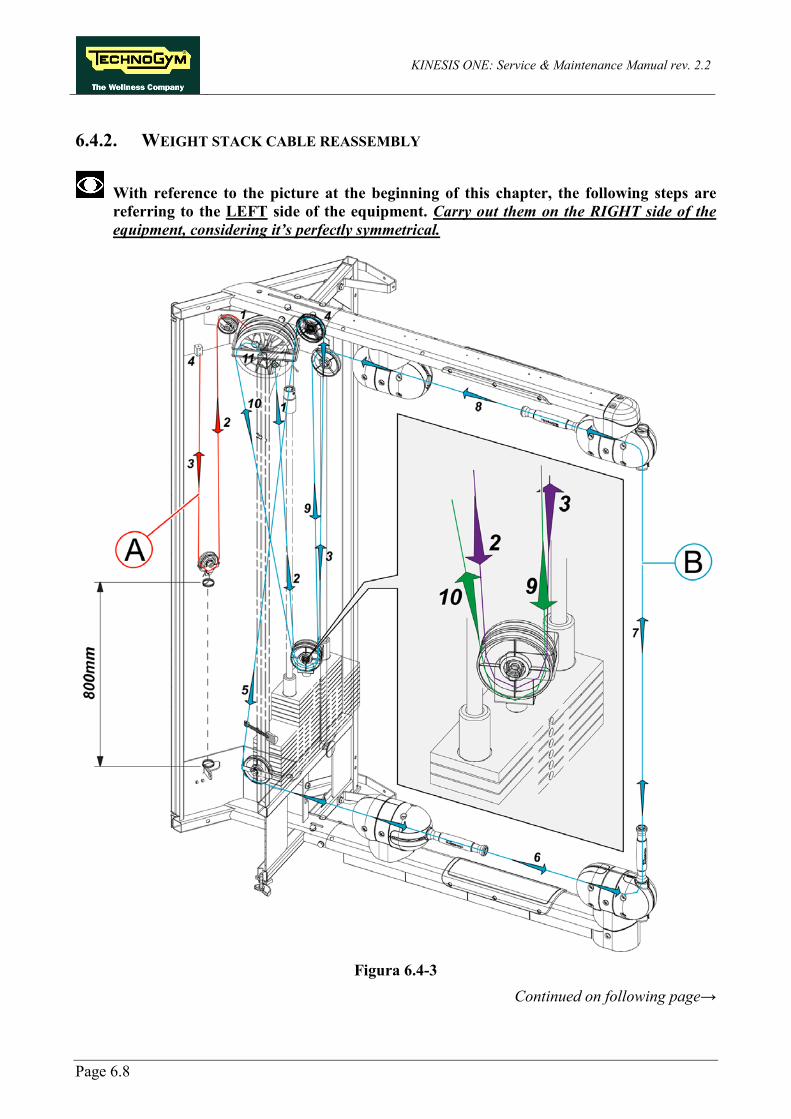
With reference to the picture at the beginning of this chapter, the following steps are referring to the LEFT side of the equipment. Carry out them on the RIGHT side of the equipment, considering it’s perfectly symmetrical.
Figura 6.4-3
Continued on following page→
KINESIS ONE: Service & Maintenance Manual rev. 2.2
Page 6.9
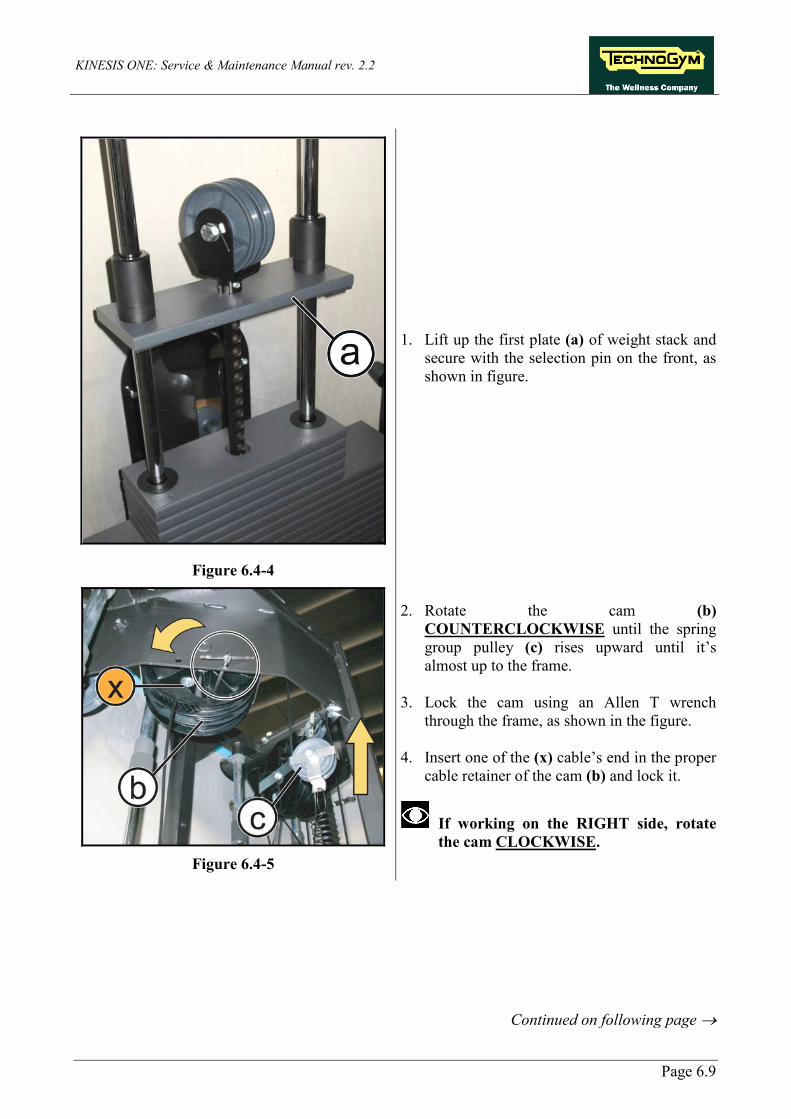
Figure 6.4-4
1. Lift up the first plate (a) of weight stack and secure with the selection pin on the front, as shown in figure.
Figure 6.4-5
2. Rotate the cam (b) COUNTERCLOCKWISE until the spring group pulley (c) rises upward until it’s almost up to the frame.
3. Lock the cam using an Allen T wrench
through the frame, as shown in the figure.
4. Insert one of the (x) cable’s end in the proper cable retainer of the cam (b) and lock it.
If working on the RIGHT side, rotate the cam CLOCKWISE.
Continued on following page →
KINESIS ONE: Service & Maintenance Manual rev. 2.2
Page 6.10
Figure 6.4-6
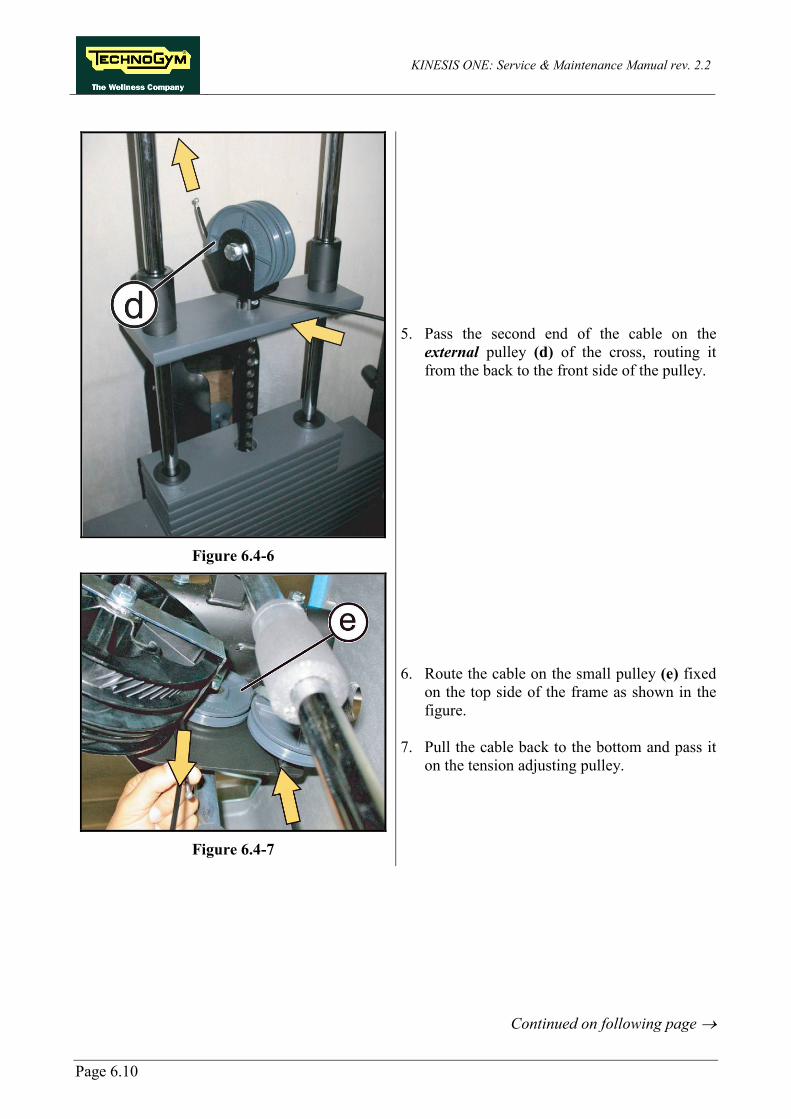
5. Pass the second end of the cable on the external pulley (d) of the cross, routing it from the back to the front side of the pulley.
Figure 6.4-7
6. Route the cable on the small pulley (e) fixed on the top side of the frame as shown in the figure.
7. Pull the cable back to the bottom and pass it
on the tension adjusting pulley.
Continued on following page →
KINESIS ONE: Service & Maintenance Manual rev. 2.2
Page 6.11
Figure 6.4-8
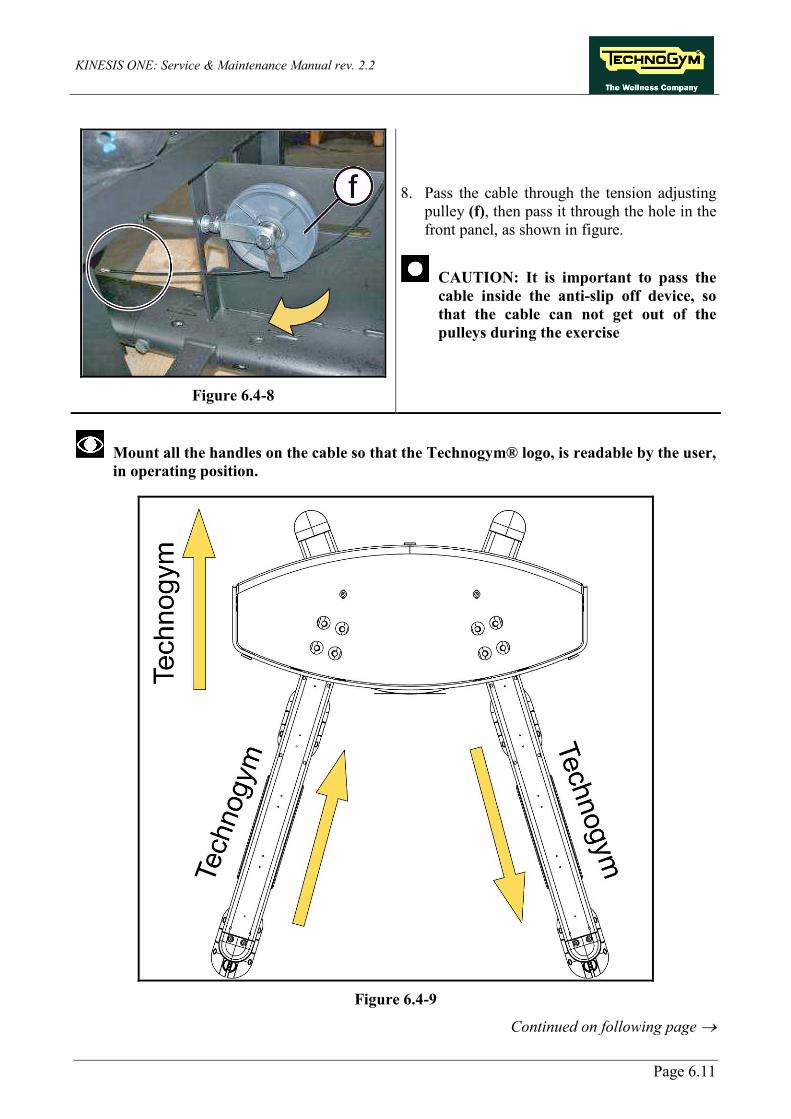
8. Pass the cable through the tension adjusting pulley (f), then pass it through the hole in the front panel, as shown in figure.
CAUTION: It is important to pass the cable inside the anti-slip off device, so that the cable can not get out of the pulleys during the exercise
Mount all the handles on the cable so that the Technogym® logo, is readable by the user, in operating position.
Figure 6.4-9
Continued on following page →
KINESIS ONE: Service & Maintenance Manual rev. 2.2
Page 6.12
Figure 6.4-10
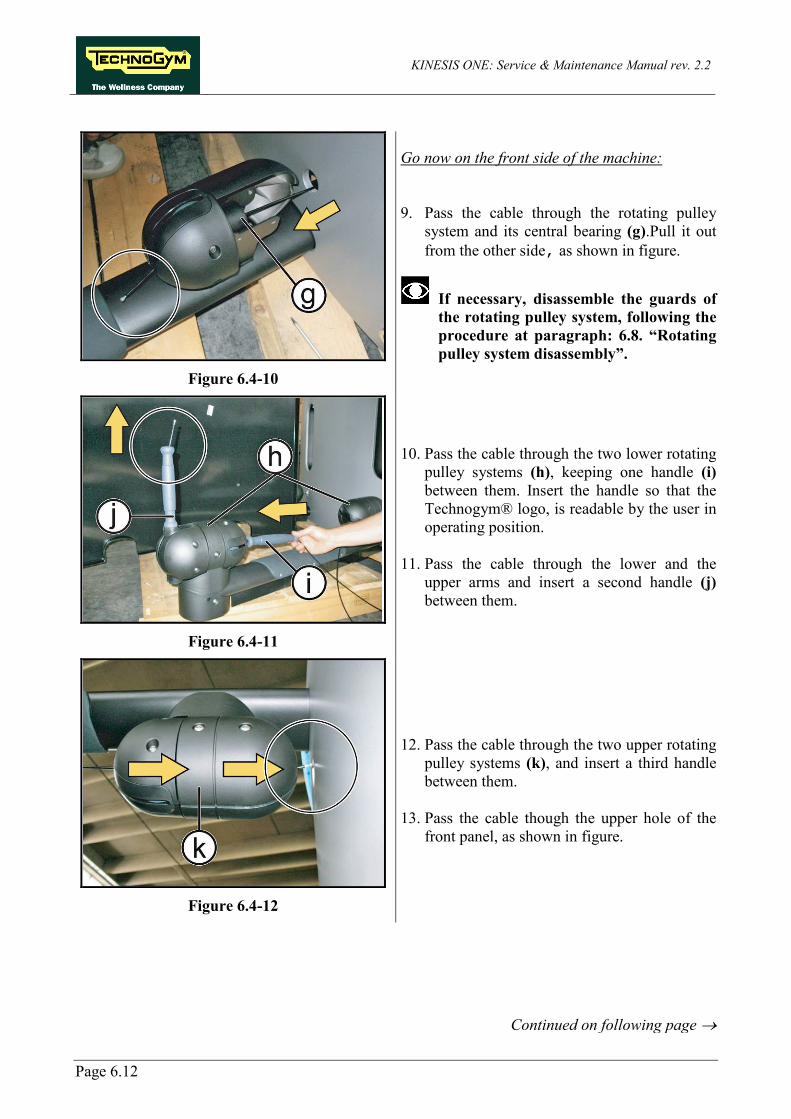
Go now on the front side of the machine: 9. Pass the cable through the rotating pulley
system and its central bearing (g).Pull it out from the other side, as shown in figure.
If necessary, disassemble the guards of the rotating pulley system, following the procedure at paragraph: 6.8. “Rotating pulley system disassembly”.
Figure 6.4-11
10. Pass the cable through the two lower rotating pulley systems (h), keeping one handle (i) between them. Insert the handle so that the Technogym® logo, is readable by the user in operating position.
11. Pass the cable through the lower and the
upper arms and insert a second handle (j) between them.
Figure 6.4-12
12. Pass the cable through the two upper rotating pulley systems (k), and insert a third handle between them.
13. Pass the cable though the upper hole of the
front panel, as shown in figure.
Continued on following page →
KINESIS ONE: Service & Maintenance Manual rev. 2.2
Page 6.13
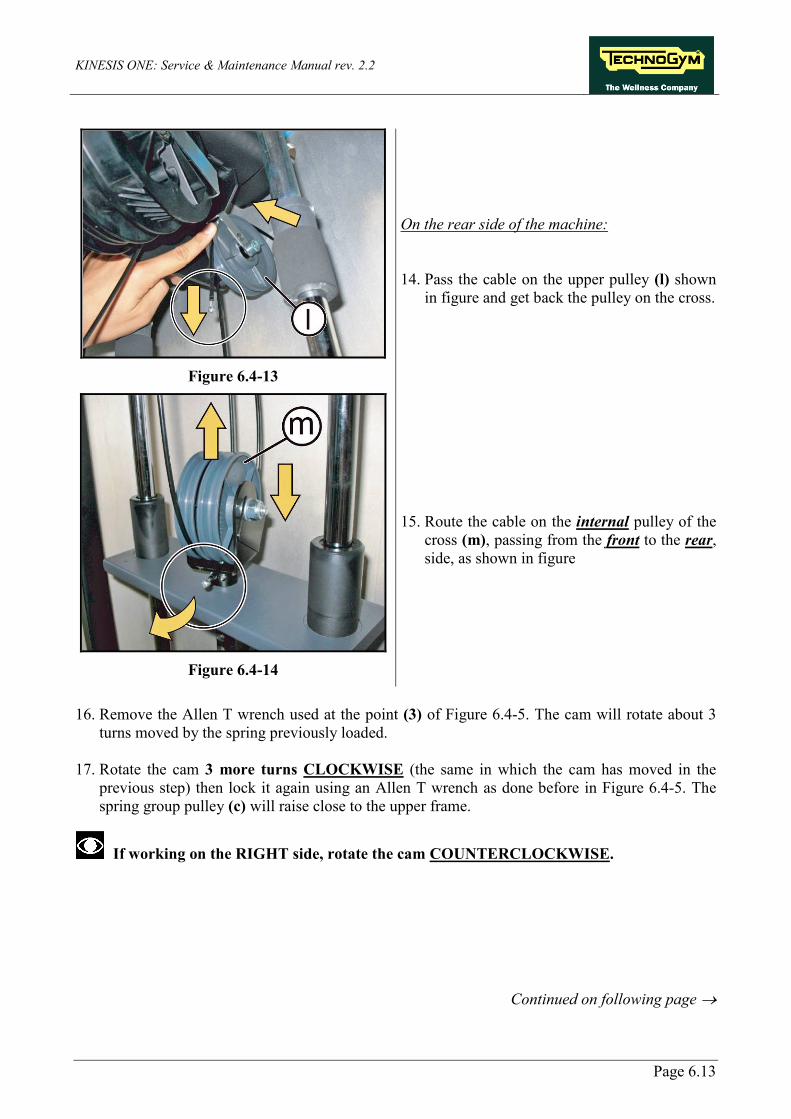
Figure 6.4-13
On the rear side of the machine: 14. Pass the cable on the upper pulley (l) shown
in figure and get back the pulley on the cross.
Figure 6.4-14
15. Route the cable on the internal pulley of the cross (m), passing from the front to the rear, side, as shown in figure
16. Remove the Allen T wrench used at the point (3) of Figure 6.4-5. The cam will rotate about 3
turns moved by the spring previously loaded.
17. Rotate the cam 3 more turns CLOCKWISE (the same in which the cam has moved in the previous step) then lock it again using an Allen T wrench as done before in Figure 6.4-5. The spring group pulley (c) will raise close to the upper frame.
If working on the RIGHT side, rotate the cam COUNTERCLOCKWISE.
Continued on following page →
KINESIS ONE: Service & Maintenance Manual rev. 2.2
Page 6.14
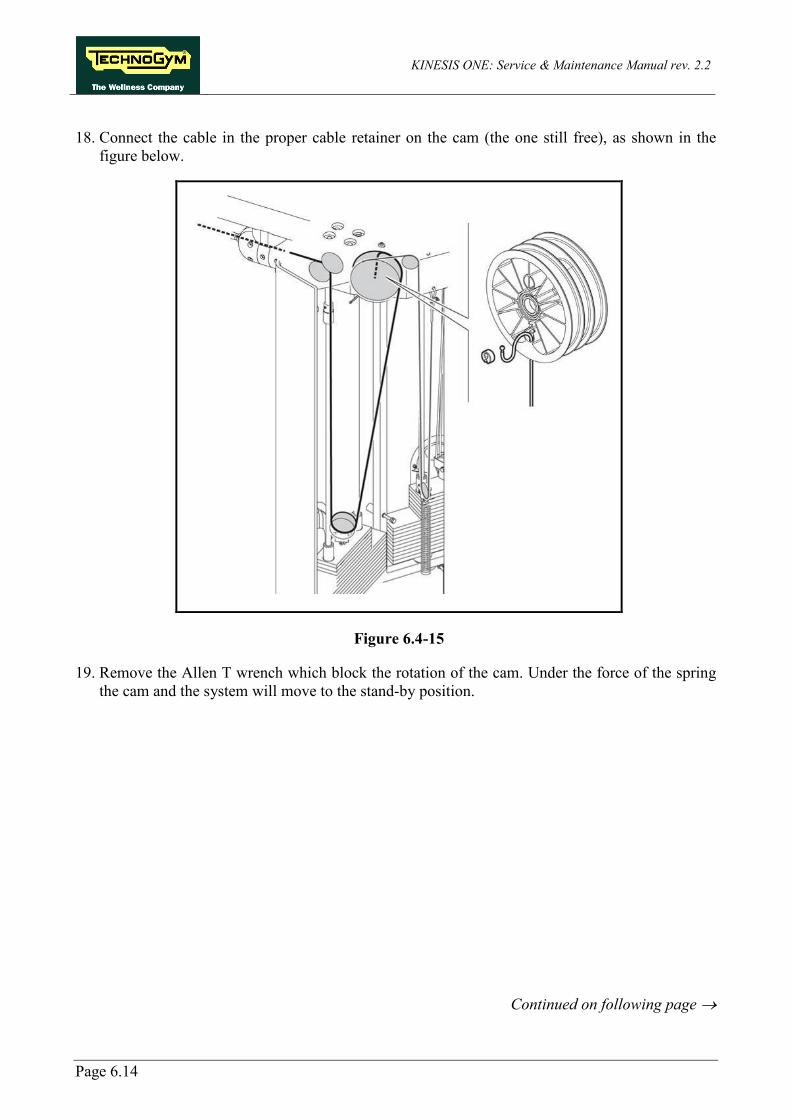
18. Connect the cable in the proper cable retainer on the cam (the one still free), as shown in the
figure below.
Figure 6.4-15
19. Remove the Allen T wrench which block the rotation of the cam. Under the force of the spring the cam and the system will move to the stand-by position.
Continued on following page →
KINESIS ONE: Service & Maintenance Manual rev. 2.2
Page 6.15
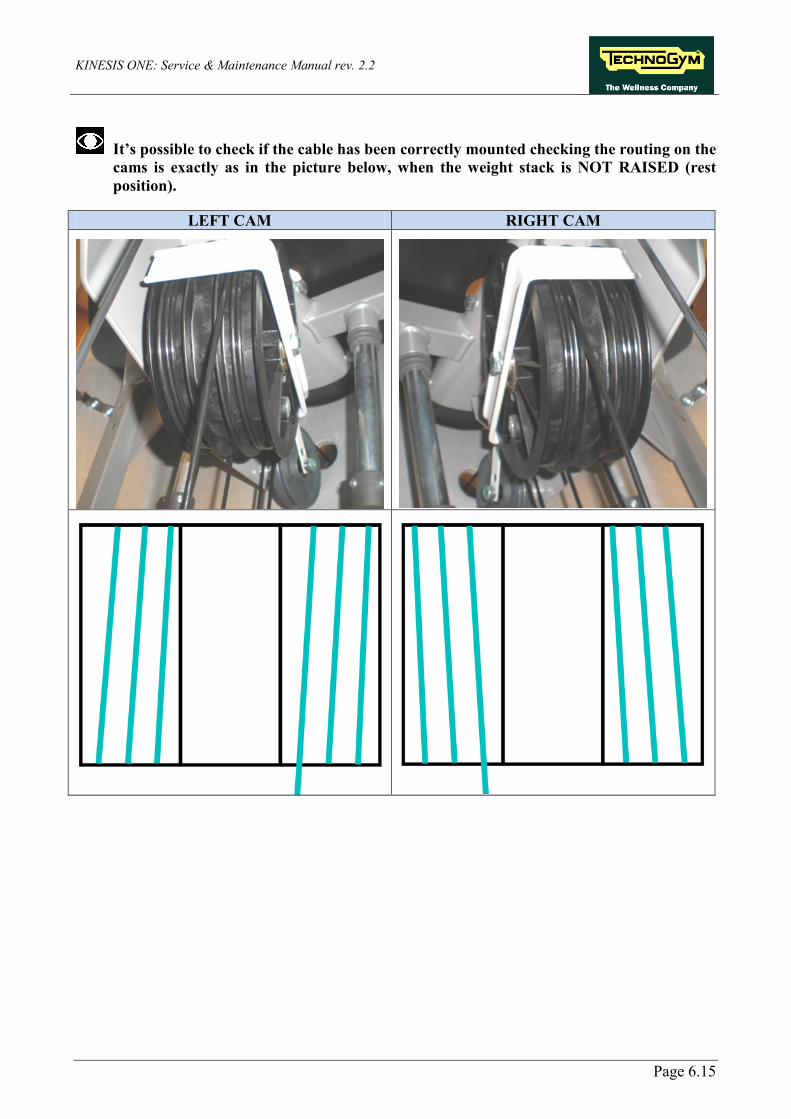
It’s possible to check if the cable has been correctly mounted checking the routing on the cams is exactly as in the picture below, when the weight stack is NOT RAISED (rest position).
LEFT CAM RIGHT CAM
KINESIS ONE: Service & Maintenance Manual rev. 2.2
Page 6.16
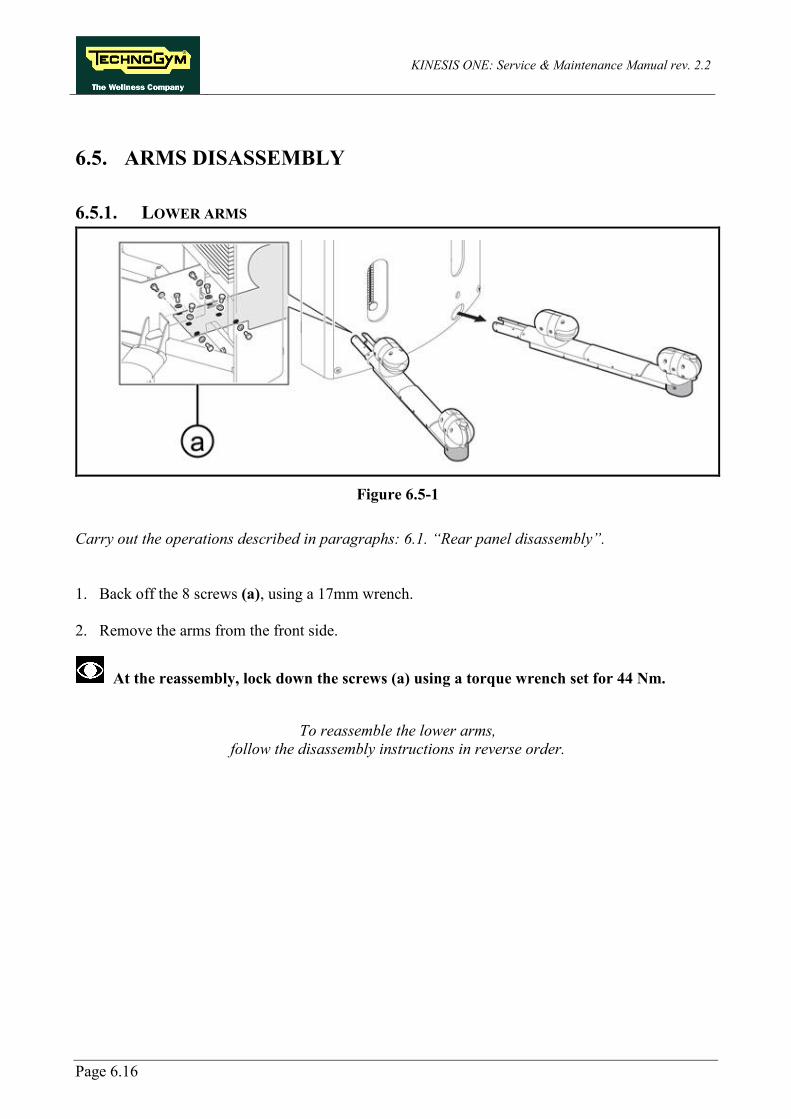
6.5. ARMS DISASSEMBLY
6.5.1. LOWER ARMS
Figure 6.5-1
Carry out the operations described in paragraphs: 6.1. “Rear panel disassembly”. 1. Back off the 8 screws (a), using a 17mm wrench. 2. Remove the arms from the front side.
At the reassembly, lock down the screws (a) using a torque wrench set for 44 Nm.
To reassemble the lower arms,
follow the disassembly instructions in reverse order.
KINESIS ONE: Service & Maintenance Manual rev. 2.2
Page 6.17
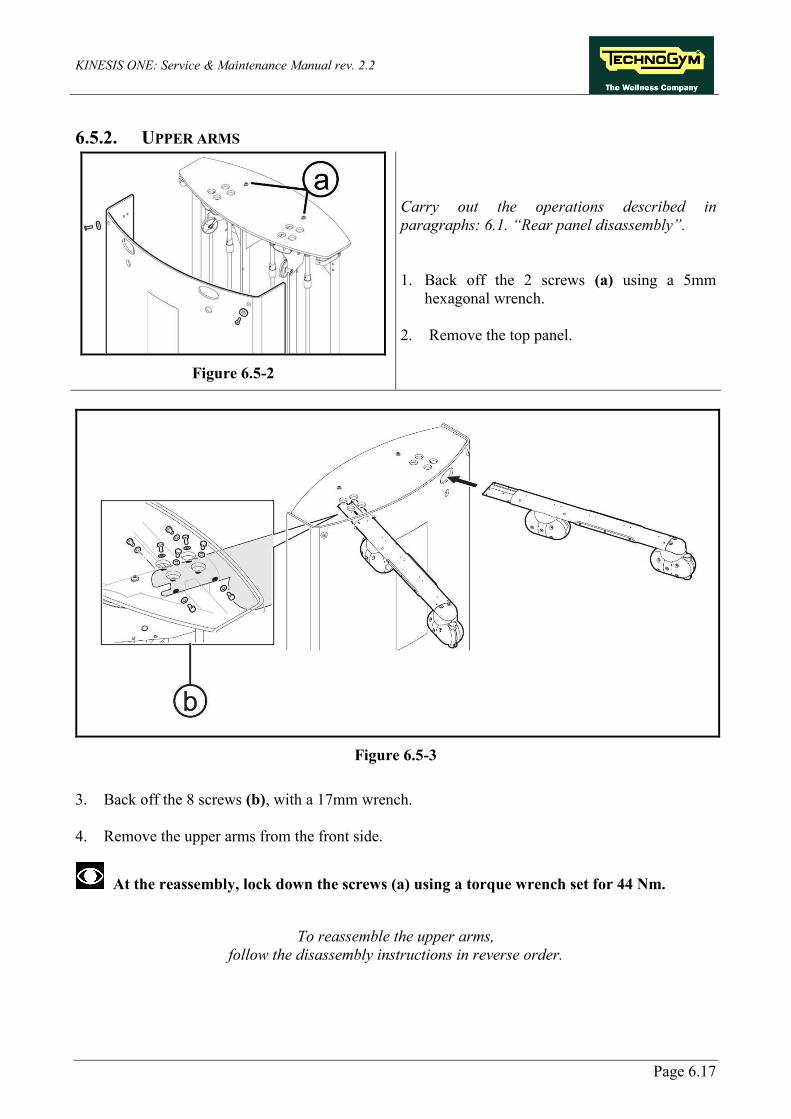
6.5.2. UPPER ARMS
Figure 6.5-2
Carry out the operations described in paragraphs: 6.1. “Rear panel disassembly”. 1. Back off the 2 screws (a) using a 5mm
hexagonal wrench. 2. Remove the top panel.
Figure 6.5-3
3. Back off the 8 screws (b), with a 17mm wrench. 4. Remove the upper arms from the front side.
At the reassembly, lock down the screws (a) using a torque wrench set for 44 Nm.
To reassemble the upper arms,
follow the disassembly instructions in reverse order.

KINESIS ONE: Service & Maintenance Manual rev. 2.2
Page 6.18
6.6. PULLEY DISASSEMBLY
Figure 6.6-1
Carry out the operations described in paragraphs: 6.1. “Rear panel disassembly”. 1. Back off the central screw (a) using a 17mm
wrench, locking the nut on the opposite side with another 17mm wrench, as shown in the figure at the side.
Figure 6.6-2
2. Remove the pulleys mounted on the cross. 3. Back off the two grub screws (b) using a
4mm hexagonal wrench. 4. Remove the pulleys support.
Figure 6.6-3
To reassemble the cross, follow the disassembly instructions in reverse order.
At the reassembly be careful to insert again all the washers and the spacers; according to the sequence in the figure to side.
Mount the pulleys on the frame, using a torque wrench set for 44 Nm to lock down the fixing nut.
KINESIS ONE: Service & Maintenance Manual rev. 2.2
Page 6.19
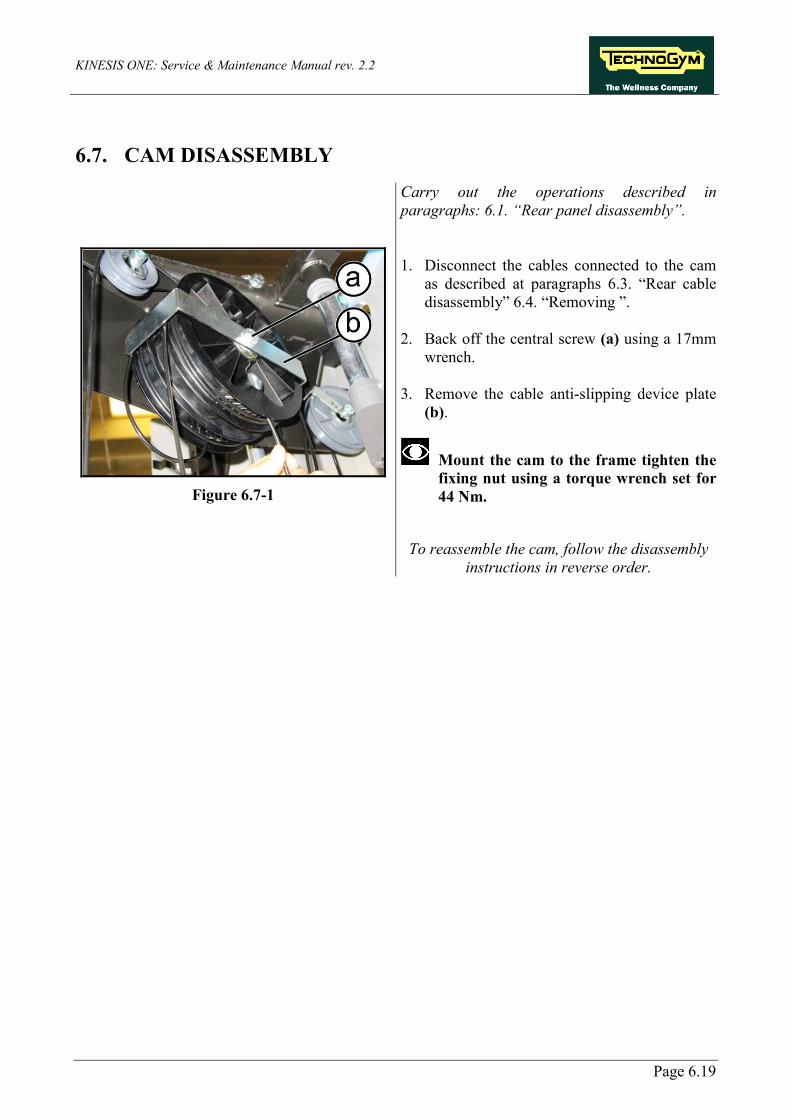
6.7. CAM DISASSEMBLY
Figure 6.7-1
Carry out the operations described in paragraphs: 6.1. “Rear panel disassembly”. 1. Disconnect the cables connected to the cam
as described at paragraphs 6.3. “Rear cable disassembly” 6.4. “Removing ”.
2. Back off the central screw (a) using a 17mm
wrench. 3. Remove the cable anti-slipping device plate
(b).
Mount the cam to the frame tighten the fixing nut using a torque wrench set for 44 Nm.
To reassemble the cam, follow the disassembly
instructions in reverse order.
KINESIS ONE: Service & Maintenance Manual rev. 2.2
Page 6.20
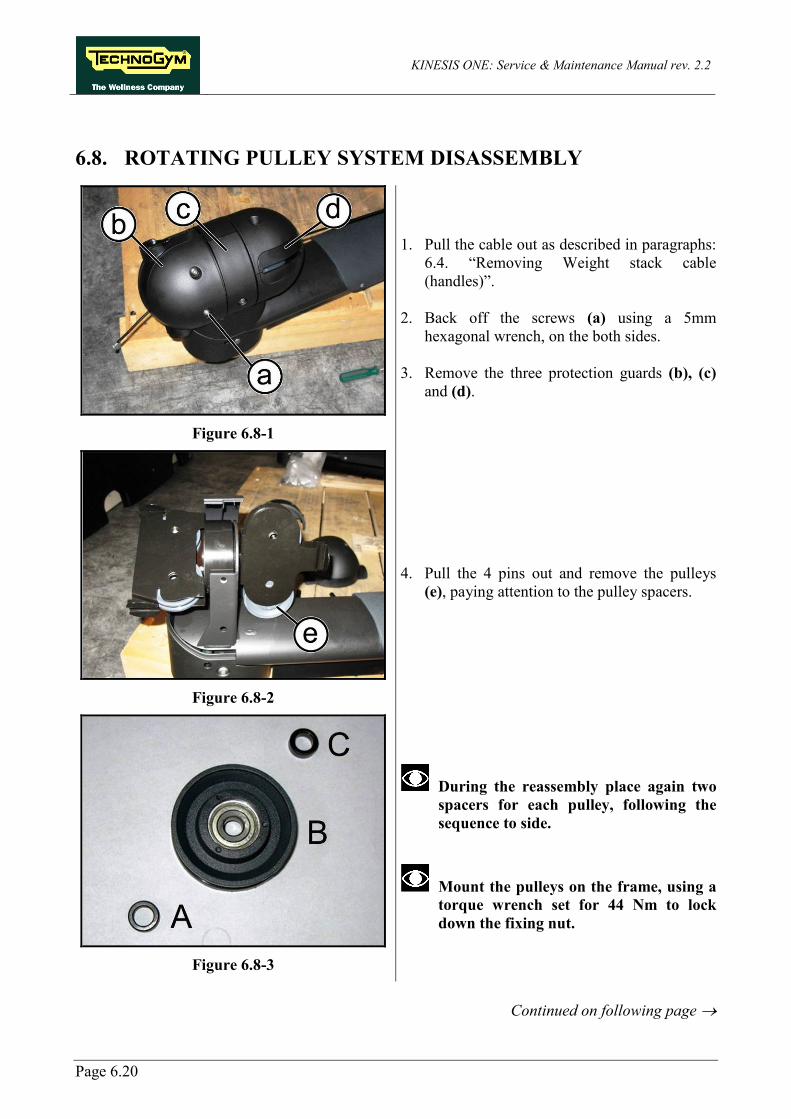
6.8. ROTATING PULLEY SYSTEM DISASSEMBLY
Figure 6.8-1
1. Pull the cable out as described in paragraphs: 6.4. “Removing Weight stack cable (handles)”.
2. Back off the screws (a) using a 5mm
hexagonal wrench, on the both sides. 3. Remove the three protection guards (b), (c)
and (d).
Figure 6.8-2
4. Pull the 4 pins out and remove the pulleys (e), paying attention to the pulley spacers.
Figure 6.8-3
During the reassembly place again two spacers for each pulley, following the sequence to side.
Mount the pulleys on the frame, using a torque wrench set for 44 Nm to lock down the fixing nut.
Continued on following page →

KINESIS ONE: Service & Maintenance Manual rev. 2.2
Page 6.21
Figure 6.8-4
5. Remove the 2 seeger (f) and (g).
Figure 6.8-5
6. Use a T wrench and a rubber hammer, to slightly hit the pulleys support (h) and remove it from the opposite side, as shown in figure.
Figure 6.8-6
7. Remove the pulleys support (g), as shown in figure.
To reassemble the rotating pulley system, follow
the disassembly instructions in reverse order.
KINESIS ONE: Service & Maintenance Manual rev. 2.2
Page 6.22
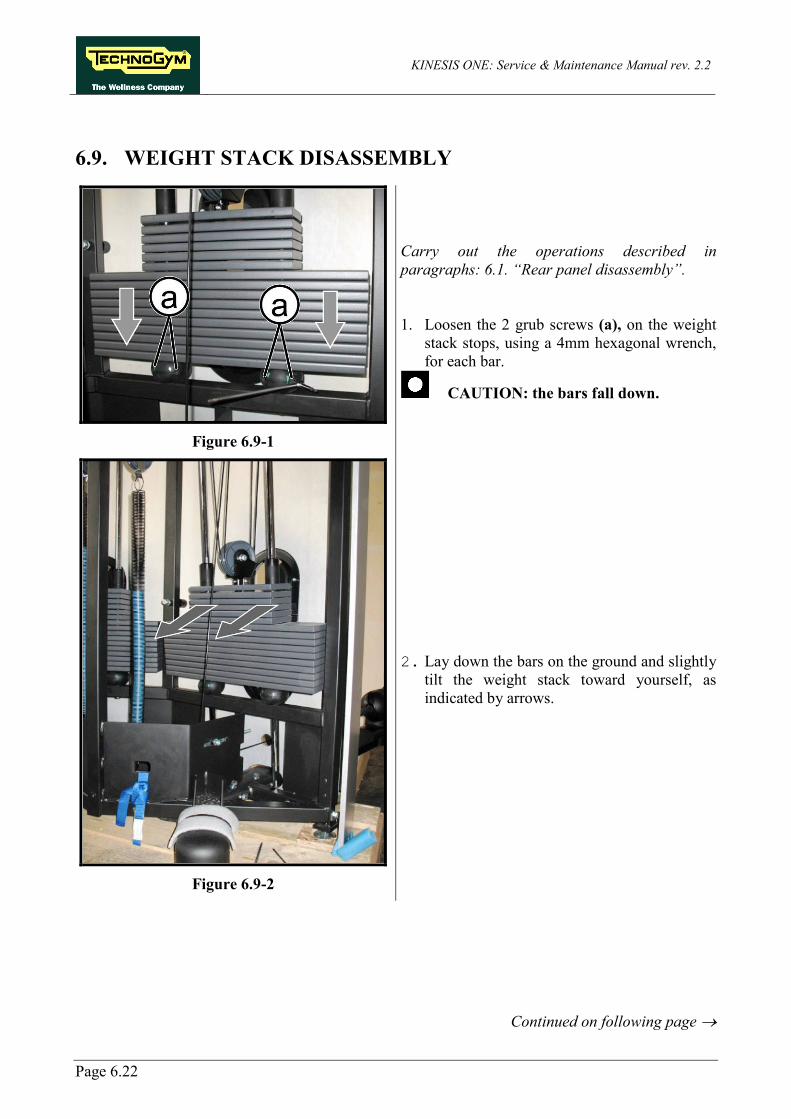
6.9. WEIGHT STACK DISASSEMBLY
Figure 6.9-1
Carry out the operations described in paragraphs: 6.1. “Rear panel disassembly”. 1. Loosen the 2 grub screws (a), on the weight
stack stops, using a 4mm hexagonal wrench, for each bar.
CAUTION: the bars fall down.
Figure 6.9-2
2. Lay down the bars on the ground and slightly tilt the weight stack toward yourself, as indicated by arrows.
Continued on following page →
KINESIS ONE: Service & Maintenance Manual rev. 2.2
Page 6.23
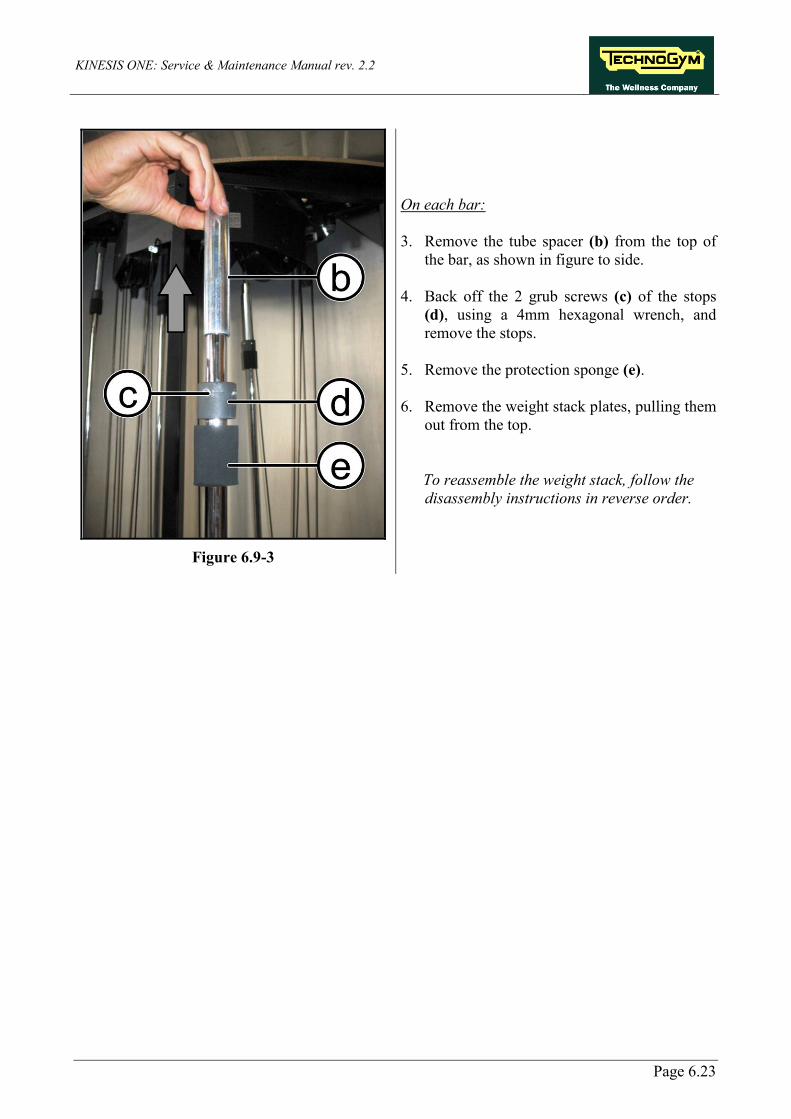
Figure 6.9-3
On each bar: 3. Remove the tube spacer (b) from the top of
the bar, as shown in figure to side. 4. Back off the 2 grub screws (c) of the stops
(d), using a 4mm hexagonal wrench, and remove the stops.
5. Remove the protection sponge (e). 6. Remove the weight stack plates, pulling them
out from the top.
To reassemble the weight stack, follow the disassembly instructions in reverse order.
KINESIS ONE: Service & Maintenance Manual rev. 2.2
Page 6.24
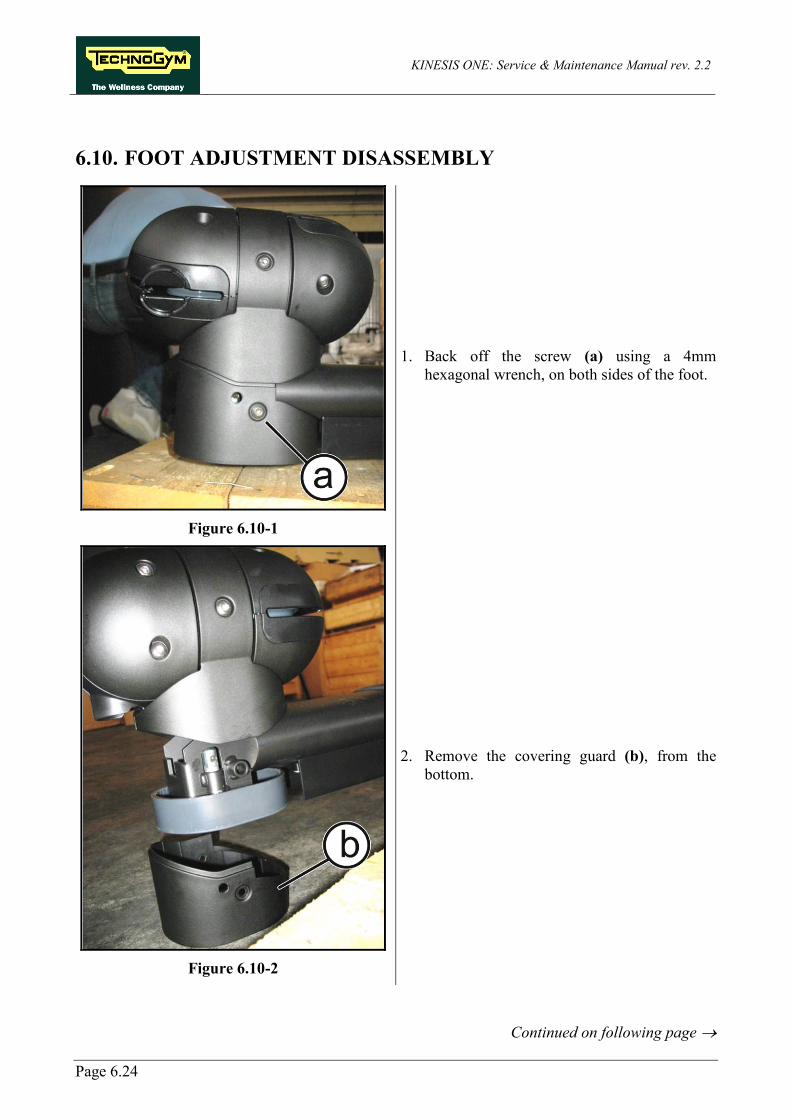
6.10. FOOT ADJUSTMENT DISASSEMBLY
Figure 6.10-1
1. Back off the screw (a) using a 4mm hexagonal wrench, on both sides of the foot.
Figure 6.10-2
2. Remove the covering guard (b), from the bottom.
Continued on following page →
KINESIS ONE: Service & Maintenance Manual rev. 2.2
Page 6.25
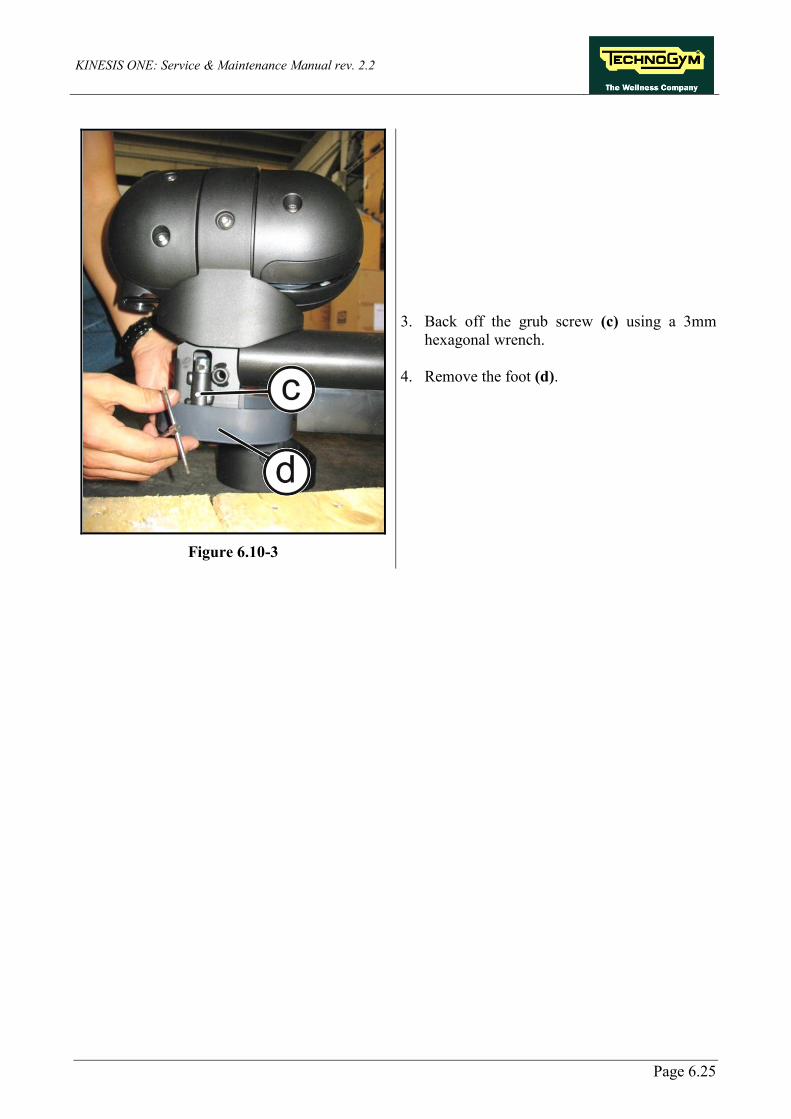
Figure 6.10-3
3. Back off the grub screw (c) using a 3mm hexagonal wrench.
4. Remove the foot (d).

KINESIS ONE: Service & Maintenance Manual rev. 2.2
Page 6.26
Page intentionally left blank

KINESIS ONE: Service & Maintenance Manual rev. 2.2
Page 7.1
7. ADJUSTMENT
7.1. THE WEIGHT STACK IS NOT FLOWING FLUID This problem is possible for a lack lubrication of the bars or "dirty" that accumulates fox a mix of dust and oil.
CAUTION: When the bars and bushings are particularly dirty, if the only cross or at most the first plate is selected, it is possible that these can not lay down on the weight stack. In this case you must clean and lubricate the bars and the internal side of the bushes.
Figure 7.1-1
Carry out the operations described in paragraphs: 6.1. “Rear panel disassembly”. 1. Use a paper towel slightly dampened with
ethyl alcohol to clean the weight stack bars of the machine, removing dust and grime.
2. Reassemble the cross and add a few drops of
the oil found in the service box to the cross bushings as shown in the photo below.
WARNING: Do not use too much oil, and dry all excess thoroughly since too much oil could cause more dust to build up.
3. Move the cross up and down, making sure to distribute the oil evenly along the full length of the bars.
4. Dry excess oil from the bushings with a dry
cloth.
KINESIS ONE: Service & Maintenance Manual rev. 2.2
Page 7.2
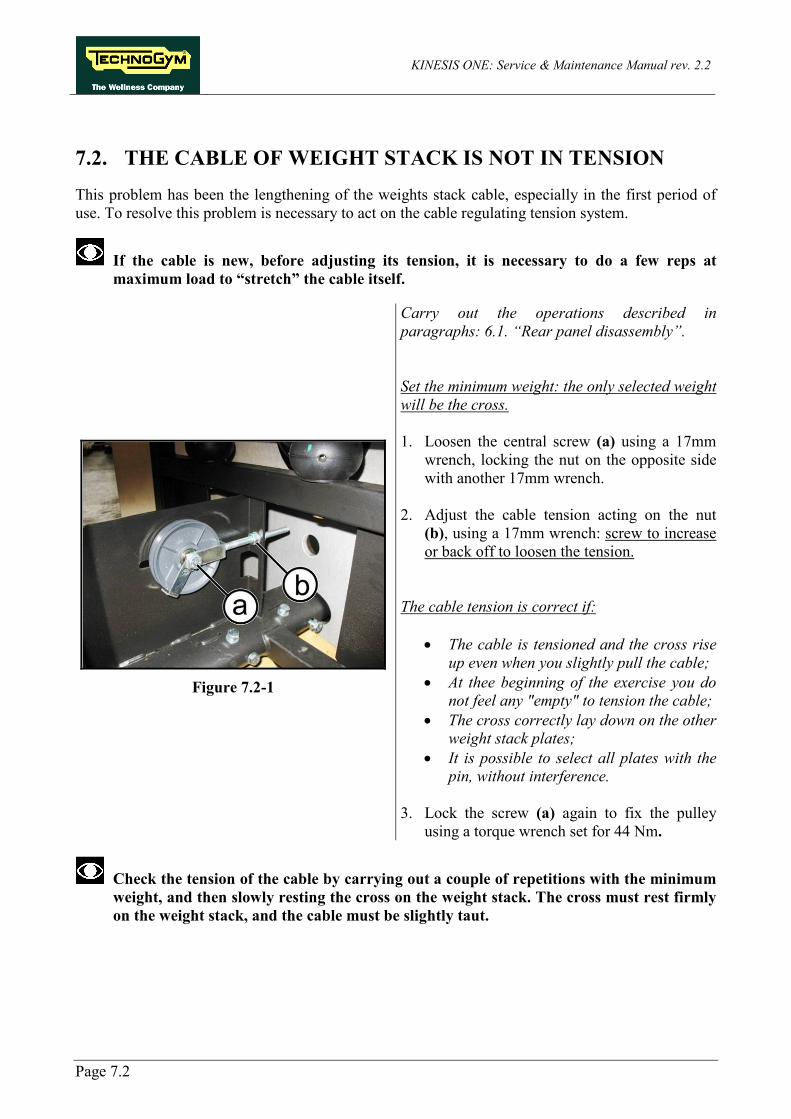
7.2. THE CABLE OF WEIGHT STACK IS NOT IN TENSION This problem has been the lengthening of the weights stack cable, especially in the first period of use. To resolve this problem is necessary to act on the cable regulating tension system.
If the cable is new, before adjusting its tension, it is necessary to do a few reps at maximum load to “stretch” the cable itself.
Figure 7.2-1
Carry out the operations described in paragraphs: 6.1. “Rear panel disassembly”. Set the minimum weight: the only selected weight will be the cross. 1. Loosen the central screw (a) using a 17mm
wrench, locking the nut on the opposite side with another 17mm wrench.
2. Adjust the cable tension acting on the nut
(b), using a 17mm wrench: screw to increase or back off to loosen the tension.
The cable tension is correct if:
• The cable is tensioned and the cross rise up even when you slightly pull the cable;
• At thee beginning of the exercise you do not feel any "empty" to tension the cable;
• The cross correctly lay down on the other weight stack plates;
• It is possible to select all plates with the pin, without interference.
3. Lock the screw (a) again to fix the pulley
using a torque wrench set for 44 Nm.
Check the tension of the cable by carrying out a couple of repetitions with the minimum weight, and then slowly resting the cross on the weight stack. The cross must rest firmly on the weight stack, and the cable must be slightly taut.
KINESIS ONE: Service & Maintenance Manual rev. 2.2
Page 7.3
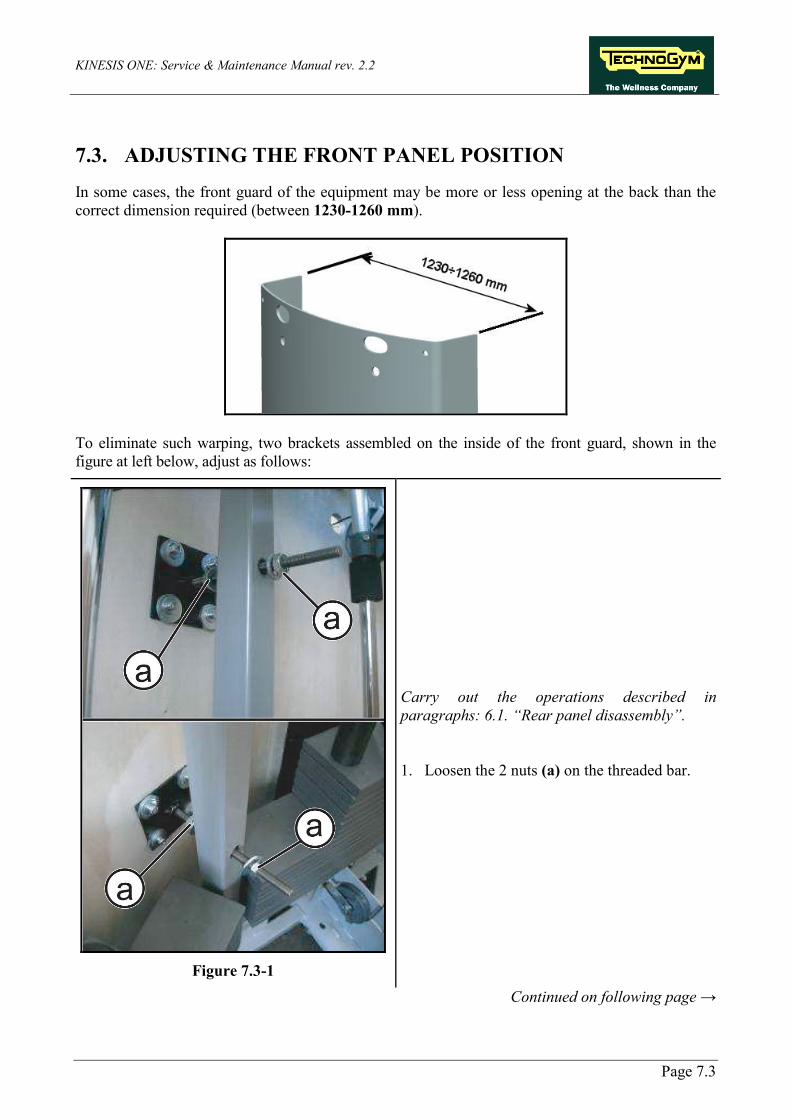
7.3. ADJUSTING THE FRONT PANEL POSITION In some cases, the front guard of the equipment may be more or less opening at the back than the correct dimension required (between 1230-1260 mm).
To eliminate such warping, two brackets assembled on the inside of the front guard, shown in the figure at left below, adjust as follows:
Figure 7.3-1
Carry out the operations described in paragraphs: 6.1. “Rear panel disassembly”. 1. Loosen the 2 nuts (a) on the threaded bar.
Continued on following page →
KINESIS ONE: Service & Maintenance Manual rev. 2.2
Page 7.4
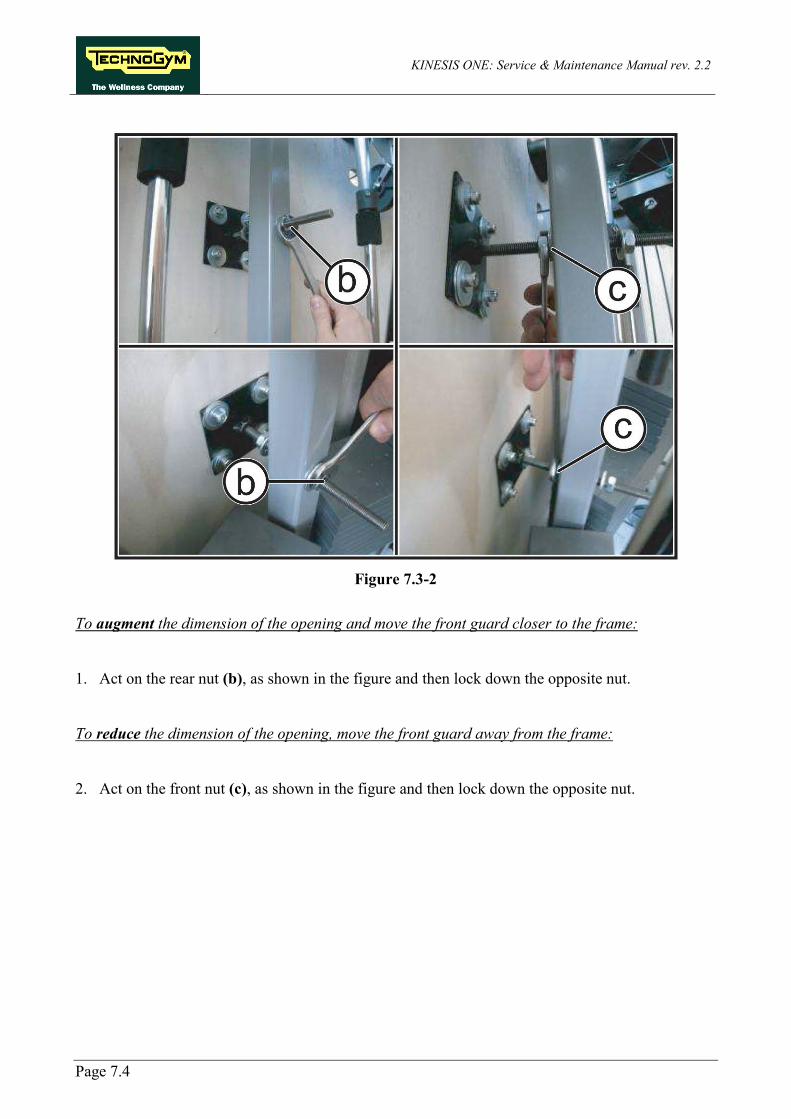
Figure 7.3-2
To augment the dimension of the opening and move the front guard closer to the frame: 1. Act on the rear nut (b), as shown in the figure and then lock down the opposite nut. To reduce the dimension of the opening, move the front guard away from the frame: 2. Act on the front nut (c), as shown in the figure and then lock down the opposite nut.
KINESIS ONE: Service & Maintenance Manual rev. 2.2
Page 7.5
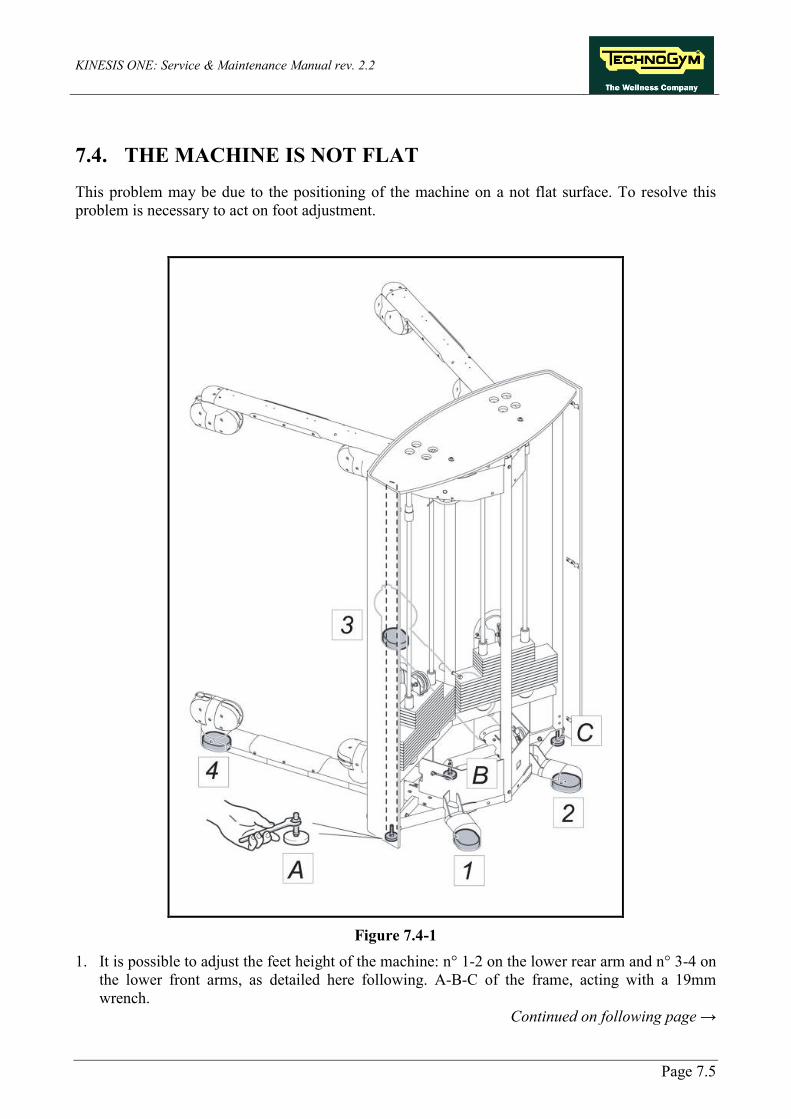
7.4. THE MACHINE IS NOT FLAT This problem may be due to the positioning of the machine on a not flat surface. To resolve this problem is necessary to act on foot adjustment.
Figure 7.4-1
1. It is possible to adjust the feet height of the machine: n° 1-2 on the lower rear arm and n° 3-4 on the lower front arms, as detailed here following. A-B-C of the frame, acting with a 19mm wrench.
Continued on following page →
KINESIS ONE: Service & Maintenance Manual rev. 2.2
Page 7.6
Figure 7.4-2
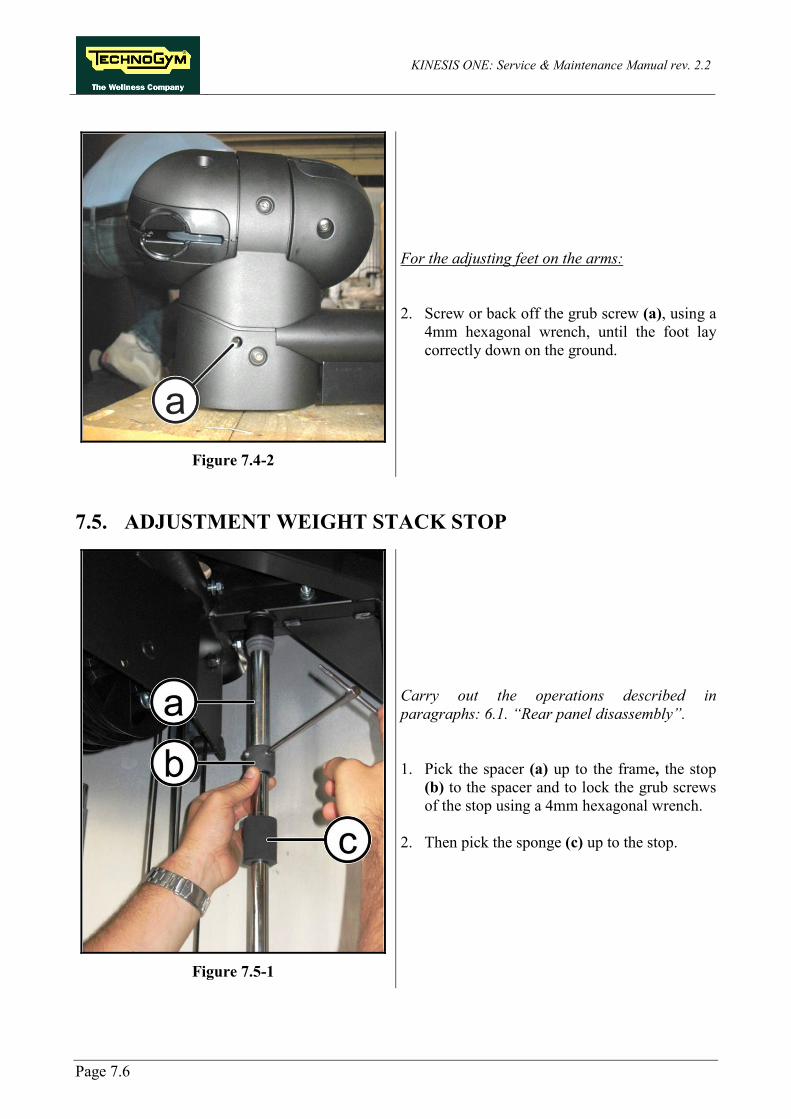
For the adjusting feet on the arms: 2. Screw or back off the grub screw (a), using a
4mm hexagonal wrench, until the foot lay correctly down on the ground.
7.5. ADJUSTMENT WEIGHT STACK STOP
Figure 7.5-1
Carry out the operations described in paragraphs: 6.1. “Rear panel disassembly”. 1. Pick the spacer (a) up to the frame, the stop
(b) to the spacer and to lock the grub screws of the stop using a 4mm hexagonal wrench.
2. Then pick the sponge (c) up to the stop.
KINESIS ONE: Service & Maintenance Manual rev. 2.2
Page 8.1
8. SCHEDULED MAINTENANCE
To keep the machine in perfect working order and forestall possible problems it is necessary to carry out the scheduled maintenance operations described below. The maintenance operations can essentially be classified according to the type of service and to who they need to be performed:
• ORDINARY maintenance operation:
The ORDINARY maintenance operations can be performed by the club manager. They do not require any kind of technical knowledge, they only consist of simple external cleaning, for the purposes of general hygiene.
• EXTRAORDINARY maintenance operation:
The EXTRAORDINARY maintenance operations have to be performed by a TG qualified technician specially trained by Technogym. They consist of the set up, the start up, all the inspections and service operations and the adjustments the machine can need to guarantee a good state of wear and the proper functioning conditions.
KINESIS ONE: Service & Maintenance Manual rev. 2.2
Page 8.2
8.1. ORDINARY MAINTENANCE OPERATIONS
8.1.1. EXTERNAL CLEANING OPERATIONS 1. Using a cloth moistened with a neutral detergent (non acidic), clean the entire machine, taking
care not to rub too vigorously, especially on the keys of the display.
Never spray the cleaning product directly on the machine.
CAUTION: do not use alcohol, petrol or other chemical products.
8.1.2. CLEANING THE COVERING PANELS 1. Clean the covering panels of the machine using a cloth moistened with water.
CAUTION: do not use alcohol, benzene, or chemical products in general.
8.1.3. CHECK THE CROSS, BARS AND WEIGHT STACK PLATES 1. Check the wear status of the cross bushings and weight stack plates. Repair and/or replace any
worn parts. 2. Check the wear status of the chrome plating of the weight stack bars. Repair and/or replace any
worn parts. 3. Check the wear status of the weight stack bars and weight stack support buffers. Repair and/or
replace any worn parts. 4. Make sure the weight stack bars are firmly fastened. Repair and/or replace any worn parts. 5. Use a paper towel slightly dampened with ethyl alcohol to clean the weight stack bars of the
machine, removing dust and grime.
CAUTION: remove any surface rust spots with a metal scrubber.
6. Lubricate the bars and bushings of the plates and cross using the oil found in the service box. 7. Check the adhesive label indicating the load corresponding to the weight stack plates. Replace
any worn parts.
KINESIS ONE: Service & Maintenance Manual rev. 2.2
Page 8.3
8.1.4. CHECK THE CABLES 1. Check the wear status of the machine cables, paying special attention to any hardened spots or
cracks in the protective plastic of the cable. Replace any worn parts. 2. Check the passage of the machine cables through pulleys and/or the terminals connected to
handles. 3. Check the tension of the machine cables.
8.1.5. CHECK THE CROSS LIMIT SWITCH 1. Check the wear status of the cross limit switch. Repair and/or replace any worn parts. 2. Check the position of the cross limit switches and make sure they are firmly fastened in place.
8.1.6. CHECKING VARIOUS RUBBER PARTS
These operations apply to handles, frame guards, feet …
1. Check the wear status of the rubber parts used on the machine. Repair and/or replace any worn parts.
KINESIS ONE: Service & Maintenance Manual rev. 2.2
Page 8.4
8.2. EXTRA-ORDINARY MAINTENANCE OPERATIONS
8.2.1. CHECK THE PULLEYS 1. Check the wear status of the pulley grooves. Repair and/or replace any worn parts.
8.2.2. CHECK THE WEIGHT STACK ROD STOPS 1. Check the wear status of the weight stack rod stops. Repair and/or replace any worn parts. 2. Check the position of the weight stack rod stops and make sure they are firmly fastened in place.
8.2.3. REPLACING THE CABLES 1. Replace the machine cables once a year if the machines are used intensively, every 2 years
under normal use.
8.2.4. SCREW AND BOLT CHECK 1. Make sure that the screws and bolts are firmly tightened, especially in the weight stack and seat
adjustment areas, and around moving parts in general. Tighten any that are loose.
8.2.5. CHECKING FOR MECHANISM PLAY 1. Make sure that the machine mechanisms (pulleys assembly) have no play. Repair and/or replace
any worn parts.
8.2.6. CHECKING CROSS ALIGNMENT 1. Do not select any weight, and lift the cross. Make sure that the sinker is properly centred over
the plate hole, and that all plates in the weight stack may be selected without any strain on the selection knob. Force it to the centre by hand.
KINESIS ONE: Service & Maintenance Manual rev. 2.2
Page 9.1
9. APPENDICE
9.1. TOOLS TO USE The following tools are necessary to carry out all disassembly, adjustment and maintenance operations on the machines:
• 17mm wrench; • 19mm wrench; • 17mm retchet wrench; • 19mm retchet wrench; • 4mm hexagonal wrench; • 5mm hexagonal wrench; • 6mm hexagonal wrench; • 8mm hexagonal wrench; • Torque wrench, • Pliers; • Cutter.

KINESIS ONE: Service & Maintenance Manual rev. 2.2
Page 9.2
Page intentionally left blank


0SM00550AA-UK
TECHNOGYM S.p.A. Via G. Perticari, 20
47035 Gambettola (FC) ITALIA
Tel.: +39-0547-650638 Fax: +39-0547-650150
e-mail: [email protected]
Related Documents