Copyright (c) 2019 by Amazon.com, Inc. or its affiliates. Serverless Transit Network Orchestrator is licensed under the terms of Apache License Version 2.0 available at https://www.apache.org/licenses/LICENSE-2.0 Serverless Transit Network Orchestrator AWS Implementation Guide Lalit Grover Aijun Peng November 2019

Welcome message from author
This document is posted to help you gain knowledge. Please leave a comment to let me know what you think about it! Share it to your friends and learn new things together.
Transcript

Copyright (c) 2019 by Amazon.com, Inc. or its affiliates.
Serverless Transit Network Orchestrator is licensed under the terms of Apache License Version 2.0 available at
https://www.apache.org/licenses/LICENSE-2.0
Serverless Transit Network Orchestrator
AWS Implementation Guide
Lalit Grover
Aijun Peng
November 2019

Amazon Web Services – Serverless Transit Network Orchestrator November 2019
Page 2 of 31
Contents
Overview ................................................................................................................................... 4
Cost ........................................................................................................................................ 4
Architecture Overview........................................................................................................... 5
Solution Components ............................................................................................................... 7
AWS Lambda ......................................................................................................................... 7
State Machine ........................................................................................................................ 7
Amazon DynamoDB .............................................................................................................. 7
AWS Resource Access Manager ............................................................................................ 7
Transit Network Management Web Interface ...................................................................... 7
Deployment Considerations ..................................................................................................... 8
AWS Accounts ....................................................................................................................... 8
Transit Gateway Routing Tables ........................................................................................... 8
Tagging .................................................................................................................................. 8
Manual Approval Tagging ................................................................................................. 9
Choosing a Hub Account ..................................................................................................... 10
Spoke Template ................................................................................................................... 10
Regional Deployment .......................................................................................................... 10
AWS CloudFormation Templates .......................................................................................... 10
Automated Deployment .......................................................................................................... 11
Prerequisites ......................................................................................................................... 11
What We’ll Cover .................................................................................................................. 11
Step 1. Launch the Hub Stack .............................................................................................. 12
Step 2. Launch the Spoke Stack ........................................................................................... 15
Step 3. Manage Network Activities ......................................................................................16
Sign in to the Transit Network Management web interface ............................................16
Manage network activities ................................................................................................16
Security .................................................................................................................................... 17

Amazon Web Services – Serverless Transit Network Orchestrator November 2019
Page 3 of 31
IAM Roles ............................................................................................................................. 17
Amazon CloudFront ............................................................................................................. 17
Amazon Cognito .................................................................................................................. 18
Amazon EventBridge........................................................................................................... 18
Additional Resources .............................................................................................................. 18
Appendix A: Cost Estimate Breakdown ................................................................................. 18
Appendix B: Solution Workflows ........................................................................................... 20
Automated Approval Process .............................................................................................. 20
Manual Approval Process .................................................................................................... 21
Appendix C: Enable AWS RAM for AWS Organization Accounts ......................................... 23
Appendix D: Identify the AWS Organizations ARN .............................................................. 24
Appendix E: Create Custom Route Tables ............................................................................. 24
Custom Route Tables .......................................................................................................... 25
Create a Custom Route Table and Attachment .................................................................. 26
Appendix F: Set Up for Manual Approvals ............................................................................ 28
Appendix G: On-Premises Connectivity ................................................................................ 28
Appendix H: Collection of Operational Metrics..................................................................... 30
Source Code ............................................................................................................................. 31
Document Revisions ................................................................................................................ 31
About This Guide This implementation guide discusses architectural considerations and configuration steps for
deploying the Serverless Transit Network Orchestrator (STNO) solution on Amazon Web
Services (AWS). It includes links to AWS CloudFormation templates that launch and
configure the AWS services required to deploy this solution using AWS best practices for
security and availability.
The guide is intended for IT infrastructure architects, administrators, and networking
professionals who have practical experience with networking and architecting in the AWS
Cloud.

Amazon Web Services – Serverless Transit Network Orchestrator November 2019
Page 4 of 31
Overview AWS Transit Gateway is a service that enables customers to connect their Amazon Virtual
Private Clouds (VPCs) and their on-premises networks to a single gateway. AWS Transit
Gateway acts as a hub that controls how traffic is routed among all the connected networks
which act like spokes. This hub and spoke model helps simplify management and reduce
operational costs because each network only has to connect to AWS Transit Gateway and not
to every other network. Any new VPC or subnet that is connected to AWS Transit Gateway is
then automatically available to every other network connected via AWS Transit Gateway.
The Serverless Transit Network Orchestrator (STNO) solution adds automation to AWS
Transit Gateway. This solution provides the tools necessary to automate the process of setting
up and managing transit networks in distributed AWS environments. A web interface is
created to help control, audit, and approve (transit) network changes. STNO supports both
AWS Organizations and standalone AWS account types.
You can use this solution out-of-the-box or customize the solution to meet your specific use
case.
Cost You are responsible for the cost of the AWS services used while running this solution. As of
the date of publication, the cost for running this solution with default settings in the US East
(N. Virginia) Region with two VPCs attached to AWS Transit Gateway, with each VPC
containing two subnets and using Amazon DynamoDB to store network data is
approximately $72.64 per month. For a cost breakdown, see Appendix A.

Amazon Web Services – Serverless Transit Network Orchestrator November 2019
Page 5 of 31
Architecture Overview Deploying this solution builds the following environment in the AWS Cloud.
Figure 1: Serverless Transit Network Orchestrator solution architecture
This solution includes an AWS CloudFormation template (aws-transit-network-
orchestrator-hub) you deploy in the account you want to act as the hub in the solution’s
hub-and-spoke model. For guidance on choosing a hub account, see Choosing a Hub
Account. This template launches all the components necessary to automatically connect
your VPCs to AWS Transit Gateway.
Note: Before you launch the hub template, have the spoke account IDs or the AWS Organizations ARN accessible. You will enter them into the applicable template parameters during deployment.
The hub template launches AWS Lambda functions, AWS Step Functions, Amazon
DynamoDB, Amazon EventBridge, Amazon Simple Notification Service (Amazon SNS),
AWS Resource Access Manager (AWS RAM), and AWS Transit Gateway. The template also
deploys a Transit Network Management web interface that consists of Amazon Simple
Storage Service (Amazon S3), Amazon CloudFront, AWS AppSync, and Amazon Cognito.

Amazon Web Services – Serverless Transit Network Orchestrator November 2019
Page 6 of 31
Note: You must wait for the hub stack launch to complete before you launch spoke templates. The spoke template depends on the Amazon CloudWatch Events bus policy that is created during the hub stack launch.
The solution also includes a template (aws-transit-network-orchestrator-spoke)
you deploy in spoke accounts. This template deploys a CloudWatch Events rule that
monitors VPC and subnet tags. To identify VPCs (spoke accounts) you want the solution to
manage, tag the VPCs and the selected subnets within those VPCs. This tag change is sent to
the hub account through an Amazon EventBridge bus. When the event is received in the
hub account, an AWS Lambda function is triggered that starts the STNO workflow. For
more information about the workflow, see Appendix B.
AWS Step Functions (STNO state machine) and Lambda process network requests from the
spoke accounts and event details are stored in DynamoDB. You can choose whether to
approve requests automatically or manually. If you choose to approve requests automatically,
the VPC attaches to AWS Transit Gateway. If you choose to approve request manually,
Amazon SNS sends an email you can use to approve the request. After the request is
approved, the STNO state machine applies the network change. If the request is rejected,
DynamoDB and the spoke resources tag are updated with the rejected status.
When a request is approved, the solution updates the route table associated with the subnet
in the spoke account with a default route with AWS Transit Gateway as the target to provide
for bi-directional connectivity. The solution workflow updates the subnet’s route table with
the default route as defined in the hub template.
The solution also adds (or updates) an STNO Status tag with the request status as a
mechanism to update the spoke account user. The spoke account user checks on the status
using either the Transit Network Management web interface (if they have permission) or
views the tag in their spoke account.
Note: The STNO will not overwrite existing default routes with different targets.
The Transit Network Management web interface is deployed into an Amazon S3 bucket
configured for static web hosting. Amazon CloudFront is used to provide public access to the
solution’s bucket contents. Amazon Cognito is used to manage user access to the web
interface.
With the web interface, users can view tagging event details and the history of network
requests from different accounts, and monitor their status. Administrators can accept or
reject requests when manual approval is required.

Amazon Web Services – Serverless Transit Network Orchestrator November 2019
Page 7 of 31
Solution Components
AWS Lambda This solution deploys two AWS Lambda functions. One function starts the state machine
execution when it is invoked by the Amazon CloudWatch event, and processes the events
from the Transit Network Management web interface during a manual approval workflow.
The other function performs all the transit gateway related tasks including transit network
changes, Amazon DynamoDB updates, sending Amazon Simple Notification Service
(Amazon SNS) notifications, tagging spoke resources, and accepting resource share (AWS
Resource Access Manager (AWS RAM)) invitations from the spoke account.
State Machine The STNO state machine consists of AWS Step Functions that orchestrate the changes
required to tether the network components. The state machine enables network
administrators to analyze each event and troubleshoot any unexpected errors.
Amazon DynamoDB Amazon DynamoDB stores all tagging events made by users in the spoke accounts. It enables
the administrator to retain and audit network changes made based on the tag changes.
By default, items expire after 90 days but you can change the value by changing the Audit
Trail Retention Period parameter in the hub template.
AWS Resource Access Manager This solution uses AWS RAM to create a resource share for transit gateway. Accounts that
were identified during the hub template deployment or within AWS Organizations,
depending on your network environment, are shared through the transit gateway.
For accounts that use AWS Organizations, you must manually enable AWS RAM in the
Organizations console and obtain the AWS Organization’s master account ID and
organization ID. AWS RAM lets you share your resources through AWS Organizations. For
steps to enable AWS RAM with AWS Organizations, see Appendix C.
Transit Network Management Web Interface The Transit Network Management web interface is a ReactJS web application hosted in
Amazon S3, delivered by Amazon CloudFront, and authenticated by Amazon Cognito. The
web interface leverages AWS AppSync to interact with DynamoDB and calls Lambda

Amazon Web Services – Serverless Transit Network Orchestrator November 2019
Page 8 of 31
functions to trigger the STNO state machine in the manual approval workflow. The web
interface provides a dashboard for administrators to resolve manual approval requests for
network changes and allows other users to view network changes.
Deployment Considerations
AWS Accounts Serverless Transit Network Orchestrator supports AWS accounts that use AWS
Organizations. STNO can automatically enable authentication of AWS accounts that use
AWS Organizations.
The solution also supports accounts that do not use AWS Organizations. For those accounts,
each individual account (that deploys the spoke template) in your network must be
authenticated individually. Enter each spoke account ID in the Principals parameter in the
hub template. Authentication allows a standalone AWS account to trigger the STNO
workflow to create transit gateway attachment to the VPCs.
Transit Gateway Routing Tables The transit gateway route tables are used to configure routing for your transit gateway
attachments. STNO uses routing tables in the tag value to associate a transit gateway route
table with a transit gateway attachment, and to add a route from a route table to the
attachment. To establish an association and propagation, the VPC administrator tags the
network with the appropriate key value pair which generates a tag request that is sent to the
hub account. For more information about tagging, see Tagging.
This solution includes the following default routing tables: Flat, Isolated,
Infrastructure, and On-premises. However, you can create your own custom routing
tables to work with this solution. For a sample table of policy types and guidance for
creating your own routing tables, see Appendix E.
Tagging Tags identify applicable resources (VPCs and subnets) in your spoke accounts. Tags allow
CRUD operations to run on the transit gateway route table associations and propagation.
Note: Verify that you have the appropriate access privileges to tag VPCs in spoke accounts. Or, identify the appropriate administrator in your organization with the proper authorization.
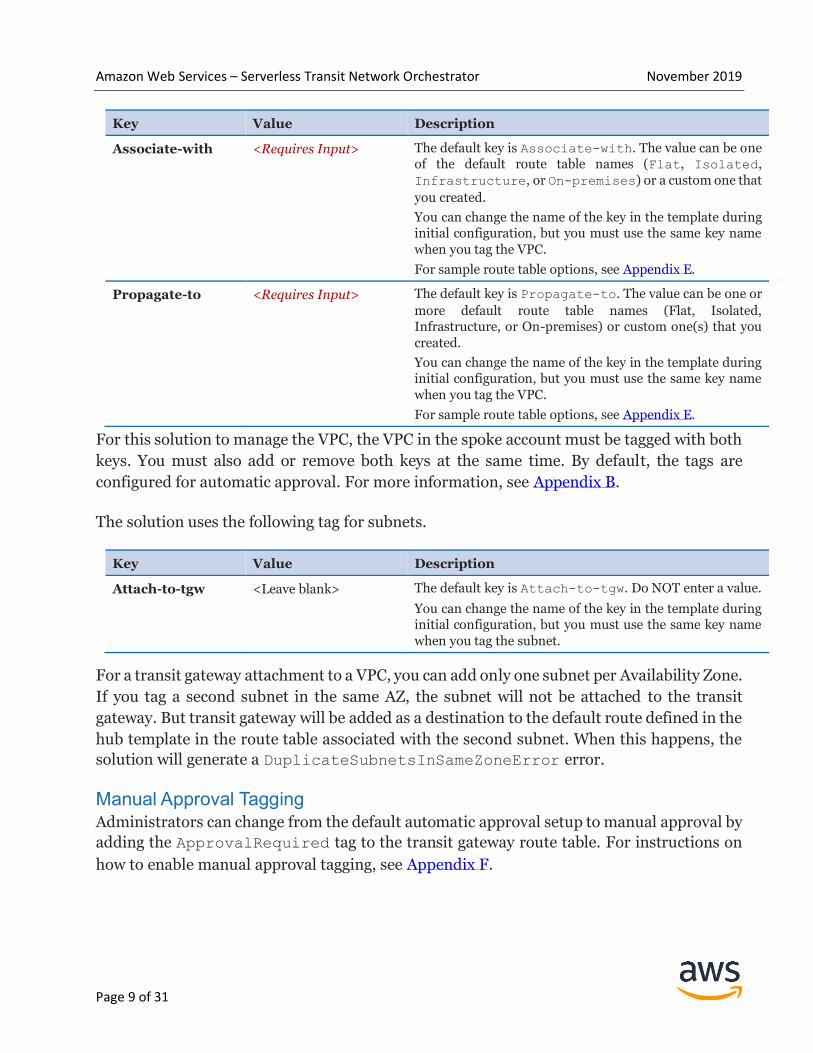
The solution uses the following tags for VPCs.
Amazon Web Services – Serverless Transit Network Orchestrator November 2019
Page 9 of 31
Key Value Description
Associate-with <Requires Input> The default key is Associate-with. The value can be one of the default route table names (Flat, Isolated,
Infrastructure, or On-premises) or a custom one that
you created.
You can change the name of the key in the template during initial configuration, but you must use the same key name
when you tag the VPC.
For sample route table options, see Appendix E.
Propagate-to <Requires Input> The default key is Propagate-to. The value can be one or
more default route table names (Flat, Isolated, Infrastructure, or On-premises) or custom one(s) that you
created.
You can change the name of the key in the template during initial configuration, but you must use the same key name
when you tag the VPC.
For sample route table options, see Appendix E.
For this solution to manage the VPC, the VPC in the spoke account must be tagged with both
keys. You must also add or remove both keys at the same time. By default, the tags are
configured for automatic approval. For more information, see Appendix B.
The solution uses the following tag for subnets.
Key Value Description
Attach-to-tgw <Leave blank> The default key is Attach-to-tgw. Do NOT enter a value.
You can change the name of the key in the template during initial configuration, but you must use the same key name
when you tag the subnet.
For a transit gateway attachment to a VPC, you can add only one subnet per Availability Zone.
If you tag a second subnet in the same AZ, the subnet will not be attached to the transit
gateway. But transit gateway will be added as a destination to the default route defined in the
hub template in the route table associated with the second subnet. When this happens, the
solution will generate a DuplicateSubnetsInSameZoneError error.
Manual Approval Tagging
Administrators can change from the default automatic approval setup to manual approval by
adding the ApprovalRequired tag to the transit gateway route table. For instructions on
how to enable manual approval tagging, see Appendix F.

Amazon Web Services – Serverless Transit Network Orchestrator November 2019
Page 10 of 31
Choosing a Hub Account We recommend deploying the hub template in an account that uses AWS Direct Connect or
has existing VPN connections because that enables you to create transit gateway attachments
to a Direct Connect Gateway(s) or VPN connection(s). For information about extending your
network, creating VPN attachments, and attaching a transit gateway to a Direct Connect
gateway, see Appendix G.
Spoke Template Deploy the spoke template in account(s) where your VPC(s) currently or will be located. If
you want to attach a VPC in your hub account with AWS Transit Gateway, you must deploy
the spoke template in your hub account.
Regional Deployment This solution uses AWS AppSync, Amazon Cognito, AWS Transit Gateway, and Amazon
EventBridge which are available in specific AWS Regions only. Therefore, you must launch
this solution in a region where these services are available. For the most current service
availability by region, see AWS service offerings by region.
AWS CloudFormation Templates This solution uses AWS CloudFormation to automate the deployment of Serverless Transit
Network Orchestrator in the AWS Cloud. It includes the following AWS CloudFormation
templates, which you can download before deployment.
aws-transit-network-orchestrator-hub.template: Use this
template to launch the solution and all associated components in
your AWS network hub account. The default configuration deploys AWS Transit Gateway,
four AWS Transit Gateway route tables, AWS Step Functions (the STNO state machine), an
AWS Resource Access Manager resource share, an Amazon Simple Notification Service topic,
an AWS AppSync API, an Amazon DynamoDB table, an Amazon Cognito user pool, one
Amazon CloudFront distribution, two Amazon Simple Storage Service buckets, Amazon
EventBridge, an Amazon CloudWatch Events bus, AWS Identity and Access Management
(IAM) roles and the Transit Network Management web interface for network management.
You can also customize the template based on your specific needs.
aws-transit-network-orchestrator-spoke.template: Use
this template to launch the solution and all associated components
in your spoke account. The default configuration deploys Amazon EventBridge and IAM
roles. You can also customize the template based on your specific needs.
View template
View template

Amazon Web Services – Serverless Transit Network Orchestrator November 2019
Page 11 of 31
Note: You must wait for the hub stack launch to complete before you launch spoke templates. The spoke template depends on the Amazon CloudWatch Events bus policy that is created during the hub stack launch.
Automated Deployment Before you launch the automated deployment, please review the architecture and other
considerations discussed in this guide. Follow the step-by-step instructions in this section to
configure and deploy the solution into your account.
Time to deploy: Approximately 25 minutes
Prerequisites If your accounts are part of AWS Organizations, you must manually enable AWS Resource
Access Manager (AWS RAM) in the Organizations console and obtain the AWS Organizations
master account ID and organization ID. For more information, see Appendix C.
What We’ll Cover The procedure for deploying this architecture on AWS consists of the following steps. For
detailed instructions, follow the links for each step.
Step 1. Launch the Hub Stack
• Launch the AWS CloudFormation template in your hub account.
• Enter values for the required parameters under the following sections: Stack Name,
Account List or AWS Organizations ARN, and Web interface login
information email.
• Review the other template parameters and adjust, if necessary.
Step 2. Launch the Spoke Stack
• Launch the AWS CloudFormation template into your spoke AWS account(s).
• Enter a value for the required parameter: Network (Hub) Account.
Step 3. Manage Network Activities
• Sign in to the Transit Network Management web interface and set up passwords.

Amazon Web Services – Serverless Transit Network Orchestrator November 2019
Page 12 of 31
Manage network activities including accessing the dashboard and
action items, approving or rejecting requests, and viewing history.
Step 1. Launch the Hub Stack This automated AWS CloudFormation template deploys Serverless Transit Network
Orchestrator.
Note: You are responsible for the cost of the AWS services used while running this solution. See the Cost section for more details. For full details, see the pricing webpage for each AWS service you will be using in this solution.
1. Sign in to the AWS Management Console with your AWS
network hub account and click the button to the right to launch
the aws-transit-network-orchestrator-hub AWS
CloudFormation template.
You can also download the template as a starting point for your own implementation.
2. The template is launched in the US East (N. Virginia) Region by default. To launch this
solution in a different AWS Region, use the region selector in the console navigation bar.
Note: This solution uses AWS AppSync, Amazon Cognito, AWS Transit Gateway, and Amazon EventBridge which are available in specific AWS Regions only. Therefore, you must launch this solution in a region where these services are available. For the most current service availability by region, see AWS service offerings by region.
3. On the Create stack page, verify that the correct template URL shows in the Amazon
S3 URL text box and choose Next.
4. On the Specify stack details page, assign a name to your solution stack.
Note: The name for your solution stack should not exceed 64 characters and will include a predefined string that is appended to the name you enter. We recommend that you keep your stack name to 40 characters or less to ensure you do not exceed the character limitation. For information about character limitations, see IAM and STS Limits in the AWS Identity and Access Management User Guide.
5. Under Parameters, review the parameters for the template and modify them as
necessary.
This stack uses the following parameters.
Launch Template

Amazon Web Services – Serverless Transit Network Orchestrator November 2019
Page 13 of 31
Parameter Default Description
Account Structure
Principal Type List of
Accounts Choose whether to use the default List of Accounts or select AWS Organizations ARN. For guidance, see AWS
Accounts.
Account List or AWS
Organizations ARN <Requires Input> To use an account list, enter a comma-separated list of AWS
account numbers. For example, 123456789012. To use
AWS Organizations, enter the AWS Organization ARN to share transit gateway with the principals. For example, arn:aws:organizations::<org_master_account_
ID>:organization/ o-<example-org-ID>.
For additional guidance to identify the ARN value, see
Appendix D.
Notification Settings
Receive approval
notifications
No Choose whether to receive approval notifications.
Notification Email for the network
admins
<Optional Input> The email address for approval notifications. To use this parameter, you must set the Receive approval notifications parameter to Yes.
User Settings
Web interface login
information
<Requires Input> The email address of the administrator user for the web interface. After launch, an email will be sent to this address
with a temporary password for the web interface.
Admin Username adminuser The username for network admins with full read and write permissions to the Transit Network Management web
interface.
Read-Only Username readonlyuser The username for users with read-only permission to the
Transit Network Management web interface.
Network Settings
Default Route to
TGW
All-traffic
(0/0)
Specify the default route setting for the route table associated with the tagged subnets. Choose from All-
traffic (0/0), RFC-1918 (10/8, 172.16/12,
192.168/16) or, Configure-Manually.
Note: If the route already exists, the solution will not overwrite it.
Tag Settings
Tag key for TGW
Attachment
Attach-to-tgw Specify a custom tag key name that triggers the transit
gateway attachment workflow.
Note: After initial deployment, do not change this solution’s default parameter. If you change this

Amazon Web Services – Serverless Transit Network Orchestrator November 2019
Page 14 of 31
Parameter Default Description
parameter after deployment, you will have to manually update the tags on your VPCs.
Tag key for TGW Route Table Association with
TGW Attachment
Associate-with Specify a custom tag key name that triggers the transit gateway route table association with the transit gateway
attachment workflow.
Note: After initial deployment, do not change this solution’s default parameter. If you change this parameter after deployment, you will have to manually update the tags on your VPCs.
Tag key for Route Propagation to TGW
Route Table(s)
Propagate-to Specify a custom tag key name that triggers the route
propagation to transit gateway route table(s) workflow.
Note: After initial deployment, do not change this solution’s default parameter. If you change this parameter after deployment, you will have to manually update the tags on your VPCs.
Audit Trail Retention Settings
Audit Trail Retention
Period
90 Specify the number of days you want to retain the audit
history in Amazon DynamoDB.
6. Choose Next.
7. On the Configure stack options page, choose Next.
8. On the Review page, review and confirm the settings. Be sure to check the box
acknowledging that the template will create IAM resources.
9. Choose Create stack to deploy the stack.
You can view the status of the stack in the AWS CloudFormation console in the Status
column. You should see a status of CREATE_COMPLETE in roughly 25 minutes.
After the stack is created, you will receive two emails that contain temporary passwords for
the read-only user and the admin user. If you enabled approval notification, Amazon SNS
will send a subscription confirmation email with a link to the Transit Network Management
web interface. You can also find the link to the web interface in the AWS CloudFormation
stack Outputs tab. The link is the Value of the Console URL. After initial login, you will
be prompted to change your password.

Amazon Web Services – Serverless Transit Network Orchestrator November 2019
Page 15 of 31
Note: The temporary account expires if you do not log in within seven days. Your new password must be at least 10 characters long.
Step 2. Launch the Spoke Stack Use this procedure to configure spoke accounts.
Note: You must wait for the hub stack launch to complete before you launch spoke templates. The spoke template depends on the Amazon CloudWatch Events bus policy that is created during the hub stack launch.
1. Sign in to your AWS spoke account using the AWS Management
console and click the button to the right to launch the aws-
transit-network-orchestrator-spoke AWS
CloudFormation template.
You can also download the template as a starting point for your own implementation.
2. Launch this template in the same region as the hub template. The template is launched in
the US East (N. Virginia) Region by default.
3. On the Create stack page, verify that the correct template URL shows in the Amazon
S3 URL text box and choose Next.
4. On the Specify stack details page, assign a name to your solution stack.
5. Under Parameters, review the parameters for the template and modify them as
necessary.
This stack uses the following parameter.
Parameter Default Description
Account ID of the network account where AWS Transit Gateway resides.
Network (Hub)
Account
<Requires Input> The account ID for the hub account.
6. Choose Next.
7. On the Configure stack options page, choose Next.
8. On the Review page, review and confirm the settings. Be sure to check the box
acknowledging that the template will create IAM resources.
9. Choose Create stack to deploy the stack.
You can view the status of the stack in the AWS CloudFormation console in the Status
column.
Launch Template

Amazon Web Services – Serverless Transit Network Orchestrator November 2019
Page 16 of 31
Step 3. Manage Network Activities Sign in to the Transit Network Management web interface After the hub stack is successfully deployed, you will receive two emails containing a link to
the Transit Network Management web interface and login credentials. By default, one
Amazon Cognito adminuser (in the admin group) and one Cognito readonlyuser (in the
read-only group) are created. For more information, see Managing and Searching for User
Accounts in the Amazon Cognito Developer Guide.
Select the link to open the web interface and enter the provided user credentials to sign in.
The system-generated password must be changed the first time that you sign in.
Note: The temporary account expires if you do not log in within seven days. Your new password must be at least 10 characters long.
Manage network activities
You can use the Transit Network Management web interface to access the dashboard to view
network changes; access action items to view; approve or reject network requests when
manual approval is required; and view the history of all changes made within Serverless
Transit Network Orchestrator.
Access the Dashboard
The Dashboard tab displays fields containing information about network changes stored in
Amazon DynamoDB such as VPC ID, VPC CIDR, Status, Association Route Table,
Propagation Route Tables, Spoke Account, Subnet ID, Availability Zone, and other
relevant information. You have the flexibility to sort by any of these fields. You can view the
Status of each network change including whether it was approved, rejected, auto-approved
or auto-rejected.
Access the Action Items
The Action Items tab displays the requests that must be manually approved. If you chose
to automatically approve requests, this tab will be empty. For manual approvals, each request
contains the same fields as those in the Dashboard tab. Requests can have the following
status: requested, processing, or failed. Failed requests are highlighted in red. You
can find the reason for the failure in the comment column.
Approve or Reject Requests
When manual approval is enabled for requests, the administrator approves or rejects the
request using the Transit Network Management web interface. Only users in the admin group
can approve or reject requests. Users from the read only group can only view requests. When
an administrator approves or rejects the request, the status is set to processing.

Amazon Web Services – Serverless Transit Network Orchestrator November 2019
Page 17 of 31
When a request is processing, no further action can be taken from the web interface. The
web interface calls an AWS Lambda function which triggers the STNO state machine to
process the request. When the process is completed, the status of the request will be updated
by the STNO state machine accordingly and reflected in the web interface.
View History
View History displays the complete history of a selected network request. To view the
history of a request, select the request from either the Dashboard or Action Items tab and
select the View History button.
Item Expiration
Information and history for a VPC are set to expire based on the time you specify in the hub
template at stack launch. The default time is 90 days. Expired requests will be automatically
deleted from DynamoDB within approximately 48 hours and will not be shown in the web
interface after deletion. You can specify a different value by changing the Audit Trail
Retention Period parameter in the AWS CloudFormation hub stack at stack launch.
Security When you build systems on AWS infrastructure, security responsibilities are shared between
you and AWS. This shared model can reduce your operational burden when AWS operates,
manages, and controls the components from the host operating system and virtualization
layer down to the physical security of the facilities in which the services operate. For more
information about security on AWS, visit the AWS Security Center.
IAM Roles AWS Identity and Access Management (IAM) roles enable customers to assign granular
access policies and permissions to services and users on AWS. This solution creates IAM roles
and sets permissions in the respective accounts to allow the solution to assume a defined role
in the spoke account to make changes when necessary.
Amazon CloudFront This solution deploys a static website hosted in an Amazon S3 bucket. To help reduce latency
and improve security, this solution includes an Amazon CloudFront distribution with an
origin access identity, which is a special CloudFront user that helps provide public access to
the solution’s website bucket contents. For more information, see Restricting Access to
Amazon S3 Content by Using an Origin Access Identity.

Amazon Web Services – Serverless Transit Network Orchestrator November 2019
Page 18 of 31
Amazon Cognito This solution creates Amazon Cognito user accounts for signing in to the Transit Network
Management web interface, and grants the administrator and the read-only users with the
appropriate permissions to control user access to data.
Amazon EventBridge The Amazon EventBridge event rule contains a filtering mechanism that identifies events
that are tagged with the tags defined in the hub template. If the tag keys match the
Associate-with, Propagate-to, and Attach-to-tgw values, the Amazon CloudWatch
Events rule invokes the Serverless Transit Network Orchestrator workflow. For more
information, see Creating an Event Bus in the Amazon EventBridge User Guide.
Additional Resources • AWS Transit Gateway
• AWS Step Functions
• AWS Resource Access Manager
• AWS AppSync
• Amazon DynamoDB
• Amazon Cognito
• Amazon CloudFront
• AWS CloudFormation
• AWS Lambda
• AWS CloudWatch Events
• Amazon EventBridge
• AWS Organizations
• Amazon Virtual Private Cloud
• Amazon Simple Storage Service
Appendix A: Cost Estimate Breakdown You are responsible for the cost of the AWS services used while running this solution. As of
the date of publication, the cost for running this solution with default settings in the US East
(N. Virginia) Region is approximately $72.64 per month. This cost estimate assumes the
following:
• The solution will manage 2 VPCs attached to AWS Transit Gateway, each VPC containing
two subnets in different Availability Zones.
• Automated queries will be made to Amazon DynamoDB from an actively running Transit
Network Management web interface every five minutes. This estimate does not include
manual queries.
• A total of 1 GB of data will be sent between all VPCs via the transit gateway.

Amazon Web Services – Serverless Transit Network Orchestrator November 2019
Page 19 of 31
AWS Service Total Cost/Month
Variable Costs
AWS Transit Gateway – hourly charge (containing 2 VPC attachments)
$72.00
AWS Transit Gateway – data processing charge (data transfer of 1 GB from 2 attached VPCs)
$0.60
Amazon DynamoDB (includes automated queries only)
$0.00009
AWS AppSync (includes auto approval workflow only)
$0.035
Fixed Costs
Amazon EventBridge $0.00003
Total: $72.64
Note: When the solution is deployed and no VPC attachments are made, the cost for running the solution is less than $0.50 per month.
Prices are subject to change. For full details, see the pricing webpage for each AWS service
used in this solution.

Amazon Web Services – Serverless Transit Network Orchestrator November 2019
Page 20 of 31
Appendix B: Solution Workflows The following workflows show the automated and the manual approval processes of the
Serverless Transit Network Orchestrator (STNO).
Automated Approval Process
Figure 2: Automated Approval Process for Serverless Transit Network Orchestrator
When the VPC and/or subnet is tagged, Amazon CloudWatch Events is triggered.
The target for this CloudWatch Events rule is Amazon EventBridge in the hub
account.
Amazon EventBridge receives CloudWatch Events in the hub account. The
EventBridge policy is configured to accept events from the trusted accounts
provided by the customer in the hub template.
Note: If you use AWS Organizations, the EventBridge policy will trust all accounts in the organization.
1
2

Amazon Web Services – Serverless Transit Network Orchestrator November 2019
Page 21 of 31
Amazon EventBridge invokes another CloudWatch Events rule in the hub account
that has the STNO AWS Lambda function as the target.
The Lambda function analyzes the event and starts a state machine execution
using the CloudWatch Events details as input to the state machine.
Depending on the event, the state machine can create, update, and delete transit
gateway attachments to the VPC. It can also create or update transit gateway route
table associations, and enable or disable transit gateway route table propagations.
The state machine also adds a new status tag to the VPC or the subnet with the
status of the request.
Once the state machine finishes the tasks described in Step 5, it updates the
Amazon DynamoDB table to enable the network administrator to audit the
network change history. The changes in DynamoDB automatically get reflected in
the web interface dashboard. Administrators and users may log into the Transit
Network Management web interface to review the history of all changes that
occurred in the network.
Manual Approval Process
Figure 3: Manual Approval Process for Serverless Transit Network Orchestrator
3
4
5
6

Amazon Web Services – Serverless Transit Network Orchestrator November 2019
Page 22 of 31
When the VPC and/or subnet is tagged, CloudWatch Events is triggered. The target
for this CloudWatch Event rule is Amazon EventBridge in the hub account.
Amazon EventBridge receives CloudWatch Events in the hub account. The Amazon
EventBridge policy is configured to accept events from the trusted accounts
provided by the customer in the hub template parameter.
Note: If you use AWS Organizations, the built-in Amazon EventBridge policy will trust all accounts in the organization.
Amazon EventBridge invokes another CloudWatch Events rule in the hub account
that has the STNO Lambda function as the target.
If the ApprovalRequired flag is set to Yes in the transit gateway route table, the
state machine skips any changes. To set up this flag, see Appendix F.
The state machine notifies the network administrator by email using the email you
specified during hub stack launch. The state machine also adds a new status tag to
the VPC or subnet with the status of the request.
Amazon Simple Notification Service (Amazon SNS) generates a notification that
will be sent to the administrator.
In DynamoDB, the status is set to requested. The status change is shown in the
web interface in the Action Items tab.
The administrator logs into the web interface, navigates to the Action Items tab,
and chooses to either approve or reject each request.
When the admin resolves the action items, AWS AppSync GraphQL is triggered
and changes the DynamoDB request status to processing.
AWS AppSync GraphQL also invokes the STNO Lambda function to initiate the
downstream approve or reject process.
1
2
3
4
5
6
7
8
9
10

Amazon Web Services – Serverless Transit Network Orchestrator November 2019
Page 23 of 31
The Lambda function validates the event and starts the state machine to complete
the request.
If the administrator approved the request, the state machine makes changes
based on the details in the event. If the request was rejected, the state machine
skips all the network related changes. In both cases, the status tag is updated with
the status of the request.
The DynamoDB table is updated with either the approved or rejected status
and other event details.
Appendix C: Enable AWS RAM for AWS
Organization Accounts If you use AWS Organizations to manage your AWS accounts, you must enable AWS
Resource Access Manager (AWS RAM) for AWS Organizations before deploying the
Serverless Transit Network Orchestrator templates.
Note: For additional information about sharing with AWS Organizations, see Sharing Your Resources in the AWS Resource Access Manager User Guide.
Use the following procedure to enable AWS RAM using the AWS Organizations console.
1. Sign in to the AWS Organizations console.
2. In the navigation pane, select Settings, scroll down to AWS RAM, and select Enable
access.
Enable the sharing option in the AWS RAM console.
1. Sign in to the AWS RAM console.
2. In the navigation pane, select Settings.
3. Select Enable sharing within your AWS Organization.
4. Select Save settings.
11
12
13

Amazon Web Services – Serverless Transit Network Orchestrator November 2019
Page 24 of 31
Appendix D: Identify the AWS Organizations ARN To use the Serverless Transit Network Orchestrator (STNO) with accounts connected to AWS
Organizations, you must specify the AWS Organizations Amazon Resource Name (ARN)
when you launch the hub template. The ARN value consists of the AWS Organizations master
account ID and the organization ID. You can build the ARN string manually if you have access
to the AWS Organizations master account ID and the organization ID, or you can use the
AWS Command Line Interface (AWS CLI) to query the Organization ARN.
Note: If you do not have access to the master account ID and the organizations ID, reach out to your organization’s master account administrator.
Use the following steps to build the AWS Organizations ARN manually if you have the AWS
Organizations master account ID and the organization ID. When you have the account
information, use the following sample ARN and replace the placeholders with your account
information.
1. Sign in to AWS Organizations console from your organization’s master account.
2. In the Accounts tab, identify the master account and record the Account ID.
3. Select the Settings tab (on the upper-right corner of the page).
4. From the Organization details page, record the Organization ID.
5. Use the following sample to manually build the Organization ARN. Replace the
placeholders with your master account and organization IDs.
arn:aws:organizations::<12-digit-
org_master_account_ID>:organization/ o-<org-ID>
To use the AWS CLI to query the ARN, use the describe-organization API call. To set up AWS
CLI, see Configuring the AWS CLI in the AWS Command Line Interface User Guide.
Appendix E: Create Custom Route Tables The Serverless Transit Network Orchestrator (STNO) creates the following default transit
gateway route tables: Flat, Isolated, Infrastructure, and On-premises. Each route table and
suggested propagations include a policy for common use cases.

Amazon Web Services – Serverless Transit Network Orchestrator November 2019
Page 25 of 31
• Flat: VPCs associated with the Flat policy can reach other VPCs associated with the
Flat, Shared Services, or Hybrid policies. The Flat policy enables a VPC to have
connectivity to many other VPCs.
• Isolated: VPCs associated with the Isolated policy can only reach VPCs with the
Shared Services and Hybrid policies. VPCs in the Isolated policy cannot use AWS
Transit Gateway to connect to other VPCs in the Isolated policy. This policy is for VPCs
that do not communicate with each other.
• Infrastructure: VPCs associated with Shared Services can reach other VPCs
associated with the Isolated, Flat, or Hybrid policies. The Infrastructure policy
is used for VPCs that many other VPCs may rely on, such as shared authentication, shared
tooling, or orchestration tools.
• On-premises: This route table is used for connecting to On-premises through either
VPN or AWS Direct Connect. Associate your On-premises connections to the On-
premises route table.
Policy Types Associate with (route table
name)
Propagate to
(list of route table names)
Flat (East-West) Flat Flat, On-premises, Infrastructure
Isolated (North-
South) Isolated On-premises, Infrastructure
SharedServices Infrastructure Flat, On-premises, Isolated
Hybrid On-premises Flat, Infrastructure, Isolated
Note: In this document, a policy is defined by both an association to a single transit gateway route table and the transit gateway route table propagation. To implement these concepts, both the association and propagation must be tagged on each spoke VPC according to the intended design because the policies below are not centrally managed. Inconsistent tagging may create drift between the desired policy and what is configured. You can utilize the ApprovalRequired tag on route tables you consider important to control. By default, STNO is set up for automatic approval, but you can change this tag to set up manual approval. For more information, see Appendix F.
Custom Route Tables If these policies do not meet your requirements, you can create your own transit gateway
route table configurations. For example, if you need a policy that allows developers to create
VPCs that do not have access to sensitive resources in the Isolated or Infrastructure route
tables, you can create a new Development policy by creating a new transit gateway route
Amazon Web Services – Serverless Transit Network Orchestrator November 2019
Page 26 of 31
table that propagates to the Flat, On-premises, and its own route tables. Those route tables
would also propagate to the new Development route table. For instructions on how to set up
a custom route table, see Create a Custom Route Table and Attachment.
Alternatively, you could modify the existing Flat policy to meet the new requirements if
you do not need the provided Flat policy. Disable propagation to the Infrastructure route
table and remove the Flat propagation from the Infrastructure route table.
Note: You do not need a separate route table for each VPC to achieve segmentation. Segmentation is accomplished by controlling the propagation. For example, an Isolated route table does not propagate to itself and, as a result, nothing associated with an Isolated route table is able to reach other Isolated resources through the transit gateway.
The administrator can create new transit gateway route tables in the AWS Virtual Private
Cloud console in the hub account. The combination of route tables and propagation
provided with the transit gateway allows for a wide variety of connection policies.
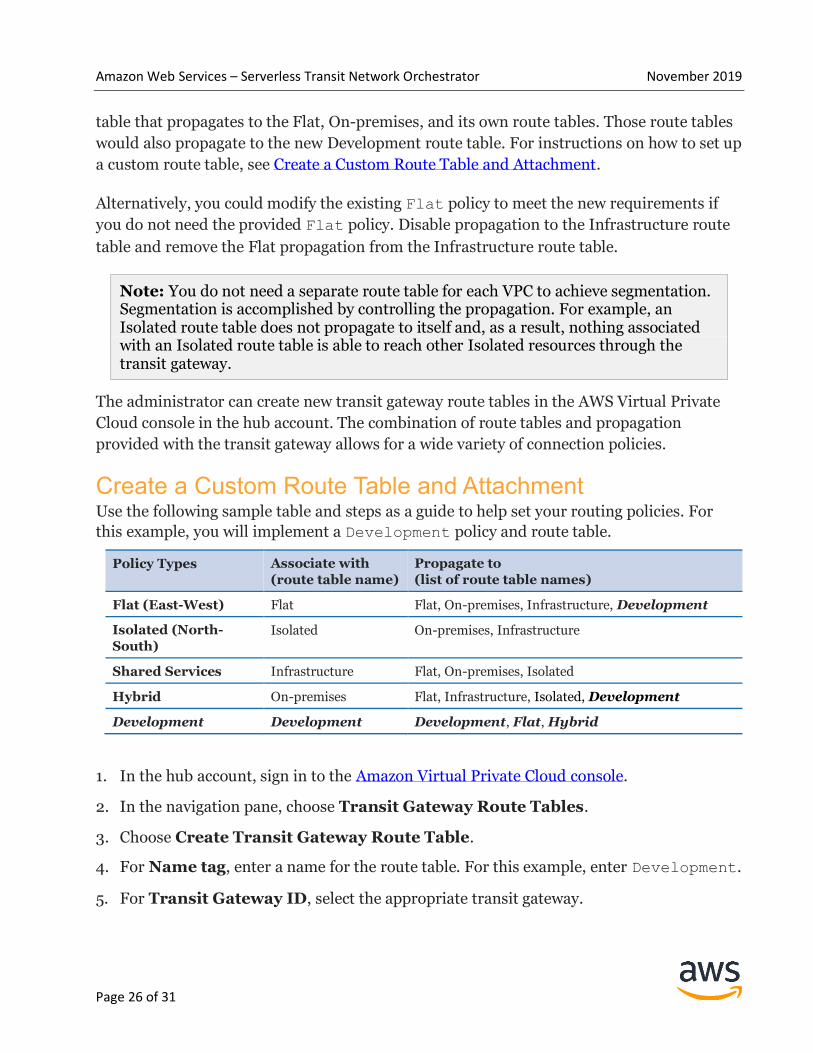
Create a Custom Route Table and Attachment Use the following sample table and steps as a guide to help set your routing policies. For
this example, you will implement a Development policy and route table.
Policy Types Associate with
(route table name)
Propagate to
(list of route table names)
Flat (East-West) Flat Flat, On-premises, Infrastructure, Development
Isolated (North-
South) Isolated On-premises, Infrastructure
Shared Services Infrastructure Flat, On-premises, Isolated
Hybrid On-premises Flat, Infrastructure, Isolated, Development
Development Development Development, Flat, Hybrid
1. In the hub account, sign in to the Amazon Virtual Private Cloud console.
2. In the navigation pane, choose Transit Gateway Route Tables.
3. Choose Create Transit Gateway Route Table.
4. For Name tag, enter a name for the route table. For this example, enter Development.
5. For Transit Gateway ID, select the appropriate transit gateway.

Amazon Web Services – Serverless Transit Network Orchestrator November 2019
Page 27 of 31
6. Choose Create Transit Gateway Route Table.
You will receive a confirmation message.
7. Select Close.
8. Optional: If you want changes to this route table to be manually approved:
a. Select the newly created route table from the list.
b. Choose the Tags tab.
c. Choose Add/Edit tags and then choose Create Tag.
d. In the Key field, enter ApprovalRequired and in the Value field, enter Yes.
e. Choose Save.
When the new route table is created, determine the access model. For two transit gateway
attachments to communicate, each of their associated route tables must have each other’s
routes.
First, determine where your new route table should propagate routes, defined by the other
transit gateway route tables. For example, should the Infrastructure route table be
propagated from your new route table?
Next, check that the other route tables are reciprocating the propagation for two-way
communication. For example, you may want to propagate Infrastructure, Flat, and Hybrid
route table to your new route table.
Note: If your custom route table requires access to VPCs that have already been attached, you must change the Propagate-to tag for each spoke VPC to include your new route table.
To associate a new VPC to this route table:
1. Tag the new VPC with the Associate-with key and reference the new route table
name in the value.
For example, Associate-with: <ExampleRouteTable>
2. Tag the new VPC with the Propagate-to key and reference the route tables you want
to propagate to from the previous step.
For example, Propagate-to: Infrastructure, Flat, Hybrid
3. Tag one subnet in each Availability Zone.
For example, Attach-to-tgw: <leave blank>

Amazon Web Services – Serverless Transit Network Orchestrator November 2019
Page 28 of 31
Note: If you configured manual approval, you may need to sign in to the Transit Network Management web interface to approve the change. If that is the case, you will receive an email with the request that will contain the link to the Transit Network Management web interface.
To confirm the attachment, you can look for attachments on the transit gateway in the VPC
management console, in the Transit Network Management interface, or in the state
machine history.
For more information about transit gateway route tables, see Transit Gateway Route Tables.
Appendix F: Set Up for Manual Approvals The Serverless Transit Network Orchestrator provides the flexibility to invoke a manual
approval workflow for route table associations. To activate this feature, do the following:
1. Navigate to the Amazon Virtual Private Cloud console in the hub account.
2. In the navigation pane, choose Transit Gateway Route Tables.
3. Choose the Tags tab and select Add/Edit Tags.
4. In the Key column, locate the ApprovalRequired key and update the Value to Yes.
After the network administrator updates the tag value, future requests or changes related to
the transit gateway route table association will require approval and, if enabled, will trigger
a notification being sent to the administrator. The administrator must approve or reject the
request. For more information, see Manual Approval Workflow.
Appendix G: On-Premises Connectivity Serverless Transit Network Orchestrator builds the base network, giving you the automation
to attach VPCs to AWS Transit Gateway. You can extend your network by creating transit
gateway route tables using the web interface, creating VPN attachments, or attaching a
transit gateway to an AWS Direct Connect gateway.
For instructions on how to manually attach a VPN to the transit gateway for on-premises
connectivity, see Transit Gateway VPN Attachments.
For instructions on how to manually attach Direct Connect to the transit gateway for on-
premises connectivity, see Transit Gateway Attachments to a Direct Connect Gateway.

Amazon Web Services – Serverless Transit Network Orchestrator November 2019
Page 29 of 31

Amazon Web Services – Serverless Transit Network Orchestrator November 2019
Page 30 of 31
Appendix H: Collection of Operational Metrics This solution includes an option to send anonymous usage data to AWS. We use this data to
better understand how customers use this solution and related products and services. When
enabled, the following information is collected and sent to AWS every time a solution
template is launched:
• Solution ID: The AWS solution identifier
• Unique ID (UUID): Randomly generated, unique identifier for each solution
deployment
• Timestamp: Data-collection timestamp
• Launch Region: The AWS Region where the stack was launched
Note that AWS will own the data gathered via this survey. Data collection will be subject to
the AWS Privacy Policy. To opt out of this feature, modify the AWS CloudFormation template
mapping section as follows:
AnonymousData:
SendAnonymousData:
Data: Yes
to
AnonymousData:
SendAnonymousData:
Data: No
Amazon Web Services – Serverless Transit Network Orchestrator November 2019
Page 31 of 31
Source Code This solution is coded in Python and the web interface is coded in ReactJS.
You can visit our GitHub repository to download the templates and scripts for this solution,
and to share your customizations with others.
Document Revisions Date Change
November 2019 Initial release
Notices
Customers are responsible for making their own independent assessment of the information in this document.
This document: (a) is for informational purposes only, (b) represents current AWS product offerings and
practices, which are subject to change without notice, and (c) does not create any commitments or assurances
from AWS and its affiliates, suppliers or licensors. AWS products or services are provided “as is” without
warranties, representations, or conditions of any kind, whether express or implied. The responsibilities and
liabilities of AWS to its customers are controlled by AWS agreements, and this document is not part of, nor does
it modify, any agreement between AWS and its customers.
Serverless Transit Network Orchestrator on AWS is licensed under the terms of the Apache License 2.0 available
at http://www.apache.org/licenses/LICENSE-2.0.
© 2019, Amazon Web Services, Inc. or its affiliates. All rights reserved.
Related Documents