SentriKey Real Estate Website 4/4/2019 Page 1 of 48 User Guide Overview The SentriKey™ Real Estate website is exclusive to SentriLock users. You’ll find the site friendly and useful. This user guide describes the following website functions regarding your lockbox: Login .................................................................................................................................... 2 Add a Listing ....................................................................................................................... 4 Assign Your Lockbox to a Listing ...................................................................................... 9 Assign a One Day Code to a Lockbox ............................................................................. 15 View One Day Codes ........................................................................................................ 21 View the SentriCard® Access Log................................................................................... 23 Manage Your Showing Notification Preferences .......................................................... 24 Manage Your Account ..................................................................................................... 29 Forgot Password? ............................................................................................................. 34 Message Center................................................................................................................ 37 Agent Team ....................................................................................................................... 38 Live Support Online ......................................................................................................... 43 Grant SentriConnect® Access......................................................................................... 46

Welcome message from author
This document is posted to help you gain knowledge. Please leave a comment to let me know what you think about it! Share it to your friends and learn new things together.
Transcript
SentriKey Real Estate Website
4/4/2019 Page 1 of 48
User Guide
Overview
The SentriKey™ Real Estate website is exclusive to SentriLock users. You’ll find the site friendly
and useful. This user guide describes the following website functions regarding your lockbox:
Login .................................................................................................................................... 2
Add a Listing ....................................................................................................................... 4
Assign Your Lockbox to a Listing ...................................................................................... 9
Assign a One Day Code to a Lockbox ............................................................................. 15
View One Day Codes ........................................................................................................ 21
View the SentriCard® Access Log ................................................................................... 23
Manage Your Showing Notification Preferences .......................................................... 24
Manage Your Account ..................................................................................................... 29
Forgot Password? ............................................................................................................. 34
Message Center ................................................................................................................ 37
Agent Team ....................................................................................................................... 38
Live Support Online ......................................................................................................... 43
Grant SentriConnect® Access ......................................................................................... 46
SentriKey Real Estate Website
4/4/2019 Page 2 of 48
User Guide
Login
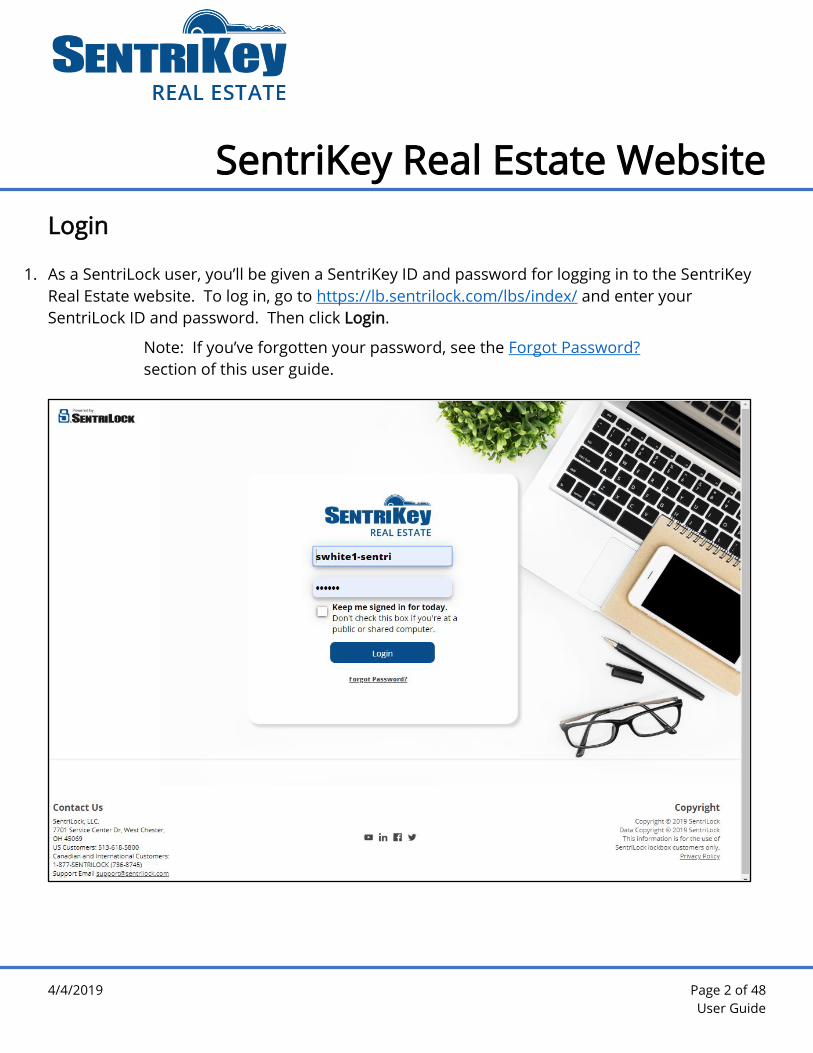
1. As a SentriLock user, you’ll be given a SentriKey ID and password for logging in to the SentriKey
Real Estate website. To log in, go to https://lb.sentrilock.com/lbs/index/ and enter your
SentriLock ID and password. Then click Login.
Note: If you’ve forgotten your password, see the Forgot Password?
section of this user guide.
SentriKey Real Estate Website
4/4/2019 Page 3 of 48
User Guide
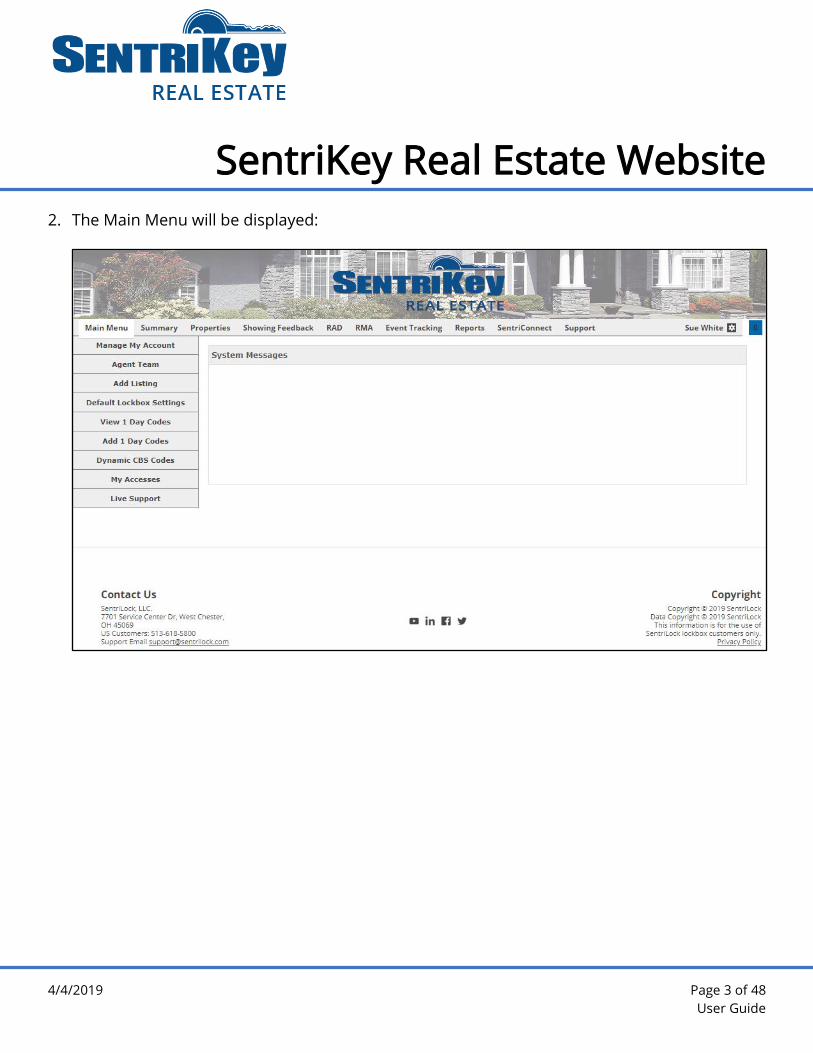
2. The Main Menu will be displayed:
SentriKey Real Estate Website
4/4/2019 Page 4 of 48
User Guide
Add a Listing
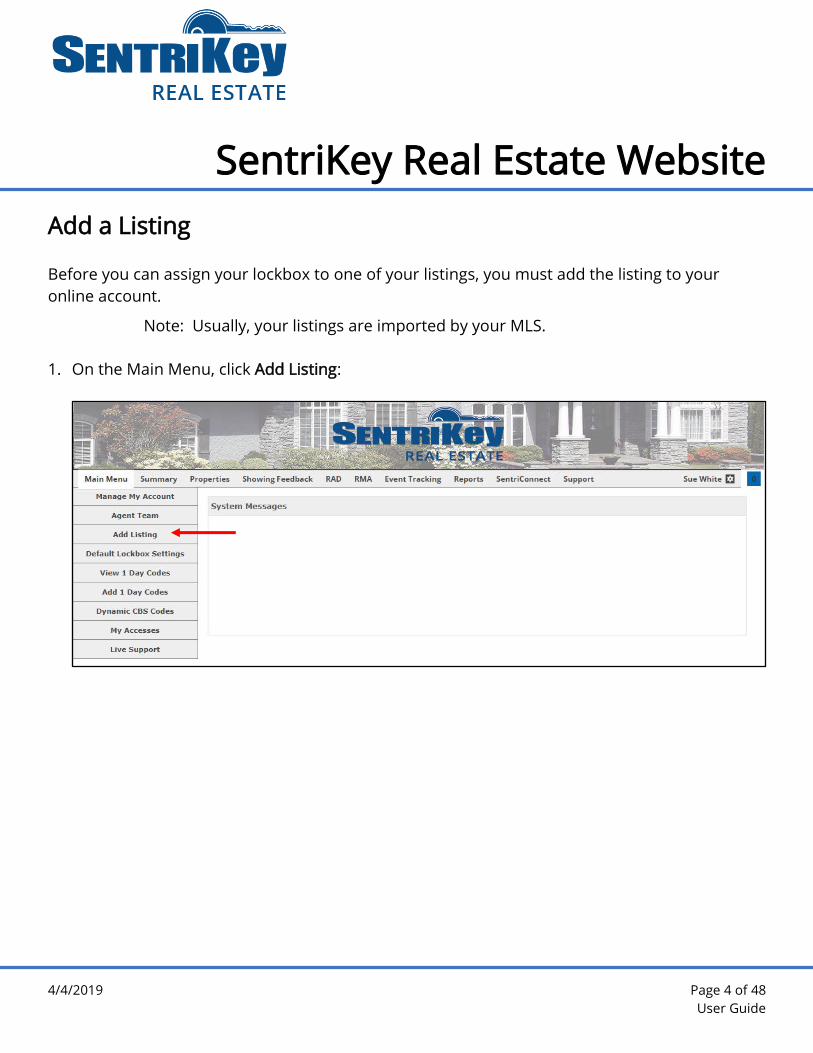
Before you can assign your lockbox to one of your listings, you must add the listing to your
online account.
Note: Usually, your listings are imported by your MLS.
1. On the Main Menu, click Add Listing:
SentriKey Real Estate Website
4/4/2019 Page 5 of 48
User Guide
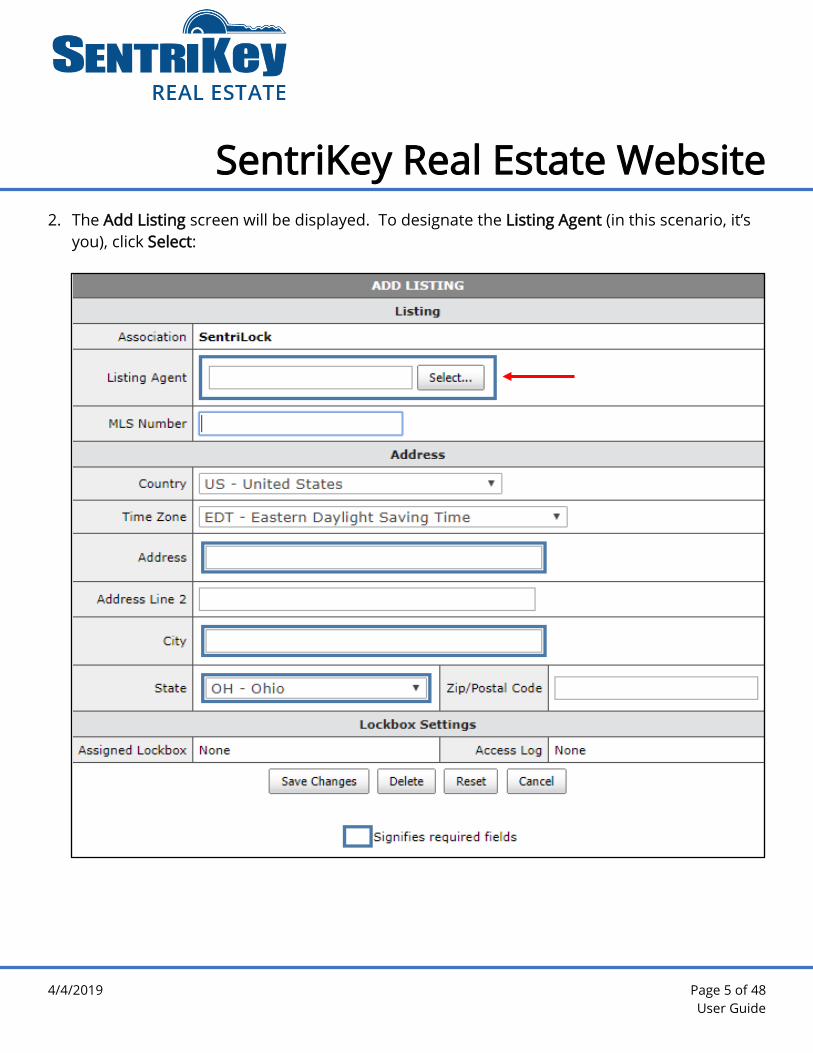
2. The Add Listing screen will be displayed. To designate the Listing Agent (in this scenario, it’s
you), click Select:

SentriKey Real Estate Website
4/4/2019 Page 6 of 48
User Guide
3. The Agents popup screen will be displayed. Click the button next to your name and click
Submit Changes:

SentriKey Real Estate Website
4/4/2019 Page 7 of 48
User Guide
4. The Add Listing screen will be displayed again, showing you as the Listing Agent. Enter the
remaining information and click Save Changes:

SentriKey Real Estate Website
4/4/2019 Page 8 of 48
User Guide
5. You’ll receive a message across the top of the Main Menu confirming that your listing
information has been updated:

SentriKey Real Estate Website
4/4/2019 Page 9 of 48
User Guide
Assign Your Lockbox to a Listing
When you assign a lockbox to a listing, other Agents who want to show your listing can find the
lockbox serial number (which they’ll need in order to open the lockbox) by looking up the MLS
number or the street address of the listing. This is also an important part of the SentriLock
system overall because the lockbox’s access log keeps track of who goes in and out of the listing
to which it’s assigned.
1. On the Main Menu, click Properties:
SentriKey Real Estate Website
4/4/2019 Page 10 of 48
User Guide
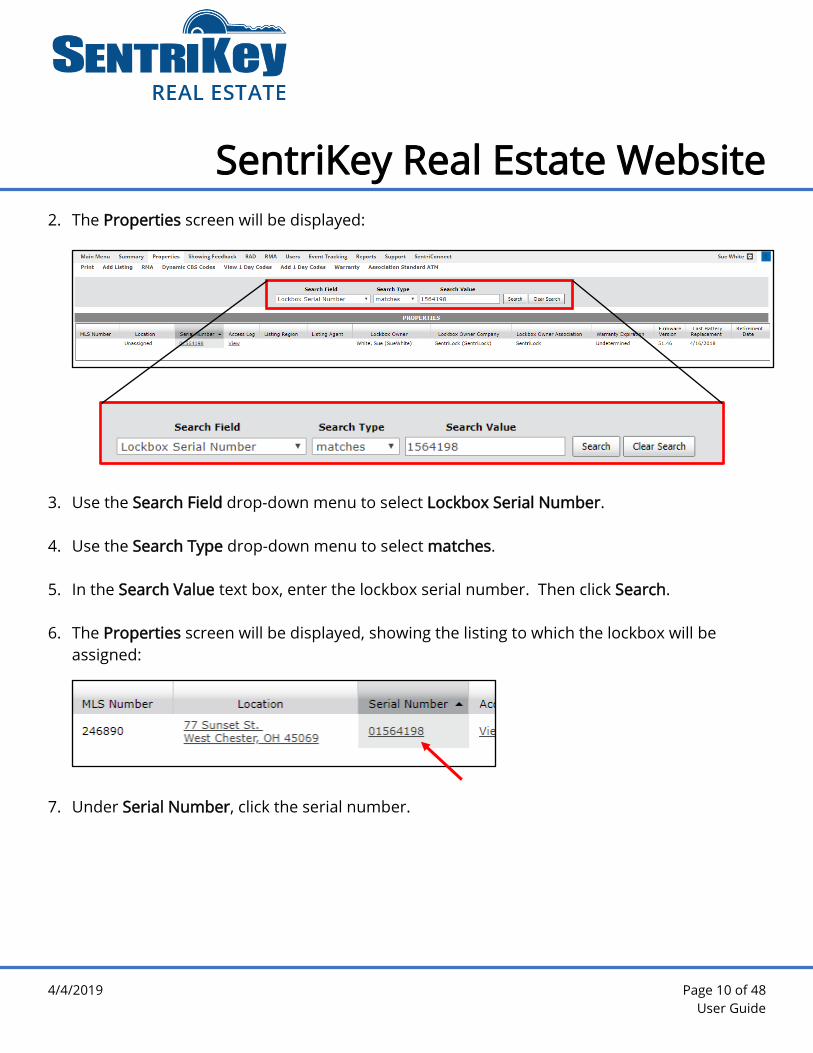
2. The Properties screen will be displayed:
3. Use the Search Field drop-down menu to select Lockbox Serial Number.
4. Use the Search Type drop-down menu to select matches.
5. In the Search Value text box, enter the lockbox serial number. Then click Search.
6. The Properties screen will be displayed, showing the listing to which the lockbox will be
assigned:
7. Under Serial Number, click the serial number.

SentriKey Real Estate Website
4/4/2019 Page 11 of 48
User Guide
8. Your lockbox’s information will be displayed on the Edit Lockbox screen. To assign the
lockbox to the listing, click Select:
SentriKey Real Estate Website
4/4/2019 Page 12 of 48
User Guide
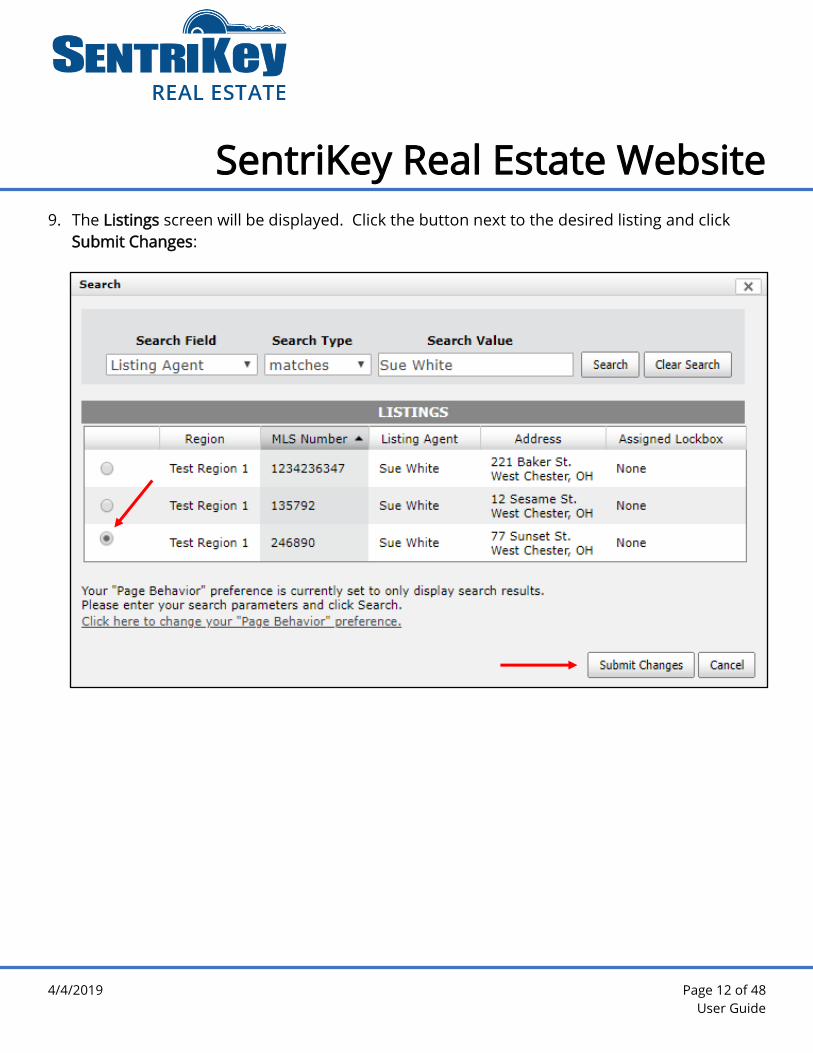
9. The Listings screen will be displayed. Click the button next to the desired listing and click
Submit Changes:
SentriKey Real Estate Website
4/4/2019 Page 13 of 48
User Guide
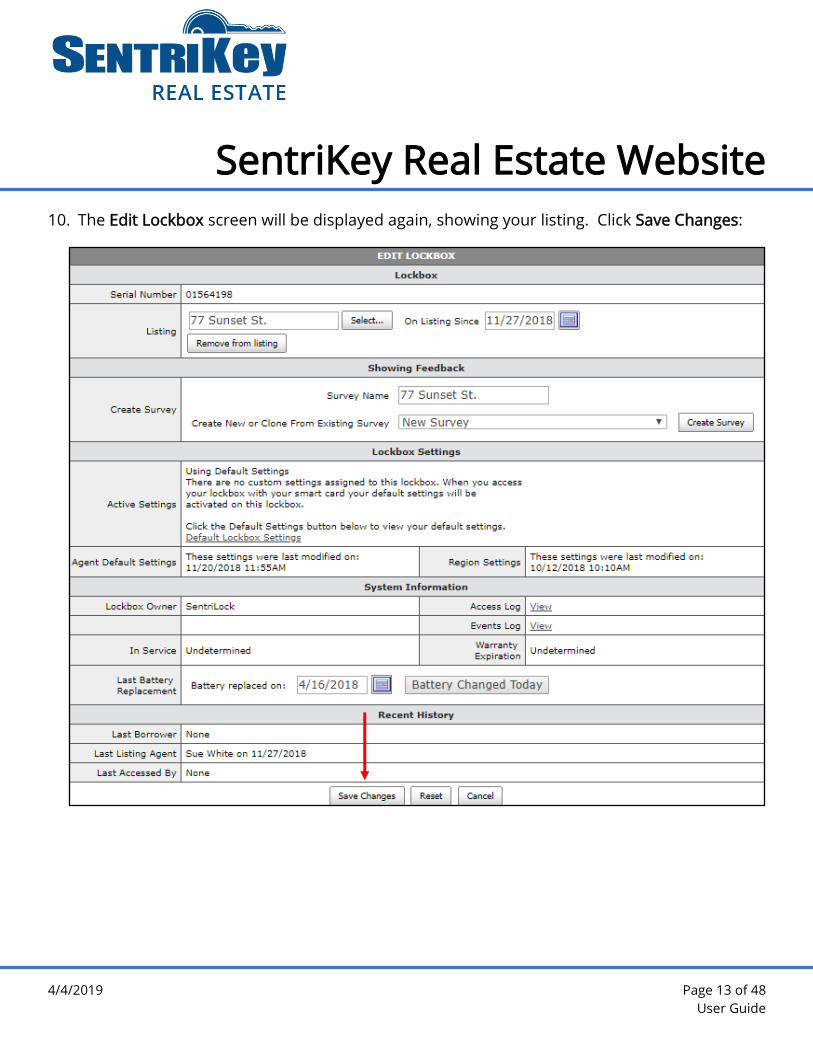
10. The Edit Lockbox screen will be displayed again, showing your listing. Click Save Changes:
SentriKey Real Estate Website
4/4/2019 Page 14 of 48
User Guide
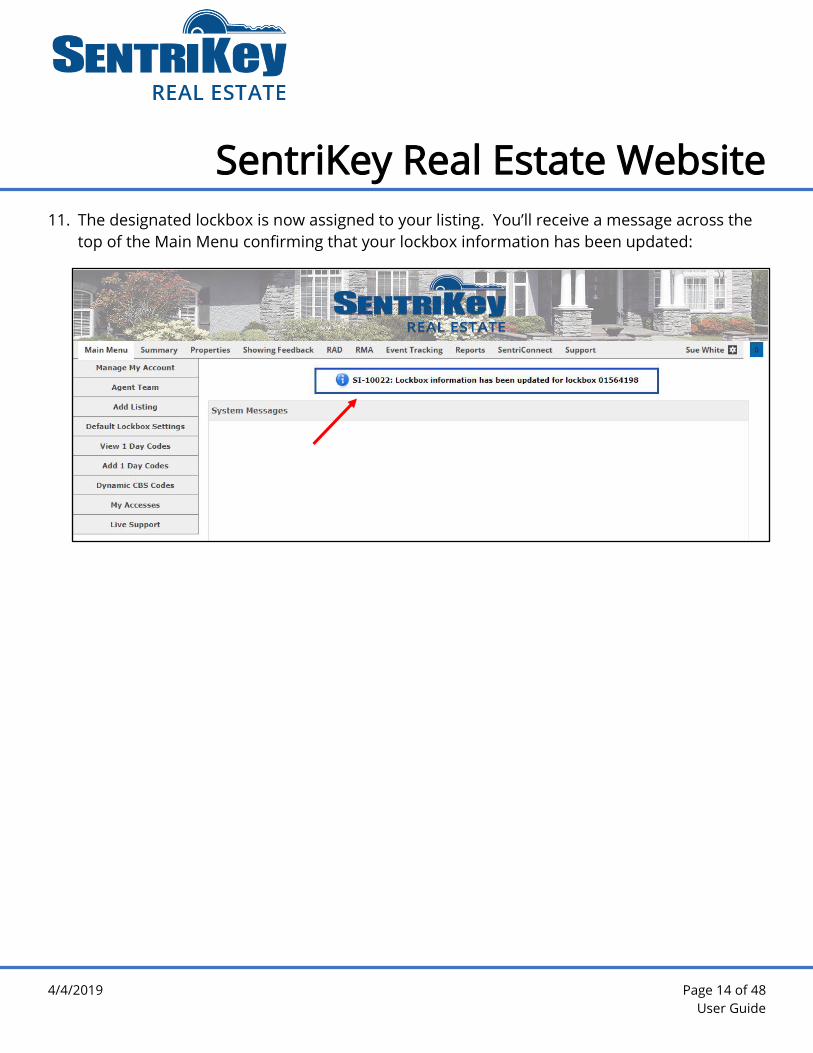
11. The designated lockbox is now assigned to your listing. You’ll receive a message across the
top of the Main Menu confirming that your lockbox information has been updated:

SentriKey Real Estate Website
4/4/2019 Page 15 of 48
User Guide
Assign a One Day Code to a Lockbox
If you’re a lockbox owner, or if you have privileges through a team or Broker-sharing, you can
create a One Day Code. This code is used to open a lockbox and is ideal for use by other Agents,
homeowners, and contractors who need access to a property but are not SentriLock members.
The code is active for the remainder of the day it’s created. Or, you can make the code active for
a full day up to two weeks in advance.
Once the code is created, the code’s designated active time will be displayed.
If you’re a lockbox owner, you can generate a One Day Code on the SentriKey Real Estate
website.
1. On the Main Menu, click Add 1 Day Codes:

SentriKey Real Estate Website
4/4/2019 Page 16 of 48
User Guide
2. The Add 1 Day Codes screen will be displayed. To choose the listing for the lockbox, click
Select:

SentriKey Real Estate Website
4/4/2019 Page 17 of 48
User Guide
3. The Select Lockbox screen will be displayed:
4. Click the button next to the desired listing and then click Submit Changes.

SentriKey Real Estate Website
4/4/2019 Page 18 of 48
User Guide
5. The lockbox’s serial number will be displayed:
6. Select the date that the code will be valid. Then click Generate Codes.
7. The Edit 1 Day Codes screen will be displayed. In the Assigned To text box, enter the name of
the person(s) who will get the One Day Code. Then click Assign:
SentriKey Real Estate Website
4/4/2019 Page 19 of 48
User Guide
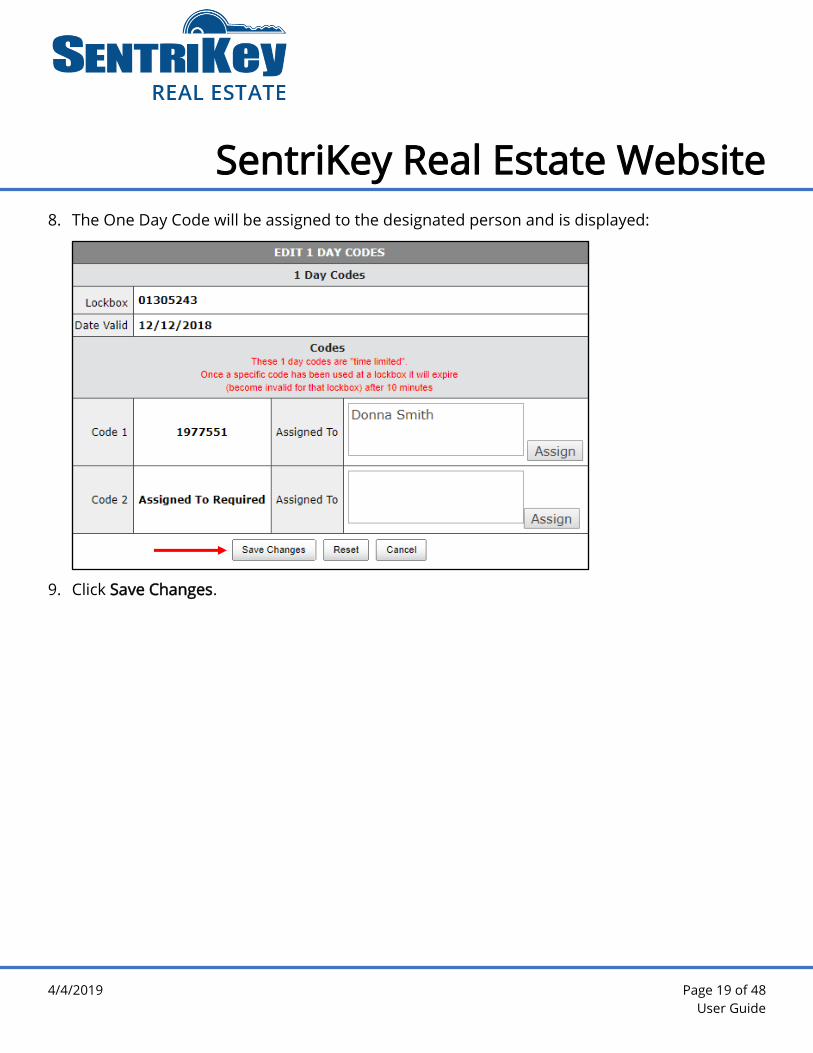
8. The One Day Code will be assigned to the designated person and is displayed:
9. Click Save Changes.
SentriKey Real Estate Website
4/4/2019 Page 20 of 48
User Guide
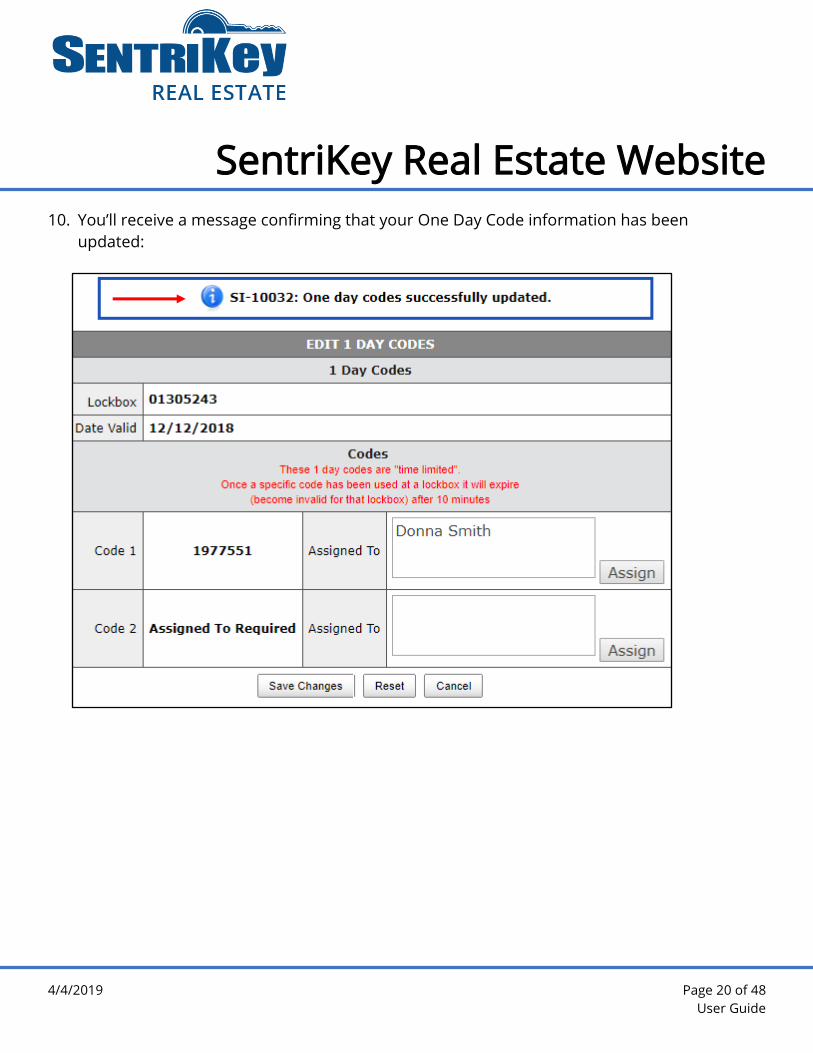
10. You’ll receive a message confirming that your One Day Code information has been
updated:

SentriKey Real Estate Website
4/4/2019 Page 21 of 48
User Guide
View One Day Codes
Use the following instructions to search for and view One Day Codes that were generated for a
lockbox you own or one for which you have ownership permission.
1. On the Main Menu, click View 1 Day Codes:

SentriKey Real Estate Website
4/4/2019 Page 22 of 48
User Guide
2. The One Day Codes screen will be displayed, showing your listings:
3. Under Date Valid, click the date of the desired listing.
4. Your One Day Codes for that listing on that date will be displayed:

SentriKey Real Estate Website
4/4/2019 Page 23 of 48
User Guide
View the SentriCard® Access Log
The SentriCard Access Log shows your card accesses to lockboxes.
1. On the Main Menu, click My Accesses:
2. The SentriCard Access Log screen will be displayed:
SentriKey Real Estate Website
4/4/2019 Page 24 of 48
User Guide
Manage Your Showing Notification Preferences
You have several options regarding your showing notification preferences.
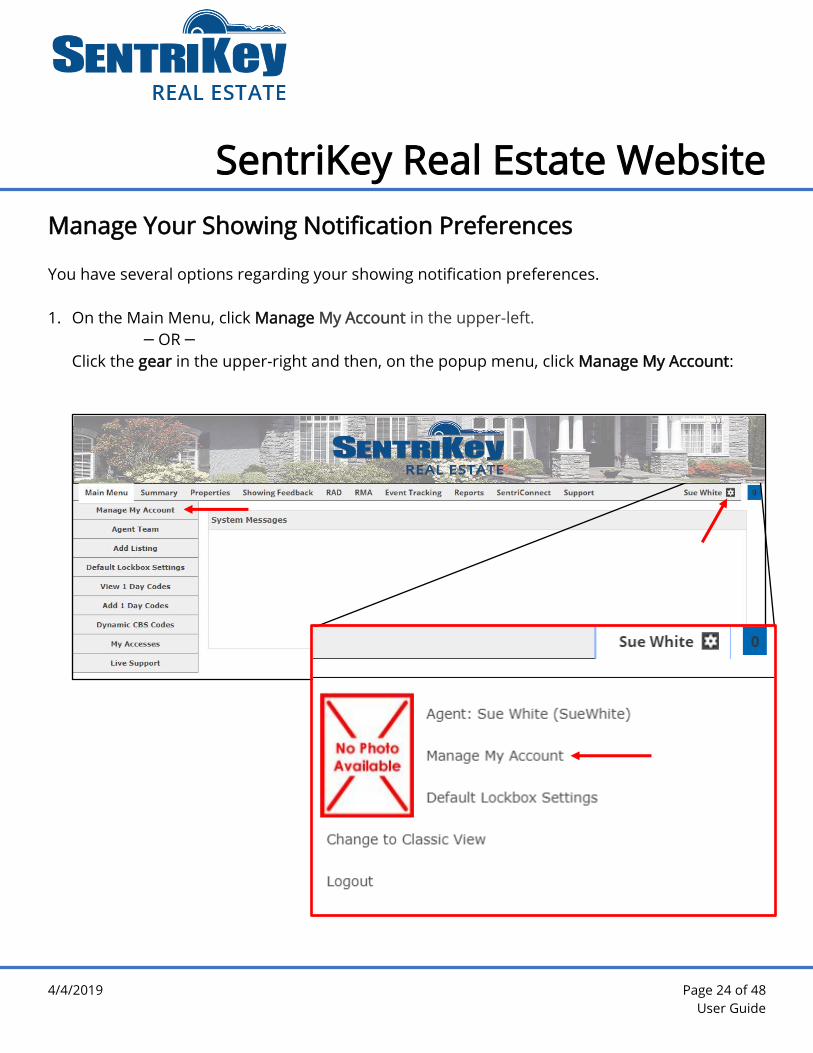
1. On the Main Menu, click Manage My Account in the upper-left.
ꟷ OR ꟷ
Click the gear in the upper-right and then, on the popup menu, click Manage My Account:

SentriKey Real Estate Website
4/4/2019 Page 25 of 48
User Guide
2. The Edit User screen will be displayed:

SentriKey Real Estate Website
4/4/2019 Page 26 of 48
User Guide
3. Click Preferences:

SentriKey Real Estate Website
4/4/2019 Page 27 of 48
User Guide
4. The Edit Preferences screen will be displayed. Go to the Showing Notifications grouping:
SentriKey Real Estate Website
4/4/2019 Page 28 of 48
User Guide
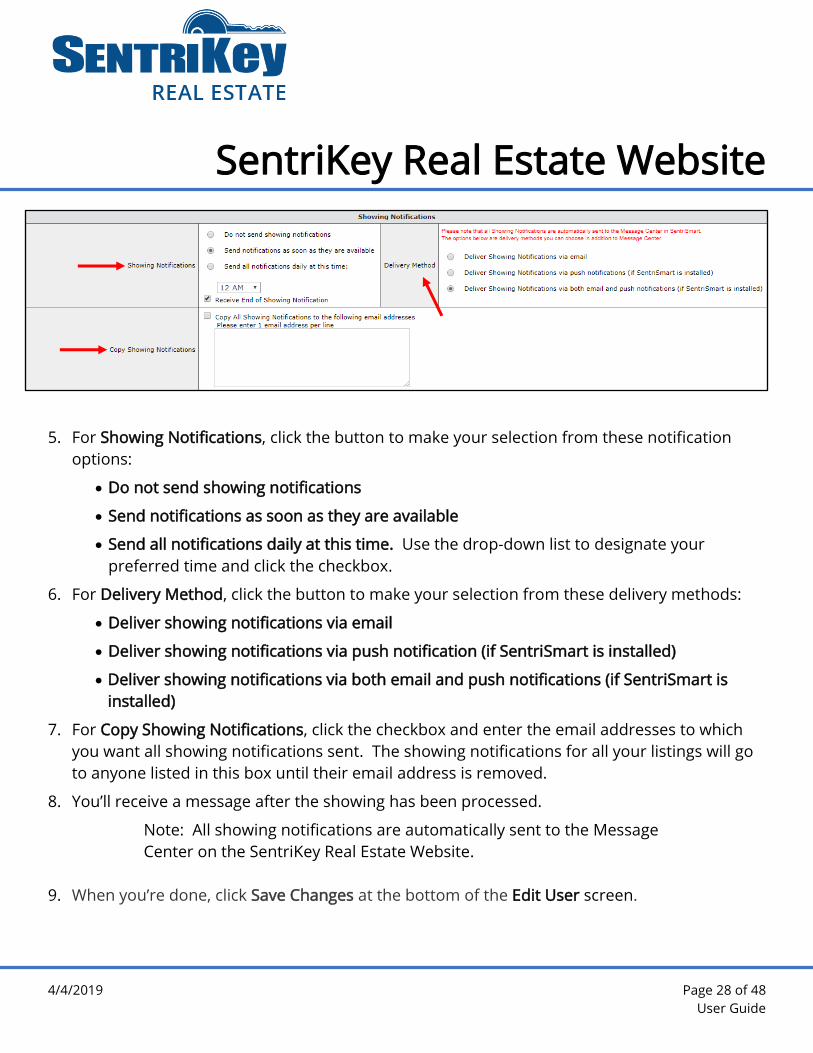
5. For Showing Notifications, click the button to make your selection from these notification
options:
• Do not send showing notifications
• Send notifications as soon as they are available
• Send all notifications daily at this time. Use the drop-down list to designate your
preferred time and click the checkbox.
6. For Delivery Method, click the button to make your selection from these delivery methods:
• Deliver showing notifications via email
• Deliver showing notifications via push notification (if SentriSmart is installed)
• Deliver showing notifications via both email and push notifications (if SentriSmart is
installed)
7. For Copy Showing Notifications, click the checkbox and enter the email addresses to which
you want all showing notifications sent. The showing notifications for all your listings will go
to anyone listed in this box until their email address is removed.
8. You’ll receive a message after the showing has been processed.
Note: All showing notifications are automatically sent to the Message
Center on the SentriKey Real Estate Website.
9. When you’re done, click Save Changes at the bottom of the Edit User screen.
SentriKey Real Estate Website
4/4/2019 Page 29 of 48
User Guide
Manage Your Account
There are several things you can do to manage your account; for example, you can change your
password. But if you’re unable to change or update any of your personal information, you must
notify your Association to make the changes for you.
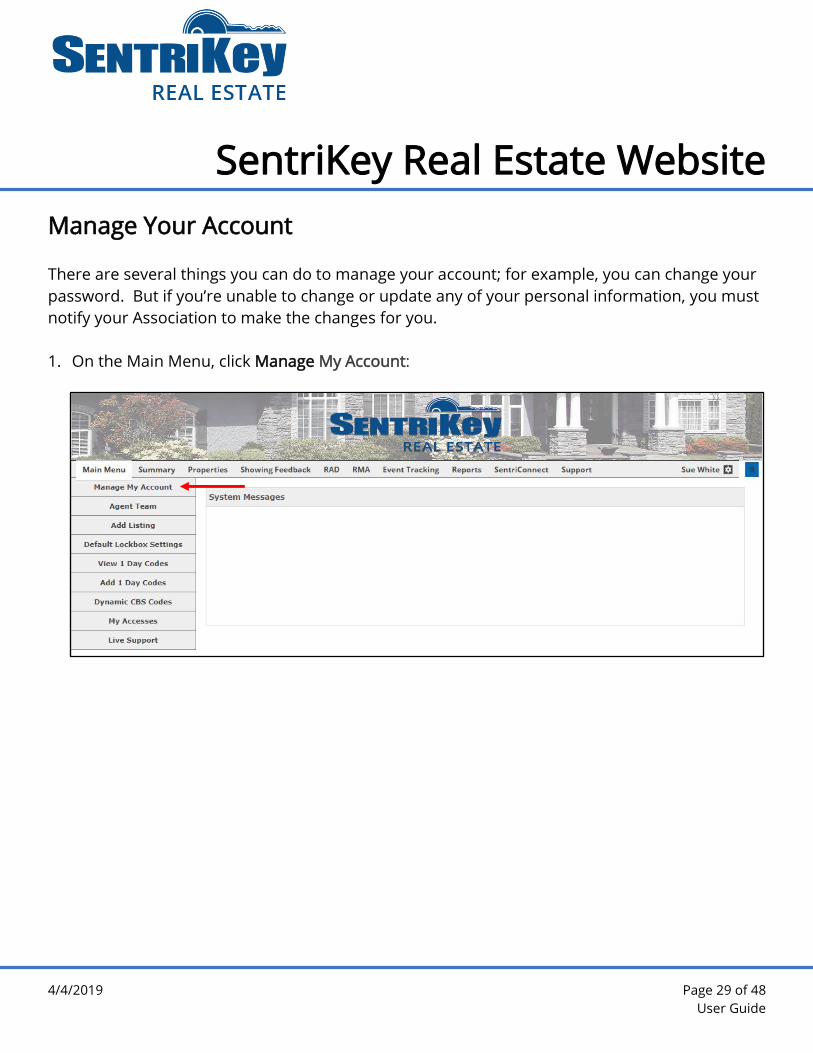
1. On the Main Menu, click Manage My Account:
SentriKey Real Estate Website
4/4/2019 Page 30 of 48
User Guide
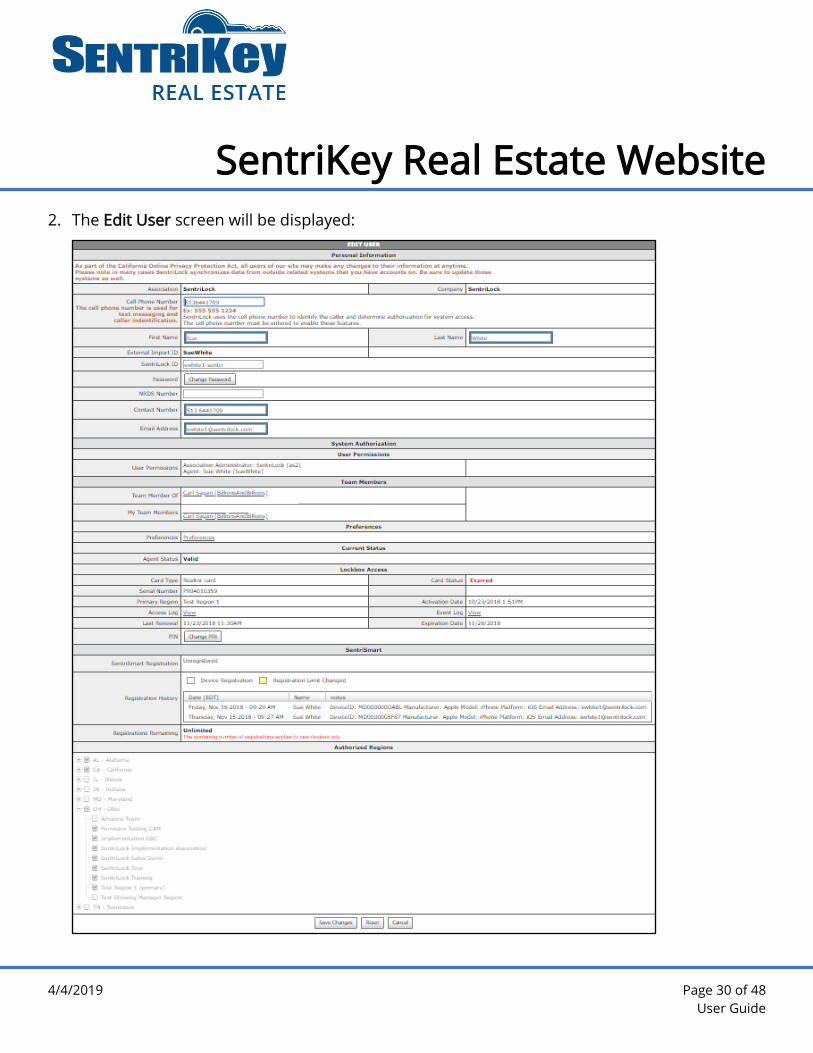
2. The Edit User screen will be displayed:

SentriKey Real Estate Website
4/4/2019 Page 31 of 48
User Guide
3. Under Personal Information, you can manage your Cell Phone Number, your Password, and
your Email Address:
4. To change your password, click Change Password. The Change Password screen will
be displayed:
5. Enter your New Password; then enter it again to Confirm New Password. Remember,
your password must contain at least six characters, one capital letter, and one number.
6. Click Save Changes.

SentriKey Real Estate Website
4/4/2019 Page 32 of 48
User Guide
7. The Edit User screen will be displayed again. Under System Authorization, you can view
your User Permissions and Team Members:
8. Under Lockbox Access, you can change your PIN. Click Change PIN:
SentriKey Real Estate Website
4/4/2019 Page 33 of 48
User Guide
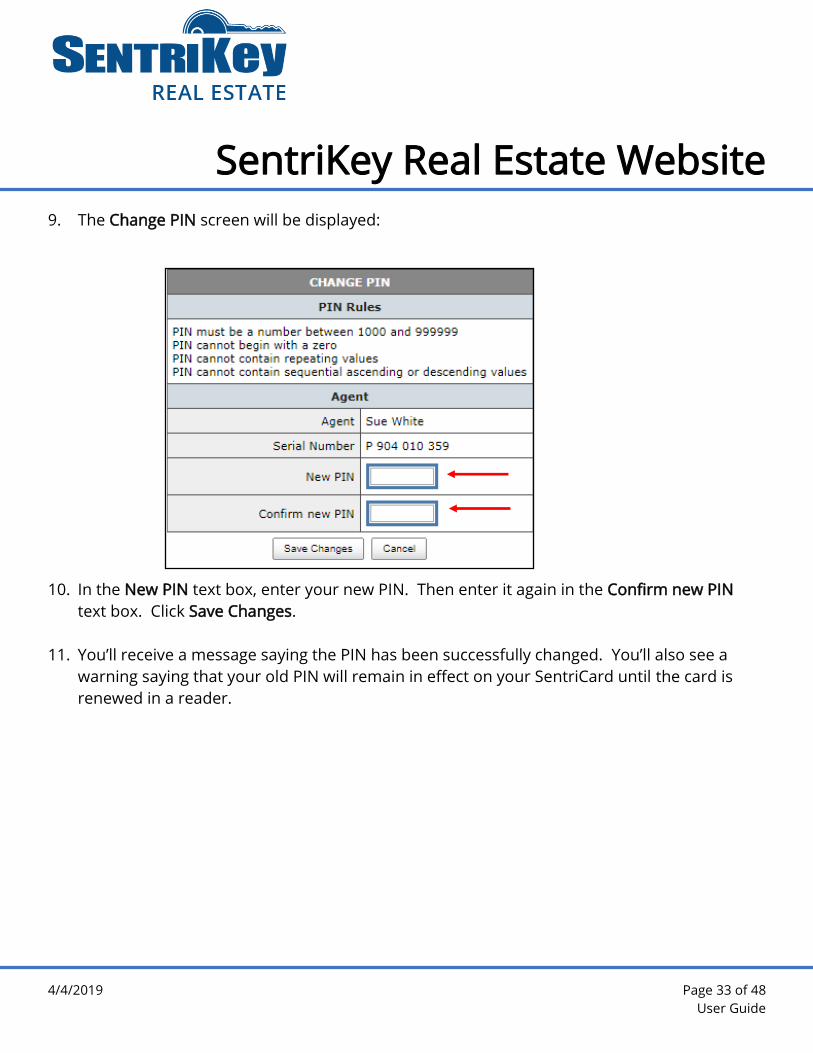
9. The Change PIN screen will be displayed:
10. In the New PIN text box, enter your new PIN. Then enter it again in the Confirm new PIN
text box. Click Save Changes.
11. You’ll receive a message saying the PIN has been successfully changed. You’ll also see a
warning saying that your old PIN will remain in effect on your SentriCard until the card is
renewed in a reader.

SentriKey Real Estate Website
4/4/2019 Page 34 of 48
User Guide
Forgot Password?
You can reset your password on the SentriKey Real Estate website.
1. Go to https://lb.sentrilock.com/lbs/index/ and click Forgot Password?

SentriKey Real Estate Website
4/4/2019 Page 35 of 48
User Guide
2. The Forgot Password screen will be displayed:
3. In the text box, enter your SentriCard serial number or your username or your Mobile
Authorization ID.
4. Click Send E-mail. You’ll see a message from the SentriKey Real Estate website, telling you
that a link to change your password has been sent to your email.
5. Click the link in the email.
Note: This link will expire in 24 hours.

SentriKey Real Estate Website
4/4/2019 Page 36 of 48
User Guide
6. The link will take you to the Change Password screen. Enter your new password, and then
enter it again:
7. Click Save Changes. Your new password has been created and can be used to log in to the
SentriKey Real Estate website.
SentriKey Real Estate Website
4/4/2019 Page 37 of 48
User Guide
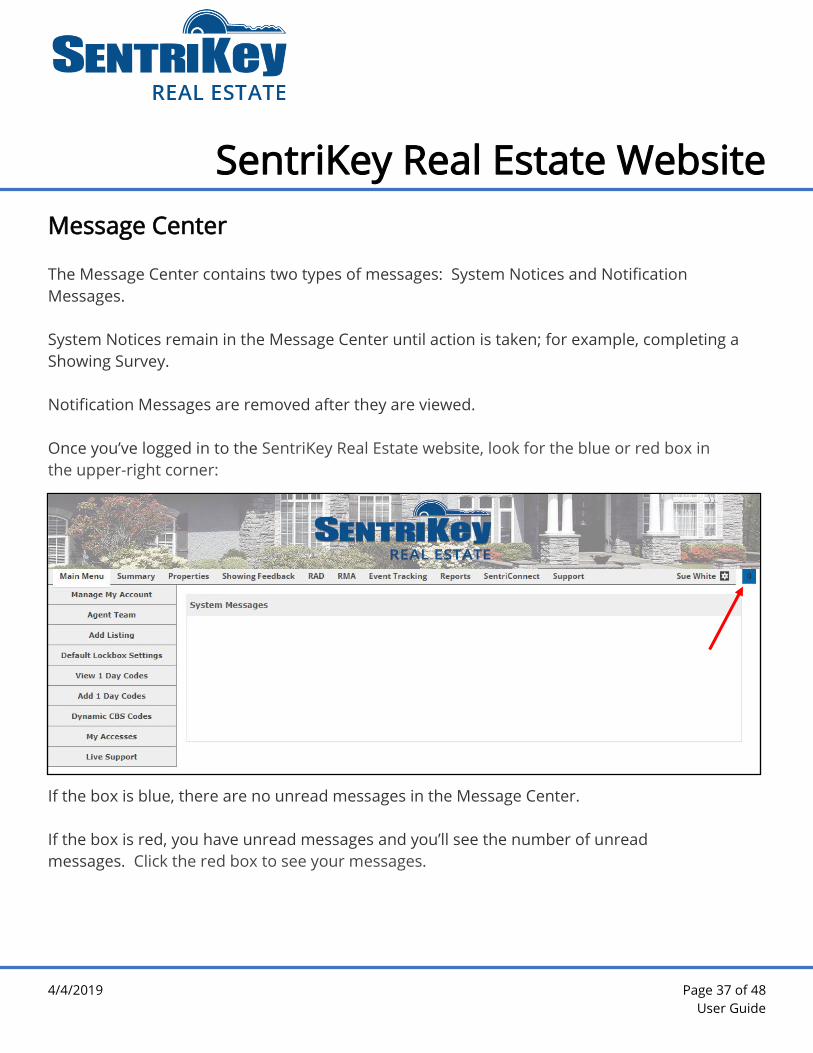
Message Center
The Message Center contains two types of messages: System Notices and Notification
Messages.
System Notices remain in the Message Center until action is taken; for example, completing a
Showing Survey.
Notification Messages are removed after they are viewed.
Once you’ve logged in to the SentriKey Real Estate website, look for the blue or red box in
the upper-right corner:
If the box is blue, there are no unread messages in the Message Center.
If the box is red, you have unread messages and you’ll see the number of unread
messages. Click the red box to see your messages.

SentriKey Real Estate Website
4/4/2019 Page 38 of 48
User Guide
Agent Team
The Agent Team function allows you to search for other Agents within your Association by
region, ID, team, and status. This function also allows you to add someone to your team.
1. On Main Menu, click Agent Team:

SentriKey Real Estate Website
4/4/2019 Page 39 of 48
User Guide
2. The Agent Team screen will be displayed:
To search for an Agent:
3. Use the Search Field drop-down menu to select, for example, Agent First Name.
4. Use the Search Type drop-down menu to select a search parameter: begins with, contains,
ends with, or matches.
5. In the Search Value text box, enter a value based on what you selected from the Search
Field’s drop-down menu.
6. Click Search. Your selected Agent will be displayed:

SentriKey Real Estate Website
4/4/2019 Page 40 of 48
User Guide
7. To add a team member, click Add Team Member in the upper-left:
8. The Add Agent Team Member screen will be displayed. Click Select:

SentriKey Real Estate Website
4/4/2019 Page 41 of 48
User Guide
9. The Agents screen will be displayed. Click the button next to the desired Agent and click
Submit Changes:
SentriKey Real Estate Website
4/4/2019 Page 42 of 48
User Guide
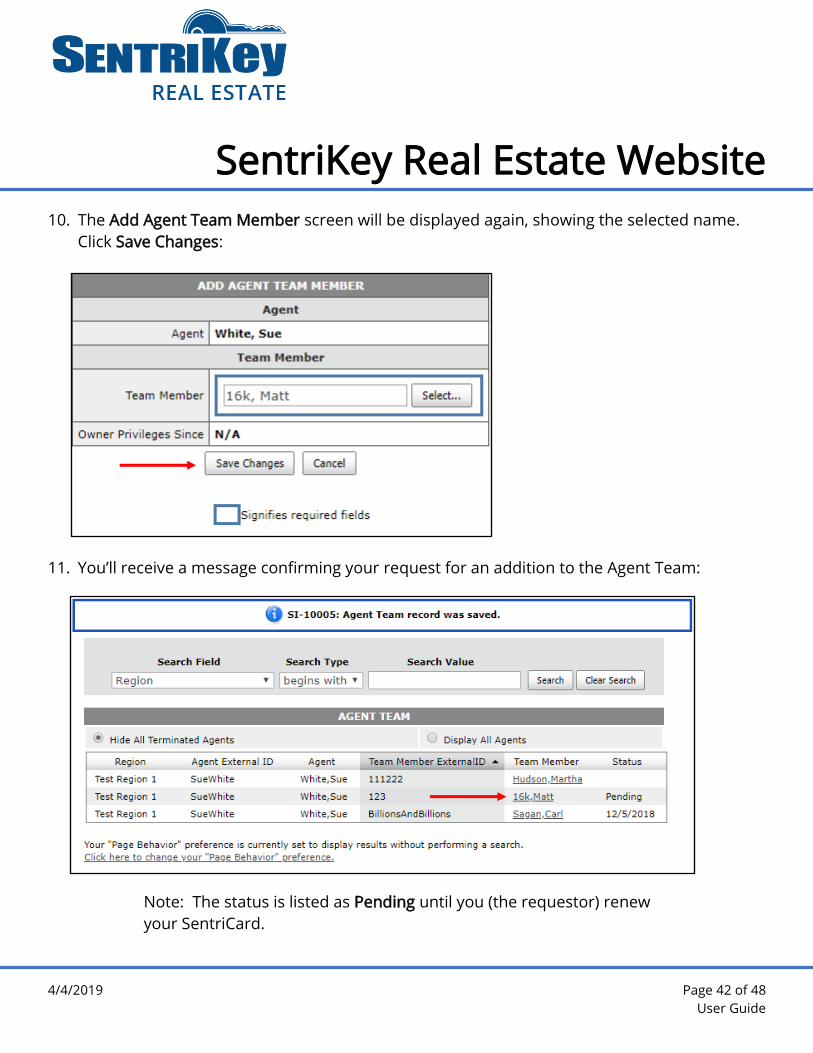
10. The Add Agent Team Member screen will be displayed again, showing the selected name.
Click Save Changes:
11. You’ll receive a message confirming your request for an addition to the Agent Team:
Note: The status is listed as Pending until you (the requestor) renew
your SentriCard.
SentriKey Real Estate Website
4/4/2019 Page 43 of 48
User Guide
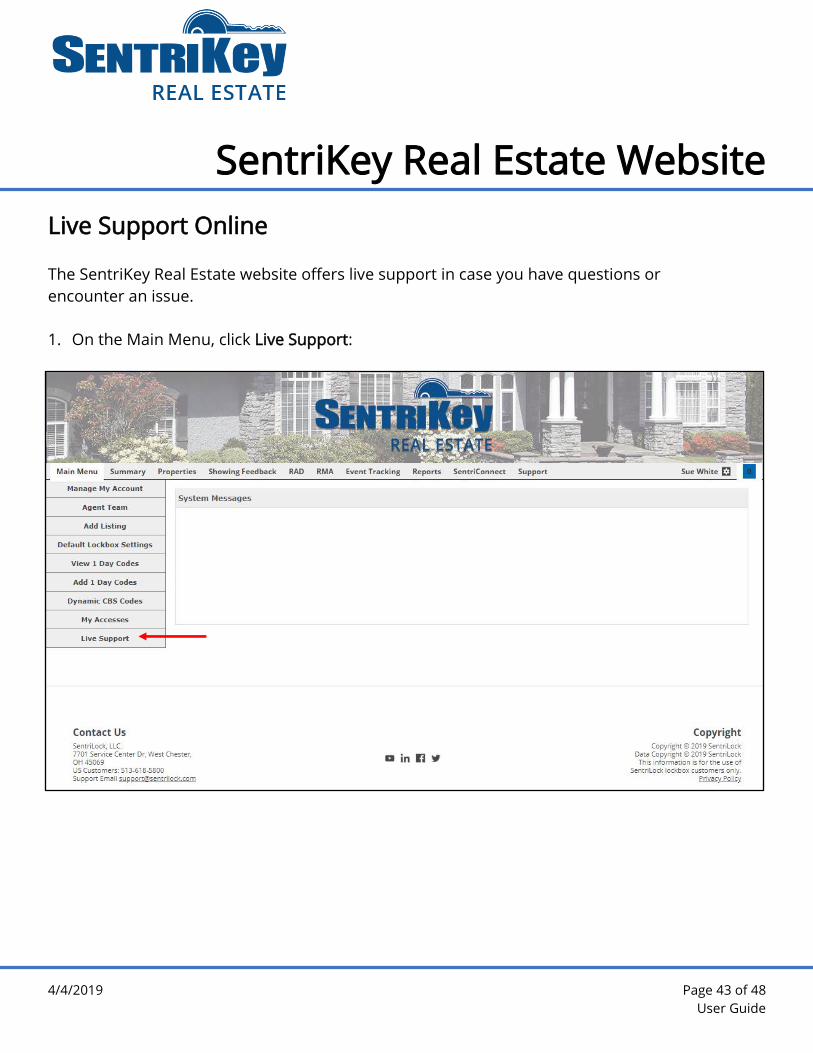
Live Support Online
The SentriKey Real Estate website offers live support in case you have questions or
encounter an issue.
1. On the Main Menu, click Live Support:

SentriKey Real Estate Website
4/4/2019 Page 44 of 48
User Guide
2. This screen will be displayed:
3. Read the SentriLock Chat Rules and the Chat Instructions.
4. Click the Live Support image.

SentriKey Real Estate Website
4/4/2019 Page 45 of 48
User Guide
5. The Live Chat screen will be displayed:
6. Click select department. On the drop-down list, click your department.
7. Enter your name and email.
8. Click Submit. A chat window will be displayed, and a support representative will
respond.
Note: You’ll be asked for your SentriCard number when you are
connected to Live Support via Live Chat.

SentriKey Real Estate Website
4/4/2019 Page 46 of 48
User Guide
Grant SentriConnect® Access
If you’re an Agent with a lockbox that is assigned to a listing, you can authorize someone to use
the SentriConnect mobile app in order to access your lockbox.
Your Association must have enabled SentriConnect. Then you can use the SentriKey Real
Estate website to grant SentriConnect access to, for example, a contractor so they can access
your lockbox.
Note: In order for you to grant access, the lockbox firmware must be
version 50.44 or higher and the lockbox must be assigned to a listing.
1. On the Main Menu, click SentriConnect:
SentriKey Real Estate Website
4/4/2019 Page 47 of 48
User Guide
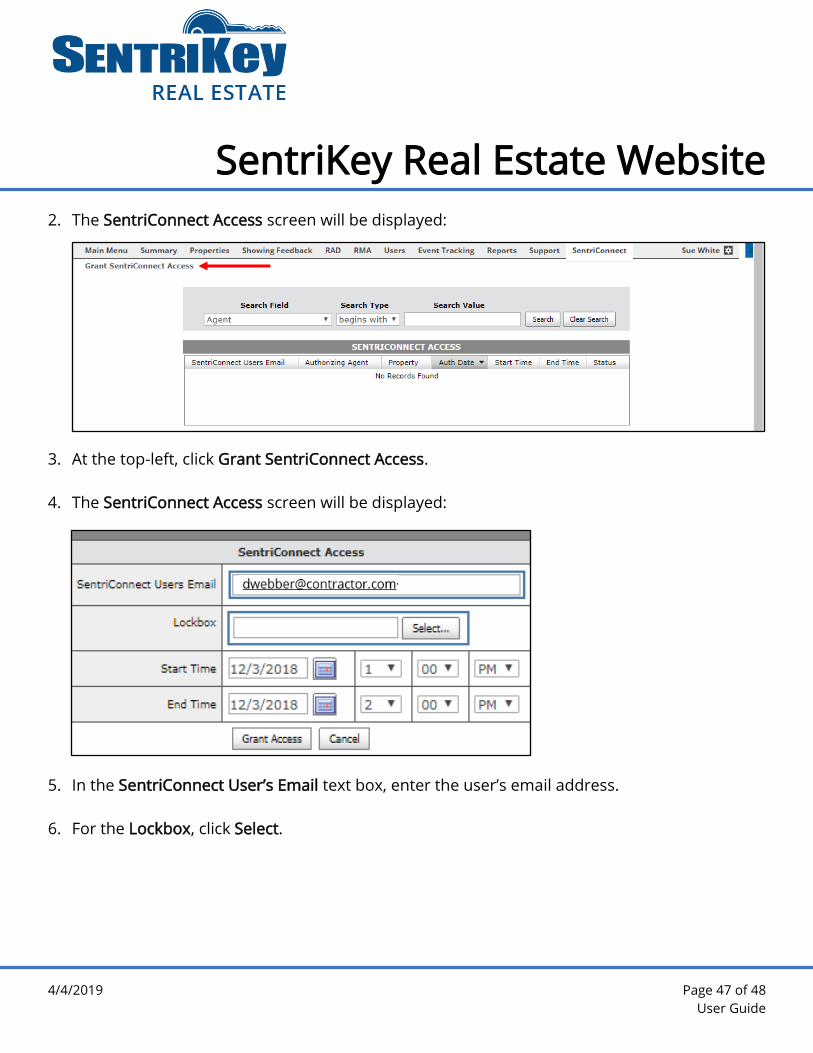
2. The SentriConnect Access screen will be displayed:
3. At the top-left, click Grant SentriConnect Access.
4. The SentriConnect Access screen will be displayed:
5. In the SentriConnect User’s Email text box, enter the user’s email address.
6. For the Lockbox, click Select.
SentriKey Real Estate Website
4/4/2019 Page 48 of 48
User Guide
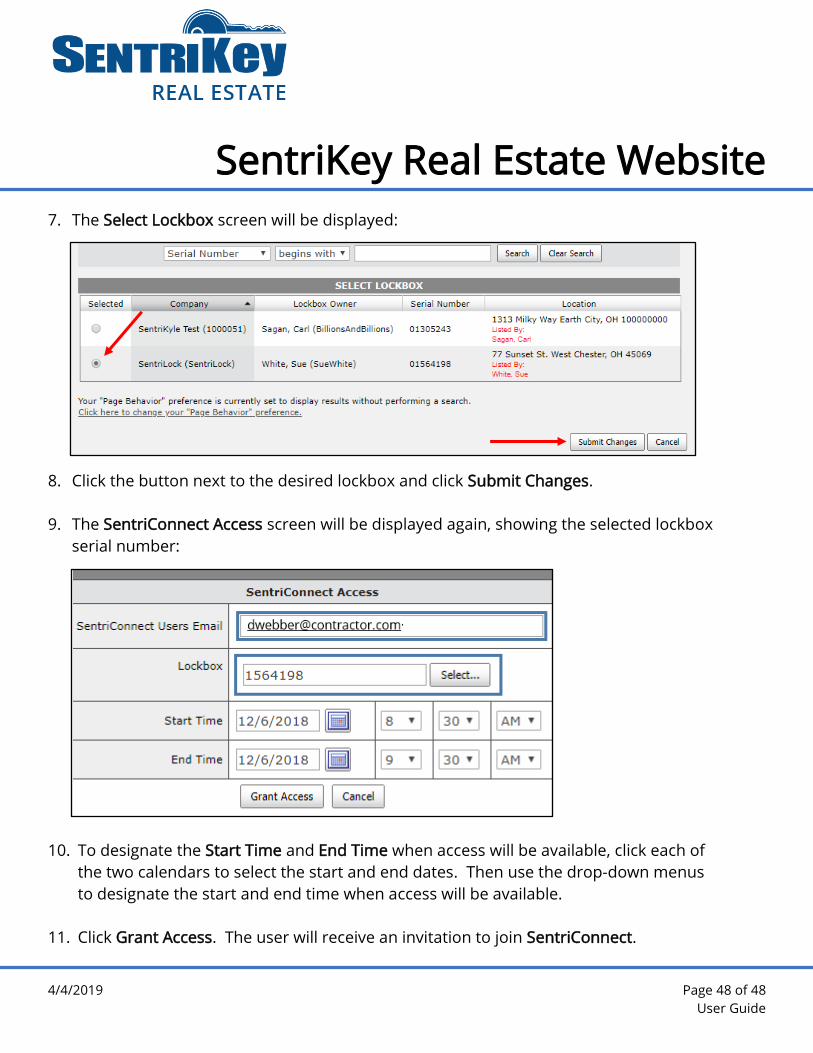
7. The Select Lockbox screen will be displayed:
8. Click the button next to the desired lockbox and click Submit Changes.
9. The SentriConnect Access screen will be displayed again, showing the selected lockbox
serial number:
10. To designate the Start Time and End Time when access will be available, click each of
the two calendars to select the start and end dates. Then use the drop-down menus
to designate the start and end time when access will be available.
11. Click Grant Access. The user will receive an invitation to join SentriConnect.
Related Documents