TALLINN UNIVERSITY OF TECHNOLOGY Faculty of Information Technology Department of Computer Engineering Tallinn 2015 IDK40LT Kirill Strelkov 073639IASB SELENIUM-BASED WEB TEST AUTOMATION FRAMEWORK DEVELOPMENT Bachelor thesis Kaarel Allik MSc

Welcome message from author
This document is posted to help you gain knowledge. Please leave a comment to let me know what you think about it! Share it to your friends and learn new things together.
Transcript
TALLINN UNIVERSITY OF TECHNOLOGY
Faculty of Information Technology
Department of Computer Engineering
Tallinn 2015
IDK40LT
Kirill Strelkov 073639IASB
SELENIUM-BASED WEB TEST
AUTOMATION FRAMEWORK
DEVELOPMENT
Bachelor thesis
Kaarel Allik
MSc
2
Author’s declaration of originality
I hereby certify that I am the sole author of this thesis. All the used materials, references
to the literature and the work of others have been referred to. This thesis has not been
presented for examination anywhere else.
Author: Kirill Strelkov
20.05.2015
3
Abstract
Aim of this work was to develop of web test automation framework that is simple and
can be used by new users. Requirements for users should not contain programming
experience or previous experience of test automation. The framework should introduce
users to the test automation process.
Information about test automation and testing itself is out of this scope. This paper focuses
on concrete developed framework and presents main features that were implemented to
fulfil main goal. The framework was developed using Python programming language,
popular Python libraries, Page Object pattern and Selenium WebDriver.
During this work I have learned that it is very hard to create generic framework because
each framework should be modified or extended to support testing of a specific web site.
In the end we got fully functional framework which can be use by both novice and
advanced users to facilitate in test automation process of a web site.
This thesis is written in English and is 32 pages long, including 6 chapters, 13 figures and
0 tables.
4
Annotatsioon
Selenium-põhise veebi testide automatiseerimine raamistiku arendus
Käesoleva töö eesmärk oli arendada veebi testide automatiseerimise raamistikku. Kõige
tähtsam nõue oli raamistiku kasutamise lihtsus uute kasutajate jaoks. Uued kasutajad ei
pea omama erilisi programmeerimise oskusi ega eelnevat kogemust automatiseeritud
testimises. Loodud raamistiku kasutajatele peab olema arusaadav, kuidas üldse toimub
automatiseeritud testimine.
Testimise ja testide automatiseerimise teooria ei kuulu selle töö skoopi. Töö põhirõhk on
pandud arendatud raamistikule endale ja selle raamistiku võimalustele. Arenduses
kasutati programeerimiskeelt Python, populaarseid Python'i teeke, Page Object mustrit ja
Selenium WebDriver'it.
Töö tegemisel ma sain aru, et teha üldist automatiseeritud testimise raamistikku on raske
ülesanne. Kõige suurem probleem on erinevuses veebi lehte kujundamisel ja kuidas
selline lehe on tehtud. Selleks, et korrektselt testida, on mõnikord vaja laiendada valitud
raamistiku võimalusi (näiteks kui veebi leht kasutab frame'i mõistet). Abiks sellises mures
võiks olla raamistiku litsents – kasutajad võivad muuta lähtekoodi ilma piiranguteta.
Töö tulemusena on loodud täisfunktsionaalne raamistik, mida võivad kasutada nii algajad
kui ka edasijõudnud kasutajad. Raamistik toetab kasutajaid testi loomisel, käivitamisel ja
muutmisel, luues seega kasutajasõbraliku keskkonna automatiseeritud testimise
läbiviimiseks.
Lõputöö on kirjutatud Inglise keeles ning sisaldab teksti 32 leheküljel, 6 peatükki, 13
joonist, 0 tabelit.
5
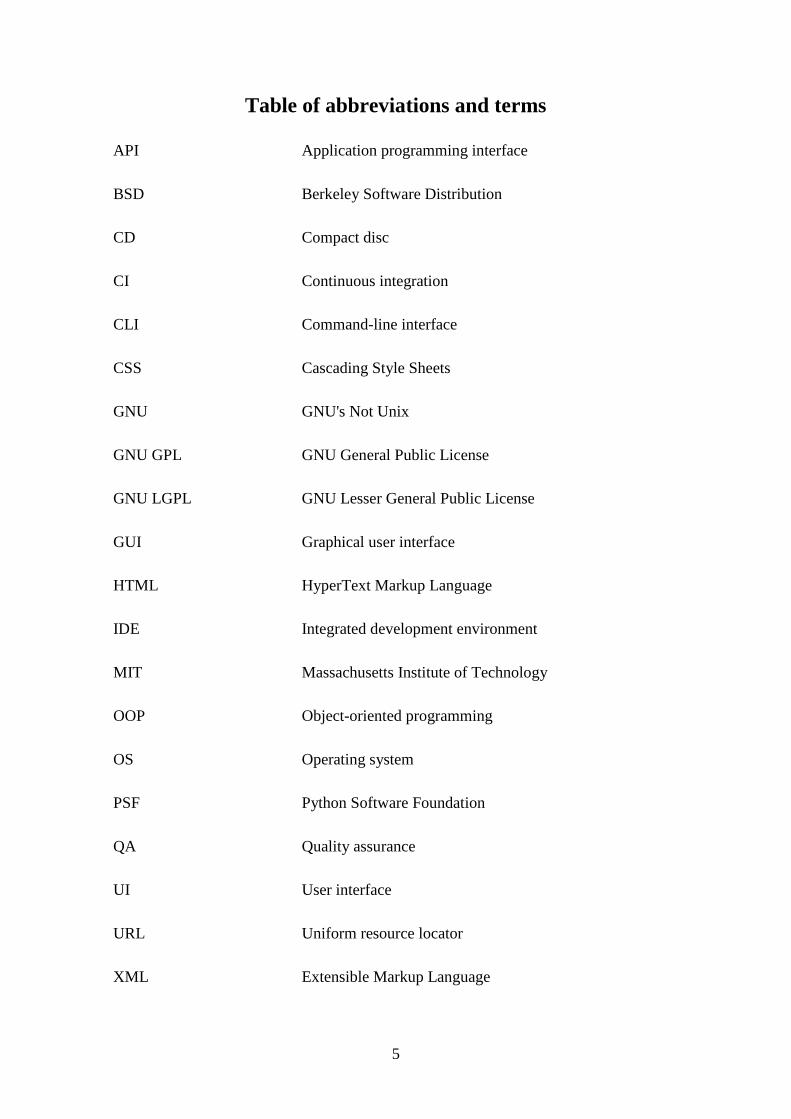
Table of abbreviations and terms
API Application programming interface
BSD Berkeley Software Distribution
CD Compact disc
CI Continuous integration
CLI Command-line interface
CSS Cascading Style Sheets
GNU GNU's Not Unix
GNU GPL GNU General Public License
GNU LGPL GNU Lesser General Public License
GUI Graphical user interface
HTML HyperText Markup Language
IDE Integrated development environment
MIT Massachusetts Institute of Technology
OOP Object-oriented programming
OS Operating system
PSF Python Software Foundation
QA Quality assurance
UI User interface
URL Uniform resource locator
XML Extensible Markup Language
6
Table of contents
1. Introduction .............................................................................................................. 9
2. Dependencies .......................................................................................................... 10
2.1. Python 2.7 ........................................................................................................ 10
2.2. wxPython ......................................................................................................... 10
2.3. Selenium WebDriver ....................................................................................... 10
2.4. Nose ................................................................................................................. 11
2.4.1. nose-htmloutput plug-in ........................................................................... 11
2.4.2. nose-pathmunge plug-in ........................................................................... 11
3. Page Object pattern ................................................................................................. 12
4. Framework .............................................................................................................. 13
4.1. Basics ............................................................................................................... 16
4.2. Generator ......................................................................................................... 18
4.2.1. Implementation ......................................................................................... 18
4.2.2. GUI ........................................................................................................... 18
4.2.3. Problems ................................................................................................... 19
4.3. Editor ............................................................................................................... 20
4.3.1. Implementation ......................................................................................... 20
4.3.2. GUI ........................................................................................................... 20
4.3.3. Problems ................................................................................................... 21
4.4. Test runner ....................................................................................................... 21
4.4.1. Implementation ......................................................................................... 21
4.4.2. GUI ........................................................................................................... 21
4.4.3. CLI ............................................................................................................ 22
4.5. Installation ....................................................................................................... 23
4.6. License ............................................................................................................. 23
4.7. IDE's compatibility .......................................................................................... 23
7
4.8. Example project ............................................................................................... 24
4.9. Browsers support ............................................................................................. 27
4.10. Continuous Integration support .................................................................... 27
5. Alternative – Ixonos Visual Test ............................................................................ 29
6. Conclusions ............................................................................................................ 30
References ...................................................................................................................... 31
Appendix 1 – Part of Browser class source code ........................................................... 33
Appendix 2 – Source code of the framework ................................................................. 36
8
List of figures
Figure 1. Use Case Diagram for the framework's UI ..................................................... 14
Figure 2. Activity diagram for single test creation with UI............................................ 15
Figure 3. BasePageObject class ...................................................................................... 16
Figure 4. BaseTest class ................................................................................................. 17
Figure 5. Screenshot of the Generator UI ....................................................................... 19
Figure 6. Screenshot of the Editor UI ............................................................................. 20
Figure 7. Screenshot of the Test Runner UI ................................................................... 22
Figure 8. Generated structure of the example project .................................................... 24
Figure 9. DuckDuckGoMain class ................................................................................. 25
Figure 10. DuckDuckGoFound class ............................................................................. 25
Figure 11. DuckDuckGoTest class ................................................................................. 26
Figure 12. Jenkins job's configuration ............................................................................ 28
Figure 13. Jenkins job's report ........................................................................................ 28
9
1. Introduction
In this document building of web test automation framework will be considered. Main
focus of the framework is to be a starting point for a new QA test automation engineers
and support engineers thought whole test development life cycle. As migration from
manual tester to automation tester could be difficult and require a lot of different
knowledge framework should simplify this transfer.
Idea appeared when I worked at a company that tried to create their own framework. The
goal was to create generic test automation framework for web applications. Today it is
fully featured test automation framework which supports data-driven and model-based
testing but as a result the framework became over complicated.
This gave an idea to create framework with basic minimalistic features which could be
used even by manual testers. This work describes how the framework was built, what the
main features are and how they can facilitate in test automation process.
Finding correct selector for HTML element could be tricky for a new tester and even for
an experienced developer especially if legacy system is used. This will be one part of our
framework – generation of good selectors for HTML elements.
Connection between elements' selectors and the web page usually is hidden (as selectors
are located in separate code or text file). Increasing transparency between them would be
another challenge which will be resolved in current work.
Creating a test case should be easy as main audience might not have experience in
programming. Ideally a person should interact with element on web page and by this
interaction relevant code will be create inside the test case.
Last but not least execution of created test cases should be simple, configurable and
support different outputs.
At the end we should get a framework which solves previously mentioned issues and
helps tester to create, maintain and execute test cases.
10
2. Dependencies
2.1. Python 2.7
Python – programming language which emphasize on code readability [1]. Easiest to
learn, regarded as best programming language for beginners [2].
There is also a good package management system called pip [3]. It gives great flexibility
in installation of new packages for Python. As it is written in Python it can be used on
every OSes where Python could be installed. pip installs and updates packages from
remote repository called PyPI(Python Package Index) [4]. All packages which are used
in this framework can be acquired via pip.
License: PSF License [5].
2.2. wxPython
Cross platform GUI toolkit which is a Python wrapper around wxWidgets [6]. wxWidgets
is a C++ library which allows to create GUI for Windows, Linux and Mac OS [7]. Both
of these software are very popular and constantly developing.
License: wxWindows Library Licence [8].
2.3. Selenium WebDriver
Selenium is a popular web test automation framework [9]. Currently is divided into two
parts: Selenium WebDriver and Selenium IDE. Selenium IDE created test cases in its
own scripting language using capture-and-playback technique. Selenium WebDriver has
bindings for many programming language so test cases can be written in pure
programming language using your own favourite tools.
Selenium Webdriver – driver which controls browser's behaviour. There are a lot of
different implementations to support main modern browser(Firefox, Google Chrome,
Internet Explorer, Opera Browser, Safari) and even some headless
browsers(HTMLUnitDriver and PhantomJS) [10].
11
W3C currently developing specification for the WebDriver API. Current status is Editor's
Draft. Hopefully, in future it would become a standard. So that all modern browsers would
support the WebDriver API [11, 12].
Main classes of Selenium WebDriver are: WebDriver and WebElement. WebDriver
object represents an instance of a real browser's driver and controls browser's behaviour.
WebElement object represents an element on the web page.
License: Apache License 2.0 [13].
2.4. Nose
Great extension for standard unit test module in Python. Highly customizable via plug-
ins and supports a lot of useful features out-of-box (different logging levels,
multiprocessing, xUnit output, coverage report and etc.) [14]. Nose and its plug-ins will
be used in our test runner.
License: GNU LGPL [14].
2.4.1. nose-htmloutput plug-in
This plug-in is used for formatting output in HTML format [15]. The plug-in gives HTML
output capability to our framework so that no additional development is needed.
License: BSD license [15].
2.4.2. nose-pathmunge plug-in
This plug-in is used for Python system path manipulation [16]. The plug-in is needed to
support relative imports in our framework. This plug-in is used to support to add project
folder to Python path otherwise imports of the page object classes inside the test file
would not work.
License: Apache License 2.0 [16].
12
3. Page Object pattern
Page Object pattern allows to hide and simplify underlying complexity of HTML page
by splitting the page into smaller logically related groups and implementing higher level
API [17, 18]. This leads to more maintainable tests as page object API should not change
if any modifications were done to the initial web page. Secondly, higher level page object
API adds greater readability for test cases.
Basic rules:
public method are services that the page offers
methods usually return basic types or other Page Objects
hide internals of the page
should not represent the entire page
There are controversial proposals regarding to use of assertions inside a page object, but
both approaches have its good and bad points. If assertions are used inside the page object
then it could give better and simpler verification mechanism, on the contrary, this mixes
logic between verification and interaction.
In one study implementation of Page Object pattern decreased time for realigning test
suites by the factor of 3 and reduced number of lines to modify by the factor of 8 [19].
13
4. Framework
The framework is written in Python and has classes with higher level API of the Selenium
WebDriver. Main point of implementing additional level is simplification of API.
For better readability Python tuple is used to keep information about selector for a web
element. Python tuple is an immutable list of objects. First argument is selector's type and
second argument is its value. For example: FIELD_NAME = (By.ID, u'menu'), where By
– is a Selenium class which is implemented as simple enum. These locators can be used
inside page object classes or test classes.
Several useful classes were added to ease test case development: Browser, BaseTest and
BasePageObject classes. More about them will be in the next chapter. This gives ability
to use framework as a library or module.
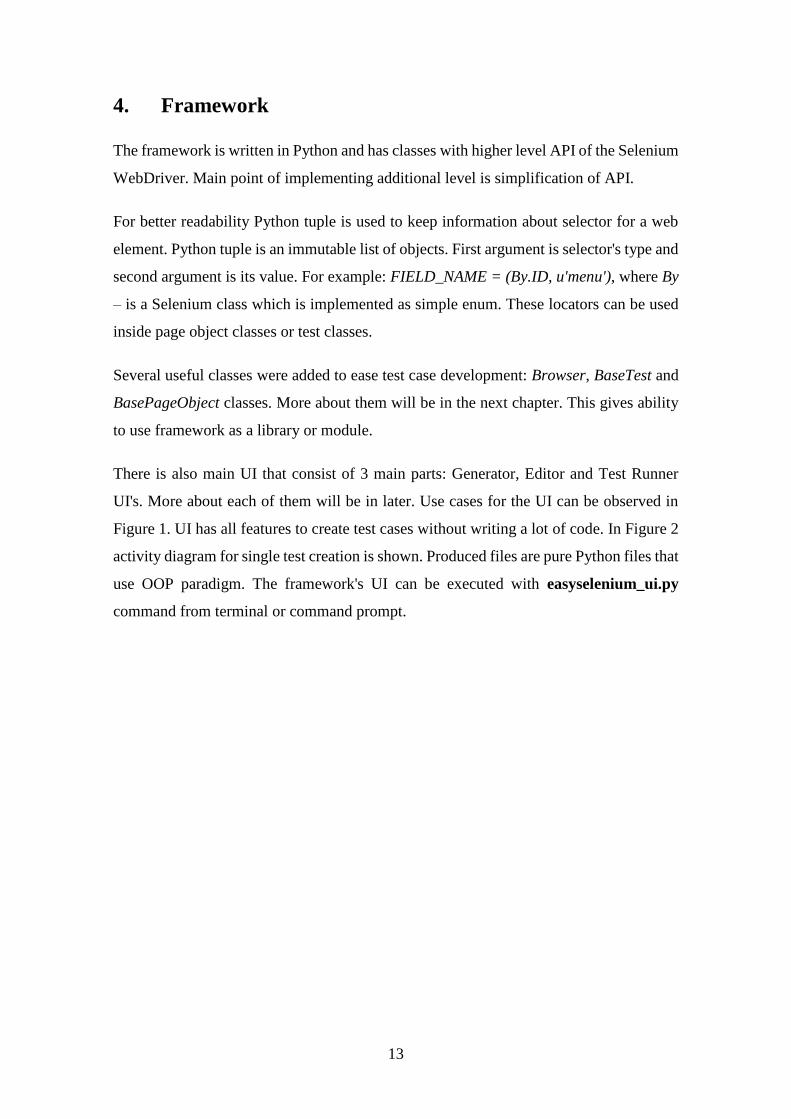
There is also main UI that consist of 3 main parts: Generator, Editor and Test Runner
UI's. More about each of them will be in later. Use cases for the UI can be observed in
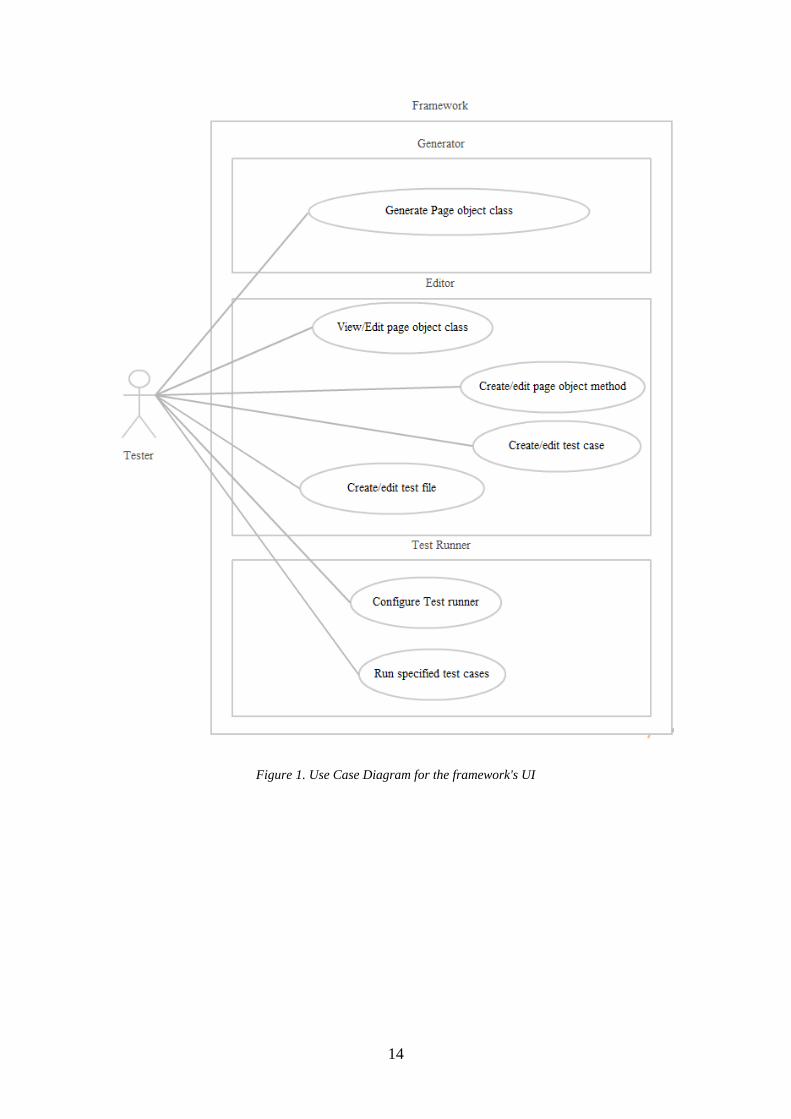
Figure 1. UI has all features to create test cases without writing a lot of code. In Figure 2
activity diagram for single test creation is shown. Produced files are pure Python files that
use OOP paradigm. The framework's UI can be executed with easyselenium_ui.py
command from terminal or command prompt.
14
Figure 1. Use Case Diagram for the framework's UI
15
Figure 2. Activity diagram for single test creation with UI
16
4.1. Basics
Main part of the framework is a Browser class. Browser class has higher level API of the
WebDriver class. It is in charge of simplified WebDriver class instantiation and contains
wrappers for most methods of the WebDriver class. Those methods simplify their usage
and have implicit logging. User can specify which browser will be used then Browser
class will try to construct correct WebDriver object for certain browser (__create_driver
method in Browser class). As Browser class code is quite long part of it is demonstrated
in Appendix 1.
Next critical parts of the framework are classes which are useful in writing page object
and test classes. For page object classes there is BasePageObject class and for test classes
– BaseTest class.
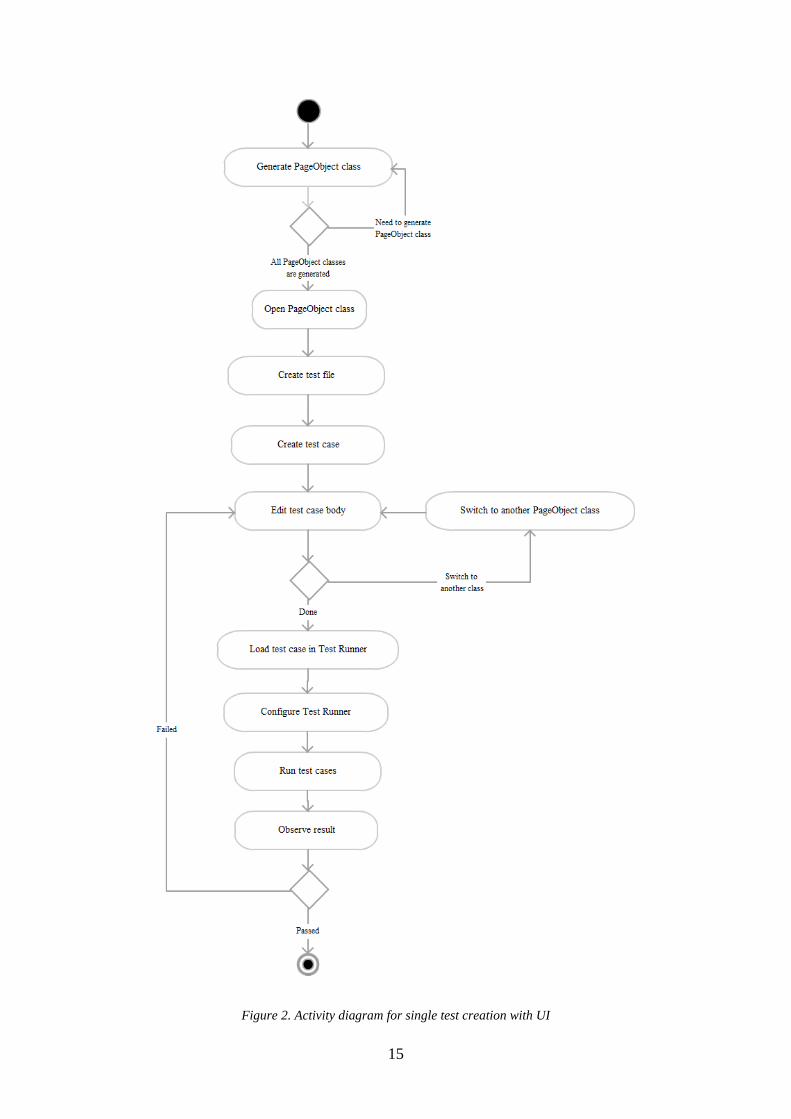
In Figure 3 implementation of BasePageObject class is presented and main points are:
constructor and inheritance of TestCase class. The constructor contains of two parameters
– browser and logger. browser is an instance of Browser class – it allows to control real
browser's behaviour and logger is an instance of Logger class – is used for enhanced
logging. TestCase class is a class from built-in unit test Python module and gives ability
to use assertions inside page object class. It is recommended that all page object classes
are subclasses of BasePageObject class.
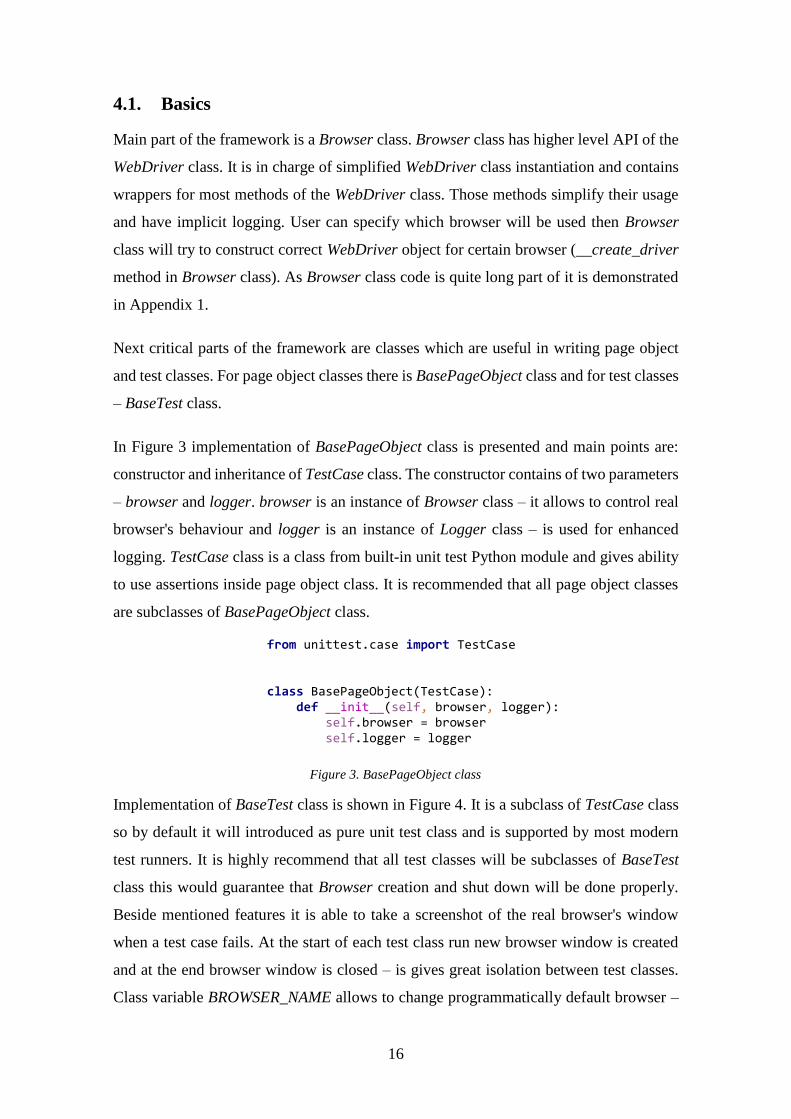
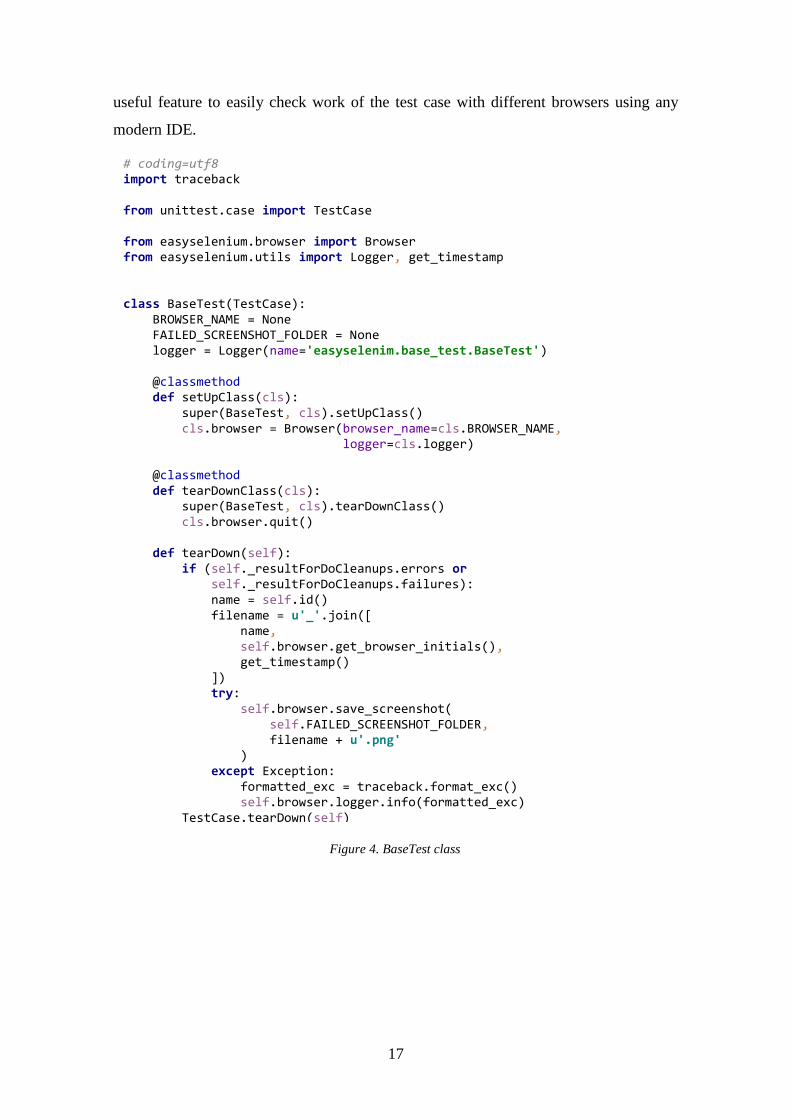
Implementation of BaseTest class is shown in Figure 4. It is a subclass of TestCase class
so by default it will introduced as pure unit test class and is supported by most modern
test runners. It is highly recommend that all test classes will be subclasses of BaseTest
class this would guarantee that Browser creation and shut down will be done properly.
Beside mentioned features it is able to take a screenshot of the real browser's window
when a test case fails. At the start of each test class run new browser window is created
and at the end browser window is closed – is gives great isolation between test classes.
Class variable BROWSER_NAME allows to change programmatically default browser –
from unittest.case import TestCase class BasePageObject(TestCase): def __init__(self, browser, logger): self.browser = browser self.logger = logger
Figure 3. BasePageObject class
17
useful feature to easily check work of the test case with different browsers using any
modern IDE.
# coding=utf8 import traceback from unittest.case import TestCase from easyselenium.browser import Browser from easyselenium.utils import Logger, get_timestamp class BaseTest(TestCase): BROWSER_NAME = None FAILED_SCREENSHOT_FOLDER = None logger = Logger(name='easyselenim.base_test.BaseTest') @classmethod def setUpClass(cls): super(BaseTest, cls).setUpClass() cls.browser = Browser(browser_name=cls.BROWSER_NAME, logger=cls.logger) @classmethod def tearDownClass(cls): super(BaseTest, cls).tearDownClass() cls.browser.quit() def tearDown(self): if (self._resultForDoCleanups.errors or self._resultForDoCleanups.failures): name = self.id() filename = u'_'.join([ name, self.browser.get_browser_initials(), get_timestamp() ]) try: self.browser.save_screenshot( self.FAILED_SCREENSHOT_FOLDER, filename + u'.png' ) except Exception: formatted_exc = traceback.format_exc() self.browser.logger.info(formatted_exc) TestCase.tearDown(self)
Figure 4. BaseTest class
18
4.2. Generator
Generator is used for creating page object classes that hold information about web page
(URL, path to the screenshot, interested area and elements as fields). Each element's field
has a comment with its' coordinates and size. This data is used in the Editor for element
selection on the screenshot. Generation time is different with different browsers and is
dependable on HTML structure (more elements – bigger generation time).
4.2.1. Implementation
Generator's steps:
1. Open a web page
2. Find all relevant HTML elements on the page
3. Find selector and create PageObjectClassField object for each element
4. Create PageObjectClass object with all PageObjectClassField's
5. Save PageObjectClass object to Python file and a screenshot of the web page
WebDriver uses different selectors for finding HTML element on a web page. As in our
framework we use UI to connect HTML elements with theirs position on screenshot
selectors should be unique. This requirement can be achieved with XPath selector. XPath
was designed especially for that. But finding an element with XPath is very time
consuming other selectors should be supported as well [20]. Priority for searching a good
selector for an element: id → link text → class name → CSS selector → XPath.
4.2.2. GUI
GUI interaction flow:
1. Open browser window with correct URL
2. Specify area where interested web elements are located
3. Generate page object class
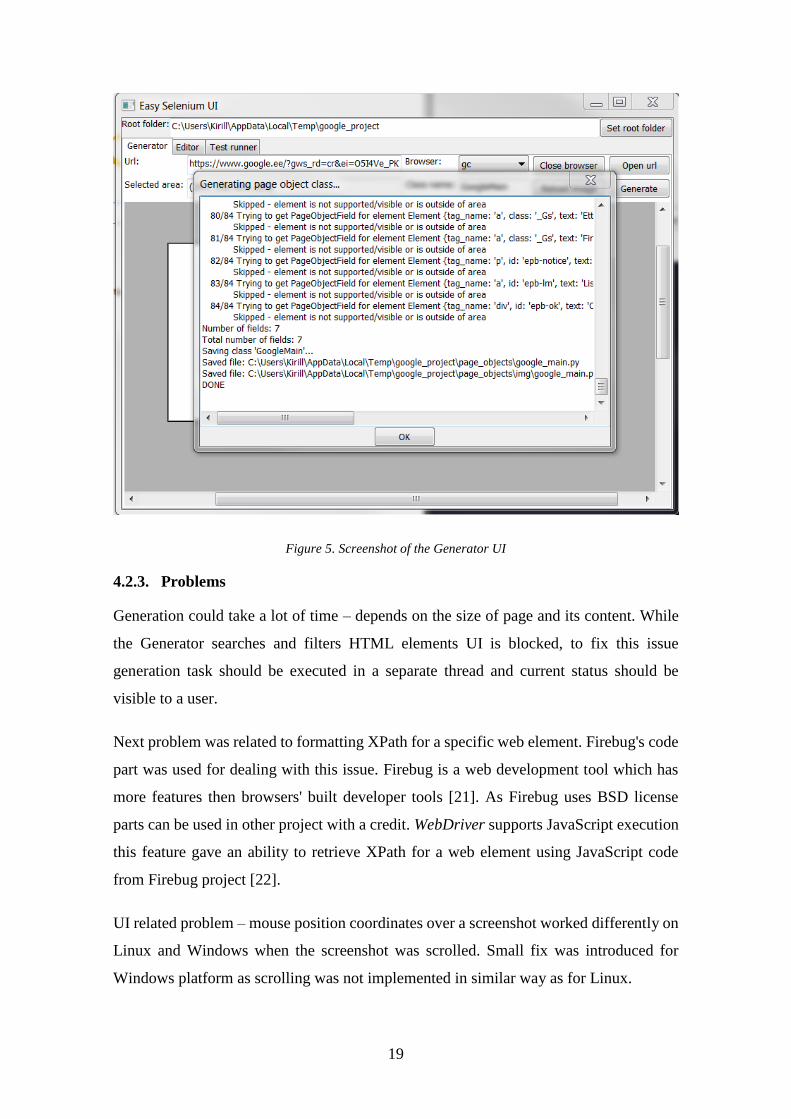
Generation process is done in a separate thread because it is time consuming action and
would block main UI. After user click „Generate” button new window pops up where
overall status and additional information is shown (Figure 5).
19
Figure 5. Screenshot of the Generator UI
4.2.3. Problems
Generation could take a lot of time – depends on the size of page and its content. While
the Generator searches and filters HTML elements UI is blocked, to fix this issue
generation task should be executed in a separate thread and current status should be
visible to a user.
Next problem was related to formatting XPath for a specific web element. Firebug's code
part was used for dealing with this issue. Firebug is a web development tool which has
more features then browsers' built developer tools [21]. As Firebug uses BSD license
parts can be used in other project with a credit. WebDriver supports JavaScript execution
this feature gave an ability to retrieve XPath for a web element using JavaScript code
from Firebug project [22].
UI related problem – mouse position coordinates over a screenshot worked differently on
Linux and Windows when the screenshot was scrolled. Small fix was introduced for
Windows platform as scrolling was not implemented in similar way as for Linux.
20
4.3. Editor
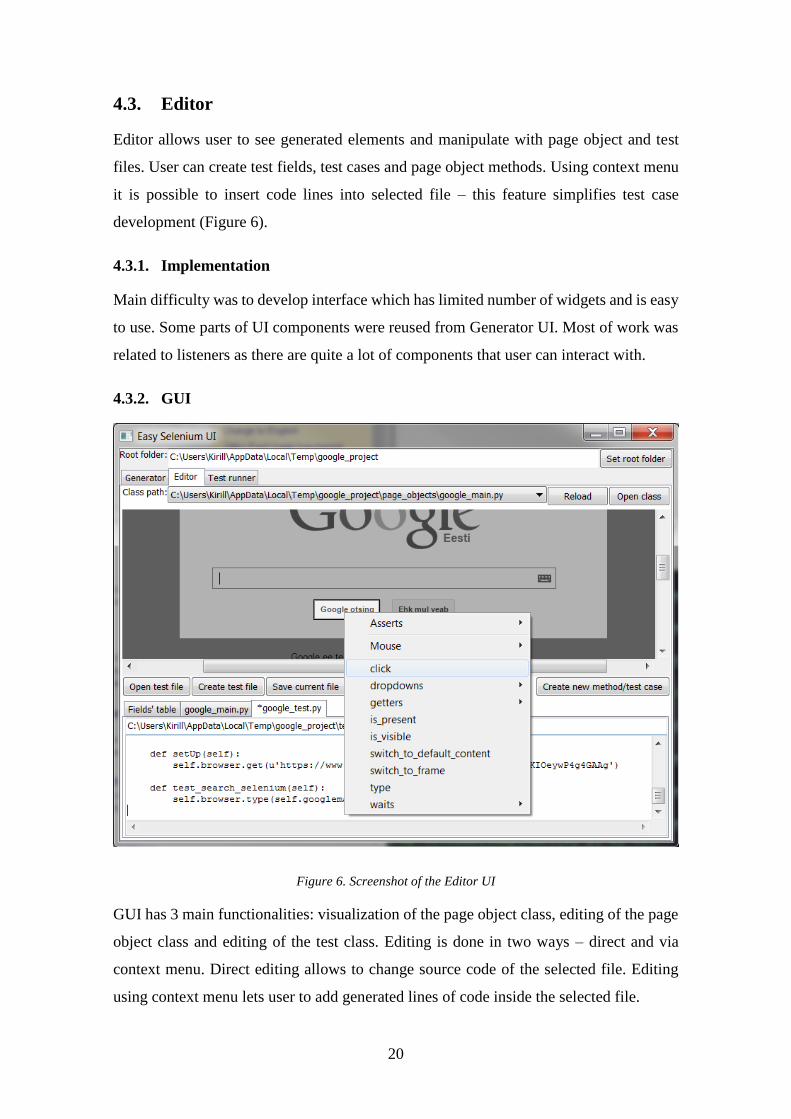
Editor allows user to see generated elements and manipulate with page object and test
files. User can create test fields, test cases and page object methods. Using context menu
it is possible to insert code lines into selected file – this feature simplifies test case
development (Figure 6).
4.3.1. Implementation
Main difficulty was to develop interface which has limited number of widgets and is easy
to use. Some parts of UI components were reused from Generator UI. Most of work was
related to listeners as there are quite a lot of components that user can interact with.
4.3.2. GUI
Figure 6. Screenshot of the Editor UI
GUI has 3 main functionalities: visualization of the page object class, editing of the page
object class and editing of the test class. Editing is done in two ways – direct and via
context menu. Direct editing allows to change source code of the selected file. Editing
using context menu lets user to add generated lines of code inside the selected file.
21
To generate a code fragment user need to right click on element and choose action which
should be used for particular element (In Figure 6 code generation for „click” on „Google
otsing” button is shown).
4.3.3. Problems
The problem of screenshot coordinates which was mentioned in Generator UI section
appeared here as well.
As the Editor deals with content of text files problem with different newline character on
different operating system appeared. Small fixes where introduced to overcome this issue.
4.4. Test runner
Test runner is able to execute created test cases with different configurations. Main
requirement for the test runner was ability to specify browser that will be used for
execution. If all necessary plug-ins were installed then test runner also supports two main
reporting formats – HTML and XML. HTML is quite useful for humans and XML is used
by continuous integration tools.
4.4.1. Implementation
Nose, popular Python testing framework, was taken as a basis for our test runner [14].
Additional nose plug-in was created to support browser selection – this feature is available
in both CLI and GUI test runners.
4.4.2. GUI
GUI allows to configure the test runner – select test cases that will be executed, Additional
option of the nose framework can be specified – could be used by advanced users. GUI
also shows command that can be used to execute same tests with CLI test runner.
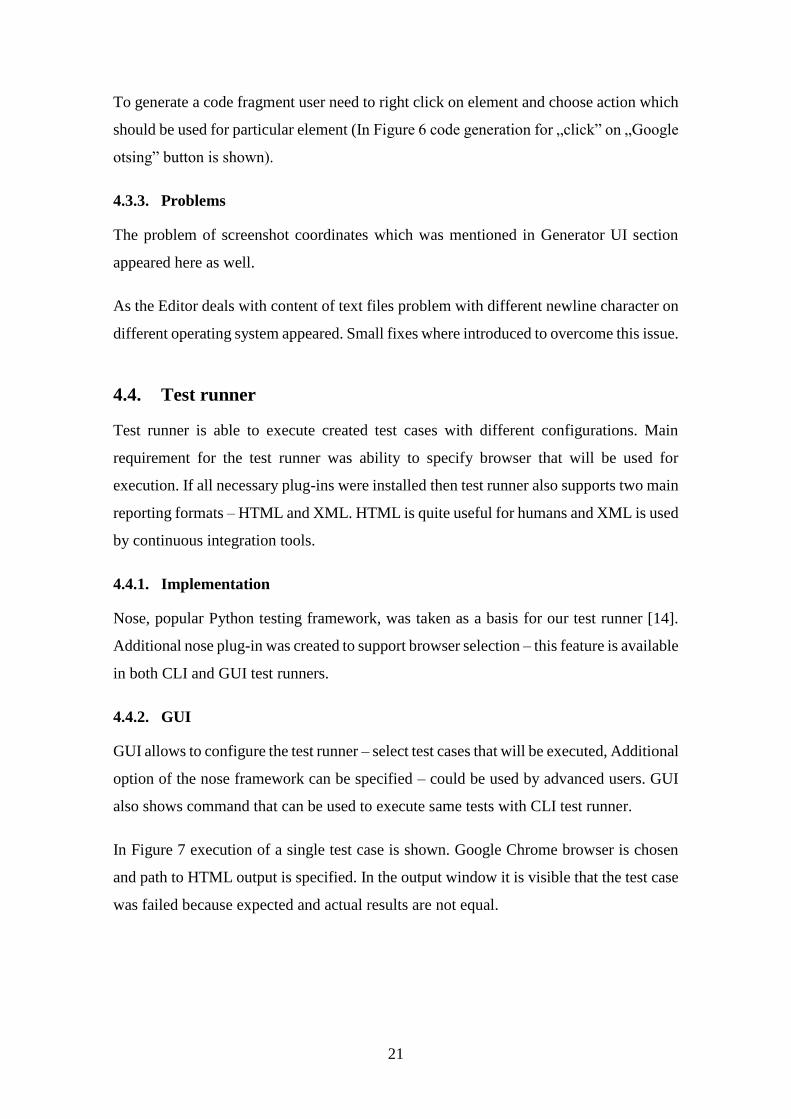
In Figure 7 execution of a single test case is shown. Google Chrome browser is chosen
and path to HTML output is specified. In the output window it is visible that the test case
was failed because expected and actual results are not equal.
22
Figure 7. Screenshot of the Test Runner UI
4.4.3. CLI
Command line interface of the test runner has same functionality as the GUI test runner.
Main reason for creating separate CLI is to support continuous integration tools. Both
GUI and CLI test runner produce identical results.
It can be executed by running easyselenium_cli.py command in a terminal or command
prompt.

23
4.5. Installation
Installation is done according to Python Distribution Utilities (distutils) [23]. This is a
standard tool for building and installing modules into Python installation [24].
This give us ability to distribute code to different operating systems but install it in a
similar way.
Installation flow:
4. Download latest code from GitHub as archive file
5. Unzip it
6. Open terminal or command line console
7. Navigate to extracted folder
8. Run: python setup.py install
As a result related Python modules and packages will placed to C:\Python27\Lib\site-
packages\ and scripts – C:\Python27\Scripts\ on Windows.
4.6. License
MIT License was chosen as it is simple and permissible license [25, 26]. Users can modify
source code for their needs and parts can be used in other projects without any restrictions.
Source code or its parts can be used even in commercial products.
4.7. IDE's compatibility
As our framework generates all files inside single root folder this folder can be imported
as a project to an IDE. Only thing that should be checked is that the root of the project is
added to IDE's Python path otherwise imports would not work. The framework's test
runner can be attached as external tool to an IDE for test case execution.
Test case development using modern IDEs are much faster than using this framework,
especially, if all necessary page object classes are generated. One drawback of IDEs is
that a user should have a background in programming.
24
4.8. Example project
Suppose we would like to test search functionality of https://duckduckgo.com/ web site.
This site is a search engine just like http://www.google.com/.
Here is test procedure for our test case:
1. Go to https://duckduckgo.com/
2. Search for „selenium” text
3. Verify that „selenium” text is in search input field
4. Verify that there is a link with „Selenium – Web Browser Automation” text
As a result we generated two page object classes: DuckDuckGoMain and
DuckDuckGoFound. DuckDuckGoMain class presents main search form and
DuckDuckGoFound class – fragment of a page with found results.
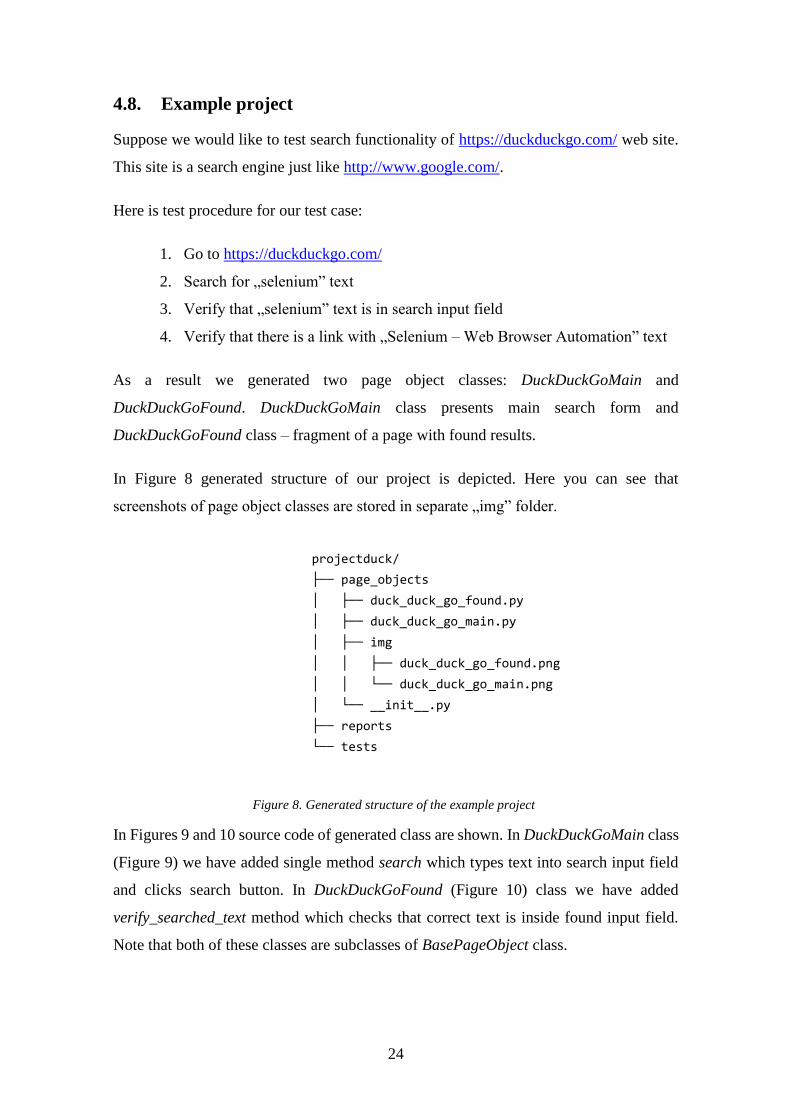
In Figure 8 generated structure of our project is depicted. Here you can see that
screenshots of page object classes are stored in separate „img” folder.
In Figures 9 and 10 source code of generated class are shown. In DuckDuckGoMain class
(Figure 9) we have added single method search which types text into search input field
and clicks search button. In DuckDuckGoFound (Figure 10) class we have added
verify_searched_text method which checks that correct text is inside found input field.
Note that both of these classes are subclasses of BasePageObject class.
projectduck/
├── page_objects
│ ├── duck_duck_go_found.py
│ ├── duck_duck_go_main.py
│ ├── img
│ │ ├── duck_duck_go_found.png
│ │ └── duck_duck_go_main.png
│ └── __init__.py
├── reports
└── tests
Figure 8. Generated structure of the example project

25
Figure 9. DuckDuckGoMain class
Generated page object class contain information about URL, selected area, path of the
file itself and its' screenshot file. Page object class variables represent elements on a web
page and contain information about location and size inside comments. All information
about these variables is used in Editor UI for interaction with the screenshot.
# coding=utf8 from selenium.webdriver.common.by import By from easyselenium.base_page_object import BasePageObject class DuckDuckGoMain(BasePageObject): # Please do NOT remove auto-generated comments # Url: https://duckduckgo.com/ # Area: (288, 345, 739, 93) # File path: /tmp/projectduck/page_objects/duck_duck_go_main.py # Image path: /tmp/projectduck/page_objects/img/duck_duck_go_main.png SEARCH_FORM_INPUT_HOMEPAGE = (By.ID, u'search_form_input_homepage') # location: (347, 374) dimensions: (562, 46) SEARCH_BUTTON_HOMEPAGE = (By.ID, u'search_button_homepage') # location: (912, 377) dimensions: (52, 40) def search(self, text): self.browser.type(self.SEARCH_FORM_INPUT_HOMEPAGE, text) self.browser.click(self.SEARCH_BUTTON_HOMEPAGE)
# coding=utf8 from selenium.webdriver.common.by import By from easyselenium.base_page_object import BasePageObject class DuckDuckGoFound(BasePageObject): # Please do NOT remove auto-generated comments # Url: https://duckduckgo.com/?q=selenium&ia=about # Area: (85, 17, 895, 476) # File path: /tmp/projectduck/page_objects/duck_duck_go_found.py # Image path: /tmp/projectduck/page_objects/img/duck_duck_go_found.png SEARCH_FORM_INPUT = (By.ID, u'search_form_input') # location: (111, 21) dimensions: (799, 38) SELENIUM_LINK = (By.LINK_TEXT, u'Selenium - Web Browser Automation') # location: (111, 394) dimensions: (319, 22) def verify_searched_text(self, expected_text): value = self.browser.get_value(self.SEARCH_FORM_INPUT) self.assertEqual(value, expected_text)
Figure 10. DuckDuckGoFound class
26
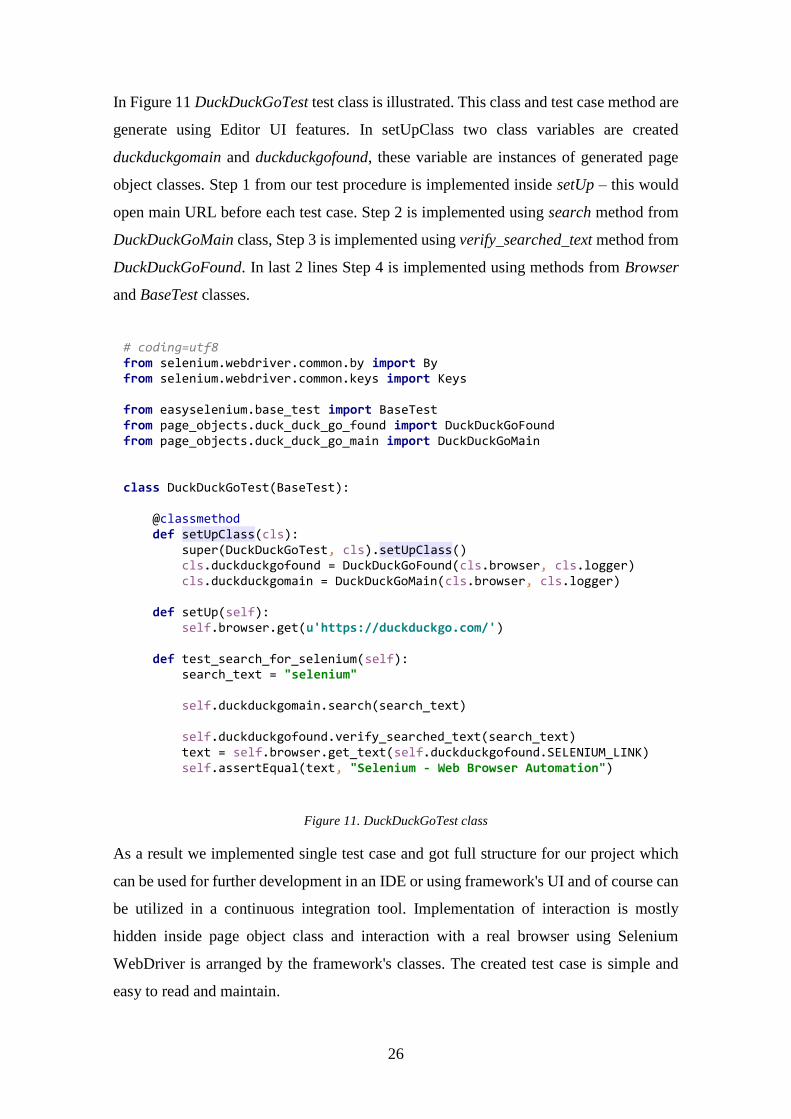
In Figure 11 DuckDuckGoTest test class is illustrated. This class and test case method are
generate using Editor UI features. In setUpClass two class variables are created
duckduckgomain and duckduckgofound, these variable are instances of generated page
object classes. Step 1 from our test procedure is implemented inside setUp – this would
open main URL before each test case. Step 2 is implemented using search method from
DuckDuckGoMain class, Step 3 is implemented using verify_searched_text method from
DuckDuckGoFound. In last 2 lines Step 4 is implemented using methods from Browser
and BaseTest classes.
Figure 11. DuckDuckGoTest class
As a result we implemented single test case and got full structure for our project which
can be used for further development in an IDE or using framework's UI and of course can
be utilized in a continuous integration tool. Implementation of interaction is mostly
hidden inside page object class and interaction with a real browser using Selenium
WebDriver is arranged by the framework's classes. The created test case is simple and
easy to read and maintain.
# coding=utf8 from selenium.webdriver.common.by import By from selenium.webdriver.common.keys import Keys from easyselenium.base_test import BaseTest from page_objects.duck_duck_go_found import DuckDuckGoFound from page_objects.duck_duck_go_main import DuckDuckGoMain class DuckDuckGoTest(BaseTest): @classmethod def setUpClass(cls): super(DuckDuckGoTest, cls).setUpClass() cls.duckduckgofound = DuckDuckGoFound(cls.browser, cls.logger) cls.duckduckgomain = DuckDuckGoMain(cls.browser, cls.logger) def setUp(self): self.browser.get(u'https://duckduckgo.com/') def test_search_for_selenium(self): search_text = "selenium" self.duckduckgomain.search(search_text) self.duckduckgofound.verify_searched_text(search_text) text = self.browser.get_text(self.duckduckgofound.SELENIUM_LINK) self.assertEqual(text, "Selenium - Web Browser Automation")
27
4.9. Browsers support
Currently the framework supports Internet Explorer, Firefox, Google Chrome and Opera.
Selenium WebDriver supports more browsers with additional drivers but to add them to
the framework further development is needed, mainly related to instantiation of Browser
class.
4.10. Continuous Integration support
As framework's test runner is built on Nose, this gives us benefit that xUnit compatible
XML format is supported out-of-box. Further examples will be related to Jenkins
continuous integration tool [27], mainly because it is popular and open source, but it
should work with any continuous integration tool which supports xUnit XML report files.
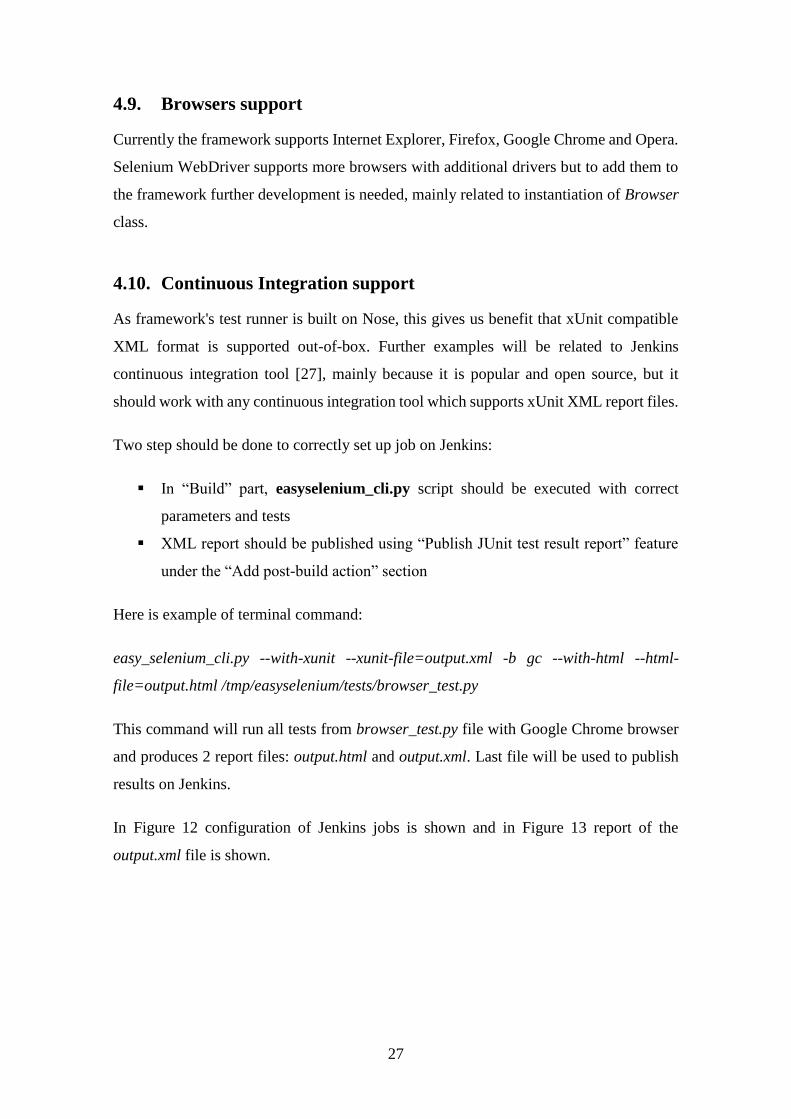
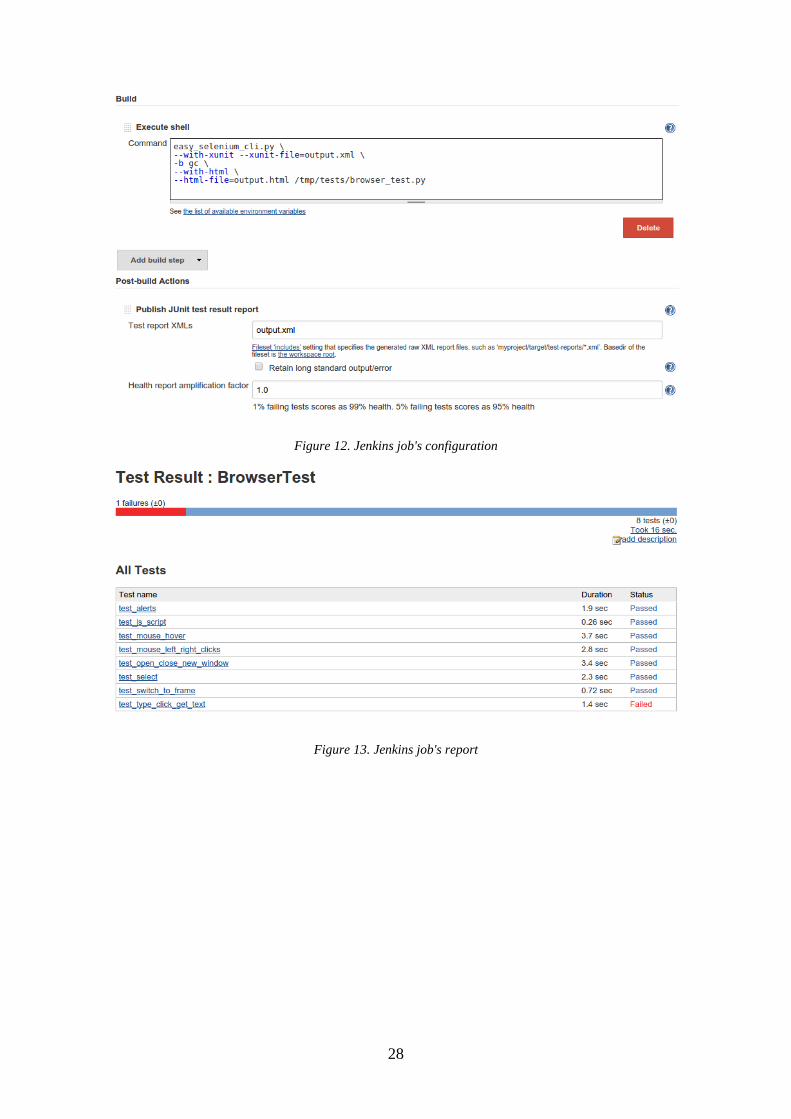
Two step should be done to correctly set up job on Jenkins:
In “Build” part, easyselenium_cli.py script should be executed with correct
parameters and tests
XML report should be published using “Publish JUnit test result report” feature
under the “Add post-build action” section
Here is example of terminal command:
easy_selenium_cli.py --with-xunit --xunit-file=output.xml -b gc --with-html --html-
file=output.html /tmp/easyselenium/tests/browser_test.py
This command will run all tests from browser_test.py file with Google Chrome browser
and produces 2 report files: output.html and output.xml. Last file will be used to publish
results on Jenkins.
In Figure 12 configuration of Jenkins jobs is shown and in Figure 13 report of the
output.xml file is shown.
28
Figure 12. Jenkins job's configuration
Figure 13. Jenkins job's report
29
5. Alternative – Ixonos Visual Test
Ixonos Visual Test – test automation framework for web and mobile applications. This
framework is based on open source components (Selenium WebDriver, Appium, Python
programming language and etc.). Selenium WebDriver is used for testing web
applications and Appium framework is used for mobile testing. Page Model approach is
used which is expanded version of Page Object pattern [28].
Mobile testing support is very demanding feature in testing nowadays and is definitely
great advantage of this framework. Another advantage is a support of data-driven and
model-driven testing [29]. Next interesting feature is a screenshot verification ability.
Last but not least, the framework has good UI to maintain both test classes and Page
Models.
Main disadvantages are complexity and commercial license. Complexity is a result of
many implemented features. Some features are difficult to use, this results in position
where some features are not used at all. Commercial license is a drawback because it
makes the framework rigid and immutable. This leads to a problem when changes should
be done to meet new requirements or introduced features. License could be costly, simple
license starts with 150€ per 3 months.
Due to copyright there are no screenshots of the framework but there is a good thesis
publish in the Internet which describes more thoroughly features of the Ixonos Visual
Test. It can be access for reading without any restrictions. The thesis title is “Model-based
acceptance testing as a part of continuous delivery, Case: Contriboard” [30].
Although Ixonos Visual Test covers most of the features of our developed framework but
two main points of test automation framework are missed – ease of use and extensibility
[29]. These two points are highly critical for users or companies that will use a framework
for their own test automation process.
30
6. Conclusions
Web sites become more and more complex in nowadays and it is very hard to develop
good generic solution for a web test automation, nonetheless, building simple solution is
possible. This simplicity and open source license add a good benefit as this framework
and/or its features could be modified and updated for a specific needs.
The current work describes developed framework and its main features. Full source code
is not included due to its size and information about it can be found in Appendix 2. In the
end, small and simple web test automation framework was created with its own
advantages and disadvantages. Advantages are: higher API of WebDriver, usage of Page
Object pattern; UI for generation, editing of the files and execution of the test cases; IDE
and continuous integration support. Disadvantages: cumbersome UI, generated structure
is not flexible and no mobile support. Created UI could be a great helper for both new
and experienced users.
As for the future plans further development of the framework should be done to get
framework in a good shape. Firstly, fix all current bugs. Then UI and test generation
process should be reconsidered for simplification. Last but not least, add support for
mobile browsers.
Work on this thesis increased my experience in programming, creating complex user
interfaces, multitasking, software distribution and knowledge of Python modules and
Selenium WebDriver.
31
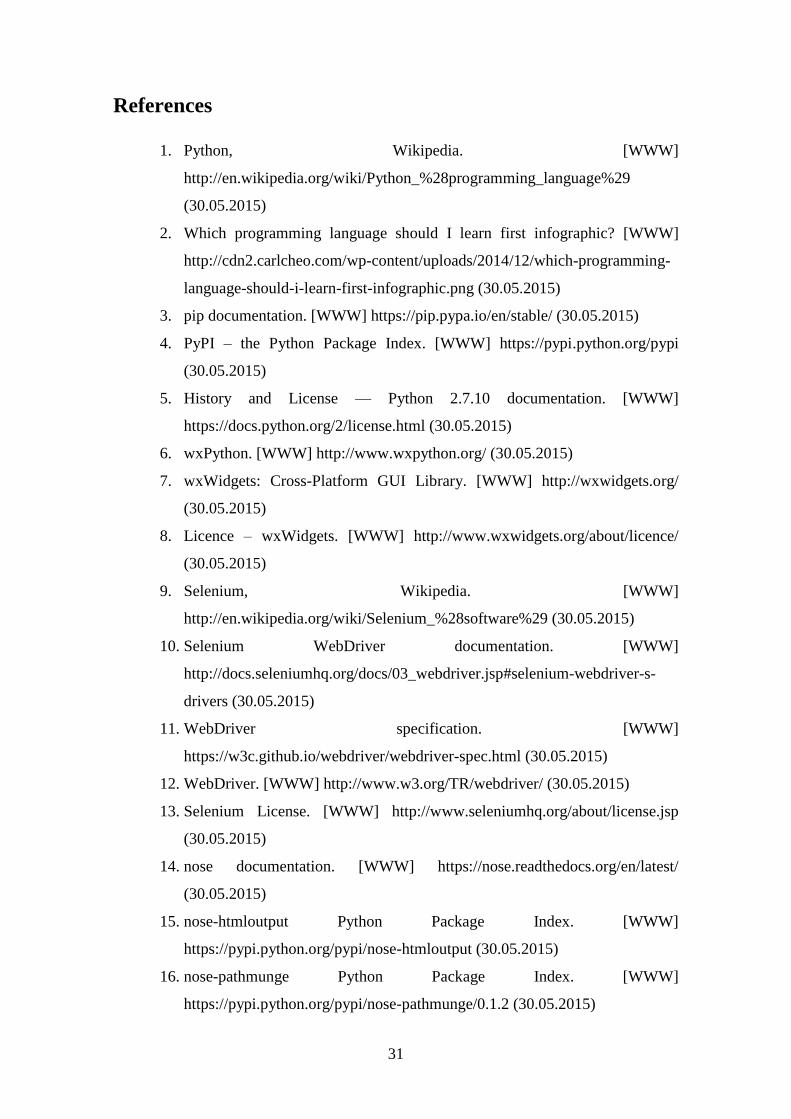
References
1. Python, Wikipedia. [WWW]
http://en.wikipedia.org/wiki/Python_%28programming_language%29
(30.05.2015)
2. Which programming language should I learn first infographic? [WWW]
http://cdn2.carlcheo.com/wp-content/uploads/2014/12/which-programming-
language-should-i-learn-first-infographic.png (30.05.2015)
3. pip documentation. [WWW] https://pip.pypa.io/en/stable/ (30.05.2015)
4. PyPI – the Python Package Index. [WWW] https://pypi.python.org/pypi
(30.05.2015)
5. History and License — Python 2.7.10 documentation. [WWW]
https://docs.python.org/2/license.html (30.05.2015)
6. wxPython. [WWW] http://www.wxpython.org/ (30.05.2015)
7. wxWidgets: Cross-Platform GUI Library. [WWW] http://wxwidgets.org/
(30.05.2015)
8. Licence – wxWidgets. [WWW] http://www.wxwidgets.org/about/licence/
(30.05.2015)
9. Selenium, Wikipedia. [WWW]
http://en.wikipedia.org/wiki/Selenium_%28software%29 (30.05.2015)
10. Selenium WebDriver documentation. [WWW]
http://docs.seleniumhq.org/docs/03_webdriver.jsp#selenium-webdriver-s-
drivers (30.05.2015)
11. WebDriver specification. [WWW]
https://w3c.github.io/webdriver/webdriver-spec.html (30.05.2015)
12. WebDriver. [WWW] http://www.w3.org/TR/webdriver/ (30.05.2015)
13. Selenium License. [WWW] http://www.seleniumhq.org/about/license.jsp
(30.05.2015)
14. nose documentation. [WWW] https://nose.readthedocs.org/en/latest/
(30.05.2015)
15. nose-htmloutput Python Package Index. [WWW]
https://pypi.python.org/pypi/nose-htmloutput (30.05.2015)
16. nose-pathmunge Python Package Index. [WWW]
https://pypi.python.org/pypi/nose-pathmunge/0.1.2 (30.05.2015)
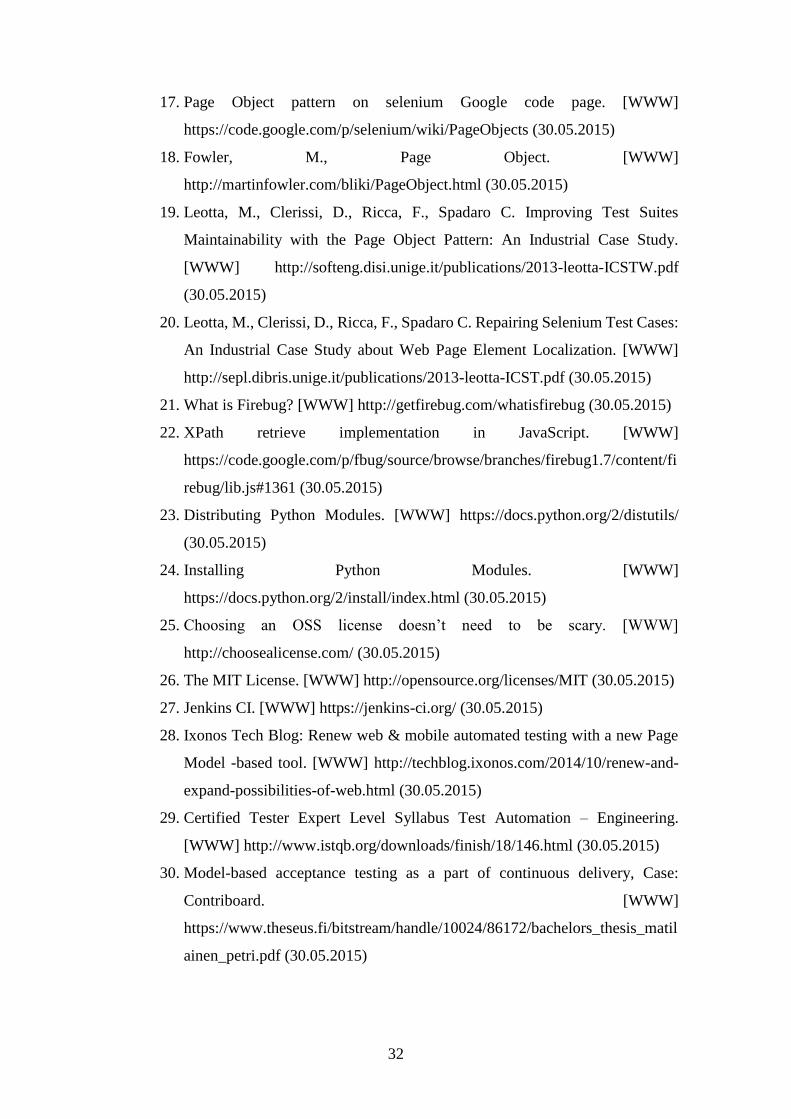
32
17. Page Object pattern on selenium Google code page. [WWW]
https://code.google.com/p/selenium/wiki/PageObjects (30.05.2015)
18. Fowler, M., Page Object. [WWW]
http://martinfowler.com/bliki/PageObject.html (30.05.2015)
19. Leotta, M., Clerissi, D., Ricca, F., Spadaro C. Improving Test Suites
Maintainability with the Page Object Pattern: An Industrial Case Study.
[WWW] http://softeng.disi.unige.it/publications/2013-leotta-ICSTW.pdf
(30.05.2015)
20. Leotta, M., Clerissi, D., Ricca, F., Spadaro C. Repairing Selenium Test Cases:
An Industrial Case Study about Web Page Element Localization. [WWW]
http://sepl.dibris.unige.it/publications/2013-leotta-ICST.pdf (30.05.2015)
21. What is Firebug? [WWW] http://getfirebug.com/whatisfirebug (30.05.2015)
22. XPath retrieve implementation in JavaScript. [WWW]
https://code.google.com/p/fbug/source/browse/branches/firebug1.7/content/fi
rebug/lib.js#1361 (30.05.2015)
23. Distributing Python Modules. [WWW] https://docs.python.org/2/distutils/
(30.05.2015)
24. Installing Python Modules. [WWW]
https://docs.python.org/2/install/index.html (30.05.2015)
25. Choosing an OSS license doesn’t need to be scary. [WWW]
http://choosealicense.com/ (30.05.2015)
26. The MIT License. [WWW] http://opensource.org/licenses/MIT (30.05.2015)
27. Jenkins CI. [WWW] https://jenkins-ci.org/ (30.05.2015)
28. Ixonos Tech Blog: Renew web & mobile automated testing with a new Page
Model -based tool. [WWW] http://techblog.ixonos.com/2014/10/renew-and-
expand-possibilities-of-web.html (30.05.2015)
29. Certified Tester Expert Level Syllabus Test Automation – Engineering.
[WWW] http://www.istqb.org/downloads/finish/18/146.html (30.05.2015)
30. Model-based acceptance testing as a part of continuous delivery, Case:
Contriboard. [WWW]
https://www.theseus.fi/bitstream/handle/10024/86172/bachelors_thesis_matil
ainen_petri.pdf (30.05.2015)
33
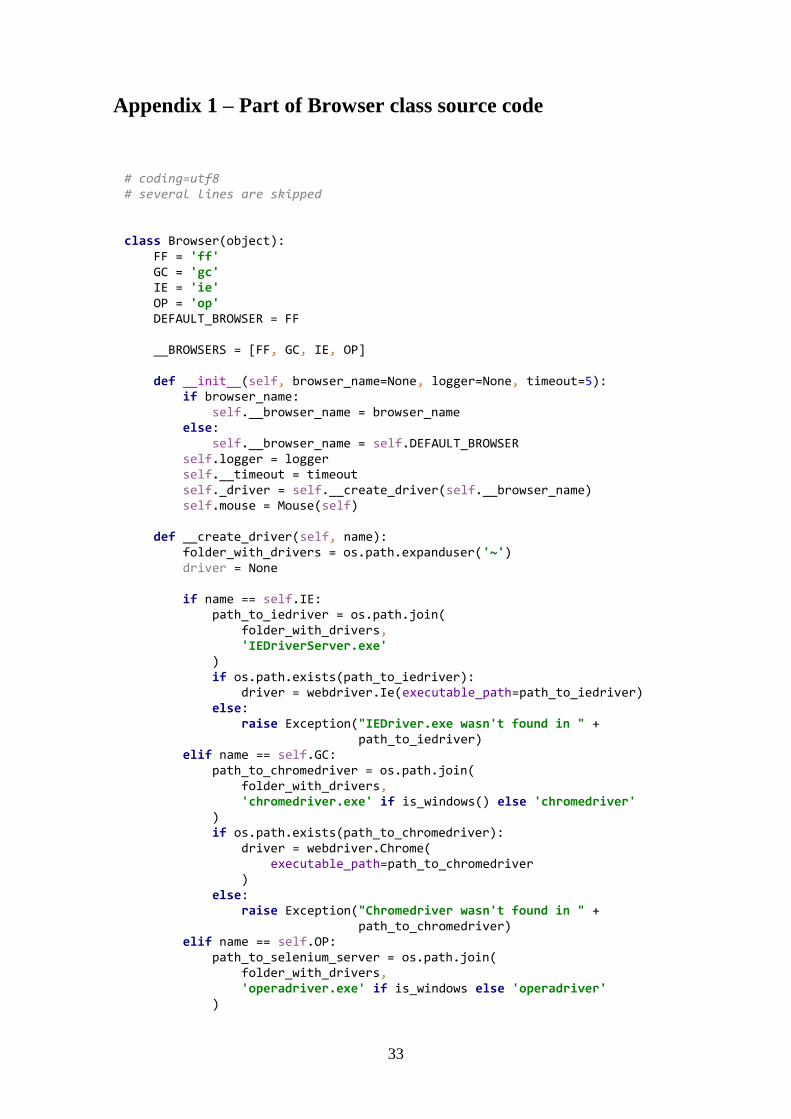
Appendix 1 – Part of Browser class source code
# coding=utf8 # several lines are skipped class Browser(object): FF = 'ff' GC = 'gc' IE = 'ie' OP = 'op' DEFAULT_BROWSER = FF __BROWSERS = [FF, GC, IE, OP] def __init__(self, browser_name=None, logger=None, timeout=5): if browser_name: self.__browser_name = browser_name else: self.__browser_name = self.DEFAULT_BROWSER self.logger = logger self.__timeout = timeout self._driver = self.__create_driver(self.__browser_name) self.mouse = Mouse(self) def __create_driver(self, name): folder_with_drivers = os.path.expanduser('~') driver = None if name == self.IE: path_to_iedriver = os.path.join( folder_with_drivers, 'IEDriverServer.exe' ) if os.path.exists(path_to_iedriver): driver = webdriver.Ie(executable_path=path_to_iedriver) else: raise Exception("IEDriver.exe wasn't found in " + path_to_iedriver) elif name == self.GC: path_to_chromedriver = os.path.join( folder_with_drivers, 'chromedriver.exe' if is_windows() else 'chromedriver' ) if os.path.exists(path_to_chromedriver): driver = webdriver.Chrome( executable_path=path_to_chromedriver ) else: raise Exception("Chromedriver wasn't found in " + path_to_chromedriver) elif name == self.OP: path_to_selenium_server = os.path.join( folder_with_drivers, 'operadriver.exe' if is_windows else 'operadriver' )
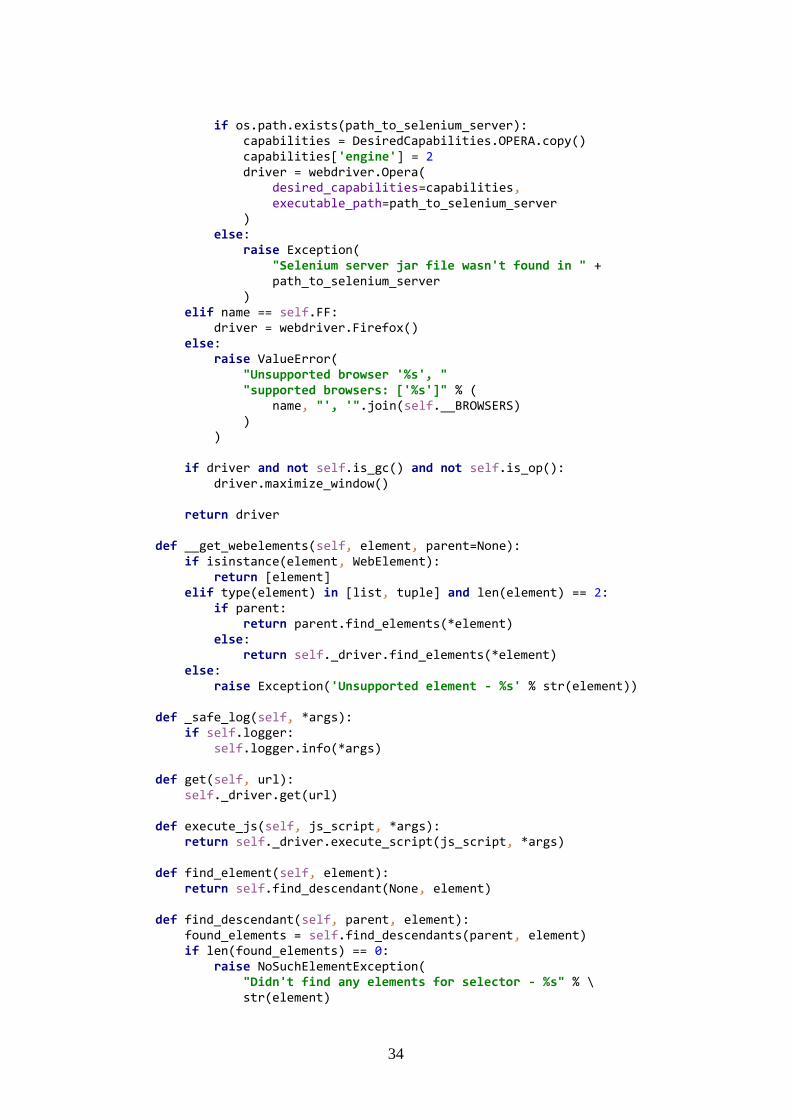
34
if os.path.exists(path_to_selenium_server): capabilities = DesiredCapabilities.OPERA.copy() capabilities['engine'] = 2 driver = webdriver.Opera( desired_capabilities=capabilities, executable_path=path_to_selenium_server ) else: raise Exception( "Selenium server jar file wasn't found in " + path_to_selenium_server ) elif name == self.FF: driver = webdriver.Firefox() else: raise ValueError( "Unsupported browser '%s', " "supported browsers: ['%s']" % ( name, "', '".join(self.__BROWSERS) ) ) if driver and not self.is_gc() and not self.is_op(): driver.maximize_window() return driver def __get_webelements(self, element, parent=None): if isinstance(element, WebElement): return [element] elif type(element) in [list, tuple] and len(element) == 2: if parent: return parent.find_elements(*element) else: return self._driver.find_elements(*element) else: raise Exception('Unsupported element - %s' % str(element)) def _safe_log(self, *args): if self.logger: self.logger.info(*args) def get(self, url): self._driver.get(url) def execute_js(self, js_script, *args): return self._driver.execute_script(js_script, *args) def find_element(self, element): return self.find_descendant(None, element) def find_descendant(self, parent, element): found_elements = self.find_descendants(parent, element) if len(found_elements) == 0: raise NoSuchElementException( "Didn't find any elements for selector - %s" % \ str(element)
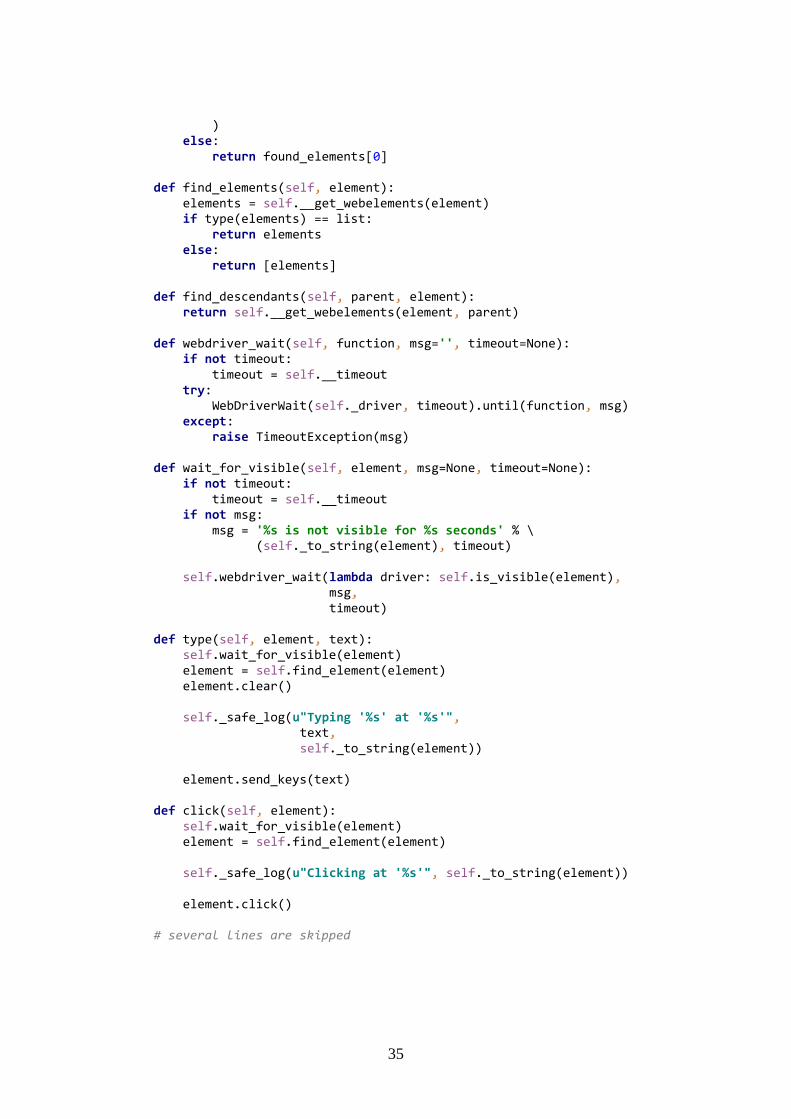
35
) else: return found_elements[0] def find_elements(self, element): elements = self.__get_webelements(element) if type(elements) == list: return elements else: return [elements] def find_descendants(self, parent, element): return self.__get_webelements(element, parent) def webdriver_wait(self, function, msg='', timeout=None): if not timeout: timeout = self.__timeout try: WebDriverWait(self._driver, timeout).until(function, msg) except: raise TimeoutException(msg) def wait_for_visible(self, element, msg=None, timeout=None): if not timeout: timeout = self.__timeout if not msg: msg = '%s is not visible for %s seconds' % \ (self._to_string(element), timeout) self.webdriver_wait(lambda driver: self.is_visible(element), msg, timeout) def type(self, element, text): self.wait_for_visible(element) element = self.find_element(element) element.clear() self._safe_log(u"Typing '%s' at '%s'", text, self._to_string(element)) element.send_keys(text) def click(self, element): self.wait_for_visible(element) element = self.find_element(element) self._safe_log(u"Clicking at '%s'", self._to_string(element)) element.click() # several lines are skipped
36
Appendix 2 – Source code of the framework
Full source code of the framework takes quite a lot of space, but there are two options of
obtaining it:
1. From the GitHub – https://github.com/kirillstrelkov/easyselenium
2. From the attached CD
Structure of the source code is depicted here:
.
├── easyselenium
│ ├── base_page_object.py
│ ├── base_test.py
│ ├── browser.py
│ ├── __init__.py
│ ├── licenses
│ │ ├── easyselenium_license.txt
│ │ └── firebug_license.txt
│ ├── scripts
│ │ ├── easy_selenium_cli.py
│ │ └── easy_selenium_ui.py
│ ├── tests
│ │ ├── browser_test.py
│ │ ├── data
│ │ │ ├── duckduckgo_class_with_method.py
│ │ │ ├── expected_duckduckgo_class.py
│ │ │ └── pickled_po_class_object
│ │ ├── page_object_class_test.py
│ │ ├── page_object_generator_test.py
│ │ ├── parsed_class_test.py
│ │ ├── root_folder_test.py
│ │ ├── string_utils_test.py
│ │ └── utils_test.py
│ ├── ui
│ │ ├── context_menu.py
│ │ ├── editor
│ │ │ ├── editor_ui.py
│ │ │ ├── field_context_menu.py
│ │ │ ├── __init__.py
│ │ │ └── utils.py
│ │ ├── file_utils.py
│ │ ├── generator
37
│ │ │ ├── generator_ui.py
│ │ │ ├── __init__.py
│ │ │ ├── page_object_class.py
│ │ │ └── page_object_generator.py
│ │ ├── image
│ │ │ ├── image_panel.py
│ │ │ ├── image_with_elements.py
│ │ │ ├── __init__.py
│ │ │ └── selectable_image.py
│ │ ├── __init__.py
│ │ ├── parser
│ │ │ ├── __init__.py
│ │ │ └── parsed_class.py
│ │ ├── root_folder.py
│ │ ├── string_utils.py
│ │ ├── test_runner_ui.py
│ │ └── utils.py
│ └── utils.py
├── README.md
└── setup.py
Related Documents