ibm.com/redbooks IBM System i Security Guide for IBM i5/OS Version 5 Release 4 Debbie Landon Tom Barlen Stephan Imhof Lars-Olov Spångberg Security management practices from an IBM System i point of view A guide to IBM i5/OS security features Key security concepts and guidelines

Welcome message from author
This document is posted to help you gain knowledge. Please leave a comment to let me know what you think about it! Share it to your friends and learn new things together.
Transcript

ibm.com/redbooks
IBM System iSecurity Guidefor IBM i5/OS Version 5 Release 4
Debbie LandonTom Barlen
Stephan ImhofLars-Olov Spångberg
Security management practices from an IBM System i point of view
A guide to IBM i5/OS security features
Key security concepts and guidelines
Front cover

IBM System i Security Guidefor IBM i5/OS Version 5 Release 4
October 2006
International Technical Support Organization
SG24-6668-01

© Copyright International Business Machines Corporation 2005, 2006. All rights reserved.Note to U.S. Government Users Restricted Rights -- Use, duplication or disclosure restricted by GSA ADPSchedule Contract with IBM Corp.
Second Edition (October 2006)
This edition applies to IBM i5/OS Version 5, Release 4.
Note: Before using this information and the product it supports, read the information in “Notices” on page xiii.

Contents
Notices . . . . . . . . . . . . . . . . . . . . . . . . . . . . . . . . . . . . . . . . . . . . . . . . . . . . . . xiiiTrademarks . . . . . . . . . . . . . . . . . . . . . . . . . . . . . . . . . . . . . . . . . . . . . . . . . . . xiv
Preface . . . . . . . . . . . . . . . . . . . . . . . . . . . . . . . . . . . . . . . . . . . . . . . . . . . . . . xvThe team that wrote this redbook. . . . . . . . . . . . . . . . . . . . . . . . . . . . . . . . . . . xvBecome a published author . . . . . . . . . . . . . . . . . . . . . . . . . . . . . . . . . . . . . . xviiiComments welcome. . . . . . . . . . . . . . . . . . . . . . . . . . . . . . . . . . . . . . . . . . . . xviii
Part 1. Security concepts . . . . . . . . . . . . . . . . . . . . . . . . . . . . . . . . . . . . . . . . . . . . . . . . . . . . . 1
Chapter 1. Security management practices . . . . . . . . . . . . . . . . . . . . . . . . . 31.1 Computer security . . . . . . . . . . . . . . . . . . . . . . . . . . . . . . . . . . . . . . . . . . . . 41.2 Security compliance . . . . . . . . . . . . . . . . . . . . . . . . . . . . . . . . . . . . . . . . . . 51.3 Security management . . . . . . . . . . . . . . . . . . . . . . . . . . . . . . . . . . . . . . . . . 5
1.3.1 Assets, vulnerabilities, threats, risks, and countermeasures . . . . . . . 51.3.2 Security controls . . . . . . . . . . . . . . . . . . . . . . . . . . . . . . . . . . . . . . . . . 61.3.3 Roles and responsibilities . . . . . . . . . . . . . . . . . . . . . . . . . . . . . . . . . . 71.3.4 Information classification. . . . . . . . . . . . . . . . . . . . . . . . . . . . . . . . . . . 8
1.4 Security implementation layers . . . . . . . . . . . . . . . . . . . . . . . . . . . . . . . . . . 91.5 More information . . . . . . . . . . . . . . . . . . . . . . . . . . . . . . . . . . . . . . . . . . . . 11
Chapter 2. Security process and policies . . . . . . . . . . . . . . . . . . . . . . . . . . 132.1 Security program . . . . . . . . . . . . . . . . . . . . . . . . . . . . . . . . . . . . . . . . . . . . 14
2.1.1 Security policy . . . . . . . . . . . . . . . . . . . . . . . . . . . . . . . . . . . . . . . . . . 142.1.2 Baselines. . . . . . . . . . . . . . . . . . . . . . . . . . . . . . . . . . . . . . . . . . . . . . 142.1.3 Standards . . . . . . . . . . . . . . . . . . . . . . . . . . . . . . . . . . . . . . . . . . . . . 152.1.4 Guidelines . . . . . . . . . . . . . . . . . . . . . . . . . . . . . . . . . . . . . . . . . . . . . 152.1.5 Procedures . . . . . . . . . . . . . . . . . . . . . . . . . . . . . . . . . . . . . . . . . . . . 16
2.2 Security process model . . . . . . . . . . . . . . . . . . . . . . . . . . . . . . . . . . . . . . . 162.2.1 Identifying and documenting the security requirements . . . . . . . . . . 172.2.2 Planning and writing a security policy . . . . . . . . . . . . . . . . . . . . . . . . 172.2.3 Implementing the security policy . . . . . . . . . . . . . . . . . . . . . . . . . . . . 182.2.4 Monitoring for implementation accuracy . . . . . . . . . . . . . . . . . . . . . . 192.2.5 Monitoring for compliance with the security policy . . . . . . . . . . . . . . 202.2.6 Independent security policy and implementation review. . . . . . . . . . 20
2.3 Security policy contents. . . . . . . . . . . . . . . . . . . . . . . . . . . . . . . . . . . . . . . 212.3.1 Considerations for security policy content. . . . . . . . . . . . . . . . . . . . . 222.3.2 Processes . . . . . . . . . . . . . . . . . . . . . . . . . . . . . . . . . . . . . . . . . . . . . 222.3.3 Security controls . . . . . . . . . . . . . . . . . . . . . . . . . . . . . . . . . . . . . . . . 23
© Copyright IBM Corp. 2005, 2006. All rights reserved. iii
2.4 More information . . . . . . . . . . . . . . . . . . . . . . . . . . . . . . . . . . . . . . . . . . . . 25
Chapter 3. System i security overview . . . . . . . . . . . . . . . . . . . . . . . . . . . . 273.1 System i architecture. . . . . . . . . . . . . . . . . . . . . . . . . . . . . . . . . . . . . . . . . 28
3.1.1 Object-based design . . . . . . . . . . . . . . . . . . . . . . . . . . . . . . . . . . . . . 283.2 What the System i offers . . . . . . . . . . . . . . . . . . . . . . . . . . . . . . . . . . . . . . 29
3.2.1 Security at the system layer . . . . . . . . . . . . . . . . . . . . . . . . . . . . . . . 293.2.2 Security at the network layer. . . . . . . . . . . . . . . . . . . . . . . . . . . . . . . 353.2.3 Security at the application layer . . . . . . . . . . . . . . . . . . . . . . . . . . . . 40
Part 2. The basics of System i security . . . . . . . . . . . . . . . . . . . . . . . . . . . . . . . . . . . . . . . . 43
Chapter 4. System i security fundamentals . . . . . . . . . . . . . . . . . . . . . . . . 454.1 Global settings. . . . . . . . . . . . . . . . . . . . . . . . . . . . . . . . . . . . . . . . . . . . . . 46
4.1.1 Security system values . . . . . . . . . . . . . . . . . . . . . . . . . . . . . . . . . . . 464.1.2 Common Criteria . . . . . . . . . . . . . . . . . . . . . . . . . . . . . . . . . . . . . . . . 504.1.3 Locking system values . . . . . . . . . . . . . . . . . . . . . . . . . . . . . . . . . . . 514.1.4 Network attributes . . . . . . . . . . . . . . . . . . . . . . . . . . . . . . . . . . . . . . . 544.1.5 Work management elements . . . . . . . . . . . . . . . . . . . . . . . . . . . . . . 554.1.6 Communication configuration . . . . . . . . . . . . . . . . . . . . . . . . . . . . . . 58
4.2 User profiles and group profiles . . . . . . . . . . . . . . . . . . . . . . . . . . . . . . . . 594.2.1 Individual user profiles . . . . . . . . . . . . . . . . . . . . . . . . . . . . . . . . . . . 594.2.2 Group profiles . . . . . . . . . . . . . . . . . . . . . . . . . . . . . . . . . . . . . . . . . . 634.2.3 IBM-supplied user profiles. . . . . . . . . . . . . . . . . . . . . . . . . . . . . . . . . 65
4.3 Resource protection . . . . . . . . . . . . . . . . . . . . . . . . . . . . . . . . . . . . . . . . . 714.3.1 Information access . . . . . . . . . . . . . . . . . . . . . . . . . . . . . . . . . . . . . . 714.3.2 Authority for new objects in a library . . . . . . . . . . . . . . . . . . . . . . . . . 764.3.3 Object ownership . . . . . . . . . . . . . . . . . . . . . . . . . . . . . . . . . . . . . . . 774.3.4 Public authority . . . . . . . . . . . . . . . . . . . . . . . . . . . . . . . . . . . . . . . . . 814.3.5 Protection strategies . . . . . . . . . . . . . . . . . . . . . . . . . . . . . . . . . . . . . 824.3.6 Authorization search sequence. . . . . . . . . . . . . . . . . . . . . . . . . . . . . 894.3.7 Output distribution . . . . . . . . . . . . . . . . . . . . . . . . . . . . . . . . . . . . . . . 904.3.8 Save and restore considerations. . . . . . . . . . . . . . . . . . . . . . . . . . . . 944.3.9 Securing commands . . . . . . . . . . . . . . . . . . . . . . . . . . . . . . . . . . . . . 95
4.4 Authorization lists . . . . . . . . . . . . . . . . . . . . . . . . . . . . . . . . . . . . . . . . . . . 984.4.1 Creating an authorization list. . . . . . . . . . . . . . . . . . . . . . . . . . . . . . . 994.4.2 Authorization list details . . . . . . . . . . . . . . . . . . . . . . . . . . . . . . . . . 100
4.5 Registered exit points . . . . . . . . . . . . . . . . . . . . . . . . . . . . . . . . . . . . . . . 1014.5.1 Benefits of exit programs . . . . . . . . . . . . . . . . . . . . . . . . . . . . . . . . 1024.5.2 Registration facility . . . . . . . . . . . . . . . . . . . . . . . . . . . . . . . . . . . . . 1024.5.3 Exit programs . . . . . . . . . . . . . . . . . . . . . . . . . . . . . . . . . . . . . . . . . 102
4.6 Limiting access to program functions . . . . . . . . . . . . . . . . . . . . . . . . . . . 1054.6.1 Managing user access to program functions . . . . . . . . . . . . . . . . . 105
4.7 Backup and recovery for security information . . . . . . . . . . . . . . . . . . . . . 115
iv IBM System i Security Guide for IBM i5/OS Version 5 Release 4
Chapter 5. Security tools . . . . . . . . . . . . . . . . . . . . . . . . . . . . . . . . . . . . . . 1195.1 Security Wizard . . . . . . . . . . . . . . . . . . . . . . . . . . . . . . . . . . . . . . . . . . . . 120
5.1.1 Running the Security Wizard. . . . . . . . . . . . . . . . . . . . . . . . . . . . . . 1205.1.2 Security wizard reports . . . . . . . . . . . . . . . . . . . . . . . . . . . . . . . . . . 126
5.2 Security auditing tools . . . . . . . . . . . . . . . . . . . . . . . . . . . . . . . . . . . . . . . 1315.2.1 Security Tools menu . . . . . . . . . . . . . . . . . . . . . . . . . . . . . . . . . . . . 1315.2.2 Customizing your security . . . . . . . . . . . . . . . . . . . . . . . . . . . . . . . . 133
5.3 Java policy tool . . . . . . . . . . . . . . . . . . . . . . . . . . . . . . . . . . . . . . . . . . . . 137
Chapter 6. Security audit journal . . . . . . . . . . . . . . . . . . . . . . . . . . . . . . . . 1396.1 Audit journal . . . . . . . . . . . . . . . . . . . . . . . . . . . . . . . . . . . . . . . . . . . . . . 1406.2 Planning for security auditing . . . . . . . . . . . . . . . . . . . . . . . . . . . . . . . . . 1416.3 Creating the security audit journal . . . . . . . . . . . . . . . . . . . . . . . . . . . . . . 141
6.3.1 Creating a journal receiver . . . . . . . . . . . . . . . . . . . . . . . . . . . . . . . 1416.3.2 Creating a security audit journal . . . . . . . . . . . . . . . . . . . . . . . . . . . 142
6.4 System values that control security auditing . . . . . . . . . . . . . . . . . . . . . . 1436.5 Using the security audit journal for reports . . . . . . . . . . . . . . . . . . . . . . . 144
6.5.1 Security audit journal. . . . . . . . . . . . . . . . . . . . . . . . . . . . . . . . . . . . 1446.5.2 Audit journal flow. . . . . . . . . . . . . . . . . . . . . . . . . . . . . . . . . . . . . . . 1446.5.3 Journal entry types . . . . . . . . . . . . . . . . . . . . . . . . . . . . . . . . . . . . . 1446.5.4 Converting security audit journal entries . . . . . . . . . . . . . . . . . . . . . 145
6.6 User and object auditing . . . . . . . . . . . . . . . . . . . . . . . . . . . . . . . . . . . . . 1456.6.1 User auditing . . . . . . . . . . . . . . . . . . . . . . . . . . . . . . . . . . . . . . . . . . 1466.6.2 Object auditing . . . . . . . . . . . . . . . . . . . . . . . . . . . . . . . . . . . . . . . . 1486.6.3 Action auditing. . . . . . . . . . . . . . . . . . . . . . . . . . . . . . . . . . . . . . . . . 149
6.7 Third-party tools . . . . . . . . . . . . . . . . . . . . . . . . . . . . . . . . . . . . . . . . . . . 150
Chapter 7. Confidentiality and integrity . . . . . . . . . . . . . . . . . . . . . . . . . . 1517.1 Data confidentiality and integrity . . . . . . . . . . . . . . . . . . . . . . . . . . . . . . . 1527.2 Object signing . . . . . . . . . . . . . . . . . . . . . . . . . . . . . . . . . . . . . . . . . . . . . 152
7.2.1 Objects that can be signed . . . . . . . . . . . . . . . . . . . . . . . . . . . . . . . 1557.2.2 Advantages of digital object signing . . . . . . . . . . . . . . . . . . . . . . . . 1567.2.3 Signature commands . . . . . . . . . . . . . . . . . . . . . . . . . . . . . . . . . . . 1567.2.4 Considerations . . . . . . . . . . . . . . . . . . . . . . . . . . . . . . . . . . . . . . . . 1587.2.5 Prerequisites . . . . . . . . . . . . . . . . . . . . . . . . . . . . . . . . . . . . . . . . . . 158
7.3 Virus scanning. . . . . . . . . . . . . . . . . . . . . . . . . . . . . . . . . . . . . . . . . . . . . 1597.3.1 Exit points . . . . . . . . . . . . . . . . . . . . . . . . . . . . . . . . . . . . . . . . . . . . 1597.3.2 System values. . . . . . . . . . . . . . . . . . . . . . . . . . . . . . . . . . . . . . . . . 1597.3.3 Setting security policy properties for virus scanning . . . . . . . . . . . . 161
7.4 Data encryption . . . . . . . . . . . . . . . . . . . . . . . . . . . . . . . . . . . . . . . . . . . . 1667.4.1 Data encryption in DB2 Universal Database. . . . . . . . . . . . . . . . . . 1677.4.2 Encryption and decryption APIs . . . . . . . . . . . . . . . . . . . . . . . . . . . 169
Part 3. Network security . . . . . . . . . . . . . . . . . . . . . . . . . . . . . . . . . . . . . . . . . . . . . . . . . . . . 171
Contents v

Chapter 8. TCP/IP security . . . . . . . . . . . . . . . . . . . . . . . . . . . . . . . . . . . . . 1738.1 The TCP/IP model. . . . . . . . . . . . . . . . . . . . . . . . . . . . . . . . . . . . . . . . . . 1748.2 Controlling which TCP/IP servers start automatically . . . . . . . . . . . . . . . 175
8.2.1 Configuring the autostart value for a TCP/IP server . . . . . . . . . . . . 1768.2.2 More information . . . . . . . . . . . . . . . . . . . . . . . . . . . . . . . . . . . . . . . 178
8.3 Controlling the start of TCP/IP interfaces . . . . . . . . . . . . . . . . . . . . . . . . 1788.4 Controlling the start of Point-to-Point Profiles . . . . . . . . . . . . . . . . . . . . . 1798.5 Port restrictions . . . . . . . . . . . . . . . . . . . . . . . . . . . . . . . . . . . . . . . . . . . . 180
8.5.1 Configuring port restrictions . . . . . . . . . . . . . . . . . . . . . . . . . . . . . . 1808.5.2 More information . . . . . . . . . . . . . . . . . . . . . . . . . . . . . . . . . . . . . . . 181
8.6 Exit programs . . . . . . . . . . . . . . . . . . . . . . . . . . . . . . . . . . . . . . . . . . . . . 1818.6.1 FTP exit program example . . . . . . . . . . . . . . . . . . . . . . . . . . . . . . . 1838.6.2 Configuring exit programs . . . . . . . . . . . . . . . . . . . . . . . . . . . . . . . . 1848.6.3 More information . . . . . . . . . . . . . . . . . . . . . . . . . . . . . . . . . . . . . . . 186
8.7 IP packet filtering. . . . . . . . . . . . . . . . . . . . . . . . . . . . . . . . . . . . . . . . . . . 1878.7.1 Activating IP packet filtering rules . . . . . . . . . . . . . . . . . . . . . . . . . . 1888.7.2 Network Address Translation . . . . . . . . . . . . . . . . . . . . . . . . . . . . . 1898.7.3 Configuring NAT . . . . . . . . . . . . . . . . . . . . . . . . . . . . . . . . . . . . . . . 1908.7.4 More information . . . . . . . . . . . . . . . . . . . . . . . . . . . . . . . . . . . . . . . 192
8.8 Intrusion detection system. . . . . . . . . . . . . . . . . . . . . . . . . . . . . . . . . . . . 1928.8.1 Overview: i5/OS intrusion detection system implementation . . . . . 1938.8.2 Intrusion detection system setup tasks . . . . . . . . . . . . . . . . . . . . . . 1968.8.3 Policy management. . . . . . . . . . . . . . . . . . . . . . . . . . . . . . . . . . . . . 1988.8.4 Analyzing intrusion attempts . . . . . . . . . . . . . . . . . . . . . . . . . . . . . . 1988.8.5 More information . . . . . . . . . . . . . . . . . . . . . . . . . . . . . . . . . . . . . . . 199
8.9 Point-to-Point Protocol . . . . . . . . . . . . . . . . . . . . . . . . . . . . . . . . . . . . . . 1998.9.1 Security considerations for Point-to-Point Protocol . . . . . . . . . . . . . 1998.9.2 Configuring Point-to-Point Protocol profiles . . . . . . . . . . . . . . . . . . 2008.9.3 More information . . . . . . . . . . . . . . . . . . . . . . . . . . . . . . . . . . . . . . . 200
8.10 RADIUS. . . . . . . . . . . . . . . . . . . . . . . . . . . . . . . . . . . . . . . . . . . . . . . . . 2008.10.1 Enabling RADIUS support. . . . . . . . . . . . . . . . . . . . . . . . . . . . . . . 2018.10.2 More information . . . . . . . . . . . . . . . . . . . . . . . . . . . . . . . . . . . . . . 202
8.11 HTTP proxy server . . . . . . . . . . . . . . . . . . . . . . . . . . . . . . . . . . . . . . . . 2028.11.1 Reverse proxy server . . . . . . . . . . . . . . . . . . . . . . . . . . . . . . . . . . 2038.11.2 Configuring the HTTP server as a proxy server . . . . . . . . . . . . . . 2038.11.3 More information . . . . . . . . . . . . . . . . . . . . . . . . . . . . . . . . . . . . . . 205
8.12 SOCKS . . . . . . . . . . . . . . . . . . . . . . . . . . . . . . . . . . . . . . . . . . . . . . . . . 2058.12.1 Client SOCKS support on the System i platform. . . . . . . . . . . . . . 2068.12.2 Configuring client SOCKS support . . . . . . . . . . . . . . . . . . . . . . . . 2068.12.3 More information . . . . . . . . . . . . . . . . . . . . . . . . . . . . . . . . . . . . . . 207
8.13 OpenSSH and OpenSSL. . . . . . . . . . . . . . . . . . . . . . . . . . . . . . . . . . . . 2088.13.1 Portable Utilities for i5/OS . . . . . . . . . . . . . . . . . . . . . . . . . . . . . . . 2088.13.2 OpenSSH . . . . . . . . . . . . . . . . . . . . . . . . . . . . . . . . . . . . . . . . . . . 209
vi IBM System i Security Guide for IBM i5/OS Version 5 Release 4

8.13.3 OpenSSL. . . . . . . . . . . . . . . . . . . . . . . . . . . . . . . . . . . . . . . . . . . . 2118.13.4 More information . . . . . . . . . . . . . . . . . . . . . . . . . . . . . . . . . . . . . . 211
8.14 Secure socket APIs . . . . . . . . . . . . . . . . . . . . . . . . . . . . . . . . . . . . . . . . 2118.15 Security considerations for e-mail . . . . . . . . . . . . . . . . . . . . . . . . . . . . . 212
8.15.1 Controlling e-mail access . . . . . . . . . . . . . . . . . . . . . . . . . . . . . . . 2128.15.2 Preventing e-mail access . . . . . . . . . . . . . . . . . . . . . . . . . . . . . . . 2148.15.3 Securing e-mail . . . . . . . . . . . . . . . . . . . . . . . . . . . . . . . . . . . . . . . 2148.15.4 More information . . . . . . . . . . . . . . . . . . . . . . . . . . . . . . . . . . . . . . 216
8.16 Security considerations for FTP . . . . . . . . . . . . . . . . . . . . . . . . . . . . . . 216
Chapter 9. Cryptographic support. . . . . . . . . . . . . . . . . . . . . . . . . . . . . . . 2179.1 Encryption versus hashing . . . . . . . . . . . . . . . . . . . . . . . . . . . . . . . . . . . 2189.2 Encryption methods. . . . . . . . . . . . . . . . . . . . . . . . . . . . . . . . . . . . . . . . . 219
9.2.1 Symmetric keys. . . . . . . . . . . . . . . . . . . . . . . . . . . . . . . . . . . . . . . . 2199.2.2 Asymmetric keys . . . . . . . . . . . . . . . . . . . . . . . . . . . . . . . . . . . . . . . 219
9.3 Digital signature. . . . . . . . . . . . . . . . . . . . . . . . . . . . . . . . . . . . . . . . . . . . 2209.4 Digital certificate . . . . . . . . . . . . . . . . . . . . . . . . . . . . . . . . . . . . . . . . . . . 2219.5 Digital Certificate Manager . . . . . . . . . . . . . . . . . . . . . . . . . . . . . . . . . . . 223
9.5.1 Issuing certificates. . . . . . . . . . . . . . . . . . . . . . . . . . . . . . . . . . . . . . 2239.5.2 Using DCM . . . . . . . . . . . . . . . . . . . . . . . . . . . . . . . . . . . . . . . . . . . 2239.5.3 Prerequisites . . . . . . . . . . . . . . . . . . . . . . . . . . . . . . . . . . . . . . . . . . 2249.5.4 Accessing DCM components . . . . . . . . . . . . . . . . . . . . . . . . . . . . . 2249.5.5 More information . . . . . . . . . . . . . . . . . . . . . . . . . . . . . . . . . . . . . . . 226
9.6 Secure Sockets Layer . . . . . . . . . . . . . . . . . . . . . . . . . . . . . . . . . . . . . . . 2269.6.1 Securing applications with SSL. . . . . . . . . . . . . . . . . . . . . . . . . . . . 2279.6.2 OpenSSL. . . . . . . . . . . . . . . . . . . . . . . . . . . . . . . . . . . . . . . . . . . . . 2289.6.3 Supported SSL and TLS protocols . . . . . . . . . . . . . . . . . . . . . . . . . 2289.6.4 Using certificates within the SSL protocol . . . . . . . . . . . . . . . . . . . . 2299.6.5 SSL handshake. . . . . . . . . . . . . . . . . . . . . . . . . . . . . . . . . . . . . . . . 2309.6.6 Enabling SSL on System i standard server applications. . . . . . . . . 2319.6.7 More information . . . . . . . . . . . . . . . . . . . . . . . . . . . . . . . . . . . . . . . 233
9.7 Hardware cryptographic support . . . . . . . . . . . . . . . . . . . . . . . . . . . . . . . 2339.7.1 Software requirements . . . . . . . . . . . . . . . . . . . . . . . . . . . . . . . . . . 2359.7.2 Examples for using the hardware cryptographic products . . . . . . . 2359.7.3 Configuring the hardware Cryptographic Coprocessor . . . . . . . . . . 2369.7.4 More information . . . . . . . . . . . . . . . . . . . . . . . . . . . . . . . . . . . . . . . 236
9.8 Data encryption and key management . . . . . . . . . . . . . . . . . . . . . . . . . . 2379.8.1 Key management . . . . . . . . . . . . . . . . . . . . . . . . . . . . . . . . . . . . . . 2379.8.2 DB2 for i5/OS built-in SQL encryption. . . . . . . . . . . . . . . . . . . . . . . 2409.8.3 Cryptographic Services APIs . . . . . . . . . . . . . . . . . . . . . . . . . . . . . 2419.8.4 Common Cryptographic Architecture APIs . . . . . . . . . . . . . . . . . . . 2429.8.5 Summarization of System i cryptographic support . . . . . . . . . . . . . 2439.8.6 More information . . . . . . . . . . . . . . . . . . . . . . . . . . . . . . . . . . . . . . . 245
Contents vii
Chapter 10. Virtual private network . . . . . . . . . . . . . . . . . . . . . . . . . . . . . . 24710.1 Introduction to VPN . . . . . . . . . . . . . . . . . . . . . . . . . . . . . . . . . . . . . . . . 24810.2 VPN protocols . . . . . . . . . . . . . . . . . . . . . . . . . . . . . . . . . . . . . . . . . . . . 250
10.2.1 SSL VPN . . . . . . . . . . . . . . . . . . . . . . . . . . . . . . . . . . . . . . . . . . . . 25110.3 Layer 2 Tunnel Protocol . . . . . . . . . . . . . . . . . . . . . . . . . . . . . . . . . . . . 252
10.3.1 L2TP tunnel modes: Compulsory and voluntary . . . . . . . . . . . . . . 25210.3.2 Multi-hop connection . . . . . . . . . . . . . . . . . . . . . . . . . . . . . . . . . . . 255
10.4 L2TP and IPSec . . . . . . . . . . . . . . . . . . . . . . . . . . . . . . . . . . . . . . . . . . 25510.5 Comparison of IPSec, SSL, and OpenSSH . . . . . . . . . . . . . . . . . . . . . 25610.6 VPN on the System i platform . . . . . . . . . . . . . . . . . . . . . . . . . . . . . . . . 257
10.6.1 VPN prerequisites . . . . . . . . . . . . . . . . . . . . . . . . . . . . . . . . . . . . . 25810.6.2 Configuring VPN . . . . . . . . . . . . . . . . . . . . . . . . . . . . . . . . . . . . . . 258
10.7 Configuring L2TP . . . . . . . . . . . . . . . . . . . . . . . . . . . . . . . . . . . . . . . . . 26210.7.1 Protecting an L2TP tunnel with IPSec. . . . . . . . . . . . . . . . . . . . . . 26310.7.2 More information . . . . . . . . . . . . . . . . . . . . . . . . . . . . . . . . . . . . . . 264
Chapter 11. Firewalls . . . . . . . . . . . . . . . . . . . . . . . . . . . . . . . . . . . . . . . . . 26511.1 Introduction to firewalls . . . . . . . . . . . . . . . . . . . . . . . . . . . . . . . . . . . . . 26611.2 External firewall concepts . . . . . . . . . . . . . . . . . . . . . . . . . . . . . . . . . . . 266
11.2.1 Demilitarized zone. . . . . . . . . . . . . . . . . . . . . . . . . . . . . . . . . . . . . 26711.3 Support for native Linux on System i. . . . . . . . . . . . . . . . . . . . . . . . . . . 269
11.3.1 Hosted and non-hosted partitions running Linux. . . . . . . . . . . . . . 27011.3.2 Security considerations for partitions . . . . . . . . . . . . . . . . . . . . . . 27111.3.3 More information . . . . . . . . . . . . . . . . . . . . . . . . . . . . . . . . . . . . . . 271
11.4 Internal firewall on the System i platform using Linux . . . . . . . . . . . . . . 27111.4.1 Native LAN adapter requirements. . . . . . . . . . . . . . . . . . . . . . . . . 27211.4.2 Scenario 1: DMZ for LPARs and two firewalls . . . . . . . . . . . . . . . 27211.4.3 Scenario 2: DMZ for other hosts and two firewalls . . . . . . . . . . . . 27311.4.4 Scenario 3: i5/OS partitions under control of two firewalls . . . . . . 27411.4.5 Scenario 4: i5/OS partition under control of one firewall . . . . . . . . 27511.4.6 Basic scenarios without DMZ . . . . . . . . . . . . . . . . . . . . . . . . . . . . 276
11.5 Hosted and non-hosted partitions for a firewall . . . . . . . . . . . . . . . . . . . 27711.6 StoneGate firewall solution for the System i platform . . . . . . . . . . . . . . 278
11.6.1 Hardware and software requirements . . . . . . . . . . . . . . . . . . . . . . 27911.6.2 Implementation of the StoneGate firewall . . . . . . . . . . . . . . . . . . . 280
Part 4. Authentication . . . . . . . . . . . . . . . . . . . . . . . . . . . . . . . . . . . . . . . . . . . . . . . . . . . . . . 281
Chapter 12. System i authentication methods . . . . . . . . . . . . . . . . . . . . . 28312.1 Authentication concepts . . . . . . . . . . . . . . . . . . . . . . . . . . . . . . . . . . . . 284
12.1.1 Authentication versus authorization . . . . . . . . . . . . . . . . . . . . . . . 28412.2 Passwords. . . . . . . . . . . . . . . . . . . . . . . . . . . . . . . . . . . . . . . . . . . . . . . 28512.3 Digital certificates . . . . . . . . . . . . . . . . . . . . . . . . . . . . . . . . . . . . . . . . . 28812.4 Kerberos . . . . . . . . . . . . . . . . . . . . . . . . . . . . . . . . . . . . . . . . . . . . . . . . 290
viii IBM System i Security Guide for IBM i5/OS Version 5 Release 4
12.4.1 Kerberos on the System i platform . . . . . . . . . . . . . . . . . . . . . . . . 29112.4.2 More information . . . . . . . . . . . . . . . . . . . . . . . . . . . . . . . . . . . . . . 292
12.5 Exit programs for authentication . . . . . . . . . . . . . . . . . . . . . . . . . . . . . . 29312.6 Validation lists . . . . . . . . . . . . . . . . . . . . . . . . . . . . . . . . . . . . . . . . . . . . 294
12.6.1 More information . . . . . . . . . . . . . . . . . . . . . . . . . . . . . . . . . . . . . . 29412.7 Lightweight Directory Access Protocol . . . . . . . . . . . . . . . . . . . . . . . . . 294
12.7.1 More information . . . . . . . . . . . . . . . . . . . . . . . . . . . . . . . . . . . . . . 29512.8 Centralized access control administration. . . . . . . . . . . . . . . . . . . . . . . 296
12.8.1 Remote Authentication Dial-In User Service. . . . . . . . . . . . . . . . . 29612.8.2 Terminal Access Controller Access Control System. . . . . . . . . . . 29812.8.3 Diameter . . . . . . . . . . . . . . . . . . . . . . . . . . . . . . . . . . . . . . . . . . . . 29812.8.4 Common Open Policy Service . . . . . . . . . . . . . . . . . . . . . . . . . . . 299
12.9 Other protocols and authentication topics . . . . . . . . . . . . . . . . . . . . . . . 29912.9.1 Lightweight Third-Party Authentication . . . . . . . . . . . . . . . . . . . . . 29912.9.2 Password Authentication Protocol . . . . . . . . . . . . . . . . . . . . . . . . 30012.9.3 Challenge Handshake Authentication Protocol. . . . . . . . . . . . . . . 30112.9.4 Extensible Authentication Protocol . . . . . . . . . . . . . . . . . . . . . . . . 30212.9.5 Microsoft Challenge-Handshake Authentication Protocol . . . . . . . 30212.9.6 Secure European System for Application in a Multi-vendor
Environment . . . . . . . . . . . . . . . . . . . . . . . . . . . . . . . . . . . . . . . . . . 302
Chapter 13. Single sign-on . . . . . . . . . . . . . . . . . . . . . . . . . . . . . . . . . . . . . 30313.1 Understanding single sign-on . . . . . . . . . . . . . . . . . . . . . . . . . . . . . . . . 304
13.1.1 SSO techniques . . . . . . . . . . . . . . . . . . . . . . . . . . . . . . . . . . . . . . 30413.1.2 Vertical and horizontal SSO . . . . . . . . . . . . . . . . . . . . . . . . . . . . . 306
13.2 SSO using Enterprise Identity Mapping . . . . . . . . . . . . . . . . . . . . . . . . 30713.2.1 EIM and Kerberos . . . . . . . . . . . . . . . . . . . . . . . . . . . . . . . . . . . . . 30813.2.2 Advantages of using EIM . . . . . . . . . . . . . . . . . . . . . . . . . . . . . . . 30913.2.3 More information . . . . . . . . . . . . . . . . . . . . . . . . . . . . . . . . . . . . . . 310
13.3 SSO using a Windows user ID and password. . . . . . . . . . . . . . . . . . . . 31013.4 SSO with user and password synchronization . . . . . . . . . . . . . . . . . . . 31213.5 SSO with WebSphere . . . . . . . . . . . . . . . . . . . . . . . . . . . . . . . . . . . . . . 31213.6 Using LDAP as a shared user registry . . . . . . . . . . . . . . . . . . . . . . . . . 313
Part 5. Security management. . . . . . . . . . . . . . . . . . . . . . . . . . . . . . . . . . . . . . . . . . . . . . . . 315
Chapter 14. Regulations and standards . . . . . . . . . . . . . . . . . . . . . . . . . . 31714.1 The Sarbanes-Oxley Act of 2002 . . . . . . . . . . . . . . . . . . . . . . . . . . . . . 318
14.1.1 SOX text and key messages. . . . . . . . . . . . . . . . . . . . . . . . . . . . . 31814.1.2 How SOX applies to companies outside the United States . . . . . 32114.1.3 COBIT . . . . . . . . . . . . . . . . . . . . . . . . . . . . . . . . . . . . . . . . . . . . . . 32114.1.4 Public Company Accounting Oversight Board . . . . . . . . . . . . . . . 32214.1.5 SOX and the System i platform. . . . . . . . . . . . . . . . . . . . . . . . . . . 32214.1.6 References . . . . . . . . . . . . . . . . . . . . . . . . . . . . . . . . . . . . . . . . . . 323
Contents ix

14.2 ISO/IEC 17799-2005 IT security techniques: Code of practice for information security management . . . . . . . . . . . . . . . . . . . . . . . . . . . . . . . . . . . . . . . 323
14.3 Other regulations and standards . . . . . . . . . . . . . . . . . . . . . . . . . . . . . . 32514.3.1 American Express Data Security Requirements . . . . . . . . . . . . . . 32514.3.2 Australia/New Zealand 4360 Risk Management . . . . . . . . . . . . . . 32514.3.3 Basel II . . . . . . . . . . . . . . . . . . . . . . . . . . . . . . . . . . . . . . . . . . . . . 32614.3.4 Gramm-Leach-Bliley Act . . . . . . . . . . . . . . . . . . . . . . . . . . . . . . . . 32614.3.5 Health Insurance Portability and Accountability Act . . . . . . . . . . . 32714.3.6 Personal Information Protection and Electronic Documents Act. . 32714.3.7 Statement on Auditing Standards No. 70, Service Organizations. 32714.3.8 Systems Security Engineering Capability Maturity Model . . . . . . . 32814.3.9 Payment Card Industry Data Security Standard . . . . . . . . . . . . . . 32814.3.10 Visa Cardholder Information Security Program. . . . . . . . . . . . . . 328
Chapter 15. Security monitoring . . . . . . . . . . . . . . . . . . . . . . . . . . . . . . . . 33115.1 Security auditing environment . . . . . . . . . . . . . . . . . . . . . . . . . . . . . . . . 332
15.1.1 Security auditing . . . . . . . . . . . . . . . . . . . . . . . . . . . . . . . . . . . . . . 33215.1.2 Security reviews . . . . . . . . . . . . . . . . . . . . . . . . . . . . . . . . . . . . . . 33215.1.3 Security monitoring . . . . . . . . . . . . . . . . . . . . . . . . . . . . . . . . . . . . 333
15.2 Techniques for monitoring security . . . . . . . . . . . . . . . . . . . . . . . . . . . . 33315.2.1 Security audit journal. . . . . . . . . . . . . . . . . . . . . . . . . . . . . . . . . . . 33315.2.2 Exit points . . . . . . . . . . . . . . . . . . . . . . . . . . . . . . . . . . . . . . . . . . . 33415.2.3 Security messages . . . . . . . . . . . . . . . . . . . . . . . . . . . . . . . . . . . . 33415.2.4 Reports and baselines . . . . . . . . . . . . . . . . . . . . . . . . . . . . . . . . . 335
15.3 Security event and state monitoring . . . . . . . . . . . . . . . . . . . . . . . . . . . 33515.3.1 General system security . . . . . . . . . . . . . . . . . . . . . . . . . . . . . . . . 33515.3.2 Auditing . . . . . . . . . . . . . . . . . . . . . . . . . . . . . . . . . . . . . . . . . . . . . 33615.3.3 System values. . . . . . . . . . . . . . . . . . . . . . . . . . . . . . . . . . . . . . . . 33615.3.4 User profiles . . . . . . . . . . . . . . . . . . . . . . . . . . . . . . . . . . . . . . . . . 33615.3.5 Password control. . . . . . . . . . . . . . . . . . . . . . . . . . . . . . . . . . . . . . 33915.3.6 Authorization control . . . . . . . . . . . . . . . . . . . . . . . . . . . . . . . . . . . 34015.3.7 Unauthorized access. . . . . . . . . . . . . . . . . . . . . . . . . . . . . . . . . . . 34215.3.8 Unauthorized programs. . . . . . . . . . . . . . . . . . . . . . . . . . . . . . . . . 34215.3.9 Database triggers . . . . . . . . . . . . . . . . . . . . . . . . . . . . . . . . . . . . . 34315.3.10 Exit points . . . . . . . . . . . . . . . . . . . . . . . . . . . . . . . . . . . . . . . . . . 34415.3.11 Other . . . . . . . . . . . . . . . . . . . . . . . . . . . . . . . . . . . . . . . . . . . . . . 344
15.4 More information . . . . . . . . . . . . . . . . . . . . . . . . . . . . . . . . . . . . . . . . . . 345
Chapter 16. Considerations and recommendations . . . . . . . . . . . . . . . . 34716.1 System security auditing . . . . . . . . . . . . . . . . . . . . . . . . . . . . . . . . . . . . 34816.2 Authority . . . . . . . . . . . . . . . . . . . . . . . . . . . . . . . . . . . . . . . . . . . . . . . . 348
16.2.1 Adopted authority . . . . . . . . . . . . . . . . . . . . . . . . . . . . . . . . . . . . . 34816.2.2 Swapping user profiles . . . . . . . . . . . . . . . . . . . . . . . . . . . . . . . . . 348
x IBM System i Security Guide for IBM i5/OS Version 5 Release 4
16.2.3 Library and directory public access. . . . . . . . . . . . . . . . . . . . . . . . 34916.3 Commands . . . . . . . . . . . . . . . . . . . . . . . . . . . . . . . . . . . . . . . . . . . . . . 349
16.3.1 Using the Limit Capabilities field to control command authority . . 34916.3.2 Library create authority (QCRTAUT). . . . . . . . . . . . . . . . . . . . . . . 350
16.4 Operating system . . . . . . . . . . . . . . . . . . . . . . . . . . . . . . . . . . . . . . . . . 35016.4.1 Restrict object tampering . . . . . . . . . . . . . . . . . . . . . . . . . . . . . . . 35116.4.2 Check Object Integrity command . . . . . . . . . . . . . . . . . . . . . . . . . 35116.4.3 System cleanup. . . . . . . . . . . . . . . . . . . . . . . . . . . . . . . . . . . . . . . 35216.4.4 Creating and monitoring the QSYSMSG message queue . . . . . . 35216.4.5 TCP/IP servers . . . . . . . . . . . . . . . . . . . . . . . . . . . . . . . . . . . . . . . 35216.4.6 Identifying all exit point programs . . . . . . . . . . . . . . . . . . . . . . . . . 35216.4.7 Other environments. . . . . . . . . . . . . . . . . . . . . . . . . . . . . . . . . . . . 353
16.5 System values and network attributes. . . . . . . . . . . . . . . . . . . . . . . . . . 35316.5.1 System security level system value . . . . . . . . . . . . . . . . . . . . . . . 35316.5.2 Locking security system values. . . . . . . . . . . . . . . . . . . . . . . . . . . 35416.5.3 Password control system values. . . . . . . . . . . . . . . . . . . . . . . . . . 35416.5.4 Network attributes . . . . . . . . . . . . . . . . . . . . . . . . . . . . . . . . . . . . . 355
16.6 User profiles . . . . . . . . . . . . . . . . . . . . . . . . . . . . . . . . . . . . . . . . . . . . . 35516.7 More information . . . . . . . . . . . . . . . . . . . . . . . . . . . . . . . . . . . . . . . . . . 358
Appendix A. LPAR security considerations . . . . . . . . . . . . . . . . . . . . . . . 359The hypervisor . . . . . . . . . . . . . . . . . . . . . . . . . . . . . . . . . . . . . . . . . . . . . . . . 360
Partition isolation. . . . . . . . . . . . . . . . . . . . . . . . . . . . . . . . . . . . . . . . . . . . 360Hypervisor on POWER5 systems . . . . . . . . . . . . . . . . . . . . . . . . . . . . . . . 361Managing security for LPARs . . . . . . . . . . . . . . . . . . . . . . . . . . . . . . . . . . 362More information . . . . . . . . . . . . . . . . . . . . . . . . . . . . . . . . . . . . . . . . . . . . 364
Interpartition communications . . . . . . . . . . . . . . . . . . . . . . . . . . . . . . . . . . . . 364External LAN . . . . . . . . . . . . . . . . . . . . . . . . . . . . . . . . . . . . . . . . . . . . . . . 364OptiConnect . . . . . . . . . . . . . . . . . . . . . . . . . . . . . . . . . . . . . . . . . . . . . . . 365Virtual Ethernet . . . . . . . . . . . . . . . . . . . . . . . . . . . . . . . . . . . . . . . . . . . . . 367More information . . . . . . . . . . . . . . . . . . . . . . . . . . . . . . . . . . . . . . . . . . . . 368
Controlling virtual LAN traffic . . . . . . . . . . . . . . . . . . . . . . . . . . . . . . . . . . . . . 368Connecting virtual LANs to external LANs . . . . . . . . . . . . . . . . . . . . . . . . . . . 370
More information . . . . . . . . . . . . . . . . . . . . . . . . . . . . . . . . . . . . . . . . . . . . 371Other security considerations. . . . . . . . . . . . . . . . . . . . . . . . . . . . . . . . . . . . . 371
Appendix B. Operations Console . . . . . . . . . . . . . . . . . . . . . . . . . . . . . . . 373Configuring Operations Console . . . . . . . . . . . . . . . . . . . . . . . . . . . . . . . . . . 374Console device authentication . . . . . . . . . . . . . . . . . . . . . . . . . . . . . . . . . . . . 375
User authentication . . . . . . . . . . . . . . . . . . . . . . . . . . . . . . . . . . . . . . . . . . 375Data privacy . . . . . . . . . . . . . . . . . . . . . . . . . . . . . . . . . . . . . . . . . . . . . . . 375Data integrity . . . . . . . . . . . . . . . . . . . . . . . . . . . . . . . . . . . . . . . . . . . . . . . 376
Operations Console LAN console . . . . . . . . . . . . . . . . . . . . . . . . . . . . . . . . . 376
Contents xi

Creating additional DST and SST profiles . . . . . . . . . . . . . . . . . . . . . . . . 376Creating additional service tools device profiles . . . . . . . . . . . . . . . . . . . . 376
More information . . . . . . . . . . . . . . . . . . . . . . . . . . . . . . . . . . . . . . . . . . . . . . 378
Appendix C. Applications and middleware security considerations . . . 379WebSphere Application Server . . . . . . . . . . . . . . . . . . . . . . . . . . . . . . . . . . . 380
Enabling security. . . . . . . . . . . . . . . . . . . . . . . . . . . . . . . . . . . . . . . . . . . . 381WebSphere user profiles. . . . . . . . . . . . . . . . . . . . . . . . . . . . . . . . . . . . . . 383Protecting WebSphere Application Server files and resources. . . . . . . . . 383More information . . . . . . . . . . . . . . . . . . . . . . . . . . . . . . . . . . . . . . . . . . . . 384
WebSphere MQ . . . . . . . . . . . . . . . . . . . . . . . . . . . . . . . . . . . . . . . . . . . . . . . 384MQ user profiles . . . . . . . . . . . . . . . . . . . . . . . . . . . . . . . . . . . . . . . . . . . . 387Protecting WebSphere MQ files and resources . . . . . . . . . . . . . . . . . . . . 388
Lotus Domino . . . . . . . . . . . . . . . . . . . . . . . . . . . . . . . . . . . . . . . . . . . . . . . . . 389Domino for i5/OS. . . . . . . . . . . . . . . . . . . . . . . . . . . . . . . . . . . . . . . . . . . . 390Protecting Domino files and resources . . . . . . . . . . . . . . . . . . . . . . . . . . . 391Important files to consider . . . . . . . . . . . . . . . . . . . . . . . . . . . . . . . . . . . . . 392More information . . . . . . . . . . . . . . . . . . . . . . . . . . . . . . . . . . . . . . . . . . . . 393
IBM HTTP Server (powered by Apache) . . . . . . . . . . . . . . . . . . . . . . . . . . . . 393HTTP server user profiles . . . . . . . . . . . . . . . . . . . . . . . . . . . . . . . . . . . . . 394Protecting HTTP server files and resources . . . . . . . . . . . . . . . . . . . . . . . 395Important files to consider . . . . . . . . . . . . . . . . . . . . . . . . . . . . . . . . . . . . . 396More information . . . . . . . . . . . . . . . . . . . . . . . . . . . . . . . . . . . . . . . . . . . . 396
Appendix D. Program temporary fixes . . . . . . . . . . . . . . . . . . . . . . . . . . . 397Planning your fix management strategy . . . . . . . . . . . . . . . . . . . . . . . . . . . . . 398
Why an i5/OS strategy . . . . . . . . . . . . . . . . . . . . . . . . . . . . . . . . . . . . . . . 398Maintenance strategy recommendations . . . . . . . . . . . . . . . . . . . . . . . . . 398
High impact or pervasive fixes . . . . . . . . . . . . . . . . . . . . . . . . . . . . . . . . . . . . 399
Related publications . . . . . . . . . . . . . . . . . . . . . . . . . . . . . . . . . . . . . . . . . . 403IBM Redbooks . . . . . . . . . . . . . . . . . . . . . . . . . . . . . . . . . . . . . . . . . . . . . . . . 403Other publications . . . . . . . . . . . . . . . . . . . . . . . . . . . . . . . . . . . . . . . . . . . . . 404Online resources . . . . . . . . . . . . . . . . . . . . . . . . . . . . . . . . . . . . . . . . . . . . . . 405How to get IBM Redbooks . . . . . . . . . . . . . . . . . . . . . . . . . . . . . . . . . . . . . . . 407Help from IBM . . . . . . . . . . . . . . . . . . . . . . . . . . . . . . . . . . . . . . . . . . . . . . . . 408
Index . . . . . . . . . . . . . . . . . . . . . . . . . . . . . . . . . . . . . . . . . . . . . . . . . . . . . . . 409
xii IBM System i Security Guide for IBM i5/OS Version 5 Release 4

Notices
This information was developed for products and services offered in the U.S.A.
IBM may not offer the products, services, or features discussed in this document in other countries. Consult your local IBM representative for information on the products and services currently available in your area. Any reference to an IBM product, program, or service is not intended to state or imply that only that IBM product, program, or service may be used. Any functionally equivalent product, program, or service that does not infringe any IBM intellectual property right may be used instead. However, it is the user's responsibility to evaluate and verify the operation of any non-IBM product, program, or service.
IBM may have patents or pending patent applications covering subject matter described in this document. The furnishing of this document does not give you any license to these patents. You can send license inquiries, in writing, to: IBM Director of Licensing, IBM Corporation, North Castle Drive Armonk, NY 10504-1785 U.S.A.
The following paragraph does not apply to the United Kingdom or any other country where such provisions are inconsistent with local law: INTERNATIONAL BUSINESS MACHINES CORPORATION PROVIDES THIS PUBLICATION "AS IS" WITHOUT WARRANTY OF ANY KIND, EITHER EXPRESS OR IMPLIED, INCLUDING, BUT NOT LIMITED TO, THE IMPLIED WARRANTIES OF NON-INFRINGEMENT, MERCHANTABILITY OR FITNESS FOR A PARTICULAR PURPOSE. Some states do not allow disclaimer of express or implied warranties in certain transactions, therefore, this statement may not apply to you.
This information could include technical inaccuracies or typographical errors. Changes are periodically made to the information herein; these changes will be incorporated in new editions of the publication. IBM may make improvements and/or changes in the product(s) and/or the program(s) described in this publication at any time without notice.
Any references in this information to non-IBM Web sites are provided for convenience only and do not in any manner serve as an endorsement of those Web sites. The materials at those Web sites are not part of the materials for this IBM product and use of those Web sites is at your own risk.
IBM may use or distribute any of the information you supply in any way it believes appropriate without incurring any obligation to you.
Information concerning non-IBM products was obtained from the suppliers of those products, their published announcements or other publicly available sources. IBM has not tested those products and cannot confirm the accuracy of performance, compatibility or any other claims related to non-IBM products. Questions on the capabilities of non-IBM products should be addressed to the suppliers of those products.
This information contains examples of data and reports used in daily business operations. To illustrate them as completely as possible, the examples include the names of individuals, companies, brands, and products. All of these names are fictitious and any similarity to the names and addresses used by an actual business enterprise is entirely coincidental.
COPYRIGHT LICENSE: This information contains sample application programs in source language, which illustrates programming techniques on various operating platforms. You may copy, modify, and distribute these sample programs in any form without payment to IBM, for the purposes of developing, using, marketing or distributing application programs conforming to the application programming interface for the operating platform for which the sample programs are written. These examples have not been thoroughly tested under all conditions. IBM, therefore, cannot guarantee or imply reliability, serviceability, or function of these programs. You may copy, modify, and distribute these sample programs in any form without payment to IBM for the purposes of developing, using, marketing, or distributing application programs conforming to IBM's application programming interfaces.
© Copyright IBM Corp. 2005, 2006. All rights reserved. xiii

TrademarksThe following terms are trademarks of the International Business Machines Corporation in the United States, other countries, or both:
AIX®AS/400®DB2®DB2 Universal Database™Distributed Relational Database
Architecture™Domino®DRDA®eServer™i5/OS®IBM®IBM Solution Connection™IMS™
Integrated Language Environment®
iSeries™Language Environment®Lotus®Lotus Notes®MQSeries®Net.Commerce™Netfinity®NetServer™Notes®OS/400®PartnerWorld®POWER5™
PowerPC®QuickPlace®Redbooks™Redbooks (logo) ™RACF®Sametime®SQL/400®System i™System i5™System/38™Tivoli®WebSphere®Workplace™xSeries®
The following terms are trademarks of other companies:
Java, JavaServer, JavaServer Pages, JDBC, J2EE, Solaris, Sun, Sun Microsystems, and all Java-based trademarks are trademarks of Sun Microsystems, Inc. in the United States, other countries, or both.
Microsoft, Outlook, Windows Server, Windows, and the Windows logo are trademarks of Microsoft Corporation in the United States, other countries, or both.
Intel, Pentium, Intel logo, Intel Inside logo, and Intel Centrino logo are trademarks or registered trademarks of Intel Corporation or its subsidiaries in the United States, other countries, or both.
UNIX is a registered trademark of The Open Group in the United States and other countries.
Linux is a trademark of Linus Torvalds in the United States, other countries, or both.
Other company, product, and service names may be trademarks or service marks of others.
xiv IBM System i Security Guide for IBM i5/OS Version 5 Release 4

Preface
The IBM® System i™ family, with its operating system IBM i5/OS®, is considered one of the most secure systems in the industry. From the beginning, security was designed as an integral part of the system. The System i platform provides a rich set of security features and services that pertain to the goals of authentication, authorization, integrity, confidentiality, and auditing. However, if an IBM Client does not know that a service, such as a virtual private network (VPN) or hardware cryptographic support, exists on the system, they will not use it.
In addition, there are more and more security auditors and consultants who are in charge of implementing corporate security policies in an organization. In many cases, they are not familiar with the System i platform, but need to understand the security services that are available.
This IBM Redbook guides you through the native security features that are available on the System i platform. This book is intended for security auditors and consultants, IBM System Specialists, Business Partners, and Clients to help you answer first-level questions concerning the security features that are available on the System i platform.
The team that wrote this redbookThis redbook was produced by a team of specialists from around the world working at the International Technical Support Organization (ITSO), Rochester Center.
Debbie Landon is an IBM certified Senior IT Specialist in the IBM ITSO, Rochester Center. Her current area of expertise is on IBM Workplace™ products, Lotus® Domino® for i5/OS, and related collaboration products such as Sametime® and QuickPlace®. Debbie has been with IBM for 23 years, working first with the S/36 and now with the IBM System i5™ family. Before joining the ITSO in November 2000, Debbie was a member of the PartnerWorld® for Developers, IBM eServer™ iSeries™ team, supporting Business Partners in the area of collaboration products.
© Copyright IBM Corp. 2005, 2006. All rights reserved. xv
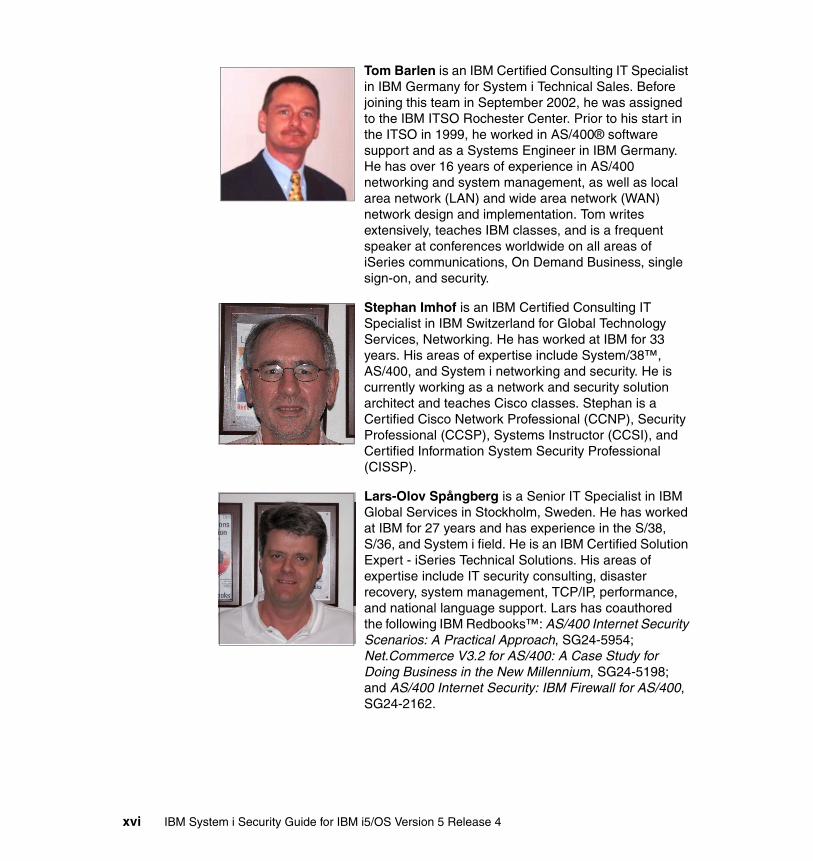
Tom Barlen is an IBM Certified Consulting IT Specialist in IBM Germany for System i Technical Sales. Before joining this team in September 2002, he was assigned to the IBM ITSO Rochester Center. Prior to his start in the ITSO in 1999, he worked in AS/400® software support and as a Systems Engineer in IBM Germany. He has over 16 years of experience in AS/400 networking and system management, as well as local area network (LAN) and wide area network (WAN) network design and implementation. Tom writes extensively, teaches IBM classes, and is a frequent speaker at conferences worldwide on all areas of iSeries communications, On Demand Business, single sign-on, and security.
Stephan Imhof is an IBM Certified Consulting IT Specialist in IBM Switzerland for Global Technology Services, Networking. He has worked at IBM for 33 years. His areas of expertise include System/38™, AS/400, and System i networking and security. He is currently working as a network and security solution architect and teaches Cisco classes. Stephan is a Certified Cisco Network Professional (CCNP), Security Professional (CCSP), Systems Instructor (CCSI), and Certified Information System Security Professional (CISSP).
Lars-Olov Spångberg is a Senior IT Specialist in IBM Global Services in Stockholm, Sweden. He has worked at IBM for 27 years and has experience in the S/38, S/36, and System i field. He is an IBM Certified Solution Expert - iSeries Technical Solutions. His areas of expertise include IT security consulting, disaster recovery, system management, TCP/IP, performance, and national language support. Lars has coauthored the following IBM Redbooks™: AS/400 Internet Security Scenarios: A Practical Approach, SG24-5954; Net.Commerce V3.2 for AS/400: A Case Study for Doing Business in the New Millennium, SG24-5198; and AS/400 Internet Security: IBM Firewall for AS/400, SG24-2162.
xvi IBM System i Security Guide for IBM i5/OS Version 5 Release 4

Many thanks to the following people for their contributions to this project:
Steve BladeCarol BudnikJim CoonWissam ElriachyEd FishelTim FynskovChristopher GloeBeth HagemeisterLarry HallRon HaugenTerry HennessyPete HeyrmanMark MangesBrian NoordykeJeff RemfertRick SandersBarb SmithSteve SparrowJeff UehlingJon WoldIBM Rochester Development Lab
Thomas GrayJoanna Pohl-MisczykJenifer ServaisITSO, Rochester Center
We extend a special thank you to the previous authors of this redbook:
Erik LarssonRichard StoeklinTom Parsons
Preface xvii

Become a published authorJoin us for a two- to six-week residency program! Help write an IBM Redbook dealing with specific products or solutions, while getting hands-on experience with leading-edge technologies. You will team with IBM technical professionals, Business Partners and/or customers.
Your efforts will help increase product acceptance and customer satisfaction. As a bonus, you will develop a network of contacts in IBM development labs, and increase your productivity and marketability.
Find out more about the residency program, browse the residency index, and apply online at:
ibm.com/redbooks/residencies.html
Comments welcomeYour comments are important to us!
We want our Redbooks to be as helpful as possible. Send us your comments about this or other Redbooks in one of the following ways:
� Use the online Contact us review redbook form found at:
ibm.com/redbooks
� Send your comments in an e-mail to:
� Mail your comments to:
IBM Corporation, International Technical Support OrganizationDept. HYTD Mail Station P0992455 South RoadPoughkeepsie, NY 12601-5400
xviii IBM System i Security Guide for IBM i5/OS Version 5 Release 4
Part 1 Security concepts
This part includes the following chapters:
� Chapter 1, “Security management practices” on page 3� Chapter 2, “Security process and policies” on page 13� Chapter 3, “System i security overview” on page 27
Part 1
© Copyright IBM Corp. 2005, 2006. All rights reserved. 1

2 IBM System i Security Guide for IBM i5/OS Version 5 Release 4

Chapter 1. Security management practices
An organization’s management must understand the many different security threats that the organization faces. Management must also ensure that proper security controls are in place to address the threats.
In this chapter, we introduce security management, identify some of the threats that can affect an organization’s security, and discuss general security management practices.
1
© Copyright IBM Corp. 2005, 2006. All rights reserved. 3

1.1 Computer securityThere are many definitions for computer security. In general, computer security involves the implementation of specific measures taken to protect a computer environment against espionage, sabotage, crime, attack, or any type of unintentional or accidental harm. The computer environment is inclusive of the hardware, network, applications, and data.
To implement computer security, you must understand and analyze the risks to the computer environment and take appropriate actions to reduce the risks to the acceptable level appropriate for the organization. No consultant or auditor can tell you how to set up security for your organization unless they have a complete understanding of your organization’s assets, threats, risks, and environment.
To determine the proper security settings for a system, you must implement a security program. This chapter introduces many of the terms used in a security program. Chapter 2, “Security process and policies” on page 13, introduces the process you should follow to build a security program. A security policy is the central component of a security program and must be documented before the proper level of security controls can be applied to the computer environment.
Everyone from senior management to users should be concerned with security. Security protects your computer system and sensitive information from both intentional and unintentional security breaches.
An important step in implementing a security program is to determine which systems, information, and additional items to secure. After you establish your security policy, you must conduct training to educate the users to be compliant with the new security rules.
Security is what you have after you analyze the risks, mitigate the risks that you can, and know which risks you have chosen to accept.
An organization achieves their desired level of security by:
� Defining a security policy� Implementing the security policy� Monitoring for compliance with the security policy� Obtaining independent confirmation that the security policy is sufficient and
has been properly implemented
Mitigate: To mitigate is to make less harsh, severe, or painful.
4 IBM System i Security Guide for IBM i5/OS Version 5 Release 4
1.2 Security complianceEffective security compliance requires an organization-wide, top-down management commitment to the security program. Security compliance means to act according to accepted policies, regulations, standards, and guidelines. Security compliance within an organization refers to the organization that conforms to their documented security policy, industry or government regulations and standards, and all other details of their security program.
1.3 Security managementAn organization must protect its assets by implementing the proper security management practices for the organization. The security management practices that are introduced in this chapter include:
� Assets, vulnerabilities, threats, risks, and countermeasures� Security controls� Roles and responsibilities� Information classification
1.3.1 Assets, vulnerabilities, threats, risks, and countermeasuresAssets, vulnerabilities, threats, risks, and countermeasures are related terms that you need to understand and evaluate as input into the organization’s security policy:
� Asset: In general, an asset is a resource, process, product, or system that has value to the organization. Since assets have a value, they normally require some level of protection. The level of protection depends on the value of the asset, the threats that exist against the asset, and how vulnerable the asset is should the threat be exploited. Assets can be either tangible or intangible. Examples of tangible assets are computer hardware, computer data, licensed products, and software applications. Data privacy and the organization’s public image are examples of intangible assets.
� Vulnerability: A vulnerability is a weakness that threatens the confidentiality, integrity, or availability of an asset. Vulnerabilities are not only deficiencies of software or inappropriate implementation of technical measures. Consider untrained employees, incorrect procedures and missing documentation as well. The threat is that someone will uncover a specific vulnerability and take advantage of it for malicious purposes.
� Threat: A threat is any activity that can have an adverse or undesirable affect on an organizational asset. Threats exploit vulnerabilities. Hardware failure,
Chapter 1. Security management practices 5
fire, hackers, espionage, malicious code, sabotage, vandalism, and weather are some of the many different threats that an organization might face.
� Risk: A risk is the possibility of a threat exploiting a vulnerability. Risks can be mitigated, but at a cost. Also a risk can never be completely eliminated. An important input for developing a security policy is to determine how much risk your organization is willing to accept for each asset that needs to be protected.
� Countermeasure: Countermeasures are security safeguards that mitigate the risk of threats.
To be aware of i5/OS-specific threats and to help understand vulnerabilities, risks, and countermeasures, you should read computer security literature, attend computer security conferences, and keep up to date with security advisories.
1.3.2 Security controlsA security control is the ability to allow or deny the use of a resource, such as a file or program, by an individual or a process. The permission to use a resource is defined using permissions such as operational, management, existence, alter, and reference object authorities. There are three types of security controls:
� Physical controls: These controls protect the security of the physical environment. Examples of physical controls include:
– Guards– Video cameras– Locks– Alarm systems– Uninterrptible Power Supply
� Technical controls: These controls use computer hardware and software to implement access control. Examples of technical controls include:
– Object authority– Data authority– Encryption
� Administrative controls: These controls include the security policy and security procedures implemented as a part of the security program. Examples of administrative controls include:
– Security policy– Security guidelines– Security procedures– Security training
6 IBM System i Security Guide for IBM i5/OS Version 5 Release 4

1.3.3 Roles and responsibilitiesAs you might expect, specific roles and responsibilities are related to an organization’s security program. Organizations may choose to use different role names, and several roles may be assigned to the same individual. Here are some of the common security related roles that you should include in your organization’s security program:
� Management: Senior management is typically the organization’s asset and data owner for business applications. Senior management should demonstrate its commitment to the organization’s security program by releasing management communication that introduces and supports the security policy. Senior management must always adhere to the security policy, as does everyone else in the organization.
� Security Officer: The security officer plays a key role to secure the company’s information system. On behalf of the senior management, the security officer develops the corporate security policy. The security officer ensures that the information system is implemented and run in accordance with the security policy. This person evaluates vulnerabilities and determines enhanced security measures. This person also ensures the enforcement of the corporate security policy.
� Owner: An owner, such as a data owner, does not own the asset or data, but rather is responsible for the protection of the organization’s assets and data. Data owners are typically members of the organization’s senior management and can be held personally and financially liable for their negligence in protecting assets and data.
The general responsibilities of a data owner are to decide on the classification level of the data, determine how to protect the data, and define who can access the data. The data owner usually delegates the daily data owner responsibility for assets and data to a data custodian, such as the Information Technology (IT) department. The delegated responsibilities may include both logical access and physical access control.
� Custodian: A data custodian is someone who is entrusted with guarding and protecting data. The daily responsibilities of the data owner are typically delegated to the computer or IT department for data and possibly a security department for the physical facilities. The IT department is then responsible for the regular maintenance and protection of the organization’s assets and data.
This responsibility can be referred to as logical access control, and the person to whom this responsibility is delegated can be referred to as the system security administrator. This daily responsibility usually includes keeping systems operational; protecting system data; validating the
Chapter 1. Security management practices 7

confidentiality, availability, and integrity of systems and data; and performing system and data backups and restores.
� Technical security specialist: The technical security specialist is usually a member of the IT department. This person is trained to work with the data owners and data custodians to make sure the security program is reasonable and that any exposures are acceptable to the data owners.
� System security administrator: The system security administrator is responsible for implementing and maintaining the system security controls required by the security policy. This includes activities such as creating, updating, and deleting user profiles; assigning new users to group profiles; setting an initial password for new users; and updating and revoking user privileges as required.
The system security administrator also reviews the security audit logs and compares system security settings to monitor the overall security status of the system. Any identified deviations should cause the security administrator to open a security incident report and start an investigation.
� User: A user is anyone who uses the organization’s assets and data to fulfill their responsibilities in the organization. Users must be given the proper and limited access rights to the assets and data to fulfill their responsibilities. The typical responsibilities for a user include being responsible for following the organization’s security policy, standards, and procedures.
� Security auditor: A security auditor can be an internal organization auditor or a member of an external auditor organization. A security auditor performs regular and repeated reviews of the organization’s security procedures and control to make sure they meet the requirements of the security policy, processes, procedures, and guidelines. A security audit is usually required to satisfy an industry, government, or owner responsibilities.
1.3.4 Information classificationAn organization’s data is usually a valuable business asset. The value of the data asset helps determine the necessary level of data protection. A single value and protection standard cannot be applied across all data. Information classification assists in assigning a value to data and establishing the correct level of data protection. Common levels of data classification are used in such commercial work as confidential, private, sensitive, and public.
8 IBM System i Security Guide for IBM i5/OS Version 5 Release 4

1.4 Security implementation layersTo achieve the highest level of protection, the security program should be developed and implemented in layers. Security is usually defined in five layers as shown in Figure 1-1.
Figure 1-1 Security implementation layers
Each layer is explained as follows:
� Application security: For the purposes of demonstrating security implementation layers, application security does not refer to business applications such as payroll or order entry. Instead it refers to such applications as the Hypertext Transfer Protocol (HTTP) server, Secure Sockets Layer (SSL), and system exit programs.
� System security: System security is an integrated function of the System i platform. It is implemented at the system instruction level and controls all system software functions. Users are identified and authenticated at the system level by a single security mechanism for all functions and environments that are available on the system.
� Network security: Security should be included as part of the network design. Network security includes controls such as firewalls, virtual private networks (VPNs), and gateways.
� Physical security: Physical security includes protecting assets such as the system, devices, and backup media from accidental or deliberate damage. Most measures that you can implement to ensure the physical security of your
System Security
Network Security
Physical Security
Use
r edu
catio
n
Corporate Security
Lock
s, a
cces
s co
ntro
lFi
rew
all,
VP
N g
atew
ay
LAN
inte
rface
User profile
Obj
ect a
cces
s
Intru
sion
det
ectio
n
UP
S, b
acku
p co
mm
. lin
e
Secu
rity
polic
ies
Should meet security goals of
Authentication
Authorization
Confidentiality
Audit/Logging
ApplicationSecuritySSL, exitprograms Availability
Integrity
Chapter 1. Security management practices 9

system are external to the system. Physical security includes access controls, uninterrptible power supplies, and redundant capabilities such as backup communications lines.
� Corporate security: Corporate security is responsible for all aspects of an organization’s security program, including the organization’s security policies, security training, the organization’s business systems, and planning for and managing disaster recovery.
Implementing security in your environment must begin with creating your organization’s security program. Simply implementing a security control at a single layer, such as a firewall in the network layer, is not enough to prevent unwanted access to confidential data on your system. After you determine what your security program should include, you must tailor it to secure your environment at all the security implementation layers. In Chapter 2, “Security process and policies” on page 13, you learn how to use the security process to define a security program and most importantly a security policy.
Each security control or mechanism should satisfy one or more of the following security goals:
� Confidentiality: Only authorized users can view the data. For data that is transmitted through a network, there are two ways to achieve this goal:
– Encrypt the data.– Make sure that only authorized persons can access the network.
� Integrity: Only authorized users can modify the data, but only in approved ways. The data should be protected so it cannot be changed either accidently or maliciously.
� Availability: This security goal sets the requirement for protection against intentional or accidental attempts to perform deletion of data or otherwise cause a denial of service or data. Availability is frequently an organization’s foremost security objective.
� Authentication: This goal determines whether users are who they claim to be. The most common technique to authenticate is by user profile name and password. However, other methods exist such as using user certificates or Kerberos as an authentication protocol in a single sign-on (SSO) environment.
� Authorization: This security goal permits a user to access resource and perform actions on them. An example of authorization is the permissions (public or private rights) to i5/OS objects.
10 IBM System i Security Guide for IBM i5/OS Version 5 Release 4

� Auditing or logging: As soon as your security plan is implemented, you must monitor the system for any out-of-policy security activity, and resolve any discrepancies created by the activity. Depending on your organization and security policy, you may also need to issue a security warning to the person who performed the out-of-policy security activity so they know not to perform this action in the future.
1.5 More informationRefer to the following books for assistance in understanding security management, threats, and practices:
� CISSP: Certified Information Systems Security Professional Study Guide, Second Edition by Ed Tittel, James Michael Stewart, and Mike Chapple
� Information Security Management Handbook, Fourth Edition, by Harold F. Tipton and Micki Krause
Note: Even though the availability of the information system is an overriding security objective for many organizations, we do not address this requirement in this redbook since it includes functions that are covered in other documentation.
For more information about availability on the System i platform, see the Information Center at the following Web address and select the path Systems Management → Availability.
http://publib.boulder.ibm.com/infocenter/iseries/v5r4/index.jsp
Chapter 1. Security management practices 11

12 IBM System i Security Guide for IBM i5/OS Version 5 Release 4

Chapter 2. Security process and policies
Instead of arbitrarily changing system values, network attributes, and user profile settings based on the latest security blog, magazine article, or book, an organization should follow a simple security process model to achieve the desired level of computer security. An example of one such model entails these actions:
1. Define a security program.2. Implement the security program.3. Monitor for compliance with the security program.4. Obtain independent confirmation that the security program is sufficient and
implemented.
In this chapter, we present an overview of how an organization can achieve its desired level of computer security by using a security process to create a security program and, most importantly, a security policy.
2
© Copyright IBM Corp. 2005, 2006. All rights reserved. 13

2.1 Security programThe security process should include all areas that might be part of the organization’s security program. The security policy forms the basis of the security program. But, the security program may also include procedures, documents, standards, compliancy enforcement measures, devices, software, training, and personnel. The focus of this chapter is on creating an organization’s security policy, not the entire security program.
2.1.1 Security policyA security policy is a formal set of rules, regarding an organization’s technology and information assets, which users must accept and follow. A security policy combines the policies required by senior management with any regulatory policy requirements. The senior management policies identify the organization’s security objectives, responsibilities of management and users, and laws. They also identify regulations that govern the organization, liability issues, and any general requirements and security controls.
If applicable, based on the organization’s location and industry, the addition of regulatory content to the security policy will most likely include detailed and concise policy information as required by a country, government, industry, or other legal requirements.
2.1.2 BaselinesBaselines establish the minimum level of required security for an organization. After baselines are documented, you can define standards. If desired or necessary, you can apply baselines directly to systems, establishing the system with the minimum security level required by the organization.
Note: This chapter contains references to the iSeries Information Center, which has been updated since this book was written. To find the main Web site, go to the following Web address and select your i5/OS version. The language version is determined by your Web browser settings:
http://publib.boulder.ibm.com/iseries/
All references in this chapter take you to the iSeries Information Center for V5R4 page. On this page, you can simply click the iSeries Information Center, Version 5 Release 4 link in the navigation area and select the topics that are specified:
http://publib.boulder.ibm.com/infocenter/iseries/v5r4/index.jsp
14 IBM System i Security Guide for IBM i5/OS Version 5 Release 4
You can view baselines as the standard or rules that you must follow to obtain a specific level of security. In this case, baselines are the planned goal, and the standard shows the steps to obtain the goal.
2.1.3 StandardsStandards are usually derived directly from the security policy. Standards are mandatory requirements; there is most likely no option as to whether you should follow or ignore the standard.
Standards further define, support, and enforce the security policy. Standards are rules that might indicate what an organization’s employees should and should not do, how specific hardware can be used, and what are acceptable configurations for software products or applications.
A standard might require the use of a specific technology by the organization, without specifying which product to use for the technology or how to implement the product for the technology.
2.1.4 GuidelinesMany organizations have employees who are not properly trained or experienced with system security management or who know how to develop a security policy. Employees are unaware of what the security policy should contain. They are unsure as to what should be documented.
Guidelines, sometimes also referred to as “best practices”, are recommendations for organizations that need help getting started with their security program. Guidelines can come from within the organization and indicate how specific situations or events should be handled. Guidelines can also come from other organizations such as the International Organization for Standardization (ISO).
ISO 17799 is an international set of security guidelines divided into eleven security domains or areas. One of the security domains addresses how an organization should develop a security policy.
For additional information about ISO, refer to the ISO Web site at:
http://www.iso.org
For information about ISO 17799, see 14.2, “ISO/IEC 17799-2005 IT security techniques: Code of practice for information security management” on page 323.
Chapter 2. Security process and policies 15

2.1.5 ProceduresProcedures are the documented step-by-step instructions on how to implement the directives in the security policy and security standards. They are usually documented as desk procedures for security officers, system operators, and system administrators. Procedures help to make sure that, regardless of who makes a change, if the procedure is followed, then the change is performed in a standardized, accepted, and repeatable manner.
2.2 Security process modelAt the beginning of this chapter, we introduced the security process model. This section expands the security process model by examining each step in additional detail.
The security process model is derived from a traditional management model and involves steps to plan, implement, monitor, and evaluate. The security process model is summarized here, with a slightly expanded view to create a security policy:
1. Identify and document the security requirements.
This planning step is used to identify and document the list of general security requirements based on the organization, industry, government regulations, and standards.
2. Plan and write a security policy.
During this planning step, the security policy is created, along with the standards, guidelines, baselines, and procedures. The standards, guidelines, baselines, and procedure must relate to and support the security policy.
3. Implement the security policy.
In this step, the security policy, standards, guidelines, baselines, and procedures previously created are implemented.
4. Monitor for implementation accuracy.
The policy must often be interpreted and applied to different technologies. Monitoring the accuracy of the implementation helps evaluate if the right controls are in place based on the interpretation and technology application as required by the security policy.
5. Monitor for compliance with the security policy.
The entire environment that is covered by the security policy must be monitored to assure compliance with the documented security policy, standards, guidelines, baselines, and procedures.
16 IBM System i Security Guide for IBM i5/OS Version 5 Release 4
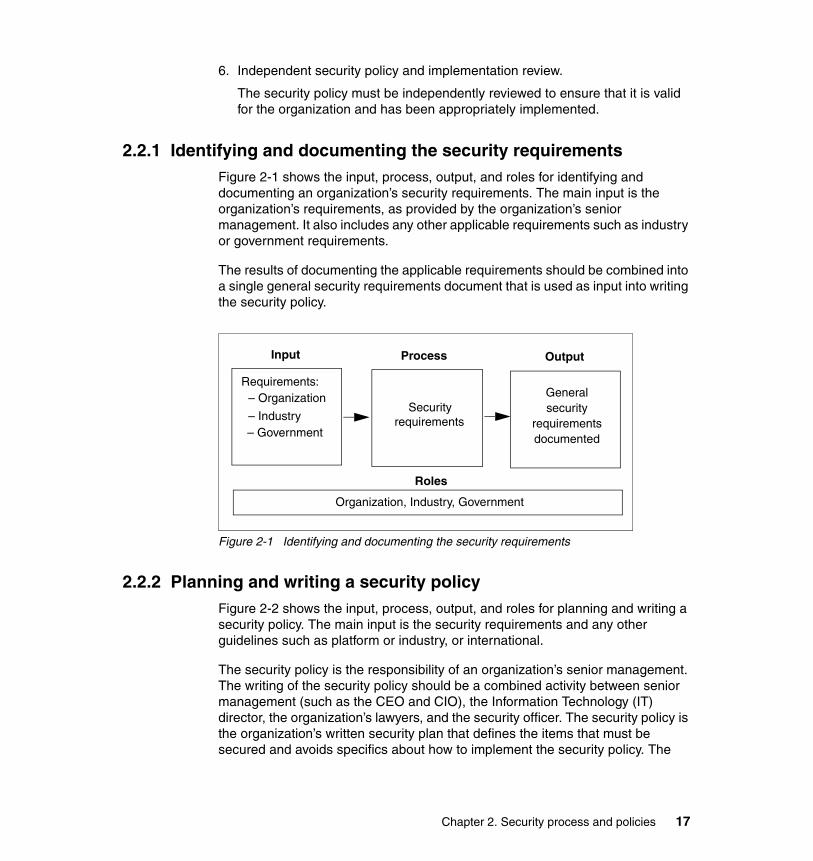
6. Independent security policy and implementation review.
The security policy must be independently reviewed to ensure that it is valid for the organization and has been appropriately implemented.
2.2.1 Identifying and documenting the security requirementsFigure 2-1 shows the input, process, output, and roles for identifying and documenting an organization’s security requirements. The main input is the organization’s requirements, as provided by the organization’s senior management. It also includes any other applicable requirements such as industry or government requirements.
The results of documenting the applicable requirements should be combined into a single general security requirements document that is used as input into writing the security policy.
Figure 2-1 Identifying and documenting the security requirements
2.2.2 Planning and writing a security policyFigure 2-2 shows the input, process, output, and roles for planning and writing a security policy. The main input is the security requirements and any other guidelines such as platform or industry, or international.
The security policy is the responsibility of an organization’s senior management. The writing of the security policy should be a combined activity between senior management (such as the CEO and CIO), the Information Technology (IT) director, the organization’s lawyers, and the security officer. The security policy is the organization’s written security plan that defines the items that must be secured and avoids specifics about how to implement the security policy. The
Input Process Output
Requirements:
– Industry– Government
Security requirements
Generalsecurity
requirementsdocumented
Roles
Organization, Industry, Government
– Organization
Chapter 2. Security process and policies 17

security policy must cover computer systems as well as all security areas including the manual process such as physical security.
The results of planning and writing the security policy are a documented, management-supported policy that should be communicated by senior management to the organization.
Figure 2-2 Planning and writing a security policy
For additional information about the contents of a security policy, refer to 2.3, “Security policy contents” on page 21.
2.2.3 Implementing the security policyFigure 2-3 shows the input, process, output, and roles for implementing a security policy. In this step, you change the system security configuration as required by the security policy.
The main input is the security policy. The security policy should clearly identify the controls to be implemented and any settings for the controls. Implementing the security policy is usually the responsibility of the security officer, security administrator, or security technical specialist. The results of implementing the security policy are a system secured according to the security policy.
Process Output
Plan and
Roles
CEO, CIO, IT Director, Lawyers, Security Officer
write the security policy
– Written policy– Management
support – Widely
communicated
Security
Input
Guidelines
requirements
18 IBM System i Security Guide for IBM i5/OS Version 5 Release 4

Figure 2-3 Implementing the security policy
2.2.4 Monitoring for implementation accuracyFigure 2-4 shows the input, process, output, and roles for monitoring the implementation accuracy of the security policy. In this step, you configure the system to monitor the security configuration to ensure compliance with the security policy.
The main input is the security policy. The security policy should clearly identify the security controls to be implemented and any settings for the controls. Monitoring the implementation accuracy of the security policy is usually the responsibility of the security officer, security administrator, or security technical specialist. The results of this step are reports that show the implementation accuracy of the security policy.
Figure 2-4 Monitoring for implementation accuracy
Process Output
Roles
Security Officer, Security Administrator, Security Technical Specialist
Implementingthe security policy
System securedaccording to thesecurity policy
Securitypolicy
Input
Input Process Output
Roles
Security policyMonitor
implementationaccuracy
Periodicreports
Security Officer, Security Administrator, Security Technical Specialist
Chapter 2. Security process and policies 19
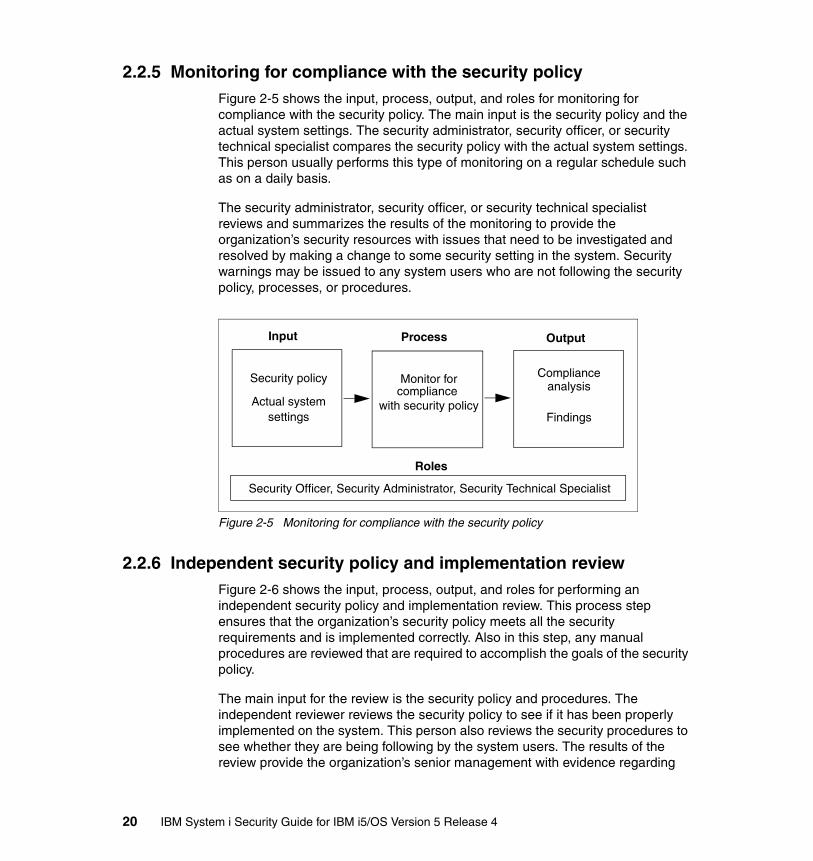
2.2.5 Monitoring for compliance with the security policyFigure 2-5 shows the input, process, output, and roles for monitoring for compliance with the security policy. The main input is the security policy and the actual system settings. The security administrator, security officer, or security technical specialist compares the security policy with the actual system settings. This person usually performs this type of monitoring on a regular schedule such as on a daily basis.
The security administrator, security officer, or security technical specialist reviews and summarizes the results of the monitoring to provide the organization’s security resources with issues that need to be investigated and resolved by making a change to some security setting in the system. Security warnings may be issued to any system users who are not following the security policy, processes, or procedures.
Figure 2-5 Monitoring for compliance with the security policy
2.2.6 Independent security policy and implementation reviewFigure 2-6 shows the input, process, output, and roles for performing an independent security policy and implementation review. This process step ensures that the organization’s security policy meets all the security requirements and is implemented correctly. Also in this step, any manual procedures are reviewed that are required to accomplish the goals of the security policy.
The main input for the review is the security policy and procedures. The independent reviewer reviews the security policy to see if it has been properly implemented on the system. This person also reviews the security procedures to see whether they are being following by the system users. The results of the review provide the organization’s senior management with evidence regarding
Input Process Output
Security policy Monitor for Compliance
Findings
Roles
Security Officer, Security Administrator, Security Technical Specialist
Actual systemcompliance
with security policy
analysis
settings
20 IBM System i Security Guide for IBM i5/OS Version 5 Release 4

compliance with the policy, implementation, finds, and recommended policy changes.
Figure 2-6 Independent security policy and implementation review
2.3 Security policy contentsIt is inappropriate to think of a security policy using only requirements such as the control of system values settings, user profile parameters, and public access to libraries. A security policy must cover all areas that are related to the use of IT. This section presents some processes that need to be defined in a security policy and some of the more important areas that a security policy must address.
The organization must review the security policy for all security activities within the organization to ensure compliance with the policy. As new organization projects are planned and started, use the security policy to provide security scope and direction to the project.
A senior manager in the organization should communicate in writing, to all employees, the importance of the organization’s security policy. This communication should stress that the information stored on the computer systems is an asset that must be protected like any other of the organization’s assets.
The Security Wizard can assist in planning and implementing a basic i5/OS security policy. The iSeries Security Wizard makes it easier for an organization to implement and manage system security.
The Security Wizard, available as part of i5/OS, asks high-level questions about the System i environment. Based on the answers that you provide to the questions, the wizard provides recommendations for implementing security on the system. Additionally, the wizard can implement the recommendations on the
Input Process Output
Security policy Policy andimplementation
Compliance
Findings
Proposed policychanges
Roles
Independent reviewer
reviewand procedures
Chapter 2. Security process and policies 21
system. For more information about the Security Wizard, see 5.1, “Security Wizard” on page 120.
For additional information, refer to the iSeries Information Center document Plan and set up system security, V5R4. To find this document, go to the following Web address and click the path Security → Plan and set up system security.
http://publib.boulder.ibm.com/infocenter/iseries/v5r4/index.jsp
2.3.1 Considerations for security policy contentYou must examine the technologies that are used by your organization and include content in the security policy based on the organization’s environment, systems, users, and resources that need to be protected. When planning for security policy content, you must consider the following items among others:
� Technologies used by the organization� Organization’s requirements� Roles and responsibilities in the organization� Industry regulations� Government regulations
2.3.2 ProcessesMany security processes can be defined in a security policy. The security policy should define the scope for each process, indicate who will perform each process, and specify how often to perform each process. Some security processes to consider in a security policy include the following items:
� Continued business need
You must validate the continued business need for all system users.
� Systematic attack detection and handling
You must detect possible systematic attacks based on criteria such as invalid logon attempts and disabled profiles.
� Security controls
You must verify that the required security controls are in place.
� Security incident management
Use incident reporting to establish a repeatable process for reporting incidents to collate information about intruder activity.
� Security and integrity advisory process for high impact pervasive PTFs
22 IBM System i Security Guide for IBM i5/OS Version 5 Release 4

� TCP/IP vulnerability scanning
The goal of performing vulnerability scanning is to identify services that are open to known vulnerabilities. Vulnerability is required to prevent unnecessary exposure of IT infrastructure to threats from vulnerabilities and exposures.
� Intrusion detection and handling
In general, intrusion detection is the detection of inappropriate or incorrect activity. Intrusion refers to attacks from outside the system.
� Policy implementation deviations
This entails a manual process for requesting and approving any implementation that deviates from the policy.
� Profile management
A manual process is necessary for security-related tasks such as how to obtain a new password, disable a profile, or reset a profile that has been disabled.
2.3.3 Security controlsFor each of the following security control areas, a brief description is provided to help you understand the type of content to include in the security policy. You can use this list of security controls as a table of contents for your security policy.
Physical security controlsConsider who should have access to the data center and other areas that should be controlled such as power distribution panels, wiring closets, patch panels. Also consider how to protect printed output and access to workstations and other computer devices.
Logical access controlsConsider how users will be identified and authenticated, how resources will be protected, and the processes for granting users system authority and security administrative authority. Also consider the capabilities and privileges allowed for each system user role, who is authorized to access the system, and the functions that they are authorized to perform.
This security control area includes the logging of system, network, and resource accesses and the detection and resolution of any potential systematic attacks. Also in regard to this area, consider password rules, such as password changes and allowable syntax, and password sharing by users.
Chapter 2. Security process and policies 23

Security status checkingConsider which systems need periodic security status checking performed, and the actions that must be taken when deviations from expected or required results that are detected by the security status check. Periodic status checking can include auditing for the accuracy of policy implementation, acceptable use monitoring, and activity reviews to check for evidence of authority misuse. This should include internal audits and external audits if required by some government regulations, industry certification, or shareholder requirements.
Portable mediaConsider labels that include ownership and data classification. Also examine the physical protection of media including storage, mounting, and movement between locations. Finally, look at any residual information possibly remaining on storage media from a prior use.
WorkstationsConsider who can access workstations and workstation security, such as not leaving a workstation signed on when the user is away from their desk.
IncidentsConsider which security incidents to investigate, who will perform the investigation, the procedure to conduct the investigation, and the evidence to collect.
AdvisoriesConsider who is responsible for obtaining security and integrity advisory information, how to assign a severity to the advisory, and based on the severity, the implementation schedule that is required after considering testing. Also consider system availability and the number of systems to which the fix must be applied.
Applications and dataConsider which applications and application data to protect from unauthorized access and use.
NetworkConsider voice systems, software that monitors for modified network configurations or devices, and any system interconnections.
FirewallsConsider filter rules, system access logs, and system activity logs.
24 IBM System i Security Guide for IBM i5/OS Version 5 Release 4
Security servicesConsider scanning TCP/IP to determine whether potential vulnerabilities or security exposures exist. Perform intrusion detection, security testing to detect as many significant exposures as possible to improve the technical security posture. In addition, conduct security process reviews to verify that processes are in place to support the requirements that are specified in the policy and that supporting audit-ready evidence records exist.
Policy exceptionsConsider any situations where the security policy was not able to be implemented.
2.4 More informationRefer to Plan and set up system security, which is available in the iSeries Information Center (under the path Security → Plan and set up system security), for additional information about writing, implementing, and monitoring security policies:
http://publib.boulder.ibm.com/infocenter/iseries/v5r4/index.jsp
Chapter 2. Security process and policies 25

26 IBM System i Security Guide for IBM i5/OS Version 5 Release 4

Chapter 3. System i security overview
In this chapter, we introduce the security features of the IBM System i platform. This chapter serves as an entry point and a reference to more detailed information provided in subsequent chapters of this redbook. It may also guide you to additional references outside of this redbook.
3
© Copyright IBM Corp. 2005, 2006. All rights reserved. 27

3.1 System i architectureThe System i platform has always been a platform where the operating system and features are developed with a focus on security. These systems have always enjoyed the reputation as one of the most secure systems that you can buy.
From the beginning, security was designed as an integral part of the system. Security was not an afterthought, as it is in many other computer systems. The reason for this is the object-based design that makes the System i operating system, i5/OS, highly virus resistant.
When installed, i5/OS already provides a base level of protection. The many easy-to-manage security features and services enable administrators to implement the required level of protection fast and reliably.
i5/OS, offers an integrated architecture combined with legendary availability, easy-to-manage security, and mainframe-class technology. Because of this, the System i platform is uniquely positioned to play a leadership role, providing simplicity and security in an on demand world.
3.1.1 Object-based designObjects are packaged into containers that are consistent with their object type. Most of the resources in the System i architecture (user and system data structures) are packaged into one of these object containers. In an object-oriented architecture, objects are encapsulated. This means that the objects cannot be used in a manner that is inconsistent with their object type. The list of valid ways in which an object can be used is inseparable from an object.
The important consequence in terms of security of an object-based design is that this design delivers a high level of system integrity and security.
All objects are structured with a common object header and a functional portion that is dependent on object type. Therefore, on the System i platform, instructions work on only what they are supposed to work. Data cannot be treated as executable code. Executable code cannot be treated as data by having something written into the middle of it.
Certain instructions apply to all objects, while other instructions work only on specific types of objects. It is not possible to misuse an object, unlike the situation that exists for non-System i platforms without an object-based approach.
28 IBM System i Security Guide for IBM i5/OS Version 5 Release 4
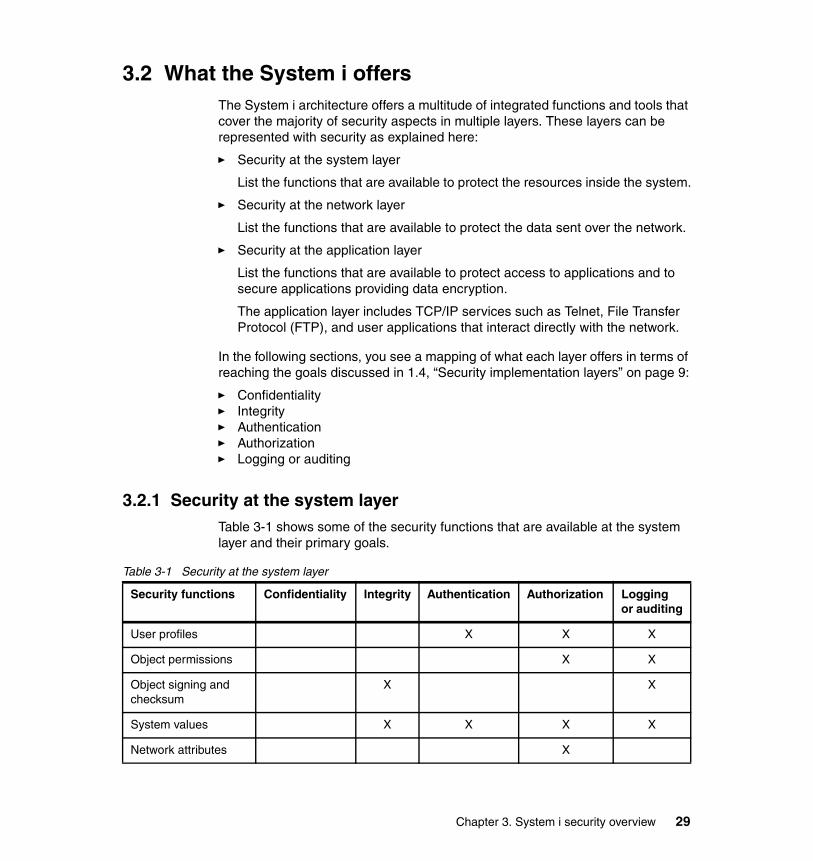
3.2 What the System i offersThe System i architecture offers a multitude of integrated functions and tools that cover the majority of security aspects in multiple layers. These layers can be represented with security as explained here:
� Security at the system layer
List the functions that are available to protect the resources inside the system.
� Security at the network layer
List the functions that are available to protect the data sent over the network.
� Security at the application layer
List the functions that are available to protect access to applications and to secure applications providing data encryption.
The application layer includes TCP/IP services such as Telnet, File Transfer Protocol (FTP), and user applications that interact directly with the network.
In the following sections, you see a mapping of what each layer offers in terms of reaching the goals discussed in 1.4, “Security implementation layers” on page 9:
� Confidentiality� Integrity� Authentication� Authorization� Logging or auditing
3.2.1 Security at the system layerTable 3-1 shows some of the security functions that are available at the system layer and their primary goals.
Table 3-1 Security at the system layer
Security functions Confidentiality Integrity Authentication Authorization Logging or auditing
User profiles X X X
Object permissions X X
Object signing and checksum
X X
System values X X X X
Network attributes X
Chapter 3. System i security overview 29

User profilesUser profiles contain security-related information that controls how the user signs on to the system, what the user is allowed to do after signing on, and how the user’s actions are audited.
For more information, refer to 4.2, “User profiles and group profiles” on page 59.
Object permissionsObject permissions allow you to define who can use objects and how those objects can be used. The ability to access an object is called object authority. Object authority gives permissions to the user for a specific object and can specify what the user is allowed to do with the object.
For more information, refer to 4.3, “Resource protection” on page 71.
Object signing and checksumObject signing and signature verification are security capabilities to verify the integrity of the objects. You use a digital certificate’s private key to sign an object, and you use the certificate, which contains the corresponding public key, to verify the digital signature. A digital signature ensures the integrity of time and content of the object you are signing.
Message authentication code (MAC) is a way to calculate a checksum over a given set of data. The data can be any type: numeric, alphabetic, packed, or
Digital certificates X X Xa
Security audit journal X
Exit programs X X X
Kerberos X Xb
DB2® Universal Database™ data encryption
X
Application administration
X
Virus scanning X
a. When associated with an i5/OS user profileb. Depends on the Kerberos server and service implementations
Security functions Confidentiality Integrity Authentication Authorization Logging or auditing
30 IBM System i Security Guide for IBM i5/OS Version 5 Release 4
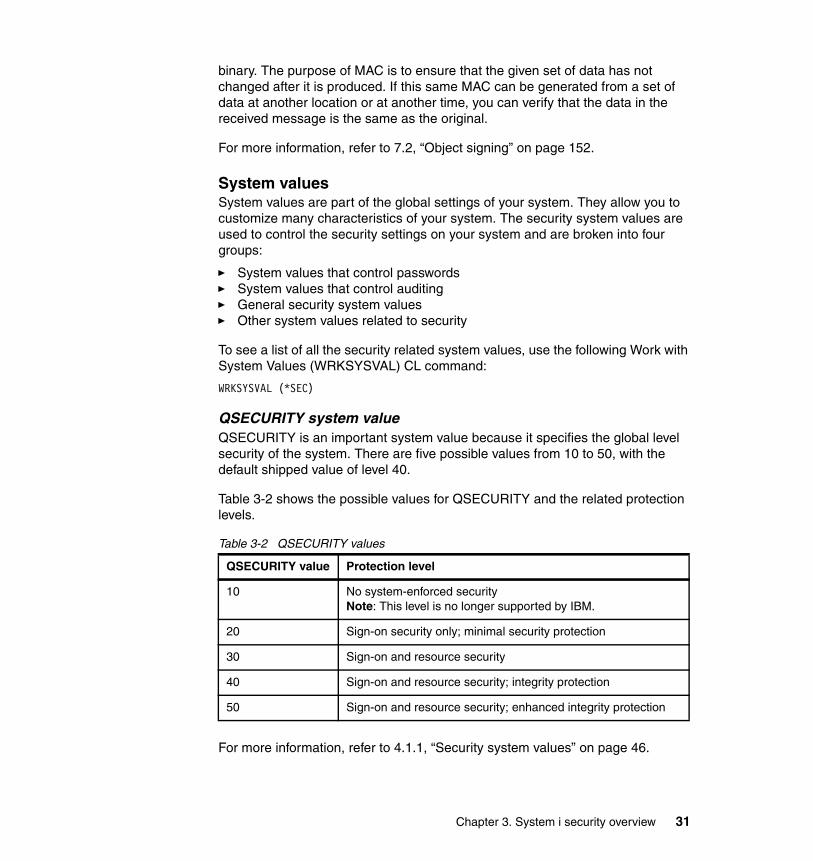
binary. The purpose of MAC is to ensure that the given set of data has not changed after it is produced. If this same MAC can be generated from a set of data at another location or at another time, you can verify that the data in the received message is the same as the original.
For more information, refer to 7.2, “Object signing” on page 152.
System valuesSystem values are part of the global settings of your system. They allow you to customize many characteristics of your system. The security system values are used to control the security settings on your system and are broken into four groups:
� System values that control passwords� System values that control auditing� General security system values� Other system values related to security
To see a list of all the security related system values, use the following Work with System Values (WRKSYSVAL) CL command:
WRKSYSVAL (*SEC)
QSECURITY system valueQSECURITY is an important system value because it specifies the global level security of the system. There are five possible values from 10 to 50, with the default shipped value of level 40.
Table 3-2 shows the possible values for QSECURITY and the related protection levels.
Table 3-2 QSECURITY values
For more information, refer to 4.1.1, “Security system values” on page 46.
QSECURITY value Protection level
10 No system-enforced security Note: This level is no longer supported by IBM.
20 Sign-on security only; minimal security protection
30 Sign-on and resource security
40 Sign-on and resource security; integrity protection
50 Sign-on and resource security; enhanced integrity protection
Chapter 3. System i security overview 31

Network attributesNetwork attributes control how your System i platform participates, or chooses not to participate, in a network with other systems. Many of these network attribute values are for a Systems Network Architecture (SNA)-based network. Security-related network attributes that also apply to a TCP/IP-based network include:
� DDM/DRDA® request access (DDMACC): Specifies the security options when a remote system requests access to a file on the system
� Client Access Express request (PCSACC): Specifies the security options when a remote client workstation requests access to the system
� Allow Add To Cluster (ALWADDCLU): Specifies whether to allow this system to be part of a System i cluster definition; is used to enhance application availability
To display or change the network attributes, you can use the Display Network Attributes (DSPNETA) or Change Network Attributes (CHGNETA) CL commands.
For more information, refer to 4.1.4, “Network attributes” on page 54.
Digital certificatesA digital certificate is an electronic credential that you can use to establish proof of identity in an electronic transaction. There is an increasing number of uses for digital certificates to provide enhanced network security measures. For example, digital certificates are essential to configuring and using the Secure Sockets Layer (SSL).
The System i platform provides extensive digital certificate support that allows you to use digital certificates as credentials in a variety of security applications. In addition to using certificates to configure SSL, you can use them as credentials for client authentication in both SSL and virtual private network (VPN) transactions.
You can also use digital certificates and their associated security keys to sign objects. Signing objects allows you to detect changes or possible tampering to objects by verifying signatures on the objects to ensure their integrity.
You can use digital certificates on a system level when the certificate is associated with a user profile for authentication. You can use a client certificate to authenticate the client user and to control access to the system or system resources.
For more information about using digital certificates for authentication, refer to 12.3, “Digital certificates” on page 288. You can find more details about using
32 IBM System i Security Guide for IBM i5/OS Version 5 Release 4

digital certificates for encryption in 9.6, “Secure Sockets Layer” on page 226. Also to learn more about using digital certificate for object signing, see 7.2, “Object signing” on page 152.
Security audit journalWhen monitoring your security, the operating system can log events which occur on your system. The security audit journal is the primary source of auditing information on the system. A security auditor inside or outside your organization can use the auditing function provided by the system to gather information about security-related events that occurred on the system. The events are recorded in special system objects called journal receivers.
When a security-related event that may be audited occurs, the system checks whether you have selected that event for audit. If you have selected the event, the system writes a journal entry in the current journal receiver for the security auditing journal (QAUDJRN).
When you want to analyze the audit information that you have collected in the QAUDJRN journal, you can use the Display Journal (DSPJRN) CL command. With this command, information from the QAUDJRN journal can be written to a database file. You can then use an application program or a query tool to analyze the data.
For more information, refer to Chapter 6, “Security audit journal” on page 139.
Exit programsExit programs are called and given control by an application program or system program. They can be used to customize particular functions that you need. They can also be used to add functionality to i5/OS functions or applications and act as an interface between a user input or request and i5/OS applications.
The main usage of exit programs are to:
� Perform additional checking during authentication of users in many TCP/IP applications
� Authorize users to specific objects or functions in many TCP/IP applications
� Implement custom logging facilities
To learn more about exit programs, see 4.5.3, “Exit programs” on page 102, and 8.6, “Exit programs” on page 181.
Chapter 3. System i security overview 33

KerberosKerberos is a secure mechanism that is used to authenticate users to resources across your entire enterprise from a central server. Microsoft® Windows® 2000 servers use Kerberos to authenticate users to a Windows domain. Kerberos uses tickets to authenticate data that is transmitted in a Kerberos environment. Tickets are essentially an encrypted data structure which use shared keys to communicate in a secure fashion.
In i5/OS, the Kerberos authentication mechanism is often used with Enterprise Identity Mapping (EIM) to create a single sign-on (SSO) solution. The Kerberos server can be implemented in i5/OS Portable Application Solutions Environment (PASE). Or you can decide to use an external server, such as a Microsoft Windows 2000 server, to authenticate the users.
For more information, refer to 12.4, “Kerberos” on page 290.
DB2 Universal Database data encryptionDB2 Universal Database data encryption is for encrypting data that resides on your System i platform. You have the option to use either the Cryptographic Services application programming interfaces (APIs) or the cryptographic functions available through Structured Query Language (SQL).
For more information, refer to 7.4, “Data encryption” on page 166.
Application administrationApplication administration allows administrators to control the system functions or applications that are available to users and groups on a specific system. This includes controlling the functions that are available to users that access their system through clients.
You can use either the graphical application administration interface of iSeries Navigator. Alternatively you can use the following CL commands to manage access to these applications:
� Display Function Usage (DSPFCNUSG)� Work with Function Usage (WRKFCNUSG)� Change Function Usage (CHGFCNUSG)
On one system, the administrator can now write a CL program that contains all access policies and restrictions. Afterward, the administrator can distribute the program to other systems within the network.
To learn more about application administration, refer to 4.6, “Limiting access to program functions” on page 105.
34 IBM System i Security Guide for IBM i5/OS Version 5 Release 4

Virus scanningThere is support in i5/OS that allows a third-party vendor to write virus scanning software and plug it into i5/OS. For a listing of currently available third-party virus scanning software, refer to the following Web site:
http://www.developer.ibm.com/vic/hardware/portal/iii_pages/iii_tools_innov_improve#secureyour
For more information, refer to 7.3, “Virus scanning” on page 159.
3.2.2 Security at the network layerTable 3-3 shows some of the security functions that are available at the network layer and the primary goals of each function.
Table 3-3 Security at the network layer
IP packet filteringIP packet filtering lets you control the IP traffic that you want to allow into and out of your network. It protects your network by filtering packets according to rules that you define.
For more information, refer to 8.7, “IP packet filtering” on page 187.
Security function Confidentiality Integrity Authentication Authorization Logging or auditing
IP filtering and NAT X X X
IDS X
VPN X X X X X
L2TP X X Xa
a. Layer 2 Tunneling Protocol (L2TP) is available only when RADIUS accounting is used.
SSL/TLSb
b. SSL occurs at the application layer, but protects network traffic by encrypting the data.
X X X X Xc
c. Logging capabilities depend on the individual application.
OpenSSHOpenSSL
X X X
Software cryptographic support
X X X
Hardware cryptographic support
X X X
Chapter 3. System i security overview 35

Network Address TranslationNetwork Address Translation (NAT) translates internal or private IP addresses to public or globally routable IP addresses. It can also translate ports. Even if NAT has nothing to do with the primary security goals (confidentiality, integrity, authentication, authorizations, logging, and auditing), you can consider it as a security function because it can help to hide sensitive network information, such as the internal IP network addresses from the outside word.
For more information, refer to 8.7.2, “Network Address Translation” on page 189.
Intrusion detection systemIntrusion detection system (IDS) involves gathering information about unauthorized access attempts and attacks coming in over the TCP/IP network. Administrators analyze the auditing records that intrusion detection provides to secure the System i network from these types of attacks. The i5/OS implementation provides monitoring for several commonly used types of intrusion attacks, such as scanning events or SYN flood events.
IDS uses the i5/OS quality of service (QoS) to enable intrusion detection services. A policy file must be set up to configure the events to be detected.
For more information, refer to 8.8, “Intrusion detection system” on page 192.
Virtual private networkA VPN allows your company to securely extend its private intranet over the existing framework of a public network, such as the Internet. With VPN, your company can control network traffic while providing important security features such as authentication and data privacy.
VPN is a optionally installable component of iSeries Navigator, the graphical user interface (GUI) for i5/OS. It allows you to create a secure end-to-end path between any combination of hosts and gateway. i5/OS VPN uses authentication methods, encryption algorithms, and other precautions to make sure the data sent between the two endpoints of its connection remains secure.
VPN also supports L2TP solutions.
You can learn more about VPN in Chapter 10, “Virtual private network” on page 247.
36 IBM System i Security Guide for IBM i5/OS Version 5 Release 4
Layer 2 Tunneling ProtocolL2TP is a protocol that manages the tunneling of the link layer of the Point-to-Point Protocol (PPP). L2TP provides a virtual PPP tunnel across a network. It extends the corporate address space to the remote client.
Refer to 10.3, “Layer 2 Tunnel Protocol” on page 252, to learn more about L2TP.
Secure Sockets Layer/Transport Layer SecuritySSL has become an industry standard for enabling applications for secure communications sessions over an unprotected network, such as the Internet. SSL provides privacy and integrity of the data and applications exchange.
Based on SSL Version 3.0, Transport Layer Security (TLS)1.0 is the latest industry standard SSL protocol. The major goal of TLS is to make SSL more secure and to make the specification of the protocol more precise and complete.
SSL occurs at the application layer. It also protects network traffic by encrypting the data. Learn more about SSL in 9.6, “Secure Sockets Layer” on page 226.
Portable Utilities for i5/OS (5733-SC1)Portable Utilities for i5/OS is a licensed program offering (LPO) that is available for i5/OS users. The 5733-SC1 LPO contains the OpenSSH, OpenSSL, and zlib open source packages ported to i5/OS using the i5/OS PASE runtime environment. The 5733-SC1 LPO requires that i5/OS V5R3 or later and i5/OS option 33 (i5/OS PASE) be installed.
For more information, refer to 8.13.1, “Portable Utilities for i5/OS” on page 208.
OpenSSLOpenSSL is an open source software that provides a full-featured SSL implementation by implementing SSL V3 and TLS V1. You use OpenSSL to create the environment that is needed to run SSL-enabled applications.
OpenSSL is available on many platforms. This is one of the reasons why programmers, who write applications that use SSL/TLS sockets, use OpenSSL. The advantage is that they can use a single program source and run it on various platforms, as opposed to using vendor-specific SSL implementations.
OpenSSL occurs at the application layer, but is also used to protect network traffic. You can find more information about OpenSSL in 9.6.2, “OpenSSL” on page 228.
Chapter 3. System i security overview 37
OpenSSHOpenSSH is an open source software that provides a secure shell and secure tunneling service to protect data traffic over an untrusted network. It provides secure alternatives for Telnet and FTP. It verifies the authenticity of both the client and server, and all of the data (including user IDs and passwords) is encrypted as it travels in the network. This encryption is done transparently to the end user.
OpenSSH is the free version of the SSH protocol suite. To learn more about OpenSSH, see 8.13.2, “OpenSSH” on page 209.
Software cryptographic supportUser applications can use cryptographic services indirectly via i5/OS functions such as SSL, VPN IPSec, and Lightweight Directory Access Protocol (LDAP). User applications can also access cryptographic services directly via the following APIs:
� Common Cryptographic Architecture (CCA) APIs
The CCA API set is provided for running cryptographic operations on a Cryptographic Processor.
� Cryptographic Services (CS) APIs
The CS API set is provided for running cryptographic operations within the system or on the IBM 2058 Cryptographic Accelerator.
� DB2 Universal Database SQL
SQL supports encryption and decrypting of database fields.
� Java™ Cryptography Extension (JCE)
� i5/OS SSL and Java Secure Sockets Extensions (JSSE)
� Network authentication services: GSS (Generic Security Services), Java GSS, and Kerberos APIs
For more information, refer to 9.8, “Data encryption and key management” on page 237.
Hardware cryptographic supportThe System i platform offers several cryptographic hardware products to address your cryptographic needs:
38 IBM System i Security Guide for IBM i5/OS Version 5 Release 4
� IBM 4758 PCI Cryptographic Coprocessor
This card provides cryptographic processing capabilities and secure storage of cryptographic keys. It is mainly used to store the cryptographic keys in a tamper-responding environment, but can also be used to offload the main processor of the system from computational-intensive, cryptographic processing during the establishment of an SSL session.
� IBM 2058 Cryptographic Accelerator
This card offloads your system from compute-intensive, public-key, cryptographic operations employed in the SSL protocol. The 2058 Cryptographic Accelerator provides a competitive option to customers who do not require the high security of a 4758 Cryptographic Coprocessor, but need the high cryptographic performance that hardware acceleration provides to offload a host processor.
� IBM 4764 PCI Cryptographic Coprocessor
This card is available for i5/OS V5R3 and IBM POWER5™ systems.
You can also write your own application program using the CCA APIs to access the Cryptographic Coprocessors for PIN processing for example.
The IBM 4764 PCI Cryptographic Coprocessor can be used to improve handshake processing for i5/OS SSL and i5/OS JSSE.
In terms of network, hardware cryptographic support is used to improve the SSL handshake. The other functions of the Cryptographic Coprocessor, such as PIN processing, signature generation, and secure key store, fit in the application layer, because they are typically used in user applications.
You can learn more in 9.7, “Hardware cryptographic support” on page 233.
Note: i5/OS supports three different hardware-based cryptographic solutions:
� IBM 4758 PCI Cryptographic Coprocessor� IBM 2058 Cryptographic Accelerator� IBM 4764 PCI Cryptographic Coprocessor
The IBM 4758 and IBM 2058 adapters still run with i5/OS V5R4, but they have now been withdrawn from marketing.
Important: The IBM 4764 is not supported by OpenSSL or other SSL implementations that run on i5/OS.
Chapter 3. System i security overview 39

3.2.3 Security at the application layerThe application layer provides the ability for user applications, such as Telnet, FTP, HTTP and all other network software services, to interact with the network. User applications and tiered applications that interact directly with the network are also in the application layer. However, software that uses the service of an application in the application layer is not considered to be part of this layer. For example, a Web browser does not reside at the application layer, because it uses the services offered by HTTP that operate at the application layer to send the information to the network.
Table 3-4 shows some of the security functions that are available at the application layer and their primary goals.
Table 3-4 Security at the application layer
Validation listsValidation lists are objects that store user names and passwords or SSL certificates for use in access control. For example, you can use a validation list to limit access to your HTTP server. Your system uses validation lists in conjunction with other resources to limit access to your system resources.
For more information, refer to 12.6, “Validation lists” on page 294.
Security function Confidentiality Integrity Authentication Authorizations Logging or auditing
Validation lists X X X
Digital certificates X X X
Exit programs X X X
SSL X X X X X
Port restrictions X
Kerberos X X
Software cryptographic support
X X X
Hardware cryptographic support
X X X
Secure socket APIs X X X X X
OpenSSL X X X X X
40 IBM System i Security Guide for IBM i5/OS Version 5 Release 4

Digital certificatesYou read about digital certificates at the system layer in “Digital certificates” on page 32. At the application layer, digital certificates provide encryption through the use of public and private keys to protect network traffic.
Exit programsExit programs at the system layer are explained in “Exit programs” on page 33. However, they can also be part of the application layer because they can be used to add functionality to i5/OS functions or applications.
For example, the FTP server does not provide a standard interface to enable logging of FTP subcommands performed by a signed on user. With the help of the Request Validation exit point, you can write your own exit program to log these commands.
SSLSSL at the network layer is explained in “Secure Sockets Layer/Transport Layer Security” on page 37. It is used to encrypt the network traffic, but it occurs at the application layer, because applications must be ready and enabled for SSL.
Port restrictionsPort restrictions are used to restrict ports being used by unauthorized applications and users. By default, TCP/IP allows any user to access to any port. For more information, refer to 8.5, “Port restrictions” on page 180.
KerberosYou learned about Kerberos in “Kerberos” on page 34. The Kerberos protocol allows you to authenticate and verify the identity of principals. These principals can be users and applications across your network.
Software cryptographic supportSoftware cryptographic support was introduced at the network layer in “Software cryptographic support” on page 38. User applications can use cryptographic services indirectly via i5/OS functions such as SSL, VPN or IPSec. User applications can also access cryptographic services directly via APIs, such as the CS APIs.
Hardware cryptographic supportHardware cryptographic support was introduced at the network layer in “Hardware cryptographic support” on page 38. These adapters can be used to improve SSL handshake performance by offloading the RSA encryption work during the handshake from the main CPU. However, the Cryptographic
Chapter 3. System i security overview 41

Coprocessors provide many more functions, such as PIN processing, signature generation, secure key store, and so on. These functions are typically used in user applications.
Secure socket APIsSecure socket APIs allow programmers to create secure socket applications on the system. Secure socket APIs consist of the following types:
� SSL_APIs
SSL_ APIs are native to the i5/OS operating system and are used to create secure socket applications.
� Global Secure Toolkit (GSKit) APIs
GSKit APIs are a set of programmable interfaces that allow an application to be SSL enabled. GSKit APIs are supported across all IBM platforms, so we recommend that you use GSKit APIs when developing applications for secure socket connections.
For more information, refer to 9.6.1, “Securing applications with SSL” on page 227.
OpenSSLOpenSSL was introduced in “OpenSSL” on page 37. It is used to create the environment that is needed to run SSL-enabled applications.
42 IBM System i Security Guide for IBM i5/OS Version 5 Release 4
Part 2 The basics of System i security
This part contains the following chapters:
� Chapter 4, “System i security fundamentals” on page 45� Chapter 5, “Security tools” on page 119� Chapter 6, “Security audit journal” on page 139� Chapter 7, “Confidentiality and integrity” on page 151
Part 2
© Copyright IBM Corp. 2005, 2006. All rights reserved. 43

44 IBM System i Security Guide for IBM i5/OS Version 5 Release 4

Chapter 4. System i security fundamentals
In this chapter, we explain the concept of the fundamental i5/OS security options that are available to secure your System i platform according to your security policy.
4
Note: This chapter contains references to the iSeries Information Center for V5R4 page. On this page, you can simply click the iSeries Information Center, Version 5 Release 4 link in the navigation area and select the topics that are specified:
http://publib.boulder.ibm.com/infocenter/iseries/v5r4/index.jsp
© Copyright IBM Corp. 2005, 2006. All rights reserved. 45

4.1 Global settings
The global settings influence how the system appears to users, and they affect how jobs run on the system. The following items are considered part of the global settings:
� Security system values: These values are used to control the security on the system and are divided in four different groups:
– General security system values– Other system values associated to security– System values that control passwords– System values that control auditing
� Network attributes: These attributes control how your system participates, or chooses not to participate, in a network with other systems.
� Work management elements: These elements establish how work enters the system and the environment that the work runs in.
� Communication configuration: This configuration influences how work enters your system.
The global settings are sometimes referred to as system level security.
4.1.1 Security system valuesSystem values represent the foundation upon which almost everything else is built (see Figure 4-1). They allow you to customize many characteristics of your system. A group of system values is used to define system-wide security settings. It is important that you set your system values according to your security policy.
i5/OS specifies many settings that are applied system-wide for all activities on the system. Many of these settings are defaults that may be overridden for a specific job, task, or user. This IBM Redbook presents a general discussion of a set of security and auditing-based system values. Examples include the system security level, password rules, actions to take when a 5250 job is inactive for a long period of time, and the kinds of auditing to perform.
Important: Be sure to use your company’s IT security policy when implementing your security. Without a security policy, you have no clear security requirements for your organization. See Chapter 2, “Security process and policies” on page 13.
46 IBM System i Security Guide for IBM i5/OS Version 5 Release 4
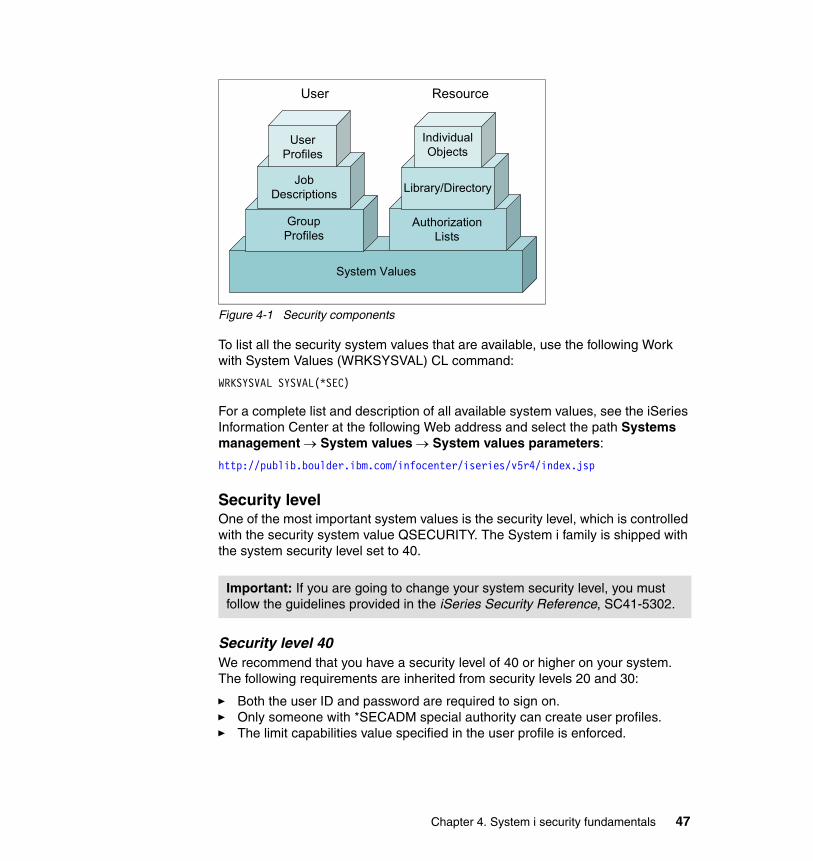
Figure 4-1 Security components
To list all the security system values that are available, use the following Work with System Values (WRKSYSVAL) CL command:
WRKSYSVAL SYSVAL(*SEC)
For a complete list and description of all available system values, see the iSeries Information Center at the following Web address and select the path Systems management → System values → System values parameters:
http://publib.boulder.ibm.com/infocenter/iseries/v5r4/index.jsp
Security levelOne of the most important system values is the security level, which is controlled with the security system value QSECURITY. The System i family is shipped with the system security level set to 40.
Security level 40We recommend that you have a security level of 40 or higher on your system. The following requirements are inherited from security levels 20 and 30:
� Both the user ID and password are required to sign on.� Only someone with *SECADM special authority can create user profiles.� The limit capabilities value specified in the user profile is enforced.
Important: If you are going to change your system security level, you must follow the guidelines provided in the iSeries Security Reference, SC41-5302.
User Resource
System Values
AuthorizationLists
Library/Directory
IndividualObjects
UserProfiles
JobDescriptions
GroupProfiles
Chapter 4. System i security fundamentals 47
� Users must be given specific authority to use resources on the system.� Only user profiles created with the *SECOFR user class are given *ALLOBJ
special authority automatically.
Security level 40 adds:
� Prevention of the use of unsupported interfaces
The system prevents attempts to directly call system programs that are not documented as call-level interfaces. The system uses the domain attribute of an object and the state attribute of a program to enforce this protection.
– Domain: Every object belongs to a domain, either a *SYSTEM or *USER domain. *SYSTEM domain objects can be accessed only by *SYSTEM state programs or by *INHERIT state programs that are called by *SYSTEM state programs.
– State: Three different program states exist: *SYSTEM, *INHERIT, and *USER state. *USER programs can only directly access *USER domain objects. *SYSTEM domain objects can be accessed by *USER state programs by using appropriate command or application programming interface (API). The *SYSTEM and *INHERIT states are reserved for IBM-supplied programs.
� Job description protection
The user that submits a job must have *USE authority to both the job description and the user profile that are specified in the job description. Otherwise, the job fails.
� No default sign-on
The i5/OS stops any attempt to sign on without a user ID and password that can be done on lower security levels.
� Enhanced hardware storage protection (HSP)
Enhanced hardware storage protection allows blocks of system information to be defined as read-write, read only, or no access. The system controls how *USER state programs access these protected blocks. Some critical system control blocks have additional hardware storage protection that makes storage read-only from any program state. Even i5/OS cannot write to this critical system control blocks without taking special steps. This is not supported on earlier B, C, and D models.
� System protection of a program’s associated space
A user state program cannot directly change the associated space of a program object.
48 IBM System i Security Guide for IBM i5/OS Version 5 Release 4

� System protection of a job’s address space
A user state program cannot obtain the address for another job on the system.
� System validation of parameters
The system specifically checks every parameter passed between a user state program and a system state program that is in a user domain.
� Validation of program restored
When a program is created, the system calculates a validation value which is stored with the program. When the program is restored, the validation value is calculated again and compared to the validation value that is stored with the program. If the validation values does not match, the actions taken by the system are controlled by the QFRCCVNRST and QALWOBJRST system values.
Security level 50Security level 50 was initially designed to meet the requirements defined by the U.S. Department of Defense for C2 security. In 1998, the United States and other national governments adopted a new security evaluation scheme called the Common Criteria (CC). For additional information about Common Criteria, refer to 4.1.2, “Common Criteria” on page 50.
Security level 50 provides enhanced integrity protection in addition to what is provided by security level 40. These additional security functions include:
� Restricted user domain objects
The user domain object types that are restricted are:
– User space (*USRSPC)– User index (*USRIDX) – User queue (*USRQ)
The object types in a user domain can be manipulated directly without using system-provided APIs and commands. This allows a user to access an object without creating an audit record.
Note: Objects of type *PGM, *SRVPGM, and *SQLPKG can also be in the user domain. Their contents cannot be manipulated directly, and they are not affected by the restrictions.
Chapter 4. System i security fundamentals 49

A user must not be permitted to pass security-relevant information to another user without the ability to send an audit record. To enforce this:
– No job can get addressability to the QTEMP library for another job. Therefore, if user domain objects are stored in the QTEMP library, they cannot be used to pass information to another user.
– To provide compatibility with existing applications that use user domain objects, you can specify additional libraries in the QALWUSRDMN system value. If your system has a high security requirement, you should allow user domain objects only in the QTEMP library.
� Restricted message handling
The following rules apply to message handling at security level 50:
– Any user state program can send a message of any type to any other user state program.
– Any system state program can send a message of any type to any user or system state program.
– A user state program can send a non-exception message to any system state program.
– A user state program can send an exception type message (status, notify, or escape) to a system state program if one of the following statements is true:
• The system state program is a request processor.• The system state program called a user state program.
– When a user state program receives a message from an external source (*EXT), any pointers in the message replacement text are removed.
� Prevention of modification of internal control blocks
At security level 50, no system internal control blocks can be modified. This includes the open data path (ODP), the spaces for CL commands and programs, and the S/36 environment job control block.
4.1.2 Common CriteriaIn 1998, the United States and other national governments adopted a new security evaluation scheme called the Common Criteria. Common Criteria was adopted by the International Organization for Standards (ISO) and International Electrotechnical Commission (IEC) as an international standard, ISO/IEC 15408, in 1999.
The Common Criteria (CC) Control Access Protection Profile (CAPP) defines an implementation-independent set of IT security requirements for the evaluated product. The CAPP was derived from the C2 class of the U.S. Department of
50 IBM System i Security Guide for IBM i5/OS Version 5 Release 4

Defence (DoD) Trusted Computer System Evaluation Criteria (TCSEC). The CAPP provides security functions and assurances that are equivalent to those provided by the TCSEC. It also replaces the requirements used for C2 trusted product evaluations.
The Common Criteria evaluation has two parts:
� The Protection Profile (PP) that defines the requirements specification
There exists over sixty different PPs, and CAPP is one of them. You can find the Control Access Protection Profile specification on the Web at:
http://www.commoncriteriaportal.org/public/files/ppfiles/capp.pdf
� The evaluation rating, Evaluation Assurance Level (EAL), which can be between 1 and 7
The rating expresses the grade of confidence that you can place on the system. The higher value is, the better the ranking is.
A system that has a certification with CAPP/EAL3 is about equivalent with the U.S. TCSEC C2 rating.
i5/OS V5R3M0 has been evaluated by the Common Criteria Evaluation and Validation Scheme (CCEVS) for EAL 4 Augmented ALC_FLR.2, CAPP. i5/OS received its certification on 10 August 2005. You can find the evaluation report for i5/OS V5R3M0 at the official Web site for the Common Criteria project at:
http://www.commoncriteriaportal.org/public/files/epfiles/ST_VID4035-VR.pdf
If you want to configure your i5/OS to meet the Common Criteria security requirements, refer to Configure Your System For Common Criteria Security, SC41-5336.
For more information regarding the Common Criteria, go to:
http://www.commoncriteriaportal.org
4.1.3 Locking system valuesSince V5R2, you can control whether a user can change security-related system values. You control it with the Allow system value parameter in the System Service Tool (SST) or Dedicated Service Tool (DST) settings.
You can also use the Display Security Attributes (DSPSECA) CL command to see if the security-related system values are locked.
Chapter 4. System i security fundamentals 51

Restricting the ability to place tampered objects on the systemHere are some tips for restricting the placement of tampered objects on your system:
� Restrict the following system values:
– Allow Object Restore (QALWOBJRST): Set the restore option to *NONE. Do not allow objects with security sensitive attributes to be restored.
– Force Conversion On Restore (QFRCCVNRST): Set the restore option to option 5, force conversion. Objects that contain sufficient creation data will be converted.
– Verify Object On Restore (QVFYOBJRST): Set the verify object on the restore option to 5, verify signatures on restore. Do not restore unsigned user-state objects. Restore signed user-state objects only if the signature is valid.
� Lock out the security-related system values using SST as explained in the following section.
Locking security-related system valuesTo lock or unlock security related system values with SST:
1. Enter the STRSST command on a command line.
2. Enter your service tools user ID and password when prompted.
3. Select Work with system security (option 7).
4. In the screen that is displayed, in the Allow system value security changes parameter, type either 1 to unlock the system values or 2 to lock the system values.
To lock or unlock security related system values with DST:
1. Select Use Dedicated Service Tools (option 3) from the IPL or Install the System display. We presume that you are in recovery mode and are performing an attended initial program load (IPL).
2. Sign on to DST using your service tools user ID and password.
3. Select Work with system security (option 13).
4. In the screen that is displayed, in the Allow system value security changes parameter, type either 1 to unlock the system values or 2 to lock the system values.
52 IBM System i Security Guide for IBM i5/OS Version 5 Release 4
Locked system valuesIf you decide to lock the security related system values, a user is prevented from changing the following values:
� Auditing system values
– Activate action auditing, QAUDLVL– Activate action auditing extension, QAUDLVL2– Activate object auditing, QAUDCTL– Audit journal error action, QAUDENDACN– Default auditing for newly created objects, QCRTOBJAUD– Number of journal entries written to the security audit journal before the
entry data is forced to auxiliary storage, QAUDFRCLVL
� Device system values
– Local controllers and devices, QAUTOCFG– Pass-through devices and Telnet, QAUTOVRT– Action to take when a device error occurs, QDEVRCYACN– Remote controllers and devices, QAUTORMT
� Jobs system values
– Time-out interval, QDSCJOBITV– When a job reaches time-out, QINACTMSGQ– Allow jobs to be interrupted to run user-defined exit programs,
QALWJOBITP
� Password system values
– Password expiration, QPWDEXPITV– Restrict consecutive digits, QPWDLMTAJC– Restricted characters, QPWDLMTCHR– Restrict repeating characters, QPWDLMTREP– Password level, QPWDLVL– Maximum password length, QPWDMAXLEN– Minimum password length, QPWDMINLEN– Require a new character in each position, QPWDPOSDIF– Require at least one digit, QPWDRQDDGT– Password reuse cycle, QPWDRQDDIF– Password validation program, QPWDVLDPGM
� Messages and service system values
– Allow remote service of system, QRMTSRVATR
� Restore system values
– Verify object signatures on restore, QVFYOBJRST– Convert objects during restore, QFRCCVNRST– Allow restore of security sensitive objects, QALWOBJRST
Chapter 4. System i security fundamentals 53

� Security system values
– Security level, QSECURITY– Allow system security information to be retained, QRETSVRSEC– Users who can work with programs with adopted authority, QUSEADPAUT– Default authority for newly created objects in QSYS.LIB file system,
QCRTAUT– Allow use of shared or mapped memory with write capability,
QSHRMEMCTL– Allow user domain objects in libraries, QALWUSRDMN– Scan a file system, QSCANFS– Scan file system control, QSCANFSCTL
� Sign-on system values
– Use pass-through or Telnet for remote sign-on, QRMTSIGN– Display sign-on information, QDSPSGNINF– Restrict privileged users to specific device session, QLMTSECOFR– Limit each user to one device session, QLMTDEVSSN– Maximum incorrect sign-on attempts, QMAXSIGN– Action when maximum is reached, QMAXSGNACN
4.1.4 Network attributesNetwork attributes control how your system participates, or chooses not to participate, in a network with other systems. You can read more about network attributes in iSeries Security Reference, SC41-5302.
i5/OS has a set of security-based network attributes. Only the i5/OS CL commands of Display Network Attributes (DSPNETA) and Change Network Attributes (CHGNETA) can directly access these attributes. Many of these attribute values are for a Systems Network Architecture (SNA)-based network. Security-related network attributes that also apply to a TCP/IP-based network include:
� Job action (JOBACN): Specifies how your system processes incoming requests to run jobs
� DDM/DRDA request access (DDMACC): Specifies the security options when a remote system requests access to a file on the local system
� Client Access Express request (PCSACC): Specifies the security options when a remote client workstation requests access to the local system
� Allow Add To Cluster (ALWADDCLU): Specifies whether to allow this system to be part of a System i cluster definition; is used to enhance application availability
54 IBM System i Security Guide for IBM i5/OS Version 5 Release 4
How you set these network attributes depends on your security policy. If you do not have a security policy, you do not know the rules with which you must comply.
4.1.5 Work management elementsWork management elements determine how work enters the system and the environment on which the work runs. In the following sections, we describe the work management elements:
� Jobs� Job queues� Subsystem� Output queues� Message queues
Work management supports the commands and operating system functions that are necessary to control system operations and the daily workload on the system. All the work done on the system is submitted though the work management functions. When i5/OS is installed, it includes a work management environment that supports interactive, batch, and communications jobs. The operating system can be tailored to create an individual, user-defined work management environment.
For complete information about work management topics, see the iSeries Information Center at the following Web address and select the path Systems management → Work management → Concepts:
http://publib.boulder.ibm.com/infocenter/iseries/v5r4/index.jsp
JobsThe System i platform uses the term job to refer to your terminal session as well as any batch jobs or system jobs that may be running on the system. Five types of jobs are relevant to security:
� Interactive job: An interactive job is started when a user signs on to a terminal session. The terminal session itself is called an interactive job. The user is identified to the system with a user profile, and the authentication is tested through password checking.
� Batch job: Several methods exist for submitting batch jobs and for specifying the objects used by the job. Authority is checked for the user profile and objects that are needed to run the batch job.
� Communications job: A communications job is started when another system issues a request over a communications line. Many techniques are available to control the attachment of a proper user profile to that job.
Chapter 4. System i security fundamentals 55
� Autostart job: The autostart job is started automatically when a subsystem is started. It requires a job description to identify the user profile for the job. An autostart job can be used to perform some operations on a routine basis.
� Prestart job: You can use prestart job entries to make a subsystem ready for certain kinds of jobs so that the jobs start more quickly. Prestart jobs may start when the subsystem starts or when they are needed. Make sure that prestart job entries perform only authorized, intended functions.
Job queuesA job queue (*JOBQ) is a list of jobs that is waiting to be run by the system. Each job queue is associated with a subsystem (the processing environment).
A job is placed on a job queue by the Submit Job (SBMJOB) CL command or by starting a spool reader that reads the job from a database file. Jobs are selected from the job queue to run based on the job queue scheduling priority. Security information can be included in the job queue description to define who can control the job queue and manage the jobs on the queue.
SubsystemA subsystem (*SBSD) is a single, predefined operating environment through which i5/OS workflows and resource use are coordinated. A subsystem is a means to separate activities, such as interactive users and batch jobs, on the system.
Each piece of work running in a subsystem is called a job. In a subsystem, work entries are defined to identify the sources from which jobs can be started for running in that subsystem. The subsystem description controls how jobs enter your system and how jobs are started.
For more information, see iSeries Security Reference, SC41-5302.
Output queuesAn output queue (*OUTQ) is a list of spooled files waiting to be printed. Printer files are objects that are used to define the attributes for output from jobs on the system. If the processing of a job results in output, the subsystem running the job creates the output as one or more spooled files in the output queue. Subsystems have output associated with starting and completion status. Security for output queues is considered in “Output queue security” on page 93.
Message queuesA message queue (*MSGQ) is a list in which messages are placed when they are sent to a user or program. A message queue is like a mailbox for messages.
56 IBM System i Security Guide for IBM i5/OS Version 5 Release 4
Messages sent to an “address”, such as a user or a program, in the system are placed in the message queue associated with the address.
System operator message queueThe system operator message queue (QSYSOPR) is a special message queue to which the system sends messages. The messages may be in regard to changes in the status of the system, devices, and jobs, or to a condition that needs operator intervention.
System message queueThe system message queue (QSYSMSG) is an optional message queue that you can create in the QSYS library to direct special system messages to. In this way, you can write a program to gain control when one of the special system messages arrives at QSYSMSG message queue. This program should be written as a break-handling program.
A break-handling program is one that is automatically called when a message arrives at a message queue (in this case at QSYSMSG) that is in *BREAK mode. The name of the program and break delivery must both be specified on the same Change Message Queue (CHGMSGQ) command. To learn more about break-handling programs, refer to CL Programming, SC41-5721.
Some messages that are directed to QSYSMSG are also directed to the QSYSOPR message queue, but some others are not. Do not create the QSYSMSG queue unless you want it to receive specific messages.
Enter the following Create Message Queue (CRTMSGQ) command to create the QSYSMSG message queue:
CRTMSGQ QSYS/QSYSMSG TEXT(‘Optional message queue to receive specific system messages’)
The following examples are messages that are directed to QSYSMSG and QSYSOPR:
� CPF1393: User profile has been disabled because a maximum number of sign-on attempts has been reached.
� CPF1397: Subsystem is varied off the workstation.
� CPF9E7C: OS/400® grace period is expired.
� CPI091F: PWRDWNSYS command is in progress.
� CPI0949: Mirrored protection is suspended on disk unit.
� CPI0953: ASP storage threshold has been reached.
� CPI0954: ASP storage limit is exceeded.
Chapter 4. System i security fundamentals 57

� CPI095A: IASP mirror copy storage threshold has been reached.
� CPI096E: Disk unit connection is missing.
� CPI0970: Disk unit is not operating.
� CPI0998: Error occurred on disk unit.
� CPI116A: Mirrored protection is suspended on the load source disk unit.
� CPI1154: System password bypass period will end in xx days.
� CPI1160: System ID has expired.
� CPI1161: Unit with device parity protection is not fully operational.
� CPI1168: Error occurred on the disk unit.
� CPI22AA: Unable to write audit record to QAUDJRN.
� CPI2209: User profile xxxxx was deleted because it was damaged.
� CPI2283: QAUDCTL system value is changed to *NONE.
� CPI96C4: Password is not correct for the user profile.
� CPI96C5: User xxxxx does not exist.
� CPP1604: *Attention* Impending DASD failure. Contact your hardware service provider now.
� CPPEA02: *Attention* Contact your hardware service provider now.
� CPPEA13: *Attention* Contact your hardware service provider. Internal analysis of exception data indicates that hardware service is recommended to maintain system performance. It is recommended that you contact your hardware service provider to have the cache battery pack of an I/O card replaced. Failure to do so can result in reduced system performance.
You can find all the specific messages that are directed to the QSYSMSG message queue and examples of monitoring programs in CL Programming, SC41-5721.
4.1.6 Communication configurationYour communications configuration influences how work enters your system. It is important that you protect your interfaces so that only traffic that is allowed according to your security policy is permitted. For information about how to secure your communication and network environment, see Chapter 8, “TCP/IP security” on page 173.
58 IBM System i Security Guide for IBM i5/OS Version 5 Release 4
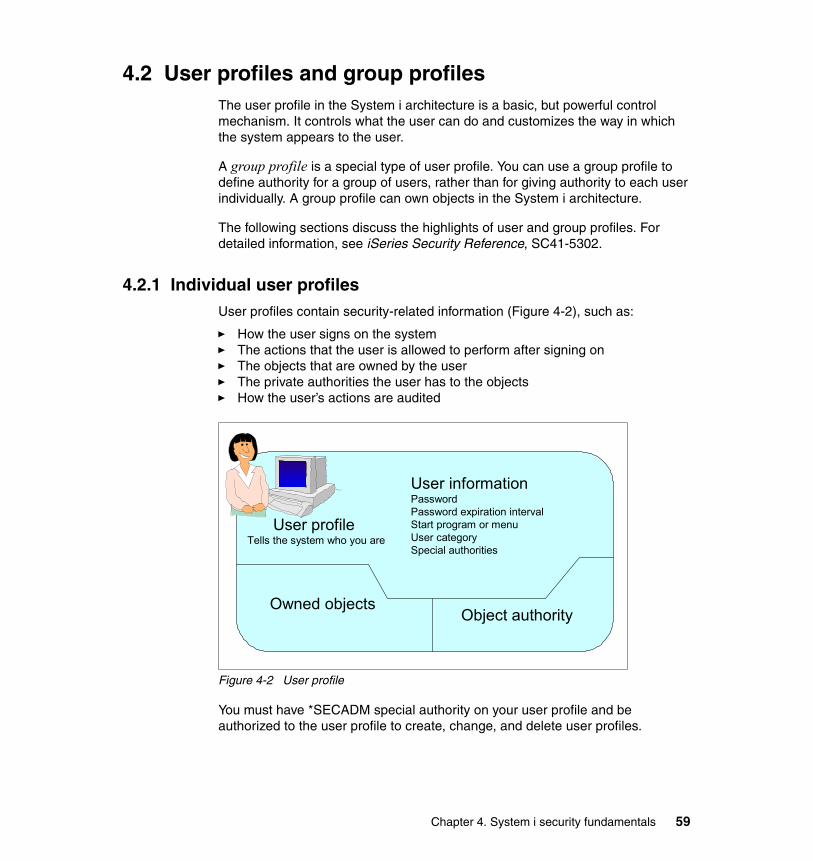
4.2 User profiles and group profilesThe user profile in the System i architecture is a basic, but powerful control mechanism. It controls what the user can do and customizes the way in which the system appears to the user.
A group profile is a special type of user profile. You can use a group profile to define authority for a group of users, rather than for giving authority to each user individually. A group profile can own objects in the System i architecture.
The following sections discuss the highlights of user and group profiles. For detailed information, see iSeries Security Reference, SC41-5302.
4.2.1 Individual user profilesUser profiles contain security-related information (Figure 4-2), such as:
� How the user signs on the system� The actions that the user is allowed to perform after signing on� The objects that are owned by the user� The private authorities the user has to the objects� How the user’s actions are audited
Figure 4-2 User profile
You must have *SECADM special authority on your user profile and be authorized to the user profile to create, change, and delete user profiles.
User informationPasswordPassword expiration intervalStart program or menuUser categorySpecial authorities
Object authorityOwned objects
User profileTells the system who you are
Chapter 4. System i security fundamentals 59

You can create user profiles in several ways:
� From the Work with User Profiles (WRKUSRPRF) display� Using the Create User Profile (CRTUSRPRF) command� Using the Work with User Enrollment option from the SETUP menu
You cannot delete a user profile that owns objects or is the primary group for an object. You must delete any objects that are owned by the user profile or transfer ownership of those objects to another profile. However, you can delete a user profile even though that profile still owns spooled files. After you delete a user profile, use the Work with Spooled Files (WRKSPLF) command to locate and delete any spooled files owned by the user profile.
When you delete a user profile, the user is removed from all distribution lists and from the system directory. You do not need to change ownership of the message queue or delete the user’s message queue. The system automatically deletes the message queue when the profile is deleted.
With the WRKUSRPRF command, you can delete a user profile and delete owned objects, transfer them to another user, or do a combination of both. In addition to being able to create, change, and delete user profiles, you can copy, list, enable, or disable user profiles.
PasswordA user’s password is an important key to controlling access to system resources. If a password is disclosed, the system’s integrity is reduced. Therefore, users should be educated about your company’s security policy and the need for good practices in password control and management.
Password management involves enforcement of several rules:
� The password must be changed at certain intervals.� The same password cannot be reused.� Non-trivial passwords of a reasonable length must be used.� Users must keep passwords secret.
Password management is facilitated through the use of system values and user profile parameters. User education is an important component of password management.
Note: When an user profile is copied, it does not copy the entire user profile with all its associated information. Rather it allows a user profile to be created that “looks like” an existing user profile with many, but not all, of the same parameter settings. Digital certificate information, password information, server authentication entries, interactive user profile entries, authorities, ownership, and so on are not copied.
60 IBM System i Security Guide for IBM i5/OS Version 5 Release 4

Password levelThe password level of the system defines the following items:
� The maximum possible password length� The character set that can be used in a password
– Uppercase or lowercase– Special characters– Blanks
� How the password is encrypted or hashed� Whether other related passwords are permitted to be stored on the system
The password level is controlled by the system value QPWDLVL.
For more information regarding password level, see the iSeries Security Reference, SC41-5302. To learn more about authentication and authentication methods, see Chapter 12, “System i authentication methods” on page 283.
Special authoritySpecial authority is used to specify which actions a user can perform on system resources and tasks. A user can be given one or more special authorities. The special authorities that are available are:
� *ALLOBJ: The user can access any resource on the system, even if the user has no private authority to the resource.
Only a limited number of user profiles should be given *ALLOBJ special authority, and you may want to audit these users.
� *AUDIT: The user can set up auditing parameters, start and end auditing, and access the audit journal (QAUDJRN) that contains logged auditing events.
With V5R4, users with *AUDIT special authority, and users with *ALLOBJ authority, can perform the following CL commands:
– Copy Audit Journal Entries (CPYAUDJRNE)– Display Audit Journal Entries (DSPAUDJRNE)– Display Security Auditing (DSPSECAUD)– Print Adopting Objects (PRTADPOBJ)– Print Communications Security (PRTCMNSEC)– Print JOBD Authority (PRTJOBDAUT)– Print Private Authorities (PRTPVTAUT)– Print Public Authorized Objects (PRTPUBAUT)
Important: Before you change password levels, plan carefully. Operations with other systems may fail, or users may not be able to sign on to your system if you have not planned for the password level change adequately.
Chapter 4. System i security fundamentals 61
– Print Queue Authority (PRTQAUT)– Print Subsystem Description (PRTSBSDAUT)– Print System Security Attribute (PRTSYSSECA)– Print Trigger Programs (PRTTRGPGM)– Print User Objects (PRTUSROBJ)– Print User Profile (PRTUSRPRF)
Prior to V5R3, a user needed *ALLOBJ authority to perform these commands.
For more information regarding auditing, see Chapter 6, “Security audit journal” on page 139.
� *IOSYSCFG: The user can change how the system is configured, add or remove communications configuration information, work with TCP/IP servers, create and delete line, controller, and device description objects.
� *JOBCTL: The user can hold, release, change, and end other user jobs, stop subsystems, and perform an IPL.
For more information regarding what you can do with output queues if you have the special authority of *JOBCTL, see “Output queue security” on page 93.
� *SAVSYS: The user can save and restore all objects on the system.
� *SECADM: The user can manage user and group profiles but has some restrictions on the authorities or privileges that the user assigns to another user profile.
� *SERVICE: The user can perform certain IBM serviceability functions such as collecting software and communications trace information.
� *SPLCTL: The user can hold, release, start, and stop spooling activity.
For a complete description of the special authorities, see iSeries Security Reference, SC41-5302.
User classA user class is used to control the menu options that are shown to the user on i5/OS menus. It offers a convenient way to specify special authorities.
Note: The Display Audit Journal Entries (DSPAUDJRNE) command will have no further enhancements. We recommend you that you use a combination of the Copy Audit Journal Entries (CPYAUDJRN) command followed by Run Query (RUNQRY) command. This combination provides function that is similar to DSPAUDJRNE.
62 IBM System i Security Guide for IBM i5/OS Version 5 Release 4

Table 4-1 shows the possible user classes and the default special authorities for each user class. The entries indicate that the authority is given at security level 20 only, at all security levels, or not at all. We recommend that you run your system at security level 40 or 50. See “Security system values” on page 46.
Table 4-1 Default special authorities by user class
Most users do not need to perform system functions. Set the user class to *USER, unless a user specifically needs to use system functions.
Limited capabilityLimited capability applies to commands that are run from the i5/OS command line, File Transfer Protocol (FTP), REXEC, using the QCAPCMD API, or an option from a command grouping menu. You can use the Limit capabilities field in the user profile to limit the user’s ability to enter commands. You can also use it to override the initial program, initial menu, current library, and attention-key-handling program specified in the user profile. This field is one tool for preventing users from experimenting on the system.
For more information regarding limited capability, see the iSeries Security Reference, SC41-5302.
4.2.2 Group profilesA group profile is a fundamental security structure that is especially useful when several users have similar security requirements. If members of a department require access to the same applications, a group profile can be set up for the department. As users join or leave the department, the group profile field in their user profiles can be changed. This is easier to manage than adding or removing individual user access to objects.
Special authority *SECOFR *SECADM *PGMR *SYSOPR *USER
*ALLOBJ All 20 20 20 20
*AUDIT All
*IOSYSCFG All
*JOBCTL All 20 20 All
*SAVSYS All 20 20 All 20
*SECADM All All
*SERVICE All
*SPLCTL All
Chapter 4. System i security fundamentals 63

A user may be a member of up to 16 group profiles. The first group profile is specified in the GRPPRF parameter of the user profile. Additional groups are specified in the SUPGRPPRF parameter.
Authority may be given for group profiles to use certain objects on the system. A member of the group gets the group’s authority unless an authority is specifically defined for that user.
Group ownership of objectWhen an object is created, the system looks at the profile of the user who is creating the object to determine object ownership. If the user is a member of a group profile, the OWNER field in the user profile specifies whether the user or the group should own the new object.
If the group owns the object (OWNER is *GRPPRF), the user that is creating the object is not automatically given any specific authority to the object. The user gets authority to the object through the group. If the user owns the object (OWNER is *USRPRF), the group’s authority to the object is determined by the GRPAUT field and the GRPAUTTYP field in the user profile. The group authority becomes a private authority or a primary group authority to the object. If the user who owns the object changes to a different user group, the original group profile still retains authority to any objects created.
The object owner decides which authority the other users can have through a group profile and as an individual.
It may be beneficial to have group ownership in a test and development environment. At the time that the objects are moved to a production environment, ownership should be transferred to the application owner.
Planning for group profilesWhen using group profiles, remember the following rules:
� Use a naming standard that makes recognition of the group profiles easier.� The group profile should have a password of *NONE.� A group profile should not own objects in a production environment.
Creating profiles specifically to be group profiles is preferable to making existing profiles into group profiles. You may find that a specific user has all the authorities needed by a group of users and be tempted to make that user profile
Important: If you give ownership of an application to a group profile in a production environment, you can have a security exposure.
64 IBM System i Security Guide for IBM i5/OS Version 5 Release 4

into a group profile. However, using an individual’s profile as a group profile may cause problems in the future:
� If the user whose profile is used as the group profile changes responsibilities, a new profile needs to be designated as the group profile, authorities need to be changed, and object ownership needs to be transferred.
� All members of the group automatically have authority to any objects created by the group profile. The user whose profile is the group profile loses the ability to have private objects, unless that user specifically excludes other users.
Try to plan group profiles in advance. Create specific group profiles with a password *NONE.
Supplemental group profilesA user can be a member of up to 16 groups: the first group (GRPPRF parameter in the user profile) and 15 supplemental groups (SUPGRPPRF parameter) in the user profile.
Follow these suggestions when using multiple group profiles:
� Try to use multiple groups in combination with primary group authority, and eliminate private authority to objects.
� Carefully plan the sequence in which group profiles are assigned to a user. The user’s first group should relate to the user’s primary assignment and the objects used most often.
� If you plan to use multiple groups, study the authority checking process described in 4.3.6, “Authorization search sequence” on page 89. Be sure that you understand how using multiple groups in combination with other authority techniques, such as authorization lists, may affect your performance.
4.2.3 IBM-supplied user profilesSeveral user profiles are shipped with i5/OS. These IBM-supplied user profiles are used as object owners for various system functions. Some system functions also run under specific IBM-supplied user profiles.
IBM-supplied user profiles, except QSECOFR, are shipped with a password of *NONE and are not intended for sign-on. To allow you to install your system for the first time, the password for the security officer (QSECOFR) profile is the same for every system that is shipped. However, the password for QSECOFR is shipped as expired. For new systems, you are required to change the password the first time that you sign on as QSECOFR.
Chapter 4. System i security fundamentals 65

When you install a new release of the operating system, passwords for IBM-supplied user profiles are not changed. If profiles, such as QPGMR and QSYSOPR, have passwords, those passwords are not set to *NONE automatically.
Table 4-2 lists the IBM-supplied user profiles. This table includes only some, but not all user profiles for licensed program products (LPPs).
Table 4-2 IBM-supplied user profiles
Attention: You must keep the QSECOFR user profile and QSECOFR service tools ID passwords in a secure and known location. If you lose both passwords, you might have to scratch install the system. IBM does not have a method for recovering those passwords.
Note: We recommend that you do not sign on with an IBM-supplied user profile, nor use the profiles to own user (non-IBM supplied) objects.
QADSM QAFOWN QAFUSR QAFDFTUSR QANZAGENT
QAUTPROF QBRMS QCLUMGT QCLUSTER QCOLSRV
QDBSHR QDBSHRDO QDFTOWN QDIRSRV QDLFM
QDOC QDSNX QEJBSVR QEJB QFNC
QGATE QIBMHELP QIPP QLPAUTO QLPINSTALL
QMGTC QMSF QMQM QNSFANON QNETSPLF
QNETWARE QNTP QOIUSER QOSIPS QPGMR
QPEX QPM400 QPRJOWN QRDARSADM QRDAR
QRDAR4001 QRDAR4002 QRDAR4003 QRDAR4004 QRDAR4005
QRMTCAL QRJE QSECOFR QSNADS QSOC
QSPL QSPLJOB QSRV QSRVAGT QSRVBAS
QSVCCS QSVCM QSVSM QSVSMSS QSYS
QSYSOPR QTCM QTCP QTFTP QTMPLPD
QTMTWSG QTMHHTTP QTMHHTP1 QTSTRQS QUMB
QUMVUSER QUSER QX400 QYCMCIMOM QYPSJSVR
QYPUOWN
66 IBM System i Security Guide for IBM i5/OS Version 5 Release 4
Service tools user IDsService tools user IDs are required to access service functions through DST, SST, iSeries Navigator (for logical partitions (LPAR) and disk unit management), and Operations Console. Service tools user IDs are created through DST or SST and are separate from i5/OS user profiles.
IBM provides the following service tools user IDs:
� QSECOFR� QSRV� 22222222� 11111111
The passwords for service tools user IDs QSECOFR, QSRV, and 22222222 are shipped as expired. All service tools passwords are case sensitive. The service tools passwords are shipped in uppercase.
You can create a maximum of 100 service tools user IDs, including the four IBM-supplied user IDs listed earlier.
For information about how to work with service tools user IDs, see the Service tools topic in the iSeries Information Center at the following Web address. When you reach this Information Center, follow the path Security → Service tools user IDs and passwords in the left navigation area:
http://publib.boulder.ibm.com/infocenter/iseries/v5r4/index.jsp
Changing a password for service tools user IDTo change a service tools user ID password using SST:
1. Start SST. Type STRSST on an i5/OS command line and press Enter.
2. The Start SST Sign On display appears. Sign on to SST using a service tools user ID and password that has the service tool security privilege.
3. The System Service Tools (SST) main menu appears. Type option 8 (Work with service tools user IDs and devices) and press Enter.
4. From the Work With Service Tools User IDs and Devices display, type option 1 (Service tools user IDs) and press Enter.
5. On the Service Tools User IDs display, find the user ID to change. In the Option field next to it, type option 2 (Change password) and press Enter.
Important: Some IBM-supplied user profiles are granted private authorities to objects that are shipped with the operating system. You must not remove such authorities, because removing any of these authorities may cause the system functions to fail.
Chapter 4. System i security fundamentals 67
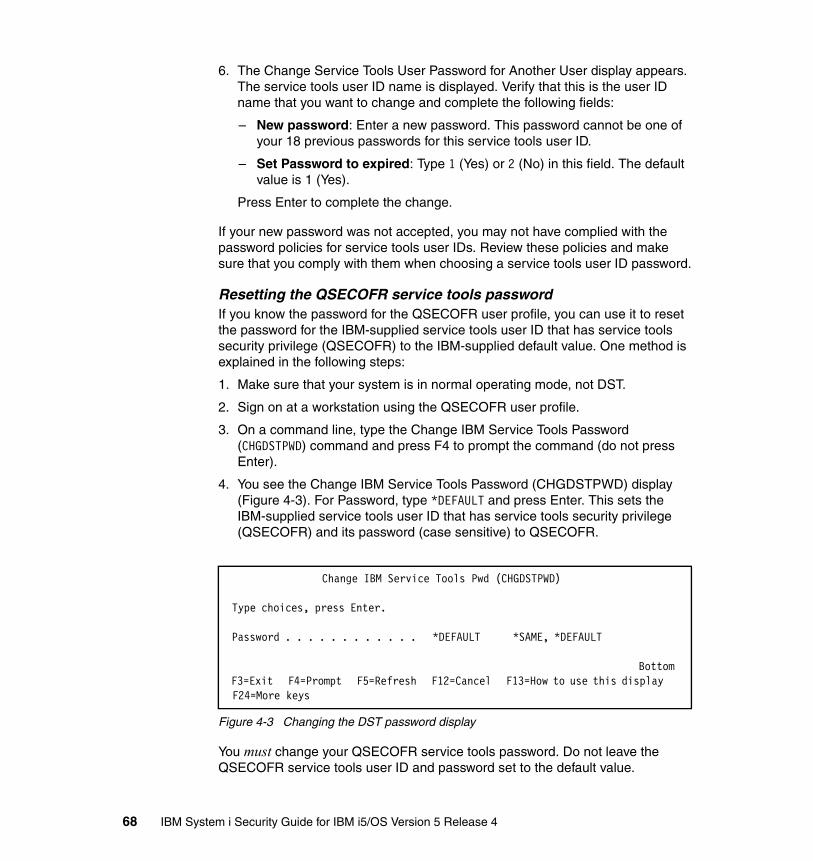
6. The Change Service Tools User Password for Another User display appears. The service tools user ID name is displayed. Verify that this is the user ID name that you want to change and complete the following fields:
– New password: Enter a new password. This password cannot be one of your 18 previous passwords for this service tools user ID.
– Set Password to expired: Type 1 (Yes) or 2 (No) in this field. The default value is 1 (Yes).
Press Enter to complete the change.
If your new password was not accepted, you may not have complied with the password policies for service tools user IDs. Review these policies and make sure that you comply with them when choosing a service tools user ID password.
Resetting the QSECOFR service tools passwordIf you know the password for the QSECOFR user profile, you can use it to reset the password for the IBM-supplied service tools user ID that has service tools security privilege (QSECOFR) to the IBM-supplied default value. One method is explained in the following steps:
1. Make sure that your system is in normal operating mode, not DST.
2. Sign on at a workstation using the QSECOFR user profile.
3. On a command line, type the Change IBM Service Tools Password (CHGDSTPWD) command and press F4 to prompt the command (do not press Enter).
4. You see the Change IBM Service Tools Password (CHGDSTPWD) display (Figure 4-3). For Password, type *DEFAULT and press Enter. This sets the IBM-supplied service tools user ID that has service tools security privilege (QSECOFR) and its password (case sensitive) to QSECOFR.
Figure 4-3 Changing the DST password display
You must change your QSECOFR service tools password. Do not leave the QSECOFR service tools user ID and password set to the default value.
Change IBM Service Tools Pwd (CHGDSTPWD) Type choices, press Enter. Password . . . . . . . . . . . . *DEFAULT *SAME, *DEFAULT
Bottom F3=Exit F4=Prompt F5=Refresh F12=Cancel F13=How to use this display F24=More keys
68 IBM System i Security Guide for IBM i5/OS Version 5 Release 4

If you set the Allow a service tools user ID with a default and expired password to change its own password parameter to the default value 2 (No), you must use the following procedure to change your default password:
1. From the front panel of your system, place the system into manual mode.
2. Use the arrow keys to access Function 21, and press the Enter button on the panel.
3. On the console, a DST sign-on screen is shown. Sign on with the DST security profile QSECOFR. You are forced to change your password; select a password that complies with your security policy. Remember that the password is case sensitive.
4. Exit the Dedicated Service tools menu.
5. Remove the system from Manual mode.
You have now reset the password for the IBM-supplied service tools user ID QSECOFR to the IBM-supplied default value and changed its password.
Resetting the i5/OS user profile QSECOFR passwordTo reset the QSECOFR password, use the following method and then IPL your system:
1. From the front panel of your system, place the system into manual mode.
2. Use the arrow keys to access Function 21, and press the Enter button on the panel.
3. On the console, you see a DST sign-on screen. Sign on with the DST security profile. This profile is QSECOFR, but it is not the QSECOFR user profile.
4. From the Use Dedicated Service Tools menu, type option 5 (Work with DST Environment) and press Enter.
5. From the Work with DST Environment menu, type option 6 (Work with Service Tools Security Data) and press Enter.
6. You see the Work with Service Tools Security Data menu. Type option 1 (Reset operating system default password) and press Enter.
7. The Confirm Reset of System Default Password display appears. Press Enter to confirm the reset. You see a confirmation message informing you that the system has set the operating system password to override.
Note: You can only change the Allow a service tools user ID with a default and expired password to change its own password parameter when you are logged on in the service tool.
Chapter 4. System i security fundamentals 69
8. Press F3 (Exit) continuously until you return to the Exit Dedicated Service tools menu.
9. Remove the system from Manual mode.
The system resets the QSECOFR user profile to the default shipped value on next IPL. The IPL may be a normal (unattended) one. You must have the system scheduled to IPL, or have someone, such as an operator or someone with authority to power down the system, do it. If you do not, then you must power down the system from the front panel, and then start it from there.
For more information about how to reset the QSECOFR password, see the iSeries Information Center at the following Web address and select the path Security → Service tools user IDs and passwords → Manage service tools user IDs and passwords → Manage service tools user IDs → Recover or reset QSECOFR passwords:
http://publib.boulder.ibm.com/infocenter/iseries/v5r4/index.jsp
Default owner QDFTOWNThe system supplies the QDFTOWN user profile because all objects must have an owner. By default, only a user with *ALLOBJ special authority can display and access this user profile and transfer ownership of objects associated with the QDFTOWN user profile. QDFTOWN is shipped with a password of *NONE to prevent sign-on.
The QDFTOWN user profile is used when an object has no owner or when object ownership might mean a security exposure. The following situations may cause ownership of an object to be assigned to the QDFTOWN profile:
� If an owning profile becomes damaged and is deleted
In this case, its objects no longer have an owner. Using the Reclaim Storage (RCLSTG) command assigns ownership of these objects to the default owner (QDFTOWN) user profile.
� If an object is restored and the owner profile does not exist
� If a program that needs to be created again is restored, but the program creation is not successful
� If the maximum storage limit is exceeded for the user profile that owns an authority holder that has the same name as a file being moved, renamed, or whose library is being renamed
You should not have any objects owned by QDFTOWN. If you do, correct the ownership of the objects to match your security policy.
70 IBM System i Security Guide for IBM i5/OS Version 5 Release 4
4.3 Resource protectionResource protection defines the users who are allowed to use specific objects on your system and the operations that they are allowed to perform over those objects. This section presents the different approaches for resource protection and related management issues, along with recommendations for implementation. It also highlights considerations about users with special authorities and the security exposures they can create. In addition, security of printed output is considered.
4.3.1 Information accessTo access the resources on your system, a user must be authorized to these resources. You can give authority to access objects to individual users, specific groups of users, primary groups, and any other users (known as public authority).
How a user can access informationTo access any object on the system, you must have the appropriate authority to that object. Authority determines the type of access that you are allowed to the object. Different operations require different types of authority. Authority to an object is divided into three categories (see Figure 4-4):
� Object authority: Defines the operations that can be performed on the object as a whole
� Data authority: Defines the operations that can be performed on the contents of the object
� Field authority: Defines the operations that can be performed on the data fields.
Important: Some administrators attempt to secure access to the data, rather than to secure the data itself. This is risky, because it requires administrators to understand all of the methods by which users can access data.
Chapter 4. System i security fundamentals 71

Figure 4-4 Specific object authority
Commonly used authoritiesThe System i architecture defines several commonly used sets of authorities to let you perform typical operations on an object and its data. The authorities are *ALL, *USE, *CHANGE, and *EXCLUDE. *EXCLUDE authority is different than having no authority. *EXCLUDE authority specifically denies access to the object, while having no authority means that you use the public authority that is defined for the object.
Table 4-3 shows the object control authorities that go with the system defined set of authorities.
Table 4-3 Object control authorities
Authorities Object control
Operational Management Existence Alter Reference
All X X X X X
Change X
Use X
Exclude
Specific object authority
Object Authorities Data Authorities
Exclude
Operational
Management
Existence
Alter
Reference
Authorization list
Read
Add
Update
Delete
Execute
Field Authorities
Management
Alter
Reference
Read
Add
Update
72 IBM System i Security Guide for IBM i5/OS Version 5 Release 4

Table 4-4 shows the data authorities that go with the system defined set of authorities.
Table 4-4 Data authority
Table 4-5 shows the object control authorities that are available using the Work with Authority (WRKAUT) and Change Authority (CHGAUT) CL commands.
Table 4-5 Object control authorities (*RWX)
Table 4-6 shows the data authorities that are available using the Work with Authority (WRKAUT) and Change Authority (CHGAUT) CL commands.
Table 4-6 Data authority (*RWX)
Authorities Data authority
Read Add Update Delete Execute
All X X X X X
Change X X X X X
Use X X
Exclude
Authorities Object control
Operational Management Existence Alter Reference
*RWX X
*RW X
*RX X
*R X
*WX X
*W X
*X X
Authorities Data authority
Read Add Update Delete Execute
*RWX X X X X X
*RW X X X X
Chapter 4. System i security fundamentals 73

Table 4-7 helps you to understand the authorities that are needed on an object and library to perform particular functions.
Table 4-7 Necessary authorities
Information that can be accessedYou can define resource security for both individuals or groups of objects in the System i architecture. To secure groups of objects within libraries, you can use library security or authorization lists.
Library securityMany objects on the system reside in libraries. To access an object, you need authority to both the library and the object itself. When you want to secure an application, start by securing the libraries:
� Learn which libraries are included in the application. Do not forget the libraries with the source code.
� Determine which user profiles must have access to the libraries, and if any of them needs specific authorities.
*RX X X
*R X
*WX X X X X
*W X X X
*X X
Object type Function Necessary object authority
Necessary library authority
File Change data Change Use
Delete file All Use
Create file Change
Program Execute program Use Use
Change (compile) program Change
Delete program All Use
Authorities Data authority
Read Add Update Delete Execute
74 IBM System i Security Guide for IBM i5/OS Version 5 Release 4
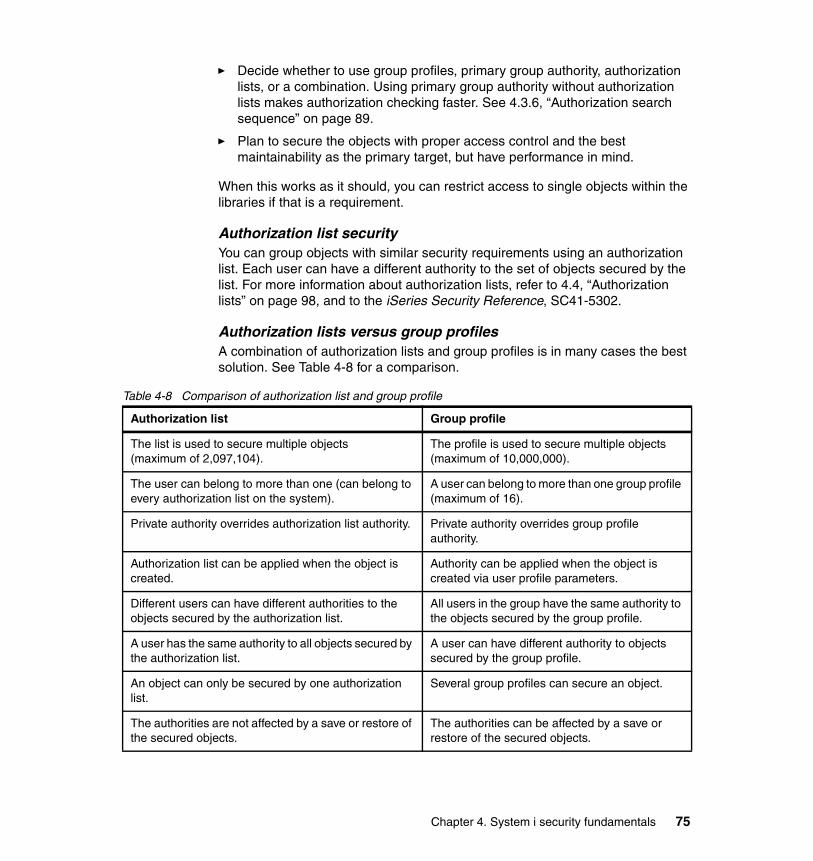
� Decide whether to use group profiles, primary group authority, authorization lists, or a combination. Using primary group authority without authorization lists makes authorization checking faster. See 4.3.6, “Authorization search sequence” on page 89.
� Plan to secure the objects with proper access control and the best maintainability as the primary target, but have performance in mind.
When this works as it should, you can restrict access to single objects within the libraries if that is a requirement.
Authorization list securityYou can group objects with similar security requirements using an authorization list. Each user can have a different authority to the set of objects secured by the list. For more information about authorization lists, refer to 4.4, “Authorization lists” on page 98, and to the iSeries Security Reference, SC41-5302.
Authorization lists versus group profilesA combination of authorization lists and group profiles is in many cases the best solution. See Table 4-8 for a comparison.
Table 4-8 Comparison of authorization list and group profile
Authorization list Group profile
The list is used to secure multiple objects(maximum of 2,097,104).
The profile is used to secure multiple objects(maximum of 10,000,000).
The user can belong to more than one (can belong to every authorization list on the system).
A user can belong to more than one group profile (maximum of 16).
Private authority overrides authorization list authority. Private authority overrides group profile authority.
Authorization list can be applied when the object is created.
Authority can be applied when the object is created via user profile parameters.
Different users can have different authorities to the objects secured by the authorization list.
All users in the group have the same authority to the objects secured by the group profile.
A user has the same authority to all objects secured by the authorization list.
A user can have different authority to objects secured by the group profile.
An object can only be secured by one authorization list.
Several group profiles can secure an object.
The authorities are not affected by a save or restore of the secured objects.
The authorities can be affected by a save or restore of the secured objects.
Chapter 4. System i security fundamentals 75
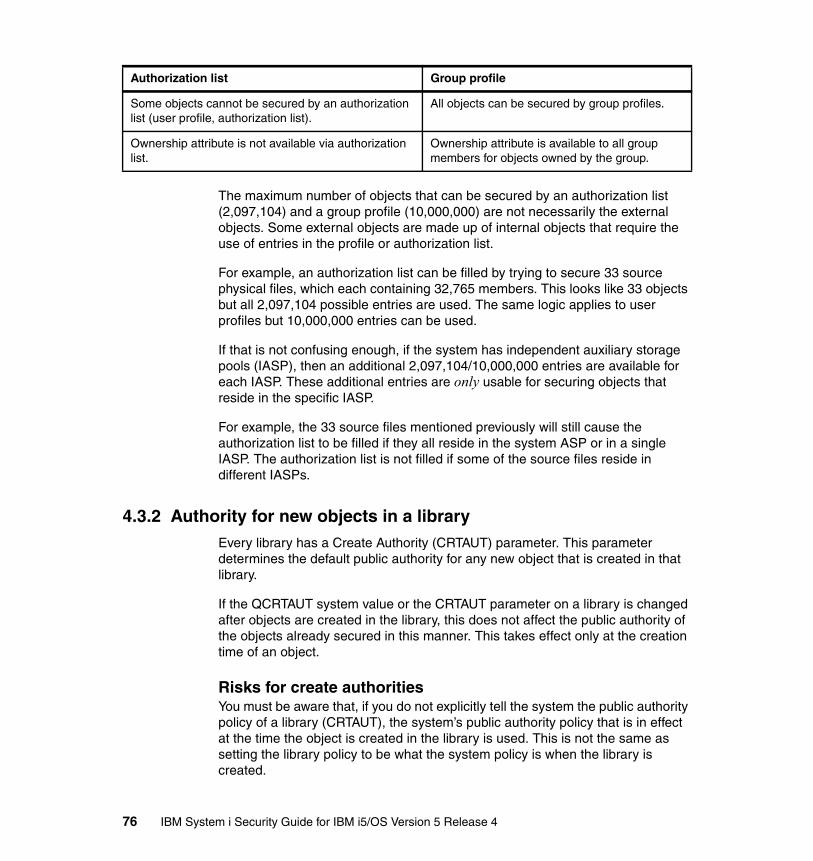
The maximum number of objects that can be secured by an authorization list (2,097,104) and a group profile (10,000,000) are not necessarily the external objects. Some external objects are made up of internal objects that require the use of entries in the profile or authorization list.
For example, an authorization list can be filled by trying to secure 33 source physical files, which each containing 32,765 members. This looks like 33 objects but all 2,097,104 possible entries are used. The same logic applies to user profiles but 10,000,000 entries can be used.
If that is not confusing enough, if the system has independent auxiliary storage pools (IASP), then an additional 2,097,104/10,000,000 entries are available for each IASP. These additional entries are only usable for securing objects that reside in the specific IASP.
For example, the 33 source files mentioned previously will still cause the authorization list to be filled if they all reside in the system ASP or in a single IASP. The authorization list is not filled if some of the source files reside in different IASPs.
4.3.2 Authority for new objects in a libraryEvery library has a Create Authority (CRTAUT) parameter. This parameter determines the default public authority for any new object that is created in that library.
If the QCRTAUT system value or the CRTAUT parameter on a library is changed after objects are created in the library, this does not affect the public authority of the objects already secured in this manner. This takes effect only at the creation time of an object.
Risks for create authoritiesYou must be aware that, if you do not explicitly tell the system the public authority policy of a library (CRTAUT), the system’s public authority policy that is in effect at the time the object is created in the library is used. This is not the same as setting the library policy to be what the system policy is when the library is created.
Some objects cannot be secured by an authorization list (user profile, authorization list).
All objects can be secured by group profiles.
Ownership attribute is not available via authorization list.
Ownership attribute is available to all group members for objects owned by the group.
Authorization list Group profile
76 IBM System i Security Guide for IBM i5/OS Version 5 Release 4
For more information regarding the library CRTAUT parameter, see the iSeries Security Reference, SC41-5302.
4.3.3 Object ownershipEach object is assigned an owner when it is created. The owner is either the user who creates the object or the group profile if the member user profile has specified that the group profile should be the owner of the object. (Refer to “Group ownership of object” on page 64 for more information about group ownership.) When you create an object, the owner is given all the object and data authorities to the object.
The owner of an object always has all the authority for the object unless any or all authority is removed specifically. As an object owner, you may choose to remove some specific authority as a precautionary measure. For example, if a file exists that contains critical information, you may remove your object existence authority to prevent yourself from accidentally deleting the file. However, as object owner, you can grant any object authority to yourself at any time.
Ownership of an object can be transferred from one user to another. Ownership can be transferred to an individual user profile or a group profile. A group profile can own objects regardless of whether the group has members.
When changing an object’s owner, you have the option to keep or revoke the former owner’s authority. To transfer ownership, any user (including the object’s present owner) must have the following types of authority:
� Object existence authority for the object (except authorization list)
� Object operational and object existence authorities if the object is a file, library, or subsystem description
� All object (*ALLOBJ) special authority or ownership if the object is an authorization list
� Add authority for the new owner’s user profile
� Delete authority for the present owner’s user profile
� All object (*ALLOBJ) and security administrator (*SECADM) special authorities to change the object owner of a program or an Structured Query Language (SQL) package that adopts its owner’s authority
� *USE authority to the auxiliary storage pool device if one is specified
Note: This does not apply to an object in the integrated file system.
Chapter 4. System i security fundamentals 77

Object ownership is used as a management tool by the System i architecture. The owner profile for an object contains a list of all users who have private authority to the object. This information is used to build displays for editing or viewing object authority.
Adopted authorityCertain programs or commands called by a user may require a higher level of authority (for the duration of the command) than is normally available to that user. Adopted authority provides a means for handling this situation. Adopted authority allows a user to temporarily gain the authority of the owner of a program (in addition to the user’s own authorities) while that program is running. This provides a method to give a user additional access to objects, without requiring direct authority to objects.
For example, a user may be allowed to change the information in a customer file when using application programs that provide that function. However, the same user should be allowed to view, but not change, customer information when using a decision support tool, such as SQL. In this situation, first give the user *USE authority to customer information to allow querying of the files. Then use adopted authority in the customer maintenance programs to allow the user to change the files.
Potential exposuresAllowing a program to run using adopted authority is an intentional release of control. You permit the user to have authority to objects, and possibly special authority, which the user does not normally have. Adopted authority provides an important tool for meeting diverse authority requirements, but use it with care:
� Adopt the minimum authority required to meet the application requirements. Adopting the authority of an application owner is preferable to adopting the authority of QSECOFR or a user with *ALLOBJ special authority.
� Carefully monitor the function provided by programs that adopt authority. Make sure these programs do not provide a means for the user to access objects outside the control of the program, such as command entry capability.
� Programs that adopt authority and call other programs must perform a library qualified call. Do not use the library list (*LIBL) on the call.
Important: To prevent impacts to performance, do not assign object ownership to only one owner profile for your entire system. Each application and the application objects should be owned by a separate profile. Also, IBM-supplied user profiles should not own user data or objects.
78 IBM System i Security Guide for IBM i5/OS Version 5 Release 4

� Control which users are permitted to call programs that adopt authority. Use menu interfaces and library security to prevent these programs from being called without sufficient control.
You may not want some programs to use the adopted authority of previous programs in the program stack. For example, if you use an initial menu program that adopts owner authority, you may not want some of the programs called from the menu program to use that authority. The Use Adopted Authority (USEADPAUT) parameter of a program determines whether the system uses the adopted authority of previous programs in the stack when checking authority for objects.
When you create a program, the default is to use adopted authority from previous programs in the stack. If you do not want the program to use adopted authority from previous program in the stack, you can change the program by using the Change Program (CHGPGM) command or the Change Service Program (CHGSRVPGM) command to set the USEADPAUT parameter to *NO. If a program is created using REPLACE(*YES) on the CRTxxxPGM command, the new copy of the program has the same USRPRF, USEADPAUT, and AUT values as the replaced program.
For information regarding exit programs, see 4.5.3, “Exit programs” on page 102.
Note: Adopted authority can be inhibited by the operating system under certain conditions. For example, when an exit program is called, the operating system inhibits the use of adopted authority even if the USEADPAUT parameter specifies *YES on the exit program. The operating system inhibits the use of adopted authority when using integrated file system commands or APIs.
Chapter 4. System i security fundamentals 79

Figure 4-5 shows an example of how authorities are passed between programs depending on which user profile to use and the Use Adopted Authority parameter (USEADPAUT).
Figure 4-5 Adopted authority
The adopted authority in Figure 4-5 follows this flow:
1. A user executes the program PGM1 owned by user profile APP_OWNER. The program is set to adopt authority (User profile: *OWNER). During the execution, the program runs with the executing user’s authority and the gained authority from the program’s owners.
2. PGM1 calls program PGM2 that adopts the authority of the owner, in this case QSECOFR. The execution authority is now the initial users, APP_OWNER from PGM1 and QSECOFR authority gained from PGM2.
3. Program PGM2 calls PGM3 that does not adopt authority. However, the parameter for use adopted authority from previous programs in the stack is not set to *NO, so this program still has the initial users, APP_OWNER and QSECOFR’s authority.
4. Program PGM3 calls PGM4 owned by APP_OWNER. The program is set to run with adopted authority but has the USEADPAUT set to *NO which means that the program does not use authority from previous programs in the stacks.
PGM4 Owner: App_OwnerUser Profile: *OwnerUse Adopted Aut: *No
PGM3 Owner: QPGMRUser Profile: *User
PGM 2 Owner: QSECOFRUser Profile: *Owner
PGM1
Owner: App_OwnerUser Profile: *Owner
Authority during Execution
User and App_Owner
User, App_Owner and QSECOFR
User, App_Owner and QSECOFR
User and App_Owner
80 IBM System i Security Guide for IBM i5/OS Version 5 Release 4
Swapping user profilesAdopted authority is not available in the integrated file system. A common method used to work around this limitation is to swap user profiles. Adopted authority temporarily adds the authority from the owner of the program, but not the group authorities from the owner of the program.
When swapping user profiles, the swap-to user does not inherit any authority from the swap-from user. The authority is not additive; it is a replacement of the authority. Swapping user profiles causes the swap-to user and its group’s authority to be used, but the swap-from user and its group’s authority is not available.
After swapping user profiles, any existing adopted authority still applies; it is not lost, but it is added to the swap-to user’s authority. You are running as the swap-to user. This does affect the ownership of newly created objects and other user profile related functions. Some aspects of the job are not changed (for example, the job name, authority to already open files, and so on), which are initialized or established prior to swapping user profiles.
To swap to another user profile, you need authority to the user-to profile or must know the password of the swap-to user profile. You must also consider that audit records written when using swapped user profiles are written indicating the swap-to user performed the actions, for as long as the job or thread is swapped.
You can find information about useful security related APIs in the iSeries Information Center at the following Web address. When you reach this site, select the path Programming → APIs → APIs by category → Security → Security-related APIs:
http://publib.boulder.ibm.com/infocenter/iseries/v5r4/index.jsp
4.3.4 Public authorityPublic authority is the default authority for an object. It is used if users do not have any specific (private) authority to an object, are not on the authorization list (if one is specified) for the object, or their group or groups have no specific authority to the object.
Public authority to objectsPublic authority is assigned to new objects created on the system. If you do not specify the public authority that an object should have when you create it, the system uses the library public authority policy for the library where the object is created.
Chapter 4. System i security fundamentals 81
If the create command used has the Authority parameter set to *LIBRCRTAUT, consider that *LIBRCRTAUT is not the default value for some CRTxxxxx CL commands. Create Out Queue (CRTOUTQ) and some other commands do not support a value of *LIBRCRTAUT (CRTVLDL).
When you create objects in a directory, the object inherits the authority from the directory in which it is created.
Public authority to librariesWhen you create a library, using the Create Library (CRTLIB) command, there are two authority parameters:
� Library authority: The public authority granted to the library (AUT)
� Library public authority policy: The authority given to objects created in the library (CRTAUT)
You must be aware that if you do not explicitly tell the system the public authority policy of a library, the system’s public authority policy in affect at the time the object is created in the library is used. This is not the same as setting the library policy to be what the system policy is when the library is created. If the default parameters are used when creating a library, the library authority and library public authority policy are set as the system value of Create default public authority (QCRTAUT).
For more information regarding public authority, see the iSeries Security Reference, SC41-5302.
4.3.5 Protection strategiesIt is important that you secure the data itself, before you attempt to secure the access to the data. To secure the access to the data, you must understand all of the methods by which users can access data.
Library securityLibrary security establishes security at the library level. This concept assumes that libraries contain objects with similar protection requirements and that, in general, nonspecific protection is adequate. This concept typically applies when applications are maintained in separate libraries, and test and production objects are separated at the library level.
82 IBM System i Security Guide for IBM i5/OS Version 5 Release 4

Object security
Object security defines authorization at the more granular object level, that is below the library level. It is used where different objects within a library have different protection requirements. Object security may be necessary where the library structure does not support security requirements or may be used to implement exceptions to the general library authorization structure.
In applying object security, there are two issues to define:
� Authorization method� Object ownership
Individual or group authorityFor object authority, we make the following recommendations:
� Public authority is set to exclude.� Multiple groups are in the correct search sequence.� Individual authority if nothing else is suitable.
Individual or group ownershipIn a production environment, you have better control of security when a single user profile owns all the objects in an application. In a test environment, it may be an advantage to make programmers members of group profiles and give the group profile ownership of all objects.
When the objects are moved from the test environment to the production environment, the ownership must be changed.
Menu securityMenu security is related to limiting a user’s capabilities and restricting them to a predefined secured environment. The user’s initial program and menu structure restricts them to the functions and objects that they are allowed to use. They are not allowed to issue commands. Therefore, all functions required should be available from a menu. Also, every menu that is accessed should only have options that are needed.
Integrated file system securityThe integrated file system provides multiple ways to store and view information on the system. The integrated file system is a part of the i5/OS operating system
Note: Object security applies to objects whose addressability can be stored in libraries. For object security in the integrated file system, see “Integrated file system security” on page 83.
Chapter 4. System i security fundamentals 83
that supports stream input and output operations. It provides storage management methods that are similar to, and compatible with, personal computer operating systems and UNIX® operating systems.
The root file system acts as an umbrella, or a foundation, for all other file systems on the System i platform. At a high level, it provides an integrated view of all of the objects on the system. Other file systems that can exist on the system provide varying approaches to object management and integration, depending on the underlying purpose of each file system. The QOPT (optical) file system, for example, allows applications and servers, including the iSeries Access for Windows file server, to access the CD-ROM drive on the system. Similarly, the QFileSvr.400 file system allows applications to access integrated file system data on a remote System i platform. The QLANSrv file server allows access to files that are stored on the Integrated xSeries® Server or other connected servers in the network.
The integrated file system is designed to follow Portable Operating System Interface for Computer Environments (POSIX) standards as closely as possible. This leads to interesting behavior where i5/OS authority and POSIX permissions are mixed.
For more information about the integrated file system, see the iSeries Information Center at the following Web address and select the path Files and file system → Integrated file system → Overview of the integrated file system:
http://publib.boulder.ibm.com/infocenter/iseries/v5r4/index.jsp
Public authority to the root directoryThe default public authority to the root directory is *RWX, *OBJEXIST, *OBJALTER, *OBJREF, and *OBJMGT. It is important to adequately protect the objects that are created. When a user creates a directory, the public authority to the directory should not be *RWX (the default). The user should set public authority either to *RX or to *EXCLUDE, depending on the contents of the directory.
When you create new directories in the root (/), QOpenSys, or user-defined file systems, you can choose to perform one of the following actions:
� Override the default authority when creating new directories. The default is to inherit authority from the immediate parent directory. If you create a directory in the root directory, by default the public authority is *RWX.
Important: A single object can have multiple path names that lead to it (via a symbolic or hard link). Extra care must be taken to ensure that the objects are secured properly, because restricting directory access in one path may still leave access open via a different directory.
84 IBM System i Security Guide for IBM i5/OS Version 5 Release 4

� Consider changing the public authority for the root directory to prevent users from creating objects in that directory. Remove *W, *OBJEXIST, *OBJALTER, *OBJREF, and *OBJMGT authorities. However, you need to evaluate whether this change will cause problems for any of your applications. For example, you might have UNIX-like applications that expect to be able to delete objects from the root directory.
Restricting access to QSYS.LIB file systemBecause the root file system is the umbrella file system, the QSYS.LIB file system appears as a subdirectory within the root directory. Therefore, any PC user with access to your system can manipulate objects stored in the libraries (the QSYS.LIB file system) with normal PC commands and actions. For example, a PC user can drag a QSYS.LIB object, such as the library with your critical data files, to the shredder if the user has *OBJEXIST authority to the object.
If you do not want users to access the entire QSYS.LIB file system via a network drive, Universal Naming Convention (UNC) name, network neighborhood, or iSeries Navigator, you can restrict access to an IBM-supplied authorization list called QPWFSERVER. If you change the public authority to the QPWFSERVER authorization list to *EXCLUDE, it prevents all network drives from accessing QSYS.LIB.
When a user’s authority to the QPWFSERVER authorization list is *EXCLUDE, the user cannot enter the QSYS.LIB directory from the root directory structure. When a user’s authority is *USE, the user can enter the directory. When the user has authority to enter the directory, normal object authority applies for any action the user attempts to perform on an object within the QSYS.LIB file system. The authority to the QPWFSERVER authorization list acts like a door to the entire QSYS.LIB file system. For the user with *EXCLUDE authority, the door is locked. For the user with *USE authority (or any greater authority), the door is open.
For most situations, users do not need to use a directory interface to access objects in the QSYS.LIB file system. You can set public authority to the QPWFSERVER authorization list to *EXCLUDE. Remember that authority to the authorization list opens or closes the door to all libraries within the QSYS.LIB file system, including user libraries. If you encounter users who object to this exclusion, you can evaluate their requirements on an individual basis. If appropriate, you can explicitly authorize an individual user to the authorization list. However, you need to ensure that the user has appropriate authority to objects within the QSYS.LIB file system. Otherwise, the user might unintentionally delete objects or entire libraries.
The default public authority to the QPWFSERVER authorization list is *USE. The QPWFSERVER authorization list does not prevent access to directories in QSYS.LIB via FTP, Open Database Connectivity (ODBC), and other protocols.
Chapter 4. System i security fundamentals 85

Authorization listsWhere group profiles do not offer the required granularity, we recommend that you use authorization lists. Authorization lists offer performance advantages of save and restore over specific object authorization (based on the implementation, usually not visible to the end user). They functionally have the advantage that they survive the deletion of their related objects.
An authorization list can be established to secure all libraries within an application, and other major objects where appropriate, during the initial security implementation. See 4.4, “Authorization lists” on page 98, for more information.
Logical filesFor access to critical files, use logical files. This way the owner of the file can authorize other users to specific fields (for example, address and phone number, but not salary) or specific records rather than the entire physical file. This is commonly known as field or record-level security.
Use object access control to secure your logical files. See 4.3.1, “Information access” on page 71, and “Object security” on page 83.
Overall recommendationsAlways secure the data itself (object security), before securing the access methods, such as FTP and ODBC. The overall recommendations given in this topic rely on one important principle: simplicity. If you keep your security design as simple as possible, you can manage and audit your system security with ease.
We recommend that you use the different philosophies in combination. Use the following recommendations when designing the overall security scheme:
� Move from general to specific– Plan security for libraries and directories first. Deal with individual objects
only when necessary.
– Plan public authority first, followed by group authority and then individual authority. Refer to 4.3.4, “Public authority” on page 81.
� Library security: Design libraries in a way that objects contained in a library have identical or at least similar protection requirements. Authorizations to libraries should then be established as a first step. We recommend that explicit authorizations be defined for all production libraries. It may be acceptable to protect test libraries through *PUBLIC authorization.
� Directory security: Directories should protect the objects in it in an appropriate way. Establish authorization to directories as a first step. We recommend that you define explicit authorizations for all production directories.
86 IBM System i Security Guide for IBM i5/OS Version 5 Release 4

� Object security: Specific object authorities should be defined only to handle exceptions. Exceptions exist where a few objects within a library have more stringent protection requirements than defined for the library, and where temporary access must be granted. Otherwise, the public authority to the object should be adequate.
� Menu security: If you are using terminal sessions, we recommend that you use the limited capability approach where appropriate to complement library and object security.
� Interface security: You must protect your interfaces to your system. Today many different methods exist to access your system. Restrict your network interfaces and access to certain functions. Here are some functions that exist on the system:
– Port restriction– IP filtering– Exit point programs– Limit access to program function
See Part 3, “Network security” on page 171, for more information.
Exclusionary access controlThe significance with exclusionary access control is that only those that have explicit rights to an object have access to it; all others are excluded. Exclusionary access control means that the system PUBLIC authority is set to *EXCLUDE. The library PUBLIC authority is *SYSVAL, unless you explicitly select another policy for a specific library.
It might seem impossible to implement a method for exclusionary access control in a production environment, but it is not. Here is an example method to use:
Note: We do not believe that menu security alone is a feasible alternative. This recommendation is based on the fact that library and object security is enforced by the System i architecture, while initial programs, menus, and so on are largely user-designed and more likely to have security exposures.
Note: The procedure presented here does not address any objects or data in the integrated file system of i5/OS.
Chapter 4. System i security fundamentals 87

1. Change the PUBLIC create authority for your system (system value) and libraries to *EXCLUDE.
a. Change the library CRTAUT attribute for the QSYS library to *CHANGE, if it is *SYSVAL.
b. For each application, change the libraries used by the application that have a CRTAUT attribute of *SYSVAL to *CHANGE.
c. When you have finished making the CRTAUT changes on your libraries, alter the system value QCRTAUT to *EXCLUDE.
In i5/OS V5R4, operating system functions continue to work as intended, despite of the system value QCRTAUT and the QSYS library CRTAUT attribute. If an application fails, you can easily determine the cause and make suitable changes for that application’s *PUBLIC authority.
2. Reduce the PUBLIC authority to new objects that are created in libraries.
a. You must determine whether the application is dependent on the library’s CRTAUT attribute. The application might have created all necessary objects already.
b. If the application is not dependent on the library’s CRTAUT attribute, alter it to *EXCLUDE. If the application is dependent on the library’s CRTAUT, set it to the value that suites best.
Set the library’s CRTAUT parameter to *EXCLUDE whenever it is possible and to a value that is more restricted than *CHANGE on as many of the remaining libraries as possible.
c. Verify and test your changes. If no problems occur in at least one business cycle, where all critical applications are executed, then alter the library’s CRTAUT parameter from *EXCLUDE to *SYSVAL. For those libraries that do not have CRTAUT set to *EXCLUDE, no changes are required.
3. Decrease the *PUBLIC authority necessary for existing libraries and objects.
a. If you have group profiles and authorization lists, without difficulty, you can decrease the *PUBLIC authority for the application’s library to *EXCLUDE. If that is not possible, you can change the *PUBLIC authority to *USE.
b. The library or the authentication list that is used to secure the library, has to be granted *CHANGE authority for the user profiles or group profiles that are representing all authorized application users. Change the *PUBLIC authority for the library to *EXCLUDE.
c. Verify and test this authority until you are convinced that your changes have not introduced any problems.
88 IBM System i Security Guide for IBM i5/OS Version 5 Release 4

d. If no problems occur, decrease the authority to *USE, which demands extensive testing.
• If authorized users cannot run their application successfully after the previous change, undo the previous step. Note that the application has to be further analyzed. Continue with your next application.
• If authorized users can run their applications successfully with *USE authority. Secure the objects within the library, using the same approach that was used for the library. The objects inside the library are likely more sensitive to private authority changes.
When implementing this on the object level, use your knowledge of your application and how it works. Make logical guesses about which authorization is needed to the objects for authorized users. For example, the probable authority required for a database file is *CHANGE, and for an executable program is *USE.
If you implement the steps in this section for every application on your system, you implement a method for exclusionary access control on your system.
4.3.6 Authorization search sequenceTo check the authority to an object, the System i architecture searches for the authority according to a schema. For detailed information about the authorization search sequence, see the iSeries Security Reference, SC41-5302.
Chapter 4. System i security fundamentals 89
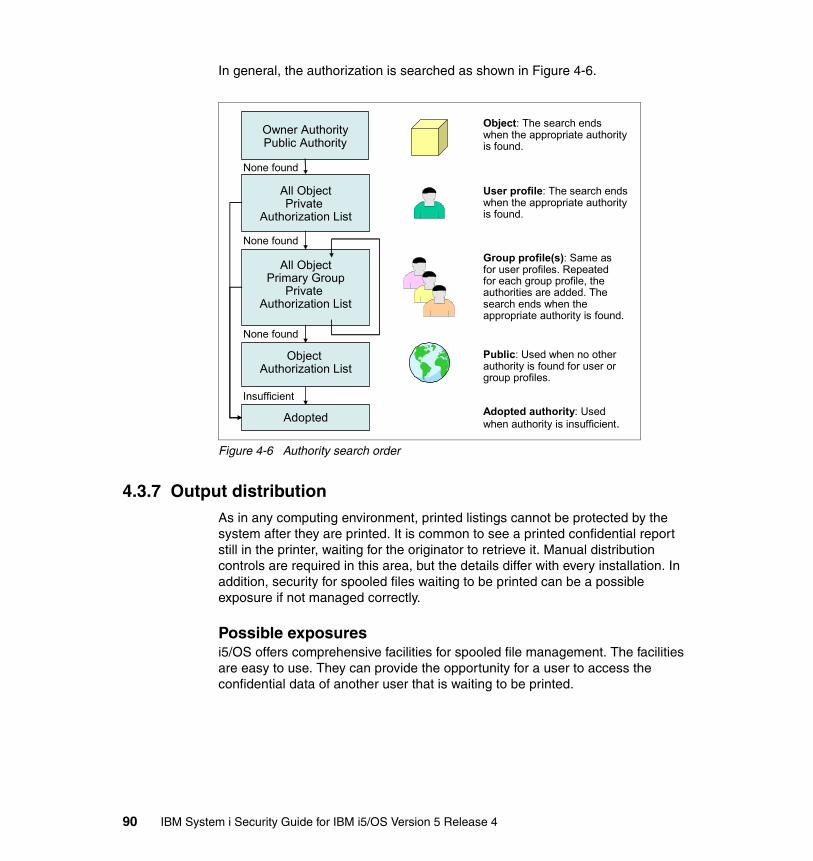
In general, the authorization is searched as shown in Figure 4-6.
Figure 4-6 Authority search order
4.3.7 Output distributionAs in any computing environment, printed listings cannot be protected by the system after they are printed. It is common to see a printed confidential report still in the printer, waiting for the originator to retrieve it. Manual distribution controls are required in this area, but the details differ with every installation. In addition, security for spooled files waiting to be printed can be a possible exposure if not managed correctly.
Possible exposuresi5/OS offers comprehensive facilities for spooled file management. The facilities are easy to use. They can provide the opportunity for a user to access the confidential data of another user that is waiting to be printed.
User profile: The search endswhen the appropriate authorityis found.
Group profile(s): Same as for user profiles. Repeatedfor each group profile, theauthorities are added. The search ends when the appropriate authority is found.
Public: Used when no otherauthority is found for user orgroup profiles.
Adopted authority: Usedwhen authority is insufficient.
All ObjectPrivate
Authorization List
All ObjectPrimary Group
Private Authorization List
Object Authorization List
Adopted
None found
Insufficient
None found
Owner AuthorityPublic Authority
None found
Object: The search endswhen the appropriate authorityis found.
90 IBM System i Security Guide for IBM i5/OS Version 5 Release 4
Protection methodsThere are several levels of security to an output queue. The definitions must be set in conjunction with the capabilities that different users need:
� Working with all output queues� Displaying the content of the spooled files on the output queue� Working with the spooled files (change, delete, and so on)
The level of authority to an output queue, and to the spooled files in the output queue, is determined by parameters in both the user profile and in the output queue itself. Table 4-9 on page 93 summarizes the parameters which affect OUTQ security.
A user with spool control (*SPLCTL) special authority can perform all operations on all output queues, including their contents, regardless of other parameter settings in the output queue. Therefore, only a limited set of users should have *SPLCTL special authority if there is confidential data waiting to be printed.
Beware that creating an OUTQ in a library that has an authority of PUBLIC *EXCLUDE does not prevent users with *JOBCTL or *SPLCTL from viewing or manipulating the spooled files. Similarly, a user with *ALLOBJ authority is not prevented from manipulating an output queue if the object authority to the output queue is *EXCLUDE.
ExampleIn our example, end users have access only to their specific output queues. The access to different print output queues is restricted to the appropriate site and department, for which the output is designated.
The output queues must be configured in a proper way to establish an environment where each department only has access to its own output (see Figure 4-7). The users on site level, in our example Lee and Jack, must have access rights and management rights to all departments on their own site. Department users only have access to the output queues that are designated for their department (in our example Sandra, John, Hakan, Tom, Bill, and Lars). Therefore, the Display any file (DSPDTA) and Operation control (OPRCTL) parameters in the output queue description must be set to *NO. The Authority to check (AUTCHK) parameter is set to Data Authority (*DTAAUT).
Chapter 4. System i security fundamentals 91
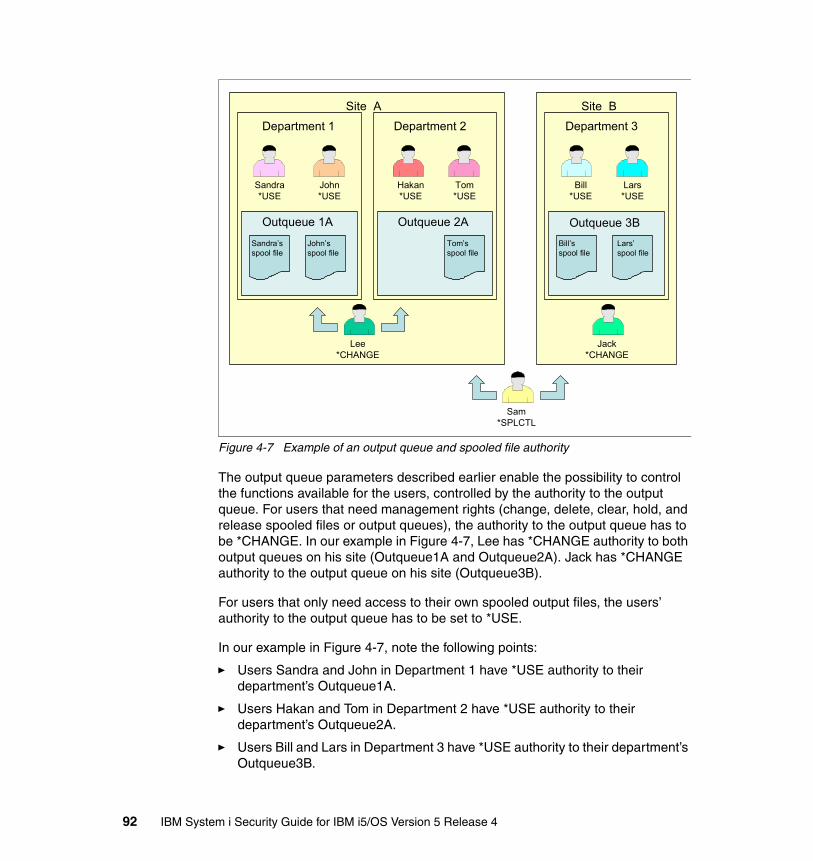
Figure 4-7 Example of an output queue and spooled file authority
The output queue parameters described earlier enable the possibility to control the functions available for the users, controlled by the authority to the output queue. For users that need management rights (change, delete, clear, hold, and release spooled files or output queues), the authority to the output queue has to be *CHANGE. In our example in Figure 4-7, Lee has *CHANGE authority to both output queues on his site (Outqueue1A and Outqueue2A). Jack has *CHANGE authority to the output queue on his site (Outqueue3B).
For users that only need access to their own spooled output files, the users’ authority to the output queue has to be set to *USE.
In our example in Figure 4-7, note the following points:
� Users Sandra and John in Department 1 have *USE authority to their department’s Outqueue1A.
� Users Hakan and Tom in Department 2 have *USE authority to their department’s Outqueue2A.
� Users Bill and Lars in Department 3 have *USE authority to their department’s Outqueue3B.
Site A Site B
Sandra*USE
Bill*USE
Lars*USE
Tom*USE
Hakan*USE
John*USE
Jack*CHANGE
Sam*SPLCTL
Lee*CHANGE
Outqueue 1A
Sandra’s spool file
John’s spool file
Tom’s spool file
Bill’s spool file
Lars’spool file
Department 1 Department 2 Department 3
Outqueue 2A Outqueue 3B
92 IBM System i Security Guide for IBM i5/OS Version 5 Release 4

All other users have no authority to the output queue; this is controlled by the public authority to the output queue. The public authority to the output queue has to be excluded (*PUBLIC = *EXCLUDE).
We have also a user named Sam, who has the special authority *SPLCTL. He can see and manage all spooled files on all out queues on the system.
In our example, John can only see his own spooled file. He cannot see the contents of Sandra’s spooled file that resides on the same out queue.
You can have department and site specific supplemental group profiles to accomplish the authority required for each department or site. The authority is given by granting the required authority to the output queue, for example *CHANGE or *USE authority.
Output queue securityTable 4-9 shows how the authorization to different functions are related to each other based on output queue parameters, output queue authority, and special authority.
Table 4-9 Output queue parameters
Printing functions DSPDTA AUTCHK OPRCTL Output queue authority
Special authority
Add spooled files to queue *READ None
*YES *JOBCTL
View list of spooled files(WRKOUTQ)
*READ None
*YES *JOBCTL
Display, copy, or send spooled files (DSPSPLF, CPYSPLF,SNDNETSPLF, SNDTCPP)
*YES *READ None
*NO *DTAAUT *READ*ADD*DLT
None
*NO *OWNER Owner (of the output queue)
None
*YES *YES *JOBCTL
*NO *YES *JOBCTL
*OWNER
Chapter 4. System i security fundamentals 93

4.3.8 Save and restore considerationsA user with save system (*SAVSYS) special authority, represents a potential security exposure to your system. *SAVSYS special authority gives the user the authority to save, restore, and free storage for all objects on your system, regardless of whether that user has object existence authority to the objects.
The user with *SAVSYS special authority can:
� Save an object and take it to another system to be restored.� Save an object and display (or dump) the tape to view the data.� Save an object and free the storage, deleting the data portion of an object
(for applicable object types only).� Save a document and delete it.
Giving *SAVSYS special authority to a user enables the user to do certain operations that can be security exposures. That is why you must carefully evaluate the need for this special authority. If you grant this authority, keep track of the users who have it and periodically review their operations.
To control the ability to restore objects to the System i platform, see “Restricting the ability to place tampered objects on the system” on page 52.
For more information about security considerations for save and restore, see the iSeries Security Reference, SC41-5302. For information regarding save and restore procedures, see Backup and Recovery, SC41-5304.
Change, delete, hold and release spooled files(CHGSPLF, DLTSPLF,HLDSPLF, RLSSPLF)
*DTAAUT *READ*ADD*DLT
None
*OWNER Owner (of the output queue)
None
*YES *JOBCTL
Start a writer for the queue (STRPRTWTR, STRRMTWTR)
*DTAAUT *CHANGE None
*YES *JOBCTL
Important: A user with *SPLCTL special authority can perform all functions on all entries, regardless of how the output queue is defined.
Printing functions DSPDTA AUTCHK OPRCTL Output queue authority
Special authority
94 IBM System i Security Guide for IBM i5/OS Version 5 Release 4

4.3.9 Securing commandsCertain commands on i5/OS require you to control access to them because they represent an exposure to your system’s security, availability, and normal operation.
Control language commandsEvery interactive user that has access to a command line has the ability to enter a control language (CL) command. Some of these CL commands can reside in multiple libraries. To be completely protected, secure all versions of these commands with *PUBLIC *EXCLUDE. See “Revoking public authority” on page 136 for information about a command that can help you to revoke public authority on a set of commands and programs.
We recommend that you carefully decide which users will be able to execute commands that can harm your environment. Consider the following list as an example of CL commands for you to protect:
� System values and network attributes
– Change Network Attributes (CHGNETA)– Change System Value (CHGSYSVAL)
� Directory entries
– Add Directory Entry (ADDDIRE)
� Changing or deleting line, controller or device descriptions
– Change Line Description (CHGLINxxx)– Delete Line Description (DLTLINxxx)– Change Controller Description (CHGCTLxxx)– Delete Controller Description (DLTCTLxxx)– Change Device Description (CHGDEVxxx)– Delete Device Description (DLTDEVxxx)
� Controlling communications status
– Vary Configuration (VRYCFG)
� Working with subsystem descriptions
– Change Subsystem Description (CHGSBSD)– Delete Subsystem Description (DLTSBSD)
� Working with job descriptions
– Change Job Description (CHGJOBD)– Delete Job Description (DLTJOBD)
Chapter 4. System i security fundamentals 95
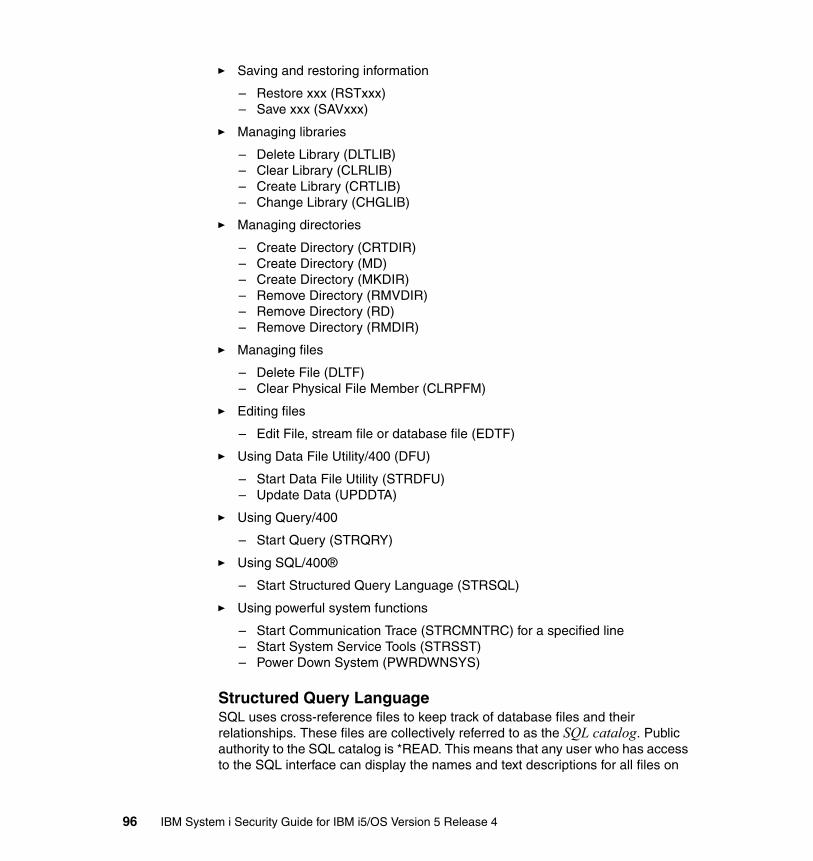
� Saving and restoring information
– Restore xxx (RSTxxx)– Save xxx (SAVxxx)
� Managing libraries
– Delete Library (DLTLIB)– Clear Library (CLRLIB)– Create Library (CRTLIB)– Change Library (CHGLIB)
� Managing directories
– Create Directory (CRTDIR)– Create Directory (MD)– Create Directory (MKDIR)– Remove Directory (RMVDIR)– Remove Directory (RD)– Remove Directory (RMDIR)
� Managing files
– Delete File (DLTF)– Clear Physical File Member (CLRPFM)
� Editing files
– Edit File, stream file or database file (EDTF)
� Using Data File Utility/400 (DFU)
– Start Data File Utility (STRDFU) – Update Data (UPDDTA)
� Using Query/400
– Start Query (STRQRY)
� Using SQL/400®
– Start Structured Query Language (STRSQL)
� Using powerful system functions
– Start Communication Trace (STRCMNTRC) for a specified line – Start System Service Tools (STRSST)– Power Down System (PWRDWNSYS)
Structured Query LanguageSQL uses cross-reference files to keep track of database files and their relationships. These files are collectively referred to as the SQL catalog. Public authority to the SQL catalog is *READ. This means that any user who has access to the SQL interface can display the names and text descriptions for all files on
96 IBM System i Security Guide for IBM i5/OS Version 5 Release 4

your system. The SQL catalog does not affect the normal authority required to access the contents of database files.
Use care when employing a CL program that adopts authority to start SQL or Query Manager. Both of these query programs allow users to specify a file name. Therefore, the user can access any file to which the adopted profile has authority.
QshellQshell is a command environment based on POSIX and X/Open standards. It consists of two parts:
� The shell interpreter (or qsh) is a program that reads commands from an input source, interprets each command, and then runs the command using the services of the operating system.
� The utilities (or commands) are external programs that provide additional functions and can be simple or complex.
The Start QSH (STRQSH) command, also known as QSH, is a CL command that either starts a Qshell interactive session or runs a Qshell command. The QSH and STRQSH commands are delivered with public authority set to *USE.
For information about Qshell, see the iSeries Information Center at the following Web address and click the path Programming → Shells and utilities → Qshell:
http://publib.boulder.ibm.com/infocenter/iseries/v5r4/index.jsp
i5/OS PASEThe QP2TERM program runs an interactive terminal session that starts a batch job to run an i5/OS Portable Application Solutions Environment (PASE) program. This program uses the workstation display in the interactive terminal to present output and accept input for files stdin, stdout, and stderr in the batch job. The QP2TERM program, that runs an interactive terminal session, has the public authority set to *USE by default.
Most i5/OS PASE commands support the same options and provide the same behavior as AIX® commands, with some exceptions.
For information about i5/OS PASE, refer to the iSeries Information Center at the following Web address and select the path Programming → Shells and utilities → i5/OS PASE shells and utilities:
http://publib.boulder.ibm.com/infocenter/iseries/v5r4/index.jsp
Note: When a Qshell interactive session is active, the QINACTITV system value is not in effect; that is the job does not time out.
Chapter 4. System i security fundamentals 97

4.4 Authorization listsAuthorization lists provide a convenient way of grouping users and authorities to resources. There are many advantages of authorization lists:
� Securing a resource can authorize all the users on an authorization list to a resource in one operation.
� Adding a user to an authorization list authorizes that user to all resources secured by the authorization list.
� The restore of resources to the system where they were saved automatically attaches the resource to an authorization list.
� Authorization lists reduce the number of authority entries, and the time to perform system back up is reduced.
An authorization list references both user profiles and the resources (objects). These user profiles are authorized to the objects on the authorization list. The authorization list AUTL1, shown in Figure 4-8, has four user profiles and a *PUBLIC authority of *EXCLUDE. The user profiles are authorized to the three objects secured by the list. The file NEWFILE is added to the authorization list.
Figure 4-8 Authorization list and objects
FILE_B NEWFILEPROG_D
BILLDEBHAKANGRPPRF1
AUTL1
FILE_A
User List Mgt
*ALL*CHANGE*USE*CHANGE
XX
Authority
*PUBLIC *EXCLUDE
98 IBM System i Security Guide for IBM i5/OS Version 5 Release 4

All user profiles on the authorization list are authorized to an object in one operation. The list of user profiles are authorized to the file NEWFILE by simply specifying the name of the authorization list (AUTL1) when the file is created. This single operation requires less effort than authorizing the individual user profiles. The use of authorization lists, rather than individual user authorities, also improves the system backup time. A similar one-step operation can remove an authorization list from an object. This step, in effect, removes the authority to the object from all the user profiles on the authorization list.
Adding a user profile to an authorization list authorizes the user profile to all the objects secured by the authorization list. Adding the user profile NEWUSER to the authorization list AUTL1 gives this user profile authority to the objects FILE_A, FILE_B, PROG_D and (the new object) NEWFILE.
The user profiles in an authorization list can be individual user profiles or group profiles. In Figure 4-8, the profile GRPPRF1 is a group profile that has multiple members. Since the group profile is on the authorization list, each member of the group is authorized with *CHANGE authority. If profiles HAKAN, MIKE, SUSAN and TOM are the members of GRPPRF1, they have *CHANGE authority to the objects. When a user profile that is a member of the group is also on the authorization list, the individual user profile authority is used instead of the group profile. Because the user profile HAKAN is authorized in the list AUTL1, the authority for user profile HAKAN is *USE.
4.4.1 Creating an authorization listAuthorization lists are created by the Create Authorization List (CRTAUTL) command. In our example, the authorization list AUTL1 is created with the following command:
CRTAUTL AUTL(AUTL1) AUT(*EXCLUDE) TEXT(‘Sample Authorization List’)
This command places the owner, BILL in this example, on the authorization list with *ALL and *AUTLMGT authority, as shown in Figure 4-8.
The AUT parameter of the CRTAUTL command defines the public authority on the authorization list. This public authorization list is used when the public authority on the object is specified as *AUTL and there is no authority for the user profile or the group profile for the user. When an object has public authority, the public authority on the authorization list is not used.
Important: An authorization list name must be unique.
Chapter 4. System i security fundamentals 99

Adding or removing users from an authorization listSeveral commands are useful for adding, removing or editing users on an authorization list.
After you secure objects with an authorization list, use either the Add Authorization List Entry (ADDAUTLE) or the Edit Authorization List (EDTAUTL) CL command to add the users to your authorization list. In the following example, the user HAKAN is added to the authorization list AUTL1:
ADDAUTLE AUTL(AUTL1) USER(HAKAN) AUT(*USE)
To use the EDTAUTL command to add a user profile to the authorization list, enter the following command:
EDTAUTL AUTL(AUTL1)
On the Edit Authorization List display, press F6 to add a user profile to the authorization list.
To remove a user from an authorization list, either use the Remove Authority List Entry (RMVAUTLE) or the EDTAUTL CL command. In the following example, the user HAKAN is removed from the authorization list AUTL1:
RMVAUTLE AUTL(AUTL1) USER(HAKAN)
4.4.2 Authorization list detailsAn authorization list, as a list of users and authorities, is a conceptual representation. An authorization list does not contain a list of users. There are no users in an authorization list, but rather the users are authorized to the authorization list object. The user profile for users that are on the authorization list contains an authorization entry for the authorization list. Like all objects, the header of an authorization list contains the *PUBLIC and owner’s authority.
Figure 4-9 shows the conceptual representation and actual implementation. The conceptual representation is shown on the left, and the actual implementation is shown on the right. The *PUBLIC and owners authority (BILL in this example) are stored in the object header of the authorization list.
100 IBM System i Security Guide for IBM i5/OS Version 5 Release 4

Figure 4-9 Actual implementation of authorization lists
4.5 Registered exit pointsAn exit point is a specific point in a system function or application program where control may be passed to one or more exit programs to perform a function. An exit program is a program to which the exit point passes control.
For each exit point, there is an associated programming interface, called an exit point interface. The exit point uses this interface to pass information between the system function or application program and the exit program. Each exit point has a unique name. Each exit point interface has an exit point format name that defines how information is passed between the system function or application program and the exit program.
Many security exit points exist. Such examples include those that are system related that start with QIBM_QSY_xxxxxx, those that are for FTP server starts with QIBM_QTMF_xxxxxx, and those for REXEC starts with QIBM_QTMX_xxxxxx.
Different exit points may share the same exit point interface. When this is the case, multiple exit points can call a single exit program.
BILLDEBHAKANGRPPRF1
AUTL1
User List Mgt
*ALL*CHANGE*USE*CHANGE
XX
Authority
*PUBLIC *EXCLUDE
AUTL1
Object header
Public Access
*EXCLUDE *ALL
Owner Access
Conceptual Representation Actual Implementation
BILL
Authorized ObjectsObject
adr(AUTL1)
Authority
*ALL
*AUTLMGT
DEB
Authorized ObjectsObject
adr(AUTL1)
*AUTLMGT
HAKAN
Authorized ObjectsObject
adr(AUTL1)Authority
*CHANGE
Authority
*USE
GRPPRF1
Authorized ObjectsObject
adr(AUTL1)Authority
*CHANGE
Chapter 4. System i security fundamentals 101

4.5.1 Benefits of exit programsBefore you choose to implement exit programs, you must understand that the best way to secure your system is first to implement proper object authority on your system. This eliminates potential security exposures and makes sure that only users with appropriate authority gain access to objects.
Some i5/OS system functions provide an exit so that your system can run a user-created program to perform additional checking and validation. For example, you can run an exit program every time someone attempts to change, create, or delete a user profile on your system. You can use the registration function to specify exit programs that run under certain conditions.
Several TCP/IP servers (such as FTP, TFTP, TELNET, and REXEC) provide exit points. You can add exit programs to handle logon and to validate user requests, such as requests to get or put a specific file. You can also use these exits to provide anonymous FTP on your system.
See 8.6, “Exit programs” on page 181, to learn more about exit programs for TCP/IP servers.
4.5.2 Registration facilityThe registration facility provides a central point to store and retrieve information about i5/OS exit points and their associated exit programs. This information is stored in the registration facility repository and can be retrieved to determine which exit points and exit programs already exist.
For security exit programs, the application program typically requests the exit program to indicate if a specified operation should be allowed. When no exit program has been added to an exit point, the application program assumes that no additional security controls are to be applied.
You can use the Work with Registration Information (WRKREGINF) CL command to list, add, and remove exit programs in repository, and to retrieve information about exit points and exit programs.
4.5.3 Exit programsRemember that solutions for the exit point program only protect access to interfaces. An exit program does not protect access to the data. Exit points do not exist for every possible way of access to data on your system. For example, the IBM HTTP Server (powered by Apache) does not have any exit points. Not all exit points support a return indicator that indicates whether the function should be performed. Some exit points simply call the exit program to notify it that a security
102 IBM System i Security Guide for IBM i5/OS Version 5 Release 4

function is being performed, for example that a user profile is being created, changed, or deleted.
Exit programs are called and given control by an application program or system program. They can be used to customize particular functions to your needs. An exit program is a program to which control is passed from a calling program. As mentioned in “Adopted authority” on page 78, when an exit program is called, the operating system inhibits the use of adopted authority.
To transfer control to an exit program, you do an external call as you do to any other program. Figure 4-10 shows the flow for a request where a registered exit point exists and the exit point supports the return of a function indicator.
Figure 4-10 Exit program flow
The exit program follows this flow:
1. The program or system request arrives at an exit point.
2. If no exit program is registered in the exit point registry database, the request is allowed to run.
Yes
No
Exit Points
Registry Database
ExitProgram
Registered
ReturnCode
X’F0’
Exit Program
YesNo
ServerRequest
Run Request
Terminate
Chapter 4. System i security fundamentals 103

3. If an exit program is registered, the control is transferred to the exit program. The system passes the following two parameters to the exit program:
– A one-byte return code value– A structure containing information about your request
This structure is different for each of the exit points.
4. The exit program executes.
5. If the exit program sets the return code to X'F0', the system rejects the request. If multiple exit programs are registered at the exit point, the control is returned to step 3. If the return code is set to anything else, the system allows the request.
You can use the same program for multiple exit points. The program can determine which function is being called by looking at the data in the second parameter structure.
Creating an exit programThe following steps are involved in designing and writing exit programs:
1. Review the purpose of the exit point and the format of its interface.2. Define the scope and operation of your exit program.3. Design the exit program.4. Code the exit program5. Add the exit program to the appropriate exit point in the registration facility.
6. Test your exit program, and test it for each user ID and each operation.
The most important step in establishing security exit programs is verifying that the exit program works. You must ensure that the security wall works and does not have any weaknesses. If the exit program fails or returns an incorrect output parameter, the operation is not allowed by the system function or application program.
You can find examples of exit programs in the iSeries Information Center by searching on exit programs at:
http://publib.boulder.ibm.com/infocenter/iseries/v5r4/index.jsp
Note: Only users with both *SECADM and *ALLOBJ authority are allowed to add and remove TCP/IP application programs. This also applies to the security exit points QIBM_QSY_xxxxx.
104 IBM System i Security Guide for IBM i5/OS Version 5 Release 4

4.6 Limiting access to program functionsThe limit access to program function allows you to provide security for a program when you do not have an object to secure for the program. You can use the limit access to program function to more easily control access to an application, parts of an application, or functions within a program.
The limit access to program function is only available for applications or system functions that are explicitly designed and coded to check for function limitations. It cannot be used with any arbitrary application or system function that might currently exist on the system.
4.6.1 Managing user access to program functionsWith the limit access to program function, the administrator specifies who is allowed or denied access to a function. As an example, you can grant or deny access to the Printers function in Basic Operations or grant or deny access to the entire Basic Operations administrable function in iSeries Navigator.
The different functions or applications are organized into three categories. For each of the functions, you can manage the access settings:
� iSeries Navigator, including any plug-in extensions
For an example, see “Limiting access to iSeries Navigator functions” on page 112.
� Client applications, including iSeries Access for Windows, that provide functions on clients that can be administered through Application Administration
� Host applications, including all applications that reside entirely on the system and provide functions that can be administered
For an example, see “Managing user access with iSeries Navigator” on page 106, and “Managing user access through CL commands” on page 113.
You can choose from three methods to manage user access to application functions. Two methods are through iSeries Navigator, and the third method is managed through CL commands. See “Managing user access through CL commands” on page 113.
Important: The limit access to program function does not prevent a user from accessing a resource, such as a file or program, from another interface. You still need to use resource security. Consider limiting access to program functions as an extra layer of security. Always apply resource security on the file or program that you want to protect.
Chapter 4. System i security fundamentals 105
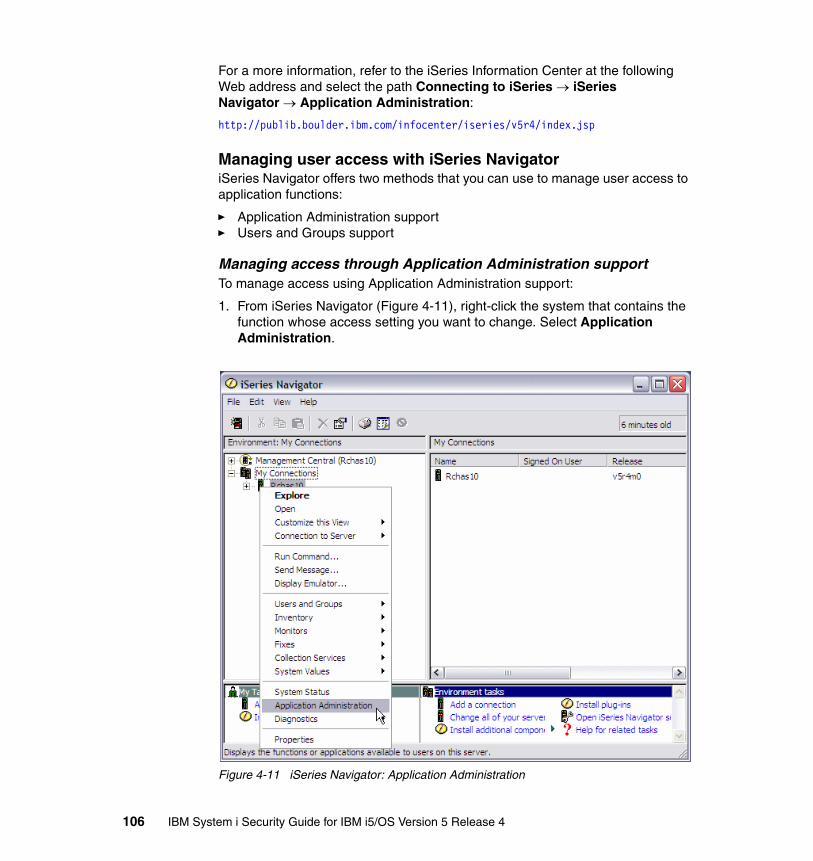
For a more information, refer to the iSeries Information Center at the following Web address and select the path Connecting to iSeries → iSeries Navigator → Application Administration:
http://publib.boulder.ibm.com/infocenter/iseries/v5r4/index.jsp
Managing user access with iSeries NavigatoriSeries Navigator offers two methods that you can use to manage user access to application functions:
� Application Administration support� Users and Groups support
Managing access through Application Administration supportTo manage access using Application Administration support:
1. From iSeries Navigator (Figure 4-11), right-click the system that contains the function whose access setting you want to change. Select Application Administration.
Figure 4-11 iSeries Navigator: Application Administration
106 IBM System i Security Guide for IBM i5/OS Version 5 Release 4

2. If you are on an administration system, select Local Settings. Otherwise, continue with the next step.
3. On the Application Administration window (Figure 4-12), complete these tasks:
a. Click the Host Applications tab.
b. Under the Function section, select an administrable function.
c. Select Default Access, if applicable. Selecting this option enables all users to access the function by default.
d. Select All Object Access, if applicable. Selecting this option enables all users with all object system privilege to access this function.
e. Click Customize, if applicable.
Figure 4-12 Application Administration window
Chapter 4. System i security fundamentals 107
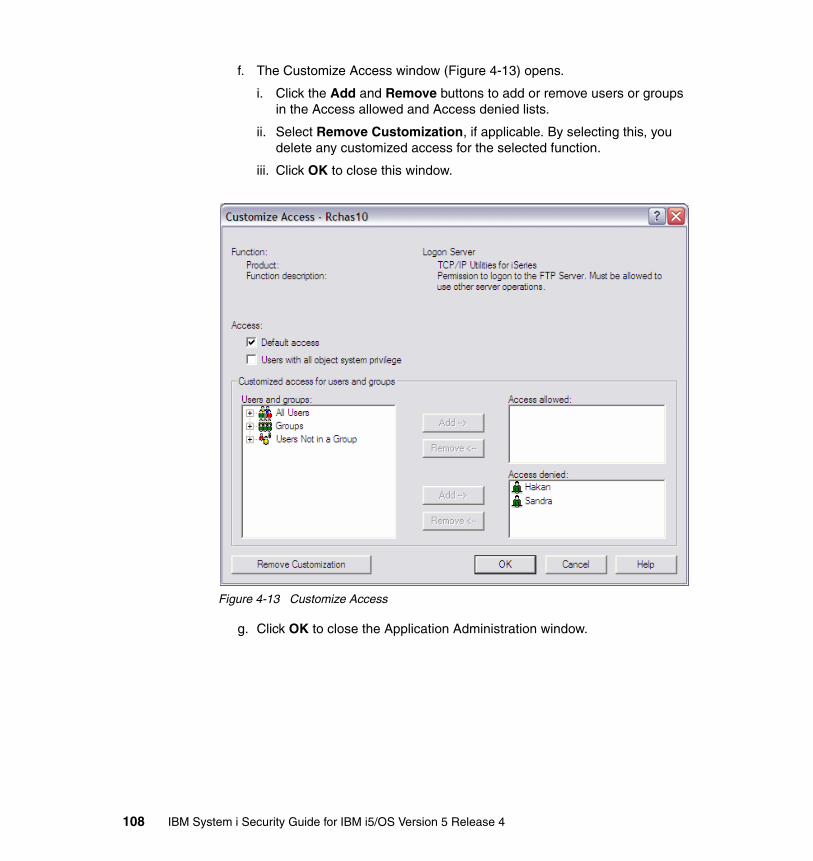
f. The Customize Access window (Figure 4-13) opens.
i. Click the Add and Remove buttons to add or remove users or groups in the Access allowed and Access denied lists.
ii. Select Remove Customization, if applicable. By selecting this, you delete any customized access for the selected function.
iii. Click OK to close this window.
Figure 4-13 Customize Access
g. Click OK to close the Application Administration window.
108 IBM System i Security Guide for IBM i5/OS Version 5 Release 4

Managing access through Users and Groups supportThis method of managing user access involves iSeries Navigator Users and Groups support:
1. From iSeries Navigator, expand Users and Groups (see Figure 4-14).
2. In the right panel, select All Users, Groups, or Users Not in a Group to display a list of users and groups. In this example, we select All Users.
Figure 4-14 iSeries Navigator: Users and Groups
Chapter 4. System i security fundamentals 109
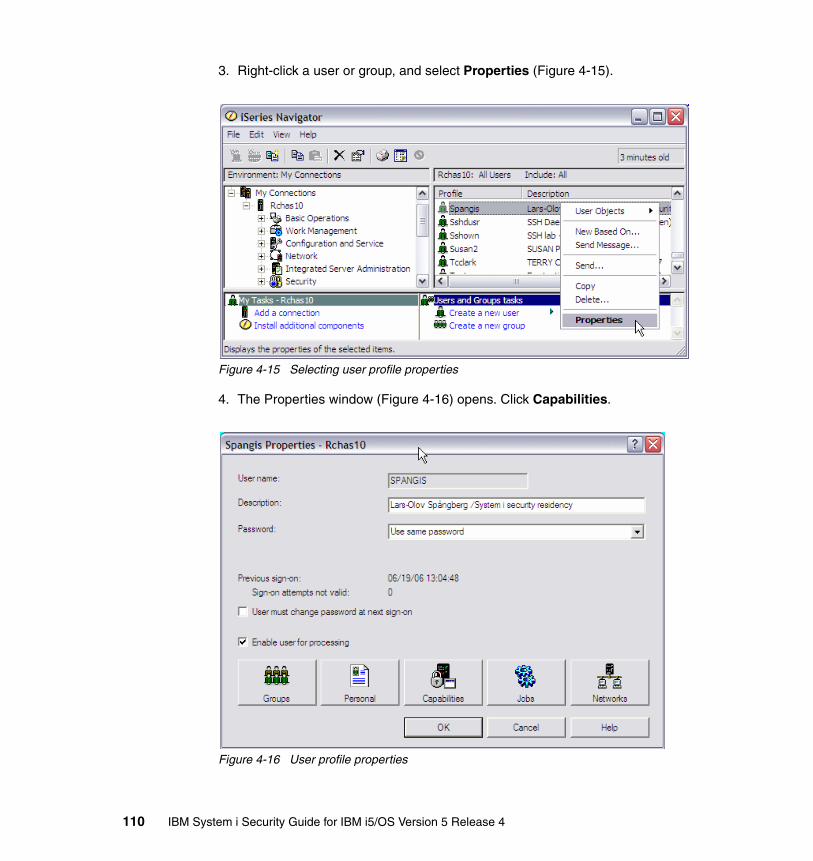
3. Right-click a user or group, and select Properties (Figure 4-15).
Figure 4-15 Selecting user profile properties
4. The Properties window (Figure 4-16) opens. Click Capabilities.
Figure 4-16 User profile properties
110 IBM System i Security Guide for IBM i5/OS Version 5 Release 4
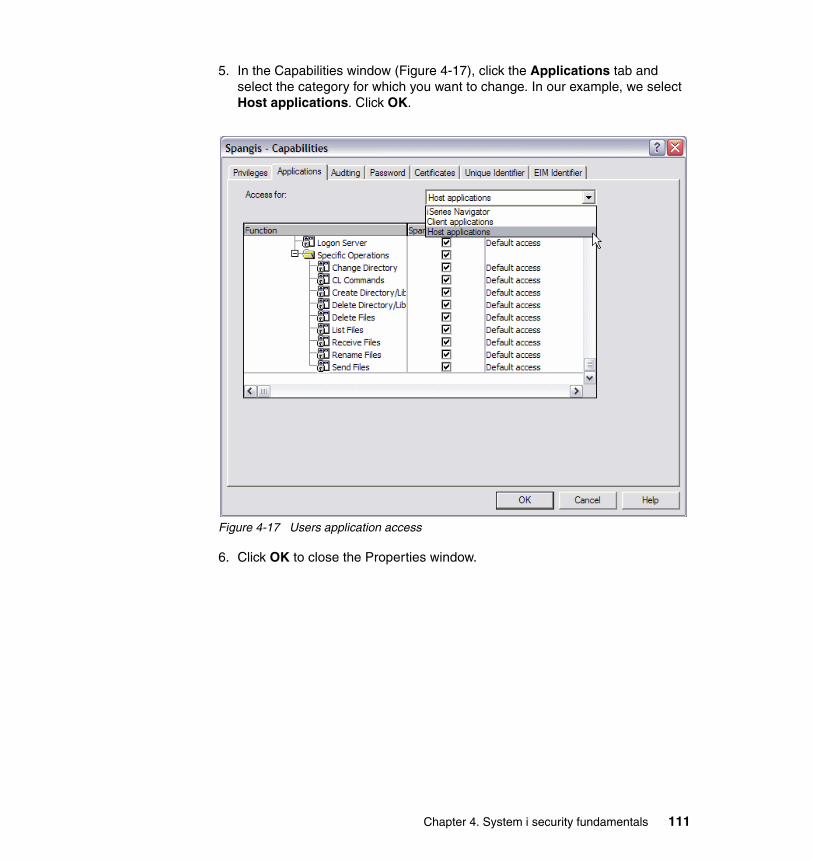
5. In the Capabilities window (Figure 4-17), click the Applications tab and select the category for which you want to change. In our example, we select Host applications. Click OK.
Figure 4-17 Users application access
6. Click OK to close the Properties window.
Chapter 4. System i security fundamentals 111

Limiting access to iSeries Navigator functionsWith the limit access to program function, you can also specify who is permitted or denied access to a specific iSeries Navigator function.
In the Capabilities window (Figure 4-17), click the Applications tab. For Access for, select iSeries Navigator and then click OK. In our example, the user Sandra only has access to the Basic Operations administrable functions in iSeries Navigator. See Figure 4-18.
Figure 4-18 iSeries Navigator function access
112 IBM System i Security Guide for IBM i5/OS Version 5 Release 4
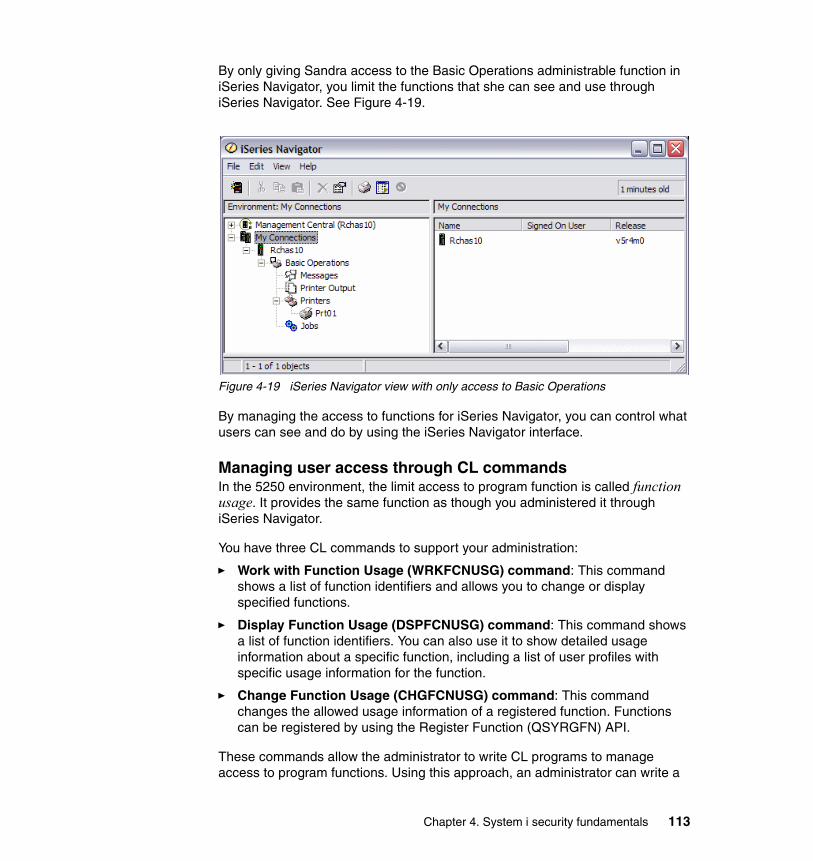
By only giving Sandra access to the Basic Operations administrable function in iSeries Navigator, you limit the functions that she can see and use through iSeries Navigator. See Figure 4-19.
Figure 4-19 iSeries Navigator view with only access to Basic Operations
By managing the access to functions for iSeries Navigator, you can control what users can see and do by using the iSeries Navigator interface.
Managing user access through CL commandsIn the 5250 environment, the limit access to program function is called function usage. It provides the same function as though you administered it through iSeries Navigator.
You have three CL commands to support your administration:
� Work with Function Usage (WRKFCNUSG) command: This command shows a list of function identifiers and allows you to change or display specified functions.
� Display Function Usage (DSPFCNUSG) command: This command shows a list of function identifiers. You can also use it to show detailed usage information about a specific function, including a list of user profiles with specific usage information for the function.
� Change Function Usage (CHGFCNUSG) command: This command changes the allowed usage information of a registered function. Functions can be registered by using the Register Function (QSYRGFN) API.
These commands allow the administrator to write CL programs to manage access to program functions. Using this approach, an administrator can write a
Chapter 4. System i security fundamentals 113
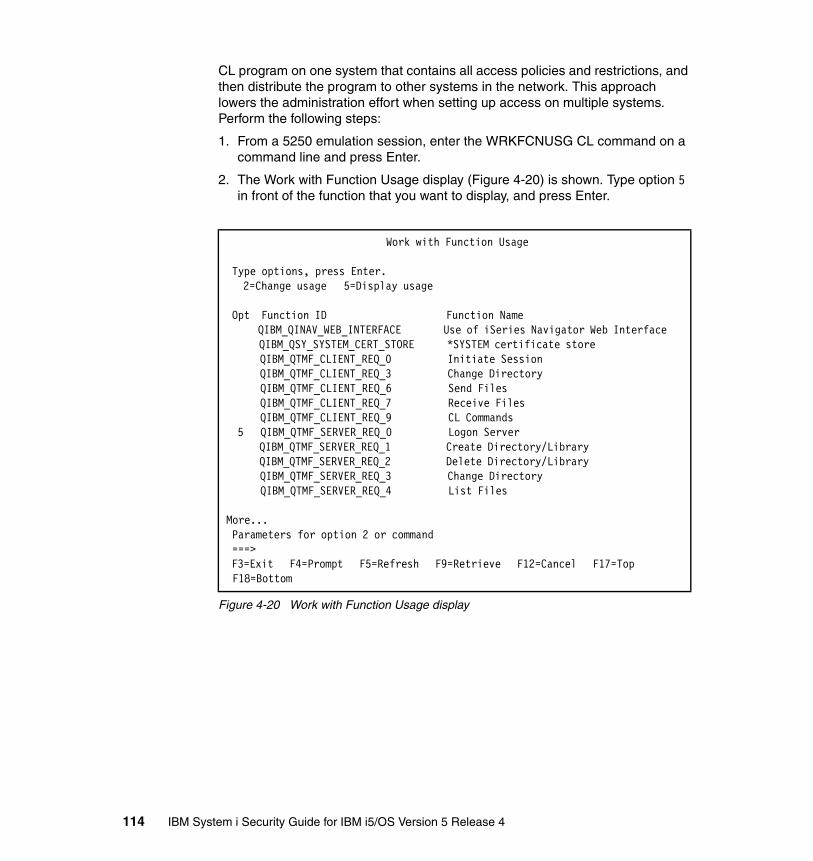
CL program on one system that contains all access policies and restrictions, and then distribute the program to other systems in the network. This approach lowers the administration effort when setting up access on multiple systems. Perform the following steps:
1. From a 5250 emulation session, enter the WRKFCNUSG CL command on a command line and press Enter.
2. The Work with Function Usage display (Figure 4-20) is shown. Type option 5 in front of the function that you want to display, and press Enter.
Figure 4-20 Work with Function Usage display
Work with Function Usage Type options, press Enter. 2=Change usage 5=Display usage Opt Function ID Function Name QIBM_QINAV_WEB_INTERFACE Use of iSeries Navigator Web Interface QIBM_QSY_SYSTEM_CERT_STORE *SYSTEM certificate store QIBM_QTMF_CLIENT_REQ_0 Initiate Session QIBM_QTMF_CLIENT_REQ_3 Change Directory QIBM_QTMF_CLIENT_REQ_6 Send Files QIBM_QTMF_CLIENT_REQ_7 Receive Files QIBM_QTMF_CLIENT_REQ_9 CL Commands 5 QIBM_QTMF_SERVER_REQ_0 Logon Server QIBM_QTMF_SERVER_REQ_1 Create Directory/Library QIBM_QTMF_SERVER_REQ_2 Delete Directory/Library QIBM_QTMF_SERVER_REQ_3 Change Directory QIBM_QTMF_SERVER_REQ_4 List Files More... Parameters for option 2 or command ===> F3=Exit F4=Prompt F5=Refresh F9=Retrieve F12=Cancel F17=Top F18=Bottom
114 IBM System i Security Guide for IBM i5/OS Version 5 Release 4

The Display Function Usage display (Figure 4-21) is shown. It contains a description of the functional identifier, the default authority for the function, and any users that are given a customized access.
Figure 4-21 Display Function Usage display
4.7 Backup and recovery for security informationIt is important that you back up your security information. You may have to recover user profiles or object authorities. Without your security information, you may need to manually rebuild user profiles and object authorities.
Table 4-10 shows CL commands that you can use to save and restore security information. For a complete list of save and restore commands, see iSeries Backup and Recovery, SC41-5304.
Display Function Usage Function ID . . . . . . : QIBM_QTMF_SERVER_REQ_0 Function name . . . . . : Logon Server Description . . . . . . : Permission to logon to the FTP Server. Must be allowed to use other server operations. Product . . . . . . . . : QIBM_QTM_TCPIP Group . . . . . . . . . : QIBM_QTMF_FTP_SERVER Default authority . . . . . . . . . . . . : *ALLOWED *ALLOBJ special authority . . . . . . . . : *NOTUSED User Type Usage User Type Usage HAKAN User *DENIED SANDRA User *DENIED Bottom F3=Exit F12=Cancel F17=Top F18=Bottom (C) COPYRIGHT IBM CORP. 1980, 2005.
Chapter 4. System i security fundamentals 115
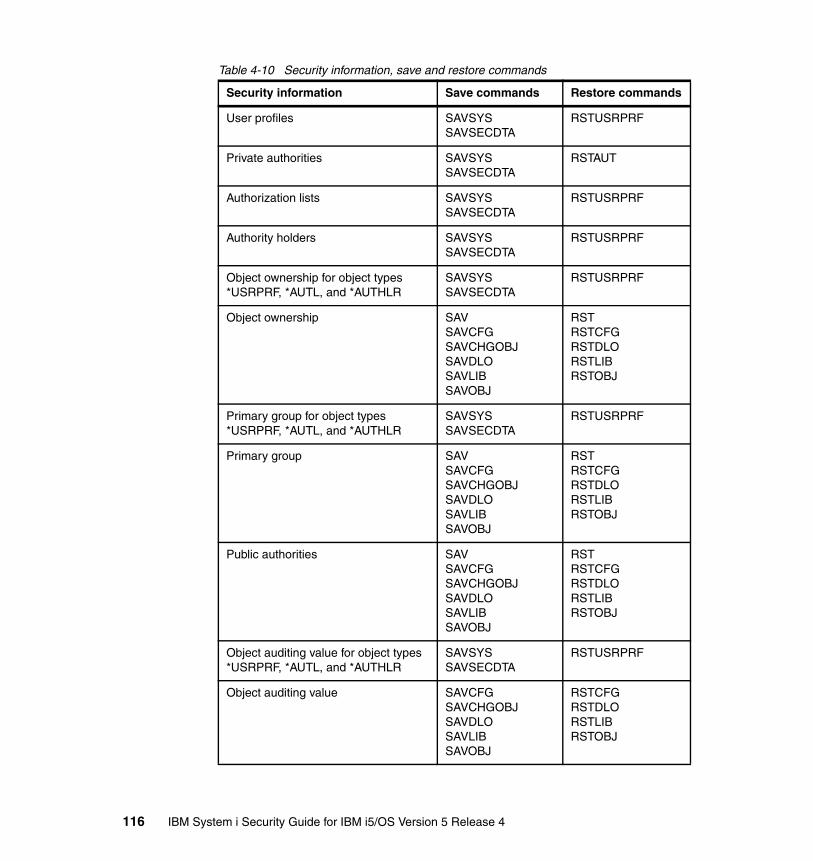
Table 4-10 Security information, save and restore commands
Security information Save commands Restore commands
User profiles SAVSYSSAVSECDTA
RSTUSRPRF
Private authorities SAVSYSSAVSECDTA
RSTAUT
Authorization lists SAVSYSSAVSECDTA
RSTUSRPRF
Authority holders SAVSYSSAVSECDTA
RSTUSRPRF
Object ownership for object types *USRPRF, *AUTL, and *AUTHLR
SAVSYSSAVSECDTA
RSTUSRPRF
Object ownership SAVSAVCFGSAVCHGOBJSAVDLOSAVLIBSAVOBJ
RSTRSTCFGRSTDLORSTLIBRSTOBJ
Primary group for object types *USRPRF, *AUTL, and *AUTHLR
SAVSYSSAVSECDTA
RSTUSRPRF
Primary group SAVSAVCFGSAVCHGOBJSAVDLOSAVLIBSAVOBJ
RSTRSTCFGRSTDLORSTLIBRSTOBJ
Public authorities SAVSAVCFGSAVCHGOBJSAVDLOSAVLIBSAVOBJ
RSTRSTCFGRSTDLORSTLIBRSTOBJ
Object auditing value for object types *USRPRF, *AUTL, and *AUTHLR
SAVSYSSAVSECDTA
RSTUSRPRF
Object auditing value SAVCFGSAVCHGOBJSAVDLOSAVLIBSAVOBJ
RSTCFGRSTDLORSTLIBRSTOBJ
116 IBM System i Security Guide for IBM i5/OS Version 5 Release 4
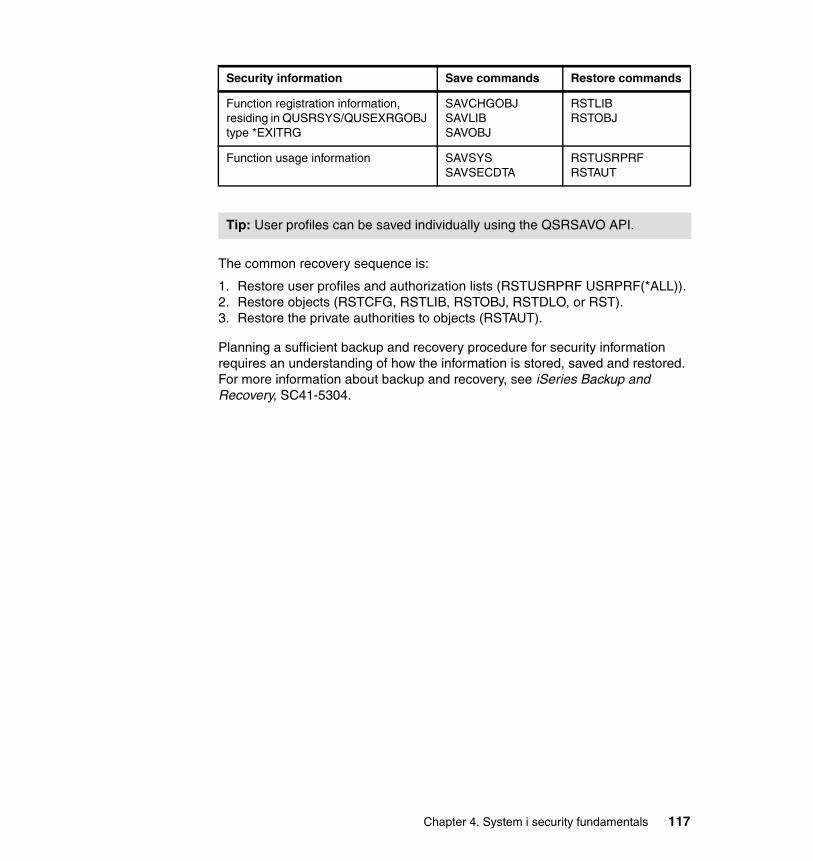
The common recovery sequence is:
1. Restore user profiles and authorization lists (RSTUSRPRF USRPRF(*ALL)).2. Restore objects (RSTCFG, RSTLIB, RSTOBJ, RSTDLO, or RST).3. Restore the private authorities to objects (RSTAUT).
Planning a sufficient backup and recovery procedure for security information requires an understanding of how the information is stored, saved and restored. For more information about backup and recovery, see iSeries Backup and Recovery, SC41-5304.
Function registration information, residing in QUSRSYS/QUSEXRGOBJ type *EXITRG
SAVCHGOBJSAVLIBSAVOBJ
RSTLIBRSTOBJ
Function usage information SAVSYSSAVSECDTA
RSTUSRPRFRSTAUT
Tip: User profiles can be saved individually using the QSRSAVO API.
Security information Save commands Restore commands
Chapter 4. System i security fundamentals 117

118 IBM System i Security Guide for IBM i5/OS Version 5 Release 4

Chapter 5. Security tools
In addition to the large set of security-related system values, commands, and journals that are available on the System i platform, you have a set of tools to help you to configure and audit security on your system. There are also some third-party vendors that provide security products for the System i platform. In this chapter, we provide an overview of some security-related tools that are available for the System i platform.
One type of security-related tool is the Security Wizard. It helps you produce reports that reflect your security needs. Based on your answers to several high-level questions about your system environment, the wizard provides recommendations for security.
The best approach is to have a security policy on which to base your security implementation. However, if you do not have a security policy, the second best approach is to use one of these tools to help create a security policy.
5
Note: This chapter contains references to the iSeries Information Center for V5R4 page. On this page, you can simply click the iSeries Information Center, Version 5 Release 4 link in the navigation area and select the topics that are specified:
http://publib.boulder.ibm.com/infocenter/iseries/v5r4/index.jsp
© Copyright IBM Corp. 2005, 2006. All rights reserved. 119
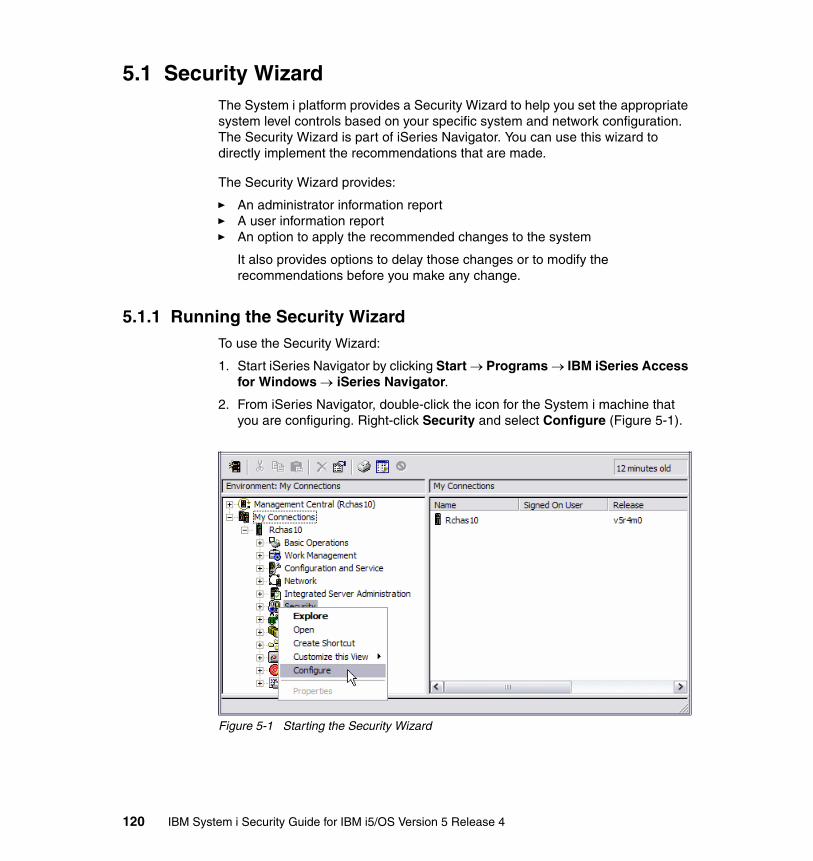
5.1 Security WizardThe System i platform provides a Security Wizard to help you set the appropriate system level controls based on your specific system and network configuration. The Security Wizard is part of iSeries Navigator. You can use this wizard to directly implement the recommendations that are made.
The Security Wizard provides:
� An administrator information report� A user information report� An option to apply the recommended changes to the system
It also provides options to delay those changes or to modify the recommendations before you make any change.
5.1.1 Running the Security WizardTo use the Security Wizard:
1. Start iSeries Navigator by clicking Start → Programs → IBM iSeries Access for Windows → iSeries Navigator.
2. From iSeries Navigator, double-click the icon for the System i machine that you are configuring. Right-click Security and select Configure (Figure 5-1).
Figure 5-1 Starting the Security Wizard
120 IBM System i Security Guide for IBM i5/OS Version 5 Release 4
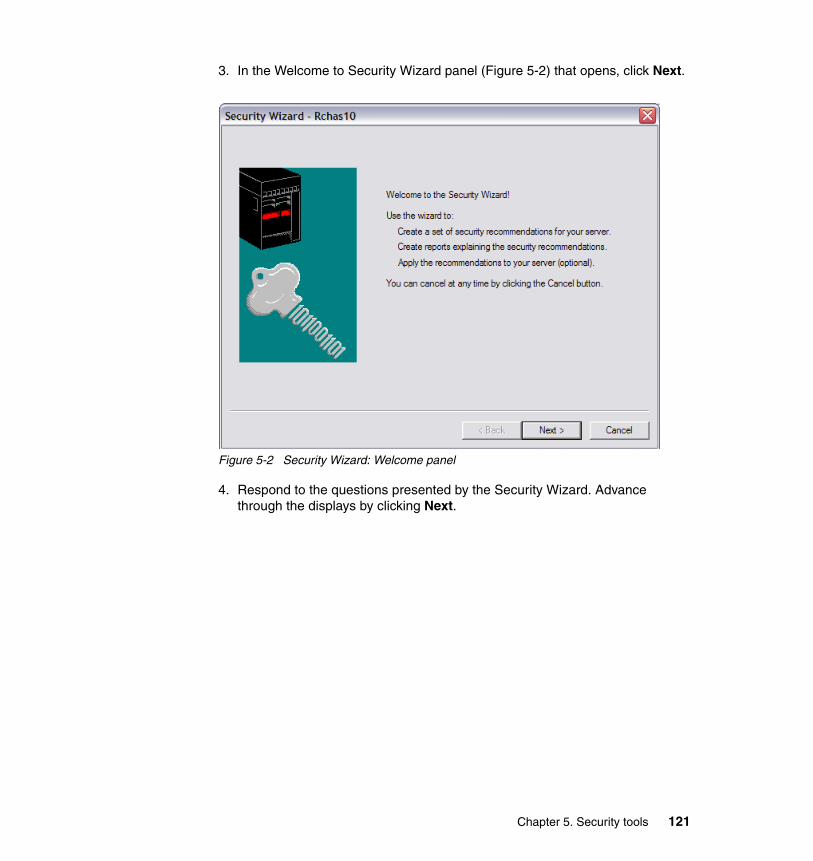
3. In the Welcome to Security Wizard panel (Figure 5-2) that opens, click Next.
Figure 5-2 Security Wizard: Welcome panel
4. Respond to the questions presented by the Security Wizard. Advance through the displays by clicking Next.
Chapter 5. Security tools 121

5. After you answer all the questions, you see the details panel (Figure 5-3).
a. Click the Details button.
Figure 5-3 Security Wizard: Details panel
122 IBM System i Security Guide for IBM i5/OS Version 5 Release 4

b. The Summary of Recommendations window (Figure 5-4) opens in which you review the security recommendations. At this point, the Security Wizard allows you to change the settings that it has recommended.
By choosing the various tabs, you can select the different security areas. You can see the different recommendations provided and the current settings on your system. If you deselect a check box, you keep your current settings. Review the recommendations and then click OK.
Figure 5-4 Security Wizard: Summary of recommendations
c. When you return to the details panel (Figure 5-3), click Next.
Chapter 5. Security tools 123

6. In the next panel, you see the two reports produced by the wizard. As shown in the example in Figure 5-5, you can specify where you want to save the Administrator Information and User Information reports. Click Next.
Figure 5-5 Specifying the directories in which to save the reports
124 IBM System i Security Guide for IBM i5/OS Version 5 Release 4
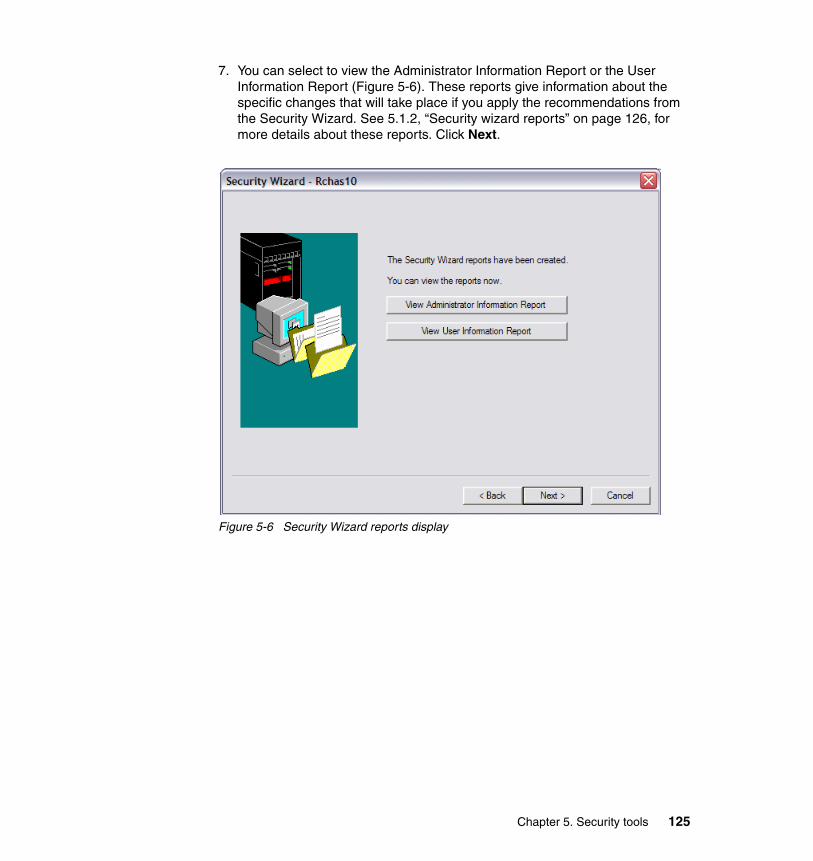
7. You can select to view the Administrator Information Report or the User Information Report (Figure 5-6). These reports give information about the specific changes that will take place if you apply the recommendations from the Security Wizard. See 5.1.2, “Security wizard reports” on page 126, for more details about these reports. Click Next.
Figure 5-6 Security Wizard reports display
Chapter 5. Security tools 125
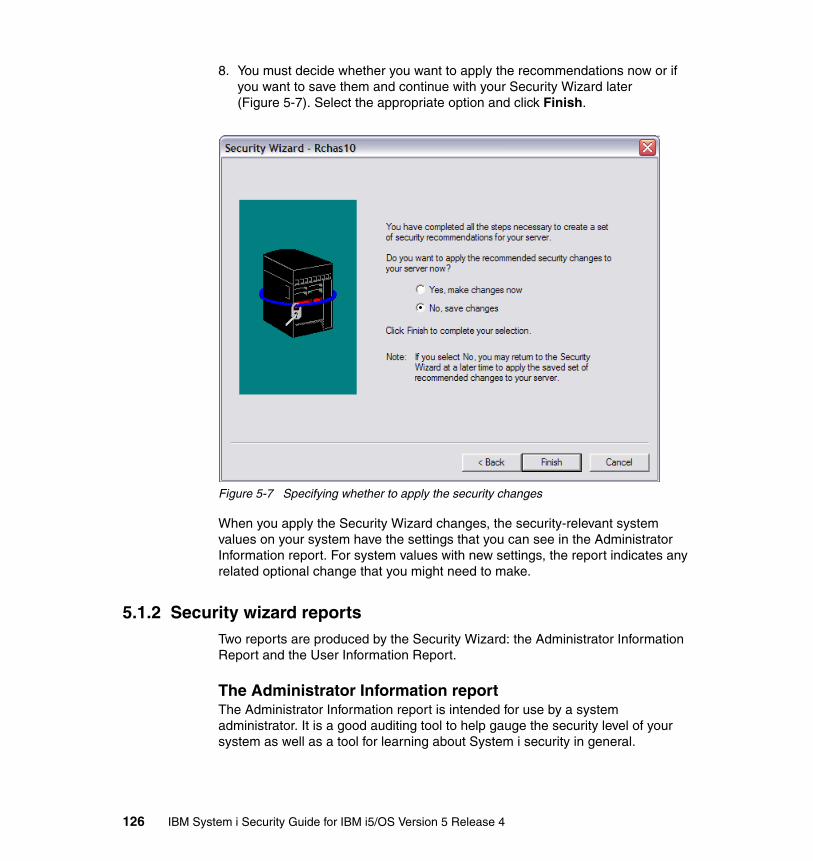
8. You must decide whether you want to apply the recommendations now or if you want to save them and continue with your Security Wizard later (Figure 5-7). Select the appropriate option and click Finish.
Figure 5-7 Specifying whether to apply the security changes
When you apply the Security Wizard changes, the security-relevant system values on your system have the settings that you can see in the Administrator Information report. For system values with new settings, the report indicates any related optional change that you might need to make.
5.1.2 Security wizard reportsTwo reports are produced by the Security Wizard: the Administrator Information Report and the User Information Report.
The Administrator Information reportThe Administrator Information report is intended for use by a system administrator. It is a good auditing tool to help gauge the security level of your system as well as a tool for learning about System i security in general.
126 IBM System i Security Guide for IBM i5/OS Version 5 Release 4

The administrator report has the following characteristics:
� It makes recommendations. Figure 5-8 shows an example of such recommendations.
Figure 5-8 A recommendation in the Administrator Information report
Chapter 5. Security tools 127
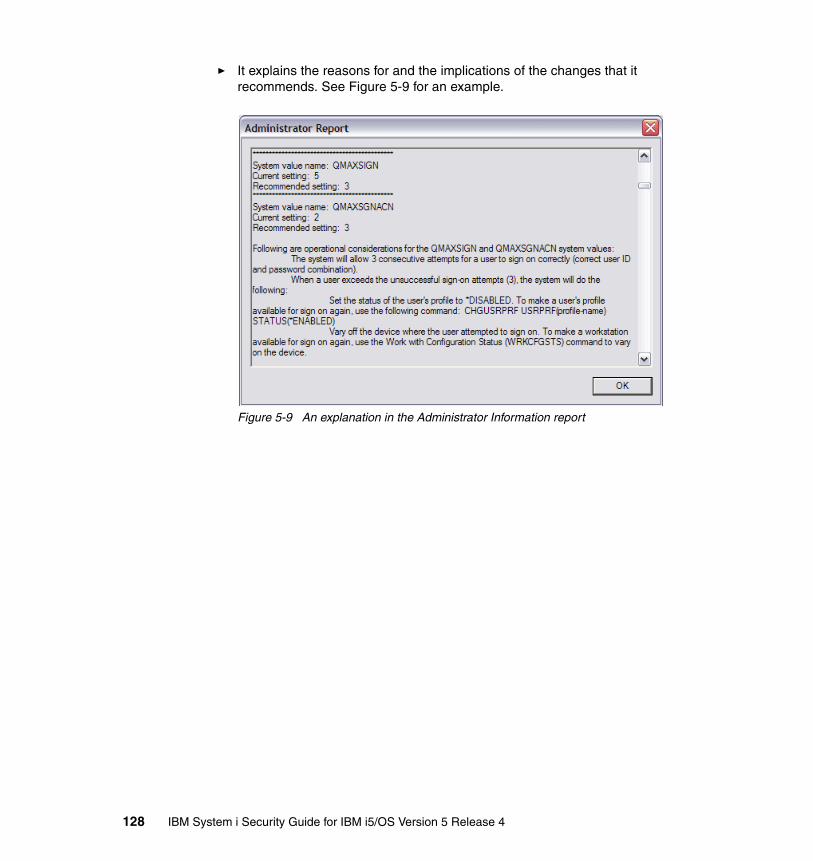
� It explains the reasons for and the implications of the changes that it recommends. See Figure 5-9 for an example.
Figure 5-9 An explanation in the Administrator Information report
128 IBM System i Security Guide for IBM i5/OS Version 5 Release 4
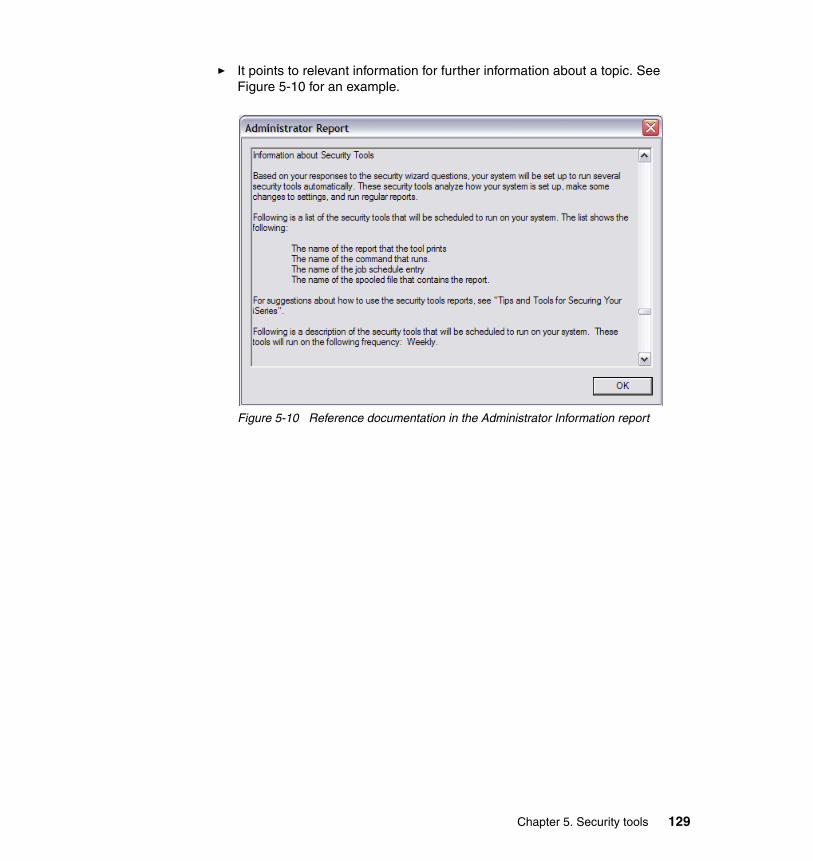
� It points to relevant information for further information about a topic. See Figure 5-10 for an example.
Figure 5-10 Reference documentation in the Administrator Information report
Chapter 5. Security tools 129
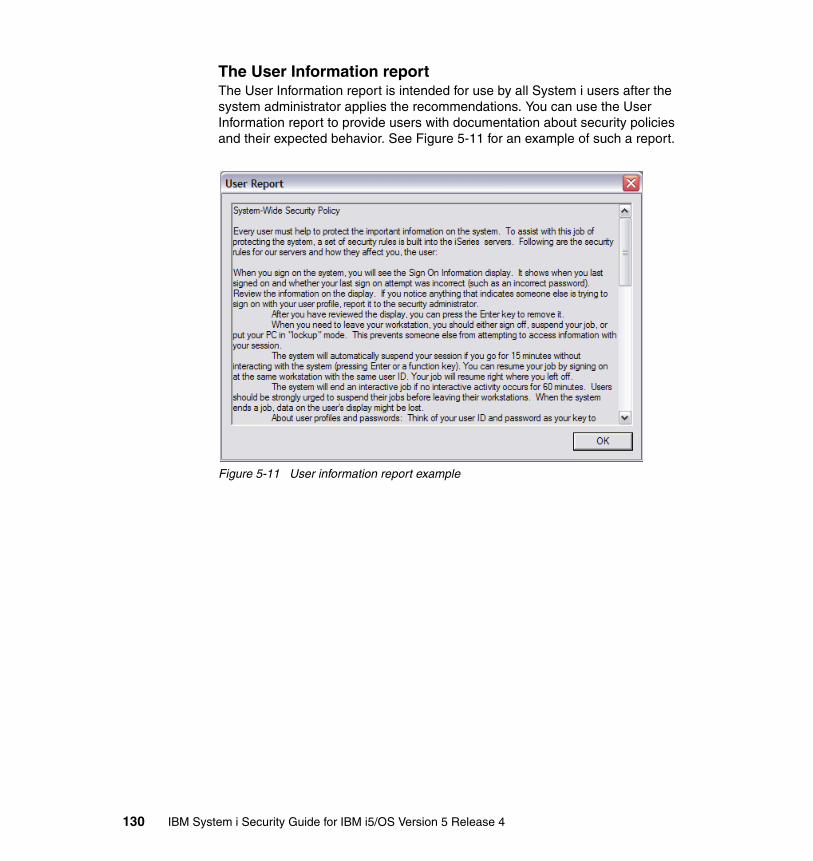
The User Information reportThe User Information report is intended for use by all System i users after the system administrator applies the recommendations. You can use the User Information report to provide users with documentation about security policies and their expected behavior. See Figure 5-11 for an example of such a report.
Figure 5-11 User information report example
130 IBM System i Security Guide for IBM i5/OS Version 5 Release 4

5.2 Security auditing toolsThe System i platform provides a set of commands and menus to help you create reports that you can use to see if you are compliant with your security policy. The security tools consist of two menus:
� Security Tools menu (SECTOOLS): This menu helps to run the menu options (and underlying commands) interactively.
� Submit or Schedule Security Reports to Batch menu (SECBATCH): This menu is divided into two parts. The first part submits the reports, and the second part of the menu schedules the commands to be run later.
5.2.1 Security Tools menuTo access the Security Tools menu, type the GO SECTOOLS command on a command line and press Enter. Then you see the Security Tools menu as shown in Figure 5-12.
Figure 5-12 Security Tools menu
SECTOOLS Security Tools System:RCHAS10 Select one of the following: Work with profiles 1. Analyze default passwords 2. Display active profile list 3. Change active profile list 4. Analyze profile activity 5. Display activation schedule 6. Change activation schedule entry 7. Display expiration schedule 8. Change expiration schedule entry 9. Print profile internals More... Selection or command ===> F1=Help F3=Exit F4=Prompt F9=Retrieve F12=Cancel (C) COPYRIGHT IBM CORP. 1980, 2005.
Chapter 5. Security tools 131
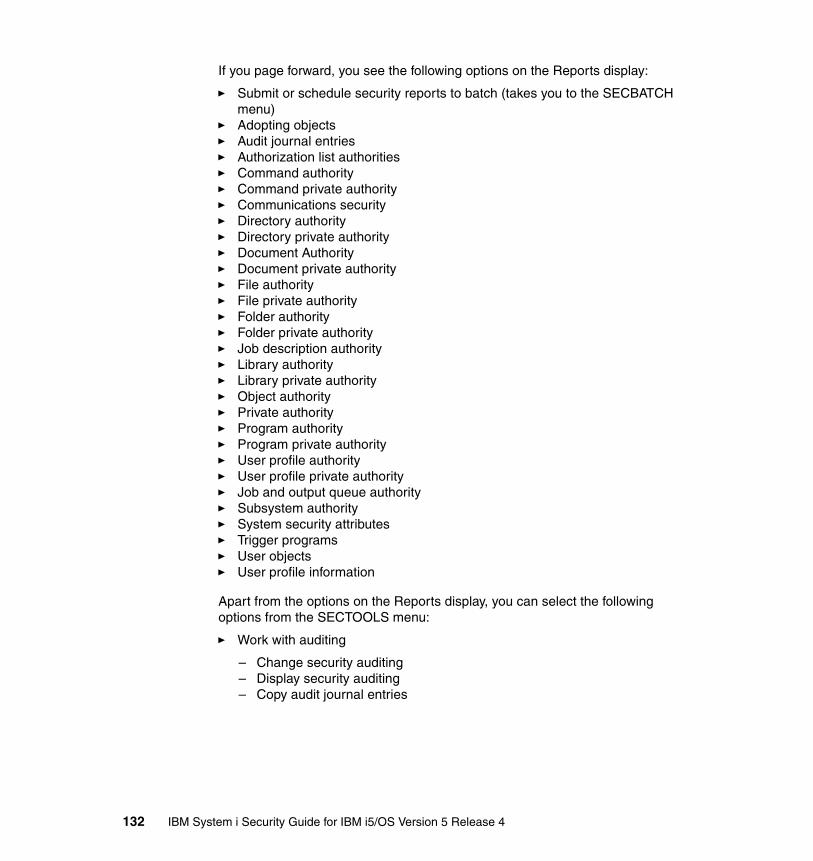
If you page forward, you see the following options on the Reports display:
� Submit or schedule security reports to batch (takes you to the SECBATCH menu)
� Adopting objects� Audit journal entries� Authorization list authorities� Command authority� Command private authority� Communications security� Directory authority� Directory private authority� Document Authority� Document private authority� File authority� File private authority� Folder authority� Folder private authority� Job description authority� Library authority� Library private authority� Object authority� Private authority� Program authority� Program private authority� User profile authority� User profile private authority� Job and output queue authority� Subsystem authority� System security attributes� Trigger programs� User objects� User profile information
Apart from the options on the Reports display, you can select the following options from the SECTOOLS menu:
� Work with auditing
– Change security auditing– Display security auditing– Copy audit journal entries
132 IBM System i Security Guide for IBM i5/OS Version 5 Release 4
� General system security
– Configure system security– Revoke public authority to objects– Check object integrity– Related security tasks
For a complete listing of all available options, the commands behind the menu options, and what they do, see Appendix G in the iSeries Security Reference, SC41-5302.
5.2.2 Customizing your securityOn the SECTOOLS menu, there are some commands and menu options that you can use to customize your security. In the following sections, we provide examples of the actions that you can perform from the SECTOOLS menu.
Analyze default passwordBy selecting option 1 (Analyze default password) from the SECTOOLS menu, or by running the Analyze Default Password (ANZDFTPWD) CL command, you receive a printed report of all user profiles that have a default password.
When running this command, you have the option to choose one of the following actions for the profiles that have a default password:
� Disable the user profiles (*DISABLE)� Set the user profile password to expire (*PWDEXP)� Take no action against the user profiles (*NONE)
User profile informationBy selecting option 49 (User profile information) on the SECTOOLS menu, or by running the Print User Profile (PRTUSRPRF) CL command, you receive a printed report of the user profiles.
The printed report gives you vital information about the user profiles such as:
� User profiles special authorities� User class� Limited capability� Initial menu� Initial program� Job description� Whether the user profile is enabled or disabled� Not valid sign-on� Whether the user profile does not have a password� Local password management
Chapter 5. Security tools 133
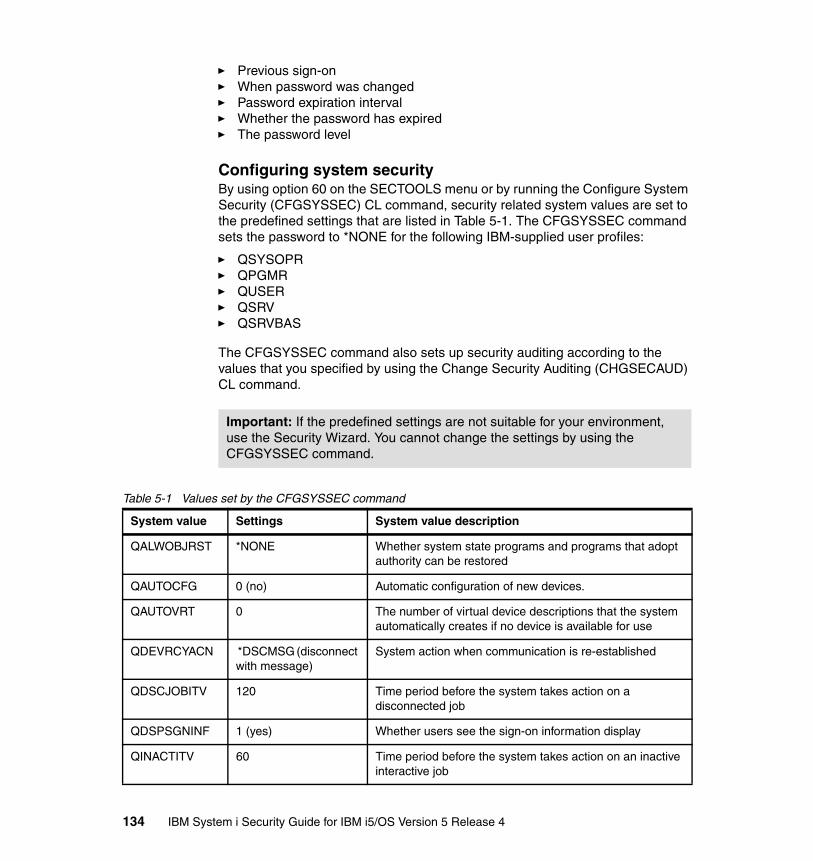
� Previous sign-on� When password was changed� Password expiration interval� Whether the password has expired� The password level
Configuring system securityBy using option 60 on the SECTOOLS menu or by running the Configure System Security (CFGSYSSEC) CL command, security related system values are set to the predefined settings that are listed in Table 5-1. The CFGSYSSEC command sets the password to *NONE for the following IBM-supplied user profiles:
� QSYSOPR� QPGMR� QUSER� QSRV� QSRVBAS
The CFGSYSSEC command also sets up security auditing according to the values that you specified by using the Change Security Auditing (CHGSECAUD) CL command.
Table 5-1 Values set by the CFGSYSSEC command
Important: If the predefined settings are not suitable for your environment, use the Security Wizard. You cannot change the settings by using the CFGSYSSEC command.
System value Settings System value description
QALWOBJRST *NONE Whether system state programs and programs that adopt authority can be restored
QAUTOCFG 0 (no) Automatic configuration of new devices.
QAUTOVRT 0 The number of virtual device descriptions that the system automatically creates if no device is available for use
QDEVRCYACN *DSCMSG (disconnect with message)
System action when communication is re-established
QDSCJOBITV 120 Time period before the system takes action on a disconnected job
QDSPSGNINF 1 (yes) Whether users see the sign-on information display
QINACTITV 60 Time period before the system takes action on an inactive interactive job
134 IBM System i Security Guide for IBM i5/OS Version 5 Release 4
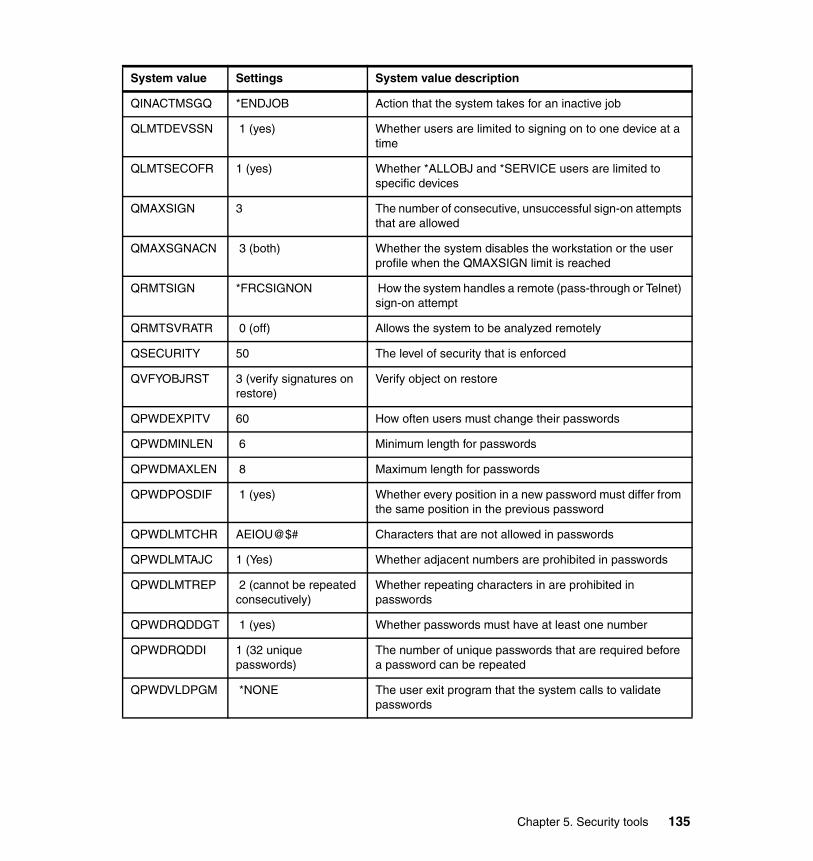
QINACTMSGQ *ENDJOB Action that the system takes for an inactive job
QLMTDEVSSN 1 (yes) Whether users are limited to signing on to one device at a time
QLMTSECOFR 1 (yes) Whether *ALLOBJ and *SERVICE users are limited to specific devices
QMAXSIGN 3 The number of consecutive, unsuccessful sign-on attempts that are allowed
QMAXSGNACN 3 (both) Whether the system disables the workstation or the user profile when the QMAXSIGN limit is reached
QRMTSIGN *FRCSIGNON How the system handles a remote (pass-through or Telnet) sign-on attempt
QRMTSVRATR 0 (off) Allows the system to be analyzed remotely
QSECURITY 50 The level of security that is enforced
QVFYOBJRST 3 (verify signatures on restore)
Verify object on restore
QPWDEXPITV 60 How often users must change their passwords
QPWDMINLEN 6 Minimum length for passwords
QPWDMAXLEN 8 Maximum length for passwords
QPWDPOSDIF 1 (yes) Whether every position in a new password must differ from the same position in the previous password
QPWDLMTCHR AEIOU@$# Characters that are not allowed in passwords
QPWDLMTAJC 1 (Yes) Whether adjacent numbers are prohibited in passwords
QPWDLMTREP 2 (cannot be repeated consecutively)
Whether repeating characters in are prohibited in passwords
QPWDRQDDGT 1 (yes) Whether passwords must have at least one number
QPWDRQDDI 1 (32 unique passwords)
The number of unique passwords that are required before a password can be repeated
QPWDVLDPGM *NONE The user exit program that the system calls to validate passwords
System value Settings System value description
Chapter 5. Security tools 135
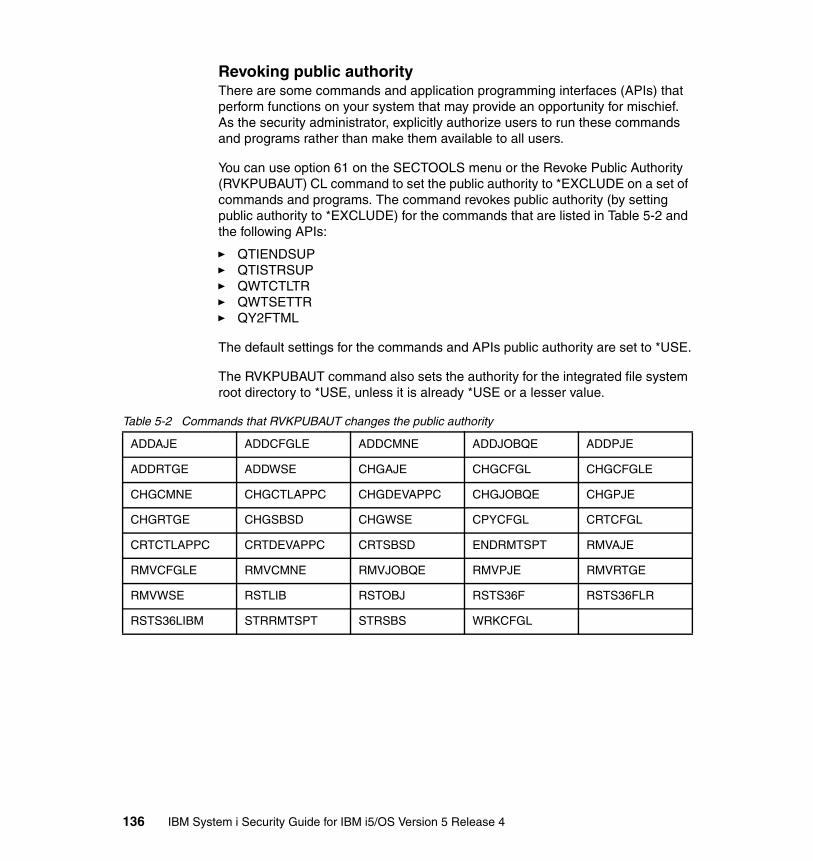
Revoking public authorityThere are some commands and application programming interfaces (APIs) that perform functions on your system that may provide an opportunity for mischief. As the security administrator, explicitly authorize users to run these commands and programs rather than make them available to all users.
You can use option 61 on the SECTOOLS menu or the Revoke Public Authority (RVKPUBAUT) CL command to set the public authority to *EXCLUDE on a set of commands and programs. The command revokes public authority (by setting public authority to *EXCLUDE) for the commands that are listed in Table 5-2 and the following APIs:
� QTIENDSUP � QTISTRSUP � QWTCTLTR � QWTSETTR � QY2FTML
The default settings for the commands and APIs public authority are set to *USE.
The RVKPUBAUT command also sets the authority for the integrated file system root directory to *USE, unless it is already *USE or a lesser value.
Table 5-2 Commands that RVKPUBAUT changes the public authority
ADDAJE ADDCFGLE ADDCMNE ADDJOBQE ADDPJE
ADDRTGE ADDWSE CHGAJE CHGCFGL CHGCFGLE
CHGCMNE CHGCTLAPPC CHGDEVAPPC CHGJOBQE CHGPJE
CHGRTGE CHGSBSD CHGWSE CPYCFGL CRTCFGL
CRTCTLAPPC CRTDEVAPPC CRTSBSD ENDRMTSPT RMVAJE
RMVCFGLE RMVCMNE RMVJOBQE RMVPJE RMVRTGE
RMVWSE RSTLIB RSTOBJ RSTS36F RSTS36FLR
RSTS36LIBM STRRMTSPT STRSBS WRKCFGL
136 IBM System i Security Guide for IBM i5/OS Version 5 Release 4
5.3 Java policy toolIn Java 2 Software Developer Kit (SDK), Standard Edition, version 1.2, the policy tool creates and changes the external policy configuration files that define the Java security policy of your installation. It is compatible with the policy tool that is supplied by Sun™ Microsystems™, Inc. The policy tool is a graphical user interface (GUI) tool that is available using the Qshell Interpreter and the Remote Abstract Window Toolkit.
For information about IBM Developer Kit for Java Remote Abstract Window Toolkit, go to the iSeries Information Center and follow the path Programming → Java → IBM Developer Kit for Java → Run your Java application on a host that does not have a graphical user interface → Native Abstract Windowing Toolkit:
http://publib.boulder.ibm.com/infocenter/iseries/v5r4/index.jsp
For more information about the Java policy tool, go to the following Web site and type policy tool in the Search field:
http://developers.sun.com/
Chapter 5. Security tools 137

138 IBM System i Security Guide for IBM i5/OS Version 5 Release 4

Chapter 6. Security audit journal
In this chapter, we introduce the security audit journal. The security audit journal is designed to record security-related activity and the ability to log selected security-related events in a security audit journal. We also describe the system values, user profile values, and object values that control the events that are logged.
6
© Copyright IBM Corp. 2005, 2006. All rights reserved. 139

6.1 Audit journalThe security audit journal is the primary source of information for security-related events on your system. To take advantage of the i5/OS audit functions and to ensure that security is implemented at an appropriate level, you must create the audit journal. You must also establish the audit criteria in system values, in user profiles, in selected objects, or in all three.
You can organize the audit types into three major groups:
� System-wide audit
– Action auditing– Object access auditing
� Specific objects
– All users’ access– Selected users’ access
� Selected users
– Additional action auditing– Audit of selected objects
Figure 6-1 provides an overview of the security auditing structure.
Figure 6-1 Security auditing structure
System Values User ProfileAudit Events
QAUDCTL
QAUDLVL
QAUDLVL2
QAUDENDACT
QAUDFRCLVL
QCRTOBJAUD
Action:
CHGUSRAUD
Object:
CHGAUD
CHGOBJAUD
Values:
OBJAUD
AUDLVL
*AUDIT SPCAUT
140 IBM System i Security Guide for IBM i5/OS Version 5 Release 4

6.2 Planning for security auditingThe events that you must log depend on your security policy and your potential exposure. If you do not have a security policy, you do not know the rules with which you must comply. For additional information about security policies, see Chapter 2, “Security process and policies” on page 13.
Plan the use of security auditing on your system as required by your security policy:
1. Determine which security-related events you should record for all the users. The auditing of security related events is called action auditing.
2. Check whether you need additional auditing for specific users.
3. Confirm whether you must audit the use of specific objects on the system.
4. Verify whether you must use object auditing for all users or specific users.
The auditing journal, QSYS/QAUDJRN, is intended exclusively for security auditing and should not be used for any other journaling.
For information regarding security monitoring, see Chapter 15, “Security monitoring” on page 331.
6.3 Creating the security audit journalBefore you select your auditing options, you must:
� Create a journal receiver� Create an audit journal
6.3.1 Creating a journal receiverThe journal receiver holds the entries that are logged. Create a journal receiver in a library of your choice by using the Create Journal Receiver (CRTJRNRCV) CL command. In our example, we use a library called JRNLIB for journal receivers. To ensure the highest level of security, create the journal receiver in a library that has a *PUBLIC authority of *EXCLUDE and give the journal receiver a *PUBLIC authority of *EXCLUDE:
CRTJRNRCV JRNRCV(JRNLIB/AUDRCV0001) THRESHOLD(100000) AUT(*EXCLUDE) TEXT(’Auditing Journal Receiver’)
Important: Place your journal receiver in a library that is alphabetically before the QSYS library. In case of a restore, the journal receiver should be restored before the audit journal.
Chapter 6. Security audit journal 141

When using the CRTJRNRCV command, employ the following criteria:
� Create the journal receiver in a library that is regularly saved. Do not place the journal receiver in library QSYS, even though that is where the audit journal will be.
� Choose a journal receiver name, such as AUDRCV0001, that can be used to create a naming standard for future journal receivers. You can then use the *GEN option of the Create Journal (CRTJRN) command when you change journal receivers to continue the naming standard.
� Specify a journal receiver threshold that is appropriate to your system’s size and activity. Base the size that you choose on the number of transactions on your system and the number of actions you choose to audit.
For more information about journal receiver threshold, refer to journal management in the iSeries Security Reference, SC41-5302.
� Specify *EXCLUDE on the AUT parameter of the Create Journal Receiver (CRTJRNRCV) command, to limit access to the information stored in the journal.
6.3.2 Creating a security audit journalThe audit journal contains information about how the journal receiver is managed. Create the security audit journal called QAUDJRN in the QSYS library using the CRTJRN CL command:
CRTJRN JRN(QSYS/QAUDJRN) JRNRCV(JRNLIB/AUDRCV0001) MNGRCV(*SYSTEM) DLTRCV(*NO) AUT(*EXCLUDE) TEXT(’Auditing Journal’)
When using the CRTJRN command, employ the following criteria:
� You must use the name QSYS/QAUDJRN.
� Specify the name of the journal receiver you created previously. For our example, this was AUDRCV0001.
� Specify *EXCLUDE on the AUT parameter of the CRTJRN command to limit access to the information stored in the audit journal. You must have authority to add objects to QSYS to create the journal.
� Use the Manage receiver (MNGRCV) parameter to automatically change the journal receiver and attach a new one. The system detaches and attaches a new receiver when the attached receiver exceeds the threshold that was specified when the journal receiver was created. If you choose this option,
Important: The security audit journal must be named QAUDJRN and created in the QSYS library.
142 IBM System i Security Guide for IBM i5/OS Version 5 Release 4
you do not have to use the Change Journal (CHGJRN) command to detach receivers and create and attach new receivers manually.
� Do not delete detached receivers. Specify DLTRCV(*NO) of the CRTJRN command, which is the default. The QAUDJRN receivers are your security audit trail. Make sure to adequately save them before you delete them from the system.
Your security policy should tell you the minimum retention period for the journal receivers. A standard practice is to have a retention period for a minimum of 60 days.
6.4 System values that control security auditingThe following system values control security auditing on the System i platform:
� QAUDCTL: Auditing Control determines whether auditing is performed. It functions like an on and off switch.
� QAUDENDACN: Auditing End Action determines the action that the system takes if auditing is active and the system is unable to write entries to the audit journal.
� QAUDFRCLVL: Auditing Force Level determines how often new audit journal entries are forced from memory to auxiliary storage. This system value controls the amount of auditing data that may be lost if the system ends abnormally.
� QAUDLVL: Auditing Level determines which security-related events are logged to the security audit journal (QAUDJRN) for all users on the system. You can specify more than one value for the QAUDLVL system value, unless you specify *NONE. You can specify up to 16 auditing options in QAUDLVL.
If you a have requirement for more options, you must specify *AUDLVL2 and continue to type your options in system value QAUDLVL2. If the QAUDLVL system value does not contain the value *AUDLVL2, then the values in the QAUDLVL2 system value are ignored.
� QAUDLVL2: Auditing Level is a continuation of the system value QAUDLVL. If you have *AUDLVL2 as one of the values in the QAUDLVL system value, it causes the system to look for auditing values in the QAUDLVL2 system value. QAUDLVL2 can contain up to 99 auditing options.
� QCRTOBJAUD: Auditing for New Objects is used to specify the auditing for a new object if the auditing default for the library of the new object is set to *SYSVAL.
Chapter 6. Security audit journal 143
6.5 Using the security audit journal for reportsBased on the entries in the security audit journal receivers, the auditor can produce various reports to monitor security related system activity. Depending on the QAUDLVL and QAUDLVL2 system values, different journal entry types are logged and can be displayed or listed by various means.
6.5.1 Security audit journalThe security audit journal (QAUDJRN) in library QSYS is processed like any other journal. We recommend that you keep the security audit journal only for security information. Do not journal files to the security audit journal.
System entries that appear in this journal are entries identified by a journal code of “J”. These entries relate to initial program load (IPL) and general operations performed on journal receivers (for example, a save of the receiver). The security related audit journal entries have a journal code of “T”.
Recovery from a damaged audit journal or audit journal receiver is the same as for other journals. See Backup and Recovery, SC41-5304, for recovery information.
6.5.2 Audit journal flowThe audit entry is written in the journal receiver in the following way:
1. A user or program performs an activity that triggers an auditable event.
2. Either system value QAUDLVL, QAUDLVL2, or both determine whether the event should be audited.
3. The journal QAUDJRN identifies the journal receiver where the event is recorded.
6.5.3 Journal entry typesEach security audit journal entry contains the standard prefix fields for any journal entry, such as date, time, and journal sequence number. For a list of journal entry types, see Appendix F in the iSeries Security Reference, SC41-5302.
144 IBM System i Security Guide for IBM i5/OS Version 5 Release 4
6.5.4 Converting security audit journal entriesYou can use the Copy Audit Journal Entries (CPYAUDJRNE) CL command to copy security audit records from the security auditing journal (QAUDJRN) into one or more output files. Only one invocation of the command is needed to produce the five types of audit records:
� Authority failure (AF)� Delete object (DO)� DST password reset (DS)� Invalid password (PW)� System value changed (SV)
Each audit entry type selected is copied to a separate output file.
The output of the following CPYAUDJRNE command is five output files named QAUDITxx, where xx is AF, DO, DS, PW or SV:
CPYAUDJRNE ENTTYP(AF DO DS PW SV) OUTFILE(QTEMP/QAUDIT)
If no audit records exists in the audit journal for the journal entry type that is selected, no output file is produced. The files are created from the QASYxxJ5 physical files in QSYS library. See Appendix F in the iSeries Security Reference, SC41-5302, for a list of journal entry types.
The audit data sent to the output files can then be analyzed by using a query, Structured Query Language (SQL), or a user-written program. See “Auditing QSECOFR activity” on page 149 for an example of a query program.
6.6 User and object auditingYou can audit security-related events at three levels:
� System-wide, for all users� Specific users� Specific objects
The previous sections describe how you can implement system-wide auditing. The following sections explain how you can audit specific users as well as specific objects.
Chapter 6. Security audit journal 145
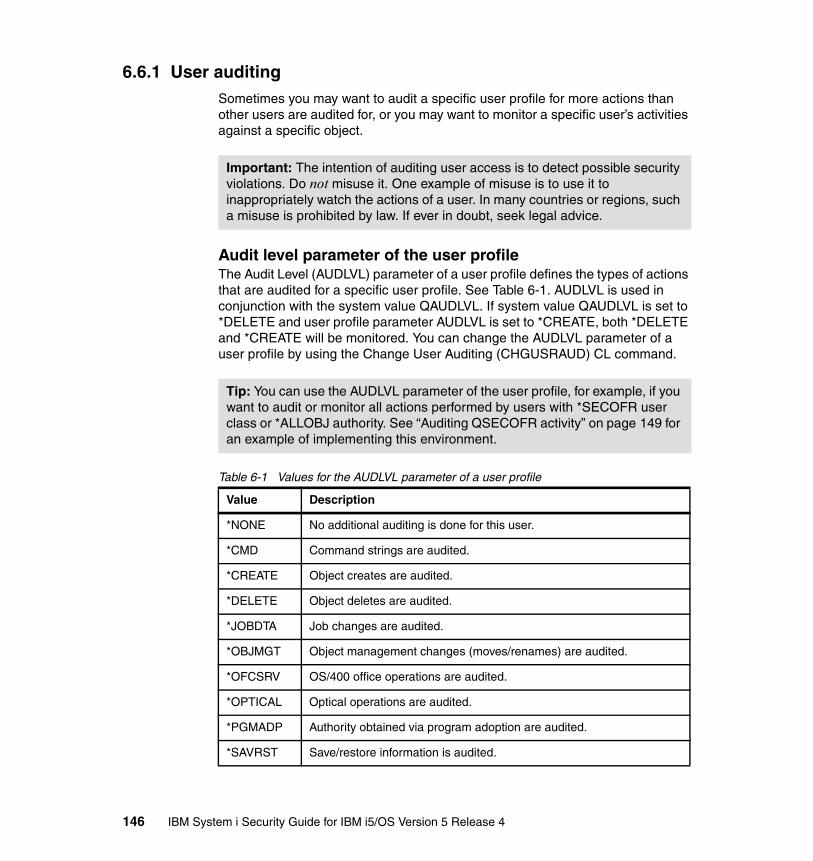
6.6.1 User auditingSometimes you may want to audit a specific user profile for more actions than other users are audited for, or you may want to monitor a specific user’s activities against a specific object.
Audit level parameter of the user profileThe Audit Level (AUDLVL) parameter of a user profile defines the types of actions that are audited for a specific user profile. See Table 6-1. AUDLVL is used in conjunction with the system value QAUDLVL. If system value QAUDLVL is set to *DELETE and user profile parameter AUDLVL is set to *CREATE, both *DELETE and *CREATE will be monitored. You can change the AUDLVL parameter of a user profile by using the Change User Auditing (CHGUSRAUD) CL command.
Table 6-1 Values for the AUDLVL parameter of a user profile
Important: The intention of auditing user access is to detect possible security violations. Do not misuse it. One example of misuse is to use it to inappropriately watch the actions of a user. In many countries or regions, such a misuse is prohibited by law. If ever in doubt, seek legal advice.
Tip: You can use the AUDLVL parameter of the user profile, for example, if you want to audit or monitor all actions performed by users with *SECOFR user class or *ALLOBJ authority. See “Auditing QSECOFR activity” on page 149 for an example of implementing this environment.
Value Description
*NONE No additional auditing is done for this user.
*CMD Command strings are audited.
*CREATE Object creates are audited.
*DELETE Object deletes are audited.
*JOBDTA Job changes are audited.
*OBJMGT Object management changes (moves/renames) are audited.
*OFCSRV OS/400 office operations are audited.
*OPTICAL Optical operations are audited.
*PGMADP Authority obtained via program adoption are audited.
*SAVRST Save/restore information is audited.
146 IBM System i Security Guide for IBM i5/OS Version 5 Release 4
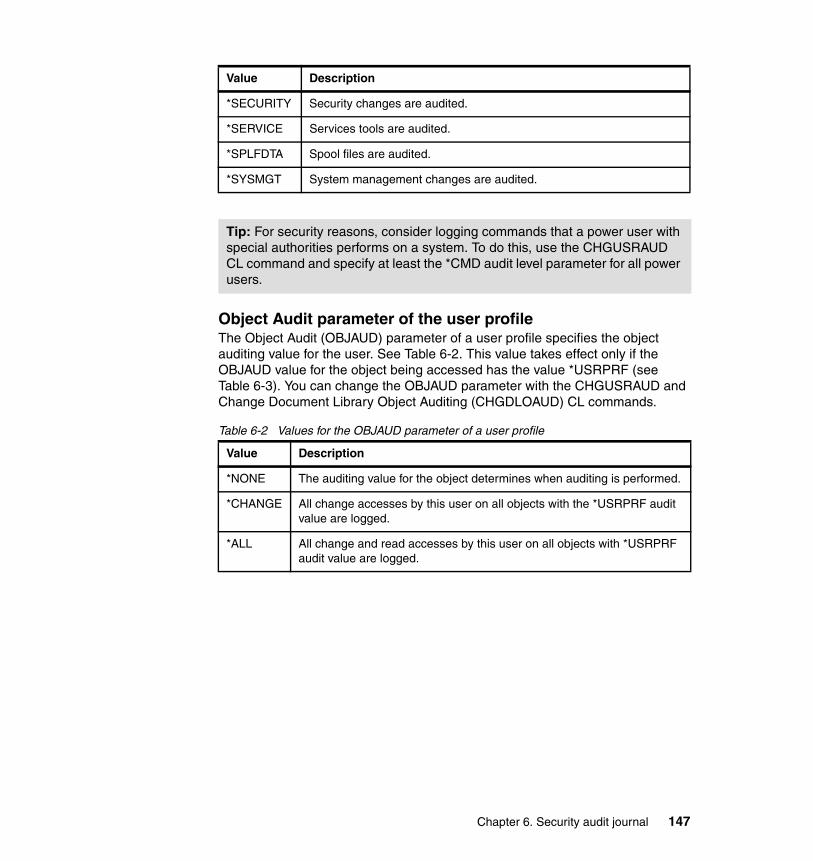
Object Audit parameter of the user profileThe Object Audit (OBJAUD) parameter of a user profile specifies the object auditing value for the user. See Table 6-2. This value takes effect only if the OBJAUD value for the object being accessed has the value *USRPRF (see Table 6-3). You can change the OBJAUD parameter with the CHGUSRAUD and Change Document Library Object Auditing (CHGDLOAUD) CL commands.
Table 6-2 Values for the OBJAUD parameter of a user profile
*SECURITY Security changes are audited.
*SERVICE Services tools are audited.
*SPLFDTA Spool files are audited.
*SYSMGT System management changes are audited.
Tip: For security reasons, consider logging commands that a power user with special authorities performs on a system. To do this, use the CHGUSRAUD CL command and specify at least the *CMD audit level parameter for all power users.
Value Description
*NONE The auditing value for the object determines when auditing is performed.
*CHANGE All change accesses by this user on all objects with the *USRPRF audit value are logged.
*ALL All change and read accesses by this user on all objects with *USRPRF audit value are logged.
Value Description
Chapter 6. Security audit journal 147
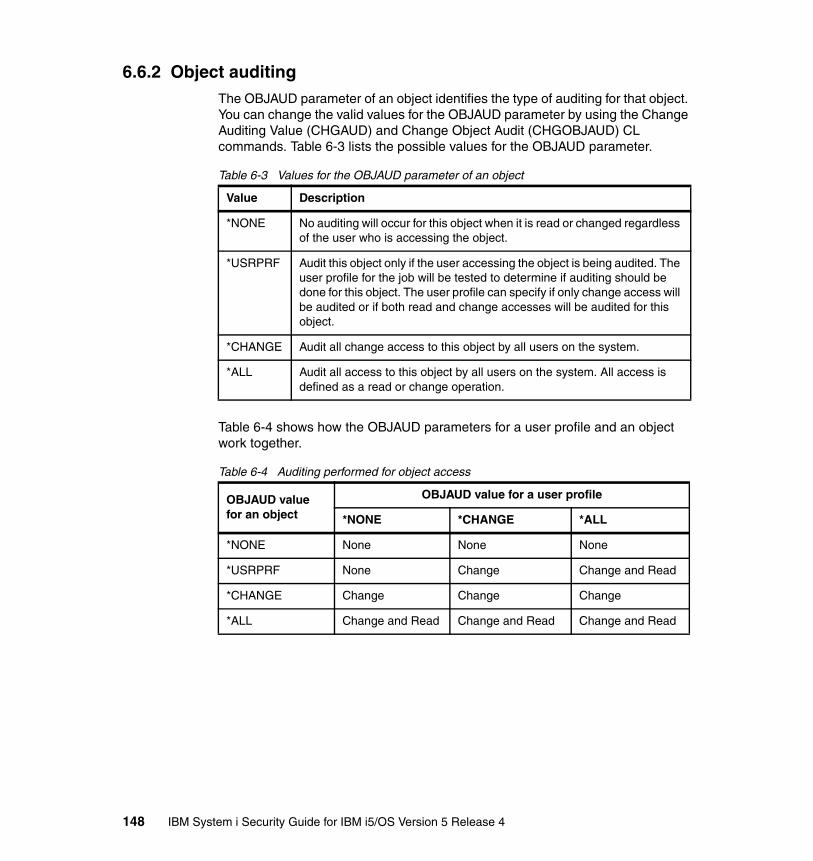
6.6.2 Object auditingThe OBJAUD parameter of an object identifies the type of auditing for that object. You can change the valid values for the OBJAUD parameter by using the Change Auditing Value (CHGAUD) and Change Object Audit (CHGOBJAUD) CL commands. Table 6-3 lists the possible values for the OBJAUD parameter.
Table 6-3 Values for the OBJAUD parameter of an object
Table 6-4 shows how the OBJAUD parameters for a user profile and an object work together.
Table 6-4 Auditing performed for object access
Value Description
*NONE No auditing will occur for this object when it is read or changed regardless of the user who is accessing the object.
*USRPRF Audit this object only if the user accessing the object is being audited. The user profile for the job will be tested to determine if auditing should be done for this object. The user profile can specify if only change access will be audited or if both read and change accesses will be audited for this object.
*CHANGE Audit all change access to this object by all users on the system.
*ALL Audit all access to this object by all users on the system. All access is defined as a read or change operation.
OBJAUD value for an object
OBJAUD value for a user profile
*NONE *CHANGE *ALL
*NONE None None None
*USRPRF None Change Change and Read
*CHANGE Change Change Change
*ALL Change and Read Change and Read Change and Read
148 IBM System i Security Guide for IBM i5/OS Version 5 Release 4

6.6.3 Action auditingAction auditing means that you audit what a particular user performs on the system or you audit all users that touch a specific file.
Auditing QSECOFR activityYou can audit any user profile. In the following example, we audit the user profile of QSECOFR.
Many security policies demand that activities performed by privileged users, such as QSECOFR (or other *ALLOBJ users), be monitored and recorded. The User Action Auditing capability offers an easy way to implement this. In this example, the system value QAUDLVL or QAUDLVL2 already has the auditing options selected according to the security policy. We add only auditing for CL command strings (*CMD) in this example.
To set up this environment:
1. Make sure the QAUDJRN journal and a journal receiver have been created. See 6.3, “Creating the security audit journal” on page 141.
2. Verify that the audit options in either system value QAUDLVL, QAUDLVL2, or both match your security policy.
3. Make sure the QAUDCTL system value has been set to include *AUDLVL.
4. Enter the following CHGUSRAUD command:
CHGUSRAUD USRPRF(QSECOFR) AUDLVL(*CMD)
5. Remove the *AUDIT special authority from user profiles with *ALLOBJ and *SECADM special authority. This makes it more complicated for these users to change the auditing characteristics of their own profiles.
6. After a period of activity, print a report of the commands issued by QSECOFR:
a. Copy the audit journal entries to an output file using the following Copy Audit Journal Entries (CPYAUDJRNE) CL command:
CPYAUDJRNE ENTTYP(CD) OUTFILE(SECURITY/SECOFR) USRPRF(QSECOFR) FROMTIME(date and time) TOTIME(date and time)
This produces an output file named SECOFR in the library SECURITY.
Note: If the swapping user profiles method is used, keep in mind that audit records that are written when using a swapped user profile are written indicating that the swapped-to user performed the actions. This is true as long as the job or thread is swapped. For more information about swapping user profiles, see “Swapping user profiles” on page 81.
Chapter 6. Security audit journal 149

b. Run a query program against your output file. A report is created as shown in Figure 6-2. You can see the date, time, and the commands entered by QSECOFR.
Figure 6-2 Sample output for the QSECOFR command report
6.7 Third-party toolsInstead of writing your own tools to analyze the audit journal, you can use readily available tools from various software vendors in the market. These are typically products that consist of various tools to manage and evaluate security within i5/OS.
For the security audit journal, the tools can help you generate reports based on various input criteria. Some tools even provide real-time monitoring of the audit journal for specific events or conditions. You can either search the Web for such tools or consult the IBM Solution Connection™ Web page at the following address (and type security in the Search field).
http://www.ibm.com/servers/solutions/finder/portal/search.jsp
Timestamp Object Library CL Program Command name name PGM name string 2006-06-14-20.45.11.147408 WRKSYSVAL QSYS N QCMD WRKSYSVAL 2006-06-14-20.45.20.367760 WRKUSRPRF QSYS N QCMD WRKUSRPRF USRPRF(HAKAN) 2006-06-14-20.45.28.816032 DSPNETA QSYS N QCMD DSPNETA 2006-06-14-20.45.56.741760 WRKSYSSTS QSYS N QCMD WRKSYSSTS 2006-06-14-20.46.13.872048 DSPLIB QSYS N QCMD DSPLIB LIB(SPANGIS) 2006-06-14-20.46.27.949408 WRKOBJPDM QSYS N QCMD WRKOBJPDM LIB(TEST) 2006-06-14-20.47.34.099216 GO QSYS N QCMD GO MENU(SECTOOLS) 2006-06-14-20.47.53.353664 ANZDFTPWD QSYS N QCMD ANZDFTPWD 2006-06-14-20.48.05.921888 WRKSPLF QSYS N QCMD WRKSPLF 2006-06-14-20.48.17.722464 DSPSPLF *SYSTEM N QCMD *SYSTEM/DSPSPLF 2006-06-14-20.49.30.763648 WRKUSRPRF QSYS N QCMD WRKUSRPRF USRPRF(HAKAN) 2006-06-14-20.49.38.574496 WRKOBJ QSYS N QCMD WRKOBJ OBJ(SANDRA) 2006-06-14-20.49.42.978576 DSPOBJAUT QSYS N QCMD DSPOBJAUT ?*OBJ(QSYS/HAKAN)2006-06-14-20.50.06.482096 SIGNOFF QSYS N QCMD SIGNOFF
150 IBM System i Security Guide for IBM i5/OS Version 5 Release 4
Chapter 7. Confidentiality and integrity
In this chapter, we explain how object signing and data encryption work on i5/OS. We also give a brief introduction to object signing, virus scanning, and data encryption. Because many books have been written about encryption already, we do not describe encryption in depth.
7
Note: This chapter contains references to the iSeries Information Center for V5R4 page. On this page, you can simply click the iSeries Information Center, Version 5 Release 4 link in the navigation area and select the topics that are specified:
http://publib.boulder.ibm.com/infocenter/iseries/v5r4/index.jsp
© Copyright IBM Corp. 2005, 2006. All rights reserved. 151
7.1 Data confidentiality and integrityThe objective of confidentiality is to:
� Protect against disclosing information to unauthorized people� Restrict access to confidential information� Protect against curious users and outsiders
The objective of integrity is to:
� Protect against unauthorized changes to data� Restrict manipulation of data to only authorized users� Provide assurance that data is trustworthy
7.2 Object signingAll of the security precautions that you take are meaningless if someone can bypass them by introducing tampered data into your system. The System i architecture has many built-in features that you can use to keep tampered software from being loaded onto your system and to detect whether any such software is already there.
Digitally signing objects provides a way to ensure the integrity of the contents of an object as well as the source of an object’s origin. Using digital signatures gives you greater control over the software that can be loaded onto your system. It also allows you more power to detect changes after it is loaded. The system value Verify Object on Restore (QVFYOBJRST) provides a mechanism for setting a restrictive policy that requires that software loaded onto the system to be signed by known software sources. You can also choose a more open policy and verify signatures if they are present.
Most i5/OS software, as well as most System i licensed programs and program temporary fixes (PTFs), have been signed by a system trusted source. These signatures help the system to protect its integrity. They are checked when fixes are applied to the system to make sure that the fix has come from a system trusted source and that it did not change in transit. These signatures can also be checked when the software is on the system.
i5/OS provides support for using certificates to digitally sign objects and to verify the digital signature on them. Because i5/OS objects are considerably more
Note: Software that is affected by the system value QVFYOBJRST has an object type of *PGM, *SRVPGM, *MODULE, *SQLPKG, *CMD, and *STMF objects, which contain Java programs.
152 IBM System i Security Guide for IBM i5/OS Version 5 Release 4
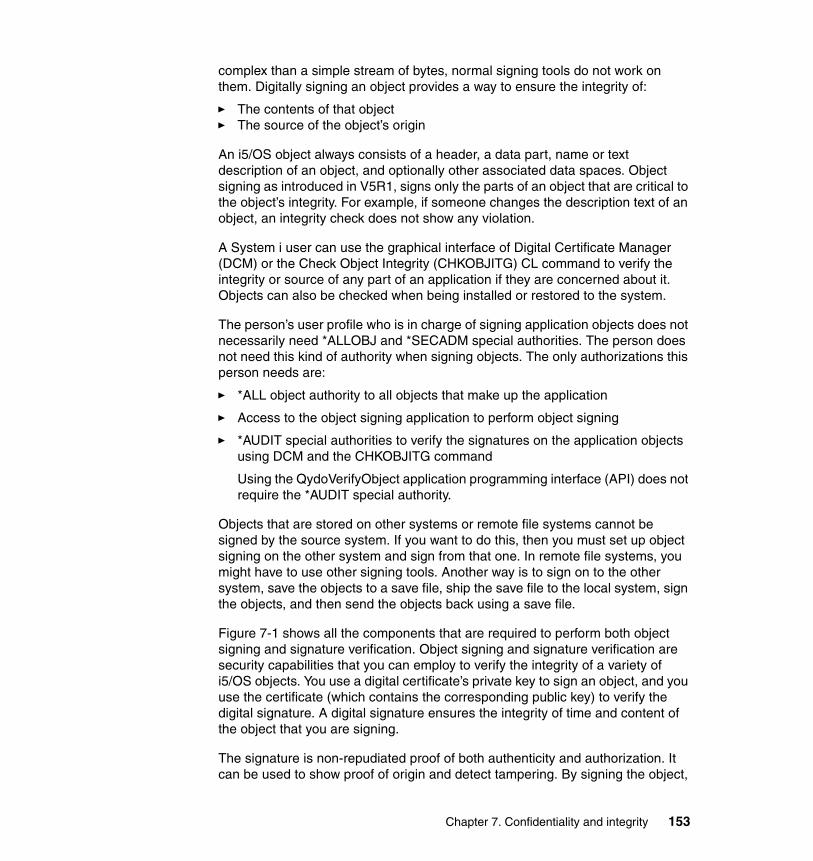
complex than a simple stream of bytes, normal signing tools do not work on them. Digitally signing an object provides a way to ensure the integrity of:
� The contents of that object� The source of the object’s origin
An i5/OS object always consists of a header, a data part, name or text description of an object, and optionally other associated data spaces. Object signing as introduced in V5R1, signs only the parts of an object that are critical to the object’s integrity. For example, if someone changes the description text of an object, an integrity check does not show any violation.
A System i user can use the graphical interface of Digital Certificate Manager (DCM) or the Check Object Integrity (CHKOBJITG) CL command to verify the integrity or source of any part of an application if they are concerned about it. Objects can also be checked when being installed or restored to the system.
The person’s user profile who is in charge of signing application objects does not necessarily need *ALLOBJ and *SECADM special authorities. The person does not need this kind of authority when signing objects. The only authorizations this person needs are:
� *ALL object authority to all objects that make up the application
� Access to the object signing application to perform object signing
� *AUDIT special authorities to verify the signatures on the application objects using DCM and the CHKOBJITG command
Using the QydoVerifyObject application programming interface (API) does not require the *AUDIT special authority.
Objects that are stored on other systems or remote file systems cannot be signed by the source system. If you want to do this, then you must set up object signing on the other system and sign from that one. In remote file systems, you might have to use other signing tools. Another way is to sign on to the other system, save the objects to a save file, ship the save file to the local system, sign the objects, and then send the objects back using a save file.
Figure 7-1 shows all the components that are required to perform both object signing and signature verification. Object signing and signature verification are security capabilities that you can employ to verify the integrity of a variety of i5/OS objects. You use a digital certificate’s private key to sign an object, and you use the certificate (which contains the corresponding public key) to verify the digital signature. A digital signature ensures the integrity of time and content of the object that you are signing.
The signature is non-repudiated proof of both authenticity and authorization. It can be used to show proof of origin and detect tampering. By signing the object,
Chapter 7. Confidentiality and integrity 153
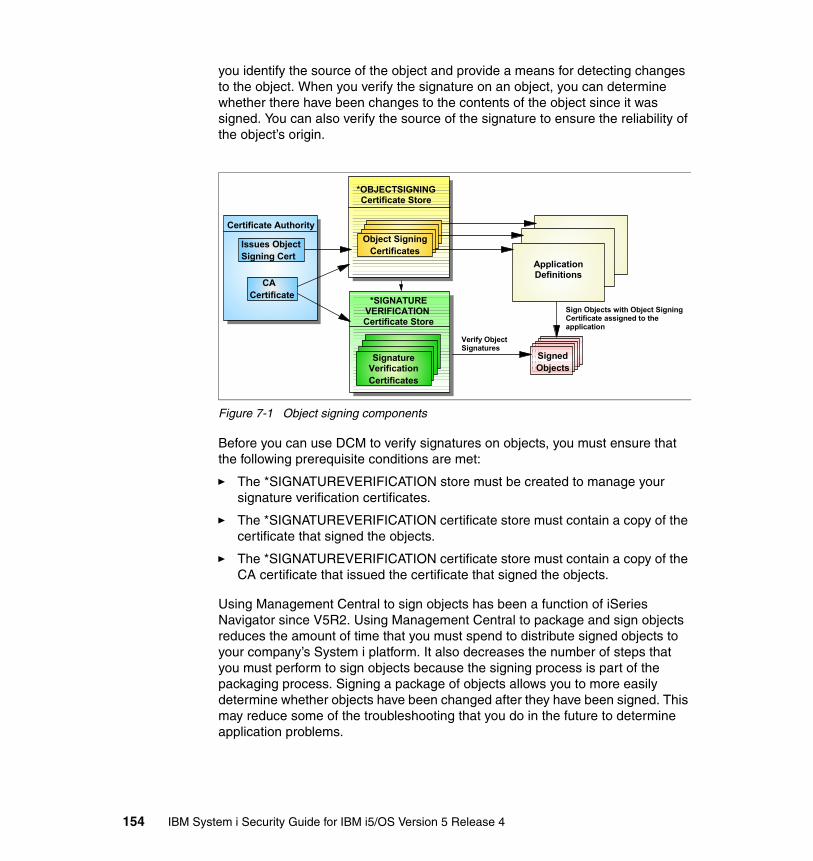
you identify the source of the object and provide a means for detecting changes to the object. When you verify the signature on an object, you can determine whether there have been changes to the contents of the object since it was signed. You can also verify the source of the signature to ensure the reliability of the object’s origin.
Figure 7-1 Object signing components
Before you can use DCM to verify signatures on objects, you must ensure that the following prerequisite conditions are met:
� The *SIGNATUREVERIFICATION store must be created to manage your signature verification certificates.
� The *SIGNATUREVERIFICATION certificate store must contain a copy of the certificate that signed the objects.
� The *SIGNATUREVERIFICATION certificate store must contain a copy of the CA certificate that issued the certificate that signed the objects.
Using Management Central to sign objects has been a function of iSeries Navigator since V5R2. Using Management Central to package and sign objects reduces the amount of time that you must spend to distribute signed objects to your company’s System i platform. It also decreases the number of steps that you must perform to sign objects because the signing process is part of the packaging process. Signing a package of objects allows you to more easily determine whether objects have been changed after they have been signed. This may reduce some of the troubleshooting that you do in the future to determine application problems.
ApplicationDefinitions
*SIGNATUREVERIFICATION Certificate Store
SignedObjects
*OBJECTSIGNINGCertificate Store
Object SigningCertificates
Signature
VerificationCertificates
Certificate Authority
Issues Object Signing Cert
CA Certificate
Sign Objects with Object Signing Certificate assigned to the application
Verify ObjectSignatures
154 IBM System i Security Guide for IBM i5/OS Version 5 Release 4

Figure 7-2 shows the flow from the creation of the object signing certificate store to the verification of the signature.
Figure 7-2 Overview of object signing
For a detailed description about object signing, see the IBM Redbook IBM eServer iSeries Wired Network Security: OS/400 V5R1 DCM and Cryptographic Enhancements, SG24-6168.
7.2.1 Objects that can be signedObjects that are compiled for a release prior to V5R1 cannot be digitally signed. The objects must also reside on the local file system. Objects that can be digitally signed include:
� Save files (not empty ones) in the QSYS.LIB file system
� Programs of types *PGM, *SVRPGM, *SQLPKG, *JVAPGM, and *MODULE, as well as stream files with attached Java programs
Create signature verification store
Import a verification certificate into the
verification certificate store (and CA
certificate)
Add application and assign certificate
Define list ofobjects to sign
Sign objects
Create object signing certificate
Create object signingcertificate store
Verify setting of system value QVFYOBJRST
Verify signatures
Restore the application
Verify and package
Ship to customer
Export signing certificate as
verification certificate
Chapter 7. Confidentiality and integrity 155

� Command objects (*CMD)
� Integrated file system stream files in local file systems
Command objects have two parts that can be signed. Some commands use a signature that does not cover all parts of the object. Some parts of the command are not signed, while other parts are signed only when they contain a non-default value. This type of signature allows some changes to be made to the command without invalidating its signature. Examples of changes that will not invalidate these types of signatures include:
� Changing command defaults� Adding a validity checking program to a command that does not have one� Changing the Where allowed to run parameter� Changing the Allow limited user parameter
If you prefer, you can add your own signature to these commands that includes these areas of the command object.
7.2.2 Advantages of digital object signingBy signing an object digitally, you ensure the integrity of the object. Signing an object means that the recipient can be sure that no one has changed or manipulated the content of the material and that it is definitely from the claimed sender. This is achieved by digitally signing the object and then verifying it on the target system.
Traditional controls cannot protect an object from unauthorized tampering while in transit across the Internet or other untrusted network, or while the object is stored on a non-System i platform. Using digital signatures on an object protects it from unauthorized changes.
7.2.3 Signature commandsThis section provides listings of some of the more useful signature commands.
Commands to view signature information for an objectThe following CL commands are for viewing signature information for an object:
� Display Object Description (DSPOBJD) command: You can use this command to determine whether an object is signed and to view information about the signature.
� Display Object Links (DSPLNK) and Work with Object Links (WRKLNK) integrated file system commands: You can use either of these commands to display signature information for an object in the integrated file system.
156 IBM System i Security Guide for IBM i5/OS Version 5 Release 4

Commands to verify object signaturesThe following CL commands are for verifying object signatures:
� Check Object Integrity (CHKOBJITG) command: This command allows you to determine if objects on your system have integrity violations. You can use this command to verify signatures in much the same way that you use a virus checker to determine when a virus has corrupted files or other objects on your system.
� Check Product Option (CHKPRDOPT) command: This command reports differences between the correct structure and the actual structure of a software product. For example, the command reports an error if an object is deleted from an installed product. You can use the Check Signature (CHKSIG) parameter to specify how the command is to handle and report possible signature problems for the product.
� Save Licensed Program (SAVLICPGM) command: This command saves a copy of the objects that make up a licensed program. It saves the licensed program in a form that can be restored by the Restore Licensed Program (RSTLICPGM) command. You can use the CHKSIG parameter to specify how the command is to handle and report possible signature problems for the product.
� Restore (RST) command: This command restores a copy of one or more objects that can be used in the integrated file system. How the Restore command handles signed and signable objects is determined by the setting for the Verify Object Signatures During Restore (QVFYOBJRST) system value.
� Restore Library (RSTLIB) command: This command restores one library or a group of libraries that was saved by the Save Library (SAVLIB) command. The RSTLIB command restores the whole library, which includes the library description, object descriptions, and contents of the objects in the library. How this command handles signed and signable objects is determined by the setting for the QVFYOBJRST system value.
� Restore Licensed Program (RSTLICPGM) command: This command loads or restores a licensed program, either for initial installation or new release installation. How this command handles signed and signable objects is determined by the setting for the QVFYOBJRST system value.
� Restore Object (RSTOBJ) command: This command restores one or more objects in a single library that were saved on diskette, tape, optical volume, or in a save file by using a single command. How this command handles signed and signable objects is determined by the setting for the QVFYOBJRST system value.
Chapter 7. Confidentiality and integrity 157

7.2.4 ConsiderationsSome CL commands cause the signatures to be removed from the object. These commands include:
� Change Program (CHGPGM) and Change Service Program (CHGSRVPGM), except when changing the text description
� Change Module (CHGMOD), except when changing the text description and removing observable information RMVOBS(*ILDTA)
� Update Program (UPDPGM) and Update Service Program (UPDSVRPGM)
� Run Java Program (RUNJVA), which removes the digital signature of a stream file if the command changes any of the Java programs
� Create Java Program (CRTJVAPGM) and Change Java Program (CHGJVAPGM), which normally removes the digital signature of a stream file.
When an object is signed, a certificate is used to store information about the signer. All certificates have finite lifetimes. When their expiration date is past, they can no longer be used when signing objects. The one exception to this is a verification certificate. When its expiration date is past, although it is outdated, it will be tolerated and can still be used for verifying signatures.
There are various ways to ship objects from the signing system to a destination system. You must be careful about the method that you choose to transfer an object to ensure that object signatures are not removed.
Transferring methods to retain the object signatureThe only way to keep the signature on an object when shipping or transferring it to another system is to save it to a save file or media, such as a tape. When saving the object in a save file, you can either FTP the save file to another system or use the Send Net File (SNDNETF) command.
Transferring methods that remove the object signatureUsing FTP stream files or using the cut and paste function on mapped drives to transfer objects to another system removes the object’s signature. The signature is removed because an i5/OS object signature can cause problems on a target system if this system does not support an i5/OS object signature.
7.2.5 PrerequisitesYou need the following licensed program products (LPPs) installed on your system to use object signing:
� 5722-SS1 Option 34 Digital Certificate Manager� 5722-DG1 HTTP Server for i5/OS (for using DCM)
158 IBM System i Security Guide for IBM i5/OS Version 5 Release 4

You also need to have the HTTP ADMIN server active on the system since the DCM is run through a Web browser interface.
7.3 Virus scanningIn V5R3, support was added to i5/OS that allows a third-party vendor to write virus scanning software and plug it into i5/OS.
7.3.1 Exit pointsFor virus scanning to work, the product needs to register itself to the following new exit points:
� QIBM_QP0L_SCAN_OPEN� QIBM_QP0L_SCAN_CLOSE
To limit the performance impact of virus scanning, the System i development team has implemented a way to manage scanning operations that is far superior to what you typically find for PC-based scanning techniques when run against the integrated file system:
� With the System i architecture, i5/OS keeps track of scanning activities and file changes.
� Only when a file changes or the virus definition file is updated, i5/OS calls the exit program (scanning software) to scan files for viruses.
� Even in an independent auxiliary storage pool (IASP) environment where disk subsystems can be moved between systems, scanning statistics are maintained across system boundaries, so that no new scanning must be done. This requires that the virus definition files are kept in sync on the systems.
7.3.2 System valuesThe new system value, Scan File Systems (QSCANFS), controls whether virus scanning is performed. You can set this value to:
� Scan objects of type *STMF that are in *TYPE2 directories in the root(/), QOpenSys, and user-defined file systems (*ROOTOPNUD)
� Perform no scanning (*NONE)
Chapter 7. Confidentiality and integrity 159

The second system value, Scan File Systems control (QSCANFSCTL), controls scanning behaviors and properties. Valid QSCANFSCTL parameter values include:
� *NONE: This indicates that the system uses the following scanning options when calling the registered exit programs:
– Perform write access upgrades– Fail close request if scan fails during close– Scan on next access after object is restored
� *FSVRONLY: When you select this option (Scan accesses through file servers only), only access from a file server to the system is scanned. Access through the Network File System (NFS) is scanned as well as other file server methods. However, native or direct connections to the system are not scanned. If this option is not selected, all access is scanned regardless of whether you connect directly to the system or through a file server.
� *ERRFAIL: When you select this option (Fail request if exit program fails), you specify to fail the request or operation which triggered the call to the exit program, if there are errors when the exit program is called. Possible errors may be that the program is not found or the program is not coded properly to handle the exit program request. If such an error happens, the requested operation receives an indication that the object failed a scan. If this option is not selected, the system skips the failing exit program and treats the object as though it was not scanned by this exit program.
� *NOWRTUPG: When you select this option (Perform no write access upgrades), you specify that you do not want to allow the system to upgrade the access for the scan descriptor passed to the exit program to include write access. Do not use this option if you want the exit program to fix or modify objects even though they were originally opened with read-only access. This option does not upgrade the access to include write access.
� *USEOCOATR: By selecting this option (Use only when objects have changed), the system uses the specification of the “object change only” attribute to scan the object if it has been modified (not also because scan software has indicated an update). If this option is not specified, the “object change only” attribute is not used. Then, the object is scanned after it is modified and when scan software indicates an update.
� *NOFAILCLO: By selecting this option (Fail close request if scan fails during close), the system does not fail the close request if an object failed a scan during close processing. This option applies only to close requests. This value overrides the *ERRFAIL specification for close processing, but not for any other scan-related exit points.
� *NOPOSTRST: When you select this option (Scan on next access after object has been restored), objects are not scanned simply because they are
160 IBM System i Security Guide for IBM i5/OS Version 5 Release 4
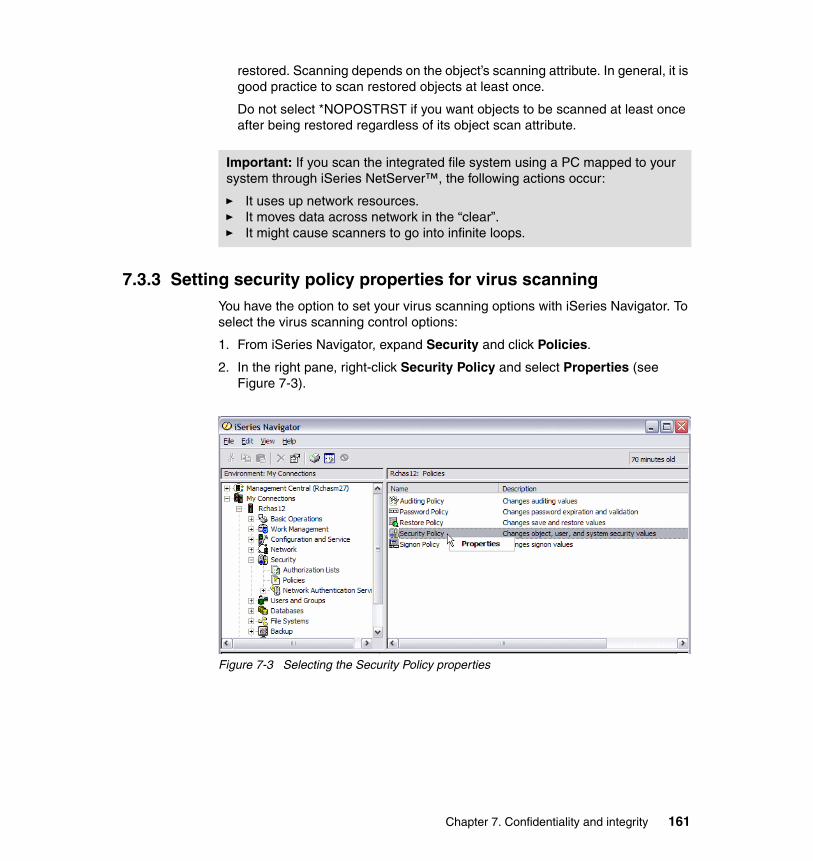
restored. Scanning depends on the object’s scanning attribute. In general, it is good practice to scan restored objects at least once.
Do not select *NOPOSTRST if you want objects to be scanned at least once after being restored regardless of its object scan attribute.
7.3.3 Setting security policy properties for virus scanningYou have the option to set your virus scanning options with iSeries Navigator. To select the virus scanning control options:
1. From iSeries Navigator, expand Security and click Policies.
2. In the right pane, right-click Security Policy and select Properties (see Figure 7-3).
Figure 7-3 Selecting the Security Policy properties
Important: If you scan the integrated file system using a PC mapped to your system through iSeries NetServer™, the following actions occur:
� It uses up network resources.� It moves data across network in the “clear”.� It might cause scanners to go into infinite loops.
Chapter 7. Confidentiality and integrity 161
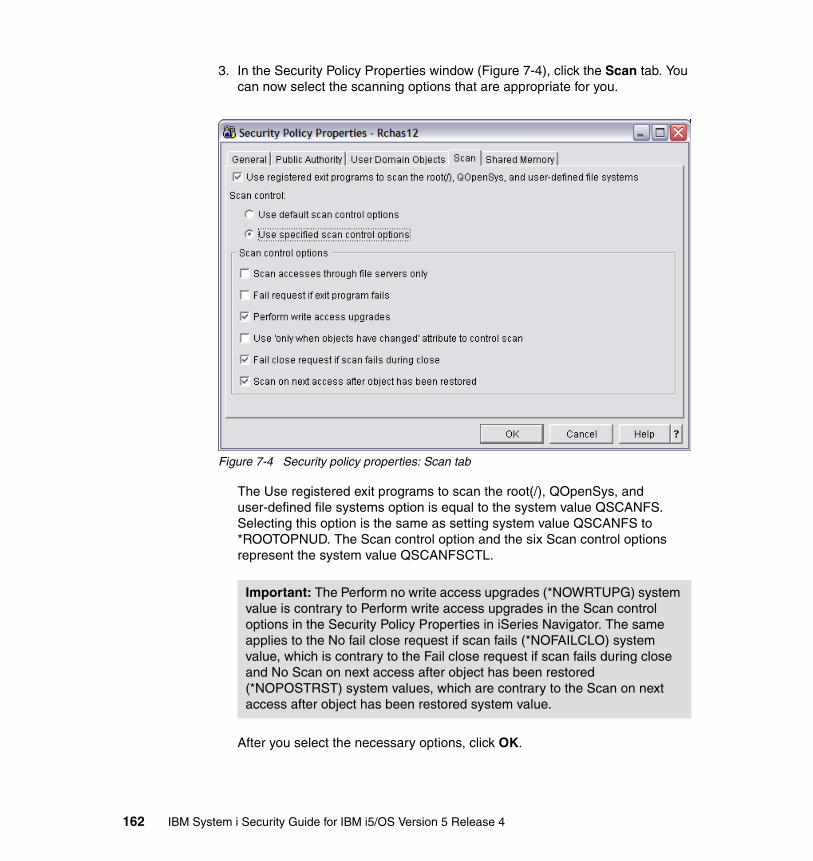
3. In the Security Policy Properties window (Figure 7-4), click the Scan tab. You can now select the scanning options that are appropriate for you.
Figure 7-4 Security policy properties: Scan tab
The Use registered exit programs to scan the root(/), QOpenSys, and user-defined file systems option is equal to the system value QSCANFS. Selecting this option is the same as setting system value QSCANFS to *ROOTOPNUD. The Scan control option and the six Scan control options represent the system value QSCANFSCTL.
After you select the necessary options, click OK.
Important: The Perform no write access upgrades (*NOWRTUPG) system value is contrary to Perform write access upgrades in the Scan control options in the Security Policy Properties in iSeries Navigator. The same applies to the No fail close request if scan fails (*NOFAILCLO) system value, which is contrary to the Fail close request if scan fails during close and No Scan on next access after object has been restored (*NOPOSTRST) system values, which are contrary to the Scan on next access after object has been restored system value.
162 IBM System i Security Guide for IBM i5/OS Version 5 Release 4

Folder and file scanning optionsFrom iSeries Navigator, you can see the scanning option on the Security tab of the Properties page for *TYPE2 directories and stream files.
1. From iSeries Navigator, double-click the icon for your system.
2. Expand the view by clicking File Systems → Integrated File System → Root (Figure 7-5).
Figure 7-5 Integrated file system structure
3. Scroll down the file structure until you find the folder for which you want to see the scanning option.
Chapter 7. Confidentiality and integrity 163
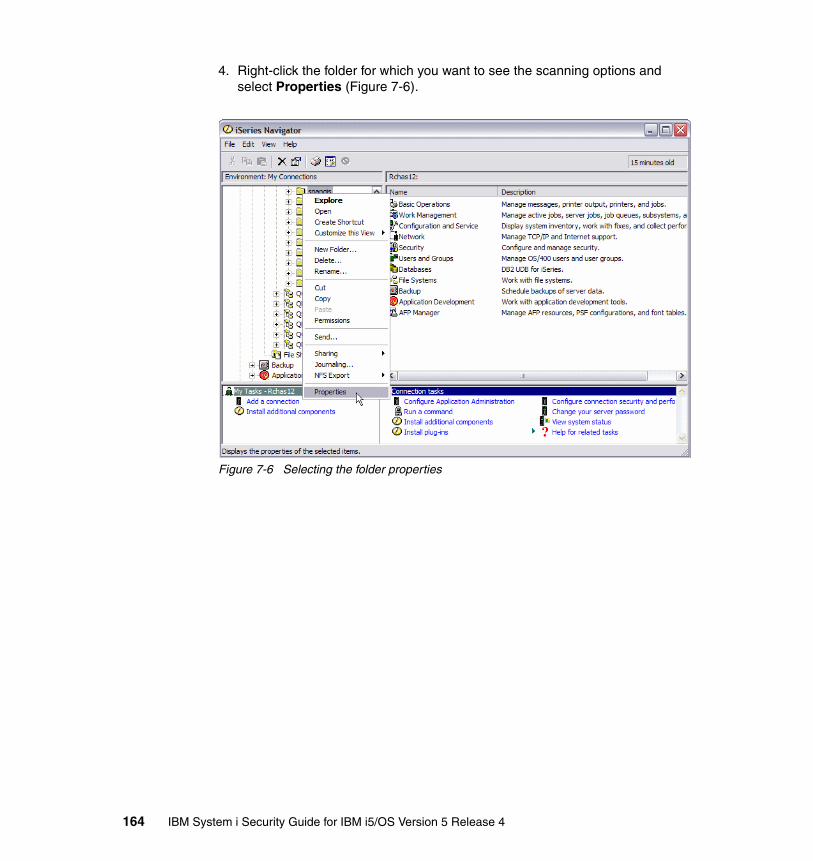
4. Right-click the folder for which you want to see the scanning options and select Properties (Figure 7-6).
Figure 7-6 Selecting the folder properties
164 IBM System i Security Guide for IBM i5/OS Version 5 Release 4

5. In the folder Properties window (Figure 7-7), click the Security tab. The scanning options that are shown correspond with the Create object scanning option (CRTOBJSCAN) parameter in the directory attributes. Click OK.
Figure 7-7 Integrated file system folder properties
6. Back in the iSeries Navigator window, select a stream file inside the folder by right-clicking it and selecting Properties.
Chapter 7. Confidentiality and integrity 165
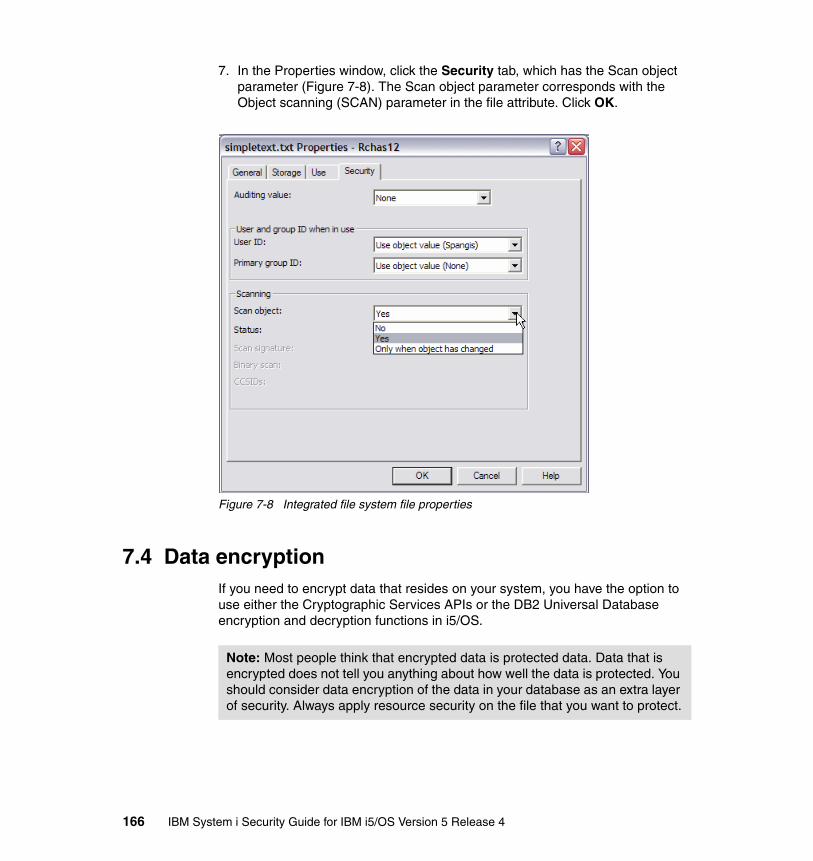
7. In the Properties window, click the Security tab, which has the Scan object parameter (Figure 7-8). The Scan object parameter corresponds with the Object scanning (SCAN) parameter in the file attribute. Click OK.
Figure 7-8 Integrated file system file properties
7.4 Data encryptionIf you need to encrypt data that resides on your system, you have the option to use either the Cryptographic Services APIs or the DB2 Universal Database encryption and decryption functions in i5/OS.
Note: Most people think that encrypted data is protected data. Data that is encrypted does not tell you anything about how well the data is protected. You should consider data encryption of the data in your database as an extra layer of security. Always apply resource security on the file that you want to protect.
166 IBM System i Security Guide for IBM i5/OS Version 5 Release 4
7.4.1 Data encryption in DB2 Universal DatabaseThe encryption and decryption functions were introduced to DB2 Universal Database in i5/OS V5R3. DB2 Universal Database encryption and decryption provide another layer of protection to your DB2 Universal Database columns that contain sensitive data.
With V5R3, the Rivest Cipher 2 (RC2) block cipher algorithm is used for encryption. Other encryption algorithms are not supported with V5R3. In V5R4, support for Triple Data Encryption Standard (3DES) was added.
The value add provided by DB2 Universal Database is that applications can invoke a simple Structured Query Language (SQL) function. Contrast this with coding calls to complex cryptography APIs and services.
For example, you can store a credit card number in an encrypted format, and users, who are authorized to the object, are returned a binary string of encrypted data. To view the actual credit number, you must have access to the decryption function and the encryption password.
You must consider how the business process and your application must change to deal with selective decryption of the encrypted columns in the database. The encryption and decryption column functions for DB2 Universal Database use the encryption algorithms embedded in the base i5/OS. You do not gain any benefit from the IBM Cryptographic Coprocessor and Accelerator to the encryption algorithms when using the encryption and decryption functions. Some of the IBM Cryptographic Services APIs can benefit from the coprocessor and accelerator. See 7.4.2, “Encryption and decryption APIs” on page 169, for details.
The Column Encryption in IBM DB2 UDB for iSeries white paper describes column encryption in DB2 Universal Database on the System i platform. You can download this paper from the following Web address:
http://www.ibm.com/servers/enable/site/education/abstracts/4682_abs.html
Preparing for data encryptionDo not automatically encrypt and decrypt data. Using SQL or data description specifications (DDS) keywords, telling DB2 Universal Database to automatically encrypt or decrypt the data, does not give you any extra layer of security. For example, if you automatically let DB2 Universal Database decrypt the credit card number for all users that are reading the table, you have not applied an extra layer of protection. Everyone who can read the file will have the encrypted column data decrypted automatically.
Chapter 7. Confidentiality and integrity 167

Password managementNever hard code the encryption password in the application source code. We recommend that you store the password in a validation list and retrieve it when needed. The advantage of using a validation list is that the passwords can be encrypted when they are stored in the validation list. Each entry in the validation list allows you to store an entry identifier with each encrypted data value. The password, which is encrypted, is stored in the encrypted data value. The table name can be assigned to the list entry identifier.
You have a set of i5/OS APIs that can help you to populate and retrieve values from a validation list.
Validation list APIsValidation lists contain entries that consist of an identifier, data that will be encrypted when it is stored, and free-form data. Entries can be added, changed, removed, found, and validated. You can validate entries by providing the correct entry identifier and data that is encrypted. For more information, see 12.6, “Validation lists” on page 294.
For more information regarding validation list APIs, go to:
http://publib.boulder.ibm.com/infocenter/iseries/v5r4/index.jsp
Integrated encryption and Instead Of TriggersInstead Of Triggers are created to enhance the behavior of Insert, Update, and Delete operations against SQL views. The transparency often falls short in the cases of Update, Delete, and Insert operations, since all but the simplest views are not updateable. For example, the presence of a scalar function, such as DayName or Decrypt in the Select list of a view definition, makes that view read only.
Consult the iSeries SQL Reference for a complete description of the attributes that cause an SQL view to be not updateable. You can find the iSeries SQL Reference at:
http://www.ibm.com/servers/eserver/iseries/db2/books.html
Instead Of Triggers extend the usability of non-updateable SQL views. If you perform an insert, update, or delete against a read-only SQL view. The Instead Of Triggers allow DB2 Universal Database to call the trigger logic instead of signaling a read-only view error condition. The biggest difference with Instead Of Triggers (compared to the existing DB2 trigger support) is that Instead Of Triggers can be defined only over SQL views.
168 IBM System i Security Guide for IBM i5/OS Version 5 Release 4
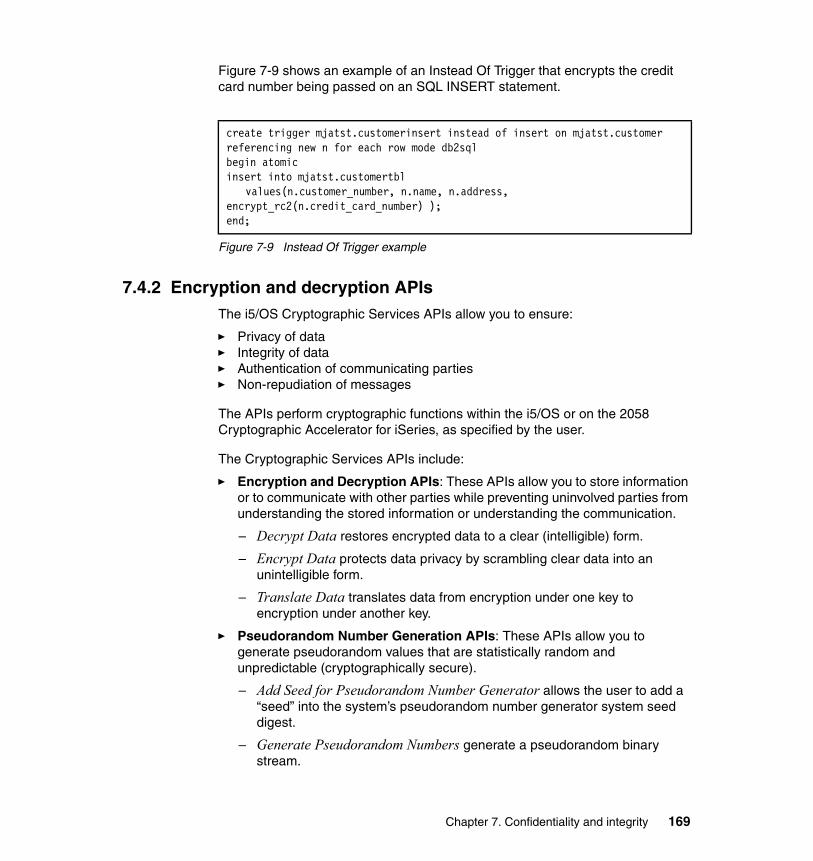
Figure 7-9 shows an example of an Instead Of Trigger that encrypts the credit card number being passed on an SQL INSERT statement.
Figure 7-9 Instead Of Trigger example
7.4.2 Encryption and decryption APIsThe i5/OS Cryptographic Services APIs allow you to ensure:
� Privacy of data � Integrity of data� Authentication of communicating parties� Non-repudiation of messages
The APIs perform cryptographic functions within the i5/OS or on the 2058 Cryptographic Accelerator for iSeries, as specified by the user.
The Cryptographic Services APIs include:
� Encryption and Decryption APIs: These APIs allow you to store information or to communicate with other parties while preventing uninvolved parties from understanding the stored information or understanding the communication.
– Decrypt Data restores encrypted data to a clear (intelligible) form.
– Encrypt Data protects data privacy by scrambling clear data into an unintelligible form.
– Translate Data translates data from encryption under one key to encryption under another key.
� Pseudorandom Number Generation APIs: These APIs allow you to generate pseudorandom values that are statistically random and unpredictable (cryptographically secure).
– Add Seed for Pseudorandom Number Generator allows the user to add a “seed” into the system’s pseudorandom number generator system seed digest.
– Generate Pseudorandom Numbers generate a pseudorandom binary stream.
create trigger mjatst.customerinsert instead of insert on mjatst.customer referencing new n for each row mode db2sql begin atomic insert into mjatst.customertbl
values(n.customer_number, n.name, n.address, encrypt_rc2(n.credit_card_number) ); end;
Chapter 7. Confidentiality and integrity 169

� Cryptographic Context APIs: These APIs are used to temporarily store the key and algorithm parameters for cryptographic operations.
– Create Algorithm Context creates a temporary area for holding the algorithm parameters and the state of the cryptographic operation.
– Create Key Context creates a temporary area for holding a cryptographic key.
– Destroy Algorithm Context destroys the algorithm context created with the Create Algorithm Context API.
– Destroy Key Context destroys the key context created with the Create Key Context API.
� Authentication APIs: These APIs allow you to ensure the data has not been altered or that data is not from an imposter.
– Calculate Hash uses a one-way hash function to produce a fixed-length output string from a variable-length input string.
– Calculate HMAC uses a one-way hash function and a secret shared key to produce an authentication value.
– Calculate MAC produces a message authentication code.
– Calculate Signature produces a digital signature by hashing the input data and encrypting the hash value using a public key algorithm (PKA).
– Verify Signature verifies that a digital signature is correctly related to the input data.
� Key Generation APIs: These APIs allow you to generate random key values for both symmetric and asymmetric (PKA) algorithms.
– Calculate Diffie-Hellman Secret Key calculates a Diffie-Hellman shared secret key.
– Generate Diffie-Hellman Key Pair generates a Diffie-Hellman private/public key pair needed for calculating a Diffie-Hellman shared secret key.
– Generate Diffie-Hellman Parameters generates the parameters needed for generating a Diffie-Hellman key pair.
– Generate PKA Key Pair generates a random PKA key pair.
– Generate Symmetric Key generates a random key value that can be used with a symmetric cipher algorithm.
For more information about the Cryptographic Services APIs, look in the path Programming → APIs → APIs by category → Cryptographic Services, in the iSeries Information Center:
http://publib.boulder.ibm.com/infocenter/iseries/v5r4/index.jsp
170 IBM System i Security Guide for IBM i5/OS Version 5 Release 4
Part 3 Network security
This part contains the following chapters:
� Chapter 8, “TCP/IP security” on page 173� Chapter 9, “Cryptographic support” on page 217� Chapter 10, “Virtual private network” on page 247� Chapter 11, “Firewalls” on page 265
Part 3
© Copyright IBM Corp. 2005, 2006. All rights reserved. 171

172 IBM System i Security Guide for IBM i5/OS Version 5 Release 4

Chapter 8. TCP/IP security
Transmission Control Protocol/Internet Protocol (TCP/IP) is a common way that computers of all types communicate with each other. TCP/IP applications are well-known and widely used throughout the “information highway”.
The System i platform supports many TCP/IP applications. When you decide to allow one TCP/IP application on your system, you may also be enabling other TCP/IP applications. As security administrator, you need to be aware of the range of TCP/IP applications and the security implications of these applications.
In this chapter, we provide information about general TCP/IP security concepts that are available on the System i platform.
8
Note: This chapter contains references to the iSeries Information Center for V5R4 page. On this page, you can simply click the iSeries Information Center, Version 5 Release 4 link in the navigation area and select the topics that are specified:
http://publib.boulder.ibm.com/infocenter/iseries/v5r4/index.jsp
© Copyright IBM Corp. 2005, 2006. All rights reserved. 173
8.1 The TCP/IP modelThe standard model for networking protocols and distributed applications is the International Standard Organization’s Open System Interconnect (ISO/OSI) model. It defines seven network layers:
� Physical layer� Data link layer� Network layer� Transport layer� Session layer� Presentation layer� Application layer
The Open System Interconnection (OSI) model is widely used and often cited as the standard. However TCP/IP is designated around a simple four-layer scheme. It omits some features found under the OSI model. It also combines the features of some adjacent OSI layers and splits other layers apart.
TCP does not provide security functions. It has two functions, sequence numbers and port numbers, that provide weak security. These two functions were designed to protect against network errors and to identify connections. You should not rely on these TCP features for security.
The TCP layer is responsible for communication sessions. To transport data, it uses the IP. TCP does not guarantee any of the main goals of security, which is why it is important to use other mechanisms to reach these security goals.
Figure 8-1 shows some of the major System i security functions and where they fit in the TCP/IP model.
174 IBM System i Security Guide for IBM i5/OS Version 5 Release 4

Figure 8-1 TCP/IP model
8.2 Controlling which TCP/IP servers start automaticallyAs security administrator, you need to control which TCP/IP applications start automatically when TCP/IP is started. We recommend that you start only the servers that are required in your environment. The ports used by applications that are not needed are in a listen state and can be subject to possible attacks.
The Start TCP/IP (STRTCP) CL command is used to start TCP/IP protocols and all the TCP/IP servers that specified AUTOSTART(*YES) in their properties. By default, the STRTCP command is submitted automatically at every IPL by the IPL attributes. This means that all the TCP/IP servers that have the parameter AUTOSTART(*YES) in their properties are started automatically during the IPL when TCP/IP is started.
The STRTCP command can also be submitted automatically at IPL using the CL startup program referenced in the Startup Program (QSTRUPPGM) system value. The default startup program provided by IBM is QSTRUP in library QSYS. You can edit this CL startup program to add the STRTCP command, or you can create your own startup program. The QSTRUPPM system value is used to specify the name of the startup program called at IPL.
We recommend that you use the IPL attributes instead of the startup program to submit the STRTCP command at IPL. If you previously used your startup
TCP/
IP m
odel
Application (Telnet, FTP, etc.)
Transport (TCP, UDP)
Network (IP)
Data Link (Ethernet, Token Ring, PPP)
Physical (Hardware, Network Adapter)
SSL/TLS
Physical Locks
L2TP
IPsec
RADIUS
Journaling/AuditingExit Programs
IP Filtering
Digital Certificates
Kerberos
SSH
Chapter 8. TCP/IP security 175

program to start TCP/IP, and you do not want to change it, modify the default value for the parameter Start TCP/IP to *NO in the IPL attributes, using the Change IPL Attributes (CHGIPLA) command. It is important to set the AUTOSTART parameter to *YES in the properties for only the TCP/IP servers that you really want to start automatically.
8.2.1 Configuring the autostart value for a TCP/IP serverYou can use the CHGxxxA command to change the attributes of a specific server. For example, the command for Telnet is Change Telnet Attributes (CHGTELNA). Type CHGTELNA on a command line and press the F4 key to prompt the command screen as shown in Figure 8-2.
Figure 8-2 Change TELNET Attributes display
Note: You can also start or stop the TCP/IP servers individually using the Start TCP/IP Server (STRTCPSVR) or End TCP/IP Server (ENDTCPSVR) commands. The default value for these commands is *ALL.
Change TELNET Attributes (CHGTELNA) Type choices, press Enter. Autostart server . . . . . . . . *YES *YES, *NO, *SAME Number servers . . . . . . . . . *CALC 1-200, *SAME, *CALC Session keep alive timeout . . . *CALC 0-2147483647, *SAME, *CALC... Default NVT type . . . . . . . . *VT100 *SAME, *VT100, *NVT Coded character set identifier *MULTINAT 1-65533, *SAME, *MULTINAT... ASCII fullscreen mapping: Outgoing EBCDIC/ASCII table . *CCSID Name, *SAME, *CCSID, *DFT Library . . . . . . . . . . Name, *LIBL, *CURLIB Incoming ASCII/EBCDIC table . *CCSID Name, *SAME, *CCSID, *DFT Library . . . . . . . . . . Name, *LIBL, *CURLIB Allow Secure Socket Layer . . . *YES *YES, *NO, *ONLY, *SAME
F3=Exit F4=Prompt F5=Refresh F12=Cancel F13=How to use this display F24=More keys
176 IBM System i Security Guide for IBM i5/OS Version 5 Release 4
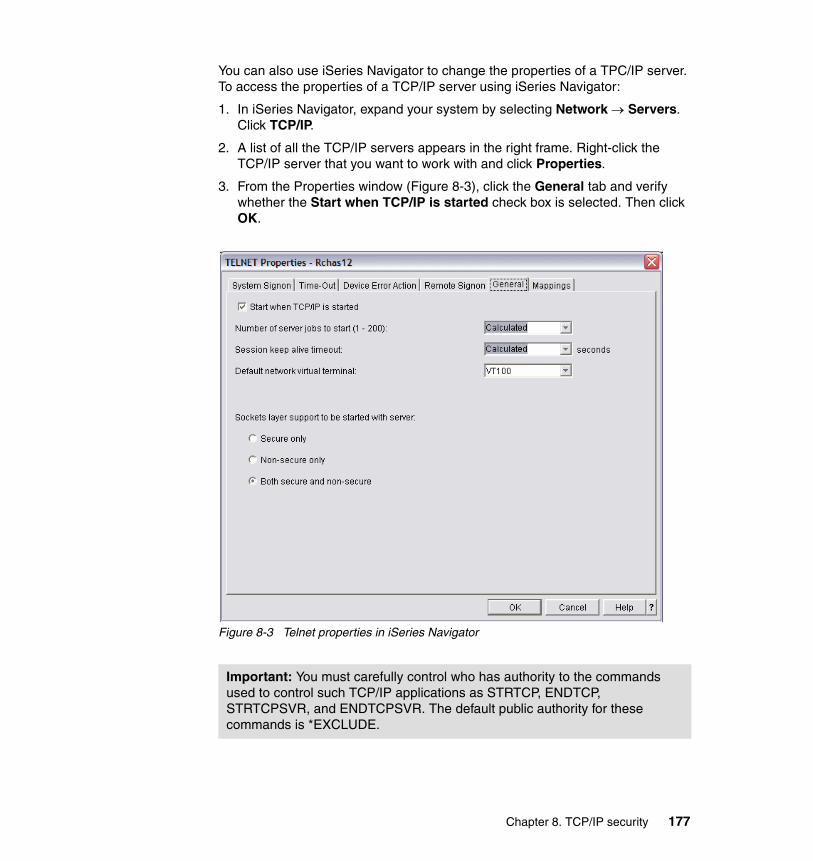
You can also use iSeries Navigator to change the properties of a TPC/IP server. To access the properties of a TCP/IP server using iSeries Navigator:
1. In iSeries Navigator, expand your system by selecting Network → Servers. Click TCP/IP.
2. A list of all the TCP/IP servers appears in the right frame. Right-click the TCP/IP server that you want to work with and click Properties.
3. From the Properties window (Figure 8-3), click the General tab and verify whether the Start when TCP/IP is started check box is selected. Then click OK.
Figure 8-3 Telnet properties in iSeries Navigator
Important: You must carefully control who has authority to the commands used to control such TCP/IP applications as STRTCP, ENDTCP, STRTCPSVR, and ENDTCPSVR. The default public authority for these commands is *EXCLUDE.
Chapter 8. TCP/IP security 177

8.2.2 More informationFor more information about controlling which TCP/IP servers start automatically on your system, refer to the iSeries Information Center at the following Web address and select the path Networking → TCP/IP setup:
http://publib.boulder.ibm.com/infocenter/iseries/v5r4/index.jsp
8.3 Controlling the start of TCP/IP interfacesAlong with controlling the list of TCP/IP servers that start when TCP/IP is activated, it is equally as important to control the list of TCP/IP interfaces that start. The TCP/IP interfaces are your gateway to the networks. For example, if you only want your globally routable interface to be activated during core business hours, you may want to indicate that the interface should not start with TCP/IP but instead have it started and ended by a scheduled CL program.
To specify whether a TCP/IP interface should start with TCP/IP:
1. In iSeries Navigator, expand your system by selecting Network → TCP/IP → Configuration → IPv4 → Interfaces. Right-click the interface that you want to change and select Properties.
2. In the Properties window (Figure 8-4), click the Advanced tab and click the Start interface when TCP/IP is started check box as appropriate.
Figure 8-4 TCP/IP interface properties in iSeries Navigator
178 IBM System i Security Guide for IBM i5/OS Version 5 Release 4
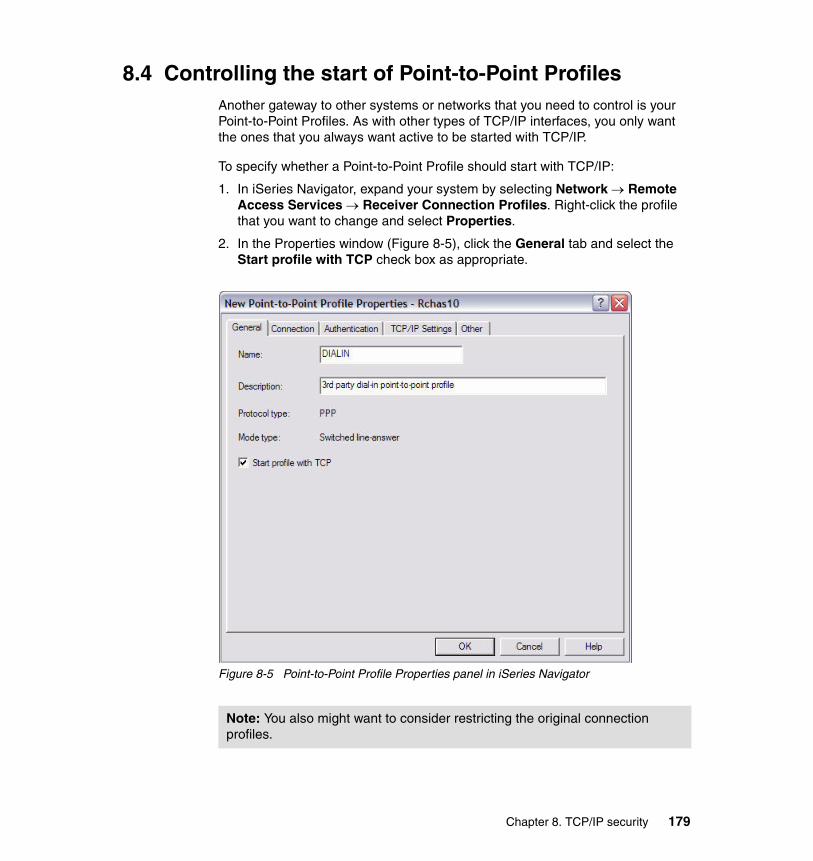
8.4 Controlling the start of Point-to-Point ProfilesAnother gateway to other systems or networks that you need to control is your Point-to-Point Profiles. As with other types of TCP/IP interfaces, you only want the ones that you always want active to be started with TCP/IP.
To specify whether a Point-to-Point Profile should start with TCP/IP:
1. In iSeries Navigator, expand your system by selecting Network → Remote Access Services → Receiver Connection Profiles. Right-click the profile that you want to change and select Properties.
2. In the Properties window (Figure 8-5), click the General tab and select the Start profile with TCP check box as appropriate.
Figure 8-5 Point-to-Point Profile Properties panel in iSeries Navigator
Note: You also might want to consider restricting the original connection profiles.
Chapter 8. TCP/IP security 179
8.5 Port restrictionsThe Add TCP/IP Port Restriction (ADDTCPPORT) CL command is used to restrict a port or range of ports in the TCP/IP configuration to a particular user profile. A port can be restricted to use by multiple user profiles. The addition of the user profile takes effect immediately. Any user profiles currently using a port that will not have access to that port after the use of this command are allowed to finish processing.
The default authorization for TCP/IP ports allows any user profile access to any port. If it is unnecessary to restrict a port to a user profile or a group of user profiles, the system administrator does not need to use this function.
After an application running under a user profile has obtained the use of a restricted port, TCP/IP does not prohibit that application from passing its rights to another job that may be running under another user profile. The new user profile for the port is not checked against the list of user profiles that have exclusive rights to that port. That is because the allocation of the port occurred under the user profile that had exclusive rights to that port.
The check for restricted use of the port occurs only on the BIND operation to the port. If other users are currently using a port, an administrator may want to restrict a port or range of ports. In this case, the administrator may need to end all current TCP/IP connections or User Datagram Protocol (UDP) sockets using that port.
There are independent sets of ports for TCP and UDP. Processing of TCP and UDP port restrictions are independent from each other. They are completely separate sets of ports and have no relationship to one another.
8.5.1 Configuring port restrictionsYou can use the ADDTCPPORT CL command or iSeries Navigator to restrict ports. Using iSeries Navigator, perform the following steps as shown in Figure 8-6:
1. In iSeries Navigator, expand your system and select Network. Right-click TCP/IP Configuration and select Properties.
2. In the TCP/IP Configuration Properties window (lower right corner in Figure 8-6), click the Port Restrictions tab.
The user profile USER3 is allowed to bind to TCP/IP ports 1591 through 1600. User profiles that have not been added to this set, or are not in a group profile that has been added, are not allowed to use TCP/IP ports 1591 through 1600.
180 IBM System i Security Guide for IBM i5/OS Version 5 Release 4

Figure 8-6 Port restrictions configuration from iSeries Navigator
Alternatively, you can perform these steps by using the ADDTCPPORT CL command as shown in the following example:
ADDTCPPORT PORT(1591 1600) PROTOCOL(*TCP) USRPRF(USER3)
8.5.2 More informationFor more information about port restrictions, see the following references:
� TCP/IP Configuration and Reference, SC41-5420
� The iSeries Information Center path Networking → TCP/IP setup
http://publib.boulder.ibm.com/infocenter/iseries/v5r4/index.jsp
8.6 Exit programsMany i5/OS functions provide an exit so that your system can run a user-created program to perform additional checking and validation. For example, you can set up your system to run an exit program every time that someone attempts to open a distributed data management (DDM) file on your system. You can use the registration function to specify exit programs that run under certain conditions.
Tip: To prevent someone from using restricted ports, you can delete the user profile USER3 after port restriction has been defined. Another user who has at least *USE authorities to the user can no longer use the port.
Chapter 8. TCP/IP security 181
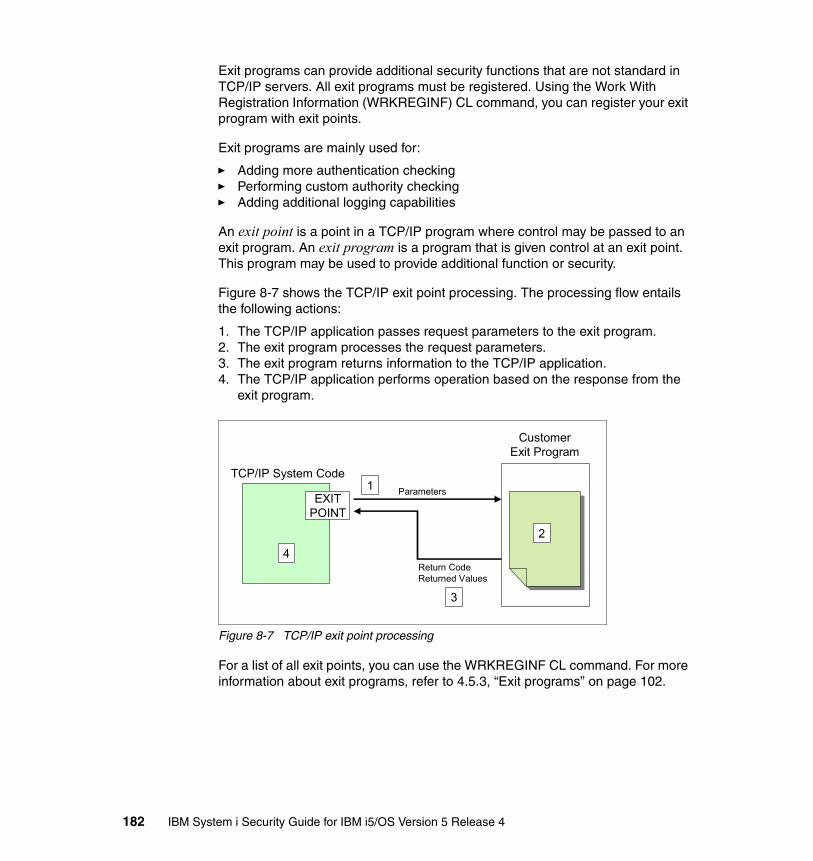
Exit programs can provide additional security functions that are not standard in TCP/IP servers. All exit programs must be registered. Using the Work With Registration Information (WRKREGINF) CL command, you can register your exit program with exit points.
Exit programs are mainly used for:
� Adding more authentication checking� Performing custom authority checking� Adding additional logging capabilities
An exit point is a point in a TCP/IP program where control may be passed to an exit program. An exit program is a program that is given control at an exit point. This program may be used to provide additional function or security.
Figure 8-7 shows the TCP/IP exit point processing. The processing flow entails the following actions:
1. The TCP/IP application passes request parameters to the exit program.2. The exit program processes the request parameters.3. The exit program returns information to the TCP/IP application.4. The TCP/IP application performs operation based on the response from the
exit program.
Figure 8-7 TCP/IP exit point processing
For a list of all exit points, you can use the WRKREGINF CL command. For more information about exit programs, refer to 4.5.3, “Exit programs” on page 102.
EXITPOINT
TCP/IP System Code
CustomerExit Program
1
2
3
4
Parameters
Return CodeReturned Values
182 IBM System i Security Guide for IBM i5/OS Version 5 Release 4

8.6.1 FTP exit program exampleFigure 8-8 shows an example of the TCP/IP processing flow for File Transfer Protocol (FTP) using an exit program. This process flow entails these actions:
1. The FTP server receives a client request and passes a parameter to the exit point QIBM_QTMF_SERVER_REQ.
2. The registered exit point passes the request parameter on to the registered user exit program.
3. The exit program processes the request.
4. The exit program sends a return code to the exit point.
5. The exit point returns the result to the server application.
Figure 8-8 Exit program usage example
The exit points for FTP are:
� QIBM_QTMF_SVR_LOGON (FTP server logon)� QIBM_QTMF_CLIENT_REQ (FTP client)� QIBM_QTMF_SERVER_REQ (FTP server)
The exit point format VLRQ0100 is the same for the client and the server, so a single program can be used to handle client and server requests.
TCP/IP Application Exit PointInterfaces
User Exit Program
Appl. ExitPoint
Parameter
ReturnCode
Checkauthorization
1 23
45
Chapter 8. TCP/IP security 183

8.6.2 Configuring exit programsAfter you create your own exit program, tell the application server the name of the program and the library in which it is located by using the WRKREGINF or Add Exit Program (ADDEXITPGM) CL command (similar parameters). For example, for the FTP server, register your exit program to exit point QIBM_QTMF_SERVER_REQ.
1. Enter the following WRKREGINF CL command:
WRKREGINF EXITPNT(QIBM_QTMF*)
2. In the Work with Registration Information display (Figure 8-9), find the FTP Client Request Validation and FTP Server Request Validation exit points. Type option 8 next to QIBM_QTMF_SERVER_REQ and press Enter.
Figure 8-9 Work with Registration Information display
Work with Registration Information Type options, press Enter. 5=Display exit point 8=Work with exit programs Exit Exit Point Opt Point Format Registered Text QIBM_QTMF_CLIENT_REQ VLRQ0100 *YES FTP Client Request Validation 8 QIBM_QTMF_SERVER_REQ VLRQ0100 *YES FTP Server Request Validation QIBM_QTMF_SVR_LOGON TCPL0100 *YES FTP Server Logon QIBM_QTMF_SVR_LOGON TCPL0200 *YES FTP Server Logon QIBM_QTMF_SVR_LOGON TCPL0300 *YES FTP Server Logon QIBM_QTMX_SERVER_REQ VLRQ0100 *YES REXEC Server Request Validati QIBM_QTMX_SVR_LOGON TCPL0100 *YES REXEC Server Logon QIBM_QTMX_SVR_LOGON TCPL0300 *YES REXEC Server Logon QIBM_QTMX_SVR_SELECT RXCS0100 *YES REXEC Server Command Processi QIBM_QTOD_DHCP_ABND DHCA0100 *YES DHCP Address Binding Notify QIBM_QTOD_DHCP_ARLS DHCR0100 *YES DHCP Address Release Notify More... Command ===> F3=Exit F4=Prompt F9=Retrieve F12=Cancel
184 IBM System i Security Guide for IBM i5/OS Version 5 Release 4

3. In the Work with Exit Programs display (Figure 8-10), type option 1 on the first blank line under the Opt column and press Enter.
Figure 8-10 Work with Exit Programs display
4. In the Add Exit Program (ADDEXITPGM) display (Figure 8-11), add your exit program and press Enter.
Figure 8-11 Add Exit Program (ADDEXITPGM) display
Work with Exit Programs Exit point: QIBM_QTMF_SERVER_REQ Format: VLRQ0100 Type options, press Enter. 1=Add 4=Remove 5=Display 10=Replace Exit Program Exit Opt Number Program Library 1 (No exit programs found.)
Bottom Command ===> F3=Exit F4=Prompt F5=Refresh F9=Retrieve F12=Cancel
Add Exit Program (ADDEXITPGM) Type choices, press Enter. Exit point . . . . . . . . . . . > QIBM_QTMF_SERVER_REQ Exit point format . . . . . . . > VLRQ0100 Name Program number . . . . . . . . . > 1 1-2147483647, *LOW, *HIGH Program . . . . . . . . . . . . MYPGM Name Library . . . . . . . . . . . MYLIB Name, *CURLIB Threadsafe . . . . . . . . . . . *UNKNOWN *UNKNOWN, *NO, *YES Multithreaded job action . . . . *SYSVAL *SYSVAL, *RUN, *MSG, *NORUN Text 'description' . . . . . . . *BLANK Bottom F3=Exit F4=Prompt F5=Refresh F10=Additional parameters F12=Cancel F13=How to use this display F24=More keys
Chapter 8. TCP/IP security 185
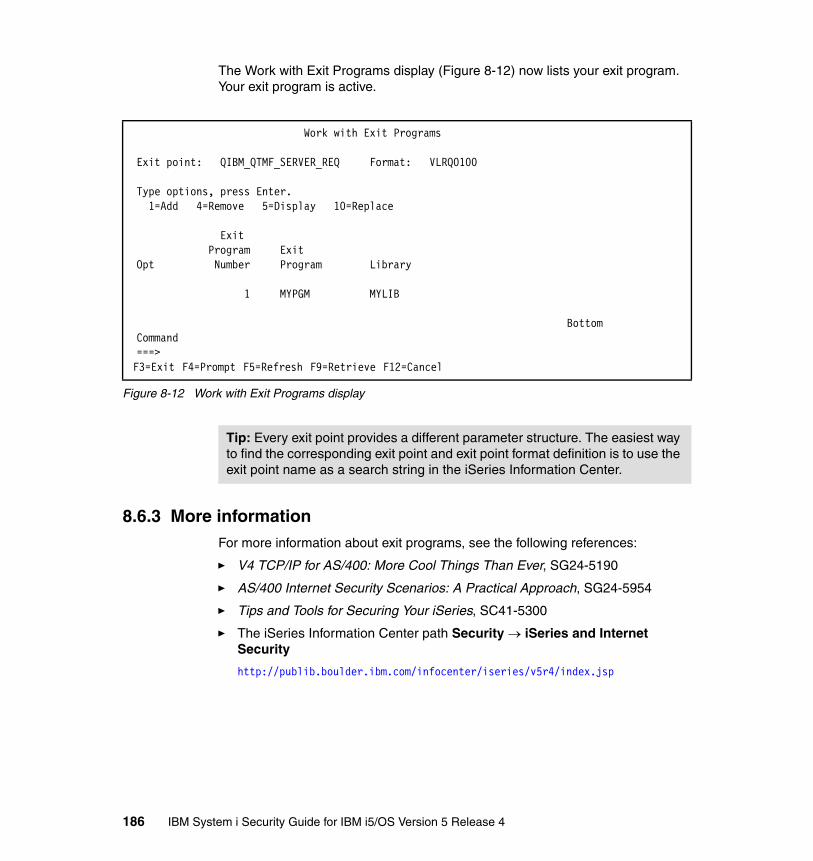
The Work with Exit Programs display (Figure 8-12) now lists your exit program. Your exit program is active.
Figure 8-12 Work with Exit Programs display
8.6.3 More informationFor more information about exit programs, see the following references:
� V4 TCP/IP for AS/400: More Cool Things Than Ever, SG24-5190
� AS/400 Internet Security Scenarios: A Practical Approach, SG24-5954
� Tips and Tools for Securing Your iSeries, SC41-5300
� The iSeries Information Center path Security → iSeries and Internet Security
http://publib.boulder.ibm.com/infocenter/iseries/v5r4/index.jsp
Work with Exit Programs Exit point: QIBM_QTMF_SERVER_REQ Format: VLRQ0100 Type options, press Enter. 1=Add 4=Remove 5=Display 10=Replace Exit Program Exit Opt Number Program Library 1 MYPGM MYLIB
Bottom Command ===> F3=Exit F4=Prompt F5=Refresh F9=Retrieve F12=Cancel
Tip: Every exit point provides a different parameter structure. The easiest way to find the corresponding exit point and exit point format definition is to use the exit point name as a search string in the iSeries Information Center.
186 IBM System i Security Guide for IBM i5/OS Version 5 Release 4
8.7 IP packet filteringIP packet filtering support enables you to explicitly control the IP traffic that is allowed in your network. To enable this support, you must create packet filters. Packet filters are a set of rules that limit IP packets into or out of a network. You define the policies that determine which packets are allowed access into or out the network. If there are no matching rules, the default rules are used to deny access and discard the packets. You can filter packets based on these criteria:
� You can limit a specific source address for the outbound traffic to be restricted to the local network only, or you can scan for a restricted destination address.
� You can restrict traffic for certain applications using a particular combination of protocol and port number, such as Telnet using TCP with port number 23.
� You can restrict access to a specific port number; these rules can apply for either inbound or outbound traffic.
Two actions are associated with the filtering rules. Either you allow or permit someone to enter your system or you deny the access.
The default action on any physical interface that has one or more rules defined is “deny”, so you must explicitly “permit” packets that you want to accept. This prevents accidental access from unwanted hosts.
Most packet filters permit or deny packets based on:
� Source and destination IP addresses� Protocols such as TCP, UDP, or Internet Control Message Protocol (ICMP)� Source and destination ports and ICMP types and codes� Direction (inbound or outbound)� The physical interface that the packet is traversing
Figure 8-13 shows the basic concept of IP packet filtering.
i5/OS supports stateless IP packet filtering and no stateful inspection. Stateless packet filtering means that no state information about active connections is kept. Stateless packet filters are vulnerable to spoofing since the source IP address and acknowledgement (ACK) bit in the packet’s header can be potentially forged by attackers. However, implementing i5/OS IP packet filtering is an excellent approach to establish a second line of defense or primary protection from unauthorized access requests from the intranet.
Chapter 8. TCP/IP security 187
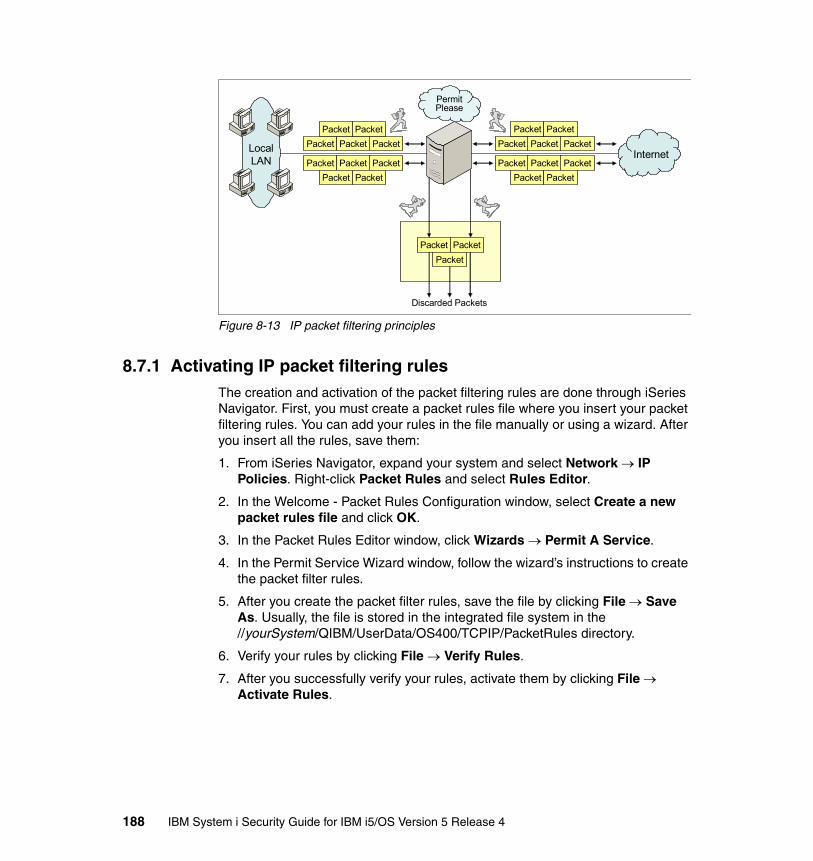
Figure 8-13 IP packet filtering principles
8.7.1 Activating IP packet filtering rulesThe creation and activation of the packet filtering rules are done through iSeries Navigator. First, you must create a packet rules file where you insert your packet filtering rules. You can add your rules in the file manually or using a wizard. After you insert all the rules, save them:
1. From iSeries Navigator, expand your system and select Network → IP Policies. Right-click Packet Rules and select Rules Editor.
2. In the Welcome - Packet Rules Configuration window, select Create a new packet rules file and click OK.
3. In the Packet Rules Editor window, click Wizards → Permit A Service.
4. In the Permit Service Wizard window, follow the wizard’s instructions to create the packet filter rules.
5. After you create the packet filter rules, save the file by clicking File → Save As. Usually, the file is stored in the integrated file system in the //yourSystem/QIBM/UserData/OS400/TCPIP/PacketRules directory.
6. Verify your rules by clicking File → Verify Rules.
7. After you successfully verify your rules, activate them by clicking File → Activate Rules.
LocalLAN
Packet Packet PacketPacket Packet
Packet Packet PacketPacket Packet
Packet Packet PacketPacket Packet
Packet Packet PacketPacket Packet
Internet
Packet PacketPacket
Discarded Packets
PermitPlease
188 IBM System i Security Guide for IBM i5/OS Version 5 Release 4

Figure 8-14 shows an example of a simple rule that was created by the wizard to permit only Telnet inbound traffic from IP address 10.10.1.34 to any addresses of the system over the ETHLINE. For services that support Secure Sockets Layer (SSL), the wizard also creates packet rules for secure connections, such as port 992 for secure Telnet.
Since IP traffic typically flows both INBOUND and OUTBOUND over a connection, it is common to have two related statements to permit traffic in both directions. These two statements are called mirrors of each other and are shown in Figure 8-14. These statements are created automatically by the wizard.
Figure 8-14 IP packet filtering, filter statement
8.7.2 Network Address TranslationNetwork Address Translation (NAT) translates internal or private IP addresses to public or globally routable IP addresses. It can also translate ports.
NAT changes the source or the destination IP addresses of packets that flow through the system. NAT provides a more transparent alternative to the proxy and SOCKS servers of a firewall. NAT can also simplify network configuration by enabling networks with incompatible addressing structures to connect to each other. Consequently, you can use NAT rules so that a system can function as a
Important: In case of problems after activating the packet rules, you have the ability to remove all of the rules using the Remove TCP/IP Table (RMVTCPTBL) CL command. This is the best way to reset your system and clear any errors. Also, if you lock yourself out of iSeries Navigator, you can use this command to go back and repair any rules.
# ------------------------------------------------# Statements to permit inbound TELNET over ETHLINE# ------------------------------------------------INCLUDE FILE = /QIBM/UserData/OS400/TCPIP/PacketRules/Services.i3pFILTER SET TELNET_INBOUND ACTION = PERMIT DIRECTION = OUTBOUND SRCADDR = * DSTADDR = 10.10.1.34 SERVICE = TELNET_23_FS JRN = OFFFILTER SET TELNET_INBOUND ACTION = PERMIT DIRECTION = INBOUND SRCADDR = 10.10.1.34 DSTADDR = * SERVICE = TELNET_23_FC JRN = OFFFILTER SET TELNET_INBOUND ACTION = PERMIT DIRECTION = OUTBOUND SRCADDR = * DSTADDR = 10.10.1.34 SERVICE = TELNET_992_FS JRN = OFFFILTER SET TELNET_INBOUND ACTION = PERMIT DIRECTION = INBOUND SRCADDR = 10.10.1.34 DSTADDR = * SERVICE = TELNET_992_FC JRN = OFFFILTER_INTERFACE LINE = ETHLINE SET = TELNET_INBOUND# ------------------------------------------------
Chapter 8. TCP/IP security 189

gateway between two networks which have conflicting or incompatible addressing schemes. You can also use NAT to hide the real IP addresses of one network by dynamically substituting one or more addresses for the real ones. Because IP packet filtering and NAT complement each other, you often use them together to enhance network security.
Using the combination of IP packet filtering and NAT, your system acts like a firewall to protect your internal network from intruders. Figure 8-15 shows an example of using NAT to hide the subnetwork information. In this example, the system is configured as a gateway between the Research and Corporate Networks. The i5/OS NAT function hides the addresses of the Research hosts, and all hosts in the Research network are translated to a single IP address.
Figure 8-15 Hiding subnetwork information using NAT
8.7.3 Configuring NATTo configure NAT:
1. From iSeries Navigator, expand your system and select Network → IP Policies. Right-click Packet Rules and select Rules Editor.
2. In the Welcome - Packet Rules Configuration window, select Create a new packet rules file and click OK.
3. In the Packet Rules Editor window, select Wizards → Address Translation.
4. In the Address Translation Wizard - Welcome window, click Next.
i5/OSNAT
System iGateway
10.1.1.1 10.1.1.2
10.1.1.3
10.1.1.4 192.168.1.1
192.168.1.2
192.168.1.3
192.168.1.4
Translate10.1.1.3 to192.168.1.1
ResearchNetwork
CorporateNetwork
190 IBM System i Security Guide for IBM i5/OS Version 5 Release 4

5. In the Address Translation Selection window, select Map address translation or Hide address translation depending on your configuration. In the example shown in Figure 8-15, we want to hide the set of IP addresses of 10.1.1.1 through 10.1.1.4. Click Next.
6. In the Hidden Addresses window, select the address range you want to hide. In our example, this is 10.1.1.1 through 10.1.1.4. Then click Next.
7. In the Interface Address window, select the interface that will hide the address. In our example, this is 192.168.1.1. Then click Next.
8. You see a Summary window (Figure 8-16), which shows you the packet rules that are being created. Click Finish.
Figure 8-16 Summary of the packet rules being created
After you finish creating these packet rules, verify them to ensure that they will activate without errors. Then you can activate them.
Chapter 8. TCP/IP security 191

8.7.4 More informationFor more information about NAT, see the following references:
� AS/400 Internet Security Scenarios: A Practical Approach, SG24-5954
� TCP/IP Tutorial and Technical Overview, GG24-3376
� V4 TCP/IP for AS/400: More Cool Things Than Ever, SG24-5190
� The iSeries Information Center path Security → IP Filtering and network address translation
http://publib.boulder.ibm.com/infocenter/iseries/v5r4/index.jsp
8.8 Intrusion detection systemMany system administrators monitor application and system activities on their various systems. However, not many of them are aware of the fact that their system might be under attack. Various intrusion attacks exist to assist a hacker to break into a system or prevent legitimate users from accessing a system.
Intrusion detection involves gathering information about unauthorized access attempts and attacks coming in over the TCP/IP network. Administrators can analyze the auditing records that intrusion detection provides to secure the System i network from these types of attacks.
Intrusion encompasses many undesirable activities such as information theft and denial-of-service attacks. The objective of an intrusion may be to acquire information that a person is not authorized to have (information theft). The objective may be to cause a business harm by rendering a network, system, or application unusable (denial of service). Or the objective may be to gain unauthorized use of a system as a means for further intrusions elsewhere. Most intrusions follow a pattern of information gathering, attempted access, and then destructive attacks.
Some attacks can be detected and neutralized by the target system. Other attacks cannot be effectively neutralized by the target system. Most of the attacks also use spoofed packets, which are not easily traceable to their true origin. Many attacks use unwitting accomplices, which are machines or networks that are used without authorization to hide the identity of the attacker. For these reasons, a vital part of intrusion detection is gathering information, detecting access attempts, and attacking behaviors.
The term intrusion detection is used two ways in the System i documentation. In the first sense, intrusion detection refers to the prevention and detection of security exposures. For example, a hacker might be trying to break into the
192 IBM System i Security Guide for IBM i5/OS Version 5 Release 4

system using an invalid user ID, or an inexperienced user with too much authority might alter important objects in system libraries. In the second sense, intrusion detection refers to the new intrusion detection function that uses policies to monitor suspicious traffic on the system.
To set up an effective intrusion detection system (IDS), an administrator must have a firm understanding of security and IP networking characteristics at the same time. Otherwise, intrusion attempts might not be logged, or events are reported as intrusion attempts that are in fact regular connection requests.
8.8.1 Overview: i5/OS intrusion detection system implementationMany different types of intrusions can be carried out in a network. The i5/OS IDS implementation, which was introduced with V5R4, provides monitoring support for several commonly used types of intrusion attacks. In most cases, an attacker must know first which system is active in a network and the kind of application services that are running. This is done through IP address and port scans. When an intruder has gathered this information, a specific attack for an active service can be launched.
You can create an intrusion detection policy that audits suspicious intrusion events that come in through the TCP/IP network. Examples of problems that the IDS looks for include:
� Scanning events
The IDS detects scans to individual ports. Through statistics gathering and auditing, the IDS determines whether the system has been the target of a global scan. When the TCP/IP stack detects an intrusion event, the stack calls the intrusion detection function and generates statistics and audit records.
Scans are recognized as the result of multiple information gathering events from a single source IP within a defined period of time. Scan policies do not reject traffic. They can only detect and report scanning events.
� Attack events
An attack is defined as an assault on system security that derives from an intelligent threat. It is an intelligent act that is a deliberate attempt to evade security services and violate the security policy of a system. An attack may be in the form of a single packet or multiple packets.
– Malformed packet events
A malformed packet is built in such a way as to cause a system to crash or hang when it is processed. When the IDS policy detects a malformed packet, it writes an audit record. The TCP/IP stack deletes the malformed packets.
Chapter 8. TCP/IP security 193

– Fragment restriction events
An invalid fragment overlays IP or transport headers in an attempt to bypass firewall checks. On the System i platform, it is not possible to overlay an IP header. The TCP/IP stack checks to ensure that the first fragment of a fragmented datagram is a minimum of 576 bytes. The stack also checks that each fragment beyond the first one has an offset of greater than 256 bytes. The IDS policy audits invalid IP fragments.
– IP option restrictions
The IP options field in a datagram is a variable-length list of optional information. Some of the IP options, such as Loose Source Route, can be used in network attacks. You can use the IDS policy to restrict which IP options an inbound packet can contain.
– IP protocol restrictions
The IP protocol field is an 8-bit field in the IP header. Undefined IP protocols are sometimes used to establish back door attacks in the network. You can use the IDS policy to restrict which IP protocols an inbound packet can contain. The policy can specify whether an inbound packet with a restricted IP protocol will be audited. You also can generate statistics on the number of inbound packets with restricted IP protocols.
– SYN flood events
TCP SYN flood events create a large number of half-open sockets. These flood events fill up the socket connection backlog for a given application and deny valid connections from being accepted. A SYN flood event spoofs the source IP address with the address of an unreachable system. The IDS policy flags SYN flood events and writes an audit record.
– ICMP redirect events
You can use Internet Control Message Protocol (ICMP) redirect messages to override intended network routes. You can specify the IGNOREREDIRECT option in the IDS policy file to either ignore or process ICMP redirect messages.
– Perpetual echo on UDP ports
You can use port 7, which is called the echo port, to test a UDP connection. With this kind of attack, both the source port and target port are set to port 7, which causes each port to echo back what it gets. The data that is sent through UDP is echoed back.
A perpetual echo is an attack on UDP port 7. The TCP/IP stack detects the event if the source port is equal to the target port. If there is an IDS policy for attack-type events, the system writes an audit record whenever it detects a perpetual echo attack on the UDP port.
194 IBM System i Security Guide for IBM i5/OS Version 5 Release 4
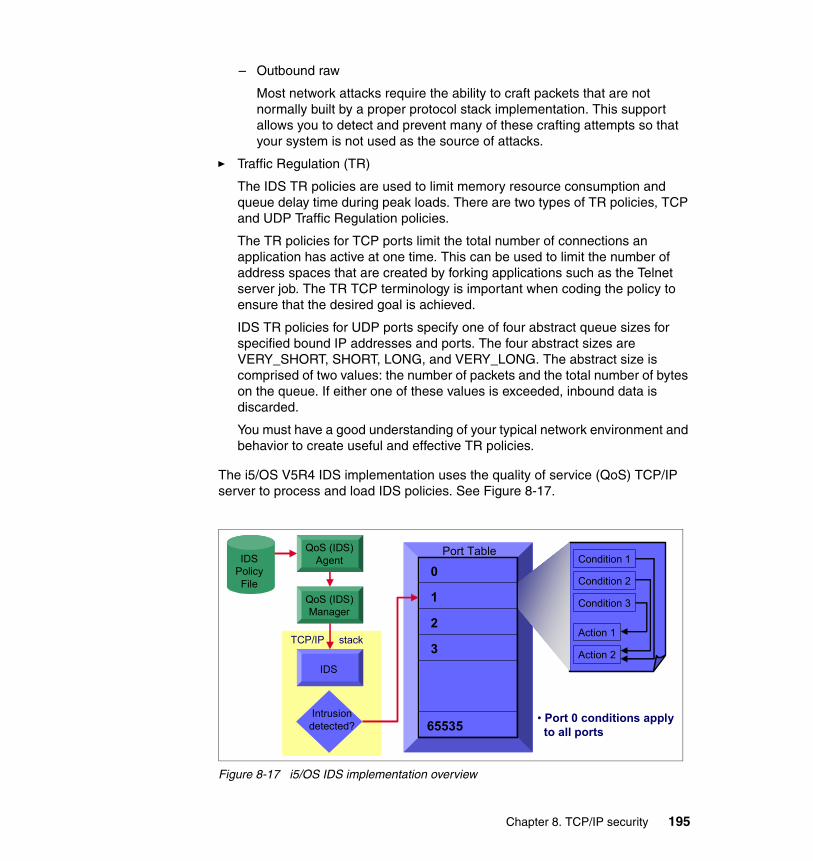
– Outbound raw
Most network attacks require the ability to craft packets that are not normally built by a proper protocol stack implementation. This support allows you to detect and prevent many of these crafting attempts so that your system is not used as the source of attacks.
� Traffic Regulation (TR)
The IDS TR policies are used to limit memory resource consumption and queue delay time during peak loads. There are two types of TR policies, TCP and UDP Traffic Regulation policies.
The TR policies for TCP ports limit the total number of connections an application has active at one time. This can be used to limit the number of address spaces that are created by forking applications such as the Telnet server job. The TR TCP terminology is important when coding the policy to ensure that the desired goal is achieved.
IDS TR policies for UDP ports specify one of four abstract queue sizes for specified bound IP addresses and ports. The four abstract sizes are VERY_SHORT, SHORT, LONG, and VERY_LONG. The abstract size is comprised of two values: the number of packets and the total number of bytes on the queue. If either one of these values is exceeded, inbound data is discarded.
You must have a good understanding of your typical network environment and behavior to create useful and effective TR policies.
The i5/OS V5R4 IDS implementation uses the quality of service (QoS) TCP/IP server to process and load IDS policies. See Figure 8-17.
Figure 8-17 i5/OS IDS implementation overview
QoS (IDS)Agent
QoS (IDS)Manager
IDSPolicyFile
IDS
Intrusiondetected?
TCP/IP stack
Port Table
0
2
1
65535
3
Condition 1
Condition 2
Condition 3
Action 1
Action 2
• Port 0 conditions applyto all ports
Chapter 8. TCP/IP security 195

The logical flow to process and load IDS policies is as follows:
1. An IDS policy file (idspolicy.conf) is used to define specific types of intrusions. Then you start the QoS server. Whether an event is considered an intrusion is defined as a condition in the policy file. Conditions are defined for ports. When a condition is met, an action, which is also defined in the policy file, is performed.
2. The QoS policy agent reads the intrusion detection policy in the idspolicy.conf file.
3. The QoS policy agent sends a message with machine instructions to the QoS manager.
4. The QoS manager interprets the machine instructions and sends them to the IDS inside the TCP/IP stack. The TCP/IP stack manages outbound traffic and inbound traffic in the network, and routes requests to other computers in the network.
5. The IDS creates the policies in the port table. The port table entries represent ports 0 through port 65 535.
In the example in Figure 8-17, three conditions and two actions are defined for port 1. When conditions 1 or 2 are met, action 2 is performed. When condition 3 is met, action 1 is performed. You can have multiple conditions defined that point to the same action. Port 0 is not a valid port. All conditions and actions that are defined for port 0 apply to all ports (1 - 65535).
6. When the TCP/IP stack detects an intrusion, it looks for matching conditions in the port table and executes the specific action, such as creating an intrusion monitor (IM) auditing record or system statistics.
7. The system creates an IM audit record, which describes the type of intrusion event.
8. A system administrator must analyze the system audit journal on a regular basis to detect intrusions based on the audit record of type IM and then take action. For example, to close a port via IP packet filtering. In V5R4, intrusions are reported only to the system audit journal.
8.8.2 Intrusion detection system setup tasksSetting up the environment and system configuration for IDS involves the following tasks. However, for several intrusion events, the definition of conditions and actions in the IDS policy file require detailed knowledge of the network environment. The following steps summarize the tasks that you must perform to configure IDS in i5/OS:
196 IBM System i Security Guide for IBM i5/OS Version 5 Release 4
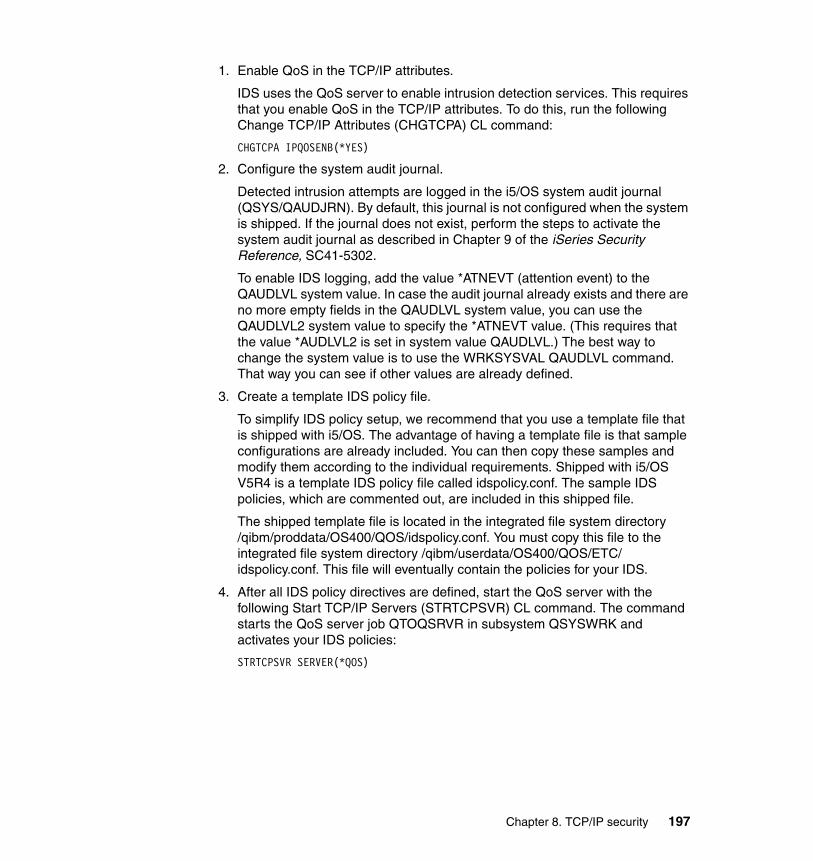
1. Enable QoS in the TCP/IP attributes.
IDS uses the QoS server to enable intrusion detection services. This requires that you enable QoS in the TCP/IP attributes. To do this, run the following Change TCP/IP Attributes (CHGTCPA) CL command:
CHGTCPA IPQOSENB(*YES)
2. Configure the system audit journal.
Detected intrusion attempts are logged in the i5/OS system audit journal (QSYS/QAUDJRN). By default, this journal is not configured when the system is shipped. If the journal does not exist, perform the steps to activate the system audit journal as described in Chapter 9 of the iSeries Security Reference, SC41-5302.
To enable IDS logging, add the value *ATNEVT (attention event) to the QAUDLVL system value. In case the audit journal already exists and there are no more empty fields in the QAUDLVL system value, you can use the QAUDLVL2 system value to specify the *ATNEVT value. (This requires that the value *AUDLVL2 is set in system value QAUDLVL.) The best way to change the system value is to use the WRKSYSVAL QAUDLVL command. That way you can see if other values are already defined.
3. Create a template IDS policy file.
To simplify IDS policy setup, we recommend that you use a template file that is shipped with i5/OS. The advantage of having a template file is that sample configurations are already included. You can then copy these samples and modify them according to the individual requirements. Shipped with i5/OS V5R4 is a template IDS policy file called idspolicy.conf. The sample IDS policies, which are commented out, are included in this shipped file.
The shipped template file is located in the integrated file system directory /qibm/proddata/OS400/QOS/idspolicy.conf. You must copy this file to the integrated file system directory /qibm/userdata/OS400/QOS/ETC/idspolicy.conf. This file will eventually contain the policies for your IDS.
4. After all IDS policy directives are defined, start the QoS server with the following Start TCP/IP Servers (STRTCPSVR) CL command. The command starts the QoS server job QTOQSRVR in subsystem QSYSWRK and activates your IDS policies:
STRTCPSVR SERVER(*QOS)
Chapter 8. TCP/IP security 197
8.8.3 Policy managementAs described in 8.8.1, “Overview: i5/OS intrusion detection system implementation” on page 193, the i5/OS IDS implementation can monitor various kinds of intrusion events. You must decide what events you want to monitor. The difficulty is to decide which directives and values are useful for your particular environment. Unfortunately, no set of values fits all environments. You can find some recommendations, best practices configurations, and rules on the Snort open source project Web page:
http://www.snort.org
Also refer to the Security → Intrusion detection section, which contains several examples, in the iSeries Information Center at:
http://publib.boulder.ibm.com/infocenter/iseries/v5r4/index.jsp
There is only one way to configure the IDS policy directives with i5/OS V5R4. You must edit the idspolicy.conf file in the integrated file system. You can do this by using the Edit File (EDTF) CL command, for example:
EDTF STMF('/QIBM/UserData/OS400/QOS/ETC/IDSPOLICY.CONF')
8.8.4 Analyzing intrusion attemptsIntrusion events are logged in the system audit journal QAUDJRN. The number of entries for a given intrusion type and event that are logged depends on the directives that are specified in the IDS action policy. All intrusion events are logged under the audit journal entry type IM.
You can use the Copy Audit Journal Entries (CPYAUDJRNE) CL command in V5R4 to generate a file with intrusion events. You can find a detailed description of the individual data in the IM audit journal entry in the iSeries Security Reference, SC41-5302.
Note: You must analyze the audit journal on a regular basis to be notified of intrusion events. For obvious reasons, it does not make sense to analyze the audit journal once a week. We recommend that you run a job that looks for IM journal entries every couple of minutes. If an intrusion event is found, the program can then inform an administrator via a message, e-mail, pager, or other notification methods.
198 IBM System i Security Guide for IBM i5/OS Version 5 Release 4

8.8.5 More informationFor more information about IDS, the i5/OS implementation, the i5/OS IDS policy directives table, and the IM audit journal entry structure, see the following references:
� IBM eServer iSeries IP Networks: Dynamic!, SG24-6718
� System audit journal setup and analysis in iSeries Security Reference V5R4, SC41-5302
� The iSeries Information Center path Security → Intrusion detection
http://publib.boulder.ibm.com/infocenter/iseries/v5r4/index.jsp
� Snort IDS Web page
http://www.snort.org
8.9 Point-to-Point ProtocolPoint-to-Point Protocol (PPP) is a method of connecting two hosts to each other over, for example, a switched line or a leased line. A common example is a PPP connection, which is established between a remote office and the home office in order to transfer data using the TCP/IP protocol.
PPP is available as part of TCP/IP and the configuration is done through iSeries Navigator. Some limited configurations are possible from the i5/OS command line interface.
8.9.1 Security considerations for Point-to-Point ProtocolPPP provides the ability to have dedicated connections, where the same user always has the same IP address. With dedicated addresses, you have the potential for IP spoofing, where an imposter system pretends to be a trusted system with a known IP address. However, the enhanced authentication capabilities that PPP provides help to protect against IP spoofing.
PPP defines multiple types of authentication that can be used by the peers to identify each other:
� Password Authentication Protocol (PAP)� Challenge Handshake Authentication Protocol (CHAP)� Extensible Authentication Protocol (EAP)
These types all perform authentication of the remote devices, but only PAP provides a basic authentication level. CHAP is more secured by using a
Chapter 8. TCP/IP security 199
calculated value with an algorithm that is known only to the authenticator and the remote access device.
For more information about these authentication methods, refer to 12.9, “Other protocols and authentication topics” on page 299.
8.9.2 Configuring Point-to-Point Protocol profilesTo configure PPP using iSeries Navigator:
1. From iSeries Navigator, expand your system and select Network → Remote Access Services.
2. Select one of the following options:
– Right-click Originator Connection Profiles to set the system to initiate connections.
– Right-click Receiver Connection Profiles to set the system to allow incoming connections from remote systems and users.
Simple dial and answer profiles can also be done by using the Add TCP/IP Point-To-Point (ADDTCPPTP) CL command.
8.9.3 More informationFor more information about PPP, see the following references:
� V4 TCP/IP for AS/400: More Cool Things Than Ever, SG24-5190
� The iSeries Information Center path Networking → TCP/IP applications, protocols, and services → Remote Access services: PPP connections
http://publib.boulder.ibm.com/infocenter/iseries/v5r4/index.jsp
8.10 RADIUSRemote Authentication Dial-In User Service (RADIUS) is an Internet standard protocol that provides centralized authentication, accounting, and IP management services for remote access users in a distributed dial-up network. RADIUS centralizes secure access for remote users. You can use it on the system for PPP and Layer Two Tunneling Protocol (L2TP) authentication.
Figure 8-18 shows an example of authentication using a RADIUS server. When remote users attempt to connect, the Network Access Server (NAS) running on the system forwards the authentication information to a RADIUS server in the network. The RADIUS server, which maintains all authentication information for the network, processes the authentication request and responds. If the user is
200 IBM System i Security Guide for IBM i5/OS Version 5 Release 4
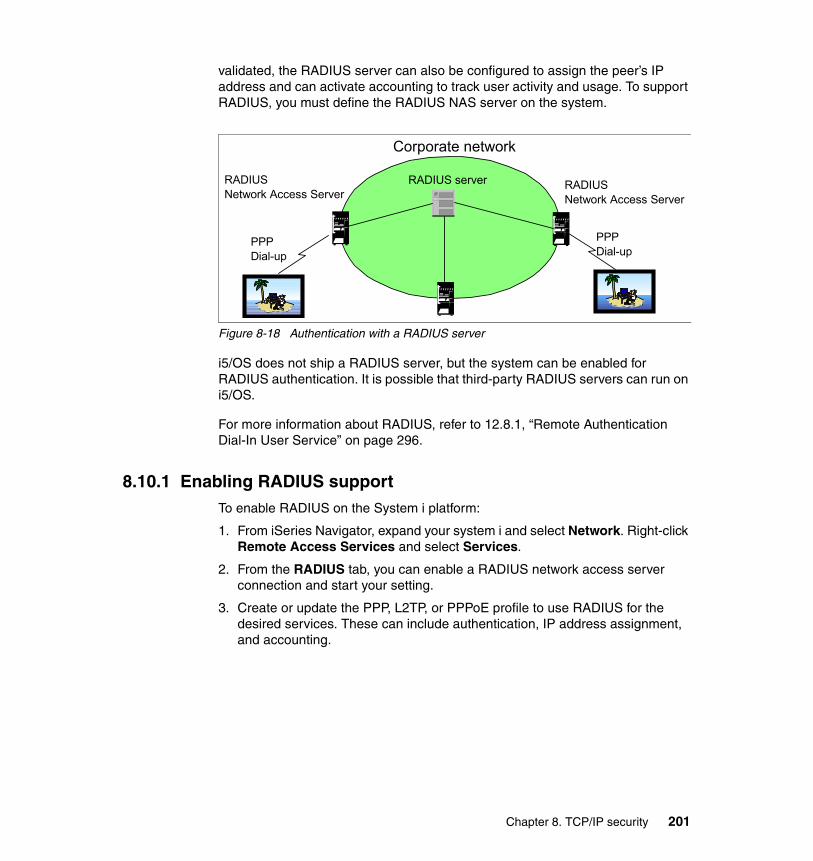
validated, the RADIUS server can also be configured to assign the peer’s IP address and can activate accounting to track user activity and usage. To support RADIUS, you must define the RADIUS NAS server on the system.
Figure 8-18 Authentication with a RADIUS server
i5/OS does not ship a RADIUS server, but the system can be enabled for RADIUS authentication. It is possible that third-party RADIUS servers can run on i5/OS.
For more information about RADIUS, refer to 12.8.1, “Remote Authentication Dial-In User Service” on page 296.
8.10.1 Enabling RADIUS supportTo enable RADIUS on the System i platform:
1. From iSeries Navigator, expand your system i and select Network. Right-click Remote Access Services and select Services.
2. From the RADIUS tab, you can enable a RADIUS network access server connection and start your setting.
3. Create or update the PPP, L2TP, or PPPoE profile to use RADIUS for the desired services. These can include authentication, IP address assignment, and accounting.
Corporate network
RADIUS server
PPP Dial-up
PPP Dial-up
RADIUSNetwork Access Server
RADIUSNetwork Access Server
Chapter 8. TCP/IP security 201
8.10.2 More informationFor more information about RADIUS, see the following references:
� TCP/IP Tutorial and Technical Overview, GG24-3376
� The iSeries Information Center path Networking → TCP/IP applications, protocols, and services → Remote Access Services: PPP connections → Plan PPP → System authentication → RADIUS overview
http://publib.boulder.ibm.com/infocenter/iseries/v5r4/index.jsp
8.11 HTTP proxy serverThe HTTP proxy server comes with the IBM HTTP Server. The proxy server receives HTTP requests from Web browsers and resends them to Web servers. Web servers that receive the requests are only aware of the IP address of the proxy server. They cannot determine the names or addresses of the PC that originated the requests.
The proxy server also provides caching capability. Consequently, when users request a page, the proxy server checks whether the page is in the cache. If it is, the proxy server returns the cached page.
You can use HTTP proxy support in the IBM HTTP Server to consolidate Web access. Addresses of PC clients are hidden from the Web servers that they access, so only the IP address of the proxy server is known. Web page caching can also reduce communication bandwidth requirements and firewall workload.
The wide success of SSL has made it vital that the HTTP proxy protocol be extended. This allows an SSL client to open a secure tunnel through the proxy. Using SSL tunneling, the proxy does not have access to the data transferred between the client and the destination server in either direction. Certificates are exchanged between the client and the server and the proxy is not involved. The proxy only knows the source and target addresses of the data as well as any user authentication information.
202 IBM System i Security Guide for IBM i5/OS Version 5 Release 4
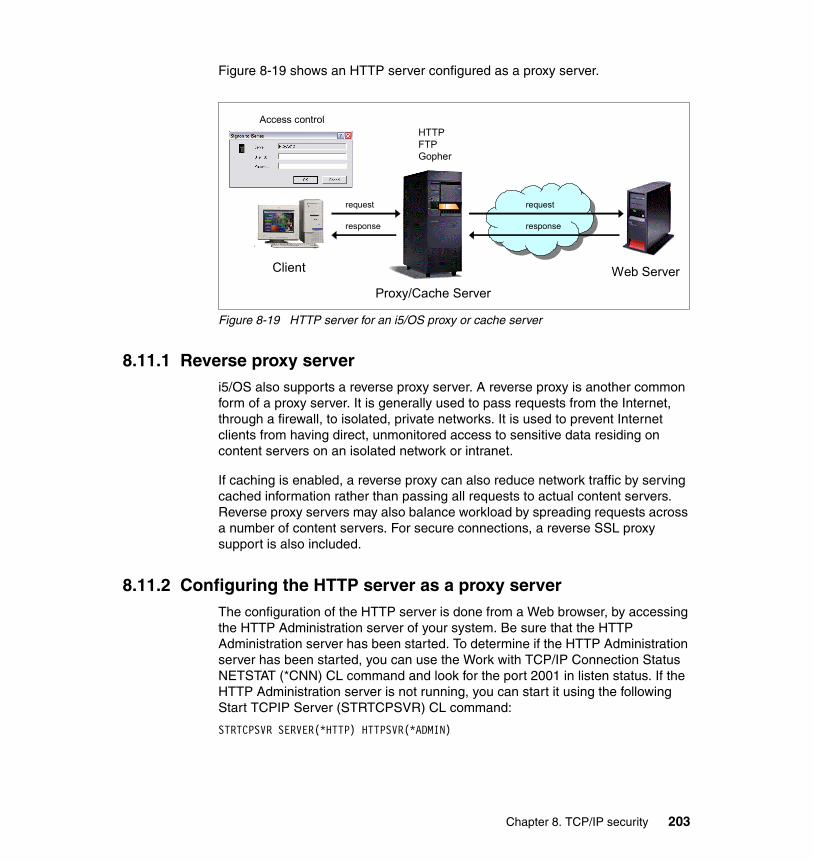
Figure 8-19 shows an HTTP server configured as a proxy server.
Figure 8-19 HTTP server for an i5/OS proxy or cache server
8.11.1 Reverse proxy serveri5/OS also supports a reverse proxy server. A reverse proxy is another common form of a proxy server. It is generally used to pass requests from the Internet, through a firewall, to isolated, private networks. It is used to prevent Internet clients from having direct, unmonitored access to sensitive data residing on content servers on an isolated network or intranet.
If caching is enabled, a reverse proxy can also reduce network traffic by serving cached information rather than passing all requests to actual content servers. Reverse proxy servers may also balance workload by spreading requests across a number of content servers. For secure connections, a reverse SSL proxy support is also included.
8.11.2 Configuring the HTTP server as a proxy serverThe configuration of the HTTP server is done from a Web browser, by accessing the HTTP Administration server of your system. Be sure that the HTTP Administration server has been started. To determine if the HTTP Administration server has been started, you can use the Work with TCP/IP Connection Status NETSTAT (*CNN) CL command and look for the port 2001 in listen status. If the HTTP Administration server is not running, you can start it using the following Start TCPIP Server (STRTCPSVR) CL command:
STRTCPSVR SERVER(*HTTP) HTTPSVR(*ADMIN)
request
response
request
response
Access controlHTTPFTPGopher
Proxy/Cache Server
Client Web Server
Chapter 8. TCP/IP security 203

Alternatively, you can use iSeries Navigator to start the HTTP Administration server:
1. From iSeries Navigator, expand your system and select Network → Servers → TCP/IP.
2. In the right pane, right-click HTTP Administration and select Start.
Configure the HTTP proxy server:
1. From a Web browser, enter the following URL:
http://your_System:2001
2. From the i5/OS Tasks window, click IBM Web Administration for i5/OS.
3. Click the Manage tab and then click the HTTP Servers sub-tab.
4. From the Server list, select your HTTP Server (powered by Apache).
5. From the Server area list, select Global configuration.
6. Expand Server Properties and select Proxy. Figure 8-20 shows the Proxy panel that opens.
Figure 8-20 HTTP proxy configuration
204 IBM System i Security Guide for IBM i5/OS Version 5 Release 4

8.11.3 More informationFor more information about the HTTP proxy server, see the following references:
� AS/400 Internet Security Scenarios: A Practical Approach, SG24-5954
� IBM HTTP Server (powered by Apache): An Integrated Solution for IBM eServer iSeries Servers, SG24-6716
� The iSeries Information Center path Networking → HTTP Server → Tasks → Proxy tasks
http://publib.boulder.ibm.com/infocenter/iseries/v5r4/index.jsp
8.12 SOCKSA SOCKS server is a TCP/IP server application that allows you to send information through a wide variety of protocols without providing the internal TCP/IP network information. To use a SOCKS server, the client must support the SOCKS protocol.
SOCKS is a standard for circuit-level gateways. It does not require the overhead of a more conventional proxy server where a user has to consciously connect to the firewall first before requesting the second connection to the destination.
The user starts a client application with the destination server TCP/IP address. Instead of directly starting a session with the destination server, the client initiates a session to the SOCKS server on the firewall. Next the SOCKS server validates that the source address and user ID are permitted to establish onward connection into the insecure network. Then it creates the second session.
SOCKS servers have no knowledge of the application protocol that they are using. These servers, for example, do not distinguish Telnet from HTTP. As a result, SOCKS servers can be written in a more efficient manner than other proxy server applications. The downside is that SOCKS servers cannot perform such actions as caching or logging URLs that are accessed through the server.
SOCKS needs to have new versions of the client code (called socks-enabled clients). Both the client and the SOCKS server need SOCKS code. The SOCKS server acts as an application-level router between the client and the real application server. The majority of Web browsers are socks enabled and you can get socks-enabled TCP/IP stacks for most platforms.
The System i platform supports a SOCKS client in its TCP/IP stack (versatile clients), so that all client applications can use a SOCKS server. The client configuration gives the name of the SOCKS server to use and the rules for when the server should be used.
Chapter 8. TCP/IP security 205

8.12.1 Client SOCKS support on the System i platformThe System i platform uses SOCKS Version 4 to enable programs that use AF_INET address family with SOCK_STREAM socket type to communicate with server programs that run on systems outside a firewall. A firewall is a secure host that a network administrator places between a secure internal network and a less secure external network. Typically such a network configuration does not allow communications that originate from the secure host to be routed on the less secure network, and vice versa. Proxy servers that exist on the firewall help manage required access between secure hosts and less secure networks.
Applications that run on hosts in a secure internal network must send their requests to firewall proxy servers to navigate the firewall. The proxy servers can then forward these requests to the real server on the less secure network and relay the reply back to the applications on the originating host. A common example of a proxy server is an HTTP proxy server, but HTTP proxy servers handle only HTTP clients.
A common alternative to running multiple proxy servers on a firewall is to run a more robust proxy server known as a SOCKS server. A SOCKS server can act as a proxy for any TCP client connection that is established using the sockets application programming interface (API). The key advantage to System i client SOCKS support is that it enables client applications to access a SOCKS server transparently without changing any client code.
8.12.2 Configuring client SOCKS supportTo configure client SOCKS support on the System i machine:
1. From iSeries Navigator, expand your system and select Network. Right-click TCP/IP Configuration and select Properties.
206 IBM System i Security Guide for IBM i5/OS Version 5 Release 4

2. In the TCP/IP Configuration Properties window (Figure 8-21), click the SOCKS tab and enter your connection information. Then click OK.
Figure 8-21 Configuring SOCKS information
8.12.3 More informationFor more information about SOCKS, see the following references:
� AS/400 Internet Security Scenarios: A Practical Approach, SG24-5954
� TCP/IP Tutorial and Technical Overview, GG24-3376
� V4 TCP/IP for AS/400: More Cool Things Than Ever, SG24-5190
� The iSeries Information Center path Programming → Communications → Socket Programming → Advanced Socket Concept → Client SOCKS support
http://publib.boulder.ibm.com/infocenter/iseries/v5r4/index.jsp
Chapter 8. TCP/IP security 207

8.13 OpenSSH and OpenSSLTraditionally, the System i platform supported the following technologies to protect data traffic transported on IP networks:
� SSL and Transport Layer Security (TLS)� Virtual private network (VPN) complying with the IPSec protocol framework
However, when using these technologies, you can encounter the following problems:
� To use SSL/TLS for data protection, applications must be changed to support SSL sockets.
� Different SSL socket APIs are available, so it is difficult to write portable code.
� VPN does not always work. For example, NAT support may be missing in clients or servers.
There was a demand for an open source SSL implementation that could run on various platforms and a solution to protect data traffic without changing an application or enabling VPN in an operating system. The open source solutions that are available in i5/OS V5R3 and later are:
� OpenSSH, which provides a secure shell and secure tunneling service to protect data traffic on untrusted networks
� OpenSSL, which provides SSL and TLS protocols and tools
These programs are packaged in a licensed program offering (LPO) called Portable Utilities for i5/OS.
8.13.1 Portable Utilities for i5/OSThe free-of-charge LPO, IBM Portable Utilities for i5/OS (5733-SC1), is available in i5/OS with V5R3 and later. This LPO contains the OpenSSH, OpenSSL, and zlib open source packages that are ported to i5/OS using the i5/OS Portable Solutions Application Environment (PASE) runtime environment. The 5733-SC1 LPO requires i5/OS and that i5/OS option 33 (i5/OS PASE) be installed.
The 5733-SC1 LPO consists of two options, *BASE and option 1, that must both be installed. These two options are installed on the system via the Restore License Program (RSTLICPGM) command.
208 IBM System i Security Guide for IBM i5/OS Version 5 Release 4

8.13.2 OpenSSHTCP/IP connectivity applications, such as Telnet and FTP, transmit data and passwords over the network in plain text. This means that the data and passwords can be intercepted and read by other users in the network. The Secure Shell (SSH) protocol suite is a software solution that provides secure alternatives for Telnet and FTP. SSH verifies the authenticity of both the client and server, and all of the data (including user IDs and passwords) is encrypted as it travels in the network. This encryption is done transparently to the end user.
OpenSSH is a good alternative solution to SSL and VPN because:
� It provides a host-to-host encryption.� It can forward any TCP protocol.� It is an open source program and can be available on any platform.� It is a free version of the SSH protocol suite and does not use any patented
components.
The OpenSSH portion of 5733-SC1 consists of these utilities:
� ssh: ssh is a secure Telnet replacement that allows an i5/OS user to connect as a client to a server running the sshd daemon. i5/OS presents the ssh client with the i5/OS PASE shell instead of a 5250 session. An ssh client can also be used to connect to the Hardware Management Console (HMC) on System i 5xx models.
� sftp: sftp is a secure FTP replacement. As with all implementations of sftp on other platforms, it can only transfer data in binary format. Note that sftp also does not provide the enhanced functions available in the i5/OS FTP utility when transferring files in the QSYS.LIB file system; nor does it provide the CCSID data conversion options available in the i5/OS FTP utility. sftp is best suited to transfer files in directories.
� scp: scp is a secure file copy program. Basically this is an alternative to sftp for copying a single file in the integrated file system in i5/OS.
� ssh-keygen: ssh-keygen is a public/private key generation and management tool. SSH allows users to authenticate using these public and private keys as an alternative to using their i5/OS sign-on password.
� ssh-agent: ssh-agent is an authentication agent that can store private keys. It allows a user to load their public/private key passphrase into memory to avoid needing to retype the passphrase each time an ssh connection is started.
� sshd: sshd is the daemon that handles incoming ssh connections. The sshd daemon utility allows users to connect to i5/OS via an ssh client. In contrast to connecting to i5/OS via Telnet and being presented with a 5250 screen interface, users that connect via ssh to an i5/OS system running the sshd
Chapter 8. TCP/IP security 209

daemon are presented with a character interface and an i5/OS PASE command line.
Figure 8-22 shows the process to connect to a Telnet server using an SSH channel.
Figure 8-22 Secure connection through an SSH channel
Before the sshd daemon can connect to the System i platform from a client via ssh, it must be running in the i5/OS PASE environment.
Configuration overviewBefore you start the sshd daemon, you must perform the following setup:
1. Within the i5/OS PASE shell, change to the OpenSSH configuration directory:
cd /QOpenSys/QIBM/UserData/SC1/OpenSSH/openssh-3.5p1/etc
2. Set up the public/private keys for the ssh protocol 1. To generate the keys, use the ssh-kegen utility:
ssh-keygen –t rsa1 -b 2048 -f ssh_host_key -N ''
3. Set up the public/private keys for SSH protocol 2. Two keys are needed for SSH protocol 2 (dsa and rsa keys). To generate the keys, use the ssh-kegen utility:
ssh-keygen –t dsa -b 2048 -f ssh_host_dsa_key -N '' ssh-keygen –t rsa -b 2048 -f ssh_host_rsa_key -N ''
4. If changes are required, for example when the default values does not meet requirements, modify the sshd configuration file using the Edit File (EDTF) command:
edtf sshd_config
5. Start sshd manually or by scheduling the autostart of SSHD:
call pgm(qp2shell) parm(‘/QOpenSys/usr/sbin/sshd’)sbmjob cmd(call pgm(qp2shell) parm(‘/QOpenSys/usr/sbin/sshd’))
The user under which the sshd daemon runs must have *ALLOBJ special authority.
Secure SSH channel
ssh clientport 2200
to Server1port 23
Telnet clientDst addr: localhostDst port: 2200
Client Server
Port Forwarding to port 23
sshdport 22
Telnetserver
210 IBM System i Security Guide for IBM i5/OS Version 5 Release 4

We recommend that you create a separate user profile, such as SSHDUSR and submit the job under that user, for example:
sbmjob cmd(call pgm(qp2shell) parm(‘/QOpenSys/usr/sbin/sshd’)) job (sshd) jobq(your_queue) user(SSHDUSR)
You can then verify whether the server is running using the Network Status (NETSTAT) CL command.
8.13.3 OpenSSLOpenSSL is an open source project that provides an SSL and TLS implementation. It supports the SSL version 2 and version 3 and TLS version 1 protocols. It also consists of a cryptographic library.
You can use OpenSSL to create the environment that is needed to run SSL-enabled applications. OpenSSL is available on many platforms. For more information about OpenSSL, refer to 9.6.2, “OpenSSL” on page 228.
8.13.4 More informationFor more information about how to set up and use the SSH utilities, refer to the IBM Redpaper Securing Communications with OpenSSH on IBM i5/OS, REDP-4163.
For more information about Open SSH, OpenSSL, and IBM Portable Utilities for i5/OS, see the following references:
� OpenSSH Web site
http://www.openssh.org
� IBM Portable Utilities for i5/OS Web page
http://www.ibm.com/servers/enable/site/porting/tools/openssh.html
For a comparison of OpenSSH with other technologies, refer to 10.5, “Comparison of IPSec, SSL, and OpenSSH” on page 256.
8.14 Secure socket APIsTo develop applications that are SSL-enabled, consider using the secure socket APIs. They consist of the following APIs:
� Global Secure Toolkit (GSKit) APIs
GSKit is a set of programmable interfaces that allow an application to be SSL-enabled. GSKit APIs are supported across all IBM platforms.
Chapter 8. TCP/IP security 211

We recommend that you use GSKit APIs when developing applications for secure socket connections.
� SSL_ APIs
SSL_ APIs are native to the i5/OS operating system and are used to create secure socket applications on the System i platform.
For more information about using these APIs, refer to 9.6.1, “Securing applications with SSL” on page 227.
8.15 Security considerations for e-mailYou depend on e-mail as an essential business tool, so it is important to promote a secure environment on your System i environment. The System i platform uses protocols, such as Simple Mail Transfer Protocol (SMTP) and Post Office Protocol (POP), to make your e-mail run smoothly and efficiently in the network.
� Simple Mail Transfer Protocol
SMTP e-mail is a protocol that allows the system to send and receive e-mail. SMTP is essentially end-to-end delivery of mail from one mail server to another.
There is a direct connection between an SMTP sender (the client) and the destination SMTP receiver (the server). The SMTP client keeps the mail at the sender until it transmits and copies it successfully to the SMTP receiver (server).
� Post Office Protocol
The POP server is the System i implementation of the POP Version 3 mail interface. It provides electronic mailboxes on the system from which clients can retrieve mail. Any mail client that supports the POP3 protocol can use this server, such as Netscape Mail, Outlook® Express, and so on. Clients may be running on any platform, such as Windows, AIX, or Macintosh.
8.15.1 Controlling e-mail accessIf you want to allow SMTP clients to access your system, you can protect your system from attack by employing the following measures:
� If possible, avoid using an *ANY *ANY entry in the system distribution directory. When your system does not have an *ANY *ANY entry, it is more difficult for someone to attempt to use SMTP to “flood” your system or overwhelm your network. Flooding occurs when your auxiliary storage is filled with unwanted mail that is routed through your system to another system.
212 IBM System i Security Guide for IBM i5/OS Version 5 Release 4
� Set adequate threshold limits for your auxiliary storage pools (ASPs) to prevent a user from swamping your system with unwanted objects. You can display and set the thresholds for ASPs by using either the System Service Tools (SST) or the Dedicated Service Tools (DST).
� Tune the maximum number of prestart jobs that will be created by using the Change Prestart Job Entry (CHGPJE) command. This limits the number of jobs created during a denial-of-service attack. The default is 256 for the maximum threshold.
� To prevent your system from outsiders using your connection to send unsolicited e-mail (spam), use the Restrict relays and Restrict connections functions. Refer to 8.15.3, “Securing e-mail” on page 214, for more information.
If you want to allow POP clients to access your system, be aware of the following security issues:
� The POP mail server provides authentication for clients who attempt to access their mailboxes. The client sends a user ID and password to the server. The password is sent in the clear and can be vulnerable.
The POP mail server verifies the user ID and password against the i5/OS user profile and password for that user. Because you do not have control over how the user ID and password are stored on the POP client, you might want to create a special user profile that has limited authority on your system. To prevent anyone from using the user profile for an interactive session, you can set the following values in the user profile:
– Set initial menu (INLMNU) to *SIGNOFF– Set initial program (INLPGM) to *NONE– Set limit capabilities (LMTCPB) to *YES
� To prevent a malicious intruder from flooding your system with unwanted objects, make sure that you have set adequate threshold limits for your ASPs. The ASP storage threshold prevents your system from stopping because the operating system does not have sufficient working space. You can display and set the thresholds for ASPs by using either the SST or DST.
� Although you need to make sure that your ASP threshold prevents your system from being flooded, make sure that your system has adequate space to properly store and deliver mail. If your system cannot deliver mail because it does not have adequate storage for transient mail, this is an integrity problem for your users. When system storage use is high, mail stops running.
Chapter 8. TCP/IP security 213

8.15.2 Preventing e-mail accessIf you do not want anyone to use SMTP to distribute mail to or from your system, prevent the SMTP server from running. Consider the following recommendations for protecting e-mail access to your System i platform:
� Do not configure SMTP. SMTP is configured by default to start automatically when TCP/IP starts. If you do not plan to use SMTP at all, do not configure it on your system. Refer to 8.2, “Controlling which TCP/IP servers start automatically” on page 175, for more information.
� Prevent access to SMTP ports. Prevent someone from associating a user application, such as a socket application, with the port that the System i platform normally uses for SMTP. The default port used for SMTP is 25, and the protocol is TCP. Refer to 8.5, “Port restrictions” on page 180, for more information about port restrictions.
8.15.3 Securing e-mailIt is important to promote a secure environment on your System i SMTP server. You must protect your SMTP server and your users from internal and external hindrances.
Employ the following tactics to help ensure a secure e-mail environment:
� Send e-mail through a router or firewall.
An e-mail router is an intermediate system that SMTP delivers mail to when it cannot locate the recipient’s exact IP address. The e-mail router routes the e-mail to the IP address or to another router. Route your outgoing e-mail to an alternative system if your local server fails to deliver the e-mail to the system. If you have a firewall, you can use the firewall as your router.
� Restrict relays.
A common concern that you may face is protecting your system from people who try to use your e-mail server for spamming or sending large amounts of bulk e-mail. To avoid these problems, use the relay restriction function to specify as closely as possible who can use your system for relay. You have six options for allowing relay:
– Allow all relay messages.– Block all relay messages.– Accept relay messages for only recipients in the near domains list.– Accept relay messages from only the address relay list.– Accept relay messages using both the near domains and address relay
lists.– Accept relay messages from POP clients for a specified period of time.
214 IBM System i Security Guide for IBM i5/OS Version 5 Release 4
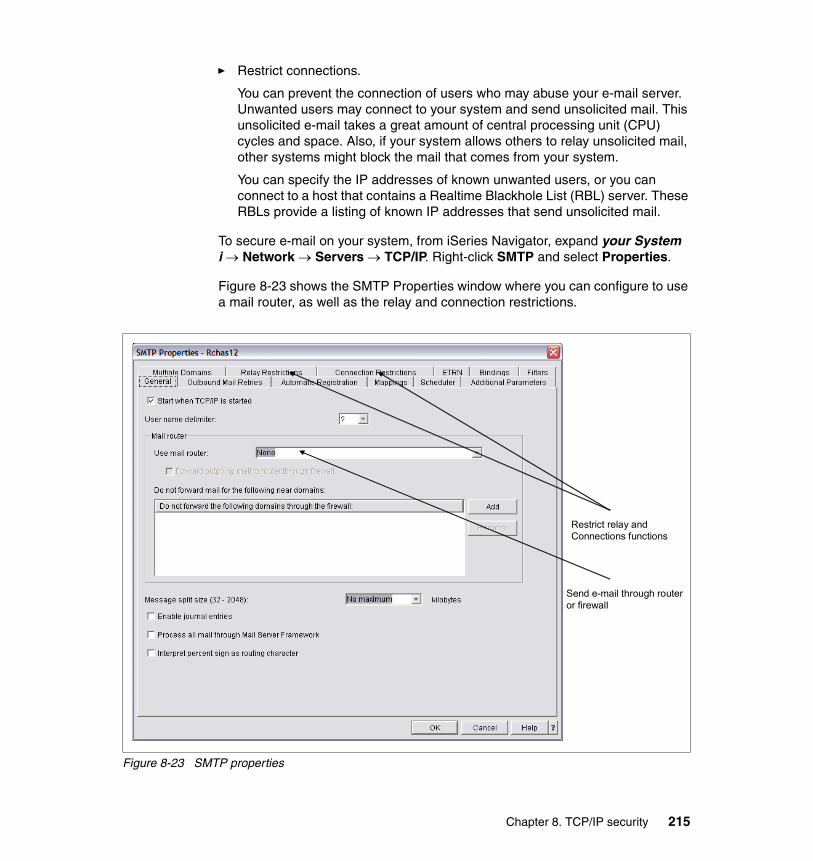
� Restrict connections.
You can prevent the connection of users who may abuse your e-mail server. Unwanted users may connect to your system and send unsolicited mail. This unsolicited e-mail takes a great amount of central processing unit (CPU) cycles and space. Also, if your system allows others to relay unsolicited mail, other systems might block the mail that comes from your system.
You can specify the IP addresses of known unwanted users, or you can connect to a host that contains a Realtime Blackhole List (RBL) server. These RBLs provide a listing of known IP addresses that send unsolicited mail.
To secure e-mail on your system, from iSeries Navigator, expand your System i → Network → Servers → TCP/IP. Right-click SMTP and select Properties.
Figure 8-23 shows the SMTP Properties window where you can configure to use a mail router, as well as the relay and connection restrictions.
Figure 8-23 SMTP properties
Send e-mail through routeror firewall
Restrict relay andConnections functions
Chapter 8. TCP/IP security 215
8.15.4 More informationFor more information about securing e-mail on the System i platform, see the following references:
� AS/400 Internet Security Scenarios: A Practical Approach, SG24-5954
� The iSeries Information Center path Networking → TCP/IP applications, protocols, and services → E-mail
http://publib.boulder.ibm.com/infocenter/iseries/v5r4/index.jsp
8.16 Security considerations for FTPFTP provides the capability to transfer files between a client and your system. Consequently, FTP is useful for working with remote systems or to move files between systems. However, the use of FTP across the Internet, or other untrusted networks, exposes you to certain security risks.
Consider the following security issues when using FTP on your system:
� Establish full System i object security on your system. Change the system’s security model from “menu security” to “object security”. This is your best, most secure option.
For example, the public authority for your objects may be *USE, but today you are preventing most users from accessing those objects by using menu security. Menu security prevents users from doing anything that is not on their menu options. Since FTP users are not restricted to menus, they can read all objects on your system.
� Write exit programs for FTP to restrict access to files which may be transferred through FTP. These exit programs should provide security that is at least the equivalent as security that the menu program provides.
� Use the logon exit program of the FTP server to reject logon requests by any system user profiles and those user profiles that you designated not to be allowed FTP access.
� Use the logon exit program of the FTP server to limit the client machine from which a given user profile is allowed to access the FTP server.
� Use the logon program of the FTP server to log the user name and IP address of all FTP logon attempts and review the logs regularly.
� If FTP needs to be used across an untrusted network such as the Internet, consider using secure FTP.
216 IBM System i Security Guide for IBM i5/OS Version 5 Release 4
Chapter 9. Cryptographic support
Cryptography is the science of keeping data secure. It allows you to store information, or to communicate with other parties, while preventing non-involved parties from understanding the stored information or understanding the communication. Encryption transforms understandable text into an unintelligible piece of data (ciphertext). Decryption restores the understandable text from the unintelligible data. Both processes involve a mathematical formula, or algorithm, and a secret sequence of data (the key).
In this chapter, we provide information about cryptography in general and how it is implemented on the System i platform.
9
Note: This chapter contains references to the iSeries Information Center for V5R4 page. On this page, you can simply click the iSeries Information Center, Version 5 Release 4 link in the navigation area and select the topics that are specified:
http://publib.boulder.ibm.com/infocenter/iseries/v5r4/index.jsp
© Copyright IBM Corp. 2005, 2006. All rights reserved. 217

9.1 Encryption versus hashingEncryption is the mechanism for making information unreadable via an encryption algorithm and a key. The same encryption algorithm and a key are used to decrypt the information and make it readable. Figure 9-1 shows the encryption and decryption mechanism.
Figure 9-1 Encryption and decryption mechanism
A hashing algorithm produces a hash value called a message digest. This message digest is a kind of “number” generated from a string of text, and it is substantially smaller than the text itself. It is generated by a formula in such a way that it is unlikely that some other text will produce the same hash value. Also from the hash value, it is impossible to recover the original text.
Hashes play a role in security where they are used to ensure that transmitted messages have not been tampered with. The sender generates a hash of the message, encrypts it using a secret key, and sends it with the message itself. The receiver then decrypts both the message and the hash, produces another hash from the received message, and compare the two hashes. If they are the same, there is a high probability that the message was transmitted intact. Figure 9-2 shows the hash mechanism to produce the message digest.
Figure 9-2 Hashing mechanism
This message should
not be readeable
traversing the network
lakj sk$k&kshd sk''s
kkashd *jksh ^$%df
dfj 04834[k(^^ka h..
Encryption
Algorithm
lakj sk$k&kshd sk''s
kkashd *jksh ^$%df
dfj 04834[k(^^ka h..
Decryption
Algorithm
This message should
not be readeable
traversing the network
Pass over network
This message should
not be altered while
traversing the network
Hash
Algorithm
Hash (message digest)
209303823023034830
218 IBM System i Security Guide for IBM i5/OS Version 5 Release 4
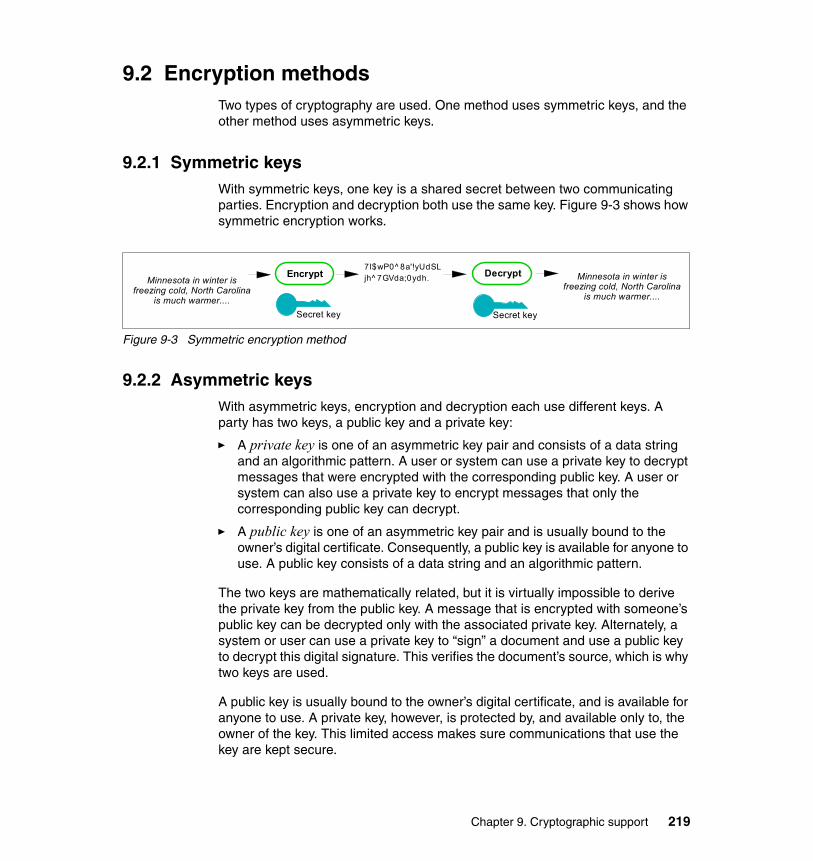
9.2 Encryption methodsTwo types of cryptography are used. One method uses symmetric keys, and the other method uses asymmetric keys.
9.2.1 Symmetric keysWith symmetric keys, one key is a shared secret between two communicating parties. Encryption and decryption both use the same key. Figure 9-3 shows how symmetric encryption works.
Figure 9-3 Symmetric encryption method
9.2.2 Asymmetric keysWith asymmetric keys, encryption and decryption each use different keys. A party has two keys, a public key and a private key:
� A private key is one of an asymmetric key pair and consists of a data string and an algorithmic pattern. A user or system can use a private key to decrypt messages that were encrypted with the corresponding public key. A user or system can also use a private key to encrypt messages that only the corresponding public key can decrypt.
� A public key is one of an asymmetric key pair and is usually bound to the owner’s digital certificate. Consequently, a public key is available for anyone to use. A public key consists of a data string and an algorithmic pattern.
The two keys are mathematically related, but it is virtually impossible to derive the private key from the public key. A message that is encrypted with someone’s public key can be decrypted only with the associated private key. Alternately, a system or user can use a private key to “sign” a document and use a public key to decrypt this digital signature. This verifies the document’s source, which is why two keys are used.
A public key is usually bound to the owner’s digital certificate, and is available for anyone to use. A private key, however, is protected by, and available only to, the owner of the key. This limited access makes sure communications that use the key are kept secure.
Encrypt Decrypt7l$wP0^ 8a'!yUdSLjh^ 7GVda;0ydh. Minnesota in winter is
freezing cold, North Carolina is much warmer....
Minnesota in winter is freezing cold, North Carolina
is much warmer....Secret key Secret key
Chapter 9. Cryptographic support 219
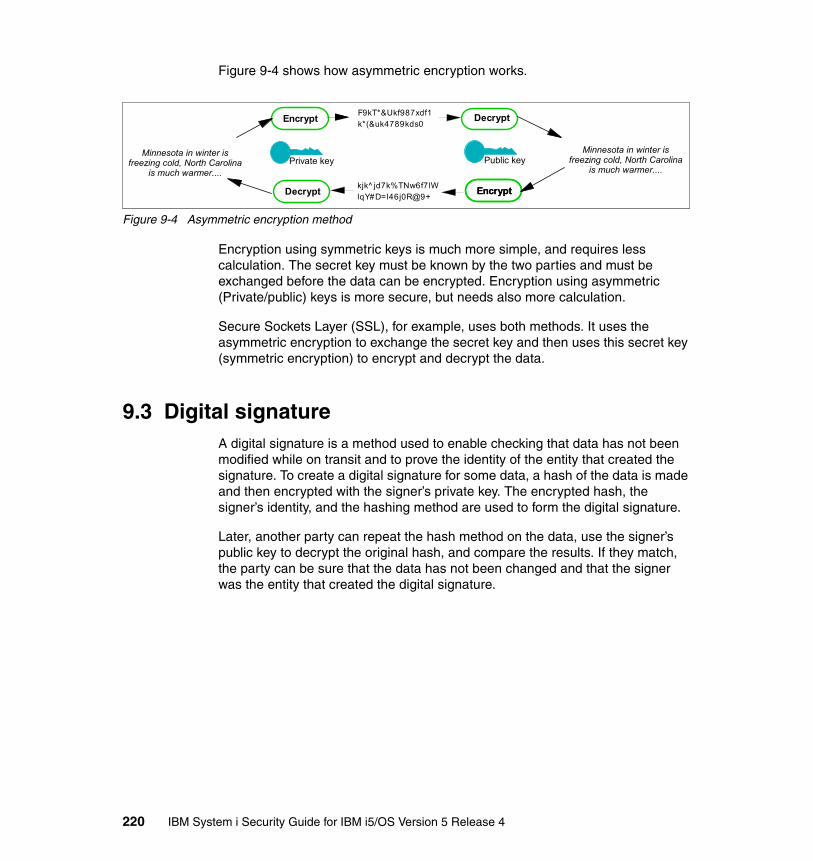
Figure 9-4 shows how asymmetric encryption works.
Figure 9-4 Asymmetric encryption method
Encryption using symmetric keys is much more simple, and requires less calculation. The secret key must be known by the two parties and must be exchanged before the data can be encrypted. Encryption using asymmetric (Private/public) keys is more secure, but needs also more calculation.
Secure Sockets Layer (SSL), for example, uses both methods. It uses the asymmetric encryption to exchange the secret key and then uses this secret key (symmetric encryption) to encrypt and decrypt the data.
9.3 Digital signatureA digital signature is a method used to enable checking that data has not been modified while on transit and to prove the identity of the entity that created the signature. To create a digital signature for some data, a hash of the data is made and then encrypted with the signer’s private key. The encrypted hash, the signer’s identity, and the hashing method are used to form the digital signature.
Later, another party can repeat the hash method on the data, use the signer’s public key to decrypt the original hash, and compare the results. If they match, the party can be sure that the data has not been changed and that the signer was the entity that created the digital signature.
Encrypt F9kT*&Ukf987xdf1k*(&uk4789kds0
Decrypt kjk^ jd7k%TNw6f7lWlqY#D=l46j0R@9+
Decrypt
EncryptEncrypt
Minnesota in winter is freezing cold, North Carolina
is much warmer....
Minnesota in winter is freezing cold, North Carolina
is much warmer....Private key Public key
220 IBM System i Security Guide for IBM i5/OS Version 5 Release 4
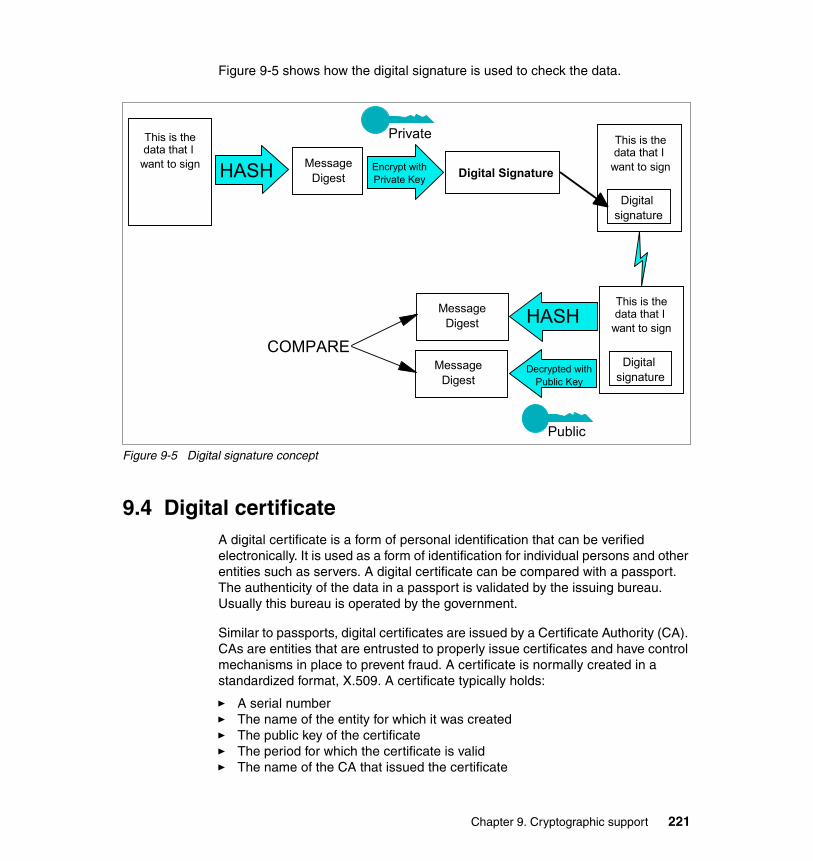
Figure 9-5 shows how the digital signature is used to check the data.
Figure 9-5 Digital signature concept
9.4 Digital certificateA digital certificate is a form of personal identification that can be verified electronically. It is used as a form of identification for individual persons and other entities such as servers. A digital certificate can be compared with a passport. The authenticity of the data in a passport is validated by the issuing bureau. Usually this bureau is operated by the government.
Similar to passports, digital certificates are issued by a Certificate Authority (CA). CAs are entities that are entrusted to properly issue certificates and have control mechanisms in place to prevent fraud. A certificate is normally created in a standardized format, X.509. A certificate typically holds:
� A serial number� The name of the entity for which it was created� The public key of the certificate� The period for which the certificate is valid� The name of the CA that issued the certificate
This is the data that I
want to signDigital Signature
Digital signature
Digital signature
MessageDigest
MessageDigest
MessageDigest
HASH Encrypt withPrivate Key
HASH
Decrypted withPublic Key
COMPARE
Private
Public
This is the data that I
want to sign
This is the data that I
want to sign
Chapter 9. Cryptographic support 221

Figure 9-6 shows the contents of a public key certificate.
Figure 9-6 Digital certificate
Figure 9-7 shows the details of a digital certificate structure.
Figure 9-7 Details of a public key digital certificate
CC ERTIFICATEERTIFICATE
Owner's Name: AS4B
CA
Owner's Public Key:
Issuer's Name: RALAS4CA
Issuer's Signature:
VersionSerial number
Signature (algorithm)Issuer (X.500 DN)
ValiditySubject (X.500 DN)
Subject Public Key InfoIssuer Unique Identifier (v2)
Subject Unique Identifier (v2)Extensions (v3):
Subject Alternative NameAuthority Key IdentifierSubject Key Identifier
CRL Distribution Points...
Signature AlgorithmSignature Value
222 IBM System i Security Guide for IBM i5/OS Version 5 Release 4
9.5 Digital Certificate ManagerThe System i platform provides extensive digital certificate support that allows you to use digital certificates as credentials in a number of security applications. In addition to using certificates to configure SSL, you can use them as credentials for client authentication in both SSL and virtual private network (VPN) transactions. You can also use digital certificates and their associated security keys to sign objects. Signing objects allows you to detect changes or possible tampering to object contents by verifying signatures on the objects to ensure their integrity.
Capitalizing on the system’s support for certificates is easy when you use Digital Certificate Manager (DCM). DCM is a free i5/OS feature that is available to centrally manage certificates for your applications. DCM allows you to manage certificates that you obtain from any CA. You can also use DCM to create and operate your own local CA to issue private certificates to applications and users in your organization.
9.5.1 Issuing certificatesYou can decide to operate your own CA using DCM to issue certificates and trust certificates only from this CA. Alternatively you can accept certificates issued by any well-known CA, once the certificate and associated entity have passed your security checks.
If your site will only be used within your intranet, you can create your own system certificate using your local CA. In this case, you can distribute your CA’s certificate to each employee or train employees to install the certificate in their own Web browsers or applications.
If your site will be available to the public, your certificate should come from a well-known CA. If you create your own CA and use it to sign your own system certificates, then users who visit your site will receive a series of questions, asking if they trust you and if they will accept your certificate.
9.5.2 Using DCMTo enable the cryptographic functions that use digital certificates on your System i machine, you need to use the DCM. DCM is the central tool on the system for managing digital certificates and secure applications. All system-provided, SSL-enabled applications are automatically registered in DCM. A system or client certificate must be assigned to an application to establish a secure connection. You can also operate your own local CA. When operating your own CA, you can issue user certificates for your i5/OS user profiles.
Chapter 9. Cryptographic support 223
DCM provides a graphical user interface (GUI) to manage digital certificates and all related functions.
9.5.3 PrerequisitesYou must have the following prerequisites installed on your System i machine to use DCM and SSL:
� 5722-SS1 option 34 of i5/OS - Digital Certificate Manager� 5722-SS1 option 35 of i5/OS - CCA Cryptographic Service Provider
This option is only required when using the 4758 or 4764 Cryptographic Coprocessor to protect a certificate’s private key.
� 5722-TC1 TCP/IP Connectivity Utilities� 5722-DG1 IBM HTTP Server� 5722-JV1 IBM Developer Kit for Java
This is required only for Java SSL and is not required for DCM and system SSL.
9.5.4 Accessing DCM componentsMost tasks are available only if your user profile has *ALLOBJ and *SECADM special authorities. To use DCM to verify object signatures, your user profile must also have *AUDIT special authority. To start and access the DCM functions:
1. If it is not already started, start the HTTP Administration server (*ADMIN) instance, using the following Start TCP Server (STRTCPSVR) CL command:
STRTCPSVR SERVER(*HTTP) HTTPSVR(*ADMIN)
Alternatively you can use iSeries Navigator to start the HTTP Administration server.
Note: Starting with V5R4, the cryptographic functions are enabled in the base operating system or, in case of the Client Encryption product, in the iSeries Access for Windows product. In releases prior to i5/OS V5R4, you needed the following licensed program products (LPP) to enable cryptographic functions in the operating system:
� 5722-AC3 (128-bit) Cryptographic Access Provider� 5722-CE3 (128-bit) Client Encryption
If you want to use SSL with any iSeries Access for Windows or IBM Toolbox for Java component, you must install 5722-CE3 (128-bit) Client Encryption. iSeries Access for Windows needs this product to establish a secure connection prior to i5/OS V5R4.
224 IBM System i Security Guide for IBM i5/OS Version 5 Release 4

2. Make sure the HTTP administration server (*ADMIN) is up and running under the QHTTPSVR subsystem, or verify that at least the port 2001 is in Listen state using the NETSTAT *CNN command.
3. From your Web browser, enter the following URL. Port number 2001 is used to access the HTTP Administration server (*ADMIN) instance.
http://your_System_i_machine:2001
4. Sign on to the Tasks page with a user profile that has *ALLOBJ and *SECADM special authorities.
5. From the Tasks page, click Digital Certificate Manager. Figure 9-8 shows the main DCM page that opens.
Figure 9-8 Digital Certificate Manager
Note: Users can only manage their user certificate, view the object signature for those objects to which they are authorized, or sign objects with the object signing applications they are authorized to use. Through the Application Administration interface of iSeries Navigator or through the equivalent Work with Function Usage (WRKFCNUSG) CL command, you can also authorized non-privileged users to access the *SYSTEM certificate store.
Chapter 9. Cryptographic support 225

9.5.5 More informationFor more information about DCM, see the following references:
� AS/400 Internet Security: Developing a Digital Certificate Infrastructure, SG24-5659
� IBM eServer iSeries Wired Network Security: OS/400 V5R1 DCM and Cryptographic Enhancements, SG24-6168
� V4 TCP/IP for AS/400: More Cool Things Than Ever, SG24-5190
� The iSeries Information Center path Security → Digital Certificate Manager
http://publib.boulder.ibm.com/infocenter/iseries/v5r4/index.jsp
9.6 Secure Sockets LayerWith the SSL protocol, you can establish secure connections between client and server applications which provide authentication of one or both endpoints of a communication session. SSL also provides privacy and integrity of the data that client and server applications exchange.
i5/OS also supports the Transport Layer Security (TLS) standard.
On the System i platform, most of the TCP/IP server applications can communicate over SSL, including the following applications:
� Applications that are written to the iSeries Access for Windows set of application programming interfaces (APIs)
� Applications that are developed using the secure sockets APIs supported on the System i platform
� Distributed Relational Database Architecture™ (DRDA) and distributed data management (DDM) server
� Enterprise Identity Mapping (EIM)
� File Transfer Protocol (FTP) server
� FTP client
� HTTP server (powered by Apache)
� IBM Directory Server (LDAP)
� iSeries Access for Windows
� Java applications that use the Java Secure Sockets Extension (JSSE)
The supported APIs are Global Secure Toolkit (GSKit) and the SSL_ iSeries native APIs.
226 IBM System i Security Guide for IBM i5/OS Version 5 Release 4
� Management Central server
� Telnet server
� IBM WebSphere® Application Server - Express
9.6.1 Securing applications with SSLSecure sockets consists of the following APIs or Java implementations:
� GSKit APIs� SSL_ APIs� JSSE
Currently, i5/OS supports three methods of creating secure socket applications. The GSKit APIs and SSL_ APIs provide communications privacy over an open communications network, which in most cases is the Internet. These APIs allow client/server applications to communicate in a way that is designed to prevent eavesdropping, tampering, and message forgery. Both server and client authentication allow an application to use the SSL protocol. However, GSKit APIs are supported across all IBM platforms, while SSL_ APIs are native to the i5/OS operating system.
To ensure interoperability across platforms, we recommend that you use GSKit APIs when developing applications for secure socket connections. Also the open source software, OpenSSL, can be used to develop applications that are SSL-enabled.
The third option for secure sockets applications is JSSE, a Java implementation of the SSL protocol. JSSE provides the following functions:
� Encrypts data� Authenticates remote user IDs� Authenticates remote system names� Performs client/server authentication� Ensures message integrity
Integrated into the Java 2 Software Development Kit, Standard Edition (J2SDK), version 1.4 and subsequent releases, JSSE provides more functionality than SSL does alone.
For more information about secure socket programming using APIs, refer to the path Programming → Communications → Socket programming → Socket concepts → Secure sockets in the iSeries Information Center. For JSSE, refer to the path Programming → Java → IBM Developer Kit for Java → Java Security → Java Secure Sockets Extension:
http://publib.boulder.ibm.com/infocenter/iseries/v5r4/index.jsp
Chapter 9. Cryptographic support 227

9.6.2 OpenSSLOpenSSL is an open source project that provides an SSL and TLS implementation. It supports the SSL version 2 and version 3 and TLS version 1 protocols. It also consists of a cryptographic library that supports the following algorithms:
� Symmetric ciphers (Blowfish, CAST, DES, IDEA, RC2, RC4, RC5)� Public key and key agreements (DSA, DH, RSA)� Authentication codes (HMAC, MD2, MD4, MD5, MDC2, RIPEMD, SHA)
OpenSSL also provides a command line utility under the same name. The OpenSSL utility can be used for the following tasks:
� Creation of the RSA, DH, and DSA key parameters� Creation of X.509 certificates, Certificate Signing Requests (CSRs) and
Certificate Revocation Lists (RCLs)� Calculation of message digests� Encryption and decryption with ciphers� SSL/TLS client and server tests� Handling of S/MIME signed or encrypted mail
OpenSSL can be used to create the environment that is needed to run SSL-enabled applications. The source code and documentation is available from the OpenSSL Web site at:
http://www.openssl.org
OpenSSL is part of the licensed program option (LPO) 5733-SC1, IBM Portable Utilities for i5/OS. For more information about this LPO, refer to 8.13.1, “Portable Utilities for i5/OS” on page 208.
9.6.3 Supported SSL and TLS protocolsThere are several versions of the SSL protocol defined. The latest version, TLS, is based on SSL 3.0 and is a product of the Internet Engineering Task Force (IETF). The i5/OS implementation supports the following versions of the SSL and TLS protocols:
� TLS version 1.0� TLS Version 1.0 with SSL Version 3.0 compatibility� SSL Version 3.0� SSL Version 2.0� SSL Version 3.0 with SSL Version 2.0 compatibility
228 IBM System i Security Guide for IBM i5/OS Version 5 Release 4

9.6.4 Using certificates within the SSL protocolThe SSL protocol uses certificates for:
� Data encryption and decryption
A secret key is generated for each session and used to encrypt and decrypt data. Secret keys have much better performance than public or private keys. However, to generate a secret key in a secure manner, the public key in the server’s certificate and the related private key are required.
One party, normally the server, sends its certificate to the client first. At this time, the server might also request a certificate from the client. Next the client creates the secret key, encrypts it with the other party’s public key, and sends the encrypted key back.
The first party uses its private key to decrypt the secret key. From that point, the secret key is used because encryption techniques with shared secret keys require much less computation than those using public and private key pairs. The secret key automatically expires after a specific time. After the session has expired, another handshake must be performed again.
� Data integrity
To detect any changes to data between the sender and receiver, a message digest is generated from the original data. This message digest is then encrypted and added to the sent data. When received, the message digest can be decrypted and compared with a newly calculated message digest.
� Authentication
Each party can use the other’s certificate to verify its identity. The SSL protocol has flexibility in this, and authentication will only be implemented if it is needed. Authentication allows you to check that the other party’s certificate is valid and is really the party with whom you are communicating.
– Server authentication
With server authentication, the client makes sure the server certificate is valid and that it is signed by a CA which the client trusts.
– Client authentication
Many applications allow the option to enable client authentication. With client authentication, the server ensures that the client certificate is valid and that it is signed by a CA that the server trusts. The following System i applications support client authentication:
• IBM HTTP Server (powered by Apache)• FTP server• Telnet server• LDAP server
Chapter 9. Cryptographic support 229

For more information about using certificates for authentication, refer to 12.3, “Digital certificates” on page 288.
9.6.5 SSL handshakeBefore data can be sent or received over a connection protected by the SSL protocol, a session must be established. Digital certificates play an important role within an SSL handshake, which has to flow in a predefined order using standard formats.
The handshake protocol is responsible for negotiating a Cipher Spec and generating a shared secret key. The Cipher Spec defines the kind of encryption (DES, RC, RC4) and authentication (MD5, SHA) algorithms that can be used for the communication session. Figure 9-9 illustrates the steps that are performed during the SSL handshake.
Figure 9-9 SSL handshake
Cipher Suite listsThe Cipher Suite lists for SSL-enabled applications are:
� TLS_RSA_WITH_RC4_128_MD5� TLS_RSA_WITH_RC4_128_SHA
Handshake
start
Client Server1. Requests a secure connection and sends supported CipherSuiteList (Client Hello)
Owner:SmithXYZ Corp.
Issuer:USPS
USPS
2. Sends the server's certificate to the client and chosen CipherSuite (Server Hello) optionally requests the client certificate
3. Checks trust status of the certificate
4. Optionally sends the client certificate to the server
5. Sends Server Hello Done and waits for the client response
Secure Data FlowApplication Data Application Data
8. Decrypts the premaster secret using server's private key
Secret key
Private
7. Sends the encrypted premaster secret to the server
6. Creates a premaster secret and encrypts it using the server's public key
Public
Secret key
04050A090306
050A
Allowedcipher suites
05
230 IBM System i Security Guide for IBM i5/OS Version 5 Release 4

� TLS_RSA_WITH_AES_128_CBC_SHA� TLS_RSA_WITH_AES_256_CBC_SHA� TLS_RSA_WITH_3DES_EDE_CBC_SHA� TLS_RSA_WITH_DES_CBC_SHA � TLS_RSA_EXPORT_WITH_RC4_40_MD5� TLS_RSA_EXPORT_WITH_RC2_CBC_40_MD5
9.6.6 Enabling SSL on System i standard server applicationsOn the System i platform, many TCP/IP server applications can communicate over SSL. The following sequence presents an overview of the steps that you must perform using DCM to enable SSL for the standard server applications:
1. Obtain a server certificate for your system. This server certificate can be obtained from a well-known Internet CA or from your System i machine configured as a intranet local CA.
If you want to use your System i machine as a local CA, in the left navigation pane, click Create a Certificate Authority (CA). Then you see the DCM panel on the right (Figure 9-10) to create the CA. Provide the necessary information to create the CA. After you create the CA, you are guided to also create a server certificate and then to assign this certificate to applications.
Figure 9-10 Creating a local CA
Chapter 9. Cryptographic support 231

2. Assign the server certificate to be associated with an application server. Figure 9-11 shows the DCM panel where you can assign a certificate to the server application.
Figure 9-11 Assigning a digital certificate to an application
3. Export the local CA certificate to the client system.
4. On the client system, restore and install the CA certificate received.
5. On the client system, specify your system local CA as a trusted CA.
Note: If the CA certificate has been issued by your local CA, it must be installed on the client system.
232 IBM System i Security Guide for IBM i5/OS Version 5 Release 4
9.6.7 More informationFor more information about SSL, see the following references:
� AS/400 Internet Security: Developing a Digital Certificate Infrastructure, SG24-5659
� IBM eServer iSeries Wired Network Security: OS/400 V5R1 DCM and Cryptographic Enhancements, SG24-6168
� The iSeries Information Center path Security → Digital Certificate Manager
http://publib.boulder.ibm.com/infocenter/iseries/v5r4/index.jsp
For a comparison of SSL with other technologies, refer to 10.5, “Comparison of IPSec, SSL, and OpenSSH” on page 256.
9.7 Hardware cryptographic supportThe IBM 4764 PCI Cryptographic Coprocessor hardware-based cryptographic adapter is available for the System i platform. The IBM 4764 PCI Cryptographic Coprocessor can offload portions of cryptographic processing from the host CPU. The host CPU issues requests to the coprocessor hardware. The hardware then executes the cryptographic function and returns the results to the host CPU. Because this hardware-based solution handles selected compute-intensive functions, the host CPU is available to support other system activity. SSL network communications can use this option to dramatically offload cryptographic processing related to establish an SSL session.
This option has a lot to offer to System i customers that require a high level of security for data that is stored on their system and for SSL transactions.
IBM 4758 PCI Cryptographic CoprocessorThe 4758 PCI Cryptographic Coprocessor provides cryptographic processing capability and secure storage of cryptographic keys. The main benefit of the 4758 Cryptographic Coprocessor is that it provides the capability to store encryption keys. It does this in a tamper-responding, battery backed-up module, which is also referred to as the secure module. You can use the Cryptographic Coprocessor to store the private key for a server or client certificate and for a local CA certificate.
Note: The following hardware-based cryptographic adapter solutions still run with i5/OS V5R4, but they have been withdrawn from marketing:
� IBM 4758 PCI Cryptographic Coprocessor� IBM 2058 Cryptographic Accelerator
Chapter 9. Cryptographic support 233

Another benefit of the 4758 Cryptographic Coprocessor is that it can be used to offload the System i main CPU from computational-intensive cryptographic processing during the establishment of an SSL session. User data encryption is still handled by the main CPU. The 4758 Cryptographic Coprocessor provides a role-based access control facility that allows you to enable and control access to individual cryptographic operations supported by the coprocessor.
IBM 2058 Cryptographic AcceleratorThe 2058 Cryptographic Accelerator provides a competitive option to customers who do not require the high security of a 4758 Cryptographic Coprocessor. However, these customers need the high cryptographic performance that hardware acceleration provides to offload a host processor.
The 2058 Cryptographic Accelerator has been designed to improve the performance of those SSL applications that do not require secure key storage. It does not provide tamper-resistant storage for keys such as the 4758 Cryptographic Coprocessor.
You can install up to four 2058 Cryptographic Accelerator cards in a System i machine. The 2058 Cryptographic Accelerator provides special hardware that is optimized for RSA encryption (modular exponentiation) with data key lengths up to 2048 bits.
IBM 4764 PCI Cryptographic Coprocessor The 4764 PCI Cryptographic Coprocessor is available for IBM POWER5 servers at i5/OS V5R3 or later. It supports secure storage of cryptographic keys in a tamper-resistant module, which is designed to meet FIPS 140-2 Level 4 security requirements. This cryptographic card offers the security and performance required to support On Demand Business and emerging digital signature applications.
For banking and finance applications, the 4764 Cryptographic Coprocessor delivers much improved performance for RSA and financial personal identification number (PIN) processing. IBM Common Cryptographic Architecture (CCA) APIs are provided to enable finance and other specialized applications to access the services of the coprocessor. For banking and finance applications, the 4674 Cryptographic Coprocessor is a replacement for the older 4758-023 Cryptographic Coprocessor.
The 4764 Cryptographic Coprocessor can also be used to improve the performance of high-transaction-rate secure Web applications that use SSL and TLS protocols. The 4764 Cryptographic Coprocessor offloads cryptographic processing associated with the establishment of an SSL/TLS session, freeing the System i machine for other processing.
234 IBM System i Security Guide for IBM i5/OS Version 5 Release 4
New device support is needed to support 4764 Cryptographic Coprocessor. When you purchase this coprocessor, the device support supplied by IBM eServer iSeries Cryptographic Device Manager (5733-CY1) is added to your order, provided that you are using the e-configurator. The Cryptographic Device Manager is a prerequisite for 4764 Cryptographic Coprocessor and must be installed before you use the coprocessor.
9.7.1 Software requirementsThe following software requirements are for using the hardware-based cryptographic support for the cryptographic coprocessors on the System i platform:
� 5722-SS1 option 35 - CCA Cryptographic Service Provider
� 5722-SS1 option 34 - Digital Certificate Manager
This is required if you are planning to use the Cryptographic Coprocessor configuration Web-based utility.
� 5722-TC1 TCP/IP Connectivity Utilities
This is required if you are planning to use the Cryptographic Coprocessor configuration Web-based utility.
� 5722-DG1 IBM HTTP Server
This is required if you are planning to use the Cryptographic Coprocessor configuration Web-based utility.
� 5733-CY1Cryptographic Device Manager
This is required if you are using the 4764 Cryptographic Coprocessor.
9.7.2 Examples for using the hardware cryptographic productsThe following examples indicate where hardware cryptographic products can be used:
� Enhance System i SSL performance
If the System i machine receives a high number of SSL transaction requests from the network, the 4764 Cryptographic Coprocessor can be used to perform cryptographic processing in the initiation of SSL transactions.
� Protect private keys with cryptographic hardware
You may need to increase the security of the System i digital certificate private keys that are associated with SSL-secured business transactions. The 4758 and 4764 Cryptographic Coprocessors can be used to both encrypt and store private keys associated with SSL transactions in the tamper-responding module.
Chapter 9. Cryptographic support 235

� Write i5/OS applications to use the Cryptographic Coprocessor using APIs
You can write an i5/OS application program using the CCA Cryptographic Service Provider (CSP) APIs that are part of 5722-SS1 option 35. For example, you can use these APIs to access the cryptographic services in the Cryptographic Coprocessors to verify a member’s PINs. i5/OS application programs written for the Cryptographic Coprocessor use the coprocessor to perform security-sensitive tasks and cryptographic operations.
9.7.3 Configuring the hardware Cryptographic CoprocessorThe easiest and fastest way to configure your Cryptographic Coprocessor is to use the Cryptographic Coprocessor configuration Web-based utility on the i5/OS Tasks page at the following URL:
http://your_System_i_machine:2001
The utility includes the basic configuration wizard that is used to configure a Cryptographic Coprocessor that has not been previously configured. This configuration must be done under a secure connection. If the HTTP server administration instance and SSL have not been previously configured, you must do that before you use the Cryptographic Coprocessor Configuration Wizard.
9.7.4 More informationFor more information about the hardware cryptographic products on the System i platform, see the following references:
� IBM eServer iSeries Wired Network Security: OS/400 V5R1 DCM and Cryptographic Enhancements, SG24-6168
� The iSeries Information Center path Security → Cryptographic hardware
http://publib.boulder.ibm.com/infocenter/iseries/v5r4/index.jsp
� CCA Basic Services Reference and Guide for the IBM 4758 PCI and IBM 4764 PCI-X Cryptographic Coprocessors Releases 2.53, 2.54, 3.20, and 3.23
http://www.ibm.com/security/cryptocards/pdfs/bs323mstr.pdf
� IBM eServer Cryptographic Hardware Products
http://www.ibm.com/security/cryptocards/
236 IBM System i Security Guide for IBM i5/OS Version 5 Release 4
9.8 Data encryption and key managementEncrypting data can be a challenging task. You must do thorough planning before you set up encryption or change applications. Planning includes the following tasks among others:
� Determining data types and the length of encrypted data in a database
� Deciding how to generate, store, maintain, and back up encryption keys, key encrypting keys, and master keys
� Defining the list of application objects that access encrypted data or store data in the encrypted form
� Defining data import and export processes for encrypted data
While this list does not cover all aspects of implementing an encryption solution, it gives you an idea of what you must be prepared for when doing such a project.
Object level access, resource protection, and system-level security must be set up correctly prior to starting an encryption project. Without proper object-level security, encryption does not make a lot of sense, because someone with *ALL authorities to objects or *ALLOBJ special authorities typically also has access to the encryption keys. Needless to say, many users with high authorities can then use keys to decrypt data, even though they are not supposed to.
Encryption is only as good as the protection of the encryption keys. If keys are not well protected and secured against unauthorized use, your encryption does not buy you any additional protection. Therefore, key management is one of the most important topics when dealing with encryption.
i5/OS provides a series of encryption and key management features that provide a programmer with all necessary functions to manage keys and perform encryption tasks. The range of functions allow for simple encryption techniques with a predefined set of options to more flexible functions that are more complex to integrate but also provide the highest level of protection.
The following sections introduce various encryption interfaces and discuss key management issues.
9.8.1 Key managementGenerating, maintaining, and protecting keys has a direct relationship to the level of protection that you gain with data encryption. Typically, you establish a hierarchy of keys that are used in an encryption system.
First you have data encryption keys. These keys are used to encrypt data before they are stored on disk. The data encryption keys, by default, are not protected.
Chapter 9. Cryptographic support 237
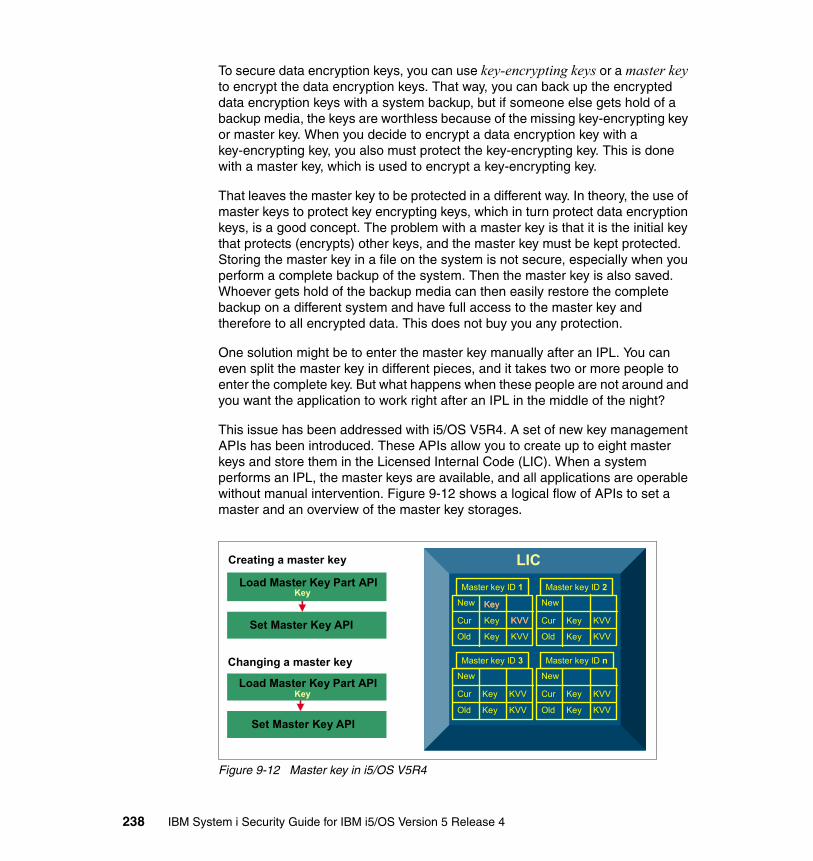
To secure data encryption keys, you can use key-encrypting keys or a master key to encrypt the data encryption keys. That way, you can back up the encrypted data encryption keys with a system backup, but if someone else gets hold of a backup media, the keys are worthless because of the missing key-encrypting key or master key. When you decide to encrypt a data encryption key with a key-encrypting key, you also must protect the key-encrypting key. This is done with a master key, which is used to encrypt a key-encrypting key.
That leaves the master key to be protected in a different way. In theory, the use of master keys to protect key encrypting keys, which in turn protect data encryption keys, is a good concept. The problem with a master key is that it is the initial key that protects (encrypts) other keys, and the master key must be kept protected. Storing the master key in a file on the system is not secure, especially when you perform a complete backup of the system. Then the master key is also saved. Whoever gets hold of the backup media can then easily restore the complete backup on a different system and have full access to the master key and therefore to all encrypted data. This does not buy you any protection.
One solution might be to enter the master key manually after an IPL. You can even split the master key in different pieces, and it takes two or more people to enter the complete key. But what happens when these people are not around and you want the application to work right after an IPL in the middle of the night?
This issue has been addressed with i5/OS V5R4. A set of new key management APIs has been introduced. These APIs allow you to create up to eight master keys and store them in the Licensed Internal Code (LIC). When a system performs an IPL, the master keys are available, and all applications are operable without manual intervention. Figure 9-12 shows a logical flow of APIs to set a master and an overview of the master key storages.
Figure 9-12 Master key in i5/OS V5R4
LIC
New
Old
Cur
Master key ID 1
New
Old
Cur
Master key ID 2
Key
Key KVV
KVV
New
Old
Cur
Master key ID 3
Key
Key KVV
KVV
New
Old
Cur
Master key ID n
Key
Key KVV
KVV
Load Master Key Part APIKey
Key
Set Master Key API KVV
Set Master Key API
Key
Load Master Key Part APIKey
Key
KVVKey
KVV
Creating a master key
Changing a master key
238 IBM System i Security Guide for IBM i5/OS Version 5 Release 4

The System i platform is capable of storing eight master keys, which cannot be directly modified or accessed by the user, including the security officer. These master keys are 256-bit Advanced Encryption Standard (AES) keys and can be used with the cryptographic services APIs to protect other keys.
Each master key is composed of three 32-byte values, called versions. The versions are new, current, and old.
� The new master key version contains the value of the master key while it is being loaded.
� The current master key version contains the active master key value. This is the value that will be used when a master key is specified on a cryptographic operation, unless specifically stated otherwise.
� The old master key version contains the previous current master key version. It is used to prevent the loss of data and keys when the master key is changed.
The server’s master keys are not saved as part of a SAVSYS operation. Therefore, the passphrases used with Load Master Key Part should be saved so that a master key can be restored in the event that it is lost. For example, the master keys are destroyed when the LIC is installed.
A master key can be used to encrypt key encrypting keys or data encryption keys in a key store file object. This is a new object that was introduced with V5R4. The key store file, as illustrated in a simplified manner in Figure 9-13, can hold asymmetric and symmetric keys. Only a single master key can be used to encrypt keys in a single key file, but several key stores can exist on the system that are encrypted under one master key or under different master keys.
Figure 9-13 Key store file
Key store: MYKEYSLibrary: KEYLIBPublic authority: *EXCLUDEMaster Key ID: 2
PublicKey
Key label
Key Type
Key Size
KVVMaster
EncryptedKey
Key label
Key Type
Key Size
KVVMaster
EncryptedPrivate Key
Asymmetric Key
Symmetric Key
Key Store
Chapter 9. Cryptographic support 239

Whenever a master key is changed, all keys encrypted under that master key require re-encryption.
Whenever a key is encrypted under a master key, the Key Verification Value for the current version of the master key is returned. Keys encrypted under a master key can be stored in a key store file or stored at the discretion of the user. When a key is stored in a key store file, the Key Verification Value of the master key is stored in the key record along with the key value. When a key encrypted under a master key is stored by the user, the user should also save the Key Verification Value. When a key encrypted under a master key is used on an API and the master key KVV is supplied, cryptographic services check the supplied Key Verification Value against the master key versions’ Key Verification Values.
If the supplied Key Verification Value matches the current version Key Verification Value, the operation proceeds normally. If the supplied KVV matches the old version Key Verification Value, the operation proceeds but returns a diagnostic to the API and to QSYSOPR informing the user that the key needs retranslation. If the supplied Key Verification Value matches neither Key Verification Value, the operation ends with an error.
The previously discussed key management and key store APIs are part of the Cryptographic Services APIs. This API set also provides other APIs to generate symmetric and asymmetric keys that are not protected under the V5R4 master key implementation.
9.8.2 DB2 for i5/OS built-in SQL encryptionA relatively simple way to encrypt data is to use the SQL built-in encryption functions. While they are simple to use, they do not provide all the options that you might need. For example, if you want to encrypt data with an AES encryption algorithm, the SQL built-in functions cannot be used. DB2 built-in encryption functions were introduced with i5/OS V5R3.
Encryption and decryption can be performed through standard SQL statements. The DB2 encryption allows you to encrypt data on a per column basis. The same or a different data encryption key can be used for different columns.
With V5R3, the RC2 block cipher algorithm is used for encryption. Other encryption algorithms are not supported with V5R3. The encryption key is derived by hashing a specified password with the MD5 hashing algorithm. In V5R4, support for 3DES was added. The internal encryption algorithm used is 3DES block cipher with padding; the 128-bit secret key is derived from the password using an SHA1 message digest.
240 IBM System i Security Guide for IBM i5/OS Version 5 Release 4

The password or passphrase can be specified on the encrypt function itself or set through a Set Encryption Password function before encryption takes place. For decryption, different functions are available for the different data types.
From an implementation point of view, the changes that are required within an application to use SQL encryption are not that complex. For example, you can use trigger programs to perform the encryption and views (logical files) to perform the decryption, or you can use embedded SQL in ILE applications.
SQL built-in encryption does not use specialized cryptographic hardware, such as the 4764 cryptographic coprocessor, to perform cryptographic functions. All cryptographic tasks are performed by the main CPU on a System i machine.
9.8.3 Cryptographic Services APIsCryptographic Services APIs were introduced with i5/OS V5R3. They can be used to ensure:
� Privacy of data� Integrity of data� Authentication of communicating parties� Non-repudiation of messages� Key management
Some of these APIs were also made available for OS/400 V5R2 users.
In V5R4 all APIs can use the main CPU to perform cryptographic functions. Some of the APIs can also perform their functions on the 2058 cryptographic accelerator. For more information about the 2058 adapter, see “IBM 2058 Cryptographic Accelerator” on page 234.
Cryptographic Services APIs can be used in any Integrated Language Environment® (ILE). The iSeries Information Center provides many examples of how to use these APIs. This API set is fairly simply to use and provides full flexibility in terms of algorithm selection and key management tasks. A programmer who wants to use these APIs should be familiar with basic cryptographic concepts.
Note: The 2058 adapter has now been withdrawn from marketing.
Chapter 9. Cryptographic support 241
9.8.4 Common Cryptographic Architecture APIsCCA APIs provide a variety of cryptographic processes and data security techniques. Your application program can call verbs to perform the following functions:
� Encrypt and decrypt information, typically using the 3DES algorithm in the cipher block chaining (CBC) mode to enable data confidentiality
� Hash data to obtain a digest or to process the data to obtain message authentication code (MAC) that is useful in demonstrating data integrity
� Create and validate digital signatures to demonstrate both data integrity and form the basis for non-repudiation
� Generate, encrypt, translate, and verify finance industry PINs and transaction validation codes with a comprehensive set of finance-industry-specific services
� Manage the various DES and RSA keys necessary to perform the previous operations
� Control the initialization and operation of CCA
The CCA APIs are designed so that a call can be issued from essentially any high-level programming language. The call, or request, is forwarded to the cryptographic-services access layer and receives a synchronous response. That is, your application program loses control until the access layer returns a response after processing your request.
CCA APIs are used together with a cryptographic coprocessor, such as the 4758-023 or 4764. The APIs are available with the operating system option 35 (CCA Cryptographic Service Provider).
CCA APIs provide the highest level of protection for cryptographic operations due to secure key store in a tamper-responding module on the cryptographic coprocessor card. All cryptographic operations are performed in the secure module. Due to the role-based access model for the cryptographic coprocessors, you can authorize a user or application to perform only certain functions on the coprocessor. For example, you can enable an application to only encrypt data, but not to decrypt the data. You then need a second application to handle the decryption. The CCA APIs are probably the most complex-to-use APIs of all cryptographic APIs for i5/OS.
242 IBM System i Security Guide for IBM i5/OS Version 5 Release 4

9.8.5 Summarization of System i cryptographic supportThe following tables highlight the System i cryptographic hardware and software support. Table 9-1 summarizes the status of the System i cryptographic hardware, functions, APIs, and i5/OS services that are supported by the cryptographic hardware.
Table 9-1 System i cryptographic hardware, availability, and support
i5/OS functions Cryptographic Coprocessor 4758
Cryptographic Accelerator 2058
Cryptographic Coprocessor 4764
i5/OS support V4R5 or later V5R2 or later V5R3 or later
Softwareprerequisites
5733-CY1 Cryptographic Device Manager
CCA CSP i5/OS option 35
CCA CSP i5/OS option 35
Marketing status Withdrawn,V5R4 support
Withdrawn,V5R4 support
Available
FIPS standards PUB 140-1 Lvl 3 PUB 140-2 Lvl 4
Cryptographic key storage Yes Yes
Offload i5/OS SSL session establishment
Yes Yes Yes
Financial transactions Yes Yes
Data encryption Yes Yes Yes
CCA APIs Yes Yes
CS APIs Yes
DB2 Universal Database SQL
5722-CR1 Cryptographic APIs a
a. 5722-CR1 Cryptographic APIs will be withdrawn from marketing after i5/OS V5R4. We recommend that youuse the CCA APIs or the CS APIs.
i5/OS SSL and JSSE Yes Yes Yes
i5/OS DCM Yes Yes
i5/OS IPSec, SSH
Network authentication services (NAS)
- - -
Chapter 9. Cryptographic support 243

Table 9-2 reviews the cryptographic APIs and i5/OS services that use cryptographic algorithms. It summarizes the functions that are provided by each of the APIs, the programming required, and the involved cryptographic hardware.
Table 9-2 Cryptographic APIs, functions and hardware involvement
API services CCA APIs CS APIs DB2 Universal Database SQL
i5/OS SSL, JSSE
i5/OS DCM
Cryptographic hardware support
4758, 4764 All APIs in CPU, some in 2058
No 4758, 4764, and 2058
4758, 4764
Key generation and management
Yes Yes
Financial transactions(PIN, SET, EMV)
Yes
Cryptographic functions, including data encryption
3DES, RSA, MD5, SHA1
SHA, MD5, DH, 3DES, AES and more
RC2, 3DES
Generate and store private key
Yes Yes Yes
SSL session establishment
Yes
Role-based access control
Yes
Programming required
RPG, C, Cobol
Any high-level language
SQL APIs and i5/OS functions
No, i5/OS function
244 IBM System i Security Guide for IBM i5/OS Version 5 Release 4
9.8.6 More informationFor more information about encryption methods on the System i platform, see the following references:
� Column Encryption in IBM DB2 UDB for iSeries, an SQL built-in encryption paper by Kent Milligan
http://www.ibm.com/servers/enable/site/education/wp/4682/4682.pdf
� Cryptographic Services API support for the 2058 Cryptographic Accelerator in the iSeries Information Center
http://publib.boulder.ibm.com/infocenter/iseries/v5r4/index.jsp?topic=/apis/qc3Compare.htm
� IBM Common Cryptographic Architecture (CCA) library
http://www.ibm.com/security/cryptocards/pcixcc/library.shtml
� IBM eServer Cryptographic Hardware Products
http://www.ibm.com/security/cryptocards/
� The following paths in the iSeries Information Center
http://publib.boulder.ibm.com/infocenter/iseries/v5r4/index.jsp
– Cryptographic Services APIs: Programming → APIs → APIs by category → Cryptographic Services
– Java encryption using the IBMJCE and IBMJCEFIPS JCE providers: Programming → Java → IBM Developer Kit for Java → Java security → Java Cryptography Extension
– SQL built-in encryption: Database → Reference → SQL Reference → Built-in functions
– System i cryptographic hardware: Security → Cryptography
Chapter 9. Cryptographic support 245

246 IBM System i Security Guide for IBM i5/OS Version 5 Release 4
Chapter 10. Virtual private network
A virtual private network (VPN) allows your company to securely extend its private intranet over the existing framework of a public network such as the Internet. With VPN, your company can control network traffic while providing important security features such as authentication and data privacy.
In this chapter, we provide information about VPN, explain how it is implemented by i5/OS, and a give brief overview of the options that are available to configure VPN with i5/OS.
10
Note: This chapter contains references to the iSeries Information Center for V5R4 page. On this page, you can simply click the iSeries Information Center, Version 5 Release 4 link in the navigation area and select the topics that are specified:
http://publib.boulder.ibm.com/infocenter/iseries/v5r4/index.jsp
© Copyright IBM Corp. 2005, 2006. All rights reserved. 247
10.1 Introduction to VPNThe goal of VPN is to use public telecommunication networks to conduct private data communications. Most VPN implementations use the Internet as the public infrastructure and a variety of specialized protocols to support private communications through the Internet.
VPN is an extension of an enterprise’s private intranet. You can use it across a public network, such as the Internet, creating a secure private connection, essentially through a private “tunnel”. VPNs securely convey information across the Internet, connecting other users to your system. These include:
� Remote users� Branch offices� Business partners and suppliers
VPN runs in the network layer of the TCP/IP layered communications stack model (layer 3). Specifically, VPN uses the IP Security Architecture (IPSec) open framework.
VPN uses the following IPSec protocols:
� Authentication Header (AH), which provides data origin authentication, data integrity, and replay protection
� Encapsulating Security Payload (ESP), which provides data confidentiality, data origin authentication, data integrity, and replay protection
� Internet Key Exchange (IKE), which provides a method for automatic key management
VPN also supports Layer 2 Tunnel Protocol (L2TP) VPN solutions. L2TP connections, which are also called virtual lines, provide cost-effective access for remote users by allowing a corporate network server to manage the IP addresses assigned to its remote users. Further, L2TP connections provide secure access to your system or network when you protect them with IPSec.
248 IBM System i Security Guide for IBM i5/OS Version 5 Release 4
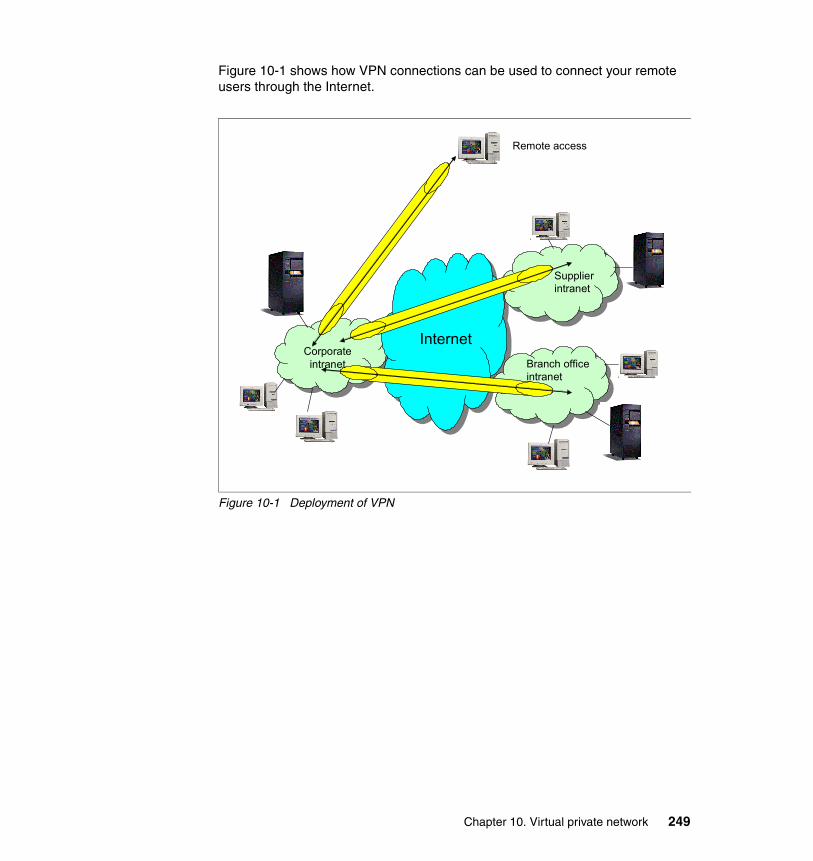
Figure 10-1 shows how VPN connections can be used to connect your remote users through the Internet.
Figure 10-1 Deployment of VPN
Corporateintranet
InternetBranch officeintranet
Supplierintranet
Remote access
Chapter 10. Virtual private network 249

10.2 VPN protocolsFigure 10-2 shows the TCP/IP layered protocol stack with the VPN- related protocols associated with each layer.
Figure 10-2 TCP/IP protocol stack with VPN-related protocols
IBM chose to use IPSec and L2TP for its VPN solutions for the following reasons:
� Open, standards-based, network layer security technology� Support of authentication, integrity checking, and encryption per packet
L2TP is a good companion for IPSec because it offers the following advantages:
� Open, standards-based link layer technology� Transports multiprotocol data over the Internet� Cost-effective (extends Point-to-Point Protocol (PPP) connections to
destination network)� Industry standard defined in RFC 2661� No inherent encryption features (uses IPSec for security)
Figure 10-3 summarizes the roles of the main VPN protocols. Note that establishing an L2TP connection is not essential but provides additional functionality. L2TP provides a virtual PPP tunnel across a network. It extends the corporate address space to the remote client.
L2TP provides the authentication methods of PPP, which include Password Authentication Protocol (PAP), Challenge Handshake Authentication Protocol (CHAP), and Extensible Authentication Protocol (EAP).
Data Link
IP(Internetwork)
TCP/UDP(Transport)
ApplicationsIKES-HTTPS-MIME
SOCKS V5SSL/TLSSSH
IPsec (AH, ESP)
L2TPPAPCHAP
250 IBM System i Security Guide for IBM i5/OS Version 5 Release 4

Figure 10-3 Summary of the main VPN protocols
10.2.1 SSL VPNRecently Secure Socket Layer (SSL) VPN has emerged as an additional VPN alternative. SSL VPN, also called Web VPN, provides remote secure access over the standard public Internet using only a Web browser and its native SSL encryption.
SSL VPN is used as a stand-alone remote access to corporate services. It serves mobile users that sometimes need access to the corporate intranet from a public Internet access location. There is no need to install any software on the user workstation. Only an SSL-enabled Web browser is required. Users authenticate to a Web portal and download a small plug-in. Transparent to the user, these plug-ins take the client/server traffic and tunnel it over SSL.
SSL typically requires more processing resources from the gateway than IPSec. Since no native software is installed with the client, there is a limited ability to push security software to the endpoint, such as a personal firewall.
PPP
L2TP
L2TP is an enhanced link protocol that providesa multi-hop virtual circuit through the Internet
IPsecPolicies
IPSecPolicies
Based on pre-configuredpolicies, the key values andparameters are set with theInternet Key Exchange protocol
ISP ISP
5%98ssoiu4-8**pasoui 4-dsdpf
3. L2TPOpen the linkthat creates thecircuit
1. IKEGenerate theencryption keysand policies
2. IPsecTransfer the dataencrypted at the IP layer The secure “tunnel” encrypts all data at the
IP layer and uses special IP headers to identify the tunnel in use
Important: SSL VPN is not supported on i5/OS.
Chapter 10. Virtual private network 251
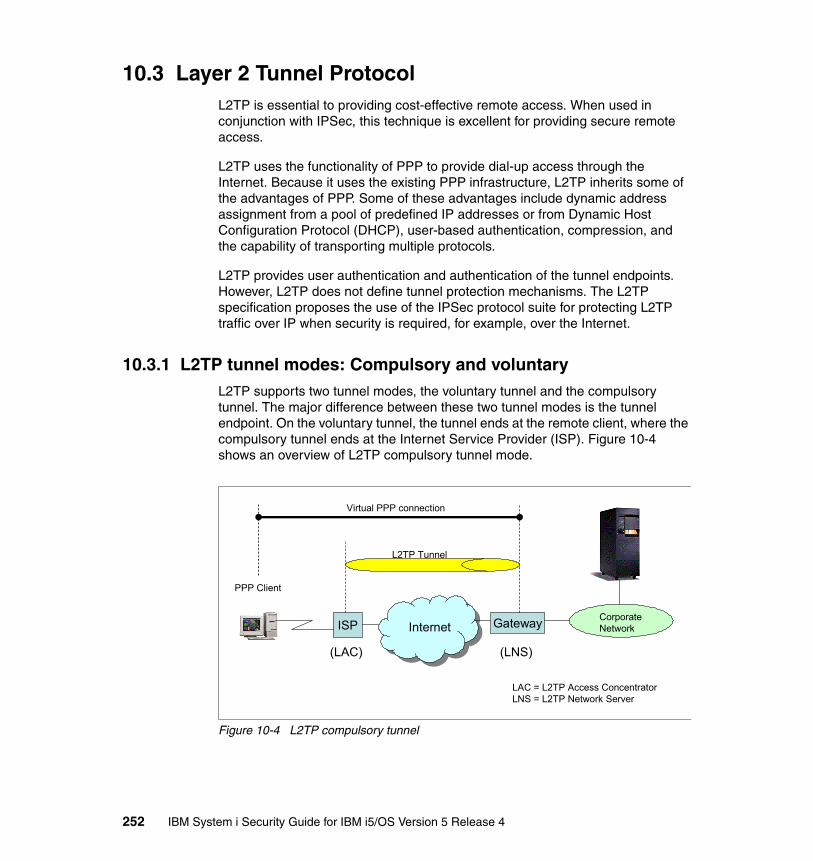
10.3 Layer 2 Tunnel ProtocolL2TP is essential to providing cost-effective remote access. When used in conjunction with IPSec, this technique is excellent for providing secure remote access.
L2TP uses the functionality of PPP to provide dial-up access through the Internet. Because it uses the existing PPP infrastructure, L2TP inherits some of the advantages of PPP. Some of these advantages include dynamic address assignment from a pool of predefined IP addresses or from Dynamic Host Configuration Protocol (DHCP), user-based authentication, compression, and the capability of transporting multiple protocols.
L2TP provides user authentication and authentication of the tunnel endpoints. However, L2TP does not define tunnel protection mechanisms. The L2TP specification proposes the use of the IPSec protocol suite for protecting L2TP traffic over IP when security is required, for example, over the Internet.
10.3.1 L2TP tunnel modes: Compulsory and voluntaryL2TP supports two tunnel modes, the voluntary tunnel and the compulsory tunnel. The major difference between these two tunnel modes is the tunnel endpoint. On the voluntary tunnel, the tunnel ends at the remote client, where the compulsory tunnel ends at the Internet Service Provider (ISP). Figure 10-4 shows an overview of L2TP compulsory tunnel mode.
Figure 10-4 L2TP compulsory tunnel
ISP Gateway CorporateNetwork
PPP Client
(LAC) (LNS)
Internet
Virtual PPP connection
L2TP Tunnel
LAC = L2TP Access ConcentratorLNS = L2TP Network Server
252 IBM System i Security Guide for IBM i5/OS Version 5 Release 4

Figure 10-5 shows an overview of L2TP voluntary tunnel mode.
Figure 10-5 L2TP voluntary tunnel
The L2TP compulsory tunnel does not require any configuration on the remote client. The ISP has to provide the L2TP Access Concentrator (LAC) function. The corporate network side has to provide the necessary network and access information to the ISP. A tunnel is created without any action from the user and without allowing the user any choice.
There are several key characteristics of L2TP compulsory tunneling:
� The client is not assigned a globally routable IP address. Therefore, it is protected against intrusion from the Internet. It cannot access the Internet directly, but only though the corporate gateway.
� The client does not need to support L2TP functions.
� The L2TP tunnel is transparent to the client.
� The ISP must support LAC functions.
� The ISP initiates the L2TP tunnel.
� L2TP tunnel is between the ISP and corporate network gateway.
The L2TP voluntary tunnel requires additional configuration on the remote client. In voluntary tunneling, a tunnel is created by the user, typically by using an L2TP-enabled client. As a result, the L2TP-enabled client sends L2TP packets to the network-attached storage (NAS) in the ISP, which forwards them on to the L2TP network server (LNS). In voluntary tunneling, the NAS in the ISP does not
ISP Gateway CorporateNetwork
L2TP Client
(LAC) (LNS)
Internet
Virtual PPP connection
L2TP Tunnel
LAC = L2TP Access ConcentratorLNS = L2TP Network Server
Physical PPP connection
Chapter 10. Virtual private network 253

need to support L2TP, and the L2TP Access Concentrator (LAC) resides on the remote client.
There are also several key characteristics of L2TP voluntary tunneling:
� The remote dial-in client must support LAC functions.
� The configuration of the remote client is more complex.
� The ISP does not need to provide LAC services, and it is not involved in establishing the tunnel.
� The combined role of the client (user and LAC on the same system) is transparent to the corporate gateway.
� The L2TP client is the initiator of the connection and the tunnel to the LNS.
� The client is assigned a globally routable IP address by the ISP and has direct access to Internet.
� Multiple sessions to multiple LNS are possible.
VPN tunnels comparisonThree main VPN tunnel types can be built over the Internet. Assuming that the L2TP tunnels are protected by IPSec so that all compared tunnels have the same level of security, the following points summarize the position of the VPN tunnels:
� L2TP compulsory tunnel protected by IPSec
– This is best suited for home office workers and branch office gateways where the services of the same ISP that provides LAC support can be used.
– There are no global IP address assigned to the remote client, reducing the need for firewalls or extra filters at the remote client.
– It does not require L2TP-capable clients.
� L2TP voluntary tunnel protected by IPSec
– This is best suited for mobile or traveling workers that need to access the Internet through different ISPs, where the LAC support at the ISP cannot be guaranteed.
– Global and private corporate IP addresses are assigned to the client, allowing direct access to the Internet.
� Native IPSec tunnels
– This is best suited for remote sites where the network gateway is connected to the Internet through dedicated links and fixed IP addresses.
– Create a secure tunnel providing authentication, integrity, encryption, and dynamic key generation even if L2TP support is not available.
254 IBM System i Security Guide for IBM i5/OS Version 5 Release 4
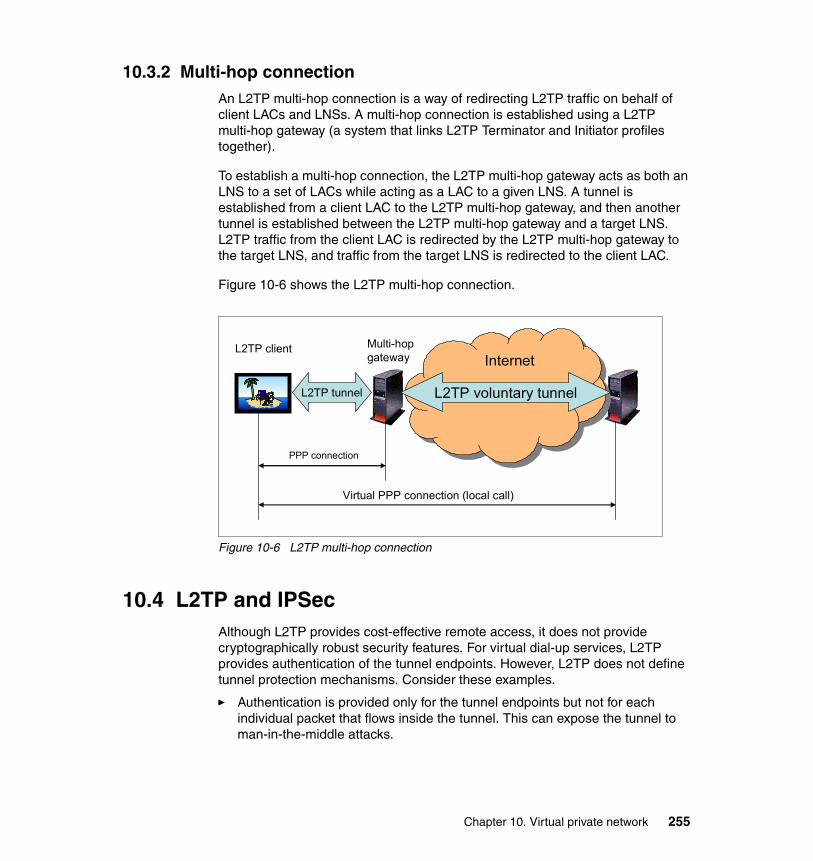
10.3.2 Multi-hop connectionAn L2TP multi-hop connection is a way of redirecting L2TP traffic on behalf of client LACs and LNSs. A multi-hop connection is established using a L2TP multi-hop gateway (a system that links L2TP Terminator and Initiator profiles together).
To establish a multi-hop connection, the L2TP multi-hop gateway acts as both an LNS to a set of LACs while acting as a LAC to a given LNS. A tunnel is established from a client LAC to the L2TP multi-hop gateway, and then another tunnel is established between the L2TP multi-hop gateway and a target LNS. L2TP traffic from the client LAC is redirected by the L2TP multi-hop gateway to the target LNS, and traffic from the target LNS is redirected to the client LAC.
Figure 10-6 shows the L2TP multi-hop connection.
Figure 10-6 L2TP multi-hop connection
10.4 L2TP and IPSecAlthough L2TP provides cost-effective remote access, it does not provide cryptographically robust security features. For virtual dial-up services, L2TP provides authentication of the tunnel endpoints. However, L2TP does not define tunnel protection mechanisms. Consider these examples.
� Authentication is provided only for the tunnel endpoints but not for each individual packet that flows inside the tunnel. This can expose the tunnel to man-in-the-middle attacks.
L2TP voluntary tunnelL2TP tunnel
L2TP client Multi-hopgateway Internet
PPP connection
Virtual PPP connection (local call)
Chapter 10. Virtual private network 255

� Without per-packet integrity, it is possible to mount denial-of-service attacks by generating bogus control messages that can terminate either the L2TP tunnel or the underlying PPP connection.
� L2TP itself provides no facility to encrypt user data traffic.
� While the payload of the PPP packet can be encrypted, the PPP suite does not provide mechanisms for automatic key generation or automatic key refresh.
10.5 Comparison of IPSec, SSL, and OpenSSHFigure 10-2 on page 250 shows that SSL is implemented in the transport layer (Transmission Control Protocol/User Datagram Protocol (TCP/UDP)). It also requires modification of the applications that use it. Only those TCP/IP server and client applications written to SSL can use this protocol.
In contrast, secure tunneling protocols, such as IPSec, on which i5/OS VPN support is based, are implemented in the network layer (IP) of the TCP/IP stack. Network-layer security protocols provide blanket protection for the upper-layer application without requiring modification of the upper layer applications that use the secure tunnel. After a host supports IPSec, all TCP/IP applications are protected without any changes to the application. This provides the virtual network view of the interconnected VPN hosts.
It is important to note that, both the server and the client must be SSL-enabled to participate in an SSL session. For example, the System i Telnet server is SSL-enabled, but the Telnet client is not. Therefore, you cannot use a Telnet 5250 emulation session to access the Telnet server running over SSL. You need to use an SSL-enabled 5250 emulator such as IBM Personal Communications.
To participate in a VPN connection, either the host or the intervening security gateway must support compatible VPN protocols.
SSL offers more granularity for authentication which is provided for each application independent of one another. SSL authenticates the user-based on a user digital certificate, while VPN authenticates the hosts.
Secure Shell (SSH) is common in UNIX and Linux®. SSH was originally designed to provide mainly a secure remote login to and a file transfer utility between remote computers. OpenSSH is the Open Source version of SSH, which is implemented by i5/OS.
SSH offers an option to establish secure connections based on public key authentication. For instance, you do not need to store a user ID and password as part of your file transfer script if you intend to run the file transfer as a batch job.
256 IBM System i Security Guide for IBM i5/OS Version 5 Release 4
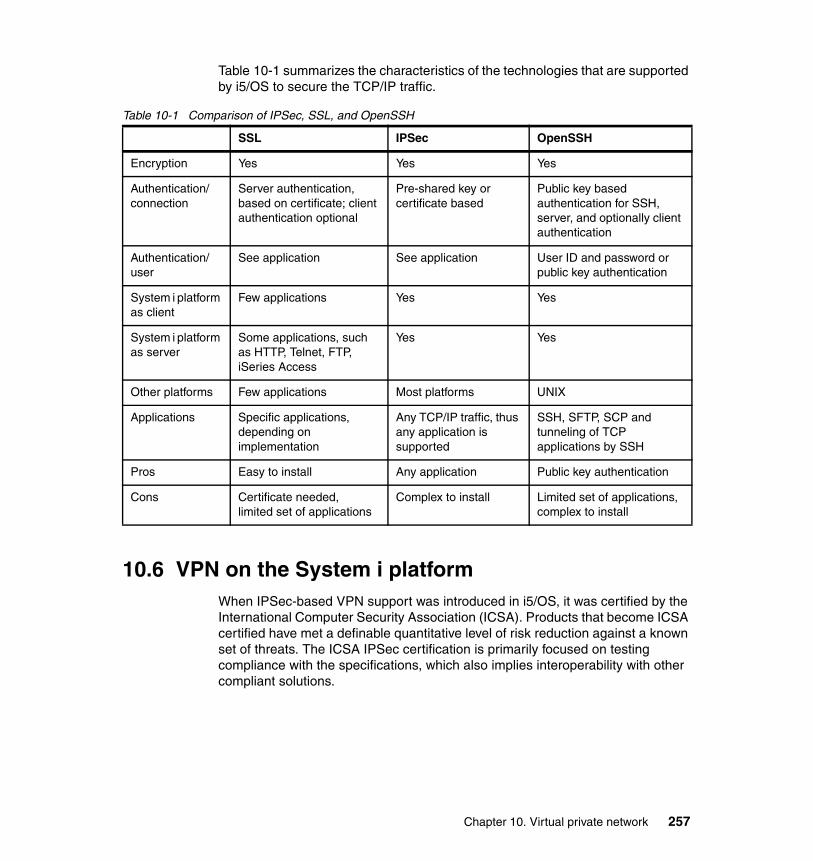
Table 10-1 summarizes the characteristics of the technologies that are supported by i5/OS to secure the TCP/IP traffic.
Table 10-1 Comparison of IPSec, SSL, and OpenSSH
10.6 VPN on the System i platformWhen IPSec-based VPN support was introduced in i5/OS, it was certified by the International Computer Security Association (ICSA). Products that become ICSA certified have met a definable quantitative level of risk reduction against a known set of threats. The ICSA IPSec certification is primarily focused on testing compliance with the specifications, which also implies interoperability with other compliant solutions.
SSL IPSec OpenSSH
Encryption Yes Yes Yes
Authentication/connection
Server authentication, based on certificate; client authentication optional
Pre-shared key or certificate based
Public key based authentication for SSH, server, and optionally client authentication
Authentication/user
See application See application User ID and password or public key authentication
System i platform as client
Few applications Yes Yes
System i platform as server
Some applications, such as HTTP, Telnet, FTP, iSeries Access
Yes Yes
Other platforms Few applications Most platforms UNIX
Applications Specific applications, depending on implementation
Any TCP/IP traffic, thus any application is supported
SSH, SFTP, SCP and tunneling of TCP applications by SSH
Pros Easy to install Any application Public key authentication
Cons Certificate needed,limited set of applications
Complex to install Limited set of applications, complex to install
Chapter 10. Virtual private network 257

The following list summarizes the main features of i5/OS VPN support:
� IPSec protocol
– Authentication Header – Encapsulated Security Payload – Internet Key Exchange
� Manual connections
– SPI values, cryptographic keys are predefined and manually refreshed.– Use manual connections when the VPN partner does not support IKE.– Configuration is not supported by the VPN configuration wizard.
� Dynamic key connections
– IKE, AH, and ESP protocols are supported, according to the latest Request For Comments (RFC) specifications.
– They support the IKE protocol for dynamic key generation and refresh.– They use pre-shared key or RSA Signature authentication.– The configuration is supported by the VPN configuration wizard.
You achieve additional security if the VPN partners are protected behind a NAT firewall and both client and server support NAT traversal. The i5/OS VPN client and server both support NAT traversal as of V5R4.
10.6.1 VPN prerequisitesThe following items are required to be installed and configured along with i5/OS before you set up a VPN:
� 5722-SS1 option 34 - Digital Certificate Manager� 5722-XE1 (iSeries Access for Windows) and iSeries Navigator� 5722-AC3 Cryptographic Access Provider (on V5R3 or earlier)� Retain Server Security Data (QRETSVRSEC) system value set to 1� TCP/IP, including the IP interfaces, routes, local host name, and local domain
name
10.6.2 Configuring VPNiSeries Navigator’s network component provides the IP packet security and VPN graphical user interfaces (GUIs), which are required for VPN configuration. In turn, the VPN GUI provides the New Connection Wizard, which simplifies the process of creating VPN connections for dynamic key connections and dynamic IP groups. The iSeries Navigator Network component is also used to create virtual PPP connections, which are required for L2TP connections.
iSeries Navigator provides a wizard which allows you to create a VPN between any combination of hosts and gateways, such as host-to-host, gateway-to-host,
258 IBM System i Security Guide for IBM i5/OS Version 5 Release 4
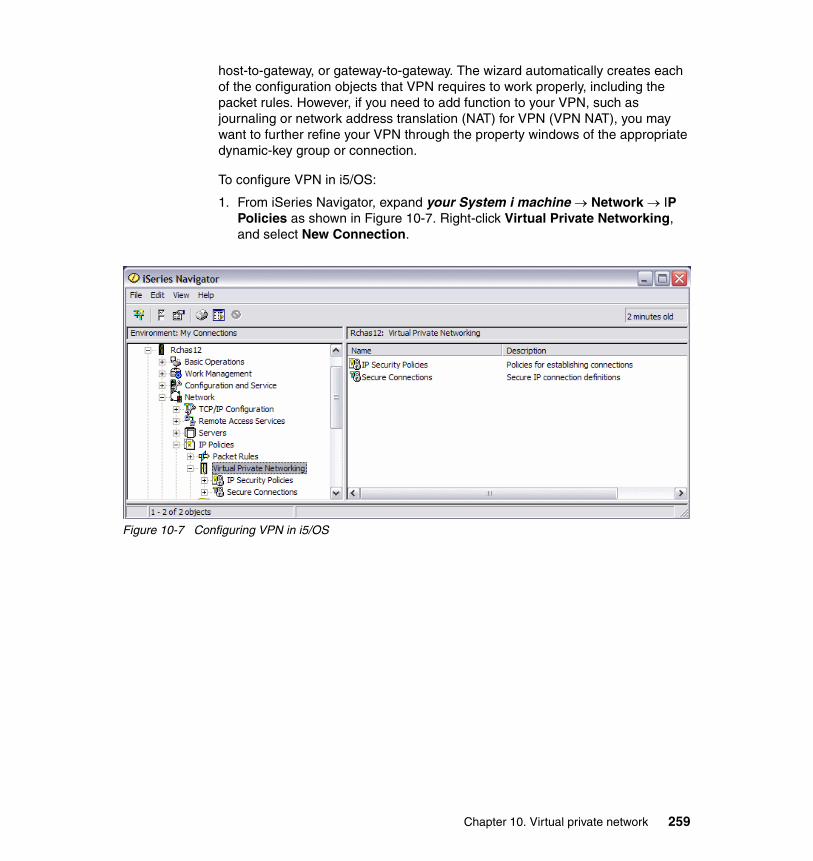
host-to-gateway, or gateway-to-gateway. The wizard automatically creates each of the configuration objects that VPN requires to work properly, including the packet rules. However, if you need to add function to your VPN, such as journaling or network address translation (NAT) for VPN (VPN NAT), you may want to further refine your VPN through the property windows of the appropriate dynamic-key group or connection.
To configure VPN in i5/OS:
1. From iSeries Navigator, expand your System i machine → Network → IP Policies as shown in Figure 10-7. Right-click Virtual Private Networking, and select New Connection.
Figure 10-7 Configuring VPN in i5/OS
Chapter 10. Virtual private network 259

2. The New Connection wizard starts. You see a welcome window like the example in Figure 10-8. Click Next.
Figure 10-8 New VPN connection wizard
260 IBM System i Security Guide for IBM i5/OS Version 5 Release 4

3. In the Connection Scenario window (Figure 10-9), specify the type of VPN to create. In this example, we select Connect your gateway to another gateway. Click Next.
Figure 10-9 Selecting the VPN type
Determining how you will use your VPN is one of the first steps in successful planning. To do this, you need to understand the role that both the local key server and the remote key server play in the connection:
– Connect your gateway to another gateway
The connection endpoints of both systems are different from the data endpoints. The IPSec protocol protects traffic as it travels between the gateways. However, IPSec does not protect data traffic on either side of the gateways within the internal networks. This is a common setup for connections between branch offices because traffic that is routed beyond the branch office gateways, into the internal networks, is often considered trusted.
Chapter 10. Virtual private network 261

– Connect your gateway to another host
IPSec protects data traffic as it travels between your gateway and a host in a remote network. VPN does not protect data traffic in the local network because you consider it trusted.
– Connect your host to another gateway
VPN protects data traffic as it travels between a host in the local network and a remote gateway. VPN does not protect data traffic in the remote network.
– Connect your host to another host
The connection endpoints are the same as the data endpoints on both the local and the remote systems. VPN protects data traffic as it travels between a host in the local network and a host in the remote network. This type of VPN provides end-to-end IPSec protection.
After the wizard creates the VPN configuration objects, you can customize the parameters that are configured by using the VPN GUI.
10.7 Configuring L2TPThe L2TP tunnel is configured through a PPP profile. If the L2TP tunnel is protected by IPSec, a VPN configuration is also required. iSeries Navigator’s Network component provides the configuration GUIs for PPP profiles and VPN.
To configure the L2TP tunnel, you must configure a PPP connection profile with a line connection type of Virtual line:
1. From iSeries Navigator, expand your System i machine → Network → Remote Access Services. Right-click Originator Connection Profiles or Receiver Connection Profiles depending your configuration, and select New Profile.
262 IBM System i Security Guide for IBM i5/OS Version 5 Release 4

2. In the New Point-to-Point Connection Profile Setup window (Figure 10-10), select L2TP (virtual line) for the connection type. Then click OK.
Figure 10-10 PPP configuration
10.7.1 Protecting an L2TP tunnel with IPSecTo protect an L2TP tunnel with IPSec:
1. Configure VPN along with i5/OS.2. Configure a PPP connection profile and virtual line.3. Apply the dynamic-key group created during the VPN configuration to your
PPP profile.
Chapter 10. Virtual private network 263
10.7.2 More informationFor more information and detailed instructions to configure VPN and L2TP in i5/OS, see the following references:
� AS/400 Internet Security: Implementing AS/400 Virtual Private Networks, SG24-5404
� OS/400 V5R2 Virtual Private Networks: Remote Access to the IBM eServer iSeries Server with Windows 2000 VPN Clients, REDP-0153
� TCP/IP Tutorial and Technical Overview, GG24-3376
� The iSeries Information Center path Security → Virtual Private Networking (VPN)
http://publib.boulder.ibm.com/infocenter/iseries/v5r4/index.jsp
264 IBM System i Security Guide for IBM i5/OS Version 5 Release 4

Chapter 11. Firewalls
There are several considerations to make when selecting a security solution, whether you plan to consolidate servers onto the System i platform or secure existing systems as they become accessible through the Web. A firewall can significantly improve the level of site security, while permitting access to vital Internet services. A firewall is basically the first line of defense for your network. The basic purpose of a firewall is to keep uninvited guests from browsing your network.
In this chapter, we present an overview of the Linux firewall solution running on the System i platform. We discuss several approaches for implementing a firewall solution using a Linux system running in a System i logical partition (LPAR).
11
Note: This chapter contains references to the iSeries Information Center for V5R4 page. On this page, you can simply click the iSeries Information Center, Version 5 Release 4 link in the navigation area and select the topics that are specified:
http://publib.boulder.ibm.com/infocenter/iseries/v5r4/index.jsp
© Copyright IBM Corp. 2005, 2006. All rights reserved. 265

11.1 Introduction to firewallsWhen connecting to an untrusted network, your security policy must describe a comprehensive security scheme, including the security measures that you will implement at the network level. Installing a firewall is one of the best means of deploying a comprehensive set of network security measures.
Also, your Internet Service Provider (ISP) can and should provide an important element in your network security plan. Your network security scheme should outline what security measures your ISP will provide, such as filtering rules for the ISP router connection and public Domain Name Service (DNS) precautions.
Although a firewall represents one of your main lines of defense in your total security plan, it should not be your only line of defense. Because potential Internet security risks can occur at a variety of levels, you need to set up security measures that provide multiple layers of defense against these risks.
While a firewall provides a tremendous amount of protection from certain kinds of attack, a firewall is only part of your total security solution. For instance, a firewall cannot protect data that you send over the Internet through applications such as SMTP mail, FTP, and Telnet. Unless you choose to encrypt this data, anyone on the Internet can access it as it travels to its destination.
Consider using a firewall product as your main line of defense whenever you connect your system or your internal network to the Internet. A firewall is a blockade between a secure internal network and an untrusted network such as the Internet. Most companies use a firewall to connect an internal network safely to the Internet, although you can also use a firewall to secure one internal network from another.
11.2 External firewall conceptsA firewall is a collection of hardware and software that, when used together, prevent unauthorized access to a portion of a network. A firewall consists of the following components:
� Hardware: Firewall hardware usually consists of a separate computer or device dedicated to running the firewall software functions.
� Software: Firewall software provides a variety of applications. In terms of network security, a firewall provides these security controls through a variety of technologies.
266 IBM System i Security Guide for IBM i5/OS Version 5 Release 4

A basic firewall implementation consists of one firewall between the internal network and the Internet as shown in Figure 11-1. Systems on the Internet are blocked by the firewall from accessing any machine on the internal network. Systems on the internal network can send and receive data to the Internet.
Figure 11-1 Basic firewall implementation
11.2.1 Demilitarized zoneA demilitarized zone (DMZ) is a separate network used to control access to the systems inside, avoiding direct access from other networks to these systems. The DMZ sits between the Internet and an internal network’s line of defense. The DMZ can be architected in many varieties, but it is essential in keeping Web application servers accessible and usable, and back-end systems secure.
A DMZ is a secure network segment typically used that contains Web (HTTP) servers, File Transfer Protocol (FTP) servers, Simple Mail Transfer Protocol (SMTP, e-mail) servers, and DNS servers. The DMZ is accessible by both Internet and internal users.
InternetInternetInternal network
Firewall
Chapter 11. Firewalls 267

Figure 11-2 shows an example of an environment with two external firewalls and a DMZ between.
Figure 11-2 Dual firewall with a DMZ between
In this configuration, the network segment within the firewalls is a segment where the Internet and intranet users cannot get in without passing through one of the firewalls. If a user on the Internet wants to access a machine in the DMZ, they must pass through the perimeter firewall. Internal users can access the same machine in the DMZ, but they must first pass through the internal firewall. Machines on the internal network are to send and receive data to and from the Internet, which must pass through both firewalls.
When using multiple firewalls, consider using different types of implementations of the firewall, so that any security flaw that may exist in one will probably not exist in the other.
Figure 11-3 shows what is commonly referred to as a three-legged firewall solution. In this implementation, the DMZ uses a third network interface on the firewall. This firewall functions are similar to the DMZ between two firewalls, but the internal network, as shown in Figure 11-2, has an additional layer of security. In Figure 11-3, if someone breaks into the firewall, it may be easier to gain access to other network segments.
InternetInternet
Internal network
System i in the DMZbetween two firewalls
Perimeterfirewall
Internal firewall
268 IBM System i Security Guide for IBM i5/OS Version 5 Release 4
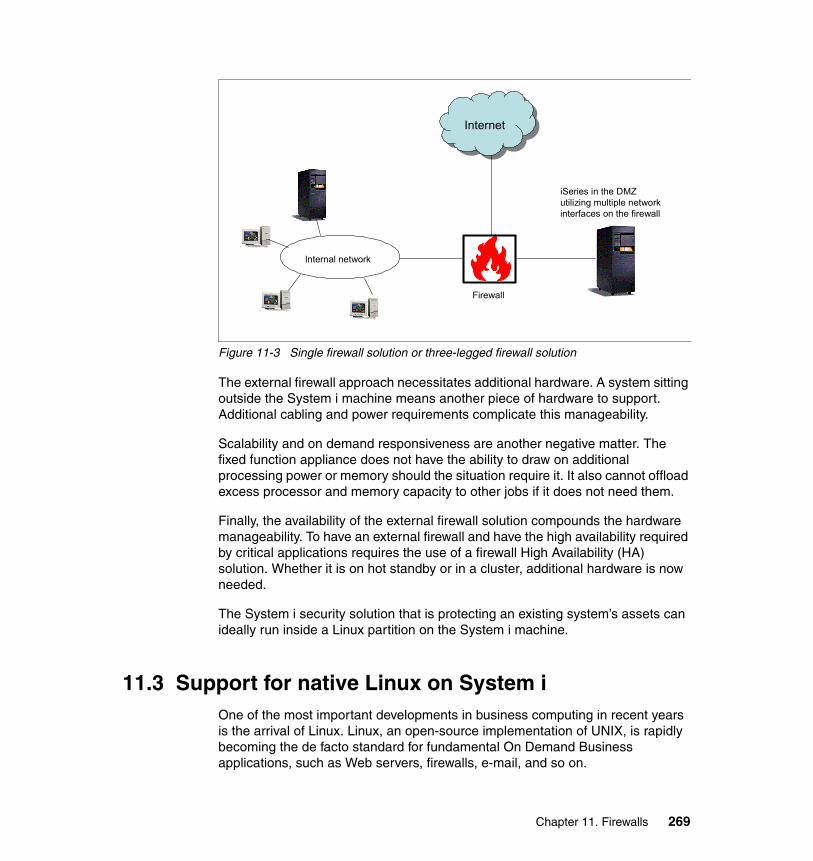
Figure 11-3 Single firewall solution or three-legged firewall solution
The external firewall approach necessitates additional hardware. A system sitting outside the System i machine means another piece of hardware to support. Additional cabling and power requirements complicate this manageability.
Scalability and on demand responsiveness are another negative matter. The fixed function appliance does not have the ability to draw on additional processing power or memory should the situation require it. It also cannot offload excess processor and memory capacity to other jobs if it does not need them.
Finally, the availability of the external firewall solution compounds the hardware manageability. To have an external firewall and have the high availability required by critical applications requires the use of a firewall High Availability (HA) solution. Whether it is on hot standby or in a cluster, additional hardware is now needed.
The System i security solution that is protecting an existing system’s assets can ideally run inside a Linux partition on the System i machine.
11.3 Support for native Linux on System iOne of the most important developments in business computing in recent years is the arrival of Linux. Linux, an open-source implementation of UNIX, is rapidly becoming the de facto standard for fundamental On Demand Business applications, such as Web servers, firewalls, e-mail, and so on.
InternetInternet
Internal network
iSeries in the DMZutilizing multiple networkinterfaces on the firewall
Firewall
Chapter 11. Firewalls 269

The System i platform allows Linux to run natively in an LPAR. In this environment, Linux runs in its own isolated LPAR, allowing you to manage it as though it were on a separate physical system.
On LPAR capable systems prior to POWER5 systems, Linux runs on a System i machine in a secondary partition. The primary partition must be running OS/400 V5R1 or later, which provides the hypervisor required to boot the kernel in a secondary partition. The Linux operating system needs to be installed and run in a secondary System i partition.
The POWER5 technology-based systems provide a new system architecture for logical partitioning. The hypervisor is shipped as a firmware part of all POWER5 models. No primary partition is needed to run the hypervisor.
The System i platform provides the following benefits to the Linux customer:
� A hardware platform of proven reliability and stability
� The ability to deploy less than a whole CPU to a partition for simple system functions, yet retain the ability to partition servers through shared processors
� Virtual disk, enabling Redundant Array of Independent Disks-5 (RAID-5) and disk striping to be deployed without extra effort
� Virtual local area network (LAN), which enables a Linux partition to communicate with other partitions running i5/OS, Linux or AIX efficiently, but without expensive gigabit hardware
� The ability to “right size” disk storage to what is needed using virtual disk, rather than to the size of the device
� The ability to share System i hardware that provides access to large amounts of the hard disk drive and centralized management of resources
� Server consolidation
11.3.1 Hosted and non-hosted partitions running LinuxA hosted partition uses I/O resources that belong to a hosting i5/OS partition. The I/O resources that a hosted partition can use from a system include disk, CD, and tape devices. A hosted partition has the root file system on the virtual disk. A network server description (NWSD) is required to use an initial program load (IPL) on this partition and provide access to virtual services. The only resources required for Linux in this situation are the minimum amount of main storage required for any partition and a portion of processor resource.
A non-hosted partition has the root file system on the native disk. It is not dependent on a hosting i5/OS partition for any I/O resources. In this mode, Linux controls the hard disk drive and can control the LAN Adapters, CD-ROM or
270 IBM System i Security Guide for IBM i5/OS Version 5 Release 4

DVD-RAM, and tape drive. The partition is initially loaded from the Virtual Service Panel or by NWSD.
11.3.2 Security considerations for partitionsPartition isolation on the System i platform (non-POWER 5 and POWER5 systems) is provided by a component called the hypervisor. It provides isolation between partitions to the processor, memory, and I/O device level.
For more information about security considerations using LPARs on the System i platform, refer to Appendix A, “LPAR security considerations” on page 359.
11.3.3 More informationFor more information about running Linux on System i, see the following sources:
� Linux on the IBM eServer iSeries Server: An Implementation Guide, SG24-6232
� The iSeries Information Center path Integrated operating environments → Linux
http://publib.boulder.ibm.com/infocenter/iseries/v5r4/index.jsp
� IBM Linux Web site
http://www.ibm.com/servers/eserver/iseries/linux/index.html
11.4 Internal firewall on the System i platform using Linux
To improve the security of network traffic, and enhance the manageability of the system, it is possible to secure a System i machine with a firewall inside the box. This firewall typically resides in a Linux partition inside the System i machine. It is attached to other partitions through a virtual Ethernet or direct I/O adapters if the architecture requires it.
An enormous advantage with Linux on System i is that the resources allocated to Linux can be easily adjusted. You can start with a moderate amount of processor and memory, and then increase or decrease the resources as needed. Also, disk space can be easily increased by adding virtual disks.
Usually a firewall does not need a lot of processing power. The amount of processing power depends on the firewall strategy and the amount of traffic that needs to pass through the firewall. If you need to do a lot of logging or want to inspect the contents of the packets, then you need more processing power.
Chapter 11. Firewalls 271
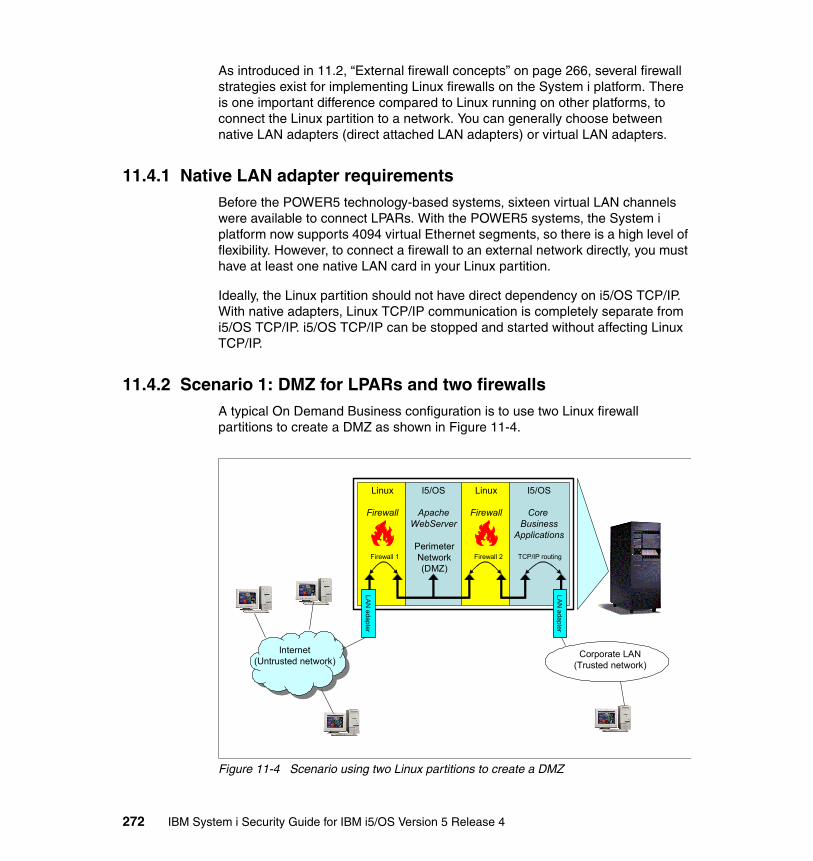
As introduced in 11.2, “External firewall concepts” on page 266, several firewall strategies exist for implementing Linux firewalls on the System i platform. There is one important difference compared to Linux running on other platforms, to connect the Linux partition to a network. You can generally choose between native LAN adapters (direct attached LAN adapters) or virtual LAN adapters.
11.4.1 Native LAN adapter requirementsBefore the POWER5 technology-based systems, sixteen virtual LAN channels were available to connect LPARs. With the POWER5 systems, the System i platform now supports 4094 virtual Ethernet segments, so there is a high level of flexibility. However, to connect a firewall to an external network directly, you must have at least one native LAN card in your Linux partition.
Ideally, the Linux partition should not have direct dependency on i5/OS TCP/IP. With native adapters, Linux TCP/IP communication is completely separate from i5/OS TCP/IP. i5/OS TCP/IP can be stopped and started without affecting Linux TCP/IP.
11.4.2 Scenario 1: DMZ for LPARs and two firewallsA typical On Demand Business configuration is to use two Linux firewall partitions to create a DMZ as shown in Figure 11-4.
Figure 11-4 Scenario using two Linux partitions to create a DMZ
Linux
Firewall
I5/OS
ApacheWebServer
Linux
Firewall
I5/OS
Core Business
Applications
Internet(Untrusted network)
PerimeterNetwork(DMZ)
Corporate LAN(Trusted network)
LAN
adapter
LAN
adapter
Firewall 1 Firewall 2 TCP/IP routing
272 IBM System i Security Guide for IBM i5/OS Version 5 Release 4

In this scenario, all the partitions are interconnected using virtual Ethernet adapters (VLAN), but you can also use standard LAN adapters to connect your partitions to the corporate LAN. The partition isolation provided by the System i hypervisor makes sure that attacks on the firewall partition, such as denial-of-service attacks that consume all the processing resources of the firewall, or integrity attacks, such as buffer overflow attacks, cannot affect other systems or partitions.
In this scenario, three separate virtual LAN segments are used to interconnect the partitions. Because these virtual LAN segments are distinct and isolated, traffic between the first firewall and the Web server partition is completely isolated from traffic between the Web server and the second firewall.
11.4.3 Scenario 2: DMZ for other hosts and two firewallsThe topology shown in Figure 11-5 protects the System i machine from the Internet and intranet, and provides a real perimeter network. This topology is important if the hosts in the DMZ are not i5/OS LPARs and cannot be a part of a virtual LAN DMZ.
Figure 11-5 DMZ for other hosts
Linux
Firewall
i5/OS
ApacheWebServer
Linux
Firewall
i5/OSCore
BusinessApplications
Internet(Untrusted network)
PerimeterNetwork(DMZ)
Corporate LAN(Trusted network)
LAN
adapter
LAN
adapter
Firewall 1 Firewall 2 TCP/IP routing
LAN
adapter
Perimeter NetworkDMZ
Chapter 11. Firewalls 273

11.4.4 Scenario 3: i5/OS partitions under control of two firewallsIn the previous scenarios, the corporate LAN was connected to the Internet via native LAN adapters in the i5/OS LPAR. This involves some setup in the i5/OS partition regarding TCP/IP routing and so on. It also has some disadvantages. One such disadvantage is that the corporate network cannot connect to the Internet if i5/OS TCP/IP is not active. It is better to bundle the network routing and security in the firewalls.
An optimal situation is shown in Figure 11-6. To access core business applications, first a user needs to pass through the firewall, so even traffic from and to hosts on the corporate LAN can be screened. Then, it is possible to restrict access to the i5/OS partition or log on connections to the i5/OS partition.
Figure 11-6 i5/OS partitions under control of the firewall
Linux
Firewall
i5/OS
ApacheWebServer
Linux
Firewall
i5/OS
Core Business
Applications
Internet(Untrusted network)
PerimeterNetwork(DMZ)
Corporate LAN(Trusted network)
LAN
adapter
LAN
adapter
Firewall 1 Firewall 2
LAN
adapter
Perimeter NetworkDMZ
274 IBM System i Security Guide for IBM i5/OS Version 5 Release 4
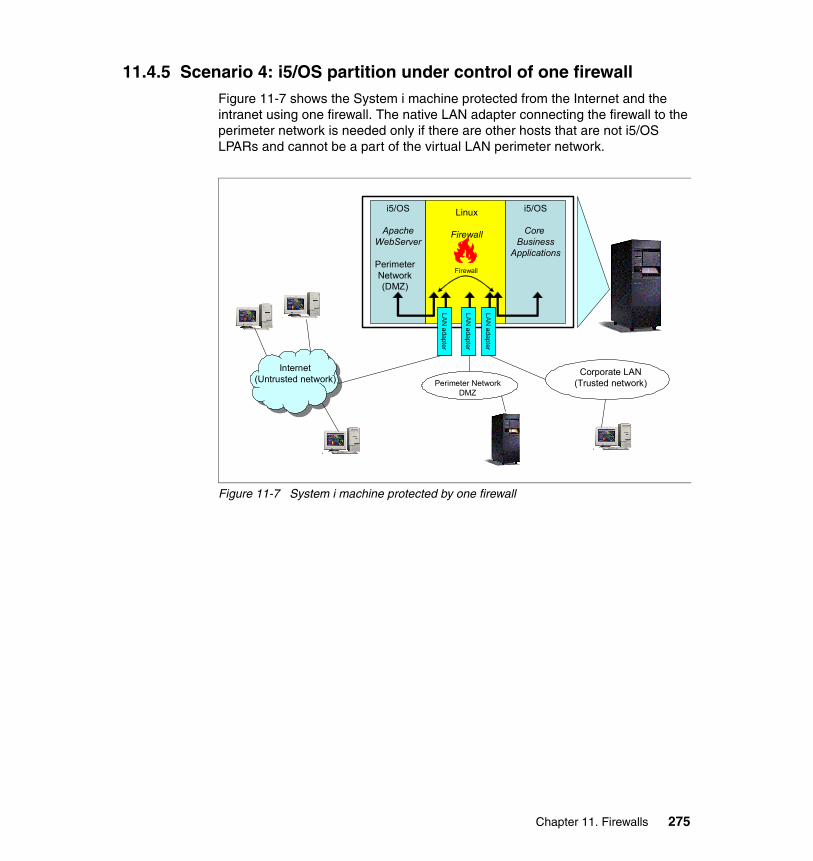
11.4.5 Scenario 4: i5/OS partition under control of one firewallFigure 11-7 shows the System i machine protected from the Internet and the intranet using one firewall. The native LAN adapter connecting the firewall to the perimeter network is needed only if there are other hosts that are not i5/OS LPARs and cannot be a part of the virtual LAN perimeter network.
Figure 11-7 System i machine protected by one firewall
i5/OS
ApacheWebServer
Linux
Firewall
i5/OS
Core Business
Applications
Internet(Untrusted network)
PerimeterNetwork(DMZ)
Corporate LAN(Trusted network)
LAN
adapter
LAN
adapter
Firewall
LAN
adapter
Perimeter NetworkDMZ
Chapter 11. Firewalls 275

11.4.6 Basic scenarios without DMZFor small systems or networks, if a DMZ is not needed, the topology shown in Figure 11-8 and Figure 11-9 are efficient.
Figure 11-8 Basic configuration of a Linux firewall without DMZ
The only difference between the two topologies is that in Figure 11-9, the i5/OS partition can be controlled by the firewall, and routing is done in the Linux firewall and not in Linux and i5/OS as shown in Figure 11-8.
Linux
Firewall
i5/OS
Core Business
Applications
Internet(Untrusted network)
Corporate LAN(Trusted network)
LAN
adapter
LAN
adapter
Firewall 1 TCP/IP routing
276 IBM System i Security Guide for IBM i5/OS Version 5 Release 4

Figure 11-9 Basic configuration of a firewall with a native LAN adapter on Linux
11.5 Hosted and non-hosted partitions for a firewallIt is not safe to run a firewall on the same system that you use to run other applications. Separate these tasks into different systems, because if the firewall is broken into, the other applications can be changed, or more importantly, data from those partitions can be read. On the other side, if someone can break into the application, such as a Web server, they can tamper with the firewall.
Another reason for separation is related to denial-of-service attacks. If the firewall is running on the same system as a business application, and the firewall is extremely loaded, the business application will stop running. When running a firewall and a business application in two separate LPARs on one System i machine, they run on the same hardware box, but the LPAR implementation is done so that partitions cannot influence each other.
However, there is a small way in which the Linux firewall can add some load to the i5/OS partition. If the Linux partition is a hosted partition, and it is using a virtual hard disk drive, the hosting partition has to perform all the read-and-write instructions that the Linux partition requests. Consequently, the Linux partition can use some resources of the hosting i5/OS partition.
To completely isolate the Linux firewall from i5/OS partitioning, the Linux firewall partition should be a non-hosted partition. However, a denial-of-service attack
Linux
Firewall
i5/OS
Core Business
Applications
Internet(Untrusted network)
Corporate LAN(Trusted network)
LAN
adapter
LAN
adapter
Firewall 1
Chapter 11. Firewalls 277
will mostly effect the processor usage and the memory usage of the host being attacked. These resources are strictly limited for LPARs, unless a huge amount of logfile entries is written to virtual disk.
11.6 StoneGate firewall solution for the System i platform
The StoneGate High Availability Firewall and VPN solution, from Stonesoft Corporation, includes its own integrated and hardened operating system. It is built on the principle that everything is denied unless it is expressly permitted. The StoneGate firewall provides a true stateful inspection firewall as well as multi-layer inspection. The firewall can function as a packet filter, a stateful inspection firewall, or where required, as an application level proxy all on a rule-by-rule basis.
Communications between all components are encrypted by default. Communications are also authenticated using advanced PKI digital certificates. Secure Shell (SSH)-based interaction with the firewalls is possible, but is not enabled by default, and the security policy must permit this type of communication.
Stonesoft has built their firewall system around a distributed architecture allowing you to deploy the system components effectively to different network environments. This total system can be managed via a single user interface. The StoneGate system is built of three components: the firewall engine, the StoneGate Management Center (SMC), and the GUI client (Administration client).
The StoneGate firewall and VPN solution provides a consolidated System i machine with the necessary granular security and VPN termination next to the applications between the virtual networks. StoneGate runs inside the System i machine bringing VPN termination as close to the application as possible, providing a better security level than an external firewall.
Terminating VPN close to the applications is a requirement written in many corporate security policies. The closer the encryption is done to the application, the less chance there is that someone can tap into the decrypted information. Many companies today require encryption to be done next to the application to prevent leakage of confidential data and not to risk the security of the communication.
278 IBM System i Security Guide for IBM i5/OS Version 5 Release 4
StoneGate firewall and VPN provide:
� Multi-layer inspection
– Packet filtering– Stateful inspection– Application layer inspection
� Standards compliant VPN
– IPSec compliant– Multi-Link Technology
� Manageability
StoneGate includes a graphical Java-based centralized management system so that multiple StoneGate firewall and VPN gateways can be managed through a single user interface. Through this interface, it is possible to remotely upgrade firewall instances, create automatic graphical reports about network traffic, and manage the firewalls. Administrators are not required to know Linux in order to use the StoneGate firewall.
11.6.1 Hardware and software requirementsThis section specifies the minimum requirements for the firewall LPAR on the System i platform and the SMC server.
StoneGate firewall version 2.2.10The StoneGate firewall version 2.2.10 is compatible with:
� IBM POWER5 processors� i5/OS Version 5 Release 3 or later
Stonesoft recommends that you use the following StoneGate component versions:
� StoneGate Management System v3.5.0� StoneGate VPN Client v2.6.2� StoneGate Server Pool Monitoring Agent v2.6.2
Firewall partition requirementsThe minimum requirements for each StoneGate firewall instance on the System i platform are:
� Dedicated StoneGate LPAR on the System i platform� Minimum for 0.1 CPU allocation� Minimum of 256 MB main storage� Minimum of 2 GB storage space
Chapter 11. Firewalls 279

StoneGate Management Center requirementsThe basic hardware requirements for the SMC are:
� Intel® Pentium® III processor or later recommended (suggested minimum processor speed 1 GHz) or equivalent on a non-Intel platform
� Mouse or pointing device required for GUI installations� SVGA (1024x768) display or higher required for GUI installations� 512 MB RAM� Disk space for Management Server: 2 GB� Disk space for Log Server: 20 GB to 80 GB
The SMC is supported on the following operating systems and versions:
� Microsoft Windows 2003� Microsoft Windows XP SP1 and SP2� Microsoft Windows 2000 SP3 and SP4� Red Hat Linux 7.3 and 9� Red Hat Enterprise Linux 2.1 and 3.0� Sun Solaris™ 8 and 9
11.6.2 Implementation of the StoneGate firewallTo implement the StoneGate firewall on the System i platform, you must first create a dedicated StoneGate partition on your system. To do this, refer to the following sources of information:
� Linux on the IBM eServer iSeries Server: An Implementation Guide, SG24-6232
� Logical Partitions on System i5: A Guide to Planning and Configuring LPAR with HMC on System i, SG24-8000
� The iSeries Information Center path Systems management → Logical partitions
http://publib.boulder.ibm.com/infocenter/iseries/v5r4/index.jsp
To learn more about the StoneGate firewall solution, see the following Web site:
http://www.stonesoft.com/products/IBM_iSeries/
Installation of the StoneGate Management Center is done using the StoneGate installation CD-ROM. Installation of the StoneGate engine on the System i machine is done by varying on the StoneGate partition and installing the StoneGate engine from a terminal window on the Hardware Management Console (HMC).
280 IBM System i Security Guide for IBM i5/OS Version 5 Release 4
Part 4 Authentication
This part covers the following chapters:
� Chapter 12, “System i authentication methods” on page 283� Chapter 13, “Single sign-on” on page 303
Part 4
© Copyright IBM Corp. 2005, 2006. All rights reserved. 281

282 IBM System i Security Guide for IBM i5/OS Version 5 Release 4
Chapter 12. System i authentication methods
Even though the System i platform is considered by most to be a secure platform, security is not stronger than its weakest link. In this chapter, we present an overview of the various authentication methods and explain how they are implemented on the System i platform.
We also examine the following topics and the extent to which you can use them:
� Authentication� User IDs and passwords� User certificates� Kerberos� Exit programs for authentication� Validation lists� Lightweight Directory Access Protocol (LDAP)� Remote Authentication Dial in User Service (RADIUS)� Password Authentication Protocol (PAP)� Challenge Handshake Authentication Protocol (CHAP)
12
© Copyright IBM Corp. 2005, 2006. All rights reserved. 283

12.1 Authentication conceptsOne of the most common ways for authentication on computer-based systems is through the use of a user name and password. Authentication entails having a user name and password that are usually stored in a local user registry where, validation takes place during the sign-on process.
Other options are available to verify the identity of a user. However, as the user, you must provide some form of information that can prove that you are who you say you are.
You can provide different characteristics to authenticate a user:
� Something you know, for example a password or pass phrase� Something you have, for example a key card, security token, or a one-time
password� Something you are, for example your fingerprint, retina scan, or voice
You can use these characteristics separately or combine them to create one-, two-, or three-factor authentication mechanisms. To achieve what is considered strong authentication, use a two or three-factor solution.
These solutions are normally something that is run on the client. The System i platform does not have support for a fingerprint or retina scan, for example. It is up to each client to implement the authentication mechanism if a more advanced solution is to be implemented.
After the authentication is satisfied, then it is up to the system to apply appropriate authorization levels to that session.
12.1.1 Authentication versus authorizationAuthentication should not be confused with authorization. If the identity has been established, it is up to the operating system or application to ensure correct access levels. This requires some form of user profile or account information about the target registry.
Note: This chapter contains references to the iSeries Information Center for V5R4 page. On this page, you can simply click the iSeries Information Center, Version 5 Release 4 link in the navigation area and select the topics that are specified:
http://publib.boulder.ibm.com/infocenter/iseries/v5r4/index.jsp
284 IBM System i Security Guide for IBM i5/OS Version 5 Release 4

Under normal client/server operations, this usually does not pose a problem, since the authentication mechanism is integrated into the server environment. However, when you implement single sign-on, or build applications that rely on remote or back-end systems, be aware of how credentials are passed to other systems.
A common scenario is that of a Web-based application that uses a dedicated profile to access a back-end database (see Figure 12-1).
Figure 12-1 Web application accessing a back-end database as a single DB user
This type of scenario can create several problems and issues:
� Authentication considerations for the DB profile
– Is the password hard coded into the application, perhaps in clear text?– Is the password ever changed?
� Authorization
– Can the authorization to the database be limited per actual user?– Does the database user profile have too much authorization?
� Audit consideration
– Is it possible to trace requests back to an actual user?– Can the audit trail be considered trusted?
These concerns tend to increase when more applications start to access the database. From the back-end server point of view, only a couple of profiles are accessing the data.
12.2 PasswordsThe common way to raise the level of security is to use rules that force increased complexity of the password and user name. The System i architecture allows for a wide range of possible password rules, including long passwords of up to 128
iSeriesserver
Web server
DB
Internet
Chapter 12. System i authentication methods 285
characters. Although this can seem extreme, it can be easier to remember a long sentence rather than a garbled password, with mixed numbers and characters that the user is forced to change every 30 to 90 days.
The main reason for increased complexity of passwords is to make it more difficult for brute force or dictionary attacks to succeed. The downside of this is that users have a tendency to write down passwords, use the same password on other systems, or even simplify passwords with complex rules to readable text (for example only4me, open2all, and so on). Even rules that prevent the reuse of previous passwords are circumvented by the user changing their password multiple times.
Some solutions can use cognitive passwords. They rely on some form of information, such as a favorite color, that is fact or opinion to the user. Although this is much easier for a user to remember, it is not a technique that is normally used for system application environments.
Another option is the use of one-time passwords. These can be generated from a token device that either generates passwords on a given interval or generates passwords from a personal identification number (PIN) or code that is provided for each sign-on attempt. Although i5/OS has no native support for these types of passwords, they can still be used through a third-party application or by implementing the RADIUS protocol.
You can set the password rules for the System i platform by either using the iSeries Navigator or using the following Work with System Values (WRKSYSVAL) CL command:
WRKSYSVAL*SEC
Table 12-1 lists the i5/OS system values that are related to password usage.
Table 12-1 Password system values
System value Default Description
QPWDEXPITV *NOMAX Password expiration interval (can be from 1 to 366 days or *NOMAX)
Specifies the number of days for which passwords are valid. Users are required to change their passwords after a specified number of days. If the password is not changed within the specified number of days, the user cannot sign on until the password is changed.
QPWDLMTAJC 0 Limit adjacent digits in password (0 = Allowed, 1 = Not allowed)
286 IBM System i Security Guide for IBM i5/OS Version 5 Release 4
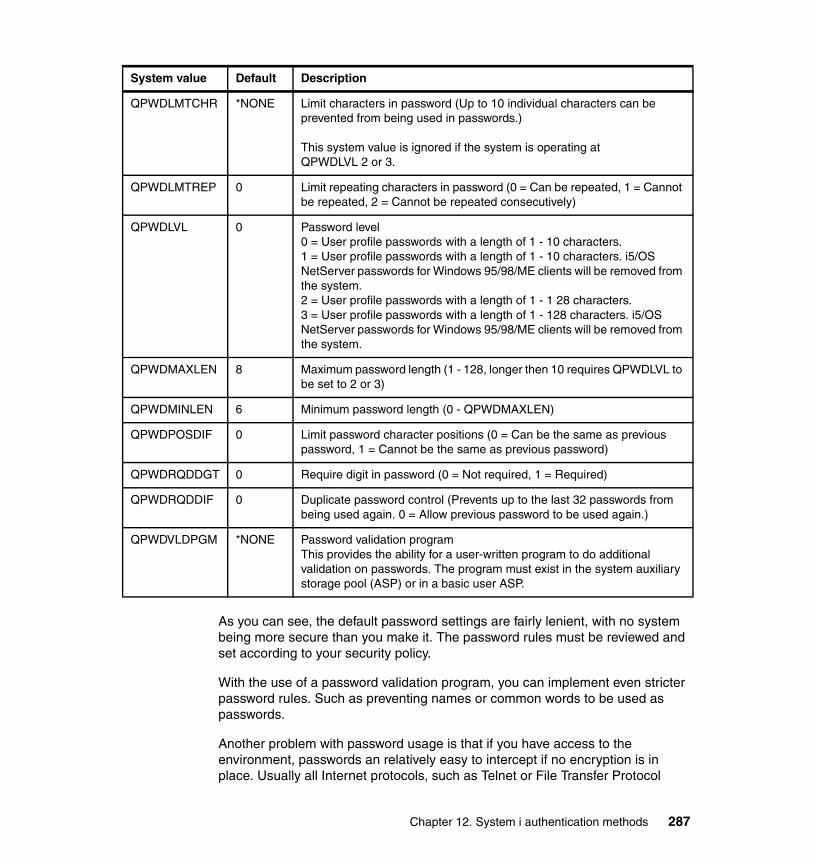
As you can see, the default password settings are fairly lenient, with no system being more secure than you make it. The password rules must be reviewed and set according to your security policy.
With the use of a password validation program, you can implement even stricter password rules. Such as preventing names or common words to be used as passwords.
Another problem with password usage is that if you have access to the environment, passwords an relatively easy to intercept if no encryption is in place. Usually all Internet protocols, such as Telnet or File Transfer Protocol
QPWDLMTCHR *NONE Limit characters in password (Up to 10 individual characters can be prevented from being used in passwords.)
This system value is ignored if the system is operating at QPWDLVL 2 or 3.
QPWDLMTREP 0 Limit repeating characters in password (0 = Can be repeated, 1 = Cannot be repeated, 2 = Cannot be repeated consecutively)
QPWDLVL 0 Password level0 = User profile passwords with a length of 1 - 10 characters.1 = User profile passwords with a length of 1 - 10 characters. i5/OS NetServer passwords for Windows 95/98/ME clients will be removed from the system.2 = User profile passwords with a length of 1 - 1 28 characters.3 = User profile passwords with a length of 1 - 128 characters. i5/OS NetServer passwords for Windows 95/98/ME clients will be removed from the system.
QPWDMAXLEN 8 Maximum password length (1 - 128, longer then 10 requires QPWDLVL to be set to 2 or 3)
QPWDMINLEN 6 Minimum password length (0 - QPWDMAXLEN)
QPWDPOSDIF 0 Limit password character positions (0 = Can be the same as previous password, 1 = Cannot be the same as previous password)
QPWDRQDDGT 0 Require digit in password (0 = Not required, 1 = Required)
QPWDRQDDIF 0 Duplicate password control (Prevents up to the last 32 passwords from being used again. 0 = Allow previous password to be used again.)
QPWDVLDPGM *NONE Password validation programThis provides the ability for a user-written program to do additional validation on passwords. The program must exist in the system auxiliary storage pool (ASP) or in a basic user ASP.
System value Default Description
Chapter 12. System i authentication methods 287

(FTP), do not encrypt the password. Any network sniffer or trace tool can identify the passwords in clear text. See Figure 12-2 for an example. No matter how complex the password rules are, consider using more advanced sign-on authentication methods.
Figure 12-2 User HAKAN with the password PASSWORD captured in a communications trace
From a security point of view, we strongly recommend that you enable encryption using Secure Sockets Layer (SSL). This implies some additional administrative overhead in terms of configuration, but the benefit of added security should be well worth the effort. To learn more about using SSL on the System i platform, refer to 9.6, “Secure Sockets Layer” on page 226.
12.3 Digital certificatesA digital certificate, sometimes known as digital ID, is a form of personal identification that can be verified electronically. It is used as a form of identification for individual persons and other entities, such as servers. A digital certificate can be compared to a passport. The authenticity of the data in a passport is validated by the issuing bureau. Usually, this bureau is operated by the government. Similar to passports, digital certificates are issued by a Certificate Authority (CA).
CAs are entities that are entrusted to properly issue certificates and have control mechanisms in place to prevent fraud. An individual may have many certificates from many different CAs, similar to how we have many forms of personal identification. Like you trust a passport more than a membership card as personal identification, you will trust a certificate issued by a well-known CA more than one that is issued by an unknown CA. A certificate is normally created in a standardized format. The System i platform uses the common format X.509 that is described in the RFC 2459, which is available from the following Web site:
http://www.ietf.org/rfc/rfc2459.txt
R 74 15:30:59.121536 00096B773867 000223565C20 ETHV2 Type: 0800 Frame Type : IP DSCP: 26 ECN: 00-NECT Length: 74 Protocol: TCP Datagram ID: 0C6D Src Addr: 10.10.0.106 Dest Addr: 10.10.0.83 Fragment Flags: DON'T,LAST IP Header : 3567004B0C6D40003B060003090A836A03054C53 IP Options : NONE TCP . . . : Src Port: 1158,Unassigned Dest Port: 23,TELNET SEQ Number: 3663818957 ('DA6170CD'X) ACK Number: 2908297695 ('AD5919DF'X) Code Bits: ACK PSH Window: 64098 TCP Option: NONE TCP Header : 04860017DA6170CDAD5919DF5018FA6228220000 Data . . . . . : 002012A000000400 80031517F1111507 C5D9C9D240E6C1E2 40C8C5D9C5407A5D *............1...HAKAN....PASSWORD* FFEF *.. *
288 IBM System i Security Guide for IBM i5/OS Version 5 Release 4
The user certificate can be stored in a common place such as an LDAP Directory server. It enables anyone who can access the server to validate credentials created by the private key, which should only be stored with the actual user.
You can employ user certificates to authenticate the user and to control access to the system or application. Depending on what you want to achieve with certificates, you must perform additional programming in your application. For example, if you want to store a user certificate into a validation list, you need to modify your application to perform this task.
User certificates can be used on the system level when the certificate is associated with a user profile.
The following System i applications support authentication with digital certificates:
� IBM HTTP Server (powered by Apache)� FTP server� Telnet server� Management Central endpoint system� Directory server (LDAP)
For a detailed guide about enabling access to use SSL, refer to the IBM Redbook iSeries Access for Windows V5R2 Hot Topics: Tailored Images, Application Administration, SSL, and Kerberos, SG24-6939.
Alternatively from the iSeries Information Center, click the path Security → Digital Certificate Manager:
http://publib.boulder.ibm.com/infocenter/iseries/v5r4/index.jsp
You can find detailed information about operating a local CA and working with user certificates in the IBM Redbook IBM eServer iSeries Wired Network Security: OS/400 V5R1 DCM and Cryptographic Enhancements, SG24-6168.
User certificate: In this context, we refer to a user certificate as a certificate that stores a user’s public key, which has been signed (encrypted using the private key of) a CA. The owner of a certificate can publish the certificate for others to use. The public key can then be used to encrypt data for the certificate owner to read. It can also be used to decrypt data sent by the certificate owner. This is normally done to prove that the certificate owner was the one who sent the data.
Chapter 12. System i authentication methods 289

12.4 KerberosKerberos is a network authentication protocol developed by the Massachusetts Institute of Technology (MIT). Kerberos is designed to provide strong authentication for client/server applications by using secret-key cryptography.
From the user point of view, it does not differ much from a normal sign-on process. Kerberos still relies on the user providing some form of credentials to verify their identity. The exchange of credentials is encrypted throughout the entire authentication process, enabling a secure authentication mechanism.
The major difference is that after an identity is proven, a temporary ticket is issued to the client. This ticket allows the user to access other systems and applications that exist within the circle of trust, or more correctly, the Kerberos realm.
Today most people are using Kerberos without even knowing it. Microsoft decided to implement it as the authentication method of choice into the Windows 2000 Server Active Directory.
Figure 12-3 illustrates the flow of Kerberos as explained in the following sequence:
1. The user performs an initial authentication using a secret key (for example, a password) known only to the user and the server. This step is done once during the course of a day.
2. If the authentication was successful, the KDC responds with a Ticket Granting Ticket (TGT). A master ticket makes future requests possible without the user having to re-enter their credentials.
3. When the user wants to access a new application or server, a request is created for that application using the TGT.
4. The KDC validates the request and returns a Service Ticket for the requested application.
5. The client presents the Service Ticket to the application as a request to use the service.
6. The application verifies that the Service Ticket was created by the KDC and allows the client to access the application. The application can also return a
Note: Before a client can use a service within the Kerberos realm, a trust relationship must have been established between the Key Distribution Center (KDC) and the server that holds the service as illustrated in Figure 12-3.
290 IBM System i Security Guide for IBM i5/OS Version 5 Release 4
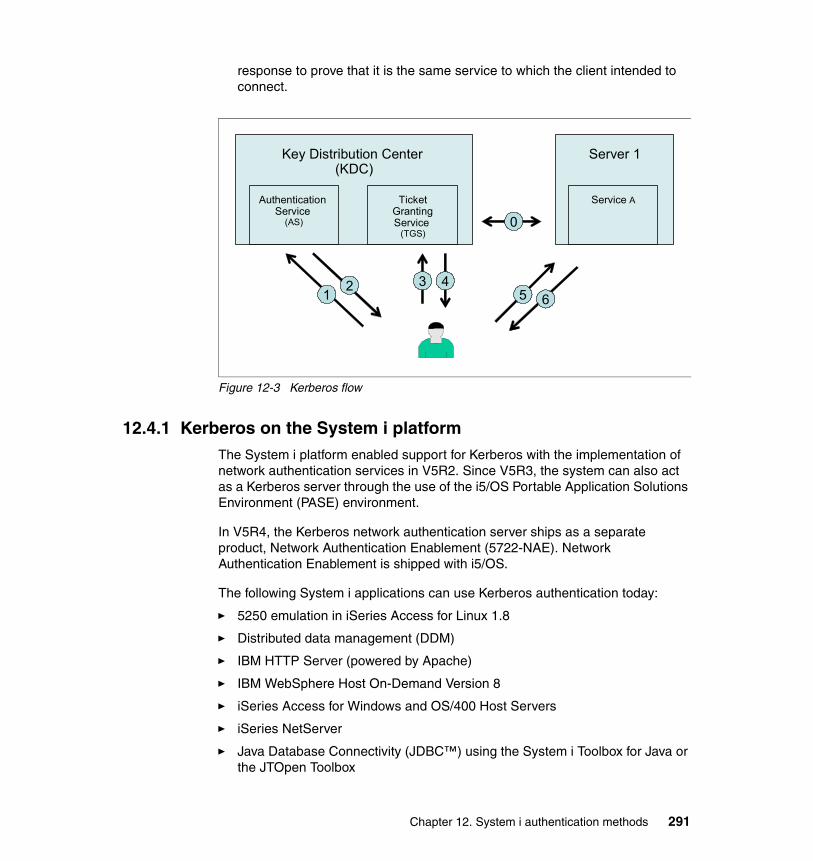
response to prove that it is the same service to which the client intended to connect.
Figure 12-3 Kerberos flow
12.4.1 Kerberos on the System i platformThe System i platform enabled support for Kerberos with the implementation of network authentication services in V5R2. Since V5R3, the system can also act as a Kerberos server through the use of the i5/OS Portable Application Solutions Environment (PASE) environment.
In V5R4, the Kerberos network authentication server ships as a separate product, Network Authentication Enablement (5722-NAE). Network Authentication Enablement is shipped with i5/OS.
The following System i applications can use Kerberos authentication today:
� 5250 emulation in iSeries Access for Linux 1.8
� Distributed data management (DDM)
� IBM HTTP Server (powered by Apache)
� IBM WebSphere Host On-Demand Version 8
� iSeries Access for Windows and OS/400 Host Servers
� iSeries NetServer
� Java Database Connectivity (JDBC™) using the System i Toolbox for Java or the JTOpen Toolbox
Server 1Key Distribution Center (KDC)
Authentication Service
(AS)
TicketGrantingService
(TGS)
Service A
1 2 3 45 6
0
Chapter 12. System i authentication methods 291

� LDAP
� Management Central
� Open Database Connectivity (ODBC) through the ODBC driver that comes with iSeries Access for Windows
� PC5250 and Telnet
� QFileSvr.400
� Structured Query Language (SQL)/Distributed Relational Database Architecture (DRDA)
� Windows integration
The Kerberos authentication mechanism is strong and should be considered when implementing security on any System i model. All of the previously listed services and applications, except LDAP, Management Central, and IBM HTTP Server (powered by Apache), must be used in combination with Enterprise Identity Mapping (EIM) for single sign-on to work. Management Central and the IBM HTTP Server (powered by Apache) can be configured to optionally exploit EIM. This is discussed in more detail in Chapter 13, “Single sign-on” on page 303.
When using Kerberos, make sure that the Keberos server itself is secure. If the Kerberos environment is compromised, your environment is compromised.
When a client is authenticated, it is important that a user does not leave the authenticated client unprotected. Not only are the local files vulnerable, but other systems that implement Kerberos sign-on are also accessible.
If the Kerberos service is not available, new requests for services cannot complete, effectively preventing new users to sign on to the system. However, clients that have already received a service ticket will normally be able to reuse these credentials for a limited amount of time.
12.4.2 More informationThe Information Center (see the following Web site) has more information about configuring a system both as a Kerberos server and to participate in a Kerberos realm. Look under the path Security → Network authentication service.
http://publib.boulder.ibm.com/infocenter/iseries/v5r4/index.jsp
292 IBM System i Security Guide for IBM i5/OS Version 5 Release 4
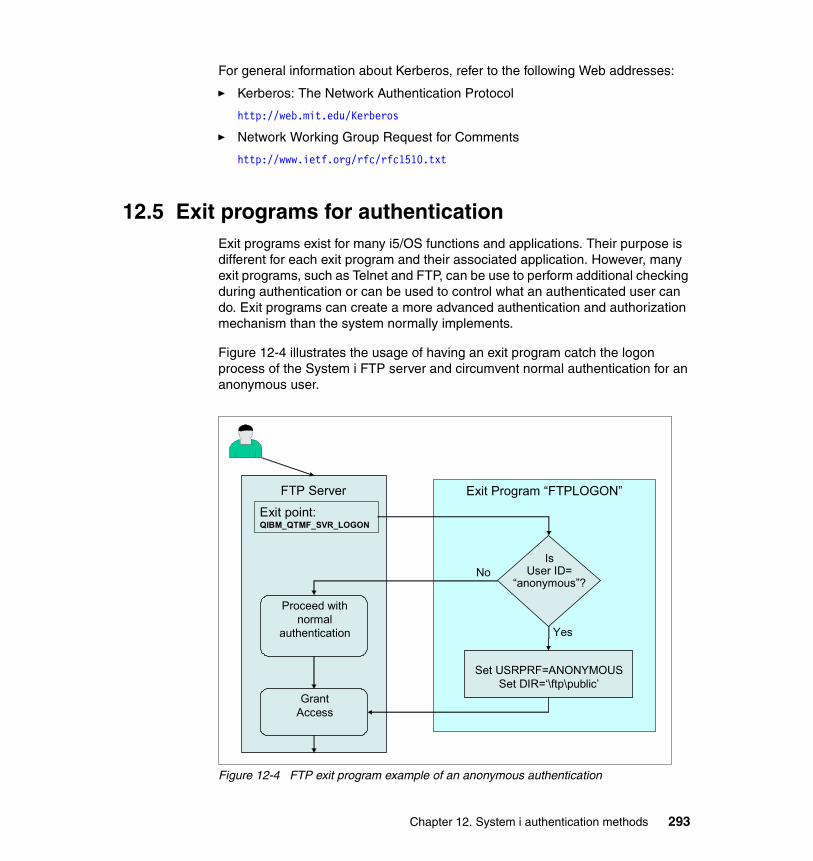
For general information about Kerberos, refer to the following Web addresses:
� Kerberos: The Network Authentication Protocol
http://web.mit.edu/Kerberos
� Network Working Group Request for Comments
http://www.ietf.org/rfc/rfc1510.txt
12.5 Exit programs for authenticationExit programs exist for many i5/OS functions and applications. Their purpose is different for each exit program and their associated application. However, many exit programs, such as Telnet and FTP, can be use to perform additional checking during authentication or can be used to control what an authenticated user can do. Exit programs can create a more advanced authentication and authorization mechanism than the system normally implements.
Figure 12-4 illustrates the usage of having an exit program catch the logon process of the System i FTP server and circumvent normal authentication for an anonymous user.
Figure 12-4 FTP exit program example of an anonymous authentication
Exit Program “FTPLOGON”
Yes
NoIs
User ID=“anonymous”?
Set USRPRF=ANONYMOUSSet DIR=‘\ftp\public’
Proceed with normal
authentication
Exit point:QIBM_QTMF_SVR_LOGON
Grant Access
FTP Server
Chapter 12. System i authentication methods 293
You can find more information about exit programs in 8.6, “Exit programs” on page 181.
12.6 Validation listsValidation lists can be an alternative for storing information about remote users in the i5/OS environment without having to create a user profile. Validation lists can contain a list of users and their passwords.
Validation lists primarily handle Internet or dial-up users that should not have access to other parts of the system. However, any application that needs to store user credentials, rather than a database file, can use the lists. One advantage of using validation lists like this is that the passwords contained in a validation list are encrypted.
Validation lists can be managed through the HTTP administration interface (for Web users) or through iSeries Navigator (for dialup and virtual private network (VPN) users).
If you are currently using validation lists, but are considering moving these lists into an LDAP server, the Copy Validation List To Directory (QGLDCPYVL) application programming interfaces (APIs) provided with i5/OS V5R3 can simplify this task. This can be the preferred method for such applications as WebSphere Application Server, WebSphere Portal Server, and other applications that have implemented support for LDAP authentication. For more information about the QGLDPYVL API, see the following System i LDAP Web site:
http://www.ibm.com/servers/eserver/iseries/ldap/copyvldl.html
12.6.1 More informationConsult the iSeries Security Reference, SC41-5302, for more information about validation lists. Also for additional details about the validation list APIs, see the Information Center at:
http://publib.boulder.ibm.com/infocenter/iseries/v5r4/index.jsp
12.7 Lightweight Directory Access ProtocolThe LDAP is a set of protocols for accessing information directories. This protocol is based on the standards contained within the X.500 standard and provides simple access to a directory. The LDAP is not an authentication protocol, but one that can enable other applications or systems to access a common resource for user registries.
294 IBM System i Security Guide for IBM i5/OS Version 5 Release 4

LDAP enables almost any application running on any computer platform to obtain directory information, such as subscriber data, user information and public keys. Because LDAP is an open protocol, there is no need to worry about the type or location of servers that are hosting the directory for applications.
In i5/OS, LDAP functionality is provided either through a native Directory server or the use of a Domino server.
Directory Services can be used for a variety of tasks, such as:
� User authentication and authorization for Web servers or other LDAP-enabled applications
� Locating and providing information about people and distributed resources like printers
� Policies that are shared by multiple applications or application instances
Since V4R3, LDAP has been included free of charge in i5/OS as part of Directory Services for OS/400 (option 32). Starting with V5R1, Directory Services is automatically included in the base operating system, and option 32 is no longer needed. Directory Services includes an LDAP server and a complete set of LDAP clients and utilities.
A Web Administration tool is provided for configuring the IBM Directory Server on the System i platform. You must use this tool to configure the replication, authority, and access control list (ACL) group functions. In releases prior to V5R3, you could configure these functions using iSeries Navigator. Since V5R3, the Directory Management Tool is no longer provided.
You must use the WebSphere Application Server - Express product with the Web Administration tool. If your System i machine is too small to run this server, you can use an alternate version of the Web Administration tool. To obtain the alternative version, call IBM Service.
12.7.1 More informationFor more information about LDAP on the System i platform, refer to the IBM Redbook Implementation and Practical Use of LDAP on the IBM eServer iSeries Server, SG24-6193. You can also go to the Information Center and select the path Networking → TCP/IP applications, protocols, and services → Directory Server (LDAP):
http://publib.boulder.ibm.com/infocenter/iseries/v5r4/index.jsp
Chapter 12. System i authentication methods 295

12.8 Centralized access control administrationCentralized access control administration implies the ability to control sign-on attempts from a centralized point. These protocols allow systems and applications to forward authentication requests to a centralized authentication server. They intercept the sign-on information and send it to a remote server that verifies the validity. Then the protocols send a short response indicating the status of whether the validation was successful.
Primarily these protocols and techniques where developed to centralize the authentication of large remote access environments, such as modem pools and network router equipment. However, they have proven to be useful when implementing third-party authentication mechanisms such as key cards, security tokens or one-time passwords to achieve two-factor authentication on systems that normally do not support such devices.
12.8.1 Remote Authentication Dial-In User ServiceRADIUS is an open and easily integrated authentication protocol. Initially was developed to provide dial-up Point-to-Point Protocol (PPP) and terminal server access. Today it is sometimes implemented as the authentication and accounting solution for the entire enterprise.
Remote user authentication requests that are initiated from a system are sent to a centralized RADIUS server and are either accepted or rejected. All security information pertaining to the authenticated user can be located in a single, central database, instead of scattered around the network in several different devices.
Figure 12-5 illustrates the flow of a RADIUS authentication as explained here:
1. A user connects to the system using a dial-up or VPN client.
2. The system receives the user credentials and forwards them to the RADIUS server. If the RADIUS server does not respond, an alternative server can be used. This allows for increased availability of the authentication mechanism.
3. A response is sent back to the system with an accept or reject status. Optionally, additional information, such as to dictate what TCP/IP address the client should have, can be passed back to the system. The RADIUS server can also enable accounting to centrally keep track of this session.
4. If the response is accept, then the authentication is complete and a session is established.
296 IBM System i Security Guide for IBM i5/OS Version 5 Release 4

Figure 12-5 Authentication using RADIUS
Optionally the network access server can inform the RADIUS server when a connection ends. This allows for more detailed accounting and tracking of user sessions on the RADIUS server.
RADIUS servers act on received user connection requests by authenticating the user and then returning all configuration information necessary, to the network access server. This enables the network access server to deliver authorized services to the authenticated dial-in user.
RADIUS is an Internet standard described in RFC 2865, which you can find on the Web at:
http://www.ietf.org/rfc/rfc2865.txt
For a sample RADIUS configuration on the System i platform, in the iSeries Information Center, follow the path Networking → TCP/IP applications, protocols, and services → Remote Access Services: PPP connections → Scenarios → Scenario: Authenticate dial up connections with RADIUS NAS:
http://publib.boulder.ibm.com/infocenter/iseries/v5r4/index.jsp
Note: On the System i platform, you can enable RADIUS for PPP and Layer 2 Tunneling Protocol (L2TP, with or without IP Security Architecture (IPSec)). Telnet, FTP, and similar protocols do not support RADIUS in i5/OS.
RADIUS Server
System i5platform(network access server)
1
32
4
PPP or VPNCorporate network
Chapter 12. System i authentication methods 297
12.8.2 Terminal Access Controller Access Control SystemThe Terminal Access Controller Access Control System (TACACS) offers more capabilities than RADIUS in the form of authentication and authorization. TACACS is a proprietary protocol developed by Cisco. It has been developed into Extended TACACS (XTACACS) and then into today’s more common TACACS+.
Where RADIUS combines authentication and authorization in a user profile, TACACS+ separates the two operations, enabling more flexibility in configuration options and usage.
You can learn more about TACACS in RFC1492, which is on the Web at:
http://www.ietf.org/rfc/rfc1492.txt
12.8.3 DiameterThe Diameter protocol was developed due to issues and limitations in the RADIUS model. It was also developed to handle future requirements from diverse networks, such as roaming and wireless networks. It is intended to extend the capabilities to handle diverse mechanisms such as wireless devices.
The Diameter Base Protocol is defined by RFC 3588, which you can find on the Web at:
http://www.ietf.org/rfc/rfc3588.txt
To learn more about Diameter, refer to the following Web addresses:
� diameter.org
http://www.diameter.org/
� Open Diameter
http://www.opendiameter.org/
Important: TACACS, XTACACS, and TACACS+ are not supported on i5/OS.
Important: Diameter is not supported on i5/OS.
298 IBM System i Security Guide for IBM i5/OS Version 5 Release 4
12.8.4 Common Open Policy ServiceThe Common Open Policy Service (COPS) protocol describes a simple query and response protocol that can be used to exchange policy information between a policy server and its clients. COPS was designed to be extensible so that other kinds of policy clients may be supported in the future.
COPS does not make any assumptions about the methods of the policy server, but is based on the server returning decisions to policy requests. Each message consists of the COPS header followed by a number of typed objects.
For more information about COPS, see RFC 2748 on the Web at:
http://www.ietf.org/rfc/rfc2748.txt
12.9 Other protocols and authentication topicsThis section describes some common authentication protocols and the extent to which they are used in the i5/OS environment.
12.9.1 Lightweight Third-Party AuthenticationThe Lightweight Third-Party Authentication (LTPA) protocol (or mechanism) is designed to interact with user registries that are not standardized. For example, this can be an application that stores user credentials in a local database and not the local system registry or LDAP.
LTPA allows the possibility to communicate with these nonstandard registries in a standardized way. On the System i platform, LTPA is primarily used by the WebSphere Application Server and Domino.
Important: COPS is not supported on i5/OS.
Chapter 12. System i authentication methods 299

12.9.2 Password Authentication ProtocolPAP provides a simple method for the peer system to establish its identity using a two-way handshake. This is done only upon initial link establishment. After the link establishment is complete, a user ID and password pair is sent repeatedly by the peer to the authenticator until authentication is acknowledged or the connection is terminated.
Passwords are sent over the link “in the clear”, and there is no protection from playback or repeated trial-and-error attacks. The peer is in control of the frequency and timing of the attempts. See Figure 12-6.
Figure 12-6 The Password Authentication Protocol
CallerAuthenticator
User ID/Password
ACK
300 IBM System i Security Guide for IBM i5/OS Version 5 Release 4
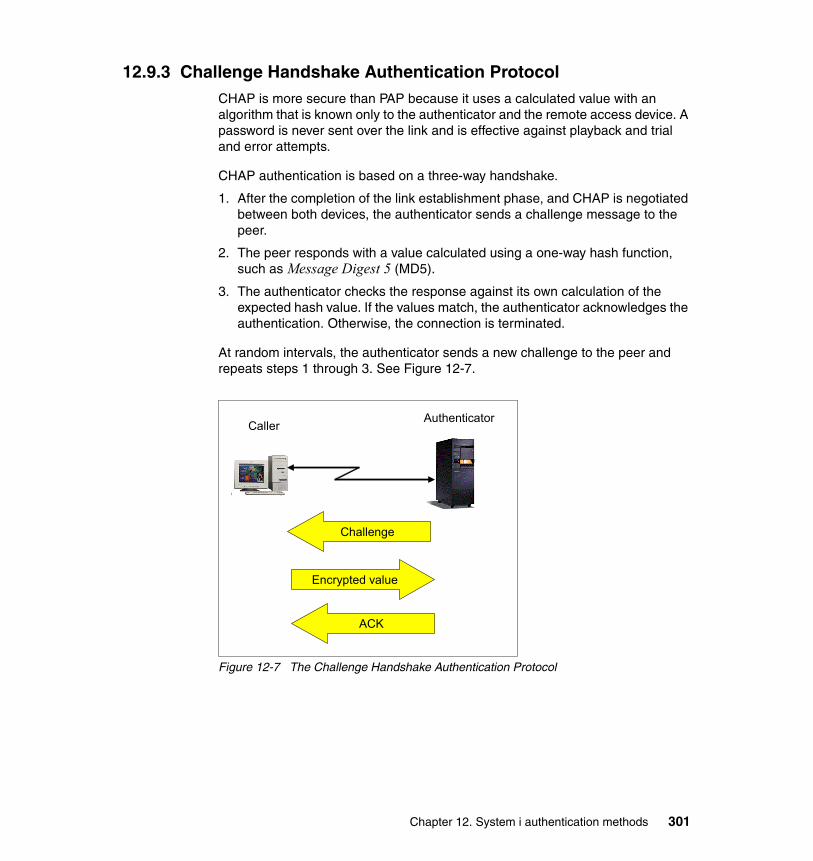
12.9.3 Challenge Handshake Authentication ProtocolCHAP is more secure than PAP because it uses a calculated value with an algorithm that is known only to the authenticator and the remote access device. A password is never sent over the link and is effective against playback and trial and error attempts.
CHAP authentication is based on a three-way handshake.
1. After the completion of the link establishment phase, and CHAP is negotiated between both devices, the authenticator sends a challenge message to the peer.
2. The peer responds with a value calculated using a one-way hash function, such as Message Digest 5 (MD5).
3. The authenticator checks the response against its own calculation of the expected hash value. If the values match, the authenticator acknowledges the authentication. Otherwise, the connection is terminated.
At random intervals, the authenticator sends a new challenge to the peer and repeats steps 1 through 3. See Figure 12-7.
Figure 12-7 The Challenge Handshake Authentication Protocol
CallerAuthenticator
Encrypted value
ACK
Challenge
Chapter 12. System i authentication methods 301

12.9.4 Extensible Authentication ProtocolExtensible Authentication Protocol (EAP) allows third-party authentication modules to interact with the PPP implementation. EAP extends PPP by providing a standard support mechanism for authentication schemes such as token (smart) cards, Kerberos, Public Key, and S/Key. EAP responds to the increasing demand to augment reliability, availability, and serviceability (RAS) authentication with third-party security devices.
EAP protects secure VPNs from attempts to use dictionary attacks and password guessing. However, the System i platform currently only supports a version of EAP that is basically equivalent to CHAP-MD5.
12.9.5 Microsoft Challenge-Handshake Authentication ProtocolMicrosoft Challenge-Handshake Authentication Protocol (MS-CHAP) is an implementation of CHAP that was created by Microsoft to authenticate remote Windows clients. MS-CHAP is similar to CHAP, with some differences. MS-CHAP is based on the encryption and hashing algorithms used by Windows networks. The MS-CHAP response to a challenge is in a format that is optimized for compatibility with Windows operating systems.
12.9.6 Secure European System for Application in a Multi-vendor Environment
Secure European System for Application in a Multi-vendor Environment (SESAME) was a project that was designed to extend the functionality of Kerberos. SESAME uses both symmetric and asymmetric cryptographic techniques to protect the authentication process, where Kerberos uses only symmetric cryptography.
Important: The System i platform does not support MS-CHAP. Make sure that you use CHAP-MD5 instead when configuring PPP clients.
Important: There is no support for SESAME on the System i platform.
302 IBM System i Security Guide for IBM i5/OS Version 5 Release 4

Chapter 13. Single sign-on
In this chapter, we discuss the concept of single sign-on (SSO) and present some options that are available for a System i environment. The goal of this chapter is to make you aware of the choices that you have and to help you determine which solution is best suited for your environment.
13
Note: This chapter contains references to the iSeries Information Center for V5R4 page. On this page, you can simply click the iSeries Information Center, Version 5 Release 4 link in the navigation area and select the topics that are specified:
http://publib.boulder.ibm.com/infocenter/iseries/v5r4/index.jsp
© Copyright IBM Corp. 2005, 2006. All rights reserved. 303

13.1 Understanding single sign-onThe meaning of SSO is considered obvious to some. It is not a security concept by itself, but rather a means to simplify the authentication process to multiple systems and environments. This can improve security by the fact that passwords to multiple systems are no longer handled in a trivial manner. However, some SSO implementations can create new security exposures because of the way they choose to store user credentials. There is also a concern that if an SSO solution is compromised, all systems and environments are exposed.
SSO is considered to be the ability to sign on once and then access all applications or systems within the enterprise. However, quite often you run into the problem that some systems or applications are not compatible with a selected solution.
Many software vendors sometimes refer to a certain product or solution when discussing SSO. While these products can prove to be viable solutions, it is important to understand that currently no product can solve every case of authentication for all known user registries.
With this in mind, SSO can be anything from skipping one step in the sign-on process to enabling a user to access every application and environment with a one-time use of their user credentials.
The term single sign-on is often misinterpreted or confused with having a single user ID and password to sign on to many systems. In most cases, users must still sign on to each application or service individually. With a true SSO solution, a user signs on only once to the network (a central authentication service) and then accesses all participating services, without re-entering a user ID or password. Some SSO solutions offer SSO only in a Web environment. It is desirable to have an SSO solution that works for both Web browser-accessible applications and local applications, such as Telnet or database access.
13.1.1 SSO techniquesTo understand the SSO solution that is best suited for your environment, we must first discuss the different techniques used to achieve SSO goals. It is common that multiple techniques exist within an enterprise.
The authentication mechanisms on all the participating platforms do not need to be the same. However, each platform must trust the other platform to properly authenticate.
304 IBM System i Security Guide for IBM i5/OS Version 5 Release 4

Single authentication directoryUsually a directory server keeps a central record of a user's credentials (user ID and password, distinguished name, and other attributes), which can be used to validate the user’s identity and authenticate them. This is desirable to make sure that a user has the same identity (user ID) and authorization credentials (password or certificate) in all applications. However, simply using a single authentication directory does not in itself provide SSO. A user who visits multiple applications can receive authentication challenges from each application.
The advantage of a central directory is that the user should not have to remember multiple sets of user IDs and passwords. Naturally, it is also possible to simply store duplicate information in multiple directories, but it is often difficult to synchronize these.
Persistent authenticationPersistent authentication involves storing or caching user credentials and presenting them again whenever they are requested. For example, when a Web browser user is challenged by a Web server 401 return code (access denied to resource), the Web browser presents a window, for the user to enter a user ID and password, rather than displays the forbidden access message. The user enters their user ID and password, which is presented to the Web server. If it is accepted, the Web browser automatically presents it to the same server and all servers in the same realm until the Web browser session ends.
Similarly, if a client has a certificate, usually an x.509v3 certificate, which is acceptable to all servers that they access, there is the illusion of SSO, but the certificate will be re-authenticated if a user’s session ends and is later restarted. This occurs if a user established an SSL session with a server, then visited a second server, and finally returned to the first server. It has the advantage that authentication is transparent to the user.
Lotus Notes® client access to Domino servers follows this model. The user is prompted only for a password to open their Lotus Notes ID file. In addition, their certificate or certificates are presented for authentication without the user prompting each server that the user accesses.
Persistent authentication sessionsIt is also possible for the first server that the user contacts to perform authentication against the user’s security credentials and then create an
Realm: A realm is the host name and file system directory that are accessed, but the Web server can define an arbitrary string to group servers into an extended realm.
Chapter 13. Single sign-on 305

authentication token. When the user again contacts the server or any other server that “trusts” it, the authentication token is presented as proof of authentication. The second server can either accept the authentication or re-authenticate, based on the contents of the token.
Generally, the authentication token is issued with a limited lifetime so that its validity will expire after a period of time, either of inactivity or simply from its creation. The authentication token often also carries state information or a pointer to state information stored by the application. State information can include the user’s last location, contents of a shopping cart, application selections, and the like.
Reverse proxy or access management applicationsThe reverse proxy or access management applications servers intercept user requests. The servers pass the requests on to an application server, retrieving and sending any necessary authentication information on the user’s behalf. This technique allows coexistence of applications with inconsistent authentication and state management implementations.
13.1.2 Vertical and horizontal SSOWith SSO, we must distinguish between horizontal and vertical SSO approaches:
� Vertical SSO might be what we consider the normal approach to SSO. It describes an approach where a user signs on from the client to each individual server using SSO. The main benefit of vertical SSO is that it simplifies sign-on for the end user and can reduce the number of password-related calls to the help desk.
� Horizontal SSO involves a user signing on, for example, to a server application, which in turn connects to another server to access a database. The horizontal SSO concept allows the transfer of the user credentials to the back-end system. Horizontal SSO enables a higher level of traceability and security to back-end systems.
Without SSO, this second step is normally performed by using a database or generic user ID that acts as a proxy to the back-end system.
Vertical and horizontal SSO do not exclude each other. The ideal implementation supports both of these aspects into the SSO solution as shown in Figure 13-1.
306 IBM System i Security Guide for IBM i5/OS Version 5 Release 4

Figure 13-1 Vertical and horizontal SSO
13.2 SSO using Enterprise Identity MappingEnterprise Identity Mapping (EIM) provides an infrastructure that lowers the expense for application developers to provide SSO solutions. EIM allows for operating system programmers and independent software vendors (ISVs) to independently implement support for an SSO environment without waiting for support from a specific product vendor.
EIM is part of the IBM autonomic computing initiative. It has a goal to give businesses the ability to manage systems and technology infrastructures that are hundreds of times more complex than those in existence today. The initiative represents the next stage of development under new tools. Self-managing servers are the ultimate technology in new tools for our customers. They are self-optimizing, self-configuring, self-healing, and self-protecting.
EIM is basically a set of application programming interfaces (APIs) that use a directory server (Lightweight Directory Access Protocol (LDAP)) environment to store information about users, registries, and their relationship between each other. It is up to the authentication mechanism on each platform or environment to implement these APIs in order to participate in an EIM domain.
Vertical SSO
Horizontal SSO
Chapter 13. Single sign-on 307

Figure 13-2 illustrates the flow of authentication using EIM. This flow is explained as follows:
1. A user presents their credentials to Server A. This can be a Kerberos ticket, a user certificate, or another means of authentication.
2. Server A forwards the user information to the EIM Domain Controller and requests information about who this user is.
3. The EIM Domain controller stores information about each user as a unique EIM identifier. This identifier is mapped to one or more user registries and their respective user ID characteristics.
4. The user ID for Server A is provided as a response to the requesting server.
5. The user is signed on with the user ID.
Figure 13-2 EIM flow
13.2.1 EIM and KerberosEIM and Kerberos are two different components. EIM is a mechanism to map (associate) a person or entity to the appropriate user identities in various registries throughout the enterprise. Kerberos is one type of mechanism that is used for authentication.
In V5R4, group registry definitions were introduced to potentially lower administration efforts for managing EIM user associations. Logically grouping the
EIM Domain Controller
Server A
1
2
RegistryDefinitions
Associations
EIMIdentifiers
A B C
A
C
5
Who is Sam B. Elliot?
User: SE508524
3
308 IBM System i Security Guide for IBM i5/OS Version 5 Release 4

registry definitions allows you to reduce the amount of work that you must perform to configure EIM mapping.
13.2.2 Advantages of using EIMThe advantages of using EIM are the same as the advantages that you get from implementing an SSO solution:
� Makes it easier for customers to associate a user’s multiple identities in the enterprise and to manage those associations
� Is developed in such a way that it can be extended to other facets of cross-platform management
� Simplifies administration
– Relies on existing security semantics already in place for existing data– Reduces load on administrators for lost passwords and therefore cost– Reduces client side risks (cached passwords, post-it notes, and so on)
� Better application design
– No need to implement new user registries– No need to define or enforce additional security semantics– Provides maximum flexibility for distributed, multi-tier application
developers
� Simplifies the process for the user, access is controlled under the covers
� Provides seamless audit trails in a multi-tier environment
The support for EIM has grown since its first introduction in 2002. There are a number of predefined user registry types that EIM provides to cover most operating system user registries:
� AIX� Domino (long name)� Domino (short name)� Kerberos� Kerberos (case sensitive)� LDAP (short name)� Linux� Novell� Directory server� i5/OS or OS/400� Tivoli® Access Manager� RACF®� Windows (local)� Windows domain (Kerberos; is case sensitive)� X.509 (standard for digital certificates)
Chapter 13. Single sign-on 309

The i5/OS exploitation of EIM and Kerberos, along with exploitation by other IBM eServer platforms and IBM software, provides SSO capabilities. This, in turn, provides users, administrators, and application developers the benefits of easier password and user identity management across multiple platforms without changing the underlying security schema.
The following i5/OS application services can exploit SSO:
� iSeries Navigator� Distributed Relational Database Architecture (DRDA)� PC5250 and Telnet� NetServer� QFileSrv.400� ODBC/JDBC� Management Central� IBM HTTP Server (powered by Apache)
13.2.3 More informationTo learn more about EIM and how to configure it on the System i platform, refer to the IBM Redbook Windows-based Single Signon and the EIM Framework on the IBM eServer iSeries Server, SG24-6975.
You can also refer to the Information Center and the path Security → Enterprise Identity Mapping (EIM):
http://publib.boulder.ibm.com/infocenter/iseries/v5r4/index.jsp
13.3 SSO using a Windows user ID and passwordYou can use the Windows logon user ID and password for connections to the systems that use iSeries Navigator. This provides a form of SSO functionality to the System i platform.
An attempt is made to use the local credentials from the current client. If the user and password on both the PC and system are the same, you are not prompted to re-enter them. Your Windows logon user ID and password must follow the i5/OS naming conventions in order for this to work. See Figure 13-3.
Note: The System i File Transfer Protocol (FTP) server does not currently support Kerberos, but it can authenticate through certificates, which in turn can use EIM.
310 IBM System i Security Guide for IBM i5/OS Version 5 Release 4
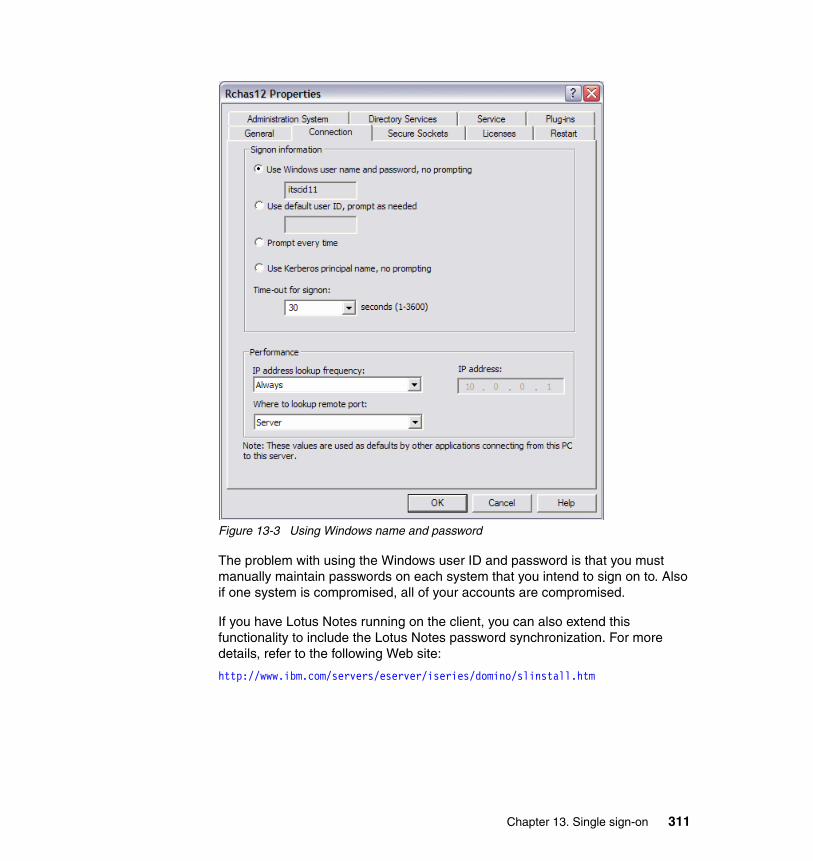
Figure 13-3 Using Windows name and password
The problem with using the Windows user ID and password is that you must manually maintain passwords on each system that you intend to sign on to. Also if one system is compromised, all of your accounts are compromised.
If you have Lotus Notes running on the client, you can also extend this functionality to include the Lotus Notes password synchronization. For more details, refer to the following Web site:
http://www.ibm.com/servers/eserver/iseries/domino/slinstall.htm
Chapter 13. Single sign-on 311
13.4 SSO with user and password synchronizationPassword synchronization implies that passwords will be synchronized between one or more user registries. Unlike the “Windows user and password” concept, this concept copies a user ID and password to a target registry on a manual or automated basis. This concept allows the management of only one user registry.
It is fairly simple to set user passwords with a remote command call to the System i environment. This can be performed, for example, by a central password synchronization tool within the enterprise.
However, it is more of a challenge to verify that passwords are in sync. Also, the risk of someone discovering a password in one environment increases with the more user registries that are used. It does not increase the security, but can simplify life for the end user.
In a System i environment, password synchronization is normally used to manage user accounts running on an Integrated xSeries Server or Integrated xSeries Adapter. The Change Network Server User Area (CHGNWSUSRA) CL command is used to propagate i5/OS user profiles to a Windows account on the Integrated xSeries Server or Integrated xSeries Adapter.
For more information, refer to the IBM Redbook Microsoft Windows Server 2003 Integration with iSeries, SG24-6959.
13.5 SSO with WebSphereThe WebSphere Application Server and the WebSphere Portal Server can use a Lightweight Third-Party Authentication (LTPA) token to provide SSO. When the user is authenticated, the WebSphere Application Server server creates an LTPA SSO cookie that contains the user credentials. This encrypted cookie conforms to the format used by a WebSphere Application Server. The cookie can be decrypted by all application servers in a shared domain, providing they all have the same standard key. The cookie enables all servers in the cluster to access the user’s credentials without additional prompting, giving the impression of a seamless SSO environment.
In this SSO scenario, an HTTP cookie is used to propagate a user’s authentication information to disparate Web servers. This cookie relieves the user from entering authentication information for every new client-server session (assuming basic authentication).
312 IBM System i Security Guide for IBM i5/OS Version 5 Release 4

SSO only supports applications that can read and issue the WebSphere Application Server LTPA tokens. This can be enabled through the WebSphere Application Server Administrative Console interface.
To view SSO, from the WebSphere Application Server Administrative Console, in the left navigation panel, click Security → Authentication Mechanisms → LTPA. In the SSO panel that appears on the right, select the check box next to Enabled to enable SSO as shown in Figure 13-4.
Figure 13-4 Enabling SSO in WebSphere Application Server (V5)
13.6 Using LDAP as a shared user registryIt is common to use LDAP that is used by public directory services to locate such information about people (telephone number searches, e-mail searches, and so on). LDAP is a form of object-oriented database that can easily be extended and become an integral part of your applications.
An LDAP server is a practical place to centrally store user credentials for access from multiple environments. Perhaps the most common type of environment is
Chapter 13. Single sign-on 313
Web based, which requires some form of adaptation from the application or the application server. The LDAP server does not by itself achieve SSO, but enables application developers and system administrators to point to a single user registry for authentication purposes.
When you configure i5/OS to publish the information type Users to the Directory Server, the feature automatically exports entries from the system distribution directory to the Directory Server, by using the Synchronize System Distribution Directory to LDAP (QGLDSSDD) API. This feature also keeps the LDAP directory synchronized with changes that are made in the system distribution directory.
For information about the QGLDSSDD API, refer to the Information Center and the path Networking → TCP/IP applications, protocols, and services → Directory Server (LDAP):
http://publib.boulder.ibm.com/infocenter/iseries/v5r4/index.jsp
314 IBM System i Security Guide for IBM i5/OS Version 5 Release 4

Part 5 Security management
This part includes the following chapters:
� Chapter 14, “Regulations and standards” on page 317� Chapter 15, “Security monitoring” on page 331� Chapter 16, “Considerations and recommendations” on page 347
Part 5
© Copyright IBM Corp. 2005, 2006. All rights reserved. 315

316 IBM System i Security Guide for IBM i5/OS Version 5 Release 4
Chapter 14. Regulations and standards
In this chapter, we provide a partial list of common standards and regulations that relate to computer security. We begin by discussing the Sarbanes-Oxley (SOX) Act of 2002. Then we present a brief summary of many of the more common standards and regulations.
In general, regulations and standards are not written at the IT computer level, and many contain no direct references to computers or security. To satisfy the regulation or standard, the content must be reviewed and, as appropriate, translated to platform-specific practices. Often there is no clear direction for platform-specific practices. Therefore, satisfying the regulation or standard requires an understanding of the regulation or standard, combined with an understanding of the implementation environment and required level of security.
14
© Copyright IBM Corp. 2005, 2006. All rights reserved. 317

14.1 The Sarbanes-Oxley Act of 2002As a result of major corporate and accounting scandals and a general degradation in financial reporting, on 30 July 30 2002, the United States Congress signed into law a bill known as the Sarbanes-Oxley Act of 2002. Common names for this bill include SOX and Sarb-Ox. SOX establishes new and enhanced standards for corporate accountability and how management carries out its responsibilities. SOX applies to publicly traded U.S. companies.
SOX is about forcing corporate executives of publicly traded U.S. companies to take responsibility for their actions regarding the proper reporting of corporate financial information. SOX is not directly about computers or computer security, but since corporations use computers to produce financial reports, SOX can be directly related to computers and computer security.
SOX contains 36 different sections, three of which specifically relate to the IT department.
� Title III: Corporate responsibility
– Section 302: Corporate responsibility for financial reports
� Title IV: Enhanced financial disclosures
– Section 404: Management assessment of internal controls– Section 409: Real-time issuer disclosures
The following criminal penalty sections also relate to the IT department.
� Title VIII: Corporate and criminal fraud accountability
– Section 802: Criminal penalties for altering documents
� Title IX: White-collar crime penalty enhancements
– Section 906: Corporate Responsibility for Financial Reports
� Title XI: Corporate Fraud Accountability
– Section 1102: Tampering with a record or otherwise impeding an official proceeding
14.1.1 SOX text and key messagesThis section includes actual verbiage from sections copied directly from the Sarbanes-Oxely Act of 2002. The actual verbiage is followed by a summary of the key messages of the verbiage. None of the SOX verbiage directly addresses computer, information technology (IT), or security, but much of SOX verbiage can be applied to computer technology.
318 IBM System i Security Guide for IBM i5/OS Version 5 Release 4

Section 302: Corporate responsibility for financial reportsSEC. 302. CORPORATE RESPONSIBILITY FOR FINANCIAL REPORTS.(a) REGULATIONS REQUIRED.—The Commission shall, by rule, require, for each company filing periodic reports under section 13(a) or 15(d) of the Securities Exchange Act of 1934 (15 U.S.C. 78m, 78o(d)), that the principal executive officer or officers and the principal financial officer or officers, or persons performing similar functions, certify in each annual or quarterly report filed or submitted under either such section of such Act that—
(1) the signing officer has reviewed the report;
(2) based on the officer’s knowledge, the report does not contain any untrue statement of a material fact or omit to state a material fact necessary in order to make the statements made, in light of the circumstances under which such statements were made, not misleading;
(3) based on such officer’s knowledge, the financial statements, and other financial information included in the report, fairly present in all material respects the financial condition and results of operations of the issuer as of, and for, the periods presented in the report;
(4) the signing officers—
(A) are responsible for establishing and maintaining internal controls;
(B) have designed such internal controls to ensure that material information relating to the issuer and its consolidated subsidiaries is made known to such officers by others within those entities, particularly during the period in which the periodic reports are being prepared;
(C) have evaluated the effectiveness of the issuer’s internal controls as of a date within 90 days prior to the report; and
(D) have presented in the report their conclusions about the effectiveness of their internal controls based on their evaluation as of that date;
(5) the signing officers have disclosed to the issuer’s auditors and the audit committee of the board of directors (or persons fulfilling the equivalent function)—
(A) all significant deficiencies in the design or operation of internal controls which could adversely affect the issuer’s ability to record, process, summarize, and report financial data and have identified for the issuer’s auditors any material weaknesses in internal controls; and
(B) any fraud, whether or not material, that involves management or other employees who have a significant role in the issuer’s internal controls; and
(6) the signing officers have indicated in the report whether or not there were significant changes in internal controls or in other factors that could significantly affect internal controls subsequent to the date of their
Chapter 14. Regulations and standards 319
evaluation, including any corrective actions with regard to significant deficiencies and material weaknesses.
(b) FOREIGN REINCORPORATIONS HAVE NO EFFECT.—Nothing in this section 302 shall be interpreted or applied in any way to allow any issuer to lessen the legal force of the statement required under this section 302, by an issuer having reincorporated or having engaged in any other transaction that resulted in the transfer of the corporate domicile or offices of the issuer from inside the United States to outside of the United States.
(c) DEADLINE.—The rules required by subsection (a) shall be effective not later than 30 days after the date of enactment of this Act.
Section 302 key messagesExecutives must personally certify the accuracy of financial statements. They must know that the computer data has not been tampered with and a signoff is required indicating that the data is accurate and tamper free. Any deficiencies in internal controls must be reported.
Section 404: Management assessment of internal controlsSEC. 404. MANAGEMENT ASSESSMENT OF INTERNAL CONTROLS.(a) RULES REQUIRED.—The Commission shall prescribe rules requiring each annual report required by section 13(a) or 15(d) of the Securities Exchange Act of 1934 (15 U.S.C. 78m or 78o(d)) to contain an internal control report, which shall—
(1) state the responsibility of management for establishing and maintaining an adequate internal control structure and procedures for financial reporting; and
(2) contain an assessment, as of the end of the most recent fiscal year of the issuer, of the effectiveness of the internal control structure and procedures of the issuer for financial reporting.
(b) INTERNAL CONTROL EVALUATION AND REPORTING.—With respect to the internal control assessment required by subsection (a), each registered public accounting firm that prepares or issues the audit report for the issuer shall attest to, and report on, the assessment made by the management of the issuer. An attestation made under this subsection shall be made in accordance with standards for attestation engagements issued or adopted by the Board. Any such attestation shall not be the subject of a separate engagement.
Section 404 key messagesControls must be documented and in place to safeguard company data. Section 404 requires an assessment to confirm that the controls are adequate, and an annual management report, attested to by an external audit firm, on internal controls.
320 IBM System i Security Guide for IBM i5/OS Version 5 Release 4

Section 409: Real-time issuer disclosuresSection 13 of the Securities Exchange Act of 1934 (15 U.S.C. 78m), as amended by this Act, is amended by adding at the end the following:
(l) REAL TIME ISSUER DISCLOSURES.—Each issuer reporting under section 13(a) or 15(d) shall disclose to the public on a rapid and current basis such additional information concerning material changes in the financial condition or operations of the issuer, in plain English, which may include trend and qualitative information and graphic presentations, as the Commission determines, by rule, is necessary or useful for the protection of investors and in the public interest.
Section 409 key messagesProducing timely financial information requires the type of automation provided by computer systems. The computer system must be protected from both intentional and accidental loss of information. The financial information must be accurate and free of any tampering. Corporations must disclose within 48 hours any information related to changes in the companies financial condition.
14.1.2 How SOX applies to companies outside the United StatesThe following types of companies are subject to comply with Sarbanes-Oxley legislation:
� Companies listed (or intending a listing) in the U.S. Stock Exchange Market (called public companies) must be compliant with the Sarbanes-Oxley Act. Such companies tend to be large multinational or international companies, with hundreds of entities. All entities of those groups must be compliant.
� Subsidiaries of public U.S. companies must be in compliance with the Sarbanes-Oxley Act.
� Companies with strong U.S. trade, U.S. relations, or U.S. investors, even though not enforced by law, may take market-driven actions to comply with SOX.
Internationally, many companies, without any direct legal reason, are investigating the Sarbanes-Oxley Act.
14.1.3 COBITSOX defines the required results for corporate financial reporting, but not how the required financial reporting is to be achieved. Control Objectives for Information and related Technology (COBIT) is used by many auditing firms as an accepted standard for good IT security and control practices.
Chapter 14. Regulations and standards 321

COBIT provides a reference framework, divided in to 34 high-level control objectives, for management, users, and Information Systems (IS) audit, control, and security practitioners. COBIT can be further divided into more detailed objectives. Many of these detailed objectives have been identified as relevant to SOX compliance.
For additional information, refer to the Information Systems Audit and Control Association (ISACA) Web site:
http://www.isaca.org/cobit
14.1.4 Public Company Accounting Oversight BoardThe Public Company Accounting Oversight Board (PCAOB) was created by the SOX act to oversee the auditors of public companies, in order to protect investor interests and increase the public interest in the preparation of independent audit reports. Section 103 of SOX directs the PCAOB to establish auditing and related attestation standards, quality control standards, and ethics standards. These standards are to be used by registered public accounting firms in the preparation and issuance of audit reports, as required by the Act or the rules of the Commission. Or they may be necessary or appropriate in the public interest or for the protection of investors.
For additional information, refer to the PCAOB Web site:
http://www.pcaobus.org
14.1.5 SOX and the System i platformIn addition to the common practice of auditors certifying the financial results, SOX Section 404 adds the requirement that auditors also certify the processes by which the results are determined. This requirement is the foundation that links SOX to computers and ultimately computer security. To certify the processes, you must have an in-depth knowledge of the processes and controls in an organization, including the organization’s computer systems.
Attestation: Attestation means to sign your name as a witness to the act of watching someone sign a legal document.
322 IBM System i Security Guide for IBM i5/OS Version 5 Release 4

14.1.6 ReferencesFor more information, consult the following references:
� American Institute of Certified Public Accountants
http://www.aicpa.org/sarbanes/index.asp
� SOX Act PDF from the University of Cincinnati College of Law
http://www.law.uc.edu/CCL/SOact/soact.pdf
14.2 ISO/IEC 17799-2005 IT security techniques: Code of practice for information security management
Originally published in 2000, the ISO/IEC 17799 standard is used internationally. It is based on the British Standard BS 7799-1, which was originally published in 1995 and updated in 1999. ISO 17799 is an international set of guidelines that address how a company should develop a security policy, classify assets, implement system access controls, and enforce compliance.
ISO 17799 is an internationally recognized generic information security standard. Its purpose is to give recommendations for information security management for use by those who are responsible for initiating, implementing, or maintaining security in their organization. It is intended to provide a common basis for developing organizational security standards and effective security management practice. It also provides confidence in inter-organizational dealings.
ISO 17799 is a detailed security standard that provides a code of practice for information security management. As a general organizational information security management guide, ISO 17799 is not intended to give definitive details or “how-to’s.” Rather, the standard addresses topics in terms of policies and general good practices. The standard specifically identifies itself as “a starting point for developing organization-specific guidance.” It states that not all of the guidance and controls it contains may be applicable and that additional controls not contained may be required.
ISO 17799 has now established itself as the major standard for information security. Many organizations have embarked upon the process of getting full certification under the ISO methodology, with a number already fully certified.
ISO/IEC 17999-2005 contains 134 controls grouped into 11 areas or domains:
� Security policy: To provide management direction and support for information security
� Organization of information security: To manage information security within the company; to maintain the security of organizational information
Chapter 14. Regulations and standards 323

processing facilities and information assets accessed by third parties; to maintain the security of information when the responsibility for information processing has been outsourced to another organization
� Asset management: To maintain appropriate protection of corporate assets and ensure that information assets receive an appropriate level of protection
� Human resources security: To reduce risks of human error, theft, fraud, or misuse of facilities; to ensure that users are aware of information security threats and concerns, and are equipped to support the corporate security policy in the course of their normal work; to minimize damage from security incidents and malfunctions, and learn from such incidents
� Physical and environmental security: To prevent unauthorized access, damage, and interference to business premises and information; to prevent loss, damage, or compromise of assets and interruption to business activities; to prevent compromise or theft of information and information processing facilities
� Communications and operations management: To ensure the correct and secure operation of information processing facilities; to minimize the risk of system failures; to protect the integrity of software and information; to maintain the integrity and availability of information processing and communication; to ensure the safeguarding of information in networks and the protection of the supporting infrastructure; to prevent damage to assets and interruptions to business activities; to prevent loss, modification, or misuse of information exchanged between organizations
� Access control: To control access to information; to prevent unauthorized access to information systems; to ensure the protection of networked services; to prevent unauthorized computer access; to detect unauthorized activities; to ensure information security when using mobile computing and Telnet working facilities
� Information system acquisition, development and maintenance: To ensure security is built into operational systems; to prevent loss, modification, or misuse of user data in application systems; to protect the confidentiality, authenticity, and integrity of information; to ensure IT projects and support activities are conducted in a secure manner; to maintain the security of application system software and data
� Information security incident management
� Business continuity management: To counteract interruptions to business activities and to critical business processes from the effects of major failures or disasters
Note: This section was added in the 2005 update to ISO 17799.
324 IBM System i Security Guide for IBM i5/OS Version 5 Release 4
� Compliance: To avoid breaches of any criminal or civil law, statutory, regulatory, or contractual obligations, and of any security requirements; to ensure compliance of systems with organizational security policies and standards; to maximize the effectiveness of and minimize interference to and from the system audit process
ISO 17799 documentation is available for a fee from the International Organization for Standardization (ISO) Web site:
http://www.iso.org
14.3 Other regulations and standardsThe following sections summarize some of the more commonly known regulations and standards.
14.3.1 American Express Data Security RequirementsAny business that accepts the American Express Card is expected to ensure the privacy of customers, including when card information is stored for future or recurring billing. This security requirement addresses data security requirements for merchants that accept the American Express Card. These requirements can be applied to additional businesses. This standard applies to commercial business security regulations.
For more information, see the American Express Merchants Fraud protection: Data: Security requirements page:
http://www125.americanexpress.com/merchant/oam/ns/USEng/FrontServlet?request_type=navigate&page=dataSecurityRequirements
14.3.2 Australia/New Zealand 4360 Risk ManagementThis standard applies to Australian and New Zealand Governments. It is now obsolete and has been replaced by ISO 17799. It was prepared by the Joint Standards Australia/Standards New Zealand Committee on Risk Management as a revision of AS/NZS 4360:1995 Risk Management.
For more information, see the following Web site:
http://www.e.govt.nz/services/authentication/authentication-bpf/chapter13.html/view?searchterm=4360%20Risk%20Management
Chapter 14. Regulations and standards 325
14.3.3 Basel IIBasel II is an international agreement developed by the Basel Committee on Banking Supervision. The committee is an association of banking supervisory authorities, such as national banks, from the major industrialized economies. It formulates supervisory standards and guidelines. It usually meets at the Bank of International Settlements (BIS) in Basel, Switzerland.
Basel II was created to establish a global standard for how banks and other financial institutions measure risk and allocate capital. Basel II is based on a framework that assesses the operational risk of a financial institution as well as of its customers. Operational risk is defined as the risk of loss resulting from inadequate or failed internal processes, people, and systems.
With banks and most other companies, the information system is the essential part of the operation. It is expected that Basel II will substantially turn on the attention to IT security measurements.
Basel II will be available for implementation as of year-end 2007. It is expected that individual banking supervisory authorities will take steps to implement it through detailed arrangements, statutory or otherwise. The financial system as a whole will become more resilient and more stable.
For more information, see the Bank for International Settlements Web site:
http://www.bis.org/
14.3.4 Gramm-Leach-Bliley ActThe Gramm-Leach Bliley Act (GLBA) applies to US Banking Security Regulations. This act is also known as the Financial Modernization Act of 1999. GLBA includes provisions to protect consumer personal financial information held by financial institutions. There are three principal parts to the privacy requirements:
� Financial privacy rule: This rule governs the collection and disclosure of consumer personal financial information by financial institutions. The rule also applies to companies other than financial institutions that receive consumer personal financial information.
� Safeguards rule: This rule requires all financial institutions to design, implement and maintain safeguards to protect consumer information. It applies to financial institutions that collect information from their own customers and institutions that receive customer information from other financial institutions.
326 IBM System i Security Guide for IBM i5/OS Version 5 Release 4

� Pretexting provisions: Pretexting refers to accessing information using false pretenses. The GLBA protects consumers from individuals and companies that obtain their personal financial information under false pretenses.
For more information, see:
http://www.ftc.gov/privacy/privacyinitiatives/glbact.html
14.3.5 Health Insurance Portability and Accountability ActThe Health Insurance Portability and Accountability (HIPPA) Act applies to the U.S. healthcare industry. It amends the Internal Revenue Service Code of 1986. The goal of HIPAA is to improve the integrity, security, and privacy of health care information. HIPPA includes an Administrative Simplification section that requires:
� Improved efficiency in health care delivery by standardizing electronic data interchange
� Protection of confidentiality and security of health data through setting and enforcing standards
For more information, see the following Web site:
http://www.hhs.gov/ocr/hipaa/
14.3.6 Personal Information Protection and Electronic Documents Act
The Personal Information Protection and Electronic Documents Act (PIPEDA) protects individuals in Canada. It establishes rules for how private sector organizations collect, use, or disclose personal information in the course of commercial activities. The law gives individuals the right to access and request correction of the personal information that these organizations may have collected about them.
To learn more about PIPEDA, see the following Web site:
http://www.privcom.gc.ca/
14.3.7 Statement on Auditing Standards No. 70, Service Organizations
The Statement on Auditing Standards (SAS) 70 is an international auditing standard developed by the American Institute of Certified Public Accountants (AICPA). A SAS 70 audit indicates that a service organization has been through an in-depth audit of their control activities, which usually include information technology controls. SAS 70 provides guidance to enable an auditor to issue an
Chapter 14. Regulations and standards 327
opinion about a service organization’s description of controls. SAS 70 is not a predetermined checklist of control objectives or control activities. Auditors follow the AICPA standards for fieldwork, quality control, and reporting.
To learn more about SAS 70, see the following Web site:
http://www.sas70.com/
14.3.8 Systems Security Engineering Capability Maturity ModelThe Systems Security Engineering Capability Maturity Model (SSE CMM) is a process-reference model that applies to industry security standards. It is focused on the requirements for implementing security in a system or series of related systems.
You can learn more about SSE CMM on the Web at:
http://www.sse-cmm.org
14.3.9 Payment Card Industry Data Security StandardThe Payment Card Industry (PCI) Data Security Standard offers a single approach to safeguard sensitive data for all card brands worldwide. This standard is a result of a collaboration between Visa and MasterCard. It is designed to create common industry security requirements. Other card companies have endorsed the PCI Data Security Standard.
For more information about the PCI Data Security Standard, refer to the following Web sites:
� Visa Payment Card Industry Data Security Standard
http://usa.visa.com/download/business/accepting_visa/ops_risk_management/cisp_PCI_Data_Security_Standard.pdf
� Merchant e-solutions Payment Card Industry (PCI) Data Security Standard
http://www.merchante-solutions.net/infosecurity/mandates.htm
14.3.10 Visa Cardholder Information Security ProgramVisa Cardholder Information Security Program (Visa CISP) compliance is required of all merchants and service providers worldwide that store, process, or transmit Visa cardholder data. The program applies to all Visa uses, including retail, mail, telephone, and e-commerce.
Merchants and service providers must adhere to the PCI Data Security Standard. Using PCI as the framework, the standard incorporates the CISP
328 IBM System i Security Guide for IBM i5/OS Version 5 Release 4

requirements. CISP provides the tools and measurements needed to protect against cardholder data exposure and compromise across the entire payment industry. The PCI Data Security Standard consists of 12 basic requirements supported by more detailed sub-requirements.
You can find more information about the Visa CISP standard at the following Web sites:
� Visa Cardholder Information Security Program
http://usa.visa.com/business/accepting_visa/ops_risk_management/cisp.html
� Visa U.S.A. Cardholder Information Security Program (CISP) Payment Application Best Practices
http://usa.visa.com/download/business/accepting_visa/ops_risk_management/cisp_Payment_Application_Best_Practices.pdf?it=search
Chapter 14. Regulations and standards 329

330 IBM System i Security Guide for IBM i5/OS Version 5 Release 4
Chapter 15. Security monitoring
In this chapter, we introduce security auditing, monitoring, and reviews for i5/OS. We provide a summary of the information that is contained in the identified references. For complete details, read the reference materials.
15
Note: This chapter contains references to the iSeries Information Center for V5R4 page. On this page, you can simply click the iSeries Information Center, Version 5 Release 4 link in the navigation area and select the topics that are specified:
http://publib.boulder.ibm.com/infocenter/iseries/v5r4/index.jsp
© Copyright IBM Corp. 2005, 2006. All rights reserved. 331
15.1 Security auditing environmentSecurity auditing involves using logs, exit points, message queues, and an assortment of i5/OS commands to access various system resources. Such resources include the system history log, the security audit journal, system values, network attributes, user profiles, and authorization lists.
The term security auditing is often used interchangeably with other terms such as security reviews and security monitoring. It can refer to similar or different activities based on who you are talking to about security. In some manuals, security auditing refers to the establishment of a journaling environment for the system to automatically record security related activities. In other manuals, security auditing refers to the act of an auditor reviewing the security activities to determine if the activities occur within or outside the scope of the organization’s security policy.
In-depth knowledge of an organization’s business, industry, regulations, structure, policies, and procedures is an important prerequisite to performing a security audit, security review, or security monitoring. This chapter uses the definitions in the following sections for security auditing, security reviews, and security monitoring.
15.1.1 Security auditingA security audit can be performed by an internal auditor, someone from within the organization, or an external organization. A security audit is a regular and repeated review of the organization’s security procedures and control to make sure they meet the requirements of the security policy, processes, procedures, and guidelines. A security audit is usually required to satisfy an industry, government, or owner responsibility.
15.1.2 Security reviewsA security review is similar to a security audit, but is generally performed by an internal auditor, or someone from an external organization who is acting as an internal auditor. Security reviews are generally referred to as friendly audits, since the goal of the review is to determine if the organization’s security procedures and controls satisfy the requirements of the security policy, process, procedures, and guidelines. Security reviews are not usually initiated as a result of an industry, government, or owner responsibility.
332 IBM System i Security Guide for IBM i5/OS Version 5 Release 4

15.1.3 Security monitoringSecurity monitoring is a regularly scheduled security activity, usually performed by a security administrator, security officer, or security technical resource. Security monitoring involves using i5/OS commands to review system and security logs and journals for the appropriateness of security-related activities. It also uses i5/OS commands to review various reports and message queues.
Security monitoring can occur in real-time, hourly, daily, weekly, or for any other specified time period. During each security monitoring cycle, the security-related activities performed on the system are reviewed to determine if the activities were appropriately performed as required by procedures detailed in the organization’s security policy. The activities are also reviewed to determine if any activity has occurred that has caused the system to be out of compliance with respect to the controls that are established in the security policy.
15.2 Techniques for monitoring securityBased on your requirements, you can select from several different security monitoring techniques. You can use one, several, or all the of the techniques in the following sections at the same time to create a security monitoring program specific to your organization’s security monitoring requirements.
15.2.1 Security audit journalThe security audit journal, QAUDJRN, is the primary source of information about security events on the System i platform. The security audit journal environment must be established on a system before the system can use the security audit journal to automatically record security related events.
There are two basic techniques for processing the security audit journal:
� Journal reading: You can use the Receive Journal Entry (RCVJRNE) command to create a locally developed journal reader exit program. This program continuously receives journal entries. Based on information in the received journal entry, the exit program can take specific action dependent on the security nature of each journal entry. RCVJRNE provides journal entries to the exit program as they occur, which enables immediate actions to be taken if appropriate. A journal reader can only process a given journal entry at a single time.
� Journal displaying: Using the Copy Audit Journal Entries (CPYAUDJRNE) command, you can directly view or build a database file that contains all entries or a selected subset of entries. A locally developed program can then process the database file and produce a report or take specific actions based
Chapter 15. Security monitoring 333

on the nature of each journal entry. You can specify various selection criteria for the CPYAUDJRNE command.
For additional information about establishing the security audit journal, refer to Chapter 6, “Security audit journal” on page 139.
15.2.2 Exit pointsSome System i functions provide an exit point so that your system can run a user-created program to perform additional checking and validation. For example, you can set up your system to run an exit program every time someone creates a new user profile or attempts to open a distributed data management (DDM) file on your system:
� Registered exit points: The Work with Registration Information (WRKREGINF) command shows a list of registered exit points where control can be passed for specific system functions or programs.
� Other: Refer to the iSeries Information Center at the following Web address and select the path Security → Plan and setup system security → Manage security → Configure the system to use security tools → Use security exit programs, which contains a list of where to find other security exit programs, such as password validation, and remote sign-on:
http://publib.boulder.ibm.com/infocenter/iseries/v5r4/index.jsp
Similar to registered exit points, these other exit points are given control when specific functions are performed. This same chapter contains references as to where you can find example exit programs for each exit program type.
For additional information, refer to 4.5, “Registered exit points” on page 101.
15.2.3 Security messagesIf you create a message queue called QSYSMSG in the QSYS library, the system automatically sends messages about critical system events to the QSYSMSG message queue in addition to sending them to the QSYSOPR message queue. The QSYSMSG message queue can be monitored separately by a program or system operator. Critical messages in QSYSOPR are sometimes missed because of the volume of messages that are sent to that message queue.
For additional information, refer to 4.1.5, “Work management elements” on page 55.
334 IBM System i Security Guide for IBM i5/OS Version 5 Release 4
15.2.4 Reports and baselinesMany commands are available to produce reports or database files that reflect the current security status of your system. A baseline is a report on file that is produced at a known time and compliance status that can be used for future comparisons to determine if the system is still in compliance or if the system has been changed. When the system has changed, the difference between the baseline reports or files and the current reports or files highlight exactly the information that has changed and possibly requires investigation.
15.3 Security event and state monitoringEvent monitoring is when the system is monitored using the QAUDJRN security audit journal. If the security audit journal exists, the system automatically logs specific security-related events to the journal.
State monitoring is the comparison of security specific settings between two points in time. The first point is usually the baseline and represents the system at a known security compliance level when all settings are specified as required by the security policy. The second point is any time the security state of the system is reviewed, such as the current actual settings. A comparison between the baseline and the actual settings show any settings that have been changed, which possibly change the compliance status of the system with respect to the security policy.
The following sections contain a partial list of the main security-related state and event monitoring that you might want to regularly monitor for on your system. You can find many of the commands in the Security Tools (GO SECTOOLS) menu. The commands that produce reports can be compared to the baseline reports to identify any changes since the baseline.
15.3.1 General system securityYou can monitor system security attributes by using the Print System Security Attributes (PRTSYSSECA) command. This command enables you to print a report of security-related system values and network attributes to a spooled file. The report includes the system value or network attribute name, the current value, and the recommended value.
Chapter 15. Security monitoring 335

15.3.2 AuditingYou can use the following commands to monitor auditing:
� Monitoring security auditing: The Display Security Auditing (DSPSECAUD) command displays current information about the security audit journal and the current settings for the system values that control what is being audited on the system.
� Monitoring audit journal entries: The Copy Audit Journal Entries (CPYAUDJRNE) command allows you to generate security journal audit reports. The reports are based on the audit entry types and the user profile specified on the command. Reports can be limited to specific time frames and detached journal receivers can be searched. The reports are copied into one or more outfiles. For more information about how to create security journal audit reports, see 6.5.4, “Converting security audit journal entries” on page 145.
The audit entries for which you can run reports are a subset of the audit entries that may be generated. For information about all of the possible audit entries, see Chapter 9 in the iSeries Security Reference, SC41-5302.
15.3.3 System valuesYou can monitor for system value changes by using the following Work with System Values (WRKSYSVAL) command:
WRKSYSVAL OUTPUT(*PRINT)
This command enables you to print a list of all system values and the current settings of each system value. The current or actual system values report can be compared to the baseline report to identify any system values that have been changed. System value changes can also be logged to the security audit journal, which can be monitored by reviewing entries associated with each of these activities.
Users can be restricted from changing security-related system values by a service tool setting. For additional information about restricting changes to system values, refer to 4.1.3, “Locking system values” on page 51.
15.3.4 User profilesFor the monitoring of user profiles, use the following methods depending on your need for information:
� Monitoring the security officer’s actions: To enable profile auditing for QSECOFR or any other profile, use the Change User Auditing (CHGUSRAUD) command. Consider activating auditing for any privileged
336 IBM System i Security Guide for IBM i5/OS Version 5 Release 4

profile, but especially for profiles with *ALLOBJ and *SECADM special authorities.
For additional information and detailed steps to perform this analysis, refer to Chapter 9 in the iSeries Security Reference, SC41-5302.
� Monitoring password changes to IBM-supplied user profiles: IBM ships i5/OS with many user profiles designed to own object or run system functions. Use the Display Authorized Users (DSPAUTUSR) command to list and verify that IBM supplied user profiles have a password of *NONE, indicating that the profile has no password.
For additional information, refer to Chapter 4 and Appendix B in the iSeries Security Reference, SC41-5302.
� Monitoring user profiles: You can display or print a complete list of users on your system by using the DSPAUTUSR command. The list can be sequenced by profile name or group profile name. The Display User Profile (DSPUSRPRF) command is also available to display, print, or send to a database file, one, a group by generic name, or all user profiles and details. The results of these commands can be compared to baseline output to discover new, updated, and deleted user profiles.
� Monitoring profile creations, changes and deletions: You can use the Print User Profile (PRTUSRPRF) command to print a report containing information for all the user profiles on the system. You can specify to include authority information, environment information, password information, or *ALL information about selected user profiles.
Monitoring for profile changes should include changes that gain authorities for users, such as changes to the user class or special authorities:
PRTUSRPRF TYPE(*ALL)
Profile activities can also be logged to the security audit journal, which can be monitored by reviewing entries associated with each of these activities.
� Monitoring for default passwords: The Analyze Default Passwords (ANZDFTPWD) command allows you to print a report of all the user profiles on the system that have a default password and to take an action against the profiles. A profile has a default password when the profile’s password matches the user profile name.
� Monitoring the active profile list: The Display Active Profile List (DSPACTPRFL) command displays the list of user profiles that will always be considered active and therefore will not be disabled by the Analyze Profile Activity (ANZPRFACT) CL command function. Those IBM user profiles which are never considered to be inactive are not listed. This information was gathered from the Change Active Profile List (CHGACTPRFL) command. If the DSPACTPRFL command is issued before the CHGACTPRFL command, an empty report is produced.
Chapter 15. Security monitoring 337
The CHGACTPRFL command adds or removes users from the list of profiles that will always be considered active by the ANZPRFACT command. These profiles will never be disabled even if they have been inactive for the specified number of days.
We recommend that you add to this list any profiles that have been created to own application objects and are not used to sign on. You also need to add any other IBM (“Q”) profiles to this list that you do not want disabled.
� Monitoring for user profile activity: The ANZPRFACT command determines if profiles have been inactive for the specified number of days. If a profile has been inactive for the specified number of days, then it is disabled. The last used date on the user profile is used to determine the number of days that a profile has been inactive. If the last used date is blank, the restore date is used. If the restore date is blank, the creation date is used.
When a profile is disabled, a message is sent to the message queue of the user who issued the ANZPRFACT command. Examine the profiles that are disabled by this command to determine if they are still needed. If they are not, then delete them. User profiles can also be excluded from this processing by using the CHGACTPRFL command to add them to the list of profiles that will always be considered active.
We recommend that you add to this list any profiles that have been created to own application objects and are not used to sign on. You will also want to add any other IBM (“Q”) profiles to this list that you do not want disabled. The ANZPRFACT help text lists the IBM (“Q”) profiles that will never be considered inactive.
� Monitoring the profile activation schedule: The Display Activation Schedule (DSPACTSCD) command displays user profiles with their enable and disable time, and the days the profiles will be activated. This information is in the QASECACT file in the QUSRSYS library and was gathered from the Change Activation Schedule Entry (CHGACTSCDE) command.
The CHGACTSCDE command allows you to make a user profile available for sign-on only for a specific period of time on specific days. If you specify a new schedule for a user profile (using CHGACTSCDE again for that user), the system replaces that profile's existing schedule with the new information.
When a profile is enabled or disabled, a message is sent to the message queue of the user who issued the CHGACTSCDE command. The enable and disable times are set up to occur on the same day. For example, if you specify an enable time of 07:00, a disable time of 18:00, and *MON for the days, the profile is enabled on Monday at 7:00 and disabled on Monday at 18:00. If you want to span days so that a profile should be enabled Monday at 23:00 and disabled Tuesday at 07:00, you need to specify *ALL for the days. (The profile will be enabled from 23:00 to 07:00 every day.)
338 IBM System i Security Guide for IBM i5/OS Version 5 Release 4
To remove a user profile from the file so that it is no longer enabled and disabled, specify:
ENBTIME(*NONE) DSBTIME(*NONE)
The activation schedule can be displayed with the DSPACTSCD command.
� Monitoring the profile expiration schedule: The Display Expiration Schedule (DSPEXPSCD) command shows the list of user profiles, their expiration date, and the expiration action to be taken (disable or delete the profile). If the expiration action is deleted, then the owned object option (*NODLT, *DLT, *CHGOWN) and the primary group option (*NOCHG, *CHGPGP) are shown. If the owned object option is *CHOWN, then the new owner is shown. If the primary group option is *CHGPGP, then the new primary group and the new primary group authority are shown. This information was gathered from the Change Expiration Schedule Entry (CHGEXPSCDE) command. If the DSPEXPSCD command is run before the CHGEXPSCDE command, an empty report is produced.
The CHGEXPSCDE command allows you to expire a user profile on a certain date. The expired user profile can either be disabled or deleted. When a profile is disabled or deleted, a message is sent to the message queue of the user who issued the CHGEXPSCDE command.
To remove a user profile from the file so that it no longer expires, specify EXPDATE(*NONE). This information can be displayed using the DSPEXPSCD command.
After a profile is scheduled to be disabled or deleted, the CHGEXPSCDE job runs nightly. If you want to change the time the job runs, you can use the Change Job Schedule Entry (CHGJOBSCDE) command to change the QSECEXP1 job.
� Monitoring profile internal information: The Print Profile Internals (PRTPRFINT) command allows you to print a report that contains information about the number of entries contained in a user profile (*USRPRF) object. The number of entries in the user profile determines the size of the user profile.
15.3.5 Password controlFor monitoring password control, use the following methods:
� Monitoring password expiration interval: System value QPWDEXPITV and profile setting PWDEXPITV work together to determine the password expiration interval. Use the Display System Value (DSPSYSVAL) and DSPUSRPRF commands to validate the setting of the system value and profiles are as required in the security policy. Consider setting the
Chapter 15. Security monitoring 339
PWDEXPITV profile setting to *SYSVAL and system value QPWDEXPITV to a value between 30 and 90 days.
� Monitoring group profiles: Group profiles should not have a password. Use the DSPAUTUSR command to check for any group profiles that have passwords.
15.3.6 Authorization controlTo monitor authorization control, use the following methods:
� Monitoring public authority: The Print Publicly Authorized Objects (PRTPUBAUT) command allows you to print a report of the specified objects that do not have public authority of *EXCLUDE. For *PGM objects, only the programs that do not have public authority of *EXCLUDE, that a user can call (the program is either user domain, or the system security level (QSECURITY system value) is 30 or lower), are included in the report. This provides a way to check for objects that every user on the system is authorized to access.
This command prints two reports:
– The Full Report contains all of the specified objects that do not have public authority of *EXCLUDE.
– The Changed Report contains the objects that now do not have public authority of *EXCLUDE, but that previously had a public authority of *EXCLUDE, or did not exist when the PRTPUBAUT command was previously run.
If the PRTPUBAUT command was not run for the specified objects and library or folder, no Changed Report is produced. If the command was run, but no additional objects have public authority of *EXCLUDE, then the Changed Report is printed but no objects are listed. Public access to user profiles should be set to *EXCLUDE, preventing access to profiles by anyone who is not specifically authorized.
Consider running this command to include a minimum of these objects:
– Commands– Directories– Documents– Files– Folders– Libraries– Programs– User profiles
Public access to user profiles should be set to *EXCLUDE, preventing access to profiles by anyone who is not specifically authorized. Use the Print Publicly Authorized Objects (PRTPUBAUT) command to print a
340 IBM System i Security Guide for IBM i5/OS Version 5 Release 4

report of objects, specifically user profiles, that do not have public authority of *EXCLUDE, for example:
PRTPUBAUT OBJTYPE(*USRPRF)
� Monitoring authority to job descriptions: The Print Job Description Authority (PRTJOBDAUT) command allows you to print a report of job descriptions in a library that does not have public authority of *EXCLUDE, and a user name is specified in the job description. The command checks for job descriptions on the system, to which every user is authorized to use, that allow the user to run as another user profile, for example:
PRTJOBDAUT LIB(library-name)
� Monitoring object authority: To determine who has authorities to libraries on the system, use a combination of the Display Object Description (DSPOBJD), Display Object Authority (DSPOBJAUT), and Display Library (DSPLIB) commands. For more information and detailed steps to perform this analysis, see Chapter 9 in the iSeries Security Reference, SC41-5302.
� Monitoring private authority: The Print Private Authority (PRTPVTAUT) command allows you to print a report of all the private authorities for objects of a specified type in a specified library, folder, or directory. The report lists all objects of the specified type and the users that are authorized to the object. This is a way to check for different sources of authority to objects.
Consider running this command to include a minimum of these objects:
– Authorization lists– Commands– Directories– Documents– Files– Folders– Libraries– Programs– User profiles
This command prints three reports for the selected objects:
– The Full Report contains all of the private authorities for each of the selected objects.
– The Changed Report contains additions and changes to the private authorities of the selected objects if the PRTPVTAUT command was run for the specified objects in the specified library or folder. Any new objects of the selected type, new authorities to existing objects, or changes to existing authorities to the existing objects are listed in this report.
If the PRTPVTAUT command was not run for the specified objects in the specified library or folder, there is no Changed Report. If the command
Chapter 15. Security monitoring 341
was run, but no changes were made to the authorities on the objects, then the Changed Report is printed but no objects are listed.
– The Deleted Report contains any deletions of privately authorized users from the specified objects since the PRTPVTAUT command was run. Any objects that were deleted or any users that were removed as privately authorized users are listed in the Deleted Report. If the PRTPVTAUT command was not run, there is no Deleted Report. If the command was run, but no delete operations were done to the objects, then the Deleted Report is printed, but no objects are listed.
15.3.7 Unauthorized accessTo monitor for unauthorized access, use the following methods:
� Monitoring for invalid logon attempt: Invalid logon attempts due to an invalid password or an invalid user profile can be logged to the security audit journal. From this journal, they can be monitored by reviewing entries associated with each of these activities.
� Monitoring for programs that adopt authority: Programs that adopt the authority of another user, especially an *ALLOBJ special authority user, can represent a security exposure. To determine which programs adopt the authorities of other users, you can use a combination of the Display Program Adopt (DSPPGMADP) and DSPOBJAUT commands.
For additional information and detailed steps to perform this analysis, refer to:
– Chapter 9 in the iSeries Security Reference, SC41-5302
– iSeries Information Center and the path Security → Plan and setup system security
http://publib.boulder.ibm.com/infocenter/iseries/v5r4/index.jsp
� Monitoring for adopting objects: The Print Adopting Objects (PRTADPOBJ) command allows you to print a report of the objects that adopt the special and private authorities of the specified user profile. This is a way to check for security exposures associated with program adoption.
15.3.8 Unauthorized programsTo monitor for unauthorized programs, use the following methods:
� Monitoring for user objects in libraries: The Print User Objects (PRTUSROBJ) command allows you to print a report of the objects in a library that are not created by IBM. Objects are included in the report if the Created by user attribute is not *IBM or QLPINSTALL. Use this command to check for user-created objects that are in libraries intended for use only by IBM. For
342 IBM System i Security Guide for IBM i5/OS Version 5 Release 4
example, you may want to run this program for the QSYS library to determine if it contains any non-IBM (user) objects.
� Monitoring for altered objects: Use the Check Object Integrity (CHKOBJITG) command to look for objects that have been altered. CHKOBJITG checks all objects that are owned by a specified user profile, the objects that match the specified path name, or all objects on the system to determine if any objects have been altered, thereby creating an integrity violation.
If an integrity violation has occurred, the object name, library, object type, object owner, and type of failure are logged to a specified database file. An altered object may indicate that someone is attempting to tamper with your system.
For additional information and detailed steps to perform this analysis, refer to Chapter 9 in the iSeries Security Reference, SC41-5302.
� Monitoring the operating system: Use the Check System (QYDOCHKS) application programming interface (API) to see if any key operating system object have been changed since it was signed. Any object that is not signed or has been changed since it was signed is reported as an error.
For additional information and detailed steps to perform this analysis, refer to:
– Chapter 9 in the iSeries Security Reference, SC41-5302
– iSeries Information Center and the path Security → Plan and setup system security
http://publib.boulder.ibm.com/infocenter/iseries/v5r4/index.jsp
15.3.9 Database triggersTo monitor for database triggers, monitor the use of trigger programs. DB2 Universal Database provides the capability to associate trigger programs with database files. When you associate a trigger program with a database file, you specify when the trigger program runs.
Use the Print Trigger Programs (PRTTRGPGM) command to print a list of all trigger programs for the physical files in a specified library or in all libraries. Use the initial report as a baseline to evaluate any trigger programs that already exist on the system. Then, you can print the changed report regularly to see whether new trigger programs have been added to your system. To understand what a trigger program does, you must review the source code for the program.
Chapter 15. Security monitoring 343
For additional information and detailed steps to perform this analysis, refer to iSeries Information Center at the following Web address and select the path Security → Plan and setup system security:
http://publib.boulder.ibm.com/infocenter/iseries/v5r4/index.jsp
15.3.10 Exit pointsTo monitor for exit points, monitor the exit point programs. When certain events occur the system runs, if defined, the exit program associated with that event. Many exit points are provided with i5/OS. Review and evaluate any exit points with programs defined to understand the purpose of the exit program and to be assured that the program is not performing a questionable activity that can compromise the security compliance status of the system.
For additional information and detailed steps to perform this analysis, refer to the iSeries Information Center and the path Security → Plan and setup system security:
http://publib.boulder.ibm.com/infocenter/iseries/v5r4/index.jsp
15.3.11 OtherYou may want to consider monitoring the following areas:
� Monitoring communications security: The Print Communications Security (PRTCMNSEC) command allows you to print a report that contains the security attributes of the *DEVD, *CTLD, and *LIND objects currently on the system. This command provides a way to check the security of your communications configuration on the system.
� Monitoring print output queue authority: The Print Output Queue Authority (PRTQAUT) command allows you to print a report of the output queue and job queue authority information for the objects in the specified library. This command provides a way to check the authority attributes of the output queue and job queue objects on the system.
� Monitoring subsystem authority: The Print Subsystem Authority (PRTSBSDAUT) command allows you to print a report of the subsystem descriptions in a library that contains a default user in a subsystem description entry. This command provides a way to check for subsystem descriptions that allow work to be performed on your system while running under a default user profile.
344 IBM System i Security Guide for IBM i5/OS Version 5 Release 4
15.4 More informationConsult the following resources to learn more about security monitoring:
� Chapter 9, “Auditing Security on the iSeries System” in iSeries Security Reference, SC41-5302
� The iSeries Information Center path Security → Plan and setup system security
http://publib.boulder.ibm.com/infocenter/iseries/v5r4/index.jsp
Chapter 15. Security monitoring 345

346 IBM System i Security Guide for IBM i5/OS Version 5 Release 4
Chapter 16. Considerations and recommendations
In this chapter, we introduce some recommendations and considerations regarding best practices for security for the System i platform. We summarize many of the security recommendations found in this redbook along with additional recommendations provided by the authors.
The recommendations in this chapter provide an excellent starting point toward a more secure system. We document additional security considerations and recommendations in the references at the end of this chapter.
16
Note: This chapter contains references to the iSeries Information Center for V5R4 page. On this page, you can simply click the iSeries Information Center, Version 5 Release 4 link in the navigation area and select the topics that are specified:
http://publib.boulder.ibm.com/infocenter/iseries/v5r4/index.jsp
© Copyright IBM Corp. 2005, 2006. All rights reserved. 347

16.1 System security auditingThe Display Security Auditing (DSPSECAUD) CL command displays current information about the security audit journal and the current settings for the system values that control what is being audited on your system. Security auditing should be active and journal receivers should be changed regularly (for example, daily). They must also be archived to tape if needed to investigate a security incident.
For additional information, refer to Chapter 6, “Security audit journal” on page 139.
16.2 AuthorityThis section addresses some recommendations and considerations for authorities.
16.2.1 Adopted authoritySometimes a user needs different authorities to an object or an application, depending on the situation. A solution for this temporary gain of authority is to use adopted authority. Identify and document all programs that are created to use adopted authority, and review the code for any activities that can be exploited by the program users. As a part of regular system monitoring, review the system for new programs that adopt authority. These new programs need to be reviewed and documented.
For additional information, refer to 4.3.3, “Object ownership” on page 77.
16.2.2 Swapping user profilesThe operating system inhibits the use of adopted authority when using integrated file system commands or application programming interfaces (APIs). A common method to work around it is to swap user profiles. You must consider that audit records that are written when using swapped user profiles are written indicating that the swap-to user performed the actions, for as long as the job or thread is swapped. You should identify and document all programs that swap user profiles and review the code for any activities that can be exploited by the program users. As a part of regular system monitoring, review the system for new programs that swap user profiles. These new programs must be reviewed and documented.
For additional information, refer to 4.3.3, “Object ownership” on page 77.
348 IBM System i Security Guide for IBM i5/OS Version 5 Release 4

16.2.3 Library and directory public accessCheck the public access to application libraries and directories. The Display Object Authority (DSPOBJAUT) CL command displays the list of authorized users of an object, such as a library, and their assigned authority. The Display Authority (DSPAUT) command displays the list of authorized users of an object or directory. If the object is secured by an authorization list, the name of the authorization list is also displayed. If the user does not have object management authority for the object, only the user’s authority to the object is displayed. The public authority and primary group authority are also shown.
Libraries that indicate *PUBLIC *CHANGE and directories that indicate *PUBLIC *RWX, *RW, *WX, or *W mean anyone on the system can change the contents of the library or directory.
Objects within the library or directory can be uniquely secured (for example *PUBLIC *EXCLUDE). This check gives an indication of the general access to libraries, directories, and objects. The recommendation is to secure objects at the library, directory, or the individual object level. Libraries or directories that are found with *PUBLIC *ALL mean that anyone on the system can do anything to the library or directory, which can be an exposure.
For additional information, refer to 4.3.4, “Public authority” on page 81.
16.3 CommandsMany i5/OS commands are supplied with public use (*PUBLIC *USE) authority. Review the commands to decide who needs the ability to execute the command. Public authority can be changed from *USE to *EXCLUDE. You can change the public authority for each command. Or you can use the Revoke Public Authority (RVKPUBAUT) CL command to remove public authority from a predefined list of commands which can be customized based on local system requirements.
For additional information, refer to 4.3.9, “Securing commands” on page 95.
16.3.1 Using the Limit Capabilities field to control command authorityYou can use the Limit Capabilities (LMTCPB) field in a user profile to limit a user’s ability to enter commands and to override the initial program, initial menu, current library, and attention-key-handling program specified in the user profile. A user with LMTCPB(*YES) can only run commands that are defined as Allow Limited User (ALWLMTUSR) *YES.
Chapter 16. Considerations and recommendations 349

The Limit Capabilities (LMTCPB) field in a user profile and the Allow Limited User (ALWLMTUSR) parameter apply only to commands that are run from the command line, the Command Entry display, or an option from a command grouping menu.
The following commands are shipped by IBM with ALWLMTUSR(*YES):
� Sign Off (SIGNOFF)� Send Message (SNDMSG)� Display Messages (DSPMSG)� Display Job (DSPJOB)� Display Job log (DSPJOBLOG)� Start PC Organizer (STRPCO)� Work with Messages (WRKMSG)
For additional information, refer to 4.2.1, “Individual user profiles” on page 59.
16.3.2 Library create authority (QCRTAUT)Consider changing the default for the Create Library (CRTLIB) command so that new libraries are created with create authority *EXCLUDE. This sets the default public authority for all objects created in the library to *EXCLUDE. The Create Directory commands (CRTDIR, MD, or MKDIR) have similar parameters to set the default public authority for object and data to *EXCLUDE.
For additional information, refer to 4.3.2, “Authority for new objects in a library” on page 76.
16.4 Operating systemProgram temporary fixes (PTFs) are released only for supported operating system levels. A critical problem might be reported that can apply to both supported and unsupported operating system levels, but is fixed only via PTFs on the supported level. Running a currently supported operating system level assures you that high impact pervasive fixes will be available.
You can display the currently installed release level by selecting option 10 (Display installed licensed programs) from the Work with Licensed Programs menu (GO LICPGM) and then pressing F11 (Display release). If you are not authorized to the menu option, then you can use the following Display Data Area (DSPDTAARA) command to display data area QSS1MRI:
DSPDTAARA DTAARA(QUSRSYS/QSS1MRI)
350 IBM System i Security Guide for IBM i5/OS Version 5 Release 4

Figure 16-1 shows an example of the data area QSS1MRI, indicating that the system is a V5R4M0 system.
Figure 16-1 Example of data area QSS1MRI showing the i5/OS version
16.4.1 Restrict object tamperingSet the following system values to make it more difficult for someone to place an object on the system that has been tampered with:
� Allow Object Restore (QALWOBJRST)� Force Conversion on Restore (QFRCCVNRST)� Verify Object on Restore (QVFYOBJRST)
For additional information, refer to 4.1.1, “Security system values” on page 46.
16.4.2 Check Object Integrity commandThe Check Object Integrity (CHKOBJITG) CL command checks the objects owned by the specified user profile, the objects that match the specified path name, or all objects on the system to determine if any objects have integrity violations. An integrity violation occurs if:
� A command has been tampered with.� An object has a digital signature that is not valid.� An object has an incorrect domain attribute for its object type.� A program or module object has been tampered with.
Display Data Area System: ABC Data area . . . . . . . : QSS1MRI Library . . . . . . . : QUSRSYS Type . . . . . . . . . : *CHAR Length . . . . . . . . : 750 Text . . . . . . . . . : Value Offset *...+....1....+....2....+....3....+....4....+....5 0 'V5R4M000 2924 ' 50 ' ' 100 ' ' 150 ' ' 200 ' ' 250 ' ' 300 ' ' 350 ' ' 400 ' '
Chapter 16. Considerations and recommendations 351
� A library’s attributes have been tampered with.� An object failed a file system scan.
16.4.3 System cleanupConsider the following recommendations for cleaning up your system:
� Products: Know which products you need and use on your system. Remove unnecessary product options from your system.
� Libraries: Remove unnecessary libraries from your system, such as test libraries. Test libraries often contain copies of production files and code. Know which libraries you need and use on your system. Investigate and remove, if appropriate, any unnecessary libraries.
� Integrated file system: Remove unnecessary integrated file system directories from your system. Know which directories you need and use. Investigate and remove, if appropriate, any unnecessary directories.
16.4.4 Creating and monitoring the QSYSMSG message queueCreate the QSYSMSG message queue and monitor it for critical system and security-related messages. For additional information, refer to 4.1.5, “Work management elements” on page 55.
16.4.5 TCP/IP serversOnly start the TCP/IP servers required by your system. Change the autostart setting of the TCP/IP servers so that required servers can be started automatically, and servers not required by your system will not be started. Limit who can run the Start TCP/IP Server (STRTCPSVR) CL command.
For additional information, refer to 8.2, “Controlling which TCP/IP servers start automatically” on page 175.
16.4.6 Identifying all exit point programsExit point programs are available for i5/OS commands and other functions. You should use a baseline, or create a snap shot, of all programs attached to exit points. You must also examine the intention of each program to understand the actual function that the exit point program is providing.
For additional information, refer to 4.5, “Registered exit points” on page 101.
352 IBM System i Security Guide for IBM i5/OS Version 5 Release 4

16.4.7 Other environmentsCheck your system to see if it hosts other environments or middleware. The following partial list of environments and middleware can be hosted by a System i machine:
� AIX� Linux� Microsoft Windows 2000 server� IBM HTTP Server (powered by Apache) Web server� Lotus Domino server� Netfinity®� WebSphere
For additional information, refer to Appendix C, “Applications and middleware security considerations” on page 379.
16.5 System values and network attributesIn this section, we address recommendations and considerations for System values and network attributes.
16.5.1 System security level system valueYou can view the current system security level by running the Display Security Attributes (DSPSECA) command. The DSPSECA command also shows you the current password level and a few other security related attributes of the system.
Run the system at security level 40 or 50, unless there is an application on the system that is documented as requiring level 30.
For additional information, refer to 4.1.1, “Security system values” on page 46, or see the Information Center on the Web at:
http://publib.boulder.ibm.com/infocenter/iseries/v5r4/index.jsp
Important: If you are going to change your security level, you must follow the guidelines in iSeries Security Reference, SC41-5302.
Chapter 16. Considerations and recommendations 353

16.5.2 Locking security system valuesSince OS/400 V5R2, you can use System Service Tools (SST) or Dedicated Service Tools (DST) to control whether users can change security-related system values. After properly setting and documenting system values, use either SST or DST to lock the system values.
For additional information, refer to 4.1.3, “Locking system values” on page 51.
16.5.3 Password control system valuesCheck the following system values that provide password change control and password limitations:
� QPWDLMTAJC: Limit adjacent digits in password� QPWDLMTCHR: Limit characters in password� QPWDLMTREP: Limit repeating characters in password� QPWDLVL: Password level� QPWDMAXLEN: Maximum password length (1 - 128)� QPWDMINLEN: Minimum password length (1 - 128)� QPWDPOSDIF: Limit password character positions� QPWDRQDDGT: Require a digit in password� QPWDRQDDIF: Duplicate password control
For additional information, refer to 12.2, “Passwords” on page 285.
Password expiration (QPWDEXPITV) system valueThe passwords for system users should be set up to expire at an interval defined in the security policy, forcing users to periodically change their passwords. Users should not have permanent, non-expiring passwords. The passwords of privileged users, users with special authorities, should expire more frequently than the passwords of non-privileged users.
Password validation program (QPWDVLDPGM) system valueA locally developed password validation program can be created to perform additional password checks, such as the user profile name being part of the password. The password validation program is invoked by the operating system whenever a user uses the Change Password (CHGPWD) command or iSeries Navigator to change their password. The password validation program is not invoked when a password is changed using the Change User Profile (CHGUSRPRF) command.
354 IBM System i Security Guide for IBM i5/OS Version 5 Release 4

16.5.4 Network attributesNetwork attributes control how the System i platform communicates with other systems. Some network attributes control how remote requests to process job and access information are handled. These network attributes directly affect security. You must understand these attributes so you can set them at the appropriate values for your organization, based on the system that needs to receive remote job streams and use distributed data management (DDM). Security-related network attributes include:
� Job action (JOBACN)� Client request access (PCSACC)� DDM Request access (DDMACC)
For additional information, refer to 4.1.4, “Network attributes” on page 54.
16.6 User profilesIn this section, we address recommendations and considerations for System i user profiles.
Security officer (QSECOFR) user profileUsers do not normally need to use the QSECOFR profile. Some products require the use of QSECOFR to install or customize the product. When the use of QSECOFR is required, procedures should exist to obtain temporary use of the QSECOFR profile, and then to reset the QSECOFR password after use is no longer required. If procedures do not exist, you must create and implement them.
User profiles with special authoritiesUsers with any special authorities are often referred to as privileged users. Only give users the privileges that they need to do their job. Do not give special authorities to users who do not specifically require the authority.
Inactive user profilesUser profiles can be queried for last-use information. Inactive profiles are profiles that have not been used for some period of time. Establish a threshold of a number of days to determine if a profile is inactive. Investigate inactive profiles to determine if you should remove them from the system.
Product profilesMany vendors, including IBM, ship products with profiles. Some of the profiles are ownership profiles, meaning that they own the application objects or at least some of them. Other profiles are provided as templates for profiles that you can
Chapter 16. Considerations and recommendations 355

copy to use the application. Avoid assigning a password to profiles provided by the vendor without a password. Instead, duplicate the profile and use the copy instead.
User profile sharingEvery profile should be owned by someone in the organization. A profile should not be shared between users unless the profile was specifically created for the purposes of being shared. Procedures should exist to check out the shared profiles and check them back in so that the current or past user of the profile can always be identified.
The Work User Profile (WRKUSRPRF) CL command allows you to view the user profiles on the system. Each user should have their own unique user profile so that no users are sharing a common profile. Accountability cannot be established to a user when using common shared profiles.
Service tools user IDsService tools user IDs are used to access system service function. IBM ships i5/OS with several predefined standard service IDs with default passwords set to expired. The service tools user ID passwords should be changed on a regular basis, similar to privileged user profiles, and the new passwords should be controlled.
For additional information, refer to 4.2.3, “IBM-supplied user profiles” on page 65.
Granted authorities to group profilesUse group profiles when several users have similar security requirements. Users can gain both special authorities, such as *ALLOBJ, and private authorities from group profiles. Because of the authorization search order, authorities granted at the group level can be overridden at the user level. An example is a user profile that inherits *ALLOBJ from the group, but is *EXCLUDE for the user. Because of the authorization search order, the user is excluded from the object before the *ALLOBJ test, and therefore, cannot access the object.
Group profiles with passwordsAvoid creating group profiles with passwords. Group profiles can be displayed using the Display Authorized User (DSPAUTUSR) CL command.
Default passwordsA default password is when the user profile name and the password are the same. Analyze the profiles for default passwords and take immediate action if any profiles have default passwords.
356 IBM System i Security Guide for IBM i5/OS Version 5 Release 4

It is common for IBM and other vendors to ship products with default passwords. The expectation is that you will change the password after installation to a password that satisfies the organization’s password controls. The Analyze Default Passwords (ANZDFTPWD) CL command allows you to print a report of all the user profiles on the system that have a default password and to take action against the profiles.
Limit users with spool control special authorityUsers with the special authority of spool control (*SPLCTL) are capable of performing all operations on all output queues and spooled files. If confidential data will be spooled or printed, give only a limited set of users *SPLCTL special authority.
For additional information, refer to 4.3.7, “Output distribution” on page 90.
Objects owned by QDFTOWNCheck for excessive ownership of objects by the user profile of QDFTOWN (default owner). When objects are restored to a system where the owning user profile does not exist, the ownership of the objects will be changed to the QDFTOWN user profile. Since the QDFTOWN user profile is not normally used or maintained by a responsible owner, the restored objects can present a vulnerability in that there may be objects that should be owned or maintained by a responsible individual.
Run the Display User Profile (DSPUSRPRF) CL command to see which objects are owned by the QDFTOWN profile:
DSPUSRPRF USRPRF(QDFTOWN) TYPE(*OBJOWN)
For additional information, refer to 4.2.3, “IBM-supplied user profiles” on page 65.
Note: There are other reasons why the QDFTOWN profile might own objects, such as running the Delete User Profile (DLTUSRPRF) command and specifying QDFTOWN as the new object owner for the objects owned by the deleted profile. Also an application might create objects with QDFTOWN as the owner.
Chapter 16. Considerations and recommendations 357

16.7 More informationMany additional security considerations and recommendations are documented in the following references.
� System i documents:
– Chapter 9, “Auditing Security on the iSeries System” in iSeries Security Reference, SC41-5302
– The iSeries Information Center and the path Security → Plan and set up system security
http://publib.boulder.ibm.com/infocenter/iseries/v5r4/index.jsp
� Web sites:
– Security Improvement
http://www.cert.org/nav/index_green.html
– How to bulletproof OS/400
http://whatis.techtarget.com/featuredTopic/0,290042,sid3_gci1078368,00.htm
� Books:
– Experts’ Guide to OS/400 & i5/OS Security by Patrick Botz and Carol Woodbury
358 IBM System i Security Guide for IBM i5/OS Version 5 Release 4
Appendix A. LPAR security considerations
The System i platform has the scalability and reliability to consolidate multiple servers into a single box. However, that consolidation is only a feasible solution for customers if they can be assured that the integrity of their solutions is not compromised by moving the function from multiple physical systems to a single physical system. The technology in the System i platform ensures that the operating systems and applications in separate logical partitions (LPARs) are kept separate.
The security-related tasks that you perform on a partitioned server are the same as on a server without LPARs. However, when you create LPARs, you work with more than one independent system. Therefore you must perform the same tasks on each LPAR instead of only one time on a system without LPARs.
A
Note: This appendix contains references to the iSeries Information Center for V5R4 page. On this page, you can simply click the iSeries Information Center, Version 5 Release 4 link in the navigation area and select the topics that are specified:
http://publib.boulder.ibm.com/infocenter/iseries/v5r4/index.jsp
© Copyright IBM Corp. 2005, 2006. All rights reserved. 359

The hypervisorThe hypervisor provides all the partition control and partition mediation in the system. The hypervisor is the system component that responsible for isolating one partition from another.
On LPAR capable systems prior to POWER5 systems, the hypervisor is loaded by the primary partition as shown in Figure A-1.
Figure A-1 LPAR on LPAR-capable systems prior to POWER5 system
IBM PowerPC® processors used in the System i machine have specific support for the hypervisor model. Some low-level processor instructions can only be run by the hypervisor. This prevents any program running outside the hypervisor from accidentally or maliciously executing an instruction that can affect another partition.
Partition isolationThe System i hypervisor provides isolation between partitions to the processor, memory, and I/O device level:
� A program or operating system running in one partition does not affect another partition. This statement includes the fact that a software failure, either of an application or of the operating system, in one partition does not affect another partition.
� The memory spaces of different partitions are isolated based on the allocation of resources in the configuration, and are strictly enforced by the hypervisor. It is not possible for one partition to access or modify data stored in the memory allocated to another partition.
SecondaryPartition 1
SecondaryPartition 2
Primarypartition
Primary partitionconsole
Hypervisor
360 IBM System i Security Guide for IBM i5/OS Version 5 Release 4

� Physical I/O devices assigned to one partition cannot be accessed or modified by another partition. For example, the data stored on a disk unit assigned to one LPAR cannot be accessed by another LPAR.
This isolation exists regardless of the operating system running in the partition.
Micro partition isolationThe System i platform supports micro partitions. This technology allows for allocating a single CPU to multiple partitions. As the CPU becomes a shared resource, concerns have arisen as to how the hypervisor and processors ensure that there is no reuse of one partition’s information to another.
The System i machine implements highly secure micro partitioning through the firmware-based hypervisor. On a partition basis, the hypervisor virtualizes the CPUs that are configured and reported to the operating systems. For each virtual processor in the system, the hypervisor has storage in hypervisor memory space that contains the register state of the virtual CPU. When a virtual processor is dispatched to run on a physical CPU, the hypervisor restores all of the CPU hardware in registers mode to the physical CPU and then starts the partition running on the physical CPU. This allows multiple virtual processors from multiple partitions to share the same physical CPU resources while maintaining isolation between partitions.
Dynamic LPARDynamic LPAR (DLPAR) represents a capability to dynamically add and remove resources from partitions and reallocate to other partitions. It must be enabled through the Hardware Management Console (HMC) interface. DLPAR represents a dynamic access control change for the hypervisor enforcement of resources.
Re-assignment of resources starts with the HMC requesting that the partition releases a specific resource. Upon release, the hypervisor takes control of the resource, restricting any further access to that resource by any other partition. After associating with a different partition, the hypervisor uses its enforcement mechanisms to ensure that this resource is only usable by the assigned partition.
Hypervisor on POWER5 systemsPOWER5 technology-based systems provide a new system architecture for logical partitioning. The LPAR hypervisor is now shipped as a firmware part of all POWER5 models. It is stored in a non-volatile random access memory (NVRAM) of the Service Processor. Previously, it was part of the system Licensed Internal Code (LIC) shipped with i5/OS.
Appendix A. LPAR security considerations 361
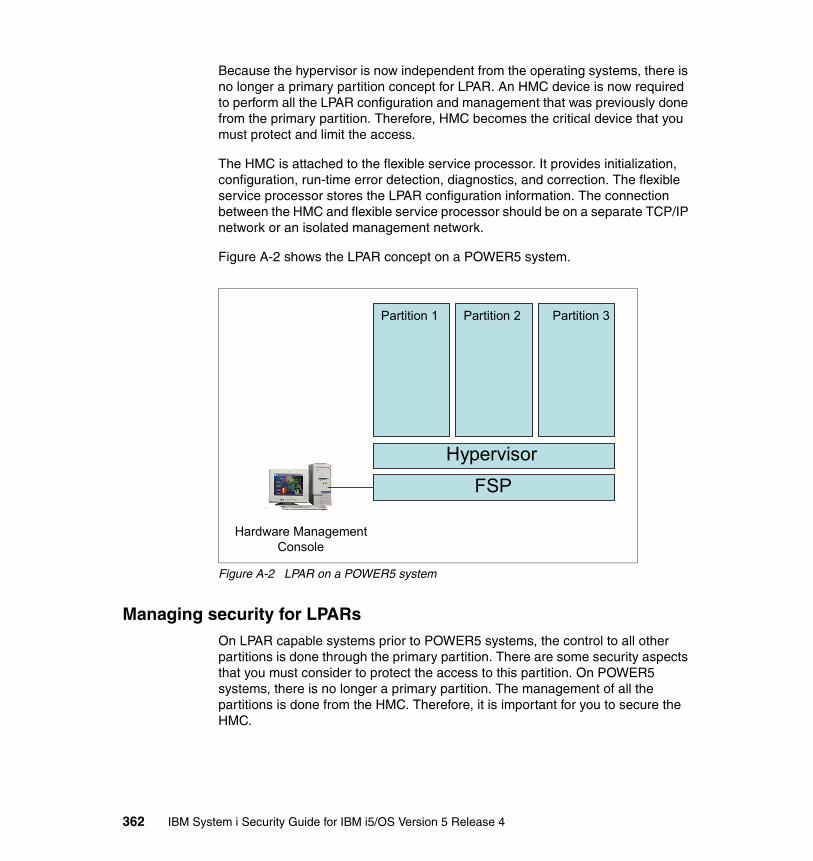
Because the hypervisor is now independent from the operating systems, there is no longer a primary partition concept for LPAR. An HMC device is now required to perform all the LPAR configuration and management that was previously done from the primary partition. Therefore, HMC becomes the critical device that you must protect and limit the access.
The HMC is attached to the flexible service processor. It provides initialization, configuration, run-time error detection, diagnostics, and correction. The flexible service processor stores the LPAR configuration information. The connection between the HMC and flexible service processor should be on a separate TCP/IP network or an isolated management network.
Figure A-2 shows the LPAR concept on a POWER5 system.
Figure A-2 LPAR on a POWER5 system
Managing security for LPARsOn LPAR capable systems prior to POWER5 systems, the control to all other partitions is done through the primary partition. There are some security aspects that you must consider to protect the access to this partition. On POWER5 systems, there is no longer a primary partition. The management of all the partitions is done from the HMC. Therefore, it is important for you to secure the HMC.
Partition 2 Partition 3Partition 1
Hypervisor
Hardware ManagementConsole
FSP
362 IBM System i Security Guide for IBM i5/OS Version 5 Release 4
Protecting your primary partition on non-POWER5 systemsFrom the primary partition, you have control to all other partitions. You can change the status of a secondary partition, move resources from one partition to another, and so on. Therefore, you must limit the access to the primary partition.
The hypervisor associated with the primary partition provides LPAR function to the other partitions. An operating system failure in the primary partition can cause the secondary partitions to fail. Consider the following recommendations:
� Limit the number of people who have authority to use the Dedicated Service Tools (DST) and System Service Tools (SST) on the primary partition.
� If possible, use the primary partition only as a management partition, with limited access and without any business applications running on it. If some major problems occurs on the primary partition (for example a system dump), it can affect all the other partitions.
� The system control panel controls the primary partition. When you set the panel mode to Secure, no actions can be performed on the Work with Partition Status display from SST. To force DST from the system control panel, you must change the mode to Manual.
Protecting the HMC on POWER5 systemsTo access the HMC, you must have an HMC user ID and password. Each HMC user can be member of one to six different roles. Each of these roles allows the user to access different parts of the HMC. The user roles as specified by the HMC are:
� System Administrator� Advanced Operator� Service Representative� Operator� User Administrator� Viewer
You can define additional HMC user roles and control what each user is allowed to do. The HMC also has a firewall on each of its Ethernet adapters. If you want to control the HMC remotely or give remote access to others, modify the firewall settings on the HMC.
Appendix A. LPAR security considerations 363
More informationFor more information about System i LPARs, refer to:
� LPAR Configuration and Management Working with IBM eServer iSeries Logical Partitions, SG24-6251
� Logical Partitions on System i5: A Guide to Planning and Configuring LPAR with HMC on System i, SG24-8000
� The iSeries Information Center path Security → Plan and set up system security → Plan your security strategy → Plan LPAR security http://publib.boulder.ibm.com/infocenter/iseries/v5r4/index.jsp
Interpartition communicationsYou can make various choices and use several methods to set up internal communications between the LPARs, including:
� External LAN� High speed link (HSL) OptiConnect� Virtual OptiConnect� Virtual Ethernet
External LANTraditional external LAN connections are available for interpartition communications. The standard communication security aspects must be involved as though it is an independent system. Figure A-3 shows interpartition communication using a traditional, external local area network (LAN).
364 IBM System i Security Guide for IBM i5/OS Version 5 Release 4
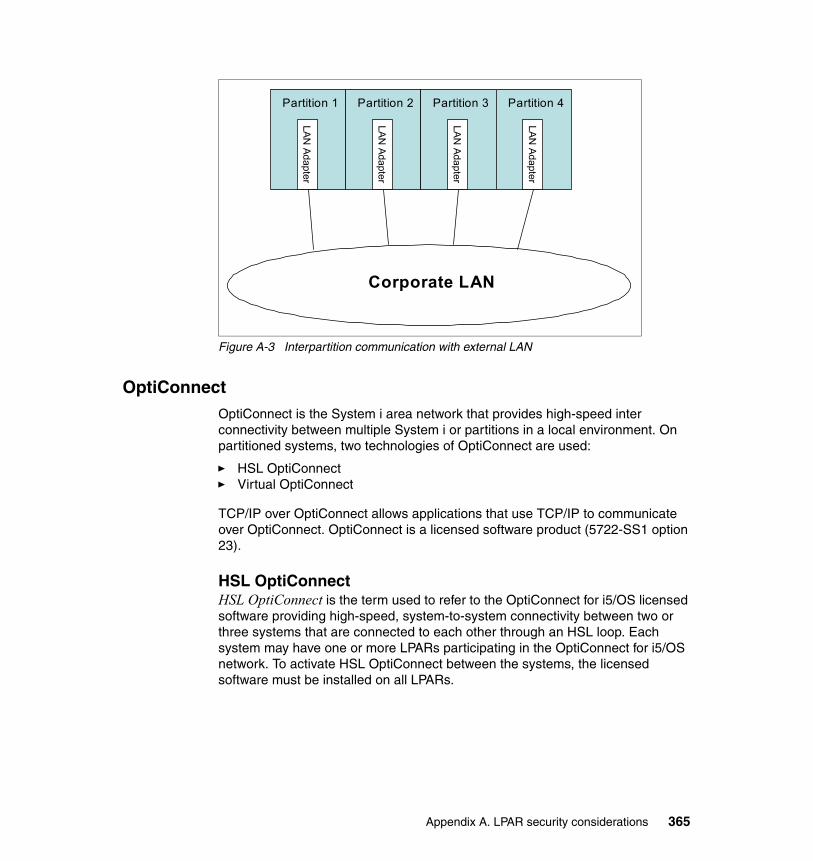
Figure A-3 Interpartition communication with external LAN
OptiConnectOptiConnect is the System i area network that provides high-speed inter connectivity between multiple System i or partitions in a local environment. On partitioned systems, two technologies of OptiConnect are used:
� HSL OptiConnect� Virtual OptiConnect
TCP/IP over OptiConnect allows applications that use TCP/IP to communicate over OptiConnect. OptiConnect is a licensed software product (5722-SS1 option 23).
HSL OptiConnectHSL OptiConnect is the term used to refer to the OptiConnect for i5/OS licensed software providing high-speed, system-to-system connectivity between two or three systems that are connected to each other through an HSL loop. Each system may have one or more LPARs participating in the OptiConnect for i5/OS network. To activate HSL OptiConnect between the systems, the licensed software must be installed on all LPARs.
Partition 1 Partition 2 Partition 3 Partition 4
LAN Adapter
Corporate LAN
LAN Adapter
LAN Adapter
LAN Adapter
Appendix A. LPAR security considerations 365

Figure A-4 shows an example of a system, its expansion unit, and another system interconnected using an HSL OptiConnect Loop.
Figure A-4 HSL OptiConnect loop
Virtual OptiConnectVirtual OptiConnect is the term used to refer to OptiConnect for i5/OS licensed software that provides high-speed, system-to-system connectivity, such as distributed data management (DDM) or Distributed Relational Database Architecture (DRDA), between two or more partitions on a single system using memory-to memory bus technology. No additional hardware is required to support Virtual OptiConnect. Virtual OptiConnect is supported by the hypervisor.
Figure A-5 shows three partitions that are connected through Virtual OptiConnect. Partition 3 is not connected.
Figure A-5 Virtual OptiConnect
HSL Loop
Server ServerPCI Expansion Unit
Partition 1 Partition 2 Partition 3 Partition 4
Flexible Service Processor (FSP)
HMC
Hypervisor
366 IBM System i Security Guide for IBM i5/OS Version 5 Release 4

Virtual EthernetVirtual Ethernet provides the equivalent function as an external 1 Gigabit (Gb) Ethernet environment. A partition can use virtual LAN (VLAN) to establish multiple high-speed, interpartition connections. They can communicate with each other using TCP/IP.
After your virtual Ethernet adapters are created, then you can configure TCP/IP for that communication device in the operating system, as though it were a physical Ethernet adapter. After TCP/IP is configured for the communication device, the virtual Ethernet adapter can communicate with other virtual Ethernet adapters with the same virtual LAN ID.
Figure A-6 shows four partitions that are interconnected through two virtual Ethernet (VE) LAN segments. VE ID 1 interconnects partition 1 and partition 2, and VE ID 2 interconnects partition 2, partition 3, and partition 4. Using the HMC, you configure the Virtual Ethernet environment. The hypervisor supports the configured virtual Ethernet LAN segments and enforces the separation.
Figure A-6 Virtual Ethernet
Partition 1
Slot 2 VE ID1
Slot 3 VE ID2
Slot 2 VE ID2
Slot 2 VE ID2
Slot 2 VE ID1
LAN ID 1 LAN ID 2
Partition 2 Partition 3 Partition 4
Hypervisor
Flexible Service Processor
HMC
Appendix A. LPAR security considerations 367

More informationFor more information about interpartition communications, refer to:
� iSeries OptiConnect for OS/400, SC41-5414
� Logical Partitions on System i5: A Guide to Planning and Configuring LPAR with HMC on System i, SG24-8000
� LPAR Configuration and Management Working with IBM eServer iSeries Logical Partitions, SG24-6251
� The IBM eServer Hardware Information Center path Partitioning the server → Concepts for partitioning the server → Communication options for logical partitions
http://publib.boulder.ibm.com/infocenter/iseries/v1r2s/en_US/index.htm
Controlling virtual LAN trafficWith the introduction of IP filtering for VLAN interfaces in OS/400 V5R1, you can control IP traffic between LPARs. With small Linux partitions running Linux firewalls, you can build a multi-tier environment with full security on a single logically partitioned system.
Figure A-7 shows an example of server consolidation using VLANs, Linux firewall partitions, and IP packet filtering rules. VLANs are defined between adjacent partitions only. In addition, IP packet filtering is used to limit the traffic between the adjacent partitions.
Figure A-7 Server consolidation
Linux
Firewall
i5/OS
ApacheWebServer
Linux
Firewall
i5/OS
Core Business
Applications
Internet
IP Packet Filtering between Partitions
i5/OS security
Adapt.
368 IBM System i Security Guide for IBM i5/OS Version 5 Release 4
The following scenario outlines the strengths of the isolation provided by the System i platform. This scenario describes a typical On Demand Business configuration. A business makes information available to the Internet through a Web server. In this, and many similar environments, the Web server is separated from the production systems with a firewall, and is additionally protected from the Internet using a second firewall.
In this scenario, isolation and integrity are important. Normally we recommend that you run a firewall on a physically isolated system. However, the partition isolation provided by the System i hypervisor ensures that attacks on the firewall partition cannot affect other systems. Such attacks may be denial-of-service attacks that consume all the processing resources of the firewall or integrity attacks such as buffer overflow attacks.
In the scenario shown in Figure A-7, three separated virtual LAN segments are used to interconnect the partitions. Because these virtual LAN segments are distinct and isolated, traffic between the first firewall and the Web server partition is completely isolated from traffic between the Web server and the second firewall.
Devices, such as disk drives and physical Ethernet cards are owned by specific partitions, as configured on the HMC. The ownership is enforced by the hypervisor; that is these devices can be accessed only from those partitions. There is no possibility for data coming from the Ethernet card owned by the first firewall from accidentally being delivered to another partition. No partition can read or write data stored on the disk drives that are owned by another partition.
The design of the System i machine is such that the configuration provides the equivalent separation of operating system images as four physically separate systems. It is important to note that the security and integrity of the applications and operating systems running within the partitions of the system remain the responsibility of the customer. A poorly configured firewall that erroneously allows access to data stored on a system is a problem whether the firewall is on a separate system or running as a partition within a single system. Unauthorized individuals who gain access over a TCP/IP connection are a concern whether the TCP/IP traffic is traveling over a real LAN or a virtual LAN.
Appendix A. LPAR security considerations 369

Connecting virtual LANs to external LANsUsing a virtual Ethernet network for interpartition communication, you may need to enable these partitions to communicate with a physical, external LAN. Figure A-8 shows an example of two partitions that are interconnected with a virtual LAN. Partition 2 has a standard Ethernet adapter connected to an external LAN.
Figure A-8 Connecting virtual Ethernet to external LANs
You can enable or disable IP packets to be forwarded to the external LAN through partition 2 by turning on or off the IP datagram forwarding on partition 2. This is done using the Change TCP/IP Attributes (CHGTCPA) command on partition 2 and specifying *YES for the IP datagram forwarding (IPDTGFWD) parameter. The default value is *NO, so by default, partitions will not forward IP traffic to another subnet.
IP traffic initiated by partition 1 goes from its virtual Ethernet interface to the virtual Ethernet interface on partition 2. By implementing any of the following TCP/IP techniques, you can enable the IP packets to continue on to an external interface and toward their destination:
� TCP/IP routing� Network address translation� Proxy ARP
VirtualEthernet TCP/IP
Interface
i5/OSVirtual
EthernetLine
Description
Partition 1
i5/OSVirtual
EthernetLine
Description
Partition 2
i5/OSVirtual
EthernetLine
Description
External LANVirtualEthernet TCP/IP
Interface
VirtualEthernet TCP/IP
Interface
IP Packets
370 IBM System i Security Guide for IBM i5/OS Version 5 Release 4

More informationFor more information about connecting virtual LANs to external LANs, refer to:
� TCP/IP Tutorial and Technical Overview, GG24-3376
� V4 TCP/IP for AS/400: More Cool Things Than Ever, SG24-5190
� The following paths in the iSeries Information Center:
http://publib.boulder.ibm.com/infocenter/iseries/v5r4/index.jsp
– The online manual iSeries Security, Plan and set up system security V5R4, in the path Security → Plan and set up system security
– The path Networking → TCP/IP setup → TCP/IP techniques connecting virtual Ethernet to external LANs
Other security considerationsIt is possible to have different i5/OS security levels (QSECURITY) in each LPAR and a different security policy implemented by the customer for each partition. One partition may have security down to the object level, but another partition may have all objects secured by group profiles.
A user profile is required for each partition on a physical machine. System-supplied user profiles exist on each partition after the operating system is installed. However, there is no dependency between partitions for these profiles.
Appendix A. LPAR security considerations 371
372 IBM System i Security Guide for IBM i5/OS Version 5 Release 4
Appendix B. Operations Console
Operations Console allows you to use a dedicated PC to access and control your system.
B
Note: This appendix contains references to the iSeries Information Center for V5R4 page. On this page, you can simply click the iSeries Information Center, Version 5 Release 4 link in the navigation area and select the topics that are specified:
http://publib.boulder.ibm.com/infocenter/iseries/v5r4/index.jsp
© Copyright IBM Corp. 2005, 2006. All rights reserved. 373
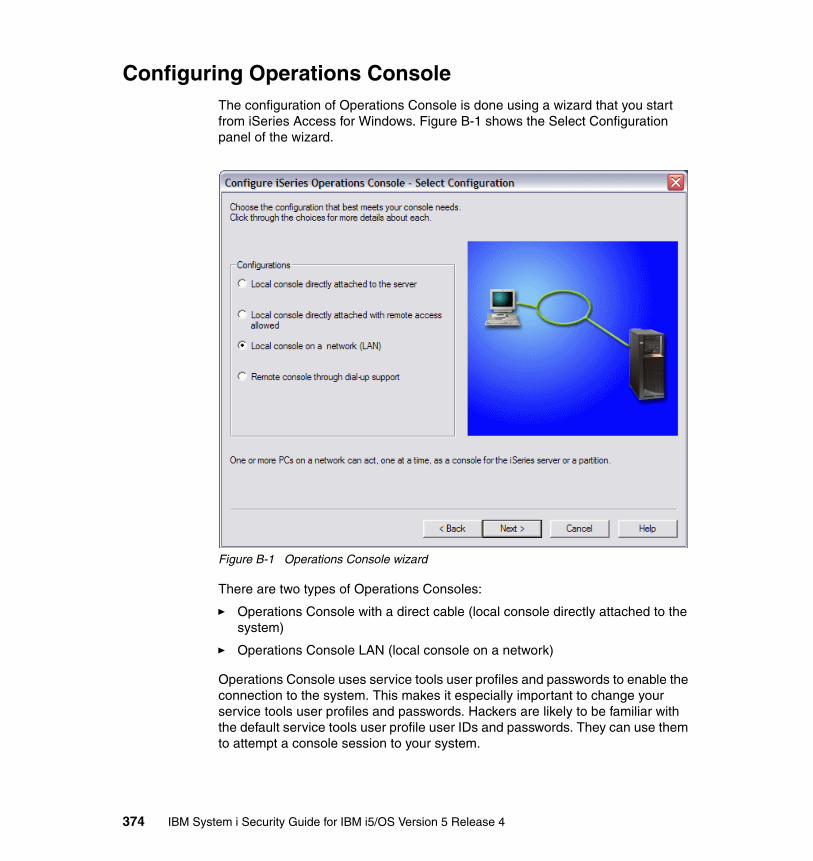
Configuring Operations ConsoleThe configuration of Operations Console is done using a wizard that you start from iSeries Access for Windows. Figure B-1 shows the Select Configuration panel of the wizard.
Figure B-1 Operations Console wizard
There are two types of Operations Consoles:
� Operations Console with a direct cable (local console directly attached to the system)
� Operations Console LAN (local console on a network)
Operations Console uses service tools user profiles and passwords to enable the connection to the system. This makes it especially important to change your service tools user profiles and passwords. Hackers are likely to be familiar with the default service tools user profile user IDs and passwords. They can use them to attempt a console session to your system.
374 IBM System i Security Guide for IBM i5/OS Version 5 Release 4
Operations Console LAN provides enhanced authentication and data encryption network security for console procedures. Since encryption support is included in the system for i5/OS V5R4 and in the base code of iSeries Access for Windows, Operations Console automatically uses the strongest encryption capabilities that are available on the system. For V5R4, that is full 128-bit encryption.
Operations Console security consists of:
� Console device authentication� User authentication� Data privacy� Data integrity
Console device authenticationConsole device authentication assures which physical device is the console. Operations Console with direct connectivity uses a physical connection similar to a twinaxial console. Operations Console using a direct connection may be physically secured similar to a twinaxial console to control access to the physical device.
Operations Console with LAN connectivity uses a version of Secure Sockets Layer (SSL) which supports device and user authentication but without using certificates. For this form of connection, device authentication is based on a service tools device profile.
User authenticationUser authentication provides assurance about who is using the console device. All issues related to user authentication are the same regardless of console type.
Data privacyData privacy provides confidence that the console data can only be read by the intended recipient. Operations Console with direct connectivity uses a physical connection similar to a twinaxial console. Operations Console using a direct connection has the same data privacy of a twinaxial connection. If the physical connection is secure, the console data remains protected.
Operations Console with LAN connectivity uses a secure network connection if possible. Operations Console automatically uses the strongest encryption capabilities available on the system. Because encryption support is included in the system for i5/OS V5R4 and in the base code of iSeries Access for Windows, 128-bit encryption is used.
Appendix B. Operations Console 375
Data integrityData integrity provides confidence that the console data has not changed during delivery to the recipient. Operations Console with direct connectivity uses a physical connection similar to a twinaxial console. If the physical connection is secure, the console data remains protected.
Operations Console with LAN connectivity uses a secure network connection if possible. The PC automatically uses encryption since encryption support is included in the system for i5/OS V5R4 and in the base code of iSeries Access for Windows.
Operations Console LAN consoleWith the Operations Console LAN, a single PC can act as a console to multiple systems or partitions. When the Operations Console LAN function is selected, you must ensure that there is adequate security around it. Since the PC is on the LAN, this PC may need additional security.
Enhanced authentication and data encryption provide network security for console procedures. Operations Console with LAN connectivity uses a version of SSL that supports device and user authentication but without using certificates.
Creating additional DST and SST profilesWhen working with Operations Console, a Dedicated Service Tools (DST) profile is required. The use of System Service Tools (SST) is also available and uses the user profiles from DST for authentication. We recommend that you create additional profiles, rather than using the default profiles such as QSECOFR, when possible.
Creating additional service tools device profilesThe service tools device ID is used for the console device authentication. When a configuration is created for a local console on a network (PC), input of a service tools device ID name is required. Starting with V5R4, you no longer need to specify a password since one is assigned automatically based on the name. This service tools device ID and its password must match the service tools device ID that you set on the PC during the configuration with the Operations Console configuration wizard.
The service tools device ID password is changed and re-encrypted during each successful connection. Therefore, it must always be synchronized between the system and the PC.
376 IBM System i Security Guide for IBM i5/OS Version 5 Release 4
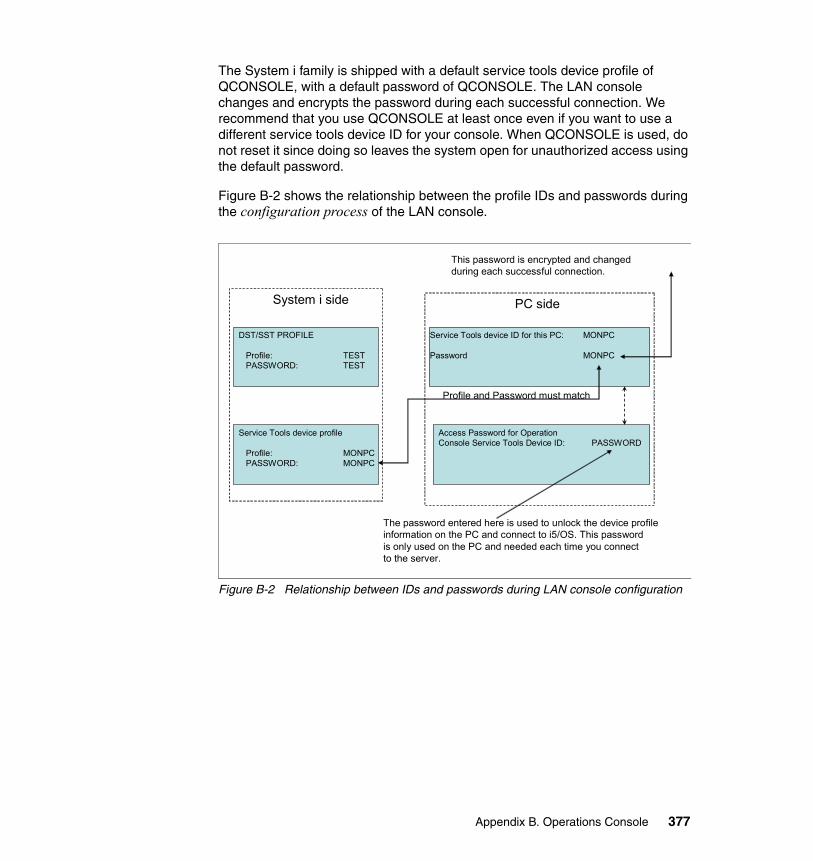
The System i family is shipped with a default service tools device profile of QCONSOLE, with a default password of QCONSOLE. The LAN console changes and encrypts the password during each successful connection. We recommend that you use QCONSOLE at least once even if you want to use a different service tools device ID for your console. When QCONSOLE is used, do not reset it since doing so leaves the system open for unauthorized access using the default password.
Figure B-2 shows the relationship between the profile IDs and passwords during the configuration process of the LAN console.
Figure B-2 Relationship between IDs and passwords during LAN console configuration
DST/SST PROFILE
Profile: TESTPASSWORD: TEST
Service Tools device profile
Profile: MONPCPASSWORD: MONPC
System i side
Service Tools device ID for this PC: MONPC
Password MONPC
Access Password for Operation Console Service Tools Device ID: PASSWORD
The password entered here is used to unlock the device profile information on the PC and connect to i5/OS. This password is only used on the PC and needed each time you connect to the server.
This password is encrypted and changed during each successful connection.
Profile and Password must match
PC side
Appendix B. Operations Console 377
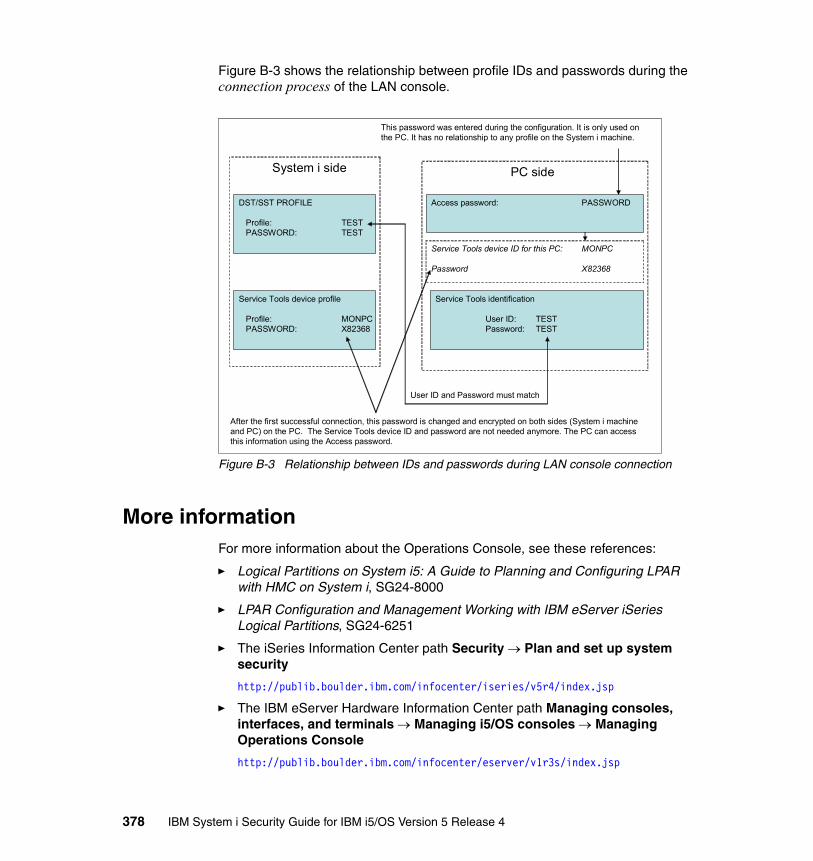
Figure B-3 shows the relationship between profile IDs and passwords during the connection process of the LAN console.
Figure B-3 Relationship between IDs and passwords during LAN console connection
More informationFor more information about the Operations Console, see these references:
� Logical Partitions on System i5: A Guide to Planning and Configuring LPAR with HMC on System i, SG24-8000
� LPAR Configuration and Management Working with IBM eServer iSeries Logical Partitions, SG24-6251
� The iSeries Information Center path Security → Plan and set up system security
http://publib.boulder.ibm.com/infocenter/iseries/v5r4/index.jsp
� The IBM eServer Hardware Information Center path Managing consoles, interfaces, and terminals → Managing i5/OS consoles → Managing Operations Console
http://publib.boulder.ibm.com/infocenter/eserver/v1r3s/index.jsp
DST/SST PROFILE
Profile: TESTPASSWORD: TEST
Service Tools device profile
Profile: MONPCPASSWORD: X82368
System i side
Access password: PASSWORD
Service Tools identification
User ID: TESTPassword: TEST
PC side
User ID and Password must match
This password was entered during the configuration. It is only used on the PC. It has no relationship to any profile on the System i machine.
After the first successful connection, this password is changed and encrypted on both sides (System i machine and PC) on the PC. The Service Tools device ID and password are not needed anymore. The PC can access this information using the Access password.
Service Tools device ID for this PC: MONPC
Password X82368
378 IBM System i Security Guide for IBM i5/OS Version 5 Release 4
Appendix C. Applications and middleware security considerations
In this appendix, we provide information about some of the application and middleware components that run on the System i platform.
In this appendix, we cover the following applications and middleware:
� WebSphere Application Server� WebSphere MQ� Lotus Domino Server� IBM HTTP Server (powered by Apache)
C
Note: This appendix presents an overview of the applications and middleware environment. We do not discuss in detail all the security features of each product.
© Copyright IBM Corp. 2005, 2006. All rights reserved. 379

WebSphere Application ServerWebSphere Application Server is a platform that enables Java applications to run in a uniform, standardized environment. WebSphere Application Server works in conjunction with your HTTP server to provide dynamic function in a Web site. WebSphere Application Server Version 5 and later are compliant with the Java 2 Platform, Enterprise Edition (J2EE™).
You can choose from three types of WebSphere Application Server to run on the System i platform: Express, Base, and Network Deployment (ND). The Express edition is an entry version of WebSphere Application Server that enables the basic functions such as servlets and JavaServer™ Pages™ (JSPs). In the Base edition, most functions in WebSphere Application Server are enabled. The ND edition provides added functionality for high availability and cluster support. Also, since the release of WebSphere Application Server Version 5.1, there is a Developers Edition that is basically a Base version with a different licensing.
At the time this IBM Redbook was written, the versions of WebSphere Application Server listed Table C-1 were available for the System i platform.
Table C-1 WebSphere versions available on the System i platform
Note: This appendix contains references to the iSeries Information Center for V5R4 page. On this page, you can simply click the iSeries Information Center, Version 5 Release 4 link in the navigation area and select the topics that are specified:
http://publib.boulder.ibm.com/infocenter/iseries/v5r4/index.jsp
Product name Product ID
WebSphere Application Server Advanced Single Server Edition V4 for iSeries*
5733-WS4
WebSphere Application Server Advanced Edition V4 for iSeries* 5733-WA4
WebSphere Application Server V5 for iSeries - Express 5722-IWE
WebSphere Application Server V5 for iSeries 5733-WS5**
WebSphere Application Server V5.1 for iSeries - Express 5722-E51
WebSphere Application Server V5.1 for iSeries 5733-W51**
WebSphere Application Server V6 for OS/400 5733-W60**
* No longer supported on the System i platform.** The different versions (Base, ND) come as options for each product ID.
380 IBM System i Security Guide for IBM i5/OS Version 5 Release 4

Enabling securityTo activate any security features in WebSphere Application Server, you first must activate global security. For example, if global security is not enabled, someone can access the administration environment without the use of authentication credentials.
Global security applies to all applications that run in the WebSphere Application Server environment. It determines the type of registry against which authentication takes place, the type of authentication mechanism, and other security values. Figure C-1 shows where on the WebSphere Application Server Administrative Console that you enable global security.
Figure C-1 Enabling security in WebSphere Application Server Version 5
Note: If security for WebSphere Application Server is enabled, you cannot use the System i integrated Web administration interface. Instead, the WebSphere Application Server Administrative Console must be used.
Appendix C. Applications and middleware security considerations 381

Enforcing J2EE securityAlso in Global Security is the option Enforce Java 2 Security. It is activated automatically when activating Global Security. This enables the Java 2 security model to be implemented and requires that applications are compliant with this. Be aware that some performance impact will occur when you enable security.
Figure C-2 Illustrates the building blocks that comprise the operating environment of WebSphere Application Server security.
Figure C-2 WebSphere Application Server security model
Application developers can choose to implement their own security model to handle access, resource restrictions, and so on. However, from a security point of view, we recommend that you use these functions in a production environment.
382 IBM System i Security Guide for IBM i5/OS Version 5 Release 4

WebSphere user profilesWhen it is first installed, by default, WebSphere Application Server uses the following system user profiles:
� QEJB: This profile provides access to some administrative data, including passwords.
� QEJBSVR: This profile provides the context in which your WebSphere Application Server runs. For security or administrative purposes, you may want to create other user profiles under which to run various parts of WebSphere Application Server.
For more information and a sample instruction, follow the path e-business and Web serving → Application Servers → WebSphere Application Server - Express V5 → Security → Run application servers under specific user profiles in the iSeries Information Center:
http://publib.boulder.ibm.com/infocenter/iseries/v5r4/index.jsp
Protecting WebSphere Application Server files and resourcesThe file structure of WebSphere Application Server is similar to those on other platforms. However, it is important to understand where the WebSphere Application Server files reside on the System i platform.
Each version of WebSphere Application Server is installed in a separate integrated file system directory. It is possible to have multiple versions of WebSphere Application Server installed on the same system. When you install WebSphere Application Server, you see the product data in the integrated file system directories as shown in Table C-2. User and application files can be located in other places within the integrated file system.
Table C-2 WebSphere Application Server file location and subsystem names
WAS version Integrated file system location Subsystem Library
V5.0 - Express /QIBM/ProdData/WebASE/ASE5//QIBM/UserData/WebASE/ASE5/instance/
QASE5 QASE5
V.5.0 - Base /QIBM/ProdData/WebAS5/Base//QIBM/UserData/WebAS5/Base/instance/
QEJBAS5 QEJBAS5
V5.0 - ND /QIBM/ProdData/WebAS5/ND//QIBM/UserData/WebAS5/ND/instance/
QEJBASND5 QEJBAS5
V5.1 - Express /QIBM/UserData/WebASE51/ASE/QIBM/UserData/WebASE51/ASE/instance/
QEJBASE51 QASE51
Appendix C. Applications and middleware security considerations 383

More informationThere are many sources of information about WebSphere Application Server and security. You can find additional information in the following IBM Redpaper and Redbooks:
� IBM WebSphere V5.0 Security WebSphere Handbook Series, SG24-6573
� WebSphere Application Server - Express V5.0 for iSeries, REDP-3624
� WebSphere Application Server V5 for iSeries: Installation, Configuration, and Administration, SG24-6588
� WebSphere Application Server V6 Security Handbook, SG24-6316
In addition, you can follow the path e-business and Web serving → Application Servers in the iSeries Information Center at:
http://publib.boulder.ibm.com/infocenter/iseries/v5r4/index.jsp
WebSphere MQWebSphere MQ is about good infrastructure for information flow. WebSphere MQ for iSeries is not a product you buy because of its end-user graphics, bargain price, or ease-of-use. You buy WebSphere MQ because you realize that you must. Then on the top of that, you will be surprised by its clear structure and friendly user interface both for green-screen users and more graphical minded Windows users. Despite its name, WebSphere MQ runs without WebSphere Application Server.
WebSphere MQ characteristics are “assured delivery”, and “asynchronous messaging”. That is, your message, such as text messages to your cell phone or pager, that contains important application information arrives to the destination,
V5.1 - Base /QIBM/ProdData/WebAS51/Base//QIBM/UserData/WebAS51/Base/instance
QEJBAS51 QEJBAS51
V5.1 - ND /QIBM/ProdData/WebAS51/ND//QIBM/UserData/WebAS51/ND/instance/
QEJBASND51 QEJBAS51
V6.0 - Express/Base
/QIBM/ProdData/WebSphere/AppServer/V6/Base//QIBM/UserData/WebSphere/AppServer/V6/Base/
QWAS6 QWAS6
V6.0 - ND /QIBM/ProdData/WebSphere/AppServer/V6/ND//QIBM/UserData/WebSphere/AppServer/V6/ND/
QWAS6 QWAS6
WAS version Integrated file system location Subsystem Library
384 IBM System i Security Guide for IBM i5/OS Version 5 Release 4
regardless of whether that remote place is powered on, when you are sending data.
WebSphere MQ is a typical middleware. It stands between application programming and networking. WebSphere MQ has evolved into a de facto standard for asynchronous exchange of messages between total different system platforms. You can exchange information with this standard to almost any IT platform including AIX, UNIX, Linux, Sun Solaris, Windows, Main Frame (VSE and IMS™), and System i, (and even Tandem and OS2). Windows and Java clients are both supported.
The supported releases for the System i platform are:
� WebSphere MQ for iSeries V5.3 (5724-B41)� WebSphere MQ for iSeries V6.0 (5724-H72)
In addition, the licensed program product (LPP) WebSphere MQ classes for Java and Java Message Service (JMS) 5.3 (5639-C34) is available for the System i platform. This LPP contains Java application programming interfaces (APIs) and offers better integration with WebSphere Application Server.
You can find and review WebSphere MQ support and fixpack information on the WebSphere MQ Product support Web page at the following address:
http://www-306.ibm.com/software/integration/wmq/support/
The advantage compared to System i proprietary techniques, such as USRQ and DTAQ, is that messages in WebSphere MQ can survive an initial program load (IPL) that is planned or unplanned, network down, and so on. WebSphere MQ messages can (and should) be synchronized with database transactions with the common commit or rollback technique.
The parts of WebSphere MQ include queue managers. You construct one or more queue managers on your system. Channels and queues belong to one queue manager:
� Channels: Channels define the traffic to and from queue managers in the network. A sender channel on one queue manager corresponds to a receivers channel on the receiving queue manager. These channels must have the same name on both systems.
� Queues: There are three types of queues:
– Local queues store the messages (the data).– Local transmit queues are associated with sender channels.– Remote queues point to a local queue at a remote queue manager.
� Processes: Processes are used to defined how to trigger the execution of a program.
Appendix C. Applications and middleware security considerations 385
There are more specific types of channels and queues than listed previously. There are also server channels, non-delivered-message-queues, model-queues, cluster-queues, and alias-queues as well as others.
Using WebSphere MQ, the application programmer does not deal with communication or networking techniques. Application programs read or write from a database as usual, and they use APIs for putting data on a queue or reading data from a queue. The programmer acts as though all data was in local queues. If the program writes to a remote queue, the queue manager expedites the data to its destination queue manager.
Several sample programs come with WebSphere MQ to assist programmers. Source programs are supplied in RPG400, ILE-RPG, COBOL, C, and Java.
A simple WebSphere MQ application program has a structure similar to the following list:
� Connect to a local queue manager (API MQConn)� Open database files� Open Queues (API MQOpen)� Repeatedly:
– Reading or writing data records from the database– Reading or writing data messages from queues (API MQGet or MQPut)– Commit
� Close the database files� Close the queues (API MQClose)� Disconnect from the queue manager (API MQDisc)
Programs waiting for data to be returned in reply queues are also in the samples, as are programs that use APIs for manipulating the queue manager objects.
For each queue manager you start, several service jobs also start, some automatically and others at your request, for example:
� TCP/IP Listener� Command Server� Channel Agents� Channel Initiator
The actual WebSphere MQ code from IBM is the same for all WebSphere MQ (distributed) platforms.
386 IBM System i Security Guide for IBM i5/OS Version 5 Release 4

The exceptions to the System i platform are:
� Linear or circular logs are substituted by i5/OS journal management.
� There are additional special i5/OS CL commands for creating and maintaining WebSphere MQ objects, for example:
– Work Queue Manager (WRKMQM)– Create Queue Manager (CRTMQM)– Create Channel (CRTMQMCHL)– Delete Queue Manager (DLTMQM)
� The install process uses the standard i5/OS Restore Licensed Program (RSTLICPGM) CL command.
Refer to the IBM Redpaper MQSeries Primer, REDP-0021, which describes the basics of WebSphere MQ.
MQ user profilesWebSphere MQ comes with two System i user profiles, QMQM and QMQMADM. These profiles are not intended for signing on to the system:
� QMQM is the owner of all the WebSphere MQ objects.
� QMQMADM is normally the group profile for users that operate the WebSphere MQ environment. QMQMADM has authority to all WebSphere MQ CL commands and authority to create and maintain WebSphere MQ objects. A user who creates and maintains WebSphere MQ related objects should have QMQMADM as a group profile. Programmers do not need this authority if they only use the APIs in the programs they create.
Application users who only use programs to read and write messages from WebSphere MQ queues do not need any special authority, other than access to programs and files. You may have WebSphere MQ applications that go beyond this public access. Either they create WebSphere MQ objects, or the WebSphere MQ objects (queues normally) have been given special restrictions.
If this is the case, use the authority system that comes with WebSphere MQ. The System i object security system will not help you, because object access is done by WebSphere MQ programs that check the WebSphere MQ authority system. Be aware that authority information is cached, so you might have to reload security or restart your queue manager for changes to take effect.
Appendix C. Applications and middleware security considerations 387
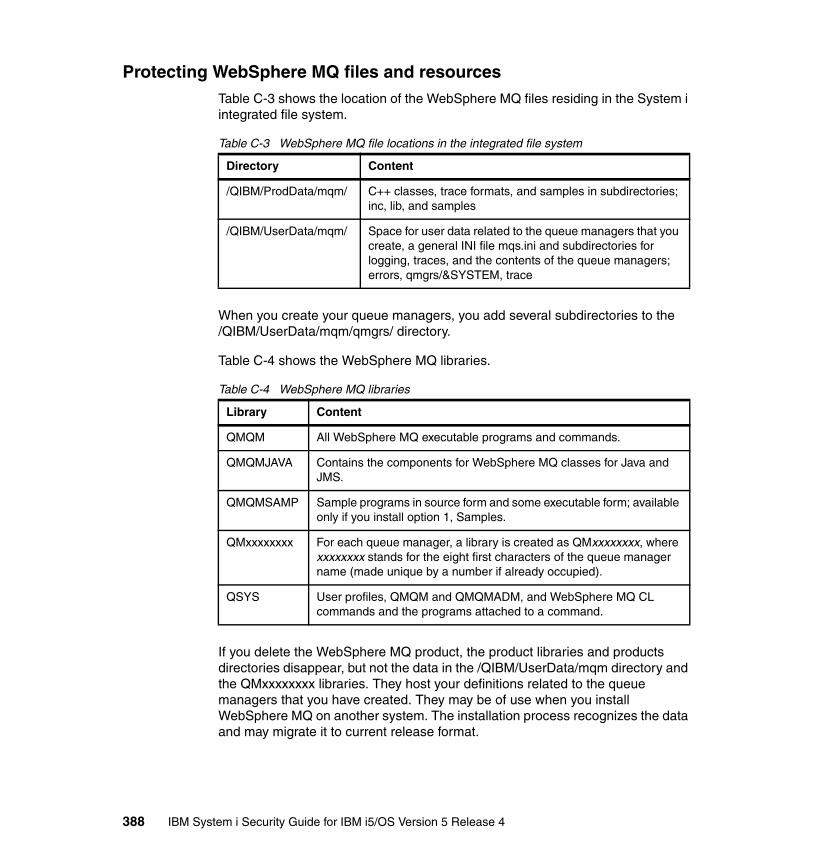
Protecting WebSphere MQ files and resourcesTable C-3 shows the location of the WebSphere MQ files residing in the System i integrated file system.
Table C-3 WebSphere MQ file locations in the integrated file system
When you create your queue managers, you add several subdirectories to the /QIBM/UserData/mqm/qmgrs/ directory.
Table C-4 shows the WebSphere MQ libraries.
Table C-4 WebSphere MQ libraries
If you delete the WebSphere MQ product, the product libraries and products directories disappear, but not the data in the /QIBM/UserData/mqm directory and the QMxxxxxxxx libraries. They host your definitions related to the queue managers that you have created. They may be of use when you install WebSphere MQ on another system. The installation process recognizes the data and may migrate it to current release format.
Directory Content
/QIBM/ProdData/mqm/ C++ classes, trace formats, and samples in subdirectories; inc, lib, and samples
/QIBM/UserData/mqm/ Space for user data related to the queue managers that you create, a general INI file mqs.ini and subdirectories for logging, traces, and the contents of the queue managers; errors, qmgrs/&SYSTEM, trace
Library Content
QMQM All WebSphere MQ executable programs and commands.
QMQMJAVA Contains the components for WebSphere MQ classes for Java and JMS.
QMQMSAMP Sample programs in source form and some executable form; available only if you install option 1, Samples.
QMxxxxxxxx For each queue manager, a library is created as QMxxxxxxxx, where xxxxxxxx stands for the eight first characters of the queue manager name (made unique by a number if already occupied).
QSYS User profiles, QMQM and QMQMADM, and WebSphere MQ CL commands and the programs attached to a command.
388 IBM System i Security Guide for IBM i5/OS Version 5 Release 4

WebSphere MQ object authority managerSecurity within WebSphere MQ is configured using the WebSphere MQ object authority manager (OAM) in conjunction with i5/OS object level security.
The OAM manages user authorizations to manipulate WebSphere MQ objects, including queues and process definitions. It also provides a command interface through which you can grant or revoke access authority to an object for a specific group of users.
Using SSL with WebSphere MQIt is now possible to use Secure Sockets Layer (SSL) to enable channel security. This can protect against eavesdropping, tampering, and impersonation attempts from external sources.
Using SSL with WebSphere MQ also provides a way to authenticate queue manager-to-queue manager connections and WebSphere MQ client-to-queue manager connections. A certificate is given to a queue manager, and then it is proven that it uses the same certificate when it starts the channel. Provided that nobody has stolen a copy of the certificate, mutual authentication is performed.
More informationFor additional information about WebSphere MQ, consult the following references:
� WebSphere MQ Security in an Enterprise Environment, SG24-6814
� WebSphere MQ for iSeries Best Practice Guide
ftp://ftp.software.ibm.com/software/dw/wes/0310_phillips/phillips.pdf
Lotus DominoLotus Domino is an environment that makes it easier for you to productively perform unstructured work using a wealth of rapidly changing information and knowledge. It is middleware that lets you add the “human touch” to the Web and to your business-to-business interactions.
Domino is built on several key foundations that make it perfect for the applications that today’s knowledge workers need and extendable for the applications of the future:
� A messaging infrastructure that lets users and applications send anything to anyone
Rich, full-function e-mail is one example. With Domino, people can send messages to applications, and applications can send messages to people or
Appendix C. Applications and middleware security considerations 389
to other applications, which is critical for workflow and business process automation.
� A rich application development environment that is visual, event-driven and easy to use
� Unmatched replication capability that is perfect for today’s distributed, mobile workforce
Information can exist in multiple places, including central servers, distributed servers, desktops, disconnected mobile computers. Domino keeps it all in sync.
What kind of applications are appropriate for Domino? Many are available as the thousands that are available from Lotus independent software vendors (ISVs) demonstrate. They fall into several broad groups:
� Collaborative applications that track information (such as ISO9000 projects, legal cases, Federal Department of Agriculture (FDA) approval processes), disseminate information (corporate policy documents, Human Resource (HR) procedures, tips and techniques), and share ideas (discussion forums)
� Web applications that focus on information sharing, collaboration, and business process automation
A Domino database is a collection of documents (such as a Web site). It has built-in capabilities for sorting and viewing in different ways, for managing the documents (complete with built-in workflow for approval), and for e-mail integration. These are all things you need for a good Web site.
� Knowledge Management, the next wave of applications to manage and leverage intellectual capital, and the new currency of business
Domino for i5/OSSince Domino for i5/OS Version 6.0.3, you can run multiple versions of Domino servers in the same i5/OS environment.
Domino comes with one System i user profile, QNOTES. QNOTES owns all program files and files that reside within each Domino server. Also, all Domino server jobs are started and run using the QNOTES profile.
The user profile that administrates the Domino server from the System i point of view must have access to the System i Domino CL commands. It must also have read, write, and execute authority to the Domino server directory and the files that reside within it.
390 IBM System i Security Guide for IBM i5/OS Version 5 Release 4
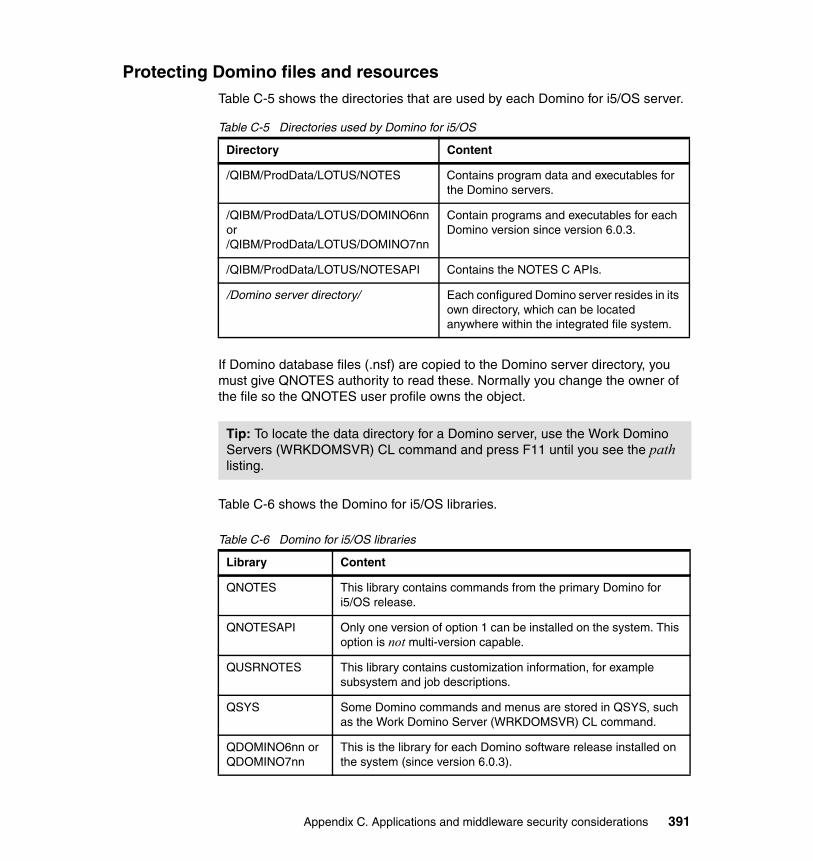
Protecting Domino files and resourcesTable C-5 shows the directories that are used by each Domino for i5/OS server.
Table C-5 Directories used by Domino for i5/OS
If Domino database files (.nsf) are copied to the Domino server directory, you must give QNOTES authority to read these. Normally you change the owner of the file so the QNOTES user profile owns the object.
Table C-6 shows the Domino for i5/OS libraries.
Table C-6 Domino for i5/OS libraries
Directory Content
/QIBM/ProdData/LOTUS/NOTES Contains program data and executables for the Domino servers.
/QIBM/ProdData/LOTUS/DOMINO6nnor /QIBM/ProdData/LOTUS/DOMINO7nn
Contain programs and executables for each Domino version since version 6.0.3.
/QIBM/ProdData/LOTUS/NOTESAPI Contains the NOTES C APIs.
/Domino server directory/ Each configured Domino server resides in its own directory, which can be located anywhere within the integrated file system.
Tip: To locate the data directory for a Domino server, use the Work Domino Servers (WRKDOMSVR) CL command and press F11 until you see the path listing.
Library Content
QNOTES This library contains commands from the primary Domino for i5/OS release.
QNOTESAPI Only one version of option 1 can be installed on the system. This option is not multi-version capable.
QUSRNOTES This library contains customization information, for example subsystem and job descriptions.
QSYS Some Domino commands and menus are stored in QSYS, such as the Work Domino Server (WRKDOMSVR) CL command.
QDOMINO6nn or QDOMINO7nn
This is the library for each Domino software release installed on the system (since version 6.0.3).
Appendix C. Applications and middleware security considerations 391
Important files to considerA key file for a Domino server is the NOTES.INI file. This file contains startup and configuration values that dictate how the Domino server operates. Other files in the Domino server data directory require extra attention, such as admin4.nsf, catalog.nsf, and names.nsf.
When the first Domino server in a new Domino domain is configured, ID files are created and stored in the specified Domino server data directory. The names of the ID files are:
� CERT.ID
The CERT.ID file contains the organization certifier ID. It is the base to create IDs for any users, servers, or certifiers for organizational units within the same organization. Therefore, you need access to the CERT.ID file from a Notes client (functioning as an administration client) whenever you want to register additional users or servers.
� USER.ID
The USER.ID file is the administrator’s ID file. After the first Domino server of an organization is configured, the administrator is the only user registered in the Domino Directory.
� SERVER.ID
To register additional users or servers to perform administration functions, or test the server functions from a Lotus Notes client, you must copy the CERT.ID and USER.ID files from the integrated file system to the administrator’s client workstation.
The SERVER.ID file is used to identify the Domino server. It must be kept in the Domino server data directory assigned to that server. You should copy the server ID file for backup.
Attention: In many Domino installations, it is common that the SERVER.ID file does not have a password set. The primary cause for this is to simplify operations by avoiding password prompting when a server is started. If a password on the SERVER.ID file is not set, a user with malicious intent can retrieve the file and can quite easily gain access to most databases on the Domino server.
392 IBM System i Security Guide for IBM i5/OS Version 5 Release 4

More informationFor additional information about Domino security, refer to the following IBM Redbooks:
� IBM Lotus Domino 6 for iSeries Implementation, SG24-6592
� Lotus Domino 6 Multi-Versioning Support on the IBM eServer iSeries Server, SG24-6940
IBM HTTP Server (powered by Apache)IBM has chosen Apache as the foundation for its HTTP server on the System i platform. This replaces the now unsupported IBM HTTP Server (Original).
The IBM HTTP Server (powered by Apache), hereafter referred to as the HTTP server, continues to evolve together with the developments of the Apache Software Foundation. Currently version 2.0.52 is available on the System i platform. The version is automatically upgraded when HTTP program temporary fixes (PTFs) are applied, but it is good to be aware of the version of the HTTP server. This is relevant because security issues and exploits related to the versions can become an issue for the System i version as well.
If you are using the HTTP server in a production environment, the group PTF package SF99114 (for i5/OS V5R4M0) or SF99099 (for i5/OS V5R3M0) should be installed on a regular basis. You can find PTF ordering information on the Web at the following address:
http://www.ibm.com/servers/eserver/support/iseries/fixes/index.html
To see the current version of the HTTP server installed on your system, you can type the following Start TCP/IP Server (STRTCPSVR) CL command when starting the HTTP server manually:
STRTCPSVR SERVER(*HTTP) HTTPSVR(servername ‘-V’)
This command should produce a verbose output similar to what is shown in Figure C-3.
Appendix C. Applications and middleware security considerations 393

Figure C-3 Displaying the HTTP server (Apache server) version
HTTP server user profilesThe IBM HTTP Server (powered by Apache) uses the following default user profiles within i5/OS:
� QTMHHTTP: This profile owns and runs the HTTP server components. QTMHHTTP must have at least read authority to the Web pages that are intended to be used. User QTMHHTTP requires *RWX (write) authority to directory '/tmp'.
� QTMHHTP1: The QTMHHTP1 user profile is the default user profile that the HTTP server uses when running CGI programs. This user profile must have read and execute authority to the location of any CGI program.
The ServerUserID and UserID directives can be used to override or replace one or both of these defaults.
The user profile that you use to create and administrate the HTTP server must have *IOSYSCFG and *CHANGE authority to the QUSRSYS library.
Server version: Apache/2.0.52 Server built: Feb 3 2005 15:30:37 Server's Module Magic Number: 20020903:9 Architecture: 128-bit Server compiled with.... -D APR_HAS_SENDFILE -D NO_LINGCLOSE -D APR_USE_FCNTL_SERIALIZE -D APR_USE_PTHREAD_SERIALIZE -D APR_PROCESS_LOCK_IS_GLOBAL -D APR_HAS_OTHER_CHILD -D APR_CHARSET_EBCDIC -D APACHE_XLATE -D HTTPD_ROOT="/QIBM/UserData/HTTPA" -D AS400 -D DEFAULT_SCOREBOARD="logs/apache_runtime_status" -D DEFAULT_ERRORLOG="logs/error_log" -D AP_TYPES_CONFIG_FILE="conf/mime.types" ===> ________________________________________________________________________________________________________________________________________________ F3=Exit F4=End of File F6=Print F9=Retrieve F17=Top F18=Bottom F19=Left F20=Right F21=User Window
394 IBM System i Security Guide for IBM i5/OS Version 5 Release 4
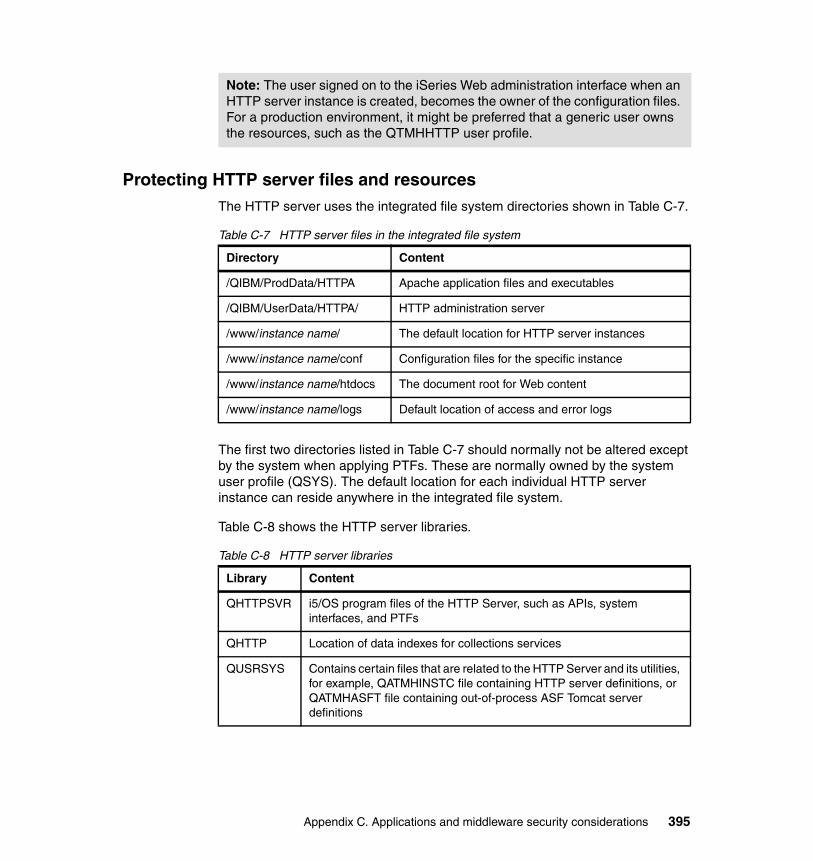
Protecting HTTP server files and resourcesThe HTTP server uses the integrated file system directories shown in Table C-7.
Table C-7 HTTP server files in the integrated file system
The first two directories listed in Table C-7 should normally not be altered except by the system when applying PTFs. These are normally owned by the system user profile (QSYS). The default location for each individual HTTP server instance can reside anywhere in the integrated file system.
Table C-8 shows the HTTP server libraries.
Table C-8 HTTP server libraries
Note: The user signed on to the iSeries Web administration interface when an HTTP server instance is created, becomes the owner of the configuration files. For a production environment, it might be preferred that a generic user owns the resources, such as the QTMHHTTP user profile.
Directory Content
/QIBM/ProdData/HTTPA Apache application files and executables
/QIBM/UserData/HTTPA/ HTTP administration server
/www/instance name/ The default location for HTTP server instances
/www/instance name/conf Configuration files for the specific instance
/www/instance name/htdocs The document root for Web content
/www/instance name/logs Default location of access and error logs
Library Content
QHTTPSVR i5/OS program files of the HTTP Server, such as APIs, system interfaces, and PTFs
QHTTP Location of data indexes for collections services
QUSRSYS Contains certain files that are related to the HTTP Server and its utilities, for example, QATMHINSTC file containing HTTP server definitions, or QATMHASFT file containing out-of-process ASF Tomcat server definitions
Appendix C. Applications and middleware security considerations 395

Important files to considerThe httpd.conf file is the main configuration file for each HTTP server. This file contains directives regarding how the HTTP server should operate and the rights that are granted to each directory. When you configure the HTTP server from the iSeries Web Administration interface, you make changes to this file.
The syntax of this file is the same as Apache servers that reside on other platforms. This allows someone without System i knowledge to understand and alter an HTTP server configuration on the System i platform.
In some cases, you can use .htaccess files to restrict access to certain Web directories. If the Access control file names function is activated, the HTTP server looks for this access file in each directory before granting access.
In general, we do not recommend use of the .htaccess files.
More informationFor additional information about the IBM HTTP Server (powered by Apache), consult the following resources:
� The IBM Redbook IBM HTTP Server (powered by Apache): An Integrated Solution for IBM eServer iSeries Servers, SG24-6716
� The iSeries Information Center path Networking → HTTP Server
http://publib.boulder.ibm.com/infocenter/iseries/v5r4/index.jsp
� HTTP Server for i5/OS Product Web site
http://www.ibm.com/server/eserver/iseries/software/http
� Official Apache Web site
http://www.apache.org
Important: Access control file names, such as .htaccess files, use a simple hashed encoding of passwords. If an .htaccess file was extracted, it is possible to run a password crack utility to retrieve passwords.
396 IBM System i Security Guide for IBM i5/OS Version 5 Release 4

Appendix D. Program temporary fixes
Periodically, problems are discovered in System i programs. IBM issues a fix, also known as a program temporary fix (PTF), to correct the problem. Multiple fixes are bundled together to form a cumulative PTF package, which contains certain recommended fixes. Install cumulative PTF packages quarterly in dynamic environments and less frequently in stable ones. Also consider using cumulative PTF packages when you make major hardware or software changes to your environment.
Fixes, fix groups, cumulative packages, and high-impact pervasive (HIPER) fixes play an important part in your System i platform maintenance strategy. Your maintenance strategy can reduce server downtime, add functionality, or provide optimal availability.
D
© Copyright IBM Corp. 2005, 2006. All rights reserved. 397

Planning your fix management strategyIBM has guidelines to help you develop an effective program maintenance strategy. These guidelines are intended to provide basic program maintenance definitions, information, and direction for new users or for those who currently do not have a program maintenance strategy in place.
Why an i5/OS strategyThree out of four defect-related problems that are reported are rediscoveries of previously reported problems. Many users may have avoided the problem or outage if the available fix had been applied to their server. Unplanned outages have a tremendous impact on employee productivity, business operations, and revenue.
Maintenance strategy recommendationsUnfortunately, there is no single recommendation. Each server or environment must be assessed individually.
As you develop your strategy, consider the following questions:
� What are you doing to prevent unexpected failures associated with i5/OS licensed programs, including interruptions to communications networks or unscheduled outages on your system?
� Is your standard approach to program maintenance reactive, in that you apply corrective fixes when failures occur?
� Do you have a preventive maintenance strategy in place for your system?
� Is your system in a 24x7 production environment that requires maximum availability, or is it limited to testing new applications and used only during prime shift Monday through Friday by a limited set of programmers?
� Is your system on a new software release or on a release that has proven stable in your environment?
� What is the tolerance and cost to the business of an unexpected server outage?
For more information about creating a fix maintenance strategy, see the Guide to Fixes Web site at the following Web site:
http://www.ibm.com/servers/eserver/support/iseries/fixes/guide/index.html
Important: Security PTFs are generally available through Hiper group PTFs.
398 IBM System i Security Guide for IBM i5/OS Version 5 Release 4
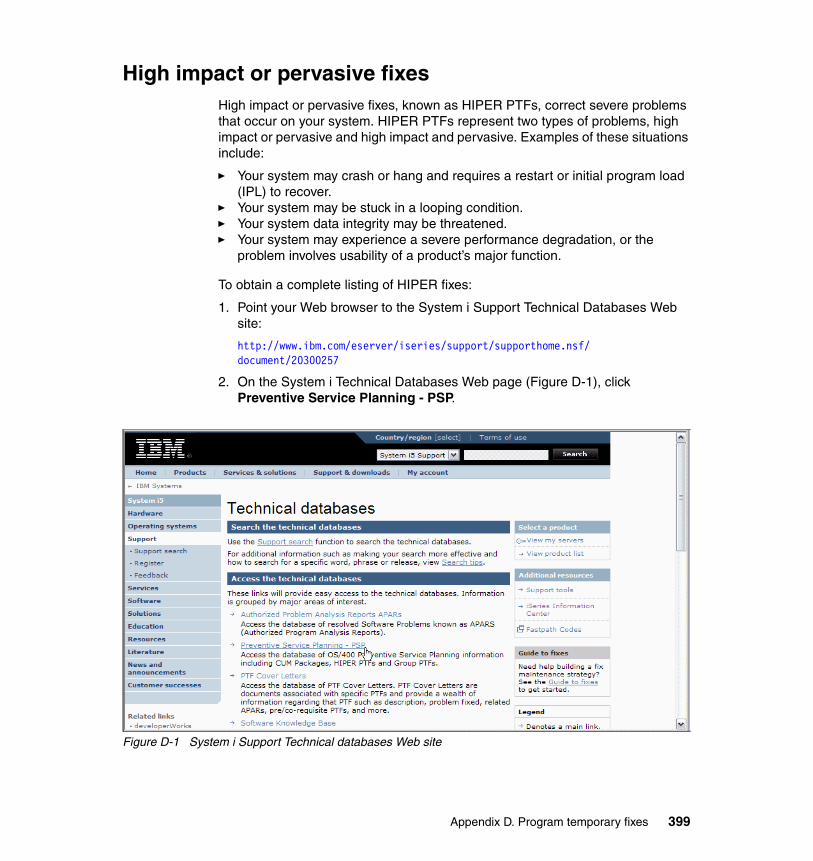
High impact or pervasive fixesHigh impact or pervasive fixes, known as HIPER PTFs, correct severe problems that occur on your system. HIPER PTFs represent two types of problems, high impact or pervasive and high impact and pervasive. Examples of these situations include:
� Your system may crash or hang and requires a restart or initial program load (IPL) to recover.
� Your system may be stuck in a looping condition.� Your system data integrity may be threatened.� Your system may experience a severe performance degradation, or the
problem involves usability of a product’s major function.
To obtain a complete listing of HIPER fixes:
1. Point your Web browser to the System i Support Technical Databases Web site:
http://www.ibm.com/eserver/iseries/support/supporthome.nsf/document/20300257
2. On the System i Technical Databases Web page (Figure D-1), click Preventive Service Planning - PSP.
Figure D-1 System i Support Technical databases Web site
Appendix D. Program temporary fixes 399
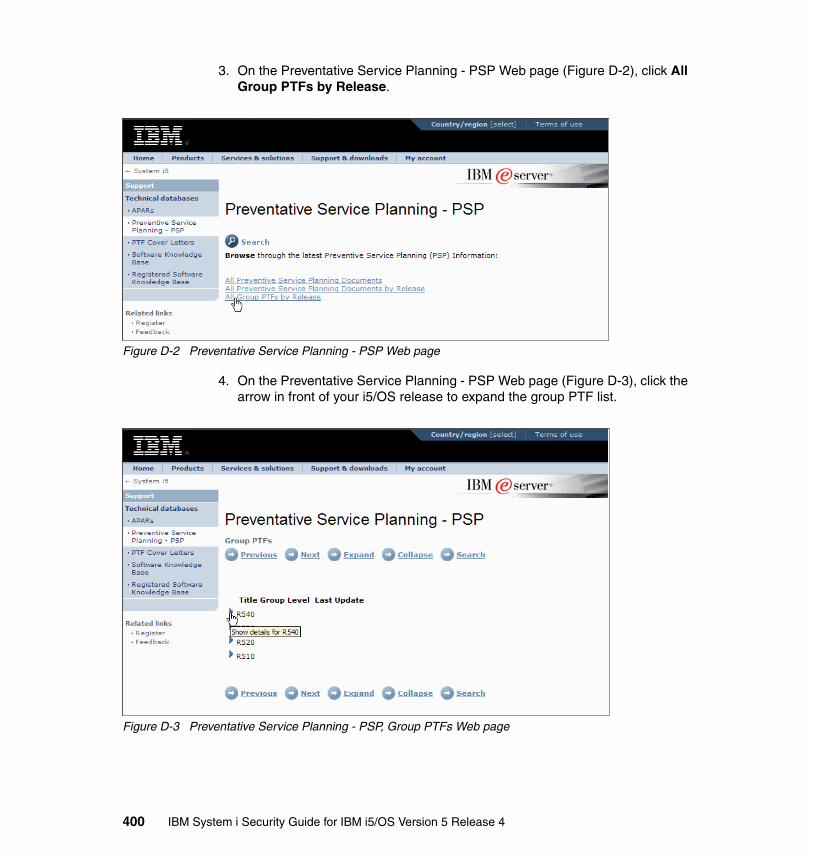
3. On the Preventative Service Planning - PSP Web page (Figure D-2), click All Group PTFs by Release.
Figure D-2 Preventative Service Planning - PSP Web page
4. On the Preventative Service Planning - PSP Web page (Figure D-3), click the arrow in front of your i5/OS release to expand the group PTF list.
Figure D-3 Preventative Service Planning - PSP, Group PTFs Web page
400 IBM System i Security Guide for IBM i5/OS Version 5 Release 4
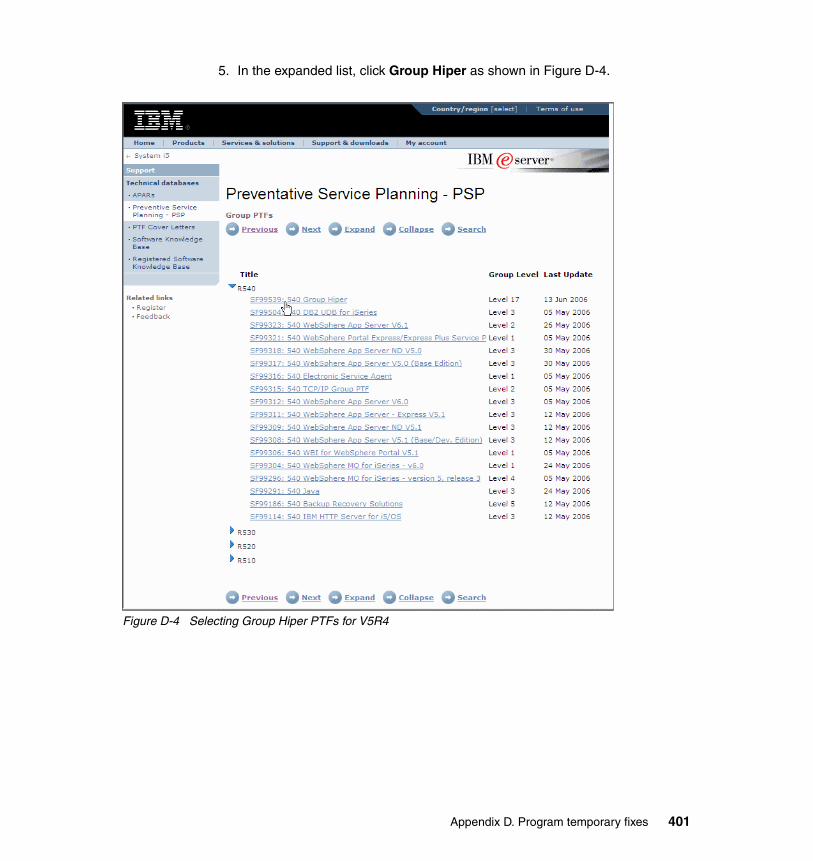
5. In the expanded list, click Group Hiper as shown in Figure D-4.
Figure D-4 Selecting Group Hiper PTFs for V5R4
Appendix D. Program temporary fixes 401
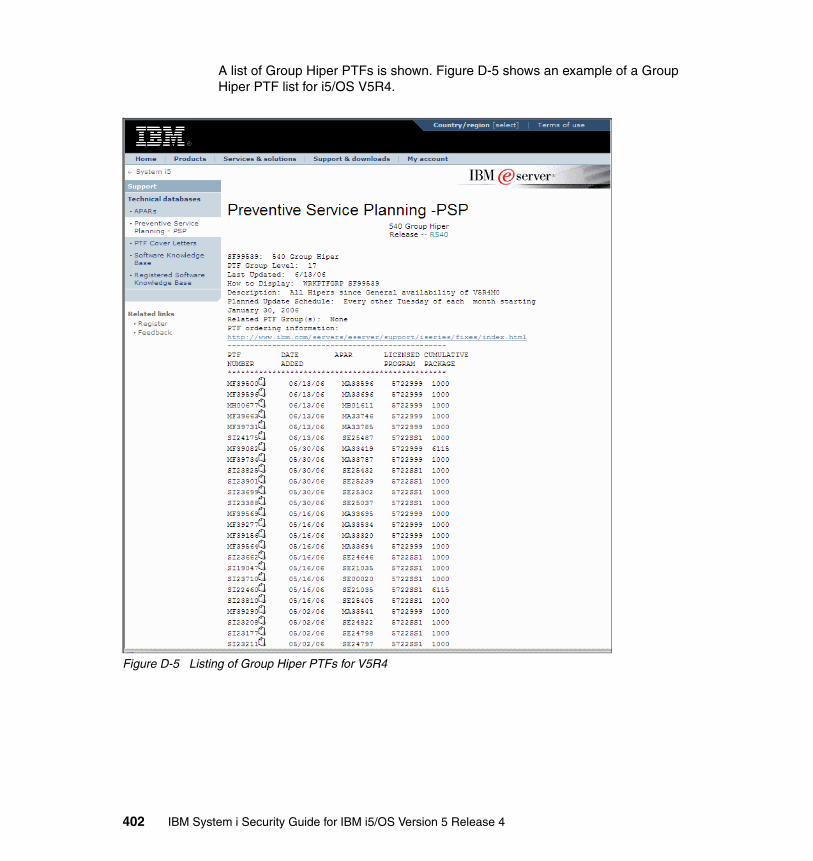
A list of Group Hiper PTFs is shown. Figure D-5 shows an example of a Group Hiper PTF list for i5/OS V5R4.
Figure D-5 Listing of Group Hiper PTFs for V5R4
402 IBM System i Security Guide for IBM i5/OS Version 5 Release 4

Related publications
The publications listed in this section are considered particularly suitable for a more detailed discussion of the topics covered in this redbook.
IBM RedbooksFor information about ordering these publications, see “How to get IBM Redbooks” on page 407. Note that some of the documents referenced here may be available in softcopy only.
� AS/400 Internet Security: IBM Firewall for AS/400, SG24-2162
� AS/400 Internet Security: Implementing AS/400 Virtual Private Networks, SG24-5404
� AS/400 Internet Security: Developing a Digital Certificate Infrastructure, SG24-5659
� AS/400 Internet Security Scenarios: A Practical Approach, SG24-5954
� IBM eServer iSeries IP Networks: Dynamic!, SG24-6718
� IBM eServer iSeries Wired Network Security: OS/400 V5R1 DCM and Cryptographic Enhancements, SG24-6168
� IBM HTTP Server (powered by Apache): An Integrated Solution for IBM eServer iSeries Servers, SG24-6716
� IBM Lotus Domino 6 for iSeries Implementation, SG24-6592
� IBM WebSphere V5.0 Security WebSphere Handbook Series, SG24-6573
� Implementation and Practical Use of LDAP on the IBM eServer iSeries Server, SG24-6193
� Linux on the IBM eServer iSeries Server: An Implementation Guide, SG24-6232
� Logical Partitions on System i5: A Guide to Planning and Configuring LPAR with HMC on System i, SG24-8000
� Lotus Domino 6 Multi-Versioning Support on the IBM eServer iSeries Server, SG24-6940
� Lotus Security Handbook, SG24-7017
� LPAR Configuration and Management Working with IBM eServer iSeries Logical Partitions, SG24-6251
© Copyright IBM Corp. 2005, 2006. All rights reserved. 403
� Microsoft Windows Server 2003 Integration with iSeries, SG24-6959
� MQSeries Primer, REDP-0021
� Net.Commerce V3.2 for AS/400: A Case Study for Doing Business in the New Millennium, SG24-5198
� OS/400 V5R2 Virtual Private Networks: Remote Access to the IBM eServer iSeries Server with Windows 2000 VPN Clients, REDP-0153
� Securing Communications with OpenSSH on IBM i5/OS, REDP-4163
� TCP/IP Tutorial and Technical Overview, GG24-3376
� V4 TCP/IP for AS/400: More Cool Things Than Ever, SG24-5190
� WebSphere Application Server - Express V5.0 for iSeries, REDP-3624
� WebSphere Application Server V5 for iSeries: Installation, Configuration, and Administration, SG24-6588
� WebSphere Application Server V6 Security Handbook, SG24-6316
� WebSphere MQ Security in an Enterprise Environment, SG24-6814
� Windows-based Single Signon and the EIM Framework on the IBM eServer iSeries Server, SG24-6975
Other publicationsThese publications are also relevant as further information sources:
� Backup and Recovery, SC41-5304
� CL Programming, SC41-5721
� Configure Your System For Common Criteria Security, SC41-5336
� iSeries Security Reference, SC41-5302
� OS/400 Work Management, SC41-5306
� OptiConnect for OS/400, SC41-5414
� TCP/IP Configuration and Reference, SC41-5420
� CCA Basic Services Reference and Guide for the IBM 4758 PCI and IBM 4764 PCI-X Cryptographic Coprocessors Releases 2.53, 2.54, 3.20, and 3.23
http://www.ibm.com/security/cryptocards/pdfs/bs323mstr.pdf
� Column Encryption in IBM DB2 UDB for iSeries white paper
http://www.ibm.com/servers/enable/site/education/abstracts/4682_abs.html
� WebSphere MQ for iSeries Best Practice Guide
ftp://ftp.software.ibm.com/software/dw/wes/0310_phillips/phillips.pdf
404 IBM System i Security Guide for IBM i5/OS Version 5 Release 4
� Chapple, Mike; Stewart, James Michael; and Tittel, Ed. CISSP: Certified Information Systems Security Professional Study Guide, Second Edition. Sybex, July 2004. ISBN 0782143350.
� Botz, Patrick and Woodbury, Carol. Experts’ Guide to OS/400 & i5/OS Security. Penton Publishing (29th Street Press), May 2004. ISBN 158304096X.
� Krause, Micki and Tipton, Harold F. Information Security Management Handbook, Fourth Edition, Volume 1. Auerbach Publications, October 1999. ISBN 0849398290.
Online resourcesThese Web sites are also relevant as further information sources:
� American Express Data Security Requirements
http://www125.americanexpress.com/merchant/oam/ns/USEng/FrontServlet?request_type=navigate&page=dataSecurityRequirements
� American Institute of certified public accountants
http://www.aicpa.org/sarbanes/index.asp
� Apache Software Foundation
http://www.apache.org
� Australia / New Zealand 4360 Risk Management
http://www.e.govt.nz/services/authentication/authentication-bpf/chapter13.html/view?searchterm=4360%20Risk%20Management
� Bank for International Settlements Web site:
http://www.bis.org/
� Bulletproofing the OS/400
http://whatis.techtarget.com/featuredTopic/0,290042,sid3_gci1078368,00.htm
� Common Criteria
http://www.commoncriteriaportal.org
� Common Open Policy Service (COPS)
http://www.ietf.org/rfc/rfc2748.txt
� Diameter Base Protocol
– http://www.ietf.org/rfc/rfc3588.txt– http://www.diameter.org/– http://www.opendiameter.org/
Related publications 405
� Gramm-Leach-Bliley Act (GLB) Act
http://www.ftc.gov/privacy/privacyinitiatives/glbact.html
� Guide to Fixes
http://www-03.ibm.com/servers/eserver/support/iseries/fixes/guide/index.html
� Health Insurance Portability and Accountability Act (HIPAA)
http://www.hhs.gov/ocr/hipaa/
� IBM eServer Cryptographic Hardware Products
http://www.ibm.com/security/cryptocards/
� IBM Linux on System i5 Web site
http://www.ibm.com/servers/eserver/iseries/linux/index.html
� IBM Portable Utilities for i5/OS
http://www.ibm.com/servers/enable/site/porting/tools/openssh.html
� Information Systems Audit and and Control Association (ISACA)
http://www.isaca.org/cobit
� International Organization for Standardization (ISO)
http://www.iso.org
� Internet X.509 Public Key Infrastructure Certificate and CRL Profile
http://www.ietf.org/rfc/rfc2459.txt
� iSeries Information Center for V5R4
http://publib.boulder.ibm.com/infocenter/iseries/v5r4/index.jsp
� Kerberos
– http://web.mit.edu/Kerberos– http://www.ietf.org/rfc/rfc1510.txt
� OpenSSH
http://www.openssh.org
� OpenSSL Web
http://www.openssl.org
� Payment Card Industry (PCI) Data Security Standard
– https://sdp.mastercardintl.com/pdf/pcd_manual.pdf– http://www.merchante-solutions.net/infosecurity/mandates.htm
� Personal Information Protection and Electronic Documents Act (PIPEDA)
http://www.privcom.gc.ca/
406 IBM System i Security Guide for IBM i5/OS Version 5 Release 4
� Public Company Accounting Oversight Board (PCAOB)
http://www.pcaobus.org
� Remote Authentication Dial In User Service (RADIUS)
http://www.ietf.org/rfc/rfc2865.txt
� Security Improvement
http://www.cert.org/nav/index_green.html
� Snort
http://www.snort.org
� SOX Act PDF from the University of Cincinnati College of Law
http://www.law.uc.edu/CCL/SOact/soact.pdf
� Statement on Auditing Standards (SAS) No. 70, Service Organizations
http://www.sas70.com/
� StoneGate firewall solution
http://www.stonesoft.com/products/IBM_iSeries/
� Systems Security Engineering Capability Maturity Model (SSE CMM)
http://www.sse-cmm.org
� Terminal Access Controller Access Control System (TACACS)
http://www.ietf.org/rfc/rfc1492.txt
� Visa Cardholder Information Security Program (Visa CISP)
http://usa.visa.com/business/accepting_visa/ops_risk_management/cisp.html
How to get IBM RedbooksYou can search for, view, or download Redbooks, Redpapers, Hints and Tips, draft publications and Additional materials, as well as order hardcopy Redbooks or CD-ROMs, at this Web site:
ibm.com/redbooks
Related publications 407

Help from IBMIBM Support and downloads
ibm.com/support
IBM Global Services
ibm.com/services
408 IBM System i Security Guide for IBM i5/OS Version 5 Release 4

Index
Symbols*ALLOBJ 61*AUDIT 61*IOSYSCFG 62*JOBCTL 62*SAVSYS 62, 94*SECADM 62*SERVICE 62*SIGNATUREVERIFICATION 154*SPLCTL 62, 357
Aaccess restriction to QSYS.LIB file system 85action auditing 141, 149activation of IP packet filtering 188Add Exit Program (ADDEXITPGM) 184Add TCP/IP Point-To-Point (ADDTCPPTP) 200Add TCP/IP Port Restriction (ADDTCPPORT) 180administrative controls 6administrator 8Administrator Information Report 126adopted authority 78, 342, 348advisories 24Allow Add To Cluster (ALWADDCLU) 32, 54Allow Object Restore (QALWOBJRST) 52altered objects 343American Express Data Security Requirements 325Analyze Default Passwords (ANZDFTPWD) 337, 357Application Administration 105applications
enablement of Secure Sockets Layer (SSL) 231enabling Secure Sockets Layer (SSL) 227security 9, 24, 34, 40, 379
asset 5asymmetric keys 219attack 193
event 193attestation 322audit journal 33, 140, 333
creation 141entries 336
© Copyright IBM Corp. 2005, 2006. All rights reserved
entry types 144journal displaying 333journal reading 333planning for 141reports 144third party tools 150
audit level parameter of user profile (AUDLVL) 146audit types 140auditing 11, 332, 336
actions 149objects 148QSECOFR activity 149users 146
Auditing Control (QAUDCTL) 143Auditing End Action (QAUDENDACN) 143Auditing for New Objects (QCRTOBJAUD) 143Auditing Force Level (QAUDFRCLVL) 143Auditing Level (QAUDLVL) 143Auditing Level (QAUDLVL2) 143auditing, security 348auditor, security 8Australia/New Zealand 4360 Risk Management 325authentication 10, 229, 284
codes 228exit programs 293token 306versus authorization 284
authority 30for new objects in a library 76
authorization 10control 340search sequence 89verses authentication 284
authorization list creation 99Authorization List Entry (ADDAUTLE) 100authorization lists 86, 98
addition of users 100editing users 100removal of users 100
autostart job 56autostart value for a TCP/IP server 176availability 10
. 409

Bbackup security information 115Basel II 326baselines 14, 335batch job 55best practices 15, 347break-handling program 57
Ccentralized access control administration 296Certificate Authority (CA) 221, 288certificates within SSL protocol 229Challenge Handshake Authentication Protocol (CHAP) 199, 250, 301Change Active Profile List (CHGACTPRFL) 337Change Auditing Value (CHGAUD) 148Change Document Library Object Auditing (CHGD-LOAUD) 147Change Function Usage (CHGFCNUSG) 34, 113Change IBM Service Tools Password (CHGDSTP-WD) 68Change IPL Attributes (CHGIPLA) 176Change Java Program (CHGJVAPGM) 158Change Journal (CHGJRN) 143Change Message Queue (CHGMSGQ) 57Change Module (CHGMOD) 158Change Network Attributes (CHGNETA) 32, 54Change Network Server User Area (CHGNWSUS-RA) 312Change Object Audit (CHGOBJAUD) 148Change Prestart Job Entry (CHGPJE) 213Change Program (CHGPGM) 79, 158Change Security Auditing (CHGSECAUD) 134Change Service Program (CHGSRVPGM) 79, 158Change Telnet Attributes (CHGTELNA) 176Change User Auditing (CHGUSRAUD) 146, 149, 336Check Object Integrity (CHKOBJITG) 153, 157, 343, 351Check Product Option (CHKPRDOPT) 157Check System (QYDOCHKS) API 343checksum 30Cipher Spec 230ciphertext 217Cisco 298classification 8Client Access Express request (PCSACC) 32, 54Common Criteria (CC) 49
Control Access Protection Profile (CAPP) 50Common Cryptographic Architecture (CCA) APIs 38, 234, 236, 242Common Open Policy Service (COPS) 299commonly used authorities 72communications job 55communications security 344compliance 5, 20compulsory tunnel 252
protected by IPSec 254computer security 4confidentiality 11configuration
client SOCKS support 206exit programs 184hardware cryptographic products 236HTTP server as a proxy server 203Layer 2 Tunnel Protocol (L2TP) 262Network Address Translation (NAT) 190Operations Console 374port restrictions 180PPP profiles 200virtual private network (VPN) 258
Configure System Security (CFGSYSSEC) 134contents of security policy 21control language (CL) commands 95, 349
securing 95Control Objectives for Information and related Tech-nology (COBIT) 321control of e-mail access 212controls, security 6cookie 312Copy Audit Journal Entries (CPYAUDJRNE) 145, 333Copy Audit Journal Entries (DSPAUDJRNE) 336Copy Validation List To Directory (QGLDCPYVL) API 294corporate security 10countermeasure 6Create Authorization List (CRTAUTL) 99Create Default Public Authority (QCRTAUT) 82Create Java Program (CRTJVAPGM) 158Create Journal (CRTJRN) 142Create Journal Receiver (CRTJRNRCV) 141Create User Profile (CRTUSRPRF) 60cryptographic hardware products 38, 233, 235Cryptographic Services (CS) APIs 38, 169, 240cryptographic support 38cryptography 217, 290
410 IBM System i Security Guide for IBM i5/OS Version 5 Release 4
current master key version 239custodian 7
Ddata authority 71data encryption 34, 166, 237data encryption keys 237data integrity 229database triggers 343DB2 Universal Database encryption 34, 167DDM/DRDA request access (DDMACC) 32, 54decryption 217–218, 229default owner (QDFTOWN) 70default passwords 337, 356Delete User Profile (DLTUSRPRF) 357demilitarize zone (DMZ) 267denial-of-service attack 192, 213, 277diameter protocol 298digital certificate 32, 221, 288
public key 219Digital Certificate Manager (DCM) 153, 223
DCM component access 224prerequisites 224
digital ID 288digital signature 30, 220digitally signing objects 152
advantages 156prerequisites 158removing signatures 158retaining signatures during object transfer 158
Directory Management Tool 295directory security 86Display Activation Schedule (DSPACTSCD) 338Display Active Profile List (DSPACTPRFL) 337Display Authority (DSPAUT) 349Display Authorized Users (DSPAUTUSR) 337, 340Display Function Usage (DSPFCNUSG) 34, 113Display Journal (DSPJRN) 33Display Library (DSPLIB) 341Display Network Attributes (DSPNETA) 32, 54Display Object Authority (DSPOBJAUT) 341, 349Display Object Description (DSPOBJD) 156, 341Display Object Links (DSPLNK) 156Display Security Attributes (DSPSECA) 51Display Security Auditing (DSPSECAUD) 336, 348Display User Profile (DSPUSRPRF) 337DLPAR (dynamic LPAR) 361documenting security requirements 17
domain 48Domino for i5/OS 390dynamic LPAR (DLPAR) 361
Eecho port 194Edit Authorization List (EDTAUTL) 100EIM (Enterprise Identity Mapping) 307e-mail 212
access control 212preventing access 214Realtime Blackhole List (RBL) server 215router 214securing 214security considerations 212
encryption 217–218, 229asymmetric keys 219methods 219symmetric keys 219
End TCP/IP Server (ENDTCPSVR) 176Enforce Java 2 Security 382Enhanced hardware storage protection 48Enterprise Identity Mapping (EIM) 34, 292, 307
advantages 309group registry definitions 308verses Kerberos 308
Evaluation Assurance Level (EAL) 51event monitoring 335exceptions 25exclusionary access control 87exit point 182, 334, 344
interface 101registered 101virus scanning 159
exit program 33, 102, 181, 352configuration 184creation 104for authentication 293FTP example 183
Extended TACACS (XTACACS) 298Extensible Authentication Protocol (EAP) 199, 250, 302external LAN 364
Ffield authority 71field-level security 86File Transfer Protocol (FTP)
Index 411

exit program example 183, 293security considerations 216
financial privacy rule 326firewall 24, 206, 266
concepts 266DMZ 267internal firewall on System i using Linux 271StoneGate firewall solution 278
fix management strategy 398flexible service processor 362flooding 212Force Conversion On Restore (QFRCCVNRST) 52fragment restriction event 194function usage 113
GGlobal Secure Toolkit (GSKit) APIs 42, 211, 227global security 381
settings 46Gramm-Leach-Bliley Act (GLB) Act 326granted authorities 356group ownership of objects 64group profiles 59, 63, 340, 356
passwords 356supplemental 65verses authorization lists 75
group registry definitions 308guidelines 15
Hhandshake 230, 300hardware cryptographic products 236
examples for use 235Hardware Management Console (HMC) 362hardware storage protection 48hashing 218Health Insurance Portability and Accountability Act (HIPPA) 327high impact fixes 399HIPER PTFs 399horizontal SSO 306hosted partition 270HSL OptiConnect 365HTTP cookie 312HTTP proxy server 202
configuration 203HTTP reverse proxy server 203httpd.conf 396
hypervisor 271, 360micro partition 361on POWER5 servers 361
Ii5/OS Portable Application Solutions Environment (PASE) 97IASP (independent auxiliary storage pool) 76IBM 2058 Cryptographic Accelerator 39, 234IBM 4758 PCI Cryptographic Coprocessor 39, 233IBM 4764 PCI Cryptographic Coprocessor 39, 234IBM Common Cryptographic Architecture (CCA) APIs 234, 236IBM Directory Server 295IBM HTTP Server (powered by Apache)
httpd.conf 396protecting HTTP server files and resources 395user profiles 394
IBM supplied user profiles 65monitoring 337
ICMP redirect event 194identifying security requirements 17IDS (intrusion detection system) 36, 192idspolicy.conf 196implementing the security policy 18inactive user profiles 355incidents 24independent auxiliary storage pool (IASP) 76information access 71information classification 8Instead Of Triggers 168integrated file system 83
public authority to root directory 84integrity 10interactive job 55interface security 87International Computer Security Association (ICSA) 257International Electrotechnical Commission (IEC) 50International Organization for Standards (ISO) 50International Organizations for Standardization (ISO) 15International Standard Organization’s Open System Interconnect (ISO/OSI) 174Internet Control Message Protocol (ICMP) redirect messages 194Internet Service Provider (ISP) 266intrusion detection 23, 192
412 IBM System i Security Guide for IBM i5/OS Version 5 Release 4
intrusion detection system (IDS) 36, 192invalid logon attempt 342IP option restriction 194IP packet filtering 35, 187
activating 188on virtual LANs 368
IP protocol restriction 194IP Security Architecture (IPSec) 248
protecting a L2TP tunnel 263verses Secure Sockets Layer (SSL) 256
IP spoofing 199IPSec (IP Security Architecture) 248iSeries Security Wizard 120
reports 126ISO 17799 15ISO/IEC 17799-2005 323
JJ2EE security 382Java Cryptography Extension (JCE) 38Java policy tool 137Java Secure Sockets Extension (JSSE) 38, 227job 55
descriptions 341queues 56
job action (JOBACN) 54journal
displaying 333reading 333receiver 33receiver creation 141
KKerberos 34, 290
Key Distribution Center 290Network Authentication Enablement (5722-NAE) 291network authentication service 291on System i 291Ticket Granting Ticket (TGT) 290verses Enterprise Identity Mapping (EIM) 308
Key Distribution Center 290key management 237Key Verification Value 240key-encrypting keys 238
LL2TP (Layer 2 Tunnel Protocol) 252Layer 2 Tunnel Protocol (L2TP) 37, 248, 252
compulsory tunnel protected by IPSec 254configuration 262multi-hop connection 255native IPSec tunnels 254protecting a tunnel with IPSec 263tunnel modes 252voluntary tunnel protected by IPSec 254
LDAP Directory Management Tool 295library create authority (QCRTAUT) 350library security 74, 82, 86
authority for new objects 76public authority 82
Lightweight Directory Access Protocol (LDAP) 294, 313
QGLDSSDD API 314Lightweight Third-Party Authentication (LTPA) 299, 312limit access to program function 105limited capability 63Linux 269
internal firewall on System i 271locking system values 51, 354logging 11logical access controls 23logical files 86logical partitions 360
hypervisor 360interpartition communications 364managing security 362
Lotus Domino 389protecting Domino files and resources 391QNOTES 390
MMAC (message authentication code) 30maintenance strategy recommendations 398malformed packet event 193management 7managing user access
limiting access to iSeries Navigator functions 112through Application Administration support 106through CL commands 113through iSeries Navigator 106through Users and Groups support 109
Index 413

master key 238menu security 83, 87, 216message authentication code (MAC) 30message digest 218message queues 56messages 334methods of encryption 219micro partiton 361Microsoft Challenge-Handshake Authentication Protocol (MS-CHAP) 302mitigate 4monitoring
passwords 339security policy 19user profiles 336
multi-hop connection 255
NNetwork Address Translation (NAT) 36, 189
configuration 190network attributes 32, 54, 353Network Authentication Enablement (5722-NAE) 291network authentication service 291network security 9, 24, 35new master key version 239non-hosted partition 270
OOAM (object authority manager) 389object
auditing 148monitoring for altered objects 343owned by default owner (QDFTOWN) 357ownership 77permission 30security 83, 87signature removal 158tampering 351
object audit parameter of user profile (OBJAUD) 147object authority 30, 71, 341
commonly used authorities 72group ownership 64new objects in a library 76public authority 81
object authority manager (OAM) 389object signing 30, 152
advantages 156prerequisites 158
object-based design 28old master key version 239OpenSSH 38, 208, 256OpenSSL 37, 208, 211, 228operational risk 326Operations Console 374
device authentication 375LAN console 376
OptiConnect 365outbound raw 195output distribution 90output queue security 56, 91, 93owner 7
PPassword Authentication Protocol (PAP) 199, 250, 300password reset
QSECOFR password 69QSECOFR service tools password 68
password synchronization 312passwords 60, 285
defaults 356group profiles 356monitoring 339monitoring for default passwords 337service tools user ID 67system values 286
Payment Card Industry (PCI) Data Security Stan-dard 328perpetual echo 194
on UDP ports 194Personal Information Protection and Electronic Doc-uments Act (PIPEDA) 327pervasive fixes 399physical security 6, 9, 23planning
for a security policy 17for group profiles 64for security audit journal 141your fix management strategy 398
Point-to-Point Profiles 179policy 4, 14port restrictions 41, 180portable media 24Portable Utilities for i5/OS 37, 208
414 IBM System i Security Guide for IBM i5/OS Version 5 Release 4

Post Office Protocol (POP) 212PPP profiles 200prerequisites
Digital Certificate Manager (DCM) 224object signing 158virtual private network (VPN) 258
prestart job 56pretexting provisions 327preventing e-mail access 214Print Adopting Objects (PRTADPOBJ) 342Print Communications Security (PRTCMNSEC) 344Print Job Description Authority (PRTJOBDAUT) 341Print Output Queue Authority (PRTQAUT) 344Print Private Authority (PRTPVTAUT) 341Print Publicly Authorized Objects (PRTPUBAUT) 340Print Subsystem Authority (PRTSBSDAUT) 344Print System Security Attributes (PRTSYSSECA) 335Print User Objects (PRTUSROBJ) 342Print User Profile (PRTUSRPRF) 133, 337private authority 341private key 219, 235privileged users 355procedures 16process model 16program state 48Program Temporary Fixes (PTFs) 350, 397
HIPER PTFs 399programs that adopt authority 342protect with cryptographic hardware 235Protection Profile (PP) 51protection strategies 82public access 349public authority 71, 81, 340, 349
integrated file system root directory 84Public Company Accounting Oversight Board (PCA-OB) 322public key 219, 228
QQALWOBJRST 49, 52QAUDCTL 143QAUDENDACN 143QAUDFRCLVL 143QAUDJRN 33, 141, 333
QAUDLVL 143QAUDLVL2 143QCRTOBJAUD 143QDFTOWN 70, 357QEJB 383QEJBSVR 383QFRCCVNRST 49, 52QGLDCPYVL API 294QGLDSSDD API 314QIBM_QP0L_SCAN_CLOSE 159QIBM_QP0L_SCAN_OPEN 159QMQM 387QMQMADM 387QNOTES 390QP2TERM 97QPWDLVL 61QPWFSERVER 85QSECOFR 355
auditing activity 149monitoring 336password reset 69service tools password reset 68
QSECURITY 31, 47Qshell 97QSYS.LIB file system, access restriction to 85QSYSMSG 57, 334, 352QSYSOPR 57QTMHHTP1 394QTMHHTTP 394QVFYOBJRST 52QydoVerifyObject API 153
Rrealm 305Realtime Blackhole List (RBL) server 215Receive Journal Entry (RCVJRNE) 333Reclaim Storage (RCLSTG) 70record-level security 86Redbooks Web site 407
Contact us xviiiregistered exit points 101, 334registration facility 102regulations 317Remote Authentication Dial-In User Service (RADI-US) 200, 286, 296Remove Authority List Entry (RMVAUTLE) 100Remove TCP/IP Table (RMVTCPTBL) 189reports 335
Index 415
resource protection 71Restore (RST) 157Restore Library (RSTLIB) 157Restore Licensed Program (RSTLICPGM) 157Restore Object (RSTOBJ) 157restricting object tampering 351retaining object signatures during transfer 158reverse proxy server 203Revoke Public Authority (RVKPUBAUT) 136, 349RFC 2459 288risk 6roles and responsibilities 7root directory public authority 84Run Java Program (RUNJVA) 158
Ssafeguards rule 326Sarbanes-Oxley Act of 2002 (SOX) 318save and restore considerations 94Save Library (SAVLIB) 157Save Licensed Program (SAVLICPGM) 157save system (*SAVSYS) special authority 94Scan File Systems (QSCANFS) 159Scan File Systems Control (QSCANFSCTL) 160scanning event 193scp 209search sequence 89Secure European System for Application in a Multi-vendor Environment (SESAME) 302secure module 233Secure Shell (SSH) 209, 256secure socket APIs 42, 211secure socket programming 227Secure Sockets Layer (SSL) 32, 37, 226, 229, 233, 235
enablement on System i applications 231handshake 230securing applications with SSL 227supported versions 228tunneling 202using with WebSphere MQSeries 389verses IP Security Architecture (IPSec) 256VPN 251
securing commands 95securing e-mail 214security
administrator 8applications layer 40
auditing 11, 332, 336, 348auditor 8compliance 5controls 6, 23enablement for WebSphere Application Server 381event 335global settings 46goals 10implementation layers 9level 47management 5messages 334monitoring 332network layer 35officer (QSECOFR) 355officer monitoring actions 336process model 13, 16program 4, 14program roles and responsibilities 7regulations 317reports 126, 335requirements 17review 332services 25standards 317status checking 24system layer 29techniques for monitoring 333
security audit journal 33, 140, 333creation 141entries 336entry types 144journal displaying 333journal reading 333planning for 141reports 144third party tools 150
security considerationse-mail 212File Transfer Protocol (FTP) 216
security policy 4, 14, 20contents 21exceptions 25implementing 18independent review 20monitoring 19planning 17writing 17
416 IBM System i Security Guide for IBM i5/OS Version 5 Release 4
Security Wizard 21, 120reports 126
Send Net File (SNDNETF) 158Service Ticket 290service tools user IDs 67, 356
password change 67password reset QSECOFR service tools 68
SESAME (Secure European System for Application in a Multivendor Environment) 302sftp 209signature verification 30signing objects
removing signatures 158retaining signatures during object transfer 158
Simple Mail Transfer Protocol (SMTP) 212single sign-on (SSO) 304
EIM 307horizontal 306vertical 306Windows user ID and password 310with user and password synchronization 312with WebSphere 312
Snort 198SOCKS 205
configuration of client SOCKS support 206socks-enabled clients 205software cryptographic support 38spam 214special authorities 61, 355
save system (*SAVSYS) 94spool control 357spool control (*SPLCTL) 91
spool control (*SPLCTL) special authority 91, 357spool file management 90SQL catalog 96ssh 209SSH (Secure Shell) 209ssh-agent 209sshd 209ssh-keygen 209SSL VPN 251SSL_APIs 42, 212, 227SSO (single sign-on) 304standards 15, 317Start QSH (STRQSH) 97Start TCP/IP (STRTCP) 175Start TCP/IP Server (STRTCPSVR) 176starting point-to-point profiles 179starting TCP/IP interfaces 178
starting TCP/IP servers automatically 175Startup Program (QSTRUPPGM) 175state 48
monitoring 335Statement on Auditing Standards (SAS) No. 70 327StoneGate firewall solution 278
implementation 280requirements 279
Structured Query Language (SQL) 96Submit Job (SBMJOB) 56subsystem 56
authority 344supplemental group profiles 65swapping user profiles 81symmetric
ciphers 228keys 219
SYN flood event 194Synchronize System Distribution Directory to LDAP (QGLDSSDD) API 314system cleanup 352system distribution directory 212System i
control language (CL) commands 95cryptographic functions 223cryptographic hardware products 38, 233Domino for i5/OS 390enablement of SSL on System i applications 231global security settings 46hosted partition 270internal firewall running Linux 271Kerberos 291Linux support 269logical partitions 360network attributes 32, 54non-hosted partition 270Portable Utilities for i5/OS 37security at the applications layer 40security at the network layer 35security at the system layer 29security level 47Security Wizard 120StoneGate firewall solution 278system level security 46system values 31, 46
locking 51virtual private network (VPN) 257work management 55
Index 417

system level security 46system message queue (QSYSMSG) 57system operator message queue (QSYSOPR) 57system security 9
administrator 8attributes 335auditing 348level 353
system values 31, 46, 336, 353Auditing Control (QAUDCTL) 143Auditing End Action (QAUDENDACN) 143Auditing for New Objects (QCRTOBJAUD) 143Auditing Force Level (QAUDFRCLVL) 143Auditing Level (QAUDLVL) 143Auditing Level (QAUDLVL2) 143Create Default Public Authority (QCRTAUT) 82Duplicate Password Control (QPWDRQDDIF) 287Limit Adjacent Digits in Password (QPWDLMTA-JC) 286Limit Characters in Password (QPWDLMTCHR) 287Limit Password Character Positions (QPWD-POSDIF) 287Limit Repeating Characters in Password (QP-WDLMTREP) 287locking 51, 354Maximum Password Length (QPWDMAXLEN) 287Minimum Password Length (QPWDMINLEN) 287Password Expiration Interval (QPWDEXPITV) 286, 354Password Level (QPWDLVL) 287Password Validation Program (QPWDVLD-PGM) 287, 354Require Digit in Password (QPWDRQDDGT) 287Scan File Systems (QSCANFS) 159Scan File Systems control (QSCANFSCTL) 160Startup Program (QSTRUPPGM) 175Verify Object On Restore (QVFYOBJRST) 152Verify Object Signatures During Restore (QVFY-OBJRST) 157
Systems Security Engineering Capability Maturity Model (SSE CMM) 328
TTCP/IP 174, 352
autostart value for a TCP/IP server 176controlling the start of interfaces 178port restrictions 180SOCKS 205starting servers automatically 175
technical controls 6technical security specialist 8Terminal Access Controller Access Control System (TACACS) 298threats 5three-legged firewall solution 268ticket 290Ticket Granting Ticket (TGT) 290tickets 34TLS (Transport Layer Security) 226TR policies 195Traffic Regulation (TR) 195Transport Layer Security (TLS) 37, 226, 228Trusted Computer System Evaluation Criteria (TC-SEC) 51types of security audits 140
Uunauthorized access 342unauthorized programs 342Update Program (UPDPGM) 158Update Service Program (UPDSVRPGM) 158user 8user auditing 146user certificate 288–289user class 62User Information Report 126user objects in libraries 342user profile 30, 59, 355
audit level parameter (AUDLVL) 146IBM supplied 65inactive 355information 133limited capability 63monitoring 336–337monitoring for activity 338object audit parameter (OBJAUD) 147passwords 60QSECOFR 355sharing 356special authority 61, 355
418 IBM System i Security Guide for IBM i5/OS Version 5 Release 4

swapping 81user class 62WebSphere Application Server 383WebSphere MQSeries 387
Vvalidation lists 40, 168, 294
QGLDCPYL API 294Verify Object On Restore (QVFYOBJRST) 52, 152Verify Object Signatures During Restore (QVFYOB-JRST) 157versions 239vertical SSO 306Virtual Ethernet 367virtual LANs
connecting to external LANs 370IP packet filtering 368
virtual lines 248Virtual OptiConnect 365–366virtual private network (VPN) 36, 248
configuration 258implementation on System i platform 257prerequisites 258
virus scanning 35, 159setting options 161
Visa Cardholder Information Security Program (Visa CISP) 328voluntary tunnel 252
protected by IPSec 254vulnerability 5
WWeb VPN 251WebSphere Application Server 380
enforcing J2EE security 382protecting files and resources 383security enablement 381user profiles 383using single sign-on (SSO) 312
WebSphere MQSeries 384object authority manager (OAM) 389protecting files and resources 388user profiles 387using with Secure Sockets Layer (SSL) 389
work management 55Work with Function Usage (WRKFCNUSG) 34, 113, 225Work with Object Links (WRKLNK) 156
Work with Registration Information (WRKREGINF) 102, 184Work with Spooled Files (WRKSPLF) 60Work with System Values (WRKSYSVAL) 47Work with User Profiles (WRKUSRPRF) 60workstations 24writing a security policy 17
XX.500 294X.509 221, 288
Index 419

420 IBM System i Security Guide for IBM i5/OS Version 5 Release 4

(0.5” spine)0.475”<
->0.875”
250 <->
459 pages
IBM System
i Security Guide for IBM i5/OS Version 5 Release 4


®
SG24-6668-01 ISBN 0738496863
INTERNATIONAL TECHNICALSUPPORTORGANIZATION
BUILDING TECHNICALINFORMATION BASED ONPRACTICAL EXPERIENCE
IBM Redbooks are developed by the IBM International Technical Support Organization. Experts from IBM, Customers and Partners from around the world create timely technical information based on realistic scenarios. Specific recommendations are provided to help you implement IT solutions more effectively in your environment.
For more information:ibm.com/redbooks
IBM System iSecurity Guidefor IBM i5/OS Version 5 Release 4
Security management practices from an IBM System i point of view
A guide to IBM i5/OS security features
Key security concepts and guidelines
The IBM System i family, with its operating system IBM i5/OS, is considered one of the most secure systems in the industry. From the beginning, security was designed as an integral part of the system. The System i platform provides a rich set of security features and services that pertain to the goals of authentication, authorization, integrity, confidentiality, and auditing. However, if an IBM Client does not know that a service, such as a virtual private network (VPN) or hardware cryptographic support, exists on the system, they will not use it.
In addition, there are more and more security auditors and consultants who are in charge of implementing corporate security policies in an organization. In many cases, they are not familiar with the System i platform, but need to understand the security services that are available.
This IBM Redbook guides you through the native security features that are available on the System i platform. This book is intended for security auditors and consultants, IBM System Specialists, Business Partners, and Clients to help you answer first-level questions concerning the security features that are available on the System i platform.
Back cover
Related Documents