Sitecore CMS 6 Security Administrator´s Cookbook Rev: 9.27.2010 Sitecore® is a registered trademark. All other brand and product names are the property of their respective holders. The contents of this document are the property of Sitecore. Copyright © 2001-2010 Sitecore. All rights reserved. Sitecore CMS 6 Security Administrator´s Cookbook A Practical Guide to Administering Security in Sitecore

Welcome message from author
This document is posted to help you gain knowledge. Please leave a comment to let me know what you think about it! Share it to your friends and learn new things together.
Transcript

Sitecore CMS 6 Security Administrator´s Cookbook Rev: 9.27.2010
Sitecore® is a registered trademark. All other brand and product names are the property of their respective holders. The contents of this document are the property of Sitecore. Copyright © 2001-2010 Sitecore. All rights reserved.
Sitecore CMS 6
Security Administrator´s Cookbook A Practical Guide to Administer ing Security in Sitecore
Sitecore CMS 6 Security Administrator´s Cookbook
Sitecore® is a registered trademark. All other brand and product names are the property of their respective holders. The contents of this document are the property of Sitecore. Copyright © 2001-2010 Sitecore. All rights reserved.
Page 2 of 74
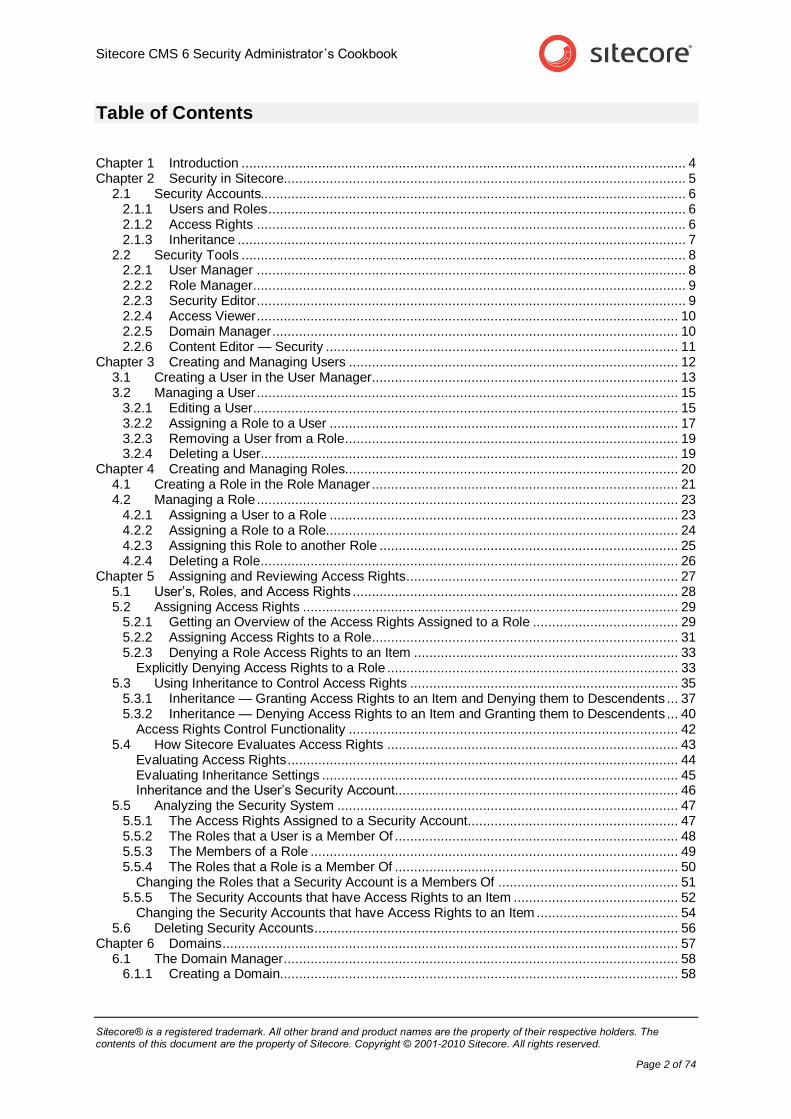
Table of Contents
Chapter 1 Introduction .................................................................................................................... 4 Chapter 2 Security in Sitecore......................................................................................................... 5
2.1 Security Accounts............................................................................................................... 6 2.1.1 Users and Roles ............................................................................................................. 6 2.1.2 Access Rights ................................................................................................................ 6 2.1.3 Inheritance ..................................................................................................................... 7
2.2 Security Tools .................................................................................................................... 8 2.2.1 User Manager ................................................................................................................ 8 2.2.2 Role Manager ................................................................................................................. 9 2.2.3 Security Editor ................................................................................................................ 9 2.2.4 Access Viewer .............................................................................................................. 10 2.2.5 Domain Manager .......................................................................................................... 10 2.2.6 Content Editor — Security ............................................................................................ 11
Chapter 3 Creating and Managing Users ...................................................................................... 12 3.1 Creating a User in the User Manager................................................................................ 13 3.2 Managing a User .............................................................................................................. 15
3.2.1 Editing a User ............................................................................................................... 15 3.2.2 Assigning a Role to a User ........................................................................................... 17 3.2.3 Removing a User from a Role ....................................................................................... 19 3.2.4 Deleting a User............................................................................................................. 19
Chapter 4 Creating and Managing Roles....................................................................................... 20 4.1 Creating a Role in the Role Manager ................................................................................ 21 4.2 Managing a Role .............................................................................................................. 23
4.2.1 Assigning a User to a Role ........................................................................................... 23 4.2.2 Assigning a Role to a Role............................................................................................ 24 4.2.3 Assigning this Role to another Role .............................................................................. 25 4.2.4 Deleting a Role ............................................................................................................. 26
Chapter 5 Assigning and Reviewing Access Rights ....................................................................... 27 5.1 User’s, Roles, and Access Rights ..................................................................................... 28 5.2 Assigning Access Rights .................................................................................................. 29
5.2.1 Getting an Overview of the Access Rights Assigned to a Role ...................................... 29 5.2.2 Assigning Access Rights to a Role ................................................................................ 31 5.2.3 Denying a Role Access Rights to an Item ..................................................................... 33
Explicitly Denying Access Rights to a Role ............................................................................ 33 5.3 Using Inheritance to Control Access Rights ...................................................................... 35
5.3.1 Inheritance — Granting Access Rights to an Item and Denying them to Descendents ... 37 5.3.2 Inheritance — Denying Access Rights to an Item and Granting them to Descendents ... 40
Access Rights Control Functionality ...................................................................................... 42 5.4 How Sitecore Evaluates Access Rights ............................................................................ 43
Evaluating Access Rights ...................................................................................................... 44 Evaluating Inheritance Settings ............................................................................................. 45 Inheritance and the User’s Security Account.......................................................................... 46
5.5 Analyzing the Security System ......................................................................................... 47 5.5.1 The Access Rights Assigned to a Security Account....................................................... 47 5.5.2 The Roles that a User is a Member Of .......................................................................... 48 5.5.3 The Members of a Role ................................................................................................ 49 5.5.4 The Roles that a Role is a Member Of .......................................................................... 50
Changing the Roles that a Security Account is a Members Of ............................................... 51 5.5.5 The Security Accounts that have Access Rights to an Item ........................................... 52
Changing the Security Accounts that have Access Rights to an Item ..................................... 54 5.6 Deleting Security Accounts ............................................................................................... 56
Chapter 6 Domains ....................................................................................................................... 57 6.1 The Domain Manager ....................................................................................................... 58
6.1.1 Creating a Domain........................................................................................................ 58
Sitecore CMS 6 Security Administrator´s Cookbook
Sitecore® is a registered trademark. All other brand and product names are the property of their respective holders. The contents of this document are the property of Sitecore. Copyright © 2001-2010 Sitecore. All rights reserved.
Page 3 of 74
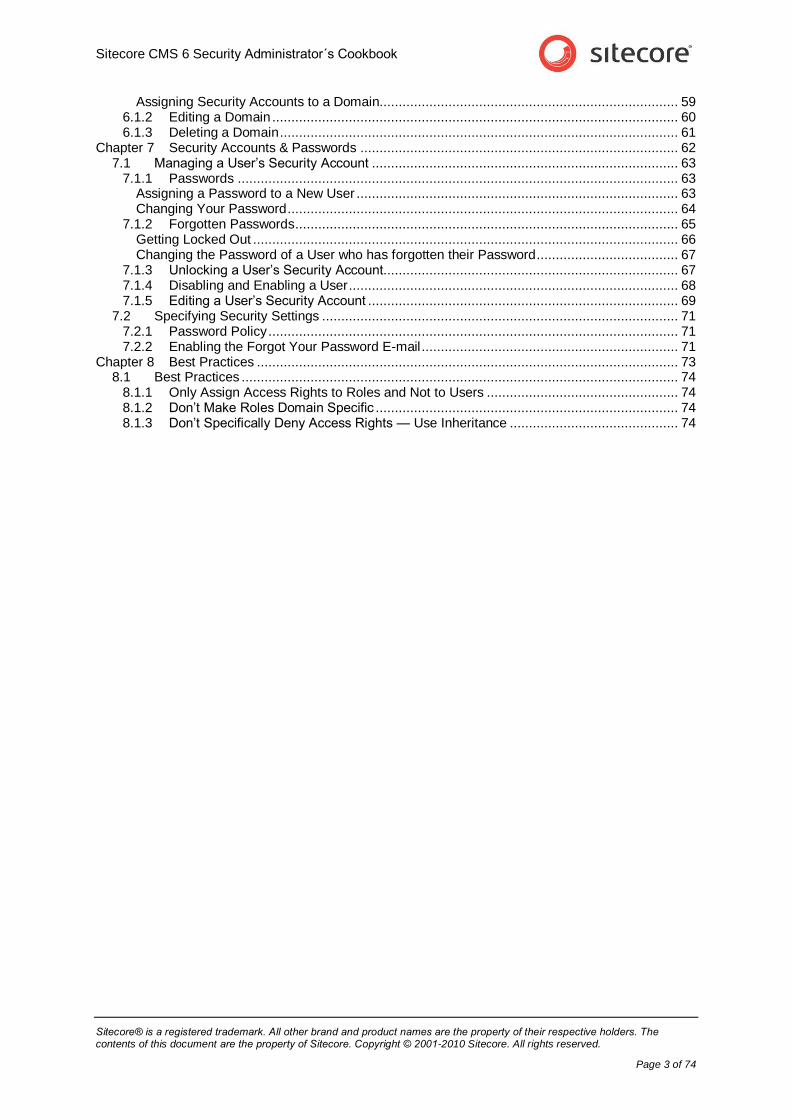
Assigning Security Accounts to a Domain.............................................................................. 59 6.1.2 Editing a Domain .......................................................................................................... 60 6.1.3 Deleting a Domain ........................................................................................................ 61
Chapter 7 Security Accounts & Passwords ................................................................................... 62 7.1 Managing a User’s Security Account ................................................................................ 63
7.1.1 Passwords ................................................................................................................... 63 Assigning a Password to a New User .................................................................................... 63 Changing Your Password ...................................................................................................... 64
7.1.2 Forgotten Passwords .................................................................................................... 65 Getting Locked Out ............................................................................................................... 66 Changing the Password of a User who has forgotten their Password ..................................... 67
7.1.3 Unlocking a User’s Security Account............................................................................. 67 7.1.4 Disabling and Enabling a User ...................................................................................... 68 7.1.5 Editing a User’s Security Account ................................................................................. 69
7.2 Specifying Security Settings ............................................................................................. 71 7.2.1 Password Policy ........................................................................................................... 71 7.2.2 Enabling the Forgot Your Password E-mail ................................................................... 71
Chapter 8 Best Practices .............................................................................................................. 73 8.1 Best Practices .................................................................................................................. 74
8.1.1 Only Assign Access Rights to Roles and Not to Users .................................................. 74 8.1.2 Don’t Make Roles Domain Specific ............................................................................... 74 8.1.3 Don’t Specifically Deny Access Rights — Use Inheritance ............................................ 74

Sitecore CMS 6 Security Administrator´s Cookbook
Sitecore® is a registered trademark. All other brand and product names are the property of their respective holders. The contents of this document are the property of Sitecore. Copyright © 2001-2010 Sitecore. All rights reserved.
Page 4 of 74
Chapter 1
Introduction
The Security Administrator’s Cookbook is designed to give security administrators the information they need to administer security in Sitecore. This cookbook is primarily aimed at introducing new security administrators to the tools that Sitecore contains. However, the procedures described in this document will also be beneficial for more experienced and security administrators who are unfamiliar with the tools that Sitecore contains.
This cookbook contains the following chapters:
Chapter 1 — Introduction This brief description of this document and its intended audience
Chapter 2 — Security in Sitecore An overview of the basic concepts that security administrators need to understand and a brief introduction to the security tools that are available in Sitecore
Chapter 3 — Creating and Managing Users Step by step instructions for user management tasks
Chapter 4 — Creating and Managing Roles Step by step instructions for role management
Chapter 5 — Assigning and Reviewing Access Rights Step by step instructions for managing access rights
Chapter 6 — Domains Step by step instructions for managing domains
Chapter 7 — Security Accounts & Passwords Step by step instructions for managing security accounts and passwords
Chapter 8 — Best Practices A discussion of best practices for administering security in Sitecore
Sitecore CMS 6 Security Administrator´s Cookbook
Sitecore® is a registered trademark. All other brand and product names are the property of their respective holders. The contents of this document are the property of Sitecore. Copyright © 2001-2010 Sitecore. All rights reserved.
Page 5 of 74
Chapter 2
Security in Sitecore
This chapter is a description of all the basic concepts that security administrators need to understand to get the most out of the Sitecore security system. It also contains a brief introduction to the security tools that are available in Sitecore.
This chapter contains the following sections:
Security Accounts
Security Tools
Sitecore CMS 6 Security Administrator´s Cookbook
Sitecore® is a registered trademark. All other brand and product names are the property of their respective holders. The contents of this document are the property of Sitecore. Copyright © 2001-2010 Sitecore. All rights reserved.
Page 6 of 74
2.1 Security Accounts
In Sitecore, you use security accounts to control the access that users have to the items and content on their Web site as well as the access they have to the functionality that Sitecore contains.
In Sitecore, a security account can be either a user or a role.
2.1.1 Users and Roles
After you have created a user in Sitecore, you should assign them one or more of the roles that exist in Sitecore. A role contains a set of access rights to the various items that make up your Sitecore installation as well as permission to use the various tools that Sitecore contains.
By assigning roles to users you simplify the security administration process. The roles that a user is assigned determine the access rights that the user has.
If the predefined security roles that Sitecore contains do not suit your needs, you can easily create new roles and give these roles the appropriate access rights to the items and functionality that the Web site contains.
In short, users should be members of roles and the roles should be assigned the access rights that govern the permission that the members of each role have to the items in Sitecore. However, if you think that it is necessary, you can also assign individual access rights to the user as well.
If a user is a member of several roles they are given the accumulated access rights of all the roles.
Furthermore, a user can be a member of many different roles and roles can be members of other roles. When a role is a member of another role the access rights that the different roles contain are added together to give the users who have been assigned these roles the accumulated access rights of both roles.
For more information about the way Sitecore interprets security settings and access rights, see How Sitecore Evaluates Access Rights on page 43.
2.1.2 Access Rights
The access rights that you assign to a security account in Sitecore determine the access that the account has to the items and functionality that Sitecore contains.
The access rights that you can assign to an account are:
Read — controls whether or not a user can see an item in the content tree and/or on the published Web site.
Write — controls whether or not a user can update field values. The write access right requires the read access right and field read and field write access rights for individual fields (field read and field write are allowed by default).
Rename — controls whether or not a user can change the name of an item. The rename access right requires the read access right.
Create — controls whether or not a user can create child items under this item. The create access right requires the read access right.
Delete — controls whether or not a user can delete an item. The delete access right requires the read access right.
Administer — controls whether or not a user can configure access rights on an item. The administer access right requires the read and write access rights.
Field Read — controls whether or not a user can read a specific field on an item.
Field Write — controls whether or not a user can update a specific field on an item.
Sitecore CMS 6 Security Administrator´s Cookbook
Sitecore® is a registered trademark. All other brand and product names are the property of their respective holders. The contents of this document are the property of Sitecore. Copyright © 2001-2010 Sitecore. All rights reserved.
Page 7 of 74
Language Read — controls whether or not a user can read a specific language version of items.
Language Write — controls whether or not a user can update a specific language version of items.
Site Enter — controls whether or not a user can access a specific site.
Show in Insert — controls whether or not a template is shown in the Content Editor in the Insert Options list and in the Page Editor in the Insert dialog box.
Workflow Command Execute — controls whether or not a user can execute a specific workflow command.
Workflow State Delete — controls whether or not a user can delete items when they are in a specific workflow state.
Workflow State Write — controls whether or not a user can update items when they are in a specific workflow state.
* — controls whether or not all the access rights assigned to a specific item are assigned or denied.
2.1.3 Inheritance
Sitecore uses inheritance to streamline the process of assigning access rights. By using inheritance Sitecore spares security administrators the tedious task of assigning each role explicit access rights to every item in the content tree.
An item can inherit the access rights that have been specified for other items that are higher up the content tree. Any item can be configured to inherit the security settings of its parent item.
A security administrator can, for example, configure the security settings of a single item and by using inheritance, let these settings influence the security settings of all the items that are lower down the content tree.
Although items inherit security settings by default, Sitecore allows you to configure which items should inherit security settings and which should not. Sitecore defines the ability to inherit security settings as an access right; that you can allow or deny, just like Read and Write.
For more information about using inheritance to controls access rights, see Chapter 5, Assigning and Reviewing Access Rights.
Sitecore CMS 6 Security Administrator´s Cookbook
Sitecore® is a registered trademark. All other brand and product names are the property of their respective holders. The contents of this document are the property of Sitecore. Copyright © 2001-2010 Sitecore. All rights reserved.
Page 8 of 74
2.2 Security Tools
Sitecore contains several different tools for managing security.
The Sitecore security tools are:
User Manager
Role Manager
Security Editor
Access Viewer
Domain Manager
The Security tab in the Content Editor
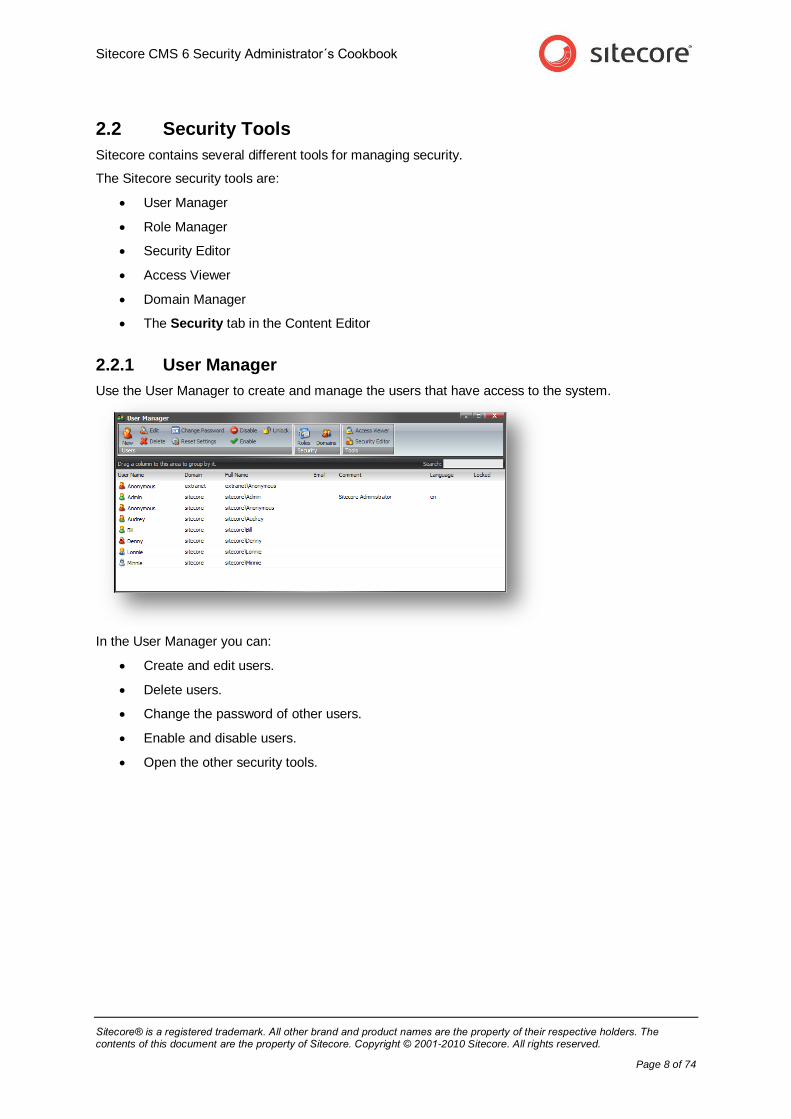
2.2.1 User Manager
Use the User Manager to create and manage the users that have access to the system.
In the User Manager you can:
Create and edit users.
Delete users.
Change the password of other users.
Enable and disable users.
Open the other security tools.
Sitecore CMS 6 Security Administrator´s Cookbook
Sitecore® is a registered trademark. All other brand and product names are the property of their respective holders. The contents of this document are the property of Sitecore. Copyright © 2001-2010 Sitecore. All rights reserved.
Page 9 of 74
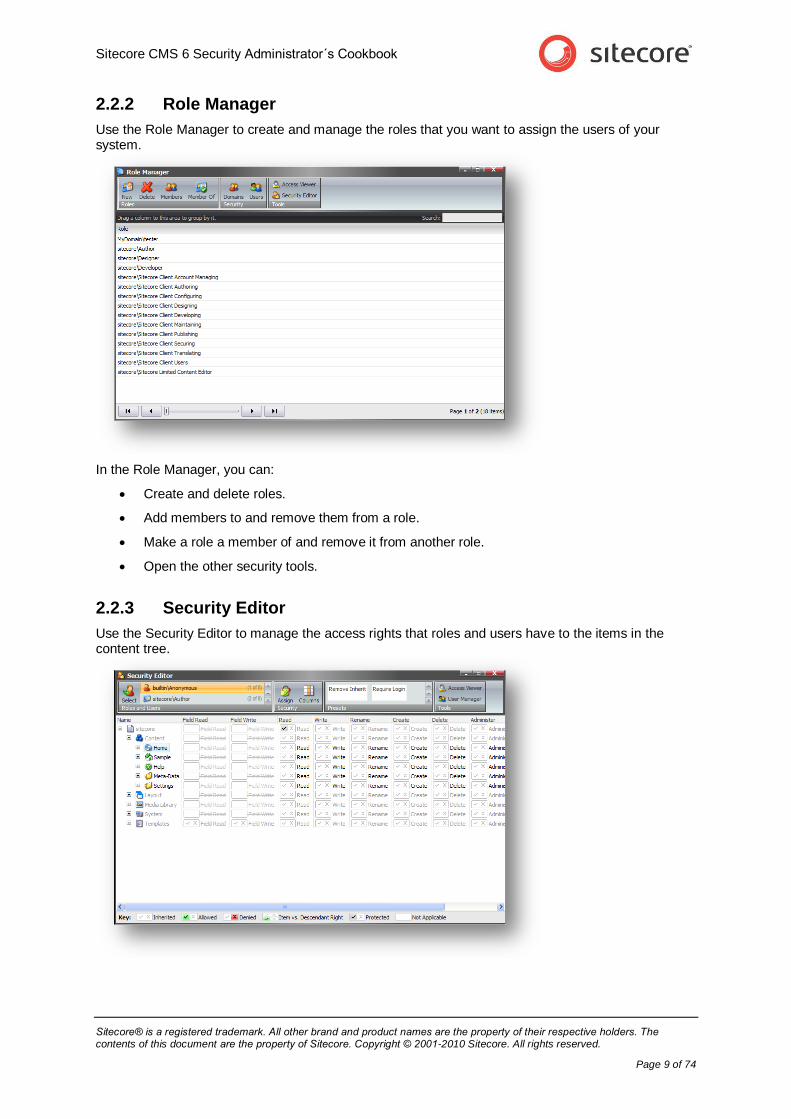
2.2.2 Role Manager
Use the Role Manager to create and manage the roles that you want to assign the users of your system.
In the Role Manager, you can:
Create and delete roles.
Add members to and remove them from a role.
Make a role a member of and remove it from another role.
Open the other security tools.
2.2.3 Security Editor
Use the Security Editor to manage the access rights that roles and users have to the items in the content tree.
Sitecore CMS 6 Security Administrator´s Cookbook
Sitecore® is a registered trademark. All other brand and product names are the property of their respective holders. The contents of this document are the property of Sitecore. Copyright © 2001-2010 Sitecore. All rights reserved.
Page 10 of 74
In the Security Editor, you can:
Select the security account that you want to manage.
Assign access rights to the selected security account.
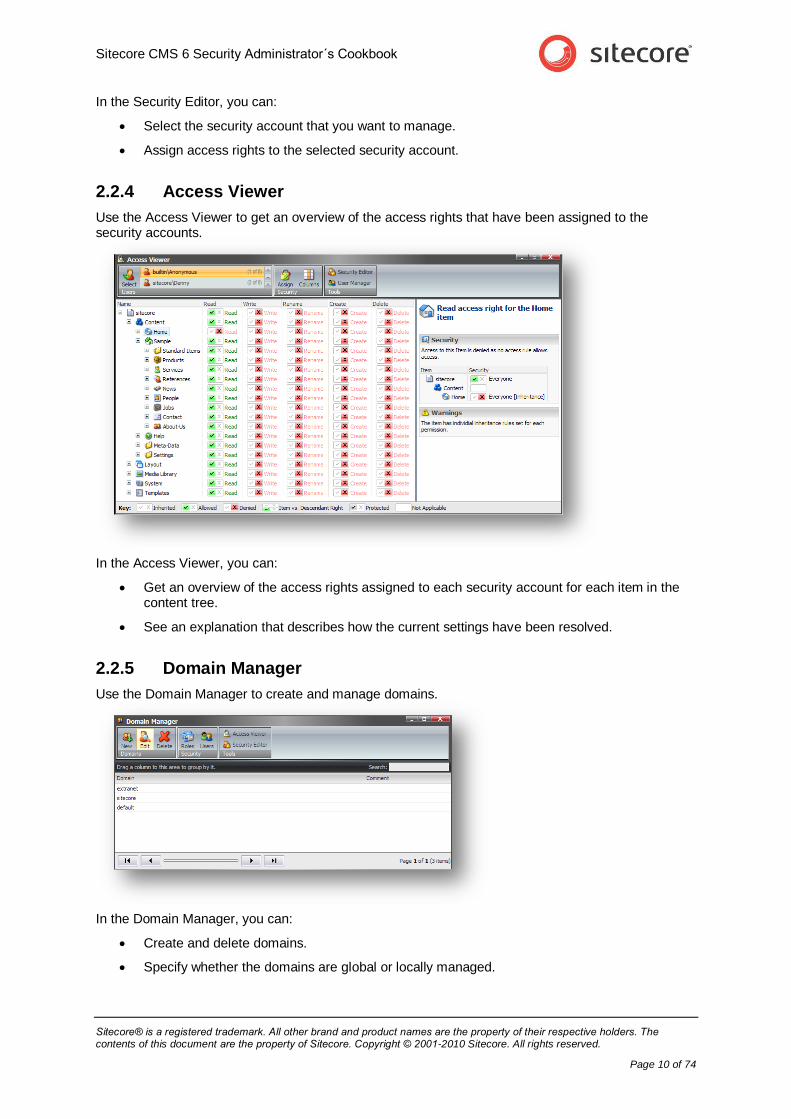
2.2.4 Access Viewer
Use the Access Viewer to get an overview of the access rights that have been assigned to the security accounts.
In the Access Viewer, you can:
Get an overview of the access rights assigned to each security account for each item in the content tree.
See an explanation that describes how the current settings have been resolved.
2.2.5 Domain Manager
Use the Domain Manager to create and manage domains.
In the Domain Manager, you can:
Create and delete domains.
Specify whether the domains are global or locally managed.

Sitecore CMS 6 Security Administrator´s Cookbook
Sitecore® is a registered trademark. All other brand and product names are the property of their respective holders. The contents of this document are the property of Sitecore. Copyright © 2001-2010 Sitecore. All rights reserved.
Page 11 of 74
2.2.6 Content Editor — Security
There are also some important security tools available on the Security tab in the Content Editor.
In the Content Editor, you can:
Assign access rights to security accounts that give them access to individual items in the content tree.
Get an overview of the roles and users that have access rights to individual items in the content tree.
Change the ownership of items.
Sitecore CMS 6 Security Administrator´s Cookbook
Sitecore® is a registered trademark. All other brand and product names are the property of their respective holders. The contents of this document are the property of Sitecore. Copyright © 2001-2010 Sitecore. All rights reserved.
Page 12 of 74
Chapter 3
Creating and Managing Users
This chapter describes how to use the User Manager to create new users and make them members of security roles.
This chapter contains the following sections:
Creating a User in the User Manager
Managing a User
Sitecore CMS 6 Security Administrator´s Cookbook
Sitecore® is a registered trademark. All other brand and product names are the property of their respective holders. The contents of this document are the property of Sitecore. Copyright © 2001-2010 Sitecore. All rights reserved.
Page 13 of 74
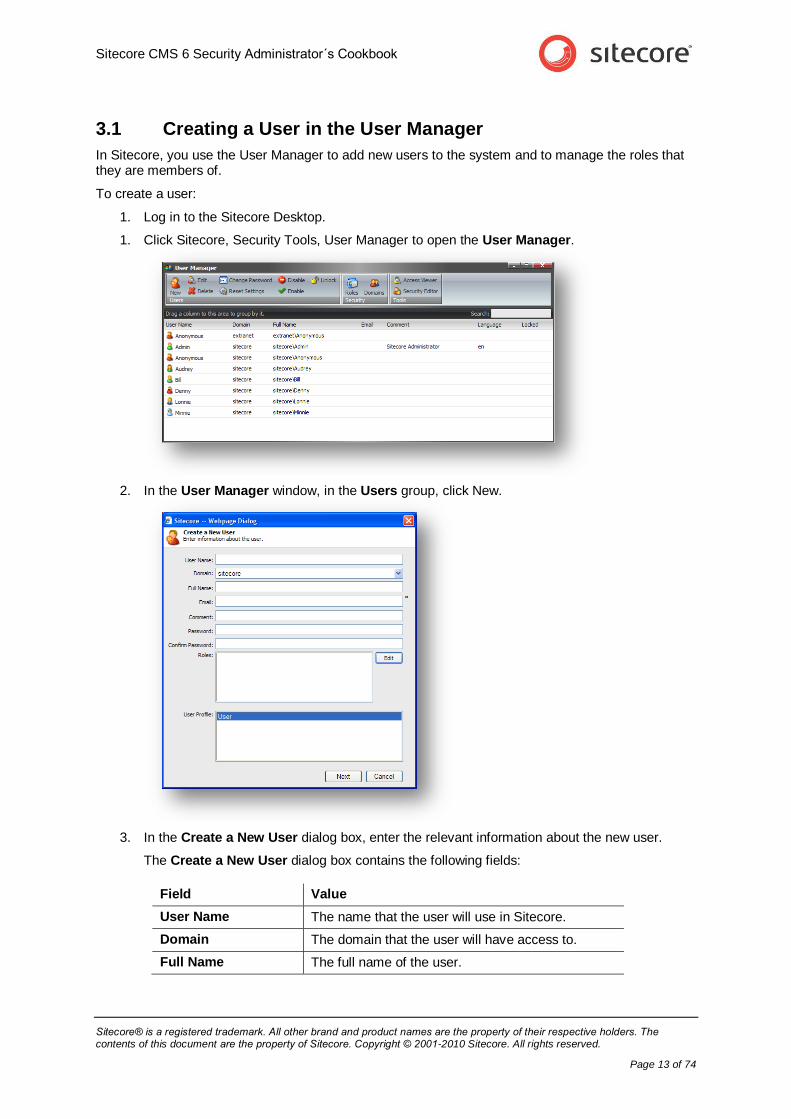
3.1 Creating a User in the User Manager
In Sitecore, you use the User Manager to add new users to the system and to manage the roles that they are members of.
To create a user:
1. Log in to the Sitecore Desktop.
1. Click Sitecore, Security Tools, User Manager to open the User Manager.
2. In the User Manager window, in the Users group, click New.
3. In the Create a New User dialog box, enter the relevant information about the new user.
The Create a New User dialog box contains the following fields:
Field Value
User Name The name that the user will use in Sitecore.
Domain The domain that the user will have access to.
Full Name The full name of the user.
Sitecore CMS 6 Security Administrator´s Cookbook
Sitecore® is a registered trademark. All other brand and product names are the property of their respective holders. The contents of this document are the property of Sitecore. Copyright © 2001-2010 Sitecore. All rights reserved.
Page 14 of 74
Field Value
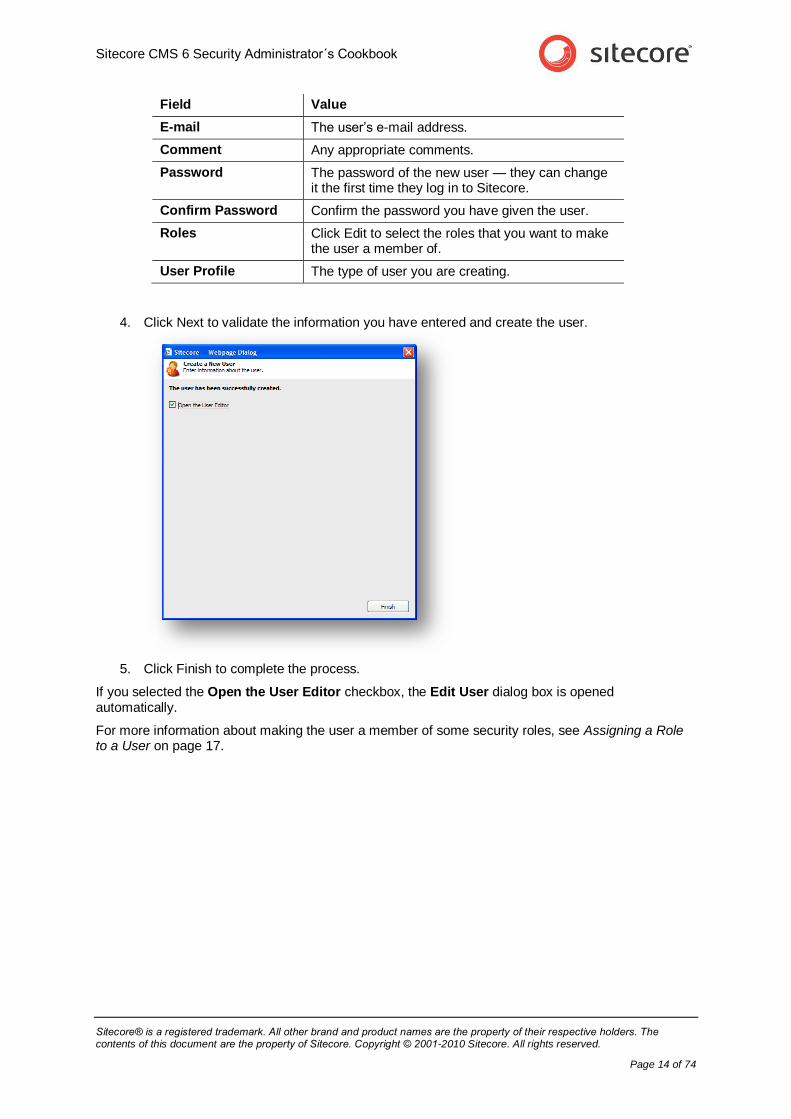
E-mail The user’s e-mail address.
Comment Any appropriate comments.
Password The password of the new user — they can change it the first time they log in to Sitecore.
Confirm Password Confirm the password you have given the user.
Roles Click Edit to select the roles that you want to make the user a member of.
User Profile The type of user you are creating.
4. Click Next to validate the information you have entered and create the user.
5. Click Finish to complete the process.
If you selected the Open the User Editor checkbox, the Edit User dialog box is opened automatically.
For more information about making the user a member of some security roles, see Assigning a Role to a User on page 17.

Sitecore CMS 6 Security Administrator´s Cookbook
Sitecore® is a registered trademark. All other brand and product names are the property of their respective holders. The contents of this document are the property of Sitecore. Copyright © 2001-2010 Sitecore. All rights reserved.
Page 15 of 74
3.2 Managing a User
After you have created a new user, you can make them members of roles and remove them from roles. You may also need to edit their information in their Sitecore account. You can also delete a user from the system.
3.2.1 Editing a User
To edit a user:
1. In the User Manager, in the Users group, click Edit.
2. In the General tab, you can change the name and e-mail address of the user. You can also select the image that is used as a portrait of the user in Sitecore.
3. In the Member Of tab, you can edit the roles and domains that the user is a member of.

Sitecore CMS 6 Security Administrator´s Cookbook
Sitecore® is a registered trademark. All other brand and product names are the property of their respective holders. The contents of this document are the property of Sitecore. Copyright © 2001-2010 Sitecore. All rights reserved.
Page 16 of 74
For more information about making a user a member of some security roles, see Chapter 4, Creating and Managing Roles.
4. In the Profile tab, in the User Profile section, you can specify which Sitecore tool is displayed to the user when they log in.
If you select Then
Content Editor The user can only open the Content Editor.
Page Editor The user can only open the Page Editor.
Preview The user can open the Preview client and then they can open the Page Editor.
Desktop The user can select the client that they want to open on the login page.
URL You must enter a custom URL and the client selected by the user is ignored.
5. In the Additional Properties section, you can edit information about the profile that was selected for this user when their account was created.
You can change the image used as wallpaper for this user in the Desktop.
Sitecore CMS 6 Security Administrator´s Cookbook
Sitecore® is a registered trademark. All other brand and product names are the property of their respective holders. The contents of this document are the property of Sitecore. Copyright © 2001-2010 Sitecore. All rights reserved.
Page 17 of 74
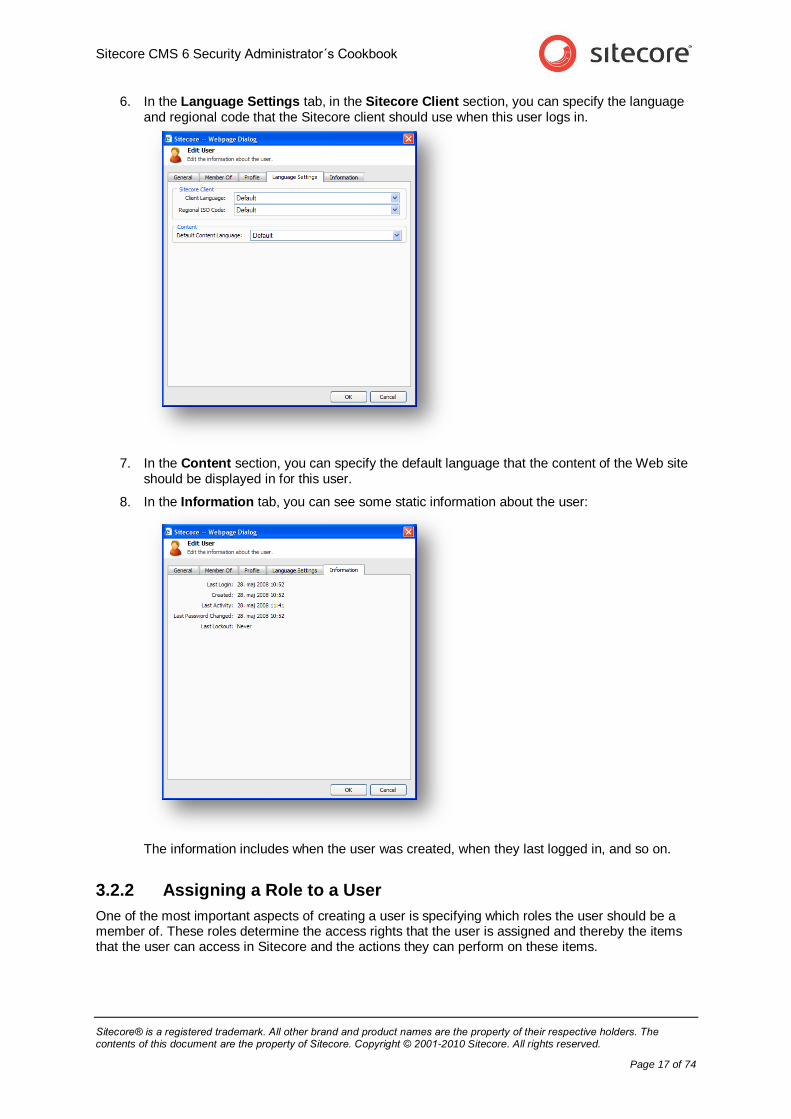
6. In the Language Settings tab, in the Sitecore Client section, you can specify the language and regional code that the Sitecore client should use when this user logs in.
7. In the Content section, you can specify the default language that the content of the Web site should be displayed in for this user.
8. In the Information tab, you can see some static information about the user:
The information includes when the user was created, when they last logged in, and so on.
3.2.2 Assigning a Role to a User
One of the most important aspects of creating a user is specifying which roles the user should be a member of. These roles determine the access rights that the user is assigned and thereby the items that the user can access in Sitecore and the actions they can perform on these items.
Sitecore CMS 6 Security Administrator´s Cookbook
Sitecore® is a registered trademark. All other brand and product names are the property of their respective holders. The contents of this document are the property of Sitecore. Copyright © 2001-2010 Sitecore. All rights reserved.
Page 18 of 74
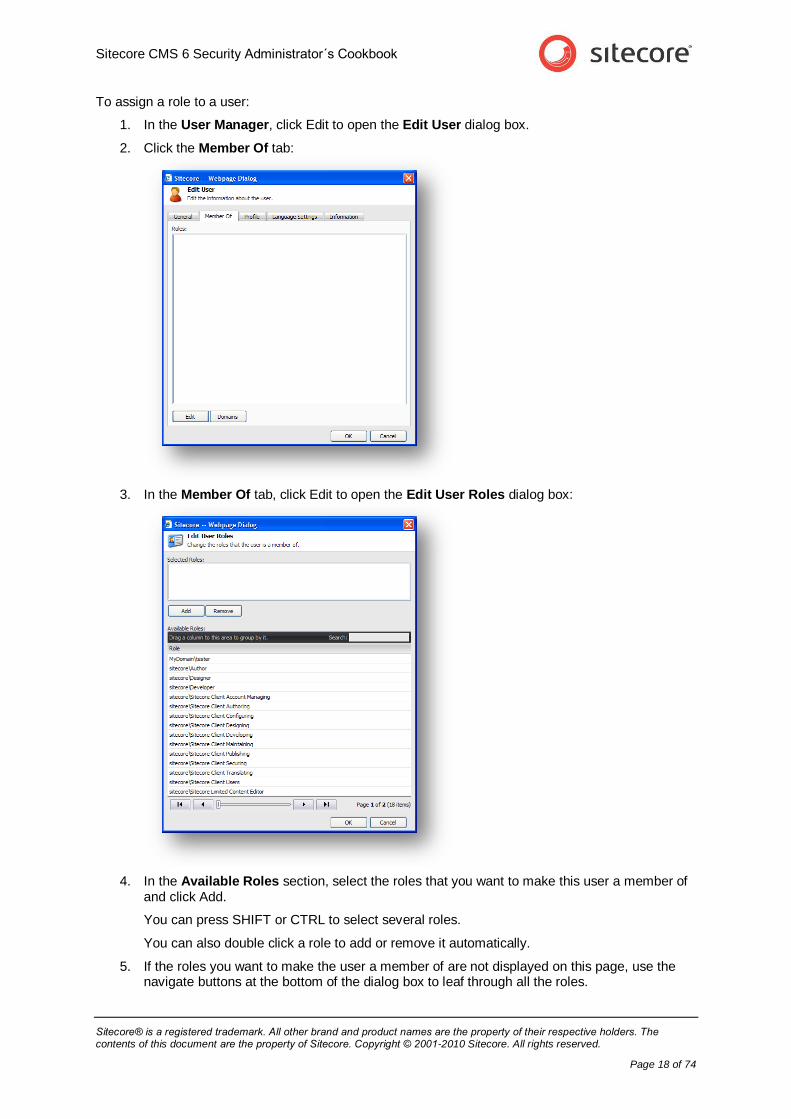
To assign a role to a user:
1. In the User Manager, click Edit to open the Edit User dialog box.
2. Click the Member Of tab:
3. In the Member Of tab, click Edit to open the Edit User Roles dialog box:
4. In the Available Roles section, select the roles that you want to make this user a member of and click Add.
You can press SHIFT or CTRL to select several roles.
You can also double click a role to add or remove it automatically.
5. If the roles you want to make the user a member of are not displayed on this page, use the navigate buttons at the bottom of the dialog box to leaf through all the roles.
Sitecore CMS 6 Security Administrator´s Cookbook
Sitecore® is a registered trademark. All other brand and product names are the property of their respective holders. The contents of this document are the property of Sitecore. Copyright © 2001-2010 Sitecore. All rights reserved.
Page 19 of 74
3.2.3 Removing a User from a Role
As a security administrator, you will often have to revoke a user’s membership of some roles.
To remove a member from a role:
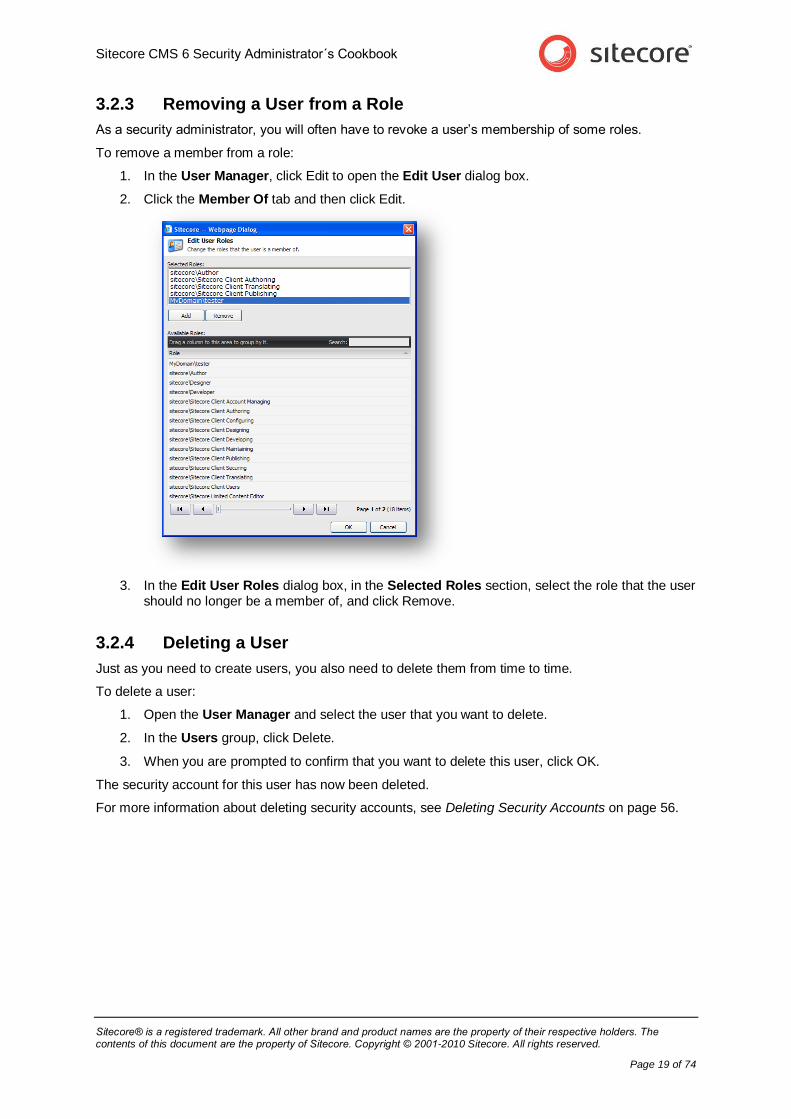
1. In the User Manager, click Edit to open the Edit User dialog box.
2. Click the Member Of tab and then click Edit.
3. In the Edit User Roles dialog box, in the Selected Roles section, select the role that the user should no longer be a member of, and click Remove.
3.2.4 Deleting a User
Just as you need to create users, you also need to delete them from time to time.
To delete a user:
1. Open the User Manager and select the user that you want to delete.
2. In the Users group, click Delete.
3. When you are prompted to confirm that you want to delete this user, click OK.
The security account for this user has now been deleted.
For more information about deleting security accounts, see Deleting Security Accounts on page 56.
Sitecore CMS 6 Security Administrator´s Cookbook
Sitecore® is a registered trademark. All other brand and product names are the property of their respective holders. The contents of this document are the property of Sitecore. Copyright © 2001-2010 Sitecore. All rights reserved.
Page 20 of 74
Chapter 4
Creating and Managing Roles
This chapter describes how to create and manage a role in the Role Manager. The topics include creating a role, assigning users to a role, and assigning a role to a role.
There is also an explanation of how the various roles work when combined.
This chapter contains the following sections:
Creating a Role in the Role Manager
Managing a Role

Sitecore CMS 6 Security Administrator´s Cookbook
Sitecore® is a registered trademark. All other brand and product names are the property of their respective holders. The contents of this document are the property of Sitecore. Copyright © 2001-2010 Sitecore. All rights reserved.
Page 21 of 74
4.1 Creating a Role in the Role Manager
In Sitecore, you use the User Manager to create new roles and manage the roles that already exist.
Roles are containers for access rights that make it easier for you to manage the access rights that the users have to the items and tools that your Sitecore installation contains. When you make a user a member of a role they receive the access rights that belong to the role.
To create a role:
1. Log in to the Sitecore desktop.
2. Click Sitecore, Security Tools, Role Manager.
3. In the Role Manager window, in the Roles group, click New.
4. In the Role Name field, enter the name of the new role.
5. In the Domain field, select the domain that this user should belong to.

Sitecore CMS 6 Security Administrator´s Cookbook
Sitecore® is a registered trademark. All other brand and product names are the property of their respective holders. The contents of this document are the property of Sitecore. Copyright © 2001-2010 Sitecore. All rights reserved.
Page 22 of 74
The new role is added in the Role Manager window:
For more information about domains, see Chapter 6, Domains on page 57.
Sitecore CMS 6 Security Administrator´s Cookbook
Sitecore® is a registered trademark. All other brand and product names are the property of their respective holders. The contents of this document are the property of Sitecore. Copyright © 2001-2010 Sitecore. All rights reserved.
Page 23 of 74
4.2 Managing a Role
After you have created a role, you can make some users members of this role. In Sitecore, you can make any security account a member of a role — both users and roles. You can also delete a role.
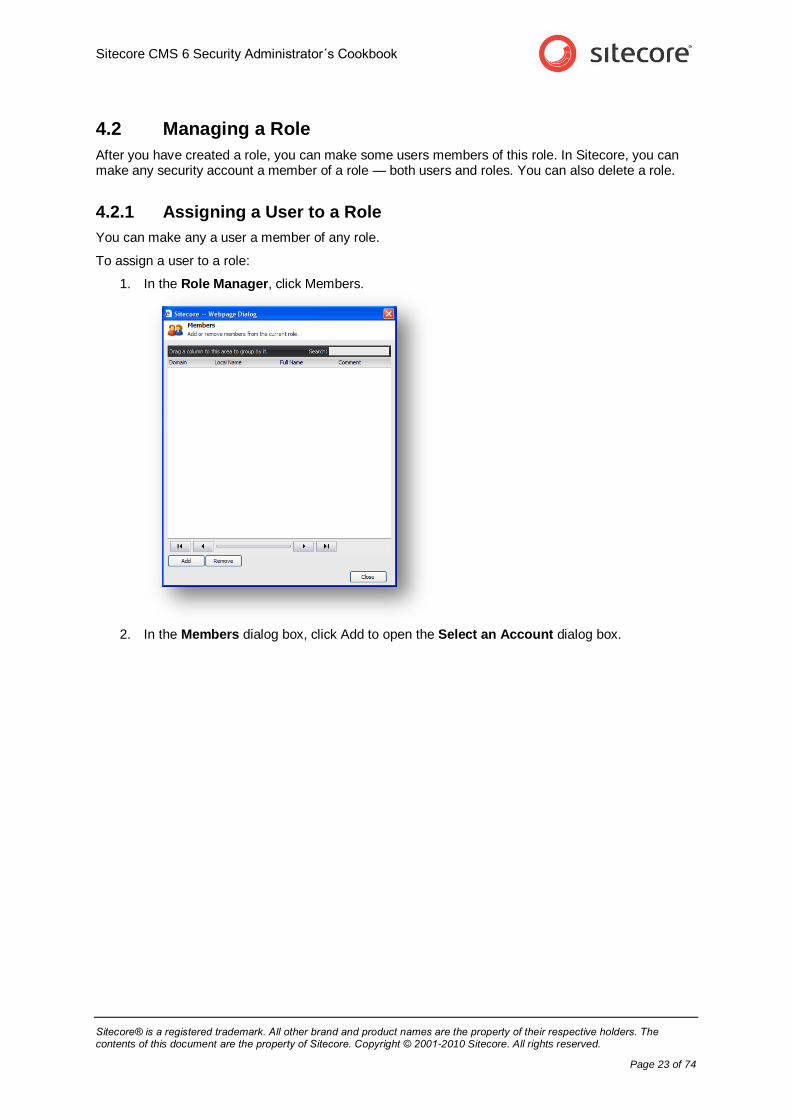
4.2.1 Assigning a User to a Role
You can make any a user a member of any role.
To assign a user to a role:
1. In the Role Manager, click Members.
2. In the Members dialog box, click Add to open the Select an Account dialog box.

Sitecore CMS 6 Security Administrator´s Cookbook
Sitecore® is a registered trademark. All other brand and product names are the property of their respective holders. The contents of this document are the property of Sitecore. Copyright © 2001-2010 Sitecore. All rights reserved.
Page 24 of 74
3. In the Select an Account dialog box, in the Account Type section, click Users to see a list of users.
If there is more than one page of users, use the buttons at the bottom of the window to leaf through the list of users.
4. Select the user that you want to add to this role.
5. Click OK and the user is added to the Members dialog box and is now a member of that role.
4.2.2 Assigning a Role to a Role
You can also make a role a member of another role.
To assign a role to a role:
1. In the Role Manager, click Members.

Sitecore CMS 6 Security Administrator´s Cookbook
Sitecore® is a registered trademark. All other brand and product names are the property of their respective holders. The contents of this document are the property of Sitecore. Copyright © 2001-2010 Sitecore. All rights reserved.
Page 25 of 74
2. In the Members dialog box, click Add to open the Select an Account dialog box.
3. In the Select an Account dialog box, in the Account Type section, click Roles to see a list of all the roles.
4. Select the role that you want to add to this role.
5. Click OK and the role is added to the Members dialog box and is now a member of that role.
4.2.3 Assigning this Role to another Role
The role that you created earlier is like any other role and you can make it a member of another role.
To assign this role to another role:
1. In the Role Manager, select the role you created earlier.
2. In the Roles group, click Member Of.

Sitecore CMS 6 Security Administrator´s Cookbook
Sitecore® is a registered trademark. All other brand and product names are the property of their respective holders. The contents of this document are the property of Sitecore. Copyright © 2001-2010 Sitecore. All rights reserved.
Page 26 of 74
3. In the Member Of dialog box, click Add.
4. In the Select an Account dialog box, select the role that you want to make this role a member of.
5. Click OK and the role you selected is added to the Member Of window. The role you created is now a member of the other role.
4.2.4 Deleting a Role
Just as you need to create roles, you also need to delete them from time to time.
To delete a role:
1. In the Role Manager, select the role you want to delete.
2. In the Roles group, click Delete.
3. When you are prompted to confirm that you want to delete this user, click OK.
This role is now removed from the security system. The security accounts that were members of this role are not removed from the system but they no longer possess the set of access rights that this role contained unless these access rights are granted to the security accounts by virtue of their membership of other roles.
For more information about deleting security accounts, see Deleting Security Accounts on page 56.
Sitecore CMS 6 Security Administrator´s Cookbook
Sitecore® is a registered trademark. All other brand and product names are the property of their respective holders. The contents of this document are the property of Sitecore. Copyright © 2001-2010 Sitecore. All rights reserved.
Page 27 of 74
Chapter 5
Assigning and Reviewing Access Rights
This chapter describes how to assign access rights to security accounts. There is also a description of how the access rights that an account is assigned affect each other. The last section in this chapter describes how to get an overview of the security system.
User’s, Roles, and Access Rights
Assigning Access Rights
Using Inheritance to Control Access Rights
How Sitecore Evaluates Access Rights
Analyzing the Security System
Deleting Security Accounts
Sitecore CMS 6 Security Administrator´s Cookbook
Sitecore® is a registered trademark. All other brand and product names are the property of their respective holders. The contents of this document are the property of Sitecore. Copyright © 2001-2010 Sitecore. All rights reserved.
Page 28 of 74
5.1 User’s, Roles, and Access Rights
In Sitecore, the term security account can apply to either a user or a role. You can assign access rights to both users and roles.
However, we recommend that you only assign access rights to roles and not to users. You can then make all your users members of the roles that match their function in your organization. This simplifies security administration because you no longer have to think in terms of individual users and their access rights but only in terms of roles and the access rights that they possess.
This means that when an employee leaves your company or moves to another department, you simply remove them from some roles and make them members of other roles. Similarly when you hire a new employee you make them members of the roles that possess the access rights that match their function in your organization.
This method of working saves the security administrator a considerable amount of repetitive work and streamlines the security system.
Sitecore CMS 6 Security Administrator´s Cookbook
Sitecore® is a registered trademark. All other brand and product names are the property of their respective holders. The contents of this document are the property of Sitecore. Copyright © 2001-2010 Sitecore. All rights reserved.
Page 29 of 74
5.2 Assigning Access Rights
A security account in Sitecore is useless until you assign it some access rights. You can assign access rights to both users and roles.
However, before you start to assign access rights to a role, you should try to get an overview of the access rights that the role has already been assigned.
5.2.1 Getting an Overview of the Access Rights Assigned to a Role
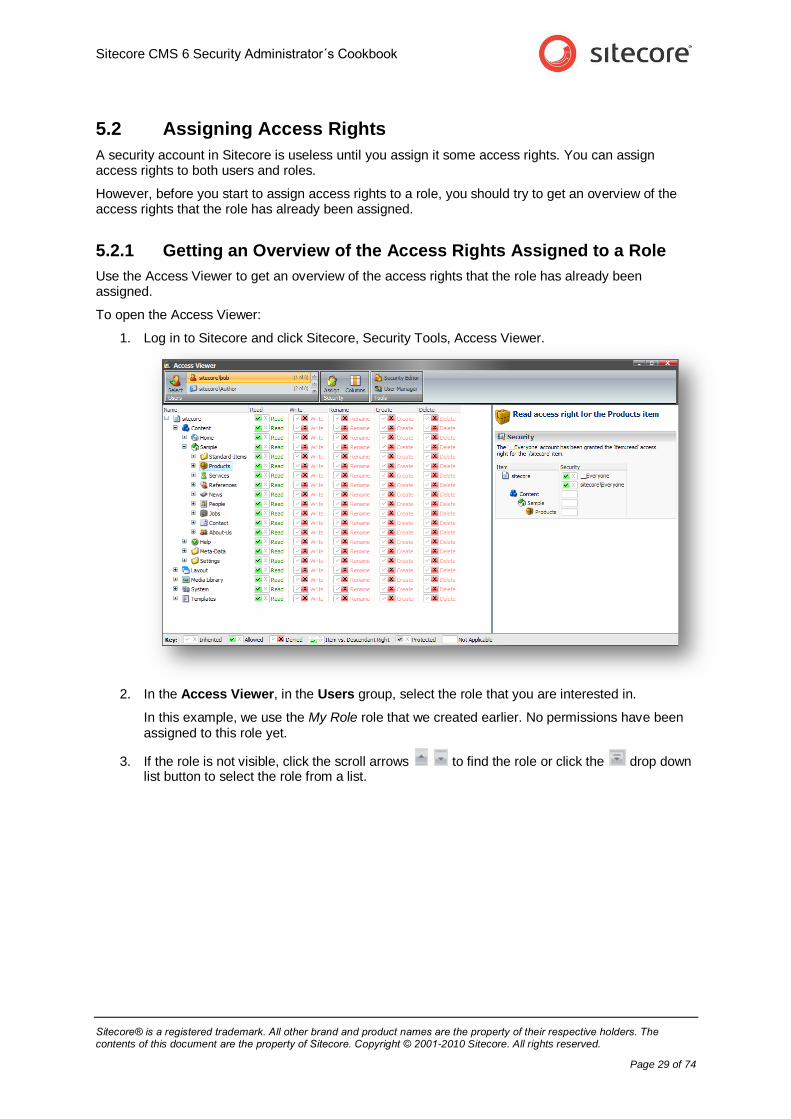
Use the Access Viewer to get an overview of the access rights that the role has already been assigned.
To open the Access Viewer:
1. Log in to Sitecore and click Sitecore, Security Tools, Access Viewer.
2. In the Access Viewer, in the Users group, select the role that you are interested in.
In this example, we use the My Role role that we created earlier. No permissions have been assigned to this role yet.
3. If the role is not visible, click the scroll arrows to find the role or click the drop down list button to select the role from a list.
Sitecore CMS 6 Security Administrator´s Cookbook
Sitecore® is a registered trademark. All other brand and product names are the property of their respective holders. The contents of this document are the property of Sitecore. Copyright © 2001-2010 Sitecore. All rights reserved.
Page 30 of 74
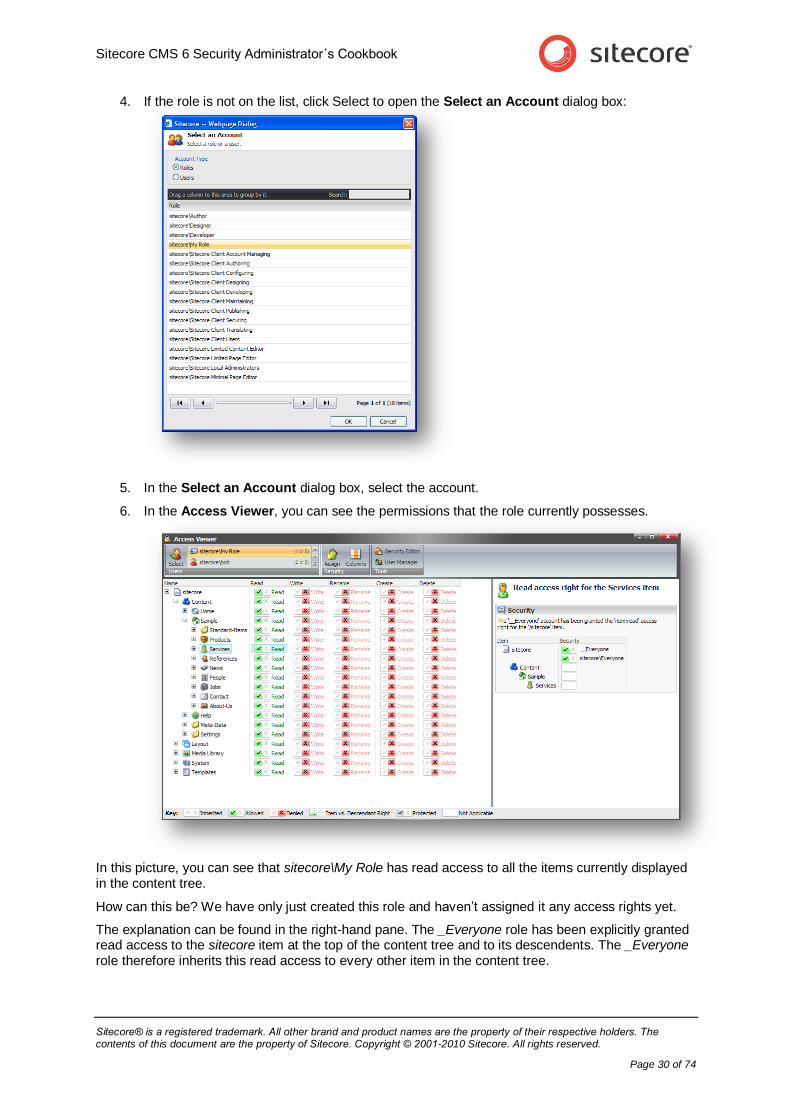
4. If the role is not on the list, click Select to open the Select an Account dialog box:
5. In the Select an Account dialog box, select the account.
6. In the Access Viewer, you can see the permissions that the role currently possesses.
In this picture, you can see that sitecore\My Role has read access to all the items currently displayed in the content tree.
How can this be? We have only just created this role and haven’t assigned it any access rights yet.
The explanation can be found in the right-hand pane. The _Everyone role has been explicitly granted read access to the sitecore item at the top of the content tree and to its descendents. The _Everyone role therefore inherits this read access to every other item in the content tree.
Sitecore CMS 6 Security Administrator´s Cookbook
Sitecore® is a registered trademark. All other brand and product names are the property of their respective holders. The contents of this document are the property of Sitecore. Copyright © 2001-2010 Sitecore. All rights reserved.
Page 31 of 74
Every security account in Sitecore is automatically a member of the _Everyone role. My Role has therefore been granted read access to these items by virtue of its membership of the _Everyone role.
My Role does not have any other access rights to any of the items in the content tree.
Not specified means denied for access rights.
5.2.2 Assigning Access Rights to a Role
The new role must be able to do more than read items if it is to be a useful. You must therefore assign it some other access rights.
To assign access rights to a role:
1. Log in to Sitecore and click Sitecore, Security Tools, Security Editor.
2. In the Security Editor, in the Roles and Users group, select the role that you want to assign access rights to.
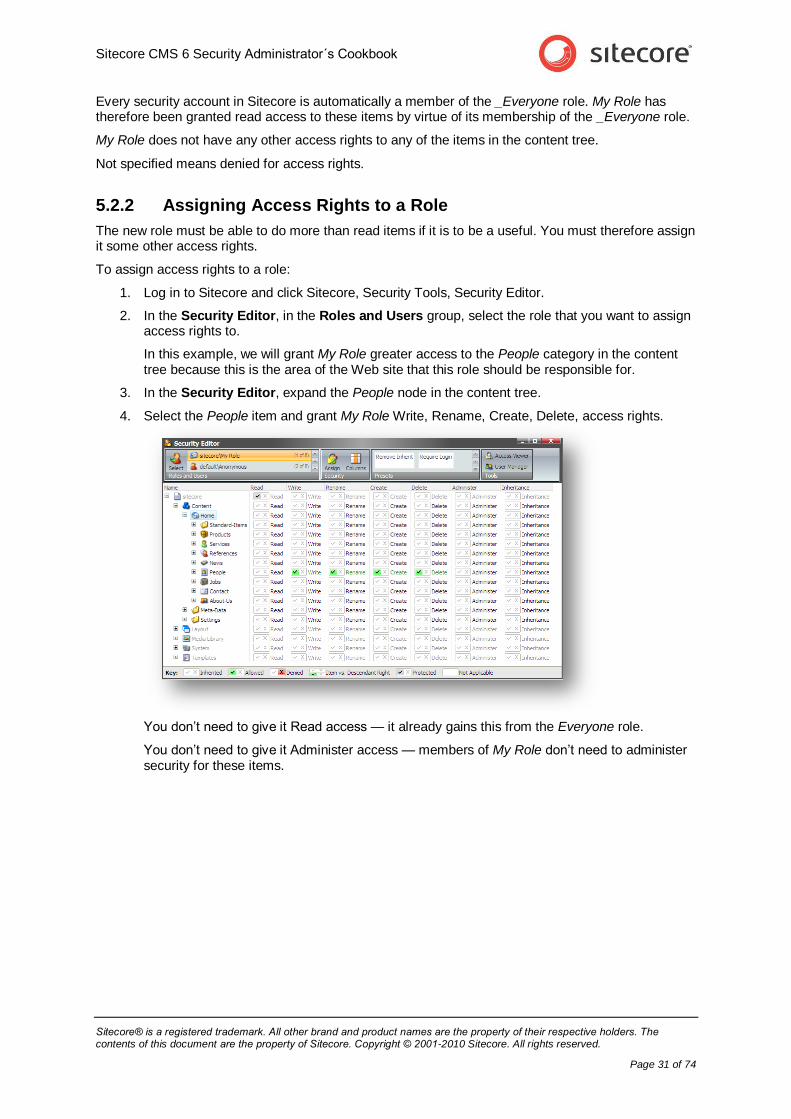
In this example, we will grant My Role greater access to the People category in the content tree because this is the area of the Web site that this role should be responsible for.
3. In the Security Editor, expand the People node in the content tree.
4. Select the People item and grant My Role Write, Rename, Create, Delete, access rights.
You don’t need to give it Read access — it already gains this from the Everyone role.
You don’t need to give it Administer access — members of My Role don’t need to administer security for these items.
Sitecore CMS 6 Security Administrator´s Cookbook
Sitecore® is a registered trademark. All other brand and product names are the property of their respective holders. The contents of this document are the property of Sitecore. Copyright © 2001-2010 Sitecore. All rights reserved.
Page 32 of 74
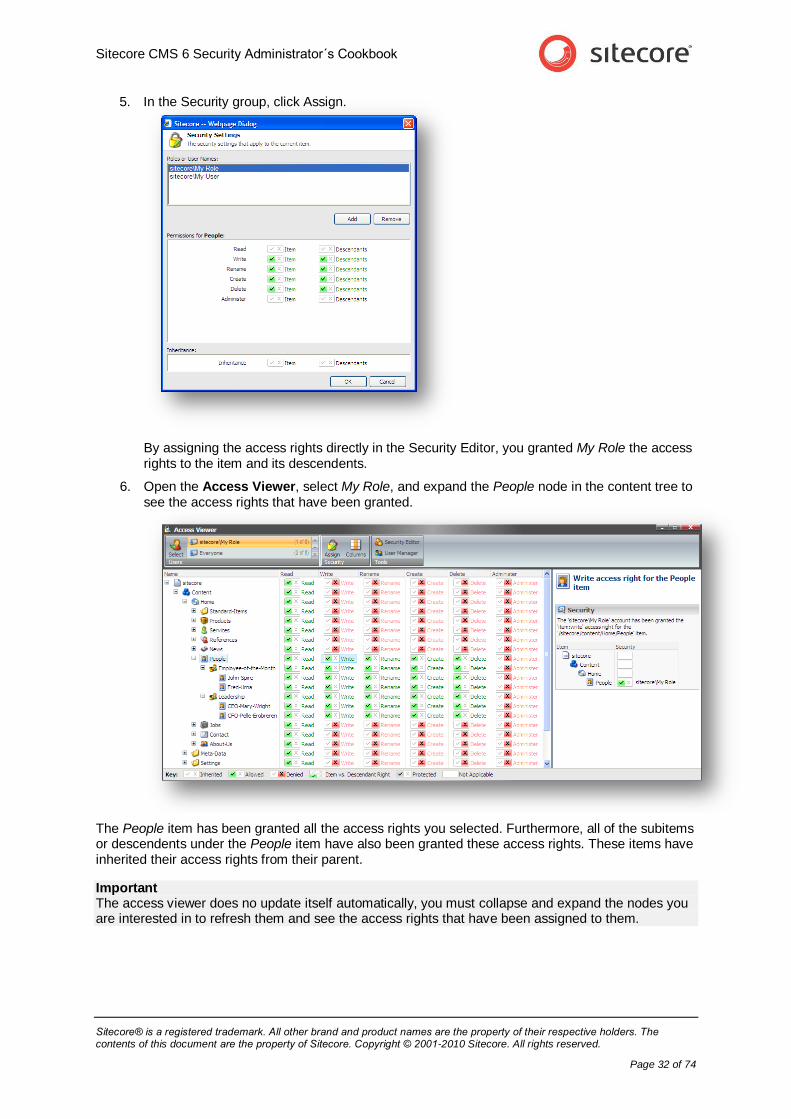
5. In the Security group, click Assign.
By assigning the access rights directly in the Security Editor, you granted My Role the access rights to the item and its descendents.
6. Open the Access Viewer, select My Role, and expand the People node in the content tree to see the access rights that have been granted.
The People item has been granted all the access rights you selected. Furthermore, all of the subitems or descendents under the People item have also been granted these access rights. These items have inherited their access rights from their parent.
Important The access viewer does no update itself automatically, you must collapse and expand the nodes you are interested in to refresh them and see the access rights that have been assigned to them.

Sitecore CMS 6 Security Administrator´s Cookbook
Sitecore® is a registered trademark. All other brand and product names are the property of their respective holders. The contents of this document are the property of Sitecore. Copyright © 2001-2010 Sitecore. All rights reserved.
Page 33 of 74
5.2.3 Denying a Role Access Rights to an Item
However, you don’t want members of My Role to edit the information about the company’s management that is posted on your Web site. You must therefore deny this role access to the Leadership item and all of its subitems.
There are two ways to accomplish this; you can:
Explicitly deny the role the relevant access rights.
Use inheritance to control the access rights that the role possesses.
Explicitly Denying Access Rights to a Role
To explicitly deny access rights to a role:
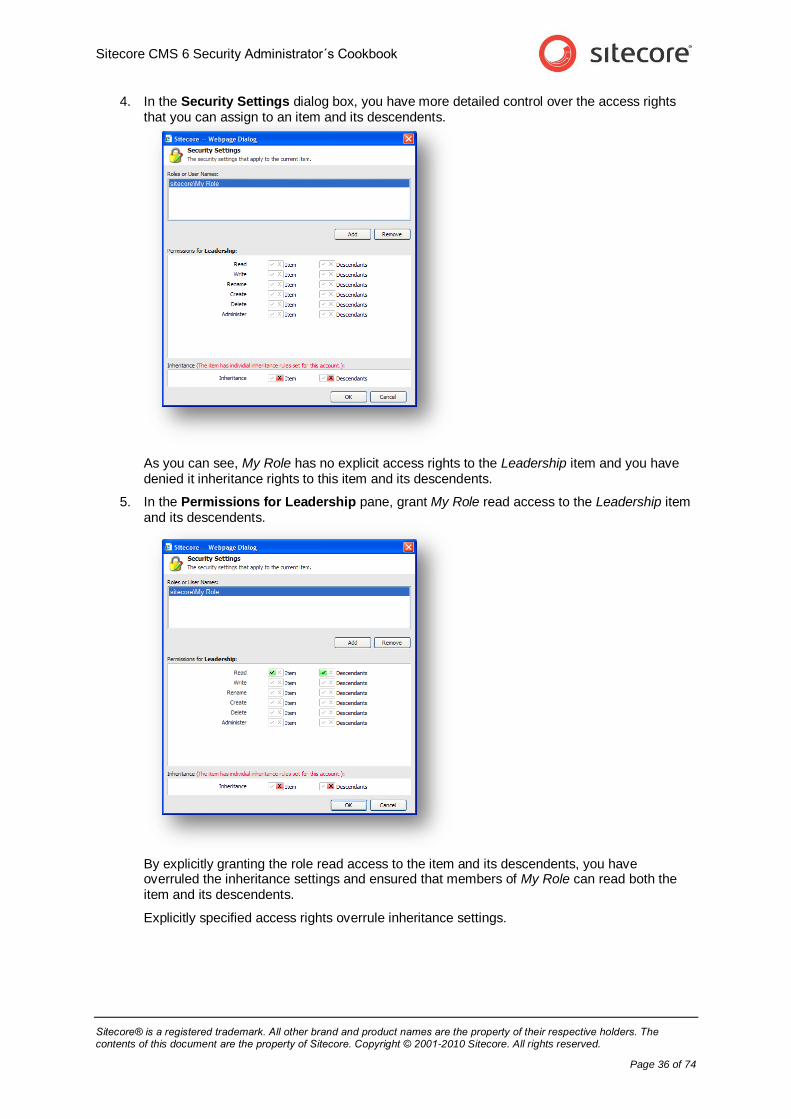
1. In the Security Editor, select My Role, select the Leadership item, and in the Security Group, click Assign.
2. In the Security Settings dialog box, in the Permissions for Leadership pane, grant My Role read access to the item and its descendents and deny it access rights to do anything else to the Leadership item and its descendents.
Sitecore CMS 6 Security Administrator´s Cookbook
Sitecore® is a registered trademark. All other brand and product names are the property of their respective holders. The contents of this document are the property of Sitecore. Copyright © 2001-2010 Sitecore. All rights reserved.
Page 34 of 74
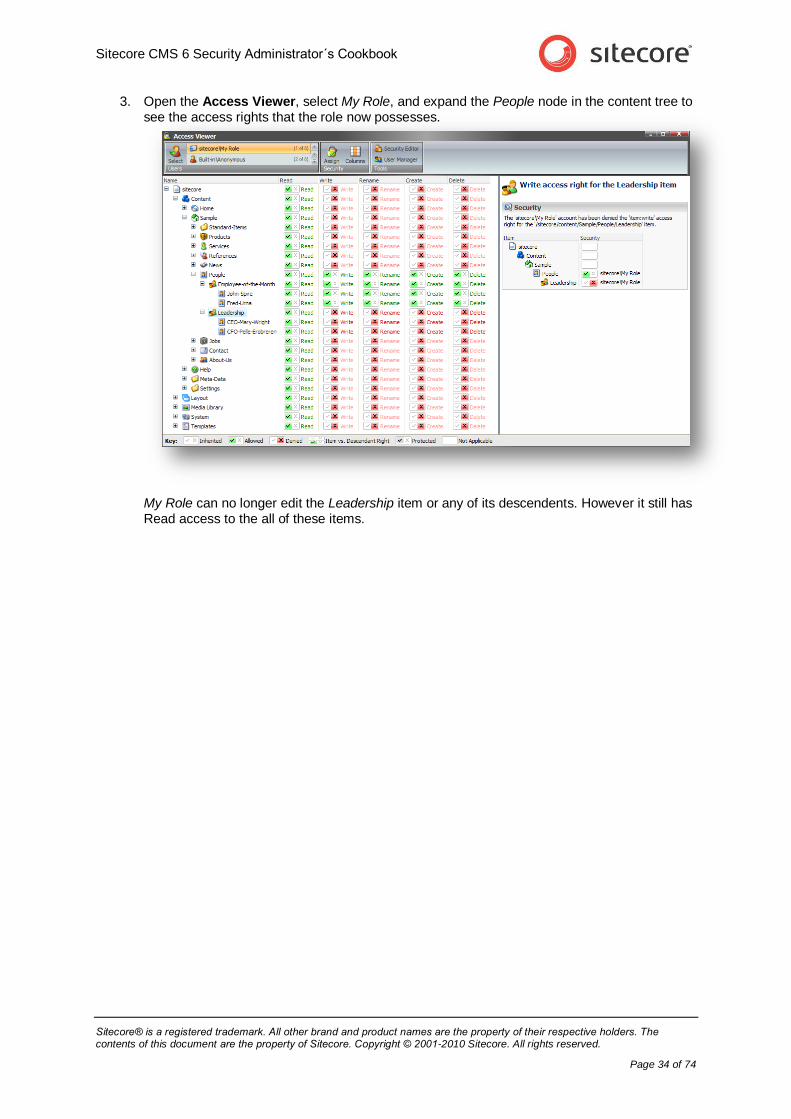
3. Open the Access Viewer, select My Role, and expand the People node in the content tree to see the access rights that the role now possesses.
My Role can no longer edit the Leadership item or any of its descendents. However it still has Read access to the all of these items.

Sitecore CMS 6 Security Administrator´s Cookbook
Sitecore® is a registered trademark. All other brand and product names are the property of their respective holders. The contents of this document are the property of Sitecore. Copyright © 2001-2010 Sitecore. All rights reserved.
Page 35 of 74
5.3 Using Inheritance to Control Access Rights
You can also use inheritance to control the access that a role has to the items in the content tree.
Note To follow this example, you must undo the security settings that you applied in the previous section.
To use inheritance to deny access rights to a role:
1. In the Security Editor, select My Role and grant it access to the People item and deny it inheritance rights to the Leadership item:
2. Open the Access Viewer, select My Role, and expand the Leadership node in the content tree to see the access rights that the role now possesses:
As you can see, My Role no longer has any access to the Leadership item and any of its subitems. However, by denying the role inheritance rights to the descendents of the Leadership item, you have denied it every access right to these items including read access.
3. In the Security Editor, select My Role, select the Leadership item, and in the Security Group, click Assign.
Sitecore CMS 6 Security Administrator´s Cookbook
Sitecore® is a registered trademark. All other brand and product names are the property of their respective holders. The contents of this document are the property of Sitecore. Copyright © 2001-2010 Sitecore. All rights reserved.
Page 36 of 74
4. In the Security Settings dialog box, you have more detailed control over the access rights that you can assign to an item and its descendents.
As you can see, My Role has no explicit access rights to the Leadership item and you have denied it inheritance rights to this item and its descendents.
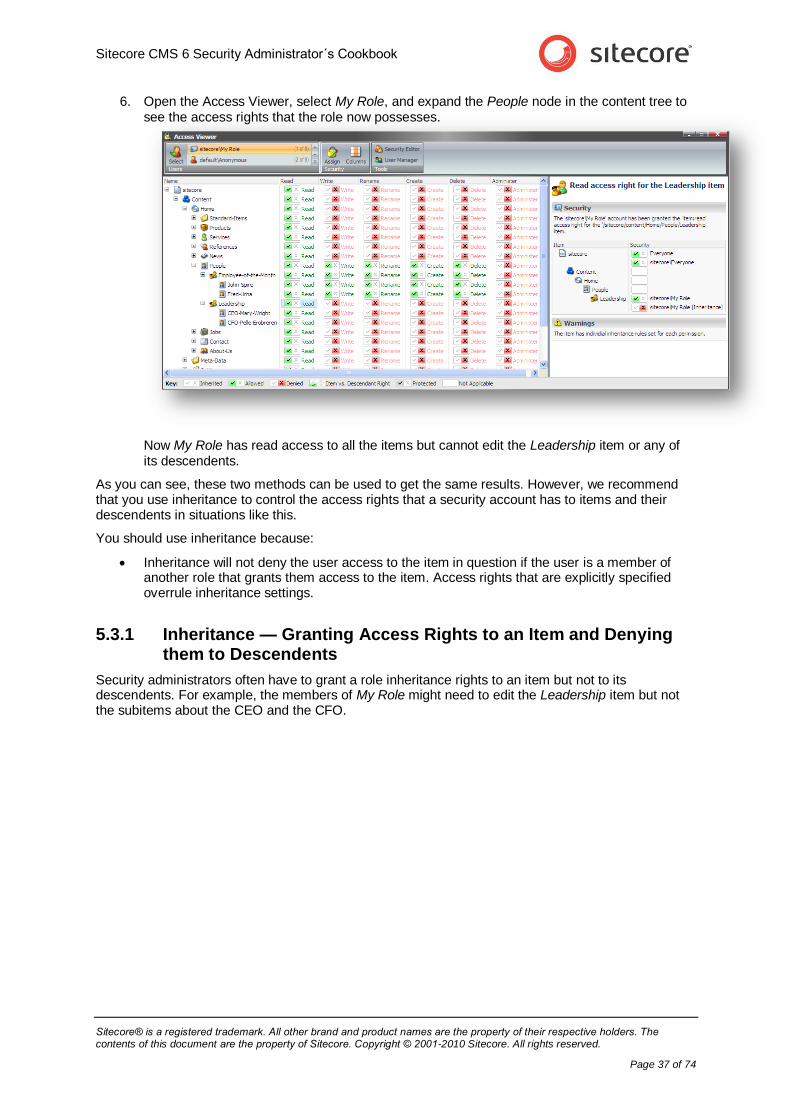
5. In the Permissions for Leadership pane, grant My Role read access to the Leadership item and its descendents.
By explicitly granting the role read access to the item and its descendents, you have overruled the inheritance settings and ensured that members of My Role can read both the item and its descendents.
Explicitly specified access rights overrule inheritance settings.
Sitecore CMS 6 Security Administrator´s Cookbook
Sitecore® is a registered trademark. All other brand and product names are the property of their respective holders. The contents of this document are the property of Sitecore. Copyright © 2001-2010 Sitecore. All rights reserved.
Page 37 of 74
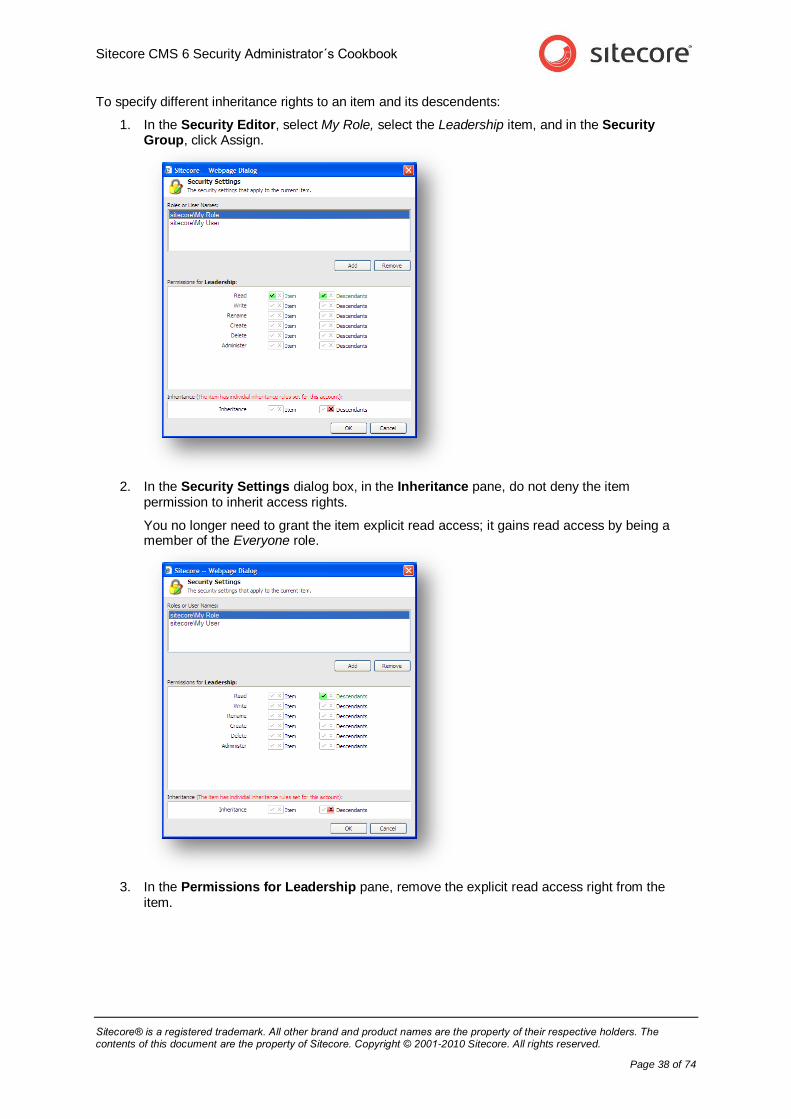
6. Open the Access Viewer, select My Role, and expand the People node in the content tree to see the access rights that the role now possesses.
Now My Role has read access to all the items but cannot edit the Leadership item or any of its descendents.
As you can see, these two methods can be used to get the same results. However, we recommend that you use inheritance to control the access rights that a security account has to items and their descendents in situations like this.
You should use inheritance because:
Inheritance will not deny the user access to the item in question if the user is a member of another role that grants them access to the item. Access rights that are explicitly specified overrule inheritance settings.
5.3.1 Inheritance — Granting Access Rights to an Item and Denying them to Descendents
Security administrators often have to grant a role inheritance rights to an item but not to its descendents. For example, the members of My Role might need to edit the Leadership item but not the subitems about the CEO and the CFO.
Sitecore CMS 6 Security Administrator´s Cookbook
Sitecore® is a registered trademark. All other brand and product names are the property of their respective holders. The contents of this document are the property of Sitecore. Copyright © 2001-2010 Sitecore. All rights reserved.
Page 38 of 74
To specify different inheritance rights to an item and its descendents:
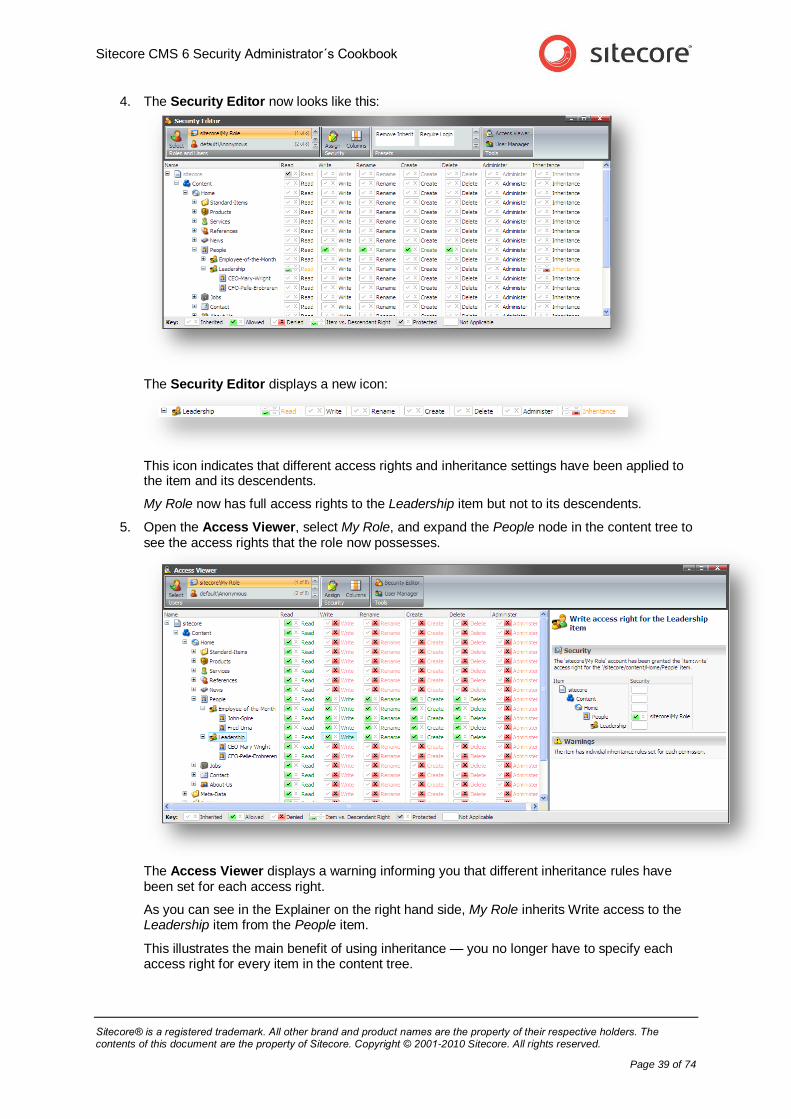
1. In the Security Editor, select My Role, select the Leadership item, and in the Security Group, click Assign.
2. In the Security Settings dialog box, in the Inheritance pane, do not deny the item permission to inherit access rights.
You no longer need to grant the item explicit read access; it gains read access by being a member of the Everyone role.
3. In the Permissions for Leadership pane, remove the explicit read access right from the item.
Sitecore CMS 6 Security Administrator´s Cookbook
Sitecore® is a registered trademark. All other brand and product names are the property of their respective holders. The contents of this document are the property of Sitecore. Copyright © 2001-2010 Sitecore. All rights reserved.
Page 39 of 74
4. The Security Editor now looks like this:
The Security Editor displays a new icon:
This icon indicates that different access rights and inheritance settings have been applied to the item and its descendents.
My Role now has full access rights to the Leadership item but not to its descendents.
5. Open the Access Viewer, select My Role, and expand the People node in the content tree to see the access rights that the role now possesses.
The Access Viewer displays a warning informing you that different inheritance rules have been set for each access right.
As you can see in the Explainer on the right hand side, My Role inherits Write access to the Leadership item from the People item.
This illustrates the main benefit of using inheritance — you no longer have to specify each access right for every item in the content tree.
Sitecore CMS 6 Security Administrator´s Cookbook
Sitecore® is a registered trademark. All other brand and product names are the property of their respective holders. The contents of this document are the property of Sitecore. Copyright © 2001-2010 Sitecore. All rights reserved.
Page 40 of 74
5.3.2 Inheritance — Denying Access Rights to an Item and Granting them to Descendents
You can also use inheritance to ensure that a role has access rights to the descendents of an item that it does not have to the item itself.
In this example, we will reverse the security settings that we applied in the previous section. The members of My Role should not have full access to the Leadership item but must have full access to its descendents; the CEO and CFO items.
To deny access rights to an item and grant them to its descendents:
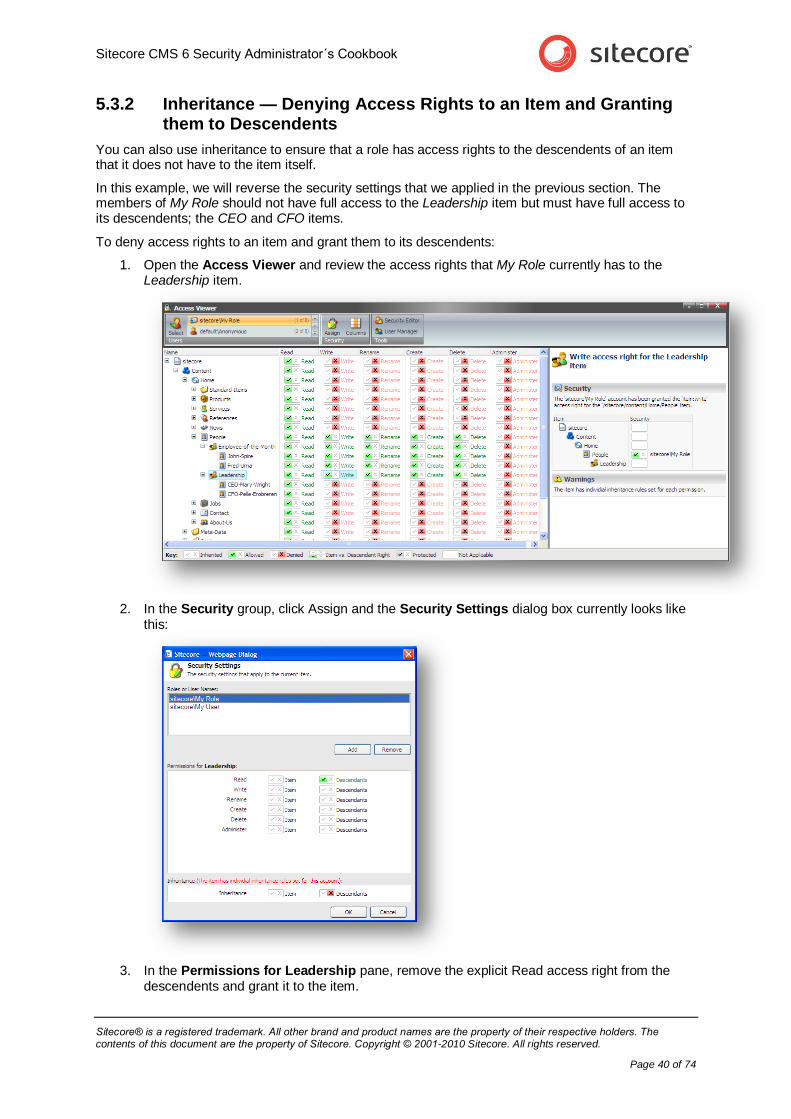
1. Open the Access Viewer and review the access rights that My Role currently has to the Leadership item.
2. In the Security group, click Assign and the Security Settings dialog box currently looks like this:
3. In the Permissions for Leadership pane, remove the explicit Read access right from the descendents and grant it to the item.
Sitecore CMS 6 Security Administrator´s Cookbook
Sitecore® is a registered trademark. All other brand and product names are the property of their respective holders. The contents of this document are the property of Sitecore. Copyright © 2001-2010 Sitecore. All rights reserved.
Page 41 of 74
This ensures that My Role can read the item.
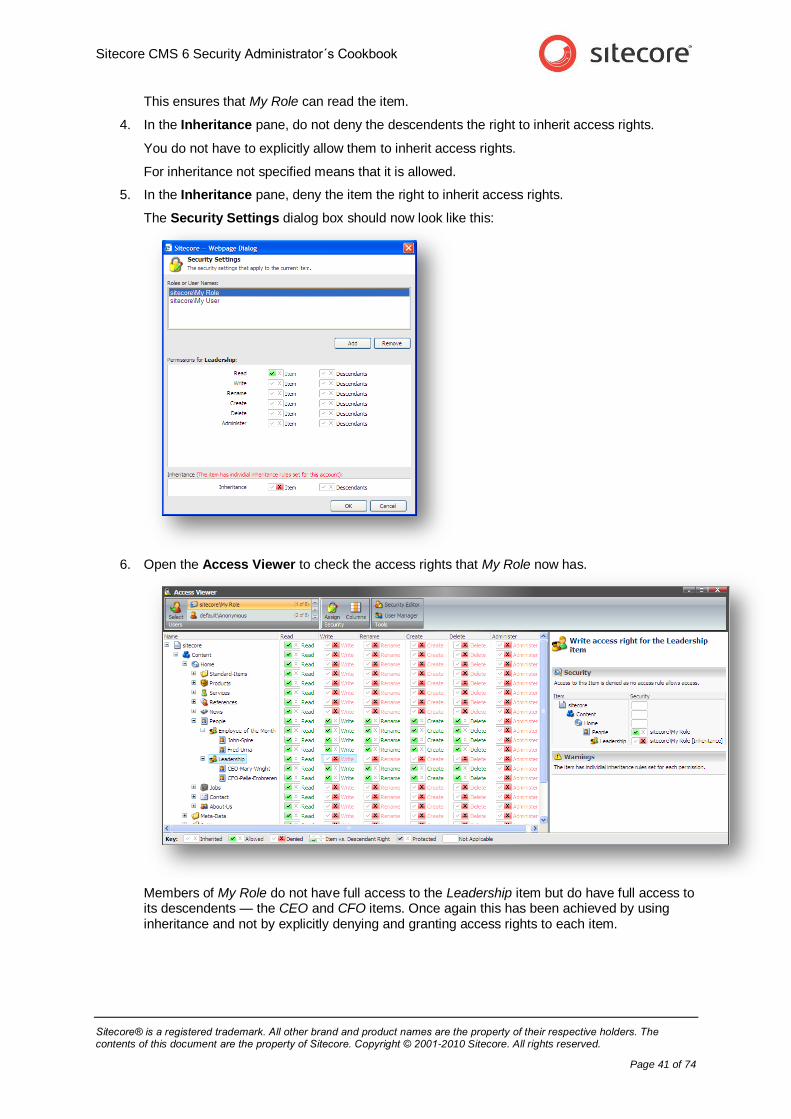
4. In the Inheritance pane, do not deny the descendents the right to inherit access rights.
You do not have to explicitly allow them to inherit access rights.
For inheritance not specified means that it is allowed.
5. In the Inheritance pane, deny the item the right to inherit access rights.
The Security Settings dialog box should now look like this:
6. Open the Access Viewer to check the access rights that My Role now has.
Members of My Role do not have full access to the Leadership item but do have full access to its descendents — the CEO and CFO items. Once again this has been achieved by using inheritance and not by explicitly denying and granting access rights to each item.
Sitecore CMS 6 Security Administrator´s Cookbook
Sitecore® is a registered trademark. All other brand and product names are the property of their respective holders. The contents of this document are the property of Sitecore. Copyright © 2001-2010 Sitecore. All rights reserved.
Page 42 of 74
Access Rights Control Functionality
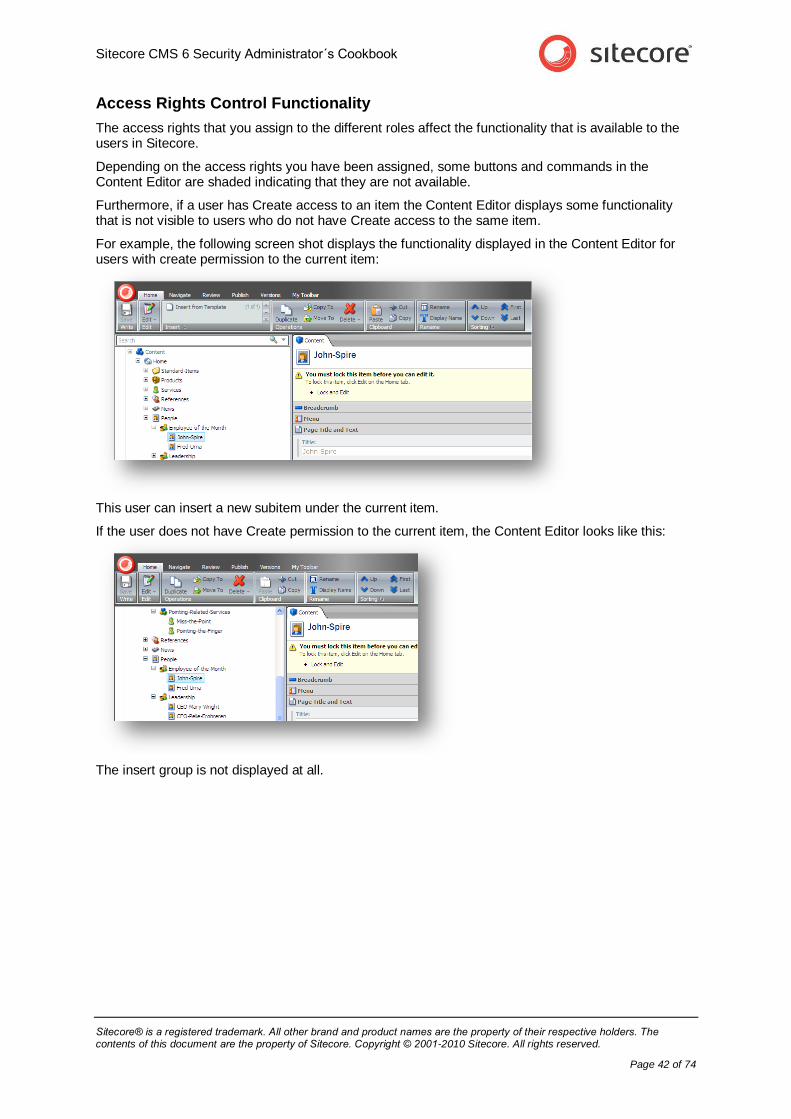
The access rights that you assign to the different roles affect the functionality that is available to the users in Sitecore.
Depending on the access rights you have been assigned, some buttons and commands in the Content Editor are shaded indicating that they are not available.
Furthermore, if a user has Create access to an item the Content Editor displays some functionality that is not visible to users who do not have Create access to the same item.
For example, the following screen shot displays the functionality displayed in the Content Editor for users with create permission to the current item:
This user can insert a new subitem under the current item.
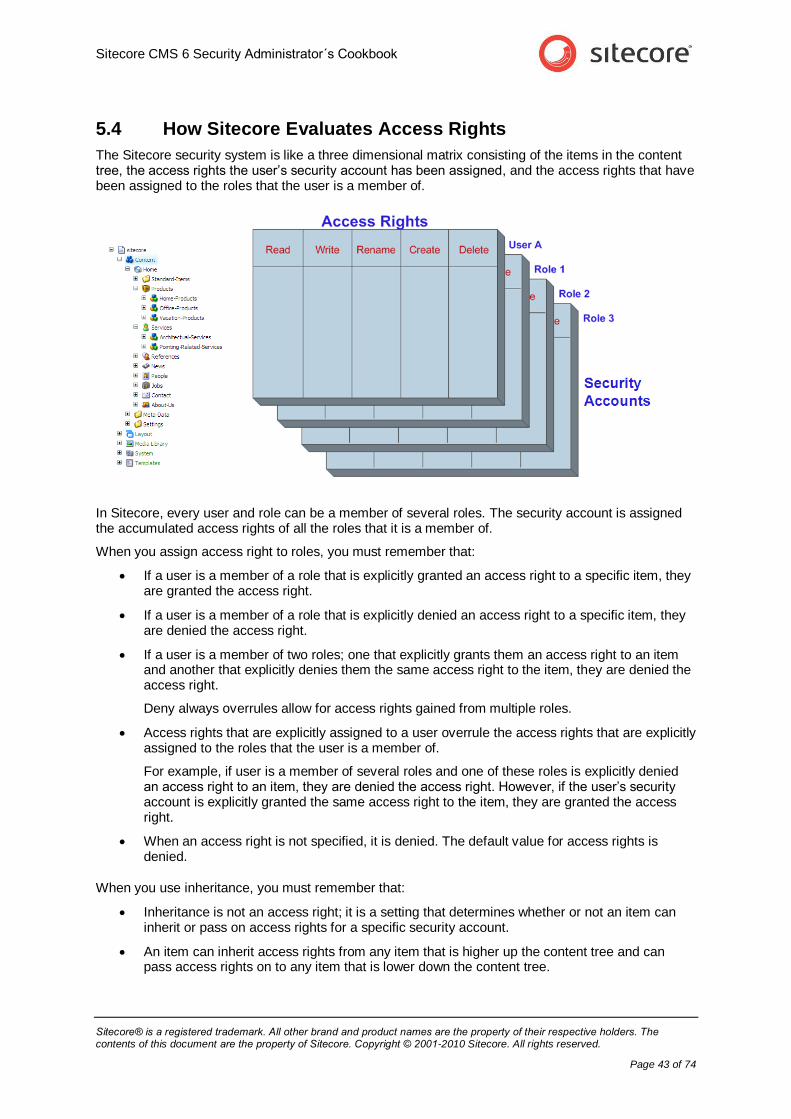
If the user does not have Create permission to the current item, the Content Editor looks like this:
The insert group is not displayed at all.
Sitecore CMS 6 Security Administrator´s Cookbook
Sitecore® is a registered trademark. All other brand and product names are the property of their respective holders. The contents of this document are the property of Sitecore. Copyright © 2001-2010 Sitecore. All rights reserved.
Page 43 of 74
5.4 How Sitecore Evaluates Access Rights
The Sitecore security system is like a three dimensional matrix consisting of the items in the content tree, the access rights the user’s security account has been assigned, and the access rights that have been assigned to the roles that the user is a member of.
In Sitecore, every user and role can be a member of several roles. The security account is assigned the accumulated access rights of all the roles that it is a member of.
When you assign access right to roles, you must remember that:
If a user is a member of a role that is explicitly granted an access right to a specific item, they are granted the access right.
If a user is a member of a role that is explicitly denied an access right to a specific item, they are denied the access right.
If a user is a member of two roles; one that explicitly grants them an access right to an item and another that explicitly denies them the same access right to the item, they are denied the access right.
Deny always overrules allow for access rights gained from multiple roles.
Access rights that are explicitly assigned to a user overrule the access rights that are explicitly assigned to the roles that the user is a member of.
For example, if user is a member of several roles and one of these roles is explicitly denied an access right to an item, they are denied the access right. However, if the user’s security account is explicitly granted the same access right to the item, they are granted the access right.
When an access right is not specified, it is denied. The default value for access rights is denied.
When you use inheritance, you must remember that:
Inheritance is not an access right; it is a setting that determines whether or not an item can inherit or pass on access rights for a specific security account.
An item can inherit access rights from any item that is higher up the content tree and can pass access rights on to any item that is lower down the content tree.
Sitecore CMS 6 Security Administrator´s Cookbook
Sitecore® is a registered trademark. All other brand and product names are the property of their respective holders. The contents of this document are the property of Sitecore. Copyright © 2001-2010 Sitecore. All rights reserved.
Page 44 of 74
When inheritance is not specified, it is allowed. The default value for inheritance is allowed.
If a user is a member of two roles; one that allows them to inherit an access right to an item and another that does not allow them to inherit the same access right to the item, they are denied the access right.
Access rights that are explicitly granted to one role overrule the inheritance settings specified for another role.
For example, if a user is a member of two roles; one that does not allow them to inherit an access right to an item and another that explicitly grants them the same access right, they are granted the access right.
The inheritance settings specified for the user’s security account, behave the same way as the other inheritance settings.
For example, if a user is a member of a role that does not allow them to inherit an access right to an item and the user’s security account does allow them to inherit the same access right to the item; they are denied the access right.
If a user is a member of a role that allows them to inherit an access right to an item and the user’s security account does not allow them to inherit the same access right to the item, they are denied the access right.
If the user’s security account explicitly assigns an access right to the descendents of an item and one of the roles that the user is a member of denies this access right to a descendent item, the access right is denied to the descendent item.
If the user’s security account explicitly assigns an access right to the descendents of an item and one of the roles that the user is a member explicitly denies the same access right to the descendents of the item, the access right is granted to the descendent item.
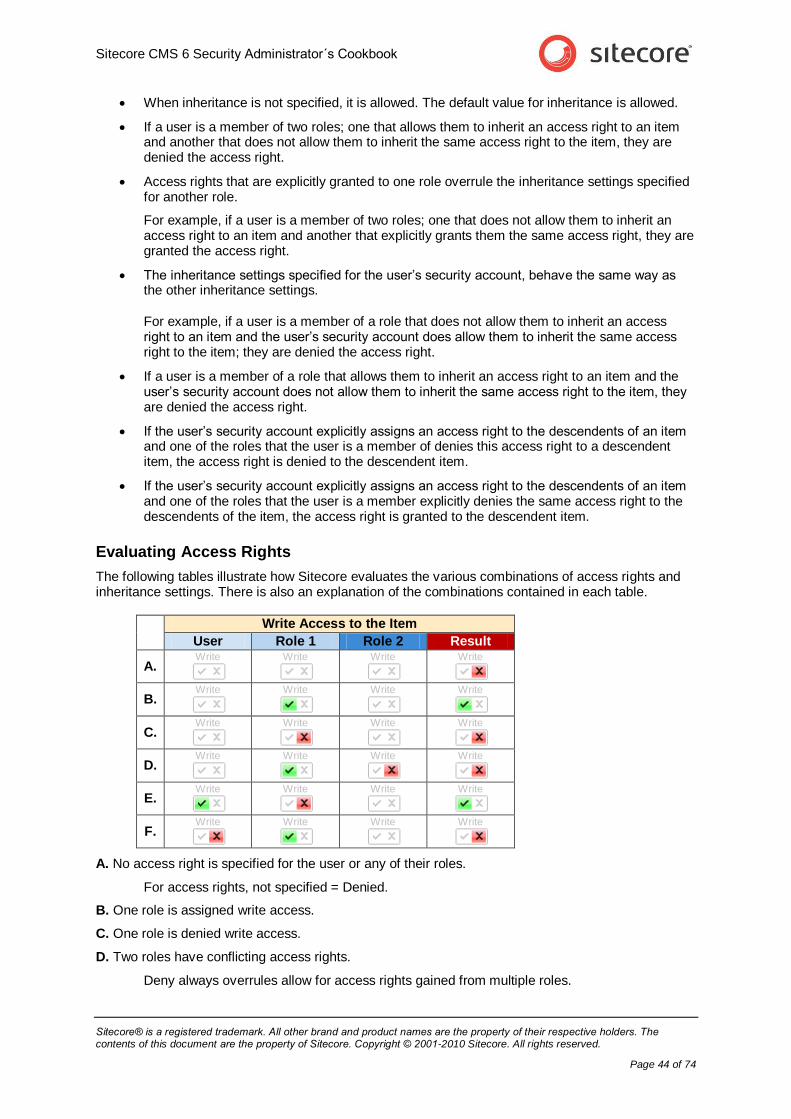
Evaluating Access Rights
The following tables illustrate how Sitecore evaluates the various combinations of access rights and inheritance settings. There is also an explanation of the combinations contained in each table.
Write Access to the Item
User Role 1 Role 2 Result
A. Write
Write
Write
Write
B. Write
Write
Write
Write
C. Write
Write
Write
Write
D. Write
Write
Write
Write
E. Write
Write
Write
Write
F. Write
Write
Write
Write
A. No access right is specified for the user or any of their roles.
For access rights, not specified = Denied.
B. One role is assigned write access.
C. One role is denied write access.
D. Two roles have conflicting access rights.
Deny always overrules allow for access rights gained from multiple roles.

Sitecore CMS 6 Security Administrator´s Cookbook
Sitecore® is a registered trademark. All other brand and product names are the property of their respective holders. The contents of this document are the property of Sitecore. Copyright © 2001-2010 Sitecore. All rights reserved.
Page 45 of 74
E. One role is denied write access and the user is granted write access.
F. One role is assigned write access and the user is denied write access.
Access rights that are explicitly assigned to a user’s security account overrule the explicit access rights assigned to the roles that the user is a member of.
Evaluating Inheritance Settings
Parent Item Child Item
Result Role 3 User Role 1 Role 2
Item Descendents Item Inheritance Item Inheritance Item Inheritance
A. Write
Write
Write
Inheritance
Write
Inheritance
Write
Inheritance
Write
B. Write
Write
Write
Inheritance
Write
Inheritance
Write
Inheritance
Write
C. Write
Write
Write
Inheritance
Write
Inheritance
Write
Inheritance
Write
D. Write
Write
Write
Inheritance
Inheritance
Write
Inheritance
Inheritance
Write
E. Write
Write
Write
Inheritance
Write
Inheritance
Write
Inheritance
Write
F. Write
Write
Write
Inheritance
Write
Inheritance
Write
Inheritance
Write
G. Write
Write
Write
Inheritance
Write
Inheritance
Write
Inheritance
Write
H. Write
Write
Write
Inheritance
Write
Inheritance
Write
Inheritance
Write
I. Write
Write
Write
Inheritance
Write
Inheritance
Write
Inheritance
Write
J. Write
Write
Write
Inheritance
Write
Inheritance
Write
Inheritance
Write
K. Write
Write
Write
Inheritance
Write
Inheritance
Write
Inheritance
Write
L. Write
Write
Write
Inheritance
Write
Inheritance
Write
Inheritance
Write
One of the roles that the user is a member of gives them write access to the descendents of the Parent Item.
The user’s security account and the roles they are a member of can all have different inheritance settings to the Child Item. They can also have access rights set on the Child Item.
A. No inheritance settings are set on the child item.
For inheritance, not specified = Allowed.
B. One of the roles allows the child item to inherit access rights.
C. One of the roles does not allow the child item to inherit access rights.
D. One of the roles allows the child item to inherit access rights and another role does not.
E. One of the roles allows the child item to inherit access rights and another role denies this access right to the item.
F. One of the roles does not allow the child item to inherit access rights and another role grants the access right to the item.
Sitecore CMS 6 Security Administrator´s Cookbook
Sitecore® is a registered trademark. All other brand and product names are the property of their respective holders. The contents of this document are the property of Sitecore. Copyright © 2001-2010 Sitecore. All rights reserved.
Page 46 of 74
Access rights explicitly granted to an item overrule inheritance settings.
G. One of the roles allows the child item to inherit access rights and the user’s security account does not allow the child item to inherit access rights.
H. One of the roles does not allow the child item to inherit access rights and the user’s security account does.
The inheritance settings on the user’s account work the same as the inheritance settings on roles.
I. The user’s security account allows the child item to inherit access rights and one of the roles denies this access right to the item.
J. The user’s account does not allow the child item to inherit access rights and one of the roles grants this access right to the item.
Once again, access rights explicitly granted to an item overrule inheritance settings.
K. The user’s security account denies this access right and one of the roles allows the child item to inherit access rights.
L. The user’s security account grants this access right and one of the roles does not allow the child item to inherit access rights.
Yet again, access rights explicitly granted to an item overrule inheritance settings.
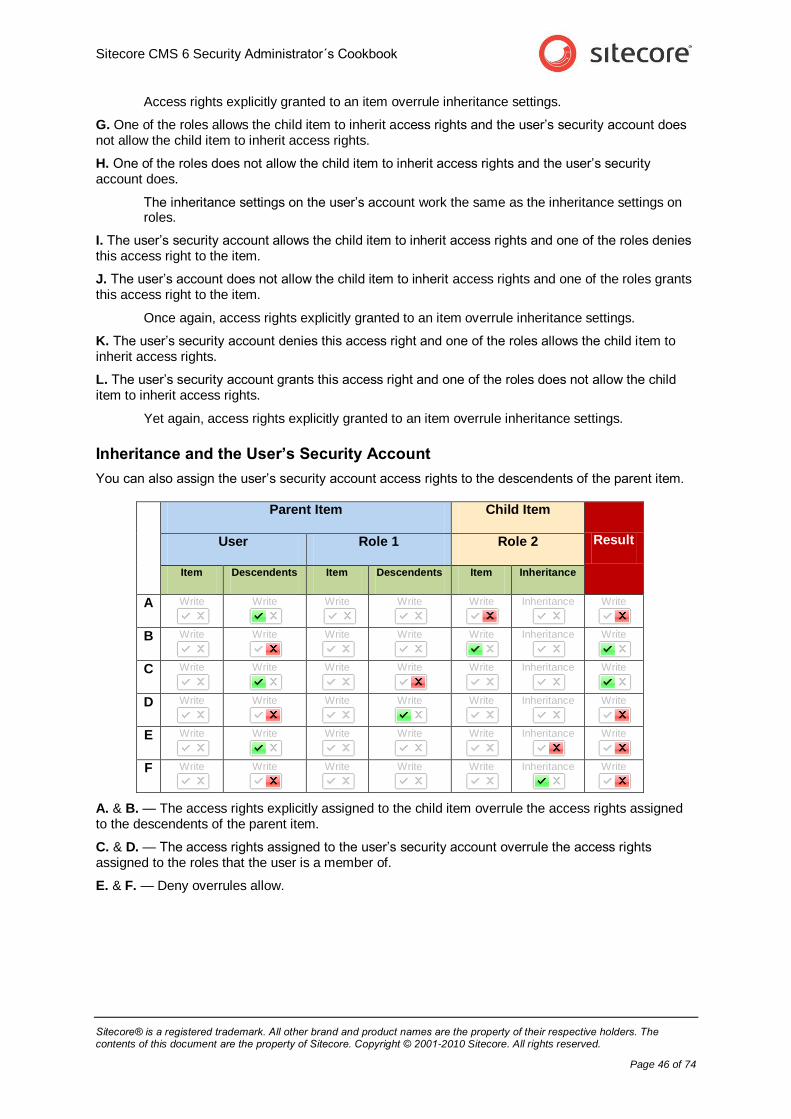
Inheritance and the User’s Security Account
You can also assign the user’s security account access rights to the descendents of the parent item.
Parent Item Child Item
Result User Role 1 Role 2
Item Descendents Item Descendents Item Inheritance
A Write
Write
Write
Write
Write
Inheritance
Write
B Write
Write
Write
Write
Write
Inheritance
Write
C Write
Write
Write
Write
Write
Inheritance
Write
D Write
Write
Write
Write
Write
Inheritance
Write
E Write
Write
Write
Write
Write
Inheritance
Write
F Write
Write
Write
Write
Write
Inheritance
Write
A. & B. — The access rights explicitly assigned to the child item overrule the access rights assigned to the descendents of the parent item.
C. & D. — The access rights assigned to the user’s security account overrule the access rights assigned to the roles that the user is a member of.
E. & F. — Deny overrules allow.
Sitecore CMS 6 Security Administrator´s Cookbook
Sitecore® is a registered trademark. All other brand and product names are the property of their respective holders. The contents of this document are the property of Sitecore. Copyright © 2001-2010 Sitecore. All rights reserved.
Page 47 of 74
5.5 Analyzing the Security System
As a Security Administrator, you must keep track of all the security accounts that are created for your Web site. You must be able to find out which:
Access rights have been assigned to a security account.
Roles a user is a member of.
Security accounts are members of a role.
Roles a role is a member of.
Security accounts have access rights to a particular item.
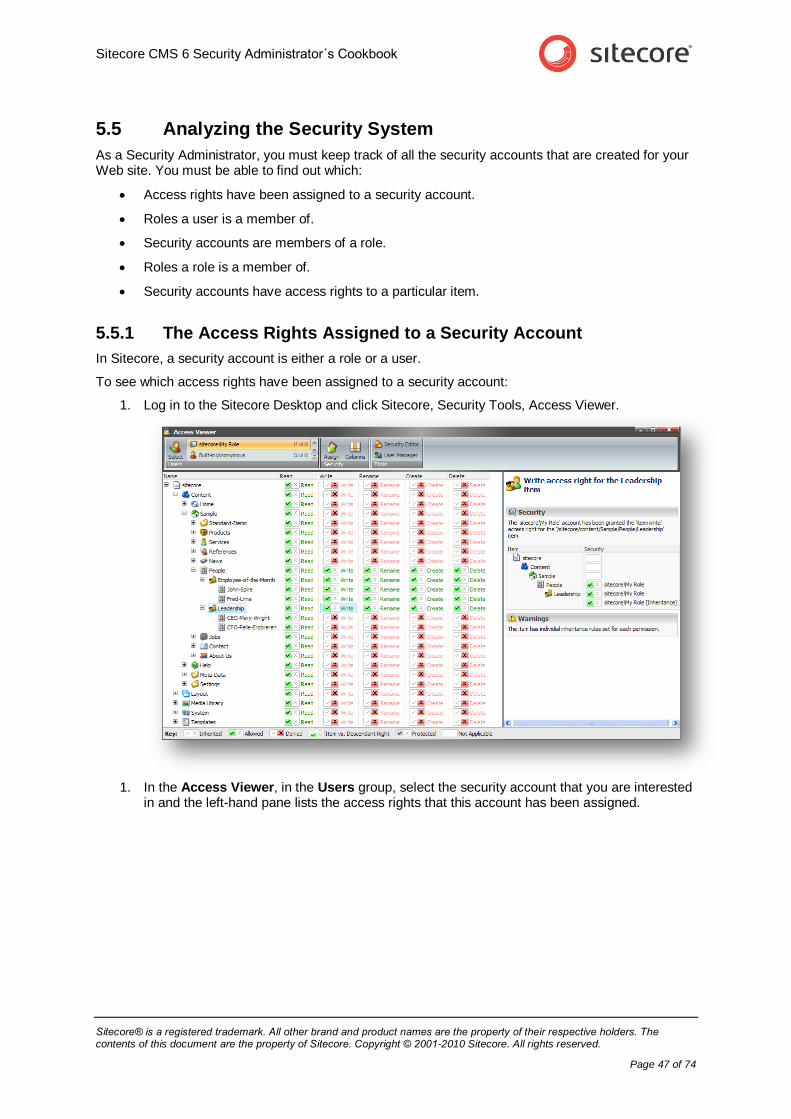
5.5.1 The Access Rights Assigned to a Security Account
In Sitecore, a security account is either a role or a user.
To see which access rights have been assigned to a security account:
1. Log in to the Sitecore Desktop and click Sitecore, Security Tools, Access Viewer.
1. In the Access Viewer, in the Users group, select the security account that you are interested in and the left-hand pane lists the access rights that this account has been assigned.
Sitecore CMS 6 Security Administrator´s Cookbook
Sitecore® is a registered trademark. All other brand and product names are the property of their respective holders. The contents of this document are the property of Sitecore. Copyright © 2001-2010 Sitecore. All rights reserved.
Page 48 of 74
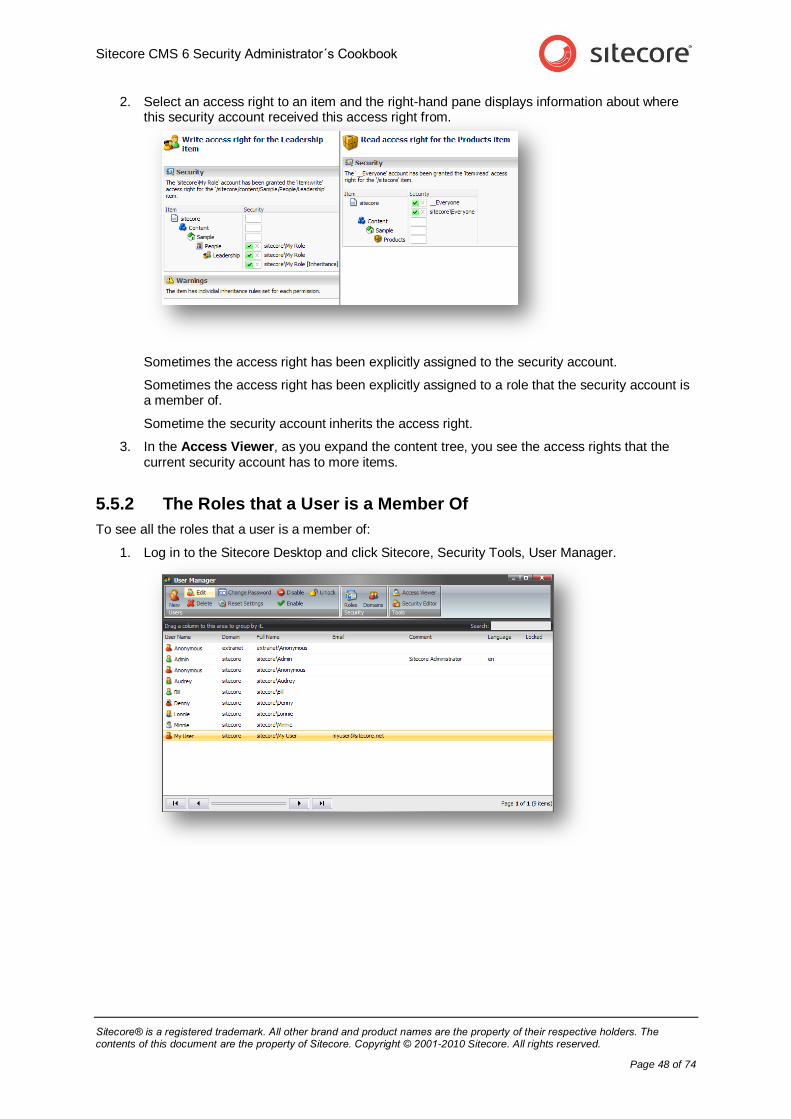
2. Select an access right to an item and the right-hand pane displays information about where this security account received this access right from.
Sometimes the access right has been explicitly assigned to the security account.
Sometimes the access right has been explicitly assigned to a role that the security account is a member of.
Sometime the security account inherits the access right.
3. In the Access Viewer, as you expand the content tree, you see the access rights that the current security account has to more items.
5.5.2 The Roles that a User is a Member Of
To see all the roles that a user is a member of:
1. Log in to the Sitecore Desktop and click Sitecore, Security Tools, User Manager.
Sitecore CMS 6 Security Administrator´s Cookbook
Sitecore® is a registered trademark. All other brand and product names are the property of their respective holders. The contents of this document are the property of Sitecore. Copyright © 2001-2010 Sitecore. All rights reserved.
Page 49 of 74
2. In the User Manager, select the user you are interested in and in the Users group, click Edit.
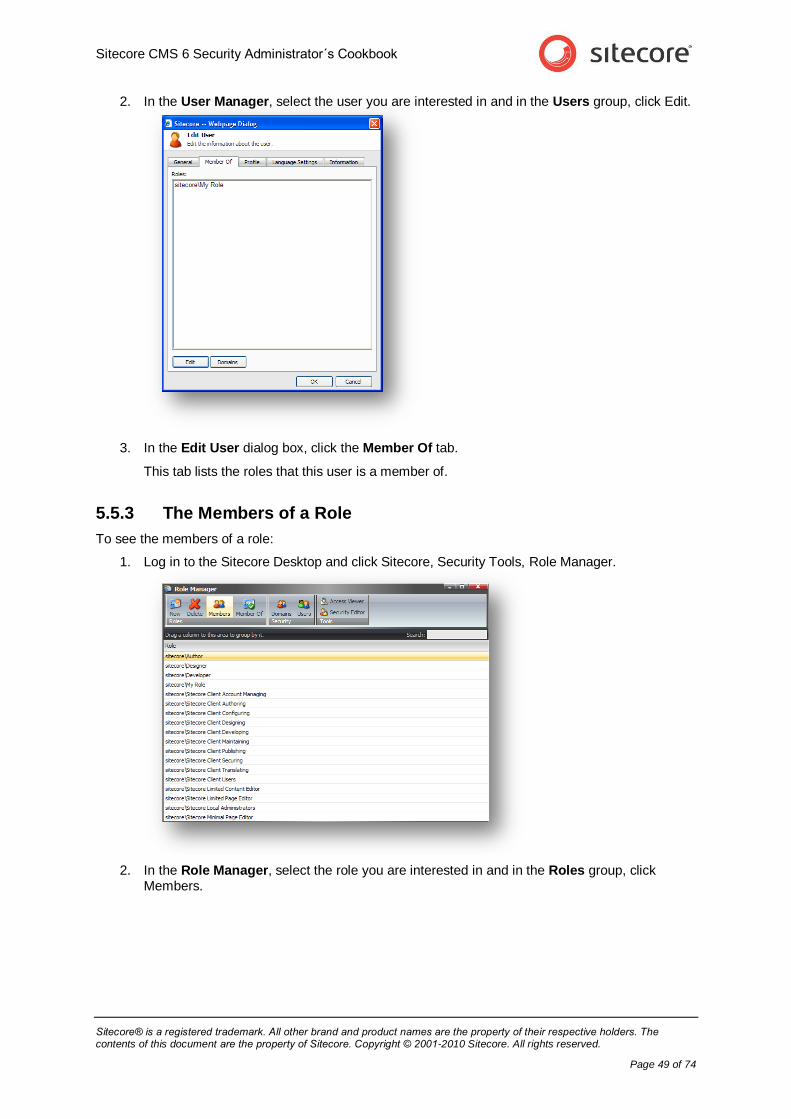
3. In the Edit User dialog box, click the Member Of tab.
This tab lists the roles that this user is a member of.
5.5.3 The Members of a Role
To see the members of a role:
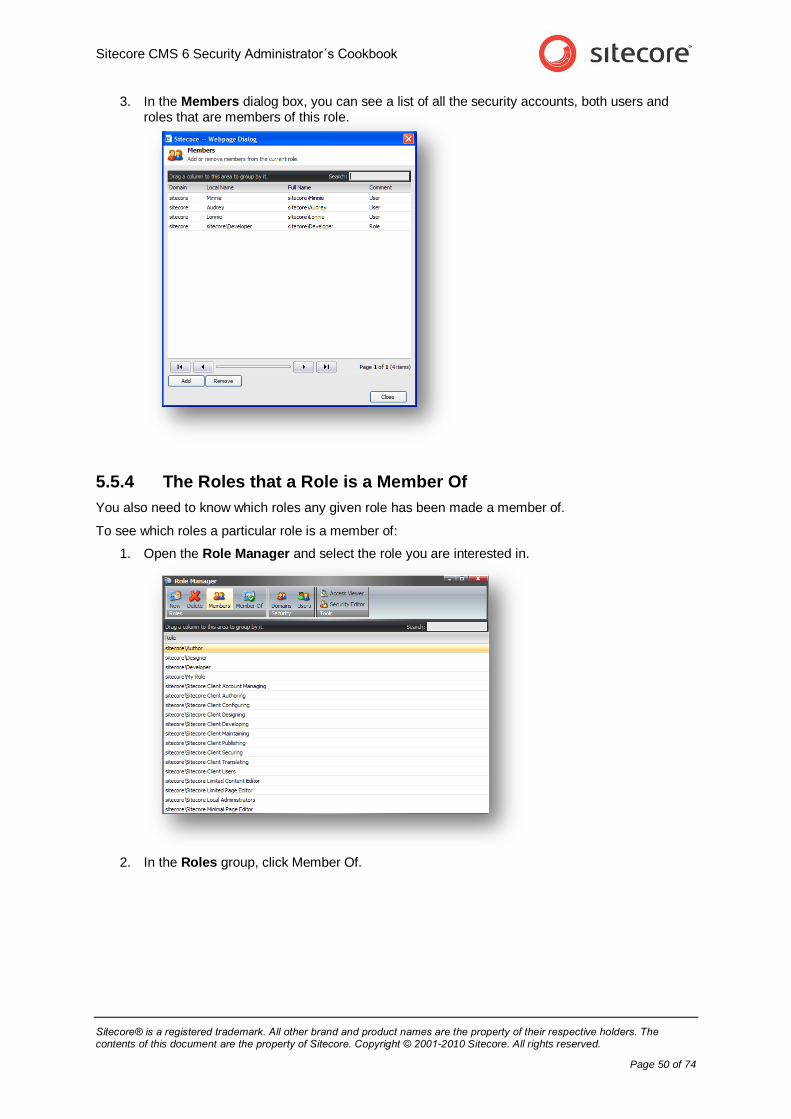
1. Log in to the Sitecore Desktop and click Sitecore, Security Tools, Role Manager.
2. In the Role Manager, select the role you are interested in and in the Roles group, click Members.
Sitecore CMS 6 Security Administrator´s Cookbook
Sitecore® is a registered trademark. All other brand and product names are the property of their respective holders. The contents of this document are the property of Sitecore. Copyright © 2001-2010 Sitecore. All rights reserved.
Page 50 of 74
3. In the Members dialog box, you can see a list of all the security accounts, both users and roles that are members of this role.
5.5.4 The Roles that a Role is a Member Of
You also need to know which roles any given role has been made a member of.
To see which roles a particular role is a member of:
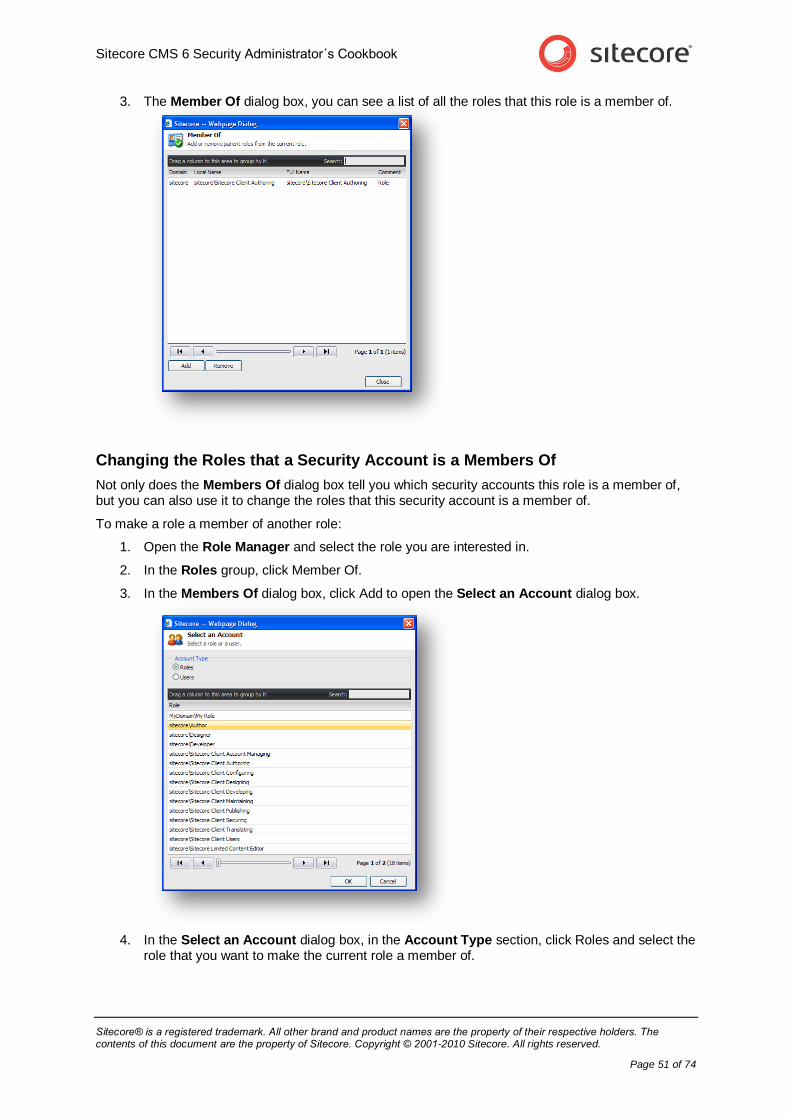
1. Open the Role Manager and select the role you are interested in.
2. In the Roles group, click Member Of.
Sitecore CMS 6 Security Administrator´s Cookbook
Sitecore® is a registered trademark. All other brand and product names are the property of their respective holders. The contents of this document are the property of Sitecore. Copyright © 2001-2010 Sitecore. All rights reserved.
Page 51 of 74
3. The Member Of dialog box, you can see a list of all the roles that this role is a member of.
Changing the Roles that a Security Account is a Members Of
Not only does the Members Of dialog box tell you which security accounts this role is a member of, but you can also use it to change the roles that this security account is a member of.
To make a role a member of another role:
1. Open the Role Manager and select the role you are interested in.
2. In the Roles group, click Member Of.
3. In the Members Of dialog box, click Add to open the Select an Account dialog box.
4. In the Select an Account dialog box, in the Account Type section, click Roles and select the role that you want to make the current role a member of.
Sitecore CMS 6 Security Administrator´s Cookbook
Sitecore® is a registered trademark. All other brand and product names are the property of their respective holders. The contents of this document are the property of Sitecore. Copyright © 2001-2010 Sitecore. All rights reserved.
Page 52 of 74
To remove members from a role:
1. Open the Role Manager and select the role you are interested in.
2. In the Roles group, click Member Of.
3. In the Members Of dialog box, select the role that you want the current role to no longer be a member of.
4. Click Remove to remove the role from the list of roles that the current role is a member of.
5.5.5 The Security Accounts that have Access Rights to an Item
A security administrator must also be able to get an overview of the individual items and the security accounts that have access rights to them.
To see which security accounts have been assigned explicit access rights to an item:
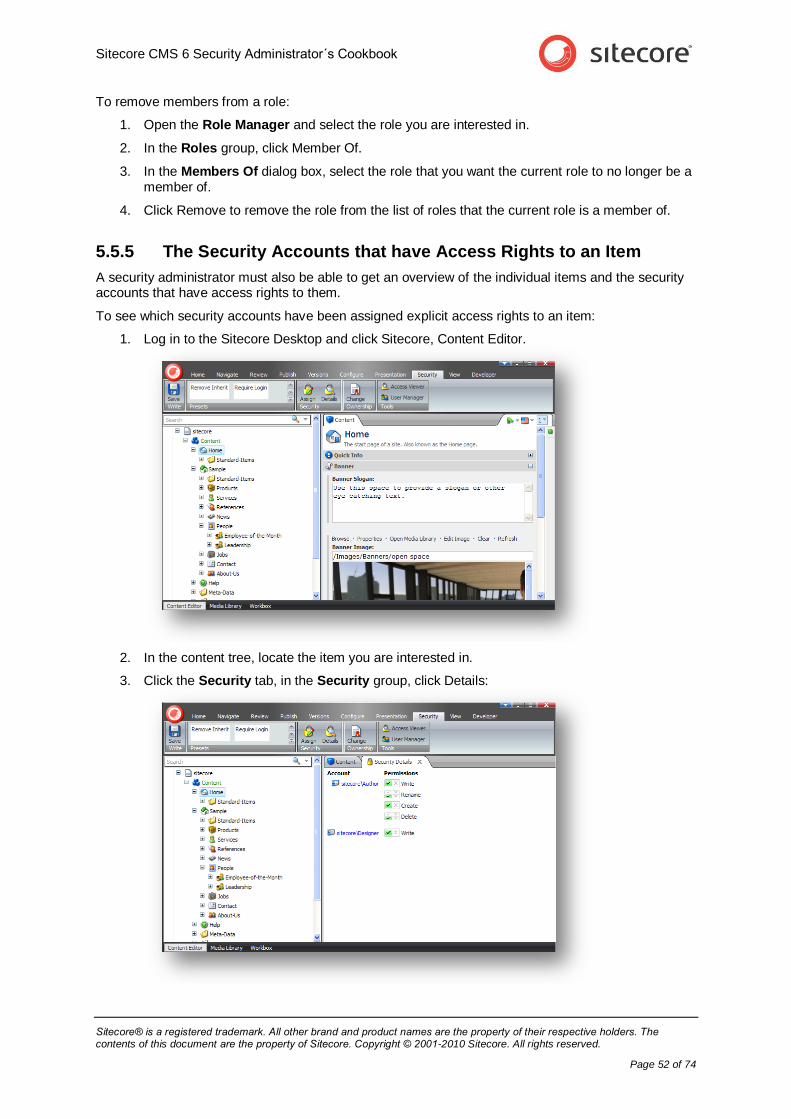
1. Log in to the Sitecore Desktop and click Sitecore, Content Editor.
2. In the content tree, locate the item you are interested in.
3. Click the Security tab, in the Security group, click Details:
Sitecore CMS 6 Security Administrator´s Cookbook
Sitecore® is a registered trademark. All other brand and product names are the property of their respective holders. The contents of this document are the property of Sitecore. Copyright © 2001-2010 Sitecore. All rights reserved.
Page 53 of 74
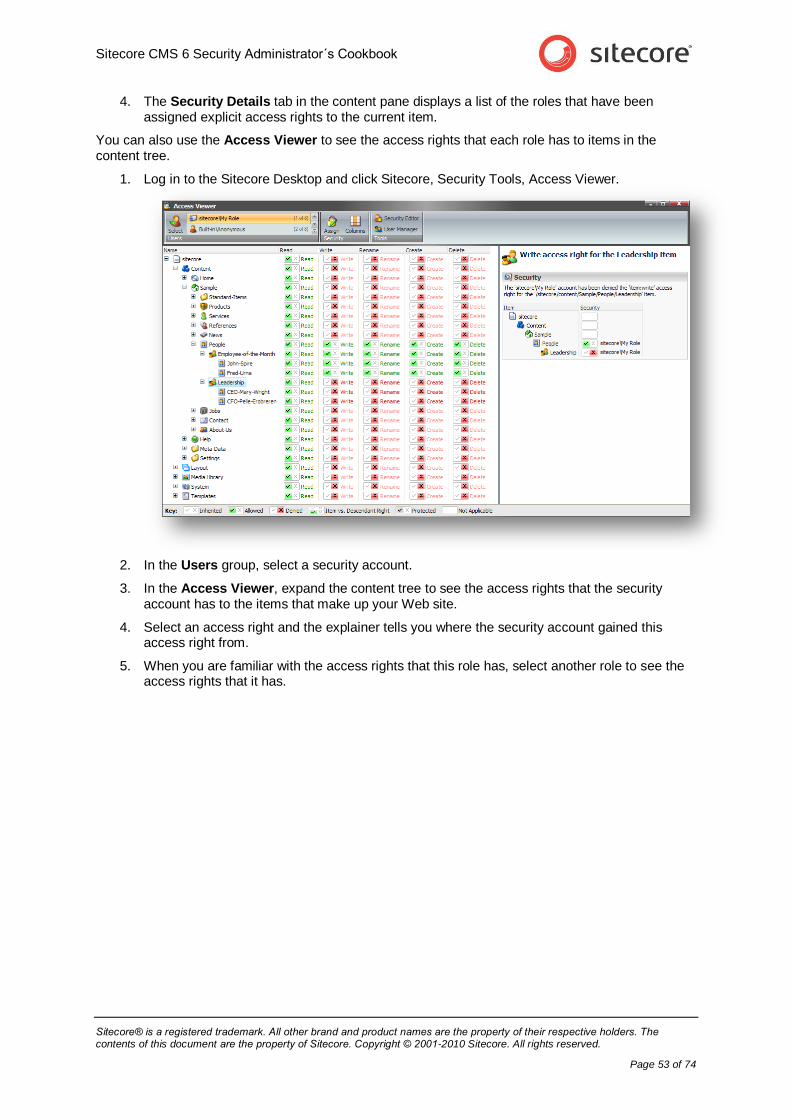
4. The Security Details tab in the content pane displays a list of the roles that have been assigned explicit access rights to the current item.
You can also use the Access Viewer to see the access rights that each role has to items in the content tree.
1. Log in to the Sitecore Desktop and click Sitecore, Security Tools, Access Viewer.
2. In the Users group, select a security account.
3. In the Access Viewer, expand the content tree to see the access rights that the security account has to the items that make up your Web site.
4. Select an access right and the explainer tells you where the security account gained this access right from.
5. When you are familiar with the access rights that this role has, select another role to see the access rights that it has.
Sitecore CMS 6 Security Administrator´s Cookbook
Sitecore® is a registered trademark. All other brand and product names are the property of their respective holders. The contents of this document are the property of Sitecore. Copyright © 2001-2010 Sitecore. All rights reserved.
Page 54 of 74
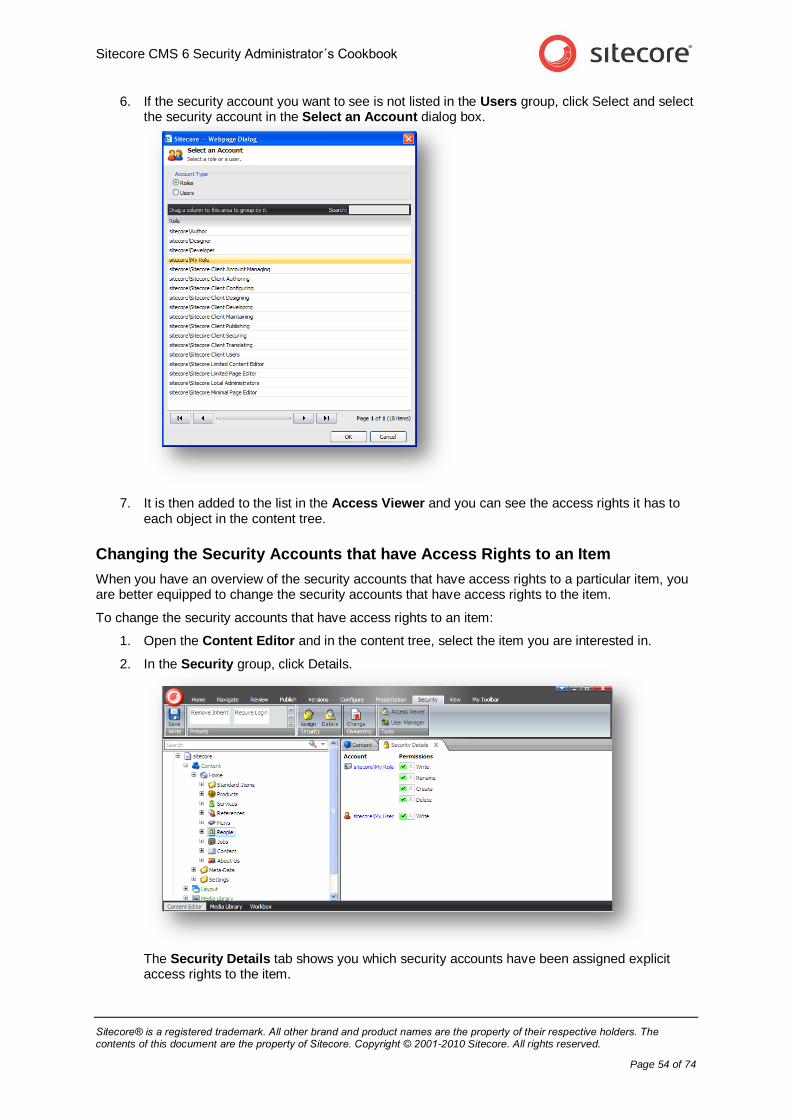
6. If the security account you want to see is not listed in the Users group, click Select and select the security account in the Select an Account dialog box.
7. It is then added to the list in the Access Viewer and you can see the access rights it has to each object in the content tree.
Changing the Security Accounts that have Access Rights to an Item
When you have an overview of the security accounts that have access rights to a particular item, you are better equipped to change the security accounts that have access rights to the item.
To change the security accounts that have access rights to an item:
1. Open the Content Editor and in the content tree, select the item you are interested in.
2. In the Security group, click Details.
The Security Details tab shows you which security accounts have been assigned explicit access rights to the item.
Sitecore CMS 6 Security Administrator´s Cookbook
Sitecore® is a registered trademark. All other brand and product names are the property of their respective holders. The contents of this document are the property of Sitecore. Copyright © 2001-2010 Sitecore. All rights reserved.
Page 55 of 74
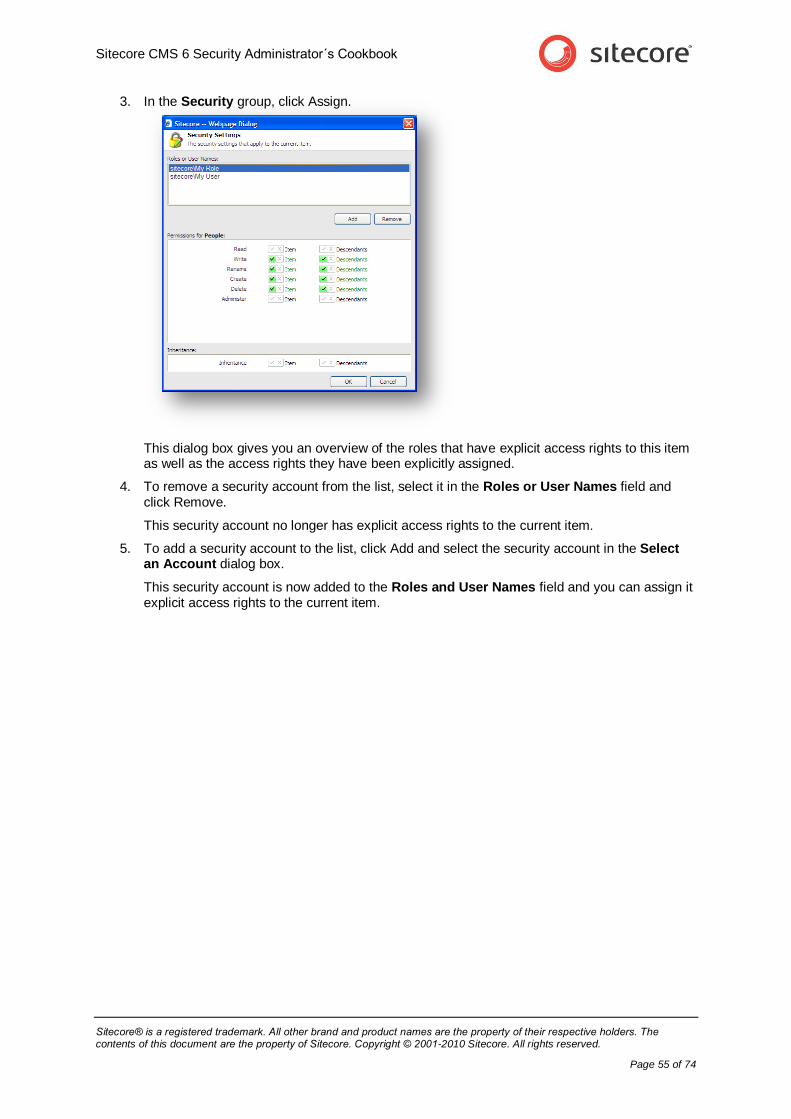
3. In the Security group, click Assign.
This dialog box gives you an overview of the roles that have explicit access rights to this item as well as the access rights they have been explicitly assigned.
4. To remove a security account from the list, select it in the Roles or User Names field and click Remove.
This security account no longer has explicit access rights to the current item.
5. To add a security account to the list, click Add and select the security account in the Select an Account dialog box.
This security account is now added to the Roles and User Names field and you can assign it explicit access rights to the current item.

Sitecore CMS 6 Security Administrator´s Cookbook
Sitecore® is a registered trademark. All other brand and product names are the property of their respective holders. The contents of this document are the property of Sitecore. Copyright © 2001-2010 Sitecore. All rights reserved.
Page 56 of 74
5.6 Deleting Security Accounts
In Sitecore, a security account is identified by its name — domain name\account name. Two security accounts therefore cannot have the same name.
As a security administrator, you will have to remove users and roles from the security system as your company changes and grows.
When you delete a security account, you must be aware that:
Sitecore removes the account definitions.
Sitecore does not remove the access rights associated with the accounts.
The access rights are still stored on the individual items in the content tree.
This means that if you create a new security account with the same name as one that you deleted earlier, the new security account is granted the same access rights as the old security account.
Furthermore, when you delete a role, Sitecore:
Removes membership of this role from all the users who were members of the role.
Removes all the access rights associated with this role from all the users who were members of the role.
If you create a new role with the same name as the role you deleted:
The new role is granted all the access rights that the old role possessed.
The new role does not have any members.
When you delete a user, Sitecore:
Sitecore removes this user from all the roles that they are a member of.
If you create a new user with the same name as the user you deleted:
The new user is granted all the access rights that were assigned to the old user’s security account.
The new user does not automatically become a member of any roles.
This is one of the reasons that we recommend only assigning access rights to roles. If you do not assign access rights to a user’s security account, you minimize the risk of inadvertently granting them individual access rights to items in the content tree. You can concentrate on managing the access rights of the roles that they are members of.

Sitecore CMS 6 Security Administrator´s Cookbook
Sitecore® is a registered trademark. All other brand and product names are the property of their respective holders. The contents of this document are the property of Sitecore. Copyright © 2001-2010 Sitecore. All rights reserved.
Page 57 of 74
Chapter 6
Domains
This chapter describes how Sitecore uses domains. There is also a description of how to add security accounts to a domain.
This chapter contains the following sections:
The Domain Manager

Sitecore CMS 6 Security Administrator´s Cookbook
Sitecore® is a registered trademark. All other brand and product names are the property of their respective holders. The contents of this document are the property of Sitecore. Copyright © 2001-2010 Sitecore. All rights reserved.
Page 58 of 74
6.1 The Domain Manager
Domains are used to simplify the process of managing multiple Web sites within a single system. Domains are also security constructs that allow you to create different users and roles for each domain.
Sitecore contains the following domains by default:
Extranet — this domain contains the users that correspond to the visitors to the Web site. It also contains the customized roles that manage read access to the content of the Web site.
Sitecore — this domain contains all the users who can access the Sitecore clients and the Sitecore Client roles that influence the client features that are available to users. It also contains the customized roles that control the access that users have to content items.
Members of the Sitecore domain can access the Sitecore client tools and edit the Web site — if they have the appropriate access rights.
If you are a member of the Extranet domain and are a member of the appropriate Sitecore roles (for example, Sitecore Client Authoring), you can access the Sitecore domain and use the client tools to edit the content of the Web site.
If you are a member of the Sitecore domain, you may be able to access the Extranet domain depending on how the developers and the security architect have designed the domain and the login page.
Furthermore, there are two types of domain — global domains and locally managed domains. In a locally managed domain, the users can only see that specific domain and not the other domains in the system. In a global domain users may be able to see all the domains in the system depending on how the security architect has configured the system.
You can create extra domains, for example, for the Web site of another company or a subsidiary.
Creating and managing domains is a task for a security architect. When you create a domain, you must create a database for it and register both the domain and the database in the Web.config file.
6.1.1 Creating a Domain
As a security administrator, you may occasionally have to create a domain.
To create a domain:
1. Log in to the Sitecore Desktop and click Sitecore, Security Tools, Domain Manager.
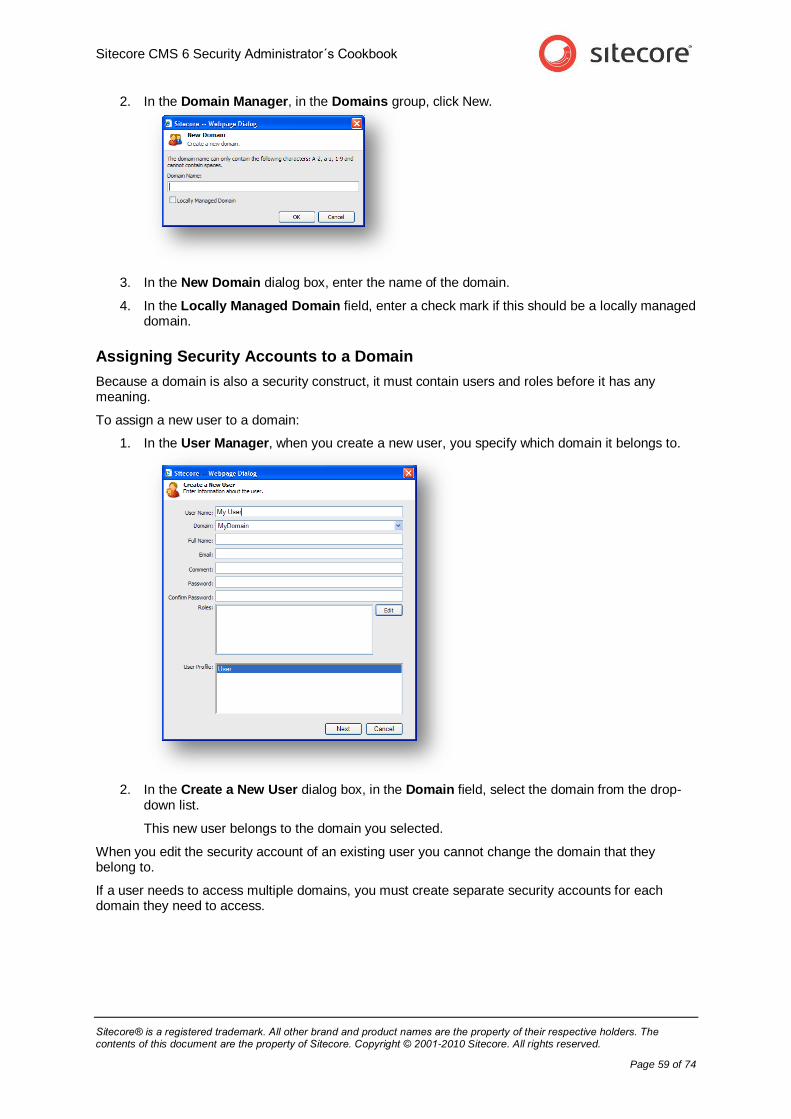
Sitecore CMS 6 Security Administrator´s Cookbook
Sitecore® is a registered trademark. All other brand and product names are the property of their respective holders. The contents of this document are the property of Sitecore. Copyright © 2001-2010 Sitecore. All rights reserved.
Page 59 of 74
2. In the Domain Manager, in the Domains group, click New.
3. In the New Domain dialog box, enter the name of the domain.
4. In the Locally Managed Domain field, enter a check mark if this should be a locally managed domain.
Assigning Security Accounts to a Domain
Because a domain is also a security construct, it must contain users and roles before it has any meaning.
To assign a new user to a domain:
1. In the User Manager, when you create a new user, you specify which domain it belongs to.
2. In the Create a New User dialog box, in the Domain field, select the domain from the drop-down list.
This new user belongs to the domain you selected.
When you edit the security account of an existing user you cannot change the domain that they belong to.
If a user needs to access multiple domains, you must create separate security accounts for each domain they need to access.

Sitecore CMS 6 Security Administrator´s Cookbook
Sitecore® is a registered trademark. All other brand and product names are the property of their respective holders. The contents of this document are the property of Sitecore. Copyright © 2001-2010 Sitecore. All rights reserved.
Page 60 of 74
To assign a new role to a domain:
1. In the Role Manager, when you create a new role, you specify which domain it belongs to.
2. In the New Role dialog box, in the Domain field, select the domain from the drop-down list.
This new role belongs to the domain you selected.
You cannot edit an existing role and change the domain that it belongs to.
6.1.2 Editing a Domain
You can also edit a domain. When you edit a domain, the only setting you can change is whether or not it is a locally managed domain.
To edit a domain:
1. Log in to the Sitecore Desktop and click Sitecore, Security Tools, Domain Manager.
2. In the Domain Manager, select the domain you want to edit and in the Domains group, click Edit.
3. In the Edit Domain dialog box, select or clear the Locally Managed Domain field.
In a locally managed domain, the users and roles are domain specific and the users can only see the items in the domain that they belong to and not the other domains in the system.

Sitecore CMS 6 Security Administrator´s Cookbook
Sitecore® is a registered trademark. All other brand and product names are the property of their respective holders. The contents of this document are the property of Sitecore. Copyright © 2001-2010 Sitecore. All rights reserved.
Page 61 of 74
6.1.3 Deleting a Domain
You can also delete a domain when you no longer need it.
To delete a domain:
1. Log in to the Sitecore Desktop and click Sitecore, Security Tools, Domain Manager.
2. In the Domain Manager, select the domain you want to edit and in the Domains group, click Delete.
When you delete a domain, the users and roles that belong to the domain are not deleted. However, these security accounts are useless as the domain no longer exists.

Sitecore CMS 6 Security Administrator´s Cookbook
Sitecore® is a registered trademark. All other brand and product names are the property of their respective holders. The contents of this document are the property of Sitecore. Copyright © 2001-2010 Sitecore. All rights reserved.
Page 62 of 74
Chapter 7
Security Accounts & Passwords
Security administrators can spend a considerable amount of time managing the security accounts that they have created. The tasks they must perform include editing security accounts, managing passwords and instructing user’s in their corporate password policy.
This chapter contains the following sections:
Managing a User’s Security Account
Specifying Security Settings
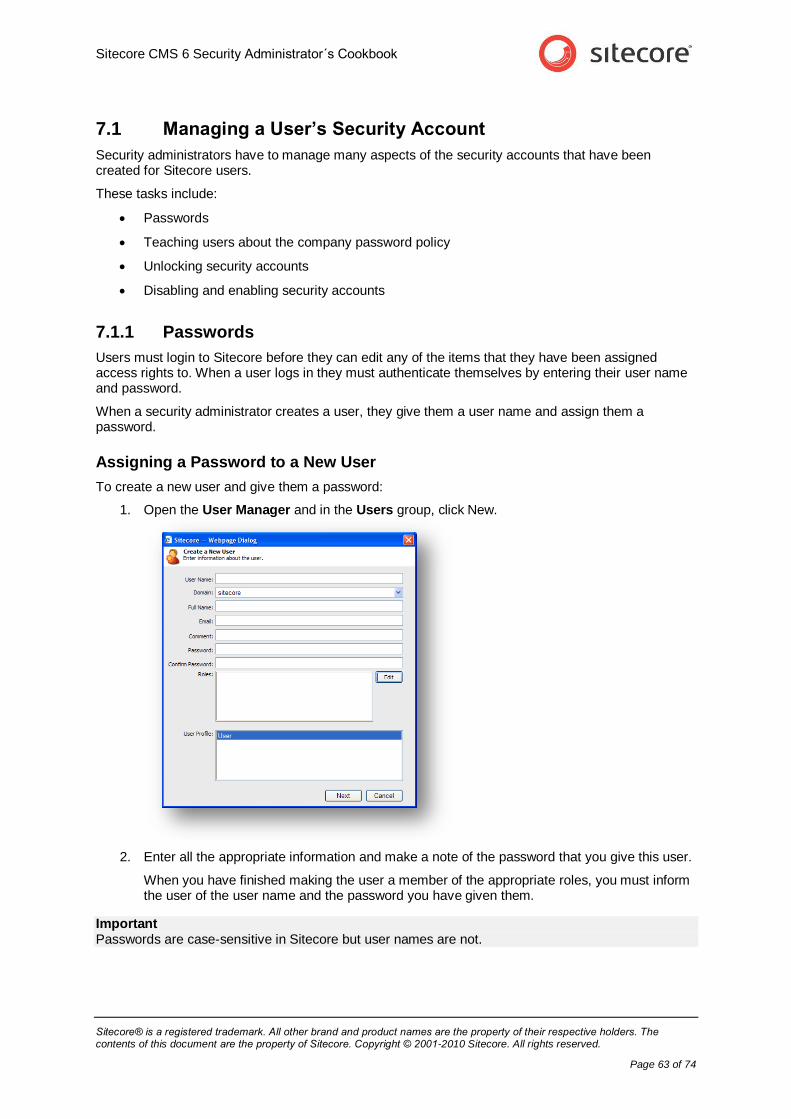
Sitecore CMS 6 Security Administrator´s Cookbook
Sitecore® is a registered trademark. All other brand and product names are the property of their respective holders. The contents of this document are the property of Sitecore. Copyright © 2001-2010 Sitecore. All rights reserved.
Page 63 of 74
7.1 Managing a User’s Security Account
Security administrators have to manage many aspects of the security accounts that have been created for Sitecore users.
These tasks include:
Passwords
Teaching users about the company password policy
Unlocking security accounts
Disabling and enabling security accounts
7.1.1 Passwords
Users must login to Sitecore before they can edit any of the items that they have been assigned access rights to. When a user logs in they must authenticate themselves by entering their user name and password.
When a security administrator creates a user, they give them a user name and assign them a password.
Assigning a Password to a New User
To create a new user and give them a password:
1. Open the User Manager and in the Users group, click New.
2. Enter all the appropriate information and make a note of the password that you give this user.
When you have finished making the user a member of the appropriate roles, you must inform the user of the user name and the password you have given them.
Important Passwords are case-sensitive in Sitecore but user names are not.

Sitecore CMS 6 Security Administrator´s Cookbook
Sitecore® is a registered trademark. All other brand and product names are the property of their respective holders. The contents of this document are the property of Sitecore. Copyright © 2001-2010 Sitecore. All rights reserved.
Page 64 of 74
Changing Your Password
When the new user logs in to Sitecore, one of the first things they must do is change their password to one that they know and can remember. The user cannot change their user name.
The security administrator must therefore tell them how to change their password and inform them about any password policies that they must follow.
To change your password:
1. Open the Login page.
2. Click Change Password.
3. In the Change Your Password page, enter your user name, the password the security administrator has given you, and the new password you want to use.
This new password must conform to the password policy that has been defined by the security architect.
4. Click Change Password to change your password. You can now log in to Sitecore with your new password.
For more information about defining the password policy, see Specifying Security Settings on page 71.
Note If the user’s security account has been locked, they cannot change their password. If they try, a message is displayed telling them that at least one of the passwords that they entered is invalid. They can keep trying to change their password but will keep seeing the same message.
Alternatively, you can:
1. Log in to the Sitecore Desktop with the password you were given by the security administrator.
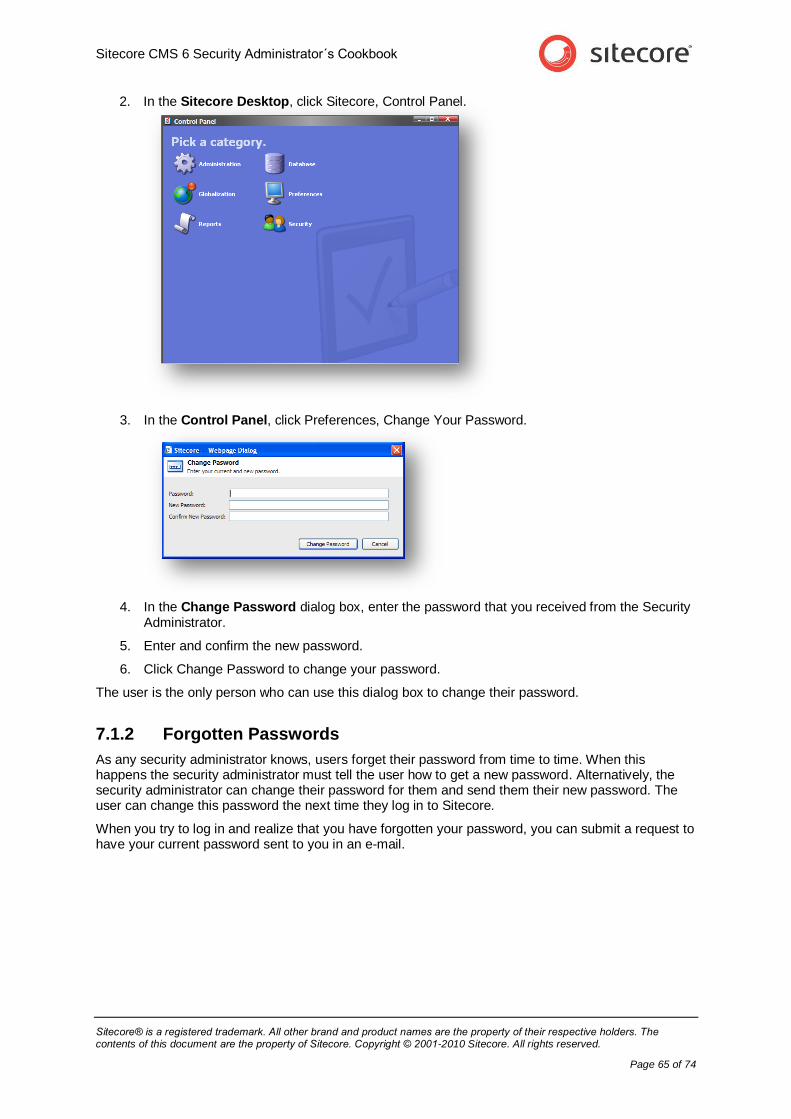
Sitecore CMS 6 Security Administrator´s Cookbook
Sitecore® is a registered trademark. All other brand and product names are the property of their respective holders. The contents of this document are the property of Sitecore. Copyright © 2001-2010 Sitecore. All rights reserved.
Page 65 of 74
2. In the Sitecore Desktop, click Sitecore, Control Panel.
3. In the Control Panel, click Preferences, Change Your Password.
4. In the Change Password dialog box, enter the password that you received from the Security Administrator.
5. Enter and confirm the new password.
6. Click Change Password to change your password.
The user is the only person who can use this dialog box to change their password.
7.1.2 Forgotten Passwords
As any security administrator knows, users forget their password from time to time. When this happens the security administrator must tell the user how to get a new password. Alternatively, the security administrator can change their password for them and send them their new password. The user can change this password the next time they log in to Sitecore.
When you try to log in and realize that you have forgotten your password, you can submit a request to have your current password sent to you in an e-mail.
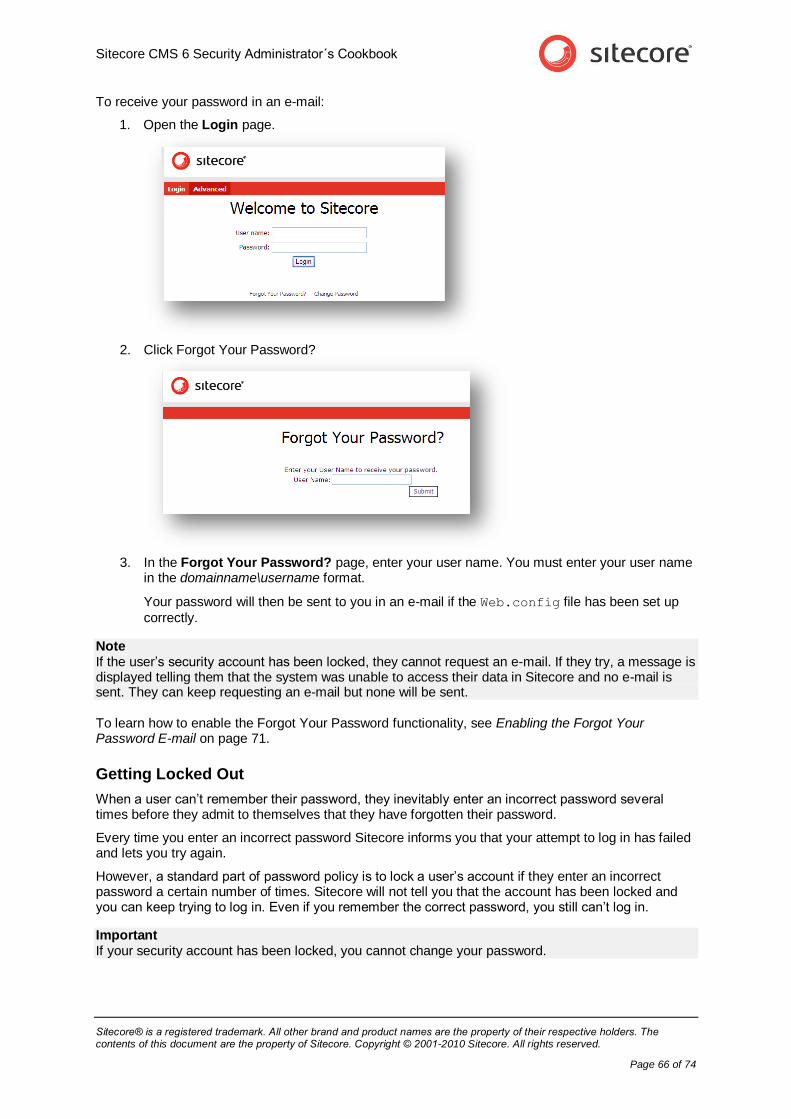
Sitecore CMS 6 Security Administrator´s Cookbook
Sitecore® is a registered trademark. All other brand and product names are the property of their respective holders. The contents of this document are the property of Sitecore. Copyright © 2001-2010 Sitecore. All rights reserved.
Page 66 of 74
To receive your password in an e-mail:
1. Open the Login page.
2. Click Forgot Your Password?
3. In the Forgot Your Password? page, enter your user name. You must enter your user name in the domainname\username format.
Your password will then be sent to you in an e-mail if the Web.config file has been set up
correctly.
Note If the user’s security account has been locked, they cannot request an e-mail. If they try, a message is displayed telling them that the system was unable to access their data in Sitecore and no e-mail is sent. They can keep requesting an e-mail but none will be sent.
To learn how to enable the Forgot Your Password functionality, see Enabling the Forgot Your Password E-mail on page 71.
Getting Locked Out
When a user can’t remember their password, they inevitably enter an incorrect password several times before they admit to themselves that they have forgotten their password.
Every time you enter an incorrect password Sitecore informs you that your attempt to log in has failed and lets you try again.
However, a standard part of password policy is to lock a user’s account if they enter an incorrect password a certain number of times. Sitecore will not tell you that the account has been locked and you can keep trying to log in. Even if you remember the correct password, you still can’t log in.
Important If your security account has been locked, you cannot change your password.
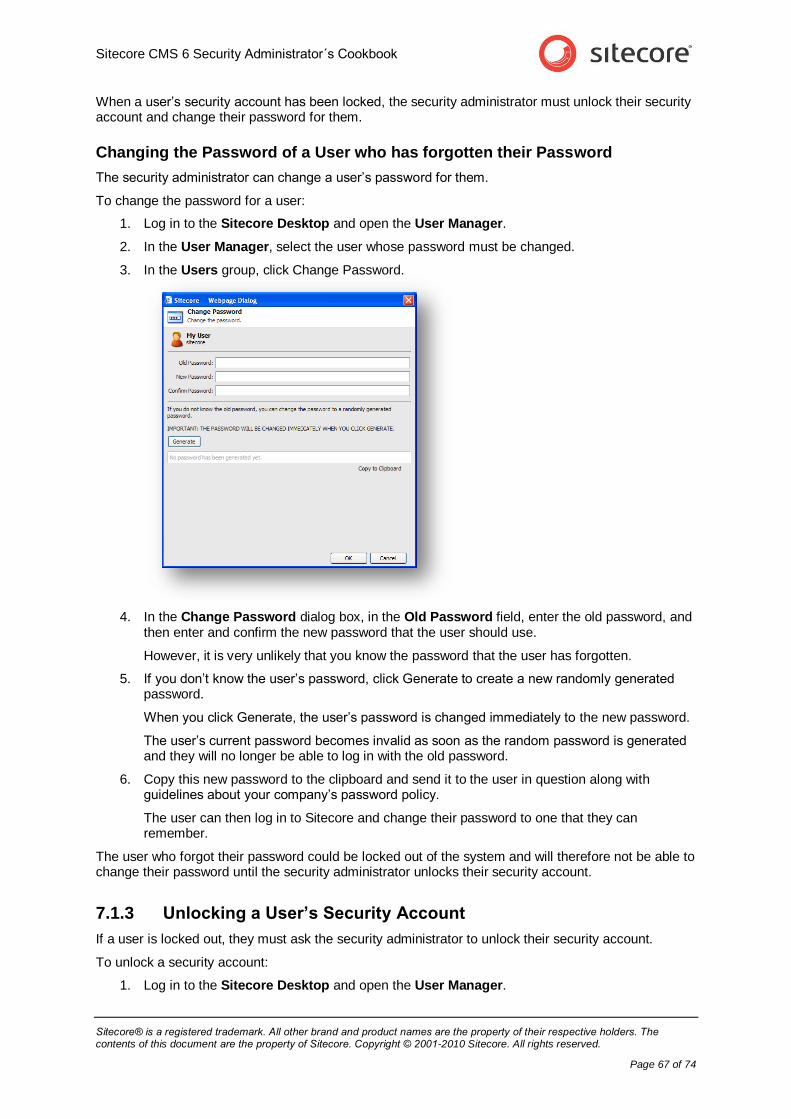
Sitecore CMS 6 Security Administrator´s Cookbook
Sitecore® is a registered trademark. All other brand and product names are the property of their respective holders. The contents of this document are the property of Sitecore. Copyright © 2001-2010 Sitecore. All rights reserved.
Page 67 of 74
When a user’s security account has been locked, the security administrator must unlock their security account and change their password for them.
Changing the Password of a User who has forgotten their Password
The security administrator can change a user’s password for them.
To change the password for a user:
1. Log in to the Sitecore Desktop and open the User Manager.
2. In the User Manager, select the user whose password must be changed.
3. In the Users group, click Change Password.
4. In the Change Password dialog box, in the Old Password field, enter the old password, and then enter and confirm the new password that the user should use.
However, it is very unlikely that you know the password that the user has forgotten.
5. If you don’t know the user’s password, click Generate to create a new randomly generated password.
When you click Generate, the user’s password is changed immediately to the new password.
The user’s current password becomes invalid as soon as the random password is generated and they will no longer be able to log in with the old password.
6. Copy this new password to the clipboard and send it to the user in question along with guidelines about your company’s password policy.
The user can then log in to Sitecore and change their password to one that they can remember.
The user who forgot their password could be locked out of the system and will therefore not be able to change their password until the security administrator unlocks their security account.
7.1.3 Unlocking a User’s Security Account
If a user is locked out, they must ask the security administrator to unlock their security account.
To unlock a security account:
1. Log in to the Sitecore Desktop and open the User Manager.

Sitecore CMS 6 Security Administrator´s Cookbook
Sitecore® is a registered trademark. All other brand and product names are the property of their respective holders. The contents of this document are the property of Sitecore. Copyright © 2001-2010 Sitecore. All rights reserved.
Page 68 of 74
2. In the User Manager, select the user who is locked out.
When a user has been locked out, there is an entry in the Locked column of the User Manager to tell you that this user is locked out.
3. In the Users group, click Unlock.
7.1.4 Disabling and Enabling a User
A security administrator will occasionally have to prevent some users from accessing the system for certain periods of time, for example, when they are on extended leave.
To disable a user:
1. Log in to the Sitecore Desktop and open the User Manager.
2. In the User Manager, select the user that you want to disable.
3. In the Users group, click Disable.
To enable a user:
1. Log in to the Sitecore Desktop and open the User Manager.
2. In the User Manager, select the user that you want to enable.

Sitecore CMS 6 Security Administrator´s Cookbook
Sitecore® is a registered trademark. All other brand and product names are the property of their respective holders. The contents of this document are the property of Sitecore. Copyright © 2001-2010 Sitecore. All rights reserved.
Page 69 of 74
When a user has been locked out, there is an entry in the Locked column of the User Manager to tell you that this user is locked out.
3. In the Users group, click Enable.
7.1.5 Editing a User’s Security Account
After you have created a user, situations will arise where it becomes necessary for the security administrator to change some of the information stored in their security account. For example, you might need to change their e-mail address, the roles they are members of, and so on.
To edit a user’s security account:
1. Log in to the Sitecore Desktop and open the User Manager.
2. In the User Manager, select the user that you want to edit.

Sitecore CMS 6 Security Administrator´s Cookbook
Sitecore® is a registered trademark. All other brand and product names are the property of their respective holders. The contents of this document are the property of Sitecore. Copyright © 2001-2010 Sitecore. All rights reserved.
Page 70 of 74
3. In the Users group, click Edit.
4. In the Edit User dialog box, you can change any of the information that is displayed on any of the tabs.
Note The name displayed in the Full Name field in the Edit User dialog box is not the name of the user’s security account. It is their full name. You cannot change the name of the user’s security account after it has been created. The name of the security account is its identifier and all of the user’s security settings are associated with this name. Similarly, you cannot change the name of a security role.
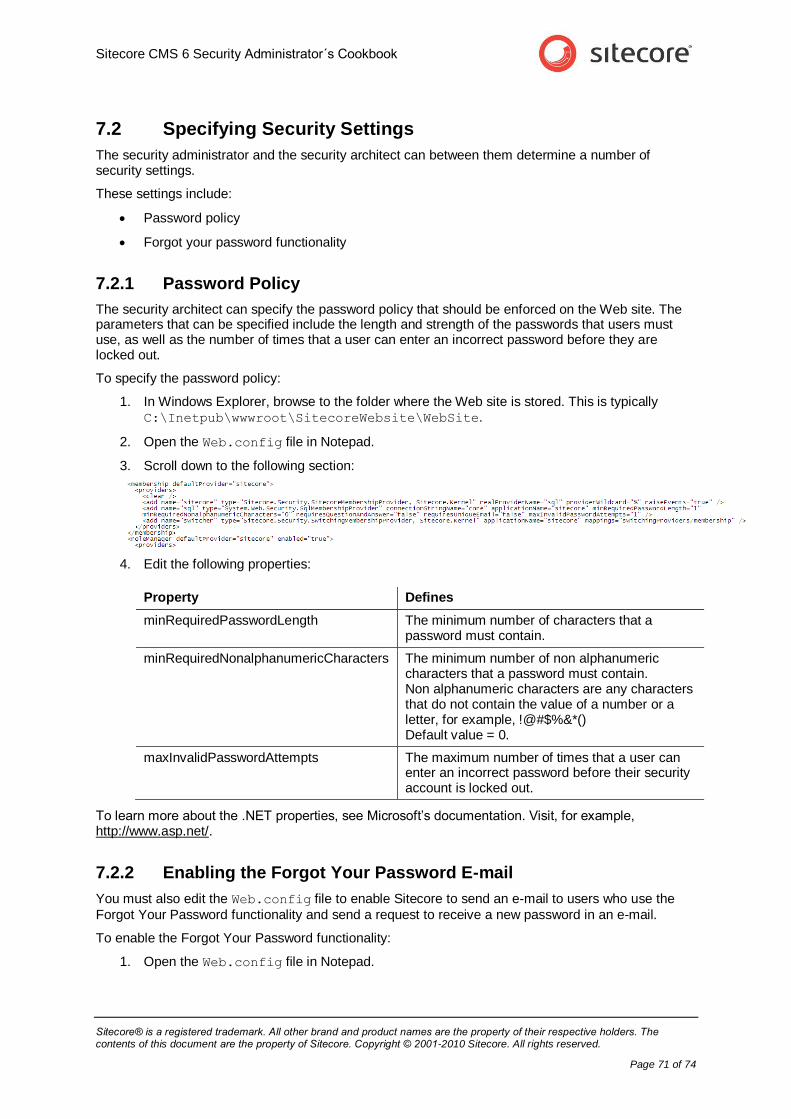
Sitecore CMS 6 Security Administrator´s Cookbook
Sitecore® is a registered trademark. All other brand and product names are the property of their respective holders. The contents of this document are the property of Sitecore. Copyright © 2001-2010 Sitecore. All rights reserved.
Page 71 of 74
7.2 Specifying Security Settings
The security administrator and the security architect can between them determine a number of security settings.
These settings include:
Password policy
Forgot your password functionality
7.2.1 Password Policy
The security architect can specify the password policy that should be enforced on the Web site. The parameters that can be specified include the length and strength of the passwords that users must use, as well as the number of times that a user can enter an incorrect password before they are locked out.
To specify the password policy:
1. In Windows Explorer, browse to the folder where the Web site is stored. This is typically C:\Inetpub\wwwroot\SitecoreWebsite\WebSite.
2. Open the Web.config file in Notepad.
3. Scroll down to the following section:
4. Edit the following properties:
Property Defines
minRequiredPasswordLength The minimum number of characters that a password must contain.
minRequiredNonalphanumericCharacters The minimum number of non alphanumeric characters that a password must contain. Non alphanumeric characters are any characters that do not contain the value of a number or a letter, for example, !@#$%&*() Default value = 0.
maxInvalidPasswordAttempts The maximum number of times that a user can enter an incorrect password before their security account is locked out.
To learn more about the .NET properties, see Microsoft’s documentation. Visit, for example, http://www.asp.net/.
7.2.2 Enabling the Forgot Your Password E-mail
You must also edit the Web.config file to enable Sitecore to send an e-mail to users who use the
Forgot Your Password functionality and send a request to receive a new password in an e-mail.
To enable the Forgot Your Password functionality:
1. Open the Web.config file in Notepad.
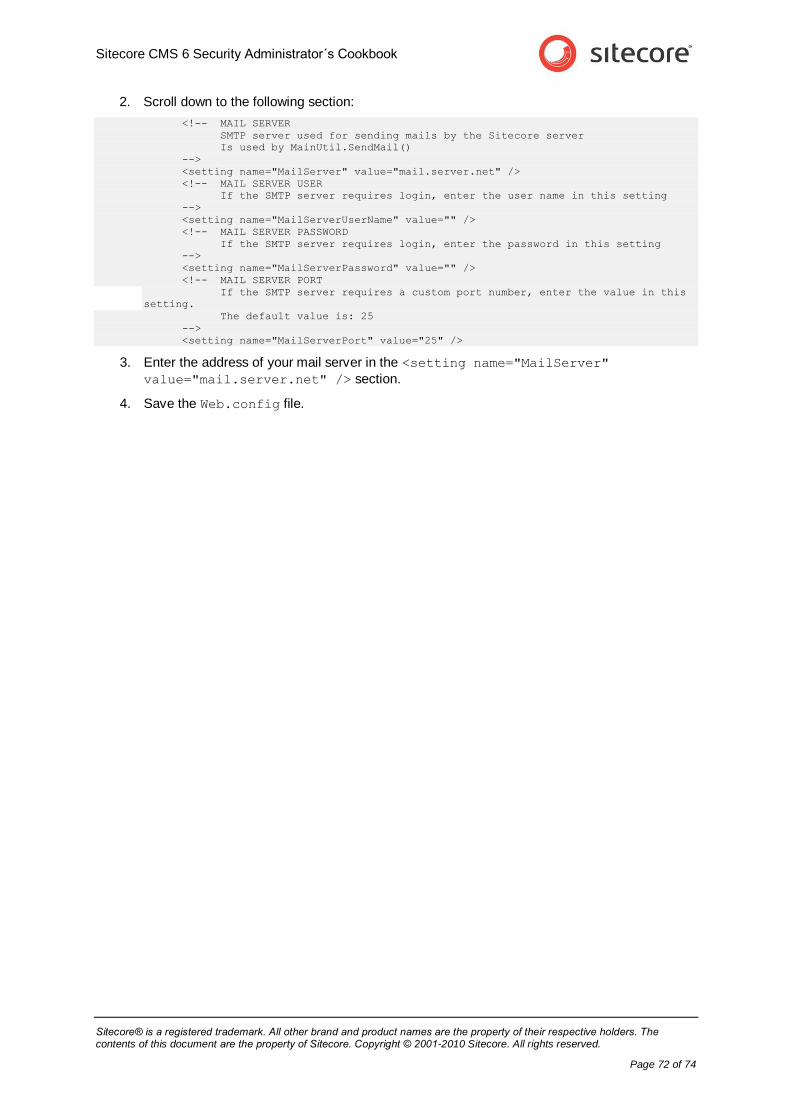
Sitecore CMS 6 Security Administrator´s Cookbook
Sitecore® is a registered trademark. All other brand and product names are the property of their respective holders. The contents of this document are the property of Sitecore. Copyright © 2001-2010 Sitecore. All rights reserved.
Page 72 of 74
2. Scroll down to the following section:
<!-- MAIL SERVER
SMTP server used for sending mails by the Sitecore server
Is used by MainUtil.SendMail()
-->
<setting name="MailServer" value="mail.server.net" />
<!-- MAIL SERVER USER
If the SMTP server requires login, enter the user name in this setting
-->
<setting name="MailServerUserName" value="" />
<!-- MAIL SERVER PASSWORD
If the SMTP server requires login, enter the password in this setting
-->
<setting name="MailServerPassword" value="" />
<!-- MAIL SERVER PORT
If the SMTP server requires a custom port number, enter the value in this
setting.
The default value is: 25
-->
<setting name="MailServerPort" value="25" />
3. Enter the address of your mail server in the <setting name="MailServer"
value="mail.server.net" /> section.
4. Save the Web.config file.
Sitecore CMS 6 Security Administrator´s Cookbook
Sitecore® is a registered trademark. All other brand and product names are the property of their respective holders. The contents of this document are the property of Sitecore. Copyright © 2001-2010 Sitecore. All rights reserved.
Page 73 of 74
Chapter 8
Best Practices
This chapter lists some of the best practices that we recommend for security administrators.
This chapter contains the following section:
Best Practices
Sitecore CMS 6 Security Administrator´s Cookbook
Sitecore® is a registered trademark. All other brand and product names are the property of their respective holders. The contents of this document are the property of Sitecore. Copyright © 2001-2010 Sitecore. All rights reserved.
Page 74 of 74
8.1 Best Practices
We have a few recommendations for security administrators that should make their job a bit easier.
8.1.1 Only Assign Access Rights to Roles and Not to Users
By only assigning access rights to roles you simplify the process of assigning access rights. You no longer think in terms of users but in terms of the roles and functions that exist in your organization.
By mapping the roles you create to the functions in your organization, you can easily manage the access rights that that your employees should be assigned. If they perform this function in your organization, they should be members of this role.
When an employee’s job description changes, you simply make them a member of the appropriate roles and remove them from the roles they no longer need. When an employee leaves your organization, just delete their user account and they are automatically removed from all the roles that they were members of. When another employee replaces them you just make them members of the appropriate roles.
Furthermore, by only assigning access rights to roles, you make it easier to control the access rights that an individual user has to items in the content tree. For example, if you want to ensure that a user is granted or denied access to a particular item for a period of time, you don’t have to study all the roles the user belongs to, you just grant or deny this access right to the user’s security account. This setting overrules the access rights specified for the roles the user is a member of and the user is then granted or denied the access right. To revert to the standard settings, you just remove the explicit security setting from the user’s security account.
8.1.2 Don’t Make Roles Domain Specific
We recommend that you only make domain specific roles when you have to.
By keeping all your roles in the Sitecore domain, you ensure that they are available to all of the domains managed by your system. Once you have created a role and made it domain specific, you cannot change the domain that it belongs to.
8.1.3 Don’t Specifically Deny Access Rights — Use Inheritance
We recommend that you use inheritance whenever possible to limit the access that roles have to the items in Sitecore.
Using inheritance instead of directly denying access rights to items makes it easier to manage the security system. You no longer have to check the access rights assigned to each item for a particular role you only manage the inheritance settings on the parent items that determine whether or not the access rights are inherited by their descendents.
Related Documents