Redbooks Securing Securing Your Critical Workloads with IBM Hyper Protect Services Lydia Parziale Cecilia A De Leon Jean-Yves Girard Carlos Guarany Gomes Florian Schwanzara

Welcome message from author
This document is posted to help you gain knowledge. Please leave a comment to let me know what you think about it! Share it to your friends and learn new things together.
Transcript
Redbooks
Securing
Securing Your Critical Workloads with IBM Hyper Protect Services
Lydia Parziale
Cecilia A De Leon
Jean-Yves Girard
Carlos Guarany Gomes
Florian Schwanzara


IBM Redbooks
Securing Your Critical Workloads with IBM Hyper Protect Services
February 2022
SG24-8469-01

© Copyright International Business Machines Corporation 2020, 2022. All rights reserved.Note to U.S. Government Users Restricted Rights -- Use, duplication or disclosure restricted by GSA ADP ScheduleContract with IBM Corp.
Second Edition (February 2022)
This edition applies to IBM Hyper Protect Virtual Servers V1.2.0, IBM Hyper Protect Crypto Services V1.0.0, and IBM Hyper Protect DBaaS V1.0.0.
Note: Before using this information and the product it supports, read the information in “Notices” on page vii.

Contents
Notices . . . . . . . . . . . . . . . . . . . . . . . . . . . . . . . . . . . . . . . . . . . . . . . . . . . . . . . . . . . . . . . . . viiTrademarks . . . . . . . . . . . . . . . . . . . . . . . . . . . . . . . . . . . . . . . . . . . . . . . . . . . . . . . . . . . . . viii
Preface . . . . . . . . . . . . . . . . . . . . . . . . . . . . . . . . . . . . . . . . . . . . . . . . . . . . . . . . . . . . . . . . . ixAuthors. . . . . . . . . . . . . . . . . . . . . . . . . . . . . . . . . . . . . . . . . . . . . . . . . . . . . . . . . . . . . . . . . . ixNow you can become a published author, too! . . . . . . . . . . . . . . . . . . . . . . . . . . . . . . . . . . . xiComments welcome. . . . . . . . . . . . . . . . . . . . . . . . . . . . . . . . . . . . . . . . . . . . . . . . . . . . . . . . xiStay connected to IBM Redbooks . . . . . . . . . . . . . . . . . . . . . . . . . . . . . . . . . . . . . . . . . . . . . xii
Chapter 1. Introducing IBM Hyper Protect Services . . . . . . . . . . . . . . . . . . . . . . . . . . . . 11.1 Industry and IBM Hyper Protect Services portfolio overview . . . . . . . . . . . . . . . . . . . . . 21.2 IBM Hyper Protect Crypto Services . . . . . . . . . . . . . . . . . . . . . . . . . . . . . . . . . . . . . . . . 21.3 IBM Cloud Hyper Protect Database as a Service . . . . . . . . . . . . . . . . . . . . . . . . . . . . . . 41.4 IBM Cloud Hyper Protect Virtual Servers . . . . . . . . . . . . . . . . . . . . . . . . . . . . . . . . . . . . 41.5 IBM Hyper Protect Virtual Servers on-premises . . . . . . . . . . . . . . . . . . . . . . . . . . . . . . . 6
1.5.1 Building images with integrity: Securing Continuous Integration and Continuous Delivery. . . . . . . . . . . . . . . . . . . . . . . . . . . . . . . . . . . . . . . . . . . . . . . . . . . . . . . . . . 6
1.5.2 Managing infrastructure with least privilege access to applications and data. . . . . 71.5.3 Deploying images with trusted provenance . . . . . . . . . . . . . . . . . . . . . . . . . . . . . . 7
1.6 Security features . . . . . . . . . . . . . . . . . . . . . . . . . . . . . . . . . . . . . . . . . . . . . . . . . . . . . . . 71.6.1 Cryptography . . . . . . . . . . . . . . . . . . . . . . . . . . . . . . . . . . . . . . . . . . . . . . . . . . . . . 71.6.2 IBM Secure Service Container . . . . . . . . . . . . . . . . . . . . . . . . . . . . . . . . . . . . . . . 10
Chapter 2. IBM Cloud Hyper Protect Crypto Services . . . . . . . . . . . . . . . . . . . . . . . . . . 132.1 Overview . . . . . . . . . . . . . . . . . . . . . . . . . . . . . . . . . . . . . . . . . . . . . . . . . . . . . . . . . . . . 142.2 IBM Hyper Protect Crypto Services provisioning . . . . . . . . . . . . . . . . . . . . . . . . . . . . . 14
2.2.1 Provisioning an instance by using the IBM Cloud console . . . . . . . . . . . . . . . . . . 152.2.2 Provisioning your instance by using the IBM Cloud CLI . . . . . . . . . . . . . . . . . . . . 26
2.3 Service initialization: Crypto units master key initialization . . . . . . . . . . . . . . . . . . . . . . 312.3.1 Activating your service’s master key . . . . . . . . . . . . . . . . . . . . . . . . . . . . . . . . . . . 312.3.2 Using the IBM Cloud TKE CLI plug-in and master key part files. . . . . . . . . . . . . . 342.3.3 Getting the crypto units details and enabling cryptocurrency cryptography . . . . . 512.3.4 Zeroing out the crypto unit master key . . . . . . . . . . . . . . . . . . . . . . . . . . . . . . . . . 542.3.5 Selecting administrator signature keys when working in secure mode. . . . . . . . . 562.3.6 Initializing your IBM Hyper Protect Crypto Services master key by using recovery
crypto units . . . . . . . . . . . . . . . . . . . . . . . . . . . . . . . . . . . . . . . . . . . . . . . . . . . . . . 572.3.7 Initializing your IBM Hyper Protect Crypto Services master key by using smart cards
and the Management Utilities . . . . . . . . . . . . . . . . . . . . . . . . . . . . . . . . . . . . . . . . 632.4 Using the IBM Key Protect REST API. . . . . . . . . . . . . . . . . . . . . . . . . . . . . . . . . . . . . 105
2.4.1 Key Protect concepts and programming language software developer kits . . . . 1052.4.2 Setting your authentication configuration to call API functions . . . . . . . . . . . . . . 1062.4.3 Retrieving connection information to your IBM Hyper Protect Crypto Services
instance . . . . . . . . . . . . . . . . . . . . . . . . . . . . . . . . . . . . . . . . . . . . . . . . . . . . . . . 1082.4.4 Creating IBM Key Protect keys . . . . . . . . . . . . . . . . . . . . . . . . . . . . . . . . . . . . . . 1102.4.5 Working with Key Protect root keys . . . . . . . . . . . . . . . . . . . . . . . . . . . . . . . . . . 1192.4.6 Key Protect root key rotation. . . . . . . . . . . . . . . . . . . . . . . . . . . . . . . . . . . . . . . . 1292.4.7 Bring Your Own Key to the cloud: importing a Key Protect root key. . . . . . . . . . 1332.4.8 Integrating IBM Cloud services with IBM Hyper Protect Crypto Services . . . . . . 136
2.5 Using the Public Key Cryptography Standards #11 API with IBM Hyper Protect Crypto
© Copyright IBM Corp. 2020, 2022. All rights reserved. iii

Services . . . . . . . . . . . . . . . . . . . . . . . . . . . . . . . . . . . . . . . . . . . . . . . . . . . . . . . . . . . 1512.5.1 The PKCS #11 API . . . . . . . . . . . . . . . . . . . . . . . . . . . . . . . . . . . . . . . . . . . . . . . 1522.5.2 How to use the IBM Enterprise PKCS #11 over gRPC API . . . . . . . . . . . . . . . . 182
Chapter 3. IBM Cloud Hyper Protect Database as a Service. . . . . . . . . . . . . . . . . . . . 2073.1 Introducing IBM Cloud Hyper Protect DBaaS . . . . . . . . . . . . . . . . . . . . . . . . . . . . . . . 2083.2 Sizing and topology. . . . . . . . . . . . . . . . . . . . . . . . . . . . . . . . . . . . . . . . . . . . . . . . . . . 2093.3 Public Cloud service instantiation . . . . . . . . . . . . . . . . . . . . . . . . . . . . . . . . . . . . . . . . 210
3.3.1 Prerequisites . . . . . . . . . . . . . . . . . . . . . . . . . . . . . . . . . . . . . . . . . . . . . . . . . . . . 2103.3.2 Web interface . . . . . . . . . . . . . . . . . . . . . . . . . . . . . . . . . . . . . . . . . . . . . . . . . . . 2103.3.3 IBM Cloud Command-Line Interface. . . . . . . . . . . . . . . . . . . . . . . . . . . . . . . . . . 2133.3.4 The IBM Hyper Protect DBaaS RESTful API . . . . . . . . . . . . . . . . . . . . . . . . . . . 215
3.4 Administration and operations. . . . . . . . . . . . . . . . . . . . . . . . . . . . . . . . . . . . . . . . . . . 2183.4.1 Managing an IBM Hyper Protect DBaaS service . . . . . . . . . . . . . . . . . . . . . . . . 2183.4.2 Managing database instances . . . . . . . . . . . . . . . . . . . . . . . . . . . . . . . . . . . . . . 2223.4.3 Logging and monitoring . . . . . . . . . . . . . . . . . . . . . . . . . . . . . . . . . . . . . . . . . . . 2233.4.4 Backing up and restoring . . . . . . . . . . . . . . . . . . . . . . . . . . . . . . . . . . . . . . . . . . 229
3.5 Security and compliance . . . . . . . . . . . . . . . . . . . . . . . . . . . . . . . . . . . . . . . . . . . . . . . 2323.6 Use case: Encrypting databases with your keys protected. . . . . . . . . . . . . . . . . . . . . 2333.7 API interaction and code samples. . . . . . . . . . . . . . . . . . . . . . . . . . . . . . . . . . . . . . . . 234
3.7.1 Cloning the GitHub example Python code . . . . . . . . . . . . . . . . . . . . . . . . . . . . . 2353.7.2 Setting up a Python virtual environment with requests . . . . . . . . . . . . . . . . . . . . 2353.7.3 Running the example file . . . . . . . . . . . . . . . . . . . . . . . . . . . . . . . . . . . . . . . . . . 236
Chapter 4. IBM Cloud Hyper Protect Virtual Servers . . . . . . . . . . . . . . . . . . . . . . . . . . 2394.1 Introducing IBM Cloud Hyper Protect Virtual Servers . . . . . . . . . . . . . . . . . . . . . . . . . 2404.2 IBM Cloud Hyper Protect Virtual Servers use cases. . . . . . . . . . . . . . . . . . . . . . . . . . 2404.3 Sizing . . . . . . . . . . . . . . . . . . . . . . . . . . . . . . . . . . . . . . . . . . . . . . . . . . . . . . . . . . . . . 2414.4 Public cloud service instantiation . . . . . . . . . . . . . . . . . . . . . . . . . . . . . . . . . . . . . . . . 242
4.4.1 Prerequisites . . . . . . . . . . . . . . . . . . . . . . . . . . . . . . . . . . . . . . . . . . . . . . . . . . . . 2424.4.2 Web interface . . . . . . . . . . . . . . . . . . . . . . . . . . . . . . . . . . . . . . . . . . . . . . . . . . . 2424.4.3 IBM Cloud Command-Line Interface. . . . . . . . . . . . . . . . . . . . . . . . . . . . . . . . . . 245
4.5 Administration and operations. . . . . . . . . . . . . . . . . . . . . . . . . . . . . . . . . . . . . . . . . . . 2474.5.1 Managing an IBM Hyper Protect Virtual Servers service . . . . . . . . . . . . . . . . . . 2474.5.2 Managing IBM Hyper Protect Virtual Servers instances . . . . . . . . . . . . . . . . . . . 2494.5.3 Topology . . . . . . . . . . . . . . . . . . . . . . . . . . . . . . . . . . . . . . . . . . . . . . . . . . . . . . . 249
Chapter 5. IBM Hyper Protect Virtual Servers on-premises . . . . . . . . . . . . . . . . . . . . 2535.1 Introducing IBM Hyper Protect Virtual Servers on-premises. . . . . . . . . . . . . . . . . . . . 2545.2 IBM Hyper Protect Virtual Servers key features . . . . . . . . . . . . . . . . . . . . . . . . . . . . . 255
5.2.1 Trusted CI/CD . . . . . . . . . . . . . . . . . . . . . . . . . . . . . . . . . . . . . . . . . . . . . . . . . . . 2565.2.2 Enterprise PKCS #11 over gRPC . . . . . . . . . . . . . . . . . . . . . . . . . . . . . . . . . . . . 2575.2.3 User management . . . . . . . . . . . . . . . . . . . . . . . . . . . . . . . . . . . . . . . . . . . . . . . 2585.2.4 Bring Your Own Image . . . . . . . . . . . . . . . . . . . . . . . . . . . . . . . . . . . . . . . . . . . . 2585.2.5 Encryption . . . . . . . . . . . . . . . . . . . . . . . . . . . . . . . . . . . . . . . . . . . . . . . . . . . . . . 258
5.3 IBM Hyper Protect Virtual Servers use cases . . . . . . . . . . . . . . . . . . . . . . . . . . . . . . . 2595.4 IBM Hyper Protect Virtual Servers architecture overview . . . . . . . . . . . . . . . . . . . . . . 2615.5 A sample use case: IBM Hyper Protect Virtual Servers for secure storage . . . . . . . . 266
5.5.1 Creating a Secure Storage Server in IBM Hyper Protect Virtual Servers . . . . . . 268
Chapter 6. IBM Hyper Protect Virtual Servers on-premises installation . . . . . . . . . . 2716.1 Planning and prerequisites for IBM Hyper Protect Virtual Servers on-premises. . . . . 2726.2 Downloading the package to the management server . . . . . . . . . . . . . . . . . . . . . . . . 2736.3 Setting up the Secure Service Container LPAR . . . . . . . . . . . . . . . . . . . . . . . . . . . . . 274
iv Securing Your Critical Workloads with IBM Hyper Protect Services

6.3.1 Creating the Secure Service Container LPAR . . . . . . . . . . . . . . . . . . . . . . . . . . 2756.3.2 Installing the IBM Hyper Protect Virtual Servers appliance. . . . . . . . . . . . . . . . . 2766.3.3 Configuring storage disks on the hosting appliance . . . . . . . . . . . . . . . . . . . . . . 279
6.4 Networking for IBM Hyper Protect Virtual Servers . . . . . . . . . . . . . . . . . . . . . . . . . . . 2856.4.1 Networking to the hosting appliance (SSC LPAR) . . . . . . . . . . . . . . . . . . . . . . . 2856.4.2 Networking inside the hosting appliance (networking for IBM Hyper Protect Virtual
Servers containers through the CLI). . . . . . . . . . . . . . . . . . . . . . . . . . . . . . . . . . 2866.4.3 Creating an Ethernet interface . . . . . . . . . . . . . . . . . . . . . . . . . . . . . . . . . . . . . . 2876.4.4 Creating a VLAN interface . . . . . . . . . . . . . . . . . . . . . . . . . . . . . . . . . . . . . . . . . 291
6.5 Installing the IBM Hyper Protect Virtual Servers CLI on the management server. . . . 2956.5.1 Setting up the environment by using the setup script . . . . . . . . . . . . . . . . . . . . . 295
6.6 Configuring the IBM Hyper Protect Virtual Servers environment . . . . . . . . . . . . . . . . 2996.6.1 Configuring the internal network . . . . . . . . . . . . . . . . . . . . . . . . . . . . . . . . . . . . . 3006.6.2 Pushing the base images to a remote Docker repository . . . . . . . . . . . . . . . . . . 3026.6.3 Setting up an IBM Hyper Protect Virtual Servers instance . . . . . . . . . . . . . . . . . 3046.6.4 Backing up and restoring IBM Hyper Protect Virtual Servers . . . . . . . . . . . . . . . 3086.6.5 Setting up the Secure Build container. . . . . . . . . . . . . . . . . . . . . . . . . . . . . . . . . 3096.6.6 Setting up the monitoring instance . . . . . . . . . . . . . . . . . . . . . . . . . . . . . . . . . . . 3126.6.7 Integrating with Enterprise Public Key Cryptography Standards #11 . . . . . . . . . 316
6.7 Public Cloud service instantiation . . . . . . . . . . . . . . . . . . . . . . . . . . . . . . . . . . . . . . . . 322
Chapter 7. IBM Hyper Protect Virtual Servers key features . . . . . . . . . . . . . . . . . . . . 3237.1 User roles in IBM Hyper Protect Virtual Servers . . . . . . . . . . . . . . . . . . . . . . . . . . . . . 3247.2 Trusted Continuous Integration and Continuous Delivery: Building and deploying
containers securely. . . . . . . . . . . . . . . . . . . . . . . . . . . . . . . . . . . . . . . . . . . . . . . . . . . 3257.2.1 Importance of establishing a trusted CI/CD pipeline . . . . . . . . . . . . . . . . . . . . . . 3257.2.2 Trusted CI/CD pipeline architecture . . . . . . . . . . . . . . . . . . . . . . . . . . . . . . . . . . 3267.2.3 Using the Secure Build application to build and store an image in a repository . 3277.2.4 Building an image from a trusted base image. . . . . . . . . . . . . . . . . . . . . . . . . . . 333
7.3 Monitoring . . . . . . . . . . . . . . . . . . . . . . . . . . . . . . . . . . . . . . . . . . . . . . . . . . . . . . . . . . 3347.3.1 Deploying a monitoring container . . . . . . . . . . . . . . . . . . . . . . . . . . . . . . . . . . . . 3347.3.2 Viewing the metrics from the monitoring service . . . . . . . . . . . . . . . . . . . . . . . . 335
7.4 Enterprise Public Key Cryptography Standards #11 over gRPC . . . . . . . . . . . . . . . . 3377.4.1 Deploying a GREP11 container . . . . . . . . . . . . . . . . . . . . . . . . . . . . . . . . . . . . . 3377.4.2 Adding GREP11 functions into your applications . . . . . . . . . . . . . . . . . . . . . . . . 338
7.5 Bring Your Own Image (deploying your applications securely). . . . . . . . . . . . . . . . . . 3417.5.1 Signing your image by using Docker Content Trust . . . . . . . . . . . . . . . . . . . . . . 3417.5.2 Adding the registry . . . . . . . . . . . . . . . . . . . . . . . . . . . . . . . . . . . . . . . . . . . . . . . 3417.5.3 Generating the signing keys . . . . . . . . . . . . . . . . . . . . . . . . . . . . . . . . . . . . . . . . 3427.5.4 Registering a repository as a trusted repository . . . . . . . . . . . . . . . . . . . . . . . . . 3437.5.5 Preparing the configuration. . . . . . . . . . . . . . . . . . . . . . . . . . . . . . . . . . . . . . . . . 3437.5.6 Deploying a securely built image from a trusted repository . . . . . . . . . . . . . . . . 344
Chapter 8. Secure Bitcoin Wallet: A sample use case that spans multiple IBM Hyper Protect Services . . . . . . . . . . . . . . . . . . . . . . . . . . . . . . . . . . . . . . . . . . . . . . 347
8.1 Secure Bitcoin Wallet application . . . . . . . . . . . . . . . . . . . . . . . . . . . . . . . . . . . . . . . . 3488.1.1 Planning for the installation by using IBM Hyper Protect Services . . . . . . . . . . . 349
8.2 Building the Secure Bitcoin Wallet application container . . . . . . . . . . . . . . . . . . . . . . 3508.2.1 Using IBM Cloud Hyper Protect with Bring Your Own Image . . . . . . . . . . . . . . . 3508.2.2 Using IBM Hyper Protect Secure Build Servers on-premises . . . . . . . . . . . . . . . 3648.2.3 Using IBM Cloud Hyper Protect Secure Build Server . . . . . . . . . . . . . . . . . . . . . 371
8.3 Testing the Secure Bitcoin Wallet application . . . . . . . . . . . . . . . . . . . . . . . . . . . . . . . 377
Appendix A. Configuration parameters . . . . . . . . . . . . . . . . . . . . . . . . . . . . . . . . . . . . 385
Contents v

Configuration parameters for the management server . . . . . . . . . . . . . . . . . . . . . . . . . . . 386Configuration parameters for the IBM Secure Service Container logical partition . . . . . . . 386Configuration parameters for the Secure Build container server . . . . . . . . . . . . . . . . . . . . 387Configuration parameters for repository definition files . . . . . . . . . . . . . . . . . . . . . . . . . . . 389Configuration parameters for IBM Hyper Protect Virtual Servers. . . . . . . . . . . . . . . . . . . . 389Configuration parameters for the monitoring component . . . . . . . . . . . . . . . . . . . . . . . . . . 390Configuration parameters for the Enterprise PKCS #11 over gRPC container . . . . . . . . . 390The rtoa_destination PGP public key. . . . . . . . . . . . . . . . . . . . . . . . . . . . . . . . . . . . . . . . . 391
Appendix B. Additional material . . . . . . . . . . . . . . . . . . . . . . . . . . . . . . . . . . . . . . . . . . 393Locating the GitHub material . . . . . . . . . . . . . . . . . . . . . . . . . . . . . . . . . . . . . . . . . . . . . . . 393Cloning the GitHub material . . . . . . . . . . . . . . . . . . . . . . . . . . . . . . . . . . . . . . . . . . . . . . . . 393
Related publications . . . . . . . . . . . . . . . . . . . . . . . . . . . . . . . . . . . . . . . . . . . . . . . . . . . . 395IBM Redbooks . . . . . . . . . . . . . . . . . . . . . . . . . . . . . . . . . . . . . . . . . . . . . . . . . . . . . . . . . . 395Online resources . . . . . . . . . . . . . . . . . . . . . . . . . . . . . . . . . . . . . . . . . . . . . . . . . . . . . . . . 395Help from IBM . . . . . . . . . . . . . . . . . . . . . . . . . . . . . . . . . . . . . . . . . . . . . . . . . . . . . . . . . . 397
Abbreviations and acronyms . . . . . . . . . . . . . . . . . . . . . . . . . . . . . . . . . . . . . . . . . . . . . 399
vi Securing Your Critical Workloads with IBM Hyper Protect Services

Notices
This information was developed for products and services offered in the US. This material might be available from IBM in other languages. However, you may be required to own a copy of the product or product version in that language in order to access it.
IBM may not offer the products, services, or features discussed in this document in other countries. Consult your local IBM representative for information on the products and services currently available in your area. Any reference to an IBM product, program, or service is not intended to state or imply that only that IBM product, program, or service may be used. Any functionally equivalent product, program, or service that does not infringe any IBM intellectual property right may be used instead. However, it is the user’s responsibility to evaluate and verify the operation of any non-IBM product, program, or service.
IBM may have patents or pending patent applications covering subject matter described in this document. The furnishing of this document does not grant you any license to these patents. You can send license inquiries, in writing, to:IBM Director of Licensing, IBM Corporation, North Castle Drive, MD-NC119, Armonk, NY 10504-1785, US
INTERNATIONAL BUSINESS MACHINES CORPORATION PROVIDES THIS PUBLICATION “AS IS” WITHOUT WARRANTY OF ANY KIND, EITHER EXPRESS OR IMPLIED, INCLUDING, BUT NOT LIMITED TO, THE IMPLIED WARRANTIES OF NON-INFRINGEMENT, MERCHANTABILITY OR FITNESS FOR A PARTICULAR PURPOSE. Some jurisdictions do not allow disclaimer of express or implied warranties in certain transactions, therefore, this statement may not apply to you.
This information could include technical inaccuracies or typographical errors. Changes are periodically made to the information herein; these changes will be incorporated in new editions of the publication. IBM may make improvements and/or changes in the product(s) and/or the program(s) described in this publication at any time without notice.
Any references in this information to non-IBM websites are provided for convenience only and do not in any manner serve as an endorsement of those websites. The materials at those websites are not part of the materials for this IBM product and use of those websites is at your own risk.
IBM may use or distribute any of the information you provide in any way it believes appropriate without incurring any obligation to you.
The performance data and client examples cited are presented for illustrative purposes only. Actual performance results may vary depending on specific configurations and operating conditions.
Information concerning non-IBM products was obtained from the suppliers of those products, their published announcements or other publicly available sources. IBM has not tested those products and cannot confirm the accuracy of performance, compatibility or any other claims related to non-IBM products. Questions on the capabilities of non-IBM products should be addressed to the suppliers of those products.
Statements regarding IBM’s future direction or intent are subject to change or withdrawal without notice, and represent goals and objectives only.
This information contains examples of data and reports used in daily business operations. To illustrate them as completely as possible, the examples include the names of individuals, companies, brands, and products. All of these names are fictitious and any similarity to actual people or business enterprises is entirely coincidental.
COPYRIGHT LICENSE:
This information contains sample application programs in source language, which illustrate programming techniques on various operating platforms. You may copy, modify, and distribute these sample programs in any form without payment to IBM, for the purposes of developing, using, marketing or distributing application programs conforming to the application programming interface for the operating platform for which the sample programs are written. These examples have not been thoroughly tested under all conditions. IBM, therefore, cannot guarantee or imply reliability, serviceability, or function of these programs. The sample programs are provided “AS IS”, without warranty of any kind. IBM shall not be liable for any damages arising out of your use of the sample programs.
© Copyright IBM Corp. 2020, 2022. All rights reserved. vii

Trademarks
IBM, the IBM logo, and ibm.com are trademarks or registered trademarks of International Business Machines Corporation, registered in many jurisdictions worldwide. Other product and service names might be trademarks of IBM or other companies. A current list of IBM trademarks is available on the web at “Copyright and trademark information” at http://www.ibm.com/legal/copytrade.shtml
The following terms are trademarks or registered trademarks of International Business Machines Corporation, and might also be trademarks or registered trademarks in other countries.
Db2®FICON®IBM®IBM Cloud®
IBM Research®IBM Z®IBM z14®Passport Advantage®
Redbooks®Redbooks (logo) ®z15™
The following terms are trademarks of other companies:
The registered trademark Linux® is used pursuant to a sublicense from the Linux Foundation, the exclusive licensee of Linus Torvalds, owner of the mark on a worldwide basis.
Microsoft, Windows, and the Windows logo are trademarks of Microsoft Corporation in the United States, other countries, or both.
Java, and all Java-based trademarks and logos are trademarks or registered trademarks of Oracle and/or its affiliates.
OpenShift, Red Hat, are trademarks or registered trademarks of Red Hat, Inc. or its subsidiaries in the United States and other countries.
VMware, VMware vSphere, and the VMware logo are registered trademarks or trademarks of VMware, Inc. or its subsidiaries in the United States and/or other jurisdictions.
Other company, product, or service names may be trademarks or service marks of others.
viii Securing Your Critical Workloads with IBM Hyper Protect Services

Preface
Many organizations must protect their mission-critical applications in production, but security threats also can surface during the development and pre-production phases. Also, during deployment and production, insiders who manage the infrastructure that hosts critical applications can pose a threat because of their super-user credentials and level of access to secrets or encryption keys.
Organizations must incorporate secure design practices in their development operations and embrace DevSecOps to protect their applications from the vulnerabilities and threat vectors that can compromise their data and potentially threaten their business.
IBM® Cloud® Hyper Protect Services provide built-in data-at-rest and data-in-flight protection to help developers easily build secure cloud applications by using a portfolio of cloud services that are powered by IBM LinuxONE.
The LinuxONE platform ensures that client data is always encrypted, whether at rest or in transit. This feature grants customers complete authority over sensitive data and associated workloads (which restricts access, even for cloud admins) and helps them meet regulatory compliance requirements. LinuxONE also allows customers to build mission-critical applications that require a quick time to market and dependable rapid expansion.
This IBM Redbooks® publication has the following goals:
� Introduce IBM Hyper Protect Services on IBM LinuxONE on IBM Cloud and on-premises.
� Provide high-level architectures.
� Describe deployment best practices.
� Provide guides to getting started and examples of IBM Hyper Protect Services.
The target audience for this book is IBM Hyper Protect Virtual Services technical specialists, IT architects, and system administrators.
Authors
This book was produced by a team of specialists from around the world working at IBM Redbooks, Poughkeepsie Center.
Lydia Parziale is a Project Leader for the IBM Redbooks team in Poughkeepsie, New York, with domestic and international experience in technology management including software development, project leadership, and strategic planning. Her areas of expertise include business development and database management technologies. Lydia is a PMI certified PMP and an IBM Certified IT Specialist with an MBA in Technology Management and has been employed by IBM for over 25 years in various technology areas.
© Copyright IBM Corp. 2020, 2022. ix

Thanks to the following people for their contributions to this project:
Robert Haimowitz and Makenzie MannaIBM Redbooks, Poughkeepsie Center
Patrik Hysky IBM Systems Technical Sales Services, Austin
Tom Ambrosio and Bill Lamastro IBM CPO
Cecilia A De Leon is an IBM Z® and LinuxONE Technical Specialist at the Systems business unit at IBM Philippines. She has over 25 years of experience in the IT industry. She holds a Computer Engineering degree from the Mapua Institute of Technology. Her areas of expertise include IBM Z and LinuxONE servers, infrastructure, and operating systems (OSs). She has extensive experience as a systems programmer, technical consultant, and technical support manager.
Jean-Yves Girard is an IBM Certified Lab Services architect at the IBM Cloud and Cognitive Software business unit at IBM France. He has 25 years of experience in the IT industry. His EMEA job role is to support the IBM Hyper Protect Digital Asset platform and blockchain projects. He worked as a subject matter expert (SME) for several blockchain projects and led their implementation on LinuxONE servers that use IBM CryptoExress that is configured with Public Key Cryptography Standards (PKCS) #11 firmware. He also has expertise in the implementation of several independent software vendor (ISV) core banking software on IBM technologies and Oracle database.
Carlos Guarany Gomes is a Senior Solution Architect at IBM Cloud Brazil. He has 24 years of experience in the IT industry. He is certified as a Distinguished Architect by The Open Group. He holds a Computer Network Management degree from the UNA University Center in Belo Horizonte/MG - Brazil. His areas of expertise include virtualization, VMWare, networks, IBM Cloud infrastructure, and platform services.
Florian Schwanzara is an Enterprise IT Architect in Germany. He has more than 20 years of experience in the IT Infrastructure field. His background in hardware, software, and the financial industry has lead to his roles as leading architect for Fin-Tecs in DACH. His areas of expertise include secure infrastructure, blockchain, digital asset custody, confidential computing, and Zero Trust Architecture.
x Securing Your Critical Workloads with IBM Hyper Protect Services

Arnaud ManteIBM Cloud and Cognitive Software, Montpellier
Alex McMullenIBM Cloud Hyper Protect Services
Thanks to the authors of the previous editions of this book.
� Authors of the first edition, Securing Your Critical Workloads with IBM Hyper Protect Services, published in March 2021, were:
Barry Silliman, Diana Henderson, Elton de Souza, Jin VanStee, Jordan Cartwright, Madhuri Gangireddy, Matt Mondics, Matthew Arnold, Ravi Kumar Gullapalli, Sandeep Ambekar, Sandeep Sarkar, Sarath Chandra Mekala, Vasfi Gucer, Qi Ye
Now you can become a published author, too!
Here’s an opportunity to spotlight your skills, grow your career, and become a published author—all at the same time! Join an IBM Redbooks residency project and help write a book in your area of expertise, while honing your experience using leading-edge technologies. Your efforts will help to increase product acceptance and customer satisfaction, as you expand your network of technical contacts and relationships. Residencies run from two to six weeks in length, and you can participate either in person or as a remote resident working from your home base.
Find out more about the residency program, browse the residency index, and apply online at:
ibm.com/redbooks/residencies.html
Comments welcome
Your comments are important to us!
We want our books to be as helpful as possible. Send us your comments about this book or other IBM Redbooks publications in one of the following ways:
� Use the online Contact us review Redbooks form found at:
ibm.com/redbooks
� Send your comments in an email to:
� Mail your comments to:
IBM Corporation, IBM RedbooksDept. HYTD Mail Station P0992455 South RoadPoughkeepsie, NY 12601-5400
Preface xi

Stay connected to IBM Redbooks
� Find us on LinkedIn:
http://www.linkedin.com/groups?home=&gid=2130806
� Explore new Redbooks publications, residencies, and workshops with the IBM Redbooks weekly newsletter:
https://www.redbooks.ibm.com/Redbooks.nsf/subscribe?OpenForm
� Stay current on recent Redbooks publications with RSS Feeds:
http://www.redbooks.ibm.com/rss.html
xii Securing Your Critical Workloads with IBM Hyper Protect Services

Chapter 1. Introducing IBM Hyper Protect Services
This chapter introduces IBM Hyper Protect Services.
This chapter includes the following topics:
� Industry and IBM Hyper Protect Services portfolio overview
� IBM Hyper Protect Crypto Services
� IBM Cloud Hyper Protect Database as a Service
� IBM Cloud Hyper Protect Virtual Servers
� IBM Hyper Protect Virtual Servers on-premises
� Security features
1
© Copyright IBM Corp. 2020, 2022. All rights reserved. 1

1.1 Industry and IBM Hyper Protect Services portfolio overview
Organizations worldwide face challenges in protecting their enterprise. As malicious actors continue to evolve their methods to leverage vulnerabilities in enterprise systems, organization’s enterprise data remains at risk. When considering the move to cloud, organizations expect that services operate in an always-on state and are quick to switch providers if they experience response times and uptimes that does not meet their expectations. Downtime can cost a brand its image, loyalty, and ultimately revenue.
Security and data protection are two of the biggest inhibitors to organizations that are moving sensitive data and applications to the cloud. No organization wants to be featured in the headlines because of a data breach. With data privacy laws emerging across all industries and worldwide, companies can find themselves liable for fines for millions of dollars or even a percentage of their revenue (whichever is higher), so the financial implications are significant.
When we think more about a company’s data, it is their intellectual property and their competitive differentiation. Organizations must protect their client data to maintain their reputation and because of audit requirements and the governance of consumer privacy laws. Ultimately, clients are faced with the opportunity, flexibility, and agility that cloud brings, but also must consider their security standards.
To address these concerns, IBM introduced IBM Hyper Protect Services, which is a portfolio of services. This portfolio protects an enterprise’s most critical data while delivering cloud agility with the qualities of service that many organizations trusted for years to run their core workloads in their own data center.
IBM Hyper Protect Services are available in IBM Cloud, and they are deployed on IBM LinuxONE servers. These services are available in four Multi-Zone Region (MZR) sites worldwide (Dallas, Frankfurt, Sydney, and Washington), where each multi-zone-region contains three availability zones or physical data centers with the LinuxONE hardware. If any disruption in service occurs, the clients’ data is backed up, protected, and can fail over to another availability zone.
The following IBM Hyper Protect Services portfolio offerings are available:
� IBM Cloud Hyper Protect Crypto Services� IBM Cloud Hyper Protect Database as a Service (DBaaS)� IBM Cloud Hyper Protect Virtual Servers � IBM Hyper Protect Virtual Servers (on-premises)
For more information, see Confidential computing on IBM Cloud.
1.2 IBM Hyper Protect Crypto Services
Enterprises are concerned about data security and compliance in the cloud, so encryption of that data becomes an imperative. However, this issue raises the following key challenges:
� Customers want to use their own keys to encrypt, but who manages and controls the encryption keys?
� Application developers want to focus on their application development without having to become security experts.
2 Securing Your Critical Workloads with IBM Hyper Protect Services

IBM Hyper Protect Crypto Services delivers on both of these needs by offering key management and encryption application programming interfaces (APIs) to manage access to data and the lifecycle of encryption keys. Delivering on both of these needs is competitively differentiated when compared to other solutions that offer only one of the two capabilities.
IBM Hyper Protect Crypto Services enables customers to control their cloud data encryption keys (DEKs) and Cloud Hardware Security Module (HSM), which is built on industry-leading Federal Information Processing Standard (FIPS) 140-2 Level 4 certified hardware. Built on LinuxONE technology, the service runs on a secure enclave, which ensures that no one, including cloud administrators, can access a user’s keys.
Another key capability is Keep Your Own Key (KYOK), compared to what is more common in the industry, Bring Your Own Key (BYOK). BYOK requires that users trust another entity to handle their keys when bringing them to the cloud. Conversely, with KYOK, users can maintain control of their keys. A client integrates them directly to the HSM as opposed to handing them over to a program that then stores the keys. In this manner, a user can keep their own DEKs within a dedicated customer-controlled HSM that the cloud service provider has no access to by any means.
By using IBM Hyper Protect Crypto Services, developers can design and code applications with a standard API that requests encryption. This feature enables organizations to invoke security without their development teams needing to become encryption experts. Data integrity is enabled through digital signing and confidentiality from the data encryption. Applications can use a Public Key Cryptographic Standards 11 (PKCS #11) library to perform specific cryptographic functions, such as digital signing and validation and Secure Sockets Layer (SSL) offloading. IBM Hyper Protect Crypto Services provides a set of Enterprise PCKS #11 over gRPC (GREP11) API calls that enable remote application access to run cryptographic functions in the cloud HSM. For more information about using the GREP11 feature, see 2.5, “Using the Public Key Cryptography Standards #11 API with IBM Hyper Protect Crypto Services” on page 151.
In addition, this service is built with a cloud command-line interface (CLI) for the HSM Key Ceremony process for the user to take ownership of the cloud HSM. The service uses the same key provider API as IBM Key Protect, which is the multi-tenant Key Management Service (KMS) that provides a consistent approach for adopting IBM Cloud services. At the time of writing, there are new ways of initializing the master key. Another option is to use recovery crypto units, which means that when you provision a service instance in either region with this feature enabled, by default you can back up your master keys. A third option is to use a smart card and its management utilities where key parts are stored encrypted in smart cards.
IBM Hyper Protect Crypto Services can also integrate with IBM Cloud services so that you can manage encryption keys in the cloud. Several database and storage service offerings, such as IBM Cloud Storage and IBM Hyper Protect Database as a Service (DBaaS), are supported for integration, so that you can use envelope encryption, which is the practice of encrypting data with DEK and then wrapping it with the root key. Integration with compute services such as VMware vSphere and Virtual Server for IBM Virtual Private Cloud (VPC) provides secure key management. Container service integrations are also available to protect secrets and provide more granular control on access. To see the list of supported integration services and for more information about integrating IBM Cloud services, see Integrating IBM Cloud services with Hyper Protect Crypto Services.
For more information about IBM Hyper Protect Crypto Services, see Chapter 2, “IBM Cloud Hyper Protect Crypto Services” on page 13 and IBM Cloud Hyper Protect Crypto Services.
Chapter 1. Introducing IBM Hyper Protect Services 3

1.3 IBM Cloud Hyper Protect Database as a Service
The IBM Cloud Hyper Protect DBaaS solution enables the provisioning and management of highly secured databases to provide data confidentiality to mission-critical workloads without needing a traditional database administrator (DBA) to maintain it.
Imagine that a development organization wants to build an application in the cloud. However, with security top of mind and organizational concerns about cloud, management is instead considering pulling the application back behind the firewall for protection. It might even be necessary to get a sign-off on the architecture from the Chief Information Security Officer (CISO), who considers the following key questions:
� Is our customer’s data safe in the cloud?
� How can we ensure that the data is protected from internal and external threats?
� Will the application integrate well? How easy will the process be to get started?
� Can we get the same level of security and performance in the cloud as we do with our on-premises solution today?
IBM Hyper Protect DBaaS offers complete data confidentiality for data that is hosted in the cloud so that even the cloud administrators cannot access customer data. The solution is deployed on IBM LinuxONE technology with industry-leading data confidentiality through built-in workload isolation and data encryption, restricted administrator access, tamper protection for data at rest and in flight, and with vertical scale and performance, all to enable users to maintain complete control over their data in the cloud. IBM Hyper Protect DBaaS also provides nondisruptive version upgrades, monitoring, and support so that users can focus on application development.
This service offers standard APIs to provision, manage, maintain, and monitor multiple databases. This solution is built with high availability (HA), where every deployment is built as a HA clustered configuration, including 3-node clusters (one primary and two replicas) with each deployed instance that is hosted on LinuxONE in an MZR setup within an IBM Cloud region with daily automated backups. IBM Hyper Protect DBaaS also supports industry certifications, such as the General Data Protection Regulation (GDPR) and clients’ regulatory compliance activities.
Currently, the following options are available:
� IBM Hyper Protect DBaaS for MongoDB� IBM Hyper Protect DBaaS for PostgreSQL
For more information about IBM Hyper Protect DBaaS, see Chapter 3, “IBM Cloud Hyper Protect Database as a Service” on page 207, and see IBM Cloud Hyper Protect DBaaS.
1.4 IBM Cloud Hyper Protect Virtual Servers
The adoption of cloud brought rapid business changes over the past decade. What remains is a challenge in the migration of workloads and data from highly regulated industries, such as financial services, healthcare, telecommunications, and government. Market analysis shows that 80% of workloads are still being run on-premises because of concerns about moving sensitive data to the cloud and the risk of data compromise.
4 Securing Your Critical Workloads with IBM Hyper Protect Services

For example, healthcare is a multi-trillion dollar industry in the United States and features unique challenges when it comes to securing data. With medical records of millions of people, health systems are regulated by tight federal laws, such as the Health Insurance Portability and Accountability Act (HIPAA) and GDPR.
However, as the healthcare structure continues to evolve, healthcare companies are pressured to adapt. Examples of this adaptation include moving sensitive data to the cloud and taking advantage of the latest technology in the hopes of reducing costs and improving patient outcomes.
Naturally, these changes are attracting critics amid heightened attention to data privacy, and the healthcare industry is not alone in hesitating to move to cloud. IBM Cloud Hyper Protect Virtual Servers is an offering that alleviates these concerns.
IBM Cloud Hyper Protect Virtual Servers is the industry’s first customer-managed, LinuxONE -based virtual server platform in the public cloud. It provides customers with complete authority over their LinuxONE -based workloads without the cloud administrators accessing their data. Customers manage their LinuxONE -based workloads through users who instantiate their own Linux virtual servers with their own public Secure Shell (SSH) key to maintain. Users can build their applications and create development and test environments and use them for disaster recovery (DR) or geographic expansions where a client wants a presence but cannot build a complete data center on their own.
Managing IBM Cloud Hyper Protect Virtual Servers is done through the IBM Cloud portal for tasks such as checking the status of virtual servers and information about instances. In addition, the Dashboard has information about how to connect to instances and perform tasks like create, modify, and delete users, and install applications.
As LinuxONE -based virtual servers on the IBM Cloud, IBM Cloud Hyper Protect Virtual Servers include security that is enforced at the hardware layer that does not depend only on software policies or operational best practices. Only the user who provisioned the virtual server with their public SSH key can access it (not even the cloud administrators are granted this access), which assures the user that even the cloud administrator has no technical way of accessing the data.
With IBM LinuxONE and Secure Service Container (SSC) technology, IBM Cloud Hyper Protect Virtual Servers provide built-in pervasive encryption of data at rest and in flight, and tamper protection from inside and outside threats. This feature can give organizations peace of mind that highly sensitive data, such as medical records, are always protected. IBM Cloud Hyper Protect Virtual Servers offer a confidential computing environment that addresses the top security concerns of regulated enterprises.
IBM Cloud Hyper Protect Virtual Servers also provide users high reliability and availability for mission-critical applications. Workloads are deployed on high-performance Linux virtual machines (VMs), and an instance can be built as a HA cluster with MZR support. Overall, IBM Cloud Hyper Protect Virtual Servers offer users control and security without compromising performance.
For more information, see Chapter 4, “IBM Cloud Hyper Protect Virtual Servers” on page 239, and IBM Cloud Hyper Protect Virtual Servers.
Chapter 1. Introducing IBM Hyper Protect Services 5
1.5 IBM Hyper Protect Virtual Servers on-premises
The IBM Hyper Protect Virtual Servers offering delivers unique security capabilities to protect applications on-premises that are deployed to IBM LinuxONE or IBM Z servers.
Many organizations must protect their mission-critical applications in production, but security threats can also surface during the development and pre-production phases. Also, during deployment and production, insiders who manage the infrastructure that hosts critical applications might pose a threat because of their super-user credentials and level of access to secrets or encryption keys. Organizations must incorporate secure design practices in their development operations and embrace DevSecOps to protect their applications from the vulnerabilities and threat vectors that can compromise their data and potentially threaten their business.
IBM Hyper Protect Virtual Servers, which is the evolution of the IBM Secure Service Container for IBM Cloud Private offering, protect Linux workloads on IBM Z and IBM LinuxONE platforms throughout their lifecycle, build, management, and deployment phases. This solution delivers the security that is needed to protect mission-critical applications in hybrid multicloud deployments.
IBM Hyper Protect Virtual Servers provide a simplified CLI tool to manage various containers throughout the lifecycle. Command sets are available to manage virtual servers and Secure Build Server (SBS), and monitor the appliance health and Enterprise PKCS #11 (EP11) interfaces for crypto operations. Recently, commands were enhanced to deliver benefits such as reduced deployment time of images and to update the default Docker and bridge network definitions (previously, only the default name and subnet were supported).
IBM Hyper Protect Virtual Servers enables the following security benefits:
� Developers can securely build their applications in a trusted environment with integrity.
� IT infrastructure providers can manage the servers and virtualized environment where the applications are deployed without having access to those applications or their sensitive data.
� Application users can validate that those securely built applications originate from a trusted source by integrating this validation into their own auditing processes.
� CISOs can be confident that their data is protected and private from internal and external threats.
1.5.1 Building images with integrity: Securing Continuous Integration and Continuous Delivery
Developers can securely build their own applications by using the IBM Hyper Protect Virtual Servers Secure Build Continuous Integration and Continuous Delivery (CI/CD) pipeline flow to sign their applications and sign and encrypt the application configuration information. Through this CI/CD, developers can validate the code that is used to build their images and reassure their users of the integrity of their applications.
IBM Hyper Protect Virtual Servers can also use the IBM Crypto Express HSM with FIPS 140-2 Level 4-certified cryptographic capabilities to generate public or private key pairs for signing and encrypting the securely built, and signed application images that are deployed as virtual servers.
6 Securing Your Critical Workloads with IBM Hyper Protect Services

1.5.2 Managing infrastructure with least privilege access to applications and data
After deploying signed IBM Hyper Protect Virtual Servers images, infrastructure providers can manage the underlying infrastructure that hosts the images without accessing the application’s sensitive data to ensure separation of duties and access. The IBM Hyper Protect Virtual Servers image, which is deployed in an SSC appliance, can be managed by using:
� Only RESTful APIs alone� Disabled SSH for production builds� Enabled SSH for development builds
Multiple management options provide a flexible choice in access level to match the lifecycle stage of the application.
IBM Hyper Protect Virtual Servers is designed for zero trust. It uses technical assurance, which means technology is enforced so that the administrator cannot access data, which is unlike operational assurance, which trusts that the provider will not access or provide an internal admin unauthorized access to the data.
1.5.3 Deploying images with trusted provenance
The origin of IBM Hyper Protect Virtual Servers images can be validated to ensure that the image to be deployed and its components come from a trusted source, such as an independent software vendor (ISV) organization or internal development team. The images can be checked to verify that no back door is introduced during the image build. Users of IBM Hyper Protect Virtual Servers application images can use an image’s manifest during an audit to approve an image for deployment.
For more information, see Chapter 5, “IBM Hyper Protect Virtual Servers on-premises” on page 253 and IBM Hyper Protect Virtual Servers.
1.6 Security features
The IBM Hyper Protect Virtual Servers services are based on SSC on IBM LinuxONE, which is the most secure platform in the industry. In this section, we describe the following security features that are used by the IBM Hyper Protect Virtual Servers services:
� Cryptography� SSC� Encryption key management
1.6.1 Cryptography
IBM Hyper Protect Virtual Servers services on IBM Cloud and on-premises are hosted on the most secure platform, which is IBM LinuxONE. In this section, we describe some cryptographic concepts to help you understand some security features on this platform.
Chapter 1. Introducing IBM Hyper Protect Services 7

KeysIn modern cryptography, keys must be kept secret. Depending on the effort that is made to protect the key, keys are classified into the following levels:
� A clear key is a key that is transferred from the application in clear text to the cryptographic function. The key value is stored in the clear (at least briefly) somewhere in unprotected memory areas. Therefore, the key can be made available to someone under certain circumstances who is accessing this memory area. This risk must be considered when clear keys are used. However, many applications exist where this risk can be accepted. For example, the transaction security for the (widely used) encryption methods Secure Sockets Layer (SSL) and Transport Layer Security (TLS) is based on clear keys.
� The value of a protected key is stored only in clear in memory areas that cannot be read by applications or users. The key value does not exist outside of the physical hardware, although the hardware might not be tamper-resistant. The principle of protected keys is unique to IBM Z and LinuxONE systems.
� For a secure key, the key value does not exist in clear format outside of a special hardware device (HSM), which must be secured and tamper-resistant. A secure key is protected from disclosure and misuse, and it can be used for the trusted execution of cryptographic algorithms on highly sensitive data. If used and stored outside the HSM, a secure key must be encrypted with a master key, which is created within the HSM and never leaves the HSM. On IBM LinuxONE, secure keys are in IBM Crypto Express adapters, which are described in “IBM Crypto Express adapter”.
CP Assist for Cryptographic FunctionsOn each processor unit (PU) or core of the LinuxONE server, an independent cryptographic coprocessor that is named CP Assist for Cryptographic Functions (CPACF) is available. The CPACF coprocessor is not classified as an HSM. It is not suitable for handling algorithms that use secure keys. However, it can be used for algorithms that use clear keys and protected keys.
The CPACF offers a set of symmetric cryptographic functions that enhances the encryption and decryption performance of clear key operations. CPACF is designed to facilitate the privacy of cryptographic key material when used for data encryption through key wrapping implementation. It ensures that key material is not visible to applications or operating systems (OSs) during encryption operations. Because CPACF is on the same PU, it runs at processor speed (5.2 GHz). Therefore, it is a fast cryptographic device that performs synchronous cryptographic operations.
CPACF offers a set of symmetric cryptographic functions (for example, AES and DES) that enhances the encryption and decryption performance of clear key operations. These functions are for SSL, virtual private network (VPN), and data-storing applications that do not require FIPS 140-2 Level 4 security.
CPACF can encrypt up to 13 GB of data per second per core. CPACF can provide performance improvements of up to 6x, and it is best suited for symmetric, high-speed bulk encryption.
IBM Crypto Express adapterIBM Z and LinuxONE include a PCIe cryptographic adapter feature that is exclusive to these platforms that is designed for FIPS 140-2 Level 4 certification. This feature is an HSM that is compliant with PCI-HSM certifications and provides a secure programming and hardware environment on which crypto processes are run. It provides tamper-sensing and tamper-responding high-performance cryptographic operations.
8 Securing Your Critical Workloads with IBM Hyper Protect Services

Each cryptographic adapter can be configured in one of the following configurations:
� Secure IBM Common Cryptographic Architecture (CCA) coprocessor (CEX7C) for FIPS 140-2 Level 4 certification.
� Accelerator (CEX7A) for acceleration of public key and private key cryptographic operations that are used with SSL/TLS processing.
� Secure IBM Enterprise EP11 coprocessor (CEX7P) implements an industry-standardized set of services that adheres to the PKCS #11 specification V2.20 and more recent amendments. This mode introduced the PKCS #11 secure key function. In EP11, keys can be generated and securely wrapped under the EP11 Master Key. A Trust Key Entry (TKE) workstation is always required to support the administration of the Crypto Express7S when it is configured in EP11 mode. IBM Hyper Protect Virtual Servers employ an EP11 over gRPC (GREP11) container that enables API calls to cryptographic functions on the HSM from other applications or microservices.
These modes can be configured by using the Support Element (SE). The PCIe adapter must be configured offline to change the mode.
The Trust Key Entry workstationThe TKE workstation is an optional feature that offers key management functions. The TKE provides a secure, remote, and flexible method of providing Master Key Part Entry and to remotely manage PCIe cryptographic coprocessors. The cryptographic functions on the TKE are run by one PCIe cryptographic coprocessor. The TKE workstation communicates with the IBM Z or LinuxONE system through a TCP/IP connection. TKE securely manages multiple cryptographic modules that run in CCA or EP11 and use compliant-level hardware-based key management techniques from a single point of control.
Chapter 1. Introducing IBM Hyper Protect Services 9

1.6.2 IBM Secure Service Container
IBM SSC provides the base infrastructure on IBM LinuxONE for integrating OS, middleware, and software components that are packaged to work autonomously and provide core services and infrastructure with a focus on consumability and security.
Figure 1-1 shows an overview of the SSC.
Figure 1-1 Secure Service Container
The SSC focuses specifically on protections from misuse of privileged user credentials and delivers this protection and other security capabilities that applications or code can use without changing the code. In addition, the SSC framework encrypts the underlying infrastructure data in flight and at rest, which prevents access to memory or processor state; deploys to a logical partition (LPAR) that is certified for Enterprise Assurance Level (EAL) 5+ level isolation; and prevents direct access to the embedded OS. The SSC provides communication and management through defined APIs in the appliance framework.
Security mechanismsThe following security mechanisms also are applied to protect the data in the SSC:
� Persistence data is encrypted by using the automatic file system encryption technology Linux Unified Key Setup (LUKS). The encryption keys are stored within appliances, and they are not accessible by administrators. Keys are managed based on the appliance lifecycle. The Docker container data that is mounted to disk is also encrypted.
� In-flight data is encrypted by using the automatic network encryption technology TLS. Data is transferred through encrypted management REST API interfaces among SSC partitions.
10 Securing Your Critical Workloads with IBM Hyper Protect Services

� Diagnostic data is encrypted, which includes first-failure data capture (FFDC) data that is required to fix problems, dump data (including log message buffers), and so on. Such data is accessible to the service team only.
� OS access to the underlying SSC appliance is prohibited. Back doors to this host level are eliminated because SSH is disabled on the SSC partitions by default. Access to the cluster nodes are available by using SSH keys that are protected by the cloud administrator. Users with OS access cannot access application data and customer data.
Encryption algorithms that are used for storage and data transport are provided by the IBM SSC in IBM Hyper Protect Virtual Servers services.
IBM Hyper Protect Virtual Servers services are based on the SSC technology. They inherit all the security mechanisms that are provided by the SSC, as described in “Security mechanisms” on page 10.
Note: IBM SSC encrypts your data at-rest and in-flight by using CPACF on IBM LinuxONE at CPU speed. Optionally, to provide the most secure environment that is compliant with FIPS 140-2 Level 4 certification, SSC also uses PCI-HSM on LinuxONE for secure keys management by configuring the PCI-HSM or crypto adapters with the EP11 mode.
Note: At the time of writing, secure keys management in IBM Hyper Protect Virtual Servers services uses EP11 library and APIs, including IBM Cloud Hyper Protect Crypto Services and IBM Hyper Protect Virtual Servers on-premises.
Chapter 1. Introducing IBM Hyper Protect Services 11

12 Securing Your Critical Workloads with IBM Hyper Protect Services

Chapter 2. IBM Cloud Hyper Protect Crypto Services
In this chapter, we describe how cryptographic operations and private keys can be secured by using IBM Hyper Protect Crypto Services in IBM Cloud by using Hardware Security Modules (HSMs). This chapter covers the service configuration, the programming application programming interfaces (APIs) that are available and examples, and the connection setup to the IBM Hyper Protect Crypto Services instance.
This chapter includes the following topics:
� Overview
� IBM Hyper Protect Crypto Services provisioning
� Service initialization: Crypto units master key initialization
� Using the IBM Key Protect REST API
� Using the Public Key Cryptography Standards #11 API with IBM Hyper Protect Crypto Services
2
© Copyright IBM Corp. 2020, 2022. All rights reserved. 13

2.1 Overview
IBM Hyper Protect Crypto Services is a dedicated Key Management Service (KMS) and HSM that uses Federal Information Processing Standard (FIPS) 140-2 Level 4 certified hardware that is available in the public IBM Cloud.
Your application connects the IBM Hyper Protect Crypto Services over a TCP/TP Transport Layer Security (TLS) connection and authenticates it by using valid IBM Cloud service authentication tokens.
IBM Hyper Protect Crypto Services provides HSM master key lifecycle management capabilities like master key generation, master key rotation, and master key recovery.
IBM Hyper Protect Crypto Services provides a programming model that allows an application to secure the data by securing the management of cryptographic keys and cryptographic operations in a cloud service. Three programming models are available to application developers:
� The IBM Key Protect REST API.
� The Public Key Cryptography Standards (PKCS) #11 over gRPC API (GREP11) to request encryption or to sign the application data.
� Native PKCS #11 C library.
PKCS #11 defines a standard platform that is an independent set of cryptographic APIs (also referred to as cryptoki). The cryptoki API implements cryptographic operations, such as key generation for symmetric keys and asymmetric key pairs; encryption and decryption; hashing; and digital signatures, which occur securely within the HSM.
The HSM devices that are used in IBM Hyper Protect Crypto Services are certified at FIPS 140-2 Level 4, which is the highest protection level that is defined by the standard. IBM Hyper Protect Crypto Services clients have a dedicated HSM crypto unit (a single-tenant model).
2.2 IBM Hyper Protect Crypto Services provisioning
An instance of IBM Hyper Protect Crypto Services can be created by using the IBM Cloud console (the IBM Cloud user interface that is available on the internet from your browser) or the IBM Cloud Command-Line Interface (CLI). Two mandatory steps are required before your application can use the services:
1. Provision your IBM Hyper Protect Crypto Services, as described in 2.2.1, “Provisioning an instance by using the IBM Cloud console” on page 15.
2. Initialize your service by setting up its HSM master key, as described in 2.2.2, “Provisioning your instance by using the IBM Cloud CLI” on page 26.
Note: For more information about the differences between the various FIPS 140-2 security levels, see What is the difference between FIPS 140-2 Level 1, 2, 3, and Level 4?.
For more information about the official FIPS 140-2 specification, which is from the United States Government’s National Institute of Standards and Technology (NIST), see the NIST publication Security Requirements for Cryptographic Modules.
14 Securing Your Critical Workloads with IBM Hyper Protect Services

Online information also is available at the following resources:
� Provisioning an instance by using the IBM Cloud console.� Provisioning an instance by using the IBM Cloud CLI.
2.2.1 Provisioning an instance by using the IBM Cloud console
IBM Cloud console is the user interface that is available at Log in to IBM Cloud. You use a web browser application like Google Chrome, Firefox, or Microsoft Edge to connect the IBM Cloud console.
In this book, it is assumed that you own an IBM Cloud account with which you can perform the tasks that are shown in this chapter.
Listing your IBM Hyper Protect ServicesWhen you connect to https://cloud.ibm.com, you see the login window that is shown in Figure 2-1.
Figure 2-1 IBM Cloud login window
Tip: The authors of this book used Chrome Version 89.0.4389.114 running on Linux and KDE Plasma 5.21 for the screen captures of the IBM Cloud console that are shown in this chapter.
For more information about supported browsers, see What are the IBM Cloud prerequisites?
Chapter 2. IBM Cloud Hyper Protect Crypto Services 15
Enter your IBM Cloud user ID and click Continue.
After you are authenticated, a new window opens. Click the Navigation Menu icon (the one with three horizontal bars, often referred to as a “hamburger menu”).
Figure 2-2 Navigation Menu
Select Resource List, as shown in Figure 2-3 on page 17.
16 Securing Your Critical Workloads with IBM Hyper Protect Services

Figure 2-3 Resource list
The Resource List window opens and displays your list of resources. They are grouped by category. If you are an IBM Cloud client, you already might have some of the resources that are listed.
Chapter 2. IBM Cloud Hyper Protect Crypto Services 17

Figure 2-4 shows that the account has an HPCS-RedBook service running.
Figure 2-4 Instance HPCS-RedBook is listed in the Services drop-down list
Creating your IBM Hyper Protect Crypto Services instance by using the IBM Cloud catalog
In this section, we describe two methods of creating an IBM Hyper Protect Crypto Services instance.
Method 1: Menu toolbarClick the magnifying glass in the menu toolbar of your IBM Cloud console, as shown in Figure 2-5.
Figure 2-5 Searching for a resource
18 Securing Your Critical Workloads with IBM Hyper Protect Services

Type the first letter of Hyper Protect. The full list of IBM Hyper Protect Services displays, as shown in Figure 2-6.
Figure 2-6 Looking for a resource by using the menu toolbar
Select Hyper Protect Crypto Services, as shown in Figure 2-7.
Figure 2-7 Selecting Hyper Protect Crypto Services
Chapter 2. IBM Cloud Hyper Protect Crypto Services 19

Method 2: Catalog menuIf you prefer, you can select the Hyper Protect Crypto Services in the complete list of IBM Cloud services. To do this task, click Catalog in the upper toolbar menu, as shown in Figure 2-8.
Figure 2-8 Selecting Catalog in the upper toolbar menu
Select Services in the left menu, as shown in Figure 2-9.
Figure 2-9 Selecting Services in the left menu
20 Securing Your Critical Workloads with IBM Hyper Protect Services
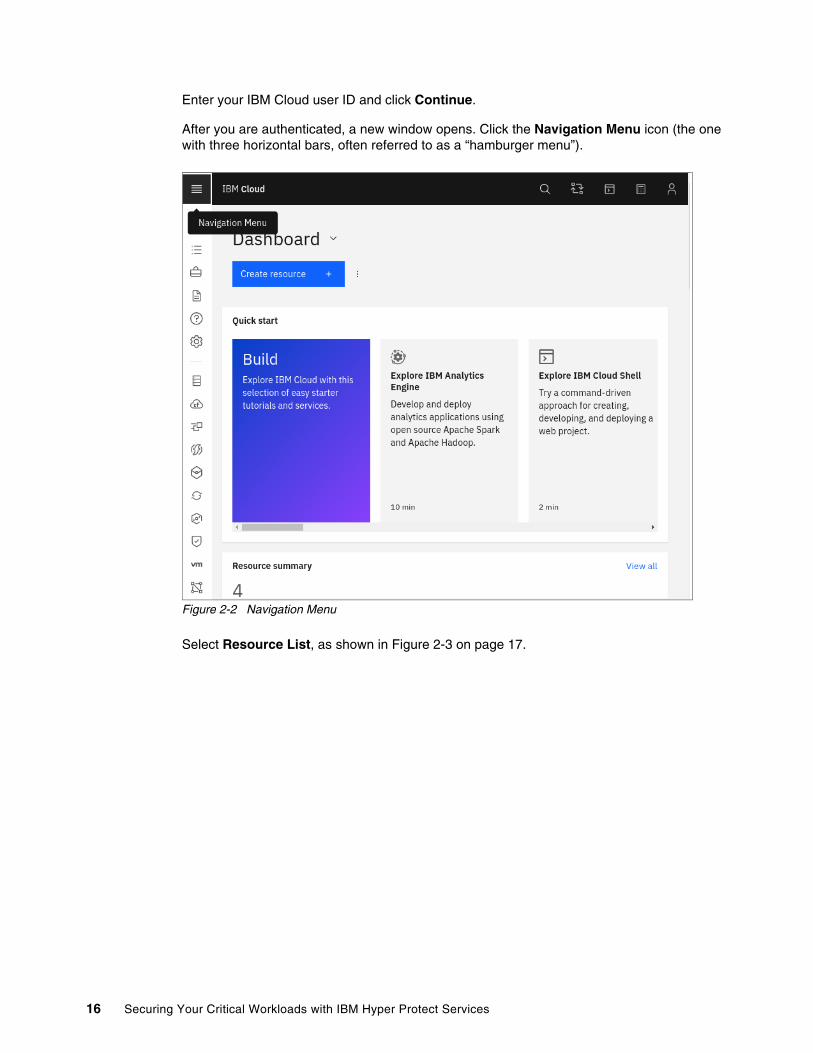
Scroll down the list of services to find the tile for the Hyper Protect Crypto Services service (Figure 2-10).
Figure 2-10 Finding and selecting Hyper Protect Crypto Services in the list of available services
Chapter 2. IBM Cloud Hyper Protect Crypto Services 21
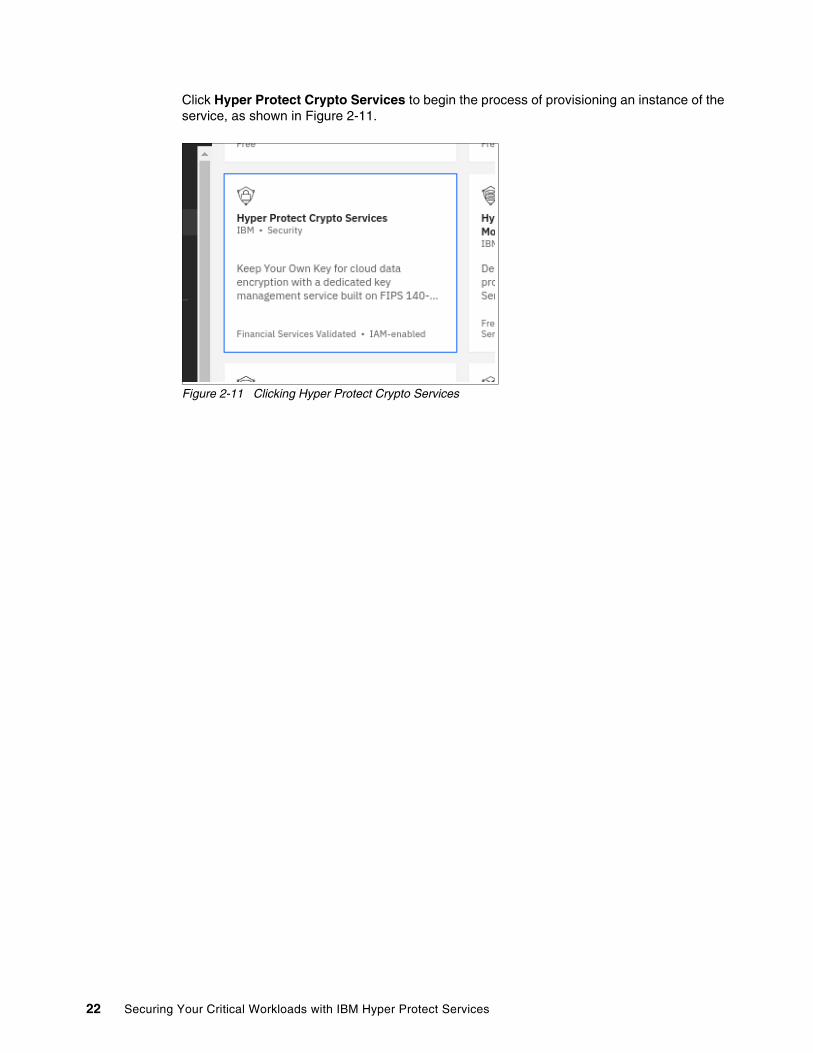
Click Hyper Protect Crypto Services to begin the process of provisioning an instance of the service, as shown in Figure 2-11.
Figure 2-11 Clicking Hyper Protect Crypto Services
22 Securing Your Critical Workloads with IBM Hyper Protect Services

You should see the service creation that is shown in Figure 2-12.
Figure 2-12 Hyper Protect Crypto Services Creation window
Chapter 2. IBM Cloud Hyper Protect Crypto Services 23

Clicking the tile opens a window in which you can specify settings for your instance. We entered the following values, as shown in Figure 2-13.
Figure 2-13 Choosing your options when creating an IBM Hyper Protect Crypto Services instance
Select a region We selected Dallas from the list of regions in which the service is available (Dallas, Washington DC, Sydney, and Frankfurt at the time of writing. More regions might host the service in the future).
Service name We entered a name of my-hpcs-instance.
Resource group We accepted the default. By using resource groups, you can organize your IBM Cloud account resources for access control and billing purposes. If you use this feature and use defined resource groups, select a suitable group (the choice is up to you). For more information about resource groups, see Best practices for organizing resources and assigning access.
Tags We left this field blank. Tags are optional. For more information, hover the cursor over the information tooltip that is next to the Tags label.
24 Securing Your Critical Workloads with IBM Hyper Protect Services

Number of crypto units We selected 2 - (multi-zone for high availability), which is the minimum recommendation for production usage.
Public (default) or Private network We kept the default public option. This option can be modified later. The IBM Hyper Protect Crypto Services keys can be managed only by using a CLI in a private network.
After you select your settings, you might want to click View Terms in the Summary pane on the right below the Create button or estimate your costs by using the link in the Summary pane.
Click Create to create your IBM Hyper Protect Crypto Services instance.
After a couple of seconds, the Resource list opens, as shown in Figure 2-14, and you see the in-progress provisioning of your service. After a couple of minutes, everything is ready.
Figure 2-14 On-going creation of the HPCS service
Your instance is created, but as a developer you cannot start using it. The HSM master keys that protect your application keys and their cryptographic operations must be set up, as described in 2.3, “Service initialization: Crypto units master key initialization” on page 31.
IBM Cloud Virtual Private Cloud (VPC) support: If you have an IBM Cloud VPC instance, you can connect the VPC instance to your IBM Hyper Protect Crypto Services instance through a virtual private endpoint (VPE) gateway so that you can manage your keys by using IBM Hyper Protect Crypto Services through a private network.
Note: Figure 2-13 shows the price of the service at time of writing. You might see a different price in your configuration.
Chapter 2. IBM Cloud Hyper Protect Crypto Services 25

2.2.2 Provisioning your instance by using the IBM Cloud CLI
In this section, we guide you through an installation and configuration of the IBM Cloud CLI and how to create an IBM Hyper Protect Crypto Services instance.
Installing the IBM Cloud CLI The IBM Cloud CLI must be installed on your workstation for you to complete all the other tasks in this section.
You can determine whether the IBM Cloud CLI is installed by running the command that is shown in Example 2-1.
Example 2-1 The ibmcloud command: Checking your release number
$ ibmcloud --versionibmcloud version 1.5.1+7684ebe-2021-04-27T18:17:58+00:00
If you do not receive output that displays a version number but instead receive a message indicating that the ibmcloud command is not found, you can learn how to install the IBM Cloud CLI command at Getting started with the IBM Cloud CLI.
Configuring your IBM Cloud CLILog in to IBM Cloud by using the ibmcloud login command and select the correct account that will be billed for the provisioning of the IBM Hyper Protect Crypto Services, as shown in Example 2-2.
Example 2-2 Log in to IBM Cloud by using an IBM Corporate account and a one-time temporary password
$ ibmcloud login --ssoAPI endpoint: https://cloud.ibm.comRegion: eu-de
Get a one-time code from https://identity-1.uk-south.iam.cloud.ibm.com/identity/passcode to proceed.Open the URL in the default browser? [Y/n] > YOne-time code > Authenticating...OK
Select an account:1. Redbooks Author1's Account (156c853fbde0df21e3041ae895dd62a) <-> 22972372. IBM (c2a75eec409305d799123abc59659aa9a) <-> 241839873. ITSO's Account (f5606ddf8d449f4fe0384ebccb7570a8) <-> 93181231Enter a number> 1
Note: Commands run in a terminal emulator. The authors of this book used a Linux notebook and its terminal emulator applications like konsole or gnome-terminal. The $ sign represents a shell prompt and might be different on your notebook.
Important: You must ensure that you can successfully run the command that is shown in Example 2-1 before you can perform any of the remaining tasks that are necessary to get your service instance ready to use.
26 Securing Your Critical Workloads with IBM Hyper Protect Services

Targeted account Redbooks Author1's Account (156c853fbde0df21e3041ae895dd62a)<-> 2297237
API endpoint: https://cloud.ibm.com Region: us-south User: [email protected]: Redbooks Author1's Account (156c853fbde0df21e3041ae895dd62a)<-> 2297237Resource group: No resource group targeted, use 'ibmcloud target -g RESOURCE_GROUP' CF API endpoint: Org: Space:
The following steps guide you through the configurations options:
1. Select a region.
You must select a region (IBM Cloud data center) where IBM Hyper Protect Crypto Services is available. At the time of writing, you can select Dallas, Washington DC, Sydney, or Frankfurt.
To list the available regions, run the command that is shown in Example 2-3. It shows a mapping between Display name and Name for the various regions. Name value is what you specify as option parameters when required.
Example 2-3 Listing available regions
$ ibmcloud regionsListing regions...
Name Display name au-syd Sydney in-che Chennai jp-osa Osaka jp-tok Tokyo kr-seo Seoul eu-de Frankfurt eu-gb London us-south Dallas us-south-test Dallas Test us-east Washington DC $
Use the Name and not the Display name of the region where you want to provision your service. For our example, we want us-south, so we select Dallas.
Using your region, run the command that is shown in Example 2-4.
Example 2-4 Targeting the correct region
$ ibmcloud target -r us-southSwitched to region us-south
Chapter 2. IBM Cloud Hyper Protect Crypto Services 27

2. Select a resource group.
Your account has a default resource group that is defined when the service is provisioned and billed. You can list the available resource groups of your account by running the ibmcloud resource groups command, as shown in Example 2-5.
Example 2-5 Listing your resource groups
$ ibmcloud resource groupsRetrieving all resource groups under account 537544c2222297f40ed689e8473e7849 as [email protected] ID Default Group State default b6c700bd2c854f62bbb708f199479245 true ACTIVE zsb006ResourceGroup d48a36a73a8141e48e66008a1180d89f false ACTIVE
default is defined as the default group for your account.
You can select another group by using the ibmcloud target command, as shown in Example 2-6.
Example 2-6 Selecting another resource group to provision IBM Hyper Protect Crypto Services
$ ibmcloud target -g zsb006ResourceGroupTargeted resource group zsb006ResourceGroup
API endpoint: https://cloud.ibm.com Region: us-southUser: [email protected]: Redbooks Author1's Account (156c853fbde0df21e3041ae895dd62a)<-> 2297237Resource group: zsb006ResourceGroup CF API endpoint: Org: Space:
Creating your IBM Hyper Protect Crypto Services instanceIn this step, we guide you with examples that assist you in the following tasks:
� Listing your services.
� Creating a service instance and listing the running service instances.
Listing your servicesYou can list your running IBM Hyper Protect Crypto Services instances by using the ibmcloud resource service-instances command, as shown in Example 2-7. The command applies to a specific resource group. In our example, default is still selected as the resource group.
Example 2-7 Listing all running services
$ ibmcloud resource service-instances --type allRetrieving instances with all types in resource group default in all locations under account Redbooks Author1's Account as [email protected] Location State Type Watson Studio-z4 us-south active service_instance cloud-object-storage-jh global active service_instance
28 Securing Your Critical Workloads with IBM Hyper Protect Services

watson-vision-combined-at us-south active service_instance my-hpcs-instance us-south active service_instance
Any type of service is listed and includes non- IBM Hyper Protect Services. As a best practice, include the type of service in the name of your IBM Hyper Protect Crypto Services. In Example 2-7 on page 28, we used the hpcs acronym in the name so that we can easily see that the my-hpcs-instance, which was previously created by using the IBM Cloud console, is an IBM Hyper Protect Services instance.
To retrieve more information about an active service by using its name, run the command that is shown in Example 2-8.
Example 2-8 Getting more information about an active service
$ ibmcloud resource service-instance my-hpcs-instanceRetrieving service instance my-hpcs-instance in all resource groups under account edBook Author1's Account as [email protected]...
OK Name: my-hpcs-instance ID: crn:v1:bluemix:public:hs-crypto:us-south:a/537544c2222297f40ed689e8473e7849:8207abd0-b8d8-4c52-a257-966eda16a64d:: GUID: 8207abd0-b8d8-4c52-a257-966eda16a64d Location: us-south Service Name: hs-crypto Service Plan Name: standard Resource Group Name: default State: active Type: service_instance Sub Type: kms Created at: 2021-05-05T06:54:07Z Created by: [email protected] at: 2021-05-05T06:56:16Z Last Operation: Status create succeeded Message Asynchronous provision completed successfully.
Creating a service instance and listing the running service instancesThe ibmcloud resource service-instance-create command, as shown in Example 2-9, creates a service instance.
The service name itso-second-hpcs-instance and the region us-south are mandatory parameters.
Example 2-9 Instantiating IBM Hyper Protect Crypto Services
$ ibmcloud resource service-instance-create itso-second-hpcs-instance hs-crypto standard us-south Creating service instance itso-second-hpcs-instance in resource group default of account Redbooks Author1's Account as [email protected] instance itso-second-hpcs-instance was created. Name: itso-second-hpcs-instance
Chapter 2. IBM Cloud Hyper Protect Crypto Services 29
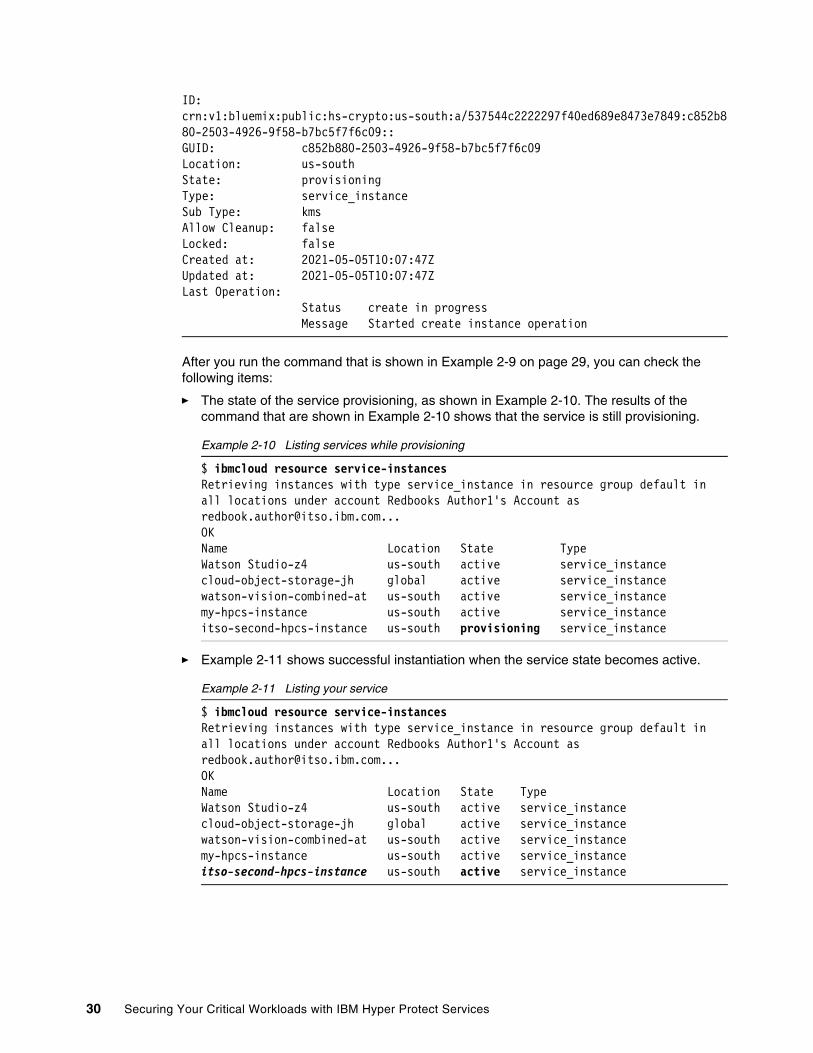
ID: crn:v1:bluemix:public:hs-crypto:us-south:a/537544c2222297f40ed689e8473e7849:c852b880-2503-4926-9f58-b7bc5f7f6c09:: GUID: c852b880-2503-4926-9f58-b7bc5f7f6c09 Location: us-south State: provisioning Type: service_instance Sub Type: kms Allow Cleanup: false Locked: false Created at: 2021-05-05T10:07:47Z Updated at: 2021-05-05T10:07:47Z Last Operation: Status create in progress Message Started create instance operation
After you run the command that is shown in Example 2-9 on page 29, you can check the following items:
� The state of the service provisioning, as shown in Example 2-10. The results of the command that are shown in Example 2-10 shows that the service is still provisioning.
Example 2-10 Listing services while provisioning
$ ibmcloud resource service-instancesRetrieving instances with type service_instance in resource group default in all locations under account Redbooks Author1's Account as [email protected] Location State Type Watson Studio-z4 us-south active service_instance cloud-object-storage-jh global active service_instance watson-vision-combined-at us-south active service_instance my-hpcs-instance us-south active service_instance itso-second-hpcs-instance us-south provisioning service_instance
� Example 2-11 shows successful instantiation when the service state becomes active.
Example 2-11 Listing your service
$ ibmcloud resource service-instancesRetrieving instances with type service_instance in resource group default in all locations under account Redbooks Author1's Account as [email protected] Location State Type Watson Studio-z4 us-south active service_instance cloud-object-storage-jh global active service_instance watson-vision-combined-at us-south active service_instance my-hpcs-instance us-south active service_instance itso-second-hpcs-instance us-south active service_instance
30 Securing Your Critical Workloads with IBM Hyper Protect Services

2.3 Service initialization: Crypto units master key initialization
The HSM master key that is used by IBM Hyper Protect Crypto Services protects all the cryptographic material that is created in the service. You must initialize it before by using your service.
2.3.1 Activating your service’s master key
You must verify whether your service is initialized and active before you can use your service.
In the IBM Cloud console resource list, click the name of one of your provisioned IBM Hyper Protect Crypto Services instances to start its configuration. In this example, we use the my-hpcs-instance, as shown in Figure 2-15.
Figure 2-15 Listing your service in the Resource List of the IBM Cloud console
Advanced options: In the IBM Cloud console, the number of crypto units and the private-only option can be specified by adding the following parameter options to the ibmcloud resource service-instance-create command:
-p '{"units": <number_of_crypto_units>, "allowed_network": "<network_access>"}
By default, a minimum of two crypto units are provisioned, and public and private networks are enabled for the service.
Chapter 2. IBM Cloud Hyper Protect Crypto Services 31

If your HSM master key is not configured, you see a yellow warning toolbar telling you that the master key has not been activated, as shown in Figure 2-16.
Figure 2-16 HSM master key is not configured
The master key (also known as the HSM master key) is used to encrypt the cryptographic materials that are stored in the service-allocated keystores. It is a symmetric 256-bit AES key. For the initialization, you must prepare and load it or you can auto-generate it. One service instance has only one master key. If you delete the master key of the service instance, you can effectively crypto-shred all data that was encrypted with the keys that are wrapped by the HSM master key.
With an HSM master key, you take the ownership of the cloud HSM and own the root of trust that encrypts your application keys and the cryptographic operations with them. You can keep and protect a copy of this HSM master key by using multiple smart cards or multiple files that are protected by a specific password that is known by multiple individuals.
The activated HSM master key never leaves the HSM. IBM Cloud administrators cannot extract this key out of the HSM.
By restoring this master key in another HSM, you can restore your operations at another site. This task requires a quorum of Security Officers (SOs) to provide their master key copy part and enter their password. IBM Hyper Protect Crypto Services includes recovery crypto units that make this procedure easy and transparent.
The procedure to manipulate this HSM master key is highly sensitive, and it is done by using a set of specific ibmcloud tke commands. (The tke acronym means Trusted Key Entry.)
Note: The HSM is certified at Security Level 4 of the United States government’s FIPS 140-2 standard, which is the highest security level that is defined in the standard.
For more information about the FIPS 140-2 specification, see What is the difference between FIPS 140-2 Level 1, 2, 3, and Level 4.
FIPS 140-2 Level 4 means that the HSM responds to virtually all attempts at tampering by destroying all critical security parameters, that is, the master key. It is almost impossible for a malicious actor to steal your master key from the HSM.
32 Securing Your Critical Workloads with IBM Hyper Protect Services

Table 2-1 describes three approaches that can be used to initialize your HSM master key.
Table 2-1 Three options to initialize the HSM master key
Approaches Tool Master key storage
Master key backup
Master key rotationa
a. Master Key rotation is the action to switch the current HSM master key to a new one, which forces a re-encryption of the existing ciphered materials in IBM Hyper Protect Crypto Services keys stores and maybe your application data too.
Using smart cards and the IBM Hyper Protect Crypto Services Management Utilities.
The Management Utilities
The master key is composed of several master key parts that are stored on smart cards.
You are responsible for backing up the master key by using smart cards.
Not supported at the time of writing.
Using recovery crypto units.For more information, see 2.3.6, “Initializing your IBM Hyper Protect Crypto Services master key by using recovery crypto units” on page 57.
IBM Cloud Trust Key Entry (TKE) CLI plug-in
The master key is automatically generated and stored within the recovery crypto units of your service instance.
The master key is automatically backed up in recovery crypto units. You can recover your master key from the backups if the master key is lost or destroyed.
You do not need to prepare a new master key for the rotation. The new master key is automatically generated in a recovery crypto unit and then propagated to the operational crypto units and other recovery crypto units.
Using key part files. For more information, see 2.3.2, “Using the IBM Cloud TKE CLI plug-in and master key part files” on page 34.
IBM Cloud TKE CLI plug-in
The master key is composed of several master key parts that are stored on your local workstation files.
The local files serve as a backup of the master key. You need to make sure that the files are properly saved and only the master key custodian knows the password.
You must prepare a new master key on your local workstation before you can rotate the master key for your service instance.
Note: At the time of writing, only the us-south and us-east regions are enabled with the recovery crypto units.
Chapter 2. IBM Cloud Hyper Protect Crypto Services 33

2.3.2 Using the IBM Cloud TKE CLI plug-in and master key part files
Figure 2-17 shows an operational model of a master key initialization by using a notebook that connects to IBM Hyper Protect Crypto Services on IBM Cloud.
Figure 2-17 Master key management by using the IBM Cloud TKE CLI plug-in
The following list describes the master key parts that are shown in Figure 2-17:
� SOs
To use the IBM Cloud TKE CLI plug-in and master key part files, first you must do the following tasks:
– Identify a set of trusted people that will be referred to as SOs or administrators in this book. They are responsible for the crypto unit master key lifecycle. A minimum of two people are required. Each one owns a signature key file that is created by running the ibmcloud tke sigkey-add command. The file is used to sign their actions on the HSM master key.
– Define a quorum of SOs that are required to apply an action on the master key. The quorum is defined by running the ibmcloud tke cryptounit-thrhld-set command. This command also switches the crypto unit from an insecure mode that is used for the HSM master configuration to a secure mode.
� A TKE notebook
The master key initialization happens on a single notebook where the signature key file of each SO (protected by their password) is temporarily stored. This notebook can run a Linux, Mac, or MS Windows operating system (OS). The examples that are documented in this book used a Linux notebook.
On this notebook, you have the following items:
– The IBM Cloud TKE CLI plug-in installed.
– A copy of the administrators or SOs signature keys, as described in “Create your administrators’ signature keys.” on page 37.
34 Securing Your Critical Workloads with IBM Hyper Protect Services

– A copy of the master key parts that were previously generated by each administrator or SO by running the ibmcloud tke mk-add command. The parts are protected a password. For more information, see “Creating the master key parts on your notebook” on page 44.
The notebook OS environment variable CLOUDTKEFILES defines the directory where signature keys and key parts are stored. This directory is a working one that also keeps some contextual information for an ibmcloud tke working session as:
– The selected crypto units on which you want to apply an action.
– The selected set of administrator signature keys that are used to sign and authenticate your action when the crypto units are switched to the secure mode.
� Security context
Except for administrator signature key and master key part generation, all the ibmcloud tke commands require you to log in to IBM Cloud with your account.
The crypto units are initially provisioned for an IBM Cloud user in an insecure mode (called imprint). By using this temporary mode, you can define administrators and the master key registers for all crypto units that are associated with the service instance.
The same set of administrators must be added in all crypto units. They are defined by using the administrator signature keys and the ibmcloud tke cryptounit-admin-add (and ibmcloud tke cryptounit-admin-rm) commands. For more information, see step 4 on page 39.
To switch the crypto units from configuration mode to a secure mode, specify the quorum or threshold of administrator signatures. In secure mode, all actions (that use ibmcloud tke) on them must be signed by at least the threshold number of signature keys. These signatures must be selected before running the action. For more information, see 2.3.5, “Selecting administrator signature keys when working in secure mode” on page 56.
You can check the status of your crypto units by running the ibmcloud tke cryptounit-thrhlds command.
All crypto units exit imprint mode at the same time.
Note: CLOUDTKEFILES must be defined as an absolute path name.
Chapter 2. IBM Cloud Hyper Protect Crypto Services 35

Master key activationFigure 2-18 describes the four steps that are necessary to activate the master key:
1. Key generation
2. Key loading
3. Key committing
4. Key activation
Figure 2-18 Managing HSM master keys registers by using the CLI
The HSM card has two internal registers:
� The Current Master Key Register is used by current cryptographic operations.� The New Master Key Register that temporary stores a key before its activation into the
Current Master Key Register.
The ibmcloud tke commands are used to move a key from the new to the current register. The two master key registers also can be cleared if you do something wrong:
� ibmcloud tke cryptounit-mk-clrcur clears the current master key register.� ibmcloud tke cryptounit-mk-clrnew clears the new master key register.
As shown in Figure 2-18, the master key parts are loaded into the new key register by using the following command:
ibmcloud tke cryptounit-mk-load
Ultimately, the master key is activated by using the following two commands:
ibmcloud tke cryptounit-mk-commit ibmcloud tke cryptounit-mk-setimm.
The service is ready for application developers. As a best practice, remove the key parts and signature keys from this initial setup workstation for security reasons.
36 Securing Your Critical Workloads with IBM Hyper Protect Services

Installing the IBM Cloud TKE CLI plug-inBy using The TKE plug-in in your IBM Cloud CLI environment, you can manage the HSM master key of your service. To install the plug-in, complete the following steps:
1. List your installed plug-ins.
List your installed plug-ins by using the command that is shown in Example 2-12. In the example, the TKE plug-in is not listed, which means that it is not installed.
Example 2-12 IBM Cloud plug-in list
$ ibmcloud plugin listListing installed plug-ins...
Plug-in Name Version Status Private endpoints supported cloud-object-storage 1.2.1 Update Available false container-registry 0.1.497 Update Available false container-service/kubernetes-service 1.0.208 Update Available false cloud-functions/wsk/functions/fn 1.0.47 Update Available false
2. Run the IBM Cloud CLI TKE plug-in installation command.
Install the plug-in by running the ibmcloud plugin install tke command, as shown in Example 2-13.
Example 2-13 Installing the Trusted Key Entry plug-in
$ ibmcloud plugin install tkeibmcloud plugin install tkeLooking up 'tke' from repository 'IBM Cloud'...Plug-in 'tke 1.1.4' found in repository 'IBM Cloud'Attempting to download the binary file... 12.32 MiB / 12.32 MiB [=========================================================================================================================================================] 100.00% 5s12921694 bytes downloadedInstalling binary...OKPlug-in 'tke 1.1.4' was successfully installed into /home/itsouser/.bluemix/plugins/tke. Use 'ibmcloud plugin show tke' to show its details.
3. Create your administrators’ signature keys.
These keys are required to authenticate the actions that are applied to the crypto units and HSM during the activation and management the HSM master key. Each signature key file is protected on the notebook by a password that is required during an ibmcloud tke command invocation.
In our scenario, we simulate three different administrators who are called admin1, admin2, and admin3.
Note: It is expected that each administrator provides their signature file and its master key part and store it on the notebook that is used during the HSM setup. These files are stored in a directory that is specified by the CLOUDTKEFILES OS environment variable.
Chapter 2. IBM Cloud Hyper Protect Crypto Services 37

To create the signature key for admin1, open a terminal emulator and run the command that is shown in Example 2-14. In this example, the command results in an error message.
Example 2-14 Error message that results if you fail to create a directory to store your TKE files
$ export CLOUDTKEFILES=$HOME/securestorage$ ibmcloud tke sigkeysFAILEDError accessing the subdirectory defined by the CLOUDTKEFILES environment variable.
Check that the subdirectory exists and is specified correctly by the environment variable.
CLOUDTKEFILES=/home/itso/securestorage
You receive an error because a directory that you need is not on your notebook. Example 2-15 demonstrates how to fix this error. In our case, we used a notebook that uses a Linux OS.
To create signature key for each administrator, run the ibmcloud tke sigkey-add command.
Example 2-15 Generating a system administrator signature file for each admin
$ export CLOUDTKEFILES=$HOME/securestorage$ mkdir -p $HOME/securestorage$ ibmcloud tke sigkeysNo files containing a signature key were found.
To create a file containing a signature key, use the 'ibmcloud tke sigkey-add' command.
$ ibmcloud tke sigkey-addEnter an administrator name to be associated with the signature key:> admin1Enter a password to protect the signature key:> Reenter the password to confirm:> OKA signature key was created.The available signature keys on this workstation are:
KEYNUM DESCRIPTION SUBJECT KEY IDENTIFIER 1 admin1 48d998c79b703b91bc0b1bc529b369...
No KEYNUM is selected as current signature keys.
$ ibmcloud tke sigkey-addEnter an administrator name to be associated with the signature key:> admin2Enter a password to protect the signature key:> Reenter the password to confirm:> OK
38 Securing Your Critical Workloads with IBM Hyper Protect Services
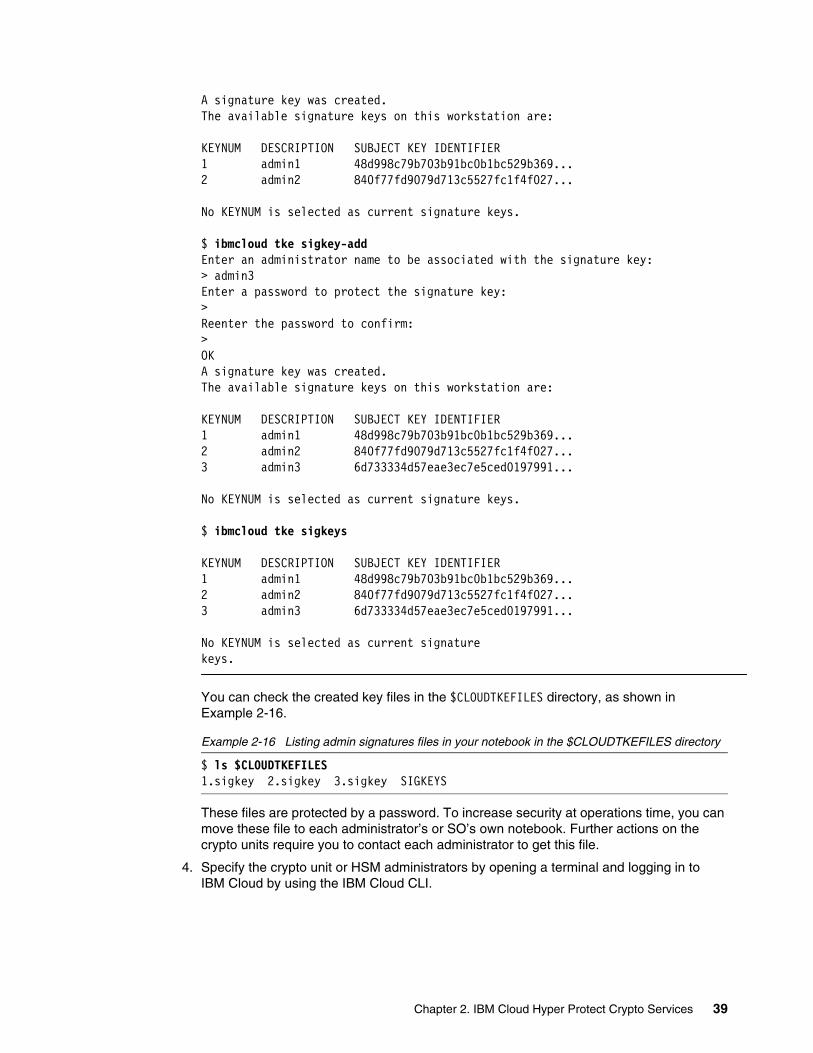
A signature key was created.The available signature keys on this workstation are:
KEYNUM DESCRIPTION SUBJECT KEY IDENTIFIER 1 admin1 48d998c79b703b91bc0b1bc529b369... 2 admin2 840f77fd9079d713c5527fc1f4f027...
No KEYNUM is selected as current signature keys.
$ ibmcloud tke sigkey-addEnter an administrator name to be associated with the signature key:> admin3Enter a password to protect the signature key:> Reenter the password to confirm:> OKA signature key was created.The available signature keys on this workstation are:
KEYNUM DESCRIPTION SUBJECT KEY IDENTIFIER 1 admin1 48d998c79b703b91bc0b1bc529b369... 2 admin2 840f77fd9079d713c5527fc1f4f027... 3 admin3 6d733334d57eae3ec7e5ced0197991...
No KEYNUM is selected as current signature keys.
$ ibmcloud tke sigkeys
KEYNUM DESCRIPTION SUBJECT KEY IDENTIFIER 1 admin1 48d998c79b703b91bc0b1bc529b369... 2 admin2 840f77fd9079d713c5527fc1f4f027... 3 admin3 6d733334d57eae3ec7e5ced0197991...
No KEYNUM is selected as current signature keys.
You can check the created key files in the $CLOUDTKEFILES directory, as shown in Example 2-16.
Example 2-16 Listing admin signatures files in your notebook in the $CLOUDTKEFILES directory
$ ls $CLOUDTKEFILES1.sigkey 2.sigkey 3.sigkey SIGKEYS
These files are protected by a password. To increase security at operations time, you can move these file to each administrator’s or SO’s own notebook. Further actions on the crypto units require you to contact each administrator to get this file.
4. Specify the crypto unit or HSM administrators by opening a terminal and logging in to IBM Cloud by using the IBM Cloud CLI.
Chapter 2. IBM Cloud Hyper Protect Crypto Services 39
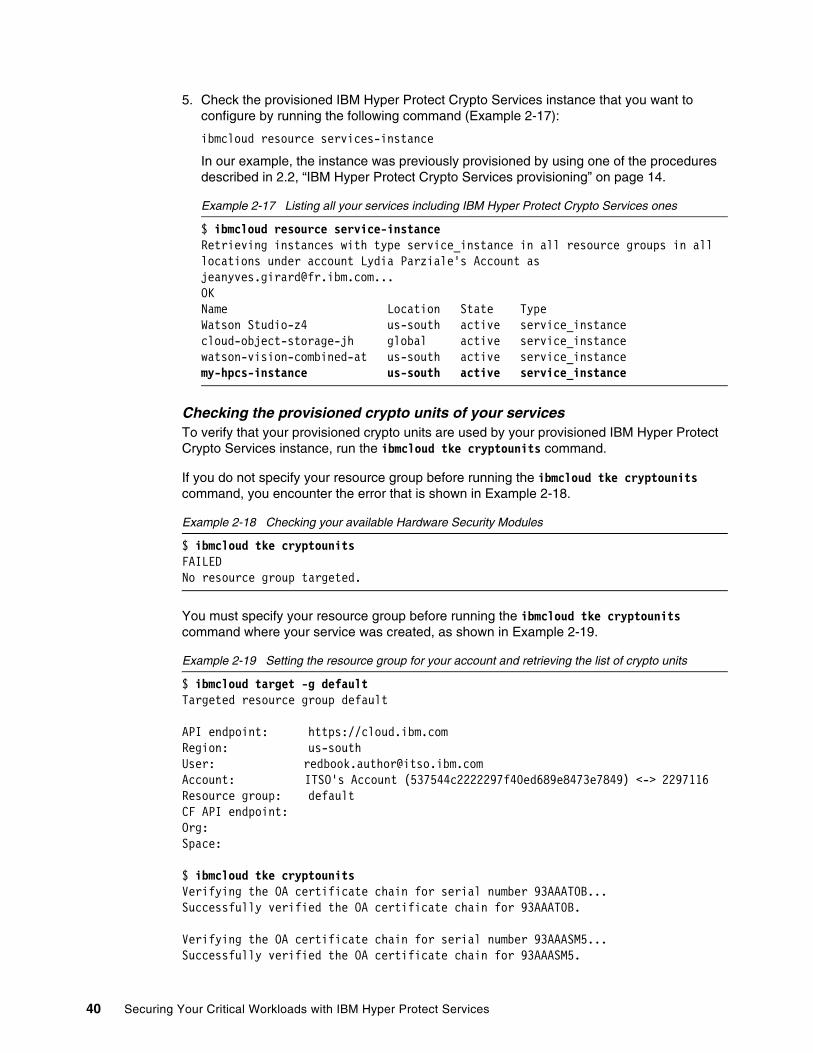
5. Check the provisioned IBM Hyper Protect Crypto Services instance that you want to configure by running the following command (Example 2-17):
ibmcloud resource services-instance
In our example, the instance was previously provisioned by using one of the procedures described in 2.2, “IBM Hyper Protect Crypto Services provisioning” on page 14.
Example 2-17 Listing all your services including IBM Hyper Protect Crypto Services ones
$ ibmcloud resource service-instanceRetrieving instances with type service_instance in all resource groups in all locations under account Lydia Parziale's Account as [email protected] Location State Type Watson Studio-z4 us-south active service_instance cloud-object-storage-jh global active service_instance watson-vision-combined-at us-south active service_instance my-hpcs-instance us-south active service_instance
Checking the provisioned crypto units of your servicesTo verify that your provisioned crypto units are used by your provisioned IBM Hyper Protect Crypto Services instance, run the ibmcloud tke cryptounits command.
If you do not specify your resource group before running the ibmcloud tke cryptounits command, you encounter the error that is shown in Example 2-18.
Example 2-18 Checking your available Hardware Security Modules
$ ibmcloud tke cryptounits FAILEDNo resource group targeted.
You must specify your resource group before running the ibmcloud tke cryptounits command where your service was created, as shown in Example 2-19.
Example 2-19 Setting the resource group for your account and retrieving the list of crypto units
$ ibmcloud target -g defaultTargeted resource group default
API endpoint: https://cloud.ibm.com Region: us-south User: [email protected] Account: ITSO's Account (537544c2222297f40ed689e8473e7849) <-> 2297116 Resource group: default CF API endpoint: Org: Space:
$ ibmcloud tke cryptounits Verifying the OA certificate chain for serial number 93AAAT0B...Successfully verified the OA certificate chain for 93AAAT0B.
Verifying the OA certificate chain for serial number 93AAASM5...Successfully verified the OA certificate chain for 93AAASM5.
40 Securing Your Critical Workloads with IBM Hyper Protect Services

Verifying the OA certificate chain for serial number 93AAATZ1...Successfully verified the OA certificate chain for 93AAATZ1.
Verifying the OA certificate chain for serial number 93AABA6J...Successfully verified the OA certificate chain for 93AABA6J.
API endpoint: https://cloud.ibm.comRegion: us-southUser: [email protected]: ITSO's Account (537544c2222297f40ed689e8473e7849)Resource group: default
SERVICE INSTANCE: 8207abd0-b8d8-4c52-a257-966eda16a64dCRYPTO UNIT NUM SELECTED TYPE LOCATION 1 false OPERATIONAL [us-south].[AZ3-CS6].[02].[07] 2 false OPERATIONAL [us-south].[AZ1-CS4].[00].[09] 3 false RECOVERY [us-south].[AZ3-CS9].[01].[11] 4 false RECOVERY [us-east].[AZ3-CS3].[01].[05]
Note: all operational crypto units in a service instance must be configured the same.Use 'ibmcloud tke cryptounit-compare' to check how crypto units are configured.
Selecting the crypto units to set up their master keyIn Example 2-19 on page 40, you might notice that your crypto units are not selected, so any command to modify their configuration would fail, as shown in Example 2-20.
Example 2-20 Error when no Hardware Security Module or crypto unit is selected
$ ibmcloud tke cryptounit-adminsFAILEDNo crypto units have been selected.
You must select one or more crypto units by using the 'ibmcloud tke cryptounit-add' command before running this command.
Note: The ibmcloud tke cryptounits command lists all crypto units and HSMs of all IBM Hyper Protect Crypto Services instances that you provisioned in a resource group. The service instance’s Globally Unique Identifier (GUID) is specified before each group of associated crypto units.
To check whether the GUID corresponds to the service, run the ibmcloud resource service-instance <service names> command.
Chapter 2. IBM Cloud Hyper Protect Crypto Services 41
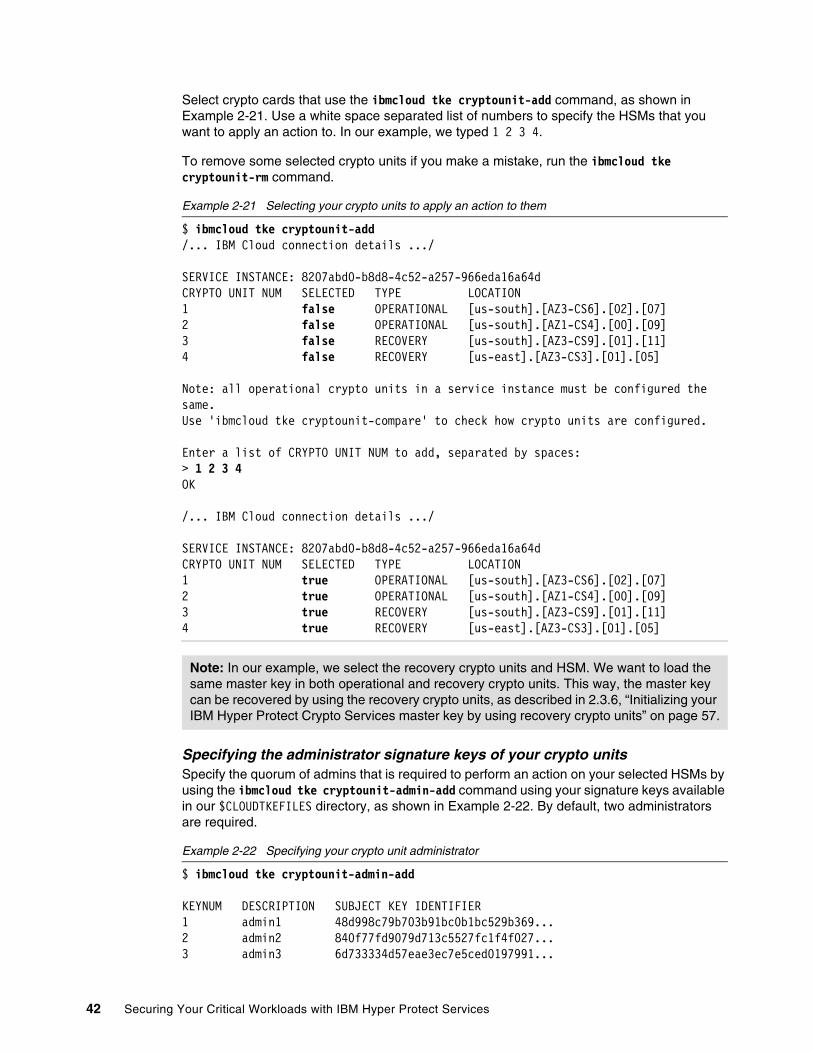
Select crypto cards that use the ibmcloud tke cryptounit-add command, as shown in Example 2-21. Use a white space separated list of numbers to specify the HSMs that you want to apply an action to. In our example, we typed 1 2 3 4.
To remove some selected crypto units if you make a mistake, run the ibmcloud tke cryptounit-rm command.
Example 2-21 Selecting your crypto units to apply an action to them
$ ibmcloud tke cryptounit-add /... IBM Cloud connection details .../
SERVICE INSTANCE: 8207abd0-b8d8-4c52-a257-966eda16a64dCRYPTO UNIT NUM SELECTED TYPE LOCATION 1 false OPERATIONAL [us-south].[AZ3-CS6].[02].[07] 2 false OPERATIONAL [us-south].[AZ1-CS4].[00].[09] 3 false RECOVERY [us-south].[AZ3-CS9].[01].[11] 4 false RECOVERY [us-east].[AZ3-CS3].[01].[05]
Note: all operational crypto units in a service instance must be configured the same.Use 'ibmcloud tke cryptounit-compare' to check how crypto units are configured.
Enter a list of CRYPTO UNIT NUM to add, separated by spaces:> 1 2 3 4OK
/... IBM Cloud connection details .../
SERVICE INSTANCE: 8207abd0-b8d8-4c52-a257-966eda16a64dCRYPTO UNIT NUM SELECTED TYPE LOCATION 1 true OPERATIONAL [us-south].[AZ3-CS6].[02].[07] 2 true OPERATIONAL [us-south].[AZ1-CS4].[00].[09] 3 true RECOVERY [us-south].[AZ3-CS9].[01].[11] 4 true RECOVERY [us-east].[AZ3-CS3].[01].[05]
Specifying the administrator signature keys of your crypto unitsSpecify the quorum of admins that is required to perform an action on your selected HSMs by using the ibmcloud tke cryptounit-admin-add command using your signature keys available in our $CLOUDTKEFILES directory, as shown in Example 2-22. By default, two administrators are required.
Example 2-22 Specifying your crypto unit administrator
$ ibmcloud tke cryptounit-admin-add
KEYNUM DESCRIPTION SUBJECT KEY IDENTIFIER 1 admin1 48d998c79b703b91bc0b1bc529b369... 2 admin2 840f77fd9079d713c5527fc1f4f027... 3 admin3 6d733334d57eae3ec7e5ced0197991...
Note: In our example, we select the recovery crypto units and HSM. We want to load the same master key in both operational and recovery crypto units. This way, the master key can be recovered by using the recovery crypto units, as described in 2.3.6, “Initializing your IBM Hyper Protect Crypto Services master key by using recovery crypto units” on page 57.
42 Securing Your Critical Workloads with IBM Hyper Protect Services
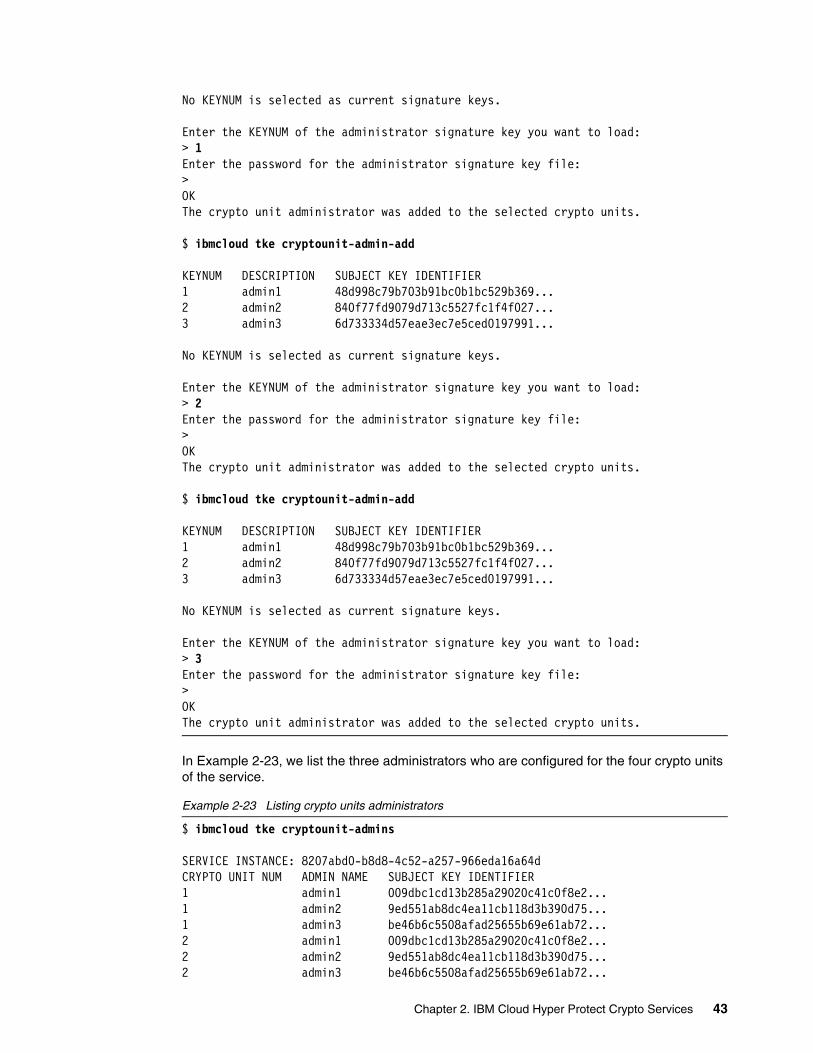
No KEYNUM is selected as current signature keys.
Enter the KEYNUM of the administrator signature key you want to load:> 1Enter the password for the administrator signature key file:> OKThe crypto unit administrator was added to the selected crypto units.
$ ibmcloud tke cryptounit-admin-add
KEYNUM DESCRIPTION SUBJECT KEY IDENTIFIER 1 admin1 48d998c79b703b91bc0b1bc529b369... 2 admin2 840f77fd9079d713c5527fc1f4f027... 3 admin3 6d733334d57eae3ec7e5ced0197991...
No KEYNUM is selected as current signature keys.
Enter the KEYNUM of the administrator signature key you want to load:> 2Enter the password for the administrator signature key file:> OKThe crypto unit administrator was added to the selected crypto units.
$ ibmcloud tke cryptounit-admin-add
KEYNUM DESCRIPTION SUBJECT KEY IDENTIFIER 1 admin1 48d998c79b703b91bc0b1bc529b369... 2 admin2 840f77fd9079d713c5527fc1f4f027... 3 admin3 6d733334d57eae3ec7e5ced0197991...
No KEYNUM is selected as current signature keys.
Enter the KEYNUM of the administrator signature key you want to load:> 3 Enter the password for the administrator signature key file:> OKThe crypto unit administrator was added to the selected crypto units.
In Example 2-23, we list the three administrators who are configured for the four crypto units of the service.
Example 2-23 Listing crypto units administrators
$ ibmcloud tke cryptounit-admins
SERVICE INSTANCE: 8207abd0-b8d8-4c52-a257-966eda16a64dCRYPTO UNIT NUM ADMIN NAME SUBJECT KEY IDENTIFIER 1 admin1 009dbc1cd13b285a29020c41c0f8e2... 1 admin2 9ed551ab8dc4ea11cb118d3b390d75... 1 admin3 be46b6c5508afad25655b69e61ab72... 2 admin1 009dbc1cd13b285a29020c41c0f8e2... 2 admin2 9ed551ab8dc4ea11cb118d3b390d75... 2 admin3 be46b6c5508afad25655b69e61ab72...
Chapter 2. IBM Cloud Hyper Protect Crypto Services 43

3* admin1 009dbc1cd13b285a29020c41c0f8e2... 3* admin2 9ed551ab8dc4ea11cb118d3b390d75... 3* admin3 be46b6c5508afad25655b69e61ab72... 4* admin1 009dbc1cd13b285a29020c41c0f8e2... 4* admin2 9ed551ab8dc4ea11cb118d3b390d75... 4* admin3 be46b6c5508afad25655b69e61ab72...
Creating the master key parts on your notebookBefore creating the master key parts, check that all the crypto units are in imprint mode by running the ibmcloud tke cryptounit-thrhlds command, as shown in Example 2-24.
Imprint mode is a nonsecure mode that you use to activate a master key on nonconfigured crypto units.
Example 2-24 Checking the crypto units mode
$ ibmcloud tke cryptounit-thrhlds
SIGNATURE THRESHOLDSSERVICE INSTANCE: 8207abd0-b8d8-4c52-a257-966eda16a64dCRYPTO UNIT NUM SIGNATURE THRESHOLD REVOCATION THRESHOLD 1 0 0 2 0 0 3* 0 0 4* 0 0
* Indicates a recovery crypto unit that is used only to hold a backup master key value.
==> Crypto units with a signature threshold of 0 are in IMPRINT MODE. <==
The threshold (number of signatures required) is set to zero, which indicates that the crypto units are in imprint mode.
Now, you can create the master key parts by running the ibmcloud tke mk-add --random command, as shown in Example 2-25. This command creates a randomized key part. By using The --value option, you can load your own key part.
In our scenario, we create one key part per administrator or SO. If needed, you can create more key parts.
Each key part is protected by a password. In our scenario, each password is known by only one specific administrator or SO. The password can be different from their signature key password.
Example 2-25 Generating master key parts on your notebook
$ ibmcloud tke mks
No files containing an EP11 master key part were found.
$ ibmcloud tke mk-add --randomEnter a description for the key part:> key part 1-3Enter a password to protect the key part:>
44 Securing Your Critical Workloads with IBM Hyper Protect Services

Reenter the password to confirm:> OKA key part was created.The available EP11 master key parts on this workstation are:
KEYNUM DESCRIPTION VERIFICATION PATTERN 1 key part 1-3 d4fbbb0f5f8b09bdcee23dd605899c13 b106e76ec0dd0ddbccf38c83b31c4688
$ ibmcloud tke mk-add --randomEnter a description for the key part:> key part 2-3Enter a password to protect the key part:> Reenter the password to confirm:> OKA key part was created.The available EP11 master key parts on this workstation are:
KEYNUM DESCRIPTION VERIFICATION PATTERN 1 key part 1-3 d4fbbb0f5f8b09bdcee23dd605899c13 b106e76ec0dd0ddbccf38c83b31c4688 2 key part 2-3 a0791c825f4751c2c8c9163f034adfe2 69fd190e39bc2b7187ab329a31eeb627
$ ibmcloud tke mk-add --randomEnter a description for the key part:> key part 3-3Enter a password to protect the key part:> Reenter the password to confirm:> OKA key part was created.The available EP11 master key parts on this workstation are:
KEYNUM DESCRIPTION VERIFICATION PATTERN 1 key part 1-3 d4fbbb0f5f8b09bdcee23dd605899c13 b106e76ec0dd0ddbccf38c83b31c4688 2 key part 2-3 a0791c825f4751c2c8c9163f034adfe2 69fd190e39bc2b7187ab329a31eeb627 3 key part 3-3 c4949dd64f92b2a96d7832b8420ee62c e021d4c9efe2a9f9141668ec6ef262bf
$ ibmcloud tke mks
KEYNUM DESCRIPTION VERIFICATION PATTERN 1 key part 1-3 d4fbbb0f5f8b09bdcee23dd605899c13 b106e76ec0dd0ddbccf38c83b31c4688 2 key part 2-3 a0791c825f4751c2c8c9163f034adfe2 69fd190e39bc2b7187ab329a31eeb627
Chapter 2. IBM Cloud Hyper Protect Crypto Services 45

3 key part 3-3 c4949dd64f92b2a96d7832b8420ee62c e021d4c9efe2a9f9141668ec6ef262bf
Example 2-26 lists the files in our $CLOUDTKEFILES directory for both signature files and key part files.
Example 2-26 Listing the master key files after they are generated
$ ls $CLOUDTKEFILES1.mkpart 1.sigkey 2.mkpart 2.sigkey 3.mkpart 3.sigkey CRYPTOMODULES DOMAINS MKPARTS SIGKEYS
As for signature files, each key part file that is assigned to a SO can be moved to their notebook, but they are secured by a password on the notebook where they were created.
A key part and a signature file may not be assigned to the same person. Typically, the key part is not owned by an information technology person or department, but rather by business people.
Getting out of imprint mode before loading a master keyImprint mode is a specific operational mode for the crypto units that allows actions that do not need to be signed with any administrator signature keys. After an IBM Hyper Protect Crypto Services provisioning, the associated crypto units start in this mode. You exit the imprint mode when you set a threshold level.
Installing a master key requires that you to exit imprint mode and define the same signature threshold value on each crypto unit.
Tips: In the description in Example 2-25 on page 44, we specify the total number of key parts and the key part number so that you do not miss a file.
Do you see the verification pattern? You retrieve these numbers from the crypto units Master Key Register, which is a good way to know which key parts were used to load the Master Key in case of recovery.
Important: All master key part files and signature key files that you use must be on a common workstation. If the files were created on separate workstations, make sure that the file names are different to avoid collision. The master key part file owners and the signature key file owners must enter the file passwords when the master key register is loaded on the common workstation.
Master key restoration: By restoring the master key parts file in the $CLOUDTKEFILES directory and running the ibmcloud tke cryptounit-mk-load command, you can restore your master key and activate it by using the procedure that is described in “Activating the master key” on page 49.
The other option is to use the recovery crypto units, which is described in 2.3.6, “Initializing your IBM Hyper Protect Crypto Services master key by using recovery crypto units” on page 57.
This scenario can be considered for a disaster recovery (DR) or Digital Asset cold wallet scenario. Of course, administrators and SOs secret keys must be restored too.
46 Securing Your Critical Workloads with IBM Hyper Protect Services
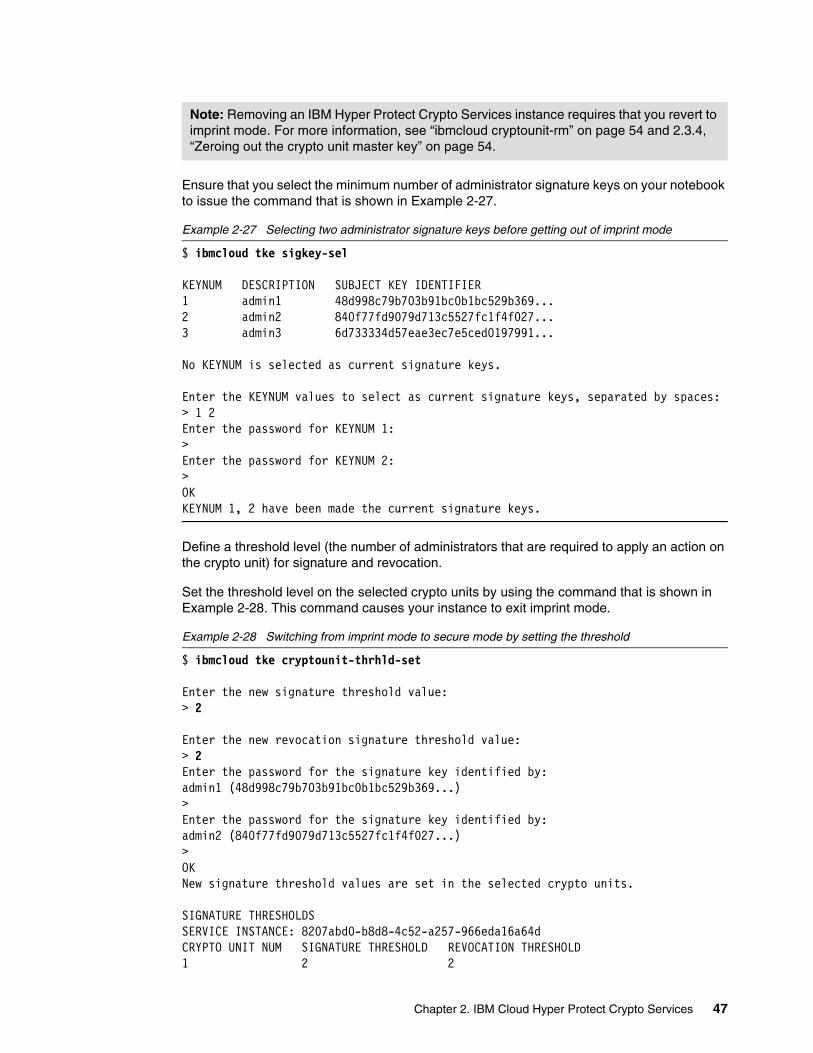
Ensure that you select the minimum number of administrator signature keys on your notebook to issue the command that is shown in Example 2-27.
Example 2-27 Selecting two administrator signature keys before getting out of imprint mode
$ ibmcloud tke sigkey-sel
KEYNUM DESCRIPTION SUBJECT KEY IDENTIFIER 1 admin1 48d998c79b703b91bc0b1bc529b369... 2 admin2 840f77fd9079d713c5527fc1f4f027... 3 admin3 6d733334d57eae3ec7e5ced0197991...
No KEYNUM is selected as current signature keys.
Enter the KEYNUM values to select as current signature keys, separated by spaces:> 1 2Enter the password for KEYNUM 1:> Enter the password for KEYNUM 2:> OKKEYNUM 1, 2 have been made the current signature keys.
Define a threshold level (the number of administrators that are required to apply an action on the crypto unit) for signature and revocation.
Set the threshold level on the selected crypto units by using the command that is shown in Example 2-28. This command causes your instance to exit imprint mode.
Example 2-28 Switching from imprint mode to secure mode by setting the threshold
$ ibmcloud tke cryptounit-thrhld-set
Enter the new signature threshold value:> 2
Enter the new revocation signature threshold value:> 2Enter the password for the signature key identified by:admin1 (48d998c79b703b91bc0b1bc529b369...)> Enter the password for the signature key identified by:admin2 (840f77fd9079d713c5527fc1f4f027...)> OKNew signature threshold values are set in the selected crypto units.
SIGNATURE THRESHOLDSSERVICE INSTANCE: 8207abd0-b8d8-4c52-a257-966eda16a64dCRYPTO UNIT NUM SIGNATURE THRESHOLD REVOCATION THRESHOLD 1 2 2
Note: Removing an IBM Hyper Protect Crypto Services instance requires that you revert to imprint mode. For more information, see “ibmcloud cryptounit-rm” on page 54 and 2.3.4, “Zeroing out the crypto unit master key” on page 54.
Chapter 2. IBM Cloud Hyper Protect Crypto Services 47
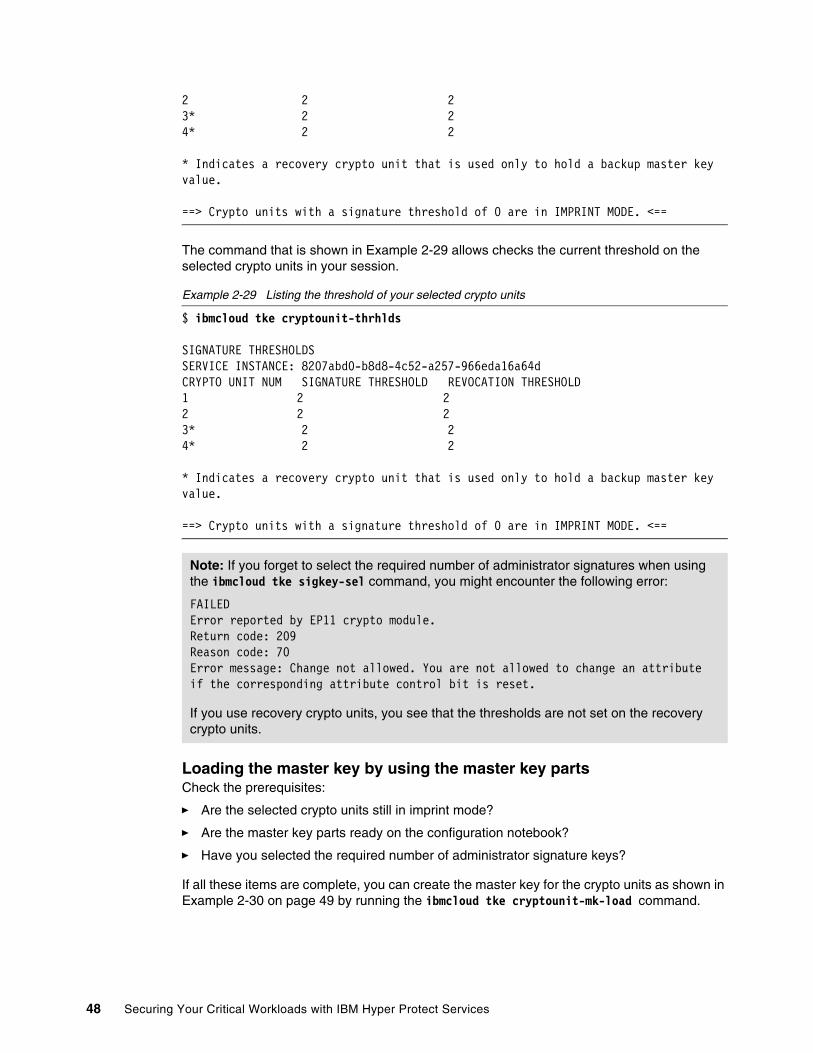
2 2 2 3* 2 2 4* 2 2
* Indicates a recovery crypto unit that is used only to hold a backup master key value.
==> Crypto units with a signature threshold of 0 are in IMPRINT MODE. <==
The command that is shown in Example 2-29 allows checks the current threshold on the selected crypto units in your session.
Example 2-29 Listing the threshold of your selected crypto units
$ ibmcloud tke cryptounit-thrhlds
SIGNATURE THRESHOLDSSERVICE INSTANCE: 8207abd0-b8d8-4c52-a257-966eda16a64dCRYPTO UNIT NUM SIGNATURE THRESHOLD REVOCATION THRESHOLD 1 2 2 2 2 2 3* 2 2 4* 2 2
* Indicates a recovery crypto unit that is used only to hold a backup master key value.
==> Crypto units with a signature threshold of 0 are in IMPRINT MODE. <==
Loading the master key by using the master key partsCheck the prerequisites:
� Are the selected crypto units still in imprint mode?
� Are the master key parts ready on the configuration notebook?
� Have you selected the required number of administrator signature keys?
If all these items are complete, you can create the master key for the crypto units as shown in Example 2-30 on page 49 by running the ibmcloud tke cryptounit-mk-load command.
Note: If you forget to select the required number of administrator signatures when using the ibmcloud tke sigkey-sel command, you might encounter the following error:
FAILEDError reported by EP11 crypto module.Return code: 209Reason code: 70Error message: Change not allowed. You are not allowed to change an attribute if the corresponding attribute control bit is reset.
If you use recovery crypto units, you see that the thresholds are not set on the recovery crypto units.
48 Securing Your Critical Workloads with IBM Hyper Protect Services
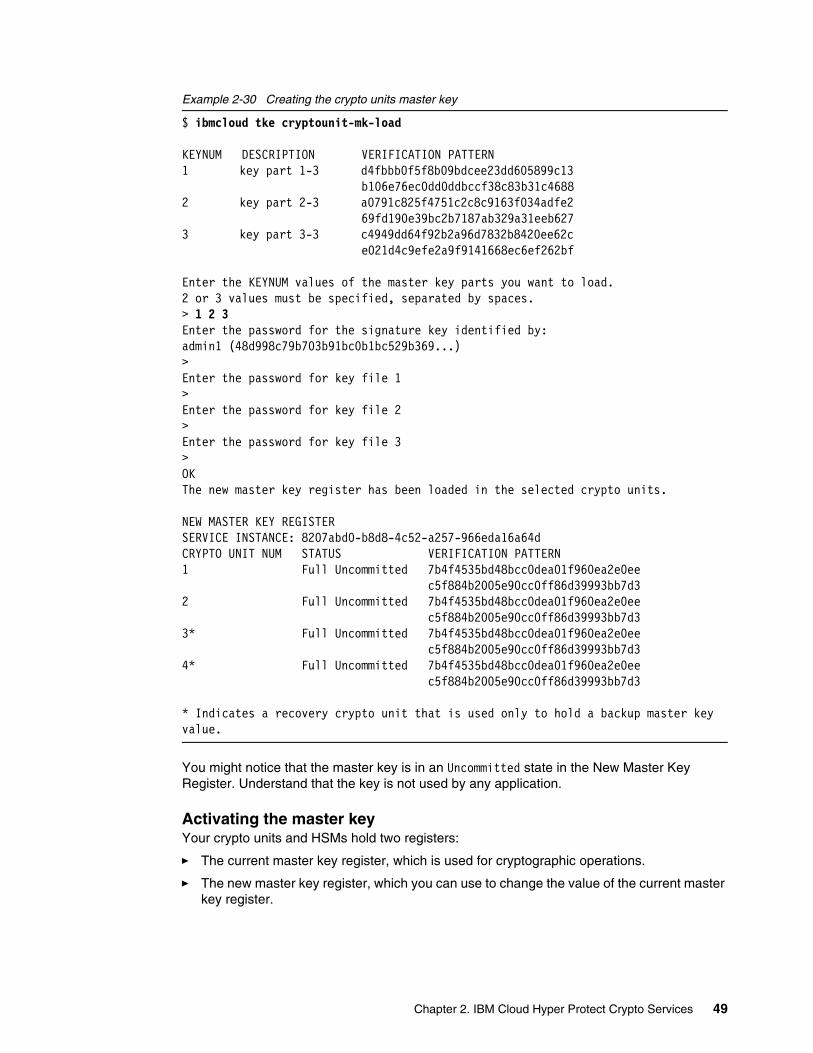
Example 2-30 Creating the crypto units master key
$ ibmcloud tke cryptounit-mk-load
KEYNUM DESCRIPTION VERIFICATION PATTERN 1 key part 1-3 d4fbbb0f5f8b09bdcee23dd605899c13 b106e76ec0dd0ddbccf38c83b31c4688 2 key part 2-3 a0791c825f4751c2c8c9163f034adfe2 69fd190e39bc2b7187ab329a31eeb627 3 key part 3-3 c4949dd64f92b2a96d7832b8420ee62c e021d4c9efe2a9f9141668ec6ef262bf
Enter the KEYNUM values of the master key parts you want to load.2 or 3 values must be specified, separated by spaces.> 1 2 3Enter the password for the signature key identified by:admin1 (48d998c79b703b91bc0b1bc529b369...)> Enter the password for key file 1> Enter the password for key file 2> Enter the password for key file 3> OKThe new master key register has been loaded in the selected crypto units.
NEW MASTER KEY REGISTERSERVICE INSTANCE: 8207abd0-b8d8-4c52-a257-966eda16a64dCRYPTO UNIT NUM STATUS VERIFICATION PATTERN 1 Full Uncommitted 7b4f4535bd48bcc0dea01f960ea2e0ee c5f884b2005e90cc0ff86d39993bb7d3 2 Full Uncommitted 7b4f4535bd48bcc0dea01f960ea2e0ee c5f884b2005e90cc0ff86d39993bb7d3 3* Full Uncommitted 7b4f4535bd48bcc0dea01f960ea2e0ee c5f884b2005e90cc0ff86d39993bb7d3 4* Full Uncommitted 7b4f4535bd48bcc0dea01f960ea2e0ee c5f884b2005e90cc0ff86d39993bb7d3
* Indicates a recovery crypto unit that is used only to hold a backup master key value.
You might notice that the master key is in an Uncommitted state in the New Master Key Register. Understand that the key is not used by any application.
Activating the master keyYour crypto units and HSMs hold two registers:
� The current master key register, which is used for cryptographic operations.
� The new master key register, which you can use to change the value of the current master key register.
Chapter 2. IBM Cloud Hyper Protect Crypto Services 49

The master key activation is a two-step process:
1. Committing the new master key register.
2. Performing the activation, which moves the value of the new master key register into the current master key register. this action makes any data that is protected with the previous key on the service unreadable.
To commit the master key on the crypto units, use the command that is shown in Example 2-31. In our example, we use two out of three administrator signature keys as defined in our threshold and our list of crypto units admins.
Example 2-31 Committing the master key in the new master key register
$ ibmcloud tke cryptounit-mk-commitEnter the password for the signature key identified by:admin1 (48d998c79b703b91bc0b1bc529b369...)> Enter the password for the signature key identified by:admin2 (840f77fd9079d713c5527fc1f4f027...)> OKThe new master key register has been committed in the selected crypto units.
NEW MASTER KEY REGISTERSERVICE INSTANCE: 8207abd0-b8d8-4c52-a257-966eda16a64dCRYPTO UNIT NUM STATUS VERIFICATION PATTERN 1 Full Committed 7b4f4535bd48bcc0dea01f960ea2e0ee c5f884b2005e90cc0ff86d39993bb7d3 2 Full Committed 7b4f4535bd48bcc0dea01f960ea2e0ee c5f884b2005e90cc0ff86d39993bb7d3 3* Full Committed 7b4f4535bd48bcc0dea01f960ea2e0ee c5f884b2005e90cc0ff86d39993bb7d3 4* Full Committed 7b4f4535bd48bcc0dea01f960ea2e0ee c5f884b2005e90cc0ff86d39993bb7d3
* Indicates a recovery crypto unit that is used only to hold a backup master key value.
To activate the master key on the crypto units, use the command that is shown in Example 2-32. Activating the master key moves it from the new key register to the current key register.
Example 2-32 Activating the master key
$ ibmcloud tke cryptounit-mk-setimmWarning! Any key storage that is associated with the targeted service instance must be prepared to accept the new master key value before running this command. Otherwise, key storage might become unusable.Do you want to continue?Answer [y/N]:> yEnter the password for the signature key identified by:admin1 (48d998c79b703b91bc0b1bc529b369...)> OKSet immediate completed successfully in the selected crypto units.
50 Securing Your Critical Workloads with IBM Hyper Protect Services

NEW MASTER KEY REGISTERSERVICE INSTANCE: 8207abd0-b8d8-4c52-a257-966eda16a64dCRYPTO UNIT NUM STATUS VERIFICATION PATTERN 1 Empty 00000000000000000000000000000000 00000000000000000000000000000000 2 Empty 00000000000000000000000000000000 00000000000000000000000000000000 3* Empty 00000000000000000000000000000000 00000000000000000000000000000000 4* Empty 00000000000000000000000000000000 00000000000000000000000000000000
CURRENT MASTER KEY REGISTERSERVICE INSTANCE: 8207abd0-b8d8-4c52-a257-966eda16a64dCRYPTO UNIT NUM STATUS VERIFICATION PATTERN 1 Valid 7b4f4535bd48bcc0dea01f960ea2e0ee c5f884b2005e90cc0ff86d39993bb7d3 2 Valid 7b4f4535bd48bcc0dea01f960ea2e0ee c5f884b2005e90cc0ff86d39993bb7d3 3* Valid 7b4f4535bd48bcc0dea01f960ea2e0ee c5f884b2005e90cc0ff86d39993bb7d3 4* Valid 7b4f4535bd48bcc0dea01f960ea2e0ee c5f884b2005e90cc0ff86d39993bb7d3
* Indicates a recovery crypto unit that is used only to hold a backup master key value.
The crypto units are now in a valid state. Your application can now use IBM Hyper Protect Crypto Services.
You see that the value in the new master key register is set to empty, and the value of the current master key register is now set to the new value.
2.3.3 Getting the crypto units details and enabling cryptocurrency cryptography
To see whether a change has been applied, run the ibmcloud tke cryptounit-compare command. The command that is shown in Example 2-33 provides a view of your crypto units administrators, capabilities, and their master keys status.
Example 2-33 Viewing your crypto units administrators, capabilities, and their master keys status
$ ibmcloud tke cryptounit-compare
SIGNATURE THRESHOLDSSERVICE INSTANCE: 8207abd0-b8d8-4c52-a257-966eda16a64dCRYPTO UNIT NUM SIGNATURE THRESHOLD REVOCATION THRESHOLD 1 2 2 2 2 2 3* 2 2 4* 2 2
Note: For this command, only one administrator signature key is needed. When prompted, enter the password for the signature key file that is to be used.
Chapter 2. IBM Cloud Hyper Protect Crypto Services 51

* Indicates a recovery crypto unit that is used only to hold a backup master key value.
==> Crypto units with a signature threshold of 0 are in IMPRINT MODE. <==
CRYPTO UNIT ADMINISTRATORSSERVICE INSTANCE: 8207abd0-b8d8-4c52-a257-966eda16a64dCRYPTO UNIT NUM ADMIN NAME SUBJECT KEY IDENTIFIER 1 admin1 48d998c79b703b91bc0b1bc529b369... admin2 840f77fd9079d713c5527fc1f4f027... admin3 6d733334d57eae3ec7e5ced0197991... 2 admin1 48d998c79b703b91bc0b1bc529b369... admin2 840f77fd9079d713c5527fc1f4f027... admin3 6d733334d57eae3ec7e5ced0197991... 3* admin1 48d998c79b703b91bc0b1bc529b369... admin2 840f77fd9079d713c5527fc1f4f027... admin3 6d733334d57eae3ec7e5ced0197991... 4* admin1 48d998c79b703b91bc0b1bc529b369... admin2 840f77fd9079d713c5527fc1f4f027... admin3 6d733334d57eae3ec7e5ced0197991...
* Indicates a recovery crypto unit that is used only to hold a backup master key value.
NEW MASTER KEY REGISTERSERVICE INSTANCE: 8207abd0-b8d8-4c52-a257-966eda16a64dCRYPTO UNIT NUM STATUS VERIFICATION PATTERN 1 Empty 00000000000000000000000000000000 00000000000000000000000000000000 2 Empty 00000000000000000000000000000000 00000000000000000000000000000000 3* Empty 00000000000000000000000000000000 00000000000000000000000000000000 4* Empty 00000000000000000000000000000000 00000000000000000000000000000000
CURRENT MASTER KEY REGISTERSERVICE INSTANCE: 8207abd0-b8d8-4c52-a257-966eda16a64dCRYPTO UNIT NUM STATUS VERIFICATION PATTERN 1 Valid 7b4f4535bd48bcc0dea01f960ea2e0ee c5f884b2005e90cc0ff86d39993bb7d3 2 Valid 7b4f4535bd48bcc0dea01f960ea2e0ee c5f884b2005e90cc0ff86d39993bb7d3 3* Valid 7b4f4535bd48bcc0dea01f960ea2e0ee c5f884b2005e90cc0ff86d39993bb7d3 4* Valid 7b4f4535bd48bcc0dea01f960ea2e0ee c5f884b2005e90cc0ff86d39993bb7d3
* Indicates a recovery crypto unit that is used only to hold a backup master key value.
CONTROL POINTSSERVICE INSTANCE: 8207abd0-b8d8-4c52-a257-966eda16a64dCRYPTO UNIT NUM XCP_CPB_ALG_EC_25519 XCP_CPB_BTC XCP_CPB_ECDSA_OTHER 1 Set Set Set 2 Set Set Set 3* Set Set Set 4* Set Set Set
* Indicates a recovery crypto unit that is used only to hold a backup master key value.
52 Securing Your Critical Workloads with IBM Hyper Protect Services
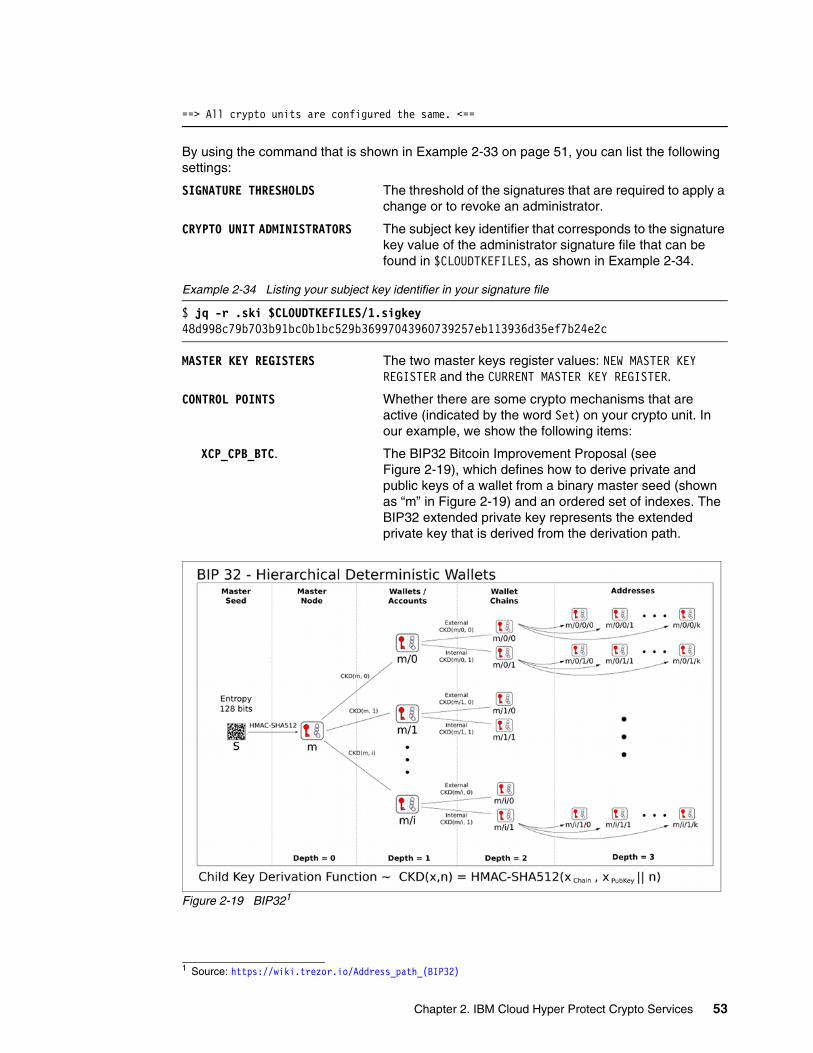
==> All crypto units are configured the same. <==
By using the command that is shown in Example 2-33 on page 51, you can list the following settings:
SIGNATURE THRESHOLDS The threshold of the signatures that are required to apply a change or to revoke an administrator.
CRYPTO UNIT ADMINISTRATORS The subject key identifier that corresponds to the signature key value of the administrator signature file that can be found in $CLOUDTKEFILES, as shown in Example 2-34.
Example 2-34 Listing your subject key identifier in your signature file
$ jq -r .ski $CLOUDTKEFILES/1.sigkey48d998c79b703b91bc0b1bc529b36997043960739257eb113936d35ef7b24e2c
MASTER KEY REGISTERS The two master keys register values: NEW MASTER KEY REGISTER and the CURRENT MASTER KEY REGISTER.
CONTROL POINTS Whether there are some crypto mechanisms that are active (indicated by the word Set) on your crypto unit. In our example, we show the following items:
XCP_CPB_BTC. The BIP32 Bitcoin Improvement Proposal (see Figure 2-19), which defines how to derive private and public keys of a wallet from a binary master seed (shown as “m” in Figure 2-19) and an ordered set of indexes. The BIP32 extended private key represents the extended private key that is derived from the derivation path.
Figure 2-19 BIP321
1 Source: https://wiki.trezor.io/Address_path_(BIP32)
Chapter 2. IBM Cloud Hyper Protect Crypto Services 53
XCP_CPB_ALG_EC_25519 The Edwards-curve Digital Signature Algorithm (EdDSA) is a secure digital signature algorithm that used on performance-optimized elliptic curves. For more information, see EdDSA.
XCP_CPB_ECDSA_OTHER The Schnorr digital signature is proposed as an alternative algorithm to the Elliptic Curve Digital Signature Algorithm (ECDSA) for cryptographic signatures in the Bitcoin system. The Schnorr signature is known for simplicity and efficiency.
If you must enable the BIP32, Schnorr, or EdDSA capabilities on your card, select the crypto units cards by using the following commands, as shown in Example 2-21 on page 42:
ibmcloud tke cryptounitsibmcloud tke cryptounit-addibmcloud cryptounit-rm
Then, run the following commands:
� ibmcloud tke cryptounit-cp-eddsa (Enables EdDSA.)� ibmcloud tke cryptounit-cp-sig-other (Enables the Schnorr algorithm.)� ibmcloud tke cryptounit-cp-btc (Enables BIP32.)
2.3.4 Zeroing out the crypto unit master key
Sometimes, you might become lost in your setup or implement a cold wallet solution for a digital wallet. In each of these cases, you might need to zero your crypto units master keys.
Zeroing out a crypto unit clears the crypto unit, which includes removing all crypto unit administrators, clearing the master key, and placing the crypto unit back in imprint mode.
Recovery crypto units contain the only backup copies of the master key value. If all recovery crypto units for a service instance are zeroized, the master key value is permanently lost and cannot be recovered.
If keys were created for a service instance and placed in key storage keystores, zeroing out a crypto unit prevents those keys from being used. Data that was encrypted and uses those keys can no longer be used.
To zero your crypto unit, complete the following steps:
1. Select the correct set of crypto units by using the following commands:
– ibmcloud tke cryptounits
– ibmcloud tke cryptounit-add
– ibmcloud cryptounit-rm
For more information, see “Selecting the crypto units to set up their master key” on page 41.
The crypto units that are tagged as true in the SELECTED column are zeroed out, as shown in Example 2-35 on page 55. If you run multiple IBM Hyper Protect Crypto Services instances, ensure that you zero the correct crypto unit.
54 Securing Your Critical Workloads with IBM Hyper Protect Services
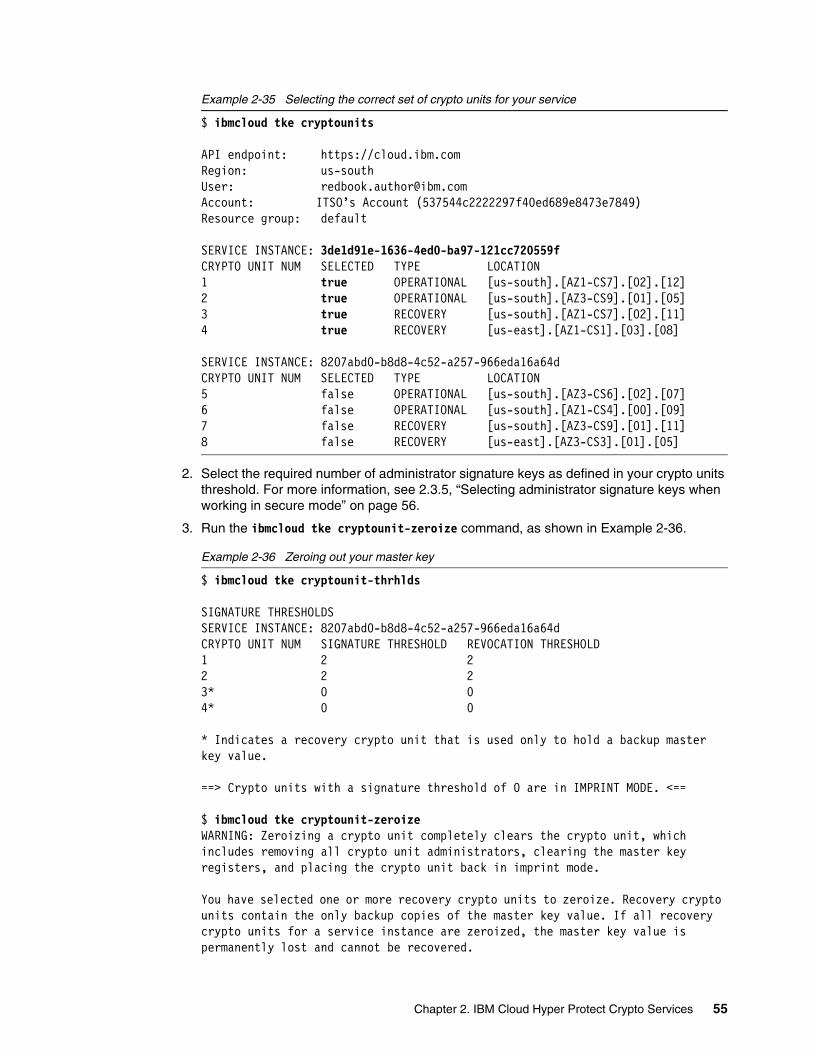
Example 2-35 Selecting the correct set of crypto units for your service
$ ibmcloud tke cryptounits
API endpoint: https://cloud.ibm.comRegion: us-southUser: [email protected]: ITSO’s Account (537544c2222297f40ed689e8473e7849)Resource group: default
SERVICE INSTANCE: 3de1d91e-1636-4ed0-ba97-121cc720559fCRYPTO UNIT NUM SELECTED TYPE LOCATION 1 true OPERATIONAL [us-south].[AZ1-CS7].[02].[12] 2 true OPERATIONAL [us-south].[AZ3-CS9].[01].[05] 3 true RECOVERY [us-south].[AZ1-CS7].[02].[11] 4 true RECOVERY [us-east].[AZ1-CS1].[03].[08]
SERVICE INSTANCE: 8207abd0-b8d8-4c52-a257-966eda16a64dCRYPTO UNIT NUM SELECTED TYPE LOCATION 5 false OPERATIONAL [us-south].[AZ3-CS6].[02].[07] 6 false OPERATIONAL [us-south].[AZ1-CS4].[00].[09] 7 false RECOVERY [us-south].[AZ3-CS9].[01].[11] 8 false RECOVERY [us-east].[AZ3-CS3].[01].[05]
2. Select the required number of administrator signature keys as defined in your crypto units threshold. For more information, see 2.3.5, “Selecting administrator signature keys when working in secure mode” on page 56.
3. Run the ibmcloud tke cryptounit-zeroize command, as shown in Example 2-36.
Example 2-36 Zeroing out your master key
$ ibmcloud tke cryptounit-thrhlds
SIGNATURE THRESHOLDSSERVICE INSTANCE: 8207abd0-b8d8-4c52-a257-966eda16a64dCRYPTO UNIT NUM SIGNATURE THRESHOLD REVOCATION THRESHOLD 1 2 2 2 2 2 3* 0 0 4* 0 0
* Indicates a recovery crypto unit that is used only to hold a backup master key value.
==> Crypto units with a signature threshold of 0 are in IMPRINT MODE. <==
$ ibmcloud tke cryptounit-zeroize WARNING: Zeroizing a crypto unit completely clears the crypto unit, which includes removing all crypto unit administrators, clearing the master key registers, and placing the crypto unit back in imprint mode.
You have selected one or more recovery crypto units to zeroize. Recovery crypto units contain the only backup copies of the master key value. If all recovery crypto units for a service instance are zeroized, the master key value is permanently lost and cannot be recovered.
Chapter 2. IBM Cloud Hyper Protect Crypto Services 55
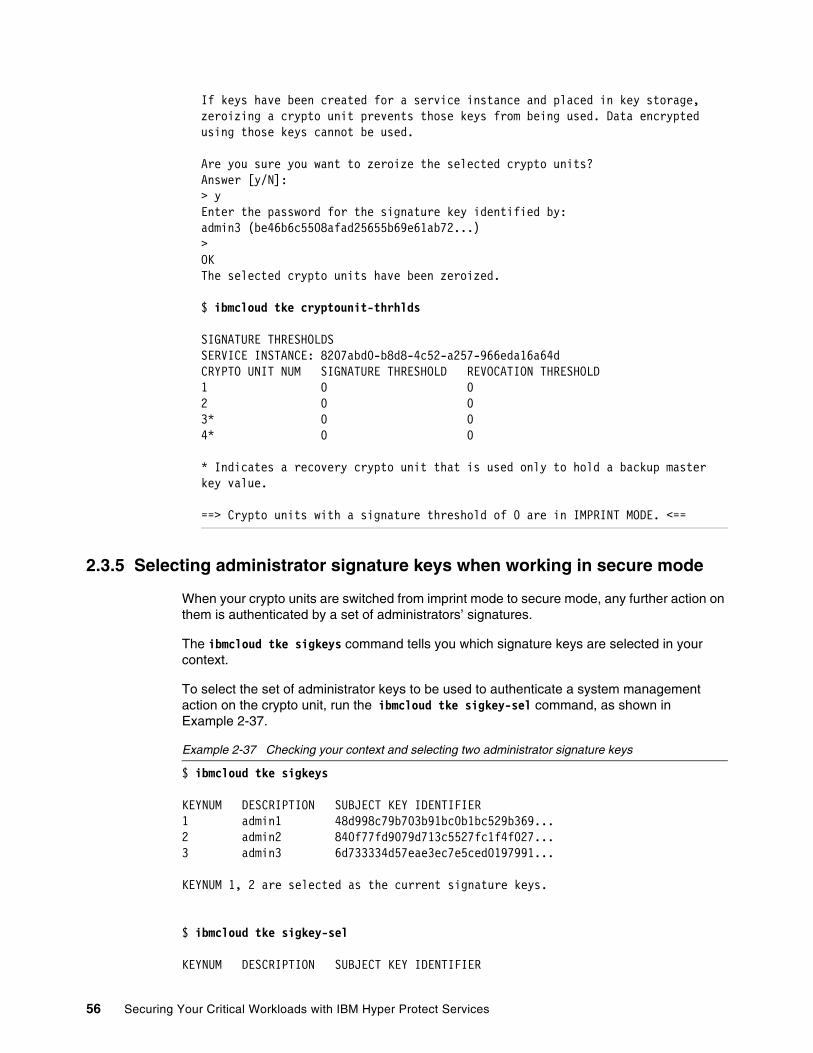
If keys have been created for a service instance and placed in key storage, zeroizing a crypto unit prevents those keys from being used. Data encrypted using those keys cannot be used.
Are you sure you want to zeroize the selected crypto units?Answer [y/N]:> yEnter the password for the signature key identified by:admin3 (be46b6c5508afad25655b69e61ab72...)> OKThe selected crypto units have been zeroized.
$ ibmcloud tke cryptounit-thrhlds
SIGNATURE THRESHOLDSSERVICE INSTANCE: 8207abd0-b8d8-4c52-a257-966eda16a64dCRYPTO UNIT NUM SIGNATURE THRESHOLD REVOCATION THRESHOLD 1 0 0 2 0 0 3* 0 0 4* 0 0
* Indicates a recovery crypto unit that is used only to hold a backup master key value.
==> Crypto units with a signature threshold of 0 are in IMPRINT MODE. <==
2.3.5 Selecting administrator signature keys when working in secure mode
When your crypto units are switched from imprint mode to secure mode, any further action on them is authenticated by a set of administrators’ signatures.
The ibmcloud tke sigkeys command tells you which signature keys are selected in your context.
To select the set of administrator keys to be used to authenticate a system management action on the crypto unit, run the ibmcloud tke sigkey-sel command, as shown in Example 2-37.
Example 2-37 Checking your context and selecting two administrator signature keys
$ ibmcloud tke sigkeys
KEYNUM DESCRIPTION SUBJECT KEY IDENTIFIER 1 admin1 48d998c79b703b91bc0b1bc529b369... 2 admin2 840f77fd9079d713c5527fc1f4f027... 3 admin3 6d733334d57eae3ec7e5ced0197991...
KEYNUM 1, 2 are selected as the current signature keys.
$ ibmcloud tke sigkey-sel
KEYNUM DESCRIPTION SUBJECT KEY IDENTIFIER
56 Securing Your Critical Workloads with IBM Hyper Protect Services
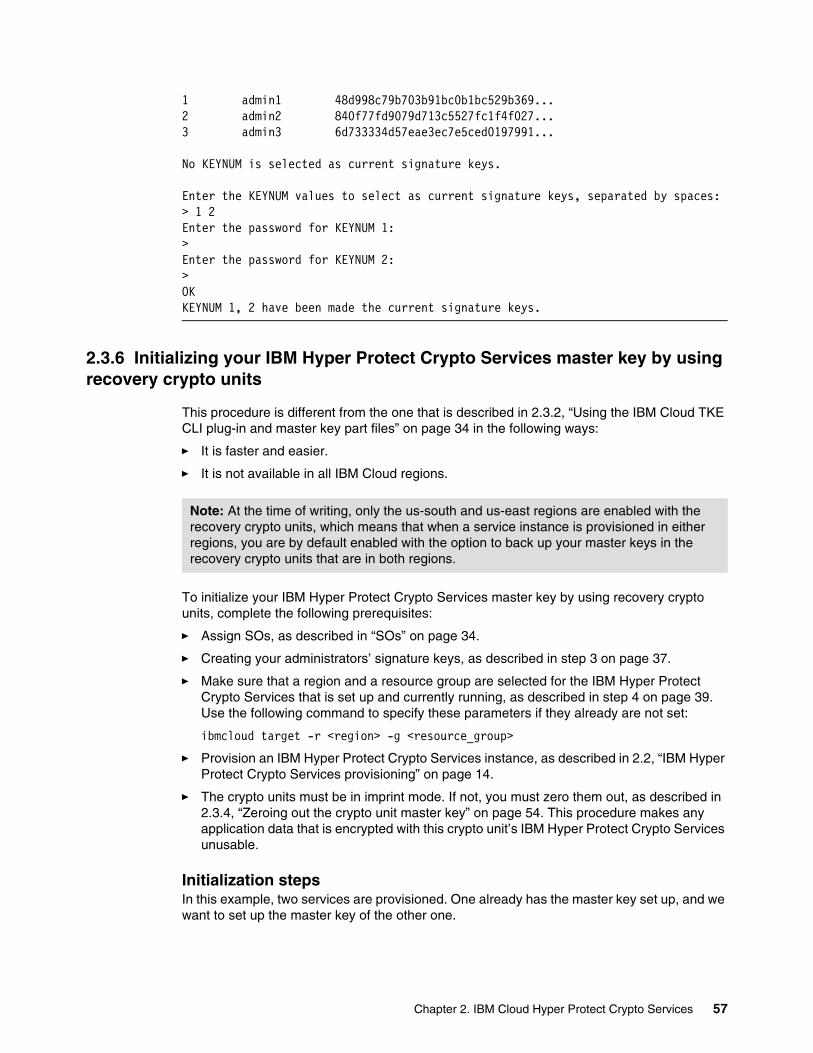
1 admin1 48d998c79b703b91bc0b1bc529b369... 2 admin2 840f77fd9079d713c5527fc1f4f027... 3 admin3 6d733334d57eae3ec7e5ced0197991...
No KEYNUM is selected as current signature keys.
Enter the KEYNUM values to select as current signature keys, separated by spaces:> 1 2Enter the password for KEYNUM 1:> Enter the password for KEYNUM 2:> OKKEYNUM 1, 2 have been made the current signature keys.
2.3.6 Initializing your IBM Hyper Protect Crypto Services master key by using recovery crypto units
This procedure is different from the one that is described in 2.3.2, “Using the IBM Cloud TKE CLI plug-in and master key part files” on page 34 in the following ways:
� It is faster and easier.
� It is not available in all IBM Cloud regions.
To initialize your IBM Hyper Protect Crypto Services master key by using recovery crypto units, complete the following prerequisites:
� Assign SOs, as described in “SOs” on page 34.
� Creating your administrators’ signature keys, as described in step 3 on page 37.
� Make sure that a region and a resource group are selected for the IBM Hyper Protect Crypto Services that is set up and currently running, as described in step 4 on page 39. Use the following command to specify these parameters if they already are not set:
ibmcloud target -r <region> -g <resource_group>
� Provision an IBM Hyper Protect Crypto Services instance, as described in 2.2, “IBM Hyper Protect Crypto Services provisioning” on page 14.
� The crypto units must be in imprint mode. If not, you must zero them out, as described in 2.3.4, “Zeroing out the crypto unit master key” on page 54. This procedure makes any application data that is encrypted with this crypto unit’s IBM Hyper Protect Crypto Services unusable.
Initialization stepsIn this example, two services are provisioned. One already has the master key set up, and we want to set up the master key of the other one.
Note: At the time of writing, only the us-south and us-east regions are enabled with the recovery crypto units, which means that when a service instance is provisioned in either regions, you are by default enabled with the option to back up your master keys in the recovery crypto units that are in both regions.
Chapter 2. IBM Cloud Hyper Protect Crypto Services 57

Complete the following steps:
1. Open a terminal and log in to the IBM Cloud. Use the ibmcloud login command, as shown in Example 2-38. You can specify the resource group with the -g option.
Example 2-38 Logging in to IBM Cloud by using a terminal and IBM Cloud CLI
$ ibmcloud login --sso -g default
2. Check your running services (Example 2-39) to identify the GUID of the service that you want to set up.
Example 2-39 Listing your service
$ ibmcloud resource service-instances --longRetrieving instances with type service_instance in resource group default in all locations under account ITSO's Account as [email protected] GUID Name Location State Type Resource ID crn:v1:bluemix:public:data-science-experience:us-south:a/537544c2222297f40ed689e8473e7849:4c089dc4-370f-4071-8147-507dab12bbed:: 4c089dc4-370f-4071-8147-507dab12bbed Watson Studio-z4 us-south active service_instance 39ba9d4c-b1c5-4cc3-a163-38b580121e01
crn:v1:bluemix:public:cloud-object-storage:global:a/537544c2222297f40ed689e8473e7849:63328d0b-6918-46ca-a9ef-47c1e7772b59:: 63328d0b-6918-46ca-a9ef-47c1e7772b59 cloud-object-storage-jh global active service_instance dff97f5c-bc5e-4455-b470-411c3edbe49c
crn:v1:bluemix:public:watson-vision-combined:us-south:a/537544c2222297f40ed689e8473e7849:530b4003-9ea9-4715-852e-27bf3ad7a118:: 530b4003-9ea9-4715-852e-27bf3ad7a118 watson-vision-combined-at us-south active service_instance 700c7e8b-6609-71eb-e136-0a0f0ef9c2a2
crn:v1:bluemix:public:hs-crypto:us-south:a/537544c2222297f40ed689e8473e7849:8207abd0-b8d8-4c52-a257-966eda16a64d:: 8207abd0-b8d8-4c52-a257-966eda16a64d my-hpcs-instance us-south active service_instance d589492e-6ac0-4a11-9c28-a157851c8f68
crn:v1:bluemix:public:hs-crypto:us-south:a/537544c2222297f40ed689e8473e7849:3de1d91e-1636-4ed0-ba97-121cc720559f:: 3de1d91e-1636-4ed0-ba97-121cc720559f hpcs-2 us-south active service_instance d589492e-6ac0-4a11-9c28-a157851c8f68
In our example, we provisioned hpcs-2 and we want to set up its master key.
3. Check that you installed the administrator signature keys that will be defined as the crypto units administrator, as shown in Example 2-40.
Example 2-40 Checking that your have administrator signature keys on the notebook
$ ibmcloud tke sigkeys
KEYNUM DESCRIPTION SUBJECT KEY IDENTIFIER 1 admin1 48d998c79b703b91bc0b1bc529b369... 2 admin2 840f77fd9079d713c5527fc1f4f027... 3 admin3 6d733334d57eae3ec7e5ced0197991...
58 Securing Your Critical Workloads with IBM Hyper Protect Services
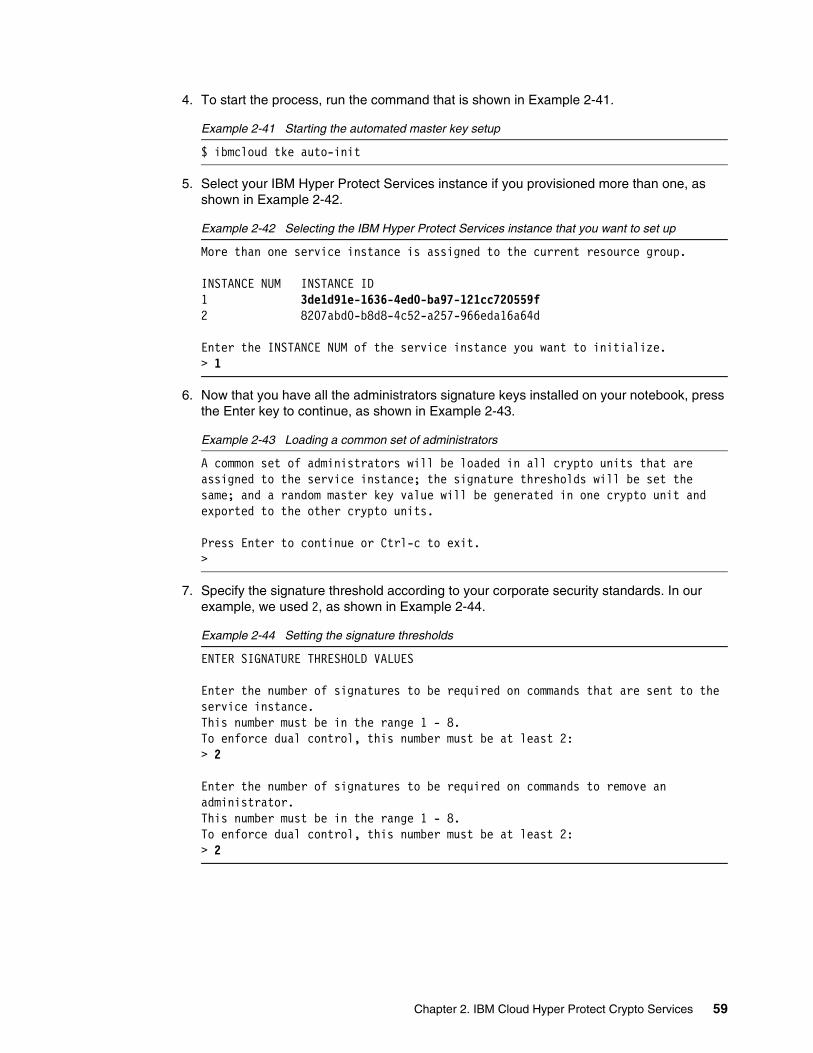
4. To start the process, run the command that is shown in Example 2-41.
Example 2-41 Starting the automated master key setup
$ ibmcloud tke auto-init
5. Select your IBM Hyper Protect Services instance if you provisioned more than one, as shown in Example 2-42.
Example 2-42 Selecting the IBM Hyper Protect Services instance that you want to set up
More than one service instance is assigned to the current resource group.
INSTANCE NUM INSTANCE ID 1 3de1d91e-1636-4ed0-ba97-121cc720559f 2 8207abd0-b8d8-4c52-a257-966eda16a64d
Enter the INSTANCE NUM of the service instance you want to initialize.> 1
6. Now that you have all the administrators signature keys installed on your notebook, press the Enter key to continue, as shown in Example 2-43.
Example 2-43 Loading a common set of administrators
A common set of administrators will be loaded in all crypto units that are assigned to the service instance; the signature thresholds will be set the same; and a random master key value will be generated in one crypto unit and exported to the other crypto units.
Press Enter to continue or Ctrl-c to exit.>
7. Specify the signature threshold according to your corporate security standards. In our example, we used 2, as shown in Example 2-44.
Example 2-44 Setting the signature thresholds
ENTER SIGNATURE THRESHOLD VALUES
Enter the number of signatures to be required on commands that are sent to the service instance.This number must be in the range 1 - 8.To enforce dual control, this number must be at least 2:> 2
Enter the number of signatures to be required on commands to remove an administrator.This number must be in the range 1 - 8.To enforce dual control, this number must be at least 2:> 2
Chapter 2. IBM Cloud Hyper Protect Crypto Services 59
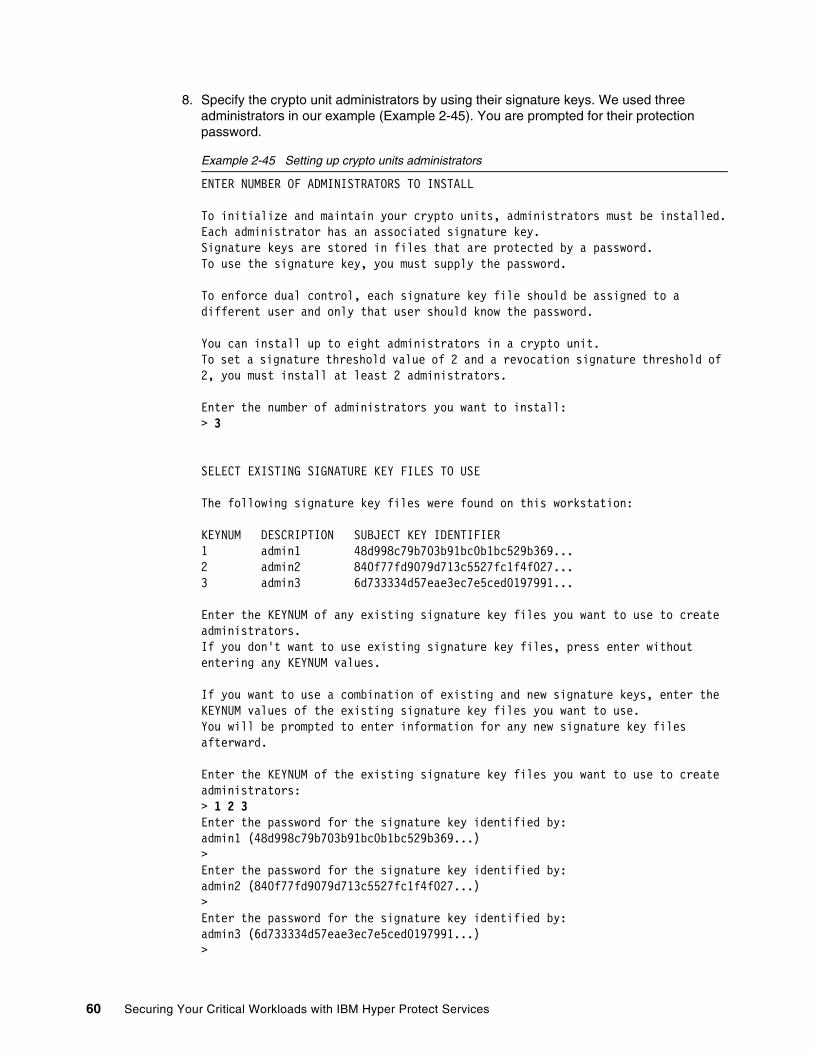
8. Specify the crypto unit administrators by using their signature keys. We used three administrators in our example (Example 2-45). You are prompted for their protection password.
Example 2-45 Setting up crypto units administrators
ENTER NUMBER OF ADMINISTRATORS TO INSTALL
To initialize and maintain your crypto units, administrators must be installed.Each administrator has an associated signature key.Signature keys are stored in files that are protected by a password.To use the signature key, you must supply the password.
To enforce dual control, each signature key file should be assigned to a different user and only that user should know the password.
You can install up to eight administrators in a crypto unit.To set a signature threshold value of 2 and a revocation signature threshold of 2, you must install at least 2 administrators.
Enter the number of administrators you want to install:> 3
SELECT EXISTING SIGNATURE KEY FILES TO USE
The following signature key files were found on this workstation:
KEYNUM DESCRIPTION SUBJECT KEY IDENTIFIER 1 admin1 48d998c79b703b91bc0b1bc529b369... 2 admin2 840f77fd9079d713c5527fc1f4f027... 3 admin3 6d733334d57eae3ec7e5ced0197991...
Enter the KEYNUM of any existing signature key files you want to use to create administrators.If you don't want to use existing signature key files, press enter without entering any KEYNUM values.
If you want to use a combination of existing and new signature keys, enter the KEYNUM values of the existing signature key files you want to use.You will be prompted to enter information for any new signature key files afterward.
Enter the KEYNUM of the existing signature key files you want to use to create administrators:> 1 2 3Enter the password for the signature key identified by:admin1 (48d998c79b703b91bc0b1bc529b369...)> Enter the password for the signature key identified by:admin2 (840f77fd9079d713c5527fc1f4f027...)> Enter the password for the signature key identified by:admin3 (6d733334d57eae3ec7e5ced0197991...)>
60 Securing Your Critical Workloads with IBM Hyper Protect Services

You asked to install 3 administrators and selected 3 existing signature keys to use.No new signature key files will be created.
Installing 1 of 3 administrators...Installing 2 of 3 administrators...Installing 3 of 3 administrators...Setting signature thresholds...Generating a random master key value...Transferring the master key value to 1 of 3 crypto units...Transferring the master key value to 2 of 3 crypto units...Transferring the master key value to 3 of 3 crypto units...
OKThe selected service instance has been initialized.To see what administrators are installed and what signature threshold and master key register values are set, use the 'ibmcloud tke cryptounit-compare' command.
9. Your service is now ready to be used by applications. To check and compare the configuration settings of the selected crypto units, run the command that is shown in Example 2-46.
Example 2-46 Checking the crypto units state
$ ibmcloud tke cryptounit-compare
SIGNATURE THRESHOLDSSERVICE INSTANCE: 3de1d91e-1636-4ed0-ba97-121cc720559fCRYPTO UNIT NUM SIGNATURE THRESHOLD REVOCATION THRESHOLD 1 2 2 2 2 2 3* 2 2 4* 2 2
* Indicates a recovery crypto unit that is used only to hold a backup master key value.
==> Crypto units with a signature threshold of 0 are in IMPRINT MODE. <==
CRYPTO UNIT ADMINISTRATORSSERVICE INSTANCE: 3de1d91e-1636-4ed0-ba97-121cc720559fCRYPTO UNIT NUM ADMIN NAME SUBJECT KEY IDENTIFIER 1 admin1 48d998c79b703b91bc0b1bc529b369... admin2 840f77fd9079d713c5527fc1f4f027... admin3 6d733334d57eae3ec7e5ced0197991... 2 admin1 48d998c79b703b91bc0b1bc529b369... admin2 840f77fd9079d713c5527fc1f4f027... admin3 6d733334d57eae3ec7e5ced0197991... 3* admin1 48d998c79b703b91bc0b1bc529b369... admin2 840f77fd9079d713c5527fc1f4f027... admin3 6d733334d57eae3ec7e5ced0197991... 4* admin1 48d998c79b703b91bc0b1bc529b369... admin2 840f77fd9079d713c5527fc1f4f027... admin3 6d733334d57eae3ec7e5ced0197991...
Chapter 2. IBM Cloud Hyper Protect Crypto Services 61

* Indicates a recovery crypto unit that is used only to hold a backup master key value.
NEW MASTER KEY REGISTERSERVICE INSTANCE: 3de1d91e-1636-4ed0-ba97-121cc720559fCRYPTO UNIT NUM STATUS VERIFICATION PATTERN 1 Empty 00000000000000000000000000000000 00000000000000000000000000000000 2 Empty 00000000000000000000000000000000 00000000000000000000000000000000 3* Empty 00000000000000000000000000000000 00000000000000000000000000000000 4* Empty 00000000000000000000000000000000 00000000000000000000000000000000
CURRENT MASTER KEY REGISTERSERVICE INSTANCE: 3de1d91e-1636-4ed0-ba97-121cc720559fCRYPTO UNIT NUM STATUS VERIFICATION PATTERN 1 Valid c6943b3844ba5de073201cf16d76cd8e 5651a38abd6f561bd6c65b97faf701f2 2 Valid c6943b3844ba5de073201cf16d76cd8e 5651a38abd6f561bd6c65b97faf701f2 3* Valid c6943b3844ba5de073201cf16d76cd8e 5651a38abd6f561bd6c65b97faf701f2 4* Valid c6943b3844ba5de073201cf16d76cd8e 5651a38abd6f561bd6c65b97faf701f2
* Indicates a recovery crypto unit that is used only to hold a backup master key value.
CONTROL POINTSSERVICE INSTANCE: 3de1d91e-1636-4ed0-ba97-121cc720559fCRYPTO UNIT NUM XCP_CPB_ALG_EC_25519 XCP_CPB_BTC XCP_CPB_ECDSA_OTHER 1 Set Set Set 2 Set Set Set 3* Set Set Set 4* Set Set Set
* Indicates a recovery crypto unit that is used only to hold a backup master key value.
==> All crypto units are configured the same. <==
62 Securing Your Critical Workloads with IBM Hyper Protect Services

2.3.7 Initializing your IBM Hyper Protect Crypto Services master key by using smart cards and the Management Utilities
This third option is like 2.3.2, “Using the IBM Cloud TKE CLI plug-in and master key part files” on page 34. However, here are the key differences:
� The administrator files and master key part files are stored on encrypted smart cards and not files.
� The communication between the smart card reader and the utilities over the USB cable is encrypted in the same way a virtual private network (VPN) protects communication on the internet. You are protected against malware that can read your keystrokes or your display on your notebook.
� A certificate authority (CA) smart card is required.
� It is the most secure way to initialize your crypto unit master key.
You must have the following prerequisites:
� Two smart card readers. The supported smart card reader type is SPR332 v2.0 Secure Class 2 PIN Pad Reader (part number 905127-1), which can be acquired at several online market places.
� Some smart cards (give at a minimum).
� The ability to install the smart card reader drives that are described in “Smart card reader drivers” and the TKE Smart Card Utility Program, which is described in “TKE Smart Card Utility Program”, on a Linux OS notebook.
� The Linux notebook must connect to the IBM Cloud Hyper Protect Crypto Services by using an IBM Cloud account over a Internet Protocol network.
See the fully documented procedure at Setting up smart cards and the Management Utilities.
Smart Card utility and TKE software installation on LinuxIn this section, we install the “Smart card reader drivers” and the “TKE Smart Card Utility Program” on a notebook with a Linux OS.
Smart card reader driversIn our lab environment, we use the Personal Computers/Smart Card (PCSC) Lite Framework for Linux, which is available at GitHub, as our smart card reader driver. PCSC is a specification that facilitates the integration of smart cards into computer environments.
Install the pcsc-lite package on your Linux distribution. We used the Mageia 8 release. On Red Hat Enterprise Linux (RHEL) 8.0.0, you can install the smart card reader by using the command that is shown in Example 2-47.
Example 2-47 Installing a smart card reader driver
$ sudo yum install pcsc-lite...$ sudo yum install libusb...
Make sure that the opensc and sc packages are not installed because they might cause unexpected errors during operations on the smart card readers.
Chapter 2. IBM Cloud Hyper Protect Crypto Services 63

Start the pcscd service by using the command that is shown in Example 2-48.
Example 2-48 Starting the pcscd service
$ systemctl start pcscd$ journalctl -l -u pcscdMay 19 14:06:56 linux.home systemd[1]: Started PC/SC Smart Card Daemon.
TKE Smart Card Utility ProgramThe TKE Smart Card Utility Program (SCUP) allows you to create and manage CA, TKE, and Enterprise PKCS #11 (EP11) smart cards and to enroll the TKE workstation crypto adapter in a zone.
To install the Linux card reader utilities, download the cloudtke.bin binary file from GitHub.
The TKE plug-in for IBM Cloud CLI must be installed, as described in “Installing the IBM Cloud TKE CLI plug-in” on page 37.
To install the card reader utilities, run the commands that are shown in Example 2-49. The binary files are installed in the /opt/ibm/hpcs/management-utilities directory.
Example 2-49 Installing IBM Management Utilities
$ sudo bash cloudtke.bin [sudo] password for itsouser: Preparing to installExtracting the JRE from the installer archive...Unpacking the JRE...Extracting the installation resources from the installer archive...Configuring the installer for this system's environment...
Launching installer...
$ ls /opt/ibm/hpcs/management-utilitiesapplets/ cloudscup.gif* cloudtke.jar* jcop2.jar* lax.jar Logs/ sample.linux.installer.properties* smartcard.properties*base-core.jar* cloudscup.jar* gson-2.7.jar* jre/ libOCFPCSC1.so* opencard.properties* scup* tke*base-opt.jar* cloudtke.gif* _installation/ kobil.jar* license/ pcsc-wrapper.jar* scup.lax*
You should see the Software License Agreement that is shown in Figure 2-20 on page 65.
64 Securing Your Critical Workloads with IBM Hyper Protect Services

Figure 2-20 Starting the smart card reader installation program
As shown in Figure 2-21, do not create links when prompted.
Figure 2-21 Selecting Don't create links
Chapter 2. IBM Cloud Hyper Protect Crypto Services 65

Checking your smart card readersYou must plug in the two smart card readers for all operations. Plug each smart card reader into a USB port. You should hear a beep when they are connected properly.
To determine whether your SPR532 smart card readers are properly detected, run the commands that are shown in Example 2-50.
Example 2-50 Checking the smart card reader connection
$ lsusbBus 001 Device 042: ID 04e6:e003 SCM Microsystems, Inc. SPR532 PinPad SmartCard ReaderBus 001 Device 043: ID 04e6:e003 SCM Microsystems, Inc. SPR532 PinPad SmartCard Reader...
$ dmesg | tail -n 13[239072.718341] usb 1-4.2: USB disconnect, device number 41[239076.230460] usb 1-4.2: new full-speed USB device number 42 using xhci_hcd[239076.321963] usb 1-4.2: New USB device found, idVendor=04e6, idProduct=e003, bcdDevice= 7.01[239076.321971] usb 1-4.2: New USB device strings: Mfr=1, Product=2, SerialNumber=5[239076.321975] usb 1-4.2: Product: SPRx32 USB Smart Card Reader[239076.322004] usb 1-4.2: Manufacturer: SCM Microsystems Inc.[239076.322007] usb 1-4.2: SerialNumber: 51271815200080[239080.153481] usb 1-3: new full-speed USB device number 43 using xhci_hcd[239080.282907] usb 1-3: New USB device found, idVendor=04e6, idProduct=e003, bcdDevice= 7.01[239080.282909] usb 1-3: New USB device strings: Mfr=1, Product=2, SerialNumber=5[239080.282910] usb 1-3: Product: SPRx32 USB Smart Card Reader[239080.282911] usb 1-3: Manufacturer: SCM Microsystems Inc.[239080.282912] usb 1-3: SerialNumber: 51271809200008
When using the software to configure the smart cards, you might notice that the two smart card readers have different indexes. Ensure that you insert the smart card into the correct reader number when prompted.
66 Securing Your Critical Workloads with IBM Hyper Protect Services

Figure 2-22 shows our notebook, smart card readers, and smart cards.
Figure 2-22 Our notebook, smart card readers, and smart cards
Preparing the certificate authority smart cardThe first step is to generate a CA smart card that is used in all subsequent actions because it includes part of the cryptographic materials.
To prepare a smart card for the CA, complete the following steps:
1. Start the smart card utility scup, as shown in Example 2-51, in a terminal emulator. The emulator is a graphical application that requires a GUI to be running. IBM utilities are installed in the /opt/ibm/hpcs/management-utilities directory.
Example 2-51 Running the scup utility
$ cd /opt/ibm/hpcs/management-utilities$ ./scup
Tips from the pros:
� You can easily become overwhelmed by the number of smart cards. Prepare some labels to stick on your smart cards and write down the purpose of each smart card (admin signature, CA, key part, or backup).
� Use the same PIN (123456) for every smart card during the initialization. When done, each smart card owner changes the PIN to a more secure one.
Chapter 2. IBM Cloud Hyper Protect Crypto Services 67

A window opens, as shown in Figure 2-23.
Figure 2-23 scup utility started
2. Select CA Smart Card → Initialize and personalize CA smart card, as shown in Figure 2-24.
Figure 2-24 Initializing the CA smart card
68 Securing Your Critical Workloads with IBM Hyper Protect Services

You are prompted to enter a 6-digit PIN twice. Enter the PIN twice within 20 seconds. Otherwise, the session expires and you must reenter the PIN.
3. Specify the name of your zone, as shown in Figure 2-25. We use CA as the name of our zone. The name is a logical way to describe the domain in which all the smart cards will be created.
Figure 2-25 Setting a name to the CA smart card
Chapter 2. IBM Cloud Hyper Protect Crypto Services 69
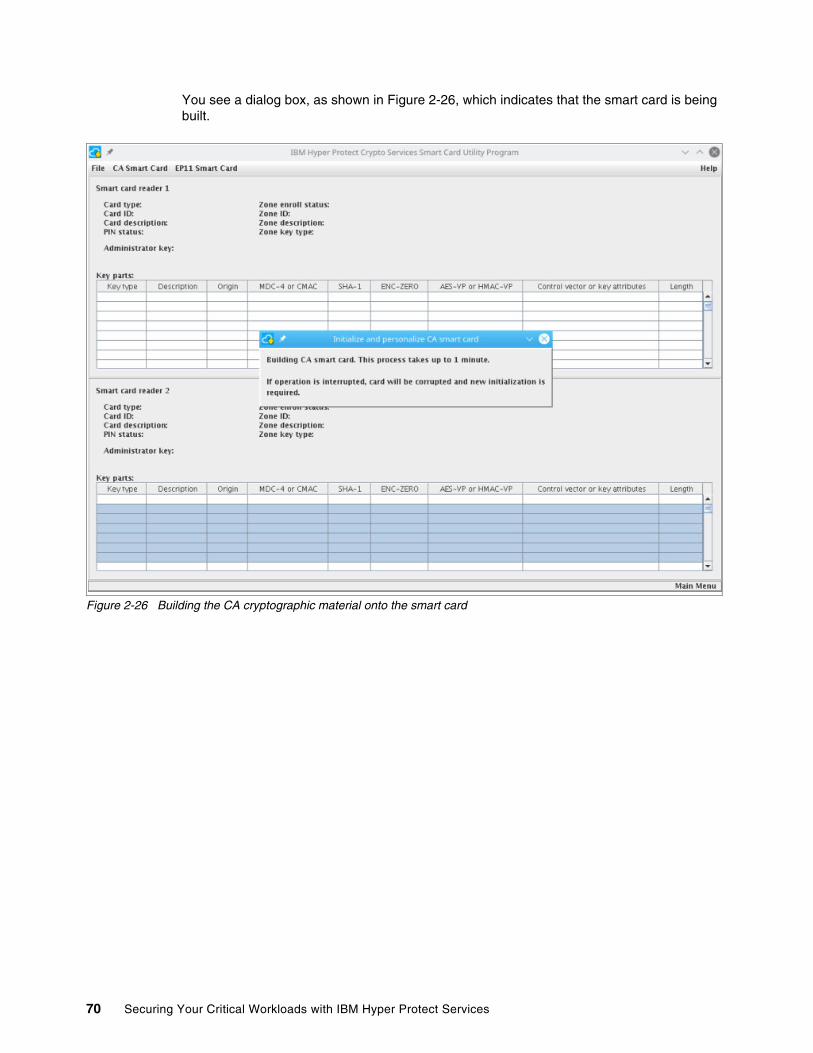
You see a dialog box, as shown in Figure 2-26, which indicates that the smart card is being built.
Figure 2-26 Building the CA cryptographic material onto the smart card
70 Securing Your Critical Workloads with IBM Hyper Protect Services

Figure 2-27 shows the successful creation message.
Figure 2-27 Successful smart card creation
Chapter 2. IBM Cloud Hyper Protect Crypto Services 71

4. Check your card as shown in Figure 2-28:
– Your card description.
– The PIN has been set.
– Your Zone ID, which will be the same for all other smart cards that are created with this zone description (in our case, CA).
Figure 2-28 Checking your smart card
Initializing smart cards for administrator signaturesYou can use the scup utility for as many EP11 smart cards as you have SOs. Each smart card holds a specific signature. One smart card can store only one signature. In our example, we consider two administrators.
The CA card must be present in the first smart card reader.
Tip: It is a best practice that you create a backup copy of your CA smart card. You can create a backup copy by selecting CA Smart Card → Backup CA smart card.
72 Securing Your Critical Workloads with IBM Hyper Protect Services
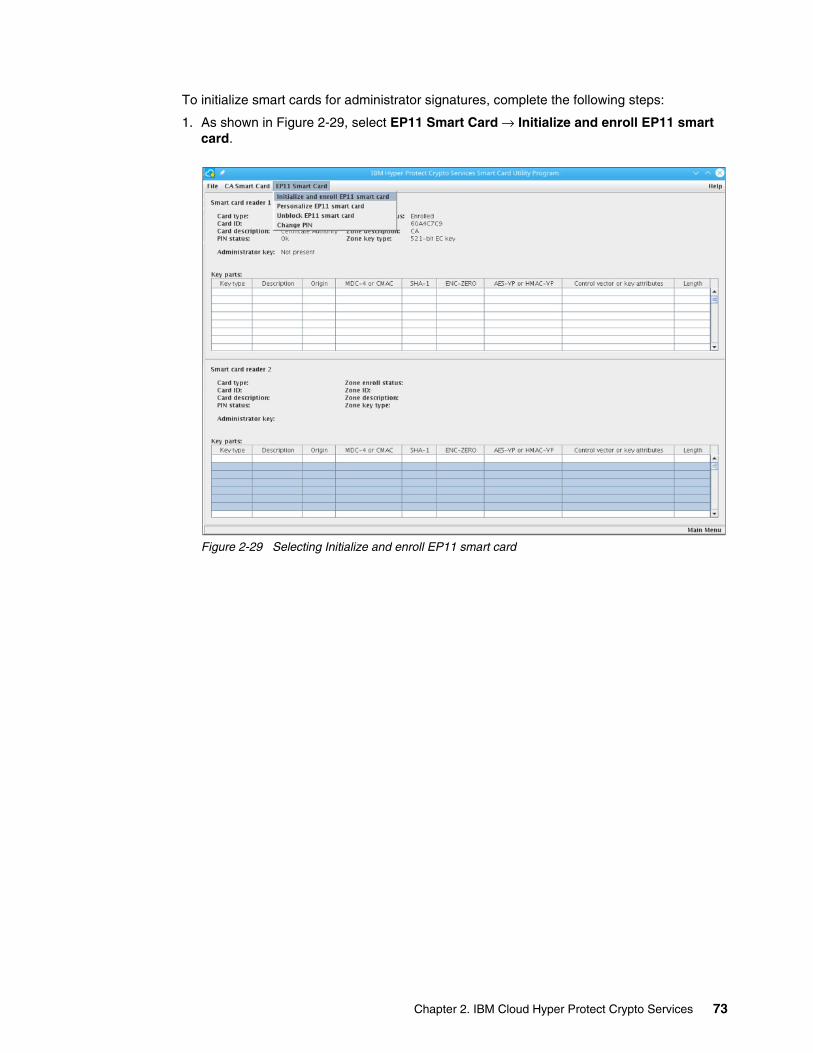
To initialize smart cards for administrator signatures, complete the following steps:
1. As shown in Figure 2-29, select EP11 Smart Card → Initialize and enroll EP11 smart card.
Figure 2-29 Selecting Initialize and enroll EP11 smart card
Chapter 2. IBM Cloud Hyper Protect Crypto Services 73

2. Insert your smart card when you are prompted, as shown in Figure 2-30.
Figure 2-30 Prompt to insert a smart card
The initialization process can take up to 1 minute, as shown in Figure 2-31.
Figure 2-31 Smart card is being initialized
74 Securing Your Critical Workloads with IBM Hyper Protect Services
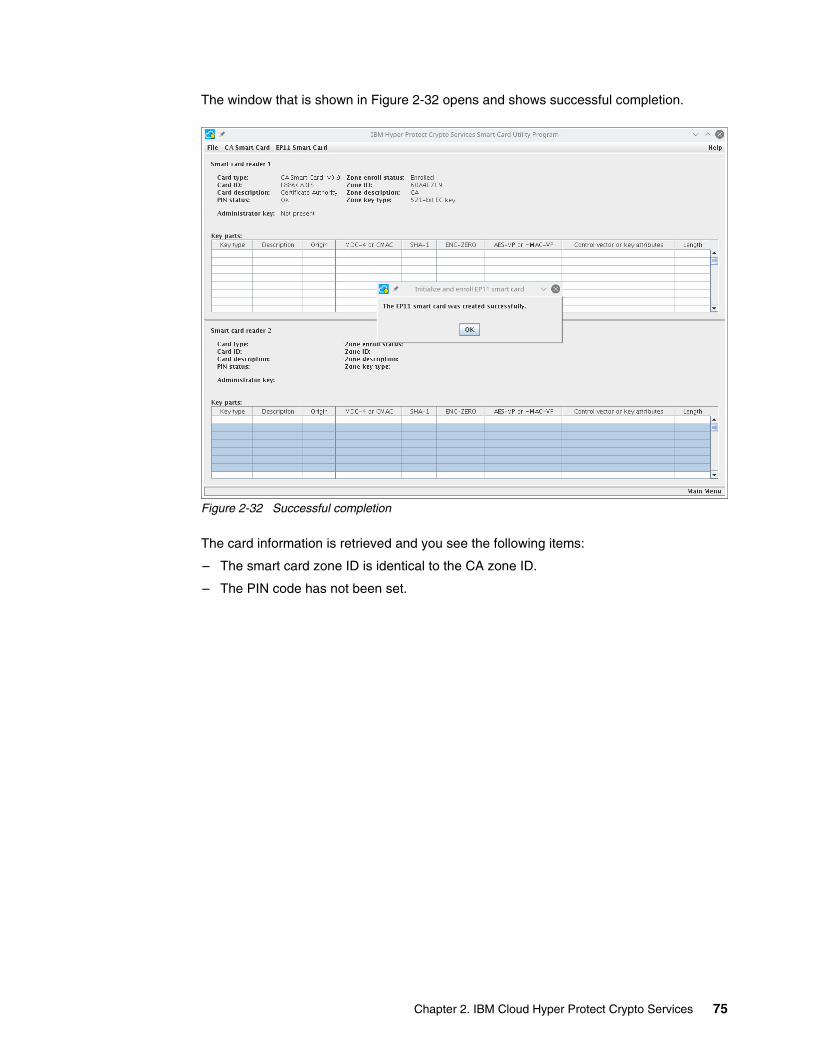
The window that is shown in Figure 2-32 opens and shows successful completion.
Figure 2-32 Successful completion
The card information is retrieved and you see the following items:
– The smart card zone ID is identical to the CA zone ID.
– The PIN code has not been set.
Chapter 2. IBM Cloud Hyper Protect Crypto Services 75
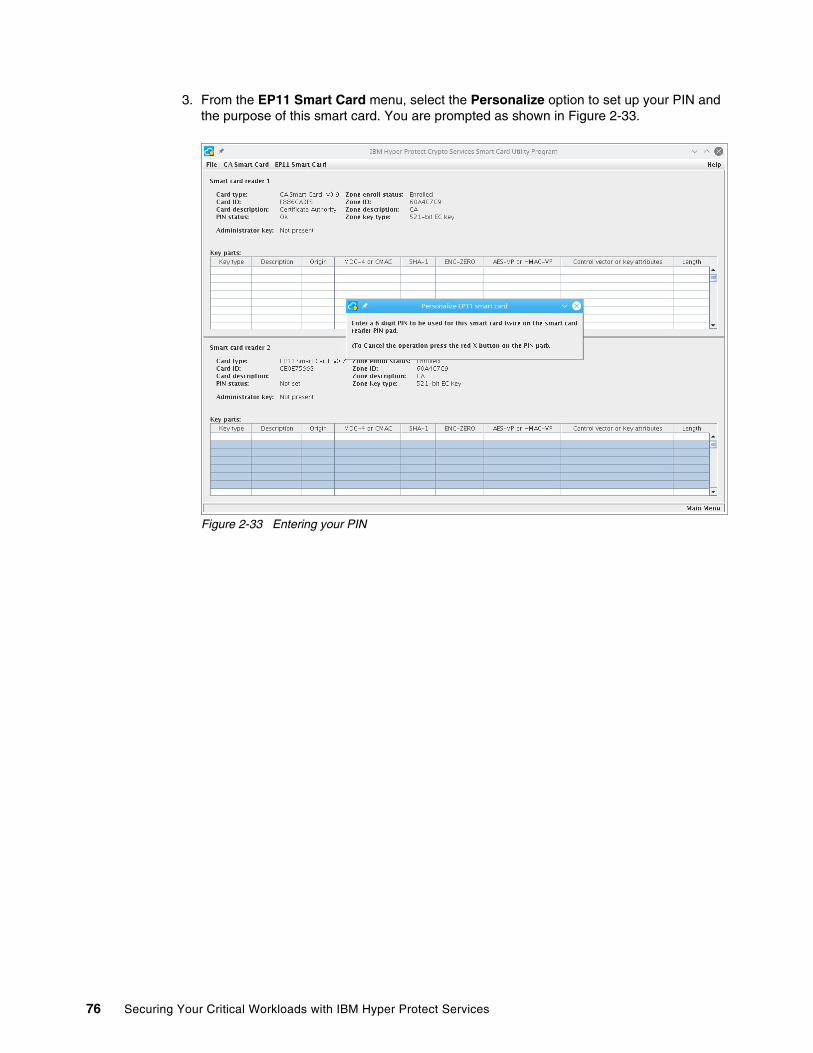
3. From the EP11 Smart Card menu, select the Personalize option to set up your PIN and the purpose of this smart card. You are prompted as shown in Figure 2-33.
Figure 2-33 Entering your PIN
76 Securing Your Critical Workloads with IBM Hyper Protect Services

4. Specify the administrator name that will be the card holder, as shown in Figure 2-34.
Figure 2-34 Specifying the owner of the smart card
Chapter 2. IBM Cloud Hyper Protect Crypto Services 77

5. Repeat steps 3 on page 76 and 4 on page 77 for the second administrator, as shown in Figure 2-35.
Figure 2-35 Second administrator smart card ready
Generating your administrator signature keysYour smart cards are now ready. You can generate each administrator’s signature key and store it on a smart card.
Do not forget to provision your IBM Hyper Protect Crypto Services instance as described in 2.2, “IBM Hyper Protect Crypto Services provisioning” on page 14.
The TKE tool requires that you log in to the IBM Cloud with your account.
To generate your administrator signature keys, complete the following steps:
1. Open two terminals by completing the following steps:
a. Log in to IBM Cloud by running the ibmcloud login -g <resource group> command in one terminal.
b. Start the tke utility on the other terminal. The tke and scup utilities cannot be running concurrently on the notebook. You set up the CLOUDTKEFILES environment variable with an existing directory on your Linux notebook before starting the tke tool.
As shown in Example 2-52, log in to IBM Cloud and verify that you can see the provisioned crypto units for your service (we have three in our example). They do not need to be selected.
Example 2-52 Logging in to IBM Cloud in one terminal
$ export CLOUDTKEFILES=$HOME/tke$ mkdir $CLOUDTKEFILES$ ibmcloud login -sso -g zsb006API endpoint: https://cloud.ibm.com
78 Securing Your Critical Workloads with IBM Hyper Protect Services

Region: us-south
Get a one-time code from https://identity-1.uk-south.iam.cloud.ibm.com/identity/passcode to proceed.Open the URL in the default browser? [Y/n] > YOne-time code > Authenticating...OK
Select an account:...Targeted resource group zsb006
API endpoint: https://cloud.ibm.com Region: us-south User: [email protected] Account: ITSO Account (537544c2222297f40ed689e8473e7849) <-> 2297116 Resource group: zsb006 CF API endpoint: Org: Space:
$ ibmcloud tke cryptounits
API endpoint: https://cloud.ibm.comRegion: us-southUser: [email protected]: Lydia Parziale's Account (537544c2222297f40ed689e8473e7849)Resource group: zsb006
SERVICE INSTANCE: 269dad25-4ae9-4f55-9dfe-d0036fde1f38CRYPTO UNIT NUM SELECTED TYPE LOCATION 1 false OPERATIONAL [us-south].[AZ2-CS8].[01].[16] 2 false OPERATIONAL [us-south].[AZ3-CS9].[01].[10] 3 false RECOVERY [us-south].[AZ2-CS8].[01].[08] 4 false RECOVERY [us-east].[AZ1-CS1].[02].[06]
SERVICE INSTANCE: 34b5af99-c165-4863-af2e-aaa6d7af8137CRYPTO UNIT NUM SELECTED TYPE LOCATION 5 false OPERATIONAL [us-south].[AZ3-CS6].[02].[07] 6 false OPERATIONAL [us-south].[AZ1-CS4].[00].[09] 7 false RECOVERY [us-south].[AZ3-CS9].[01].[11] 8 false RECOVERY [us-east].[AZ2-CS2].[03].[06]
SERVICE INSTANCE: d300bb89-1807-4d6b-9927-3a1a2882e2b7CRYPTO UNIT NUM SELECTED TYPE LOCATION 9 false OPERATIONAL [us-south].[AZ3-CS9].[00].[03] 10 false OPERATIONAL [us-south].[AZ1-CS7].[01].[16] 11 false RECOVERY [us-south].[AZ1-CS7].[01].[15] 12 false RECOVERY [us-east].[AZ2-CS2].[03].[13]
Chapter 2. IBM Cloud Hyper Protect Crypto Services 79

2. Start the tke application, as shown in Example 2-53.
Example 2-53 Starting tke in the second terminal
$ cd /opt/ibm/hpcs/management-utilities$ export CLOUDTKEFILES=$HOME/tke$ ./tke
You might get a few dialog boxes like the one that is shown in Figure 2-36. These dialog boxes appear if CLOUDTKEFILES is empty. You get the same message if you run the ibmcloud tke cryptounits command:
Verifying the OA certificate chain for serial number 93AAAUAC...
Figure 2-36 Connection dialog box at launch time
When using the user interface, the window that is shown in Figure 2-37 opens. You see all the same crypto units displayed if you run the ibmcloud tke cryptounits command.
Figure 2-37 TKE started and showing the available crypto units in your IBM Hyper Protect Crypto Services instance
80 Securing Your Critical Workloads with IBM Hyper Protect Services

3. Check the IBM Cloud console (Figure 2-38) to verify that your master key has not yet been initialized for your service. Check the target instance ID (our target instance ID shows 269dad25-4ae9-4f55-9dfe-d0036fde1f38).
Figure 2-38 IBM Console showing the details of the IBM Hyper Protect Crypto Services instance that we want to initialize
Chapter 2. IBM Cloud Hyper Protect Crypto Services 81

4. Go back to the TKE, click Add crypto units, and enter the number that corresponds to your IBM Hyper Protect Crypto Services instance (our instance is 269dad25-4ae9-4f55-9dfe-d0036fde1f38, as shown in Figure 2-39). The selected status should switch to true in the scup user interface.
Figure 2-39 Selecting the right crypto units to initialize
5. Click the Administrators tab in the left menu in the TKE and click Generate Signature Key.
82 Securing Your Critical Workloads with IBM Hyper Protect Services

Specify the administrator name to be associated with the generated key, as shown in Figure 2-40.
Figure 2-40 Entering the administrator name for the signature
The key is stored on a smart card.
6. Insert the admin1/signature smart card into reader 2 (with the CA card in reader 1) and enter the PIN when prompted, as shown in Figure 2-41.
Figure 2-41 Entering the PIN to use the admin1 signature smart card
Chapter 2. IBM Cloud Hyper Protect Crypto Services 83
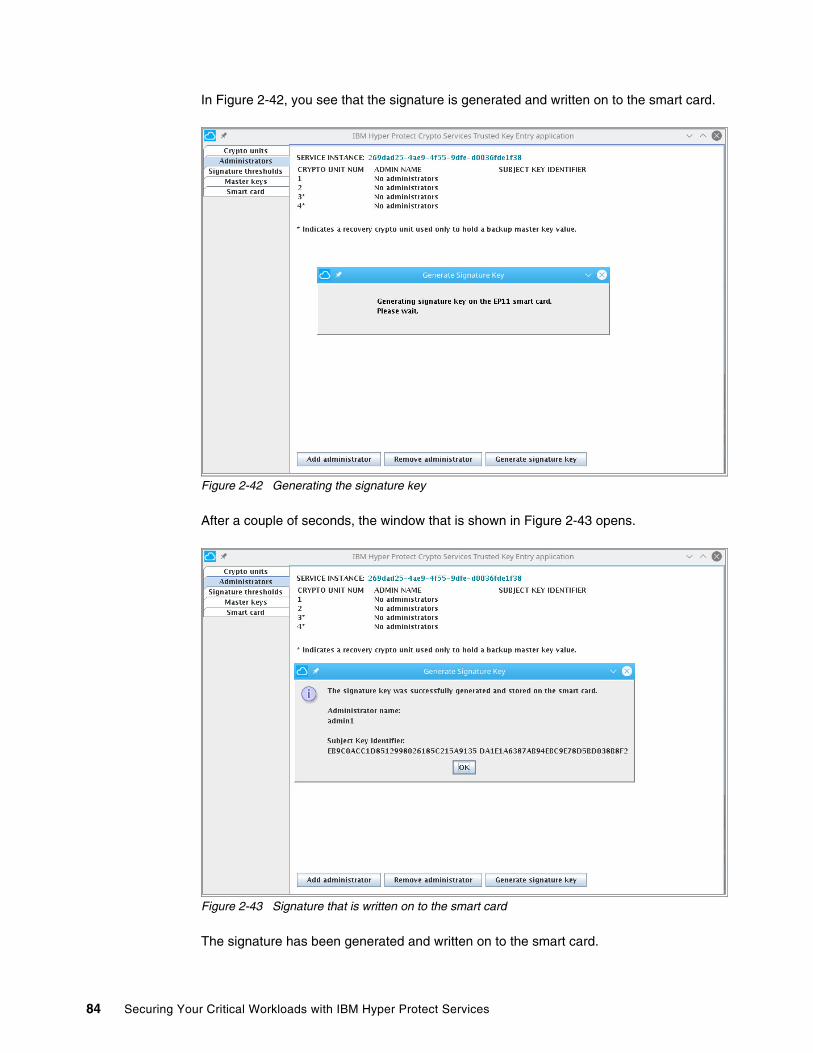
In Figure 2-42, you see that the signature is generated and written on to the smart card.
Figure 2-42 Generating the signature key
After a couple of seconds, the window that is shown in Figure 2-43 opens.
Figure 2-43 Signature that is written on to the smart card
The signature has been generated and written on to the smart card.
84 Securing Your Critical Workloads with IBM Hyper Protect Services

7. Click Add Administrator to add this first administrator as the administrator of the crypto units of your instance by using the smart card content. You should be prompted for the smart card PIN, as shown in Figure 2-44.
Figure 2-44 Entering the PIN to access the smart card content
Your admin appears as shown in Figure 2-45 after the content of the smart card has been read.
Figure 2-45 The first administrator of your crypto units
Chapter 2. IBM Cloud Hyper Protect Crypto Services 85

Repeat steps 4 on page 82 - 7 on page 85 for all the other administrators by using their own signature smart card. The window that is shown in Figure 2-46 opens.
Figure 2-46 Two administrators listed
Setting up a threshold and entering the secure codeComplete the following steps:
1. Click the Signature thresholds tab in TKE left menu and click Change signature thresholds. Enter the threshold value, as shown in Figure 2-47 on page 87.
We specified 2 in our example. Use your security guidelines and the number of administrator signature smart cards that you prepared to determine this value.
86 Securing Your Critical Workloads with IBM Hyper Protect Services

Figure 2-47 Change signature thresholds window
2. You are prompted to insert the administrator signature smart cards into reader 2 to authenticate this action because you are using secure mode, as shown in Figure 2-48. Enter your PIN.
Figure 2-48 Inserting the signature smart card when requested
Chapter 2. IBM Cloud Hyper Protect Crypto Services 87

In Figure 2-49, each administrator signed the action and a threshold is set.
Figure 2-49 Threshold set
Preparing the key parts smart cardsComplete the following steps:
1. Click the Master keys tab on the TKE left menu. The window that is shown in Figure 2-50 opens.
Figure 2-50 No master key in both crypto units registers
88 Securing Your Critical Workloads with IBM Hyper Protect Services

Before you load the key parts, you must first create them on smart cards.
2. Exit the TKE and restart the scup tool.
3. As described in “Initializing smart cards for administrator signatures” on page 72, we must initialize our smart cards to store the key parts. You should have the following items:
– The CA smart card.
– The Administrator signature smart cards.
– The key parts smart cards.
Select EP11 Smart Card → Initialize, and then select EP11 Smart Card- → Personalize. The windows that are shown in Figure 2-51 and Figure 2-52 on page 90 open.
Figure 2-51 Smart card initialization
Chapter 2. IBM Cloud Hyper Protect Crypto Services 89

Figure 2-52 Preparing to set up a description
Figure 2-53 on page 91 and Figure 2-54 on page 92 show the naming for the key parts in this example. For clarity, if you must restore this master key, here is a description of the key parts:
� Master key first for key part1� Master key last for key part 2
90 Securing Your Critical Workloads with IBM Hyper Protect Services

As a best practice, set the card index and the total number of parts in the description.
Figure 2-53 Specifying the description for the first smart card
Chapter 2. IBM Cloud Hyper Protect Crypto Services 91

Figure 2-54 Specifying the description for the second smart card
Generating the master key partsTo generate the master key parts, complete the following steps:
1. Exit scup and restart the tke program.
2. Click Generate key part.
Tip: Do not forget to write down the description on the note that you stick on these smart cards.
92 Securing Your Critical Workloads with IBM Hyper Protect Services

3. Insert a key part and enter its PIN, as shown in Figure 2-55.
Figure 2-55 Inserting the key to generate the key part
Tip: Use the format YYYY/MM/DD-#outof# in the description of your signatures keys to make it easier to retrieve them in the tke application.
Chapter 2. IBM Cloud Hyper Protect Crypto Services 93

4. In the Generate master key part dialog box, enter a description and click OK, as shown in Figure 2-56.
Figure 2-56 Specifying the key part description
Your first key part should now be ready, as shown in Figure 2-57.
Figure 2-57 First key part generated
If you click Smart Card in the left menu, you can list the content of your smart card, as shown in Figure 2-58 on page 95.
94 Securing Your Critical Workloads with IBM Hyper Protect Services

Figure 2-58 Checking the content of your smart card by using the Smart Card menu
5. Repeat steps 2 on page 92 - 4 on page 94 to generate a second key part with a similar description, as shown in Figure 2-59.
Figure 2-59 Creating the second key part
Chapter 2. IBM Cloud Hyper Protect Crypto Services 95

In Figure 2-60, you might see that the second smart card has a previous key part that was generated in 2020. Multiple key parts can be stored on a smart card.
Figure 2-60 Multiple key parts on a smart card
Loading the key part to the new master key registerNormally, all the required key parts are ready and stored on multiple smart cards, and they are protected by a PIN. To load the key part to the new master key register, complete the following steps:
1. Select the Master keys tab of the TKE application and click Load.
2. Specify the number of key parts to load, as shown in Figure 2-61 on page 97.
96 Securing Your Critical Workloads with IBM Hyper Protect Services

Figure 2-61 Specifying the number of key parts to load
3. For each key part, insert the correct key part smart card and enter the corresponding PIN to read them, as shown in Figure 2-62.
Figure 2-62 Reading the smart card content
Chapter 2. IBM Cloud Hyper Protect Crypto Services 97

The smart card content is displayed, as shown in Figure 2-63. You must select the correct key part.
Figure 2-63 Selecting the correct key part on smart card 1
4. On the second card, you may select between multiple key parts. Because our description included the date, we know that we must select the last one, as shown in Figure 2-64.
Figure 2-64 Multiple choices on the second smart card.
98 Securing Your Critical Workloads with IBM Hyper Protect Services

The window that is shown in Figure 2-65 opens and shows that all key parts are loaded. Your NEW MASTER KEY REGISTER is in an uncommitted state, which means that it has not been used by the application.
Figure 2-65 All the key parts are now loaded
Chapter 2. IBM Cloud Hyper Protect Crypto Services 99
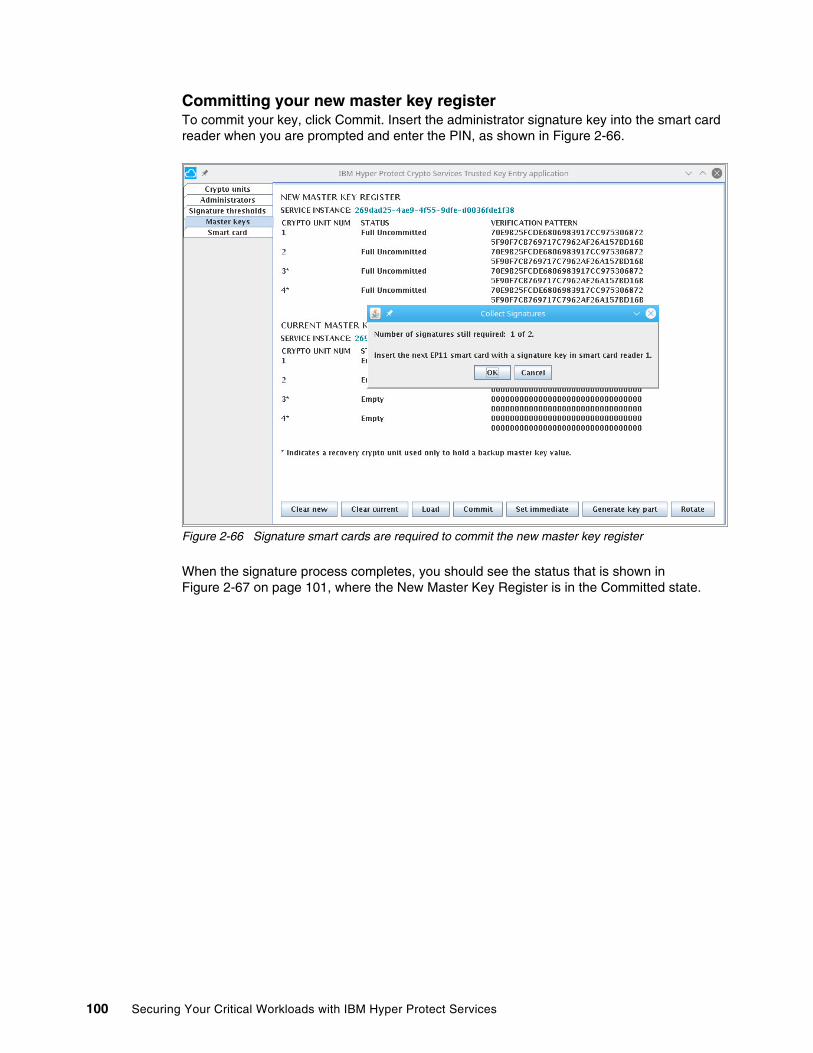
Committing your new master key registerTo commit your key, click Commit. Insert the administrator signature key into the smart card reader when you are prompted and enter the PIN, as shown in Figure 2-66.
Figure 2-66 Signature smart cards are required to commit the new master key register
When the signature process completes, you should see the status that is shown in Figure 2-67 on page 101, where the New Master Key Register is in the Committed state.
100 Securing Your Critical Workloads with IBM Hyper Protect Services

Figure 2-67 New master key register in the Committed state
Setting your new master key register as the current master key registerClick Set immediate. You get the warning that is shown in Figure 2-68.
Figure 2-68 Set immediate window
Chapter 2. IBM Cloud Hyper Protect Crypto Services 101

Figure 2-69 shows the final setup.
Figure 2-69 Final setup of the new key
The verification patterns allow you to retrieve the correct key part that is stored on the smart card. You have one verification pattern per key part.
You might notice that this verification pattern is also displayed when you look at the key part smart card content, as shown in Figure 2-57 on page 94 (see the AES VP number).
Figure 2-70 on page 103 is what your table should look like:
� One CA smart card with a red sticker� Two key part smart cards with a green sticker� Two admin signature smart cards with a yellow sticker
For your information: There is a difference between Set immediate and Rotate:
� Set immediate: The cryptographic materials that are stored in the crypto unit are not reencrypted with the new key, so you lose access to those materials.
� Rotate: Reencrypts all the cryptographic materials.
102 Securing Your Critical Workloads with IBM Hyper Protect Services

Figure 2-70 Completed smart cards
You now can accomplish the following tasks:
� Create smart card backups.
� Hand out the smart cards to the correct persons, for example, you could hand out the yellow ones to your IT people and the green ones to business people.
� Change the PINs.
Chapter 2. IBM Cloud Hyper Protect Crypto Services 103

You can check to see whether your IBM Hyper Protect Crypto Services instance is ready for an application by using the IBM Cloud console, as shown in Figure 2-71.
Figure 2-71 IBM Cloud console showing that the instance is ready
Tip: If you take too much time between your two actions, your IBM Cloud CLI connection might time out. We used the ibmcloud tke plug-in in the background. For example, you might get the warning that is shown in Figure 2-72 on page 105.
104 Securing Your Critical Workloads with IBM Hyper Protect Services

Figure 2-72 Getting a error because the IBM Cloud CLI session timed out
If this situation occurs, open a new terminal and log in by running the ibmcloud login -g <resource group> command. Then, retry your action on the tke application.
2.4 Using the IBM Key Protect REST API
In this section, we describe how to use the IBM Key Protect REST API.
2.4.1 Key Protect concepts and programming language software developer kits
IBM Hyper Protect Crypto Services implements the IBM Key Protect REST API that provides Key Protect concepts to applications developers to store sensitive data as a key ID and payload map model.
Each key is assigned a unique identifier, a name, and a description. Multiple keys can have the same name but different unique identifiers.
Key Protect keys can be disabled and reenabled.
Two key types are available:
� Key Protect standard keys can store any base64-encoded string. This type comes in handy when there is need to keep credentials in a vault.
A Key Protect standard key payload is extractable: Your application can retrieve its plain text data (payload) out of the IBM Hyper Protect Services keystore.
Chapter 2. IBM Cloud Hyper Protect Crypto Services 105

Access to Key Protect standard keys is managed by IBM Cloud Identity and Access Management (IAM): Any access is logged and tracked in the Activity Tracker with LogDN and can be easily audited. For more information, see Getting started with IBM Cloud Activity Tracker.
If you store a data encryption key (DEK) or other sensitive data, it is a best practice to encrypt the Key Protect standard key data by using symmetric encryption. The Key Protect REST API offers wrap and unwrap encryption functions that are coupled with a Key Protect root key for this purpose.
� Key Protect root keys are primary resources in Key Protect. They are symmetric key-wrapping keys that are used as roots of trust for wrapping (encrypting) and unwrapping (decrypting) other keys that are stored in a data service. They implement AES Galois and counter-mode encryption.
Typically, Key Protect root keys wrap and unwrap DEKs, and the resulting wrapped data encryption keys (wDEKs) are stored as a Key Protect standard key. A DEK is a key that is used by your application. The Key Protect root key protects these DEKs.
The Key Protect root key can either be imported from your notebook or generated by the Key Protect service. Then, the plain text value of a root key never leaves the IBM Hyper Protect Services instance. The key is nonextractable and protected by the HSM master key.
You can work with IBM Key Protect standard keys and root keys by using one of the following methods:
� The IBM Hyper Protect Crypto Services GUI.
� Several software development kits (SDKs) are available for Node.js, Java, Python, and Golang.
� The IBM Cloud CLI Key Protect plug-in.
This Key Protect API is documented at IBM Key Protect API and includes code snippets for the curl CLI, Java, Python, and Go programming language.
For Python, install the Key Protect module by running the pip install -U keyprotect command. This keyprotect package is a wrapper around the redstone package. Its documentation is available at Redstone: Encrypting/Decrypting with Key Protect.
The Golang Key Protect SDK is available at GiHub. To install it on your Go environment, run the go get github.com/IBM/keyprotect-go-client command.
The Key Protect Node.js SDK is available at GitHub. To install it, run the npm install @ibm-cloud/ibm-key-protect command.
2.4.2 Setting your authentication configuration to call API functions
IBM Cloud IAM is the primary method to authenticate Key Protect API calls. A convenient way to secure access to your IBM Hyper Protect Crypto Services instance is to use an API key. You can create a specific service ID to control access to this service.
This section describes the procedure by using a terminal and the IBM Cloud CLI. You can achieve the same result by using the IBM Cloud console.
106 Securing Your Critical Workloads with IBM Hyper Protect Services

Creating an IBM service ID on your IBM Cloud accountA service ID identifies a service or an application the same way as a user ID identifies a user. A service ID can be used to enable an application outside of IBM Cloud access to your IBM Cloud services.
� You assign specific access policies to the service ID to restrict permissions from using specific services.
� Service IDs are not tied to a specific user. If a user happens to leave an organization and is deleted from the account, the service ID remains, which ensures that your application or service keeps running.
In Example 2-54, we create a service ID that is called hpvs-sid. Under the Linux OS, open a terminal and log in to your IBM Cloud account with the CLI and create your service ID.
Example 2-54 Creating a service ID
$ ibmcloud iam service-id-create hpvs-sidCreating service ID hpvs-sid bound to current account as [email protected] ID hpvs-sid is created successfully ID ServiceId-a4594010-afe7-467e-909d-8aa906481617 Name hpvs-sid Description CRN crn:v1:bluemix:public:iam-identity::a/537544c2222297f40ed689e8473e7849::serviceid:ServiceId-a4594010-afe7-467e-909d-8aa906481617 Version 1-ae2f75c82c6a5f0331a5c56ad3a9f232 Locked false
Generating an API key for your service IDAn API key is a unique identifier that is used to authenticate access to an IBM Cloud service. The API key is used in our example and by the application that you might build.
Generate such a key for your service ID by running the command that is shown in Example 2-55. This command creates a key that is called hpvskey for the service ID hpvs-sid that was previously created in Example 2-54. The command stores the API key in a file that is called mykey on your notebook.
Example 2-55 Creating an API key for your IBM Hyper Protect Crypto Services instance
$ ibmcloud iam service-api-key-create hpvskey hpvs-sid --file mykeyCreating API key hpvskey of service ID hpvs-sid under account 537544c2222297f40ed689e8473e7849 as [email protected] ID API key hpvskey is createdSuccessfully save API key information to mykey
Preserve the API key! It cannot be retrieved after it is created. ID ApiKey-ed6f6731-fbad-4266-a01e-d0adb10c906e Name hpvskey Description Created At 2021-05-07T12:46+0000 API Key 8vFwZ9yQIyG8iDI0j2UYKRdWNh4Oi3l-vBwAvcZd5oDX Locked false
Chapter 2. IBM Cloud Hyper Protect Crypto Services 107

Then, you can retrieve the value of your API key by using the command that is shown in Example 2-56. Its value is exported as the API_KEY environment variable (for a Linux OS).
Example 2-56 Extracting your API key from the generated mykey file
$ export API_KEY=$(jq -r .apikey mykey)
Keep the mykey file in a safe file because it stores authentication data for your service.
Creating an access policyYou now must grant Editor access to the service ID to your IBM Hyper Protect Crypto Services instance, as shown in Example 2-57.
Editor is an IBM Cloud defined role that groups a set of actions that are available for IBM Hyper Protect Crypto Services.
In our example, the IBM Hyper Protect Crypto Services name is hpcs-svc. Run the commands that are shown in Example 2-57.
Example 2-57 Granting access to the IBM Hyper Protect Crypto Services instance to your service ID
$ ibmcloud resource service-instancesRetrieving instances with type service_instance in resource group zsb006 in all locations under account ITSO's Account as [email protected] Location State Type hpcs-svc us-south active service_instance
$ ibmcloud iam service-policy-create hpvs-sid --roles Editor --service-name hpcs-svc Creating policy under current account for service ID hpvs-sid as [email protected] policy is successfully created
Policy ID: d59cdef5-24ba-4b6b-b660-4093cc3ee0f4 Version: 1-3adada66ca15940431148e6e72c0b61c Roles: Editor Resources: Service Name hpcs-svc
2.4.3 Retrieving connection information to your IBM Hyper Protect Crypto Services instance
To connect and use your IBM Hyper Protect Crypto Services instance, you require three things:
� The API key of the service ID, which was defined in 2.4.2, “Setting your authentication configuration to call API functions” on page 106.
� The service instance ID of your IBM Hyper Protect Crypto Services instance.
� The endpoint URL of your IBM Hyper Protect Crypto Services instance.
108 Securing Your Critical Workloads with IBM Hyper Protect Services
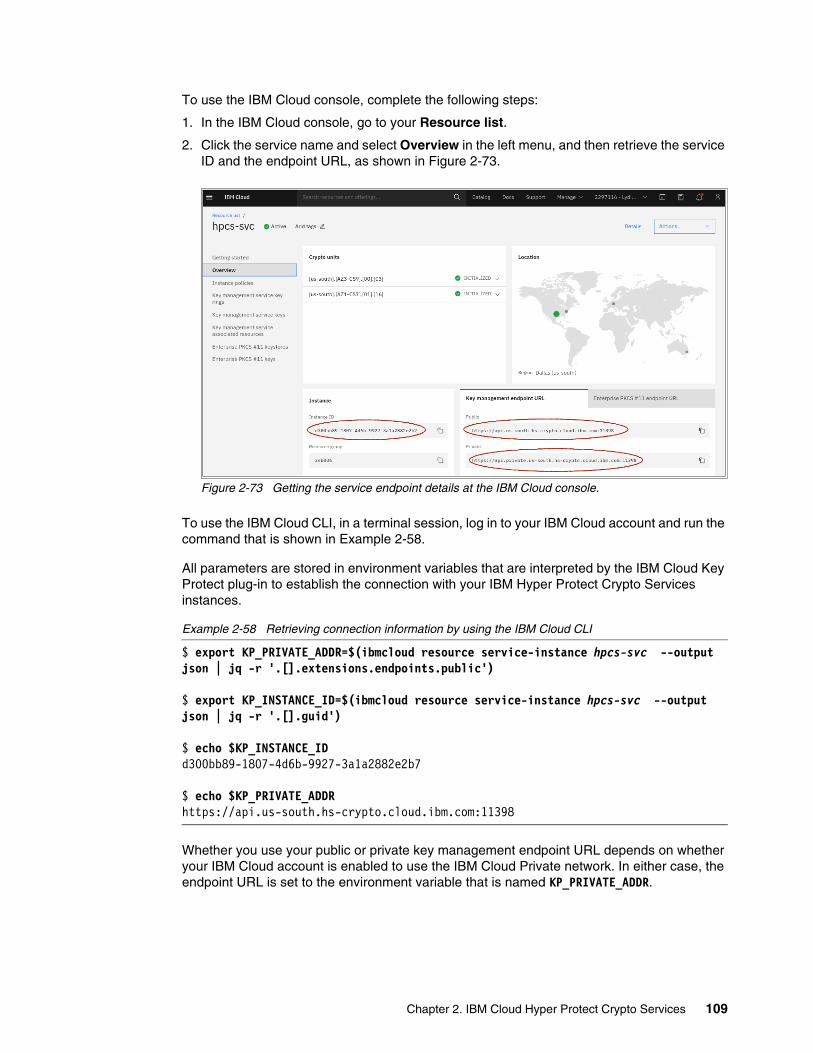
To use the IBM Cloud console, complete the following steps:
1. In the IBM Cloud console, go to your Resource list.
2. Click the service name and select Overview in the left menu, and then retrieve the service ID and the endpoint URL, as shown in Figure 2-73.
Figure 2-73 Getting the service endpoint details at the IBM Cloud console.
To use the IBM Cloud CLI, in a terminal session, log in to your IBM Cloud account and run the command that is shown in Example 2-58.
All parameters are stored in environment variables that are interpreted by the IBM Cloud Key Protect plug-in to establish the connection with your IBM Hyper Protect Crypto Services instances.
Example 2-58 Retrieving connection information by using the IBM Cloud CLI
$ export KP_PRIVATE_ADDR=$(ibmcloud resource service-instance hpcs-svc --output json | jq -r '.[].extensions.endpoints.public')
$ export KP_INSTANCE_ID=$(ibmcloud resource service-instance hpcs-svc --output json | jq -r '.[].guid')
$ echo $KP_INSTANCE_IDd300bb89-1807-4d6b-9927-3a1a2882e2b7
$ echo $KP_PRIVATE_ADDRhttps://api.us-south.hs-crypto.cloud.ibm.com:11398
Whether you use your public or private key management endpoint URL depends on whether your IBM Cloud account is enabled to use the IBM Cloud Private network. In either case, the endpoint URL is set to the environment variable that is named KP_PRIVATE_ADDR.
Chapter 2. IBM Cloud Hyper Protect Crypto Services 109

2.4.4 Creating IBM Key Protect keys
Creating an IBM Key Protect key with a predefined payload is referred to as an imported key. Most of the examples in this book create Key Protect standard keys as imported keys. Importing a Key Protect root key is described in 2.4.7, “Bring Your Own Key to the cloud: importing a Key Protect root key” on page 133.
Key import requires that you specify the payload by using base64 encoding. In our examples, we use the Linux base64 shell tool for this purpose.
An expiration date may be specified. If an expiration date is defined when the key is created, the key is automatically disabled by the IBM Hyper Protect Crypto Services instance after the expiration date passes.
Using the IBM Cloud ConsoleYou can easily create or import a key from a file by using the IBM Cloud console by completing the following steps:
1. In your Resource list, select your IBM Hyper Protect Crypto Services instance.
2. In the left menu, select Key management service keys.
3. In the right pane, click Add Key. The window that is shown in Figure 2-74 opens.
Figure 2-74 Creating a key by using the IBM Cloud console
Tip: Define the KP_PRIVATE_ADDR and KP_INSTANCE_ID environment variables to avoid connection and authorization errors. They can be defined in your shell environment in the .bash_profile file to make them permanent for every CLI session.
For more information, see Performing key mangement operations with the CLI.
110 Securing Your Critical Workloads with IBM Hyper Protect Services

Using this menu, you can create or import a key.
To create a key, specify the following items:
– Its type: root or standard.
– Its name.
You may indicate some other options like the following items:
– Its expiration date.– Its description.– Its ring, which is a way to logically group Key Protect keys.
4. When you are done, click Create Key.
Creating IBM Key Protect keys in Python Make sure that you installed the Key Protect module by using the pip tool, as described in 2.4.1, “Key Protect concepts and programming language software developer kits” on page 105.
To connect the IBM Hyper Protect Crypto Services instance, our sample program uses three Linux environment variables:
� The API_KEY variable. Its setup procedure is shown in “Generating an API key for your service ID” on page 107.
� The KP_INSTANCE_ID and KP_PRIVATE_ADDR variables. Their setup procedures are shown in 2.4.3, “Retrieving connection information to your IBM Hyper Protect Crypto Services instance” on page 108.
In Example 2-59, the kp session object is created by using the three environment variables.
Then, the create() function that follows the kp session object allows you to easily create the key and specify its parameters, such as type and name.
You must import the keyprotect module as specified at the beginning of the program to use the Key Protect function.
Example 2-59 Python program that creates one Key Protect standard key and one Key Protect root key
import osimport keyprotectfrom keyprotect import bxauth
kp = keyprotect.Client( credentials= bxauth.TokenManager(api_key=os.getenv("API_KEY")), #region="us-south", service_instance_id=os.getenv("KP_INSTANCE_ID"), # Set custom service endpoint endpoint_url=os.getenv("KP_PRIVATE_ADDR"),)print(kp.endpoint_url)# Initialize the Key Protect client as specified in Authenticationkey = kp.create(name="itso rocks")print("Created key '%s'" % key["id"])
rootkey = kp.create(name="itso really rocks", root=True)print("Created root key '%s'" % rootkey["id"])
Chapter 2. IBM Cloud Hyper Protect Crypto Services 111
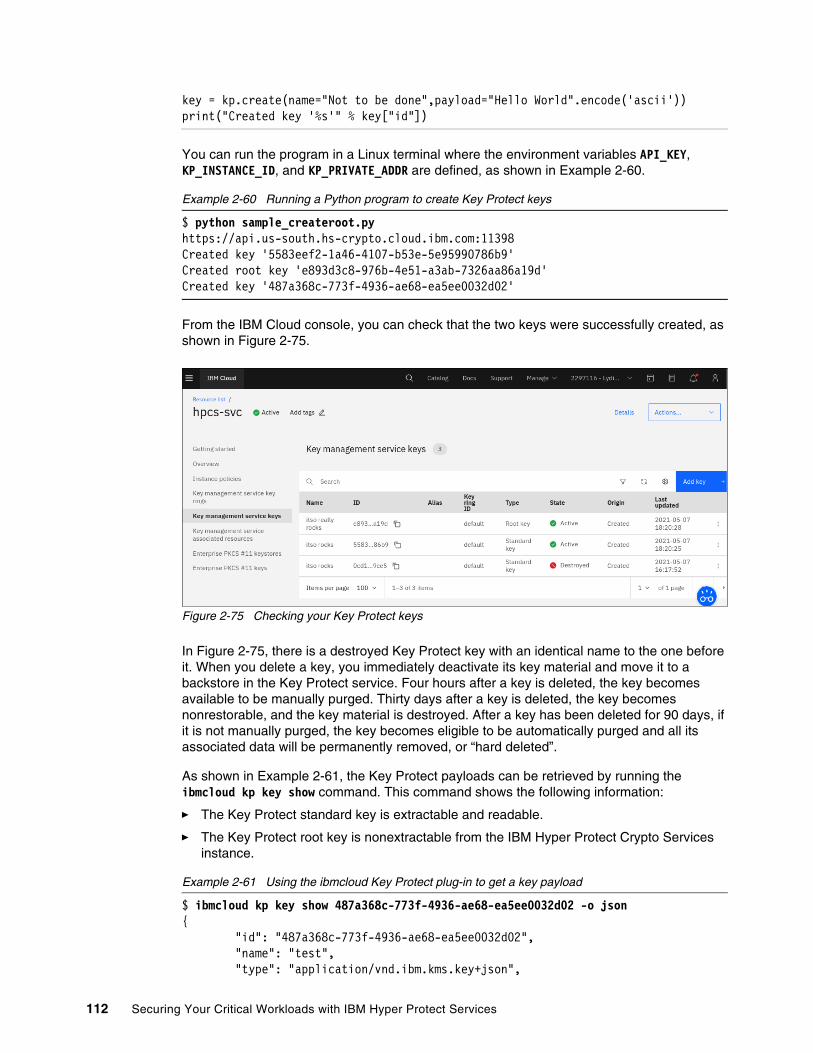
key = kp.create(name="Not to be done",payload="Hello World".encode('ascii'))print("Created key '%s'" % key["id"])
You can run the program in a Linux terminal where the environment variables API_KEY, KP_INSTANCE_ID, and KP_PRIVATE_ADDR are defined, as shown in Example 2-60.
Example 2-60 Running a Python program to create Key Protect keys
$ python sample_createroot.py https://api.us-south.hs-crypto.cloud.ibm.com:11398Created key '5583eef2-1a46-4107-b53e-5e95990786b9'Created root key 'e893d3c8-976b-4e51-a3ab-7326aa86a19d'Created key '487a368c-773f-4936-ae68-ea5ee0032d02'
From the IBM Cloud console, you can check that the two keys were successfully created, as shown in Figure 2-75.
Figure 2-75 Checking your Key Protect keys
In Figure 2-75, there is a destroyed Key Protect key with an identical name to the one before it. When you delete a key, you immediately deactivate its key material and move it to a backstore in the Key Protect service. Four hours after a key is deleted, the key becomes available to be manually purged. Thirty days after a key is deleted, the key becomes nonrestorable, and the key material is destroyed. After a key has been deleted for 90 days, if it is not manually purged, the key becomes eligible to be automatically purged and all its associated data will be permanently removed, or “hard deleted”.
As shown in Example 2-61, the Key Protect payloads can be retrieved by running the ibmcloud kp key show command. This command shows the following information:
� The Key Protect standard key is extractable and readable.
� The Key Protect root key is nonextractable from the IBM Hyper Protect Crypto Services instance.
Example 2-61 Using the ibmcloud Key Protect plug-in to get a key payload
$ ibmcloud kp key show 487a368c-773f-4936-ae68-ea5ee0032d02 -o json{ "id": "487a368c-773f-4936-ae68-ea5ee0032d02", "name": "test", "type": "application/vnd.ibm.kms.key+json",
112 Securing Your Critical Workloads with IBM Hyper Protect Services

"algorithmType": "AES", "createdBy": "iam-ServiceId-a4594010-afe7-467e-909d-8aa906481617", "creationDate": "2021-05-07T21:33:39Z", "lastUpdateDate": "2021-05-07T21:33:39Z", "keyRingID": "default", "extractable": true, "imported": true, "payload": "SGVsbG8gV29ybGQ=", "state": 1, "crn": "crn:v1:bluemix:public:hs-crypto:us-south:a/537544c2222297f40ed689e8473e7849:d300bb89-1807-4d6b-9927-3a1a2882e2b7:key:487a368c-773f-4936-ae68-ea5ee0032d02", "deleted": false, "dualAuthDelete": { "enabled": false }}$ echo "SGVsbG8gV29ybGQ=" | base64 -dHello World
$ ibmcloud kp key show e893d3c8-976b-4e51-a3ab-7326aa86a19d -o json | jq '.extractable,.payload'false
$
Creating IBM Key Protect keys with GoMake sure that you installed the Key Protect module by using the go get command, as described in 2.4.1, “Key Protect concepts and programming language software developer kits” on page 105.
To connect the IBM Hyper Protect Crypto Services instance, our sample program use three Linux environment variables:
� The API_KEY parameter, which is described in “Generating an API key for your service ID” on page 107.
� The KP_INSTANCE_ID and KP_PRIVATE_ADDR parameters, which are described in 2.4.3, “Retrieving connection information to your IBM Hyper Protect Crypto Services instance” on page 108.
Example 2-62 on page 114 and Example 2-63 on page 115 provide code samples that list and create Key Protect keys. They use environment variables to create a session object that is named client. Example 2-64 on page 116 shows how to compile and run the code samples.
In Go, import the github.com/IBM/keyprotect-go-client module to use Key Protect functions.
The GetKeys() function is used to retrieve all the keys that are managed by our IBM Hyper Protect Crypto Services instance.
Chapter 2. IBM Cloud Hyper Protect Crypto Services 113
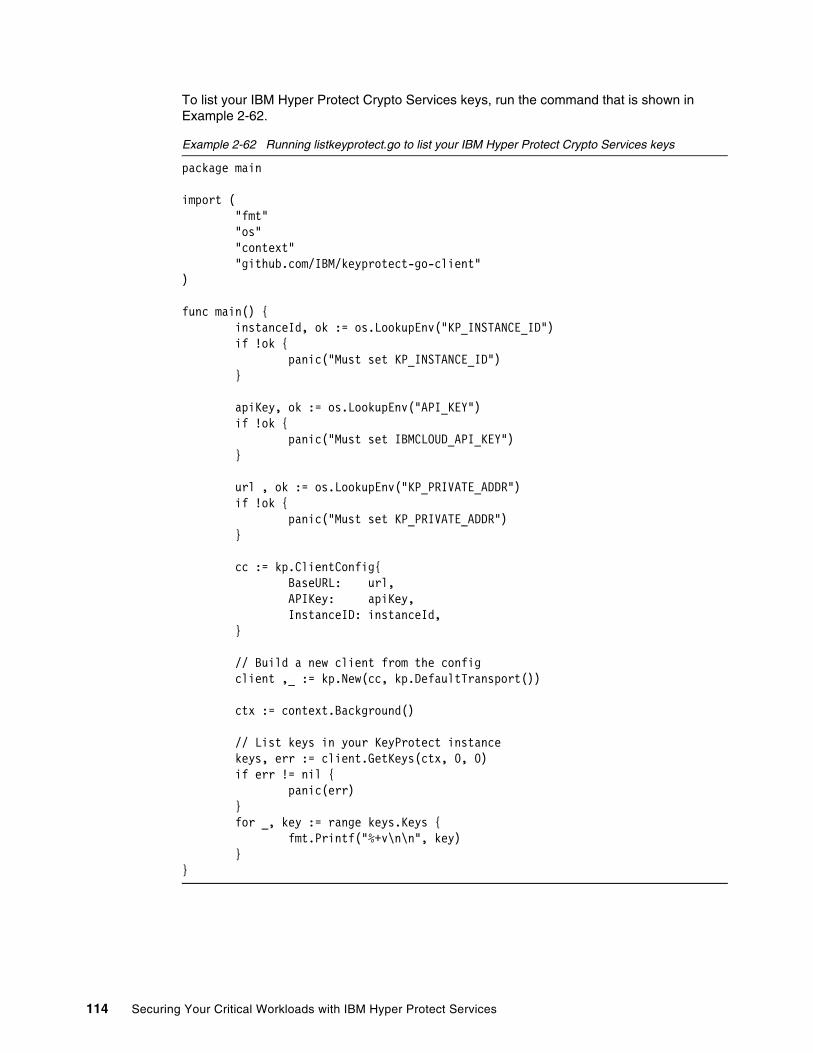
To list your IBM Hyper Protect Crypto Services keys, run the command that is shown in Example 2-62.
Example 2-62 Running listkeyprotect.go to list your IBM Hyper Protect Crypto Services keys
package main
import ( "fmt" "os" "context" "github.com/IBM/keyprotect-go-client")
func main() { instanceId, ok := os.LookupEnv("KP_INSTANCE_ID") if !ok { panic("Must set KP_INSTANCE_ID") }
apiKey, ok := os.LookupEnv("API_KEY") if !ok { panic("Must set IBMCLOUD_API_KEY") } url , ok := os.LookupEnv("KP_PRIVATE_ADDR") if !ok { panic("Must set KP_PRIVATE_ADDR") }
cc := kp.ClientConfig{ BaseURL: url, APIKey: apiKey, InstanceID: instanceId, }
// Build a new client from the config client ,_ := kp.New(cc, kp.DefaultTransport())
ctx := context.Background()
// List keys in your KeyProtect instance keys, err := client.GetKeys(ctx, 0, 0) if err != nil { panic(err) } for _, key := range keys.Keys { fmt.Printf("%+v\n\n", key) }}
114 Securing Your Critical Workloads with IBM Hyper Protect Services

In the second example, which is shown in Example 2-63, the following actions occur:
� CreateRootKey can take an expiration date as a third argument (nil in our example).
� CreateImportedStandardKey also takes a nil expiration date as its third argument. The last argument is the value of our key that we encrypt with base64encoding. This data is extractable.
� GetKey retrieves the payload of the standard key.
Example 2-63 Running createkeyprotect.go to create a root key and a standard key
package main
import ( "fmt" "os" "context" "github.com/IBM/keyprotect-go-client"
b64 "encoding/base64")
func main() { instanceId, ok := os.LookupEnv("KP_INSTANCE_ID") if !ok { panic("Must set KP_INSTANCE_ID") }
apiKey, ok := os.LookupEnv("API_KEY") if !ok { panic("Must set IBMCLOUD_API_KEY") } url , ok := os.LookupEnv("KP_PRIVATE_ADDR") if !ok { panic("Must set KP_PRIVATE_ADDR") }
cc := kp.ClientConfig{ BaseURL: url, APIKey: apiKey, InstanceID: instanceId, }
// Build a new client from the config client ,_ := kp.New(cc, kp.DefaultTransport())
ctx := context.Background()
// Create a root key named MyRootKey with no expiration key, err := client.CreateRootKey(ctx, "goRootkey", nil) if err != nil { fmt.Println(err) } fmt.Println(key.ID, key.Name)
// Create a new standard key
Chapter 2. IBM Cloud Hyper Protect Crypto Services 115
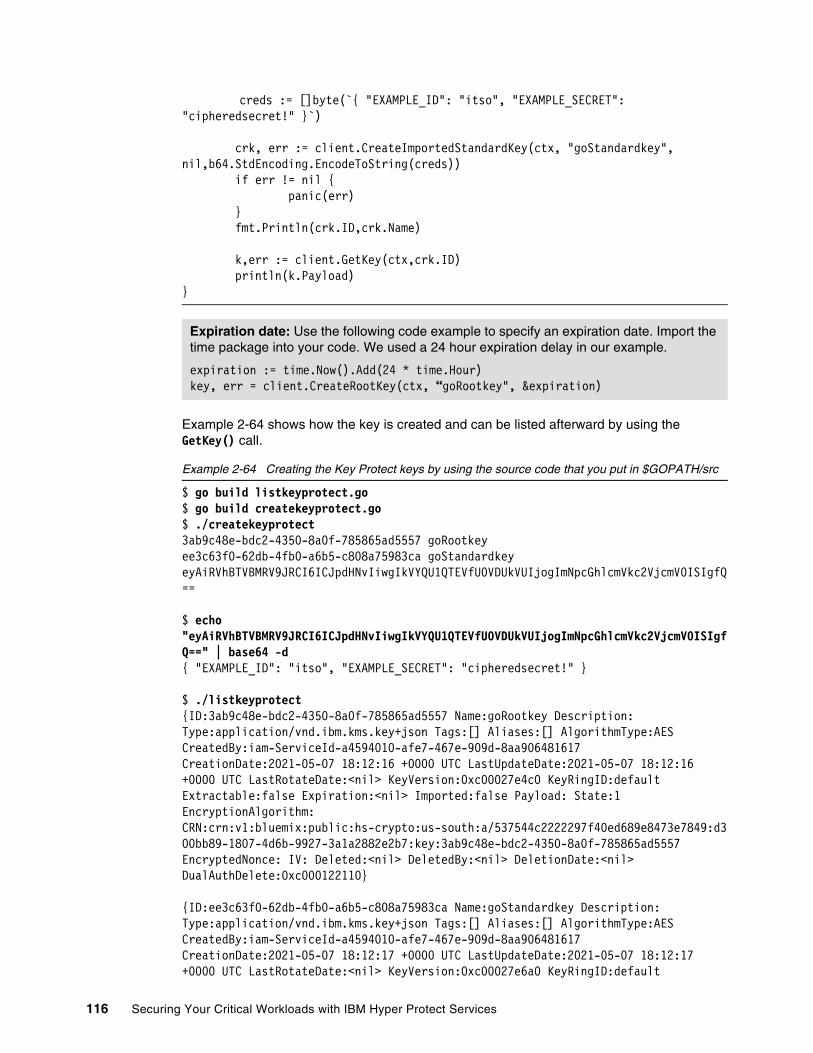
creds := []byte(`{ "EXAMPLE_ID": "itso", "EXAMPLE_SECRET": "cipheredsecret!" }`)
crk, err := client.CreateImportedStandardKey(ctx, "goStandardkey", nil,b64.StdEncoding.EncodeToString(creds)) if err != nil { panic(err) } fmt.Println(crk.ID,crk.Name)
k,err := client.GetKey(ctx,crk.ID) println(k.Payload)}
Example 2-64 shows how the key is created and can be listed afterward by using the GetKey() call.
Example 2-64 Creating the Key Protect keys by using the source code that you put in $GOPATH/src
$ go build listkeyprotect.go$ go build createkeyprotect.go$ ./createkeyprotect 3ab9c48e-bdc2-4350-8a0f-785865ad5557 goRootkeyee3c63f0-62db-4fb0-a6b5-c808a75983ca goStandardkeyeyAiRVhBTVBMRV9JRCI6ICJpdHNvIiwgIkVYQU1QTEVfU0VDUkVUIjogImNpcGhlcmVkc2VjcmV0ISIgfQ==
$ echo "eyAiRVhBTVBMRV9JRCI6ICJpdHNvIiwgIkVYQU1QTEVfU0VDUkVUIjogImNpcGhlcmVkc2VjcmV0ISIgfQ==" | base64 -d{ "EXAMPLE_ID": "itso", "EXAMPLE_SECRET": "cipheredsecret!" }
$ ./listkeyprotect {ID:3ab9c48e-bdc2-4350-8a0f-785865ad5557 Name:goRootkey Description: Type:application/vnd.ibm.kms.key+json Tags:[] Aliases:[] AlgorithmType:AES CreatedBy:iam-ServiceId-a4594010-afe7-467e-909d-8aa906481617 CreationDate:2021-05-07 18:12:16 +0000 UTC LastUpdateDate:2021-05-07 18:12:16 +0000 UTC LastRotateDate:<nil> KeyVersion:0xc00027e4c0 KeyRingID:default Extractable:false Expiration:<nil> Imported:false Payload: State:1 EncryptionAlgorithm: CRN:crn:v1:bluemix:public:hs-crypto:us-south:a/537544c2222297f40ed689e8473e7849:d300bb89-1807-4d6b-9927-3a1a2882e2b7:key:3ab9c48e-bdc2-4350-8a0f-785865ad5557 EncryptedNonce: IV: Deleted:<nil> DeletedBy:<nil> DeletionDate:<nil> DualAuthDelete:0xc000122110}
{ID:ee3c63f0-62db-4fb0-a6b5-c808a75983ca Name:goStandardkey Description: Type:application/vnd.ibm.kms.key+json Tags:[] Aliases:[] AlgorithmType:AES CreatedBy:iam-ServiceId-a4594010-afe7-467e-909d-8aa906481617 CreationDate:2021-05-07 18:12:17 +0000 UTC LastUpdateDate:2021-05-07 18:12:17 +0000 UTC LastRotateDate:<nil> KeyVersion:0xc00027e6a0 KeyRingID:default
Expiration date: Use the following code example to specify an expiration date. Import the time package into your code. We used a 24 hour expiration delay in our example.
expiration := time.Now().Add(24 * time.Hour)key, err = client.CreateRootKey(ctx, “goRootkey", &expiration)
116 Securing Your Critical Workloads with IBM Hyper Protect Services

Extractable:false Expiration:<nil> Imported:false Payload: State:1 EncryptionAlgorithm: CRN:crn:v1:bluemix:public:hs-crypto:us-south:a/537544c2222297f40ed689e8473e7849:d300bb89-1807-4d6b-9927-3a1a2882e2b7:key:ee3c63f0-62db-4fb0-a6b5-c808a75983ca EncryptedNonce: IV: Deleted:<nil> DeletedBy:<nil> DeletionDate:<nil> DualAuthDelete:0xc000122130}
For more information about the topics in this section, see GitHub.
Using the Key Protect plug-in with the IBM Cloud CLIThe key-protect plug-in is installed in a terminal, as shown in Example 2-65.
Example 2-65 Installing the Key Protect plug-in
$ ibmcloud plugin install key-protectLooking up 'key-protect' from repository 'IBM Cloud'...Plug-in 'key-protect/kp 0.6.1' found in repository 'IBM Cloud'Attempting to download the binary file... 11.12 MiB / 11.12 MiB [===========================================================================================================================================================================================================================================] 100.00% 6s11655065 bytes downloadedInstalling binary...OKPlug-in 'key-protect 0.6.1' was successfully installed into /home/itso/.bluemix/plugins/key-protect. Use 'ibmcloud plugin show key-protect' to show its details.
Listing the Key Protect keysTo list the IBM Key Protect keys, run the ibmcloud kp keys command, as shown in Example 2-66.
Example 2-66 list the keys that were previously created with the Python examples that are shown in “Creating IBM Key Protect keys in Python” on page 111.
The ibmcloud kp command uses the KP_INSTANCE_ID and KP_PRIVATE_ADDR environment variables that you defined. Your IBM Cloud credentials are used here and not your service ID API key.
Example 2-66 Listing your Key Protect keys
$ ibmcloud kp keysRetrieving keys...OKKey ID Key Name 5583eef2-1a46-4107-b53e-5e95990786b9 itso rocks e893d3c8-976b-4e51-a3ab-7326aa86a19d itso really rocks
Chapter 2. IBM Cloud Hyper Protect Crypto Services 117

Creating your Key Protect keysThe ibmcloud kp create command can create both a Key Protect root key (Example 2-67) or a Key Protect standard key. To create a standard key, use --standard-key option with the command for the standard key.
Example 2-67 Creating and getting the details of the Key Protect root key by using the Key Protect CLI plug-in
$ ibmcloud kp create mynewrootkeyCommand "create" is deprecated, as of 0.4.0 use `key create`Creating key: 'mynewrootkey', in instance: 'd300bb89-1807-4d6b-9927-3a1a2882e2b7'...OKKey ID Key Name f0a0a495-ada0-480f-9c55-1f78ac7080b9 mynewrootkey
$ ibmcloud kp keys Retrieving keys...OKKey ID Key Name 5583eef2-1a46-4107-b53e-5e95990786b9 itso rocks e893d3c8-976b-4e51-a3ab-7326aa86a19d itso really rocks f0a0a495-ada0-480f-9c55-1f78ac7080b9 mynewrootkey
$ ibmcloud kp key show f0a0a495-ada0-480f-9c55-1f78ac7080b9 -o json{ "id": "f0a0a495-ada0-480f-9c55-1f78ac7080b9", "name": "mynewrootkey", "type": "application/vnd.ibm.kms.key+json", "algorithmType": "AES", "createdBy": "IBMid-27000182VX", "creationDate": "2021-05-07T16:52:41Z", "lastUpdateDate": "2021-05-07T16:52:41Z", "keyVersion": { "id": "f0a0a495-ada0-480f-9c55-1f78ac7080b9", "creationDate": "2021-05-07T16:52:41Z" }, "keyRingID": "default", "extractable": false, "state": 1, "crn": "crn:v1:bluemix:public:hs-crypto:us-south:a/537544c2222297f40ed689e8473e7849:d300bb89-1807-4d6b-9927-3a1a2882e2b7:key:f0a0a495-ada0-480f-9c55-1f78ac7080b9", "deleted": false, "dualAuthDelete": { "enabled": false }}
Example 2-68 on page 119 shows how to use a Key Protect standard key to store a JSON string that is used to initialize the creds bash variable. They key can represent some application credentials that we want to save in the Key Protect vault.
This string is base64-encoded by using the base64 tool.
We use the -i option to specify the IBM Hyper Protect Crypto Services instance if there are multiple instances that are provisioned.
118 Securing Your Critical Workloads with IBM Hyper Protect Services
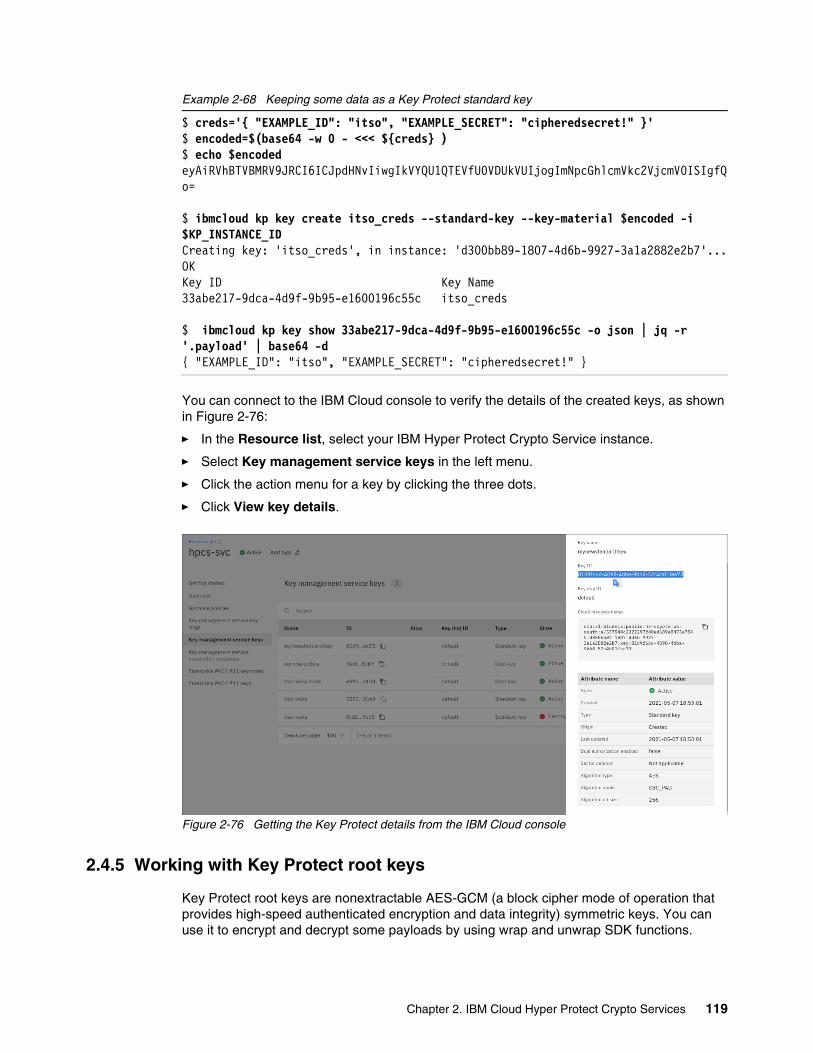
Example 2-68 Keeping some data as a Key Protect standard key
$ creds='{ "EXAMPLE_ID": "itso", "EXAMPLE_SECRET": "cipheredsecret!" }'$ encoded=$(base64 -w 0 - <<< ${creds} )$ echo $encodedeyAiRVhBTVBMRV9JRCI6ICJpdHNvIiwgIkVYQU1QTEVfU0VDUkVUIjogImNpcGhlcmVkc2VjcmV0ISIgfQo=
$ ibmcloud kp key create itso_creds --standard-key --key-material $encoded -i $KP_INSTANCE_IDCreating key: 'itso_creds', in instance: 'd300bb89-1807-4d6b-9927-3a1a2882e2b7'...OKKey ID Key Name 33abe217-9dca-4d9f-9b95-e1600196c55c itso_creds
$ ibmcloud kp key show 33abe217-9dca-4d9f-9b95-e1600196c55c -o json | jq -r '.payload' | base64 -d{ "EXAMPLE_ID": "itso", "EXAMPLE_SECRET": "cipheredsecret!" }
You can connect to the IBM Cloud console to verify the details of the created keys, as shown in Figure 2-76:
� In the Resource list, select your IBM Hyper Protect Crypto Service instance.
� Select Key management service keys in the left menu.
� Click the action menu for a key by clicking the three dots.
� Click View key details.
Figure 2-76 Getting the Key Protect details from the IBM Cloud console
2.4.5 Working with Key Protect root keys
Key Protect root keys are nonextractable AES-GCM (a block cipher mode of operation that provides high-speed authenticated encryption and data integrity) symmetric keys. You can use it to encrypt and decrypt some payloads by using wrap and unwrap SDK functions.
Chapter 2. IBM Cloud Hyper Protect Crypto Services 119

Root keys can be rotated. The unwrap function always works with previous Key Protect root keys, but a new encrypted payload with a new key is returned. It is a best practice that your application stores this new encrypted workload and discards the previous one. Some SDK unwrap calls might not support rotated keys. For more information, see 2.4.6, “Key Protect root key rotation” on page 129.
PythonFor this example, we open a terminal and configure environment variables, as described in “Creating IBM Key Protect keys in Python” on page 111.
In the first example, we use a Key Protect root key that we created, which is described in 2.4.4, “Creating IBM Key Protect keys” on page 110.
Retrieve the Key Protect root keys as shown in Example 2-69 and select one (itso really rocks in our example).
Set its identifier in the ROOTKEYID environment variable.
Example 2-69 Retrieving a Key Protect root key
$ ibmcloud kp keysRetrieving keys...OKKey ID Key Name 3ab9c48e-bdc2-4350-8a0f-785865ad5557 goRootkey 487a368c-773f-4936-ae68-ea5ee0032d02 test 5583eef2-1a46-4107-b53e-5e95990786b9 itso rocks 81d9f66d-4098-4dba-9b68-52c4b01fea73 mynewstandardtkey e893d3c8-976b-4e51-a3ab-7326aa86a19d itso really rocks ee3c63f0-62db-4fb0-a6b5-c808a75983ca goStandardkey f0a0a495-ada0-480f-9c55-1f78ac7080b9 mynewrootkey
$ export ROOTKEYID=e893d3c8-976b-4e51-a3ab-7326aa86a19d
Example 2-70 uses the Python wrapping and unwrapping function to create a sample application that encrypts and decrypts a message by using our selected root key.
Example 2-70 Wrapping and unwrapping by using a Key Protect root key Python snippet
import osimport keyprotectfrom keyprotect import bxauth
kp = keyprotect.Client( credentials= bxauth.TokenManager(api_key=os.getenv("API_KEY")), #region="us-south", service_instance_id=os.getenv("KP_INSTANCE_ID"), # Set custom service endpoint endpoint_url=os.getenv("KP_PRIVATE_ADDR"),)
# wrap/unwrap, payload should be a bytestring if python3message = b'This is a really important message.'wrapped = kp.wrap(key_id=os.getenv("ROOTKEYID"), plaintext=message)ciphertext = wrapped.get("ciphertext")print(ciphertext)
120 Securing Your Critical Workloads with IBM Hyper Protect Services
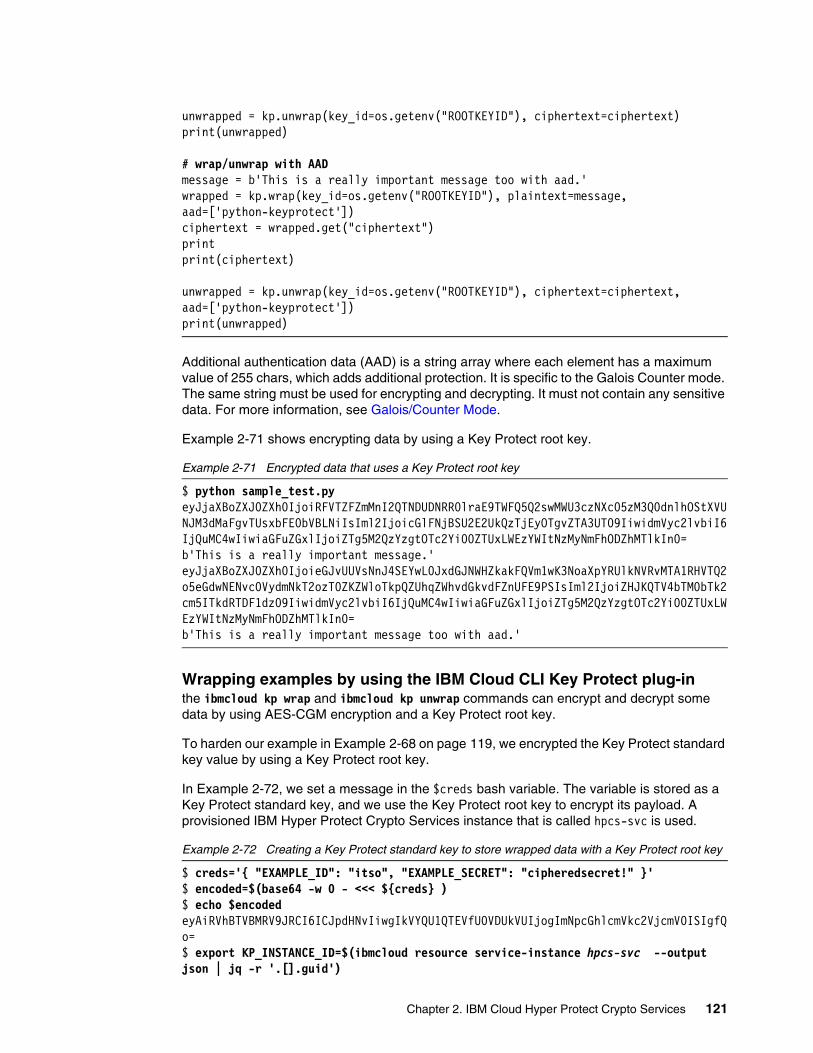
unwrapped = kp.unwrap(key_id=os.getenv("ROOTKEYID"), ciphertext=ciphertext)print(unwrapped)
# wrap/unwrap with AADmessage = b'This is a really important message too with aad.'wrapped = kp.wrap(key_id=os.getenv("ROOTKEYID"), plaintext=message, aad=['python-keyprotect'])ciphertext = wrapped.get("ciphertext")printprint(ciphertext)
unwrapped = kp.unwrap(key_id=os.getenv("ROOTKEYID"), ciphertext=ciphertext, aad=['python-keyprotect'])print(unwrapped)
Additional authentication data (AAD) is a string array where each element has a maximum value of 255 chars, which adds additional protection. It is specific to the Galois Counter mode. The same string must be used for encrypting and decrypting. It must not contain any sensitive data. For more information, see Galois/Counter Mode.
Example 2-71 shows encrypting data by using a Key Protect root key.
Example 2-71 Encrypted data that uses a Key Protect root key
$ python sample_test.py eyJjaXBoZXJ0ZXh0IjoiRFVTZFZmMnI2QTNDUDNRR0lraE9TWFQ5Q2swMWU3czNXc05zM3Q0dnlhOStXVUNJM3dMaFgvTUsxbFE0bVBLNiIsIml2IjoicGlFNjBSU2E2UkQzTjEyOTgvZTA3UT09IiwidmVyc2lvbiI6IjQuMC4wIiwiaGFuZGxlIjoiZTg5M2QzYzgtOTc2Yi00ZTUxLWEzYWItNzMyNmFhODZhMTlkIn0=b'This is a really important message.'eyJjaXBoZXJ0ZXh0IjoieGJvUUVsNnJ4SEYwL0JxdGJNWHZkakFQVm1wK3NoaXpYRUlkNVRvMTA1RHVTQ2o5eGdwNENvc0VydmNkT2ozT0ZKZWloTkpQZUhqZWhvdGkvdFZnUFE9PSIsIml2IjoiZHJKQTV4bTM0bTk2cm5ITkdRTDF1dz09IiwidmVyc2lvbiI6IjQuMC4wIiwiaGFuZGxlIjoiZTg5M2QzYzgtOTc2Yi00ZTUxLWEzYWItNzMyNmFhODZhMTlkIn0=b'This is a really important message too with aad.'
Wrapping examples by using the IBM Cloud CLI Key Protect plug-inthe ibmcloud kp wrap and ibmcloud kp unwrap commands can encrypt and decrypt some data by using AES-CGM encryption and a Key Protect root key.
To harden our example in Example 2-68 on page 119, we encrypted the Key Protect standard key value by using a Key Protect root key.
In Example 2-72, we set a message in the $creds bash variable. The variable is stored as a Key Protect standard key, and we use the Key Protect root key to encrypt its payload. A provisioned IBM Hyper Protect Crypto Services instance that is called hpcs-svc is used.
Example 2-72 Creating a Key Protect standard key to store wrapped data with a Key Protect root key
$ creds='{ "EXAMPLE_ID": "itso", "EXAMPLE_SECRET": "cipheredsecret!" }'$ encoded=$(base64 -w 0 - <<< ${creds} )$ echo $encodedeyAiRVhBTVBMRV9JRCI6ICJpdHNvIiwgIkVYQU1QTEVfU0VDUkVUIjogImNpcGhlcmVkc2VjcmV0ISIgfQo=$ export KP_INSTANCE_ID=$(ibmcloud resource service-instance hpcs-svc --output json | jq -r '.[].guid')
Chapter 2. IBM Cloud Hyper Protect Crypto Services 121

$ ibmcloud kp key create itso_rootkey -i $KP_INSTANCE_IDCreating key: 'itso_rootkey', in instance: 'd300bb89-1807-4d6b-9927-3a1a2882e2b7'...OKKey ID Key Name 17c8168a-5472-49f6-84f7-60f6bdc61c4e itso_rootkey
$ ROOT_KEY_ID=17c8168a-5472-49f6-84f7-60f6bdc61c4e
$ ciphertext=$(ibmcloud kp key wrap $ROOT_KEY_ID -p $encoded -i $KP_INSTANCE_ID --aad "itso author" -o json | jq -r .ciphertext)
$ ibmcloud kp key create itso_creds --standard-key --key-material $ciphertext -i $KP_INSTANCE_IDCreating key: 'itso_creds', in instance: 'd300bb89-1807-4d6b-9927-3a1a2882e2b7'...OKKey ID Key Name 1db657fe-e613-4b8e-b2db-868581660c4b itso_creds
If we check the payload of the Key Protect standard key, we see that data is encrypted by using AES-CGM encryption, as shown in Example 2-73. The data cannot be extracted without the Key Protect root key.
Example 2-73 Checking the payload of the wrapped Key Protect standard key payload
$ ibmcloud kp key show 1db657fe-e613-4b8e-b2db-868581660c4b -o json | jq -r .payload eyJjaXBoZXJ0ZXh0IjoibUtoQ0d0dGRLU3JKaDZHWlp6eE5wNzgrTyttQ1IycVE4a0RuRHUwWGpRN2JuUnpCUzM2Z3lrcjc0akFTcGZnVzk4NUd6QnJ4VEpYUW5CODJuTGtlMnc9PSIsIml2IjoidzEwTWM0dzRQWk05ZG01SlBOUVJiUT09IiwidmVyc2lvbiI6IjQuMC4wIiwiaGFuZGxlIjoiMTdjODE2OGEtNTQ3Mi00OWY2LTg0ZjctNjBmNmJkYzYxYzRlIn0=
$ ibmcloud kp key show 1db657fe-e613-4b8e-b2db-868581660c4b -o json | jq -r .payload | base64 -d{"ciphertext":"mKhCGttdKSrJh6GZZzxNp78+O+mCR2qQ8kDnDu0XjQ7bnRzBS36gykr74jASpfgW985GzBrxTJXQnB82nLke2w==","iv":"w10Mc4w4PZM9dm5JPNQRbQ==","version":"4.0.0","handle":"17c8168a-5472-49f6-84f7-60f6bdc61c4e"}
We retrieve the original data by unwrapping the payload of the Key Protect standard key payload with the Key Protect root key, as shown in Example 2-74.
Example 2-74 Unwrapping example
$ encrypted_data_b64=$(ibmcloud kp key show 1db657fe-e613-4b8e-b2db-868581660c4b -o json | jq -r .payload)
$ ibmcloud kp key unwrap $ROOT_KEY_ID $encrypted_data_b64 -i $KP_INSTANCE_ID --aad "itso author" -o json | jq -r .plaintext | base64 -d{ "EXAMPLE_ID": "itso", "EXAMPLE_SECRET": "cipheredsecret!" }
AAD: The AAD is a string array where each element can be up to 255 chars. The same string must be used for wrapping and unwrapping calls. Do not use sensitive data in the AAD. Passing AAD to wrap and unwrap calls to provide another level of protection for your encrypted Key Protect data payload.
122 Securing Your Critical Workloads with IBM Hyper Protect Services

JavaScript end-to-end example by using Node.jsFirst, the Key Protect Node.js SDK must be installed by running the npm install command, as described in 2.4.1, “Key Protect concepts and programming language software developer kits” on page 105.
The connection to the IBM Hyper Protect Crypto Services instance for our example is defined with three Linux environment variables:
� For API_KEY, see “Generating an API key for your service ID” on page 107.
� For KP_INSTANCE_ID and KP_PRIVATE_ADDR, see 2.4.3, “Retrieving connection information to your IBM Hyper Protect Crypto Services instance” on page 108.
Example 2-75 creates a Key Protect root key. A text is wrapped by using this key and storing it as a Key Protect standard key payload.
KeyProtectClient represents the session and is created by the KeyProtectV2 constructor. The createKey() function is used to create the key.
The await keyword allows waiting for a synchronous response to the call so that we can read the key identifier.
Example 2-75 The end-to-end.js program: Creating a Key Protect root key
const KeyProtectV2 = require('@ibm-cloud/ibm-key-protect/ibm-key-protect-api/v2');const { IamAuthenticator } = require('@ibm-cloud/ibm-key-protect/auth');
// env vars, using external configuration in this exampleconst envConfigs = { apiKey: process.env.API_KEY, serviceUrl: process.env.KP_PRIVATE_ADDR, bluemixInstance: process.env.KP_INSTANCE_ID,};
async function keyProtectSdkExample() { let response;
// Create an IAM authenticator. const authenticator = new IamAuthenticator({ apikey: envConfigs.apiKey, });
// Construct the service client. const keyProtectClient = new KeyProtectV2({ authenticator, serviceUrl: envConfigs.serviceUrl, });
Key Protect root key rotation: When you unwrap wrapped data by using a rotated root key, the service returns a new ciphertext in the response entity-body. Each ciphertext remains available for unwrap actions. If you unwrap some data with a previous ciphertext, the service also returns the latest ciphertext and latest key version in the response. Store and use the new ciphertext value for future envelope encryption operations so that your data is protected by the latest root key.
For more information, see 2.4.6, “Key Protect root key rotation” on page 129.
Chapter 2. IBM Cloud Hyper Protect Crypto Services 123

// Create a root key as not extractable const bodyroot = { metadata: { collectionType: 'application/vnd.ibm.kms.key+json', collectionTotal: 1, }, resources: [ { type: 'application/vnd.ibm.kms.key+json', name: 'nodejsrootKey', extractable: false, }, ], };
const createParams = Object.assign({}, envConfigs); createParams.body = bodyroot; response = await keyProtectClient.createKey(createParams); const keyId = response.result.resources[0].id; console.log('Root key created, id is: ' + keyId+"\n");
Example 2-76 shows the following actions:
� The getKey() function retrieves the payload of the standard key.
� The wrapKey() function and its parameter wraps some data by using the Key Protect root key that we created.
Example 2-76 The end-to-end.js program: Wrapping some data with a Key Protect root key
// Get the root key const getKeyParams = Object.assign({}, envConfigs); getKeyParams.id = keyId; response = await keyProtectClient.getKey(getKeyParams);
// Wrap and unwrap key const samplePlaintext = 'SGVsbG8gd29ybGQK'; // Hello World in base64 encoded plaintext
console.log("Original text: ",samplePlaintext,"\n");
const wrapKeyParams = Object.assign({}, envConfigs); wrapKeyParams.id = keyId; wrapKeyParams.keyActionWrapBody = { plaintext: samplePlaintext, }; response = await keyProtectClient.wrapKey(wrapKeyParams); console.log("Ciphered Text:", response.result.ciphertext,"\n");
const ciphertextResult = response.result.ciphertext;
124 Securing Your Critical Workloads with IBM Hyper Protect Services

In Example 2-77, we show how to create a Key Protect standard key by using this wrapped data.
Example 2-77 The end-to-end.js package: Creating a Key Protect standard key with wrapped text as the payload
// const bodystandard = { metadata: { collectionType: 'application/vnd.ibm.kms.key+json', collectionTotal: 1, }, resources: [ { type: 'application/vnd.ibm.kms.key+json', name: 'nodejsKey', extractable: true, payload: ciphertextResult }, ], };
const createParams_std = Object.assign({}, envConfigs); createParams_std.body = bodystandard; response = await keyProtectClient.createKey(createParams_std); const keyId_std = response.result.resources[0].id; console.log('Standard Key created, id is: ' + keyId_std+"\n");
In Example 2-78, we retrieve the Key Protect standard key data and we unwrap it by using a Key Protect root key and the unwrapKey() function.
Example 2-78 The end-to-end.js program: Retrieving a payload from a Key Protect standard key and unwrapping it by using a Key Protect root key
// Get the standard key const getKeyParams_std = Object.assign({}, envConfigs); getKeyParams_std.id = keyId_std; response = await keyProtectClient.getKey(getKeyParams_std); retrieved_ciphertext=response.result.resources[0].payload;
// const unwrapKeyParams = Object.assign({}, envConfigs); unwrapKeyParams.id = keyId; unwrapKeyParams.keyActionUnwrapBody = { ciphertext: retrieved_ciphertext, // from wrap key response }; response = await keyProtectClient.unwrapKey(unwrapKeyParams); console.log("Unwrapped plain text: ",response.result.plaintext,"\n");}
keyProtectSdkExample();
Chapter 2. IBM Cloud Hyper Protect Crypto Services 125

We run this program as shown in Example 2-79.
Example 2-79 Running the nodejs end-to-end program
$ npm install @ibm-cloud/ibm-key-protect$ node end-to-end.js Root key created, id is: dc3edb4c-2339-48fb-86e7-bccf3b320fbd
Original text: SGVsbG8gd29ybGQK
Ciphered Text: eyJjaXBoZXJ0ZXh0IjoiSE1HRVpVNHhGblY2aGxZZjBqQWE3dz09IiwiaXYiOiI3ZGdLQlpqNUlDZWptMEJRL2RZNGRRPT0iLCJ2ZXJzaW9uIjoiNC4wLjAiLCJoYW5kbGUiOiJkYzNlZGI0Yy0yMzM5LTQ4ZmItODZlNy1iY2NmM2IzMjBmYmQifQ==
Standard Key created, id is: bf6f3d6b-f1cd-49b2-9111-63323ad7240f
Unwrapped plain text: SGVsbG8gd29ybGQK
$ echo SGVsbG8gd29ybGQK | base64 -dHello world
Go end-to-end exampleTo do this example, ensure that you installed and configured the Go programming language software on your Linux environment and installed the Key Protect module by using the go get command, as described in 2.4.1, “Key Protect concepts and programming language software developer kits” on page 105.
To connect to the IBM Hyper Protect Crypto Services instance, our sample program uses three Linux environment variables:
� API_KEY, which is described in “Generating an API key for your service ID” on page 107.
� KP_INSTANCE_ID and KP_PRIVATE_ADDR, which is described in 2.4.3, “Retrieving connection information to your IBM Hyper Protect Crypto Services instance” on page 108.
The example in Example 2-69 on page 120 retrieves the previously created Key Protect root key. In Example 2-80, we set the ROOTKEYID environment variable to the value of this key.
Example 2-80 Retrieving a Key Protect root key
$ ibmcloud kp keysRetrieving keys...OKKey ID Key Name 3ab9c48e-bdc2-4350-8a0f-785865ad5557 goRootkey 487a368c-773f-4936-ae68-ea5ee0032d02 test 5583eef2-1a46-4107-b53e-5e95990786b9 itso rocks 81d9f66d-4098-4dba-9b68-52c4b01fea73 mynewstandardtkey e893d3c8-976b-4e51-a3ab-7326aa86a19d itso really rocks ee3c63f0-62db-4fb0-a6b5-c808a75983ca goStandardkey f0a0a495-ada0-480f-9c55-1f78ac7080b9 mynewrootkey
$ export ROOTKEYID=3ab9c48e-bdc2-4350-8a0f-785865ad5557
126 Securing Your Critical Workloads with IBM Hyper Protect Services

The Key Protect SDK allows you to create a connection object to work with your IBM Hyper Protect Crypto Services instance. In our example, that instance is named client, and it is shown in Example 2-81.
The following functions are provided by this object to work with the service:
� The Wrap() function encrypts some data by using a Key Protect root key. The function takes as a parameter a base64-encoded payload and AAD string arrays that are used to better secure the wrapping. The same AAD must used for both wrapping and unwrapping calls.
� The CreateImportedStandardKey() function creates an imported key with a specific name by using a specified workload. It returns the generate key ID.
� The GetKey() function retrieves the Key Protect key details. Because a Key Protect standard key is extractable, its value is stored in the payload attribute.
� The Unwrap() function decrypts some data by using Key Protect root key symmetric encryption. The same AAD string array that was used for the Wrap() function must be used. The decrypted result is returned.
Example 2-81 The wrapkeyprotect.go source code
package main
import ( "fmt" "os" "context" "github.com/IBM/keyprotect-go-client" b64 "encoding/base64")
func main() { instanceId, ok := os.LookupEnv("KP_INSTANCE_ID") if !ok { panic("Must set KP_INSTANCE_ID") }
apiKey, ok := os.LookupEnv("API_KEY") if !ok { panic("Must set API_KEY") } url , ok := os.LookupEnv("KP_PRIVATE_ADDR") if !ok { panic("Must set KP_PRIVATE_ADDR") } rootkeyid, ok := os.LookupEnv("ROOTKEYID") if !ok { panic("Must set ROOTKEYID") }
cc := kp.ClientConfig{ BaseURL: url,
Note: Unwrap() does not work if your Key Protect root key will be rotated. Instead, use UnwrapV2(), as described in 2.4.6, “Key Protect root key rotation” on page 129.
Chapter 2. IBM Cloud Hyper Protect Crypto Services 127

APIKey: apiKey, InstanceID: instanceId, } client ,_ := kp.New(cc, kp.DefaultTransport()) ctx := context.Background()
creds := []byte(`{ "EXAMPLE_ID": "itso", "EXAMPLE_SECRET": "cipheredsecret!" }`)
myAAD := []string{"First aad string", "second aad string", "third aad string"} wrappedCreds, err := client.Wrap(ctx, rootkeyid,[]byte(b64.StdEncoding.EncodeToString(creds)), &myAAD) if err != nil { panic(err) } println("Our wrapped b64 data: "+string(wrappedCreds)+"\n")
crk, err := client.CreateImportedStandardKey(ctx, "goStandardkey", nil,string(wrappedCreds)) if err != nil { panic(err) }
fmt.Println(crk.ID,crk.Name)
k,err := client.GetKey(ctx,crk.ID) if err != nil { panic(err) } println("Key Protect standard key payload: " +k.Payload+"\n")
unwrappedPayload, err := client.Unwrap(ctx, rootkeyid, []byte(k.Payload), &myAAD) if err != nil { panic(err) } println("Unwrapped payload: "+string(unwrappedPayload))}
The data from the call, { "EXAMPLE_ID": "itso", "EXAMPLE_SECRET": "cipheredsecret!" }, is stored encrypted in a Key Protect standard key. The application retrieves its value by using the Unwrap() function. All data is encoded with base64.
Example 2-82 shows how to recompile and run the program in a Linux terminal with Go installed on the system. You must edit wrapkeyprotect.go in your $GOPATH directory.
Example 2-82 Compiling and running our wrapkeyprotect.go program
$ go build wrapkeyprotect.go $ ./wrapkeyprotect Our wrapped b64 data: eyJjaXBoZXJ0ZXh0IjoiVFpGL0ljcVY1UFFIQXh5bS9lRWduMHQ0U1dSYzE0Y2VzSGl6bDBEaFdwMXZwM2VmM2RRc3dPYTR4eU5HN1hpUWcrTU5CVXdYMFEwUHM0TVdWQjFrMGc9PSIsIml2IjoiZ3RoUG9BbGRkVlVUbmw1anR0TTY5Zz09IiwidmVyc2lvbiI6IjQuMC4wIiwiaGFuZGxlIjoiZTg5M2QzYzgtOTc2Yi00ZTUxLWEzYWItNzMyNmFhODZhMTlkIn0=
128 Securing Your Critical Workloads with IBM Hyper Protect Services

811a055b-7dc2-4cd6-bf53-d7afa54a88bd goStandardkeyKey Protect standard key payload: eyJjaXBoZXJ0ZXh0IjoiVFpGL0ljcVY1UFFIQXh5bS9lRWduMHQ0U1dSYzE0Y2VzSGl6bDBEaFdwMXZwM2VmM2RRc3dPYTR4eU5HN1hpUWcrTU5CVXdYMFEwUHM0TVdWQjFrMGc9PSIsIml2IjoiZ3RoUG9BbGRkVlVUbmw1anR0TTY5Zz09IiwidmVyc2lvbiI6IjQuMC4wIiwiaGFuZGxlIjoiZTg5M2QzYzgtOTc2Yi00ZTUxLWEzYWItNzMyNmFhODZhMTlkIn0=
Unwrapped payload: eyAiRVhBTVBMRV9JRCI6ICJpdHNvIiwgIkVYQU1QTEVfU0VDUkVUIjogImNpcGhlcmVkc2VjcmV0ISIgfQ==
$ echo eyAiRVhBTVBMRV9JRCI6ICJpdHNvIiwgIkVYQU1QTEVfU0VDUkVUIjogImNpcGhlcmVkc2VjcmV0ISIgfQ== | base64 -d{ "EXAMPLE_ID": "itso", "EXAMPLE_SECRET": "cipheredsecret!" }
2.4.6 Key Protect root key rotation
A best practice is to rotate your Key Protect root keys (that is, to create a new version of the key) on a regular basis.
You can disable a compromised Key Protect root key by using the IBM Cloud console or the ibmcloud kp key disable <compromised_keyid> -i <your_hpcs_service_id> IBM Cloud Key Protect CLI command.
In Example 2-83, we store in a Key Protect standard key some data that is encrypted with a Key Protect root key. Then, this root key is rotated. We want to check that the previously encrypted data can still be decrypted.
Example 2-83 Storing encrypted data in a Key Protect standard key
$ creds='{ "EXAMPLE_ID": "itso", "EXAMPLE_SECRET": "cipheredsecret!" }'$ encoded=$(base64 -w 0 - <<< ${creds} )$ echo $encodedeyAiRVhBTVBMRV9JRCI6ICJpdHNvIiwgIkVYQU1QTEVfU0VDUkVUIjogImNpcGhlcmVkc2VjcmV0ISIgfQo=
// retrieve one of your Key Protect root key$ ROOT_KEY_ID=17c8168a-5472-49f6-84f7-60f6bdc61c4e $ ciphertext=$(ibmcloud kp key wrap $ROOT_KEY_ID -p $encoded -i $KP_INSTANCE_ID --aad "itso author" -o json | jq -r .ciphertext)$ ibmcloud kp key create itso_creds --standard-key --key-material $ciphertext -i $KP_INSTANCE_IDCreating key: 'itso_creds', in instance: 'd300bb89-1807-4d6b-9927-3a1a2882e2b7'...OKKey ID Key Name 5175b70d-c9e3-4d5d-aafb-d3226e331b7c itso_creds $ KEYID=5175b70d-c9e3-4d5d-aafb-d3226e331b7c$ encrypted_data_b64=$(ibmcloud kp key show 1db657fe-e613-4b8e-b2db-868581660c4b -o json | jq -r .payload)
$ ibmcloud kp key unwrap $ROOT_KEY_ID $encrypted_data_b64 -i $KP_INSTANCE_ID --aad "itso author" -o json | jq -r .plaintext | base64 -d{ "EXAMPLE_ID": "itso", "EXAMPLE_SECRET": "cipheredsecret!" }
Chapter 2. IBM Cloud Hyper Protect Crypto Services 129

$ ibmcloud kp key unwrap $ROOT_KEY_ID $encrypted_data_b64 -i $KP_INSTANCE_ID --aad "itso author" -o json { "plaintext": "eyAiRVhBTVBMRV9JRCI6ICJpdHNvIiwgIkVYQU1QTEVfU0VDUkVUIjogImNpcGhlcmVkc2VjcmV0ISIgfQo=", "rewrappedPlaintext": ""}
Rotate the Key Protect root key by using the IBM Cloud Key Protect CLI in a Linux terminal to run the ibmcloud kp key rotate command, as shown in Example 2-84.
We see that the unwrap command that was applied to the original encrypted data returns the following information:
� The decrypted data that was wrapped by the AES-GCM key before the rotation.
� A new encrypted payload that represents the encrypted payload that was wrapped by the new rotated AES-GCM key.
Example 2-84 Key Protect root key rotation by using the IBM Cloud CLI Key Protect plug-in
$ ibmcloud kp key rotate $ROOT_KEY_IDRotating root key...OK
$ ibmcloud kp key unwrap $ROOT_KEY_ID $encrypted_data_b64 -i $KP_INSTANCE_ID --aad "itso author" -o json { "plaintext": "eyAiRVhBTVBMRV9JRCI6ICJpdHNvIiwgIkVYQU1QTEVfU0VDUkVUIjogImNpcGhlcmVkc2VjcmV0ISIgfQo=", "rewrappedPlaintext": "eyJjaXBoZXJ0ZXh0Ijoia3JwRjg1STIyTXFZOHN6Q3pNUm1TZnM0cDQrL2J4TGZ5S2NGNzJvTzM5YnV1SFR1RVNXSDVOdHBYdTV6VkQxS1JDVElUNDhOMjlXL1M3Rmo4c09kRnc9PSIsIml2IjoiWmEyYkk5WFVtdjMxcFFaUUNnbEJCUT09IiwidmVyc2lvbiI6IjQuMC4wIiwiaGFuZGxlIjoiN2M2OTllOTAtZTViOS00YmIyLTgzYjktYThhODBhZGU1ZjRlIn0="}
Using this rewrappedPlaintext payload for the same unwrap command returns only the decrypted data as it was before the key rotation.
To take advantage of the newly rotated key, you must update your previously encrypted data with the new encrypted data, as shown in Example 2-88 on page 133 when using the IBM Cloud CLI Key Protect plug-in.
Example 2-85 shows unwrapping the data that was encrypted with the rotated key.
Example 2-85 Unwrapping the data that was encrypted with the rotated key
$new_encrypted_data_b64=eyJjaXBoZXJ0ZXh0IjoiK25qOTBCUUZIZ0FYZUpkdDVqallLcGlUSW1ab2llNm5NN1loUmZLUlRCdWFjSWxrWUppY1AxSDgrVklBTHlDbXNqMWRKQUlQRkdVRldjUmI3Q3VDN2c9PSIsIml2IjoiQ0tCWVFhWWkzSHVSREVabDdaY21aQT09IiwidmVyc2lvbiI6IjQuMC4wIiwiaGFuZGxlIjoiN2M2OTllOTAtZTViOS00YmIyLTgzYjktYThhODBhZGU1ZjRlIn0=$ ibmcloud kp key unwrap $ROOT_KEY_ID $new_encrypted_data_b64 -i $KP_INSTANCE_ID --aad "itso author" -o json{
130 Securing Your Critical Workloads with IBM Hyper Protect Services

"plaintext": "eyAiRVhBTVBMRV9JRCI6ICJpdHNvIiwgIkVYQU1QTEVfU0VDUkVUIjogImNpcGhlcmVkc2VjcmV0ISIgfQo=", "rewrappedPlaintext": ""}$ echo $new_encrypted_data_b64| base64 -d{"ciphertext":"LzfKanscdlgFAbR+P/8Y9IBYyufkNQChWqclOjSZlsUUY8ISvxu9N7rp2Q7PZXMMiFvksvx8RhoPpF5d6JbjSg==","iv":"8MXD6zvu77iLD/TDYbalfw==","version":"4.0.0","handle":"7c699e90-e5b9-4bb2-83b9-a8a80ade5f4e"}
You can achieve the same results with both the Node.js and Go SDKs.
As prerequisites, ensure that the following tasks are done:
� You installed the Key Protect module by using the go get command, as described in 2.4.1, “Key Protect concepts and programming language software developer kits” on page 105.
� You defined the following three environment variables:
– API_KEY, as described in “Generating an API key for your service ID” on page 107.– KP_INSTANCE_ID and KP_PRIVATE_ADDR, as described in 2.4.3, “Retrieving connection
information to your IBM Hyper Protect Crypto Services instance” on page 108.
In Example 2-86, we modified our previous Go example (Example 2-81 on page 127) to use the UnwrapV2() function instead of Unwrap(). UnwrapV2() supports Key Protect root key rotation, and a second argument is returned with the data encrypted with the new rotated key.
Example 2-86 The unwrapkey.go program: Unwrapping with a rotated key by using Go
package main
import ( "os" "context" "github.com/IBM/keyprotect-go-client")
func main() { instanceId, ok := os.LookupEnv("KP_INSTANCE_ID") if !ok { panic("Must set KP_INSTANCE_ID") } apiKey, ok := os.LookupEnv("API_KEY") if !ok { panic("Must set API_KEY") } url , ok := os.LookupEnv("KP_PRIVATE_ADDR") if !ok { panic("Must set KP_PRIVATE_ADDR") } rootkeyid, ok := os.LookupEnv("ROOTKEYID") if !ok { panic("Must set ROOTKEYID") } keyid, ok := os.LookupEnv("KEYID") if !ok { panic("Must set KEYID")
Chapter 2. IBM Cloud Hyper Protect Crypto Services 131

} cc := kp.ClientConfig{ BaseURL: url, APIKey: apiKey, InstanceID: instanceId, } client ,_ := kp.New(cc, kp.DefaultTransport()) ctx := context.Background()
k,err := client.GetKey(ctx,keyid) if err != nil { panic(err) } myAAD := []string{"itso author"} unwrappedPayload, unwrappedPayload2, err := client.UnwrapV2(ctx, rootkeyid, []byte(k.Payload), &myAAD) if err != nil { panic(err) } println("Unwrapped payload with previous key : "+string(unwrappedPayload)) println("New ciphered payload with new key : "+string(unwrappedPayload2))}
As shown in Example 2-87, we recompiled the program that is shown in Example 2-86 on page 131. In this example, we retrieve a Key Protect root key the same way as we did in Example 2-69 on page 120. We set the ROOTKEYID environment variable to the value of the Key Protect root key that we want to rotate to. Then, we specify a Key Protect standard key ID by using the KEYID environment variable.
Run this example to achieve identical behavior to using the IBM Cloud CLI: You decipher data by using the old AES-GCM key and receive a new payload that is encrypted with the new rotated AES-GCM key.
Example 2-87 Unwrapping the rotated key in Go
$ go build unwrapkey.go$ export ROOTKEYID=$ROOT_KEY_ID$ export KEYID=5175b70d-c9e3-4d5d-aafb-d3226e331b7c$ ./unwrapkey Unwrapped payload with previous key : eyAiRVhBTVBMRV9JRCI6ICJpdHNvIiwgIkVYQU1QTEVfU0VDUkVUIjogImNpcGhlcmVkc2VjcmV0ISIgfQo=New ciphered payload with new key : eyJjaXBoZXJ0ZXh0IjoiTHpmS2Fuc2NkbGdGQWJSK1AvOFk5SUJZeXVma05RQ2hXcWNsT2pTWmxzVVVZOElTdnh1OU43cnAyUTdQWlhNTWlGdmtzdng4UmhvUHBGNWQ2SmJqU2c9PSIsIml2IjoiOE1YRDZ6dnU3N2lMRC9URFliYWxmdz09IiwidmVyc2lvbiI6IjQuMC4wIiwiaGFuZGxlIjoiN2M2OTllOTAtZTViOS00YmIyLTgzYjktYThhODBhZGU1ZjRlIn0=$ echo eyJjaXBoZXJ0ZXh0IjoiTHpmS2Fuc2NkbGdGQWJSK1AvOFk5SUJZeXVma05RQ2hXcWNsT2pTWmxzVVVZOElTdnh1OU43cnAyUTdQWlhNTWlGdmtzdng4UmhvUHBGNWQ2SmJqU2c9PSIsIml2IjoiOE1YRDZ6dnU3N2lMRC9URFliYWxmdz09IiwidmVyc2lvbiI6IjQuMC4wIiwiaGFuZGxlIjoiN2M2OTllOTAtZTViOS00YmIyLTgzYjktYThhODBhZGU1ZjRlIn0= | base64 -d{"ciphertext":"LzfKanscdlgFAbR+P/8Y9IBYyufkNQChWqclOjSZlsUUY8ISvxu9N7rp2Q7PZXMMiFvksvx8RhoPpF5d6JbjSg==","iv":"8MXD6zvu77iLD/TDYbalfw==","version":"4.0.0","handle":"7c699e90-e5b9-4bb2-83b9-a8a80ade5f4e"}
132 Securing Your Critical Workloads with IBM Hyper Protect Services

In Example 2-88, we delete the original key and create a new one by using encrypted data that uses the new rotated key. The unwrapping command returns only one answer.
Example 2-88 Re-create a new Key Protect standard key by using the newly wrapped payload
$ ibmcloud kp key delete 5175b70d-c9e3-4d5d-aafb-d3226e331b7cDeleting key: '5175b70d-c9e3-4d5d-aafb-d3226e331b7c', from instance: 'd300bb89-1807-4d6b-9927-3a1a2882e2b7'...OKDeleted Key 5175b70d-c9e3-4d5d-aafb-d3226e331b7c
$ ciphertext=$(ibmcloud kp key wrap $ROOT_KEY_ID -p $encoded -i $KP_INSTANCE_ID --aad "itso author" -o json | jq -r .ciphertext)$ ibmcloud kp key create itso_creds --standard-key --key-material $ciphertext -i $KP_INSTANCE_IDCreating key: 'itso_creds', in instance: 'd300bb89-1807-4d6b-9927-3a1a2882e2b7'...OKKey ID Key Name aab7ff12-096d-4bc8-8922-bb4ae5f1068c itso_creds $ encrypted_data_b64=$(ibmcloud kp key show aab7ff12-096d-4bc8-8922-bb4ae5f1068c -o json | jq -r .payload)$ ibmcloud kp key unwrap $ROOT_KEY_ID $encrypted_data_b64 -i $KP_INSTANCE_ID --aad "itso author" -o json{ "plaintext": "eyAiRVhBTVBMRV9JRCI6ICJpdHNvIiwgIkVYQU1QTEVfU0VDUkVUIjogImNpcGhlcmVkc2VjcmV0ISIgfQo=", "rewrappedPlaintext": ""}
2.4.7 Bring Your Own Key to the cloud: importing a Key Protect root key
IBM Hyper Protect Crypto Services creates keys that are rooted in HSMs that are specific to your instance, but you might need to generate key material from your internal solution that imports the keys into your Hyper Protect Crypto Services instance.
Obviously, you want assurance that the key material is protected while it is in flight. This task is achieved by using an import token.
In our example, we use the openssl tool to create a 256-bit symmetric encryption key.
Python support: Redstone is a Python library for interacting with IBM Cloud services, and its module Unwrap function returns only the plain text attribute of the response. You must modify this Unwrap() function to support key rotation to return both plaintext and rewrappedPlaintext responses.
Chapter 2. IBM Cloud Hyper Protect Crypto Services 133

To import the key material into the Hyper Protect Crypto Services, two options are available:
� Securely transfer the key by using the TLS 1.2 protocol. This method is the default one when importing the key by using the IBM Cloud console menu.
� Use an import token to mitigate risks against man-in-the-middle attacks. In this method, you must:
– Use the RSAES_OAEP_SHA_1 RSA encryption scheme.
– Securely generate a nonce (an arbitrary number that can be used only once).
To use the second method, which uses the ibmcloud key protect command, complete the following steps:
1. Create an import token for your Hyper Protect Crypto Services instance, as specified in the KP_INSTANCE_ID in Example 2-89.
Example 2-89 Creating an import token by using IBM Cloud CLI
$ ibmcloud kp import-token create --instance-id $KP_INSTANCE_ID --max-retrievals=1 --expiration=1200 OK Created 2021-05-10 08:56:25 +0000 UTC Expires 2021-05-10 09:16:25 +0000 UTC Max Retrievals 1 Remaining Retrievals 1
$ ibmcloud kp import-token showRetrieving import token details...OK Nonce 5O5LMK84KnRpakCO Payload LS0tLS1CRUdJTiBQVUJMSUMgS0VZLS0tLS0KTUlJQ0lEQU5CZ2txaGtpRzl3MEJBUUVGQUFPQ0FnMEFNSUlDQ0FLQ0FnRUF5aDF5eXBNRkk2UUNDRG1tMGtUcApUQkkwVWhCSE9IOXRaVUxTY3QrZGRkS0pBem43OVM2R2xjMTRka2VPWWYvdU92NGlkOGhUSVJmbE5jd0FPZm5QCmJUQkVvV0oxL0w4dzQ0aTFOYjRsV2czT2ZGWWhyMVFJKzdDbDQwR3hWbW1weTNQcXNXUDN1RFllUHZvcmdjZTMKK01qYmsvYldvT1lHcGFmRXdQbWo2Smo1VUZ1TFdLVElRakU4dHdDOEJUdWN5MG5jNXFyYmdoTTRPbjJuZ2hxVwpFd0VxQ3lVSU5HNXI0Qno1UTJYSFNmZWc5YUVaUXBEWDVtRHc3NWoxaDBZeWNVZGJMQU9VeEo1b0hwcTlaN0IvCktnQmZyRCtSbzhTamcrM25tWFRKSnBIcVFKQ2xjbUVmM2xXcXllK0g3bXBGOFZUUTZoZ3pWckNXQUgxUVFObEMKQS9OMi85UXhxSE5sUjZIRW9uQ29rYXlaN3FtMDVFdVFSckxUV2FCcVFseGc3OUhFc3k3TkhuK1Q0K3BRbGdDUwo3emhXSDlHSldoSExBSnhHZ0Jqek5VRURrQnN0U3FSU256WmoxcUJVRU1wZzNxY1FtV3VzUlRxSm0yak8zKy9pCmhDUjI5ZktOUDBUVmZyZnE3RVRDMFN0RVJES0xZL2FBUXZWaFhOUXBMaDQzM2grMVhNYU96V2k2L3d4MGhVenQKNmdsWGwwcUJldUM0NUpiQUpiaE1WWHFFZ3k3SjA2K1hYb1NUVEdhLytXcUd1M1M3V2pPWG1FSDM1SjdjZXhmNgo5Y0xmQzhjZDFyS0d1bVVsM1ZFdEMrQWw5S0Qva2NtK1M5UDRaV0xlRHo3OXliN29oQTVUdThIdHFod3ZudE1CCk8ydVoxb0NZdmYrZ3lYV3RkNzIwWEUwQ0FSRT0KLS0tLS1FTkQgUFVCTElDIEtFWS0tLS0tCg==
2. The resulting import token payload is a base64-encoded public key. Extract the nonce value and the public key value into some shell variables, as shown in Example 2-90.
Example 2-90 Retrieving the import token public key in a file and nonce in an environment variable in a Linux terminal
$ NONCE=$(ibmcloud kp import-token show -o json | jq -r .nonce)$ PUBKEYB64=$(ibmcloud kp import-token show -o json | jq -r .payload )
134 Securing Your Critical Workloads with IBM Hyper Protect Services

3. Create a 256-bit encryption key by using the openssl command and encode it in base64 encoding by using the base64 tool, as shown in Example 2-91.
Example 2-91 Generating the key on a Linux terminal
$ openssl rand 32 > PlainTextKey.bin$ KEY_MATERIAL=$(base64 PlainTextKey.bin)
4. Prepare your response to the Hyper Protect Crypto Services by encrypting both the nonce and the symmetric key. Run the commands that are shown in Example 2-92.
Example 2-92 Encrypting the nonce and the symmetric key in a Linux terminal
$ ibmcloud kp import-token nonce-encrypt --key "$KEY_MATERIAL" --nonce "$NONCE" --cbc -o json > EncryptedValues.json$ ENCRYPTED_NONCE=$(jq -r .encryptedNonce EncryptedValues.json)$ IV=$(jq -r .iv EncryptedValues.json)
$ ENCRYPTED_KEY=$(ibmcloud kp import-token key-encrypt --key $KEY_MATERIAL --pubkey $PUBKEYB64 --hash SHA1 -o json | jq -r .encryptedKey)
5. The final step is running the command that is shown in Example 2-93.
Example 2-93 Creating the Key Protect root key by using the key material
$ ibmcloud kp key create new-imported-key --key-material $ENCRYPTED_KEY --encrypted-nonce $ENCRYPTED_NONCE --iv $IV -o json
Alternatively, the following steps can be used in place of step 5:
1. Retrieve an access token for your API_KEY, as shown in Example 2-94. An access token is a temporary credential that expires after 1 hour.
Example 2-94 Retrieving an access token by using your service API key
$ curl -X POST "https://iam.cloud.ibm.com/identity/token" -H "Content-Type: application/x-www-form-urlencoded" -H "Accept: application/json" -d "grant_type=urn:ibm:params:oauth:grant-type:apikey&apikey=$API_KEY" > token.json
$ ACCESS_TOKEN="Bearer $(jq -r .access_token token.json)"
2. Import the encrypted key into your IBM Hyper Protect Crypto Services instance, as shown in Example 2-95. Specify your key name in the KEYNAME variable. You also can specify it in the resources JSON definition.
Example 2-95 Importing a root key
$ KEYNAME="ITSO imported key"$ curl -X POST $KP_PRIVATE_ADDR/api/v2/keys -H "Accept: application/vnd.ibm.collection+json" -H "Authorization: $ACCESS_TOKEN" -H "Content-Type: application/json" -H "Bluemix-Instance: $KP_INSTANCE_ID" -d '{ "metadata": { "collectionType": "application/vnd.ibm.kms.key+json", "collectionTotal": 1 }, "resources": [ {
Chapter 2. IBM Cloud Hyper Protect Crypto Services 135

"name": "'"$KEYNAME"'", "type": "application/vnd.ibm.kms.key+json", "payload": "'"$ENCRYPTED_KEY"'", "extractable": false, "encryptionAlgorithm": "RSAES_OAEP_SHA_1", "encryptedNonce": "'"$ENCRYPTED_NONCE"'", "iv": "'"$IV"'" } ] }' {"metadata":{"collectionType":"application/vnd.ibm.kms.key+json","collectionTotal":1},"resources":[{"id":"7efc97c8-e61e-442a-8bc3-11ef3c2b40c4","type":"application/vnd.ibm.kms.key+json","name":"ITSO imported key","state":1,"crn":"crn:v1:bluemix:public:hs-crypto:us-south:a/537544c2222297f40ed689e8473e7849:d300bb89-1807-4d6b-9927-3a1a2882e2b7:key:7efc97c8-e61e-442a-8bc3-11ef3c2b40c4","extractable":false,"imported":true}]}
3. Verify that the key was as expected by using the command that is shown in Example 2-96.
Example 2-96 Checking your imported root key
$ ibmcloud kp keysRetrieving keys...OKKey ID Key Name 7efc97c8-e61e-442a-8bc3-11ef3c2b40c4 ITSO imported key
2.4.8 Integrating IBM Cloud services with IBM Hyper Protect Crypto Services
The following services are offered in the IBM Cloud and offer integration with IBM Hyper Protect Crypto Services to provide extra protection:
� Database service integrations
– IBM Hyper Protect Database as a Service (DBaaS) for PostgreSQL
https://cloud.ibm.com/docs/hyper-protect-dbaas-for-postgresql?topic=hyper-protect-dbaas-for-postgresql-hpcs-byok
– IBM Hyper Protect DBaaS for MongoDB
https://cloud.ibm.com/docs/hyper-protect-dbaas-for-mongodb?topic=hyper-protect-dbaas-for-mongodb-hpcs-byok
– IBM Cloud Databases for DataStax
https://cloud.ibm.com/docs/cloud-databases?topic=cloud-databases-hpcs
– IBM Cloud Databases for Elasticsearch
https://cloud.ibm.com/docs/cloud-databases?topic=cloud-databases-hpcs
– IBM Cloud Databases for etcd
https://cloud.ibm.com/docs/cloud-databases?topic=cloud-databases-hpcs
– IBM Cloud Databases for Enterprise DB (EDB)
https://cloud.ibm.com/docs/cloud-databases?topic=cloud-databases-hpcs
– IBM Cloud Databases for MongoDB
https://cloud.ibm.com/docs/cloud-databases?topic=cloud-databases-hpcs
136 Securing Your Critical Workloads with IBM Hyper Protect Services
– IBM Cloud Databases for PostgreSQL
https://cloud.ibm.com/docs/cloud-databases?topic=cloud-databases-hpcs
– IBM Cloud Databases for Redis
https://cloud.ibm.com/docs/cloud-databases?topic=cloud-databases-hpcsitso-
– IBM Cloud Messages for RabbitMQ
https://cloud.ibm.com/docs/messages-for-rabbitmq?topic=cloud-databases-hpcs
� Storage service integrations:
– IBM Cloud Object Storage
https://cloud.ibm.com/docs/cloud-object-storage?topic=cloud-object-storage-encryption
– IBM Cloud Block Storage for Virtual Private Cloud (VPC)
https://cloud.ibm.com/docs/vpc?topic=vpc-block-storage-vpc-encryption
� Compute service integrations:
– IBM Cloud Virtual Servers for VPC
Create an encrypted block storage volume when you create a virtual server instance by using IBM Hyper Protect Crypto Services. Use your own root keys that you manage in IBM Hyper Protect Crypto Services to protect the DEKs that encrypt your data at rest.
https://cloud.ibm.com/docs/vpc-on-classic-vsi?topic=vpc-on-classic-vsi-creating-instances-byok
– Key Management Interoperability Protocol (KMIP) for VMware on IBM Cloud
KMIP, maintained by OASIS, is a cryptographic standard that enables secure key exchange for encryption and decryption without requiring direct access to the key.
KMIP for VMware works together with VMware native vSphere encryption and VSAN encryption and supports IBM Cloud Key Protect or IBM Hyper Protect Crypto Services customer-managed keys.
The tutorial is available online at the following site:
https://cloud.ibm.com/docs/hs-crypto?topic=hs-crypto-tutorial-kmip-vmware
– HyTrust DataControl for IBM Cloud
https://cloud.ibm.com/docs/vmwaresolutions?topic=vmwaresolutions-htdc-hpcs-detail
� Container service integration:
– Red Hat OpenShift on IBM Cloud (See “Red Hat OpenShift” on page 148.)
– IBM Cloud Kubernetes service (See “IBM Cloud Kubernetes” on page 138.)
� Ingestion service integrations:
– IBM Cloud Monitoring. Use this service to gain operational visibility into the performance and health of your IBM Hyper Protect Crypto Services instance.
https://cloud.ibm.com/docs/Monitoring-with-Sysdig?topic=Monitoring-with-Sysdig-mng-data
– IBM Cloud Schematics
https://cloud.ibm.com/docs/schematics?topic=schematics-secure-data#pi-encrypt
Chapter 2. IBM Cloud Hyper Protect Crypto Services 137
– Event Streams
https://cloud.ibm.com/docs/EventStreams?topic=EventStreams-managing_encryption
� Security service integrations:
– App ID
https://cloud.ibm.com/docs/appid?topic=appid-mng-data
– Secrets Manager
https://cloud.ibm.com/docs/secrets-manager?topic=secrets-manager-mng-data#data-encryption
– Certificate Manager
https://cloud.ibm.com/docs/certificate-manager?topic=certificate-manager-mng-data
– Security and Compliance Center
https://cloud.ibm.com/docs/security-compliance?topic=security-compliance-mng-data
IBM Cloud KubernetesBy configuring a KMS in your Kubernetes cluster, you can protect your Kubernetes secret by using a KMS encryption provider. It uses an envelope encryption scheme to encrypt data in etcd.
For more information on this topic, see Features and limitations of KMS providers.
As prerequisites, you must provision both an IBM Kubernetes Service and one Hyper Protect Crypto Services with the HSM master key initialized:
� When using the IBM Cloud Console or the IBM Cloud CLI, provision a Kubernetes cluster.
� Provision and configure your IBM Hyper Protect Crypto Services as described in 2.2.2, “Provisioning your instance by using the IBM Cloud CLI” on page 26.
The procedure can be achieved by using the IBM Cloud console or the IBM Cloud CLI.
Tip: This list is expected to grow over time as more services that are offered in IBM Cloud add support for integration with IBM Hyper Protect Crypto Services. For more information about the list of services, see Integrating IBM Cloud services with Hyper Protect Crypto Services.
138 Securing Your Critical Workloads with IBM Hyper Protect Services

Using the IBM Cloud consoleIn this section, we outline how to use the IBM Cloud console to provision a Kubernetes cluster. To do so, complete the following steps:
1. Open your IBM Cloud console and select your Kubernetes service to reach its main page, as shown in Figure 2-77.
Figure 2-77 IBM Cloud console for the IBM Kubernetes Service
Chapter 2. IBM Cloud Hyper Protect Crypto Services 139

2. Click Enable under the Key Management Service heading under the Integrations section, as shown in Figure 2-78.
Figure 2-78 Enabling IBM Hyper Protect Crypto Services with Kubernetes
140 Securing Your Critical Workloads with IBM Hyper Protect Services

3. Select your Hyper Protect Crypto Services instance, as shown in Figure 2-79.
Figure 2-79 Selecting your IBM Hyper Protect Crypto Services instance
Chapter 2. IBM Cloud Hyper Protect Crypto Services 141

4. Select a root key that is available for the selected service, as shown in Figure 2-80.
Figure 2-80 Selecting a key
142 Securing Your Critical Workloads with IBM Hyper Protect Services
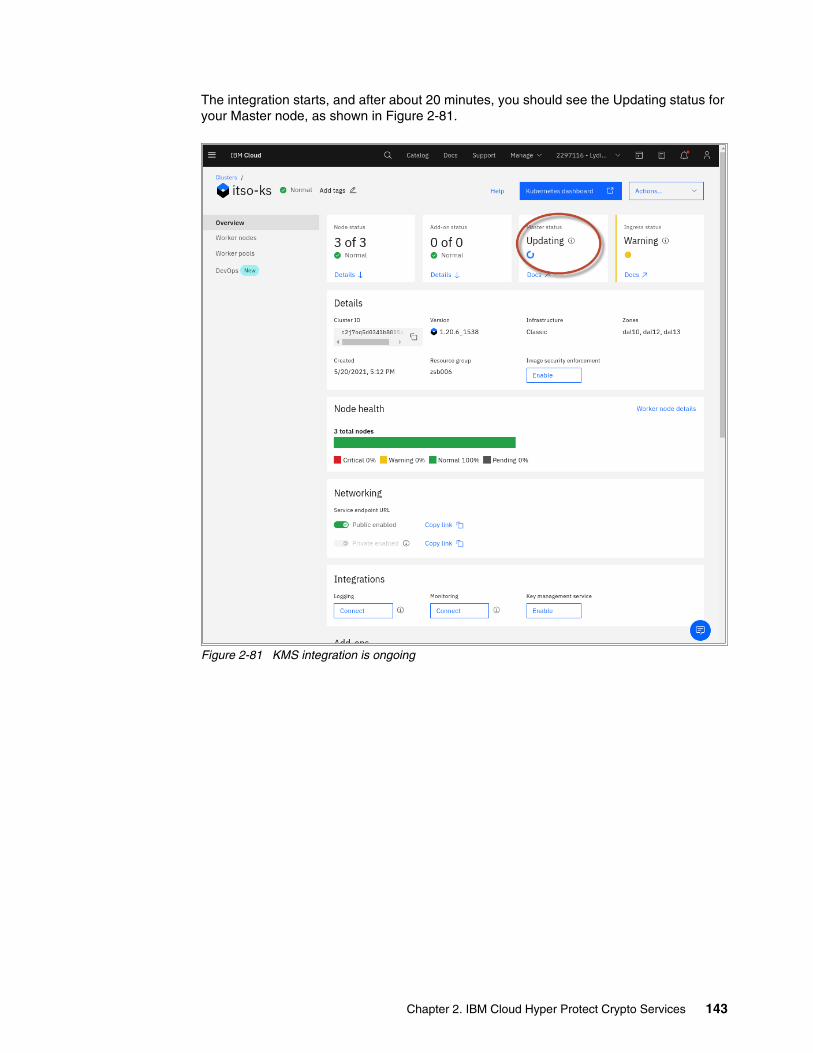
The integration starts, and after about 20 minutes, you should see the Updating status for your Master node, as shown in Figure 2-81.
Figure 2-81 KMS integration is ongoing
Chapter 2. IBM Cloud Hyper Protect Crypto Services 143

Figure 2-82 shows the dashboard after this process completes. In the Integrations section, you can see that the Key Management service has an Enabled status.
Figure 2-82 Kubernetes integration with an IBM Hyper Protect Crypto Services instance active
Using the IBM Cloud CLIYou can check your available services by using the commands ibmcloud ks ls for the Kubernetes cluster and ibmcloud ks kms instance ls for the KMSs instances, as shown in Example 2-97. You can also use the IBM Cloud console for the same purpose.
Example 2-97 Listing Kubernetes and HPCS services by using IBM Cloud CLI
$ ibmcloud ks cluster lsOKName ID State Created Workers Location Version Resource Group Name Provider itso-ks c2cj56gd0cf37mbjdla0 normal 27 minutes ago 1 Dallas 1.20.6_1538 - classic
$ ibmcloud ks kms instance ls OKName ID Region Service
144 Securing Your Critical Workloads with IBM Hyper Protect Services

my-hpcs-instance 8207abd0-b8d8-4c52-a257-966eda16a64d us-south Hyper Protect Crypto Services hpcs-svc d300bb89-1807-4d6b-9927-3a1a2882e2b7 us-south Hyper Protect Crypto Services
In our example, we used the hpcs-svc crypto service. You can retrieve the Key Protect root key that is available in this service as shown in Example 2-98.
Example 2-98 Getting the Key Protect root key of the service
$ ibmcloud ks kms crk ls --instance-id d300bb89-1807-4d6b-9927-3a1a2882e2b7OKName ID itso_rootkey 17c8168a-5472-49f6-84f7-60f6bdc61c4e goRootkey 3ab9c48e-bdc2-4350-8a0f-785865ad5557 itso really rocks e893d3c8-976b-4e51-a3ab-7326aa86a19d goStandardkey ee3c63f0-62db-4fb0-a6b5-c808a75983ca mynewrootkey f0a0a495-ada0-480f-9c55-1f78ac7080b9
Enable encryption for your Kubernetes service by using the ibmcloud ks kms enable command with the following arguments:
� The Kubernetes cluster name.� The Hyper Protect Crypto Services instance ID.� The Key Protect root key ID.
In Example 2-99, we use the “itso really rocks” root key of the hpcs-svc service.
Example 2-99 Enabling the IBM Hyper Protect Crypto Services instance with Kubernetes
$ ibmcloud ks kms enable -c itso-ks --instance-id d300bb89-1807-4d6b-9927-3a1a2882e2b7 --crk e893d3c8-976b-4e51-a3ab-7326aa86a19d OK
You can check that KMS encryption is enabled on your cluster by running the command that is shown in Example 2-100.
Example 2-100 Checking that the IBM Hyper Protect Crypto Services instance is enabled on the Kubernetes service
$ ibmcloud ks cluster get -c itso-ksRetrieving cluster itso-ks...OK Name: itso-ksID: c2cj56gd0cf37mbjdla0State: normal Status: All Workers Normal Created: 2021-05-10T14:04:04+0000 Location: dal10 Pod Subnet: 172.30.0.0/16 Service Subnet: 172.21.0.0/16 Master URL: https://c113.us-south.containers.cloud.ibm.com:30252 Public Service Endpoint URL: https://c113.us-south.containers.cloud.ibm.com:30252 Private Service Endpoint URL: -
Chapter 2. IBM Cloud Hyper Protect Crypto Services 145

Master Location: Dallas Master Status: VPN server configuration update requested. (22 seconds ago) Master State: deployed Master Health: normal Ingress Subdomain: - † Ingress Secret: - † Ingress Status: warning Ingress Message: Registering Ingress subdomain Workers: 1 Worker Zones: dal10 Version: 1.20.6_1538 Creator: - Monitoring Dashboard: - Resource Group ID: 12db27d1ef1744559d56513e23108c00 Resource Group Name: zsb006 Key Protect: enabled † Your Ingress subdomain and secret might not be ready yet. For more info by cluster type, see 'https://ibm.biz/ingress-sub' for Kubernetes or 'https://ibm.biz/ingress-sub-ocp' for Red Hat OpenShift.
This process takes several minutes to activate. You should see the status that is shown in Example 2-101 if the KMS activation has not completed.
Example 2-101 The ibmcloud ks cluster get -c itso-ks not ready message
...Master Status: Key management service enablement in progress. (4 minutes ago) Master State: updating ...
Then, you can create Kubernetes secrets and transparently have them encrypted by the AES-GCM Hyper Protect Crypto Services root key. Data is stored on the etcd component as k8s secret.
You can still retrieve the secrets by using the kubectl (authenticated) command. The secrets are unwrapped automatically by using the Key Protect root key while they are encrypted in etcd.
Example 2-102 Creating your Kubernetes keys by using IBM Hyper Protect Crypto Services
$ ibmcloud ks cluster config --cluster c2cj56gd0cf37mbjdla0OKThe configuration for c2cj56gd0cf37mbjdla0 was downloaded successfully.
Added context for c2cj56gd0cf37mbjdla0 to the current kubeconfig file.You can now run 'kubectl' commands against your cluster. For example, run 'kubectl get nodes'.If you are accessing the cluster for the first time, 'kubectl' commands might fail for a few seconds while RBAC synchronizes.$ kubectl create secret generic secret1 -n default --from-literal=mykey=mydatasecret/secret1 created
$ kubectl describe secret secret1 -n defaultName: secret1
146 Securing Your Critical Workloads with IBM Hyper Protect Services

Namespace: defaultLabels: <none>Annotations: <none>
Type: Opaque
Data====mykey: 6 bytes
$ kubectl get secret secret1 -n default -o json{ "apiVersion": "v1", "data": { "mykey": "bXlkYXRh" }, "kind": "Secret", "metadata": { "creationTimestamp": "2021-05-20T15:20:52Z", "managedFields": [ { "apiVersion": "v1", "fieldsType": "FieldsV1", "fieldsV1": { "f:data": { ".": {}, "f:mykey": {} }, "f:type": {} }, "manager": "kubectl-create", "operation": "Update", "time": "2021-05-20T15:20:52Z" } ], "name": "secret1", "namespace": "default", "resourceVersion": "8097", "uid": "f1a8ff7b-deae-4c25-bb06-a258eff741ee" }, "type": "Opaque"}$ echo bXlkYXRh | base64 -dmydata
Important: Do not delete the Key Protect root keys in your Hyper Protect Crypto Services instance, even if you rotate to use a new key. If you delete a root key that a cluster uses, the cluster becomes unusable, loses all its data, and cannot be recovered. When you rotate a root key, you cannot reuse a previous root key for the same cluster.
If you disable a Key Protect root key, operations that rely on reading secrets fail. However, unlike deleting a root key, you can re-enable a disabled key to make your cluster usable again, as shown in Example 2-107 on page 150.
Chapter 2. IBM Cloud Hyper Protect Crypto Services 147

Red Hat OpenShiftIn this section, we describe the following topics:
� Enabling the OpenSSL GREP11 engine for the Red Hat OpenShift router
� Encrypting the Kubernetes master’s local disk and secrets
Enabling the OpenSSL GREP11 engine for the Red Hat OpenShift routerFor more information about enabling the OpenSSL GREP11 engine for the Red Hat OpenShift router, see Encrypting routes with keys stored in Hyper Protect Crypto Services.
A private key that is stored in an IBM Hyper Protect Crypto Services instance can be used by an Red Hat OpenShift router in a TLS session establishment and in a Certificate Signing Request (CSR) signing. To access IBM Hyper Protect Crypto Services, an Red Hat OpenShift router must use the OpenSSL Engine GREP11 to make calls to the GREP11 API. However, the default router in Red Hat OpenShift on IBM Cloud Version 4 clusters cannot be configured to use an alternative OpenSSL engine integration.
Instead, you can deploy the custom IBM Cloud HPCS Router, which uses the GREP11 OpenSSL Engine to access private keys that are stored in an IBM Hyper Protect Crypto Services instance to encrypt routes. The IBM Cloud HPCS Router is managed by an Red Hat OpenShift operator, and provides the same route management system as the default router.
Encrypting the Kubernetes master local disk and secrets The Kubernetes master is the main controlling unit of the cluster, and it manages the cluster’s workload and directs communication across the system.
IBM Key Protect for IBM Cloud is a KMS provider for public cloud or on-premises environments. It is supported by Red Hat OpenShift on IBM Cloud. For more information about this topic, see Features and limitations of KMS providers.
To encrypt the Kubernetes master local disk and secrets, complete the following steps:
1. On your Red Hat OpenShift cluster, specify a Key Protect root key that was created in an IBM Hyper Protect Crypto Services instance as a KMS provider. With this key, you can encrypt your Kubernetes secret by using AES-GCM symmetric encryption on the Red Hat OpenShift master node.
2. Provision an Red Hat OpenShift cluster in the IBM Cloud and IBM Hyper Protect Crypto Services instance by using the IBM Cloud Console or by using the IBM Cloud CLI, as described in 2.2.2, “Provisioning your instance by using the IBM Cloud CLI” on page 26.
3. Create a Key Protect root key, as described in 2.4.4, “Creating IBM Key Protect keys” on page 110.
4. Select the resource group where your Hyper Protect Crypto Services and Red Hat OpenShift cluster run by running the ibmcloud target -g <group> command.
5. Check your available Red Hat OpenShift cluster, as shown in Example 2-103.
Example 2-103 Listing your Red Hat OpenShift cluster
$ ibmcloud oc cluster lsOKName ID State Created Workers Location Version Resource Group Name Provider itso-ocp c2clhprd0qsn78u1m7rg normal 14 hours ago 1 Dallas 4.6.23_1540_openshift zsb006 classic
148 Securing Your Critical Workloads with IBM Hyper Protect Services

6. Check your available Hyper Protect Crypto Services instance and choose a Key Protect root key to encrypt your Red Hat OpenShift Kubernetes secrets (Example 2-104). Create one if necessary.
Example 2-104 Listing your Hyper Protect Crypto Services instance and available Key Protect root keys
$ ibmcloud oc kms instance lsOKName ID Region Service my-hpcs-instance 8207abd0-b8d8-4c52-a257-966eda16a64d us-south Hyper Protect Crypto Services hpcs-svc d300bb89-1807-4d6b-9927-3a1a2882e2b7 us-south Hyper Protect Crypto Services
$ ibmcloud oc kms crk ls --instance-id d300bb89-1807-4d6b-9927-3a1a2882e2b7OKName ID itso_rootkey 17c8168a-5472-49f6-84f7-60f6bdc61c4e goRootkey 3ab9c48e-bdc2-4350-8a0f-785865ad5557 itso really rocks e893d3c8-976b-4e51-a3ab-7326aa86a19d goStandardkey ee3c63f0-62db-4fb0-a6b5-c808a75983ca mynewrootkey f0a0a495-ada0-480f-9c55-1f78ac7080b9
7. To enable your Hyper Protect Crypto Services instance as a KMS provider for your Red Hat OpenShift cluster and use a Key Protect root key for encryption of secrets, run the command that is shown in Example 2-105.
Example 2-105 Enabling Hyper Protect Crypto Services as a KMS provider
$ ibmcloud oc kms enable -c c2clhprd0qsn78u1m7rg --instance-id d300bb89-1807-4d6b-9927-3a1a2882e2b7 --crk e893d3c8-976b-4e51-a3ab-7326aa86a19d OK
It takes several minutes to update the cluster. You can monitor the status of your cluster by running the ibmcloud oc cluster get -c <cluster id> command.
You should see the following messages during the waiting time:
Master Status: Key management service enablement in progress. (11 minutes ago) Master State: updating
The change is complete when the results are like what is shown in Example 2-106.
Example 2-106 Checking that Key Protect is enabled on your Red Hat OpenShift cluster
$ ibmcloud oc cluster get -c c2clhprd0qsn78u1m7rgRetrieving cluster c2clhprd0qsn78u1m7rg...OK Name: itso-ocp ID: c2clhprd0qsn78u1m7rg State: normal Status: All Workers Normal Created: 2021-05-10T16:01:43+0000 Location: dal12 Pod Subnet: 172.30.0.0/16 Service Subnet: 172.21.0.0/16 Master URL: https://c114-e.us-south.containers.cloud.ibm.com:31749 Public Service Endpoint URL: https://c114-e.us-south.containers.cloud.ibm.com:31749
Chapter 2. IBM Cloud Hyper Protect Crypto Services 149

Private Service Endpoint URL: - Master Location: Dallas Master Status: Ready (1 minute ago) Master State: deployed Master Health: normal Ingress Subdomain: itso-ocp-c89fed71325d648350833a28d6641984-0000.us-south.containers.appdomain.cloud Ingress Secret: itso-ocp-c89fed71325d648350833a28d6641984-0000 Ingress Status: healthy Ingress Message: All Ingress components are healthy Workers: 1 Worker Zones: dal12 Version: 4.6.23_1540_openshift Creator: - Monitoring Dashboard: - Resource Group ID: 12db27d1ef1744559d56513e23108c00 Resource Group Name: zsb006 Key Protect: enabled
By using the IBM Cloud console or ibmcloud kp key disable/enable keyid command, you can verify whether the KMS is active.
If you disable the key (Example 2-107), the Red Hat OpenShift cluster cannot retrieve secrets.
Example 2-107 Disabling the KMS Key Protect key for testing
$ oc get secrets NAME TYPE DATA AGEall-icr-io kubernetes.io/dockerconfigjson 1 8dbuilder-dockercfg-lc8mc kubernetes.io/dockercfg 1 8dbuilder-token-7rjt4 kubernetes.io/service-account-token 4 8dbuilder-token-p8xrg kubernetes.io/service-account-token 4 8ddefault-dockercfg-lkg4k kubernetes.io/dockercfg 1 8ddefault-token-5b5b5 kubernetes.io/service-account-token 4 8ddefault-token-w4rx4 kubernetes.io/service-account-token 4 8ddeployer-dockercfg-t46fm kubernetes.io/dockercfg 1 8ddeployer-token-5m6hq kubernetes.io/service-account-token 4 8ddeployer-token-zfzr9 kubernetes.io/service-account-token 4 8d
$ ibmcloud kp key disable e893d3c8-976b-4e51-a3ab-7326aa86a19dDisabling key: 'e893d3c8-976b-4e51-a3ab-7326aa86a19d', in instance: 'd300bb89-1807-4d6b-9927-3a1a2882e2b7'...OK
After a few minutes, the cluster should become unreachable, as shown in Example 2-108.
Example 2-108 The Red Hat OpenShift cluster becomes unreachable
$ oc get secretsError from server (InternalError): Internal error occurred: unable to transform key "/kubernetes.io/secrets/default/all-icr-io": rpc error: code = Unknown desc = Unable to decrypt, the Key Protect key is not enabled
$ oc get nodesUnable to connect to the server: dial tcp 52.116.231.210:31749: i/o timeout
150 Securing Your Critical Workloads with IBM Hyper Protect Services

Re-enable your Key Protect root key to restore operations, as shown in Example 2-109.
Example 2-109 Re-enable the key to go back to the normal state
$ ibmcloud kp key enable e893d3c8-976b-4e51-a3ab-7326aa86a19dEnabling key: 'e893d3c8-976b-4e51-a3ab-7326aa86a19d', in instance: 'd300bb89-1807-4d6b-9927-3a1a2882e2b7'...OK$ oc get nodesNAME STATUS ROLES AGE VERSION10.184.54.85 NotReady master,worker 8d v1.19.0+a5a0987
2.5 Using the Public Key Cryptography Standards #11 API with IBM Hyper Protect Crypto Services
In addition to the Key Protect API, IBM Hyper Protect Crypto Services provides two more APIs for applications:
� The standard PKCS #11 API
� The Enterprise PKCS #11 over gRPC (GREP11) API
PKCS #11 API uses dedicated keystores that are provided by IBM Hyper Protect Crypto Services to ensure data isolation and security. Privileged users (IBM Cloud system administrators) are locked out for protection against abusive use of system administrator credentials or root user credentials.
GREP11 is stateless and does not manage keystores.
For more information about a comparison between the PKCS #11 API and the GREP11 API, see Comparing the PKCS #11 API with the GREP11 API.
Each Hyper Protect Crypto Services instance and its keystores runs in its own protected enclave in a Secure Service Container (SSC) logical partition (LPAR). SSC is a logical partitioning technology that is Common Criteria Enterprise Assurance Level (EAL) 5+ certified for separation and isolation. For more information, see IBM Secure Service Container.
FIPS 140-2 Level 4 compliant cloud HSM is enabled for the highest physical protection of secrets. Each Hyper Protect Crypto Services instance uses its own specific HSM domain.
Table 2-2 provides a comparison chart of both APIs:
Table 2-2 Comparing PKCS11 # API and GREP11
Feature PKCS #11 API GREP11
Interface implementation
Stateful interface. Data is stored on the host.The result of a request can vary depending on the implicit state, such as session state and user login state.
Stateless interface. The result request always stays the same. No data is stored on the host.
Prior installation PKCS #11 library on your local workstation.
No extra installation.
Chapter 2. IBM Cloud Hyper Protect Crypto Services 151

2.5.1 The PKCS #11 API
PKCS #11 is a standard that specifies an API, which is called Cryptoki, for devices that hold cryptographic information and perform cryptographic functions.
On your Hyper Protect Crypto Services instance, you can define multiple slots. Each slot has its own public and private keystore. An API key controls the access to these slots. Three levels of access are possible:
� As a SO, if you need to reset a label or perform some other system administration operations.
� As a user for read/write operations, for example, if you must create some objects such as cryptographic keys in the slot.
� As anonymous access or read only, if your application performs only cryptographic operations by using keys that were created by another user.
A specific IAM API key can be assigned for each user to control access. For more information, see Setting up PKCS #11 API user types.
By default, you use the same API key. This read/write access model should fit 80% of application needs that perform their cryptographic operations by using their own cryptographic keys. Crypto unit system management operations like key store management and access control are done by using Hyper Protect Crypto Services functions.
Application migration None if applications use the standard PKCS #11 API.
Must use IBM GREP11 SDKs, which are available for Go, JavaScript, and Rust.
Authentication and access management
SO, user, and anonymous HSM access are mapped to IAM user API keys. For more information, see Setting up PKCS #11 API user types.
Standard IAM access.
Keystore The PKCS #11 keys are protected by the HSM master key and are stored in cloud databases (keystores). Keystores are reencrypted for HSM Master key rotation.
The application is responsible for storing wrapped keys that are created by using the GREP11 API. In particular, the application must manage HSM master key rotation and rewrap cryptographic materials with the new future key.
Supported cryptographic operations
The PKCS #11 API supports most of the standard PKCS #11 functions.
The GREP11 API does not support general-purpose functions and session management functions. It supports most of the EP11 cryptographic functions.
Feature PKCS #11 API GREP11
152 Securing Your Critical Workloads with IBM Hyper Protect Services

PKCS #11 mechanismsA Hyper Protect Crypto Services instance implements many cryptographic operations like encryption, hashing functions, key derivations, or random number generations. They are referred to as mechanisms. A mechanism is used as a parameter to a PKCS #11 call to specify which algorithm is used and what kind of keys should be created. Examples are AES encryption and SHA512 signing.
Table 2-3 provides a list of some of those mechanisms and the functions that they support.
Table 2-3 Hyper Protect Crypto Services PKCS #11 mechanisms
Function group Supported mechanisms
Encrypt and decrypt. CKM_RSA_PKCS, CKM_RSA_PKCS_OAEP, CKM_AES_ECB, CKM_AES_CBC, CKM_AES_CBC_PAD, CKM_DES3_ECB, CKM_DES3_CBC, CKM_DES3_CBC_PAD
Sign and verify. CKM_RSA_PKCS, CKM_RSA_PKCS_PSS, CKM_RSA_X9_31, CKM_SHA1_RSA_PKCS, CKM_SHA256_RSA_PKCS, CKM_SHA224_RSA_PKCS, CKM_SHA384_RSA_PKCS, CKM_SHA512_RSA_PKCS, CKM_SHA1_RSA_PKCS_PSS, CKM_SHA224_RSA_PKCS_PSS, CKM_SHA256_RSA_PKCS_PSS, CKM_SHA384_RSA_PKCS_PSS, CKM_SHA512_RSA_PKCS_PSS, CKM_SHA1_RSA_X9_31, CKM_DSA, CKM_DSA_SHA1, CKM_ECDSA, CKM_ECDSA_SHA1, CKM_ECDSA_SHA224, CKM_ECDSA_SHA256, CKM_ECDSA_SHA384, CKM_ECDSA_SHA512, CKM_SHA1_HMAC, CKM_SHA256_HMAC, CKM_SHA384_HMAC, CKM_SHA512_HMAC, CKM_SHA512_224_HMAC, CKM_SHA512_256_HMAC, CKM_IBM_ED25519_SHA512
Digest. CKM_SHA_1, CKM_SHA224, CKM_SHA256, CKM_SHA384, CKM_SHA512, CKM_SHA512_224, CKM_SHA512_256
Generate key or generate key pair.
CKM_RSA_PKCS_KEY_PAIR_GEN, CKM_RSA_X9_31_KEY_PAIR_GEN, CKM_DSA_KEY_PAIR_GEN, CKM_DSA_PARAMETER_GEN, CKM_EC_KEY_PAIR_GEN (CKM_ECDSA_KEY_PAIR_GEN), CKM_DH_PKCS_KEY_PAIR_GEN, CKM_DH_PKCS_PARAMETER_GEN, CKM_GENERIC_SECRET_KEY_GEN, CKM_AES_KEY_GEN, CKM_DES2_KEY_GEN, CKM_DES3_KEY_GEN
Wrap and unwrap. CKM_RSA_PKCS, CKM_RSA_PKCS_OAEP, CKM_AES_ECB, CKM_AES_CBC, CKM_AES_CBC_PAD, CKM_DES3_ECB, CKM_DES3_CBC, CKM_DES3_CBC_PAD
Derive. CKM_ECDH1_DERIVE, CKM_DH_PKCS_DERIVE, CKM_DES3_ECB_ENCRYPT_DATA, CKM_SHA1_KEY_DERIVATION, CKM_SHA224_KEY_DERIVATION, CKM_SHA256_KEY_DERIVATION, CKM_SHA384_KEY_DERIVATION, CKM_SHA512_KEY_DERIVATION, CKM_IBM_BTC_DERIVE
Chapter 2. IBM Cloud Hyper Protect Crypto Services 153
PKCS #11 objectsBy using the PKCS #11 API, your application creates objects in the HSM keystores with different attributes:
� CKA_CLASS defines the object type. For example, a symmetric key is specified as CKO_SECKET_KEY, and a private key is specified as CKO_PRIVATE.
� CKA_LABEL provides a description, which is useful for retrieving your key in the keystores:
� CKA_TOKEN specifies whether your object is a session-only object or a token:
– A session object is kept only in memory and disappears when the session is closed.
– A token is stored in the keystores, and then it can be shared across different microservices and application components. For example, a symmetric key that is created with CKA_TOKEN set as false disappears at the end of the session that is established by your application.
� CKA_ID is an identifier. It can be useful to specify a unique ID as an attribute for a key to identify it. We can create two objects with same label (CKA_LABEL) and the same CKA_ID. Both CKA_ID and CKA_LABEL are useful for retrieving your keys that are stored on the Hyper Protect Crypto Services HSM.
� CKA_EXTRACTABLE indicates whether the key can be wrapped into ciphertext out of the keystores by your application and unwrapped to restore it into the crypto unit keystores. If the key is a set to be not extractable, it cannot leave the HSM keystore in an encrypted form and cannot be wrapped. The value is true (CK_TRUE) or false (CK_FALSE).
� CKA_PRIVATE is used to indicate whether the key should be stored in a public or a private IBM Hyper Protect Crypto Services keystore. Public keys are created in the public keystore with this parameter set to false (CK_FALSE).
These objects can be retrieved from the HSM by using C_FindObjects() PKCS11. C_GetAttributeValue() to retrieve the attribute value.
Table 2-4 provides a list of PKCS #11 data types and their descriptions.
Table 2-4 PKCS #11 data types
PKCS11 type Description
Data Application data, such as details about stored keys. However, IBM Hyper Protect Crypto Services does not support C_CreateObject() and C_CopyObject().
Keys Cryptographic keys: Public/private (asymmetric) or secret (symmetric). Each type of these keys has subtypes for use in specific mechanisms:� Public key: The public component of a key pair that is used by
anyone to encrypt messages that are intended for a recipient that has access to the private key of the key pair. The public key also is used to verify signatures that are created by the private key.
� Private key: The private component of a key pair that is used to decrypt messages. The private key also is used to create signatures.
� Secret key: A secret key is a generated stream of bits that is used to encrypt and decrypt messages symmetrically.
These keys are not Key Protect keys. They cannot be displayed by using the ibmcloud kp keys command.
Certificates X509 Certificates. IBM Hyper Protect Crypto Services does not support the C_CreateObject() call.
154 Securing Your Critical Workloads with IBM Hyper Protect Services
PKCS #11 sessionTo run cryptographic operations on a Hyper Protect Crypto Services instance, your program starts by opening a session with the service that is authenticated with an API key. The structure is as follows:
� Initialize your PKCS11 GREP11 native library.
� Connect your Hyper Protect Crypto Services PKCS11 endpoint by using your API Key with a C_Login().
� Get the list of available slots (specified by the configuration file).
� Open a session one slot with C_OpenSession(), where you specify the session mode (read only/read write) and the API key.
� Create or retrieve objects like cryptographic keys by using C_FindObjects in your session. Perform some cryptography operations by using these objects with C_Encrypt, C_Derive, C_Sign, C_Verify, C_GenerateKey, or other PKCS #11 encryption functions.
Created objects last only for the session lifetime or are persistent within the Hyper Protect Crypto Services keystores. Use the CTA_TOKEN attribute in the key templates to set persistence.
PKCS #11 encryption functions take the following input arguments:
– Some key template structures that describe the cryptographic PKCS #11 objects to be created. The structures can be a random number, a key pair, or a symmetric key.
– A mechanism structure that specifies the PKCS #11 function that is used, like encryption, digesting, and key generation. This mechanism object also may take a parameter object structure as required by the mechanism. For example, for AES encryption, we must pass the initialization vector.
� You close the session by using C_CloseSession() and C_Logout().
� Libraries are finalized.
Python, Go, JavaScript, and Java programming languages offer several PKCS #11 wrappers that can be easily installed, and they are the ones that we used in this book.
The pkcs11-tool tool is a convenient and standard CLI tool to retrieve objects in your PKCS11 IBM Hyper Protect Crypto Services instance. To use it, use the OpenSC package on a Linux OS.
You also can use the IBM Cloud console to create cryptographic keys easily:
1. Go to your service.
2. Click EP11 keys in the left menu.
3. Click Add Key to create your key.
Note: IBM Hyper Protect Crypto Services does not support the following PKCS# 11 functions:
� C_CreateObject, C_CopyObject� C_DigestKey� C_SignRecoverInit, C_SignRecover, C_VerifyRecoverInit, C_VerifyRecover� C_DigestEncryptUpdate, C_DecryptDigestUpdate� C_SignEncryptUpdate, C_DecryptVerifyUpdate� C_SeedRandom
Chapter 2. IBM Cloud Hyper Protect Crypto Services 155

To perform a PKCS #11 API call, you must complete the following tasks:
� Install the PKCS #11 library. It is available for both the AMD64 and s390x processor architectures for Linux OS. For more information, see “Installing the IBM Hyper Protect Crypto Services PKCS #11 native library” on page 156.
� Set up one service ID and an associated API key for your IBM Hyper Protect Crypto Services instance. For more information, see “Retrieving your connection data” on page 157.
One service ID is enough (as we used in this book), but you might want to specify specific API keys for each PKCS #11 access level: SO, normal user, and anonymous. The keys can be specified in the GREP11 native library configuration file, as described in “Setting up your configuration file” on page 159.
For information about PKCS #11, see Introducing PKCS #11.
The PKCS #11 standard documentation is available at the following websites:
� http://docs.oasis-open.org/pkcs11/pkcs11-ug/v2.40/pkcs11-ug-v2.40.html � http://docs.oasis-open.org/pkcs11/pkcs11-base/v2.40/pkcs11-base-v2.40.html � http://docs.oasis-open.org/pkcs11/pkcs11-curr/v2.40/pkcs11-curr-v2.40.html
Installing the IBM Hyper Protect Crypto Services PKCS #11 native libraryThe IBM Hyper Protect Crypto Services PKCS #11 library can be retrieved from GitHub.
It must be installed on a Linux OS. To do this task, complete the following steps:
1. Use an FTP client to retrieve the correct file for your hardware architecture at the correct release level.
2. Copy the pkcs11-grep11-xxxx.so.xxxx file into your Linux library directory. In Example 2-110, we use /usr/local/lib.
Example 2-110 Installing the library
$ lftp -e 'pget -n 5 https://github.com/IBM-Cloud/hpcs-pkcs11/releases/download/v2.3.90/pkcs11-grep11-amd64.so.2.3.90'45932432 bytes transferred in 23 seconds (1.89 MiB/s) lftp :~> quit$ sudo cp pkcs11-grep11-amd64.so.2.3.90 /usr/local/lib
3. Install the opensc software on your Linux notebook.
4. In RHEL, run the following command:
sudo yum install opensc
For other Linux distributions, use the appropriate software installation tools to install opensc.
Note: For multi-level access, you can create three services IDs and assign a specific custom IAM role. For more information, see Step 2: Create service IDs and API keys for the SO user, normal user, and anonymous user.
Use the respective API key of each service ID as the PIN parameter when you open the PKCS #11 session and do not write them into the GREP11 native library configuration file on the system.
156 Securing Your Critical Workloads with IBM Hyper Protect Services

Retrieving your connection dataComplete the following steps:
1. Retrieve your Hyper Protect Crypto Services instance ID and endpoint URL in the IBM Console, as shown in Figure 2-83.
Figure 2-83 Retrieving the PKCS #11 endpoint and Hyper Protect Crypto Services instance ID
2. Generate an API key to access your service:
a. By creating a service ID, as described in “Creating an IBM service ID on your IBM Cloud account” on page 107.
b. By creating an API key for your IBM Cloud account, as shown in Example 2-111.
Example 2-111 Creating an API key for your IBM Cloud account
$ ibmcloud iam api-key-create apikeyhpcs -d "API key for Hyper Protect Crypto Services PKCS11"Creating API key apikeyhpcs under 537544c2222297f40ed689e8473e7849 as [email protected] key apikeyhpcs was created
Preserve the API key! It cannot be retrieved after it is created. ID ApiKey-4cbfb9ab-5835-4b19-9c99-b0cff1b9679d Name apikeyhpcs Description API key for Hyper Protect Crypto Services PKCS11 Created At 2021-05-11T13:01+0000 API Key Yh7CXSg4qnK-VcqeKgsjZwXefAB7jSCKMCMz4b-Bn_Zm Locked false
Creating your public and private EP11 keystores in the IBM Cloud consoleYour PKCS #11 keys are stored in the IBM Cloud and encrypted with the HSM master key. The keys are stored in the Hyper Protect Crypto Services keystores.
Chapter 2. IBM Cloud Hyper Protect Crypto Services 157
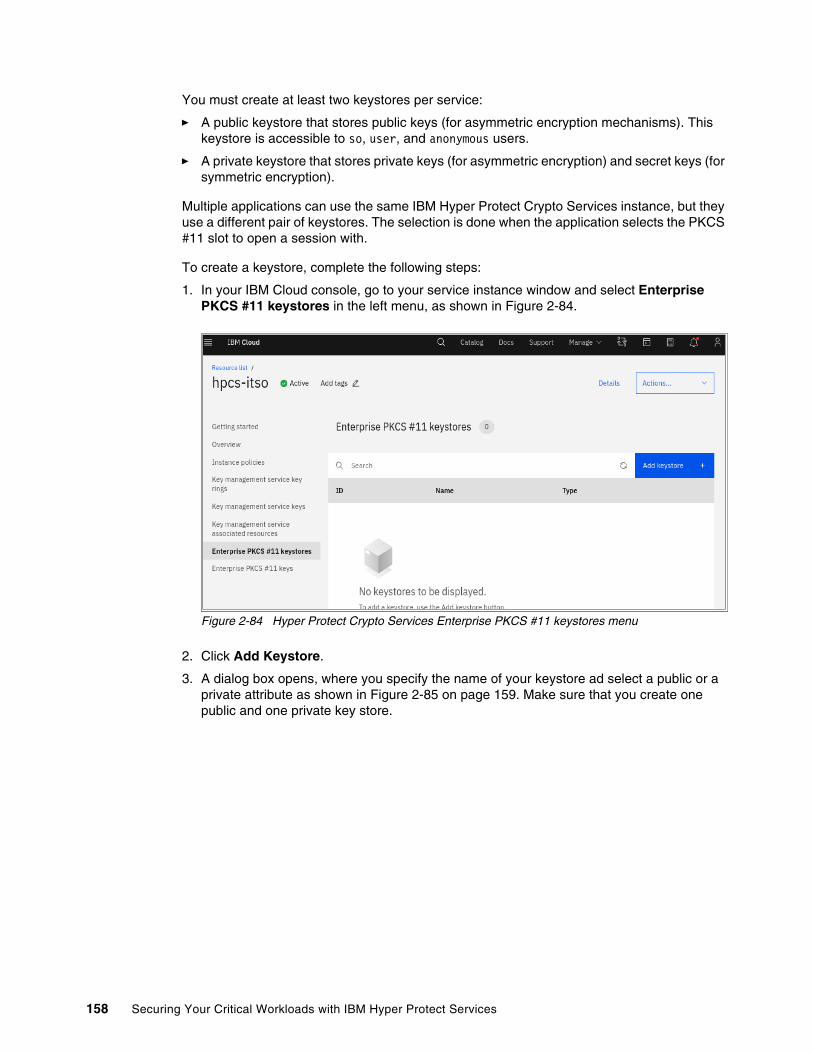
You must create at least two keystores per service:
� A public keystore that stores public keys (for asymmetric encryption mechanisms). This keystore is accessible to so, user, and anonymous users.
� A private keystore that stores private keys (for asymmetric encryption) and secret keys (for symmetric encryption).
Multiple applications can use the same IBM Hyper Protect Crypto Services instance, but they use a different pair of keystores. The selection is done when the application selects the PKCS #11 slot to open a session with.
To create a keystore, complete the following steps:
1. In your IBM Cloud console, go to your service instance window and select Enterprise PKCS #11 keystores in the left menu, as shown in Figure 2-84.
Figure 2-84 Hyper Protect Crypto Services Enterprise PKCS #11 keystores menu
2. Click Add Keystore.
3. A dialog box opens, where you specify the name of your keystore ad select a public or a private attribute as shown in Figure 2-85 on page 159. Make sure that you create one public and one private key store.
158 Securing Your Critical Workloads with IBM Hyper Protect Services

Figure 2-85 Creating keystores on your IBM Hyper Protect Crypto Services instance
4. Create as many pairs of keystores as needed. For example, we have two pairs in Figure 2-86.
Figure 2-86 Listing your keystores
5. For the next steps of the configuration, select:
– The keystore ID of a private key store.
– The keystore ID of a public key store.
Setting up your configuration fileComplete the following steps:
1. Create the library configuration file in the /etc/ep11client directory by running the commands that are shown in Example 2-112.
Example 2-112 Creating the /etc/ep11client/grep11client.yaml file by using the vi editor
$ mkdir /etc/ep11client/$ vi /etc/ep11client/grep11client.yaml
Chapter 2. IBM Cloud Hyper Protect Crypto Services 159

2. While in the vi editor, specify the following four required parameters:
– The Hyper Protect Crypto Services instance ID that can be retrieved in the IBM Cloud console, for example, by using the ibmcloud resource service-instances --long command in a terminal or by running the ibmcloud tke cryptounits command with the CLOUDTKEFILES environment variable set up.
– The address and port number of the PKCS #11 endpoint (see Figure 2-83 on page 157).
– The API key that is used for opening a PKCS #11 session as the value for the apikey attribute in the iamauth section.
– The IDs of the private and public keystores that you created in the console on the two tokenID parameters in the users section of a tokens section entry:
• Specify the keystore ID of the private store in the tokens.0.users.1 section.• Specify the keystore ID of the public store in the tokens.O.users.2 section.
In Example 2-113, we used the f938845d-cb0e-4cf1-bee2-7c0dcca08ec7 keystore for the private key store and 7878e7df-8616-47cb-a16a-3bffa5a63e42 for the public keystore.
A PKCS #11 native library configuration file is shown in Example 2-113. The second token definition is not printed.
Example 2-113 The /etc/ep11client/grep11client.yaml file
iamcredentialtemplate: &defaultiamcredential enabled: true endpoint: "https://iam.cloud.ibm.com" # Keep the 'apikey' empty. It will be overridden by the Anonymous user API key configured later. apikey: # The Universally Unique IDentifier (UUID) of your IBM Hyper Protect Crypto Services instance. instance: "34b5af99-c165-4863-af2e-aaa6d7af8137"
tokens: 0: grep11connection: # The EP11 endpoint address starting from 'ep11'. # For example, "ep11.us-south.hs-crypto.cloud.ibm.com" address: "ep11.us-south.hs-crypto.cloud.ibm.com" # The EP11 endpoint port number port: "11491" tls: # Grep11 requires TLS connection. enabled: true # Grep11 requires server only authentication, so 'mutual' needs to be set as 'false'. mutual: false # 'cacert' is a full-path certificate file. # In Linux with the 'ca-ca-certificates' package installed, this file is normally not needed. cacert: # Grep11 requires the server-only authentication, so 'certfile' and 'keyfile' need to be empty. certfile: keyfile:
160 Securing Your Critical Workloads with IBM Hyper Protect Services

storage: filestore: enabled: false storagepath: # 'remotestore' needs to be enabled if you want to generate keys with the attribute CKA_TOKEN. remotestore: enabled: true users: 0: # The index of the Security Officer (SO) user must be 0. # The name for the Security Officer (SO) user. For example, "Administrator". # NEVER put the API key under the SO user for security reasons. name: "Administrator" iamauth: <<: *defaultiamcredential 1: # The index of the normal user must be 1. # The name for the normal user. For example, "Normal user". # NEVER put the API key under the normal user for security reasons. name: "Normal user" # The Space ID is a 128-bit UUID and can be chosen freely. # The UUID can be generated by third-party tools, such as 'https://www.uuidgenerator.net/'. # For example, "f00db2f1-4421-4032-a505-465bedfa845b". # 'tokenspaceID' under the normal user is to identify the private keystore. tokenspaceID: "f938845d-cb0e-4cf1-bee2-7c0dcca08ec7" iamauth: <<: *defaultiamcredential 2: # The index of the anonymous user must be 2. # The name for the anonymous user. For example, "Anonymous". name: "Anonymous" # The Space ID is a 128-bit UUID and can be chosen freely. # The UUID can be generated by third-party tools, such as 'https://www.uuidgenerator.net/'. # For example, "ca22be26-b798-4fdf-8c83-3e3a492dc215". # 'tokenspaceID' under the anonymous user is to identify the public keystore. tokenspaceID: "7878e7df-8616-47cb-a16a-3bffa5a63e42" iamauth: <<: *defaultiamcredential # This API key for the Anonymous user must be provided. # It will override the 'apikey' in the previous defaultcredentials.iamauth.apikey field apikey: "Yh7CXSg4qnK-VcqeKgsjZwXefAB7jSCKMCMz4b-Bn_Zm"
1:########################################################################### Add a second slot definition by using different keystore IDs########################################################################logging: # Set the logging level. # The supported levels, in an increasing order of verboseness, are: # 'panic', 'fatal', 'error', 'warning'/'warn', 'info', 'debug', 'trace'. # The Default value is 'debug'. loglevel: debug
Chapter 2. IBM Cloud Hyper Protect Crypto Services 161

# The full path of your logging file. # For example, /tmp/grep11client.log logpath: /tmp/grep11client.log
Checking the configuration by using the pkcs11-toolUsing pkcs11-tool and specifying the pkcs11-grep native library, you can get details about your Hyper Protect Crypto Services setup. In Example 2-115, we create two token sections for keystore1and keystore2 in the grep11client.yaml file.
Example 2-115 Listing the IBM Hyper Protect Crypto Services HSM details
$ pkcs11-tool --module=/usr/local/lib/pkcs11-grep11-amd64.so.2.3.90 -IAvailable slots:Slot 0 (0x1): token label : GREP11 Token token manufacturer : IBM token model : GREP11 token flags : login required, rng, token initialized, PIN initialized, other flags=0x200 hardware version : 0.0 firmware version : 0.0 serial num : 000/0000 pin min/max : 16/65536Slot 1 (0x0):
Defining multiple tokens: To define multiple tokens on your Hyper Protect Crypto Services instance, complete the following steps:
1. Copy the token.0 section to create token.1, token.2, ..., token.n entries as necessary for your application, as shown in Example 2-114. One token section defines one slot with one token. In this configuration, multiple microservices can use the same Hyper Protect Crypto Services instance, but they use different keystores. The same HSM master key is used for all the slots.
Example 2-114 The grep11client.yaml file that defines multiple tokens
...tokens: 0: grep11connection:
............ config token 1 ...............1: grep11connection:
............ config token 2 ...............
2. In each token section:
– Specify tokenspaceID for the private keystore in the tokens.#.users.1 section.
– Specify tokenspaceID for the public keystore in the tokens.#.users.2 section.
– Specify the API keys to access to use these keystores as the value of the apikey attribute in the tokens.#.users.2.iamauth section.
C_Intialize(): The keystore’s creation initializes the token by using the Hyper Protect Crypto Services instance. If you call this function in your application with a label parameter, it resets the two keystores of the crypto unit slot to this label and removes existing keys in the keystores, which will be lost.
162 Securing Your Critical Workloads with IBM Hyper Protect Services

token label : GREP11 Token token manufacturer : IBM token model : GREP11 token flags : login required, rng, token initialized, PIN initialized, other flags=0x200 hardware version : 0.0 firmware version : 0.0 serial num : 000/0000 pin min/max : 16/65536
You can retrieve the available mechanisms by using the pkcs11-tool -M command. The --slot option is used to specify the slot number. It gives you information about which algorithms are implemented and which type of PKCS #11 function is used for key generation, encryption, signature, wrapping, derivation, and digest. Example 2-116 demonstrates this command and its output.
Example 2-116 Listing the available mechanisms on your HSM
$ pkcs11-tool --module=/usr/local/lib/pkcs11-grep11-amd64.so.2.3.90 -M --slot 0Using slot 0 with a present token (0x0)Supported mechanisms: RSA-PKCS, keySize={512,4096}, encrypt, decrypt, sign, verify, wrap, unwrap RSA-PKCS-OAEP, keySize={512,4096}, encrypt, decrypt, wrap, unwrap RSA-PKCS-KEY-PAIR-GEN, keySize={512,4096}, generate_key_pair RSA-X9-31-KEY-PAIR-GEN, keySize={512,4096}, generate_key_pair RSA-PKCS-PSS, keySize={512,4096}, sign, verify SHA1-RSA-X9-31, keySize={512,4096}, sign, verify SHA1-RSA-PKCS, keySize={512,4096}, sign, verify SHA1-RSA-PKCS-PSS, keySize={512,4096}, sign, verify SHA256-RSA-PKCS, keySize={512,4096}, sign, verify SHA256-RSA-PKCS-PSS, keySize={512,4096}, sign, verify SHA224-RSA-PKCS, keySize={512,4096}, sign, verify SHA224-RSA-PKCS-PSS, keySize={512,4096}, sign, verify SHA384-RSA-PKCS, keySize={512,4096}, sign, verify SHA384-RSA-PKCS-PSS, keySize={512,4096}, sign, verify SHA512-RSA-PKCS, keySize={512,4096}, sign, verify SHA512-RSA-PKCS-PSS, keySize={512,4096}, sign, verify AES-KEY-GEN, keySize={16,32}, generate AES-ECB, keySize={16,32}, encrypt, decrypt AES-CBC, keySize={16,32}, encrypt, decrypt, wrap, unwrap AES-CBC-PAD, keySize={16,32}, encrypt, decrypt, wrap, unwrap DES2-KEY-GEN, keySize={16,16}, generate DES3-KEY-GEN, keySize={24,24}, generate DES3-ECB, keySize={16,24}, encrypt, decrypt DES3-CBC, keySize={16,24}, encrypt, decrypt, wrap, unwrap DES3-CBC-PAD, keySize={16,24}, encrypt, decrypt, wrap, unwrap GENERIC-SECRET-KEY-GEN, keySize={8,256}, generate, derive SHA256, digest mechtype-0x393, derive SHA256-HMAC, keySize={16,32}, sign, verify SHA224, digest mechtype-0x396, derive SHA224-HMAC, keySize={14,32}, sign, verify SHA-1, digest SHA1-KEY-DERIVATION, derive SHA-1-HMAC, keySize={10,32}, sign, verify
Chapter 2. IBM Cloud Hyper Protect Crypto Services 163

SHA384, digest mechtype-0x394, derive SHA384-HMAC, keySize={24,32}, sign, verify SHA512, digest mechtype-0x395, derive SHA512-HMAC, keySize={32,32}, sign, verify mechtype-0x4C, digest mechtype-0x80010012, digest mechtype-0x4D, keySize={16,32}, sign, verify mechtype-0x80010014, keySize={16,32}, sign, verify mechtype-0x48, digest mechtype-0x80010013, digest mechtype-0x49, keySize={14,32}, sign, verify mechtype-0x80010015, keySize={14,32}, sign, verify ECDSA-KEY-PAIR-GEN, keySize={192,521}, generate_key_pair, other flags=0x1900000 ECDSA, keySize={192,521}, sign, verify, other flags=0x1900000 ECDSA-SHA1, keySize={192,521}, sign, verify, other flags=0x1900000 ECDH1-DERIVE, keySize={192,521}, derive, other flags=0x1100000 mechtype-0x80020007, keySize={192,521}, derive, other flags=0x1100000 mechtype-0x8001000C, keySize={192,521}, encrypt DSA-PARAMETER-GEN, keySize={1024,3072}, generate DSA-KEY-PAIR-GEN, keySize={1024,3072}, generate_key_pair DSA, keySize={1024,3072}, sign, verify DSA-SHA1, keySize={1024,3072}, sign, verify DH-PKCS-PARAMETER-GEN, keySize={1024,3072}, generate DH-PKCS-KEY-PAIR-GEN, keySize={1024,3072}, generate_key_pair DH-PKCS-DERIVE, keySize={1024,3072}, derive mechtype-0x80020006, keySize={1024,3072}, derive RSA-X9-31, keySize={512,4096}, sign, verify PBE-SHA1-DES3-EDE-CBC, keySize={24,24}, generate mechtype-0x80020004, keySize={,4096}, wrap, unwrap ECDSA-SHA224, keySize={192,521}, sign, verify, other flags=0x1900000 mechtype-0x80010008, keySize={192,521}, sign, verify, other flags=0x1900000 ECDSA-SHA256, keySize={192,521}, sign, verify, other flags=0x1900000 mechtype-0x80010009, keySize={192,521}, sign, verify, other flags=0x1900000 ECDSA-SHA384, keySize={192,521}, sign, verify, other flags=0x1900000 mechtype-0x8001000A, keySize={192,521}, sign, verify, other flags=0x1900000 ECDSA-SHA512, keySize={192,521}, sign, verify, other flags=0x1900000 mechtype-0x8001000B, keySize={192,521}, sign, verify, other flags=0x1900000 mechtype-0x80010031, keySize={192,521}, sign, verify, other flags=0x1900000 mechtype-0x8001001B, keySize={256,256}, derive, other flags=0x1100000 mechtype-0x8001001C, keySize={256,256}, sign, verify, other flags=0x1100000 mechtype-0x8001000D, derive mechtype-0x80040001, keySize={,256}, wrap mechtype-0x80010007, keySize={16,32}, sign, verify mechtype-0x80070001, keySize={16,64}, derive
You are now ready to use your Hyper Protect Crypto Services instance with the PKCS #11 native library.
The pkcs11-tool utility is a standard CLI tool that you can use to create keys, delete keys, generate keys, sign some data, derive some keys, encrypt and decrypt some data, and generate random numbers according to the mechanisms that are available on the HSM. Example 2-117 on page 165 demonstrates the uses of pkcs11-tool.
164 Securing Your Critical Workloads with IBM Hyper Protect Services

Example 2-117 Using pkcs11-tools with your Hyper Protect Crypto Services instance
$ head -c 1k </dev/urandom >myfile$ pkcs11-tool --module=/usr/local/lib/pkcs11-grep11-amd64.so.2.3.90 --slot 0 --login --pin $API_KEY --hash --input-file myfile --output-file shaUsing slot 0 with a present token (0x0)Using digest algorithm SHA256$ hexdump -ve '1/1 "%.2x"' sha396b3407214a0e4f61a311b20547f83f37b44cedaf727f6050ead15ad6b25d97$ sha256sum myfile 396b3407214a0e4f61a311b20547f83f37b44cedaf727f6050ead15ad6b25d97 myfile
$ pkcs11-tool --module=/usr/local/lib/pkcs11-grep11-amd64.so.2.3.90 --slot 0 --login --pin $API_KEY --generate-random 128 | base64 -w0oV7eDerZnhmYQePRjA7WW58Ugr2/emRAP/yw7MVmfOVaw9tgQG3c018OSJdL+RkcegZfLBRCL+7K0LgyyHJEqryZ0H1aBpC0iXxg4Act7LuRkv1xnkfR9raQkyrXrHrVQAL1qkPGMJsTHdUEHP1lWV/zydaqW81zNXz1y4QQTfs=
$ pkcs11-tool --module=/usr/local/lib/pkcs11-grep11-amd64.so.2.3.90 --login --pin $API_KEY --keygen --key-type AES:32 --id 20 --label "itso aes" --slot 1Key generated:Secret Key Object; AES length 32 label: itso aes ID: 20 Usage: encrypt, decrypt, verify, wrap, unwrapwarning: PKCS11 function C_GetAttributeValue(ALWAYS_SENSITIVE) failed: rv = CKR_ATTRIBUTE_TYPE_INVALID (0x12)
Access: extractable, local
$ pkcs11-tool --module=/usr/local/lib/pkcs11-grep11-amd64.so.2.3.90 --login --pin $API_KEY --keypairgen --label itsoECkeys --id 200 --key-type EC:secp384r1 --slot 1Using slot 0 with a present token (0x0)Key pair generated:Private Key Object; EC label: itsoECkeys ID: 10 Usage: sign, derivewarning: PKCS11 function C_GetAttributeValue(ALWAYS_AUTHENTICATE) failed: rv = CKR_ATTRIBUTE_TYPE_INVALID (0x12)
warning: PKCS11 function C_GetAttributeValue(ALWAYS_SENSITIVE) failed: rv = CKR_ATTRIBUTE_TYPE_INVALID (0x12)
Access: sensitive, extractable, localPublic Key Object; EC EC_POINT 384 bits EC_POINT: 046104bd7758ca425781cf04d0a5c9ff55214908139305ebc388bdaf94cdc825540192d46d4bb08d988ff7f41d59684536fa5757a09df7923a3f5c88ef8fbb4e87d61594a06c150f023272c090f204631007712b74b14727e7cc680090c27e61ae79c8 EC_PARAMS: 06052b81040022 label: itsoECkeys ID: 10 Usage: verify, derive Access: none
Chapter 2. IBM Cloud Hyper Protect Crypto Services 165

$ pkcs11-tool --module=/usr/local/lib/pkcs11-grep11-amd64.so.2.3.90 --login --pin $API_KEY --keypairgen --label itsoECkeys --id 100 --key-type EC:secp384r1 --slot 0Key pair generated:Private Key Object; EC label: itsoECkeys ID: 10 Usage: sign, derivewarning: PKCS11 function C_GetAttributeValue(ALWAYS_AUTHENTICATE) failed: rv = CKR_ATTRIBUTE_TYPE_INVALID (0x12)
warning: PKCS11 function C_GetAttributeValue(ALWAYS_SENSITIVE) failed: rv = CKR_ATTRIBUTE_TYPE_INVALID (0x12)
Access: sensitive, extractable, localPublic Key Object; EC EC_POINT 384 bits EC_POINT: 046104b91a0fd50ce1679fc13082a5fe04b81087bce7d9366794f6b2498bb76c3d89833f220739bd6633e5ec10bcbc901ac41f727bc472578a97dfc78c737124957dba17a61312583d01b12091ff9f717a4c284cedb831ca79e9b600f2bf6ba40bc42c EC_PARAMS: 06052b81040022 label: itsoECkeys ID: 10 Usage: verify, derive Access: none
On the IBM Cloud console, select EP11keys in the left menu to see the keys that you created, as shown in Figure 2-87:
� The label is assigned as you specified in the CLI command.
� They key class is secret for the AES key and private/public for the EC keys.
� The respective keystores are assigned as follows:
– The slot number that you specified in your command.
– The type of the key: private/secret or public.
Figure 2-87 Listing your PCKS #11 keys by using the IBM Cloud console
166 Securing Your Critical Workloads with IBM Hyper Protect Services

As shown in Figure 2-88, you can easily create your own keys. Click Add key and specify the key’s attributes. By using the C_Findobjects() PKCS #11 function, your program can retrieve the key by using its key ID or its name combined with its type.
Figure 2-88 Creating cryptographic keys
PKCS #11 programming with JavaScript, Python, or GoThe C programming language can be used with the pkcs11-grep11 dynamic library. Use the C PKCS #11 API for this task. Samples are available at GitHub.
For other programming languages, several PKCS #11 library wrappers are available. They can be used with this pkcs11-grep11 library.
PKCS #11 JavaScript wrappersThe pkcs11js package is a PKCS #11 wrapper. The package and its documentation are available at GitHub.
Graphene is another PKCS #11 wrapper. The package and its documentation are available at npm.
To run the examples, the following prerequisites are required:
� The pkcs11-grep11 package must be installed and properly set up as described in “Installing the IBM Hyper Protect Crypto Services PKCS #11 native library” on page 156.
� A properly configured Node.js application is installed on your system.
You can install the pkcs11js and graphene-pk11 Node.js modules, as shown in Example 2-118.
Example 2-118 Installing pkcs11js or graphene-pk11 for an application called myapp
$ mkdir myapp && cd myapp$ npm install pkcs11js
$ npm install graphene-pk11
Chapter 2. IBM Cloud Hyper Protect Crypto Services 167
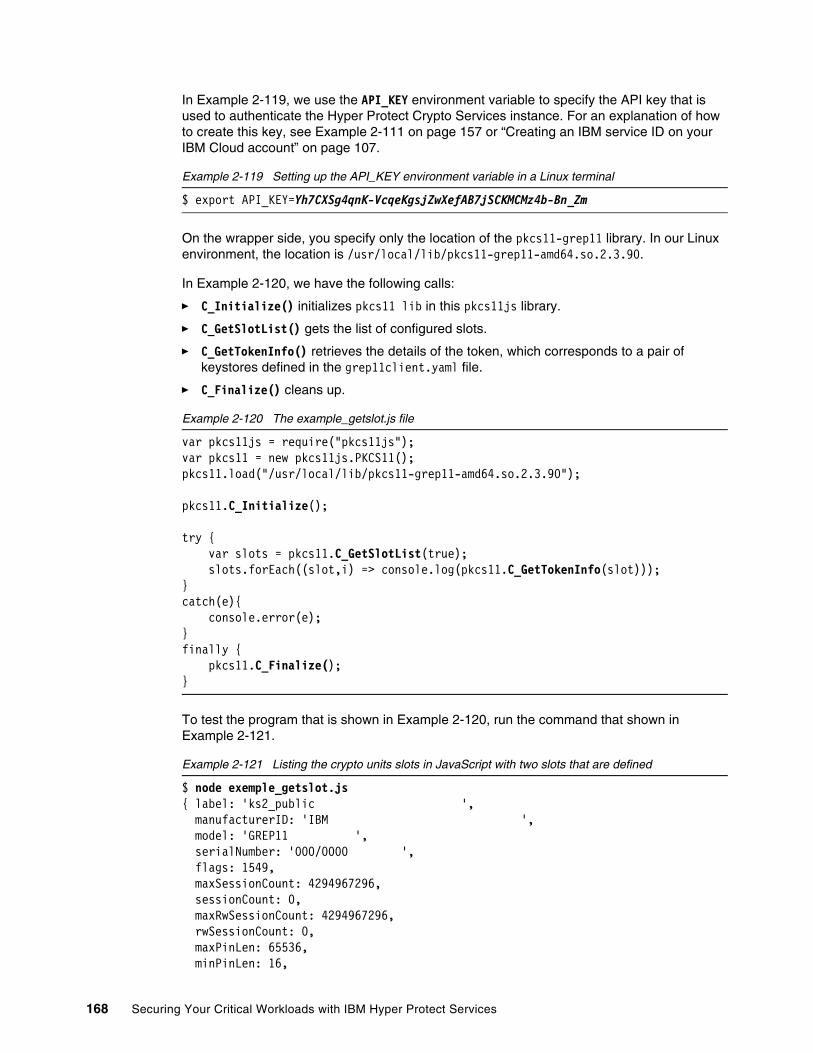
In Example 2-119, we use the API_KEY environment variable to specify the API key that is used to authenticate the Hyper Protect Crypto Services instance. For an explanation of how to create this key, see Example 2-111 on page 157 or “Creating an IBM service ID on your IBM Cloud account” on page 107.
Example 2-119 Setting up the API_KEY environment variable in a Linux terminal
$ export API_KEY=Yh7CXSg4qnK-VcqeKgsjZwXefAB7jSCKMCMz4b-Bn_Zm
On the wrapper side, you specify only the location of the pkcs11-grep11 library. In our Linux environment, the location is /usr/local/lib/pkcs11-grep11-amd64.so.2.3.90.
In Example 2-120, we have the following calls:
� C_Initialize() initializes pkcs11 lib in this pkcs11js library.
� C_GetSlotList() gets the list of configured slots.
� C_GetTokenInfo() retrieves the details of the token, which corresponds to a pair of keystores defined in the grep11client.yaml file.
� C_Finalize() cleans up.
Example 2-120 The example_getslot.js file
var pkcs11js = require("pkcs11js");var pkcs11 = new pkcs11js.PKCS11();pkcs11.load("/usr/local/lib/pkcs11-grep11-amd64.so.2.3.90");
pkcs11.C_Initialize();
try { var slots = pkcs11.C_GetSlotList(true); slots.forEach((slot,i) => console.log(pkcs11.C_GetTokenInfo(slot)));}catch(e){ console.error(e);}finally { pkcs11.C_Finalize();}
To test the program that is shown in Example 2-120, run the command that shown in Example 2-121.
Example 2-121 Listing the crypto units slots in JavaScript with two slots that are defined
$ node exemple_getslot.js { label: 'ks2_public ', manufacturerID: 'IBM ', model: 'GREP11 ', serialNumber: '000/0000 ', flags: 1549, maxSessionCount: 4294967296, sessionCount: 0, maxRwSessionCount: 4294967296, rwSessionCount: 0, maxPinLen: 65536, minPinLen: 16,
168 Securing Your Critical Workloads with IBM Hyper Protect Services
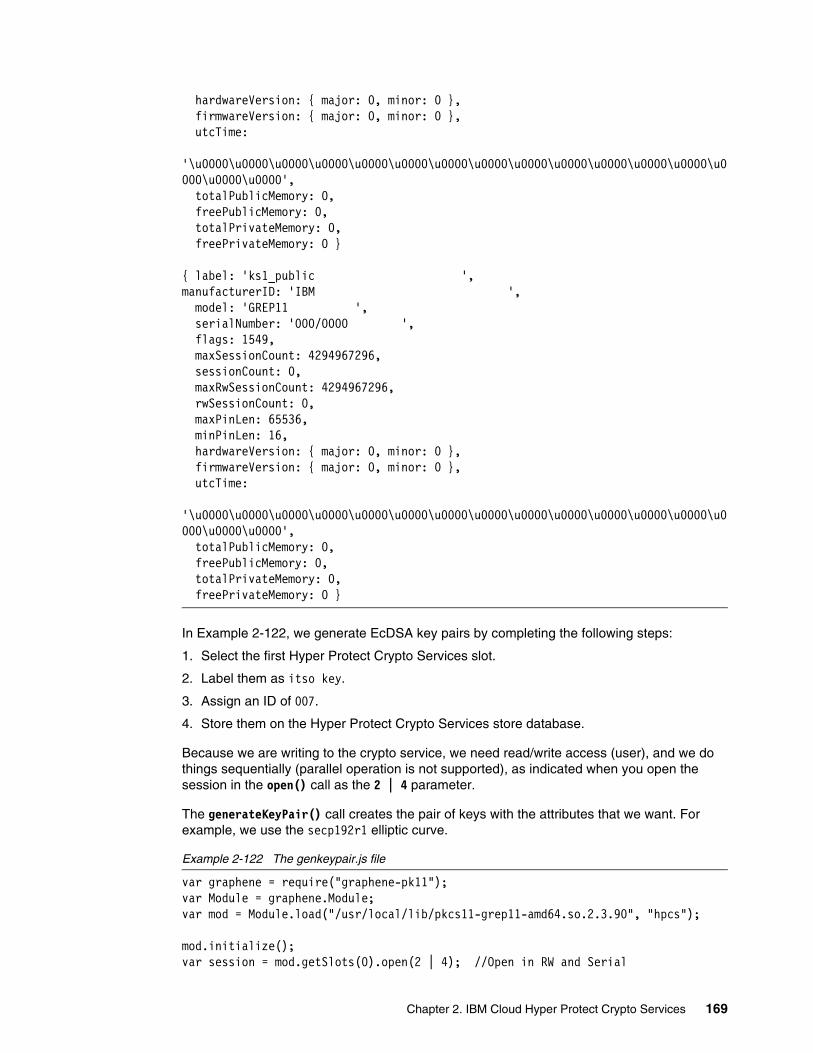
hardwareVersion: { major: 0, minor: 0 }, firmwareVersion: { major: 0, minor: 0 }, utcTime: '\u0000\u0000\u0000\u0000\u0000\u0000\u0000\u0000\u0000\u0000\u0000\u0000\u0000\u0000\u0000\u0000', totalPublicMemory: 0, freePublicMemory: 0, totalPrivateMemory: 0, freePrivateMemory: 0 }
{ label: 'ks1_public ',manufacturerID: 'IBM ', model: 'GREP11 ', serialNumber: '000/0000 ', flags: 1549, maxSessionCount: 4294967296, sessionCount: 0, maxRwSessionCount: 4294967296, rwSessionCount: 0, maxPinLen: 65536, minPinLen: 16, hardwareVersion: { major: 0, minor: 0 }, firmwareVersion: { major: 0, minor: 0 }, utcTime: '\u0000\u0000\u0000\u0000\u0000\u0000\u0000\u0000\u0000\u0000\u0000\u0000\u0000\u0000\u0000\u0000', totalPublicMemory: 0, freePublicMemory: 0, totalPrivateMemory: 0, freePrivateMemory: 0 }
In Example 2-122, we generate EcDSA key pairs by completing the following steps:
1. Select the first Hyper Protect Crypto Services slot.
2. Label them as itso key.
3. Assign an ID of 007.
4. Store them on the Hyper Protect Crypto Services store database.
Because we are writing to the crypto service, we need read/write access (user), and we do things sequentially (parallel operation is not supported), as indicated when you open the session in the open() call as the 2 | 4 parameter.
The generateKeyPair() call creates the pair of keys with the attributes that we want. For example, we use the secp192r1 elliptic curve.
Example 2-122 The genkeypair.js file
var graphene = require("graphene-pk11");var Module = graphene.Module;var mod = Module.load("/usr/local/lib/pkcs11-grep11-amd64.so.2.3.90", "hpcs");
mod.initialize();var session = mod.getSlots(0).open(2 | 4); //Open in RW and Serial
Chapter 2. IBM Cloud Hyper Protect Crypto Services 169

session.login(process.env.API_KEY); // generate ECDSA key pairvar keys = session.generateKeyPair(graphene.KeyGenMechanism.ECDSA, { keyType: graphene.KeyType.ECDSA, label: "itso pub key", id: Buffer.from("007"), token: true, verify: true, paramsECDSA: graphene.NamedCurve.getByName("secp192r1").value}, { keyType: graphene.KeyType.ECDSA, label: "itso priv key", id: Buffer.from("007"), token: true, sign: true});
session.logout();session.close();mod.finalize();
Run the program and check whether the keys were properly created by running pkcs11-tool, as shown in Example 2-123.
Example 2-123 Generating two key pairs by using the PKCS #11 in IBM Hyper Protector Crypto Services
$ node genkeypair.js
$ pkcs11-tool --module=/usr/local/lib/pkcs11-grep11-amd64.so.2.3.90 --login --pin $API_KEY --list-object --slot 0Using slot 0 with a present token (0x0)Public Key Object; EC EC_POINT 192 bits EC_POINT: 043104e6a25eba8392a253ae2cd0e70fc705d02042f7bd3f477059eaa33f36443f8680331e7b4bc4e5a020ecb915d96df131d9 EC_PARAMS: 06082a8648ce3d030101 label: itso pub key ID: 303037 Usage: verify Access: nonePrivate Key Object; EC label: itso priv key ID: 303037 Usage: signwarning: PKCS11 function C_GetAttributeValue(ALWAYS_AUTHENTICATE) failed: rv = CKR_ATTRIBUTE_TYPE_INVALID (0x12)
warning: PKCS11 function C_GetAttributeValue(ALWAYS_SENSITIVE) failed: rv = CKR_ATTRIBUTE_TYPE_INVALID (0x12)
Access: sensitive, extractable, local
170 Securing Your Critical Workloads with IBM Hyper Protect Services

In Example 2-124, we use the pair of keys to sign a message and verify it. You can create two separate programs for this task.
We retrieve a reference to the key that is stored in the Hyper Protect Crypto Servicess instance by using session.find(). To filter the search, we specify an array with a pair of PKCS #11 attributes and their values: the type of key (public or private key), its label (itso pub or priv key), and its ID (007).
The reference is retrieved as a JavaScript collection, and we convert the first element to a key.
Example 2-124 The sign_verify.js sample program
var graphene = require("graphene-pk11");var Module = graphene.Module;var mod = Module.load("/usr/local/lib/pkcs11-grep11-amd64.so.2.3.90", "hpcs");mod.initialize();var session = mod.getSlots(0).open( ); session.login(process.env.API_KEY);
// Get a number of private key objects on tokencol_sk=session.find({class: graphene.ObjectClass.PRIVATE_KEY,label:"itso priv key",id: Buffer.from("007")});col_pub=session.find({class: graphene.ObjectClass.PUBLIC_KEY,label:"itso pub key",id: Buffer.from("007")});
// should be only one key returns. Check col_sk.length otherwisesk = col_sk.items(0).toType()pub = col_pub.items(0).toType()
// sign contentvar sign = session.createSign("ECDSA_SHA512", sk);
sign.update("simple text 1");sign.update("simple text 2");var signature = sign.final();console.log("Signature DSA-SHA512:", signature.toString("hex")); // verify contentvar verify = session.createVerify("ECDSA_SHA512", pub);verify.update("simple text 1");verify.update("simple text 2");var verify_result = verify.final(signature);console.log("Signature DSA-SHA512 verify:", verify_result);
session.logout();session.close();
mod.finalize();
Chapter 2. IBM Cloud Hyper Protect Crypto Services 171

We verify this sample program by running the program in a Linux terminal, as shown Example 2-125.
Example 2-125 Signing data and verifying a program’s signature by using IBM Hyper Protect Crypto Services
$ node sign_verify.jsSignature DSA-SHA512: c316d9b049153acaca9758d7ba089356d560d172e65d2b292ec48ba8ac8fbef4d6e8c8b54b372eb994a0a499d2d11e13Signature DSA-SHA512 verify: true
Clean up your HSM afterward by deleting both the private key and the public key, as shown in Example 2-126. Use the appropriate type pubkey for public key and privkey for the private key.
Example 2-126 Removing your keys by using the pkcs11-tool CLI
$ pkcs11-tool --module=/usr/local/lib/pkcs11-grep11-amd64.so.2.3.90 --login --pin $API_KEY --delete-object --type pubkey --label "itso pub key" --id 303037 --slot 0Using slot 0 with a present token (0x0)
$ pkcs11-tool --module=/usr/local/lib/pkcs11-grep11-amd64.so.2.3.90 --login --pin $API_KEY --delete-object --type privkey --label "itso priv key" --id 303037 --slot 0Using slot 0 with a present token (0x0)
PKCS #11 Python wrapperPyKCS11 and pkcs11 are two Python modules that you can use with IBM Hyper Protect Crypto Services.
The PyKCS11 documentation is available at Welcome to PyKCS11 documentation.
The pkcs11 module documentation is available at Python PKCS #11 - High-Level Wrapper API.
To install the modules on a Linux OS, consider the following items:
� For PyPKCS11, make sure that the swig tools and python-dev package are installed, and install the module by using the following command:
pip install PyKCS11
� For pkcs11, install the python-dev package, and then install the pcks11 module by using the following command:
pip install pkcs11
When using pkcs11, the pkcs11-grep11 native library must be specified with the pkcs11.lib() call. The Python module must be imported into the program by using an import statement because the pkcs11-grep11 dynamic library is loaded before initialization.
In Example 2-127 on page 173, we create one AES symmetric key that is stored in the Hyper Protect Crypto Services HSM slot private keystore because we specified the PKCS# 11 TOKEN attribute as true. The key does not disappear when the session closes, and it can be retrieved later in another session. We work with slot #0.
The session is opened in read/write mode (user mode) because we create a secret key object in the crypto unit keystore.
172 Securing Your Critical Workloads with IBM Hyper Protect Services

We also specify a label and one identifier so that other applications can retrieve and use it.
The Python SDK generate_key() calls the PKCS #11 C_GenerateKey() function that is provided by the pkcs11-grep11 library.
Example 2-127 Creating an AES secret key by using Python
import pkcs11import os
# Initialise our PKCS #11 librarylib = pkcs11.lib("/usr/local/lib/pkcs11-grep11-amd64.so.2.3.90")
slot =lib.get_slots()token = slot[0].get_token()
# Open a session on our tokenwith token.open(rw=True,user_pin=os.getenv("API_KEY")) as session: # Generate an AES key in this session key = session.generate_key(pkcs11.KeyType.AES, 256, template={ pkcs11.constants.Attribute.LABEL: 'itsokey', pkcs11.constants.Attribute.ID: bytes("007","ascii"), pkcs11.constants.Attribute.TOKEN: True, pkcs11.constants.Attribute.EXTRACTABLE: 0
})
Ensure that the AES key was created with the correct label and ID, as shown in Example 2-128.
The key was set as not extractable from the HSM, which means that the key cannot be wrapped in ciphertext outside of the HSM keystores.
Example 2-128 Listing the AES key in the HSM
$ pkcs11-tool --module=/usr/local/lib/pkcs11-grep11-amd64.so.2.3.90 --login --pin $API_KEY --list-object Using slot 0 with a present token (0x0)Secret Key Object; AES length 32 label: itsokey ID: 303037 Usage: encrypt, decrypt, verify, wrap, unwrapwarning: PKCS11 function C_GetAttributeValue(ALWAYS_SENSITIVE) failed: rv = CKR_ATTRIBUTE_TYPE_INVALID (0x12)
Access: sensitive, never extractable, local
Chapter 2. IBM Cloud Hyper Protect Crypto Services 173

In Example 2-129, we write a simple encryption and decryption program that uses a Hyper Protect Crypto Services nonextractable secret key. In this example, we open a session in read-only (as anonymous), but we still use the API key to authenticate the service by completing the following steps:
1. We retrieve the AES key that is stored in the HSM keystore by calling the PKCS #11 C_FindObjects call.
2. We generate a true random number by calling the PKCS #11 C_GenerateRandom call.
3. We perform the encryption by using the itsokey#007 that is labeled as an AES key in the HSM by calling the PKCS #11 C_Encrypt call.
One initialization vector parameter is provided by the application for both AES encryption and AES decryption. It has the same value for both operations.
Example 2-129 The crypt.py Python encryption example
import pkcs11import osimport syslib = pkcs11.lib("/usr/local/lib/pkcs11-grep11-amd64.so.2.3.90")slot =lib.get_slots()token = slot[0].get_token()
with token.open(user_pin=os.getenv("API_KEY")) as session:#retrieving our keykey = session.get_key(label='itsokey',id=bytes('007','ascii'))
iv = session.generate_random(128)print(iv.hex())plaintext=sys.argv[1]print(plaintext)ciphertext = key.encrypt(plaintext, mechanism_param=iv)
print(ciphertext.hex())
The decryption program uses the same initialization vector and the encrypted text that was provided by the crypt.py program (Example 2-130).
Example 2-130 The uncrypt.py decryption Python example
import pkcs11import osimport syslib = pkcs11.lib("/usr/local/lib/pkcs11-grep11-amd64.so.2.3.90")slot =lib.get_slots()token = slot[0].get_token()
with token.open(user_pin=os.getenv("API_KEY")) as session:key = session.get_key(label='itsokey',id=bytes('007','ascii'))
iv = bytes.fromhex(sys.argv[1])ciphertext = bytes.fromhex(sys.argv[2])
plaintext = key.decrypt(ciphertext, mechanism_param=iv)print(plaintext)
174 Securing Your Critical Workloads with IBM Hyper Protect Services

Example 2-131 demonstrates both programs.
Example 2-131 Using crypt.py and uncrypt.py
$ python crypt.py "Hello dangerous world"b09c08302dc1adeffc45f03e814dc69976c1f4108291531d308d41acf3ce5fc0a1e41853ce9176d077d65cb80956479c
$ python uncrypt.py b09c08302dc1adeffc45f03e814dc699 76c1f4108291531d308d41acf3ce5fc0a1e41853ce9176d077d65cb80956479c
'Hello dangerous world'
If you are finished, you now can delete your keys from the Hyper Protect Crypto Services instance by using pkcs11-tool, as shown in Example 2-132.
Example 2-132 Removing your AES key from the HSM
$ pkcs11-tool --module=/usr/local/lib/pkcs11-grep11-amd64.so.2.3.90 --login --pin $API_KEY --list-object Using slot 0 with a present token (0x0)Secret Key Object; AES length 32 label: itsokey ID: 303037 Usage: encrypt, decrypt, verify, wrap, unwrapwarning: PKCS11 function C_GetAttributeValue(ALWAYS_SENSITIVE) failed: rv = CKR_ATTRIBUTE_TYPE_INVALID (0x12)
Access: sensitive, never extractable, local$ pkcs11-tool --module=/usr/local/lib/pkcs11-grep11-amd64.so.2.3.90 --login --pin $API_KEY --delete-object --type secrkey --label "itsokey" --id 303037Using slot 0 with a present token (0x0)
PKCS #11 Go wrapperAs a prerequisite, make sure that your Go environment is set up in the following way:
� Go software packages are installed on your workstation.� The GOPATH and GOROOT environment variables are defined in your shell.
You can install the Go PKCS #11 wrapper by issuing the command that is shown in Example 2-133.
Example 2-133 Installing the PKCS #11 library wrapper Go module on a Linux notebook
$ cd $GOPATH$ go get github.com/miekg/pkcs11
The documentation for this library is available at GitHub.
To use this module, specify pkcs11 "github.com/miekg/pkcs11" in the import section of your program.
Chapter 2. IBM Cloud Hyper Protect Crypto Services 175
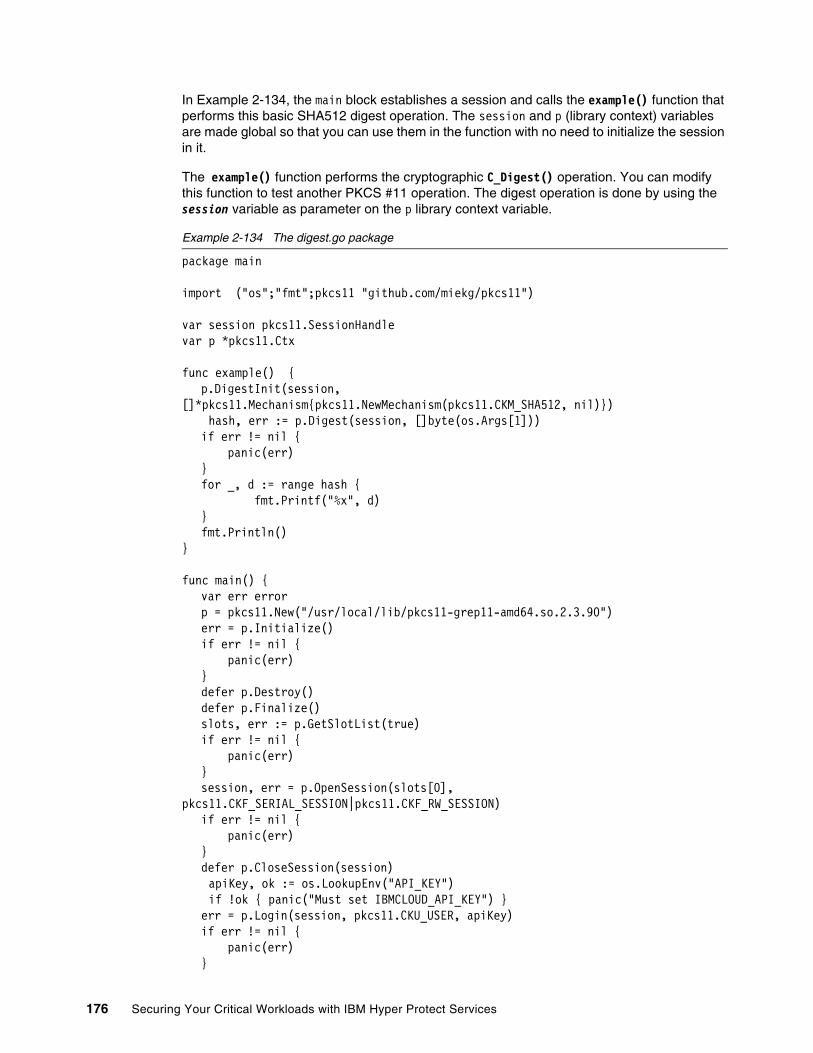
In Example 2-134, the main block establishes a session and calls the example() function that performs this basic SHA512 digest operation. The session and p (library context) variables are made global so that you can use them in the function with no need to initialize the session in it.
The example() function performs the cryptographic C_Digest() operation. You can modify this function to test another PKCS #11 operation. The digest operation is done by using the session variable as parameter on the p library context variable.
Example 2-134 The digest.go package
package main
import ("os";"fmt";pkcs11 "github.com/miekg/pkcs11")
var session pkcs11.SessionHandlevar p *pkcs11.Ctx
func example() {p.DigestInit(session,
[]*pkcs11.Mechanism{pkcs11.NewMechanism(pkcs11.CKM_SHA512, nil)}) hash, err := p.Digest(session, []byte(os.Args[1]))
if err != nil { panic(err)}for _, d := range hash { fmt.Printf("%x", d)}fmt.Println()
}
func main() {var err errorp = pkcs11.New("/usr/local/lib/pkcs11-grep11-amd64.so.2.3.90")err = p.Initialize()if err != nil { panic(err)}defer p.Destroy()defer p.Finalize()slots, err := p.GetSlotList(true)if err != nil { panic(err)}session, err = p.OpenSession(slots[0],
pkcs11.CKF_SERIAL_SESSION|pkcs11.CKF_RW_SESSION)if err != nil { panic(err)}defer p.CloseSession(session)
apiKey, ok := os.LookupEnv("API_KEY") if !ok { panic("Must set IBMCLOUD_API_KEY") }
err = p.Login(session, pkcs11.CKU_USER, apiKey)if err != nil { panic(err)}
176 Securing Your Critical Workloads with IBM Hyper Protect Services

defer p.Logout(session)
example()}
To test the digest in a Linux terminal, run the commands that are shown in Example 2-135.
Example 2-135 Testing the digest Go example in a Linux terminal
$ go build digest.go$ ./digest "hello world"309ecc489c12d6eb4cc4f50c92f2b4d0ed77ee511a7c7a9bcd3ca86d4cd86f989dd35bc5ff499670da34255b45b0cfd830e81f605dcf7dc5542e93ae9cd76f
$ echo -n "hello world" | sha512sum309ecc489c12d6eb4cc40f50c902f2b4d0ed77ee511a7c7a9bcd3ca86d4cd86f989dd35bc5ff499670da34255b45b0cfd830e81f605dcf7dc5542e93ae9cd76f -
In Example 2-136, we show another example that illustrates how to extract an AES key from a crypto unit keystore into your application by using a public key to restore it later by using the corresponding private key. Therefore, the AES key can be restored only where the private key is present in a keystore. If this private key is nonextractable, the AES key can be restored only in this crypto unit.
Example 2-136 shows how to complete the following steps:
1. Create a pair of public and private keys by using RSA_PKCS.
2. Create an AES key.
3. Use the wrap() and unwrap() calls.
The wrap() function wraps the AES key with the public key. We create this key in the HSM and make this AES key extractable (or it could not be wrapped). The program output is a hexadecimal encoding of this AES key.
Example 2-136 The wrap.go package
package mainimport ("os";pkcs11 "github.com/miekg/pkcs11";"fmt" ; "encoding/hex")var session pkcs11.SessionHandlevar p *pkcs11.Ctx
func genKeyPair() (pkcs11.ObjectHandle, pkcs11.ObjectHandle) {publicKeyTemplate := []*pkcs11.Attribute{
pkcs11.NewAttribute(pkcs11.CKA_TOKEN, true),pkcs11.NewAttribute(pkcs11.CKA_CLASS, pkcs11.CKO_PUBLIC_KEY),pkcs11.NewAttribute(pkcs11.CKA_KEY_TYPE, pkcs11.CKK_RSA),pkcs11.NewAttribute(pkcs11.CKA_MODULUS_BITS, 2048),pkcs11.NewAttribute(pkcs11.CKA_PUBLIC_EXPONENT, []byte{1, 0, 1}),pkcs11.NewAttribute(pkcs11.CKA_WRAP, true),
pkcs11.NewAttribute(pkcs11.CKA_LABEL, "itso extraction pub"),
}privateKeyTemplate := []*pkcs11.Attribute{
pkcs11.NewAttribute(pkcs11.CKA_CLASS, pkcs11.CKO_PRIVATE_KEY),pkcs11.NewAttribute(pkcs11.CKA_TOKEN, true),
pkcs11.NewAttribute(pkcs11.CKA_UNWRAP, true),
Chapter 2. IBM Cloud Hyper Protect Crypto Services 177
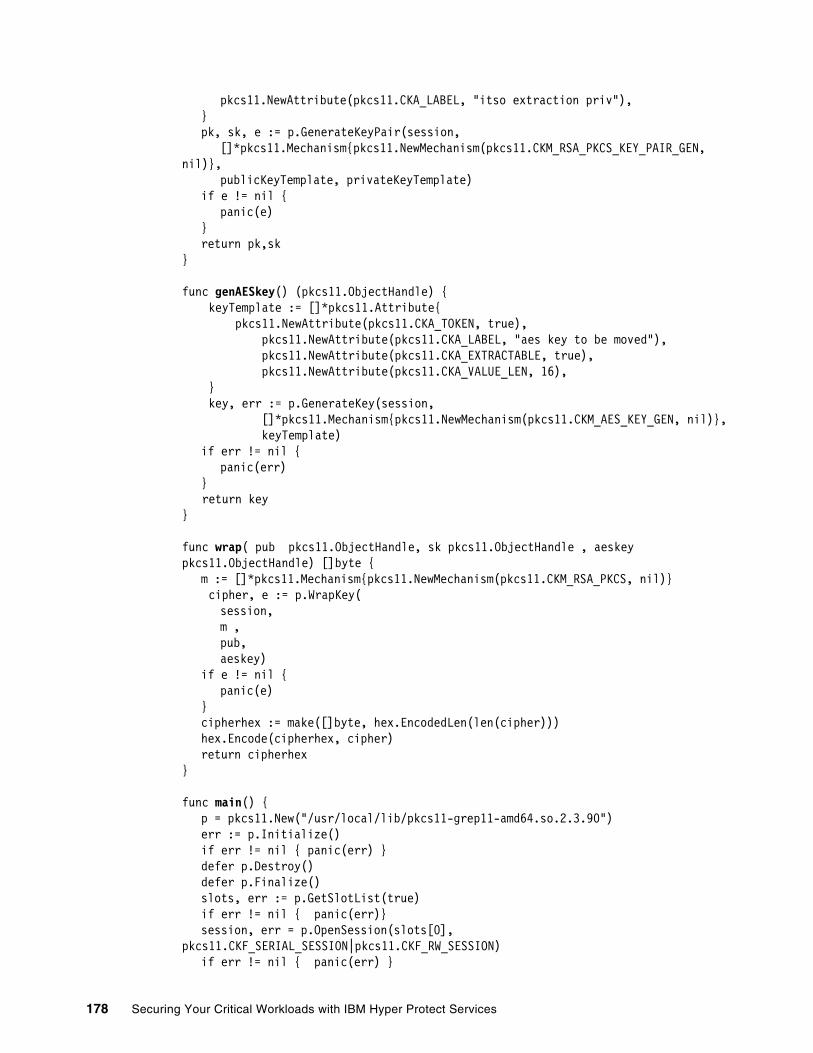
pkcs11.NewAttribute(pkcs11.CKA_LABEL, "itso extraction priv"),}pk, sk, e := p.GenerateKeyPair(session,
[]*pkcs11.Mechanism{pkcs11.NewMechanism(pkcs11.CKM_RSA_PKCS_KEY_PAIR_GEN, nil)},
publicKeyTemplate, privateKeyTemplate)if e != nil {
panic(e)}return pk,sk
}
func genAESkey() (pkcs11.ObjectHandle) { keyTemplate := []*pkcs11.Attribute{ pkcs11.NewAttribute(pkcs11.CKA_TOKEN, true), pkcs11.NewAttribute(pkcs11.CKA_LABEL, "aes key to be moved"), pkcs11.NewAttribute(pkcs11.CKA_EXTRACTABLE, true), pkcs11.NewAttribute(pkcs11.CKA_VALUE_LEN, 16), } key, err := p.GenerateKey(session, []*pkcs11.Mechanism{pkcs11.NewMechanism(pkcs11.CKM_AES_KEY_GEN, nil)}, keyTemplate)
if err != nil {panic(err)
} return key}
func wrap( pub pkcs11.ObjectHandle, sk pkcs11.ObjectHandle , aeskey pkcs11.ObjectHandle) []byte {
m := []*pkcs11.Mechanism{pkcs11.NewMechanism(pkcs11.CKM_RSA_PKCS, nil)} cipher, e := p.WrapKey(
session, m , pub, aeskey)
if e != nil {panic(e)
}cipherhex := make([]byte, hex.EncodedLen(len(cipher)))hex.Encode(cipherhex, cipher)return cipherhex
}
func main() {p = pkcs11.New("/usr/local/lib/pkcs11-grep11-amd64.so.2.3.90")err := p.Initialize()if err != nil { panic(err) }defer p.Destroy()defer p.Finalize()slots, err := p.GetSlotList(true)if err != nil { panic(err)}session, err = p.OpenSession(slots[0],
pkcs11.CKF_SERIAL_SESSION|pkcs11.CKF_RW_SESSION)if err != nil { panic(err) }
178 Securing Your Critical Workloads with IBM Hyper Protect Services

defer p.CloseSession(session)
apiKey, ok := os.LookupEnv("API_KEY") if !ok { panic("Must set IBMCLOUD_API_KEY") }
err = p.Login(session, pkcs11.CKU_USER, apiKey)if err != nil { panic(err) }defer p.Logout(session)
pubkey, privkey := genKeyPair()key := genAESkey()cipheredkeyhex := wrap(pubkey,privkey, key)fmt.Printf("%s\n",cipheredkeyhex)
}
In Example 2-137, we see how to retrieve the private key by using the findObject PKCS #11 call. We take the first key because we are sure that there is only one key that was created. The value of this private key can never be read by the application.
Then, we unwrap the AES key and make sure it is restored into the crypto unit keystore.
Example 2-137 unwrap.go
package mainimport ("os";pkcs11 "github.com/miekg/pkcs11"; "encoding/hex")var session pkcs11.SessionHandlevar p *pkcs11.Ctx
func unwrap(sk pkcs11.ObjectHandle , cipherhex []byte) {cipher := make([]byte, hex.DecodedLen(len(cipherhex)))_, _ = hex.Decode(cipher, cipherhex)
template := []*pkcs11.Attribute{ pkcs11.NewAttribute(pkcs11.CKA_CLASS, pkcs11.CKO_SECRET_KEY), pkcs11.NewAttribute(pkcs11.CKA_KEY_TYPE, pkcs11.CKK_AES),
pkcs11.NewAttribute(pkcs11.CKA_TOKEN, true),pkcs11.NewAttribute(pkcs11.CKA_LABEL, "aes key"),pkcs11.NewAttribute(pkcs11.CKA_EXTRACTABLE, true),
}
_ , e := p.UnwrapKey( session, []*pkcs11.Mechanism{pkcs11.NewMechanism(pkcs11.CKM_RSA_PKCS, nil)}, sk, cipher, template)
if e != nil {panic(e)
}}
func findObject(class uint, label string) pkcs11.ObjectHandle { template := []*pkcs11.Attribute{ pkcs11.NewAttribute(pkcs11.CKA_CLASS, class), pkcs11.NewAttribute(pkcs11.CKA_LABEL, label), } if err := p.FindObjectsInit(session, template); err != nil {
Chapter 2. IBM Cloud Hyper Protect Crypto Services 179

panic(err) } obj, _, err := p.FindObjects(session, 1) if err != nil { panic(err) } if err := p.FindObjectsFinal(session); err != nil { panic(err) } if len(obj) > 0 { return obj[0] } return 0xffffffff}
func main() {p = pkcs11.New("/usr/local/lib/pkcs11-grep11-amd64.so.2.3.90")err := p.Initialize()if err != nil { panic(err) }defer p.Destroy()defer p.Finalize()slots, err := p.GetSlotList(true)if err != nil { panic(err)}session, err = p.OpenSession(slots[0],
pkcs11.CKF_SERIAL_SESSION|pkcs11.CKF_RW_SESSION)if err != nil { panic(err) }defer p.CloseSession(session)
apiKey, ok := os.LookupEnv("API_KEY") if !ok { panic("Must set IBMCLOUD_API_KEY") }
err = p.Login(session, pkcs11.CKU_USER, apiKey)if err != nil { panic(err) }defer p.Logout(session)
privkey := findObject(pkcs11.CKO_PRIVATE_KEY,"itso extraction priv")
unwrap(privkey, []byte(os.Args[1]))}
After you compile both programs by using the go build command, you can test the programs as shown in Example 2-138. The first program creates three keys: two asymmetric keys and one AES secret key.
We delete the secret key after it is wrapped.
Example 2-138 Creating the three keys by using Go, listing them, and deleting the secret one
$ ./wrap54e1e8dc8b37b40dce4bb149d56d21c26c50caec190cba040db0ff8aa8213dbbd9a7bd789bf31189d9159c3a0778cc94e6ba5b7b90f1abc39c53cedbd85d044bb205d2342f321e1fd102574893ef6dd98f7b426292c83337d75417a65de254b5b0a7537cd0bed85ece93c7fd30b44084f0398580dceaca3a119ba54333d722954333031dc8dc18c5a91badac5e8f5530dee6db8af8475b241a1e43e135468af117ef36c298096678339c028ce28c31c382e4d2ff236d4744eca24ebb0417b9a63e2d09ceb9a40a6ffbf12feed76150c4f026007cc500682033a5aafcb4c994cae01c8c37347b8a7f635093bd4f531de78911658eabc15583bbd4a53ef632cda6
180 Securing Your Critical Workloads with IBM Hyper Protect Services

$ pkcs11-tool --module=/usr/local/lib/pkcs11-grep11-amd64.so.2.3.90 --login --pin $API_KEY --list-object Using slot 0 with a present token (0x0)Public Key Object; RSA 2048 bits label: itso extraction pub Usage: verify, wrap Access: none
Private Key Object; RSA label: itso extraction priv Usage: unwrapwarning: PKCS11 function C_GetAttributeValue(ALWAYS_AUTHENTICATE) failed: rv = CKR_ATTRIBUTE_TYPE_INVALID (0x12)
warning: PKCS11 function C_GetAttributeValue(ALWAYS_SENSITIVE) failed: rv = CKR_ATTRIBUTE_TYPE_INVALID (0x12)
Access: sensitive, extractable, local
Secret Key Object; AES length 16 label: aes key to be moved Usage: encrypt, decrypt, verifywarning: PKCS11 function C_GetAttributeValue(ALWAYS_SENSITIVE) failed: rv = CKR_ATTRIBUTE_TYPE_INVALID (0x12)
Access: sensitive, extractable, local
$ pkcs11-tool --module=/usr/local/lib/pkcs11-grep11-amd64.so.2.3.90 --login --pin $API_KEY --delete-object --type secrkey --label "aes key to be moved" Using slot 0 with a present token (0x0)
We can restore our AES key by using the hexadecimal dump, as shown in Example 2-139. You might notice the label changed because we specified it in the unwrap.go program.
Example 2-139 Restoring the AES key with a different label
$ ./unwrap 54e1e8dc8b37b40dce4bb149d56d21c26c50caec190cba040db0ff8aa8213dbbd9a7bd789bf31189d9159c3a0778cc94e6ba5b7b90f1abc39c53cedbd85d044bb205d2342f321e1fd102574893ef6dd98f7b426292c83337d75417a65de254b5b0a7537cd0bed85ece93c7fd30b44084f0398580dceaca3a119ba54333d722954333031dc8dc18c5a91badac5e8f5530dee6db8af8475b241a1e43e135468af117ef36c298096678339c028ce28c31c382e4d2ff236d4744eca24ebb0417b9a63e2d09ceb9a40a6ffbf12feed76150c4f026007cc500682033a5aafcb4c994cae01c8c37347b8a7f635093bd4f531de78911658eabc15583bbd4a53ef632cda6
$ pkcs11-tool --module=/usr/local/lib/pkcs11-grep11-amd64.so.2.3.90 --login --pin $API_KEY --list-object --type secrkeyUsing slot 0 with a present token (0x0)warning: PKCS11 function C_GetAttributeValue(VALUE_LEN) failed: rv = CKR_ATTRIBUTE_TYPE_INVALID (0x12)
Secret Key Object; AES label: aes key Usage: nonewarning: PKCS11 function C_GetAttributeValue(ALWAYS_SENSITIVE) failed: rv = CKR_ATTRIBUTE_TYPE_INVALID (0x12)
Chapter 2. IBM Cloud Hyper Protect Crypto Services 181

Access: sensitive, extractable
Using Oracle and IBM Db2 with a PKCS #11 native libraryIn this section, we describe IBM Db2® native encryption and Oracle Transparent Data Encryption (TDE).
Db2 native encryptionIBM Db2 native encryption protects key database files and database backup images from inappropriate access while they are stored on external storage media. The database system automatically encrypts and decrypts data when it is used by authorized users and applications.
Db2 native encryption uses a two-tiered key hierarchy:
� Data is encrypted with a DEK. The DEK is encrypted with a master key and stored in the database or a backup image. A unique DEK is generated by Db2 for each encrypted database and for each encrypted backup.
� A master key is used to encrypt a DEK. Each encrypted database is associated with one master key at one time.
Hyper Protect Crypto Services provides a secure solution to the master key. The online tutorial at Using Hyper Protect Crypto Services PKCS #11 for IMB Db2 native encryption explains how to store your master keys in an Hyper Protect Crypto Services instance.
Oracle Transparent Data Encryption TDE encrypts sensitive data in databases like the Oracle database. With TDE, a database system encrypts data on database storage media, such as table spaces and files, and on backup media. The database system automatically and transparently encrypts and decrypts data when it is used by authorized users and applications. Database users do not need to be aware of TDE, and database applications do not need to be adapted specifically for TDE.
TDE uses a two-tiered key hierarchy, which is composed of the following items:
� A TDE DEK, which is used to encrypt and decrypt data. � A TDE master encryption key that is used to encrypt and decrypt the TDE DEK.
Hyper Protect Crypto Services provides a secure solution to the TDE master key.
An online tutorial to configure Oracle TDE is available at Using Hyper Protect Crypto Services PKCS #11 for Oracle Transparent Database Encryption.
2.5.2 How to use the IBM Enterprise PKCS #11 over gRPC API
GREP11 implements the IBM Enterprise PKCS #11 API over the Google Remote Procedure Call (RPC) protocol (gRPC). GREP11 is a stateless interface that is like the industry-standard PKCS #11 API but with the following differences:
� The application is responsible for storing the PKCS #11 objects: GREP11 is stateless and does not use any keystores. Cryptographic material, such as keys, is stored (encrypted) outside of the HSM by the application. You might consider using Key Protect standard keys for this purpose. This material is safe because it wrapped with the HSM master key of IBM Hyper Protect Crypto Services. It is unusable outside the HSM.
182 Securing Your Critical Workloads with IBM Hyper Protect Services
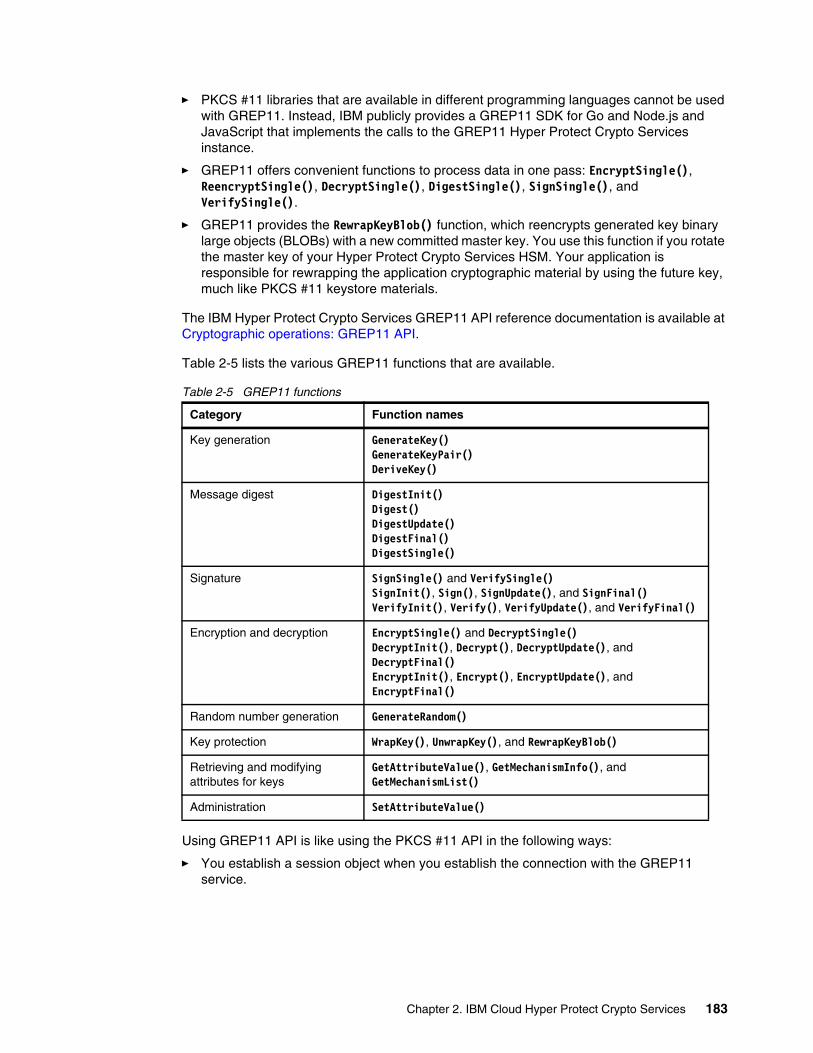
� PKCS #11 libraries that are available in different programming languages cannot be used with GREP11. Instead, IBM publicly provides a GREP11 SDK for Go and Node.js and JavaScript that implements the calls to the GREP11 Hyper Protect Crypto Services instance.
� GREP11 offers convenient functions to process data in one pass: EncryptSingle(), ReencryptSingle(), DecryptSingle(), DigestSingle(), SignSingle(), and VerifySingle().
� GREP11 provides the RewrapKeyBlob() function, which reencrypts generated key binary large objects (BLOBs) with a new committed master key. You use this function if you rotate the master key of your Hyper Protect Crypto Services HSM. Your application is responsible for rewrapping the application cryptographic material by using the future key, much like PKCS #11 keystore materials.
The IBM Hyper Protect Crypto Services GREP11 API reference documentation is available at Cryptographic operations: GREP11 API.
Table 2-5 lists the various GREP11 functions that are available.
Table 2-5 GREP11 functions
Using GREP11 API is like using the PKCS #11 API in the following ways:
� You establish a session object when you establish the connection with the GREP11 service.
Category Function names
Key generation GenerateKey()GenerateKeyPair()DeriveKey()
Message digest DigestInit()Digest()DigestUpdate()DigestFinal()DigestSingle()
Signature SignSingle() and VerifySingle()SignInit(), Sign(), SignUpdate(), and SignFinal()VerifyInit(), Verify(), VerifyUpdate(), and VerifyFinal()
Encryption and decryption EncryptSingle() and DecryptSingle()DecryptInit(), Decrypt(), DecryptUpdate(), and DecryptFinal()EncryptInit(), Encrypt(), EncryptUpdate(), and EncryptFinal()
Random number generation GenerateRandom()
Key protection WrapKey(), UnwrapKey(), and RewrapKeyBlob()
Retrieving and modifying attributes for keys
GetAttributeValue(), GetMechanismInfo(), and GetMechanismList()
Administration SetAttributeValue()
Chapter 2. IBM Cloud Hyper Protect Crypto Services 183

� You prepare a message that corresponds to a PKCS #11 function. The message includes the following components:
– The PKCS #11 mechanism, which can include its required parameter, such as type of elliptic curve or an initialization vector.
– The templates of the keys that are created within the HSM by the PKCS #11 function.
� The message is sent to the GREP11 Hyper Protect Crypto Services that performs the cryptographic operation and returns the results wrapped with the HSM Master Key. This return data is equivalent to what is stored in the keystores for a PKCS #11 call. This data is unusable outside the crypto units of the Hyper Protect Crypto Services.
For more information about the GREP11 API cryptographic operations, see Cryptographic operations: GREP11 API.
For more information about how to set up the GREP11 API IBM libraries for Go, Node.js, and JavaScript programming languages with examples, see GitHub.
Retrieving IBM Hyper Protect Crypto Services connection informationTo establish the connection between your application and the GREP11 service, you need the following pieces of information:
� Your IBM Cloud IAM endpoint, which can be found at:
https://iam.cloud.ibm.com
� Your Hyper Protect Crypto Services instance ID and its PKCS #11 endpoint URL, as shown in the IBM Console in Figure 2-89.
Figure 2-89 Retrieving the PKCS #11 endpoint and IBM Hyper Protect Crypto Services instance ID
The Hyper Protect Crypto Services instance ID also can be retrieved in a terminal by running ibmcloud resource service-instances --long command or the command ibmcloud tke cryptounits with the CLOUDTKEFILES environment variable.
184 Securing Your Critical Workloads with IBM Hyper Protect Services

� An API key to access your service that can be generated in the following ways:
– By creating a service ID, as described in “Creating an IBM service ID on your IBM Cloud account” on page 107.
– By creating an API key for your IBM Cloud account, as shown in Example 2-140.
Example 2-140 Creating an API key for your IBM Cloud account
$ ibmcloud iam api-key-create apikeyhpcs -d "API key for Hyper Protect Crypto Services PKCS11"Creating API key apikeyhpcs under 537544c2222297f40ed689e8473e7849 as [email protected] key apikeyhpcs was created
Preserve the API key! It cannot be retrieved after it's created. ID ApiKey-4cbfb9ab-5835-4b19-9c99-b0cff1b9679d Name apikeyhpcs Description API key for Hyper Protect Crypto Services PKCS11 Created At 2021-05-11T13:01+0000 API Key Yh7CXSg4qnK-VcqeKgsjZwXefAB7jSCKMCMz4b-Bn_Zm Locked false
Using GREP11 with the Go programming languageIn this section, we guide you in the installation of Go, and we provide some examples of using of Go with GREP11.
Go GREP11 IBM SDK installationInstall the Go run time on your OS. On RHEL, run the following command:
yum module install go-toolset
Make sure that your GOPATH and GOROOT environment variables are set up.
You can install the necessary modules by using the go get command, as shown in Example 2-141. Example 2-143 on page 186 demonstrates how to create your own program.
Example 2-141 Installing the IBM GREP11 Go module on your system
$ go get github.com/IBM-Cloud/hpcs-grep11-go/ep11$ go get github.com/IBM-Cloud/hpcs-grep11-go/grpc$ go get github.com/IBM-Cloud/hpcs-grep11-go/util
Using GREP11 with Go examplesCreate and edit the files for this section in your $GOPATH/src directory.
A complete list of code examples and cryptographic operations can be found at GitHub.
Chapter 2. IBM Cloud Hyper Protect Crypto Services 185

In this section, we create three programs for use as examples:
� genkey.go creates an AES key and a random number as an initialization vector. The results are encoded by using hexadecimal, and they are reused by the two other programs as arguments.
� encrypt.go encrypts a message that is provided as a third argument that outputs the encrypted result in hexadecimal encoding. This result is wrapped by the HSM master key.
� decrypt.go decrypts the encrypted text by using the AES wrapped key and initialization vector.
You can easily reuse the skeleton of these examples by writing a function with your business logic that is called by the main() function. Replace the genkey(), encrypt(), and decrypt() functions with your own naming conventions.
The main() function initializes the connection with the Hyper Protect Crypto Services instance. It creates a grpc.ClientConn object that is used to create the CryptoClient session object whose functions send the request to the Hyper Protect Crypto Services instance. They are defined as global variables in our examples.
To establish the connection, four environment variables must be provided for your service. Ours are shown in Example 2-142. To see how to retrieve these parameters for your Hyper Protect Crypto Services instance, see “Retrieving IBM Hyper Protect Crypto Services connection information” on page 184.
Example 2-142 Environment variables
$ export HPCS_INSTANCE_ID=34b5af99-c165-4863-af2e-aaa6d7af8137$ export API_KEY=8vFwZ3yQIyG8iDI0k2UYKRdWNh4Oi3l-vawAvcZE5oDX$ export EP11_ADDR=ep11.us-south.hs-crypto.cloud.ibm.com:11491$ export IAM_ENDPOINT=https://iam.cloud.ibm.com
In Example 2-143, we show the genkey() function in the genkey.go program. Note the following items:
� The util.AttributeMap function creates a PKCS #11 key template.
� The ep11.EP11Attribute function creates a PKCS #11 object by using an array of pair of PKCS #11 attributes, which are defined as ep11.CKA_XXX, and their PKCS #11 value, which is defined as ep11.CKX_XXX.
Example 2-143 The genkey.go package
package main
import ( "os";"context";"crypto/tls";"fmt";"encoding/hex" "github.com/IBM-Cloud/hpcs-grep11-go/ep11" pb "github.com/IBM-Cloud/hpcs-grep11-go/grpc" "github.com/IBM-Cloud/hpcs-grep11-go/util" "google.golang.org/grpc/credentials" grpc "google.golang.org/grpc";)
var ep11addr stringvar callOpts []grpc.DialOptionvar conn *grpc.ClientConnvar cryptoClient pb.CryptoClient
186 Securing Your Critical Workloads with IBM Hyper Protect Services

func Genkey() {
keyLen := 128 // bits keyTemplate := ep11.EP11Attributes{ ep11.CKA_KEY_TYPE: ep11.CKK_GENERIC_SECRET, ep11.CKA_CLASS: ep11.CKO_SECRET_KEY, ep11.CKA_VALUE_LEN: keyLen / 8, ep11.CKA_EXTRACTABLE: false, }
keygenmsg := &pb.GenerateKeyRequest{ Mech: &pb.Mechanism{Mechanism: ep11.CKM_AES_KEY_GEN}, Template: util.AttributeMap(keyTemplate), }
generateKeyStatus, err := cryptoClient.GenerateKey(context.Background(), keygenmsg)
keyhex := make([]byte, hex.EncodedLen(len(generateKeyStatus.KeyBytes))) hex.Encode(keyhex, generateKeyStatus.KeyBytes) fmt.Println("AES key: " +string(keyhex)) if err != nil { panic(fmt.Errorf("GenerateKey Error: %s", err)) }
rngTemplate := &pb.GenerateRandomRequest{ Len: (uint64)(ep11.AES_BLOCK_SIZE), } rng, err := cryptoClient.GenerateRandom(context.Background(), rngTemplate) if err != nil { panic(fmt.Errorf("GenerateRandom Error: %s", err)) }
iv := rng.Rnd[:ep11.AES_BLOCK_SIZE] ivhex := make([]byte, hex.EncodedLen(len(iv))) hex.Encode(ivhex, iv) fmt.Println("Generated IV: "+string(ivhex))}
func main() { instanceId, ok := os.LookupEnv("HPCS_INSTANCE_ID") if !ok { panic("Must set HPCS_INSTANCE_ID") } apiKey, ok := os.LookupEnv("API_KEY") if !ok { panic("Must set IBMCLOUD_API_KEY") } iamurl , ok := os.LookupEnv("IAM_ENDPOINT") if !ok { panic("Must set IAM_ENDPOINT_") } ep11addr , ok = os.LookupEnv("EP11_ADDR") if !ok { panic("Must set EP11_ADDR") }
callOpts = []grpc.DialOption{ grpc.WithTransportCredentials(credentials.NewTLS(&tls.Config{})),
grpc.WithPerRPCCredentials(&util.IAMPerRPCCredentials{ APIKey: apiKey,
Endpoint: iamurl, Instance: instanceId, }),
}
Chapter 2. IBM Cloud Hyper Protect Crypto Services 187

var err error conn, err = grpc.Dial(ep11addr, callOpts...) if err != nil { panic(fmt.Errorf("Could not connect to server: %s", err)) } defer conn.Close()
cryptoClient = pb.NewCryptoClient(conn)
Genkey()}
The PCKCS #11 C_GenerateKey() call is performed in two steps with GREP11:
1. A message is prepared by creating a pb.GenerateKeyRequest object that takes the mechanism and the key templates as input parameters.
2. The request is sent to the IBM Hyper Protect Crypto Services instance by using the cryptoClient.GenerateKey() call that uses the crytoClient connection object.
As result, the function returns the generated key that is wrapped by using the HSM master key.
You can retrieve more code snippets for each GREP11 call with inputs and output messages, as described at Cryptographic operations: GREP11 API.
Example 2-144 shows the program encrypt.go, which takes the AES key and IV initialization vector as parameters and a text file as a third argument.
The wrapped key is passed by the program to the Hyper Protect Crypto Services instance when building the pb.EncryptInitRequest message. The encryption mechanism and the initialization vector are passed as a parameter. The mechanism pb.Mechanism{Mechanism builds the message structure. The function util.SetMechParm is a helper function that returns a mechanism parameter with the correct format.
Example 2-144 The encrypt.go package
package main
import ( "os";"context";"crypto/tls";"fmt";"encoding/hex" "github.com/IBM-Cloud/hpcs-grep11-go/ep11" pb "github.com/IBM-Cloud/hpcs-grep11-go/grpc" "github.com/IBM-Cloud/hpcs-grep11-go/util" "google.golang.org/grpc/credentials";grpc "google.golang.org/grpc")
var ep11addr stringvar callOpts []grpc.DialOptionvar conn *grpc.ClientConnvar cryptoClient pb.CryptoClient
func Encrypt() {
cipher := make([]byte, hex.DecodedLen(len(os.Args[1]))) hex.Decode(cipher, []byte(os.Args[1]))
iv := make([]byte, hex.DecodedLen(len(os.Args[2]))) hex.Decode(iv, []byte(os.Args[2]))
188 Securing Your Critical Workloads with IBM Hyper Protect Services

encryptInitRequest := &pb.EncryptInitRequest{ Mech: &pb.Mechanism{Mechanism: ep11.CKM_AES_CBC_PAD, Parameter: util.SetMechParm(iv)}, Key: cipher, // you may want to store this }
encryptInitResponse, err := cryptoClient.EncryptInit(context.Background(), encryptInitRequest) if err != nil { panic(fmt.Errorf("Failed EncryptInit [%s]", err)) }
plain := []byte(os.Args[3]) encryptUpdateRequest := &pb.EncryptUpdateRequest{ State: encryptInitResponse.State, Plain: plain[:20], } encryptUpdateResponse, err := cryptoClient.EncryptUpdate(context.Background(), encryptUpdateRequest) if err != nil { panic(fmt.Errorf("Failed EncryptUpdate [%s]", err)) }
ciphertext := encryptUpdateResponse.Ciphered[:] encryptUpdateRequest = &pb.EncryptUpdateRequest{ State: encryptUpdateResponse.State, Plain: plain[20:], } encryptUpdateResponse, err = cryptoClient.EncryptUpdate(context.Background(), encryptUpdateRequest) if err != nil { panic(fmt.Errorf("Failed EncryptUpdate [%s]", err)) } ciphertext = append(ciphertext, encryptUpdateResponse.Ciphered...) encryptFinalRequest := &pb.EncryptFinalRequest{ State: encryptUpdateResponse.State, } encryptFinalResponse, err := cryptoClient.EncryptFinal(context.Background(), encryptFinalRequest) if err != nil { panic(fmt.Errorf("Failed EncryptFinal [%s]", err)) } ciphertext = append(ciphertext, encryptFinalResponse.Ciphered...) ciphertexthex := make([]byte, hex.EncodedLen(len(ciphertext))) hex.Encode(ciphertexthex, ciphertext) fmt.Println("Encrypted message: "+string(ciphertexthex)+"\n")}
func main() { instanceId, ok := os.LookupEnv("HPCS_INSTANCE_ID") if !ok { panic("Must set HPCS_INSTANCE_ID") } apiKey, ok := os.LookupEnv("API_KEY") if !ok { panic("Must set IBMCLOUD_API_KEY") } iamurl , ok := os.LookupEnv("IAM_ENDPOINT") if !ok { panic("Must set IAM_ENDPOINT_") } ep11addr , ok = os.LookupEnv("EP11_ADDR") if !ok { panic("Must set EP11_ADDR") }
Chapter 2. IBM Cloud Hyper Protect Crypto Services 189

callOpts = []grpc.DialOption{ grpc.WithTransportCredentials(credentials.NewTLS(&tls.Config{})),
grpc.WithPerRPCCredentials(&util.IAMPerRPCCredentials{ APIKey: apiKey,
Endpoint: iamurl, Instance: instanceId, }),
}
var err error conn, err = grpc.Dial(ep11addr, callOpts...) if err != nil { panic(fmt.Errorf("Could not connect to server: %s", err)) } defer conn.Close()
cryptoClient = pb.NewCryptoClient(conn)
Encrypt()}
In Example 2-145, decrypt.go works in a similar way as encrypt.go.
Example 2-145 The decrypt.go package
package main
import ( "os";"context";"crypto/tls";"fmt";"encoding/hex" "github.com/IBM-Cloud/hpcs-grep11-go/ep11" pb "github.com/IBM-Cloud/hpcs-grep11-go/grpc" "github.com/IBM-Cloud/hpcs-grep11-go/util" "google.golang.org/grpc/credentials";grpc "google.golang.org/grpc") var ep11addr stringvar callOpts []grpc.DialOptionvar conn *grpc.ClientConnvar cryptoClient pb.CryptoClient
func Decrypt() { cipher := make([]byte, hex.DecodedLen(len(os.Args[1]))) hex.Decode(cipher, []byte(os.Args[1]))
iv := make([]byte, hex.DecodedLen(len(os.Args[2]))) hex.Decode(iv, []byte(os.Args[2]))
ciphertext := make([]byte, hex.DecodedLen(len(os.Args[3]))) hex.Decode(ciphertext, []byte(os.Args[3]))
decryptInitRequest := &pb.DecryptInitRequest{ Mech: &pb.Mechanism{Mechanism: ep11.CKM_AES_CBC_PAD, Parameter: util.SetMechParm(iv)}, Key: cipher, } decryptInitResponse, err := cryptoClient.DecryptInit(context.Background(), decryptInitRequest) if err != nil { panic(fmt.Errorf("Failed DecryptInit [%s]", err)) }
decryptUpdateRequest := &pb.DecryptUpdateRequest{
190 Securing Your Critical Workloads with IBM Hyper Protect Services

State: decryptInitResponse.State, Ciphered: ciphertext[:16], } decryptUpdateResponse, err := cryptoClient.DecryptUpdate(context.Background(), decryptUpdateRequest) if err != nil { panic(fmt.Errorf("Failed DecryptUpdate [%s]", err)) }
plaintext := decryptUpdateResponse.Plain[:] decryptUpdateRequest = &pb.DecryptUpdateRequest{ State: decryptUpdateResponse.State, Ciphered: ciphertext[16:], } decryptUpdateResponse, err = cryptoClient.DecryptUpdate(context.Background(), decryptUpdateRequest) if err != nil { panic(fmt.Errorf("Failed DecryptUpdate [%s]", err)) } plaintext = append(plaintext, decryptUpdateResponse.Plain...)
decryptFinalRequest := &pb.DecryptFinalRequest{ State: decryptUpdateResponse.State, } decryptFinalResponse, err := cryptoClient.DecryptFinal(context.Background(), decryptFinalRequest) if err != nil { panic(fmt.Errorf("Failed DecryptFinal [%s]", err)) } plaintext = append(plaintext, decryptFinalResponse.Plain...) fmt.Printf("Decrypted message: %s\n", plaintext)}
func main() { instanceId, ok := os.LookupEnv("HPCS_INSTANCE_ID") if !ok { panic("Must set HPCS_INSTANCE_ID") } apiKey, ok := os.LookupEnv("API_KEY") if !ok { panic("Must set IBMCLOUD_API_KEY") } iamurl , ok := os.LookupEnv("IAM_ENDPOINT") if !ok { panic("Must set IAM_ENDPOINT_") } ep11addr , ok = os.LookupEnv("EP11_ADDR") if !ok { panic("Must set EP11_ADDR") }
callOpts = []grpc.DialOption{ grpc.WithTransportCredentials(credentials.NewTLS(&tls.Config{})),
grpc.WithPerRPCCredentials(&util.IAMPerRPCCredentials{ APIKey: apiKey,
Endpoint: iamurl, Instance: instanceId, }),
} var err error conn, err = grpc.Dial(ep11addr, callOpts...) if err != nil { panic(fmt.Errorf("Could not connect to server: %s", err)) } defer conn.Close() cryptoClient = pb.NewCryptoClient(conn)
Decrypt()}
Chapter 2. IBM Cloud Hyper Protect Crypto Services 191

To compile the three programs, run the commands that are shown in Example 2-146.
Example 2-146 Compiling the GREP11 encryption example
$ cd $GOPATH/src$ go build genkey.go $ go build encrypt.go $ go build decrypt.go
You can test the example by running the command that is shown in Example 2-147.
The AES key and the IV initialization vector are used as arguments to the encrypt and decrypt program. These arguments were generated by the HSM, but they must be stored within your shell environment. The shell environment is safe because they are wrapped by the HSM master key that we cannot access.
Using the HSM master key, we encrypt and decrypt, inside the HSM, the message "Hello world, this message is going to be ciphered", which is passed as a third argument. This operation is also performed within the HSM.
Example 2-147 Running the GREP11 encryption example
$ ./genkey AES key: 00000000000000000000000000000000000000000000000000000000000000006ea0671d84899442dd073ca5e3561abf0000000000008d260000000000000001123411f43ea6ce6362ed1b6d72f26119c9e82b165f9a6f4a409dba966d5de7e832e6b703cbb79870ba9e847ce80605c592289a35c2085ee08b163ca7a8d7da0ab28c24447cb997f3b1a39c759419a9ab75212070d14a94d3b7cf5afda879cb77a32f5493f02889ac2a86e7037debf4a51d757bcf520790f22b95f1dcc3d043e46c7461442bba3e87a2ff715a43a9e2236708f994e10c6290fd28eb5d696ed899265cbcab0e6811cdb8e549e86f7fa113db6f4b594c8f6041ff9372f474f259e6Generated IV: 64e08c81325e9a4ef12a9c3baf0695e7
$ ./encrypt 00000000000000000000000000000000000000000000000000000000000000006ea0671d84899442dd073ca5e3561abf0000000000008d260000000000000001123411f43ea6ce6362ed1b6d72f26119c9e82b165f9a6f4a409dba966d5de7e832e6b703cbb79870ba9e847ce80605c592289a35c2085ee08b163ca7a8d7da0ab28c24447cb997f3b1a39c759419a9ab75212070d14a94d3b7cf5afda879cb77a32f5493f02889ac2a86e7037debf4a51d757bcf520790f22b95f1dcc3d043e46c7461442bba3e87a2ff715a43a9e2236708f994e10c6290fd28eb5d696ed899265cbcab0e6811cdb8e549e86f7fa113db6f4b594c8f6041ff9372f474f259e6 64e08c81325e9a4ef12a9c3baf0695e7 "Hello world, this message is going to be ciphered"Encrypted message: d6b963a8b66da5855e752174d2848ebc6310e9646908a4776852f3c9823acc85ce6356e8587dbc8c4a00b829641299441536d139c7f4ba7635bff9c3c30c822a
$ ./decrypt 00000000000000000000000000000000000000000000000000000000000000006ea0671d84899442dd073ca5e3561abf0000000000008d260000000000000001123411f43ea6ce6362ed1b6d72f26119c9e82b165f9a6f4a409dba966d5de7e832e6b703cbb79870ba9e847ce80605c592289a35c2085ee08b163ca7a8d7da0ab28c24447cb997f3b1a39c759419a9ab75212070d14a94d3b7cf5afda879cb77a32f5493f02889ac2a86e7037debf4a51d757bcf520790f22b95f1dcc3d043e46c7461442bba3e87a2ff715a43a9e2236708f994e10c6290fd28eb5d696ed899265cbcab0e6811cdb8e549e86f7fa113db6f4b594c8f6041ff9372f474f259e6 64e08c81325e9a4ef12a9c3baf0695e7 d6b963a8b66da5855e752174d2848ebc6310e9646908a4776852f3c9823acc85ce6356e8587dbc8c4a00b829641299441536d139c7f4ba7635bff9c3c30c822aDecrypted message: Hello world, this message is going to be ciphered
192 Securing Your Critical Workloads with IBM Hyper Protect Services
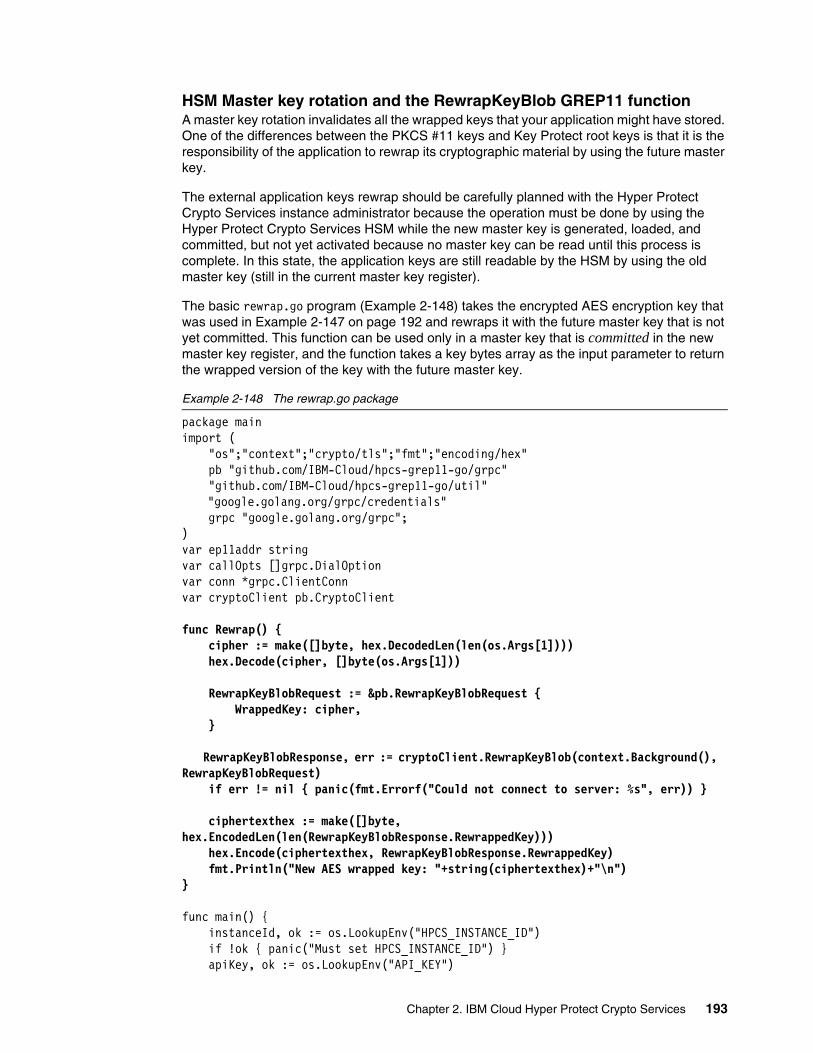
HSM Master key rotation and the RewrapKeyBlob GREP11 functionA master key rotation invalidates all the wrapped keys that your application might have stored. One of the differences between the PKCS #11 keys and Key Protect root keys is that it is the responsibility of the application to rewrap its cryptographic material by using the future master key.
The external application keys rewrap should be carefully planned with the Hyper Protect Crypto Services instance administrator because the operation must be done by using the Hyper Protect Crypto Services HSM while the new master key is generated, loaded, and committed, but not yet activated because no master key can be read until this process is complete. In this state, the application keys are still readable by the HSM by using the old master key (still in the current master key register).
The basic rewrap.go program (Example 2-148) takes the encrypted AES encryption key that was used in Example 2-147 on page 192 and rewraps it with the future master key that is not yet committed. This function can be used only in a master key that is committed in the new master key register, and the function takes a key bytes array as the input parameter to return the wrapped version of the key with the future master key.
Example 2-148 The rewrap.go package
package mainimport ( "os";"context";"crypto/tls";"fmt";"encoding/hex" pb "github.com/IBM-Cloud/hpcs-grep11-go/grpc" "github.com/IBM-Cloud/hpcs-grep11-go/util"
"google.golang.org/grpc/credentials" grpc "google.golang.org/grpc";) var ep11addr stringvar callOpts []grpc.DialOptionvar conn *grpc.ClientConnvar cryptoClient pb.CryptoClient
func Rewrap() { cipher := make([]byte, hex.DecodedLen(len(os.Args[1]))) hex.Decode(cipher, []byte(os.Args[1]))
RewrapKeyBlobRequest := &pb.RewrapKeyBlobRequest { WrappedKey: cipher, }
RewrapKeyBlobResponse, err := cryptoClient.RewrapKeyBlob(context.Background(), RewrapKeyBlobRequest) if err != nil { panic(fmt.Errorf("Could not connect to server: %s", err)) }
ciphertexthex := make([]byte, hex.EncodedLen(len(RewrapKeyBlobResponse.RewrappedKey))) hex.Encode(ciphertexthex, RewrapKeyBlobResponse.RewrappedKey) fmt.Println("New AES wrapped key: "+string(ciphertexthex)+"\n")}
func main() { instanceId, ok := os.LookupEnv("HPCS_INSTANCE_ID") if !ok { panic("Must set HPCS_INSTANCE_ID") } apiKey, ok := os.LookupEnv("API_KEY")
Chapter 2. IBM Cloud Hyper Protect Crypto Services 193
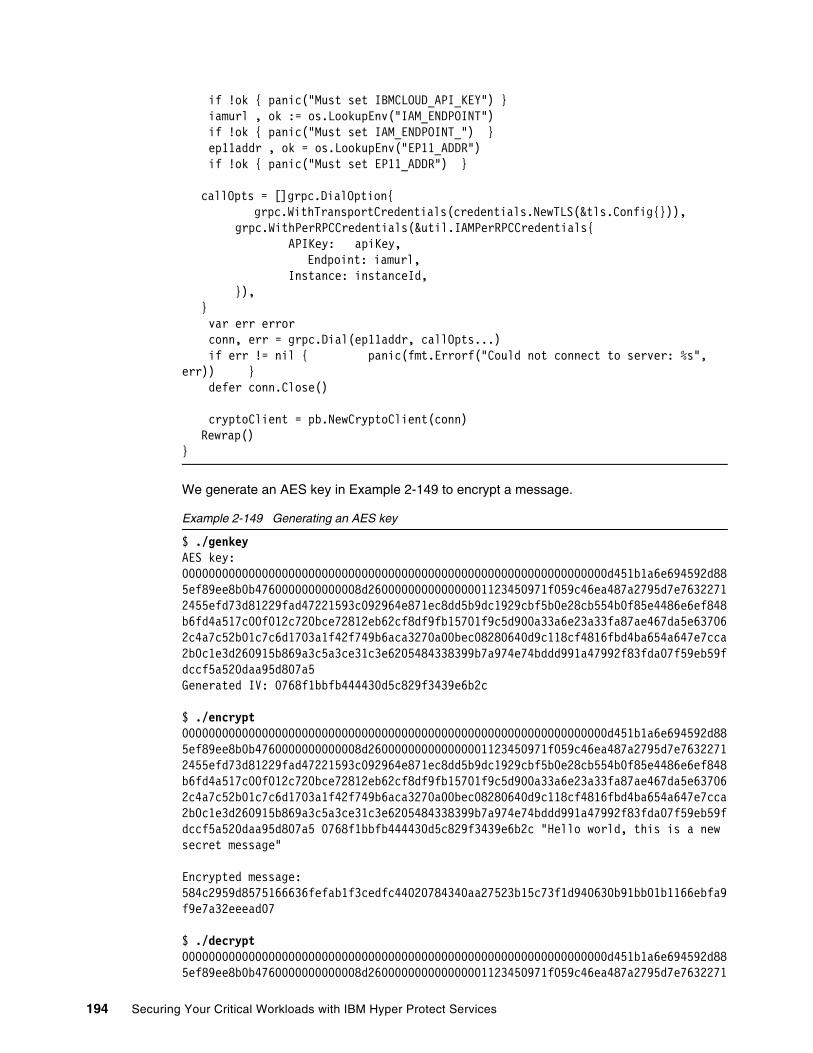
if !ok { panic("Must set IBMCLOUD_API_KEY") } iamurl , ok := os.LookupEnv("IAM_ENDPOINT") if !ok { panic("Must set IAM_ENDPOINT_") } ep11addr , ok = os.LookupEnv("EP11_ADDR") if !ok { panic("Must set EP11_ADDR") }
callOpts = []grpc.DialOption{ grpc.WithTransportCredentials(credentials.NewTLS(&tls.Config{})),
grpc.WithPerRPCCredentials(&util.IAMPerRPCCredentials{ APIKey: apiKey,
Endpoint: iamurl, Instance: instanceId, }),
} var err error conn, err = grpc.Dial(ep11addr, callOpts...) if err != nil { panic(fmt.Errorf("Could not connect to server: %s", err)) } defer conn.Close()
cryptoClient = pb.NewCryptoClient(conn)Rewrap()
}
We generate an AES key in Example 2-149 to encrypt a message.
Example 2-149 Generating an AES key
$ ./genkey AES key: 0000000000000000000000000000000000000000000000000000000000000000d451b1a6e694592d885ef89ee8b0b4760000000000008d260000000000000001123450971f059c46ea487a2795d7e76322712455efd73d81229fad47221593c092964e871ec8dd5b9dc1929cbf5b0e28cb554b0f85e4486e6ef848b6fd4a517c00f012c720bce72812eb62cf8df9fb15701f9c5d900a33a6e23a33fa87ae467da5e637062c4a7c52b01c7c6d1703a1f42f749b6aca3270a00bec08280640d9c118cf4816fbd4ba654a647e7cca2b0c1e3d260915b869a3c5a3ce31c3e6205484338399b7a974e74bddd991a47992f83fda07f59eb59fdccf5a520daa95d807a5Generated IV: 0768f1bbfb444430d5c829f3439e6b2c
$ ./encrypt 0000000000000000000000000000000000000000000000000000000000000000d451b1a6e694592d885ef89ee8b0b4760000000000008d260000000000000001123450971f059c46ea487a2795d7e76322712455efd73d81229fad47221593c092964e871ec8dd5b9dc1929cbf5b0e28cb554b0f85e4486e6ef848b6fd4a517c00f012c720bce72812eb62cf8df9fb15701f9c5d900a33a6e23a33fa87ae467da5e637062c4a7c52b01c7c6d1703a1f42f749b6aca3270a00bec08280640d9c118cf4816fbd4ba654a647e7cca2b0c1e3d260915b869a3c5a3ce31c3e6205484338399b7a974e74bddd991a47992f83fda07f59eb59fdccf5a520daa95d807a5 0768f1bbfb444430d5c829f3439e6b2c "Hello world, this is a new secret message"
Encrypted message: 584c2959d8575166636fefab1f3cedfc44020784340aa27523b15c73f1d940630b91bb01b1166ebfa9f9e7a32eeead07
$ ./decrypt 0000000000000000000000000000000000000000000000000000000000000000d451b1a6e694592d885ef89ee8b0b4760000000000008d260000000000000001123450971f059c46ea487a2795d7e7632271
194 Securing Your Critical Workloads with IBM Hyper Protect Services

2455efd73d81229fad47221593c092964e871ec8dd5b9dc1929cbf5b0e28cb554b0f85e4486e6ef848b6fd4a517c00f012c720bce72812eb62cf8df9fb15701f9c5d900a33a6e23a33fa87ae467da5e637062c4a7c52b01c7c6d1703a1f42f749b6aca3270a00bec08280640d9c118cf4816fbd4ba654a647e7cca2b0c1e3d260915b869a3c5a3ce31c3e6205484338399b7a974e74bddd991a47992f83fda07f59eb59fdccf5a520daa95d807a5 0768f1bbfb444430d5c829f3439e6b2c 584c2959d8575166636fefab1f3cedfc44020784340aa27523b15c73f1d940630b91bb01b1166ebfa9f9e7a32eeead07
Decrypted message: Hello world, this is a new secret message
To generate a new master key, we rotate the previous master key part in our workstation and generate two new key parts, as shown in Example 2-150.
Example 2-150 Rotating the HSM master key: Generating new key parts
$ cd $CLOUDTKEFILES$ mkdir SAV$ mv *.mkpart SAV$ ibmcloud tke mksNo files containing an EP11 master key part were found
$ ibmcloud tke mk-add --randomEnter a description for the key part:> key part firstEnter a password to protect the key part:> Reenter the password to confirm:> Passwords did not match. Try again.Enter a password to protect the key part:> Reenter the password to confirm:> OKA key part was created.The available EP11 master key parts on this workstation are:
KEYNUM DESCRIPTION VERIFICATION PATTERN 1 key part first afd5acb33e82a9bdb5c5705638b639cc b8161cc8048c7aa015154959b45e3f0e
$ ibmcloud tke mk-add --randomEnter a description for the key part:> key part lastEnter a password to protect the key part:> Reenter the password to confirm:> OKA key part was created.The available EP11 master key parts on this workstation are:
KEYNUM DESCRIPTION VERIFICATION PATTERN 1 key part first afd5acb33e82a9bdb5c5705638b639cc b8161cc8048c7aa015154959b45e3f0e 2 key part last 171dc2cf0931e317c82c0edc96f1c465 86c8765f4b94d9b24189a0cf0fdd43cf
Chapter 2. IBM Cloud Hyper Protect Crypto Services 195

We load the new key parts into the new master key register by using the ibmcloud tke cryptounit-mk-load command (Example 2-151).
Example 2-151 Rotating the HSM master key: Loading the new key into the new master key register
$ ibmcloud tke cryptounit-mk-load
KEYNUM DESCRIPTION VERIFICATION PATTERN 1 key part first afd5acb33e82a9bdb5c5705638b639cc b8161cc8048c7aa015154959b45e3f0e 2 key part last 171dc2cf0931e317c82c0edc96f1c465 86c8765f4b94d9b24189a0cf0fdd43cf
Enter the KEYNUM values of the master key parts you want to load.2 or 3 values must be specified, separated by spaces.> 1 2Enter the password for the signature key identified by:admin1 (48d998c79b703b91bc0b1bc529b369...)> Enter the password for key file 1> Enter the password for key file 2> OKThe new master key register has been loaded in the selected crypto units.
NEW MASTER KEY REGISTERSERVICE INSTANCE: 34b5af99-c165-4863-af2e-aaa6d7af8137CRYPTO UNIT NUM STATUS VERIFICATION PATTERN 1 Full Uncommitted cd388da4397ef1611cec7a698d559e07 569c7c855a4546dcb3ea27ef149bf207 2 Full Uncommitted cd388da4397ef1611cec7a698d559e07 569c7c855a4546dcb3ea27ef149bf207 3* Full Uncommitted cd388da4397ef1611cec7a698d559e07 569c7c855a4546dcb3ea27ef149bf207 4* Full Uncommitted cd388da4397ef1611cec7a698d559e07 569c7c855a4546dcb3ea27ef149bf207
* Indicates a recovery crypto unit that is used only to hold a backup master key value.
We see that the key is not committed in the new master key register. Use the ibmcloud tke cryptounit-mk-commit command to commit it, as shown in Example 2-152. The status of the crypto-card switches to Full Committed.
Example 2-152 Rotating the master key: Committing the key in the new master key register
$ ibmcloud tke cryptounit-mk-commitEnter the password for the signature key identified by:admin2 (840f77fd9079d713c5527fc1f4f027...)> Enter the password for the signature key identified by:admin3 (6d733334d57eae3ec7e5ced0197991...)> OKThe new master key register has been committed in the selected crypto units.
196 Securing Your Critical Workloads with IBM Hyper Protect Services

NEW MASTER KEY REGISTERSERVICE INSTANCE: 34b5af99-c165-4863-af2e-aaa6d7af8137CRYPTO UNIT NUM STATUS VERIFICATION PATTERN 1 Full Committed cd388da4397ef1611cec7a698d559e07 569c7c855a4546dcb3ea27ef149bf207 2 Full Committed cd388da4397ef1611cec7a698d559e07 569c7c855a4546dcb3ea27ef149bf207 3* Full Committed cd388da4397ef1611cec7a698d559e07 569c7c855a4546dcb3ea27ef149bf207 4* Full Committed cd388da4397ef1611cec7a698d559e07 569c7c855a4546dcb3ea27ef149bf207
* Indicates a recovery crypto unit that is used only to hold a backup master key value.
The new key is not yet active. We can decrypt our message by using the old key and generate the new AES key that is wrapped with the new master key register. In the committed state, we can rewrap our application keys, as shown in Example 2-153.
Example 2-153 Rewrapping application keys
$ ./rewrap 0000000000000000000000000000000000000000000000000000000000000000d451b1a6e694592d885ef89ee8b0b4760000000000008d260000000000000001123450971f059c46ea487a2795d7e76322712455efd73d81229fad47221593c092964e871ec8dd5b9dc1929cbf5b0e28cb554b0f85e4486e6ef848b6fd4a517c00f012c720bce72812eb62cf8df9fb15701f9c5d900a33a6e23a33fa87ae467da5e637062c4a7c52b01c7c6d1703a1f42f749b6aca3270a00bec08280640d9c118cf4816fbd4ba654a647e7cca2b0c1e3d260915b869a3c5a3ce31c3e6205484338399b7a974e74bddd991a47992f83fda07f59eb59fdccf5a520daa95d807a5
New AES wrapped key: 0000000000000000000000000000000000000000000000000000000000000000cd388da4397ef1611cec7a698d559e070000000000008d2600000000000000011234d75928a77494c773ce031e64a7f0c0ce8c288364ed50ab4ea7f5c01c08e683c39bee76540f2cafe7eb8dc67e0d19385ee87ada41cd62e5909a00c91cedf92a400441e8e93ded74423ebdd7de1fe6751209c761c73e7497f1d9385aafe6a505b8f450a5903890c471801b6034f5536548e89c78fa63a7e6af13c4ee05d8f7f8ba01b933a04210afefaa77c8c97478ec26442b653860fa1e741d1302db7a208cfcace39903b35b35a0707f0a994e3600373668f5311e2dd27d6d0eb3e30e0d
We can now activate the new master key register key, which loads the current master key register with a new value by using the ibmcloud tke cryptounit-mk-setimm command, as shown in Example 2-154.
Example 2-154 HSM Master Key rotation: Activating the new master key register to the current one
$ ibmcloud tke cryptounit-mk-setimmWarning! Any key storage that is associated with the targeted service instance must be prepared to accept the new master key value before running this command. Otherwise, key storage may become unusable.Do you want to continue?Answer [y/N]:> yEnter the password for the signature key identified by:admin1 (48d998c79b703b91bc0b1bc529b369...)>
Chapter 2. IBM Cloud Hyper Protect Crypto Services 197

OKSet immediate completed successfully in the selected crypto units.
NEW MASTER KEY REGISTERSERVICE INSTANCE: 34b5af99-c165-4863-af2e-aaa6d7af8137CRYPTO UNIT NUM STATUS VERIFICATION PATTERN 1 Empty 00000000000000000000000000000000 00000000000000000000000000000000 2 Empty 00000000000000000000000000000000 00000000000000000000000000000000 3* Empty 00000000000000000000000000000000 00000000000000000000000000000000 4* Empty 00000000000000000000000000000000 00000000000000000000000000000000
CURRENT MASTER KEY REGISTERSERVICE INSTANCE: 34b5af99-c165-4863-af2e-aaa6d7af8137CRYPTO UNIT NUM STATUS VERIFICATION PATTERN 1 Valid cd388da4397ef1611cec7a698d559e07 569c7c855a4546dcb3ea27ef149bf207 2 Valid cd388da4397ef1611cec7a698d559e07 569c7c855a4546dcb3ea27ef149bf207 3* Valid cd388da4397ef1611cec7a698d559e07 569c7c855a4546dcb3ea27ef149bf207 4* Valid cd388da4397ef1611cec7a698d559e07 569c7c855a4546dcb3ea27ef149bf207
* Indicates a recovery crypto unit that is used only to hold a backup master key value.
The current master key register is now loaded with the new master key. Use the command that is shown in Example 2-155 to verify that the previous wrapped key does not work anymore, indicating that you must use the newly wrapped key.
Example 2-155 Checking that the new wrapped key decrypts the encrypted message
$ ./decrypt 0000000000000000000000000000000000000000000000000000000000000000d451b1a6e694592d885ef89ee8b0b4760000000000008d260000000000000001123450971f059c46ea487a2795d7e76322712455efd73d81229fad47221593c092964e871ec8dd5b9dc1929cbf5b0e28cb554b0f85e4486e6ef848b6fd4a517c00f012c720bce72812eb62cf8df9fb15701f9c5d900a33a6e23a33fa87ae467da5e637062c4a7c52b01c7c6d1703a1f42f749b6aca3270a00bec08280640d9c118cf4816fbd4ba654a647e7cca2b0c1e3d260915b869a3c5a3ce31c3e6205484338399b7a974e74bddd991a47992f83fda07f59eb59fdccf5a520daa95d807a5 0768f1bbfb444430d5c829f3439e6b2c 584c2959d8575166636fefab1f3cedfc44020784340aa27523b15c73f1d940630b91bb01b1166ebfa9f9e7a32eeead07panic: Failed DecryptInit [rpc error: code = Unknown desc = CKR_IBM_WKID_MISMATCH]
goroutine 1 [running]:main.Decrypt() /home/girardjy/go/src/decrypt.go:33 +0xabfmain.main() /home/girardjy/go/src/decrypt.go:96 +0x3c5
198 Securing Your Critical Workloads with IBM Hyper Protect Services

$ ./decrypt 0000000000000000000000000000000000000000000000000000000000000000cd388da4397ef1611cec7a698d559e070000000000008d2600000000000000011234d75928a77494c773ce031e64a7f0c0ce8c288364ed50ab4ea7f5c01c08e683c39bee76540f2cafe7eb8dc67e0d19385ee87ada41cd62e5909a00c91cedf92a400441e8e93ded74423ebdd7de1fe6751209c761c73e7497f1d9385aafe6a505b8f450a5903890c471801b6034f5536548e89c78fa63a7e6af13c4ee05d8f7f8ba01b933a04210afefaa77c8c97478ec26442b653860fa1e741d1302db7a208cfcace39903b35b35a0707f0a994e3600373668f5311e2dd27d6d0eb3e30e0d 0768f1bbfb444430d5c829f3439e6b2c 584c2959d8575166636fefab1f3cedfc44020784340aa27523b15c73f1d940630b91bb01b1166ebfa9f9e7a32eeead07
Decrypted message: Hello world, this is a new secret message
Using JavaScript and Node.js with GREP11In this section, we demonstrate the installation and setup of the GREP11 IBM libraries.
GREP11 IBM libraries installation and setupOn a Linux terminal, install the git command and copy the IBM JavaScript sample directory on to your workstation, as shown in Example 2-156.
Example 2-156 Cloning the IBM samples repository on your workstation
$ git clone https://github.com/IBM-Cloud/hpcs-grep11-jsCloning into 'hpcs-grep11-js'...remote: Enumerating objects: 33, done.remote: Counting objects: 100% (33/33), done.remote: Compressing objects: 100% (22/22), done.remote: Total 33 (delta 7), reused 30 (delta 7), pack-reused 0Receiving objects: 100% (33/33), 73.83 KiB | 1.34 MiB/s, done.Resolving deltas: 100% (7/7), done.
If you plan to run only the samples, follow the instructions at GitHub and run the start_test.sh script.
Example 2-156 creates a directory that is called hpcs-grep-js that you can rename to the name of your application.
In this directory, the samples are in the examples directory, which you can rename, for example, as myapp. You can create your own programs in this directory by running the commands that are shown in Example 2-157.
Example 2-157 Renaming a directory
$ mv hpcsgrep11-js newsvc$ cd newsvc$ mv examples myapp
Install the missing dependency by using npm tools by running the command that is shown in Example 2-158.
Example 2-158 Installing Node.js modules
$ npm install @grpc/grpc-js --save + @grpc/[email protected]
Chapter 2. IBM Cloud Hyper Protect Crypto Services 199

To setup the connection with your Hyper Protect Crypto Services instance, you can use either of the following methods:
� Edit the file myapp/client.js and edit the four variables:
– apiKey = '<YOUR API KEY>',– iamEndpoint = 'https://iam.cloud.ibm.com',– instanceId = '<Your HPVS INSTANCE ID>',– ep11Address = '<Your GREP11 URL:PORT>';
� Define the following four environment variables that specify the parameters to connect the Hyper Protect Crypto Services instance:
– IAM_API_KEY – IAM_ENDPOINT– INSTANCE_ID– EP11_ADDRESS
Example 2-159 demonstrates specifying the environment variables by using the export command in a Linux terminal.
Example 2-159 Connection setup: Specifying environment variables in a Linux terminal
$ export IAM_API_KEY=8vFwZ9yQIyG8iDI0j2UzKRdWdh4Oi3l-vBwAvcZd5oDX$ export IAM_ENDPOINT=https://iam.cloud.ibm.com $ export INSTANCE_ID=34b5af99-c165-4863-af2e-aaa6d7af8137$ export EP11_ADDRESS=ep11.us-south.hs-crypto.cloud.ibm.com:11491
Using JavaScript and Node.js with GREP11IBM provides several program examples for the different PCKS#11 cryptographic operations. These cryptographic operations are listed in Table 2-6.
Table 2-6 GREP11 JavaScript and Node.js examples
Domain Sample
Listing HSM cards mechanisms https://github.com/IBM-Cloud/hpcs-grep11-js/blob/master/examples/mechanism-info.js https://github.com/IBM-Cloud/hpcs-grep11-js/blob/master/examples/mechanism-list.js
Encryption and decryptionSymmetric key generation
https://github.com/IBM-Cloud/hpcs-grep11-js/blob/master/examples/encrypt-and-decrypt.js
Signing and verifyingAsymmetric key generation
https://github.com/IBM-Cloud/hpcs-grep11-js/blob/master/examples/sign-and-verify-dsa.js https://github.com/IBM-Cloud/hpcs-grep11-js/blob/master/examples/sign-and-verify-ecdsa.js https://github.com/IBM-Cloud/hpcs-grep11-js/blob/master/examples/sign-and-verify-rsa.js
Key wrapping and unwrapping https://github.com/IBM-Cloud/hpcs-grep11-js/blob/master/examples/wrap-and-unwrap-key.js
200 Securing Your Critical Workloads with IBM Hyper Protect Services

To test your cryptographic functions, follow the instructions in “GREP11 IBM libraries installation and setup” on page 199 and run the commands that are shown in Example 2-160.
Example 2-160 Testing the Node.js functions
$ node myapp/derive-keys.js MESSAGE: Hello World!CIPHERTEXT: f0725e76ed15e6900f81cca173ccfc4dPLAINTEXT: Hello World!
$ node myapp/wrap-and-unwrap-key.js AES KEY: 00000000000000000000000000000000000000000000000000000000000000006ea0671d84899442dd073ca5e3561abf0000000000008d250000000000000001123474ef435470a036518a842aafc1bde34a82ad254fd56bab74e847dd8ebb83d55cc3cbd5ad266536de0ff330df5d9836350602f69609507720bd154452b3b56fdd797bf00ae13191226af7f9ad3e00f3e36df8d3b8d7de671daa8ffa69bb34b5b6a1dfe43cf9deeb8ab5f0ba851263517cfcd14bf10fb6f9051e67bc3bfa5a098da9fe98bfd5362557ca9059185ffcae406ae2d12541fcede431f95f7c358ada87e5ec9fda13bed32d238a64eb9b2fbb5f3ca29353d358716702f9ced81ce8WRAPPED: 23337d7bfbb9c855bdd02d17fa598fc02a79cf7cd45d9977f1b29a6ff53b539cc4c87eee977ad418cd1f9ee197dcac65dcb4b2e46d815e273e452c10e06ed88de1ad093e8e574a444c81b8576ee2da40b8237495922c24324b03250346f095f23ed8fd0e3421cfbb9f8f5c2865edc3cac759ee17dbbef0ee23f554405491a33f65e6dac7087040c479b9181b6c3b3c60b3f967ef21c3896e7fd5c84d747a7232cb637a3b46d659fee315b128e39a0990a42eb33f5c7e9cf540a742a1c31da2fd3e25425b1746b8be8434d1950f6b642bef82606dc5b97c6b9547a8af701212a9ed2f647220da9d6796b012d284be65f0b03166763e54303401c4e362fad31cecCHECKSUM: 22120500000080UNWRAPPED KEY: 00000000000000000000000000000000000000000000000000000000000000006ea0671d84899442dd073ca5e3561abf0000000000000c0100000000000000011234c6cb9e81e258bb3a22d3cce09e4c18e11d1498add636ac3758189db7b2524b1b0fe3b15868fceacfa8033bc4df7754b13fe0825cc1eaaa51a4edd9164e794dac25325299e2510c601476b54e8b857b936a1b3442f08786ecf188e75bdd21034c7d22c86afc91cc2d5a6c81eb6fbd769e19452de9ea95501d9d73d07f012ad224afd97a71ad9177bea3cec5f41fcdf8ec035df6b361746340b6dd1f0947a071627f52cf41e3d0178339e4fda40c755256e625c68869d90d7af722b34818a64489f80e1414f2fbe723a0bcd591ac39
$ node myapp/sign-and-verify-ecdsa.js DATA: 9fa6c619db022915ff788599c81c27ac5a349834146cfc5034e7353ed5d92727VERIFIED SIGNATURE: a611561b6fc2bd53890544b19c3290ae615a371fcbf84192e5e37671b5078ebd9ae47695cc6aaf982a5ca657279003bab3b7c69526553f8e7a6e5b03312e46e7
Key derivation https://github.com/IBM-Cloud/hpcs-grep11-js/blob/master/examples/derive-keys.js https://github.com/IBM-Cloud/hpcs-grep11-js/blob/master/examples/derive-keys-dh.js
Digest https://github.com/IBM-Cloud/hpcs-grep11-js/blob/master/examples/digest-multiple.js https://github.com/IBM-Cloud/hpcs-grep11-js/blob/master/examples/digest-single.js https://github.com/IBM-Cloud/hpcs-grep11-js/blob/master/examples/derive-keys-dh.js
Domain Sample
Chapter 2. IBM Cloud Hyper Protect Crypto Services 201
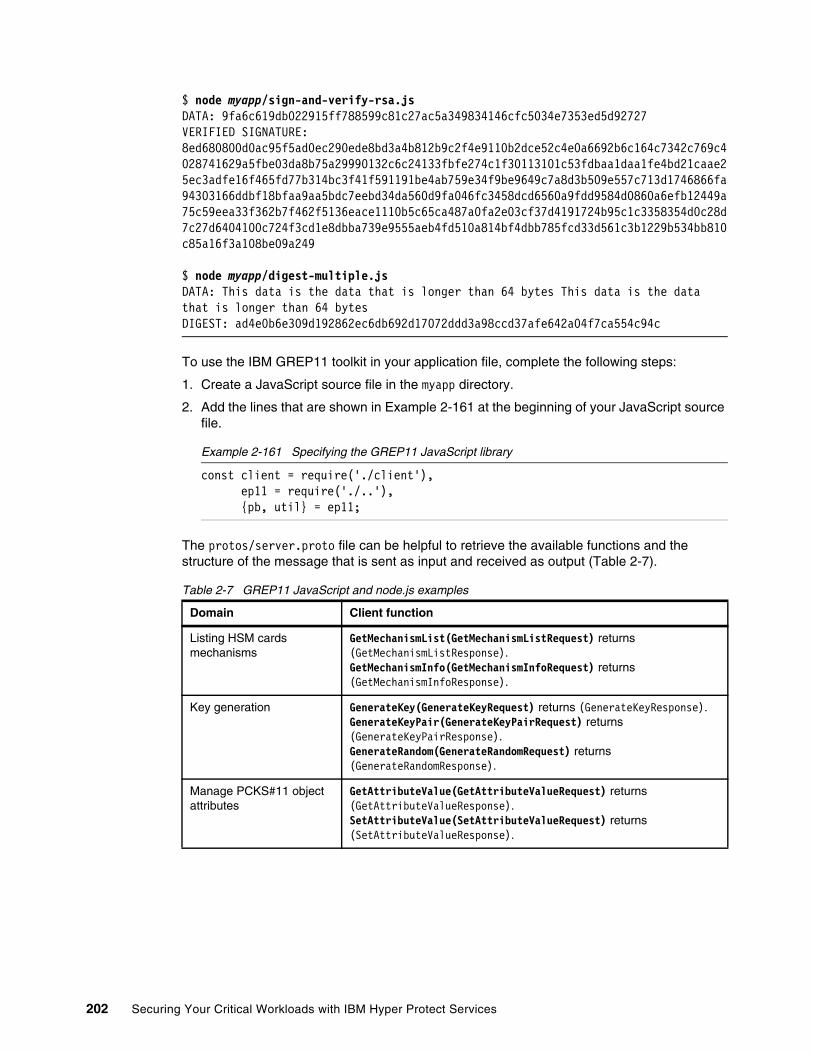
$ node myapp/sign-and-verify-rsa.js DATA: 9fa6c619db022915ff788599c81c27ac5a349834146cfc5034e7353ed5d92727VERIFIED SIGNATURE: 8ed680800d0ac95f5ad0ec290ede8bd3a4b812b9c2f4e9110b2dce52c4e0a6692b6c164c7342c769c4028741629a5fbe03da8b75a29990132c6c24133fbfe274c1f30113101c53fdbaa1daa1fe4bd21caae25ec3adfe16f465fd77b314bc3f41f591191be4ab759e34f9be9649c7a8d3b509e557c713d1746866fa94303166ddbf18bfaa9aa5bdc7eebd34da560d9fa046fc3458dcd6560a9fdd9584d0860a6efb12449a75c59eea33f362b7f462f5136eace1110b5c65ca487a0fa2e03cf37d4191724b95c1c3358354d0c28d7c27d6404100c724f3cd1e8dbba739e9555aeb4fd510a814bf4dbb785fcd33d561c3b1229b534bb810c85a16f3a108be09a249
$ node myapp/digest-multiple.js DATA: This data is the data that is longer than 64 bytes This data is the data that is longer than 64 bytesDIGEST: ad4e0b6e309d192862ec6db692d17072ddd3a98ccd37afe642a04f7ca554c94c
To use the IBM GREP11 toolkit in your application file, complete the following steps:
1. Create a JavaScript source file in the myapp directory.
2. Add the lines that are shown in Example 2-161 at the beginning of your JavaScript source file.
Example 2-161 Specifying the GREP11 JavaScript library
const client = require('./client'), ep11 = require('./..'), {pb, util} = ep11;
The protos/server.proto file can be helpful to retrieve the available functions and the structure of the message that is sent as input and received as output (Table 2-7).
Table 2-7 GREP11 JavaScript and node.js examples
Domain Client function
Listing HSM cards mechanisms
GetMechanismList(GetMechanismListRequest) returns (GetMechanismListResponse).GetMechanismInfo(GetMechanismInfoRequest) returns (GetMechanismInfoResponse).
Key generation GenerateKey(GenerateKeyRequest) returns (GenerateKeyResponse).GenerateKeyPair(GenerateKeyPairRequest) returns (GenerateKeyPairResponse).GenerateRandom(GenerateRandomRequest) returns (GenerateRandomResponse).
Manage PCKS#11 object attributes
GetAttributeValue(GetAttributeValueRequest) returns (GetAttributeValueResponse).SetAttributeValue(SetAttributeValueRequest) returns (SetAttributeValueResponse).
202 Securing Your Critical Workloads with IBM Hyper Protect Services

In protos/server.proto, you retrieve the input and output parameters of each of these functions, as shown in Example 2-162.
Example 2-162 GenerateKeyRequest and Response objects as defined in protos/server.proto
message GenerateKeyRequest { Mechanism Mech = 1; map<uint64,AttributeValue> Template = 6;}
message GenerateKeyResponse { bytes KeyBytes = 4;
Encryption and decryption EncryptInit(EncryptInitRequest) returns (EncryptInitResponse).DecryptInit(DecryptInitRequest) returns (DecryptInitResponse).EncryptUpdate(EncryptUpdateRequest) returns (EncryptUpdateResponse).DecryptUpdate(DecryptUpdateRequest) returns (DecryptUpdateResponse).Encrypt(EncryptRequest) returns (EncryptResponse).Decrypt(DecryptRequest) returns (DecryptResponse).EncryptFinal(EncryptFinalRequest) returns (EncryptFinalResponse).DecryptFinal(DecryptFinalRequest) returns (DecryptFinalResponse).EncryptSingle(EncryptSingleRequest) returns (EncryptSingleResponse).DecryptSingle(DecryptSingleRequest) returns (DecryptSingleResponse).
Signing and verifying SignInit(SignInitRequest) returns (SignInitResponse).VerifyInit(VerifyInitRequest) returns (VerifyInitResponse).SignUpdate(SignUpdateRequest) returns (SignUpdateResponse).VerifyUpdate(VerifyUpdateRequest) returns (VerifyUpdateResponse).SignFinal(SignFinalRequest) returns (SignFinalResponse).VerifyFinal(VerifyFinalRequest) returns (VerifyFinalResponse).Sign(SignRequest) returns (SignResponse).Verify(VerifyRequest) returns (VerifyResponse).SignSingle(SignSingleRequest) returns (SignSingleResponse).VerifySingle(VerifySingleRequest) returns (VerifySingleResponse).
Key wrapping and unwrapping
WrapKey(WrapKeyRequest) returns (WrapKeyResponse).UnwrapKey(UnwrapKeyRequest) returns (UnwrapKeyResponse).
Key derivation DeriveKey(DeriveKeyRequest) returns (DeriveKeyResponse).
RewrapKeyBlob RewrapKeyBlob (RewrapKeyBlobRequest) returns (RewrapKeyBlobResponse) {}.
Digest DigestInit(DigestInitRequest) returns (DigestInitResponse).Digest(DigestRequest) returns (DigestResponse).DigestUpdate(DigestUpdateRequest) returns (DigestUpdateResponse).DigestKey(DigestKeyRequest) returns (DigestKeyResponse).DigestFinal(DigestFinalRequest) returns (DigestFinalResponse).DigestSingle(DigestSingleRequest) returns (DigestSingleResponse).
Domain Client function
Chapter 2. IBM Cloud Hyper Protect Crypto Services 203
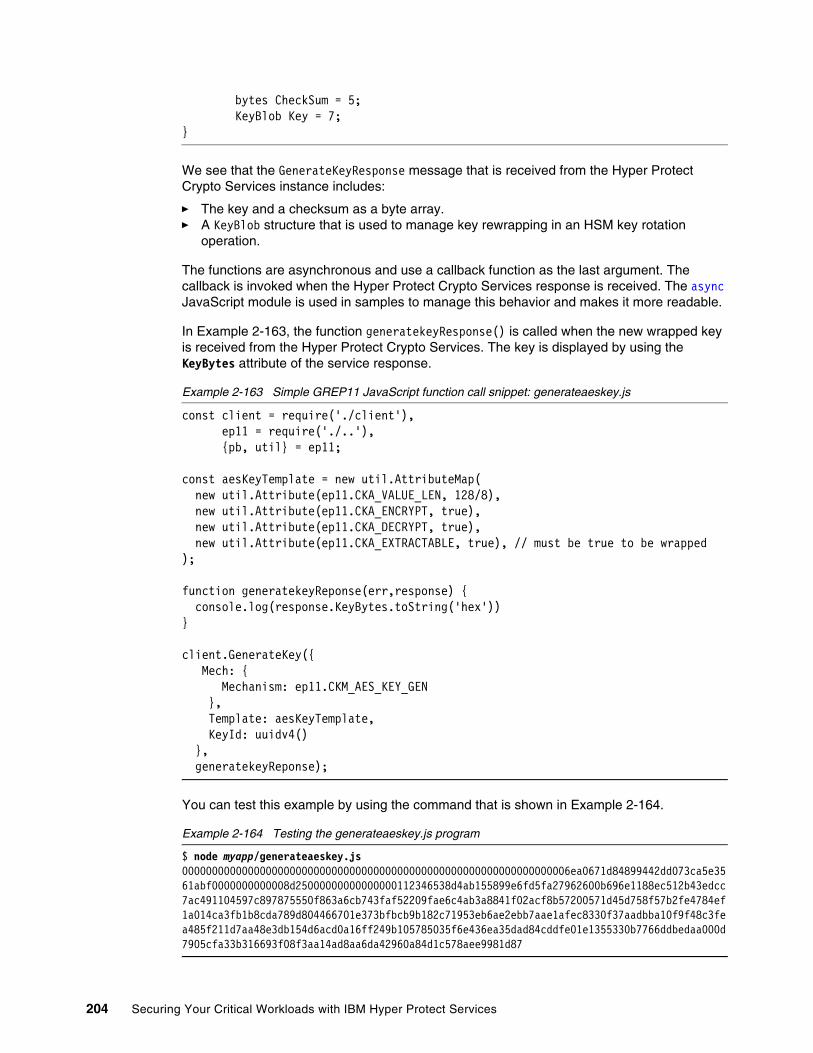
bytes CheckSum = 5; KeyBlob Key = 7;}
We see that the GenerateKeyResponse message that is received from the Hyper Protect Crypto Services instance includes:
� The key and a checksum as a byte array.� A KeyBlob structure that is used to manage key rewrapping in an HSM key rotation
operation.
The functions are asynchronous and use a callback function as the last argument. The callback is invoked when the Hyper Protect Crypto Services response is received. The async JavaScript module is used in samples to manage this behavior and makes it more readable.
In Example 2-163, the function generatekeyResponse() is called when the new wrapped key is received from the Hyper Protect Crypto Services. The key is displayed by using the KeyBytes attribute of the service response.
Example 2-163 Simple GREP11 JavaScript function call snippet: generateaeskey.js
const client = require('./client'), ep11 = require('./..'), {pb, util} = ep11;
const aesKeyTemplate = new util.AttributeMap( new util.Attribute(ep11.CKA_VALUE_LEN, 128/8), new util.Attribute(ep11.CKA_ENCRYPT, true), new util.Attribute(ep11.CKA_DECRYPT, true), new util.Attribute(ep11.CKA_EXTRACTABLE, true), // must be true to be wrapped);
function generatekeyReponse(err,response) { console.log(response.KeyBytes.toString('hex'))}
client.GenerateKey({ Mech: { Mechanism: ep11.CKM_AES_KEY_GEN }, Template: aesKeyTemplate, KeyId: uuidv4() }, generatekeyReponse);
You can test this example by using the command that is shown in Example 2-164.
Example 2-164 Testing the generateaeskey.js program
$ node myapp/generateaeskey.js00000000000000000000000000000000000000000000000000000000000000006ea0671d84899442dd073ca5e3561abf0000000000008d25000000000000000112346538d4ab155899e6fd5fa27962600b696e1188ec512b43edcc7ac491104597c897875550f863a6cb743faf52209fae6c4ab3a8841f02acf8b57200571d45d758f57b2fe4784ef1a014ca3fb1b8cda789d804466701e373bfbcb9b182c71953eb6ae2ebb7aae1afec8330f37aadbba10f9f48c3fea485f211d7aa48e3db154d6acd0a16ff249b105785035f6e436ea35dad84cddfe01e1355330b7766ddbedaa000d7905cfa33b316693f08f3aa14ad8aa6da42960a84d1c578aee9981d87
204 Securing Your Critical Workloads with IBM Hyper Protect Services

The IBM GREP11 JavaScript libraries provide helpers (lib/util.js and lib/header_consts.js) that do the following actions:
� Specify PKCS #11 key templates with their argument by using util.AttributeMap and util.Attribute.
� Specify some DER parameters like Elliptic cure OID lib/util.js, for example, util.OIDNamedCurveP256.
� Specify PKCS #11 constants like ep11.CKM_EC_KEY_PAIR_GEN, ep11.CKA_EXTRACTABLE, and ep11.CKA_EXTRACTABLE.
To create your own application:
� Use the provided samples for the different cryptographic operations.
� Use JavaScript code snippets that are available at Cryptographic operations: GREP11 API, which includes the input and output parameters.
� Consider using the Key Protect API standard key to store your cryptographic material.
Chapter 2. IBM Cloud Hyper Protect Crypto Services 205

206 Securing Your Critical Workloads with IBM Hyper Protect Services

Chapter 3. IBM Cloud Hyper Protect Database as a Service
This chapter introduces IBM Cloud Hyper Protect Database as a Service (DBaaS).
This chapter includes the following topics:
� Introducing IBM Cloud Hyper Protect DBaaS
� Sizing and topology
� Public Cloud service instantiation
� Administration and operations
� Security and compliance
� Use case: Encrypting databases with your keys protected
� API interaction and code samples
3
© Copyright IBM Corp. 2020, 2022. All rights reserved. 207

3.1 Introducing IBM Cloud Hyper Protect DBaaS
IBM Cloud Hyper Protect DBaaS is a solution that offers clients the ability to easily provision fully managed and highly secured database environments for enterprise workloads with sensitive information without the need for specialized database administration skills.
IBM Hyper Protect DBaaS is built upon IBM LinuxONE technologies that provide built-in encryption along with abilities for excellent scaling and performance. These features allow for workload isolation that keeps data owners in complete control of their data. The solution provides a developer-friendly platform with fully managed logging, monitoring, backups, high availability (HA), and scaling solutions, which enable developers to focus on higher value application development rather than the management of the environment.
Figure 3-1 shows an IBM Hyper Protect DBaaS service instance for HA.
Figure 3-1 IBM Hyper Protect DBaaS service instance for high availability
208 Securing Your Critical Workloads with IBM Hyper Protect Services

3.2 Sizing and topology
IBM Hyper Protect DBaaS provides different plans in terms of database instances. The Free Plan offers a service instance with a fixed 1 GB Memory and 2 GB of data storage, and the instance is deleted after 30 days. The Flexible Plan allows a choice of configuration, as shown in Table 3-1.
Table 3-1 Acceptable resource allocation values for Flexible Plan
You can select a suitable initial size of a database instance based on your workload requirements, and if it is a Flexible Plan instance, you can change it at any time after provisioning is done.
After an instance is created, you can migrate your own data to the database by using a memory dump and the restore function of the databases. For more information about migrating databases to IBM Hyper Protect DBaaS see Migrating PostgreSQL databases to Hyper Protect DBaaS for PostgreSQL and Migrating MongoDB databases to the Hyper Protect DBaaS for MongoDB.
At the time of writing, the IBM Cloud Hyper Protect DBaaS service provides 99.95% of HA and reliability for mission-critical workloads. After an instance is created, IBM Hyper Protect DBaaS provides automatic in-region data redundancy and failover by default.
By default, your IBM Hyper Protect DBaaS service instance consists of three nodes: one primary and two secondary nodes in three different availability zones in your selected IBM Cloud region. The data in your primary node is automatically replicated to secondary nodes (replicas) with low latency, as shown in Figure 3-2.
Figure 3-2 IBM Hyper Protect DBaaS high availability diagram
Resource Unit Value range
Memory GB per node {2, 3, 4, 5, 8, 12, 16, 24, 32, 64, 96, 128}
Disk GB per node {5, 10, 16, 24, 32, 64, 128, 160, 256, 320, 512, 640, 1280}
vCPU vCPU per node {1, 2, 3, 4, 5, 6, 8, 9, 12, 16}
Chapter 3. IBM Cloud Hyper Protect Database as a Service 209

When your primary node fails, a secondary node in the cluster is selected as the primary to prevent your applications from being affected. In this way, you have automatic HA within one region for your data.
To create cross-region data redundancy for disaster recovery (DR), you must regularly back up your complete databases from your service instance in a region. When the region is unavailable, you can provision a service instance in another available region to restore your database manually. The time that it takes to restore varies because it depends on the size of your data and network condition.
Also, IBM Cloud Hyper Protect DBaaS automatically triggers a backup of your complete database once every 24 hours. These encrypted backups are available for the last 7 days and redundantly available on local storage in all availability zones of the supported regions. You can open a support request to restore your database through IBM Cloud support.
3.3 Public Cloud service instantiation
The IBM Hyper Protect DBaaS service has different options that are available for service instantiation through the following methods:
� Web interface (GUI)� IBM Cloud Command-Line Interface (CLI)� The IBM Hyper Protect DBaaS RESTful application programming interface (API)
3.3.1 Prerequisites
The IBM Hyper Protect DBaaS service shares a set of prerequisites with the other IBM Cloud Hyper Protect Services. To begin the service instantiation process, it is assumed that the following prerequisites were met:
� IBM Cloud Account and access permission.
� Supported browser. For more information, see What are the IBM Cloud prerequisites?
� Installations of the following items:
– IBM Cloud CLI. For more information, see Installing the stand-alone IBM Cloud CLI.– IBM Cloud DBaaS CLI plug-in. For more information, see Installing the DBaaS CLI
components (by operating system).
3.3.2 Web interface
This section describes creating an IBM Hyper Protect DBaaS service instance on IBM Cloud by using the web interface (GUI). It is assumed that you meet the prerequisites that are described in 3.3.1, “Prerequisites” on page 210.
Complete the following steps:
1. Log in to your IBM Cloud account at https://cloud.ibm.com/login.
2. From the IBM account dashboard, click Catalog in the upper menu toolbar, as shown in Figure 3-3 on page 211.
Note: It is also possible to use CLI commands by using IBM Cloud Shell directly on the browser, as described in Getting started with IBM Cloud Shell.
210 Securing Your Critical Workloads with IBM Hyper Protect Services

Figure 3-3 IBM Cloud Dashboard
3. Enter Hyper Protect DBaaS into the search toolbar and choose which database offering to provision for use, such as Hyper Protect DBaaS for MongoDB or Hyper Protect DBaaS for PostgreSQL, as shown in Figure 3-4.
Figure 3-4 Catalog search results for IBM Hyper Protect DBaaS for MongoDB and PostgreSQL
4. After selecting which database offering to provision, choose a deployment region on the service create page.
Note: IBM Cloud offers multiple availability zones in regions across the globe to host your IBM Hyper Protect DBaaS service instance, such as Dallas, Washington DC, Frankfurt, or Sydney.
Chapter 3. IBM Cloud Hyper Protect Database as a Service 211

5. Choose a pricing plan and sizing. An example pricing option for IBM Hyper Protect DBaaS is shown in Figure 3-5. For more information about sizing, see 3.2, “Sizing and topology” on page 209.
Figure 3-5 IBM Hyper Protect DBaaS for MongoDB pricing plans
6. Configure your resource by setting the Service Name, Resource Group, Tags (optional), Access Management Tags (optional), Database Cluster Name, Database Administrator User Name, Database Administrator Password, Initial RAM Allocation, Initial Disk Allocation, Initial vCPU Allocation, Key Management Service (KMS) Instance, Root Ky, and Endpoint (Public or Private), as shown in Figure 3-6.
Figure 3-6 Example of “Configure your Resource” for IBM Hyper Protect DBaaS for MongoDB
7. Agree to the terms and select Create.
Note: Free Plan instances are for evaluation only and not suitable for production workloads. Free Plan IBM Hyper Protect DBaaS services are automatically deleted after a period of 30 days.
212 Securing Your Critical Workloads with IBM Hyper Protect Services

3.3.3 IBM Cloud Command-Line Interface
This section describes creating an IBM Hyper Protect DBaaS service instance on IBM Cloud by using the IBM Cloud CLI and DBaaS CLI plug-in. It is assumed that the prerequisites that are outlined in 3.3.1, “Prerequisites” on page 210 are met.
To verify the installation of the IBM Cloud CLI and the DBaaS plug-in, run the ibmcloud command. The system shows dbaas in the list of available commands.
Logging in to the IBM Cloud CLIBefore issuing a create service command, authenticate the IBM Cloud CLI by issuing the following example command:
ibmcloud login --sso -a https://cloud.ibm.com
For more information and reference material about all options for authentication, see ibmcloud login.
The CLI prompts for a one-time authorization code that can be opened in the default browser or by copying the link into a supported browser, as shown in the output in Example 3-1.
Example 3-1 Authentication output from IBM Cloud CLI by using SSO
Get One Time Code from https://identity-2.us-south.iam.cloud.ibm.com/identity/passcode to proceed.Open the URL in the default browser? [Y/n] > nOne Time Code >Authenticating...OK
Targeting a resource groupAfter authenticating with the IBM Cloud CLI, target a resource group by using the ibmcloud target command to direct your deployments. In the following example, the resource group Default is used:
ibmcloud target -g Default
For more information about resource groups, see Managing resource groups.
Choosing a target regionIBM Cloud provides various service endpoints in regions across the globe that can be used to deploy services. You select a region that corresponds to the geographical deployment of the IBM Hyper Protect DBaaS service instance.
To find a region, use the ibmcloud regions command, as shown in Example 3-2.
Example 3-2 IBM Cloud CLI output of regions
~$ ibmcloud regionsListing regions...
Name Display nameau-syd Sydney in-che Chennai jp-osa Osaka jp-tok Tokyo kr-seo Seoul
Chapter 3. IBM Cloud Hyper Protect Database as a Service 213

eu-de Frankfurt eu-gb London ca-tor Toronto us-south Dallas us-east Washington DC br-sao Sao Paulo
Creating a service instanceTo create a service instance by using the IBM Cloud CLI, run the ibmcloud resource service-instance-create command, as shown in Example 3-3.
Example 3-3 IBM Cloud CLI syntax to create a service
~$ ibmcloud resource service-instance-create
NAME: service-instance-create - Create a service instance
USAGE: ibmcloud resource service-instance-create NAME (SERVICE_NAME | SERVICE_ID) (SERVICE_PLAN_NAME | SERVICE_PLAN_ID) LOCATION [-d, --deployment DEPLOYMENT_NAME] [-p, --parameters @JSON_FILE | JSON_STRING ] [-g RESOURCE_GROUP] [--service-endpoints SERVICE_ENDPOINTS_TYPE] [--allow-cleanup] [--lock] [-q, --quiet] OPTIONS: -d value, --deployment value Name of deployment -p value, --parameters value JSON file or JSON string of parameters to create service instance -g value, Resource group name --service-endpoints value, Types of the service endpoints. Possible values are 'public', 'private', 'public-and-private'. --allow-cleanup, Whether the service instance should be deleted (cleaned up) during the processing of a region instance delete call --lock, Whether to create the service instance with locked state -q, --quiet, Suppress verbose output
To see all the services that are available to be created in the IBM Cloud Catalog, run the ibmcloud catalog service-marketplace command. IBM Hyper Protect DBaaS is listed in the catalog, as shown in Example 3-4.
Example 3-4 IBM Cloud CLI Catalog list results for IBM Hyper Protect DBaaS
Name Provider hyperp-dbaas-mongodb...............................IBM hyperp-dbaas-postgresql..............................IBM
After deciding on the type of database to provision, Example 3-5 on page 215 and Example 3-6 on page 215 show how the command can be issued. A sample of CLI parameters is listed in Table 3-2 on page 215.
Note: At the time of writing, IBM Cloud Hyper Protect DBaaS is supported in the us-south, us-east, eu-de, and au-syd regions. The supported regions can be referenced in the documentation for the service.
214 Securing Your Critical Workloads with IBM Hyper Protect Services

Example 3-5 Creating a MongoDB service instance by using the IBM CLI
~$ ibmcloud resource service-instance-create ExampleMongoDB hyperp-dbaas-mongodb mongodb-free us-east -p '{"name":"DBaaSMongoCLICluster", "admin_name":"admin","password":"passWORD4User19", "confirm_password":"passWORD4User19", "license_agree":["agreed"]}'
Example 3-6 Creating a PostgreSQL service instance by using the IBM CLI
~$ ibmcloud resource service-instance-create ExamplePostgreSQL hyperp-dbaas-postgresql postgresql-free us-east -p '{"name":"DBaaSPostgresCLICluster", "admin_name":"admin","password":"passWORD4User19", "confirm_password":"passWORD4User19", "license_agree":["agreed"]}'
Table 3-2 CLI parameters
This creation process takes a few minutes to complete. The status of the new service can be verified through the IBM Cloud CLI by running the ibmcloud resource service-instances command, as shown in Example 3-7. When the service state is active, the database is ready to use.
Example 3-7 Output of a DBaaS instance that is ready to use in the active state
~$ ibmcloud resource service-instances
Retrieving instances with type service_instance in resource group Default in all locations under account Jordan Cartwright as [email protected]
Name Location State TypeMyDBaaSIns03 us-east active service_instance
Alternatively, the service creation progress also can be seen in the web interface for IBM Cloud on the Resource list page.
3.3.4 The IBM Hyper Protect DBaaS RESTful API
This section describes creating an IBM Hyper Protect DBaaS service instance on IBM Cloud by using the IBM Hyper Protect DBaaS RESTful API. It is assumed that you meet the prerequisites that are outlined in 3.3.1, “Prerequisites” on page 210.
Parameter Definition
ExamplePostgreSQL The name of the service instance.
hyperp-dbaas-postgresql The catalog name of IBM Hyper Protect DBaaS for PostgreSQL.
postgresql-free The service plan name.
us-east The region where the service is deployed.
-p A JSON string that contains parameters for instantiation.
Note: For more information about other DBaaS CLI plug-in commands, see Hyper Protect DBaaS for MongoDB CLI.
Chapter 3. IBM Cloud Hyper Protect Database as a Service 215

Generating an API keyA customer API key is needed for communicating with the DBaaS RESTful API. To obtain a key to use with the account, complete the following steps:
1. On the IBM Cloud dashboard, select Manage → Access (IAM).
2. From the Identity and Access Management (IAM) dashboard, select IBM Cloud API Keys.
3. Click Create an IBM Cloud API Key on this page. In the modal window, enter a name and description for the API key. Click Create.
You can copy your API key and download a JSON file that contains information about your API key. An example of this file is shown in Example 3-8.
Example 3-8 Generated API key output
{ "name": "My API key", "description": "DBaaS Manager Key", "createdAt": "2021-05-05T18:58+0000", "apiKey": "******"}
Choosing a DBaaS ManagerCreating an IBM Hyper Protect Service instance requires direct communication to the dbaas manager in the region of deployment. This requirement exists because the dbaas manager represents the region to which you are deploying.
The supported regions at the time of writing are shown in Table 3-3.
Table 3-3 DBaaS managers
Authenticating by using the APIAfter obtaining an API key to use with the IBM Hyper Protect DBaaS API, users must authenticate with the API directly to request an access token for commands to be issued against the DBaaS service.
Example 3-9 on page 217 shows the API authentication call by using the API that is generated from Example 3-8. We also are communicating directly with the Dallas DBaaS manager by using the Dallas hostname from Table 3-3.
Note: This information cannot be seen after leaving the page. Take note of this value now. An option to download the API key JSON file also is available.
URL Port number Region City
dbaas900.hyperp-dbaas.cloud.ibm.com 20000 us-south Dallas
dbaas902.hyperp-dbaas.cloud.ibm.com 20000 eu-de Frankfurt
dbaas904.hyperp-dbaas.cloud.ibm.com 20000 au-syd Sydney
dbaas906.hyperp-dbaas.cloud.ibm.com 20000 us-east Washington DC
216 Securing Your Critical Workloads with IBM Hyper Protect Services
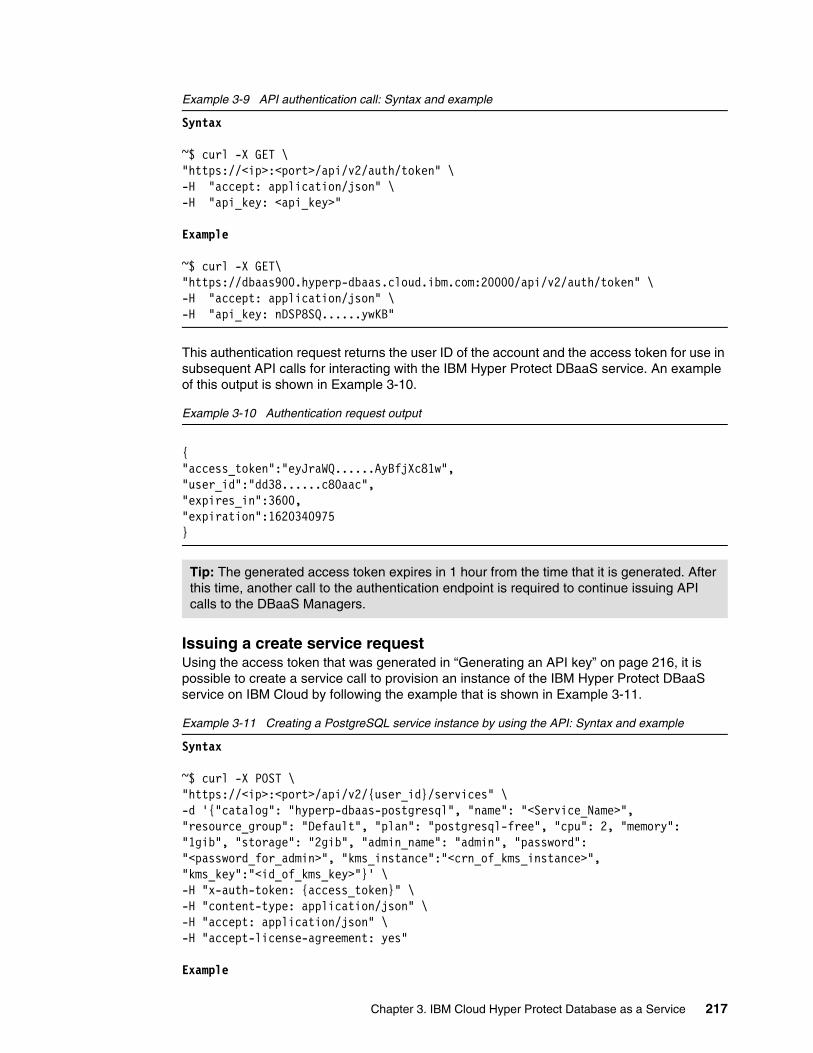
Example 3-9 API authentication call: Syntax and example
Syntax
~$ curl -X GET \"https://<ip>:<port>/api/v2/auth/token" \-H "accept: application/json" \-H "api_key: <api_key>"
Example
~$ curl -X GET\"https://dbaas900.hyperp-dbaas.cloud.ibm.com:20000/api/v2/auth/token" \-H "accept: application/json" \-H "api_key: nDSP8SQ......ywKB"
This authentication request returns the user ID of the account and the access token for use in subsequent API calls for interacting with the IBM Hyper Protect DBaaS service. An example of this output is shown in Example 3-10.
Example 3-10 Authentication request output
{"access_token":"eyJraWQ......AyBfjXc81w","user_id":"dd38......c80aac","expires_in":3600,"expiration":1620340975}
Issuing a create service requestUsing the access token that was generated in “Generating an API key” on page 216, it is possible to create a service call to provision an instance of the IBM Hyper Protect DBaaS service on IBM Cloud by following the example that is shown in Example 3-11.
Example 3-11 Creating a PostgreSQL service instance by using the API: Syntax and example
Syntax
~$ curl -X POST \"https://<ip>:<port>/api/v2/{user_id}/services" \-d '{"catalog": "hyperp-dbaas-postgresql", "name": "<Service_Name>", "resource_group": "Default", "plan": "postgresql-free", "cpu": 2, "memory": "1gib", "storage": "2gib", "admin_name": "admin", "password": "<password_for_admin>", "kms_instance":"<crn_of_kms_instance>", "kms_key":"<id_of_kms_key>"}' \-H "x-auth-token: {access_token}" \-H "content-type: application/json" \-H "accept: application/json" \-H "accept-license-agreement: yes"
Example
Tip: The generated access token expires in 1 hour from the time that it is generated. After this time, another call to the authentication endpoint is required to continue issuing API calls to the DBaaS Managers.
Chapter 3. IBM Cloud Hyper Protect Database as a Service 217

~$ curl -X POST \"https://dbaas900.hyperp-dbaas.cloud.ibm.com:20000/api/v2/dd38......c80aac/services" \-d '{"catalog": "hyperp-dbaas-postgresql", "name": "HPDBaaSPostgreSQLAPI", "resource_group": "Default", "plan": "postgresql-free", "cpu": 2, "memory": "1gib", "storage": "2gib", "admin_name": "admin", "password": "passWORD4User19"}' -H "x-auth-token: eyJraWQ......AyBfjXc81w" \-H "content-type: application/json" \-H "accept: application/json" \-H "accept-license-agreement: yes"
This command from Example 3-11 on page 217 is issuing a POST request against the IBM Hyper Protect DBaaS API services endpoint to create a PostgreSQL cluster on the IBM Cloud account with the associated API key.
We are creating a Free Plan IBM Hyper Protect DBaaS PostgreSQL instance with an administrator user that is named admin.
For more information about IBM Cloud APIs, see IBM Cloud Docs.
3.4 Administration and operations
IBM Hyper Protect DBaaS supports various levels of administration oversight for the service.
3.4.1 Managing an IBM Hyper Protect DBaaS service
Managing an IBM Hyper Protect DBaaS service can be done through the IBM Cloud Portal dashboard under the Services section on the Resource List page. On this page, users can use the actions menu by clicking the hamburger menu that is to the right of the targeted service instance.
Clicking the name of an IBM Hyper Protect DBaaS service brings administrators to the service dashboard for that selected service. This management interface enables the use of more fine-tuned options for administrative management of an IBM Hyper Protect DBaaS service. The dashboard shows the menu items Getting started, Manage, Resources, Databases, Users, Nodes, Observability, and Plan, as shown in Figure 3-7.
Figure 3-7 Example of IBM Hyper Protect DBaaS for PostgreSQL dashboard
218 Securing Your Critical Workloads with IBM Hyper Protect Services

Getting startedThe Getting started menu shows an overview with the requirements and some guidelines about how to use the IBM Hyper Protect DBaaS service.
ManageThe Manage menu shows the status of the service and of each node, storage consumption, location, information about the plan and the version, and information about how to connect to the database. This menu is also the location for users to retrieve their certificate authority (CA) file to form a secure connection to their database, as shown in Figure 3-8.
Figure 3-8 Example of IBM Hyper Protect DBaaS for PostgreSQL Manage menu
ResourceThe Resource menu shows the current allocation of memory, disk, and vCPU for the IBM Hyper Protect DBaaS service, as shown in Figure 3-9. In this section, is also possible to scale any one of the resources by clicking a new plan and then clicking Apply.
Figure 3-9 Example of IBM Hyper Protect DBaaS for PostgreSQL Resource menu
Chapter 3. IBM Cloud Hyper Protect Database as a Service 219
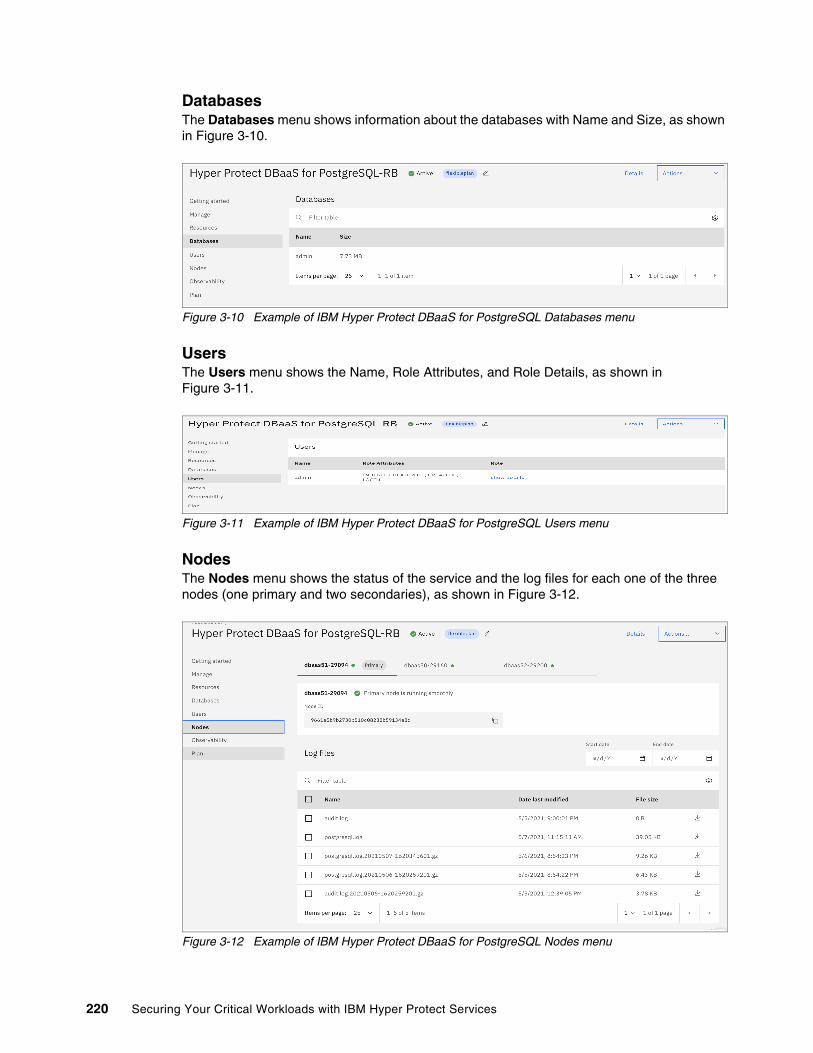
DatabasesThe Databases menu shows information about the databases with Name and Size, as shown in Figure 3-10.
Figure 3-10 Example of IBM Hyper Protect DBaaS for PostgreSQL Databases menu
UsersThe Users menu shows the Name, Role Attributes, and Role Details, as shown in Figure 3-11.
Figure 3-11 Example of IBM Hyper Protect DBaaS for PostgreSQL Users menu
NodesThe Nodes menu shows the status of the service and the log files for each one of the three nodes (one primary and two secondaries), as shown in Figure 3-12.
Figure 3-12 Example of IBM Hyper Protect DBaaS for PostgreSQL Nodes menu
220 Securing Your Critical Workloads with IBM Hyper Protect Services
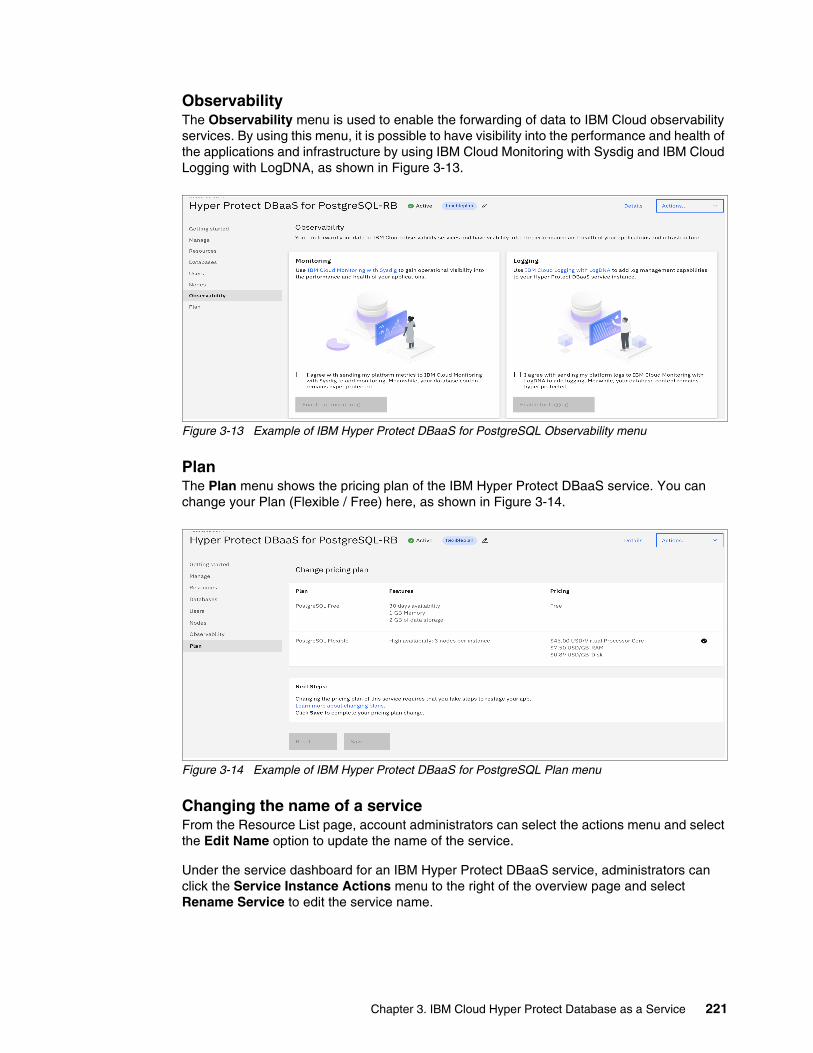
ObservabilityThe Observability menu is used to enable the forwarding of data to IBM Cloud observability services. By using this menu, it is possible to have visibility into the performance and health of the applications and infrastructure by using IBM Cloud Monitoring with Sysdig and IBM Cloud Logging with LogDNA, as shown in Figure 3-13.
Figure 3-13 Example of IBM Hyper Protect DBaaS for PostgreSQL Observability menu
PlanThe Plan menu shows the pricing plan of the IBM Hyper Protect DBaaS service. You can change your Plan (Flexible / Free) here, as shown in Figure 3-14.
Figure 3-14 Example of IBM Hyper Protect DBaaS for PostgreSQL Plan menu
Changing the name of a serviceFrom the Resource List page, account administrators can select the actions menu and select the Edit Name option to update the name of the service.
Under the service dashboard for an IBM Hyper Protect DBaaS service, administrators can click the Service Instance Actions menu to the right of the overview page and select Rename Service to edit the service name.
Chapter 3. IBM Cloud Hyper Protect Database as a Service 221

Deleting a serviceFrom the Resource List page, account administrators can select the actions menu and choose the Delete option to remove the service from your account. When a service is deleted, all data that is associated with the IBM Hyper Protect DBaaS service is gone and permanently inaccessible.
3.4.2 Managing database instances
After creating an IBM Hyper Protect DBaaS PostgreSQL or MongoDB database, it is necessary to use a client tool to connect to the databases and perform all the management tasks like create, delete, and modify databases, table spaces, and users. The IBM Cloud Hyper Protect DBaaS Dashboard in the Manage menu, which is shown in Figure 3-8 on page 219, has information about how to do this connection.
IBM Hyper Protect DBaaS allows only SSL-secured client connections.
Connecting to databasesTo connect to the IBM Hyper Protect DBaaS database, it is necessary to follow one of the two options that are presented at the bottom of the Manage menu, as shown in Figure 3-15 for PostgreSQL and in Figure 3-16 on page 223 for MongoDB.
Figure 3-15 Example of IBM Hyper Protect DBaaS for PostgreSQL connection methods
222 Securing Your Critical Workloads with IBM Hyper Protect Services

Figure 3-16 Example of IBM Hyper Protect DBaaS for MongoDB connection methods
3.4.3 Logging and monitoring
In this section, the logging and monitoring functions are described.
LoggingIBM Hyper Protect DBaaS allows for log downloading through the Nodes page under the management interface dashboard for a database cluster. On the Nodes page, users can choose a replica to download specific log files or all log files for the database replica. An example of the Nodes page is shown in Figure 3-17.
Figure 3-17 Log files from the Nodes page
IBM Log Analysis with LogDNAIn addition to downloading the logs, users can set up external logging through integration with a Log DNA instance on IBM Cloud for more log analysis.
To set up your IBM Hyper Protect DBaaS, complete the following steps:
1. Ensure that you are logged in to an IBM account on IBM Cloud.
2. Create a LogDNA instance by browsing to the Observability dashboard on IBM Cloud. To do this task, click the hamburger menu on the left side of the IBM Cloud dashboard and select Observability.
Chapter 3. IBM Cloud Hyper Protect Database as a Service 223

3. On the Observability page, select Logging → Create instance under IBM Log Analysis with LogDNA. The following page prompts you for information that is needed to create the logging instance. Enter a meaningful name for the LogDNA instance, and then choose a deployment region, resource group, and a pricing plan for your instance to determine log retention.
4. After providing the information to create your IBM LogDNA instance, select Create and browse back to your DBaaS service to enable logging. To enable logging on the DBaaS cluster, browse to the service management page and click the Observability tab.
5. Select the I agree with sending my platform logs to IBM Cloud Monitoring with LogDNA to add logging. Meanwhile, your database content remains hyper protected checkbox, and then click Enable for logging, as shown in Figure 3-18.
Figure 3-18 Example of Enabling Logging for IBM Hyper Protect DBaaS: Enable for logging
6. Next, click Add Logging, as shown in Figure 3-19 on page 225.
Note: The region that is selected is the region that features monitored logging. This region is the same region to which the IBM Hyper Protect DBaaS instance was deployed.
224 Securing Your Critical Workloads with IBM Hyper Protect Services

Figure 3-19 Example of Enabling Logging for IBM Hyper Protect DBaaS: Add logging
7. Select the LogDNA Instance that was created in this procedure and click Select, as shown in Figure 3-20.
Figure 3-20 Example of Enabling Logging for IBM Hyper Protect DBaaS: Selecting a LogDNA instance
Chapter 3. IBM Cloud Hyper Protect Database as a Service 225

8. The LogDNA instance is configured to display the logs from the IBM Hyper Protect DBaaS service. Start LogDNA by clicking Launch logging, as shown in Figure 3-21.
Figure 3-21 Example of Enabling Logging for IBM Hyper Protect DBaaS: Launch logging
9. The LogDNA dashboard opens, as shown in Figure 3-22, with th logs of the IBM Hyper Protect DBaaS instance.
Figure 3-22 LogDNA user interface
Note: It can take some time for LogDNA to register the DBaaS instance as a source for logs initially. After the source for the logs is registered, the registered logs are shown in the main window.
226 Securing Your Critical Workloads with IBM Hyper Protect Services

Monitoring a databaseAs with logging, database monitoring is disabled on an IBM Hyper Protect DBaaS service by default. To enable monitoring on your cluster and set up your IBM Hyper Protect DBaaS, complete the following steps:
1. Ensure that you are logged in to an IBM account on IBM Cloud.
2. Create an IBM Cloud Monitoring instance by browsing to the Observability dashboard on IBM Cloud. To do this task, open the hamburger menu on the left side of the IBM Cloud dashboard and select Observability.
3. On the Observability page, select Monitoring → Create instance under Monitoring. The following page prompts you for information that is needed to create the monitoring instance. Enter a meaningful name for the IBM Cloud Monitoring instance, and choose a deployment region, resource group, and a pricing plan.
4. After providing the information to create your IBM Cloud Monitoring instance, make sure that IBM platform metrics is set to Enable, and then select Create.
5. Browse back to your DBaaS service to enable monitoring. To enable monitoring on the DBaaS cluster, browse to the service management page and click the Observability tab.
6. Select the I agree with sending my platform metrics to IBM Cloud Monitoring with Sysdig to add monitoring. Meanwhile, your database content remains hyper protected checkbox, and then click Enable for monitoring, as shown in Figure 3-23.
Figure 3-23 Example of Enabling Monitoring for IBM Hyper Protect DBaaS: Enable for monitoring
Note: The region that is selected is the region that features monitored logging. This region is the same region to which the IBM Hyper Protect DBaaS instance was deployed.
Chapter 3. IBM Cloud Hyper Protect Database as a Service 227
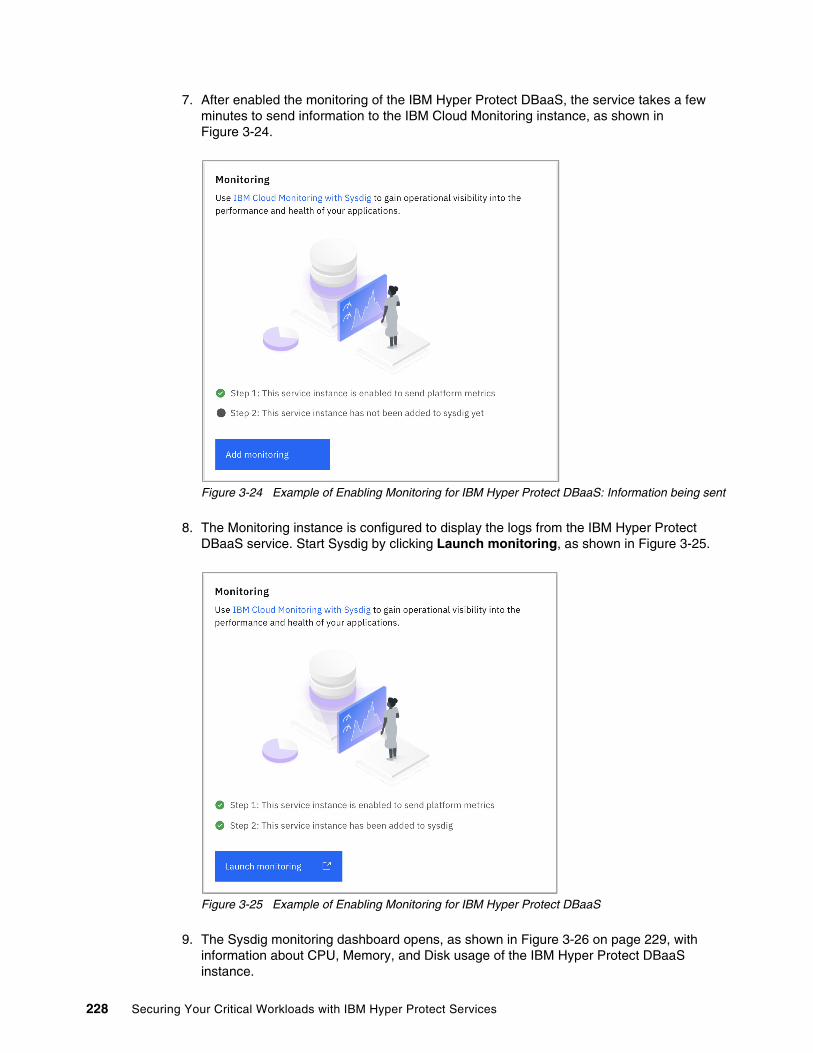
7. After enabled the monitoring of the IBM Hyper Protect DBaaS, the service takes a few minutes to send information to the IBM Cloud Monitoring instance, as shown in Figure 3-24.
Figure 3-24 Example of Enabling Monitoring for IBM Hyper Protect DBaaS: Information being sent
8. The Monitoring instance is configured to display the logs from the IBM Hyper Protect DBaaS service. Start Sysdig by clicking Launch monitoring, as shown in Figure 3-25.
Figure 3-25 Example of Enabling Monitoring for IBM Hyper Protect DBaaS
9. The Sysdig monitoring dashboard opens, as shown in Figure 3-26 on page 229, with information about CPU, Memory, and Disk usage of the IBM Hyper Protect DBaaS instance.
228 Securing Your Critical Workloads with IBM Hyper Protect Services

Figure 3-26 Example of IBM Cloud Monitoring Dashboard for IBM Hyper Protect DBaaS for PostegreSQL
3.4.4 Backing up and restoring
As described in 3.2, “Sizing and topology” on page 209, IBM Hyper Protect DBaaS includes automatic database backups in all availability zones every 24 hours by default. You can restore from those backups within the last 7 days by way of IBM Support.
In some cases, you want to make more backups manually to increase your data availability. For example, in a DR scenario, you might want to back up your database to IBM Cloud Object Storage in a different region and restore it on another database instance.
This section describes manual backup a database, with PostgreSQL and MongoDB, to IBM Object Storage and restoring the data to another database instance.
Before you back up your database to IBM Object Storage, you must create an IBM Object Storage instance in another IBM Cloud region (for example, in the UK) while your database is in Dallas, US. For more information about creating an IBM Object Storage instance, bucket, and service credentials, see Provisioning storage.
After you create an IBM Object Storage instance, you can use an object storage client to access the data that is in the storage bucket.
Note: In addition to IBM Cloud monitoring, external tools can be used, such as MongoDB Compass and pgAdmin, to connect to and interact with an IBM Hyper Protect DBaaS instance.
Note: Many third-party object storage clients are available. You can use any S3 client that you prefer. In this section, s3cmd is used to complete the object storage operations.
The s3cmd tool is available at the GitHub website.
Chapter 3. IBM Cloud Hyper Protect Database as a Service 229

Backing up a PostreSQL database to IBM Object StorageIn this example, a sample database sakila is in the Dallas region. Example 3-12 shows the command to back up the data to your local disk.
Example 3-12 Backing up database to your local disk
# pg_dump -h dbaas901.hyperp-dbaas.cloud.ibm.com -p 28154 -U db01 -d sakila -f sakila.dump
After the backup is done, you can use the S3 client to upload the data to the IBM Object Storage instance (see Example 3-13).
Example 3-13 Uploading data to IBM Object Storage
# s3cmd ls2019-12-05 16:18 s3://s3-bucket-database
# s3cmd put sakila.dump s3://s3-bucket-databaseupload: 'sakila.dump' -> 's3://s3-bucket-database/sakila.dump' [1 of 1] 3084689 of 3084689 100% in 0s 3.95 MB/s done
# s3cmd la2019-12-05 21:34 3084689 s3://s3-bucket-database/sakila.dump
When it is needed, you can download the file from the IBM Object Storage instance and restore the data to a database instance (see Example 3-14).
Example 3-14 Restoring data
# psql -h dbaas901.hyperp-dbaas.cloud.ibm.com -p 28154 -U db01 -d sakila -f sakila.dumpSETSETSETSETSET set_config------------
(1 row)
SETSETSETSETALTER SCHEMACREATE EXTENSIONCREATE EXTENSIONCREATE TYPEALTER TYPECREATE DOMAINALTER DOMAINCREATE FUNCTIONALTER FUNCTIONCREATE FUNCTIONALTER FUNCTION
230 Securing Your Critical Workloads with IBM Hyper Protect Services

CREATE FUNCTIONALTER FUNCTIONCREATE FUNCTION...setval-------- 32098(1 row)
setval-------- 16049(1 row)
setval-------- 2(1 row)
Backing up a MongoDB database to IBM Object StorageIn this example, a sample database that is named inventory is in the Dallas region. Example 3-15 shows the command to back up the data to your local disk.
Example 3-15 Backing up a MongoDB database
#mongodump --host "mongo/dbaas30.hyperp-dbaas.cloud.ibm.com:28032,dbaas31.hyperp-dbaas.cloud.ibm.com:28117,dbaas29.hyperp-dbaas.cloud.ibm.com:28242" --ssl --username mongo --authenticationDatabase admin --db inventory --sslCAFile cert_mongo.pem --out listing.dump
2019-12-06T16:06:19.681+0000writing inventory.listings to2019-12-06T16:06:20.846+0000[........................] inventory.listings 101/48377 (0.2%)2019-12-06T16:06:23.846+0000[###.....................] inventory.listings 7821/48377 (16.2%)2019-12-06T16:06:26.846+0000[########................] inventory.listings 16459/48377 (34.0%)2019-12-06T16:06:29.846+0000[############............] inventory.listings 24890/48377 (51.5%)2019-12-06T16:06:32.846+0000[################........] inventory.listings 33463/48377 (69.2%)2019-12-06T16:06:35.846+0000[####################....] inventory.listings 41847/48377 (86.5%)2019-12-06T16:06:37.742+0000[########################] inventory.listings 48377/48377 (100.0%)2019-12-06T16:06:37.742+0000done dumping inventory.listings (48377 documents)
After the backup is complete, you can use the S3 client to upload the data to IBM Object Storage, as shown in Example 3-13 on page 230.
Chapter 3. IBM Cloud Hyper Protect Database as a Service 231

When it is needed, you can download the files from IBM Object Storage and restore the data to a database instance, as shown in Example 3-16.
Example 3-16 Restoring data to a MongoDB database
# mongorestore --host "mongo/dbaas30.hyperp-dbaas.cloud.ibm.com:28032,dbaas31.hyperp-dbaas.cloud.ibm.com:28117,dbaas29.hyperp-dbaas.cloud.ibm.com:28242" --ssl --username mongo --authenticationDatabase admin --db inventory_new --sslCAFile cert_mongo.pem listing.dump/inventory
2019-12-06T16:22:53.585+0000the --db and --collection args should only be used when restoring from a BSON file. Other uses are deprecated and will not exist in the future; use --nsInclude instead2019-12-06T16:22:53.585+0000building a list of collections to restore from listing.dump/inventory dir2019-12-06T16:22:53.627+0000reading metadata for inventory_new.listings from listing.dump/inventory/listings.metadata.json2019-12-06T16:22:53.674+0000restoring inventory_new.listings from listing.dump/inventory/listings.bson2019-12-06T16:22:56.142+0000[####....................] inventory_new.listings 49.6MB/275MB (18.1%)2019-12-06T16:22:59.142+0000[#########...............] inventory_new.listings 111MB/275MB (40.4%)2019-12-06T16:23:02.142+0000[###############.........] inventory_new.listings 178MB/275MB (64.9%)2019-12-06T16:23:05.142+0000[#####################...] inventory_new.listings 247MB/275MB (89.7%)2019-12-06T16:23:06.691+0000[########################] inventory_new.listings 275MB/275MB (100.0%)2019-12-06T16:23:06.692+0000no indexes to restore2019-12-06T16:23:06.692+0000finished restoring inventor_new.listings (48377 documents)2019-12-06T16:23:06.692+0000done
3.5 Security and compliance
Data at rest and data in transit of IBM Hyper Protect DBaaS is encrypted by a dedicated Hardware Security Module (HSM) by default. The entire database environment is a secure enclave.
The data is encrypted on a Federal Information Processing Standard (FIPS) 140-2 Level 4-certified HSM, which is the highest level of security in the industry. Access to the service occurs over HTTPS, which is the service that uses Transport Layer Security (TLS) 1.2 protocol to encrypt data in transit. Therefore, no one else, including IBM Cloud administrators, can access the data in your databases in the cloud without keys. Only Environment Log information is included outside of a secure enclave for the IBM Support team.
The IBM Hyper Protect DBaaS service features the following industry and security compliance certifications:
� FIPS 140-2 Level 4� General Data Protection Regulation (GDPR)
232 Securing Your Critical Workloads with IBM Hyper Protect Services

� ISO 27001, 27017, and 27018� Health Insurance Portability and Accountability Act (HIPPA)
For more information about IBM Cloud regulatory compliance, see IBM Cloud compliance programs.
3.6 Use case: Encrypting databases with your keys protected
The data in the IBM Hyper Protect DBaaS service on IBM Cloud is pervasively encrypted with HSM by default by randomly generated keys. The IBM Hyper Protect DBaaS service supports scenarios of Keep Your Own Key (KYOK) and Bring Your Own Key (BYOK).
Therefore, you can use IBM Cloud Hyper Protect Crypto Services to create, add, and manage encryption keys and associate the keys with your IBM Hyper Protect DBaaS service instances to encrypt your databases. In that way, you can control your encryption keys.
To integrate IBM Hyper Protect Crypto Services and IBM Hyper Protect DBaaS, complete the following steps:
1. Create an instance of IBM Hyper Protect Crypto Services.
2. In the IBM Hyper Protect Crypto Services instance, create or import a root key.
3. Grant authorization to IBM Hyper Protect DBaaS instances by using the IBM Hyper Protect Crypto Services with IAM in your account:
a. From the menu toolbar, click Manage → Access (IAM).b. In the side navigation, click Authorizations.c. Click Create.d. In the Source service menu, select Hyper Protect DBaaS for MongoDB.e. In the Source service instance menu, select All service instances.f. In the Target service menu, select Hyper Protect Crypto Services.g. In the Target service instance menu, select the service instance to authorize.h. Enable the Reader role.i. Click Authorize.
Chapter 3. IBM Cloud Hyper Protect Database as a Service 233
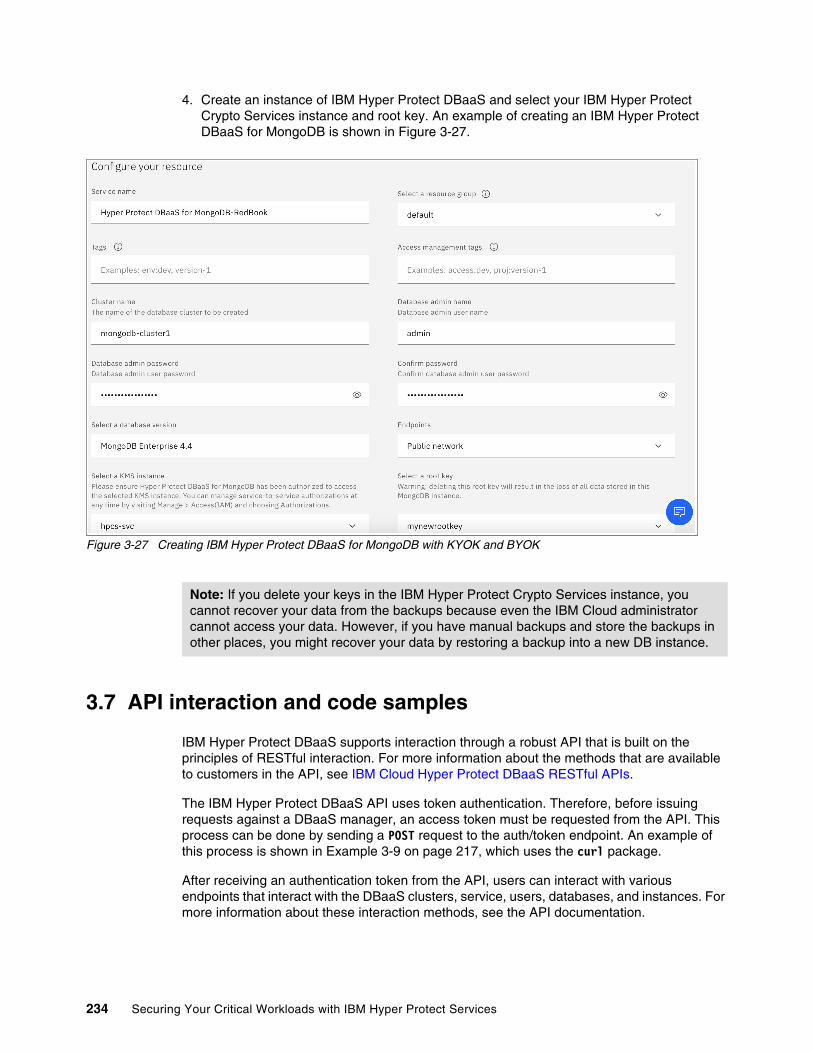
4. Create an instance of IBM Hyper Protect DBaaS and select your IBM Hyper Protect Crypto Services instance and root key. An example of creating an IBM Hyper Protect DBaaS for MongoDB is shown in Figure 3-27.
Figure 3-27 Creating IBM Hyper Protect DBaaS for MongoDB with KYOK and BYOK
3.7 API interaction and code samples
IBM Hyper Protect DBaaS supports interaction through a robust API that is built on the principles of RESTful interaction. For more information about the methods that are available to customers in the API, see IBM Cloud Hyper Protect DBaaS RESTful APIs.
The IBM Hyper Protect DBaaS API uses token authentication. Therefore, before issuing requests against a DBaaS manager, an access token must be requested from the API. This process can be done by sending a POST request to the auth/token endpoint. An example of this process is shown in Example 3-9 on page 217, which uses the curl package.
After receiving an authentication token from the API, users can interact with various endpoints that interact with the DBaaS clusters, service, users, databases, and instances. For more information about these interaction methods, see the API documentation.
Note: If you delete your keys in the IBM Hyper Protect Crypto Services instance, you cannot recover your data from the backups because even the IBM Cloud administrator cannot access your data. However, if you have manual backups and store the backups in other places, you might recover your data by restoring a backup into a new DB instance.
234 Securing Your Critical Workloads with IBM Hyper Protect Services

The examples from the documentation pages were created by using the curl command. However, the API also can be wrapped by other languages, such as Python, to interact with the DBaaS REST API. The example from this GitHub repository provides basic wrapping options for some of the DBaaS API endpoints by using Python 3 and the Requests package.
3.7.1 Cloning the GitHub example Python code
The example code from GitHub can be cloned from this repository. Example 3-17 shows the git command that is used.
Example 3-17 Cloning the GitHub example repository
$ git clone https://github.com/IBMRedbooks/SG248469-Securing-your-critical-workloads-with-IBM-Hyper-Protect-Services.gitCloning into 'SG248469-Securing-your-critical-workloads-with-IBM-Hyper-Protect-Services'...remote: Enumerating objects: 3, done.remote: Counting objects: 100% (3/3), done.remote: Compressing objects: 100% (2/2), done.remote: Total 3 (delta 0), reused 0 (delta 0), pack-reused 0Unpacking objects: 100% (3/3), done.
3.7.2 Setting up a Python virtual environment with requests
After cloning the repository from GitHub, you can initialize a Python virtual environment to keep an installation of Python separate, as shown in Example 3-18.
Example 3-18 Setting up a Python virtual environment
$ python3 -m venv venv$ source venv/bin/activate(venv) $ pip install requestsRequirement already satisfied: requests in ./venv/lib/python3.9/site-packages (2.25.1)Requirement already satisfied: idna<3,>=2.5 in ./venv/lib/python3.9/site-packages (from requests) (2.10)Requirement already satisfied: certifi>=2017.4.17 in ./venv/lib/python3.9/site-packages (from requests) (2020.12.5)Requirement already satisfied: urllib3<1.27,>=1.21.1 in ./venv/lib/python3.9/site-packages (from requests) (1.26.4)Requirement already satisfied: chardet<5,>=3.0.2 in ./venv/lib/python3.9/site-packages (from requests) (4.0.0)
A virtual environment can be created by using many methods, which can be used instead of this example. After setting up the environment for the example code, open the variables.py file in the repository to input the cluster ID, IBM Cloud API Key, and the DBaaS manager IP address and port for the region to which your cluster is deployed.
Note: This example app was created to connect and run in IBM Cloud Hyper Protect DBaaS for MongoDB.
Chapter 3. IBM Cloud Hyper Protect Database as a Service 235
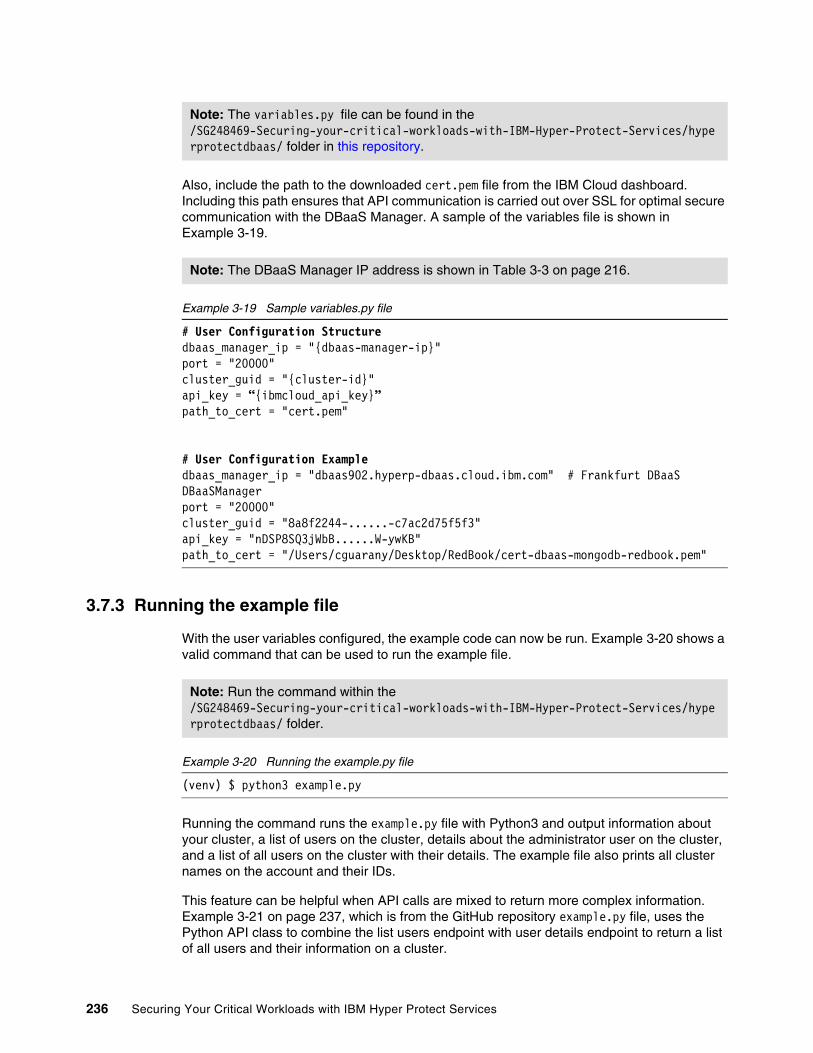
Also, include the path to the downloaded cert.pem file from the IBM Cloud dashboard. Including this path ensures that API communication is carried out over SSL for optimal secure communication with the DBaaS Manager. A sample of the variables file is shown in Example 3-19.
Example 3-19 Sample variables.py file
# User Configuration Structuredbaas_manager_ip = "{dbaas-manager-ip}"port = "20000"cluster_guid = "{cluster-id}"api_key = “{ibmcloud_api_key}”path_to_cert = "cert.pem"
# User Configuration Exampledbaas_manager_ip = "dbaas902.hyperp-dbaas.cloud.ibm.com" # Frankfurt DBaaS DBaaSManagerport = "20000"cluster_guid = "8a8f2244-......-c7ac2d75f5f3"api_key = "nDSP8SQ3jWbB......W-ywKB"path_to_cert = "/Users/cguarany/Desktop/RedBook/cert-dbaas-mongodb-redbook.pem"
3.7.3 Running the example file
With the user variables configured, the example code can now be run. Example 3-20 shows a valid command that can be used to run the example file.
Example 3-20 Running the example.py file
(venv) $ python3 example.py
Running the command runs the example.py file with Python3 and output information about your cluster, a list of users on the cluster, details about the administrator user on the cluster, and a list of all users on the cluster with their details. The example file also prints all cluster names on the account and their IDs.
This feature can be helpful when API calls are mixed to return more complex information. Example 3-21 on page 237, which is from the GitHub repository example.py file, uses the Python API class to combine the list users endpoint with user details endpoint to return a list of all users and their information on a cluster.
Note: The variables.py file can be found in the /SG248469-Securing-your-critical-workloads-with-IBM-Hyper-Protect-Services/hyperprotectdbaas/ folder in this repository.
Note: The DBaaS Manager IP address is shown in Table 3-3 on page 216.
Note: Run the command within the /SG248469-Securing-your-critical-workloads-with-IBM-Hyper-Protect-Services/hyperprotectdbaas/ folder.
236 Securing Your Critical Workloads with IBM Hyper Protect Services

Example 3-21 Code that returns a list of all users and their details
cluster_users = dbaas_manager.user_list(cluster_id=cluster_guid).json()['users']all_users_with_details = []for user in cluster_users: response = dbaas_manager.user_show( cluster_id=cluster_guid, user_id=f"{user['auth_db']}.{user['name']}" ) all_users_with_details.append(response.json())print(all_users_with_details)
The examples from this folder are a brief demonstration on how Python can be used to write a wrapper around the DBaaS APIs to be used within programs or automation.
Chapter 3. IBM Cloud Hyper Protect Database as a Service 237

238 Securing Your Critical Workloads with IBM Hyper Protect Services

Chapter 4. IBM Cloud Hyper Protect Virtual Servers
This chapter introduces IBM Cloud Hyper Protect Virtual Servers.
This chapter includes the following topics:
� Introducing IBM Cloud Hyper Protect Virtual Servers
� IBM Cloud Hyper Protect Virtual Servers use cases
� Sizing
� Public cloud service instantiation
� Administration and operations
4
© Copyright IBM Corp. 2020, 2022. All rights reserved. 239

4.1 Introducing IBM Cloud Hyper Protect Virtual Servers
IBM Cloud Hyper Protect Virtual Servers is the industry’s first customer-managed LinuxONE based virtual servers offering in the public cloud. The offering gives clients complete authority over their workloads, and it ensures confidentiality of code, data, and business IP within a secure environment. This solution allows a client’s public cloud to use IBM LinuxONE, the industry’s most secure enterprise server for Linux-based workloads.
IBM Cloud Hyper Protect Virtual Servers includes the following benefits:
� Run workloads and protect sensitive data, code, and business IP through built-in data at rest and runtime encryption.
� Ensure security and confidentiality through industry compliance and certifications.
� Easily provision, manage, maintain, and monitor instances in the IBM Cloud by using a standard UI.
� No IBM Z hardware and skills are required. IBM Z technology is accessed without having to purchase, install, and maintain the required hardware.
4.2 IBM Cloud Hyper Protect Virtual Servers use cases
The following IBM Cloud Hyper Protect Virtual Servers use cases are described:
� Digital asset custody
Financial technology (fintech) start-ups are rapidly upending the established financial services industry by innovating on traditional and blockchain banking services. Institutional investors, crypto-hedge funds, exchanges, token issuance platforms, private banking, Wall Street titans, and others started using digital assets for lending, depository, escrow, and payments services.
This new financial infrastructure is built on a foundation of institutional digital asset custody. IBM Hyper Protect Virtual Servers offer a global, standardized, resilient, and compliant custody service for the safekeeping of institutional digital asset investments. In a highly regulated industry with valuable, digitized assets, security is a top priority.
This solution provides all the security without sacrificing scale or performance. Concurrently, it is important for fintech companies and their establishment competitors to remain innovative and competitive in this changing market, which makes cloud adoption inevitable. Clients need a solution that is resilient, compliant, and secure because of cloud security policies and best practices that are also enforced at the hardware level.
IBM Cloud Hyper Protect Virtual Servers provide the highest level of security at the hardware level and can be adopted by fintech companies to grow and innovate with the cloud without worrying about the security of their data.
Note: This chapter focuses on the public cloud offering. For more information about IBM Hyper Protect Virtual Servers on-premises, see Chapter 5, “IBM Hyper Protect Virtual Servers on-premises” on page 253.
240 Securing Your Critical Workloads with IBM Hyper Protect Services

� Migrating monolithic applications to the cloud
For many companies, migrating business-critical applications to the cloud is hindered by fears around security, privacy, and regulation. Companies spent decades hardening the security around their on-premises data and workloads, so the idea of trusting a third-party organization to manage business and mission-critical applications was out the question.
Many clients in regulated industries, such as government, banking, healthcare, and telecommunications, require highly secure compute resources to meet data privacy and geo-and industry-specific regulations. This reason is why so many companies migrated only their supporting applications to a public cloud, but did not touch their critical applications.
For example, in the US healthcare industry, the Health Insurance Portability and Accountability Act (HIPAA) is the primary law that covers the collection, use, exchange, and protection of patient information. Although most (if not all) public cloud providers are actively working to make their platforms HIPAA-compliant, steep penalties and potentially dangerous results for patients because of a breach slowed public cloud adoption for critical applications in the industry. HIPAA is one of many industry certifications that IBM Hyper Protect Virtual Servers supports.
IBM Hyper Protect Virtual Servers enable healthcare companies to move their critical workloads and applications to the cloud while maintaining on-premises level security, privacy, and compliance.
� LinuxONE clients who want to use IBM Cloud for development, testing, and backup
IBM LinuxONE users who are familiar with the platform and understand its strengths around security, resiliency, and availability are often uncertain about the use of a different platform (especially a public cloud) for workloads that are typically run on LinuxONE. However, cloud platforms feature unmatched ability to scale across multiple geographies to provide benefits that clients cannot usually find in an on-premises server infrastructure. The combination of that level of horizontal agility with the LinuxONE unmatched dynamic vertical scaling of cores, memory, and I/O, and the security benefits of the hardware creates the ideal host for development and testing, backups, and innovation in the cloud.
IBM Cloud Hyper Protect Virtual Servers are ideal for LinuxONE clients looking for cost efficient ways of developing and testing, hosting disaster recovery (DR), and experimenting with new capabilities in the cloud.
4.3 Sizing
IBM Hyper Protect Virtual Servers provides different plans. The Free Plan offers a service instance that is deleted after 30 days. The pricing plans configuration options are shown in Table 4-1.
Table 4-1 The pricing plans options for IBM Hyper Protect Virtual Servers
Plan vCPU Memory Storage boot Storage data
Free One vCPU 2 GB 25 GB 25 GB
Entry One vCPU 4 GB 25 GB 75 GB
Small Two vCPUs 8 GB 25 GB 75 GB
Medium Four vCPUs 16 GB 25 GB 75 GB
Chapter 4. IBM Cloud Hyper Protect Virtual Servers 241

4.4 Public cloud service instantiation
The IBM Cloud Hyper Protect Virtual Servers service has different options that are available for service instantiation through the following methods of interaction:
� Web interface (GUI)� IBM Cloud Command-Line Interface (CLI)
4.4.1 Prerequisites
The IBM Hyper Protect Virtual Servers service shares a set of prerequisites with the other IBM Cloud Hyper Protect Services. To begin the service instantiation process, it is assumed that the following prerequisites are met:
� IBM Cloud Account and access permission.
� Supported browser. For more information, see What are the IBM Cloud prerequisites?
� The following items are installed:
– IBM Cloud CLI. For more information, see Installing the stand-alone IBM Cloud CLI.– IBM Cloud Database as a Service (DBaaS) CLI plug-in. For more information, see
Installing the DBaaS CLI components (by operating system).
� Have a Secure Shell (SSH) key pair ready, which you need for creating and connecting to your virtual server instance. For more information, see Generating SSH keys.
4.4.2 Web interface
This section describes creating an IBM Hyper Protect Virtual Servers service instance on IBM Cloud by using the web interface (GUI). It is assumed that you meet the prerequisites that are described in 4.4.1, “Prerequisites” on page 242.
Complete the following steps:
1. Log in to your IBM Cloud account at https://cloud.ibm.com/login.
2. From the IBM account dashboard, click Catalog in the upper menu toolbar, as shown in Figure 4-1.
Figure 4-1 IBM Cloud Dashboard
3. Enter Hyper Protect Virtual Server into the search toolbar and choose the card that is shown in Figure 4-2 on page 243.
Note: It is also possible to use CLI commands through the IBM Cloud shell directly on the browser. For more information, see Getting started with IBM Cloud Shell.
242 Securing Your Critical Workloads with IBM Hyper Protect Services

Figure 4-2 Catalog search results for IBM Hyper Protect Virtual Server
4. After selecting which database offering to provision, choose a deployment data center on the service creation page.
Note: IBM Cloud offers multiple data centers across the globe to host your IBM Hyper Protect Virtual Servers service instance, such as Dallas (dal10, dal12, or dal13), Washington DC (wdc04, wdc06, or wdc 07) Frankfurt (fra02, fra04, or fra05), or Sydney (syd01, syd04, or syd05).
Chapter 4. IBM Cloud Hyper Protect Virtual Servers 243

5. Choose the location, pricing plan, instance name, resource group, and SSH public key, as shown in Figure 4-3. Then, click Create to create an instance.
Figure 4-3 Deploying an IBM Hyper Protect Virtual Servers instance in IBM Cloud
6. Check the instance status in the Resource list page, as shown in Figure 4-4. It takes several minutes to complete the deployment. After the deployment is done, the status shows as provisioned.
Figure 4-4 IBM Cloud Hyper Protect Virtual Servers instance status
244 Securing Your Critical Workloads with IBM Hyper Protect Services

4.4.3 IBM Cloud Command-Line Interface
This section describes instantiating an IBM Hyper Protect Virtual Servers service instance on IBM Cloud by using the IBM Cloud CLI plug-in. It is assumed that the 4.4.1, “Prerequisites” on page 242 are met.
Logging in to the IBM Cloud CLIBefore issuing a create service command, authenticate the IBM Cloud CLI by issuing the following example command:
ibmcloud login --sso -a https://cloud.ibm.com
For more information and reference material about all options for authentication, see ibmcloud login.
The CLI prompts for a one-time authorization code that can be opened in the default browser or by copying the link into a supported browser, as shown in the output in Example 4-1.
Example 4-1 Authentication output from IBM Cloud CLI by using SSO
Get One Time Code from https://identity-2.us-south.iam.cloud.ibm.com/identity/passcode to proceed.Open the URL in the default browser? [Y/n] > nOne Time Code >Authenticating...OK
Creating a service instanceTo create a service instance by using the IBM Cloud CLI, run the ibmcloud hpvs instance-create command, as shown in Example 4-2.
Example 4-2 IBM Cloud CLI syntax to create a service
~$ ibmcloud hpvs instance-create NAME PLAN LOCATION [(--ssh SSH-KEY | --ssh-path SSH-KEY-PATH)] [(--rd REGISTRATION-DEFINITION | --rd-path REGISTRATION-DEFINITION-PATH)] [-i IMAGE-TAG] [-e ENV-CONFIG1 -e ENV-CONFIG2 ...] [-g RESOURCE-GROUP-ID] [-t TAG1 -t TAG2 ...] [--outbound-only]
PARAMETERSNAME
Is the name of your instance.
PLANIs the name or ID of your service plan, for example, the plan name for a Free Plan is lite-s. The possible values for plan name are: lite-s, entry, small, and medium.
LOCATIONIs the target location to create the service instance. The possible values are: dal10, dal12, dal13, fra02, fra04, fra05, syd01, syd04, syd05, wdc04, wdc06, wdc07.
Chapter 4. IBM Cloud Hyper Protect Virtual Servers 245
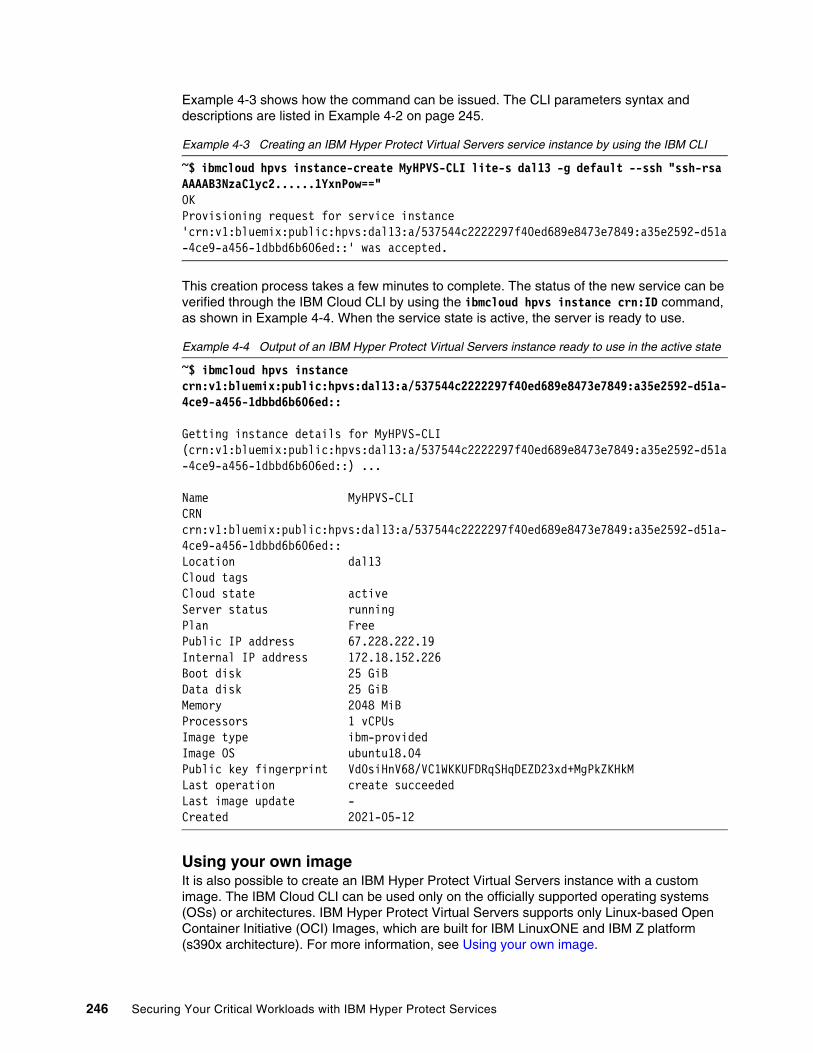
Example 4-3 shows how the command can be issued. The CLI parameters syntax and descriptions are listed in Example 4-2 on page 245.
Example 4-3 Creating an IBM Hyper Protect Virtual Servers service instance by using the IBM CLI
~$ ibmcloud hpvs instance-create MyHPVS-CLI lite-s dal13 -g default --ssh "ssh-rsa AAAAB3NzaC1yc2......1YxnPow=="OKProvisioning request for service instance 'crn:v1:bluemix:public:hpvs:dal13:a/537544c2222297f40ed689e8473e7849:a35e2592-d51a-4ce9-a456-1dbbd6b606ed::' was accepted.
This creation process takes a few minutes to complete. The status of the new service can be verified through the IBM Cloud CLI by using the ibmcloud hpvs instance crn:ID command, as shown in Example 4-4. When the service state is active, the server is ready to use.
Example 4-4 Output of an IBM Hyper Protect Virtual Servers instance ready to use in the active state
~$ ibmcloud hpvs instance crn:v1:bluemix:public:hpvs:dal13:a/537544c2222297f40ed689e8473e7849:a35e2592-d51a-4ce9-a456-1dbbd6b606ed::
Getting instance details for MyHPVS-CLI (crn:v1:bluemix:public:hpvs:dal13:a/537544c2222297f40ed689e8473e7849:a35e2592-d51a-4ce9-a456-1dbbd6b606ed::) ... Name MyHPVS-CLI CRN crn:v1:bluemix:public:hpvs:dal13:a/537544c2222297f40ed689e8473e7849:a35e2592-d51a-4ce9-a456-1dbbd6b606ed:: Location dal13 Cloud tags Cloud state active Server status running Plan Free Public IP address 67.228.222.19 Internal IP address 172.18.152.226 Boot disk 25 GiB Data disk 25 GiB Memory 2048 MiB Processors 1 vCPUs Image type ibm-provided Image OS ubuntu18.04 Public key fingerprint Vd0siHnV68/VC1WKKUFDRqSHqDEZD23xd+MgPkZKHkM Last operation create succeeded Last image update - Created 2021-05-12
Using your own imageIt is also possible to create an IBM Hyper Protect Virtual Servers instance with a custom image. The IBM Cloud CLI can be used only on the officially supported operating systems (OSs) or architectures. IBM Hyper Protect Virtual Servers supports only Linux-based Open Container Initiative (OCI) Images, which are built for IBM LinuxONE and IBM Z platform (s390x architecture). For more information, see Using your own image.
246 Securing Your Critical Workloads with IBM Hyper Protect Services

Use the IBM Cloud CLI to create an IBM Hyper Protect Virtual Servers instance with a custom image, as shown in Example 4-5.
Example 4-5 Creating an IBM Hyper Protect Virtual Servers service instance by using a custom image
~ $ ibmcloud hpvs instance-create myServerName lite-s dal13 --rd-path "/MyRegistrationDefinitions/registration.json.asc" -i latest
4.5 Administration and operations
In this section, we describe how IBM Hyper Protect Virtual Servers supports various levels of administration oversight for the service.
4.5.1 Managing an IBM Hyper Protect Virtual Servers service
Managing an IBM Hyper Protect Virtual Servers service can be done by using the IBM Cloud Portal dashboard under the Services section on the Resource List page. On this page, users can use the actions menu by clicking the hamburger menu that is at the right of the targeted service instance.
Clicking the name of an IBM Hyper Protect Virtual Servers service brings administrators to the service dashboard for that selected service. This management interface enables the use of more fine-tuned options for administrative management. The dashboard shows the sections Manage and Getting Started, as shown in Figure 4-5.
Figure 4-5 Example of the IBM Hyper Protect Virtual Servers dashboard
Chapter 4. IBM Cloud Hyper Protect Virtual Servers 247

ManageThe Manage page shows the status of the service, server configuration (Processors, RAM, Boot disk, and Data disk), information about the plan and data creation, service location, and information about how to connect to the virtual server, as shown in Figure 4-6.
Figure 4-6 Example of the IBM Hyper Protect Virtual Servers Manage section
Getting startedThe Getting started page provides an overview with the requirements and some guidelines about how to use the IBM Hyper Protect Virtual Servers service.
Changing the name of a serviceFrom the Resource List page, account administrators can select the actions menu and select the Edit Name option to update the name of the service.
Under the service dashboard for an IBM Hyper Protect Virtual Servers service, administrators can click the service instance actions menu to the right of the overview page and select Rename Service to edit the service name.
248 Securing Your Critical Workloads with IBM Hyper Protect Services

Deleting a serviceFrom the Resource List page, account administrators can select the actions menu and choose the Delete option to remove the service from your account. When a service is deleted, all data that is associated with the IBM Hyper Protect Virtual Servers service is gone and permanently inaccessible.
4.5.2 Managing IBM Hyper Protect Virtual Servers instances
After creating an IBM Hyper Protect Virtual Servers instance, it is necessary to connect to the server and perform all the management tasks, such as create, delete, and modify users, and install applications. The IBM Cloud Hyper Protect Virtual Servers Dashboard in the Manage page, which is shown in Figure 4-6 on page 248, has information about how to make this connection.
Connecting to a virtual serverYou can get the virtual server’s public and internal IP addresses from the instance details page and access the virtual server by using SSH, as shown in Example 4-6.
Example 4-6 Accessing the IBM Hyper Protect Virtual Servers instance
# ssh [email protected]
The authenticity of host '169.63.212.116 (169.63.212.116)' can't be established.Elliptic Curve Digital Signature Algorithm (ECDSA) key fingerprint is SHA256:QSCObQURhcY8CJLlTKna89tvIuI6R5zzYmYFsME6x4U.Are you sure you want to continue connecting (yes/no/[fingerprint])? yesWarning: Permanently added '169.63.212.116' (ECDSA) to the list of known hosts.Unauthorized access to this machine is prohibited.Welcome to Ubuntu 18.04.5 LTS (GNU/Linux 4.15.0-99-generic s390x)
* Documentation: https://help.ubuntu.com * Management: https://landscape.canonical.com * Support: https://ubuntu.com/advantage
The programs that are included with the Ubuntu system are free software;the exact distribution terms for each program are described in theindividual files in /usr/share/doc/*/copyright.
Ubuntu comes with ABSOLUTELY NO WARRANTY, to the extent permitted byapplicable law.
Unauthorized access to this machine is prohibited.You have mail.root@49f81d370bfd:~#
4.5.3 Topology
This section describes the following topics:
� High availability and disaster recovery
� Backup
� Securing your data in IBM Hyper Protect Virtual Servers
Chapter 4. IBM Cloud Hyper Protect Virtual Servers 249

High availability and disaster recoveryThe IBM Cloud Hyper Protect Virtual Servers service runs on a highly available (HA) and reliable IBM LinuxONE infrastructure with no single point of failure. However, a single virtual server can still have an outage in a disaster scenario. Therefore, deploy your workload in active-active mode across multiple virtual server instances, which are running in different data centers (for example, Dallas 10, Dallas 12, and Dallas 13). This setup ensures an operable workload with fault tolerance on the underlying virtual servers.
Example workloads that you can deploy this way are databases (PostgreSQL, MongoDB, or MySQL) or applications with no local state.
If the latency requirements or types of workload do not allow you to run an active-active configuration across data centers, you can perform regular backups from one virtual server to another instance in a different data center. In a disaster, the amount of lost data depends on the frequency of the backups and the time to restore a backup. For more information, see High availability and disaster recovery.
BackupBack up the data from business-relevant virtual servers (primary virtual servers) to recovery virtual server instances. A virtual server that is created with IBM Hyper Protect Virtual Servers is configured with two disks: One for the OS and the other one for data (mounted as /data/). One possible way to back up the data disk is to set up a cron job, which copies the content of the disk to a recovery virtual server instance. Choose the appropriate backup frequency for the workload. For example, for a maximum loss of data changes of 1 hour, add the text file (for example, cron_backup) that is shown in Example 4-7 to /etc/cron.hourly.
Example 4-7 Backup command to be used in the cron job
#!/bin/sh
rsync -a /data/ <public HPVS IP or internal HPVS IP>:/data
It is necessary to exchange the SSH keys so that the cron job script can run. How this task works depends on the backup server's SSH server configuration. With the default configuration, you must place the public SSH key as a line in the $HOME/.ssh/authorized_keys file of the user that is used on the backup server. To make rsync use the private SSH key, this key must be placed in the cron jobs user's $HOME/.ssh with a default name, for example, for RSA keys, use the name id_rsa. Other options are to configure the SSH client for this user or to adjust the rsync command.
If needed, quiesce the application before the backup operation. If the primary and the recovery virtual servers are in one region, use the internal IP address for the backup.
To maintain multiple backups outside virtual server instances that are created with IBM Hyper Protect Virtual Servers, it is possible to package the data into a compressed file, encrypt it with GnuPG, and store it in IBM Cloud Object Storage.
Also, install the application to the recovery virtual server instance to enable a quick failover.
Finally, always access the application that should be recoverable by using a URL that is pointing to the virtual server IP address. Never access the IP address directly.
In a recovery scenario, you can adjust the URL to point to the recovery virtual server.
For more information, see High availability and disaster recovery.
250 Securing Your Critical Workloads with IBM Hyper Protect Services

Securing your data in IBM Hyper Protect Virtual ServersTo ensure that you can securely manage your data when you use IBM Cloud Hyper Protect Virtual Servers, it is important that you know exactly what data is stored and encrypted and how you can delete any personal data. All data that is stored on IBM Hyper Protect Virtual Servers disks is automatically encrypted, and the encryption key is stored on a secure enclave.
Data at restThe data that you store in IBM Hyper Protect Virtual Servers is encrypted securely at rest by using a randomly generated key, which the underlying IBM Secure Service Container (SCC) technology manages. Use the Linux CLI tools to delete data in a virtual server.
Data in flightThe IBM LinuxONE infrastructure components for the IBM Hyper Protect Virtual Servers service are colocated with the data centers, which means that these components are placed in the same data centers as the IBM Cloud infrastructure but have their own network setup, which affects the network connection, as shown in Figure 4-7. For more information, see Securing your data in Hyper Protect Virtual Servers.
Figure 4-7 IBM Hyper Protect Virtual Servers architecture network isolation
Chapter 4. IBM Cloud Hyper Protect Virtual Servers 251

252 Securing Your Critical Workloads with IBM Hyper Protect Services

Chapter 5. IBM Hyper Protect Virtual Servers on-premises
This chapter introduces the IBM Hyper Protect Services on-premises offering.
This chapter includes the following topics:
� Introducing IBM Hyper Protect Virtual Servers on-premises
� IBM Hyper Protect Virtual Servers key features
� IBM Hyper Protect Virtual Servers use cases
� IBM Hyper Protect Virtual Servers architecture overview
� A sample use case: IBM Hyper Protect Virtual Servers for secure storage
5
© Copyright IBM Corp. 2020, 2022. All rights reserved. 253

5.1 Introducing IBM Hyper Protect Virtual Servers on-premises
IBM Hyper Protect Virtual Servers on-premises (referred to as IBM Hyper Protect Virtual Servers) is a virtualization platform that protects and hosts Linux container workloads on IBM Z and IBM LinuxONE servers throughout their lifecycle, build, management, and deployment phases. This solution delivers the security that is needed to protect mission-critical applications in hybrid multicloud deployments.
The IBM Hyper Protect Virtual Servers offering provide an encrypted environment (data at-rest and data in-flight) with peer-to-peer and peer-to-host isolation that protects container applications from access by using hardware and operating system (OS) administrator credentials whether access is accidental or malicious or internal or external to an organization.
These servers ensure that your applications can be deployed and managed from trusted sources without providing the possibility for the infrastructure team to access the data, secrets, or application.
IBM Cloud Hyper Protect Virtual Servers address the security concerns of regulated enterprises. To provision one of these Linux Virtual Servers in the public cloud, the user must provide a public Secure Shell (SSH) key, which means that only the user with the corresponding private key part can access it. There is no technical possibility for an administrator of the cloud to get access to the data inside the virtual server.
The same operational principle is true with IBM Hyper Protect Virtual Servers on-premises. Built-in workload isolation, tamper protection from privileged user access, and encryption of all data at rest and in flight provides data protection and security in your own data center without sacrificing vertical scalability or performance.
IBM Hyper Protect Virtual Servers enable the following users:
� Developers to securely build their applications in a trusted environment with integrity.
� IT infrastructure providers to manage the servers and virtualized environment where the applications are deployed without accessing those applications or their sensitive data.
� Application users to validate that those securely built applications originate from a trusted source by integrating this validation into their own auditing processes.
� Chief Information Security Officers (CISOs) to be confident that their data is protected and private from internal and external threats.
IBM Hyper Protect Virtual Servers includes the following key benefits:
� Protect workloads from internal threats.
IBM Hyper Protect Virtual Servers is the evolution of the IBM Secure Service Container (SCC) for IBM Cloud Private. As with IBM SSC technology, IBM Hyper Protect Virtual Servers protect your workloads from internal and external threats. On-premises, the enhanced capabilities provide developers with security throughout the entire development lifecycle.
� Apply cloud-native application development.
Empower developers with familiar tools and an automated, continuous software delivery pipeline to develop in a private, public, or hybrid cloud. IBM Hyper Protect Services provide secure cloud services for on- and off-premises deployments.
254 Securing Your Critical Workloads with IBM Hyper Protect Services

� Simplify management.
Integrate IBM Z and LinuxONE into a hybrid, multicloud environment and manage everything from behind the firewall. IBM Hyper Protect Virtual Servers reduces user management of low-level execution environment and uses Enterprise Assurance Level (EAL) 5+ certified logical partitions (LPARs) for peer isolation. Although cloud and infrastructure providers cannot access your sensitive data, they can manage images by using application programming interfaces (APIs).
� Extend encryption everywhere.
Advanced data encryption, key management, and tamper-resistance incorporates security and compliance as a part of DevSecOps rather than adding in security measures after the fact. Application secrets are encrypted, which ensures that the confidentiality of the application is protected. Cloud providers and system administrators cannot access data, which protects against insider threats and malicious attacks.
� Maintain image integrity.
With IBM Hyper Protect Virtual Servers, developers can securely build source files, starting with the containerized application. Solution developers can keep image integrity, knowing that it contains only what is intended, and maintain confidence in the deployed application’s origin.
� Build securely with trusted Continuous Integration and Continuous Delivery (CI/CD).
All images can be encrypted and securely built with a trusted CI/CD flow. Developers can build images and ensure that users can validate their origin, which removes the possibility of a back-door introduction during the build process. Signed container images inherit security without any code changes, which prevent access to data while it is being processed in the database.
5.2 IBM Hyper Protect Virtual Servers key features
An IBM Hyper Protect Virtual Servers solution is deployed to an IBM SSC based LPAR. It uses IBM SSC technology to integrate security directly into the solution.
Although security policies and best practices are still a fundamental piece of enterprise security, a technological layer of security bolsters the enterprise’s ability to protect its sensitive data and workloads, even from threat vectors such as internal threats and leaked privileged credentials.
IBM Hyper Protect Virtual Servers expand on the security benefits of IBM SSCs. This expansion creates a secure enclave to host the most secure data and applications by deploying into the virtual machine (VM), with no need to modify the code of the application itself.
Chapter 5. IBM Hyper Protect Virtual Servers on-premises 255

IBM Hyper Protect Virtual Servers use technical assurance to protect data instead of operational assurance (see Figure 5-1).
Figure 5-1 Operational assurance versus technical assurance
Operational assurance uses trust, visibility, and controls, which mean that you trust that a service provider or internal administrator will not allow unauthorized access to your data and they promise to not access your data. With audit logging, you can control and identify bad behavior, but that is always after the data is compromised.
With technical assurance, you use technology so that administrators cannot allow access to your data for unauthorized use when the data is hosted in the cloud or on-premises. You can be assured that your own data is concealed from everybody else, including whoever is hosting the service. With IBM Hyper Protect Virtual Servers, it is not technically possible for IBM or other parties to access your data, which introduces the idea of confidential computing.
The following features are described in this section:
� Trusted CI/CD� GREP11� User management� Bring Your Own Image (BYOI)� Encryption
5.2.1 Trusted CI/CD
CI/CD is a core principle of DevOps, and one of the main drivers behind cloud computing.
Continuous integration (CI) is a DevOps practice in which each developer integrates their work with the main branch of code regularly and consistently (preferably once a day, or many times a day). Continuous delivery (CD) is another DevOps practice that focuses on delivering any validated changes to code (updates, bug fixes, and even new features) to users as quickly and safely as possible.
CD picks up where CI ends. It automates the delivery of applications to selected infrastructure environments. It also ensures automated pushing of code changes to different environments, such as development, testing, and production.
256 Securing Your Critical Workloads with IBM Hyper Protect Services

This practice of automated pushing and delivering of new code opens the door for vulnerabilities that might pass unnoticed. What occurs when a malicious actor gains access to the build process or repository from which the code is automatically updated?
Secure BuildThe first step to ensure that the code or application that is running in your virtual server is safe is to ensure that the build process is not vulnerable. Without the proper security at build, application developers can deliberately or accidentally introduce vulnerabilities into the source. Application builders also can build alternative source code and introduce harmful artifacts.
IBM SSC technology contains features that alleviate this risk, such as static code scanning to identify common coding errors, and image scanning to identify whether an image contains a component that is known to be vulnerable.
IBM Hyper Protect Virtual Servers contains a component that is called the Secure Build Server (SBS), which is packaged as a container and loaded into the SSC by using a command-line interface (CLI) tool. By using the securebuild command, you can build, tag, sign, and push images to a trusted repository.
For more information about Trusted CI/CD and Secure Build, see 7.2, “Trusted Continuous Integration and Continuous Delivery: Building and deploying containers securely” on page 325.
Repository RegistrationThe Secure Build feature works hand-in-hand with the Repository Registration feature. From a Secure Build, containerized application images are signed with GNU Privacy Guard (GPG) keys when published, and verified again when it is deployed. The signing keys are generated within the Secure Build process and your private keys are never revealed. Only the images that are generated by using the Secure Build procedure can be uploaded to the organization’s container repository and installed onto the SSC partitions. The repository and the containerized images are protected with different keys on different stages.
The SSC partition pulls images from only the registered repository, and it creates IBM Hyper Protect Virtual Servers instances of those images on the partition. Registration is simple with a few standard commands.
For more information about the commands that are required to register and use your repository with IBM Hyper Protect Virtual Servers images, see IBM Hyper Protect Virtual Servers.
For more information about Repository Registration, see 7.5, “Bring Your Own Image (deploying your applications securely)” on page 341.
5.2.2 Enterprise PKCS #11 over gRPC
IBM Hyper Protect Virtual Servers provides Enterprise Public Key Cryptography Standards (PKCS) #11 over gRPC (GREP11) containers for crypto operations, such as key generation, encryption and decryption, and data wrapping and unwrapping. With the GREP11 containers, you can integrate your application with the asymmetric (public and private) key pairs that are generated by the Hardware Security Modules (HSMs) on the IBM Z or LinuxONE servers. GREP11 is a stateless interface for cryptographic operations on cloud.
Several algorithms are supported by the GREP11 virtual server, like Schnorr, Ed25519, BIP32, or SLIP-0010.
Chapter 5. IBM Hyper Protect Virtual Servers on-premises 257

For more information about GREP11, see 7.4, “Enterprise Public Key Cryptography Standards #11 over gRPC” on page 337 or IBM Hyper Protect Virtual Servers 1.2.x.
5.2.3 User management
One of the primary concerns that IBM Hyper Protect Virtual Servers mitigates are attack vectors from internal threats. Historically, enterprise security is focused on building walls around the organization to protect from external threats. However, recent studies show that most data leaks and breaches are the result of malicious actors inside the organization, or the leaking of those individuals’ internal credentials. Firewalls, remediation of vulnerable software, and strict security policies do not do much to prevent an employee with root access to the system from stealing sensitive data.
On traditional cloud platforms (public cloud and on-premises), typically a single superuser (cluster administrator or similar role) has full access to the solution stack, from hardware to the containerized applications that are running in the environment.
With IBM Hyper Protect Virtual Servers, administrative responsibilities are split between various roles, and each role accesses only the parts of the environment for which that role is responsible. If each administrative role is granted to separate individuals in the organization, one person cannot access all of the data that is present in the VM.
For more information about user management, see 7.1, “User roles in IBM Hyper Protect Virtual Servers” on page 324.
5.2.4 Bring Your Own Image
IBM Hyper Protect Virtual Servers allow the deployment of images from only trusted, registered repositories into the hosting appliance. This feature prevents users from loading potentially harmful images from external repositories that are not officially trusted by the organization. Because this feature is part of IBM SSC technology and the hosting appliance, registered repositories are not a new feature.
However, a limitation with registered repositories was that only IBM can create the necessary JSON registration files. IBM Hyper Protect Virtual Servers introduces BYOI, a new feature that allows users to create their own JSON registration files so organizations can decide for themselves which registry they want to trust, and then deploy images from that registry.
For more information about BYOI, see 7.5, “Bring Your Own Image (deploying your applications securely)” on page 341.
5.2.5 Encryption
IBM Hyper Protect Virtual Servers provide various security advantages by using the IBM SSC as the solution’s hosting environment.
IBM SSC supports the deployment of software container technology without requiring application changes to use the security capabilities. To gain these security capabilities, a user must deploy only their workload into the SSC.
258 Securing Your Critical Workloads with IBM Hyper Protect Services

This feature is especially useful considering the regulatory focus on protecting critical data from internal and external threats, as shown in the following examples:
� The infrastructure and data are protected against access and abuse by root users, system administrator credentials, and other privileged user access.
� Infrastructure management organizations can manage the physical IT infrastructure without having visibility into the user’s applications and customer data.
As a system or appliance administrator who manages the underlying infrastructure, you can download the appliance, deploy it, and then make it available on their system for their developers.
A developer can focus on creating their containerized solution and deploy it into this environment, and still know that their solution is not visible to the system administrator.
Various security mechanisms are applied to protect the data in the IBM Hyper Protect Virtual Servers. For more information, see 5.5, “A sample use case: IBM Hyper Protect Virtual Servers for secure storage” on page 266.
For more information about the cryptographic capabilities of the SSC web server and other solution components, see IBM Documentation.
5.3 IBM Hyper Protect Virtual Servers use cases
As enterprises move their data to the cloud, concerns around security, privacy, and regulation inhibit many enterprises from moving their sensitive data and workloads. As the probability of a breach rises every day, so too does the costs that are associated with breaches: downtime, fines, and damage to brand image.
IBM Hyper Protect Virtual Servers incorporates the security capabilities of SSCs with the cloud or on-premises so that stakeholders can be comfortable knowing that their data and workloads are protected by the IBM LinuxONE platform.
IBM Hyper Protect Virtual Servers also provide a way to deploy a virtual server in an SSC to ensure confidentiality of data and code that is run within that virtual server. No external access to data is possible, even for privileged users, such as administrators. Only the user who provisioned the virtual server with the public keys can access the virtual server.
A virtual server with this high level of security is applicable to use cases across businesses and workloads of all types for on-premises and public cloud environments. The following sections describe a few examples of IBM Hyper Protect Virtual Servers that are in use around the world.
An organization might be inclined to keep all of their data and workloads on their own hardware, in their own data center, or managed by their own people for many reasons, including the following examples:
� Compliance
Many regulated industries, such as financial services, healthcare, and government, have strict requirements about where data is located and who can access it. Many countries, states, and other levels of government have their own compliance standards that must also be met.
Chapter 5. IBM Hyper Protect Virtual Servers on-premises 259

� Protection of intellectual property
Some companies are not limited by compliance, but because of the sensitive nature of their data and intellectual property, they do not trust a third party to host it. Instead, they want to rely on themselves to manage the security and privacy responsibilities.
However, the need to keep data in-house does not need to be a reason to avoid cloud technology altogether. IBM Hyper Protect Virtual Servers can be integrated into an on-premises, private cloud infrastructure to gain all of the benefits of a cloud platform while retaining complete control of the data, security, and management.
IBM Hyper Protect Virtual Servers protect Linux workloads on IBM Z and LinuxONE throughout their lifecycle build management and deployment. This solution delivers the security that is needed to protect mission-critical applications in hybrid multi-cloud deployments.
Consider the following IBM Hyper Protect Virtual Servers on-premises use cases:
� Digital asset custody
In recent years, the video game industry transformed into an online and digital market instead of distributing physical copies of their games for consoles. This digital transformation means that the gaming industry is a prime candidate for a cloud platform.
A large gaming company wanted on-demand environments for their developers with easy integration into existing facilities, services instead of hardware purchases, and environmental control. The company tapped into IBM Hyper Protect Virtual Servers in a private cloud that is connected to customer facilities, which gives developers the needed environments while satisfying administrators’ requirement for control and visibility.
� Workload sensitivity
A financial services firm wanted a retail payment fraud prevention production environment. Because of workload sensitivity, the firm did not consider a public cloud an option. Its IT leaders wanted environmental control and security, bare metal database servers for performance, advanced storage features, and reliable, consistent pricing. IBM created three interconnected private clouds (two in North America and one in Europe), which provided the environments they needed and were close to their operations and customers.
� Simplified audibility
Audits are needed for certifications and trust. But with every audit, there is time and costs that are involved, and with growing businesses, the cost can rise exponentially in a regulated environment. With IBM Hyper Protect Virtual Servers and technical assurance, the whole group of administrators have no technical way to access the contents of a virtual server.
260 Securing Your Critical Workloads with IBM Hyper Protect Services

5.4 IBM Hyper Protect Virtual Servers architecture overview
Figure 5-2 shows the IBM Hyper Protect Virtual Servers on-premises architecture.
Figure 5-2 IBM Hyper Protect Virtual Servers on-premises architecture
The following components are part of the IBM Hyper Protect Virtual Servers on-premises solution:
� IBM Z or LinuxONE (Processor Resource/Systems Manager (PR/SM))
IBM Z and LinuxONE provide a Type1 hypervisor that allows multiple LPARs to share resources (such as CPU, I/O channels, and local area network (LAN) interfaces) with EAL5+ certified isolation from other workloads.
� SSC LPAR
A partition with LPAR-type SSC that is based on the SSC framework. It contains its own embedded OS, security mechanisms, and other features that are designed for simplifying the installation of appliances and securely hosting them.
� SSC
SSC is a container technology that is a runq-based, virtualized Docker container environment that provides containers isolation and data protection on top of the IBM Z or LinuxONE servers.
� Hosting appliance
A software appliance that supports REST API access to the resources on the SSC.
PR/SMSSC LPAR
Secure Service Container
Docker Engine
`
REST
Hosting ApplianceREST
ApplianceMonitoring
qemu qemu
VirtualServer
More Information on runQ repository : https://github.com/gotoz/runq
CLI
App User
Container
Secu
re S
ervi
ce C
onta
iner
for I
BM Z
C
loud
Priv
ate
Virtu
al S
erve
rs
Mon
itorin
g
Secu
re B
uild
Reg
istra
tion
File
s
qemu
VirtualServer
ApplianceMonitoring
kernel
VirtualServer
SecureBuild
qemu
kernel
VirtualServer
Grep11
Gre
p11
Command Line Interface
Runc instance
Source coderepository
runc runq runq runq runq
Qemu instance Runq instance
Application
kernelkernel
Chapter 5. IBM Hyper Protect Virtual Servers on-premises 261

� Docker Engine
Open-source containerization technology with workflows to build and containerize applications.
� runq
runq is a specialized Docker runtime environment that is used to create a dedicated Quick Emulator (QEMU) VM for each instantiated Docker image. It also provides a dedicated guest OS kernel for each of those QEMU VMs, which are later used as the runtime environment for workloads.
It is an open-sourced hypervisor-based Docker runtime environment, which is based on runc to run regular containerized images in a lightweight kernel-based virtual machine (KVM) or QEMU VM.
� runc
runc is a CLI tool for creating and running containers according to the Open Container Initiative (OCI) specification.
� IBM Hyper Protect Virtual Servers
IBM Hyper Protect Virtual Servers for on-premises provides a secure, virtualized infrastructure for private cloud deployments. It protects the entire lifecycle of critical Linux workloads during their build, deployment, and management on-premises.
� CLI tool
A management server or node where the CLI is available to manage the lifecycle operations of various containers that are deployed on IBM Hyper Protect Virtual Servers on-premises solution. It provides the following command set:
– Automate the base infrastructure of the IBM Cloud Private worker and proxy nodes by using the isolated VM image.
– Create and manage the IBM Hyper Protect Virtual Servers container.
– Securely build and publish your applications as containerized workloads.
– Deploy your containerized workloads to the SSC framework.
– Monitor IBM Hyper Protect appliance health, such as the usage of CPU, memory, disk, and uptime.
– Provide Enterprise PKCS #11 (EP11) interfaces for crypto operations, such as key generation, encryption, decryption, and data wrapping and unwrapping in EP11 over gRPC (GREP11) client applications.
� SBS
The container that provides an environment for building the application code from a Git-like source repository into a container image for s390x architecture. It signs the image by using the authentication keys, and then it publishes the image to the remote repository for later integration.
Figure 5-3 on page 263 shows the SBS.
262 Securing Your Critical Workloads with IBM Hyper Protect Services

Figure 5-3 Secure Build Server
� Repository
A repository is a set of containerized images. A repository can be shared by pushing it to a registry server. Different images in the repository can be labeled by using tags, for example, hpvsop-base.
� Registry
A registry is a hosted service that contains repositories of container images that respond to the Registry API, for example, Docker Hub.
� Registration files
A registration file is used to register the repository for authentication or validation reasons, such that a hosting appliance trusts that the image is authentic when pulled from the registry.
� BYOI
A base image of an IBM Hyper Protect Virtual Servers container that can be used to host customer application code. A customer can create and build an image by using this base image and application code that uses the BYOI capability that is provided in the IBM Hyper Protect Virtual Servers on-premises solution.
IBM Hyper Protect Virtual Servers
securebuild CLI commands
Secure Service Container
Docker EngineREST
REST
qemu
Secure Build Server
HPVS Base Image
kernel
b ildsecurebuildconfig
(securebuild.yaml)
REST
log
RepoReg
Manifest
src
img
runq
SBS ActionsBuildStatusUpdate
S3
Git APIcompatiblerepository
S3 APIcompatiblestorage
Docker notary
DockerHubAPIcompatiblerepository
Chapter 5. IBM Hyper Protect Virtual Servers on-premises 263

Figure 5-4 shows the BYOI registration files flow.
Figure 5-4 Bring Your Own Image
� hpvsop-base
The Docker image of the base IBM Hyper Protect Virtual Servers image without the SSH daemon.
� hpvsop-base-ssh
The Docker image of the base IBM Hyper Protect Virtual Servers image with the SSH daemon for debugging your application.
� Appliance monitoring
Monitoring images that help gather metrics, such as CPU, memory, disk, uptime, and load from the SSC. Two containers support monitoring appliance level metrics, such as CPU, memory, disk, up-time, and load from the SSC: One container operates on runq, and the other container operates on runc.
Figure 5-5 on page 265 shows the monitoring containers integration.
264 Securing Your Critical Workloads with IBM Hyper Protect Services

Figure 5-5 Monitoring containers integration
� PKCS #11 and EP11
PKCS #11 is a Public Key Cryptography Standard that defines a platform-independent API to cryptographic tokens, such as HSM and smart cards. EP11 is a library that is implemented by the Cryptographic Service Providers (CSP) back end.
� GREP11
GREP11 is a container (GREP11 container) that provides EP11 interfaces over gRPC, which communicates with HSM. This container provides interfaces for crypto operations, such as encrypt, decrypt, get mechanisms, wrap, and unwrap.
SSC LPAR
Secure Service Container
5.1 Get metrics
Docker Engine
runq
MonitoringContainer
runc
HostContainer
MonitoringClient
https
Chapter 5. IBM Hyper Protect Virtual Servers on-premises 265

Figure 5-6 shows the GREP11 integration architecture.
Figure 5-6 GREP11 integration architecture
5.5 A sample use case: IBM Hyper Protect Virtual Servers for secure storage
In a cloud-native environment, applications are deployed as microservices. Using stateless systems does not work well for applications that are prone to failure. To enable effective recovery from application failures, data persistence is necessary. To persist the data, system administrators must provision volumes that must be used by the applications for storage.
With more data, the responsibility of securing it also increases. System administrators must answer the following questions before configuring these data volumes:
� Where should the secondary volumes be stored?� How will the volumes be managed?� How are applications going to access these volumes?� Should the data be replicated or distributed storage?
Third-party software-defined storage (SDS) solutions are available that can help system administrators with challenges. But, how do you secure this environment? With more security in place, a chance of overdoing it is possible, which results in a complicated environment that is difficult to manage and troubleshoot.
While deploying any new applications, system administrators must ensure that enough security is in place to prevent unauthorized application deployment. With images built into Docker, a probability exists that those images might include vulnerable software.
SSC LPAR
Secure Service Container
ASIC
FPGA
DDR3
DDR3
DDR3
Battery
Backup RAM
Tamper
Circui
try
RNG
RTC
Flash
Flash
Crypto
Engine
sPP
C L2Cry
ptoEng
ines
Zcrypt (HSM
devicedriver)
HMC
Domain-2
HSM – Hardware Security Module
Zcrypt (HSM
devicedriver)
runqGrep11Container
Libep11library
runqHPVS2
Grep11clientapp
Domain-1
runqGrep11Container
Libep11library
runqHPVS1
Grep11clientapp
HSM to LPAR domain configuration
EP11 - gRPC EP11 - gRPC
runq runq runqrunq
Docker Engine
266 Securing Your Critical Workloads with IBM Hyper Protect Services

When new applications are deployed, a system administrator must answer the following questions:
� How secure is this application?� Is it going to make my platform vulnerable?� How can any unauthorized application be prevented from being deployed in my platform?� How can applications be prevented from accessing unauthorized directories?
When developers want to deploy a custom application in a private cloud, they must answer the following questions:
� Does the platform support custom applications? � How can the application be deployed in the cloud environment?� How it is going to be accessible by others?� Will it get enough resources?
IBM Hyper Protect Virtual Servers answers most of these questions through the following features:
� Because SSH is disabled, no user can log in to the LPAR, which is the host of these applications.
� Every Docker image must be signed and uploaded into the repository.
� Unsigned Docker images are not deployed into the LPAR.
� Developers can configure the required storage and CPU requirements for their application by using a configuration file. The IBM Hyper Protect Virtual Servers CLI uses this script to deploy the container.
� All containers that are deployed are runq containers as opposed to runc containers. The runc containers are a process that is running within a namespace, and runq containers are almost a VM.
� Users cannot mount any system directory into a container, so the host is secured against any unauthorized access and data leakage.
� Every image is associated with a repository definition file. These repository definition files are blueprints of runq containers. They contain information, such as the location of the image in repository and access credentials. Encrypting these files ensures the prevention of unnecessary data breaches.
� Monitoring servers enable system administrators to collect system-related data. Users can deploy the Prometheus server to publish the details.
� With features such as BYOI and SBS, customers can deploy their own custom images security. Also, unauthorized application deployment is prevented.
� GREP11 enables customers to take advantage of the hardware-accelerated support of crypto operations. At the time of writing, this feature enables developers and customers to manage keys and secrets securely.
The communication follows the gRPC standard along with the PKCS 11 standard for cryptographic operations. IBM Hyper Protect Virtual Servers makes it impossible to steal secrets and keys, and customers do not need to worry about the performance implications because of the cryptographic operation.
Chapter 5. IBM Hyper Protect Virtual Servers on-premises 267

5.5.1 Creating a Secure Storage Server in IBM Hyper Protect Virtual Servers
As described in 5.5, “A sample use case: IBM Hyper Protect Virtual Servers for secure storage” on page 266, in the world of cloud-native applications where microservices come and go, it is important to persist data for effective recovery. Various technologies exist in the marketplace that provide data persistence. For this solution, we use GlusterFS, which is a popular SDS solution that is used for managing volumes. It is open source in nature and enables system administrators to provision distributed, replicated, or distributed-replicated volumes.
Customers can build GlusterFS containers with glusterfs-server and glusterfs-client packages, sign the image, and host it in an image repository by using an SBS. Then, this image can be deployed in an IBM Hyper Protect Virtual Servers environment by using the hpvs-cli command, such as HPVS create.
Containers in an IBM Hyper Protect Virtual Servers environment are not typical Docker containers, and they are not VMs. For clarity, we say that they are virtual servers, which are little more than a Docker container, but a little less than a VM (see Figure 5-7).
Figure 5-7 Sample container
268 Securing Your Critical Workloads with IBM Hyper Protect Services

Because the GlusterFS server listens to port 24006 and 24007, applications can use GlusterFS client packages to communicate with the server and run volume management commands. Developers can write their own application to monitor the GlusterFS server by using API calls that use Python.
Chapter 5. IBM Hyper Protect Virtual Servers on-premises 269

270 Securing Your Critical Workloads with IBM Hyper Protect Services

Chapter 6. IBM Hyper Protect Virtual Servers on-premises installation
This chapter describes IBM Hyper Protect Virtual Servers on-premises prerequisites and installation.
This chapter includes the following topics:
� Planning and prerequisites for IBM Hyper Protect Virtual Servers on-premises
� Downloading the package to the management server
� Setting up the Secure Service Container LPAR
� Networking for IBM Hyper Protect Virtual Servers
� Installing the IBM Hyper Protect Virtual Servers CLI on the management server
� Configuring the IBM Hyper Protect Virtual Servers environment
� Public Cloud service instantiation
6
Note: For more information about IBM Hyper Protect Virtual Servers and IBM Secure Service Container (SCC) logical partitions (LPARs) see the following resources:
� IBM Documentation
� Secure Service Container User‘s Guide, SC28-7005.
© Copyright IBM Corp. 2020, 2022. All rights reserved. 271

6.1 Planning and prerequisites for IBM Hyper Protect Virtual Servers on-premises
In this section, we describe the requirements for IBM Hyper Protect Virtual Servers on-premises (which is referred to as IBM Hyper Protect Virtual Servers) installation. For a basic installation, you need:
� One Linux management server (x86 or s390x)� One IBM Secure Service Container (SSC) LPAR
As an overall guidance, the installation requires the following steps:
1. Download the IBM Hyper Protect Virtual Servers package to the management server.
2. Set up the SSC LPAR with a basic network and a master user ID.
3. Install and configure the appliance on the prepared SSC LPAR with the proper storage and network.
4. Install the IBM Hyper Protect Virtual Servers command-line interface (CLI) on the management server.
5. Build and deploy your virtual server containers.
Hardware requirements for the Linux management serverThe management server is used to download the IBM Hyper Protect Virtual Servers installation binary files and install the IBM Hyper Protect Virtual Servers CLI tool.
The minimal management server requirements are:
� Two or more x86 cores with at least 2.4 GHz or 1 Integrated Facility for Linux (IFL) on the mainframe
� 8 GB RAM
� 150 GB disk space
Hardware requirements for the Secure Service Container LPARAn SSC LPAR can be configured on the following IBM Z and LinuxONE systems:
� IBM z15™
� IBM z14®
� IBM LinuxONE III
� IBM Linux ONE Emperor II or IBM LinuxONE Rockhopper II
The following minimum hardware requirements must be met to deploy IBM Hyper Protect Virtual Servers services (one IBM Hyper Protect Virtual Servers container and one Secure Build container):
� 2 IFLs
� Container Hosting Foundation (#0104)
� 12 GB RAM
� 190 GB storage (50 GB for the hosting appliance, 100 GB in the storage pool for one IBM Hyper Protect Virtual Servers container, and 40 GB for one Secure Build container)
272 Securing Your Critical Workloads with IBM Hyper Protect Services
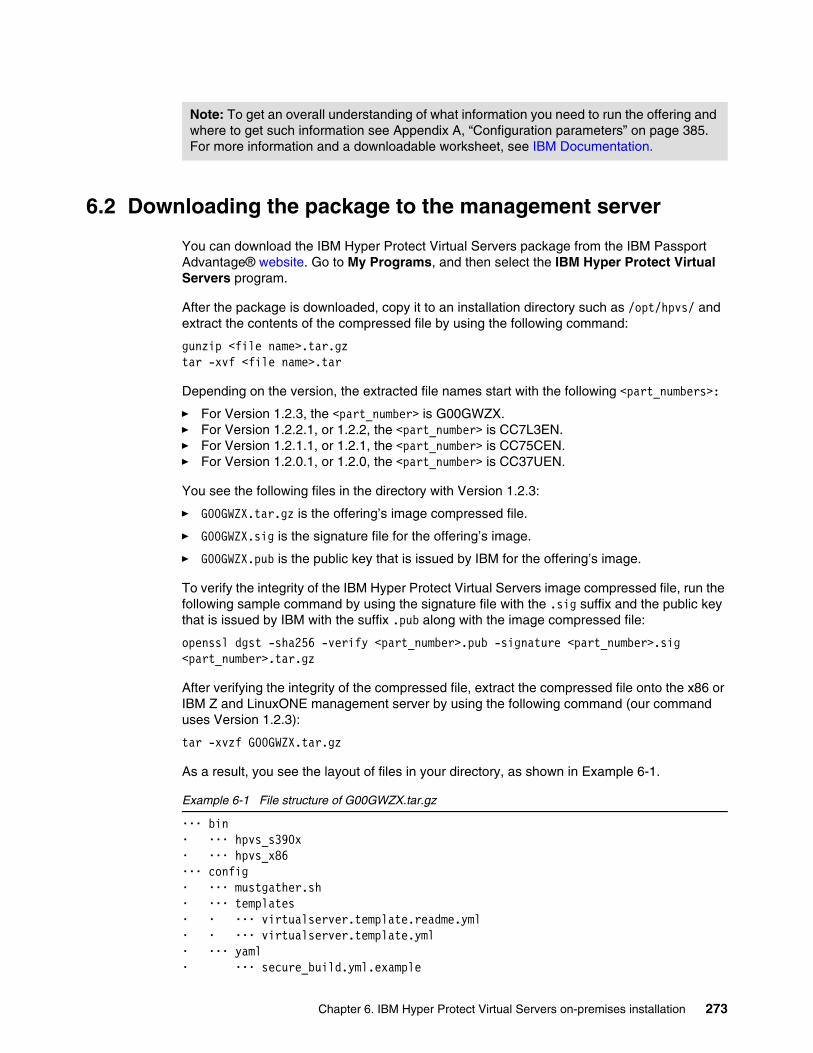
6.2 Downloading the package to the management server
You can download the IBM Hyper Protect Virtual Servers package from the IBM Passport Advantage® website. Go to My Programs, and then select the IBM Hyper Protect Virtual Servers program.
After the package is downloaded, copy it to an installation directory such as /opt/hpvs/ and extract the contents of the compressed file by using the following command:
gunzip <file name>.tar.gztar -xvf <file name>.tar
Depending on the version, the extracted file names start with the following <part_numbers>:
� For Version 1.2.3, the <part_number> is G00GWZX.� For Version 1.2.2.1, or 1.2.2, the <part_number> is CC7L3EN.� For Version 1.2.1.1, or 1.2.1, the <part_number> is CC75CEN.� For Version 1.2.0.1, or 1.2.0, the <part_number> is CC37UEN.
You see the following files in the directory with Version 1.2.3:
� G00GWZX.tar.gz is the offering’s image compressed file.
� G00GWZX.sig is the signature file for the offering’s image.
� G00GWZX.pub is the public key that is issued by IBM for the offering’s image.
To verify the integrity of the IBM Hyper Protect Virtual Servers image compressed file, run the following sample command by using the signature file with the .sig suffix and the public key that is issued by IBM with the suffix .pub along with the image compressed file:
openssl dgst -sha256 -verify <part_number>.pub -signature <part_number>.sig <part_number>.tar.gz
After verifying the integrity of the compressed file, extract the compressed file onto the x86 or IBM Z and LinuxONE management server by using the following command (our command uses Version 1.2.3):
tar -xvzf G00GWZX.tar.gz
As a result, you see the layout of files in your directory, as shown in Example 6-1.
Example 6-1 File structure of G00GWZX.tar.gz
••• bin• ••• hpvs_s390x• ••• hpvs_x86••• config• ••• mustgather.sh• ••• templates• • ••• virtualserver.template.readme.yml• • ••• virtualserver.template.yml• ••• yaml• ••• secure_build.yml.example
Note: To get an overall understanding of what information you need to run the offering and where to get such information see Appendix A, “Configuration parameters” on page 385. For more information and a downloadable worksheet, see IBM Documentation.
Chapter 6. IBM Hyper Protect Virtual Servers on-premises installation 273

• ••• secure_create.yml.example• ••• vs_configfile_readme.yml• ••• vs_grep11.yml• ••• vs_hpvsopbasessh.yml• ••• vs_hpvsopbase.yml• ••• vs_monitoring.yml• ••• vs_regfiledeployexample.yml• ••• vs_securebuild.yml••• envcheck.sh••• G00GWZX.tar.gz••• images• ••• CollectdHost.tar.gz• ••• hpcsKpGrep11_runq.tar.gz• ••• HpvsopBaseSSH.tar.gz• ••• HpvsopBase.tar.gz• ••• Monitoring.tar.gz• ••• SecureDockerBuild.tar.gz••• License• ••• ** all Languges files **• ••• non_ibm_license• ••• notices••• mustgather.sh••• readme.txt••• secure-service-container-for-hpvs.appliance.3.17.0.img.gz••• setup.sh••• SSC4ICP• ••• config• • ••• ICPIsolatedvm.tar.gz• ••• hpvs-cli-installer.docker-image.tar• ••• readme.txt••• version
The red marked image file is used to install the IBM Hyper Protect Virtual Servers appliance on the SSC LPAR, as described in step 3 on page 278.
For more information about the individual files, see Downloading IBM Hyper Protect Virtual Servers.
6.3 Setting up the Secure Service Container LPAR
In this section, we show how to set up SSC partitions for using with IBM Hyper Protect Virtual Servers. This section describes the following topics:
� Creating the Secure Service Container LPAR� Installing the IBM Hyper Protect Virtual Servers appliance� Configuring storage disks on the hosting appliance
Note: To get an overall understanding of what information you need to run the offering and where to get such information, see Appendix A, “Configuration parameters” on page 385. For more information and a downloadable worksheet, see Planning for the environment.
274 Securing Your Critical Workloads with IBM Hyper Protect Services

6.3.1 Creating the Secure Service Container LPAR
To create and manage SSC partitions, you can use specific tasks on the Hardware Management Console (HMC) for a host system running either in standard mode or with Dynamic Partition Manager (DPM) enabled.
In this book, we use a system running in standard mode. For more information about DPM mode, see Creating the Secure Service Container partition.
Complete the following steps:
1. Open the Customize/Delete Activation Profiles task, and then select SSC mode on the Customize Image Profiles General page, as shown in Figure 6-1.
Figure 6-1 SSC mode
2. Configure the processor requirements on the Processor page (minimum of two IFLs), specify the partition security options on the Security page, and specify the amount of storage that is required on the Storage page (minimum of 12 GB).
3. Provide or modify any cryptographic controls on the Crypto page.
Chapter 6. IBM Hyper Protect Virtual Servers on-premises installation 275

4. On the SSC page, ensure that the Secure Service Container installer option is selected under Boot selection if you are creating the partition for the first time, and then provide values for the default Master user ID (we use root), password, and IP address of the network adapter for the SSC LPAR, as shown in Figure 6-2.
Figure 6-2 SSC Boot selection, master user ID, and network
5. Click Save to save the changes and wait for the partition to be created.
6. Select the image of the SSC partition, and start the SSC LPAR by using the Activate task.
6.3.2 Installing the IBM Hyper Protect Virtual Servers appliance
Complete the following tasks:
1. Open the web interface of the SSC installer by using the IP address and master user ID that you created in step 4 (see Figure 6-3 on page 277).
276 Securing Your Critical Workloads with IBM Hyper Protect Services

Figure 6-3 SSC installer login
2. On the main page, click the plus (+) icon to install image files from your local disk (Figure 6-4). The page display changes to the Install Software Appliance page.
Figure 6-4 SSC Installer main page
Chapter 6. IBM Hyper Protect Virtual Servers on-premises installation 277
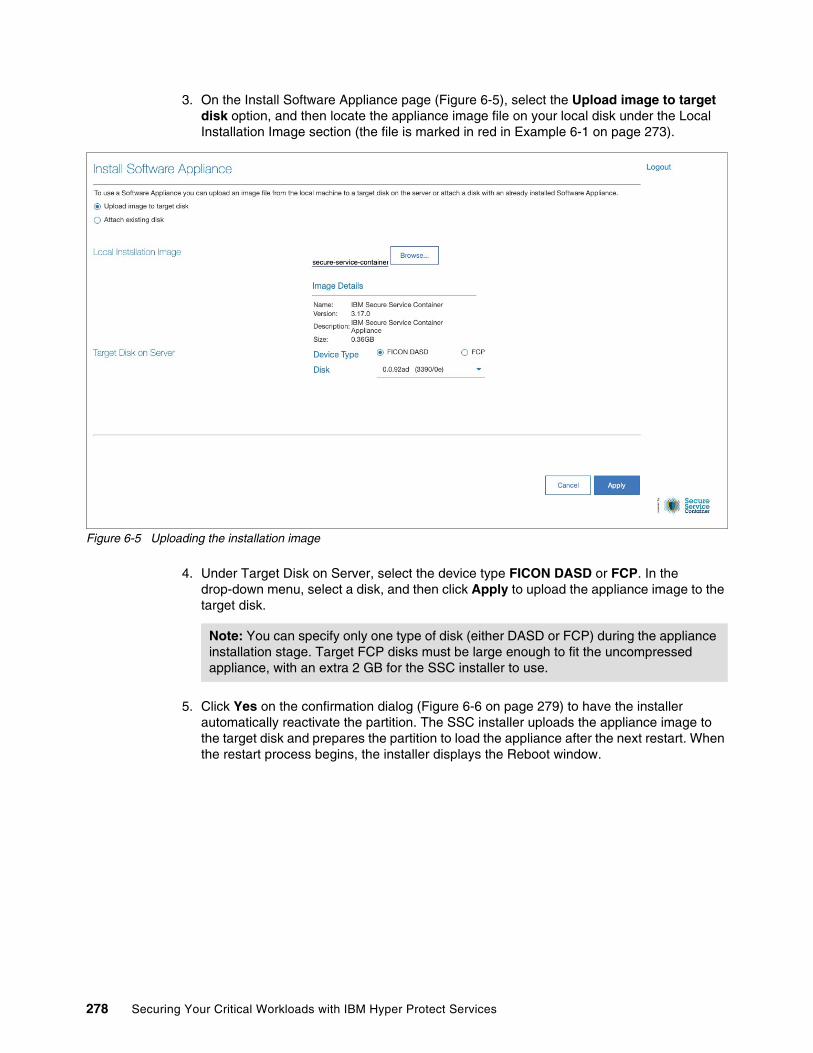
3. On the Install Software Appliance page (Figure 6-5), select the Upload image to target disk option, and then locate the appliance image file on your local disk under the Local Installation Image section (the file is marked in red in Example 6-1 on page 273).
Figure 6-5 Uploading the installation image
4. Under Target Disk on Server, select the device type FICON DASD or FCP. In the drop-down menu, select a disk, and then click Apply to upload the appliance image to the target disk.
5. Click Yes on the confirmation dialog (Figure 6-6 on page 279) to have the installer automatically reactivate the partition. The SSC installer uploads the appliance image to the target disk and prepares the partition to load the appliance after the next restart. When the restart process begins, the installer displays the Reboot window.
Note: You can specify only one type of disk (either DASD or FCP) during the appliance installation stage. Target FCP disks must be large enough to fit the uncompressed appliance, with an extra 2 GB for the SSC installer to use.
278 Securing Your Critical Workloads with IBM Hyper Protect Services

Figure 6-6 Confirm Appliance Installation
6. When the restart completes, you are redirected to the appliance page. Accept the self-signed certificate for the SSL connection, and log in to the SSC user interface by using the master user ID and password.
6.3.3 Configuring storage disks on the hosting appliance
Complete the following steps:
1. Log in to the user interface of the SSC by using the IP address of the SSC.
2. In the navigation pane, click the Storage icon.
Note: To get an overall understanding of what information you need to run the offering and where to get such information, see Appendix A, “Configuration parameters” on page 385. For more information and a downloadable worksheet, see Planning for the environment.
Chapter 6. IBM Hyper Protect Virtual Servers on-premises installation 279

3. In the LV Data Pool area, click the plus sign (+) to add a disk to the LV Data Pool (Figure 6-7).
Figure 6-7 Storage configuration
280 Securing Your Critical Workloads with IBM Hyper Protect Services

4. In the Available Devices area, select the disks that you want to add, and click the >> icon to move the selected disks to the Assigned Devices list (Figure 6-8).
Figure 6-8 Selecting the available devices
Chapter 6. IBM Hyper Protect Virtual Servers on-premises installation 281

5. Verify the disks and click Apply (Figure 6-9).
Figure 6-9 Verifying the assigned disks
6. The Confirm Add disk page opens (Figure 6-10 on page 283).
282 Securing Your Critical Workloads with IBM Hyper Protect Services

Figure 6-10 Confirming adding a disk
7. Review your selection and click Yes to proceed.
Attention: The disk will be formatted with this step.
Chapter 6. IBM Hyper Protect Virtual Servers on-premises installation 283

8. You can view the status of the attachment and formatting of the disks (Figure 6-11). Depending on the size of the disks, the format takes some time. As an example, it takes 300 GB disks about 30 minutes to format.
Figure 6-11 Format in progress
9. A green indicator appears when the attachment and formatting of the disks are complete. You can view the details of the disks that you added in the LV Data Pool area, as shown in Figure 6-12.
Figure 6-12 Format disk complete
284 Securing Your Critical Workloads with IBM Hyper Protect Services

The volumes for IBM Hyper Protect Virtual Servers containers and Secure Build containers can be created and allocated from this storage pool when those containers are created on the appliance.
6.4 Networking for IBM Hyper Protect Virtual Servers
IBM Hyper Protect Virtual Servers support Open Systems Adapter (OSA) for networking on IBM Z and LinuxONE servers that are configured for the SSC LPAR. HiperSockets are now also supported by IBM Hyper Protect Virtual Servers V1.2.3 or later. You can configure the network devices for the hosting appliance by using the appliance user interface.
The containers on the SSC partitions communicate through the Ethernet-type or VLAN-type connections over the network devices that are bound to Open Systems Adapter-Express (OSA-Express) devices, or HiperSockets.
If you want the IBM Hyper Protect Virtual Servers container on the SSC partition to be accessed by external services, you must configure two network devices with one for internal communication, and another one for external access. You can configure one network device to each of the OSA-Express devices on the SSC partitions, or multiple network devices on one OSA-Express device. You also can achieve internal network communication between IBM Hyper Protect Virtual Servers within the same IBM Z or LinuxONE system by configuring a HiperSockets device.
6.4.1 Networking to the hosting appliance (SSC LPAR)
The network interface is a software driver component of the operating system (OS) that uses OSA or HiperSockets for networking. The following types of network interfaces are supported:
� Ethernet
This interface works in promiscuous mode and forwards all packets to and from the switch. Whenever any other LPAR broadcasts a packet for address resolution (ARP), that LPAR interacts with this interface type. As a result, the network can experience slow periods if many LPARs are connected to the same switch and running concurrent start and stop operations frequently.
� VLAN
This interface supports Ethernet packets that are tagged with a VLAN for network isolation. In addition, IP ranges may be reused by using a different VLAN ID.
� Bond
This interface can be used for failover scenarios. A bond interface might be connected to more than one OSA, and if one OSA is not functioning, the bond interface steers network traffic to another OSA, which enables the failover scenario.
Chapter 6. IBM Hyper Protect Virtual Servers on-premises installation 285

Figure 6-13 shows the network architecture.
Figure 6-13 Network architecture
6.4.2 Networking inside the hosting appliance (networking for IBM Hyper Protect Virtual Servers containers through the CLI)
IBM Hyper Protect Virtual Servers is based on a Docker (runq) engine. Therefore, it often uses a Docker bridge interface to communicate between IBM Hyper Protect Virtual Servers containers and components that are outside of the LPAR. The Docker bridge interface can be created by the IBM Hyper Protect Virtual Servers CLI on top of a network interface of the SSC LPAR (Ethernet, VLAN, or Bond).
The following types of Docker bridge interfaces are available:
� Bridge
This type of Docker bridge interface is used when virtual machines (VMs) want to communicate among themselves and VMs can access data that is outside of the LPAR through NAT. However, the problem with this type of networking is that we cannot communicate with VMs from outside of the same network that our VMs use. To access the VM’s services, we must use a Port Address Translation (PAT) to access VMs from outside of the network by using the LPAR’s network (not directly by using the VM's network).
� macvlan
This type of Docker bridge interface is used to communicate with VMs in the LPAR from outside the LPAR by using the same network that the VM acquired. In this case, the VM’s MAC address is registered to the OSA and switch and it directly falls under the switch network.
Figure 6-14 on page 287 shows the networking in the hosting appliance.
286 Securing Your Critical Workloads with IBM Hyper Protect Services

Figure 6-14 Networking in the hosting appliance
Setting up the internal network is described in 6.6.1, “Configuring the internal network” on page 300.
6.4.3 Creating an Ethernet interface
In this section, we describe how to create an Ethernet interface.
To create an Ethernet interface, complete the following steps:
1. In your appliance UI (https://<ssc_lpar_ip>), click the Networks section.
2. Click the plus (+) icon and select Ethernet, as shown in Figure 6-15.
Figure 6-15 Network Connections window
Note: To get an overall understanding of what information that you need to run the offering and where to get such information, see Appendix A, “Configuration parameters” on page 385. For more information and a downloadable worksheet, see Planning for the environment.
Chapter 6. IBM Hyper Protect Virtual Servers on-premises installation 287

A window opens in which you are prompted for the network information, as shown in Figure 6-16.
Figure 6-16 Entering network information
3. In the General tab, add the following information (see Figure 6-17 on page 289):
– Network Device: Add any device in the range that is allocated to your OSA. Select from the available devices in the list (for example, 0.0.1e29).
– Connection Name: Automatically populated as enccw0.0.f1e29 (information can be added to the name for usability, such as “external“).
– Port: 0.
– Device Details: List extra information like Device Type, CHPID, and Device Numbers.
288 Securing Your Critical Workloads with IBM Hyper Protect Services
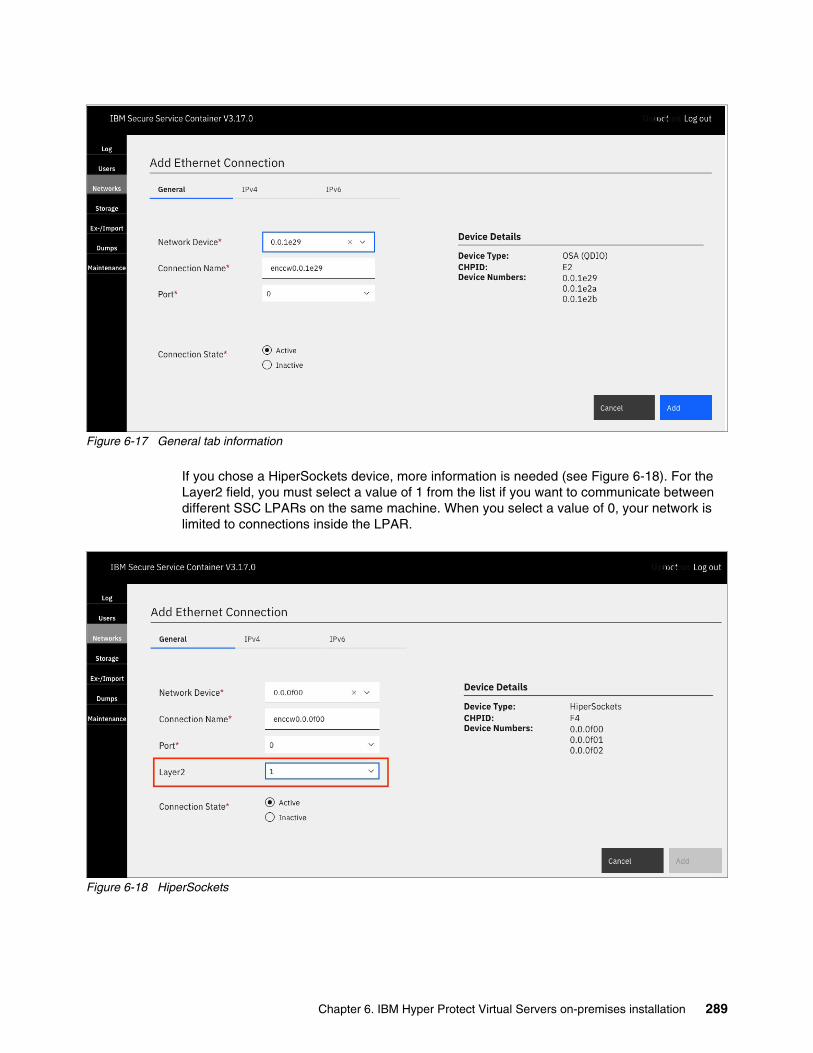
Figure 6-17 General tab information
If you chose a HiperSockets device, more information is needed (see Figure 6-18). For the Layer2 field, you must select a value of 1 from the list if you want to communicate between different SSC LPARs on the same machine. When you select a value of 0, your network is limited to connections inside the LPAR.
Figure 6-18 HiperSockets
Chapter 6. IBM Hyper Protect Virtual Servers on-premises installation 289

4. In the IPV4 tab, make the following selections (see Figure 6-19):
– Addresses: Manual.– Gateway: 192.168.0.1.– Address: 192.168.0.10.– Prefix: 24.
Figure 6-19 IPv4 tab information
5. Click Add (see Figure 6-20).
Figure 6-20 New Ethernet device
A enccw0.0.1e29 device is now added to the 192.168.0.0/24 network on which you can create your containers.
By selecting the interface, you can also change the settings, or start, stop, or delete it by using the icons in the upper right.
290 Securing Your Critical Workloads with IBM Hyper Protect Services
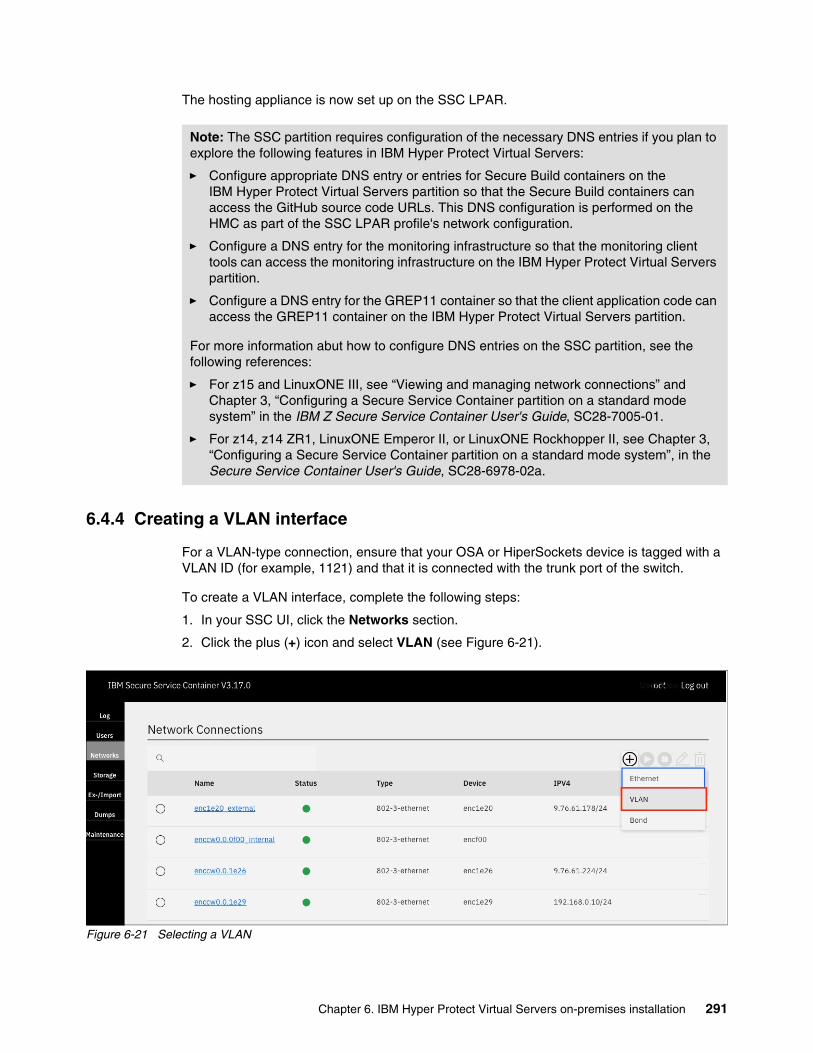
The hosting appliance is now set up on the SSC LPAR.
6.4.4 Creating a VLAN interface
For a VLAN-type connection, ensure that your OSA or HiperSockets device is tagged with a VLAN ID (for example, 1121) and that it is connected with the trunk port of the switch.
To create a VLAN interface, complete the following steps:
1. In your SSC UI, click the Networks section.
2. Click the plus (+) icon and select VLAN (see Figure 6-21).
Figure 6-21 Selecting a VLAN
Note: The SSC partition requires configuration of the necessary DNS entries if you plan to explore the following features in IBM Hyper Protect Virtual Servers:
� Configure appropriate DNS entry or entries for Secure Build containers on the IBM Hyper Protect Virtual Servers partition so that the Secure Build containers can access the GitHub source code URLs. This DNS configuration is performed on the HMC as part of the SSC LPAR profile's network configuration.
� Configure a DNS entry for the monitoring infrastructure so that the monitoring client tools can access the monitoring infrastructure on the IBM Hyper Protect Virtual Servers partition.
� Configure a DNS entry for the GREP11 container so that the client application code can access the GREP11 container on the IBM Hyper Protect Virtual Servers partition.
For more information abut how to configure DNS entries on the SSC partition, see the following references:
� For z15 and LinuxONE III, see “Viewing and managing network connections” and Chapter 3, “Configuring a Secure Service Container partition on a standard mode system” in the IBM Z Secure Service Container User's Guide, SC28-7005-01.
� For z14, z14 ZR1, LinuxONE Emperor II, or LinuxONE Rockhopper II, see Chapter 3, “Configuring a Secure Service Container partition on a standard mode system”, in the Secure Service Container User's Guide, SC28-6978-02a.
Chapter 6. IBM Hyper Protect Virtual Servers on-premises installation 291

3. A window opens in which you are prompted to enter the network information, as shown in Figure 6-22. If you click the plus sign (+) that is marked in blue, you can create a device, as described in 6.4.3, “Creating an Ethernet interface” on page 287.
Figure 6-22 Add VLAN Connection: General tab
292 Securing Your Critical Workloads with IBM Hyper Protect Services

4. Under the General tab (see Figure 6-23.), add the following information:
– Parent Device: Select the device that you added. In this case, enc1e29.– VLAN ID: Add your VLAN ID, for example, 1121.– Connection Name: Automatically populated with vlan01e29.1121.– VLAN Device: Automatically populated with vlan01e29.1121.
Figure 6-23 Completing information in the General tab
Chapter 6. IBM Hyper Protect Virtual Servers on-premises installation 293
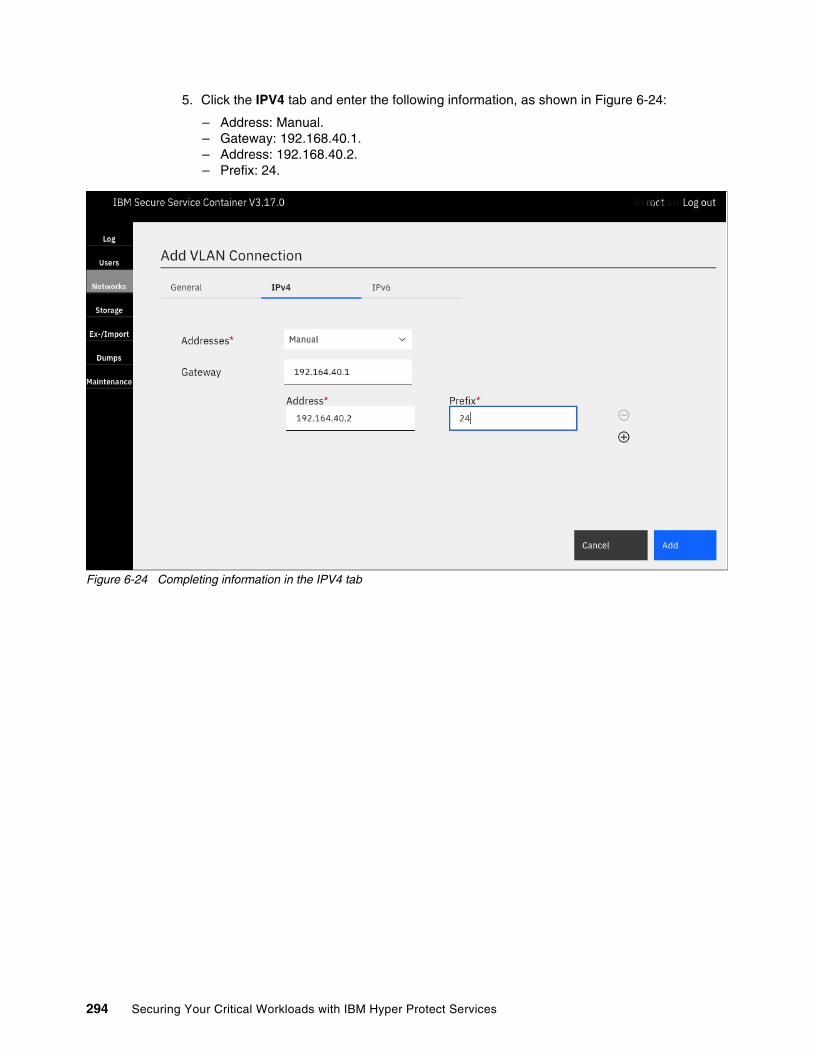
5. Click the IPV4 tab and enter the following information, as shown in Figure 6-24:
– Address: Manual.– Gateway: 192.168.40.1.– Address: 192.168.40.2.– Prefix: 24.
Figure 6-24 Completing information in the IPV4 tab
294 Securing Your Critical Workloads with IBM Hyper Protect Services

6. Click Add (see Figure 6-25).
Figure 6-25 VLAN created
You created a vlan01e29.1121 device that is added to the 192.168.40.0/24 network, on which you can create your containers.
6.5 Installing the IBM Hyper Protect Virtual Servers CLI on the management server
In this section, we describe how to install and set up the CLI on the management server. In our environment, the Linux management server is on a mainframe LPAR (s390x), but you also can use a x86 based system.
6.5.1 Setting up the environment by using the setup script
The installation script should be in the directory that you created in 6.2, “Downloading the package to the management server” on page 273.
Check that the x86 or Linux on IBM Z/LinuxONE (s390x architecture) management server has the following required software packages:
� The haveged utility (for example, by running sudo apt install haveged)
� One of the supported Docker versions (V19.03.2 or later)
� OpenSSL or a similar tool
� GNU Privacy Guard (GPG)
Chapter 6. IBM Hyper Protect Virtual Servers on-premises installation 295
Before you start, make sure that you have the information that you need to access the appliance and your registry (Docker Hub or IBM Cloud Container Registry). On your x86 or Linux on IBM Z/LinuxONE (s390x architecture) management server, complete the following steps under the <installation_directory> directory:
1. Run the setup.sh shell script to complete the environment preparation on the management server. When you run the setup script the first time, you must accept the license to continue with the setup.
./setup.sh -e LICENSE=accept
A message is displayed stating that the license was accepted and the setup continues.
To view the license, run the following command:
./setup.sh -e LICENSE=view -e LANG=xx
xx is your language code. For more information, see “Available language codes” in the ./License directory. If no language code is specified, the default language is used, which is English.
If you already accepted the license earlier and want to run the setup script again, run the following command:
./setup.sh
The setup.sh shell script automates the following actions:
– Starts the envcheck.sh script to validate the prerequisites. The envcheck.sh shell script automates the checking of the following requirements of the management server by doing the following tasks:
• The system architecture: When the system architecture is not x86 or Linux on IBM Z or LinuxONE (a s390x architecture), the script fails, and a message stating that the architecture is not supported is displayed.
• The Linux distribution: When the Linux distribution is not Ubuntu or Red Hat Enterprise Linux (RHEL), the script fails and a message is displayed stating that the script is supported only Ubuntu and RHEL-based systems.
• The Ubuntu or RHEL Version: When the Ubuntu version is not 18.04 or later or 16.04 or later, or the RHEL Version is not 7.X or later or 8.X or later, a warning message is displayed indicating that the Ubuntu or RHEL versions are not supported, and the script continues execution.
• GPG version: When the GPG version is not 2.2.4 or later, the script fails and a message is displayed stating that the GPG version must be upgraded.
• Docker Installation: When Docker is not installed, the script fails. Also, when Docker is not at V19.03.2 or later for x86 or V18.06.3 or later for s390x, the script fails.
• Number of CPU cores: When number of cores is less than 4 for x86 and 1 for x390x, a warning message is displayed that there are fewer cores than required, and the script continues execution.
Note: To get an overall understanding of what information that you need to run the offering and where to get such information, see Appendix A, “Configuration parameters” on page 385. For more information and a downloadable worksheet, see Planning for the environment.
Note: If you have not accepted the license once, then running the script results in an error, and you are prompted to accept the license.
296 Securing Your Critical Workloads with IBM Hyper Protect Services
• Amount of memory: When the memory is less than 8 GB, a warning message is displayed that the memory is less than required, and the script continues execution.
• Disk space: When the disk space is less than 150 GB, a warning message is displayed that the disk space is less than required, and the script continues execution.
• OpenSSL: When OpenSSL is not installed, the script fails. A message prompting you to install OpenSSL and retry the script is displayed.
• The haveged utility: When haveged is not installed, the script fails. A message prompting you to install haveged and retry the script is displayed.
– Sets the PATH for the hpvs commands.
– Creates the $HOME/hpvs (working directory) directory structure and copies all the keys, registry files, and the required config files, and creates symbolic links of the images to this folder.
– Extracts and verifies the base images in the installation directory.
– Loads the base images hpvsop-base and hpvsop-base-ssh into your local Docker registry and uploads both to the repositories on your remote Docker registry server. You must enter the required information for your remote Docker registry server when prompted.
– Creates and updates the $HOME/hpvs/config/reg.json config file with the registry details for your remote Docker registry server or with the IBM Cloud Registry details. The credentials are encrypted after the script completes.
– Updates the $HOME/hpvs/hosts config file with the SSC partition information. You must enter the IP address of the partition and the connection credentials.
2. You are prompted to select an option for configuring the container registry, as shown in Example 6-2.
Example 6-2 Selecting the registry
# Setting up registry list...Select option for configuring container registry 1.Docker Hub(publicly hosted) 2.IBM Cloud Registry?
Select a value of 1 when you want to use Docker Hub (publicly hosted). Select a value of 2 when you want to use the IBM Cloud Registry. Use one of the following sets of instructions, depending on the option that you choose for configuring the container registry.
You can use IBM Hyper Protect Virtual Servers only with Docker Hub or IBM Cloud Container Registry.
a. When the script is running the setup of the Docker registry (when you chose a value of 1), you are prompted to enter the following information:
• The Docker registry name, for example, docker_hub/repo.
• The Docker registry username, for example, docker_username.
• The Docker registry password. Type in the password of the Docker registry.
b. When the script is running the setup of the IBM Cloud Registry (when you chose a value of 2), you are prompted to enter the following information:
• The IBM Cloud Registry name, for example, cloud_reg.
• The IBM Cloud Registry Server URL, for example, us.icr.io.
Chapter 6. IBM Hyper Protect Virtual Servers on-premises installation 297

• The CONTENT_TRUST_SERVER URL, for example, https://us.icr.io:4443/.
• The IBM Cloud application programming interface (API) key: Type in the IBM Cloud API key. (For more information, see “Creating an IBM Cloud API Key” at IBM Cloud).
3. When the script is running the setup of the hosts config file, you are prompted to enter the following information to access the appliance:
– The SSC LPAR (Host) IP address, for example, 10.20.4.23.
– The SSC LPAR (Host) Name, for example, redbookssc1.
– The username of the SSC LPAR, for example, root.
– The password.
After the script completes, you can run the hpvs command locally to validate that the environment is ready to use. The hpvs --help command shows you a list of supported actions to manage IBM Hyper Protect Virtual Servers. For more information about the hpvs command, see Commands in IBM Hyper Protect Virtual Servers.
4. To push base images to the container registry, see 6.6.2, “Pushing the base images to a remote Docker repository” on page 302.
Example 6-3 shows the directory structure (working directory) that is created by the setup script and the symbolic links that were created.
Example 6-3 Working directory
/root/hpvs/••• config• ••• grep11• • ••• images• • • ••• hpcsKpGrep11_runq.tar.gz -> /opt/hpvs/images/hpcsKpGrep11_runq.tar.gz• • ••• keys• • ••• regfiles• • ••• vs_grep11.yml• ••• hpvsopbase• • ••• images• • • ••• HpvsopBase.tar.gz -> /opt/hpvs/images/HpvsopBase.tar.gz• • ••• keys• • ••• regfiles• • ••• vs_hpvsopbase.yml• ••• hpvsopbasessh• • ••• images• • • ••• HpvsopBaseSSH.tar.gz -> /opt/hpvs/images/HpvsopBaseSSH.tar.gz• • ••• keys• • ••• regfiles• • ••• vs_hpvsopbasessh.yml• ••• monitoring• • ••• images• • • ••• CollectdHost.tar.gz -> /opt/hpvs/images/CollectdHost.tar.gz• • • ••• Monitoring.tar.gz -> /opt/hpvs/images/Monitoring.tar.gz• • ••• keys• • ••• regfiles• • ••• vs_monitoring.yml• ••• reg.json• ••• securebuild• • ••• images
298 Securing Your Critical Workloads with IBM Hyper Protect Services

• • • ••• SecureDockerBuild.tar.gz -> /opt/hpvs/images/SecureDockerBuild.tar.gz• • ••• keys• • ••• regfiles• • ••• secure_build.yml.example• • ••• secure_create.yml.example• • ••• vs_securebuild.yml• ••• templates• • ••• virtualserver.template.readme.yml• • ••• virtualserver.template.yml• ••• vs_configfile_readme.yml• ••• vs_regfiledeployexample.yml••• hosts••• logs ••• hpvs_2021May.log
� images/HpvsopBase.tar.gz is the base image of an IBM Hyper Protect Virtual Servers container without Secure Shell (SSH) access.
� images/HpvsopBaseSSH.tar.gz is the base image of an IBM Hyper Protect Virtual Servers container with the SSH access.
� images/CollectdHost.tar.gz is the base image of the collectd-host container of the monitoring infrastructure.
� images/SecureDockerBuild.tar.gz is the Docker image of the Secure Build container.
� images/Monitoring.tar.gz is the base image of the monitoring-host container of the monitoring infrastructure.
� images/hpcsKpGrep11_runq.tar.gz is the base image of the GREP11 container.
� config/templates/virtualserver.template.yml is the template example of network, quotagroup, and resource definitions for the virtual server.
� config/*/vs_*.yml contains configuration example files for the IBM Hyper Protect Virtual Servers containers of each type.
� config/*/keys and config/*/regfiles. You can use these folders to save the keys or the .enc files that you generate.
6.6 Configuring the IBM Hyper Protect Virtual Servers environment
In this section, the following sections explain the setup of the different services.
� Configuring the internal network
� Pushing the base images to a remote Docker repository
� Setting up an IBM Hyper Protect Virtual Servers instance
� Backing up and restoring IBM Hyper Protect Virtual Servers
� Setting up the Secure Build container
� Setting up the monitoring instance
� Integrating with Enterprise Public Key Cryptography Standards #11
Chapter 6. IBM Hyper Protect Virtual Servers on-premises installation 299

6.6.1 Configuring the internal network
In 6.4, “Networking for IBM Hyper Protect Virtual Servers” on page 285, the networking environment was set up. To use the defined interfaces, two different methods are available:
� Method 1: “Creating networks manually” on page 300
� Method 2: “Creating networks automatically” on page 301 by using the hpvs deploy command
The more convenient way is to use the hpvs deploy and undeploy commands because the system takes care of the creation and removal of the resources.
Creating networks manuallyTo have networks available all the time, you can create them manually by completing the following steps:
1. Define the network by running the hpvs network command:
hpvs network create --driver macvlan --name external_network --parent enc1e23 --subnet 9.76.61.0/24 --gateway 9.76.61.1hpvs network create --driver bridge --name internal_network --parent encf00 --subnet 192.168.0.0/24 --gateway 192.168.0.1
2. Verify the available networks by running the hpvs network list command. The output looks like the following string:
+------------------+| NETWORK NAME |+------------------+| external_network || host || none || internal_network |+------------------+
3. The network details can be viewed by running the hpvs network show --name <network name> command:
hpvs network show --name external_network
The result shows the details that you defined:
+--------------+---------------------+| PROPERTIES | VALUES |+--------------+---------------------+| Name | external_network || Driver | macvlan || Containers | [] || IPAM | Gateway:9.76.61.1 || | Subnet:9.76.61.0/24 || ParentDevice | enc1e23 || Scope | local |+--------------+---------------------+
Note: To get an overall understanding of what information that you need to run the offering and where to get such information, see Appendix A, “Configuration parameters” on page 385. For more information and a downloadable worksheet, see Planning for the environment.
300 Securing Your Critical Workloads with IBM Hyper Protect Services

Creating networks automaticallyBy running the hpvs deploy command, the networks (and all other resources) are created by the system automatically. In this case, you specify the possible settings in the template file that is in your installation directory.
Update the template file $HOME/hpvs/config/templates/virtualserver.template.yml based on the networking configuration. You must specify the details for the network based on your network configurations. Example 6-4 provides an example of the YAML file.
Example 6-4 Example virtualserver.template.yml
version: v1type: virtualserver-templatenetworktemplates:name: external_network subnet: "9.76.61.0/22" gateway: "9.76.61.1" parent: enc1e23 driver: macvlan- name: internal_network subnet: "192.168.0.0/24" gateway: "192.168.0.1" parent: encf00 driver: bridge
When a new container is deployed by running the hpvs deploy command, you specify only the network name (such as external_network in Example 6-4) and the IP address to be used by the container in the virtual server configuration YAML file (vs_config.yml), as shown in Example 6-5. If not already present, the corresponding network is created automatically. Optionally, you can also use port mapping.
Example 6-5 Example network in the vs_config.yml file
networks: - ref: external_network ipaddress: 9.76.61.200ports: #optional - hostport: 21443 protocol: tcp containerport: 443
If you use port mapping for a Secure Build virtual server, monitoring infrastructure, and a GREP11 virtual server, ensure that the ports or configured mapping ports (shown in Table 6-1) are available on the SSC partition. Otherwise, you must request an IP address for each virtual server that uses the external network on the SSC partition.
Table 6-1 shows the required ports on the SSC partition.
Table 6-1 Ports on the SSC partition for port mapping
Port number Required by module
443 Hosting appliance REST API
443 Secure Build Server (SBS) or Bring Your Own Image (BYOI) with macvlan
Any non-reserved port SBS
Chapter 6. IBM Hyper Protect Virtual Servers on-premises installation 301

6.6.2 Pushing the base images to a remote Docker repository
You must register the base images in the remote Docker repository by using your ID and password. The remote Docker repository can be a Docker Hub or IBM Cloud Container Registry. In our example, we use Docker Hub.
The base images are the default IBM Hyper Protect Virtual Servers container images that can be used to host your application code, and they include two different types of container images for your development and production environments:
� HpvsopBaseSSH packages the SSH daemon into the default IBM Hyper Protect Virtual Servers container image so that you can log in to the IBM Hyper Protect Virtual Servers by using the SSH and your private key for debugging and development.
� HpvsopBase excludes the SSH daemon on the default IBM Hyper Protect Virtual Servers container image, and it can be used in the production environment.
For more information, see IBM Hyper Protect Virtual Servers.
To push the base images to the Docker repository, complete the following steps:
1. Check that you enabled Docker Content Trust (DCT) for your remote Docker registry server by running the following command:
export DOCKER_CONTENT_TRUST=1
To set DCT permanently, add it to your shell configuration file, which is found in either $HOME/.bashrc or as a global setting in /etc/environment.
2. Run the docker images command to check whether the base images are loaded into the local registry successfully (Example 6-6).
Example 6-6 The docker images command
root@rdbkhpvm:/home/lnxadmin# docker imagesREPOSITORY TAG IMAGE ID CREATED SIZEibmzcontainers/hpvsop-base 1.2.3-release-d0651e4 a53aae01b3ef 2 months ago 1.37 GBibmzcontainers/hpvsop-base-ssh 1.2.3-release-d0651e4 cd4e5704ae92 2 months ago 1.31 GB
3. Use the docker tag command to tag base images with the same ID that is used by the CLI tool. For example, 1.2.3 is the tag ID of the CLI tool that you get by running the docker images command. Run the commands that are shown in Example 6-7 to tag both base images. In our example, our user ID is hpvsrdbk.
Example 6-7 Tagging the base images command
sudo docker tag ibmzcontainers/hpvsop-base-ssh:1.2.3-release-d0651e4 hpvsrdbk/hpvsop-base-ssh:1.2.3-release-d0651e4
sudo docker tag ibmzcontainers/hpvsop-base:1.2.3-release-d0651e4 hpvsrdbk/hpvsop-base:1.2.3-release-d0651e4
8443 To access monitoring by Prometheus
25826 Used by the collectd host
9876 GREP11 container
Port number Required by module
302 Securing Your Critical Workloads with IBM Hyper Protect Services

4. Run the docker images command to check whether the tags for the base images are as expected, as shown in Example 6-8.
Example 6-8 Newly tagged Docker images
root@rdbkhpvm:/opt/hpvs# docker imagesREPOSITORY TAG IMAGE ID CREATED SIZEhpvsrdbk/hpvsop-base 1.2.3-release-d0651e4 a53aae01b3ef 2 months ago 1.37 GBibmzcontainers/hpvsop-base 1.2.3-release-d0651e4 a53aae01b3ef 2 months ago 1.37 GBhpvsrdbk/hpvsop-base-ssh 1.2.3-release-d0651e4 cd4e5704ae92 2 months ago 1.31 GBibmzcontainers/hpvsop-base-ssh 1.2.3-release-d0651e4 cd4e5704ae92 2 months ago 1.31 GB
5. Push the base images to your remote Docker repositories, as shown in Example 6-9.
Example 6-9 Pushing the base images
sudo docker push hpvsrdbk/hpvsop-base-ssh:1.2.3-release-d0651e4sudo docker push hpvsrdbk/hpvsop-base:1.2.3-release-d0651e4
If your repository does not exist, it is created for you, and you see a message similar to what is shown in Example 6-10.
Example 6-10 Repository creation
...Signing and pushing trust metadataYou are about to create a new root signing key passphrase. This passphrase will be used to protect the most sensitive key in your signing system. Choose a long, complex passphrase and be careful to keep the password and the key file itself secure and backed up. It is highly recommended that you use a password manager to generate the passphrase and keep it safe. There will be no way to recover this key. You can find the key in your config directory.Enter passphrase for new root key with ID 87ff18c:Repeat passphrase for new root key with ID 87ff18c:Enter passphrase for new repository key with ID f9579e6:Repeat passphrase for new repository key with ID f9579e6:
The output looks like what is shown in Example 6-11.
Example 6-11 Output of the docker push command
root@rdbkhpvm:/root/hpvs# sudo docker push hpvsrdbk/hpvsop-base:1.2.3-release-d0651e4The push refers to repository [docker.io/hpvsrdbk/hpvsop-base]b35fb91a5173: Preparingd94a20bcb941: Preparing03a1a3cc0fb5: Preparing97f487669d09: Preparing...db82f9aa280b: Pushed7561afdecc29: Pushed669a052684c9: Pushed0eff1edc710b: Pushed6fa715d34cb2: Pushed1.2.3-release-d0651e4: digest: sha256:aa866c3a90334ff48629f6cf63bd6b32294dec1b9c57b835184d90226500459c size: 12805Signing and pushing trust metadataYou are about to create a new root signing key passphrase. This passphrase will be used to protect the most sensitive key in your signing system. Choose a long, complex passphrase and be careful to keep the password and the key file itself secure and backed up. It is highly
Chapter 6. IBM Hyper Protect Virtual Servers on-premises installation 303

recommended that you use a password manager to generate the passphrase and keep it safe. There will be no way to recover this key. You can find the key in your config directory.Enter passphrase for new root key with ID 87ff18c:Repeat passphrase for new root key with ID 87ff18c:Enter passphrase for new repository key with ID f9579e6:Repeat passphrase for new repository key with ID f9579e6:Finished initializing "docker.io/hpvsrdbk/hpvsop-base"Successfully signed docker.io/hpvsrdbk/hpvsop-base:1.2.3-release-d0651e4
6. Verify the results on http://hub.docker.com, as shown in Figure 6-26.
Figure 6-26 Docker Hub
6.6.3 Setting up an IBM Hyper Protect Virtual Servers instance
The base images are the default IBM Hyper Protect Virtual Servers container images that can be used to host your application code, and they include two different types of container images for your development and production environments:
� HpvsopBaseSSH packages the SSH daemon into the default IBM Hyper Protect Virtual Servers container image so that you can log in to the IBM Hyper Protect Virtual Servers by using the SSH and your private key for debugging and development.
� HpvsopBase excludes the SSH daemon on the default IBM Hyper Protect Virtual Servers container image, and it can be used in the production environment.
To start an instance, you can use the hpvs deploy or the hpvs vs create commands. As a best practice, use the hpvs deploy command to provision an instance because of its ease of use and the ability to create multiple instances quickly. The definitions are stored in .yml files. As an alternative, you can use the hpvs vs create command, where all definitions are set by parameters. In this book, we use only the hpvs deploy command. The complete hpvs command reference can be found at Commands in IBM Hyper Protect Virtual Servers.
Note: To get an overall understanding of what information that you need to run the offering and where to get such information, see Appendix A, “Configuration parameters” on page 385. For more information and a downloadable worksheet, see Planning for the environment.
304 Securing Your Critical Workloads with IBM Hyper Protect Services

To set up an IBM Hyper Protect Virtual Servers instance based on the HpvsopBaseSSH image, complete the following steps.
1. Generate an SSH key pair:
ssh-keygen -t rsa -b 4096 -C "[email protected]" -f $HOME/hpvs/config/hpvsopbasessh/id_rsa
2. Run the following command to convert the .pub file to base64 format and save it to the keys directory of the hpvsopbasessh configuration file ($HOME/hpvs/config/hpvsopbasessh/keys/) as follows:
echo $(cat id_rsa.pub | base64)| tr -d ' ' >> /$HOME/hpvs/config/hpvsopbasessh/keys/id_rsa_base64.pub
3. Export the SSH public key as the environment variable for instance provisioning by using the following command:
export key=$(cat $HOME/hpvs/config/hpvsopbasessh/keys/id_rsa_base64.pub)
To make this environmental variable permanent, add it to your shell configuration file, for example, $HOME/.bashrc.
4. The vs_hpvsopbasessh.yml file that has the configuration details for the virtual server refers to the corresponding sections of the virtualserver.template.yml when you run the hpvs deploy command:
a. Update the template file $HOME/hpvs/config/templates/virtualserver.template.yml based on the networking configuration of the IBM Hyper Protect Virtual Servers instance. For more information, see 6.6.1, “Configuring the internal network” on page 300.
b. Create the configuration YAML file demo_hpvsopbasessh.yml for the instance by referring to the example file $HOME/hpvs/config/securebuild/vs_hpvsopbasessh.yml. The following command shows an example:
cp vs_hpvsopbasessh.yml demo_hpvsopbasessh.yml
c. Change the configuration to meet your environment. Example 6-12 shows our vs_hpvsopbasessh.yml file.
Example 6-12 vs_shpvsopbasessh.yml
version: v1type: virtualservervirtualservers:- name: test-hpvsopbasessh host: SSC_LPAR_NAME # insert your SSC lpar name as shown with “hpvs host list” hostname: hpvsopbasessh-container repoid: HpvsopBaseSSH imagetag: 1.2.3-release-d0651e4 imagefile: HpvsopBaseSSH.tar.gz imagecache: true resourcedefinition: ref: small environment: - key: LOGTARGET value: "/dev/console" - key: ROOTFS_LOCK value: "y" - key: ROOT_SSH_KEY
Chapter 6. IBM Hyper Protect Virtual Servers on-premises installation 305

value: "@/root/hpvs/config/hpvsopbasessh/keys/id_rsa_base64.pub" # provide ssh key in base64 format - key: RUNQ_ROOTDISK value: newroot networks: - ref: external_network # update the network as defined ipaddress: 10.20.4.112 # set your IP address volumes: - name: qg_hpvsopbasessh ref : np-medium mounts: - mount_id: newroot mountpoint: /newroot filesystem: ext4 size: 10GB reset_root: false - mount_id: data mountpoint: /data filesystem: ext4 size: 10GB
For more information about the configuration file, see Configuration files of IBM Hyper Protect Virtual Servers.
5. Create the instance by using the configurations in the YAML file and the hpvs deploy command, as shown here:
hpvs deploy --config $HOME/hpvs/config/hpvsopbasessh/demo_hpvsopbasessh.yml
Note:
� You must configure the mount point as /newroot when you deploy the HpvsopBaseSSH image.
� For creating a virtual server by using the hpvs-op base image, use the vs_hpvsopbase.yml configuration file.
� The resourcedefinition: ref value refers to the resourcedefinitiontemplate definition in the template file.
� The quotagroup: ref value refers to the quotagrouptemplates definition in the template file.
� The network: ref value refers to the networktemplates definition in the template file.
� When you specify @ at the beginning of a file path, it indicates that the path is read as a file, and the content within the file is assigned as the value.
306 Securing Your Critical Workloads with IBM Hyper Protect Services

Example 6-13 shows our detailed output.
Example 6-13 Output of the hpvs deploy command
root@rdbkhpvm:~/hpvs/config/hpvsopbasessh# hpvs deploy --config /root/hpvs/config/hpvsopbasessh/demo_hpvsopbasessh.yml*******************************************************************************Starting virtual server deployment...*******************************************************************************Skipping Loading image as image tag 1.2.3-release-d0651e4 is present.**************************************************************************************************************************************************************Creating virtual server demo_hpvsopbasessh ...+-------------+------------------------------+| PROPERTIES | VALUES |+-------------+------------------------------+| Name | demo_hpvsopbasessh || CPU | 2 || Memory | 2048 || State | running || Status | Up Less than a second || Networks | Subnet:24 || | Gateway:9.76.61.1 || | IPAddress:9.76.61.225 || | MacAddress:02:42:09:4c:3d:e1 || | Network:external_network || | IPAddress:192.168.0.22 || | MacAddress:02:42:c0:a8:00:16 || | Network:internal_network || | Subnet:24 || | Gateway:192.168.0.1 || Ports | || Quotagroups | [qg_hpvsopbasessh] |+-------------+------------------------------+*******************************************************************************Virtual server demo_hpvsopbasessh creation successful.**********************************************************************************Completed virtual server deployment*******************************************************************************
6. The command hpvs vs list shows the running containers, and hpvs vs show --name <container name> shows the details of container (see Example 6-14).
Example 6-14 Output of hpvs list and show commands
root@rdbkhpvm:~/hpvs/config/hpvsopbasessh# hpvs vs list+--------------------+---------+--------------+------------------------------------------------------+| NAMES | STATE | STATUS | IMAGE |+--------------------+---------+--------------+------------------------------------------------------+| demo_hpvsopbasessh | running | Up 5 minutes | ibmzcontainers/hpvsop-base-ssh:1.2.3-release-d0651e4 |+--------------------+---------+--------------+------------------------------------------------------+root@rdbkhpvm:~/hpvs/config/hpvsopbasessh# hpvs vs show --name demo_hpvsopbasessh+-------------+------------------------------+| PROPERTIES | VALUES |+-------------+------------------------------+| Name | demo_hpvsopbasessh || CPU | 2 |
Chapter 6. IBM Hyper Protect Virtual Servers on-premises installation 307

| Memory | 2048 || State | running || Status | Up 8 minutes || Networks | MacAddress:02:42:09:4c:3d:e1 || | Network:external_network || | Subnet:24 || | Gateway:9.76.61.1 || | IPAddress:9.76.61.225 || | Gateway:192.168.0.1 || | IPAddress:192.168.0.22 || | MacAddress:02:42:c0:a8:00:16 || | Network:internal_network || | Subnet:24 || Ports | || Quotagroups | [qg_hpvsopbasessh] |+-------------+------------------------------+
7. You can connect to the provisioned IBM Hyper Protect Virtual Servers instance by using the SSH and the private key. For example:
ssh [email protected] -i $HOME/hpvs/config/hpvsopbasessh/id_rsa
To work with your container, use the hpvs vs start, hpvs vs stop, hpvs vs restart, hpvs vs delete or hpvs undeploy commands.
6.6.4 Backing up and restoring IBM Hyper Protect Virtual Servers
You can create backups and restore from those backups as part of your disaster recovery (DR) plan by using the hpvs snapshot command.
To create a backup for an IBM Hyper Protect Virtual Servers container with your application, use the command that is shown in Example 6-15.
Example 6-15 Creating a backup
root@rdbkhpvm# hpvs snapshot create --name hpvs_snapshot1 --vs testVS1+---------------+--------------------+| PROPERTY | VALUE |+---------------+--------------------+| VS Name | testVS1 || Snapshot Name | hpvs_snapshot1 || Status | created || Quotagroups | [qg_hpvsopbasessh] |+---------------+--------------------+
To restore the IBM Hyper Protect Virtual Servers container from a snapshot, use the hpvs snapshot restore command that is shown in Example 6-16 on page 309. You must restart the IBM Hyper Protect Virtual Servers container after it is restored from a snapshot.
Note: This step is applicable only for a virtual server that is created by using the HpvsopBaseSSH image. The HpvsopBase image excludes the SSH daemon on the default IBM Hyper Protect Virtual Servers container image.
Note: The snapshots of the IBM Hyper Protect Virtual Servers containers are stored on the SSC partition.
308 Securing Your Critical Workloads with IBM Hyper Protect Services
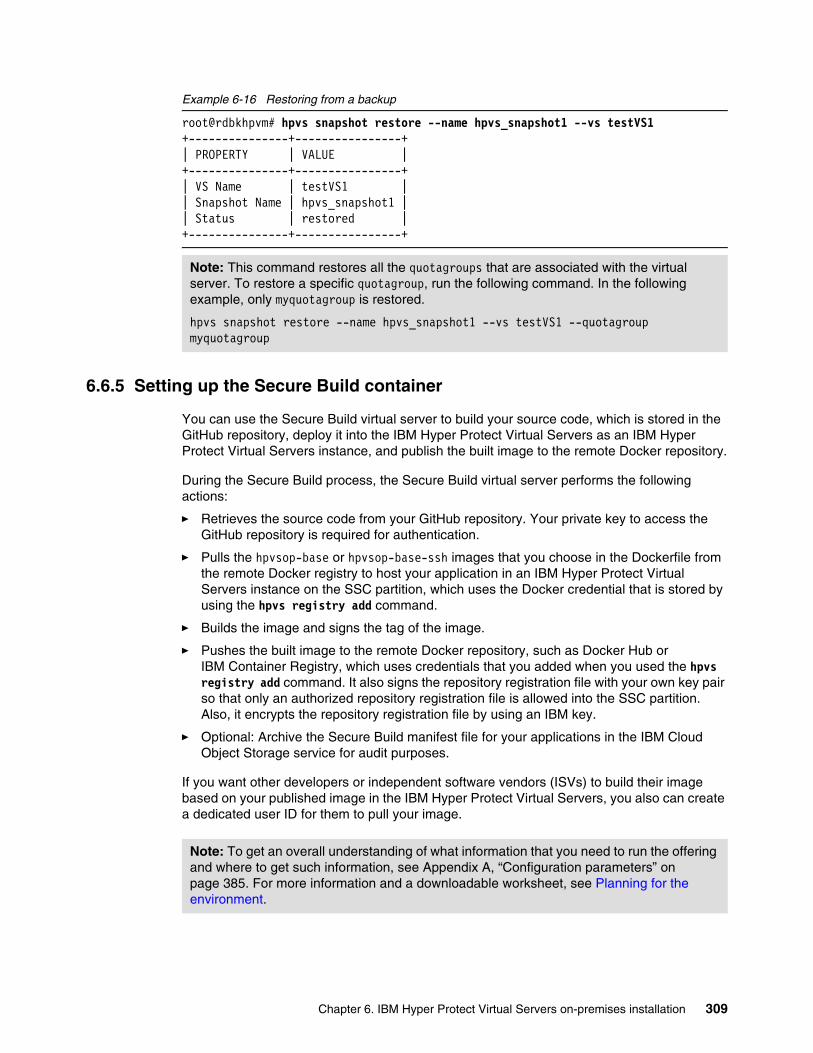
Example 6-16 Restoring from a backup
root@rdbkhpvm# hpvs snapshot restore --name hpvs_snapshot1 --vs testVS1+---------------+----------------+| PROPERTY | VALUE |+---------------+----------------+| VS Name | testVS1 || Snapshot Name | hpvs_snapshot1 || Status | restored |+---------------+----------------+
6.6.5 Setting up the Secure Build container
You can use the Secure Build virtual server to build your source code, which is stored in the GitHub repository, deploy it into the IBM Hyper Protect Virtual Servers as an IBM Hyper Protect Virtual Servers instance, and publish the built image to the remote Docker repository.
During the Secure Build process, the Secure Build virtual server performs the following actions:
� Retrieves the source code from your GitHub repository. Your private key to access the GitHub repository is required for authentication.
� Pulls the hpvsop-base or hpvsop-base-ssh images that you choose in the Dockerfile from the remote Docker registry to host your application in an IBM Hyper Protect Virtual Servers instance on the SSC partition, which uses the Docker credential that is stored by using the hpvs registry add command.
� Builds the image and signs the tag of the image.
� Pushes the built image to the remote Docker repository, such as Docker Hub or IBM Container Registry, which uses credentials that you added when you used the hpvs registry add command. It also signs the repository registration file with your own key pair so that only an authorized repository registration file is allowed into the SSC partition. Also, it encrypts the repository registration file by using an IBM key.
� Optional: Archive the Secure Build manifest file for your applications in the IBM Cloud Object Storage service for audit purposes.
If you want other developers or independent software vendors (ISVs) to build their image based on your published image in the IBM Hyper Protect Virtual Servers, you also can create a dedicated user ID for them to pull your image.
Note: This command restores all the quotagroups that are associated with the virtual server. To restore a specific quotagroup, run the following command. In the following example, only myquotagroup is restored.
hpvs snapshot restore --name hpvs_snapshot1 --vs testVS1 --quotagroup myquotagroup
Note: To get an overall understanding of what information that you need to run the offering and where to get such information, see Appendix A, “Configuration parameters” on page 385. For more information and a downloadable worksheet, see Planning for the environment.
Chapter 6. IBM Hyper Protect Virtual Servers on-premises installation 309

To allow other developers to build their image based on your published image, complete the following steps:
1. Create the certificate and key to securely communicate with the SBS.2. Create a virtual SBS by using the YAML configuration file and the hpvs deploy command.3. Generate the signing keys.4. Build the application by using Secure Build.
On your x86, IBM Z, or LinuxONE (s390x architecture) management server, complete the following steps with root user authority:
1. Create the certificate and key to securely communicate with the SBS:
a. Go to the keys directory of the Secure Build service in the IBM Hyper Protect Virtual Servers installation directory by running the following command:
cd $HOME/hpvs/config/securebuild/keys
b. Create the certificate and key to securely communicate with the SBS. The key file (sbs.key) and the certificate (sbs.cert) are created by running the following command:
openssl req -newkey rsa:2048 -new -nodes -x509 -days 3650 -out sbs.cert -keyout sbs.key -subj "/C=US/O=IBM/CN=SBS.example.com"
The output look like the output in Example 6-17.
Example 6-17 Generating a key and certificate for Secure Build Server
root@rdbkhpvm:~/hpvs/config/securebuild/keys# openssl req -newkey rsa:2048 -new -nodes -x509 -days 3650 -out sbs.cert -keyout sbs.key -subj "/C=US/O=IBM/CN=SBS.example.com"Generating an RSA private key.....+++++...............................+++++writing new private key to 'sbs.key'-----
c. To change the certificate to base64-encoding, run the following command:
echo $(cat sbs.cert | base64) | tr -d ' ' >> sbs_base64.cert
2. Create a Secure Build virtual server by using the YAML configuration file and the hpvs deploy command. As an alternative, you can use the hpvs vs create command (not described in this procedure).
The vs_securebuild.yml file that has the configuration details for the virtual server refers to the corresponding sections of the virtualserver.template.yml file when you run the hpvs deploy command.
a. Update the template file $HOME/hpvs/config/templates/virtualserver.template.yml based on the networking configuration of the IBM Hyper Protect Virtual Servers instance. For more information, see 6.6.1, “Configuring the internal network” on page 300.
b. Create the configuration YAML file demo_securebuild.yml for the instance by referring to the example file $HOME/hpvs/config/securebuild/vs_securebuild.yml and running the following command:
cp vs_securebuild.yml demo_securebuild.yml
310 Securing Your Critical Workloads with IBM Hyper Protect Services
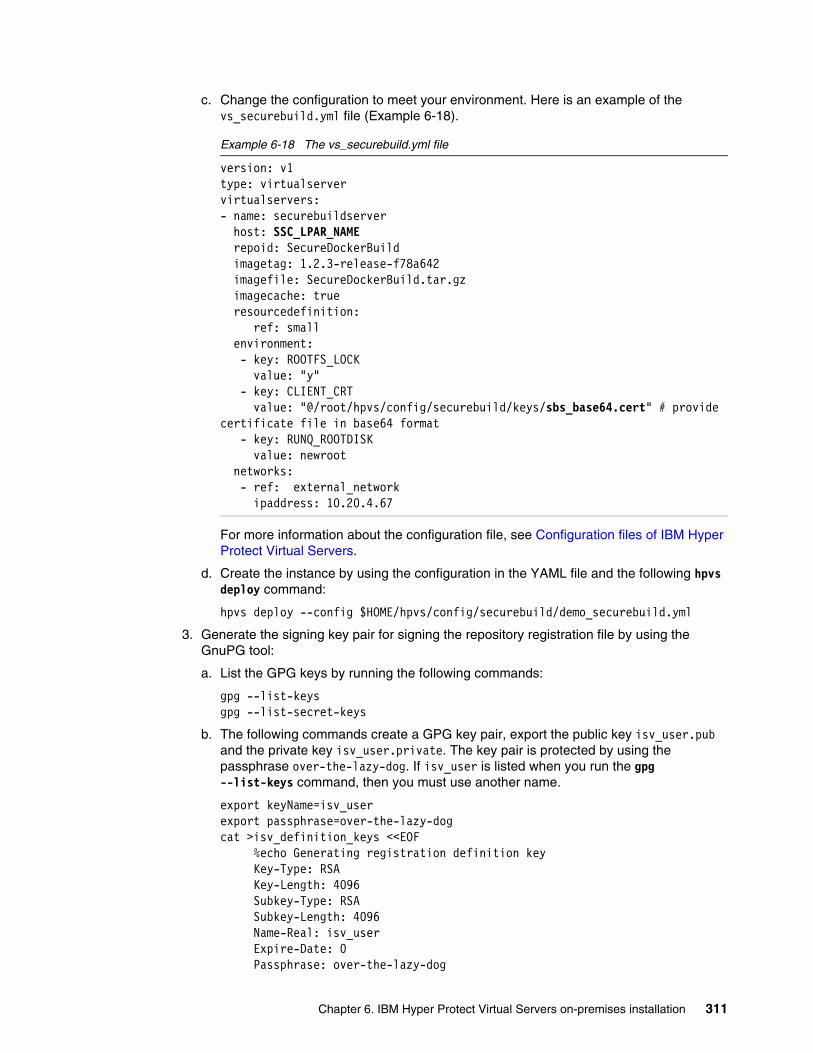
c. Change the configuration to meet your environment. Here is an example of the vs_securebuild.yml file (Example 6-18).
Example 6-18 The vs_securebuild.yml file
version: v1type: virtualservervirtualservers:- name: securebuildserver host: SSC_LPAR_NAME repoid: SecureDockerBuild imagetag: 1.2.3-release-f78a642 imagefile: SecureDockerBuild.tar.gz imagecache: true resourcedefinition: ref: small environment: - key: ROOTFS_LOCK value: "y" - key: CLIENT_CRT value: "@/root/hpvs/config/securebuild/keys/sbs_base64.cert" # provide certificate file in base64 format - key: RUNQ_ROOTDISK value: newroot networks: - ref: external_network ipaddress: 10.20.4.67
For more information about the configuration file, see Configuration files of IBM Hyper Protect Virtual Servers.
d. Create the instance by using the configuration in the YAML file and the following hpvs deploy command:
hpvs deploy --config $HOME/hpvs/config/securebuild/demo_securebuild.yml
3. Generate the signing key pair for signing the repository registration file by using the GnuPG tool:
a. List the GPG keys by running the following commands:
gpg --list-keysgpg --list-secret-keys
b. The following commands create a GPG key pair, export the public key isv_user.pub and the private key isv_user.private. The key pair is protected by using the passphrase over-the-lazy-dog. If isv_user is listed when you run the gpg --list-keys command, then you must use another name.
export keyName=isv_userexport passphrase=over-the-lazy-dogcat >isv_definition_keys <<EOF %echo Generating registration definition key Key-Type: RSA Key-Length: 4096 Subkey-Type: RSA Subkey-Length: 4096 Name-Real: isv_user Expire-Date: 0 Passphrase: over-the-lazy-dog
Chapter 6. IBM Hyper Protect Virtual Servers on-premises installation 311

# Do a commit here so that we can later print "done" :-) %commit %echo doneEOFgpg -a --batch --generate-key isv_definition_keysgpg --armor --pinentry-mode=loopback --passphrase ${passphrase} --export-secret-keys ${keyName} > ${keyName}.privategpg --armor --export ${keyName} > ${keyName}.pub
The export keyName=isv_user and Name-Real: isv_user must be unique. You cannot use the same keys to sign multiple images. You should not have multiple keys with the same username, and you should not have multiple images that are singed with same key in an SSC.
c. Copy the generated key pair isv_user.pub and isv_user.private to the $HOME/hpvs/config directory.
4. Build your application by using Secure Build.
Using the Secure Build configuration file (secure_build.yml.example) and the deployment of your application by using the YAML file and the hpvs deploy command are explained in 7.2.3, “Using the Secure Build application to build and store an image in a repository” on page 327.
6.6.6 Setting up the monitoring instance
You can monitor various components by using the monitoring infrastructure that is provided by IBM Hyper Protect Virtual Servers.
To set up monitoring, complete the following steps:
1. Create certificate authority (CA) signed certificates for the monitoring infrastructure.2. Update the virtualserver.template.yml file.3. Create and deploy the monitoring instance.
Before you begin, ensure that the following prerequisites are met:
� The IP address of the SSC partition is available.
� Ports 8443 and 25826 are available for the monitoring infrastructure on the SSC partition.
For monitoring, the following containers are created:
� Monitoring� Collectd-Host
Note: The monitoring metrics are collected from SSC partitions. Only the Hyper Protect hosting appliance and SSC partition level metrics are supported for IBM Hyper Protect Virtual Servers V1.2.x.
For more information about this collection of metrics, see Metrics collected by the monitoring infrastructure.
To get an overall understanding of what information that you need to run the offering and where to get such information, see Appendix A, “Configuration parameters” on page 385. For more information and a downloadable worksheet, see Planning for the environment.
312 Securing Your Critical Workloads with IBM Hyper Protect Services

Creating CA signed certificates for the monitoring infrastructureYou can generate CA root and CA signed certificates for the monitoring infrastructure by using the openssl utility or any other certificate generation tools that comply with your organization rules.
Complete the following steps:
1. Go to the following directory on your workstation to run the openssl command or any similar tool:
cd $HOME/hpvs/config/monitoring/keys/ca-certificates
So, as the root user (used in this procedure), the directory is /root/hpvs/config/monitoring/keys/ca-certificates.
2. Create CA Root certificates by using the following procedure. The root CA certificate is used to sign CA certificates.
a. Create the CA root private key. After the command completes, the CA root private key myrootCA.key is generated under the current directory.
openssl genrsa -out myrootCA.key 4096
b. Create the Certificate Signing Request (CSR) based on the CA root private key. After the command completes, the CSR myrootCA.csr is generated under the current directory. The command prompts you to enter values for various certificate fields, such as Organization Unit (OU), Common Name (CN), Email, Country Code, State/Province name, City, Organization, or Company Name. Here is an example of our openssl command:
openssl req -verbose -new -key myrootCA.key -out myrootCA.csr -sha256
c. Create the CA root certificate by using the following command:
openssl ca -out myrootCA.crt -keyfile myrootCA.key -verbose -selfsign -md sha256 -infiles myrootCA.csr
d. Validate the CA root certificate by using the following command. After the command completes, the details of the CA root certificate are printed in the output.
openssl x509 -noout -text -in myrootCA.crt
3. Create the CSR for the CA signed server certificate and client certificate by completing the instructions. Generate certificates for the secure communication between the Hyper Protect monitoring infrastructure (server) and the monitoring client. The monitor client launches the collectd-exporter endpoint on the server to show the collected metrics.
a. Create a private key by using the following command. After the command completes, a private key is created under the current directory.
For a server certificate, use the following command:
openssl genrsa -out server.key 4096
Tip: If you are new to OpenSSL and CA, make yourself familiar with your environment. A good starting point is your OpenSSL configuration file at /etc/openssl/openssl.cnf.
Note: When you generate certificates, use collectdhost-<metric-dn-suffix>.<dns-name> or *.<dns-name> as the Common Name. A wildcard certificate with *.<dns-name> Common Name can be used across multiple partitions.
Chapter 6. IBM Hyper Protect Virtual Servers on-premises installation 313

For a client certificate, use the following command:
openssl genrsa -out client.key 4096
b. Create a CSR based on the private key that you created. You are prompted to enter values for various certificate fields, such as OU, CN, Email, Country Code, State or Province name, City, Organization, or Company Name. After the command completes, a CSR file is created under the current directory.
To create the server certificate, use the following command:
openssl req -new -key server.key -out server-certificate.csr
To create the client certificate, use the following command:
openssl req -new -key server.key -out server-certificate.csr
c. Finally, create the CA signed certificates by using the CA root certificate.
To create the CA signed server certificate, use the following command:
openssl x509 -req -days 365 -in server-certificate.csr -CA myrootCA.crt -CAkey myrootCA.key -CAcreateserial -out ./server-certificate.crt
To create the CA signed client certificate, use the following command:
openssl x509 -req -days 365 -in client-certificate.csr -CA myrootCA.crt -CAkey myrootCA.key -CAcreateserial -out ./client-certificate.crt
d. Copy the certificate and key files for the monitoring infrastructure into the ./keys directory. The certificates and keys are used by the monitoring infrastructure to encrypt the metric data in transit.
cp -p server.key /root/hpvs/config/monitoring/keys/server.keycp -p server.key /root/hpvs/config/monitoring/keys/client.keycp -p server-certificate.crt /root/hpvs/config/monitoring/keys/server-certificate.crtcp -p client-certificate.crt /root/hpvs/config/monitoring/keys/client-certificate.crtcp -p myrootCA.crt /root/hpvs/config/monitoring/keys/myrootCA.crt
Creating the YAML configuration files and deploy the monitoring containerAs a best practice, use the hpvs deploy command to provision the instance because it is an easier method for creating multiple instances quickly. The definitions are stored in .yml files. As an alternative, you can use the hpvs vs create command (not described in this procedure).
The vs_monitoring.yml file that has the configuration details for the virtual server refers to the corresponding sections of the virtualserver.template.yml when you run the hpvs deploy command.
Complete the following steps:
1. Update the template file $HOME/hpvs/config/templates/virtualserver.template.yml based on the networking configuration of the IBM Hyper Protect Virtual Servers instance. For more information, see 6.6.1, “Configuring the internal network” on page 300.
2. Create the configuration YAML file demo_monitoring.yml for the instance. Copy the sample file $HOME/hpvs/config/monitoring/vs_monitoring.ymlas a template:
cp vs_monitoring.yml demo_monitoring.yml
314 Securing Your Critical Workloads with IBM Hyper Protect Services

Change the configuration to meet your environment. Example 6-19 shows our vs_monitoring.yml file.
Example 6-19 The vs_monitoring.yml file
version: v1type: virtualservervirtualservers:- name: test-monitoring host: SSC_LPAR_NAME hostname: monitoring-host-container repoid: Monitoring imagetag: 1.2.3 imagefile: Monitoring.tar.gz imagecache: true environment: - key: "PRIVATE_KEY_SERVER" value: "@/root/hpvs/config/monitoring/keys/server.key" - key: "PUBLIC_CERT_SERVER" value: "@/root/hpvs/config/monitoring/keys/server-certificate.crt" - key: "PUBLIC_CERT_CLIENT" value: "@/root/hpvs/config/monitoring/keys/myrootCA.crt" - key: "METRIC_DN_SUFFIX" value: "first" - key: "COMMON_NAME" value: "example.com" ports: - hostport: 8443 protocol: tcp containerport: 8443 - hostport: 25826 protocol: udp containerport: 25826- name: test-collectd host: SSC_LPAR_NAME hostname: collectd-host-container repoid: CollectdHost imagetag: 1.2.3 imagefile: CollectdHost.tar.gz imagecache: true
Because an external IP is not specified for the monitoring container, this container can be reached by using the SSC partition's IP address over port 8443. If you want to customize the network, resource, or storage settings, see the parameters and examples of a virtual server configuration file on IBM Documentation.
3. Create the instance by using the configurations in the YAML file:
hpvs deploy --config /root/hpvs/config/monitoring/demo_monitoring.yml
4. After the containers are successfully created, you can collect the metrics by using the wget command or by configuring any one of the tools that show the metrics in a graphical manner (for example, Prometheus). In this example, we use the wget method to collect the metrics of the SSC LPAR, as shown in the following example:
wget https://collectdhost-first.example.com:8443/metrics -ca-certificate=myrootCA.crt --certificate=client-certificate.crt --private-key=client.key
Chapter 6. IBM Hyper Protect Virtual Servers on-premises installation 315
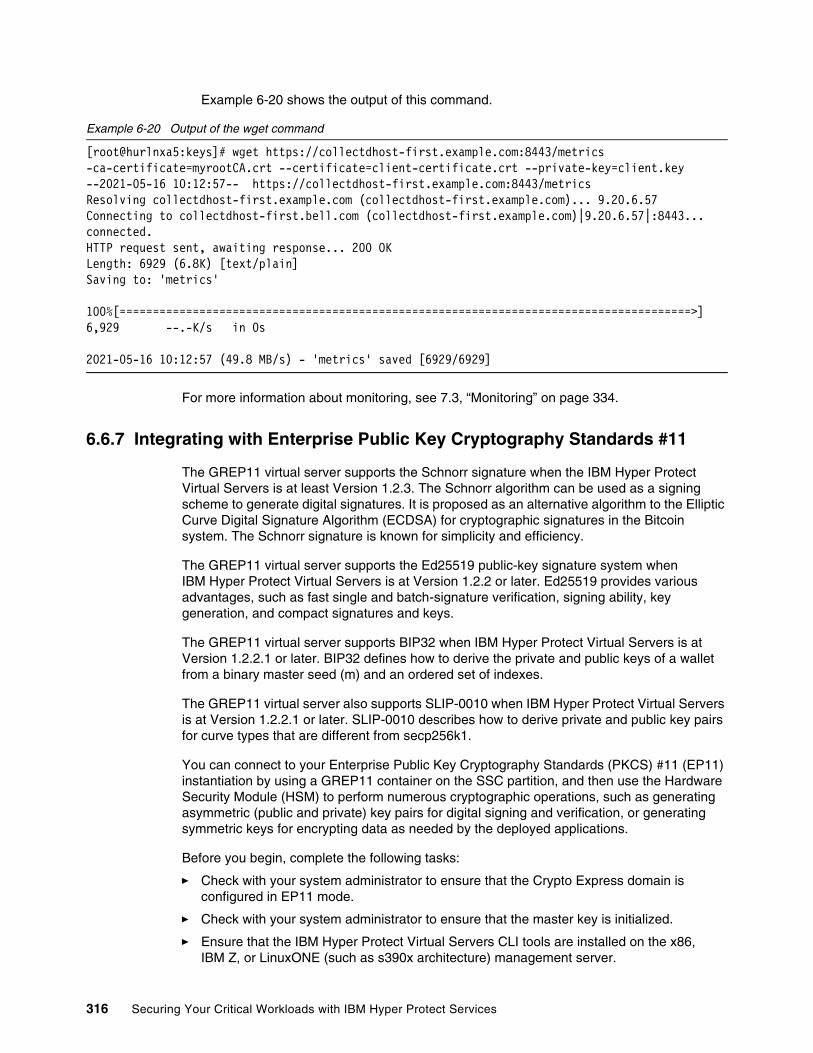
Example 6-20 shows the output of this command.
Example 6-20 Output of the wget command
[root@hurlnxa5:keys]# wget https://collectdhost-first.example.com:8443/metrics -ca-certificate=myrootCA.crt --certificate=client-certificate.crt --private-key=client.key--2021-05-16 10:12:57-- https://collectdhost-first.example.com:8443/metricsResolving collectdhost-first.example.com (collectdhost-first.example.com)... 9.20.6.57Connecting to collectdhost-first.bell.com (collectdhost-first.example.com)|9.20.6.57|:8443... connected.HTTP request sent, awaiting response... 200 OKLength: 6929 (6.8K) [text/plain]Saving to: 'metrics'
100%[======================================================================================>] 6,929 --.-K/s in 0s
2021-05-16 10:12:57 (49.8 MB/s) - 'metrics' saved [6929/6929]
For more information about monitoring, see 7.3, “Monitoring” on page 334.
6.6.7 Integrating with Enterprise Public Key Cryptography Standards #11
The GREP11 virtual server supports the Schnorr signature when the IBM Hyper Protect Virtual Servers is at least Version 1.2.3. The Schnorr algorithm can be used as a signing scheme to generate digital signatures. It is proposed as an alternative algorithm to the Elliptic Curve Digital Signature Algorithm (ECDSA) for cryptographic signatures in the Bitcoin system. The Schnorr signature is known for simplicity and efficiency.
The GREP11 virtual server supports the Ed25519 public-key signature system when IBM Hyper Protect Virtual Servers is at Version 1.2.2 or later. Ed25519 provides various advantages, such as fast single and batch-signature verification, signing ability, key generation, and compact signatures and keys.
The GREP11 virtual server supports BIP32 when IBM Hyper Protect Virtual Servers is at Version 1.2.2.1 or later. BIP32 defines how to derive the private and public keys of a wallet from a binary master seed (m) and an ordered set of indexes.
The GREP11 virtual server also supports SLIP-0010 when IBM Hyper Protect Virtual Servers is at Version 1.2.2.1 or later. SLIP-0010 describes how to derive private and public key pairs for curve types that are different from secp256k1.
You can connect to your Enterprise Public Key Cryptography Standards (PKCS) #11 (EP11) instantiation by using a GREP11 container on the SSC partition, and then use the Hardware Security Module (HSM) to perform numerous cryptographic operations, such as generating asymmetric (public and private) key pairs for digital signing and verification, or generating symmetric keys for encrypting data as needed by the deployed applications.
Before you begin, complete the following tasks:
� Check with your system administrator to ensure that the Crypto Express domain is configured in EP11 mode.
� Check with your system administrator to ensure that the master key is initialized.
� Ensure that the IBM Hyper Protect Virtual Servers CLI tools are installed on the x86, IBM Z, or LinuxONE (such as s390x architecture) management server.
316 Securing Your Critical Workloads with IBM Hyper Protect Services

Creating the CA certificate for GREP11 virtual serversTo configure the GREP11 service for your IBM Hyper Protect Virtual Servers container, create certificates that are used for secure communication. The certificates can be generated by using one-way Transport Layer Security (TLS) communication or mutual TLS communication. In our example, we use mutual TLS communication to generate certificates.
To generate CA signed certificates for the GREP11 infrastructure by using the openssl utility with root user authority, complete the following steps:
1. Generate the CA key by running the following command:
openssl genrsa -out ca.key 2048
2. Create the CA certificate by running the following command:
openssl req -new -x509 -key ca.key -days 730 -out ca.pem
3. Generate the Server key by running the following command:
openssl genrsa -out server-key.pem 2048
4. Export the COMMON_NAME (fully qualified domain name), path length, and Subject Alternative Name (to indicate all the domain names and IP addresses that are secured by the certificate) by running the following commands. These values are used to generate the server certificate.
export COMMON_NAME=grep11.example.comexport PATHLEN=CA:trueexport SUBJECT_ALT_NAME=DNS:<domain-name:port>,IP:<ip>
For example:
export SUBJECT_ALT_NAME=DNS:grep11.example.com:9876,IP:10.20.6.62
5. Create the openssl.cnf file and copy the content that is shown in Example 6-21.
Example 6-21 An openssl.conf example
# OpenSSL configuration file.## Establish working directory.
dir = .
[ ca ] default_ca = CA_default
[ CA_default ] serial = $dir/serial #database = ${ENV::DIR}/index.txt #new_certs_dir = $dir/newcerts #private_key = $dir/ca.key #certificate = $dir/ca.cer default_days = 730 default_md = sha256 preserve = no
Note: To get an overall understanding of what information that you need to run the offering and where to get such information, see Appendix A, “Configuration parameters” on page 385. For more information and a downloadable worksheet, see Planning for the environment.
Chapter 6. IBM Hyper Protect Virtual Servers on-premises installation 317

email_in_dn = no nameopt = default_ca certopt = default_ca default_crl_days = 45 policy = policy_match
[ policy_match ] countryName = match stateOrProvinceName = optional organizationName = match organizationalUnitName = optional commonName = supplied emailAddress = optional
[ req ] default_md = sha256 distinguished_name = req_distinguished_name prompt = yes
[ req_distinguished_name ] #countryName = Country #countryName_default = US #countryName_min = 2 #countryName_max = 2 #localityName = Locality #localityName_default = Los Angeles #organizationName = Organization #organizationName_default = IBM #commonName = Common Name #commonName_max = 64
C = US ST = California L = Los Angeles O = IBM CN = ${ENV::COMMON_NAME}
[ certauth ] subjectKeyIdentifier = hash authorityKeyIdentifier = keyid:always,issuer:always keyUsage = digitalSignature, keyEncipherment, dataEncipherment, keyCertSign, cRLSign keyUsage = digitalSignature, keyEncipherment, dataEncipherment, keyCertSign, cRLSign basicConstraints = ${ENV::PATHLEN} #crlDistributionPoints = @crl
[ server ] basicConstraints = CA:FALSE keyUsage = digitalSignature, keyEncipherment, dataEncipherment extendedKeyUsage = serverAuth nsCertType = server crlDistributionPoints = @crl subjectAltName = ${ENV::SUBJECT_ALT_NAME}
318 Securing Your Critical Workloads with IBM Hyper Protect Services
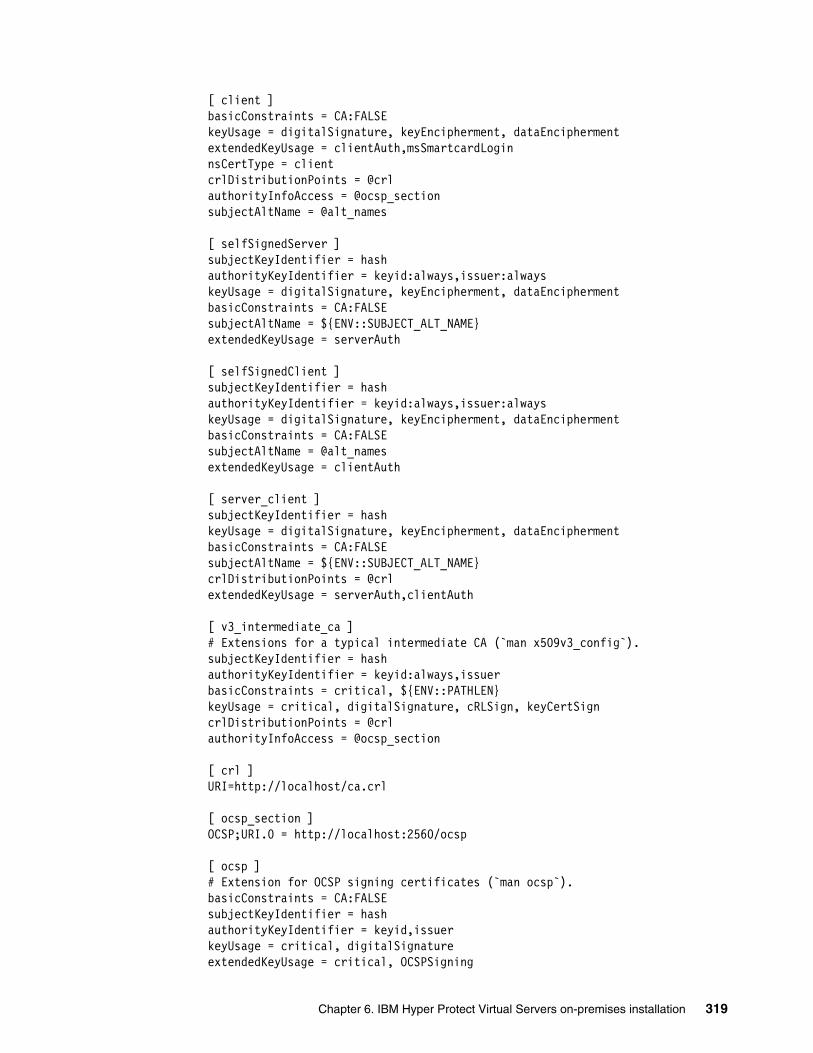
[ client ] basicConstraints = CA:FALSE keyUsage = digitalSignature, keyEncipherment, dataEncipherment extendedKeyUsage = clientAuth,msSmartcardLogin nsCertType = client crlDistributionPoints = @crl authorityInfoAccess = @ocsp_section subjectAltName = @alt_names
[ selfSignedServer ] subjectKeyIdentifier = hash authorityKeyIdentifier = keyid:always,issuer:always keyUsage = digitalSignature, keyEncipherment, dataEncipherment basicConstraints = CA:FALSE subjectAltName = ${ENV::SUBJECT_ALT_NAME} extendedKeyUsage = serverAuth
[ selfSignedClient ] subjectKeyIdentifier = hash authorityKeyIdentifier = keyid:always,issuer:always keyUsage = digitalSignature, keyEncipherment, dataEncipherment basicConstraints = CA:FALSE subjectAltName = @alt_names extendedKeyUsage = clientAuth
[ server_client ] subjectKeyIdentifier = hash keyUsage = digitalSignature, keyEncipherment, dataEncipherment basicConstraints = CA:FALSE subjectAltName = ${ENV::SUBJECT_ALT_NAME} crlDistributionPoints = @crl extendedKeyUsage = serverAuth,clientAuth
[ v3_intermediate_ca ] # Extensions for a typical intermediate CA (`man x509v3_config`). subjectKeyIdentifier = hash authorityKeyIdentifier = keyid:always,issuer basicConstraints = critical, ${ENV::PATHLEN} keyUsage = critical, digitalSignature, cRLSign, keyCertSign crlDistributionPoints = @crl authorityInfoAccess = @ocsp_section
[ crl ] URI=http://localhost/ca.crl
[ ocsp_section ] OCSP;URI.0 = http://localhost:2560/ocsp
[ ocsp ] # Extension for OCSP signing certificates (`man ocsp`). basicConstraints = CA:FALSE subjectKeyIdentifier = hash authorityKeyIdentifier = keyid,issuer keyUsage = critical, digitalSignature extendedKeyUsage = critical, OCSPSigning
Chapter 6. IBM Hyper Protect Virtual Servers on-premises installation 319

[alt_names] # email= ${ENV::SUBJECT_ALT_NAME} otherName=msUPN;UTF8:${ENV::SUBJECT_ALT_NAME}
[v3_conf] keyUsage = digitalSignature, keyEncipherment, dataEncipherment, keyCertSign, cRLSign basicConstraints = CA:FALSE
6. Create the server CSR by running the following command:
openssl req -new -key server-key.pem -out server.csr
7. Create the server certificate by running the following command:
openssl x509 -sha256 -req -in server.csr -CA ca.pem -CAkey ca.key -set_serial 8086 -extfile openssl.cnf -extensions server -days 730 -outform PEM -out server.pem
8. Create the client key by running the following command:
openssl genrsa -out client-key.pem 2048
9. Create the client CSR by running the following command:
openssl req -new -key client-key.pem -out client.csr
10.Create the client certificate by running the following command:
openssl x509 -req -days 730 -in client.csr -CA ca.pem -CAcreateserial -CAkey ca.key -out client.pem
11.Copy the keys to the <$HOME/hpvs>/config/grep11/keys directory on your management server by running the following commands:
cp -p server.pem /root/hpvs>/config/grep11/keys/cp -p server-key.pem /root/hpvs>/config/grep11/keys/cp -p ca.pem /root/hpvs>/config/grep11/keys/
Creating the GREP11 container by using a YAML configuration fileComplete the following commands:
1. Check the available crypto domains on the HSM by using the hpvs crypto list command:
root@rdbkhpvm# hpvs crypto list
Here is the output of the command:
+--------------+--------+| CRYPTODOMAIN | STATUS |+--------------+--------+| 01.001f | online || 03.0020 | online || 05.001f | online || 06.001e | online |+--------------+--------+
320 Securing Your Critical Workloads with IBM Hyper Protect Services
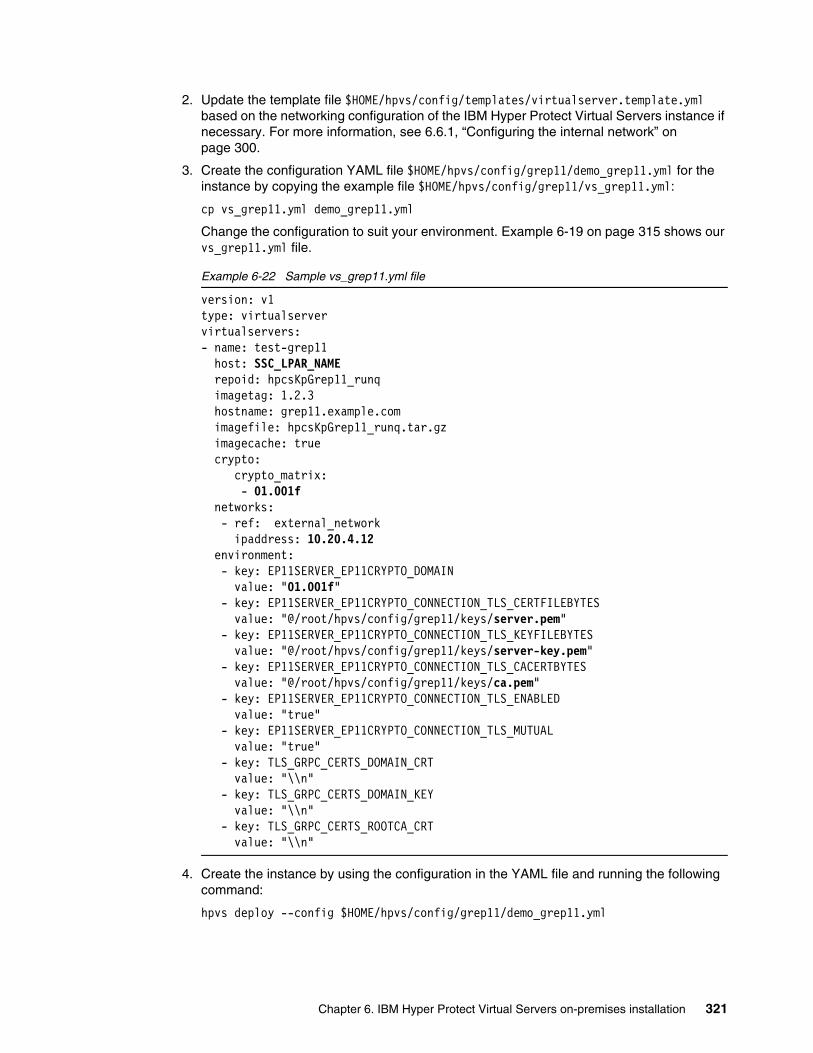
2. Update the template file $HOME/hpvs/config/templates/virtualserver.template.yml based on the networking configuration of the IBM Hyper Protect Virtual Servers instance if necessary. For more information, see 6.6.1, “Configuring the internal network” on page 300.
3. Create the configuration YAML file $HOME/hpvs/config/grep11/demo_grep11.yml for the instance by copying the example file $HOME/hpvs/config/grep11/vs_grep11.yml:
cp vs_grep11.yml demo_grep11.yml
Change the configuration to suit your environment. Example 6-19 on page 315 shows our vs_grep11.yml file.
Example 6-22 Sample vs_grep11.yml file
version: v1type: virtualservervirtualservers:- name: test-grep11 host: SSC_LPAR_NAME repoid: hpcsKpGrep11_runq imagetag: 1.2.3 hostname: grep11.example.com imagefile: hpcsKpGrep11_runq.tar.gz imagecache: true crypto: crypto_matrix: - 01.001f networks: - ref: external_network ipaddress: 10.20.4.12 environment: - key: EP11SERVER_EP11CRYPTO_DOMAIN value: "01.001f" - key: EP11SERVER_EP11CRYPTO_CONNECTION_TLS_CERTFILEBYTES value: "@/root/hpvs/config/grep11/keys/server.pem" - key: EP11SERVER_EP11CRYPTO_CONNECTION_TLS_KEYFILEBYTES value: "@/root/hpvs/config/grep11/keys/server-key.pem" - key: EP11SERVER_EP11CRYPTO_CONNECTION_TLS_CACERTBYTES value: "@/root/hpvs/config/grep11/keys/ca.pem" - key: EP11SERVER_EP11CRYPTO_CONNECTION_TLS_ENABLED value: "true" - key: EP11SERVER_EP11CRYPTO_CONNECTION_TLS_MUTUAL value: "true" - key: TLS_GRPC_CERTS_DOMAIN_CRT value: "\\n" - key: TLS_GRPC_CERTS_DOMAIN_KEY value: "\\n" - key: TLS_GRPC_CERTS_ROOTCA_CRT value: "\\n"
4. Create the instance by using the configuration in the YAML file and running the following command:
hpvs deploy --config $HOME/hpvs/config/grep11/demo_grep11.yml
Chapter 6. IBM Hyper Protect Virtual Servers on-premises installation 321

You can update your application to use the asymmetric key pairs that are provided by the GREP11 containers. For more information about how to verify whether the GREP11 virtual server is working as expected, see Testing the GREP11 virtual server.
For more information about to use the APIs, see 2.5.2, “How to use the IBM Enterprise PKCS #11 over gRPC API” on page 182.
6.7 Public Cloud service instantiation
The IBM Hyper Protect Virtual Servers service is also available in IBM Cloud, as described in 4.4, “Public cloud service instantiation” on page 242.
322 Securing Your Critical Workloads with IBM Hyper Protect Services

Chapter 7. IBM Hyper Protect Virtual Servers key features
In this chapter, we describe the key features of IBM Hyper Protect Virtual Servers, and for each feature, explain step by step how to enable and start using that feature.
This chapter includes the following topics:
� User roles in IBM Hyper Protect Virtual Servers
� Trusted Continuous Integration and Continuous Delivery: Building and deploying containers securely
� Monitoring
� Enterprise Public Key Cryptography Standards #11 over gRPC
� Bring Your Own Image (deploying your applications securely)
7
© Copyright IBM Corp. 2020, 2022. All rights reserved. 323
7.1 User roles in IBM Hyper Protect Virtual Servers
In this section, we describe the different roles and responsibilities that are involved in the administration of an IBM Hyper Protect Virtual Servers cloud platform. We also describe how this separation of user roles and limiting of the permissions of each role achieves a heightened level of security for critical workloads in the public cloud and the private cloud.
In a typical cloud platform, public or private, user roles that have low-level administrative permissions to access the infrastructure underlying the cloud typically can access the containers that are running in the cloud, the workloads that are running in those containers, and the data those containers use. Even if the administrators secure the cloud from threats from outside the organization, a threat exists from persons inside the organization who hold administrative user roles, tamper with the workloads that are running on the cloud, or steal data or secrets that the cloud stores.
The IBM Hyper Protect Virtual Servers feature has many administrator roles, each with their own responsibilities. A best practice is that a different person in the organization holds each of the following user roles to prevent one person from having administrative access to too many of the resources in the cloud:
� IBM Z and LinuxONE System Administrator
Creates and manages logical partitions (LPARs). They are responsible for the low-level provisioning and management of the IBM Z mainframe or IBM LinuxONE server systems.
� Appliance Manager
Deploys and manages the Secure Service Container (SSC) application that allows the dynamic provisioning of network, storage, and container resources onto which the LPAR on the Appliance Manager installs SSC. An Application Manager can build a secure cloud on the LPAR by using the SCC application.
� Application Manager
Deploys containerized applications onto the LPAR that is running an SSC application (SSC LPAR).
� Application Builder
Builds and validates containerized applications to run on the SSC LPAR.
� Application Developer
Writes containerized applications that the Application Builder builds, and the Application Manager deploys to the SSC LPAR.
� Application User
Interacts with the containerized applications or virtual servers that are deployed on the SSC LPAR.
� Independent software vendor (ISV)
Creates and distributes applications to for Application Managers from different businesses or organizations to run on their private cloud. In IBM Hyper Protect Virtual Servers, the ISV creates containerized applications to run on the SSC LPARs that the ISV’s customers create.
324 Securing Your Critical Workloads with IBM Hyper Protect Services

The Appliance Manager, Application Manager, and the LinuxONE system administrator cannot access the containerized applications or the data those applications use when the containers run inside an SSC LPAR. Therefore, a cloud for your critical workloads that uses IBM Hyper Protect Virtual Servers, which uses the SSC technology along with advanced security features that are native to the IBM Z platform, such as encryption of data at rest and in-flight, is secure from insider threats.
IBM Cloud Hyper Protect Virtual Servers uses the same SSC technology to protect your critical workloads that are running in the IBM public cloud. Therefore, IBM Service Engineers who act as the Application Manager, Appliance Manager, and LinuxONE system administrator roles cannot access an IBM Cloud Hyper Protect Virtual Servers instance. Those IBM administrators also cannot access the data and secrets that are associated with an instance.
Access to containers and the data that the containers use is possible only by using private credentials (such as a Secure Shell (SSH) private key or authentication token) that only the Application User knows and can access. A typical use case for interaction with an IBM Hyper Protect Virtual Servers container is to restrict the methods by which an Application User can interact with the container to only the end points of that containerized application’s REST application programming interface (API). This restriction further reduces the attack surface of the container because it does not include general-purpose access by using SSH or a similar interface. This best practice is for designing containerized applications that run on IBM Hyper Protect Virtual Servers.
7.2 Trusted Continuous Integration and Continuous Delivery: Building and deploying containers securely
In this section, we describe how, for on-premises installations, IBM Hyper Protect Virtual Servers enables a heightened level of security and traceability in your Continuous Integration and Continuous Delivery (CI/CD) pipeline through the IBM Hyper Protect Virtual Servers Trusted CI/CD infrastructure. By using an example, we also demonstrate how to use this infrastructure to build an application image, sign it, and push it to a trusted repository in a container registry.
7.2.1 Importance of establishing a trusted CI/CD pipeline
An organization that wants to build a highly secure cloud to run critical workloads requires a solution where only trusted images can run on the secure cloud. Allowing any workload to run on the cloud introduces exploitable vulnerabilities, including the following examples:
� The Application Manager can create an instance of an insecure application from an image in a public container registry. Public registries, such as Docker Hub, contain many unofficial repositories that include widely varying standards of quality that an image must meet before a developer can push an image to that repository. For example, a particular repository can allow developers to push an image to it even if that image has known vulnerabilities.
Allowing the Application Manager to deploy a container from any public repository means that the Application Manager can deploy images with vulnerabilities into your cloud.
� An Application Developer can build a malicious image and upload it to a repository that an Application Manager decided to trust. The Application Developer understands the image build pipeline and can use that knowledge to build an image with a vulnerability that the build pipeline does not detect.
Chapter 7. IBM Hyper Protect Virtual Servers key features 325

An Application Manager must audit how the Application Builder built an image and what source code the Application Builder used to build it before deploying the image.
� A bad actor can tamper with an Application Builder’s build environment or the CI/CD pipeline. This tampering results in the Application Builder unintentionally building and uploading a compromised image to the repository. This process can happen if a user with lower-level administrative role, such as the Appliance Manager, can access the container or virtual machine (VM) that is building the image.
The result of this tampering is that the build process pushes an image to your trusted repository, which is not the same as the image Application Builder thinks they built.
The Trusted CI/CD feature of IBM Hyper Protect Virtual Servers establishes trust, security, and provenance at every step of the image deployment process (build, storage, and instantiation) to avoid introducing these attack vectors into your build process. It prevents you from introducing compromised containers into your cloud.
7.2.2 Trusted CI/CD pipeline architecture
In this section, we describe the pipeline that creates trusted images that an Application Manager can deploy as IBM Hyper Protect Virtual Servers container instances.
The Application Manager creates one instance of the Secure Build application, an IBM Hyper Protect Virtual Servers container, on the SSC LPAR for each image the Application Builder wants to build. The IBM Hyper Protect Virtual Servers software package includes the Secure Build container image. The Application Manager loads this image onto the SSC LPAR during installation. For more information about the process for loading this image onto the SSC LPAR and creating an instance of a Secure Build container, see 6.6.5, “Setting up the Secure Build container” on page 309.
A Secure Build instance reviews the source code for a containerized application from GitHub and builds the application image by using Docker. Because the Secure Build instance runs in the SSC LPAR, administrative users cannot access the Secure Build instance and they cannot tamper with the image build process.
Each Secure Build instance must push the image that it builds to a separate repository. An Application Builder cannot reconfigure a Secure Build instance to make it push images to a different repository after the Secure Build image pushes an image to its associated repository.
Also, a new Secure Build instance cannot push an image to a repository that is associated with a different Secure Build instance. This feature ensures that only one build machine can push images to a particular repository, which ensures the provenance of the images in that repository.
The Secure Build instance also generates a signed manifest file whenever it completes a build. The manifest file can be used to audit what source code of the Secure Build instance is used during the build that generated the manifest file and how it built the image.
After a Secure Build instance pushes an image to a repository, the Application Manager cannot deploy that image immediately. The Application Manager must first register the repository on the SSC before deploying images from it by using a registration file that the Application Builder or ISV signed and encrypted.
326 Securing Your Critical Workloads with IBM Hyper Protect Services
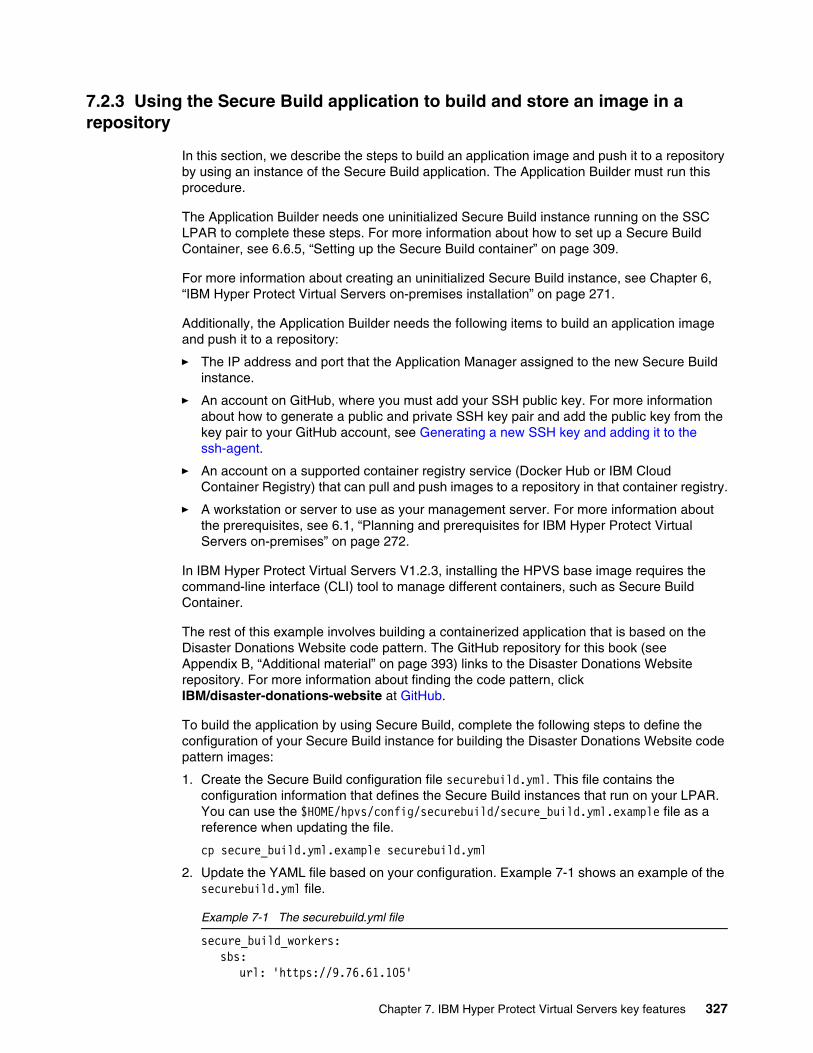
7.2.3 Using the Secure Build application to build and store an image in a repository
In this section, we describe the steps to build an application image and push it to a repository by using an instance of the Secure Build application. The Application Builder must run this procedure.
The Application Builder needs one uninitialized Secure Build instance running on the SSC LPAR to complete these steps. For more information about how to set up a Secure Build Container, see 6.6.5, “Setting up the Secure Build container” on page 309.
For more information about creating an uninitialized Secure Build instance, see Chapter 6, “IBM Hyper Protect Virtual Servers on-premises installation” on page 271.
Additionally, the Application Builder needs the following items to build an application image and push it to a repository:
� The IP address and port that the Application Manager assigned to the new Secure Build instance.
� An account on GitHub, where you must add your SSH public key. For more information about how to generate a public and private SSH key pair and add the public key from the key pair to your GitHub account, see Generating a new SSH key and adding it to the ssh-agent.
� An account on a supported container registry service (Docker Hub or IBM Cloud Container Registry) that can pull and push images to a repository in that container registry.
� A workstation or server to use as your management server. For more information about the prerequisites, see 6.1, “Planning and prerequisites for IBM Hyper Protect Virtual Servers on-premises” on page 272.
In IBM Hyper Protect Virtual Servers V1.2.3, installing the HPVS base image requires the command-line interface (CLI) tool to manage different containers, such as Secure Build Container.
The rest of this example involves building a containerized application that is based on the Disaster Donations Website code pattern. The GitHub repository for this book (see Appendix B, “Additional material” on page 393) links to the Disaster Donations Website repository. For more information about finding the code pattern, click IBM/disaster-donations-website at GitHub.
To build the application by using Secure Build, complete the following steps to define the configuration of your Secure Build instance for building the Disaster Donations Website code pattern images:
1. Create the Secure Build configuration file securebuild.yml. This file contains the configuration information that defines the Secure Build instances that run on your LPAR. You can use the $HOME/hpvs/config/securebuild/secure_build.yml.example file as a reference when updating the file.
cp secure_build.yml.example securebuild.yml
2. Update the YAML file based on your configuration. Example 7-1 shows an example of the securebuild.yml file.
Example 7-1 The securebuild.yml file
secure_build_workers: sbs:
url: 'https://9.76.61.105'
Chapter 7. IBM Hyper Protect Virtual Servers key features 327

# <url of the Secure Build service. for example, https://9.76.61.105> port: '443' cert_path: '/root/hpvs/config/securebuild/keys/sbs_cert'
# <complete path of certificate. > key_path: '/root/hpvs/config/securebuild/keys/sbs_key'
# <complete path of key.>regfile:
id: 'RB_regfile' github:
url: '[email protected]:MyOrg/my-docker-app.git'branch: 'master' ssh_private_key_path: '/root/github/github.rsa'
# <complete path of key github private key.recurse_submodules: 'False' dockerfile_path: './Dockerfile' docker_build_path: 'docker_base_user/My DockerAPP'
# <Enter the path to the subdirectory within the Github project to be used as the build context for the Docker build>
docker: push_server: 'docker'
# <get this from hpvs registry list. for example, docker_push> base_server: 'docker'
# <get this from hpvs registry list. for example, docker_base> pull_server: 'docker'
# <get this from hpvs registry list. for example, docker_pull> repo: 'docker_user_name/docker_image_name'image_tag_prefix: 'latest' content_trust_base: 'True'
manifest_cos: bucket_name: 'my-cos-bucket1'
# <Enter the bucket name on the S3 object store where manifest files will be transferred to after each build>
api_key: '0viPH...kliJ'# <Enter the API key used to authenticate with the S3 object store> resource_crn: 'crn:v1...::1'# <Enter the resource instance ID for the S3 object store>
auth_endpoint: 'iam.cloud.ibm.com'# <Enter the authentication endpoint for the S3 object store>
endpoint: 's3.....cloud'# <Enter the endpoint for the S3 object store> # Add all allowlist environment variables that are required in your virtual server. If you try to create a virtual server with environment variables that are not added to the allowlist, then creating the virtual server fails. This is an optional parameter and if you do not have any environment variable for the virtual server, you can comment this parameter.
env: whitelist: [KEY1,KEY2]
build: args:
<ARG1>: '<value1>' <ARG2>: '<value2>'
signing_key: private_key_path: '/root/hpvs/isv_user.private'
# <Enter the absolute private key path. public_key_path: '/root/hpvs/isv_user.pub'
328 Securing Your Critical Workloads with IBM Hyper Protect Services

# <Enter the absolute public key path.
#Add linux capabilities to Hyper Protect Virtual Server. List of linux # # # #capabilities are available here #https://man7.org/linux/man-pages/man7/capabilities.7.html. # All the capabilities that are listed are supported except "CAP_PERFMON", "CAP_BPF", and CAP_CHECKPOINT_RESTORE". # While adding capabilities remove the prefix "CAP". # For example, CAP_AUDIT_CONTROL will be AUDIT_CONTROL cap_add: ["ALL"] # For example, ["NET_ADMIN","NET_RAW"], or ["ALL"]
For a full list of supported parameters in the configuration file, see Secure Build configuration.
To configure an IBM Cloud Object Storage service to archive the application manifest files of your applications that are built by your Secure Build container, ensure that you have the following information about your IBM Cloud Object Storage available:
� The API key to the IBM Cloud Object Storage service
� The object storage bucket to store the manifest
� The resource instance name of the IBM Cloud Object Storage service
� The authentication endpoint for the IBM Cloud Object Storage service
� The endpoint for the IBM Cloud Object Storage service
Notes:
� If the base image in the Dockerfile is not signed, then the base_server parameter is not required and content_trust_base must be False.
� If you want to specify a non-default SSH port, then you can add the value of the port that you want to use in the GitHub URL parameter, as shown in Example 7-1, when IBM Hyper Protect Virtual Servers is at Version 1.2.3 or later. When no port is specified, the GitHub URL can be specified as "[email protected]:MyOrg/my-docker-app.git".
� The cap_add: [] parameter is applicable for IBM Hyper Protect Virtual Servers V1.2.3 or later. To enable all privileges, you can use cap_add:["ALL"], but as a best practice, provide the least possible privileges to your virtual server.
� Build parameters (build args) are used to give more information that might be required for the specific application that you want to run on the virtual server.
� You must provide a valid GitHub URL and ensure that you use a .git extension when specifying the URL.
� As a best practice, choose an endpoint URL that is in the same region as your service or application, and specify this URL as the value for the endpoint parameter in the manifest_cos section of the secure_build.yml file. For more information about identifying the endpoint URL, see Endpoints and storage locations.
Chapter 7. IBM Hyper Protect Virtual Servers key features 329

Table 7-1 lists the important parameters of the securebuild.yaml configuration file and the values that you must set those parameters to build the images for the back-end and front-end services for the Disaster Donations Website.
Table 7-1 Parameters in the securebuild.yaml configuration file
Category Name Description Example value
SBS url URL of the Secure Build Service. https://10.20.4.67
port The port that the Secure Build instance’s REST API is accessible on.
Obtain this value from your Application Manager. The value is 443 if the Secure Build instance has its own dedicated IP address.
cert_path Complete path of the certificate. /root/hpvs/config/securebuild/keys/sbs_cert
key_path Complete path of the key. /root/hpvs/config/securebuild/keys/sbs_key
GitHub url GitHub SSH URL of the GitHub repository from which you are building.
[email protected]:IBM/disaster-donations-website.git
branch Branch of the GitHub project to check out and build from.
master
ssh_private_key_path
Complete path of the GitHub private key.
/home/itso/github/github_rsa
docker_build_path
Path to the directory in the GitHub repository to use as the build context when building the image.
frontend/(If building the front-end image)backend/(If building the back-end image)
key Private key for the public key that is associated with your GitHub account. The Secure Build instance uses this key to clone the GitHub repository.
(You must add your own GitHub private key here.)
Docker repo Repository that the Secure Build instance pushes the image to which it builds.You cannot change this value after you initialize a Secure Build container.
mynamespace/ddwbackend ormynamespace/ddwfrontend
push_server Container registry to which the Secure Build Server (SBS) pushes the image that it builds.
us.icr.io
base_server Container registry from which the Secure Build instance pulls the base image.
docker.io
pull_server Container registry to which the SBS pulls down the image it builds.
itsorepo
docker_content_trust_base
True or false value that controls whether the SBS can build images only where Docker Content Trust (DCT) signed the image’s base image.
False
330 Securing Your Critical Workloads with IBM Hyper Protect Services

You can use the example values that are provided in Table 7-1 on page 330 to build a Node.js front end and a Python back end for the Disaster Donations Website application.
You must add your own GitHub private key, container registry credentials, and your Secure Build instance port and IP address to securebuild.yaml for each Secure Build instance that you want to create.
You can define multiple Secure Build configurations in securebuild.yaml. For example, you can define one configuration to build the front-end image, and one configuration to build the back-end image. If you have two Secure Build instances that are available, you can initialize one Secure Build instance with the configuration to build the front end, and the other Secure Build instance with the configuration to build the back end.
3. Build your application and upload the application manifest file to IBM Cloud Object Storage by using Secure Build. You can choose either of the following options:
a. Use one command to perform all the Secure Build actions including initializing, building, and generating the encrypted repository registration file. This option is a best practice if you are building the application by using the Secure Build for the first time.
hpvs sb init --config $HOME/hpvs/config/securebuild/secure_build.yml.example --out $HOME/hpvs/config/MyDockerAppImageRegfile.enc --build
b. Use individual commands to perform each step of building the application by using the Secure Build virtual server. This option is a best practice if you plan to build the application by using the Secure Build multiple times. In this scenario, you can run the hpvs sb build command for subsequent builds.
hpvs sb build --config $HOME/hpvs/config/securebuild/secure_build.yml.example
hpvs sb regfile --config $HOME/hpvs/config/securebuild/secure_build.yml.example --out $HOME/hpvs/config/MyDockerAppImageRegfile.enc
You can log in to your cloud account and check that the application manifest file was transferred to its bucket in your IBM Cloud Object Storage service after the commands complete.
You can use the hpvs sb manifest command to download the manifest file of the Secure Build:
hpvs sb manifest --config $HOME/hpvs/config/securebuild/secure_build.yml.example --name <build_name>
Env whitelist Allowlist of environment variables that an Application Manager can pass into an instance of an image when its container starts.
For the back-end image:PASSWORD,USERNAME,DBNAME,ENDPOINT,REPLICASETNot required for the front-end image.
signing_key private_key_path
The absolute private key path. /root/hpvs/config/isv_user.private
public_key_path
The absolute public key path. /root/hpvs/config/isv_user.pub
Category Name Description Example value
Chapter 7. IBM Hyper Protect Virtual Servers key features 331

You can get the <build_name> by using the hpvs sb status command after the build completes. When the command completes, the manifest file is downloaded to the current directory from which the hpvs sb manifest command was run. To verify the signature of the manifest file, see Verifying the signature of the manifest file.
4. You can select from the following options to deploy the application:
– Deploy the application by using the YAML configuration file and hpvs deploy command:
i. Create the configuration YAML file $HOME/hpvs/config/demo_app.yml for the instance by referring to the example file $HOME/hpvs/config/vs_regfiledeployexample.yml, which is shown in Example 7-2.
Example 7-2 The vs_regfiledeployexample.yml file
version: v1type: virtualservervirtualservers:- name: testcontainer host: SSC_LPAR_NAME repoid: MyDockerRepo imagetag: latest reporegfile: /HOME/hpvs/config/MyDockerAppImageRegfile.enc imagecache: true resourcedefinition: ref: small networks: - ref: external_network ipaddress: 10.20.4.61 volumes: - name: myquotagroup ref : np-medium mounts: - mount_id: new mountpoint: /new filesystem: ext4
Note:
� If the hpvs sb init, hpvs sb build, or hpvs sb regfile commands fail for any reason, for example, if you specified incorrect parameters, then you can use the hpvs sb update command to update the configuration of the Secure Build configuration and rerun the commands with the updated configuration. The regfile[id] and docker[repo] parameters cannot be updated by using this command.
� You can use the hpvs sb log command to view the runtime logs of the Secure Build process, or for troubleshooting or debugging. The logs are available when you run the hpvs sb init, hpvs sb build, or hpvs sb regfile commands.
� You can use the hpvs sb status command to view the status of the last Secure Build process.
� You can use the hpvs sb clean command to clean the logs of the Secure Build process. Build artifacts from the earlier builds are deleted.
� For more information about the Secure Build commands, see hpvs sb.
332 Securing Your Critical Workloads with IBM Hyper Protect Services

size: 10GB
ii. Deploy the image by using the configuration in the YAML file and the following command:
hpvs deploy --config $HOME/hpvs/config/demo_app.yml
– Deploy the application by using the hpvs vs create command:
i. Register the repository on the SSC partition for the application image by using the generated repository registration file:
hpvs repository register --pgp=$HOME/hpvs/config/MyDockerAppImageRegfile.enc --id=MyDockerRepo
ii. Create the quotagroup of the application image on the SSC partition:
hpvs quotagroup create --name myquotagroup --size=30GB
If you create a non-pass through quotagroup for the Secure Build virtual server, as a best practice, ensure that 20% of disk space is always available to address any I/O errors.
iii. Deploy the application image into the IBM Hyper Protect Virtual Servers as an IBM Hyper Protect Virtual Servers instance:
hpvs vs create --name testcontainer --repo MyDockerRepo --tag latest --cpu 2 --ram 2048 --env={env_var1=value1,env_var2=value2} --quotagroup "{quotagroup = myquotagroup, mountid = new, mount = /newroot, filesystem = btrfs, size = 25GB}" --network "{name = external_net,ip = 10.20.4.73}"
7.2.4 Building an image from a trusted base image
Building your image by using the Secure Build builds trust into the parts of the image build process under your direct control. Most Application Builders build images from a base image rather than building the image from scratch. Therefore, control over part of the image build process (the part that builds the base image) is under control of a different person or entity.
Building an image from a base image introduces a possible attack vector because the Application Builder does not have control over who builds the base image and how the base image builder does so. Therefore, it is possible that the base image build was tampered with, or a base image builder knowingly pushed a version of the base image with a known vulnerability to the base image’s repository.
The mitigation for this attack vector is to build only your images to run as IBM Hyper Protect Virtual Servers from a base image that the base image builder also built by using the Trusted CI/CD process.
IBM provides two base images that IBM built by using the Trusted CI/CD and validated that they passed the IBM quality assurance and security testing process for images that are designed for IBM Hyper Protect Virtual Servers. You can use these images as trusted base images for building your own images to run on IBM Hyper Protect Virtual Servers.
Note:
� You can use the hpvs undeploy command to delete this virtual server. This command is supported in IBM Hyper Protect Virtual Servers V1.2.2, or later.
� You can update the resources or configuration of a virtual server after the completion of the deployment operation by using the -u (--update) flag of the hpvs deploy command.
Chapter 7. IBM Hyper Protect Virtual Servers key features 333

IBM distributes a trusted base image that includes SSH that you can use to build your development images, and an image without SSH that you can use to build a locked-down production image for your production environments.
For more information about these base images, see 6.6.5, “Setting up the Secure Build container” on page 309.
7.3 Monitoring
In this section, we describe how to deploy a monitoring service onto your SSC LPAR to monitor the containers that are running on the SSC LPAR. This service enables you to monitor the status and health of your SSC LPAR.
7.3.1 Deploying a monitoring container
The Application Manager must run this procedure.
To deploy the IBM Hyper Protect Virtual Servers’ monitoring service and connect a metrics viewing service to it, you must create CA signed certificates for the monitoring infrastructure, update the virtualserver.template.yml file, and create and deploy the monitoring instance.
For more information about how to deploy the monitoring service, see 6.6.6, “Setting up the monitoring instance” on page 312.
Consider the following points:
� A monitoring service consists of two containers: A monitoring container that is called monitoring-host-container in the vs_monitoring.yaml file, and a collectd container that is called collectd-host-container in the vs_monitoring.yaml file.
� To complete the vs_monitoring.yaml configuration file, you must define the container templates for these two containers under the virtualservers: subsection. Table 7-2 lists the important parameters for these two container templates along with example values.
Table 7-2 Parameters for the monitoring-host and the collectd-host containers
Container template name
Container template parameter
Parameter description Example value
monitoring-host private-key-server Path to the private key to use with the monitoring container.
@/root/hpvs/config/monitoring/keys/server.key
public-cert-server Path to the public server certificate to use with the monitoring container.
@/root/hpvs/config/monitoring/keys/server-certificate.crt
public-cert-client Path to the public client certificate to use with the monitoring container.
@/root/hpvs/config/monitoring/keys/myrootCA.crt
metric_dn_suffix Domain suffix for the monitoring service.
first
common_name DNS name for the monitoring service.
example.com
334 Securing Your Critical Workloads with IBM Hyper Protect Services
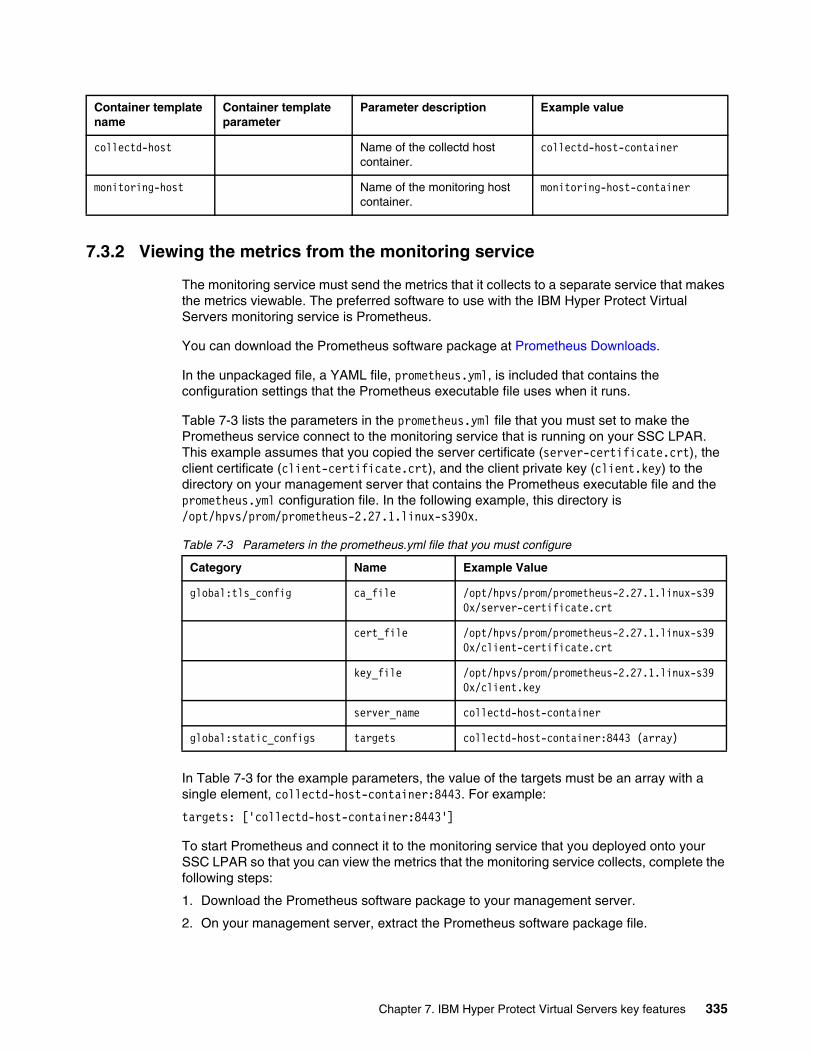
7.3.2 Viewing the metrics from the monitoring service
The monitoring service must send the metrics that it collects to a separate service that makes the metrics viewable. The preferred software to use with the IBM Hyper Protect Virtual Servers monitoring service is Prometheus.
You can download the Prometheus software package at Prometheus Downloads.
In the unpackaged file, a YAML file, prometheus.yml, is included that contains the configuration settings that the Prometheus executable file uses when it runs.
Table 7-3 lists the parameters in the prometheus.yml file that you must set to make the Prometheus service connect to the monitoring service that is running on your SSC LPAR. This example assumes that you copied the server certificate (server-certificate.crt), the client certificate (client-certificate.crt), and the client private key (client.key) to the directory on your management server that contains the Prometheus executable file and the prometheus.yml configuration file. In the following example, this directory is /opt/hpvs/prom/prometheus-2.27.1.linux-s390x.
Table 7-3 Parameters in the prometheus.yml file that you must configure
In Table 7-3 for the example parameters, the value of the targets must be an array with a single element, collectd-host-container:8443. For example:
targets: ['collectd-host-container:8443']
To start Prometheus and connect it to the monitoring service that you deployed onto your SSC LPAR so that you can view the metrics that the monitoring service collects, complete the following steps:
1. Download the Prometheus software package to your management server.
2. On your management server, extract the Prometheus software package file.
collectd-host Name of the collectd host container.
collectd-host-container
monitoring-host Name of the monitoring host container.
monitoring-host-container
Container template name
Container template parameter
Parameter description Example value
Category Name Example Value
global:tls_config ca_file /opt/hpvs/prom/prometheus-2.27.1.linux-s390x/server-certificate.crt
cert_file /opt/hpvs/prom/prometheus-2.27.1.linux-s390x/client-certificate.crt
key_file /opt/hpvs/prom/prometheus-2.27.1.linux-s390x/client.key
server_name collectd-host-container
global:static_configs targets collectd-host-container:8443 (array)
Chapter 7. IBM Hyper Protect Virtual Servers key features 335

3. Replace the parameters in the prometheus.yml file with the parameters for your monitoring service, including the paths to your server certificate, client certificate, and client key that you use with your monitoring service.
4. Run the Prometheus executable file prometheus:
./prometheus --config.file=prometheus.yml
5. Open a web browser.
6. Browse to http://MANAGEMENT_SERVER_IP:9090/graph to view the Prometheus web GUI.
7. To view the data for a metric that the monitoring service collects, complete the following steps:
a. Select the Graph tab (listed as #1 in Figure 7-1).
b. Select the metric that you want to view from the drop-down list next to the Execute button (listed as #2 in Figure 7-1).
c. Click Execute (listed as #3 in Figure 7-1).
Figure 7-1 Prometheus: Selecting a metric
336 Securing Your Critical Workloads with IBM Hyper Protect Services

Figure 7-2 shows an example of a graph that Prometheus can display for one of the metrics (collectd_load_shortterm) that the monitoring service collects.
Figure 7-2 Prometheus: Monitoring load
7.4 Enterprise Public Key Cryptography Standards #11 over gRPC
In this section, we describe the requirements for deploying an IBM Hyper Protect Virtual Servers GREP11 service. This service enables you to use the IBM Z or IBM LinuxONE server’s Hardware Security Module (HSM) to generate secrets, such as public and private key pairs, and store the private part of the secret securely in the HSM.
A GREP11 container is a microservice that runs on your SSC LPAR that provides an Enterprise Public Key Cryptography Standards (PKCS) #11 over gRPC (GREP11) API that enables you to call the cryptographic functions on the HSM from other microservices or applications, including from a virtual server that is running on your SSC LPAR. You can use the HSM cryptographic functions to encrypt and decrypt data, calculate the digest (hash value) of data, and sign and verify data. The HSM securely stores the private keys that the cryptographic operations use without exposing the private keys to system administrators.
7.4.1 Deploying a GREP11 container
Client programs or services authenticate with a GREP11 service by using one-way authentication over Transport Layer Security (TLS) or mutual authentication over TLS. This method is different from the method a client uses to authenticate with a Hyper Protect Crypto Services instance, which uses your IBM Cloud API key and an IBM Cloud Identity and Access Management (IAM) endpoint for authentication.
Note: Two crypto domains across two crypto express cards are recommended for production environments for high availability (HA) purposes.
Chapter 7. IBM Hyper Protect Virtual Servers key features 337

For your client applications to authenticate with your GREP11 container, you must generate a set of certificates and private keys. Which and what type of certificates and private keys you generate depends on the authentication method that you choose to use:
� If you use one-way authentication over TLS, you must generate a self-signed certificate and private key, which the client application and GREP11 service use.
� If you use mutual authentication over TLS, you must generate a certificate authority (CA) certificate and private key. Then, use the CA certificate to generate a server certificate and private key pair, which you pass into the GREP11 container when you create it, and a client certificate and private key pair, which the client application uses.
For more information about GREP11 container deployment including CA certificate creation, see 6.6.7, “Integrating with Enterprise Public Key Cryptography Standards #11” on page 316.
7.4.2 Adding GREP11 functions into your applications
This GitHub repository provides a source code example for using the GREP11 API that the GREP11 container provides. This book uses the examples for the Golang programming language. You can reuse code from these examples to add GREP11 functions to your own applications.
To authenticate with an IBM Hyper Protect Virtual Servers GREP11 service, use your client certificate if you use one-way authentication over TLS. If you use mutual authentication over TLS, use the CA certificate and your client private key. The following example explains how to run the suite of tests the Golang examples in the ibm-cloud-hyperprotectcrypto repository provide against a gREP11 container by using mutual authentication over TLS:
1. Install Golang on your management server. You can download Golang from https://go.dev/.
2. Check and make a note of your GOPATH directory by running the go env command.
3. Create the src/github.com/ibm-developer/ subdirectory in your GOPATH directory.
4. Browse to the ibm-developer/ subdirectory in the directories that you created.
5. Clone the repository https://github.com/mattarnoatibm/ibm-cloud-hyperprotectcrypto in to the ibm-developer/ directory.
6. Browse to the ibm-cloud-hyperprotectcrypto/golang/examples directory in the GitHub project that is cloned to your management server.
7. Open the server_test.go file.
8. Add the imports crypto/x509 and io/ioutil to the list of imports to use in the Golang program.
9. Replace the value of const address with the address and port of your gREP11 service.
10.Remove grpc.WithPerRPCCredentials(...) from []grpc.DialOption { ... }, which is the value of callOpts.
11.Add the keys and values that are listed in Table 7-4 on page 339 to the tls.Config data structure grpc.WithTransportCredentials uses.
338 Securing Your Critical Workloads with IBM Hyper Protect Services
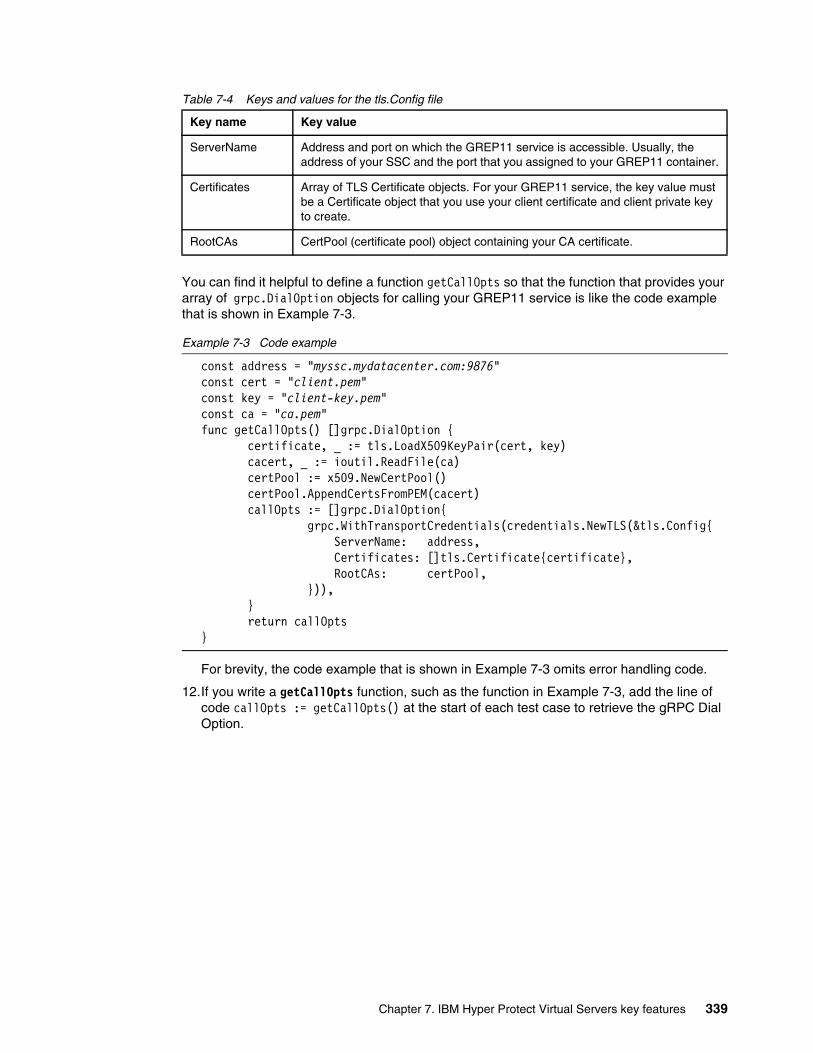
Table 7-4 Keys and values for the tls.Config file
You can find it helpful to define a function getCallOpts so that the function that provides your array of grpc.DialOption objects for calling your GREP11 service is like the code example that is shown in Example 7-3.
Example 7-3 Code example
const address = "myssc.mydatacenter.com:9876"const cert = "client.pem"const key = "client-key.pem"const ca = "ca.pem"func getCallOpts() []grpc.DialOption { certificate, _ := tls.LoadX509KeyPair(cert, key) cacert, _ := ioutil.ReadFile(ca) certPool := x509.NewCertPool() certPool.AppendCertsFromPEM(cacert) callOpts := []grpc.DialOption{ grpc.WithTransportCredentials(credentials.NewTLS(&tls.Config{ ServerName: address, Certificates: []tls.Certificate{certificate}, RootCAs: certPool, })), } return callOpts}
For brevity, the code example that is shown in Example 7-3 omits error handling code.
12.If you write a getCallOpts function, such as the function in Example 7-3, add the line of code callOpts := getCallOpts() at the start of each test case to retrieve the gRPC Dial Option.
Key name Key value
ServerName Address and port on which the GREP11 service is accessible. Usually, the address of your SSC and the port that you assigned to your GREP11 container.
Certificates Array of TLS Certificate objects. For your GREP11 service, the key value must be a Certificate object that you use your client certificate and client private key to create.
RootCAs CertPool (certificate pool) object containing your CA certificate.
Chapter 7. IBM Hyper Protect Virtual Servers key features 339

13.If you are using one-way authentication over TLS, Figure 7-3 shows how to modify server_test.go to test your GREP11 container.
Figure 7-3 How to modify server_test.go to test your GREP11 container
14.Run the go test -v command to run the suite of tests.
15.Look for the following output messages in the output of the command, which indicate each test in the test suit ran successfully and that the test suite demonstrated each crypto function of gRPC11 and the HSM works for your HSM and GREP11 service:
=== RUN Example_getMechanismInfo--- PASS: Example_getMechanismInfo (1.04s)=== RUN Example_encryptAndDecrypt--- PASS: Example_encryptAndDecrypt (2.34s)=== RUN Example_digest--- PASS: Example_digest (1.90s)=== RUN Example_signAndVerifyUsingRSAKeyPair--- PASS: Example_signAndVerifyUsingRSAKeyPair (2.21s)=== RUN Example_signAndVerifyUsingECDSAKeyPair--- PASS: Example_signAndVerifyUsingECDSAKeyPair (1.64s)=== RUN Example_signAndVerifyToTestErrorHandling--- PASS: Example_signAndVerifyToTestErrorHandling (1.54s)=== RUN Example_wrapAndUnwrapKey--- PASS: Example_wrapAndUnwrapKey (2.00s)=== RUN Example_deriveKey--- PASS: Example_deriveKey (2.10s)=== RUN Example_tls--- PASS: Example_tls (1.11s)
340 Securing Your Critical Workloads with IBM Hyper Protect Services

7.5 Bring Your Own Image (deploying your applications securely)
The Application Manager must register a repository on the SSC as a trusted repository before the Application Manager can deploy instances of images from that repository to the SSC LPAR.
In this section, we describe how to deploy your own Linux based container image as an IBM Hyper Protect Virtual Servers instance on IBM Hyper Protect Virtual Servers. This feature is also known as Bring Your Own Image (BYOI).
You complete the following subsections with root authority.
� Signing your image by using Docker Content Trust
� Adding the registry
� Generating the signing keys
� Registering a repository as a trusted repository
� Preparing the configuration
� Deploying a securely built image from a trusted repository
7.5.1 Signing your image by using Docker Content Trust
Ensure that your Linux-based images are signed by using DCT. If the images are not signed, complete the following steps:
1. Run the following command to load the image from Docker Hub on to your management server.
docker image pull <your_docker_id>/<result_image_name>:<tag>
2. To enable DCT, specify the server for the DCT service by running the following commands:
export DOCKER_CONTENT_TRUST=1export DOCKER_CONTENT_TRUST_SERVER=https://notary.docker.io
3. Retag your Docker images by running the following command:
docker tag <your_docker_id>/<result_image_name>:<tag> <your_docker_id>/<result_image_name>:<new-tag>
4. Push the tagged images to Docker Hub by running the following command:
docker push <your_docker_id>/<result_image_name>:<new-tag>
Enter your root passphrase and repository passphrase when you are prompted. The generated public key is stored in the following directory:
~/.docker/trust/tuf/docker.io/<your_docker_id>/<result_image_name>/metadata/root.json/
7.5.2 Adding the registry
Verify whether you already have a registry by running the following command:
hpvs registry list
Chapter 7. IBM Hyper Protect Virtual Servers key features 341

If there are no registries that are displayed, then add a registry by running the following command:
hpvs registry add --name registry_name --user <username> --dct https://notary.docker.io --url docker.io
In the command:
� registry_name: Specify a name for your registry.
� <username>: Docker registry username.
7.5.3 Generating the signing keys
This step is also included in the SBS setup.
Generate the signing key pair for signing the repository registration file by using the GnuPG tool:
1. List the GNU Privacy Guard (GPG) keys by running the following commands:
gpg --list-keysgpg --list-secret-keys
2. The following commands create a GPG key pair and export the public key isv_user.pub and the private key isv_user.private. The key pair is protected by using the passphrase over-the-lazy-dog. If isv_user is listed when you run the gpg --list-keys command, then you must use another name.
export keyName=isv_userexport passphrase=over-the-lazy-dogcat >isv_definition_keys <<EOF %echo Generating registration definition key Key-Type: RSA Key-Length: 4096 Subkey-Type: RSA Subkey-Length: 4096 Name-Real: isv_user Expire-Date: 0 Passphrase: over-the-lazy-dog # Do a commit here so that we can later print "done" :-) %commit %echo doneEOFgpg -a --batch --generate-key isv_definition_keysgpg --armor --pinentry-mode=loopback --passphrase ${passphrase} --export-secret-keys ${keyName} > ${keyName}.privategpg --armor --export ${keyName} > ${keyName}.pub
Both "export keyName=isv_user" and "Name-Real: isv_user" must be unique. You cannot use the same keys to sign multiple images. You should not have multiple keys with the same username, and you should not have multiple images that are signed with the same key in an SSC.
3. Copy the generated key pair isv_user.pub and isv_user.private to the $HOME/hpvs/config directory.
342 Securing Your Critical Workloads with IBM Hyper Protect Services
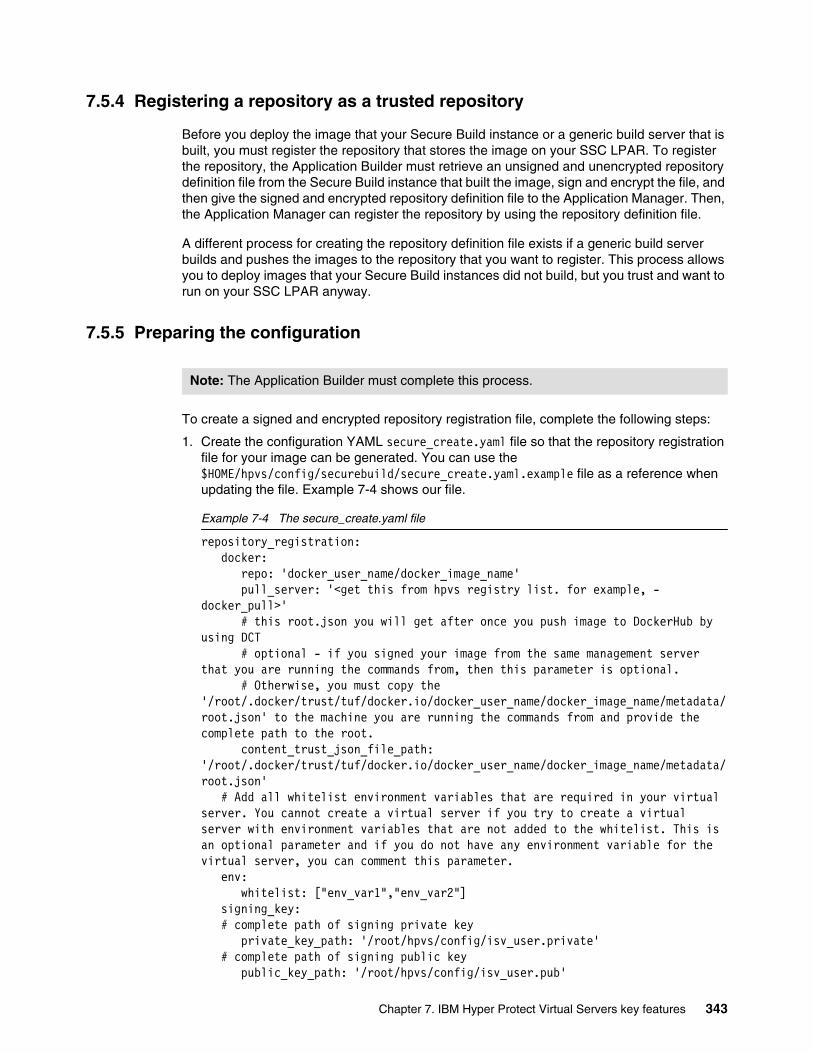
7.5.4 Registering a repository as a trusted repository
Before you deploy the image that your Secure Build instance or a generic build server that is built, you must register the repository that stores the image on your SSC LPAR. To register the repository, the Application Builder must retrieve an unsigned and unencrypted repository definition file from the Secure Build instance that built the image, sign and encrypt the file, and then give the signed and encrypted repository definition file to the Application Manager. Then, the Application Manager can register the repository by using the repository definition file.
A different process for creating the repository definition file exists if a generic build server builds and pushes the images to the repository that you want to register. This process allows you to deploy images that your Secure Build instances did not build, but you trust and want to run on your SSC LPAR anyway.
7.5.5 Preparing the configuration
To create a signed and encrypted repository registration file, complete the following steps:
1. Create the configuration YAML secure_create.yaml file so that the repository registration file for your image can be generated. You can use the $HOME/hpvs/config/securebuild/secure_create.yaml.example file as a reference when updating the file. Example 7-4 shows our file.
Example 7-4 The secure_create.yaml file
repository_registration: docker: repo: 'docker_user_name/docker_image_name' pull_server: '<get this from hpvs registry list. for example, - docker_pull>' # this root.json you will get after once you push image to DockerHub by using DCT # optional - if you signed your image from the same management server that you are running the commands from, then this parameter is optional. # Otherwise, you must copy the '/root/.docker/trust/tuf/docker.io/docker_user_name/docker_image_name/metadata/root.json' to the machine you are running the commands from and provide the complete path to the root. content_trust_json_file_path: '/root/.docker/trust/tuf/docker.io/docker_user_name/docker_image_name/metadata/root.json' # Add all whitelist environment variables that are required in your virtual server. You cannot create a virtual server if you try to create a virtual server with environment variables that are not added to the whitelist. This is an optional parameter and if you do not have any environment variable for the virtual server, you can comment this parameter. env: whitelist: ["env_var1","env_var2"] signing_key: # complete path of signing private key private_key_path: '/root/hpvs/config/isv_user.private' # complete path of signing public key public_key_path: '/root/hpvs/config/isv_user.pub'
Note: The Application Builder must complete this process.
Chapter 7. IBM Hyper Protect Virtual Servers key features 343

# Add Linux capabilities to Hyper Protect Virtual Server. List of linux capabilities # are available here https://man7.org/linux/man-pages/man7/capabilities.7.html. # All the capabilities that are listed are supported except "CAP_PERFMON", "CAP_BPF", and CAP_CHECKPOINT_RESTORE". # While adding capabilities remove the prefix "CAP". # For example, CAP_AUDIT_CONTROL will be AUDIT_CONTROL
cap_add: [] # for example, ["NET_ADMIN","NET_RAW"], or ["ALL"]
2. Generate the repository registration file for your image:
hpvs regfile create --config $HOME/hpvs/config/securebuild/secure_create.yaml --out $HOME/hpvs/config/encryptedRegfile.enc
7.5.6 Deploying a securely built image from a trusted repository
To deploy an instance of an image to your SSC LPAR from an image that is stored in a trusted repository that you registered on your SSC, you must add information that describes the container deployment that you want to run in your IBM Hyper Protect Virtual Servers configuration file.
Deploy your own image by using either of the following options:
� The hpvs deploy command:
a. Update the virtual server template if necessary. Normally, this template is initially updated in the setup of SBS.
b. Create the configuration YAML file $HOME/hpvs/config/demo_byoi.yml for the instance by referring to the example file $HOME/hpvs/config/vs_regfiledeployexample.yml. Example 7-5 shows our vs_regfiledeployexample.yml file.
Example 7-5 The vs_regfiledeployexample.yml file
version: v1type: virtualservervirtualservers:- name: testcontainer host: SSC_LPAR_NAME repoid: MyOwnRepo imagetag: latest reporegfile: /root/hpvs/config/encryptedRegfile.enc imagecache: true resourcedefinition: ref: small
Note: The cap_add: [ ] parameter is applicable for IBM Hyper Protect Virtual Servers V1.2.3 or later. To enable all privileges, use cap_add:["ALL"], but as a best practice, provide the least possible privileges to your virtual server. For a complete list of supported parameters in the secure_create.yaml file, see Create repository registration.
Note: The Application Manager must complete the following procedure.
344 Securing Your Critical Workloads with IBM Hyper Protect Services

networks: - ref: external_network ipaddress: 10.20.4.61 volumes: - name: myquotagroup ref : np-medium mounts: - mount_id: new mountpoint: /new filesystem: ext4 size: 10GB
The imagecache parameter is supported when IBM Hyper Protect Virtual Servers is at Version 1.2.3 or later. In this example, the network definition is for an external network.
c. Deploy the image by using the configuration in the YAML file:
hpvs deploy --config $HOME/hpvs/config/demo_byoi.yml
� The hpvs vs create command:
a. Register the repository on the SSC partition:
hpvs repository register --pgp=$HOME/hpvs/config/encryptedRegfile.enc --id=MyOwnRepo
b. Pull the image from the registered Docker Hub or IBM Cloud Registry by running the following command (run this command to avoid cache issues):
hpvs image pull --tag=latest --repo MyOwnRepo
c. Create the quotagroup on the SSC partition for the IBM Hyper Protect Virtual Servers instance that will host your own Linux based image:
hpvs quotagroup create --name myquotagroup --size=50GB
d. Create the network on the SSC partition for the IBM Hyper Protect Virtual Servers instance that will host your own Linux based image:
hpvs network create --driver macvlan --gateway 10.20.4.1 --name external_network --parent encf900 --subnet 10.20.4.0/22
e. Deploy your image as an IBM Hyper Protect Virtual Servers instance:
hpvs vs create --name testcontainer --repo MyOwnRepo --tag latest --cpu 2 --ram 2048 --env={env_var1=value1,env_var2=value2} --quotagroup "{quotagroup = myquotagroup, mountid = new, mount = /new, filesystem = btrfs, size = 30GB}" \--network "{name = external_network, ip = 10.20.4.188}"
In the command, --repo MyOwnRepo is the repository name when registering the repository.
With SBS, you can securely build your own image that you can then use with BYOI. This task is possible by using the SBS function to sign your applications and also to sign and encrypt the registration definition for deployment. When you build your image securely, you can validate your build code and reassure your users of the integrity level of their applications.
Note: If you create a non-pass through quotagroup, ensure that you specify a value that is at least 5 GB greater than the size that you require for the virtual server. For more information about the hpvs quotagroup command, see Commands in IBM Hyper Protect Virtual Servers.
Chapter 7. IBM Hyper Protect Virtual Servers key features 345

346 Securing Your Critical Workloads with IBM Hyper Protect Services
Chapter 8. Secure Bitcoin Wallet: A sample use case that spans multiple IBM Hyper Protect Services
This chapter provides a Secure Bitcoin Wallet use case that uses multiple IBM Hyper Protect Services instances.
This chapter includes the following topics:
� Secure Bitcoin Wallet application
� Building the Secure Bitcoin Wallet application container
� Testing the Secure Bitcoin Wallet application
8
© Copyright IBM Corp. 2020, 2022. All rights reserved. 347

8.1 Secure Bitcoin Wallet application
The popularity of digital asset investment is on the rise. With more than 20% of institutional investors that are already exposed and many more exploring this new investment class, the safekeeping or custody of these assets became a critical aspect of the business.
CNBC reported that $1.1 billion USD worth of cryptocurrency was stolen in just the first half of 2018.1 Many hacks were due to insider attacks in which a system administrator was compromised or socially engineered to perform malicious actions.
According to Unbound Tech, a rogue insider was the reason behind Bithumb’s third hack in two years during which $20 million USD worth of crypto currencies were stolen.2 Another popular attack is to target the cryptocurrency exchange or digital asset service provider directly. These companies must use multiple security practices and security technologies to safeguard their clients’ assets.
IBM LinuxONE with IBM Hyper Protect Services offers a unique platform for digital asset service providers. With IBM Hyper Protect Virtual Servers, clients have a secure enclave that protects against insider attacks and offers pervasive encryption at rest and in-flight.
With IBM Hyper Protect Crypto Services, clients have Federal Information Processing Standard (FIPS) 140-2 level 4 Hardware Security Modules (HSMs) that provide key management and an application programming interface (API) to use for encryption of keystores, wallets, and application data. The IBM Hyper Protect Virtual Servers on-premises offering also provides a Secure Build process to ensure that the image that is deployed to the IBM Hyper Protect Virtual Servers instance is signed and validated by authorized parties.
As a demonstration of some of these capabilities, IBM Research® ported over a version of the popular Bitcoin Wallet called Electrum over to the s390x architecture. The Secure Bitcoin Wallet runs inside an IBM Hyper Protect Virtual Servers instance and encrypts the wallet file by using the IBM Hyper Protect Crypto Services instance to protect the encryption key.
The Secure Bitcoin Wallet GitHub repository is available at GitHub.
The repository readme file describes the Wallet code pattern in more detail and includes an architectural diagram of the components.
This section reviews the steps that you perform to deploy the Secure Bitcoin Wallet to an IBM Hyper Protect Virtual Servers instance running in either an IBM Cloud or on-premises system that accesses an IBM Hyper Protect Crypto Services instance running in IBM Cloud.
The Secure Bitcoin Wallet repository is constantly being updated with new features. Review the repository often to get the latest code.
1 https://www.cnbc.com/2018/06/07/1-point-1b-in-cryptocurrency-was-stolen-this-year-and-it-was-easy-to-do.html
2 https://www.unboundtech.com/crypto-hacks-the-rise-of-the-rogue-insider/
Note: The Secure Bitcoin Wallet is a demonstration code pattern. It connects to a Bitcoin Testnet, which is a test network and not the real Bitcoin network. The Bitcoin Testnet is used by developers to send and receive Bitcoins for testing purposes, so the cryptocurrencies that are traded have no real value.
348 Securing Your Critical Workloads with IBM Hyper Protect Services
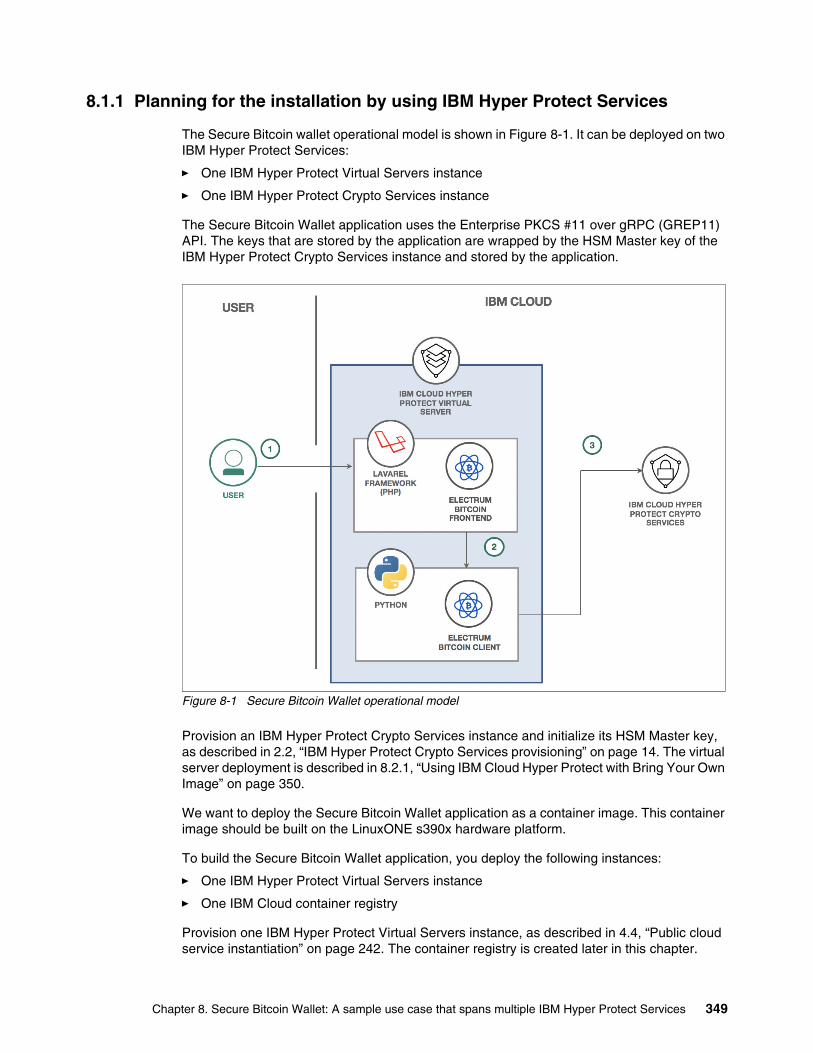
8.1.1 Planning for the installation by using IBM Hyper Protect Services
The Secure Bitcoin wallet operational model is shown in Figure 8-1. It can be deployed on two IBM Hyper Protect Services:
� One IBM Hyper Protect Virtual Servers instance
� One IBM Hyper Protect Crypto Services instance
The Secure Bitcoin Wallet application uses the Enterprise PKCS #11 over gRPC (GREP11) API. The keys that are stored by the application are wrapped by the HSM Master key of the IBM Hyper Protect Crypto Services instance and stored by the application.
Figure 8-1 Secure Bitcoin Wallet operational model
Provision an IBM Hyper Protect Crypto Services instance and initialize its HSM Master key, as described in 2.2, “IBM Hyper Protect Crypto Services provisioning” on page 14. The virtual server deployment is described in 8.2.1, “Using IBM Cloud Hyper Protect with Bring Your Own Image” on page 350.
We want to deploy the Secure Bitcoin Wallet application as a container image. This container image should be built on the LinuxONE s390x hardware platform.
To build the Secure Bitcoin Wallet application, you deploy the following instances:
� One IBM Hyper Protect Virtual Servers instance
� One IBM Cloud container registry
Provision one IBM Hyper Protect Virtual Servers instance, as described in 4.4, “Public cloud service instantiation” on page 242. The container registry is created later in this chapter.
Chapter 8. Secure Bitcoin Wallet: A sample use case that spans multiple IBM Hyper Protect Services 349

8.2 Building the Secure Bitcoin Wallet application container
In this section, we describe the following topics:
� Using IBM Cloud Hyper Protect with Bring Your Own Image
� Using IBM Hyper Protect Secure Build Servers on-premises
� Using IBM Cloud Hyper Protect Secure Build Server
8.2.1 Using IBM Cloud Hyper Protect with Bring Your Own Image
This procedure consists of two steps:
1. Building the Secure Bitcoin Wallet application container in an IBM Hyper Protect Virtual Servers instance.
2. Creating an IBM Hyper Protect registration file for this image and starting it as an IBM Hyper Protect Virtual Servers instance in IBM Cloud.
Planning for a build serverComplete the following steps:
1. As a prerequisite, provision an IBM Hyper Protect Virtual Servers instance. An IBM Hyper Protect container image must be built with the s390x hardware architecture and binary files.
2. Retrieve the IP address of your provisioned build server, as shown in Example 8-1 or by using the IBM Cloud console.
Example 8-1 Retrieving the details of your s390x build server
$ ibmcloud hpvs instances hpvs-buildName hpvs-build CRN crn:v1:bluemix:public:hpvs:dal10:a/537544c2222297f40ed689e8473e7849:476fbdfc-150d-4ca0-adee-54bacc7fe592:: Location dal10 Cloud tags Cloud state active Server status running Plan Small Public IP address 169.63.212.73 Internal IP address 172.18.24.227 Boot disk 25 GiB Data disk 75 GiB Memory 8192 MiB Processors 2 vCPUs Image type ibm-provided Image OS ubuntu18.04 Public key fingerprint 1ArRU1KM1sZiRHB+1LbK6leJXyg3arEs0gjM35xLZ+Q Last operation create succeeded Last image update - Created 2021-05-20
350 Securing Your Critical Workloads with IBM Hyper Protect Services

3. Connect to your IBM Hyper Protect Virtual Servers instance by using Secure Shell (SSH) (such as PuTTY on MS Windows), as shown in Example 8-2. Use your virtual server public IP address and your passphrase for your key if you set up one. If you did not set up a passphrase for your RSA key, you are logged in immediately without being prompted to enter one.
Example 8-2 Logging in to IBM Hyper Protect Virtual Servers
$ ssh [email protected] passphrase for key '/Users/newuser/.ssh/id_rsa':Welcome to Ubuntu 18.04.3 LTS (GNU/Linux 4.15.0-55-generic s390x)
* Documentation: https://help.ubuntu.com * Management: https://landscape.canonical.com * Support: https://ubuntu.com/advantage
* Overheard at KubeCon: "microk8s.status just blew my mind".
https://microk8s.io/docs/commands#microk8s.statusLast login: Thu Dec 19 17:53:23 2019 from 47.18.17.156
4. To build the image, install the git and Docker software packages, as shown in Example 8-3.
Example 8-3 Installing the git and Docker packages
$ apt-get update...$ apt install git...$ apt install libltdl7...
5. Install Docker, as shown in Example 8-4.
Example 8-4 Installing Docker on the IBM Hyper Protect Virtual Servers instance
$ curl https://download.docker.com/linux/ubuntu/dists/bionic/pool/stable/s390x/docker-ce_18.06.3~ce~3-0~ubuntu_s390x.deb -o docker.deb% Total % Received % Xferd Average Speed Time Time Time Current Dload Upload Total Spent Left Speed100 28.4M 100 28.4M 0 0 46.1M 0 --:--:-- --:--:-- --:--:-- 46.1M
$ dpkg -i docker.deb (Reading database ... 16601 files and directories currently installed.)Preparing to unpack docker.deb ...Unpacking docker-ce (18.06.3~ce~3-0~ubuntu) over (18.06.3~ce~3-0~ubuntu) ...Setting up docker-ce (18.06.3~ce~3-0~ubuntu) ...Processing triggers for systemd (237-3ubuntu10.45) ...Processing triggers for man-db (2.8.3-2ubuntu0.1) ...
Chapter 8. Secure Bitcoin Wallet: A sample use case that spans multiple IBM Hyper Protect Services 351

Retrieving the application source code and building the containerRetrieve the Secure Bitcoin Wallet source code by running the git command, as shown in Example 8-5.
Example 8-5 Retrieving the Secure Bitcoin Wallet source code
$ git clone https://github.com/IBM/secure-bitcoin-wallet.gitCloning into 'secure-bitcoin-wallet'...remote: Enumerating objects: 532, done.remote: Counting objects: 100% (200/200), done.remote: Compressing objects: 100% (136/136), done.remote: Total 532 (delta 119), reused 129 (delta 63), pack-reused 332Receiving objects: 100% (532/532), 1.45 MiB | 8.92 MiB/s, done.Resolving deltas: 100% (290/290), done.
The build stage can take up to 30 minutes to complete because the process is a multi-stage Docker build that requires pulling down other Docker images and building many prerequisite packages (see Example 8-6).
Example 8-6 Building the Secure Bitcoin Wallet Docker image
root@cc648b49b9d7:~# cd secure-bitcoin-walletroot@cc648b49b9d7:~/secure-bitcoin-wallet# docker build -t secure-bitcoin-wallet .......Successfully tagged secure-bitcoin-wallet:latest
Take care to place the period after the Docker build command. The output of the build command is not shown here. You see a stream of output as the Docker build progresses through this multi-stage build process.
After the build process completes, you see secure-bitcoin-wallet listed in your docker images output, as shown in Example 8-7.
Example 8-7 Output of the docker images command
root@cc648b49b9d7:~# # docker imagesREPOSITORY TAG IMAGE ID CREATED SIZEsecure-bitcoin-wallet latest 2fba1e837a98 2 hours ago 1.27GBpython 3.7-slim 0dd76f657ba9 8 days ago 111MBnode 10.16.0-stretch-slim dcdc4bb90cb0 22 months ago 156MB
Creating a container registry on IBM CloudComplete the following steps:
1. On your notebook, log in to IBM Cloud in a region and a resource group.
2. Create a container registry by using your own namespace (in this example, we chose bitcoin-wallet) in the region and resource group where you logged in by using the IBM Cloud Command-Line Interface (CLI), as shown in Example 8-8.
Example 8-8 Creating a container registry in IBM Cloud by using the IBM Cloud CLI
$ ibmcloud cr namespace-add bitcoin-walletAdding namespace 'bitcoin-wallet' in resource group 'zsb006' for account ITSO's Account in registry us.icr.io...
352 Securing Your Critical Workloads with IBM Hyper Protect Services
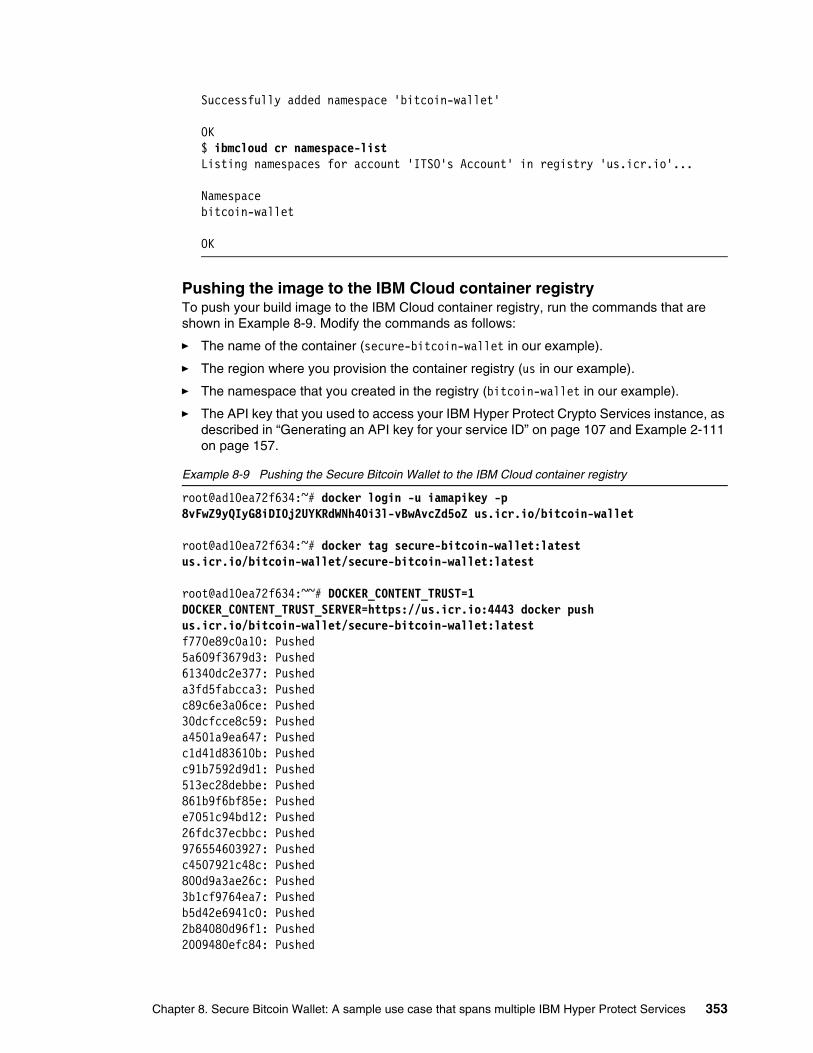
Successfully added namespace 'bitcoin-wallet'
OK$ ibmcloud cr namespace-listListing namespaces for account 'ITSO's Account' in registry 'us.icr.io'...
Namespace bitcoin-wallet
OK
Pushing the image to the IBM Cloud container registryTo push your build image to the IBM Cloud container registry, run the commands that are shown in Example 8-9. Modify the commands as follows:
� The name of the container (secure-bitcoin-wallet in our example).
� The region where you provision the container registry (us in our example).
� The namespace that you created in the registry (bitcoin-wallet in our example).
� The API key that you used to access your IBM Hyper Protect Crypto Services instance, as described in “Generating an API key for your service ID” on page 107 and Example 2-111 on page 157.
Example 8-9 Pushing the Secure Bitcoin Wallet to the IBM Cloud container registry
root@ad10ea72f634:~# docker login -u iamapikey -p 8vFwZ9yQIyG8iDI0j2UYKRdWNh4Oi3l-vBwAvcZd5oZ us.icr.io/bitcoin-wallet
root@ad10ea72f634:~# docker tag secure-bitcoin-wallet:latest us.icr.io/bitcoin-wallet/secure-bitcoin-wallet:latest
root@ad10ea72f634:~~# DOCKER_CONTENT_TRUST=1 DOCKER_CONTENT_TRUST_SERVER=https://us.icr.io:4443 docker push us.icr.io/bitcoin-wallet/secure-bitcoin-wallet:latestf770e89c0a10: Pushed 5a609f3679d3: Pushed 61340dc2e377: Pushed a3fd5fabcca3: Pushed c89c6e3a06ce: Pushed 30dcfcce8c59: Pushed a4501a9ea647: Pushed c1d41d83610b: Pushed c91b7592d9d1: Pushed 513ec28debbe: Pushed 861b9f6bf85e: Pushed e7051c94bd12: Pushed 26fdc37ecbbc: Pushed 976554603927: Pushed c4507921c48c: Pushed 800d9a3ae26c: Pushed 3b1cf9764ea7: Pushed b5d42e6941c0: Pushed 2b84080d96f1: Pushed 2009480efc84: Pushed
Chapter 8. Secure Bitcoin Wallet: A sample use case that spans multiple IBM Hyper Protect Services 353

test-1: digest: sha256:2c4fef3ce9c86ca435ef30ef34e37a511db8e8455e83b388411d8b685824a0f2 size: 5339Signing and pushing trust metadataYou are about to create a new root signing key passphrase. This passphrasewill be used to protect the most sensitive key in your signing system. Choose a long, complex passphrase and be careful to keep the password and thekey file itself secure and backed up. It is highly recommended that you use apassword manager to generate the passphrase and keep it safe. There will be noway to recover this key. You can find the key in your config directory.Enter passphrase for new root key with ID 44be513: Repeat passphrase for new root key with ID 44be513: Enter passphrase for new repository key with ID 37ab635: Repeat passphrase for new repository key with ID 37ab635: Passphrases do not match. Retry.Enter passphrase for new repository key with ID 37ab635: Repeat passphrase for new repository key with ID 37ab635: Finished initializing "us.icr.io/bitcoin-wallet/secure-bitcoin-wallet"Successfully signed us.icr.io/bitcoin-wallet/secure-bitcoin-wallet:latest
For more information about how Docker Content Trust (DCT) is supported by the IBM Cloud container registry, see Signing images for trusted content.
Tip: The first time that you push a signed image to a new repository, the command creates two signing keys (the root key and repository key) and stores them in your local computer. You are the repository owner. They are stored in the following directories:
� On Linux and Mac: ~/.docker/trust/private
� On Windows: %HOMEPATH%\.docker\trust\private
Enter and save secure passphrases for each key, and then back up your keys.
The repository key signs the image tags and manages delegations. The root key is created once. Backing up your keys is critical because your recovery options are limited. You might be in a situation where you cannot push your images if you are missing a key.
Add delegation to users to allow them to push new container images onto this repository by completing the following steps:
1. The user generates their key pair:
$ docker trust key generate user1
2. As repository owner, add the generated public key to the repository:
root@ad10ea72f634:~# export DOCKER_CONTENT_TRUST_SERVER=https://us.icr.io:4443root@ad10ea72f634:~# docker trust signer add --key user1.pub user1 us.icr.io/bitcoin-wallet/secure-bitcoin-walletAdding signer "jyg" to us.icr.io/bitcoin-wallet/secure-bitcoin-wallet...Enter passphrase for repository key with ID 37ab635: Successfully added signer: jyg to us.icr.io/bitcoin-wallet/secure-bitcoin-wallet
3. The user pushes their image by using the following command:
$ docker trust sign us.icr.io/bitcoin-wallet/secure-bitcoin-wallet:new
354 Securing Your Critical Workloads with IBM Hyper Protect Services

Retrieving container image signatures from your registryComplete the following steps:
1. On your Linux workstation, make sure that the GNU Privacy Guard (GPG) software is installed.
2. Log in with your IBM Cloud account.
To create your registration file, you need the following information:
– Your container repository name.
– Your Docker username. In our example, we use an IBM Cloud Container Registry, so the username is iamapikey.
– Your Docker password. In our example, we use an IBM Cloud Container Registry, so we use the API key that is associated with the service ID.
– The public key ID of the image that you retrieve from the repository.
– Three public keys:
• The public key that identifies the container that is pushed to the container registry.
• The public key of the application packager of the container that signs the registration file.
• An IBM Cloud public key that is used to encrypt the registration file.
3. Retrieve your repository name by using the ibmcloud cr image-list command, as shown in Example 8-10.
Example 8-10 Retrieving your image repository name
$ ibmcloud cr image-listListing images...
Repository Tag Digest Namespace Created Size Security status us.icr.io/bitcoin-wallet/secure-bitcoin-wallet latest 2c4fef3ce9c8 bitcoin-wallet 11 hours ago 470 MB 6 Issues
OK
4. On your Linux notebook, log in to the container registry with your API key as the first command, as shown in Example 8-11.
5. Extract the root key ID that is used by the developer by using the docker trust inspect command on your container repository name by using, for example, the jq command, as shown in Example 8-11.
Example 8-11 Retrieving the public key ID parameter
$ docker login -u iamapikey -p 8vFwZ9yQIyG3iDI0j7UYKRdWNh4Oi3l-vBwAvcZd5oDW us.icr.io/bitcoin-walletWARNING! Using --password through the CLI is insecure. Use --password-stdin.Login Succeeded
$ DOCKER_CONTENT_TRUST_SERVER=https://us.icr.io:4443 docker trust inspect us.icr.io/bitcoin-wallet/secure-bitcoin-wallet:latest | jq -r '.[0].AdministrativeKeys[] | select(.Name=="Root").Keys[0].ID'
25bd40b8729bb219ad6819b4d57371e4dc66d853cdf9c71698fb9b00593ba004
Chapter 8. Secure Bitcoin Wallet: A sample use case that spans multiple IBM Hyper Protect Services 355

You receive your first parameter, as shown in Table 8-1.
Table 8-1 Registration file parameters
6. Open a terminal and connect to your build server by using SSH.
7. Install the jq tool, as shown in Example 8-12.
8. Use the previous root key ID and your container repository name to extract the public key, as shown in Example 8-12.
Example 8-12 Retrieving the public key parameter
root@ad10ea72f634:~# apt install jq...root@ad10ea72f634:~# IMG=us.icr.io/bitcoin-wallet/secure-bitcoin-wallet
root@ad10ea72f634:~# KEY=25bd40b8729bb219ad6819b4d57371e4dc66d853cdf9c71698fb9b00
root@ad10ea72f634:~# jq -r .signed.keys.\"$KEY\".keyval.public ~/.docker/trust/tuf/$IMG/metadata/root.jsonLS0tLS1CRUdJTiBDRVJUSUZJQ0FURS0tLS0tCk1JSUJwakNDQVV1Z0F3SUJBZ0lRUEtIdndqSThBcWgzSkF2YkpCQzBxVEFLQmdncWhrak9QUVFEQWpBNU1UY3cKTlFZRFZRUURFeTUxY3k1cFkzSXVhVzh2WW1sMFkyOXBiaTEzWVd4c1pYUXZjMlZqZFhKbExXSnBkR052YVc0dApkMkZzYkdWME1CNFhEVEl4TURVeU1ESXhORE0xTVZvWERUTXhNRFV4T0RJeE5ETTFNVm93T1RFM01EVUdBMVVFCkF4TXVkWE11YVdOeUxtbHZMMkpwZEdOdmFXNHRkMkZzYkdWMEwzTmxZM1Z5WlMxaWFYUmpiMmx1TFhkaGJHeGwKZERCWk1CTUdCeXFHU000OUFnRUdDQ3FHU000OUF3RUhBMElBQk1tamFDWFFCdnJyczk1d2ZNandMVGdXcURnVgpISC9xOVpmQjJSTWFwc0dodDlxUEEvQXdsbjUwQm1yVzBFM0hhcGd6T1lyRlp1cXptMTgzNWlBKytoeWpOVEF6Ck1BNEdBMVVkRHdFQi93UUVBd0lGb0RBVEJnTlZIU1VFRERBS0JnZ3JCZ0VGQlFjREF6QU1CZ05WSFJNQkFmOEUKQWpBQU1Bb0dDQ3FHU000OUJBTUNBMGtBTUVZQ0lRQ0NhdVV2ZHF0bExzUGZmaWlpSG44MlJMdjRJU0xnRnREZwpBSVNqRDQ1alNRSWhBUHNrTVV6QXhqa09jWit0UGdmaks5dFF5dHp2a3FCK1ZYRnRzaHliQ0RiMgotLS0tLUVORCBDRVJUSUZJQ0FURS0tLS0tCg==
Key Value
Public key ID(root key ID)
25bd40b8729bb219ad6819b4d57371e4dc66d853cdf9c71698fb9b00593ba004
Public key
Vendor key
Tip: To read the root.json file, use the following command:
jq . root.json
356 Securing Your Critical Workloads with IBM Hyper Protect Services
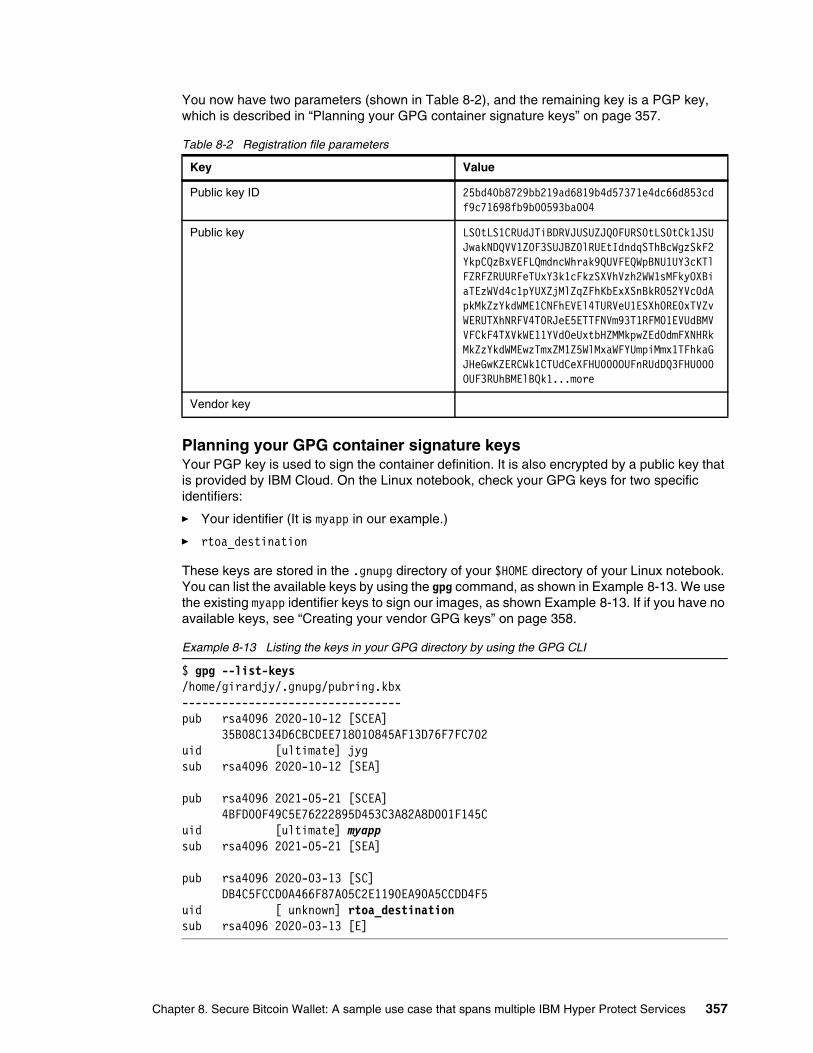
You now have two parameters (shown in Table 8-2), and the remaining key is a PGP key, which is described in “Planning your GPG container signature keys” on page 357.
Table 8-2 Registration file parameters
Planning your GPG container signature keys Your PGP key is used to sign the container definition. It is also encrypted by a public key that is provided by IBM Cloud. On the Linux notebook, check your GPG keys for two specific identifiers:
� Your identifier (It is myapp in our example.)
� rtoa_destination
These keys are stored in the .gnupg directory of your $HOME directory of your Linux notebook. You can list the available keys by using the gpg command, as shown in Example 8-13. We use the existing myapp identifier keys to sign our images, as shown Example 8-13. If if you have no available keys, see “Creating your vendor GPG keys” on page 358.
Example 8-13 Listing the keys in your GPG directory by using the GPG CLI
$ gpg --list-keys/home/girardjy/.gnupg/pubring.kbx---------------------------------pub rsa4096 2020-10-12 [SCEA] 35B08C134D6CBCDEE718010845AF13D76F7FC702uid [ultimate] jygsub rsa4096 2020-10-12 [SEA]
pub rsa4096 2021-05-21 [SCEA] 4BFD00F49C5E76222895D453C3A82A8D001F145Cuid [ultimate] myappsub rsa4096 2021-05-21 [SEA]
pub rsa4096 2020-03-13 [SC] DB4C5FCCD0A466F87A05C2E1190EA90A5CCDD4F5uid [ unknown] rtoa_destinationsub rsa4096 2020-03-13 [E]
Key Value
Public key ID 25bd40b8729bb219ad6819b4d57371e4dc66d853cdf9c71698fb9b00593ba004
Public key LS0tLS1CRUdJTiBDRVJUSUZJQ0FURS0tLS0tCk1JSUJwakNDQVV1Z0F3SUJBZ0lRUEtIdndqSThBcWgzSkF2YkpCQzBxVEFLQmdncWhrak9QUVFEQWpBNU1UY3cKTlFZRFZRUURFeTUxY3k1cFkzSXVhVzh2WW1sMFkyOXBiaTEzWVd4c1pYUXZjMlZqZFhKbExXSnBkR052YVc0dApkMkZzYkdWME1CNFhEVEl4TURVeU1ESXhORE0xTVZvWERUTXhNRFV4T0RJeE5ETTFNVm93T1RFM01EVUdBMVVFCkF4TXVkWE11YVdOeUxtbHZMMkpwZEdOdmFXNHRkMkZzYkdWMEwzTmxZM1Z5WlMxaWFYUmpiMmx1TFhkaGJHeGwKZERCWk1CTUdCeXFHU000OUFnRUdDQ3FHU000OUF3RUhBMElBQk1...more
Vendor key
Chapter 8. Secure Bitcoin Wallet: A sample use case that spans multiple IBM Hyper Protect Services 357
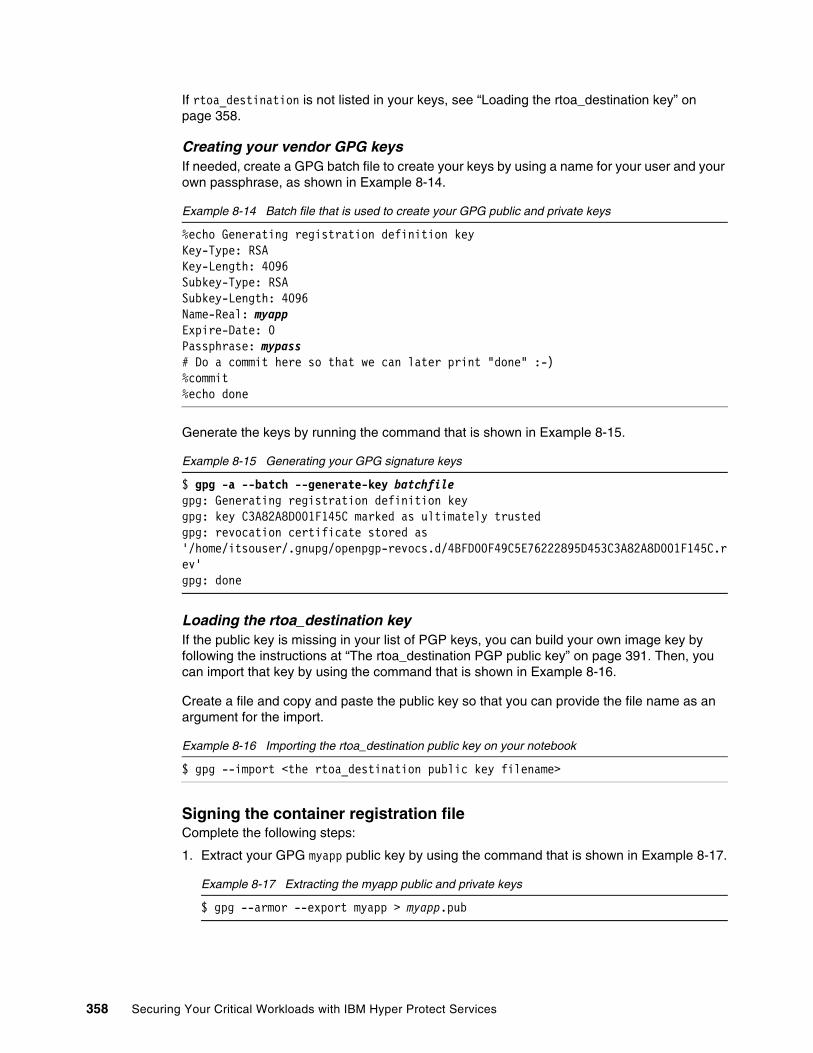
If rtoa_destination is not listed in your keys, see “Loading the rtoa_destination key” on page 358.
Creating your vendor GPG keysIf needed, create a GPG batch file to create your keys by using a name for your user and your own passphrase, as shown in Example 8-14.
Example 8-14 Batch file that is used to create your GPG public and private keys
%echo Generating registration definition keyKey-Type: RSAKey-Length: 4096Subkey-Type: RSASubkey-Length: 4096Name-Real: myappExpire-Date: 0Passphrase: mypass# Do a commit here so that we can later print "done" :-)%commit%echo done
Generate the keys by running the command that is shown in Example 8-15.
Example 8-15 Generating your GPG signature keys
$ gpg -a --batch --generate-key batchfile gpg: Generating registration definition keygpg: key C3A82A8D001F145C marked as ultimately trustedgpg: revocation certificate stored as '/home/itsouser/.gnupg/openpgp-revocs.d/4BFD00F49C5E76222895D453C3A82A8D001F145C.rev'gpg: done
Loading the rtoa_destination keyIf the public key is missing in your list of PGP keys, you can build your own image key by following the instructions at “The rtoa_destination PGP public key” on page 391. Then, you can import that key by using the command that is shown in Example 8-16.
Create a file and copy and paste the public key so that you can provide the file name as an argument for the import.
Example 8-16 Importing the rtoa_destination public key on your notebook
$ gpg --import <the rtoa_destination public key filename>
Signing the container registration fileComplete the following steps:
1. Extract your GPG myapp public key by using the command that is shown in Example 8-17.
Example 8-17 Extracting the myapp public and private keys
$ gpg --armor --export myapp > myapp.pub
358 Securing Your Critical Workloads with IBM Hyper Protect Services

2. Format the key as shown in Example 8-18 so that you can insert it into the registration file.
Example 8-18 Formatting the myapp public key to include it in the container
$ sed -z 's/\n/\\n/g' myapp.pub -----BEGIN PGP PUBLIC KEY BLOCK-----\n\nmQINBGCnXR4BEADlUv10sJSI9P7g/Uth/bVmvgDPyT3TvqubCmBaQXSTO1dZ97Am\n6xktWmDuHRde5ttlyLH/QnenRkRcDjNh1xhib/FLR5cyADUTGfSxQjKnWBqirJNh\nOwFL/ZBNY7i71vCtQO28VgxxiDJgrKnwzsvEeKXuqWVRFl4Bvb/vzUb4IiH4OoNp\nTHxSq6U/e0OJj6BVgMw0kX0HatjD4FVYbO7zaWu+q9Gml2d3F3lLQSGj0YE2dkcF\nXa/VR4XuqKQdUeD3RWGK2Qkr5zIBgkCbUJnqH+kzexTybXxAr+....bD2\n=TRg8\n-----END PGP PUBLIC KEY BLOCK-----\n
You now have all the required parameters for your container file, as listed in Table 8-3.
Table 8-3 Registration file parameters
3. Create the Secure Bitcoin Wallet container registration file, as shown in Example 8-19.
Example 8-19 The secure_bitcoin_wallet.reg file: Editing the container registration file with all parameters
{ "repository_name": "us.icr.io/bitcoin-wallet/secure-bitcoin-wallet", "docker_username": "iamapikey", "docker_password": "8vFwZ9yQIyG8iDI0j2UYKRdWNh4Oi3l-vBwAvcZd5oDWS", "envs_whitelist": ["RUNQ_ROOTDISK", "RUNQ_RUNQENV", "RUNQ_SYSTEMD", "IMAGE_TAG", "REGION", "PHASE", "LPAR_NAME", "CPC", "RUNQ_CPU", "RUNQ_MEM", "POD","ZHSM", "APIKEY", "INSTANCE_ID", "IAM_ENDPOINT" ],
Key Value
Public key ID 25bd40b8729bb219ad6819b4d57371e4dc66d853cdf9c71698fb9b00593ba004
Public key LS0tLS1CRUdJTiBDRVJUSUZJQ0FURS0tLS0tCk1JSUJwakNDQVV1Z0F3SUJBZ0lRUEtIdndqSThBcWgzSkF2YkpCQzBxVEFLQmdncWhrak9QUVFEQWpBNU1UY3cKTlFZRFZRUURFeTUxY3k1cFkzSXVhVzh2WW1sMFkyOXBiaTEzWVd4c1pYUXZjMlZqZFhKbExXSnBkR052YVc0dApkMkZzYkdWME1CNFhEVEl4TURVeU1ESXhORE0xTVZvWERUTXhNRFV4T0RJeE5ETTFNVm93T1RFM01EVUdBMVVFCkF4TXVkWE11YVdOeUxtbHZMMkpwZEdOdmFXNHRkMkZzYkdWMEwzTmxZM1Z5WlMxaWFYUmpiMmx1TFhkaGJHeGwKZERCWk1CTUdCeXFHU000OUFnRUdDQ3FHU000OUF3RUhBMElBQk1...more
Vendor key -----BEGIN PGP PUBLIC KEY BLOCK-----\n\nmQINBGCnXR4BEADlUv10sJSI9P7g/Uth/bVmvgDPyT3TvqubCmBaQXSTO1dZ97Am\n6xktWmDuHRde5ttlyLH/QnenRkRcDjNh1xhib/FLR5cyADUTGfSxQjKnWBqirJNh\nOwFL/ZBNY7i71vCtQO28VgxxiDJgrKnwzsvEeKXuqWVRFl4Bvb/vzUb4IiH4OoNp\nTHxSq6U/e0OJj6BVgMw0kX0HatjD4FVYbO7zaWu+q9Gml2d3F3lLQSGj0YE2dkcF\nXa/VR4XuqKQdUeD3RWGK2Qkr5zIBgkCbUJnqH+kzexTybXxAr+...more ...bD2\n=TRg8\n-----END PGP PUBLIC KEY BLOCK-----\n
Chapter 8. Secure Bitcoin Wallet: A sample use case that spans multiple IBM Hyper Protect Services 359

"public_key_id": "25bd40b8729bb219ad6819b4d57371e4dc66d853cdf9c71698fb9b00593ba004", "public_key": "LS0tLS1CRUdJTiBDRVJUSUZJQ0FURS0tLS0tCk1JSUJwakNDQVV1Z0F3SUJBZ0lRUEtIdndqSThBcWgzSkF2YkpCQzBxVEFLQmdncWhrak9QUVFEQWpBNU1UY3cKTlFZRFZRUURFeTUxY3k1cFkzSXVhVzh2WW1sMFkyOXBiaTEzWVd4c1pYUXZjMlZqZFhKbExXSnBkR052YVc0dApkMkZzYkdWME1CNFhEVEl4TURVeU1ESXhORE0xTVZvWERUTXhNRFV4T0RJeE5ETTFNVm93T1RFM01EVUdBMVVFCkF4TXVkWE11YVdOeUxtbHZMMkpwZEdOdmFXNHRkMkZzYkdWMEwzTmxZM1Z5WlMxaWFYUmpiMmx1TFhkaGJHeGwKZERCWk1CTUdCeXFHU000OUFnRUdDQ3FHU000OUF3RUhBMElBQk1tamFDWFFCdnJyczk1d2ZNandMVGdXcURnVgpISC9xOVpmQjJSTWFwc0dodDlxUEEvQXdsbjUwQm1yVzBFM0hhcGd6T1lyRlp1cXptMTgzNWlBKytoeWpOVEF6Ck1BNEdBMVVkRHdFQi93UUVBd0lGb0RBVEJnTlZIU1VFRERBS0JnZ3JCZ0VGQlFjREF6QU1CZ05WSFJNQkFmOEUKQWpBQU1Bb0dDQ3FHU000OUJBTUNBMGtBTUVZQ0lRQ0NhdVV2ZHF0bExzUGZmaWlpSG44MlJMdjRJU0xnRnREZwpBSVNqRDQ1alNRSWhBUHNrTVV6QXhqa09jWit0UGdmaks5dFF5dHp2a3FCK1ZYRnRzaHliQ0RiMgotLS0tLUVORCBDRVJUSUZJQ0FURS0tLS0tCg==", "vendor_key": "-----BEGIN PGP PUBLIC KEY BLOCK-----\n\nmQINBGCnXR4BEADlUv10sJSI9P7g/Uth/bVmvgDPyT3TvqubCmBaQXSTO1dZ97Am\n6xktWmDuHRde5ttlyLH/QnenRkRcDjNh1xhib/FLR5cyADUTGfSxQjKnWBqirJNh\nOwFL/ZBNY7i71vCtQO..niINdWkcDeAF8r/2aAFpLbdqP4w6MzBzkqZDevkCXbayToGqKEYo4woCIn+yFhNg1\n2rNX3oWp6lv3nJPqRWyldmVTRr9C/YCGejsL/jTvjoXCCHIX47wzuPJ8FC0RQC7H\nrW04nUsKcP0S0dWRyQtYqSiBwZCchcaAUlxUHPTHHcd4qTakMFcwHbyT5NrRCoxl\nPsuwMZymfz1LYL9cvfsAYgVr1CLXpcdA0UKwkO/bFSpuPI2mW3g5Vf10g67lSPCY\nIjZF2sRwibD2\n=TRg8\n-----END PGP PUBLIC KEY BLOCK-----\n"}
You might notice in the environment allowlist that we authorized the four environment variables that enable you to specify the connection to a specific IBM Hyper Protect Crypto Services instance:
– ZHSM: The Enterprise Public Key Cryptography Standards (PKCS) #11 (EP11) endpoint URL.
– APIKEY: The API key for the HPCS instance.
– INSTANCE_ID: The instance ID of the HPCS instance.
– IAM_ENDPOINT: The URL of an Identity and Access Management (IAM) endpoint, which is optional. The default value https://iam.cloud.ibm.com is used if the endpoint is not specified.
You also can generate the registration file by using environment variables on your notebook after you retrieve the DOCKER_TRUST information from your build virtual server, as shown in Example 8-20.
Example 8-20 Using the IMG, API_KEY, and GPG environment variables
$ IMG=us.icr.io/bitcoin-wallet/secure-bitcoin-wallet$ API_KEY=azhejui-2313jklmqsdazoslqsd34a12klm2313$ KEY=25bd40b8729bb219ad6819b4d57371e4dc66d853cdf9c71698fb9b00$ PUB=LS0tLS1CRUdJTiBDRVJUZJQ0FURS0tL0tCk1JSUJwakNDQVV1Z0F3SUJBZ0lRUEtIdndqSThBcWgXVhVzh2WW1sMFkyOXBiaTEzWVd4c1pYUXZjMlZqZFhKbExXSnBkR052YVc0dApkMkZzYkdWME1CNFhEVEl4TURVeU1ESXhORE0xTVZvWERUTXhNRFV4T0RJeE5ETTFNVm93T1RFM01EVUdBMVVFCkF4TXVkWE11YVdOeUxtbHZMMkpwZEdOdmFXNHRkMkZzYkdWMEwzTmxZM1Z5WlMxaWFYUmpiMmx1TFhkaGJHeGwKZERCWk1CTUdCeXFHU000OUFnRUdDQ3FHU000OUF3RUhBMElBQk1tamFDWFFCdnJyczk1d2ZNandMVGdXcURnVgpISC9xOVpmQjJSTWFwc0dodDlxUEEvQXdsbjUwQm1yVzBFM0hhcGd6T1lyRlp1cXptMTgzNWlBKytoeWpOVEF6Ck1BNEdBMVVkRHdFQi93UUVBd0lGb0RBVEJnTlZIU1VFRERBS0JnZ3JCZ0VGQlFjREF6QU1CZ05WSFJNQkFmOEUKQWpBQU1Bb0dDQ3FHU000OUJBTUNBMGtBTUVZQ0lRQ0NhdVV2ZHF0bExzUG
360 Securing Your Critical Workloads with IBM Hyper Protect Services

ZmaWlpSG44MlJMdjRJU0xnRnREZwpBSVNqRDQ1alNRSWhBUHNrTVV6QXhqa09jWit0UGdmaks5dFF5dHp2a3FCK1ZYRnRzaHliQ0$ GPG=$(gpg --armor --export myapp | sed -z 's/\n/\\n/g')
$ jq -n --arg API_KEY $API_KEY --arg IMG $IMG --arg KEY $KEY --arg PUB "$PUB" --arg GPG "$GPG" '{ "repository_name": "\($IMG)", "docker_username" : "iamapikey","docker_password" : "\($API_KEY)", "envs_whitelist": ["RUNQ_ROOTDISK", "RUNQ_RUNQENV", "RUNQ_SYSTEMD", "IMAGE_TAG", "REGION", "PHASE", "LPAR_NAME", "CPC", "RUNQ_CPU", "RUNQ_MEM", "POD", ], "public_key_id": "\($KEY)","public_key": "\($PUB)","vendor_key": "\($GPG)","ZHSM", "APIKEY", "INSTANCE_ID", "IAM_ENDPOINT" }' > secure_bitcoin_wallet.reg
4. Create the registration file by using the gpg command in a terminal on Linux, as shown in Example 8-21.
Example 8-21 Signing a registration file
$ gpg --encrypt --sign --local-user myapp --armor -r rtoa_destination secure_bitcoin_wallet.reggpg: 8005C6CC3C619DEB: There is no assurance that this key belongs to the named user
sub rsa4096/8005C6CC3C619DEB 2020-03-13 rtoa_destination Primary key fingerprint: DB4C 5FCC D0A4 66F8 7A05 C2E1 190E A90A 5CCD D4F5 Subkey fingerprint: 6B16 D151 FB1A 3EF2 D1CB 2551 8005 C6CC 3C61 9DEB
It is NOT certain that the key belongs to the person namedin the user ID. If you *really* know what you are doing,you may answer the next question with yes.
Use this key anyway? (y/N) y
This registration file is used to provision an IBM Hyper Protect Virtual Servers instance by using this container image.
You should have a new (encrypted) file in your directory that is called secure_bitcoin_wallet.reg.asc. This file is used as input by IBM Cloud to provision an IBM Hyper Protect Virtual Servers instance by using your build container that is stored on your registry.
Note: Make sure that the rtoa_destination public key is imported. Check your list of keys by using the command gpg --list-public-keys. You should see the following lines:
pub rsa4096 2020-03-13 [SC] DB4C5FCCD0A466F87A05C2E1190EA90A5CCDD4F5uid [ unknown] rtoa_destinationsub rsa4096 2020-03-13 [E]
If you do not see the line, see “Loading the rtoa_destination key” on page 358.
Chapter 8. Secure Bitcoin Wallet: A sample use case that spans multiple IBM Hyper Protect Services 361

Starting an IBM Hyper Protect Virtual Servers instance with your container imageYou can now securely deploy this application by using a description file that is signed by your PGP key.
Without using an IBM Hyper Protect Crypto Services instanceTo start the application in the US South region with the zsb006 resource group, run the command that is shown in Example 8-22.
Example 8-22 Running the Secure Bitcoin Wallet application without an IBM Hyper Protect Crypto Services instance
$ ibmcloud hpvs instance-create itso-bitcoinwallet lite-s dal13 --rd-path secure_bitcoin_wallet.reg.asc -g zsb006 -i latestOKProvisioning request for service instance 'crn:v1:bluemix:public:hpvs:dal13:a/537544c2222297f40ed689e8473e7849:0d1e935c-25d2-4a86-a463-fa40eb91c50d::' was accepted. To check the provisioning status run: ibmcloud hpvs instance crn:v1:bluemix:public:hpvs:dal13:a/537544c2222297f40ed689e8473e7849:0d1e935c-25d2-4a86-a463-fa40eb91c50d::
Using an IBM Hyper Protect Crypto Services instanceComplete the following steps:
1. Using the IBM Cloud console or CLI, retrieve your EP11 endpoint. In our example, we use hpcs-smartcardreader, as shown in Example 8-23.
Example 8-23 Retrieving your IBM Hyper Protect Crypto Services endpoint address
$ ibmcloud resource service-instances Retrieving instances with type service_instance in resource group zsb006 in all locations under account Lydia Parziale's Account as [email protected] Location State Type hpcs-svc us-south active service_instance hpcs-itso us-south active service_instance hpcs-smartcardreader us-south active service_instance kube-certmgr-c2j7oq5d034lb80l54p0 us-south active service_instance hpvs-build dal10 active service_instance
$ ibmcloud resource service-instance hpcs-smartcardreader --output json | jq -r '.[].extensions.endpoints.public' | sed 's/api/ep11/'https://ep11.us-south.hs-crypto.cloud.ibm.com:11633
2. Create your IBM Hyper Protect Virtual Servers instance, as shown in Example 8-24 on page 363.
You can pass the following four environment variables (ZHSM, APIKEY, INSTANCE_ID, and IAM_ENDPOINT) as parameters while creating the virtual server by using the -e option.
362 Securing Your Critical Workloads with IBM Hyper Protect Services

Example 8-24 Creating your IBM Hyper Protect Virtual Servers instance in the dal13 data center in the zsb006 resource group
$ export INSTANCE_ID=$(ibmcloud resource service-instance hpcs-smartcardreader --output json | jq -r '.[].guid')$ export APIKEY=8vFwZ9yQIyG8iDxxxxxxxh4Oi3l-vBwAvcZd5oDX $ export ZHSM=$(ibmcloud resource service-instance hpcs-smartcardreader --output json | jq -r '.[].extensions.endpoints.public' | sed 's/api/ep11/')$ export IAM_ENDPOINT=https://iam.cloud.ibm.com
$ ibmcloud hpvs instance-create itso-bitcoinwallet entry dal13 --rd-path secure_bitcoin_wallet.reg.asc -g zsb006 -i latest -e ZHSM=$ZHSM -e IAM_ENDPOINT=$IAM_ENDPOINT -e APIKEY=$APIKEY -e INSTANCE_ID=$INSTANCE_IDOKProvisioning request for service instance 'crn:v1:bluemix:public:hpvs:dal13:a/537544c2222297f40ed689e8473e7849:dd00afb3-b11e-41cc-b63d-4c65c3e5d05f::' was accepted. To check the provisioning status run: ibmcloud hpvs instance crn:v1:bluemix:public:hpvs:dal13:a/537544c2222297f40ed689e8473e7849:dd00afb3-b11e-41cc-b63d-4c65c3e5d05f::
Retrieving your IP address Retrieve the IP address of your provisioned server by using the IBM Cloud console, as in Figure 8-2, or by using the IBM Cloud CLI.
Figure 8-2 Getting your service public IP address by using the IBM Cloud console
Chapter 8. Secure Bitcoin Wallet: A sample use case that spans multiple IBM Hyper Protect Services 363

8.2.2 Using IBM Hyper Protect Secure Build Servers on-premises
In this scenario, we start the Secure Bitcoin Wallet application within an IBM Hyper Protect hosting appliance that is installed and configured on a LinuxONE IBM Secure Service Container (SSC) partition.
The Secure Bitcoin Wallet container is built by using the Secure Build process, and it is stored in the same IBM container registry, as described in 8.2.1, “Using IBM Cloud Hyper Protect with Bring Your Own Image” on page 350.
PrerequisitesYou need the following items:
� A Secure Build Server (SBS) that is configured and running in an IBM Hyper Protect Virtual Servers appliance on an on-premises system. The hpvs command on the CLI allows connection to the host.
� An IBM Cloud container registry, as described in “Retrieving container image signatures from your registry” on page 355.
� An IBM Cloud API key that is defined with access to the IBM Cloud Container Registry service.
� A provisioned and initialized IBM Hyper Protect Crypto Services instance that can be accessed with the same API key.
As an example, in our IBM Redbooks lab environment, we have the virtual servers that are shown in Example 8-25.
Example 8-25 IBM Redbooks hosting appliance virtual servers
itso@rdbkhpvm:~# hpvs vs list+------------------+---------+-------------+------------------------------------+| NAMES | STATE | STATUS | IMAGE |+------------------+---------+-------------+------------------------------------+| demo_securebuild | running | Up 6 days |ibmzcontainers/secure-docker-build-...| test-monitoring | running | Up 27 hours | ibmzcontainers/monitoring:1.2.3 | test-collectd | running | Up 27 hours | ibmzcontainers/collectd-host:1.2.3 +------------------+---------+-------------+------------------------------------+
itso@rdbkhpvm:~# hpvs vs show --name demo_securebuild+-------------+------------------------------+| PROPERTIES | VALUES |+-------------+------------------------------+| Name | demo_securebuild || CPU | 2 || Memory | 2048 || State | running || Status | Up 3 hours || Networks | Gateway:9.76.61.1 || | IPAddress:9.76.61.101 || | MacAddress:02:42:09:4c:3d:65 || | Network:external_network || | Subnet:24 || Ports | || Quotagroups | [qg_securebuild] |+-------------+------------------------------+
364 Securing Your Critical Workloads with IBM Hyper Protect Services

Registries definitionFor our example, we plan for the following actions:
� The Secure Build virtual server uploads the created container on to an IBM Cloud Container registry.
� The hosting appliance pulls the container image from the same IBM Cloud Container Registry when the virtual server is created.
� The Secure Build virtual server pulls the base image, as defined in the Secure Bitcoin Wallet Dockerfile, from Docker Hub.
Define the following registry entries for both the IBM Cloud Container registry as itsoRepo and Docker Hub as docker in the hosting appliance, as shown in Example 8-26.
Both registries use different credentials, as shown in Table 8-4.
Table 8-4 Container registries credentials
Example 8-26 Defining your container registries credentials within the hosting appliance
$ echo <8vFwZ9yQIyG Your API Key -vBwAvcZd5oDX> | hpvs registry add --name itsoRepo --dct https://us.icr.io:4443 --url us.icr.io --user iamapikey
$ hpvs registry add --name docker --dct https://notary.docker.io:4443 --url docker.io --user itsouser
$ hpvs registry list+---------------+| REGISTRY NAME |+---------------+| itsoRepo || docker |+---------------+
Building your containerComplete the following steps:
1. Create a Secure Build configuration file for the wallet_db.yaml file.
2. Specify the following parameters according to your own environment:
– The itsoRepo in the docker section for pull and push operations because we use an IBM Cloud container registry to store our container image.
– The image name in the Docker section as a repo attribute, where you include the namespace (bitcoin-wallet) that was created in the IBM Cloud registry container. In our example, we used the following name:
repo: 'bitcoin-wallet/secure-bitcoin-wallet-hpvs'
– The IP address and certificates that are defined for your SBS in the sbs section.
– A public and private key pair that is used to authenticate the GitHub website. In our example, the private key is stored as /home/itso/github/github_rsa.
Registry type User Password
IBM Cloud Container Registry <API Key> iamapikey
Docker Hub Docker Hub username Docker Hub password
Chapter 8. Secure Bitcoin Wallet: A sample use case that spans multiple IBM Hyper Protect Services 365

– The git url repo in the github section of the Secure Bitcoin Wallet application:
[email protected]:IBM/secure-bitcoin-wallet.git
– The IBM Cloud Object Storage configuration that you provision in IBM Cloud, as shown in Figure 8-3. The configuration stores the build manifest files. In our example, we named it itso-sbs. From the IBM Console, retrieve the endpoint URL and the CRN and specify them in the manisfest_cos. Specify the API key used to access this service as well. We used the same key to provision the Hyper Protect Crypto Services in our example.
Figure 8-3 IBM Cloud Object Storage service configuration
– Your GPG keys in the signing_key section. For more information, see step 3a., “List the GPG keys by running the following commands:” on page 311.
You can extract your GPG keys by using the commands that are shown in Example 8-27.
Example 8-27 Retrieving your GPG keys after they are created
$ gpg --export-secret-keys --armor myapp > /home/itso/myapp.private$ gpg --export --armor myapp > /home/itso/myapp.pub
366 Securing Your Critical Workloads with IBM Hyper Protect Services

– Specify the content_trust_base parameter as False because the Dockerfile of the application specifies a non-trusted image that is pulled from Docker Hub. The image should accept the following environment variables: ZHSM, APIKEY, INSTANCE_ID, and IAM_ENDPOINT, which we specify in the env whitelist parameter.
Example 8-28 shows the wallet_sb.yaml Secure Build configuration file.
Example 8-28 The wallet_sb.yaml Secure Build configuration file
secure_build_workers: sbs: url: 'https://9.76.61.101' port: '443' cert_path: '/home/itso/config/securebuild/keys/sbs.cert' key_path: '/home/itso/config/securebuild/keys/sbs.key' regfile: id: 'myapp' github: url: '[email protected]:IBM/secure-bitcoin-wallet.git' branch: 'master' ssh_private_key_path: '/home/itso/github/github_rsa' recurse_submodules: 'False' dockerfile_path: './Dockerfile' docker_build_path: './' docker: push_server: 'itsoRepo' #base_server: 'docker' pull_server: 'itsoRepo' repo: 'bitcoin-wallet/secure-bitcoin-wallet-hpvs' image_tag_prefix: 'latest' content_trust_base: 'False' # content_trust_base: 'True' manifest_cos: bucket_name: itso-sbs api_key: 8vFwZ9yQIyG8iDI0 .... dWNh4Oi3l-vBwAvcZd5oDX resource_crn: 'crn:v1:bluemix:public:cloud-object-storage:global:a/537544c2222297f40ed689e8473e7849:d06b0c95-7405-4084-ad9b-8056aa834878:bucket:itso-sbs' auth_endpoint: https://iam.cloud.ibm.com/identity/token endpoint: https://s3.eu-de.cloud-object-storage.appdomain.cloud env: whitelist: [ "ZHSM", "APIKEY","INSTANCE_ID","IAM_ENDPOINT" ] build: args: signing_key: private_key_path: '/home/itso/myapp.private' public_key_path: '/home/itso/myapp.pub'
3. Build the container by using the file that is named wallet_sb.yaml (from our home directory in this example), as shown in Example 8-29.
Example 8-29 Building your containers by using Secure Build
itso@rdbkhpvm:~# hpvs sb init --config wallet_sb.yaml{"status":"OK"}itso@rdbkhpvm:~# hpvs sb build --config wallet_sb.yaml+--------+-------------------------+
Chapter 8. Secure Bitcoin Wallet: A sample use case that spans multiple IBM Hyper Protect Services 367

| status | OK: async build started |+--------+-------------------------+########################################################################################################################################################################################################################################################################################################################################################################################################################################################################Interactive build timed out but build is in progress, check "hpvs sb log" command to check the bu
itso@rdbkhpvm:~# hpvs sb log --config wallet_sb.yaml .....t-369f09c.2021-05-27_10-38-32.831022.sig.tbz2021-05-27 10:38:47,552 root INFO manifest bucket_name: itso-sbs2021-05-27 10:38:47,553 root INFO cleaning up the build environment2021-05-27 10:38:47,553 root INFO github_dir=secure-bitcoin-wallet2021-05-27 10:38:47,556 root INFO completed a build
You might see the following messages in the build log regarding a rate limit issue:
2021-05-27 08:33:23,557 root INFO run: Step 1/47 : FROM node:10.16.0-stretch-slim AS node2021-05-27 08:33:24,025 root INFO run: toomanyrequests: You have reached your pull rate limit. You may increase the limit by authenticating and upgrading: https://www.docker.com/increase-rate-limit
If so, you can try to use your Docker hub credentials by completing the following steps:
a. Modify the Secure Build file wallet_sb.yaml to specify the following settings:
base_server: 'docker'content_trust_base: 'True'
b. Run the build again until it fails:
hpvs sb update --config wallet_sb.yamlhpvs sb build --config wallet_sb.yaml
c. Modify the Secure Build file wallet_sb.yaml to specify the following settings:
#base_server: 'docker'content_trust_base: 'False'
d. Relaunch the build:
hpvs sb update --config wallet_sb.yamlhpvs sb build --config wallet_sb.yaml
4. When the build completes, register the repository in the hosting appliance by using the commands that are shown in Example 8-30.
Example 8-30 Registering the repository in the hosting appliance
$ ibmcloud cr image-listListing images...
Repository Tag Digest Namespace Created Size Security status us.icr.io/bitcoin-wallet/secure-bitcoin-wallet-hpvs latest 2c4fef3ce9c8 bitcoin-wallet 6 days ago 470 MB 6 Issues us.icr.io/bitcoin-wallet/secure-bitcoin-wallet-hpvs latest-369f09c a06c8380e329 bitcoin-wallet 1 hour ago 470 MB 6 Issues
# hpvs sb regfile --config wallet_sb.yaml --out wallet.encEnter Signing Private key passphrase:
# hpvs repository register --pgp=wallet.enc --id=SecureBitcoinWallet+-----------------+-----------------------------------------------------+
368 Securing Your Critical Workloads with IBM Hyper Protect Services

| repository_name | us.icr.io/bitcoin-wallet/secure-bitcoin-wallet-hpvs || runtime | runq |+-----------------+-----------------------------------------------------+
# hpvs repository list+-------------------+---------------------------------------------------------+----------+| REPOSITORY ID | REPOSITORY NAME | RUN TIME |+-------------------+---------------------------------------------------------+----------+| HpvsopBaseSSH | docker.io/ibmzcontainers/hpvsop-base-ssh | runq || Monitoring | docker.io/ibmzcontainers/monitoring | runq || SecureDockerBuild | docker.io/ibmzcontainers/secure-docker-build | runq || SecureWallet | us.icr.io/bitcoin-wallet/secure-bitcoin-wallet-hpvs-new | runq || CollectdHost | docker.io/ibmzcontainers/collectd-host | runc |+-------------------+---------------------------------------------------------+----------+
The build manifest is transparently stored in the cloud object storage, as shown in Figure 8-4.
Figure 8-4 The build manifest files after many successful builds
Starting your container on the hosting applianceCreate a storage instance and start your container by using the hpvs vs create command, as shown in Example 8-31.
Example 8-31 Starting the Secure Wallet application on the hosting appliance
# hpvs network show --name external_network+--------------+---------------------------------------+| PROPERTIES | VALUES |+--------------+---------------------------------------+| Name | external_network || Driver | macvlan || Containers | [demo_securebuild] || IPAM | Gateway:9.76.61.1 || | Subnet:9.76.61.0/24 |
Chapter 8. Secure Bitcoin Wallet: A sample use case that spans multiple IBM Hyper Protect Services 369

| ParentDevice | enc1e26 || Scope | local |+--------------+---------------------------------------+
# hpvs quotagroup create --name itso --size=200GB+-------------+---------------------------+| PROPERTIES | VALUES |+-------------+---------------------------+| Name | itso || Filesystem | btrfs || Passthrough | false || PoolID | lv_data_pool || Size | 200 GB || Containers | || Available | 190 GB |+-------------+---------------------------+
# hpvs vs create --name itsowallet --repo SecureWallet --tag latest --cpu 1 --ram 4048 --quotagroup "{quotagroup = itso, mountid = new, mount = /newroot, filesystem = btrfs, size = 25GB}" --network "{name = external_network,ip = 9.76.61.150}" --env={IAM_ENDPOINT=$IAM_ENDPOINT,ZHSM=$ZHSM,APIKEY=$APIKEY,INSTANCE_ID=$INSTANCE_ID}+-------------+------------------------------+| PROPERTIES | VALUES |+-------------+------------------------------+| Name | itsowallet || CPU | 1 || Memory | 4048 || State | running || Status | Up Less than a second || Networks | MacAddress:02:42:09:4c:3d:96 || | Network:external_network || | Subnet:24 || | Gateway:9.76.61.1 || | IPAddress:9.76.61.150 || Ports | || Quotagroups | [itso] |+-------------+------------------------------+
Make sure that the environment variables are defined in your environment, as shown previously in Example 8-24 on page 363. These variables are used as parameters by the container to specify which IBM Hyper Protect Crypto Services instance that it should connect to.
We specified the IP address 9.76.61.150 in the hpvs vs create command for this virtual server. This address was the IP address from our IBM Redbooks lab environment.
370 Securing Your Critical Workloads with IBM Hyper Protect Services

8.2.3 Using IBM Cloud Hyper Protect Secure Build Server
The procedure for this Secure Bitcoin Wallet application is documented at GitHub.
Tool installationUsing the SBS on the IBM Cloud requires that you install Python tools on your workstation so that you can build, configure, and use the SBS.
Example 8-32 shows the set of commands you use to install the Python tools if you are running Ubuntu on your notebook.
Example 8-32 Tool installation for a Linux notebook
$ apt-get update$ apt-get install python3 python3-pip$ python3 -m pip install -U pip
$ git clone [email protected]:ibm-hyper-protect/secure-build-cli.git$ cd secure-build-cli$ pip3 install -r requirements.txt
Creating your Secure Build instance Create a file that is named sbs-config.json, as shown in Example 8-33.
Example 8-33 The sbs-config.json file
{ "CICD_PUBLIC_IP": "", "CICD_PORT": "443", "IMAGE_TAG": "1.3.0", "GITHUB_KEY_FILE": "~/github/github_rsa", "GITHUB_URL": "[email protected]:IBM/secure-bitcoin-wallet.git", "GITHUB_BRANCH": "master", "CONTAINER_NAME": "SBContainer", "REPO_ID": "sbs", "DOCKER_REPO": "bitcoin-wallet/secure-bitcoin-wallet-sbscloud", "DOCKER_BASE_SERVER": "", "DOCKER_PUSH_SERVER": "us.icr.io", "DOCKER_USER": "iamapikey", "DOCKER_PASSWORD": "8vFwZ9yQIyG8iDI0j2 <your IBM CLoud API key >wAvcZd5oDX", "IMAGE_TAG_PREFIX": "latest", "DOCKER_CONTENT_TRUST_BASE": "False", "DOCKER_CONTENT_TRUST_BASE_SERVER": "", "DOCKER_RO_USER": "iamapikey", "DOCKER_RO_PASSWORD": "8vFwZ9yQIyG8iDI0j2 <your IBM CLoud API keywAvcZd5oDX", "DOCKER_CONTENT_TRUST_PUSH_SERVER": "https://us.icr.io:4443", "ENV_WHITELIST": [ "ZHSM", "APIKEY", "INSTANCE_ID", "IAM_ENDPOINT" ], "ARG": {}}
Chapter 8. Secure Bitcoin Wallet: A sample use case that spans multiple IBM Hyper Protect Services 371

You should have SSH key-authenticated access to the GitHub website. Specify your private key as the GITHUB_KEY_FILE attribute.
To use an IBM Cloud Container Registry, specify the address depending on your IBM Cloud region where it was created for the DOCKER_PUSH_SERVER and DOCKER_CONTENT_TRUST_PUSH_SERVER attributes. For the root user password, specify iamapikey and your API key for DOCKER_USER, DOCKER_PASSWORD, DOCKER_RO_USER, and DOCKER_RO_PASSWORD.
For the Secure Bitcoin Wallet application, DOCKER_CONTENT_TRUST_BASE must be set to False because the base image that is specified in the Dockerfile in the source code is not trusted.
For the DOCKER_REPO attribute, select a container image name and add the namespace that you created for your IBM Cloud registry, as described in “Creating a container registry on IBM Cloud” on page 352.
The ENV_WHITELIST attribute specifies the list of environment variables that you use to specify the IBM Hyper Protect Crypto Services endpoint to the Secure Bitcoin Wallet application.
Starting your Secure Build Server on IBM CloudComplete the following steps:
1. Create your certificates, as shown in Example 8-34. This command also updates your sbs-config.json file with two new parameters: UUID and SECRET.
Example 8-34 Creating certificates
$ ./build.py create-client-cert --env sbs-config.jsonINFO:__main__:parameter file sbs-config.json renamed to sbs-config.json.2021-05-27_16-22-50.975567INFO:root:client_certificate: generating client CA and certificate
2. To retrieve the certificate authority (CA) and client certificates that will be used as parameters to star the SBS, run the command that is shown in Example 8-35.
Example 8-35 Retrieving the -e CLIENT_CRT and -e CLIENT_CA parameter values
$ ./build.py instance-env --env sbs-config.jsonINFO:root:client_certificate: using supplied pem files client_crt_key=.SBContainer-edc53f02-519c-4d4b-a291-8a9dd766ed80 capath=./.SBContainer-edc53f02-519c-4d4b-a291-8a9dd766ed80.d/client-ca.pem cakeypath=./.SBContainer-edc53f02-519c-4d4b-a291-8a9dd766ed80.d/client-ca-key.pem-e CLIENT_CRT=LS0tLS1CRUdJTiBDRVJUSUZJQ0FURS0tLS0tCk1JSUR3RENDQXFpZ0F3SUJBZ0lFQk5CdjlG....d3g5NXJsbWhpUloxN3A1Zm52MW9uZm1tKzdURUsxbkdTTUdtYUhYeUEKTWxxRjh1dzFydWxSdUdietLUVORCBDRVJUSUZJQ0FURS0tLS0tCg== -e CLIENT_CA=LS0tLS1CRUdJTiBDRVJUSUZJQ0FURS0tLS0tCk1JSUR4akNDQXE2Z0F3SUJBZ0lFQS9hMlRqGc0lFRnpjMlYwY3pFU01CQUdBMVVFQXd3SlEyeHBaVzUwSUVOQk1CNFhEVEl4Ck1EVXlOekUyTWpJMU1Wb1h....lHOXcwQkFRc0ZBQU9DQVFFQW8wZVpwVGFsCmhpN3V1bzJHOGZ1a05DclFTcm5xYmJFRzRhZGdXcGFT09Ci0tLS0tRU5EIENFUlRJRklDQVRFLS0tLS0K
372 Securing Your Critical Workloads with IBM Hyper Protect Services

3. Start the SBS on IBM Cloud, as shown in Example 8-36.
Example 8-36 Starting the IBM Cloud build server with the CLIENT_CRT and CLIENT_CA parameters
$ ibmcloud login --sso -g zsb006
$ ibmcloud hpvs instance-create SBContainer entry dal12 --rd-path "secure_build.asc" -i 1.3.0 -g zsb006 -e CLIENT_CRT=LS0tLS1CRUdJTiBDRVJUSUZJQ0FURS0tLS0tCk1JSUR3RENDQXFpZ0F3SUJBZ0lFQk5CdjlG....d3g5NXJsbWhpUloxN3A1Zm52MW9uZm1tKzdURUsxbkdTTUdtYUhYeUEKTWxxRjh1dzFydWxSdUdietLUVORCBDRVJUSUZJQ0FURS0tLS0tCg== -e CLIENT_CA=LS0tLS1CRUdJTiBDRVJUSUZJQ0FURS0tLS0tCk1JSUR4akNDQXE2Z0F3SUJBZ0lFQS9hMlRqGc0lFRnpjMlYwY3pFU01CQUdBMVVFQXd3SlEyeHBaVzUwSUVOQk1CNFhEVEl4Ck1EVXlOekUyTWpJMU1Wb1h....lHOXcwQkFRc0ZBQU9DQVFFQW8wZVpwVGFsCmhpN3V1bzJHOGZ1a05DclFTcm5xYmJFRzRhZGdXcGFT09Ci0tLS0tRU5EIENFUlRJRklDQVRFLS0tLS0KProvisioning request for service instance 'crn:v1:bluemix:public:hpvs:dal12:a/537544c2222297f40ed689e8473e7849:0a91a9ef-7d69-488d-b9b8-2292b46d3997::' was accepted. To check the provisioning status run: ibmcloud hpvs instance crn:v1:bluemix:public:hpvs:dal12:a/537544c2222297f40ed689e8473e7849:0a91a9ef-7d69-488d-b9b8-2292b46d3997::
We specify the zsb006 resource group and dal12 data center in this example. Modify these parameters according to your own environment.
The secure_build.asc IBM Cloud registration file of the SBS can be retrieved at Protecting your image build.
4. Retrieve the IP address of your Secure Build container and specify this address for the CICD_PUBLIC_IP attribute of your sbs-config.json file, as shown in Example 8-37.
Example 8-37 Retrieving the Secure Build service IP address
$ ibmcloud hpvs instance SBContainerGetting instance details for SBContainer (crn:v1:bluemix:public:hpvs:dal12:a/537544c2222297f40ed689e8473e7849:0a91a9ef-7d69-488d-b9b8-2292b46d3997::) ...
Name SBContainer CRN crn:v1:bluemix:public:hpvs:dal12:a/537544c2222297f40ed689e8473e7849:0a91a9ef-7d69-488d-b9b8-2292b46d3997:: Location dal12 Cloud tags Cloud state active Server status running Plan Entry Public IP address 52.116.250.234 Internal IP address 172.18.88.227 Boot disk 25 GiB Data disk 75 GiB Memory 4096 MiB Processors 1 vCPUs Image type self-provided Image OS self-defined Image name ibmzcontainers/secure-docker-build:1.3.0
Chapter 8. Secure Bitcoin Wallet: A sample use case that spans multiple IBM Hyper Protect Services 373
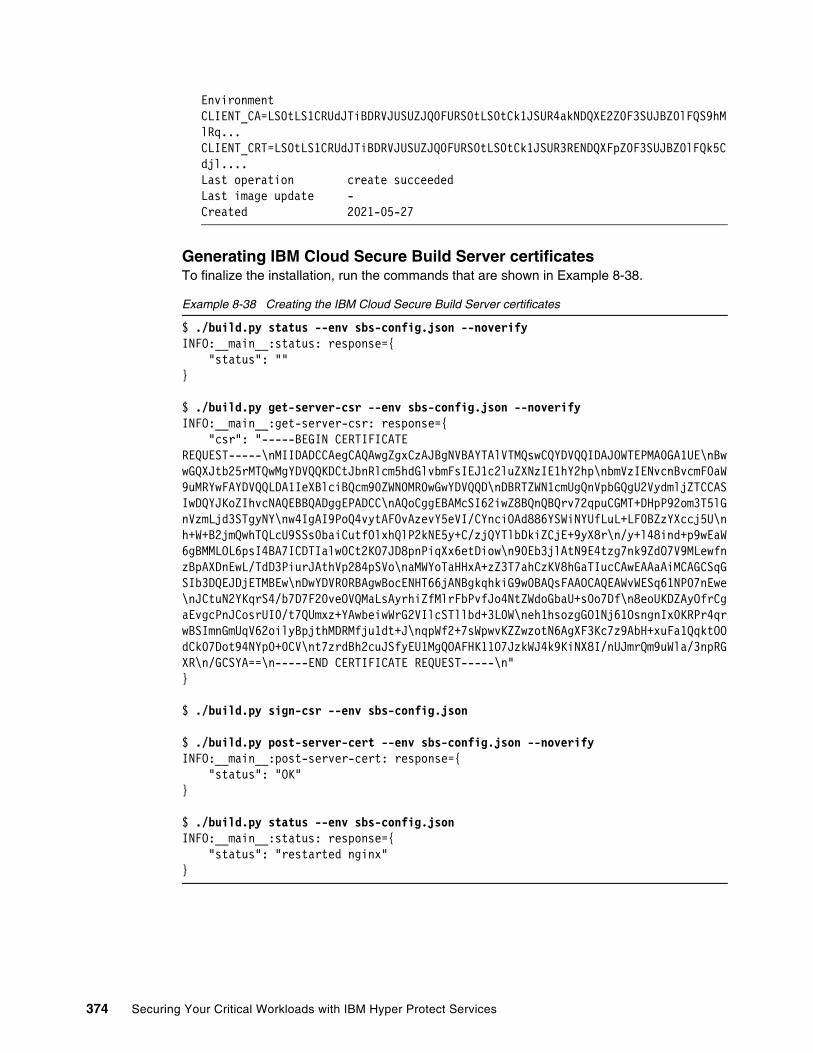
Environment CLIENT_CA=LS0tLS1CRUdJTiBDRVJUSUZJQ0FURS0tLS0tCk1JSUR4akNDQXE2Z0F3SUJBZ0lFQS9hMlRq... CLIENT_CRT=LS0tLS1CRUdJTiBDRVJUSUZJQ0FURS0tLS0tCk1JSUR3RENDQXFpZ0F3SUJBZ0lFQk5Cdjl....Last operation create succeeded Last image update - Created 2021-05-27
Generating IBM Cloud Secure Build Server certificatesTo finalize the installation, run the commands that are shown in Example 8-38.
Example 8-38 Creating the IBM Cloud Secure Build Server certificates
$ ./build.py status --env sbs-config.json --noverifyINFO:__main__:status: response={ "status": ""}
$ ./build.py get-server-csr --env sbs-config.json --noverifyINFO:__main__:get-server-csr: response={ "csr": "-----BEGIN CERTIFICATE REQUEST-----\nMIIDADCCAegCAQAwgZgxCzAJBgNVBAYTAlVTMQswCQYDVQQIDAJOWTEPMA0GA1UE\nBwwGQXJtb25rMTQwMgYDVQQKDCtJbnRlcm5hdGlvbmFsIEJ1c2luZXNzIE1hY2hp\nbmVzIENvcnBvcmF0aW9uMRYwFAYDVQQLDA1IeXBlciBQcm90ZWN0MR0wGwYDVQQD\nDBRTZWN1cmUgQnVpbGQgU2VydmljZTCCASIwDQYJKoZIhvcNAQEBBQADggEPADCC\nAQoCggEBAMcSI62iwZ8BQnQBQrv72qpuCGMT+DHpP92om3T5lGnVzmLjd3STgyNY\nw4IgAI9PoQ4vytAFOvAzevY5eVI/CYnciOAd886YSWiNYUfLuL+LF0BZzYXccj5U\nh+W+B2jmQwhTQLcU9SSs0baiCutf0lxhQlP2kNE5y+C/zjQYTlbDkiZCjE+9yX8r\n/y+l48ind+p9wEaW6gBMMLOL6psI4BA7ICDTIalw0Ct2KO7JD8pnPiqXx6etDiow\n90Eb3jlAtN9E4tzg7nk9ZdO7V9MLewfnzBpAXDnEwL/TdD3PiurJAthVp284pSVo\naMWYoTaHHxA+zZ3T7ahCzKV8hGaTIucCAwEAAaAiMCAGCSqGSIb3DQEJDjETMBEw\nDwYDVR0RBAgwBocENHT66jANBgkqhkiG9w0BAQsFAAOCAQEAWvWESq61NP07nEwe\nJCtuN2YKqrS4/b7D7F20veOVQMaLsAyrhiZfMlrFbPvfJo4NtZWdoGbaU+s0o7Df\n8eoUKDZAyOfrCgaEvgcPnJCosrUI0/t7QUmxz+YAwbeiwWrG2VIlcSTllbd+3L0W\neh1hsozgGO1Nj61OsngnIx0KRPr4qrwBSImnGmUqV62oilyBpjthMDRMfju1dt+J\nqpWf2+7sWpwvKZZwzotN6AgXF3Kc7z9AbH+xuFa1QqktOOdCk07Dot94NYp0+0CV\nt7zrdBh2cuJSfyEU1MgQOAFHK11O7JzkWJ4k9KiNX8I/nUJmrQm9uWla/3npRGXR\n/GCSYA==\n-----END CERTIFICATE REQUEST-----\n"}
$ ./build.py sign-csr --env sbs-config.json
$ ./build.py post-server-cert --env sbs-config.json --noverifyINFO:__main__:post-server-cert: response={ "status": "OK"}
$ ./build.py status --env sbs-config.jsonINFO:__main__:status: response={ "status": "restarted nginx"}
374 Securing Your Critical Workloads with IBM Hyper Protect Services

Building your container imageYou can now build a container image by using the commands that are shown in Example 8-39. The container uses the specification of the sbs-config.json file.
Example 8-39 Building your container: An ideal case with no error
$ ./build.py init --env sbs-config.json 1INFO:__main__:init: response={ "status": "OK"}$ ./build.py build --env sbs-config.json 2 and 4INFO:__main__:build: response={ "status": "OK: async build started"}
$ ./build.py status --env sbs-config.json 3INFO:__main__:status: response={ "build_image_tag": "1.3.0", "build_name": "us.icr.io.bitcoin-wallet.secure-bitcoin-wallet-sbscloud.latest-369f09c.2021-05-27_16-58-09.553022", "image_tag": "latest-369f09c", "manifest_key_gen": "soft_crypto", "manifest_public_key": "manifest.us.icr.io.bitcoin-wallet.secure-bitcoin-wallet-sbscloud.latest-369f09c.2021-05-27_16-58-09.553022-public.pem", "status": "success"}
In Example 8-39, the following steps take place:
1. Initialize the build.
2. Start the build and check the status.
3. Monitor the build log if necessary.
4. Restart the build if necessary.
You can check your build log by using the command that is shown in Example 8-40.
Example 8-40 Checking whether your build has any problems
$ ./build.py log --log build --env sbs-config.json....
When the build is successful, you can check that the image was pushed to your IBM Cloud Container Registry by using the command that is shown in Example 8-41.
Example 8-41 Listing your container images in the IBM Cloud Container Registry
$ ibmcloud cr image-list Liste des images...
Référentiel Balise Condensé Espace de nom Créé Taille Statut de sécurité us.icr.io/bitcoin-wallet/secure-bitcoin-wallet-sbscloud latest c27b1a7d429b bitcoin-wallet 1 hour ago 470 MB 6 problèmes us.icr.io/bitcoin-wallet/secure-bitcoin-wallet-sbscloud latest-369f09c c27b1a7d429b bitcoin-wallet 1 hour ago 470 MB 6 problèmes
Chapter 8. Secure Bitcoin Wallet: A sample use case that spans multiple IBM Hyper Protect Services 375

Creating your registration fileCreate a container registration file by using the command that is shown in Example 8-42.
The key ID parameter is your GPG “vendor” key that is stored in your PGP wallet. To create or retrieve an existing key, see “Creating your vendor GPG keys” on page 358.
Example 8-42 Creating your registration file: myapp is the key identifier in your GPG wallet
$ ./build.py get-config-json --env sbs-config.json --key-id myappINFO:__main__:a json config file has been written to sbs.enc.
sbs is specified by using the REPO_ID attribute of the sbs-config.json file.
The registration file sbs.enc is used to provision the image as input to the ibmcloud hpvs command. The file can be decrypted only by IBM Cloud, and it includes the deployment file that is signed by your GPG key.
Starting your applicationYou can now start your Secure Bitcoin Wallet container by using the commands that are shown in Example 8-43, where we create the virtual server in the dal12 data center and zsb006 resource group. We name the virtual server securewallet.
Be sure that the environment variables that are used to specify the connection to the IBM Hyper Protect Crypto Services are defined in your environment, as shown in Example 8-24 on page 363. The environment variables are specified with the -e option in the container environment. Also, specify the image tag.
Example 8-43 Starting your securely built Secure Bitcoin Wallet application on IBM Cloud
$ ibmcloud hpvs instance-create securewallet entry dal12 --rd-path sbs.enc -i latest -g zsb006 -e ZHSM=$ZHSM -e IAM_ENDPOINT=$IAM_ENDPOINT -e APIKEY=$APIKEY -e INSTANCE_ID=$INSTANCE_IDProvisioning request for service instance 'crn:v1:bluemix:public:hpvs:dal12:a/537544c2222297f40ed689e8473e7849:97e92922-bf05-4fb0-9284-7a7d7abd220b::' was accepted. To check the provisioning status run: ibmcloud hpvs instance crn:v1:bluemix:public:hpvs:dal12:a/537544c2222297f40ed689e8473e7849:97e92922-bf05-4fb0-9284-7a7d7abd220b::
$ ibmcloud hpvs instance securewalletGetting instance details for securewallet (crn:v1:bluemix:public:hpvs:dal12:a/537544c2222297f40ed689e8473e7849:97e92922-bf05-4fb0-9284-7a7d7abd220b::) ... Name securewallet CRN crn:v1:bluemix:public:hpvs:dal12:a/537544c2222297f40ed689e8473e7849:97e92922-bf05-4fb0-9284-7a7d7abd220b:: Location dal12 Cloud tags Cloud state active Server status running Plan Entry Public IP address 52.116.250.148 Internal IP address 172.18.88.228
376 Securing Your Critical Workloads with IBM Hyper Protect Services
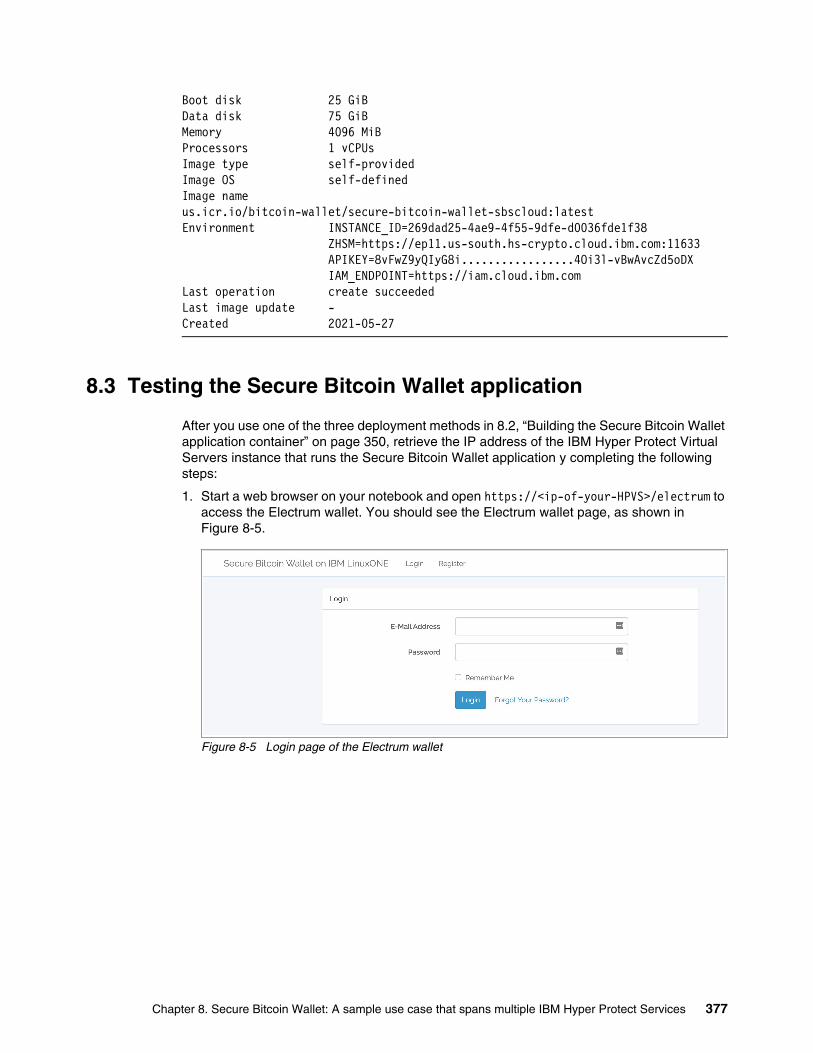
Boot disk 25 GiB Data disk 75 GiB Memory 4096 MiB Processors 1 vCPUs Image type self-provided Image OS self-defined Image name us.icr.io/bitcoin-wallet/secure-bitcoin-wallet-sbscloud:latest Environment INSTANCE_ID=269dad25-4ae9-4f55-9dfe-d0036fde1f38 ZHSM=https://ep11.us-south.hs-crypto.cloud.ibm.com:11633 APIKEY=8vFwZ9yQIyG8i.................4Oi3l-vBwAvcZd5oDX IAM_ENDPOINT=https://iam.cloud.ibm.com Last operation create succeeded Last image update - Created 2021-05-27
8.3 Testing the Secure Bitcoin Wallet application
After you use one of the three deployment methods in 8.2, “Building the Secure Bitcoin Wallet application container” on page 350, retrieve the IP address of the IBM Hyper Protect Virtual Servers instance that runs the Secure Bitcoin Wallet application y completing the following steps:
1. Start a web browser on your notebook and open https://<ip-of-your-HPVS>/electrum to access the Electrum wallet. You should see the Electrum wallet page, as shown in Figure 8-5.
Figure 8-5 Login page of the Electrum wallet
Chapter 8. Secure Bitcoin Wallet: A sample use case that spans multiple IBM Hyper Protect Services 377

2. Select Register and register a user, as shown in Figure 8-6.
Figure 8-6 Registering a user to the Electrum wallet
3. After you click Register, you are automatically logged on as the user that you registered, and you will see a window that is like Figure 8-7.
Figure 8-7 User’s login view
4. Click the Wallet tab, and you see the page that is shown in Figure 8-8 on page 379. Enter a Wallet password and leave the Seed field blank. Then, click Create wallet. After a few seconds, you see the following message:
Your wallet created! Load your wallet after recording your seed.
You also see that the seed field is populated now. Record your seed value.
378 Securing Your Critical Workloads with IBM Hyper Protect Services

Figure 8-8 Your wallet was created view
Note: You can also choose to create a multi-signature wallet (multisig wallet), which allows another person to cosign the wallet with you. You need your cosigner’s public certificate to create this type of wallet.
Chapter 8. Secure Bitcoin Wallet: A sample use case that spans multiple IBM Hyper Protect Services 379

5. After you record your seed information, click Load wallet. You see the window that is shown in Figure 8-9.
Figure 8-9 Wallet loaded
6. Reload (press the F5 key) the wallet on your browser. Wait a few seconds, and then your test wallet is displayed, as shown in Figure 8-10.
Figure 8-10 Wallet home page
7. Go to the Receive tab of the wallet and copy the receiving address. In the example that is shown in Figure 8-11, the receiving address is myBQabMFy528pr9Se4JJppszhFhjTWRed1.
Figure 8-11 Copying the wallet’s receiving address
8. Use the Bitcoin Testnet Faucet to test receiving and sending Bitcoin to the testnet.
380 Securing Your Critical Workloads with IBM Hyper Protect Services

9. Paste your wallet’s receiving address into the Bitcoin address box, as shown in Figure 8-12. Enter the number of Bitcoins that you want to send from the testnet to your wallet, and click Send testnet bitcoins (see Figure 8-12).
Figure 8-12 Bitcoin testnet to test receiving and sending Bitcoin to the test network
10.Return to the test wallet view and go to the History tab. You see that the transaction is in the test wallet, as shown in Figure 8-13.
Figure 8-13 Wallet History view to see the receive transaction
11.After waiting a few minutes, you see a green checkmark next to the transaction, which indicates that the transaction was committed to the Bitcoin Testnet (see Figure 8-14).
Figure 8-14 Wallet History view to see the committed receive transaction
12.You also see the previous transaction in the Transaction history on the Bitcoin Testnet Faucet page (see Figure 8-15).
Figure 8-15 Bitcoin Testnet Faucet transaction history showing the send transaction
Chapter 8. Secure Bitcoin Wallet: A sample use case that spans multiple IBM Hyper Protect Services 381

13.Test sending the money back to the address at the Bitcoin Testnet page. The Testnet address that is listed on the web page is 2NGZrVvZG92qGYqzTLjCAewvPZ7JE8S8VxE.
As shown in Figure 8-16, paste that address into the Destination address field, enter the wallet password that was set when the wallet was registered, and click Max to return everything in the wallet. You see that it is returning only 0.00009734 Bitcoins because a small transaction fee was deducted when the wallet received the Bitcoins.
Figure 8-16 Sending Bitcoins to the testnet address
14.After you click Send, you see that the Partial transaction and Signed transaction fields are populated, as shown in Figure 8-17.
Figure 8-17 Sent Bitcoins to the testnet address
15.Return to the testnet web page. In the Transaction history section, you see a green box that indicates that a receive transaction is pending (see Figure 8-18).
Figure 8-18 Testnet page transaction history shows that a receive transaction is pending
382 Securing Your Critical Workloads with IBM Hyper Protect Services
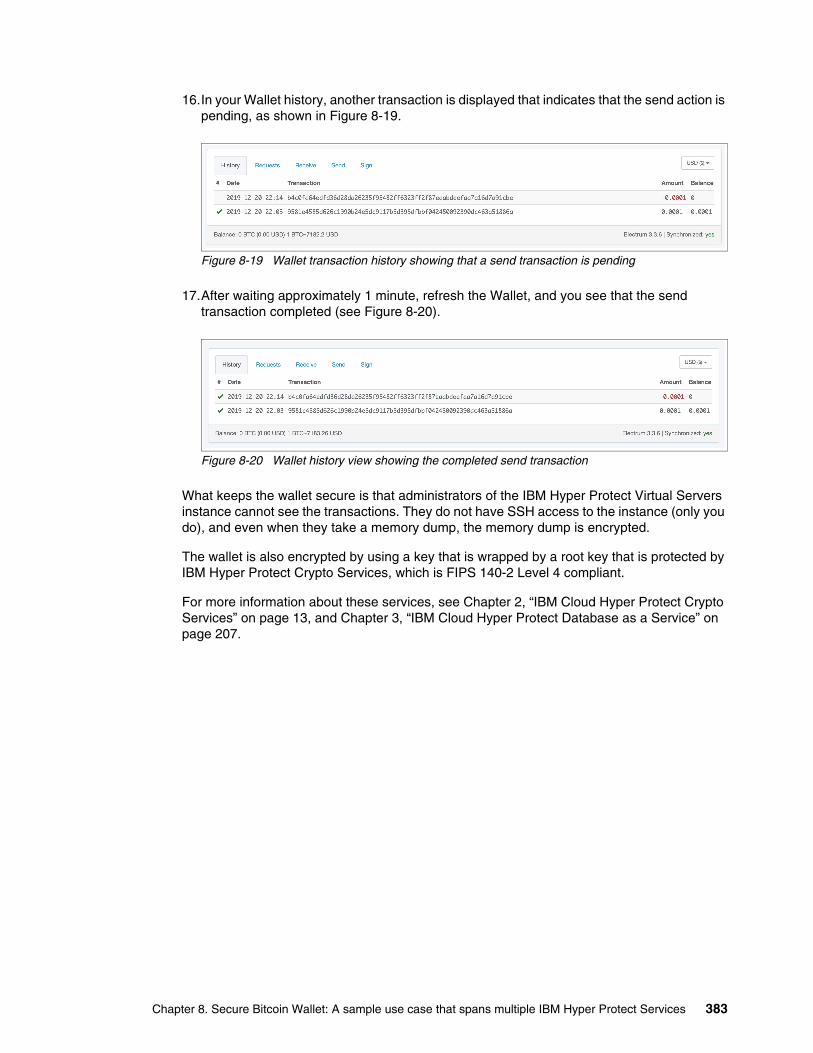
16.In your Wallet history, another transaction is displayed that indicates that the send action is pending, as shown in Figure 8-19.
Figure 8-19 Wallet transaction history showing that a send transaction is pending
17.After waiting approximately 1 minute, refresh the Wallet, and you see that the send transaction completed (see Figure 8-20).
Figure 8-20 Wallet history view showing the completed send transaction
What keeps the wallet secure is that administrators of the IBM Hyper Protect Virtual Servers instance cannot see the transactions. They do not have SSH access to the instance (only you do), and even when they take a memory dump, the memory dump is encrypted.
The wallet is also encrypted by using a key that is wrapped by a root key that is protected by IBM Hyper Protect Crypto Services, which is FIPS 140-2 Level 4 compliant.
For more information about these services, see Chapter 2, “IBM Cloud Hyper Protect Crypto Services” on page 13, and Chapter 3, “IBM Cloud Hyper Protect Database as a Service” on page 207.
Chapter 8. Secure Bitcoin Wallet: A sample use case that spans multiple IBM Hyper Protect Services 383

384 Securing Your Critical Workloads with IBM Hyper Protect Services

Appendix A. Configuration parameters
This appendix contains some configuration parameters for the installation of IBM Hyper Protect Virtual Servers on-premises. It can be useful for collecting all the needed information in advance to speed up the setup phase.
This appendix includes the following topics:
� Configuration parameters for the management server
� Configuration parameters for the IBM Secure Service Container logical partition
� Configuration parameters for the Secure Build container server
� Configuration parameters for repository definition files
� Configuration parameters for IBM Hyper Protect Virtual Servers
� Configuration parameters for the monitoring component
� Configuration parameters for the Enterprise PKCS #11 over gRPC container
� The rtoa_destination PGP public key
For more information and a downloadable worksheet, see IBM Documentation.
A
© Copyright IBM Corp. 2020, 2022. 385

Configuration parameters for the management server
Table A-1 lists the configuration parameters that are used for the management server.
Table A-1 Configuration parameters for the management server
Configuration parameters for the IBM Secure Service Container logical partition
Table A-2 lists the configuration parameters that are used for the IBM Secure Service Container (SSC) logical partition (LPAR).
Table A-2 Configuration parameters for the SSC LPAR
Parameter Resource Value Example Where to get
1 Architecture x86 or s390x Linux
s390x Cloud administrator
2 Hostname management_server Hostname
3 Primary Network Interface Controller (NIC)
eth0 ifconfig -a
4 Management Server IP 10.152.151.100 ifconfig -a (inet addr parameter in the result)
5 Password for the user root
root_user_password System administrator
6 Internal IP address 192.168.40.251 Network administrator
7 NIC for internal network eth1 Network administrator
8 Subnet mask for internal IP address
192.168.40.0/24 Network administrator
9 Gateway for internal IP address
192.168.40.1 Network administrator
Parameter Resource Value Example Where to get
1 Partition IP address 10.152.151.105 System administrator
2 Master ID ssc_master_user System administrator
3 Master password ssc_master_password System administrator
4 Storage disks for quotagroups resizing
3600507630affc427000000000002000 (FCP) or 0.0.78CA (IBM FICON DASD)
System administrator
386 Securing Your Critical Workloads with IBM Hyper Protect Services

Configuration parameters for the Secure Build container server
Table A-3 lists the configuration parameters that are used for the Secure Build container server.
Table A-3 Configuration parameters for the Secure Build container server
Parameter Resource Value Example Where to get
1 Partition IP address 10.152.151.105 System administrator
2 Secure Build container name
securebuild1 Cloud administrator
3 CPU thread number 2 System administrator
4 Memory (GB) 12 System administrator
5 Storage for the Secure Build container application (GB)
10 System administrator
6 Storage for the Docker images built by Secure Build (GB)
16 System administrator
7 Storage for log configuration data for the Secure Build container (GB)
2 System administrator
8 Quotagroup of Secure Build container
myquotagroup Cloud administrator
9 Connection method (port-mapping/IP)
IP System administrator
10 Internal network name encf900_internal_network (Because the internal network name is dynamically generated (depending on the customer’s hardware), this parameter might be different in your environment.)
Cloud administrator
11 Internal IP address (only needed if an internal network is used)
192.168.40.6 Cloud administrator
12 External IP address (only needed if an external network is used)
164.23.2.77 System administrator
13 Forward port for external (only needed if an external IP address is not assigned)
10433 System administrator
Appendix A. Configuration parameters 387

14 Repository ID of the Secure build container image
SecureDockerBuild Cloud administrator
15 Tag of the Secure Build container image
latest Cloud administrator
16 Repository ID for your apps
MyDockerApp Cloud administrator
17 Source code repository URL
github.com:MyOrg/my-docker-app.git
App developer or independent software vendor (ISV)
18 Source code branch dev App developer or ISV
19 Private key for Source code repository
App developer or ISV
20 Remote Docker registry server
docker.io Cloud administrator
21 Remote Docker repository name for built images
docker_base_user/MyDockerApp
Cloud administrator
22 Remote Docker registry username to register the base images
docker_base_user Cloud administrator
23 Remote Docker registry user password to register the base images
passw0rd Cloud administrator
24 Remote Docker registry username to push the images
docker_writable_user Cloud administrator
25 Remote Docker registry user password to push the images
passw0rd Cloud administrator
26 IBM Cloud Object Storage service application programming interface (API) key (optional)
0viPH...kliJ Cloud administrator
27 IBM Cloud Object Storage service bucket (optional)
my-cos-bucket1 Cloud administrator
28 IBM Cloud Object Storage service resource crn (optional)
crn:v1...::1 Cloud administrator
Parameter Resource Value Example Where to get
388 Securing Your Critical Workloads with IBM Hyper Protect Services

Configuration parameters for repository definition files
Table A-4 lists the configuration parameters that are used to create repository definition files.
Table A-4 Configuration parameters to create repository definition files
Configuration parameters for IBM Hyper Protect Virtual Servers
Table A-5 lists the configuration parameters that are used to create IBM Hyper Protect Virtual Servers.
Table A-5 Configuration parameters to create IBM Hyper Protect Virtual Servers
29 IBM Cloud Object Storage service auth_endpoint (optional)
iam.cloud.ibm.com Cloud administrator
30 IBM Cloud Object Storage service end_point (optional)
s3.....cloud Cloud administrator
Parameter Resource Value Example Where to get
Parameter Resource Value Example Where to get
1 Repository name docker.io/docker_base_user/MyDockerApp
Cloud administrator
2 Read-only Docker Hub user ID
docker_readonly_user Cloud administrator
3 Docker Hub user password
docker_password Cloud administrator
4 The public key isv_user.pub App developer or ISV
5 The private key isv_user.private App developer or ISV
Parameter Resource Value Example Where to get
1 Partition IP address 10.152.151.105 System administrator
2 External network name encf900_network Cloud administrator
3 Container external IP address
164.20.5.78 Cloud administrator
4 Internal network name encf900_internal_networka
Cloud administrator
5 Internal IP address 192.168.40.188 Cloud administrator
6 Parent device encf900 Appliance administrator
7 Gateway 192.168.40.1 Cloud administrator
8 Subnet 192.168.40.0/24 Cloud administrator
Appendix A. Configuration parameters 389

Configuration parameters for the monitoring component
Table A-6 lists the configuration parameters that are used to create the monitoring component.
Table A-6 Configuration parameters to create the monitoring component
Configuration parameters for the Enterprise PKCS #11 over gRPC container
Table A-7 lists the configuration parameters to create and configure the Enterprise PKCS #11 over gRPC (GREP11) container.
Table A-7 configuration parameters to create and configure the GREP11 container
9 Repository name MyDockerApp Cloud administrator
10 Image tag latest Cloud administrator
11 CPU threads number 2 Cloud administrator
12 Memory size (GB) 12 Cloud administrator
13 Quotagroup size (GB) 100G Cloud administrator
a. Because an internal network name is dynamically generated (depending upon the customer’s hardware), this parameter might be different in your environment.
Parameter Resource Value Example Where to get
Parameter Resource Value Example Where to get
1 Partition IP address 10.152.151.105 System administrator
2 Domain suffix first System administrator
3 DNS name example.com System administrator
4 Connection method (port-mapping/IP)
8443 System administrator
5 Private key for the monitoring infrastructure
server.key openssl utility
6 Certificate for the monitoring infrastructure
server-certificate.pem
openssl utility
7 Certificates for the monitoring client
client-certificate.pem
openssl utility
Parameter Resource Value Example Where to get
1 Partition IP address 10.152.151.105 System administrator
2 Crypto domain name
09.000b System administrator
390 Securing Your Critical Workloads with IBM Hyper Protect Services

The rtoa_destination PGP public key
Example A-1 shows the PGP rtoa_destination Build Your Own Image key.
Example A-1 PGP rtoa_destination Build Your Own Image key1
-----BEGIN PGP PUBLIC KEY BLOCK-----mQINBF5q0TYBEACx5qWOp9JuiK7qKInYuBiqQp8Ac29e27XqGRtlk5UWbK0XP4wzzm6chk2LM1pKx5jY0MbQc7DO8QWQE2W/6EAFqi/1T/iWWddE4sv9q29usFeL7d5tcXk4oBorT/gdl3KiAlXuYUa111opdElmPUam6GyMXc9eZEZ+0rFno4RJO+lSp8CXl4ejnsdl+NFt7eYmECd9Zq0ADdV2wNZvrA7vj0faAlSqVvXqMCkAosF5HqNTY5vsrMwL3SRagPHOCjg/Tx5K1nugTh+W6nH4c2P52X3a06q7jCZ9JkGb5ZudVCwmZNI14NhPkp9rNUCPEUS+hOL5C2ZBok5rwr59tXkZEnHT5gRdpSD4htLiCQVys+lUHkFuSTrLihgGaFXYtAT3N6q/0EM5tBX4kwTsDuRefW71Kxa0X/f6s3dpyTALdZox504UBeA9AtZi43cp48uDEIVGUC5moP2Z5hL/yANFRCQNFeWy52ghhsUGdL2lBKvqFbzpAqtoJGA9+1ymolVQXYrBNmFcAdHYa06W3det2q9fhF2nBdI4AbrOg4T0huebNTBnqurf6+PZLF+NmCzE1jlqSrnsionuhBJn2Myb1O+u0IfifLmvPYXgpRG49OjfNNI2i3sdBThhb3a3aaEEKmMQn5C3mUyYYwFJ8cQqj56/uzv7AsxZ1rneBgZvowARAQABtBBydG9hX2Rlc3RpbmF0aW9uiQIxBBMBCgAbBQJeatE2AhsDAgsJAhUKBRYCAwEAAh4BAheAAAoJEBkOqQpczdT1ef4P+wRqr83AaeRW6ckjdaeSA2YgAG1/aUydpOAKz/iQv7jjlcdP+/IcRvpSX6C7/G/+/4WLyG3EMHnDqwBCzvvTASbvVexY2HcKqt69rTBv8757rWTiz0TE/IoNsjHPwqiSBWEHzc5/Mdy5Ihwy5kISEnHSttltPMHi4cb2P+Iq+wzz72jjJT81oQ8mp+cKpBPPaGRLB2BciBpY4ZuOz6P/s/30D4Y1W7rSU8NwJlpKUndhqp0hokpNgsA5mPERwJIj8LS+qs3dCyM0YL0A8uas5YPJw3Cc2CBkROuzJIci7P33+dbg7cZDMh00eiEeh5jXrr5YgywiQP6oVA/nlJ0p4G+Rta8fQJz/TeDyolt+akBXyWSRZV8XJoviqltDu7lQ4zyupDI9NvVKe7VKwqvWypXJ1d0bbkS/W88iXplsTWSJWDKjY/O595zCrNy/BT2/uPRya9UrHoRcwzNV0Xxk9cVSqSkaNBC7CU/1QnDw8A/up/x4iNJf6z5PKCqUzJAWbgVQws9ATHzLr+CeCPOFAxZKE0Ai0dV2jNdioiZXAZarFCL/xQA1cJYXO5dQMsBKr7so4VZ8omSOYU6Ky6XEifBoIs6395g5+yxqTlYDZYstPx1Rf1mYMuoQ5wIRCsA7jdK5A0aASqwFnJdGEwxR2Tu/b4DqISwRr48S9oVahzPKuQINBF5q0TYBEACvCOW16MFimC6FbAHyLfHrF7rzNk0bPUoxeTnP0J8XAxzVho0zYt9pwvfVaZxSFOEoOmGFDdunhEE4apLfQRfN2q50XFGDBWToJdY/loCs
3 Domain suffix grep11 System administrator
4 DNS name example.com System administrator
5 Connection method(port-mapping/IP)
IP System administrator
6 Internal network name
my-private-network-namea
System administrator
7 IP address 192.168.10.106 System administrator
8 Transport LayerSecurity (TLS) key and certificate
key.pem and cert.pem
The openssl utility
a. Because an internal network name is dynamically generated (depending on the customer’s hardware), this parameter might be different in your environment.
Parameter Resource Value Example Where to get
1 Source: https://cloud.ibm.com/docs/hp-virtual-servers?topic=hp-virtual-servers-byoi
Appendix A. Configuration parameters 391
i2FGWjs+nO0IaBBm1G2uMJ+zdnO/96aHZiwu5xlkAY+v91xR3gkhoRd/GDFgJQBdZZXFJJM9zMNI+wKN/K9oBF38IE3HzM7OsQuzUcfmz4fxlLOAT4SCdGXjEWtJ0j/pB6fjJz/n8g9YhilB77wgxAEJLMZ99wkugK2EWm+Ofzy9xg+/sLskJ5dIUZhFDpwMfVK46gA+14c/WK5NTJujYp5p6lxhqK7Ja8zTRCHF1cOpFiJm3nRDZeM9cufpZeIAmWgr8FMDQIA/oco8Axx6V7af7j3tXHmkEZMSxE2/SrKNYE13l+Lrm13TLB0hvJRdous5RI7Ml4vPcJN+/4gLpdznR7EjhMPZ362CtGwiJ5tDDFD9SK3kNKfNXJF2gYsCKCzppGMsL40dMKEzK35w50tCvr8DBhnBIY/DuZybl5ktl0cnmzPTk0v06F5fMlE4E/bi/UDDctwKzEdYg1SXMfY3OHZcduVELYRn+7O7i6EBiASuQU7wIz73+rzKSQLytTkH4/96ah7TfO4uIZHpXgbikY2r8AhTFR/njqRkllaJCU/gyAKVJmUGH+ah0+ZZsQARAQABiQIfBBgBCgAJBQJeatE2AhsMAAoJEBkOqQpczdT1Ne0P/RPiMBCVUrW6IA/PuiHygaDrhVFgWtRmVm6vQkhE7fxNXUiDf/Ud+iX+3Y3XQM2vFqXjHVpI66i1OhJ8mV9TwuRh60l/gUBL24xXWJS+JYOZ1C963v05ZR9VTg33p8y9F8k1DxlGzpHroepoOvsF4CkdpnH0v1fpKV3tSWhTh2JP/5P0VGZZLdWVHsJsMbcQBMTPrfbPnacMJ7DzRRfcjxjEB0cISimiYwDPDKUqB9AMykp7DPb/w1/vBtcT22s909Mg4ZQDiCBxNtRPGMXmaOlSjpJH3dfjlH+YDa/UNOn7pItyhz8eyeoVPMLEAfQoX72pXLSPEurotMyHcpos14WbZAyxyr04K3oeHjhr/zOqsimu08Umb8TGhYPv27FMqVxTGiAwuWAI0DXVraLMrEzxx6XXywQa4wA8enP95ZZD8xHB7YGvCgwb/FyR8TMtp/j0neGD+wAC9SgWLbYqqJIFFSWWNGxWHZ1iwflbTTWWsE6W5odOAxOAPArXLXKagkvtVrNz9127SwagEnrl0kGfmbpnOEnJYk4AvCHy1e1rL5To0lU4uPBacs5vQNLc4lrOi23NXQ/qcIbBbZ+ze1y1x9c0uRpRVV47Zm2fvaMMMh4OGf09x0C3WaWE5CR9TfOpmOqybI9imae7WLtydkQnM7Shc1l2CmBCHH8ClSJN=DsnN-----END PGP PUBLIC KEY BLOCK-----
392 Securing Your Critical Workloads with IBM Hyper Protect Services

Appendix B. Additional material
This book refers to additional material that can be downloaded from the internet as described in the following sections.
Locating the GitHub material
The web material that is associated with this book is available in softcopy on the internet from the IBM Redbooks GitHub web page:
https://github.com/IBMRedbooks/SG248469-Securing-your-critical-workloads-with-IBM-Hyper-Protect-Services
Cloning the GitHub material
To clone the GitHub repository for this book, complete the following steps:
1. Download and install the git client if it is not installed from Git.
2. Clone the GitHub repository by running the following command:
git clone https://github.com/IBMRedbooks/SG248469-Securing-your-critical-workloads-with-IBM-Hyper-Protect-Services.git.
B
© Copyright IBM Corp. 2020, 2022. All rights reserved. 393

394 Securing Your Critical Workloads with IBM Hyper Protect Services
Related publications
The publications that are listed in this section are considered suitable for a more detailed description of the topics that are covered in this book.
IBM Redbooks
The following IBM Redbooks publication provides more information about the topics in this document. This publication might be available in softcopy only.
Implementation Guide for IBM Blockchain Platform for Multicloud, SG24-8458
You can search for, view, download, or order this document and other Redbooks, Redpapers, web docs, drafts, and additional materials at the following website:
ibm.com/redbooks
Online resources
The following websites are also relevant as further information sources:
� Creating a root key with the IBM Hyper Protect Crypto Services GUI:
https://cloud.ibm.com/docs/services/hs-crypto?topic=hs-crypto-create-root-keys#root-key-gui
� Creating a root key with the Key Management application programming interface (API):
https://cloud.ibm.com/docs/services/hs-crypto?topic=hs-crypto-create-root-keys#root-key-api
� Creating a standard key with the IBM Hyper Protect Crypto Services GUI:
https://cloud.ibm.com/docs/services/hs-crypto?topic=hs-crypto-create-standard-keys#standard-key-gui
� Creating a standard key with the Key Management API:
https://cloud.ibm.com/docs/services/hs-crypto?topic=hs-crypto-create-standard-keys#create-standard-key-api
� GREP11 API reference:
https://cloud.ibm.com/docs/services/hs-crypto?topic=hs-crypto-grep11-api-ref
� GREP11 sample code for the Go language:
https://cloud.ibm.com/docs/services/hs-crypto?topic=hs-crypto-grep11-api-ref#code-example
� IBM Cloud console:
https://cloud.ibm.com
� IBM Hyper Protect Crypto Services tutorials:
https://cloud.ibm.com/docs/services/hs-crypto
© Copyright IBM Corp. 2020, 2022. All rights reserved. 395

� IBM Hyper Protect Virtual Servers V1.2.0 documentation:
https://www.ibm.com/support/knowledgecenter/SSHPMH_1.2.0/kc_welcome_page.html
� IBM Secure Service Container (SCC) for IBM Cloud Private installation:
https://www.ibm.com/support/knowledgecenter/SSUPZ7_1.1.0/topics/install_ssc4icp.html
� The Identity and Access Management (IAM) endpoint for IBM Cloud:
https://iam.cloud.ibm.com
� Importing a root key with the IBM Hyper Protect Crypto Services GUI:
https://cloud.ibm.com/docs/services/hs-crypto?topic=hs-crypto-import-root-keys#import-root-key-gui
� Importing a root key with the Key Management API:
https://cloud.ibm.com/docs/services/hs-crypto?topic=hs-crypto-import-root-keys#import-root-key-api
� Importing a standard key with the IBM Hyper Protect Crypto Services GUI:
https://cloud.ibm.com/docs/services/hs-crypto?topic=hs-crypto-import-standard-keys#import-standard-key-gui
� Importing a standard key with the Key Management API:
https://cloud.ibm.com/docs/services/hs-crypto?topic=hs-crypto-import-standard-keys#import-standard-key-api
� Listing all keys from the IBM Hyper Protect Crypto Services GUI:
https://cloud.ibm.com/docs/services/hs-crypto?topic=hs-crypto-view-keys#view-key-gui
� Listing all keys from the Key Management API:
https://cloud.ibm.com/docs/services/hs-crypto?topic=hs-crypto-view-keys#retrieve-keys-api
� Official Federal Information Processing Standard (FIPS) 140-2 specification:
https://nvlpubs.nist.gov/nistpubs/FIPS/NIST.FIPS.140-2.pdf
� To set up Go tools:
https://golang.org/doc/install
� To set up your Go workspace:
https://golang.org/doc/code.html#Workspaces
� Unwrapping a standard key with the Key Management API:
https://cloud.ibm.com/docs/services/hs-crypto?topic=hs-crypto-wrap-keys#wrap-keys-api
� Wrapping a standard key with the Key Management API:
https://cloud.ibm.com/docs/services/hs-crypto?topic=hs-crypto-wrap-keys#wrap-keys-api
396 Securing Your Critical Workloads with IBM Hyper Protect Services

Help from IBM
IBM Support and downloads:
ibm.com/support
IBM Global Services:
ibm.com/services
Related publications 397

398 Securing Your Critical Workloads with IBM Hyper Protect Services

ronyms
AAD additional authentication data
API application programming interface
ARP address resolution
BLOB binary large object
BYOI Bring Your Own Image
BYOK Bring Your Own Key
CA certificate authority
CCA Common Cryptographic Architecture
CD continuous delivery
CI/CD Continuous Integration and Continuous Delivery
CI continuous integration
CISO Chief Information Security Officer
CLI command-line interface
CN Common Name
CPACF CP Assist for Cryptographic Functions
CSP Cryptographic Service Providers
CSR Certificate Signing Request
DBA database administrator
DBaaS database as a service
DCT Docker Content Trust
DEK data encryption key
DPM Dynamic Partition Manager
DR disaster recovery
EAL Enterprise Assurance Level
ECDSA Elliptic Curve Digital Signature Algorithm
EDB Enterprise DB
EdDSA Edwards-curve Digital Signature Algorithm
EP11 Enterprise PKCS #11
FFDC first-failure data capture
fintech financial technology
FIPS Federal Information Processing Standard
GDPR General Data Protection Regulation
GPG GNU Privacy Guard
GREP11 Enterprise PKCS #11 over gRPC
GUID Globally Unique Identifier
HA high availability or highly available
Abbreviations and ac
© Copyright IBM Corp. 2020, 2022.
HIPAA Health Insurance Portability and Accountability Act
HMC Hardware Management Console
HSM Hardware Security Module
IAM Identity and Access Management
IBM International Business Machines Corporation
IFL IBM Integrated Facility for Linux
ISV independent software vendor
KMIP Key Management Interoperability Protocol
KMS Key Management Service
KVM kernel-based virtual machine
KYOK Keep Your Own Key
LAN local area network
LPAR logical partition
LUKS Linux Unified Key Setup
MZR Multi-Zone Region
OCI Open Container Initiative
OS operating system
OSA Open Systems Adapter
OU Organization Unit
PAT Port Address Translation
PCSC Personal Computers/Smart Card
PKCS Public Key Cryptography Standards
PR/SM Processor Resource/Systems Manager
PU processor unit
QEMU Quick Emulator
RHEL Red Hat Enterprise Linux
RPC Remote Procedure Call
SBS Secure Build Server
SCUP Smart Card Utility Program
SDK software developer kit
SDS software-defined storage
SE Support Element
SO Security Officer
SSC Secure Service Container
SSH Secure Shell
SSL Secure Sockets Layer
TDE Transparent Data Encryption
399

TKE Trust Key Entry
TLS Transport Layer Security
UUID Universally Unique Identifier
VM virtual machine
VPC Virtual Private Cloud
VPE virtual private endpoint
VPN virtual private network
wDEK wrapped data encryption key
400 Securing Your Critical Workloads with IBM Hyper Protect Services

ISB
N 0738460338
SG
24-8469-01
(0.5” spine)0.475”<
->0.873”
250 <->
459 pages
Securing Your Critical Workloads w
ith IBM Hyper Protect Services


ibm.com/redbooks
Printed in U.S.A.
Back cover
0738460338
SG24-8469-01
®
Related Documents