1 Section IV Implementation Tools This section includes tools that were used by Bridger Coal, Badger Mining, and Vulcan Materials to implement their ergonomics processes. When applicable, information is also provided to describe the purpose of the tool, when to use the tool, and how to complete the tool. Because tools were modified throughout the course of implementing the three processes, only the latest version of the tool is provided. Electronic files for the tools are provided on the enclosed CD and can be modified for personal use as desired. Table 9 provides summary information about each tool, including how to administer the tool and the time required. Table 10 provides information on when to use the tools included in this section.

Welcome message from author
This document is posted to help you gain knowledge. Please leave a comment to let me know what you think about it! Share it to your friends and learn new things together.
Transcript

1
Section IV
Implementation Tools
This section includes tools that were used by Bridger Coal, Badger Mining, and Vulcan
Materials to implement their ergonomics processes. When applicable, information is also
provided to describe the purpose of the tool, when to use the tool, and how to complete the tool.
Because tools were modified throughout the course of implementing the three processes, only the
latest version of the tool is provided. Electronic files for the tools are provided on the enclosed
CD and can be modified for personal use as desired. Table 9 provides summary information
about each tool, including how to administer the tool and the time required. Table 10 provides
information on when to use the tools included in this section.

2
Table 9.-Summary information about each tool included in this section
Tool How to administer Time
required
Notes/Comments
A Risk Factor
Report Card
Self-administered by
employees
5 minutes This card is a very simple way for employees to
report concerns they have about their jobs.
Information from the card can be entered into a
spreadsheet and tracked.
B Musculoskeletal
Discomfort
Form
Self-administered
questionnaire for
employees;
One-on-one interview;
Group setting
5-10 minutes The survey should be administered periodically
to assess changes. For determining the
effectiveness of a process, discomfort levels
should be tracked yearly for at least 3-4 years.
For specific task interventions, discomfort levels
could be tracked sooner, perhaps at 6-month
intervals.
C General Risk
Factor Exposure
Checklist
Self-administered
questionnaire for
employees after
instructions are read to
the employees either
individually or in a
group.
15-20 minutes Can be used to obtain information from several
employees about the same job or position. As
part of reading the instructions, complete the
first and second exposures listed as examples of
how the checklist should be completed
The information collected can be used to
prioritize jobs for improvements.
D Ergonomics
Observations
Form
Completed by observer
during observation/
interview of worker
being observed
10-20 minutes
(depends on
length of
interview)
Can be used during observations conducted for a
BBS process to collect additional information
needed to determine appropriate job
improvements.
Can be used to track number of exposures
observed and to prioritize task interventions.
E Hand Tool
Checklist
Completed by safety
and health personnel
5-10 minutes Compares handtools so each can be evaluated in
terms of the ergonomic design features. All of
the features are weighted equally.
F Manual Task
Risk Assessment
Form
Completed by safety
and health personnel
when evaluating tasks
10-20 minutes Provides a very basic risk assessment and
ranking system for comparing risk before and
after an intervention is implemented and for
prioritizing interventions by body part affected.
G Ergonomic Task
Improvement
Form
Completed by safety
and health personnel or
supervisor
10-20 minutes When possible, include photographs of
intervention or how the task was done both
before and after the intervention.
H Risk Factor
Cards
__ __ Can be used as a handout during training to
reinforce concepts taught during training or as a
quick reference by safety and health personnel.
I Sticker __ __ Can be given to employees attending
ergonomics training or used as an incentive to
report exposures.

3
Table 10.-Brief description of when to use the tools included in this section
If you want to…. Tools… Obtain information about risk factor exposures
from employees
A Risk Factor Report Card
Prepare a baseline prior to implementing an
intervention, including an ergonomics process for
reducing MSD risk
B Musculoskeletal Discomfort Form
C General Risk Factor Exposure Checklist
Evaluate the effectiveness of an intervention B Musculoskeletal Discomfort Form
C General Risk Factor Exposure Checklist
Obtain detailed information about risk factor
exposures for a BBS process
D Ergonomics Observations Form
Evaluate ergonomic features of handtools,
powered and nonpowered
E Handtool Checklist
Identify and assess risk factor exposures F Manual Task Risk Assessment Form
Assign risk level to risk factor exposures or job
tasks
F Manual Task Risk Assessment Form
Publicize the effectiveness of an intervention G Before/After Ergonomic Task
Improvement Form
Promote application of material learned in training
about risk factor exposures
H Risk Factor Cards
I Sticker

4
Purpose
To encourage employee participation in the ergonomics process by providing a reporting
mechanism for potential risk factor exposures and any body discomfort that may be related to the
exposure.
When to Use It
The Risk Factor Report Card can be introduced to employees as a homework assignment
during training. After training, employees can then use this tool to report their exposures and any
body discomfort associated with risk factor exposures. The employees can also use it to provide
input on how to change the task to reduce or eliminate the exposures. To promote reporting, the
cards should be placed in areas where they are readily accessible to employees, such as
lunch/break rooms, locker rooms, or posted on safety and health bulletin boards.
How to Use It
The information obtained from the Risk Factor Report Card can be used to target an
intervention for the specific task identified on the card or to target interventions based on trends
from information obtained from multiple cards. Examples of how information from multiple
cards can be analyzed to target interventions are presented below for Risk Factor Report Cards
submitted by Bridger Coal and Vulcan employees. To conduct these types of analyses, it would
be useful to maintain the information obtained from the cards in a spreadsheet or database.
Bridger Coal Co.
The results of an analysis of concerns are shown in Figure 7. Of the 36 concerns
processed by the Ergonomics Committee, one-third of the concerns were submitted by
mechanics and another third by heavy equipment operators. The most frequently reported
risk factor exposure was repetition, followed by heavy lifting and forceful gripping. The
least reported exposure was vibration from using handtools. Discomfort was most
frequently reported in the lower back and wrists/hands. These results indicate that
TOOL A
Risk Factor Report Card

5
interventions should be targeted for tasks done by mechanics that may require lifting or
gripping tools or by heavy equipment operators who operate controls and sit for
prolonged periods.
Figure 7. – Analysis of Bridger employee responses from submitted Risk Factor Report Cards.
0
2
4
6
8
10
12
14
16
Poor Posture Forceful Gripping Repetition Heavy Lifting Vibration - Tools Bouncing/Jarring
Nu
mb
er o
f Ex
po
sure
s R
epo
rted
Risk Factors
A. Risk Factor Exposure Reports
0
2
4
6
8
10
12
Neck Shoulders Upper Back Elbows Lower Back Wrists/Hands Hips/Thighs Knees Ankles/Feet
Nu
mb
er o
f C
on
cern
s R
epo
rtin
g D
isco
mfo
rt
Body Parts
B. Body Part Discomfort Reports
0
2
4
6
8
10
12
14
Mechanics Heavy EquipmentOperator
Dragline Crew Drill-Blast Crew Conveyor Crew Trade Office
Nu
mb
er o
f C
on
cern
s R
epo
rted
Positions
C. Concerns Reported by Position

6
Vulcan Materials Co.
As a homework assignment given during employee training, Vulcan employees
submitted 42 report cards, 14 from the North Quarry and 28 from the Royal Stone
Quarry. From the initial submittal of cards, risk factors and body discomfort were
evaluated (Figures 8 and 9, respectively). At the North Quarry, poor postures, repetitive
motions, and bouncing/jarring were the most frequently reported risk factors, while knees
were the most frequently reported body part experiencing discomfort. By contrast, at
Royal Stone, repetitive work and bouncing/jarring were the most frequently reported risk
factors, while the lower back was the most frequently reported body part experiencing
discomfort. Many of the reported exposures were associated with seating issues in heavy
equipment. This information was used to initiate a study of whole-body vibration
exposures from operating heavy equipment, primarily haul trucks and front-end loaders.
Figure 8. –Percentage of Risk Factor Report Cards identifying exposures to specific
risk factors (more than one response permitted.)
0
10
20
30
40
50
60
Pe
rce
nt
Risk Factors
Royal StoneNorth Quarry

7
Figure 9.—Percentage of Risk Factor Report Cards identifying specific
body parts with discomfort (more than one response permitted.)
How to Complete the Tool
1. Identify work area and/or job title.
2. Briefly describe the task. Provide enough information so that another person can understand the
nature of the task.
3. Mark the risk factor exposures associated with the task. If the risk factor is not listed, identify or
describe it on the "Other risk factors" line. (NOTE: The risk factors listed on the card are those
common to mining tasks. The list can be modified if other risk factors are present.)
4. If discomfort is occurring, place an "X" on the body part in the diagram that is experiencing
discomfort associated with the task.
5. In the "Comments/Suggestions" area, provide information that will be useful in evaluating the risk
factor exposure. Examples may include: ways to improve the task, date when the discomfort started,
and how is this task done differently than other similar tasks.
6. Indicate the name of the plant or mine. This line can be omitted if the ergonomics process involves
only one site or mine.
0
10
20
30
40
50
60
70
Neck Shoulders U Back Elbows L Back Wrist/Hands Hips/Thighs Knees Ankles/Feet
Pe
rce
nt
Affected Body Part
Royal Stone
North Quarry

8
NOTE: The Risk Factor Report Card can be printed on 3 x 5 or 4 x 6 index cards.
RISK FACTOR REPORT CARD Name: _________________________
1. Work area: _____________________________________________________
2. Describe task: _________________________________________________ _______________________________________________________________ _______________________________________________________________
3. Check all risk factors that apply: 4. Place X on affected areas.
□ Poor Posture □ Forceful Gripping □ Repetitive Work □ Heavy Lifting/Carrying □ Vibrating Tools □ Bouncing/Jarring □ Static Position □ Heavy Shoveling
Other risk factors: _____________________
5. Comments/suggestions: ______________ ____________________________________________________________________________________________________________
6. Plant/Mine Name: _____________________

9
Purpose
To identify the presence of discomfort by body part experienced by workers.
When to Use It
Use the Musculoskeletal Discomfort Form before and after implementing a process or a
task specific intervention.
How to Use It
The Musculoskeletal Discomfort Form can be used to determine the effectiveness of an
ergonomics process or a task specific intervention. The form is administered to employees to
obtain a baseline prior to implementing a process or a task specific intervention, and then
periodically after the process or task specific intervention has been implemented. The discomfort
information can also be used to target interventions. For example, if several employees indicated
they experienced shoulder pain, one could identify tasks that involve risk factor exposures for the
shoulder, such as awkward postures or excessive force exertions, and then target those exposures
for an intervention.
How to Complete the Tool
Employee ID: Indicate name or employee number.
Job/Position: Indicate job title or position.
How long have you been doing this job: Indicate number of years and months that you
have worked in the job or position described above.
How many hours do you work each week: Indicate on average the number of hours
worked per week.
Gender: Circle "M" for male, "F" for female.
Height: Indicate height in feet and inches.
Weight: Indicate weight in pounds.
To be answered by everyone (left column of table): For each body part listed, mark
"No" if you have no discomfort or "Yes" if you have discomfort.
TOOL B
Musculoskeletal Discomfort Form

10
To be answered by those who have had trouble (discomfort) (middle and right
columns of table):
Have you at any time during the last 12 months been prevented from doing
your normal work because of the trouble? If you had discomfort any time
during the past 12 months that prevented you from doing your normal work, mark
"Yes" for that body part. If the discomfort did not prevent you from doing your
normal work, mark "No."
Have you had trouble at any time during the last 7 days? If you had
discomfort any time during the past 7 days, mark "Yes" for that body part. If the
discomfort did not occur during the past 7 days, mark "No."

11
Musculoskeletal Discomfort Survey (Based on the Nordic Questionnaire) Employee ID:__________________
Job/Position: ___________________________ How long have you been doing this job? ___years ___ months How many hours do you work each
week? _____ Gender: M F Age: _______ Height: ____ ft.____ in. Weight: _____________
How to answer the questionnaire:
Picture: In this picture you can see the approximate
position of the parts of the body referred to in the table.
Limits are not sharply defined, and certain parts overlap.
You should decide for yourself in which part you have
or have had your trouble (if any).
[Kuorinka et al. 1987]
Table: Please answer by putting an "X" in the appropriate box - one "X" for each question. You may be
in doubt as to how to answer, but please do your best anyway. Note that column 1 of the questionnaire is
to be answered even if you have never had trouble in any part of your body; columns 2 and 3 are to be
answered if you answered yes in column 1.
To be answered by everyone To be answered by those who have had trouble
Have you at any time during the last 12 months
had trouble (ache, pain, discomfort, numbness)
in:
Have you at any time during the
last 12 months been prevented
from doing your normal work (at home or away from home)
because of the trouble?
Have you had trouble at any
time during the last 7 days?
Neck
No Yes
No Yes
No Yes
Shoulders
No Yes, right shoulder
Yes, left shoulder
Yes, both shoulders
No Yes
No Yes
Elbows
No Yes, right elbow
Yes, left elbow
Yes, both elbows
No Yes
No Yes
Wrists/Hands
No Yes, right wrist/hand
Yes, left wrist/hand
Yes, both wrists/hands
No Yes
No Yes
Upper Back
No Yes
No Yes
No Yes
Lower Back (small of back)
No Yes
No Yes
No Yes
One or Both Hips/Thighs
No Yes
No Yes
No Yes
One or Both Knees
No Yes
No Yes
No Yes
One or Both Ankles/Feet
No Yes
No Yes
No Yes
12
Purpose
To obtain risk factor exposure profiles for specific jobs.
When to Use It
This tool is used prior to implementing a process or task-specific intervention to obtain a
baseline for exposures. The checklist can then be administered periodically to determine if the
exposures have been reduced or eliminated after the intervention has been implemented to
determine the effectiveness of the process or intervention.
How to Use It
The information obtained will yield a listing of exposures associated with a job. This can
be used to rank jobs based on exposures, providing a basis for prioritizing interventions. The
checklist can also be used to categorize risk factor exposures by jobs, departments or teams,
sites, or body part affected. This tool was designed to be completed by employees after receiving
instructions from an administrator, such as a safety director. Once the exposures are known, then
followup with employees is needed to determine the specific tasks associated with the risk factor
exposures. The information obtained from the checklist can be used during brainstorming
sessions with employees to facilitate discussion and focus the direction of the discussion.
An example of how this checklist was used at the Badger mines is shown in Tables 11
and 12. The percentage and number of employees reporting specific exposures were determined
in order to identify the most frequently experienced risk factor exposures at each location
(Table 11). The shaded cells indicate risk factor exposures that were reported by at least 60% of
the employees at that site. This information could be used to determine which risk factors needed
to be targeted at each site and which site had the greatest number of exposures affecting the
greatest number of workers. For example, the information in Table 11 indicates that
interventions may be needed to address the intensive keying and static postures for the Support
employees and whole-body vibration exposures at Taylor, Fairwater, and Trucking. Risk factor
TOOL C
General Risk Factor Exposure Checklist

13
exposures reported by employees on each work team at the two mines were also determined. The
results for the Taylor Mine are shown in Table 12. These results identified the Mine Team as
having the greatest number of employees with reported exposures (shoveling, whole-body
vibration, and static postures). The Wash, Rail, and Maintenance Teams also had some risk
factor exposures that were reported by 90% of the team members. This information allows one to
target the intervention efforts to have the greatest impact on employee health after reducing or
eliminating exposures.
A system was developed to obtain a single risk factor exposure score for each employee.
The score is based on the number of exposures and severity of each exposure, according to
duration of exposure, repetition of exposure, or weight lifted. All risk factors are scored equally,
i.e., no risk factor is considered more important or weighted more than another risk factor.
Potential Issues With Checklist
Because of the large number of risk factors included in the checklist, the analysis can
become daunting, particularly if a large number of checklists are completed. To simplify the
analysis, it may be helpful to limit the risk factors to those affecting body parts of interest. For
example, if back injuries are a problem, then only include the risk factors affecting the back.
Using a software program (e.g., Microsoft Excel) to analyze the responses may also be helpful.
For the Badger analysis, some of the risk factors were combined to simplify the analysis. In this
case, the lifting risk factors were combined, as well as pushing and pulling risk factors.

14
Table H.--Number and percentage of employees reporting risk factor exposures (Shaded areas indicate risk factor exposures reported by at least 60% of employees at each location.
N = total number of employees at each location; n = number of employees reporting exposure.)
Risk
factor Description
Badger location
Taylor
Mine
(N=50)
Fairwater
Mine
(N=25)
Trucking
(N=15)
Support
(N=44)
n % n % n % n %
Forceful
exertion
Lifting 31 62 14 56 7 47 9 20
Shoveling 37 74 15 60 2 13 5 11
Pinch grip 29 58 18 72 6 40 7 15
Grasping 32 64 18 72 8 53 5 11
Carrying 19 38 10 40 3 20 9 20
Pushing 16 32 10 40 5 33 4 9
Pulling 11 22 7 28 4 27 4 9
Awkward
posture
Hands
above head
23 46 13 52 5 33 4
Neck bent 33 66 18 72 6 40 27 61
Wrist bent 24 48 21 84 10 67 24 55
Back bent
(stooping)
30 60 17 68 11 73 4 9
Squatting 22 44 13 52 7 47 4 9
Kneeling 22 44 13 52 10 67 3 7
Static
position
26 52 16 64 11 73 40 91
Vibration Moderate
hand-arm
15 30 11 44 5 33 2 5
High hand-
arm
16 32 9 36 4 27 1 2
Whole body 42 84 18 72 10 67 3 7
Contact stress 20 40 8 32 5 33 3 7
Intensive keying 18 36 11 44 2 13 40 91
Repetition 20 40 14 56 2 13 9 20

15
Table 12.-Number of employees reporting risk factor exposures by teams at the Taylor Mine
(Shaded areas indicate risk factor exposures reported by most employees for specific teams when the number of team members exceeds 1.
(N = total number of employees on team; n = number of associates reporting risk factor exposure)
Risk factor
category
Specific
risk factor
Taylor Teams
Dry
N=7
Electrical
N=1
Maintenance
N=5
QTAT
N=1
Rail
N=6
Wash
N=11
Mine
N=16
Transload
N=1
Operations
N=2
n n n n n n n n n
Forceful
exertion
Lifting 2 1 5 0 6 8 7 1 1
Shoveling 3 0 3 1 5 8 15 1 1
Pinch grip 3 1 3 1 4 9 8 0 0
Grasping 2 1 3 0 6 9 9 1 1
Carrying 0 1 4 1 0 7 4 1 1
Pushing 1 1 2 1 1 6 3 1 0
Pulling 0 1 1 0 1 5 2 1 0
Awkward
posture
Hands
above head
0 1 3 0 3 8 6 1 1
Neck bent 0 1 4 1 6 10 8 1 1
Wrist bent 1 1 1 0 3 7 9 1 0
Back bent
(stooping)
0 1 4 1 6 10 7 1 0
Squatting 0 1 2 0 6 7 6 0 0
Kneeling 1 1 4 0 6 6 4 0 0
Static
position
1 1 1 1 0 6 13 1 2
Vibration Moderate
hand-arm
0 1 3 0 0 8 3 0 0
High hand-
arm
0 1 3 0 0 8 4 0 0
Whole body 3 1 4 0 4 11 16 1 1
Contact stress 0 1 3 1 1 7 5 1 1
Intensive keying 2 1 0 0 2 8 2 1 2
Repetition 2 1 3 1 1 5 7 0 0

16
How to Complete the Tool
Because this tool is intended to be administered to employees, written instructions, shown
below, have been prepared and are included with the tool.
Instructions
The purpose of completing this form is to identify exposures to MSD risk factors that occur when
doing tasks required by your job. Your answers will be used to track the effectiveness of applying
ergonomics at your mine.
1. ID: Name or employee number of employee completing checklist. (It is important to enter
your name on the checklist so your checklist can be matched to future checklists.)
2. Job Name: Provide the name of your job. Please be as specific as possible. (mechanic, dozer
operator, crusher operator, etc.)
3. Team/Department Name: Indicate name of your organization.
4. Date: Date checklist is completed.
5. Mine/Plant: Name of your mine or plant.
6. Shift: Check the length of your typical shift.
7. Brief Description of Job: Provide a list of the main tasks you do for your job. Also list the
number of hours/shift you spend doing each task and any equipment or tools you use. For
example:
Main Tasks Number of Hours Tools/Equipment
Operate dozer 4 hours CAT D10
Repair truck brakes 3 hours pneumatic wrench
Risk Factors: Read each description of the risk factors while thinking about all the tasks you do that
are a part of your job. Mark the choice that best applies to your job with a or X. If you do not do
the risk factor described, check “Never.” If you do the risk factor described periodically (once /week
or once/month), then mark “Occasionally.”
Some risk factors ask for additional information. Please write your response in the space provided.
On the last page of the checklist, list two tasks that you do for your job that you believe are the most
physically demanding. Physically demanding means a lot of effort is required to do the task, or it
involves one or more of the risk factors listed in this checklist.

17
General Risk Factor Exposure Checklist ID _________________________________
Job / Position Name ______________________________ Date _____________________________
Team / Department _______________________________ Mine/Plant ________________________
Shift ______8 hrs ______10 hrs ______12 hrs _____Other (describe) ______________________
Brief Description of Your Job
Main Tasks Number of Hours Tools/Equipment Used
Heavy or Frequent Lifting / Lowering / Shoveling
Lifting or lowering object weighing more than 75 pounds:
____ Never __-_Occasionally
____ less than one time per day
____ one or more times per day
Lifting or lowering object weighing 55 to 75 pounds:
____ Never ____Occasionally
____ less than 10 times per day
____ more than 10 times per day
Back / Shoulders
Lifting or lowering object weighing more than 25 pounds:
____ Never ____Occasionally
____ less than 25 times per day
____ more than 25 times per day
Back / Shoulders
Lifting or lowering object weighing more than 10 pounds:
____ Never ____Occasionally
____less than 2 hours total per day
____more than 2 hours total per day
Back / Shoulders
Shoveling:
____ Never ____Occasionally
____less than 1 hour total per day
____from 1 to 2 hours total per day
____more than 2 hours total per day
What material do you shovel?_____________
Back / Shoulders /
Arms

18
Awkward Postures
Working with the hand(s) above the head, or the elbow(s)
above the shoulders:
____ Never ____Occasionally
____ for less than 2 hours per day
____ from 2 to 4 hours total per day
____ more than 4 hours total per day
Shoulders
Working with the neck bent more than 30 degrees (without
support) :
____ Never ____Occasionally
____ for less than 2 hours per day
____ from 2 to 4 hours total per day
____ more than 4 hours total per day
Neck
Working with a bent wrist(s) – flexion, extension or
deviation: Indicate Posture
____ Never ____Occasionally ___________
____ for less than 2 hours per day ___________
____ from 2 to 4 hours total per day ___________
____ more than 4 hours total per day ___________
Wrists / Arms
Working with the back bent more than 30o (without
support):
____ Never ____Occasionally
____ for less than 2 hours per day
____ from 2 to 4 hours total per day
____ more than 4 hours total per day
Back
Squatting:
____ Never ____Occasionally
____ for less than 2 hours per day
____ from 2 to 4 hours total per day
____ more than 4 hours total per day
Kneeling:
____ Never ____Occasionally
____ for less than 2 hours per day
____ from 2 to 4 hours total per day
____ more than 4 hours total per day
Knees
30o
Deviation
30o
30o
45o

19
High Hand Force - Pinch Grip
Pinching an unsupported object:
____ Never ____Occasionally
____ for less than 2 hours per day
____ from 2 to 4 hours total per day
____ more than 4 hours total per day
What object do you pick up with a pinch grip?
____________________________________
Elbows /
Wrists / Hands
Pinch grip + wrists bent (flexion, extension or in
deviation):
____ Never ____Occasionally
____ for less than 2 hours per day
____ from 2 to 4 hours total per day
____ more than 4 hours total per day
Elbows /
Wrists / Hands
High Hand Force - Grasp or Power Grip
Grasping an unsupported object(s) weighing 10 or more
pounds per hand, or grasping with a forceful grip:
____ Never ____Occasionally
____ for less than 2 hours per day
____ from 2 to 4 hours total per day
____ more than 4 hours total per day
Elbows /
Wrists / Hands
Grasping plus wrists bent (flexion, extension or in
deviation):
____ Never ____Occasionally
____ for less than 2 hours per day
____ from 2 to 4 hours total per day
____ more than 4 hours total per day
Elbows /
Wrists / Hands
Deviation
Deviation
Extension
Flexion
30o 45o
Extension
45o
Flexion
30o

20
Highly Repetitive Work
Repeating the same motion (excluding keying activities) with
little or no variation every few seconds:
____ Never ____Occasionally
____ for less than 2 hours per day
____ from 2 to 6 hours total per day
____ more than 6 hours total per day
Repeating the same motion (excluding keying activities) with
little or no variation every few seconds plus wrists bent (flexion,
extension or in deviation) plus high, forceful exertions with the
hands:
____ Never ____Occasionally
____ for less than 2 hours per day
____ from 2 to 4 hours total per day
____ more than 4 hours total per day
Shoulders / Wrists /
Arms
Performing intensive keying (perform only keying with few or
no breaks):
____ Never ____Occasionally
____ for less than 4 hours per day
____ from 4 to 7 hours total per day
____ more than 7 hours total per day
Performing intensive keying plus wrists bent (flexion, extension
or in deviation):
____ Never ____Occasionally
____ for less than 2 hours per day
____ from 2 to 4 hours total per day
____more than 4 hours total per day
Arms / Wrists /
Shoulders / Neck
Vibrating Tools (Hand-Arm Vibration)
Using grinders, sanders, jigsaws or other hand tools that
typically have moderate vibration levels:
____ Never ____Occasionally
____ for less than 2 hours per day
____ from 2 to 4 hours total per day
____more than 4 hours total per day
Arms / Wrists /
Shoulders
Using impact wrenches, chain saws, percussive tools
(jackhammers, scalers, chipping hammers) or other tools that
typically have high vibration levels:
____ Never ____Occasionally
____ for less than 30 minutes total per day
____ for more than 30 minutes total per day
Arms / Wrists /
Shoulders / Back

21
Bouncing or Jarring (Whole Body Vibration)
Operating mobile equipment:
____ Never ____Occasionally List Equipment:
____ for less than 2 hours per day _______________
____ from 2 to 4 hours total per day _______________
____more than 4 hours total per day _______________
I travel over rough roads: (circle one)
Never Sometimes Most of the time All of the time
Back / Hips / Legs
Contact or Impact Stress
Contacting hard or sharp objects like work surface edges or narrow
tool handles, or striking an object with a hammer:
____ Never ____Occasionally
____ for less than 2 hours per day
____ from 2 to 4 hours total per day
____ more than 4 hours total per day
Describe sharp object / hammer ____________________________
Shoulders / Elbows /
Wrists / Arms
Static Postures
Standing without changing posture:
____ Never ____Occasionally
____ for less than 2 hours per day
____ from 2 to 4 hours total per day
____ more than 4 hours total per day
Sitting without changing posture:
____ Never ____Occasionally
____ for less than 2 hours per day
____ from 2 to 4 hours total per day
____ more than 4 hours total per day
Back/ Hips / Legs
Carrying
Carrying objects more than 7 feet (check weight and frequency for
most difficult carry):
OBJECT WEIGHT FREQUENCY
____Less than 20 pounds ____Occasionally ____ Never
____21 to 35 pounds ____Less than 1 carry/minute
____36 to 50 pounds ____1-2 carries/minute
____More than 50 pounds ____3-6 carries/minute
____More than 6 carries/minute
Back / Shoulders /
Elbows /
Legs

22
Pushing and Pulling
Pushing against an object, such as a cart or handle, with a
maximum effort (body leaning with bent legs into the push):
____ Never ____Occasionally
____ less than 8 times per day
____ from 8 to 30 times per day
____ more than 30 times per day
Pushing against an object, such as a cart or handle, with a moderate
effort (body slightly leaning with straight legs into the push –
similar to pushing a full grocery cart):
____ Never ____Occasionally
____ less than 16 times per day
____ from 16 to 50 times per day
____ more than 50 times per day
Back / Shoulders /
Elbows /
Legs
Pulling against an object, such as a/an electrical cable, fuel hose, cart or
handle, with a maximum effort (body leaning with bent legs into the pull):
____ Never ____Occasionally
____ less than 8 times per day
____ from 8 to 30 times per day
____ more than 30 times per day
Pulling against an object, such as an electrical cable, fuel hose, cart or
handle, with a moderate effort (body slightly leaning with straight legs
into the pull – similar to pulling a full grocery cart):
____ Never ___Occasionally
____ less than 16 times per day
____ from 16 to 50 times per day
____ more than 50 times per day
Back / Shoulders /
Elbows /
Legs
Most Difficult or Physically-Demanding Tasks (Please provide a brief description of each task)
Why is this task difficult?
1.
2.

23
How to Score the Risk Factor Exposures
RISK FACTORS SCORE o Lifting or lowering object weighing more than 75 pounds
o Lifting or lowering object weighing more than 55 pounds
o Lifting or lowering object weighing more than 25 pounds
0 never
1 occasionally
2 less than 1 time per day
3 more than 1 time per day
o Lifting or lowering object weighing more than 10 pounds 0 never
1 occasionally
2 less than 2 hours total per day
3 more than 2 hours total per day
o Shoveling more than 5 pounds if done more than 3 times per minute 0 never
1 occasionally
2 less than 1 hour total per day
3 from 1 to 2 hours total per day
4 more than 2 hours total per day
o Working with the hand(s) above the head or the elbow(s) above the
shoulders
o Working with the neck bent more than 30 degrees
o Working with bend wrist(s)
o Working with the back bent
o Squatting
o Kneeling
o Pinching and unsupported object
o Pinch grip + wrists bent (flexion, extension, or deviation)
o Grasping unsupported object(s) weighing 10 or more pounds per
hand or grasping with a forceful grip
o Grasping plus wrists bent (flexion, extension, or deviation)
o Repeating the same motion (excluding keying activities) with little or
no variation every few seconds plus wrists bent (flexion, extension,
or deviation) plus high, forceful exertions with the hands
o Performing intensive keying plus wrists bent (flexion, extension, or
deviation)
o Using grinders, sanders, jigsaws, or other handtools that typically
have moderate vibration levels
o Operating mobile equipment
o Contacting hard or sharp objects like work surface edges or narrow
tool handles
o Sitting without changing posture
o Standing without changing posture
0 never
1 occasionally
2 for less than 2 hours total per day
3 from 2 to 4 hours total per day
4 more than 4 hours total per day
o Repeating the same motion (excluding keying activities) with little or
no variation every few seconds
0 never
1 occasionally
2 for less than 2 hours total per day
3 from 2 to 6 hours total per day
4 more than 6 hours total per day
o Perform intensive keying 0 never
1 occasionally
2 for less than 4 hours total per day
3 from 4 to 7 hours total per day
4 more than 7 hours total per day
o Using impact wrenches, chain saws, percussive tools (jackhammers,
scalers, chipping hammers), or other tools that typically have high
vibration levels
0 never
1 occasionally
2 for less than 30 minutes total per day
3 for more than 30 minutes total per day
o Pushing against an object, such as a card or handle, with a maximum
effort (body leaning with bent legs into the push)
o Pulling against an object, such as a cart or handle, with a maximum
effort (body leaning with bent legs into the pull)
0 if not checked
1 less than 8 times per day
2 from 8 to 30 times per day
3 more than 30 times per day

24
o Pushing against an object, such as a cart or handle, with a moderate
effort body slightly leaning with straight legs into the push, similar to
pushing a full grocery cart)
o Pulling against an object, such as a cart or handle, with a moderate
effort (body slightly leaning with straight legs into the pull, similar to
pulling a full grocery cart)
0 never
1 occasionally
2 less than 16 times per day
3 from 16 to 50 times per day
4 more than 50 times per day
o Carrying objects more than 7 feet 0 never
1 less than 35 pounds
2 21 to 35 pounds
3 36 to 50 pounds
4 more than 50 pounds
1 occasionally
2 less than 1 carry/minute
3 1-2 carries/minute
4 3-6 carries/minute
5 more than 6 carries/minute
Total score for each employee = Sum of scores for each risk factor
NOTE: This checklist was based on the Washington State Caution and Hazard Zone Checklists
and the Followup Physical Risk Factor Checklist, but modified to be more applicable to mining
and to be completed by employees. This checklist has not been statistically validated and should
only be used as a guide.

25
Purpose
To identify risk factor exposures and subsequent actions to reduce or eliminate
exposures.
When to Use It
This tool can be used to collect exposure information when observing work tasks as part
of a risk assessment. It can also be used when observing tasks as part of a BBS process. Because
many risk factor exposures result from inadequately designed equipment, tools, and work
stations and not from an unsafe behavior, it is important to capture information that will allow
action to be taken to correct the root cause of the exposure.
How to Use It
This form can be used to track information about risk factor exposures. It can be used
specifically to track the type of risk factor exposures, the occurrence of body discomfort, and the
root cause of the exposure. This form can also be used to document simple improvements taken
to reduce or eliminate the exposures. Because the form also asks the observer to rate the level of
risk he or she believes is associated with the risk factor exposure, it can be used as a very basic
prioritization method. For example, exposures rated with "very high risk" would have a higher
priority for an intervention than those rated with "low risk."
How to Complete the Tool
Mine: List name of mine.
Location: List geographic location of mine (name of nearest town/city).
Team/Department: List name of team or department that is the subject of the
observation. Task: Briefly describe the task being observed.
Time: Indicate the time of the observation.
Date: Indicate the date of the observation.
# Observed: Indicate the number of employees being observed.
TOOL D
Ergonomics Observations

26
Observer: Indicate the name of the person doing the observation.
1. Indicate the risk factor exposure(s) observed by marking the box next to the risk factor.
If the risk factor is not listed, check the "Other" box and briefly describe the risk factor
exposure.
2. Indicate how often the task is performed to determine the frequency of the exposure.
Determine if the task is done on a regular basis or seasonally. For tasks that are done on a
regular basis:
o Indicate the number of times a task is done per shift. For example, if the task is
done six times during a shift, complete this question as "6 times/shift."
o Indicate how many shifts this task is performed per week, month, or year.
If the task is done every week, indicate the number of shifts the task is
performed per week.
If the task is not done every week, but is done every month, then
indicate the number of shifts per month the task is performed. For
example, if the task is done seven shifts per month, then complete this
question as "7 shifts/month."
If the task is not done every month, then indicate the number of shifts
per year the task is performed. For example, if the task is done 15
shifts per year, then complete this question as "15 shifts/year."
For tasks that are performed on a seasonal basis:
o Check the box to indicate that the task is seasonal, and then record the number of
weeks per year the task is performed.
o Indicate the number of times a task is done per shift. For example, if the task is
done 12 times during a shift, complete this question as "12 times/shift."
o Indicate the number of shifts the task is performed per week. For example, if the
task is done three shifts during a week, complete this question as "3 shifts/week."
3. Indicate if the employee being observed is experiencing any discomfort, and then mark
the body part with discomfort by placing an "X" on the body part in the diagram. This
information will not only identify the development of potential MSDs, but can help focus
job improvements.

27
4. Check the root cause of the risk factor (why the risk factor is occurring), and give a brief
description of the root cause. Identifying the root cause can provide direction on how to
change the task to reduce the risk factor exposures. For example:
o If the employee is required to lift an object weighing 90 pounds, then check
"effort or strength required" as the root cause, and then briefly describe it - "lifted
object weighs 90 pounds."
o If the task is repeated throughout the shift, such as operating a loader, then check
"cycle time" as the root cause, and then describe it - "time to fill and dump one
bucket is 20 seconds"; and also check "duration of task" as another root cause, and
then describe it - "loader is operated for 7 hours per shift."
5. Rate the degree of risk of the exposure as either "none," "low," "medium," "high," or
"very high." This rating is based on understanding the level of exposure, how often the
exposure occurs, and the duration of the exposure. For example, if the exposure is from
lifting an object weighing 30 pounds once a week, then the risk would be rated as "low."
If the exposure is from lifting an object weighing 100 pounds once a week, then the risk
would be rated as "high." The conditions provided in Section I under "Basic Elements of
Ergonomics Risk Management Processes" can be used as a guide for ranking the task. If
any of the conditions are present, the task would be rated as either "medium," "high," or
"very high" risk. (This risk ranking is only meant as a very crude attempt to set a
prioritization when several exposures may need to be addressed and limited resources are
available to address the exposures.)
6. Indicate if there is another way to do the task that would reduce or eliminate the exposure
and describe how the task can be changed. This question provides the observer with an
opportunity to obtain ideas from the worker about ways to change the task.
7. Indicate if the exposure was reduced or eliminated at the time of the observation.
8. Provide any pertinent comments related to the exposure, discomfort, or ways to control
the exposure.
9. Indicate any of the suggested job improvements that were discussed or tried at the time of
the observation. This information will be useful for determining appropriate followup to
resolve the exposure.

28
ERGONOMICS OBSERVATIONS
Mine:_____________ Location:________ Team:________________ Task:________________________
Time:____________ Date:___________ # Observed:_________ Observer:________________________
1. Check all the risk factors that you observe. □ forceful exertion □ repetition □ static posture □ awkward postures □ contact stress
□ pressure points □ vibration □ other__________________________
2. How often is this task performed? ________times/shift ________shifts/week
□ Seasonal ___weeks/year ________shifts/month ________shifts/year
3. Does employee experience any discomfort when doing this task? Yes No
If yes, what body parts have discomfort? (Place X on body part)
4. What is causing the risk factors? Check (√) root cause (s) and give brief description.
CHECK ROOT CAUSE BRIEF DESCRIPTION Effort or strength required
Location of parts, equipment or tools
Position of parts, equipment or tools (How the part is positioned in reference to the worker)
Design of parts, equipment or tools
Frequency of task (how often is task done)
Duration of task (how long it takes to do task)
Productivity levels
Method used / required to do the task
Training not adequate / need training
PPE not available / wrong PPE used
Environment – heat, cold, restricted space, etc.
Other
5. Rate the degree of risk factor exposures for the observed task: None Low Medium High Very High
COMPLETE ONLY IF EXPOSURES ARE RATED MEDIUM, HIGH or VERY HIGH
6. Is there another way to do this task that eliminates/reduces the risk factor(s)? Yes No
If yes, describe how the task can be changed: __________________________________________________
7. Was the risk factor exposure resolved at the time of the observation? Yes No
8. Comments: _____________________________________________________________________________
9. Indicate options discussed by checking the box next to the solutions shown below and on back side of page.
Personal Protective Equipment
Anti-vibration gloves – reduce vibration transmission
Knee pads – reduce pressure points
Shoe inserts – reduce foot discomfort and fatigue
Cooling devices – reduce body temperature increases
Cold weather clothing
Administrative Controls
Job enlargement
Job rotation
Work pace and duration
Work-rest cycles
Training
Shift schedule / overtime
Exercise / stretches
29
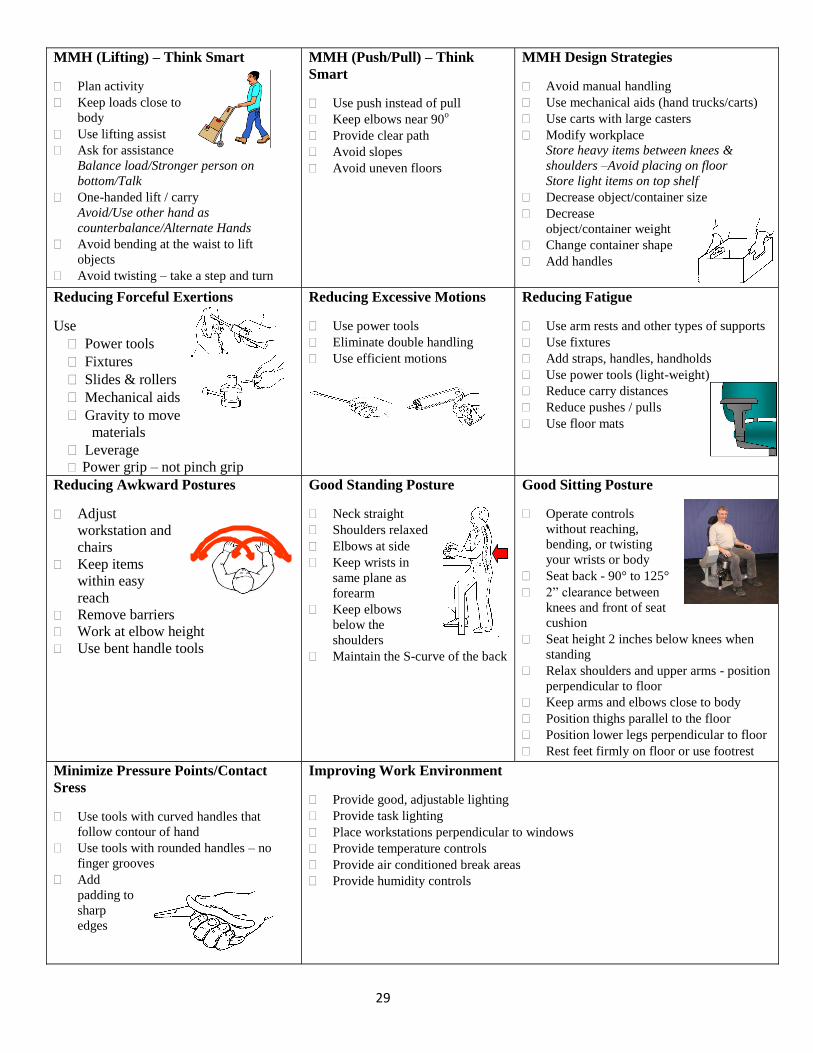
MMH (Lifting) – Think Smart
Plan activity
Keep loads close to
body
Use lifting assist
Ask for assistance
Balance load/Stronger person on
bottom/Talk
One-handed lift / carry
Avoid/Use other hand as
counterbalance/Alternate Hands
Avoid bending at the waist to lift
objects
Avoid twisting – take a step and turn
MMH (Push/Pull) – Think
Smart
Use push instead of pull
Keep elbows near 90o
Provide clear path
Avoid slopes
Avoid uneven floors
MMH Design Strategies
Avoid manual handling
Use mechanical aids (hand trucks/carts)
Use carts with large casters
Modify workplace
Store heavy items between knees &
shoulders –Avoid placing on floor
Store light items on top shelf
Decrease object/container size
Decrease
object/container weight
Change container shape
Add handles
Reducing Forceful Exertions
Use
Power tools
Fixtures
Slides & rollers
Mechanical aids
Gravity to move
materials
Leverage
Power grip – not pinch grip
Reducing Excessive Motions
Use power tools
Eliminate double handling
Use efficient motions
Reducing Fatigue
Use arm rests and other types of supports
Use fixtures
Add straps, handles, handholds
Use power tools (light-weight)
Reduce carry distances
Reduce pushes / pulls
Use floor mats
Reducing Awkward Postures
Adjust
workstation and
chairs
Keep items
within easy
reach
Remove barriers
Work at elbow height
Use bent handle tools
Good Standing Posture
Neck straight
Shoulders relaxed
Elbows at side
Keep wrists in
same plane as
forearm
Keep elbows
below the
shoulders Maintain the S-curve of the back
Good Sitting Posture
Operate controls
without reaching,
bending, or twisting
your wrists or body
Seat back - 90° to 125°
2” clearance between
knees and front of seat
cushion
Seat height 2 inches below knees when
standing
Relax shoulders and upper arms - position
perpendicular to floor
Keep arms and elbows close to body
Position thighs parallel to the floor
Position lower legs perpendicular to floor
Rest feet firmly on floor or use footrest
Minimize Pressure Points/Contact
Sress
Use tools with curved handles that
follow contour of hand
Use tools with rounded handles – no
finger grooves
Add
padding to
sharp
edges
Improving Work Environment
Provide good, adjustable lighting
Provide task lighting
Place workstations perpendicular to windows
Provide temperature controls
Provide air conditioned break areas
Provide humidity controls

30
Purpose
To evaluate and compare design features of hand tools.
When to Use It
The Hand Tool Checklist can be used prior to purchasing new hand tools or when
evaluating hand tools for risk factor exposures.
How to Use It
The Hand Tool Checklist consists of a list of design criteria that are based on ergonomic
principles. The checklist can be used when selecting new hand tools to ensure that they meet
these design criteria and they do not result in risk factor exposures, such as pressure points,
awkward postures, or excessive vibration. Comparisons can be made among new tools to assist
in deciding which tool to purchase. The checklist can also be used to compare a new tool with an
old tool to ensure that the new tool meets specific design features important to the task for which
the tool was selected.
How to Complete the Tool
Evaluation Completed By: Add name of person completing the evaluation.
Date: Date evaluation conducted.
Task: Describe task that will be completed with tool being evaluated.
Tool 1 (Describe): Provide name of tool being evaluated.
Manufacturer: Indicate the manufacturer of the tool.
Model: Indicate the model number/name of tool.
Tool 2 (Describe): If more than one tool is being evaluated, provide name of second tool.
TOOL E
Hand Tool Checklist

31
Manufacturer: Indicate the manufacturer of the second tool being evaluated.
Model: Indicate the model number/name of second tool being evaluated.
Questions: For each tool being evaluated, check "Yes" if the tool has or meets the design
criteria described, check "No" if the tool does not have or meet the design criteria
described, or check "NA" if the design criteria does not apply to the tool being evaluated.
Totals: Indicate the number of "Yes," "No," and "NA" responses for each tool. These
numbers provide a quick look at how many design criteria are met by each tool.
Other Features: Indicate any other positive feature of the tool that was not included in
the questions.
NOTE: The Hand Tool Checklist is based on a checklist published in the OSHA Draft Proposed
Ergonomic Protection Standard, Addendum B-1, Assessment of and Solutions to Worksite Risk
Factors, March 20, 1995. The checklist has been formatted to allow for a comparison among
tools. The checklist is not meant to be inclusive of all design features, but to highlight major
design features. While a "Yes" answer indicates a more ergonomic design, you will have to
consider the function of the tool and the task it is being used to complete to determine if one of
these features is more or less important.
An additional resource is Easy Ergonomics: A Guide to Selecting Non-Powered Hand Tools
[NIOSH and Cal/OSHA 2004].
32
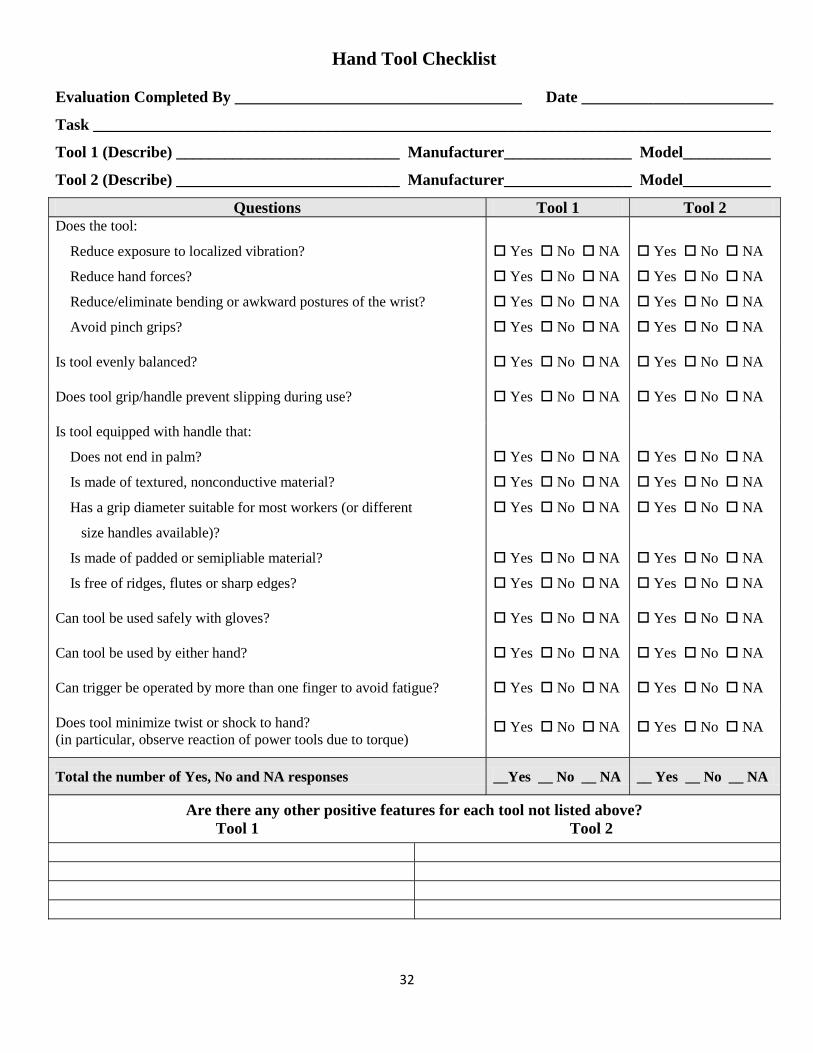
Hand Tool Checklist
Evaluation Completed By ____________________________________ Date ________________________
Task _____________________________________________________________________________________
Tool 1 (Describe) ____________________________ Manufacturer________________ Model___________
Tool 2 (Describe) ____________________________ Manufacturer________________ Model___________
Questions Tool 1 Tool 2 Does the tool:
Reduce exposure to localized vibration?
Reduce hand forces?
Reduce/eliminate bending or awkward postures of the wrist?
Avoid pinch grips?
Yes No NA
Yes No NA
Yes No NA
Yes No NA
Yes No NA
Yes No NA
Yes No NA
Yes No NA
Is tool evenly balanced? Yes No NA Yes No NA
Does tool grip/handle prevent slipping during use? Yes No NA Yes No NA
Is tool equipped with handle that:
Does not end in palm?
Is made of textured, nonconductive material?
Has a grip diameter suitable for most workers (or different
size handles available)?
Is made of padded or semipliable material?
Is free of ridges, flutes or sharp edges?
Yes No NA
Yes No NA
Yes No NA
Yes No NA
Yes No NA
Yes No NA
Yes No NA
Yes No NA
Yes No NA
Yes No NA
Can tool be used safely with gloves? Yes No NA Yes No NA
Can tool be used by either hand? Yes No NA Yes No NA
Can trigger be operated by more than one finger to avoid fatigue? Yes No NA Yes No NA
Does tool minimize twist or shock to hand?
(in particular, observe reaction of power tools due to torque) Yes No NA Yes No NA
Total the number of Yes, No and NA responses __Yes __ No __ NA __ Yes __ No __ NA
Are there any other positive features for each tool not listed above?
Tool 1 Tool 2

33
Purpose
To conduct a risk assessment of risk factor exposures associated with manual tasks.
When to Use It
Use the Manual Task Risk Assessment Form when you are evaluating risk factor
exposures and would like to have a risk ranking that can be used to prioritize interventions,
demonstrating reduction in exposures, or to focus on body parts most affected by the exposures.
How to Use It
This form can be used to evaluate risk factor exposures associated with manual tasks to
rank the risk factor exposures and determine affected body parts. This information can then be
used to target specific interventions and to prioritize tasks for interventions. The information can
also be used to promote the success of interventions (see the Ergonomic Task Improvement
Form).
How to Complete the Tool
Task: Describe the manual task being evaluated.
Date: Date evaluation is being conducted.
Assessed by: Name of person conducting the evaluation.
In consultation with: Name of person assisting with the evaluation.
Comments: Describe the task in detail, including:
Why the task is being assessed, such as to investigate an injury report or discomfort
report, evaluate productivity issues, conduct baseline assessment, etc.
Tools - powered or nonpowered tools (include manufacturer, model, size, etc.)
Equipment - mining equipment, lifting assist devices, transportation equipment, etc.
Materials - any materials needed to complete the task such as equipment parts,
building materials, supplies, etc.
Overall process that includes the task being assessed.
TOOL F
Manual Task Risk Assessment

34
Exposure Risk Assessment:
Identify all primary risk factor exposures, and circle the descriptions that are most
applicable.
Circle the duration description that is most applicable to the task.
Circle the repetition description that is most applicable to the task.
Check any other secondary risk factors present that are listed in the box on the right
side of the page.
Determine the risk assessment score by adding the numbers listed above the circled
boxes. If additional risk factors are present, add a plus sign (+) to the score for each
secondary risk factor exposure.
Example:
A miner drives a haul truck for a l0-hour shift. The road is rough, and the miner
experiences periodic jolting and jarring. The miner has a 30-minute lunch and two 15-
minute breaks. Because of productivity requirements, the miner has 10 minutes to
load, haul, and dump the product and then return for another load.
1. The risk factor exposure is whole-body vibration. Because jolting and jarring
occurs, circle the box "high amplitude whole-body vibration" (score = 4).
2. Because the exposure occurs throughout the shift, circle "performed continuously
for majority of shift" (score = 8).
3. Because of time pressure from productivity requirements, check "High time
pressure." Also check "Lack of opportunities for social interaction," because the
miner is isolated in the haul truck for most of the shift (score = ++).
4. Total score = 12++
Body Part Injury Risk: Using the risk assessment conducted in the previous section of
the form, transfer the scores to the body regions affected by the risk factor exposures.
Once the scores have been transferred, add up the individual scores to obtain the total
score for each body region. If you have scores for more than one body region, then the
body region with the highest total score would be the focus of the intervention.

35
Controls: This section of the form can be used to document controls that may be
implemented to reduce or eliminate the risk factor exposures. Potential interventions can
be identified during discussions or brainstorming sessions with miners, engineers,
supervisors, etc.
NOTE: The Manual Task Risk Assessment tool was developed by Robin Burgess-
Limerick, Ph.D., CPE (University of Queensland, Australia). A software version is
available by contacting him at: robin@burgess-limerickcom

36
Manual Task Risk Assessment
Assess the degree of exposure to each primary risk factor for each body region using the table. Determine whether
TASK: LOCATION: DATE:
ASSESSED BY:
IN CONSULTATION WITH:
COMMENTS
(REASON ASSESSED; TOOLS, EQUIPMENT, MATERIALS, PROCESSES INVOLVED, ETC.)
MANUAL TASK: ANY ACTIVITY REQUIRING THE WORKER TO GRASP, MANIPULATE, STRIKE, THROW, CARRY, MOVE, HOLD OR RESTRAIN
AN OBJECT, LOAD OR BODY PART.

37
Assess the degree of exposure to each primary risk factor for each body region using the table. Determine whether any of the additional risk factors listed are present. For the purposes of priority setting, a risk ranking may be determined using the numeric ratings in the table.
Green
1
Yellow
2
Orange
4
Red
8
Exertion Low force and speed Moderate forces or speed, but well within capability
High force or speed, but not close to maximal
Forces or speeds close to the person’s maximum
Duration Performed infrequently for short periods
Performed regularly, but with many breaks or changes of task
Performed frequently, without many breaks or changes of task
Performed continuously for majority of shift
Repetition Dynamic and varied patterns of movement
Little or no movement, or repeated similar movements
Repeated identical movements
Posture
Comfortable postures, within a normal range about neutral
Uncomfortable postures, but not involving postures at the extreme of the range of motion
Postures at the extreme of the range of motion
Vibration No hand-arm or whole body vibration
Moderate amplitude hand-arm vibration or whole body vibration
High amplitude hand-arm vibration or whole body vibration
Determine the body region(s) that may be at risk of injury. (Alternately, assess the task for each of the following regions: lower limbs; lower back; neck/shoulders and upper back; elbows, wrists and hands).
Body Region Exertion Duration Repetition Posture Vibration Total Risk Score
Neck, Shoulders and Upper Back
Elbows, Wrists and Hands
Low Back
Legs, Knees and Feet
Engineering Controls Administrative Controls Personal Protective Equipment
Hot or Cold Environment
High Stress Environment
High Time Pressure
Lack of Control Over Work
CognitiveOver/Under Load
Lack of Opportunities for
Social Interaction

38
Purpose
To provide an effective method to highlight interventions implemented to reduce or
eliminate risk factor exposures.
When to Use It
Use the Ergonomic Task Improvement Form after an intervention has been implemented.
How to Use It
This form can be use to compare how a task was done before and after an intervention
was implemented to demonstrate the reduction of the risk factor exposures. Forms can be posted
on bulletin boards or the company Intranet. If similar operations are conducted at multiple sites,
the form can be used to provide ideas for interventions at other sites. An example of a completed
form is shown below.
How to Complete the Tool
Name of Manual Task: Add name of task in the title (in the example below, "Moving
Electromagnetic").
Division: Add name of division.
Mine: Add name of mine.
Department: Add name of department.
Task Description: Briefly describe the task, including information pertinent to the risk
factor exposures.
Equipment/Tools Used in Task: List the specific equipment and tools involved.
Frequency of Task: Indicate how many times the task is done.
TOOL G
Ergonomic Task Improvement Form

39
Number of Workers Affected: Indicate the number of workers who perform this task.
Employee Concerns: Describe the number and type of injuries, or the presence of body
discomfort reported by employees associated with doing this task.
Risk Assessment: Complete the table based on risk assessment results.
Objective of Control Measure: Indicate how the risk factor exposures will be reduced
or eliminated.
Description of Control: Briefly describe the controls used to reduce or eliminate the risk
factor exposures. Include model number if applicable.
Manufacturer/Contact Information: Provide the source of the control measure,
including contact information (phone and/or e-mail address).
Cost: Provide cost information for the control. If the control was constructed in-house,
provide an estimate of materials and labor costs.
Effect of Control on Productivity: Indicate if the control resulted in either an increase
or decrease in productivity.
Effect of Control on Injury Risk: Indicate if the control is expected to impact injury
risk.
Risk Assessment: Repeat the risk assessment after the implementation of the control.
Further Actions / Administrative Controls Required: Include information on actions
that will be needed as a result of implementing the control, such as maintenance,
inspections, reports, schedule changes, etc.
NOTE: If possible, include photographs to show how the task was done before and after
implementing the control, and include the worker in the photographs. Follow the same
color scheme in the risk assessment tables that was defined in the Manual Task Risk
Assessment.

40
Ergonomic Task Improvement
Task: Moving Electromagnet
DIVISION_____________________ MINE_______________DEPARTMENT____________________
TASK Description: The electromagnet is manually pulled to the scrap bin by pulling down on a chain over a pulley. The magnet is heavy and maximum effort is required. The worker reaches to his maximum height to grasp the chain and pull down using all his body weight.
EQUIPMENT/TOOLS USED IN TASK: Electromagnet
FREQUENCY OF TASK: Daily NUMBER OF WORKERS AFFECTED: 5
ROOT CAUSES OF RISK FACTORS: The mass of the magnet requires very high force to move
EMPLOYEE CONCERNS: An acute shoulder injury was reported and resulted in a lost-time injury
6 1 1 1 1 2 Lower Limb
Leg, Knee, and Foot
7 1 1 2 1 2 Lower Back
15 1 1 4 1 8 Upper Limb
Elbow, Wrist, Arm & Hand
18 1 4 4 1 8 Upper Body
Neck, Shoulders & Upper Back
RISK RANK Vibration Posture Repetition Duration Exertion Body Region B
E
F
O
R
E 5-10 = Low Risk 11-15 = Medium Risk 16-24 = High Risk
OBJECTIVE OF CONTROL MEASURE: Substitute the manual effort with a winch which pulls the magnet into place above the scrap bin
6 1 1 2 1 1 Lower Limb
Leg, Knee, and Foot
5 1 1 1 1 1 Lower Back
5 1 1 1 1 1 Upper Limb
Elbow, Wrist, Arm & Hand
6 1 4 4 1 1 Upper Body
Neck, Shoulders & Upper Back
RISK RANK Vibration Posture Repetition Duration Exertion Body Region
A
F
T
E
R
DESCRIPTION OF CONTROL (tool, equipment, or workstation changes/purchases): Electric
winch purchased and installed by contractor
MANUFACTURER/CONTACT INFO: Acme winches
COST: $5,000
EFFECT OF CONTROL ON PRODUCTIVITY: Winch is considerably faster
EFFECT OF CONTROL ON INJURY RISKS: Risk of injury eliminated
FURTHER ACTIONS/ADMINISTRATIVE CONTROLS REQUIRED: Winch maintenance needs to be added to maintenance schedule and inspected

41
Purpose
The risk factor cards were designed for use as a guide to identify risk factor exposures
and to suggest some simple job improvements.
When to Use It
Examples of the cards are shown in Figure 10. The primary use of the cards is as a
handout following training on risk factor exposures. The cards serve as a reminder to employees
to identify and report risk factor exposures associated with their jobs. The cards are slightly
larger than a credit card, and can be easily carried in the pocket. Information is printed on both
sides of the cards. For cards highlighting risk factors, examples of risk factor exposures are
provided on the front of the card, with potential solutions to the risk factors provided on the
reverse.
Because electronic versions of the cards are provided, poster-sized versions can be made
and placed at locations where employees would have an opportunity to view them, such as a
break room or locker room. Posters can be displayed in conjunction with toolbox or refresher
training addressing risk factor exposures. The cards can also be used by trainers as a handout
during training sessions to reinforce information presented during the training. The cards can be
either laminated or printed on plastic sheets to improve durability.
TOOL H
Risk Factor Cards

42
Enhancing Safety
Through Ergonomics
Targeting Risk Factors
Definition of Risk Factors: Actions or conditions
found to contribute to worker discomfort or
development of Musculoskeletal Disorders
Look Out for Risk Factors!
Risk for injury increases when
multiple risk factors are present.
MAIN RISK FACTORS• Awkward Posture
• Forceful Exertion
• Repetitive Motion
• Vibration
Extreme reaching increases the stress on
muscles and tendons possibly leading to
inflammation. Inflammation can increase the
pressure on nerves and blood vessels
causing pain and reducing blood flow to
muscles.
Reaching overhead
compresses the nerves
and reduces strength
Reaching forward
reduces the strength of
the shoulder and may
result in back flexion
Reaching backward
causes hyperextension of
the shoulder
Awkward PostureShoulder
Awkward back and neck postures
often occur with awkward shoulder
postures.
Solutions
Place worker on platform, in a trough or
sunken floor so working targets are near
elbow height
Provide variable height workstations to
accommodate workers of different stature
Place extra step on bottom of access
ladders to minimize shoulder reaching
when getting on equipment
Eliminate barriers that prevent getting close
to target, i.e. make cutout in workstation
Avoid storing materials above shoulder
height to reduce overhead reaching
Use a tool to retrieve hard to reach items
Minimize reaching, staying within the
normal reach envelope (gray region)
Keep your work close to you!
Neutral PostureHand/ Wrist, Neck, Shoulders, Back
Good posture comes with awareness.
Examine your posture often and
correct it when necessary!
When sitting, back is fully
supported and breastbone is
lifted
When standing, back has a
small hollow in the lower back,
breastbone is lifted, and
buttocks are slightly tucked in
Hands, wrists and forearms
are straight, in-line, and
parallel to the floor
Head is level or bent slightly
forward, facing forward, and
balanced in line with torso
Shoulders are held back
slightly and relaxed with the
upper arms hanging at the
side of the body
Neutral postures have aligned joints with
minimal stress/strain on muscles, tendons,
ligaments, nerves, and bones.
Adjustments should be made so:
The seat pan height is at knee level when
standing
There is a 2-3 finger-width gap between the
seat pan and the back of the leg
Seating
Adjustability is key to improving
comfort and allowing neutral posture!
Adjustable seating is vital to attaining neutral
seated posture.
The backrest
creates a 90 -105
angle with the seat
pan
The armrests support
the arms so the elbows
are about 90 and the
shoulders are relaxed
Figure 10.-Examples of risk factor cards. (The front of each card is shown
on the left, the reverse on the right.)

43
Purpose
The stickers are meant to reinforce the application of ergonomics to improve mining jobs.
When to Use It
The sticker, shown in Figure 11, is primarily intended as a handout following training on risk
factor exposures. It serves as a reminder to participate in the ergonomics process by identifying and
reporting risk factor exposures associated with jobs. The sticker can be placed on hardhats, lunch boxes,
locker doors, etc. It can also be used as an incentive to encourage employees to report risk factor
exposures. Employees would receive a sticker after reporting a potential exposure.
The sticker can be modified to make it specific to a particular company. Figure 12 shows the sticker as
modified by Bridger Coal Co. (name of company added to sticker) and Vulcan Materials Co. (colors
changed to company colors).
Figure 11.-Surface mining sticker promoting ergonomics.
TOOL I
Ergonomics Sticker

44
Figure 12.---Stickers modified by Bridger Coal Co. (left) and Vulcan Materials Co. (right).
Related Documents