440575-001 Rev. G MAGic ® Screen Magnification Software with Speech User’s Guide Freedom Scientific, Inc.

Welcome message from author
This document is posted to help you gain knowledge. Please leave a comment to let me know what you think about it! Share it to your friends and learn new things together.
Transcript
440575-001 Rev. G
MAGic®
Screen Magnification Software with Speech
User’s Guide
Freedom Scientific, Inc.
ii
MAGic® User’s Guide
PUBLISHED BY
Freedom Scientific 11800 31st Court North St. Petersburg, Florida 33716-1805 USA www.FreedomScientific.com
Information in this document is subject to change without notice. No part of this publication may be reproduced or transmitted in any form or any means, electronic or mechanical, for any purpose, without the express written permission of Freedom Scientific.
Copyright © 2013 Freedom Scientific, All Rights Reserved.
MAGic and JAWS are registered trademarks of Freedom Scientific in the United States and other countries. Speech On Demand is a trademark of Freedom Scientific in the United States and other countries. Microsoft, Windows 7, Windows Vista, Windows Server, Microsoft Word, Microsoft Excel, and Internet Explorer are registered trademarks of Microsoft Corporation in the U.S. and/or other countries. Other product and company names mentioned herein may be the trademark of their respective owners.
iii
Table of Contents
Introduction – MAGic User’s Guide ...................................................... 1
About This Book .............................................................................................. 1
Items Checklist ................................................................................................ 2
Chapter 1 Quick Start Guide ................................................................. 3
Welcome to MAGic .......................................................................................... 3
System Requirements ..................................................................................... 4
Installing MAGic ............................................................................................... 5
Uninstalling MAGic ...................................................................................... 5
Product Activation ............................................................................................ 6
Activating with Internet License Manager .................................................... 7
Activating by Telephone .............................................................................. 9
Activating by Fax ....................................................................................... 10
Activating through a Trusted Third Party ................................................... 11
Dongle Authorization ................................................................................. 13
MAGic Startup Wizard ................................................................................... 13
Startup Settings ......................................................................................... 14
Installing Vocalizer Direct Synthesizer ........................................................... 15
MAGic Program Group .................................................................................. 15
Explore MAGic .......................................................................................... 16
Tools Folder .............................................................................................. 16
Starting MAGic .............................................................................................. 16
Quitting MAGic .............................................................................................. 17
MAGic Key and Hot Keys .............................................................................. 17
Reading Text with MAGic .............................................................................. 18
Using the Mouse to Read Text .................................................................. 18
Using the Keyboard to Read Text ............................................................. 18
Typing Echo .............................................................................................. 20
Saving your MAGic Settings .......................................................................... 20

iv
Application-Specific Settings ..................................................................... 20
Changing Preferences ................................................................................... 23
Automatically Start MAGic ......................................................................... 23
Minimize on Startup .................................................................................. 26
Run MAGic from System Tray ................................................................... 26
Prompt to Save Settings on Exit ................................................................ 26
Disable Screen Saver................................................................................ 26
Enable Bilingual User Interface ................................................................. 26
Prompt to Overwrite Schemes ................................................................... 27
Enable Remote Access Client ................................................................... 27
Enable Remote Access Server .................................................................. 27
Automatic Notification of Updates ............................................................. 27
Getting Help ................................................................................................... 28
Online Help System .................................................................................. 28
What’s This? Help ..................................................................................... 28
MAGic User’s Guide .................................................................................. 28
MAGic Basic Training ................................................................................ 29
Technical Support ..................................................................................... 29
About MAGic ............................................................................................. 29
FSReader and Training Materials .................................................................. 29
Installing Training Materials When Installing MAGic .................................. 29
Installing Training Materials Later .............................................................. 30
Starting and Using FSReader.................................................................... 30
Updating MAGic............................................................................................. 31
Checking for Updates ................................................................................ 31
Downloading Special Updates................................................................... 32
Disabling Automatic Updates .................................................................... 33
Chapter 2 Navigating MAGic .............................................................. 35
Use Your Mouse and Your Keyboard ............................................................ 35
Using the Keyboard with MAGic .................................................................... 35

v
The MAGic Key ......................................................................................... 35
Customizing the Keyboard ........................................................................ 36
Using the Mouse with MAGic ......................................................................... 36
Point and Click .......................................................................................... 36
Left-Click vs. Right-Click ........................................................................... 37
Mouse Wheel Commands ......................................................................... 37
Using the MAGic Context Menu ..................................................................... 37
Chapter 3 User Interface ..................................................................... 39
User Interface Basics ..................................................................................... 39
Split Buttons .................................................................................................. 40
Focus Indicator .............................................................................................. 41
Keyboard Navigation of the User Interface .................................................... 42
User Interface Keystrokes ......................................................................... 42
Buttons and Other Controls ....................................................................... 43
Visual Tab and Buttons .................................................................................. 43
Speech Tab and Buttons ............................................................................... 45
Tools Tab and Buttons ................................................................................... 46
MAGic Menus ................................................................................................ 48
Chapter 4 Customizing MAGic ........................................................... 51
Choosing Color Enhancements ..................................................................... 52
Choosing a Magnification Level ..................................................................... 52
Adjusting the Mouse Pointer .......................................................................... 53
Adjusting the Cursor ...................................................................................... 54
Adjusting Focus ............................................................................................. 54
Choosing a Magnification View ...................................................................... 54
Saving Visual Settings ................................................................................... 55
Speech Settings ............................................................................................ 55
Full Speech or Speech On Demand .............................................................. 56
Speech Rate .................................................................................................. 56
Mouse and Typing Echo ................................................................................ 56

vi
Selecting a Voice for MAGic .......................................................................... 57
Saving Voice Setting ...................................................................................... 57
Chapter 5 Visual.................................................................................. 59
Visual Tab Overview ...................................................................................... 59
Visual Enhancements On/Off Button ......................................................... 60
1x Toggle Button ....................................................................................... 60
Magnification Level Buttons ...................................................................... 61
Magnification Views List ............................................................................ 62
View Properties ......................................................................................... 63
Resize View .............................................................................................. 67
Mouse Enhancements Button ................................................................... 68
Cursor Enhancements Button ................................................................... 69
Color Enhancements Button ..................................................................... 69
Focus Enhancements Button .................................................................... 70
Visual Menu Overview ................................................................................... 70
Display ...................................................................................................... 71
Mouse Enhancements............................................................................... 73
Mouse, Cursor, and Color Schemes ......................................................... 77
Cursor Enhancements............................................................................... 79
Color Enhancements ................................................................................. 82
Focus Enhancements ............................................................................... 85
Locator ...................................................................................................... 86
Panning ..................................................................................................... 88
Tracking .................................................................................................... 90
Multi-Monitor Settings................................................................................ 92
Multi-Monitor Operation ................................................................................. 96
Turning On Multi-Monitor Mode ................................................................. 96
Configuring Multi-Monitor Mode ................................................................ 96
Using View Lock ........................................................................................ 98
Multi-Monitor Keystrokes ........................................................................... 98
vii
Troubleshooting ........................................................................................ 99
Multi-Monitor Configuration .......................................................................... 100
System Requirements ............................................................................. 100
Windows Configuration ........................................................................... 100
Chapter 6 Speech ............................................................................. 103
Speech Tab Overview ................................................................................. 103
Speech Button......................................................................................... 104
Voice Profiles Button ............................................................................... 105
Mouse Echo Button ................................................................................. 106
Typing Echo Button ................................................................................. 106
Speech Menu Overview ............................................................................... 106
Voices ..................................................................................................... 107
Voice Group Box ..................................................................................... 110
Say All Group Box ................................................................................... 113
Selecting a Voice Profile ......................................................................... 115
Mouse Echo ............................................................................................ 117
Typing Echo ............................................................................................ 118
Verbosity ................................................................................................. 120
Verbosity Scheme ................................................................................... 122
Reading Options ..................................................................................... 125
Spotlight Options ..................................................................................... 126
Sound Cards ........................................................................................... 128
Speech On Demand .................................................................................... 130
What is Speech On Demand? ................................................................. 130
Switching to Speech On Demand Mode .................................................. 131
Changing Speech On Demand Settings .................................................. 131
Designating an Action for Speech On Demand ....................................... 132
Default Actions and Hot Keys .................................................................. 133
Chapter 7 Tools................................................................................. 135
Tools Tab Overview ..................................................................................... 135

viii
Links List Button ...................................................................................... 135
Headings List Button ............................................................................... 136
Skim Read Button ................................................................................... 137
Research It Button .................................................................................. 137
Keyboard Manager Button ...................................................................... 139
Dictionary Manager Button ...................................................................... 139
Script Manager Button............................................................................. 140
Tools Menu Overview .................................................................................. 140
Keyboard Manager .................................................................................. 141
Dictionary Manager ................................................................................. 146
Quick View Frame ................................................................................... 150
Chapter 8 Application Specific Functions ......................................... 155
MAGic Help System ..................................................................................... 155
Keyboard Manager ...................................................................................... 155
Chapter 9 Contacting Freedom Scientific ......................................... 157
Freedom Scientific Web Site ........................................................................ 157
Sales ........................................................................................................... 157
Technical Support ........................................................................................ 158
Appendix A Remote Access ............................................................. 159
System Requirements ................................................................................. 159
Server System Requirements.................................................................. 159
Client System Requirements ................................................................... 160
User and Shared Profiles for Remote Access .............................................. 160
Assigning Access Privileges ........................................................................ 161
Remote Access Installation Instructions ....................................................... 161
Installing MAGic on the Server ................................................................ 161
Installing MAGic on Client Computers ..................................................... 162
Authorizing MAGic for Remote Access ........................................................ 163
Starting a Terminal Session ......................................................................... 163
ix
Ending a Terminal Session .......................................................................... 164
Appendix B SAPI Synthesizers on a Network ................................... 165
Appendix C Hot Keys ........................................................................ 167
General ........................................................................................................ 167
General Layer .............................................................................................. 168
Magnification, Views, and Enhancements .................................................... 168
Panning and Screen Movement ................................................................... 169
Tracking ....................................................................................................... 170
Cursor Movement ........................................................................................ 170
Locator Mode ............................................................................................... 171
Quick View Frame ....................................................................................... 171
Speech ........................................................................................................ 172
Document and Text Reading ....................................................................... 173
Dialog Box Reading ..................................................................................... 175
Table Reading ............................................................................................. 175
Table Layer Keystrokes ............................................................................... 176
Typing Echo ................................................................................................. 178
Mouse Echo ................................................................................................. 178
Multi-Monitor ................................................................................................ 179
Appendix D Windows Shortcut Keys ................................................ 181
General ........................................................................................................ 181
For Windows and Menus ............................................................................. 181
For Dialog Boxes ......................................................................................... 182
For Reading Text ......................................................................................... 182
For Editing Text ........................................................................................... 183
For Windows Explorer ................................................................................. 184
Index ................................................................................................. 185

1
Introduction –
MAGic User’s Guide
About This Book
The MAGic® User’s Guide teaches you to use and customize MAGic’s magnification and speech capabilities to fit your personal needs. In the front of the book, you can find perforated keystroke reference cards that contain a list of important MAGic commands.
The following briefly highlights the sections of this book:
Chapter 1 – Quick Start Guide gives you the basics to get up and running with MAGic.
Chapter 2 – Navigating MAGic explains how to use your keyboard and mouse with MAGic.
Chapter 3 – User Interface provides details on the buttons and other options available on the MAGic user interface.
Chapter 4 – Customizing MAGic serves as a guide for first time users when setting their visual and speech preferences.
Chapter 5 – Visual describes how to customize MAGic’s magnification features, including mouse, cursor, color enhancements, and multi-monitor operation.
Chapter 6 – Speech explains how you can customize how MAGic uses synthesized speech to read text on your screen.
Chapter 7 – Tools provides information on customizing MAGic’s keystrokes.
Chapter 8 – Application Specific Functions describes how to find information about MAGic commands that you can use in Microsoft Word, Excel, and Internet Explorer.
Chapter 9 – Contacting Freedom Scientific tells you how to find our Web site and contact technical support.

2
Items Checklist
The following items are included in your MAGic package. If you discover damaged or missing items, please contact your retailer.
MAGic® Screen Magnification and JAWS® for Windows® program DVD with Vocalizer Direct speech synthesizer, FSReader (Freedom Scientific’s DAISY book reader), and basic training files in DAISY book format
Authorization CD
MAGic User’s Guide
MAGic Quick Start Guide

3
Chapter 1 Quick Start Guide
Welcome to MAGic
MAGic is a software solution ideally suited for computer users with low vision, or anyone who spends extended periods of time in front of a computer screen.
MAGic lets you magnify your computer screen from 1 to 36 times its usual size. You can choose from a number of different adjustable views that let you see both a magnified and unmagnified portion of the screen at the same time.
Speech features assist you in processing the information on your screen. MAGic can read text that you type or point at with the mouse. MAGic moves the magnified area of the screen so you always see the text being read and spotlighted as it is spoken.
If you want to limit the amount of speaking performed by MAGic as you navigate windows and documents, use the Speech On Demand™ feature. It allows MAGic to only announce actions that are associated with a limited set of hot keys. Mouse echo is still available when using Speech On Demand.
Mouse and cursor enhancements help you track the location of the mouse pointer and cursor on the screen. You can choose from a wide variety of enhancement styles. MAGic lets you change the color of these enhancements, apply transparency effects, adjust their size, and more.
Color enhancements let you change how colors display on your screen. You can create rules that replace one color with another or switch two colors. You can also apply color tinting; make your screen black-and-white (monochrome), and invert the brightness and colors of your display.
Other MAGic features track elements of your screen, such as the mouse pointer, dialog boxes, and so on. The Locator feature provides you with a way to quickly find and move to different areas of the screen. The MAGic multi-directional panning system gives you complete control with adjustable speed, direction, stop and start, and screen navigation controls.
4
System Requirements
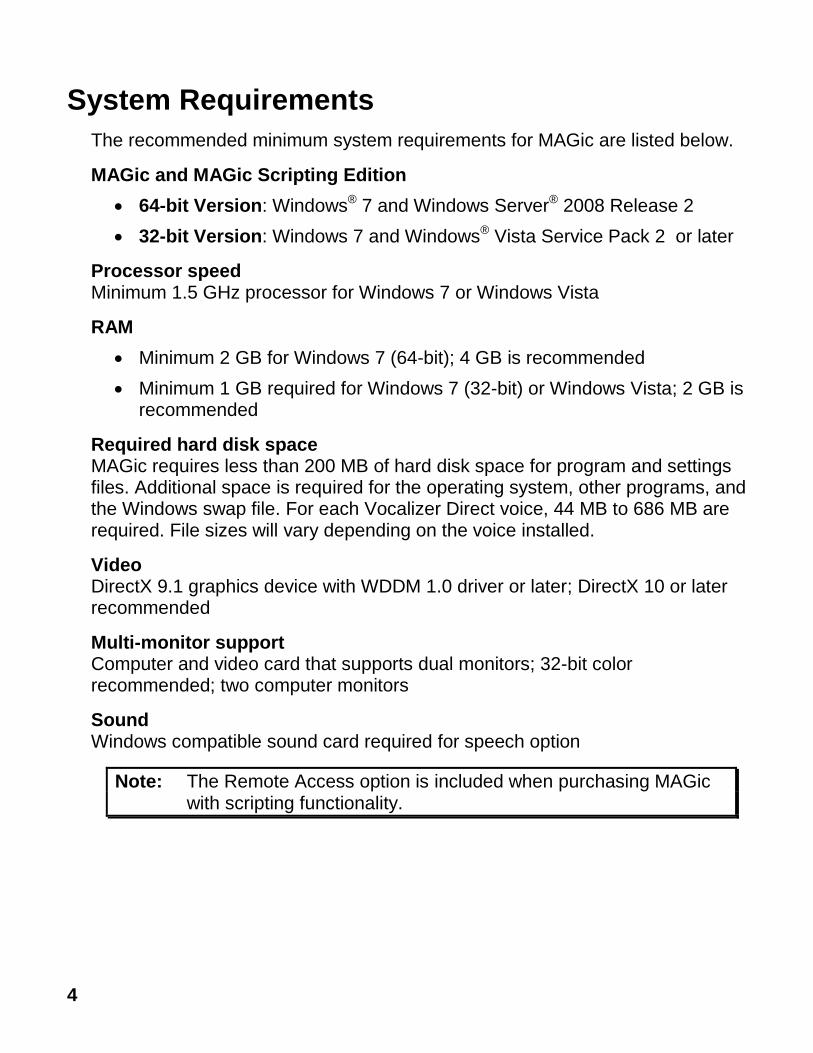
The recommended minimum system requirements for MAGic are listed below.
MAGic and MAGic Scripting Edition
64-bit Version: Windows® 7 and Windows Server® 2008 Release 2
32-bit Version: Windows 7 and Windows® Vista Service Pack 2 or later
Processor speed Minimum 1.5 GHz processor for Windows 7 or Windows Vista
RAM
Minimum 2 GB for Windows 7 (64-bit); 4 GB is recommended
Minimum 1 GB required for Windows 7 (32-bit) or Windows Vista; 2 GB is recommended
Required hard disk space MAGic requires less than 200 MB of hard disk space for program and settings files. Additional space is required for the operating system, other programs, and the Windows swap file. For each Vocalizer Direct voice, 44 MB to 686 MB are required. File sizes will vary depending on the voice installed.
Video DirectX 9.1 graphics device with WDDM 1.0 driver or later; DirectX 10 or later recommended
Multi-monitor support Computer and video card that supports dual monitors; 32-bit color recommended; two computer monitors
Sound Windows compatible sound card required for speech option
Note: The Remote Access option is included when purchasing MAGic with scripting functionality.
5
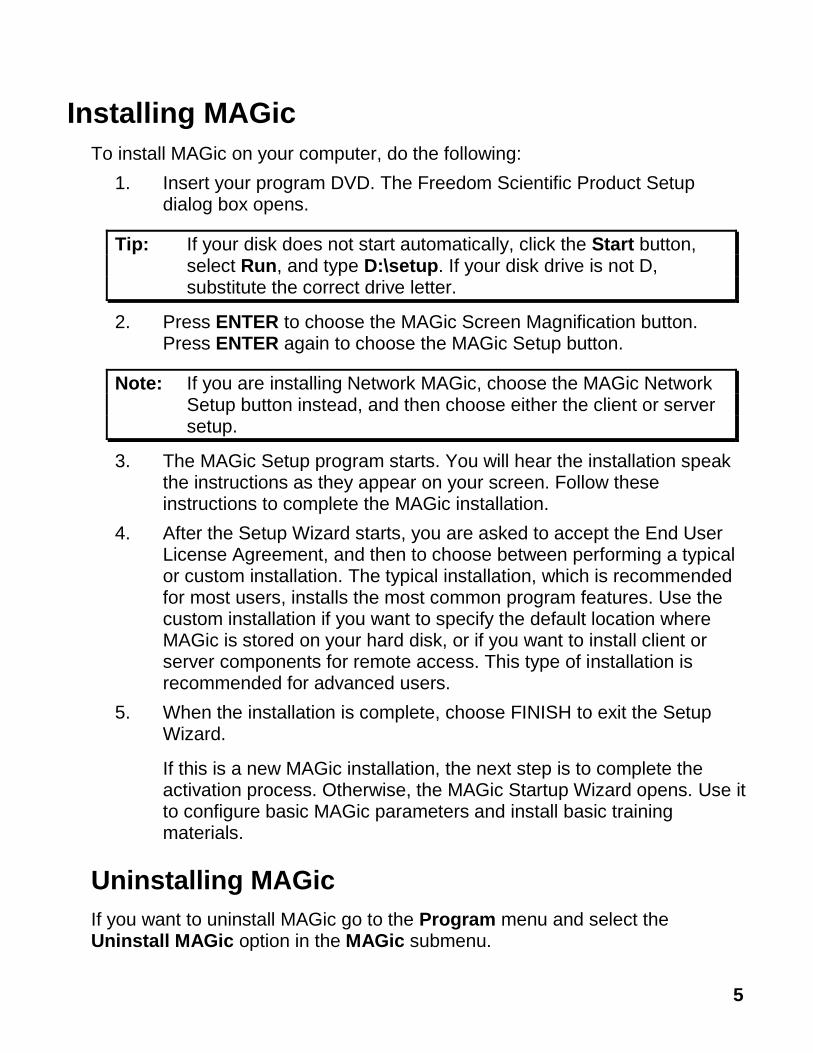
Installing MAGic
To install MAGic on your computer, do the following:
1. Insert your program DVD. The Freedom Scientific Product Setup dialog box opens.
Tip: If your disk does not start automatically, click the Start button, select Run, and type D:\setup. If your disk drive is not D, substitute the correct drive letter.
2. Press ENTER to choose the MAGic Screen Magnification button. Press ENTER again to choose the MAGic Setup button.
Note: If you are installing Network MAGic, choose the MAGic Network Setup button instead, and then choose either the client or server setup.
3. The MAGic Setup program starts. You will hear the installation speak the instructions as they appear on your screen. Follow these instructions to complete the MAGic installation.
4. After the Setup Wizard starts, you are asked to accept the End User License Agreement, and then to choose between performing a typical or custom installation. The typical installation, which is recommended for most users, installs the most common program features. Use the custom installation if you want to specify the default location where MAGic is stored on your hard disk, or if you want to install client or server components for remote access. This type of installation is recommended for advanced users.
5. When the installation is complete, choose FINISH to exit the Setup Wizard.
If this is a new MAGic installation, the next step is to complete the activation process. Otherwise, the MAGic Startup Wizard opens. Use it to configure basic MAGic parameters and install basic training materials.
Uninstalling MAGic
If you want to uninstall MAGic go to the Program menu and select the Uninstall MAGic option in the MAGic submenu.
6
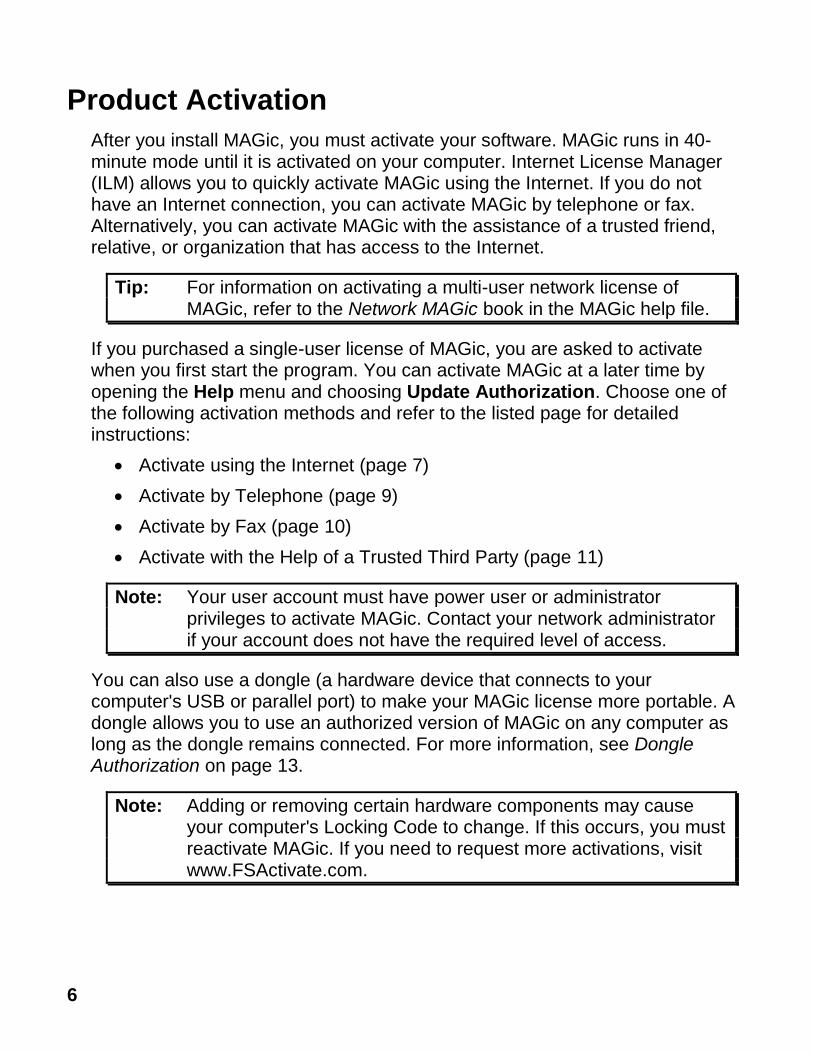
Product Activation
After you install MAGic, you must activate your software. MAGic runs in 40-minute mode until it is activated on your computer. Internet License Manager (ILM) allows you to quickly activate MAGic using the Internet. If you do not have an Internet connection, you can activate MAGic by telephone or fax. Alternatively, you can activate MAGic with the assistance of a trusted friend, relative, or organization that has access to the Internet.
Tip: For information on activating a multi-user network license of MAGic, refer to the Network MAGic book in the MAGic help file.
If you purchased a single-user license of MAGic, you are asked to activate when you first start the program. You can activate MAGic at a later time by opening the Help menu and choosing Update Authorization. Choose one of the following activation methods and refer to the listed page for detailed instructions:
Activate using the Internet (page 7)
Activate by Telephone (page 9)
Activate by Fax (page 10)
Activate with the Help of a Trusted Third Party (page 11)
Note: Your user account must have power user or administrator privileges to activate MAGic. Contact your network administrator if your account does not have the required level of access.
You can also use a dongle (a hardware device that connects to your computer's USB or parallel port) to make your MAGic license more portable. A dongle allows you to use an authorized version of MAGic on any computer as long as the dongle remains connected. For more information, see Dongle Authorization on page 13.
Note: Adding or removing certain hardware components may cause your computer's Locking Code to change. If this occurs, you must reactivate MAGic. If you need to request more activations, visit www.FSActivate.com.
7
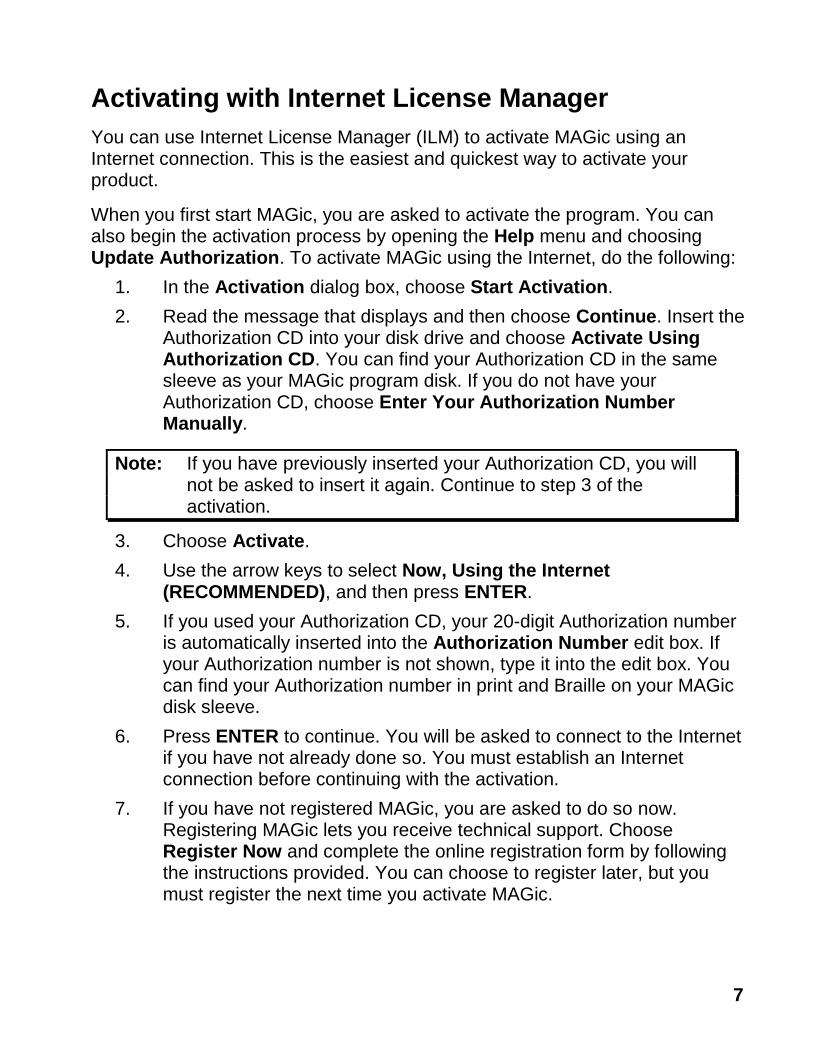
Activating with Internet License Manager
You can use Internet License Manager (ILM) to activate MAGic using an Internet connection. This is the easiest and quickest way to activate your product.
When you first start MAGic, you are asked to activate the program. You can also begin the activation process by opening the Help menu and choosing Update Authorization. To activate MAGic using the Internet, do the following:
1. In the Activation dialog box, choose Start Activation.
2. Read the message that displays and then choose Continue. Insert the Authorization CD into your disk drive and choose Activate Using Authorization CD. You can find your Authorization CD in the same sleeve as your MAGic program disk. If you do not have your Authorization CD, choose Enter Your Authorization Number Manually.
Note: If you have previously inserted your Authorization CD, you will not be asked to insert it again. Continue to step 3 of the activation.
3. Choose Activate.
4. Use the arrow keys to select Now, Using the Internet (RECOMMENDED), and then press ENTER.
5. If you used your Authorization CD, your 20-digit Authorization number is automatically inserted into the Authorization Number edit box. If your Authorization number is not shown, type it into the edit box. You can find your Authorization number in print and Braille on your MAGic disk sleeve.
6. Press ENTER to continue. You will be asked to connect to the Internet if you have not already done so. You must establish an Internet connection before continuing with the activation.
7. If you have not registered MAGic, you are asked to do so now. Registering MAGic lets you receive technical support. Choose Register Now and complete the online registration form by following the instructions provided. You can choose to register later, but you must register the next time you activate MAGic.

8
8. After you submit your registration, Internet License Manager attempts to activate MAGic. This process may take several minutes. When the activation is successful, choose Finish.
Note: If Internet License Manager cannot activate MAGic because of your firewall software, see Troubleshooting Firewall Software on page 8.
Troubleshooting Firewall Software
Firewalls protect computer systems from being accessed by unauthorized users. Some network or personal firewall software may interfere with the installation, activation, or usage of MAGic. The following information will help you reconfigure your firewall to work with MAGic. Refer to your firewall software documentation for more information on allowing access for programs and files.
Note: Hardware firewalls do not interfere with installing, activating, or running MAGic.
Firewall Interferes with Installation
If your firewall software is preventing you from installing MAGic on your computer, reconfigure the firewall to allow the file Setup.exe to run. Then retry the installation procedure.
Firewall Interferes with Activation
If your firewall software prevents you from activating MAGic using the Internet, reconfigure the firewall to allow the following files to run: FSActivate.exe, CAUtil.exe, and CAUtil.enu. Once you have reconfigured your firewall, retry the activation process. If you cannot reconfigure the firewall, or if you still cannot activate MAGic, go to www.FSActivate.com. Follow the instructions on the Web page to retrieve an Activation License code and activate your software. For more information on using www.FSActivate.com, see Activating through a Trusted Third Party on page 11.
Firewall Interferes with Using MAGic
If the firewall software prevents MAGic from running or starting, or displays a warning message, reconfigure the firewall to allow the file JFW.exe to run.
9
Advanced Troubleshooting Information
For a complete list of all files that need to be allowed by your firewall software, including the connection type, incoming port, and outgoing port, refer to Advanced Troubleshooting in the MAGic help file.
Activating by Telephone
If you do not have an Internet connection, you can call Freedom Scientific Customer Service. Customer Service will send you a CD in the mail that will automatically activate MAGic.
When you first start MAGic, you are asked to activate the program. You can also begin the activation process by opening the Help menu and choosing Update Authorization. To activate MAGic by telephone, do the following:
1. In the Activation dialog box, choose Start Activation.
2. Read the message that displays and then choose Continue. Insert the Authorization CD into your disk drive and choose Activate Using Authorization CD. You can find your Authorization CD in the same sleeve as your MAGic program disk. If you do not have your Authorization CD, choose Enter Your Authorization Number Manually.
Note: If you have previously inserted your Authorization CD, you will not be asked to insert it again. Continue to step 3 of the activation.
3. Choose Activate.
4. Use the arrow keys to select Telephone to Receive Activation by Mail, and then press ENTER.
5. Call (727) 803-8015. Provide the customer service representative with the Authorization number and Locking code shown in this dialog box. If your Authorization number is not shown, you can find it in print and Braille on your MAGic disk sleeve.
6. Choose Quit. You can continue using MAGic in 40-minute mode until you receive your CD.
When you receive the CD with your Activation License code from Freedom Scientific, insert it into your disk drive to automatically activate MAGic.

10
Note: If the CD does not automatically activate your software, press WINDOWS Key+R, type "D:\ActivationCode.exe" and press ENTER. If your disk drive is not D, then substitute the correct letter.
Activating by Fax
If you do not have an Internet connection, you can send a fax to Freedom Scientific with your Authorization number and Locking code. You will then receive an Activation License code either in an e-mail message or on a CD.
When you first start MAGic, you are asked to activate the program. You can also begin the activation process by opening the Help menu and choosing Update Authorization. To activate MAGic by fax, do the following:
1. In the Activation dialog box, choose Start Activation.
2. Read the message that displays and then choose Continue. Insert the Authorization CD into your disk drive and choose Activate Using Authorization CD. You can find your Authorization CD in the same sleeve as your MAGic program disk. If you do not have your Authorization CD, choose Enter Your Authorization Number Manually.
Note: If you have previously inserted your Authorization CD, you will not be asked to insert it again. Continue to step 3 of the activation.
3. Choose Activate.
4. Use the arrow keys to select Fax, and then press ENTER.
5. Complete the form by typing the required information into the edit boxes. If you want to receive your Activation License code in an e-mail message, enter your e-mail address. If you do not enter an e-mail address, Freedom Scientific will send you a CD in the mail that will automatically activate MAGIC.
6. If you used your Authorization CD, your 20-digit Authorization number is automatically inserted into the Authorization Number edit box. If your Authorization number is not shown, type it into the edit box. You can find your Authorization number on your MAGIC disk sleeve.

11
7. Choose Print to send the form to your printer. After you have printed the form, choose Quit.
8. Fax the printed form to (727) 803-8001.
If you entered your e-mail address, you should receive an e-mail message from Freedom Scientific within one or two business days. Follow the instructions provided in the message to activate MAGIC. If you do not enter an e-mail address, you will receive a CD from Freedom Scientific in the mail. Insert the CD into your disk drive to automatically activate MAGIC.
Note: If the CD does not automatically activate your software, press WINDOWS Key+R, type "D:\ActivationCode.exe" and press ENTER. If your disk drive is not D, then substitute the correct letter.
Activating through a Trusted Third Party
If you know a friend, relative, or other trusted person with an Internet connection, they can help you activate MAGic. Alternatively, you can use an Internet connection in a library, at work, or anywhere else. You or a trusted third party can visit www.FSActivate.com to obtain your Activation License code.
Tip: A free program from Freedom Scientific called Activation Media Image Creator lets you create a CD, 3.5-inch disk, or e-mail attachment containing MAGic license information.
To obtain an Activation License code from FSActivate.com, do the following:
1. Point your Web browser to http://www.FSActivate.com.
2. Enter your 20-digit Authorization number and Locking code. Your Authorization number appears on your MAGic program disk sleeve in both print and braille. To find your computer's Locking code, open the MAGic Help menu and choose About.
Note: The Locking code is unique for each individual computer. Be sure you enter the Locking code of the computer you intend to use with MAGic when it is activated.

12
3. Choose Submit License Request to receive an Activation License code.
4. The remaining steps must be completed on the computer where the copy of MAGic you want to activate is installed. Begin by starting MAGic on this computer. From the MAGic Help menu, choose Update Authorization.
5. In the Activation dialog box, choose Start Activation.
6. Read the message that displays and then choose Continue. Insert the Authorization CD into your disk drive and choose Activate Using Authorization CD. You can find your Authorization CD in the same sleeve as your MAGic program disk. If you do not have your Authorization CD, choose Enter Your Authorization Number Manually.
Note: If you have previously inserted your Authorization CD, you will not be asked to insert it again. Continue to step 7 of the activation.
7. Choose Activate.
8. Use the arrow keys to select the Activation Generated from www.FSActivate.com radio button and press ENTER.
9. Type the Activation License code you received from www.FSActivate.com into the edit box and then press ENTER.
10. After you have successfully activated MAGic, choose Finish to complete the process.
Using Activation Media Image Creator
Activation Media Image Creator is a free program from Freedom Scientific that allows a user with an Internet connection to retrieve Activation License codes from Internet License Manager. The user can then distribute these Activation License codes on CD, 3.5-inch disk, or e-mail. Users without Internet connections can use the files created by this program to activate MAGic without having to type the lengthy Activation License code.
To download the installation package for Activation Media Image Creator, visit www.FSActivate.com. After you install the program, follow the instructions in the Activation Media Image Creator online Help to retrieve and distribute Activation License codes from Internet License Manager.
13
Dongle Authorization
A dongle is a hardware device that you can connect to a computer's parallel or USB port (depending on the type of dongle). MAGic is authorized to run on that computer as long as the dongle remains connected. This is useful if you frequently need to use MAGic on many different computers and do not want to activate the program on each of them.
When MAGic starts, it first determines whether a dongle is connected to the computer. If one is connected, MAGic uses the features and information for the license associated with the dongle to authorize MAGic. If no dongle is connected, MAGic searches for the license information stored on the computer. You can use the Dongle Viewer utility to view information on the license associated with the dongle currently connected to your computer. To start this utility, go to the MAGic program group, open the Tools submenu, and choose Dongle Viewer.
Note: It is recommended that you do not connect the dongle to your computer until after you install MAGic. If the dongle was connected before or during installation, you must restart your computer to receive proper authorization.
Dongles are sold separately or as an additional MAGic feature. Contact Freedom Scientific Sales if you want to purchase one.
Note: Certain international versions of MAGic require a dongle for authorization. Using one of these versions without a dongle displays an error message.
MAGic Startup Wizard
The MAGic Startup Wizard is a helpful tool that lets you configure specific MAGic parameters, such as the default magnification setting, hot key assignment, and startup preferences. In addition, you can install basic training materials. The wizard launches after you install and activate the software. You can always run it later from the MAGic Help menu by pressing ALT+H and choosing Startup Wizard.
The Startup Settings that appear when running the wizard let you define if and how MAGic loads when you start Windows. The options that appear will vary depending on your operating system.
14
Startup Settings
The Startup Settings dialog box contains several check boxes. If you use the default settings, MAGic will always load and run before and after you launch Windows. This dialog box contains the following items:
Select the Start MAGic at the Log On screen check box so that MAGic loads and starts when the Windows log on screen appears. The check box is selected by default. If you have Standard user rights, you cannot change the value of this check box, and MAGic will ignore and not announce the check box.
If the Start MAGic after log on for all users check box is selected, MAGic loads and starts after you log on to Windows. It is cleared by default. If you have Standard user rights, you cannot change the value of this check box, and MAGic will ignore and not announce the check box.
The Start MAGic after log on for this user combo box lets an individual control if MAGic starts after he or she logs on to Windows. If Always is selected, MAGic starts every time the current user logs on. Always is the default setting value. If Never is selected, MAGic will not start after the user logs on. If Using the All Users Setting is selected, then the following can happen: MAGic starts after the user logs on if the Start MAGic after log on for all users check box is selected, or MAGic does not start if the same check box is cleared.
Select the Run MAGic from System Tray check box to prevent the MAGic button from appearing in the Windows taskbar, which is located at the bottom of the screen, with other programs that are currently running. Instead, the MAGic icon appears in the Windows system tray, which is located in the bottom right corner of the screen, to indicate that MAGic is running. Finally, when this check box is selected, the MAGic icon does not appear in the list of active windows when you press ALT+TAB. This check box is cleared by default.
If the Minimize on Startup check box is selected, the MAGic user interface is minimized when MAGic starts. To open the user interface, choose the MAGic button in the taskbar, or press MAGic Key+U. This check box is cleared by default.

15
Installing Vocalizer Direct Synthesizer
Included on the program DVD is the Vocalizer Direct speech synthesizer. It contains a variety of voices in several languages. To install these voices, insert the DVD into your computer's disk drive. Next, follow the instructions to select which voices you want to install, and complete the installation.
After fully installing MAGic, you can sample and download other Vocalizer Direct voices by visiting www.freedomscientific.com, selecting Downloads, and then Vocalizer Direct Voices.
Note: Contact your international distributor for additional languages.
MAGic Program Group
After installing MAGic, the MAGic Program Group is created. To open it, click the Start button, choose All Programs, and then MAGic <version number>. The contents of the MAGic program group display in the MAGic submenu.
Within the MAGic program group, you will find the following:
Help – Opens the online help system
MAGic – Launches the MAGic program
Explore MAGic – See description below
Tools – See description below
16
Explore MAGic
This folder provides shortcuts to folders containing your user settings, shared settings, and program files.
Explore My Settings – Opens the folder containing your user-specific MAGic settings. When you create new schemes or modify factory schemes, MAGic saves them in this folder. Your custom settings are also saved in this folder.
Explore Program Files – Opens the folder where you installed MAGic, allowing you to access the program files.
Explore Shared Settings – Opens the folder containing your shared MAGic settings. Factory schemes and default factory settings are saved in this folder.
Tools Folder
This folder contains the following MAGic utilities:
Dongle Viewer – Allows you to view license information for the dongle currently connected to your computer. For more information on using a dongle to authorize MAGic, refer to Dongle Authorization on page 13.
MAGic Network Administrator – Network administrators use this to add, delete, and modify user settings of MAGic in a network environment.
Uninstall MAGic – Used to uninstall MAGic from your computer.
ILM Authorization Viewer – Allows you to view details of your ILM software licenses.
Remove Product Activation – Allows you to delete your ILM licenses for all versions of MAGic installed on this computer. Until you acquire a new license, you will only be able to use MAGic in 40-minute mode.
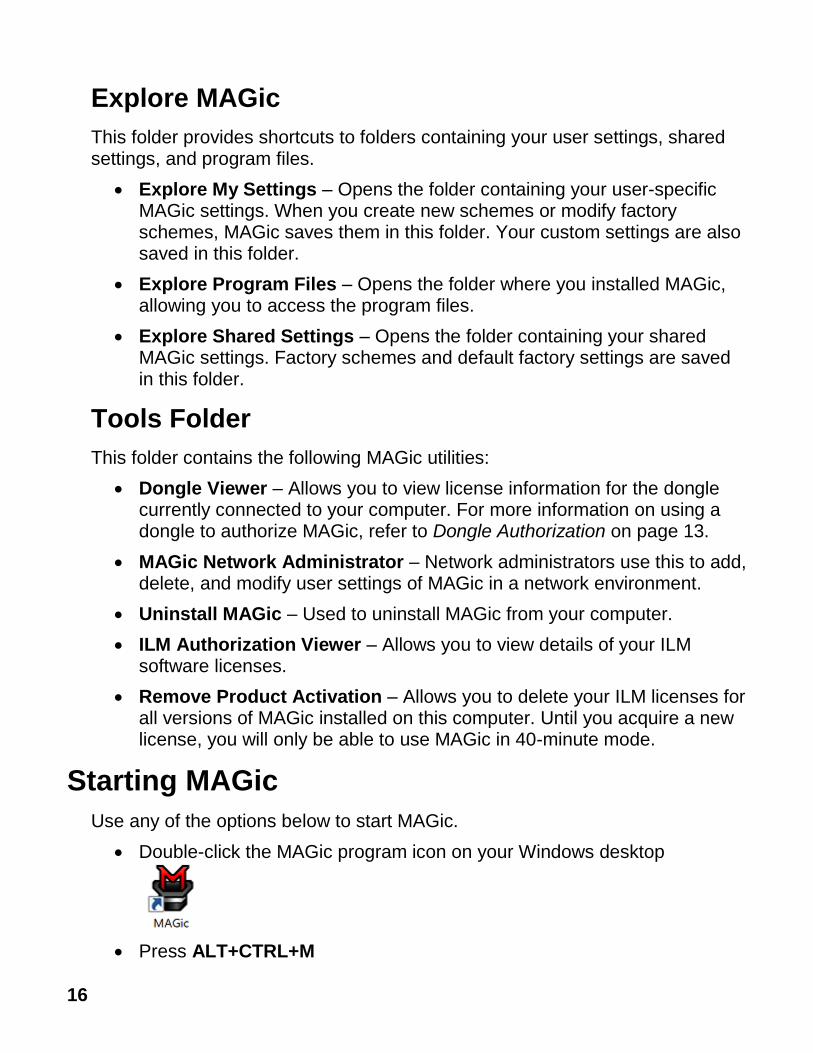
Starting MAGic
Use any of the options below to start MAGic.
Double-click the MAGic program icon on your Windows desktop
Press ALT+CTRL+M
17
Press WINDOWS Key+R, type "MAGic<version number>" (without the quotes or spaces), and press ENTER
Click the Start menu and choose All Programs, MAGic <version number>, MAGic. See MAGic Programs Group on page 15 for more information.
MAGic’s factory setting is to display the screen in Full view mode with 2x magnification. Speech is also enabled (if your software is licensed for speech). You can then change the magnification level, magnified view, speech, and many other options in the MAGic user interface and Main menu.
For information about the user interface, see page 39.
Quitting MAGic
To quit MAGic, do one of the following:
Press ALT+F4
Click the Close button in the top right hand corner of the window.
Select Exit from the File menu.
Tip: If you want MAGic to ask you to save your settings when you quit, open the File menu and choose Preferences. Select the Prompt to Save Settings on Exit check box.
MAGic Key and Hot Keys
The MAGic Key is the CAPS LOCK key on your keyboard. Pressing the MAGic Key in combination with other keys activates a number of MAGic commands. If you want to assign the MAGic Key to a different key on your keyboard, choose the Tools tab, and then Keyboard. For more information about the MAGic Key, see Chapter 2 Navigating MAGic on page 35 or MAGic Key on page 144.
In addition to the menus, magnification, and speech buttons, there are a number of keyboard hot keys you can use at any time to read text, change how MAGic magnifies your screen, or perform a variety of other functions. For a complete list of hot keys, refer to Appendix C MAGic Hot Keys on page 167.
18
Reading Text with MAGic
MAGic can use synthesized speech to read text that appears on your screen, including documents, menus, dialog boxes, e-mail messages, Web pages, and more. Additionally, MAGic can spotlight the text as it is spoken. To customize MAGic’s speech, use the commands available on the Speech menu.
Tip: You can silence MAGic’s speech at any time by pressing CTRL. To toggle speech on or off, press MAGic Key+F3.
Using the Mouse to Read Text
Mouse echo is a feature that allows you to read text with your mouse. To use mouse echo, just move your mouse pointer to some text on your screen and then stop. After a short delay, MAGic will speak the word you pointed to. You can use the Mouse Echo button to enable or disable this feature. For more information, refer to Mouse Echo on page 106.
In addition, you can hold down the MAGic Key and press the left mouse button to start reading from the current location of the mouse pointer. You do not need to hold down the MAGic Key while MAGic reads. MAGic stops reading when you move the mouse or press a key.
Using the Keyboard to Read Text
MAGic has a number of different keystrokes that let you use the keyboard to read text. To use these keystrokes, move the insertion point or mouse pointer to any location within the document. Then press one of the following key combinations to read from that location:
Note: By default, the MAGic Key is assigned to the CAPS LOCK key. To change this, open the Tools menu, choose Keyboard Manager, and then choose the MAGic Key button.
To begin reading from your current location, press INSERT+DOWN ARROW.
To read the current character, press NUM PAD 5.
To read the current word, press MAGic Key+ALT or INSERT+NUM PAD 5. To spell the current word, press the keystroke twice quickly.
To read the next word, press INSERT+RIGHT ARROW. To read the previous word, press INSERT+LEFT ARROW.
19
To read the current line, press MAGic Key+L or INSERT+UP ARROW. To read the next line, press DOWN ARROW. To read the previous line, press UP ARROW.
To read from the beginning of the line to the current position of the cursor, press INSERT+HOME. To read from the current position of the cursor to the end of the line, press INSERT+PAGE UP.
To read the current sentence, press MAGic Key+S. To read the next sentence, press MAGic Key+CTRL+S.
To read the current paragraph, press MAGic Key+P. To read the next paragraph, press MAGic Key+CTRL+P or CTRL+DOWN ARROW. To read the previous paragraph, press MAGic Key+ALT+P or CTRL+UP ARROW.
To read text that you have selected, press INSERT+SHIFT+DOWN ARROW.
To hear the contents of the Clipboard, press MAGic Key+X.
To read the contents of the Clipboard using the Clipboard Text Viewer, press MAGic Key+SPACEBAR, followed by C or INSERT+SPACEBAR, followed by C.
When you read text with these keystrokes, MAGic spotlights the word it is currently speaking. To change the color and/or style of this spotlighting, open the Speech menu and choose Spotlight Options.
Reading Text in Dialog Boxes
In addition to the reading commands listed previously, you can use the following keystrokes to hear information in Windows dialog boxes:
To read the title bar of the active window or dialog box, press MAGic Key+T or INSERT+T.
To read the bottom of the active window (which usually contains the status bar), press INSERT+PAGE DOWN. To read the top line of the active window (which usually contains the title bar), press INSERT+END.
To hear the name of the default button that will be activated when you press ENTER, press INSERT+E.
20
To read the currently selected dialog box option (such as an edit box or check box), press MAGic Key+TAB or INSERT+TAB.
To hear the access key for the currently selected dialog box option, press SHIFT+NUM PAD 5.
Typing Echo
If typing echo is enabled, MAGic repeats each character or word that you type. MAGic also speaks the character to the right of the insertion point when you use the arrow keys to move through text. You can use the Typing Echo button to enable or disable this feature. For more information, refer to Typing Echo on page 106.
Saving your MAGic Settings
If you adjust any of the magnification, speech, or other settings in the various dialog boxes, you must save your changes if you want MAGic to use those settings the next time it starts. To save your current settings, open the File menu and choose Save Default Settings or press CTRL+S. These default settings are applied whenever there are no application-specific settings for the program you are using. If you do not save your settings, your changes will be discarded when you quit MAGic.
Tip: MAGic can ask you whether you want to save your changes when you quit the program. To enable this feature, open the File menu and choose Preferences. Then, select the Prompt to Save Settings on Exit check box.
You can recall your default MAGic settings at any time. To do this, open the File menu and choose Open Default Settings or press CTRL+SHIFT+D. These default settings replace your current settings.
Application-Specific Settings
Your usual magnification and speech settings may not be suited to all programs that you use. For this reason, MAGic allows you to save specific groups of settings that are automatically applied while you use certain programs. These are referred to as application-specific settings.

21
For example, if you prefer greater magnification when surfing the Internet, you could create and save settings that are only applied while you are using Internet Explorer. Whenever you are working with Internet Explorer, MAGic will increase the level of magnification. When you quit Internet Explorer or switch to a different program, MAGic will reduce the magnification level. Application-specific settings make it easy to customize MAGic to work well with all of your favorite programs.
To save a group of application-specific settings for a program, do the following:
1. Start the program that you want to create application-specific settings for.
2. From the File menu or the MAGic Context Menu, choose Create Application Settings (where the word Application is the name of the program you are saving settings for).
Tip: The program name displayed on the menu is the last program you used before switching to MAGic. If you are using the MAGic context menu, the program is the one that is currently active. Make sure that the correct program name appears on the menu before creating or saving your settings.
3. Type a name for the application-specific settings file, or use the suggested name. Then, choose OK to create the file.
4. Use the MAGic menus and dialog boxes to select the magnification and speech options that you want to use for this program.
5. From the File menu, choose Save Application Settings (where the word Application is the name of the program you are saving settings for).
The next time you start this program, MAGic will automatically apply the settings you have selected. If you switch to a different program, MAGic returns to your default settings or the settings you have chosen for the other program. When you quit the program, MAGic applies your default settings.

22
Modifying Application-Specific-Settings
If you want to change your current application-specific settings for a program, do the following:
1. Start the program that you want to modify your application-specific settings for.
2. Use the MAGic menus and dialog boxes to select the magnification and speech options that you want to use for this program.
3. From the File menu, choose Save Application Settings (where the word Application is the name of the program settings you are saving).
Managing Application-Specific Settings
You can easily see which programs you have created application-specific settings for. To do this, open the File menu and choose Manage Application Settings. The Manage Application Settings dialog box appears, showing all programs with defined application-specific settings.
If you no longer want MAGic to use the settings you have defined for a program, clear the check box next to the program's name. To quickly clear all the check boxes, choose the Disable All button. You can re-enable any group of application-specific settings by selecting the check box next to the program's name. To quickly select all the check boxes, choose the Enable All button.
To delete an application-specific settings file, select it in the list and then choose the Remove Selected button.
23
Changing Preferences
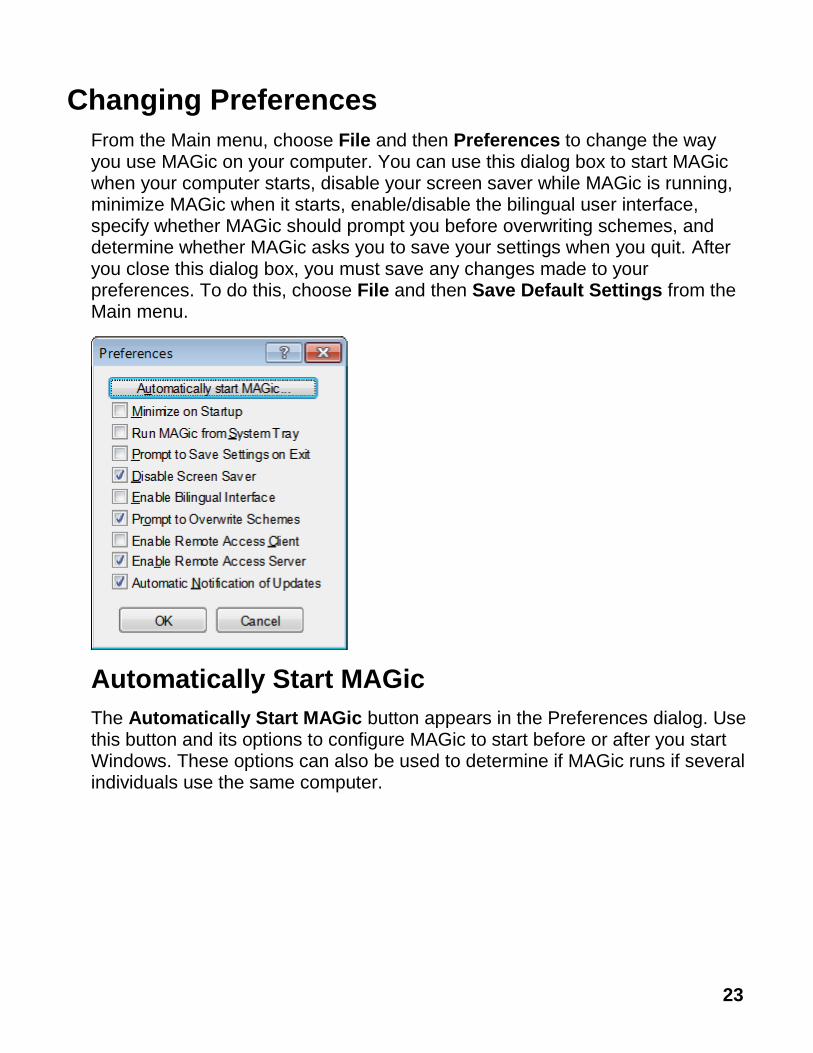
From the Main menu, choose File and then Preferences to change the way you use MAGic on your computer. You can use this dialog box to start MAGic when your computer starts, disable your screen saver while MAGic is running, minimize MAGic when it starts, enable/disable the bilingual user interface, specify whether MAGic should prompt you before overwriting schemes, and determine whether MAGic asks you to save your settings when you quit. After you close this dialog box, you must save any changes made to your preferences. To do this, choose File and then Save Default Settings from the Main menu.
Automatically Start MAGic
The Automatically Start MAGic button appears in the Preferences dialog. Use this button and its options to configure MAGic to start before or after you start Windows. These options can also be used to determine if MAGic runs if several individuals use the same computer.
24
For example, imagine that a couple owns one computer: he uses MAGic and she does not. They can set up separate user accounts so that his account always runs MAGic before and after he logs on, and her account never starts MAGic after she logs on. Another example is when MAGic is used in a classroom or network environment. If several students use MAGic, the network administrator can set up their user accounts so that MAGic is running before and after log on. However, the administrator can configure his account so that MAGic never starts.
The following options appear when you select the Automatically Start MAGic button.
Automatically Start MAGic at the Log On Screen
When this check box is selected, MAGic will load and start when the Windows log on screen appears. The check box is checked by default. Administrator rights are required to change this setting. If you have Standard user rights, you cannot change the value of this check box, and you will not hear it if speech is enabled. Clear this check box if you want speech to be off when the log on screen appears. The check box value applies to all users who log on to this version of MAGic on this computer.
Note: The default setting can always be restored by using the Startup Wizard command that appears under the MAGic Help menu.
Automatically Start MAGic after Log On for All Users
When this check box is selected, MAGic will load and start after you log on to Windows. It is unchecked by default.
Note: The only time that it is necessary to change the value of this check box is if you have an Administrator account on this computer, and you want to control how MAGic starts for all subsequent users who log on to Windows Vista using this computer. If you do not have Administrator rights, you cannot change the value of this check box, and you will not hear it using speech.
25
If you have Standard user rights on this computer, refer to the combo box labeled Start MAGic after log on for this user for information that describes how to start MAGic after logging on to Windows.
Note: The default setting can always be restored by using the Startup Wizard command that appears under the MAGic Help menu.
Start MAGic after Log On for this User
This combo box allows an individual user to control if MAGic starts after he or she logs on to Windows. This combo box has three values: Always, Never, and Using the All Users Setting. The default value is Always.
Note: This combo box is available to users with Administrator and Standard user rights. The value selected for the combo box overrides the value of the Automatically start MAGic after log on for all users check box.
If Always is selected, MAGic will start every time the current user logs on to Windows.
If Never is selected, MAGic will never start after the current user logs-on to Windows.
If the current user selects the value labeled Using the All Users Setting, then the following can happen:
MAGic will start after the current user logs on if the Administrator selected the Automatically start MAGic after log on for all users check box.
MAGic will not start after the current user logs on if the Administrator unchecked the Automatically start MAGic after log on for all users check box.
Note: The default setting can always be restored by using the Startup Wizard command that appears under the MAGic Help menu.
Start MAGic DirectX Helper after Logon for All Users
This check box allows MAGic to provide HD Text and color smoothing in some DirectX drawn applications including Internet Explorer. It is selected by default. There is no need to clear this check box.

26
Minimize on Startup
If you select the Minimize on Startup check box, the MAGic user interface will be minimized when you start the program. Click MAGic Screen Magnification in the taskbar or press MAGic Key+U to display the user interface.
Run MAGic from System Tray
Select the Run MAGic from System Tray check box if you do not want the MAGic window to appear in the Windows taskbar with other programs that you are currently using. In addition, the MAGic window does not appear in the list of active windows when you press ALT+TAB. An icon appears in the Windows system tray (located in the bottom right corner of the screen) to indicate that MAGic is running. Double-click this icon or press MAGic Key+U to display the MAGic program window. If you minimize the MAGic window, it is removed from the taskbar again. Note that you must restart MAGic before any change to this option can take effect.
Prompt to Save Settings on Exit
Select the Prompt to Save Settings on Exit check box if you want MAGic to ask you to save your settings when you quit the program or shut down your computer. If you do not select this check box, you must press CTRL+S or open the File menu and choose Save Settings to save your settings.
Disable Screen Saver
Select the Disable Screen Saver check box if you want to prevent your screen saver from starting while MAGic is running. Your screen saver will be enabled again when you quit MAGic.
Enable Bilingual User Interface
Select the Enable Bilingual User Interface check box to change the language of MAGic’s menus, dialog boxes, and online help system when you switch to a voice profile that uses a different language. The resource files for the language must be installed in order to use this feature. Clear this check box if you do not want to change the language of MAGic’s user interface when you switch to a voice profile that uses a different language.
Note: The current release of MAGic contains only English and Spanish resource files.
27
Prompt to Overwrite Schemes
Select the Prompt to Overwrite Schemes check box if you want MAGic to ask for confirmation before saving a mouse, cursor, or color enhancements scheme with the same name as an existing scheme. If you do not select this check box, MAGic will save the new scheme over the old scheme without asking for confirmation.
Note: Different types of schemes can have the same name. For example, a cursor enhancement scheme can have the same name as a mouse enhancement scheme.
Enable Remote Access Client
Select this check box if you want to use MAGic during terminal sessions. You can clear this check box if you will not be using MAGic when you connect remotely to another computer. You must purchase the remote access option for your software license to use MAGic during terminal sessions.
Enable Remote Access Server
Select this check box if users that connect remotely to your computer will be using MAGic during their terminal sessions. If you clear this check box, remote MAGic users will not have speech access to terminal sessions. You must purchase the remote access option for your software license to use MAGic during terminal sessions.
Automatic Notification of Updates
Select this check box to have MAGic indicate when a software update is available. You then have the option to install it now or later. When this check box is cleared, you will not be alerted when software updates are available. In this case, you must manually check for updates using the update feature in the MAGic Help menu. This check box is selected by default.

28
Getting Help
Online Help System
You can press F1 or use the button to open the MAGic help file. You can also open the file by choosing the Main menu button, the Help submenu, and then Help Topics. The help file provides a full-text search, index, and table of contents to help you find the information you need.
If you want MAGic to read the help topics to you, position the mouse pointer toward the beginning of the help page, and press MAGic Key+SPACEBAR. You can move to the next topic by clicking the "Next" link at the bottom of the page. To return to the previous topic, click the "Back" link.
What’s This? Help
MAGic’s What’s This? help is context-sensitive help that you can use as a reference when working with MAGic’s user interface or dialog boxes. Press SHIFT+F1 on any button on the user interface, or control in a dialog box to see a brief description of the purpose of the control and how to use it.
For mouse users, most dialog boxes contain a button in the top, right corner.
Click the button to change your mouse pointer into the What's This? Help pointer (see below). Move your pointer to the control you need more information about, and click the mouse on the control to see the What’s This? help. If you do not find enough information in the What’s This? help, try referring to the full help system.
What’s This? Help button
What’s This? Help pointer
MAGic User’s Guide
This document contains content available in the MAGic online help system and is printed in large text for easier reading. It contains detailed descriptions of MAGic’s features, and also pull-out reference cards.

29
MAGic Basic Training
Listen to the MAGic Basic Training to learn the fundamentals of using MAGic Screen Magnification. For more information, refer to the training material described on page 29.
Technical Support
If you do not find the answers to questions or problems that you have, contact Freedom Scientific Technical Support, (727) 803-8600.
About MAGic
Select About MAGic from the Help menu on the MAGic user interface to view the version number of MAGic you are currently running.
FSReader and Training Materials
The MAGic program disk includes basic training materials in a digital document format known as DAISY (Digital Accessible Information System). You can listen to and read the training modules by using the FSReader (a demonstration version of Freedom Scientific’s DAISY reader), which is automatically installed with MAGic. By default, at least one DAISY book (FS Getting Started) is also installed.
Installing Training Materials When Installing MAGic
After initially installing MAGic from the MAGic product disk, the MAGic Startup Wizard launches and prompts you to install training materials, which consists of two DAISY books (MAGic Basic Training and What’s New). To install these books, select the Install Training Materials check box, choose NEXT, and follow the remaining on-screen directions.
Note: There is an entire series of training and tutorial DAISY books available for Web download from Freedom Scientific. Use the Check for Updates function, as described in the following section, to select and download additional DAISY books, or visit the Training Web page on the Freedom Scientific Web site.
30
Installing Training Materials Later
If you decide not to install training materials during the initial product installation, you can always use Check for Updates to select, download, and install training files later. To install training materials, do the following:
1. Press ALT+CTRL+M to open the MAGic application window.
2. Press ALT+H to choose the Help menu, and the press P to choose Check for Updates.
3. MAGic searches for and then displays a list of DAISY books available to download. Use the arrow keys to move through the list, and press the SPACEBAR to select the check box next to each book that you want to download and install. You can choose the Details button to view more information about the currently selected book.
4. Choose the Install button to receive the selected books.
5. When complete, a dialog box opens announcing that files were successfully installed. It also states which files were installed. Press ENTER to close the dialog box. Open FSReader to read these books.
Starting and Using FSReader
Do the following to start FSReader from the MAGic dialog:
1. Press ALT+H, T. The Open dialog appears.
2. Select a DAISY book from the Open dialog, and choose the Open button. The selected book appears in FSReader.
3. Press CTRL+P to begin reading the book. Press CTRL+P again to pause reading the book. To fast forward five seconds, press CTRL+PERIOD. To rewind the book five seconds, press CTRL+COMMA.
Note: As long as FSReader is running, CTRL+P will toggle between play and pause. If you want to print while FSReader is active, you must use an application’s Print command.
4. When you are finished reading the book, press ALT+F, O to open another DAISY book, or press ALT+F, X to close and exit FSReader.

31
Updating MAGic
Freedom Scientific is continually seeking to improve and expand MAGIC for Windows. Periodically, updates to MAGic will be released. It is recommended that you keep your software up-to-date so that you experience the greatest possible performance. In addition, Freedom Scientific will also provide new and updated DAISY training materials for you to download.
Checking for Updates
Note: When MAGic starts, it can alert you if a software update is available. You then have the option to install it now or later. This notification method is controlled using the Automatic Notification of Updates check box. To access the check box, choose the Main menu, followed by the File menu, and then Preferences. It is selected by default. If you turn off automatic notification, you must manually check for updates as described below.
Updating your software is quick and easy. To search for updates or new training materials, do the following:
1. Establish a connection to the Internet.
2. Start MAGic.
3. From the Main menu, choose Help, and then Check for Updates.
4. MAGic searches the Internet for updates and displays a list of any that are available to download. Use the arrow keys to move through the list, and press the SPACEBAR to select the check box next to any updates that you want to download and install. You can choose the Details button to view more information about the currently selected update.
32
Note: If your computer has active firewall software (such as Windows Firewall), you may receive a warning indicating that either the FSAutoUpdate Application or FSAutoUpdate.exe is attempting to access the Internet. You must allow this process to access the Internet through the firewall in order to retrieve updates. If you are using Windows Firewall, you can do this by choosing the Unblock button when the warning message displays. For other firewall software, refer to the product's documentation. The firewall must allow MAGic to access the Internet using ports 20 and 21 or port 80.
5. When you are finished selecting updates, choose the Install button. You may be required to restart your computer.
Downloading Special Updates
Some users will be provided with a Freedom Scientific access code so that they can download special or private beta versions of MAGic. To search for these special updates, do the following:
1. Establish a connection to the Internet.
2. Start MAGic.
3. From the Help menu, choose About MAGic.
4. Choose the Special Update Code button.
5. Type your Freedom Scientific special update code in the edit box and then press ENTER.
6. From the Help menu, choose Check for Updates and follow the procedure described in the previous section to download and install updates.

33
Disabling Automatic Updates
If you do not want users to be able to update MAGic by opening the Help menu and choosing Check for Updates, you can disable this feature. This can prevent users from overwriting custom scripts that you have installed by performing an update. Organizations that use special MAGic versions or otherwise want more centralized control over updates may also want to disable this feature. This requires entry of a special access code.
To disable Automatic Updates, do the following:
1. From the Help menu, choose About MAGic.
2. Choose the Special Update Code button.
3. Type the Freedom Scientific special update code in the edit box and then press ENTER.
4. Choose OK to close the About MAGic dialog box. The Help menu will no longer show Check for Updates.

34

35
Chapter 2 Navigating MAGic
Use Your Mouse and Your Keyboard
With MAGic, you can use both your mouse and your keyboard to access most features. You decide what is best for you. Many people use a combination of the two. The MAGic documentation gives you information on how to perform actions with both the keyboard and the mouse. For example, from the Main menu, you can either press F to access the File menu, or you can point and click the word File with the mouse.
Using the Keyboard with MAGic
The MAGic Key
When you use the keyboard in MAGic, the most important thing to know is the MAGic Key. The default MAGic Key is the CAPS LOCK key on your keyboard. Using the MAGic Key in combination with other keys activates a MAGic command if one is assigned; otherwise it will pass the key combination through to the application. Pressing the MAGic Key by itself and releasing it will not carry out any action. You can specify what key you use for your MAGic Key in the MAGic Key dialog box, which is activated from the Keyboard menu. Your choices include: Extended INSERT (found on the six pack), NUM PAD INSERT, either INSERT, or SCROLL LOCK (the key just above HOME).
Pass the MAGic Key Through
If your MAGic Key is set to the default of CAPS LOCK, how do you use your CAPS LOCK key as usual?
Press the CAPS LOCK key twice quickly, and caps lock will turn on. To turn off caps lock, press the key twice quickly. Use this double key press to pass through any of the MAGic Keys that you use. For instance, if you select INSERT as your MAGic Key, press the INSERT key twice to use the actual insert function.
36
Pass Through Key Command
If you have an application that uses the same keystroke combination as one assigned to MAGic, you can pass the keystroke combination through to the application, so it will not function as a MAGic keystroke in that instance.
Press MAGic Key+3 (on the numbers row), and then press the keystroke you want to use in the application. Use the Pass Through command for any key combination that is used in MAGic and in other applications.
With MAGic, you can customize all of your keystrokes in the Keyboard Assignments dialog box, activated from the Keyboard menu. If you specify certain keystrokes for use in MAGic, you may need to use these keystrokes in other applications. Keep the Pass Through command of MAGic Key+3 in mind when you customize keystrokes.
Customizing the Keyboard
The Keyboard menu allows you to customize how you use your computer’s keyboard with MAGic. This menu allows you to re-assign the MAGic Key to a different key and manage shortcut keys. The Keyboard menu provides the following options:
Choose MAGic Key from the Keyboard menu to change which key is assigned to the MAGic Key.
Choose Keyboard Assignments from the Keyboard menu to view the current hot keys assigned to actions, assign different hot keys, remove hot keys, or restore the hot keys to the default settings.
Refer to Chapter 6 Tools for detailed information on these commands.
Using the Mouse with MAGic
Point and Click
With MAGic you don’t have to learn keystrokes to perform actions. You can use the mouse to point at items on the user interface, and click the buttons to activate features. For example, to enable mouse enhancements, just point at the Mouse Enhancements button and press the left mouse button.
If you are not sure how to activate a feature, use your mouse to open the menus and find the feature you need.

37
Left-Click vs. Right-Click
The left mouse button is the more commonly used mouse button, because it activates buttons and menus.
You can use the right mouse button and MAGic Key (press MAGic Key+RIGHT MOUSE BUTTON) to display the MAGic Context Menu. This menu allows you to quickly access many useful MAGic commands. If you are not a mouse user, you can press MAGic Key+APPLICATION Key to see the menu.
Mouse Wheel Commands
If your mouse has a mouse wheel between the left and right buttons, you can use it to perform a variety of useful MAGic commands:
Hold down the MAGic Key while rolling the MOUSE WHEEL up to increase the current magnification level.
Hold down the MAGic Key while rolling the MOUSE WHEEL down to decrease the current magnification level.
Hold down the MAGic Key and click the MOUSE WHEEL (or middle mouse button) to switch from the current magnification level to 1x magnification. Perform this command again to switch back to your previous magnification level.
Using the MAGic Context Menu
The MAGic Context Menu provides you with quick access from any program to the most commonly used visual and speech options. There are also commands that allow you to save your MAGic settings. To open the MAGic Context Menu, hold down the MAGic Key and either right-click or press the APPLICATION
Key .
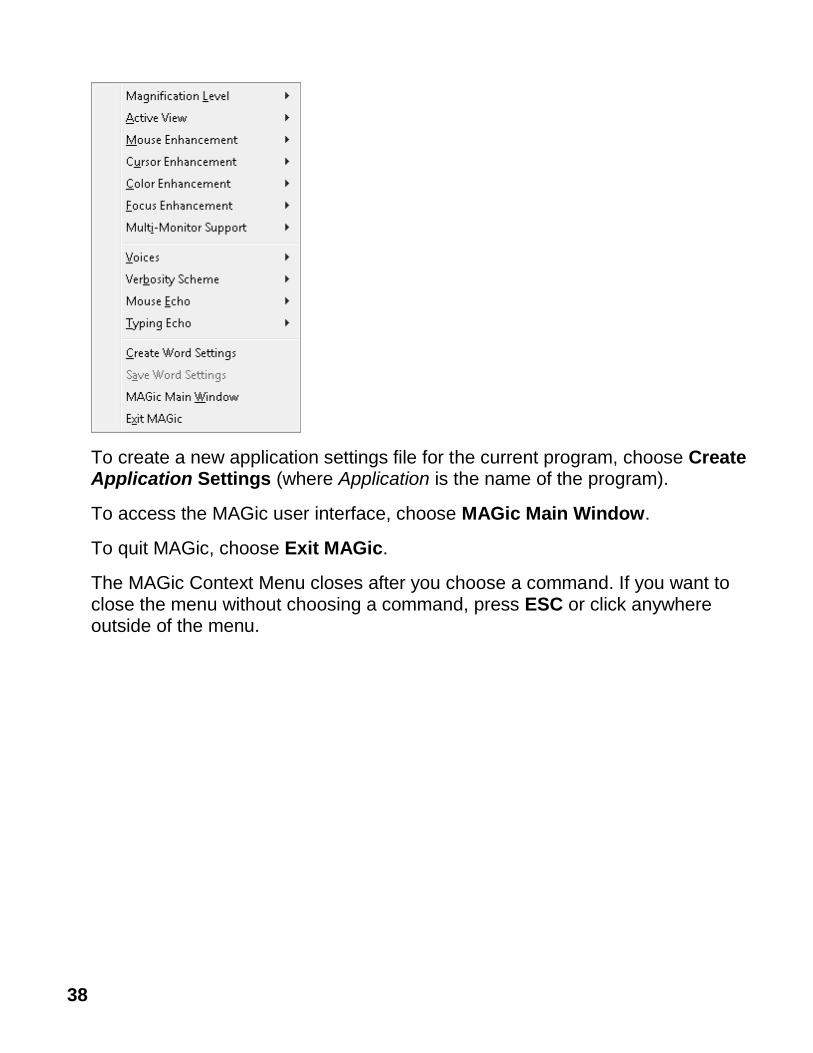
38
To create a new application settings file for the current program, choose Create Application Settings (where Application is the name of the program).
To access the MAGic user interface, choose MAGic Main Window.
To quit MAGic, choose Exit MAGic.
The MAGic Context Menu closes after you choose a command. If you want to close the menu without choosing a command, press ESC or click anywhere outside of the menu.

39
Chapter 3 User Interface
The MAGic user interface contains everything you need to customize magnification and speech to fit your needs. You can change the magnification level, magnified view, speech, and many other options by using the MAGic user interface.
The first time you start MAGic after installation, your screen displays in Full view mode with 2x magnification. Speech is also enabled. If you are working in another application or window, and you want to make the user interface active, press MAGic Key+U, or click the MAGic button in the Windows taskbar as shown in the example below.
User Interface Basics
All visual, speech, and tools features are logically grouped within tabs in the MAGic user interface. This design makes it easy to quickly find the enhancements that you want to use without having to navigate down into multi-layered settings menus. Features are laid out using split buttons where you click the top half to toggle the feature on or off, and click the lower half to display a list of standard schemes. If you want to fine-tune or create new schemes, you can select the Settings option in the list, which displays additional enhancement settings for that feature.
If you like, you can also access other settings using the Main menu, which is located in the upper left corner of the user interface.

40
Below are the main components of the user interface.
(1) Main menu button (2) Visual tab, Speech tab, and Tools tab (3) Title bar (4) Focus Indicator (5) Minimize, Close, and Help buttons (6) Status bar (7) Button/Control group, for example, Visual Enhancements
Split Buttons
Each tab contains split buttons that allow you to quickly turn on or turn off MAGic functionality and quickly select basic settings. This offers the convenience of not having to open MAGic menus to achieve the same results.
Use the top half of the button to turn on or off specific features.
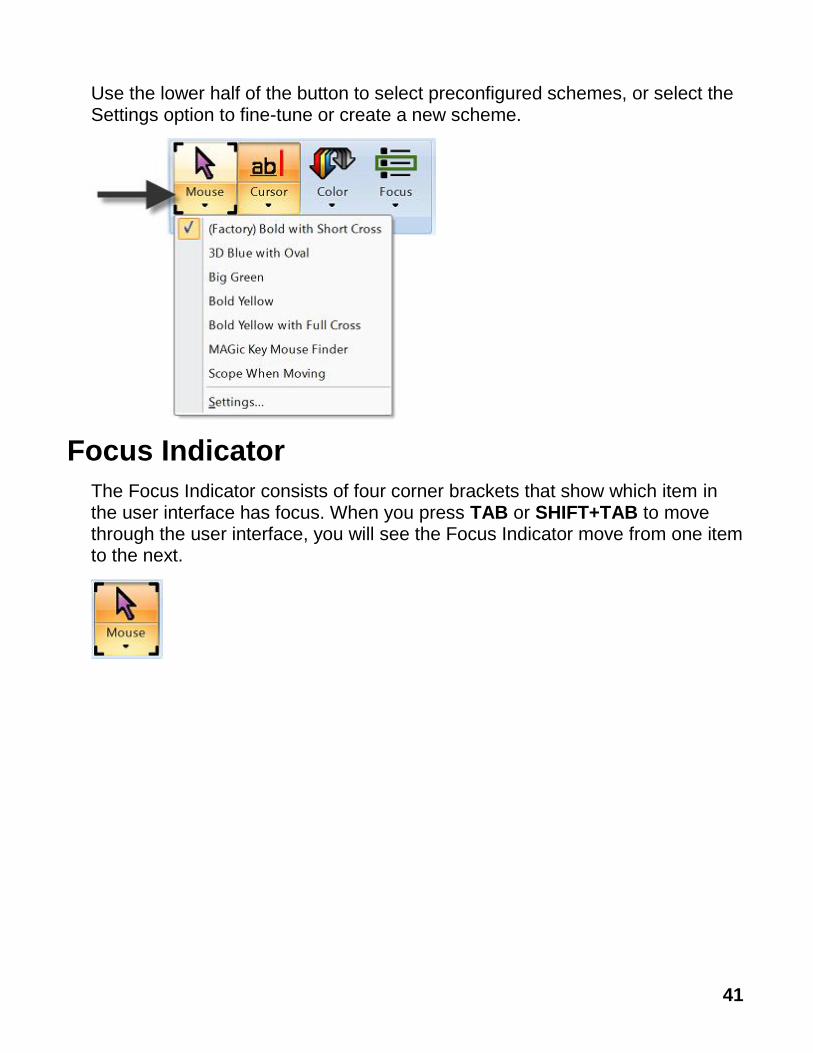
41
Use the lower half of the button to select preconfigured schemes, or select the Settings option to fine-tune or create a new scheme.
Focus Indicator
The Focus Indicator consists of four corner brackets that show which item in the user interface has focus. When you press TAB or SHIFT+TAB to move through the user interface, you will see the Focus Indicator move from one item to the next.
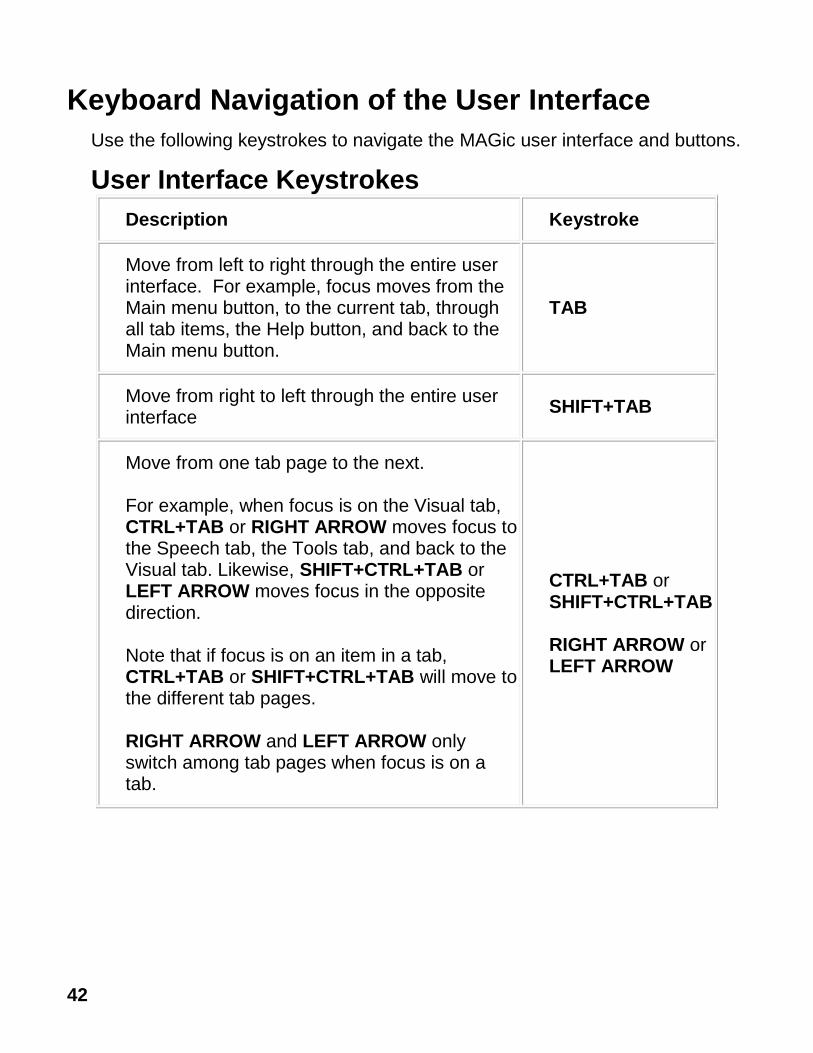
42
Keyboard Navigation of the User Interface
Use the following keystrokes to navigate the MAGic user interface and buttons.
User Interface Keystrokes
Description Keystroke
Move from left to right through the entire user interface. For example, focus moves from the Main menu button, to the current tab, through all tab items, the Help button, and back to the Main menu button.
TAB
Move from right to left through the entire user interface
SHIFT+TAB
Move from one tab page to the next. For example, when focus is on the Visual tab, CTRL+TAB or RIGHT ARROW moves focus to the Speech tab, the Tools tab, and back to the Visual tab. Likewise, SHIFT+CTRL+TAB or LEFT ARROW moves focus in the opposite direction. Note that if focus is on an item in a tab, CTRL+TAB or SHIFT+CTRL+TAB will move to the different tab pages. RIGHT ARROW and LEFT ARROW only switch among tab pages when focus is on a tab.
CTRL+TAB or SHIFT+CTRL+TAB RIGHT ARROW or LEFT ARROW
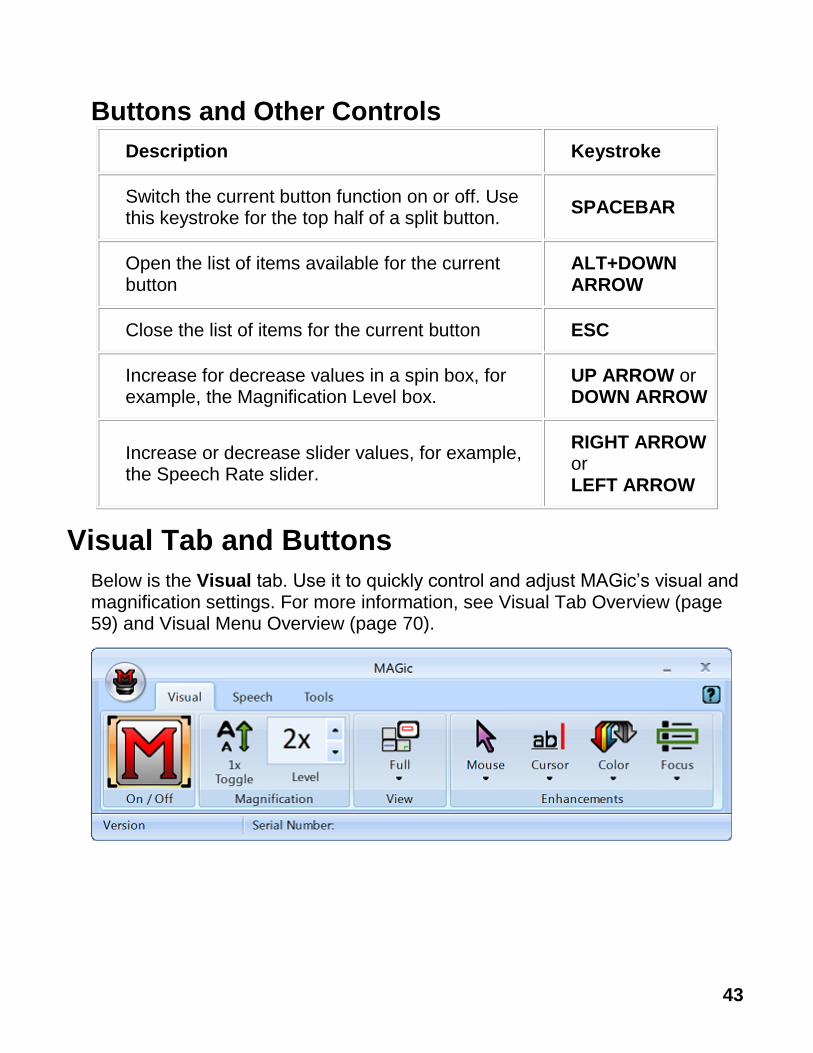
43
Buttons and Other Controls
Description Keystroke
Switch the current button function on or off. Use this keystroke for the top half of a split button.
SPACEBAR
Open the list of items available for the current button
ALT+DOWN ARROW
Close the list of items for the current button ESC
Increase for decrease values in a spin box, for example, the Magnification Level box.
UP ARROW or DOWN ARROW
Increase or decrease slider values, for example, the Speech Rate slider.
RIGHT ARROW or LEFT ARROW
Visual Tab and Buttons
Below is the Visual tab. Use it to quickly control and adjust MAGic’s visual and magnification settings. For more information, see Visual Tab Overview (page 59) and Visual Menu Overview (page 70).
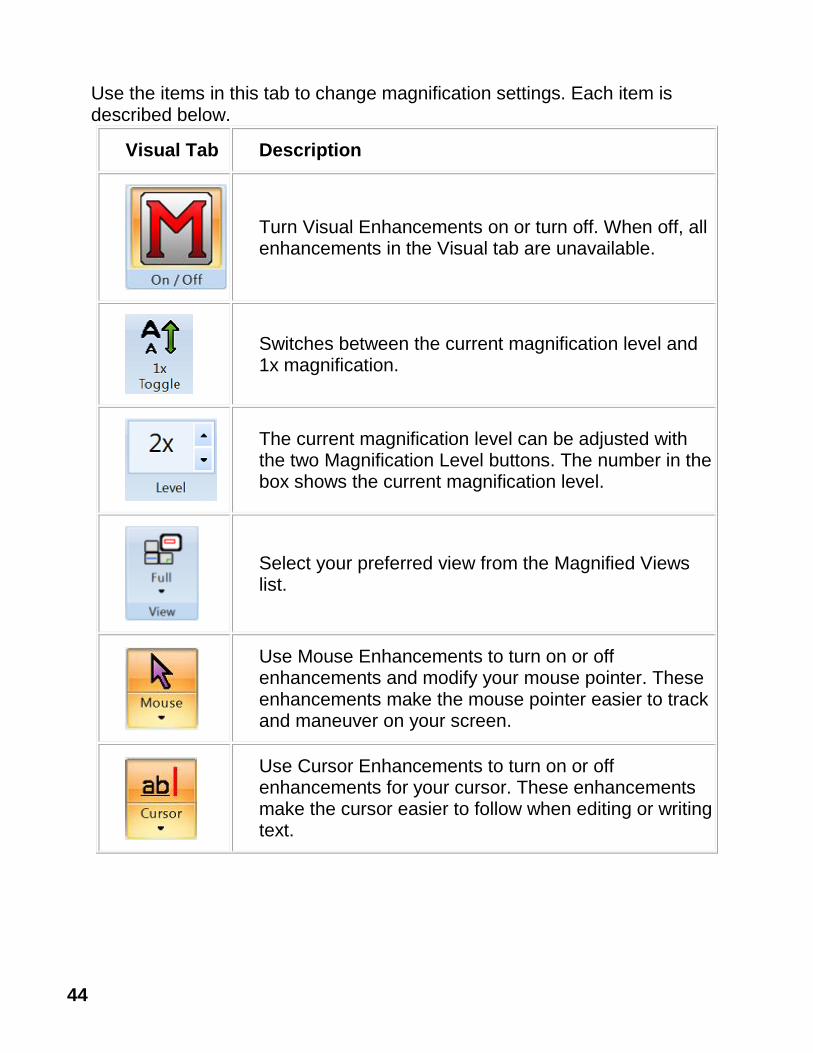
44
Use the items in this tab to change magnification settings. Each item is described below.
Visual Tab Description
Turn Visual Enhancements on or turn off. When off, all enhancements in the Visual tab are unavailable.
Switches between the current magnification level and 1x magnification.
The current magnification level can be adjusted with the two Magnification Level buttons. The number in the box shows the current magnification level.
Select your preferred view from the Magnified Views list.
Use Mouse Enhancements to turn on or off enhancements and modify your mouse pointer. These enhancements make the mouse pointer easier to track and maneuver on your screen.
Use Cursor Enhancements to turn on or off enhancements for your cursor. These enhancements make the cursor easier to follow when editing or writing text.
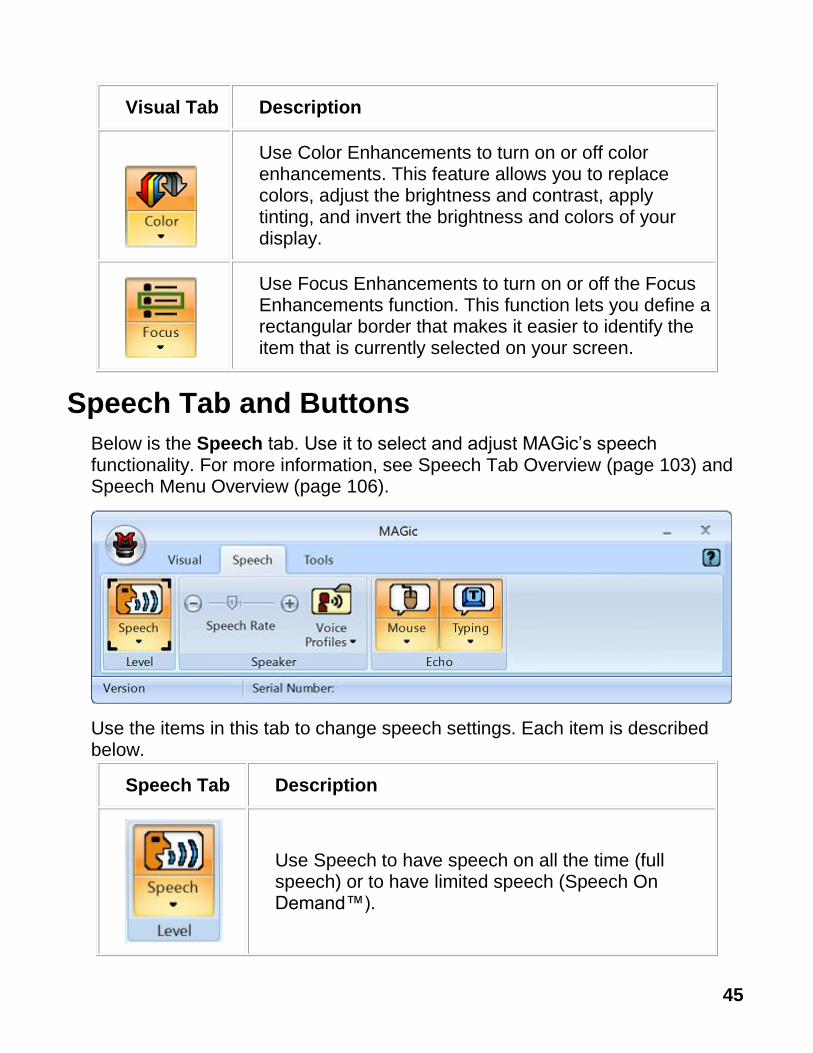
45
Visual Tab Description
Use Color Enhancements to turn on or off color enhancements. This feature allows you to replace colors, adjust the brightness and contrast, apply tinting, and invert the brightness and colors of your display.
Use Focus Enhancements to turn on or off the Focus Enhancements function. This function lets you define a rectangular border that makes it easier to identify the item that is currently selected on your screen.
Speech Tab and Buttons
Below is the Speech tab. Use it to select and adjust MAGic’s speech functionality. For more information, see Speech Tab Overview (page 103) and Speech Menu Overview (page 106).
Use the items in this tab to change speech settings. Each item is described below.
Speech Tab Description
Use Speech to have speech on all the time (full speech) or to have limited speech (Speech On Demand™).

46
Speech Tab Description
Move the slider left or right to adjust how fast or slow MAGic speaks.
Use Voice Profiles to select voice settings, synthesizers, and languages that best fit your auditory preferences.
Use Mouse Echo to switch the mouse echo feature on and off. Mouse echo enables MAGic to read text that you point at with the mouse.
Use Typing Echo to enable or disable the typing echo. If typing echo is enabled, MAGic announces the words or characters you type
Tools Tab and Buttons
Below is the Tools tab. Use it to access additional MAGic functionality for creating keystrokes, viewing lists of links and headings in documents, and more. For more information, see Tools Tab Overview (page 135) and Tools Menu Overview (page 140).
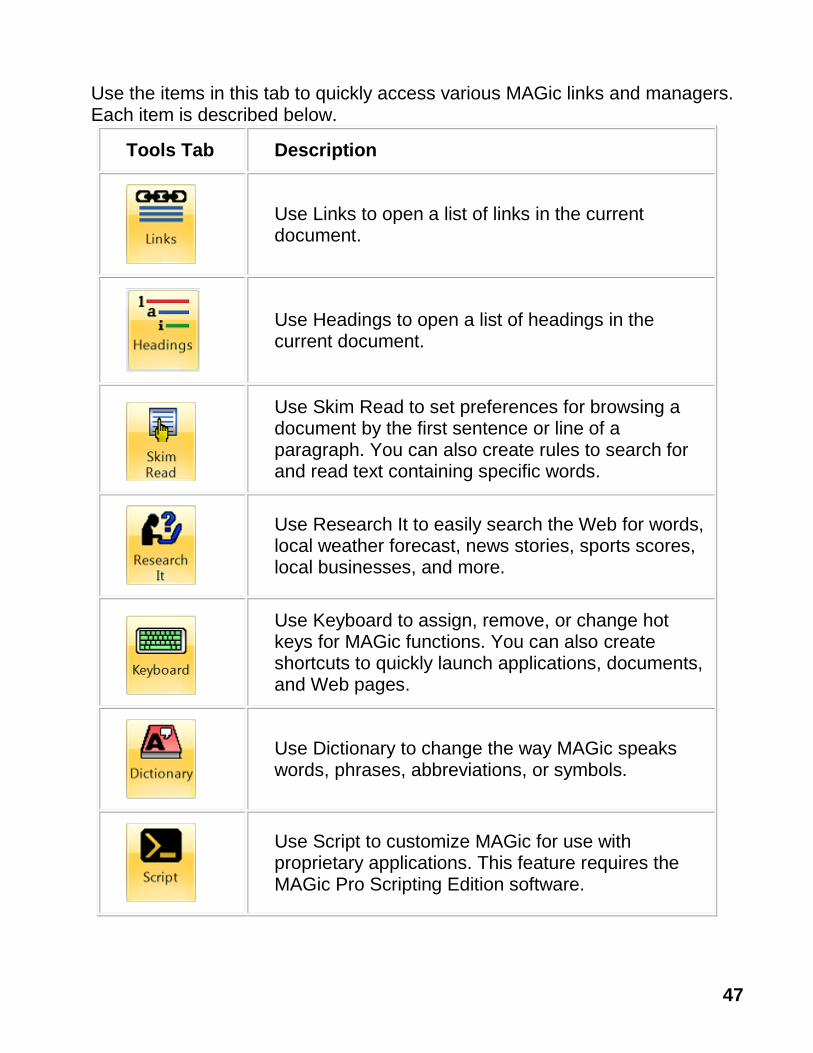
47
Use the items in this tab to quickly access various MAGic links and managers. Each item is described below.
Tools Tab Description
Use Links to open a list of links in the current document.
Use Headings to open a list of headings in the current document.
Use Skim Read to set preferences for browsing a document by the first sentence or line of a paragraph. You can also create rules to search for and read text containing specific words.
Use Research It to easily search the Web for words, local weather forecast, news stories, sports scores, local businesses, and more.
Use Keyboard to assign, remove, or change hot keys for MAGic functions. You can also create shortcuts to quickly launch applications, documents, and Web pages.
Use Dictionary to change the way MAGic speaks words, phrases, abbreviations, or symbols.
Use Script to customize MAGic for use with proprietary applications. This feature requires the MAGic Pro Scripting Edition software.
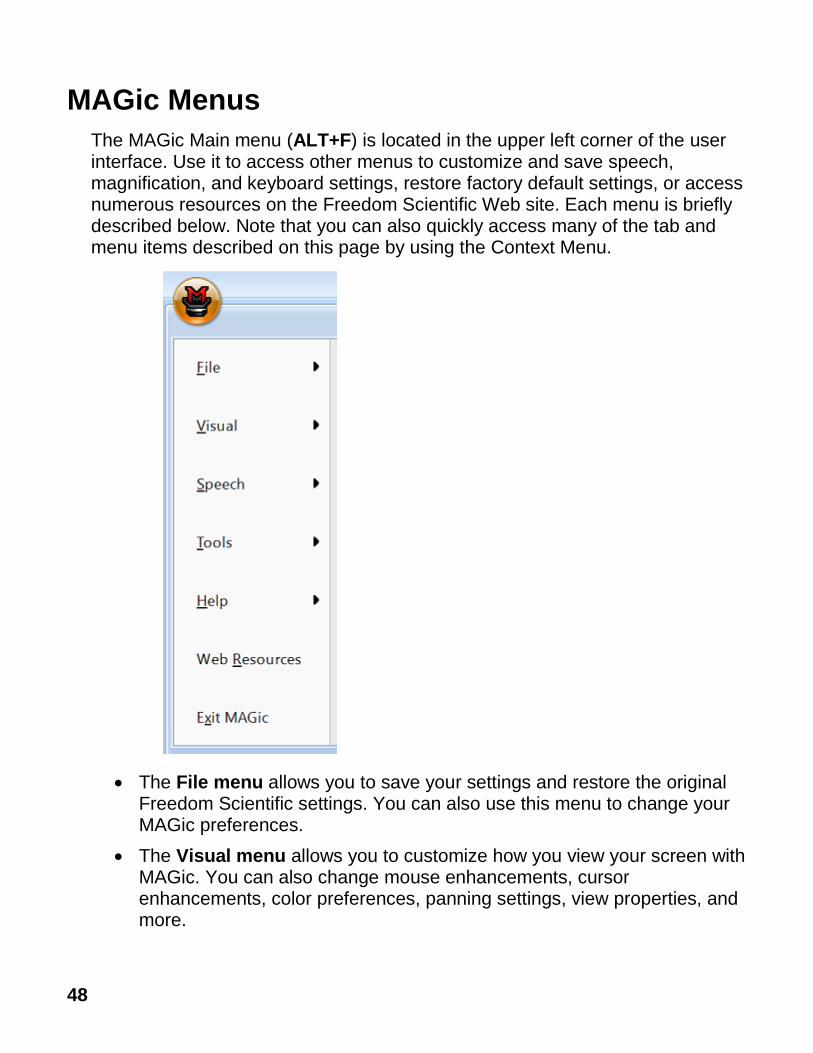
48
MAGic Menus
The MAGic Main menu (ALT+F) is located in the upper left corner of the user interface. Use it to access other menus to customize and save speech, magnification, and keyboard settings, restore factory default settings, or access numerous resources on the Freedom Scientific Web site. Each menu is briefly described below. Note that you can also quickly access many of the tab and menu items described on this page by using the Context Menu.
The File menu allows you to save your settings and restore the original Freedom Scientific settings. You can also use this menu to change your MAGic preferences.
The Visual menu allows you to customize how you view your screen with MAGic. You can also change mouse enhancements, cursor enhancements, color preferences, panning settings, view properties, and more.
49
The Speech menu allows you to customize how you read text with MAGic. You can customize MAGic’s speech components to fit your particular needs.
The Tools menu allows you to customize how you use your computer's keyboard with MAGic. You can re-assign the MAGic Key to a different key or manage shortcut keys. You can also access the Freedom Scientific Script Manager application.
The Help menu provides you with detailed help information for the various MAGic functions and options. You can also view information on the newest features for this release and see your current MAGic version.
The Web Resources menu provides helpful links to Freedom Scientific products and resources such as the Freedom Scientific Web site, Technical Support contact page, FS Activate Web page, and other helpful links.

50

51
Chapter 4 Customizing MAGic
Use the information in this chapter as a guide when tailoring MAGic for your visual and speech needs. When you first start MAGic after installation, the factory default setting is to display the screen in Full view mode with 2x magnification. Speech is also enabled if your software is licensed for speech. Note that to momentarily silence speech, press CTRL. To switch between full speech and Speech On Demand mode, press MAGic Key+F3.
The MAGic user interface contains everything you need to customize magnification and speech to fit your needs. Use the procedures below as a reference for configuring both visual and speech settings.
Visual Settings Speech Settings
Choosing Color Enhancements Speech Settings
Choosing a Magnification Level Full Speech or Speech On Demand
Adjusting the Mouse Pointer Speech Rate
Adjusting the Cursor Mouse and Typing Echo
Adjusting Focus Selecting a Voice for MAGic
Choosing a Magnification View Saving Voice Setting
Saving Visual Settings

52
Choosing Color Enhancements
The first place to start is with the Color Enhancements settings. The idea is to reduce glare and provide contrasts to make it easier to view items on the screen.
1. Click the top half of the Color Enhancements button in the Visual tab. This turns color enhancements on.
2. Next, click the bottom half of the Color Enhancements button and choose a default color scheme as a starting point. A scheme is a template that provides preset colors, brightness, and contrasts. You can set different color schemes for the magnified area of your display, the unmagnified area, or both.
Choosing a Magnification Level
The default magnification value is 2x with Full screen view. You can experiment with different magnification values using the Magnification Level spin box.
1. Click the up and down arrows in the Magnification Level box to select a comfortable magnification value. Magnification values range from 1.0x to 1.9x, 2x, and 2.5x through 36x.
2. While adjusting the magnification, click the 1x Toggle button to decrease magnification to 1x. This is a handy way of comparing how much of the display that you can actually see when it is magnified. Continue toggling between 1x and the current magnification to adjust magnification to what is comfortable for you.
Note that for a quick side-by-side comparison; try using Split view to see the adjustments that you are making. Split view divides the screen between an unmagnified view and a magnified view.
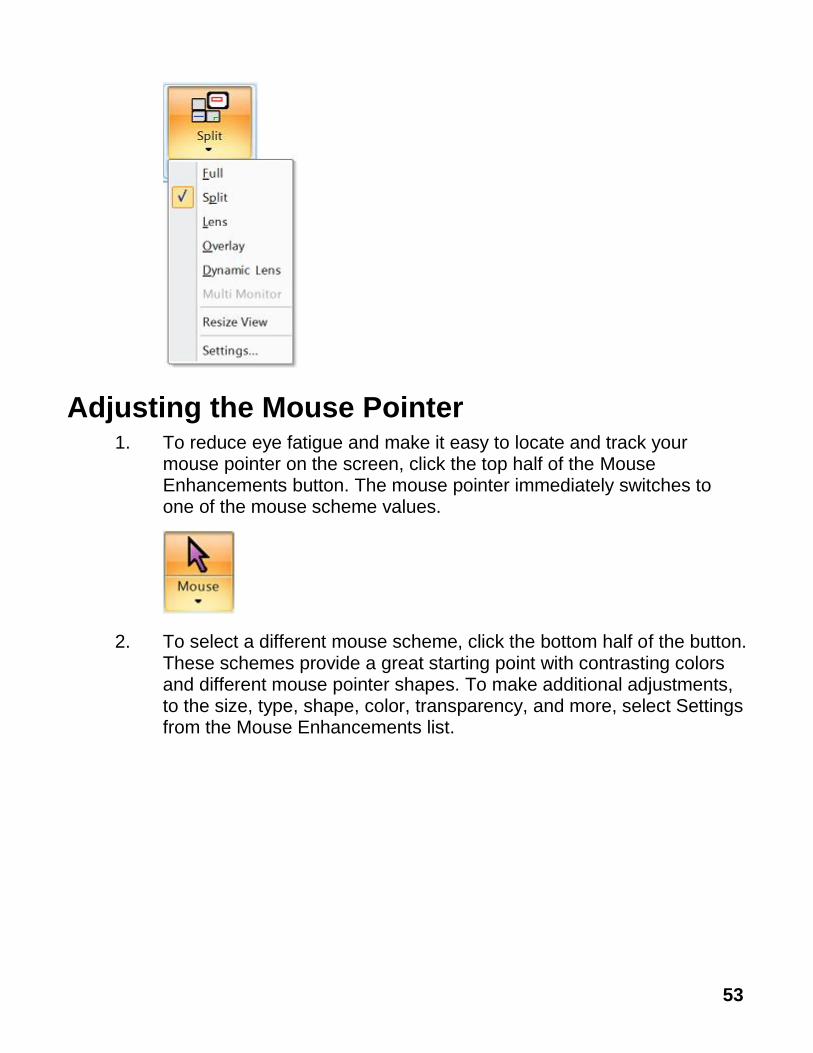
53
Adjusting the Mouse Pointer 1. To reduce eye fatigue and make it easy to locate and track your
mouse pointer on the screen, click the top half of the Mouse Enhancements button. The mouse pointer immediately switches to one of the mouse scheme values.
2. To select a different mouse scheme, click the bottom half of the button. These schemes provide a great starting point with contrasting colors and different mouse pointer shapes. To make additional adjustments, to the size, type, shape, color, transparency, and more, select Settings from the Mouse Enhancements list.

54
Adjusting the Cursor
To help the cursor standout against text and your document’s background, Cursor Enhancements can be turned on. This makes it easier to locate and follow the cursor when editing or writing text. To turn on this feature, click the top half of the Cursor Enhancements button.
While you can change the color of the flashing cursor, you can also change its style attributes, for example, an oval or box that surrounds the cursor, a crosshair that displays on top of the cursor, or triangles that display above and below the cursor. In addition, you can adjust the transparency, thickness, and more for these style attributes. To access these settings, click the lower half of the Cursor Enhancements button and then select Settings.
Adjusting Focus
To help identify and track your location in a window, dialog box, or application, use the Focus Enhancements feature. It places a visible rectangular border around objects. Click the top half of the Focus Enhancements button to turn this feature on or off.
To change the color, transparency, and other attributes, click the lower half of the button and select Settings.
Choosing a Magnification View
After experimenting with color, mouse, cursor, and focus enhancements, revisit the Magnification View list and select a screen view that is most comfortable for you.
Full. The entire screen is magnified.
Split. The screen is split horizontally or vertically where one area is magnified and the other is not.

55
Lens. Displays a magnified rectangle that follows mouse pointer movement.
Dynamic Lens. Also displays a magnified rectangle that follows the mouse pointer, and automatically resizes to only magnify the currently selected item.
Overlay. Displays a stationary magnified window in the corner of the screen while the rest of the screen is unmagnified.
Settings for Split, Lens, Dynamic Lens, and Overlay views can be fine-tuned in the View Properties dialog box. To quickly access it, click the Magnification View button and select Settings from the list.
Saving Visual Settings
To make sure that MAGic retains your visual settings, press CTRL+S to save
your settings. You can also save settings by clicking the Main menu button , choosing the File menu, and then “Save Default Settings.”
Speech Settings
Now that you have configured your visual settings for MAGic, it is now time to decide if you want to use speech, and if so, which voice features you want to use.
Allowing MAGic to speak can reduce eye fatigue. Use it to help you locate where focus is on the screen. You can use speech features such as mouse echo and typing echo in conjunction with the mouse, cursor, and focus visual enhancements.
To switch and access to basic speech settings, click the Speech tab in the MAGic user interface.
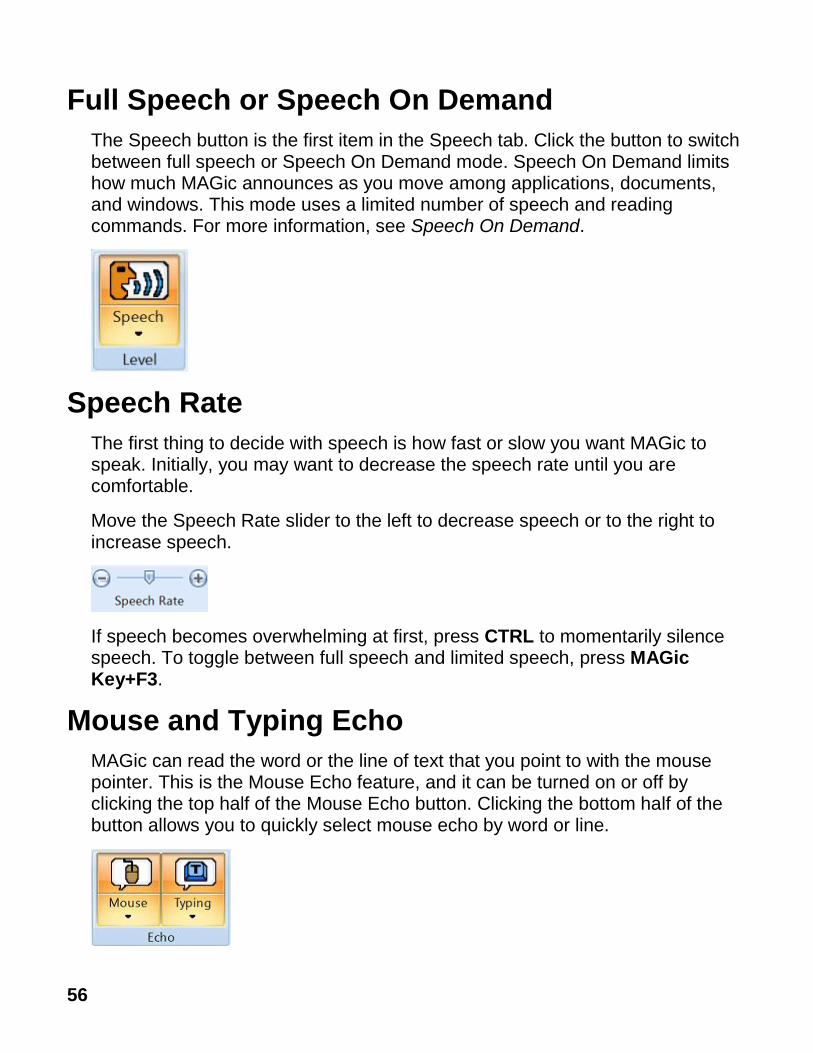
56
Full Speech or Speech On Demand
The Speech button is the first item in the Speech tab. Click the button to switch between full speech or Speech On Demand mode. Speech On Demand limits how much MAGic announces as you move among applications, documents, and windows. This mode uses a limited number of speech and reading commands. For more information, see Speech On Demand.
Speech Rate
The first thing to decide with speech is how fast or slow you want MAGic to speak. Initially, you may want to decrease the speech rate until you are comfortable.
Move the Speech Rate slider to the left to decrease speech or to the right to increase speech.
If speech becomes overwhelming at first, press CTRL to momentarily silence speech. To toggle between full speech and limited speech, press MAGic Key+F3.
Mouse and Typing Echo
MAGic can read the word or the line of text that you point to with the mouse pointer. This is the Mouse Echo feature, and it can be turned on or off by clicking the top half of the Mouse Echo button. Clicking the bottom half of the button allows you to quickly select mouse echo by word or line.
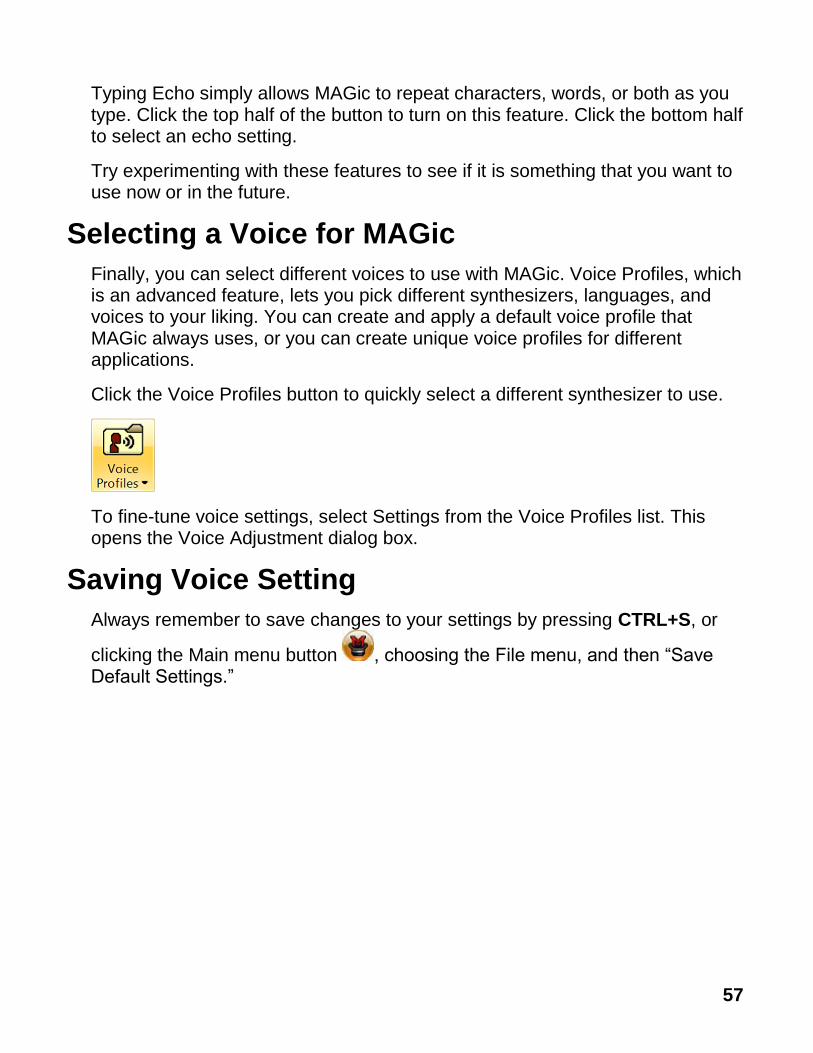
57
Typing Echo simply allows MAGic to repeat characters, words, or both as you type. Click the top half of the button to turn on this feature. Click the bottom half to select an echo setting.
Try experimenting with these features to see if it is something that you want to use now or in the future.
Selecting a Voice for MAGic
Finally, you can select different voices to use with MAGic. Voice Profiles, which is an advanced feature, lets you pick different synthesizers, languages, and voices to your liking. You can create and apply a default voice profile that MAGic always uses, or you can create unique voice profiles for different applications.
Click the Voice Profiles button to quickly select a different synthesizer to use.
To fine-tune voice settings, select Settings from the Voice Profiles list. This opens the Voice Adjustment dialog box.
Saving Voice Setting
Always remember to save changes to your settings by pressing CTRL+S, or
clicking the Main menu button , choosing the File menu, and then “Save Default Settings.”

58

59
Chapter 5 Visual
Visual Tab Overview
With MAGic’s extensive magnification features, you can customize your display to fit your low vision needs.
Magnification features can be quickly accessed using buttons in the Visual tab as shown below. For greater customization, other settings are available in the Visual Menu Overview (page 70).
The first item in the Visual tab is the Visual On/Off button, which lets you turn magnification on or off. When off, all enhancements in the Visual tab are unavailable. The remainder of the tab includes buttons that allow you to quickly change basic magnification and visual features.
The tab also contains split buttons. Use the top half of the button to quickly turn on or off specific features.
Use the lower half of the button to select preconfigured schemes, or select the Settings option to fine-tune or create a new scheme.
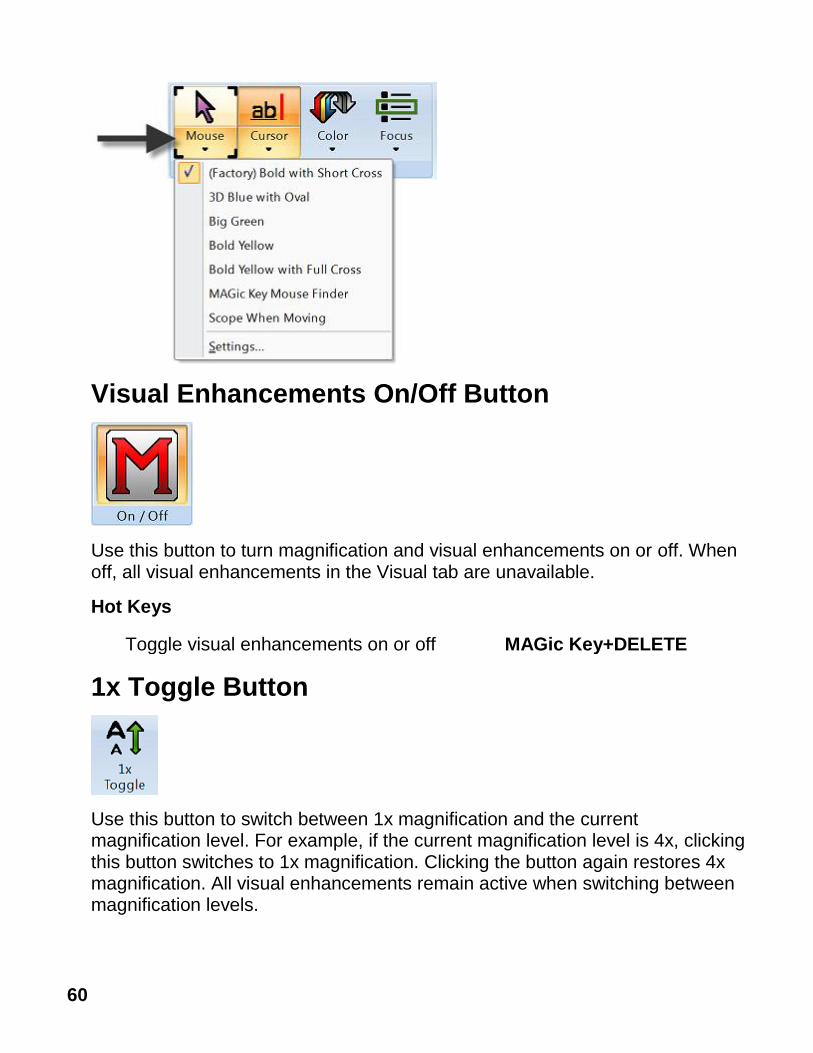
60
Visual Enhancements On/Off Button
Use this button to turn magnification and visual enhancements on or off. When off, all visual enhancements in the Visual tab are unavailable.
Hot Keys
Toggle visual enhancements on or off MAGic Key+DELETE
1x Toggle Button
Use this button to switch between 1x magnification and the current magnification level. For example, if the current magnification level is 4x, clicking this button switches to 1x magnification. Clicking the button again restores 4x magnification. All visual enhancements remain active when switching between magnification levels.

61
Hot Keys
Magnification Level Toggle between 1x and Current Magnification
MAGic Key+SHIFT+DELETE or MAGic Key+MOUSE WHEEL CLICK
Magnification Level Buttons
The UP ARROW button increases the magnification level, while the DOWN ARROW button decreases the magnification level. The number between the two buttons shows the current magnification level. The default level of magnification is 2x (2x is equivalent to two times the normal screen display).
If you press the TAB key to move into the area where the number appears, use the UP ARROW or DOWN ARROW keys to increase or decrease magnification.
It is possible to change the magnification level to 1. This allows you to continue using magnification features, such as mouse, cursor, and color enhancements, while viewing the entire screen area. You can also choose among nine incremental magnification levels between 1x and 2x magnification. There is one incremental level (2.5x) between 2x and 3x.
Hot Keys
Increase Magnification
MAGic Key+NUM PAD PLUS or CTRL+EQUALS or MOUSE WHEEL UP (scroll wheel up or away from you)
Decrease Magnification
MAGic Key+NUM PAD MINUS or CTRL+DASH or MOUSE WHEEL DOWN (scroll wheel down or towards you)
Magnification Level Toggle between 1x and Current Magnification
MAGic Key+SHIFT+DELETE or MAGic Key+MOUSE MIDDLE CLICK (press down on scroll wheel)
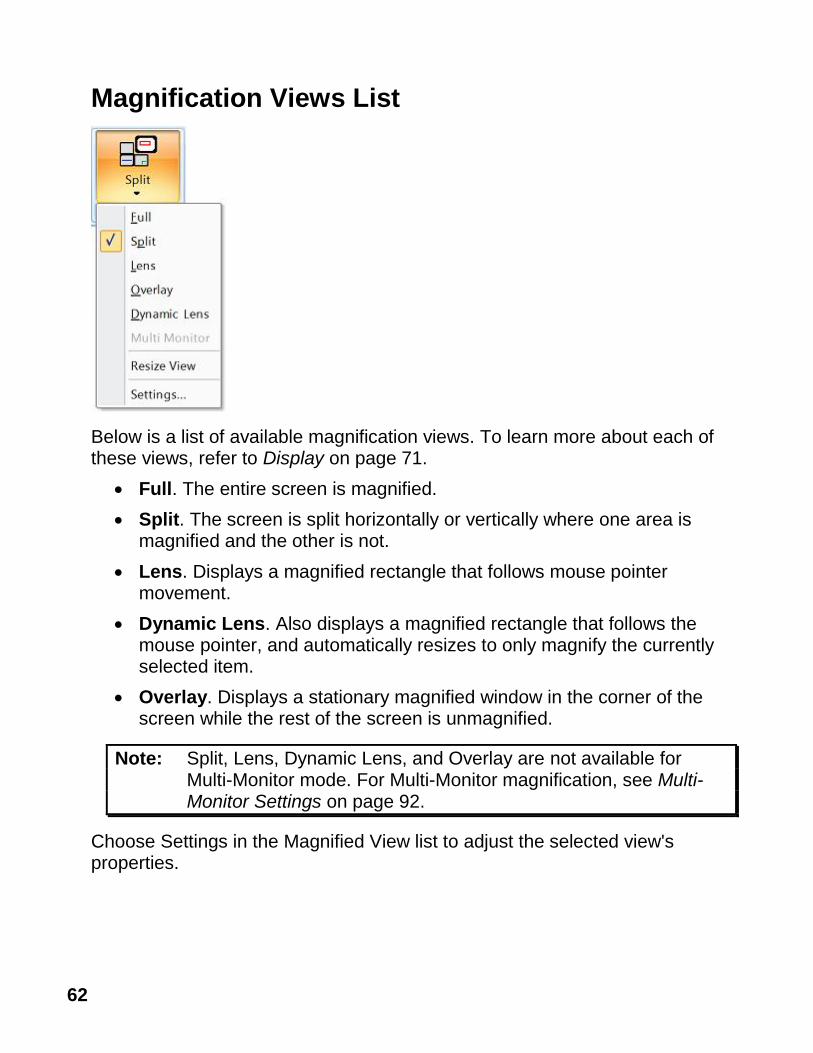
62
Magnification Views List
Below is a list of available magnification views. To learn more about each of these views, refer to Display on page 71.
Full. The entire screen is magnified.
Split. The screen is split horizontally or vertically where one area is magnified and the other is not.
Lens. Displays a magnified rectangle that follows mouse pointer movement.
Dynamic Lens. Also displays a magnified rectangle that follows the mouse pointer, and automatically resizes to only magnify the currently selected item.
Overlay. Displays a stationary magnified window in the corner of the screen while the rest of the screen is unmagnified.
Note: Split, Lens, Dynamic Lens, and Overlay are not available for Multi-Monitor mode. For Multi-Monitor magnification, see Multi-Monitor Settings on page 92.
Choose Settings in the Magnified View list to adjust the selected view's properties.
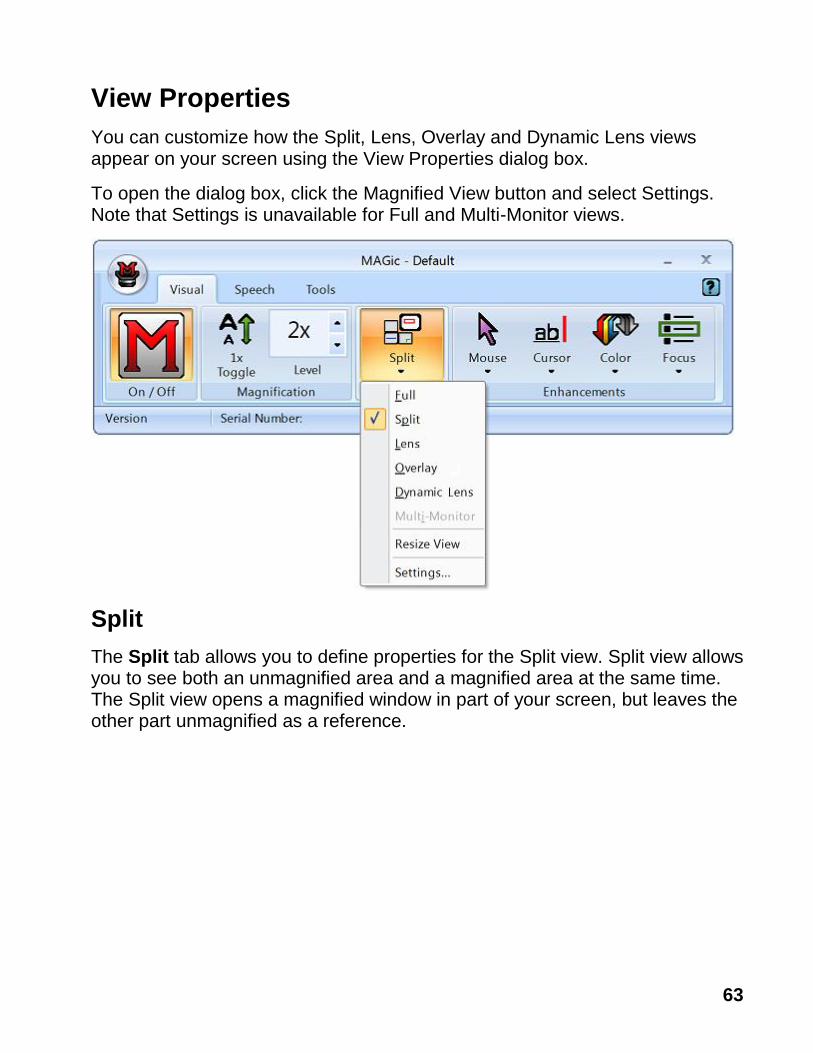
63
View Properties
You can customize how the Split, Lens, Overlay and Dynamic Lens views appear on your screen using the View Properties dialog box.
To open the dialog box, click the Magnified View button and select Settings. Note that Settings is unavailable for Full and Multi-Monitor views.
Split
The Split tab allows you to define properties for the Split view. Split view allows you to see both an unmagnified area and a magnified area at the same time. The Split view opens a magnified window in part of your screen, but leaves the other part unmagnified as a reference.
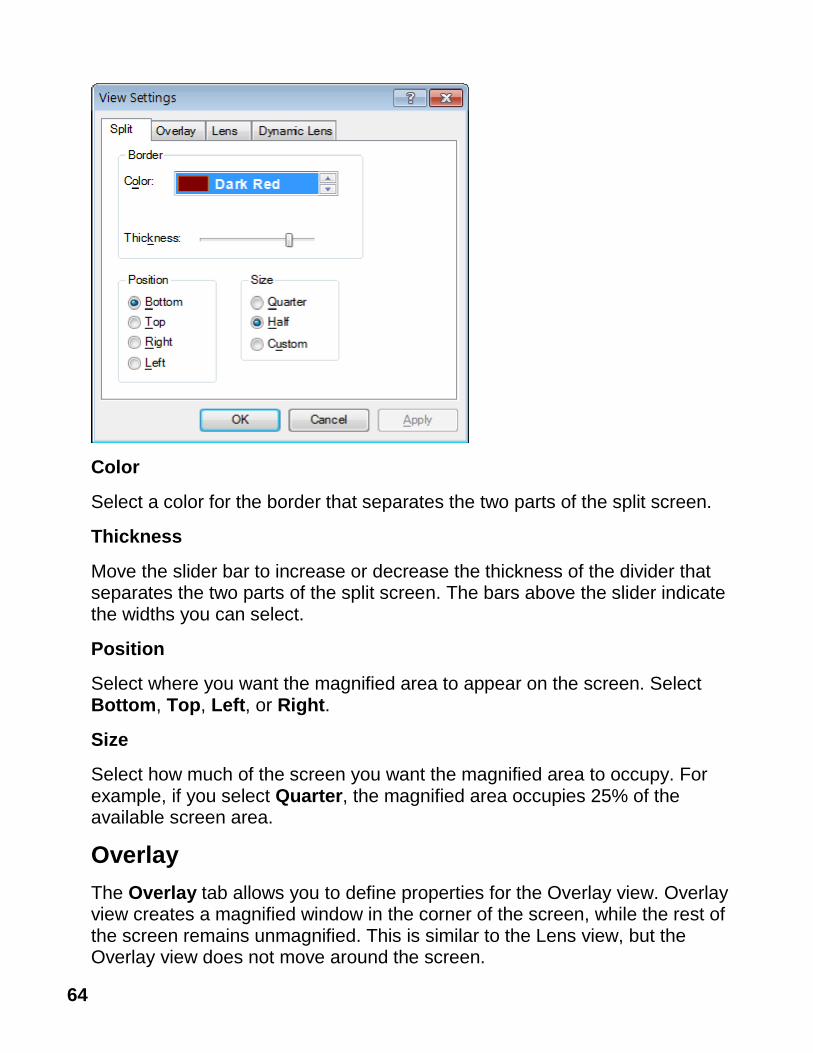
64
Color
Select a color for the border that separates the two parts of the split screen.
Thickness
Move the slider bar to increase or decrease the thickness of the divider that separates the two parts of the split screen. The bars above the slider indicate the widths you can select.
Position
Select where you want the magnified area to appear on the screen. Select Bottom, Top, Left, or Right.
Size
Select how much of the screen you want the magnified area to occupy. For example, if you select Quarter, the magnified area occupies 25% of the available screen area.
Overlay
The Overlay tab allows you to define properties for the Overlay view. Overlay view creates a magnified window in the corner of the screen, while the rest of the screen remains unmagnified. This is similar to the Lens view, but the Overlay view does not move around the screen.
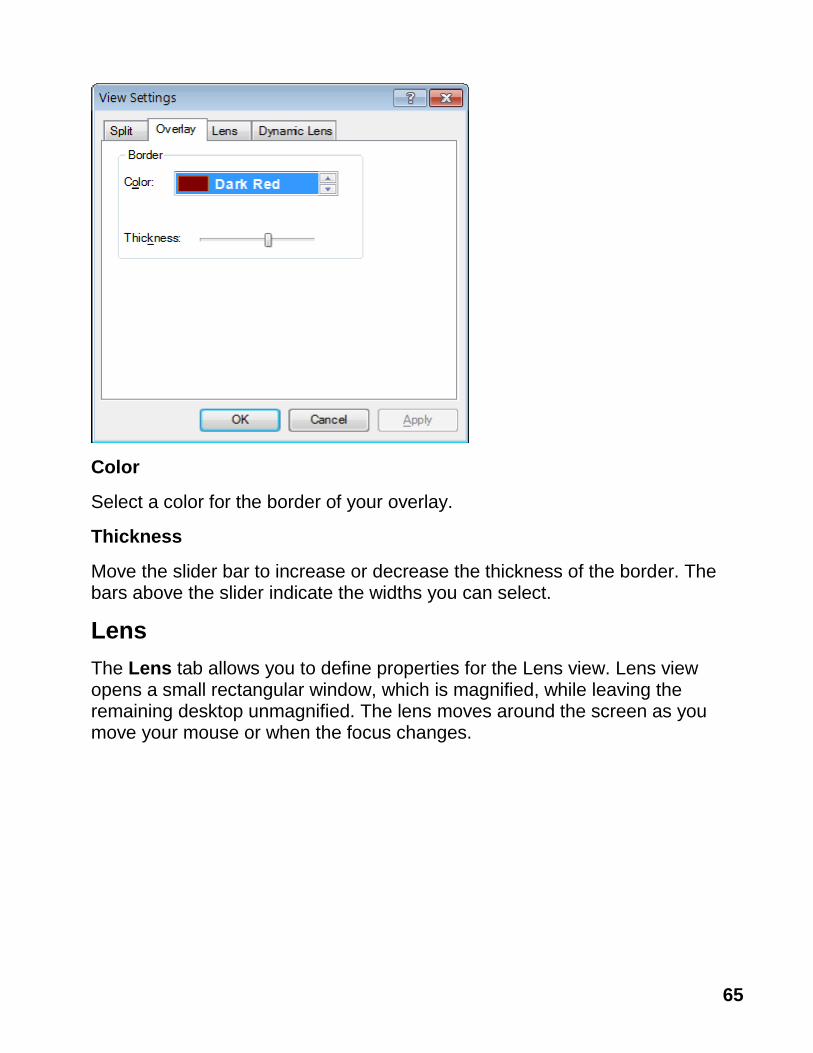
65
Color
Select a color for the border of your overlay.
Thickness
Move the slider bar to increase or decrease the thickness of the border. The bars above the slider indicate the widths you can select.
Lens
The Lens tab allows you to define properties for the Lens view. Lens view opens a small rectangular window, which is magnified, while leaving the remaining desktop unmagnified. The lens moves around the screen as you move your mouse or when the focus changes.
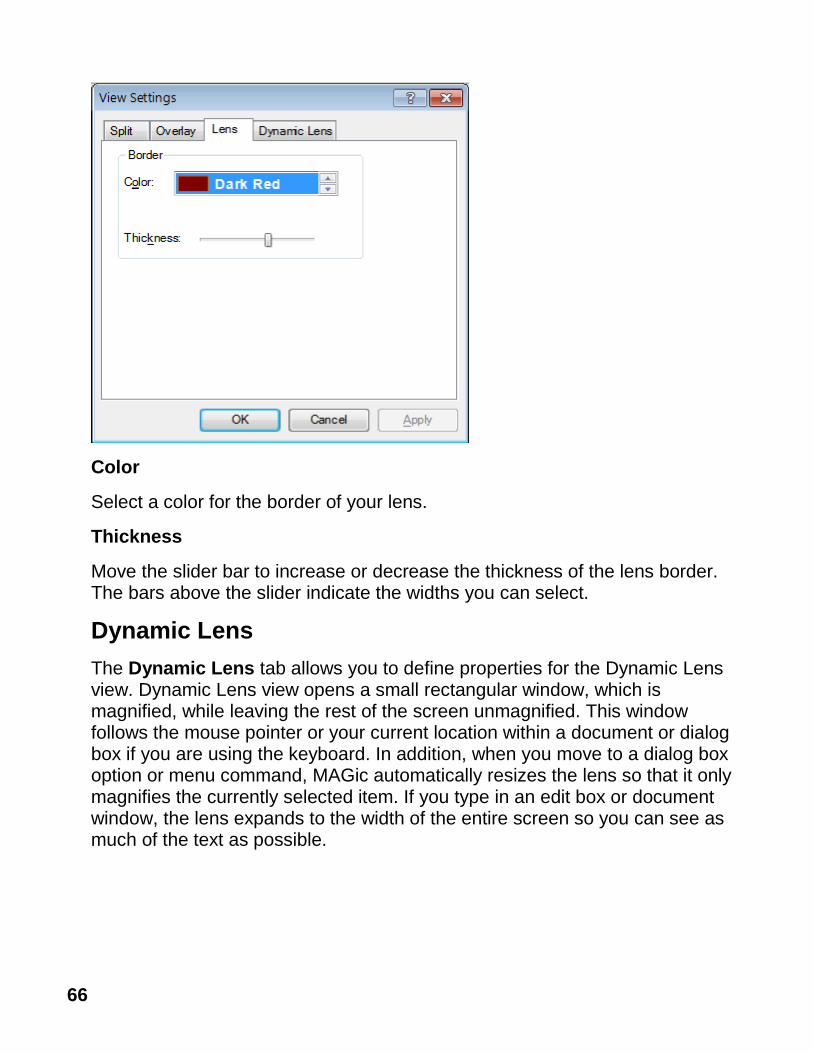
66
Color
Select a color for the border of your lens.
Thickness
Move the slider bar to increase or decrease the thickness of the lens border. The bars above the slider indicate the widths you can select.
Dynamic Lens
The Dynamic Lens tab allows you to define properties for the Dynamic Lens view. Dynamic Lens view opens a small rectangular window, which is magnified, while leaving the rest of the screen unmagnified. This window follows the mouse pointer or your current location within a document or dialog box if you are using the keyboard. In addition, when you move to a dialog box option or menu command, MAGic automatically resizes the lens so that it only magnifies the currently selected item. If you type in an edit box or document window, the lens expands to the width of the entire screen so you can see as much of the text as possible.
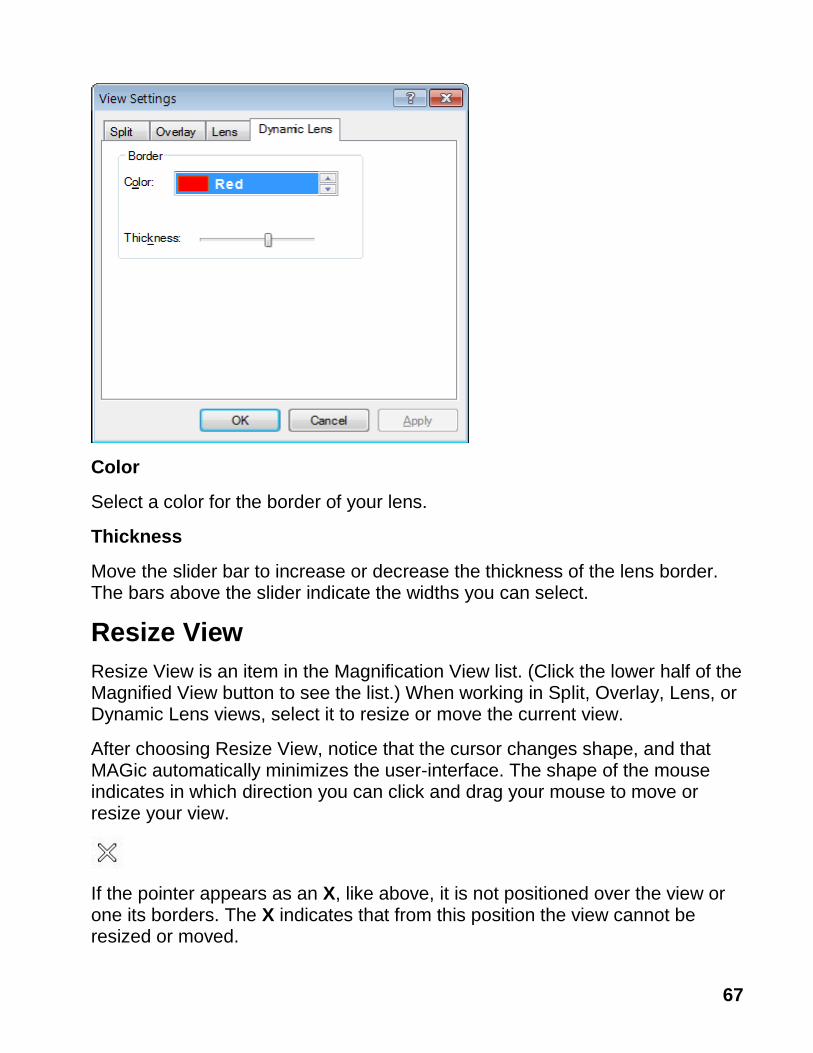
67
Color
Select a color for the border of your lens.
Thickness
Move the slider bar to increase or decrease the thickness of the lens border. The bars above the slider indicate the widths you can select.
Resize View
Resize View is an item in the Magnification View list. (Click the lower half of the Magnified View button to see the list.) When working in Split, Overlay, Lens, or Dynamic Lens views, select it to resize or move the current view.
After choosing Resize View, notice that the cursor changes shape, and that MAGic automatically minimizes the user-interface. The shape of the mouse indicates in which direction you can click and drag your mouse to move or resize your view.
If the pointer appears as an X, like above, it is not positioned over the view or one its borders. The X indicates that from this position the view cannot be resized or moved.

68
A bi-directional cross indicates the ability to move the view to a different location on your screen. Click the view, and while holding the mouse button down drag the view to another location. Split view only moves to the top, bottom, left, or right edge of your screen, while you can move Overlay to any location on your screen.
A vertical pointer indicates that resizing will occur in a vertical direction, larger or smaller.
A horizontal pointer indicates that resizing will occur in a horizontal direction, either larger or smaller.
A diagonal pointer indicates that resizing will occur in both vertical and horizontal directions. MAGic only exhibits the diagonal mouse when you position the mouse over the corner of the view. The diagonal pointer is only available for the Overlay, Dynamic Lens, and Lens views.
Mouse Enhancements Button
Use the Mouse Enhancements button to enable/disable enhancements and modifications for your mouse pointer. These enhancements make the mouse pointer easier to track and maneuver on your screen. Click the top half of the Mouse Enhancements button to turn this feature on or off.
You can apply mouse enhancements to the magnified area, unmagnified area, or both. Click the bottom half of this button to quickly choose a new mouse enhancements scheme or choose Settings from the list to customize mouse enhancements for the magnified or unmagnified area.
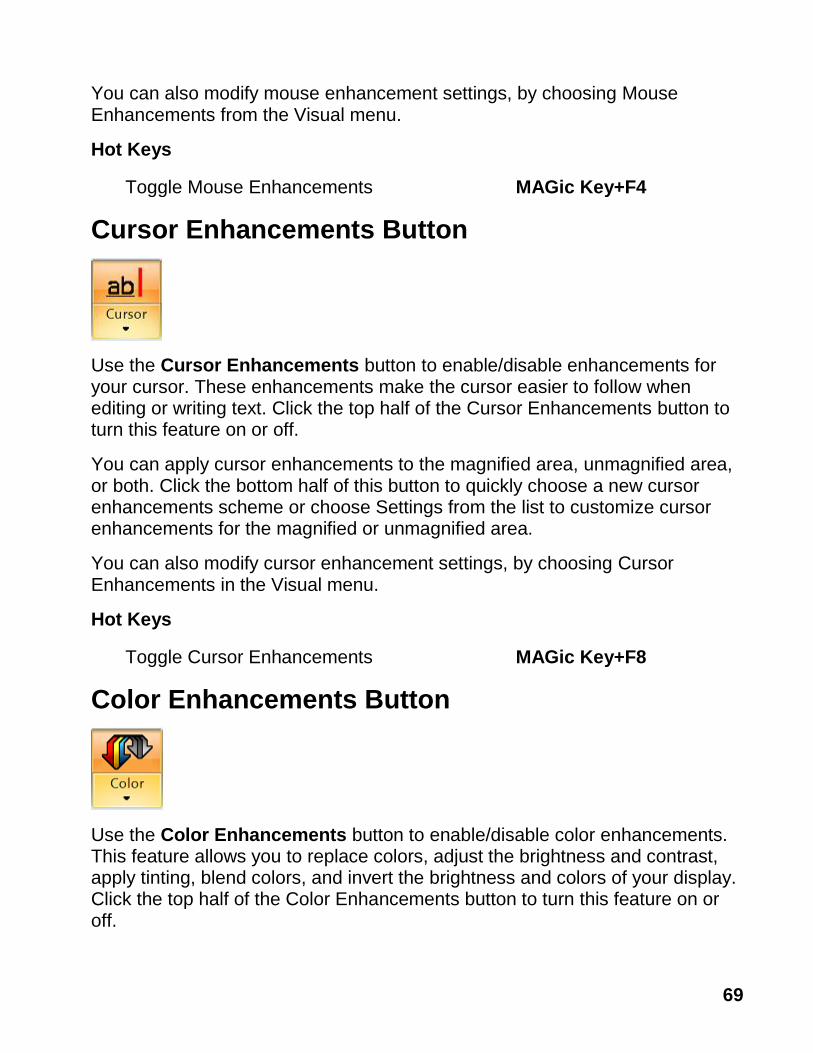
69
You can also modify mouse enhancement settings, by choosing Mouse Enhancements from the Visual menu.
Hot Keys
Toggle Mouse Enhancements MAGic Key+F4
Cursor Enhancements Button
Use the Cursor Enhancements button to enable/disable enhancements for your cursor. These enhancements make the cursor easier to follow when editing or writing text. Click the top half of the Cursor Enhancements button to turn this feature on or off.
You can apply cursor enhancements to the magnified area, unmagnified area, or both. Click the bottom half of this button to quickly choose a new cursor enhancements scheme or choose Settings from the list to customize cursor enhancements for the magnified or unmagnified area.
You can also modify cursor enhancement settings, by choosing Cursor Enhancements in the Visual menu.
Hot Keys
Toggle Cursor Enhancements MAGic Key+F8
Color Enhancements Button
Use the Color Enhancements button to enable/disable color enhancements. This feature allows you to replace colors, adjust the brightness and contrast, apply tinting, blend colors, and invert the brightness and colors of your display. Click the top half of the Color Enhancements button to turn this feature on or off.

70
You can apply color enhancements to the magnified area, unmagnified area, or both. Click the bottom half of this button to quickly choose a new color enhancements scheme or choose Settings from the list to customize color enhancements for the magnified or unmagnified area.
You can also modify color enhancement settings, by choosing Color Enhancements in the Visual menu.
Hot Keys
Toggle Color Enhancements MAGic Key+F12
Focus Enhancements Button
Choose the top half of the Focus Enhancements button to turn Focus Enhancements on or off. This function places a rectangular border around the item that is currently selected on your screen.
Choose the bottom half of the button to select Settings from the list to fine-tune or create a new scheme. For more information, refer to Focus Enhancements in the Visual menu.
Hot Keys
Toggle Focus Enhancements MAGic Key+F
Visual Menu Overview
The Visual menu, found in the Main menu , contains all of the controls needed to change the appearance of your display. The first item in the menu is Display, which allows you to select your preferred magnification view.
To learn more about the magnification features, begin with the topics in this section.
To learn more about the magnification buttons, see Visual Tab Overview on page 59.

71
Display
From the Main menu, choose Visual, and then Display to change the magnified view, magnification level, amount of vertical stretch, and text smoothing.
Note: For Multi-Monitor magnification, see Multi-Monitor Settings on page 92.

72
View
Select the magnified view you want to use. Each view is described briefly below.
Tip: To change the properties for these views, open the View Settings dialog box. It is found by choosing the Magnified View button (in the Visual tab) and selecting Settings in the the Visual menu and choose View Properties.
Full magnifies the entire screen.
Split allows you to see both an unmagnified area and a magnified one at the same time. The Split View opens a magnified window on part of your screen, but leaves the other part unmagnified as a reference.
Lens opens a small rectangular window, which is magnified, while leaving the remaining desktop unmagnified. The lens moves around the screen as you move your mouse or when the focus moves.
Dynamic Lens opens a small rectangular window, which is magnified, while leaving the rest of the screen unmagnified. This window follows the mouse pointer or your current location within a document or dialog box if you are using the keyboard. In addition, when you move to a dialog box option or menu command, MAGic automatically resizes the lens so that it only magnifies the currently selected item.
Overlay creates a magnified window on the corner of the screen, while the rest of the screen remains unmagnified. This is similar to the Lens View, although the Overlay View does not move around the screen.
Note: Split, Lens, Dynamic Lens, and Overlay are not available for Multi-Monitor mode. For Multi-Monitor magnification, see Multi-Monitor Settings on page 92.
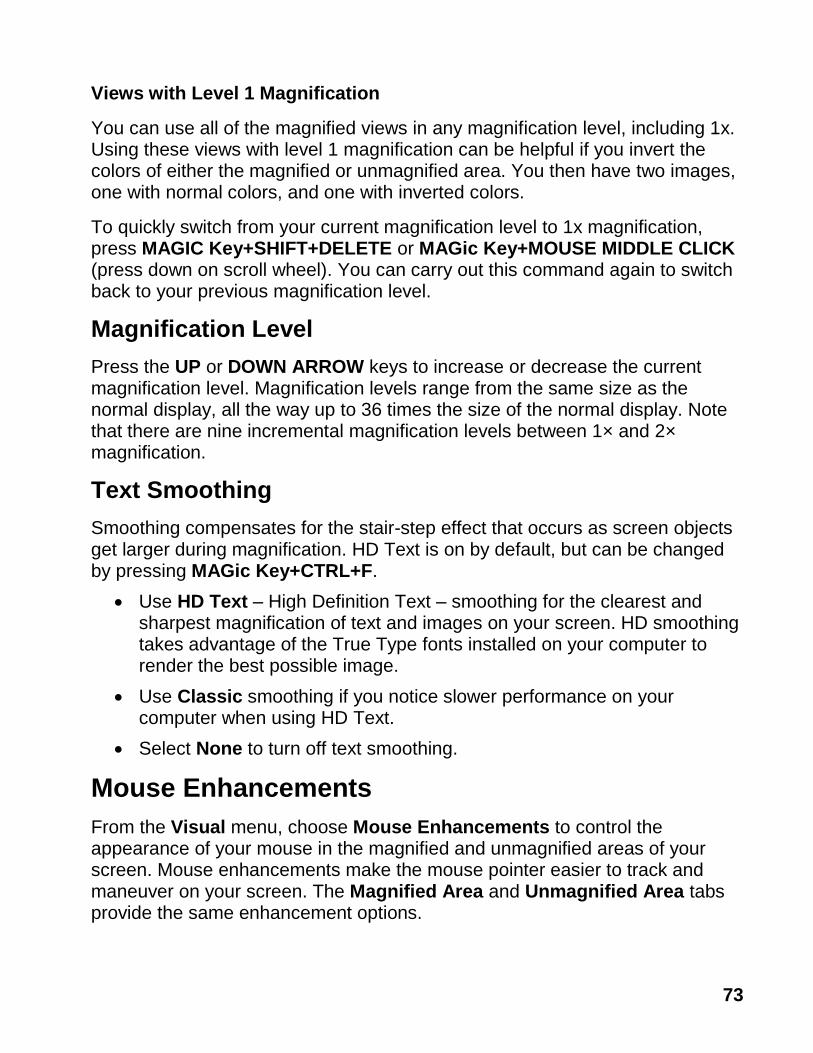
73
Views with Level 1 Magnification
You can use all of the magnified views in any magnification level, including 1x. Using these views with level 1 magnification can be helpful if you invert the colors of either the magnified or unmagnified area. You then have two images, one with normal colors, and one with inverted colors.
To quickly switch from your current magnification level to 1x magnification, press MAGIC Key+SHIFT+DELETE or MAGic Key+MOUSE MIDDLE CLICK (press down on scroll wheel). You can carry out this command again to switch back to your previous magnification level.
Magnification Level
Press the UP or DOWN ARROW keys to increase or decrease the current magnification level. Magnification levels range from the same size as the normal display, all the way up to 36 times the size of the normal display. Note that there are nine incremental magnification levels between 1× and 2× magnification.
Text Smoothing
Smoothing compensates for the stair-step effect that occurs as screen objects get larger during magnification. HD Text is on by default, but can be changed by pressing MAGic Key+CTRL+F.
Use HD Text – High Definition Text – smoothing for the clearest and sharpest magnification of text and images on your screen. HD smoothing takes advantage of the True Type fonts installed on your computer to render the best possible image.
Use Classic smoothing if you notice slower performance on your computer when using HD Text.
Select None to turn off text smoothing.
Mouse Enhancements
From the Visual menu, choose Mouse Enhancements to control the appearance of your mouse in the magnified and unmagnified areas of your screen. Mouse enhancements make the mouse pointer easier to track and maneuver on your screen. The Magnified Area and Unmagnified Area tabs provide the same enhancement options.
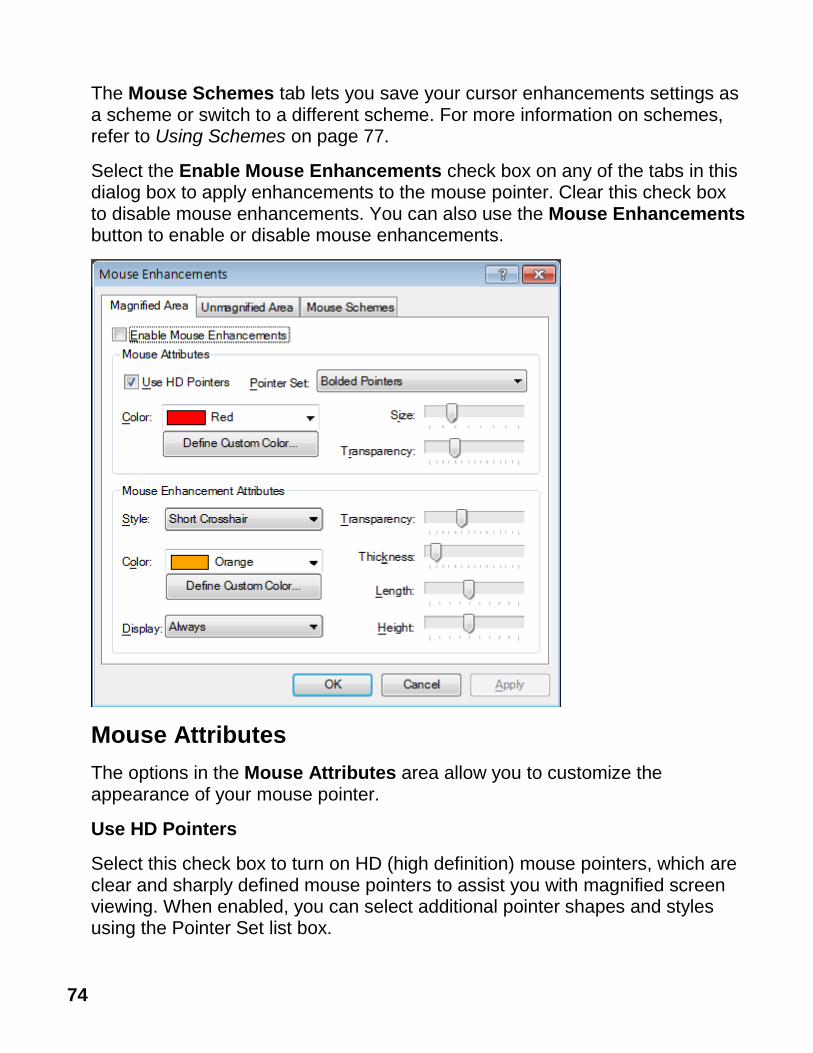
74
The Mouse Schemes tab lets you save your cursor enhancements settings as a scheme or switch to a different scheme. For more information on schemes, refer to Using Schemes on page 77.
Select the Enable Mouse Enhancements check box on any of the tabs in this dialog box to apply enhancements to the mouse pointer. Clear this check box to disable mouse enhancements. You can also use the Mouse Enhancements button to enable or disable mouse enhancements.
Mouse Attributes
The options in the Mouse Attributes area allow you to customize the appearance of your mouse pointer.
Use HD Pointers
Select this check box to turn on HD (high definition) mouse pointers, which are clear and sharply defined mouse pointers to assist you with magnified screen viewing. When enabled, you can select additional pointer shapes and styles using the Pointer Set list box.

75
Pointer Set
Use this list box to select one of the following HD mouse pointer styles: Standard pointers, Aero-like pointers based on the Windows Aero theme, or bold outline pointers. Note that this list box is unavailable when the Use HD Pointers check box is cleared.
Color
Select a color for your mouse pointer in the Color list. To use the original system colors for the mouse pointer, choose Original. To invert the brightness or colors of screen areas covered by the mouse pointer, choose Invert Brightness or Invert Colors.
To choose from additional colors, activate the Define Custom Color button and choose one of the available colors from the palette.
Size
You can use the Size list to increase the proportions of the mouse pointer. Choose from standard size or large size.
Transparency
Use the Transparency slider to adjust the transparency level of the mouse pointer. A higher level of transparency allows you to see text and images beneath the area covered by the mouse pointer.
Mouse Enhancement Attributes
Enhancements are used to further modify the mouse pointer by making it easier to locate and maneuver on the screen.
Style
In the Style list, choose one of the following enhancement types to apply to your mouse pointer:
Short Crosshair – Displays intersecting horizontal and vertical bars that are centered on your mouse pointer. You can adjust the size of these bars by using the Length and Height sliders.
Long Crosshair – This style is similar to short crosshair, but the horizontal and vertical bars extend to the edges of the view.
Oval – Displays an oval around the mouse pointer. You can adjust the size of the oval by using the Length and Height sliders.

76
Box – Displays a box around the mouse pointer. You can adjust the size of the box by using the Length and Height sliders.
Oval Scope – Combines the short crosshair and oval styles.
Box Scope – Combines the short crosshair and box styles.
Long Box Scope – Combines the long crosshair and box styles.
Long Oval Scope – Combines the long crosshair and oval styles.
Color
In the Color list, choose a color for the enhancement style you selected. To invert the brightness or colors of screen areas covered by the enhancement, choose Invert Brightness or Invert Colors. To choose from additional colors, activate the Define Custom Color button and choose one of the available colors from the palette.
Display
In the Display list, choose when MAGic should apply enhancements to the mouse pointer:
Always – The mouse enhancements are always active and visible on the screen.
Mouse Moving – The enhancements are only visible when the mouse pointer is moving.
Mouse Not Moving – The enhancements are only visible when the mouse pointer is stationary.
When MAGic Key is Pressed – The enhancements only appear when you press the MAGic Key.
Transparency
Use the Transparency slider to adjust the transparency level of the mouse enhancement. A higher level of transparency allows you to see text and images beneath areas covered by the enhancements.
Thickness
Use the Thickness slider to adjust the thickness of the lines of the enhancement style you selected. Increased thickness makes the enhancements easier to see and causes them to stand out more. Decreased thickness causes the enhancements to appear more subdued and lets you see more of the screen.
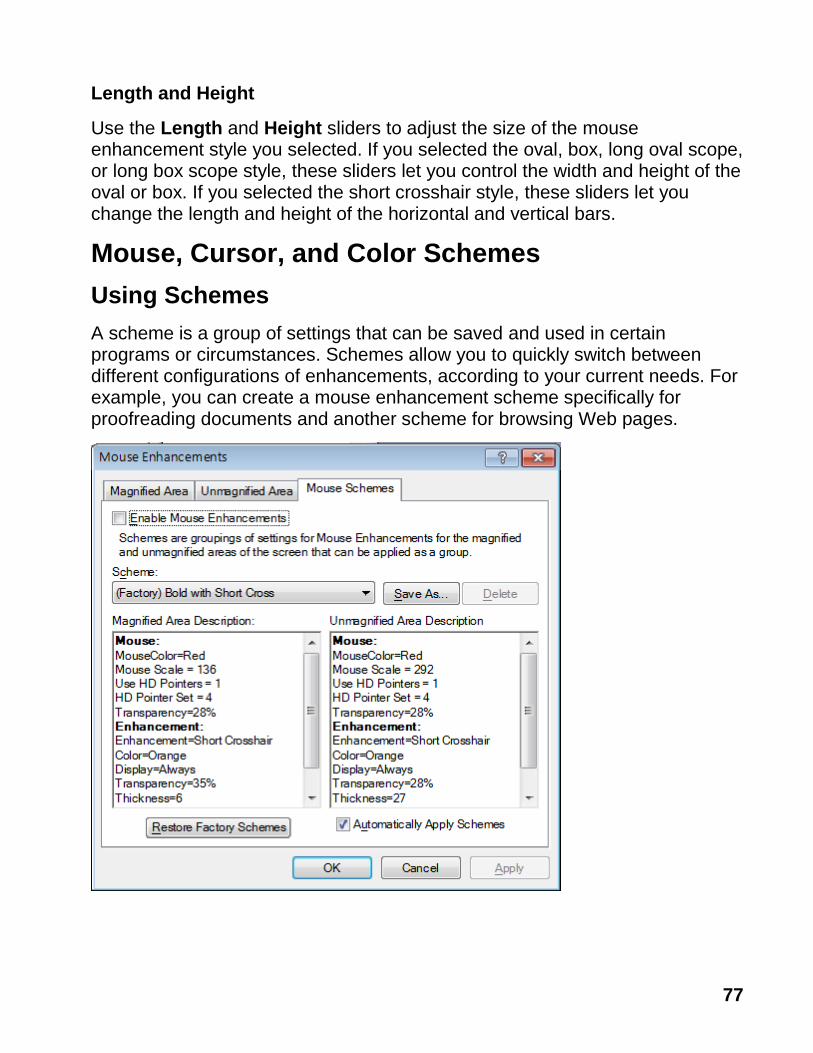
77
Length and Height
Use the Length and Height sliders to adjust the size of the mouse enhancement style you selected. If you selected the oval, box, long oval scope, or long box scope style, these sliders let you control the width and height of the oval or box. If you selected the short crosshair style, these sliders let you change the length and height of the horizontal and vertical bars.
Mouse, Cursor, and Color Schemes
Using Schemes
A scheme is a group of settings that can be saved and used in certain programs or circumstances. Schemes allow you to quickly switch between different configurations of enhancements, according to your current needs. For example, you can create a mouse enhancement scheme specifically for proofreading documents and another scheme for browsing Web pages.

78
The currently selected scheme is displayed in the Scheme list. To switch to a different scheme, choose a new scheme from the list and then click Apply or press ALT+A. If you select the Automatically Apply Schemes check box, MAGic applies the new enhancement settings as soon as you select a scheme.
Tip: You can also select a scheme directly from the Quick Access Window. To do this, right-click the Mouse Enhancements, Cursor Enhancements, or Color Enhancements button and then choose a scheme from the context menu.
The Magnified Area Description and Unmagnified Area Description boxes show the current enhancement settings for the magnified area and the unmagnified area.
Creating New Schemes
To create a new scheme, do the following:
1. Use the Magnified Area and Unmagnified Area tabs to define enhancement settings for the magnified and unmagnified areas.
2. On the Mouse Schemes tab, click Save As or press ALT+S to create a new scheme based on your current settings.
3. Enter a name for the scheme and then press ENTER. The new scheme appears in the Scheme list.
Modifying Schemes
To modify an existing scheme, do the following:
1. Select the scheme you want to modify in the Scheme list.
2. Change the enhancement settings for the magnified and unmagnified areas.
3. On the Mouse Schemes tab, click Save As or press ALT+S.
4. The name of the currently selected scheme displays in the Save Scheme dialog box. Press ENTER to save your modifications.
Deleting Schemes
To delete a scheme, do the following:
1. Select the scheme you want to delete in the Scheme list.
2. Click Delete or press ALT+D to delete the currently selected scheme.
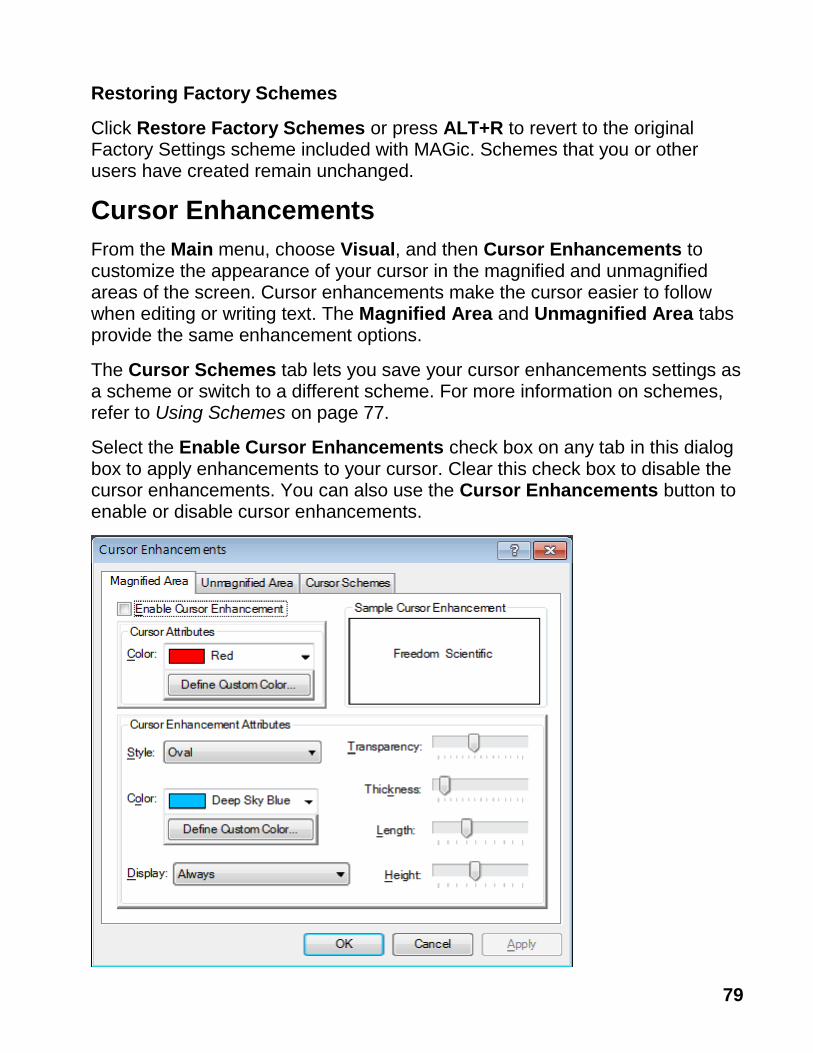
79
Restoring Factory Schemes
Click Restore Factory Schemes or press ALT+R to revert to the original Factory Settings scheme included with MAGic. Schemes that you or other users have created remain unchanged.
Cursor Enhancements
From the Main menu, choose Visual, and then Cursor Enhancements to customize the appearance of your cursor in the magnified and unmagnified areas of the screen. Cursor enhancements make the cursor easier to follow when editing or writing text. The Magnified Area and Unmagnified Area tabs provide the same enhancement options.
The Cursor Schemes tab lets you save your cursor enhancements settings as a scheme or switch to a different scheme. For more information on schemes, refer to Using Schemes on page 77.
Select the Enable Cursor Enhancements check box on any tab in this dialog box to apply enhancements to your cursor. Clear this check box to disable the cursor enhancements. You can also use the Cursor Enhancements button to enable or disable cursor enhancements.
80
Cursor Attributes
In the Color list, choose a new color for the flashing cursor that appears when you are typing text into an edit box, document, and so on. To use the original system color for the cursor, choose Original. To choose from additional colors, activate the Define Custom Color button and choose one of the available colors from the palette.
Sample Cursor Enhancement
This area allows you to preview your cursor enhancement settings. MAGic displays a sample of you current cursor enhancements using the text in this area. This lets you adjust the enhancements to achieve the desired effect before applying them.
Cursor Enhancement Attributes
The Cursor Enhancement Attributes area allows you to choose a cursor enhancement style. You can also adjust the appearance and size of the enhancement and when it displays on your screen.
Style
In the Style list, choose one of the following enhancement styles:
None – The cursor appears as a blinking vertical bar, with no additional enhancements.
Oval – A small area around the cursor is surrounded by an oval.
Triangle – Two small triangles appear above and below the current position of the cursor.
Box – The immediate area around the cursor is surrounded by a small rectangle.
Line – Perpendicular lines appear beneath the text and a small vertical line indicates the exact position of the cursor.
Color
In the Color list, choose a color for the enhancement style you selected. To invert the brightness or colors of screen areas covered by the enhancement, choose Invert Brightness or Invert Colors. To choose from additional colors, activate the Define Custom Color button and choose one of the available colors from the palette.

81
Display
In the Display list, choose when MAGic should apply enhancements to the cursor:
Always – The cursor enhancements are always active and visible on the screen.
Cursor Moving – The enhancements are only visible when the cursor is moving, such as when you are typing text or using the arrow keys.
Cursor Not Moving – The enhancements are only visible when the cursor is stationary.
When MAGic Key is Pressed – The enhancements only appear when you press the MAGic Key.
Transparency
Use the Transparency slider to adjust the transparency level of the cursor enhancement. This is useful if your cursor enhancement frequently obscures the surrounding text. Higher levels of transparency allow you to see text and images beneath the enhancement.
Thickness
Use the Thickness slider to adjust the thickness of the cursor enhancement. Thicker cursor enhancements are easier to see and stand out more. Thinner cursor enhancements are more subdued and let you see more of the text.
Length
Use the Length slider to adjust the horizontal size of the cursor enhancement style. This affects how much text is included within the oval, box, and line enhancements.
Height
Use the Height slider to adjust the vertical size of the cursor enhancement style. This affects the height of the oval and box enhancements and increases the length of the vertical portion of the line enhancement.
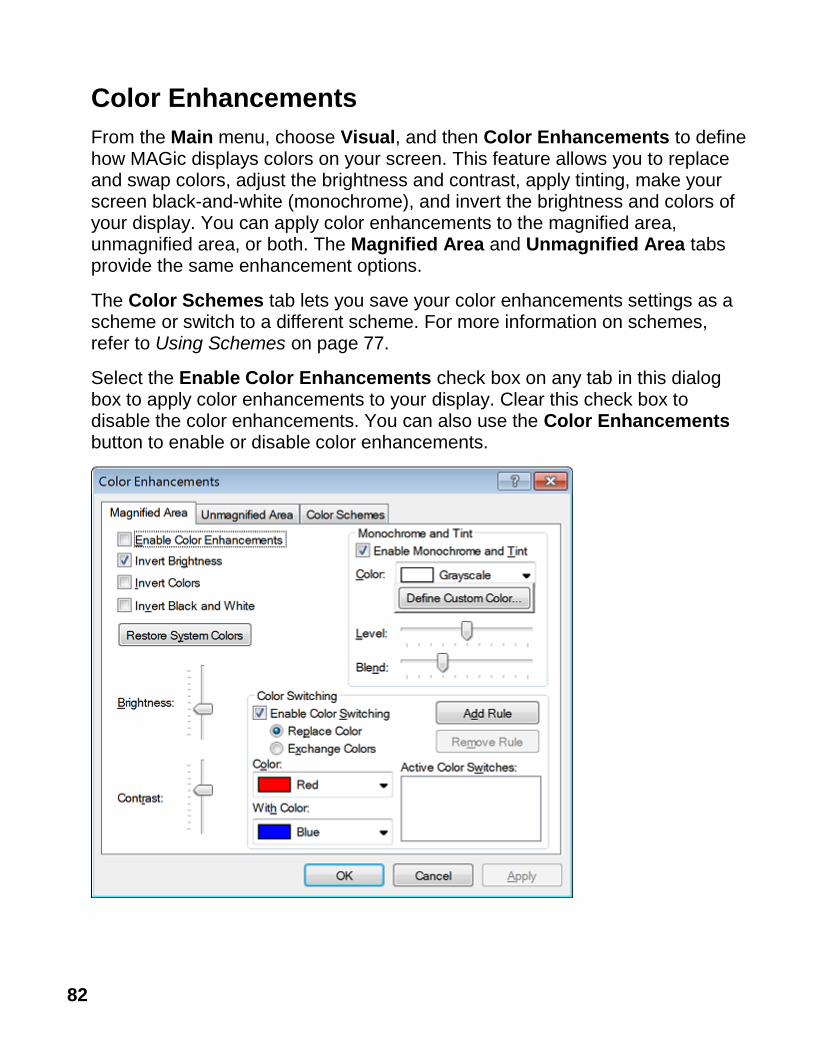
82
Color Enhancements
From the Main menu, choose Visual, and then Color Enhancements to define how MAGic displays colors on your screen. This feature allows you to replace and swap colors, adjust the brightness and contrast, apply tinting, make your screen black-and-white (monochrome), and invert the brightness and colors of your display. You can apply color enhancements to the magnified area, unmagnified area, or both. The Magnified Area and Unmagnified Area tabs provide the same enhancement options.
The Color Schemes tab lets you save your color enhancements settings as a scheme or switch to a different scheme. For more information on schemes, refer to Using Schemes on page 77.
Select the Enable Color Enhancements check box on any tab in this dialog box to apply color enhancements to your display. Clear this check box to disable the color enhancements. You can also use the Color Enhancements button to enable or disable color enhancements.
83
Invert Brightness
Select this check box if you want MAGic to invert the brightness of colors on your display. Dark colors will appear lighter, while light colors will appear darker. For example, if you select this check box, black text becomes white text and dark blue becomes light blue.
Invert Colors
Select this check box to reverse the colors that are displayed on your screen.
Invert Black and White
If you select this check box, MAGic replaces the color black with white and the color white with black.
Restore System Colors Button
Click Restore System Colors or press ALT+Y to revert to your default Windows color settings.
Brightness
Use the Brightness slider to adjust the brightness of your screen. Brightness determines how light or dark colors appear. Move the slider down to reduce the brightness, move it up to increase the brightness.
Contrast
Use the Contrast slider to adjust the contrast of you screen. Contrast determines the difference between lighter and darker areas. Move the slider down to reduce the contrast, move it up to increase the contrast.
Monochrome and Tint
The Monochrome and Tint area allows you to tint your screen with a color or make the screen monochrome (black-and-white). MAGic only applies these settings if you select the Enable Monochrome and Tint check box.
Color
In the Color list, choose the color you want MAGic to use to tint your screen. Choose Grayscale if you want your screen to appear monochrome (black-and-white). To choose from additional colors, activate the Define Custom Color button and choose one of the available colors from the palette.
84
Level
Use the Level slider to adjust the luminescence, or brightness, of the tinting. Move the slider to the left to make the color appear darker, move it to the right to make the color appear brighter.
Blend
Use the Blend slider to control the intensity of the tinting. Move the slider to the left for strong tinting. At stronger levels, the tinting affects the color of almost everything on the screen. Move the slider to the right for a lower level of tinting. At the lowest levels, the tinting only slightly alters the colors on your screen.
Color Switching
The Color Switching area allows you to define rules that switch certain colors on your screen with colors of your choice. MAGic only applies these color switching rules if you select the Enable Color Switching check box.
To create a new rule:
1. Select the Replace Color radio button if you want to use one color instead of another. Select the Swap Colors radio if you want to switch two colors on your screen. For example, if you select Replace Color and choose to replace red with blue, all red objects will appear blue instead. If you select Swap Colors and choose to swap red and blue, all red objects appear blue, and all blue objects appear red.
2. Select one color in the Color list and a second color in the With Color list. If you are creating a color replacement rule, MAGic will replace the first color with the second color. If you are creating a color swapping rule, MAGic will switch these two colors on your screen.
3. Click Add Rule or press ALT+D to define your new rule and add it to the list.
Repeat these steps to add more rules as necessary. To delete a rule, select it in the Active Color Switches list and click Remove Rule or press ALT+M.
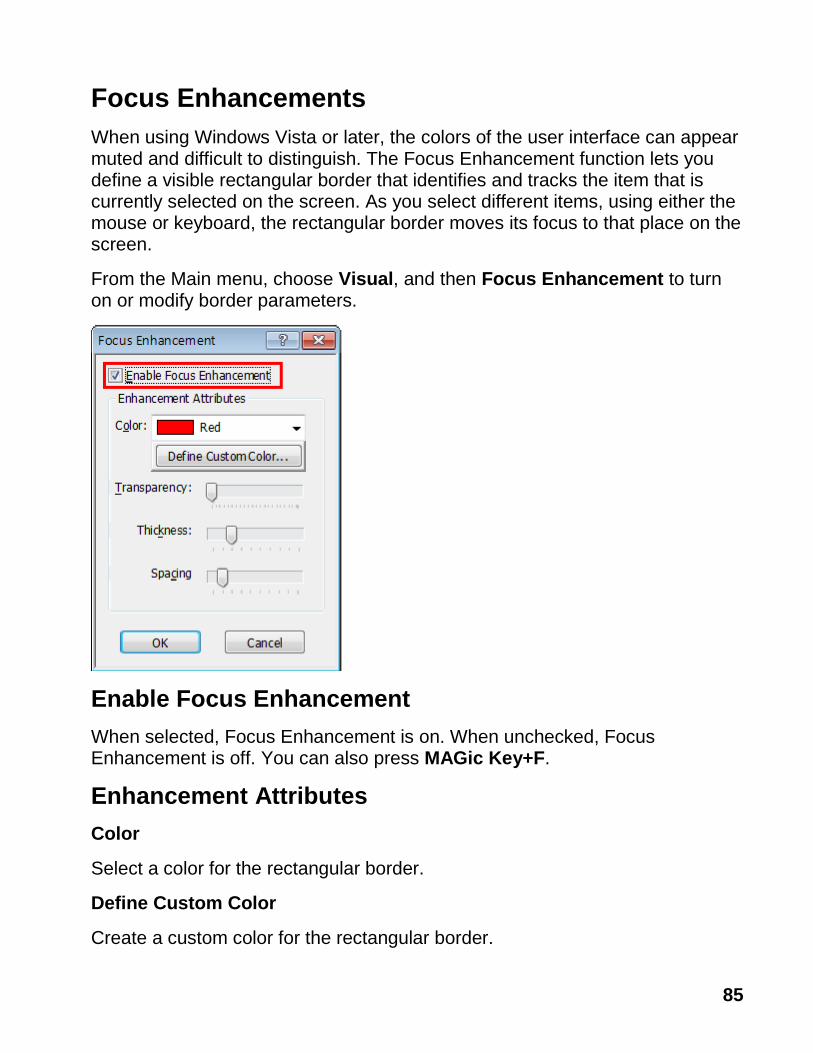
85
Focus Enhancements
When using Windows Vista or later, the colors of the user interface can appear muted and difficult to distinguish. The Focus Enhancement function lets you define a visible rectangular border that identifies and tracks the item that is currently selected on the screen. As you select different items, using either the mouse or keyboard, the rectangular border moves its focus to that place on the screen.
From the Main menu, choose Visual, and then Focus Enhancement to turn on or modify border parameters.
Enable Focus Enhancement
When selected, Focus Enhancement is on. When unchecked, Focus Enhancement is off. You can also press MAGic Key+F.
Enhancement Attributes
Color
Select a color for the rectangular border.
Define Custom Color
Create a custom color for the rectangular border.

86
Transparency
Use the Transparency slider to adjust the border's transparency level.
Thickness
Use the Thickness slider to adjust the border's thickness. Thicker borders are easier to see and stand out more. Thinner borders are more subdued.
Spacing
Use the Spacing slider to adjust the amount of space between the rectangular border and the selected item. Move the slider to the right to increase the amount of space between the item and the border. Move the slider to the left to decrease the amount of space between the item and the border.
Locator
The Locator is a small window that opens on your screen that shows the area that is currently magnified. Use it to help you find what you are looking for on the screen. When you activate the Locator, the full screen is temporarily displayed unmagnified.
Activating the Locator
Press MAGic Key+F10 to turn the Locator on or off.
Moving the Locator
Move the Locator around your screen using the mouse or the arrow keys.
Use PAGE UP to move to the top of the screen, PAGE DOWN to go to the bottom of the screen, HOME to go to the far left side of the screen, and END to go to the far right side of the screen. After you have located the item, press ENTER or the left mouse button to move the magnified area to that portion of the screen. Alternatively, you can press ESC to exit the Locator without moving the magnified area.
Selecting Styles
To select a style and border color for the Locator, choose the Main menu, and then Visual followed by Locator.
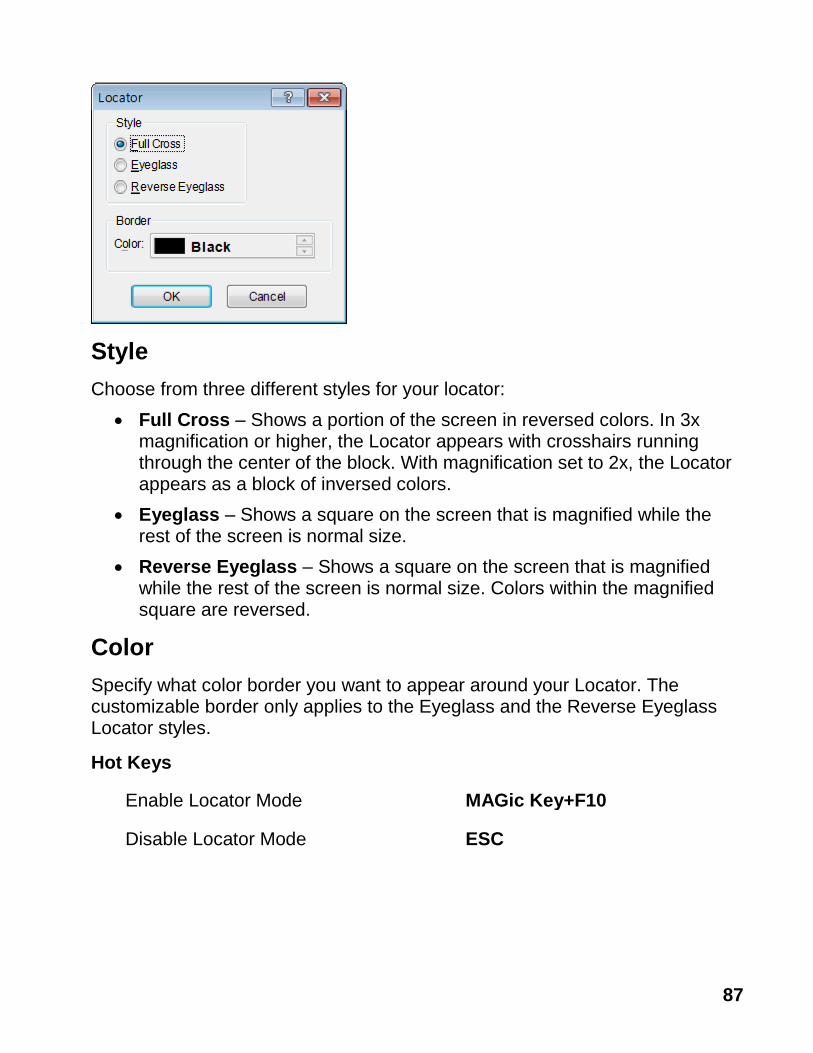
87
Style
Choose from three different styles for your locator:
Full Cross – Shows a portion of the screen in reversed colors. In 3x magnification or higher, the Locator appears with crosshairs running through the center of the block. With magnification set to 2x, the Locator appears as a block of inversed colors.
Eyeglass – Shows a square on the screen that is magnified while the rest of the screen is normal size.
Reverse Eyeglass – Shows a square on the screen that is magnified while the rest of the screen is normal size. Colors within the magnified square are reversed.
Color
Specify what color border you want to appear around your Locator. The customizable border only applies to the Eyeglass and the Reverse Eyeglass Locator styles.
Hot Keys
Enable Locator Mode MAGic Key+F10
Disable Locator Mode ESC

88
Panning
Panning moves your display either horizontally or vertically, so you can browse the screen, locate objects, and read magnified text easier. With magnification set at 2x or higher, you can pan automatically or incrementally. The advantage of automatic panning is that you can review the contents of the screen without using repetitive mouse movements. While incremental panning is similar to automatic panning, it is different in that your viewing area moves in small, fixed increments making it easier for you to explore your focal area.
Automatic Panning
Begin automatic panning in any direction by pressing the MAGic Key in conjunction with any arrow key. Panning then begins in that direction, and continues until you stop it, or until it reaches the edge of the screen.
Note: If you disable line wrap in the Panning dialog box, then panning will stop at the right edge of the screen when panning from left to right.
Stop Panning
To stop panning, press the MAGic Key or the ESC key. You can also use the arrow key that corresponds with the direction in which you are currently panning.
Change Panning Direction
Press the arrow key of the direction in which you want to pan.
Panning Quick Advance
Pressing ENTER while panning right, scrolls the view to the beginning of the next line, pauses, and then continues to the right.
Panning Speed
Adjust panning speed during panning, or through the Panning dialog box. While panning, press NUM PAD PLUS to speed up, and NUM PAD MINUS to slow down. The speed adjustment only applies to the current direction of panning.
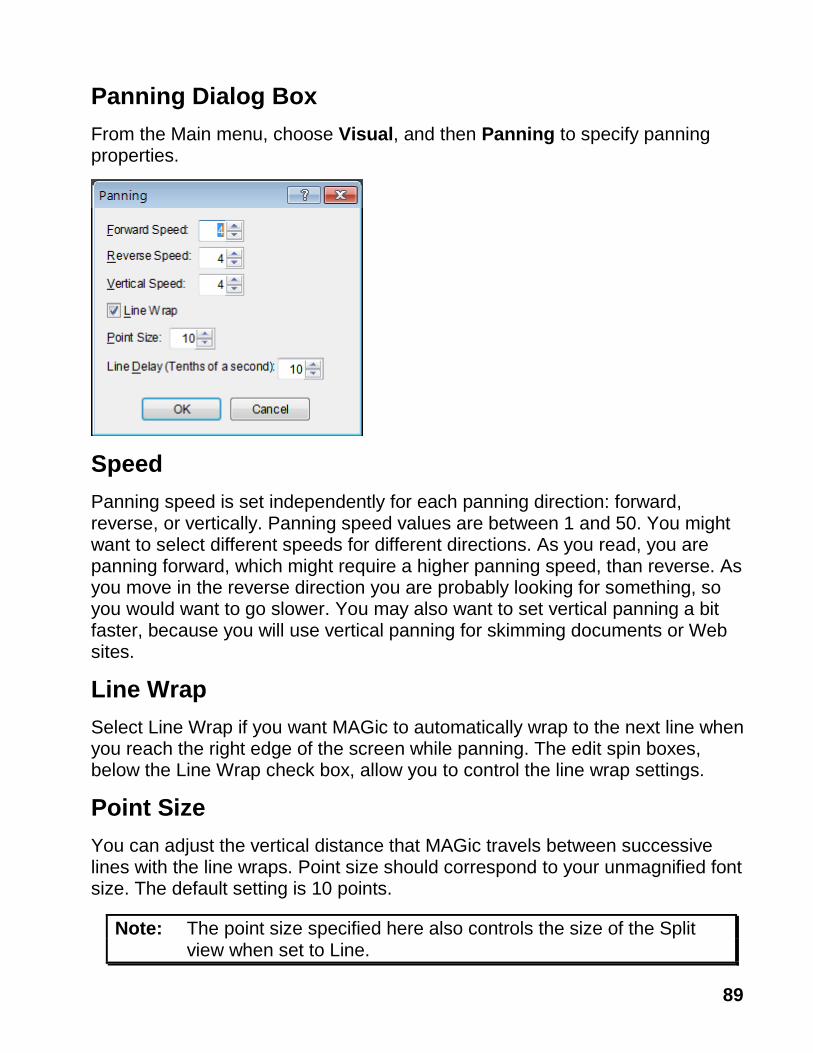
89
Panning Dialog Box
From the Main menu, choose Visual, and then Panning to specify panning properties.
Speed
Panning speed is set independently for each panning direction: forward, reverse, or vertically. Panning speed values are between 1 and 50. You might want to select different speeds for different directions. As you read, you are panning forward, which might require a higher panning speed, than reverse. As you move in the reverse direction you are probably looking for something, so you would want to go slower. You may also want to set vertical panning a bit faster, because you will use vertical panning for skimming documents or Web sites.
Line Wrap
Select Line Wrap if you want MAGic to automatically wrap to the next line when you reach the right edge of the screen while panning. The edit spin boxes, below the Line Wrap check box, allow you to control the line wrap settings.
Point Size
You can adjust the vertical distance that MAGic travels between successive lines with the line wraps. Point size should correspond to your unmagnified font size. The default setting is 10 points.
Note: The point size specified here also controls the size of the Split view when set to Line.
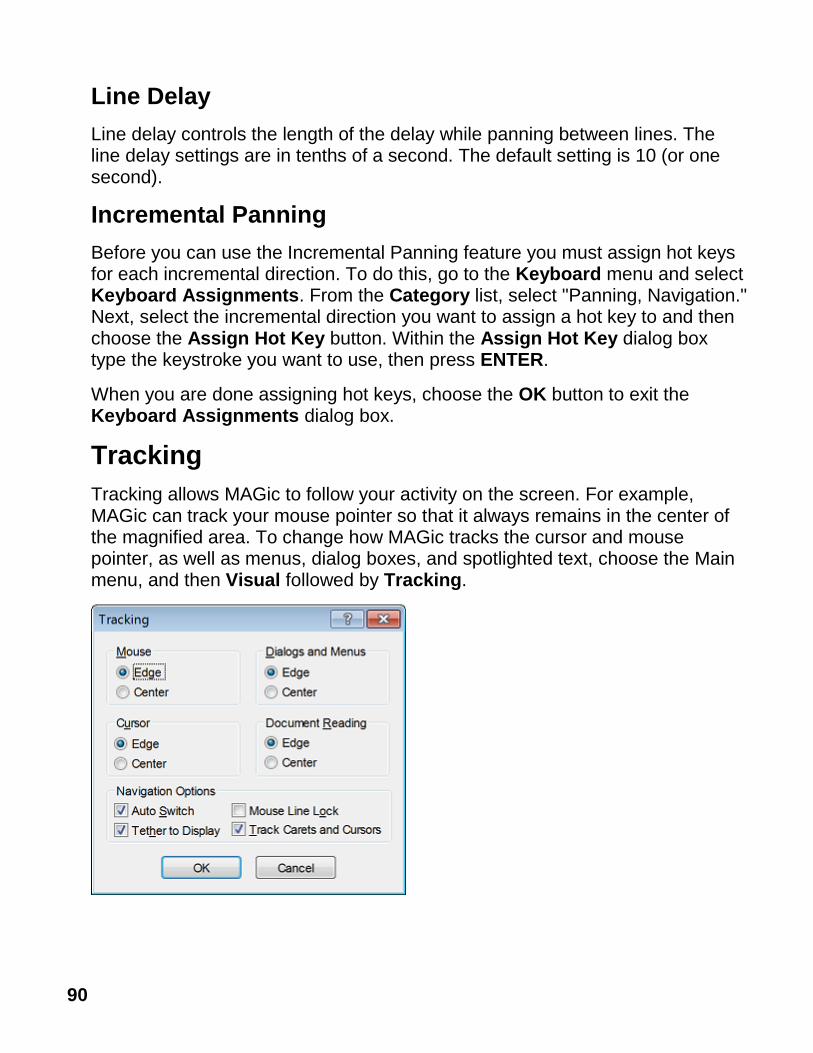
90
Line Delay
Line delay controls the length of the delay while panning between lines. The line delay settings are in tenths of a second. The default setting is 10 (or one second).
Incremental Panning
Before you can use the Incremental Panning feature you must assign hot keys for each incremental direction. To do this, go to the Keyboard menu and select Keyboard Assignments. From the Category list, select "Panning, Navigation." Next, select the incremental direction you want to assign a hot key to and then choose the Assign Hot Key button. Within the Assign Hot Key dialog box type the keystroke you want to use, then press ENTER.
When you are done assigning hot keys, choose the OK button to exit the Keyboard Assignments dialog box.
Tracking
Tracking allows MAGic to follow your activity on the screen. For example, MAGic can track your mouse pointer so that it always remains in the center of the magnified area. To change how MAGic tracks the cursor and mouse pointer, as well as menus, dialog boxes, and spotlighted text, choose the Main menu, and then Visual followed by Tracking.
91
Mouse
To control how MAGic tracks your mouse pointer, select one of the following radio buttons:
Edge – If you select this option, MAGic follows your mouse pointer only when it reaches the edge of the magnified area.
Centered – If you select this option, MAGic continuously follows your mouse pointer, ensuring that it is always in the center of the magnified area.
Cursor
To control how MAGic tracks the cursor when you are typing text, select one of the following radio buttons:
Edge – If you select this option, MAGic follows your cursor only when it reaches the edge of the magnified area.
Centered – If you select this option, MAGic continuously follows your cursor, ensuring that it is always in the center of the magnified area.
Dialogs and Menus
The Dialogs and Menus area lets you control how MAGic follows your movement through dialog boxes and menus. Select one of the following radio buttons:
Edge – MAGic automatically moves the magnified area when you reach the edge of the screen while moving through dialog boxes and menus.
Centered – MAGic continuously tracks the active dialog box option or menu command, ensuring that it is always in the center of the magnified area.
Document Reading
To control how MAGic tracks spotlighted text during document reading, select one of the following radio buttons:
Edge – MAGic automatically moves the magnified area when the spotlight reaches the edge of the screen.
Centered – MAGic continuously tracks the spotlight, ensuring that spotlighted text always remains in the center of the magnified area.

92
Auto Switch
If you select this check box, centered and mouse tracking is temporarily stopped after you stop moving the mouse. The screen remains stationary as long as you keep the mouse pointer within the boundary of the screen. When you move beyond the edge of the screen, tracking starts again.
Tether to Display
If you select this check box, the mouse pointer is "tethered," or attached, to the magnified display. As soon as you move the mouse, the mouse pointer automatically appears at the current magnified location, even if it was not visible on the screen. If you do not select this check box, MAGic moves to the current location of the mouse pointer when you move the mouse.
Tip: You can press CTRL+INSERT+NUM PAD MINUS to enable or disable this option at any time.
Mouse Line Lock
If you select this check box, you can only move the mouse pointer in horizontal and vertical directions. If you move the mouse in a diagonal direction, MAGic moves the mouse pointer in the closest direction.
Track Carets and Cursors
Select this check box if you want MAGic to track your cursor.
Multi-Monitor Settings
From the Main menu, choose Visual, followed by Multi-Monitor, and then Settings to configure multi-monitor support when multiple monitors are connected to your computer. Select Independent mode to simultaneously magnify and run two different applications on two different monitors. Select Overview mode to view the same desktop on two monitors where one is magnified and the other is not. Multi-monitor support is available with Windows Vista or later.

93
Magnified Mode
Use this combo box to select Independent or Overview multi-monitor functionality.
Independent Mode: Both monitors are magnified, and each can operate independently. For example, you can have a spreadsheet open on one monitor while editing a document on the other monitor. To move the mouse pointer between monitors, press MAGic Key+SHIFT+D, the Jump to Display keystroke. When switching between monitors, the cursor will return to its previous location in the open document. You can also drag the mouse pointer left, right, up, or down (depending on the monitor configuration) to jump to the other monitor. In Independent mode, the shortcuts WINDOWS Key+SHIFT+RIGHT ARROW and WINDOWS Key+SHIFT+LEFT ARROW allow you to move the current application window between monitors while maintaining mouse pointer and cursor location.
94
Overview Mode: The same screen and desktop appears on both monitors; however, one monitor is magnified and the other is not. Press MAGic Key+SHIFT+D to switch the magnified and unmagnified views between monitors. Note that if you switch from Independent mode, where both monitors are magnified, to Overview mode, all desktop and taskbar icons are consolidated to the primary monitor.
Restrict Mouse to Active Monitor
Select this check box to limit mouse pointer movement to the active monitor. This stops you from accidentally moving the pointer between monitors. When selected, use any of the following methods to move the mouse pointer between monitors: (1) hold the mouse pointer against the edge of the active monitor’s screen for a specified number of seconds; (2) double tap the mouse pointer against the edge of the active monitor’s screen within a specified time period; (3) hold down MAGic Key+SHIFT while dragging the mouse pointer across the active monitor to the other monitor; or (4) press MAGic Key+SHIFT+R. This check box is not available for Overview mode.
Switch After Waiting (seconds)
Select this check box so that the mouse pointer waits at the edge of the active monitor’s screen for the specified number of seconds before moving to the other monitor. In the Switch After Waiting box, enter the amount of time you want the mouse pointer to stay at the edge of the monitor’s screen before moving to the other monitor. Values range from 0.1 second to 3 seconds. This check box is not available for Overview mode.
Switch on Double Tap Within (seconds)
Select to have the mouse pointer move between monitors after tapping the mouse pointer twice against the edge of the active screen. The double tap must occur within the specified number of seconds. In the Switch on Double Tap Within box, enter the time span required to perform the double tap before the mouse pointer moves to the other monitor. If the double tap occurs outside of this period, the pointer will not move to the other monitor. Select a value from 0.1 second to 3 seconds. This check box is not available for Overview mode.
Important Note for Laptop Users
When using the touchpad on your laptop, do the following to “double tap” and move the mouse pointer between monitors.

95
To move from the left monitor to the right monitor:
Press and hold your finger on the touchpad.
Slide your finger right, left, and right again.
To move from the right monitor to the left monitor:
Press and hold your finger on the touchpad.
Slide your finger left, right, and left again.
If your monitors are arranged vertically, use an up-down-up motion or down-up-down motion.
Sound When Reaching Monitor Edge
Select a WAV file sound to indicate when the mouse pointer has reached the edge of the active monitor. This check box is not available for Overview mode.
Sound When Switching Monitors
Select a WAV file sound to indicate that the mouse pointer has successfully moved from one monitor to the other monitor. This check box is not available for Overview mode.
Unmagnified Display
Use this combo box to select which monitor will not be magnified when configured for Overview Mode. The combo box is not available for Independent Mode.
Show Enhancements in Unmagnified View
Select this check box to allow mouse, cursor, color, and focus enhancements to be used on the unmagnified monitor. When cleared, enhancements are only visible on the magnified monitor. You can also press and release MAGic Key+SPACEBAR followed by D and then E to toggle enhancements on and off on the unmagnified monitor. This check box is only available for Overview mode.
Show Mouse in Unmagnified View
Select the check box to allow the mouse pointer to be visible on the unmagnified monitor. When cleared, the mouse pointer is only visible on the magnified monitor. This check box is only available for Overview mode.

96
Multi-Monitor Operation
This section describes how to set up and use MAGic with multiple monitors. If this is the first time that you are using MAGic with multiple monitors, refer to Multi-Monitor Configuration on page 100 for more information.
Turning On Multi-Monitor Mode
From the Main menu, choose Visual, and then Multi-Monitor. By default, Enable Multi-Monitor is selected. To turn off Multi-Monitor mode, click this menu item.
Note: Once enabled, MAGic always checks to see if two monitors are connected. If not, MAGic automatically reverts to single-monitor mode without requiring a computer reboot. This is useful when traveling with a laptop computer.
Configuring Multi-Monitor Mode
To configure and use Multi-Monitor mode, do the following:
1. From the Main menu, choose Visual, followed by Multi-Monitor, and then Settings. The Multi-Monitor Settings dialog box opens.
2. In the Magnified Mode combo box, select Independent or Overview.
For Independent mode, both monitors are magnified, and each can operate independently. For example, you can have a spreadsheet open on one monitor while editing a document on the other monitor. To move the mouse pointer between monitors, press MAGic Key+SHIFT+D, the Jump to Display keystroke. When switching between monitors, the cursor will return to its previous location in the open document. You can also drag the mouse pointer left, right, up, or down (depending on the monitor configuration) to jump to the other monitor. In Independent mode, the shortcuts WINDOWS Key+SHIFT+RIGHT ARROW and WINDOWS Key+SHIFT+LEFT ARROW allow you to move the current application window between monitors while maintaining mouse pointer and cursor location.
97
For Overview mode, the same screen and desktop appears on both monitors; however, one monitor is magnified and the other is not. Press MAGic Key+SHIFT+D to switch the magnified and unmagnified views between monitors. Note that if you switch from Independent mode, where both monitors are magnified, to Overview mode, all desktop and taskbar icons are consolidated to the primary monitor.
3. If Magnified Mode is set to Independent, go to step 4. If Magnified Mode is set to Overview, go to step 5.
4. To prevent the mouse pointer from accidentally moving to the other monitor, do the following. Note that these settings are not available for Overview mode.
Select the Restrict Mouse to Active Monitor check box.
Select the Switch After Waiting check box and then specify in seconds how long the mouse pointer must stay at the edge of the screen before it moves to the next screen.
Select the Switch on Double Tap Within check box and then specify in seconds the time required to perform the double tap before the pointer moves to the other monitor. If the double tap occurs outside of this period, the pointer does not move to the other monitor. (If you are using a touchpad, the double tap is a right-left-right or left-right-left sliding motion. Use an up-down-up or down-up-down sliding motion for vertically arranged monitors.)
Use the Sound When Reaching Monitor Edge combo box to select a WAV file to play that indicates that the mouse pointer is at the edge of the screen.
Use the Sound When Switching Monitors combo box to select a WAV file to play that indicates when the mouse pointer has moved to the other monitor.
98
5. In the Unmagnified Display combo box, select the monitor that will not be magnified. This combo box is not available for Independent mode.
In Overview mode, you also have the following options.
Select the Show Enhancements in Unmagnified View check box to allow mouse, cursor, color, and focus enhancements to be used on the unmagnified monitor. When cleared, enhancements are only visible on the magnified monitor. You can also press MAGic Key+SPACEBAR followed by D and then E to toggle enhancements on or off on the unmagnified monitor.
Select the Show Mouse in Unmagnified View check box to allow the mouse pointer to be visible on the unmagnified monitor. When cleared, the mouse pointer is only visible on the magnified monitor.
6. Select OK to save changes, and close the Multi-Monitor Settings dialog box.
7. To save Multi-Monitor mode so that it is on when you restart MAGic in the future, choose Save Default Settings from the File menu.
Using View Lock
Use the View Lock feature to freely move the mouse pointer across screens without moving any objects on the desktop. Press and hold MAGic Key+SHIFT while moving the mouse pointer across the screen. This provides a smooth transition from one monitor to the other without shifting the view on the screen. Normal mouse pointer movement resumes when you release MAGic Key+SHIFT. This feature is useful when you are moving back and forth between two monitors and you want to keep the screen views locked.
Multi-Monitor Keystrokes
MAGic Key+SHIFT+D: Use this MAGic keystroke to quickly switch focus from one monitor to the other. This eliminates the need to drag the mouse between monitors.
MAGic Key+SHIFT+R: Use to restrict the mouse pointer to the active monitor.

99
WINDOWS Key+SHIFT+RIGHT ARROW or WINDOWS Key+SHIFT+LEFT ARROW: Use these Windows 7 shortcuts to move the current application or window in focus to the monitor on the right or the left. This eliminates the need to click and drag an application window from one monitor to the other.
MAGic Key+SHIFT: Press and hold while dragging the mouse to smoothly move the mouse pointer between screens without scrolling any screen content. This is the View Lock feature. To resume normal operation, release MAGic Key+SHIFT.
MAGic Key+SPACEBAR, followed by D and then E: In Overview mode, toggles mouse, cursor, color, and focus enhancements on and off on the unmagnified monitor.
Troubleshooting
Use the following to troubleshoot any Multi-Monitor issues.
Problem: Moving the mouse cursor between monitors is difficult since the application scrolls until the mouse reaches the edge. It would be better if I could just jump to the other screen without either monitor scrolling.
Solution: Press MAGic Key+SHIFT+D to quickly jump from one monitor to the other. This is easier and faster since you do not have to drag and lift the mouse (or your finger on a touchpad) several times to travel the same desktop area.
Problem: Double tapping my touchpad does not move the mouse pointer between monitors.
Solution: To double tap with a touchpad, press and hold your finger on the touchpad, and then slide it to the right, left, and right to move from the left monitor to the right monitor. Slide your finger left, right, and left to move from the right monitor to the left monitor. If your monitors are arranged vertically, use an up-down-up motion or down-up-down motion.
Problem: A message displays stating that the color depth is not the same.
Solution: Open the display settings in Windows and make sure that the color depth on both displays is the same. The recommended setting is 32-bit color.
100
Multi-Monitor Configuration
The following describes how to set up your Windows display settings and configure MAGic for multiple monitor operation. To use Multi-Monitor mode, see Turning On Multi-Monitor Mode on page 96.
System Requirements
The following hardware and software is required for Multi-Monitor operation:
A computer and video card that supports dual monitors
Two computer monitors
Windows Vista or later
Note: If using an HDTV as a computer monitor, use the VGA or HDMI connector on the TV. Both 720p and 1080p are supported.
Windows Configuration
Before using the Multi-Monitor feature in MAGic, you must connect a second monitor to your computer, and configure Windows for multiple monitor operation. These procedures will vary based on your operating system.
Note: Each monitor can use a different screen resolution. This provides greater flexibility between laptop and desktop monitors.
1. Press WINDOWS Key+M to minimize all open applications, and move focus to the Windows Desktop.
Note: Focus must be on the Windows Desktop. If you see or hear that an icon on the desktop is selected, press CTRL+SPACEBAR to unselect it.
2. Press the APPLICATION Key , and do one of the following:
For Windows 7, select Screen Resolution.
For Windows Vista, select Personalize and then Display Settings.
3. Select the extended display, and verify the following below. Note that the primary display is typically labeled as 1, and the extended display is labeled as 2.

101
The orientation is the same as the primary display (Windows 7 only).
The color quality (depth) is the same as the primary display. The recommended color setting is 32-bit color, which is the default setting for Windows 7. To locate the Windows 7 color settings, select Advanced Settings, Monitor tab, and then the Colors combo box for color settings.
For Windows 7, the Multiple Displays combo box is set to "Extend these Displays."
For Windows Vista, the Extend the Desktop onto this Monitor check box is selected.
4. Choose OK to save changes.

102

103
Chapter 6 Speech
Speech Tab Overview
Not only does MAGic magnify your computer’s screen, but it also has screen reading capabilities. You can customize MAGic’s speech components to fit your needs.
Speech features can be quickly accessed using buttons in the Speech tab as shown below. For greater customization, other settings are available in the Speech menu (see page 106).
The first item in the speech tab is the Speech button, which switches between full speech and Speech On Demand mode. When full speech is selected, MAGic announces all movement as you switch between documents and applications, or even point to text with the mouse pointer (mouse echo). Speech On Demand mode limits the amount of speech heard based on a subset of specific speech and reading commands. For more information, see Speech On Demand on page 130.
The remainder of the tab includes split buttons that allow you to quickly change basic speech features and settings.
Click the top half of a button to turn a feature on or off.

104
Click the bottom half of a button to select a preconfigured scheme for that feature, or access settings to fine-tune or create new schemes.
Speech Button
When MAGic is first installed, speech is automatically on. This is known as Full Speech mode since MAGic announces all movement as you switch between documents and applications, or even point to text with the mouse pointer (mouse echo). MAGic can also run in Speech On Demand mode. This limits the amount of speech heard based on a subset of specific speech and reading commands. For more information, see Speech On Demand on page 130.
Note that when running MAGic with JAWS for Windows screen reading software, the speech functions in MAGic are disabled because JAWS handles all speech operations.
Speech Rate Slider
Move the slider left or right to decrease or increase how fast MAGic speaks.
Hot Keys
Enable Full Speech or Enable Speech On Demand
MAGic Key+F3
Increase Speech Rate and Save New Rate
WINDOWS Key+ALT+CTRL+PAGE UP
105
Increase Speech Rate - Temporary
ALT+CTRL+PAGE UP
Decrease Speech Rate and Save New Rate
WINDOWS Key+ALT+CTRL+PAGE DOWN
Decrease Speech Rate - Temporary
ALT+CTRL+PAGE DOWN
Speech On Demand Hot Keys
See Default Actions and Hot Keys on page 133 for a list of the default actions and hot keys that are available when using Speech On Demand mode.
Voice Profiles Button
A voice profile consists of settings for the synthesizer, language, voice, and other speech items that define how MAGic speaks.
Use this button to,
Select a voice profile to use as the default, for example, Eloquence. It will apply globally for all MAGic speech.
Select a voice profile to use for the current application, which can be different from the default profile, for example, Vocalizer Direct. If you select Default, then the application will use the same voice profile defined as the MAGic default, for example, Eloquence.
Select Settings from the Voice Profile list to open the Voice Adjustment dialog box. You can then customize an existing profile and save it as a new voice profile.
For more information see Voices on page 107 or Selecting a Voice Profile on page 115.

106
Mouse Echo Button
Click the top half of the button to switch mouse echo on or off. When on, MAGic reads text that you point to with the mouse pointer. (Note that this button is available when using JAWS for Windows to control and provide speech.)
Click the bottom half of the button to select reading by word or by lines, or to stop speech when moving the mouse pointer. You can also select the Settings option to open the Mouse Echo dialog box and change the delay used between moving the mouse and MAGic speaking.
For more information, see Mouse Echo on page 117.
Hot Keys
Toggle Mouse Echo MAGic Key+M
Typing Echo Button
Click the top half of the button to switch typing echo on or off. When on, MAGic repeats text as you type.
Click the bottom half of the button to select typing echo by words, characters, or both. You can also select the Settings option to open the Typing Echo dialog box and fine-tune items to indicate capitalization while typing.
Speech Menu Overview
The Speech menu, found in the Main menu , contains all of the controls for you to change MAGic's speech to suit your needs. The first item in the menu is Voices, which allows you to customize and select your speech preferences.
To learn more about the buttons on the MAGic user-interface, see Speech Tab Overview on page 103.
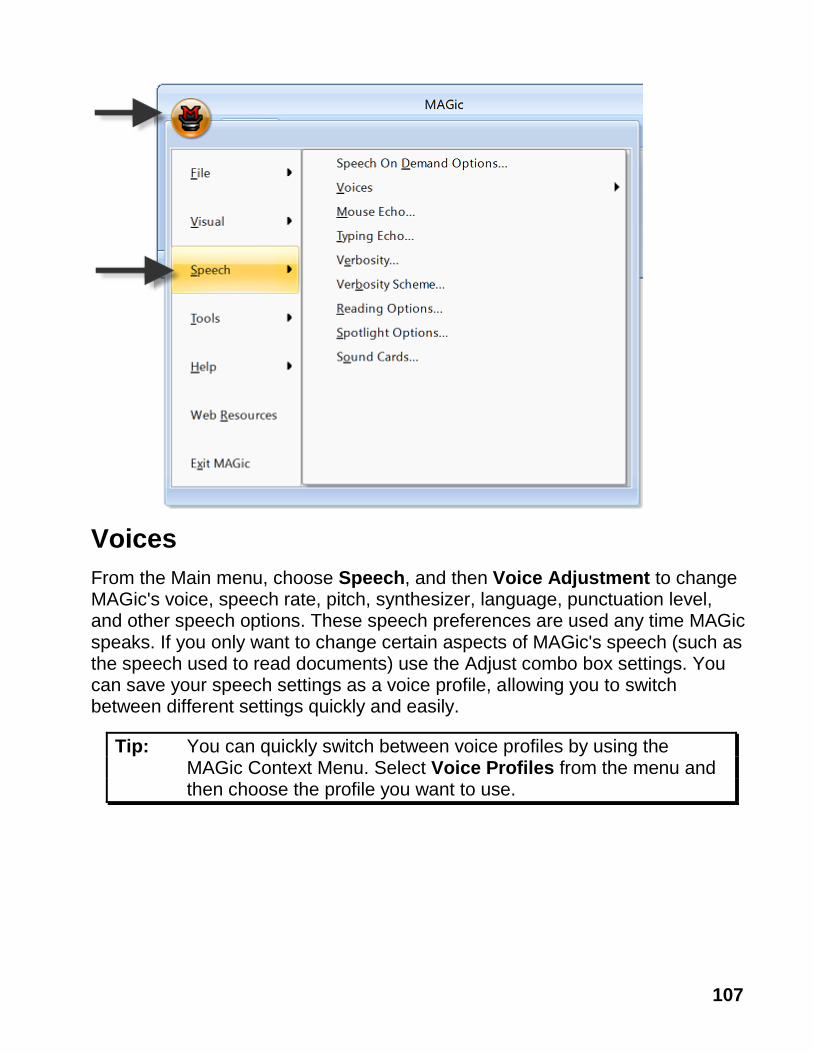
107
Voices
From the Main menu, choose Speech, and then Voice Adjustment to change MAGic's voice, speech rate, pitch, synthesizer, language, punctuation level, and other speech options. These speech preferences are used any time MAGic speaks. If you only want to change certain aspects of MAGic's speech (such as the speech used to read documents) use the Adjust combo box settings. You can save your speech settings as a voice profile, allowing you to switch between different settings quickly and easily.
Tip: You can quickly switch between voice profiles by using the MAGic Context Menu. Select Voice Profiles from the menu and then choose the profile you want to use.

108
Profile Group Box
You can save your voice settings as part of a voice profile. Use the Profile controls to select an existing profile that you want to edit or to select a factory default profile that can be used as a template to create a new voice profile. To save your current voice settings as a voice profile, choose the Save As button.
Tip: You can quickly switch to any of the voice profiles you have created by pressing MAGic Key+F11. A context menu displays, allowing you to choose one of the available profiles.

109
Name
Use this combo box to select the voice profile that you want to use. This provides a starting point for you to select a synthesizer and modify various options in this dialog box. After customizing your voice settings, you can name it and save it as a new profile using the Save As button.
Delete
Use this button to delete a voice profile. This button is not available for the standard Eloquence - (factory), SAPI 5 - (factory), RealSpeak Solo Direct - (factory), and Vocalizer Direct – (factory) voice profiles.
Synthesizer Group Box
The Synthesizer group box allows you to select a different speech synthesizer and synthesizer language.
Name
By default MAGic uses Eloquence as its speech synthesizer, although if you have other Speech Application Interface (SAPI) synthesizers installed on your computer, you can use one of those synthesizers instead. Initially, the list of synthesizers only includes Eloquence. To add synthesizers, choose the Detect SAPI Synthesizers button.
Note: When you use a synthesizer other than Eloquence, you may experience a delay of several seconds as you load the other synthesizer.
Detect SAPI 4 Synthesizers
Choose the Detect SAPI 4 Synthesizers button to find the other compatible synthesizers installed on your system. After MAGic locates all compatible synthesizers, the Update Synthesizer List dialog box appears. A list of the available SAPI 4 synthesizers is on the left side of the dialog box. The buttons in this dialog box allow you to add or remove synthesizers.

110
To add a new synthesizer:
1. Select one or more synthesizers from the Available SAPI Synthesizer list.
2. Choose the Add button to add just the selected synthesizers to the Synthesizer List for MAGic, or choose Add All to move all synthesizers to the Synthesizer List for MAGic.
To remove a synthesizer from the Synthesizer List for MAGic:
1. Select one or more synthesizers from the Synthesizer List for MAGic.
2. Choose the Remove button to remove only the selected synthesizers, or choose Remove All to remove all the synthesizers from the Synthesizer List for MAGic.
Note: Although Eloquence does not appear in the Update Synthesizer List dialog box, it always appears in the list of available synthesizers.
Language
In the Language list, select the synthesizer language that you want to use. The languages that are available are determined by the speech synthesizer you are using.
Voice Group Box
The Voice area allows you to change various characteristics of MAGic's synthesized speech.
Adjust
You can configure MAGic so that slight variations to MAGic speech are heard when navigating different parts of an application's interface, for example, menus and dialog boxes, or when listening to helpful information such as tutor messages. The Adjust combo box lets you select specific voice context and then set various voice parameters, such as speech rate and punctuation, so that you can easily distinguish where and what MAGic is reading on your computer screen. The following describes the items in the Adjust combo box.
111
All Context - When selected, you can make one set of changes to the Voice controls that can then be applied at once to the Document Reading Voice, Mouse Voice, Keyboard Voice, Message Voice, and Menu and Dialog Voice items listed in this combo box.
Document Reading Voice - This is the primary cursor used by MAGic. It corresponds to the system focus. To use a specific voice to distinguish when MAGic is reading a document, moving through or selecting options or icons, and performing most standard Windows functions, select this item and then change voice parameters such as speech rate, punctuation, person, and so on.
Mouse Voice - This item is linked to mouse pointer functions in Windows and other applications. Select Mouse Voice and then change other voice settings in the Voice group to differentiate when the mouse pointer is active.
Keyboard Voice - Use the Keyboard voice when you want MAGic to announce characters and words in a different voice when typing echo is on. To customize the Keyboard voice, select this item and then change voice settings such as rate, punctuation, and so on.
Message Voice - Use this item when you want tutor messages announced in a specific voice. A tutor message can provide navigation tips in Windows and other applications. For example, if you press ALT to access an application's menu bar, MAGic announces the message, "To navigate, press LEFT ARROW or RIGHT ARROW." To customize the Message voice, select this item and then change voice settings such as rate, punctuation, and so on.
Menu and Dialog Voice - Use this item to hear menus and dialog boxes announced using different voice settings.
Person
The Person list allows you to select which synthesizer voice you want to use. The voices that are available are determined by which speech synthesizer you have selected.
112
Rate
The Rate slider allows you to adjust the rate of speech for the currently selected synthesizer. As you use MAGic, you may want to hear different types of activities at different rates. For instance, while you are typing, you may want MAGic to read more quickly, so that you can ensure the accuracy of your typing. On the other hand, if you are reading a document, you might want MAGic to speak more slowly, so you can concentrate on content.
Move the slider to the left or right to decrease or increase the speech rate. The percentage value announced via speech is relative to the current position of the slider bar. The value displayed in the dialog box is based on a setting within the synthesizer, for example, words per minute.
Pitch
The Pitch slider allows you to adjust the pitch for the currently selected voice.
The percentage value announced via speech is relative to the current position of the slider bar. The value displayed in the dialog box is based on a setting for pitch within the synthesizer. Note that some SAPI5 and Vocalizer Direct synthesizers do not support pitch change like Eloquence and some other hardware and software synthesizers.
Punctuation
The Punctuation list allows you to specify how much punctuation MAGic speaks. Available options are "None," "Some," "Most," and "All."
Spell Rate Change Percent
When you hold down INSERT and press NUM PAD 5 twice quickly to spell a word, the word is spelled at a rate of speech slower than the normal speech rate. The value in the Spell Rate Change Percent edit box determines the extent to which the speech rate decreases.
Upper Case Pitch Change Percent
MAGic indicates that a letter is capitalized by reading it with higher-pitched speech. The value in the Upper Case Pitch Change Percent edit box determines the extent to which the pitch increases beyond the normal level. The values and ranges for this setting vary depending upon which synthesizer is selected.

113
Volume
Move the slider to the left or right to increase or decrease volume for the selected voice. The percentage value announced via speech is relative to the current position of the slider bar. The value displayed in the dialog box is based on a setting for volume within the synthesizer. Note that when using the Eloquence synthesizer, you must use the Windows volume controls to adjust volume.
Say All Group Box
MAGic can immediately switch from one synthesizer, for example, Eloquence Software, to another, such as SAPI 5 or Vocalizer Direct, when using the Say All command (INSERT+DOWN ARROW or MAGic Key+A or MAGic Key+LEFT MOUSE CLICK). While the default Eloquence voice may be useful for reading and navigating short text such as prior or next line, sentence, or paragraph, it may not be the preferred voice for longer passages of text. The SAPI 5 or Vocalizer Direct voice chosen remains active during the Say All even as you fast forward, rewind, speed up, or slow down. However, when you stop the Say All, the Eloquence voice returns.
Use the following controls in the Say All group to set preferences for how the Say All command works.
Speech Synthesizer
Use this combo box to select the synthesizer used for Say All. Select either Default, SAPI 5, or Vocalizer Direct. When using Default, all other controls in the Say All group are unavailable. Also, note that Vocalizer Direct is only available if you have downloaded and installed a Vocalizer Direct voice.
If the Say All synthesizer is Default, then either SAPI 5 or Vocalizer Direct will be used for an Alternate Say All (ALT+INSERT+DOWN ARROW). If either SAPI 5 or Vocalizer Direct is selected, the Default synthesizer is used for Alternate Say All.
114
Rate
Use this slider to select a comfortable speech rate for the Say All voice. PAGE DOWN and PAGE UP change the rate of speech by larger increments, while the UP ARROW and DOWN ARROW keys make more gradual changes. The percentage value announced via speech is relative to the current position of the slider bar. The value displayed in the dialog box is based on a setting within the synthesizer, for example, words per minute.
Punctuation
Use this list to set the punctuation level used by MAGic when the Say All voice speaks. Use the UP ARROW or DOWN ARROW keys to select a punctuation level. The options available are None, Some, Most, which is the default, and All.
Person
The Person combo box lets you to select which SAPI 5 or Vocalizer Direct synthesizer voice to use for Say All.
Pitch
The Pitch slider allows you to adjust the pitch for the selected Say All voice. The percentage value announced via speech is relative to the current position of the slider bar. The value displayed in the dialog box is based on a setting for pitch within the synthesizer. Note that some SAPI5 and Vocalizer Direct synthesizers do not support pitch change like Eloquence and some other hardware and software synthesizers.
Volume
Use the slider to increase or decrease the Say All speech volume. The DOWN ARROW , LEFT ARROW, and PAGE DOWN keys decrease volume, and the UP ARROW, RIGHT ARROW, and PAGE UP keys increase volume. The percentage value announced via speech is relative to the current position of the slider bar. The value displayed in the dialog box is based on a setting for volume within the synthesizer.
115
Selecting a Voice Profile
You can define voice settings to use a particular synthesizer, voice, and language for any application on your computer. These settings are saved as voice profiles, which you can easily select on the fly for any application by pressing MAGic Key+F11. Several factory voice profiles, based on the synthesizers installed on your computer, are available. (At a minimum, the Eloquence speech synthesizer will always be available.) This makes it easy for you to use these settings as a template for future voice profiles that you create and save for MAGic and other applications.
Selecting a Voice Profile for an Application
To select a voice profile for an application, do the following:
1. Make sure that focus is in the application and then press MAGic Key+F11 to open the Select a Voice Profile dialog box. It contains a combo box labeled Default, which assigns a voice profile that is used globally by MAGic, and the For <application name> combo box, which assigns a voice profile for a specific application.
2. If focus is in the Default combo box, press TAB to move to the For combo box.
3. Press UP ARROW or DOWN ARROW to scroll through the list of voice profiles, and then press ENTER to select a voice profile. The dialog box closes and MAGic now uses the selected profile for the open application.
Note: If you select Use Default, which is the first item in the combo box list, MAGic will use the same voice profile currently selected in the Default combo box for the current application.
Creating a New Voice Profile
To create a new voice profile using a factory template, do the following:
1. From the Menu button, choose Speech.
2. Next, from the Voices submenu, choose Voice Adjustment. The Voice Adjustment dialog box opens.
3. In the Profile Name combo box, select a factory template voice profile, for example, Eloquence - (factory), SAPI 5 - (factory), RealSpeak Solo Direct - (factory), and Vocalizer Direct – (factory) voice profiles.

116
4. Press TAB to move through and change voice settings. For additional information about voice settings, see Voice Adjustment.
5. When finished, do one of the following:
Press ALT+S to open the Save Voice Profile dialog box, type a unique name that can easily be identified with the voice profile, and then press ENTER, or
Press ALT+S to open the Save Voice Profile dialog box, and press ENTER to save the profile using the factory template name. This action will create a new voice profile using the same template name, for example, Eloquence, but will not overwrite the original factory template, for example, Eloquence - (factory).
6. Select Yes to make the new voice profile the default, or select No to continue.
7. Press ENTER to close the Voice Adjustment dialog box.
Deleting a Voice Profile
To delete a voice profile, do the following:
1. From the Menu button, choose Speech.
2. Next, from the Voices submenu, choose Voice Adjustment. The Voice Adjustment dialog box opens.
3. In the Profile Name combo box, select the voice profile that you want to delete.
4. Press TAB to move to the Delete button and then press SPACEBAR twice to delete the profile. Eloquence - (factory) now becomes the voice profile.
Note: You cannot delete factory voice profile templates. The Delete button is not available for the standard Eloquence - (factory), SAPI 5 - (factory), RealSpeak Solo Direct - (factory), Vocalizer Direct – (factory), and other factory voice profiles.
5. Select another voice profile in the Profile Name combo box, or press ENTER to close the Select a Voice Profile dialog box.

117
Mouse Echo
If mouse echo is enabled, MAGic reads text that you point to with the mouse. To customize this feature, choose the Main menu, and then Speech followed by Mouse Echo.
Enable Mouse Echo
Use this check box to turn mouse echo on or off.
Note: MAGic still speaks ToolTips if mouse echo is off. If you do not want MAGic to speak ToolTips, open the Speech menu and choose Verbosity. Then clear the Tool Tips check box.
Speech Delay
Specify the length of time you want MAGic to wait before it reads the word or line at the current location of the mouse pointer. The delay is measured in seconds. If you move the mouse pointer away before the delay has elapsed, MAGic does not read the word or line.
Point & Speak
In this area, select one of the following options:
Word at Mouse Position - MAGic reads the word at the current location of the mouse pointer. You must point at the word for the length of time specified in the Mouse Speech Delay box before MAGic reads the word.

118
Line at Mouse Position - MAGic reads the line of text at the current location of the mouse pointer. You must point at the line for the length of time specified in the Mouse Speech Delay box before MAGic reads the line.
Mouse Movement Stops Speech
Select this check box to allow MAGic to interrupt speech when you move the mouse pointer over text. If you clear this check box, you can move the mouse pointer anywhere on the screen without interrupting speech. This option does not interrupt speech generated by mouse echo.
Typing Echo
When Typing Echo is enabled, MAGic repeats characters, words, or both as you type. To customize this feature, choose the Main menu, and then Speech followed by Typing Echo.
Enable Typing Echo
Select this check box to turn on typing echo. Clear this check box to turn off typing echo.
119
Typing Echo Unit
Select one of the following options to determine whether MAGic should repeat characters you type, words that you type, or both:
Characters - MAGic speaks each character that you type.
Words - MAGic speaks each word that you type after you press the SPACEBAR.
Characters and Word - MAGic speaks each character that you type and then reads the entire word after you press the SPACEBAR.
Tip: You can press INSERT+2 at any time to cycle through the available typing echo units.
Indicate Capitalization
Select one of the following options to determine how you want MAGic to indicate that a letter is capitalized:
No Indication - MAGic does not indicate capitalization.
Pitch Increment - MAGic indicates that a letter is capitalized by reading it in a higher pitched voice.
Say "Cap" - MAGic says the word, "Cap," before reading a letter that is capitalized.
Indicate Capitalization During
If you selected the Pitch Increment radio button, select one of the following options to determine when MAGic indicates that a letter is capitalized:
Say Character and Spelling - MAGic only indicates capital letters when spelling a word or reading by character.
Say Word, Character and Spelling - MAGic indicates capital letters when spelling, reading by word, and reading by character.
Say Line, Word, Character and Spelling - MAGic indicates capital letters when spelling and when reading by line, word, or character.
Tip: You can press MAGic Key+F2 at any time to cycle through the various options for indicating capitalization.
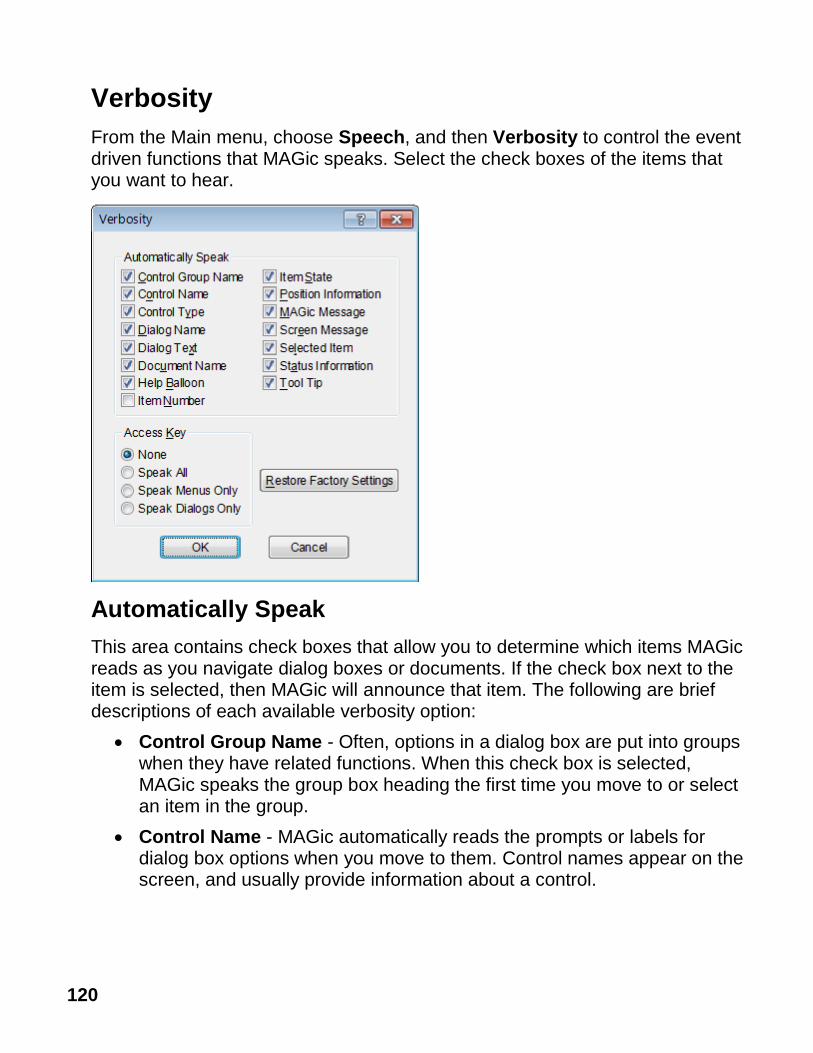
120
Verbosity
From the Main menu, choose Speech, and then Verbosity to control the event driven functions that MAGic speaks. Select the check boxes of the items that you want to hear.
Automatically Speak
This area contains check boxes that allow you to determine which items MAGic reads as you navigate dialog boxes or documents. If the check box next to the item is selected, then MAGic will announce that item. The following are brief descriptions of each available verbosity option:
Control Group Name - Often, options in a dialog box are put into groups when they have related functions. When this check box is selected, MAGic speaks the group box heading the first time you move to or select an item in the group.
Control Name - MAGic automatically reads the prompts or labels for dialog box options when you move to them. Control names appear on the screen, and usually provide information about a control.

121
Control Type - MAGic announces the type of the currently selected dialog box option. There are several common types of controls found in Windows, including edit boxes, combo boxes, buttons, list boxes, and so on. Control types do not appear as text on the screen.
Dialog Name - MAGic reads the text that appears on the title bar of a dialog box when it becomes active.
Dialog Text - MAGic reads the descriptive, non-interactive text that appears in dialog boxes.
Document Name - MAGic announces the title of the active document window. This can be the title of a document in Microsoft Word, a text document in Notepad, or e-mail message in Outlook.
Help Balloon - Help balloons provide information about the selected item. Select this check box to have MAGic automatically read this information as it displays on the screen. An example of when a help balloon displays is when you connect new hardware to your computer.
Item Number - MAGic automatically announces the selected item's numeric position in relation to the total number of items in a window, group, or list.
Item State - MAGic announces information that reflects the state of an item. For example, MAGic will notify you whether a choice in a list box is selected or not selected.
Position Information - MAGic provides information that describes an item’s location in relation to the larger structure that contains it. For example, the coordinates of a table can be considered positional information because they describe that cell’s position within the table.
MAGic Message- MAGic provides you with messages that aid in navigation by verifying that a Windows action has taken place. For example, the message, "Top of window," assists in navigation by alerting you that you have reached the top of the current window.
Screen Message - MAGic reads text that appears on the screen, but may not be attached to a particular control. For example, some radio buttons have additional or related information found in another nearby area of the screen.
Selected Item - MAGic automatically reads the selected item within a list or window.

122
Status Information - MAGic provides additional speech feedback when typing MAGic commands using the keyboard. For example, press MAGic Key+NUM PAD PLUS or MAGic Key+NUM PAD MINUS to increase or decrease the magnification level, and MAGic will also announce 3x, 4x, and so on. If you clear this check box, MAGic does not announce this additional information.
Tool Tips – Tool Tips frequently appear when you rest the mouse over an item for a brief period of time. The Tool Tip gives you a short description of the item. If this check box is selected, MAGic speaks Tool Tips of any length.
Access Key Verbosity
Within menus and buttons, often a letter is underlined. You can press the underlined letter (also called an access key) in conjunction with the ALT key to activate the command or button. You can choose which access keys MAGic announces by selecting one of the following options:
None - MAGic does not announce any access keys.
Speak All - MAGic announces access keys in both menus and dialog boxes.
Speak Menus Only - MAGic only announces access keys in menus.
Speak Dialogs Only - MAGic only announces access keys in dialog boxes.
Restore Factory Settings
Choose the Restore Factory Settings button to return to the default MAGic verbosity choices. These were the settings in use when you first installed the program.
Verbosity Scheme
From the Main menu, choose Speech, and then Verbosity Scheme to create and switch between verbosity schemes. Verbosity schemes give you additional control over which items MAGic announces, as well as how they are announced. You can also define custom text that MAGic speaks when you move to a control or other element. Alternatively, you can assign a sound that you want MAGic to play instead of speaking. You can also choose to combine both speech and sounds, or tell MAGic to ignore certain items entirely.

123
Scheme
In the Scheme list, select the verbosity scheme that you want to use. If you create and save a new scheme, it appears in this list.
Save As
After you choose which speech and sounds you want MAGic to use when announcing various control types and states, choose the Save As button to save your preferences as a scheme. Navigate to the folder where you want to save the scheme, and then type a name for the scheme in the File Name edit box. This is the name that appears in the Scheme list. Select your new scheme in the Scheme list to activate it.
Delete
Choose the Delete button to delete the verbosity scheme currently selected in the Scheme list.

124
Control Type
The Control Type list shows all of the various controls that MAGic can announce. A control can be a dialog box option, HTML element, heading, button, or other item. The Behavior column lists the action that MAGic takes when you move to that control type. "Speak" means that MAGic announces the control type using synthesized speech. "Play Sound" means that MAGic plays a specific sound instead of speech. "Speak & Play Sound" means that MAGic both speaks the control type and plays a sound. "Ignore" means that MAGic does not announce the control in any way.
Behavior
To change the action associated with a control, select the control in the Control Type list and then choose a new action from the Behavior list. If you select "Play Sound" or "Speak & Play Sound," you must choose the Select Wave File button to pick which sound you want to use.
Tip: Assign the behavior "Ignore" to control types that you do not want MAGic to announce.
Text
If you select "Speak" or "Speak & Play Sound" in the Behavior list, you can type some custom text in this edit box that you want MAGic to announce. MAGic reads this text instead of the control type.
Select Wave File
If you select "Play Sound" or "Speak & Play Sound" in the Behavior list, choose the Select Wave File button to open the Select Sound dialog box. Select the sound that you want to use and choose OK. You can choose the Play button to hear a preview of the selected sound. If the sound you want to use is not in the list, choose the Browse button to locate the file on your computer. You can use any sound file with a .wav file extension. After you locate and select the file, choose OK to add it to the list of available sounds.
125
Control State
The Control State list shows all of the control states that MAGic can announce. Control states provide various information about the status of a control. For example, the control states for a check box are "Checked" and "Unchecked." The Behavior column lists the action that MAGic takes when you move to an item with that control state. "Speak" means that MAGic announces the control state using synthesized speech. "Play Sound" means that MAGic plays a specific sound instead of speech. "Speak & Play Sound" means that MAGic both reads the control state and plays a sound. "Ignore" means that MAGic does not announce the control state in any way.
Behavior
To change the action associated with a control, select the control in the Control State list and then choose a new action from the Behavior list. If you select "Play Sound" or "Speak & Play Sound," you must choose the Select Wave File button to pick which sound you want to use.
Text
If you select "Speak" or "Speak & Play Sound" in the Behavior list, you can type some custom text in this edit box that you want MAGic to announce. MAGic reads this text instead of the control state.
Select Wave File
If you select "Play Sound" or "Speak & Play Sound" in the Behavior list, choose the Select Wave File button to open the Select Sound dialog box.
Reading Options
From the Main menu, choose Speech, and then Reading Options to customize how MAGic reads and scrolls the page.
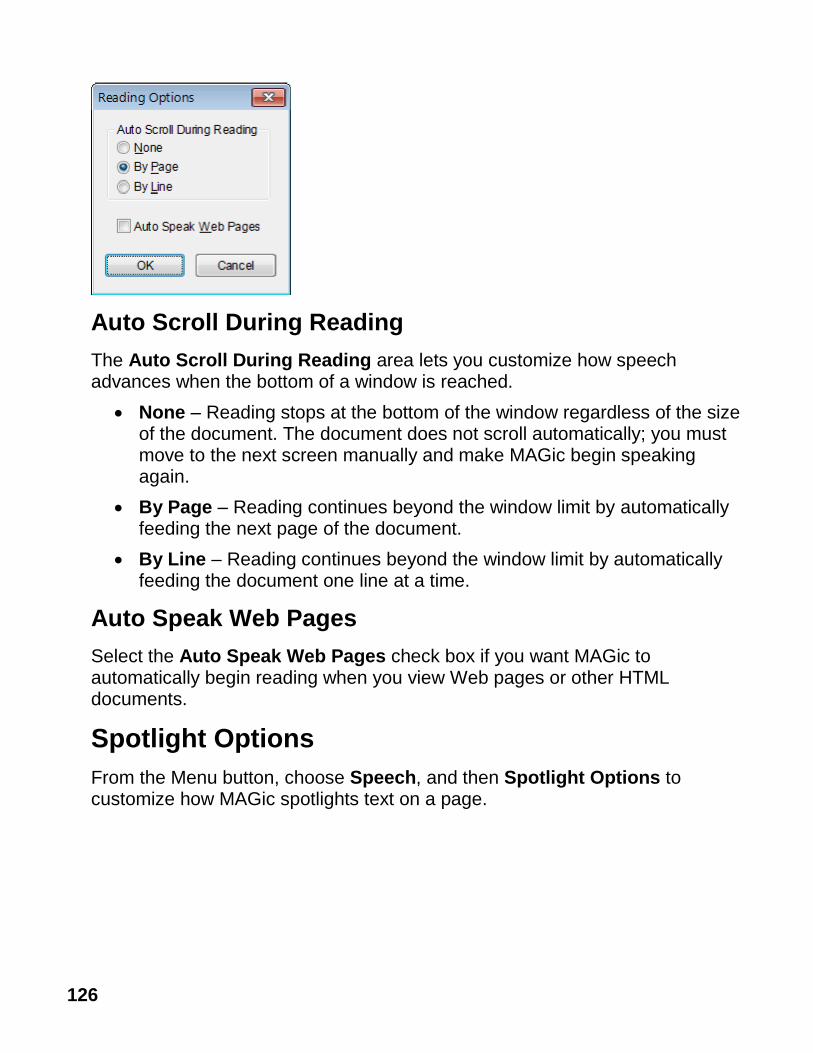
126
Auto Scroll During Reading
The Auto Scroll During Reading area lets you customize how speech advances when the bottom of a window is reached.
None – Reading stops at the bottom of the window regardless of the size of the document. The document does not scroll automatically; you must move to the next screen manually and make MAGic begin speaking again.
By Page – Reading continues beyond the window limit by automatically feeding the next page of the document.
By Line – Reading continues beyond the window limit by automatically feeding the document one line at a time.
Auto Speak Web Pages
Select the Auto Speak Web Pages check box if you want MAGic to automatically begin reading when you view Web pages or other HTML documents.
Spotlight Options
From the Menu button, choose Speech, and then Spotlight Options to customize how MAGic spotlights text on a page.

127
Spotlight Style
When MAGic uses synthesized speech to read the text on your screen, it can spotlight the text it is speaking. This allows you to easily follow the text visually while MAGic reads. In the Spotlight Style list, choose one of the following options to specify how you want MAGic to spotlight text:
None – MAGic does not spotlight text as it reads.
Box – Surrounds the text MAGic reads with an empty, rectangular outline.
Block – Spotlights the text MAGic reads with a solid rectangle.
Underline – Underlines the text that MAGic reads.
Color
In the Color list, choose a color for the spotlight style you selected. If you want to invert the colors in the area covered by the spotlight, choose "Invert Colors."
Transparency
Use the Transparency slider to adjust the transparency level of the selected spotlight style. A higher level of transparency allows you to see more of the surrounding area covered by the spotlighting.
Thickness
Use the Thickness slider to adjust the thickness of the spotlight style you selected. This lets you change the vertical size of the underline and block spotlight styles, and determine the thickness of the border for the box spotlight style.

128
Sound Cards
For instructions describing how to select a sound card for MAGic speech output when multiple sound cards are installed, go to Selecting a Sound Card for MAGic Speech on page 129. For an overview of multiple sound card operation with MAGic, read the following information.
Windows typically makes the last sound card added to your system the default sound card. This means that MAGic speech automatically goes to the new audio device, which can be frustrating if you want to use that device for something other than MAGic.
Using MAGic, you can override the Windows default selection, and choose which sound card to use for speech output. For example, if you are editing music, you can let Windows direct your music through a higher-end audio card while MAGic directs its speech output to an inexpensive sound card in your computer. You do this by selecting an audio card for MAGic from the Sound Card submenu list under the MAGic Speech menu.
Things to Remember About the Sound Card List
In Control Panel, a single sound card can appear as multiple sound devices, for example, as speakers, as a digital audio interface, as HDMI output, and so on.
Any audio device identified in the list as a "digital" item may not have speakers connected. If you select this item, you may lose speech.
Make sure to plug in speakers or a headset to any internal or external USB device that you want to use for MAGic speech.

129
When only one sound card is installed in your computer, the MAGic Sound Card submenu will always show two items: the Windows default sound card, and the name of the installed sound card. These two items represent the same audio device. By default, MAGic will choose the Windows default sound card item in the list and will identify it with a check mark. This means that when you add another sound card, MAGic will use it because Windows makes the most recently added sound card the Windows default audio device. The Windows default sound card can change as you add or remove audio devices. However, if you choose the sound card by its name, it becomes the audio device that MAGic uses for speech output. MAGic identifies it with a check mark in the submenu. When you add another sound card to your computer, the new sound card will also appear by name in the Sound Card submenu list. Although the Windows operating system will make the newly added sound card the Windows default sound card, MAGic will continue to use the first sound card since you selected it by name from the submenu list. Even as you add and remove other sound devices from the system, MAGic will continue to use this sound card for speech output. Finally, if you select a specific sound card to use for MAGic speech output, and then remove that card from the system, MAGic will automatically fall back to the Windows default sound card item in the submenu list. This means that MAGic will use the same sound card that the Windows operating system identifies as the default audio card. If you later restore the sound card to the system, MAGic will again send speech output to that card instead of the Windows default sound card.
Selecting a Sound Card for MAGic Speech
To select a sound card for speech, do the following:
1. From the Main menu, choose Speech, and then Sound Cards. Sound Cards dialog box opens. submenu. It shows a list of devices installed. The current sound card is highlighted in the list.
Note: The first item that always appears in the list is labeled Windows default sound card. It is the same sound card that Windows recognizes as the default sound device in the Control Panel. This is typically the most recent audio device added to the system.

130
2. Use the UP or DOWN ARROW keys to move to a sound device, and then press ENTER to select the card. The menu closes and MAGic now uses the selected card. The next time you open the Sound Cards submenu, the selected card is highlighted.
Speech On Demand
What is Speech On Demand?
Using speech with MAGic can reduce eye fatigue by helping to focus and find your location on the screen. However, there are times when too much speech can be overwhelming, which is where Speech On Demand™ can be very helpful. Speech On Demand is a feature that allows you to limit the amount of speaking performed by MAGic as you navigate windows and documents or perform other actions using hot keys. In MAGic 12 or later, you can now switch between full speech and Speech On Demand mode.
Speech On Demand consists of three elements: designated unit commands, mouse echo, and typing echo. Unit commands consist of such actions as Say Word, Say Sentence, Say All, as well as adjusting reading rates. The Speech On Demand factory settings are for mouse echo to be on, and typing echo to be off. These settings can quickly be changed using the Mouse Echo and Typing Echo buttons in the Speech tab. As for unit commands, a list of factory actions and hot keys are provided later in this section. Note that by using MAGic's Keyboard Manager, you can expand the number of actions and hot keys available for Speech On Demand.
During initial product installation, you can determine if MAGic starts using full speech or Speech On Demand mode. This is done using the Speech Level setting in the Speech Settings page in the Startup Wizard.
Read the remainder of this topic to learn more about:
Switching to Speech On Demand mode
Changing Speech On Demand settings
Designating an action and hot keys for Speech On Demand
Default actions and hot keys for Speech On Demand

131
Switching to Speech On Demand Mode
To switch from full speech to Speech On Demand mode, do the following.
1. Click the Speech tab.
2. Click the top half of the Speech button. MAGic announces "Speech On Demand." (By default, Mouse Echo, Voice Profiles, the Speech Rate slider, and a limited number of speech hot keys are available.)
3. Speech is now muted with the following exceptions.
MAGic announces and performs the action associated with a Speech On Demand hot key.
MAGic reads text that you point to with the mouse pointer.
To restore full speech, click the top half of the Speech button. MAGic announces "Full Speech."
Changing Speech On Demand Settings
Use the Speech On Demand settings to customize Speech On Demand, or disable all speech. To change settings for Speech On Demand, do the following.
1. Click the bottom half of the Speech button, and choose Settings. The Speech On Demand Settings dialog box opens.
132
2. Select or clear any of the following check boxes:
Allow Designated Reading Commands: When selected, only the actions marked as Speech On Demand in the Keyboard Manager will be announced by MAGic when the action is performed. When cleared, no actions initiated with a hot key are announced.
Allow Mouse Echo: Select to turn on Mouse Echo. When selected, MAGic reads text that you point to with the mouse pointer. The factory setting is for this option to be on.
Allow Typing Echo: Select to turn on Typing Echo. When selected, MAGic repeats characters, words, or both as you type. The factory setting is for this option to be off.
Note: If you prefer to use traditional functionality to switch between full speech and no speech (as available in MAGic 11 or earlier), then clear all check boxes to turn off all MAGic speech. Items in the Speech tab will be unavailable.
3. Choose OK to save changes and close the dialog box.
Designating an Action for Speech On Demand
Besides the default speech actions, you can assign other actions to be available when using Speech On Demand. For example,
The Cursor Enhancement Toggle action uses MAGic Key+F8 as a hot key. This allows you to switch between Cursor Enhancements being on or off.
When configured for full speech, pressing MAGic Key+F8 performs the action, and MAGic announces "Cursor Enhancements Enabled" or "Cursor Enhancements Disabled"
When configured for Speech On Demand, pressing the same hot key will perform the action, but MAGic will not announce, "Cursor Enhancements Enabled" or "Cursor Enhancements Disabled." This is because Cursor Enhancement Toggle is not a default Speech On Demand action.
To designate an action for Speech On Demand, do the following.
1. In the Tools tab, click the Keyboard button. The Keyboard Manager opens.
2. In the Keyboard Manager dialog box, select an action in the Action list (for example, CursorEnhancementToggle).
133
3. Select the Speech On Demand check box, which is located below the Action list.
4. Click OK to save the change and close Keyboard Manager.
5. The next time you press the hot key that is assigned to that action, MAGic will announce the action as it is performed (for example, "Cursor Enhancements Enabled").
Default Actions and Hot Keys
Below are the default actions and hot keys available when using Speech On Demand mode.
Action Hot Key
Say All From Location
INSERT+DOWN ARROW or MAGic Key+A or MAGic Key+LEFT MOUSE BUTTON CLICK
Alternate Say All INSERT+ALT+DOWN ARROW or MAGic Key+ALT+LEFT MOUSE BUTTON CLICK
Say Character NUM PAD 5
Say Word MAGic Key+ALT or INSERT+NUM PAD 5
Say Line MAGic Key+L or INSERT+UP ARROW
Say to Cursor INSERT+HOME
Say from Cursor INSERT+PAGE UP
Say Sentence MAGic Key+S
Say Paragraph MAGic Key+P
Say Selected Text INSERT+SHIFT+DOWN ARROW
Say Window Prompt and Text
MAGic Key+TAB or INSERT+TAB

134
Say Window Title MAGic Key+T or INSERT+T
Say Bottom Line of Window
INSERT+PAGE DOWN
Increase Voice Rate Permanent
WINDOWS Key+ALT+CTRL+PAGE UP
Increase Voice Rate Temporary
ALT+CTRL+PAGE UP
Decrease Voice Rate Permanent
WINDOWS Key+ALT+CTRL+PAGE DOWN
Decrease Voice Rate Temporary
ALT+CTRL+PAGE DOWN
Note: When using the document and text reading commands, if you move the mouse MAGic reads from the current location of the mouse pointer. If you move the insertion point, MAGic reads from the location of the insertion point.

135
Chapter 7 Tools
Tools Tab Overview
Use the Tools tab to access additional MAGic functionality, such as creating new keystrokes, adding items to MAGic's dictionary so that words, phrases, and abbreviations are pronounced correctly, and launching Research It, a handy tool for finding information on the Web. For more information, see Tools Menu Overview on page 140.
Links List Button
Use the Links List button to quickly locate and select links on a Web page. Press INSERT+F7 to open the Links List. Press UP ARROW or DOWN ARROW, or the first letter of a link's text to move through the list of links, and press ENTER to open a link.
You can also move through the controls in this dialog by pressing TAB. There are buttons to move to the location of a link on the page or to open a link. There are radio button groups to filter and sort the links that display in the list. There are also access keys for all these controls, so you can select the options without leaving the list of links.
136
Setting Access Key
Move to Link ALT+M
Activate Link ALT+A
Sort Links in TAB Order ALT+T
Sort Links Alphabetically ALT+P
Display All Links ALT+L
Display Visited Links Only ALT+V
Display Unvisited Links ALT+U
Headings List Button
In HTML, headings are used to indicate the start of sections and subsections of a page. When viewing all headings on a page, if the headings are used properly, the hierarchy of the heading levels indicates how the page is structured. This makes it easier to find information and understand the relationships within the information.
MAGic recognizes headings at levels 1 through 6. When Navigation Quick Keys are on (MAGic Key+Z), you can press H to move to the next heading, or press SHIFT+H to move to the prior heading.
Headings List Dialog
The Headings List dialog (INSERT+F6) shows a lists of headings on the current page, and indicates the heading level. Move to a listed heading in the Headings List with the arrow keys, or type the first few letters of heading text to move to it. Press ENTER to move to the selected heading within the web page.
137
Press ALT plus the number of the heading level (1 through 6) to display only headings at that level. Press ALT+L to display all headings.
To list headings in alphabetic order, press ALT+P. To list headings in TAB order, press ALT+T.
Skim Read Button
The Skim Reading feature lets you quickly browse through long documents by reading the first part of each paragraph. To begin skim reading in a document, click the Skim Read button or press CTRL+INSERT+DOWN ARROW.
By default, MAGic reads the first line of each paragraph, but you can choose to read the first sentence of each paragraph instead or set up your own skim reading rules. To change your skim reading preferences, press CTRL+SHIFT+INSERT+DOWN ARROW.
Tip: While skim reading, you can begin reading the entire document by pressing INSERT+DOWN ARROW to carry out the Say All command. To begin skim reading again, press CTRL+INSERT+DOWN ARROW.
Research It Button
Research It is a versatile tool that provides quick access to data while also making it easy to return to your primary task. It uses what is known as a lookup source and the Results Viewer to find information, whether it is the meaning of a word, your local weather forecast, top news stories, sports scores, directions to and information about a local business, and more. Refer to the section below for a brief tutorial. For more information, refer to MAGic’s online help.
138
Research It On the Fly
To quickly lookup an item of interest using Research It, do the following:
1. Press INSERT+SPACEBAR, R. The Research It dialog box appears with focus in the Word or Phrase edit combo box.
2. Do one of the following:
Type a word, phrase, date, tracking number, or other item into the edit combo box, press TAB, and then select a lookup source from the list.
Select an item from the edit combo box history list, press TAB, and then select a lookup source from the list.
Press TAB to jump directly to the Lookup Source list, and then select a lookup source. (This option is useful when using a news lookup source.)
3. Press ENTER. After a few seconds, the Results Viewer window opens and displays the search results.
Research It Keystrokes
The following briefly describes the available Research It keystrokes.
INSERT+SPACEBAR, R: Opens the Research It dialog box, where you can then type a word or expression of interest, and then select a lookup source to perform your search. This can be a zip code, or city and state, or city and country that can be used with the Weather lookup tool to read a forecast, or a date that is used to view baseball or football schedules and scores, or a word to use with the Wikipedia search query to view its meaning or description. This convenient, layered keystroke provides the most efficient way to search for a term.
Note: When using this keystroke, press and release INSERT+SPACEBAR, and then press R.
INSERT+WINDOWS Key+R: Launches Research It and uses the primary lookup source to directly show results in the Results Viewer.
INSERT+CTRL+WINDOWS Key+R: Functions the same as the INSERT+SPACEBAR, R keystroke.

139
INSERT+F2, R: Opens Research It from the Run Manager dialog box. It provides another way for you to select a lookup source for the word at the current cursor location. Note that this is temporary and does not change your default settings. MAGic will continue to use the primary lookup source the next time you run Research It.
ESC: Closes the Results Viewer window and returns to your original focus point.
Keyboard Manager Button
The Keyboard Manager lets you assign, remove, or edit hot keys for MAGic functions. Refer to the Keyboard Manager on page 141 for more information.
Dictionary Manager Button
Use Dictionary Manager to change the way MAGic speaks words, phrases, abbreviations, or symbols. If MAGic mispronounces your name, for example, you can change the pronunciation with the Dictionary Manager. You can also assign a sound to play, speak the word in a different language, or any combination of these options. MAGic contains a large dictionary of words and their pronunciations. As a word is read on the screen, MAGic checks it against the dictionary and follows the rules when it speaks the word. You can use the Dictionary Manager to add, change, or delete word pronunciation rules.
For more information, see Dictionary Manager on page 146.

140
Script Manager Button
Use Script Manager to create scripts and customize MAGic for use with proprietary applications. This feature requires the MAGic Pro Scripting Edition software. For more information about scripting MAGic, refer to MAGic’s online help.
Tools Menu Overview
Tools menu, found in the Main menu , provides access to advanced features for customizing MAGic. For example, with the Keyboard Manager you can assign different hot keys to actions that will apply globally or to specific applications. In addition, you can also use Keyboard Manager to reassign keys on the MAGic Large Print Keyboard. This lets you use other keystrokes that are easier for you to remember.
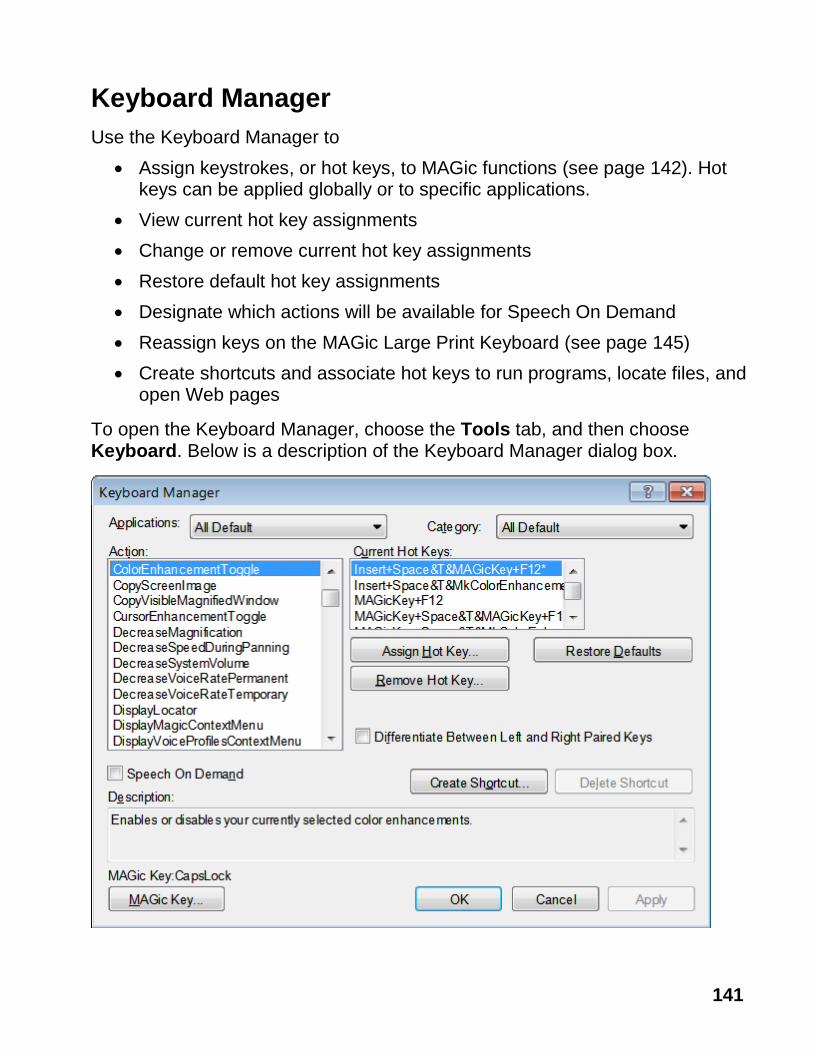
141
Keyboard Manager
Use the Keyboard Manager to
Assign keystrokes, or hot keys, to MAGic functions (see page 142). Hot keys can be applied globally or to specific applications.
View current hot key assignments
Change or remove current hot key assignments
Restore default hot key assignments
Designate which actions will be available for Speech On Demand
Reassign keys on the MAGic Large Print Keyboard (see page 145)
Create shortcuts and associate hot keys to run programs, locate files, and open Web pages
To open the Keyboard Manager, choose the Tools tab, and then choose Keyboard. Below is a description of the Keyboard Manager dialog box.
142
Use the Applications list to select a specific program and view its associated functions and hot keys. These functions appear in the Action list, and the assigned hot keys appear in the Current Hot Keys list.
Use the Category list to further define functions such as magnification, speech, and navigation. By using both the Applications and Category lists, you can reduce the number of items in the Action list and make it more manageable. A brief explanation of the selected item appears below the Action list.
Select Speech On Demand to make the action that is currently selected in the Action list available when MAGic is configured for Speech On Demand operation. This means that when you use the hot keys assigned to the action in the list, MAGic will announce the action as it is performed. For more information, see Speech On Demand on page 130.
Using the Differentiate Between Paired Keys check box, you can configure MAGic to treat the left and right paired keys (ALT, CTRL, and SHIFT) as separate keys. This means that you can make a hot key that uses only the LEFT CTRL key in combination with other keys. The RIGHT CTRL key can be used with a different set of key combinations to do something entirely different. This distinction allows you to create even more hot key combinations.
Choose Create Shortcut to make a shortcut that launches an application, opens files on your computer or network folder, or opens a favorite Web site. For example, you can assign the M1 key (available on the MAGic Large Print Keyboard) to open a document that you need to regularly access.
Finally, you can choose MAGic Key to change the modifier key (CAPS LOCK, ALT, SHIFT, CTRL, or WINDOWS Key) used to perform MAGic functions from the keyboard.
Assigning Hot Keys
To add a hot key, do the following:
1. Use the Applications and Category lists to reduce the number of items in the Action list.
2. Select an action in the Action list, and click Assign Hot Key or press ALT+S. The Assign Hot Key dialog box opens.

143
Note: If a hot key is already assigned, it appears in the Current Hot Keys list.
3. Press the combination of keys that you want to assign to the selected action. The key combination appears in the Assign To edit box. Choose OK to exit the dialog box and return to Keyboard Manager.
Note: When you assign hot keys to actions, it does not matter whether you press the right or left ALT, CTRL, or SHIFT key. However, you may want to use only the left or right key so that additional key combinations remain available.
4. To specify the left or right ALT, CTRL, or SHIFT keys for a hot key, select the appropriate check boxes in the Differentiate Between group before you activate the Assign Hot Key button. For example, if you want to create a hot key that uses only the LEFT CTRL key or the RIGHT CTRL key.
Note: The hot keys that you assign while this check box is selected will always require you to press the correct left or right key. If you later clear the check box, previously created hot keys still require you to use the correct left or right key.
5. Choose OK or Apply to save the new hot key assignment.
To remove a hot key, select it in the Current Hot Keys list and click Remove Hot Key or press ALT+R. Confirm that you want to delete the hot key.
To restore default hot keys, click Restore Defaults or press ALT+D to return all hot key assignments to their original key combinations.
Creating Shortcuts
1. Click Create Shortcut or press ALT+O.
2. In the Assign Hot Key edit field, press the key combination you want to use to activate the shortcut.

144
3. Type the path to a file, program executable, or Web site address in the Location edit field. For example, C:\\files\myfile.txt, or http://www.freedomscientific.com. Select the Browse button to search for the application or document you want to use if you do not know the direct path.
4. Type a name for the shortcut in the Shortcut Name edit field. This name then appears in the Action list.
Changing Speech On Demand Actions
1. Select an action in the Action list.
2. Do one of the following:
Select the Speech On Demand check box to make the action available when using Speech On Demand mode, or
Clear the check box to make the action unavailable when using Speech On Demand mode
3. Choose OK or Apply to save the change.
Default Speech On Demand Actions
See Default Actions and Hot Keys on page 133 for a list of default Speech On Demand actions.
MAGic Key
Pressing the MAGic Key in combination with other keys activates a MAGic command if one is assigned; otherwise it will pass the key combination through to the application. Pressing the MAGic Key by itself and releasing it will not carry out any action.
The default MAGic Key is CAPS LOCK. From the Keyboard Manager dialog, choose MAGic Key to assign the MAGic Key to any of the following keys: extended INSERT (found on the six pack), NUM PAD INSERT, either INSERT, or SCROLL LOCK (the key just above HOME on the six pack).
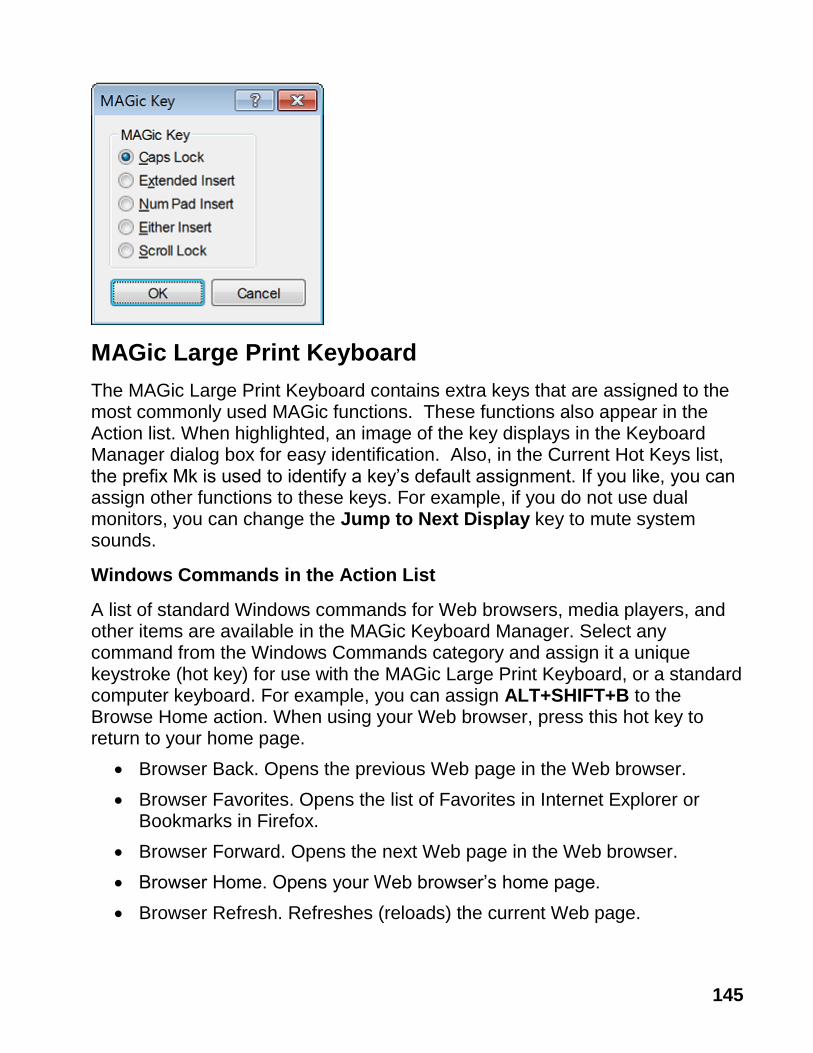
145
MAGic Large Print Keyboard
The MAGic Large Print Keyboard contains extra keys that are assigned to the most commonly used MAGic functions. These functions also appear in the Action list. When highlighted, an image of the key displays in the Keyboard Manager dialog box for easy identification. Also, in the Current Hot Keys list, the prefix Mk is used to identify a key’s default assignment. If you like, you can assign other functions to these keys. For example, if you do not use dual monitors, you can change the Jump to Next Display key to mute system sounds.
Windows Commands in the Action List
A list of standard Windows commands for Web browsers, media players, and other items are available in the MAGic Keyboard Manager. Select any command from the Windows Commands category and assign it a unique keystroke (hot key) for use with the MAGic Large Print Keyboard, or a standard computer keyboard. For example, you can assign ALT+SHIFT+B to the Browse Home action. When using your Web browser, press this hot key to return to your home page.
Browser Back. Opens the previous Web page in the Web browser.
Browser Favorites. Opens the list of Favorites in Internet Explorer or Bookmarks in Firefox.
Browser Forward. Opens the next Web page in the Web browser.
Browser Home. Opens your Web browser’s home page.
Browser Refresh. Refreshes (reloads) the current Web page.

146
Browser Stop. Terminates downloading of the current Web page or file in your Web browser.
Launch Calculator. Starts the Microsoft Calculator.
Launch Mail. Starts the default e-mail program.
Launch Media Player. Starts the default media player.
Launch My Computer. Starts My Computer, which gives access and information about your computer’s hardware.
Media Next Track. Moves to the next track in the media player.
Media Play/Pause. Switches between play and pause in the media player.
Media Previous Track. Moves to the previous track in the media player.
Media Stop. Stops the current track being played in the media player.
Microphone Mute. Mutes the microphone.
Microphone Volume Down. Decreases the microphone’s input volume level.
Microphone Volume Up. Increases the microphone’s input volume level.
Redo. Repeats the last action.
Search. Opens Windows Search so you can search for documents, e-mails, pictures, and other content on your computer.
Undo. Cancels the last action.
Volume Down. Decreases the playback volume level of the sound device.
Volume Mute. Mutes the playback volume of the sound device.
Volume Up. Increases the playback volume level of the sound device.
Dictionary Manager
The Dictionary Manager lets you change the way MAGic speaks words, phrases, abbreviations, or symbols. If MAGic mispronounces your name, for example, you can change the pronunciation with the Dictionary Manager. You can also assign a sound to play, speak the word in a different language, or any combination of these options. MAGic contains a large dictionary of words and their pronunciations. As a word is read on the screen, MAGic checks it against the dictionary and follows the rules when it speaks the word. You can use the Dictionary Manager to add, change, or delete word pronunciation rules.
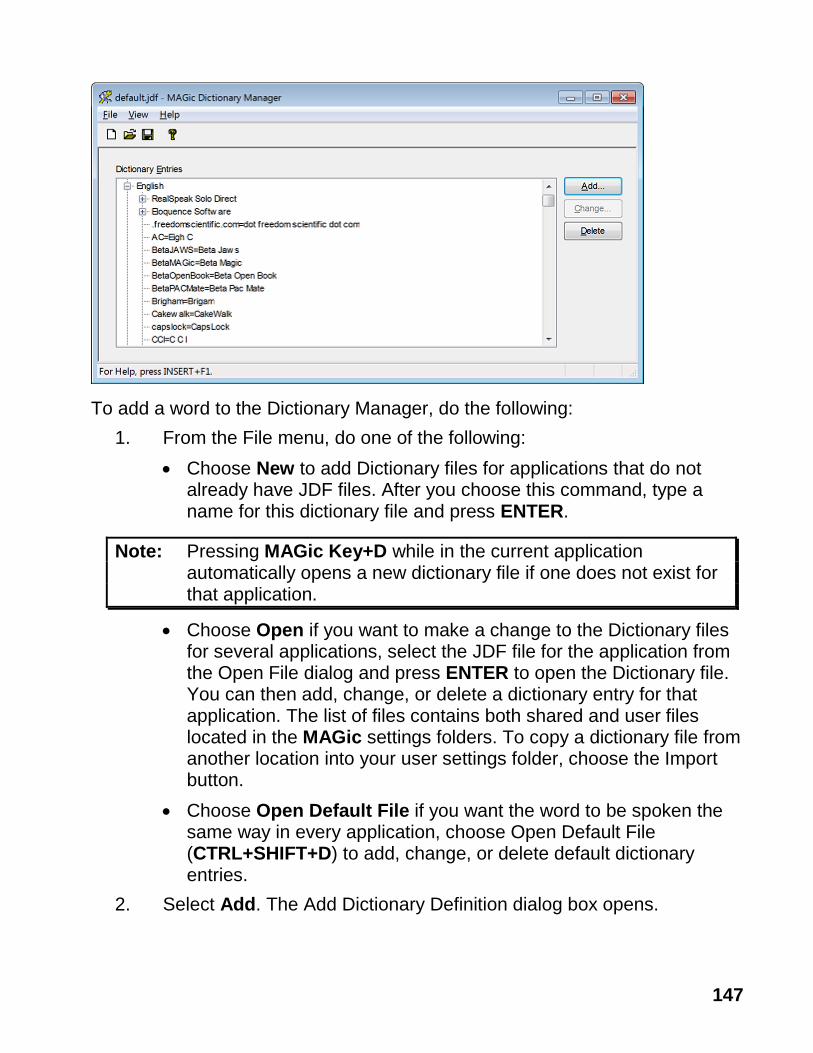
147
To add a word to the Dictionary Manager, do the following:
1. From the File menu, do one of the following:
Choose New to add Dictionary files for applications that do not already have JDF files. After you choose this command, type a name for this dictionary file and press ENTER.
Note: Pressing MAGic Key+D while in the current application automatically opens a new dictionary file if one does not exist for that application.
Choose Open if you want to make a change to the Dictionary files for several applications, select the JDF file for the application from the Open File dialog and press ENTER to open the Dictionary file. You can then add, change, or delete a dictionary entry for that application. The list of files contains both shared and user files located in the MAGic settings folders. To copy a dictionary file from another location into your user settings folder, choose the Import button.
Choose Open Default File if you want the word to be spoken the same way in every application, choose Open Default File (CTRL+SHIFT+D) to add, change, or delete default dictionary entries.
2. Select Add. The Add Dictionary Definition dialog box opens.

148
3. In the Actual Word edit field, type in the word as it is spelled in your application. When this word is later read by MAGic it will be pronounced in the way you specify in the Replacement Word edit field.
4. In the Replacement Word edit field, type in the word as you want it pronounced. When this word is later read by MAGic it will be pronounced in the way you specify. Use the Say Line command to hear the word and make sure it is being pronounced as you want. To hear the actual word, press ALT+A.
5. Use the Select Sound and Play Sound buttons if you want to associate a sound when MAGic reads the word entered in the Actual Word edit field.
149
6. Select a language from the Language combo box to limit a dictionary rule to a specific language. After selecting a language, you can further refine the rule to include an exact synthesizer and supported voice. If "All Languages" is selected, the rule applies to all languages, synthesizers, and voices.
7. Select a synthesizer from the Synthesizer combo box to limit a dictionary rule to a specific synthesizer for the current language. After selecting a synthesizer, you can further refine the rule to include an exact voice that is supported by the synthesizer and language. If "All Synthesizers" is selected, the rule applies to all synthesizers for the selected language.
8. Select a voice from the Voice combo box to limit a dictionary rule to a specific voice for the current synthesizer and language. If "All Voices" is selected, the rule applies to all voices for the selected synthesizer.
9. If you want MAGic to read the word in the Actual Word edit box using a different language, select a language from the Speak Replacement Word Using Language list. The list displays languages that are available for whichever synthesizer is selected in the Synthesizer combo box located in this dialog. If the Synthesizer combo box is set to All Synthesizers, then this language list will only contain Default.
10. If you select the Case Sensitive check box, MAGic will apply the dictionary definition to match the text that is typed into the Actual Word edit box. For example, if the word is capitalized, then the rule only applies to capitalized instances of that word. When the check box is cleared, MAGic will apply the definition to the Actual Word value no matter its case.
11. Select OK to save the dictionary definition and close the Add Dictionary Definition dialog box. The new rule now appears in the Dictionary Entries tree view.
Dictionary Entries
The Dictionary Entries tree view contains a list of all rules for the current Dictionary Manager. In addition to creating rules for specific words, rules can also be defined to restrict the rule to a particular language, synthesizer, or voice.

150
If such a rule exists, the language will appear at the top of the tree view. The language rules restrict the dictionary rule to text spoken in the language. Use the RIGHT ARROW key to expand the tree for a specific language to access language specific rules. Further restrictions within the language can apply to specific synthesizers.
The synthesizer rules restrict the dictionary rule to text spoken with a specific synthesizer. Use the RIGHT ARROW key to expand the tree for a specific synthesizer to access synthesizer specific rules. Further restrictions within the synthesizer can apply to specific synthesizer voices.
The voice rules restrict the dictionary rule to text spoken with a specific synthesizer voice. Use the RIGHT ARROW key to expand the tree for a specific synthesizer voice to access synthesizer voice specific rules. Use the LEFT ARROW to collapse items, and use the UP and DOWN ARROW keys to move through and select items in the tree view. First letter navigation is also available so that you can quickly jump to an item in the tree view.
Quick View Frame
The Quick View Frame feature allows you to specify regions of the screen (called frames) that you can monitor while you work in other areas. MAGic can display one of these frames in the magnified area so you can see any changes or updates to that part of the screen. To choose which frame you want to display, or to customize the frame's position, border color, and color enhancements, choose the Main menu, and then Tools followed by Quick View Frame.
Properties
The Properties tab allows you to select or modify the active frame and change the frame’s position and border color.
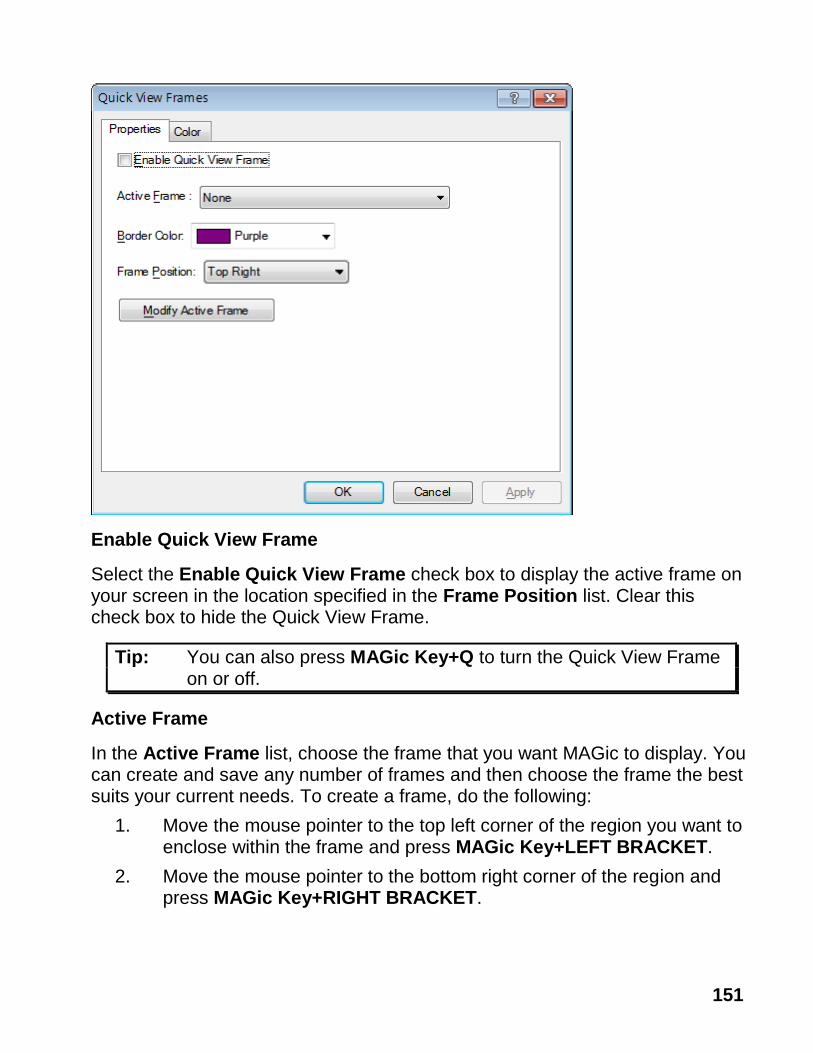
151
Enable Quick View Frame
Select the Enable Quick View Frame check box to display the active frame on your screen in the location specified in the Frame Position list. Clear this check box to hide the Quick View Frame.
Tip: You can also press MAGic Key+Q to turn the Quick View Frame on or off.
Active Frame
In the Active Frame list, choose the frame that you want MAGic to display. You can create and save any number of frames and then choose the frame the best suits your current needs. To create a frame, do the following:
1. Move the mouse pointer to the top left corner of the region you want to enclose within the frame and press MAGic Key+LEFT BRACKET.
2. Move the mouse pointer to the bottom right corner of the region and press MAGic Key+RIGHT BRACKET.
152
Tip: To quickly create a frame that is automatically sized to fit a dialog box option, move your pointer to the option and press MAGic Key+LEFT BRACKET twice quickly.
3. Type a name for this frame, then click OK or press ENTER. This is the name that will appear in the Active Frame list.
4. Ensure that the frame is positioned over the area of the screen that you want to monitor. You can move the frame to another location by dragging the frame’s title bar.
5. If you want to resize the frame, move your pointer over a corner or edge of the frame border. When the pointer changes to a double-headed arrow, drag the border in the desired direction.
6. When you have finished resizing and positioning the frame, click Close on the Quick View Manager toolbar (located in the top left corner of the screen) or press ESC. Choose Yes when MAGic asks if you want to save your changes.
Tip: You can press MAGic Key+9 to open the Quick View Manager and view/modify any frames you have saved.
Border Color
Choose a color for the border of the active frame from the Border Color list.
Frame Position
Use the Frame Position list to determine where you want the active frame to appear on your screen.
Modify Active Frame Button
Click Modify Active Frame or press ALT+M to resize or move the frame you selected in the Active Frame list. Drag the frame’s title bar to move it to another part of the screen. To resize the frame, move your pointer over a corner or edge of the frame border. When the pointer changes to a double-headed arrow, drag the border in the desired direction.

153
Color
The Color tab lets you apply color enhancements to the active frame. You can adjust the brightness and contrast, create color switching rules, apply tinting, and more. The options available on this tab are identical to those in the Color Enhancements dialog box. For more information on these options, see page 82.

154
155
Chapter 8 Application Specific Functions
For many popular software applications, such as Microsoft Word, Microsoft Excel, Internet Explorer, and Adobe Acrobat, MAGic contains application specific functions to help you work in these applications. With MAGic’s application specific functions, you will find that using these functions consolidates screen information, enhances application navigation, and gives you greater control over what is spoken. Each popular application may contain unique options, settings and key assignments. There are several ways for you to learn more which applications contain special functionality and the options available for each application.
MAGic Help System
Use the MAGic help system to view topics describing application specific keystrokes and options. To access this information, do the following:
1. From the Main menu, choose Help and then Help Topics. This opens the MAGic help system.
2. Select the book titled Popular Applications with MAGic; it appears in the Contents window on the left side of the split screen. Within this book are topics for each popular application for which MAGic provides special functionality. The application topics describe detailed keystrokes, options, and functionality for that application.
3. Once a topic is selected, it appears on the right side of the split screen. Use the links within the topic to learn more about using MAGic with the program.
Keyboard Manager
The Keyboard Manger contains all MAGic functions that can be used in any application, as well as functions that are specific to popular applications. Within the Keyboard Manager, you can learn about current assignments. You can also create or redefine hot keys using the Keyboard Manager.
156
To open the Keyboard Manager, do the following:
1. From the MAGic application window, select Keyboard Manager from the Tools menu. The Keyboard Manager dialog box opens.
2. In the Category combo box, scroll down and select an application.
3. Select an action in the Action list box. The action is defined in the Description read-only edit box at the bottom of the Keyboard Manager dialog box.

157
Chapter 9 Contacting Freedom Scientific
Corporate Headquarters
Freedom Scientific 11800 31st Court North St. Petersburg, FL 33716-1805 USA
Telephone: (727) 803-8000
Fax: (727) 803-8001
World Wide Web: www.FreedomScientific.com
Office hours: Monday through Friday 8:30 AM to 5:00 PM Eastern Time (USA)
Technical Support Hours: Monday through Friday 8:30 AM to 7:00 PM Eastern Time (USA)
Freedom Scientific Web Site
The Freedom Scientific Web site, http://www.FreedomScientific.com, is a comprehensive source of information regarding MAGic screen magnification software, JAWS screen reader software, training opportunities, application-specific cassette tutorials and the company that develops these products.
The Freedom Scientific Web site is designed to be accessible by people with disabilities and includes a great deal of technical support information as well as online ordering capability, RealAudio descriptions of many products, and continuous product update and maintenance downloads.
Sales
Contacting the Freedom Scientific Sales Department
Sales Telephone: (800) 444-4443
International Sales Telephone, including Canada: (727) 803-8000
Sales Fax: (727) 803-8001
World Wide Web: www.FreedomScientific.com
158
Sales e-mail: [email protected]
To ensure that your request is handled promptly, include your complete address and telephone number.
Office Hours: Monday through Friday, 8:30 AM to 5:00 PM Eastern Time (USA)
Technical Support
You must be a registered user to access Freedom Scientific support services. Freedom Scientific support services are subject to Freedom Scientific terms and conditions in place at the time the service is used.
Reach Technical Support using the following options:
World Wide Web: www.FreedomScientific.com
Technical Support e-mail: [email protected]
Technical Support Telephone: (727) 803-8600
Technical Support Hours: Monday through Friday 8:30 AM to 7:00 PM Eastern Time (USA)
When you call, be at your computer, have your documentation in hand, and be prepared to provide the following information:
Product serial number used for registration.
Product name and version number.
Type of computer hardware you are using.
Software version number of Windows.
Exact wording of any messages that appear on your screen.
What you were doing when the problem occurred.
How you tried to solve the problem.
159
Appendix A Remote Access
Remote access software, like Citrix Program Neighborhood and Remote Desktop Connection, allows you to establish a connection from your computer (called the “client”) to another computer (called the “server”). Once connected, you can run programs and view files just as if you were sitting at the server’s keyboard. The server handles all processing and data storage tasks. The client computer acts as an intermediary between you and the server, relaying your commands and displaying the results.
Visually, users see a graphical representation of the server’s desktop on their client computer. However, the version of MAGic installed on the client cannot read or interact with this image. With MAGic remote access, you install a version of MAGic on the server to provide access to programs you use while in a terminal session. The version of MAGic installed on the server sends the output to the client through a virtual channel. The version of MAGic installed on the client computer then relays this output to the user.
The Remote Access feature is only available for MAGic licenses that use Internet License Manager (ILM) for authorization. You cannot use the thumb drive versions of MAGic in terminal sessions. The Remote Access feature must be purchased separately. Contact Freedom Scientific Sales for more information.
System Requirements
Server System Requirements
Citrix and Terminal Services both allow client computers to connect to the server and access programs and files stored on it through the Windows user interface. Your server must meet the following requirements:
Windows Server 2008 Release 2
If you are using Citrix ICA protocol, you will need Citrix MetaFrame Feature Release 3 or later

160
Client System Requirements
Client computers can use Remote Desktop Protocol (RDP) or Citrix Independent Computer Architecture (ICA) protocol to connect to a server and access its programs and files. MAGic only supports Windows-based clients.
There are no additional system requirements beyond those required for MAGic and Citrix Program Neighborhood, Terminal Services Client, and/or Remote Desktop Connection. In addition, client computers must meet the following minimum requirements:
Program Neighborhood Client version 7.0 or later, if you are using Citrix ICA protocol.
If you are using Terminal Services, you need either Microsoft Remote Desktop Connection version 5.0 or later or Terminal Services Client version 5.0 or later.
One or more serial ports, if you are using a serial hardware synthesizer. One port is required for each device.
One or more USB ports, if you are using a USB hardware synthesizer. One port is required for each device.
User and Shared Profiles for Remote Access
Just as Windows provides a My Documents folder for each user on a computer or server, MAGic allows each user to have their own profile. This profile contains the user's custom settings. This allows different users on the same system to set up and run MAGic in completely different ways. MAGic saves your user settings in Documents and Settings\User Name\Application Data\Freedom Scientific\MAGic\Version\Settings\Enu.
In addition to these user profiles, MAGic also sets up a shared profile. MAGic uses the settings in this shared profile whenever the user has not specifically defined their own custom settings. The shared profile allows a network administrator to set up a baseline configuration for MAGic according to the needs of that network's users. MAGic saves shared settings in Documents and Settings\All Users\Application Data\Freedom Scientific\MAGic\Version\Settings\Enu.
Note: User settings override any identical setting specified in the shared profile.

161
User and shared profiles allow MAGic to work better with Citrix MetaFrame and Terminal Services. Each user that connects remotely to the server uses his or her own user settings, without overriding the shared settings or the settings of other users. Your settings for remote sessions are stored on the server and are available if you connect to the server using the same account and a different client computer. A user can have different settings for using MAGic locally on the client computer and using MAGic remotely with the server.
Assigning Access Privileges
Before installing MAGic on the server, ensure that you have full write access to the folder where MAGic will be located. All MAGic users should have read-only access to this folder using the same network name.
MAGic saves user settings files in the folder Documents and Settings\User Name\Application Data\Freedom Scientific\MAGic\Version\Settings\Enu (where User Name is the name associated with the user account). Users must have read and write access to these files.
Settings in shared files apply to all MAGIC users on the computer or network. MAGic saves shared files in Documents and Settings\All Users\Application Data\Freedom Scientific\MAGic\Version\Settings\Enu so they are accessible to each user that logs on to the computer. Users must have a minimum of read-only access to these files.
Remote Access Installation Instructions
You must install MAGic on the server and all client computers. The server and/or client must have the proper licenses with the remote access option enabled. In addition, the version of MAGic installed on the server must be identical to the version of MAGic installed on the client computer.
Installing MAGic on the Server
Do the following to install MAGic with remote access support on the server. This procedure provides MAGic speech access for local users of the server. You must have administrative privileges for the server to install MAGic. In addition, you must restart the server after installation.
Tip: For information on installing MAGic on the server remotely or without installing the drivers, refer to the MAGic online help system.
162
1. Insert the MAGic program disk into the server’s disk drive.
2. When the MAGic Setup dialog box displays, choose the MAGic Setup button. If the dialog box does not appear, press WINDOWS Key+R, type “D:\Setup.exe” and press ENTER (if your disk drive is not D, substitute the correct letter).
Note: If you are installing MAGic from the package for the Web, press WINDOWS Key+E, navigate to the folder where you saved the package file, select the file, and press ENTER.
3. When Setup asks you to select an installation type, select Custom.
4. Choose the destination folder and your startup preferences.
5. When Setup asks you to select remote access components, select the Allow MAGic Enabled Clients to Connect to this System check box. If you intend to use the server computer locally to connect to another server, you can select the Allow this System to Connect to MAGic Enabled Servers check box as well.
6. Follow the instructions and complete the installation.
Installing MAGic on Client Computers
After you install MAGic on the server, you must install the program on any client computers that will use MAGic while accessing the server remotely.
Do the following to install the program on a client computer:
1. Insert the MAGic program disk into the client computer’s disk drive.
2. When the MAGic Setup dialog box displays, choose the MAGic Setup button. If the dialog box does not appear, press WINDOWS Key+R, type “D:\Setup.exe” and press ENTER (if your disk drive is not D, substitute the correct letter).
3. When Setup asks you to select an installation type, select Custom.
4. Choose the destination folder and your startup preferences.
5. When Setup asks you to select remote access components, select the Allow this System to Connect to MAGic Enabled Servers check box.
Note: Setup will only install support for Citrix if the client software is installed on the computer. Be sure to install the Citrix client software before installing MAGic.
163
6. Follow the instructions and complete the installation. If you have a single-user license of MAGic, you can activate your product after the installation.
Authorizing MAGic for Remote Access
When using MAGic in terminal sessions, you must have a license that includes the remote access option (purchased separately). After you establish a remote connection, the version of MAGic installed on the server attempts to obtain remote access authorization from the client computer. In order to obtain authorization from the client, the version of MAGic installed on the client computer must have either a stand-alone (local) license, access to a license server with one or more free tokens, or an attached dongle. The client computer’s license must include the remote access option to provide authorization for the version of MAGic installed on the server.
If the server cannot find the correct authorization, it searches for a license server. The license server must have one or more free tokens, and its multi-user license must include the remote access option. The server cannot obtain authorization from its own stand-alone (local) license or a dongle during terminal sessions.
If the server cannot find any authorization, an error message appears and you will not be able to use MAGic during the terminal session.
Tip: For information on activating a single-user license or setting up a license server for a multi-user license, refer to Product Activation on page 6.
Starting a Terminal Session
After you have installed MAGic on the server and client computers and activated your license, you can begin using MAGic in terminal sessions. To start a terminal session, do the following:
1. Start the client software you are using to connect to the server (such as Program Neighborhood or Remote Desktop).
Tip: Remote Desktop is included with Windows. To start this program, open the Start menu and choose Programs, Accessories, Communications, and Remote Desktop Connection.
164
2. Establish a connection to the server. For information on connections, refer to your client software documentation.
3. Log on to the server using the credentials supplied by the system administrator.
4. In the terminal session window, start MAGic on the server. You will not hear any speech feedback until you start MAGic on the server.
Tip: You can start MAGic quickly by pressing WINDOWS Key+R, typing “MAGic<version number>”, and pressing ENTER.
Ending a Terminal Session
When you have finished working in a terminal session, you can choose to either disconnect or log off from the server. If you disconnect, you end the connection between the client and server computers, but your user account remains logged on. Depending on how the administrator sets up the server, this may cause your programs and files to remain open and use system resources. Logging off from the server ends the connection and closes all your programs and files, ensuring that they do not consume unnecessary server resources.
165
Appendix B
SAPI Synthesizers on a Network
When you use MAGic on a network, the procedure for selecting a synthesizer other than Eloquence is the same as when you use a standalone version of MAGic.
When you update your synthesizer list in the Voices dialog box, the synthesizers that populate the Available SAPI Synthesizers list are stored in your user profile. Therefore, the next time that you log into MAGic this information will automatically be displayed for you.
If you move to another computer that does not have the same synthesizers installed, and attempt to change your synthesizer to one of these, you will receive a message stating, “The synthesizer you have selected is not available. Would you like this synthesizer removed from your list of available synthesizers.” Choose Yes if you do not want to use this synthesizer on the network in the future. Choose No to have the synthesizer remain in your list for use on other network computers. When you choose an unavailable synthesizer, after attempting to find the synthesizer on your computer, MAGic will continue to use the synthesizer you were using before attempting to change synthesizers. If you select a synthesizer other than Eloquence as your synthesizer and move to a computer that does not have that synthesizer installed, when you log into MAGic, you will receive notification of this. Speech then defaults to Eloquence.

166

167
Appendix C
Hot Keys
Note: By default, the MAGic Key is the CAPS LOCK key on your keyboard.
General
Description General Keystrokes
Start MAGic
CTRL+ALT+M (default keystroke – can be changed using the Startup Wizard)
Run Script Manager (Only available for MAGic Pro Scripting Edition) INSERT+0
Minimize/Restore the MAGic User Interface MAGic Key+U
Pass Through Key MAGic Key+3
Refresh Screen MAGic Key+ESC
Open MAGic Context Menu
MAGic Key+APPLICATION Key or MAGic Key+RIGHT MOUSE BUTTON CLICK
Quick Settings MAGic Key+O
Toggle Navigation Quick Keys On/Off MAGic Key+Z
Append Text to Current Contents on Clipboard MAGic Key+WINDOWS Key+C
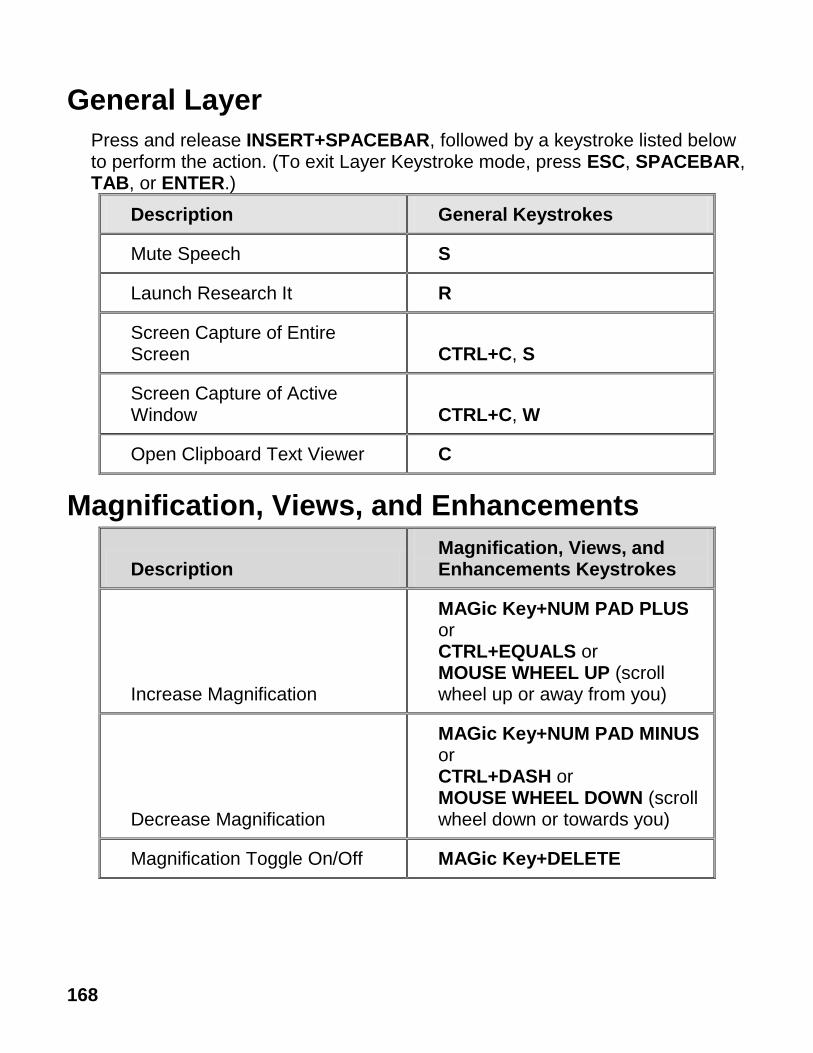
168
General Layer
Press and release INSERT+SPACEBAR, followed by a keystroke listed below to perform the action. (To exit Layer Keystroke mode, press ESC, SPACEBAR, TAB, or ENTER.)
Description General Keystrokes
Mute Speech S
Launch Research It R
Screen Capture of Entire Screen CTRL+C, S
Screen Capture of Active Window CTRL+C, W
Open Clipboard Text Viewer C
Magnification, Views, and Enhancements
Description Magnification, Views, and Enhancements Keystrokes
Increase Magnification
MAGic Key+NUM PAD PLUS or CTRL+EQUALS or MOUSE WHEEL UP (scroll wheel up or away from you)
Decrease Magnification
MAGic Key+NUM PAD MINUS or CTRL+DASH or MOUSE WHEEL DOWN (scroll wheel down or towards you)
Magnification Toggle On/Off MAGic Key+DELETE

169
Description Magnification, Views, and Enhancements Keystrokes
Toggle between 1x Magnification and Current Magnification
MAGic Key+SHIFT+DELETE or MAGic Key+MOUSE MIDDLE CLICK (press down on scroll wheel)
Switch to Next Magnified View MAGic Key+NUM PAD SLASH
Switch to Previous Magnified View
MAGic Key+SHIFT+ NUM PAD SLASH
Change Text Smoothing View (HD Text, Classic, and None) MAGic Key+CTRL+F
Toggle Color Enhancements On/Off MAGic Key+F12
Toggle Cursor Enhancements On/Off MAGic Key+F8
Toggle Mouse Enhancements On/Off MAGic Key+F4
Toggle Focus Enhancements On/Off MAGic Key+F
Panning and Screen Movement
Description Panning and Screen Movement Keystrokes
Pan Right MAGic Key+RIGHT ARROW
Pan Left MAGic Key+LEFT ARROW
Pan Down MAGic Key+DOWN ARROW
Pan Up MAGic Key+UP ARROW
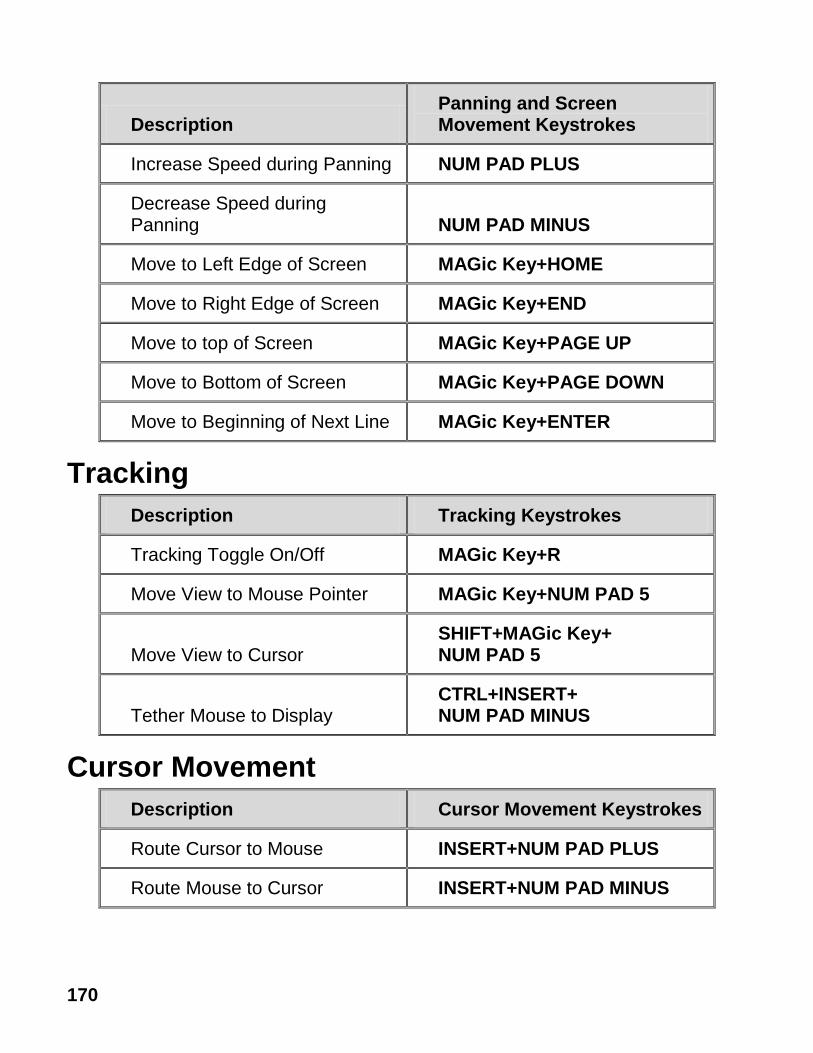
170
Description Panning and Screen Movement Keystrokes
Increase Speed during Panning NUM PAD PLUS
Decrease Speed during Panning NUM PAD MINUS
Move to Left Edge of Screen MAGic Key+HOME
Move to Right Edge of Screen MAGic Key+END
Move to top of Screen MAGic Key+PAGE UP
Move to Bottom of Screen MAGic Key+PAGE DOWN
Move to Beginning of Next Line MAGic Key+ENTER
Tracking
Description Tracking Keystrokes
Tracking Toggle On/Off MAGic Key+R
Move View to Mouse Pointer MAGic Key+NUM PAD 5
Move View to Cursor SHIFT+MAGic Key+ NUM PAD 5
Tether Mouse to Display CTRL+INSERT+ NUM PAD MINUS
Cursor Movement
Description Cursor Movement Keystrokes
Route Cursor to Mouse INSERT+NUM PAD PLUS
Route Mouse to Cursor INSERT+NUM PAD MINUS

171
Locator Mode
Description Locator Mode Keystrokes
Start Locator MAGic Key+F10
Stop Locator and Move to Selected Area ENTER
Stop Locator without Moving the Magnified Area ESC
Move Left LEFT ARROW
Move Right RIGHT ARROW
Move Up UP ARROW
Move Down DOWN ARROW
Move to Far Left Side of Screen HOME
Move to Far Right Side of Screen END
Move to Top of Screen PAGE UP
Move to Bottom of Screen PAGE DOWN
Quick View Frame
Description Quick View Frame Keystrokes
Toggle Quick View Frame On/Off MAGic Key+Q
Set upper left corner of frame MAGic Key+LEFT BRACKET
Set lower right corner of frame MAGic Key+RIGHT BRACKET

172
Description Quick View Frame Keystrokes
Create frame around current dialog box option
MAGic Key+LEFT BRACKET twice quickly
Open Quick View Manager MAGic Key+9
Speech
Description Speech Keystrokes
Silence Current Speech CTRL
Enable/Disable Speech MAGic Key+F3
Increase Speech Rate and Save New Rate
WINDOWS Key+ALT+ CTRL+PAGE UP
Increase Speech Rate - Temporary ALT+CTRL+PAGE UP
Decrease Speech Rate and Save New Rate
WINDOWS Key+ALT+ CTRL+PAGE DOWN
Decrease Speech Rate - Temporary ALT+CTRL+PAGE DOWN
Voice Profiles MAGic Key+F11
Set Screen Echo INSERT+S
Select Verbosity Scheme INSERT+ALT+S
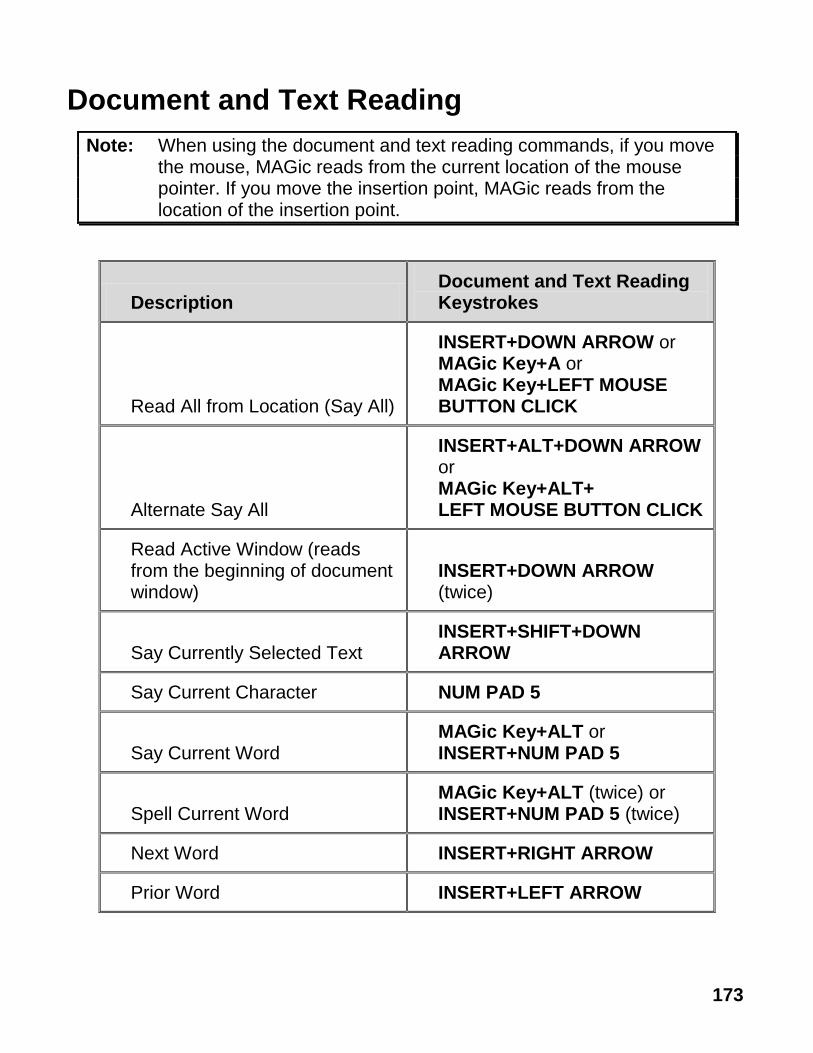
173
Document and Text Reading
Note: When using the document and text reading commands, if you move the mouse, MAGic reads from the current location of the mouse pointer. If you move the insertion point, MAGic reads from the location of the insertion point.
Description Document and Text Reading Keystrokes
Read All from Location (Say All)
INSERT+DOWN ARROW or MAGic Key+A or MAGic Key+LEFT MOUSE BUTTON CLICK
Alternate Say All
INSERT+ALT+DOWN ARROW or MAGic Key+ALT+ LEFT MOUSE BUTTON CLICK
Read Active Window (reads from the beginning of document window)
INSERT+DOWN ARROW (twice)
Say Currently Selected Text INSERT+SHIFT+DOWN ARROW
Say Current Character NUM PAD 5
Say Current Word MAGic Key+ALT or INSERT+NUM PAD 5
Spell Current Word MAGic Key+ALT (twice) or INSERT+NUM PAD 5 (twice)
Next Word INSERT+RIGHT ARROW
Prior Word INSERT+LEFT ARROW
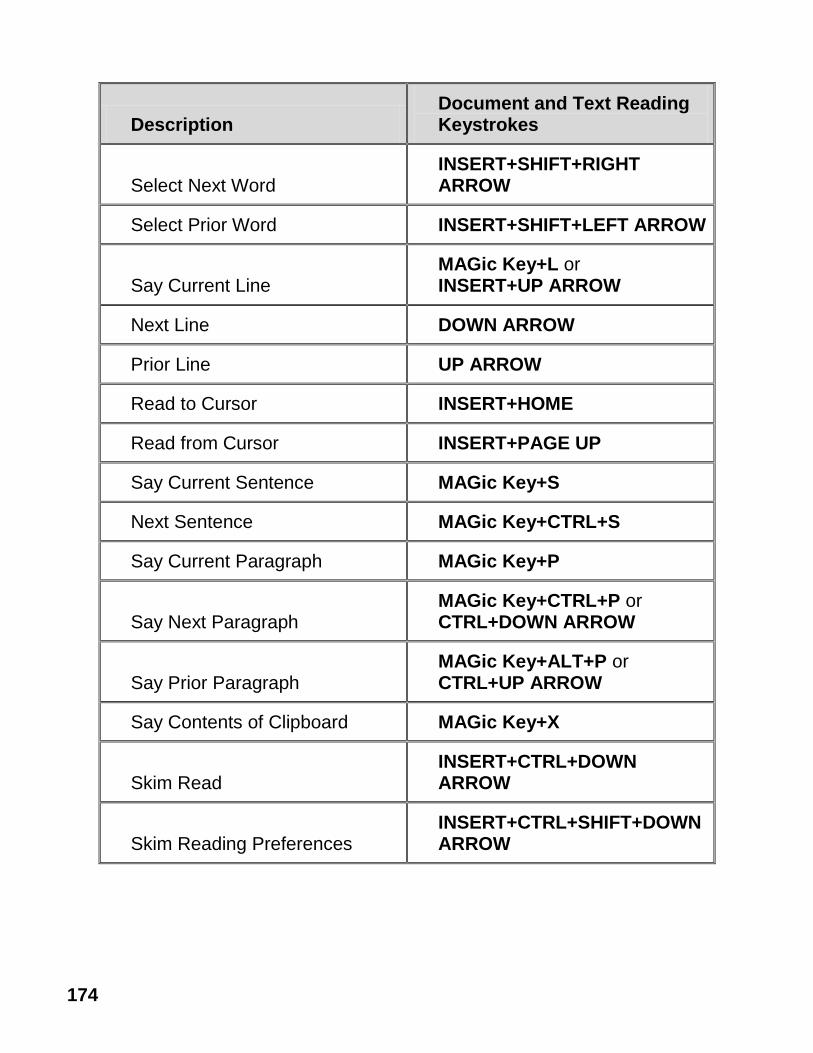
174
Description Document and Text Reading Keystrokes
Select Next Word INSERT+SHIFT+RIGHT ARROW
Select Prior Word INSERT+SHIFT+LEFT ARROW
Say Current Line MAGic Key+L or INSERT+UP ARROW
Next Line DOWN ARROW
Prior Line UP ARROW
Read to Cursor INSERT+HOME
Read from Cursor INSERT+PAGE UP
Say Current Sentence MAGic Key+S
Next Sentence MAGic Key+CTRL+S
Say Current Paragraph MAGic Key+P
Say Next Paragraph MAGic Key+CTRL+P or CTRL+DOWN ARROW
Say Prior Paragraph MAGic Key+ALT+P or CTRL+UP ARROW
Say Contents of Clipboard MAGic Key+X
Skim Read INSERT+CTRL+DOWN ARROW
Skim Reading Preferences INSERT+CTRL+SHIFT+DOWN ARROW

175
Dialog Box Reading
Description Dialog Box Reading Keystrokes
Say Title Bar MAGic Key+T or INSERT+T
Read Bottom of Window INSERT+PAGE DOWN
Say Top Line of Window INSERT+END
Say Default Button in Dialog Box INSERT+E
Say Window Prompt and Text MAGic Key+TAB or INSERT+TAB
Say Current Access Key SHIFT+NUM PAD 5
Table Reading
Description Table Reading Keystrokes
Say Current Cell ALT+CTRL+NUM PAD 5
Cell to Right ALT+CTRL+RIGHT ARROW
Cell to Left ALT+CTRL+LEFT ARROW
Cell Below ALT+CTRL+DOWN ARROW
Cell Above ALT+CTRL+UP ARROW
First Cell ALT+CTRL+HOME
Last Cell ALT+CTRL+END
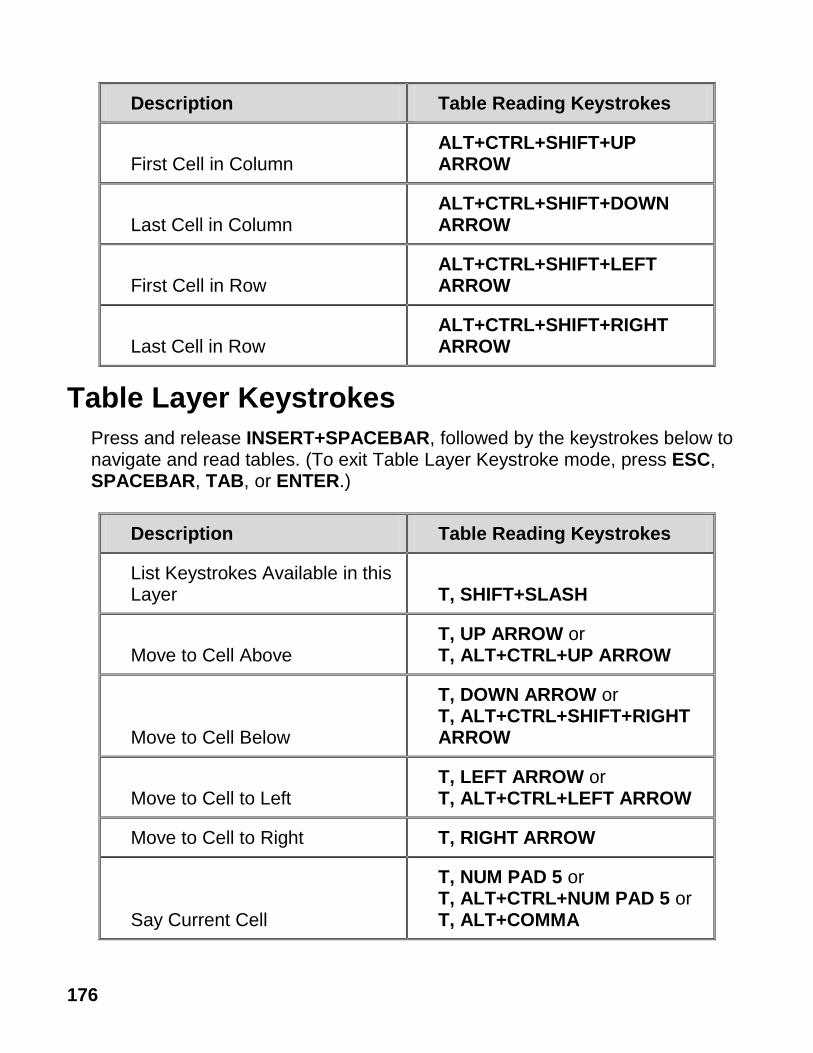
176
Description Table Reading Keystrokes
First Cell in Column ALT+CTRL+SHIFT+UP ARROW
Last Cell in Column ALT+CTRL+SHIFT+DOWN ARROW
First Cell in Row ALT+CTRL+SHIFT+LEFT ARROW
Last Cell in Row ALT+CTRL+SHIFT+RIGHT ARROW
Table Layer Keystrokes
Press and release INSERT+SPACEBAR, followed by the keystrokes below to navigate and read tables. (To exit Table Layer Keystroke mode, press ESC, SPACEBAR, TAB, or ENTER.)
Description Table Reading Keystrokes
List Keystrokes Available in this Layer T, SHIFT+SLASH
Move to Cell Above T, UP ARROW or T, ALT+CTRL+UP ARROW
Move to Cell Below
T, DOWN ARROW or T, ALT+CTRL+SHIFT+RIGHT ARROW
Move to Cell to Left T, LEFT ARROW or T, ALT+CTRL+LEFT ARROW
Move to Cell to Right T, RIGHT ARROW
Say Current Cell
T, NUM PAD 5 or T, ALT+CTRL+NUM PAD 5 or T, ALT+COMMA

177
Description Table Reading Keystrokes
Move to Beginning of Current Row
T, HOME or T, ALT+CTRL+SHIFT+LEFT ARROW
Move to End of Current Row
T, END or T, ALT+CTRL+SHIFT+RIGHT ARROW
Jump to First Cell in Table T, CTRL+HOME or T, ALT+CTRL+HOME
Jump to Last Cell in Table T, CTRL+END or T, ALT+CTRL+END
Move to Beginning of Current Column
T, CTRL+UP ARROW or T, ALT+CTRL+SHIFT+UP ARROW
Move to Bottom of Current Column
T, CTRL+DOWN ARROW or T, ALT+CTRL+SHIFT+DOWN ARROW
Move to Beginning of Current Row T, CTRL+LEFT ARROW
Move to End of Current Row T, CTRL+RIGHT ARROW
Jump to Next Table T, CTRL+ENTER or T, ALT+CTRL+ENTER
Jump to Prior Table T, CTRL+SHIFT+ENTER or T, ALT+CTRL+SHIFT+ENTER
Read the Current Row T, SHIFT+UP ARROW or T, WINDOWS Key+COMMA
Read from Current Cell T, SHIFT+PAGE UP
Read to Current Cell T, SHIFT+HOME

178
Description Table Reading Keystrokes
Read Current Column T, SHIFT+NUM PAD 5 or T, WINDOWS Key+PERIOD
Read to Bottom of Column T, SHIFT+PAGE DOWN
Read from Top of Column T, SHIFT+END
Jump to Previous Cell
T, WINDOWS Key+J or T, CTRL+SHIFT+WINDOWS Key+J
Typing Echo
Description Typing Echo Keystrokes
Cycle through Indicate Capitalization options MAGic Key+F2
Cycle through Typing Echo Unit options INSERT+2
Mouse Echo
Description Mouse Echo Keystrokes
Mouse Echo Toggle MAGic Key+M
Note: Toggling the mouse echo rotates between speak lines, speak words, and mouse echo off.
Some actions in MAGic do not have hot keys assigned. You can define hot keys for these features from within the Keyboard Manager dialog box.
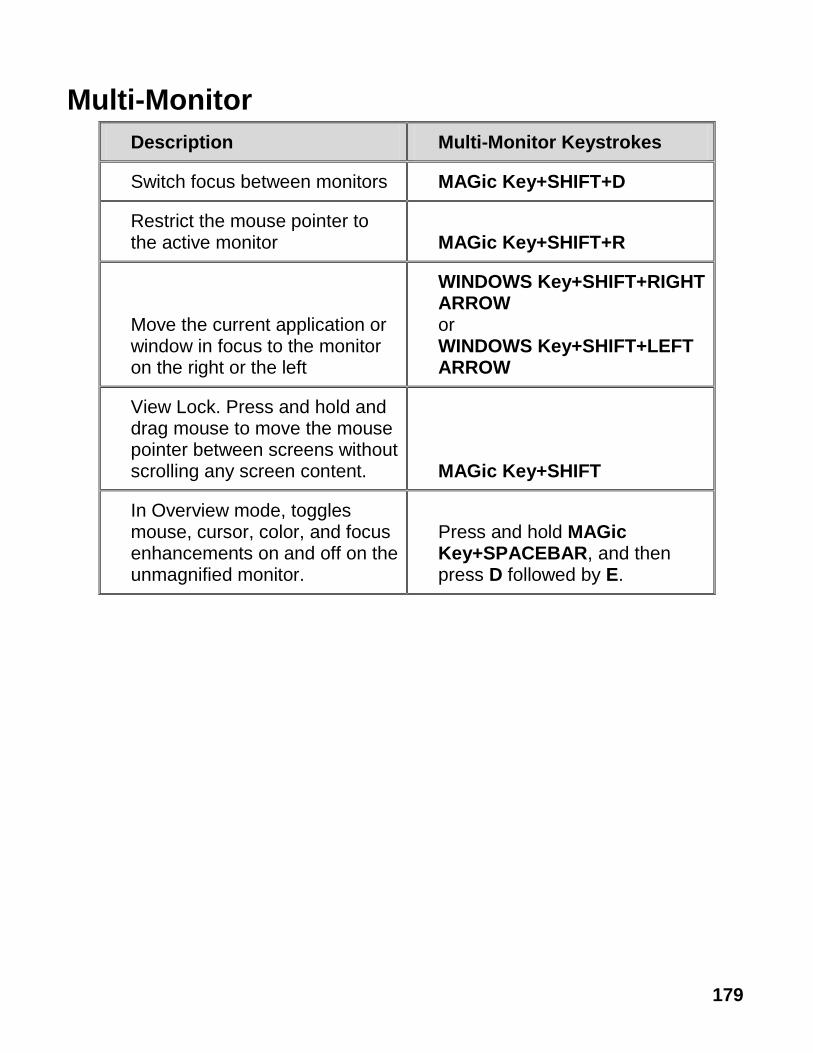
179
Multi-Monitor
Description Multi-Monitor Keystrokes
Switch focus between monitors MAGic Key+SHIFT+D
Restrict the mouse pointer to the active monitor MAGic Key+SHIFT+R
Move the current application or window in focus to the monitor on the right or the left
WINDOWS Key+SHIFT+RIGHT ARROW or WINDOWS Key+SHIFT+LEFT ARROW
View Lock. Press and hold and drag mouse to move the mouse pointer between screens without scrolling any screen content. MAGic Key+SHIFT
In Overview mode, toggles mouse, cursor, color, and focus enhancements on and off on the unmagnified monitor.
Press and hold MAGic Key+SPACEBAR, and then press D followed by E.

180
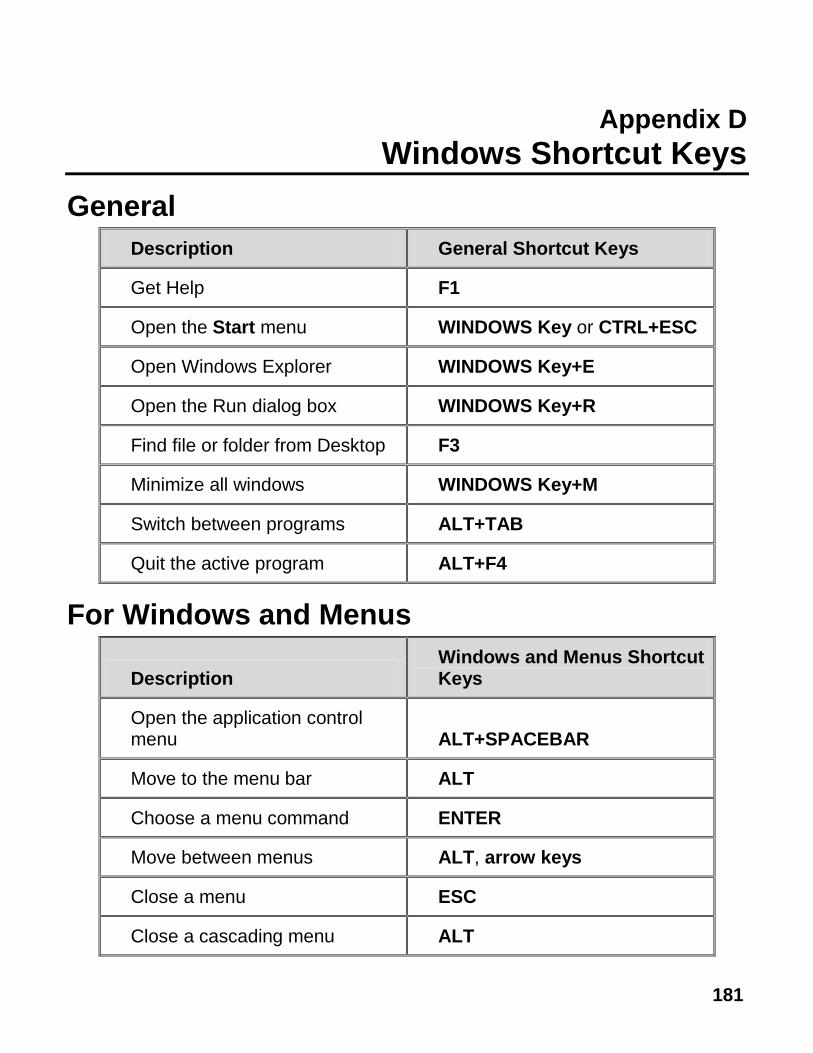
181
Appendix D Windows Shortcut Keys
General
Description General Shortcut Keys
Get Help F1
Open the Start menu WINDOWS Key or CTRL+ESC
Open Windows Explorer WINDOWS Key+E
Open the Run dialog box WINDOWS Key+R
Find file or folder from Desktop F3
Minimize all windows WINDOWS Key+M
Switch between programs ALT+TAB
Quit the active program ALT+F4
For Windows and Menus
Description Windows and Menus Shortcut Keys
Open the application control menu ALT+SPACEBAR
Move to the menu bar ALT
Choose a menu command ENTER
Move between menus ALT, arrow keys
Close a menu ESC
Close a cascading menu ALT
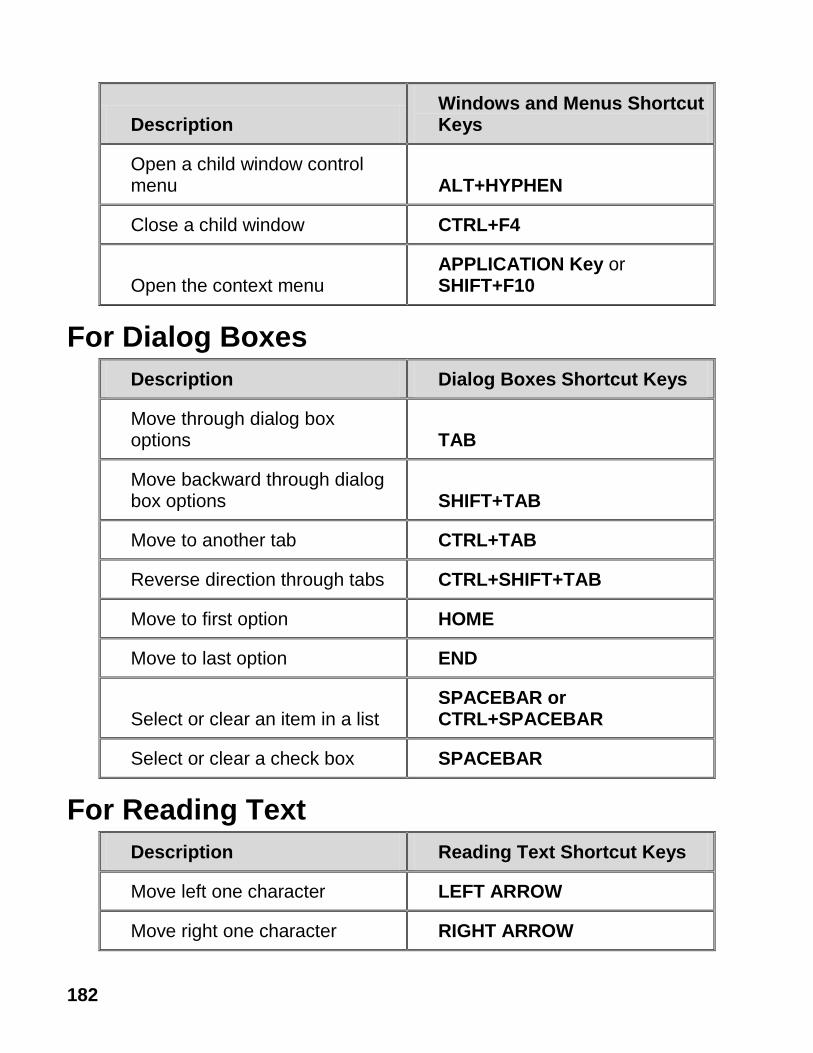
182
Description Windows and Menus Shortcut Keys
Open a child window control menu ALT+HYPHEN
Close a child window CTRL+F4
Open the context menu APPLICATION Key or SHIFT+F10
For Dialog Boxes
Description Dialog Boxes Shortcut Keys
Move through dialog box options TAB
Move backward through dialog box options SHIFT+TAB
Move to another tab CTRL+TAB
Reverse direction through tabs CTRL+SHIFT+TAB
Move to first option HOME
Move to last option END
Select or clear an item in a list SPACEBAR or CTRL+SPACEBAR
Select or clear a check box SPACEBAR
For Reading Text
Description Reading Text Shortcut Keys
Move left one character LEFT ARROW
Move right one character RIGHT ARROW
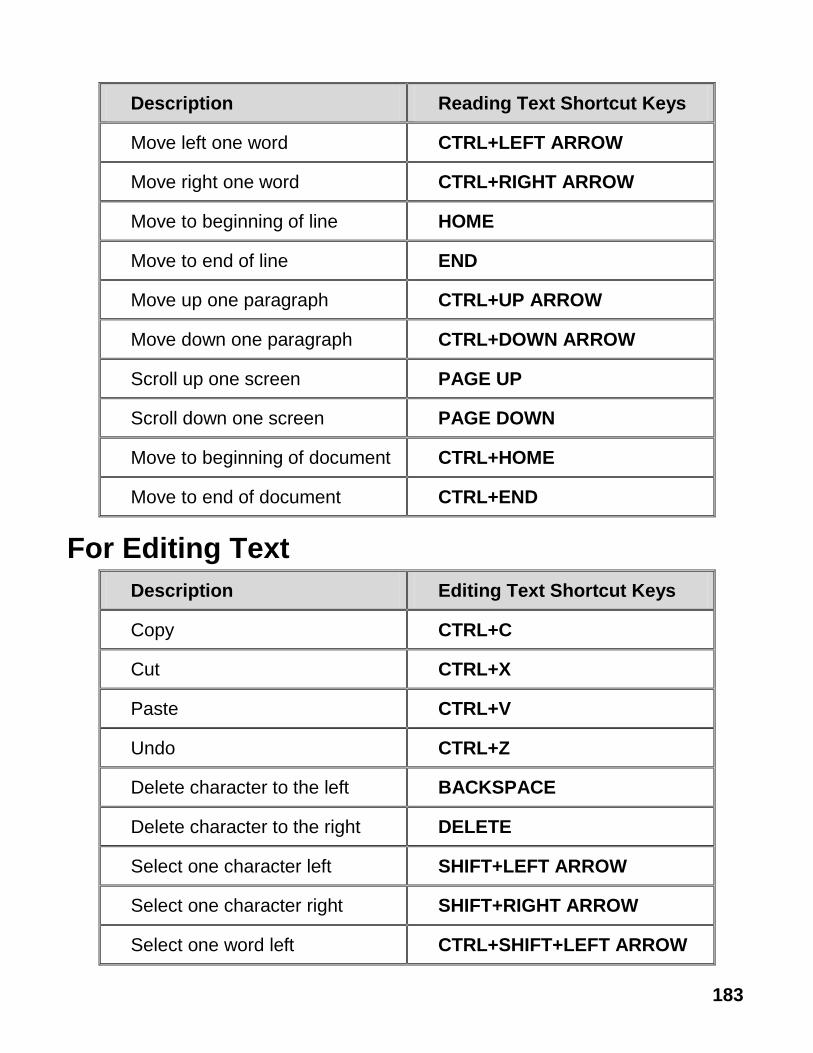
183
Description Reading Text Shortcut Keys
Move left one word CTRL+LEFT ARROW
Move right one word CTRL+RIGHT ARROW
Move to beginning of line HOME
Move to end of line END
Move up one paragraph CTRL+UP ARROW
Move down one paragraph CTRL+DOWN ARROW
Scroll up one screen PAGE UP
Scroll down one screen PAGE DOWN
Move to beginning of document CTRL+HOME
Move to end of document CTRL+END
For Editing Text
Description Editing Text Shortcut Keys
Copy CTRL+C
Cut CTRL+X
Paste CTRL+V
Undo CTRL+Z
Delete character to the left BACKSPACE
Delete character to the right DELETE
Select one character left SHIFT+LEFT ARROW
Select one character right SHIFT+RIGHT ARROW
Select one word left CTRL+SHIFT+LEFT ARROW

184
Description Editing Text Shortcut Keys
Select one word right CTRL+SHIFT+RIGHT ARROW
Select to beginning of line SHIFT+HOME
Select to end of line SHIFT+END
Select to beginning of document CTRL+SHIFT+HOME
Select to end of document CTRL+SHIFT+END
Select all CTRL+A
For Windows Explorer
Description Windows Explorer Shortcut Keys
Rename selected file or folder F2
Open properties ALT+ENTER
Refresh a window F5
Switch between panes F6 or TAB
Go up a level BACKSPACE
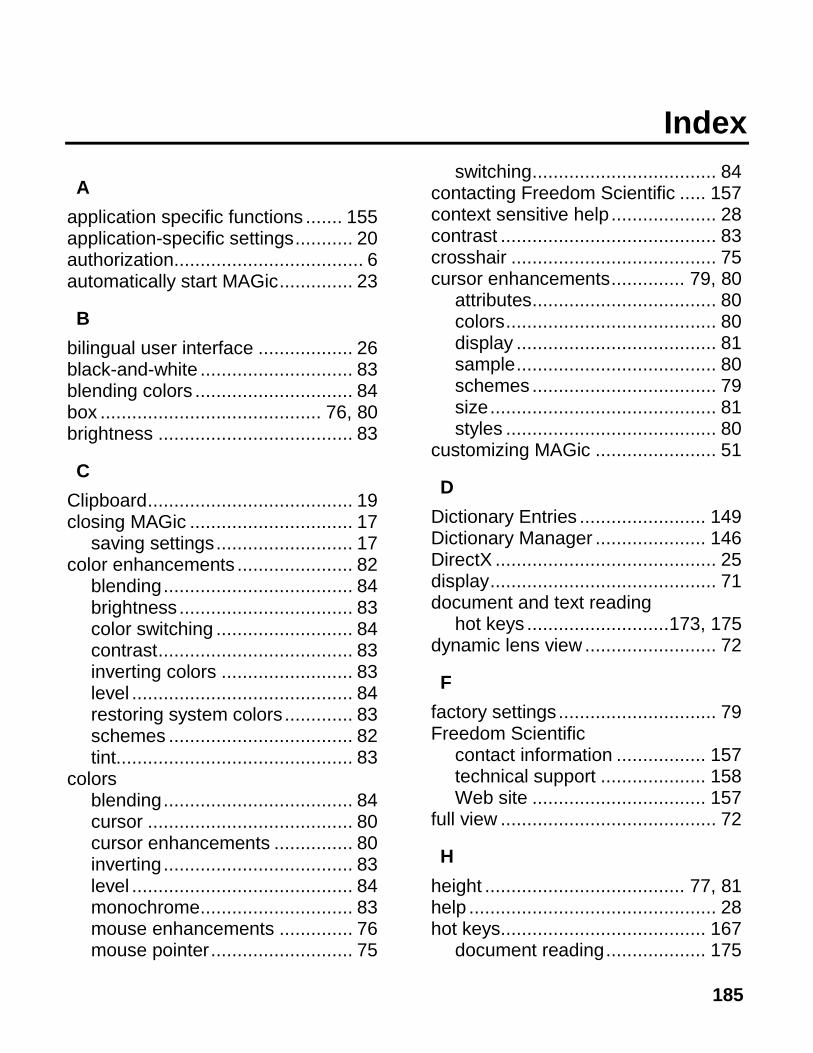
185
Index
A
application specific functions ....... 155 application-specific settings ........... 20 authorization .................................... 6 automatically start MAGic .............. 23
B
bilingual user interface .................. 26 black-and-white ............................. 83 blending colors .............................. 84 box .......................................... 76, 80 brightness ..................................... 83
C
Clipboard ....................................... 19 closing MAGic ............................... 17
saving settings .......................... 17 color enhancements ...................... 82
blending .................................... 84 brightness ................................. 83 color switching .......................... 84 contrast ..................................... 83 inverting colors ......................... 83 level .......................................... 84 restoring system colors ............. 83 schemes ................................... 82 tint............................................. 83
colors blending .................................... 84 cursor ....................................... 80 cursor enhancements ............... 80 inverting .................................... 83 level .......................................... 84 monochrome ............................. 83 mouse enhancements .............. 76 mouse pointer ........................... 75
switching ................................... 84 contacting Freedom Scientific ..... 157 context sensitive help .................... 28 contrast ......................................... 83 crosshair ....................................... 75 cursor enhancements .............. 79, 80
attributes ................................... 80 colors ........................................ 80 display ...................................... 81 sample ...................................... 80 schemes ................................... 79 size ........................................... 81 styles ........................................ 80
customizing MAGic ....................... 51
D
Dictionary Entries ........................ 149 Dictionary Manager ..................... 146 DirectX .......................................... 25 display ........................................... 71 document and text reading
hot keys ........................... 173, 175 dynamic lens view ......................... 72
F
factory settings .............................. 79 Freedom Scientific
contact information ................. 157 technical support .................... 158 Web site ................................. 157
full view ......................................... 72
H
height ...................................... 77, 81 help ............................................... 28 hot keys....................................... 167
document reading ................... 175
186
general ................................... 167 Locator ................................... 171 magnification, views, & enhancements ........................ 168 mouse echo ............................ 178 panning ................................... 169 speech .................................... 172 text reading ............................. 173 tracking ................................... 170 typing echo ............................. 178 Windows ................................. 181
I
installing MAGic .............................. 5 authorization ............................... 6
inverting black and white ......................... 83 brightness ................ 75, 76, 80, 83 colors ....................... 75, 76, 80, 83 cursor enhancements ............... 80 mouse enhancements .............. 76 mouse pointer ........................... 75
K
keyboard ................................. 18, 35 assignments ............................. 36 customizing ............................... 36 MAGic Key .............................. 144 menu .................................. 35, 36
L
languages ..................................... 26 length ...................................... 77, 81 lens view ....................................... 72 line ................................................ 80 Locator
hot keys .................................. 171
M
MAGic Context Menu .................... 37 MAGic Key ............................ 35, 144
passing through ........................ 35 magnification
display ...................................... 71 hot keys .................................. 168 level one ................................... 73 multi-monitor ........ 92, 96, 100, 179 view lock ................................... 98
magnified area ................... 73, 79, 82 minimizing MAGic on startup ......... 26 monochrome ................................. 83 mouse ..................................... 35, 36 mouse echo .................................. 18
hot keys .................................. 178 mouse enhancements ................... 73
attributes ................................... 75 colors .................................. 75, 76 display ...................................... 76 pointer attributes ....................... 74 schemes ................................... 74 size ................................ 75, 76, 77 styles ........................................ 75 transparency ............................. 75
mouse pointer ............................... 94 Multi-Monitor ............ 92, 96, 100, 179
N
navigating MAGic .......................... 35 network synthesizers ................... 165
O
opening MAGic.............................. 16 oval ......................................... 75, 80 overlay view .................................. 72
P
panning hot keys .................................. 169
pass through ................................. 36 passing the MAGic Key through .... 35 preferences ................................... 23 program group............................... 15

187
Q
Quick Start Guide ............................ 3 quitting MAGic ............................... 17
R
reading .......................................... 18 replacing colors ............................. 84 restrict mouse pointer .................... 94
S
saving settings .................. 17, 20, 26 schemes ........................................ 77
color enhancements ................. 82 creating ..................................... 78 cursor enhancements ............... 79 deleting ..................................... 78 modifying .................................. 78 mouse enhancements .............. 74 restoring factory schemes ......... 79 saving ....................................... 27
scope ............................................ 76 screen savers ................................ 26 shortcut keys ........... 36, see hot keys size............................... 75, 76, 77, 81 speech
hot keys .................................. 172 Speech On Demand .................... 130 split buttons ................................... 40 split view ....................................... 72 starting MAGic ......................... 16, 23
when Windows starts ................ 23 styles ....................................... 75, 80 swapping colors ............................ 84
synthesizers ................................ 165 network ................................... 165
system requirements ....................... 4
T
technical support ............ 29, 157, 158 thickness ................................. 76, 81 tint ........................................... 83, 84 tracking
hot keys .................................. 170 transparency ........................... 76, 81 triangle .......................................... 80 typing echo .................................... 20
hot keys .................................. 178
U
uninstalling MAGic .......................... 5 unmagnified area ............... 73, 79, 82 user interface .........................39, 167
V
version .......................................... 29 View Lock ...................................... 98 views ............................................. 72
dynamic lens............................. 72 full ............................................. 72 lens ........................................... 72 overlay ...................................... 72 split ........................................... 72
W
What’s This? help .......................... 28

188
Related Documents