User's Guide NPD6353-03 EN

Welcome message from author
This document is posted to help you gain knowledge. Please leave a comment to let me know what you think about it! Share it to your friends and learn new things together.
Transcript

User's Guide
NPD6353-03 EN
Contents
Guide to This ManualIntroduction to the Manuals. . . . . . . . . . . . . . . . . . .6Guide to Video Manuals. . . . . . . . . . . . . . . . . . . . . .6Searching for Information. . . . . . . . . . . . . . . . . . . . 6Printing Only the Pages You Need. . . . . . . . . . . . . . 7About This Manual. . . . . . . . . . . . . . . . . . . . . . . . . 7
Marks and Symbols. . . . . . . . . . . . . . . . . . . . . . . 7Notes on Screenshots and Illustrations. . . . . . . . . 8Operating System References. . . . . . . . . . . . . . . . 8
Trademarks. . . . . . . . . . . . . . . . . . . . . . . . . . . . . . . 8Copyright. . . . . . . . . . . . . . . . . . . . . . . . . . . . . . . . 9
Important InstructionsSafety Instructions. . . . . . . . . . . . . . . . . . . . . . . . . 11
Safety Instructions for Ink. . . . . . . . . . . . . . . . . 11Printer Advisories and Warnings. . . . . . . . . . . . . . 12
Advisories and Warnings for Setting Up thePrinter. . . . . . . . . . . . . . . . . . . . . . . . . . . . . . . .12Advisories and Warnings for Using the Printer. . 12Advisories and Warnings for Using thePrinter with a Wireless Connection. . . . . . . . . . .13Advisories and Warnings for Using theTouchpad. . . . . . . . . . . . . . . . . . . . . . . . . . . . . 13Advisories and Warnings for Transporting orStoring the Printer. . . . . . . . . . . . . . . . . . . . . . . 13
Protecting Your Personal Information. . . . . . . . . . . 14
Part Names and FunctionsFront. . . . . . . . . . . . . . . . . . . . . . . . . . . . . . . . . . .16Rear. . . . . . . . . . . . . . . . . . . . . . . . . . . . . . . . . . . 17
Opening the Port Cover. . . . . . . . . . . . . . . . . . . 18
Guide to the Control PanelHome Screen Configuration. . . . . . . . . . . . . . . . . . 20
Internal Light. . . . . . . . . . . . . . . . . . . . . . . . . . .21Guide to the Network Icon. . . . . . . . . . . . . . . . . 21
Switching the Screen View. . . . . . . . . . . . . . . . . . . 22Entering Characters. . . . . . . . . . . . . . . . . . . . . . . . 24
Loading Papers and CD/DVDsLoading Paper. . . . . . . . . . . . . . . . . . . . . . . . . . . . 26
Paper Handling Precautions. . . . . . . . . . . . . . . . 26Paper Loading Precautions. . . . . . . . . . . . . . . . . 27
Paper Size and Type Settings. . . . . . . . . . . . . . . .27Loading Paper in the Rear Paper Feeder. . . . . . . 29Loading Paper in the Front Paper Feeder. . . . . . .31Loading Roll Paper. . . . . . . . . . . . . . . . . . . . . . .33
Loading a CD/DVD. . . . . . . . . . . . . . . . . . . . . . . . 35Printable CD/DVDs. . . . . . . . . . . . . . . . . . . . . . 35CD/DVD Handling Precautions. . . . . . . . . . . . . 35Loading a CD/DVD. . . . . . . . . . . . . . . . . . . . . . 36Removing a CD/DVD. . . . . . . . . . . . . . . . . . . . 37
PrintingPrinting Photos. . . . . . . . . . . . . . . . . . . . . . . . . . . 40
Tips when Printing Photo Projects. . . . . . . . . . . 40Printing with Epson Print Layout. . . . . . . . . . . . 41Printing Using the Application and PrinterDriver. . . . . . . . . . . . . . . . . . . . . . . . . . . . . . . . 48Printing Varieties (Windows). . . . . . . . . . . . . . . 53Printing Varieties (Mac OS). . . . . . . . . . . . . . . . 58Printing Using Epson Photo+. . . . . . . . . . . . . . . 63Printing Information About Photo Printing. . . . .66
Printing Documents. . . . . . . . . . . . . . . . . . . . . . . .67Printing from a Computer - Windows. . . . . . . . . 67Printing from a Computer - Mac OS. . . . . . . . . . 87Printing Documents from Smart Devices (iOS). . 95Printing Documents from Smart Devices(Android). . . . . . . . . . . . . . . . . . . . . . . . . . . . . 96
Printing Using a Cloud Service. . . . . . . . . . . . . . . . 98Registering to Epson Connect Service fromthe Control Panel. . . . . . . . . . . . . . . . . . . . . . . . 98
Maintaining the PrinterChecking the Status of Consumables. . . . . . . . . . . 100
Checking the Status of Consumables(Control Panel). . . . . . . . . . . . . . . . . . . . . . . . 100Checking the Status of Consumables(Windows). . . . . . . . . . . . . . . . . . . . . . . . . . . .100Checking the Status of Consumables (Mac OS). 100
Improving Paper Feeding Problems (Rear PaperFeeder). . . . . . . . . . . . . . . . . . . . . . . . . . . . . . . . 100Improving Print Quality. . . . . . . . . . . . . . . . . . . . 101
Checking and Cleaning the Print Head. . . . . . . 101Running Power Cleaning. . . . . . . . . . . . . . . . . 103Preventing nozzle clogging. . . . . . . . . . . . . . . . 105Aligning the Print Head. . . . . . . . . . . . . . . . . . 105Cleaning the Paper Path for Ink Smears. . . . . . .106
Saving Power. . . . . . . . . . . . . . . . . . . . . . . . . . . . 106
2

Installing or Uninstalling Applications Separately. 107Installing the Applications Separately. . . . . . . . 107Adding the Printer (for Mac OS Only). . . . . . . .109Uninstalling Applications. . . . . . . . . . . . . . . . . 109Updating Applications and Firmware. . . . . . . . 111
Transporting and Storing the Printer. . . . . . . . . . . 112
Solving ProblemsThe Printer Does Not Work as Expected. . . . . . . . 116
The Printer Does Not Turn On or Off. . . . . . . . 116Paper Does Not Feed Properly. . . . . . . . . . . . . 116Cannot Print. . . . . . . . . . . . . . . . . . . . . . . . . . 120Cannot Operate the Printer as Expected. . . . . . 137
A Message is Displayed on the LCD Screen. . . . . . 139Paper Gets Jammed. . . . . . . . . . . . . . . . . . . . . . . 140
Preventing Paper Jams. . . . . . . . . . . . . . . . . . . 141It is Time to Replace the Ink Cartridges. . . . . . . . . 141
Ink Cartridge Handling Precautions. . . . . . . . . 141Replacing Ink Cartridge. . . . . . . . . . . . . . . . . . 143
It is Time to Replace the Maintenance Box. . . . . . .143Maintenance Box Handling Precautions. . . . . . 143Replacing a Maintenance Box. . . . . . . . . . . . . . 143
Print Quality is Poor. . . . . . . . . . . . . . . . . . . . . . .144Color Missing, Banding, or UnexpectedColors Appear in Printout. . . . . . . . . . . . . . . . .144Blurry Prints, Vertical Banding, orMisalignment. . . . . . . . . . . . . . . . . . . . . . . . . .145Printout Comes Out as a Blank Sheet. . . . . . . . 146Paper Is Smeared or Scuffed. . . . . . . . . . . . . . . 146Printed Photos are Sticky. . . . . . . . . . . . . . . . . 147Images or Photos are Printed in UnexpectedColors. . . . . . . . . . . . . . . . . . . . . . . . . . . . . . . 148Colors in the Printout Differ from Those onthe Display. . . . . . . . . . . . . . . . . . . . . . . . . . . .148Cannot Print Without Margins. . . . . . . . . . . . . 149Edges of the Image are Cropped DuringBorderless Printing. . . . . . . . . . . . . . . . . . . . . .150The Position, Size, or Margins of the PrintoutAre Incorrect. . . . . . . . . . . . . . . . . . . . . . . . . . 150Printed Characters Are Incorrect or Garbled. . . 151The Printed Image Is Inverted. . . . . . . . . . . . . . 151Mosaic-Like Patterns in the Prints. . . . . . . . . . .152Vertical lines Appears on Roll Paper. . . . . . . . . 152
Cannot Solve Problem. . . . . . . . . . . . . . . . . . . . . 152Cannot Solve Printing Problems. . . . . . . . . . . . 153
Adding or Replacing the Computer or DevicesConnecting to a Printer that has beenConnected to the Network. . . . . . . . . . . . . . . . . . 156
Using a Network Printer from a SecondComputer. . . . . . . . . . . . . . . . . . . . . . . . . . . . 156Using a Network Printer from a Smart Device. . 157
Re-setting the Network Connection. . . . . . . . . . . 157When Replacing the Wireless Router. . . . . . . . .157When Changing the Computer. . . . . . . . . . . . . 158Changing the Connection Method to theComputer. . . . . . . . . . . . . . . . . . . . . . . . . . . . 159Making Wi-Fi Settings from the Control Panel. .161
Connecting a Smart Device and Printer Directly(Wi-Fi Direct). . . . . . . . . . . . . . . . . . . . . . . . . . . 164
About Wi-Fi Direct. . . . . . . . . . . . . . . . . . . . . 164Connecting to an iPhone, iPad or iPod touchusing Wi-Fi Direct. . . . . . . . . . . . . . . . . . . . . . 165Connecting to Android Devices using Wi-FiDirect. . . . . . . . . . . . . . . . . . . . . . . . . . . . . . . 167Connecting to Devices other than iOS andAndroid using Wi-Fi Direct. . . . . . . . . . . . . . . 169Disconnecting Wi-Fi Direct (Simple AP)Connection. . . . . . . . . . . . . . . . . . . . . . . . . . . 172Changing the Wi-Fi Direct (Simple AP)Settings Such as the SSID. . . . . . . . . . . . . . . . . 172
Checking the Network Connection Status. . . . . . . 173Checking the Network Connection Statusfrom the Control Panel. . . . . . . . . . . . . . . . . . . 174Printing a Network Connection Report. . . . . . . 174Printing a Network Status Sheet. . . . . . . . . . . . 180
Product InformationPaper Information. . . . . . . . . . . . . . . . . . . . . . . . 182
Available Paper and Capacities. . . . . . . . . . . . . 182Unavailable Paper Types. . . . . . . . . . . . . . . . . . 190Printing to Paper Types Other than GenuinePaper. . . . . . . . . . . . . . . . . . . . . . . . . . . . . . . .191
Consumable Products Information. . . . . . . . . . . . 196Ink Cartridge Codes for SC-P900 Series. . . . . . 196Ink Cartridge Codes for SC-P700 Series. . . . . . 197Maintenance Box Code. . . . . . . . . . . . . . . . . . .199
Software Information. . . . . . . . . . . . . . . . . . . . . . 199Software for Printing. . . . . . . . . . . . . . . . . . . . 199Software for Making Settings or ManagingDevices. . . . . . . . . . . . . . . . . . . . . . . . . . . . . . 204Software for Updating. . . . . . . . . . . . . . . . . . . 205
Settings Menu List. . . . . . . . . . . . . . . . . . . . . . . . 206Screen Customization. . . . . . . . . . . . . . . . . . . .206
3
Printer Settings. . . . . . . . . . . . . . . . . . . . . . . . 206Basic Settings. . . . . . . . . . . . . . . . . . . . . . . . . . 207Network Settings. . . . . . . . . . . . . . . . . . . . . . . 208Web Service Settings. . . . . . . . . . . . . . . . . . . . 209Customer Research. . . . . . . . . . . . . . . . . . . . . 210Restore Default Settings. . . . . . . . . . . . . . . . . . 210Printer Status/Print. . . . . . . . . . . . . . . . . . . . . 210Firmware Update. . . . . . . . . . . . . . . . . . . . . . . 211
Product Specifications. . . . . . . . . . . . . . . . . . . . . 211Printer Specifications. . . . . . . . . . . . . . . . . . . . 211Interface Specifications. . . . . . . . . . . . . . . . . . . 214Network Specifications. . . . . . . . . . . . . . . . . . . 214Supported Third Party Services. . . . . . . . . . . . . 216Dimensions. . . . . . . . . . . . . . . . . . . . . . . . . . . 217Electrical Specifications. . . . . . . . . . . . . . . . . . 217Environmental Specifications. . . . . . . . . . . . . . 218Installation Location and Space. . . . . . . . . . . . .219System Requirements. . . . . . . . . . . . . . . . . . . . 220
Regulatory Information. . . . . . . . . . . . . . . . . . . . 220Standards and Approvals. . . . . . . . . . . . . . . . . 220Restrictions on Copying. . . . . . . . . . . . . . . . . . 221
Where to Get HelpTechnical Support Web Site. . . . . . . . . . . . . . . . . .224Contacting Epson Support. . . . . . . . . . . . . . . . . . 224
Before Contacting Epson. . . . . . . . . . . . . . . . . 224Help for Users in Europe. . . . . . . . . . . . . . . . . .224Help for Users in Taiwan. . . . . . . . . . . . . . . . . .224Help for Users in Australia. . . . . . . . . . . . . . . . 225Help for Users in New Zealand. . . . . . . . . . . . . 225Help for Users in Singapore. . . . . . . . . . . . . . . 226Help for Users in Thailand. . . . . . . . . . . . . . . . 226Help for Users in Vietnam. . . . . . . . . . . . . . . . 227Help for Users in Indonesia. . . . . . . . . . . . . . . .227Help for Users in Hong Kong. . . . . . . . . . . . . . 229Help for Users in Malaysia. . . . . . . . . . . . . . . . 229Help for Users in India. . . . . . . . . . . . . . . . . . . 229Help for Users in the Philippines. . . . . . . . . . . . 230
4
Guide to This Manual
Introduction to the Manuals. . . . . . . . . . . . . . . . . . . . . . . . . . . . . . . . . . . . . . . . . . . 6
Guide to Video Manuals. . . . . . . . . . . . . . . . . . . . . . . . . . . . . . . . . . . . . . . . . . . . . . 6
Searching for Information. . . . . . . . . . . . . . . . . . . . . . . . . . . . . . . . . . . . . . . . . . . . . 6
Printing Only the Pages You Need. . . . . . . . . . . . . . . . . . . . . . . . . . . . . . . . . . . . . . . 7
About This Manual. . . . . . . . . . . . . . . . . . . . . . . . . . . . . . . . . . . . . . . . . . . . . . . . . . 7
Trademarks. . . . . . . . . . . . . . . . . . . . . . . . . . . . . . . . . . . . . . . . . . . . . . . . . . . . . . . 8
Copyright. . . . . . . . . . . . . . . . . . . . . . . . . . . . . . . . . . . . . . . . . . . . . . . . . . . . . . . . .9
Introduction to the ManualsThe following manuals are supplied with your Epson printer. As well as the manuals, check the various types ofhelp information available from the printer itself or from the Epson software applications.
❏ Start Here (paper manual)Provides you with information on setting up the printer, installing the software, using the printer, solvingproblems, and so on.To obtain the latest version, visit the Epson Europe support website at http://www.epson.eu/Support, or theEpson worldwide support website at http://support.epson.net/ .
❏ User's Guide (digital manual)This manual. This manual is available as PDF and Web manuals. Provides overall information and instructionson using the printer, on network settings when using the printer on a network, and on solving problems.To view the Web manual, visit the following website, enter the product name, and then go to Support.http://epson.sn
Guide to Video ManualsYou can view video manuals to learn how to connect to the printer over Wi-Fi, or how to use the software. Accessthe following website. The contents of the video manuals are subject to change without prior notice.
SC-P900 Series: https://support.epson.net/p_doc/785/
SC-P700 Series: https://support.epson.net/p_doc/784/
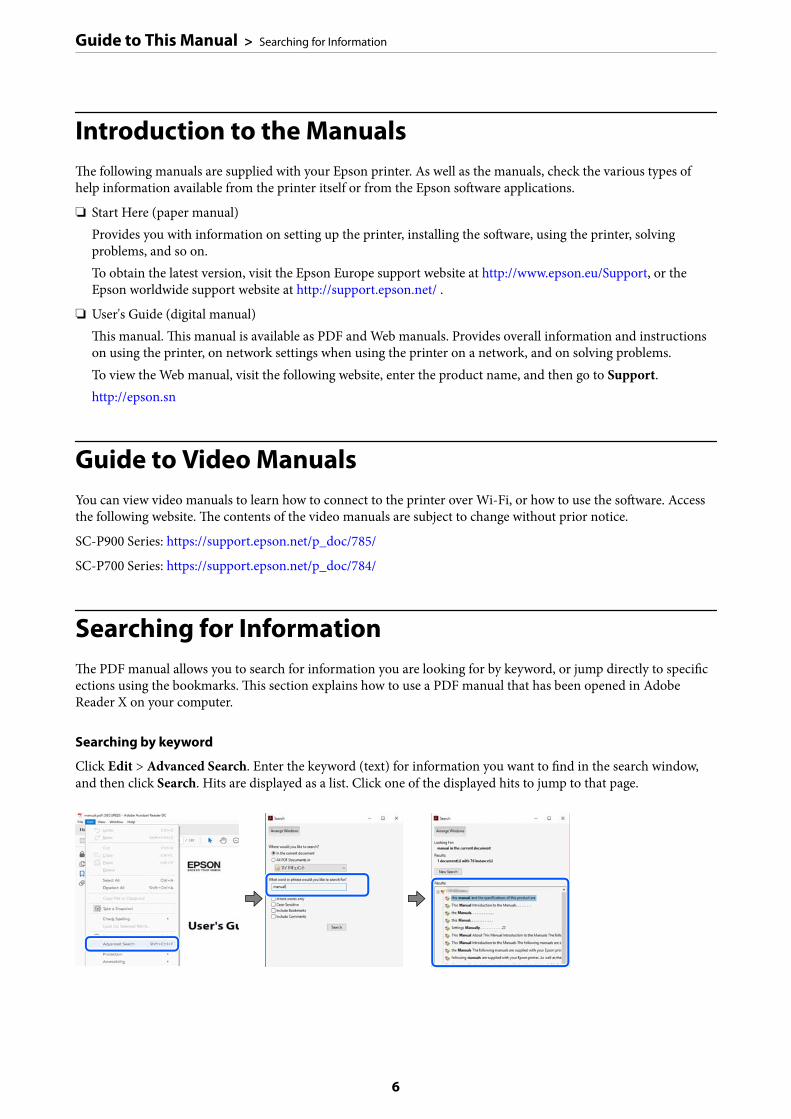
Searching for InformationThe PDF manual allows you to search for information you are looking for by keyword, or jump directly to specificections using the bookmarks. This section explains how to use a PDF manual that has been opened in AdobeReader X on your computer.
Searching by keyword
Click Edit > Advanced Search. Enter the keyword (text) for information you want to find in the search window,and then click Search. Hits are displayed as a list. Click one of the displayed hits to jump to that page.
Guide to This Manual > Searching for Information
6
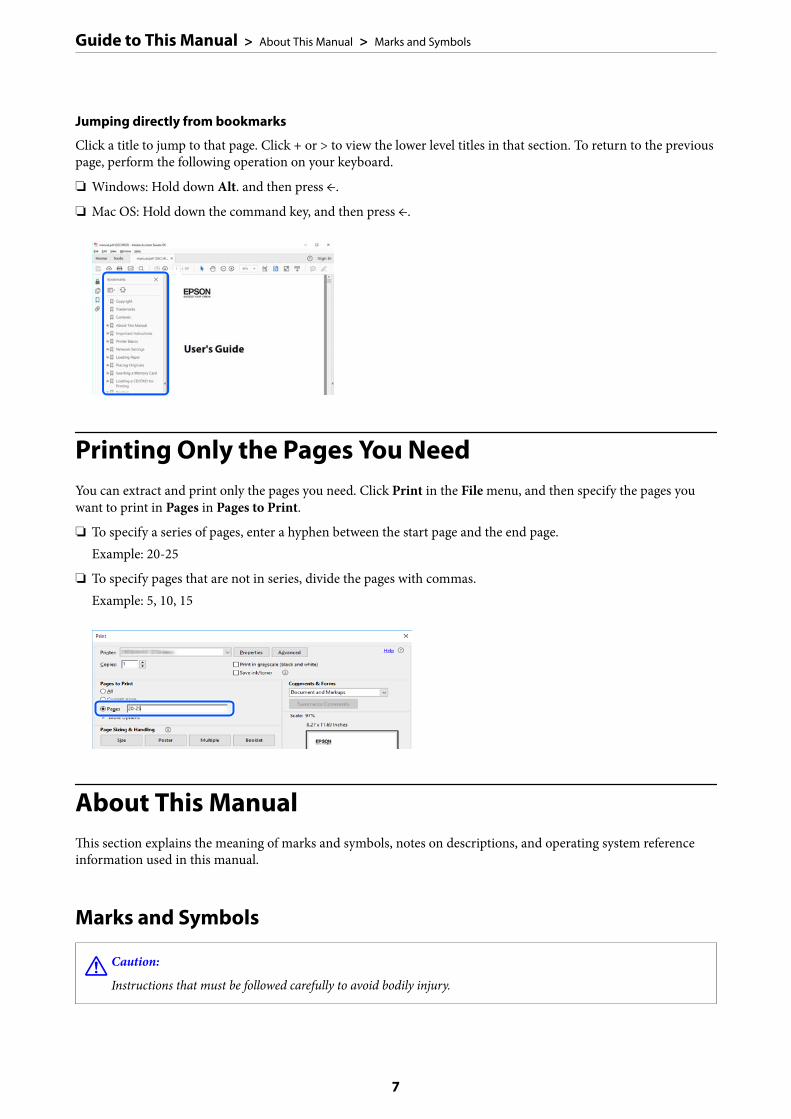
Jumping directly from bookmarks
Click a title to jump to that page. Click + or > to view the lower level titles in that section. To return to the previouspage, perform the following operation on your keyboard.
❏ Windows: Hold down Alt. and then press ←.
❏ Mac OS: Hold down the command key, and then press ←.
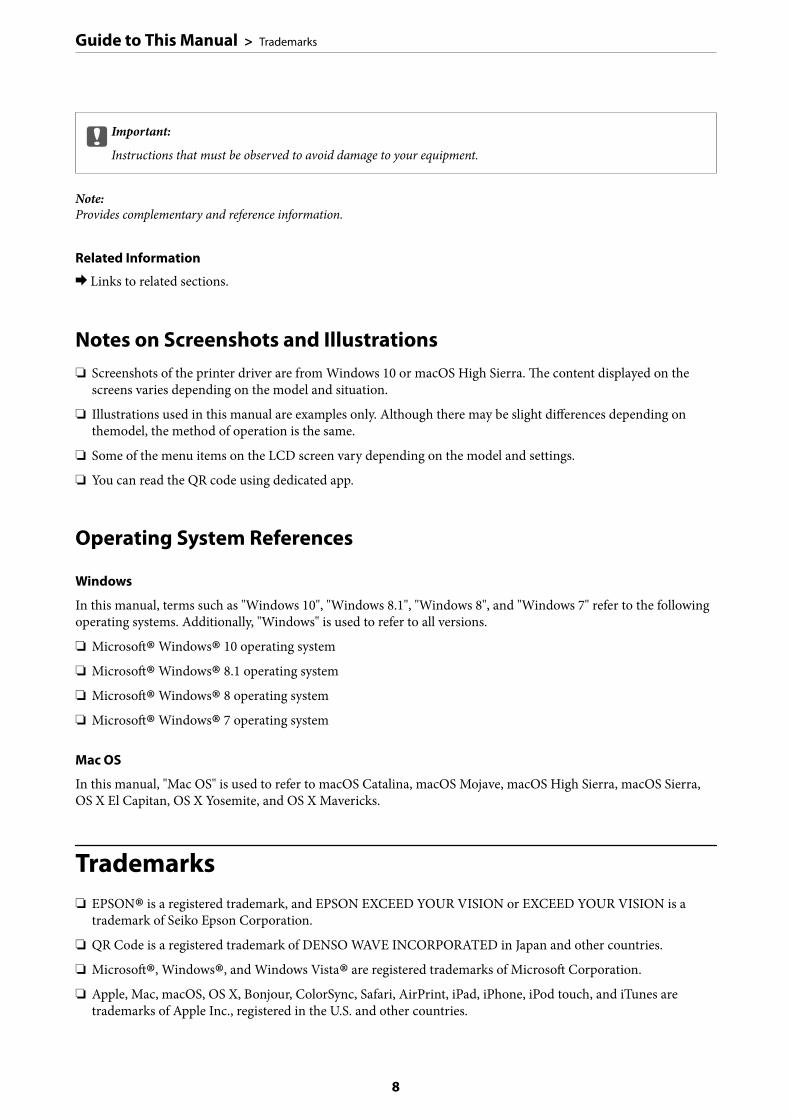
Printing Only the Pages You NeedYou can extract and print only the pages you need. Click Print in the File menu, and then specify the pages youwant to print in Pages in Pages to Print.
❏ To specify a series of pages, enter a hyphen between the start page and the end page.Example: 20-25
❏ To specify pages that are not in series, divide the pages with commas.Example: 5, 10, 15
About This ManualThis section explains the meaning of marks and symbols, notes on descriptions, and operating system referenceinformation used in this manual.
Marks and Symbols
!Caution:
Instructions that must be followed carefully to avoid bodily injury.
Guide to This Manual > About This Manual > Marks and Symbols
7
cImportant:
Instructions that must be observed to avoid damage to your equipment.
Note:Provides complementary and reference information.
Related Information
& Links to related sections.
Notes on Screenshots and Illustrations❏ Screenshots of the printer driver are from Windows 10 or macOS High Sierra. The content displayed on the
screens varies depending on the model and situation.
❏ Illustrations used in this manual are examples only. Although there may be slight differences depending onthemodel, the method of operation is the same.
❏ Some of the menu items on the LCD screen vary depending on the model and settings.
❏ You can read the QR code using dedicated app.
Operating System References
Windows
In this manual, terms such as "Windows 10", "Windows 8.1", "Windows 8", and "Windows 7" refer to the followingoperating systems. Additionally, "Windows" is used to refer to all versions.
❏ Microsoft® Windows® 10 operating system
❏ Microsoft® Windows® 8.1 operating system
❏ Microsoft® Windows® 8 operating system
❏ Microsoft® Windows® 7 operating system
Mac OS
In this manual, "Mac OS" is used to refer to macOS Catalina, macOS Mojave, macOS High Sierra, macOS Sierra,OS X El Capitan, OS X Yosemite, and OS X Mavericks.
Trademarks❏ EPSON® is a registered trademark, and EPSON EXCEED YOUR VISION or EXCEED YOUR VISION is a
trademark of Seiko Epson Corporation.
❏ QR Code is a registered trademark of DENSO WAVE INCORPORATED in Japan and other countries.
❏ Microsoft®, Windows®, and Windows Vista® are registered trademarks of Microsoft Corporation.
❏ Apple, Mac, macOS, OS X, Bonjour, ColorSync, Safari, AirPrint, iPad, iPhone, iPod touch, and iTunes aretrademarks of Apple Inc., registered in the U.S. and other countries.
Guide to This Manual > Trademarks
8

❏ Use of the Works with Apple badge means that an accessory has been designed to work specifically with thetechnology identified in the badge and has been certified by the developer to meet Apple performancestandards.
❏ Chrome, Google Play, and Android are trademarks of Google LLC.
❏ Adobe, Adobe RGB, Lightroom, Photoshop, and Photoshop Elements are either registered trademarks ortrademarks of Adobe Systems Incorporated in the United States and/or other countries.
❏ The SuperSpeed USB Trident Logo is a registered trademark of USB Implementers Forum, Inc.
❏ Firefox is a trademark of the Mozilla Foundation in the U.S. and other countries.
❏ Mopria® and the Mopria® Logo are registered and/or unregistered trademarks and service marks of MopriaAlliance, Inc. in the United States and other countries. Unauthorized use is strictly prohibited.
❏ General Notice: Other product names used herein are for identification purposes only and may be trademarksof their respective owners. Epson disclaims any and all rights in those marks.
CopyrightNo part of this publication may be reproduced, stored in a retrieval system, or transmitted in any form or by anymeans, electronic, mechanical, photocopying, recording, or otherwise, without the prior written permission ofSeiko Epson Corporation. No patent liability is assumed with respect to the use of the information containedherein. Neither is any liability assumed for damages resulting from the use of the information herein. Theinformation contained herein is designed only for use with this Epson product. Epson is not responsible for anyuse of this information as applied to other products.
Neither Seiko Epson Corporation nor its affiliates shall be liable to the purchaser of this product or third parties fordamages, losses, costs, or expenses incurred by the purchaser or third parties as a result of accident, misuse, orabuse of this product or unauthorized modifications, repairs, or alterations to this product, or (excluding the U.S.)failure to strictly comply with Seiko Epson Corporation's operating and maintenance instructions.
Seiko Epson Corporation and its affiliates shall not be liable for any damages or problems arising from the use ofany options or any consumable products other than those designated as Original Epson Products or EpsonApproved Products by Seiko Epson Corporation.
Seiko Epson Corporation shall not be held liable for any damage resulting from electromagnetic interference thatoccurs from the use of any interface cables other than those designated as Epson Approved Products by SeikoEpson Corporation.
© 2020 Seiko Epson Corporation
The contents of this manual and the specifications of this product are subject to change without notice.
Guide to This Manual > Copyright
9
Important Instructions
Safety Instructions. . . . . . . . . . . . . . . . . . . . . . . . . . . . . . . . . . . . . . . . . . . . . . . . . 11
Printer Advisories and Warnings. . . . . . . . . . . . . . . . . . . . . . . . . . . . . . . . . . . . . . . 12
Protecting Your Personal Information. . . . . . . . . . . . . . . . . . . . . . . . . . . . . . . . . . . 14
Safety InstructionsRead and follow these instructions to ensure safe use of this printer. Make sure you keep this manual for futurereference. Also, be sure to follow all warnings and instructions marked on the printer.
❏ Some of the symbols used on your printer are to ensure safety and proper use of the printer. Visit the followingWeb site to learn the meaning of the symbols.http://support.epson.net/symbols
❏ Use only the power cord supplied with the printer and do not use the cord with any other equipment. Use ofother cords with this printer or the use of the supplied power cord with other equipment may result in fire orelectric shock.
❏ Be sure your AC power cord meets the relevant local safety standard.
❏ Never disassemble, modify, or attempt to repair the power cord, plug, printer unit, or options by yourself, exceptas specifically explained in the printer's manuals.
❏ Unplug the printer and refer servicing to qualified service personnel under the following conditions:The power cord or plug is damaged; liquid has entered the printer; the printer has been dropped or the casingdamaged; the printer does not operate normally or exhibits a distinct change in performance. Do not adjustcontrols that are not covered by the operating instructions.
❏ Place the printer near a wall outlet where the plug can be easily unplugged.
❏ Do not place or store the printer outdoors, near excessive dirt or dust, water, heat sources, or in locationssubject to shocks, vibrations, high temperature or humidity.
❏ Take care not to spill liquid on the printer and not to handle the printer with wet hands.
❏ Keep the printer at least 22 cm away from cardiac pacemakers. Radio waves from this printer may adverselyaffect the operation of cardiac pacemakers.
❏ If the LCD screen is damaged, contact your dealer. If the liquid crystal solution gets on your hands, wash themthoroughly with soap and water. If the liquid crystal solution gets into your eyes, flush them immediately withwater. If discomfort or vision problems remain after a thorough flushing, see a doctor immediately.
Safety Instructions for Ink❏ If ink contacts your skin, eyes, or mouth, take the following actions.
❏ If ink gets on your skin, wash the area thoroughly with soap and water.
❏ If ink gets into your eyes, flush them immediately with water. If discomfort or vision problems continue aftera thorough flushing, see a doctor immediately.
❏ If ink gets into your mouth, see a doctor right away.
❏ Do not disassemble the ink cartridge and the maintenance box; otherwise ink may get into your eyes or on yourskin.
❏ Do not shake ink cartridges too vigorously; otherwise ink may leak from the cartridge.
❏ Keep ink cartridges and maintenance box out of the reach of children.
Important Instructions > Safety Instructions > Safety Instructions for Ink
11
Printer Advisories and WarningsRead and follow these instructions to avoid damaging the printer or your property. Make sure you keep thismanual for future reference.
Advisories and Warnings for Setting Up the Printer❏ Do not block or cover the vents and openings in the printer.
❏ When placing the printer on a desk that is easily scratched, place a desk mat or the like on the desk first beforeplacing the printer.
❏ Use only the type of power source indicated on the printer's label.
❏ Avoid using outlets on the same circuit as photocopiers or air control systems that regularly switch on and off.
❏ Avoid electrical outlets controlled by wall switches or automatic timers.
❏ Keep the entire computer system away from potential sources of electromagnetic interference, such asloudspeakers or the base units of cordless telephones.
❏ The power-supply cords should be placed to avoid abrasions, cuts, fraying, crimping, and kinking. Do not placeobjects on top of the power-supply cords and do not allow the power-supply cords to be stepped on or run over.Be particularly careful to keep all the power-supply cords straight at the ends and the points where they enterand leave the transformer.
❏ If you use an extension cord with the printer, make sure that the total ampere rating of the devices plugged intothe extension cord does not exceed the cord's ampere rating. Also, make sure that the total ampere rating of alldevices plugged into the wall outlet does not exceed the wall outlet's ampere rating.
❏ If you plan to use the printer in Germany, the building installation must be protected by a 10 or 16 amp circuitbreaker to provide adequate short-circuit protection and over-current protection for the printer.
❏ When connecting the printer to a computer or other device with a cable, ensure the correct orientation of theconnectors. Each connector has only one correct orientation. Inserting a connector in the wrong orientationmay damage both devices connected by the cable.
❏ Place the printer on a flat, stable surface that extends beyond the base of the printer in all directions. The printerwill not operate properly if it is tilted at an angle.
❏ Allow space above the printer so that you can fully raise the printer cover.
❏ Leave enough space in front of the printer for the paper to be fully ejected.
❏ Avoid places subject to rapid changes in temperature and humidity. Also, keep the printer away from directsunlight, strong light, or heat sources.
Advisories and Warnings for Using the Printer❏ Do not insert objects through the slots in the printer.
❏ Do not put your hand inside the printer during printing.
❏ Do not touch the white flat cable inside the printer.
❏ Do not use aerosol products that contain flammable gases inside or around the printer. Doing so may cause fire.
❏ Do not move the print head by hand; otherwise, the printer may be damaged.
Important Instructions > Printer Advisories and Warnings > Advisories and Warnings for Using the Printer
12
❏ Always turn the printer off using the P button. Do not unplug the printer or turn off the power at the outletuntil the P light stops flashing.
❏ If you are not going to use the printer for a long period, be sure to unplug the power cord from the electricaloutlet.
Advisories and Warnings for Using the Printer with a WirelessConnection❏ Radio waves from this printer may negatively affect the operation of medical electronic equipment, causing
them to malfunction. When using this printer inside medical facilities or near medical equipment, followdirections from the authorized personnel representing the medical facilities, and follow all posted warnings anddirections on the medical equipment.
❏ Radio waves from this printer may negatively affect the operation of automatically controlled devices such asautomatic doors or fire alarms, and could lead to accidents due to malfunction. When using this printer nearautomatically controlled devices, follow all posted warnings and directions on these devices.
Advisories and Warnings for Using the Touchpad❏ The touchpad only responds when touched directly with your finger.
❏ The touchpad may not respond if your fingers are wet, if you are wearing gloves, or if there is a protective sheetor sticker on the touchpad.
❏ Do not use sharp objects such us a ballpoint pen or mechanical pencil to perform operations. The touchpadmay be damaged.
❏ If the touchpad gets dirty, wipe it with a soft cloth. If it is very dirty, dip a soft cloth in a solution diluted withneutral detergent, squeeze it well, wipe off the dirt, and then wipe it with a soft dry cloth. Do not use volatilechemicals such as thinner, benzene, or alcohol. The surface of the touchpad may be damaged.
❏ Avoid locations subject to rapid changes in temperature and humidity. Condensation will form inside thetouchpad, and may cause performance to deteriorate.
❏ The LCD screen may contain a few small bright or dark spots, and because of its features it may have an unevenbrightness. These are normal and do not indicate that it is damaged in any way.
❏ Do not press the touchpad with too much force or subject it to heavy impacts. The touchpad could break.Contact your dealer if the touchpad surface chips or cracks, and do not touch or attempt to remove the brokenpieces.
Advisories and Warnings for Transporting or Storing the Printer❏ When storing or transporting the printer, avoid tilting it, placing it vertically, or turning it upside down;
otherwise ink may leak.
❏ Before transporting the printer, make sure that the print head is in the home (far right) position.
Important Instructions > Printer Advisories and Warnings > Advisories and Warnings for Transporting or Stori…
13

Protecting Your Personal InformationWhen you give the printer to someone else or dispose of it, erase all the personal information stored in the printer'smemory by selecting > General Settings > Restore Default Settings > Clear All Data and Settings on thecontrol panel.
Important Instructions > Protecting Your Personal Information
14
Part Names and Functions
Front. . . . . . . . . . . . . . . . . . . . . . . . . . . . . . . . . . . . . . . . . . . . . . . . . . . . . . . . . . . 16
Rear. . . . . . . . . . . . . . . . . . . . . . . . . . . . . . . . . . . . . . . . . . . . . . . . . . . . . . . . . . . . 17
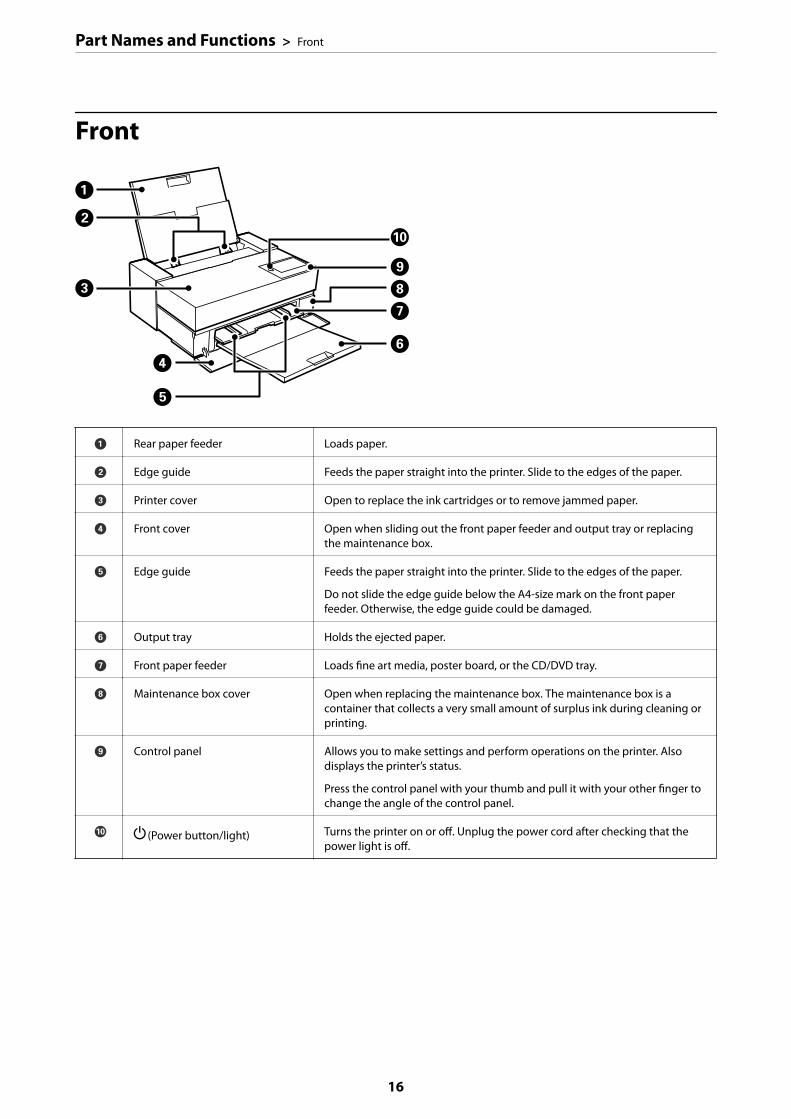
Front
A Rear paper feeder Loads paper.
B Edge guide Feeds the paper straight into the printer. Slide to the edges of the paper.
C Printer cover Open to replace the ink cartridges or to remove jammed paper.
D Front cover Open when sliding out the front paper feeder and output tray or replacingthe maintenance box.
E Edge guide Feeds the paper straight into the printer. Slide to the edges of the paper.
Do not slide the edge guide below the A4-size mark on the front paperfeeder. Otherwise, the edge guide could be damaged.
F Output tray Holds the ejected paper.
G Front paper feeder Loads fine art media, poster board, or the CD/DVD tray.
H Maintenance box cover Open when replacing the maintenance box. The maintenance box is acontainer that collects a very small amount of surplus ink during cleaning orprinting.
I Control panel Allows you to make settings and perform operations on the printer. Alsodisplays the printer’s status.
Press the control panel with your thumb and pull it with your other finger tochange the angle of the control panel.
J P(Power button/light) Turns the printer on or off. Unplug the power cord after checking that thepower light is off.
Part Names and Functions > Front
16
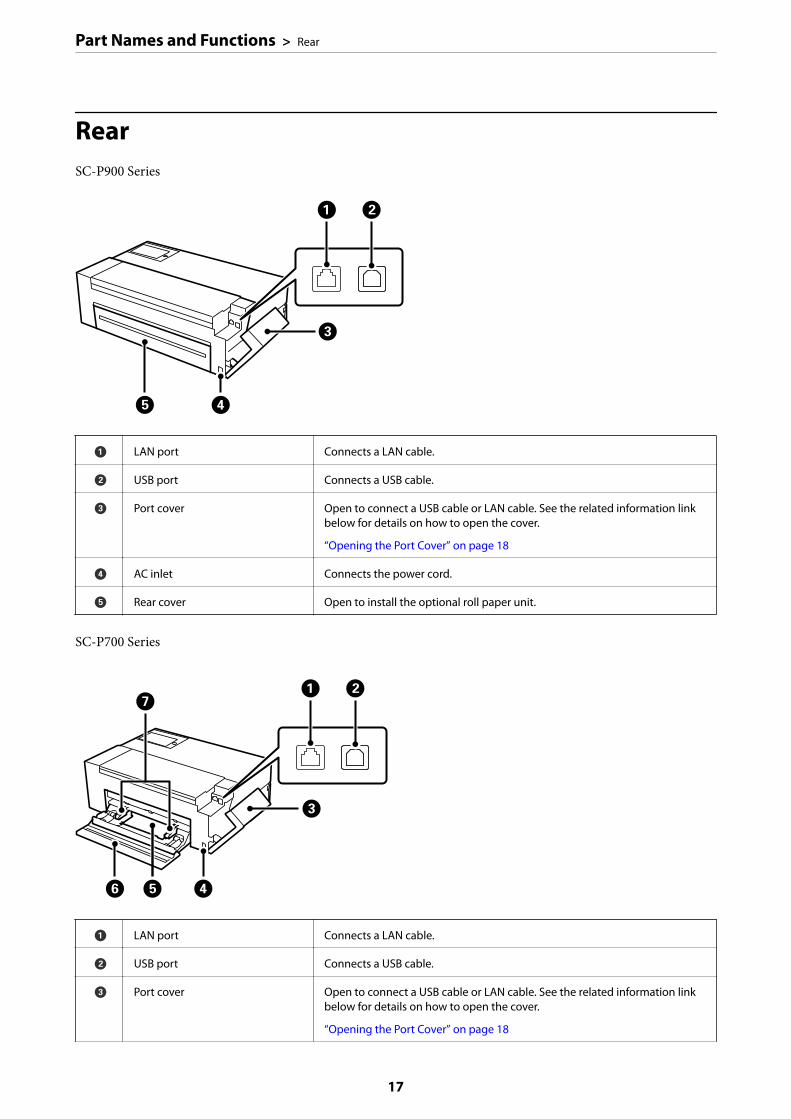
RearSC-P900 Series
A LAN port Connects a LAN cable.
B USB port Connects a USB cable.
C Port cover Open to connect a USB cable or LAN cable. See the related information linkbelow for details on how to open the cover.
“Opening the Port Cover” on page 18
D AC inlet Connects the power cord.
E Rear cover Open to install the optional roll paper unit.
SC-P700 Series
A LAN port Connects a LAN cable.
B USB port Connects a USB cable.
C Port cover Open to connect a USB cable or LAN cable. See the related information linkbelow for details on how to open the cover.
“Opening the Port Cover” on page 18
Part Names and Functions > Rear
17
D AC inlet Connects the power cord.
E Roll paper unit Loads roll paper.
F Rear cover Open to load roll paper.
G Edge guide Feeds the paper straight into the printer. Slide to the edges of the paper.
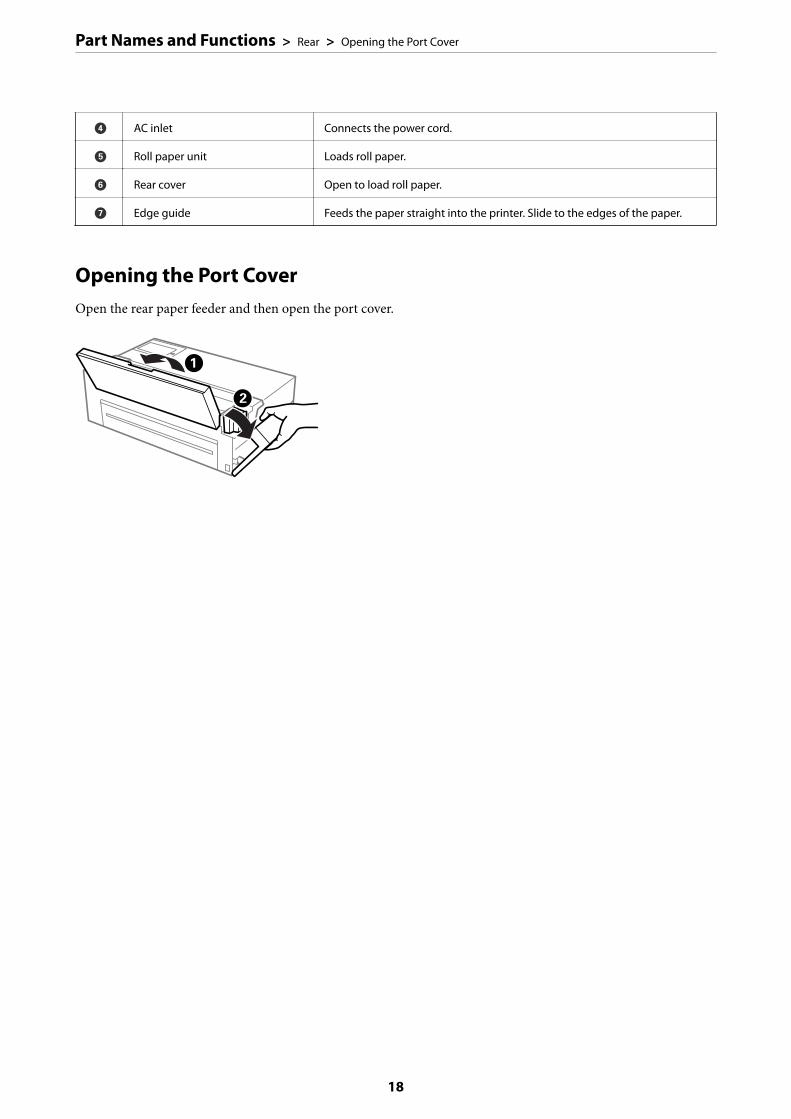
Opening the Port CoverOpen the rear paper feeder and then open the port cover.
Part Names and Functions > Rear > Opening the Port Cover
18
Guide to the Control Panel
Home Screen Configuration. . . . . . . . . . . . . . . . . . . . . . . . . . . . . . . . . . . . . . . . . . 20
Switching the Screen View. . . . . . . . . . . . . . . . . . . . . . . . . . . . . . . . . . . . . . . . . . . .22
Entering Characters. . . . . . . . . . . . . . . . . . . . . . . . . . . . . . . . . . . . . . . . . . . . . . . . 24
Home Screen Configuration
A Displays the Menu screen. You can make settings related to printer features and operations.
B Displays the Print Information Sheet screen. You can check the last 12 print histories. Forexample, if you print three copies of a photo, the printer saves three print histories. See therelated link information for details on how to print the photo information sheet.
C Allows you to turn on or off the printer's interior light.
Indicates the light is on.
Indicates the light is off.
D Allows you to switch the view of the home screen and the printing screen. See the related linkinformation for more details.
E Displays the Maintenance screen. Displays the menus recommended to improve the quality ofyour printouts such as unclogging nozzles by printing a nozzle check pattern and performinghead cleaning, and improving blurring or banding in your printouts by aligning the print head.
F Displays the network connection status. See the following for more details.
“Guide to the Network Icon” on page 21
G Displays the Printer Status screen. The number displayed indicates the number of notifications.
H Displays the printer status.
I Displays the paper settings.
J Displays the Supply Status screen. You can check the approximate ink levels and theapproximate service life of the maintenance box.
Guide to the Control Panel > Home Screen Configuration
20
K You can eject paper that has been loaded.
The following can be performed when roll paper is loaded.
❏ Move roll paper to the cutting position.
❏ Eject paper after moving the roll paper to the cutting position.
❏ Eject roll paper
L Displays the Paper Setting screen. You can select the paper size and paper type by selectingPaper Setting when paper is loaded.
Related Information
& “Switching the Screen View” on page 22& “Printing Information About Photo Printing” on page 66
Internal LightWhen printing starts, the internal light turns on allowing you to view printing as it happens through the printercover. To turn off the light, make settings from the home screen as described below.
> General Settings > Basic Settings > Inside Light > Manual
You can also turn the light on or off by selecting on the home screen.
Guide to the Network Icon
The printer is not connected to a wired (Ethernet) network or unset it.
The printer is connected to a wired (Ethernet) network.
The printer is not connected to a wireless (Wi-Fi) network.
The printer is searching for SSID, unset IP address, or having a problem with a wireless(Wi-Fi) network.
Guide to the Control Panel > Home Screen Configuration > Guide to the Network Icon
21
The printer is connected to a wireless (Wi-Fi) network.
The number of bars indicates the signal strength of the connection. The more barsthere are, the stronger the connection.
The printer is not connected to a wireless (Wi-Fi) network in Wi-Fi Direct (Simple AP)mode.
The printer is connected to a wireless (Wi-Fi) network in Wi-Fi Direct (Simple AP) mode.
Switching the Screen ViewWhen you select while the home screen or printing screen is displayed, the screen view is switched.
Home screen
Standard mode
Consumables infomation mode
You can check the approximate ink levels and the approximate service life of the maintenance box.
Printing screen
Photo display mode
Guide to the Control Panel > Switching the Screen View
22
Displays thumbnails of images when you print using the printer driver and Epson Print Layout.
Print status display mode
Displays ink levels and a progress bar when printing.
Print setting display mode
Displays print settings for the printer driver and Epson Print Layout.
Guide to the Control Panel > Switching the Screen View
23
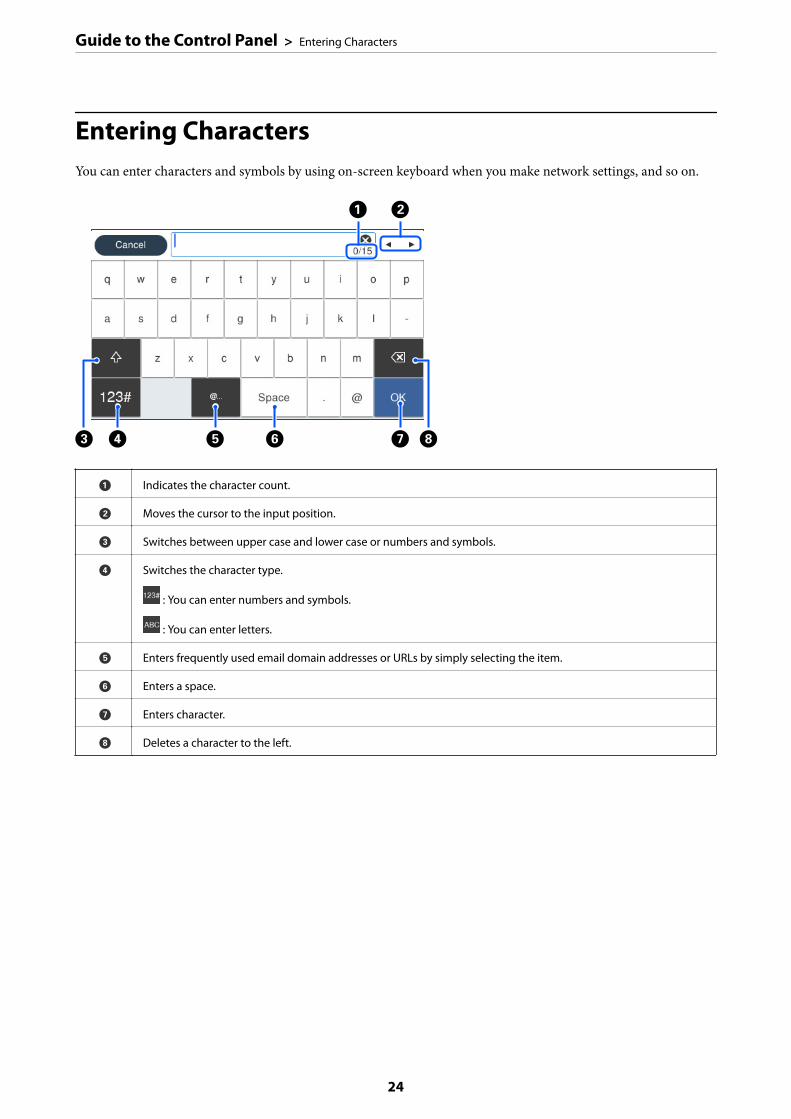
Entering CharactersYou can enter characters and symbols by using on-screen keyboard when you make network settings, and so on.
A Indicates the character count.
B Moves the cursor to the input position.
C Switches between upper case and lower case or numbers and symbols.
D Switches the character type.
: You can enter numbers and symbols.
: You can enter letters.
E Enters frequently used email domain addresses or URLs by simply selecting the item.
F Enters a space.
G Enters character.
H Deletes a character to the left.
Guide to the Control Panel > Entering Characters
24
Loading Papers and CD/DVDs
Loading Paper. . . . . . . . . . . . . . . . . . . . . . . . . . . . . . . . . . . . . . . . . . . . . . . . . . . . 26
Loading a CD/DVD. . . . . . . . . . . . . . . . . . . . . . . . . . . . . . . . . . . . . . . . . . . . . . . . 35
Loading Paper
Paper Handling PrecautionsNote the following points when handling and storing the paper. If the paper is not in good condition, print qualitymay decline.
Check the manuals supplied with each paper.
Handling Precautions
❏ Use Epson special media under normal room conditions (temperature: 15 to 25˚C; humidity: 40 to 60%).
❏ Do not fold the paper or scratch the surface of the paper.
❏ Avoid touching the printable surface of the paper with your bare hands. Moisture and oils from your hands canaffect print quality.
❏ Paper may be wavy or slack if the temperature and humidity change. Be careful not to scratch or soil the paper,and flatten it before loading it in the printer.
❏ Do not wet the paper.
❏ Do not throw away the paper packaging as you can use it for storing the paper.
❏ Avoid locations that are subject to direct sunlight, excessive heat, or humidity.
❏ Keep paper in their original package after opening, and keep them in a flat place.
Printed Paper Handling Precautions
To maintain long lasting, high quality print results, note the following points.
❏ Do not rub or scratch the printed surface. If they are rubbed or scratched, the ink may peel off.
❏ Do not touch the printed surface; otherwise, the ink may peel off.
❏ Make sure the print outs are completely dry before folding of stacking; otherwise, the color may change wherethey touch (leaves a mark). These marks will disappear if they are separated immediately and dried; however,they will remain if not separated.
❏ If you put the print outs in an album before they are completely dry, they may be blurred.
❏ Do not use a dryer to dry the print outs.
❏ Avoid direct sunlight.
❏ Prevent color distortion while displaying or storing the print outs by following the instructions in the paper’smanual.
❏ To keep your printouts from discoloring, store them in a dark place, away from high temperatures, highhumidity, and direct sunlight.
Loading Papers and CD/DVDs > Loading Paper > Paper Handling Precautions
26
Note:Typically, print outs and photos fade over time (color distortion) due to the effects of light and various constituents in the air.This also applies to Epson special media. However, with the correct storage method, the degree of color distortion can beminimized.
❏ See the manuals supplied with Epson special media for detailed information on handling the paper after printing.
❏ The colors of photos, posters, and other printed materials appear different under different lighting conditions (lightsources*). The colors of print outs from this printer may also appear different under different light sources.
* Light sources include sunlight, fluorescent light, incandescent light, and other types.
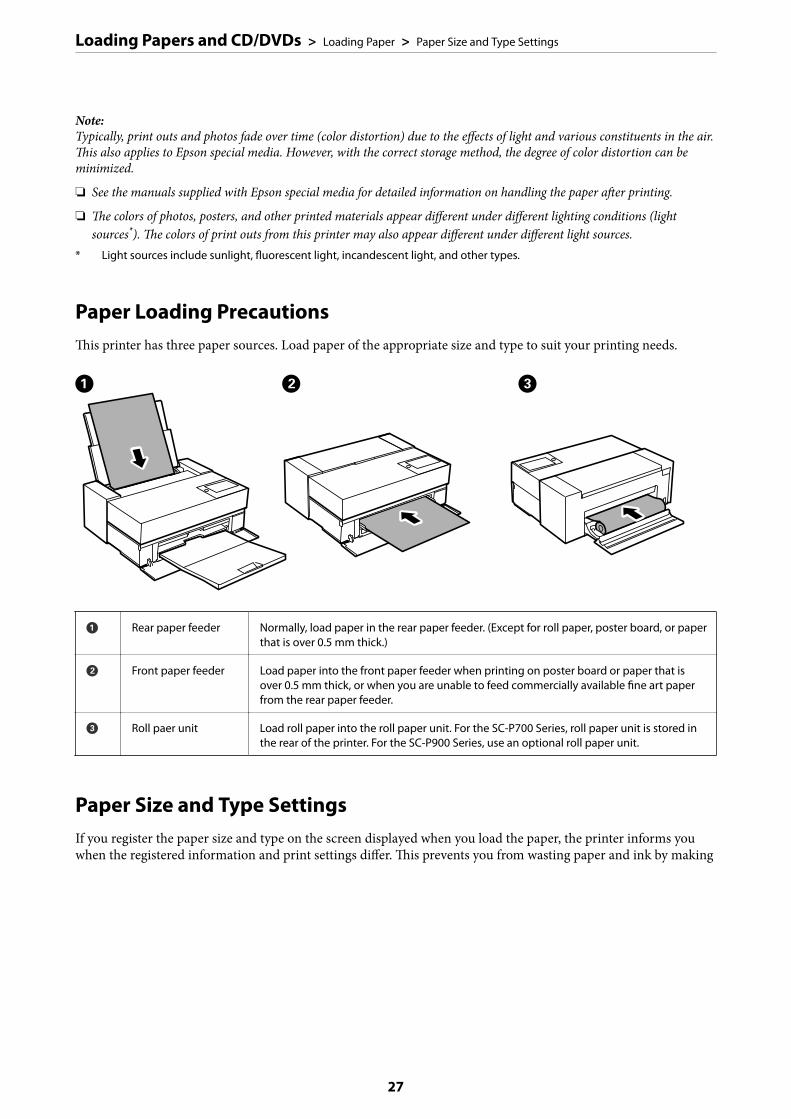
Paper Loading PrecautionsThis printer has three paper sources. Load paper of the appropriate size and type to suit your printing needs.
A Rear paper feeder Normally, load paper in the rear paper feeder. (Except for roll paper, poster board, or paperthat is over 0.5 mm thick.)
B Front paper feeder Load paper into the front paper feeder when printing on poster board or paper that isover 0.5 mm thick, or when you are unable to feed commercially available fine art paperfrom the rear paper feeder.
C Roll paer unit Load roll paper into the roll paper unit. For the SC-P700 Series, roll paper unit is stored inthe rear of the printer. For the SC-P900 Series, use an optional roll paper unit.
Paper Size and Type SettingsIf you register the paper size and type on the screen displayed when you load the paper, the printer informs youwhen the registered information and print settings differ. This prevents you from wasting paper and ink by making
Loading Papers and CD/DVDs > Loading Paper > Paper Size and Type Settings
27

sure you are not printing on the wrong paper size or printing in the wrong color due to using settings that do notmatch the paper type.
If displayed paper size and type differ from the loaded paper, select the item to change. If the settings match theloaded paper, close the screen.
List of Paper Types
To obtain optimum printing results, select the paper type that suits the paper. When using commercially availablepaper other than genuine Epson paper, select the paper type that closest to that paper.
Media Name Media Type
Control Panel Printer Driver
Bright White Ink Jet Paper Plain paper Plain Paper / Bright White Paper
Premium Glossy Photo Paper Prem. Glossy Epson Premium Glossy
Premium Semigloss Photo Paper Prem. Semigloss Epson Premium Semigloss
Photo Paper Glossy Glossy Photo Paper Glossy
Watercolor Paper - Radiant White Watercolor Paper Radiant White Watercolor Paper Radiant White
Velvet Fine Art Paper Velvet Fine Art Paper Velvet Fine Art Paper
UltraSmooth Fine Art Paper Epson UltraSmooth Fine Art paper UltraSmooth Fine Art Paper
Matte Paper-Heavyweight
Archival Matte Paper
Archival Matte Epson Archival Matte
Photo Quality Ink Jet Paper Photo Quality Ink Jet Epson Photo Quality Ink Jet
Epson Proofing Paper White Semimatte Proofing Semimatte Epson Proofing Paper WhiteSemimatte
Premium Glossy Photo Paper (250) Prem. Glossy Epson Premium Glossy
Premium Semigloss Photo Paper (250) Prem. Semigloss Epson Premium Semigloss
Premium Luster Photo Paper (260) Prem. Luster Premium Luster Photo Paper
Loading Papers and CD/DVDs > Loading Paper > Paper Size and Type Settings
28
Media Name Media Type
Control Panel Printer Driver
Premium Semimatte Photo Paper (260) Prem. Semigloss Epson Premium Semigloss
Enhanced Matte Paper Archival Matte Epson Archival Matte
Plain Paper (cut sheets) Plain paper Plain Paper / Bright White Paper
Loading Paper in the Rear Paper Feeder
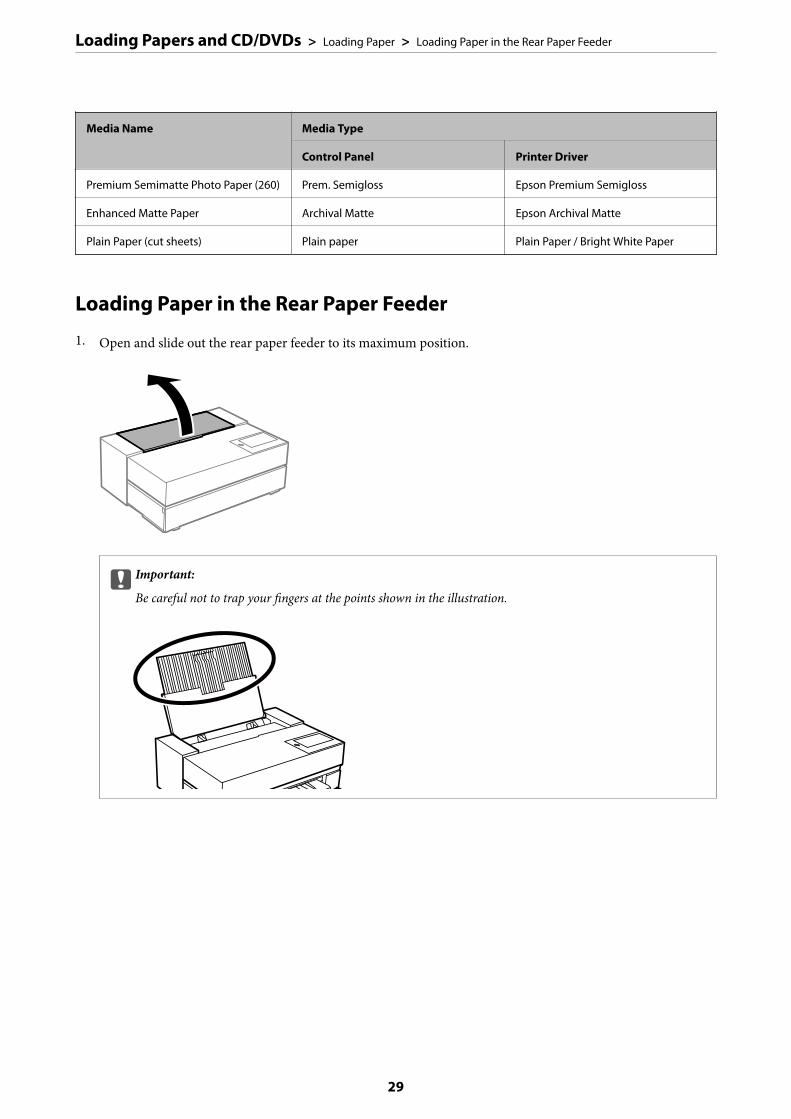
1. Open and slide out the rear paper feeder to its maximum position.
cImportant:
Be careful not to trap your fingers at the points shown in the illustration.
Loading Papers and CD/DVDs > Loading Paper > Loading Paper in the Rear Paper Feeder
29
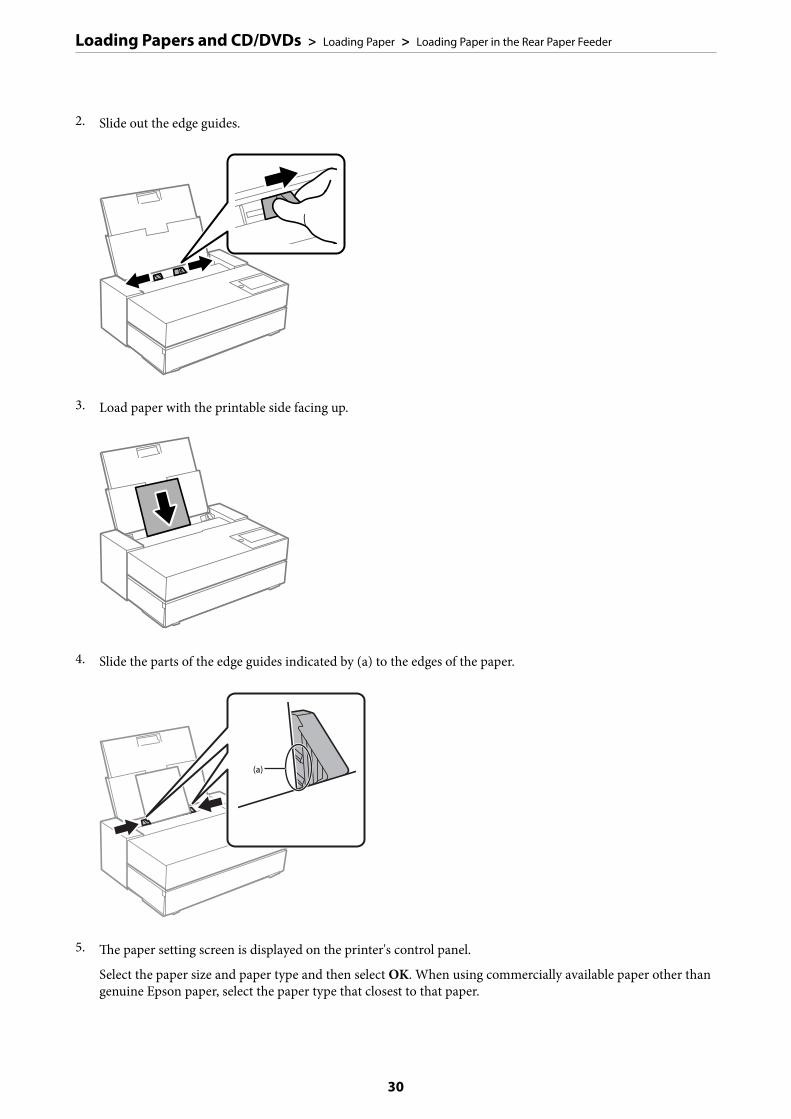
2. Slide out the edge guides.
3. Load paper with the printable side facing up.
4. Slide the parts of the edge guides indicated by (a) to the edges of the paper.
5. The paper setting screen is displayed on the printer's control panel.
Select the paper size and paper type and then select OK. When using commercially available paper other thangenuine Epson paper, select the paper type that closest to that paper.
Loading Papers and CD/DVDs > Loading Paper > Loading Paper in the Rear Paper Feeder
30
Note:If you have registered paper information to your printer, the printer informs you if the registered information and theprint settings differ. This prevents you from making the misprints.
If you have not used the register function, select > General Settings > Printer Settings, and then disable the PaperSetup Auto Display setting. If you disable this setting, some functions will be unavailable. See Related Information formore details.
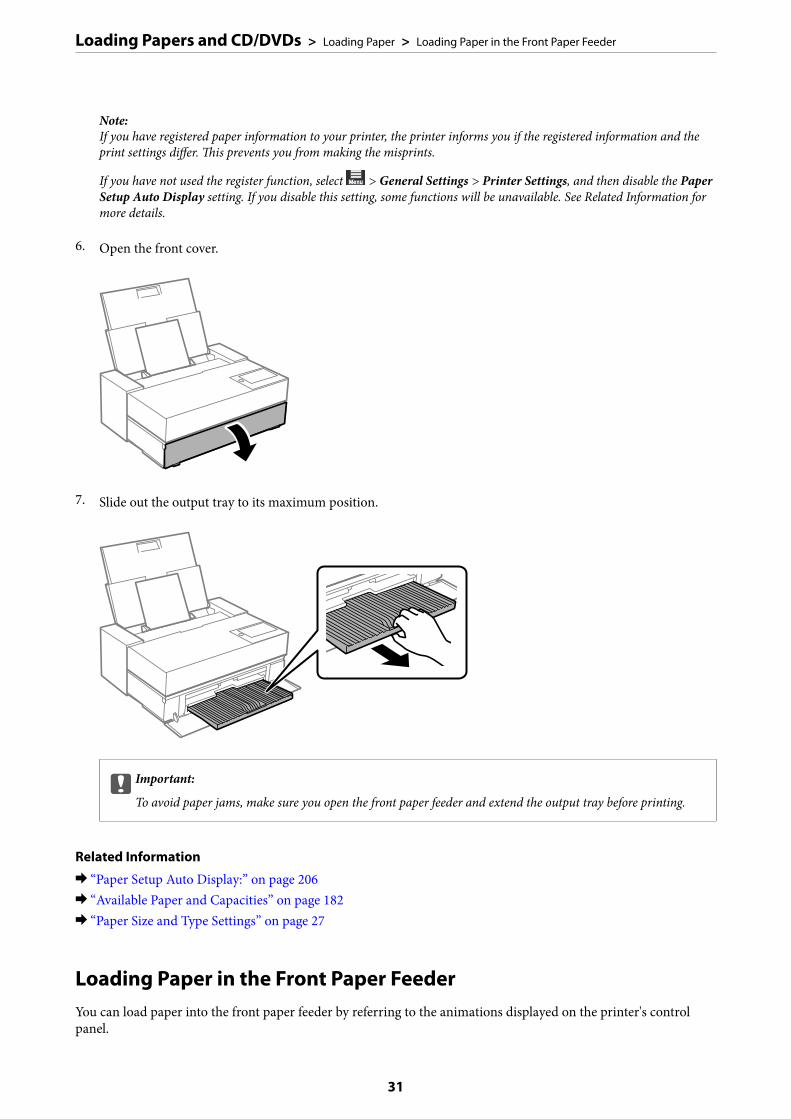
6. Open the front cover.
7. Slide out the output tray to its maximum position.
cImportant:
To avoid paper jams, make sure you open the front paper feeder and extend the output tray before printing.
Related Information
& “Paper Setup Auto Display:” on page 206& “Available Paper and Capacities” on page 182& “Paper Size and Type Settings” on page 27
Loading Paper in the Front Paper FeederYou can load paper into the front paper feeder by referring to the animations displayed on the printer's controlpanel.
Loading Papers and CD/DVDs > Loading Paper > Loading Paper in the Front Paper Feeder
31
Paper sticks out from the rear of the printer when it is loaded from the front paper feeder. Leave a space (A)between the rear of the printer and the nearest wall as shown in the figure.
SC-P900 Series: 405 mm or above
SC-P700 Series: 330 mm or above
cImportant:
❏ An error may occur if you perform the following operations during initialization movement.- Extend the front paper feeder.- Load poster board.
❏ Inserting paper from the rear may cause a malfunction or error.
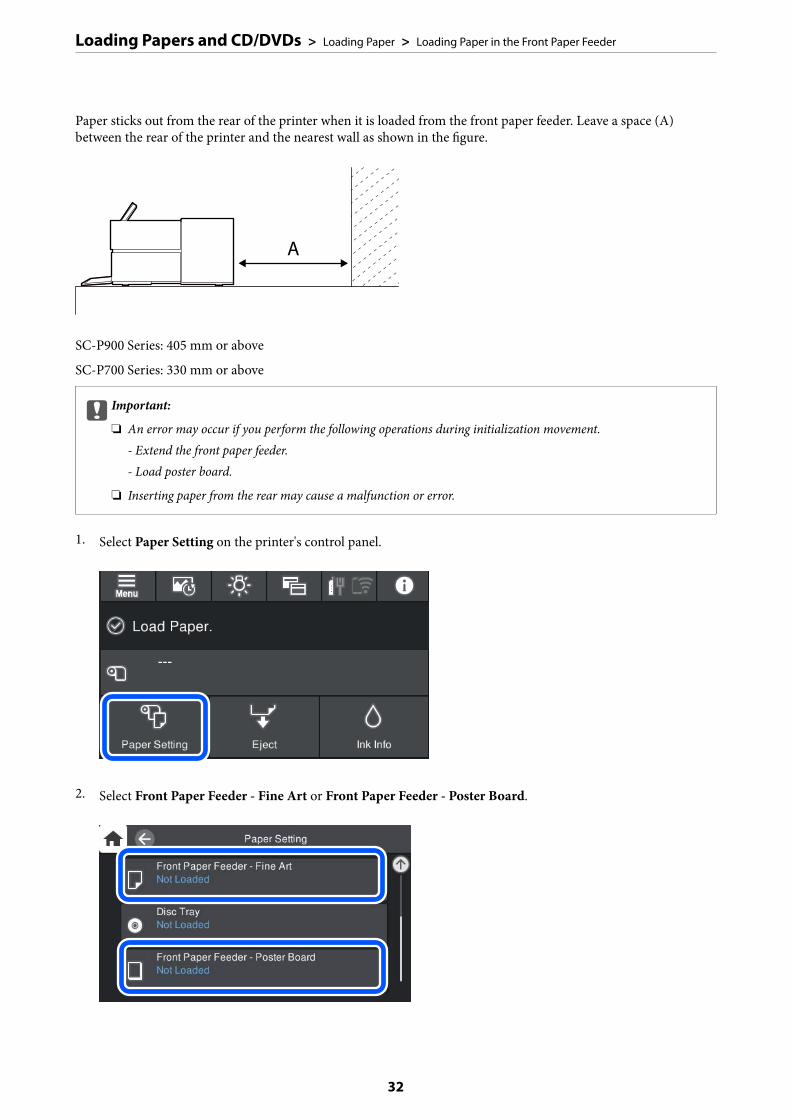
1. Select Paper Setting on the printer's control panel.
2. Select Front Paper Feeder - Fine Art or Front Paper Feeder - Poster Board.
Loading Papers and CD/DVDs > Loading Paper > Loading Paper in the Front Paper Feeder
32
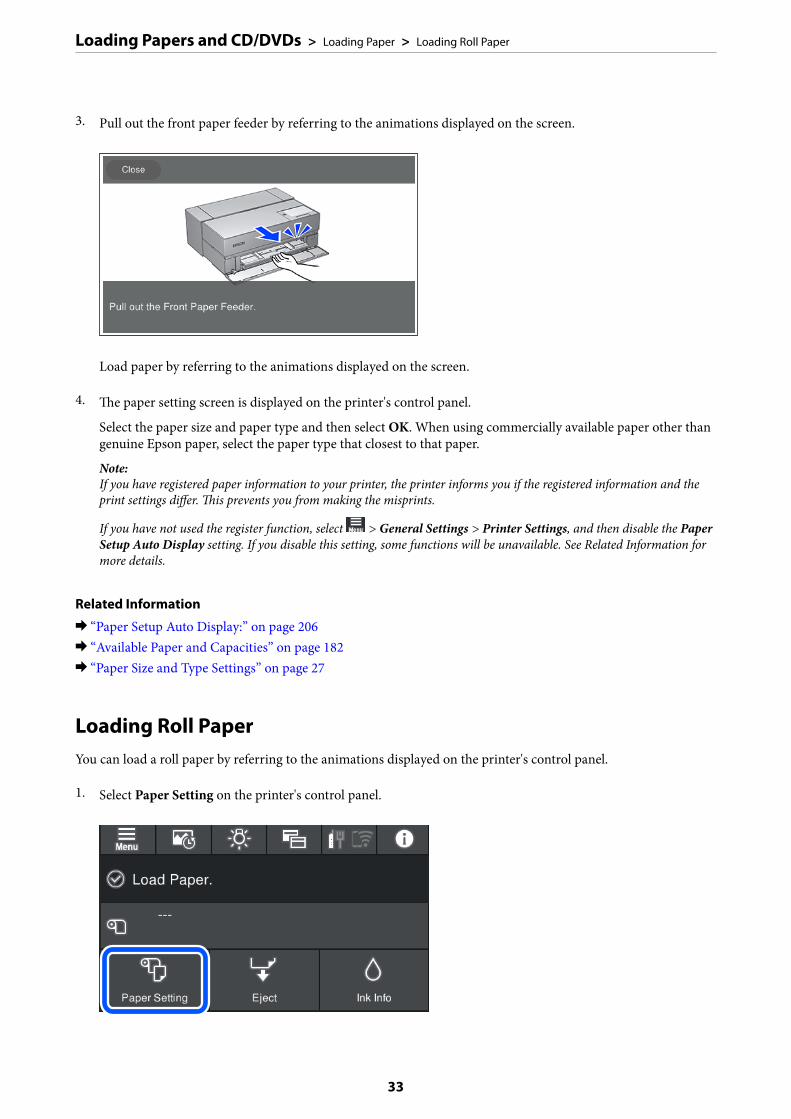
3. Pull out the front paper feeder by referring to the animations displayed on the screen.
Load paper by referring to the animations displayed on the screen.
4. The paper setting screen is displayed on the printer's control panel.
Select the paper size and paper type and then select OK. When using commercially available paper other thangenuine Epson paper, select the paper type that closest to that paper.
Note:If you have registered paper information to your printer, the printer informs you if the registered information and theprint settings differ. This prevents you from making the misprints.
If you have not used the register function, select > General Settings > Printer Settings, and then disable the PaperSetup Auto Display setting. If you disable this setting, some functions will be unavailable. See Related Information formore details.
Related Information
& “Paper Setup Auto Display:” on page 206& “Available Paper and Capacities” on page 182& “Paper Size and Type Settings” on page 27
Loading Roll PaperYou can load a roll paper by referring to the animations displayed on the printer's control panel.
1. Select Paper Setting on the printer's control panel.
Loading Papers and CD/DVDs > Loading Paper > Loading Roll Paper
33
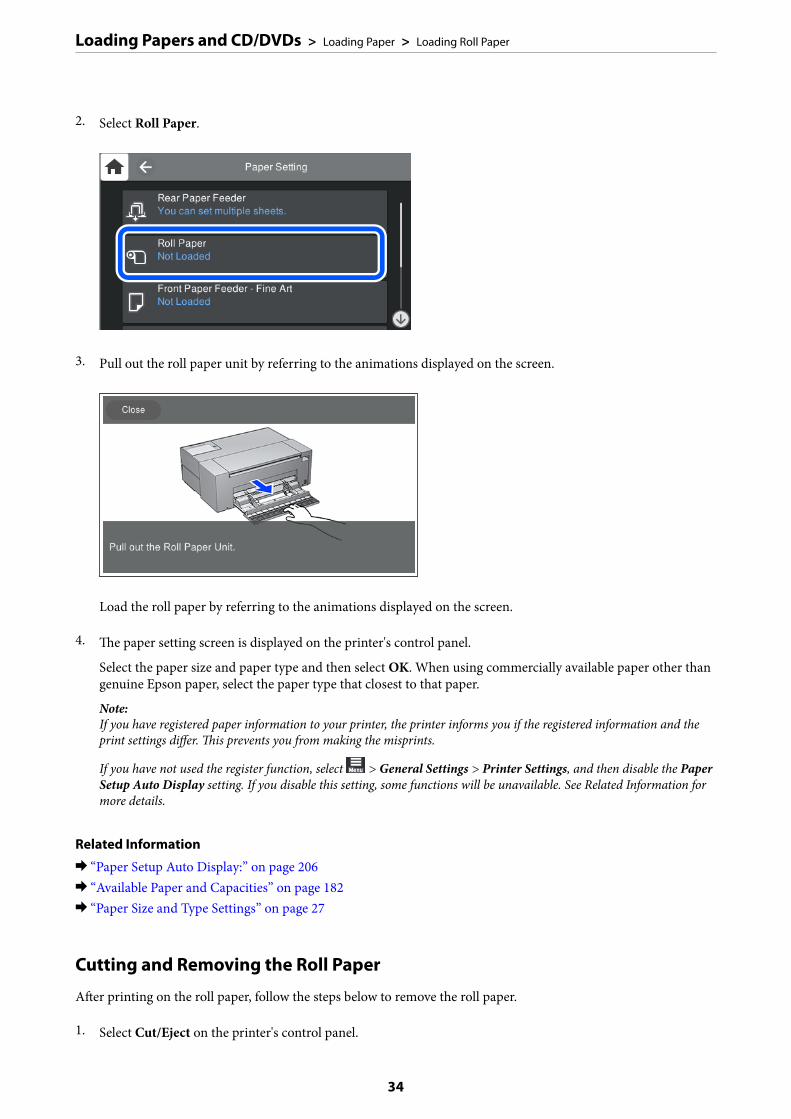
2. Select Roll Paper.
3. Pull out the roll paper unit by referring to the animations displayed on the screen.
Load the roll paper by referring to the animations displayed on the screen.
4. The paper setting screen is displayed on the printer's control panel.
Select the paper size and paper type and then select OK. When using commercially available paper other thangenuine Epson paper, select the paper type that closest to that paper.
Note:If you have registered paper information to your printer, the printer informs you if the registered information and theprint settings differ. This prevents you from making the misprints.
If you have not used the register function, select > General Settings > Printer Settings, and then disable the PaperSetup Auto Display setting. If you disable this setting, some functions will be unavailable. See Related Information formore details.
Related Information
& “Paper Setup Auto Display:” on page 206& “Available Paper and Capacities” on page 182& “Paper Size and Type Settings” on page 27
Cutting and Removing the Roll Paper
After printing on the roll paper, follow the steps below to remove the roll paper.
1. Select Cut/Eject on the printer's control panel.
Loading Papers and CD/DVDs > Loading Paper > Loading Roll Paper
34
2. Select Cut and Eject.
The roll paper is moved to the cutting position.
3. Cut the ejected paper using scissors.
4. Select Done.
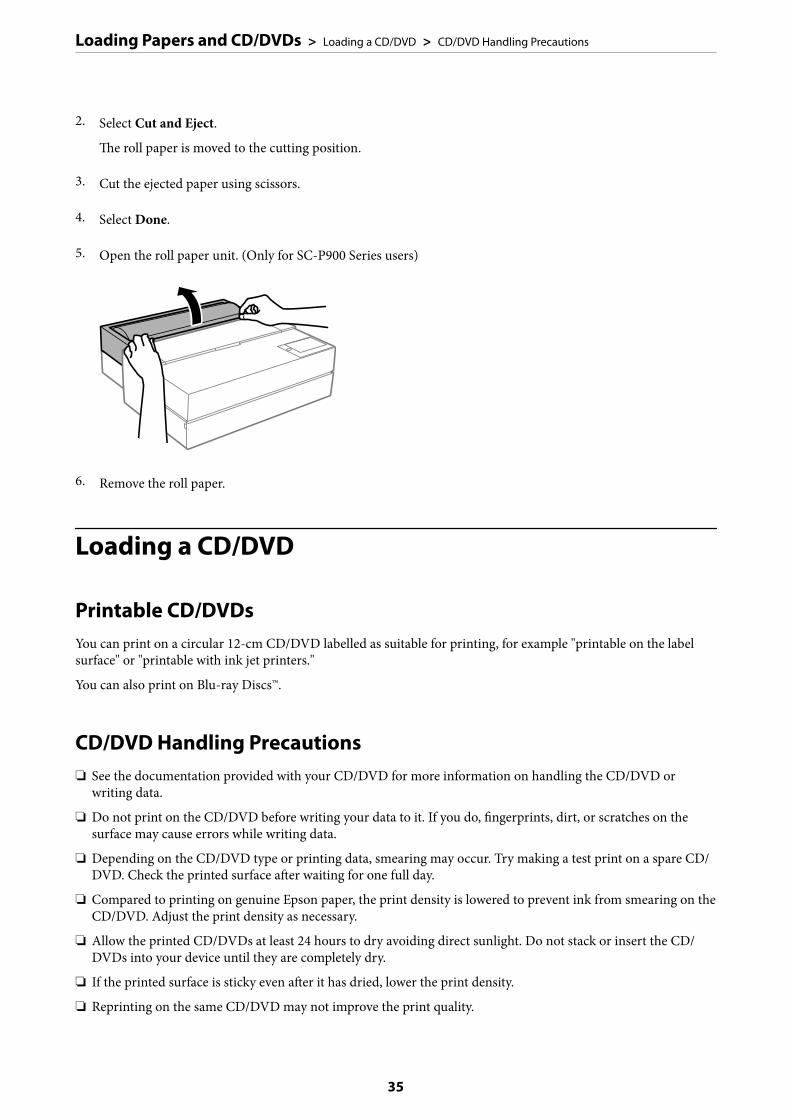
5. Open the roll paper unit. (Only for SC-P900 Series users)
6. Remove the roll paper.
Loading a CD/DVD
Printable CD/DVDsYou can print on a circular 12-cm CD/DVD labelled as suitable for printing, for example "printable on the labelsurface" or "printable with ink jet printers."
You can also print on Blu-ray Discs™.
CD/DVD Handling Precautions❏ See the documentation provided with your CD/DVD for more information on handling the CD/DVD or
writing data.
❏ Do not print on the CD/DVD before writing your data to it. If you do, fingerprints, dirt, or scratches on thesurface may cause errors while writing data.
❏ Depending on the CD/DVD type or printing data, smearing may occur. Try making a test print on a spare CD/DVD. Check the printed surface after waiting for one full day.
❏ Compared to printing on genuine Epson paper, the print density is lowered to prevent ink from smearing on theCD/DVD. Adjust the print density as necessary.
❏ Allow the printed CD/DVDs at least 24 hours to dry avoiding direct sunlight. Do not stack or insert the CD/DVDs into your device until they are completely dry.
❏ If the printed surface is sticky even after it has dried, lower the print density.
❏ Reprinting on the same CD/DVD may not improve the print quality.
Loading Papers and CD/DVDs > Loading a CD/DVD > CD/DVD Handling Precautions
35
❏ If the disc tray or the internal transparent compartment are accidentally printed on, immediately wipe off theink.
❏ Depending on the print area setting, the CD/DVD or disc tray may get dirty. Make settings to print on theprintable area.
❏ You can set the print range for the CD/DVD to a minimum of 18 mm for the inner diameter, and a maximumof 120 mm for the outer diameter. Depending on the settings, the CD/DVD or disc tray may be smeared. Setwithin the print range for the CD/DVD you want to print.
Loading a CD/DVDYou can load the CD/DVD by referring to the animations displayed on the printer's control panel.
cImportant:
❏ Do not turn the printer on or off while the tray is inserted. This could cause a malfunction.
❏ Store the tray flat. Malfunction could result if the tray is curled or deformed.
❏ An error may occur if you perform the following operations during printing.- Extend the front paper feeder.- Load poster board.
❏ Use the disk tray supplied with the printer. Using a different tray could damage the printer, tray, or disc or causeprinter malfunction.
❏ Inserting the disk tray from the rear may cause a malfunction or error.
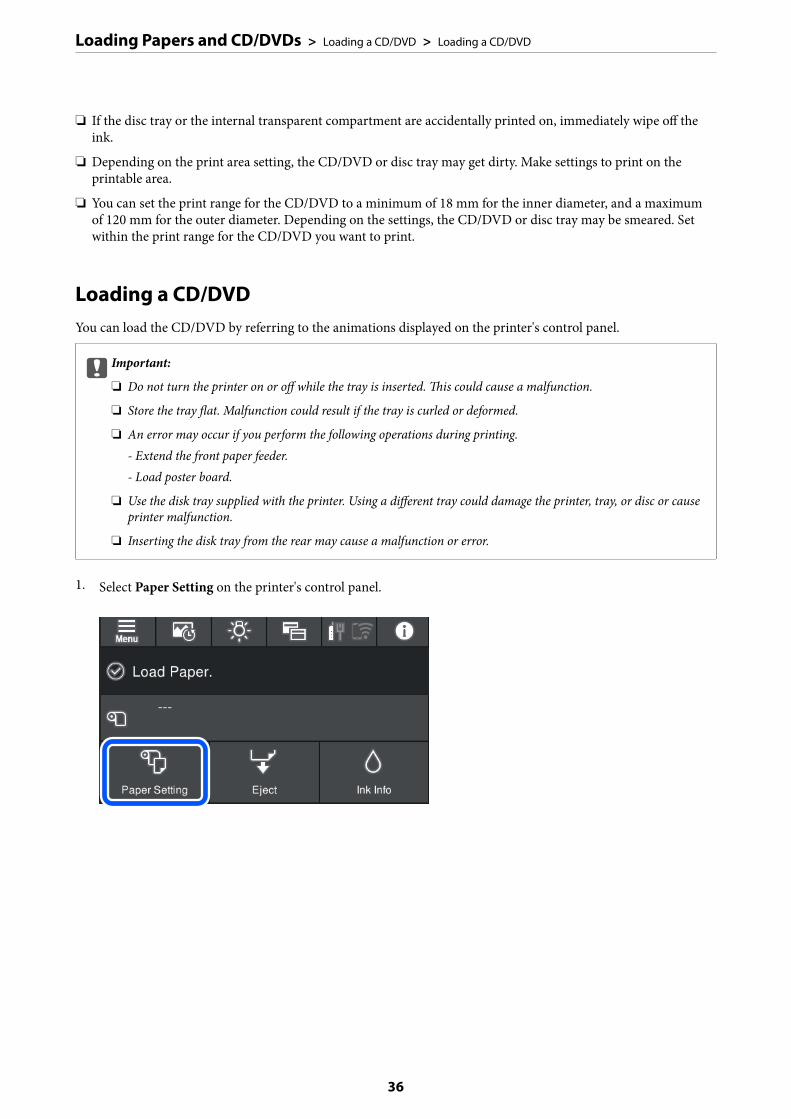
1. Select Paper Setting on the printer's control panel.
Loading Papers and CD/DVDs > Loading a CD/DVD > Loading a CD/DVD
36
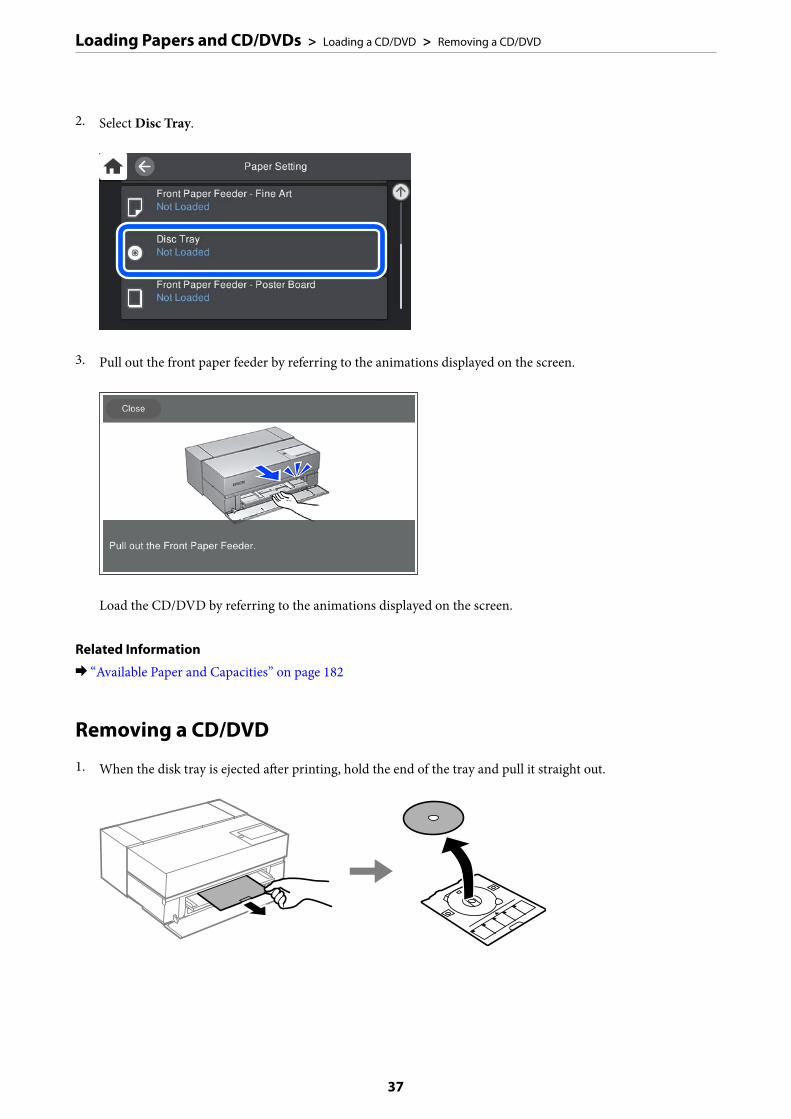
2. Select Disc Tray.
3. Pull out the front paper feeder by referring to the animations displayed on the screen.
Load the CD/DVD by referring to the animations displayed on the screen.
Related Information
& “Available Paper and Capacities” on page 182
Removing a CD/DVD
1. When the disk tray is ejected after printing, hold the end of the tray and pull it straight out.
Loading Papers and CD/DVDs > Loading a CD/DVD > Removing a CD/DVD
37
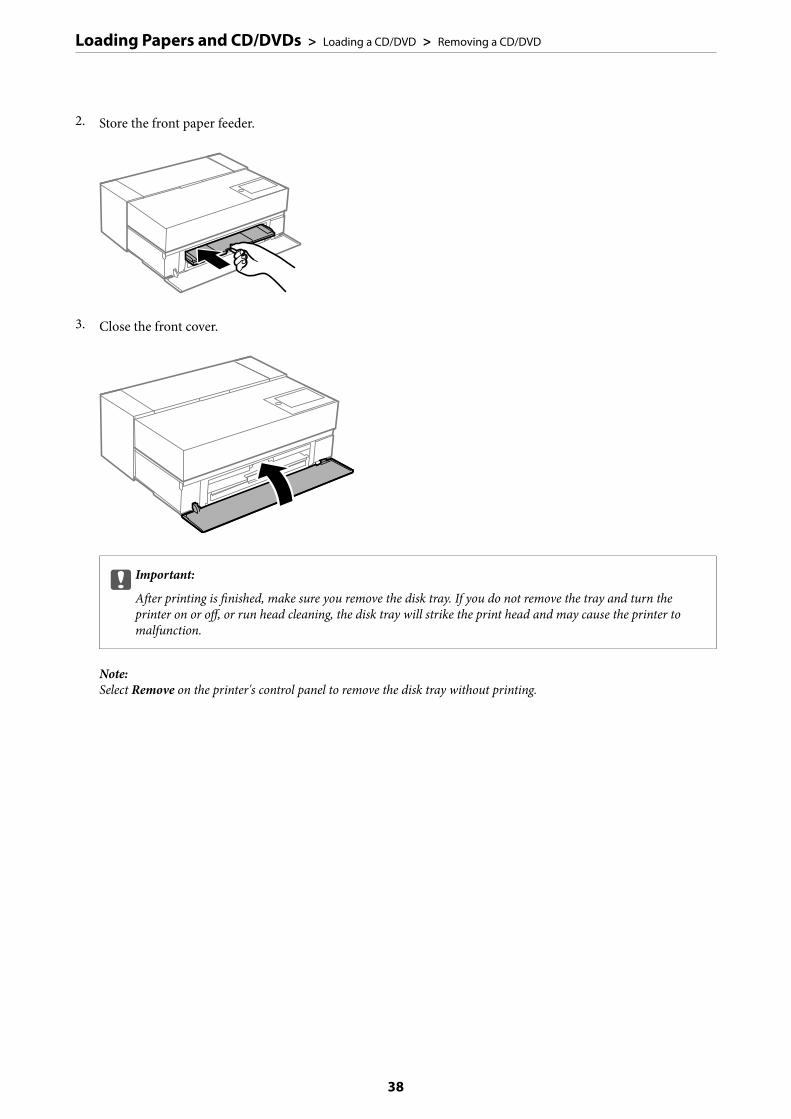
2. Store the front paper feeder.
3. Close the front cover.
cImportant:
After printing is finished, make sure you remove the disk tray. If you do not remove the tray and turn theprinter on or off, or run head cleaning, the disk tray will strike the print head and may cause the printer tomalfunction.
Note:Select Remove on the printer's control panel to remove the disk tray without printing.
Loading Papers and CD/DVDs > Loading a CD/DVD > Removing a CD/DVD
38
Printing
Printing Photos. . . . . . . . . . . . . . . . . . . . . . . . . . . . . . . . . . . . . . . . . . . . . . . . . . . .40
Printing Documents. . . . . . . . . . . . . . . . . . . . . . . . . . . . . . . . . . . . . . . . . . . . . . . . 67
Printing Using a Cloud Service. . . . . . . . . . . . . . . . . . . . . . . . . . . . . . . . . . . . . . . . 98
Printing Photos
Tips when Printing Photo ProjectsThis section explains important points to note when creating photo projects.
Shooting (Camera Settings)
Creating a photo project begins with shooting. The data storage format and size (resolution) are also importantpoints.
Some items only need to be set for the first time, while some items need to be set every time according to thesubject.
Items that only need to be set the first time
❏ Color spaces: Select sRGB if you are unsure.
❏ Storage size: We recommend saving at a resolution that suits the paper size you will use for printing, using thetable below as a guide.
Print Size Number of Pixels
A2/entire sheet 24 million (5830 x 4120)
A3/half sheet 18 million (5050 x 3570)
A4/8x10 in/10x12 in 12 million (4120 x 2920)
❏ Data format: We recommend selecting RAW when editing and printing photo data, or select JPEG just printing.
Items that need to be set every time
Set the following appropriately according to the subject.
❏ Select A mode (aperture priority auto) from shooting mode and control the F value (aperture) to set the amountof burring.
❏ Exposure: Set an approximate value to avoid halation or black defects.
❏ Shutter speed: Set the speed to avoid blurring.
❏ ISO speed: We recommend setting this as low as possible.
❏ White balance: Set an approximate setting according to the subject.
Raw Development and Editing (Printed Finish)
This process is as important as shooting to complete photo projects.
This allows you to edit photos (or perform color correction, gradation correction, cropping, and so on) withapplications* such as Adobe Photoshop or Lightroom, and save them in JPEG or TIFF format.
*You can also perform RAW development using the camera software.
❏ Adjust the color temperature to match the subject or the scene.
Printing > Printing Photos > Tips when Printing Photo Projects
40
❏ Maintain a rich gradation and do not increase the intensity of red and yellow.
❏ Adjust the black level and create a sharp photo.
Printing (Selecting the Paper and Print Settings Correctly)
You can create more attractive photos by selecting paper that suits the subject of the photo.
Most people think that glossy paper is the best for printing all photos, but there other textures available such assemigloss and matte paper. These provide a wide variety of finished photos.
Also, the soft texture of fine art paper allows you to print photos that look like paintings.
The following pages introduce the characteristics and recommended uses of typical Genuine Epson paper.
“Available Paper and Capacities” on page 182
When you print a photo, select from the following three methods depending on your knowledge and purpose ofphoto printing.
❏ If you want to easily print photos that have been edited in an application (color correction and so on).“Printing with Epson Print Layout” on page 41
❏ If you want to print using an application or the printer driver.“Printing Using the Application and Printer Driver” on page 48
❏ If you want to print photos quickly and leave color reproduction to the printer.“Printing Using Epson Photo+” on page 63
To bring the display color closer to the color of the printed material
The image on the display is expressed with the three primary colors of light (RGB), and the printed matter outputby the printer is expressed by the three primary colors (CMY) + K. Therefore, it is difficult to strictly produce thesame color.
The following three points can help to bring the colors as close as possible.
❏ Use a calibrated display
❏ Check under a light that allows you to see the correct color of the photo
❏ Set the color management settings* and print settings correctly
*Settings for matching colors displayed on different devices such as displays, digital cameras, and printers. Whenyou import photos taken with a digital camera and output them on the printer or display, each color may lookslightly different. This is because the color characteristics differ from device to device.
When printing using commercial paper
Add the paper information when you want to print easily using color matching on ordinary commercial paper.
“Printing to Paper Types Other than Genuine Paper” on page 191
Printing with Epson Print LayoutEpson Print Layout allows you to make print settings to be performed by the application and the printer driver onone screen.
Printing > Printing Photos > Printing with Epson Print Layout
41
Summary of Epson Print Layout
Epson Print Layout is an application that allows you to print retouched or developed photos in a few easy steps. Itcan also be used as a plug-in for Adobe Photoshop, Adobe Lightroom, Nikon ViewNX-i, and SILKYPIX. See theEpson Print Layout manual for details on supported applications and data formats.
You can download Epson Print Layout from the Epson Web site.
Note:You can download the manual for Epson Print Layout for iPad from the App Store. The manual for iPhone will be releasedaround July 2020. The release date is subject to change without notice.
Screen Composition
A Check the print results using the selected settings before printing.
B Save your favorite print settings and use them repeatedly.
Printing > Printing Photos > Printing with Epson Print Layout
42
C Set the print layout.
You can also select multiple photo templates and special layouts.
Template
Panorama
Gallery Wrap
D Select the color management method or Advanced B&W Photo print mode.
Making Print Settings
This section explains the procedure for printing one photo using a standard layout.
1. Start Epson Print Layout.
This section explains the procedure for starting directly from the photo to be printed.
See the Epson Print Layout manual for details on how to start from your applications.
Printing > Printing Photos > Printing with Epson Print Layout
43
❏ WindowsRight-click the photo and select Send to > Epson Print Layout.
❏ Mac OSClick the photo to be printed while holding down the Ctrl key, and then select Open With > Epson PrintLayout.
2. Set the paper information and print quality from Printer Settings.
Make sure that your printer is selected and select the correct paper type, size, and paper source.
Load fine art paper in the Rear Paper Feeder except for some commercial paper (paper except for genuineEpson paper).
Printing > Printing Photos > Printing with Epson Print Layout
44
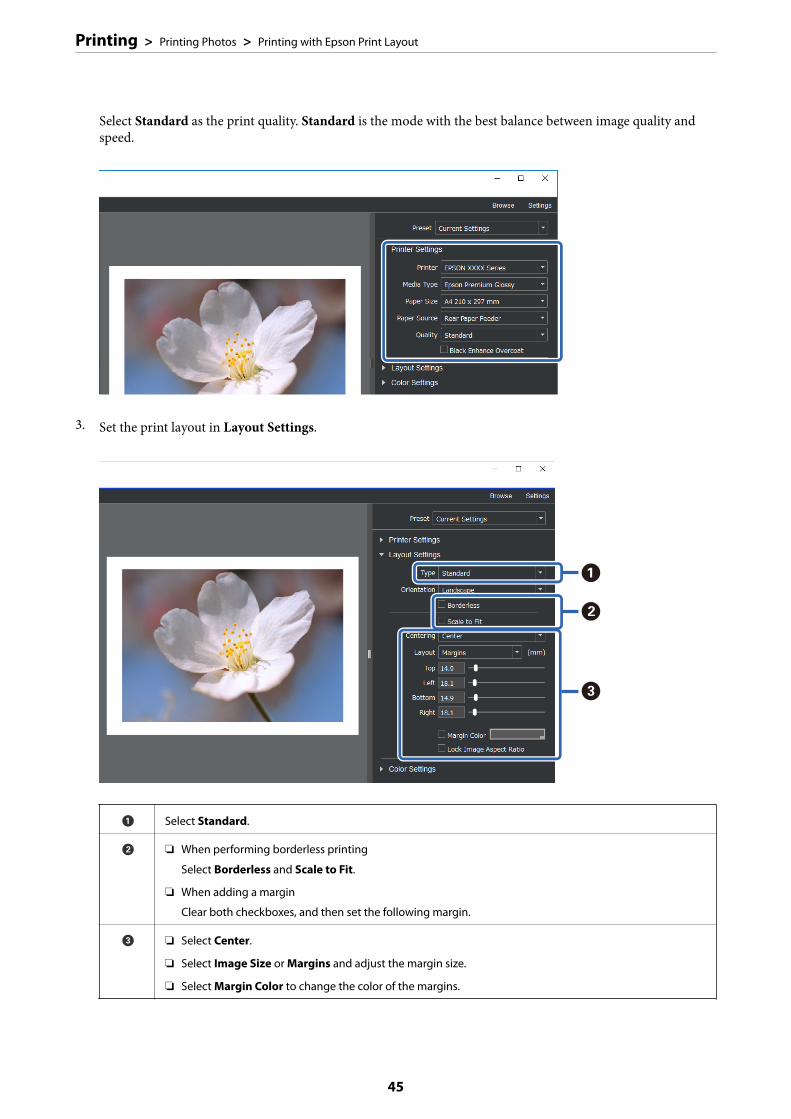
Select Standard as the print quality. Standard is the mode with the best balance between image quality andspeed.
3. Set the print layout in Layout Settings.
A Select Standard.
B ❏ When performing borderless printing
Select Borderless and Scale to Fit.
❏ When adding a margin
Clear both checkboxes, and then set the following margin.
C ❏ Select Center.
❏ Select Image Size or Margins and adjust the margin size.
❏ Select Margin Color to change the color of the margins.
Printing > Printing Photos > Printing with Epson Print Layout
45
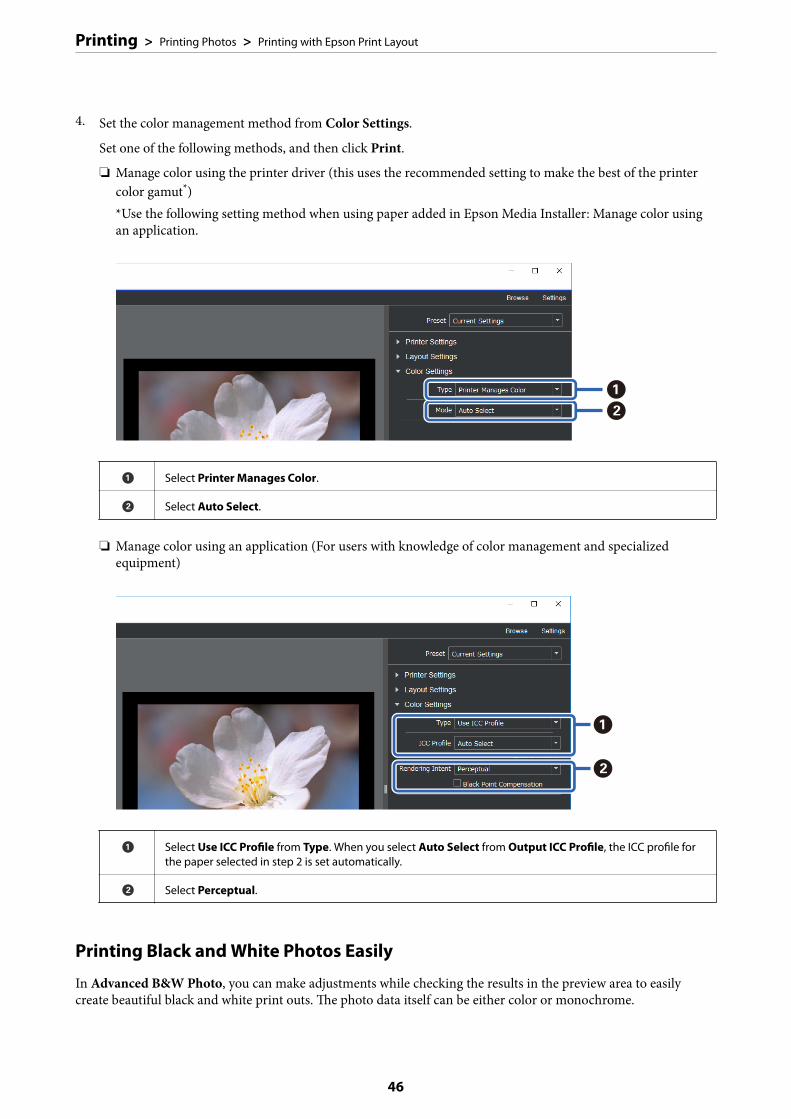
4. Set the color management method from Color Settings.
Set one of the following methods, and then click Print.
❏ Manage color using the printer driver (this uses the recommended setting to make the best of the printercolor gamut*)*Use the following setting method when using paper added in Epson Media Installer: Manage color usingan application.
A Select Printer Manages Color.
B Select Auto Select.
❏ Manage color using an application (For users with knowledge of color management and specializedequipment)
A Select Use ICC Profile from Type. When you select Auto Select from Output ICC Profile, the ICC profile forthe paper selected in step 2 is set automatically.
B Select Perceptual.
Printing Black and White Photos Easily
In Advanced B&W Photo, you can make adjustments while checking the results in the preview area to easilycreate beautiful black and white print outs. The photo data itself can be either color or monochrome.
Printing > Printing Photos > Printing with Epson Print Layout
46
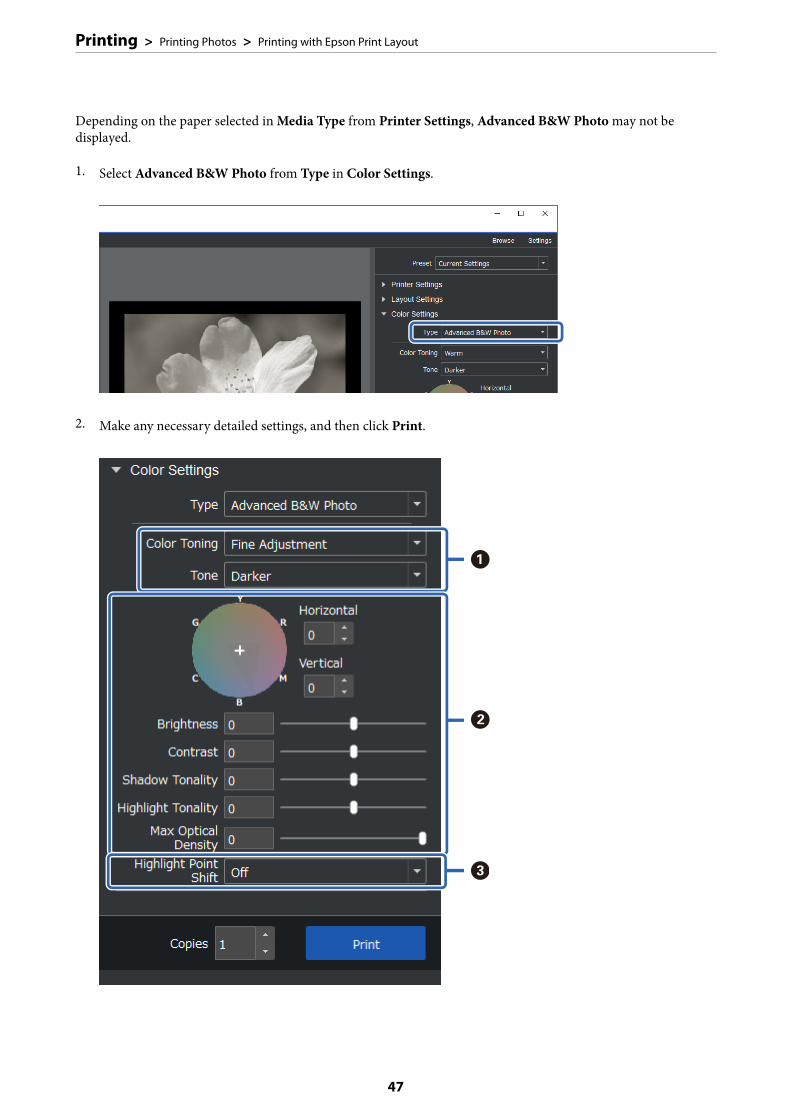
Depending on the paper selected in Media Type from Printer Settings, Advanced B&W Photo may not bedisplayed.
1. Select Advanced B&W Photo from Type in Color Settings.
2. Make any necessary detailed settings, and then click Print.
Printing > Printing Photos > Printing with Epson Print Layout
47
A Color Toning: Select your favorite black from the following four types.
❏ Neutral: Standard black
❏ Cool: Bluish black
❏ Warm: Reddish black
❏ Sepia: Brownish with a retro texture
Tone: You can adjust the modulation of black and white.
B You can adjust the black tone.
❏ When you make an adjustment, Color Toning above changes to Fine Adjustment. If you save and selectSave Custom Toning, you can print the same black and white tone next time.
❏ Note that adjustments will be undone if you change Color Toning or Tone after making adjustments.
C Switch on and off as needed.
On: Slightly adds color to the highlights of the image and reduces blown out highlights.
On (Full Page): The entire paper is coated with the adjusted color and the texture makes it look like it wasprinted on light-colored paper.
Printing Using the Application and Printer DriverSome features such as various layouts in Adobe Photoshop and advanced adjustments in the printer driver cannotbe realized with Epson Print Layout. In this case, you can make settings individually in the application and printerdriver. This section explains how to make color management settings in situations such as these.
Printing Using Color Management in Applications (Windows)
This is recommended when you want to print colors on the display correctly. You need the correct environmentalconditions such as screen calibration and surrounding lighting to view the correct print colors. The following twopoints are important for color management settings.
❏ Enable the color management settings in the application and disable those in the printer driver.
❏ Select the ICC profile for the paper in the application and select the corresponding paper name in the printerdriver.See the following for the paper names of genuine Epson paper and their corresponding ICC profiles.“Available Paper and Capacities” on page 182
1. Make settings in the application.
Setting example for Adobe Photoshop Elements 2020
Click More Options on the print screen.
Printing > Printing Photos > Printing Using the Application and Printer Driver
48
Select Color Management, and then select Photoshop Manages Colors from Color Handling. Select the ICCprofile of the paper from Printer Profile and click Printer Preferences.
2. Display the printer driver's setting screen.
3. Make the following settings on the Main tab.
❏ Media Type: Select the paper name corresponding to the ICC profile selected as the Printer Profile in step1.
❏ Mode: Select Off (No Color Adjustment).
Note:For Windows 7, Off (No Color Adjustment) is selected automatically.
4. Check other settings, and then start printing.
Printing Using Color Management in the Printer Driver (Windows)
This is recommended when you want to make the most of wide color spaces and the printer's gradation. Thisreduces matching colors on the display. Color management set in the printer driver is not saved to the image data.
The following two points are important for color management settings.
❏ Disable the color management settings in the application and enable those in the printer driver.
❏ Set Mode to match the color space of the image (sRGB/Adobe RGB) to print in the printer driver.
1. When using applications featuring a color management function, specify how to adjust colors from theseapplications.
When using applications without a color management function, start from step 2.
Depending on the type of the application, make the settings following the table below.
Application Color Management Settings
Adobe Photoshop CS3 or later
Adobe Photoshop Lightroom 1 or later
Adobe Photoshop Elements 6 or later
Printer Manages Colors
Printing > Printing Photos > Printing Using the Application and Printer Driver
49
Application Color Management Settings
Other applications No Color Management
Note:For information on the operating systems supported by each application, visit the distributor’s website.
Setting example for Adobe Photoshop Elements 2020
Click More Options on the print screen.
Select Color Management, and then select Printer Manages Colors from Color Handling. Make a note ofwhat is displayed in the Image Space, and then click Printer Preferences.
2. On the printer driver's Main tab, select the Media Type and Mode option.
For the Mode, select either of the following depending on what you noted in step 1.
❏ sRGB: EPSON Standard (sRGB)
❏ Adobe RGB: Adobe RGB
To adjust manually, click Advanced to display the Color Controls screen.
Printing > Printing Photos > Printing Using the Application and Printer Driver
50
3. If you displayed the Color Controls screen in step 2, make settings for each item.
See the printer driver help for more details on each item.
Note:You can adjust values while checking the sample image on the left of the screen. You can also make fine adjustments tothe color balance by using the color circle.
4. Check other settings, and then start printing.
Printing Using Color Management in Applications (Mac OS)
This is recommended when you want to print colors on the display correctly. You need the correct environmentalconditions such as screen calibration and surrounding lighting to view the correct print colors. The following twopoints are important for color management settings.
❏ Enable the color management settings in the application and disable those in the printer driver.
❏ Select the ICC profile for the paper in the application and select the corresponding paper name in the printerdriver.See the following for the paper names of genuine Epson paper and their corresponding ICC profiles.“Available Paper and Capacities” on page 182
1. Make settings in the application.
Setting example for Adobe Photoshop Elements 2020
Click More Options on the print screen.
Printing > Printing Photos > Printing Using the Application and Printer Driver
51
Select Color Management, and then select Photoshop Manages Colors from Color Handling. Select the ICCprofile of the paper from Printer Profile, click OK, and then click Print on the print screen.
2. On the printer driver's print dialog, select Print Settings from the pop-up menu.
3. Make the following settings.
❏ Media Type: Select the paper name corresponding to the ICC profile selected as the Printer Profile in step 1
❏ Color Settings: Select Off (No Color Adjustment).
4. Check other settings, and then start printing.
Printing Using Color Management in the Printer Driver (Mac OS)
This is recommended when you want to make the most of wide color spaces and the printer's gradation. Thisreduces matching colors on the display. Color management set in the printer driver is not saved to the image data.
The following two points are important for color management settings.
❏ Disable the color management settings in the application and enable those in the printer driver.
❏ Set Color Settings to match the color space of the image (sRGB/Adobe RGB) to print in the printer driver.
1. When using applications featuring a color management function, specify how to adjust colors from theseapplications.
When using applications without a color management function, start from step 2.
Depending on the type of the application, make the settings following the table below.
Application Color Management Settings
Adobe Photoshop CS3 or later
Adobe Photoshop Lightroom 1 or later
Adobe Photoshop Elements 6 or later
Printer Manages Colors
Other applications No Color Management
Note:For information on the operating systems supported by each application, visit the distributor’s website.
Printing > Printing Photos > Printing Using the Application and Printer Driver
52
Setting example for Adobe Photoshop Elements 2020
Click More Options on the print screen.
Select Color Management, and then select Printer Manages Colors from Color Handling. Make a note ofwhat is displayed in the Image Space, click OK, and then click Print on the print screen.
2. On the printer driver's print dialog, select Color Matching from the pop-up menu, and then click EPSONColor Controls.
Note:For the following applications, you need to make settings in step 1 to select EPSON Color Controls.
❏ Adobe Photoshop CS3 or later
❏ Adobe Photoshop Lightroom 1 or later
❏ Adobe Photoshop Elements 6 or later
3. Select Print Settings from the pop-up menu, and then select Color Settings option.
For the Color Settings, select either of the following depending on what you noted in step 1.
❏ sRGB: EPSON Standard (sRGB)
❏ Adobe RGB: Adobe RGB
To adjust the value manually, click Advanced Color Settings.
4. Set each item in basic settings.
5. Check other settings, and then start printing.
Printing Varieties (Windows)
Printing Black and White Photos
You can print black and white photos with rich gradation by adjusting the image data color by the printer driver.
The original data is not affected.
You can correct image data when printing without processing the data from applications.
Printing > Printing Photos > Printing Varieties (Windows)
53
Note:It is recommended that you use images with a color space of sRGB.
1. When using applications featuring a color management function, specify how to adjust colors from theseapplications.
When using applications without a color management function, start from step 2.
Depending on the type of the application, make the settings following the table below.
Application Color Management Settings
Adobe Photoshop CS3 or later
Adobe Photoshop Lightroom 1 or later
Adobe Photoshop Elements 6 or later
Printer Manages Colors
Other applications No Color Management
Note:For information on the operating systems supported by each application, visit the distributor’s website.
Setting example for Adobe Photoshop Elements 2020
Click More Options on the print screen.
Select Color Management, and then select Printer Manages Colors from Color Handling. Click PrinterPreferences.
2. Display the printer driver's Main tab and select Advanced B&W Photo as the Print Mode.
3. Click Advanced for Mode.
4. Make the settings for each item on the Color Controls screen.
See the printer driver help for more details on each item.
5. Check other settings, and then start printing.
Printing > Printing Photos > Printing Varieties (Windows)
54
Printing with Auto Color Correction
The printer driver for this printer comes with the Epson proprietary function PhotoEnhance that makes the mostefficient use of the color reproduction area, corrects image data to improve colors before printing.
By using PhotoEnhance, you can correct photo colors to match the subject types such as people, scenery, or nightview. You can print color data in sepia or black and white. Colors are automatically corrected simply by selectingthe print mode.
Note:It is recommended that you use images with a color space of sRGB.
1. When using applications featuring a color management function, specify how to adjust colors from theseapplications.
When using applications without a color management function, start from step 2.
Depending on the type of the application, make the settings following the table below.
Application Color Management Settings
Adobe Photoshop CS3 or later
Adobe Photoshop Lightroom 1 or later
Adobe Photoshop Elements 6 or later
Printer Manages Colors
Other applications No Color Management
Note:For information on the operating systems supported by each application, visit the distributor’s website.
Setting example for Adobe Photoshop Elements 2020
Click More Options on the print screen.
Select Color Management, and then select Printer Manages Colors from Color Handling. Click PrinterPreferences.
2. Display the Main tab in the printer driver, select PhotoEnhance for Mode, and click Advanced.
Printing > Printing Photos > Printing Varieties (Windows)
55
3. On the PhotoEnhance screen, you can set effects to apply to the print data.
See the printer driver help for more details on each item.
4. Check other settings, and then start printing.
Printing Banners
You can print banners and panoramic pictures if you create and set print data for banner printing in yourapplication. When printing using document preparation software, image editing software, and so on, create printdata with the same length and width ratio as the size you want to print.
The following printing sizes are available.
Width SC-P900 Series: 431.8mm
SC-P700 Series: 330mm
Length* Max. 18m
*: The paper length can be longer if using applications that support banner printing. However, the actual print size dependson the application, the paper size loaded in the printer, and the computer environment.
1. In the printer driver's Main tab, select Media Type.
2. Select Roll Paper from the Source list.
3. Click User Defined and match the paper size to the size of the data if necessary.
4. Make sure the Optimize Enlargement check box is selected on the Layout tab.
5. Check other settings, and then start printing.
Printing by Increasing Black Density
To print by increasing black density, use black enhance overcoat in the printer driver. This feature overcoats lightgray ink on the dark parts of printouts to increase the maximum density of black and to increase the dynamicrange.
Black enhance overcoat is only available for glossy paper. Note that it is not available for all types of glossy paper.
Printing > Printing Photos > Printing Varieties (Windows)
56
Image effects for black enhance overcoat
Note:Enabling black enhance overcoat increases black density, and disabling it increases print speed.
1. When using applications featuring a color management function, specify how to adjust colors from theseapplications.
When using applications without a color management function, start from step 2.
Depending on the type of the application, make the settings following the table below.
Application Color Management Settings
Adobe Photoshop CS3 or later
Adobe Photoshop Lightroom 1 or later
Adobe Photoshop Elements 6 or later
Printer Manages Colors
Other applications No Color Management
Note:For information on the operating systems supported by each application, visit the distributor’s website.
Setting example for Adobe Photoshop Elements 2020
Click More Options on the print screen.
Select Color Management, and them select Printer Manages Colors from Color Handling. Click PrinterPreferences.
Printing > Printing Photos > Printing Varieties (Windows)
57
2. Make sure that Black Enhance Overcoat is selected as the Level on the printer driver's Main tab.
Black Enhance Overcoat is automatically enabled when anything other than Standard is selected as the Level.
3. If you want to further increase black density, select Max Quality (Carbon Black) as the Level.
4. Check other settings, and then start printing.
Printing Varieties (Mac OS)
Printing Black and White Photos
You can print black and white photos with rich gradation by adjusting the image data color by the printer driver.
The original data is not affected.
You can correct image data when printing without processing the data from applications.
Note:It is recommended that you use images with a color space of sRGB.
Printing > Printing Photos > Printing Varieties (Mac OS)
58
1. When using applications featuring a color management function, specify how to adjust colors from theseapplications.
When using applications without a color management function, start from step 2.
Depending on the type of the application, make the settings following the table below.
Application Color Management Settings
Adobe Photoshop CS3 or later
Adobe Photoshop Lightroom 1 or later
Adobe Photoshop Elements 6 or later
Printer Manages Colors
Other applications No Color Management
Note:For information on the operating systems supported by each application, visit the distributor’s website.
Setting example for Adobe Photoshop Elements 2020
Click More Options on the print screen.
Select Color Management, and then select Printer Manages Colors from Color Handling. Click OK, andthen click Print on the print screen.
2. On the printer driver's print dialog, select Print Settings from the pop-up menu, and then select AdvancedB&W Photo as the Color setting.
3. Click Advanced Color Settings.
4. Check other settings, and then start printing.
Printing with Auto Color Correction
The printer driver for this printer comes with the Epson proprietary function PhotoEnhance that makes the mostefficient use of the color reproduction area, corrects image data to improve colors before printing.
Printing > Printing Photos > Printing Varieties (Mac OS)
59
By using PhotoEnhance, you can correct photo colors to match the subject types such as people, scenery, or nightview. You can print color data in sepia or black and white. Colors are automatically corrected simply by selectingthe print mode.
Note:It is recommended that you use images with a color space of sRGB.
1. When using applications featuring a color management function, specify how to adjust colors from theseapplications.
When using applications without a color management function, start from step 2.
Depending on the type of the application, make the settings following the table below.
Application Color Management Settings
Adobe Photoshop CS3 or later
Adobe Photoshop Lightroom 1 or later
Adobe Photoshop Elements 6 or later
Printer Manages Colors
Other applications No Color Management
Setting example for Adobe Photoshop Elements 2020
Click More Options on the print screen.
Select Color Management, and then select Printer Manages Colors from Color Handling. Click OK, andthen click Print on the print screen.
2. On the printer driver's print dialog, select Color Matching from the pop-up menu, and then click EPSONColor Controls.
Note:EPSON Color Controls is unavailable in Adobe Photoshop CS3 or later, Adobe Photoshop Lightroom 1 or later, andAdobe Photoshop Elements 6 or later unless the setting in step 1 is made.
3. Select Print Settings from the pop-up menu, select PhotoEnhance from Color Settings, and then clickAdvanced Color Settings.
4. Choose the effects that will be applied to the print data in the Advanced Color Settings screen.
Printing > Printing Photos > Printing Varieties (Mac OS)
60
5. Check other settings, and then start printing.
Printing Banners
You can print banners and panoramic pictures if you create and set print data for banner printing in yourapplication.
To print banners, select Roll Paper as the Paper Source in the printer driver.
You can print data created by document preparation software, image editing software, and so on. If you use imageediting software, create print data at a size supported by the given application while maintaining the printinglength and width ratio.
The following printing sizes are available.
Width SC-P900 Series: 431.8mm
SC-P700 Series: 330mm
Length* Max. 18m
*: The paper length can be longer if using applications that support banner printing. However, the actual print size dependson the application, the paper size loaded in the printer, and the computer environment.
1. On the printer driver's print dialog, select the size of the data created with the application in Paper Size.
If items on the Page Setup screen are not displayed on the Print screen due to the application being used,display the Page Setup screen and make settings.
2. Check other settings, and then start printing.
Printing by Increasing Black Density
To print by increasing black density, use black enhance overcoat in the printer driver. This feature overcoats lightgray ink on the dark parts of printouts to increase the maximum density of black and to increase the dynamicrange.
Black enhance overcoat is only available for glossy paper. Note that it is not available for all types of glossy paper.
Printing > Printing Photos > Printing Varieties (Mac OS)
61
Image effects for black enhance overcoat
Note:Enabling black enhance overcoat increases black density, and disabling it increases print speed.
1. When using applications featuring a color management function, specify how to adjust colors from theseapplications.
When using applications without a color management function, start from step 2.
Depending on the type of the application, make the settings following the table below.
Application Color Management Settings
Adobe Photoshop CS3 or later
Adobe Photoshop Lightroom 1 or later
Adobe Photoshop Elements 6 or later
Printer Manages Colors
Other applications No Color Management
Note:For information on the operating systems supported by each application, visit the distributor’s website.
Setting example for Adobe Photoshop Elements 2020
Click More Options on the print screen.
Select Color Management, and then select Printer Manages Colors from Color Handling. Click OK, andthen click Print on the print screen.
2. On the printer driver's print dialog, select Print Settings from the pop-up menu, and then select QualityOptions as Print Quality.
Printing > Printing Photos > Printing Varieties (Mac OS)
62
3. Select Black Enhance Overcoat.
If the check box is grayed out, move the slider for the quality level to Speed to enable the check box.
4. If you want to further increase black density, select Max Quality (Carbon Black) as the Print Quality.
5. Check other settings, and then start printing.
Printing Using Epson Photo+Epson Photo+ an application that performs easy edits such as automatic color correction, while also allowing youto make manual corrections or adjust the layout.
You can install Epson Photo+ from the Epson Web site.
Epson Photo+ automatically corrects backlight and subtle skin colors allowing you to print beautiful photos easily.You can also turn off auto correction (PhotoEnhance).
The following four steps are the main operations. For details on each operation, access the Help from the button atthe top-right of the Epson Photo+ screen. (The screenshots used in the following examples are from Windows 10.)
Printing > Printing Photos > Printing Using Epson Photo+
63
1. Select a menu according to your needs.
2. Select the template or paper size depending on the selected menu.
Printing > Printing Photos > Printing Using Epson Photo+
64
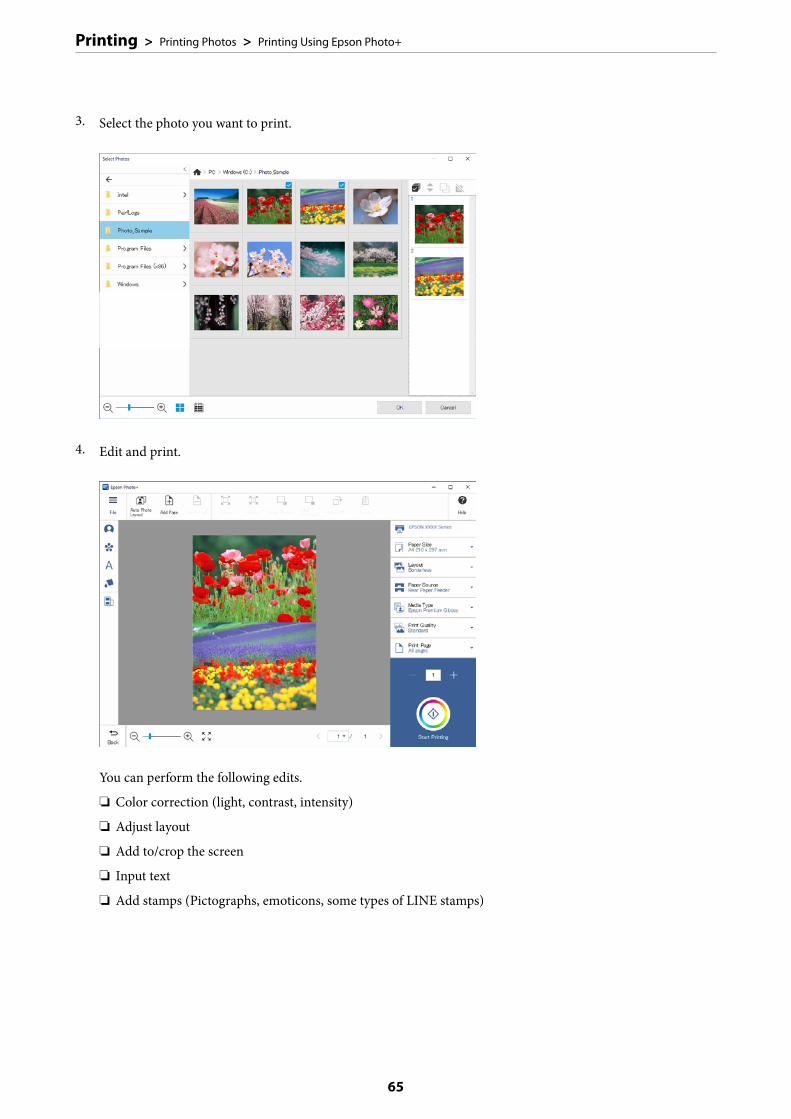
3. Select the photo you want to print.
4. Edit and print.
You can perform the following edits.
❏ Color correction (light, contrast, intensity)
❏ Adjust layout
❏ Add to/crop the screen
❏ Input text
❏ Add stamps (Pictographs, emoticons, some types of LINE stamps)
Printing > Printing Photos > Printing Using Epson Photo+
65
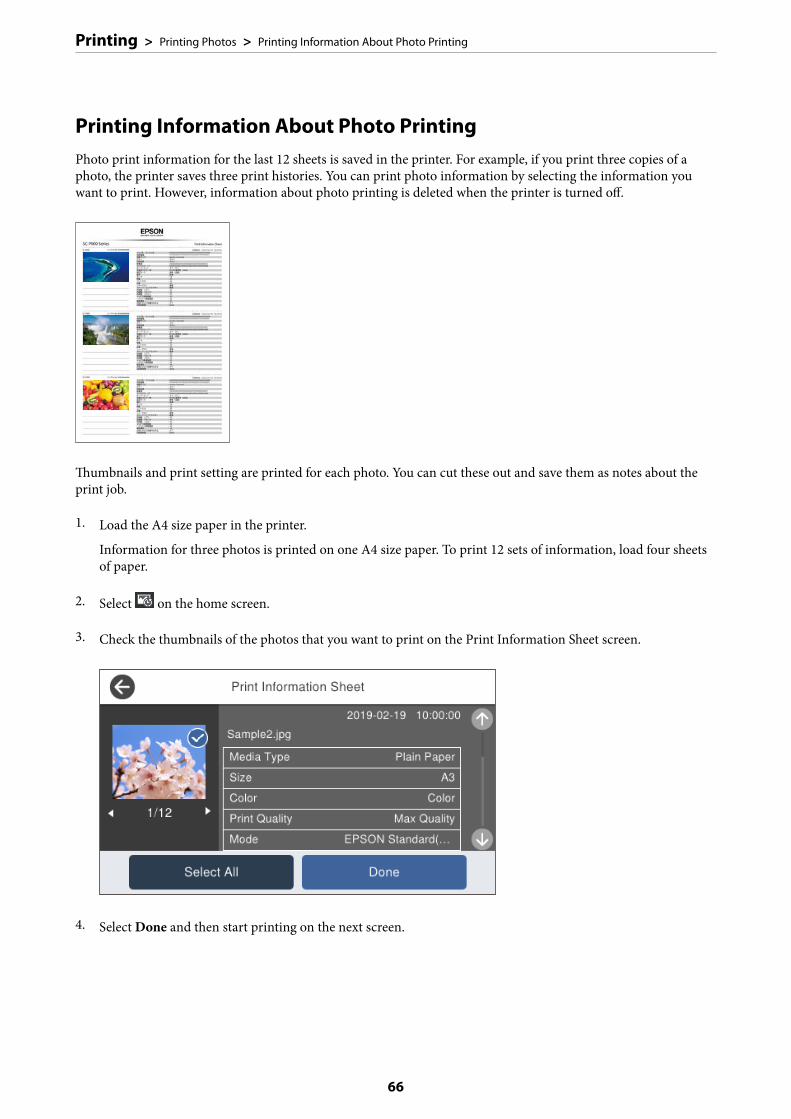
Printing Information About Photo PrintingPhoto print information for the last 12 sheets is saved in the printer. For example, if you print three copies of aphoto, the printer saves three print histories. You can print photo information by selecting the information youwant to print. However, information about photo printing is deleted when the printer is turned off.
Thumbnails and print setting are printed for each photo. You can cut these out and save them as notes about theprint job.
1. Load the A4 size paper in the printer.
Information for three photos is printed on one A4 size paper. To print 12 sets of information, load four sheetsof paper.
2. Select on the home screen.
3. Check the thumbnails of the photos that you want to print on the Print Information Sheet screen.
4. Select Done and then start printing on the next screen.
Printing > Printing Photos > Printing Information About Photo Printing
66
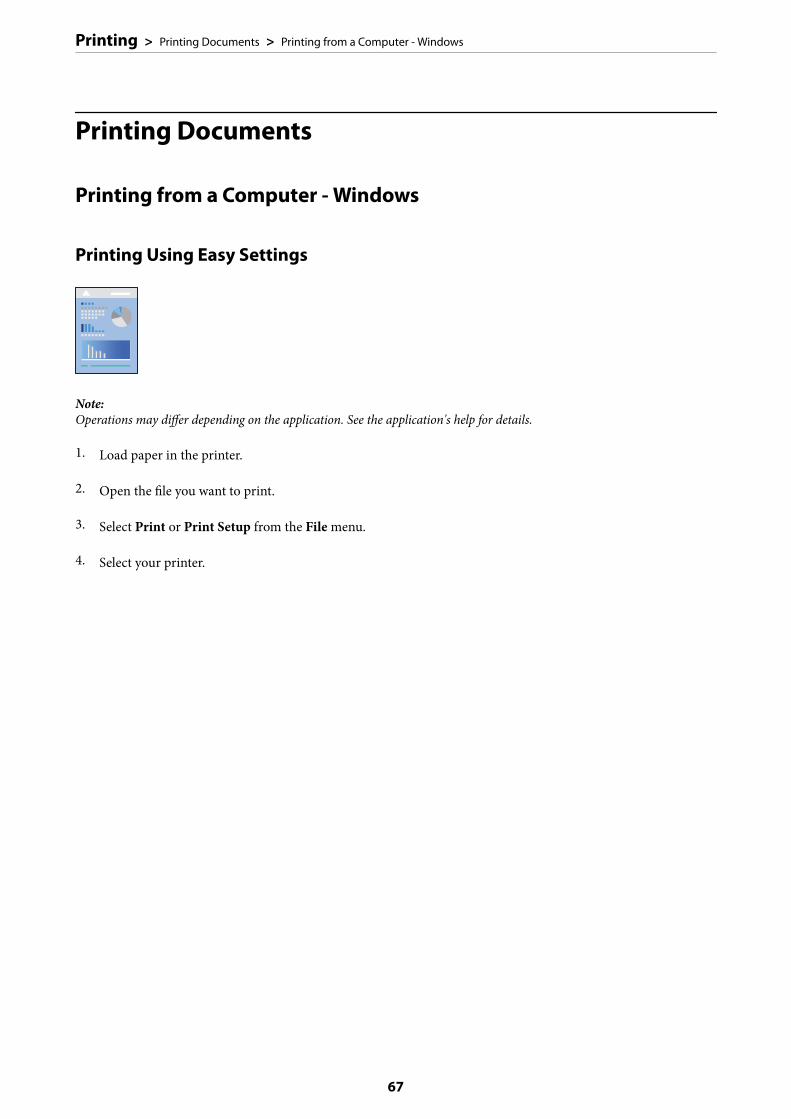
Printing Documents
Printing from a Computer - Windows
Printing Using Easy Settings
Note:Operations may differ depending on the application. See the application's help for details.
1. Load paper in the printer.
2. Open the file you want to print.
3. Select Print or Print Setup from the File menu.
4. Select your printer.
Printing > Printing Documents > Printing from a Computer - Windows
67
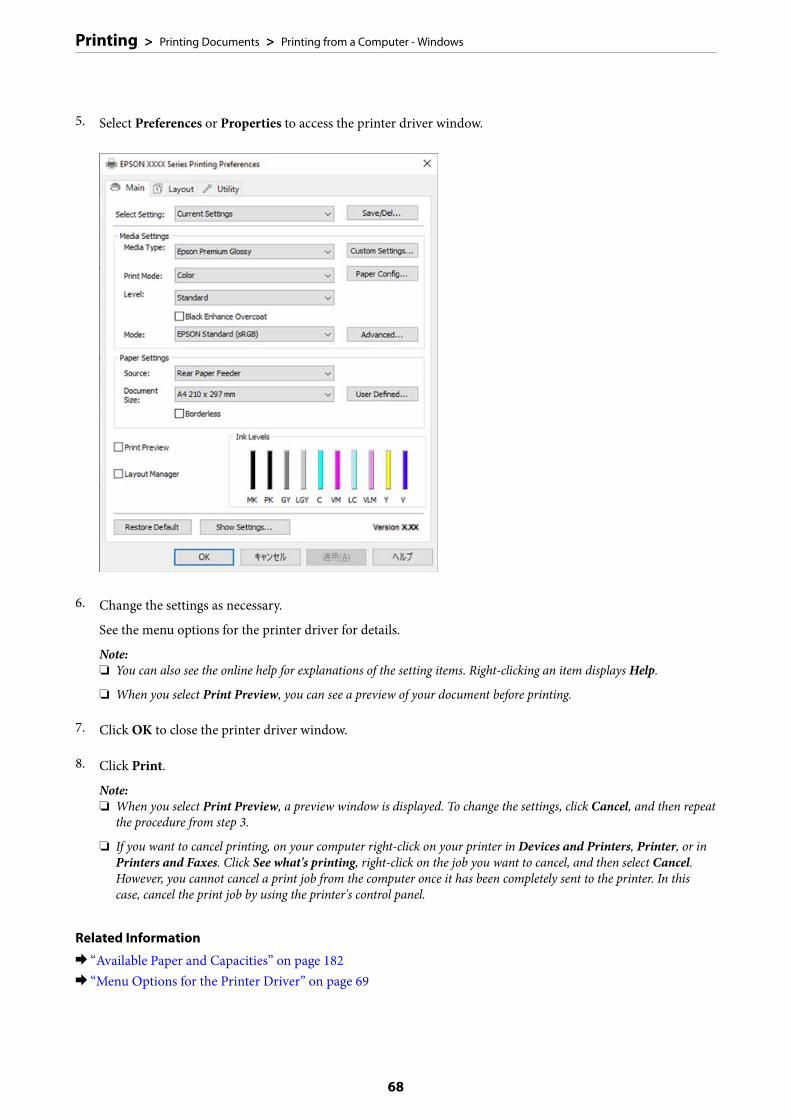
5. Select Preferences or Properties to access the printer driver window.
6. Change the settings as necessary.
See the menu options for the printer driver for details.
Note:❏ You can also see the online help for explanations of the setting items. Right-clicking an item displays Help.
❏ When you select Print Preview, you can see a preview of your document before printing.
7. Click OK to close the printer driver window.
8. Click Print.
Note:❏ When you select Print Preview, a preview window is displayed. To change the settings, click Cancel, and then repeat
the procedure from step 3.
❏ If you want to cancel printing, on your computer right-click on your printer in Devices and Printers, Printer, or inPrinters and Faxes. Click See what's printing, right-click on the job you want to cancel, and then select Cancel.However, you cannot cancel a print job from the computer once it has been completely sent to the printer. In thiscase, cancel the print job by using the printer's control panel.
Related Information
& “Available Paper and Capacities” on page 182& “Menu Options for the Printer Driver” on page 69
Printing > Printing Documents > Printing from a Computer - Windows
68
Menu Options for the Printer Driver
Open the print window in an application, select the printer, and then access the printer driver window.
Note:Menus vary depending on the option you selected.
Main Tab
Select Setting:
Save/Del:
You can add or remove your own presets for frequently used print settings. Select the preset you wantto use from the list.
Media Type:
Select the type of paper on which you print.
Print Mode:
Select whether to print in color or in monochrome.
Level:
Select the pint quality you want to use for printing. Available settings depend on the paper type youselect. When selecting higher quality, the printing speed may be slower. If you select QualityOptions, you can make detailed settings.
Gloss Smoothing:
Select this option when printing on photo paper to reduce the amount of light that is reflectedoff black areas and achieve a smoother gloss. However, black density may decrease. GlossSmoothing is available when you have selected Photo Paper as the Media Type. This optionmay not be available depending on the print quality settings.
Black Enhance Overcoat:
Select to print with enhanced image contrast and tones of black. This option can only be selected forsupported paper.
Mode:
Make the color tone settings for the prints. Available options depend on the Print Mode setting.
Clicking Advanced opens the Color Controls screen where you can select a detailed method of colorcorrection.
Source:
Select the paper source from which the paper is fed.
Document Size:
Select the size of the print file set in the application. If a predefined paper size is not available, clickUser Defined to set your own paper size.
Borderless:
Enlarges the print data slightly more than the paper size so that no margins are printed around theedges of the paper. Click Expansion to select the amount of enlargement.
Printing > Printing Documents > Printing from a Computer - Windows
69
Print Preview:
Displays a preview of your document before printing.
Layout Manager:
When you check this box and start printing, the print jobs are arranged and displayed on the LayoutManager dialog box. You can arrange data created by different applications in order of preference andcombine them into a single print job.
Note:You cannot make settings other than Document Size when Layout Manager is checked. Make the detailedprint settings on the Layout Manager dialog box.
Ink Levels:
Displays the approximate ink level.
Restore Default:
Return all settings to their factory default values. The settings on the Layout tab are also reset to theirdefaults.
Show Settings:
Displays a list of items currently set on the Main and Layout tabs. You can show or hide the currentsetting list screen.
Layout Tab
Select Setting:
Save/Del:
You can add or remove your own presets for frequently used print settings. Select the preset you wantto use from the list.
Orientation:
Select the orientation you want to use to print.
Rotate 180°:
Rotates pages 180 degrees before printing.
Mirror Image:
Inverts the image so that it prints as it would appear in a mirror.
Copies:
Set the number of copies you want to print.
Collate:
Prints multi-page documents collated in order and sorted into sets.
Reverse Order:
Allows you to print from the last page so that the pages are stacked in the correct order afterprinting.
Printing > Printing Documents > Printing from a Computer - Windows
70
Paper Size:
Select the size of the print file set in the application.
Output Size:
Select the paper size on which you want to print. If the Paper Size differs from the Output Size,Reduce/Enlarge is selected automatically. You do not have to select it when printing withoutreducing or enlarging the size of a document.
Reduce/Enlarge:
Allows you to reduce or enlarge the size of a document.
Fit to Output Size:
Automatically reduce or enlarge the document to fit to the paper size selected in Output Size.
Fit to Roll Paper WidthFit to Output Size:
Automatically reduce or enlarge the document to fit to the roll paper size selected in OutputSize. This option is available when Roll Paper is selected as the Source.
Specify Size:
Prints with a specific percentage.
Page Layout:
Allows you to print several pages on one sheet or perform poster printing. Click Settings to specifythe order in which pages are printed.
2-sided printing:
Allows you to perform 2-sided printing.
Margins:
You can specify the binding edge and the binding margins.
Folded Booklet:
Select this check box if you wish to print a single-fold booklet.
Optimize Enlargement:
Select this check box to optimize an enlargement to achieve long poster or panoramic printingwithout using a particular application. Clear this check box if text or graphics are distorted; however,output length may be limited depending on the application.
Print Bckg Color:
Select this check box to print a background color. Click Color Settings to select a background color.
Job Settings:
Select this check box to print the settings items. Click Details to open the Job Settings dialog box toselect the setting items to print.
Reset Defaults:
Return all settings to their factory default values. The settings on the Main tab are also reset to theirdefaults.
Printing > Printing Documents > Printing from a Computer - Windows
71
Show Settings:
Displays a list of items currently set on the Main and Layout tabs. You can show or hide the currentsetting list screen.
Utility Tab
Nozzle Check:
Prints a nozzle check pattern to check if the print head nozzles are clogged.
Print Head Cleaning:
Cleans the clogged nozzles in the print head. Because this feature uses some ink, clean the print headonly if the nozzles are clogged. Print a nozzle check pattern and then select Cleaning if there are justa few defects in the pattern. Power Cleaning consumes more ink than Cleaning. Only use this ifthere are many defects in the nozzle check pattern.
EPSON Status Monitor 3:
Opens the EPSON Status Monitor 3 window. Here you can confirm the status of the printer and theconsumables.
Monitoring Preferences:
Allows you to make settings for items on the EPSON Status Monitor 3 window.
Print Queue:
Displays the jobs waiting to be printed. You can check, pause, or resume print jobs.
Printer and Option Information:
Click to display the Printer and Option Information dialog box. You can view and make settings forthe optional information.
Speed and Progress:
Allows you to make a variety of settings related to printing speed and progress. Right-click each itemto view the online help for more details.
Menu Arrangement:
You can arrange the Select Setting, Media Type, and Paper Size list items. Arrange the items as youprefer, or classify the items into groups. You can also hide the items you are not using.
Export or Import:
You can export or import the printer driver settings. It is convenient to use this feature when youwant to make the same printer driver settings to multiple computers.
Epson Media Installer:
You can add media setting to printers and printer drivers from the Internet. Click when you cannotfind the media you want to print on in the driver's media types. Depending on the media you areusing, you may not be able to download media settings.
See the related information link below for details.
Printing > Printing Documents > Printing from a Computer - Windows
72
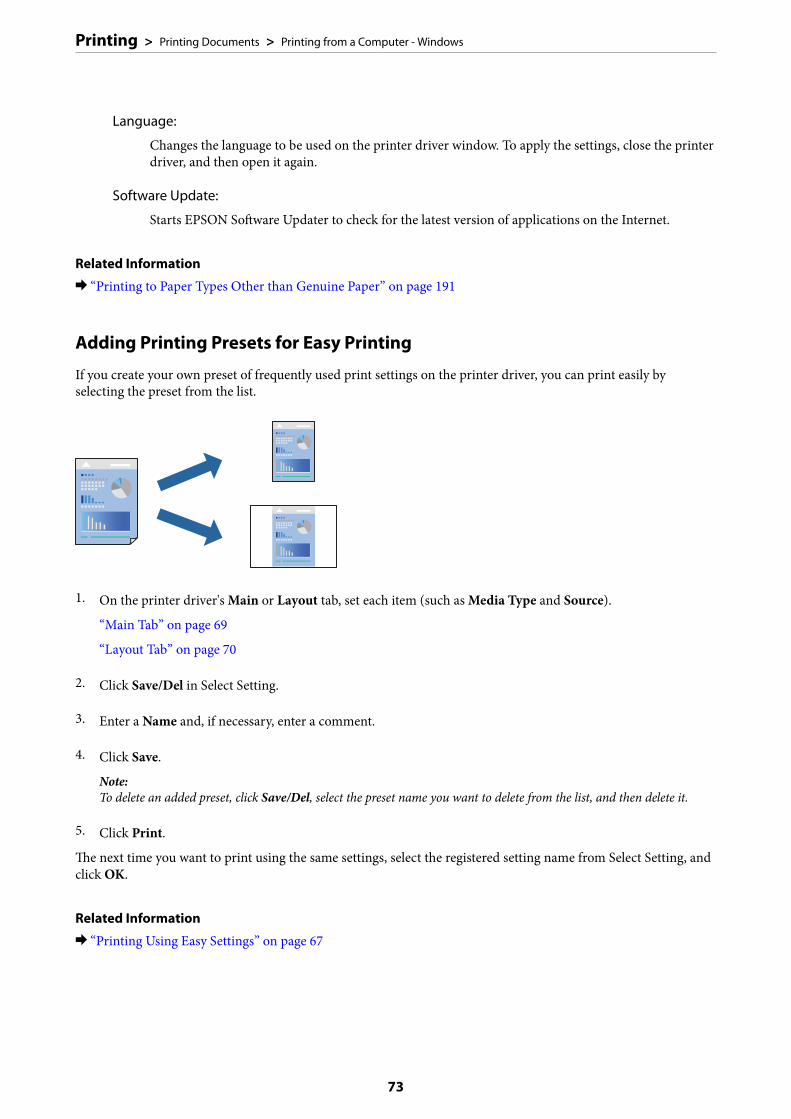
Language:
Changes the language to be used on the printer driver window. To apply the settings, close the printerdriver, and then open it again.
Software Update:
Starts EPSON Software Updater to check for the latest version of applications on the Internet.
Related Information
& “Printing to Paper Types Other than Genuine Paper” on page 191
Adding Printing Presets for Easy Printing
If you create your own preset of frequently used print settings on the printer driver, you can print easily byselecting the preset from the list.
1. On the printer driver's Main or Layout tab, set each item (such as Media Type and Source).
“Main Tab” on page 69
“Layout Tab” on page 70
2. Click Save/Del in Select Setting.
3. Enter a Name and, if necessary, enter a comment.
4. Click Save.
Note:To delete an added preset, click Save/Del, select the preset name you want to delete from the list, and then delete it.
5. Click Print.
The next time you want to print using the same settings, select the registered setting name from Select Setting, andclick OK.
Related Information
& “Printing Using Easy Settings” on page 67
Printing > Printing Documents > Printing from a Computer - Windows
73
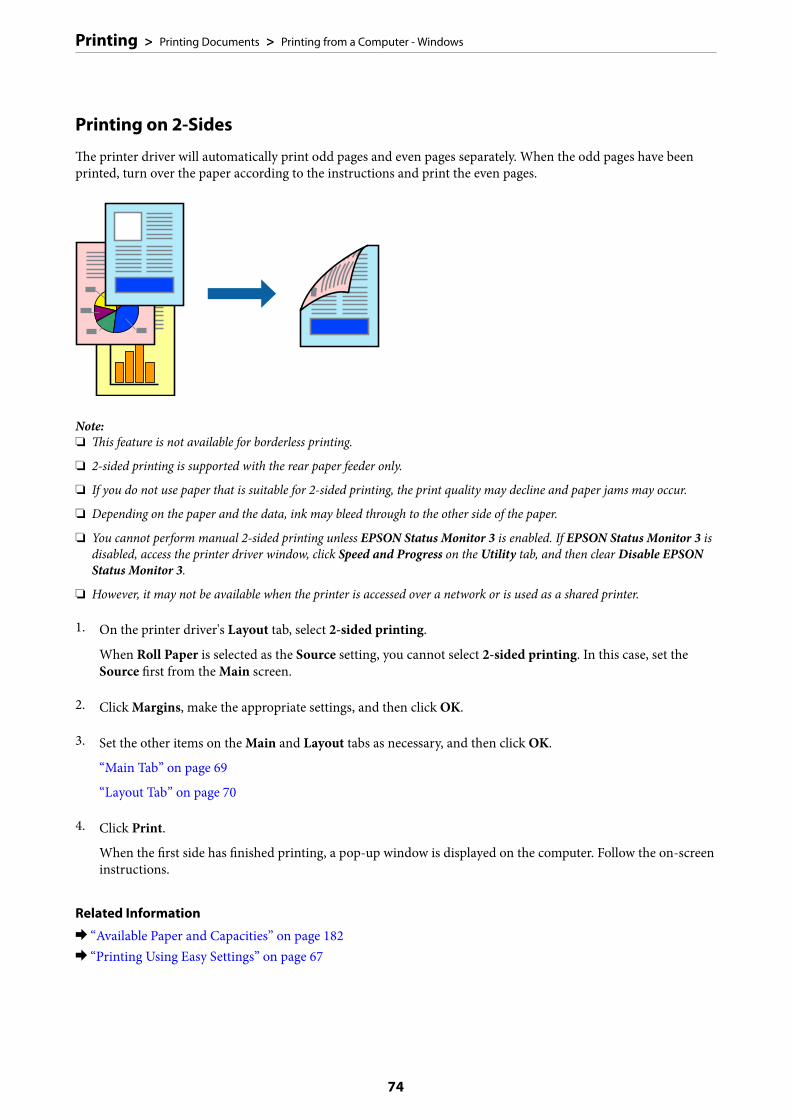
Printing on 2-Sides
The printer driver will automatically print odd pages and even pages separately. When the odd pages have beenprinted, turn over the paper according to the instructions and print the even pages.
Note:❏ This feature is not available for borderless printing.
❏ 2-sided printing is supported with the rear paper feeder only.
❏ If you do not use paper that is suitable for 2-sided printing, the print quality may decline and paper jams may occur.
❏ Depending on the paper and the data, ink may bleed through to the other side of the paper.
❏ You cannot perform manual 2-sided printing unless EPSON Status Monitor 3 is enabled. If EPSON Status Monitor 3 isdisabled, access the printer driver window, click Speed and Progress on the Utility tab, and then clear Disable EPSONStatus Monitor 3.
❏ However, it may not be available when the printer is accessed over a network or is used as a shared printer.
1. On the printer driver's Layout tab, select 2-sided printing.
When Roll Paper is selected as the Source setting, you cannot select 2-sided printing. In this case, set theSource first from the Main screen.
2. Click Margins, make the appropriate settings, and then click OK.
3. Set the other items on the Main and Layout tabs as necessary, and then click OK.
“Main Tab” on page 69
“Layout Tab” on page 70
4. Click Print.
When the first side has finished printing, a pop-up window is displayed on the computer. Follow the on-screeninstructions.
Related Information
& “Available Paper and Capacities” on page 182& “Printing Using Easy Settings” on page 67
Printing > Printing Documents > Printing from a Computer - Windows
74
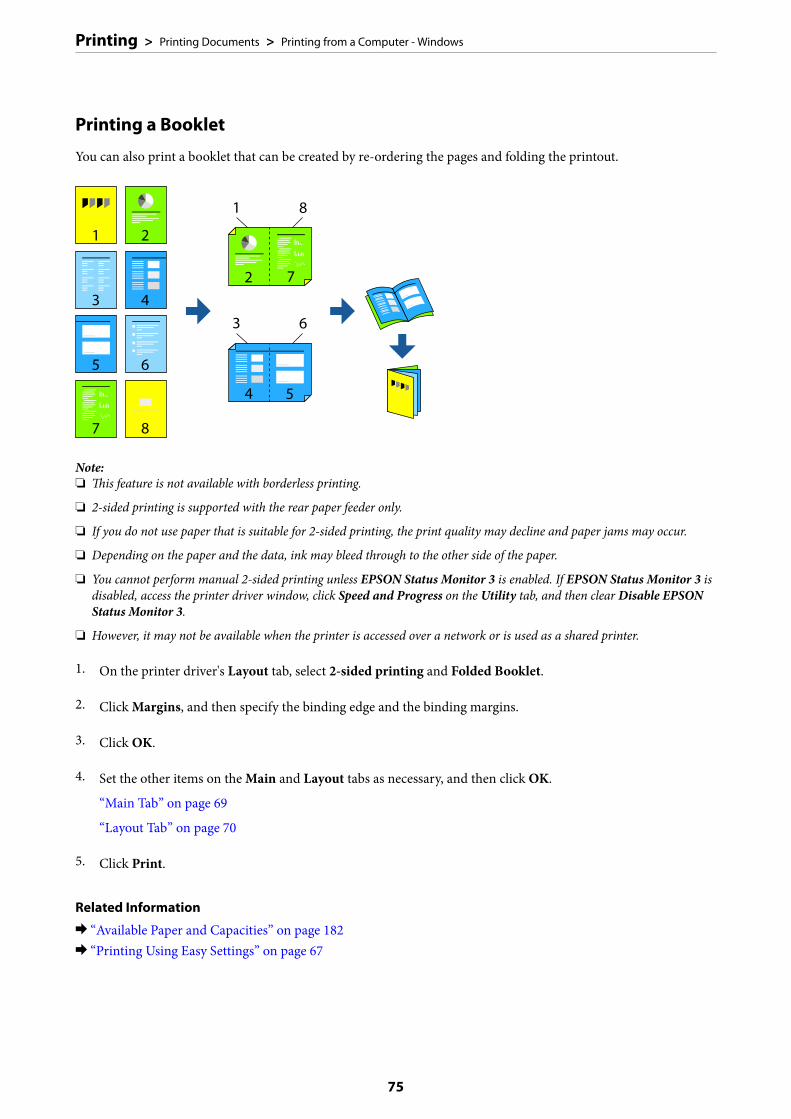
Printing a Booklet
You can also print a booklet that can be created by re-ordering the pages and folding the printout.
Note:❏ This feature is not available with borderless printing.
❏ 2-sided printing is supported with the rear paper feeder only.
❏ If you do not use paper that is suitable for 2-sided printing, the print quality may decline and paper jams may occur.
❏ Depending on the paper and the data, ink may bleed through to the other side of the paper.
❏ You cannot perform manual 2-sided printing unless EPSON Status Monitor 3 is enabled. If EPSON Status Monitor 3 isdisabled, access the printer driver window, click Speed and Progress on the Utility tab, and then clear Disable EPSONStatus Monitor 3.
❏ However, it may not be available when the printer is accessed over a network or is used as a shared printer.
1. On the printer driver's Layout tab, select 2-sided printing and Folded Booklet.
2. Click Margins, and then specify the binding edge and the binding margins.
3. Click OK.
4. Set the other items on the Main and Layout tabs as necessary, and then click OK.
“Main Tab” on page 69
“Layout Tab” on page 70
5. Click Print.
Related Information
& “Available Paper and Capacities” on page 182& “Printing Using Easy Settings” on page 67
Printing > Printing Documents > Printing from a Computer - Windows
75
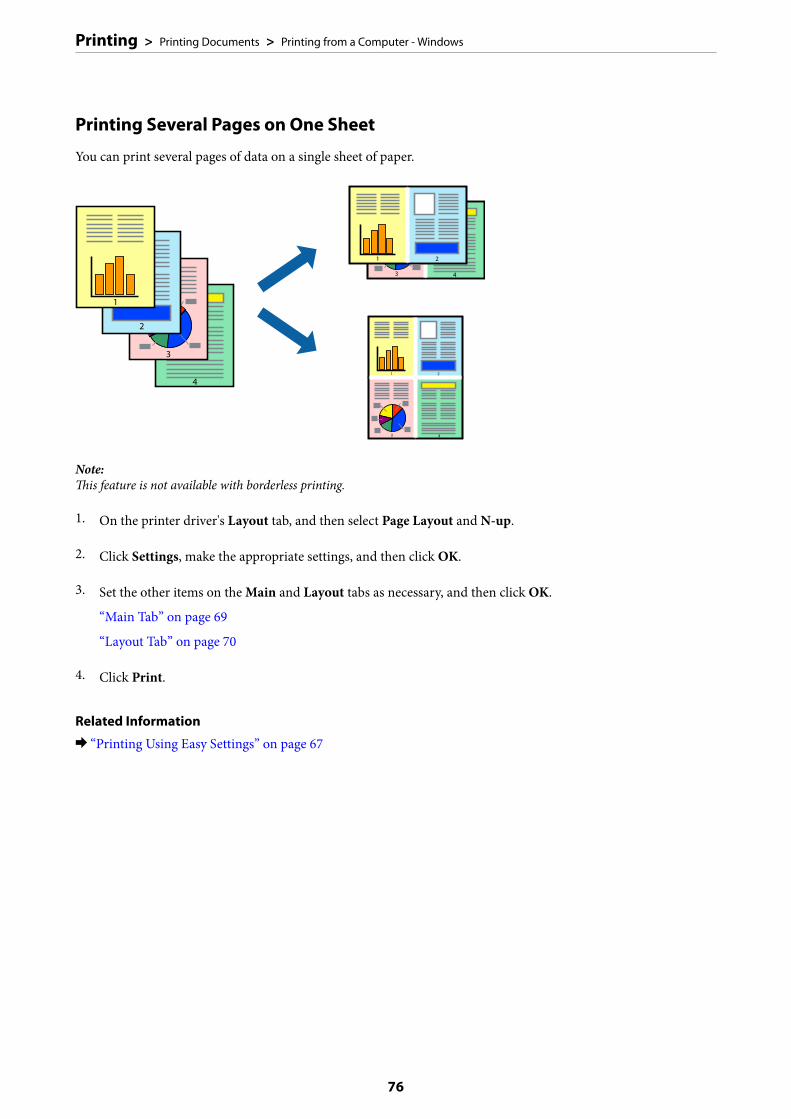
Printing Several Pages on One Sheet
You can print several pages of data on a single sheet of paper.
Note:This feature is not available with borderless printing.
1. On the printer driver's Layout tab, and then select Page Layout and N-up.
2. Click Settings, make the appropriate settings, and then click OK.
3. Set the other items on the Main and Layout tabs as necessary, and then click OK.
“Main Tab” on page 69
“Layout Tab” on page 70
4. Click Print.
Related Information
& “Printing Using Easy Settings” on page 67
Printing > Printing Documents > Printing from a Computer - Windows
76
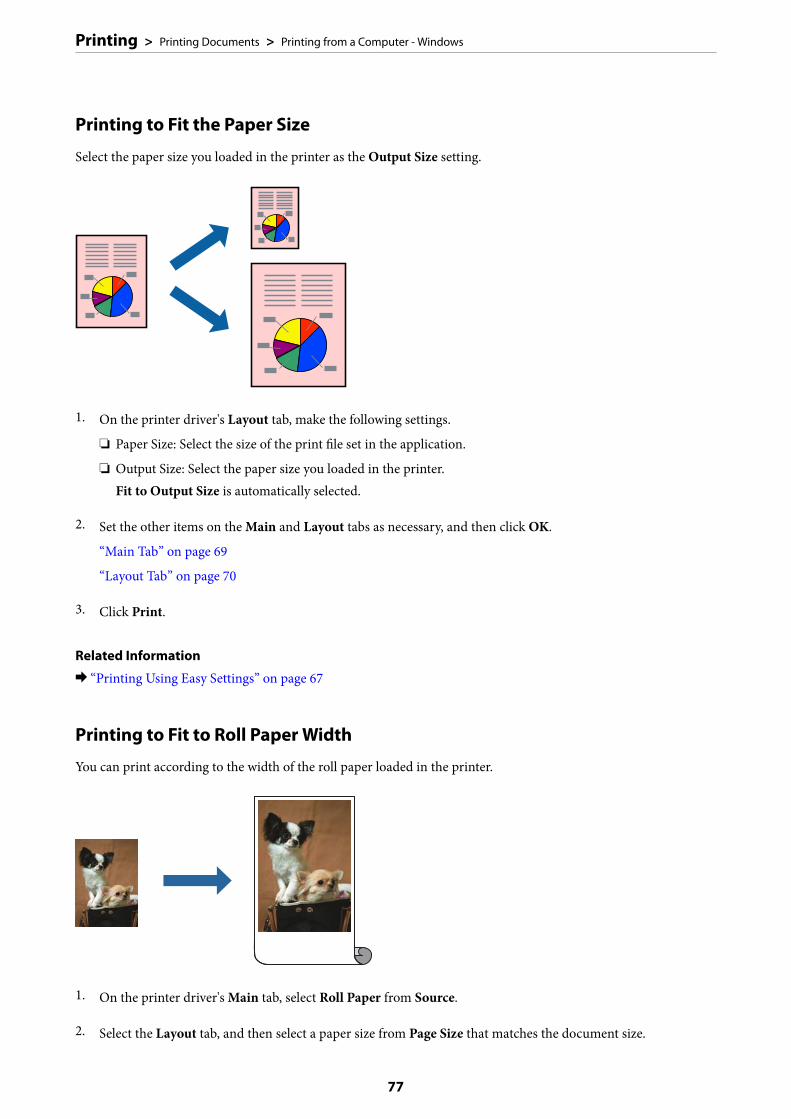
Printing to Fit the Paper Size
Select the paper size you loaded in the printer as the Output Size setting.
1. On the printer driver's Layout tab, make the following settings.
❏ Paper Size: Select the size of the print file set in the application.
❏ Output Size: Select the paper size you loaded in the printer.Fit to Output Size is automatically selected.
2. Set the other items on the Main and Layout tabs as necessary, and then click OK.
“Main Tab” on page 69
“Layout Tab” on page 70
3. Click Print.
Related Information
& “Printing Using Easy Settings” on page 67
Printing to Fit to Roll Paper Width
You can print according to the width of the roll paper loaded in the printer.
1. On the printer driver's Main tab, select Roll Paper from Source.
2. Select the Layout tab, and then select a paper size from Page Size that matches the document size.
Printing > Printing Documents > Printing from a Computer - Windows
77
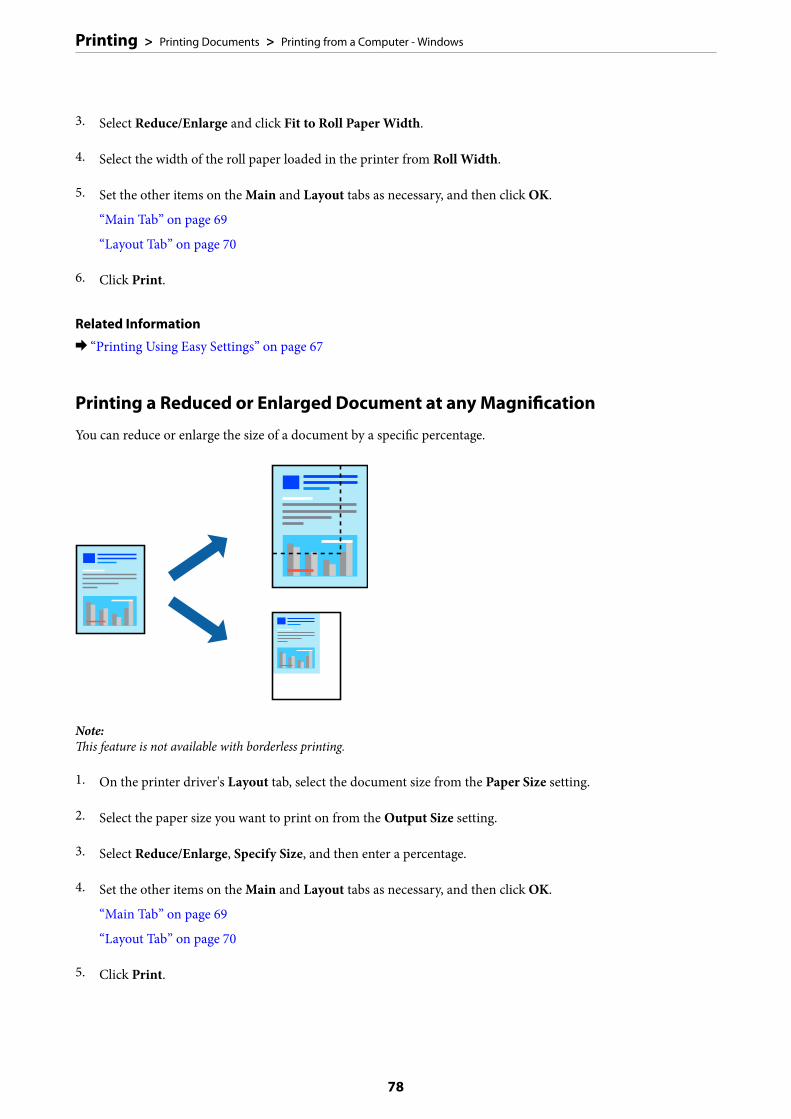
3. Select Reduce/Enlarge and click Fit to Roll Paper Width.
4. Select the width of the roll paper loaded in the printer from Roll Width.
5. Set the other items on the Main and Layout tabs as necessary, and then click OK.
“Main Tab” on page 69
“Layout Tab” on page 70
6. Click Print.
Related Information
& “Printing Using Easy Settings” on page 67
Printing a Reduced or Enlarged Document at any Magnification
You can reduce or enlarge the size of a document by a specific percentage.
Note:This feature is not available with borderless printing.
1. On the printer driver's Layout tab, select the document size from the Paper Size setting.
2. Select the paper size you want to print on from the Output Size setting.
3. Select Reduce/Enlarge, Specify Size, and then enter a percentage.
4. Set the other items on the Main and Layout tabs as necessary, and then click OK.
“Main Tab” on page 69
“Layout Tab” on page 70
5. Click Print.
Printing > Printing Documents > Printing from a Computer - Windows
78
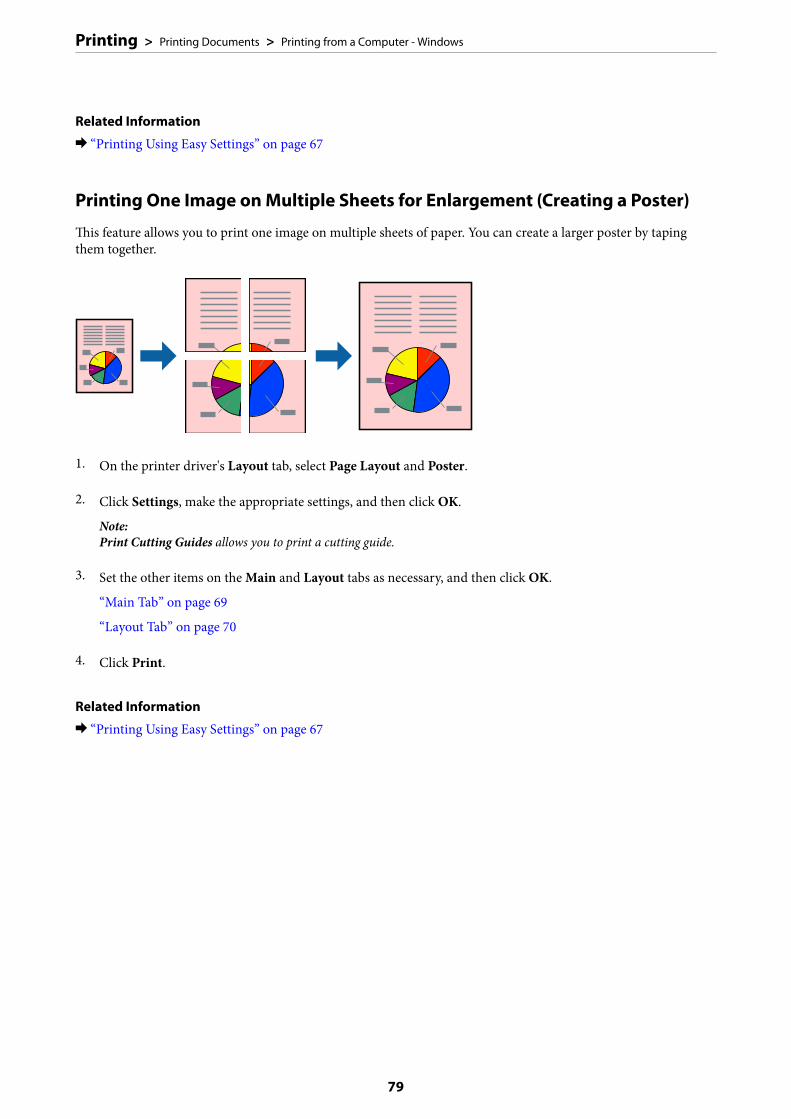
Related Information
& “Printing Using Easy Settings” on page 67
Printing One Image on Multiple Sheets for Enlargement (Creating a Poster)
This feature allows you to print one image on multiple sheets of paper. You can create a larger poster by tapingthem together.
1. On the printer driver's Layout tab, select Page Layout and Poster.
2. Click Settings, make the appropriate settings, and then click OK.
Note:Print Cutting Guides allows you to print a cutting guide.
3. Set the other items on the Main and Layout tabs as necessary, and then click OK.
“Main Tab” on page 69
“Layout Tab” on page 70
4. Click Print.
Related Information
& “Printing Using Easy Settings” on page 67
Printing > Printing Documents > Printing from a Computer - Windows
79
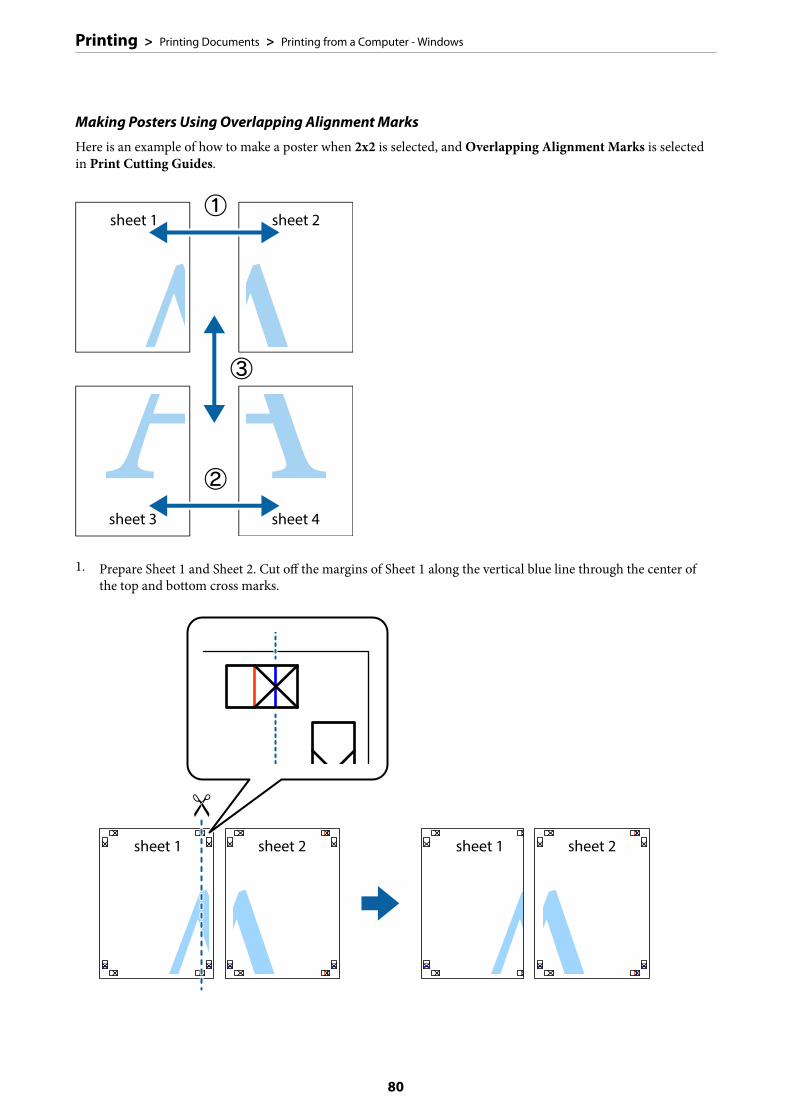
Making Posters Using Overlapping Alignment Marks
Here is an example of how to make a poster when 2x2 is selected, and Overlapping Alignment Marks is selectedin Print Cutting Guides.
1. Prepare Sheet 1 and Sheet 2. Cut off the margins of Sheet 1 along the vertical blue line through the center ofthe top and bottom cross marks.
Printing > Printing Documents > Printing from a Computer - Windows
80
2. Place the edge of Sheet 1 on top of Sheet 2 and align the cross marks, then temporarily tape the two sheetstogether from the back.
3. Cut the taped sheets in two along the vertical red line through the alignment markers (this time, the line to theleft of the cross marks).
Printing > Printing Documents > Printing from a Computer - Windows
81

4. Tape the sheets together from the back.
5. Repeat steps 1 to 4 to tape Sheet 3 and Sheet 4 together.
6. Cut off the margins of Sheet 1 and Sheet 2 along the horizontal blue line through the center of the left and rightside cross marks.
Printing > Printing Documents > Printing from a Computer - Windows
82
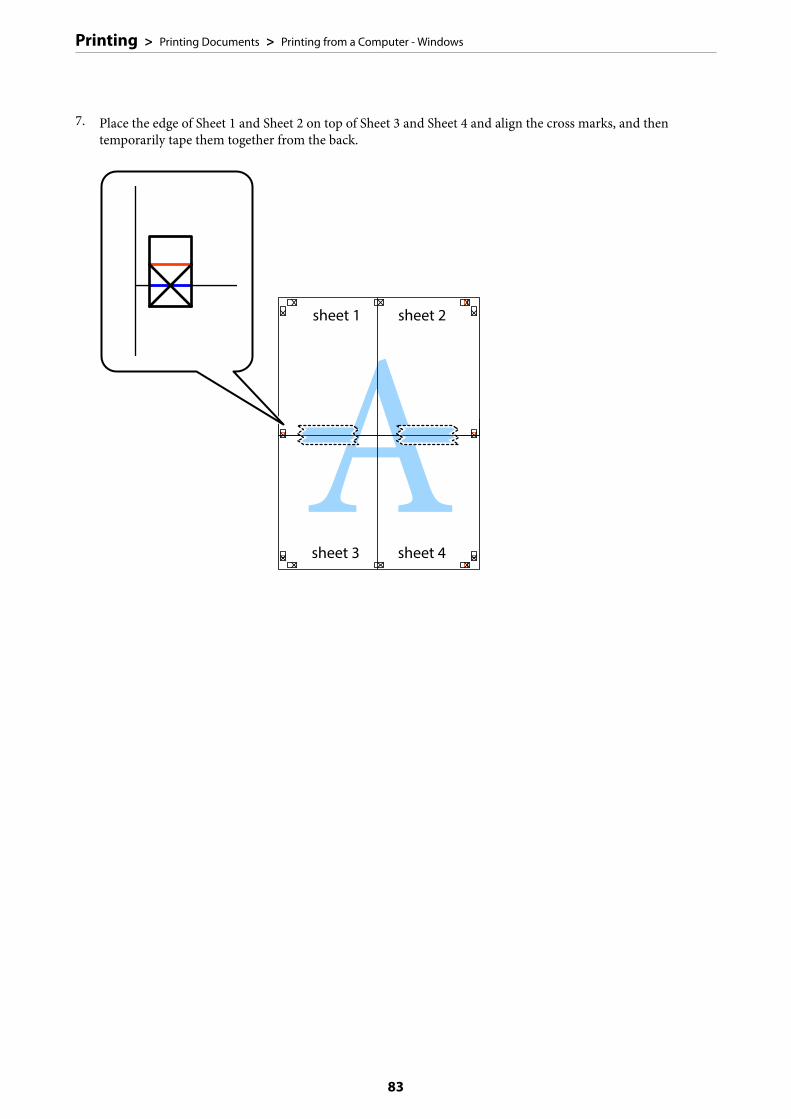
7. Place the edge of Sheet 1 and Sheet 2 on top of Sheet 3 and Sheet 4 and align the cross marks, and thentemporarily tape them together from the back.
Printing > Printing Documents > Printing from a Computer - Windows
83
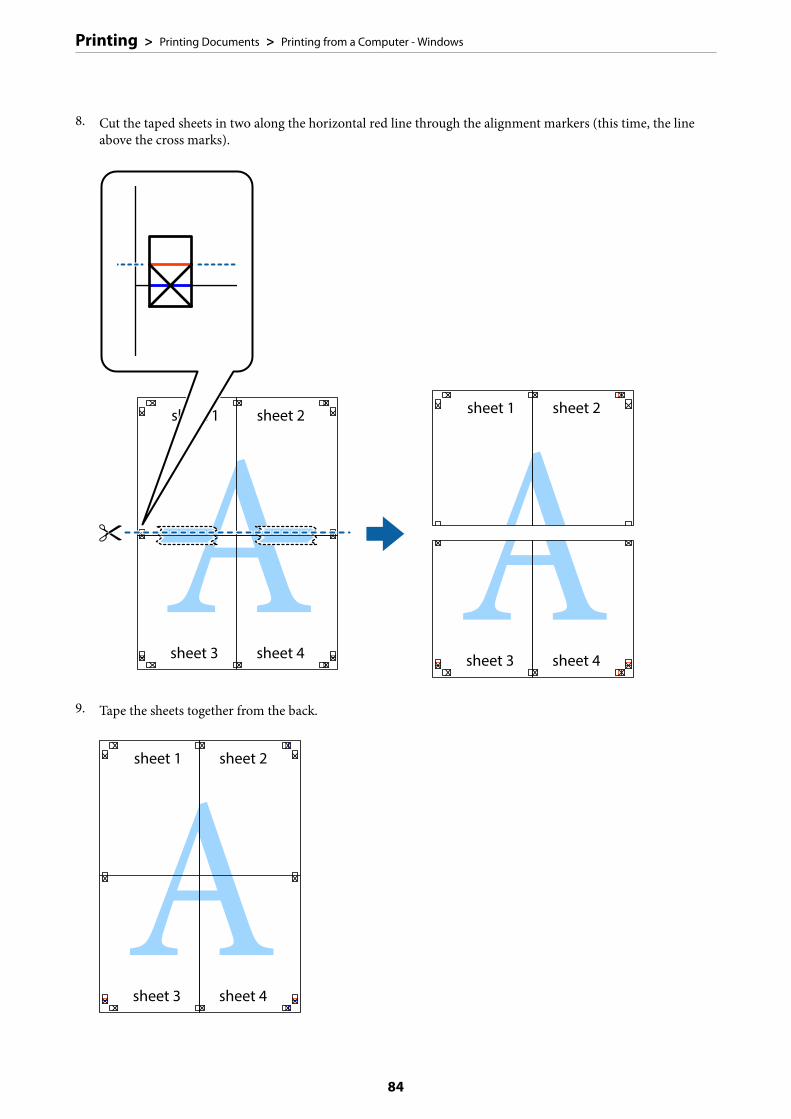
8. Cut the taped sheets in two along the horizontal red line through the alignment markers (this time, the lineabove the cross marks).
9. Tape the sheets together from the back.
Printing > Printing Documents > Printing from a Computer - Windows
84
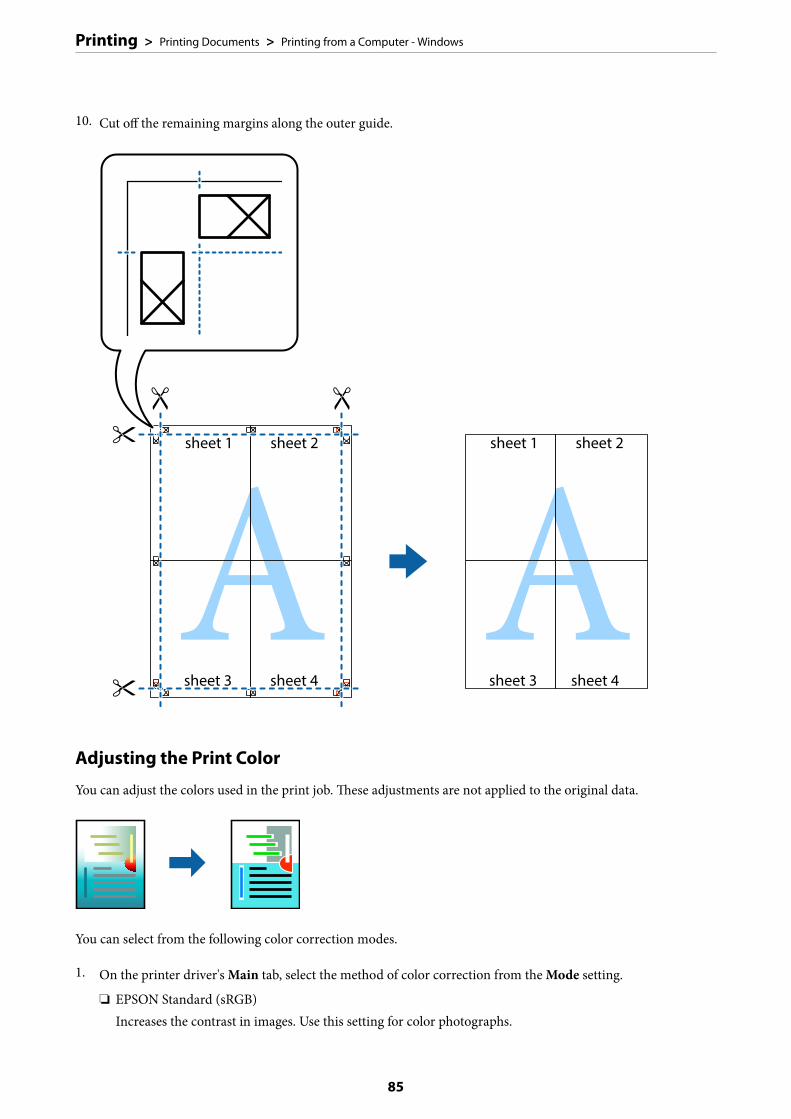
10. Cut off the remaining margins along the outer guide.
Adjusting the Print Color
You can adjust the colors used in the print job. These adjustments are not applied to the original data.
You can select from the following color correction modes.
1. On the printer driver's Main tab, select the method of color correction from the Mode setting.
❏ EPSON Standard (sRGB)Increases the contrast in images. Use this setting for color photographs.
Printing > Printing Documents > Printing from a Computer - Windows
85
❏ Adobe RGBMatches image color to the Adobe RGB. Use this setting for data that contains Adobe RGB color spaceinformation.
❏ PhotoEnhancePhotoEnhance is a feature that uses Epson's proprietary image analysis and processing technology toautomatically print images at a higher quality.
❏ ICMSelect this setting when you use the Windows ICM (Image Color Matching) feature to match colorsbetween devices such as the printer and screen display.
Click Advanced if you want to make your own settings.
2. Set the other items on the Main and Layout tabs as necessary, and then click OK.
“Main Tab” on page 69
“Layout Tab” on page 70
3. Click Print.
Related Information
& “Printing Using Easy Settings” on page 67
Printing Multiple Files Together (Layout Manager)
The Layout Manager function allows you to place multiple pieces of print data created in different applications onthe paper freely and print them at once.
You can create a poster or display material by placing multiple pieces of print data where you like. Also, LayoutManager allows you to use paper effectively.
1. Open the file you want to print in your application.
2. On the printer driver's Main tab, select Layout Manager and in Document Size set the paper size createdusing the application.
Note:The option selected for Size is the size used in the Layout Manager. The actual printing paper size is set in the screen instep 6.
Printing > Printing Documents > Printing from a Computer - Windows
86
3. Click OK. When printing with an application, the Layout Manager screen opens.
The print data is not printed, but one page is placed on the paper of the Layout Manager screen as one object.
4. Leave the Layout Manager screen open and repeat steps 1 to 3 to arrange the next pieces of data.
The objects are added to the Layout Manager screen.
5. Arrange the objects on the Layout Manager screen.
You can drag objects to move and resize them, use tool buttons and the Object menu to align and rotateobjects on the Layout Manager screen.
You can resize and replace whole objects in the Preference or Arrangement Settings screens.
See the Layout Manager screen help for more details on each feature.
6. Click File > Properties, and make print settings on the printer driver screen.
Set Media Type, Source, Document Size, and so on.
7. Click the File menu on the Layout Manager screen, and then click Print.
Related Information
& “Printing Using Easy Settings” on page 67
Printing from a Computer - Mac OS
Printing Using Easy Settings
Note:Operations and screens differ depending on the application. See the application's help for details.
1. Load paper in the printer .
2. Open the file you want to print.
3. Select Print from the File menu or another command to access the print dialog.
If necessary, click Show Details or d to expand the print window.
4. Select your printer.
Printing > Printing Documents > Printing from a Computer - Mac OS
87
5. Select Print Settings from the pop-up menu.
Note:If the Print Settings menu is not displayed on macOS High Sierra, macOS Sierra, OS X El Capitan, OS X Yosemite, OSX Mavericks, the Epson printer driver has not been installed correctly. Enable it from the following menu.
Select System Preferences from the Apple menu > Printers & Scanners (or Print & Scan, Print & Fax), remove theprinter, and then add the printer again. See the following to add a printer.
“Adding the Printer (for Mac OS Only)” on page 109
macOS Mojave or later cannot access Print Settings in applications made by Apple such as TextEdit.
6. Change the settings as necessary.
See the menu options for the printer driver for details.
7. Click Print.
Note:If you want to cancel printing, on your computer click the printer icon in the Dock. Select the job you want to cancel,
and then click next to the progress meter. However, you cannot cancel a print job from the computer once it hasbeen completely sent to the printer. In this case, cancel the print job by using the printer's control panel.
Related Information
& “Available Paper and Capacities” on page 182& “Menu Options for the Printer Driver” on page 89
Printing > Printing Documents > Printing from a Computer - Mac OS
88
Menu Options for the Printer Driver
Open the print window in an application, select the printer, and then access the printer driver window.
Note:Menus vary depending on the option you selected.
Menu Options for Layout
Pages per Sheet:
Select the number of pages to be printed on one sheet.
Layout Direction:
Specify the order in which the pages will be printed.
Border:
Prints a border around the pages.
Reverse page orientation:
Rotates pages 180 degrees before printing.
Flip horizontally:
Inverts an image to print as it would appear in a mirror.
Menu Options for Color Matching
ColorSync/EPSON Color Controls:
Select the method for color adjustment. These options adjusts colors between the printer and thecomputer display to minimize the difference in color.
Menu Options for Paper Handling
Collate pages:
Prints multi-page documents collated in order and sorted into sets.
Pages to Print:
Select to print only odd pages or even pages.
Page Order:
Select to print from the top or the last page.
Scale to fit paper size:
Prints to fit to the paper size you loaded.
❏ Destination Paper Size:Select the paper size to print on.
Printing > Printing Documents > Printing from a Computer - Mac OS
89
❏ Scale down only:Select this when you want to reduce the size only if the print data is too large for the paper sizeloaded in the printer.
Menu Options for Cover Page
Print Cover Page:
Select whether or not to print a cover page. When you want to add a back cover, select After document.
Cover Page Type:
Select the contents of the cover page.
Menu Options for Print Settings
Basic:
Page Setup:
Displays the paper setting or Standard selected in Paper Size.
Media Type:
Select the type of paper on which you print.
Color:
Select whether to print in color or in monochrome.
Color Settings:
Make the color tone settings for the prints. If Advanced B&W Photo is selected as the Color setting, setthe color tone for Color Toning.
Print Quality:
Select the pint quality you want to use for printing. The options vary depending on the paper type.
Black Enhance Overcoat:
Select to print with enhanced image contrast and tones of black. Black Enhance Overcoatcan only beselected for supported paper.
Gloss Smoothing:
Select this option when printing on photo paper to reduce the amount of light that is reflected off blackareas and achieve a smoother gloss. However, black density may decrease. Gloss Smoothing is availablewhen you have selected Photo Paper as the Media Type. This option may not be available dependingon the print quality settings.
High Speed:
Prints when the print head moves in both directions. The print speed is faster, but the quality maydecline.
Printing > Printing Documents > Printing from a Computer - Mac OS
90
Finest Detail:
Depending on the Print Quality setting you select, you can turn on Finest Detail to print text, solidgraphics, and line art with very sharp edges.
Print Preview:
Displays a preview of your document before printing.
Advanced Color Settings:
You can set the gamma and adjust brightness, contrast, and saturation.
Print Preview:
Displays a preview of your document before printing.
Menu Options for Page Layout Settings
Roll Paper Option:
You can make settings related to roll paper printing, such as Auto Rotate and Print page frame.
Expansion:
You can adjust the amount of protrusion during borderless printing.
Menu Options for Paper Configuration
Color Density:
Adjusts the strength of Color Density. Drag the slider to the right or left with your mouse to adjust thesetting. You can also type a number in the box next to the slider.
Menu Options for Supply Levels
Displays the approximate ink level.
Adding Printing Presets for Easy Printing
If you create your own preset of frequently used print settings on the printer driver, you can print easily byselecting the preset from the list.
Printing > Printing Documents > Printing from a Computer - Mac OS
91
1. Set each item such as Print Settings and Layout (Media Type, Color, and so on).
2. Click Presets to save the current settings as a preset.
3. Click OK.
Note:To delete an added preset, click Presets > Show Presets, select the preset name you want to delete from the list, and thendelete it.
4. Click Print.
The next time you want to print using the same settings, select the registered preset name from the Presets.
Related Information
& “Printing Using Easy Settings” on page 87
Printing Several Pages on One Sheet
You can print several pages of data on a single sheet of paper.
1. Select Layout from the pop-up menu.
2. Set the number of pages in Pages per Sheet, the Layout Direction (page order), and Border.
“Menu Options for Layout” on page 89
3. Set the other items as necessary.
4. Click Print.
Related Information
& “Printing Using Easy Settings” on page 87
Printing > Printing Documents > Printing from a Computer - Mac OS
92
Printing to Fit the Paper Size
Select the paper size you loaded in the printer as the Destination Paper Size setting.
1. Select Paper Handling from the pop-up menu.
2. Select Scale to fit paper size.
3. Select the paper size you loaded in the printer as the Destination Paper Size setting.
4. Set the other items as necessary.
5. Click Print.
Related Information
& “Printing Using Easy Settings” on page 87
Printing a Reduced or Enlarged Document at any Magnification
You can reduce or enlarge the size of a document by a specific percentage.
1. Select Print from the File menu or another command to access the print dialog.
Printing > Printing Documents > Printing from a Computer - Mac OS
93
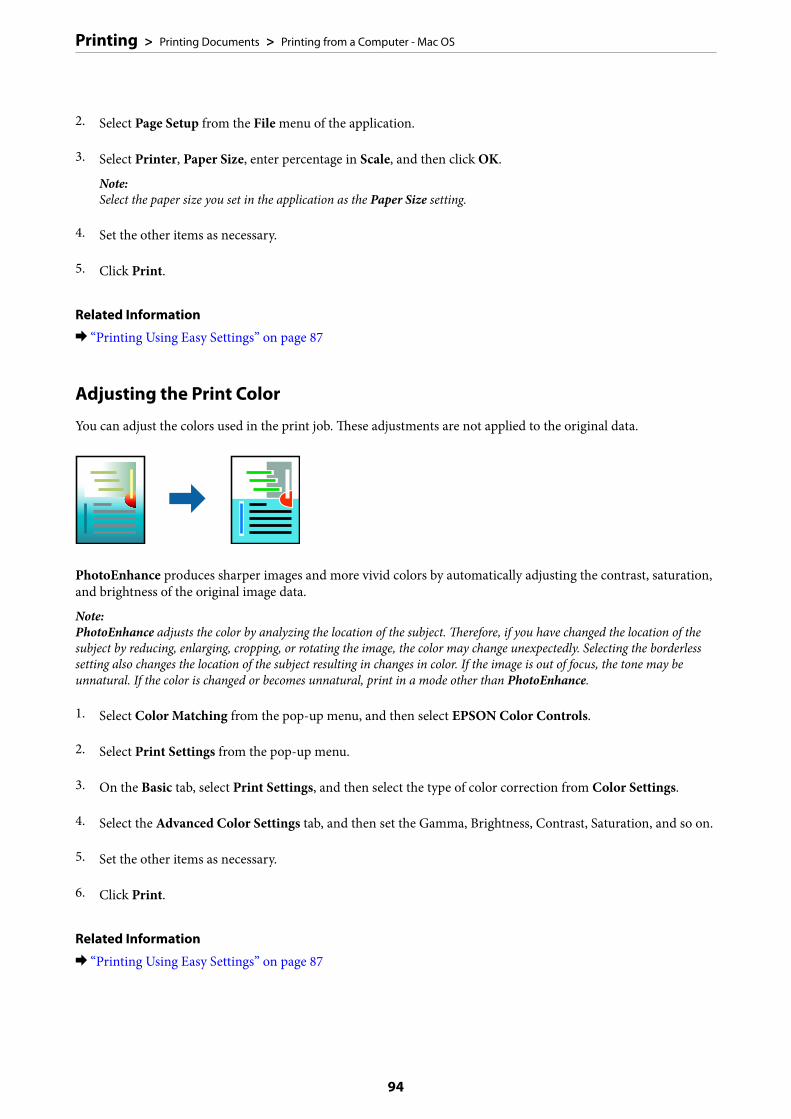
2. Select Page Setup from the File menu of the application.
3. Select Printer, Paper Size, enter percentage in Scale, and then click OK.
Note:Select the paper size you set in the application as the Paper Size setting.
4. Set the other items as necessary.
5. Click Print.
Related Information
& “Printing Using Easy Settings” on page 87
Adjusting the Print Color
You can adjust the colors used in the print job. These adjustments are not applied to the original data.
PhotoEnhance produces sharper images and more vivid colors by automatically adjusting the contrast, saturation,and brightness of the original image data.
Note:PhotoEnhance adjusts the color by analyzing the location of the subject. Therefore, if you have changed the location of thesubject by reducing, enlarging, cropping, or rotating the image, the color may change unexpectedly. Selecting the borderlesssetting also changes the location of the subject resulting in changes in color. If the image is out of focus, the tone may beunnatural. If the color is changed or becomes unnatural, print in a mode other than PhotoEnhance.
1. Select Color Matching from the pop-up menu, and then select EPSON Color Controls.
2. Select Print Settings from the pop-up menu.
3. On the Basic tab, select Print Settings, and then select the type of color correction from Color Settings.
4. Select the Advanced Color Settings tab, and then set the Gamma, Brightness, Contrast, Saturation, and so on.
5. Set the other items as necessary.
6. Click Print.
Related Information
& “Printing Using Easy Settings” on page 87
Printing > Printing Documents > Printing from a Computer - Mac OS
94
Printing Documents from Smart Devices (iOS)You can print documents from a smart device such as a smartphone or tablet.
Printing Documents Using Epson Smart Panel
Note:Operations may differ depending on the device.
1. Load paper in the printer.
“Loading Paper” on page 26
2. Set up your printer for wireless printing.
3. If Epson Smart Panel is not installed, install it.
“Application for Easily Operating the Printer from a Smart device (Epson Smart Panel)” on page 202
4. Connect your smart device to the same wireless network as your printer.
5. Start Epson Smart Panel.
6. Tap Print Documents on the home screen.
7. Tap Select Document.
8. Tap the location of the document you want to print, and then select the document.
9. Tap Print.
Printing Documents Using AirPrint
AirPrint enables instant wireless printing from iPhone, iPad, iPod touch, and Mac without the need to installdrivers or download software.
Note:If you disabled paper configuration messages on your printer control panel, you cannot use AirPrint. See the link below toenable the messages, if necessary.
Printing > Printing Documents > Printing Documents from Smart Devices (iOS)
95
1. Load paper in the printer.
“Loading Paper” on page 26
2. Set up your printer for wireless printing. See the link below.
http://epson.sn
3. Connect your Apple device to the same wireless network that your printer is using.
4. Print from your device to your printer.
Note:For details, see the AirPrint page on the Apple website.
Related Information
& “Cannot Print Even Though a Connection has been Established (iOS)” on page 135
Printing Documents from Smart Devices (Android)You can print documents from a smart device such as a smartphone or tablet.
Printing Documents Using Epson Smart Panel
Note:Operations may differ depending on the device.
1. Load paper in the printer.
“Loading Paper” on page 26
2. Set up your printer for wireless printing.
3. If Epson Smart Panel is not installed, install it.
“Application for Easily Operating the Printer from a Smart device (Epson Smart Panel)” on page 202
4. Connect your smart device to the same wireless network as your printer.
5. Start Epson Smart Panel.
6. Tap Print Documents on the home screen.
7. Tap Select Document.
8. Tap the location of the document you want to print, and then select the document.
Printing > Printing Documents > Printing Documents from Smart Devices (Android)
96
9. Tap Print.
Printing Using Mopria Print Service
Mopria Print Service enables instant wireless printing from Android smart phones or tablets.
1. Install Mopria Print Service from Google Play.
2. Load paper in the printer.
3. Set up your printer for wireless printing. See the link below.
http://epson.sn
4. Connect your Android device to the same wireless network that your printer is using.
5. Print from your device to your printer.
Note:For more details, access the Mopria Web site at https://mopria.org.
Related Information
& “Loading Paper” on page 26
Printing > Printing Documents > Printing Documents from Smart Devices (Android)
97
Printing Using a Cloud ServiceBy using Epson Connect service available on the Internet, you can print from your smartphone, tablet PC, orlaptop, anytime and practically anywhere. To use this service, you need to register the user and the printer inEpson Connect.
The features available on the Internet are as follows.
❏ Email PrintWhen you send an email with attachments such as documents or images to an email address assigned to theprinter, you can print that email and the attachments from remote locations such as your home or office printer.
❏ Remote Print DriverThis is a shared driver supported by Remote Print Driver. When printing using a printer in a remote location,you can print by changing the printer on the usual applications window.
See the Epson Connect web portal for details on how to setup or print.
https://www.epsonconnect.com/
http://www.epsonconnect.eu (Europe only)
Registering to Epson Connect Service from the Control PanelFollow the steps below to register the printer.
1. Select on the control panel.
2. Select General Settings > Web Service Settings > Epson Connect Services > Register > Start Setup to printthe registration sheet.
3. Follow the instructions on the registration sheet to register the printer.
Printing > Printing Using a Cloud Service > Registering to Epson Connect Service from the Control Panel
98
Maintaining the Printer
Checking the Status of Consumables. . . . . . . . . . . . . . . . . . . . . . . . . . . . . . . . . . . 100
Improving Paper Feeding Problems (Rear Paper Feeder). . . . . . . . . . . . . . . . . . . . . 100
Improving Print Quality. . . . . . . . . . . . . . . . . . . . . . . . . . . . . . . . . . . . . . . . . . . . 101
Saving Power. . . . . . . . . . . . . . . . . . . . . . . . . . . . . . . . . . . . . . . . . . . . . . . . . . . . 106
Installing or Uninstalling Applications Separately. . . . . . . . . . . . . . . . . . . . . . . . . . 107
Transporting and Storing the Printer. . . . . . . . . . . . . . . . . . . . . . . . . . . . . . . . . . . 112
Checking the Status of ConsumablesYou can check the approximate ink levels and the approximate service life of the maintenance box from the controlpanel or the computer.
Note:You can continue printing while the ink low message is displayed. Replace the ink cartridges when required.
Checking the Status of Consumables (Control Panel)
Select on the printer's control panel.
Checking the Status of Consumables (Windows)
1. Access the printer driver window.
2. Click EPSON Status Monitor 3 on the Utility tab.
Note:If EPSON Status Monitor 3 is disabled, click Speed and Progress on the Utility tab, and then clear Disable EPSONStatus Monitor 3.
Checking the Status of Consumables (Mac OS)
1. Select System Preferences from the Apple menu > Printers & Scanners (or Print & Scan, Print& Fax), and then select the printer.
2. Click Options & Supplies > Utility > Open Printer Utility.
3. Click EPSON Status Monitor.
Related Information
& “It is Time to Replace the Ink Cartridges” on page 141& “It is Time to Replace the Maintenance Box” on page 143
Improving Paper Feeding Problems (Rear PaperFeeder)If you have a paper feed problem from the rear paper feeder, and if you have a cleaning sheet that came with Epsongenuine paper, load the cleaning sheet and clean the inside of the printer. For details on using the cleaning sheet,see the instructions that came with the sheet.
1. Remove any paper for printing loaded in the rear paper feeder.
2. Remove the protective sheet from the cleaning sheet.
The cleaning sheet has adhesive tape under the protective sheet. Be careful not to touch the surface of thecleaning sheet or attach it to anything else.
3. Load the cleaning sheet in the rear paper feeder.
Maintaining the Printer > Improving Paper Feeding Problems (Rear Paper Feeder)
100
4. Select on the printer's control panel.
5. Select Maintenance > Paper Guide Cleaning.
6. Follow the on-screen instructions to clean the paper path.
Repeat this procedure two or three times.
Note:The cleaning sheet loses effect when used three times or more.
Improving Print Quality
Checking and Cleaning the Print HeadIf the nozzles are clogged, the printouts become faint, there is visible banding, or unexpected colors appear. If thenozzles are severely clogged, a blank sheet will be printed. When print quality has declined, first use the nozzlecheck feature to check if the nozzles are clogged. If the nozzles are clogged, clean the print head.
cImportant:
❏ Do not open the printer cover or turn off the printer during head cleaning. If the head cleaning is incomplete, youmay not be able to print.
❏ Head cleaning consumes ink and should not be performed more than necessary.
❏ When ink is low, you may not be able to clean the print head.
❏ If print quality has not improved after repeating nozzle check and head cleaning 3 times, wait for at least 6 hourswithout printing, and then run the nozzle check again and repeat the head cleaning if necessary. We recommendturning off the printer by using the P button. If print quality has still not improved, run Power Cleaning.
❏ To prevent the print head from drying out, do not unplug the printer while the power is on.
Checking and Cleaning the Print Head (Control Panel)
1. Load A4-size plain paper in the printer.
“Loading Paper in the Rear Paper Feeder” on page 29
2. Select on the printer's control panel.
3. Select Maintenance.
4. Select Print Head Nozzle Check.
5. Follow the on-screen instructions to print the nozzle check pattern.
Maintaining the Printer > Improving Print Quality > Checking and Cleaning the Print Head
101
6. Check the printed pattern to see if the print head nozzles are clogged.
❏ A:
All lines are printed. Select . No further steps are needed.
❏ B or close to B:
Some nozzles are clogged. Select , and then select Head Cleaning on the next screen.
❏ C or worse than C:
If most lines are missing or not printed, this indicates most nozzles are clogged. Select , and then selectPower Cleaning on the next screen.
7. Follow the on-screen instructions to perform print head cleaning or Power Cleaning.
8. When cleaning is finished, print the nozzle check pattern again. Repeat cleaning and printing the pattern untilall lines are printed completely.
cImportant:
If print quality has not improved after repeating nozzle check and head cleaning 3 times, wait for at least 6hours without printing, and then run the nozzle check again and repeat the head cleaning if necessary. Werecommend turning off the printer using the P button. If print quality has still not improved, run PowerCleaning.
Related Information
& “Running Power Cleaning” on page 103
Checking and Cleaning the Print Head (Windows)
1. Load A4 -size plain paper in the printer.
“Loading Paper in the Rear Paper Feeder” on page 29
2. Access the printer driver window.
3. Click Print Head Nozzle Check on the Utility tab.
Maintaining the Printer > Improving Print Quality > Checking and Cleaning the Print Head
102
4. Follow the on-screen instructions.
cImportant:
If print quality has not improved after repeating nozzle check and head cleaning 3 times, wait for at least 6hours without printing, and then run the nozzle check again and repeat the head cleaning if necessary. Werecommend turning off the printer using the P button. If print quality has still not improved, run PowerCleaning.
Related Information
& “Running Power Cleaning” on page 103
Checking and Cleaning the Print Head (Mac OS)
1. Load A4 -size plain paper in the printer.
“Loading Paper in the Rear Paper Feeder” on page 29
2. Select System Preferences from the Apple menu > Printers & Scanners (or Print & Scan, Print & Fax), andthen select the printer.
3. Click Option & Supplies > Utility > Open Printer Utility.
4. Click Print Head Nozzle Check.
5. Follow the on-screen instructions.
cImportant:
If print quality has not improved after repeating nozzle check and head cleaning 3 times, wait for at least 6hours without printing, and then run the nozzle check again and repeat the head cleaning if necessary. Werecommend turning off the printer using the P button. If print quality has still not improved, run PowerCleaning.
Related Information
& “Running Power Cleaning” on page 103
Running Power CleaningThe Power Cleaning feature may improve print quality in the following cases.
❏ When most nozzles are clogged.
❏ When you have performed a nozzle check and head cleaning 3 times and waited for at least 6 hours withoutprinting, but print quality still did not improve.
cImportant:
The Power Cleaning uses more ink than the print head cleaning.
Maintaining the Printer > Improving Print Quality > Running Power Cleaning
103
Running Power Cleaning (Control Panel)
1. Load A4 -size plain paper in the printer.
“Loading Paper in the Rear Paper Feeder” on page 29
2. Select on the printer's control panel.
3. Select Maintenance.
4. Select Print Head Cleaning > Power Cleaning.
5. When cleaning is finished, print the nozzle check pattern again. Check that all of the lines in the nozzle checkpattern are printed correctly.
cImportant:
If print quality has not improved after running Power Cleaning, wait for at least 6 hours without printing, andthen print the nozzle check pattern again. Run Head Cleaning or Power Cleaning again depending on theprinted pattern. If quality still does not improve, contact Epson support.
Related Information
& “Checking and Cleaning the Print Head” on page 101
Running Power Cleaning (Windows)
1. Access the printer driver window.
2. Click Print Head Cleaning on the Utility tab.
3. Select Power Cleaning.
4. Follow the on-screen instructions.
cImportant:
If print quality has not improved after running Power Cleaning, wait for at least 6 hours without printing, andthen print the nozzle check pattern again. Run Cleaning or Power Cleaning again depending on the printedpattern. If quality still does not improve, contact Epson support.
Related Information
& “Checking and Cleaning the Print Head” on page 101
Running Power Cleaning (Mac OS)
1. Select System Preferences from the Apple menu > Printers & Scanners (or Print & Scan, Print & Fax), andthen select the printer.
2. Click Option & Supplies > Utility > Open Printer Utility.
Maintaining the Printer > Improving Print Quality > Running Power Cleaning
104
3. Click Print Head Cleaning.
4. Select Power Cleaning.
5. Follow the on-screen instructions.
cImportant:
If print quality has not improved after running Power Cleaning, wait for at least 6 hours without printing, andthen print the nozzle check pattern again. Run Cleaning or Power Cleaning again depending on the printedpattern. If quality still does not improve, contact Epson support.
Related Information
& “Checking and Cleaning the Print Head” on page 101
Preventing nozzle cloggingAlways use the power button when turning the printer on and off.
Check that the power light is off before you disconnect the power cord.
The ink itself can dry out if it is not covered. Just like placing a cap on a fountain pen or an oil pen to prevent itfrom drying, make sure the print head is capped properly to prevent the ink from drying.
When the power cord is unplugged or a power outage occurs while the printer is in operation, the print head maynot be capped properly. If the print head is left as it is, it will dry out causing nozzles (ink outlets) to clog.
In these cases, turn the printer on and off again as soon as possible to cap the print head.
Aligning the Print Head
1. Load A4-size Photo Quality Ink Jet Paper in the printer.
You can also use plain paper instead.
“Loading Paper in the Rear Paper Feeder” on page 29
2. Select on the printer's control panel.
3. Select Maintenance > Print Head Alignment.
Maintaining the Printer > Improving Print Quality > Aligning the Print Head
105
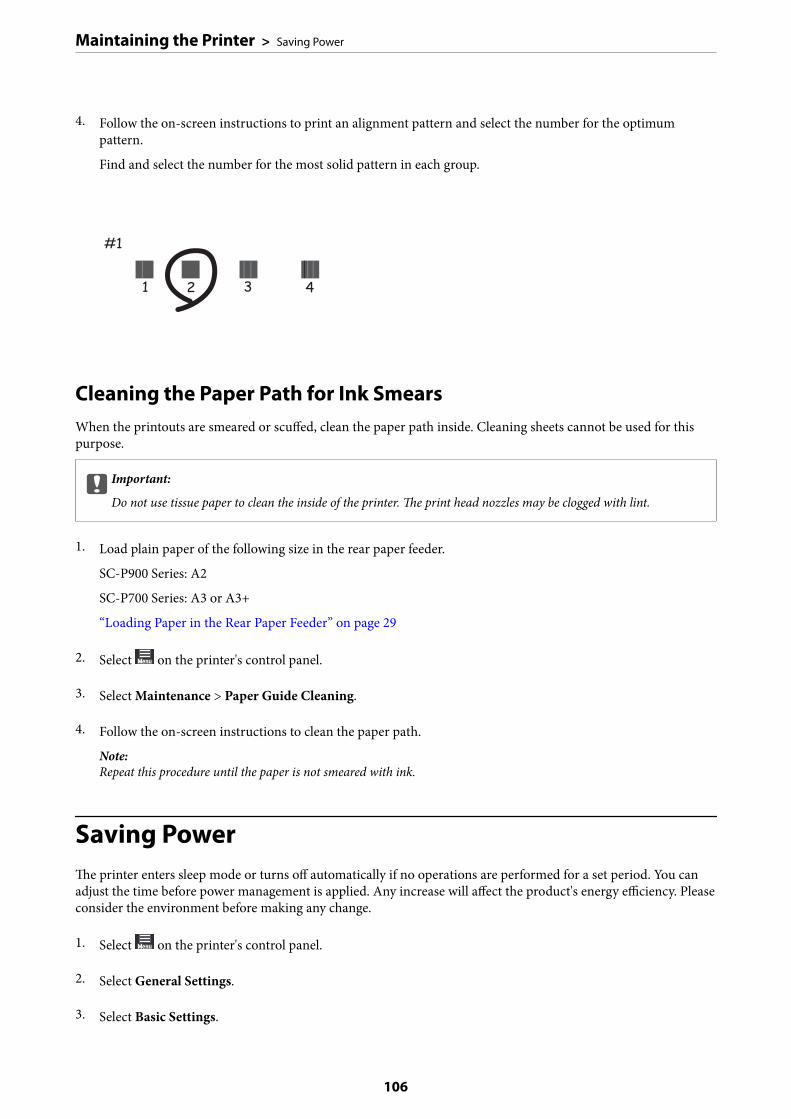
4. Follow the on-screen instructions to print an alignment pattern and select the number for the optimumpattern.
Find and select the number for the most solid pattern in each group.
Cleaning the Paper Path for Ink SmearsWhen the printouts are smeared or scuffed, clean the paper path inside. Cleaning sheets cannot be used for thispurpose.
cImportant:
Do not use tissue paper to clean the inside of the printer. The print head nozzles may be clogged with lint.
1. Load plain paper of the following size in the rear paper feeder.
SC-P900 Series: A2
SC-P700 Series: A3 or A3+
“Loading Paper in the Rear Paper Feeder” on page 29
2. Select on the printer's control panel.
3. Select Maintenance > Paper Guide Cleaning.
4. Follow the on-screen instructions to clean the paper path.
Note:Repeat this procedure until the paper is not smeared with ink.
Saving PowerThe printer enters sleep mode or turns off automatically if no operations are performed for a set period. You canadjust the time before power management is applied. Any increase will affect the product's energy efficiency. Pleaseconsider the environment before making any change.
1. Select on the printer's control panel.
2. Select General Settings.
3. Select Basic Settings.
Maintaining the Printer > Saving Power
106
4. Do one of the following.
Note:Your product may have the Power Off Settings or Power Off Timer feature depending on the location of purchase.
❏ Select Sleep Timer or Power Off Settings > Power Off If Inactive or Power Off If Disconnected.
❏ Select Sleep Timer or Power Off Timer.
5. Select the setting.
Installing or Uninstalling Applications SeparatelyConnect your computer to the network and install the latest version of applications from the website. Log in toyour computer as an administrator. Enter the administrator password if the computer prompts you.
Installing the Applications SeparatelyNote:When reinstalling an application, you need to uninstall it first.
1. Make sure the printer and the computer are available for communication, and the printer is connected to theInternet.
2. Start EPSON Software Updater.
The screenshot is an example on Windows.
3. For Windows, select your printer, and then click to check for the latest available applications.
Maintaining the Printer > Installing or Uninstalling Applications Separately > Installing the Applications Separ…
107
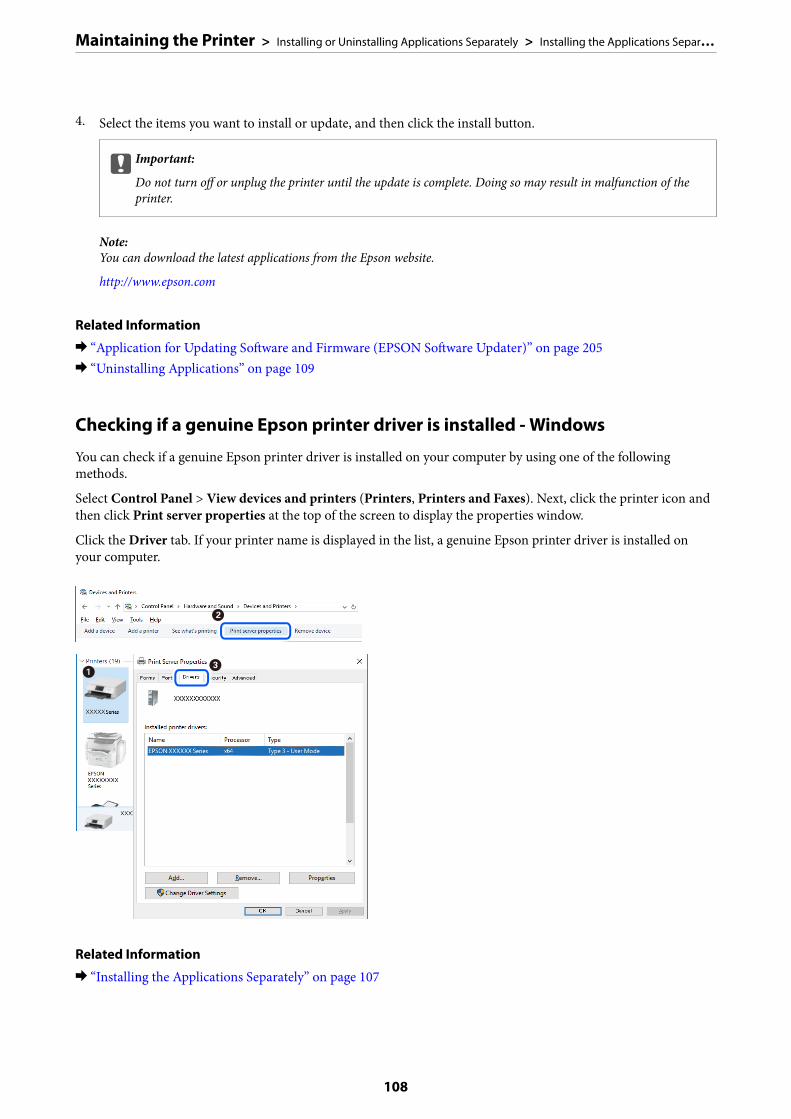
4. Select the items you want to install or update, and then click the install button.
cImportant:
Do not turn off or unplug the printer until the update is complete. Doing so may result in malfunction of theprinter.
Note:You can download the latest applications from the Epson website.
http://www.epson.com
Related Information
& “Application for Updating Software and Firmware (EPSON Software Updater)” on page 205& “Uninstalling Applications” on page 109
Checking if a genuine Epson printer driver is installed - Windows
You can check if a genuine Epson printer driver is installed on your computer by using one of the followingmethods.
Select Control Panel > View devices and printers (Printers, Printers and Faxes). Next, click the printer icon andthen click Print server properties at the top of the screen to display the properties window.
Click the Driver tab. If your printer name is displayed in the list, a genuine Epson printer driver is installed onyour computer.
Related Information
& “Installing the Applications Separately” on page 107
Maintaining the Printer > Installing or Uninstalling Applications Separately > Installing the Applications Separ…
108
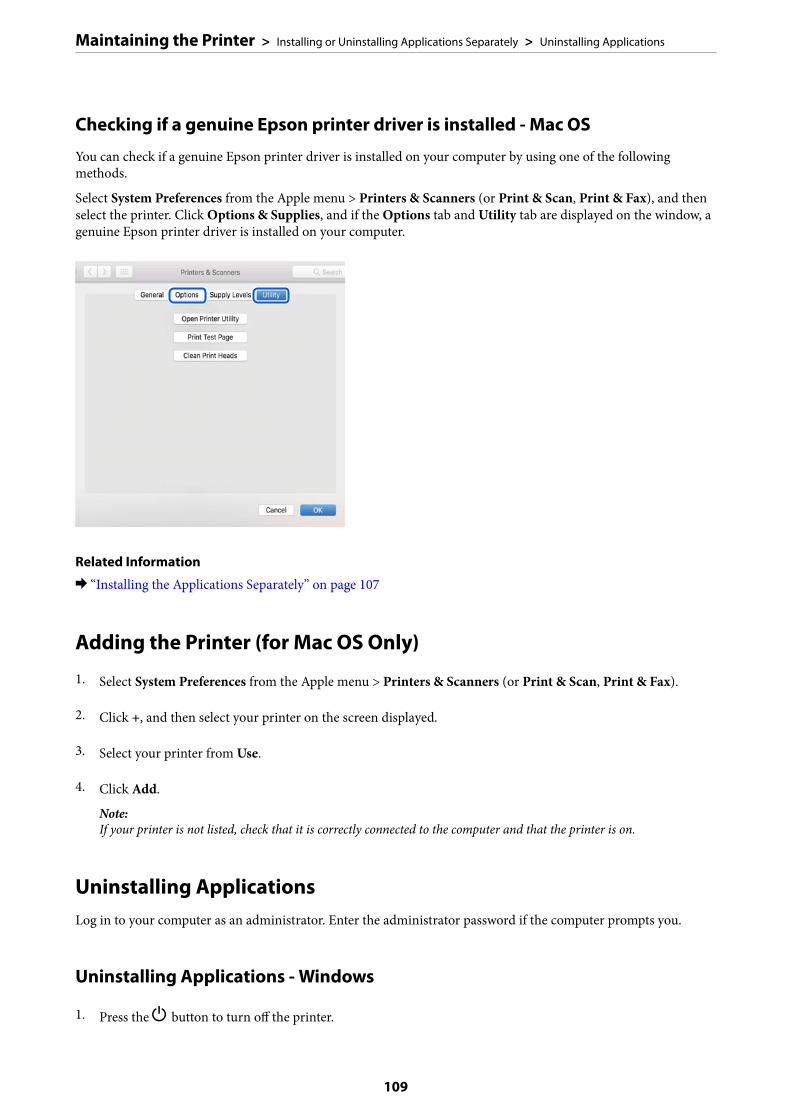
Checking if a genuine Epson printer driver is installed - Mac OS
You can check if a genuine Epson printer driver is installed on your computer by using one of the followingmethods.
Select System Preferences from the Apple menu > Printers & Scanners (or Print & Scan, Print & Fax), and thenselect the printer. Click Options & Supplies, and if the Options tab and Utility tab are displayed on the window, agenuine Epson printer driver is installed on your computer.
Related Information
& “Installing the Applications Separately” on page 107
Adding the Printer (for Mac OS Only)
1. Select System Preferences from the Apple menu > Printers & Scanners (or Print & Scan, Print & Fax).
2. Click +, and then select your printer on the screen displayed.
3. Select your printer from Use.
4. Click Add.
Note:If your printer is not listed, check that it is correctly connected to the computer and that the printer is on.
Uninstalling ApplicationsLog in to your computer as an administrator. Enter the administrator password if the computer prompts you.
Uninstalling Applications - Windows
1. Press the P button to turn off the printer.
Maintaining the Printer > Installing or Uninstalling Applications Separately > Uninstalling Applications
109
2. Quit all running applications.
3. Open Control Panel:
❏ Windows 10Click on the start button, and then select Windows System > Control Panel.
❏ Windows 8.1/Windows 8Select Desktop > Settings > Control Panel.
❏ Windows 7Click the start button and select Control Panel.
4. Open Uninstall a program (or Add or Remove Programs):
Select Uninstall a program in Programs.
5. Select the application you want to uninstall.
You cannot uninstall the printer driver if there is any print jobs. Delete or wait to be printed the jobs beforeuninstalling.
6. Uninstall the applications:
Click Uninstall/Change or Uninstall.
Note:If the User Account Control window is displayed, click Continue.
7. Follow the on-screen instructions.
Uninstalling Applications - Mac OS
1. Download the Uninstaller using EPSON Software Updater.
Once you have downloaded the Uninstaller, you do not need to download it again each time you uninstall theapplication.
2. Press the P button to turn off the printer.
3. To uninstall the printer driver, select System Preferences from the Apple menu > Printers & Scanners (orPrint & Scan, Print & Fax), and then remove the printer from the enabled printers list.
4. Quit all running applications.
5. Select Go > Applications > Epson Software > Uninstaller.
6. Select the application you want to uninstall, and then click Uninstall.
cImportant:
The Uninstaller removes all drivers for Epson inkjet printers on the computer. If you use multiple Epson inkjetprinters and you only want to delete some drivers, delete all of them first, and then install the necessary printerdriver again.
Maintaining the Printer > Installing or Uninstalling Applications Separately > Uninstalling Applications
110
Note:If you cannot find the application you want to uninstall in the application list, you cannot uninstall using theUninstaller. In this situation, select Go > Applications > Epson Software, select the application you want to uninstall,and then drag it to the trash icon.
Related Information
& “Application for Updating Software and Firmware (EPSON Software Updater)” on page 205
Updating Applications and FirmwareYou may be able to clear certain problems and improve or add functions by updating the applications and thefirmware. Make sure you use the latest version of the applications and firmware.
1. Make sure that the printer and the computer are connected, and the computer is connected to the internet.
2. Start EPSON Software Updater, and update the applications or the firmware.
cImportant:
Do not turn off the computer or the printer until the update is complete; otherwise, the printer maymalfunction.
Note:If you cannot find the application you want to update in the list, you cannot update using the EPSON Software Updater.Check for the latest versions of the applications from your local Epson website.
http://www.epson.com
Related Information
& “Application for Updating Software and Firmware (EPSON Software Updater)” on page 205
Updating the Printer's Firmware Using the Control Panel
If the printer is connected to the Internet, you can update the printer's firmware using the control panel. Byupdating the firmware, the printer's performance may improve, or new functions may be added. You can also setthe printer to regularly check for firmware updates and notify you if any are available.
1. Select on the printer's control panel.
2. Select General Settings > Firmware Update > Update.
Note:Enable Notification to set the printer to regularly check for available firmware updates.
3. Check the message displayed on the screen and select Start Checking.
4. Check the message displayed on the screen and select Start.
The firmware is updated when new firmware is found. Once the update has started, it cannot be interrupted.
Maintaining the Printer > Installing or Uninstalling Applications Separately > Updating Applications and Firm…
111
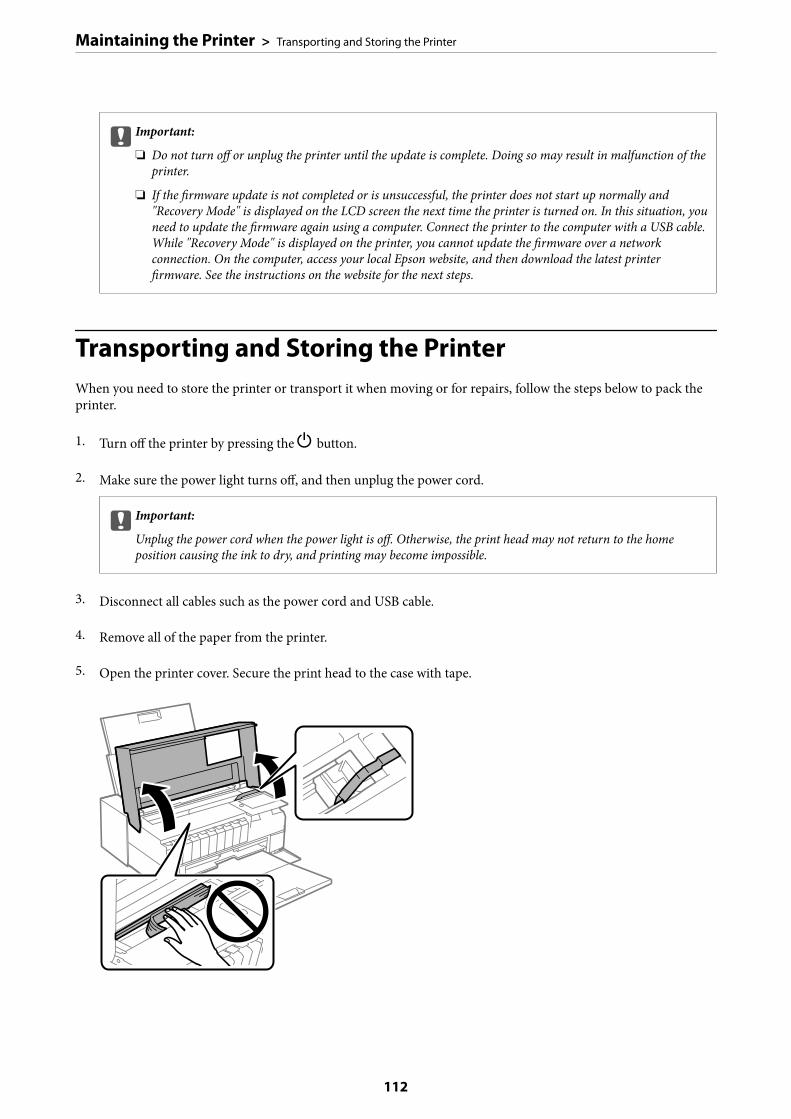
cImportant:
❏ Do not turn off or unplug the printer until the update is complete. Doing so may result in malfunction of theprinter.
❏ If the firmware update is not completed or is unsuccessful, the printer does not start up normally and"Recovery Mode" is displayed on the LCD screen the next time the printer is turned on. In this situation, youneed to update the firmware again using a computer. Connect the printer to the computer with a USB cable.While "Recovery Mode" is displayed on the printer, you cannot update the firmware over a networkconnection. On the computer, access your local Epson website, and then download the latest printerfirmware. See the instructions on the website for the next steps.
Transporting and Storing the PrinterWhen you need to store the printer or transport it when moving or for repairs, follow the steps below to pack theprinter.
1. Turn off the printer by pressing the P button.
2. Make sure the power light turns off, and then unplug the power cord.
cImportant:
Unplug the power cord when the power light is off. Otherwise, the print head may not return to the homeposition causing the ink to dry, and printing may become impossible.
3. Disconnect all cables such as the power cord and USB cable.
4. Remove all of the paper from the printer.
5. Open the printer cover. Secure the print head to the case with tape.
Maintaining the Printer > Transporting and Storing the Printer
112
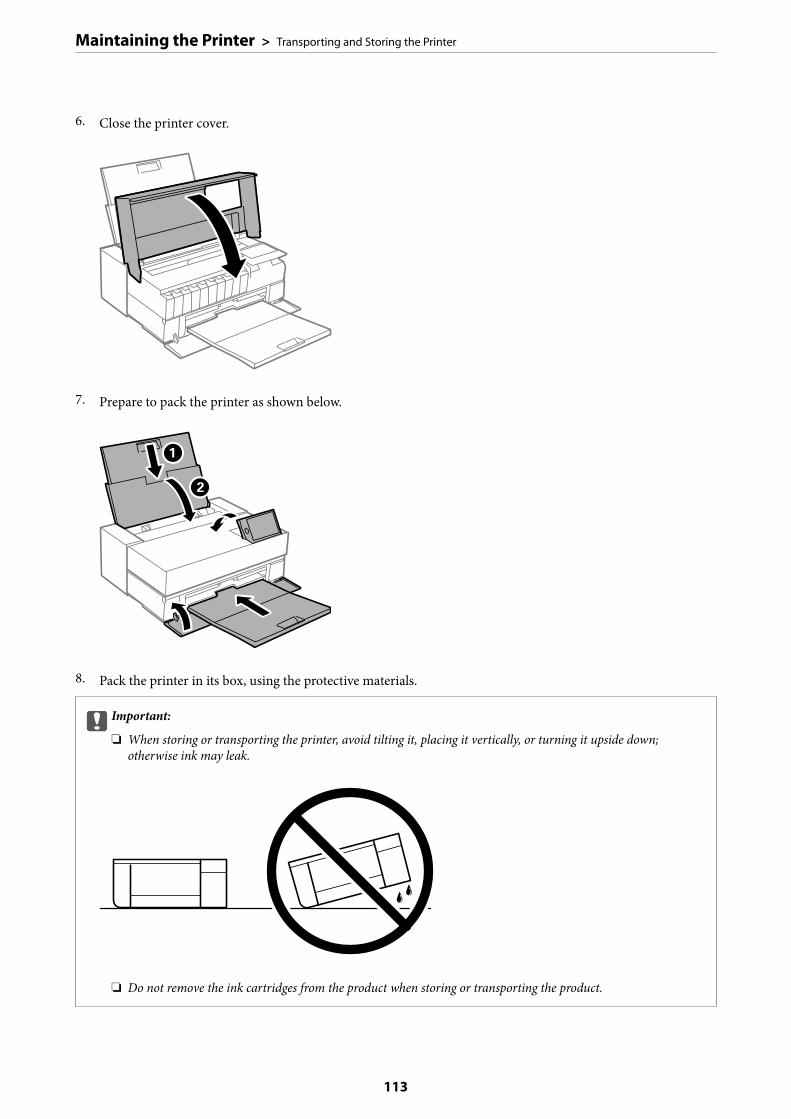
6. Close the printer cover.
7. Prepare to pack the printer as shown below.
8. Pack the printer in its box, using the protective materials.
cImportant:
❏ When storing or transporting the printer, avoid tilting it, placing it vertically, or turning it upside down;otherwise ink may leak.
❏ Do not remove the ink cartridges from the product when storing or transporting the product.
Maintaining the Printer > Transporting and Storing the Printer
113

When you use the printer again, make sure you remove the tape securing the print head. If print quality hasdeclined the next time you print, clean and align the print head.
Related Information
& “Checking and Cleaning the Print Head” on page 101& “Aligning the Print Head” on page 105
Maintaining the Printer > Transporting and Storing the Printer
114
Solving Problems
The Printer Does Not Work as Expected. . . . . . . . . . . . . . . . . . . . . . . . . . . . . . . . . 116
A Message is Displayed on the LCD Screen. . . . . . . . . . . . . . . . . . . . . . . . . . . . . . .139
Paper Gets Jammed. . . . . . . . . . . . . . . . . . . . . . . . . . . . . . . . . . . . . . . . . . . . . . . . 140
It is Time to Replace the Ink Cartridges. . . . . . . . . . . . . . . . . . . . . . . . . . . . . . . . . 141
It is Time to Replace the Maintenance Box. . . . . . . . . . . . . . . . . . . . . . . . . . . . . . . 143
Print Quality is Poor. . . . . . . . . . . . . . . . . . . . . . . . . . . . . . . . . . . . . . . . . . . . . . . 144
Cannot Solve Problem. . . . . . . . . . . . . . . . . . . . . . . . . . . . . . . . . . . . . . . . . . . . . . 152
The Printer Does Not Work as Expected
The Printer Does Not Turn On or Off
Power Does Not Turn OnThe following causes can be considered.
The power cord is not plugged in properly to the electrical outlet.
Solutions
Make sure the power cord is securely plugged in.
The P button was not pressed for long enough.
Solutions
Hold down the P button for a little longer.
Power Does Not Turn Off
The P button was not pressed for long enough.
Solutions
Hold down the P button for a little longer. If you still cannot turn off the printer, unplug the power cord.To prevent the print head from drying out, turn the printer back on and turn it off by pressing the Pbutton.
Power Turns Off Automatically
The Power Off Settings or Power Off Timer feature is enabled.
Solutions
❏ Select > General Settings > Basic Settings > Power Off Settings, and then disable the Power OffIf Inactive and Power Off If Disconnected settings.
❏ Select > General Settings > Basic Settings, and then disable the Power Off Timer Setting.
Note:Your product may have the Power Off Settings or Power Off Timer feature depending on the location of purchase.
Paper Does Not Feed Properly
No Paper FeedsThe following causes can be considered.
Solving Problems > The Printer Does Not Work as Expected > Paper Does Not Feed Properly
116

The installation location is inappropriate.
Solutions
Place the printer on a flat surface and operate in the recommended environmental conditions.
& “Environmental Specifications” on page 218
Unsupported paper is being used.
Solutions
Use paper supported by this printer.
& “Available Paper and Capacities” on page 182& “Unavailable Paper Types” on page 190
Paper handling is inappropriate.
Solutions
Follow paper handling precautions.
& “Paper Handling Precautions” on page 26
Too many sheets are loaded in the printer.
Solutions
Do not load more than the maximum number of sheets specified for the paper.
& “Available Paper and Capacities” on page 182
The paper settings on the printer are incorrect.
Solutions
Make sure the paper size and paper type settings match the actual paper size and paper type loaded in theprinter.
& “Paper Size and Type Settings” on page 27
Paper Feeds at a SlantThe following causes can be considered.
The installation location is inappropriate.
Solutions
Place the printer on a flat surface and operate in the recommended environmental conditions.
& “Environmental Specifications” on page 218
Unsupported paper is being used.
Solutions
Use paper supported by this printer.
& “Available Paper and Capacities” on page 182
Solving Problems > The Printer Does Not Work as Expected > Paper Does Not Feed Properly
117
& “Unavailable Paper Types” on page 190
Paper handling is inappropriate.
Solutions
Follow paper handling precautions.
& “Paper Handling Precautions” on page 26
The paper is loaded incorrectly.
Solutions
Load paper in the correct direction, and slide the edge guide against the edge of the paper.
& “Loading Paper” on page 26
Too many sheets are loaded in the printer.
Solutions
Do not load more than the maximum number of sheets specified for the paper.
& “Available Paper and Capacities” on page 182
The paper settings on the printer are incorrect.
Solutions
Make sure the paper size and paper type settings match the actual paper size and paper type loaded in theprinter.
& “Paper Size and Type Settings” on page 27
Several Sheets of Paper are Fed at a TimeThe following causes can be considered.
The installation location is inappropriate.
Solutions
Place the printer on a flat surface and operate in the recommended environmental conditions.
& “Environmental Specifications” on page 218
Unsupported paper is being used.
Solutions
Use paper supported by this printer.
& “Available Paper and Capacities” on page 182& “Unavailable Paper Types” on page 190
Solving Problems > The Printer Does Not Work as Expected > Paper Does Not Feed Properly
118
Paper handling is inappropriate.
Solutions
Follow paper handling precautions.
& “Paper Handling Precautions” on page 26
The paper is moist or damp.
Solutions
Load new paper.
Static electricity is causing sheets of paper to stick to each other.
Solutions
Fan the paper before loading. If the paper still does not feed, load one sheet of paper at a time.
Too many sheets are loaded in the printer.
Solutions
Do not load more than the maximum number of sheets specified for the paper.
& “Available Paper and Capacities” on page 182
The paper settings on the printer are incorrect.
Solutions
Make sure the paper size and paper type settings match the actual paper size and paper type loaded in theprinter.
& “Paper Size and Type Settings” on page 27
Multiple sheets of paper feed at the same time during manual 2-sided printing.
Solutions
Remove any paper that is loaded in the paper source before you reload the paper.
Paper Does Not Feed Properly from the Front Paper Feeder
Paper has been fed at an angle from the front paper feeder.
Solutions
After inserting paper, make sure the railing edge of the paper is aligned with the line on the front paperfeeder.
Roll Paper Does Not Feed Properly
Front paper feeder opens when loading roll paper.
Solutions
Close the front paper feeder, and load roll paper.
Solving Problems > The Printer Does Not Work as Expected > Paper Does Not Feed Properly
119

CD/DVD Tray is Ejected when You Try to Load It
The disc has not been placed properly.
Solutions
Place the disc again properly.
& “Loading a CD/DVD” on page 36
The CD/DVD tray was inserted before the printer was ready.
Solutions
Do not insert the CD/DVD tray until you are instructed to do so. Otherwise, an error occurs and the trayis ejected.
Cannot Print
Cannot Print from Windows
Make sure the computer and the printer are connected correctly.
The cause and solution to the problem differ depending on whether or not they are connected.
Checking the Connection Status
Use EPSON Status Monitor 3 to check the connection status for the computer and the printer.
1. Access the printer driver.
❏ Windows 10Click on the start button, and then select Windows System > Control Panel > View devices and printersin Hardware and Sound. Right-click on your printer, or press and hold it and then select Printingpreferences
❏ Windows 8.1/Windows 8Select Desktop > Settings > Control Panel > View devices and printers in Hardware and Sound. Right-click on your printer, or press and hold it and then select Printing preferences
❏ Windows 7Click the start button, and select Control Panel > View devices and printers in Hardware and Sound.Right-click on your printer and select Printing preferences.
2. Click the Utility tab.
3. Click EPSON Status Monitor 3.
If EPSON Status Monitor 3 is disabled, click Speed and Progress on the Utility tab, and then clear DisableEPSON Status Monitor 3.
When the remaining ink levels are displayed, a connection has been successfully established between the computerand the printer.
Check the following if a connection has not been established.
Solving Problems > The Printer Does Not Work as Expected > Cannot Print
120
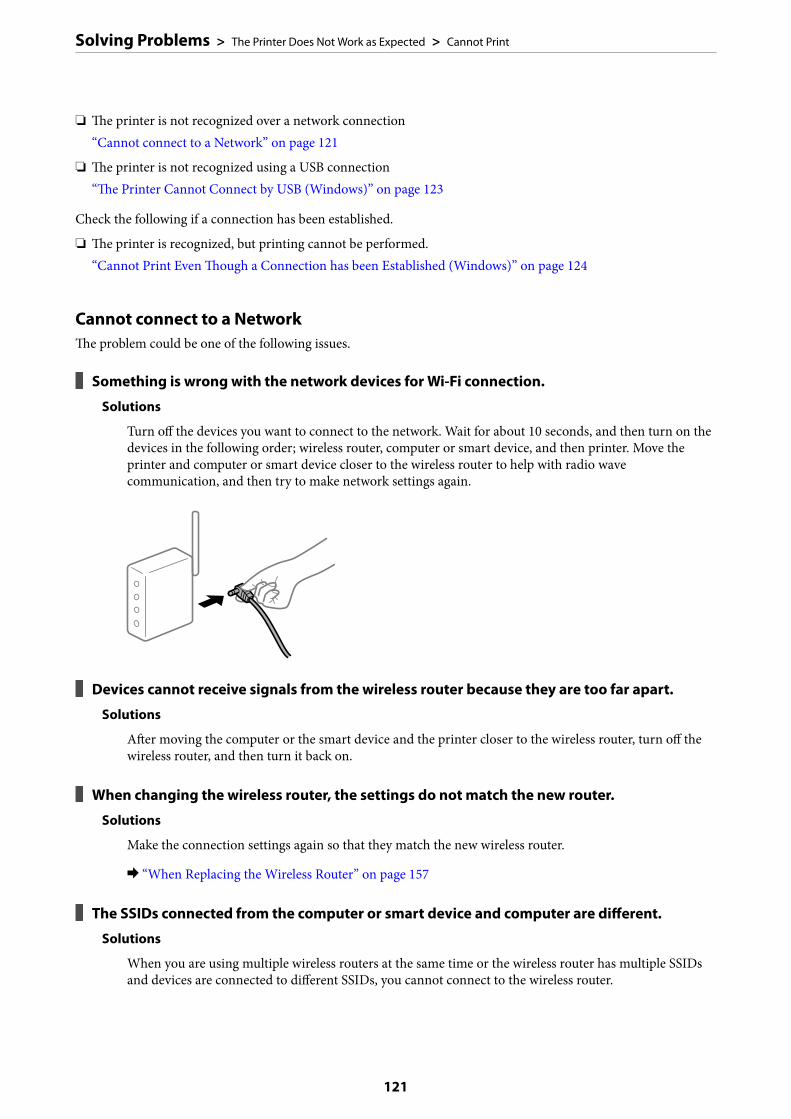
❏ The printer is not recognized over a network connection“Cannot connect to a Network” on page 121
❏ The printer is not recognized using a USB connection“The Printer Cannot Connect by USB (Windows)” on page 123
Check the following if a connection has been established.
❏ The printer is recognized, but printing cannot be performed.“Cannot Print Even Though a Connection has been Established (Windows)” on page 124
Cannot connect to a NetworkThe problem could be one of the following issues.
Something is wrong with the network devices for Wi-Fi connection.
Solutions
Turn off the devices you want to connect to the network. Wait for about 10 seconds, and then turn on thedevices in the following order; wireless router, computer or smart device, and then printer. Move theprinter and computer or smart device closer to the wireless router to help with radio wavecommunication, and then try to make network settings again.
Devices cannot receive signals from the wireless router because they are too far apart.
Solutions
After moving the computer or the smart device and the printer closer to the wireless router, turn off thewireless router, and then turn it back on.
When changing the wireless router, the settings do not match the new router.
Solutions
Make the connection settings again so that they match the new wireless router.
& “When Replacing the Wireless Router” on page 157
The SSIDs connected from the computer or smart device and computer are different.
Solutions
When you are using multiple wireless routers at the same time or the wireless router has multiple SSIDsand devices are connected to different SSIDs, you cannot connect to the wireless router.
Solving Problems > The Printer Does Not Work as Expected > Cannot Print
121
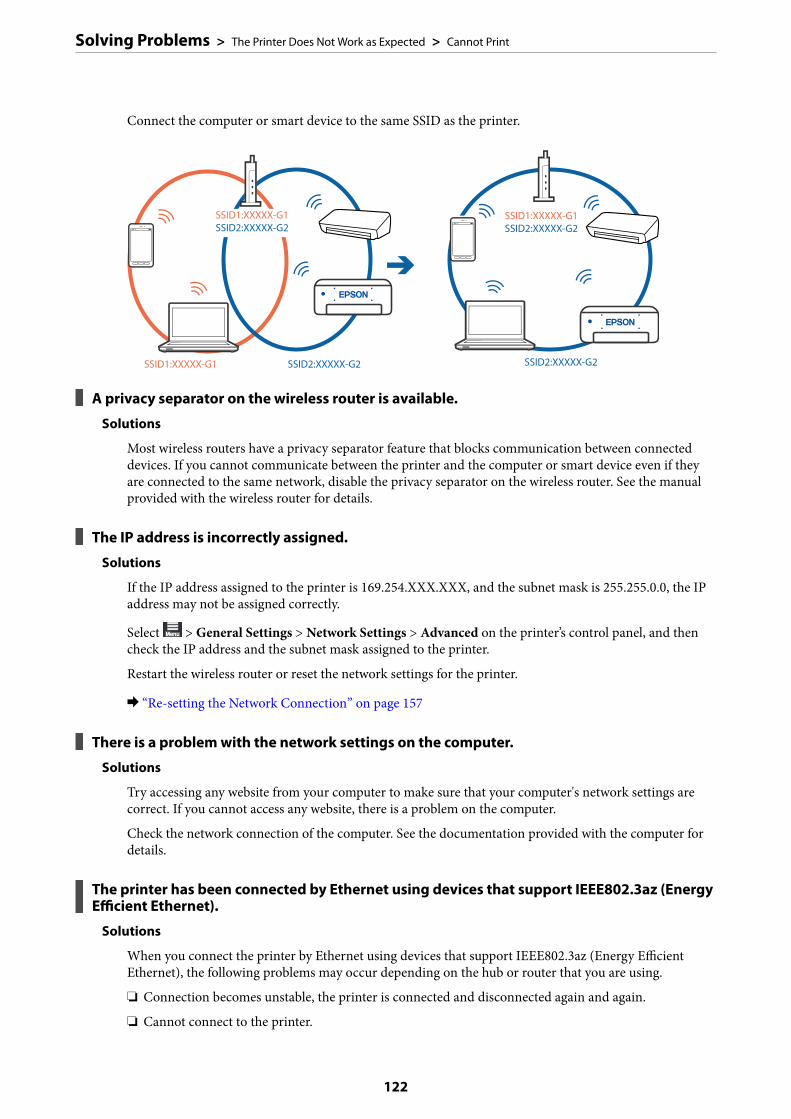
Connect the computer or smart device to the same SSID as the printer.
A privacy separator on the wireless router is available.
Solutions
Most wireless routers have a privacy separator feature that blocks communication between connecteddevices. If you cannot communicate between the printer and the computer or smart device even if theyare connected to the same network, disable the privacy separator on the wireless router. See the manualprovided with the wireless router for details.
The IP address is incorrectly assigned.
Solutions
If the IP address assigned to the printer is 169.254.XXX.XXX, and the subnet mask is 255.255.0.0, the IPaddress may not be assigned correctly.
Select > General Settings > Network Settings > Advanced on the printer’s control panel, and thencheck the IP address and the subnet mask assigned to the printer.
Restart the wireless router or reset the network settings for the printer.
& “Re-setting the Network Connection” on page 157
There is a problem with the network settings on the computer.
Solutions
Try accessing any website from your computer to make sure that your computer's network settings arecorrect. If you cannot access any website, there is a problem on the computer.
Check the network connection of the computer. See the documentation provided with the computer fordetails.
The printer has been connected by Ethernet using devices that support IEEE802.3az (EnergyEfficient Ethernet).
Solutions
When you connect the printer by Ethernet using devices that support IEEE802.3az (Energy EfficientEthernet), the following problems may occur depending on the hub or router that you are using.
❏ Connection becomes unstable, the printer is connected and disconnected again and again.
❏ Cannot connect to the printer.
Solving Problems > The Printer Does Not Work as Expected > Cannot Print
122
❏ The communication speed becomes slow.
Follow the steps below to disable IEEE802.3az for the printer and then connect.
1. Remove the Ethernet cable connected to the computer and the printer.
2. When IEEE802.3az for the computer is enabled, disable it.
See the documentation provided with the computer for details.
3. Connect the computer and the printer with an Ethernet cable directly.
4. On the printer, print a network connection report.
“Printing a Network Connection Report” on page 174
5. Check the printer's IP address on the network connection report.
6. On the computer, access Web Config.
Launch a Web browser, and then enter the printer's IP address.
“Running Web Config on a Web Browser” on page 204
7. Select the Network tab > Wired LAN.
8. Select OFF for IEEE 802.3az.
9. Click Next.
10. Click OK.
11. Remove the Ethernet cable connected to the computer and the printer.
12. If you disabled IEEE802.3az for the computer in step 2, enable it.
13. Connect the Ethernet cables that you removed in step 1 to the computer and the printer.
If the problem still occurs, devices other than the printer may be causing the problem.
The Printer Cannot Connect by USB (Windows)The following causes can be considered.
The USB cable is not plugged into the electrical outlet correctly.
Solutions
Connect the USB cable securely to the printer and the computer.
There is a problem with the USB hub.
Solutions
If you are using a USB hub, try to connect the printer directly to the computer.
Solving Problems > The Printer Does Not Work as Expected > Cannot Print
123
There is a problem with the USB cable or the USB inlet.
Solutions
If the USB cable cannot be recognized, change the port, or change the USB cable.
Cannot Print Even Though a Connection has been Established (Windows)The following causes can be considered.
A genuine Epson printer driver has not been installed.
Solutions
If a genuine Epson printer driver (EPSON XXXXX) has not been installed, the available functions arelimited. We recommend using a genuine Epson printer driver.
& “Checking if a genuine Epson printer driver is installed - Windows” on page 108& “Checking if a genuine Epson printer driver is installed - Mac OS” on page 109
There is a problem with the software or data.
Solutions
❏ If you are printing a large data size image, the computer may run out of memory. Print the image at alower resolution or a smaller size.
❏ If you have tried all of the solutions and have not solved the problem, try uninstalling and thenreinstalling the printer driver
& “Installing or Uninstalling Applications Separately” on page 107
There is a problem with the printer's status.
Solutions
Click EPSON Status Monitor 3 on the printer driver's Utility tab, and then check the printer status. IfEPSON Status Monitor 3 is disabled, click Speed and Progress on the Utility tab, and then clear DisableEPSON Status Monitor 3.
Solving Problems > The Printer Does Not Work as Expected > Cannot Print
124
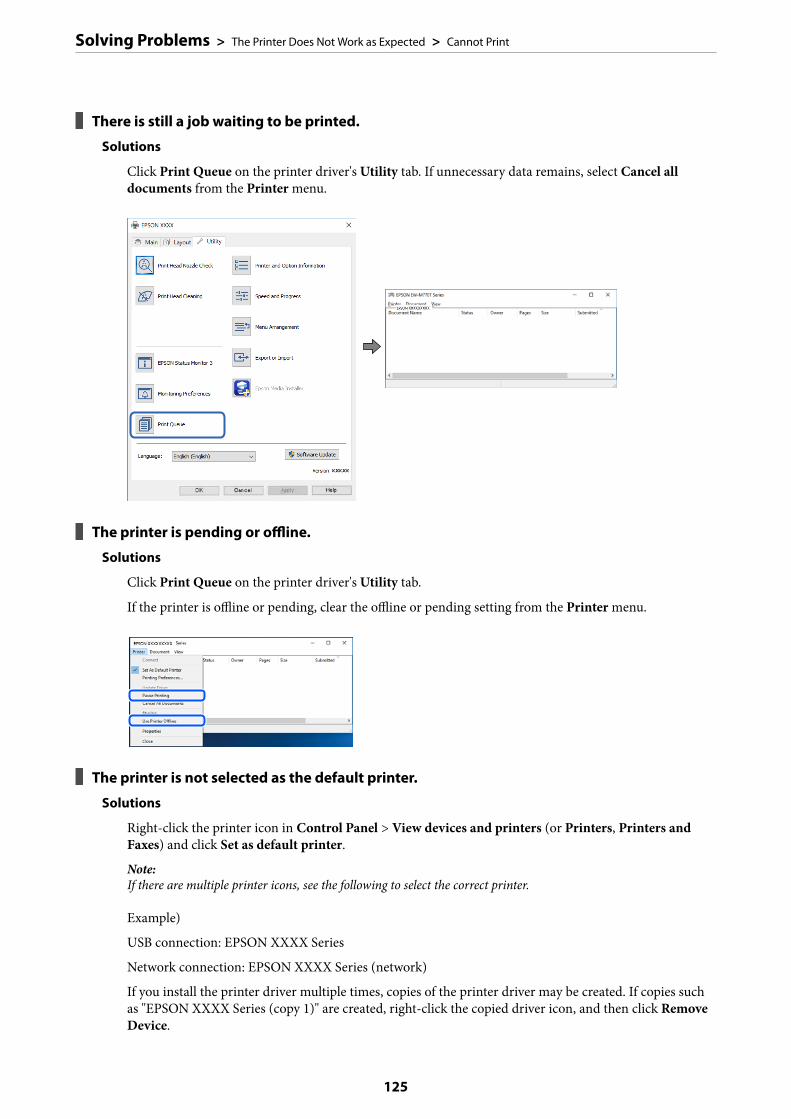
There is still a job waiting to be printed.
Solutions
Click Print Queue on the printer driver's Utility tab. If unnecessary data remains, select Cancel alldocuments from the Printer menu.
The printer is pending or offline.
Solutions
Click Print Queue on the printer driver's Utility tab.
If the printer is offline or pending, clear the offline or pending setting from the Printer menu.
The printer is not selected as the default printer.
Solutions
Right-click the printer icon in Control Panel > View devices and printers (or Printers, Printers andFaxes) and click Set as default printer.
Note:If there are multiple printer icons, see the following to select the correct printer.
Example)
USB connection: EPSON XXXX Series
Network connection: EPSON XXXX Series (network)
If you install the printer driver multiple times, copies of the printer driver may be created. If copies suchas "EPSON XXXX Series (copy 1)" are created, right-click the copied driver icon, and then click RemoveDevice.
Solving Problems > The Printer Does Not Work as Expected > Cannot Print
125

The printer port is not set correctly.
Solutions
Click Print Queue on the printer driver's Utility tab.
Make sure the printer port is set correctly as shown below in Property > Port from the Printer menu.
USB connection: USBXXX, Network connection: EpsonNet Print Port
Suddenly the Printer Cannot Print over a Network ConnectionThe problem could be one of the following issues.
The network environment has been changed.
Solutions
When you have changed the network environment, such as the wireless router or provider, try makingnetwork settings for the printer again.
Connect the computer or smart device to the same SSID as the printer.
& “Re-setting the Network Connection” on page 157
Something is wrong with the network devices for Wi-Fi connection.
Solutions
Turn off the devices you want to connect to the network. Wait for about 10 seconds, and then turn on thedevices in the following order; wireless router, computer or smart device, and then printer. Move theprinter and computer or smart device closer to the wireless router to help with radio wavecommunication, and then try to make network settings again.
The printer is not connected to the network.
Solutions
Select > General Settings > Network Settings > Connection Check, and then print the networkconnection report. If the report shows that the network connection failed, check the network connectionreport and then follow the printed solutions.
& “Printing a Network Connection Report” on page 174
There is a problem with the network settings on the computer.
Solutions
Try accessing any website from your computer to make sure that your computer's network settings arecorrect. If you cannot access any website, there is a problem on the computer.
Solving Problems > The Printer Does Not Work as Expected > Cannot Print
126
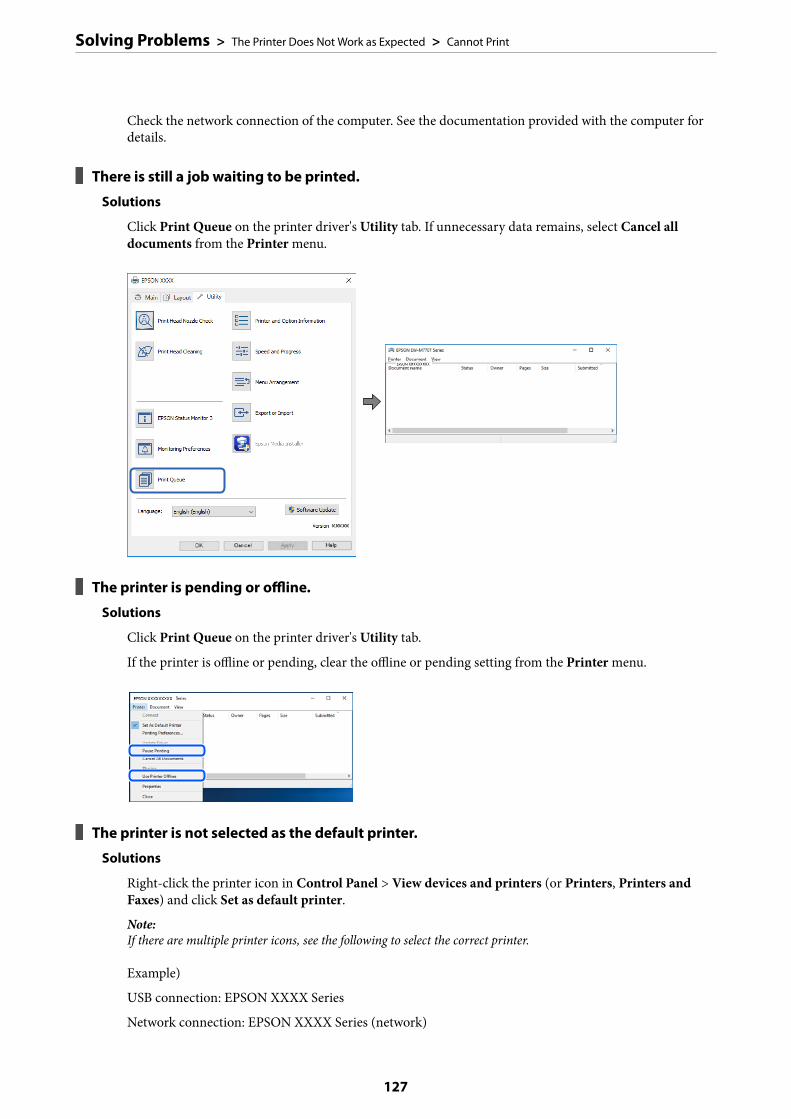
Check the network connection of the computer. See the documentation provided with the computer fordetails.
There is still a job waiting to be printed.
Solutions
Click Print Queue on the printer driver's Utility tab. If unnecessary data remains, select Cancel alldocuments from the Printer menu.
The printer is pending or offline.
Solutions
Click Print Queue on the printer driver's Utility tab.
If the printer is offline or pending, clear the offline or pending setting from the Printer menu.
The printer is not selected as the default printer.
Solutions
Right-click the printer icon in Control Panel > View devices and printers (or Printers, Printers andFaxes) and click Set as default printer.
Note:If there are multiple printer icons, see the following to select the correct printer.
Example)
USB connection: EPSON XXXX Series
Network connection: EPSON XXXX Series (network)
Solving Problems > The Printer Does Not Work as Expected > Cannot Print
127
If you install the printer driver multiple times, copies of the printer driver may be created. If copies suchas "EPSON XXXX Series (copy 1)" are created, right-click the copied driver icon, and then click RemoveDevice.
The printer port is not set correctly.
Solutions
Click Print Queue on the printer driver's Utility tab.
Make sure the printer port is set correctly as shown below in Property > Port from the Printer menu.
USB connection: USBXXX, Network connection: EpsonNet Print Port
Cannot Print from Mac OS
Make sure the computer and the printer are connected correctly.
The cause and solution to the problem differ depending on whether or not they are connected.
Checking the Connection Status
Use EPSON Status Monitor to check the connection status for the computer and the printer.
1. Select System Preferences from the Apple menu > Printers & Scanners (or Print & Scan, Print & Fax), andthen select the printer.
2. Click Options & Supplies > Utility > Open Printer Utility.
3. Click EPSON Status Monitor.
When the remaining ink levels are displayed, a connection has been successfully established between the computerand the printer.
Check the following if a connection has not been established.
❏ The printer is not recognized over a network connection“Cannot connect to a Network” on page 128
❏ The printer is not recognized using a USB connection“The Printer Cannot Connect by USB (Mac OS)” on page 131
Check the following if a connection has been established.
❏ The printer is recognized, but printing cannot be performed.“Cannot Print Even Though a Connection has been Established (Mac OS)” on page 132
Cannot connect to a NetworkThe problem could be one of the following issues.
Solving Problems > The Printer Does Not Work as Expected > Cannot Print
128
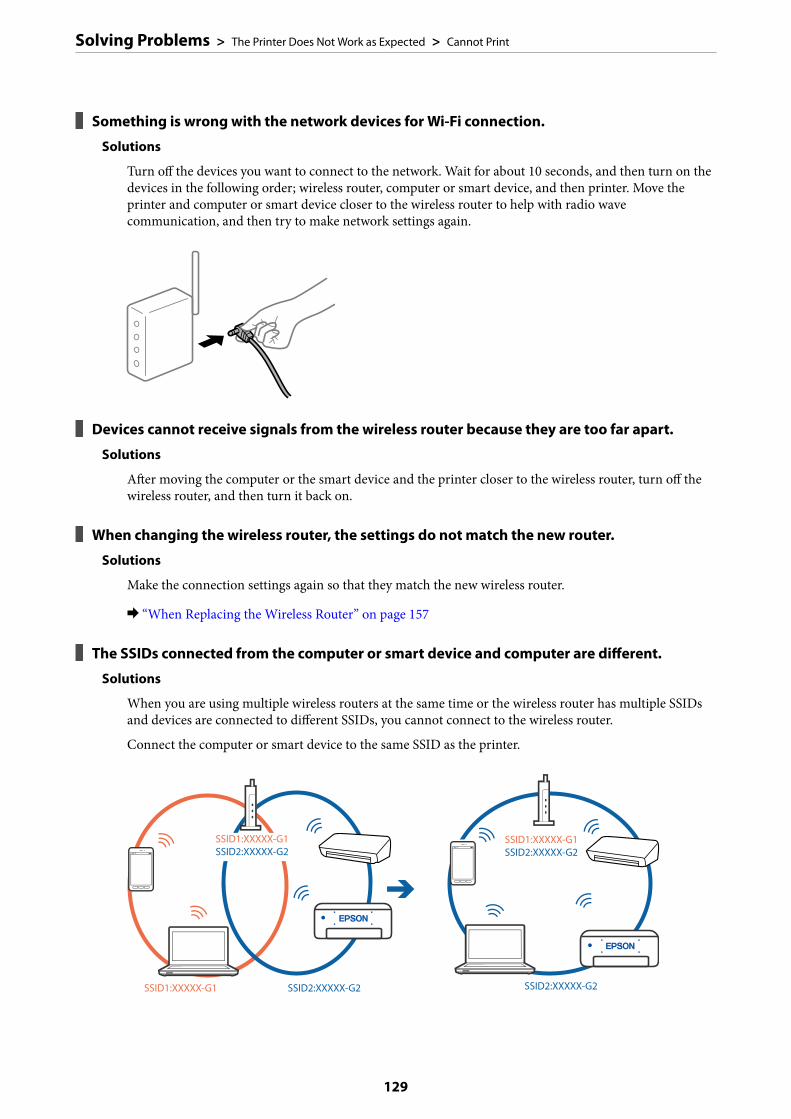
Something is wrong with the network devices for Wi-Fi connection.
Solutions
Turn off the devices you want to connect to the network. Wait for about 10 seconds, and then turn on thedevices in the following order; wireless router, computer or smart device, and then printer. Move theprinter and computer or smart device closer to the wireless router to help with radio wavecommunication, and then try to make network settings again.
Devices cannot receive signals from the wireless router because they are too far apart.
Solutions
After moving the computer or the smart device and the printer closer to the wireless router, turn off thewireless router, and then turn it back on.
When changing the wireless router, the settings do not match the new router.
Solutions
Make the connection settings again so that they match the new wireless router.
& “When Replacing the Wireless Router” on page 157
The SSIDs connected from the computer or smart device and computer are different.
Solutions
When you are using multiple wireless routers at the same time or the wireless router has multiple SSIDsand devices are connected to different SSIDs, you cannot connect to the wireless router.
Connect the computer or smart device to the same SSID as the printer.
Solving Problems > The Printer Does Not Work as Expected > Cannot Print
129
A privacy separator on the wireless router is available.
Solutions
Most wireless routers have a privacy separator feature that blocks communication between connecteddevices. If you cannot communicate between the printer and the computer or smart device even if theyare connected to the same network, disable the privacy separator on the wireless router. See the manualprovided with the wireless router for details.
The IP address is incorrectly assigned.
Solutions
If the IP address assigned to the printer is 169.254.XXX.XXX, and the subnet mask is 255.255.0.0, the IPaddress may not be assigned correctly.
Select > General Settings > Network Settings > Advanced on the printer’s control panel, and thencheck the IP address and the subnet mask assigned to the printer.
Restart the wireless router or reset the network settings for the printer.
& “Re-setting the Network Connection” on page 157
There is a problem with the network settings on the computer.
Solutions
Try accessing any website from your computer to make sure that your computer's network settings arecorrect. If you cannot access any website, there is a problem on the computer.
Check the network connection of the computer. See the documentation provided with the computer fordetails.
The device connected to the USB 3.0 port causes radio frequency interference.
Solutions
When you connect a device to the USB 3.0 port on a Mac, radio frequency interference may occur. Trythe following if you cannot connect to wireless LAN (Wi-Fi) or if operations become unstable.
❏ Place the device that is connected to the USB 3.0 port further away from the computer.
❏ Connect to the SSID for the 5 GHz range.
& “Making Wi-Fi Settings by Entering the SSID and Password” on page 161
The printer has been connected by Ethernet using devices that support IEEE802.3az (EnergyEfficient Ethernet).
Solutions
When you connect the printer by Ethernet using devices that support IEEE802.3az (Energy EfficientEthernet), the following problems may occur depending on the hub or router that you are using.
❏ Connection becomes unstable, the printer is connected and disconnected again and again.
❏ Cannot connect to the printer.
❏ The communication speed becomes slow.
Follow the steps below to disable IEEE802.3az for the printer and then connect.
1. Remove the Ethernet cable connected to the computer and the printer.
Solving Problems > The Printer Does Not Work as Expected > Cannot Print
130
2. When IEEE802.3az for the computer is enabled, disable it.
See the documentation provided with the computer for details.
3. Connect the computer and the printer with an Ethernet cable directly.
4. On the printer, print a network connection report.
“Printing a Network Connection Report” on page 174
5. Check the printer's IP address on the network connection report.
6. On the computer, access Web Config.
Launch a Web browser, and then enter the printer's IP address.
“Running Web Config on a Web Browser” on page 204
7. Select the Network tab > Wired LAN.
8. Select OFF for IEEE 802.3az.
9. Click Next.
10. Click OK.
11. Remove the Ethernet cable connected to the computer and the printer.
12. If you disabled IEEE802.3az for the computer in step 2, enable it.
13. Connect the Ethernet cables that you removed in step 1 to the computer and the printer.
If the problem still occurs, devices other than the printer may be causing the problem.
The Printer Cannot Connect by USB (Mac OS)The following causes can be considered.
The USB cable is not plugged into the electrical outlet correctly.
Solutions
Connect the USB cable securely to the printer and the computer.
There is a problem with the USB hub.
Solutions
If you are using a USB hub, try to connect the printer directly to the computer.
There is a problem with the USB cable or the USB inlet.
Solutions
If the USB cable cannot be recognized, change the port, or change the USB cable.
Solving Problems > The Printer Does Not Work as Expected > Cannot Print
131
Cannot Print Even Though a Connection has been Established (Mac OS)The following causes can be considered.
A genuine Epson printer driver has not been installed.
Solutions
If a genuine Epson printer driver (EPSON XXXXX) has not been installed, the available functions arelimited. We recommend using a genuine Epson printer driver.
& “Checking if a genuine Epson printer driver is installed - Windows” on page 108& “Checking if a genuine Epson printer driver is installed - Mac OS” on page 109
There is a problem with the software or data.
Solutions
❏ If you are printing a large data size image, the computer may run out of memory. Print the image at alower resolution or a smaller size.
❏ If you have tried all of the solutions and have not solved the problem, try uninstalling and thenreinstalling the printer driver
& “Installing or Uninstalling Applications Separately” on page 107
There is a problem with the status of the printer.
Solutions
Make sure the printer status is not Pause.
Select System Preferences from the Apple menu > Printers & Scanners (or Print & Scan, Print & Fax),and then double-click the printer. If the printer is paused, click Resume.
Suddenly the Printer Cannot Print over a Network ConnectionThe problem could be one of the following issues.
The network environment has been changed.
Solutions
When you have changed the network environment, such as the wireless router or provider, try makingnetwork settings for the printer again.
Connect the computer or smart device to the same SSID as the printer.
& “Re-setting the Network Connection” on page 157
Something is wrong with the network devices for Wi-Fi connection.
Solutions
Turn off the devices you want to connect to the network. Wait for about 10 seconds, and then turn on thedevices in the following order; wireless router, computer or smart device, and then printer. Move the
Solving Problems > The Printer Does Not Work as Expected > Cannot Print
132
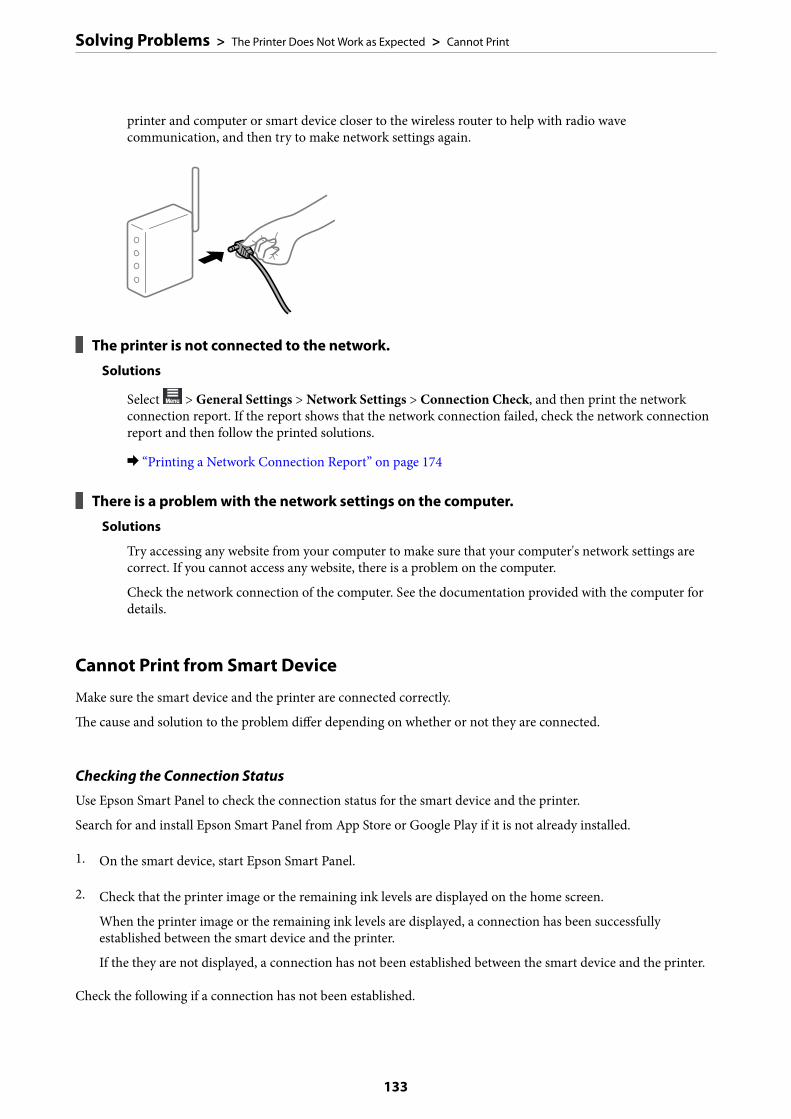
printer and computer or smart device closer to the wireless router to help with radio wavecommunication, and then try to make network settings again.
The printer is not connected to the network.
Solutions
Select > General Settings > Network Settings > Connection Check, and then print the networkconnection report. If the report shows that the network connection failed, check the network connectionreport and then follow the printed solutions.
& “Printing a Network Connection Report” on page 174
There is a problem with the network settings on the computer.
Solutions
Try accessing any website from your computer to make sure that your computer's network settings arecorrect. If you cannot access any website, there is a problem on the computer.
Check the network connection of the computer. See the documentation provided with the computer fordetails.
Cannot Print from Smart Device
Make sure the smart device and the printer are connected correctly.
The cause and solution to the problem differ depending on whether or not they are connected.
Checking the Connection Status
Use Epson Smart Panel to check the connection status for the smart device and the printer.
Search for and install Epson Smart Panel from App Store or Google Play if it is not already installed.
1. On the smart device, start Epson Smart Panel.
2. Check that the printer image or the remaining ink levels are displayed on the home screen.
When the printer image or the remaining ink levels are displayed, a connection has been successfullyestablished between the smart device and the printer.
If the they are not displayed, a connection has not been established between the smart device and the printer.
Check the following if a connection has not been established.
Solving Problems > The Printer Does Not Work as Expected > Cannot Print
133
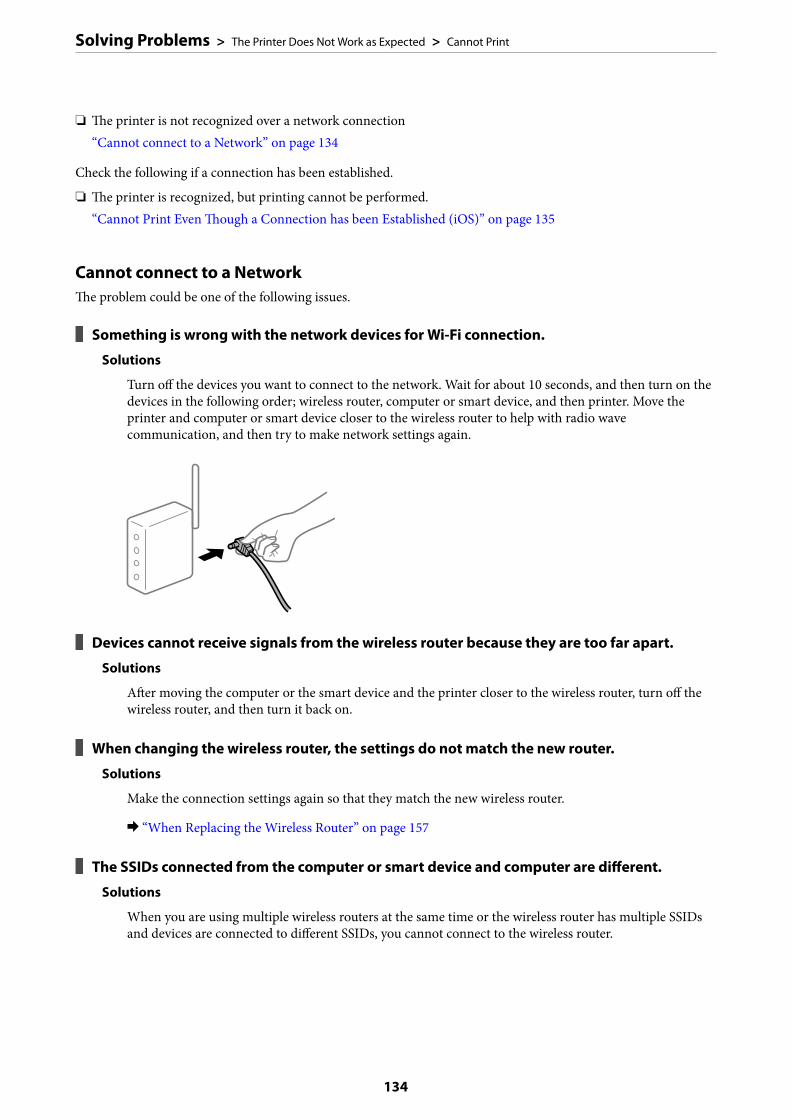
❏ The printer is not recognized over a network connection“Cannot connect to a Network” on page 134
Check the following if a connection has been established.
❏ The printer is recognized, but printing cannot be performed.“Cannot Print Even Though a Connection has been Established (iOS)” on page 135
Cannot connect to a NetworkThe problem could be one of the following issues.
Something is wrong with the network devices for Wi-Fi connection.
Solutions
Turn off the devices you want to connect to the network. Wait for about 10 seconds, and then turn on thedevices in the following order; wireless router, computer or smart device, and then printer. Move theprinter and computer or smart device closer to the wireless router to help with radio wavecommunication, and then try to make network settings again.
Devices cannot receive signals from the wireless router because they are too far apart.
Solutions
After moving the computer or the smart device and the printer closer to the wireless router, turn off thewireless router, and then turn it back on.
When changing the wireless router, the settings do not match the new router.
Solutions
Make the connection settings again so that they match the new wireless router.
& “When Replacing the Wireless Router” on page 157
The SSIDs connected from the computer or smart device and computer are different.
Solutions
When you are using multiple wireless routers at the same time or the wireless router has multiple SSIDsand devices are connected to different SSIDs, you cannot connect to the wireless router.
Solving Problems > The Printer Does Not Work as Expected > Cannot Print
134
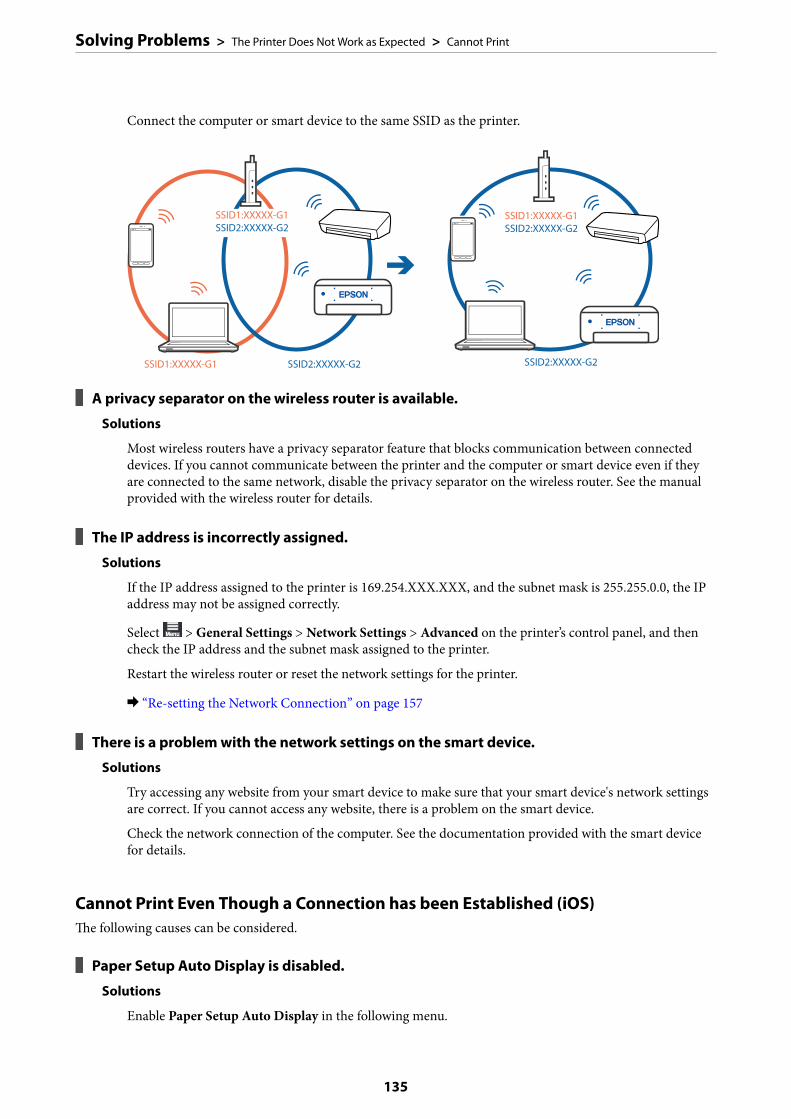
Connect the computer or smart device to the same SSID as the printer.
A privacy separator on the wireless router is available.
Solutions
Most wireless routers have a privacy separator feature that blocks communication between connecteddevices. If you cannot communicate between the printer and the computer or smart device even if theyare connected to the same network, disable the privacy separator on the wireless router. See the manualprovided with the wireless router for details.
The IP address is incorrectly assigned.
Solutions
If the IP address assigned to the printer is 169.254.XXX.XXX, and the subnet mask is 255.255.0.0, the IPaddress may not be assigned correctly.
Select > General Settings > Network Settings > Advanced on the printer’s control panel, and thencheck the IP address and the subnet mask assigned to the printer.
Restart the wireless router or reset the network settings for the printer.
& “Re-setting the Network Connection” on page 157
There is a problem with the network settings on the smart device.
Solutions
Try accessing any website from your smart device to make sure that your smart device's network settingsare correct. If you cannot access any website, there is a problem on the smart device.
Check the network connection of the computer. See the documentation provided with the smart devicefor details.
Cannot Print Even Though a Connection has been Established (iOS)The following causes can be considered.
Paper Setup Auto Display is disabled.
Solutions
Enable Paper Setup Auto Display in the following menu.
Solving Problems > The Printer Does Not Work as Expected > Cannot Print
135
> General Settings > Printer Settings > Paper Setup Auto Display
AirPrint is disabled.
Solutions
Enable the AirPrint setting on Web Config.
& “Application for Configuring Printer Operations (Web Config)” on page 204
Suddenly the Printer Cannot Print over a Network ConnectionThe problem could be one of the following issues.
The network environment has been changed.
Solutions
When you have changed the network environment, such as the wireless router or provider, try makingnetwork settings for the printer again.
Connect the computer or smart device to the same SSID as the printer.
& “Re-setting the Network Connection” on page 157
Something is wrong with the network devices for Wi-Fi connection.
Solutions
Turn off the devices you want to connect to the network. Wait for about 10 seconds, and then turn on thedevices in the following order; wireless router, computer or smart device, and then printer. Move theprinter and computer or smart device closer to the wireless router to help with radio wavecommunication, and then try to make network settings again.
The printer is not connected to the network.
Solutions
Select > General Settings > Network Settings > Connection Check, and then print the networkconnection report. If the report shows that the network connection failed, check the network connectionreport and then follow the printed solutions.
& “Printing a Network Connection Report” on page 174
Solving Problems > The Printer Does Not Work as Expected > Cannot Print
136
There is a problem with the network settings on the smart device.
Solutions
Try accessing any website from your smart device to make sure that your smart device's network settingsare correct. If you cannot access any website, there is a problem on the smart device.
Check the network connection of the computer. See the documentation provided with the smart devicefor details.
Cannot Operate the Printer as Expected
Operations are Slow
Printing Is Too SlowThe following causes can be considered.
Unnecessary applications are running.
Solutions
Close any unnecessary applications on your computer or smart device.
The print quality is set to high.
Solutions
Lower the quality setting.
Bidirectional printing is disabled.
Solutions
Enable the bidirectional (or high speed) setting. When this setting is enabled, the print head prints whilemoving in both directions, and the printing speed increases.
❏ WindowsSelect Quality Options as the Level setting on the printer driver's Main tab, and then select HighSpeed.
❏ Mac OSSelect Print Settings from the print dialog's pop-up menu, and then select High Speed.
There may be network connection problems with the wireless router.
Solutions
Reboot the wireless router while taking into consideration other users connected to the network. If thisdoes not solve the problem, place the printer closer to your wireless router or see the documentationprovided with the access point.
Solving Problems > The Printer Does Not Work as Expected > Cannot Operate the Printer as Expected
137
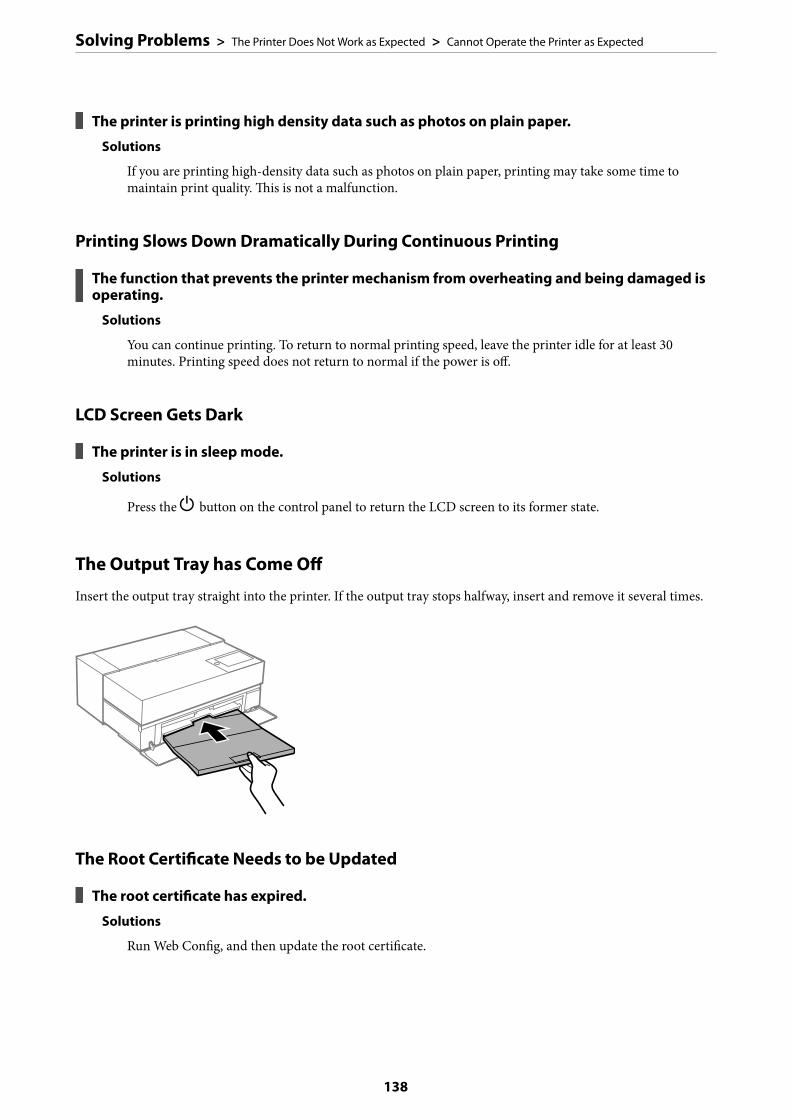
The printer is printing high density data such as photos on plain paper.
Solutions
If you are printing high-density data such as photos on plain paper, printing may take some time tomaintain print quality. This is not a malfunction.
Printing Slows Down Dramatically During Continuous Printing
The function that prevents the printer mechanism from overheating and being damaged isoperating.
Solutions
You can continue printing. To return to normal printing speed, leave the printer idle for at least 30minutes. Printing speed does not return to normal if the power is off.
LCD Screen Gets Dark
The printer is in sleep mode.
Solutions
Press the P button on the control panel to return the LCD screen to its former state.
The Output Tray has Come Off
Insert the output tray straight into the printer. If the output tray stops halfway, insert and remove it several times.
The Root Certificate Needs to be Updated
The root certificate has expired.
Solutions
Run Web Config, and then update the root certificate.
Solving Problems > The Printer Does Not Work as Expected > Cannot Operate the Printer as Expected
138
Cannot Cancel Printing from a Computer Running Mac OS X v10.6.8
There is a problem with your AirPrint setup.
Solutions
Run Web Config, and then select Port9100 as the Top Priority Protocol setting in AirPrint Setup. SelectSystem Preferences from the Apple menu > Printers & Scanners (or Print & Scan, Print & Fax), removethe printer, and then add the printer again.
& “Application for Configuring Printer Operations (Web Config)” on page 204
A Message is Displayed on the LCD ScreenIf an error message is displayed on the LCD screen, follow the on-screen instructions or the solutions below tosolve the problem.
Error Messages Solutions
The combination of the IP address and the subnetmask is invalid. See your documentation for moredetails.
Enter the correct IP address or default gateway. Contact the personwho setup the network for assistance.
Ink is low. You can continue printing until you are prompted to replace the inkcartridges. However, note that the printer cannot print if any of the inkcartridges is expended. Prepare new cartridges as soon as possible.
Ink cartridge(s) are low. Print job may not printcompletely.
Select Continue printing or Replace before printing.
When you select Continue printing, the printer may stop printingindicating that it is time to replace the ink cartridge. In this case,follow the solutions below.
❏ When printing fails and paper is ejected
Select No, cancel printing, and then replace the cartridge. If youselect Replace now, printing continues after you replace thecartridge and more paper is wasted.
❏ When paper is not ejected
Select Replace now, and then replace the cartridge. Printing isresumed after you replace the cartridge, but the color may differslightly. To avoid this, select No, cancel printing.
You need to replace Ink Cartridge(s). To ensure you receive premium print quality and to help protect yourprint head, a variable ink safety reserve remains in the cartridge whenyour printer indicates it is time to replace the cartridge. Replace thecartridge when you are prompted to do so.
“Replacing Ink Cartridge” on page 143
To use cloud services, update the root certificatefrom the Epson Web Config utility.
Run Web Config, and then update the root certificate.
“Running Web Config on a Web Browser” on page 204
The printer's Ink Pad is nearing the end of itsservice life. It is not a user-replaceable part. Pleasecontact Epson support.
Contact Epson or an authorised Epson service provider to replace theink pad. It is not a user-serviceable part.
Tap OK to resume printing.
“Where to Get Help” on page 223
Solving Problems > A Message is Displayed on the LCD Screen
139
Error Messages Solutions
The printer's Ink Pad has reached the end of itsservice life. It is not a user-replaceable part. Pleasecontact Epson support.
Contact Epson or an authorised Epson service provider to replace theink pad. It is not a user-serviceable part.
You cannot perform borderless printing until the part is replaced. Youcan still print with borders. However, if you use it as it is, the printingspeed on glossy paper may be reduced.
“Where to Get Help” on page 223
The ink pad has reached the end of its service life.It is not a user-replaceable part. Please contactEpson support. If you use it as is, printing speed onXX may slow down.
Printer error. Turn the power off and on again. Ifthe problem persists, contact Epson Support.
Do the following.
1. Open the printer cover and remove any paper or protectivematerial inside the printer. Insert the front paper feeder completely.
“Paper Gets Jammed” on page 140
2. Close the printer cover and turn the power off and on again.
If the error message is still displayed after turning the power off andon again, contact Epson support.
“Where to Get Help” on page 223
Paper Setup Auto Display is set to Off. Somefeatures may not be available. For details, see yourdocumentation.
If Paper Setup Auto Display is disabled, you cannot use AirPrint.
Recovery Mode
Update Firmware
The printer has started in recovery mode because the firmwareupdate failed. Follow the steps below to try to update the firmwareagain.
1. Connect the computer and the printer with a USB cable. (Duringrecovery mode, you cannot update the firmware over a networkconnection.)
2. Visit your local Epson website for further instructions.
Paper Gets JammedCheck the error displayed on the control panel and follow the instructions to remove the jammed paper includingany torn pieces. Next, clear the error. The LCD screen displays an animation that shows you how to removejammed paper.
!Caution:
Never touch the buttons on the control panel while your hand is inside the printer. If the printer starts operating, itcould cause an injury. Be careful not to touch the protruding parts to avoid injury.
cImportant:
Remove the jammed paper carefully. Removing the paper vigorously may cause damage to the printer.
Note:When removing jammed paper from the inside of the printer, pull out the front paper feeder so that you can easily removethe jammed paper.
Solving Problems > Paper Gets Jammed
140
Preventing Paper JamsCheck the following if paper jams occur frequently.
❏ Place the printer on a flat surface and operate in the recommended environmental conditions.“Environmental Specifications” on page 218
❏ Use the paper supported by this printer.“Available Paper and Capacities” on page 182
❏ Follow paper handling precautions.“Paper Handling Precautions” on page 26
❏ Load paper in the correct direction, and slide the edge guide against the edge of the paper.“Loading Paper” on page 26
❏ Do not load more than the maximum number of sheets specified for paper.
❏ Load one sheet of paper at a time if you have loaded several sheets of paper.
❏ Make sure the paper size and paper type settings match the actual paper size and paper type loaded in theprinter.“List of Paper Types” on page 28
❏ Insert the front paper feeder completely while you are not using it. If it is not inserted completely, paper may getjammed when the printer feeds paper from the rear paper feeder.
It is Time to Replace the Ink Cartridges
Ink Cartridge Handling Precautions
Storing precautions for ink
❏ Epson recommends storing ink cartridges in a cool and dark place.
❏ For best results, Epson recommends using up ink cartridges before the best before date printed on the package,or within six months of opening the package, whichever is earlier.
❏ After bringing an ink cartridge inside from a cold storage site, allow it to warm up at room temperature for atleast three hours before using it.
❏ Do not open an ink cartridge package until you are ready to install the ink cartridge in the product.
Solving Problems > It is Time to Replace the Ink Cartridges > Ink Cartridge Handling Precautions
141
❏ Do not drop or knock it against hard objects; otherwise, the ink may leak.
Handling precautions for replacing ink cartridges
❏ Do not touch the IC chip in the ink cartridge. Otherwise, you may not be able to perform operations or printproperly.
❏ Install all ink cartridges; otherwise you cannot print.
❏ Do not turn off the printer during ink charging. If the ink charging is incomplete, you may not be able to print.
❏ Removed ink cartridges may have ink around the ink supply port, so be careful not to get any ink on thesurrounding area when removing the cartridges.
❏ This printer uses ink cartridges equipped with a green chip that monitors information such as the amount ofremaining ink for each cartridge. This means that even if the cartridge is removed from the printer before it isexpended, you can still use the cartridge after reinserting it back into the printer.
❏ To ensure you receive premium print quality and to help protect your print head, a variable ink safety reserveremains in the cartridge when your printer indicates to replace the cartridge. The yields quoted for you do notinclude this reserve.
❏ Do not disassemble or remodel the ink cartridge, otherwise you may not be able to print normally.
❏ Do not move the print head by hand; otherwise, the printer may be damaged.
❏ While cartridges are in storage, keep the ink supply ports free of dust. The ink supply port has a valve in it so itdoes not need to be capped.
❏ Do not allow foreign objects to fall into the cartridge installation section.
❏ When the printer is powered off with the P(power) button, the print head is automatically capped to preventthe ink from drying. Do not pull out the power plug or turn off the breaker while the power is on.
❏ If one of the installed ink cartridges is expended, printing cannot be performed.
❏ If an ink cartridge is expended while printing, you can continue printing after replacing the ink cartridge.
❏ If you continue to use ink cartridges that are running low, you may need to replace the ink cartridge whileprinting. If you replace the ink cartridge while printing, colors may look different depending on how the inkdries. If you want to avoid issues such as this, we recommend replacing the cartridge before printing.
❏ You can still use the removed ink cartridge in the future until the ink cartridge is expended.
Consumption of ink
❏ All colors of ink are used during head cleaning and other non-printing maintenance operations to ensure thatthe print heads remain in good condition.
❏ Even for monochrome printing, all the ink colors are used in an operation designed to maintain the printingand print head quality.
❏ Depending on the paper type and print quality settings, colored inks may also be used for high-density blacks inmonochrome or grayscale printing.
❏ The ink in the ink cartridges supplied with your printer is partly used during initial setup. In order to producehigh quality printouts, the print head in your printer will be fully charged with ink. This one-off processconsumes a quantity of ink and therefore these cartridges may print fewer pages compared to subsequent inkcartridges.
❏ Quoted yields may vary depending on the images that you are printing, the paper type that you are using, thefrequency of your prints and environmental conditions such as temperature.
Solving Problems > It is Time to Replace the Ink Cartridges > Ink Cartridge Handling Precautions
142
Replacing Ink CartridgeWhen a message is displayed prompting you to replace the ink cartridge, select How To and then view theanimations displayed on the control panel to learn how to replace the ink cartridge.
Related Information
& “Ink Cartridge Codes for SC-P900 Series” on page 196& “Ink Cartridge Codes for SC-P700 Series” on page 197& “Ink Cartridge Handling Precautions” on page 141
It is Time to Replace the Maintenance Box
Maintenance Box Handling PrecautionsRead the following instructions before replacing the maintenance box.
❏ Do not touch the green chip on the side of the maintenance box. Doing so may prevent normal operation andprinting.
❏ Do not replace the maintenance box during printing; otherwise, ink may leak.
❏ Do not remove the maintenance box or open its cover except when replacing the maintenance box; otherwiseink may leak.
❏ Do not reuse a maintenance box which has been removed and left detached for a long period. Ink inside the boxwill have solidified and no more ink can be absorbed.
❏ Do not tilt the used maintenance box until after it is sealed in the plastic bag; otherwise ink may leak.
❏ Do not store the maintenance box in high or freezing temperatures.
❏ Keep the maintenance box out of direct sunlight.
❏ Do not drop the maintenance box or subject it to strong shocks.
❏ Do not touch the openings in the maintenance box as you may get smeared with ink.
Replacing a Maintenance BoxIn some print cycles a very small amount of surplus ink may be collected in the maintenance box. To prevent inkleakage from the maintenance box, the printer is designed to stop printing when the absorbing capacity of themaintenance box has reached its limit. Whether and how often this is required will vary according to the numberof pages you print, the type of material that you print and the number of cleaning cycles that the printer performs.
When a message is displayed prompting you to replace the maintenance box, refer to the animations displayed onthe control panel. The need for replacement of the box does not mean that your printer has ceased to operate in
Solving Problems > It is Time to Replace the Maintenance Box > Replacing a Maintenance Box
143
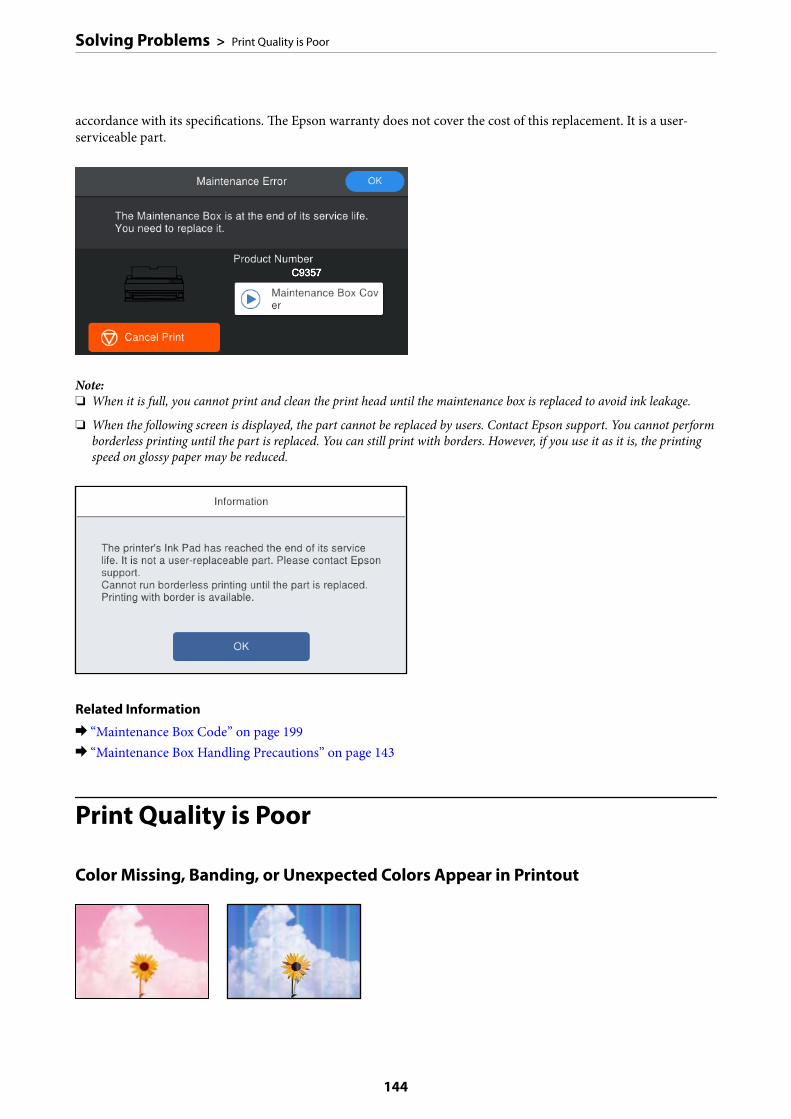
accordance with its specifications. The Epson warranty does not cover the cost of this replacement. It is a user-serviceable part.
Note:❏ When it is full, you cannot print and clean the print head until the maintenance box is replaced to avoid ink leakage.
❏ When the following screen is displayed, the part cannot be replaced by users. Contact Epson support. You cannot performborderless printing until the part is replaced. You can still print with borders. However, if you use it as it is, the printingspeed on glossy paper may be reduced.
Related Information
& “Maintenance Box Code” on page 199& “Maintenance Box Handling Precautions” on page 143
Print Quality is Poor
Color Missing, Banding, or Unexpected Colors Appear in Printout
Solving Problems > Print Quality is Poor
144
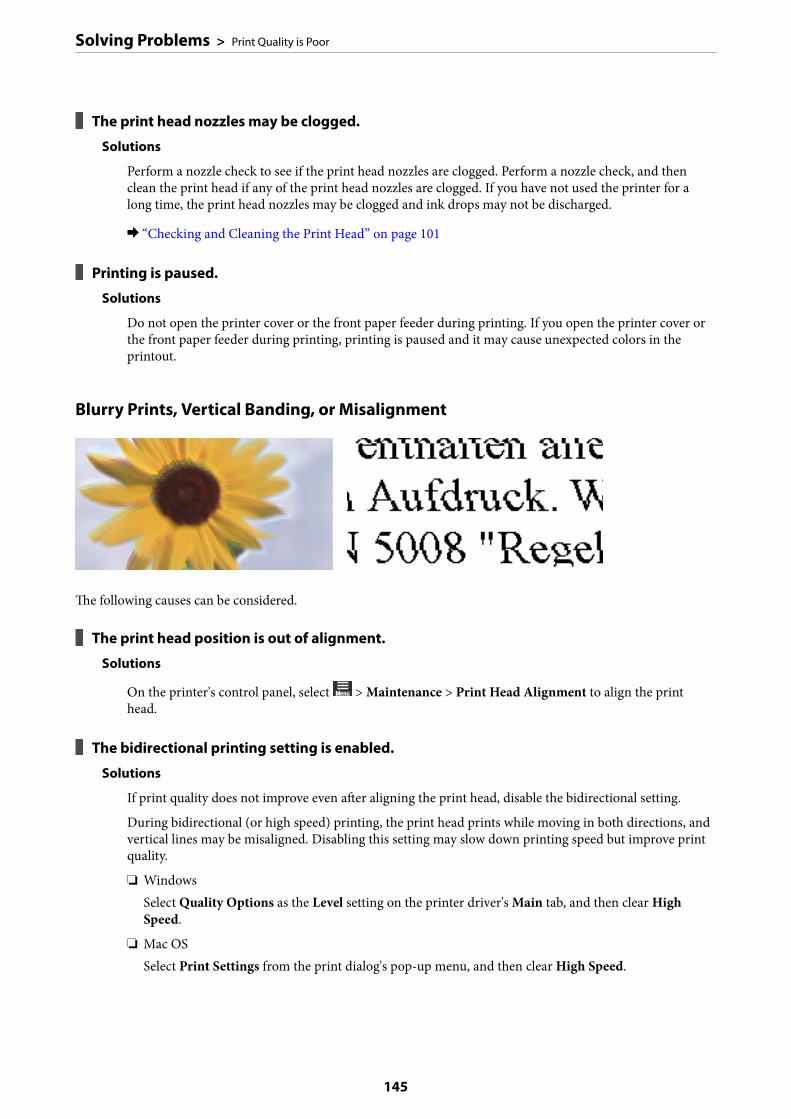
The print head nozzles may be clogged.
Solutions
Perform a nozzle check to see if the print head nozzles are clogged. Perform a nozzle check, and thenclean the print head if any of the print head nozzles are clogged. If you have not used the printer for along time, the print head nozzles may be clogged and ink drops may not be discharged.
& “Checking and Cleaning the Print Head” on page 101
Printing is paused.
Solutions
Do not open the printer cover or the front paper feeder during printing. If you open the printer cover orthe front paper feeder during printing, printing is paused and it may cause unexpected colors in theprintout.
Blurry Prints, Vertical Banding, or Misalignment
The following causes can be considered.
The print head position is out of alignment.
Solutions
On the printer's control panel, select > Maintenance > Print Head Alignment to align the printhead.
The bidirectional printing setting is enabled.
Solutions
If print quality does not improve even after aligning the print head, disable the bidirectional setting.
During bidirectional (or high speed) printing, the print head prints while moving in both directions, andvertical lines may be misaligned. Disabling this setting may slow down printing speed but improve printquality.
❏ WindowsSelect Quality Options as the Level setting on the printer driver's Main tab, and then clear HighSpeed.
❏ Mac OSSelect Print Settings from the print dialog's pop-up menu, and then clear High Speed.
Solving Problems > Print Quality is Poor
145
Printout Comes Out as a Blank Sheet
The print settings and the paper size loaded in the printer are different.
Solutions
Change the print settings according to the paper size loaded in the printer. Load paper in the printer thatmatches the print settings.
Multiple sheets of paper are fed into the printer at the same time.
Solutions
See the following to prevent multiple sheets of paper being fed into the printer at the same time.
& “Several Sheets of Paper are Fed at a Time” on page 118
The print head nozzles may be clogged.
Solutions
Perform the nozzle check, and then run the head cleaning or Power Cleaning if the print head nozzles areclogged.
& “Checking and Cleaning the Print Head” on page 101
Paper Is Smeared or Scuffed
The following causes can be considered.
Paper is loaded incorrectly.
Solutions
When horizontal banding (perpendicular to the printing direction) appears, or the top or bottom of thepaper is smeared, load paper in the correct direction and slide the edge guides to the edges of the paper.
& “Loading Paper” on page 26
Solving Problems > Print Quality is Poor
146
The paper path is smeared.
Solutions
When vertical banding (horizontal to the printing direction) appears, or the paper is smeared, clean thepaper path.
& “Cleaning the Paper Path for Ink Smears” on page 106
The paper is curled.
Solutions
Place the paper on a flat surface to check if it is curled. If it is, flatten it.
The print head is rubbing the surface of the paper.
Solutions
When printing on thick paper, the print head is close to the printing surface and the paper may bescuffed. In this case, enable the reduce scuff setting.
On the printer's control panel, select > General Settings > Printer Settings, and then enable ThickPaper.
The back of the paper was printed before the side that had already been printed was dry.
Solutions
When performing manual 2-sided printing, make sure that the ink is completely dry before reloading thepaper.
Printed Photos are Sticky
The print was made on the wrong side of the photo paper.
Solutions
Make sure you are printing on the printable side. When printing on the wrong side of the photo paper,you need to clean the paper path.
& “Cleaning the Paper Path for Ink Smears” on page 106
Solving Problems > Print Quality is Poor
147
Images or Photos are Printed in Unexpected Colors
The following causes can be considered.
The print head nozzles may be clogged.
Solutions
Perform a nozzle check to see if the print head nozzles are clogged. Perform a nozzle check, and thenclean the print head if any of the print head nozzles are clogged. If you have not used the printer for along time, the print head nozzles may be clogged and ink drops may not be discharged.
& “Checking and Cleaning the Print Head” on page 101
Color correction has been applied.
Solutions
When printing from the Windows printer driver, the Epson auto photo adjustment setting(PhotoEnhance) is applied by default depending on the paper type. Try change the setting.
On the Windows printer driver's Main tab, select Advanced in Mode. Change the Scene Correctionsetting from Auto Correct to any other option. If changing the setting does not work, use any colorcorrection method other than PhotoEnhance in Mode.
& “Adjusting the Print Color” on page 85
Colors in the Printout Differ from Those on the Display
The color properties for the display device you are using have not been adjusted correctly.
Solutions
Display devices such as computer screens have their own display properties. If the display is unbalanced,the image are not displayed with proper brightness and colors. Adjust the properties of the device. Next,perform the following.
Solving Problems > Print Quality is Poor
148
❏ WindowsSelect EPSON Standard (sRGB) as the Mode setting on the printer driver's Main tab.
❏ Mac OSSelect EPSON Standard (sRGB) as the Color Settings setting from the print dialog's Print Settingsmenu.
The display device is reflecting external light.
Solutions
Avoid direct sunlight and confirm the image where an appropriate illuminance is assured.
The display device has a high resolution.
Solutions
Colors may differ from what you see on smart devices such as smart phones or tablets with high-resolution displays.
The display device and the printer have a different process of producing colors.
Solutions
Colors on a display are not quite identical to those on paper because the display device and the printerhave a different process of producing colors. Adjust the color properties so that the colors are identical.
Cannot Print Without Margins
Borderless is not set in the print settings.
Solutions
Make borderless setting in the print settings. If you select a paper type that does not support borderlessprinting, you cannot select Borderless. Select a paper type that supports borderless printing.
❏ WindowsSelect Borderless on the printer driver's Main tab.
❏ Mac OSSelect a borderless paper size from Paper Size.
& “Available Paper and Capacities” on page 182
Solving Problems > Print Quality is Poor
149
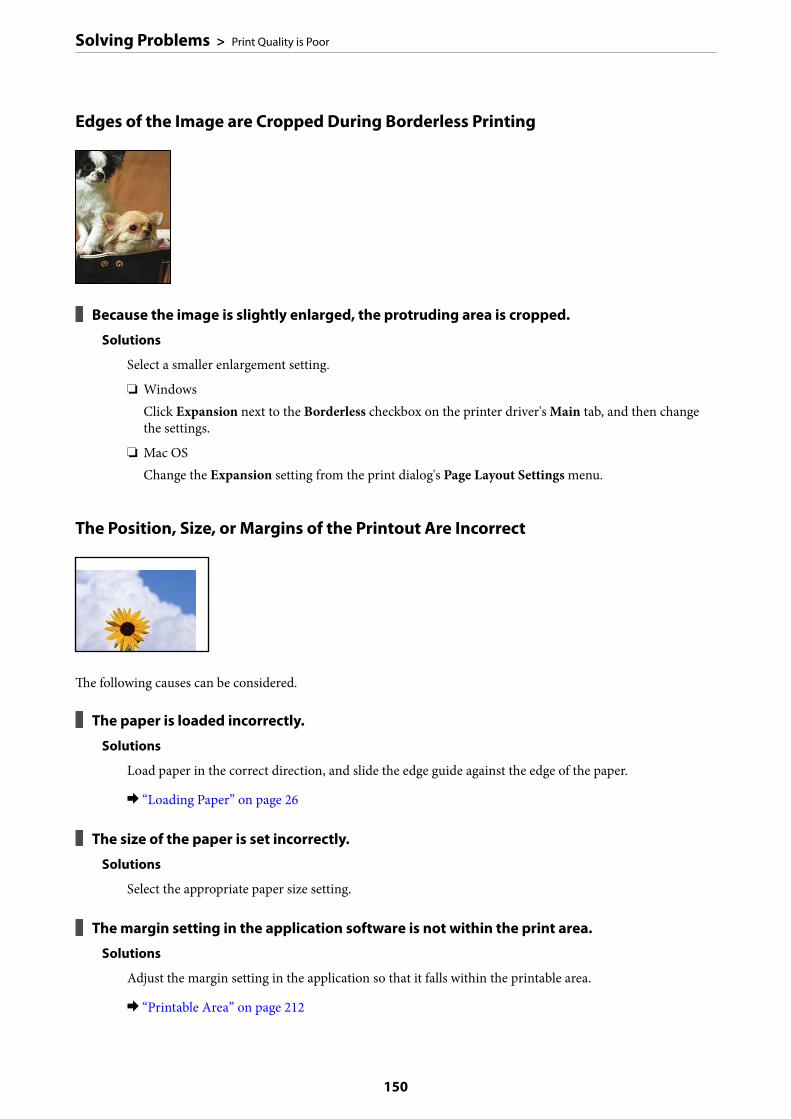
Edges of the Image are Cropped During Borderless Printing
Because the image is slightly enlarged, the protruding area is cropped.
Solutions
Select a smaller enlargement setting.
❏ WindowsClick Expansion next to the Borderless checkbox on the printer driver's Main tab, and then changethe settings.
❏ Mac OSChange the Expansion setting from the print dialog's Page Layout Settings menu.
The Position, Size, or Margins of the Printout Are Incorrect
The following causes can be considered.
The paper is loaded incorrectly.
Solutions
Load paper in the correct direction, and slide the edge guide against the edge of the paper.
& “Loading Paper” on page 26
The size of the paper is set incorrectly.
Solutions
Select the appropriate paper size setting.
The margin setting in the application software is not within the print area.
Solutions
Adjust the margin setting in the application so that it falls within the printable area.
& “Printable Area” on page 212
Solving Problems > Print Quality is Poor
150
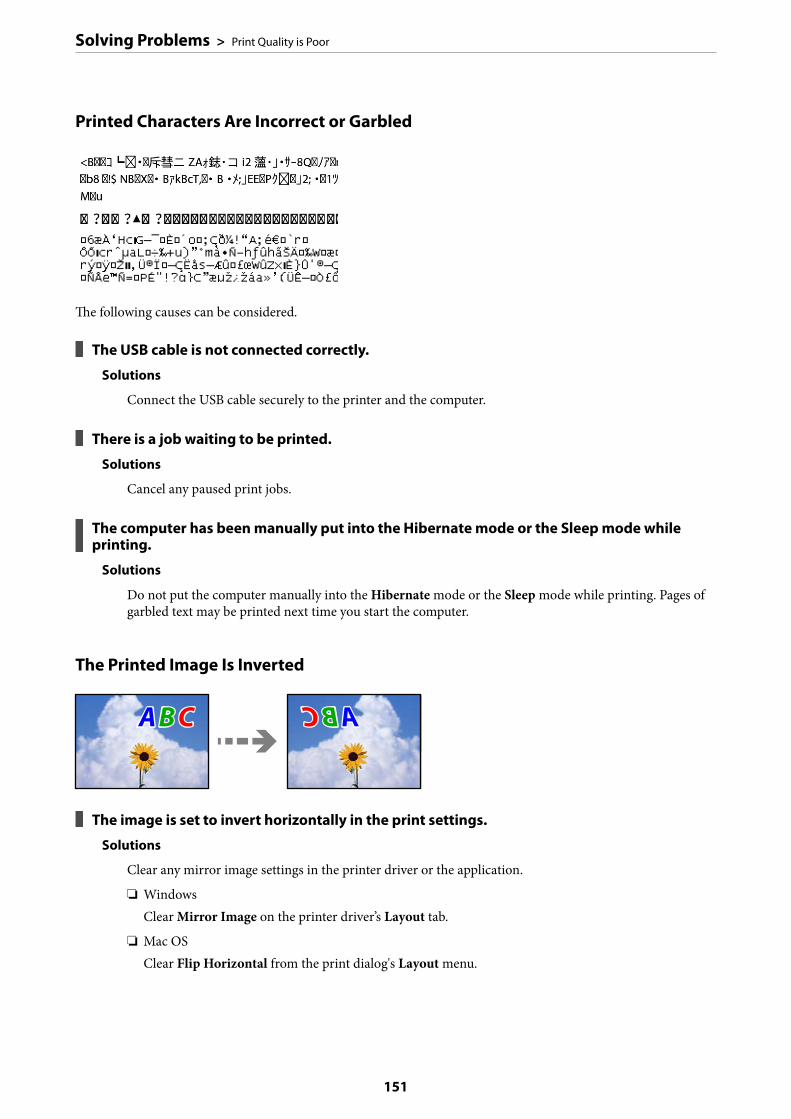
Printed Characters Are Incorrect or Garbled
The following causes can be considered.
The USB cable is not connected correctly.
Solutions
Connect the USB cable securely to the printer and the computer.
There is a job waiting to be printed.
Solutions
Cancel any paused print jobs.
The computer has been manually put into the Hibernate mode or the Sleep mode whileprinting.
Solutions
Do not put the computer manually into the Hibernate mode or the Sleep mode while printing. Pages ofgarbled text may be printed next time you start the computer.
The Printed Image Is Inverted
The image is set to invert horizontally in the print settings.
Solutions
Clear any mirror image settings in the printer driver or the application.
❏ WindowsClear Mirror Image on the printer driver’s Layout tab.
❏ Mac OSClear Flip Horizontal from the print dialog's Layout menu.
Solving Problems > Print Quality is Poor
151
Mosaic-Like Patterns in the Prints
Images or photos with a low resolution were printed.
Solutions
When printing images or photos, print using high-resolution data. Images on web sites are often lowresolution although they look good enough on the display, and so print quality may decline.
Vertical lines Appears on Roll Paper
Rollers on the roll paper unit are smeared.
Solutions
If you are printing on glossy roll paper with the SC-P900 Series printer and uneven vertical lines appear,remove the paper from the roll paper unit, and clean the rollers using a dry, soft, clean cloth. Rotate therollers as you wipe them to clean the entire surface.
Cannot Solve ProblemIf you cannot solve the problem after trying all of the solutions, contact Epson support.
If you cannot solve printing problems, see the following related information.
Solving Problems > Cannot Solve Problem
152

Related Information
& “Cannot Solve Printing Problems” on page 153
Cannot Solve Printing ProblemsTry the following problems in order starting at the top until you solve the problem.
❏ Make sure you match the paper type loaded in the printer and the paper type set on the printer to the papertype settings in the printer driver.“Paper Size and Type Settings” on page 27
❏ Use a higher quality setting on the control panel or the printer driver.
❏ Reinstall the ink cartridges already installed in the printer.Reinstalling the ink cartridges may clear clogging in the print head nozzles and allow the ink to flow smoothly.However, because the ink is consumed when the ink cartridge is reinstalled, a message asking you to replace theink cartridge may be displayed depending on the amount of ink remaining.“It is Time to Replace the Ink Cartridges” on page 141
❏ Align the print head.“Aligning the Print Head” on page 105
❏ Run a nozzle check to see if the print head nozzles are clogged.If there are missing segments in the nozzle check pattern, the nozzles may be clogged. Repeat head cleaning andthe nozzle check alternately 3 times and check if the clogging has cleared.Note that print head cleaning uses some ink.“Checking and Cleaning the Print Head” on page 101
❏ Turn off the printer, wait for at least 6 hours, and then check if the clogging has cleared.If the problem is clogging, leaving the printer for a while without printing may solve the problem.You can check the following items while the printer is off.
❏ Check that you are using genuine Epson ink cartridges.Try to use genuine Epson ink cartridges. This product is designed to adjust colors based on the use of genuineEpson ink cartridges. The use of non-genuine ink cartridges may cause print quality to decline.“Consumable Products Information” on page 196
❏ Make sure that there are no paper fragments left inside the printer.When you remove the paper, do not touch the translucent film with your hand or the paper.
❏ Check the paper.Check if the paper is curled or loaded with the printable side facing up.“Paper Handling Precautions” on page 26“Available Paper and Capacities” on page 182“Unavailable Paper Types” on page 190
❏ Make sure that you are not using an old ink cartridge.For best results, Epson recommends using up ink cartridges before the best before date printed on the package,or within six months of opening the package, whichever is earlier.
❏ If you turn off the printer, wait for at least 6 hours, and if print quality has still not improved, run PowerCleaning.“Running Power Cleaning” on page 103
Solving Problems > Cannot Solve Problem > Cannot Solve Printing Problems
153

If you cannot solve the problem by checking the solutions above, you may need to request repairs. Contact Epsonsupport.
Related Information
& “Before Contacting Epson” on page 224& “Contacting Epson Support” on page 224
Solving Problems > Cannot Solve Problem > Cannot Solve Printing Problems
154

Adding or Replacing the Computer orDevices
Connecting to a Printer that has been Connected to the Network. . . . . . . . . . . . . . .156
Re-setting the Network Connection. . . . . . . . . . . . . . . . . . . . . . . . . . . . . . . . . . . . 157
Connecting a Smart Device and Printer Directly (Wi-Fi Direct). . . . . . . . . . . . . . . .164
Checking the Network Connection Status. . . . . . . . . . . . . . . . . . . . . . . . . . . . . . . .173
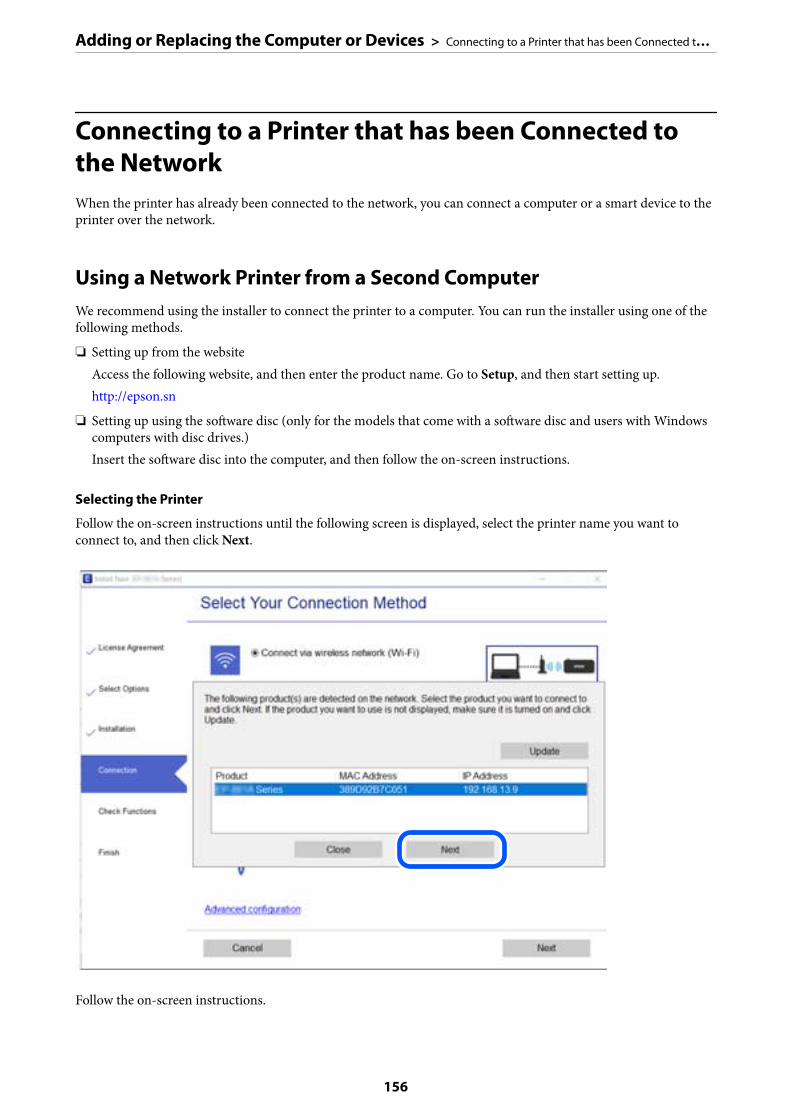
Connecting to a Printer that has been Connected tothe NetworkWhen the printer has already been connected to the network, you can connect a computer or a smart device to theprinter over the network.
Using a Network Printer from a Second ComputerWe recommend using the installer to connect the printer to a computer. You can run the installer using one of thefollowing methods.
❏ Setting up from the websiteAccess the following website, and then enter the product name. Go to Setup, and then start setting up.http://epson.sn
❏ Setting up using the software disc (only for the models that come with a software disc and users with Windowscomputers with disc drives.)Insert the software disc into the computer, and then follow the on-screen instructions.
Selecting the Printer
Follow the on-screen instructions until the following screen is displayed, select the printer name you want toconnect to, and then click Next.
Follow the on-screen instructions.
Adding or Replacing the Computer or Devices > Connecting to a Printer that has been Connected t…
156
Using a Network Printer from a Smart DeviceYou can connect a smart device to the printer using one of the following methods.
Connecting over a wireless router
Connect the smart device to the same Wi-Fi network (SSID) as the printer.
See the following for more details.
“Making Settings for Connecting to the Smart Device” on page 158
Connecting by Wi-Fi Direct
Connect the smart device to the printer directly without a wireless router.
See the following for more details.
“Connecting a Smart Device and Printer Directly (Wi-Fi Direct)” on page 164
Re-setting the Network ConnectionThis section explains how to make the network connection settings and change the connection method whenreplacing the wireless router or the computer.
When Replacing the Wireless RouterWhen you replace the wireless router, make settings for the connection between the computer or the smart deviceand the printer.
You need to make these settings if you change your Internet service provider and so on.
Making Settings for Connecting to the Computer
We recommend using the installer to connect the printer to a computer. You can run the installer using one of thefollowing methods.
❏ Setting up from the websiteAccess the following website, and then enter the product name. Go to Setup, and then start setting up.http://epson.sn
❏ Setting up using the software disc (only for the models that come with a software disc and users with Windowscomputers with disc drives.)Insert the software disc into the computer, and then follow the on-screen instructions.
Selecting the Connection Methods
Follow the on-screen instructions until the following screen is displayed.
Adding or Replacing the Computer or Devices > Re-setting the Network Connection > When Repl…
157
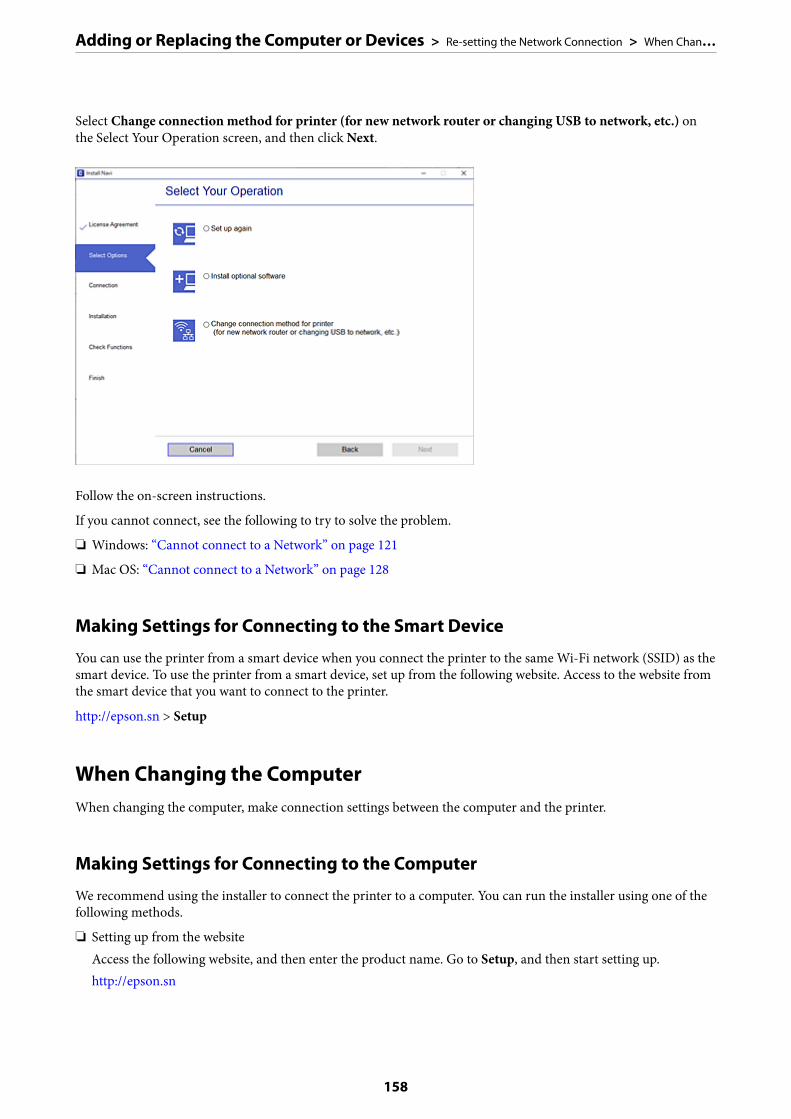
Select Change connection method for printer (for new network router or changing USB to network, etc.) onthe Select Your Operation screen, and then click Next.
Follow the on-screen instructions.
If you cannot connect, see the following to try to solve the problem.
❏ Windows: “Cannot connect to a Network” on page 121
❏ Mac OS: “Cannot connect to a Network” on page 128
Making Settings for Connecting to the Smart Device
You can use the printer from a smart device when you connect the printer to the same Wi-Fi network (SSID) as thesmart device. To use the printer from a smart device, set up from the following website. Access to the website fromthe smart device that you want to connect to the printer.
http://epson.sn > Setup
When Changing the ComputerWhen changing the computer, make connection settings between the computer and the printer.
Making Settings for Connecting to the Computer
We recommend using the installer to connect the printer to a computer. You can run the installer using one of thefollowing methods.
❏ Setting up from the websiteAccess the following website, and then enter the product name. Go to Setup, and then start setting up.http://epson.sn
Adding or Replacing the Computer or Devices > Re-setting the Network Connection > When Chan…
158

❏ Setting up using the software disc (only for the models that come with a software disc and users with Windowscomputers with disc drives.)Insert the software disc into the computer, and then follow the on-screen instructions.
Follow the on-screen instructions.
Changing the Connection Method to the ComputerThis section explains how to change the connection method when the computer and the printer have beenconnected.
Changing the Network Connection from Ethernet to Wi-Fi
Change the Ethernet connection to Wi-Fi connection from the printer's control panel. The changing connectionmethod is basically the same as the Wi-Fi connection settings.
Related Information
& “Making Wi-Fi Settings from the Control Panel” on page 161
Changing the Network Connection from Wi-Fi to Ethernet
Follow the steps below to change from a Wi-Fi connection to an Ethernet connection.
1. Tap on the printer's control panel.
2. Tap General Settings > Network Settings > Wired LAN Setup.
3. Tap Start Setup.
4. Check the message, and then tap OK.
5. Connect the printer to the router with an Ethernet cable.
Changing from USB to a Network Connection
Using the installer and re-set up in a different connection method.
❏ Setting up from the websiteAccess the following website, and then enter the product name. Go to Setup, and then start setting up.http://epson.sn
❏ Setting up using the software disc (only for the models that come with a software disc and users with Windowscomputers with disc drives.)Insert the software disc into the computer, and then follow the on-screen instructions.
Selecting Change the Connection Methods
Follow the on-screen instructions until the following screen is displayed.
Adding or Replacing the Computer or Devices > Re-setting the Network Connection > Changing t…
159
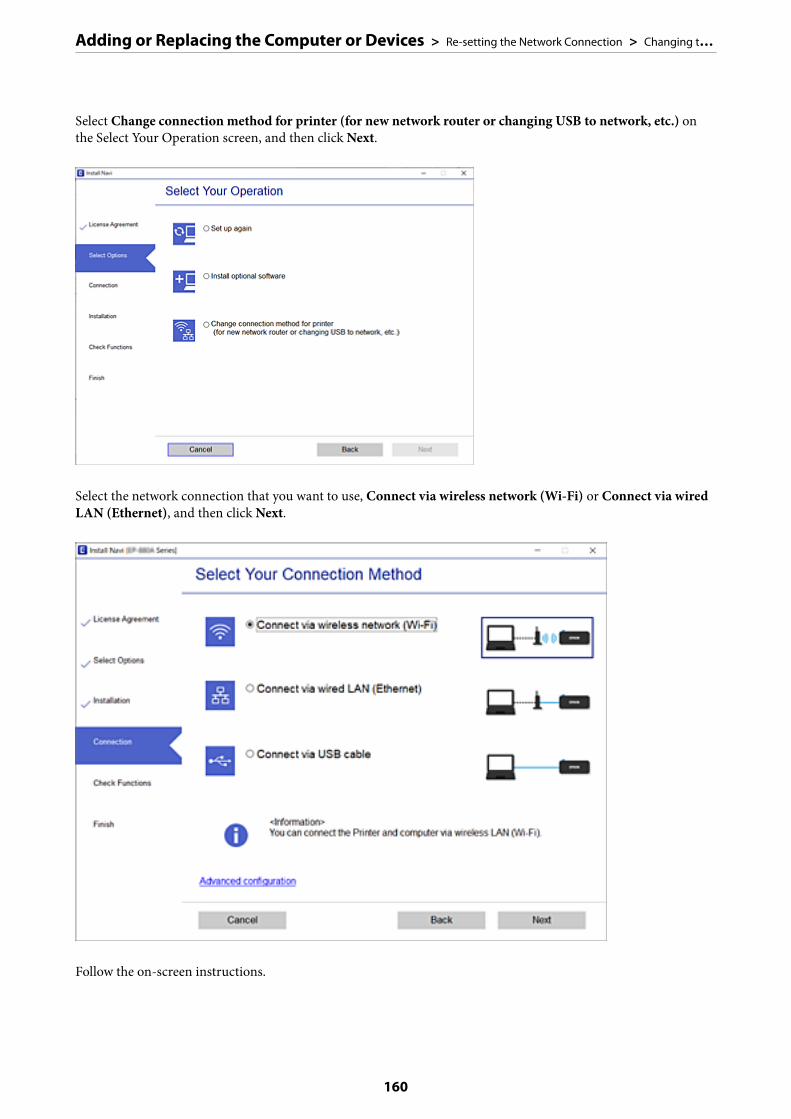
Select Change connection method for printer (for new network router or changing USB to network, etc.) onthe Select Your Operation screen, and then click Next.
Select the network connection that you want to use, Connect via wireless network (Wi-Fi) or Connect via wiredLAN (Ethernet), and then click Next.
Follow the on-screen instructions.
Adding or Replacing the Computer or Devices > Re-setting the Network Connection > Changing t…
160
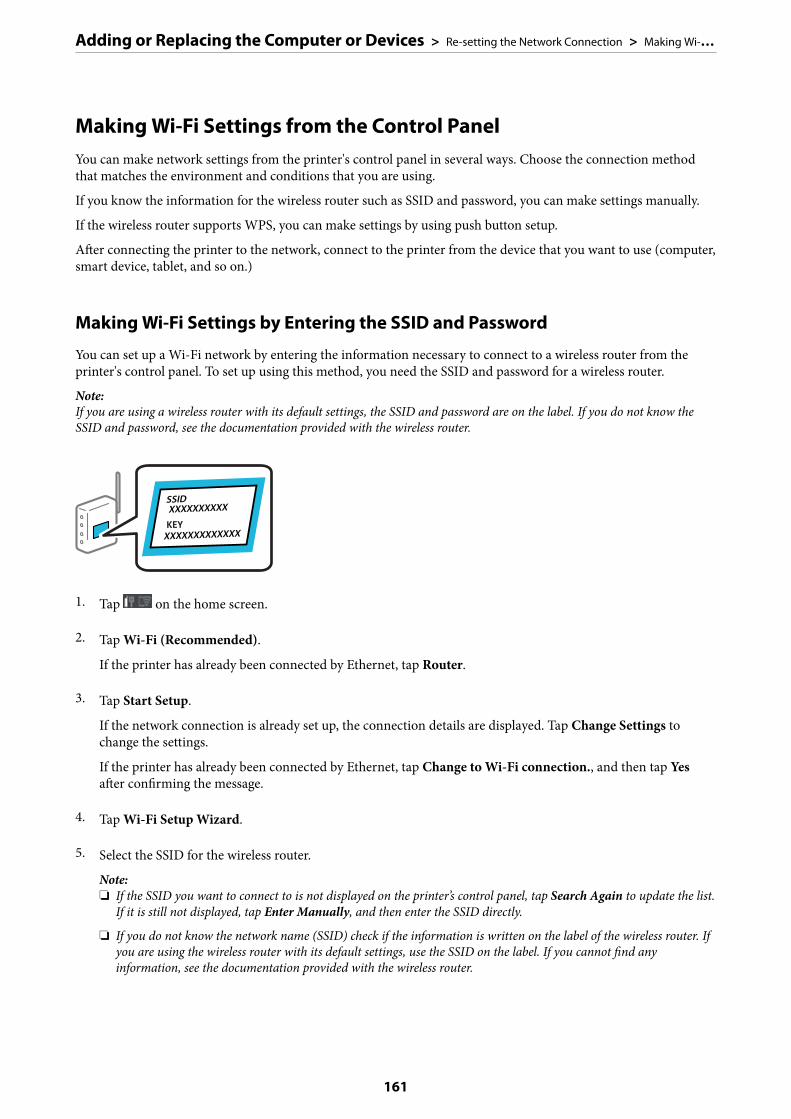
Making Wi-Fi Settings from the Control PanelYou can make network settings from the printer's control panel in several ways. Choose the connection methodthat matches the environment and conditions that you are using.
If you know the information for the wireless router such as SSID and password, you can make settings manually.
If the wireless router supports WPS, you can make settings by using push button setup.
After connecting the printer to the network, connect to the printer from the device that you want to use (computer,smart device, tablet, and so on.)
Making Wi-Fi Settings by Entering the SSID and Password
You can set up a Wi-Fi network by entering the information necessary to connect to a wireless router from theprinter's control panel. To set up using this method, you need the SSID and password for a wireless router.
Note:If you are using a wireless router with its default settings, the SSID and password are on the label. If you do not know theSSID and password, see the documentation provided with the wireless router.
1. Tap on the home screen.
2. Tap Wi-Fi (Recommended).
If the printer has already been connected by Ethernet, tap Router.
3. Tap Start Setup.
If the network connection is already set up, the connection details are displayed. Tap Change Settings tochange the settings.
If the printer has already been connected by Ethernet, tap Change to Wi-Fi connection., and then tap Yesafter confirming the message.
4. Tap Wi-Fi Setup Wizard.
5. Select the SSID for the wireless router.
Note:❏ If the SSID you want to connect to is not displayed on the printer’s control panel, tap Search Again to update the list.
If it is still not displayed, tap Enter Manually, and then enter the SSID directly.
❏ If you do not know the network name (SSID) check if the information is written on the label of the wireless router. Ifyou are using the wireless router with its default settings, use the SSID on the label. If you cannot find anyinformation, see the documentation provided with the wireless router.
Adding or Replacing the Computer or Devices > Re-setting the Network Connection > Making Wi-…
161
6. Tap the Enter Password field, and then enter the password.
Note:❏ The password is case-sensitive.
❏ If you do not know the password, check if the information is written on the label of the wireless router. On the label,the password may be written "Network Key", "Wireless Password", and so on. If you are using the wireless routerwith its default settings, use the password written on the label.
7. When you have setup finished, tap Start Setup.
8. Tap Close.
The screen automatically closes after a specific length of time if you do not tap Close.
Note:If you fail to connect, load A4 size plain paper, and then tap Print Check Report to print a connection report.
9. Tap Close on the network connection settings screen.
Related Information
& “Entering Characters” on page 24& “Checking the Network Connection Status” on page 173
Making Wi-Fi Settings by Push Button Setup (WPS)
You can automatically set up a Wi-Fi network by pressing a button on the wireless router. If the followingconditions are met, you can set up by using this method.
❏ The wireless router is compatible with WPS (Wi-Fi Protected Setup).
❏ The current Wi-Fi connection was established by pressing a button on the wireless router.
1. Tap on the home screen.
2. Tap Wi-Fi (Recommended).
If the printer has been already connected by Ethernet, tapRouter.
3. Tap Start Setup.
If the network connection is already set up, the connection details are displayed. Tap Change Settings tochange the settings.
If the printer has been already connected by Ethernet, tap Change to Wi-Fi connection., and then tap Yesafter confirming the message.
4. Tap Push Button Setup(WPS).
Adding or Replacing the Computer or Devices > Re-setting the Network Connection > Making Wi-…
162
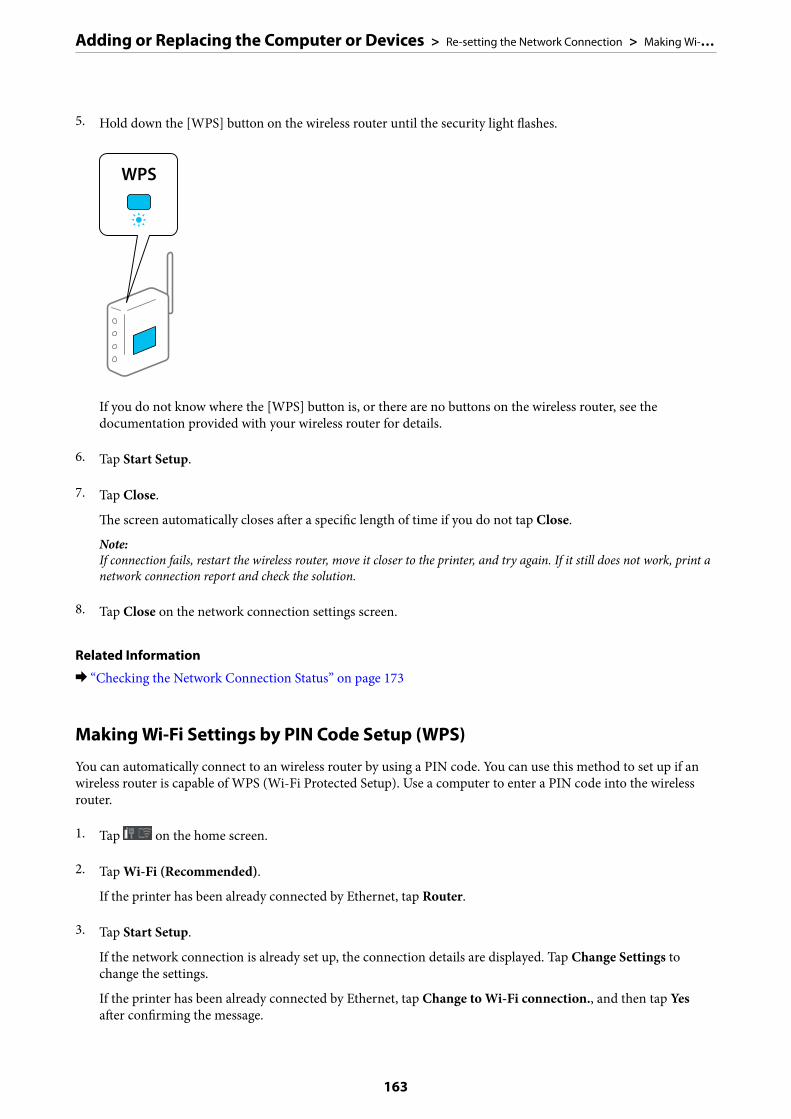
5. Hold down the [WPS] button on the wireless router until the security light flashes.
If you do not know where the [WPS] button is, or there are no buttons on the wireless router, see thedocumentation provided with your wireless router for details.
6. Tap Start Setup.
7. Tap Close.
The screen automatically closes after a specific length of time if you do not tap Close.
Note:If connection fails, restart the wireless router, move it closer to the printer, and try again. If it still does not work, print anetwork connection report and check the solution.
8. Tap Close on the network connection settings screen.
Related Information
& “Checking the Network Connection Status” on page 173
Making Wi-Fi Settings by PIN Code Setup (WPS)
You can automatically connect to an wireless router by using a PIN code. You can use this method to set up if anwireless router is capable of WPS (Wi-Fi Protected Setup). Use a computer to enter a PIN code into the wirelessrouter.
1. Tap on the home screen.
2. Tap Wi-Fi (Recommended).
If the printer has been already connected by Ethernet, tap Router.
3. Tap Start Setup.
If the network connection is already set up, the connection details are displayed. Tap Change Settings tochange the settings.
If the printer has been already connected by Ethernet, tap Change to Wi-Fi connection., and then tap Yesafter confirming the message.
Adding or Replacing the Computer or Devices > Re-setting the Network Connection > Making Wi-…
163
4. Tap Others > PIN Code Setup(WPS).
5. Use your computer to enter the PIN code (an eight digit number) displayed on the printer's control panel intothe wireless router within two minutes.
Note:See the documentation provided with your wireless router for details on entering a PIN code.
6. Tap Start Setup on the printer's control panel.
7. Tap Close.
The screen automatically closes after a specific length of time if you do not tap Close.
Note:If connection fails, restart the wireless router, move it closer to the printer, and try again. If it still does not work, print aconnection report and check the solution.
8. Tap Close on the network connection settings screen.
Related Information
& “Checking the Network Connection Status” on page 173
Connecting a Smart Device and Printer Directly (Wi-FiDirect)Wi-Fi Direct (Simple AP) allows you to connect a smart device directly to the printer without a wireless router andprint from the smart device.
About Wi-Fi DirectUse this connection method when you are not using Wi-Fi at home or at the office, or when you want to connectthe printer and the computer or smart device directly. In this mode, the printer acts as an wireless router and youcan connect the devices to the printer without having to use a standard wireless router. However, devices directlyconnected to the printer cannot communicate with each other through the printer.
Adding or Replacing the Computer or Devices > Connecting a Smart Device and Printer Directly (Wi…
164
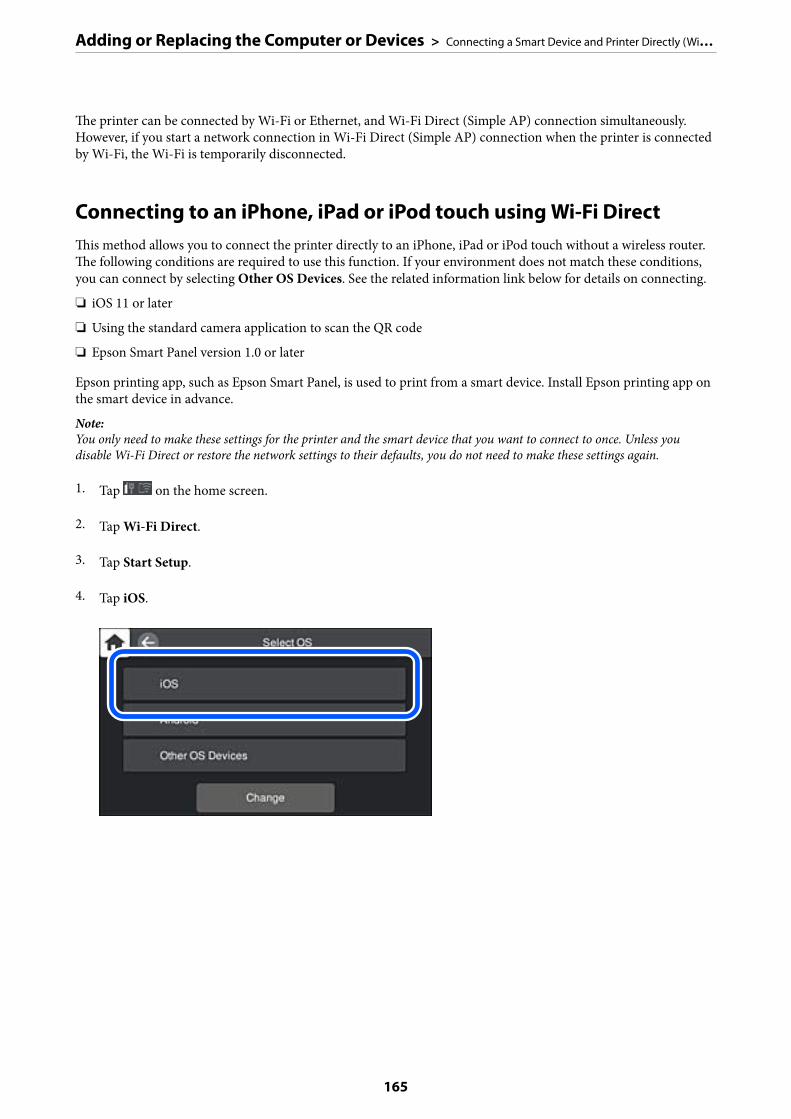
The printer can be connected by Wi-Fi or Ethernet, and Wi-Fi Direct (Simple AP) connection simultaneously.However, if you start a network connection in Wi-Fi Direct (Simple AP) connection when the printer is connectedby Wi-Fi, the Wi-Fi is temporarily disconnected.
Connecting to an iPhone, iPad or iPod touch using Wi-Fi DirectThis method allows you to connect the printer directly to an iPhone, iPad or iPod touch without a wireless router.The following conditions are required to use this function. If your environment does not match these conditions,you can connect by selecting Other OS Devices. See the related information link below for details on connecting.
❏ iOS 11 or later
❏ Using the standard camera application to scan the QR code
❏ Epson Smart Panel version 1.0 or later
Epson printing app, such as Epson Smart Panel, is used to print from a smart device. Install Epson printing app onthe smart device in advance.
Note:You only need to make these settings for the printer and the smart device that you want to connect to once. Unless youdisable Wi-Fi Direct or restore the network settings to their defaults, you do not need to make these settings again.
1. Tap on the home screen.
2. Tap Wi-Fi Direct.
3. Tap Start Setup.
4. Tap iOS.
Adding or Replacing the Computer or Devices > Connecting a Smart Device and Printer Directly (Wi…
165

The QR code is displayed on the printer's control panel.
5. On your iPhone, iPad or iPod touch, start the standard Camera app, and then scan the QR code displayed onthe printer's control panel in PHOTO mode.
Use the Camera app for iOS 11 or later. You cannot connect to the printer using the Camera app for iOS 10 orearlier. Also, you cannot connect using an app for scanning QR codes. If you cannot connect, select OtherMethods on the printer's control panel. See the related information link below for details on connecting.
6. Tap the notification displayed on the screen of the iPhone, iPad or iPod touch.
7. Tap Join.
Adding or Replacing the Computer or Devices > Connecting a Smart Device and Printer Directly (Wi…
166
8. On the printer's control panel, select Next.
9. On the iPhone, iPad or iPod touch, start Epson printing app.
Examples of Epson printing apps
10. On the Epson printing app screen, tap Printer is not selected..
On the Epson Smart Panel, the smart device automatically connects to the printer when it starts.
11. Select the printer that you want to connect to.
See the information displayed on the printer's control panel to select the printer.
12. On the printer's control panel, select Complete.
For smart devices that have been connected to the printer before, select the network name (SSID) on the smartdevice's Wi-Fi screen to connect them again.
Related Information
& “Application for Easily Operating the Printer from a Smart device (Epson Smart Panel)” on page 202& “Connecting to Devices other than iOS and Android using Wi-Fi Direct” on page 169
Connecting to Android Devices using Wi-Fi DirectThis method allows you to connect the printer directly to your Android device without a wireless router. Thefollowing conditions are required to use this function.
❏ Android 4.4 or later
❏ Epson Smart Panel version 1.0 or later
Epson Smart Panel is used to print from a smart device. Install Epson Smart Panel on the smart device in advance.
Adding or Replacing the Computer or Devices > Connecting a Smart Device and Printer Directly (Wi…
167
Note:You only need to make these settings for the printer and the smart device that you want to connect to once. Unless youdisable Wi-Fi Direct or restore the network settings to their defaults, you do not need to make these settings again.
1. Tap on the home screen.
2. Tap Wi-Fi Direct.
3. Tap Start Setup.
4. Tap Android.
5. On the smart device, start Epson printing app.
Examples of Epson printing apps
6. On the Epson printing app screen, tap Printer is not selected..
On the Epson Smart Panel, the smart device automatically connects to the printer when it starts.
Adding or Replacing the Computer or Devices > Connecting a Smart Device and Printer Directly (Wi…
168
7. Select the printer that you want to connect to.
See the information displayed on the printer's control panel to select the printer.
Note:Printers may not been displayed depending on the Android device. If printers are not displayed, connect by selectingOther OS Devices. See the related information link below for connecting.
8. When the device connection approval screen is displayed, select Approve.
9. On the printer's control panel, select Complete.
For smart devices that have been connected to the printer before, select the network name (SSID) on the smartdevice's Wi-Fi screen to connect them again.
Related Information
& “Application for Easily Operating the Printer from a Smart device (Epson Smart Panel)” on page 202& “Connecting to Devices other than iOS and Android using Wi-Fi Direct” on page 169
Connecting to Devices other than iOS and Android using Wi-FiDirectThis method allows you to connect the printer directly to smart devices without a wireless router.
Note:You only need to make these settings for the printer and the smart device that you want to connect to once. Unless youdisable Wi-Fi Direct or restore the network settings to their defaults, you do not need to make these settings again.
1. Tap on the home screen.
2. Tap Wi-Fi Direct.
3. Tap Start Setup.
Adding or Replacing the Computer or Devices > Connecting a Smart Device and Printer Directly (Wi…
169
4. Tap Other OS Devices.
The Network Name (SSID) and Password for Wi-Fi Direct for the printer are displayed.
Adding or Replacing the Computer or Devices > Connecting a Smart Device and Printer Directly (Wi…
170

5. On the smart device's Wi-Fi screen, select the SSID shown on the printer's control panel, and then enter thepassword.
6. On the printer's control panel, select Next.
Adding or Replacing the Computer or Devices > Connecting a Smart Device and Printer Directly (Wi…
171
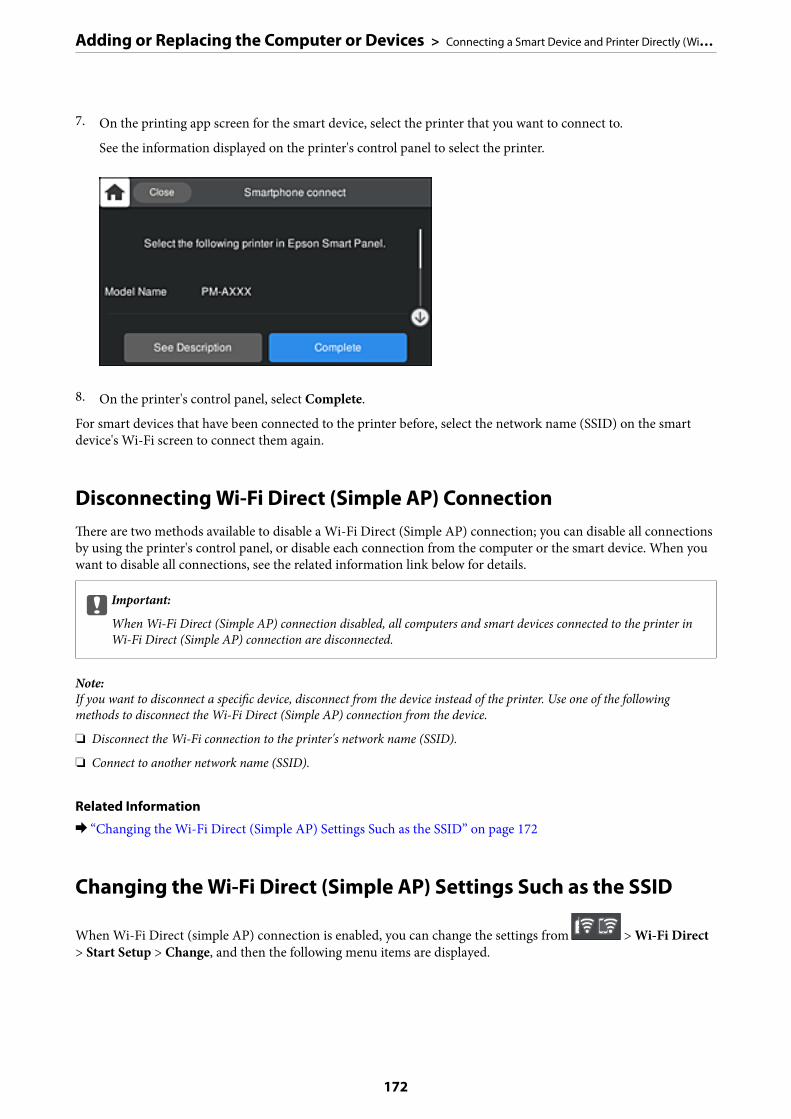
7. On the printing app screen for the smart device, select the printer that you want to connect to.
See the information displayed on the printer's control panel to select the printer.
8. On the printer's control panel, select Complete.
For smart devices that have been connected to the printer before, select the network name (SSID) on the smartdevice's Wi-Fi screen to connect them again.
Disconnecting Wi-Fi Direct (Simple AP) ConnectionThere are two methods available to disable a Wi-Fi Direct (Simple AP) connection; you can disable all connectionsby using the printer's control panel, or disable each connection from the computer or the smart device. When youwant to disable all connections, see the related information link below for details.
cImportant:
When Wi-Fi Direct (Simple AP) connection disabled, all computers and smart devices connected to the printer inWi-Fi Direct (Simple AP) connection are disconnected.
Note:If you want to disconnect a specific device, disconnect from the device instead of the printer. Use one of the followingmethods to disconnect the Wi-Fi Direct (Simple AP) connection from the device.
❏ Disconnect the Wi-Fi connection to the printer's network name (SSID).
❏ Connect to another network name (SSID).
Related Information
& “Changing the Wi-Fi Direct (Simple AP) Settings Such as the SSID” on page 172
Changing the Wi-Fi Direct (Simple AP) Settings Such as the SSID
When Wi-Fi Direct (simple AP) connection is enabled, you can change the settings from > Wi-Fi Direct> Start Setup > Change, and then the following menu items are displayed.
Adding or Replacing the Computer or Devices > Connecting a Smart Device and Printer Directly (Wi…
172
Change Network Name
Change the Wi-Fi Direct (simple AP) network name (SSID) used for connecting to the printer to your arbitraryname. You can set the network name (SSID) in ASCII characters that is displayed on the software keyboard on thecontrol panel. You can enter up to 22 characters.
When changing the network name (SSID), all connected devices are disconnected. Use the new network name(SSID) if you want to re-connect the device.
Change Password
Change the Wi-Fi Direct (simple AP) password for connecting to the printer to your arbitrary value. You can setthe password in ASCII characters that is displayed on the software keyboard on the control panel. You can enter 8to 22 characters.
When changing the password, all connected devices are disconnected. Use the new password if you want to re-connect the device.
Change Frequency Range
Change the frequency range of Wi-Fi Direct used for connecting to the printer. You can select 2.4 GHz or 5 GHz.
When changing the frequency range, all connected devices are disconnected. Re-connect the device.
Note that you cannot re-connect from devices that do not support 5 GHz frequency range when changing to 5GHz.
Depending on the region, this setting may not be displayed.
Disable Wi-Fi Direct
Disable Wi-Fi Direct (simple AP) settings of the printer. When disabling it, all devices connected to the printer inWi-Fi Direct (Simple AP) connection are disconnected.
Restore Default Settings
Restore all Wi-Fi Direct (simple AP) settings to their defaults.
The Wi-Fi Direct (simple AP) connection information of the smart device saved to the printer is deleted.
Note:You can also set up from the Network tab > Wi-Fi Direct on Web Config for the following settings.
❏ Enabling or disabling Wi-Fi Direct (simple AP)
❏ Changing network name (SSID)
❏ Changing password
❏ Changing the frequency rangeDepending on the region, this setting may not be displayed.
❏ Restoring the Wi-Fi Direct (simple AP) settings
Checking the Network Connection StatusYou can check the network connection status in the following way.
Adding or Replacing the Computer or Devices > Checking the Network Connection Status
173
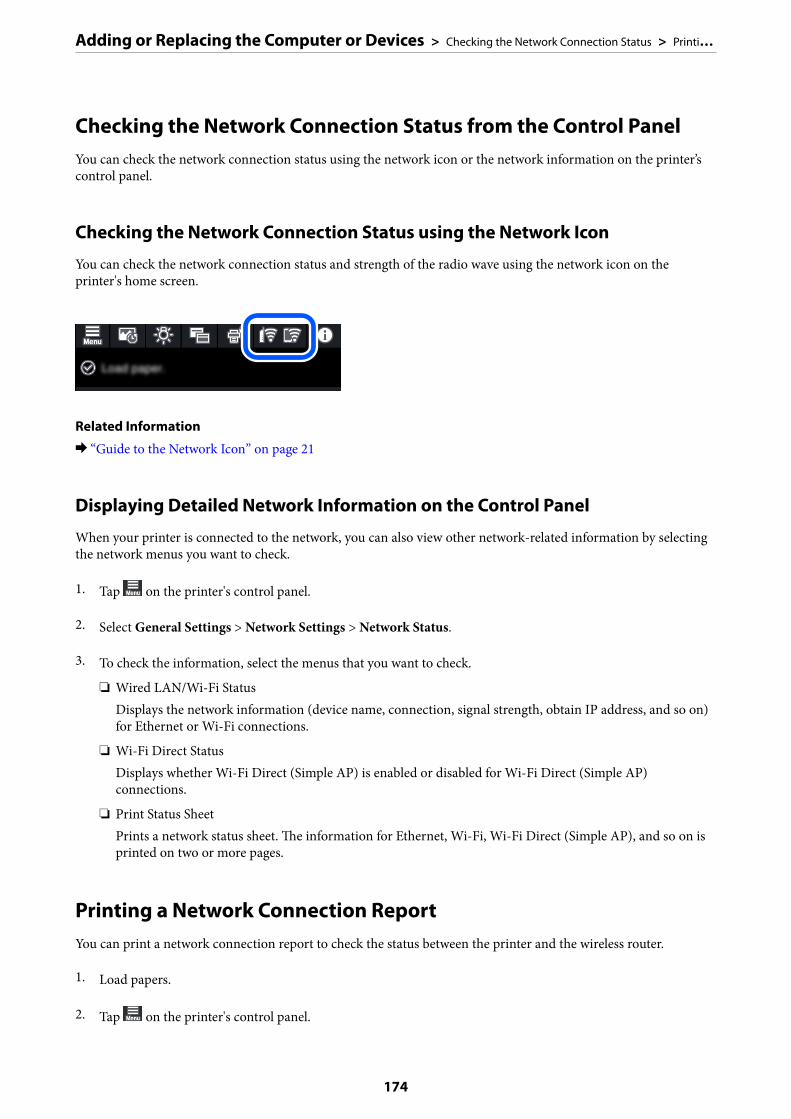
Checking the Network Connection Status from the Control PanelYou can check the network connection status using the network icon or the network information on the printer’scontrol panel.
Checking the Network Connection Status using the Network Icon
You can check the network connection status and strength of the radio wave using the network icon on theprinter's home screen.
Related Information
& “Guide to the Network Icon” on page 21
Displaying Detailed Network Information on the Control Panel
When your printer is connected to the network, you can also view other network-related information by selectingthe network menus you want to check.
1. Tap on the printer's control panel.
2. Select General Settings > Network Settings > Network Status.
3. To check the information, select the menus that you want to check.
❏ Wired LAN/Wi-Fi StatusDisplays the network information (device name, connection, signal strength, obtain IP address, and so on)for Ethernet or Wi-Fi connections.
❏ Wi-Fi Direct StatusDisplays whether Wi-Fi Direct (Simple AP) is enabled or disabled for Wi-Fi Direct (Simple AP)connections.
❏ Print Status SheetPrints a network status sheet. The information for Ethernet, Wi-Fi, Wi-Fi Direct (Simple AP), and so on isprinted on two or more pages.
Printing a Network Connection ReportYou can print a network connection report to check the status between the printer and the wireless router.
1. Load papers.
2. Tap on the printer's control panel.
Adding or Replacing the Computer or Devices > Checking the Network Connection Status > Printi…
174

3. Tap General Settings > Network Settings > Connection Check.
The connection check starts.
4. Tap Print Check Report.
5. Follow the instructions on the printer's screen to print the network connection report.
If an error has occurred, check the network connection report, and then follow the printed solutions.
6. Tap Close.
Messages and Solutions on the Network Connection Report
Check the messages and error codes on the network connection report, and then follow the solutions.
a. Error code
b. Messages on the Network Environment
Related Information
& “E-1” on page 176& “E-2, E-3, E-7” on page 176& “E-5” on page 177
Adding or Replacing the Computer or Devices > Checking the Network Connection Status > Printi…
175
& “E-6” on page 177& “E-8” on page 177& “E-9” on page 178& “E-10” on page 178& “E-11” on page 178& “E-12” on page 179& “E-13” on page 179& “Message on the Network Environment” on page 180
E-1
Solutions:
❏ Make sure the Ethernet cable is securely connected to your printer and to your hub or other network device.
❏ Make sure your hub or other network device is turned on.
❏ If you want to connect the printer by Wi-Fi, make Wi-Fi settings for the printer again because it is disabled.
E-2, E-3, E-7
Solutions:
❏ Make sure your wireless router is turned on.
❏ Confirm that your computer or device is connected correctly to the wireless router.
❏ Turn off the wireless router. Wait for about 10 seconds, and then turn it on.
❏ Place the printer closer to your wireless router and remove any obstacles between them.
❏ If you have entered the SSID manually, check if it is correct. Check the SSID from the Network Status part onthe network connection report.
❏ If an wireless router has multiple SSIDs, select the SSID that is displayed. When the SSID is using a non-compliant frequency, the printer does not display them.
❏ If you are using push button setup to establish a network connection, make sure your wireless router supportsWPS. You cannot use push button setup if your wireless router does not support WPS.
❏ Makes sure your SSID uses only ASCII characters (alphanumeric characters and symbols). The printer cannotdisplay an SSID that contains non-ASCII characters.
❏ Makes sure you know your SSID and password before connecting to the wireless router. If you are using awireless router with its default settings, the SSID and password are located on a label on the wireless router. Ifyou do not know your SSID and password, contact the person who set up the wireless router, or see thedocumentation provided with the wireless router.
❏ If you are connecting to an SSID generated from a tethering smart device, check for the SSID and password inthe documentation provided with the smart device.
❏ If your Wi-Fi connection suddenly disconnects, check for the conditions below. If any of these conditions areapplicable, reset your network settings by downloading and running the software from the following website.http://epson.sn > Setup
❏ Another smart device was added to the network using push button setup.
❏ The Wi-Fi network was set up using any method other than push button setup.
Adding or Replacing the Computer or Devices > Checking the Network Connection Status > Printi…
176
Related Information
& “Making Settings for Connecting to the Computer” on page 158& “Making Wi-Fi Settings from the Control Panel” on page 161
E-5
Solutions:
Make sure the wireless router’s security type is set to one of the following. If it is not, change the security type onthe wireless router, and then reset the printer’s network settings.
❏ WEP-64 bit (40 bit)
❏ WEP-128 bit (104 bit)
❏ WPA PSK (TKIP/AES)*
❏ WPA2 PSK (TKIP/AES)*
❏ WPA (TKIP/AES)
❏ WPA2 (TKIP/AES)
❏ WPA3-SAE (AES)
* WPA PSK is also known as WPA Personal. WPA2 PSK is also known as WPA2 Personal.
E-6
Solutions:
❏ Check if MAC address filtering is disabled. If it is enabled, register the printer’s MAC address so that it is notfiltered. See the documentation provided with the wireless router for details. You can check the printer’s MACaddress from the Network Status part on the network connection report.
❏ If your wireless router is using shared authentication with WEP security, make sure the authentication key andindex are correct.
❏ If the number of connectable devices on the wireless router is less than the number of network devices that youwant to connect, make settings on the wireless router to increase the number of connectable devices. See thedocumentation provided with the wireless router to make settings.
Related Information
& “Making Settings for Connecting to the Computer” on page 158
E-8
Solutions:
❏ Enable DHCP on the wireless router if the printer’s Obtain IP Address setting is set to Auto.
❏ If the printer’s Obtain IP Address setting is set to Manual, the IP address you manually set is invalid due to outof range (for example: 0.0.0.0). Set a valid IP address from the printer’s control panel.
Adding or Replacing the Computer or Devices > Checking the Network Connection Status > Printi…
177
Related Information
& “Network Settings” on page 208
E-9
Solutions:
Check the following.
❏ Devices are turned on.
❏ You can access the Internet and other computers or network devices on the same network from the devices youwant to connect to the printer.
If still does not connect your printer and network devices after confirming the above, turn off the wireless router.Wait for about 10 seconds, and then turn it on. Then reset your network settings by downloading and running theinstaller from the following website.
http://epson.sn > Setup
Related Information
& “Making Settings for Connecting to the Computer” on page 158
E-10
Solutions:
Check the following.
❏ Other devices on the network are turned on.
❏ Network addresses (IP address, subnet mask, and default gateway) are correct if you have set the printer’sObtain IP Address to Manual.
Reset the network address if they are incorrect. You can check the IP address, subnet mask, and default gatewayfrom the Network Status part on the network connection report.
If DHCP is enabled, change the printer’s Obtain IP Address setting to Auto. If you want to set the IP addressmanually, check the printer’s IP address from the Network Status part on the network connection report, and thenselect Manual on the network settings screen. Set the subnet mask to [255.255.255.0].
If still does not connect your printer and network devices, turn off the wireless router. Wait for about 10 seconds,and then turn it on.
Related Information
& “Network Settings” on page 208
E-11
Solutions:
Check the following.
❏ The default gateway address is correct if you set the printer’s TCP/IP Setup setting to Manual.
Adding or Replacing the Computer or Devices > Checking the Network Connection Status > Printi…
178
❏ The device that is set as the default gateway is turned on.
Set the correct default gateway address. You can check the default gateway address from the Network Status parton the network connection report.
Related Information
& “Network Settings” on page 208
E-12
Solutions:
Check the following.
❏ Other devices on the network are turned on.
❏ The network addresses (IP address, subnet mask, and default gateway) are correct if you are entering themmanually.
❏ The network addresses for other devices (subnet mask and default gateway) are the same.
❏ The IP address does not conflict with other devices.
If still does not connect your printer and network devices after confirming the above, try the following.
❏ Turn off the wireless router. Wait for about 10 seconds, and then turn it on.
❏ Make network settings again using the installer. You can run it from the following website.http://epson.sn > Setup
❏ You can register several passwords on a wireless router that uses WEP security type. If several passwords areregistered, check if the first registered password is set on the printer.
Related Information
& “Network Settings” on page 208& “Making Settings for Connecting to the Computer” on page 158
E-13
Solutions:
Check the following.
❏ Network devices such as a wireless router, hub, and router are turned on.
❏ The TCP/IP Setup for network devices has not been set up manually. (If the printer’s TCP/IP Setup is setautomatically while the TCP/IP Setup for other network devices is performed manually, the printer’s networkmay differ from the network for other devices.)
If it still does not work after checking the above, try the following.
❏ Turn off the wireless router. Wait for about 10 seconds, and then turn it on.
❏ Make network settings on the computer that is on the same network as the printer using the installer. You canrun it from the following website.http://epson.sn > Setup
Adding or Replacing the Computer or Devices > Checking the Network Connection Status > Printi…
179
❏ You can register several passwords on a wireless router that uses the WEP security type. If several passwords areregistered, check if the first registered password is set on the printer.
Related Information
& “Network Settings” on page 208& “Making Settings for Connecting to the Computer” on page 158
Message on the Network Environment
Message Solution
The Wi-Fi environment needs to beimproved. Turn the wireless router off andthen turn it on. If the connection does notimprove, see the documentation for thewireless router.
After moving the printer closer to the wireless router and removing anyobstacles between them, turn off the wireless router. Wait for about 10seconds, and then turn it on. If it still does not connect, see thedocumentation supplied with the wireless router.
*No more devices can be connected.Disconnect one of the connected devices ifyou want to add another one.
Computer and smart devices that can be connected simultaneously areconnected in full in the Wi-Fi Direct (Simple AP) connection. To add anothercomputer or smart device, disconnect one of the connected devices orconnect it to the other network first.
You can confirm the number of wireless devices which can be connectedsimultaneously and the number of connected devices by checking thenetwork status sheet or the printer’s control panel.
The same SSID as Wi-Fi Direct exists in theenvironment. Change the Wi-Fi Direct SSIDif you cannot connect a smart device to theprinter.
On the printer’s control panel, go to Wi-Fi Direct Setup screen and select themenu to change the setting. You can change the network name followingafter DIRECT-XX-. Enter within 22 characters.
Printing a Network Status SheetYou can check the detailed network information by printing it.
1. Load papers.
2. Tap on the printer's control panel.
3. Tap General Settings > Network Settings > Network Status.
4. Tap Print Status Sheet.
5. Check the message, and then print the network status sheet.
6. Tap Close.
Adding or Replacing the Computer or Devices > Checking the Network Connection Status > Printi…
180
Product Information
Paper Information. . . . . . . . . . . . . . . . . . . . . . . . . . . . . . . . . . . . . . . . . . . . . . . . .182
Consumable Products Information. . . . . . . . . . . . . . . . . . . . . . . . . . . . . . . . . . . . .196
Software Information. . . . . . . . . . . . . . . . . . . . . . . . . . . . . . . . . . . . . . . . . . . . . . 199
Settings Menu List. . . . . . . . . . . . . . . . . . . . . . . . . . . . . . . . . . . . . . . . . . . . . . . . .206
Product Specifications. . . . . . . . . . . . . . . . . . . . . . . . . . . . . . . . . . . . . . . . . . . . . . 211
Regulatory Information. . . . . . . . . . . . . . . . . . . . . . . . . . . . . . . . . . . . . . . . . . . . . 220
Paper Information
Available Paper and Capacities
Genuine Epson Paper for SC-P900 Series
Epson recommends using genuine Epson paper to ensure high-quality printouts.
Note:The availability of paper varies by location. For the latest information on paper available in your area, contact Epsonsupport.
Even if "✓" is attached to borderless printing availability, borderless printing may not be possible depending on theLevel selected in the printer driver.
Paper suitable for printing documents
Media Name Size LoadingCapacity(Sheets)
ICC Profile Borderless Black ink
Bright White Ink JetPaper
A3 40 Epson_SC-P900_700_Standard.icc
✓* Matte Black
A4 80
* You can specify and perform borderless printing; however, margins may appear or the print quality may decline due to thepaper expanding or contracting.
Paper suitable for printing photos
Media Name Size LoadingCapacity(Sheets)
ICC Profile Borderless Black ink
Premium GlossyPhoto Paper
A2 1 Epson_SC-P900_700_EpsonPremiumGlossy.icc
✓ Photo Black
A3+, A3 10
Letter, A4, 16:9 widesize(102x181 mm)
20
13x18 cm (5x7in.),10x15 cm (4x6 in.)
30
Premium SemiglossPhoto Paper
A2 1 Epson_SC-P900_700_EpsonPremiumSemigloss.icc
✓ Photo Black
A3+, A3 10
Letter, A4, 13x18 cm(5x7in.)
20
10x15 cm (4x6 in.) 30
Product Information > Paper Information > Available Paper and Capacities
182
Media Name Size LoadingCapacity(Sheets)
ICC Profile Borderless Black ink
Photo Paper Glossy A3+, A3, 11x17in. 10 Epson_SC-P900_700_PhotoPaperGlossy.icc
✓ Photo Black
Letter, A4, 13x18 cm(5x7in.), 10x15 cm(4x6 in.)
30
Watercolor Paper -Radiant White
A3+ 1 Epson_SC-P900_700_WatercolorPaperRadiantWhite.icc
✓ Matte Black
Velvet Fine Art Paper 17x22 in., A2, A3+, A3,Letter, A4
1 Epson_SC-P900_700_VelvetFineArtPaper.icc
✓ Matte Black
UltraSmooth Fine ArtPaper
17x22 in., A2, A3+ 1 Epson_SC-P900_700_UltraSmoothFineArtPaper.icc
✓ Matte Black
Matte Paper-Heavyweight
A3+, A3 10 Epson_SC-P900_700_ArchivalMattePaper.icc
✓ Matte Black
Letter, A4, 8x10in 30
Epson PremiumLuster Photo Paper
A3+, A3 10 Epson_SC-P900_700_PremiumLusterPhotoPaper.icc
✓ Photo Black
A4 30
Paper suitable for printing documents and photos
Media Name Size LoadingCapacity(Sheets)
ICC Profile Borderless Black ink
Archival Matte Paper 17x22 in., A2 1 Epson_SC-P900_700_ArchivalMattePaper.icc
✓ Matte Black
A3+, A3, 11x14in. 10
Letter, A4, 8x10in 30
Photo Quality Ink JetPaper
17x22 in., A2 10 Epson_SC-P900_700_Standard.icc
✓ Matte Black
A3+, A3, 11x17in.,Legal
50
Letter, A4 60
Double-Sided MattePaper
Letter, A4 1 Epson_SC-P900_700_ArchivalMattePaper.icc
- Matte Black
Product Information > Paper Information > Available Paper and Capacities
183
Various other paper types
Media Name Size LoadingCapacity(Sheets)
ICC Profile Borderless Black ink
Photo Quality SelfAdhesive Sheets
A4 1 Epson_SC-P900_700_ArchivalMattePaper.icc
- Matte Black
Epson Proofing PaperWhite Semimatte
A3+ 1 Epson_SC-P900_700_ProofingPaperWhiteSemimatte.icc
✓ Photo Black
Roll Paper z
Media Name Size Size Borderless Black ink
Premium GlossyPhoto Paper (250)
406 mm/16" Epson_SC-P900_700_EpsonPremiumGlossy.icc
✓* Photo Black
Premium SemiglossPhoto Paper (250)
406 mm/16" Epson_SC-P900_700_EpsonPremiumSemigloss.icc
✓* Photo Black
Premium Luster PhotoPaper (260)
406 mm/16" Epson_SC-P900_700_PremiumLusterPhotoPaper.icc
✓ * Photo Black
Premium SemimattePhoto Paper (260)
406 mm/16" Epson_SC-P900_700_PremiumLusterPhotoPaper.icc
✓* Photo Black
Enhanced MattePaper
432 mm/17" Epson_SC-P900_700_ArchivalMattePaper.icc
✓* Matte Black
Epson Proofing PaperWhite Semimatte
329 mm/13", 432 mm/17" Epson_SC-P900_700_ProofingPaperWhiteSemimatte.icc
✓* Photo Black
* There are no left and right borders.
Genuine Epson Paper for SC-P700 Series
Epson recommends using genuine Epson paper to ensure high-quality printouts.
Product Information > Paper Information > Available Paper and Capacities
184
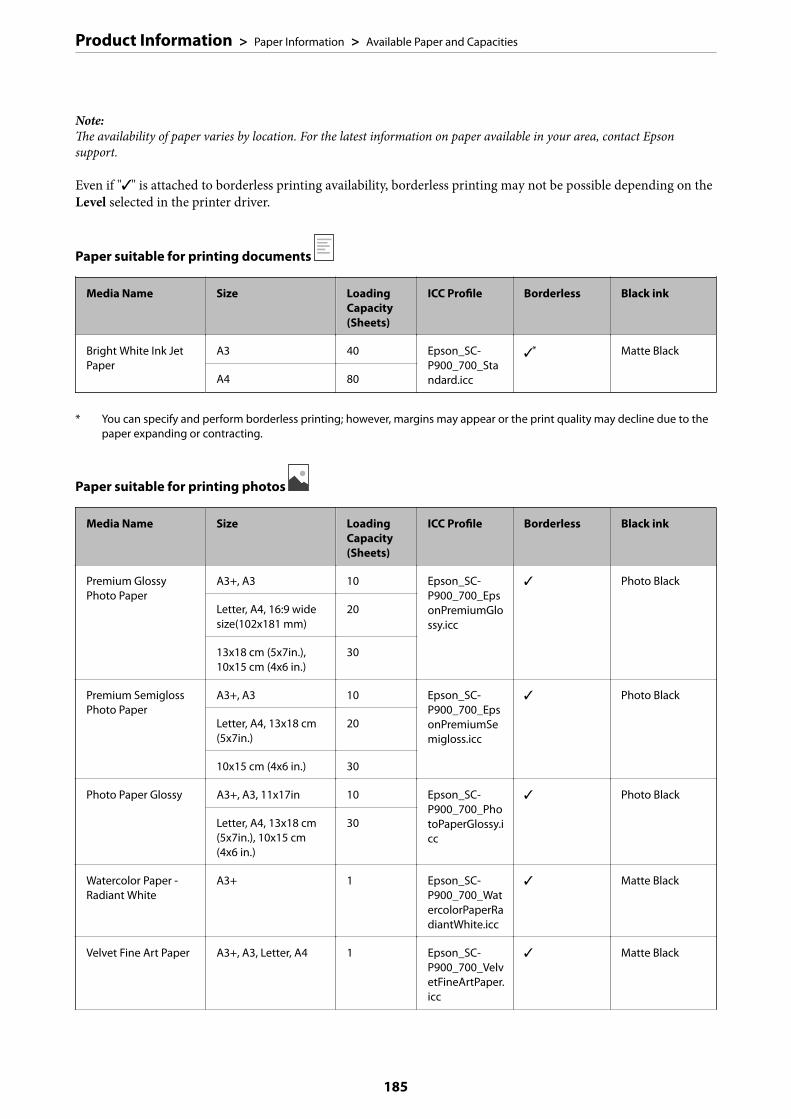
Note:The availability of paper varies by location. For the latest information on paper available in your area, contact Epsonsupport.
Even if "✓" is attached to borderless printing availability, borderless printing may not be possible depending on theLevel selected in the printer driver.
Paper suitable for printing documents
Media Name Size LoadingCapacity(Sheets)
ICC Profile Borderless Black ink
Bright White Ink JetPaper
A3 40 Epson_SC-P900_700_Standard.icc
✓* Matte Black
A4 80
* You can specify and perform borderless printing; however, margins may appear or the print quality may decline due to thepaper expanding or contracting.
Paper suitable for printing photos
Media Name Size LoadingCapacity(Sheets)
ICC Profile Borderless Black ink
Premium GlossyPhoto Paper
A3+, A3 10 Epson_SC-P900_700_EpsonPremiumGlossy.icc
✓ Photo Black
Letter, A4, 16:9 widesize(102x181 mm)
20
13x18 cm (5x7in.),10x15 cm (4x6 in.)
30
Premium SemiglossPhoto Paper
A3+, A3 10 Epson_SC-P900_700_EpsonPremiumSemigloss.icc
✓ Photo Black
Letter, A4, 13x18 cm(5x7in.)
20
10x15 cm (4x6 in.) 30
Photo Paper Glossy A3+, A3, 11x17in 10 Epson_SC-P900_700_PhotoPaperGlossy.icc
✓ Photo Black
Letter, A4, 13x18 cm(5x7in.), 10x15 cm(4x6 in.)
30
Watercolor Paper -Radiant White
A3+ 1 Epson_SC-P900_700_WatercolorPaperRadiantWhite.icc
✓ Matte Black
Velvet Fine Art Paper A3+, A3, Letter, A4 1 Epson_SC-P900_700_VelvetFineArtPaper.icc
✓ Matte Black
Product Information > Paper Information > Available Paper and Capacities
185
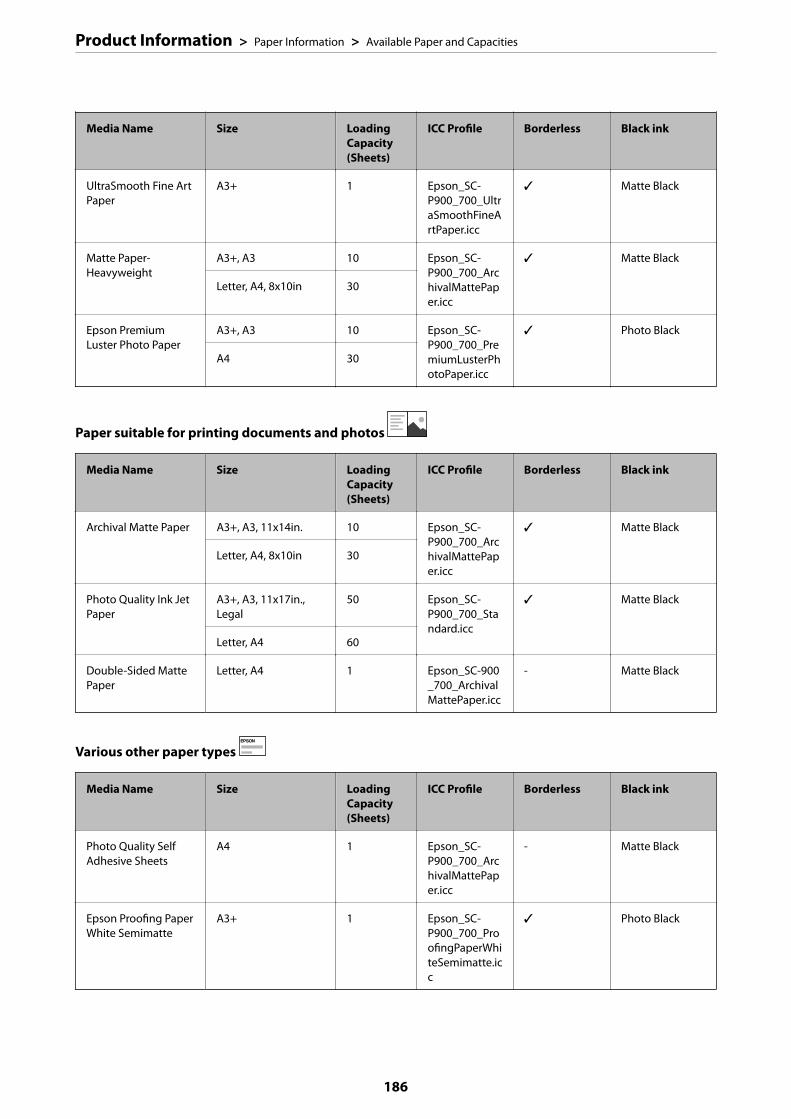
Media Name Size LoadingCapacity(Sheets)
ICC Profile Borderless Black ink
UltraSmooth Fine ArtPaper
A3+ 1 Epson_SC-P900_700_UltraSmoothFineArtPaper.icc
✓ Matte Black
Matte Paper-Heavyweight
A3+, A3 10 Epson_SC-P900_700_ArchivalMattePaper.icc
✓ Matte Black
Letter, A4, 8x10in 30
Epson PremiumLuster Photo Paper
A3+, A3 10 Epson_SC-P900_700_PremiumLusterPhotoPaper.icc
✓ Photo Black
A4 30
Paper suitable for printing documents and photos
Media Name Size LoadingCapacity(Sheets)
ICC Profile Borderless Black ink
Archival Matte Paper A3+, A3, 11x14in. 10 Epson_SC-P900_700_ArchivalMattePaper.icc
✓ Matte Black
Letter, A4, 8x10in 30
Photo Quality Ink JetPaper
A3+, A3, 11x17in.,Legal
50 Epson_SC-P900_700_Standard.icc
✓ Matte Black
Letter, A4 60
Double-Sided MattePaper
Letter, A4 1 Epson_SC-900_700_ArchivalMattePaper.icc
- Matte Black
Various other paper types
Media Name Size LoadingCapacity(Sheets)
ICC Profile Borderless Black ink
Photo Quality SelfAdhesive Sheets
A4 1 Epson_SC-P900_700_ArchivalMattePaper.icc
- Matte Black
Epson Proofing PaperWhite Semimatte
A3+ 1 Epson_SC-P900_700_ProofingPaperWhiteSemimatte.icc
✓ Photo Black
Product Information > Paper Information > Available Paper and Capacities
186
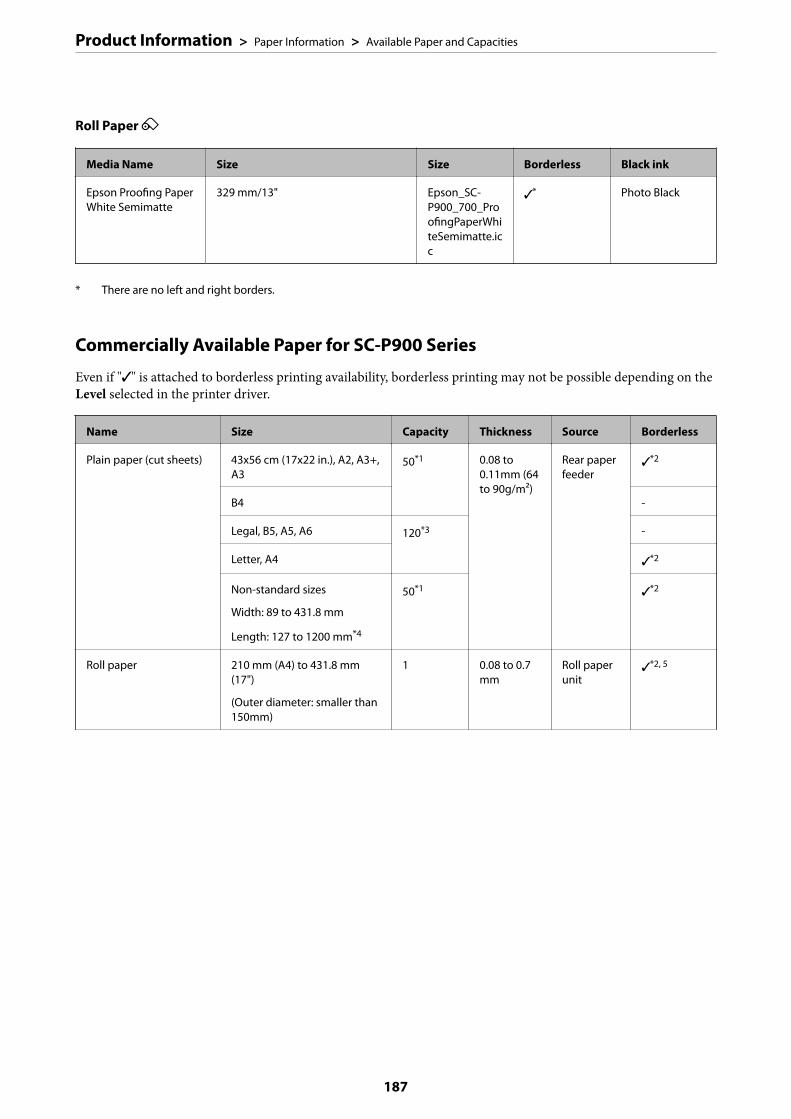
Roll Paper z
Media Name Size Size Borderless Black ink
Epson Proofing PaperWhite Semimatte
329 mm/13" Epson_SC-P900_700_ProofingPaperWhiteSemimatte.icc
✓* Photo Black
* There are no left and right borders.
Commercially Available Paper for SC-P900 Series
Even if "✓" is attached to borderless printing availability, borderless printing may not be possible depending on theLevel selected in the printer driver.
Name Size Capacity Thickness Source Borderless
Plain paper (cut sheets) 43x56 cm (17x22 in.), A2, A3+,A3
50*1 0.08 to0.11mm (64to 90g/m2)
Rear paperfeeder
✓*2
B4 -
Legal, B5, A5, A6 120*3 -
Letter, A4 ✓*2
Non-standard sizes
Width: 89 to 431.8 mm
Length: 127 to 1200 mm*4
50*1 ✓*2
Roll paper 210 mm (A4) to 431.8 mm(17")
(Outer diameter: smaller than150mm)
1 0.08 to 0.7mm
Roll paperunit
✓*2, 5
Product Information > Paper Information > Available Paper and Capacities
187
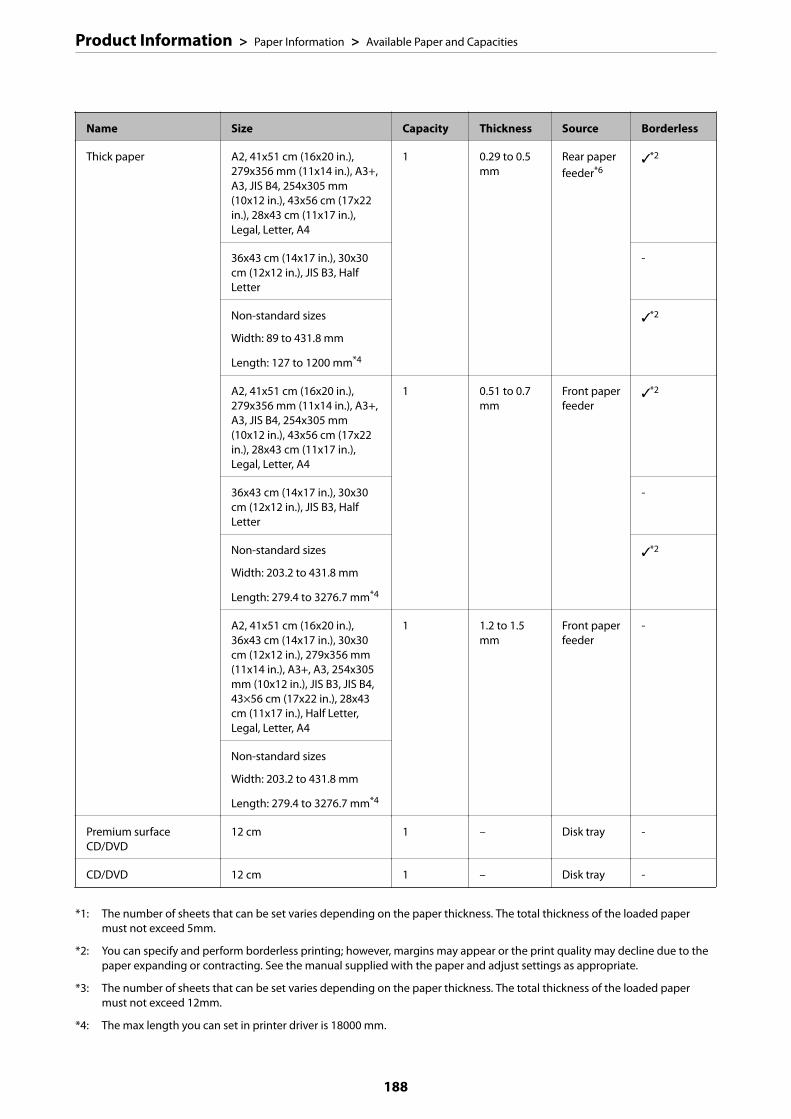
Name Size Capacity Thickness Source Borderless
Thick paper A2, 41x51 cm (16x20 in.),279x356 mm (11x14 in.), A3+,A3, JIS B4, 254x305 mm(10x12 in.), 43x56 cm (17x22in.), 28x43 cm (11x17 in.),Legal, Letter, A4
1 0.29 to 0.5mm
Rear paperfeeder*6
✓*2
36x43 cm (14x17 in.), 30x30cm (12x12 in.), JIS B3, HalfLetter
-
Non-standard sizes
Width: 89 to 431.8 mm
Length: 127 to 1200 mm*4
✓*2
A2, 41x51 cm (16x20 in.),279x356 mm (11x14 in.), A3+,A3, JIS B4, 254x305 mm(10x12 in.), 43x56 cm (17x22in.), 28x43 cm (11x17 in.),Legal, Letter, A4
1 0.51 to 0.7mm
Front paperfeeder
✓*2
36x43 cm (14x17 in.), 30x30cm (12x12 in.), JIS B3, HalfLetter
-
Non-standard sizes
Width: 203.2 to 431.8 mm
Length: 279.4 to 3276.7 mm*4
✓*2
A2, 41x51 cm (16x20 in.),36x43 cm (14x17 in.), 30x30cm (12x12 in.), 279x356 mm(11x14 in.), A3+, A3, 254x305mm (10x12 in.), JIS B3, JIS B4,43×56 cm (17x22 in.), 28x43cm (11x17 in.), Half Letter,Legal, Letter, A4
1 1.2 to 1.5mm
Front paperfeeder
-
Non-standard sizes
Width: 203.2 to 431.8 mm
Length: 279.4 to 3276.7 mm*4
Premium surfaceCD/DVD
12 cm 1 – Disk tray -
CD/DVD 12 cm 1 – Disk tray -
*1: The number of sheets that can be set varies depending on the paper thickness. The total thickness of the loaded papermust not exceed 5mm.
*2: You can specify and perform borderless printing; however, margins may appear or the print quality may decline due to thepaper expanding or contracting. See the manual supplied with the paper and adjust settings as appropriate.
*3: The number of sheets that can be set varies depending on the paper thickness. The total thickness of the loaded papermust not exceed 12mm.
*4: The max length you can set in printer driver is 18000 mm.
Product Information > Paper Information > Available Paper and Capacities
188
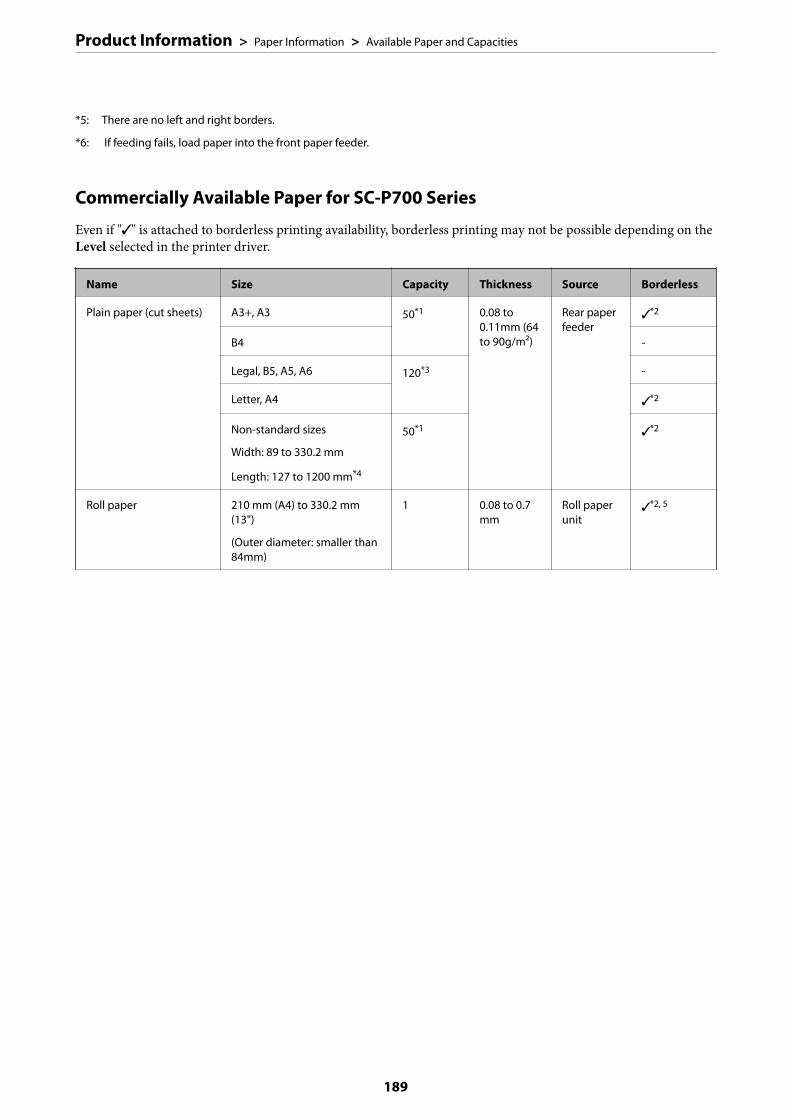
*5: There are no left and right borders.
*6: If feeding fails, load paper into the front paper feeder.
Commercially Available Paper for SC-P700 Series
Even if "✓" is attached to borderless printing availability, borderless printing may not be possible depending on theLevel selected in the printer driver.
Name Size Capacity Thickness Source Borderless
Plain paper (cut sheets) A3+, A3 50*1 0.08 to0.11mm (64to 90g/m2)
Rear paperfeeder
✓*2
B4 -
Legal, B5, A5, A6 120*3 -
Letter, A4 ✓*2
Non-standard sizes
Width: 89 to 330.2 mm
Length: 127 to 1200 mm*4
50*1 ✓*2
Roll paper 210 mm (A4) to 330.2 mm(13")
(Outer diameter: smaller than84mm)
1 0.08 to 0.7mm
Roll paperunit
✓*2, 5
Product Information > Paper Information > Available Paper and Capacities
189
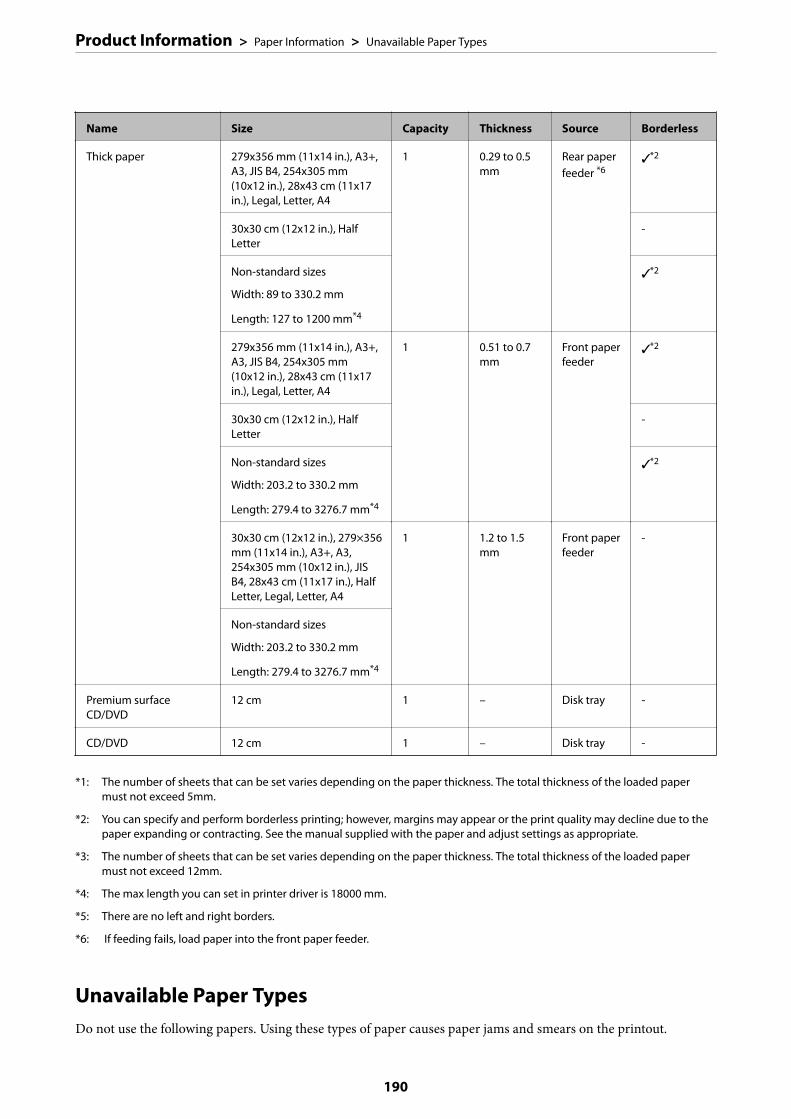
Name Size Capacity Thickness Source Borderless
Thick paper 279x356 mm (11x14 in.), A3+,A3, JIS B4, 254x305 mm(10x12 in.), 28x43 cm (11x17in.), Legal, Letter, A4
1 0.29 to 0.5mm
Rear paperfeeder *6
✓*2
30x30 cm (12x12 in.), HalfLetter
-
Non-standard sizes
Width: 89 to 330.2 mm
Length: 127 to 1200 mm*4
✓*2
279x356 mm (11x14 in.), A3+,A3, JIS B4, 254x305 mm(10x12 in.), 28x43 cm (11x17in.), Legal, Letter, A4
1 0.51 to 0.7mm
Front paperfeeder
✓*2
30x30 cm (12x12 in.), HalfLetter
-
Non-standard sizes
Width: 203.2 to 330.2 mm
Length: 279.4 to 3276.7 mm*4
✓*2
30x30 cm (12x12 in.), 279×356mm (11x14 in.), A3+, A3,254x305 mm (10x12 in.), JISB4, 28x43 cm (11x17 in.), HalfLetter, Legal, Letter, A4
1 1.2 to 1.5mm
Front paperfeeder
-
Non-standard sizes
Width: 203.2 to 330.2 mm
Length: 279.4 to 3276.7 mm*4
Premium surfaceCD/DVD
12 cm 1 – Disk tray -
CD/DVD 12 cm 1 – Disk tray -
*1: The number of sheets that can be set varies depending on the paper thickness. The total thickness of the loaded papermust not exceed 5mm.
*2: You can specify and perform borderless printing; however, margins may appear or the print quality may decline due to thepaper expanding or contracting. See the manual supplied with the paper and adjust settings as appropriate.
*3: The number of sheets that can be set varies depending on the paper thickness. The total thickness of the loaded papermust not exceed 12mm.
*4: The max length you can set in printer driver is 18000 mm.
*5: There are no left and right borders.
*6: If feeding fails, load paper into the front paper feeder.
Unavailable Paper TypesDo not use the following papers. Using these types of paper causes paper jams and smears on the printout.
Product Information > Paper Information > Unavailable Paper Types
190
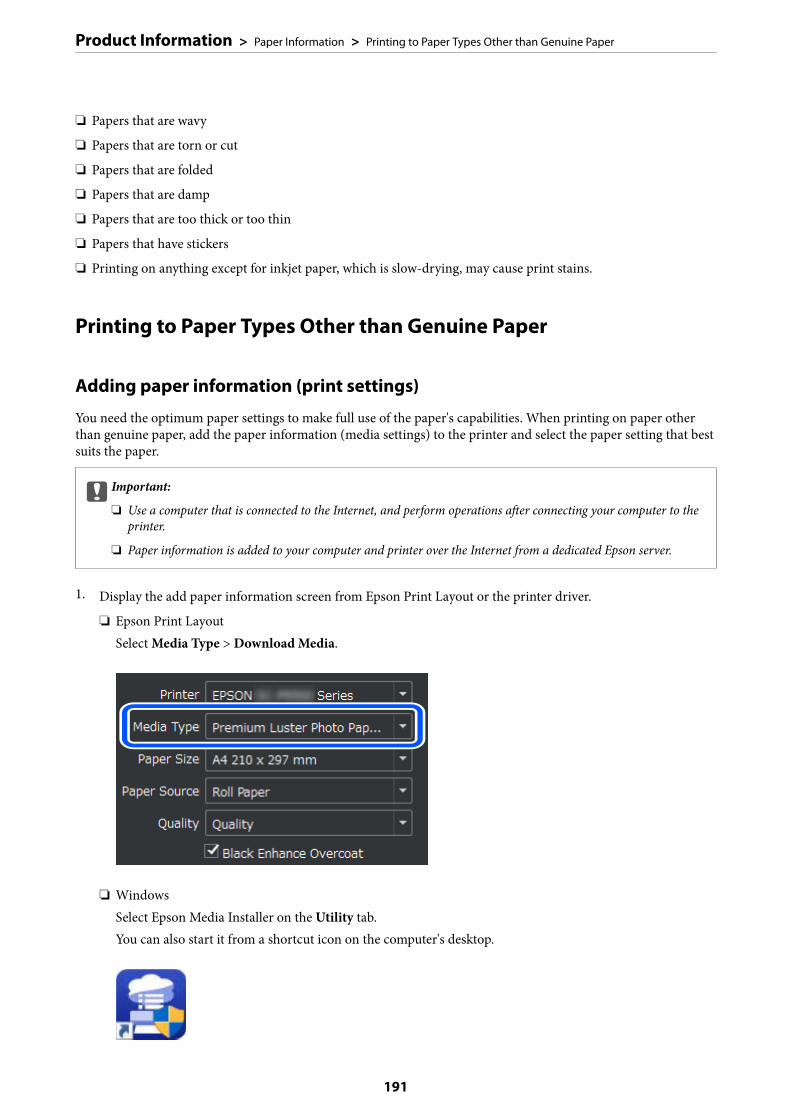
❏ Papers that are wavy
❏ Papers that are torn or cut
❏ Papers that are folded
❏ Papers that are damp
❏ Papers that are too thick or too thin
❏ Papers that have stickers
❏ Printing on anything except for inkjet paper, which is slow-drying, may cause print stains.
Printing to Paper Types Other than Genuine Paper
Adding paper information (print settings)
You need the optimum paper settings to make full use of the paper's capabilities. When printing on paper otherthan genuine paper, add the paper information (media settings) to the printer and select the paper setting that bestsuits the paper.
cImportant:
❏ Use a computer that is connected to the Internet, and perform operations after connecting your computer to theprinter.
❏ Paper information is added to your computer and printer over the Internet from a dedicated Epson server.
1. Display the add paper information screen from Epson Print Layout or the printer driver.
❏ Epson Print LayoutSelect Media Type > Download Media.
❏ WindowsSelect Epson Media Installer on the Utility tab.You can also start it from a shortcut icon on the computer's desktop.
Product Information > Paper Information > Printing to Paper Types Other than Genuine Paper
191
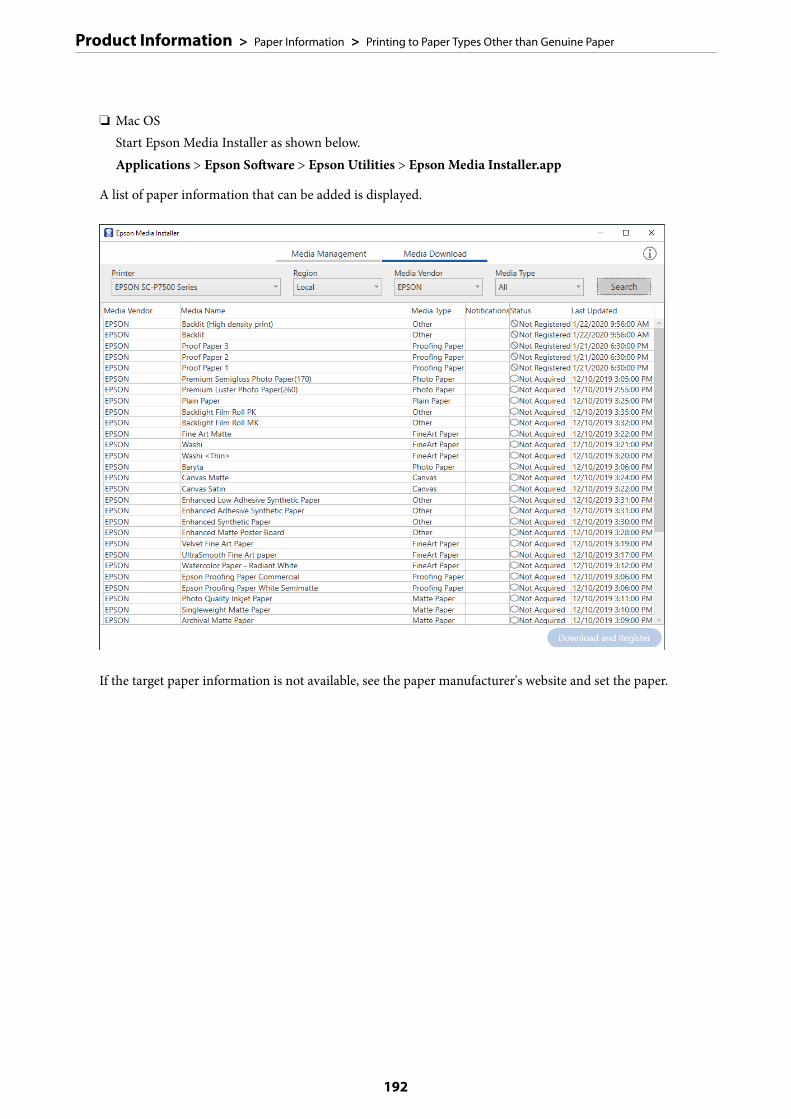
❏ Mac OSStart Epson Media Installer as shown below.Applications > Epson Software > Epson Utilities > Epson Media Installer.app
A list of paper information that can be added is displayed.
If the target paper information is not available, see the paper manufacturer's website and set the paper.
Product Information > Paper Information > Printing to Paper Types Other than Genuine Paper
192
2. Add the paper information.
Select the target paper and click Download and Register.
You can select the added paper information from Epson Print Layout, printer drivers, and the paper settingmenus on the printer's control panel.
3. Select the target paper in the paper type setting in Epson Print Layout or the printer driver, and then print.
If you have added paper information, you can use the added paper's ICC profile in Epson Print Layout, printerdrivers, and other applications.
Product Information > Paper Information > Printing to Paper Types Other than Genuine Paper
193
Editing paper information
You can edit the paper information and print using your favorite settings.
1. Start Epson Media Installer, and select Media Management. Select the paper settings (media settings) that you
want to edit, and then select .
2. Select the paper information that you copied, and then select .
Note:The edits are only performed on the copied paper information (media settings). You cannot edit the original paperinformation directly. You can copy paper information for paper with the status Registered.
Product Information > Paper Information > Printing to Paper Types Other than Genuine Paper
194
3. Specify each setting on the editing screen, and then select OK.
Items Setting Explanation
Media Setting Name Specify a name for the media settings.
Media Type Set the category name for the paper. This is displayed to the paper type display inthe printer driver or on the printer's control panel.
Platen Gap Specify the interval (platen gap) of the print head and the paper. If the paper issmeared, increase the value. If running Print Head Alignment on the printer doesnot improve graininess or blurring in the print outs, decrease the value.
Drying Time per Pass Specify the length of time to stop the print head after each pass to help the ink dry.Depending on the paper, the ink may not dry easily. Specify a longer drying timewhen ink dripping or bleeding occurs in the print outs. Note that setting a longerdrying time will increase the overall print time.
Paper Thickness Specify the paper thickness.
Paper Size Check We recommend selecting this setting. Clear this checkbox if a paper error isdisplayed even if you have loaded the paper correctly. Note that if you clear thischeckbox, printing may be performed beyond the edges of the paper and theinside of the printer may be stained with ink.
Paper Feed Offset Specify this setting when banding (horizontal band-like patterns or uneven colors)cannot be resolved even after checking and cleaning the print head or performingPrint Head Alignment on the printer. If the speed of the paper feed is too slow,dark banding will occur. In this situation, adjust the paper feed in the positive (+)direction. If the paper feed is too fast, white banding will occur. In this situation,adjust the paper feed in the negative (-) direction..
Paper Feed Offset(Bottom) Specify the value for paper feed offset for the printing area up to approximately 39mm from the end of cut paper.
ICC Profile Allows you to specify the ICC profile for other paper types.
4. Select the edited paper from paper type in Epson Print Layout or the printer driver, and then print.
Product Information > Paper Information > Printing to Paper Types Other than Genuine Paper
195
Consumable Products Information
Ink Cartridge Codes for SC-P900 SeriesThe following are the codes for genuine Epson ink cartridges.
For Europe, Australia and New Zealand
Ink color Product number
PK (Photo Black) T47A1
C (Cyan) T47A2
VM(Vivid Magenta) T47A3
Y (Yellow) T47A4
LC (Light Cyan) T47A5
VLM(Vivid Light Magenta) T47A6
GY(Gray) T47A7
MK(Matte Black) T47A8
LGY(Light Gray) T47A9
V(Violet) T47AD
For Hong Kong and Mongolia
Ink color Product number
PK (Photo Black) T47C1
C (Cyan) T47C2
VM(Vivid Magenta) T47C3
Y (Yellow) T47C4
LC (Light Cyan) T47C5
VLM(Vivid Light Magenta) T47C6
GY(Gray) T47C7
MK(Matte Black) T47C8
LGY(Light Gray) T47C9
V(Violet) T47CD
For Asian Countries except Hong Kong and Mongolia
Product Information > Consumable Products Information > Ink Cartridge Codes for SC-P900 Series
196
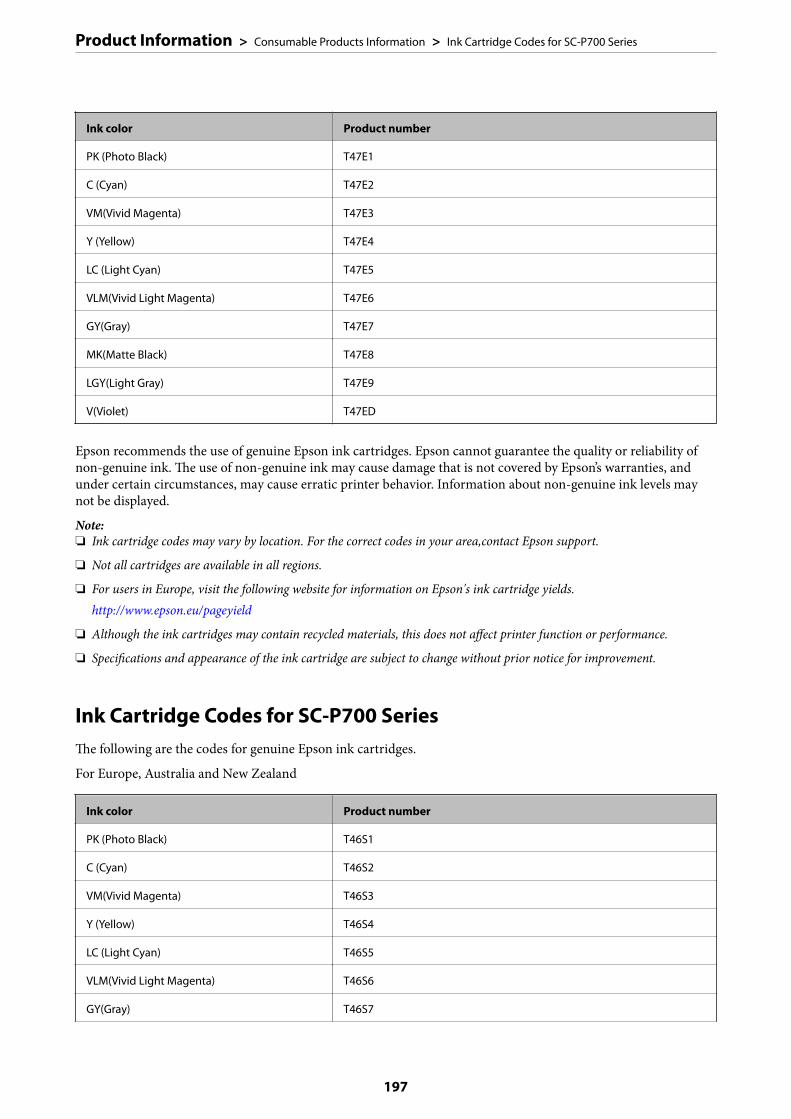
Ink color Product number
PK (Photo Black) T47E1
C (Cyan) T47E2
VM(Vivid Magenta) T47E3
Y (Yellow) T47E4
LC (Light Cyan) T47E5
VLM(Vivid Light Magenta) T47E6
GY(Gray) T47E7
MK(Matte Black) T47E8
LGY(Light Gray) T47E9
V(Violet) T47ED
Epson recommends the use of genuine Epson ink cartridges. Epson cannot guarantee the quality or reliability ofnon-genuine ink. The use of non-genuine ink may cause damage that is not covered by Epson’s warranties, andunder certain circumstances, may cause erratic printer behavior. Information about non-genuine ink levels maynot be displayed.
Note:❏ Ink cartridge codes may vary by location. For the correct codes in your area,contact Epson support.
❏ Not all cartridges are available in all regions.
❏ For users in Europe, visit the following website for information on Epson's ink cartridge yields.http://www.epson.eu/pageyield
❏ Although the ink cartridges may contain recycled materials, this does not affect printer function or performance.
❏ Specifications and appearance of the ink cartridge are subject to change without prior notice for improvement.
Ink Cartridge Codes for SC-P700 SeriesThe following are the codes for genuine Epson ink cartridges.
For Europe, Australia and New Zealand
Ink color Product number
PK (Photo Black) T46S1
C (Cyan) T46S2
VM(Vivid Magenta) T46S3
Y (Yellow) T46S4
LC (Light Cyan) T46S5
VLM(Vivid Light Magenta) T46S6
GY(Gray) T46S7
Product Information > Consumable Products Information > Ink Cartridge Codes for SC-P700 Series
197
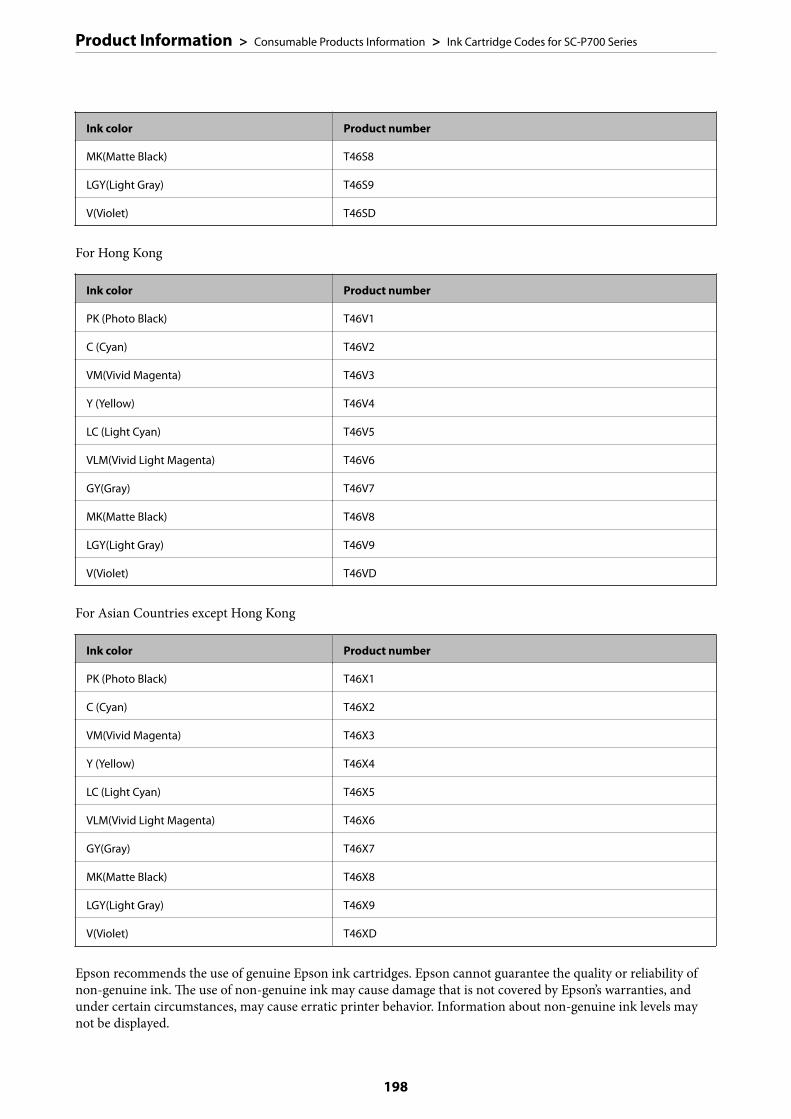
Ink color Product number
MK(Matte Black) T46S8
LGY(Light Gray) T46S9
V(Violet) T46SD
For Hong Kong
Ink color Product number
PK (Photo Black) T46V1
C (Cyan) T46V2
VM(Vivid Magenta) T46V3
Y (Yellow) T46V4
LC (Light Cyan) T46V5
VLM(Vivid Light Magenta) T46V6
GY(Gray) T46V7
MK(Matte Black) T46V8
LGY(Light Gray) T46V9
V(Violet) T46VD
For Asian Countries except Hong Kong
Ink color Product number
PK (Photo Black) T46X1
C (Cyan) T46X2
VM(Vivid Magenta) T46X3
Y (Yellow) T46X4
LC (Light Cyan) T46X5
VLM(Vivid Light Magenta) T46X6
GY(Gray) T46X7
MK(Matte Black) T46X8
LGY(Light Gray) T46X9
V(Violet) T46XD
Epson recommends the use of genuine Epson ink cartridges. Epson cannot guarantee the quality or reliability ofnon-genuine ink. The use of non-genuine ink may cause damage that is not covered by Epson’s warranties, andunder certain circumstances, may cause erratic printer behavior. Information about non-genuine ink levels maynot be displayed.
Product Information > Consumable Products Information > Ink Cartridge Codes for SC-P700 Series
198
Note:❏ Ink cartridge codes may vary by location. For the correct codes in your area,contact Epson support.
❏ Not all cartridges are available in all regions.
❏ For users in Europe, visit the following website for information on Epson's ink cartridge yields.http://www.epson.eu/pageyield
❏ Although the ink cartridges may contain recycled materials, this does not affect printer function or performance.
❏ Specifications and appearance of the ink cartridge are subject to change without prior notice for improvement.
Maintenance Box CodeThe maintenance box can be purchased and replaced by the user. Epson recommends the use of a genuine Epsonmaintenance box.
The following is the code for the genuine Epson maintenance box.
C9357
cImportant:
Once a maintenance box has been installed in a printer it cannot be used with other printers.
Software InformationThis section introduces the network services and software products available for your printer from the Epsonwebsite.
Software for Printing
Application for Printing from a Computer (Windows Printer Driver)
The printer driver controls the printer according to the commands from an application. Making settings on theprinter driver provides the best printing results. You can also check the status of the printer or keep it in topoperating condition using the printer driver utility.
You can change the language of the printer driver. Select the language you want to use from the Language settingon the Utility tab.
Accessing the printer driver from applications
To make settings that apply only to the application you are using, access from that application.
Select Print or Print Setup from the File menu. Select your printer, and then click Preferences or Properties.
Note:Operations differ depending on the application. See the application's help for details.
Accessing the printer driver from the control panel
To make settings that apply to all of the applications, access from the control panel.
Product Information > Software Information > Software for Printing
199
❏ Windows 10Click on the start button, and then select Windows System > Control Panel > View devices and printers inHardware and Sound. Right-click on your printer, or press and hold it and then select Printing preferences
❏ Windows 8.1/Windows 8Select Desktop > Settings > Control Panel > View devices and printers in Hardware and Sound. Right-clickon your printer, or press and hold it and then select Printing preferences
❏ Windows 7Click the start button, and select Control Panel > View devices and printers in Hardware and Sound. Right-click on your printer and select Printing preferences.
Accessing the printer driver from the printer icon on the task bar
The printer icon on the desktop task bar is a shortcut icon allowing you to quickly access the printer driver.
If you click the printer icon and select Printer Settings, you can access the same printer settings window as the onedisplayed from the control panel. If you double-click this icon, you can check the status of the printer.
Note:If the printer icon is not displayed on the task bar, access the printer driver window, click Monitoring Preferences on theUtility tab, and then select Register the shortcut icon to the taskbar.
Starting the utility
Access the printer driver window. Click the Utility tab.
Related Information
& “Menu Options for the Printer Driver” on page 69
Making Operation Settings for the Windows Printer Driver
You can make settings such as enabling EPSON Status Monitor 3.
1. Access the printer driver window.
2. Click Speed and Progress on the Utility tab.
3. Make the appropriate settings, and then click OK.
See the online help for explanations of the setting items.
Application for Printing from a Computer (Mac OS Printer Driver)
The printer driver controls the printer according to the commands from an application. Making settings on theprinter driver provides the best printing results. You can also check the status of the printer or keep it in topoperating condition using the printer driver utility.
Accessing the printer driver from applications
Click Page Setup or Print on the File menu of your application. If necessary, click Show Details (or d) to expandthe print window.
Product Information > Software Information > Software for Printing
200
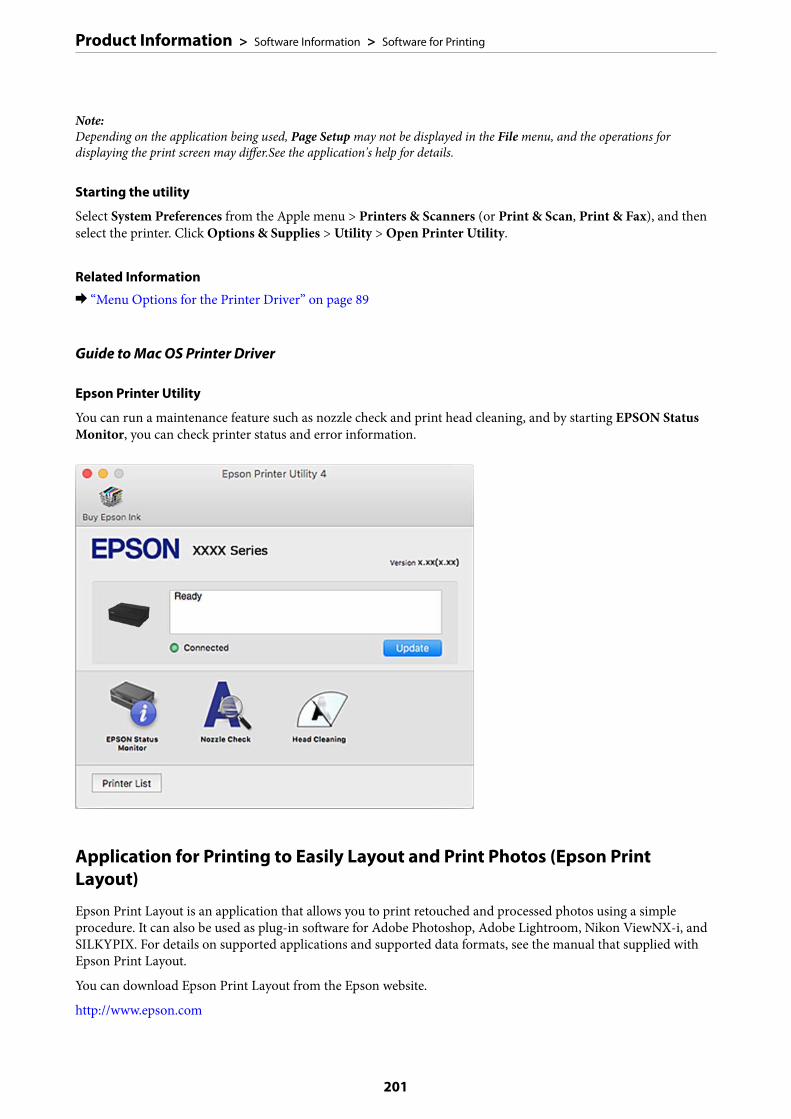
Note:Depending on the application being used, Page Setup may not be displayed in the File menu, and the operations fordisplaying the print screen may differ.See the application's help for details.
Starting the utility
Select System Preferences from the Apple menu > Printers & Scanners (or Print & Scan, Print & Fax), and thenselect the printer. Click Options & Supplies > Utility > Open Printer Utility.
Related Information
& “Menu Options for the Printer Driver” on page 89
Guide to Mac OS Printer Driver
Epson Printer Utility
You can run a maintenance feature such as nozzle check and print head cleaning, and by starting EPSON StatusMonitor, you can check printer status and error information.
Application for Printing to Easily Layout and Print Photos (Epson PrintLayout)
Epson Print Layout is an application that allows you to print retouched and processed photos using a simpleprocedure. It can also be used as plug-in software for Adobe Photoshop, Adobe Lightroom, Nikon ViewNX-i, andSILKYPIX. For details on supported applications and supported data formats, see the manual that supplied withEpson Print Layout.
You can download Epson Print Layout from the Epson website.
http://www.epson.com
Product Information > Software Information > Software for Printing
201
Note:❏ To use this application the printer driver for this printer must be installed.
❏ See to the software manual for details on how to start from commercially available application software such as AdobePhotoshop and Adobe Lightroom.
❏ You can use Epson Print Layout on iPad. This allows you to move your project to other locations.
❏ Search for and install Epson Print Layout from the App Store.
Related Information
& “Installing the Applications Separately” on page 107
Application for Quick and Fun Printing from a Computer (Epson Photo+)
Epson Photo+ is an application that allows you to easily print images with a variety of layouts. You can alsoperform image correction and adjust the position while viewing a preview of your document. You can alsobrighten up your images by adding text and stamps wherever you like. You can also print a CD/DVD jacket forCD/DVD case. When printing on genuine Epson photo paper, the ink performance is maximized creating abeautiful finish with excellent coloring.
See the application's help for details. You can download Epson Photo+ from the Epson website.
http://www.epson.com
Note:To use this application the printer driver for this printer must be installed.
Starting on Windows
❏ Windows 10Click the start button, and then select Epson Software > Epson Photo+.
❏ Windows 8.1/Windows 8Enter the application name in the search charm, and then select the displayed icon.
❏ Windows 7Click the start button, and select All Programs or Programs > Epson Software > Epson Photo+.
Starting on Mac OS
Select Go > Applications > Epson Software > Epson Photo+.
Related Information
& “Installing the Applications Separately” on page 107
Application for Easily Operating the Printer from a Smart device (Epson SmartPanel)
Epson Smart Panel is an application that allows you to perform printer operations easily including printing from asmart device such as a smartphone or tablet. You can connect the printer and smart device over a wireless network,check the ink levels and printer status, and check for solutions if an error occurs.
Product Information > Software Information > Software for Printing
202
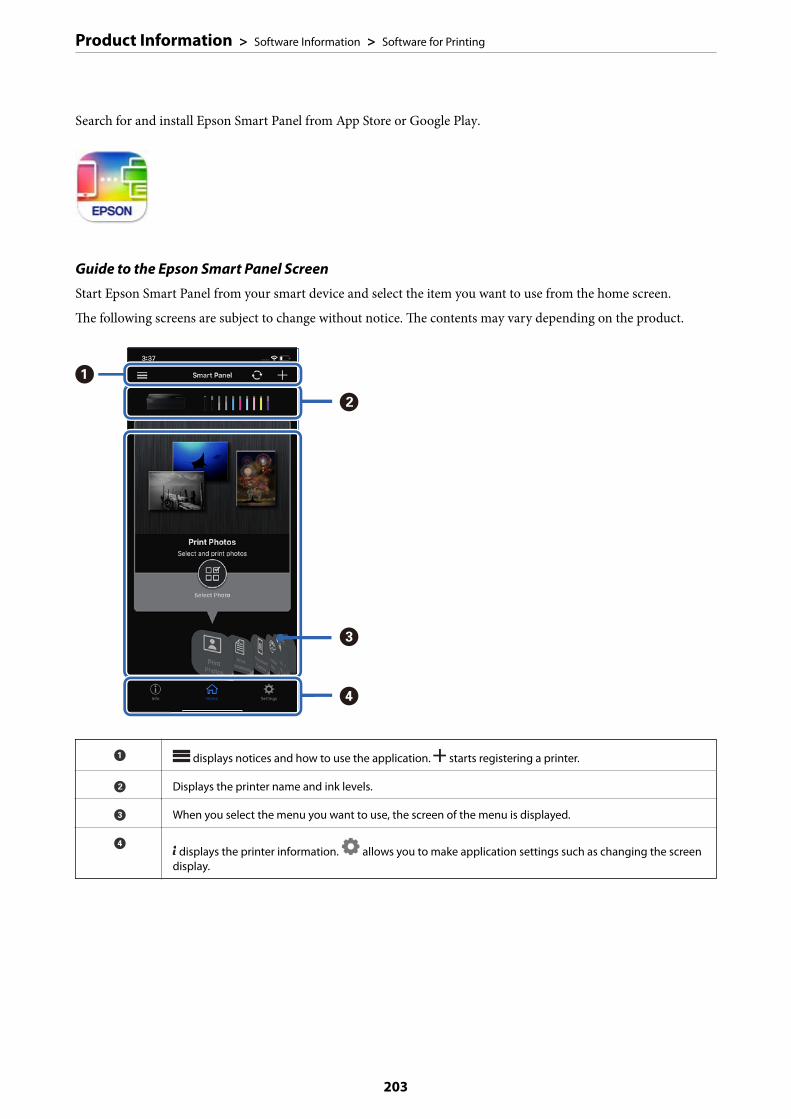
Search for and install Epson Smart Panel from App Store or Google Play.
Guide to the Epson Smart Panel Screen
Start Epson Smart Panel from your smart device and select the item you want to use from the home screen.
The following screens are subject to change without notice. The contents may vary depending on the product.
A displays notices and how to use the application. starts registering a printer.
B Displays the printer name and ink levels.
C When you select the menu you want to use, the screen of the menu is displayed.
D displays the printer information. allows you to make application settings such as changing the screen
display.
Product Information > Software Information > Software for Printing
203
Software for Making Settings or Managing Devices
Application for Configuring Printer Operations (Web Config)
Web Config is an application that runs in a web browser, such as Internet Explorer and Safari, on a computer orsmart device. You can confirm the printer status or change the network service and printer settings. To use theWeb Config, connect the printer and the computer or device to the same network.
The following browsers are supported.
Microsoft Edge, Internet Explorer 8 or later, Firefox*, Chrome*, Safari*
* Use the latest version.
Running Web Config on a Web Browser
1. Check the printer's IP address.
Select the network icon on the printer's home screen, and then select the active connection method to confirmthe printer's IP address.
Note:You can also check the IP address by printing the network connection report.
2. Launch a Web browser from a computer or smart device, and then enter the printer's IP address.
Format:
IPv4: http://the printer's IP address/
IPv6: http://[the printer's IP address]/
Examples:
IPv4: http://192.168.100.201/
IPv6: http://[2001:db8::1000:1]/
Since the printer uses a self-signed certificate when accessing HTTPS, a warning is displayed on the browserwhen you start Web Config; this does not indicate a problem and can be safely ignored.
Related Information
& “Printing a Network Connection Report” on page 174
Running Web Config on Windows
When connecting a computer to the printer using WSD, follow the steps below to run Web Config.
1. Open the printer list on the computer.
❏ Windows 10Click on the start button, and then select Windows System > Control Panel > View devices and printersin Hardware and Sound.
❏ Windows 8.1/Windows 8Select Desktop > Settings > Control Panel > View devices and printers in Hardware and Sound (orHardware).
Product Information > Software Information > Software for Making Settings or Managing Devices
204
❏ Windows 7Click the start button, and select Control Panel > View devices and printers in Hardware and Sound.
2. Right-click on your printer and select Properties.
3. Select the Web Service tab and click the URL.
Since the printer uses a self-signed certificate when accessing HTTPS, a warning is displayed on the browserwhen you start Web Config; this does not indicate a problem and can be safely ignored.
Running Web Config on Mac OS
1. Select System Preferences from the Apple menu > Printers & Scanners (or Print & Scan, Print & Fax), andthen select the printer.
2. Click Options & Supplies> Show Printer Webpage.
Since the printer uses a self-signed certificate when accessing HTTPS, a warning is displayed on the browserwhen you start Web Config; this does not indicate a problem and can be safely ignored.
Software for Updating
Application for Updating Software and Firmware (EPSON Software Updater)
EPSON Software Updater is an application that installs new software, and updates firmware and manuals over theInternet. If you want to check for update information regularly, you can set the interval for checking for updates inEPSON Software Updater's Auto Update Settings.
Starting on Windows
❏ Windows 10Click the start button, and then select Epson Software > EPSON Software Updater.
❏ Windows 8.1/Windows 8Enter the application name in the search charm, and then select the displayed icon.
❏ Windows 7Click the start button, and then select All Programs (or Programs) > Epson Software > EPSON SoftwareUpdater.
Note:You can also start EPSON Software Updater by clicking the printer icon on the task bar on the desktop, and then selectingSoftware Update.
Starting on Mac OS
Select Go > Applications > Epson Software > EPSON Software Updater.
Related Information
& “Installing the Applications Separately” on page 107
Product Information > Software Information > Software for Updating
205
Settings Menu ListSelect > General Settings on the home screen of the printer to make various settings.
Screen CustomizationSelect the menus on the control panel as described below.
> General Settings > Screen Customization
Background Color:
Change the background color of the LCD screen.
Home Screen:
Set the default screen you want to display as the home screen.
Standard:
Displays information such as paper settings, ejection status, and ink info.
Supply Status:
Displays the approximate ink levels and the approximate service life of the maintenance box.
Print Screen:
Set the default screen you want to display when printing.
Photo:
Diplays thumbnails of images when you print using printer driver and Epson Print Layout.
Print Settings:
Displays print settings for the printer driver and Epson Print Layout.
Print Status:
Displays the approximate ink levels and a progress bar when printing.
Printer SettingsSelect the menus on the control panel as described below.
> General Settings > Printer Settings
Paper Setup Auto Display:
Select On to display the Paper Setting screen when loading paper in the rear paper feeder. If youdisable this feature, you cannot print from an iPhone, iPad, or iPod touch using AirPrint.
Product Information > Settings Menu List > Printer Settings
206
Error Notice:
Paper Mismatch:
Displays a warning if the paper settings (print settings) for the print job do not match theprinter's paper settings made when you loaded the paper. This setting prevents misprinting.However, the paper setting screen is not displayed when Paper Setup Auto Display is disablesin the following menus. If you disable this feature, you cannot print from an iPhone, iPad, oriPod touch using AirPrint.
Detect Paper Meandering:
Select On to display a message when paper is fed at an angle.
Horizontal Centered:
Select On to print the image in the center of the paper.
Thick Paper:
Select On to prevent ink from smearing on your printouts.
Basic SettingsSelect the menus on the control panel as described below.
> General Settings > Basic Settings
Inside Light:
Select Auto to turn on the interior light automatically when printing.
LCD Brightness:
Adjust the brightness of the LCD screen.
Sounds:
Adjust the volume and select the type of the sound.
❏ Mute
❏ Button Press
❏ Error Tone
❏ Sound Type
Sleep Timer:
Adjust the time period to enter a sleep mode (energy saving mode) when the printer has notperformed any operations. The LCD screen turns black when the setting time passes.
Power Off Settings:
Your product may have this feature or the Power Off Timer feature depending on the location ofpurchase.
Product Information > Settings Menu List > Basic Settings
207
❏ Power Off If InactiveSelect this setting to turn the printer off automatically if it is not used for a specified period oftime. Any increase will affect the product’s energy efficiency. Please consider the environmentbefore making any change.
❏ Power Off If DisconnectedSelect this setting to turn the printer off after 30 minutes when all ports including the USB port aredisconnected. This feature may not be available depending on your region.
Power Off Timer:
Your product may have this feature or the Power Off Settings feature depending on the location ofpurchase.
Select this setting to turn the printer off automatically when it is not used for a specified period oftime. You can adjust the time before power management is applied. Any increase will affect theproduct’s energy efficiency. Please consider the environment before making any change.
Date/Time Settings:
❏ Date/TimeEnter the current date and time.
❏ Daylight Saving TimeSelect the summer time setting that applies to your area.
❏ Time DifferenceEnter the time difference between your local time and UTC (Coordinated Universal Time).
Language:
Select the language used on the LCD screen.
Length Unit:
Select the length unit.
Related Information
& “Saving Power” on page 106
Network SettingsSelect the menus on the control panel as described below.
> General Settings > Network Settings
Wi-Fi Setup:
Set up or change wireless network settings. Choose the connection method from following and thenfollow the instructions on the control panel.
Wi-Fi (Recommended):
❏ Wi-Fi Setup Wizard
❏ Push Button Setup(WPS)
Product Information > Settings Menu List > Network Settings
208
❏ Others
❏ PIN Code Setup(WPS)
❏ Wi-Fi Auto Connect
❏ Disable Wi-FiYou may be able to resolve network problems by disabling the Wi-Fi settings or making
the Wi-Fi settings again. Tap > Wi-Fi (Recommended) > Change Settings >Others > Disable Wi-Fi > Start Setup.
Wi-Fi Direct:
❏ iOS
❏ Android
❏ Other OS Devices
❏ Change
❏ Change Network Name
❏ Change Password
❏ Disable Wi-Fi Direct
❏ Restore Default Settings
Wired LAN Setup:
Set up or change a network connection that uses a LAN cable and router. When this is being used,Wi-Fi connections are disabled.
Network Status:
Displays or prints the current network settings.
❏ Wired LAN/Wi-Fi Status
❏ Wi-Fi Direct Status
❏ Print Status Sheet
Connection Check:
Checks the current network connection and prints a report. If there are any problems with theconnection, see the report to solve the problem.
Advanced:
Make the following detailed settings.
❏ Device Name
❏ TCP/IP
❏ Proxy Server
Web Service SettingsSelect the menus on the control panel as described below.
Product Information > Settings Menu List > Web Service Settings
209
> General Settings > Web Service Settings
Epson Connect Services:
Displays whether the printer is registered and connected to Epson Connect. You can register to theservice by selecting Register and follow the instructions. When you have registered, you can change thefollowing settings.
❏ Suspend/Resume
❏ Unregister
For details, see the following web site.
https://www.epsonconnect.com/
http://www.epsonconnect.eu (Europe only)
Customer ResearchSelect the menus on the control panel as described below.
> General Settings > Customer Research
Select Approve to provide product usage information such as the number of prints to Seiko Epson Corporation.
Restore Default SettingsSelect the menus on the control panel as described below.
> General Settings > Restore Default Settings
Reset the settings in the following menus to their defaults.
❏ Network Settings
❏ All Except Network Settings
❏ Clear All Data and Settings
Printer Status/PrintSelect the menus on the control panel as described below.
> General Settings > Printer Status/Print
Print Status Sheet:
Configuration Status Sheet:
Print information sheets showing the current printer status and settings.
Supply Status Sheet:
Print information sheets showing the status of consumables.
Product Information > Settings Menu List > Printer Status/Print
210
Usage History Sheet:
Print information sheets showing the usage history of the printer.
Network:
Displays the current network settings. You can also print the status sheet.
Problem Checklist:
Print sheets to check for printer problems. If the printer malfunctions, print the "customer diagnosissheets (3 sheets)" and fill in the required information on the first and second sheets. Including thethird nozzle check result with the first two sheets can make repairs smoother.
Firmware Version:
Displays the current firmware version of your printer.
Firmware UpdateSelect the menus on the control panel as described below.
> General Settings > Firmware Update
Update:
Check if the latest version of the firmware has been uploaded to the network server. The firmware isupdated when new firmware is found. Once the update has started, it cannot be interrupted.
Notification:
Select On to receive a notification if a firmware update is available.
Related Information
& “Updating the Printer's Firmware Using the Control Panel” on page 111
Product Specifications
Printer Specifications
Type Printer Inkjet
Print Head Nozzle Placement Black ink nozzles: 360
Color ink nozzles: 180 for each color
Product Information > Product Specifications > Printer Specifications
211
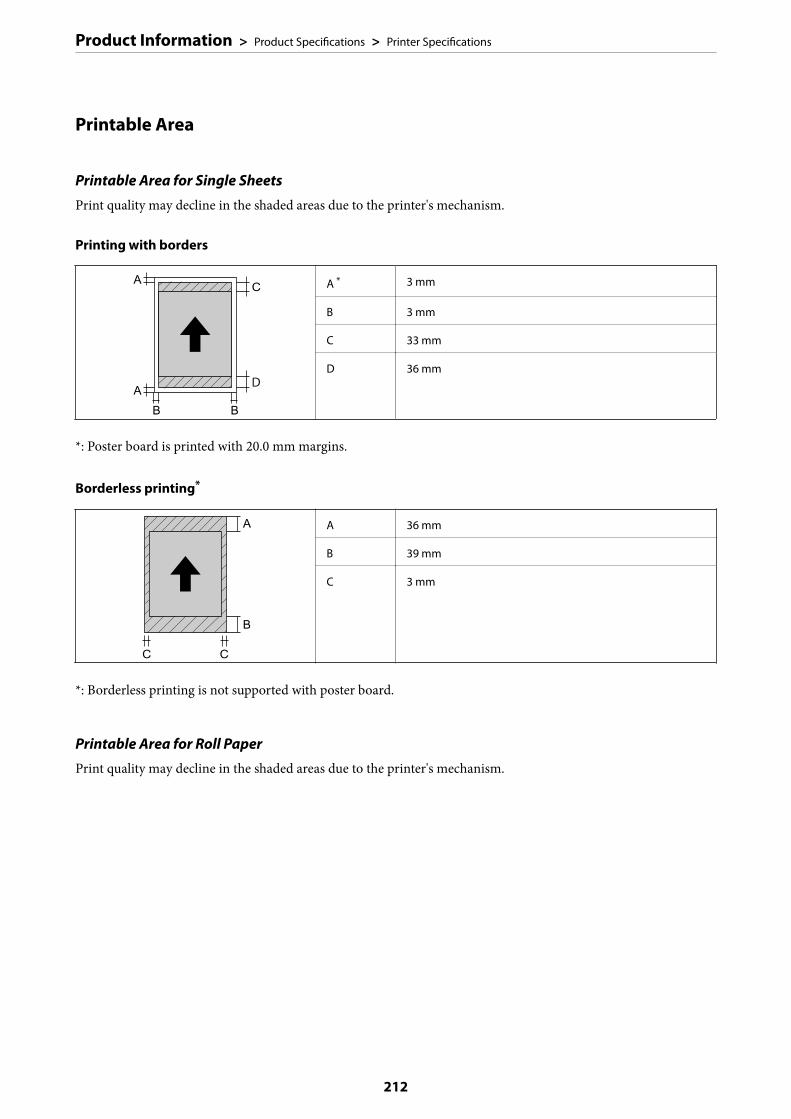
Printable Area
Printable Area for Single Sheets
Print quality may decline in the shaded areas due to the printer's mechanism.
Printing with borders
A * 3 mm
B 3 mm
C 33 mm
D 36 mm
*: Poster board is printed with 20.0 mm margins.
Borderless printing*
A 36 mm
B 39 mm
C 3 mm
*: Borderless printing is not supported with poster board.
Printable Area for Roll Paper
Print quality may decline in the shaded areas due to the printer's mechanism.
Product Information > Product Specifications > Printer Specifications
212
Printing with borders
A 50mm
B 3mm
C * 14mm
D * 50mm
*: 0 mm for continuous print jobs.
Borderless printing
A 50mm
B * 14mm
C * 50mm
*: 0 mm for continuous print jobs.
Printable Area for CD/DVD
Print quality may decline in the shaded areas due to the printer's mechanism.
A 18 mm (0.71 in.)
B 43 mm (1.69 in.)
C 116 mm (4.57 in.)
D 120 mm (4.72 in.)
Product Information > Product Specifications > Printer Specifications
213
Interface Specifications
For Computer SuperSpeed USB
Network Specifications
Wi-Fi Specifications
See the following table for Wi-Fi specifications.
Countries or regions except for those listed below Table A
Ireland, UK, Austria, Germany, Liechtenstein, Switzerland,France, Belgium, Luxemburg, Netherlands, Italy, Portugal,Spain, Denmark, Finland, Norway, Sweden, Iceland, Australia,New Zealand, China, Hong Kong, Mongolia, Taiwan, SouthKorea
Table B
Guade Loupe, Martinique, Mayotte, New Caledonia,SaintPierre,Miquelon, Reunion, French Polynesia, FrenchGuyana, Wallis Futuna
If you can select the following menu, see Table B. If youcannot, see Table A.
>General Settings > Network Settings > Wi-Fi Setup> Wi-Fi Direct > Start Setup > Change > ChangeFrequency Range
*When you select the menu above, Wi-Fi Direct turns on.
If you want to turn off Wi-Fi Direct, select >GeneralSettings > Network Settings > Wi-Fi Setup > Wi-Fi Direct> Start Setup > Change > Disable Wi-Fi Direct
Table A
Standards IEEE802.11b/g/n*1
Frequency Range 2.4 GHz
Channels 1/2/3/4/5/6/7/8/9/10/11/12/13
Coordination Modes Infrastructure, Wi-Fi Direct (Simple AP)*2*3
Security Protocols*4 WEP (64/128bit), WPA2-PSK (AES)*5, WPA3-SAE (AES)
*1: Only available for the HT20
*2: Not supported for IEEE 802.11b
*3: Infrastructure and Wi-Fi Direct modes or an Ethernet connection can be used simultaneously.
*4: Wi-Fi Direct supports WPA2-PSK (AES) only.
*5: Complies with WPA2 standards with support for WPA/WPA2 Personal.
Product Information > Product Specifications > Network Specifications
214
Table B
Standards IEEE802.11a/b/g/n*1/ac
Frequency Ranges IEEE802.11b/g/n: 2.4 GHz, IEEE802.11a/n/ac: 5 GHz
Channels Wi-Fi 2.4 GHz 1/2/3/4/5/6/7/8/9/10/11/12*2/13*2
5 GHz*3 W52 (36/40/44/48),
W53 (52/56/60/64),
W56 (100/104/108/112/116/120/124/128/132/136/140),
W58 (149/153/157/161/165)
Wi-Fi Direct 2.4 GHz 1/2/3/4/5/6/7/8/9/10/11/12*2/13*2
5 GHz*3 W52 (36/40/44/48)
W58 (149/153/157/161/165)
Connection Modes Infrastructure, Wi-Fi Direct (Simple AP)*4*5
Security Protocols*6 WEP (64/128bit), WPA2-PSK (AES)*7, WPA3-SAE (AES)
*1: Only available for the HT20
*2: Not available in Taiwan
*3: The availability of these channels and use of the product outdoors over these channels varies by location. For moreinformation, see http://support.epson.net/wifi5ghz/
*4: Not supported for IEEE 802.11b
*5: Infrastructure and Wi-Fi Direct modes or an Ethernet connection can be used simultaneously.
*6: Wi-Fi Direct only supports WPA2-PSK (AES) .
*7: Complies with WPA2 standards with support for WPA/WPA2 Personal.
Ethernet Specifications
Standards IEEE802.3i (10BASE-T)*1
IEEE802.3u (100BASE-TX)*1
IEEE802.3az (Energy Efficient Ethernet)*2
Communication Mode Auto, 10Mbps Full duplex, 10Mbps Half duplex, 100MbpsFull duplex, 100Mbps Half duplex
Connector RJ-45
*1 Use a category 5e or higher STP (Shielded twisted pair) cable to prevent risk of radio interference.
*2 The connected device should comply with IEEE802.3az standards.
Product Information > Product Specifications > Network Specifications
215
Network Functions and IPv4/IPv6
Functions Supported Remarks
Network Printing EpsonNet Print (Windows) IPv4 ✓ -
Standard TCP/IP (Windows) IPv4, IPv6 ✓ -
WSD Printing (Windows) IPv4, IPv6 ✓ Windows Vista orlater
Bonjour Printing (Mac OS) IPv4, IPv6 ✓ -
IPP Printing (Windows, MacOS)
IPv4, IPv6 ✓ -
PictBridge Printing (Wi-Fi) IPv4 ✓ Digital camera
Epson Connect (Email Print,Remote Print)
IPv4 ✓ -
AirPrint (iOS, Mac OS) IPv4, IPv6 ✓ iOS 5 or later, MacOS X v10.7 or later
Network Scanning Epson Scan 2 IPv4, IPv6 - -
Event Manager IPv4 - -
Epson Connect (Scan toCloud)
IPv4 - -
AirPrint (Scan) IPv4, IPv6 - -
Fax Send a fax IPv4 - -
Receive a fax IPv4 - -
AirPrint (Faxout) IPv4, IPv6 - -
Security Protocol
SSL/TLS HTTPS Server/Client, IPPS
SNMPv3
Supported Third Party Services
AirPrint iOS 5 or later/Mac OS X v10.7.x or later
Product Information > Product Specifications > Supported Third Party Services
216
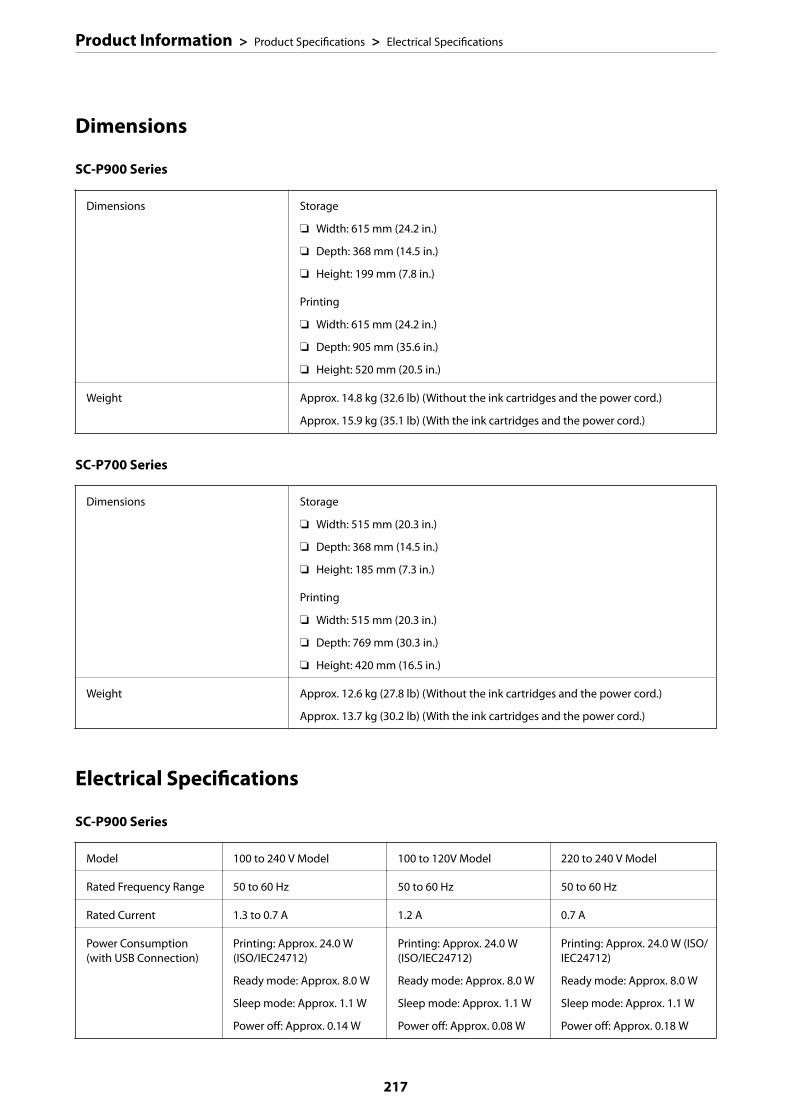
Dimensions
SC-P900 Series
Dimensions Storage
❏ Width: 615 mm (24.2 in.)
❏ Depth: 368 mm (14.5 in.)
❏ Height: 199 mm (7.8 in.)
Printing
❏ Width: 615 mm (24.2 in.)
❏ Depth: 905 mm (35.6 in.)
❏ Height: 520 mm (20.5 in.)
Weight Approx. 14.8 kg (32.6 lb) (Without the ink cartridges and the power cord.)
Approx. 15.9 kg (35.1 lb) (With the ink cartridges and the power cord.)
SC-P700 Series
Dimensions Storage
❏ Width: 515 mm (20.3 in.)
❏ Depth: 368 mm (14.5 in.)
❏ Height: 185 mm (7.3 in.)
Printing
❏ Width: 515 mm (20.3 in.)
❏ Depth: 769 mm (30.3 in.)
❏ Height: 420 mm (16.5 in.)
Weight Approx. 12.6 kg (27.8 lb) (Without the ink cartridges and the power cord.)
Approx. 13.7 kg (30.2 lb) (With the ink cartridges and the power cord.)
Electrical Specifications
SC-P900 Series
Model 100 to 240 V Model 100 to 120V Model 220 to 240 V Model
Rated Frequency Range 50 to 60 Hz 50 to 60 Hz 50 to 60 Hz
Rated Current 1.3 to 0.7 A 1.2 A 0.7 A
Power Consumption(with USB Connection)
Printing: Approx. 24.0 W(ISO/IEC24712)
Ready mode: Approx. 8.0 W
Sleep mode: Approx. 1.1 W
Power off: Approx. 0.14 W
Printing: Approx. 24.0 W(ISO/IEC24712)
Ready mode: Approx. 8.0 W
Sleep mode: Approx. 1.1 W
Power off: Approx. 0.08 W
Printing: Approx. 24.0 W (ISO/IEC24712)
Ready mode: Approx. 8.0 W
Sleep mode: Approx. 1.1 W
Power off: Approx. 0.18 W
Product Information > Product Specifications > Electrical Specifications
217
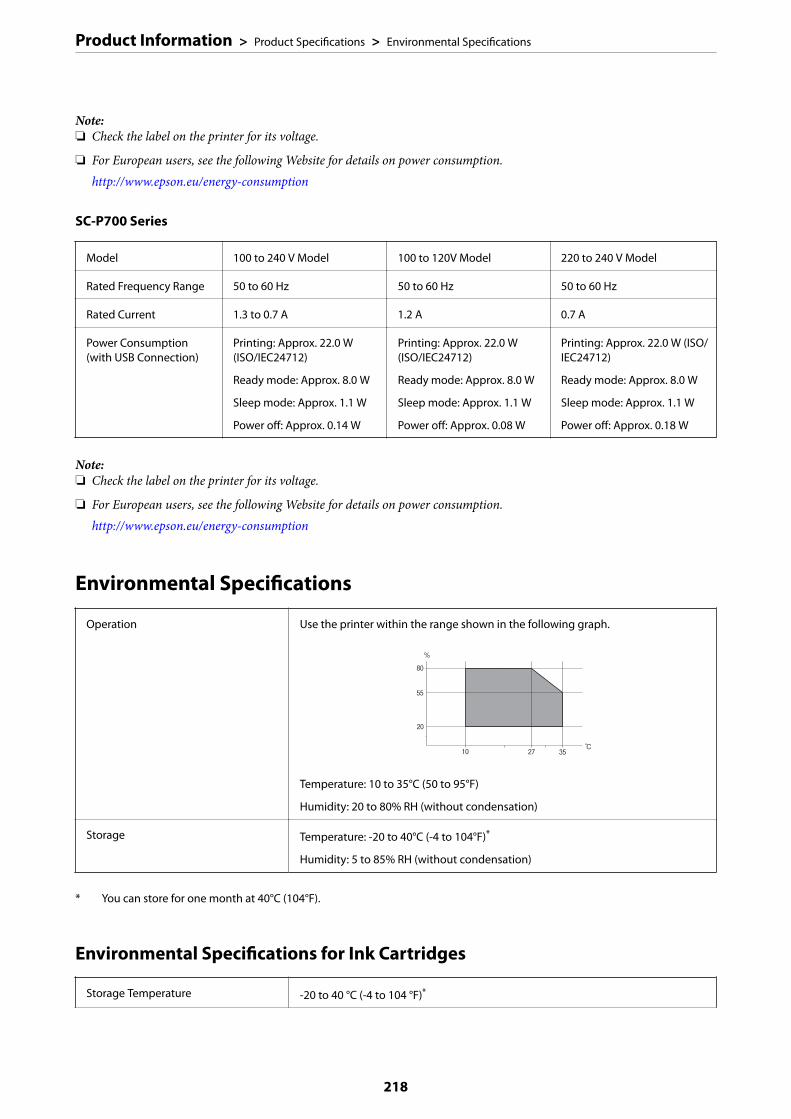
Note:❏ Check the label on the printer for its voltage.
❏ For European users, see the following Website for details on power consumption.http://www.epson.eu/energy-consumption
SC-P700 Series
Model 100 to 240 V Model 100 to 120V Model 220 to 240 V Model
Rated Frequency Range 50 to 60 Hz 50 to 60 Hz 50 to 60 Hz
Rated Current 1.3 to 0.7 A 1.2 A 0.7 A
Power Consumption(with USB Connection)
Printing: Approx. 22.0 W(ISO/IEC24712)
Ready mode: Approx. 8.0 W
Sleep mode: Approx. 1.1 W
Power off: Approx. 0.14 W
Printing: Approx. 22.0 W(ISO/IEC24712)
Ready mode: Approx. 8.0 W
Sleep mode: Approx. 1.1 W
Power off: Approx. 0.08 W
Printing: Approx. 22.0 W (ISO/IEC24712)
Ready mode: Approx. 8.0 W
Sleep mode: Approx. 1.1 W
Power off: Approx. 0.18 W
Note:❏ Check the label on the printer for its voltage.
❏ For European users, see the following Website for details on power consumption.http://www.epson.eu/energy-consumption
Environmental Specifications
Operation Use the printer within the range shown in the following graph.
Temperature: 10 to 35°C (50 to 95°F)
Humidity: 20 to 80% RH (without condensation)
Storage Temperature: -20 to 40°C (-4 to 104°F)*
Humidity: 5 to 85% RH (without condensation)
* You can store for one month at 40°C (104°F).
Environmental Specifications for Ink Cartridges
Storage Temperature -20 to 40 °C (-4 to 104 °F)*
Product Information > Product Specifications > Environmental Specifications
218
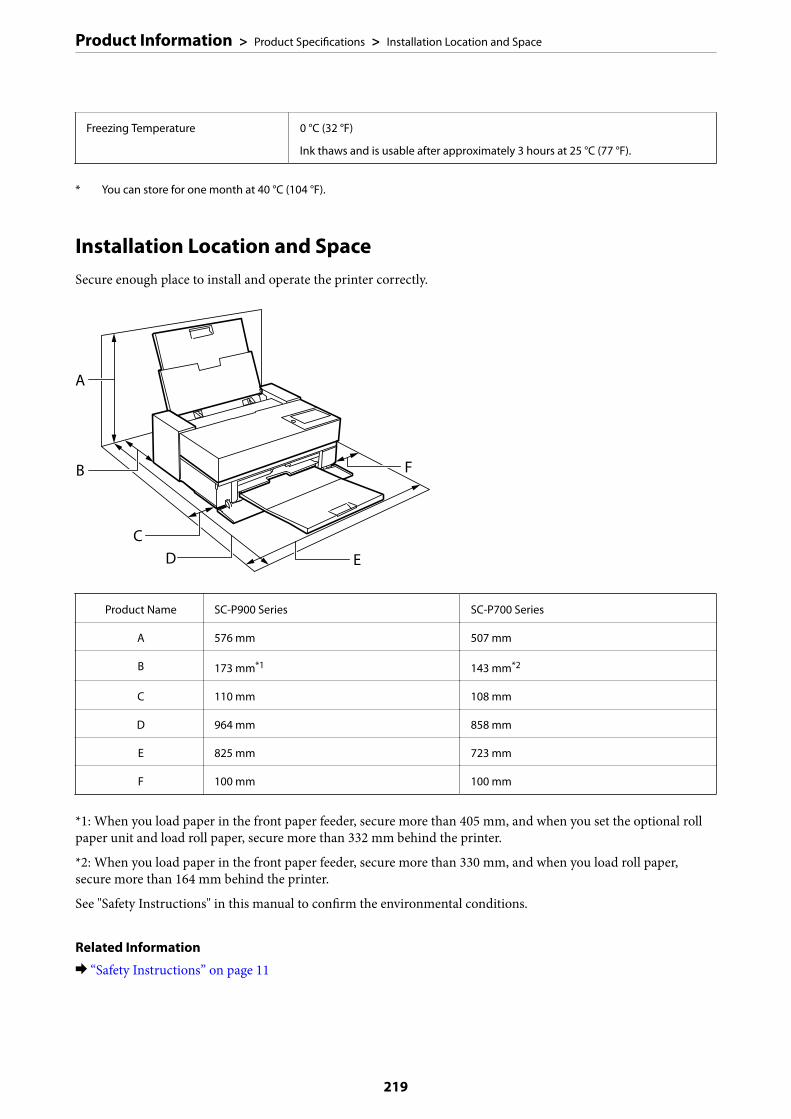
Freezing Temperature 0 °C (32 °F)
Ink thaws and is usable after approximately 3 hours at 25 °C (77 °F).
* You can store for one month at 40 °C (104 °F).
Installation Location and SpaceSecure enough place to install and operate the printer correctly.
A
CD
B F
E
Product Name SC-P900 Series SC-P700 Series
A 576 mm 507 mm
B 173 mm*1 143 mm*2
C 110 mm 108 mm
D 964 mm 858 mm
E 825 mm 723 mm
F 100 mm 100 mm
*1: When you load paper in the front paper feeder, secure more than 405 mm, and when you set the optional rollpaper unit and load roll paper, secure more than 332 mm behind the printer.
*2: When you load paper in the front paper feeder, secure more than 330 mm, and when you load roll paper,secure more than 164 mm behind the printer.
See "Safety Instructions" in this manual to confirm the environmental conditions.
Related Information
& “Safety Instructions” on page 11
Product Information > Product Specifications > Installation Location and Space
219
System Requirements❏ Windows 10 (32-bit, 64-bit)/Windows 8.1 (32-bit, 64-bit)/Windows 8 (32-bit, 64-bit)/Windows 7 (32-bit, 64-
bit)
❏ macOS Catalina(10.15)/macOS Mojave(10.14)/macOS High Sierra(10.13)/macOS Sierra(10.12)/OS X ElCapitan(10.11)/OS X Yosemite(10.10)/OS X Mavericks(10.9)
Note:❏ Mac OS may not support some applications and features.
❏ The UNIX File System (UFS) for Mac OS is not supported.
Regulatory Information
Standards and Approvals
Standards and Approvals for U.S. Model
Safety UL62368-1
CAN/CSA-C22.2 No.62368-1
EMC FCC Part 15 Subpart B Class B
CAN ICES-3 (B)/NMB-3 (B)
This equipment contains the following wireless module.
Manufacturer: Seiko Epson Corporation
Type: J26H005
This product conforms to Part 15 of the FCC Rules and RSS-210 of the IC Rules. Epson cannot acceptresponsibility for any failure to satisfy the protection requirements resulting from a non-recommendedmodification of the product. Operation is subject to the following two conditions: (1) this device may not causeharmful interference, and (2) this device must accept any interference received, including interference that maycause undesired operation of the device.
To prevent radio interference to the licensed service, this device is intended to be operated indoors and away fromwindows to provide maximum shielding. Equipment (or its transmit antenna) that is installed outdoors is subjectto licensing.
This equipment complies with FCC/IC radiation exposure limits set forth for an uncontrolled environment andmeets the FCC radio frequency (RF) Exposure Guidelines in Supplement C to OET65 and RSS-102 of the IC radiofrequency (RF) Exposure rules. This equipment should be installed and operated so that the radiator is kept at least7.9 inches (20 cm) or more away from a person's body (excluding extremities: hands, wrists, feet and ankles).
Standards and Approvals for European Model
For European users
Hereby, Seiko Epson Corporation declares that the following radio equipment model is in compliance withDirective 2014/53/EU. The full text of the EU declaration of conformity is available at the following website.
Product Information > Regulatory Information > Standards and Approvals
220
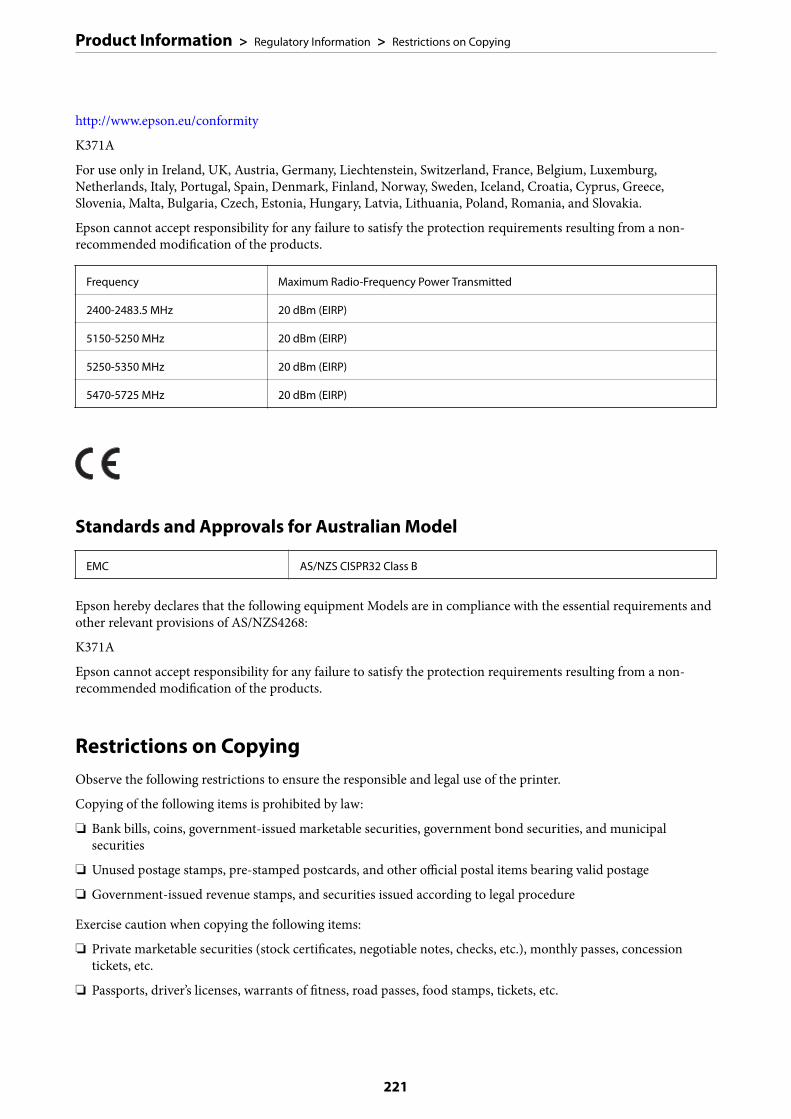
http://www.epson.eu/conformity
K371A
For use only in Ireland, UK, Austria, Germany, Liechtenstein, Switzerland, France, Belgium, Luxemburg,Netherlands, Italy, Portugal, Spain, Denmark, Finland, Norway, Sweden, Iceland, Croatia, Cyprus, Greece,Slovenia, Malta, Bulgaria, Czech, Estonia, Hungary, Latvia, Lithuania, Poland, Romania, and Slovakia.
Epson cannot accept responsibility for any failure to satisfy the protection requirements resulting from a non-recommended modification of the products.
Frequency Maximum Radio-Frequency Power Transmitted
2400-2483.5 MHz 20 dBm (EIRP)
5150-5250 MHz 20 dBm (EIRP)
5250-5350 MHz 20 dBm (EIRP)
5470-5725 MHz 20 dBm (EIRP)
Standards and Approvals for Australian Model
EMC AS/NZS CISPR32 Class B
Epson hereby declares that the following equipment Models are in compliance with the essential requirements andother relevant provisions of AS/NZS4268:
K371A
Epson cannot accept responsibility for any failure to satisfy the protection requirements resulting from a non-recommended modification of the products.
Restrictions on CopyingObserve the following restrictions to ensure the responsible and legal use of the printer.
Copying of the following items is prohibited by law:
❏ Bank bills, coins, government-issued marketable securities, government bond securities, and municipalsecurities
❏ Unused postage stamps, pre-stamped postcards, and other official postal items bearing valid postage
❏ Government-issued revenue stamps, and securities issued according to legal procedure
Exercise caution when copying the following items:
❏ Private marketable securities (stock certificates, negotiable notes, checks, etc.), monthly passes, concessiontickets, etc.
❏ Passports, driver’s licenses, warrants of fitness, road passes, food stamps, tickets, etc.
Product Information > Regulatory Information > Restrictions on Copying
221

Note:Copying these items may also be prohibited by law.
Responsible use of copyrighted materials:
Printers can be misused by improperly copying copyrighted materials. Unless acting on the advice of aknowledgeable attorney, be responsible and respectful by obtaining the permission of the copyright holder beforecopying published material.
Product Information > Regulatory Information > Restrictions on Copying
222
Where to Get Help
Technical Support Web Site. . . . . . . . . . . . . . . . . . . . . . . . . . . . . . . . . . . . . . . . . . 224
Contacting Epson Support. . . . . . . . . . . . . . . . . . . . . . . . . . . . . . . . . . . . . . . . . . . 224
Technical Support Web SiteIf you need further help, visit the Epson support website shown below. Select your country or region and go to thesupport section of your local Epson website. The latest drivers, FAQs, manuals, or other downloadables are alsoavailable from the site.
http://support.epson.net/
http://www.epson.eu/Support (Europe)
If your Epson product is not operating properly and you cannot solve the problem, contact Epson support servicesfor assistance.
Contacting Epson Support
Before Contacting EpsonIf your Epson product is not operating properly and you cannot solve the problem using the troubleshootinginformation in your product manuals, contact Epson support services for assistance. If Epson support for your areais not listed below, contact the dealer where you purchased your product.
Epson support will be able to help you much more quickly if you give them the following information:
❏ Product serial number(The serial number label is usually on the back of the product.)
❏ Product model
❏ Product software version(Click About, Version Info, or a similar button in the product software.)
❏ Brand and model of your computer
❏ Your computer operating system name and version
❏ Names and versions of the software applications you normally use with your product
Note:Depending on the product, network settings may be stored in the product’s memory. Due to breakdown or repair of aproduct, settings may be lost. Epson shall not be responsible for the loss of any data, for backing up or recovering settingseven during a warranty period. We recommend that you make your own backup data or take notes.
Help for Users in EuropeCheck your Pan-European Warranty Document for information on how to contact Epson support.
Help for Users in TaiwanContacts for information, support, and services are:
World Wide Web
http://www.epson.com.tw
Where to Get Help > Contacting Epson Support > Help for Users in Taiwan
224
Information on product specifications, drivers for download, and products enquiry are available.
Epson HelpDesk
Phone: +886-2-80242008
Our HelpDesk team can help you with the following over the phone:
❏ Sales enquiries and product information
❏ Product usage questions or problems
❏ Enquiries on repair service and warranty
Repair service center:
http://www.tekcare.com.tw/branchMap.page
TekCare corporation is an authorized service center for Epson Taiwan Technology & Trading Ltd.
Help for Users in AustraliaEpson Australia wishes to provide you with a high level of customer service. In addition to your product manuals,we provide the following sources for obtaining information:
Internet URL
http://www.epson.com.au
Access the Epson Australia World Wide Web pages. Worth taking your modem here for the occasional surf! Thesite provides a download area for drivers, Epson contact points, new product information and technical support (e-mail).
Epson Helpdesk
Phone: 1300-361-054
Epson Helpdesk is provided as a final backup to make sure our clients have access to advice. Operators on theHelpdesk can aid you in installing, configuring and operating your Epson product. Our Pre-sales Helpdesk staffcan provide literature on new Epson products and advise where the nearest dealer or service agent is located. Manytypes of queries are answered here.
We encourage you to have all the relevant information on hand when you ring. The more information you prepare,the faster we can help solve the problem. This information includes your Epson product manuals, type ofcomputer, operating system, application programs, and any information you feel is required.
Transportation of Product
Epson recommends retaining product packaging for future transportation.
Help for Users in New ZealandEpson New Zealand wishes to provide you with a high level of customer service. In addition to your productdocumentation, we provide the following sources for obtaining information:
Internet URL
http://www.epson.co.nz
Where to Get Help > Contacting Epson Support > Help for Users in New Zealand
225
Access the Epson New Zealand World Wide Web pages. Worth taking your modem here for the occasional surf!The site provides a download area for drivers, Epson contact points, new product information and technicalsupport (e-mail).
Epson Helpdesk
Phone: 0800 237 766
Epson Helpdesk is provided as a final backup to make sure our clients have access to advice. Operators on theHelpdesk can aid you in installing, configuring and operating your Epson product. Our Pre-sales Helpdesk staffcan provide literature on new Epson products and advise where the nearest dealer or service agent is located. Manytypes of queries are answered here.
We encourage you to have all the relevant information on hand when you ring. The more information you prepare,the faster we can help solve the problem. This information includes your Epson product documentation, type ofcomputer, operating system, application programs, and any information you feel is required.
Transportation of Product
Epson recommends retaining product packaging for future transportation.
Help for Users in SingaporeSources of information, support, and services available from Epson Singapore are:
World Wide Web
http://www.epson.com.sg
Information on product specifications, drivers for download, Frequently Asked Questions (FAQ), Sales Enquiries,and Technical Support via e-mail are available.
Epson HelpDesk
Toll Free: 800-120-5564
Our HelpDesk team can help you with the following over the phone:
❏ Sales enquiries and product information
❏ Product usage questions or problem troubleshooting
❏ Enquiries on repair service and warranty
Help for Users in ThailandContacts for information, support, and services are:
World Wide Web
http://www.epson.co.th
Information on product specifications, drivers for download, Frequently Asked Questions (FAQ), and e-mail areavailable.
Epson Call Centre
Phone: 66-2685-9899
Where to Get Help > Contacting Epson Support > Help for Users in Thailand
226
Email: [email protected]
Our Call Centre team can help you with the following over the phone:
❏ Sales enquiries and product information
❏ Product usage questions or problems
❏ Enquiries on repair service and warranty
Help for Users in VietnamContacts for information, support, and services are:
Epson Service Center
65 Truong Dinh Street, District 1, Ho Chi Minh City, Vietnam.
Phone(Ho Chi Minh City): 84-8-3823-9239, 84-8-3825-6234
29 Tue Tinh, Quan Hai Ba Trung, Hanoi City, Vietnam
Phone(Hanoi City): 84-4-3978-4785, 84-4-3978-4775
Help for Users in IndonesiaContacts for information, support, and services are:
World Wide Web
http://www.epson.co.id
❏ Information on product specifications, drivers for download
❏ Frequently Asked Questions (FAQ), Sales Enquiries, questions through e-mail
Epson Hotline
Phone: +62-1500-766
Fax: +62-21-808-66-799
Our Hotline team can help you with the following over the phone or fax:
❏ Sales enquiries and product information
❏ Technical support
Epson Service Center
Province Company Name Address Phone
DKI JAKARTA ESS JAKARTAMANGGADUA
Ruko Mall Mangga Dua No. 48 Jl. ArteriMangga Dua, Jakarta Utara - DKI JAKARTA
(+6221) 62301104
NORTHSUMATERA
ESC MEDAN Jl. Bambu 2 Komplek Graha Niaga NomorA-4, Medan - North Sumatera
(+6261) 42066090 / 42066091
Where to Get Help > Contacting Epson Support > Help for Users in Indonesia
227
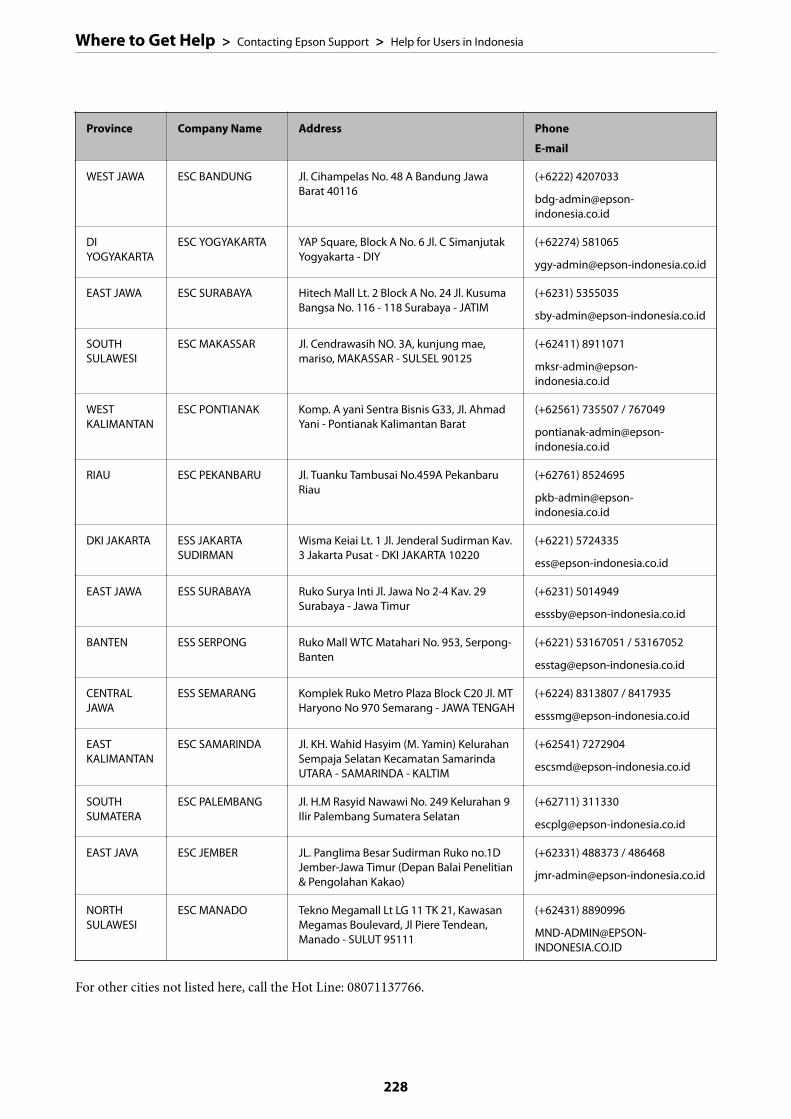
Province Company Name Address Phone
WEST JAWA ESC BANDUNG Jl. Cihampelas No. 48 A Bandung JawaBarat 40116
(+6222) 4207033
DIYOGYAKARTA
ESC YOGYAKARTA YAP Square, Block A No. 6 Jl. C SimanjutakYogyakarta - DIY
(+62274) 581065
EAST JAWA ESC SURABAYA Hitech Mall Lt. 2 Block A No. 24 Jl. KusumaBangsa No. 116 - 118 Surabaya - JATIM
(+6231) 5355035
SOUTHSULAWESI
ESC MAKASSAR Jl. Cendrawasih NO. 3A, kunjung mae,mariso, MAKASSAR - SULSEL 90125
(+62411) 8911071
WESTKALIMANTAN
ESC PONTIANAK Komp. A yani Sentra Bisnis G33, Jl. AhmadYani - Pontianak Kalimantan Barat
(+62561) 735507 / 767049
RIAU ESC PEKANBARU Jl. Tuanku Tambusai No.459A PekanbaruRiau
(+62761) 8524695
DKI JAKARTA ESS JAKARTASUDIRMAN
Wisma Keiai Lt. 1 Jl. Jenderal Sudirman Kav.3 Jakarta Pusat - DKI JAKARTA 10220
(+6221) 5724335
EAST JAWA ESS SURABAYA Ruko Surya Inti Jl. Jawa No 2-4 Kav. 29Surabaya - Jawa Timur
(+6231) 5014949
BANTEN ESS SERPONG Ruko Mall WTC Matahari No. 953, Serpong-Banten
(+6221) 53167051 / 53167052
CENTRALJAWA
ESS SEMARANG Komplek Ruko Metro Plaza Block C20 Jl. MTHaryono No 970 Semarang - JAWA TENGAH
(+6224) 8313807 / 8417935
EASTKALIMANTAN
ESC SAMARINDA Jl. KH. Wahid Hasyim (M. Yamin) KelurahanSempaja Selatan Kecamatan SamarindaUTARA - SAMARINDA - KALTIM
(+62541) 7272904
SOUTHSUMATERA
ESC PALEMBANG Jl. H.M Rasyid Nawawi No. 249 Kelurahan 9Ilir Palembang Sumatera Selatan
(+62711) 311330
EAST JAVA ESC JEMBER JL. Panglima Besar Sudirman Ruko no.1DJember-Jawa Timur (Depan Balai Penelitian& Pengolahan Kakao)
(+62331) 488373 / 486468
NORTHSULAWESI
ESC MANADO Tekno Megamall Lt LG 11 TK 21, KawasanMegamas Boulevard, Jl Piere Tendean,Manado - SULUT 95111
(+62431) 8890996
For other cities not listed here, call the Hot Line: 08071137766.
Where to Get Help > Contacting Epson Support > Help for Users in Indonesia
228

Help for Users in Hong KongTo obtain technical support as well as other after-sales services, users are welcome to contact Epson Hong KongLimited.
Internet Home Page
http://www.epson.com.hk
Epson Hong Kong has established a local home page in both Chinese and English on the Internet to provide userswith the following information:
❏ Product information
❏ Answers to Frequently Asked Questions (FAQs)
❏ Latest versions of Epson product drivers
Technical Support Hotline
You can also contact our technical staff at the following telephone and fax numbers:
Phone: 852-2827-8911
Fax: 852-2827-4383
Help for Users in MalaysiaContacts for information, support, and services are:
World Wide Web
http://www.epson.com.my
❏ Information on product specifications, drivers for download
❏ Frequently Asked Questions (FAQ), Sales Enquiries, questions through e-mail
Epson Call Centre
Phone: +60 1800-8-17349
❏ Sales enquiries and product information
❏ Product usage questions or problems
❏ Enquiries on repair services and warranty
Head Office
Phone: 603-56288288
Fax: 603-5628 8388/603-5621 2088
Help for Users in IndiaContacts for information, support, and services are:
Where to Get Help > Contacting Epson Support > Help for Users in India
229
World Wide Web
http://www.epson.co.in
Information on product specifications, drivers for download, and products enquiry are available.
Helpline
❏ Service, product information, and ordering consumables (BSNL Lines)Toll-free number: 18004250011Accessible 9am to 6pm, Monday through Saturday (Except public holidays)
❏ Service (CDMA & Mobile Users)Toll-free number: 186030001600Accessible 9am to 6pm, Monday through Saturday (Except public holidays)
Help for Users in the PhilippinesTo obtain technical support as well as other after sales services, users are welcome to contact the Epson PhilippinesCorporation at the telephone, fax numbers and e-mail address below:
World Wide Web
http://www.epson.com.ph
Information on product specifications, drivers for download, Frequently Asked Questions (FAQ), and E-mailEnquiries are available.
Epson Philippines Customer Care
Toll Free: (PLDT) 1-800-1069-37766
Toll Free: (Digital) 1-800-3-0037766
Metro Manila: (+632)441-9030
Web Site: https://www.epson.com.ph/contact
E-mail: [email protected]
Accessible 9am to 6pm, Monday through Saturday (Except public holidays)
Our Customer Care team can help you with the following over the phone:
❏ Sales enquiries and product information
❏ Product usage questions or problems
❏ Enquiries on repair service and warranty
Epson Philippines Corporation
Trunk Line: +632-706-2609
Fax: +632-706-2663
Where to Get Help > Contacting Epson Support > Help for Users in the Philippines
230
Related Documents