Item# 45-6784 If you have any problems with your new product, please contact Triumph Sports USA at 1-866-815-4173, or e-mail us at [email protected] for any technical support or warranty issues. Please keep this instruction manual for future reference Santa Fe 89” Billiard Table

Welcome message from author
This document is posted to help you gain knowledge. Please leave a comment to let me know what you think about it! Share it to your friends and learn new things together.
Transcript

Item# 45-6784
If you have any problems with your new product, please contact Triumph Sports USA at 1-866-815-4173,
or e-mail us at [email protected] any technical support or warranty issues.
Please keep this instruction manual for future reference
Santa Fe89” Billiard Table

A PURCHASE RECEIPT (or other proof of purchase date) will be required before any warranty service is initiated. All requests for warranty service can be submitted by email, in writing or by contacting our Customer Service Department at: 1-866-815-4173 or email us at [email protected]. IMPORTANT NOTICE! Please contact us before returning the product to the store.
All Triumph Sports USA, Inc. (TSU) games have a limited 90-day from date of purchase warranty. This warrants the retail purchaser for any TSU game purchased to be free from any defect in materials and construction for 90 days from the date of purchase. The only exceptions to the warranty include main frames, tabletops, playing surfaces, batteries or tools. Damaged main frames, tabletops, playing surfaces need to be returned to the store as we are unable to replace these parts. Normal play wear and usage is not covered under the warranty, nor is wear or damage due to improper use of the TSU game. This will void any and all TSU warranties.
Limited 90-Day Triumph Sports USA, Inc. Warranty
Triumph Sports USA 11327 W Lincoln Ave. West Allis, WI 53227 www.triumphsportsusa.com ©2014 Triumph Sports USA. All Rights Reserved.
Warnings
WARNING:Choking Hazard—Product contains small balls and/or small parts. Not for children under 3 years of age.
Be sure to check out all the exciting games has to offer. Visit our web site at:

Parts List
Cabinet For Billiard1 Pc
Leg-a4 Pcs
End Leg Panel2 pcs
M6 x 45mm Leg Bolt16 pcs
3.5*12mm Screw20 pcs
Chalk2pcs
Cue Stick2pcs
Billiard Balls1set
Leg -B4 Pcs
Leg Support4 pcs
Side Leg Panel2 pcs
M6 x 38mm Leg Bolt16 pcs
Leg-C4 Pcs
Leg-D4 Pcs
Leg-E4 Pcs
Plastic Pole4 Pcs
3*10mmBolt20 pcs
3.5x22mm Screw32 pcs
Leg Cap4 pcs
Allen key1 pc
Brush1 pc
M6x26mm Leg Bolt8 pcs
Triangle1 pc

NOTE: We recommend that two adults work together to assemble this game. Step 1 Find a clean, level place to begin the assembly of your billiard table. The table will be assembled upside down and then turned over on its legs once the assembly is completed. Step 2 Remove all the parts from the box and verify that you have all of the parts as shown on the parts list above. Carefully cut or tear the four corners of the box so that the bottom of the box can be used as your work surface. Step 3 Place the pre-assembled cabinet (#1) face down in your work area. Step 4 Insert plastic poles (#13) into leg E (#12) and leg D (#11). The slots on the bottom of leg D and the top of leg E should Be facing the same direction.
Assembly Tips: Attention: If you are using an electric screwdriver in the assembly, please set at low torque and do not over tighten the hardware. When assembling individual parts, loosely tighten screws until all screws are inserted, then tighten completely.
Assembly Instructions
Top View

Step 5 Attach leg C (#10) to leg A (#2) with screws (#14).
Step 6 Insert the assembled unit from Fig. 1 A into the leg A (#2). Line up and push the slots on the bottom of leg D (#11) with the grooves on the inside of the leg A (#2).
Step 7 Snap together leg B (#3) to the pre-assembled leg A (#2) by lining up the male connector along the edge of the leg with the female connection along the edge of the other leg and push together firmly.

Step 8Secure the two half legs together with screws (#15).
Step 9Place leg end cap (#16) on the assembled leg from Fig. 1 E. Repeat the steps for the other legs.
Step 10Attach the side and end panels (#4) &(#5) to the frame billiard top (#1) usingscrews (#8) and hinges . Usingscrews (#19)screw together the sideand end panels (#4) & (#5) on eachcorner.

Step 11 Attach leg support (#9) to each corner with bolts (#7).
Step 12 Attach assembled legs to the leg support (#9) with bolts (#6).
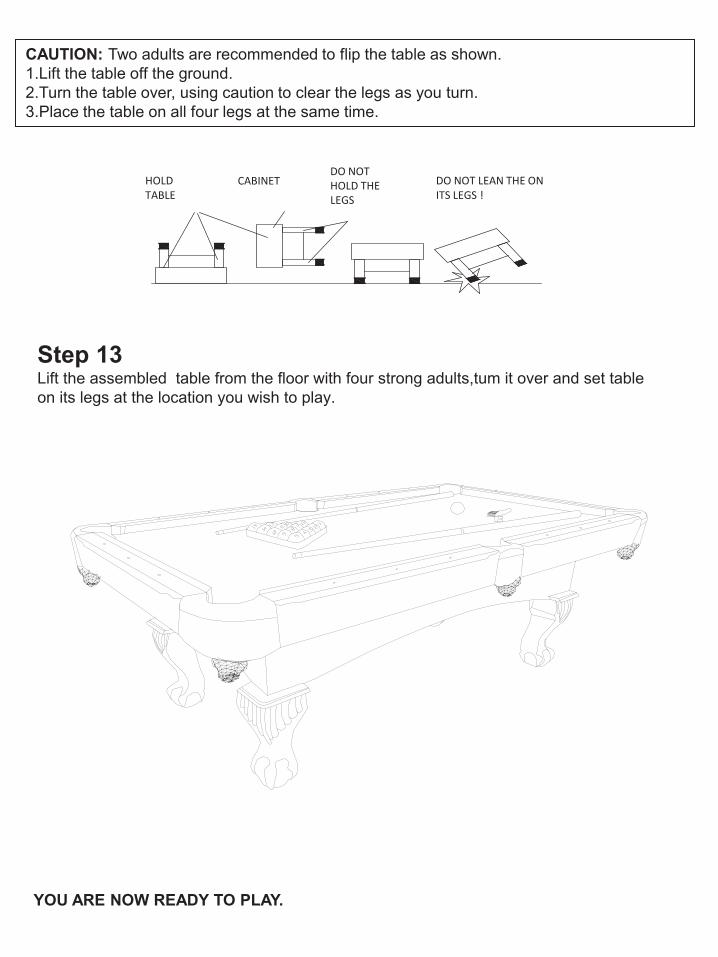
CAUTION: Two adults are recommended to flip the table as shown.1.Lift the table off the ground.2.Turn the table over, using caution to clear the legs as you turn.3.Place the table on all four legs at the same time.
Step 13Lift the assembled table from the floor with four strong adults,tum it over and set table on its legs at the location you wish to play.
HOLD TABLE
CABINETDO NOTHOLD THELEGS
DO NOT LEAN THE ON ITS LEGS !
YOU ARE NOW READY TO PLAY.

Article N° 45-6784
Santa FeTable de billard de 226cm
Si ce produit récemment acquis présente un défaut, veuillez contacter Triumph Sports USA par téléphone au
1-866-815-4173, ou par courrier électronique à [email protected] pour obtenir une aide
technique ou l’exécution de la garantie.
Veuillez conserver ce mode d’emploi pour consultation ultérieure

Un reçu ou une autre preuve d’achat sera exigé avant d’entamer toute exécution de garantie. Vous pouvez faire parvenir les demandes d’exécution de la garantie par courrier électronique, par courrier ou en contactant notre service à la clientèle par téléphone au : 1-866-815-4173 ou par courriel à [email protected]. AVIS IMPORTANT! Veuillez nous contacter avant de rapporter le produit au magasin
Tous les jeux Triumph Sports USA, Inc. (TSU) bénéficient d’une garantie limitée de 90 jours à partir de la date d’achat. Cette garantie couvre l’acquéreur d’un jeu TSU vendu au détail contre tout défaut de matériau ou de construction pendant une période de 90 jours à compter de la date d’achat. Les seules exceptions à la garantie sont les châssis, les plateaux de table, les surfaces de jeu, les piles et les outils. Un châssis, un plateau de table ou une surface de jeu endommagé n'étant pas remplaçables, il faut rapporter le jeu au magasin. L’usure due au jeu ou à une utilisation normale n’est pas couverte par la garantie, ni l’usure ou les dommages provoqués par un usage abusif du jeu, lesquels annulent toutes les garanties TSÚ.
Garantie limitée de 90 jours de Triumph Sports, Inc.
Triumph Sports USA 11327 W Lincoln Ave. West Allis, WI 53227 www.triumphsportsusa.com ©2014 Triumph Sports USA. Tous droits réservés.
Avertissements AVERTISSEMENT: Risque d'étranglement. Le produit contient de petites balles et de petites pièces. Ne convient pas aux enfants de moins de 3 ans.
Ne manquez pas de consulter tous les jeux passionnants que propose Triumph Sports USA. Visitez notre site web à:
BILLARDS FLÉCHETTES TABLES DE JEUX CASINO JEUX D’EXTÉRIEUR CIBLES DE FLÉCHETTES

Liste des pièces
Vis3.5x12mmNombre: 20
Chassis de billardNombre: 1
Pied -ANombre: 4
Panneau d?̄ extr¨|mit¨|Nombre: 2
Boulon de piedM6 x 45 mmNombre: 16
CraieNombre: 2
QueueNombre: 2
Billes de billard1 ensemble
Pied -BNombre: 4
Support de piedNombre: 4
Panneau lat¨|ralNombre: 2
Boulon de piedM6 x 38mmNombre: 16
Pied -CNombre: 4
Pied -DNombre: 4
Pied -ENombre: 4
Montant plastiqueNombre: 4
3.2*12mm BoulonNombre: 20
Vis3.5x22mmNombre: 32
Embout de piedNombre: 4
Cl¨| AllenNombre: 1
BrosseNombre: 1
Boulon de piedM6x26mmNombre: 8
TriangleNombre: 1

Étape 3 Placer le châssis monté en usine (N° 1) sens dessus dessous dans le lieu de travail. Étape 4 Enfoncer les montants en plastique (N° 13) dans le pied E (N°12) et le pied D (N° 11). Les rainures à la partie inférieure du pied D et à la partie supérieure du pied E doivent être orientées de la même manière.
Conseils de montage :
Montage
Vue de dessus
Attention: Si l’on utilise un tournevis électrique pour effectuer le montage, le régler sur un faible couple et ne jamais serrer excessivement, Lors du montage de pièces, serrer peu les vis jusqu’à ce qu’elles soient toutes insérées, puis serrerà fond.
REMARQUE: Le montage sera facilité s’il est effectué par deux adultes.
Étape 1 Trouver une surface plane propre pour commencer le montage de la table de billard. La table sera montée sens dessus dessous et retournée sur ses pieds une fois le montage terminé.
Étape 2 Retirer tout le contenu du carton et vérifier que toutes les pièces figurant sur la liste de pièces ci-dessus sont présentes. Couper ou déchirer soigneusement les quatre coins du carton de manière à utiliser le fond comme surface de travail.

Étape 5 Fixer le pied C (N° 10) au pied A (N° 2) à l’aide de vis (N° 14).
Étape 6 Introduire l’unité assemblée représentée à la Fig. 1 A dans le pied A (N° 2). Aligner les encoches à la partie inférieure du pied D (N° 11) avec les rainures de l’intérieur du pied A (N° 2) et les pousser dans celles-ci.
Étape 7 Emboîter le pied B (N° 3) au pied A monté en usine (N° 2) en alignant le connecteur mâle le long du bord du pied avec la connexion femelle le long du bord de l’autre pied et pousser fermement.

Étape 8Fixer les deux moitiés de pieds ensemble avec des vis (N° 15).
Étape 9Placer l’embout de pied (N° 16) sur le pied monté, représenté à la Fig. 1 E. Procéder de même pour les autres pieds.
Étape 10Fixer les panneaux latéraux (N° 4) et d’extrémité (N° 5) au dessus du châssis de billard (N° 1) à l’aide de vis (N° 8) et de charnières Visser ensemble les panneaux latéraux et d’extrémité (Nos 4 et 5) à chaque coin à l’aide de vis (N° 19).

Étape 11 Fixer les supports de pieds (N° 9) à chaque coin à l’aide de boulons (N° 7).
Étape 12 Fixer les pieds montés aux supports de pieds (N° 9) à l’aide de boulons (N° 6).
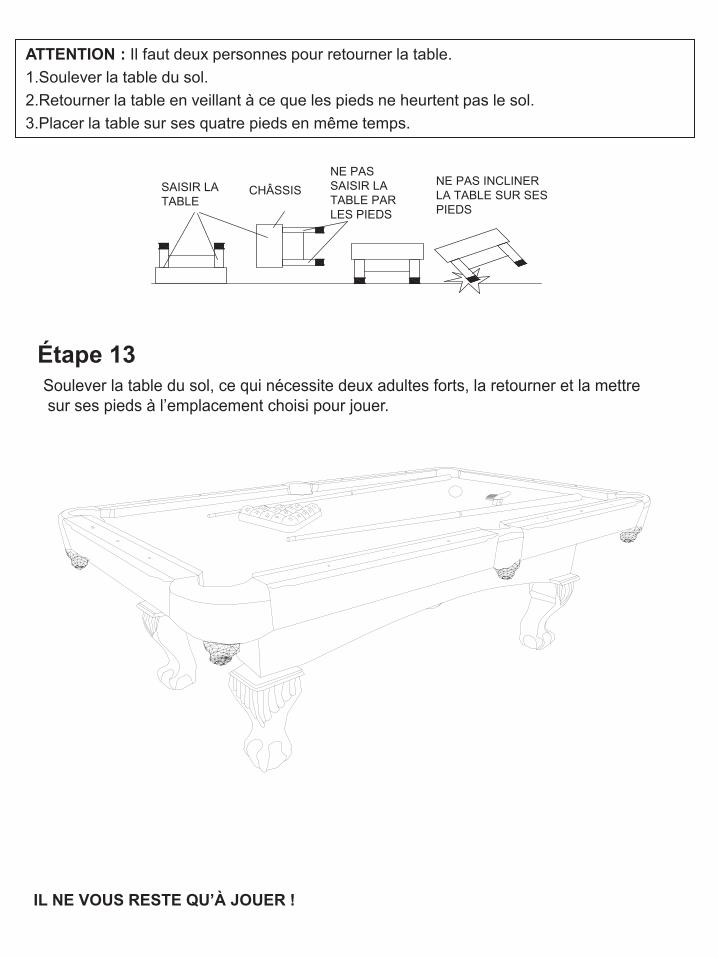
Étape 13
IL NE VOUS RESTE QU’À JOUER !
ATTENTION : Il faut deux personnes pour retourner la table.1.Soulever la table du sol.2.Retourner la table en veillant à ce que les pieds ne heurtent pas le sol.3.Placer la table sur ses quatre pieds en même temps.
SAISIR LA TABLE
CHÂSSISNE PAS SAISIR LA TABLE PAR LES PIEDS
NE PAS INCLINER LA TABLE SUR SES PIEDS
Soulever la table du sol, ce qui nécessite deux adultes forts, la retourner et la mettre sur ses pieds à l’emplacement choisi pour jouer.
Related Documents